

Sony NAS-SC500PK Operating Manual
HDD Network Audio System NAS-SC500PK
4-114-863-13(1)
Basic Operations
“GIGA JUKE” Music
Server
“GIGA JUKE” Wireless
Player
Troubleshooting
Printed in Malaysia
Precautions/
Specications
HDD Network Audio System
Operating Instructions
NAS-SC500PK
© 2009 Sony Corporation

WARNING
To reduce the risk of fire
or electric shock, do not
expose this apparatus to
rain or moisture.
To reduce the risk of fire, do not
cover the ventilation opening of
the apparatus with newspapers,
tablecloths, curtains, etc.
Do not place the naked flame
sources such as lighted candles on
the apparatus.
To reduce the risk of fire or electric
shock, do not expose this apparatus
to dripping or splashing, and do not
place objects filled with liquids, such
as vases, on the apparatus.
As the main plug is used to
disconnect the unit from the
mains, connect the unit to an easily
accessible AC outlet. Should you
notice an abnormality in the unit,
disconnect the main plug from the
AC outlet immediately.
Do not install the appliance in a
confined space, such as a bookcase
or built-in cabinet.
Do not expose batteries or apparatus
with battery-installed to excessive
heat such as sunshine fire or the like.
The unit is not disconnected from
the mains as long as it is connected
to the AC outlet, even if the unit
itself has been turned off.
Excessive sound pressure from
earphones and headphones can
cause hearing loss.
CAUTION
The use of optical instruments with
this product will increase eye hazard.
This appliance is classified as a
CLASS 1 LASER product. This
marking is located on the rear
exterior of the NAS-S500HDE.
Notice for customers: the
following information
is only applicable to
equipment sold in
countries applying EU
directives.
The manufacturer of this product
is Sony Corporation, 1-7-1 Konan,
Minato-ku, Tokyo, 108-0075 Japan.
The Authorized Representative for
EMC and product safety is Sony
Deutschland GmbH, Hedelfinger
Strasse 61, 70327 Stuttgart, Germany.
For any service or guarantee matters,
please refer to the addresses given
in separate service or guarantee
documents.
Wireless Network Audio
System NAS-C5E
Wireless adaptor UWANA1
Wireless station WAP-NA1
The Wireless Network Audio System
NAS-C5E, the wireless adaptor
UWA-NA1 and the wireless station
WAP-NA1 are intended to be used in
the following countries:
AT, BE, CH, DE, DK, ES, FI, FR, GB,
GR, IT, NL, NO, PL, PT, SE
Hereby, Sony Corp., declares that
the Wireless Network Audio System
NAS-C5E, the wireless adaptor
UWA-NA1 and the wireless station
WAP-NA1 are in compliance with
the essential requirements and other
relevant provisions of Directive
1999/5/EC. For details, please access
the following URL: http://www.
compliance.sony.de/
Wireless station WAP-NA1
only
Use this product indoors only. To
avoid the risk of electric shock by
lightning, the network to which this
product is connected should never
extend from the inside to outside of
the building.
For customers who
use this product in the
following countries:
France
The WLAN feature of the Wireless
Network Audio System NAS-C5E,
the wireless adaptor UWA-NA1 and
the wireless station WAP-NA1 shall
exclusively be used inside buildings.
Any use of the WLAN feature of
the Wireless Network Audio System
NAS-C5E, the wireless adaptor
UWA-NA1 and the wireless station
WAP-NA1 outside of the buildings
is prohibited on the French territory.
Please make sure that the WLAN
feature of the Wireless Network
Audio System NAS-C5E, the wireless
adaptor UWA-NA1 and the wireless
station WAP-NA1 disabled before
any use outside of the buildings.
(ART Decision 2002-1009 as
amended by ART Decision 03-908,
relating to radio-frequencies use
restrictions).
Italy
Use of the RLAN network is
governed:
with respect to private use, by the
Legislative Decree of 1.8.2003,
no. 259 (“Code of Electronic
Communications”). In particular
Article 104 indicates when the
prior obtainment of a general
authorization is required and Art.
105 indicates when free use is
permitted;
with respect to the supply to the
public of the RLAN access to
telecom networks and services, by
the Ministerial Decree 28.5.2003,
as amended, and Art. 25 (general
authorization for electronic
communications networks and
services) of the Code of electronic
communications.
Norway
Use of the Wireless Network Audio
System NAS-C5E, the wireless
adaptor UWA-NA1 and the wireless
station WAP-NA1 is not allowed
in the geographical area within a
radius of 20 km from the centre of
Ny-Alesund, Svalbard.
GB
2

Disposal of Old
Electrical &
Electronic
Equipment
(Applicable in
the European
Union and other European
countries with separate
collection systems)
This symbol on the product or on
its packaging indicates that this
product shall not be treated as
household waste. Instead it shall
be handed over to the applicable
collection point for the recycling of
electrical and electronic equipment.
By ensuring this product is disposed
of correctly, you will help prevent
potential negative consequences for
the environment and human health,
which could otherwise be caused
by inappropriate waste handling
of this product. The recycling of
materials will help to conserve
natural resources. For more detailed
information about recycling of this
product, please contact your local
Civic Office, your household waste
disposal service or the shop where
you purchased the product.
Applicable accessories: Remote
control, Wireless adaptor
Disposal of
waste
batteries
(applicable in
the European
Union and other European
countries with separate
collection systems)
This symbol on the battery or on the
packaging indicates that the battery
provided with this product shall not
be treated as household waste.
On certain batteries this symbol
might be used in combination with
a chemical symbol. The chemical
symbols for mercury (Hg) or lead
(Pb) are added if the battery contains
more than 0.0005% mercury or
0.004% lead.
By ensuring these batteries are
disposed of correctly, you will
help prevent potentially negative
consequences for the environment
and human health which could
otherwise be caused by inappropriate
waste handling of the battery. The
recycling of the materials will help to
conserve natural resources.
In case of products that for safety,
performance or data integrity
reasons require a permanent
connection with an incorporated
battery, this battery should be
replaced by qualified service staff
only.
To ensure that the battery will
be treated properly, hand over
the product at end-of-life to the
applicable collection point for the
recycling of electrical and electronic
equipment.
For all other batteries, please view
the section on how to remove the
battery from the product safely.
Hand the battery over to the
applicable collection point for the
recycling of waste batteries.
For more detailed information
about recycling of this product or
battery, please contact your local
Civic Office, your household waste
disposal service or the shop where
you purchased the product.
GB
3
Before operating this product
Notes on this manual
In this manual, HDD Network Audio System (NASS500HDE) is referred to as “GIGA JUKE” Music Server
and Wireless Network Audio System (NAS-C5E) is
referred to as “GIGA JUKE” Wireless Player.
About copyright protection
Material recorded with this product cannot be used
without the permission of the copyright holder except
when used solely for personal enjoyment.
About the illustrations used in this
manual
Illustrations used in the “GIGA JUKE” Music Server
section are based on the model except the UK model and
this section explains how to operate the “GIGA JUKE”
Music Server mainly using the buttons on the remote
control. Buttons and controls on the main unit with the
same or similar name as that on the remote control can be
used to perform the same operations.
“GIGA JUKE” Wireless Player section in this manual
explains how to operate the unit mainly using the buttons
and controls on the main unit. Buttons and controls on
the remote control with the same or similar name as
that on the main unit can be used to perform the same
operations.
Illustrations and screens used in this manual may vary
from the actual screens.
About services that can be used in
conjunction with an Internet connection
Please note that Internet-based services are subject to
change or termination without notice.
About the hard disk drive
The hard disk drive is easily damaged by shock and
vibration, so be sure to observe the following precautions.
See page 169 for details.
Do not subject the unit to strong shocks.
Do not move the unit while the power cord is
connected to the wall outlet.
Do not use the unit in a location subject to vibrations
or in an unstable location.
Do not move the unit or disconnect the power cord
while the unit is recording or playing.
Do not attempt to replace or upgrade the hard disk
drive by yourself, as this may result in a malfunction.
Any data that is lost due to a malfunction in the hard disk
drive cannot be recovered.
Data recorded to the hard disk drive may be damaged
during ordinary operations. Make sure to use the
unit’s backup function to back up the data regularly to
an optional USB hard disk or a shared folder on your
computer.
Sony cannot provide compensation for any destruction of
data caused by a damaged hard disk drive.
About the software supplied to this
product
Before you start using this product, make sure you read
“END-USER LICENSE AGREEMENT FOR SONY
SOFTWARE” on page 188 and “Important information on
software” on page 190.
By starting to use this product, it will be assumed that
you have read and agreed to the terms of the license
agreement.
On recording
Make a trial recording before making the actual
recording, especially when recording important
material.
Sony cannot provide compensation for any failure in
recording caused by a malfunction in this unit.
Malfunctions that occur during the normal use of
the unit will be repaired by Sony in accordance with
the conditions defined in the limited warranty for
this unit. However, Sony will not be liable for any
consequences arising from a failure to record or play
caused by a damaged or malfunctioning unit.
How to use this manual
: This mark identifies HDD Jukebox functions.
: This mark identifies CD functions.
GB
4

Table of Contents
Before operating this product ........................................................................................... 4
Checking the supplied accessories (Package contents) .........................................11
“GIGA JUKE” Music Server and its supplied accessories .............................................11
“GIGA JUKE” Wireless Player and its supplied accessories .........................................12
Wireless station and its supplied accessories ................................................................ 13
Other supplied accessories ..................................................................................................13
Guide to parts and controls .............................................................................................. 14
“GIGA JUKE” Music Server .....................................................................................................14
“GIGA JUKE” Wireless Player .................................................................................................21
Wireless station .........................................................................................................................25
Basic Operations
Selecting the display language .......................................................................................27
On the “GIGA JUKE” Music Server .......................................................................................27
On the “GIGA JUKE” Wireless Player ...................................................................................28
Setting the clock ................................................................................................................... 29
On the “GIGA JUKE” Music Server .......................................................................................29
On the “GIGA JUKE” Wireless Player ...................................................................................31
Recording a CD to the HDD Jukebox of the “GIGA JUKE” Music Server ............32
Playing the HDD Jukebox of the “GIGA JUKE” Music Server ..................................34
Playing audio data stored on the “GIGA JUKE” Music Server through the
“GIGA JUKE” Wireless Player .........................................................................................36
Listening to the Internet radio on the “GIGA JUKE” Wireless Player ...................38
Transferring audio data from the HDD Jukebox of the “GIGA JUKE” Music
Server to a “WALKMAN” .................................................................................................40
Attaching the oval attachment for “WALKMAN” ...........................................................41
Transferring audio data to a “WALKMAN” .......................................................................42
GB
5

“GIGA JUKE” Music Server
Features on this unit ............................................................................................................47
Preparation
Turning on the power .........................................................................................................49
Importing and transferring audio data
About importing and transferring audio data ...........................................................51
Setting up the unit for recording or importing .........................................................54
To change the recording destination in the HDD Jukebox ......................................56
Importing audio data to the HDD Jukebox ................................................................57
Recording from a radio broadcast, DAB service*, or externally connected
component ..........................................................................................................................57
Importing audio data from a “WALKMAN” or a USB storage device ......................58
Importing audio files from a computer ...........................................................................59
Transferring audio data from the HDD Jukebox .......................................................62
Transferring audio data to a portable device ................................................................62
Transferring audio data to a USB storage device ......................................................... 63
Changing the transfer settings ...........................................................................................63
Deleting tracks or playlists on the destination device ............................................65
Playing audio data
Playing audio data in the HDD Jukebox in different listing modes ................... 66
Checking album or track information ..............................................................................67
Registering desired tracks to playlist ................................................................................67
Searching for tracks, albums, or artists ............................................................................68
Playing tracks using the “SensMe™ Channels” function .............................................69
Using the DSEE function .......................................................................................................72
Playing a CD............................................................................................................................73
Viewing information for a CD ..............................................................................................75
Listening to the radio or DAB services ..........................................................................76
Performing DAB Initial Scan* ...............................................................................................76
Selecting an FM/AM radio station .....................................................................................76
Receiving a DAB service* ......................................................................................................77
Presetting FM/AM radio stations or DAB services* ......................................................78
Playing audio data stored on the “WALKMAN” (WM-PORT) .................................80
Connecting a digital music player to DMPORT (DIGITAL MEDIA PORT) ...........81
* For the UK model only
GB
6

Connecting an external component (AUDIO IN) ......................................................82
Repeat play · Shuffle play .................................................................................................84
Editing tracks in the HDD Jukebox
Searching and obtaining title information .................................................................86
Saving picture files ..............................................................................................................87
Editing .....................................................................................................................................89
Changing titles..........................................................................................................................89
Creating a playlist ....................................................................................................................89
Deleting recordings ................................................................................................................90
Moving recordings ..................................................................................................................91
Dividing recorded tracks .......................................................................................................91
Combining recorded tracks..................................................................................................92
Creating a folder or a group .................................................................................................93
Converting the audio format of tracks .............................................................................94
Entering text ...........................................................................................................................95
Entering text ..............................................................................................................................96
Network connection and setup
Connecting the unit to the Internet ..............................................................................98
Connecting the unit to the Internet through a wireless network ......................99
Connecting and setting up a wireless network (AOSS setup) .............................. 100
Searching the access point and setting up a wireless network ...........................101
Connecting the unit to the Internet through a wired network ........................ 102
Preparations for a wired connection .............................................................................102
Connecting and setting up a wired network (Automatic setting) ...................... 103
Confirming and changing the network settings .................................................... 105
Checking the network status ............................................................................................105
Setting up the IP address/proxy server .........................................................................106
Using the unit connected to the Internet
What you can do through an Internet connection ............................................... 107
Obtaining the latest title information ........................................................................ 108
Setting the clock through an Internet connection ............................................... 109
GB
7

Using the HOME NETWORK function
About the server and client functions of the unit ................................................. 110
Using the unit as a server ............................................................................................... 112
Listening to the same track in different rooms (PARTY MODE) ........................ 114
Using the unit as a client ................................................................................................. 116
Listening to music stored in a computer......................................................................116
Viewing information on tracks .........................................................................................117
Other settings
Using the Sleep Timer ...................................................................................................... 118
Using the Wake Up Timer ............................................................................................... 119
Using the Recording Timer ............................................................................................ 120
Recording an FM/AM radio program or DAB service* using the Recording
Timer ...................................................................................................................................120
Recording from an external component using the Recording Timer ................ 121
Checking the contents of a timer setting ................................................................. 122
Changing the unit’s settings.......................................................................................... 124
Setting the display................................................................................................................124
Setting the standby mode .................................................................................................125
Playing the demonstration video ...................................................................................125
Managing the system ...................................................................................................... 126
Backing up and restoring audio data ............................................................................126
Restoring backed up data ..................................................................................................128
Checking system information ..........................................................................................128
Updating the system application....................................................................................129
Formatting the system ........................................................................................................129
Moving track data between the unit and other components .............................. 129
* For the UK model only
GB
8

“GIGA JUKE” Wireless Player
Features on this unit ......................................................................................................... 133
Preparation
Turning on the power ...................................................................................................... 134
Network connection and setup
About the network connections .................................................................................. 135
Setting up the network through an AOSS connection ........................................ 136
Setting up the network manually ................................................................................ 137
Setting up a proxy server manually ...............................................................................138
Operation
Listening to audio data on the “GIGA JUKE” Music Server .................................. 139
Listening to the same track at the same time in different rooms (PARTY
MODE) ................................................................................................................................139
Playing tracks using the “SensMe™ Channels” function ..........................................141
Playing audio data in a computer ...............................................................................142
Repeat play • Shuffle play ............................................................................................... 144
Listening to an externally connected device ..........................................................145
Setting the sound quality ............................................................................................... 146
Selecting a sound style (Preset EQ) ................................................................................146
Generating a more dynamic sound (Dynamic Sound Generator X-tra)............146
Using the timer ................................................................................................................... 147
Using the Sleep timer .......................................................................................................... 147
Using On-timer ......................................................................................................................147
Changing settings ............................................................................................................. 149
Troubleshooting
Troubleshooting
Troubleshooting ................................................................................................................ 153
“GIGA JUKE” Music Server ..................................................................................................153
“GIGA JUKE” Wireless Player ..............................................................................................162
GB
9

Precautions/Specifications
Precautions/Specifications
Precautions .......................................................................................................................... 169
“GIGA JUKE” Music Server ..................................................................................................169
About CDs ...............................................................................................................................170
“GIGA JUKE” Wireless Player ..............................................................................................171
Wireless station ......................................................................................................................172
Specifications ...................................................................................................................... 173
“GIGA JUKE” Music Server ..................................................................................................173
”GIGA JUKE” Wireless Player ..............................................................................................175
Wireless station ......................................................................................................................175
Additional information .................................................................................................... 176
A list of directories for each listing mode ....................................................................176
Channel list of the “SensMe™ Channels” function .....................................................178
System requirements ..........................................................................................................179
Audio formats of tracks on the computer supported by the “GIGA JUKE”
Wireless Player ................................................................................................................180
Glossary ................................................................................................................................. 181
Index ...................................................................................................................................... 184
10
GB
Checking the supplied accessories (Package contents)
If you find any accessories missing or damaged,
please contact your nearest Sony dealer.
“GIGA JUKE” Music Server and its supplied accessories
“GIGA JUKE” Music Server NAS-S500HDE
(1)
Wireless adaptor UWA-NA1 (1)
Wireless adaptor extension cable (1)
How to detach the speaker cords from the
speaker connectors
If you want to use a different set of speaker
cords, you can remove the cords from the
speaker connectors.
Tips
You can use any commercially available speaker
cords of gauge AWG #18 - AWG #24.
Before attaching a new speaker cord, strip off 10 mm
of its insulation and twist the bare wires.
Push the tab on the speaker connector in the direction
of the arrow and pull out the speaker cord.
Speaker pads (8)
or
AM loop antenna (1)
Speaker codes (2)
11
GB
FM wire antenna (1)
DAB wire antenna (1) (for the UK model
only)
The attachment type (A or B) is indicated on
the bottom of the attachment.
Some of the models listed here are not available
in certain countries or regions.
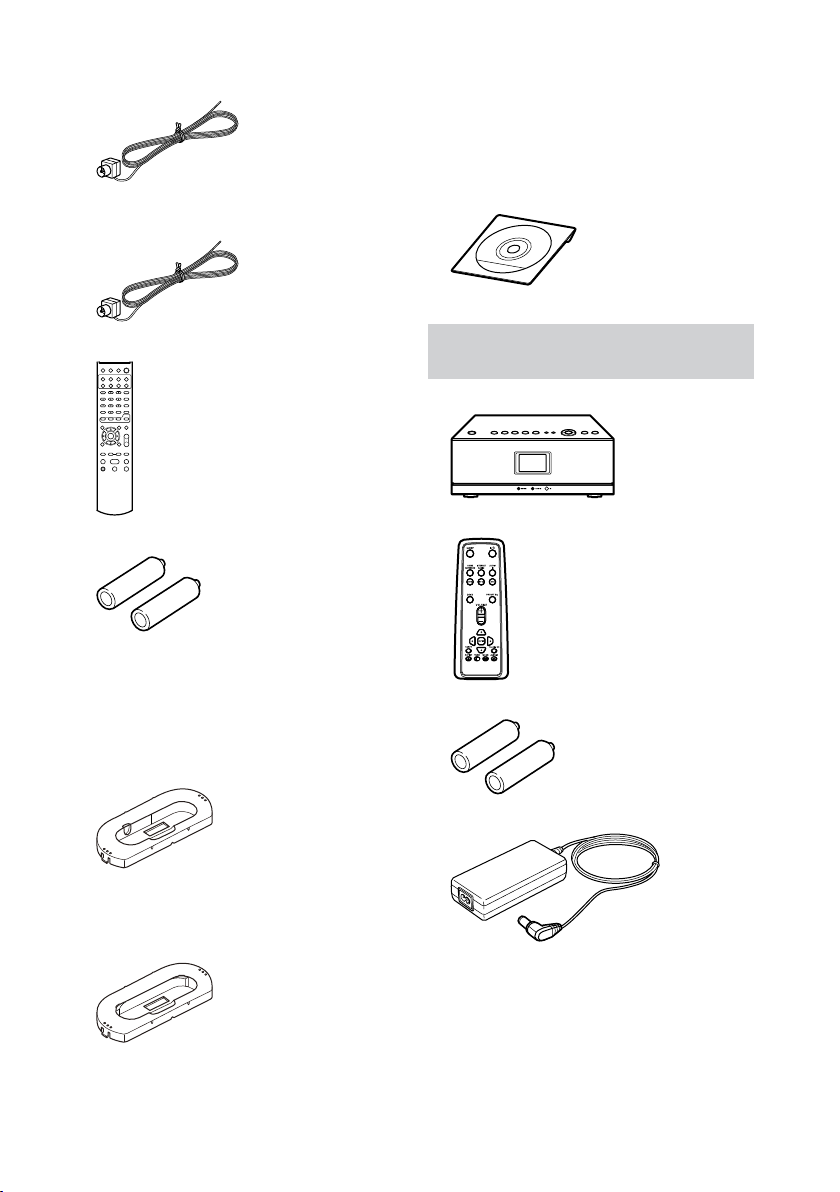
CD-ROM containing the “Music Transfer”
PC software (1)
Do not play this disc on an audio CD player.
Remote control (1)
R6 (size AA) batteries (2)
Oval attachments for “WALKMAN” (2)
Type A attachment
Compatible “WALKMAN” models:
NW-A800 series, NWZ-A810 series, NWZA820 series, NWZ-A820K series, NWZ-A720
series, NWZ-S730 series, NWZ-S630 series,
NWZ-E430 series
Type B attachment
Compatible “WALKMAN” models:
NWZ-S510 series, NWZ-S610F series, NWZX1000 series
“GIGA JUKE” Wireless Player and its supplied accessories
“GIGA JUKE” Wireless Player NAS-C5E (1)
Remote control (1)
R6 (size AA) batteries (2)
12V AC power adaptor (1)
12
GB
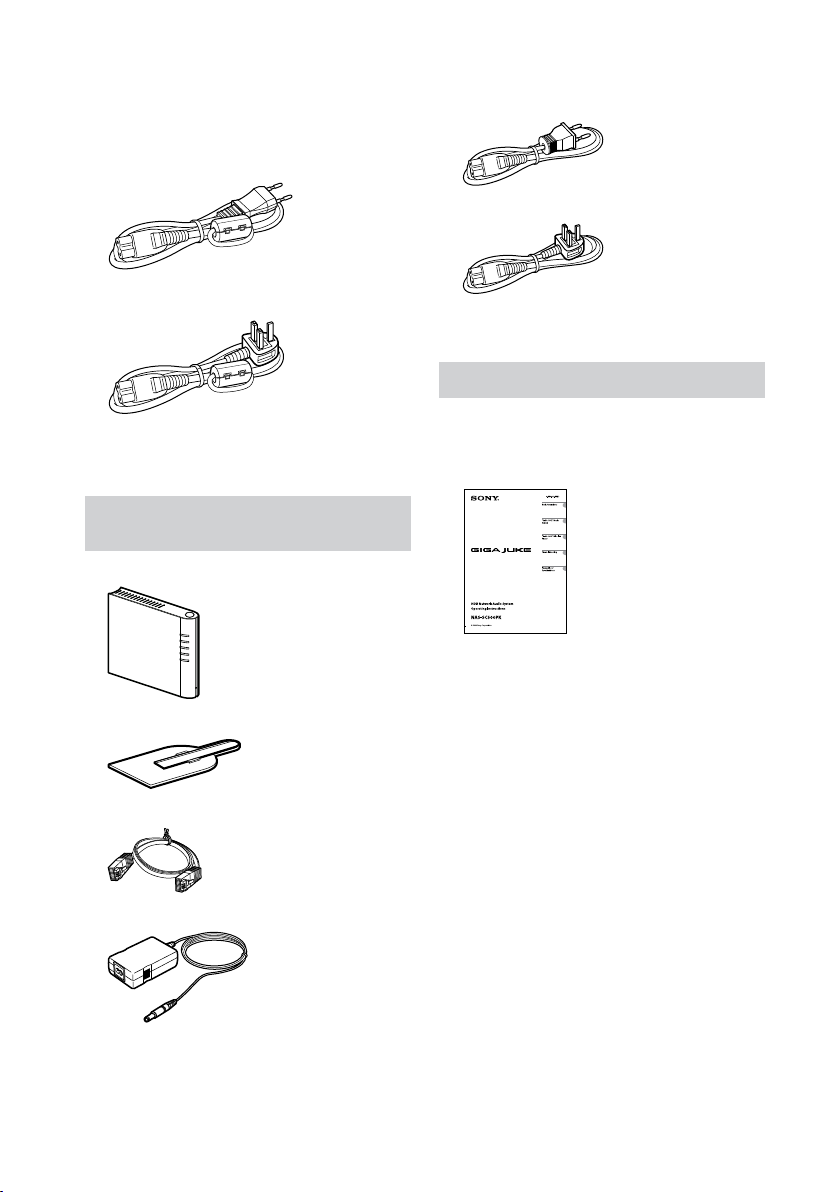
Power cord (1)
The supplied power cord comes with an
attached clamp filter. This power cord is
designed for exclusive use with NAS-C5E only.
For models except the UK model
For the UK model
“Internet Radio service on “GIGA JUKE”
Wireless Player” leaflet (1)
Wireless station and its supplied accessories
Wireless station WAP-NA1 (1)
Power cord (1)
For models except the UK model
For the UK model
Other supplied accessories
The following accessories are for common use with
all the devices in the package.
Operating Instructions (this manual)
This manual provides full
explanations of the various
settings, operations and the
network connection
procedure.
This manual also contains
precautions for the safe use
of the unit.
Wireless station stand (1)
Network (LAN) cable (1)
5V AC power adaptor (1)
Setup Guide (1)
This manual explains how to connect the
speakers and antennas, set up a wireless
network using the Instant (S-IWS) connection,
and connect to the Internet.
About the customer support site of
Sony Europe
Refer to this Web site for the latest support
information and FAQs.
For customers in Europe:
http://support.sony-europe.com/
13
GB
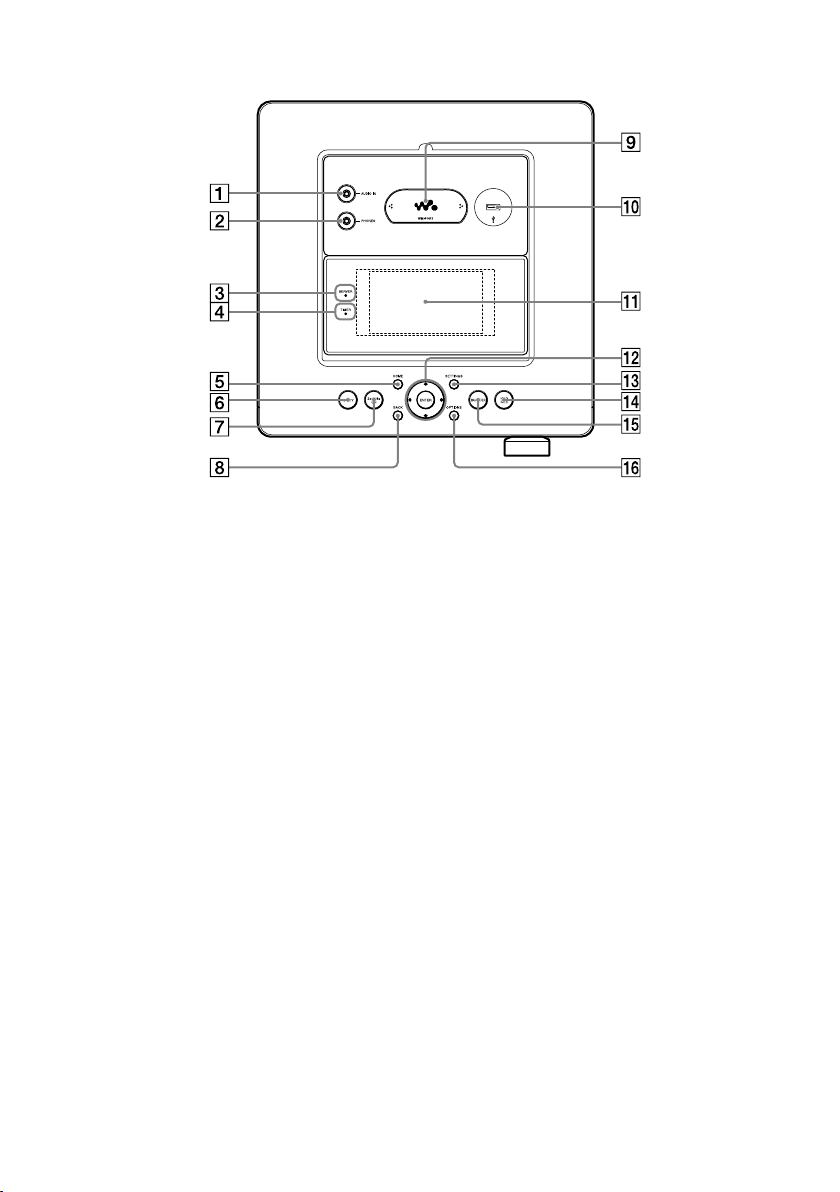
Guide to parts and controls
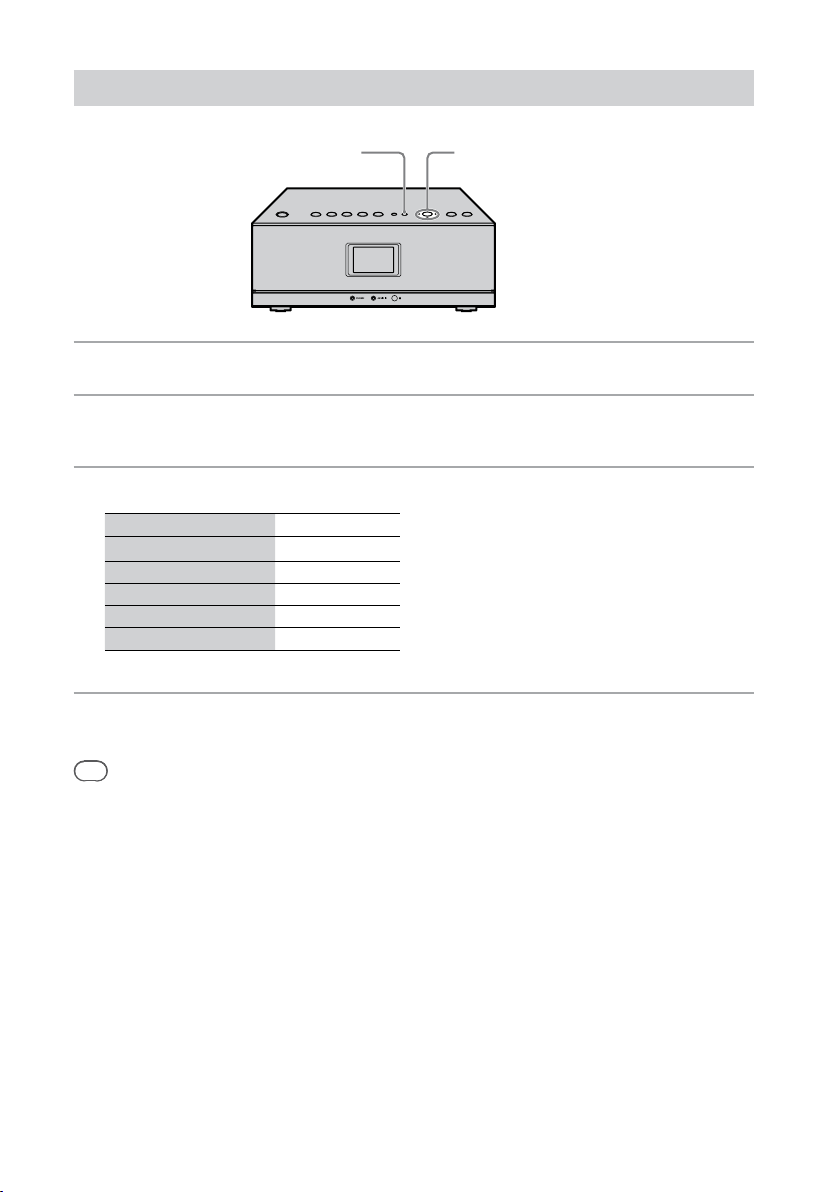
“GIGA JUKE” Music Server
Remote control
UK model*
All models except the UK model
* Function Select buttons on the UK and non-UK
models perform the same operation, with the
exception of the DAB button, which is available
on the UK model only.
GB
14
SLEEP and TIMER buttons
DIMMER button
Sets the brightness of the display and the
illumination panel.
(power) button
Turns the power on or off. When you turn the
power off, the unit automatically starts analyzing
music data (page 72). During this time, the
illumination panel slowly flashes. To cancel the
analysis and turn off the power immediately, press
the button.
Function Select buttons*
Use to select the function directly. During standby
mode, these buttons turn on the unit and start
playback at the same time.
HDD REC buttons
Use for recording to the HDD Jukebox.
SLEEP button
Use to set or confirm the sleep timer setting
(page 118).
TIMER button
Use to set the timer (pages 119 to 123).
HDD button (page 34)
CD button (page 73)
FM/AM button (page 76)
AUDIO IN button (page 83) (models except the
UK model)
WM-PORT button (page 80)
DMPORT button (page 81)
DAB button (page 76) (UK model only)
HDD REC (start recording) button (pages 33,
57)
HDD REC (pause recording) button (pages 33,
57)
DSGX and PRESET EQ buttons
DSGX button
Use to generate a more dynamic sound (Dynamic
Sound Generator X-tra).
Each press of the button switches the DSGX
function “ON” or “OFF”. This function is factory
set to “ON”.
PRESET EQ button
Selects a pre-set customized sound setting.
Each press of the button changes the sound style
as follows.
FLAT ROCK POPS JAZZ
CLASSICAL DANCE FLAT ...
(: Factory setting)
Numeric*/text buttons
Use to select a track during play or to enter text
(pages 35, 74, 95).
DELETE button
Use in each function to delete an item (page 90).
FAVORITE button
Use to add a track to “Favorites” in the playlist
(page 67).
SEARCH button
Use to search for artists or albums by initial letter
(page 68).
MUTING button
Mutes the sound.
SETTINGS button
Displays the Settings menu (page 20). Use to enter
clock, network and other system settings.
VOLUME+* and VOLUME– buttons
Use to adjust the volume.
Menu operation buttons
Use to select menu items and enter menu settings
(page 20).
, , and buttons
Use to select a menu item or to change a setting.
ENTER button
Use to enter a setting.
An asterisk (*) indicates buttons that have a tactile dot
(number “5” button and VOLUME + button).
15
GB
DMPORT MENU button
This button is used when the DIGITAL MEDIA
PORT adapter and a digital music player are
connected. Refer to the operating manual for the
DIGITAL MEDIA PORT adapter.
SensMe CH/Music Surfin’ buttons
SensMe CH button (yellow) (page 69)
Selects and plays a channel of the “SensMe™
Channels” function (page 69).
ARTIST (blue), YEAR (red), MOOD (green) and
ALBUM (yellow) buttons (page 70)
Use to select the channels of Music Surfin’ while
the “SensMe™ Channels” function is selected.
HOME button
Use to select a function from the Home menu (page
20).
Press /// to select a function and press
ENTER to enter the selection. To cancel the Home
menu, press HOME or BACK before pressing
ENTER.
OPTIONS button
Displays the Options menu (page 20).
Menu items will vary according to the selected
function.
BACK button
Use to go back to the previous display (pages 43,
70, 96).
• PRESET–, • PRESET+, ALBUM/PAGE+
• ALBUM/PAGE– buttons
and buttons
Cues the beginning of a track.
PRESET+ and PRESET– buttons
Use to select a preset radio station or DAB service
(UK model only).
ALBUM/PAGE+ and ALBUM/PAGE– buttons
Use to select an album or a group in the main
display. In a list display, use these buttons to go to
the next page or the previous page (pages 35, 74).
Operation buttons
Use in all functions to perform basic operations.
(play) button*
(fast rewind) • TUNING– and (fast
forward) • TUNING + buttons
(pause) button
(stop) button
PARTY button
Use to activate or enter PARTY MODE (page 114).
An asterisk (*) indicates buttons that have a tactile dot
(the (play) button of the operation buttons).
GB
16
Top of the main unit
AUDIO IN jack
Use to connect the audio output jack of an
external component (page 83).
PHONES (headphones) jack
Use to connect headphones.
SERVER indicator
Lights up yellowish green when the unit is
being used as a server and a client device is
playing audio data (page 112).
TIMER indicator
Indicates the status of the timer (pages 118 to
120).
HOME button
Use to select a function from the Home menu
(page 20).
Press /// to select a function and
press ENTER to enter the selection. To cancel
the Home menu, press HOME or BACK before
pressing ENTER.
PARTY button
Use to activate or enter PARTY MODE (page
114).
SensMe CH button
Selects and plays a channel of the “SensMe™
Channels” function (page 69).
BACK button
Use to go back to the previous display (pages
43, 70, 96).
Port for an oval attachment for
“WALKMAN” (WM-PORT)
Connects the oval attachment for
“WALKMAN” supplied with the unit or the
“WALKMAN” (page 41).
USB port
Use to connect a portable device such as a USB
storage device or the wireless adaptor (pages
40, 58, 100, 126).
Display window
Adjust the viewing angle by grasping both sides
of the display and pulling it forward. For details
of on the contents of the display, see page 20.
Menu operation buttons
Use to select menu items and enter menu
settings (page 20).
, , and buttons
Use to select a menu item or to change a
setting.
ENTER button
Use to enter a setting.
17
GB
SETTINGS button
Displays the Settings menu (page 20). Use to
enter clock, network and other system settings.
HDD REC button
Use for recording to the HDD Jukebox (pages
33, 57).
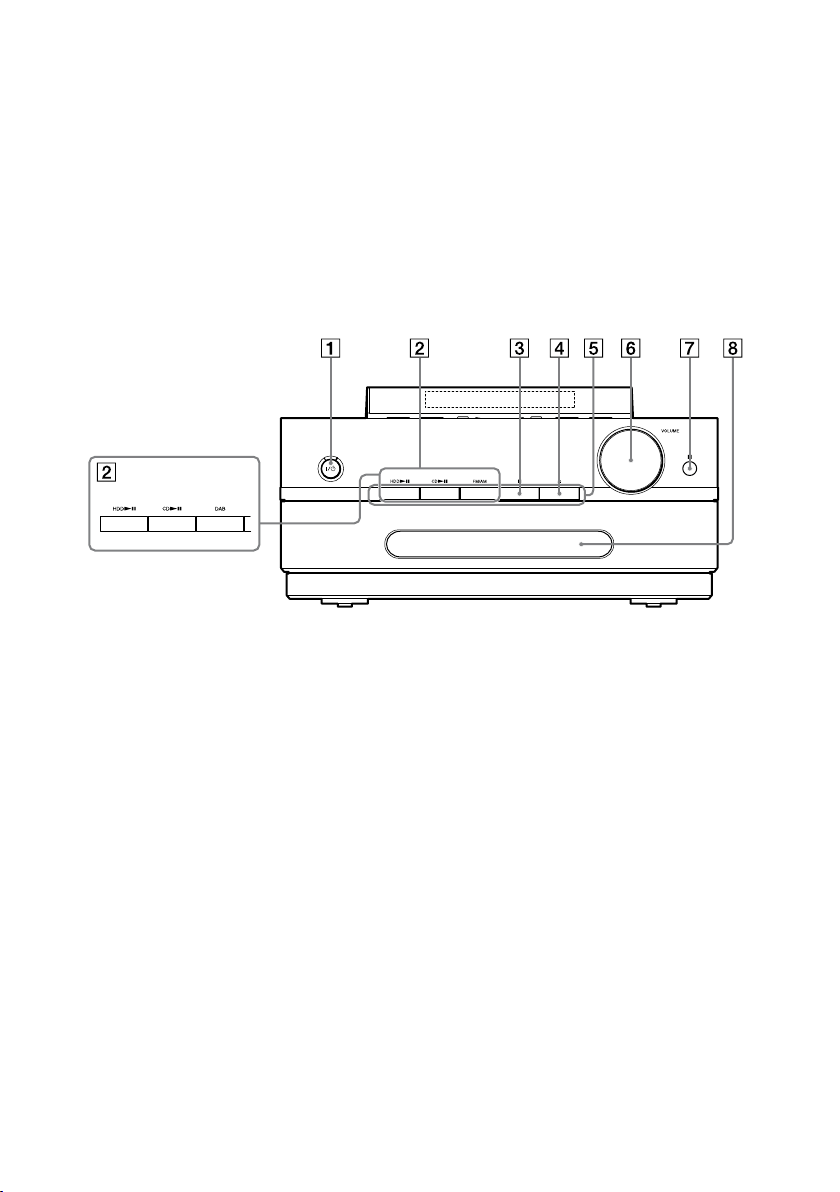
Front of the main unit
UK model
TRANSFER button
Use to transfer audio data to a “WALKMAN”
or other portable audio device (pages 42, 62).
OPTIONS button
Displays the Options menu (page 20). Menu
items will vary according to the selected
function.
(power) button and On/Standby
indicator
(power) button
Turns the power on or off (page 49).
On/Standby indicator
The color indicates the unit’s power status
(page 50).
— Green: The unit is on.
— Red : The unit is in standard (power save)
mode (page 125).
— Orange : The unit is in quick start-up
mode (page 125) or is analyzing music
data (page 72).
Function Select buttons
Use to select the function directly. During
standby mode, these buttons turn on the unit
and start playback at the same time.
HDD button (page 34)
CD button (page 73)
FM/AM button (page 76) (models except the
UK model)
DAB button (page 76) (UK model only)
GB
18
(stop) button
Use in each function to stop an operation.
button
Opens and closes the disc tray (pages 32, 73).
Illumination panel
Lights up when the power is turned on.
Flashes slowly when the unit is analyzing music
data recorded to the HDD Jukebox (pages 50,
72).
VOLUME dial
Use to adjust the volume.
Remote sensor
Disc tray
Use to load a CD (pages 32, 73).
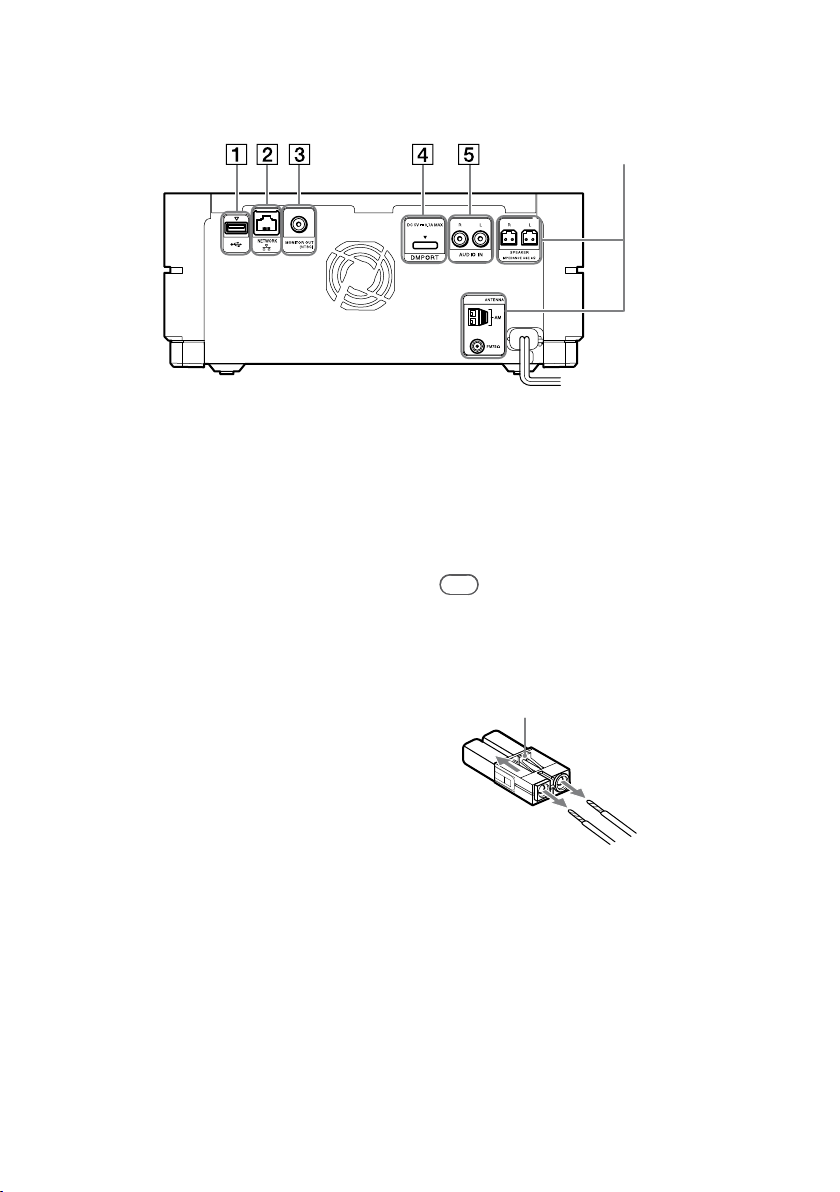
Rear of the main unit
For details on connections of the speaker cords and
antennas, refer to the supplied leaflet “Setup Guide”.
The illustration uses the models except the UK model.
USB port
Use to connect a USB storage device, another
portable device, or the supplied wireless
adaptor with the wireless adaptor extension
cable (pages 42, 58, 100, 126).
NETWORK port
Use to connect the unit to a network (pages
98, 130).
MONITOR OUT (NTSC) jack
Use to connect a TV.
DMPORT
Use to connect the DIGITAL MEDIA PORT
adapter to listen to the playback of a digital
music player (page 81).
AUDIO IN jack
Use to connect the external audio component
(page 82).
How to detach the speaker cords
from the speaker connectors
If you want to use a different set of speaker cords,
you can remove the cords from the speaker
connectors.
Tips
You can use any commercially
gauge AWG #18 - AWG #24.
Before attaching a new speaker cord, strip off 10 mm of
its insulation and twist the
Push the tab on the speaker connector in the direction
of the arrow and pull out the speaker cord.
available speaker cords of
bare wires.
19
GB

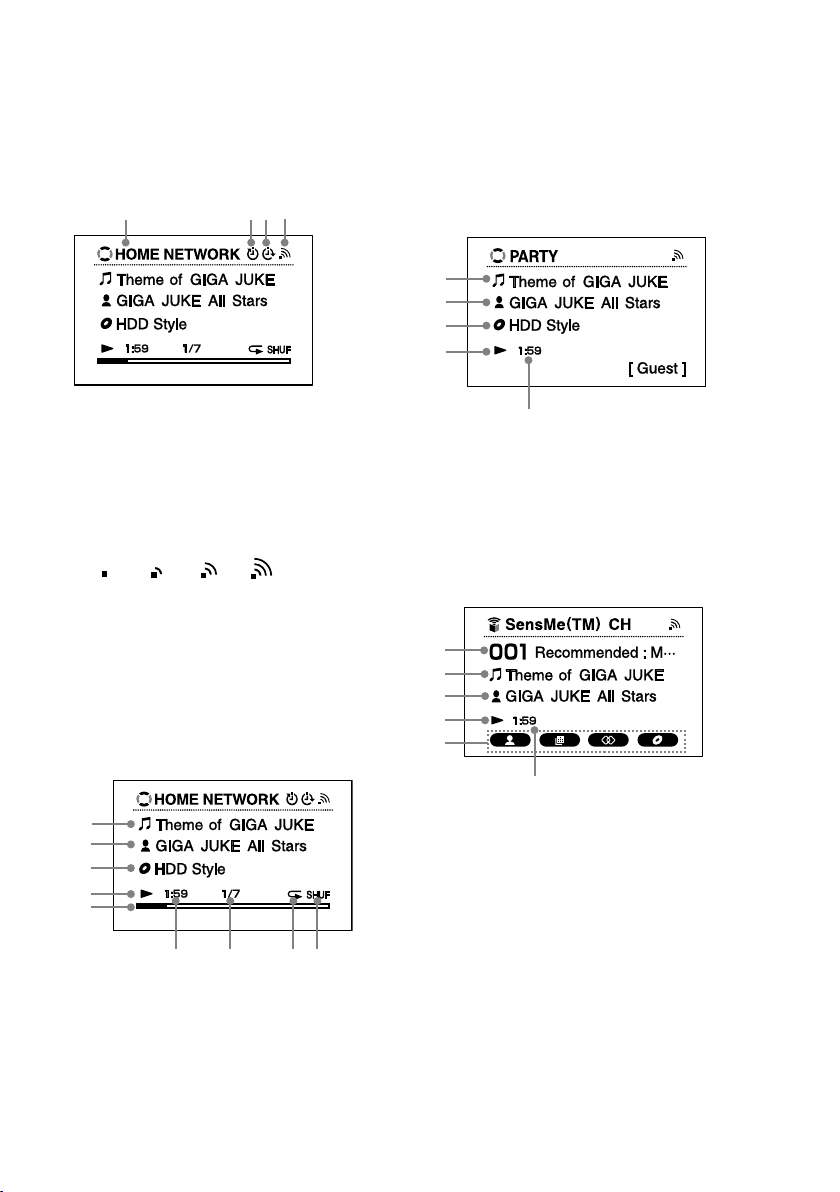
Display window
This section introduces display windows that are
frequently used.
Home menu
Appears when you press the HOME button.
For models except the UK model
For the UK model
Main display
When you select the HDD JUKEBOX, CD, DAB
or HOME NETWORK function in the Home
menu, the main display appears. When you press
///
appears (page 34).
The items that appear when the HDD JUKEBOX
function is selected are introduced in the
illustration of the main display below.
in the main display, a list display
Options menu
Appears when you press the OPTIONS button.
Settings menu
Appears when you press the SETTINGS button.
How to operate each menu
1
Press the desired menu button (HOME,
OPTIONS, or SETTINGS).
The unit enters the specified menu.
2
Press /// to select the desired item.
3
Press ENTER.
Track name
Artist name
Album name
Visualizer bar
GB
20
Moves with the music. The design of the bar
varies with the design of the display.

“GIGA JUKE” Wireless Player
Main unit
* VOL + button has a tactile dot.
(power) button and On/Standby
indicator
(power) button
Turns the power on or off (page 134).
On/Standby indicator
The color indicates the unit’s power status
(page 134).
PARTY button, PARTY indicator
PARTY button
Use to enter or leave PARTY MODE (page
139).
PARTY indicator
Lights up amber when PARTY MODE is
active (page 139).
SensMe CH button
Selects and plays a channel of the “SensMe™
Channels” function on the “GIGA JUKE”
Music Server (page 141).
HOME NETWORK button
Selects the HOME NETWORK function and
plays audio data in a “GIGA JUKE” Music
Server or a DLNA-compatible digital media
server (pages 36, 142).
INTERNET RADIO button
Selects the Internet Radio function (page 38).
AUDIO IN button
Selects the Audio In function and plays audio
data on an external device connected to the
AUDIO IN jack of the unit. Sound is output
from the unit’s speakers (page 145).
button
Use to start or pause playback.
SETTINGS button
Displays the Settings menu (page 23).
Menu operation buttons
Use to select menu items and enter menu
settings (page 23).
, , and buttons
Use to select a menu item or to change a
setting.
ENTER button
Use to enter a setting.
VOL +* or – buttons
Use to adjust the volume.
Display window (page 22)
PHONES jack
Use to connect the optional headphones.
AUDIO IN jack
Use to connect the audio output plug from an
optional portable audio device (page 145).
Remote sensor
DC IN 12V jack
Use to connect the supplied AC power adaptor
(page 134).
Service and maintenance terminal
This terminal is used during servicing and
maintenance of the unit.
21
GB
Display window
Items that appear on the display window varies
depending on the function you are using.
General display
Progress bar
Playback elapsed time
Current track number/total track count
Repeat mode (page 144)
Shuffle mode (page 144)
PARTY MODE view
Function
Sleep timer (page 147)
On-timer (page 147)
Wireless LAN signal strength indicator
This antenna icon indicates the strength of the
wireless LAN signal. More segments indicate a
stronger signal.
This icon flashes when data from a server is
being received and played back, as shown in
the illustrations above.
Display for each function
HOME NETWORK function
Elapsed time view (default)
Track name
Artist name
Album name
Playback status
Track name
Artist name
Album name
Playback status
Playback elapsed time
“SensMe™ Channels” view
Channel name
Track name
Artist name/album name
Artist name and album name appear
alternately.
Playback status
Music Surfin’ channels
Playback elapsed time
22
GB
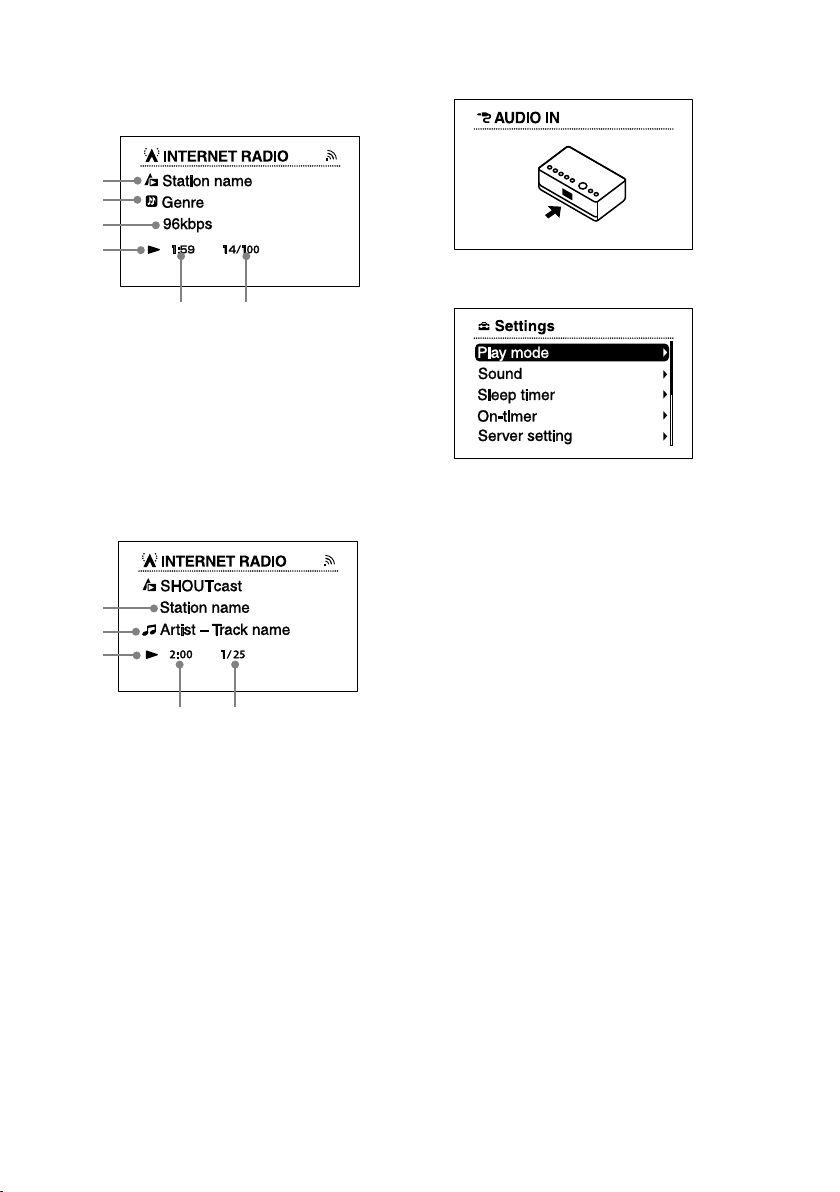
Internet Radio Function
Live365 view
Audio In Function
Radio station name
Genre name
Transfer bit rate
Playback status
Playback elapsed time
Current radio station number/total radio
station count
SHOUTcast view
Radio station name
Artist name and track name
Playback status
Playback elapsed time
Current radio station number/total radio
station count for the selected genre
Settings display
How to operate Settings menu
1
Press SETTINGS.
2
Press / to select the item.
3
Press ENTER.
23
GB
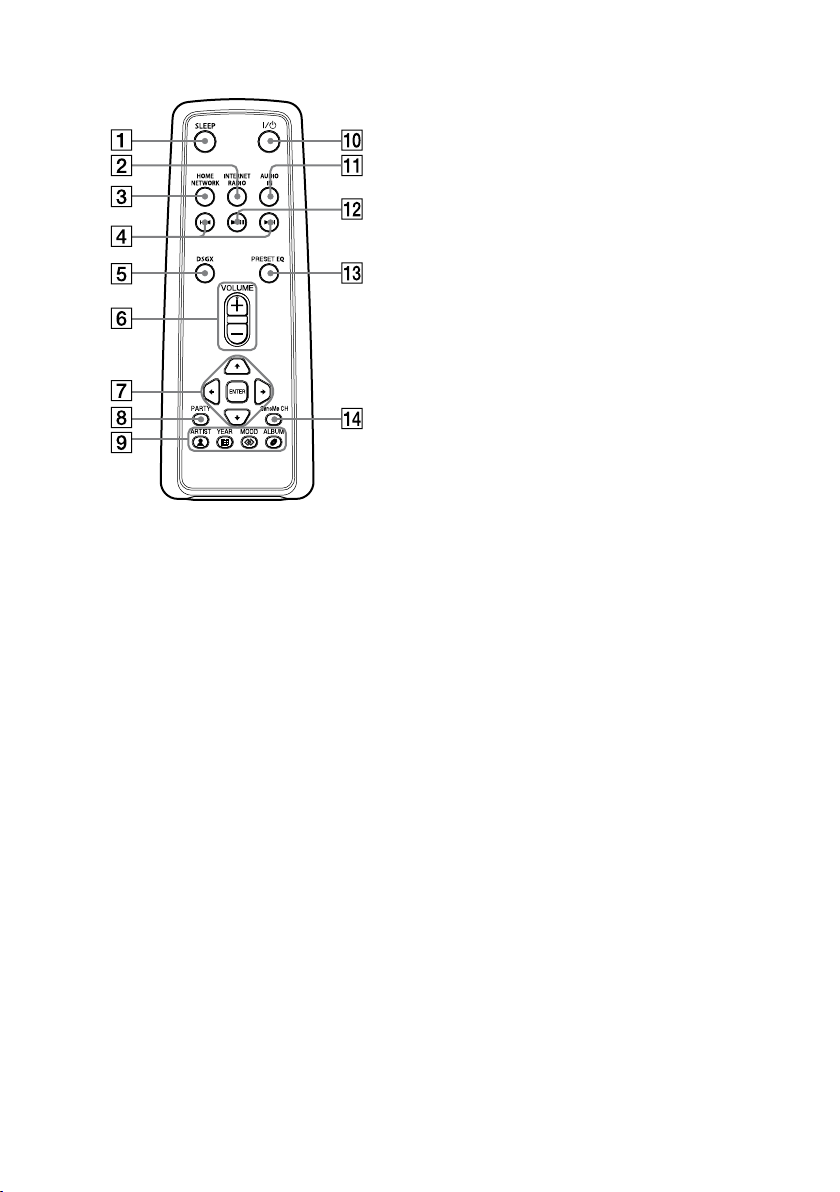
Remote control
* VOLUME + button has a tactile dot.
SLEEP button
Use to set or confirm the sleep timer setting
(page 147).
INTERNET RADIO button
Selects the Internet Radio function (page 38).
HOME NETWORK button
Selects the HOME NETWORK function and
plays audio data in a “GIGA JUKE” Music
Server or a DLNA-compatible digital media
server (pages 36, 142).
/ button
Press to cue to the beginning of the currently
playing track, next track or previous track.
Hold down to go quickly forward or
backward in the currently playing track.
While using the Internet Radio function:
Press to go to the previous or next radio
station (only when a Live365 station is
selected) (page 39).
DSGX button
Use to generate a more dynamic sound (page
146). Each press of the button switches the
DSGX (Dynamic Sound Generator X-tra)
function “On” or “Off”. This function is factory
set to “On”.
VOLUME +* and VOLUME – buttons
Use to adjust the volume.
Menu operation buttons
Use to select menu items and enter menu
settings (page 23).
, , and buttons
Use to select a menu item or to change a
setting.
ENTER button
Use to enter a setting.
PARTY button
Use to enter or leave PARTY MODE (page
139).
Music Surfin’ buttons
Use to select the channels of Music Surfin’
while the “SensMe™ Channels” function is
selected (page 141).
(power) button
Turns the power on or off.
AUDIO IN button
Selects the Audio In function and plays audio
data on an external device connected to the
AUDIO IN jack of the unit. Sound is output
from the unit’s speakers (page 145).
button
Use to start or pause playback.
PRESET EQ button
Selects a pre-set customized sound setting
(page 146). Each press of the button changes
the sound style as follows.
FLAT ROCK POPS JAZZ
CLASSICAL DANCE FLAT ...
(: Factory setting)
SensMe CH button
Selects and plays a channel of the “SensMe™
Channels” function on the “GIGA JUKE”
Music Server (page 141).
24
GB
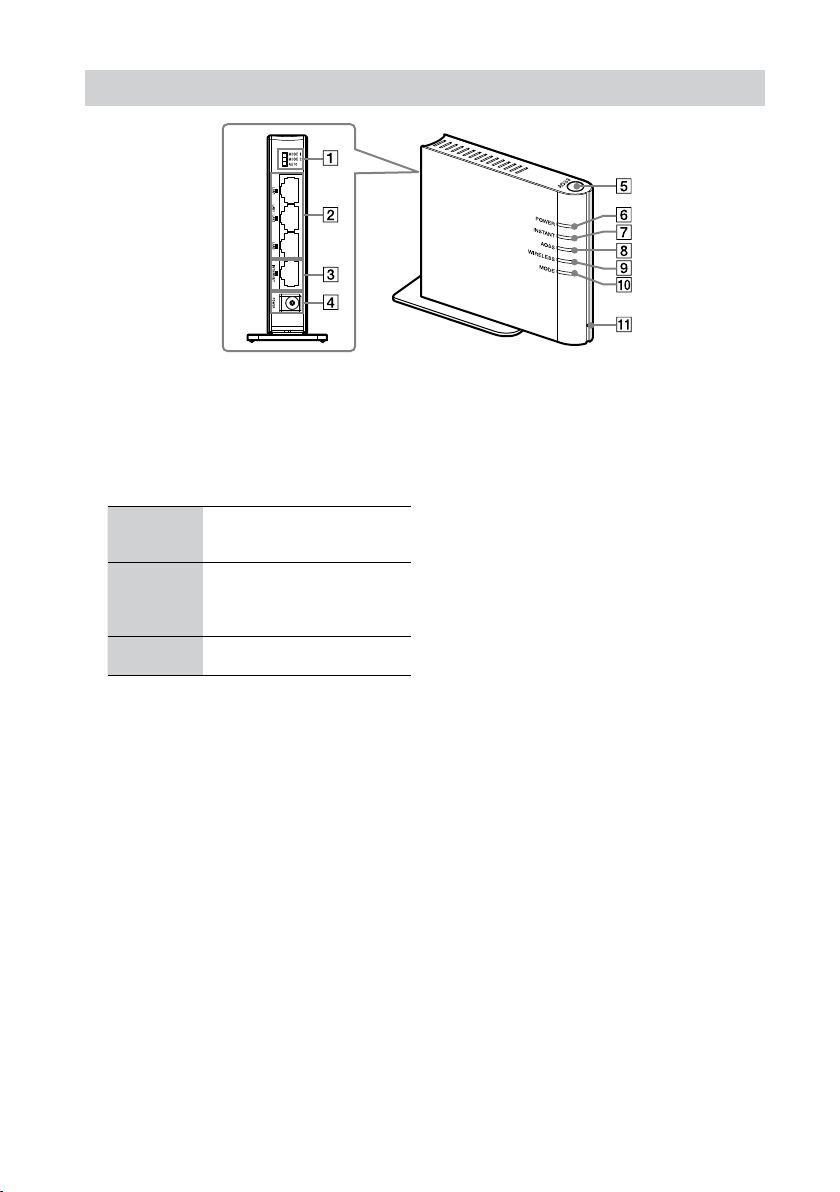
Wireless station
Operation mode switch (MODE 1, MODE 2,
AUTO)
Switches the operation mode of the wireless
station. Set the switch to “AUTO” during normal
use.
MODE 1 Use this mode when the network
MODE 2 Use this mode when the
AUTO This mode selects “MODE 1” or
(: Factory setting)
consists only of the devices in this
package.
wireless station is connected to
a broadband router for access to
the Internet.
“MODE 2” automatically.
LAN 1, LAN 2, LAN 3 ports
Use these ports to connect to the “GIGA
JUKE” Music Server through a wired
connection.
INTERNET port
Use this port to connect to a broadband router.
POWER (DC IN) jack
Use this jack to connect the supplied 5V AC
power adaptor and power cord.
AOSS button
When setting the AOSS connection, pressing
and holding down this button until the AOSS
indicator lights up changes the wireless station
to AOSS mode, causing the AOSS connection
setting to be automatically made (page 100).
POWER indicator
Lights up green when the wireless station is
turned on.
INSTANT indicator*
1
Lights up red while setting up the Instant
(S-IWS) connection and the wireless network
is connected with the Instant (S-IWS)
connection.
AOSS indicator*1*
2
Flashes red while the AOSS connection is being
set. Lights up steadily when the connection is
securely made (page 100).
WIRELESS indicator*
1
Lights up green when the wireless network is
available. Flashes when the wireless network is
being used.
MODE indicator*
1
Lights up green when the operation mode
switch is set to “MODE 1”.
RESET button
Press this button to reset the wireless station
to its factory settings or to Instant (S-IWS)
connection mode. Use something with a
pointed tip, such as a small pin, to press the
RESET button.
*1 If the INSTANT, AOSS, WIRELESS and MODE
indicators are all flashing continuously, there may be a
malfunction in the network. If this happens, check the
following.
When the indicators flash 3 times simultaneously:
There is a malfunction in the wired network. If this
happens, do the procedure “When the connection fails
or a malfunction has occurred in the wireless station”
(page 26) to reconnect the network.
25
GB

When the indicators flash 4 times simultaneously:
There is a malfunction in the wireless network. If this
happens, do the procedure “When the connection fails
or a malfunction has occurred in the wireless station”
(this page) to reconnect the network.
*2 When an AOSS connection fails, the AOSS indicator
flashes rapidly. If this happens, do the procedure
“When the connection fails or a malfunction has
occurred in the wireless station” (this page) to
reconnect the network.
When the connection fails or a
malfunction has occurred in the
wireless station
Do the following procedure to reset the network
connection.
Disconnect the 5V AC power adaptor
1
from the wireless station.
Make sure all the devices are correctly
2
and firmly connected (except for the
5V AC power adaptor of the wireless
station).
Reconnect the 5V AC power adaptor
3
to the wireless station and wait
until the WIRELESS indicator starts
flashing.
Press and hold the RESET button for
4
about 5 seconds using something
with a pointed tip, such as a small
pin, and then wait until the INSTANT
indicator lights up and the AOSS
indicator turns off (this may take
several minutes).
If this does not occur on the wireless station,
press the RESET button again.
Set up the network connection again.
5
For details on network connection setting,
refer to the supplied leaflet “Setup Guide”.
26
GB
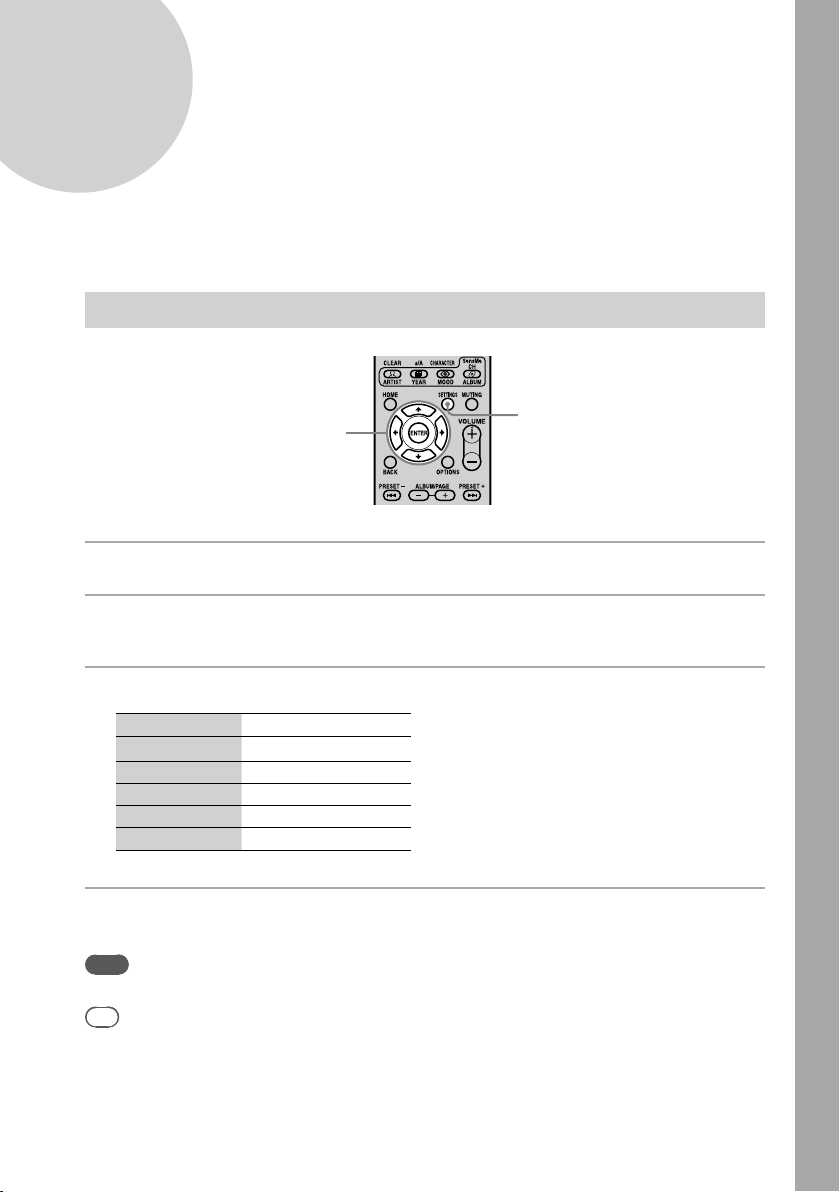
Selecting the display language
English, French, German, Italian or Spanish may be selected for the display language.
On the “GIGA JUKE” Music Server
///
ENTER
Enter the Settings menu on the “GIGA JUKE” Music Server.
1
Select [Basic settings] – [Screen setting], and then press ENTER.
2
The display for selecting the language appears.
Select the desired language from the [Language] setting and press ENTER.
3
Display Selectable language
English English
Français French
Deutsch German
Italiano Italian
Español Spanish
(: Factory setting)
Select [Execute] and press ENTER.
4
The display appears in the selected language.
Note
When you change the display language, the input language (page 95) also changes to the selected language.
Tip
Refer to “List of input characters” (page 183) to find out which characters you can use.
/
SETTINGS
Basic Operations
27
GB
28
GB
On the “GIGA JUKE” Wireless Player
SETTINGS
Enter the Settings menu on the “GIGA JUKE” Wireless Player.
1
Select [Option] – [Language].
2
The display for selecting the language appears.
Select the desired language from the [Language] setting.
3
Display Language
English English
Français French
Deutsch German
Italiano Italian
Español Spanish
( : Factory setting)
Press ENTER.
4
The display changes in the selected language.
Tip
Information whose source is the “GIGA JUKE” Music Server, a computer, or Internet Radio appears on this unit in
the language of the “GIGA JUKE” Music Server, computer, or Internet Radio service provider, regardless of the display
language selected on this unit.
///
/ ENTER
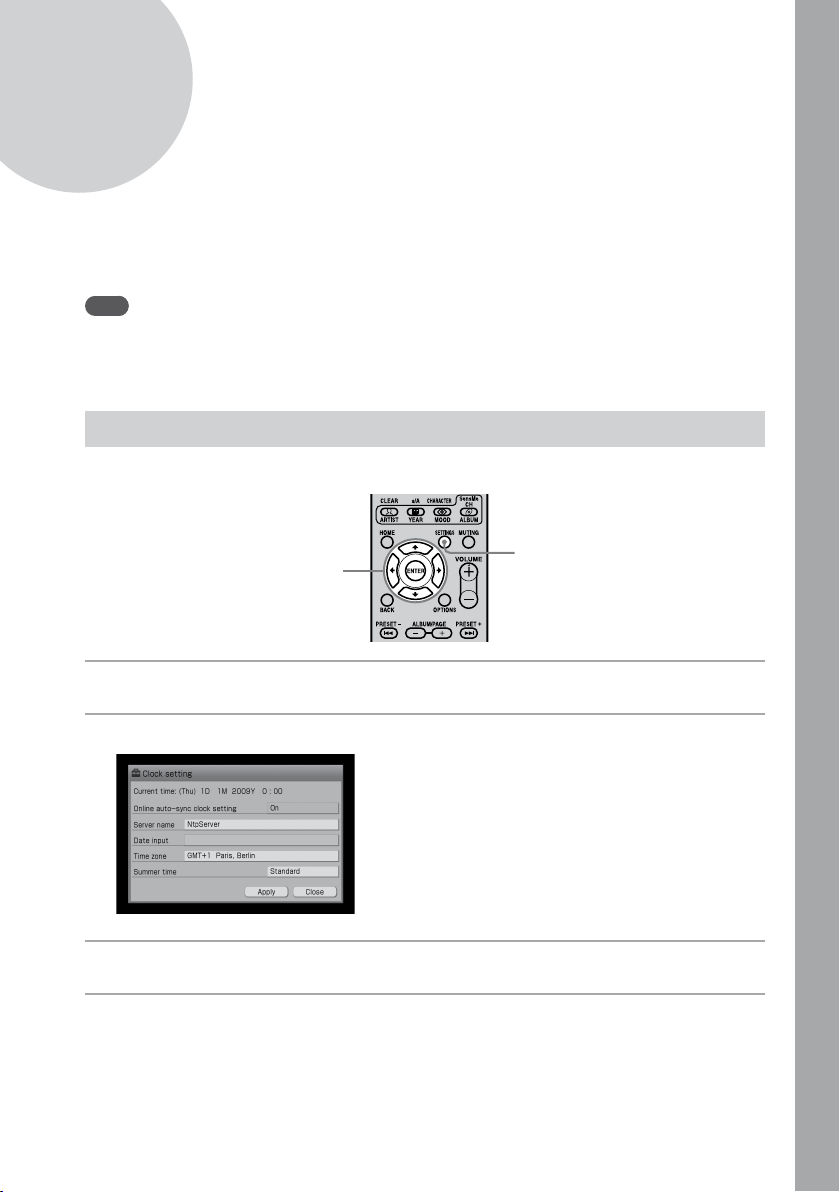
Setting the clock
The time on the clock must be correctly set for the proper operation of functions. Do the procedure below
to set the clock.
Note
If the clock has not been set, the clock setting display appears whenever you connect the power cord of the “GIGA
JUKE” Music Server or the 12V AC power adaptor of the “GIGA JUKE” Wireless Player to a wall outlet. If no operation
is performed for one minute, the clock setting display disappears and a demonstration starts playing automatically. To
disable automatic demonstration, set the clock.
On the “GIGA JUKE” Music Server
The clock can also be automatically set by connecting the unit to the Internet (page 109).
Basic Operations
///
ENTER
Enter the Settings menu on the “GIGA JUKE” Music Server.
1
Select [Basic settings] – [Clock setting], and then press ENTER.
2
Select [Online auto-sync clock setting] and press ENTER.
3
Select [Off ] and press ENTER.
4
/
SETTINGS
29
GB

30
GB
Select the desired city from the [Time zone] setting.
5
If the desired city does not appear in the [Time zone], select a city that is within the same time zone
as the desired city.
Select [Standard] or [Summer time] for the [Summer time] setting.
6
Select [Date input] and press ENTER.
7
Press / to select the day/month/year, and press / to adjust the value.
8
The date is set in order of day, month and year.
Press / to select the hour/minute, press / to set the value, and then press
9
ENTER.
Select [Apply] and press ENTER.
10
The time appears in [Current time].
Select [Close] and press ENTER.
11
To change the date and time format
You can select an M/D/Y, D/M/Y, or Y/M/D format for the date and a 12-hour or 24-hour format for the
time.
Enter the Settings menu on the “GIGA JUKE” Music Server.
1
Select [Basic settings] – [Screen setting], and then press ENTER.
2
Select the date and time format.
3
When selecting the date format:
Select [MM/DD/YYYY], [DD/MM/YYYY], or [YYYY/MM/DD] for the date format setting.
When selecting the time format:
Select [HH:MM] (24-hour system) or [HH:MM AM/PM] (12-hour system) for the time format
setting.
Select [Execute] and press ENTER.
4
 Loading...