

Sony NAS-SC500PK QUICK START GUIDE

Setup Guide
“GIGA JUKE” Multi-room Package
4-133-407-12(1)
12V AC power adaptor (1) Power cord (1)
The supplied power cord comes with an attached clamp
filter. This power cord is designed for exclusive use with
the NAS-C5E only.
For models except the UK model For the UK model
“Internet Radio service on “GIGA JUKE” Wireless Player” leaflet (1)
Connecting the speakers and antennas
2
HDD Network Audio System
NAS-SC500PK
© 2009 Sony Corporation Printed in Malaysia
Checking the supplied
1
accessories
“GIGA JUKE” Music Server and its supplied accessories
“GIGA JUKE” Music Server
NAS-S500HDE (1)
Speaker codes (2)
Wireless adaptor
UWA-NA1 (1)
Speaker pads (8)
Wireless adaptor
extension cable (1)
AM loop antenna (1)
Wireless station and its supplied accessories
Wireless station
WAP-NA1 (1)
5V AC power
adaptor (1)
Wireless station
stand (1)
Power cord (1)
For models except the UK model For the UK model
Network (LAN) cable (1)
Other supplied accessories
The following accessories are for common use with all the devices in the package
Operating Instructions (1)
This manual provides full explanations of the various settings, operations and the network
connection procedure.
This manual also contains precautions for the safe use of the unit.
Setup Guide (this manual)
or
Attach the speaker pads (supplied) to the
bottom corners of the speakers to stabilize the
speakers and to prevent them from slipping.
WARNING
DO NOT plug the power cord into a wall outlet until
the following steps to are completed.
or
Speaker cords can be replaced with other cords
of your choice (see “How to detach the speaker
cords from the speaker connectors”)
FM wire antenna (1) DAB wire antenna (1)
(for the UK model only)
R6 (size AA) batteries (2) Oval attachments for “WALKMAN” (2)
For details on the “WALKMAN” models that are
compatible with each oval attachment for “WALKMAN”
and on installing the oval attachment for “WALKMAN”
onto the unit, refer to the Operating Instructions.
Type A attachment Type B attachment
The attachment type (A or B) is indicated on the bottom
CD-ROM containing
the “Music Transfer” PC
software (1)
Do not play this disc on an
audio CD player.
of the attachment.
Remote control (1)
Before setting up the units
Do the following operations before setting up the units.
Insert batteries into the remote control
For “GIGA JUKE” Music Server
For “GIGA JUKE” Wireless Player
Prepare the Wireless Station
Operation
mode
switch
Slide and remove the battery
compartment lid.
Insert two R6 (size AA) batteries
( end first) matching the
polarities.
When the remote control is no longer
able to operate the unit, replace both
batteries with new ones.
Attach the stand (supplied) to the
wireless station.
The operation mode switch is factory set to
“AUTO”.
Connect the speaker cords to the speakers and the unit.
On the speakers
Insert the red-line end to the + terminal.
On the unit
Connect the AM loop antenna.
On the unit
Connect the FM wire antenna.
When using an external antenna On the unit
External
antenna
Connect the speaker cords to the speakers.
Make sure the metal leads (not the part covered with vinyl insulation) are securely inserted.
Connect the speaker cords to the unit.
Make sure the connectors at the end of the speaker cords are correctly aligned with the projections
in the SPEAKER terminals on the unit, and then insert the connectors into the terminals.
Make sure that the speaker cords are firmly connected to the +/– terminals on the speakers and to
the SPEAKER terminals on the unit.
To ensure good reception, keep the antenna away from the unit or any other nearby metal or
electrical devices (such as AV equipment).
When using the unit in an area with poor reception, connect an external antenna with a
commercially available 75 coaxial cable.
“GIGA JUKE” Wireless Player and its supplied accessories
“GIGA JUKE” Wireless
Player NAS-C5E (1)
Remote control (1)
R6 (size AA) batteries (2)
Tip
How to detach the speaker cords from the speaker connectors
If you want to use a different set of speaker cords, you can remove the cords from the
speaker connectors.
You can use any commercially available speaker cords of gauge AWG #18 - AWG #24.
Before attaching a new speaker cord, strip off 10 mm of its insulation and twist the bare
wires.
Push the tab on the speaker connector in the
direction of the arrow and pull out the speaker cord.
Connect the DAB antenna (for the UK model only).
DAB wire
antenna
With a commercially available DAB external antenna, you can enjoy more robust DAB reception. It
is recommended that you use the supplied DAB wire antenna in areas with strong reception only.
75 coaxial cable with an F male type connector will be needed to install a DAB external antenna.
Connecting the supplied devices over a wireless network
Connecting to the Internet and your computer
3
(Instant (S-IWS) connection)
Wireless adaptor
“GIGA JUKE” Music S erver “GIGA JUKE” Wireless Player
Turn on the wireless station.
Operation
mode switch
(AUTO)
To a wall outlet
Wireless station
Wireless station
POWER indicator
INSTANT indicator
AOSS indicator
Connecting the devices supplied in this package over a wireless network through
Instant (S-IWS)*1 connection allows you to listen audio data stored on the “GIGA
JUKE” Music Server through the speakers of the “GIGA JUKE” Wireless Player in a
different room.
*1 Instant (S-IWS) (Sony Instant Wireless Audio Setup) is a function that automatically sets up a
wireless network and connects the devices when they are turned on.
Note
Instant (S-IWS) connection is recommended when the network consists only of the devices supplied
with the NAS-SC500PK. If you want to set up the wireless network using a method other than Instant
(S-IWS), see “Connecting to the Internet and your computer (AOSS connection)” on the right or
refer to the “Network connection and setup” on page 98 in the Operating Instructions.
Make sure that the operation mode switch on the wireless station is set to “AUTO” (factory
setting).
Use the 5V AC power adaptor (supplied with the wireless station) to connect the wireless
station to a wall outlet.
Confirm that the POWER indicator is lit.
Wait until the INSTANT indicator lights up and the AOSS indicator turns off. (This may take several
minutes.)
4
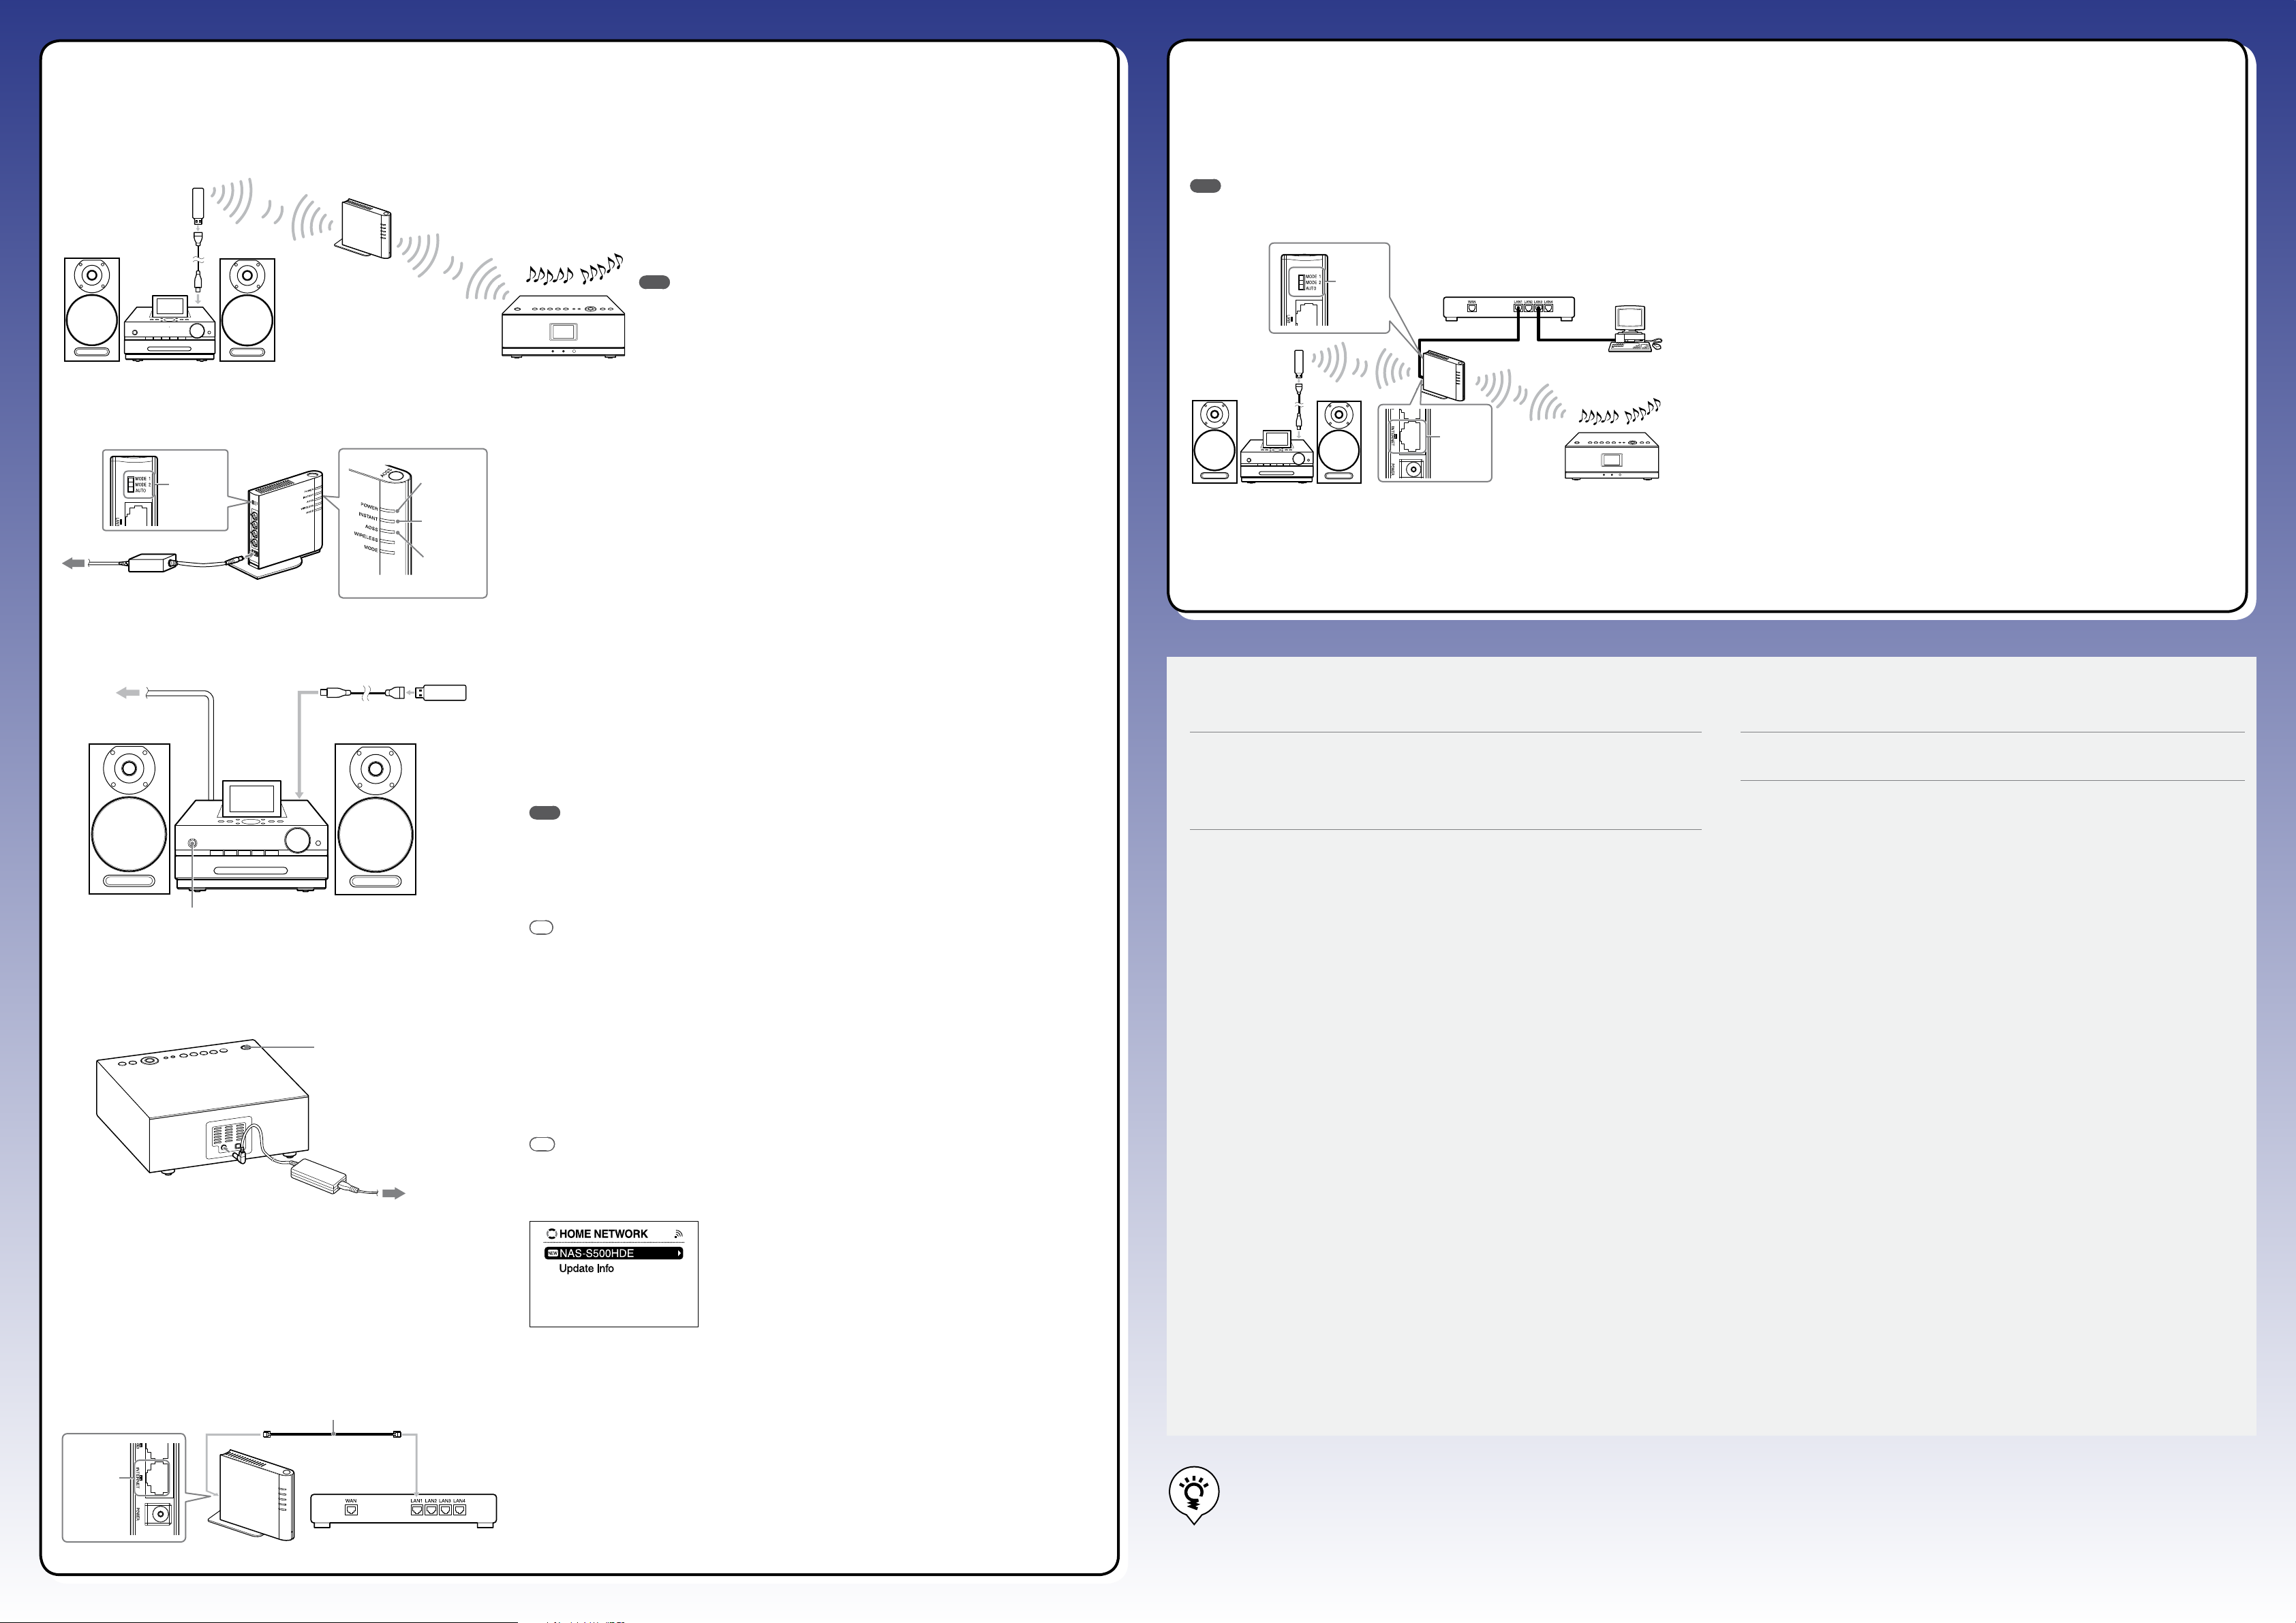
(AOSS connection)
If you want to use the devices in conjunction with your computer or use the “Music Transfer” software, the AOSS connection is recommended.
Note
When connecting the devices to the Internet together with a computer, the AOSS connection is recommended as it can obtain a security level higher than that of the Instant (S-IWS) connection.
Please note that using the Instant (S-IWS) connection may lower the security level of your home network.
Set the Operation mode switch on the wireless station to “MODE 2”.
Operation
mode switch
(MODE 2)
Wireless
adaptor
To the
INTERNET
port
“GIGA JUKE” Music Server “GIGA JUKE” Wireless Player
Broadband router
Wireless station
Computer
Connect the network (LAN) cable (supplied with the wireless station) to the
INTERNET port of the wireless station and a broadband router.
Perform the AOSS setup operation on the “GIGA JUKE” Music Server.
Press SETTINGS.
Press / to select [Network setting] – [Manual setting] – [Wireless LAN setting] – [Access
point setting] – [Automatic setting: AOSS], and then press ENTER.
Follow the instructions that appear in the display.
Perform the AOSS setup operation on the “GIGA JUKE” Wireless Player.
Press SETTINGS.
Press / to select [Network setting] – [Manual setting] – [Connection setting] – [AOSS],
and then press ENTER.
Follow the instructions that appear in the display.
Connect the “GIGA JUKE” Music Server and the wireless station.
(power)
To the USB por t To a wall outlet
“GIGA JUKE” Music S erver
Wireless adaptor
Connect the wireless adaptor to the USB port on the “GIGA JUKE” Music Server using the
wireless adaptor extension cable (supplied with the “GIGA JUKE” Music Server).
Connect the power cord of the “GIGA JUKE” Music Server to a wall outlet.
The “GIGA JUKE” Music Server automatically turns on, makes the initial settings, and then turns off.
(This may take several minutes.)
When the clock setting display appears, set the clock (refer to “Setting the clock” on page 29 in the
Operating Instructions).
Note
Do not disconnect the power cord while the initial setup is in progress. Doing so may cause the “GIGA JUKE” Music Server
to malfunction.
Press (power) to turn on the “GIGA JUKE” Music Server.
When the connection has completed, a pop-up window appears in the top left part of the display to show
the network connection status.
Tip
The language displayed on the screen depends on the language that is set on the “GIGA JUKE” Music Server. For details on
the display language setting, refer to the Operating Instructions.
Connect the “GIGA JUKE” Wireless Player and the wireless station.
(power)
To the DC IN 12V jack
“GIGA JUKE” Wireless Player
This completes the connection of the devices in the package.
To use these devices in conjunction with the Internet but without connecting to your computer, do the following:
To a wall outlet
Use the 12V AC power adaptor (supplied with the “GIGA JUKE” Wireless Player) to connect the
“GIGA JUKE” Wireless Player to a wall outlet.
When the clock setting display appears, set the clock (refer to “Setting the clock” on page 31 in the
Operating Instructions).
Press (power) to turn on the “GIGA JUKE” Wireless Player.
Tip
The language displayed on the screen depends on the language that is set on the “GIGA JUKE” Wireless Player. For details
on the display language setting, refer to the Operating Instructions.
When “Instant (S-IWS) setting with wireless station is completed.” appears, press / to
select [OK] and press ENTER.
The name of the “GIGA JUKE” Music Server (e.g., “NAS-S500HDE”)
appears in the server selection display.
If the name of the “GIGA JUKE” Music Server does not appear, press
to select [Update info] and press ENTER.
Troubleshooting
If the Instant (S-IWS) connection is not possible (“Wireless LAN Instant (S-IWS) Connected.”
does not appear in the network setting display of the “GIGA JUKE” Music Server); or
If the “GIGA JUKE” Wireless Player cannot connect with the “GIGA JUKE” Music Server (the
name of your “GIGA JUKE” Music Server does not appear in the server selection display of
the “GIGA JUKE” Wireless Player).
Do the following operation.
1 Disconnect the 5V AC power adaptor from the wireless station, and then check the operation mode
switch on the wireless station is set to “AUTO”.
If the network (LAN) cable (supplied with the wireless station) is connected to the wireless station,
disconnect it.
2 Reconnect the 5V AC power adaptor to the wireless station and wait until the WIRELESS indicator
starts flashing.
3 Press and hold the RESET button for about 5 seconds using something with a pointed tip, such as a
small pin, and then wait until the INSTANT indicator lights up and the AOSS indicator turns off (this
may take several minutes).
If this does not occur on the wireless station, press the RESET button again.
4 If a network (LAN) cable is connected to the “GIGA JUKE” Music Server, disconnect it.
5 Connect the wireless adaptor to the USB port of the “GIGA JUKE” Music Server.
6 On the “GIGA JUKE” Music Server, perform the Instant (S-IWS) connection.
Press SETTINGS, press / to select [Network setting] – [Auto setting], and then press ENTER.
Or, press SETTINGS, press / to select [Network setting] – [Manual setting] – [Wireless LAN
setting] – [Access point setting] – [Automatic setting: Instant (S-IWS)] and then press ENTER.
7 On the “GIGA JUKE” Wireless Player, perform the Instant (S-IWS) connection.
Press SETTINGS, press / to select [Network setting] – [Auto setting], and then press ENTER.
Or, Press SETTINGS, press / to select [Network setting] – [Manual setting] – [Connection
setting] – [Instant (S-IWS)], and then press ENTER.
If the “GIGA JUKE” Music Server or the “GIGA JUKE” Wireless Player cannot connect to the
Internet.
Do the following operation.
1 Disconnect the 5V AC power adaptor from the wireless station, and then set the operation mode
switch on the wireless station.
When performing the Instant (S-IWS) connection:
Set the operation mode switch to “AUTO”.
When performing the AOSS connection:
Set the operation mode switch to “MODE 2”.
If the network (LAN) cable (supplied with the wireless station) is connected to the wireless station,
disconnect it.
2 Connect the wireless station to the broadband router with the network (LAN) cable (supplied with
the wireless station).
When connecting the wireless station and a broadband router, connect the network (LAN) cable to
the INTERNET port on the wireless station (see the figures in “Connecting to the Internet and your
computer (AOSS connection)” above).
3 Reconnect the 5V AC power adaptor to the wireless station and wait until the WIRELESS indicator
starts flashing.
4 Press and hold the RESET button for about 5 seconds using something with a pointed tip, such as a
small pin, and then wait until the INSTANT indicator lights up and the AOSS indicator turns off
(this may take several minutes).
If this does not occur on the wireless station, press the RESET button again.
5 If a network (LAN) cable is connected to the “GIGA JUKE” Music Server, disconnect it.
6 Connect the wireless adaptor to the USB port of the “GIGA JUKE” Music Server.
7 When performing the Instant (S-IWS) connection:
On the “GIGA JUKE” Music Server, press SETTINGS, press / to select [Network setting] –
[Auto setting], and then press ENTER.
Or, press SETTINGS, press / to select [Network setting] – [Manual setting] – [Wireless LAN
setting] – [Access point setting] – [Automatic setting: Instant (S-IWS)], and then press ENTER.
When performing the AOSS connection:
Do step in “Connecting to the Internet and your computer (AOSS connection)” (see above).
8 When performing the Instant (S-IWS) connection:
On the “GIGA JUKE” Wireless Player, press SETTINGS, press / to select [Network setting] –
[Auto setting], and then press ENTER.
Or, press SETTINGS, press / to select [Network setting] – [Manual setting] – [Connection
setting] – [Instant (S-IWS)], and then press ENTER.
When performing an AOSS connection:
Do step in “Connecting to the Internet and your computer (AOSS connection)” (see above).
To the
INTERNET port
Wireless station
Network (LAN) cable
To the Broadband
router
Broadband router
Connect one end of the network (LAN) cable (supplied with the wireless station) to the
INTERNET port of the wireless station.
Connect the other end of the network (LAN) cable to the broadband router that is connected
to the Internet.
For more information, refer to the items on
the right.
See the Operating Instructions for full explanations of the various settings, operations,
functions and troubleshooting for the “GIGA JUKE” Music Server, the “GIGA JUKE”
Wireless Player and the wireless station.
Go to the customer support site of Sony Europe, http://support.sony-europe.com/ (for
customers in Europe only).
 Loading...