

Page 1

3-243-699-E1(1)
Portable
MiniDisc Recorder
Operating Instructions
“WALKMAN” is a trademark of Sony Corporation.
MZ-R910
©2002 Sony Corporation
Page 2

B Operating Instructions
Looking at the controls
The numbers are keyed to the illustrations in the
English text (pages 9 to 11).
The recorder
A Display window
B T MARK button
C Battery compartment
D END SEARCH button
E V OLUME +*/– buttons
*The VOLUME + button has a tactile dot.
F Terminals for attaching dry battery case.
G DC IN 3V jack
H GROUP/CANCEL button
I OPEN button
J 5-way control key
• For basic operations
Press N* to play/enter.
Press ./> to rewind/fast forward.
Press X to pause.
Press CHGx to stop/c h arge.
*The N button has a tactile dot.
• For moving the cursor and entering
selected items (during text entry and
other settings).
K Jog dial (MENU/ENTER)
Press to enter the menu, turn to select,
and then press to enter.
L LINE IN (OPT) jack
M MIC (PLUG IN POWER) * jack
*There is a tactile dot beside the MIC
(PLUG IN POWER) jack.
N REC (record) switch
O HOLD switch (at the rear)
P i/LINE OUT jack
The display window of the
recorder
A Character information display
Displays the track, group, or disc name*,
date, error messages, track numbers, etc.
*Names appear only with MDs that ha ve
been labeled.
B Group indication
C Disc indication
Shows that the disc is rotating for
recording, playing or editing an MD.
2
D REC in dication
Lights up while recording. Flashes when
standing by for recording.
E SYNC (synchro-recording) indication
Lights up whi le s ynchro-re co rding.
F Play mode indication
Shows the play mode of the MD.
G Level meter
Shows the level of the MD being played.
H LP2 (LP2 stereo), LP4 (LP4 stereo),
MONO (monaural) indication
I Sound indication
Lights up when Digital Sound Preset is
on.
J Battery level indication
Shows approximate batter y condition .
While chargi n g th e rec har g eabl e b atte r y,
this indication show s the charging
condition.
K Melody ti mer in dication
The headphones/earphones with
a remote control
A DISPLAY button
B PLAYMODE button
C RPT/ENT(repeat/enter) button
D SOUND button
E X (pause) button
F x (stop/enter) button
G Clip
H Control (./N>)
N>: play, AMS, FF
.: REW
Turn or turn and hold to play, fast
forward, rewind, etc.
I Control (VOL +/–)
Pull and turn to adjust the volume.
J Display window
K HOLD switch
The display window of the
remote control
A Disc indication
B Track number display
C Character information display
D Play mode indication
E SOUND indication
F Battery level indication
G REC in dication
H Group indication
I Melody ti mer in dication
Page 3
List of menus
Menu functions
To use menu items on the recorder, press the jog
dial to enter the menu, turn the dial to se lect the
item, and then press the dial again to confirm
the menu.
To use menu items on the remote control, press
DISPLAY for 2 seconds or more, turn the
control repeatedly to select the item, and then
press x to confirm the menu.
menu of the
recorder/the
remote
control
EDIT/EDIT Selecting editing oper at io n s
DISPLAY/— Displaying elapsed playing
PLA Y MODE /—Selecting the play mode
RecVolume/— Selecting t he automatic or
REC MODE/— Selecting the recording mode
M-TIMER/
M-TIMER
AUDIO OUT/—Selecting i/LI N E O U T jack
SOUND/— Selecting “SOUND 1”,
—/SPEED Changing the playback speed
—/GROUP Turning the group function
PERSONAL/
PERSONAL
SYNC REC/— Selecting “SYNC ON” or
TIME MARK/—Selecting the A u to Time
functions
(labeling tracks, groups, or
discs, erasing tracks, groups,
or discs, etc.) (pages 19 to
28).
time, remaining playing time,
etc.
(repeat play, shuffle play,
etc.) (page 15).
manual recording level
adjustment (page12).
(SP stereo, LP2 stereo, LP4
stereo, or monaural) (page9).
Setting the alarm (Melody
timer) (page 29).
output (page 18).
“SOUND 2,” or “SOUND
OFF” (Digital Sound Preset)
(page 16).
during play (page 17).
on and off (page 14).
Entering or erasing the disc
information in the Personal
Disc Memory (page 30).
“SYNC OFF” when synchrorecording (page 5).
Stamp setting (page 11).
menu of the
recorder/the
remote
control
MIC SENS/— Selecting the microphone
—/SEARCH Selecting the search mode
OPTION/
OPTION
OPTION/— • REC-Posi
functions
sensitivity (page 11).
(Index search/Time search)
(page 13).
• AVLS (Automatic Volume
Limiter System)
Selecting “AVLS ON” or
“AVLS OFF”.
• BEEP
Selecting “BEEP ON” or
“BEEP OFF” for both
“MAIN UNIT” or
“REMOTE” for the
recorder (page 30).
Selecting “BEEP ON” or
“BEEP OFF” for the
remote control.
Selecting the start point
when recording (page 10).
• LP Stamp
Selecting “Stamp ON” or
“Stamp OFF” (page 9).
• CONTRAST
Adjusting the contrast of
the display.
•CLOCK SET
Setting the clock (page 10).
To check the menus and menu
items that can be selected at
each menu level, see the
following pages in English text.
Menus while the recor de r is :
— stopped, see pages 81 and 82.
— pla ying, see page 83.
— recording, see page 84.
Menus while the remote control is:
— stopped, see page 85.
— playing or recording, see page 86.
3
Page 4

B Preparing
Getting started!
See the illustrations in English text (pa ge s 12
and 16).
Charge the rechargeable battery before using.
Even if the rechargeable battery is not charged,
you can use the recorder as long as the AC
power adaptor is connected.
1 Insert the nickel metal hydride
rechargeable batt ery (NH-14WM) into
the recorder with the minus end first.
To use the recorder with an alkaline dry
battery, insert the dry battery into the
dry battery case and attach it to the
recorder.
2 Charging the rechargeable battery.
1Assemble the battery charging stand.
Make sure all the parts of the battery
charging stand are firmly at tached.
2Connect the AC power adaptor to
the battery ch arging stand an d the
AC adaptor to a wall outlet.
3Place the recorder on the battery
charging stand.
V erify that the CHARGE lamp lights
up. Full charging takes about six
hours. Whe n it is completed, the
charge lamp goes off.
Do not operate the re corder when
you place it on the battery charging
stand or during the charging. If you
do so, it may cause the recorder to
malfunction or prevent the batt er y
from charging.
3 Connect the headphones/earphones with
the remote control to the recorder and
slide HOLD to unlock the cont rol .
For models supplied with the AC plug
adaptor
If the AC power adaptor does not fit the wall
outlet, use the AC plug adaptor.
Notes on rech ar g e a bl e b a ttery
• The supplied battery charging stand can be
used only with this recorder. Any other
models cannot be charged.
• Do not use the supplied battery charging stand
to charge any other battery besides the
supplied one or the one designated for it (NH14WM).
• Though the battery charging stand and the
battery may become hot during the charging
procedure, this pos es no danger.
• Be sure to use the suppli ed AC power adap tor.
• If you are recharging the battery for the first
time or after a long period of disuse, the
battery may not char ge up t o its rat ed capac ity.
This is a normal characteristic. After you use
and recharge the battery a few times, it will
return to its normal charge capacity.
• When the battery life of a fully charged
rechargeable battery beco me s a bout half the
normal life, replace it.
• If the recorder will not be used for a long
period of time, disconnect the AC power
adaptor from a wall outlet and re m ove the
recorder from the battery charging stand.
• Please note the following points when
charging the battery directly with the AC
power adaptor.
—If you press CHGx im me diately after
charging has complet ed , c h arging will
begin again. If this happens, press CHGx
again to stop the charging operation since
the battery is already ful ly ch arged.
—Charging stops when you try to operate the
recorder during charging.
Notes on dry battery
Incorrect battery usage may lead to leakage of
battery fluid or bursting batteries. To prevent
such accidents, observe the following
precautions:
• Insert the + and – poles of the battery
correctly.
• Do not try to recharge the battery.
• When the recorder is not be used for a long
time, be sure to remove the ba tte r y.
• If a battery leak should develop, carefully and
thoroughly wipe away battery fluid from the
battery compartment before inserting new
ones.
4
Page 5

B MD recording
Recording an MD right
away! (Synchrorecording)
See the illustrations in English text (pages 16
and 17).
This section explains the basic procedure for
making digital recordings using an optical cable
connected to a CD player, BS tuner or other
digital equipment. The record er st arts and s tops
recording in sync with the sour ce sound. Track
marks are added whenever they appear in the
sound source. It is recommended to use the AC
power adaptor when recording.
To record from a cassette deck, radio, etc.
t“Recording in analog (Analog Recor di ng) ”
(page 8)
To record using a group mode t “Recording
tracks using the group function (Gr oup Mode
Recordi n g )” (page 9 )
1 Insert an MD.
1Press OPEN to open th e lid.
2Insert an MD with the label side
facing front, and press the lid to
close.
Insert an recordable MD when
recording.
2 Make connections. (Insert the cables
firmly and comple tely into the
appropriate jacks.)
1Connect the LINE IN (OPT) jack of
recorder to the digital (optical) out
jacks of the source with a optica l
cable.
The recorder switches to digital
input autom atically.
2Connect the DC IN 3V j ac k of the
recorder to a wall outlet with the AC
power adaptor.
When the recorder has different sound
sources connected at the same time, the
recorder switches to the digital,
microphone, or analog inp ut in this
order of priority.
3 Record an MD.
1While the recorder is sto pped, press
the jog dial.
2Turn th e jog di al un til “ SYNC REC”
flashes in the display, and then press
to enter.
3Turn the jog dial until “SYNC ON”
flashes in the display, and then press
to enter.
To cancel synchro-recording, select
“SYNC OFF” in this step.
4Press and slide REC to the right.
“REC” and REC lamp on t he REC
switch ligh t up and recor ding starts.
5Play the source you want to record .
To stop recording, press x.
After you press x to stop, the recorder will
automatically turn off in about 10 seconds
(when using batteries) or abo ut 3 minutes
(when using AC power adaptor).
Note
If you record on a previously recorded disc, the
recorder is factor y set to overwrite the entire
contents of the disc. If you want the record ing
to start after the existing contents, do the
procedure “Recording without overwritin g
existing material” (page 10) be fo r e step 3,
“Record an MD.” (this page).
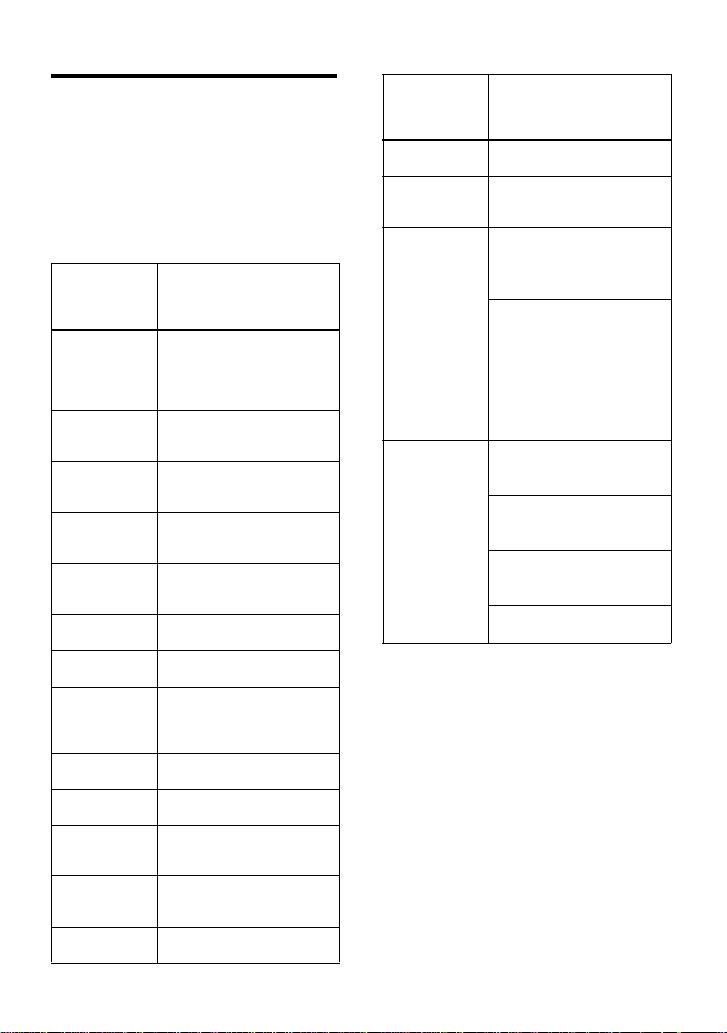
To Do this
Record from the
end of the
current
contents
Record over
partway through
the previous
recording
Pause Press X.
Remove the MD Press x, then press OPEN to
1)
If “REC-Posi” is set to “From End”, recording
operations will always start from the end of
the previously recorded mater ia l wit hout
pressing END SEARCH.
If “REC-Posi” is set to
“From Here”, press E N D
SEARCH, and then press and
1)
slide REC to the right .
If “REC-Posi” is set to
“From End”, press and slide
REC to the right .
Press N, > , or . to
find the start point of
recording and press x to
stop. Then press and slide
REC to the right .
Press X again to resume
recording.
open the lid.
2)
3)
5
Page 6

2)
A new track mark is added at the point when
you press
X again to resume recording while
pausing; thus the remainder of the track will be
counted as a new track.
3)
If you open the lid while “REC-Posi” is set to
“From End”, recording will begin from the top
of the disc the next time you record. Check the
point to start r eco r ding on the disp lay.
If the recording does not start
• Make sure the recorder is n o t locked.
• Make sure the MD is not record-protected.
• Premastered MDs cannot be recorded over.
About the DSP TYPE-R for ATRAC
“TYPE-R” is a high-level Sony specification
used in the Digital Signal Processor (DSP),
which is the hear t of the MiniDisc so un d. This
technology gives the MiniDisc recorder twice
the signal processing capa bility as previous
MiniDisc Walkman models. MDs recorded
with this specification, “TY PE -R”, produce
near-MiniDisc deck-quality sound on MD
players that support the specification. Even on
MD players that do not support the
specification, it produces higher quality sound
than MDs recorded on ordinary MD pl ayer s.
This function works only when recording or
playing in normal stereo. “TYPE-R” does not
work when the recorder is in MDLP mode .
Notes
• The pause function cannot be turned on or off
manually during synchro- rec or ding. Press
x
to stop recording.
• Do not switch the “SYNC REC” setting while
recording. Recording may not be done
properly.
• Even when there is no recorded sound on the
sound source, there may be cases when
recording does not pause automatically during
synchro-recording due to the noise level
emitted from the sound source.
• If a silent portion is encountered for
approximately 2 seconds during synchrorecording from a sound source other tha n a
CD or an MD, a new track mark is
automatically add ed a t th e p oi n t w here the
silent portion ends.
• Synchro-recording cannot be done if the
connecting cord is not an optic al cable , or if
the cable is connected to the MIC (PLUG IN
POWER) jack.
• You cannot change the recording mode during
recording.
• “Data Save ” or “T OC Edit” fl ashes whi le data
of the recording (the track’s start and end
points, etc.) is being recorded. Do not move or
jog the recorder or disconnect the power
source while the indication is fla shi ng in the
display.
• The lid does not open until “TOC Edit”
disappears in the display.
• If the power supply is disrupted (i.e. the
battery is removed or becomes exhausted or
the AC power adaptor is disconnected) during
a recording or editing operation, or while
“TOC Edit” appears in the display, then it will
not be possible to open the lid until power is
restored.
• Y ou can make a digital recording only from an
optical type output.
• When recording from a portable CD player,
set the CD player to pause, and then do the
recording procedure on the recorder.
• Note the following when recording from a
portable CD player:
—Some portable CD players may not be
capable of digital out unless powered by the
AC power. If this is the case, connect the
AC power adaptor to the portable CD player
and use it on AC power as the power source.
—On some portable CD players, optical
output may not be possible when using an
anti-skip function (e.g., ESP* or GPROTECTION). If this is the case, turn off
the anti-skip function.
* Electronic Shock Protection
6
Page 7
B MD playing
Playing an MD right away!
See the illustration in English text (page 21).
If you want to use the rechargeable battery, be
sure to recharge them before playing (page4).
1 Insert an MD.
1Press OPEN to open the lid.
2Insert an MD with the label side
facing front, and press the lid to
close.
2 Start playing.
1Press N on the recorder. Turn the
control toward s N> on the
remote control.
A short beep sounds in the
headphones/earphones.
2Press VOLU ME +/– on the recorder
to adjust the volume. Pull and turn
the control towards VOL + or
towards VOL – on the remote
control.
To stop play, press x.
After you press x to stop, the recorder will
automatically turn off in about 10 secon ds
(when using batteries) or abo ut 3 minutes
(when using AC power adaptor).
Playback starts from the point you last stopped
playing. To start playback from the beginning
of the disc, press
the recorder, or turn and hold the control
towards
remote control.
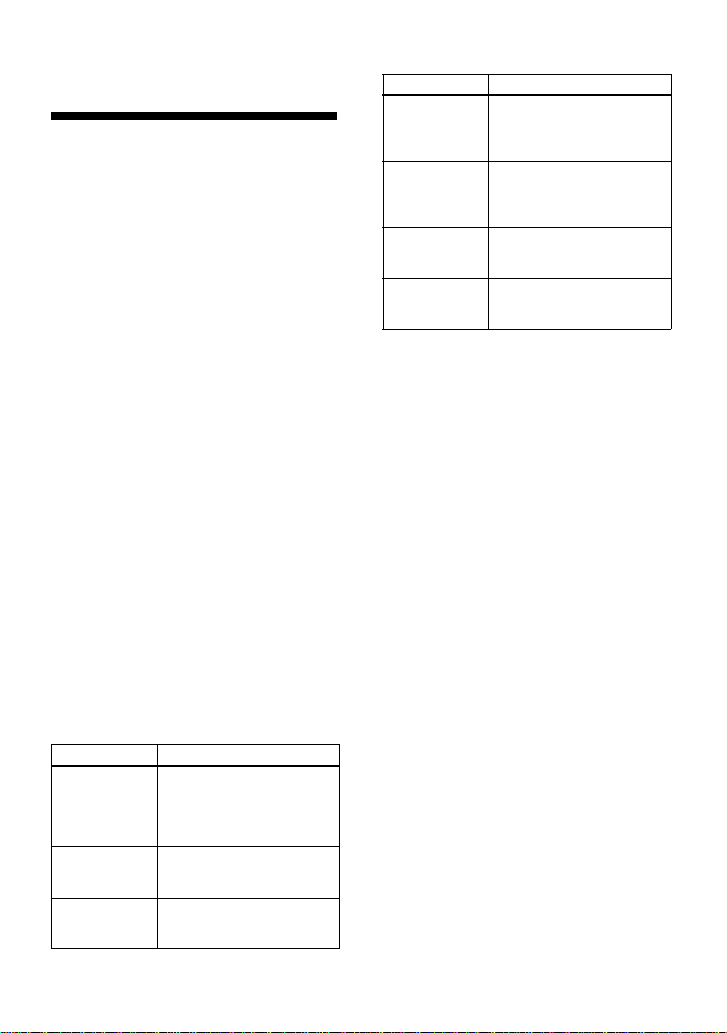
To Do this
Select the track
directly viewing
the track
number or
name.
Find the
beginning of the
current track
Find the
beginning of the
next track
N for 2 seconds or more on
N> for 2 seconds or more on the
Turn the jog dial and press to
enter.
Press .. Turn the control
towards . on the remote
1)
control.
Press >. Turn the contro l
towards N> on the
2)
remote control.
To Do this
Go backwards
while playing
Go forward
while playing
Pause Press X. Pr e ss X on the
Remove the MD Press x. Press x on the
1)
If you press . twice continueous ly whi le
playing the first track o f t h e d is c, th e recorder
goes to the beginning of teh last track o n the
disc.
2)
If you press > during the last tra ck o f the
disc, the recorder goes to the beginning of the
first track on the disc.
3)
Once you open the lid, the point to start play
will change to the beginning of the fi r st tr a ck
(except when the disc information has been
stored in the Persona l D isc Memory).
If the playback does not start
Make sure the recorder is not locked. If it is
locked, slide the HOLD switch in the opposite
direction of the arrow.
Suppressing the skips of the sound (GPROTECTION)
The G-PROTECTION function was developed
to provide a higher level of shock resistance
than that of existing players in order to allow
the recorder to be used while jogging.
Note
The playback sound may skip if:
• the recorder receives stronger continuous
shock.
• a dirty or scratched MiniDisc is played.
When using the headphones/earphones
connect them directly to the re corder
1 Press the jog dial, turn th e di al until
“AUDIO OUT” flashes in the disp lay, and
then press the dial again.
2 Turn the jog dial until “HeadPhone”
appears in the display.
3 Press the jog dial again.
Keep pressing ..
Turn and hold the control
towards . on the remote
control.
Keep pressing >. Turn
and hold the control towards
N> on the remote
control.
remote control. Press X
again to re sume play.
remote control. Then press
OPEN to open the lid.
3)
7
Page 8
B Various ways of
recording
Connecting digital (optical) and analog (line) inputs
The recorder selects digital or analog input
according to how the sound source is hooked
up.
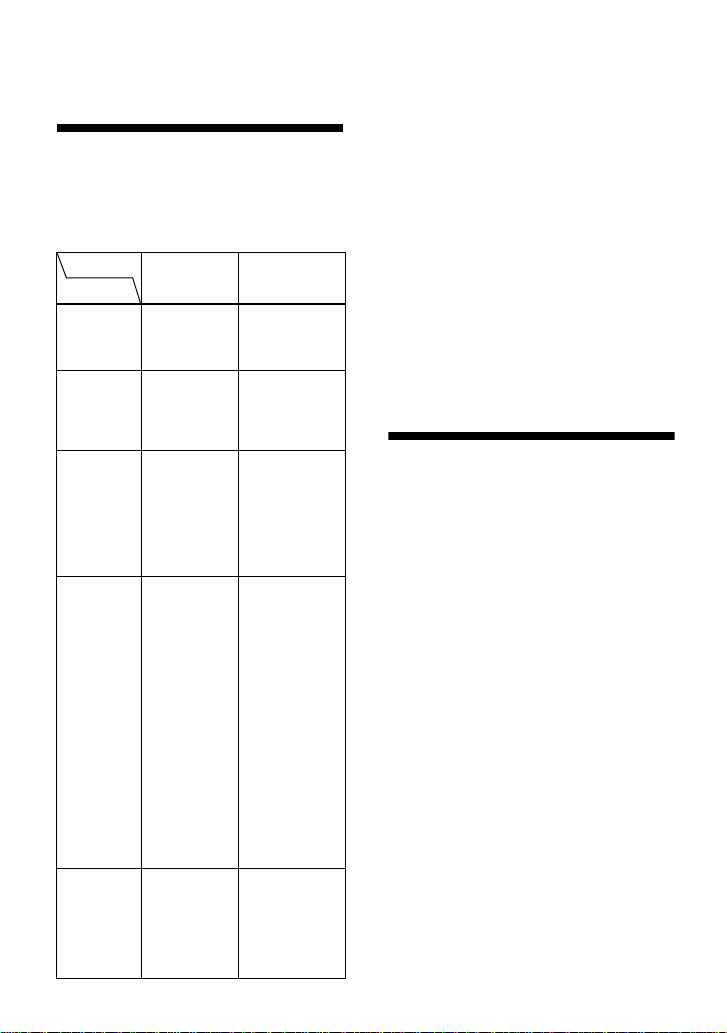
Input
Digital
Difference
Connectable
source
Usable cord Op t ic al cable
Signal from
the source
Track
marks
Recorded
sound level
(optical)
input
Equipment
with an digital
(optical)
output jack
(with an
optical or an
optical-mini
plug)
Digital Analog
Marked
1)
(copied)
automatically
• at the sam e
positions as
the source.
• after more
than 2
seconds of
blank or low
level
segment.
• when
recording is
paused while
synchrorecording.
Same as the
source.
You can also
adjust it
manually.
(Digital REC
level control)
Analog (line)
input
Equipment with
an analog (line)
output jack
Line cable (with
2 phono plugs or
a stereo-mini
plug)
Even when a
digital source
(such as a CD ) is
connected, the
signal sent to the
recorder is
analog.
Marked
• after more
than 2 seconds
of blank or
low level
2)
segment.
•while the
recorder is
paused while
recording.
• automatically
3)
at specified
intervals when
the Auto time
stamp is on.
You can erase
4)
unnecessary
marks after
recording.
Adjusted
automatically.
You can also
adjust it
manually.
1)
You can erase unnecessary marks after
recording (“Erasing a track mark” (page 27)).
2)
When the sound source is a CD or an MD
3)
With a sound source other than a CD or an
MD.
4)
The recorder pauses automatically when it
encounters a section with no audio signal for 3
seconds or more.
Notes
Track mark may be copied incorrectly:
• when you record from some CD players or
multi disc players using dig ital (optical) input.
• when the source is in shuffle or program play
mode while recording using dig ita l ( optical)
input. In this case, play the source in nor m al
play mode.
• when recording programs with audio that is
digitally broadcast (e.g., digital TV) are
recorded through the digital (optical) input.
Recording in analog (Analog Recording)
See the illustration in Englis h text (pag e 24).
The sound will be sent from the connected
equipment as analog si gnal b ut wil l be re cord ed
digitally on the disc.
1 Connect the LINE IN (OPT) jack of the
recorder to the line output jack of the
source with an line cable (not suppl ied).
The recorder switches to analog input
automatically.
2 Conne c t th e power sourc e.
To use on A C power, see “Recording an
MD right away!”.
3 Pre s s an d slide REC to the right.
“REC” and the REC lamp lights up and
recording starts.
4 Play the sound source.
Note
If you temporarily stop a recording operation
by pressing X, a new track mark will be added
at that point when you press X again to resume
recording. The recording resumes on a new
track.
8
Page 9

Long-time recording (MDLP)
See the illustration in English text (page 25).
Select each recording mode according to the
recording time that you want.
Stereo recording is possible at 2 ti m es ( LP2) or
4 times (LP4) the normal recording time
(MDLP mode). MDs recorded in monaural or
MDLP mode can be played back only on MD
components with monaural or MDLP mode.
1 P res s the jog dial.
2 Turn th e jog dial until “REC MODE ”
flashes in the display, and then press to
enter.
3 Turn the jog dial to select the desired
recording mode.
The recording mode can be select ed
from “(none)” (standard stereo mode),
“LP2” (2
“LP4” (4
and “MONO” (monaural).
´ normal recording mode),
´ normal recording mode),
4 Press and slide REC to the right.
Recordin g s tarts.
5 Sta rt t he sound source.
When you do not want “LP:” added at the beginning of the track
When recording in MDLP mode, this recorder
adds “LP:” at the front of every track name
automatically. “LP:” appears when you try to
play or edit these tracks on a recorder or player
that does not support MDLP mode (but not on a
recorder or player that supports MDLP mode).
If you change the recorder setting so that “LP:”
is not added, you'll be able to enter longer track
names by using the entire text string.
1 While the recorder is s topped, press the
jog dial.
2 Turn th e jog dial until “O PTION”
flashes in the display, and then press to
enter.
3 Turn the jog dial until “ LP St am p”
flashes in the display, and then press to
enter.
4 Turn the jog dial until “S tamp OFF”
flashes in the display, and then press to
enter.
If you want “LP:” added, select “Stamp ON” in
this step, and then press the jog dial .
Notes
• It is recommended that you use the AC power
adaptor fo r MDLP reco rdings.
• During monaural recording of a stereo sound
source connected through the digital (optical)
input jack, you can still monitor the re corded
sound in stereo by using headphones/
earphones connected the i/LINE OUT jack.
• When you record in LP4 stereo mode,
momentary noise may be produced on very
rare occasions with certain sound sources.
This is because of the special digital audio
compression technology that en a ble s a
recording time 4 times lo nge r than normal. If
noise is produced, it is recommended that you
record in normal stereo or LP2 s tereo mode to
obtain better sound quality.
Recording tracks using the group function (Group Mode Recording)
See the illustrations in Engl ish text (pa ge s 26
and 27).
What is the group function
(group mode)?
It is a function that allows you to separate
tracks on a disc into different groups for
playback, recording and editing.
It is convenient for managing multiple CD
albums recorded in MDLP (LP2 stereo/LP4
stereo) mode onto a single MD. You can create
a maximum of 99 groups on a disc.
How is group information
recorded?
When recording in group mode, the group
information is writte n to the disc na me
recording area automatically.
Therefore, the character string written in the
disc name recording area is displayed in its
entirety as the disc name if you load an MD
recorded in group mode into a system that does
not support group mode, or if you try to edit the
contents of a disc on this recorder with the
group mode turned off.
9
Page 10

You can change the character string by
performing the procedure of “Re la be li n g
recordings” in “Labeling /relabeling recordi ngs”
(page 18). However, if you rewrite this
character string by mis take, you may be unable
to use the group function of that MD.
Notes
• The group function setting is stored even if you
eject the MD or turn off the recorder.
• In group mode, the recorder treats all tracks
without group settings as belonging to the last
group on the disc. The last group is indicated in
the display window on the recorder as “Group –
–”. Within a group, the tracks appear in their
order on the disc, not their order within the
group.
• Note that a group setting cannot be made if the
total character count for the tracks, groups and
disc name on the disc exceed the maximum
number that can be input.
To activate the group mode
To record tracks in group mode, you must first
turn the group mode on before the start of
recording.
On the recorder
1 Press GROUP for 2 seconds or more.
“G” and “GROUP ON” light up in the
display and the group mode turns on.
To cancel the group mode, press
GROUP for 2 seconds or more.
On the remote control
1 Press D ISPL AY for 2 seconds or more.
2 Turn the control repeatedly until
“GROUP” flashes in the display, and
then press x to enter.
3 Turn the control rep ea ted l y unt il
“GROUP ON” flashes in t he display,
and then press x to enter.
“G” lights up in the disp la y and the
group mode turns on.
T o can cel the group mode, se lect
“GROUP OFF” in step 2.
Recording a track into a new group
• Turn the group mode on.
1 Press END SEARCH.
2 Press and slide REC to the right.
10
3 Play the source sound.
To stop recording, press x.
The material that was recorded up until x was
pressed is entered as a new group.
Recording a track into an existing group
• Insert a disc w ith group settings.
• Turn the group mode on.
1 Press GROUP slightly.
“ ” flashes and you can select a group
directly (group skip mode).
2 Within 5 seconds, press . or >
repeatedly until the group you want the
track to belong to appears.
3 Pre s s an d slide REC to the right.
4 Play the source sound.
Newly reco rd ed track is added after the
current conten ts.
Notes
• Even if “REC-Po si” is set to “From Here”,
newly recorded tracks are inserted after the
existing tracks in the specified group without
recording over the current contents.
• Group skip mode turns off automatically in
step
2 if nothing is done within 5 seconds. To
continue the procedure, do step 1 a gai n.
Recording without overwriting existing material
See the illustration in Englis h text (pag e 28).
If you wish to avoid overwriting the current
contents of an MD, do the following procedure.
All new material wi ll t hen be r ecorded from the
end of the current contents.
1 While the recorder is stopped, press the
jog dial.
2 Turn the jog dial until “OPT ION ”
flashes in the dis p l ay, and then press to
enter.
3 Turn the jog dial repea t edl y until “REC-
Posi” flashes in the display, and then
press to enter.
Page 11

4 Turn the jog dial repeat edly un t il “Fr om
End” flashes in the display, and then
press to enter.
To start recording from the current point
Select “Fr o m Here” in step
Notes
• The setting will remain even after the power is
turned off.
• If you start recording while the recorder is in
play-paused, the reco rding wil l begi n from the
point at which it is paused even when the
“REC-Posi” is set to “Fro m E nd” .
4.
Recording from a microphone
See the illustration in English text (page 29).
1 Connect a stereo microphone (ECM-
717, ECM-MS907, ECM-MS957, etc.,
not supplied) to the MIC (PLUG IN
POWER) jack.
2 Press and slide REC to the right.
To select microphone sensitivity
1 P res s the jog dial whil e the recorder is
stopped.
2 Turn the dial repeatedly until “MIC
SENS” flashes in the display, and then
press to enter.
3 Turn the jog dial repe at edly to select
“SENS HIGH” (when recording a soft
sound or a sound in the distance) or
“SENS LOW”(when recording a loud
sound or a sound at close range), and
then press to enter.
Notes
• The recorder automatically switches input in
the following order; optical input, microphone
input, and analog input. You cannot record
through the microphone while an optical cable
is connected to the LINE IN (OPT) jack.
• The microphone may pick up the operating
sound of the recorder itself. Use th e
microphone away from the recorder in such
cases. Please note that the sound of record e r
operations may be picked up if the
microphone that you use has a short
connector.
• Only the left-channel sound is recorded when
a monaural microphone is used.
Adding track marks automatically at specified intervals (Auto Time Stamp)
See the illustration in English text (page 30).
Use this feature to a dd tr a ck marks
automatically at specified intervals when
recording through the analog input connector or
a microphone.
1 While the reco r d er is recording or in
recording pause, press the jog dial.
2 Turn the jog dial repeatedly until
“TIME MARK” flashes in the display,
and then press to enter.
3 Turn the jog dial repeatedly until the
desired time interval flashes in the
display, and then press to enter.
Select one of the following intervals:
“OFF”
“5 min. ON” (track marks are added in
ever y 5 mi nutes.)
“10 min. ON” (track marks are added in
ever y 10 minutes)
“15 min. ON” (track marks are added in
ever y 15 minutes)
To cancel the setting, select “OFF” in
this step.
Notes
• Automatic track marking by Auto Time Stamp
starts when you add a normal track mark to
the disc (i.e., by pressing T MARK or X,
etc.).
• The setting will be lost when the recording
stopped.
11
Page 12

Adjusting the recording level manually (Manual Recording)
See the illustrations in English text (pa g e 3 1) .
When you record, the sound level is adjusted
automatically. If necessary, you can set the level
manually during both analog and digit al
recording.
1 While hol ding down X, press and slide
REC to the right.
The recorder stands by for recordi ng.
2 Press the jog dial.
3 Turn the jog dial until “RecVolume”
flashes in the dis p l ay, and then press to
enter.
4 Turn the jog dial until “Man ualREC”
flashes in the dis p l ay, and then press to
enter.
To switch back to the automatic level
adjustment, select “Auto REC” in this
step.
5 Play the program source.
6 While observing the level meter in the
display, adjust the recording level by
turning the dial.
Set the level so that the meter segments
light up between A (the fifth segment)
and B (the ninth segment). If the level
meter lights up to the right of B, reduce
the input level.
The upper level meter shows the L
channel input level and the middle
meter shows the R channel in p ut level.
If your source is an externally connected
component, be sure to cue the source to
the beginning of the materi al to be
recorded before you start pl ayback.
7 Press X again to start recording.
Notes
• If you press x during recording operation, the
recorder will revert to automatic recording
level adjustment mode the next time you st art
a recording operation.
• “RecVolume” cannot be selected in step 3
during synchro-recording. To set the recording
level manually during synchro-recordi ng, do
the procedure below.
1 Do 1 and 2 of “Record an MD.” (step 3 of
“Recording an MD right away! (Synchrorecording)” (page 5)) and select “SYNC
OFF” in 3.
2 Do steps 1 to 6 of manual recording
procedure. Then do the procedure of
“Record an MD.” (step 3 of “Recording an
MD right away! (Synchro-recording)”
(page 5)) again.
Recording starts automatically whenever the
source sound is played.
Setting the clock to stamp the recorded time
See the illustrations in Engli sh text (pa ges 33
and 34).
To stamp the date and time on the MD when
you record, you first need to set the clock.
1 Press the jog dial while the record er is
stopped.
2 Turn the jog dial until “OPT ION ”
flashes in the dis p l ay, and then press to
enter.
3 Turn the jog dial until “CLOCK SET”
flashes in the dis p l ay, and then press to
enter.
The digits of the year flash.
4 Change the current year by turning the
jog dial and press to enter.
The digit of the month flashes.
5 Repeat steps 4 to enter the current
month, date, hour, and minute.
When you press th e jo g dial to enter the
minute, the clock starts ope rating.
If you make a mistake whi le setting the
clock
Press . to go back wrongly entered item,
and then enter the cor rect value. You can skip a
step by pressing >.
12
Page 13

To display the current time
On the recorder
1 When the recorder is not operating or
while recording, press the jog dial.
2 Turn the dial until “DISPLA Y” appears
in the display, and then press to enter.
3 Turn the jog dial until “Clock” flashes
in the display, and then press to enter.
The current time appears in the display.
On the remote control
1 Press DISPLAY repeatedly until
current time appears in the display.
To dis play the time in the 24-hour
system
Press T MARK while setting the c loc k. To
change the clock to the 12-hour system, press T
MARK again.
To maintain the cor rect time
Once you set the clock, it will keep correct time
as long as the recorder is connected to a power
source, such as the rechargeable battery,
alkaline dry battery, or AC power adaptor.
However, if no power source is connected, the
clock setting will change back to the factory
setting after about 3 minutes.
When changing the rechargeable batt ery or
alkaline dry battery, make sure to do it within 3
minutes.
Notes
• Make sure the time is correctly set if you want
the time stamp to be accurately recorded for
an important recording.
• Under normal conditions, the clock may vary
by about plus or minus 2 minutes per month.
B Various ways of
playback
Searching for a specific track or a position quickly (Quick Search)
See the illustrations in Engl ish text (pa ge 35).
You can do two kinds of quick search.
• Index search — Searching quickly while
monitorin g th e tr ack numbers or track
names.
• Time search — Searching quickly while
monitoring the elapsed time.
Selecting the search mode
The search mode can be selected only on the
remote control while the re cord e r is st opped,
playing, or play-paus ed. The reco rder is f acto ry
set to “Index”.
1 Press DISPLAY for 2 seconds or more.
2 Turn the control repe atedly until
“SEARCH” flashes in the displa y, and
then press x to enter.
3 Turn the control repe atedly until
“Index”(in dex search) or “T ime”(time
search) flashes in the display, and then
press x to enter.
Searching for a specific track while monitoring track numbers or track names (Index Search)
To do an index search, set the search mode to
“Index” in advance (page 13).
On the recorder
1 Turn the jog dial unti l the desired track
appears in the display, and then press
the dial.
The selected track name appears in the
display and the recorder starts playing
by pressing the jog dial.
If the track has no name, the track
number appears in the display.
13
Page 14

On the remote control
1 Press X while playing a disc.
2 Turn and hold the control until the
desired tr ack number or track name
appears in the display.
3 Press X to cancel the pause.
Playback starts from the selected track.
Searching for a specific point while monitoring the elapsed time (Time Search)
To do a time search, set the search mode to
“Time” in advance (page 13).
On the recorder
1 Press X while playing a disc.
2 Keep pressing . or > until the
desired point appears in the display.
3 Press X to cancel the pause.
Playback starts from the selected point.
On the remote control
1 Press X while playing a disc.
2 Turn and hold the control until the
desired point appears in the display.
3 Press X to cancel the pause.
Playback starts from the selected point.
Using the group function (Group Mode)
See the illustrations in English text (pages 36 to
37).
The recorder can operate various playback with
a disc which has group setting.
Listening to tracks in a specific group (Group Mode Playback)
• Insert a disc w ith group settings.
On the recorder
1 Start playback.
2 Press GROUP for 2 seconds or more to
turn the group mode on.
Playback stops at the end of the last
track in the selected group.
For details on selecting another group,
see “Selecting and pl aying groups
(Group Skip Mode)” (page 14).
On the remote control
1 Start playback.
2 Press DISPLAY for 2 seconds or more.
3 Turn the control repeatedly until
“GROUP” flashes in the display, and
then press x to enter.
4 Turn the control repeatedly until
“GROUP ON” flashes in the display,
and then press x to turn the group mode
on.
To turn off the group function
• On the recorder
Press GROUP for 2 seconds or more again.
• On the remote control
Select “GROUP OFF” in step
Note
In group mode, the recorder treats all tracks
without group settings as belong ing to the last
group on the disc. The last group is indicated in
the display window on the reco rder as “Group –
–.” Within a group, the tracks appear in their
order on the disc, not their order within the
group.
Selecting and playing groups (Group Skip Mode)
Operations are possible regardless of whether
group mode is on or off. However, playback on
the recorder will differ, depending on whether
group mode is on or off.
• When group mode is on:
Playback starts from the first track of the
selected group and ends with the last track
in the group.
• When group mode is off:
Playback starts from the first track of the
selected group and ends with the last track
on the disc.
• The following proce dure is use d w he n
group mode is on.
• Insert a disc w ith group settings.
4.
14
Page 15

On the recorder
1 Press GROUP slightly while playing.
“ ” flashes in th e display and the
group become selectable.
2 Within 5 second s, tu rn th e jo g dial to
select your desired group, and the n
press to enter.
The recorder starts playing from the first
track in the group.
On the remote control
1 While the recorder is playing, press and
hold PLAYMODE until “– – –” flashes
in the display.
The group skip mode turns on.
2 Within 5 second s, turn the control
repeatedly to select your desired group.
Note
If no operation is performed within 5 seconds
after step 1, the group skip mode will be
canceled and you will not be able to perform
step 2 thereafter. To continue with step 1 at this
point, repeat from the beginning of the
procedure.
Changing a play mo de
See the illustrations in English text (pages 38 to
40).
Settings can be stored to the Personal Disc
Memory.
Selecting a play mode
On the recorder
1 While the recorder is pl aying, press the
jog dial.
2 Turn the jog dial unti l “P LAY MODE”
flashes in the display, and then press to
enter.
3 Turn the jog dial to select the play
mode, and then press to e nt er.
play mode/indication
“Normal”/“(none)” (All the
tracks are played on c e)
m
“AllRepeat”/“ ” (All the
tracks are played re peatedly)
m
“1 Track”/“1” (A single track
is played)
m
“1 Repeat”/“ 1” (A single
track is played re peatedly)
m
“Shuffle”/“SHUF ” (A fter
currently se lect ed t ra ck f i n ishes
playing, th e remainin g tracks
are played in random or der)
m
“Shuf. Rep”/“ SHUF”
(After current ly s elected track
finishes playing, the remaining
tracks are played repeatedly in
random order)
m
“PGM”/“PGM” (Tracks a r e
played in the order t h at you
specified)
m
“PGMRepeat”/“ PGM”
(tracks are play ed repeatedly in
the order that you specified).
On the remote control
1 Press PLAYMODE during playback.
Each time you press this butt on, the play
mode changes as follows.
“(none)” (All the tracks are
played once)
m
“1” (A single track is pl ayed)
m
“SHUF”(After currently
selected track finishes playing,
the remaining track s are played
in random order)
m
“PGM ” (Tracks are played in
the order that you specified).
continued
15
Page 16

2 If you want to repeat playback in th e
selected play mode, press RPT/EN T .
“ ” appears in the display.
Creating a Program (Program Play)
You can set the program with up to 20 tra c ks.
On the recorder
1 Press the jog dial while “PGM” flash e s
in the display at step 2 of “Selecting a
play mode”.
2 Turn the jog dial to select a track, and
then press to enter a track number.
3 Repea t step 2 to program more tracks.
4 Press the jog dial for 2 seconds or more.
On the remote control
1 While the recorder is playing, press
PLAYMODE repeatedly until “PGM”
flashes in th e display.
2 Turn the control repeated ly to sele ct a
track, and then press RPT/ENT to enter
a track number.
3 Repea t step 2 to program more tracks.
4 Press RPT/ENT for 2 seconds or more.
Notes
• All program settings are lost when the lid of
the recorder is opened.
• If you turn group mode on or off during the
setting of a program, program setting mode
will be canceled, but the program contents up
to that point will remain.
• You cannot turn group mode on or off while
programming tracks.
• If you turn group mode on during program
play, the program play is canceled.
16
Adjusting treble and bass (Digital Sound Preset)
See the illustrations in Engli sh text (pa ges 40
and 42).
You can adjust the treble and bass to suit your
taste. The recorder can store two sets of treblebass adjustments, which can then be selected
later during playback.
The sound can be adjusted in 8 steps (–4, –3,
...±0, ...+2, +3). Sett in g s can be stor ed to the
Personal Disc Memory.
Selecting the sound quality
Factory settings of the Digital Sound Preset are
as follows:
• “SOUND1” : bass +1, treble ±0
• “SOUND2”: bass +3, treble ±0
On the recorder
1 Press the jog dial.
2 Turn the jog dial until “S OU ND”
flashes in the dis p l ay, and then press to
enter.
3 Turn the jog dial until “S OU ND 1” or
“SOUND 2” flashes in the display, and
then press to enter.
On the remote control
1 Press SO UND on the remote control
repeatedly to select “SOUND 1” or
“SOUND 2”.
Adjusting the sound quality
On the recorder
1 Press the jog dial.
2 Turn the jog dial until “SOUND”
flashes in the dis p l ay, and then press to
enter.
3 Turn the jog dial until “SOUND 1” or
“SOUND 2” flashes in the display.
The display sho ws the currentl y select ed
T (treble) and B (bass) settings .
4 Select “T” or “B” pressing x or X.
You can change the adjust of the item in
which the cursor is flashing.
Page 17

5 Turn the jog dial to ad just the sound
level.
To move the cursor between “T”
to “B”:
Press x or X.
To s witch between “SOUND 1” to
“SOUND 2”:
Press X repeatedly to move the cursor
to the top row, and then turn the jog dial.
6 P res s the jog dial to enter.
The sound settings are saved and the
playback display ap pears again.
On the remote control
1 Press SOUND on the remote control
repeatedly to select “SOUND 1” or
“SOUND 2”.
2 During playback, press SOUND for 2
seconds or more.
The recorder changes to B - set ti ng
mode. Pressing the SOUND button for 2
seconds again c hanges th e record er back
to T-setting mode.
3 Turn the control repeatedly to adjust th e
bass or treble.
To switch “B” and “T”:
Press SOUND for 2 seconds or more.
To s witch “SOUND 1” and
“SOUND 2”:
Press SOUND for a short time.
4 Press x to enter.
To cancel the Digital Sound Preset
• On the recorder
Select “SOUND OFF” in step 3.
• On the remote cont rol
Press SOUND repeatedly until nothing
appears in the display.
Notes
• Digital Sound Preset becomes inoperative
when the “AUDIO OUT” parameter for the
i/LINE OUT jack is set to “LINE OUT ”. In
this case, set the “AUDIO OUT” to
“HeadPho ne” (page 7 ).
• When you use the Digital Sound Preset, the
sound may break or become distorted
depending on the settings or the track. In this
case, change the settings of the sound quality.
• Changing to another Digital Sound Preset
during a recording operation will not affect
the quality of recorded sound.
To change playback speed (Speed Control)
See the illustrations in Engl ish text (pa ge s 42
and 44).
The playback speed can be adjusted in 7 ste ps
(80%, 85%, ...100%, 105%, 110%).
Setting can be stored to th e Personal Disc
Memory.
1 Press DISPLAY for 2 seconds or more
during playback .
2 Turn the control repe atedly until
“SPEED” flashes in the display, and
then press x to enter.
The recorder changes to speed-setting
mode.
3 Turn the control repeatedly to selec t th e
playback speed.
“+” shows the normal speed and the
cursor shows the playback speed you
are selecting.
4 Press x to set the playback speed.
“S” appears in the disp lay when the
speed is changed.
Notes
• The playback sound will be affected by the
playback speed.
• All settings will be lost when you remove the
disc from the recorder (except when the
settings of the disc has been stored to the
Personal Disc Memory).
17
Page 18

Connecting to a stereo system (LINE OUT)
See the illustration in Englis h text 45.
Connect the i/LINE OUT jack of the rec or de r
to the LINE IN jacks of an amplifier or a tape
recorder with a line cable (RK-G129 or RKG136, not supplied).
The output is analog. The recorder plays the
MD digitally and sends analog signa ls to the
connected equipment.
When connecting a line cable to
the
i/LINE OUT jack
When connecting a li ne ca ble (n ot su pplied ), be
sure to set the “A UDIO OUT” p arameter for t he
i/LINE OUT jack.
1 Press the jog dial.
2 Turn the dial until “AUDIO OUT”
flashes in the dis p l ay, and then press to
enter.
3 Turn the dial until “LINE OUT” flashes
in the display, and then press to enter.
Notes
• If the “AUDIO OUT” parameter for the i/
LINE OUT jack is set to “LINE OUT”,
VOLUME +/– or Digital Sound Preset will
not function.
• The “A UDI O OUT” paramet er for the i/
LINE OUT jack cannot be set to “LINE OUT”
when the supplied remote control is
connected.
• When you connect the headphones/earphones
directly to the rec o r der, set the “AUDIO
OUT” parameter for the i/LINE OU T ja ck to
“HeadPhone”.
B Editing recorded tracks
You can edit your recordings by adding/erasing
track marks or labeling tracks an d d iscs.
Premastered MDs cannot be edi te d.
Notes on editing
• Y ou cannot edit tracks on an MD that is record
-protected. Before ed itin g tr acks , clo se the ta b
on the side of the MD.
• If you perform an editing operation while
playing, editing results will not be recor d ed
until you stop the recorder and “TOC Edit”
disappears in the display.
• Do not move or jog the record er w h ile “TOC
Edit”* is flashing in the display.
• The lid does not open until “TOC Edit”
disappears in the displa y after editing.
• When the group mode is on, editing can be
performed only for the tracks registered into
the selected group.
* TOC = Table of Contents
Labeling/relabeling recordings
See the illustrations in English text (pages 46 to
49).
You can name tracks, groups and discs using
the recorder’s character palette.
Available characters
• Capital and small letters of the Englis h
alphabet.
• Numb ers 0 to 9
• ! " # $ % & ( ) * . ; < = > ? @ _ `
+ – ' , / : _(space)
Numbers of characters you can
input
Track, group, or disc name: Approx. 200 each
(all available characters are mixed).
Numbers of characters you can
input in a disc
Alphanumeric characters/symbols only
Approx. 120 titles of about 10 characters each
(a maximum of about 1,700 le tt er s)
The number of titles that can be stored on a disc
depends on the number of characters tha t a r e
input for track names, group names, and disc
name.
18
Page 19

About the character palette
During operations on the recorder, characters
can be selected from the charact er pal ette i n the
display.
Since only a part of the character palette is
visible on the display, use the 5-way control key
to move the cursor and enter characters.
For configuration of the character palette, see
page 46 in English text.
Notes
• “NAME FULL” appears when you try to
enter more than 1,700 characters on a disc.
Enter a shorter name for the track, group,
or disc, or set the “LP Stamp” setting to
“Stamp OFF” so that “LP:” is not be added
at the beginning of the track name.
• When labelin g a disc which has been
recorded using the group function, make
sure group mode is on in order to prevent
the group management informa ti on from
being overwitten by mistake.
• If you enter the symbol “//” between the
characters in disc names such as “abc //
def,” you may be unable to use the group
function.
Labeling recordings
On the recorder
1 Insert a disc and do the followings.
To label a track:
Start playing or recording the track you
want to labe l, and then lab el the track
while the recorder is playing or
recording.
To label a group:
Turn the group mode on (page 14) and
start play in g or recording the track
within the group you want to label , and
then label the group wh ile the recorder
is playing or recording.
To label a disc:
Label a disc wh ile the recorder is
stopped or recording.
If you label a disc with group settings,
turn the group mode on (page 14).
2 While the recorder is s topped, press the
jog dial.
3 Turn the jog dial until “ EDIT” flash es in
the displa y, and then press to ente r.
4 Turn the dial until the following item
appears in the display, and then press to
enter.
When labeling a track:
“:Name”
When labeling a group:
“:Name”
When labeling a disc:
“:Name”
The cursor flashes in the letter input
area and the track, group, or disc is
ready to be labeled.
5 Press x.
The cursor shifts from the letter input
area to the character palette.
6 Select a letter with the 5-way control
key and press N to enter.
The selected letter appears in the letter
input area an d the cursor moves to the
next input position.
The buttons us ed for charac ter i nput a nd
their functions are listed be low.
Functions
To mo ve the cursor in
the character palette.
To select a character
in the letter input a re a.
To enter a letter. Press N.
To mo ve the cursor
from the letter input
area to the character
palette.
To mo ve the cursor
from the character
palette to the lett er
input area.
To enter a name. Press N or the jog dial
To insert a blank space
before the cursor in
the letter input are a .
To delete a letter in the
letter input are a .
1)
Operations
5-way control key.
Turn the jog dial (move
the cursor upward or
downward)
Turn the jog dial.
Press the jog dial.
Press x.
Press CANCEL.
for 2 second or more.
Press VOLUME +.
Press VOLUME –.
2)
.
continued
19
Page 20

Functions
To dis pl ay “:”, “–”
and “/” repeatedly at
the input position in
the letter input area.
To cancel labeling in
the letter input area.
1)
Functions of the buttons and control may differ
depending on where the cursor is in the letter
input area or the character palette.
2)
If phrases are stored in t he name ba nk, the firs t
phrase stored appears in th e display (page 21).
1)
Operations
Press T MARK.
Press CANCEL.
7 Repeat step 6, and then enter all
characters of the label name.
8 Press down the jog dial for 2 seconds or
more.
The disc is labeled.
On the remote control
1 Insert a disc.
See step 1 of “On th e reco rde r” t o ch e ck
the varieties of name you can label
(page 19).
2 Press DISPLAY for 2 seconds or more.
3 Turn the control repeatedly until
“EDIT” flashes in the display, and then
press x to enter.
4 Turn the control repea tedly until the
following item appears in the display,
and then press x to enter.
When labeling a track:
“:Name”
When labeling a group:
“GP : Name”
When labeling a disc:
“:Name”
5 Turn the control repeated ly to sele ct a
letter and press x to enter.
The selected le tter st ops flas hing and t he
cursor moves to the next input position.
Functions Operation
To switch between
katakana, capital letters,
small letters, n um b er s /
symbols and phrases
To move the cursor to the
left or right.
Press X
1)
.
Pull and turn the
control (VOL +/–).
Functions Operation
To change the letter to the
one before/next one.
To insert a blank space to
type in a new letter.
To cancel lab eling. Press DISPLAY for
To delete a letter and
move back all following
letters to the left.
1)
If phrases are stored in the n ame bank, the fi rst
phrase stored appears in the display (page 21).
Turn the control
(./N>).
Press DISPLAY.
2 seconds or more.
Press
PLAYMODE.
6 Repeat step 5 and enter all characters of
the label name.
7 Keep pressing x for 2 se conds or
longer.
The track or disc is labeled.
To cancel labeling
Press CANCEL on the recorder.
Press DISPLAY for 2 seconds or more on the
remote control.
Notes
• When the recording is stopped while labeling
a track, a group, or a disc during recording, or
when the playback moves on to the next track
while labeling a track during playback, the
input at that point is entered automatically.
• “LP:” has automatically been added at the
beginning of the track names for tracks
recorded in MDLP mode.
• You cannot label or relabel the premaster e d
disc.
20
Page 21

Relabeling recordings
On the recorder
1 Insert a disc and do the following.
To relabel a track:
Start playing a track you want to relabel,
and change a track name while the
recorder is playing.
To relabel a group:
Turn the group mode on (page 14) and
start playing or recording a track within
the group you want to relabel, and
change the group name while the
recorder is playing or re cording.
To relabel a disc:
Relabel the disc while th e recorder is
stopped or recording.
If you relabel a disc with group settings,
turn the group mode on (page 14).
2 Follow steps 2 to 4 of “Labeling
recordings” (page 19) to display a track,
group, or di s c name.
3 Follow steps 5 to 8 of “Labeling
recordings” (page 19), and then keep
pressing the jog dial for 2 seconds or
more.
On the remote control
1 Insert a disc and do the following.
See step 1 of “On the recorder”to check
the variet ies of name you can relabel.
2 Follow steps 2 to 4 of “On the rem ote
control” (page 20) in “Labeling
recordings” to display a track, group, or
disc name.
3 Follow steps 5 to 7 of “On the rem ote
control” (page 20) in “Labeling
recordings”, and then keep pressing the
x for 2 seconds or more.
To cancel labeling
Press CANCEL on the recorder.
Press DISPLAY for 2 seconds or more on the
remote control.
Notes
• Track and disc titles that were entered in
English katakana characters will a ppe a r in
Roman letters on minidisc pla ye r s tha t do not
support the display of katakana ch ara cters.
Such titles wi ll be marked with a “^ ” at the
beginning and the end.
• You c annot relabel premastered MDs or lab el
MDs that have not been r eco rd ed .
• The recorder cannot rewrite a track, group, or
disc name of more than 200 letters tha t was
created by another device.
Storing phrases frequently used in labeling (Name Bank Function)
See the illustrations in Engl ish text (pa ge 50).
Phrases that you often use while labeling can be
stored in the recorder’s memory.
Approximately 25 phrases of about 10
characters each (with a total character count of
about 400) can be stored in the phrase bank.
The actual number will depend on the length of
each phrases.
Storing phrases while labeling a track or disc
You can store phrases in three ways.
• Storing phrases while labeling a
track, group, or disc:
You can store phrases while labeling a
track, group, or disc by doing the
procedure “Label ing recordings”
(page 19).
• Storing phrases from a previously
labeled track, group, or disc:
You can store an existing track, group, or
disc name as a phrase.
• Inputting and storing phrases:
You can store frequently us ed phrases in
advance, and then retrieve and use them
when labeling a track, grou p, or disc .
Storing phrases while labeling a
track or disc
On the recorder
1 Follow steps 1 to 7 of “La be li ng
recordings” (page 19) to enter a phrase.
continued
21
Page 22

2 After entering the phrase, press
CANCEL to remove the cursor from the
character p alette to the letter input area.
3 Press END SEARC H for 2 secon ds or
more.
“Entry!” appears in the displ ay and the
cursor flashes after the phrase you just
stored.
4 If you continue labeling operation, do
steps 5 to 8 of “La beling recordings”
(page 19).
On the remote control
1 Follow steps 1 to 6 of “On the remote
control” (page 20) in “ L abeling
recordings” to ent er a phra se.
2 After entering the phrase, press X for 2
seconds or more.
3 If you continue labeling operation, do
steps 5 to 7 of “On the remote control”
(page 20) in “Labeling recordings”.
Storing phrases from a
previously labeled trac k, group ,
or disc
On the recorder
1 Follow steps 1 and 2 of “Relabeling
recordings” (page 21) and display the
track, group, or disc name tha t c ont ai ns
the phrase that you want to store.
2 Press ./> repeatedly to move the
cursor to the right of the phrase .
3 Press END SEARCH for 2 seconds or
more to store the phrase.
On the remote control
1 Follow steps 1 and 2 of “On the remote
control” (page 21) in “Relabeling
recordings” (page 21) and display the
track, group, or disc name tha t c ont ai ns
the phrase that you want to store.
2 Pull and turn the control towa rds V OL +
or VOL – to mov e the cursor to the right
of the phrase.
3 Press X for 2 seconds or more to store
the phrase.
Entering and storing phrases
On the recorder
1 Press the jog dial.
2 Turn the dial until “EDIT” flashes in the
display, and then press to enter.
3 Turn the jog dial until “ N a me Bank”
flashes in the dis p l ay, and then press to
enter.
4 Follow steps 5 to 8 of “Labeling
recordings” (page 19) to enter a phrase.
“Entry!” appears in the displa y a nd the
phrase is stored.
On the remote control
1 Press DISPLAY for 2 seconds or more.
2 Turn the control repeatedly until
“EDIT” flashes in the display, and press
x to enter.
3 Turn the control r epe at edly unt il “N ame
Bank” flashes in the display, and then
press x to enter.
4 Do steps 5 to 7 of “On the remote
control” (page 20) in “ L abeling
recordings” to ente r a phrase.
Note
If you have entered and then stored a phrase,
you cannot retrieve it by following the
procedure of “Searching a phrase by displaying
the stored phrase one by one”. When you
retrieve a stored phrase, follow the procedure of
“Searching for a phrase by its first letter.”
Using a retrieved phrase for labeling
There are two ways to retrieving phrases for
labeling.
• Searching for a phrase by
displaying the stored phrase:
You can retrieve a phrase by keyword, and
then use the phrase in a new label.
• Searching for a phrase by its first
letter:
You can retrieve a phrase by its first letter,
and then use the phrase in a new label.
22
Page 23

Searching for a phrase by
displaying the stored phrase
On the recorder
1 Follow steps 1 to 4 of “Labeling
recordings” (page 19).
A track, group or disc is read y to be
labeled.
2 Press END SEARCH so that the phrase
stored in the recor der’s memory appears
in the display.
3 Press x to move the cursor from the
letter input are a to the character palette.
4 Turn the jog dial until t he desire d phrase
flashes in the display.
Turning the jog dial causes the phrases
stored in the recorder’s memory to
appear one by one in sequential or de r.
5 Pr ess th e jog dial while the phra se you
want flashes in the display.
The phrase is selected and li ght s up in
the letter i np ut area.
6 Press the jog dial for 2 seconds or more.
The phrase is retrieved.
7 If you c ont inue labeling operation, do
steps 5 to 8 of “Labeling recordings”
(page 19).
On the remote control
1 Follow steps 1 to 4 of “On the rem ote
control” (page 20) in “Labeling
recordings”.
2 Press X repeatedly until the phrase
stored in the recor der’s memory appears
in the display.
3 Turn the control repeatedly.
Turning the control causes the phrases
stored in the recorder’s memory to
appear one by one.
4 Press x slightly while the phrase you
want is shown in the display.
5 If you c ont inue labeling operation, do
steps 6 to 7 of “On the remote control”
(page 20) in “Labeling recordings”.
Searching for a phrase by its
first letter
On the recorder
1 Follow steps 1 to 5 of “La be li ng
recordings” (page 19).
A track, group or disc is ready to be
labeled.
2 Turn the jog dial until the letter which
the desired phrase begins with.
3 END SEARCH to search so that the
phrase corresponding to the lett er
appears.
4 Press x to move the cursor from the
letter input area to the character pale tt e.
5 Turn the jog dial until the desired phrase
flashes in the display an d th en press the
jog dial.
The phrase is selected and lights up in
the letter inpu t area.
6 Press th e jo g dial for 2 seconds or more.
The selected phrase is retrieved.
7 If you c ont inue labeling operation, do
steps 5 to 8 of “Labeling recordi ngs”
(page 19).
On the remote control
1 Follow steps 1 to 5 of “On the remote
control” (page 20) in “Labeling
recordings”.
2 When labeling a track, group, or disc,
turn the control repeat edly until the
letter which the desired phr ase begins
with flashes in the display.
3 Press X repeatedly to search so that the
phrase corresponding to the lett er
appears.
When the letter appears, turn the control
towards N> until the desired phrase
appear one by one.
4 Press x while th e phrase you want is
shown in the display.
5 Press x for 2 seconds or more.
6 If you c ont inue labeling operation, do
steps 5 to 7 of “On the remote control”
(page 20) in “Labeling recordings”.
23
Page 24

Erasing phrases
On the recorder
1 While the recorder is stopped, press the
jog dial.
2 Turn the dial until “EDIT” ap pears, and
then press to enter.
3 Turn the jog dial unti l “Bank Erase”
appears, and then press to ent er.
4 Turn the jog dial until the phrase you
want to erase flashes in the display, and
then press to enter.
“Erase!” appears and the phra se is
erased.
On the remote control
1 While the recorder is stopped, press
DISPLA Y for 2 seconds or more.
2 Turn the control repeatedly until
“EDIT” flashes in the display, and press
x to enter.
3 Turn the control repeatedly until
“BankErase” appears in the display, and
then press x to enter.
4 Turn the control repea tedly until the
phrase you want to erase ap pears, and
then press x to enter.
To cancel the operation
Press CANCEL on the recorder.
Press DISPLAY for 2 seconds or more on the
remote control.
Registering tracks or groups as a new group (Group Setting)
See the illustrations in English text (pa g e 5 4) .
Do the following procedure to register tracks or
groups as a new group. The tracks or groups
must, however, be sequential. If the desired
tracks or groups are not consecutive, you must
move them to mak e th em consecutive before
you can register them (“Moving recorded
tracks”, page 25). The operation of this function
depends on whether group mode is on or off.
• When group mode is ON:
Several groups are registered as one group.
A track without group setting can be
registered to an existing group.
• When group mode is OFF:
Several tracks are regist ered as one group.
The following section explains the operation
when group mode is on.
On the recorder
1 Press GROUP for 2 seconds or more to
turn the group mode on.
2 While the recorder is stopped, press the
jog dial.
3 Turn the jog dial until “EDIT” flashes in
the display, and then press to enter.
4 Turn the jog dial until “ : Set”
flashes in the dis p l ay, and then press to
enter.
5 Turn the jog dial until the num be r or
name of the desired first track flashes in
the display, and then press to enter.
This selects the first tr ack of the new
group.
Even when the group mode is on, track
numbers appear according to their order
on the disc, n ot their ord er within the
group.
6 Turn the jog dial until the num be r or
name of the desired last track flash es in
the display, and then press to enter.
This select s th e last track o f the new
group.
7 Follow steps 4 to 8 of “Labeling
recordings” (page 19) to label a group.
On the remote control
1 Follow the procedure of “To activate the
group mode” (page 10) to turn the group
mode on.
2 While the recorder is stopped, press
DISPLAY for 2 seconds or more.
3 Turn the control repeatedly until
“EDIT” flashes in the display, and then
press x to enter.
4 Turn the control repeatedly until
“GP:Set” flashes in the display, and then
press x to enter.
24
Page 25

5 Turn the control repeatedl y until the
number or name of the desired first
track flashes in the display, and then
press x to enter.
6 Turn the control repeatedl y until the
number or name of the desired last track
flashes in the display, and then press x
to enter.
7 Follow steps 5 to 7 of “On the rem ote
control” (page 20) in “Labeling
recordings” to label a group.
Notes
• In step 5, the f irs t track must be ei ther th e fi rst
track of an existing group or a track that does
not belong to a group.
• When selecting the last trac k in step 4, make
sure the track comes after the one selected in
step 5. The last track must be eit h er the last
track of an existing group or a track that does
not belong to a group.
To release a group setting
See the illustrations in English text (page 55).
On the recorder
1 Press GROUP for 2 seconds or more to
turn the group mode on.
2 Play a group that you want to rele ase
and check the contents (“Selecting and
playing groups (Group Skip Mode)”
(page 14)).
3 Press x.
4 P res s the jog dial.
5 Turn the jog dial until “ EDIT” flash es in
the displa y, and then press to ente r.
6 Turn the jog dial until “ : Release”
flashes in the display, and press to enter.
“Release?” and “PushENTER” appear
in the display.
7 P res s the jog dial to enter.
The group setting of the selected group
is released.
On the remote control
1 Follow the procedure of “To activate the
group mode” (page 10) to turn the group
mode on.
2 Pla y a group that you want to release
and check the conten ts (see “Selecti n g
and playing groups (Group Skip Mode)”
(page 14)).
3 Press x.
4 Press DISPLAY for 2 seconds or more.
5 Turn the control repe atedly until
“EDIT” flashes in the display, and then
press x to enter.
6 Turn the control repe atedly until
“GPRelease” flashes in the display, and
then press x to enter.
7 Press x to enter.
Moving recorded tracks
See the illustrations in Engl ish text (pa ge 56).
You can change the order of the recorded
tracks.
On the recorder
1 Wh il e playing the track you want to
move, press the jog dial.
2 Turn the jog dial until “ EDIT” flash es in
the displa y, and then press to ente r.
3 Turn the jog dial until “ : Move”
flashes in the display, and then press to
enter.
The selected track number or name of
the group that t he se lect ed t r ack be long s
flashes in the display. If the track has
been labeled, press > to make the
track name appear in the display. Press
. to display the track number again.
4 Turn the jog dial until the destination
track number flas h es in the display.
5 Press the jog dial to enter.
The track moves to the selected
destination track.
25
Page 26

On the remote control
1 Press DISPLAY for 2 seconds or more.
2 Turn the control repeatedly until
“EDIT” flashes in the display, and then
press x to enter.
3 Turn the control repeatedly until “
: Move” flashes in the display, and then
press x to enter.
4 Turn the control repeated ly to select the
destination track number.
5 Press x to enter.
To cancel moving
Press CANCEL on the recorder.
Press DISPLAY for 2 seconds or more on the
remote control.
Note
If the disc has group settings, turn group mode
on before moving a track. Moving a track with
group mode off may affect the structure of the
group.
Moving a track to a different group
See the illustration in English text (page 57).
On the recorder
1 Press G ROUP for 2 seconds or more to
turn the group mode on.
2 While pla yi ng the track you want to
move, press the jog dial.
3 Turn the jog dial until “EDIT” flashes in
the display, and then press to enter.
4 Turn the jog dial until “ : Move”
flashes in the dis p l ay, and then press to
enter.
5 Turn the jog dial until the destination
group flashes in the display, and then
press to enter.
The group number to which the
currently playing track belon gs flas he s
in the middle section of the display. If
the group has been labeled, press >
to display the group name. Press . to
return to the group number display.
6 Turn the jog dial until the number of the
destination track within th e group
flashes in the dis p l ay, and then press to
enter.
The selected track number or name of
the group that the selected track belongs
flashes in th e display. If the track has
been labeled, press > to make th e
track name appear in the di sp la y. Press
. to display the track number again.
On the remote control
1 Follow the procedure of “To activate the
group mode” (page 10) to turn the group
mode on.
2 Press DISPLAY for 2 seconds or more
while the track you wan t to move is
playing.
3 Turn the control repeatedly until
“EDIT” flashes in the display, and then
press x.
4 Turn the control repeatedly until “
: Move” flashes in the display, and then
press x to enter.
5 Turn the control repea tedly until the
destination group flashes in the display,
and then press x to enter.
6 Turn the control repea tedly until the
number of the destination track within
the group flashes in the display, and
then press x to enter.
To cancel moving
Press CANCEL on the recorder.
Press DISPLAY for 2 seconds or more on the
remote control.
Changing the order of a group on a disc (Group Move)
See the illustrations on Englis h text (p a ge 58).
On the recorder
1 Press GROUP for 2 seconds or more.
2 While playing a track within a group
whose order you want to change, press
the jog dial.
26
Page 27

3 Turn the jog dial until “ EDIT” flash es in
the displa y, and then press to ente r.
4 Turn th e jog dial until “ : M ove”
flashes in the display, and then press to
enter.
The group number to which the
currently playing tra ck belongs flashes
in the middle section of the display. If
the group has been labeled, press >
to display the group name. Press . to
return to the group numb er display.
5 Turn the jog dial to select the
destination point on the disc, and the n
press to enter.
On the remote control
1 Follow the procedure of “To activate the
group mode” (page 97) to turn the group
mode on.
2 While playing a trac k w it hin a group
whose order you want to change, press
DISPLAY for 2 seconds or more.
3 Turn the co ntrol repeatedly u ntil
“EDIT” flashes in the display, and then
press x to enter.
4 Turn the control repeatedly until “GP :
Move” appears in the display and then
press x to enter.
5 Turn the co ntrol repeatedly to s el ect a
destination point on the disc, and the n
press x to enter.
To cancel moving
Press CANCEL on the recorder.
Press DISPLAY for 2 seconds or more on the
remote control.
Adding a track mark
See the illustrations in English text (page 59).
You can add a track mark so that the part after
the new track mark is counted as new track.
Y ou cannot add a track mark on a track that has
been checked-out from your com pute r.
1 Wh il e pl aying or pausing an MD, press
T MARK on the recorder at the point
you want to mark.
“MARK ON” appears in the display,
and the track mark is add ed .
To add track marks while
recording (except while synchrorecording)
Press T MARK at the point you want to add a
track mark. You can use Auto Time Stamp to
add track marks automatically at specified
intervals (excep t while digital recording) .
Erasing a track mark
See the illustrations in Engl ish text (pa ge 60).
When you record with analog (line) input,
unnecessary track marks ma y be rec or de d
where recording level is low. You can erase a
track mark to combine the tracks before and
after the track mark. You cannot erase a track
mark on a track that has been checked-out from
your computer.
1 While playing the track with the track
mark you want to erase, press X to
pause.
2 Find the track mark by pressing .
slightly.
“MARK” appears in the display for 2
seconds.
3 Press T MARK to erase the mark.
“MARK OFF” appears in the displa y.
The track mark is erased and the two
tracks are combined .
To cancel moving
Press CANC E L o n the recorde r.
Press DISPLAY for 2 seconds or more on the
remote control.
Notes
• When you erase a track mark between the two
consecutive tracks that are registered into
different groups, the second track is reregistered into the group containing the first
track. In addition, if you combine a track that
is registered to a group with a track that is not
registered to a group (two consecutive tracks),
the second track takes the same registration
setting (such as the recording date , track
name, etc.) as the first track. However, when
the group function is on, you can only
combine tracks with in the selected group.
• You cannot erase track marks according to the
system limitations.
27
Page 28

Erasing tracks
See the illustration in English text (page 60).
You can quickly erase recorded tracks, all the
tracks and data of the MD, or groups.
Note that once a recording has been
erased, you cannot retrieve it. Make
sure of the contents you are erasing.
To Erase a track
On the recorder
1 While pla yi ng the track you want to
erase, press the jog dial.
2 Turn the jog dial repeatedly until
“EDIT” flashes in the display, and then
press to enter.
3 Turn the jog dial until “ : Erase”
flashes in the dis p l ay, and then press to
enter.
“Erase OK?” a nd “PushEN TER” appe ar
in the display.
4 Press the jog dial to enter.
The track is erased and the next track
starts to play. All the tracks after the one
erased are automatically renumbered.
On the remote control
1 While pla yi ng the track you want to
erase, press DISPLAY for 2 seconds or
more.
2 Turn the control repeatedly until
“EDIT” flashes in the display, and then
press x to enter.
3 Turn the control repeatedly until “
: Erase” flashes in the display, and then
press x to enter.
4 Press x to enter.
To erase a part of a track
Add track marks at the beginning and the end of
the part you want to erase, then erase the part.
To erase the whole disc
1 While the recorder is stopped, press the
jog dial.
2 Turn the jog dial until “EDIT” flashes in
the display, and then press to enter.
3 Turn the jog dial until “ : Erase”
flashes in the dis p l ay, and then press to
enter.
“AllErase?” and “PushENTER” appear
in the display.
4 Press the jog dial to enter.
“TOC Edit” flashes in the display, and
all the tracks will be erased.
When erasing is complete,
“BLANKDISC” flashes and “00:00”
appears in the display.
To erase a group
1 Press GROUP for 2 seconds or more to
turn the group mode on.
2 Follow steps 1 and 2 of the procedure
described under “On the recorder” in
“Selecting and playing desired groups
(Group Skip Mode)” (page 97) to check
the contents.
3 Press x to stop playback.
4 Press the jog dial, turn the dial un til
“EDIT” flashes in the display, and then
press the dial again.
5 Turn the jog dial until “ : Erase”
flashes in the display, and then press the
jog dial.
The group name, “GP Er as e?” and
“PushENTER” appe a r in the display.
6 Press the jog dial again.
The group is erased.
To cancel erasing
Press CANCEL on the recorder.
Press DISPLAY for 2 seconds or more on the
remote control.
28
Page 29

B Other operation
Setting the alarm (Melody Timer)
See the illustrations in English text (pages 63
and 64).
You can set the alarm to go off in 1 to 99
minutes. The alarm sounds even while the
recorder is stopped.
The following sounds can be selecte d:
“TIMER 1” : Classical music 1
“TIMER 2” : Classical music 2
“TIMER 3” : Beeps
On the recorder
1 Wh il e t h e re corder is stopped, playing,
or play-paused, press the jog dial.
2 Turn th e jog dial until “M - TIMER”
flashes in the display, and press to enter.
3 Turn the jog dial unti l “O N” flashes in
the displa y, and then press to ente r.
, lights up in the display and the alarm
sound can be sel ected.
4 Turn the jog dial repeatedly to select the
alarm sound, and then press to enter.
The alarm sound is set.
5 Turn the jog dial repeatedly to select the
elapsed time.
One rotation of the control changes the
elapsed time setting (T IME :) by 1
minute, within a range of 1 to 99
minutes. To change the time quickly,
keep turning the jog dial.
6 P res s the jog dial.
Melody timer is set.
The time re maining until the alarm is
shown in the displ ay while the reco rder
is stopped or play-paused.
To show the remaining time during play,
do steps 1 to 3. After verifying the time ,
press CANCEL.
On the remote control
1 Wh il e the recorder is stopped, pla yi ng,
or play-paused, press DISPLAY for 2
seconds or more.
2 Turn the control repe atedly until “M-
TIMER” flashes in the display, and then
press x to enter.
3 Turn the control repe atedly until “ON”
flashes in the display, and then press x
to enter.
4 Turn the control repeatedly to selec t th e
alarm sound, and then press x to enter.
The time is set.
5 Turn the control repeatedly to selec t th e
elapsed time.
To cha nge the time quickly, turn and
hold the co ntrol.
6 Press x to enter.
The Melod y timer is set.
To show the remaining time during play,
do steps 1 to 3. After verifying the time,
press DISPLAY for 2 seconds or more.
To check the time remaining on the
alarm while playing
Follow steps
4
on the remote control. The remaining time
and the selected sound appear in the display.
Press CANCEL on the recorder or DISPLAY
for 2 seconds or more on the remote control
after you checked.
To cancel setting th e alarm
Press CANCEL on the recorder, or press
DISPLAY for 2 seconds or more on the remote
control.
To cancel Melody Timer
Select “OFF” in step
To stop the alarm
Press any button.
Notes
• The settings will be lost when you start
recording.
• The timer will begin counting down (using the
factory setting) from the moment you se le c t
“ON” in step
counting down again from the moment you
change the el a p s e d time in step
1 to 3 on the recorder or st eps 1 t o
3.
3. The recorder will begin
5.
29
Page 30

Storing the settings for individual discs (Personal Disc Memory)
See the illustrations in English text (pa g e 6 5) .
The recorder can store the various settings for
each disc, and then retrieve them automatically
whenever the disc is inser te d . D o the following
procedure to store the volume, playback mode,
group mode playback, playback order, sound
quality (Digital Sound Preset), an d pla yba c k
speed (Speed control) settings for a disc.
On the recorder
1 While the recorder is stopped, playing,
or play-paused, press to en te r.
2 Turn the jog dial until “PERS ONAL”
flashes in the dis p l ay, and then press to
enter.
“Entry?” flashes in the display.
3 Press the jog dial.
“Entry OK” appe ars in the display and
the disc settings are s to red in the
recorder.
On the remote control
1 While the recorder is stopped, playing,
or play-paused, press DISPLAY for 2
seconds or more.
2 Turn the control repeatedly until
“PERSONAL” flashes in the display,
and then press x to enter.
3 Press x to enter.
To erase information
On the recorder
In step 3, turn the jog dial until “Era se?” flas hes
in the display, and then press to enter.
On the remote control
In step 3, turn the c o ntro l u n ti l “E rase?” flashes
in the display, and then press
Notes
• The settings for up to 20 discs can be stored.
Any settings stored aft erwards wil l replace t he
settings for the least used disc among the 20.
• If you add tracks or perform an editing
operation (not includin g la beling) to a disc
whose settings have been stored on the
recorder, the disc will no longer be
recognizable by the recorder and the stored
x to enter.
information will become useless. In this case,
store the settings ag ai n.
Turning off the beep sound
See the illustrations in Engli sh text (page 67).
Using the recorder, you can turn off the beep
sound on the recorder and the remote contr ol.
Using the remote control, you can turn off the
beep sound on the remote control only. To turn
off the beep sound by using remote control, see
“Menu functions” (page 90).
1 Press the jog dial.
2 Turn the jog dial until “OPT ION ”
flashes in the dis p l ay, and then press to
enter.
3 Turn the jog dial until “BEEP” flashes
in the display, and then press to enter.
4 Turn the jog dial until “MAIN UNIT” or
“REMOTE” flashes in the display, and
then press to enter.
MAIN UNIT: when turning off the
beep sound on the re co rder.
REMOTE: when turning off the beep
sound on the remote control.
5 Turn the jog dial until “B EE P OFF”
flashes in the dis p l ay, and then press to
enter.
To turn on the beep sound
Select “BEEP ON” in step 5.
30
Page 31

B Power sources
You can use the recorder on …
— house current.
— a nickel metal hydride rechargeable
battery (supplied).
— dry battery (not supplied).
It is preferable to use the recorde r on house
current when recording for a long time.
When using a battery, make sure it is a fully
charged rechargeable battery or a new alkaline
dry battery to prevent operations (e.g .,
recording and editing.) from failing due to
insufficient battery power.
Battery life
The battery life may be shorter due to operating
conditions and the temper a ture of the lo cation.
When recording (JEITA1))
Batteries Stereo LP2 LP4
NH-14WM(A)
nickel metal hydride
rechargeable
2)
battery
LR6 alkaline dry
3)
battery
NH-14WM(A)
nickel metal hydride
rechargeable batter y
+ one LR6
1)Measured value by the stan dard of
JEITA(Japan Electronics and Information
Technol ogy Industries Asso c iation).
2)When using a 100% fully char ge d
rechargeable batter y.
3)When using a Sony LR6 (SG) “STAMINA”
alkaline dry battery (produce d in Ja pa n) .
When playing (JEITA)
(Unit: approx. hours)
Batteries Stereo LP2 LP4
NH-14WM(A)
nickel metal hydride
rechargeable batt ery
LR6 alkaline dry
battery
NH-14WM(A)
nickel metal hydride
rechargeable batt ery
+ one LR6
(Unit: approx. hours)
12 17 21
12 19 23
30 43 52
30 38 42
44 52 62
79 95 110
When to replace the batte ries
When the dry battery or rechargeable battery
are weak, flashing r or “LOW BATT”
appears in the display. Replace the dry battery
or charge the rechargeable battery.
The battery level indicator is approxim at e. It
may be more or less than the indic at ion
depending on the operating condition.
Note
Stop the recorder before replacing battery.
31
Page 32

B Additional information
Messages
If the recorder cannot carry out an operat ion,
error messages may fl ash in th e display windo w
as follows.
BANK FULL :
The phrase bank is almost full and cannot
store the phrase you tried to enter.Delete
some phrases from the phrase ban k , and
then reenter the new phrase.
BLANKDISC :
You tried to play an MD with no
recording on it.
BUSY :
You tried to operate the recorder while it
was accessing the recorded data. Wait
until the message goes out (in rare c as es ,
it may take a few minutes).
Data Save :
The MD recorder is recording
information (sounds) from the memory to
the disc. Wait until this process is
completed. Do not expose the recorder to
any physical shock, nor disrupt power
supply.
DISC FULL :
There is no more space to record on the
MD.
EMPTY :
You tried to erase data in the phrase bank
but no data have been recorded.
Hi DC in :
The power supply is higher than required.
Use the recommended power sources.
HOLD :
You tried to operate the recorder with the
HOLD switch slid in the direction of th e
arrow . Slide back the switch.
LINE OUT :
Y ou pres sed VOL +/– while the “AUDIO
OUT” parameter is se t to “LINE OUT”.
Use the jog dial to set the “AUDIO OUT”
parameter to “HeadPhone”.
LOW BATT :
The rechargeable bat t ery or dr y battery is
weak. Charge the rechargeable battery or
replace the dry battery.
32
MEM OVER :
You started recording with the recorder
receiving continuous vibration. Put the
recorder on the stable place and st art
recording again.
MENU :
You pressed a key on the remote control
while select ing a menu on t h e recorder.
NAME FULL :
Y ou tried to enter more than 200 letters to
label a single track or disc.
You tried to enter a total of more tha n
1700 letters for track or disc names.
NO COPY :
You tried to make a copy from a disc that
is protected by the Serial Copy
Management System. You cannot make
copies from a digitally connected sourc e
which was itself recorded using the digital
connection. Use the analog connection
instead.
NO DISC :
You tried to play or record with no disc in
the recorder.
No Entry! :
Y ou tried to erase a setting in the Personal
Disc Memory on a disc that contains no
settings in the Personal Disc Memory.
NO SIGNAL :
The recorder could not detect digital input
signals. Make sure that the sou rc e is
connected firmly. If the messag e appears
while rec ording, pr e ss x to end recording.
NO TEXT :
You tried to use the CD text copying
function to copy a track or disc nam e
from a CD that has no text data.
NV ERROR :
Internal processing was not correctly
done.
Reinsert the disc or try repeating the
recorder operation. If th e sa me mes sage
appears again, a m echani cal p roble m may
be the cause. In this case, consult your
nearest Sony dealer.
P/B ONLY :
You tried to record or edit on a
premastered MD (P/B stands for
playback).
PROTECTED :
You tried to record or edit on an MD with
its tab in the record-prot ect position.
Page 33

REC ERR :
The recording is not correctly done. Place
the recorder at no vibration and record
again.
The disc is dirty (with oil stainer f inge r
prints), scratched, or out of standard.
Record again with another disc.
READ ERR :
The recorder cannot read the disc
information corr e ctly. Reinsert the disc.
SORRY :
Y ou tired to set Digital Sound Preset
while the “AUDIO OUT” parameter is set
to “LINE OUT”. Use the jog dial to set
the “AUDIO OUT” parameter to
“HeadPhone”.
You tried to erase a track mark while
playing the MD or at the beginning of the
first track.
Y ou tried to eras e a track mark to comb ine
tracks the recorder cannot com b ine (a
track recorded in different recording
mode such as in LP2 and LP4, or a track
recorded through analog connecti on an d
digital connection)*.
You tried to overwrite a track mark.
You tried to press
MODE while synchro-recording or the
joint text fu nction is active.
* If you have recorded or erased many times
on the same MD, the data of a single track
may be scattered throughout the MD.
When the data is scattered in groups of less
than 12 seconds long, the recorder will not
be able to combine the tracks.
X, T MARK or REC
TEMP OVER :
Heat has built up in the recorder. Wait
until the recorder cools down.
TOC Edit :
The MD recorder is recording
information (track star t a nd end position)
from the memory to the disc. Wait until
this process is comple te d. Do no t expose
the recorder to physical shock, nor disrupt
power supply.
TOC ERR :
The recorder cannot read the disc
information correctly. Insert another disc .
If it is no problem to erase all the contents
of the disc, erase all (page 11 3 ) .
TR FULL:
Y ou tried to record more than 254 tracks.
TrPROTECT :
You tried to record over or edit a trac k
which has been protected from being
recorded over*.
* Track-protected MiniDiscs — Some MD
recorders will let you protect individual
tracks from being recorded over. This
recorder, however, does not offer this
feature.
33
Page 34

Page 35

Page 36

Printed in Japan
 Loading...