

Page 1

3-220-298-03(1)
ポータブルミニディスク
レコーダー
取扱説明書
お買い上げいただきありがとうございます。
この取扱説明書には、事故を防ぐための重要な注意事項と製品の
取り扱いかたを示しています。この取扱説明書をよくお読みのうえ、
製品を安全にお使いください。
お読みになったあとは、いつでも見られるところに必ず保管して
ください。
/Operating Instructions
電気製品は安全のための注意事項を守らないと、
火災や人身事故になることがあります。
WALKMAN
ソニー株式会社の
登録商標です。
は、
MZ-R900
©2000 Sony Corporation
Page 2

主な特長
長時間モード搭載
•
一枚のミニディスクに従来の2倍、
倍の録音ができるMDウォークマンで
す。
再生専用MDウォークマン並みの超小
•
型ボディに、録音機能を凝縮
ポケットやバッグに入る携帯に便利な
サイズ・軽さの、録音機能付き
ウォークマンです。
省電力設計によるロングバッテリーラ
•
イフを実現
本体ダブルジョグレバー搭載
•
編集ができる新開発の9文字対
•MD
応、光る液晶リモコン
簡単操作のスティック・コントロー
ラーリモコンで、曲名や、ディスク名
を入力したり、曲順を変えるなどの編
集操作が、簡単にできます。
パーソナルディスクメモリー搭載
•
デジタルサウンドプリセット、再生
モード(リピート再生やプログラム再
生)、スピードコントロール、音量な
どの設定を本体が記憶し、次に同じ
ディスクを入れたときに過去の設定を
呼び出して再生できます。
お好みの音でお楽しみいただける「デ
•
ジタルサウンドプリセット」機能
曲をお好みの順番に並べ替えてお楽し
•
みいただける「プログラム再生」機能
再生速度を調節できる「スピードコン
•
トロール」機能
電車の乗り越しなどを防ぐ「メロディ
•
タイマー」機能
デジタル
•
能を搭載
ネームバンク機能
•
曲名・ディスク名としてよく入力する
言葉を、あらかじめ登録しておくこと
ができます。
2
レベルコントロール機
REC
MD
から曲名を記録できるジョイント
•CD
テキスト機能
別売りのCDテキスト接続コードを
使ってCDウォークマン(ジョイント
4
テキスト対応機種)と接続し、録音と
同時にCDテキストの情報を記録する
ことができます(ジョイントテキスト
対応機種、CDテキスト対応のCD使
用時のみ)。
最長約
•
•
•
•
160秒(LP4
音飛びガードメモリー搭載
デジタルシンクロ録音
光デジタル出力があるデジタル機器と
つないで録音するとき、再生機側の操
作に合わせて、録音開始や一時停止を
自動で行います。
デート機能
録音した日時を自動的に記録します。
デジタル
AGC
MIC (PLUG IN POWER)
グ録音時)
デジタルならではの音のクオリティー
を維持しながら、録音時のわずらわし
いレベル設定を自動的に行います。
録り直しのきかない録音の場合は、必ず
•
事前にためし録りをしてください。
ポータブルミニディスクレコーダーの不
•
具合により録音されなかった場合の録音
内容の補償についてはご容赦ください。
あなたが録音したものは、個人として楽
•
しむなどのほかは、著作権法上、権利者
に無断で使用できません。なお、この商
品の価格には、著作権法の定めにより、
私的録音補償金が含まれております。
(お問い合わせ先 (社)私的録音補償金
管理協会
は知っていると便利な情報のマークです。
z
Tel.03-5353-0336
再生時)の長時間
搭載(
LINE IN(OPT)/
のアナロ
)
Page 3

安全のために
ソニー製品は安全に十分配慮して設計されています。しか
し、電気製品はすべて、まちがった使いかたをすると、火
災や感電などにより人身事故になることがあり危険です。
事故を防ぐために次のことを必ずお守りください。
v
安全のための注意事項を守る
ページの注意事項をよくお読みください。製品全般の
6〜9
注意事項が記載されています。
定期的に点検する
度は、ACパワーアダプターや充電器のプラグ部と
1年に1
コンセントの間にほこりがたまっていないか、故障したま
ま使用していないか、などを点検してください。
故障したら使わない
動作がおかしくなったり、ACパワーアダプターや充電器
などが破損しているのに気づいたら、すぐにお買い上げ店
またはソニーサービス窓口に修理をご依頼ください。
万一、異常が起きたら
警告表示の意味
取扱説明書および製品で
は、次のような表示をして
います。表示の内容をよく
理解してから本文をお読み
ください。
この表示の注意事項を守ら
ないと、火災・感電などに
より死亡や大けがなど人身
事故の原因となります。
この表示の注意事項を守ら
ないと、感電やその他の事
故によりけがをしたり周辺
の家財に損害を与えたりす
ることがあります。
注意を促す記号
行為を禁止する記号
変な音・においがしたら、
煙が出たら
1 電源を切る
2
パワーアダプター
AC
や充電器を
b
コンセントから抜く
3 お買い上げ店または
ソニーサービス窓口
に修理を依頼する
行為を指示する記号
3
Page 4

目次
・ ..............................................
付属品を確かめる ................................................
各部のなまえ .......................................................
お使いになる前に ................................................
6
10
11
14
ここだけ読ん
でも使えます
いろいろな録
音のしかた
準備する
録音する
再生する
録音もとの機器との2種類のつなぎかた
(光デジタル入力とアナログ入力)...................
アナログ入力で録音する......................................
長時間録音する....................................................
再生側に合わせて録音を始める/止める
(シンクロ録音)...............................................
上書きをせずに録音する......................................
マイクで録音する ................................................
一定時間ごとに頭出しマークをつけながら録音する
(オートタイムトラックマーク)......................
手動で録音レベルを調節する(マニュアル録音)..
残り時間や録音位置を調べる...............................
録音日時を記録する(時計合わせ).......................
の曲名などを記録しながら録音する
CD
(ジョイントテキスト機能).............................
16
19
21
23
24
25
25
26
27
28
29
30
32
33
いろいろな再
生のしかた
4
曲番や曲名を直接選ぶ(ダイレクト選曲)............
曲順を変える .......................................................
音質を設定する(デジタルサウンドプリセット)..
再生速度を変える(スピードコントロール).........
35
35
37
39
Page 5

いろいろな再
生のしかた
ディスクごとに設定を記録する
(パーソナルディスクメモリー)......................
残り時間や再生位置を調べる...............................
お手持ちのシステムで聞く(
LINE OUT
)...........
39
40
42
編集する
その他の機能
電源について
その他
編集する前に .......................................................
曲を消す ..............................................................
頭出しマーク(曲番)をつける .............................
頭出しマーク(曲番)を消す ................................
曲順を変える(ムーブ)........................................
曲名やディスク名をつける ..................................
よく使う言葉を登録する(ネームバンク機能).....
アラームを鳴らす(メロディタイマー)................
音もれを抑え耳にやさしい音にする
(音量リミット
誤操作を防ぐ(ホールド).....................................
リモコンの確認音を消す......................................
電池の持続時間....................................................
使用上のご注意....................................................
故障かな?と思ったら ..........................................
システム上の制約による症状と原因 ....................
メッセージ一覧....................................................
保証書とアフターサービス ..................................
主な仕様 ..............................................................
解説 .....................................................................
— AVLS
)..............................
43
43
44
45
46
47
50
54
56
56
57
58
59
61
64
65
67
68
70
Operating
Instructions
Operating Instructions
....................................
72
5
Page 6

下記の注意事項を守らないと火災・感電
により大けがの原因となります。
運転中は使用しない
自動車、オートバイなどの運転をしながらヘッドホンやイ
•
ヤホンなどを使用したり、細かい操作をしたり、表示画面
を見ることは絶対におやめください。交通事故の原因とな
ります。
また、歩きながら使用するときも、事故を防ぐため、周囲
•
の交通や路面状況に十分にご注意ください。
内部に水や異物を入れない
水や異物が入ると火災や感電の原因になります。
万一、水や異物が入ったときは、すぐにスイッチを切り、
パワーアダプターや充電器をコンセントから抜き、お買
AC
い上げ店またはソニーのサービス窓口にご相談ください。
国内専用機は海外で使用しない
ワールドモデル以外のACアダプターや充電器は、日本国内
専用です。
交流
源電圧で使用すると、火災や感電の原因となります。
の電源でお使いください。海外などで、異なる電
100V
雷が鳴りだしたら、電源プラグに触れない
感電の原因となります。
指定以外の充電器やACパワーアダプター、
カーバッテリーコードなどを使わない
破裂や液漏れ、過熱などにより、火災やけが、周囲の汚損の
原因となります。
6
Page 7

下記の注意事項を守らないとけがをしたり周辺の家財に
損害を与えたりすることがあります。
ぬれた手でACパワーアダプターや充電器をさわ
らない
感電の原因となることがあります。
本体やACパワーアダプター、充電器を布団など
でおおった状態で使わない
熱がこもってケースが変形したり、火災の原因となることがあ
ります。
大音量で長時間続けて聞きすぎない
耳を刺激するような大きな音量で長時間つづけて聞くと、聴力
に悪い影響を与えることがあります。とくにヘッドホンで聞く
ときにご注意ください。呼びかけられて返事ができるぐらいの
音量で聞きましょう。
はじめからボリュームを上げすぎない
突然大きな音が出て耳をいためることがあります。ボリューム
は徐々に上げましょう。とくに、MD、CDや
の少ないデジタル機器をヘッドホンで聞くときにはご注意くだ
さい。
通電中のACパワーアダプターや充電器、充電中
の電池や製品に長時間ふれない
長時間皮膚がふれたままになっていると、低温やけどの原因に
なることがあります。
DAT
など、雑音
7
Page 8
電池についての安全上のご注意
液漏れ、破裂、発熱、発火、誤飲による大けがや失明を避けるため、下記のことを必ず
お守りください。
電池の種類については、
電池本体上の表示をご確
認ください。種類によっ
ては該当しない注意事項
もあります。
充電式電池
ニカド
(Ni-Cd)
ニッケル水素
(Ni-MH)
リチウムイオン
(Li-ion)
乾電池
アルカリ
マンガン
ボタン型電池
リチウムなど
8
充電式電池について
機器の表示に合わせて+と−を正しく入れる。
•
指定された充電器以外で充電しない。
•
充電式電池用キャリングケースが付属されている場
•
合は、必ずキャリングケースに入れて携帯・保管す
る。
火の中に入れない。分解、加熱しない。
•
火のそばや直射日光のあたるところ・炎天下の車中
•
など、高温の場所で使用・保管・放置しない。
コイン、キー、ネックレスなどの金属類と一緒に携
•
帯・保管しない。ショートさせない。
外装のビニールチューブをはがしたり傷つけたりし
•
ない。
液漏れした電池は使わない。
•
指定された種類以外の充電式電池は使用しない。
•
使い切った電池は取りはずす。長時間使用しないと
•
きや交流電源で使用するときも取りはずす。
乾電池・ボタン形電池について
小さい電池は飲み込む恐れがあるので、乳幼児の手
•
の届くところに置かない。万が一飲み込んだ場合
は、窒息や胃などへの障害の原因になるので、直ち
に医師に相談する。
機器の表示に合わせて+と−を正しく入れる。
•
充電しない。
•
火の中に入れない。分解、加熱しない。
•
コイン、キー、ネックレスなどの金属類と一緒に携
•
帯・保管しない。ショートさせない。
火のそばや直射日光のあたるところ・炎天下の車中
•
など、高温の場所で使用・保管・放置しない。
外装のビニールチューブをはがしたり傷つけたりし
•
ない。
指定された種類以外の電池を使用しない。
•
液漏れした電池は使わない。
•
Page 9

アルカリ電池の液が漏れたときは
素手で液を触らない
アルカリ電池の液が目に入ったり、身体や衣服に
•
つくと、失明やけが、皮膚の炎症の原因となるこ
とがあります。そのときに異常がなくても液の化
学変化により、時間がたってから症状が現れるこ
とがあります。
必ず次の処置をする
液が目に入ったときは、目をこすらず、すぐに水
•
道水などのきれいな水で充分に洗い、ただちに医
師の治療を受けてください。
液が身体や衣服についたときはすぐにきれいな水
•
で十分洗い流してください。皮膚の炎症やけがの
症状があるときは、医師に相談してください。
全ての電池について
使い切った電池は取りはずす。長時間使用しないと
•
きや交流電源で使用するときも取りはずす。
新しい電池と使用した電池、種類の違う電池を混ぜ
•
て使わない。
お願い
使用済み充電式電池は貴重な資源です。端子(金属部分)
にテープを貼るなどの処理をして、充電式電池リサイク
ル協力店にご持参ください。
9
Page 10
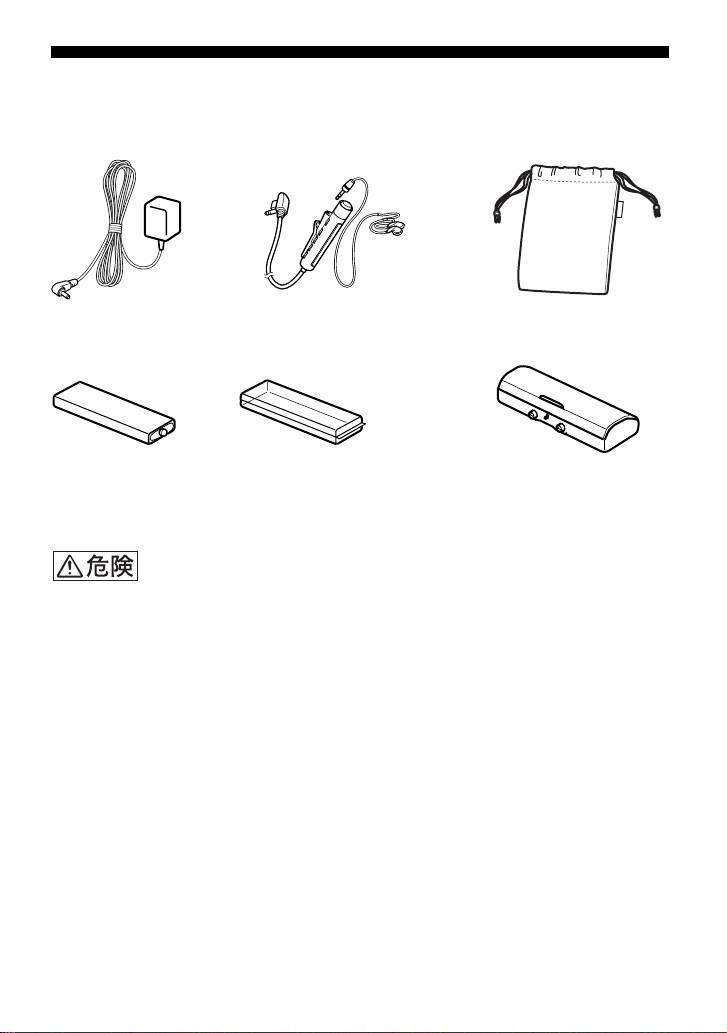
付属品を確かめる
●
パワーアダプター ● リモコン付きヘッドホン ● キャリングポーチ
AC
● 充電式ニッケル水素 ● 充電池ケース ● 乾電池ケース
電池
NH-14WM
● 取扱説明書 ● 保証書 ● ソニーご相談窓口のご案内
安全のために
付属の充電式電池を持ち運ぶときは、必ず付属の充電池ケースに入れてください。
•
ケースに入れずにコイン、キー、ネックレスなどの金属類と一緒に携帯・保管する
と、電池の+と−がショートし、発熱することがあります。
乾電池や乾電池ケースはコイン、キー、ネックレスなどの金属類と一緒に携帯・保
•
管しないでください。乾電池の+と−、または乾電池ケースの端子が金属とつなが
るとショートし、発熱することがあります。
(バッテリーキャリングケース)
10
Page 11

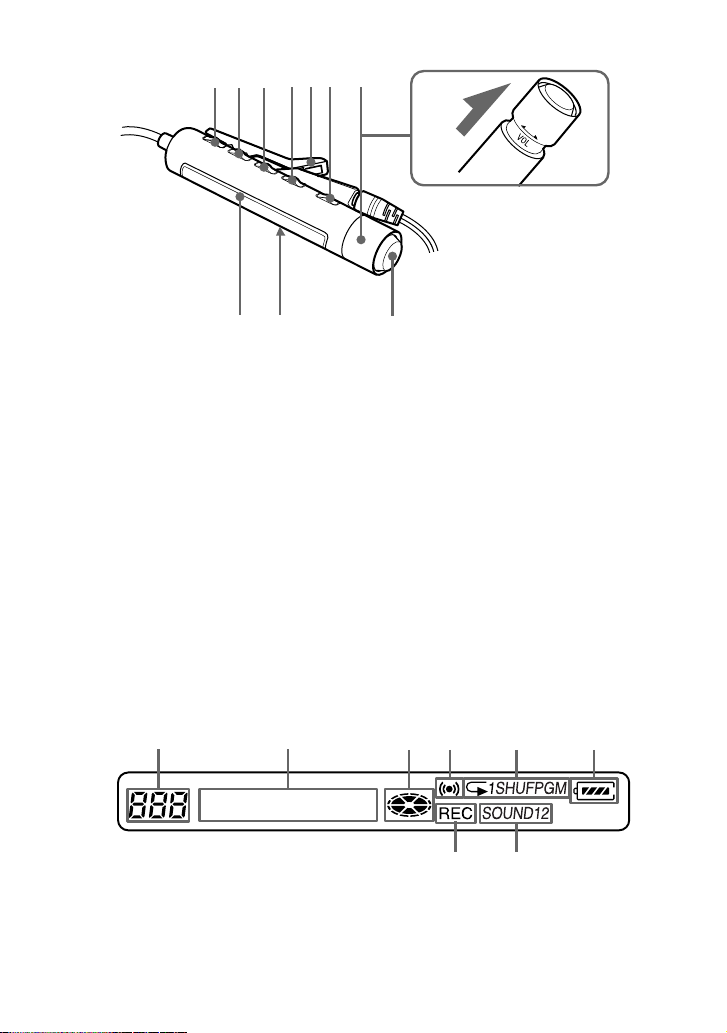
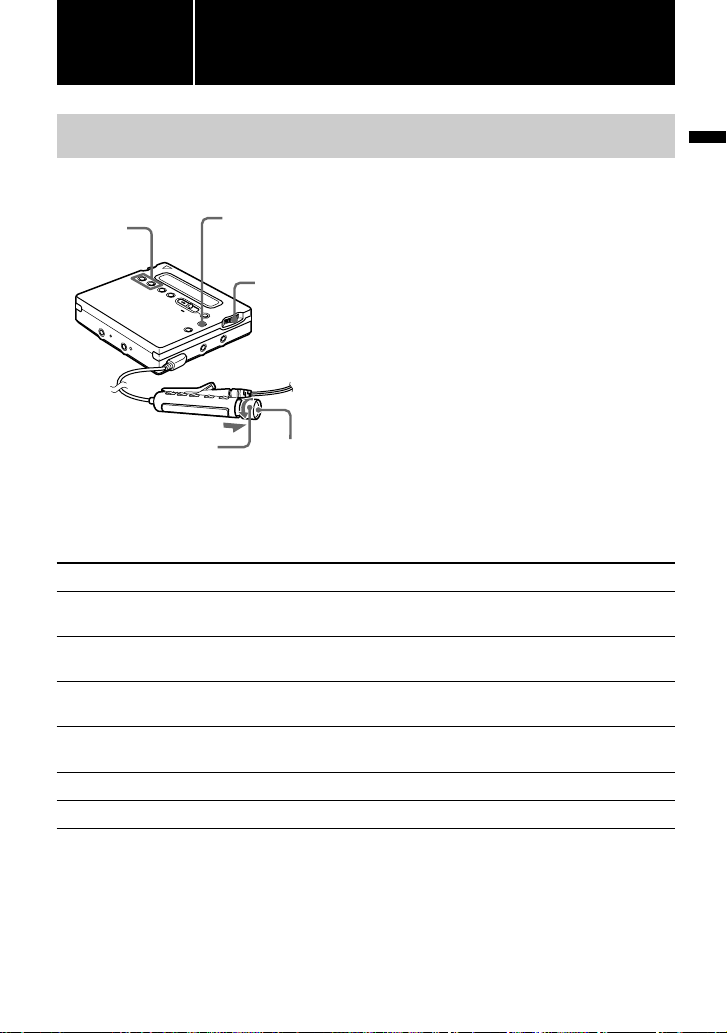
各部のなまえ
( )内のページに詳しい説明があります。
本体
1
2
3
4
5
6
7
8
9
q;
1
END SEARCH
2 電池入れ(16)
3 ジョグレバー(左)(14、26、35、
)
43、54
4
5
6
7 乾電池ケース取り付け端子(17)
8
9
q;
−ボタン(21、47)
VOL+/
REC MODE
え)ボタン(25)
ランプ(30)
REC
SYNCHRO REC ON/OFF
チ(裏面 )(25)
DC IN 3V
スイッチ(裏面)(17、56)
HOLD
ボタン(20、47)
(録音モード切り換
スイッ
ジャック(16、19)
qa
qs
qd
qf
qg
qh
qj
qk
ql
w;
qa
qs
qd X (一時停止)ボタン(20、21、
qf 表示窓(25、35、54)
qg ジョグレバー(右)(N、.
qh x (停止)
qj
qk
ql
w; i
つまみ(19、24)
REC
ボタン(17)
OPEN
29、32、45、47
>)(15、21、45、47)
19、21、26、43
LINE IN (OPT)
)
24
)
/CHARGE
)
ジャック(19、
ボタン(16、
MIC (PLUG IN POWER)
ク(27)
T MARK
ボタン(44)
/LINE OUT
ジャック(33、42)
/
ジャッ
11
Page 12

表示窓(本体)
12 345
6 7 8 9 q; qa qs qd qf
1 アラーム表示(54)
2 文字情報表示部(30、41)
ディスク名や曲名、日付、エラー
表示、曲番などが文字で表示され
ます。
3 午前/午後表示(32)
時刻が12時間表示のときに表示さ
れます。
4 時刻/時間表示(30、41)
録音時刻、現在時刻、曲の再生時
間、曲やディスクの残り時間を示
します。
5 電池残量表示(16)
充電池や乾電池の残量の目安を表
示します。
6 サウンド表示(37)
デジタルサウンドプリセットが選
ばれていることを示します。
7 レベル表示(29)
録音時には入力レベルを、再生時
には再生音のレベルを表示しま
す。
8
LP2/LP4
9 シンクロ録音表示(25)
シンクロ録音時に表示されます。
q; 録音表示(19)
録音時に表示されます。録音一時
停止のときは点滅します。
qa
REC DATE
表示窓に録音日時が出ているとき
に表示されます。
qs
REMAIN
ディスクの残り曲数、ディスクや
曲の残り時間を表示していること
を示します。
qd 再生状態表示(35)
ディスクの再生状態を表示しま
す。
qf ディスク表示(25、35)
録音、再生、編集のとき、ディス
クが回転していることを示しま
す。
、モノラル表示(25)
表示(41)
表示(30、41)
12
Page 13
リモコン
AB
C DE
F G
H
+
–
IJ
1
DISPLAY
49、54
2
PLAY MODE
3
RPT/ENT(repeat/enter
(37、38)
4
SOUND
5 クリップ
6 X(一時停止)ボタン(21、49、
52
7 回転つまみ(./N>)(15、
21、37、46、49、52、55
N>:再生、頭出し、早送り
.:頭出し、早戻し
ボタン(31、39、46、
)
ボタン(36、49)
)ボタン
ボタン(37)
)
)
表示窓(リモコン)
A
1 曲番表示部(31、37、55)
2 文字情報表示部(31、37、55)
3 ディスク表示(31、37、55)
4 アラーム表示(55)
BCDE
K
8 回転つまみ(
(15、21、49)
引いて回すと音量を調節できま
す。
9 表示窓(31、37、55)
0
qa x(停止)ボタン(21、39、46、
5 再生状態表示(37)
6 電池表示(31、37、55)
7 録音表示(31)
8 サウンド表示(37)
スイッチ(17、56)
HOLD
)
55
(音量)+/−)
VOL
HG
F
13
Page 14
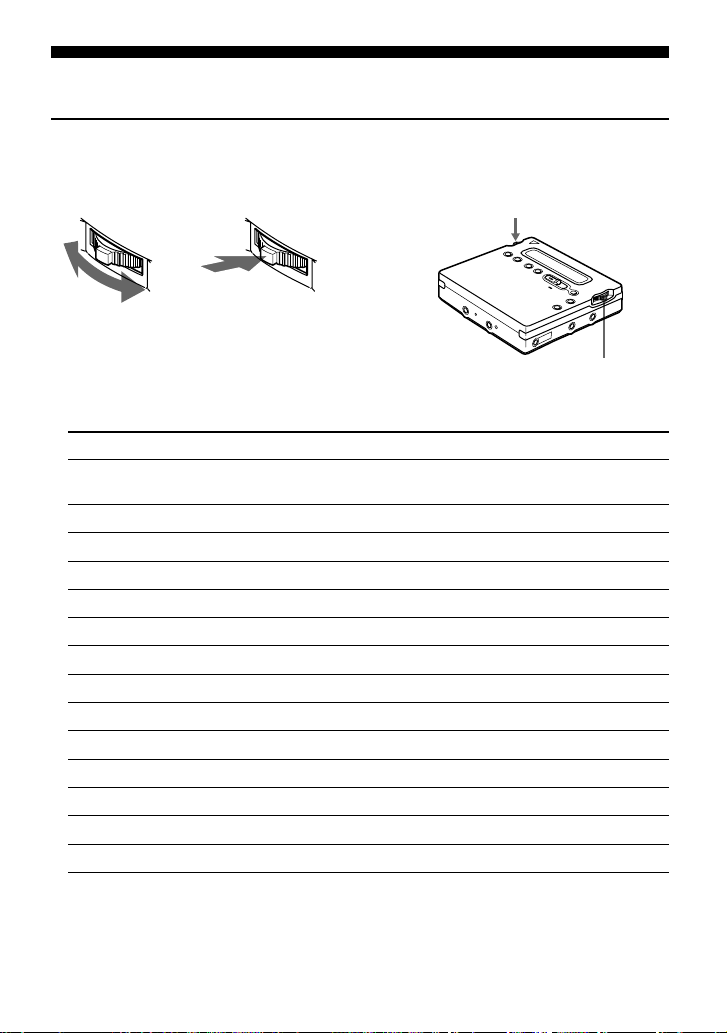
お使いになる前に
ジョグレバーの使いかた
本機では、2つのジョグレバーを使って、停止時、録音時、再生時、編集時に様々な操
作をすることができます。
動かして選択 押して確定
各ジョグレバーの用途
ジョグレバー(左)(
メニューの選択・確定
•
MENU/ENTER
次のメニューでいろいろな機能を使うことができます。
*
メニュー
EDIT
DISPLAY
PLAY MODE
RecVolume
M-TIMER
AUDIO OUT
SOUND
PERSONAL
TIME MARK
MIC SENS
機能
曲名やディスク名をつけたり、曲を消したりできます(43、44、46〜48、
ページ)。
51
曲の経過時間や残り時間などの表示を選べます(30、40ページ)。
シャッフル再生、リピート再生など、再生状態を選べます(35ページ)。
録音レベルの自動調節/手動調節を選べます(29ページ)。
メロディタイマーの設定ができます(54ページ)。
i
/LINE OUT
デジタルサウンドプリセットの設定を選べます(37ページ)。
パーソナルディスクメモリーへの登録/削除ができます(40ページ)。
オートタイムトラックマークの設定を選べます(28ページ)。
マイク感度を選べます(27ページ)。
AVLS AVLSのON/OFF
BEEP
REC-Posi
CLOCK SET
* 停止中、録音中などの動作状況により、選べるメニューは異なります。また、メニューに
は本体のみで操作できるもの、リモコンのみで操作できるもの、または本体・リモコン両
方で操作できるものがあります。詳しくは参照ページをご覧ください。
リモコンの確認音を鳴らす/鳴らさないを選ぶべます(57ページ)。
録音開始位置の設定を選べます(26ページ)。
日付けと時刻を設定できます(32ページ)。
)
出力の設定を選べます(42ページ)。
を選べます(56ページ)。
ジョグレバー(左)
ジョグレバー(右)
14
Page 15

ダイレクト選曲
•
再生しながら、次に聞きたい曲を曲名や曲番で確認して選ぶことができます(
ページ)。
35
ジョグレバー(右)(N
再生:押す(N)。
•
頭出し:.または>側に動かす。
•
早戻し/早送り:.側または>側に動かしてそのままにする。
•
/./
>)
回転つまみの使いかた
リモコンの回転つまみは次のように使います。
再生/頭出し/早送り/早戻し
N>
.
回す/回してそのままにする
音量調節(
引く 回す 戻す
+
–
VOL +/–
)
VOL+
+
–
VOL–
15
Page 16

ここだけ読ん
でも使えます
お買い上げ時には、まず充電式電池を充電してください。ただし、ACパワーアダプター
をつなげば、充電しなくても使用できます。
1
充電式電池を入れる
準備する
e
E
マイナス側を奥にして入れ
てください。
16
2
パワーアダプターをつなぎ、充電する
AC
x
/CHARGE
コンセントへ
パワーアダプター(付属)
AC
DC IN 3V
1
パワーアダプターをつなぐ
AC
2 x
/CHARGE
「
Charging
まります。
充電時間は、放電しきった状態から充分に充電
するまでに約
で中止したいときはx
ます。
3
パワーアダプターをコンセントから抜く。
AC
ボタンを押す。
」が点滅し、e表示が出て、充電が始
3時間30
ジャックへ
分かかります。充電の途中
/CHARGE
ボタンを押し
繰り返し
表示する
表示が消え
たら充電完
了
Page 17

アルカリ乾電池で使うときは
別売りのソニーアルカリ乾電池(単
充電式電池と一緒に使うと長時間使用できます。
1
取り付けネジを
はずすときは、
3
リモコンをつなぎ、ホールドを解除する
側に回します。(取り
LOCK
RELEASE
形)を1本入れます。
3
2
側に回します。)
しっかりつなぐ
3
図のようにマイナス側から入れてくだ
さい。
4
こ
こ
だ
け
読
ん
で
も
使
え
ま
す
4
ミニディスクを入れる
録音するときは録音用のディスクを入れてください。
1
OPEN
押す。
ふたが開きます。
ボタンを
HOLD
2 図のようにディスク
のラベル面をふた側
にして矢印の向きに
奥まで押し入れ、ふた
を閉める。
17
Page 18

ご注意
充電が終了し、液晶表示が消えた後すぐに
•
x
/CHARGE
始まりますが、充電は完了していますので
x
/CHARGE
ださい。
充電中に他の操作を行うと、充電は解除さ
•
れます。
充電には必ず付属のACパワーアダプターを
•
お使いください。
充電時間は充電式電池の使用状態により異
•
なります。
はじめて充電するときや、長時間使用しな
•
かったあとでは、充電しても通常の使用時
間より短いことがあります。何回か充放電
をくり返すと通常の状態に戻ります。
充電式電池を充分に充電しても使える時間
•
が通常の半分くらいになったときは、新し
い充電式電池と取り換えてください。
長い間使用しないときは、充電式電池を本
•
体から取り出しておいてください。
ボタンを押すと、再び充電が
ボタンを押して停止させてく
18
Page 19

ここだけ読ん
でも使えます
録音する
光デジタルケーブルを使って、光デジタル出力のある
とつないでデジタル録音ができます(「デジタル録音の制限について」(71ページ)もあ
わせてご覧ください)。録音はステレオになります。
アナログ録音をするときは「アナログ入力で録音する」(24ページ)をご覧ください。録
音の際は、家庭用電源(コンセント)につなぐことをおすすめします。
1
つなぐ
コンセントへ
パワー
AC
アダプター
(付属)
DC IN 3V
1 別売りの光デジタルケーブル
(奥までしっかりと差し込んでください。)
プレーヤー、
CD
プレーヤー、
MD
ビデオプレー
DVD
ヤーなど
光デジタル出力へ
角型ジャック
光デジタルケー
ブル(別売り)
へ
POC-15B
などを使ってつなぐ。
デッキやBSチューナーなど
DAT
ポータブル
プレーヤーなど
CD
光ミニジャック
LINE IN (OPT)
へ
こ
こ
だ
け
読
ん
で
も
使
え
ま
す
2
END
SEARCH
録音する
REC
x
1
2 録音したい
止めるには、■ボタンを押す。
■ボタンを押してから、電池使用時では約
秒後、ACパワーアダプター使用時では約5分
後に、自動的に電源が切れます。
つまみの中央のボタンを押しなが
REC
ら、右にずらす。
「
」表示が点灯し、録音が始まります。
REC
やテープを再生する。
CD
10
19
Page 20

こんなときは 操作
録音済み部分の後ろに新
しい録音をする
録音した内容の途中から
新しく録音する
一時停止する X を押す。
ディスクを取り出す x
1)
録音開始位置(「
から新しく録音を始めます(
2)
一時停止を解除したところで曲番(頭出しマーク)が1つ増え、そこから次の曲として記録され
ます。
3)
ふたを開けると、次の録音はディスクの最初から始まります(録音開始位置(「
設定が「
1)
1)
From Here
END SEARCH
ジョグレバー(右)を押す
始めたい位置を探し、xを押す。
を押してから、本体の
(「
TOC Edit
REC-Posi
」)の設定が「
ページ)。
26
」になっているとき)。
を押し、
2)
もう一度押すと解除されます。
」の表示が消えるまでふたは開きません。)
From End
録音が始められないときは
ホールド(誤動作防止)スイッチを確認して
•
ください。(
ディスクの誤消去防止つまみを確認してく
•
ださい。(
再生専用のミニディスクは録音できませ
•
ん。
17
ページ)。
71
ページ)。
ご注意
•「Data Save」「TOC Edit
は、録音した情報(曲の開始・終了位置な
ど)を ディスクに記録しています。衝撃を
与えたり、電源を抜いたりすると、それま
で録音した内容が記録されません。
録音終了後、「
•
までふたは開きません。
録音中や編集中、また、その後■ボタンを
•
押してから「
でに電池をはずしたり、
ター電源を切ったり、電池が消耗したとき
は、次に電源を入れるまでふたは開きませ
ん。
光(オプティカル)タイプ以外のデジタル出
•
力につなぐことはできません。
ポータブルCDプレーヤーから録音すると
•
きは、
ら録音の操作をしてください。デジタル録
音中は、音源の
的につきます。
TOC Edit
TOC Edit
プレーヤーを一時停止にしてか
CD
CDやMD
」表示の点滅中
」の表示が消える
」の表示が消えるま
パワーアダプ
AC
と同じ曲番が自動
つまみを右にずらす。
REC
、または ./> 側に動かして録音を
(N)
次に、
ボタンを押してふたを開ける。
OPEN
」になっていると、常に録音済み部分の後ろ
ポータブルCDプレーヤーから録音すると
•
きは
パワーアダプター電源でないと、光
−
AC
出力ができないポータブル
ヤーもあります。
−ポータブル
ダプターをつなぎ、家庭用電源でお使い
ください。
−音飛びガード機能
てください。
つまみを右にずらす。
REC
プレーヤーにACパワーア
CD
(ESPなど)
z
本機の
•
LINE IN (OPT)
ル・アナログ両用です。つなぐケーブルの
種類により、光デジタル入力またはアナロ
グ入力(
LINE IN
す。
録音される音の大きさは自動的に調節され
•
ます。音の大きさを変えたいときは、「手動
で録音レベルを調節する」(
覧ください。
録音中に音を聞くことができます。
•
i
/LINE OUT
ドホン(付属)をつなぎます。聞こえる音の
大きさは
VOL+/
ただし、録音される音の大きさは影響され
ません。
ジャックはデジタ
)に自動的に切り変わりま
ジャックにリモコン付きヘッ
−ボタンで調節できます。
20
REC-Posi
プレー
CD
は「切 」にし
ページ)をご
29
3)
」)の
Page 21
ここだけ読ん
でも使えます
1
聞く
再生する
1 ジョグレバー(右)を押す(N)。
−
VOL+/
回転つまみ
こんなときは 操作(リモコンの確認音1))
今聞いている曲を頭出しする ジョグレバー(右)を.側へ動かす。
次の曲を頭出しする ジョグレバー(右)を>側へ動かす。
再生しながら早戻しする
再生しながら早送りする
一時停止する X を押す。(ピ・ピ・ピ) もう一度押すと解除されます。
ディスクを取り出す ■を押してから、本体の
1)
リモコンの確認音は消すこともできます(57ページ)。
2)
一時停止(X)してジョグレバー(右)を.または>側へ動かしたまま、リモコンでは回転つ
まみを.または>側に回したままにすると、再生音を聞かずに高速で早送りや早戻しができ
ます。
3)
ふたを開けると、次の再生はディスクの最初から始まります(パーソナルディスクメモリーに登
録しているときを除く)。
x
2)
2)
ジョグレバー
(右)
x
リモコンでは回転つまみを.側に回す。(ピピピ)
リモコンでは回転つまみをN>側に回す。(ピピ)
ジョグレバー(右)を.側へ動かしたままにする。
リモコンでは回転つまみを.側に回したままにする。
ジョグレバー(右)を>側へ動かしたままにする。
リモコンでは回転つまみをN>側に回したままにする。
リモコンでは回転つまみをN>側に
回す。
リモコンで操作すると「ピ」と確認音がし
ます。
2
止めるには、xボタンを押す。
リモコンで操作すると「ピー」と確認音がしま
す。
次に再生するときは、止めたところの続きから
始まります。
■ボタンを押してから、電池使用時では約
秒後、ACパワーアダプター使用時では約5分
後に、自動的に電源が切れます。
−を押して、音量を調節する。
VOL+/
リモコンでは回転つまみを引いた状態
で、
る。
表示窓で音量を確認できます。回転つま
みは音量調節後、もとに戻します。
OPEN
−側に回して、音量を調節す
VOL +/
ボタンを押してふたを開ける。
こ
こ
だ
け
読
ん
で
も
使
え
ま
す
10
3)
21
Page 22

音飛びガード時間について
音飛びガード時間は次のようになります。
モード 表示 音飛びガード
ステレオ再生 表示なし 約40秒
ステレオ再生
LP2
ステレオ再生
LP4
モノラル再生
LP2
LP4
MONO約80
約80秒
約
160
秒
秒
再生が始められないときは
ホールド(誤操作防止)スイッチを確認してく
ださい(
ページ)。
56
ヘッドホンを直接本体につないで使うとき
は
VOL +/–
たり、ジョグレバー(左)でデジタルサウンド
プリセットの選択ができない場合は、次の操
作を行ってください。
1 ジョグレバー(左)を押し、動かして
2 ジョグレバー(左)を動かして
3 ジョグレバー(左)を押す。
ボタンで音量の調節ができなくなっ
「
AUDIO OUT
す。
「
LINE OUT
「
HeadPhone
」を点滅させ、もう一度押
」が点滅します。
」を点滅させる。
z
録音された方法により、ステレオ再生/
ステレオ再生/
再生は自動的に切り換わります。
ステレオ再生/モノラル
LP4
LP2
ご注意
ジョギング中など、連続的な振動が加わる
•
状況で使用すると、再生中に音飛びするこ
とがあります。
動作中に電池をはずしたり、ACパワーアダ
•
プター電源を抜いたり、電池が消耗したと
きは、次に電源を入れるまでふたが開かな
いことがあります。
22
Page 23

いろいろな録音のしかた
録音もとの機器との2種類のつなぎかた
(光デジタル入力とアナログ入力)
本機をCDプレーヤーやラジカセなど録音もとの機器とつなぐには、光デジタル入力を
使うつなぎかたとアナログ入力(
LINE IN
それぞれの録音のしかたは、光デジタル入力を使うときは「録音する」(19ページ)、ア
ナログ入力(
LINE IN
)を使うときは「アナログ入力で録音する」(24ページ)をご覧く
ださい。
光デジタル入力とアナログ入力の比較
相違点
つなぐことができる
機器
使用するコード
録音もとから送られる信号
録音の結果
入力の種類
頭出し
マーク
(曲番)
録音され
る音の大
きさ
光デジタル入力
光デジタル出力ジャックのある
機器
光デジタルケーブル(録音もと
の機器に角形プラグまたはミニ
プラグをつなぐ)(
デジタル信号
音源がCDやMDの場合、録音
•
もとと同じ場所に自動的につ
く。
音源がCDやMD以外の場
•
合、
2
音が続いた場所につく。
シンクロ録音中は、3秒以上
•
の無音が続くと録音一時停止
するので、その録音を一時停
止したところで自動的につく。
不要なマークがついた場合、録
音後に消してください(「頭出し
マーク
(曲番)
ジ)。
録音もとと同じ。
手動でも調節できます(デジタル
レベルコントロール)(「手動
REC
で録音レベルを調節する」
ジ)。
)を使うつなぎかたの2つの方法があります。
アナログ入力(
出力(
LINE OUT
ある機器
接続コード(録音もとの機器に
ピンプラグまたはステレオミニ
ページ)
19
秒以上の無音や小さな
を消す」45ペー
プラグをつなぐ)(
アナログ信号
などデジタル方式のものを
CD
録音もととしても、本機にはア
ナログ信号として送られる。
秒以上の無音や小さな音が
•2
続いた場所につく。
録音を一時停止したところで
•
自動的につく。
オートタイムトラックマーク
•
(
ページ)を使って一定時
28
間ごとにつく。
不要なマークがついた場合、
録音後に消してください(「頭
出しマーク
ページ)。
自動調節される。
手動でも調節できます(「手動で
録音レベルを調節する」
ペー
ジ)。
29
LINE IN
)ジャックの
(曲番)
)
ページ)
24
を消す」
29
ペー
い
ろ
い
ろ
な
録
音
の
し
か
た
45
ご注意
次のような場合、録音もとと同じ位置に頭出しマーク(曲番)が記録されないことがあります。
一部のCDプレーヤーやマルチディスクプレーヤーから、光デジタル入力で録音する場合
•
•CDやMD
には、録音もとを通常の再生状態にしてミニディスクに録音してください。
•BS
ソフトをプログラム演奏などにして光デジタル入力で録音する場合 (このような場合
)
、CS放送の番組を光デジタル入力で録音する場合
23
Page 24
アナログ入力で録音する
(接続コードが必要)
つないだ機器の出力端子から録音する音
はアナログ信号で送られますが、ミニデ
ィスクにはデジタル方式で記録されま
す。
つなぐには別売りの接続コードが必要で
す。コード類をつなぐときは、奥までし
っかりと差し込んでください。
プレーヤー、
CD
ラジカセなど
(録音もとの機器)
出力(アナログ)へ
1録音用ミニディスクを入れ、
REC
つ
まみの中央のボタンを押しながら右に
ずらす。
「
」が表示され、
REC
REC
ランプが点
灯し、録音が始まります。
2録音したい
やテープを再生する。
CD
その他の操作は「録音する」19ページ
を参照してください。
z
本機の
LINE IN (OPT)
アナログ両用です。
つなぐケーブルの種類により、光デジタル入
力またはアナログ入力(
切り換わります。
ジャックはデジタル・
)に自動的に
LINE IN
(白)
L
(赤)
R
別売り接続コード
RK-G129
REC
録音
ランプ
*
ポータブルCDプレーヤーなどのステレオ
ミニジャックにつなぐときは、別売りの接
続コード
RK-G136
接続コードには抵抗の入っていないものを
お使いください。
をお使いください。
24
など
(REC)
*
LINE IN
(OPT)
ご注意
Xボタンを押したあと、もう一度押して一時
停止を解除すると、解除したところで曲番が
つ増え、そこから次の曲として記録されま
1
す。
へ
Page 25

長時間録音する
End ¢¢7
通常のステレオ録音に加えて、録音時間
を2倍
テレオ録音することができます。またモ
ノラル録音でも通常のステレオ録音より
も2倍長く録音することができます。
本機で長時間録音した内容は、長時間再
生に対応していない他の機器では再生で
きません。
REC MODE
(録音モード)
1停止中に
返し押して録音モードを選ぶ。
録音モード
ステレオ録音 表示なし 約80分
LP2
LP4
モノラル録音
1)
より高音質の録音を行いたい場合は、ステレオ
録音、
2)
80
2
REC
がら右にずらす。
または4倍
(LP2)
(LP4)
REC MODE
1)
ステレオ録音
ステレオ録音
LP2
分ディスク使用時。
つまみの中央のボタンを押しな
表示 録音時間
LP2
LP4
MONO
ステレオ録音を選んでください。
3録音もとの機器の再生を始める。
z
または ロゴのある機器が
」、「
「
LP2
ご注意
長時間録音するときは付属のACパワーアダ
•
プターを
使いになることをおすすめします。
•「LP2
「
LP2
器で再生・編集しようとすると「
示され、再生・編集できません。
」に対応しています。
LP4
DC IN 3V
」または「
」または「
LP4
LP4
ジャックにつないでお
」で録音した内容を
」に対応していない機
長くしてス
REC
ボタンをくり
約
分
160
約
分
320
約
分
160
」と表
LP:
光デジタル入力で録音中の音は、モノラル
•
録音中でもi
レオ音声で出力されます。
• LP4
テレオ録音を実現するために、特殊な圧縮
方式を採用しています。そのため、録音元
の音源によってはごくまれに瞬間的なノイ
ズが発生することがあります。より高音質
の録音を行いたい場合は、ステレオ録音ま
たは
/LINE OUT
ステレオ録音は、通常の4倍の長時間ス
ステレオ録音を選んでください。
LP2
ジャックからステ
再生側に合わせて録音を始
める/止める
光デジタルケーブルを使ってつないだ
プレーヤーなどのデジタル機器から
CD
本機へデジタル録音するときに、録音も
とと本機のそれぞれを操作する手間を省
き、簡単に録音できます。また、録音も
との音源と、同じ位置に頭出しマーク
(曲番)が自動的につきます。
2)
1
SYNCHRO REC
にする。
シンクロ録音表示
(シンクロ録音)
プレーヤー
CD
など
REC
スイッチを「ON」
x
次ページへつづく
い
ろ
い
ろ
な
録
音
の
し
か
た
25
Page 26
「
2
」が表示されます。
SYNC
光デジタルケーブルが本機につながれ
ていないと「
ん。
の中央のボタンを押しながらつ
REC
まみを右にずらす。
録音一時停止になります。
」は表示されませ
SYNC
3録音もとの機器の再生を始める。
再生側の音が出ると、自動的に本機で
録音が始まります。
上書きをせずに録音する
録音するとき、上書きをせず、常に自動
的に録音済み部分の後ろに録音します。
ジョグレバー(左)
録音をやめるには
本機のxボタンを押します。
z
シンクロ録音中は、手動で一時停止するこ
•
とはできません。
シンクロ録音中に録音もとで約3秒の無音
•
が続くと、本機は自動的に録音一時停止に
なります。再び音を検知すると、シンクロ
録音に戻ります。録音一時停止状態が5分
以上続くと、自動的に録音が止まります。
長時間録音する場合は、「長時間録音する」
•
ページ)の手順1を行ってから、シンク
(
25
ロ録音の手順を行ってください。
ご注意
録音中は、
•
り換えないでください。正しく録音されな
いことがあります。
シンクロ録音中に録音もとで無音状態が続
•
いても、録音もとのノイズレベルが原因
で、自動的に録音一時停止にならない場合
があります。
•CDやMD
音もとの同一曲内で約
と、曲番が
•MIC(PLUG IN POWER
用したり、光デジタルケーブル以外のケー
ブルを使用した場合は、シンクロ録音でき
ません。
シンクロ録音中は、録音モードを切り換え
•
たり、録音レベルを調節することはできま
せん。
SYNCHRO REC
以外からのシンクロ録音中に、録
つ増えます。
1
秒の無音が続く
2
26
スイッチを切
)ジャックを使
1停止中にジョグレバー(左)を押す。
2ジョグレバー(左)を動かして
「
REC-Posi
バー(左)を押す。
」を点滅させ、ジョグレ
3ジョグレバー(左)を動かして、
「
From End
」を選ぶ。
4ジョグレバー(左)を押す。
設定を解除するには
手順3で「
ご注意
•
•
From Here
電源を切っても設定は解除されません。
再生一時停止状態から録音すると、一時停
止位置から録音が始まります。
」を選びます。
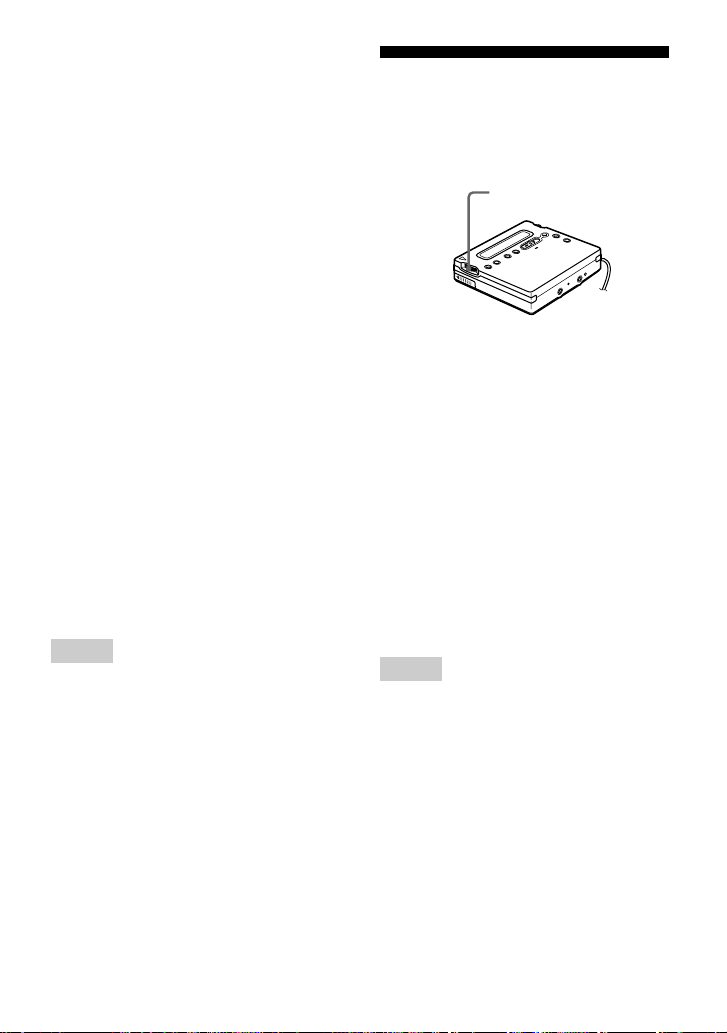
Page 27

マイクで録音する
別売りのステレオマイク
ECM-MS907、ECM-MS957
体につないで録音します。
入力は自動的にマイク入力に切り換わり
ます。
ジョグレバー
(左)
REC
ECM-717
などを本
ステレオマイク
マイク感度を変えるには
1 停止中にジョグレバー(左)を押す。
2 ジョグレバー(左)を動かして「
」を点滅させ、ジョグレバー(左)を
、
SENS
押す。
3 ジョグレバー(左)を動かして、「
」または「
HIGH
通常は「
ブ録音など、大音量を録音するときは
「
SENS LOW
4 ジョグレバーを押す。
SENS LOW
SENS HIGH
」を選びます。
」を選びます。ライ
MIC
SENS
」を選ぶ。
い
ろ
い
ろ
な
ご注意
光デジタルケーブルが
•
ックにつながっていると、マイク入力にな
りません。光デジタル入力、マイク入力、
アナログ入力の順に優先して自動的に選択
します。
本体の動作音を収音することがあります。
•
そのときは、マイクを本体から遠ざけて録
音してください。
LINE IN (OPT)
ジャ
録
音
の
し
か
た
MIC (PLUG IN
POWER)
へ
1録音用ミニディスクを入れ、録音を始
める。
つまみの中央のボタンを押しな
REC
がら右にずらします。その他の操作は
「録音する」(19ページ)をご覧くださ
い。
27
Page 28
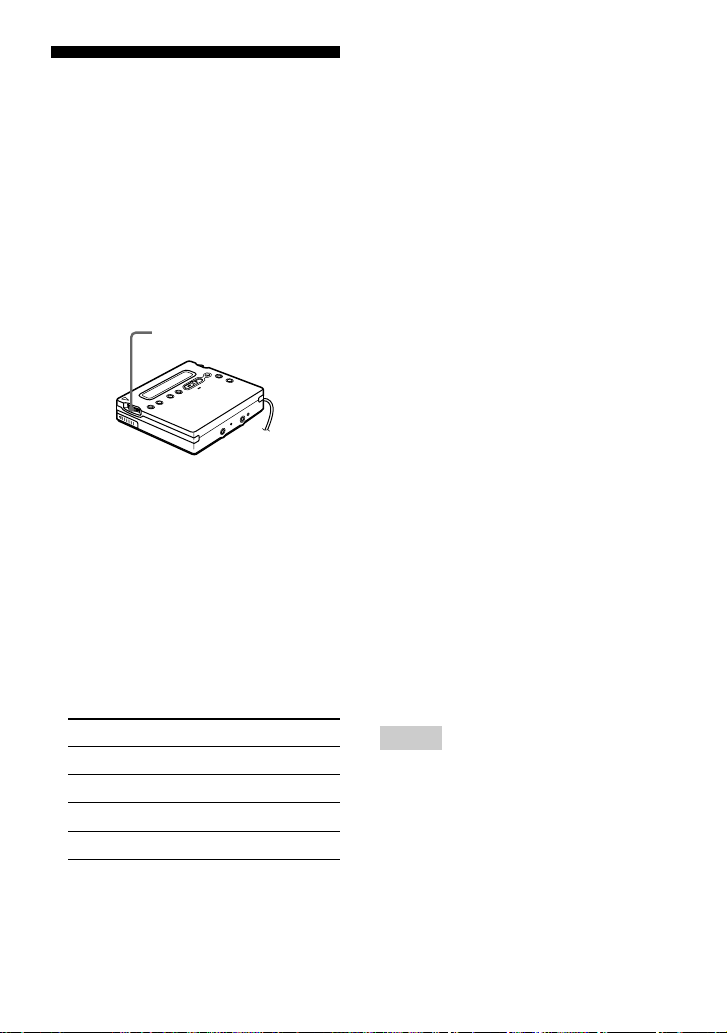
一定時間ごとに頭出しマー
クをつけながら録音する
(オートタイムトラックマーク)
長い録音をするときに、一定時間ごとに
頭出しマークを自動的につけて、途中に
区切りをつけることができます。
マイク録音、またはアナログ録音中にの
み設定することができます。
ジョグレバー(左)
1録音中または録音一時停止中にジョグ
レバー(左)を押す。
2ジョグレバー(左)を動かして
「
TIME MARK
レバー(左)を押す。
「
」が点滅します。
OFF
」を点滅させ、ジョグ
3ジョグレバー(左)を動かしてお好み
の時間を点滅させる。
表示 時間
OFF —
5min. ON
10min. ON
15min. ON
約5分
約10分
約15分
4ジョグレバー(左)を押す。
設定を解除するには
手順2で「
バー(左)を押します。または録音を停止
します。
録音中のオートタイムトラックマークの
付きかた
時間を設定したときに、録音の経過時間
が設定時間を越えていたときは、手順
の後から設定時間毎に頭出しマークがつ
きます。(例えば、録音の経過時間が8分
のときに5分毎で頭出しマークをつける
設定をすると、8分から数えて5分毎に頭
出しマークがつきます。)
時間を設定したときに、録音の経過時間
が設定時間内のときは、経過時間が設定
した時間に達したときから、設定時間毎
に頭出しマークがつきます。(例えば、録
音の経過時間が3分のときに5分毎で頭出
しマークをつける設定をすると、経過時
間が5分になったところから5分毎に頭出
しマークをつけます。)
」が点滅したら、ジョグレ
OFF
z
オートタイムトラックマークで頭出しマーク
をつけると、本体の表示窓では曲番の後ろに
」がつきます。リモコンの表示窓では、時
「
T
間表示の後ろに「
ご注意
録音の途中に
•
押したなどで、トラックマークがついてし
まったときは、その時点から設定した時間
ごとにオートタイムトラックマークが付き
はじめます。
録音を止めると、設定は解除されます。
•
」がつきます。
T
T MARK
ボタンやXボタンを
4
28
Page 29

REC +
<,
手動で録音レベルを
調節する
録音するときは、録音レベルは最適な値
になるように自動的に調整されますが、
必要に応じて手動で調整できます。
録音中は録音レベルの調節ができなくな
ります。必ず録音を始める前に行ってく
ださい。
ジョグレバー
(左)
1Xボタンを押しながら、
の中央のボタンを押しながら右にずら
す。
録音一時停止になります。
(マニュアル録音)
REC
X
つまみ
REC
2ジョグレバー(左)を押し、動かして
「
RecVolume
度押す。
」を点滅させ、もう一
3ジョグレバー(左)を動かして、
「
ManualREC
ManualREC
自動調節に戻すときは、手順2からや
り直してジョグレバー(左)を動か
し、「
Auto REC
します。
」を点滅させ、押す。
」を点滅させて、押
5表示窓を見ながらジョグレバー(左)
を動かして録音レベルを調節する。
録音レベルは、レベル表示のバーが、
左から5番目の付近で点灯するように
調節します。大きな音が入ったとき
に、レベル表示バーの左から9番目が
点灯するときは、録音レベルを下げて
ください。
音量小 音量大
番目9番目
5
6Xボタンを押して録音を始める。
手順5では録音は始まっていません。
他の機器とつないで録音するときは、
本機が録音を始めた後で、録音元の音
を最初から出し直してください。
z
xボタンを押して録音を止めると、次の録音
からは自動レベル調節に戻ります。
ご注意
録音中は手動で録音レベルの調節をするこ
•
とはできません。録音レベルの調節をする
ときは、Xボタンを押して録音一時停止に
してから手順
シンクロ録音中は、手動で録音レベルを調
•
節することはできません。
を行ってください。
5、6
い
ろ
い
ろ
な
録
音
の
し
か
た
4録音したい音を出す。
29
Page 30

A
B
残り時間や録音位置を調
べる
録音または停止中、表示窓で残り時間や
曲番などの情報を確認できます。
3ジョグレバー(左)を押す。
ジョグレバー(左)を押すと手順2で
選んだ情報が表示されます。
本体の表示窓
本体で操作する
ジョグレバー(左)
ランプ
REC
1ジョグレバー(左)を押し、動かして
「
DISPLAY
押す。
」を点滅させ、もう一度
2ジョグレバー(左)を動かして確認し
たい情報を点滅させ、押す。
本体のジョグレバー(左)を動かすたび
に、表示は次のように変わります。
LapTime
(経過時間)
m
RecRemain
(録音できる残り時間)
m
AllRemain
(再生できる全残り時間)
m
(現在時刻)
Clock
1)
停止中のみ表示されます。
<
1)
AB
曲番 経過時間
1)
曲番
残り曲数
年月日
1)
曲名が記録されているときは、「 」に続き曲
名が表示されます(停止中に
んだときのみ)。
2)
ディスク名が記録されているときは、「 」
に続きディスク名が表示されます(停止中に
AllRemain
3)
時計が合わせてあるときのみ表示されます
(
Clock
録音できる残り時間
2)
再生できる全残り曲数
3)
現在時刻
を選んだときのみ)。
を選んだときのみ)。
3)
RecRemain
z
リモコン表示は本体表示と異なります。リモ
コン表示については「リモコンで操作する」
ページ)をご覧ください。
(
31
録音状態を確認する
ランプが点灯または点滅して、録音
REC
の状態をお知らせします。
録音の状態 表示
録音中 点灯
録音一時停止 点滅
録音中ディスクが ゆっくり点滅
残り3分以下のとき
頭出しマーク
が追加されたとき
(曲番)
マイク録音中は音の
強弱に合わせて点滅
(ボイスミラー)
一瞬 消灯
を選
30
z
再生中の表示については、40ページの「残り
時間や再生位置を調べる」をご覧ください。
Page 31

リモコンで操作する
DISPLAY
1
DISPLAY
DISPLAY
は次のように変わります。
リモコンの表示窓
C D
表示C
録音中
曲番/経過時間
m
曲番/録音できる残り時間
m
—/
1)
時計が合わせてあるときのみ表示されます。
ボタンを押す。
ボタンを押すたびに、表示
D
/
現在時刻
1)
<
z
再生中の表示については、41ページの「残
•
り時間や再生位置を調べる」をご覧くださ
い。
本体表示はリモコン表示と異なります。本
•
体表示については
する」をご覧ください。
ページの「本体で操作
30
い
ろ
い
ろ
な
録
音
の
し
か
た
停止中
曲番/経過時間
<
m
曲番/曲名
1)
m
全曲数/ディスク名
1)
m
現在時刻
—/
1)
文字情報が記録されているときのみ表示されま
す。
2)
時計が合わせてあるときのみ表示されます。
2)
31
Page 32

録音日時を記録する
(時計合わせ)
時計を合わせておくと、録音の際に録音
日時が自動で記録されます。録音日時
は、一度時計を合わせると常に記録され
るようになります。録音日時を記録しな
いときは、この操作は不要です。
ジョグレバー(左)
X
1停止中に、ジョグレバー(左)を押
す。
2ジョグレバー(左)を動かして
「
CLOCK SET
西暦年の数字が点滅します。
00y 1m 1d
」を点滅させ、押す。
3ジョグレバー(左)を動かして年を合
わせ、押す。
月の数字が点滅します。
4手順
をくりかえして月、日、時、分
3
を合わせる。
分を合わせてジョグレバー(左)を押す
と、時計が0秒からスタートします。
途中で間違えたときは
xボタンを押し、もう一度手順2からやり
直してください。変更する必要のない数
字はジョグレバー(左)を押して先に進め
てください。
現在の日時を表示するには
停止中または録音中にジョグレバー
(左)を押し、動かして「
点滅させ、もう一度ジョグレバー(左)
を押します。ジョグレバー(左)を動か
して「
CLOCK
在の日時が表示されます。
」を点滅させ、押すと現
DISPLAY
」を
時計を24時間表示に変えるには
時計合わせ中にXボタンを押します。も
う一度押すと12時間表示に戻ります。
時計の設定を保つために
一度時計を合わせると、コンセントや充
電式電池、乾電池のいずれかの電源がつ
ないであれば、時計の設定は保たれま
す。ただし、いずれの電源もつないでい
ないと、約3分で時計の設定はお買い上
げ時の状態に戻ります。
充電式電池や乾電池の交換は3分以内で
行ってください。
ご注意
特に大切な録音で録音日時を記録したいとき
は、現在の日時を表示させ、時計が合ってい
ることを確認してください。
32
Page 33

の曲名などを記録しな
CD
がら録音する
(ジョイントテキスト機能)(CDテキ
スト接続ケーブル、CDテキスト対
応CDとジョイントテキスト対応
ウォークマンが必要)
CD
ジョイントテキスト機能対応のソニー製
ウォークマン(
CD
テキスト対応のCDを光デジタル入力
CD
で録音するときに、本機とCDウォーク
マンをさらにCDテキスト接続ケーブル
RK-TXT1
につなぐと、録音と同時にディスク名、
曲名などの情報をMDに記録できます。
CD
(
D-E990
(別売り)を使って下図のよう
ジョグレバー(左)
本機
i
/LINE OUT
i
/REMOTE
ウォークマン
など)
へ
D-E990
へ
RK-TXT1
(別売り)
など)から、
REC
x
LINE
IN(OPT)
LINE OUT
(OPTICAL)
へ
POC-15B
(別売り)
へ
など
1本機の
したまま右にずらして録音を始め、
CD
「
SYNC
し、「
あと、「
TEXT?
表示されます。
録音中の曲に曲名情報がないときは、
「
NO TEXT
曲名情報は記録されません。
つまみの中央のボタンを押
REC
ウォークマンの再生を始める。
」、「
CD TEXT
001
」と「
」、「 」が点灯
REC
」と数秒間表示された
(録音中の曲の曲番)
PushENTER
」と表示され、その曲の
」が交互に
2ジョグレバー(左)を押す。
曲名がスクロールして表示されたあ
と、曲名と「
表示されます。
PushENTER
」が交互に
3ジョグレバー(左)を押す。
曲名がMDに記録され、スクロールし
て表示されます。
4曲が変わるごとに、上記の手順
を繰り返して曲名を記録する。
2と3
5録音を終えたいところで本機のxボタ
ンを押す。
「 」が点灯し、「
「
PushENTER
す。
ディスク名情報を記録したくない場合
は、もう一度xボタンを押すと、ディ
スク名を記録せずに終了します。
ディスク名情報がないときは、「
」と表示され、終了します。
TEXT
000 TEXT?
」が交互に表示されま
」と
NO
6ジョグレバー(左)を押す。
ディスク名がスクロールして表示され
たあと、ディスク名と「
が交互に表示されます。
PushENTER
次ページへつづく
い
ろ
い
ろ
な
録
音
の
し
か
た
」
33
Page 34

7ジョグレバー(左)を押す。
「
TOC Edit
ィスク名がスクロールして表示されま
す。
」が点滅し、記録されたデ
ご注意
ジョイントテキスト機能は次のマークが記
•
載された機器にのみ対応しています。
z
によっては、手順1でディスク名、曲名が
CD
自動的に表示され、そのまま
情報を記録しながらの録音が始まることがあ
ります。その場合は録音が終ったら、または
録音を終えたいところで本機のxボタンを押
します。「
されたディスク名がスクロールして表示され
ます。
TOC Edit
」が点滅し、その後記録
テキストの
CD
ご注意
すでに名前が付いているディスクにディス
•
ク名情報を記録すると、ディスク名は上書
きされます。
ジョイントテキスト機能(CDの曲名などの
•
情報を記録しながら録音する機能)が働い
ているときは、様々な機能の設定や編集操
作ができなくなります。
z
録音中の音を聞くには、CDテキスト接続ケ
ーブル
RK-TXT1のMD
本機に付属のヘッドホンをつなぎ、本体の
VOL +/–
ボタンで音量を調節します。
録音モニター端子に、
ジョイントテキスト対応機種
D-E01、D-E990、D-E880
D-E770、D-F700(2000年9
ソフトは次のマークが記載された「
•CD
」対応のもののみ有効です。
TEXT
テキスト接続ケーブルは専用のケーブ
•CD
ル(
RK-TXT1
トテキスト機能対応機器以外にはつながな
いでください。
本機にCDテキスト接続ケーブル
•
をつないでいるときは、本機のリモコンか
らの操作はできません。また、リモコンの
表示窓に表示は出なくなります。
録音中にCDウォークマンを停止または再
•
生一時停止にすると、本機は自動的に録音
一時停止状態になります。録音を再開した
場所には頭出しマーク(曲番)が自動的に付
きます。
録音中の曲の曲名を記録する前にCDウォ
•
ークマンを停止または再生一時停止にする
と、その曲の曲名は
ん。
)を使用し、本機とジョイン
に記録されませ
MD
、
月現在)
RK-TXT1
CD
34
録音モニター端子
Page 35

いろいろな再生のしかた
AB
曲番や曲名を直接選ぶ
(ダイレクト選曲)
ジョグレバー(左)を使って簡単に聞きた
い曲を選ぶことができます。
ジョグレバー(左)
1ジョグレバー(左)を動かし、聞きた
い曲が表示されたらジョグレバー
(左)を押す。
動かして選択 押して確定
ジョグレバー(左)を動かすと本体の
表示窓に曲名が表示され、押すと選ん
だ曲の再生が始まります。
曲名が付いていないときは曲番のみが
表示されます。
z
シャッフル再生中に手順1を行うと、選んだ曲
からシャッフル再生が始まります。
曲順を変える
通常の再生のほか、1曲再生、シャッフ
ル再生、プログラム再生ができ、さらに
各再生状態のままくり返すことができま
す。
本体で操作する
ジョグレバー(左)
再生状態(再生モード)を選ぶ
1再生中または停止中にジョグレバー
(左)を押し、動かして「
」を点滅させ、もう一度押
MODE
す。
PLAY
2ジョグレバー(左)を動かして選択し
たい再生モードを点滅させ、押す。
ジョグレバー(左)を動かすたびに、表
示Aが次のように変わります。ジョグ
レバー(左)を押して確定すると、表示
Bが点灯します。 は選択された再生
状態をくり返して再生することを表し
ます。
本体の表示窓
い
ろ
い
ろ
な
再
生
の
し
か
た
ご注意
プログラム再生中に行なうと、通常の再生に
戻ります。
次ページへつづく
35
Page 36

表示A/B(再生状態)
Normal /—
m
AllRepeat/
m
1 Track/1
m
1 Repeat/
返して再生)
m
Shuffle/
べかえて再生)
m
Shuf. Rep/
同に並べかえて再生、さらにくり返し
並べかえて再生)
m
PGM/
えて再生)
m
PGMRepeat/
(曲を好きな順に並べかえてくり返して
再生)
(通常の再生)
(全曲をくり返し再生)
(再生中の1曲を再生)
(再生中の1曲をくり
1
(全曲を順不同に並
SHUF
SHUF
(曲を好きな順に並べか
PGM
PGM
(全曲を順不
<
好きな順に曲を並べかえる(プロ
グラム再生)
1「本体で操作する」の手順
「
」を表示させ、ジョグレバー
PGM
(左)を押す。
で
2
4手順
曲を選ぶ。
5ジョグレバー(左)を
プログラムが設定され、再生が始まり
ます。
をくり返して、好きな順に
2、3
秒以上押す。
2
z
再生が終わったとき、または途中で止めた
•
ときもプログラム設定は残っています。
全部で20曲までプログラムできます。
•
設定は、パーソナルディスクメモリーに登
•
録することができます(39ページ)。
ご注意
プログラムを設定してから、ディスクを出
•
し入れすると設定は解除されます。
停止状態での設定の途中、5分間何も操作
•
されなかったときは、そこまでの設定でプ
ログラムが確定します。
リモコンで操作する
リモコンの
ENT
できます。
PLAYMODE
PLAYMODE
ボタンを使っていろいろな聞き方が
ボタン、
RPT/ENT
RPT/
2ジョグレバー(左)を動かして曲を
選ぶ。
プログラムの順番
曲番
003<PGM01
3ジョグレバー(左)を押す。
選んだ曲が確定します。
36
回転つまみ
再生状態(再生モード)を選ぶ
1再生中または停止中に
ボタンを押す。
押すたびに表示は次のように変わりま
す。
PLAYMODE
Page 37

リモコンの表示窓
再生状態表示
表示(再生状態)
(通常の再生)
—
m
(再生中の1曲を再生)
1
m
(全曲を順不同に並べかえて
SHUF
再生)
m
(聞きたい曲を好きな順に
PGM
並べ変えて再生)
<
好きな順に曲を並べかえる(プログ
ラム再生)
1停止中、再生中、再生一時停止中に
「
」が表示されるまでリモコンの
PGM
PLAYMODE
す。
ボタンをくり返し押
2リモコンの回転つまみを.または
N>側に回して曲を選ぶ。
ご注意
プログラムを設定してから、ディスクを出
•
し入れすると設定は解除されます。
停止状態での設定の途中、5分間何も操作
•
されなかったときは、そこまでの設定でプ
ログラムが確定します。
くり返し再生する
1
RPT/ENT
が表示され、選択されている再生状
態でくり返し再生します。
ボタンを押す。
z
設定は、パーソナルディスクメモリーに登録
することができます(
ページ)。
39
音質を設定する
(デジタルサウンドプリセット)
再生中に、音質を2種類設定することが
できます。
RPT/ENT
SOUND
い
ろ
い
ろ
な
再
生
の
し
か
た
プログラムの順番
曲番
3リモコンの
曲を決定する。
4手順
を選ぶ。
5
RPT/ENT
設定した1曲めから再生が始まりま
す。
RPT/ENT
をくり返して好きな順に曲
2、3
ボタンを2秒以上押す。
ボタンを押し、
z
再生が終わったり、途中で止めてもプログ
•
ラムは残ります。
全部で20曲までプログラムできます。
•
1再生中、
押し、「
「
SOUND2
回転つまみ
SOUND
SOUND1
」を選ぶ。
ボタンをくり返し
」または
次ページへつづく
37
Page 38

2
SOUND
BASS
す。さらにもう一度
を2秒以上押すと、
ボタンを2秒以上押す。
(低音)の設定画面になりま
SOUND
TREBLE
ボタン
(高音)
の設定画面になります。
のときは「B」、
BASS
」と表示されます。
「
T
TREBLE
のときは
3回転つまみを.またはN>側に
くり返し回し、
TREBLE
例)
BASS
左から−4、−3…±0…+2、+3の8段階で設
定することができます。
BASS
画面で
と、
の強弱を設定する。
のとき
カーソルが動きます。(−
−4±0+
設定画面または
SOUND
BASSとTREBLEが、SOUND
ボタンを短く押すと、「
と「
SOUND2
設定中に、
すと、「
「
SOUND2
SOUND
SOUND1
」の設定画面が交互に切
り換わると同時に、
TREBLE
4
RPT/ENT
の設定が確定します。
ボタンを押す。
設定が登録され、再生表示に戻りま
す。
一定時間設定の操作をしないと再生表
示に戻り、設定は登録されます。
または
BASS
の位置)
2
3
TREBLE
設定
ボタンを2秒以上押す
SOUND1
」
」が切り換わります。
ボタンを短く押
」または
または
BASS
設定した音質を選ぶには
リモコンでは
•
「
•
「
「
お買い上げ時の設定は
•「SOUND1
ボタンをくり返し押して、
SOUND
SOUND1
示されない状態を選びます。
本体では
ジョグレバーを押し、動かして
SOUND1
SOUND OFF
レバーを押します。
」、「
SOUND2
」、「
SOUND2
」を選び、もう一度ジョグ
」のとき
」または何も表
」または
BASS:+1、TREBLE:±0
「
•
SOUND2
」のとき
BASS:+3、TREBLE:±0
z
設定は、パーソナルディスクメモリーに登
•
録することができます。
再生一時停止中でも設定することができま
•
す。
ご注意
本体の操作ボタンでは、設定できません。
•
•i/LINE OUT
定が、「
タルサウンドプリセットで設定した音質の
選択ができなくなります。そのときは、i
LINE OUT
てください(22ページ)。
デジタルサウンドプリセットを使っている
•
とき、設定によっては音量を上げすぎると
音が割れたり、ひずんだりすることがあり
ます。その場合は設定を変えるか、音量を
下げてください。
録音中にデジタルサウンドプリセットを切
•
りかえても、録音される音には影響はあり
ません。
出力(「
LINE OUT
の設定を「
AUDIO OUT
」になっていると、デジ
HeadPhone
」)の 設
/
」にし
38
Page 39

再生速度を変える
(スピードコントロール)
語学学習などで再生速度を変えたいとき
に便利です。速度は7種類から選ぶこと
ができます。
DISPLAY
1再生中に
押す。
回転つまみ
DISPLAY
ボタンを2秒以上
x
2回転つまみを.またはN>側に
回して「
SPEED
タンを押す。
再生速度の設定画面になります。
」を点滅させ、xボ
3回転つまみを.またはN>側に
回して再生速度を選ぶ。
音を聞きながら選んでください。
カーソルは現在の再生速度、+は再生
速度が
例)再生速度が元の速度の
−とカーソルが交互に点滅します。
100%
を表します。
95%
のとき
z
設定は、パーソナルディスクメモリーに登録
することができます(このページ)。
ご注意
本体の操作ボタンでは、設定できません。
•
再生速度の設定を変えると再生音も変わり
•
ます。
ディスクを出し入れすると、設定は
•
に戻ります。
100%
ディスクごとに設定を記
録する
(パーソナルディスクメモリー)
ディスクの設定情報を登録します。一度
登録したディスクを再度入れなおすと、
設定情報は自動的に呼び出されます。次
の設定情報が登録できます。
音量
•
再生モード
•
プログラム再生の曲順
•
音質(デジタルサウンドプリセット)
•
再生速度(スピードコントロール)
•
本体で操作する
ジョグレバー(左)
い
ろ
い
ろ
な
再
生
の
し
か
た
80% 100% 110%
80%から110%
することができます。
まで、5%ごとに7段階で設定
4xボタンを押す。
再生速度が設定されます。
以外を選んでいると「S」が点灯します。
100%
1停止中、再生中、再生一時停止中に、
ジョグレバー(左)を押す。
次ページへつづく
39
Page 40

2ジョグレバー(左)を動かして
「
PERSONAL
レバー(左)を押す。
「
Entry?
Entry?
」を点滅させ、ジョグ
」が点滅します。
3ジョグレバー(左)を押す。
「
Entry OK
スクの登録情報が登録されます。
リモコンで操作する
」と表示され、現在のディ
登録から削除するには
登録から削除したいディスクを入れ、内
容を確認します。手順2の後、本体では
ジョグレバー(左)を、リモコンでは回
転つまみを.またはN>側に回し
て「
ー(左 )(本体)またはxボタン(リモコ
ン)を押します。「
れ、ディスクの設定情報は登録から削除
されます。
登録していないディスクでこの操作を行
うと、「
す。
?」を点滅させ、ジョグレバ
Erase
Erase OK
No Entry!」が2
」と表示さ
秒間表示されま
DISPLAY
回転つまみ
1停止中、再生中、再生一時停止中に
DISPLAY
ボタンを2秒以上押す。
2回転つまみを.またはN>側に
回して「
xボタンを押す。
「
PERSONAL
」が点滅します。
Entry?
」を点滅させ、
3xボタンを押す。
「
Entry OK
スクの設定情報が登録されます。
40
」と表示され、現在のディ
ご注意
ディスク20枚分まで登録することができま
•
•
x
枚を越えると再生した時期が古い
すが、
20
ものから、自動的に消去されます。
一度登録したディスクを編集したり、録音
したりすると、別のディスクと認識され、
登録されている情報は無効になります。
残り時間や再生位置を調
べる
再生中に、表示窓で曲名・ディスク名な
どの情報を確認できます。
本体で操作する
ジョグレバー(左)
1再生中にジョグレバー(左)を押し、
動かして「
もう一度押す。
DISPLAY
」を点滅させ、
Page 41

2ジョグレバー(左)を動かして確認し
たい表示モードを点滅させ、押す。
ジョグレバー(左)を動かすたびに、
表示は次にように変わります。
LapTime
(経過時間)
<
m
1 Remain
(1曲中の残り時間)
m
AllRemain
(再生できる全残り時間)
m
RecDate
(録音日時)
3ジョグレバー(左)を押す。
ジョグレバー(左)を押すと、手順2
で選んだ情報が表示されます。
本体の表示窓
A
AB
曲番 経過時間
1)
曲番
2)
残り曲数
録音年月日
1)
2)
3)
3)
曲名が記録されているときは、「 」に続き曲
名が表示されます。
ディスク名が記録されているときは「 」に
続きディスク名が表示されます。
時計が合わせてあるときのみ表示されます。
z
リモコン表示は本体表示と異なります。リモ
コン表示については、このページの「リモコ
ンで操作する」をご覧ください。
B
曲中の残り時間
1
再生できる全残り時間
3)
録音時刻
リモコンで操作する
DISPLAY
1
DISPLAY
DISPLAY
は次のように変わります。
リモコンの表示窓
C D
表示C
曲番/経過時間
曲番/曲名
全曲数/ディスク名
—/
1)
文字情報が記録されているときのみ表示されま
す。
2)
時計が合わせてあるときのみ表示されます。
z
録音または停止中の表示については、30ペ
•
ージの「残り時間や録音位置を調べる」をご
覧ください。
本体表示はリモコン表示と異なります。本
•
体表示については
する」をご覧ください。
ボタンを押す。
ボタンを押すたびに、表示
D
/
m
1)
m
1)
m
録音した時刻
2)
ページの「本体で操作
40
<
い
ろ
い
ろ
な
再
生
の
し
か
た
41
Page 42

お手持ちのシステムで
聞く
(
LINE OUT
)
1ジョグレバー(左)を押し、動かして
「
AUDIO OUT
度押す。
」を点滅させ、もう一
本機の再生音を、他のオーディオ機器で
聞いたり録音したりすることができま
す。別売りの接続コード
は
RK-G136をi/LINE OUT
つなぎます。出力はアナログです。本機
はデジタル方式で再生しますが、つない
だ機器にはアナログ信号で送られます。
ポータブル
など
DAT
ステレオ
ミニジャック
RKG136
ジョグレバー
入力(
i
/LINE OUT
(左)
LINE IN
(赤)
R
RK-G129
ステレオ機器、
ラジカセなど
)へ
ピンジャック
へ
また
ジャックに
(白)
L
RKG129
2ジョグレバー(左)を動かして、
「
LINE OUT
バー(左)を押す。
ご注意
•i/LINE OUT
定が「
ュームやサウンドプリセットは働きませ
ん。
付属のリモコン付きヘッドホンをつないで
•
いるときは、i
」)の設定を「
OUT
ができません。
ヘッドホンを直接本体につなぐときは、i
•
LINE OUT
てください。
電源が切れると、i
•
(「
AUDIO OUT
「
HeadPhone
」を点滅させ、ジョグレ
出力(「
AUDIO OUT
LINE OUT
」になっていると、ボリ
/LINE OUT
LINE OUT
の設定を「
/LINE OUT
」)の設定は自動的に
」になります。
出力(「
」にすること
HeadPhone
出力
AUDIO
」)の 設
/
」にし
本機のi
の接続コードをつないでから次の操作を
行って、i
OUT
/LINE OUT
/LINE OUT
」)の設定をする必要があります。
ジャックに別売り
出力(「
42
AUDIO
Page 43

編集する
編集する前に
ミニディスクに頭出しマーク(曲番)をつ
けたり、曲名やディスク名をつけたりす
ることができます。ただし、再生専用ミ
ニディスクの編集はできません。次の点
にご注意ください。
ご注意
•「TOC Edit
たり電源を抜いたりしないでください。
誤消去防止つまみが開いているディスクで
•
は、編集ができません。つまみを閉めてく
ださい(
再生中に編集を行った後は、停止させてか
•
ら「
まで、電源を抜いたりしないでください。
編集を行った後、「
•
るまでは、ふたは開きません。
」表示の点滅中は、衝撃を与え
ページ)。
71
TOC Edit
」表示が数秒点滅して消える
TOC Edit
」表示が消え
曲を消す
曲を消す
1
一度消した曲は元に戻すことができませ
ん。消す前に、曲の内容をよく確認して
ください。
ジョグレバー(左)
x
1消したい曲の再生中にジョグレバー
(左)を押し、動かして「
滅させ、もう一度押す。
「 :
ト再生になります。
」が点滅し、1曲リピー
Name
EDIT
」を点
2ジョグレバー(左)を動かして
「 :
バー(左)を押す。
表示窓に「
「
PushENTER
す。消すのを中止するときは、xボタ
ンを押します。
」を点滅させ、ジョグレ
Erase
Erase OK?
」が交互に表示されま
」と
3もう一度ジョグレバー(左)を押す。
曲が消去され、次の曲の再生になりま
す。消した曲より後の曲番は1つずつ
くり上がります。
曲の一部分を消すには
無音部分など不要な部分だけを消したい
ときは、不要な部分の始まりと終わりに
頭出しマークをつけて(44ページ)、その
部分を消してください。
編
集
す
る
43
Page 44

全曲を消す
ディスク上の全ての曲を消します。
一度消したディスクは元に戻すことがで
きません。必ずディスクの内容を確認し
てから行ってください。
ジョグレバー(左)
x
1消したいディスクを再生し、ディスク
の内容を確認してから、xボタンを押
す。
頭出しマーク(曲番)をつ
ける
曲の途中に頭出しマークをつけて、そこ
から後ろを次の曲にすることができま
す。曲番は次のようになります。
1 3 42
マークをつける
231 4 5
曲番が1つ増える
2停止中に、ジョグレバー(左)を押
し、動かして「
もう一度押す。
「 :
Name
」を点滅させ、
EDIT
」が点滅します。
3ジョグレバー(左)を動かして、
「 :
レバー(左)を押す。
表示窓に「
「
PushENTER
す。消すのを中止するときは、xボタ
ンを押します。
」を点滅させ、ジョグ
Erase
AllErase?
」が交互に表示されま
」と
4ジョグレバー(左)をもう一度押す。
「
TOC Edit
去されます。消去が終わると
「
BLANKDISC
44
」表示が点滅し、全曲が消
」と表示されます。
T MARK
1再生中または再生一時停止中に、マー
クをつけたい位置で
を押す。
「
MARK ON
つ増えます。そこから次の曲として記
録されます。
録音中にマークをつけることもできま
す。
録音(シンクロ録音を除く)中にマークを
つけたい位置で
ください。また、オートタイムトラック
マークを使って、一定時間おきに頭出し
マークをつけることもできます(デジタ
ル録音中を除く)(28ページ)。
T MARK
」が表示され、曲番が1
T MARK
ボタン
ボタンを押して
Page 45

頭出しマーク(曲番)を消
す
アナログ入力(
録音したときは、静かな音が続く部分な
どに不要な頭出しマークがつくことがあ
ります。その場合は、頭出しマークを消
すと、前後の曲を1つの曲にまとめるこ
とができます。曲番は次のようになりま
す。
LINE IN
1 3 42
マークを消す
1 32
曲番が
)やマイク入力で
つ減る
1
X
ご注意
異なる録音モードで録音された曲の間
•
ステレオ録音された曲と
(
LP2
録音された曲の間など)の頭出しマークは
消すことができません。「
されます。
デジタル接続で録音された曲と、アナログ
•
接続で録音された曲の間の頭出しマークは
消すことができません。「
されます。
LP4
SORRY
SORRY
ステレオ
」が表示
」が表示
編
集
す
る
T MARK
ジョグレバー(右)
1曲番を消したい曲を再生し、Xボタン
を押して再生一時停止にする。
2ジョグレバー(右)を.側に回して
曲の先頭(
例えば、2曲目と3曲目をつなぎたい
ときは、3曲目の先頭にします。
「
MARK」が2
3「
」が表示されているときに、
MARK
T MARK
「
MARK OFF
た曲が前の曲につながります。
z
録音日時や曲名は、つないだ2曲の1曲目のも
のになります。
)にする。
00:00
秒間表示されます。
ボタンを押す。
」が表示され、指定し
45
Page 46

曲順を変える(ムーブ)
曲を移動して、曲順を変更できます。
例:C曲を2曲目に移動するとき
A C DB
曲目に
C曲を2
移動する
A B DC
本体で操作する
ジョグレバー(左)
x
1移動したい曲の再生中に、ジョグレバ
ー(左)を押し、動かして「
点滅させ、もう一度押す。
「 :
ト再生になります。
」が点滅し、1曲リピー
Name
EDIT
」を
2ジョグレバー(左)を動かして
「 :
上記の例では表示窓に
「
MV003 →003
」を点滅させ、押す。
Move
」と表示されます。
3ジョグレバー(左)を動かして、移動
先の曲番を指定する。
上記の例では表示窓に
「
MV003 →002
途中で中止するときはxボタンを押し
ます。
」と表示されます。
リモコンで操作する
DISPLAY
回転つまみ
1移動したい曲の再生中に、
ボタンを2秒以上押し、回転つまみを
.またはN>側に回して
「
」を点滅させ、xボタンを押
EDIT
す。
「 :
ト再生になります。
」が点滅し、1曲リピー
Name
x
DISPLAY
2回転つまみを.またはN>側に
回して、表示窓に「 :
示させる。
Move
」を表
3xボタンを押す。
上記の例では表示窓に「
と表示されます。
003 →003
4回転つまみを.またはN>側に
回して、移動先の曲番を指定する。
上記の例では表示窓に「
と表示されます。
途中で中止するときは
ンを2秒以上押したままにします。
003 →002
DISPLAY
ボタ
5xボタンを押す。
指定した曲の前に移動したい曲が移り
ます。
」
」
4ジョグレバー(左)を押す。
指定した曲の前に移動したい曲が移り
ます。
46
Page 47

曲名やディスク名を
つける
再生中は曲名、停止中はディスク名、録
音中は曲名・ディスク名をつけたり変え
たりことができます。曲名やディスク名
は、それぞれ
できます。
枚のディスクには、英数字/記号で約
1
文字、カナ文字のみで約
1700
力できます。
文字までつけることが
200
800
文字入
入力できる文字
カタカナ
•
アルファベットA〜Zの大文字、小文
•
字
•数字0〜9
記号 !
•
" # $ % & ( ) * . ;
= > ? @ _ `+ −
(スペース)
﹈
本体で操作する
END SEARCH
VOL +/–
ジョグレバー(左)
' , /
ジョグレバー
(右)
X
<
:
x
停止中にディスク名を入力する
1ディスクを入れる。
4ジョグレバー(左)を動かして文字を
選び、押して確定する。
確定すると、選んだ文字が点灯に変わ
り、次の文字位置でカーソルが点滅し
ます。
ジョグレバー(左)の他に使えるボタ
ンと機能は以下のとおりです。
ボタン 機能
X カナ→アルファベット→記
VOL +/–
ジョグレバー(右)
(./>)
END SEARCH/
+
VOL
END SEARCH/
VOL
–
x タイトルをつけるのを中止
1)
よく使う言葉が登録されていると(ネームバンク機
能)、一番最初に登録された言葉が表示されます
(50ページ)。
5手順
4
途中で中止するときはxボタンを押し
ます。
号と数字→よく使う言葉
の順に切り換わる。
文字カーソルを左右に移動
する。
アルファベットや記号・数
字入力時は>側へ回す
と、
文字ずつ変わる。
1
.側へ回すと戻る。カタ
カナ入力時に./>側
へ回して
「ア」y「カ」 y「サ」y
「タ」のように文字が選べ
る。
同時に押して記入位置に空
白を挿入し、一文字分の文
字を追加できる。
同時に押して記入位置の
文字を削除し、以降の文
字を一文字ずつつめる。
する。
を繰り返して名前をつける。
秒以上押すと
2
1)
編
集
す
る
2ジョグレバー(左)を押し、動かして
「
」を点滅させ、もう一度押す。
EDIT
「 :
」が点滅します。
Name
3ジョグレバー(左)を押す。
ディスク名の入力準備状態になりま
す。
6ジョグレバー(左)を
ままにする。
曲名またはディスク名がつきます。
秒以上押した
2
47
Page 48

再生中に曲名を入力する
1ディスクを入れて曲名をつけた
い曲を再生する。
2ジョグレバー(左)を押し、動かして
「
」を点滅させ、もう一度押す。
EDIT
「 :
」が点滅します。
Name
ご注意
録音中に曲名・ディスク名を入力している
•
ときに録音が終了したときや、曲名入力を
しているときに次の曲が始まったときは、
その時点の入力が自動的に確定します。
• LP2、LP4
「
LP:
で録音した曲は、自動的に
」が曲名の頭についています。
3ジョグレバー(左)を押す。
曲名の入力準備状態になります。
4「停止中にディスク名を入力する」
(47ページ)の手順4から6と同様の操
作をする。
録音中に曲名・ディスク名を入力す
る
1ジョグレバー(左)を押し、動かして
「
」を点滅させ、もう一度押す。
EDIT
「 :
2
曲名を入力するには
•
ジョグレバー(左)を押す。
ディスク名を入力するには
•
ジョグレバー(左)を動かして
「 :
す。
曲名またはディスク名の入力準備状態
になります。
」が点滅します。
Name
Name」
を点滅させ、押
3「停止中にディスク名を入力する」
(47ページ)の手順4から6と同様の操
作をする。
リモコンで操作する
DISPLAY
PLAYMODE
X
回転つまみ
停止中にディスク名を入力する
1ディスクを入れる。
すでに入っているディスクのディスク
名をつけるときは、xボタンを押して
停止します。
2
DISPLAY
転つまみを.またはN>側に回
して「
を押す。
「 :
ボタンを2秒以上押し、回
」を点滅させ、xボタン
EDIT
」が点滅します。
Name
3xボタンを押す。
ディスク名の入力準備状態になりま
す。
x
途中でやめるときは
xボタンを押します。
48
4回転つまみを.またはN>側に
回して、文字を選び、xボタンを押し
て確定する。
確定すると、選んだ文字が点灯に変わ
り、次の文字位置でカーソルが点滅し
ます。
Page 49

ボタン
X
回転つまみ
(
VOL +/–
回転つまみ
(./N>)
DISPLAY
PLAYMODE
1)
よく使う言葉が登録されていると(ネームバンク機
能)、一番最初に登録された言葉が表示されます
(52ページ)。
5手順
を繰り返して名前をつける。
4
途中で中止するときは、
タンを2秒以上押したままにします。
6xボタンを
る。
曲名またはディスク名がつきます。
機能
カナ→アルファベット→
記号と数字→よく使う言
1)
葉
の順に切り替わる。
回転つまみを引いて回す
と、文字カーソルを左右
)
に移動する。
アルファベットや記号・
数字入力時は回転つまみ
をN>側に回すと
字ずつ変わる。.側に
押すと戻る。カタカナ入
力時につまみを./
N>側に
と、「ア」y「カ」y
「サ」y「タ」の順に文字
が選べる。
秒以内で押すと、記入
2
位置に空白を挿入し、一
文字分の文字を追加でき
る。
秒以上押しつづける
2
と、ディスク名入力の操
作を中止する。
記入位置の文字を削除
し、以降の文字を一文字
ずつつめる。
秒以上押したままにす
2
秒以上押す
2
DISPLAY
再生中に曲名を入力する
1ディスクを入れて曲名をつけた
い曲を再生する。
2
DISPLAY
転つまみを.またはN>側に回
して「
文
1
を押す。
「 :
ボタンを2秒以上押し、回
」を点滅させ、xボタン
EDIT
」が点滅します。
Name
3xボタンを押す。
曲名の入力準備状態になります。
4「停止中にディスク名を入力する」
(48、このページ)の手順4から6と同
様の操作をする。
録音中に曲名・ディスク名を入力す
る
ボ
1録音中に
押し、回転つまみを.または
N>側に回して「
せ、xボタンを押す。
「 :
2
•
•
曲名またはディスク名の入力準備状態
になります。
DISPLAY
」が点滅します。
Name
曲名を入力するには
xボタンを押す。
ディスク名を入力するには
回転つまみを.またはN>側
に回して「 :
せ、xボタンを押す。
ボタンを2秒以上
」を点滅さ
EDIT
Name」
を点滅さ
編
集
す
る
3「停止中にディスク名を入力する」
(48、このページ) の手順4から6と同
様の操作をする。
49
Page 50

ご注意
録音中に曲名・ディスク名を入力している
•
ときに録音が終了したときや、録音中に曲
名入力をしているときに次の曲が始まった
ときは、その時点の入力が自動的に確定し
ます。
• LP2、LP4
「
LP:
途中でやめるときは
DISPLAY
します。
で録音した曲は、自動的に
」が曲名の前についています。
ボタンを2秒以上押したままに
名前を変えるには
手順1から3を行って、変更したい曲名ま
たはディスク名を表示させます。変更し
たい名前の上から新しい名前を入力し、
本体ではジョグレバー(左)を押す、リモ
コンではxボタンを2秒以上押します。
ご注意
カナで入力したタイトルを、カナ表示に対
•
応していないミニディスク機器で表示させ
ると、ローマ字表記になります。その際、
カナの先頭と最後に「^」がつきます。
市販のソフトや録音していないディスク
•
に、曲名やディスク名をつけたり、書き換
えたりすることはできません。
他の機器でつけた
•
ィスク名を、本機で書き換えることはでき
ません。
文字以上の曲名やデ
200
よく使う言葉を登録する
(ネームバンク機能)
曲名・ディスク名によく使う言葉を本体
内に登録することができます。タイトル
を入力中に、登録した言葉を呼び出すこ
とによって、曲名・ディスク名の入力を
簡単に行うことができます。登録のしか
たには、入力中の言葉をそのまま登録す
るやりかたと、
やりかたの2通りがあります。10文字程
度の文字数の言葉であれば、約40種類登
録できます(最大約
言葉の文字数の合計によって、登録でき
る言葉の数は異なります。
本体で操作する
入力中の言葉を登録する
1「曲名やディスク名をつける」(
ージ)の手順を行って名前をつける。
メニューで登録する
EDIT
文字)。登録する
600
VOL +/–
X
ジョグレバー(左)
47
ペ
50
2登録したい言葉を入力したら、Xボタ
ンを約2秒間押したままにする。
「
」と表示され、カーソルのあ
Entry!
る位置の直前までの言葉が登録されま
す。登録後は、そのまま名前をつける
操作を続けることもできます。
Page 51

z
すでに入力した曲名・ディスク名の言葉を
登録することもできます。
「名前を変えるには」(50ページ)の手順を行
って登録したい言葉が含まれている曲名また
はディスク名を表示させ、
押して登録したい言葉の直後にカーソルを移
動させ、Xボタンを約
登録します。
メニューで登録する
EDIT
VOL +/–
秒間押したままにして
2
ボタンを
1ジョグレバー(左)を押し、動かして
「
」を点滅させ、もう一度押す。
EDIT
2ジョグレバー(左)を動かして
「
Name Bank
」を点滅させ、押す。
3登録したい言葉を入力し、ジョグレバ
ー(左 )を約2秒間押したままにす
る。
「
登録した言葉を呼び出す
曲名・ディスク名を入力中に、登録され
た言葉を呼び出すことができます。
呼び出しかたには、登録済みの言葉を表
示して探すやりかたと、先頭の1文字で
検索するやりかたの二通りがあります。
言葉を表示して探す
」と表示され、入力した言葉
Entry!
が登録されます。
3ジョグレバー(左)を動かす。
ジョグレバー(左)を動かすたびに、
登録済みの言葉が順に1つずつ表示さ
れます。Xボタンを押すと、最初に登
録された言葉が表示されます。
4入力したい言葉を選び、ジョグレバー
(左)を押す。
選んだ言葉が確定します。
先頭の文字で検索する
1曲名・ディスク名の入力中に
VOL +/–
たい言葉の最初の1文字にカーソルを
置く。
ボタンを使って、呼び出し
2Xボタンを押して検索する。
該当する言葉が表示されます。該当す
る言葉が複数ある場合は、Xボタンを
押すと次の言葉が表示されます。
3入力したい言葉を選び、ジョグレバー
(左)を押す。
選んだ言葉が確定します。
登録した言葉を削除する
停止中に行います。
1ジョグレバー(左)を押し、動かして
「
」を点滅させ、もう一度押す。
EDIT
編
集
す
る
1「曲名やディスク名をつける」の手順
を行い、「 :
「 :
Name
レバー(左)を押す。
曲名またはディスク名の入力準備状態
になります。
」または
Name
」を点滅させ、ジョグ
2Xボタンを繰り返し押して最初に登録
した言葉を表示させる。
2ジョグレバー(左)を動かして
「
BankErase
」を点滅させ、押す。
3ジョグレバー(左)を動かして削除し
たい言葉を選び、押す。
「
れます。
言葉が登録されていない場合は、
「
」と表示され、言葉が削除さ
Erase!
」と表示されます。
EMPTY
51
Page 52

途中でやめるときは
xボタンを押します。
リモコンで操作する
DISPLAY
回転つまみ
入力中の言葉を登録する
メニューで登録する
EDIT
1
DISPLAY
つまみを.またはN>側に回し
て「
押す。
X
\
2回転つまみを.またはN>側に
回して「
xボタンを押す。
ボタンを2秒間押し、回転
」を点滅させ、xボタンを
EDIT
Name Bank
」を点滅させ、
3登録したい言葉を入力し、xボタンを
x
約2秒間押したままにする。
「
」と表示され、入力した言葉
Entry!
が登録されます。
1「曲名やディスク名をつける」の「リ
モコンで操作する」(48ページ)の手
順を行って名前をつける。
2登録したい言葉を入力し、Xボタンを
約2秒間押したままにする。
「
z
すでに入力した曲名・ディスク名の言葉を
登録することもできます。
「名前を変えるには」(50ページ)の手順を行
って登録したい言葉が含まれている曲名また
はディスク名を表示させ、回転つまみを引い
て動かして登録したい言葉の直後にカーソル
を移動させ、Xボタンを約
して登録します。
52
」と表示され、カーソルのあ
Entry!
る位置の直前までの言葉が登録されま
す。登録後は、そのまま名前をつける
操作を続けることもできます。
秒間押したままに
2
登録した言葉を呼び出す
言葉を表示して探す
1「曲名やディスク名をつける」の「リ
モコンで操作する」の手順を行い、
「 :
Name
す。
曲名またはディスク名の入力準備状態
になります。
」または「 :
Name
」を点滅させ、xボタンを押
2Xボタンを繰り返し押して、最初に登
録した文字を表示させる。
3回転つまみを.またはN>側に
繰り返し回す。
つまみを.またはN>側に回す
たびに、登録済みの言葉が順に1つず
つ表示されます。Xボタンを押すと、
最初に登録された言葉が表示されま
す。
4入力したい言葉を選び、xボタンを押
す。
選んだ言葉が確定します。
Page 53

先頭の文字で検索する
1曲名・ディスク名の入力中に回転つま
みを引いて
出したい言葉の最初の1文字にカーソ
ルを置く。
VOL+/–
側に回して、呼び
2Xボタンを押して検索する。
該当する言葉が表示されます。該当す
る言葉が複数ある場合は、Xボタンを
押すと次の言葉が表示されます。
3入力したい言葉を選び、xボタンを押
す。
選んだ言葉が確定します。
登録した言葉を削除する
停止中に行います。
1
DISPLAY
「
EDIT
す。
ボタンを2秒以上押し、
」を点滅させ、xボタンを押
2回転つまみを.またはN>側に
繰り返し回して「
滅させ、xボタンを押す。
BankErase
」を点
3回転つまみを.またはN>側に
繰り返し回して削除したい言葉を選
び、xボタンを押す。
「
「
途中でやめるときは
DISPLAY
します。
」と表示され、言葉が削除さ
Erase!
れます。
言葉が登録されていない場合は、
」と表示されます。
EMPTY
ボタンを2秒以上押したままに
編
集
す
る
53
Page 54

その他の機能
MELODY:2
アラームを鳴らす
(メロディタイマー)
電車などで乗り越しを防いだりするのに
便利です。アラームが鳴るまでの時間は
分から99分の間で設定することができ
1
ます。
本体で操作する
ジョグレバー(左)
1停止中、再生中、再生一時停止中にジ
ョグレバー(左)を押す。
2ジョグレバー(左)を動かして「
」を点滅させ、ジョグレバー
TIMER
(左)を押す。
3ジョグレバー(左)を動かして「
を点滅させ、ジョグレバー(左)を押
す。
,が点灯し、アラームが鳴るまでの時
間を設定できるようになります。
M-
ON
4ジョグレバー(左)を動かして、アラ
ームが鳴るまでの時間を選ぶ。
5ジョグレバー(左)を押す。
時間が確定し、アラームの種類を設定
できるようになります。
6ジョグレバー(左)を動かして、アラ
ームの種類を選ぶ。
アラームの種類は次の3種類から選ぶ
ことができます。
表示 アラームの種類
MELODY : 1
MELODY : 2
MELODY : 3
メロディ(天国と地獄)
メロディ(四季)
ビープ音
7ジョグレバー(左)を押す。
メロディタイマーが設定されます。
停止中はアラームが鳴るまでの時間が
表示されます。
再生中は手順3までをもう一度行うと
アラームが鳴るまでの時間が表示され
ます。
」
途中で止めるには
xボタンを押します。
リモコンで操作する
DISPLAY
TIME:01
ジョグレバー(左)を動かすたび、
「
TIME:01
ら99分)までが表示され、1分刻みで
設定することができます。
54
」から「
TIME:99」(1
分か
回転つまみ
1停止中、再生中、再生一時停止中に
DISPLAY
ボタンを2秒以上押す。
x
Page 55

2回転つまみを.またはN>側に
回して「
M-TIMER
ボタンを押す。
」を点滅させ、x
3回転つまみを.またはN>側に
回して「ON」を点滅させ、xボタン
を押す。
,が点灯し、アラームが鳴るまでの時
間を設定できるようになります。
4回転つまみを.またはN>側に
くり返し回してアラームが鳴るまでの
時間を選ぶ。
回転つまみを回すたび、「
から「
TIME:99」(1
でが表示され、1分刻みで設定するこ
とができます。
TIME:01
分から99分)ま
5xボタンを押す。
時間が確定し、アラームの種類を設定
できるようになります。
6回転つまみを.またはN>側に
回して、アラームの種類を選ぶ。
アラームの種類は次の3種類から選ぶ
ことができます。
表示 アラームの種類
MELODY : 1
MELODY : 2
MELODY : 3
メロディ(天国と地獄)
メロディ(四季)
ビープ音
7xボタンを押す。
メロディタイマーが設定されます。
停止中はアラームが鳴るまでの時間が
表示されます。
再生中は手順3までをもう一度行うと
アラームが鳴るまでの時間が表示され
ます。
途中で止めるには
DISPLAY
予約を解除するには
手順3で「
レバー(左)を、リモコンではxボタンを
押します。
」
アラームを止めるには
いずれかのボタンを押します。ボタンを
押すと、アラームは止まりますが、その
ボタン本来の機能は働きません。
z
•手順3
•
ご注意
•
•手順3で「ON
ボタンを2秒以上押します。
」を選び、本体ではジョグ
OFF
で操作を終了すると前回の設定でア
ラームが設定されます。
アラームは1分間鳴り、その後は設定が解
除されます。停止中にアラームが鳴り終わ
ると、約
アラームが鳴り終わると、そのまま再生が
続きます。
録音を開始すると、設定は解除されます。
はカウントを始めます。また、手順
ラームが鳴るまでの時間を変更した時点
で、カウントをやり直します。
秒で電源が切れます。再生中に
10
」を選んだ時点で、タイマー
4
そ
の
他
の
機
能
でア
55
Page 56

音もれを抑え耳にやさし
い音にする
(音量リミット
音量の上げすぎによる音もれや、耳への
圧迫感、周囲の音が聞こえないことへの
危険を少なくし、より快適な音量で聞く
ことができます。
— AVLS
ジョグレバー (左)
)
1ジョグレバー(左)を押し、動かして
「
」を点滅させ、もう一度押す。
AVLS
2ジョグレバー(左)を動かして
「
AVLS ON
音量を一定のレベル以上に上げようと
すると、表示窓に「
し、それ以上音量が上がらなくなりま
す。
設定を解除するには
手順2で「
グレバー(左)を押します。
」を点滅させ、押す。
AVLS
AVLS OFF
」を点滅させてジョ
」が点滅
誤操作を防ぐ(ホールド)
カバンに入れて使うときなどに、誤って
ボタンが押されて動作するのを防ぎま
す。
1
HOLD
す。
本体の
ボタンが、リモコンの
チはリモコンの操作ボタンが働かなく
なります。
設定を解除するには
スイッチを矢印と逆の方向にずら
HOLD
します。
HOLD
HOLD
スイッチを.方向にずら
スイッチは本体の操作
HOLD
スイッ
HOLD
56
Page 57

リモコンの確認音を消す
リモコンの確認音を消すことができま
す。
ジョグレバー (左)
1ジョグレバー(左)を押す。
2ジョグレバー(左)を動かして
「
(左)を押す。
」を点滅させ、ジョグレバー
BEEP
3ジョグレバー(左)を動かして
「
BEEP OFF
バー(左)を押す。
設定を解除するには
手順3で「
ョグレバー(左)を押します。
」を点滅させ、ジョグレ
BEEP ON
」を点滅させて、ジ
そ
の
他
の
機
能
57
Page 58

電源について
家庭用電源(コンセント)以外に本機で使
える電源は、以下の通りです。
本体に入れて
−充電式ニッケル水素電池
NH-14WM
バッテリーケースを使って
−単3形アルカリ乾電池
録音などで長時間お使いになるときは、
家庭用電源(コンセント)につなぐことを
おすすめします。
電池の持続時間
長時間録音するときは、家庭用電源(コ
ンセント)につないで使うことをおすす
めします。
3)
録音
使用電池 ステレオ
充電式
ニッケル
水素電池
NH-14WM
アルカリ
5)
乾電池
充電式
ニッケル
4)
水素電池
+アルカ
5)
リ乾電池
…
…
1)
(JEITA2))
LP2
ステレオ
約8時間 約
4)
約7時間 約10時間 約14時間
約19時間 約26時間 約30時間
10.5
時間
LP4
ステレオ
約
13
時間
再生
使用電池
充電式
ニッケル
水素電池
NH-14WM
アルカリ
乾電池
充電式
ニッケル
水素電池
+アルカ
リ乾電池
1)
電池持続時間は周囲の温度や使用状態、電池の種
類により、短くなる場合があります。
2)
JEITA
です。
3)
録音する場合には電池の消耗による失敗を防ぐた
め、新しい乾電池または充分に充電した充電式電
池をお使いください。
4)
100
5)
日本製ソニースタミナアルカリ乾電池
測定しています。
ステレオ
約21時間 約23時間 約26時間
4)
約30時間 約35時間 約38時間
5)
約53時間 約60時間 約66時間
4)
5)
(電子情報技術産業協会)規格による測定値
%充電時。
LP2
ステレオ
LP4
ステレオ
LR6(SG)
で
電池交換の目安について
電池が消耗すると、本体やリモコンの表
示窓にrが点滅したりまたは「
」が点滅します。新しい電池と交換
BATT
するか、充電しなおしてください。
電池残量表示は実際の残量ではなく、あ
くまでも目安として表示しています。動
作状況により増減します。
ご注意
電池を交換するときは、本体を停止してから
交換してください。
LOW
58
Page 59

その他
使用上のご注意
分解しないでください
ミニディスクレコーダーに使われているレー
ザーが目にあたると危険です。
レンズに触れないでください
レンズが汚れると音飛びが起きたり、再生で
きなくなったりする場合があります。
また、ほこりがつかないように、ディスクの
出し入れ以外はふたを必ず閉じておいてくだ
さい。
取り扱いについて
落としたり、強いショックを与えたりしな
•
いでください。故障の原因になります。
リモコンやヘッドホンのコードを強く引っ
•
ぱらないでください。
次のような場所には置かないでください。
•
温度が非常に高いところ(60℃以上)。
—
直射日光のあたる場所や暖房機具の近
—
く。
窓を閉めきった自動車内(特に夏期)。
—
風呂場など湿気の多いところ。
—
磁石、スピーカー、テレビなど磁気を
—
帯びたものの近く。
ほこりの多いところ。
—
温度が高いところ(40℃以上)や低いとこ
•
℃以下)では液晶表示が見にくくなっ
ろ(
0
たり、表示の変わりかたがゆっくりになる
ことがあります。常温に戻れば元に戻りま
す。
キャリングポーチには本体と一緒に硬いも
•
のを入れないでください。塗装のはげや傷
の原因になります。
パワーアダプターについて
AC
本機には、付属のACパワーアダプター(極性
統一形プラグ・
い。上記以外の
ると、故障の原因になることがあります。
規格)をご使用くださ
JEITA
パワーアダプターを使用す
AC
温度上昇について
本機を長時間お使いになったときや充電中
は、本体の温度が上昇することがあります
が、故障ではありません。
動作音について
本機は省電力の動作方式になっています。そ
のため、動作中は断続的に動作音がしますが
故障ではありません。
ミニディスクの取り扱いについて
ミニディスク自体はカートリッジに収納さ
•
れ、ゴミや指紋を気にせず手軽に扱えるよ
うになっています。ただし、カートリッジ
のよごれや反りなどが誤動作の原因になる
こともあります。いつまでも美しい音で楽
しめるように次のことにご注意ください。
ミニディスクに直接触れない
—
シャッターを手で開けないでくださ
い。無理に開けるとこわれます。
シャッター カートリッジ
持ち運ぶときや保管するときはケース
—
に入れる。
置き場所について
—
直射日光があたるところなど温度の高
いところや湿度の高いところには置か
ないでください。また、砂浜など、デ
ィスクに砂が入る可能性があるところ
には放置しないでください。
定期的にお手入れを
—
カートリッジ表面についたほこりやゴ
ミを、乾いた布でふきとってくださ
い。
ディスクに付属のラベルは所定以外の位置
•
に貼らないでください。必ず、ラベル用の
くぼみに合わせて貼ってください。
そ
の
他
極性統一形プラグ
59
Page 60

お手入れについて
表面のお手入れ
水やぬるま湯を少し含ませた柔らかい布で軽
くふいたあと、からぶきします。シンナー、
ベンジン、アルコールなどは表面をいためま
すので使わないでください。
ヘッドホンおよびリモコンプラグのお手入
れ
プラグが汚れていると雑音や音切れの原因に
なることがあります。常によい音でお聞きい
ただくために、プラグ部をときどき柔らかい
布でからぶきしてください。
ヘッドホンについて
付属のヘッドホンをご使用中、肌に合わな
•
いと感じたときは早めに使用を中止して医
師またはお客様ご相談センターに相談して
ください。
付属のヘッドホンは、音量を上げすぎると
•
音が外にもれます。音量を上げすぎてまわ
りの人に迷惑に
しょう。
雑音の多いところでは音量を上げてしまい
がちですが、ヘッドホンで聞くときはいつ
も呼びかけられて返事ができるくらいの音
量を目安にしてください。
いように気をつけま
*轤»
リモコンについて
付属のリモコンは本機専用です。また、他機
種に付属のリモコンで、本機の操作はできま
せん。
充電式電池について
ニッケル水素電池は、リサイクルできます。
不要になったニッケル水素電池は、金属部に
セロハンテープなどの絶縁テープを貼って充
電式電池リサイクル協力店へお持ちくださ
い。
充電式電池の収集・リサイクルおよびリサイ
クル協力店に関する問い合わせ先
社団法人電池工業会
TEL: 03-3434-0261
ホームページ
: http://www.baj.or.jp
:
万一故障した場合は、内部を開けずに、お買
い上げ店またはソニーのサービス窓口にご相
談ください。(ディスクが本体に入っていると
きに故障した場合は、故障原因の早期解決の
ため、ディスクを入れたままご相談されるこ
とをおすすめします。)
60
Page 61

故障かな?と思ったら
サービス窓口にご相談になる前にもう一度チェックしてみてください。ご不明な点があ
るときは裏表紙に記載されているテクニカルインフォメーションセンターへお問い合わ
せください。
症状 原因 処置
ふたが開かない
操作を受けつけない
通常の再生ができない
ディスクの1曲目から
再生しない
録音・編集中に電源をはずしたり
電池が消耗している。
ホールド機能が働いている
(本体の操作ボタンを押すと
「
」表示が出る)。
HOLD
結露(内部に水滴が付着)してい
る。
パワーアダプターがしっかり
AC
差し込まれていない。
充電池または乾電池が消耗してい
る( 「
LOW BATT
たは何も表示しない)。
乾電池が正しく入れられていな
い。
何も録音されていないディスクが
入っている(「
示が出る)(録音・編集のとき)。
表示窓のディスク表示が早く回転
しているときは操作を受け付けな
い。
使用中、衝撃や過大な静電気、落
雷による電源電圧の異常などのた
めに強いノイズを受けている。
損傷しているディスク、または録
音や編集の内容などの情報が正し
く入力されていないディスクが
入っている。
リピート再生を指定している。
再生モードを変えた
前回再生したときディスクの途中
で止めた。
パーソナルディスクメモリーに登
録した。
」表示が点滅ま
BLANK DISC
電源を入れ直し、消耗した電池は新し
いものと交換する。
スイッチを矢印と逆の方向に
HOLD
してホールド機能を解除する(
ページ)。
56
ディスクを取り出して、そのまま数時
間おく。
DC IN 3V
しっかり差し込む。
充電池を充電するか、乾電池を交換す
る(
乾電池のe端子とE端子を正しく
入れなおす(
他のディスクと取り換える。
」表
ディスク表示がゆっくり回転してから
次の操作をする。
次の手順で操作しなおす。
1
2 約30
3
ディスクを入れなおす。録音しなお
す。それでも表示されるときは、他の
ディスクと取りかえる。
本体ではジョグレバー(左)を使っ
て、リモコンでは
押して、
から再生を始める(
本体ではジョグレバー(左)を使って
(リモコンでは
押して)通常の再生に戻してから再生
を始める。
1
バー(左)を動かす、リモコンでは回
転つまみを.
か、
位置をディスクの最初に戻す。
パーソナルディスクメモリーから削除
する。
ジャックとコンセントに
ページ)。
16、17
17
すべての電源をはずす。
秒間そのままにする。
電源をつなぐ。
(リピート)表示を消して
PLAYMODE
曲目に戻るまで本体ではジョグレ
度ふたを開けて、再生を始める
1
ページ)。
36、37
ボタンを
ページ)。
ボタンを
RPT/ENT
側に繰り返し回す
17
、
そ
の
他
61
Page 62

症状 原因 処置
再生中に音がとぎれる
雑音が多い
充電ができない
録音・編集できない
頭出しマークのある
位置を頭出しできない
ヘッドホンから音が
出ない
ヘッドホンからの音に
雑音が入る
時計が正確に動かない
振動の多い場所に置いている。
ナレーションやイントロなど
の録音時間が極端に短い。
テレビなど強い磁気を帯びたもの
の近くに置いている。
パワーアダプターが正しくつ
AC
ながれていない。
音源と正しくつながれていない。
ポータブル
ジタル出力が出ていない。
抵抗入りの接続コードを使ってい
る(アナログ録音時)。
ディスクの誤消去防止つまみが開
いている(「
が出る)。
録音レベルが小さすぎる(手動調
節時)。
再生専用ディスクが入っている
(「
P/B ONLY
ディスクの残り時間が
秒または48秒)以下である
(「
DISC FULL
ページ)。
録音、または編集中に電源が抜か
れた、または停電になった。
ジョグレバー(右)を.または
>
た。
リモコン付きヘッドホンがしっか
り差し込まれていない。
音量が小さすぎる。
リモコンプラグが汚れている。
i
/LINE OUT
OUT
になっている。
分以上、本体から電源が外れて
3
いたため、お買い上げ時の設定に
戻ってしまった。月に
誤差が生じることがある(
ジ)。
プレーヤーからデ
CD
PROTECTED
」表示が出る)。
」表示
12秒(24
」表示が出る)(
側に動かしてから一時停止し
出力(「
」)の設定が、「
AUDIO
LINE OUT
分程度の
2
32
1
ペー
振動の少ない場所で使う。
曲
—
テレビなどから離して置く。
正しくつなぎなおす(
つなぎなおす(
ポータブルCDプレーヤーを家庭用電
源につなぎ、音飛びガード機能(
など)を「切」にする。
抵抗が入っていない接続コードを使
う。
つまみを戻す。
一時停止状態にして、ジョグレバー
(左)で録音レベルを調節する(
ページ)。
録音用ディスクと取り換える。
他の録音用ディスクと取り換える。
64
それまでの録音の内容は消えているの
で、初めから録音しなおす。
X
ジョグレバー(左)または(右)を動
かして頭出しする。
i
し込む。
リモコン本体にヘッドホンプラグを
しっかり差し込む。
VOL +/
ジョグレバー(左)を使って「
OFF
リモコンプラグをからぶきする。
i
」
の設定を、「
AC
つないで充電し、時計を合わせる。
ページ)。
16
ページ)。
19、24
ボタンを押して一時停止してから
/LINE OUT
/LINE OUT
パワーアダプターをコンセントに
ジャックにしっかり差
−ボタンで音量を調節する。
」を選択する(56ページ)。
出力(「
AUDIO OUT
HeadPhone
」にする。
AVLS
ESP
29
」)
62
Page 63

症状 原因 処置
時計表示が出ない
(
録音日時が記録されない
CD
されない
音量が調節できない、
またはデジタルサウンド
プリセットが働かない。
他機種で編集ができない
録音時、瞬間的なノイズが
発生する
になる)または
--y--m--d
テキストの文字が記録
時計合わせをしていない。またはお
買い上げ時の設定に戻ってしまっ
た。
光デジタルケーブルがつながれてい
ない。
テキスト対応のCDウォークマン
CD
(
など)とつながれていな
D-E990
い。
テキスト対応のCDを入れていな
CD
い。
i
/LINE OUT
OUT
なっている。
ステレオ長時間録音モードに対応し
ていない。
LP4
特性上、録音元の音源によっては、
ごくまれに瞬間的なノイズが発生す
る。
出力(「
」)の設定が「
ステレオ録音では、圧縮方式の
AUDIO
LINE OUT
時計を合わせる(32ページ)。
光デジタルケーブルをつなぐ(
ジ)。
CD
(
ジ)。
CD
i
の設定を「
」に
ページ)。または、リモコン付きヘッ
ドホンをつなぐ。
本機、または他のステレオ長時間録音
モードに対応している機器で編集す
る。
ステレオ録音または
を行う。
テキスト対応のCDウォークマン
など)とつなぐ(33ペー
D-E990
テキスト対応のCDを入れる。
/LINE OUT
出力(「
HeadPhone
AUDIO OUT
LP2
」にする(
ステレオ録音
19
ペー
22
」)
そ
の
他
63
Page 64

システム上の制約による症状と原因
ミニディスクシステムでは、従来のカセットや
とは異なる方式で録音が行われま
DAT
す。そのため、いくつかのシステム上の制約があり、次のような症状が出る場合があり
ます。これらは、故障ではありませんので、あらかじめご了承ください。
症状
最大録音可能時間
分、80分)に達していなくて
も、「
TR FULL
曲数も録音時間も余裕がある
のに、「
TR FULL
て、録音が止まる。
頭出しマーク(曲番)が消せな
い。
曲を消しても、ディスクの録
音できる残り時間が増えな
い。
ディスクに録音した時間と残
り時間の合計が、最大録音可
能時間
(60分、74分、80分)
一致しない。
編集した曲を再生しながら早
送り、早戻しすると、音がと
ぎれる。
(60分、74
」表示が出る。
」表示が出
に
原因
曲録音されるとそれ以上の録音はできません。
254
さらに曲を追加するには、不要な曲を消して録音してくださ
い。
同じディスクで録音、消去をくりかえすと、
連続して記録されず、空いているところに分割して記録され
ることがあります。ミニディスクは、このような場合でも離
れたデータをすばやく探し出し、順に再生します。ただし、
分割したそれぞれのデータは曲の区切り(
になり、全部で
さらに曲を追加するには、不要な曲を消して録音してくださ
い。
つなごうとする曲のデータがディスク上に分散し、それぞれ
のデータの長さが12秒以下のとき、その曲の頭出しマーク
(曲番)を消して前の曲とつなぐことはできません。また、
ステレオ録音した曲とモノラル録音した曲、デジタル接続で
録音した曲とアナログ接続で録音した曲もつなぐことはでき
ません。
ディスクの録音できる残り時間を表示するとき、12秒以下
(ステレオ録音時)、
録音時)、または
無視します。このため、短い曲を何曲消しても録音できる残
り時間が増えないことがあります。
通常、録音はステレオ録音時で約
たはモノラル録音時で約
を最小単位としてディスクに記録します。録音を止めたとこ
ろでは、記録の最後の部分が実際には
に満たない場合でも約
使います。
また、録音を止めた後再び録音を始めるときには、録音を始
めたところで約
記録を始めます。これは、録音を始めるときに誤って前の曲
を消さないためです。このため、実際に録音できる時間は録
音を止めるたびに、最大録音可能時間よりも最大で
秒または24秒)短くなります。
再生しながら早送り、早戻しするときは通常より高速で再生
するため、短い曲がディスク上のいろいろなところに点在し
ていると、探すのに時間がかかり、音がとぎれることがあり
ます。
曲になると、録音できなくなります。
254
24
秒以下(
48
秒以下(
ステレオ録音、モノラル
LP2
ステレオ録音時)の部分は
LP4
2秒、LP2
4秒、LP4
2秒(4
秒または8秒)分のスペースを空けて
2秒(4
ステレオ録音時で約8秒
秒または8秒)分のスペースを
1
曲)と同じ扱い
1
ステレオ録音ま
秒または8秒)
2秒(4
曲のデータが
64
6秒(12
Page 65

メッセージ一覧
本体の表示窓にエラー表示が出たら、下の表にしたがってチェックしてみてください。
表示 意味 対策
BLANK DISC
DISC ERR
DISC FULL
Data Save
TOC Edit
BUSY
NAME FULL
Hi DC in
HOLD
LOW BATT
MEM OVER
NO COPY
NO DISC
NO SIGNAL
何も録音されていないディスク
が入っている(再生・編集時)。
損傷しているディスク、録音や
編集の内容などの情報が正しく
入っていないディスクが入って
いる。
ディスクの残り時間が
秒または48秒)以下である(録
音時)(
録音した情報(音声)をディス
クに記録している。
録音した情報(曲の開始・終了
位置など)をディスクに記録し
ている(70ページ)。
録音または編集の内容の処理を
している。
曲名やディスク名を
越えて入力しようとした。
再生・停止中に曲名やディスク
名を
ようとした。
電源電圧が高い
ワーアダプターまたはカーバッ
テリーコードを使っていない)。
ホールド機能が働いている。
電池が消耗した。
振動のあるところで録音を始め
た。
シリアルコピーマネージメント
システム(
ングは禁止されている。
ディスクが入っていない。
デジタル入力信号が途切れた。
ページ)。
64
文字を越えて入力し
1700
SCMS
12秒(24
文字を
200
(指定のACパ
)によりダビ
他のディスクと取り換える。
ディスクを入れなおす。録音しなお
す。
他の録音用ディスクと取り換える。
しばらく待つ(衝撃を与えたり、電
源を抜いたりしない)。
しばらく待つ(衝撃を与えたり、電
源を抜いたりしない)。
しばらく待つ。まれに
る場合があります。
文字数の制限内で入力する。
指定の
カーバッテリーコードを使う。
HOLD
にしてホールド機能を解除する
(
充電池を充電し直すか、新しい乾電
池と入れ換える(16、17ページ)。
振動のないところで録音をする。
アナログ入力(
録音する(
ディスクを入れる。
光デジタル入力の接続を確かめる。
アナログ入力(
は無視する。
パワーアダプターまたは
AC
スイッチを矢印と逆の方向
ページ)。
56
ページ)。
24
LINE IN
LINE IN
分ほどかか
1
)を使って
)するとき
そ
の
他
65
Page 66

表示 意味 対策
P/B ONLY
PROTECTED
SORRY
TEMP OVER
TR FULL
TrPROTECT
MENU
LINE OUT
NO TEXT
EMPTY
BANK FULL
再生専用ディスクが入っている
(録音・編集時)。
ディスクが誤消去防止状態に
なっている(
i
/LINE OUT
」)の設定が「
OUT
になっている状態で、デジタル
サウンドプリセットを設定しよ
うとした。
ディスクの
しマークを消そうとした。
種類の異なる曲と曲の頭出し
マークを消そうとした(例えば
ステレオ録音された曲とモノラ
ル録音された曲の間の頭出し
マークを消そうとした)。
頭出しマークの上に頭出しマー
クを上書きしようとした。
シンクロ録音中、または
キストの情報を記録しながらの
録音中にXボタンまたは
MARK
本機の温度が高くなりすぎた。
曲番が
トラックプロテクト(曲の誤消
去防止)がかかっている曲に録
音・編集をしようとした。
本体でメニューの選択中にリモ
コンキーのどれかを押した。
リモコンで編集中に本体キーの
どれかを押した。
i
/LINE OUT
」)の設定が「
OUT
になっている状態で、
ボタンを押した。
ジョイントテキスト機能を使お
うとしたとき、録音もとの
に曲名またはディスク名が入っ
ていない。
ネームバンクに文字が登録され
ていないのに、削除しようとし
た。
ネームバンクに登録されている
文字が約
ページ)。
71
出力(「
LINE OUT
曲目の頭で、頭出
1
ボタンを押した。
を超えた。
254
出力(「
LINE OUT
文字を超えた。
600
AUDIO
CD
T
AUDIO
VOL +/–
録音用ディスクと取り換える。
誤消去防止つまみを戻す。
ジョグレバーを使って、i
」
OUT
定を「
ページ)。
—
テ
涼しいところで本機をしばらく休ま
せてから使う。
曲番を削除して
他の曲で録音・編集する。
—
ジョグレバー(左)を使って、i
」
LINE OUT
の設定を「
(
ページ)。
22
—
CD
—
登録数を減らして入力しなおす。
出力(「
AUDIO OUT
HeadPhone
出力(「
HeadPhone
」にする(
以下にする。
254
AUDIO OUT
/LINE
」)の 設
22
/
」)
」にする
66
Page 67

保証書とアフターサービ
ス
保証書
この製品には保証書が添付されていますの
•
で、お買い上げの際お買い上げ店でお受け
取りください。
所定事項の記入および記載内容をお確かめ
•
のうえ、大切に保存してください。
保証期間は、お買い上げ日より1年間で
•
す。
アフターサービス
調子が悪いときはまずチェックを
•
この説明書をもう一度ご覧になってお調べ
ください。
それでも具合の悪いときは
•
お買い上げ店、テクニカルインフォメーシ
ョンセンター、または添付の「ソニーサー
ビスご相談窓口のご案内」にあるお近くの
ソニー相談窓口にご相談ください。
保証期間中の修理は
•
保証書の記載内容に基づいて修理させてい
ただきます。詳しくは保証書をご覧くださ
い。
保証期間経過後の修理は
•
修理によって機能が維持できる場合は、ご
要望により有料修理させていただきます。
部品の保有期間について
•
当社ではポータブルミニディスクレコーダ
ーの補修用性能部品
ために必要な部品
間保有しています。この部品保有期間を修
理可能期間とさせていただきます。保有期
間が経過した後も、故障個所によっては修
理可能の場合がありますので、お買い上げ
店か、テクニカルインフォメーションセン
ター、またはサービス窓口にご相談くださ
い。
製品の機能を維持する
(
を、製造打ち切り後8年
)
そ
の
他
67
Page 68

主な仕様
形式
ミニディスクデジタルオーディオシス
テム
録音方式
磁界変調光学方式
再生読み取り方式
非接触光学読み取り(半導体レーザー使
用
)
レーザー
GaAIAsMQW
λ
=790nm
録音再生時間
MDW-80
モノラル最大
ステレオ最大
回転数
約
350rpm〜2800rpm(CLV)
エラー訂正方式
ACIRC
リーブリードソロモンコード)
サンプリング周波数
44.1kHz
サンプリングレートコンバーター
入力:
コーディング
ATRAC
ムアコースティックコーディング)
ATRAC3 — LP2
ATRAC3 — LP4
変調方式
EFM
チャンネル数
ステレオ2チャンネル
モノラル1チャンネル
周波数特性(光デジタル・アナログ入力時)
20〜20,000Hz±3dB
ワウフラッター
測定限界以下
ダイオード、
使用時:
(アドバンスドクロスインター
160
320
分
分
32kHz/44.1kHz/48kHz
(アダプティブトランスフォー
入力端子
マイク:ステレオミニジャック、最小
入力レベル
入力(アナログ):ステレオミニジャッ
ク、最小入力レベル
入力(光デジタル)1):光ミニジャック
0.25mV
49mV
出力端子
Ω
2)
:ステレオミニジャック
、負荷インピーダンス
:規定レベル
10k
194mV
Ω
i
/LINE OUT
ヘッドホン:最大出力レベル
5mW+5mW
16
LINE OUT
負荷インピーダンス
電源
充電式ニッケル水素電池
NH-14WM (付属)
乾電池 アルカリ単3形1本(別売り)
電池持続時間
「電池の持続時間」(58ページ)参照
本体寸法
約
78.9 × 17.1 × 72.0 mm
(幅/高さ/奥行き、最大突起を含まず)
最大外形寸法
約
80.0 × 20.5 × 75.5 mm
(幅/高さ/奥行き、最大突起を含む)
3)
JEITA
)
(
質量
約
110g
使用時 約
(
JEITA
1)
入力(光デジタル)と入力(アナログ)は兼
用ジャック
2)
ヘッドホンと
3)
(電子情報技術産業協会)規格による
JEITA
測定値です。
本機は、ドルビーラボラトリーズの米国及び
外国特許に基づく許諾製品です。
本機の仕様および外観は、改良のため予告な
く変更することがありますが、ご了承くださ
い。
135g
3)
)
LINE OUT
(本体+電池)
は兼用ジャック
、
68
Page 69

別売りアクセサリー
充電式ニッケル水素電池
ガム型ニッケル水素充電池用充電器
光デジタルケーブル
光角形プラグy光ミニプラグ
POC-5/10/15AB
光ミニプラグy光ミニプラグ
POC-5/10/15B
光ミニプラグ(入/出力)yL型
ピンコネクター
接続コード(アナログ
ステレオミニプラグyピンプラグ
(×2) RK-G129
ステレオミニプラグyステレオミニ
プラグ
テキスト接続ケーブル
CD
カーコネクティングパック
カーバッテリーコード
ステレオマイクロホン
、
MS907
ステレオヘッドホン
ECM-MS957
MDR-E888SP
アクティブスピーカー
Z1000
ミニディスク(生ディスク
キャリングポーチ
MD
ソフトキャリングポーチ
MD
ラベルプリンター
MD
車載用ロータリーコマンダー
NH-14WM
POC-DA12SP
)
RK-G136
DCC-E230
ECM-717、ECM-
*
MDR-D77/D55
SRS-Z500/Z750/
)ES
MD-4CPMN/V
MZP-1
RK-TXT1
CPA-8
シリーズ
MD-4SCPL/N
RM-WMC1
BC-9HM
7
、
そ
の
他
*
ヘッドホンは、本体のi
クに直接つなぐときも、リモコンにつなぐ
ときも、ステレオミニプラグのものをお求
めください。マイクロプラグのものは使え
ません。
ステレオミニプラグ
マイクロプラグ
/LINE OUT
ジャッ
69
Page 70

解説
ここでは、技術用語やミニディスクの特
徴的な動作について解説します。
ミニディスクとは
直径
に収めたデジタルメディア、それが、ミ
ニディスク(MD)です。大きさはコン
パクトディスク(CD)の約半分です
が、録音時間はほぼ同じ。音質において
も、音声圧縮技術
TRansform Acoustic Coding
り、CDに迫る高音質を実現していま
す。また、カートリッジに入っているた
め、指紋や傷がつきにくく、取り扱いが
手軽です。
のディスクをカートリッジ
64mm
ATRAC(Adaptive
)によ
サンプリングレートとは
サンプリングレートとは、1秒間の音声
をどれだけの量のデジタル信号にするか
を表す数値です。一般に数値が大きいほ
ど高音質になります。サンプリングレー
トの異なる機器同士では、通常デジタル
信号によるダビングはできません。これ
を可能にするのが、サンプリングレート
コンバータです。コンバータは、デジタ
ル信号を他のサンプリングレート用のデ
ジタル信号に変換します。本機はこのコ
ンバータを内蔵しています。光デジタル
入力端子に入ってきたサンプリングレー
トの異なる信号(BSチューナー
:32kHz, DAT:48kHz
ータによって、MDのサンプリングレー
ト(
す。
44.1kHz
)に変換されて録音されま
など)は、コンバ
「
TOC EDIT
」と は
TOCとはTable Of Contents
音声以外の情報を記録する、ミニディス
ク上の領域です。どの曲が何曲目でディ
スクのどこにあるかなどを記録していま
す。ミニディスクが本だとすると、索引
や目次にあたります。
録音やトラックマークの記録・削除、曲
の移動などのさい、ミニディスクレコー
ダーは
(「
TOC Edit
はディスクへの記録をしていますので、
衝撃を与えたり、電源を抜いたりしない
でください。記録が正しく行われないば
かりか、ディスクの内容が失われること
があります。
の書き換え作業を行います
TOC
」が表示されます)。この間
70
の略で、
の曲番のつきかた
MD
など曲番のついたメディアから録音
CD
した場合、レコーダーは次のような条件
で 曲番を作成し記録します。
デジタル入力からの録音→入力ソースの
トラック番号が変化したとき
アナログ入力からの録音→2秒間以上無
音状態が続き、その後音声が入ってきた
とき。
なお、CDで「
始まっているときは、
でMDに新しい曲番が記録されます。
」から新しい曲番が
-0:03
0:00
になった時点
Page 71

デジタル録音の制限について
本機は、音楽ソフトの著作権を保護する
ため、「シリアルコピーマネジメントシス
テム(
や再生専用MDなどの市販ソフトから、
光デジタル入力端子を使って録音したミ
ニディスクは、さらに他の機器でデジタ
ル録音することはできません。光デジタ
ル入力で録音したミニディスクを別のミ
ニディスクに録音するには、アナログ入
力(
LINE IN
または再生専用MDなどの市販ソフト
CD
親世代の
)」に準拠しています。
SCMS
)を使ってください。
デジタル録音可
デジタル
MD
録音不可
子世代の
CD
MD
ご注意
著作権を保護するためのコピーコントロール
信号を除去、改変してコピーを作成すること
は、個人として楽しむ目的であっても法律で
禁止されています。
誤消去防止つまみについて
録音したものを誤って消さないために、
誤消去防止つまみをずらして穴が開いた
状態にします。つまみをずらして穴があ
いた状態にすると、録音・編集ができま
せん。録音・編集するときはつまみを閉
めます。
ディスク裏面
誤消去防止つまみ
録音・編集できない
そ
の
他
マイクロホン、レコードプレーヤー、チュー
ナーなど(アナログ出力端子付き)
アナログ録音
親世代の
MD
デジタル録音可
子世代の
MD
デジタル
録音不可
孫世代の
MD
録音・編集できる
71
Page 72

English
Operating Instructions
Looking at the controls
The numbers are keyed to the illustrations
in the Japanese text (pages 11 to 13).
The recorder
1 END SEARCH button
2 Battery compartment
3 Jog lever (L) (MENU/ENTER)
4 VOL (volume) +/– buttons
5 REC MODE button
6 REC indicator
7 Terminals for attaching dry battery
case.
8 SYNCHRO REC (synchro-recording)
ON/OFF switch
9 DC IN 3V jack
q; HOLD switch (at the rear)
qa REC (record) switch
qs OPEN switch
qd X (pause) button
qf Display window
qg Jog lever (R) (N, ./>)
qh x (stop)/CHARGE button
qj LINE IN (OPT) jack
qk MIC (PLUG IN POWER) jack
ql T MARK button
w; i/LINE OUT jack
The display window of the
recorder
1 Alarm indication
2 Character information display
Displays the disc and track name*,
date, error messages, track numbers,
etc.
* Disc and track names appear only
with MDs that have been
electronically labeled.
3 AM/PM indication
Lights up along with the time
indication in the 12-hour system.
4 Time display
Shows the elapsed time of the track
being recorded or played.
5 Battery indication
Shows approximate battery condition.
While charging the rechargeable
battery, this indication shows the
charging condition.
6 Sound indication
Lights up when Digital Sound Preset is
on.
7 Level meter
Shows the level of the MD being
played or recorded.
8 LP2, LP4, MONO (monaural)
indication
9 SYNC (synchro-recording) indication
Lights up while synchro-recording.
q; REC indication
Lights up while recording. Flashes
when standing by for recording.
qa REC DATE (recorded/current date)
indication
Lights up along with the date and time
the MD was recorded. When only
“DATE” lights up, the current date
and time are displayed.
qs REMAIN (remaining time/tracks)
indication
Lights up along with the remaining
time of the track, remaining time of the
MD, or remaining number of tracks.
qd Play mode indication
Shows the play mode of the MD.
qf Disc indication
Shows that the disc is rotating for
recording, playing or editing an MD.
The headphones/earphones with a
remote control
1 DISPLAY button
2 PLAY MODE button
3 RPT/ENT(repeat/enter) button
4 SOUND button
5 Clip
6 X(pause) button
7 Control (./N>)
N>: play, AMS, FF
.: REW
8 Control (VOL +/–)
Pull and turn to adjust the volume.
9 Display window
q; HOLD switch
qa x(stop) button
72
Page 73

The display window of the remote
control
1 Track number display
2 Character information display
3 Disc indication
4 Alarm indication
5 Play mode indication
6 Battery indication
7 REC indication
8 SOUND indication
How to use the jog lever
See the illustrations in the Japanese text
(page 14).
The two jog levers on the recorder can be
used to perform various operations during
playback, recording, editing, and when the
recorder is stopped.
Jog lever functions
Jog lever (L) (MENU/ENTER)
• Selecting/entering the menu items.
To use menu items, press the jog lever
(L) to enter the menu, flip the lever to
select the item, and then press the lever
again to confirm the menu.
menu functions
SOUND Selecting “SOUND1”,
“SOUND2,” or “SOUND
OFF” (Digital Sound
Preset) (page 84).
PERSONAL Entering or erasing the
disc information in the
Personal Disc Memory
(page 85).
TIME MARK Selecting the Auto Time
Stamp setting (page 80).
MIC SENS Selecting the microphone
sensitivity (page 80).
AVLS Selecting “AVLS ON” or
“AVLS OFF” (AVLS
(Automatic Volume
Limiter System)).
BEEP Selecting “BEEP ON” or
“BEEP OFF”
(headphones/earphones
beep).
REC-Posi Selecting the start point
when recording (page 79).
CLOCK SET Setting the clock (page
81).
Operating Instructions
menu functions
EDIT Selecting editing
operations (labeling
tracks or discs, erasing
tracks or discs, etc.)
(pages 86 to 88 and 90).
DISPLAY Displaying elapsed
playing time, remaining
playing time, etc..
PLAYMODE Selecting the play mode
(repeat play, shuffle play,
etc.) (page 83).
RecVolume Selecting the automatic or
manual recording level
adjustment (page 81).
M-TIMER Setting the alarm
(Melody timer)(page 92).
AUDIO OUT Selecting i/LINE OUT
jack output (page 85).
• Selecting a track directly.
While playing an MD, you can select the
next track by looking at the track
number and track name in the display.
To select a track, flip the jog lever (L)
until the desired track appears, and then
press the lever.
Jog lever (R) (N/./>)
Play: Press the jog lever (R) (N).
AMS: Flip the jog lever (R) towards .
or >.
FF/REW: Flip and hold the jog lever (R)
towards . or >.
73
Page 74

How to use the control on the
remote control
See the illustrations in the Japanese text
(page 15).
Play/AMS/FF/REW: Turn or turn and
hold the control towards . or N>
Volume adjustment: Pull and turn the
control towards VOL + or –.
BPreparing
Getting started!
See the illustration in the Japanese text
(pages 16 and 17).
Charge the rechargeable battery before
using. Even if the rechargeable battery is
not charged, you can use the recorder as
long as the AC power adaptor is
connected.
1 Insert the supplied nickel metal
hydride rechargeable battery into the
recorder with the minus end first.
2 Connect the AC power adaptor and
press x/CHARGE to start charging.
“Charging” flashes, e appears in the
display, and charging starts.
When charging is completed, battery
indication disappears.
A completely discharged battery takes
about 3.5 hours.
To use the recorder with an alkaline
dry battery, insert the dry battery into
the supplied dry battery case and
attach it to the recorder.
3 Connect the supplied headphones/
earphones with the remote control to
the recorder and slide HOLD to unlock
the control.
4 Insert an MD.
1 Slide OPEN to open the lid.
2 Insert an MD with the label side
facing front, and press the lid to
close.
Insert an recordable MD when
recording.
74
Page 75

Notes on rechargeable battery
• If you press x/CHARGE immediately after
charging has completed, charging will begin
again. In this case, press x/CHARGE to
stop the recorder because the battery is
already fully charged.
• Charging stops when you try to operate the
recorder during charging.
• Be sure to use the supplied AC power
adaptor.
• Charging time may vary depending on the
battery condition.
• When a rechargeable battery is charged for
the first time or charged after a long period
of disuse, battery life may be shorter than
usual. Repeat discharging and recharging a
few times. The battery life should return to
normal.
• When the battery life of a fully charged
rechargeable battery becomes about half the
normal life, replace it.
• When carrying the rechargeable battery,
keep it in the supplied carrying case. It is
dangerous to carry the battery out of its case
in your pocket or a bag together with
metallic objects such as key rings, as this
may cause a short circuit.
• Remove the rechargeable battery from the
recorder when it is not to be used for a long
time.
Notes on dry battery
Incorrect battery usage may lead to leakage of
battery fluid or bursting batteries. To prevent
such accidents, observe the following
precautions :
• Insert the + and – poles of the battery
correctly.
• Do not try to recharge the battery.
• When the recorder is not be used for a long
time, be sure to remove the battery.
• If a battery leak should develop, carefully
and thoroughly wipe away battery fluid
from the battery compartment before
inserting new ones.
BMD recording
Recording an MD right away!
See the illustrations in the Japanese text
(page 19).
Connect to a digital source using an optical
cable to make digital recordings. Digital
recording is possible even from digital
equipment with different sampling rates,
such as a DAT deck or a BS turner, using
the built-in sampling rates converter. To
record from an analog source, see
“Recording with analog input (line cable
required).” It is recommended to use the
supplied the AC power adaptor when
recording.
1 Make connections. (Insert the cables
firmly and completely into the
appropriate jacks.)
1 Connect the LINE IN (OPT)
jack of recorder to the DIGITAL
OUT jacks of the source with a
optical cable.
The recorder switches to analog
input automatically.
2 Connect the DC IN 3V jack of the
recorder to a wall outlet with the
supplied AC power adaptor.
When the recorder has different sound
sources connected at the same time,
the recorder switches to the digital,
microphone, or analog input in this
order of priority.
2 Select recording start point.
If you want to add a recording to the
end of the previous recording, press
END SEARCH. (By setting
“REC-Posi” to “From End,” recording
operations will always start from the
end of the previously recorded
material.)
If you want to start recording from the
beginning, skip this step.
3 Start recording.
1 Press and slide REC to the right.
“REC” lights up and recording
starts .
2 Play the sound source.
The level of the recorded sound is
adjusted automatically.
Operating Instructions
75
Page 76

To stop recording, press x.
After you press x, the recorder will
automatically turn off in about 10 seconds
(when using batteries) or about 5 minutes
(when using AC power adaptor).
Notes
• “Data Save” or “TOC Edit” flashes while
data of the recording (the track’s start and
end points, etc.) is being recorded. Do not
move or jog the recorder or disconnect the
power source while the indication is flashing
in the display.
• The lid does not open until “TOC Edit”
disappears in the display.
To
Record partway
through the
previous
recording
Do this
Press the jog lever
(R)(N), or flip the jog
lever (R) towards >
or . to find the
start point of
recording and press x
to stop. Then slide the
REC switch.
Pause
X.
1)
Press X again to
resume recording.
Remove the MD
1)
A new track mark is added at the point
where you pressed X again to resume
recording while pausing, and the recording
will be marked with the new track number
when you resume recording.
2)
If you open the lid while “REC-Posi” is set to
“From Here”, recording will begin with the
first track the next time you record, the point
to start recording will change to the
beginning of the first track. When recording
on a recorded MD, check the point to start
recording on the display.
x, then slide OPEN to
open the lid.
2)
If the recording does not start
• Make sure the recorder is not locked.
• Make sure the MD is not record-
protected.
• Premastered MDs cannot be recorded
over.
Notes
• If the power supply is disrupted (i.e. the
battery is removed or becomes exhausted or
the AC power adaptor is disconnected)
during a recording or editing operation, or
while “TOC Edit” appears in the display,
then it will not be possible to open the lid
until power is restored.
• You can make a digital recording only from
an optical type output.
• When recording from a portable CD player,
play it on AC power and disable the antiskip function (such as ESP*).
• When recording from a portable CD player,
set the CD player to pause, and then do the
recording procedure on the recorder.
• Digital output may be disabled on some
portable CD players when the player is not
run on AC power.
* Electronic Shock Protection
76
Page 77

BMD playing
Playing an MD right away!
See the illustrations in the Japanese text
(page 21).
If you want to use the rechargeable battery,
be sure to recharge them before playing
(page 74).
1 Start playing.
1 Press the jog lever (R)(N). Turn
the control towards N> on the
remote control.
A short beep sounds in the
headphones/earphones.
2 Press VOL +/– on the recorder to
adjust the volume. Pull and turn
the control towards VOL + or
towards VOL – on the remote
control.
To stop play, press x.
To
Find the
beginning of the
current track
Find the
beginning of the
next track
Go backwards
while playing
Go forward
while playing
Pause
Do this (Beeps in the
headphones/earphones1))
Flip the jog lever (R)
towards .. Turn the
control towards . on
the remote control.
(Three short beeps)
Flip the jog lever (R)
towards >. Turn the
control towards N>
on the remote control.
(Two short beeps)
Flip and hold the jog
2)
lever (R) towards ..
Flip and hold the
control towards .
on the remote control.
Flip and hold the jog
1)
lever (R) towards >.
Flip and hold the
control towards
N> on the remote
control.
Press X. (Continuous
short beeps)
Press X again to resume
play.
Remove theMDPress x, then slide
OPEN to open the lid.
1)
You can turn off the beep sound.
2)
To go backwards or forward quickly
without listening, press X and flip and hold
the jog lever (R) towards . or > (turn
and hold the control on the remote control).
3)
Once you open the lid, the point to start play
will change to the beginning of the first track
(except when the disc information has been
stored in the Personal Disc Memory).
About the anti-skip function
The anti-skip function provides resistance
to vibrations for varying length of time
depending on the playback mode of the
track.
Mode Display Vibration
resistance time
Stereo (none) Approx. 40 sec.
LP2 Stereo LP2 Approx. 80 sec.
LP4 Stereo LP4 Approx. 160 sec.
Monaural MONO Approx. 80 sec.
If the playback does not start
Make sure the recorder is not locked. If it
is locked, slide the HOLD switch in the
opposite direction of the arrow.
When using the headphones/
earphones connect them directly
to the recorder
The VOL +/– buttons and the Digital Sound
Preset function may become inoperative. In
this case, do the procedure below.
1 Press the jog lever (L), flip the lever
until “AUDIO OUT” flashes in the
display, and then press the lever again.
2 Flip the jog lever (L) until
“HeadPhone” appears in the display.
3 Press the jog lever (L) again.
Notes
• The sound may skip during playback when
the recorder is exposed to continuous
vibration, such as while jogging.
• If the power supply is disrupted (i.e. the
battery is removed or becomes exhausted or
the AC power adaptor is disconnected)
when the recorder is operating, the lid will
not open until the power is restored.
3)
Operating Instructions
77
Page 78

BVarious ways of
recording
Connecting digital (optical)
and analog (line) inputs
The recorder selects digital or analog input
according to how the sound source is
hooked up.
Input
Difference
Connectable
source
Usable cord
Signal from
the source
Recorded
track
numbers
Digital
(optical)
input
Equipment
with an
digital
(optical)
output jack
Optical cable
(with an
optical or an
optical-mini
plug)
Digital
Marked
(copied)
automatically
•at the same
positions as
the source1).
•after more
than 2
seconds of
blank or lowlevel
segment 2).
•when
recording is
paused
while
synchrorecording3).
Analog (line)
input
Equipment
with an
analog (line)
output jack
Line cable
(with 2 phono
plugs or a
stereo-mini
plug)
Analog
Even when a
digital source
(such as a CD)
is connected,
the signal sent
to the recorder
is analog.
Marked
•after more
than 2 seconds
of blank or
low level
segment.
•while the
recorder is
paused while
recording.
•automatically
at specified
intervals
when the
Auto time
stamp is on.
You can erase
unnecessary
marks after
recording.
78
Recorded
sound level
Same as the
source.
You can also
adjust it
manually
Adjusted
automatically.
You can also
adjust it
manually.
(Digital REC
level
control).
1)
When the sound source is a CD or an MD.
2)
With a sound source other than a CD or an
MD.
3)
The recorder pauses automatically when it
encounters a section with no audio signal for 3
seconds or more.
Notes
Track marks may be copied incorrectly:
• when you record from some CD players or
multi disc players using digital (optical)
input.
• when the source is in shuffle or program
play mode while recording using digital
(optical) input. In this case, play the source
in normal play mode.
• when recording BS or CS programs through
digital (optical) input.
Recording with analog input
(line cable required)
See the illustration in Japanese text (page
24).
The sound will sent from the connected
equipment as analog signal but will be
recorded digitally on the disc.
1 Connect the LINE IN (OPT) jack of the
recorder to the line output jack of the
source with an line cable (not
supplied).
The recorder switches to analog input
automatically.
2 Connect the power source.
To use on AC power, see “Recording
an MD right away!.” To use on other
power sources, see page 75.
3 Press and slide REC to the right.
“REC” and the REC indicator lights up
and recording starts.
4 Play the sound source.
Page 79

Note
If you temporarily stop a recording operation
by pressing X, a new track mark will be
added at that point where you pressed X
again to resume recording. The recording
continues from a new track.
Recording for long times
See the illustration in Japanese text (page 25).
Select each recording mode according to
the recording time that you want.
Stereo recording is possible at 2 times (LP2)
or 4 times (LP4) the normal recording time.
1 Press REC MODE repeatedly to select
the desired recording mode.
The recording mode can be selected
from “(none)”(standard stereo mode),
“LP2” (2 × normal recording mode),
“LP4” (4 × normal recording mode),
and “MONO” (monaural).
2 Press and slide REC to the right.
Recording starts.
3 Start the sound source.
Notes
• To obtain better sound quality, select stereo
or LP2.
• It is recommended that you use the supplied
AC power adaptor for long recordings.
• If you try to play an MD recorded in LP2 or
LP4 on MD players or recorders that is not
support these modes, playback will not start
and “LP:” will appear on the display.
• Sound recorded through digital (optical)
input can be monitored in stereo through
headphones/earphones, etc.
• When you record in LP4 mode, momentary
noise may be produced on very rare
occasions with certain sound sources. This is
because of the special digital audio
compression technology that enables a
recording time 4 times longer than normal.
If noise is produced, it is recommended that
you record in normal stereo or LP2 mode to
obtain better sound quality.
Synchro-recording from a
digital source
See the illustration in Japanese text (page 25).
You can easily make a digital recording of
a digital source on an MD by using the
SYNCHRO REC switch.
Before synchro-recording, be sure to make
digital connection and insert a recordable
MD. Note that track marks are
automatically marked at the same positions
as the source.
1 Slide the SYNCHRO REC switch to
ON.
“SYNC” lights up in the display.
2 Press and slide REC to the right.
“REC” lights up in the display.
The recorder starts recording when
you start playing the source player.
3 Start the sound source.
Notes
• Do not switch SYNCHRO REC while
recording. Recording may not be done
properly.
• Even when there is no recorded sound on
the sound source, there may be cases when
recording does not pause automatically
during synchro-recording due to the noise
level emitted from the sound source.
• If a silent portion is encountered for about 2
seconds during synchro-recording from a
sound source other than a CD or an MD, a
new track mark is automatically added at
the point where the silent portion ends.
• Synchro-recording cannot be done if the
connecting cord is not an optical cable, or if
the cable is connected to the MIC (PLUG IN
POWER) jack.
• You cannot manually change the recording
mode or the recording level during synchrorecording.
Recording without
overwriting existing material
See the illustration in the Japanese text (page 26).
If you wish to avoid overwriting the
current contents of an MD, do the
following procedure. All new material will
then be recorded from the end of the
current contents.
1 While the recorder is stopped, press
the jog lever (L), flip the lever
repeatedly until “Rec-Posi” flashes in
the display, and then press the lever
again.
2 Flip the jog lever (L) repeatedly until
“From End” flashes in the display, and
then press the lever.
Operating Instructions
79
Page 80

To start recording from the current
point.
Select “From Here” in step 2.
Notes
• If you start recording while the recorder is in
play-pause mode, the recording will begin
from the point at which it is paused.
• The setting will remain even after the power
is turned off.
Recording from a microphone
See the illustration in the Japanese text
(page 27).
Connect a stereo microphone (ECM-717,
ECM-MS907, ECM-MS957, etc., not
supplied) to the MIC (PLUG IN POWER)
jack.
1 Press and slide REC to the right.
To select microphone sensitivity
1 Press the jog lever (L) while the recorder
is stopped, flip the lever repeatedly until
“MIC SENS” flashes in the display, and
then press the lever again.
2 Flip the jog lever (L) repeatedly to select
“SENS HIGH” or “SENS LOW”, and then
press the lever.
Notes
• You cannot record through the microphone
while an optical cable is connected to the
LINE IN (OPT) jack. The recorder
automatically switches input in the
following order; optical input, microphone
input, and analog input.
• The microphone may pick up the operating
sound of the recorder itself. Use the
microphone away from the recorder in such
cases.
Adding track marks
automatically at specified
intervals (Auto Time Stamp)
See the illustration in the Japanese text
(page 28).
Use this feature to add track marks
automatically at specified intervals when
recording through the analog input
connector or a microphone.
1 While the recorder is recording or in
recording pause, press the jog lever
(L).
2 Flip the jog lever (L) repeatedly until
“TIME MARK” flashes in the display,
and then press the lever again.
3 Flip the jog lever (L) repeatedly until
the desired time interval flashes in the
display.
Select one of the following intervals:
“OFF”
“5 min. ON” (track marks are added in
every 5 minutes.)
“10 min. ON” (track marks are added
in every 10 minutes)
“15 min. ON” (track marks are added
in every 15 minutes)
To cancel the setting, select “OFF” in
this step.
4 Press the jog lever (L).
Notes
• Automatic track marking by Auto Time
Stamp starts when you add a normal track
mark to the disc (i.e., by pressing T MARK
or X, etc.).
• The setting will be lost when the recording
stopped.
80
Page 81

Adjusting the recording level
manually (Manual recording)
See the illustration in the Japanese text
(page 29).
When you record, the sound level is
adjusted automatically. If necessary, you
can set the level manually.
Setting the clock to stamp the
recorded time
See the illustrations in the Japanese text
(page 32).
To stamp the date and time on the MD
when you record, you first need to set the
clock.
Note
Adjust the recording level while the recorder
is in standby mode. You cannot adjust it while
recording.
1 While holding down X, press and
slide REC to the right.
The recorder stands by for recording.
2 Press the jog lever (L), flip the lever
until “RecVolume” flashes in the
display, and then press the lever again.
3 Flip the jog lever (L) until
“ManualREC” flashes in the display,
and then press the lever.
To switch back to the automatic level
adjustment, repeat the procedure from
step 2 and press the lever (L) while
“Auto REC” flashes in the display.
4 Play the program source.
5 While observing the level meter in the
display, adjust the recording level by
flipping the lever (L).
Set the level so that the input lights up
around the fifth segment on the level
meter. If the maximum input lights up
the ninth segment, lower the level.
Recording does not start in this step.
If your source is an externally
connected component, be sure to cue
the source to the begining of the
material to be recorded before you
start playback.
6 Press X again to start recording.
Notes
• The recording level cannot be adjusted
while recording is in progress. If you want
to adjust the recording level after you have
started the recording, press X to pause the
recorder. Then do the procedure from step 5.
• You cannot adjust the recording level
manually during synchro-recording.
1 Press the jog lever (L) while no disc is
inserted or the recorder is stopped.
2 Flip the jog lever (L) until “CLOCK
SET” flashes in the display, and then
press the lever.
The digits of the year flash.
3 Change the current year by flipping
the jog lever (L) and press to enter.
The digit of the month flashes.
4 Repeat steps 3 to enter the current
month, date, hour, and minute.
When you press the jog lever (L) to
enter the minute, the clock starts
operating.
If you make a mistake while
setting the clock
Press x, and set the clock again from step
2. You can skip a step by pressing the jog
lever (L).
To display the time in the 24-hour
system
Press X while setting the clock. To change
the clock to the 12-hour system, press X
again.
To maintain the correct time
Once you set the clock, it will keep correct
time as long as the recorder is connected to a
power source, such as the rechargeable
battery, alkaline dry battery, or AC power
adaptor. However, if no power source is
connected, the clock setting will change back
to the factory setting after about 3 minutes.
When changing the rechargeable battery or
alkaline dry battery, make sure to do it within
3 minutes.
Note
Make sure the time is correctly set if you want
the time stamp to be accurately recorded for
an important recording.
Operating Instructions
81
Page 82

Copying CD text information
while recording (Joint Text)
CD text connecting cable, CD that support
CD-TEXT, and CD player that support
Joint Text required.
See the illustration in the Japanese text
(pages 33 and 34)
By connecting the recorder to a Sony
portable CD player that supports Joint Text
(the CD text copying function) (D-E990,
etc.), you can copy track and disc names
automatically during recording. In
addition to the CD text connecting cable
(RK-TXT1), make sure to connect the
recorder to the portable CD player with an
optical cable.
1 Press and slide REC to the right to start
recording on the recorder, and start
playing the CD in the portable CD
player.
“SYNC”, “REC” and “ ” lights up in
the display.
“CD TEXT” appears for a few seconds,
then “001 TEXT?” and “PushENTER”
alternate in the display.
“NO TEXT” appears at this time if no
track name information exists in the
CD. In this case, the track name will
not be copied.
2 Press the jog lever (L).
Track name scrolls, and then the track
name and “PushENTER” alternate in
the display.
3 Press the jog lever (L).
Track name scrolls in the display while
the name is copied.
4 Follow steps 2 and 3 to copy each new
track name that appears.
82
5 Press x on the recorder at the point
you want to stop recording.
“ ” lights up, and then “000 TEXT”
and “PushENTER” alternate in the
display.
If you don’t want to copy the disc
name information, press x again. The
disc name is not copied and the
operation ends.
“NO TEXT” appears at this time if no
disc name information exists in the
CD. In this case, the operation ends
without copying the disc name.
6 Press the jog lever (L).
Disc name scrolls, and then disc name
and “PushENTER” alternate in the
display.
7 Press the jog lever (L).
“TOC Edit” flashes.
Afterwards, the disc name scrolls in
the display.
Notes
• If you copy disc name information to a disc
with a previously recorded disc name, the
old disc name will be overwritten with the
new one.
• When the CD text copying function is on,
various settings and editing functions
cannot be accessed with the jog lever.
• The CD text copying function (joint text) can
only be used with component (D-E990,
D-E880, D-E770, D-F700, D-E01) with the
joint text logo.
• The CD text copying function can only be
used with CDs and component (D-E990,
etc.) that support CD-TEXT.
• The RK-TXT1 CD text connecting cable is
designed for exclusive use with this recorder
and Sony portable CD player (D-E990, etc.).
Do not use a connecting cable of another
make to copy CD text information.
• The remote becomes inoperative when the
CD text connecting cable (RK-TXT1) is
connected to the recorder.
• Stopping or pausing playback on the CD
player automatically causes recording on the
recorder to pause. A new track mark is
automatically added when you resume
recording.
• The track name of the track currently played
will not be recorded if you stop or pause CD
playback in the middle of the copying
process on the recorder.
Page 83

BVarious ways of
playback
Changing the playback order
See the illustrations in the Japanese text
(pages 35 to 37).
Steeings can be stored to the Personal Disc
Memory.
On the recorder
Selecting a play mode
1 While the recorder is playing an MD or
stopped, press the jog lever (L), flip
until “PLAY MODE” flashes in the
display, and then press the lever again.
2 Flip the jog lever (L) to select the play
mode, and then press the lever.
Each time you flip the lever (L), the
play mode changes and when you
press the lever to select, indication
appears in the display as follows.
play mode/indication
“Normal”/“(none)” (All the
tracks are played once)
m
“AllRepeat”/“ ” (All the
tracks are played repeatedly)
m
“1 Track”/“1 ” (A single track
is played)
m
“1 Repeat”/“ 1 ” (A single
track is played repeatedly)
m
“Shuffle”/“
currently selected track finishes
playing, the remaining tracks
are played in random order)
“Shuf. Rep”/“
currently selected track finishes
playing, the remaining tracks
are played repeatedly in
random order)
“PGM”/“
played in the order that you
specified)
“PGMRepeat”/“
(tracks are played repeatedly
in the order that you specified).
SHUF
” (After
m
SHUF
m
PGM
” (Tracks are
m
PGM
<
”(After
”
Creating a Program (Program play)
1 Press the jog lever (L) while “PGM”
flashes in the display at step 2 of
“Selecting a play mode.”
2 Flip the jog lever (L) to select a track.
3 Press the jog lever (L) to enter a track
number.
4 Repeat Step 2 and 3 to program more
tracks.
5 Press the jog lever (L) for 2 seconds or
more.
On the remote control
You can select variouse play mode using
the PLAYMODE and RPT/ENT buttons on
the remote control.
Selecting a play mode
Press PLAYMODE during playback.
Each time you press this button, the play
mode changes as follows.
“(none)” (All the tracks are played
once)
m
“1 ” (A single track is played)
m
“
SHUF
”(After currently selected
track finishes playing, the
remaining tracks are played in
random order)
m
“
PGM
” (Tracks are played in the
order that you specified).
Creating a Program (Program play)
1 While the recorder is stopped, playing
or play-paused, press PLAYMODE
repeatedly until “
display.
2 Turn the control towards . or
towards N> to select a track.
3 Press RPT/ENT to enter a track
number.
4 Repeat Step 2 and 3 to program more
tracks.
5 Press RPT/ENT for 2 seconds or more.
Repeat play
Press RPT/ENT on the remote control
during playback.
“ ” appears in the display.
PGM
<
” flashes in the
Operating Instructions
83
Page 84

Notes on program setting.
• All program settings are lost when the disc
is removed from the recorder.
• If the recorder is stopped and left inactive
for 5 minutes in the middle of a
programming operation, the tracks selected
up to that point are entered as the program.
To adjust the sound quality
(Digital Sound Preset)
See the illustrations in the Japanese text
(pages 37 and 38).
You can make adjustments to the sound
quality to suit your taste, and then store
two sets of these adjustments.
Settings can be stored to the Personal Disc
Memory.
1 Press SOUND on the remote control
repeatedly to select “SOUND1” or
“SOUND2”.
2 During playback, press SOUND for 2
seconds or more.
The recorder changes to bass-setting
mode. Pressing the SOUND button for
2 seconds again changes the recorder
back to treble-setting mode.
3 Turn the control on the remote control
towards . or towards N>
repeatedly to adjust the bass or the
treble.
Pressing the SOUND button for less
than 2 seconds toggles the display
between “SOUND1” and “SOUND2”.
When you press SOUND for a short
time while adjusting bass or treble, the
setting for that sound is entered and
the display switches to the other sound
setting.
The sound can be adjusted in 8 steps (–
4, –3, ...±0, ...+2, +3).
4 Press RPT/ENT .
The sound settings are saved and the
playback display appears again.
To select a preset sound
Press the jog lever (L), flip the lever until
“SOUND1” or “SOUND2” flashes or nothing
appears in the display, and then press the
lever again.
84
Factory settings of the Digital Sound
Preset
Factory settings of the Digital Sound Preset
are the followings:
• “SOUND1”: bass +1, treble ±0
• “SOUND2”: bass +3, treble ±0
Notes
• You cannot set the Digital Sound Preset with
the recorder.
• Digital Sound Preset becomes inoperative
when the “AUDIO OUT” parameter for the
i/LINE OUT jack is set to “LINE OUT”. In
this case, set the “AUDIO OUT” to
“HeadPhone” (page 77).
• Sound distortion may occur when you use
Digital Sound Preset. In this case, lower the
volume or change the settings.
• Changing to another Digital Sound Preset
during a recording operation will not affect
the quality of recorded sound.
To change playback speed
(Speed Control)
See the illustrations in the Japanese text
(page 39).
The playback speed can be adjusted in 7
steps (80%, 85%, ...100%, 105%, 110%).
Setting can be stroed to the Personal Disc
Memory.
1 Press DISPLAY on the remote control
for 2 seconds or more during playback.
2 Turn the control on the remote control
towards . or towards N> until
“SPEED” flashes in the display, and
then press x on the remote control.
The recorder changes to speed-setting
mode.
3 Turn the control towards . or
towards N> to select the playback
speed.
“+” shows the normal speed and the
cursor shows the playback speed you
are selecting.
4 Press x to set the playback speed.
“S” appears in the display when the
speed is changed.
Notes
• You cannot change playback speed with the
recorder.
• The playback sound will be affected by the
playback speed.
• All settings will be lost when you remove
the disc from the recorder.
Page 85

Storing the settings for individual discs (Personal Disc
Memory)
See the illustrations in the Japanese text
(pages 39 and 40).
The recorder can store the various settings
for each disc, and then retrieve them automatically whenever the disc is inserted. Do
the following procedure to store the volume,
the order of program play, sound quality
(Digital Sound Preset), and playback
speed(Speed control) settings for a disc.
On the recorder
1 While the recorder is stopped, playing,
or play-paused, press the jog lever (L).
2 Flip the jog lever (L) until
“PERSONAL” flashes in the display,
and then press the lever.
“Entry?” flashes in the display.
3 Press the jog lever (L).
“Entry OK” appears in the display and
the disc settings are stored in the
recorder.
On the remote control
1 While the recorder is stopped, playing,
or play-paused, press DISPLAY on the
remote control for 2 seconds or more.
2 Turn the control on the remote control
towards . or towards N> until
“PERSONAL” flashes in the display,
and then press x on the remote
control.
“Entry?” flashes in the display.
3 Press x.
“Entry OK” appears in the display and
the disc settings are stored in the
recorder.
Erasing the disc information
Insert the disc whose information is to be
erased and verify its contents. Do steps 1 and
2, then flip the jog lever (L) on the recorder or
turn the control towards . or towards
N> on the remote control until “Erase?”
flashes in the display, and then press the jog
lever (L) on the recorder or x on the remote
control. “Erase OK” appears in the display
and the disc information is erased. If you try
to erase the disc information of a disc that
have never been stored, “No Entry!” appears
in the display for 2 seconds.
Notes
• The settings for up to 20 discs can be stored.
Any settings stored afterwards will replace
the settings for the least used disc among the
20.
• If you use another minidisc recorder to edit
or add tracks to a disc whose settings have
been stored on the recorder, the disc will no
longer be recognizable by the recorder and
the stored information will become useless.
Connecting to a stereo system
(LINE OUT)
See the illustration in Japanese text (page
42).
Connect the i/LINE OUT jack of the
recorder to the LINE IN jacks of an
amplifier or a tape recorder with a line
cable (RK-G129 or RK-G136, not supplied).
The output is analog. The recorder plays
the MD digitally and sends analog signals
to the connected equipment.
When connecting a line cable to
the i/LINE OUT jack
When connecting a line cable (not
supplied), be sure to set the “AUDIO
OUT” parameter for the i/LINE OUT
jack.
1 Press the jog lever (L), flip the lever
until “AUDIO OUT” flashes in the
display, and then press the lever again.
2 Flip the lever (L) until “LINE OUT”
flashes in the display, and then press
the lever.
Notes
• If the “AUDIO OUT” parameter for the i/
LINE OUT jack is set to “LINE OUT”, VOL
+/– or Digital Sound Preset will not
function.
• The “AUDIO OUT” parameter for the i/
LINE OUT jack cannot be set to “LINE
OUT” when the supplied remote control is
connected.
• When you connect the headphones/
earphones directly to the recorder, set the
“AUDIO OUT” parameter for the i/LINE
OUT jack to “HeadPhone”.
• When you turn off the power, the “AUDIO
OUT” parameter for the i/LINE OUT jack
automatically switches to “HeadPhone”.
Operating Instructions
85
Page 86

BEditing recorded tracks
You can edit your recordings by adding/
erasing track marks or labeling tracks and
discs.
Premastered MDs cannot be edited.
Notes on editing
• Do not move or jog the recorder while “TOC
Edit”* is flashing in the display.
• You cannot edit tracks on an MD that is
record -protected. Before editing tracks,
close the tab on the side of the MD.
• If you perform an editing operation while
playing, be sure not to turn the power off
until “TOC Edit” disappears in the display.
• The lid does not open until “TOC Edit”
disappears in the display after editing.
* TOC = Table of Contents
Erasing a track
See the illustration in the Japanese text
(page 43).
You can quickly erase a recorded track.
Note that once a recording has been erased,
you cannot retrieve it. Make sure of the
track you are erasing.
1 While playing the track you want to
erase, press the jog lever (L), flip the
lever repeatedly until “EDIT” flashes
in the display, and then press the lever
again.
“ : Name” flashes in the display,
and the recorder plays the selected
track repeatedly.
2 Flip the jog lever (L) until “ : Erase”
flashes in the display, and then press
the lever.
“Erase OK?” and “PushENTER”
appear alternately in the display.
To cancel erasing, press x.
3 Press the jog lever (L) again.
The track is erased and the next track
starts to play. All the tracks after the
one erased are automatically
renumbered.
To erase a part of a track
Add track marks at the beginning and the
end of the part you want to erase, then
86
erase the part.
Erasing a whole disc
See the illustration in the Japanese text
(page 44).
You can quickly erase all the tracks and
data of the MD at the same time. Note that
once a recording has been erased, you
cannot retrieve it. Be sure to check the
contents of the disc you want to erase.
1 While the recorder is stopped, press
the jog lever (L), flip the lever until
“EDIT” flashes in the display, and then
press the lever again.
“ : Name” flashes in the display.
2 Flip the jog lever (L) until “ :
Erase” flashes in the display, and then
press the lever.
“AllErase?” and “PushENTER” appear
alternately in the display.
To cancel erasing, press x.
3 Press the jog lever (L) again.
“TOC Edit” flashes in the display, and
all the tracks will be erased.
When erasing is complete,
“BLANKDISC” appears in the display.
Adding a track mark
See the illustration in the Japanese text
(page 44).
You can insert a track mark into a track.
1 While playing or pausing an MD, press
T MARK on the recorder at the point
you want to mark.
“MARK ON” appears in the display,
and the track mark is added.
To add track marks while
recording (except while synchrorecording)
Press T MARK at the point you want to add a
track mark. You can use Auto Time Stamp to
add track marks automatically at specified
intervals.
Page 87

Erasing a track mark
See the illustrations in the Japanese text
(page 45).
Moving recorded tracks
See the illustrations in the Japanese text
(page 46).
When you record with analog (line) input,
unnecessary track marks may be recorded
where recording level is low. You can erase
a track mark to combine the tracks before
and after the track mark.
1 While playing the track with the track
mark you want to erase, press X to
pause.
2 Find the track mark by flipping the jog
lever (R) towards . slightly.
“00:00” flashes in the display.
3 Press T MARK to erase the mark.
“MARK OFF” appears in the display.
The track mark is erased and the two
tracks are combined. The number of
the newly combined track will be that
of the first track and the succeeding
tracks will be renumbered.
Notes
• You cannnot erase a track mark that has
been written between track marks recorded
in different recording mode (such as a track
mark between a track recorded in LP2 and a
track recorded in LP4). If you try to erase
such a track mark, “SORRY” appears in the
display.
• You cannot erase a track mark that has been
written between a track recorded through a
digital connection and a track recorded
through an analog connection. If you try to
erase such a track mark, “SORRY” appears
in the display.
You can change the order of the recorded
tracks.
On the recorder
1 While playing the track you want to
move, press the jog lever (L), flip the
lever until “EDIT” flashes in the
display, and then press the lever again.
“ : Name” flashes in the display
and the recorder plays the selected
track repeatedly.
2 Flip the jog lever (L) until “ : Move”
flashes in the display, and then press
the lever.
3 Flip the jog lever (L) to select the
destination track number.
To cancel moving, press x.
4 Press the jog lever (L) again.
The track moves to the selected
destination track.
On the remote control
1 Press DISPLAY for 2 seconds or more,
turn the control towards . or
towards N> until “EDIT” flashes
in the display, and then press x.
“ : Name” flashes in the display
and the recorder plays the selected
track repeatedly.
2 Turn the control towards . or
towards N> until “ : Move”
appears in the display, and then press
x.
3 Turn the control towards . or
towards N> to select the
destination track number.
4 Press x.
The selected track moves just before
the destination track.
Operating Instructions
87
Page 88

Labeling recordings
See the illustration in the Japanese text
(pages 47 and 48).
You can name tracks during playback,
discs during stop, and both during
recording. Each name can be as long as 200
letters.
Each disc can hold up to 1700
alphanumeric letters or 800 katakana
characters during playback or stop.
Available characters
• Capital and small letters of the English
alphabet.
• Numbers 0 to 9
• ! " # $ % & ( ) * . ; < = > ?
@ _ ` + – ' , / : _(space)
Labeling on the recorder
Labeling a disc during stop
1 Insert a disc.
2 Press the jog lever (L), flip the lever
until “EDIT” flashes in the display,
and then press the lever again.
“ : Name” flashes in the display.
3 Press the jog lever (L) again.
4 Flip the jog lever (L) to select a letter
and press the lever to enter.
The selected letter stops flashing and
the cursor moves to the next input
position.
Press X to switch between katakana,
the alphabet, symbols/numbers, and
phrases (if phrases are stored in the
phrase bank).
Press VOL +/– to move the cursor to
left or right.
Flip the jog lever (R) towards >
when inputting alphabet, symbol or
numbers to change the letter to the one
before/next one. Flip the jog lever (R)
towards . to go back.
Press END SEARCH together with
VOL + to insert a blank space to type
in a new letter.
Press END SEARCH together with
VOL – to delete a letter and move back
all following letters to the left.
Press x to cancel labeling.
5 Repeat step 4 and enter all characters
of the label name.
6 Press down the jog lever (L) for 2
seconds or more.
The track or disc is labeled.
Labeling a track during playback
1 Insert a disc and play the track you
want to label.
2 Press the jog lever (L), flip the lever
until “EDIT” flashes in the display,
and then press the lever again.
“ : Name” flashes in the display.
3 Press the jog lever (L) again.
4 Follow steps 4 to 6 of “Labeling a disc
during stop” above.
Labeling a track or a disc during
recording
1 While recording, press the jog lever
(L), flip the lever until “EDIT” flashes
in the display, and then press the lever
again.
“ : Name” flashes in the display.
2 To label a track, press the jog lever (L)
again.
To label a disc, flip the lever (L) until
“ : Name” flashes in the display,
and then press the lever.
3 Follow steps 4 to 6 of “Labeling a disc
during stop” above.
To cancel labeling, press x.
Labeling on the remote control
Labeling a disc during stop
1 Insert a disc.
To label a disc that is already in the
recorder, press x to stop.
2 Press DISPLAY for 2 seconds or more,
turn the control towards . or
towards N> until “EDIT” flashes
in the display, and then press x.
“ : Name” flashes in the display.
3 Press x.
The disc is ready to be labeled.
88
Page 89

4 Turn the control towards . or
towards N> to select a letter and
press x to enter.
The selected letter stops flashing and
the cursor moves to the next input
position.
Press X to switch between katakana,
the alphabet, symbols/numbers, and
phrases (if phrases are stored in the
phrase bank).
Pull and turn the control towards VOL
+ or towards – to move the cursor to
left or right.
Turn the control towards N> when
inputting alphabet, symbol or numbers
to change the letter to the one before/
next one. Turn towards . to go
back.
Press DISPLAY to insert a blank space
to type in a new letter.
Press DISPLAY for 2 seconds or more
to cancel labeling.
Press PLAYMODE to delete a letter
and move back all following letters to
the left.
5 Repeat step 4 and enter all characters
of the label name.
6 Keep pressing x for 2 seconds or
longer.
The track or disc is labeled.
Labeling a track during playback
1 Insert a disc and play the track you
want to label.
2 Press DISPLAY for 2 seconds or more,
turn the control towards . or
towards N> until “EDIT” flashes
in the display, and then press x.
“ : Name” flashes in the display.
3 Press x.
The disc is ready to be labeled.
4 Follow steps 4 to 6 of “Labeling a disc
during stop” above.
Labeling a track or a disc during
recording
1 Press DISPLAY for 2 seconds or longer
during recording, turn the control
towards . or towards N> until
“EDIT” flashes in the display, and then
press x.
“ : Name” flashes in the display.
2 To label a track, press x.
To label a disc, turn the control
towards . or towards N> until
“ : Name” flashes in the display,
then press x.
3 Follow steps 4 to 6 of “Labeling a disc
during stop” above.
To cancel labeling, press DISPLAY for 2
seconds or more.
Notes
• When the recording is stopped while
labeling a track or a disc during recording,
or when the playback moves on to the next
track while labeling a track during playback,
the input at that point is entered
automatically.
• “LP:” has automatically been added at the
beginning of the track names for tracks
recorded in LP2 or LP4 mode.
Relabeling recordings
Follow the steps corresponding to the labeling
method until the disc or track is ready to be
labeled. Enter a new character over the one
you want to change, then press the jog lever
(keep pressing x for 2 seconds or more on the
remote control).
Notes
• Track and disc titles that were entered in
Japanese katakana characters will appear in
Roman letters on minidisc players that do
not support the display of katakana
characters. Such titles will be marked with a
“^” at the beginning and the end.
• You cannot relabel premastered MDs or
label MDs that have not been recorded.
• The recorder cannot rewrite a disc or track
name of more than 200 letters that was
created by another device.
Operating Instructions
89
Page 90

Storing phrases frequently
used in labeling (Phrase Bank)
See the illustration in the Japanese text
(pages 50 and 51)
Phrases that you often use in track or disc
labeling can be stored in the recorder’s
memory. Approximately 40 phrases of
about 10 characters each (with a total
character count of about 600) can be stored
in the phrase bank. The actual number will
depend on the length of each phrases.
On the recorder
Storing phrases while labeling a track or
disc
1 Do the procedure “Labeling on the
recorder” in “Labeling recordings”
(page 88) to enter a phrase.
2 After entering the phrase, press X for 2
seconds or more.
“Entry!” appears in the display and the
cursor flashes after the phrase you just
stored. You can then continue with
labeling operation.
Storing phrases using the EDIT menu
1 Press the jog lever (L), flip the lever
until “EDIT” flashes in the display,
and then press the lever again.
2 Flip the jog lever (L) until “Name
Bank” flashes in the display, and then
press the lever.
3 Enter the phrase you want to store,
and then press the jog lever (L) for 2
seconds or more.
“Entry!” appears in the display and the
phrase is stored.
Retrieving phrases stored in the phrase
bank
You can retrieve a phrase stored in the
phrase bank anytime you want to use it in
a track or disc name.
Searching for a phrase by displaying the
stored phrase one by one
1 Do the procedure “Labeling on the
recorder” in “Labeling recordings”
(page 88) until “ :Name” or
“ :Name” flashes in the display.
90
Then press the jog lever (L).
2 Press X repeatedly until the first
phrase stored in the phrase bank
appears in the display.
3 Flip the jog lever (L) repeatedly.
Flipping the jog lever (L) causes the
phrases stored in the phrase bank to
appear one by one in sequential order.
If you press X at this time, the first
phrase stored in the phrase bank
retrieved.
4 Press the jog lever (L) while the phrase
you want is shown in the display.
The cursor flashes after the phrase you
just retrieved. You can then continue
with labeling operation.
Searching for a phrase by its first letter
1 When labeling a track or disc, use VOL
+/– to move the cursor to the letter
which the desired phrase begins with.
2 Press X to search.
The phrase for that letter appears in
the display. If there are two or more
phrases that start with that letter, press
X to see the next phrase.
3 Press the jog lever (L) while the phrase
you want is shown in the display.
The cursor flashes after the phrase you
just retrieved. You can then continue
with labeling operation.
Erasing phrases
You can erase phrases from the phrase
bank while the recorder is stopped. You
can also erase phrases when the recorder is
empty.
1 Press the jog lever (L), flip the lever
until “EDIT” appears, and then press
the lever again.
2 Flip the jog lever (L) until “BankErase”
appears, and then press the lever.
3 Flip the jog lever (L) until the phrase
you want to erase appears, and then
press the lever.
“Erase!” appears and the phrase is
erased. If no phrase is stored in the
phrase bank, “EMPTY” appears in the
display.
To cancel the operation, press x.
Page 91

On the remote control
Storing phrases while labeling
1 Do the procedure “Labeling on the
remote control” in “Labeling
recordings” (page 88) to enter a phrase.
2 After entering the phrase, press X for 2
seconds or more.
“Entry!” appears in the display and the
cursor flashes after the phrase you just
stored. You can then continue with
labeling operation.
Storing phrases using the EDIT menu
1 Press DISPLAY for 2 seconds or more,
turn the control towards . or
towards N> until “EDIT” flashes
in the display, and then press x.
2 Turn the control towards . or
towards N> until “Name Bank”
flashes in the display, and then press
x.
3 Enter the phrase you want to store,
then press x for 2 seconds or more.
“Entry!” appears in the display and the
phrase is stored.
Retrieving phrases stored in the phrase
bank
Searching for a phrase by displaying the
stored phrase one by one
1 Do the procedure “Labeling on the
remote control” in “Labeling
recordings” (page 88) until
“ :Name” or “ :Name” appears
in the display. Then press x.
2 Press X repeatedly until the first
phrase stored in the phrase bank
appears in the display.
3 Turn the control towards . or
towards N> repeatedly.
Turning the control towards . or
towards N> causes the phrases
stored in the phrase bank to appear
one by one. If you press X at this time,
the first phrase stored in the phrase
bank retrieved.
4 Press x while the phrase you want is
shown in the display.
The cursor flashes after the phrase you
just retrieved. You can then continue
with labeling operation.
Searching by the first letter of a phrase
1 When labeling a track or disc, pull and
turn the control towards VOL + or
towards – to move the cursor to the
letter which the desired phrase begins
with.
2 Press X to search.
The phrase for that letter appears in
the display. If there are two or more
phrases that start with that letter, press
X to see the next phrase.
3 Press x while the phrase you want is
shown in the display.
The cursor flashes after the phrase you
just retrieved. You can then continue
with labeling operation.
Erasing phrases
1 Press DISPLAY for 2 seconds or more,
turn the control towards . or
towards N> until “EDIT” flashes
in the display, and then press x.
2 Turn the control towards . or
towards N> repeatedly until
“BankErase” appears in the display,
and then press x.
3 Turn the control towards . or
towards N> repeatedly until the
phrase you want to erase appears, and
then press x.
“Erase!” appears in the display and the
phrase is erased.
If there is no phrase stored in the
phrase bank, “EMPTY” appears in the
display.
To cancel the operation, press DISPLAY
for 2 seconds or more.
Operating Instructions
91
Page 92

BOther operation
Setting the alarm (Melody
Timer)
See the illustrations in the Japanese text
(pages 54 and 55).
You can set the alarm to go off in 1 to 99
minutes.
On the recorder
1 While the recorder is stopped, playing,
or play-paused, press the jog lever (L).
2 Flip the jog lever (L) until “M-TIMER”
flashes in the display, and press the
lever.
3 Flip the jog lever (L) until “ON”
flashes in the display, and then press
the lever.
, lights up in the display.
4 Flip the jog lever (L) repeatedly to
select the elapsed time.
One rotation of the control changes the
elapsed time setting (TIME :) by 1
minute, within a range of 1 to 99
minutes. To change the time quickly,
flip and hold the jog lever (L).
5 Press the jog lever (L).
The time is set.
6 Flip the jog lever (L) repeatedly to
select the alarm sound.
The following sounds can be selected:
“MELODY : 1” Melody (Orpheus in
the Underworld)
“MELODY : 2” Melody (The Four
Seasons)
“MELODY : 3” Beeps
7 Press the jog lever (L).
Melody timer is set.
The time remaining until the alarm is
shown in the display while the
recorder is stopped or play-paused.
To show the remaining time during
play, do steps 1 to 3.
On the remote control
1 While the recorder is stopped, playing,
or play-paused, press DISPLAY on the
remote control for 2 seconds or more,
and then press x.
2 Turn the control towards . or
towards N> until “M-TIMER”
flashes in the display, and then press
x.
92
3 Turn the control towards . or
towards N> until “ON” flashes in
the display, and then press x.
, lights up in the display.
4 Turn the control towards . or
towards N> to select the elapsed
time.
One rotation of the control changes the
elapsed time setting (TIME :) by 1
minute, within a range of 1 to 99
minutes. To change the time quickly,
turn and hold the control towards .
or towards N>.
5 Press x.
The time is set.
6 Turn the control towards . or
towards N> to select the alarm
sound.
The following sounds can be selected:
“MELODY : 1” Melody (Orpheus in
the Underworld)
“MELODY : 2” Melody (The Four
Seasons)
“MELODY : 3” Beeps
7 Press x.
The alarm is set.
The time remaining until the alarm is
shown in the display while the
recorder is stopped or play-paused.
To show the remaining time during
play, do steps 1 to 3.
To cancel setting the alarm.
Press x on the recorder, or press DISPLAY
for 2 seconds or more on the remote
control.
To cancel Melody Timer.
Select “OFF” in step 2, and then press the
jog lever (L) on the recorder or x on the
remote control.
To stop the alarm.
Press any button.
Notes
• The settings will be lost when you start
recording.
• The timer will begin counting down (using
the factory setting) from the moment you
select “ON” in step 3. The recorder will
begin counting down again from the
moment you change the elapsed time in step
4.
Page 93

BPower sources
You can use the recorder on …
– house current.
– a nickel metal hydride rechargeable
battery (supplied).
– dry battery (not supplied).
It is preferable to use the recorder on house
current when recording for a long time.
Battery life
When recording2) (JEITA3))
Batteries Stereo LP2 LP4
NH-14WM
nickel metal
hydride
rechatgeable
battery
LR6(SG)
alkaline dry
batttery
NH-14WM
nickel metal
hydride
rechargeable
battery4) + one
LR6 (SG)
1)
(Unit: approx. hours)
8 10.5 13
4)
71014
5)
19 26 30
5)
1)
The battery life may be shorter due to
operating conditions and the temperature of
the location.
2)
When you record, use a fully charged
rechargeable battery.
3)
Measured value by the standard of
JEITA(Japan Electronics and Information
Technology Industries Association).
4)
When using a 100% fully charged rechargeable battery.
5)
When using a Sony LR6 (SG) “STAMINA”
alkaline dry battery (produced in Japan).
When to replace the batteries
When the dry battery or rechargeable
battery are weak, flashing r or “LOW
BATT” appears in the display. Replace the
dry battery or charge the rechargeable
battery.
The battery level indicator is approximate.
Note
Stop the recorder before replacing battery.
Operating Instructions
When playing (JEITA3))
(Unit: approx. hours)
Batteries Stereo LP2 LP4
NH-14WM
21 23 26
nickel metal
hydride
rechatgeable
4)
battery
LR6(SG)
alkaline dry
batttery
NH-14WM
30 35 38
5)
53 60 66
nickel metal
hydride
rechargeable
battery4) + one
LR6 (SG)
5)
93
Page 94

BAdditional information
Messages
If the recorder cannot carry out an
operation, error messages may flash in the
display window as follows.
BLANK DISC :
You tried to play an MD with no
recording on it.
DISC ERR :
The recorder cannot read the MD (it is
scratched or dirty). Reinsert the MD. If
the same message still appears, replace
the MD.
DISC FULL :
There is no more space to record on the
MD.
Data Save:
The MD recorder is recording
information (sounds) from the memory to
the disc. Wait until this process is
completed. Do not expose the recorder to
any physical shock, nor disrupt power
supply.
TOC Edit :
The MD recorder is recording
information (track start and end position)
from the memory to the disc. Wait until
this process is completed. Do not expose
the recorder to physical shock, nor
disrupt power supply.
BUSY :
You tried to operate the recorder while it
was accessing the recorded data. Wait
until the message goes out (in rare cases,
it may take a few minutes).
NAME FULL :
You tried to enter more than 200 letters to
label a single track or disc.
You tried to enter a total of more than
1700 letters for track or disc names.
Hi DC in :
The power supply is higher than
required. Use the recommended power
sources.
HOLD :
You tried to operate the recorder with the
HOLD switch slid in the direction of the
arrow. Slide back the switch.
LOW BATT :
The rechargeable battery or dry battery is
weak. Charge the rechargeable battery or
replace the dry battery.
MEM OVER :
You started recording with the recorder
receiving continuous vibration. Put the
recorder on the stable place and start
recording again.
NO COPY :
You tried to make a copy from a disc that
is protected by the Serial Copy
Management System. You cannot make
copies from a digitally connected source
which was itself recorded using the
digital connection. Use the analog
connection instead.
NO DISC :
You tried to play or record with no disc in
the recorder.
NO SIGNAL :
The recorder could not detect digital
input signals. Make sure that the source is
connected firmly. If the message appears
while recording, press x to end
recording.
P/B ONLY :
You tried to record or edit on a
premastered MD (P/B stands for
playback).
PROTECTED :
You tried to record or edit on an MD with
its tab in the record-protect position.
SORRY :
You tired to set Digital Sound Preset
while the “AUDIO OUT” parameter is set
to “LINE OUT.” Use the jog lever (L) to
set the “AUDIO OUT” parameter to
“HeadPhone.”
You tried to erase a track mark while
playing the MD or at the beginning of the
first track.
You tried to erase a track mark to
combine tracks the recorder cannot
combine (a track recorded in different
recording mode such as in LP2 and LP4,
or a track recorded through analog
connection and digital connection)*.
You tried to overwrite a track marrk.
You tried to press X, T MARK or REC
MODE while synchro-recording or the
joint text function is active.
* If you have recorded or erased many times
on the same MD, the data of a single track
may be scattered throughout the MD. When
the data is scattered in groups of less than 12
seconds long, the recorder will not be able to
combine the tracks.
TEMP OVER :
Heat has built up in the recorder. Wait
until the recorder cools down.
94
Page 95

TR FULL:
You tried to record more than 254 tracks.
TrPROTECT :
You tried to record over or edit a track
which has been protected from being
recorded over*.
* Track-protected MiniDiscs — Some MD
recorders will let you protect individual
tracks from being recorded over. This
recorder, however, does not offer this
feature.
EDITING
You pressed a key on the recorder while
editing on the remote control, or vice
versa.
LINE OUT
You pressed VOL +/– while the “AUDIO
OUT” parameter is set to “LINE OUT.”
Use the jog lever (L) to set the “AUDIO
OUT” parameter to “HeadPhone.”
NO TEXT
You tried to use the CD text copying
function to copy a track or disc name
from a CD that has no text data.
EMPTY
You tried to erase data in the phrase bank
but no data have been recorded.
BANK FULL
The phrase bank is almost full and cannot
store the phrase you tried to enter.
Delete some phrases from the phrase
bank, and then reenter the new phrase.
Operating Instructions
95
Page 96

ご案内
ソニーではお客様技術相談窓口として
「テクニカルインフォメーションセンター」
を開設しています。
お使いになってご不明な点、技術的なご質問、故障と思
われるときのご相談は下記までお問い合わせください。
テクニカルインフォメーションセンター
電話:048−794−5194
受付時間:月〜金 午前9時から午後6時まで
(祝日、年末、年始、弊社休日を除く)
ご相談になるときは次のことをお知らせください。
●型名
● ご相談内容:できるだけ詳しく
● お買い上げ年月日
この説明書は再生紙を使用しています。
VOC
(揮発性有機化合物)1%以下植物油インキ使用
Printed in Japan
 Loading...