

Page 1
Portable
3-860-705-13 (1)
Portable MiniDisc Recorder MZ-R5ST
MiniDisc Recorder
Operating instructions
Mode d'emploi
Bedienungsanleitung
Manual de instrucciones
EN
F
D
ES
MZ-R5ST
1997 by Sony Corporation
Page 2

WARNING
To prevent fire or shock hazard, do not
expose the unit to rain or moisture.
To avoid electrical shock, do not open the
cabinet. Refer servicing to qualified
personnel only.
Caution
The use of optical instruments with this
product will increase eye hazard.
Information
IN NO EVENT SHALL SELLER BE
LIABLE FOR ANY DIRECT,
INCIDENTAL OR CONSEQUENTIAL
DAMAGES OF ANY NATURE, OR
LOSSES OR EXPENSES RESULTING
FROM ANY DEFECTIVE PRODUCT
OR THE USE OF ANY PRODUCT.
"MD WALKMAN" is a trademark of Sony
Corporation.
2-EN
Page 3

Welcome!
Welcome to the world of the MiniDisc!
Here are some of the capabilities and
features you'll discover with the new
MiniDisc Recorder.
• The MiniDisc station system — Use the
recorder either by itself or attached to
the station dock. Use the recorder
attached to the station to enjoy full
features and connectivity. Use the
recorder detached from the station for
portability.
• High-fidelity recording — Low-noise,
low-distortion, high-fidelity recording
through the optical digital input jack.
• Sampling rate converter — This unit
enables you to record programs from
digital equipment using other
sampling rates, such as a BS tuner or
DAT deck.
• Variety of recording options
— Long recording with monaural
recording (up to 148 minutes).
— Time Machine recording enables
you to record from the top of a song
even if you pressed the button after
you heard the beginning of the song.
— Connect to an audio-timer to record
when you are not home.
• Easy editing with the large LCD panel
and the editing buttons
— Title samples (21 words and
phrases).
— UNDO function lets you undo an
editing operation.
• Programmed playback — Play any set
of tracks in the order of your choice.
• Card remote commander — Operate
the station from a distance. Direct
Selection available.
• Output jack for active speakers —
Connect to the active speakers SRSZ1000 (not supplied), etc., to enjoy
powerful MD playback at your
desktop.
EN
3-EN
Page 4

Table of contents
Setting up the station system ..................................6
Recording an MD right away! .................................. 8
Playing an MD right away!..................................... 10
Various ways of recording...................................... 12
Recording in sync with the source player (Synchro-recording) ....... 12
Starting recording going back 2 seconds (Time Machine
recording) ................................................................................................. 13
Recording in monaural for double the normal recording time ........14
Recording from a microphone............................................................... 15
To adjust the recording level manually ........................................... 15
Recording through analog input (Analog recording) ........................ 16
Checking the remaining time or the recording position.................... 17
On the station ....................................................................................... 17
On the recorder .................................................................................... 17
On the remote control ......................................................................... 18
Setting the clock to stamp the recorded time ...................................... 19
Various ways of playback .......................................20
Playing an MD on the station ................................................................20
Playing back with active speakers .................................................... 20
Selecting a track directly (Direct Selection) ..................................... 20
Playing selected tracks in the order of your choice
(Program Play) ..................................................................................... 21
Playing tracks repeatedly ....................................................................... 22
Emphasizing bass (DIGITAL MEGA BASS) ....................................... 23
Protecting your hearing (AVLS)............................................................ 23
Checking the remaining time or the playing position ....................... 24
On the station ....................................................................................... 24
On the recorder .................................................................................... 24
On the remote control ......................................................................... 25
4-EN
Page 5

Editing recorded tracks ...........................................26
Erasing tracks (ERASE)...........................................................................26
To erase a track .................................................................................... 26
To erase the whole disc ...................................................................... 26
Adding a track mark (TRACK MARK ON).........................................27
Erasing a track mark (TRACK MARK OFF)........................................ 28
Moving recorded tracks (MOVE).......................................................... 29
Labeling recordings (TITLE) .................................................................. 29
Cancelling the last editing operation (UNDO) ................................... 31
Other useful functions ............................................ 32
Locking the controls (HOLD) ................................................................ 32
Recording/playing with a timer ........................................................... 32
Connection and power sources .............................. 34
Hookup for recording — connecting with CD players, etc............... 34
Hookup for digital recording ............................................................ 34
Hookup for analog recording ............................................................ 34
Hookup for playback — connecting with amplifiers or active
speakers..................................................................................................... 35
Hookup with digital equipment ....................................................... 35
Hookup with analog equipment ....................................................... 35
Power sources .......................................................................................... 36
Using the station on house current ................................................... 36
Using the recorder on a lithium ion rechargeable battery ............ 36
Using the recorder on dry batteries .................................................. 37
Battery life ............................................................................................ 38
Additional information ...........................................38
Precautions ............................................................................................... 38
Troubleshooting....................................................................................... 41
System limitations ................................................................................... 44
Error Messages......................................................................................... 45
Specifications............................................................................................ 47
What is an MD?........................................................................................48
Looking at the controls ........................................................................... 50
5-EN
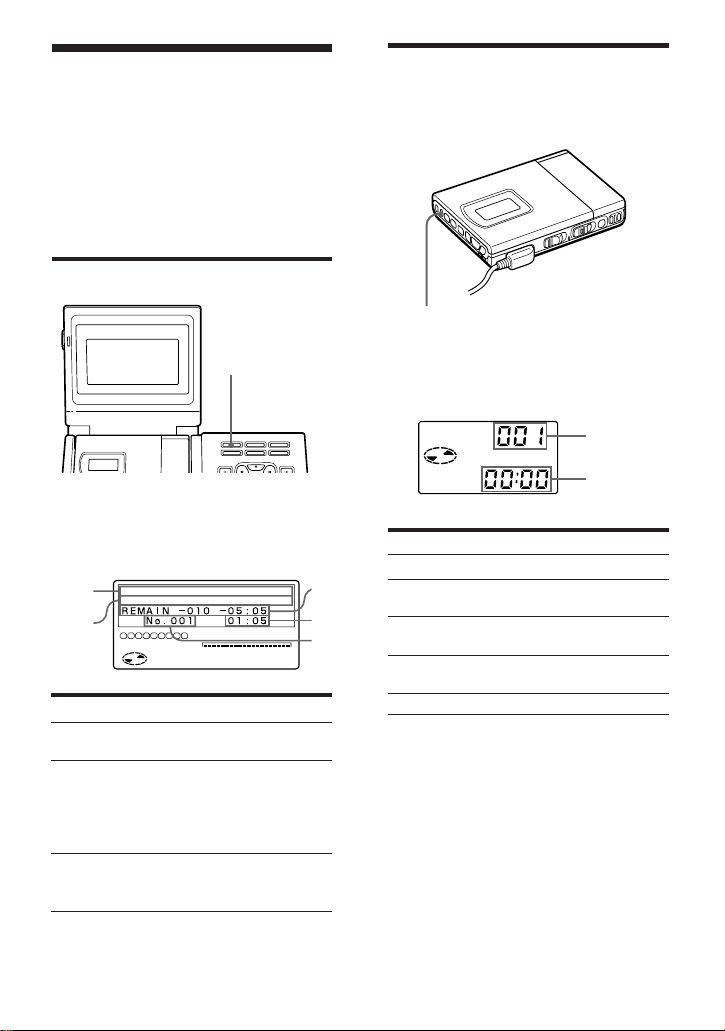
Page 6

Setting up the station system
Connect other equipment to the station before plugging in the AC
power cord. This section explains how to set up to record from a
portable CD player, etc., through digital input. To connect for other
ways of recording, see ”Hookup for recording”, (page 34).
1
Make connections.
to
DIGITAL
IN OPT1
or OPT2
Optical cable
(not supplied)
to OPTICAL
(DIGITAL)
OUT
Portable CD
player, etc.
to DC IN 9V
1 Connect the portable CD player
to the station.
2
Open the lid.
Press PUSH OPEN and open the lid.
6-EN
AC power adaptor
(supplied)
2 Connect the AC power adaptor.
to a wall outlet
∫
Page 7

3
Attach the recorder to the station.
∫
1 Fit the right side of the recorder ...
To detach the recorder from the
station
RELEASE
Slide RELEASE fully to the right during stop.
2 ... and push down the left side until
it clicks.
The display will light up on the station if
the recorder is attached correctly.
Notes
• Set the clock to stamp the recorded
date and time (see page 19).
• When recording from a portable CD
player, play it on AC power and
disable the anti-skip function (such as
ESP*).
* Electronic Shock Protection
• Do not stick stickers, etc., on surfaces
where the recorder comes to contact
with the station, as this may cause a
malfunction.
7-EN
Page 8

Recording an MD right away!
The explanation here is for recording through digital input. To record
through analog input, see page 16. To record with a microphone, see
page 15.
1
Insert a recordable MD.
1 Slide OPEN and
open the lid.
2 Insert a recordable MD
with the label side facing
up, and press the lid
down to close.
∫
OPEN
2
Select input.
Set INPUT switch to match the
input jack connected to the source.
Input jack
DIGITAL IN OPT 1
DIGITAL IN OPT 2
INPUT
INPUT switch
OPT 1
OPT 2
8-EN
3
Select the point to start recording.
If you want to record from the end of
the previous recording, press END
SEARCH.
(If you want to start recording from the
beginning, skip this step).
END SEARCH
Page 9
4
Record an MD.
CD player, etc.
(source)
1 Press and slide REC to the right .
“REC” lights up in the display and
recording starts.
2 Play the CD or tape you want to
record.
To stop recording, press p.
Note
”Toc Edit” flashes while data of the
recording (the track’s start and end points,
etc.) is being recorded. Do not move or jog
REC
To
Pause
the recorder or disconnect the power source
while the indication is flashing in the
display.
Press
1)
P
Press P again to resume recording.
Record part way through the
previous recording
2)
(, + or = to find the start point
of recording and press p to stop. Then
slide REC.
Remove the MD
Turn power off
1)
A track mark is added at the point where you press P; thus the remainder of the track will be
counted as a new track.
2)
If you start a new recording partway from a previous recording, the previous recording will be
overwritten (erased) by the new one.
3)
Once you open the lid, the point to start recording will change to the beginning of the first track.
Check the point to start recording on the display.
p and open the lid.
Press POWER
3)
If the recording does not start
•Make sure the MD is not record-protected
(page 40).
•If "SCMS NO COPY" is displayed, you
cannot record digitally (page 40).
•Premastered MDs cannot be recorded over.
For models supplied with the AC plug
adaptor
If the AC power adaptor does not fit the wall
outlet, use the AC plug adaptor.
z
•You can monitor the sound during
recording. Plug in the headphones to the
2HEADPHONES jack on the station, or to
2/REMOTE jack on the recorder. Note that
the quality of sound through the
headphones connected to the recorder is
inferior to that connected to the station. Use
it to confirm recording.
•The power turns off automatically if you
leave the station unoperated for 5 minutes
during stop. Press ( to turn the power on
again.
9-EN
Page 10

Playing an MD right away!
This section explains how to play MDs on the recorder when it is
detached from the station. Make sure the rechargeable battery is fully
charged. For charging and other power sources, see “Power
Sources”, (pages 36 to 38).
1
2
Insert the rechargeable battery.
Insert an MD.
1 Slide OPEN and open the lid.
∫
∫
OPEN
2 Insert an MD with the label side
facing up, and press the lid down to
close.
10-EN
Page 11
3
Play an MD.
VOL –/+
(
1 Press ( (Turn the control to
(•+ on the remote control).
A short beep sounds in the headphones.
2 Press VOL+/– to adjust the volume.
The volume will be shown in the display.
VOL –/+
To stop play, press p.
p
To
Pause
A long beep sounds in the headphones.
Press (Beeps in the headphones)
P (Continuous short beeps)
Press P again to resume play.
Find the beginning of the current track
= once (Turn the control to =on
the remote control)
(Three short beeps)
Find the beginning of the next track
+ once (Turn the control to
(•+ on the remote control)
(Two short beeps)
Go backwards while playing
1)
keep pressing = (Turn and hold the
control to = on the remote control)
Go forward while playing
1)
keep pressing + (Turn and hold the
control to (•+ on the remote
control)
Remove the MD
1)
To go backward or forward quickly without listening, press P and keep pressing = or +.
2)
Once you open the lid, the point to start play will change to the beginning of the first track.
p and open the lid.
2)
If the play does not start
Make sure the recorder is not locked (page
32).
z
Playback will switch automatically between
stereo and monaural according to the sound
source.
To play with the recorder attached to
the station
See "Playing an MD on the station" (page 20).
When using optional headphones
Use only headphones with a stereo miniplug. You cannot use headphones with a
micro-plug.
11-EN
Page 12
z
Various ways of recording
Recording in sync with
the source player
(Synchro-recording)
You can easily make digital recordings of
a digital source on an MD.
Before synchro-recording, make
connections to the digital source with a
digital cable, and insert a recordable MD.
CD players,
etc.
To stop recording, press p.
z
•You cannot pause manually during
synchro-recording.
•When there is no sound from the player for
more than 3 seconds during synchrorecording, the recorder goes into the
standby mode automatically. When the
sound comes from the player again, the
recorder resumes synchro-recording. If the
recorder is kept in the standby mode for 5
minutes or longer, the recorder stops
automatically.
Notes
•Do not switch SYNCHRO REC after step 2.
Recording may not be done properly.
•When recording in monaural, follow steps
1 and 2 of “Recording in monaural for
double the normal recording time” (page
14) before synchro-recording .
SYNCHRO REC
1 Set INPUT switch to ”OPT1” or
”OPT2”.
Set it to match the input jack
connected to the source.
2 Slide SYNCHRO REC to ON.
“SYNC” appears in the display.
SYNC
0% 50% 100%
LEFT
–db5040 30 20
LEVEL
RIGHT
3 Press and slide REC to the right.
The recorder stands by for recording.
4 Play the source sound.
The recorder starts recording when it
receives the playing sound.
12-EN
REC
INPUT
0246812
Page 13

Starting recording
going back 2 seconds
(Time Machine
recording)
The recorder stores sound input in its
memory during record standby. When
you start Time Machine recording, the
sound is recalled from the memory and
the recorder starts recording the sound
from 2 seconds before.
This is convenient, for example, if you do
not want to miss the beginning of a track
when recording from a BS or a FM
program.
4 Press TIME MACHINE REC to start
recording.
The recorder will go back 2 seconds
and start recording.
To stop recording, press p.
Note
If you have taken less than 2 seconds
between steps 2 and 3, then the time the
recorder will go back will also be less than 2
seconds.
Start (step 3)
2 sec.
Recording
Sound is recorded from here
TIME MACHINE REC P
Stop
Time
1 While pressing P, press and slide
REC to the right.
The recorder stands by for recording.
2 Play the sound source.
The recorder will start storing the
sound input.
3 If you want to record through analog
input, adjust the recording level
(follow step 6 in ”Recording through
analog input”, page 16).
13-EN
Page 14

Recording in monaural
for double the normal
recording time
For longer recordings, choose to record in
monaural. The recording time becomes
double the normal. Monaural recording is
possible either with the recorder detached
from or attached to the station.
P
MODE
REC
5 Play the sound source.
To stop recording, press p.
The recorder switches back to stereo
recording when you record the next time.
Notes
•For longer recordings, we recommend the
use of the recorder attached to the station.
•If you record a stereo source in monaural,
the sounds from left and right will be
mixed.
•Set SYNCHRO REC to OFF when recording
through digital input. You cannot record in
monaural if SYNCHRO REC is slid to ON.
•The MDs recorded in monaural can be
played back only with an MD player/
recorder that has the monaural playing
function.
MODE REC
1 While pressing P, press and slide
REC to the right.
The recorder stands by for recording.
2 Press MODE.
”MONO” and ”Monaural REC”
appear in the display, and the
recorder switches to monaural
recording.
3 If you want to record through analog
input on the station, adjust the
recording level (play the source and
follow step 6 in ”Recording through
analog input”, page 16).
4 Press P again to start recording.
14-EN
P
Page 15
Recording from a
microphone
Connect a stereo microphone (ECM-717,
ECM-MS907, ECM-MS957, etc.; not
supplied) to the MIC (PLUG IN POWER)
jack. When using the recorder detached
from the station, you can only record
through the microphone. The recording
level is adjusted automatically, though
you can adjust manually as well.
Stereo microphone
to MIC
(PLUG IN
MIC SENS (at the bottom)
POWER)
1 Select the sensitivity with MIC SENS.
Usually, set it to HIGH. When
recording loud sounds such as a live
concert, set it to LOW.
2 Insert a recordable MD and start
recording.
Press and slide REC to the right.
For other operations, see “Recording
an MD right away! ” (page 8). The
buttons on the station with the same
names have the same function.
To adjust the recording level
manually
=
+ REC
Pp
1 While holding down P, press and
hold REC to the right for more than 2
seconds.
The recorder stands by for recording.
REC
Recording
level meter
2 Play the source.
3 Observe the level meter in the display
and adjust the recording level by
pressing + (+) or = (–). Set the
level so that the meter shows 4 bars at
average input level.
REC
Recording
level
4 Press P again to start recording.
To stop recording, press p.
The recording level control is switched back
to automatic control.
Note
When the recorder is attached to the station,
you cannot record through the microphone.
z
Select the sensitivity with MIC SENS .
Note
Adjust the recording level while the
recorder is in standby mode. You cannot
adjust it while recording.
15-EN
Page 16

Recording through
analog input (Analog
recording)
When recording from a radio or a record,
connect analogically (page 35) and record
as follows. Be sure to adjust recording
level manually.
p
INPUT
REC
P
REC LEVEL
(ANALOG)
1 Insert a recordable MD.
2 Set INPUT to ANALOG.
3 Select the point to start recording.
If you want to record form the end of
the previous recording, press END
SEARCH.
4 While holding down P, press and
slide REC to the right.
The recorder stands by for recording.
6 Observe the level meter in the display
and adjust the recording level with
REC LEVEL. Set the level to around
12 (-12dB) at average input level.
1
REC
0% 50% 100%
LEFT
LEVEL
–db5040 30 20
RIGHT
low
0246812
high
Recording
level
indicator
7 Press P again to start recording.
Note
Note that REC LEVEL is effective even
during recording; adjusting it will change
recording level.
1
5 Play the source.
16-EN
REC
0% 50% 100%
LEFT
LEVEL
–db5040 30 20
RIGHT
0246812
Recording level indicator
Page 17

Checking the remaining
time or the recording
position
You can check information such as the
remaining time on the display window of
the station, the display window of the
recorder, or on the display window of the
remote control.
On the station
DISPLAY
1 Press DISPLAY.
With each press, the display changes
as follows.
A
1 2 3 4 5 6 7 8 9
REC
0% 50% 100%
LEFT
–db5040 30 20
LEVEL
RIGHT
Position pointer
B
Track
0246812
number
In stop mode
A
—
Remaining time for
B
Elapsed time
Elapsed time
recording
Remaining time of
the tracks in the
Remaining time of
the current track
disc
Current time and
1)
date
1)
Appears only when the clock is set.
Elapsed time
On the recorder
There is no display on the recorder when
it is attached to the station.
DISPLAY
1 Press DISPLAY.
Each time you press the button, the
display changes as follows.
REC
A
While recording
A
Remaining time for
B
Elapsed time
recording
Current time and
1)
date
1)
Appears only when the clock is set.
Elapsed time
While recording
A
Track number
—
Current year
1)
B
Elapsed time
Remaining time
for recording
Current month
and date
—
1)
Appears only when the clock is set.
Current time
B
1)
1)
continued
17-EN
Page 18

In stop mode
A
Track number
—
B
Elapsed time
Remaining time
for recording
Remaining number
of tracks
Current year
1)
Remaining time
for playback
Current month
and date
—
1)
Appears only when the clock is set.
Current time
On the remote control
DISPLAY
1 Press DISPLAY.
Each time you press the button, the
display changes as follows. When the
recorder is attached to the station, the
display will not change from the
track number and the elapsed time.
In stop mode
A
Track number
Track number
Number of tracks
B
Elapsed time
Track name
Disc name
1)
1)
in the disc
—
—
1)
1)
1)
Appears only if the disc/track has been
labeled.
2)
Appears only when the clock is set.
Current month
2)
and date
Current time
2)
z
If you want to check the playing position or
track name while playing, see page 24.
BA
While recording
A
Track number
Track number
—
—
1)
Appears only when the clock is set.
18-EN
B
Elapsed time
Remaining time
for recording
Current month
and date
Current time
1)
1)
Page 19
Setting the clock to
stamp the recorded
time
To stamp the date and time on the MD
when you record, you first need to set the
clock. You can set the clock either from
the detached recorder, or from the station
when the recorder is attached.
LINE(ANALOG)ACTIVE
IN OUT OPT 1 OPT 2
SP OUT
DC IN 9V
DIGITAL IN DIGITAL OUT
OPTICAL
CLOCK SET
CLOCK SET
1 Press CLOCK SET.
Use a pointed object. The digits of the
year flash.
Display window of the station
1 2 3 4 5 6 7 8 9
0% 50% 100%
LEFT
–db5040 30 20
LEVEL
RIGHT
0246812
2 Change the current year by pressing
 or µ.
To change the digits rapidly, keep
pressing  or µ.
3 Press m to enter the year.
The digit of the month flashes.
If you make a mistake while
setting the clock
Press p, and set the clock again from step
2. You can skip a step by pressing m.
To set the clock on the recorder
The procedure is the same as in setting
the clock on the station. Press CLOCK
SET at the bottom of the recorder so that
the digit of the year flashes. Change the
number with = or +, and enter with
(. When you press ( to enter the
minute, the clock starts operating.
When you attach the recorder to the
station after you have set the clock on the
recorder, the clock on the station will be
synchronized automatically.
To display the time in the 24hour system
While setting the clock, press DISPLAY.
To display the time in the 12-hour system,
press DISPLAY again.
Charging the built-in battery for
the clock
When you use the recorder for the first
time or after a long period of disuse,
charge the built-in battery. After setting
the clock, leave the recorder connected to
the AC power for about 2 hours to charge
the built-in battery. Once charged, the
built-in battery should last about a month
without connecting to any of the power
sources. The recorder will automatically
charge the built-in battery while
connected to AC power, dry batteries or a
rechargeable battery.
4 Repeat steps 2 and 3 to enter the
current month, date, hour, and
minute.
When you press TITLE/ENTER to
enter the minute, the clock starts
operating.
19-EN
Page 20
zVarious ways of
playback
Playing an MD on the
station
Play an MD with the recorder attached to
the station as follows. You can use the
card remote commander as well.
Note
The power turns off automatically when you
leave the station unoperated for 5 minutes
during stop. Press POWER or ( to turn the
power on again.
Playing back with active
speakers
You can enjoy MD playback on active
speakers such as SRS-Z1000 (not
supplied), etc., by connecting it to the
station (page 35).
POWER
p
+
(
=
ACTIVE SP LEVEL
POWER
1 2 3
(
=
4 5 6
7 8 9
>
10 0/10
= ( +
P p
P
To
Play
Adjust the volume
of the headphones
Pause
PLAY MODE
ACTIVE SP
Operation
Press (
Turn LEVEL on the
station
Press P
POWER
+
ACTIVE
LEVEL
SP LEVEL
p
Press P again to
resume play
Find the beginning
Press = once
of the current track
Find the beginning
Press + once
of the next track
Go backwards while
1)
playing
Go forward while
1)
playing
Remove the MD
Turn power off
1)
To go backwards or forward quickly
Keep pressing =
Keep pressing +
Press p and open
2)
the lid.
Press POWER
without listening, press P then keep
pressing = or +.
2)
Once you open the lid, the point to start
play will change to the beginning of the
first track.
P
Operate with the buttons on the station or
from the card remote commander.
To adjust volume
Press ACTIVE SP LEVEL –/+ on the
station or the card remote commander.
Selecting a track directly
(Direct Selection)
You can select a track directly by pressing
the track number on the card remote
commander.
1 Press the number key(s) for the track
number of the track of your choice.
The recorder will play the selected
track.
POWER
1 2 3
4 5 6
7 8 9
PLAY MODE
>
10 0/10
= ( +
P p
z
•To select track number 10, press 0/10.
•To select a track number larger than 10,
first press >10, then press the number for
the tens digit and then the units digit. Press
0/10 if the units digit is zero.
•To select a track number larger than 100,
first press >10 twice, then press the number
for the hundreds digit, tens digit, and the
units digit.
Number keys
ACTIVE SP
LEVEL
20-EN
Page 21

Playing selected tracks in the
order of your choice
(Program Play)
Select up to 20 tracks and play them in the
order of your choice.
POWER
1 2 3
(
4 5 6
7 8 9
>
10 0/10
= ( +
P p
PLAY MODE
ACTIVE SP
LEVEL
Number keys
PLAY MODE
1 Press PLAY MODE repeatedly until
”PROGRAM” lights up in the
display.
2 Press the number key(s) for the track
number of your choice in the order to
be played.
The tracks are programmed in
sequence. You can program up to 20
tracks.
To program from the station
1 Press MODE repeatedly until
”PROGRAM” lights up in the
display.
2 Select the track number of your
choice with the cursor keys and press
SELECT.
3 Repeat step 2 and select tracks in the
order to be played.
4 Press (.
Note
The program will be erased if you do any of
the following:
• press p
• remove the disc
• detach the recorder from the station
• record or edit
Program
number
1 2 4 8
PROGRAM
11
0% 50% 100%
LEFT
–db504030 20
LEVEL
RIGHT
Total
time
0246812
Track number
To cancel a track, press ERASE/
DELETE on the station.
3 Press (.
The recorder will play the tracks in
the programmed order.
To display the track order
Press SELECT on the station before
playing back. With each press, the track
number will be displayed in the order
programmed.
To change the program
Press ERASE/DELETE on the station
before playback to cancel the last track, or
press p to cancel all tracks. Then, repeat
from step 2.
21-EN
Page 22
Playing tracks
repeatedly
You can play tracks repeatedly in three
ways — all repeat, single repeat, and
shuffle repeat.
On the recorder
PLAY
MODE
MODE
On the station
POWER
1 2 3
4 5 6
7 8 9
PLAY MODE
>
10 0/10
ACTIVE SP
= ( +
LEVEL
P p
MODE
1 Press MODE (PLAY MODE on the
remote control) repeatedly during
playback until the play mode
indication of your choice appears in
the display.
To cancel repeat play
Press MODE (PLAY MODE on the remote
control) repeatedly until ”REPEAT” ” ”
disappears from the display.
PLAY
MODE
Play mode
All the tracks
are played
repeatedly.
(all repeat)
A single track
is played
repeatedly.
(single repeat)
All the tracks
are played
repeatedly in
random order.
(shuffle repeat)
22-EN
Recorder/
Remote control
“ ”
“1”
“
SHUF
Station
REPEAT
REPEAT 1
REPEAT
”
SHUFFLE
Page 23

Emphasizing bass
(DIGITAL MEGA BASS)
Protecting your hearing
(AVLS)
Mega Bass function intensifies low
frequency sound for richer quality audio
reproduction. You can use this function
only with the recorder detached from the
station.
DIGITAL MEGA BASS
1 Set DIGITAL MEGA BASS to ”1” or
”2”.
The bass sound will be emphasized
accordingly (1: moderate effect, 2:
strong effect).
Notes
•If the sound becomes distorted when
emphasizing bass, turn down the volume.
•Mega Bass function does not affect the
sound being recorded.
The AVLS (Automatic Volume Limiter
System) function keeps down the
maximum volume to protect your ears.
You can use this function only with the
recorder detached from the station.
AVLS
1 Set AVLS to LIMIT.
”AVLS” will appear in the display,
and the volume will be limited within
a moderate level.
23-EN
Page 24
Checking the remaining
time or the playing
position
You can check information such as track
and disc name on the display window of
the station, the display window of the
recorder, or on the display window of the
remote control.
On the station
On the recorder
There is no display on the recorder when
it is attached to the station.
DISPLAY
DISPLAY
1 Press DISPLAY during playback.
With each press, the display changes
as follows.
Disk
1)
name
Track
name
A
Remaining
number of
tracks and
remaining
time
Recorded time
and date
1)
Appears only if the disc/track has been
labeled.
2)
Appears only if the recorded date and time
has been stamped.
24-EN
1)
—
1 2 3 4 5 6 7 8 9
B
Elapsed
time
Remaining
time of
current track
Recorded
time
0% 50% 100%
LEFT
–db5040 30 20
LEVEL
RIGHT
2)
C
Track
number
Track
number
Recorded
Year month/
date
1 Press DISPLAY during playback.
With each press, the display changes
as follows.
A
B
A
Track number
A
B
C
0246812
Track number
Remaining number
of tracks
Recorded year
—
1)
Appears only if the recorded date and time
has been stamped.
2)
1)
B
Elapsed time
Remaining time of
current track
Remaining time
Recorded month
1)
and date
Recorded time
1)
Page 25

On the remote control
DISPLAY
1 Press DISPLAY during playback.
With each press, the display changes
as follows. When the recorder is
attached to the station, the display
will not change from the track
number and the elapsed time.
A
A
Track number
Track number
Number of tracks
B
B
Elapsed time
Track name
Disc name
1)
1)
in the disc
—
—
1)
Appears only if the disc/track has been
labeled.
2)
Appears only if the recorded date and time
has been stamped.
Recorded month
2)
and date
Recorded time
2)
z
If you want to check the remaining time or
the recording position while recording or in
stop mode, see page 17.
25-EN
Page 26

zEditing recorded tracks
You can edit your recordings by adding/
erasing track marks or labeling tracks and
MDs. Premastered MDs cannot be edited.
Notes on editing
•Do not move or jog the recorder while “Toc
Edit”* is flashing in the display.
•You cannot edit tracks on an MD that is
record-protected. Before editing tracks,
close the tab on the side of the MD.
*TOC = Table of Contents
Erasing tracks (ERASE)
To erase the whole disc
You can erase all the tracks and data of
the MD at the same time.
Be sure to check the contents of the disc
you want to erase.
To erase a track
Make sure of the track you are erasing.
p
ERASE/
DELETE
TITLE/
ENTER
1 Press ERASE/DELETE while playing
the track you want to erase.
“Erase OK? n Push Enter” appears
in the display, and the recorder plays
the selected track repeatedly. To
cancel erasing, press p.
2 Check the track number in the
display and press TITLE/ENTER.
The track is erased from the MD and
the remaining tracks are renumbered.
The recorder will start to play the
next track.
To erase a part of a track
Add track marks (page 27) at the
beginning and the end of the part you
want to erase, then erase the part.
p
REC
TITLE/
ENTER
ERASE/
DELETE
1 In stop mode, keep pressing ERASE/
DELETE and press and slide REC to
the right.
“All Erase OK ? n Push Enter”
appears in the display. To cancel
erasing, press p.
2 Press TITLE/ENTER.
”Toc Edit” flashes in the display.
When the MD is erased, “BLANK
DISC” appears.
26-EN
Page 27

Adding a track mark
(TRACK MARK ON)
You can add track marks so that the part
after the new track mark is counted as a
new track.
The track numbers will increase as follows.
1234
12345
4
.
Add a Track mark
Track numbers increase
To insert a track mark on the
recorder
Press T MARK during playback or pause.
A track mark will be added where you
pressed the button.
To add track marks while
recording
Press TRACK MARK on the station, T
MARK on the recorder or TRACK MARK on
the remote control. A track mark will be
added where you pressed the button.
Note
When adding a track mark with the recorder,
or when adding a track mark during
recording, the mark will be added at the
point where you pressed the T MARK or the
TRACK MARK button. You cannot adjust its
position with the cursor keys.
Cursor keys
TITLE/ENTER
TRACK MARK
1 While playing or pausing an MD,
press TRACK MARK on the station at
the point you want to add a mark.
”Rehearsal” and ”Track Mark ON
OK? n Push Enter” will appear. A
four second segment will be played
repeatedly. Press the cursor keys to
adjust the point to be marked. It can
be moved forward or backward up to
eight seconds, in 0.06 second steps.
To cancel adding, press p.
2 Press TITLE/ENTER.
”Track Mark ON” will be displayed.
A track mark is added and the
portion after the mark will be
counted as a new track.
27-EN
Page 28

Erasing a track mark
(TRACK MARK OFF)
When you record with analog (line) input,
unnecessary track marks may be recorded
where recording level is low. You can
erase a track mark to combine the tracks
before and after the track mark. The track
numbers will change as follows.
1234
.
123
Track numbers decrease
4
Erase a track mark
4 Press TITLE/ENTER.
”Track Mark OFF” will be displayed.
The track mark is erased and the two
tracks are combined. The number of
the newly combined track will be that
of the first track. The succeeding
tracks will be renumbered.
To erase a track mark on the
recorder
Press = or + during pause to find the
track mark you want to erase. Press T
MARK.
Note
When erasing a track mark with the
recorder, the mark will be erased where you
pressed the T MARK button. There will be
no repeated play.
z
When you erase a track mark, the date, time,
and name assigned to the mark are also
erased.
=
TITLE/
ENTER
P
1 While playing the track with the track
mark you want to erase, press P to
pause.
2 Find the track mark by pressing =
lightly.
For example, to erase the third track
mark, find the beginning of the third
track. “00:00” appears in the display.
3 Press TRACK MARK on the station.
”Rehearsal” will light up and ”Track
Mark OFF OK? n Push Enter” will
appear. A four second segment will
be played repeatedly.
To cancel erasing, press p.
28-EN
TRACK
MARK
Page 29
1 2 3 4 5 6 7 8 9
0% 50% 100%
LEVEL
0246812
LEFT
RIGHT
–db5040 30 20
Moving recorded tracks
(MOVE)
Labeling recordings
(TITLE)
You can change the order of the recorded
tracks.
Before moving
Track A Track B Track C Track D
1234
Move track C
After
moving
Track A Track C Track B Track D
MOVE/INSERT
$
1234
from the third to
the second track.
Cursor keys
P
TITLE/
ENTER
1 While playing or pausing the track
you want move, press MOVE/
INSERT.
For the example above, ”Move
MV003 n 003” and ”OK? n Push
Enter” appear in the display.
2 Press the cursor keys to select the
new track position.
M or µ moves the track number
down. Â or m moves the track
number up.
To cancel moving, press p.
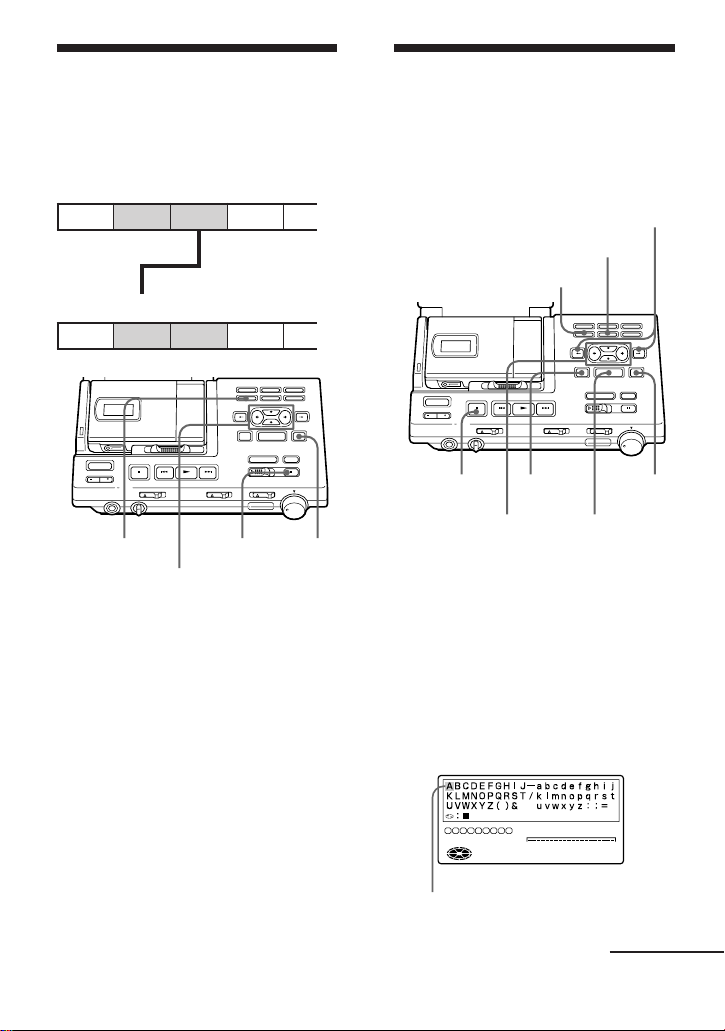
You can label the MDs and tracks you
recorded with letters, numbers, and
marks. Each label can be made up of up to
200 characters, and each MD can hold up
to about 1700 characters.
MOVE/INSERT
p
Cursor keys
INPUT POSITION
ERASE/DELETE
CAPS TITLE/
ENTER
SELECT
1 To label a track , play the track you
want to label.
To label an MD, insert the MD you
want to label. If an MD is already
inserted, press p to stop.
2 Press TITLE/ENTER.
A set of characters will be displayed.
3 Press the cursor keys to select a
character and press SELECT to enter.
3 Press TITLE/ENTER.
The track moves to the position
before the designated track.
Cursor
continued
29-EN
Page 30

Press
CAPS
To
Switch between the
alphabet, symbols and
numbers, and title
samples.
Cursor keys
Move the cursor up/
down/right/left.
INPUT
POSITION M/m
SELECT
Move the input position
left/right.
Enter a letter and move
the input position to the
right.
p
MOVE/
Cancel labeling.
Insert a blank space.
INSERT
ERASE/
DELETE
Delete a letter and move
the input position to the
left.
4 Repeat step 3 until you have entered
all the characters for the label.
5 Press TITLE/ENTER.
The track or disk is labeled.
To cancel labeling, press p.
Available characters
• Capital and small letters of the English
alphabet
• Numbers 0 to 9
• ! " # $ % & ( ) * + – . ; < = > ?
@ _ ` ' , / : _ (space)
To relabel recordings
Follow steps 1 and 2 to display the label
of the track or MD. Enter a new character
over the one you want to change, then
press TITLE/ENTER.
Notes
•You cannot relabel premastered MDs or
label MDs that have not been recorded.
•The recorder is able to display, but cannot
label using, Japanese “Katakana”
characters.
To use the title samples
Use any of the 21 sample words/phrases
as a disc name, track title, or message.
Press M/m to change the page.
Press Â/µ to move the cursor (>) up or
down.
Press SELECT to enter the title chosen
with the cursor.
1 2 3 4 5 6 7 8 9
Cursor
0% 50% 100%
LEFT
–db5040 30 20
LEVEL
RIGHT
Page indication
30-EN
0246812
Page 31

Cancelling the last
editing operation
(UNDO)
You can undo the last perfomed editing
operation and return to the previous
status.
However, you cannot undo an editing
operation if you have done any of the
following afterwards:
• slide the REC switch
• turn off the power or remove the MD
• remove the recorder from the station
• leave both the recorder and the station
unoperated for more than 5 minutes
• remove the AC power adaptor from
the wall outlet
1 Press UNDO during stop.
2 Press TITLE/ENTER.
”TOC EDIT” will appear for a few
seconds and the MD will return to the
previous status.
To cancel UNDO, press p.
Note
Once you have undone an editing operation,
you cannot undo this undoing process itself
to restore the original editing operation.
p
The following messages will appear
according to the last performed
editing operation.
Operation
Erase a track
Erase all tracks
Insert a track
mark
Erase a track
mark
Move a track
Name a disc
Name a track
Message
”Erase Undo OK?”
”All Erase Undo OK?”
”Track Mark ON Undo
OK?”
”Track Mark OFF Undo
OK?”
”Move Undo OK?”
”Disc Name Undo OK?”
”Track Name Undo
OK?”
UNDO
31-EN
Page 32

zOther useful functions
Locking the controls
(HOLD)
To prevent the buttons from being
accidentally operated when you carry the
recorder, use this function.
HOLD
HOLD
1 Slide HOLD in the direction of the
c.
On the recorder, slide HOLD to lock
the controls of the recorder. On the
remote control, slide HOLD to lock
the controls of the remote control.
Slide HOLD in the opposite direction
of the arrow to unlock the controls.
z
The HOLD function on the recorder is
disabled while it is attached to the station.
The HOLD function on the remote control is
unaffected.
Recording/playing with
a timer
Start recording or playback at a preset
time using an audio-timer (optional).
to audiotimer
TIMER
1 Plug in the AC power adaptor of the
station to the audio-timer (optional).
2 Adjust recording level manually and
press p if recording through analog
input (steps 4 to 6 of ”Recording
through analog input”, page 16).
3 Set TIMER to ”REC” or ”PLAY”.
To start recording at the preset time:
select ”REC”. Recording will start
automatically after the part that is
already recorded in the MD.
To start playback at the preset time:
select ”PLAY”.
4 Set the time on the audio-timer and
turn the power off.
The audio-timer will turn on
automatically at the preset time,
which will then turn on the station.
32-EN
Page 33

Notes
•To record monaurally using an audio-
timer, press MODE for 2 seconds or longer
after step 3. The timer recording setting will
be displayed. If the recording mode is in
”Stereo”, press MODE again so that it
changes to ”Monaural”.
•If you are using the station for the first time
or after a long period of disuse, charge the
built-in backup battery of the station before
using a timer. The recorder uses this
backup battery when it writes TOC
information (see page 49) after the timed
recording is complete and the power is
turned off. To charge the built-in battery,
connect the AC power adaptor to the
station. Full charging takes about 10 hours.
The battery will last for about a week; do
not set the timer to start recording in more
than a week.
33-EN
Page 34

zConnection and power
sources
Hookup for recording —
connecting with CD
players, etc.
Record sounds from other equipment on
the station. Connection differs with
digital and analog. Connect accordingly.
Hookup for analog recording
After connection, set the INPUT switch to
ANALOG and adjust recording level
(page 16).
Record player,
cassette deck, etc.
to line (analog)
output jacks
Hookup for digital recording
The built-in sampling rate converter
enables you to connect digital sources
with a different sampling rate (such as a
BS tuner or a DAT deck) and record
digitally.
After connection, set the INPUT switch to
OPT1 or OPT2 to match the connection.
DAT deck, CD
player, etc.
Rectangularoptical
plug
to DIGITAL
OUT
POC-10AB etc.
(not supplied)
POC-10A etc.
(not supplied)
LINE(ANALOG)ACTIVE
IN OUT OPT 1 OPT 2
to DIGITAL IN OPT1 or OPT2
SP OUT
Portable CD
player, etc.
DC IN 9V
DIGITAL IN DIGITAL OUT
OPTICAL
Optical
mini plug
CLOCK SET
RK-C310GS*
etc. (not
supplied)
R (red) L (white)
LINE(ANALOG)ACTIVE
IN OUT OPT 1 OPT 2
SP OUT
DC IN 9V
DIGITAL IN DIGITAL OUT
OPTICAL
to LINE(ANALOG) IN
* Use the connecting cords without an
attenuator.
CLOCK SET
34-EN
Page 35

Hookup for playback —
connecting with
amplifiers or active
speakers
Play or record sounds from the recorder
on other equipment. Connection differs
with usage and type of equipment.
Connect accordingly.
Hookup with analog
equipment
Active speakers SRS-Z1000,
etc. (not supplied)
Hookup with digital
equipment
LINE(ANALOG)ACTIVE
IN OUT OPT 1 OPT 2
to DIGITAL OUT
Rectangularoptical
plug
MD deck, DAT
deck, digital
amplifier, etc.
DC IN 9V
DIGITAL IN DIGITAL OUT
SP OUT
POC-10A etc.
(not supplied)
POC-10AB etc.
(not supplied)
to DIGITAL IN
Portable MD
recorder, etc.
OPTICAL
CLOCK SET
Optical
mini
plug
LINE(ANALOG)ACTIVE
SP OUT
IN OUT OPT 1 OPT 2
R (red)
Cassette deck,
amplifier, etc.
to ACTIVE SP OUT
DC IN 9V
DIGITAL IN DIGITAL OUT
OPTICAL
CLOCK SET
to LINE (ANALOG)
OUT
L (white)
RK-C310GS
etc. (not
supplied)
to LINE IN
35-EN
Page 36

Power sources
You can use the following power sources:
When the recorder is attached to the
station
— house current (wall outlet)
When the recorder is used by itself
using the battery compartment of the
recorder
— lithium ion rechargeable battery
LIP-8 (supplied)
using the supplied external battery
case
— two LR6 (size AA) dry batteries
Using the station on house
current
The station can be powered only by the
house current.
LINE(ANALOG)ACTIVE
IN OUT OPT 1 OPT 2
SP OUT
DC IN 9V
DIGITAL IN DIGITAL OUT
OPTICAL
CLOCK SET
2 Insert the LIP-8 lithium ion
rechargeable battery (supplied) in the
battery compartment of the recorder
and close the lid.
3 Attach the recorder to the station.
n will appear in the display and
charging starts.
to DC IN 9V
AC power adaptor
(supplied)
Using the recorder on a
lithium ion rechargeable
battery
Before using the supplied LIP-8 lithium
ion rechargeable battery for the first time,
charge it in the station.
1 Connect the station to the house
current (wall outlet).
36-EN
LINE(ANALOG)ACTIVE
IN OUT OPT 1 OPT 2
SP OUT
DC IN 9V
DIGITAL IN DIGITAL OUT
OPTICAL
to a wall
outlet
CLOCK SET
to a wall
outlet
displayed repeatedly
ı will appear when
charging is complete.
z
A rechargeable battery inserted in the battery
compartment of the station is charged
whether or not the power is turned on as
long as the AC power adaptor is connected
properly.
Page 37

To charge on the station with the
recorder detached
The LIP-8 lithium ion rechargeable
battery can also be charged on the station
with the recorder detached.
1 Slide the OPEN switch at the side of
the station in the direction of the
arrow.
OPEN
2 Insert the lithium ion rechargeable
battery (supplied) in the battery
compartment of the station and close
the lid.
Using the recorder on dry
batteries
Use the supplied external battery case.
1 Attach the supplied battery case.
2 Insert two LR6 (size AA) dry batteries
(not supplied).
Note
When using the lithium ion rechargeable
battery and dry batteries together, stop
operation before exchanging the battery(ies),
even when changing only one of the two.
CHARGE indicator: Lights
up while charging. Goes
off when charging is
complete.
z
If a rechargeble battery is inserted both in the
recorder and in the station, the battery in the
recorder is charged first, and the CHARGE
indicator flashes.
Charging time
80% Approx. 2 hours
100% Approx. 3 hours
(To charge a completely discharged battery)
37-EN
Page 38

Battery life
1)
For longer recordings, we recommend
using the recorder attached to the station.
Batteries
LIP-8 lithium ion
rechargeable
Recording
Approx.
3.5 hours
2)
Playback
Approx.
5.5 hours
battery
3)
Two LR6 (size
AA) Sony
-----
Approx.
9 hours
alkaline dry
batteries
3)
LIP-8 + two LR6
(size AA)
1)
The battery life may be shorter due to
operating conditions and the temperature
of the location.
2)
When you record, use a fully charged
rechargeable battery.
3)
Recording time may differ according to the
alkaline batteries.
-----
Approx.
16 hours
When to replace the batteries
When the dry batteries or rechargeable
battery are weak, b or “LoBATT”
flashes in the display of the recorder or
the remote control. Replace the dry
batteries or charge the rechargeable
battery.
z
Additional information
Precautions
On safety
Do not put any foreign objects in the DC
IN 9 V jack.
On power sources
• Use house current, lithium ion
rechargeable battery or two LR6 (size
AA) batteries.
• For use of the station: Use the AC
power adaptor supplied with this unit.
Do not use any other AC power
adaptor since it may cause the station
to malfunction.
Polarity of
the plug
• The recorder is not disconnected from
the AC power source (mains) as long
as it is connected to the wall outlet,
even if the recorder itself has been
turned off.
• If you are not going to use this recorder
for a long time, be sure to disconnect
the power supply (AC power adaptor,
dry batteries, rechargeable battery, or
car battery cord). To remove the AC
power adaptor from the wall outlet,
grasp the plug itself; never pull the
cord.
On heat build-up
Heat may build up in the recorder if it is
used for an extended period of time. In
this case, leave the recorder turned off
until it cools down.
On installation
• Never use the recorder where it will be
subjected to extremes of light,
temperature, moisture or vibration.
• Never wrap the recorder in anything
when it is being used with the AC
power adaptor. Heat build-up in the
recorder may cause malfunction or
damage.
38-EN
Page 39

On the headphones
Road safety
Do not use headphones while driving,
cycling, or operating any motorized vehicle.
It may create a traffic hazard and is illegal in
many areas. It can also be potentially
dangerous to play your recorder at high
volume while walking, especially at
pedestrian crossings. You should exercise
extreme caution or discontinue use in
potentially hazardous situations.
Preventing hearing damage
Avoid using headphones at high volume.
Hearing experts advise against continuous,
loud and extended play. If you experience a
ringing in your ears, reduce the volume or
discontinue use.
Caring for others
Keep the volume at a moderate level. This
will allow you to hear outside sounds and to
be considerate to the people around you.
On the MiniDisc cartridge
• Do not break open the shutter.
• Do not place the cartridge where it will
be subject to light, extreme
temperatures, moisture or dust.
On cleaning
• Clean the recorder casing with a soft
cloth slightly moistened with water or
a mild detergent solution. Do not use
any type of abrasive pad, scouring
powder or solvent such as alcohol or
benzene as it may mar the finish of the
casing.
• Wipe the disc cartridge with a dry cloth
to remove dirt.
• Dust on the lens may prevent the unit
from operating properly. Be sure to
close the disc compartment lid after
inserting or ejecting an MD.
Notes on batteries
Incorrect battery usage may lead to
leakage of battery fluid or bursting
batteries. To prevent such accidents,
observe the following precautions:
• Install the + and – poles of the batteries
correctly.
• Do not install new and used batteries
or different kinds of batteries together.
• Do not try to recharge dry batteries.
• When the recorder is not to be used for
a long time, be sure to remove the
batteries.
• If a battery leak should develop,
carefully and throughly wipe away
battery fluid from the battery
compartment before inserting new
ones.
Notes on lithium battery
• Keep the lithium battery out of reach of
children. Should the battery be
swallowed, consult a doctor
immediately .
• Wipe the battery with a dry cloth to
assure good contact.
• Be sure to install the battery in the
correct polarity position.
• Do not hold the battery with metallic
tweezers, as doing so may cause a
short-circuit.
• Do not break up the battery or throw it
into a fire, which might cause it to
explode.
Carefully dispose of the used battery.
CAUTION
Danger of explosion if battery is
incorrectly replaced.
Replace only with the same or equivalent
type recommended by the equipment
manufacturer.
Discard used batteries according to
manufacturer’s instructions.
Note on mechanical noise
The recorder gives off mechanical noise
while operating, which is caused by the
power-saving system of the recorder and
it is not a problem.
39-EN
Page 40

To protect a recorded MD
To record-protect an MD, slide open the
tab at the side of the MD. In this position,
the MD cannot be recorded. To record
again, slide the tab back so the tab is
visible.
Back of the MD
Tab
1 Unplug the AC power adaptor.
2 Pull out the REC LEVEL control
knob.
Record-protect
Note on digital recording
This recorder uses the Serial Copy
Management System, which allows only
first-generation digital copies to be made
from premastered software. You can only
make copies from a home-recorded MD
by using the analog (line out) connections.
CD player, MD
player, etc.
Digital recording
Homerecorded
MD
If you have any questions or problems
concerning your recorder, please consult
your nearest Sony dealer.
For the customers in Europe
When disposing of the station
The station holds two nickel cadmium
batteries inside, used to power the
recording/playback timer. When
disposing of the station unit, be sure to
remove the internal batteries following
the steps shown below, and dispose of
them properly, such as by recycling them.
No
digital
recording
Recordable
MD
40-EN
3 Unscrew 6 screws at the rear of the
unit and disassemble the cabinet.
1
2
4 Remove the batteries with a minus
driver, etc.
Notes
•Never disassemble the station unit except
for disposing of the unit.
•Do not short-circuit the plus and minus
terminals of the removed batteries.
Page 41

Troubleshooting
Should any problem persist after you have made these checks, consult your nearest Sony
dealer.
Recorder
Symptom
Cannot operate.
The lid does not
open.
Cannot record/edit.
No sound comes
through the
headphones.
Station
Symptom
Cannot operate.
Cannot charge the
rechargeable battery.
Cause/Solution
•The HOLD function is turned on (”HOLD” appears in the
display when you press an operation button on the recorder).
b
Disable HOLD by sliding the HOLD switch in the
opposite direction of the arrow (page 32).
•The rechargeable battery or dry batteries are weak (b or
”LoBATT” flashes in the display).
b
Charge the rechargeable battery/replace the dry batteries
(pages 36, 37).
•The rechargeable battery or dry batteries have not been
installed correctly.
b
Install the battery(ies) with correct polarity (pages 36, 37).
•The lock of the lid is not released.
b
Slide OPEN after charging the rechargeable battery/
replacing the dry batteries or attaching the recorder to the
station.
•The microphone is not connected (when recording with the
recorder detached from the station).
b
Connect the microphone.
•The recording level is too low (during manual recording).
b
Adjust the recording level (page 15).
•The headphones plug is not connected firmly.
b
Plug in the plug of the headphones firmly to the remote
control. Plug in the plug of the remote control firmly to
2/REMOTE.
•The plug of the remote control is dirty.
b
Clean it with a cloth.
•AVLS is on.
b
Slide AVLS to NORMAL (page 23).
Cause/Solution
•The AC power adaptor is not plugged in securely.
b
Plug it in securely to the DC IN 9V jack and the wall
outlet.
•The recorder is not attached securely to the station.
b
Attach it correctly (page 7).
•The AC power adaptor is not connected properly.
b
Connect it properly.
41-EN
Page 42

Symptom
Cannot record/edit.
Various display
appear one after
another on the display
panel.
Common
Cause/Solution
•The INPUT switch is not set correctly.
b
Set the INPUT switch to match the connection
•The recording level is too low (during analog recording).
b
Adjust the recording level (page 16).
•When recording from a portable CD player with digital
connection, you did not pause the portable CD player first
(”NO DIGITAL SIGNAL” appears in the display).
b
Pause the portable CD player, and then start recording.
•There is no digital output when attempting to record digitally
from a portable CD player.
b
Run the portable CD player on house current and disable
the anti-skip function (such as ESP).
•The analog recording was made using a connecting cord
with an attenuator.
b
Use a connecting cord without an attenuator.
•The station is in the demonstration mode. (You pressed
DISPLAY for 2 seconds or longer when the power is turned
off).
b
Press DISPLAY for 2 seconds or longer again to exit
demonstration mode.
(page 8, 34).
Symptom
Cannot operate.
Cannot play back
from the first track.
The sound skips
during playback.
42-EN
Cause/Solution
•Moisture has condensed inside the recorder.
b
Take the MD out and leave the recorder in a warm place
for several hours until the moisture evaporates.
•You pressed a button while the disc indication was rotating
quickly.
b
Wait until the indication rotates slowly.
•The recorder was exposed to mechanical shock, exessive
static electricity, abnormal power voltage caused by
lightning, etc., during operation.
b
Restart as follows.
1 Disconnect all power sources.
2 Leave the recorder for about 30 seconds.
3 Connect the power source.
•Playback was stopped in the middle of the disc the last time.
b
Press = repeatedly (turn the control to = on the
remote control) or open and close the lid once so that the
point to start play returns to the beginning of the disc.
•The recorder is placed where it receives continuous
vibration.
b
Put the recorder on a stable place.
•A very short track (such as a narration or an introduction)
may cause the sound to skip.
Page 43

Symptom
The sound has a lot of
static.
Cannot record/edit.
Cannot find the track
marks.
No sound comes
through the
headphones.
No clock display (”-y--m--d” appears).
The recorded date
and time does not get
stamped.
The clock loses time.
Cause/Solution
•You are operating near a source of strong magnetism, such as
a TV.
b
Move the recorder away from the source of magnetism.
•Power was disrupted, or there was a blackout during
recording/editing.
b
The recording up to that point will be erased. Rerecord.
•You pressed P after pressing = or +.
b
Press P before pressing = or +.
•The volume is too low.
b
Adjust the volume by pressing VOL +/– (LEVEL on the
station).
•The clock has not been set.
b
Set the clock (page 19).
•The built-in battery for the clock is weak because the power
supply had been cut off for a period of time.
b
Charge the built-in battery by attaching the recorder to
the station and plugging the AC power adaptor to DC IN
9 V on the station and the wall outlet (page 19). Note that
the clock may gain or lose up to about 2 minutes per
month under normal condition.
43-EN
Page 44

System limitations
The recording system in your MiniDisc recorder is radically different from those used in
cassette and DAT decks and is characterized by the limitations described below. Note,
however, that these limitations are due to the inherent nature of the MD recording system
itself and not to mechanical causes.
Symptom
“TRACK FULL” appears even
before the disc has reached the
maximum recording time (60 or
74 minutes).
“TRACK FULL” appears even
before the disc has reached the
maximum track number or
recording time.
Track marks cannot be erased.
The remaining recording time
does not increase even after
erasing numerous short tracks.
The total recorded time and the
remaining time on the disc may
not total the maximum
recording time (60 or 74
minutes).
The edited tracks may exhibit
sound dropout during search
operations.
Cause
When 254 tracks have been recorded on the disc,
“TRACK FULL” appears regardless of the total
recorded time. More than 254 tracks cannot be
recorded on the disc. To continue recording, erase
unnecessary tracks.
Repeated recording and erasing may cause
fragmentation and scattering of data. Although
those scattered data can be read, each fragment is
counted as a track. In this case, the number of
tracks may reach 254 and further recording is not
possible. To continue recording, erase
unnecessary tracks.
When the data of a track is fragmented, the track
mark of a fragment under 12 seconds long cannot
be erased. You cannot combine a track recorded in
stereo and a track recorded in monaural; nor can
you combine a track recorded with digital
connection and a track recorded with analog
connection.
Tracks of under 12 seconds in length are not
counted and so erasing them may not lead to an
increase in the recording time.
Normally, recording is done in minimum units of
approximately 2 seconds. When recording is
stopped, the last unit of recording always uses
this unit of 2 seconds even if the actual recording
is shorter. Likewise, when recording is restarted
after the stop, the recorder will automatically
insert a blank space amounting to 2 seconds
before the next recording. (This is to prevent
accidental erasing of a previous track whenever a
new recording is started). Therefore, the actual
recording time will decrease whenever a
recording is stopped; a maximum of 6 seconds
compared to the potential recording time for each
stop.
The fragmentation of data may cause sound
dropout while searching because the tracks are
played in higher speed than normal playback.
44-EN
Page 45

Error Messages
If the following messages flash in the display window of the station or the remote control,
check the chart below. The display of the recorder will flash when a message is
displayed on the station or the remote control.
Station (remote
control)
BLANK DISC
(BLANK)
CONNECTION
ERROR (—)
DISC ERROR
(ERROR)
DISC FULL (FULL)
EDIT BUSY (BUSY)
— (LoBATT)
MEMORY OVER
(MEMORY)
NAME FULL
NO DIGITAL
SIGNAL (—)
NO DISC (No DISC)
P/B ONLY (PbONLY)
PROTECTED DISC
(SAVED)
Meaning/Remedy
•An MD with no recording on it is inserted.
b
Insert a recorded MD.
•The recorder is not attached to the station securely.
b
Attach it securely.
•The recorder cannot read the disc (it‘s scratched or dirty).
b
Reinsert or replace the disc
•There is no more space to record on the disc (less than 12
seconds available).
b
Replace the disc.
•You tried to operate the recorder while it was accessing the
recorded data.
b
Wait until the message goes out (in rare cases, it may take
2–3 minutes).
•Batteries are weak.
b
Charge the rechargeable battery/replace the dry batteries
(pages 36, 37).
•You tried to record when there is no indication in the display,
with the recorder placed where it receives continuous
vibration.
b
Put the recorder on a stable place, and start recording
again.
•You tried to enter more than 200 characters for a track or disc
name or more than 1700 for the entire disc.
b
Enter the characters within the limit.
•The recorder could not detect digital input signals.
b
Make sure that the source is connected securely. Ignore
when recording analogically.
•You tried to play or record with no disc in the recorder.
b
Insert an MD.
•You tried to record or edit a premastered MD (P/B stands for
”playback”.)
b
Insert a recordable MD.
•You tried to record or edit on a MD with the tab in the recordprotect position.
b
Slide the tab back.
45-EN
Page 46

Station (remote
control)
PROTECTED TRACK
(TrPROT)
SCMS NO COPY (—)
SORRY (SORRY)
TEMPERATURE
OVER (TEMP)
TRACK FULL
(TrFULL)
Meaning/Remedy
•You tried to record over or edit a track that is protected from
erasing.
b
Record over/edit other tracks.
•You tried to digitally copy a source that is protected by the
Serial Copy Management System. (You cannot make copies of
a digitally connected source which was itself recorded using
digital connection).
b
Record using analog line connection (page 34).
•You tried to erase a track mark at the beginning of the first
track.
•You tried to erase a track mark to combine tracks the recorder
cannot combine (ex; a stereo and monaural track).
•Heat has built up in the recorder.
b
Let the recorder cool down.
•The disc reached the maximum number of tracks (254).
b
Erase unneccesary tracks.
46-EN
Page 47

Specifications
System
Audio playing system
MiniDisc digital audio system
Laser diode properties
Material: GaAlAs
Wavelength: λ = 780 nm
Emission duration: continuous
Laser output: less than 44.6 µW*aZx
*This output is the value measured at a
distance of 200 mm from the objective lens
surface on the optical pick-up block with
7mm aperture.
Recording and playback time
Maximum 74 minutes (MDW-74, stereo
recording)
Maximum 148 minutes (MDW-74, monaural
recording)
Revolutions
400 rpm to 900 rpm (CLV)
Error correction
Advanced Cross Interleave Reed Solomon
Code (ACIRC)
Sampling frequency
44.1 kHz
Coding
Adaptive TRansform Acoustic Coding
(ATRAC)
Modulation system
EFM (Eight to Fourteen Modulation)
Number of channels
2 stereo channels
1 monaural channel
Wow and Flutter
Below measurable limit
Recorder
Frequency response
20 to 20,000 Hz ± 3 dB
Input
MIC (PLUG IN POWER): stereo mini-jack,
input level 0.22–0.78 mV
Output
2/REMOTE: stereo mini-jack, maximum
output level 5 mW+ 5 mW, load impedance
16 ohm
Station
Frequency response
5 to 20,000 Hz ± 0.5 dB
Input
LINE (ANALOG) IN: phono jack, rated
input level 500mV
DIGITAL IN OPT1, OPT2: rectangularshaped optical plug, wavelength 660nm
Output
LINE (ANALOG) OUT: phono jack, rated
output level 500mV, load impedance 10
kilohoms or greater
ACTIVE SP OUT: stereo minijack, rated
output level 500mV, load impedance 4.7
kilohms or greater
DIGITAL OUT; rectangular-shaped optical
plug, output level -17dBm, wavelength
660nm
2HEADPHONES: stereo phone jack, peak
output level 5mW + 5mW, load impedance
16 ohms
Sampling rate converter
Input: 32 kHz/44.1 kHz/48 kHz
Output: 44.1 kHz
General
Power requirements
Recorder:
Lithium ion rechargeable battery LIP-8
(supplied)
Two LR6 (size AA) alkaline dry batteries
(not supplied)
Station:
Sony AC power adaptor (supplied)
connected to the DC IN 9V jack:
220-230V AC, 50/60 Hz (European model)
100-240V AC, 50/60 Hz (Other models)
Internal batteries for memory back-up:
Two NC-AA600FT(SYH), 1.2 V, 600 mAh,
Ni-Cd batteries (supplied)
Card remote controller:
CR2025 lithium battery
Battery life
See ”Battery life” (page 38)
Dimensions
Recorder: Approx. 104.5 x 20.1 x 77 mm
1
(4
/8 x 13/16 x 31/8 in.)
Station: Approx. 232 x 61 x 154 mm
1
(9
/4 x 21/2 x 61/8 in.) (w/h/d) not incl.
projecting parts and controls
Mass
Recorder: Approx. 185g (6.6 oz.)
Approx. 235g (8.3 oz.) incl. a recordable MD,
headphones with remote control, and LIP-8
lithium ion rechargeable battery
Station: Approx. 970g (34.2 oz.)
47-EN
Page 48

Supplied accessories
AC power adaptor (1)
Card remote commander (1)
Headphones with remote control (1)
Lithium ion rechargeable battery LIP-8 (1)
Battery case (1)
Ear attachment (2)
Carrying pouch (1)
Optional accessories
Battery charger (for LIP-8) BC-LIP8
Lithium ion rechargeable battery LIP-8
Optical Cable
POC-151HG, POC-152HG, POC-MZ1,
POC-MZ2, POC-15B, POC-15AB, POC-
DA12SP
Line Cable RK-G136
Stereo Microphones ECM-717, ECM-MS907,
ECM-MS957
Stereo Headphones* MDR-D77, MDR-D55,
MDR-CD470, MDR-E888LP
Active Speakers SRS-Z1000
Recordable MDs MDW-series
MiniDisc Carrying Case CK-MD4
MiniDisc Filing Box CK-MD10
Your dealer may not handle some of the
above listed accessories. Please ask the
dealer for detailed information about the
accessories in your country.
US and foreign patents licensed from Dolby
Laboratories Licensing Corporation.
Design and specifications are subject to
change without notice.
* Whether you should plug the headphones
directly to 2/REMOTE on the recorder or
to a remote control, use only headphones
with stereo mini-plugs.
stereo mini-plugs
What is an MD?
How MiniDisc works
MiniDisc (MD) comes in two types:
premastered (prerecorded) and
recordable (blank). Premastered MDs,
recorded at music studios, can be played
back almost endlessly. However, they
cannot be recorded on or over like
cassette tapes. To record, you must use a
"recordable MD".
Premastered MDs
Premastered MDs are recorded and
played like regular CDs. A laser beam
focuses on the pits in the surface of the
MD and reflects the information back to
the lens in the recorder. The recorder then
decodes the signals and plays them back
as music.
Recordable MDs
Recordable MDs, which use magnetooptical (MO) technology, can be recorded
again and again. The laser inside the
recorder applies heat to the MD,
demagnetizing the magnetic layer of the
MD. The recorder then applies a magnetic
field to the layer. This magnetic field
corresponds exactly to the audio signals
generated by the connected source. (The
north and south polarities equate to
digital "1" and "0".) The demagnetized
MD adopts the polarity of the magnetic
field, resulting in a recorded MD.
48-EN
Page 49

How the MiniDisc got so small
The 2.5-inch MiniDisc, encased in a
plastic cartridge that looks like a 3.5-inch
diskette (see illustration above), uses a
new digital audio compression
technology called ATRAC (Adaptive
TRansform Acoustic Coding). To store
more sound in less space, ATRAC extracts
and encodes only those frequency
components actually audible to the
human ear.
Quick Random Access
Like CDs, MDs offer instantaneous
random access to the beginning of any
music track. Premastered MDs are
recorded with location addresses
corresponding to each music selection.
Recordable MDs are manufactured with a
“User TOC Area” to contain the order of
the music. The TOC (Table of Contents)
system is similar to the “directory
management system” of floppy disks. In
other words, starting and ending
addresses for all music tracks recorded on
the disc are stored in this area. This lets
you randomly access the beginning of any
track as soon as you enter the track
number (AMS), as well as label the
location with a track name as you would
a file on a diskette.
Shock-Resistant Memory
One major drawback of optical read
systems is that they can skip or mute
when subjected to vibration. The MD
system resolves this problem by using a
buffer memory that stores audio data.
User TOC Area
Contains the order and start/end
points of the music.
Music Data
49-EN
Page 50

Looking at the controls
See pages in ( ) for details.
The recorder
1
2
3
4
5
6
7
8
9
!º
!¡
!™
!£
!¢
!∞
!§
!¶
!•
!ª
@º
@¡
1 MIC SENS (Mic sensitivity) (15)
2 DIGITAL MEGA BASS switch (23)
Select to emphasize bass sound.
3 AVLS (Automatic Volume Limiter
System) switch (23)
Slide to LIMIT to limit the maximum
volume.
4 MIC (PLUG IN POWER) jack (15)
5 VOL (volume) –/+ buttons (11)
6 MODE button (14, 22)
Each time you press here while
playing an MD, the recorder plays the
MD in a different play mode: normal
play, all repeat, single repeat, or
shuffle repeat. Press here while
recording to select monaural
recording.
7 DISPLAY button (17, 24)
Press to display the current play
mode, the remaining time of the
current track, the remaining time of
the disc, or the recording date and
time.
50-EN
8 p (stop) button (9, 11, 20)
9 = (rewind/AMS) button (9, 11, 20)
!º ( (play) button (9, 11, 20)
!¡ + (fast forward/AMS) button (9, 11,
20)
!™ HOLD switch (32)
Slide to lock the controls of the
recorder.
!£ Display window
!¢ CLOCK SET button (19)
!∞ Battery compartment (36)
!§ END SEARCH button (9)
!¶ T MARK button (27)
!• P (pause) button (9, 11, 20)
!ª REC switch (9)
@º OPEN switch (10)
@¡ 2/REMOTE (headphones/remote)
jack
Page 51

The display window of the recorder
7
8
1
2
3
4
5
REC DATE
REMAIN
6
1 REC indication
Lights up while recording. When
flashing, the recorder is in record
standby mode.
2 Battery indication (36, 38)
Appears when the rechargeable
battery is in the battery compartment
of the recorder.
3 Disc indication
Shows that the disc is rotating for
recording, playing or editing an MD.
4 REC DATE (recorded/current date)
indication (17, 24)
Lights up along with the date and
time the MD was recorded. When only
"DATE" lights up, the current date and
time are displayed.
5 REMAIN (remaining time/tracks)
indication (17, 24)
Lights up along with the remaining
number of tracks, remaining time of
the track, or remaining time of the
MD.
6 AM/PM indication (17, 24)
Lights up along with the time
indication in the 12-hour system.
REC
MONO
1SHUFAVLS
AM
PM
9
y
!º
HOLD
md
7 MONO (Monaural) indication
Appears when recording monaurally
or playing back a monaural disc.
8 Play mode indication (22)
Shows the play mode of the MD.
(all repeat): All tracks play
repeatedly.
1(single repeat): One track plays
repeatedly.
SHUF(shuffle repeat): Tracks will
be repeated in random order.
9 Track number indication
Shows the track number playing
currently.
!º HOLD indication (32)
Lights up when the HOLD switch is
set on.
!¡ AVLS indication (23)
Lights up when the AVLS switch is set
on.
!™ Time display (17, 24)
Shows the recorded time, current time,
elapsed time of the track being played
and the remaining time of the track or
the disc.
!¡
!™
51-EN
Page 52

Front panel of the Station
1
2
3
4
5
6
7
8
9
!º
!¡
!™
!£
!¢
!∞
!§
!¶
!•
!ª
@º
@¡
@™
@£
@¢
@∞
@§
@¶
@•
@ª
#º
1 ERASE/DELETE button (26)
2 MODE button (14, 22)
3 MOVE/INSERT button (14, 22)
4 DISPLAY button (17, 24)
5 PUSH OPEN button (6)
6 Display window
7 ( (play) button (9, 11, 20)
8 OPEN•RELEASE switch (7)
9 p (stop) button (9, 11, 20)
!º POWER switch
!¡ ACTIVE SP LEVEL –/+ buttons (20)
!™ 2 HEADPHONES jack for stereo plug
!£ LEVEL dial
Adjust the volume of HEADPHONE
jack on the station, not the recorder.
!¢ TIMER switch (32)
!∞ = (rewind/AMS) button (9, 11, 20)
52-EN
!§ + (fast forward/AMS) button (9, 11,
20)
!¶ TRACK MARK button (27)
!• UNDO button (30)
!ª INPUT POSITION M/m buttons (30)
@º Cursor keys
@¡ TITLE/ENTER button (26, 30)
@™ SELECT button (30)
@£ CAPS button (30)
@¢ END SEARCH button (9)
@∞ TIME MACHINE REC button (13)
@§ P (pause) button (9, 11, 20)
@¶ REC switch (9)
@• REC LEVEL (ANALOG) control (16)
@ª INPUT switch (8, 34)
#º SYNCHRO REC switch (12)
Page 53

Back panel of the Station
4
5
6
1
2
3
1 OPEN (open the lid) switch (37)
2 CHARGE lamp (37)
Lights up while charging the
rechargeable battery on the station.
3 Rechargeable battery compartment
(37)
4 ACTIVE SP OUT jack (35)
7
8
9
!º
5 DC IN 9V jack (36)
6 CLOCK SET button (19)
7 DIGITAL OUT (OPTICAL) jack (35)
8 DIGITAL IN (OPT1, OPT2) jacks (34)
9 LINE (ANALOG ) OUT jack (35)
!º LINE (ANALOG) IN jack (34)
53-EN
Page 54

The display window of the station
1
2
3
4
5
6
7
1 2 3 4 5 6 7 8 9
MONO
REC
SYNC
REPEAT 1
SHUFFLE
PROGRAM
1 Character information display (17, 24)
Displays the disc and track names*,
date, error messages, track numbers,
etc.
*Disc and track names appear only
with MDs that have been
electronically labeled.
2 MONO (monaural) indication
3 Battery indication (36, 38)
Shows battery condition. Lights up
when a rechargeable battery is
inserted. While charging the
rechargeable battery, this indication
shows the charging condition.
4 Disc indication
Shows that the disc is rotating for
recording, playing or editing an MD.
5 SYNC (sychronized recording)
indication
Lights up while synchro-recording.
6 Play mode indication (22)
Shows the play mode of the MD.
REPEAT (all repeat): All tracks play
repeatedly.
REPEAT 1 (single repeat): One track
plays repeatedly.
REPEAT SHUFFLE (shuffle repeat):
Tracks will be repeated in random
order.
PROGRAM (program play) indication:
Lights up when programming for
program play or executing program
play.
10 11 12 13 14 15 16 17 18 19 20
0% 50% 100%
LEFT
–db50 4030 20
LEVEL
RIGHT
7 REC (record) indication
Lights up while recording. When
flashing, the recorder is in record
standby mode.
8 Music calendar
Displays the number of tracks
recorded in MD, remaining tracks
during shuffle play.
9 Position pointer
Shows the current location on the MD.
The point under recording or playing
flashes. The recorded position lights
up.
Current location
0% 50%
Recorded portion
Disc length
!º Peak level meter
Shows the volume of the MD being
played or recorded.
8
OVER20
9
0246812
!º
100%
54-EN
Page 55

The headphones with a remote control
1
2
3
4
5
6
7
8
9
!º
!¡
1 Headphones
Can be replaced with optional
headphones.
2 Stereo mini-plug
3 p (stop) button (9, 11)
4 Control (11)
To play, turn to (•+ during stop.
Turn to (•+ during play to search
the beginning of the succeeding track;
hold in this position to fast-forward.
Turn to = during play to search the
beginning of the preceeding track;
hold in this position to rewind.
5 HOLD switch (32)
Slide to lock the controls of the remote
control.
6 P (pause) button (9, 11)
7 PLAY MODE button (22)
8 DISPLAY button (17, 24)
9 VOL (volume) –/+ buttons (11)
!º TRACK MARK button (27)
!¡ Display window
55-EN
Page 56

The display window of the remote control
41
52
63
1 Character information display (17, 24)
Displays the disc and track names,
date, elapsed time, etc.
2 Track number indication
Shows the track number of the track
being recorded or played.
3 Disc indication
Shows that the disc is rotating for
recording, playing or editing an MD.
4 REC (record) indication
Lights up while recording. When
flashing, the recorder is in record
standby mode.
5 Battery indication (36, 38)
Shows battery condition.While
charging the rechargeable battery, this
indication shows the charging
condition.
6 Play mode indication (22)
Shows the play mode of the MD.
56-EN
Page 57

Card remote commander
7
2
3
4
5
6
1 Number keys
2 ( (play) button (20)
3 = (rewind/AMS) button (20)
4 + (fast forward/AMS) button (20)
5 P (pause) button (20)
6 p (stop) button (20)
Using the remote commander
•You may not be able to use the remote
commander when the remote sensor on the
station is exposed to direct sunlight or
strong illumination. The effective range of
the remote commander is appoximately 5
meters.
•Other Sony audio products may respond to
the remote commander supplied with this
unit. In this case, place other products
away from the station. If you choose to use
them near each other and want to block the
effect of the remote commander on either
one, cover the remote sensor on the product
with adhesive tape, etc.
1 2 3
4 5 6
7 8 9
PLAY MODE
>
10 0/10
= ( +
P p
POWER
81
ACTIVE SP
LEVEL
9
!º
!¡
7 Transmitter
Direct it toward the remote sensor on
the station.
8 POWER button (20)
9 PLAY MODE button (22)
!º ACTIVE SP (active speaker) LEVEL
+/– buttons (20)
!¡ Battery compartment
Replacing the lithium battery
When the battery becomes weak, the range
of the remote commander becomes shorter.
Replace the battery with a new CR2025
lithium battery (not supplied).
1Insert a pointed object to the slot. Slide and
hold it as shown below.
2Pull out the battery tray.
3Insert a CR2025 lithium battery (not
supplied) with the (+) side facing up.
Insert with correct polarity, or the remote
commander will not work.
57-EN
Page 58

AVERTISSEMENT
Pour éviter tout risque d’incendie ou
d’électrocution, ne pas exposer l’appareil
à la pluie ou à l’humidité.
Ne pas ouvrir le châssis, sous risque
d’électrocution. Confier l’entretien
exclusivement à un personnel qualifié.
Attention
L’utilisation d’instruments optiques avec
cet appareil constitue un risque pour l'œil.
Informations
EN AUCUN CAS LE VENDEUR NE
POURRA ETRE TENU RESPONSABLE
DE TOUT DOMMAGE DIRECT OU
INDIRECT DE TOUTE NATURE, OU
DE TOUTE PERTE OU DEPENS
RESULTANT D’UN PRODUIT
DEFECTUEUX OU DE
L’UTILISATION DE TOUT PRODUIT.
”MD WALKMAN” est une marque de
Sony Corporation.
2-F
Page 59

Bienvenue !
Bienvenue dans le monde du minidisque !
Nous décrivons ci-dessous quelques-unes
des caractéristiques et des fonctions de
votre nouvel enregistreur de minidisques.
• Le système de station MiniDisque —
Utilisez l'enregistreur individuellement
ou fixé à la plateforme de la station.
Utilisez l'enregistreur fixé à la station
pour profiter des caractéristiques
complètes et de la connectivité. Utilisez
l'enregistreur détaché pour pouvoir
l'emporter.
• Enregistrement haute fidélité —
Enregistrement haute fidélité
caractérisé par un faible niveau de
bruit et de distorsion grâce à la prise
d’entrée numérique optique.
• Convertisseur de fréquence
d’échantillonnage — Cet appareil vous
permet d’enregistrer des programmes
au départ d’un appareil numérique en
utilisant d’autres fréquences
d’échantillonnage, par exemple un
tuner BS ou une platine DAT.
• Diverses options d'enregistrement
– Enregistrement long en monaural
(jusqu'à 148 minutes).
– L'enregistrement avec horloge vous
permet d'enregistrer du début d'une
chanson même si vous appuyez sur la
touche après avoir entendu le début de
la chanson.
– Raccordez-la à un programmateur
audio pour enregistrer lorsque vous
n'êtes pas à la maison.
• Edition aiséé avec le large panneau
LCD et les touches d'édition
– Echantillons de titre (21 mots et
phrases).
– La fonction UNDO vous permet
d'annuler une opération d'édition
• Lecture programmée — Reproduisez
un ensemble de plages dans l'ordre de
votre choix.
• Télécommande carte — Utilisez la
station à distance. Sélection directe
disponible.
• Prise de sortie pour haut-parleurs actifs
— Raccordez-la aux haut-parleurs
actifs SRS-Z1000 (non fournis), etc.,
pour obtenir un son de lecture MD
profond sur votre bureau.
F
3-F
Page 60

Table des matières
Installation du système de station ........................... 6
Enregistrement direct d’un MD ................................ 8
Lecture directe d’un MD.......................................... 10
Différents modes d’enregistrement....................... 12
Enregistrement en synchro avec le lecteur de source
(enregistrement synchro)....................................................................... 12
Commencement de l'enregistrement en reculant de 2 secondes
(enregistrement avec horloge) ............................................................... 13
Enregistrement en mode monaural pour doubler le temps
d'enregistrement normal ........................................................................ 14
Enregistrement via un microphone ...................................................... 15
Réglage manuel du niveau d'enregistrement ................................. 15
Enregistrement via une entrée analogique (enregistrement
analogique) ............................................................................................... 16
Vérification de la durée restante ou de la position
d’enregistrement ...................................................................................... 17
Sur l'écran d'affichage de la station .................................................. 17
Sur l'enregistreur ................................................................................. 17
Sur la télécommande........................................................................... 18
Réglage de l’horloge pour l’estampillage de l’heure
d’enregistrement ...................................................................................... 19
4-F
Différents modes de lecture ................................... 20
Lecture d'un MD sur la station .............................................................. 20
Lecture avec des haut-parleurs actifs ............................................... 20
Sélection directe d'une plage (Sélection directe)............................. 20
Lecture des plages sélectionnées dans l'ordre de votre choix
(lecture programmée) ......................................................................... 21
Lecture de plages répétée ....................................................................... 22
Renforcement des graves (DIGITAL MEGA BASS) ........................... 23
Protection de votre ouïe (AVLS) ........................................................... 23
Vérification de la durée restante ou de la position de lecture .......... 24
Sur la station......................................................................................... 24
Sur l'enregistreur ................................................................................. 24
Sur la télécommande........................................................................... 25
Page 61

Montage de plages enregistrées............................ 26
Suppression de plages (ERASE) ............................................................ 26
Pour effacer une plage ........................................................................ 26
Pour effacer un disque complet ........................................................ 26
Insertion de repères de plage (TRACK MARK ON) .......................... 27
Suppression de repères de plage (TRACK MARK OFF) ................... 28
Déplacement de plages enregistrées (MOVE)..................................... 29
Identification des enregistrements (TITLE) ......................................... 29
Annulation de la dernière opération d'édition (UNDO) ................... 31
Autres fonctions utiles ............................................ 32
Verrouillage des commandes (HOLD)................................................. 32
Enregistrement/lecture au moyen d'un programmateur ................. 32
Connexion et sources d'alimentation .................... 34
Raccordement pour l'enregistrement — connexion aux lecteurs
CD, etc. ...................................................................................................... 34
Raccordement pour l'enregistrement numérique........................... 34
Raccordement pour l'enregistrement analogique .......................... 34
Raccordement pour la lecture — connexion à des amplificateurs
ou haut-parleurs actifs ............................................................................ 35
Raccordement à un appareil numérique ......................................... 35
Raccordement à un appareil analogique ......................................... 35
Sources d’alimentation ........................................................................... 36
Utilisation de la station sur secteur .................................................. 36
Utilisation de l'enregistreur sur piles sèches ................................... 37
Autonomie de la batterie.................................................................... 38
Informations complémentaires .............................. 39
Précautions ............................................................................................... 39
Dépannage ................................................................................................ 41
Limites du système.................................................................................. 44
Messages ................................................................................................... 45
Spécifications............................................................................................ 47
Qu’est-ce qu’un MD ? ............................................................................. 48
Emplacement des commandes .............................................................. 50
5-F
Page 62

Installation du système de station
Raccordez d'autres appareils à la station avant de brancher le cordon
d'alimentation secteur. Cette section vous explique comment installer
l'appareil pour pouvoir enregistrer au départ d'un lecteur CD portable, etc.,
via l'entrée numérique. Pour effectuer un raccordement pour d'autres
méthodes d'enregistrement, reportez-vous à ”Raccordement pour
l'enregistrement” (page 34).
1
Effectuez le raccordement.
vers
DIGITAL
IN OPT1
ou OPT2
Câble optique
(non fourni)
vers OPTICAL
(DIGITAL)
OUT
Lecteur CD
portable, etc.
vers la prise DC
IN 9V
1 Branchez le lecteur CD portable
à la station.
2
Ouvrez le couvercle.
Appuyez sur PUSH OPEN et ouvrez
le couvercle.
6-F
Adaptateur
secteur AC
(fourni)
2 Branchez l'adaptateur secteur.
vers une prise
murale
∫
Page 63

3
Fixez l'enregistreur sur la station.
∫
1 Mettez en place la partie droite de
l'enregistreur ...
Pour détacher l'enregistreur de la
station
RELEASE
Faites glisser RELEASE à fond vers la
droite en mode d'arrêt.
2 ... et enfoncez la partie gauche
jusqu'au déclic.
L'écran d'affichage s'éclaire sur la station
si l'enregistreur est fixé correctement.
Remarques
• Réglez l'horloge pour marquer la date
et l'heure d'enregistrement (voir page
19).
• Lors de l’enregistrement à partir d’un
lecteur CD portable, branchez-le à une
prise secteur et désactivez la fonction
anti-saut (comme ESP* par exemple).
*Protection électronique des chocs
(Electronic Shock Protection)
• Ne collez pas d'adhésifs, etc., sur les
surfaces de contact entre l'enregistreur
et la station, car cela risquerait de
provoquer un dysfonctionnement.
7-F
Page 64

Enregistrement direct d’un MD
Les explications présentées ci-dessous concernent l'enregistrement
via l'entrée numérique. Si vous voulez effectuer un enregistrement
via l'entrée analogique, voir page 16. Pour enregistrer avec un
microphone, reportez-vous à la page 15.
1
Introduisez un MD enregistrable.
1 Faites coulisser
OPEN et ouvrez
le couvercle.
2 Introduisez un MD avec
l’étiquette vers le haut et
appuyez sur le couvercle
pour le refermer.
∫
OPEN
2
Sélectionnez l'entrée.
Réglez le commutateur INPUT en
fonction de la prise d'entrée
raccordée à la source.
Commutateur
INPUT
OPT 1
OPT 2
INPUT
Prise d'entrée
DIGITAL IN OPT 1
DIGITAL IN OPT 2
8-F
3
Sélectionnez le point de début d'enregistrement.
Si vous voulez enregistrer à partir de la
fin de l'enregistrement précédent,
appuyez sur END SEARCH.
(Si vous voulez démarrer l'enregistrement à
partir du début, passez cette étape.)
END SEARCH
Page 65

3
Enregistrement d’un MD.
1 Appuyez et faites coulisser REC vers
Lecteur CD, etc.
(source)
la droite.
L’indication “REC” s’allume et
l’enregistrement démarre.
2 Activez la lecture du CD ou de la
cassette que vous voulez
enregistrer.
Pour arrêter l’enregistrement, appuyez
sur p.
L'indication ”Toc Edit” clignote pendant
l'enregistrement des données de
l'enregistrement (les points de début et de fin
de la plage, etc.). Pendant que cette
indication clignote dans la fenêtre
REC
Pour
Activer une pause
d’enregistrement
d’affichage, ne déplacez pas l’enregistreur,
ne tournez pas la molette et ne débranchez
pas la prise d’alimentation.
Appuyez sur
1)
P
Appuyez à nouveau sur la touche P pour
reprendre l’enregistrement.
Enregistrer à partir de la fin de
l'enregistrement précédent.
2)
(, + ou = pour trouver le point de
début de l’enregistrement et appuyez sur p
pour arrêter. Faites ensuite coulisser REC.
Retirer le MD.
Mettre l'appareil hors tension
1)
Un repère de plage est ajouté à l'endroit où vous appuyez sur P; par conséquent, le restant de la
plage sera compté comme nouvelle plage.
2)
Si vous démarrez un nouvel enregistrement au milieu d’un enregistrement précédent, cet
enregistrement précédent sera écrasé (effacé) par le nouvel enregistrement.
3)
Lorsque vous ouvrez le couvercle, le point de début de l’enregistrement change pour le début de
la première plage. Vérifiez le point de début de l'enregistrement dans la fenêtre d'affichage.
Si l’enregistrement ne démarre pas
•Assurez-vous que le MD n’est pas protégé
contre l’enregistrement (page 40).
•Si ”SCMS NO COPY” est affiché, vous ne
pouvez pas réaliser d'enregistrement
numérique (page 40).
•Il n’est pas possible de réenregistrer des
MD préenregistrés.
Pour les modèles fournis avec un
adaptateur de fiche secteur
Si l’adaptateur secteur ne s’adapte pas dans
la prise murale, utilisez l’adaptateur de fiche
secteur.
p et ouvrez le couvercle.
Appuyez sur POWER
z
•Vous pouvez contrôler le son en cours
d'enregistrement. Branchez le casque
d'écoute sur la prise 2HEADPHONES de
la station ou sur la prise 2/REMOTE de
l'enregistreur. Sachez que la qualité du son
passant par les écouteurs raccordés à
l’enregistreur est inférieure à celle obtenue
lors d’une connexion à la station.
Utilisez-le pour confirmer l'enregistrement.
•La station se met automatiquement hors
tension si vous ne l'utilisez pas pendant 5
minutes en mode d'arrêt. Appuyez sur (
pour remettre la station sous tension.
3)
9-F
Page 66

Lecture directe d’un MD
Cette section explique comment reproduire des MD sur
l’enregistreur sans qu’il soit détaché de la station. Assurez-vous que
la batterie rechargeable est entièrement rechargée. Pour la recharge et
d’autres sources d’alimentation, reportez-vous à “Sources
d’alimentation”, (pages 36 à 38).
1
Insérez la batterie rechargeable
∫
2
Introduisez un MD.
1 Faites coulisser OPEN et
ouvrez le couvercle.
10-F
∫
OPEN
2 Introduisez un MD avec l’étiquette
vers le haut et appuyez sur le
couvercle pour le refermer.
Page 67

3
Activez la lecture du MD.
1 Appuyez sur ( (Mettez la
VOL –/+
(
2 Appuyez sur VOL +/– pour régler le
VOL –/+
commande sur (•+ de la
télécommande).
Vous entendez de brefs bips sonores
dans le casque d’écoute.
volume.
Le volume s'affichera dans la fenêtre
d'affichage.
Pour arrêter la lecture, appuyez sur p.
Vous entendez de longs bips sonores dans le
casque d’écoute.
Pour
p
Appuyez sur (émission de bips sonores dans
le casque d’écoute)
Activer une pause
de lecture
P (émission continue de brefs bips)
Appuyez à nouveau sur P pour reprendre la
lecture.
Localiser le début de
la plage en cours
Localiser le début de
la plage suivante
Revenir en arrière
en cours de lecture
1)
= une fois (Mettez la commande sur = de
la télécommande) (trois bips brefs)
+ une fois (Mettez la commande sur(•+
de la télécommande) (deux bips brefs)
maintenez la touche = enfoncée (Tournez et
maintenez la commande sur = de la
télécommande)
Avancer en cours de
1)
lecture
maintenez la touche + enfoncée (Tournez et
maintenez la commande sur (•+ de la
télécommande)
p
Retirer le MD
1)
Pour avancer ou revenir en arrière rapidement sans écouter le son, appuyez sur P et maintenez la
touche = ou + enfoncée.
2)
Si vous ouvrez le couvercle, le point de début de lecture change pour le début de la première plage.
Si la lecture ne démarre pas
Assurez-vous que l’enregistreur n’est pas
verrouillé (page 32).
z
La lecture passera automatiquement de
stéréo à mono en fonction de la source
sonore enregistrée.
et ouvrez le couvercle.
Pour effectuer une lecture avec
l'enregistreur fixé à la station
Reportez-vous à ”Lecture d'un MD sur la
station” (page 20).
Lors de l'utilisation des écouteurs en
option
Utilisez les écouteurs avec une minifiche
stéréo. Vous ne pouvez pas utiliser les
écouteurs avec une microfiche.
2)
11-F
Page 68

zDifférents modes
d’enregistrement
Enregistrement en
synchro avec le lecteur
de source
(enregistrement
synchro)
Vous pouvez réaliser de façon simple un
enregistrement sur MD d’une source
numérique.
Pour un enregistrement synchronisé,
raccordez la source numérique au moyen
d’un câble numérique et introduisez un
MD enregistrable.
Lecteur CD,
etc.
SYNCHRO REC
REC
INPUT
1 Mettez le commutateur INPUT sur
”OPT1” ou ”OPT2”.
Réglez-le en fonction de la prise
d'entrée raccordée à la source.
3 Appuyez et faites coulisser REC vers
la droite.
L’enregistreur passe en mode de
veille d’enregistrement.
4 Démarrez la lecture sur le lecteur
source. L’enregistreur démarre
l’enregistrement dès qu’il reçoit le
son de lecture.
Pour arrêter l'enregistrement, appuyez
sur p.
z
•Vous ne pouvez pas effectuer de pause
manuelle pendant l'enregistrement
synchronisé.
•Si aucun son n'est transmis par le lecteur
pendant plus de 3 secondes durant un
enregistrement synchronisé, l'enregistreur
passe automatiquement en mode de veille.
Lorsque le lecteur transmet à nouveau des
sons, l'enregistreur reprend
l'enregistrement synchronisé. Si
l'enregistreur reste en mode de veille
pendant au moins 5 minutes, l'enregistreur
s'arrête automatiquement.
Remarques
•N’enclenchez pas SYNCHRO REC après
l’étape 2. L’enregistrement risque de ne pas
se dérouler correctement.
•Lors d'un enregistrement monaural, suivez
les étapes 1 et 2 de ”Enregistrement
monaural pour doubler la durée normale
d'enregistrement” (page 14) avant
l'enregistrement synchronisé.
2 Faites coulisser SYNCHRO REC sur
la position ON.
L’indication “SYNC” apparaît dans la
fenêtre d’affichage.
SYNC
0% 50% 100%
LEFT
–db5040 30 20
LEVEL
RIGHT
12-F
0246812
Page 69

Commencement de
l'enregistrement en
reculant de 2 secondes
(enregistrement avec
horloge)
L'enregistreur mémorise l'entrée du son
en cours de veille d'enregistrement.
Lorsque vous lancez l'enregistrement avec
horloge, le son est rappelé en mémoire et
l'enregistreur commence l'enregistrement
du son en reculant de 2 secondes.
C'est très pratique, par exemple, si vous
ne désirez pas manquer le début d'une
plage lors de l'enregistrement à partir
d'un syntoniseur BS ou d'un programme
FM.
3 Si vous voulez enregistrer via l'entrée
analogique, réglez le niveau
d'enregistrement (appliquez l'étape 6
de ”Enregistrement via l'entrée
analogique” à la page 16).
4 Appuyez sur TIME MACHINE REC
pour commencer l'enregistrement.
L'enregistreur reculera de 2 secondes
et commencera l'enregistrement.
Pour arrêter l'enregistrement, appuyez
sur p.
Remarque
Si vous avez mis moins de 2 secondes entre
les étapes 2 et 3, alors le temps pour que
l'enregistreur recule sera également inférieur
à 2 secondes.
Début (étape 3)
2 sec.
Enregistrement
Le son est enregistré à partir d'ici
TIME MACHINE REC P
arrêt
1 Tout en appuyant sur P, appuyez et
faites coulisser REC vers la droite.
L'enregistreur se met en mode de
veille d'enregistrement.
2 Lancez la lecture de la source sonore.
L'enregistreur commencera à
mémoriser l'entrée sonore.
temps
13-F
Page 70

Enregistrement en
mode monaural pour
doubler le temps
d'enregistrement
normal
Pour augmenter la durée
d'enregistrement, enregistrez en mode
monaural. La durée d’enregistrement est
alors doublée par rapport à la durée
normale. L'enregistrement monaural est
possible avec l'enregistreur détaché ou
fixé à la station.
P
MODE REC
3 Si vous voulez enregistrer via l'entrée
analogique de la station, réglez le
niveau d'enregistrement (lancez la
lecture de la source et appliquez
l'étape 6 de ”Enregistrement via
l'entrée analogique” à la page 16).
4 Appuyez à nouveau sur P pour
démarrer l’enregistrement.
5 Activez la lecture de la source audio.
Pour arrêter l’enregistrement, appuyez
sur p.
L’enregistreur repasse en mode stéréo pour
votre prochain enregistrement.
Remarques
•Pour des enregistrements plus longs, nous
vous recommandons de fixer l'enregistreur
à la station.
•Si vous enregistrez une source stéréo en
mode monaural, les sons des canaux
gauche et droit seront mixés.
•Réglez SYNCHRO REC sur OFF lorsque
vous enregistrez via l'entrée numérique.
Vous ne pouvez pas enregistrer en
monaural si SYNCHRO REC est toujours
sur ON.
•Les MD enregistrés en monaural ne
peuvent être reproduits qu'au moyen d'un
lecteur/enregistreur MD doté de la
fonction de lecture en monaural.
MODE REC P
1 Tout en appuyant sur P, appuyez et
faites coulisser REC vers la droite.
L’enregistreur passe en mode de
veille d’enregistrement.
2 Appuyez sur MODE.
”MONO” et ”Monaural REC”
apparaissent sur l'écran d'affichage et
l’enregistreur passe en mode
d’enregistrement monaural.
Appuyez de nouveau sur MODE
pour enregistrer en stéréo.
14-F
Page 71

Enregistrement via un
microphone
Branchez un microphone stéréo (ECM717, ECM-MS907, ECM-MS957, etc.; non
fourni) sur la prise MIC (PLUG IN
POWER). Lors de l'utilisation de
l'enregistreur détaché de la station, vous
pouvez uniquement enregistrer via le
microphone. Le niveau d'enregistrement
se règle automatiquement, mais vous
pouvez aussi le régler manuellement.
Microphone stéréo
vers MIC
(PLUG IN
MIC SENS (sur le dessus)
POWER)
1 Sélectionnez la sensibilité avec MIC
SENS.
En principe, réglez-le sur HIGH. Lors
de l'enregistrement de sons de forte
amplitude comme un concert live,
réglez-le sur LOW.
2 Introduisez un MD enregistrable et
démarrez l’enregistrement.
Appuyez et faites coulisser REC vers
la droite.
Pour d'autres opérations, reportezvous à “Enregistrement direct d'un
MD“ (page 8). Les touches de la
station comportant les mêmes noms
ont la même fonction.
Remarque
Lorsque l'enregistreur est fixé à la station,
vous ne pouvez pas enregistrer via le
microphone.
Réglage manuel du niveau
d'enregistrement
=
+ REC
Pp
1 Tout en maintenant P enfoncé,
appuyez et maintenez REC à droite
pendant plus de 2 secondes.
L'enregistreur passe en mode de
veille d'enregistrement.
REC
Indicateur de
niveau
d'enregistrement
2 Lancez la lecture de la source.
3 Observez l'indicateur de niveau sur
l'écran d'affichage et réglez le niveau
d'enregistrement en appuyant sur
+ (+) ou = (–). Réglez le niveau
de sorte que l'indicateur affiche 4
barres au niveau d'entrée moyen.
REC
Niveau
d'enregistrement
4 Appuyez de nouveau sur P pour
commencer l'enregistrement.
Pour arrêter l’enregistrement, appuyez
sur p.
La commande de niveau d’enregistrement
revient en mode de commande automatique.
z
Sélectionnez la sensibilité avec MIC SENS.
Remarque
Réglez le niveau d'enregistrement pendant
que l'enregistreur est en mode de veille.
Vous ne pouvez pas le régler en cours
d’enregistrement.
15-F
Page 72

Enregistrement via une
entrée analogique
(enregistrement
analogique)
Si vous enregistrez au départ de la radio
ou d'un disque, réalisez une connexion
analogique (page 35) et enregistrez selon
la procédure suivante. N'oubliez pas de
régler le niveau d'enregistrement
manuellement.
p
INPUT
REC
P
REC LEVEL
(ANALOG)
1 Introduisez un MD enregistrable.
2 Mettez INPUT sur ANALOG.
3 Sélectionnez le point de début
d'enregistrement.
Si vous voulez enregistrer à partir de
la fin de l'enregistrement précédent,
appuyez sur END SEARCH.
5 Lancez la lecture de la source.
6 Observez l'indicateur de niveau sur
l'écran d'affichage et réglez le niveau
d'enregistrement au moyen de REC
LEVEL. Réglez le niveau aux
alentours de 12 (-12dB) au niveau
d'entrée moyen.
1
REC
0% 50% 100%
LEFT
LEVEL
–db5040 30 20
RIGHT
bas
0246812
élevé
Indicateur de
niveau
d'enregistrement
7 Appuyez de nouveau sur P pour
commencer l'enregistrement.
Remarque
Attention que REC LEVEL reste opérant
même pendant un enregistrement; si vous
l'ajustez, vous modifiez également le
niveau d'enregistrement.
4 Tout en maintenant P enfoncé,
appuyez et faites coulisser REC vers
la droite.
L'enregistreur se met en mode de
veille d'enregistrement.
1
REC
0% 50% 100%
LEFT
–db5040 30 20
LEVEL
RIGHT
Indicateur de niveau
d'enregistrement
16-F
0246812
Page 73

Vérification de la durée
restante ou de la
position
d’enregistrement
Vous pouvez vérifier les informations
telles que le temps restant sur l'écran
d'affichage de la station, sur l'écran
d'affichage de l'enregistreur ou sur l'écran
d'affichage de la télécommande.
Sur l'écran d'affichage de la
station
DISPLAY
1 Appuyez sur DISPLAY.
A chaque pression, l'écran change
comme suit.
A
1 2 3 4 5 6 7 8 9
REC
0% 50% 100%
LEFT
–db5040 30 20
LEVEL
RIGHT
Pointeur de positionnement
En cours d’enregistrement
A
Temps restant
B
Temps écoulé
d'enregistrement
Heure et date
1)
actuelles
1)
Apparaît uniquement lorsque l'horloge est
réglée.
Temps écoulé
B
Numéro
0246812
de
plage
En mode d’arrêt
A
—
Temps restant pour
B
Temps écoulé
Temps écoulé
l'enregistrement
Temps restant des
plages sur le disque
Heure et date
1)
actuelles
1)
Apparaît uniquement lorsque l'horloge est
réglée.
Temps restant de
la plage en cours
Temps restant
Sur l'enregistreur
Il n'y a aucun affichage à l'écran de
l'enregistreur lorsqu'il est fixé à la station.
DISPLAY
1 Appuyez sur DISPLAY. Chaque fois
que vous appuyez sur cette touche,
l’affichage change selon la séquence
suivante.
REC
En cours d’enregistrement
A
Numéro de plage
—
Année en cours
—
1)
Ne s’affichent que si l’horloge est réglée.
B
Temps écoulé
Temps restant pour
l’enregistrement
Mois et date en cours
Heure actuelle
A
B
1)
à suivre
17-F
Page 74

En mode d’arrêt
A
Numéro de plage
—
Nombre de plages
restantes
Année en cours
—
1)
Apparaît uniquement si la plage a été
identifiée.
2)
Ne s’affiche que si l’horloge est réglée.
B
Temps écoulé
Temps restant pour
l’enregistrement
Temps restant pour
la lecture
Mois et date en cours
Heure actuelle 1)
Sur la télécommande
DISPLAY
1 Appuyez sur DISPLAY. Chaque fois
que vous appuyez sur cette touche,
l’affichage change selon la séquence
suivante. Lorsque l'enregistreur est
fixé à la station, l'affichage ne
changera pas du numéro de plage et
du temps écoulé.
En mode d’arrêt
A
Numéro de plage
Numéro de plage
Le nombre de plages
B
Durée écoulée
Titre de la plage
Titre du disque
sur le disque
—
—
1)
Apparaît uniquement si le disque/plage a
été identifié.
2)
Ne s’affiche que si l’horloge est réglée.
Mois et date en
2)
cours
2)
Heure
z
Si vous voulez vérifier la position de lecture
ou le titre de la plage en cours de lecture,
reportez-vous à la page 24.
1)
1)
A
B
En cours d’enregistrement
A
Numéro de plage
Numéro de plage
B
Durée écoulée
Durée
d’enregistrement
restante
—
Mois et date en
cours
—
1)
Ne s’affichent que si l’horloge est réglée.
Heure
18-F
1)
1)
Page 75

Réglage de l’horloge
pour l’estampillage de
l’heure
d’enregistrement
Pour estampiller la date et l’heure sur le
MD lorsque vous enregistrez, vous devez
d’abord régler l’horloge. Vous pouvez
régler l'horloge soit à partir de
l'enregistreur détaché, soit à partir de la
station lorsque l'enregistreur est fixé.
LINE(ANALOG)ACTIVE
IN OUT OPT 1 OPT 2
SP OUT
DC IN 9V
DIGITAL IN DIGITAL OUT
OPTICAL
CLOCK SET
CLOCK SET
1 Appuyez sur CLOCK SET.
Utilisez un objet pointu. Les chiffres
de l’année clignotent.
Ecran d'affichage de la station
Ecran d'affichage de la station
Si vous avez commis une erreur
en réglant l’horloge
Appuyez sur p et recommencez le
réglage de l’horloge à partir de l’étape 2.
Vous pouvez sauter une étape en
appuyant sur m.
Pour régler l'horloge sur
l'enregistreur
La procédure est identique à celle du
réglage de l'horloge sur la station.
Appuyez sur CLOCK SET au bas de
l'enregistreur pour faire clignoter le
chiffre de l'année. Changez le chiffre avec
= ou + et entrez avec (. Lorsque
vous appuyez sur ( pour entrer la
minute, l'horloge commence à
fonctionner.
Lorsque vous fixez l'enregistreur sur la
station après avoir réglé l'horloge de
l'enregistreur, l'horloge de la station sera
synchronisée automatiquement.
Pour afficher l’heure suivant le
système à 24 heures
Appuyez sur DISPLAY pendant que vous
réglez l’horloge. Pour afficher l’heure
suivant le système à 12 heures, appuyez à
nouveau sur DISPLAY.
1 2 3 4 5 6 7 8 9
0% 50% 100%
LEFT
–db5040 30 20
LEVEL
RIGHT
0246812
2 Modifiez l'année en cours en
appuyant sur  ou µ.
Pour changer les chiffres rapidement,
maintenez la touche enfoncée  ou µ.
3 Appuyez sur m pour entrer l'année.
Le chiffre du mois clignote.
4 Répétez les étapes 2 et 3 pour
introduire le mois, la date, l’heure et
les minutes.
L'horloge démarre lorsque vous
appuyez sur TITLE/ENTER pour
entrer les minutes.
Charge de la batterie intégrée de
l’horloge
Lorsque vous utilisez l'enregistreur pour la
première fois où après une longue période
d'inutilisation, chargez la batterie intégrée
pour l'horloge.
Après avoir réglé l'horloge, laissez
l'enregistreur raccordé à la source
d'alimentation pendant environ 2 heures
pour charger la batterie intégrée.
Lorsqu’elle est chargée, la batterie
intégrée offre une autonomie d’environ
un mois si l’appareil n’est connecté à
aucune source d’alimentation.
L’enregistreur assure automatiquement la
charge de la batterie intégrée lorsqu’il est
connecté à l’adaptateur secteur, à des
piles sèches, au secteur ou à une batterie
rechargeable.
19-F
Page 76

zDifférents modes de
lecture
Lecture d'un MD sur la
station
Lisez un MD avec l'enregistreur fixé à la
station en procédant comme suit. Vous
pouvez également utiliser la
télécommande carte.
POWER
p
+
(
=
ACTIVE SP LEVEL
POWER
1 2 3
(
=
4 5 6
7 8 9
>
10 0/10
= ( +
P p
PLAY MODE
ACTIVE SP
LEVEL
P
Pour
Effectuer la lecture
Régler le volume
des écouteurs
Introduire une
pause
Fonction
Appuyez sur (
Réglez LEVEL sur la
station
Appuyez sur P
Appuyez de
nouveau sur P pour
reprendre la lecture
Trouver le début
de la plage en
Appuyez une fois
sur =
cours
Trouver le début
de la plage
Appuyez une fois
sur +
suivante
Reculer pendant la
1)
lecture
Avancer pendant
la lecture
1)
Retirer le MD
Maintenez =
enfoncé
Maintenez +
enfoncé
Appuyez sur p et
ouvrez le couvercle2).
Eteindre la station
Appuyez sur
POWER
20-F
P
POWER
+
ACTIVE
SP LEVEL
p
1)
Pour reculer ou avancer rapidement sans
écouter, appuyez sur P, puis maintenez
= ou + enfoncé.
2)
Dès que vous ouvrez le couvercle, l'endroit
de début de la lecture deviendra le début
de la première plage.
Remarque
La station se met automatiquement hors
tension lorsque vous ne l'utilisez pas
pendant 5 minutes en mode d'arrêt.
Appuyez sur POWER ou sur ( pour
remettre la station sous tension.
Lecture avec des hautparleurs actifs
Vous pouvez écouter le son de lecture
d'un MD via des haut-parleurs actifs tels
que les SRS-Z1000 (non fournis), etc., en
les raccordant à la station (page 35).
Utilisez les touches de la station ou de la
télécommande carte.
Pour régler le volume
Appuyez sur ACTIVE SP LEVEL –/+ de
la station ou de la télécommande carte.
Page 77

Sélection directe d'une plage
(Sélection directe)
Vous pouvez sélectionner une plage
directement en appuyant sur le numéro
de plage de la télécommande carte.
1 Appuyez sur la ou les touches
numériques correspondant au
numéro de plage de la plage de votre
choix.
L'enregistreur reproduira la plage
sélectionnée.
POWER
1 2 3
4 5 6
7 8 9
PLAY MODE
>
10 0/10
= ( +
P p
z
•Pour sélectionner le numéro de plage 10,
appuyez sur 0/10.
•Pour sélectionner un numéro de plage
supérieur à 10, appuyez tout d'abord sur
>10, puis appuyez sur le numéro du chiffre
des dizaines et puis sur le chiffre des
unités. Appuyez sur 0/10 si le chiffre des
unités est zéro.
•Pour sélectionner un numéro de plage
supérieur à 100, appuyez deux fois sur >10,
puis appuyez sur le chiffre des centaines, le
chiffre des dizaines et le chiffre des unités.
ACTIVE SP
LEVEL
Touches
numériques
Lecture des plages
sélectionnées dans l'ordre de
votre choix (lecture
programmée)
Sélectionnez jusqu'à 20 plages et
reproduisez-les dans l'ordre de votre
choix.
POWER
(
1 2 3
4 5 6
7 8 9
>
10 0/10
= ( +
P p
PLAY MODE
ACTIVE SP
LEVEL
Touches
numériques
PLAY MODE
1 Appuyez plusieurs fois sur PLAY
MODE jusqu'à ce que ”PROGRAM”
s'allume dans l'écran d'affichage.
2 Appuyez sur la ou les touches
numériques correspondant au
numéro de plage de votre choix dans
l'ordre de leur lecture.
Les plages sont programmées en
séquence. Vous pouvez programmer
jusqu'à 20 plages.
Numéro
de
programme
1 2 4 8
PROGRAM
11
0% 50% 100%
LEFT
–db504030 20
LEVEL
RIGHT
Numéro de
plage
Pour annuler une plage, appuyez sur
ERASE/DELETE sur la station.
0246812
Temps
total
3 Appuyez sur (.
L'enregistreur reproduira les plages
dans l'ordre programmé.
Pour afficher l'ordre des plages
Appuyez sur SELECT de la station avant
la lecture. A chaque pression, le numéro
de plage sera affiché dans l'ordre
programmé.
à suivre
21-F
Page 78

Pour modifier le programme
Appuyez sur ERASE/DELETE de la
station avant la lecture pour annuler la
dernière plage ou appuyez sur p pour
annuler toutes les plages. Ensuite,
rappelez l'étape 2.
Pour programmer à partir de la
station
1 Appuyez plusieurs fois sur MODE
jusqu'à ce que ”PROGRAM” s'allume
sur l'écran d'affichage.
2 Sélectionnez le numéro de plage de
votre choix au moyen des touches de
curseur et appuyez sur SELECT.
3 Répétez l'étape 2 et sélectionnez les
plages dans l'ordre de leur lecture.
4 Appuyez sur (.
Remarque
Le programme sera supprimé si vous
effectuez l'une des opérations suivantes:
• appuyez sur p
• retirez le disque
• détachez l'enregistreur de la station
• enregistrez ou éditez
Lecture de plages
répétée
Vous pouvez activer la lecture de plages
répétée suivant trois modes — lecture
répétée du MD entier, lecture répétée
d’une plage et lecture répétée aléatoire.
Sur l'enregistreur
PLAY
MODE
MODE
Sur la station
POWER
1 2 3
4 5 6
7 8 9
PLAY MODE
>
10 0/10
ACTIVE SP
= ( +
P p
PLAY
LEVEL
MODE
MODE
1 Appuyez plusieurs fois sur MODE
(PLAY MODE de la télécommande)
pendant la lecture jusqu'à ce que
l'indication du mode de lecture de
votre choix apparaisse sur l'écran
d'affichage.
22-F
Page 79

Mode de
lecture
Toutes les plages
sont reproduites
de façon répétée.
(All Repeat)
Une seule plage
est reproduite de
façon répétée.
(Single Repeat)
Toutes les plages
sont reproduites
de façon répétée
dans un ordre
aléatoire.
(Shuffle Repeat)
enregistreur
télécommande
“ ”
“1”
“
SHUF
Station
REPEAT
REPEAT
1
”
REPEAT
SHUFFLE
Pour annuler la lecture répétée
Appuyez plusieurs fois sur MODE (PLAY
MODE de la télécommande) jusqu'à ce
que ”REPEAT” ” ” disparaisse de
l'écran d'affichage.
Renforcer les graves
(DIGITAL MEGA BASS)
La fonction d’extrêmes graves Mega Bass
intensifie les basses fréquences pour une
qualité de restitution sonore accrue. Vous
pouvez utiliser cette fonction uniquement
avec l'enregistreur détaché de la station.
DIGITAL MEGA BASS
1 Mettez DIGITAL MEGA BASS sur
”1” ou ”2”.
Les sons graves seront accentués en
conséquence (1: effet modéré, 2: effet
puissant).
Remarques
•Si le son présente des distorsions lors de
l'accentuation des graves, baissez le
volume.
•La fonction Mega Bass n’affecte pas le son
enregistré.
23-F
Page 80

Protection de votre ouïe
(AVLS)
La fonction AVLS (Automatic Volume
Limiter System) de limitation
automatique du volume limite le volume
maximum de manière à préserver votre
ouïe. Vous pouvez utiliser cette fonction
uniquement avec l'enregistreur détaché
de la station.
AVLS
1 Mettez AVLS sur LIMIT.
”AVLS” apparaîtra sur l'écran
d'affichage et le volume sera limité à
un niveau modéré.
Vérification de la durée
restante ou de la
position de lecture
Vous pouvez vérifier les informations
telles que le nom de la plage et du disque
sur l'écran d'affichage de la station, sur
l'écran d'affichage de l'enregistreur ou sur
l'écran d'affichage de la télécommande.
Sur la station
DISPLAY
1 Appuyez sur DISPLAY pendant la
lecture.
A chaque pression sur la touche,
l'écran d'affichage change comme
suit.
Nom du
1)
disque
Nom
de la
plage
1)
1 2 3 4 5 6 7 8 9
0% 50% 100%
LEFT
–db5040 30 20
LEVEL
RIGHT
A
B
C
0246812
24-F
A
—
Nombre de
plages
restantes et
temps restant
Heure et date
d'enregistrement
1)
Apparaît uniquement si le disque/la plage
a été identifié.
2)
Ne s’affiche que si l’horloge est réglée.
B
Temps
écoulé
Durée
restante de la
plage en
cours
Durée
d'enregistrement
C
Numéro de
plage
Numéro de
plage
Année/
2)
mois/date
2)
Page 81

Sur l'enregistreur
Sur la télécommande
Il n'y a aucun affichage à l'écran de
l'enregistreur lorsqu'il est fixé à la station.
DISPLAY
1 Appuyez sur DISPLAY pendant la
lecture.
A chaque pression sur la touche,
l'écran d'affichage change comme
suit.
A
B
A
Numéro de plage
Numéro de plage
Nombre de plages
restantes
Année
d'enregistrement
—
1)
Apparaît uniquement si la date et l'heure
d'enregistrement ont été indiquées.
B
Temps écoulé
Temps restant sur
la plage en cours
Temps restant
Mois et date
1)
d'enregistrement
Durée
d'enregistrement
DISPLAY
1 Appuyez sur DISPLAY pendant la
lecture.
A chaque pression sur la touche,
l'écran d'affichage change comme
suit. Lorsque l'enregistreur est fixé à
la station, l'écran d'affichage ne
changera pas du numéro de plage et
du temps restant.
A
A
Numéro de plage
Numéro de plage
Le nombre de
plages sur le
disque
1)
1)
1)
Apparaît uniquement si le disquelplage a
été identifiée.
2)
Ne s’affiche que si l’horloge est réglée.
z
Si vous voulez vérifier la durée restante ou la
position d’enregistrement pendant un
enregistrement ou en mode d’arrêt, reportezvous à la page 17.
B
B
Durée écoulée
Titre de la plage
Titre du disque
—
Mois et date
d'enregistrement
—
Durée enregistrée
1)
1)
2)
2)
25-F
Page 82

zMontage de plages
enregistrées
Vous pouvez monter vos propres
enregistrements en ajoutant ou en
supprimant des repères de plage ou
encore en effaçant des plages. Les MD
préenregistrés ne peuvent être montés.
Remarques sur le montage
•Ne déplacez pas l’enregistreur et
n’actionnez pas la molette jog pendant que
l’indication “Toc Edit”* clignote dans la
fenêtre d’affichage.
•Vous ne pouvez pas monter des plages sur
un MD protégé contre l’enregistrement.
Avant de monter des plages, refermez le
taquet sur le côté du MD.
2 Vérifiez le numéro de la plage dans la
fenêtre d’affichage et appuyez sur
TITLE/ENTER. L'enregistreur
commencera à reproduire la plage
suivante.
La plage est effacée du MD et les
plages restantes sont renumérotées.
Pour effacer un passage d’une
plage
Ajoutez des repères de plage au début et
à la fin du passage que vous voulez
effacer (page 27) et supprimez ensuite ce
passage.
* TOC = Table des matières
Suppression de plages
(ERASE)
Pour effacer une plage
Assurez-vous qu'il s'agit bien de la plage
que vous désirez effacer.
p
ERASE/
DELETE
1 Appuyez sur ERASE/DELETE
pendant la lecture de la plage que
vous voulez effacer.
”Erase OK? n Push Enter” apparaît
sur l'écran d'affichage et
l’enregistreur entame la lecture
répétée de la plage sélectionnée. Pour
annuler la suppression, appuyez sur
p.
26-F
TITLE/
ENTER
Pour effacer un disque
complet
Vous pouvez supprimer toutes les plages
et toutes les données d’un MD en une
seule opération.
Vérifiez le contenu du disque que vous
voulez effacer.
p
REC
TITLE/
ENTER
ERASE/
DELETE
1 En mode d’arrêt, maintenez la touche
ERASE/DELETE enfoncée et
appuyez et faites coulisser REC vers
la droite.
”All Erase OK? n Push Enter”
apparaît sur l'écran d'affichage. Pour
annuler la suppression, appuyez sur p.
2 Appuyez sur TITLE/ENTER.
L’indication “Toc Edit” clignote dans
la fenêtre d’affichage. Lorsque le MD
est supprimé, ”BLANK DISC”
apparaîtra sur l'écran d'affichage.
Page 83

Insertion de repères de
plage (TRACK MARK ON)
Vous pouvez ajouter des repères de plage
de façon à ce que la partie suivant le
repère de la nouvelle plage soit comptée
comme une nouvelle plage.
Les numéros de plage augmentent
comme suit.
1234
12345
Le numéro de plage augmente
4
Insertion d’un repère de plage
.
Pour introduire un repère de
plage sur l'enregistreur
Appuyez sur T MARK en cours de lecture ou
de pause. Un repère de plage sera ajouté
lorsque vous appuyez sur la touche.
Pour insérer des repères de plage
en cours d’enregistrement
Appuyez sur TRACK MARK de la station, T
MARK sur l'enregistreur ou TRACK MARK
de la télécommande. Un repère de plage sera
ajouté à l'endroit où vous avez appuyé sur la
touche.
Remarque
Lorsque vous ajoutez un repère de plage
avec l'enregistreur ou lorsque vous
ajoutez un repère de plage durant
l'enregistrement, le repère est ajouté à
l'endroit où vous avez appuyé sur la
touche T MARK ou TRACK MARK. Vous
ne pouvez en ajuster la position à l'aide
des touches curseur.
Touches de curseur
TITLE/ENTER
TRACK MARK
1 Pendant la lecture ou la pause d'un
MD, appuyez sur TRACK MARK de
la station à l'endroit où vous désirez
ajouter un repère.
”Rehearsal” et ”Track Mark ON OK?
n Push Enter” apparaîtront. Un
segment de quatre secondes
s'affichera plusieurs fois. Appuyez
sur les touches de curseur pour régler
l'endroit à marquer d'un repère. Il ne
peut plus être déplacé vers l'avant ou
vers l'arrière pendant huit secondes
maximum, par incréments de 0,06
seconde.
Pour annuler l'ajout d'un repère de
plage, appuyez sur p.
2 Appuyez sur TITLE/ENTER.
”Track Mark ON” s'affichera.
Un repère de plage est ajouté et la
portion suivant le repère sera
considéré comme nouvelle plage.
27-F
Page 84

Suppression de repères
de plage (TRACK MARK
OFF)
Lorsque vous enregistrez via une entrée
(ligne) analogique, il se peut que des
repères de plage inutiles soient
enregistrés. Vous pouvez supprimer un
repère de plage de façon à combiner les
plages qui se trouvent avant et après le
repère de plage. Les numéros de plages
change selon la séquence suivante.
1234
.
123
Le numéro de plage diminue
4
Suppression d’un repère de plage
=
TITLE/
ENTER
P
TRACK
MARK
1 Pendant la lecture de la plage dont
vous voulez supprimer le repère de
plage, appuyez sur P pour passer en
mode de pause.
3 Appuyez sur TRACK MARK de la
station.
”Rehearsal” et ”Track Mark OFF OK?
n Push Enter” apparaîtront
alternativement. Un segment de
quatre secondes sera lu de manière
répétitive.
Pour annuler la suppression,
appuyez sur p.
4 Appuyez sur TITLE/ENTER.
”Track Mark OFF” sera affiché. Le
repère de plage est supprimé et les
deux plages sont combinées. Le
numéro de la plage qui vient d'être
combinée correspondra à celui de la
première plage. Les plages suivantes
seront renumérotées.
Pour supprimer un repère de
plage sur l'enregistreur
Appuyez sur = ou + en cours de
pause pour retrouver le repère de plage
que vous désirez supprimer. Appuyez sur
T MARK.
Remarque
Lorsque vous effacez un repère de plage
avec l'enregistreur, le repère est effacé à
l'endroit où vous avez appuyé sur la touche
T MARK. Il n'y aura pas de lecture répétée.
z
Lorsque vous supprimez un repère de plage,
la date, l'heure et le nom assignés au repère
sont également supprimés.
2 Recherchez le repère de plage en
appuyant légèrement sur =.
Par exemple, pour supprimer le
troisième repère de plage, localisez le
début de la troisième plage.
L’indication “00:00” apparaît dans la
fenêtre d’affichage.
28-F
Page 85

Déplacement de plages
1 2 3 4 5 6 7 8 9
0% 50% 100%
LEVEL
0246812
LEFT
RIGHT
–db5040 30 20
enregistrées (MOVE)
Identification des
enregistrements (TITLE)
Vous pouvez modifier l’ordre des plages
enregistrées.
Avant le déplacement
Plage A Plage B Plage C Plage D
1234
Déplacement de la
Après
déplacement
Plage A Plage C Plage B Plage D
1234
MOVE/INSERT
Touches de curseur
plage C de la troisième
à la deuxième position.
$
P
TITLE/
ENTER
1 En mode de lecture ou de pause de la
plage que vous désirez déplacer,
appuyez sur MOVE/INSERT.
Pour l'exemple ci-dessus, ”Move
No.003 n No.003” et ”OK? n Push
Enter” apparaissent sur l'écran
d'affichage.
2 Appuyez sur les touches de curseur
pour sélectionner la nouvelle position
de la plage.
M ou µ diminue le numéro de plage.
 ou m augmente le numéro de
plage. Pour annuler le déplacement,
appuyez sur p.
3 Appuyez à nouveau sur TITLE/
ENTER.
Le déplacement est terminé et
l’enregistreur reproduit la plage
déplacée.
Vous pouvez identifier les MD et les
plages que vous avez enregistrés au
moyen de lettres, de numéros et de
repères. Chaque identification peut se
composer d'un maximum de 200
caractères et chaque MD peut contenir
jusqu'à environ 1700 caractères.
INPUT POSITION
ERASE/DELETE
MOVE/INSERT
p
CAPS TITLE/
Touches de curseur
SELECT
ENTER
1 Pour identifier une plage, activez la
lecture de la plage que vous voulez
identifier.
Pour identifier un MD, introduisez le
MD que vous désirez identifier.
Si un MD se trouve déjà dans
l’appareil, appuyez sur p pour
arrêter.
2 Appuyez sur TITLE/ENTER.
Le titre de disque et un ensemble de
caractères s'afficheront.
3 Appuyez sur les touches de curseur
pour sélectionner un caractère et
appuyez sur SELECT pour confirmer.
Curseur
à suivre
29-F
Page 86

Appuyez sur
CAPS
Pour
Permuter entre
l'alphabet, les symboles
et les numéros et les
échantillons de titre.
Touches de
curseur
Déplacer le curseur vers
le haut/bas/droite/
gauche.
INPUT
POSITION M/m
Déplacer la position
d'entrée à gauche/
droite.
SELECT
Entrer une lettre et
déplacez la position
d'entrée vers la droite.
p
MOVE/INSERT
ERASE/DELETE
Annuler l'identification.
Insérer un espace blanc.
Supprimer une lettre et
déplacer la position
d'entrée vers la gauche.
4 Répétez l’étape 3 jusqu’à ce que vous
ayez introduit tous les caractères de
l’identification.
5 Appuyez sur TITLE/ENTER.
La plage ou le disque est identifié.
Pour annuler l’identification, appuyez
sur p.
1 2 3 4 5 6 7 8 9
Curseur
0% 50% 100%
LEFT
LEVEL
–db5040 30 20
RIGHT
0246812
Indication de la page
Pour renommer des
enregistrements
Suivez les étapes 1 et 2 pour afficher
l'identification de la plage ou du MD.
Introduisez un nouveau caractère à la
place de celui que vous voulez remplacer
et appuyez ensuite sur TITLE/ENTER.
Remarques
•Vous ne pouvez pas renommer des MD
préenregistrés ou identifier des MD non
enregistrés.
•L'enregistreur est capable d'afficher, mais
ne peut pas effectuer d'identification avec
les caractères ”Katakana” japonais.
Caractères disponibles
• Lettres majuscules et minuscules de
l’alphabet anglais
• Numéros de 0 à 9
• ! “ # $ % & ( ) * + – . ; < = > ?
@ _ ` ' , / : _ (espace)
Pour utiliser les échantillons de
titre
Utilisez l’un des 21 mots/phrases
échantillons comme nom de disque, titre
de plage ou message.
Appuyez sur M/m pour modifier la page.
Appuyez sur Â/µ pour déplacer le
curseur (>) vers le haut ou vers le bas.
Appuyez sur SELECT pour entrer le titre
choisi avec le curseur.
30-F
Page 87

Annulation de la
dernière opération
d'édition (UNDO)
Vous pouvez annuler la dernière
opération effectuée et revenir à l'état
précédent.
Toutefois, vous ne pouvez pas annuler
une opération d'édition si vous avez
effectué l'une des opérations suivantes
juste après avoir:
• fait coulisser le commutateur REC
• mis la station hors tension ou retiré le
MD
• retiré l'enregistreur de la station
• laissé l'enregistreur et la station hors
fonction pendant plus de 5 minutes
• retiré l'adaptateur secteur de la prise
murale
1 Appuyez sur UNDO en mode d'arrêt.
Fonction
Suppression d'une
plage
Suppression de
toutes les plages
Insertion d'un
repère de plage
Suppression d'un
repère de plage
Déplacement d'une
plage
Nomination d'un
disque
Nomination d'une
plage
Message
”Erase Undo OK?”
”All Erase Undo
OK?”
”Track Mark ON
Undo OK?”
”Track Mark OFF
Undo OK?”
”Move Undo OK?”
”Disc Name Undo
OK?”
”Track Name Undo
OK?”
2 Appuyez sur TITLE/ENTER.
”TOC EDIT” apparaîtra pendant
quelques secondes et le MD
reviendra à son état préalable.
Pour annuler UNDO, appuyez sur p.
Remarque
Une fois que vous avez annulé une opération
d'édition, vous ne pouvez plus annuler
l'annulation pour revenir à l'opération
d'édition d'origine.
p
Les messages suivants apparaîtront
en fonction de la dernière opération
d'édition effectuée.
UNDO
31-F
Page 88

zAutres fonctions
utiles
Verrouillage des
commandes (HOLD)
Enregistrement/lecture
au moyen d'un
programmateur
Utilisez cette fonction pour éviter que les
commandes soient accidentellement
actionnées lorsque vous transportez
l’enregistreur.
HOLD
HOLD
1 Faites coulisser HOLD dans le sens
de la c.
Sur l’enregistreur, faites coulisser
HOLD de façon à verrouiller les
commandes de l’enregistreur. Sur la
télécommande, faites coulisser HOLD
de façon à verrouiller les commandes
de la télécommande.
Faites coulisser HOLD dans le sens
opposé à la flèche pour déverrouiller
les commandes.
z
La fonction HOLD de l'enregistreur est
désactivée pendant qu'il est fixé à la
station. La fonction HOLD de la
télécommande n'est pas affectée.
Commencez l'enregistrement ou la lecture
à une heure présélectionnée à l'aide du
programmateur audio (en option).
vers le programmateur
audio
TIMER
1 Branchez l'adaptateur secteur de la
station au programmateur audio (en
option).
2 Réglez manuellement le niveau
d'enregistrement et appuyez sur p
lorsque vous effectuez un
enregistrement via l'entrée
analogique (étapes 4 à 6 de
”Enregistrement via l'entrée
analogique” à la page 16).
3 Mettez TIMER sur ”REC” ou”PLAY”.
Pour commencer l'enregistrement à
l'heure présélectionnée: sélectionnez
”REC”. L'enregistrement
commencera automatiquement après
la partie qui est déjà enregistrée sur le
MD.
Pour commencer la lecture à l'heure
présélectionnée: sélectionnez
”PLAY”.
32-F
Page 89

4 Réglez l'heure sur le programmateur
audio et mettez l'appareil hors
tension.
Le programmateur audio se mettra
en route automatiquement à l'heure
présélectionnée et mettra à son tour la
station sous tension.
Remarque
•Pour enregistrer manuellement à l'aide
d'un programmateur audio, appuyez sur
MODE pendant 2 secondes ou plus après
l'étape 3. Le réglage de l'enregistrement par
programmateur s'affichera. Si le mode
d'enregistrement est ”Stéréo”, appuyez de
nouveau sur MODE de sorte qu'il passe en
”Monaural”.
•Si vous utilisez la station pour la première
fois ou après une longue période
d'inutilisation, veillez à recharger la batterie
de secours intégrée à la station avant
d'utiliser un programmateur. L'enregistreur
utilise cette batterie de secours lorsqu'il
écrit des informations de table des matières
(TOC) (page 49) après que l'enregistrement
programmé est terminé et que l'appareil est
mis hors tension. Pour recharger la batterie
intégrée, branchez l'adaptateur secteur à la
station. Une recharge complète dure
environ 10 heures. La batterie offrira alors
une autonomie d'une semaine; ne réglez
pas le programmateur pour commencer
l'enregistrement après plus d'une semaine.
33-F
Page 90

zConnexion et sources
d'alimentation
Raccordement pour
l'enregistrement —
connexion aux lecteurs
CD, etc.
Raccordement pour
l'enregistrement analogique
Après avoir effectué le raccordement,
réglez le commutateur INPUT sur
ANALOG et ajustez le niveau
d'enregistrement (page 16).
Enregistrement de sons provenant d'un
autre appareil sur la station. La connexion
change selon qu'il s'agit de numérique ou
d'analogique. Effectuez le branchement
en conséquence.
Raccordement pour
l'enregistrement numérique
Le convertisseur du taux
d'échantillonnage intégré vous permet de
raccorder des sources numériques avec
un taux d'échantillonnage différent (tel
qu'un syntoniseur BS ou une platine
DAT) et d'enregistrer numériquement.
Après le branchement, mettez le
commutateur INPUT sur OPT1 ou OPT2
en fonction de la connexion.
Platine DAT,
lecteur CD, etc.
Fiche
numérique
rectangulaire
vers DIGITAL
OUT
POC-10AB etc.
(non fourni)
POC-10A etc.
(non fourni)
Lecteur CD
portable, etc.
Minifiche
optique
Tourne-disque, platine
à cassette, etc.
vers les prises
de sortie
(analogique)
RK-C310GS*
etc. (non
fourni)
OPTICAL
L (blanc)
CLOCK SET
R (rouge)
LINE(ANALOG)ACTIVE
IN OUT OPT 1 OPT 2
SP OUT
DC IN 9V
DIGITAL IN DIGITAL OUT
vers LINE(ANALOG) IN
*Utilisez les câbles de raccordement sans
atténuateur.
34-F
LINE(ANALOG)ACTIVE
IN OUT OPT 1 OPT 2
SP OUT
DC IN 9V
DIGITAL IN DIGITAL OUT
OPTICAL
vers DIGITAL IN OPT1 ou OPT2
CLOCK SET
Page 91

Raccordement pour la
lecture — connexion à
des amplificateurs ou
haut-parleurs actifs
Lecture ou enregistrement de sons de
l'enregistreur sur un autre appareil. Le
branchement diffère en fonction de
l'usage et du type d'équipement.
Effectuez le branchement en conséquence.
Raccordement à un appareil
numérique
Raccordement à un appareil
analogique
Haut-parleurs actifs SRSZ1000, etc. (non fourni)
vers ACTIVE SP OUT
LINE(ANALOG)ACTIVE
IN OUT OPT 1 OPT 2
SP OUT
DC IN 9V
DIGITAL IN DIGITAL OUT
OPTICAL
CLOCK SET
LINE(ANALOG)ACTIVE
IN OUT OPT 1 OPT 2
vers DIGITAL OUT
Fiche
optique
rectangulaire
Platine MD, platine
DAT, amplificateur
numérique, etc.
DC IN 9V
DIGITAL IN DIGITAL OUT
SP OUT
POC-10A etc.
(non fourni)
POC-10AB etc.
(non fourni)
vers DIGITAL IN
Enregistreur
portable MD,
etc.
OPTICAL
CLOCK SET
Minifiche
optique
R (rouge)
Platine à cassette,
amplificateur, etc.
vers LINE
(ANALOG) OUT
L (blanc)
RK-C310GS
etc. (non
fourni)
vers LINE IN
35-F
Page 92

Sources d’alimentation
Vous pouvez utiliser les sources
d'alimentation suivantes:
Lorsque l'enregistreur est fixé à la station
— secteur (prise murale)
Lorsque l'enregistreur est utilisé sur sa
propre alimentation
à l'aide du compartiment à batterie de
l'enregistreur
— batterie rechargeable au lithium-
ion LIP-8 (fournie)
utilisation du boîtier de piles externe
fourni
— deux piles sèches LR6 (AA)
Utilisation de la station sur
secteur
Le station ne peut être alimentée que sur
secteur.
2 Introduisez la batterie rechargeable
au lithium-ion LIP-8 (fournie) dans le
compartiment à batterie de
l'enregistreur et fermez le couvercle.
3 Fixez l'enregistreur sur la station.
n apparaîtra sur l'écran
d'affichage et la recharge démarrera.
LINE(ANALOG)ACTIVE
IN OUT OPT 1 OPT 2
SP OUT
DC IN 9V
DIGITAL IN DIGITAL OUT
OPTICAL
vers DC IN 9V
adaptateur
secteur (fourni)
Utilisation d'une batterie
rechargeable au lithium ion
Avant d’utiliser la batterie rechargeable
au lithium ion LIP-8 fournie pour la
première fois, chargez-la sur la station.
1 Branchez la station sur le secteur
(prise murale).
36-F
LINE(ANALOG)ACTIVE
IN OUT OPT 1 OPT 2
SP OUT
DC IN 9V
DIGITAL IN DIGITAL OUT
OPTICAL
CLOCK SET
vers une
prise
murale
CLOCK SET
vers une
prise
murale
affiché de manière
répétée
La recharge est terminée
lorsque ı apparaît.
z
Une batterie rechargeable introduite dans le
compartiment de batterie de la station se
recharge que la station soit sous tension ou
non, tant que l'adaptateur secteur est
raccordé correctement.
Page 93

Pour recharger sur la station avec
l'enregistreur détaché
La batterie rechargeable au lithium-ion
LIP-8 peut également être rechargée sur la
station avec l'enregistreur détaché.
1 Faites glisser le commutateur OPEN
sur le côté de la station dans le sens
de la flèche.
OPEN
2 Introduisez la batterie rechargeable
au lithium-ion (fournie) dans le
compartiment à batterie de la station
et fermez le couvercle.
Indicateur CHARGE:
s'allume en cours de
charge. S'éteint lorsque la
recharge est complète.
z
Si la batterie rechargeable est introduite à la
fois dans l'enregistreur et dans la station, la
batterie dans l'enregistreur se charge en
premier lieu et l'indicateur CHARGE
clignote.
Utilisation de l'enregistreur
sur piles sèches
Utilisez le boîtier de piles externe fourni.
1 Fixez le boîtier de piles fourni.
2 Introduisez les deux piles sèches LR6
(AA) (non fournies).
Remarque
Lors de l'utilisation conjointe de la batterie
rechargeable au lithium-ion et de piles
sèches, arrêtez l'utilisation de l'appareil
avant de changer la ou les pile(s), même lors
du changement d'une des deux piles.
Temps de charge
80% Approx. 2 heures
100% Approx. 3 heures
(Pour charger une batterie complètement
déchargée)
37-F
Page 94

Autonomie de la batterie
1)
Pour des enregistrements plus longs,
nous vous recommandons d'utiliser
l'enregistreur fixé sur la station.
Batterie/piles
Batterie
rechargeable
Enregistrement
Approx.
3,5 heures
Lecture
2)
Approx.
5,5 heures
au lithium ion
LIP-8
Deux piles
sèches
-----
3)
Approx.9
heures
alcalines LR6
(AA) Sony
LIP-8 +
Deux LR6
-----
3)
Approx.
16 heures
(AA)
1)
L'autonomie de la batterie peut être plus
courte en fonction des conditions
d'utilisation et de la température ambiante.
2)
Lorsque vous enregistrez, utilisez une
batterie entièrement rechargée.
3)
La durée d'enregistrement varie en fonction
des piles alcalines.
Quand remplacer les piles
Lorsque les piles sèches ou la batterie
rechargeable sont faibles, b ou
”LoBATT” clignote sur l'écran d'affichage
de l'enregistreur ou de la télécommande.
Remplacez les piles sèches ou rechargez
la batterie rechargeable.
zInformations
complémentaires
Précautions
Sécurité
N’introduisez pas d’objets étrangers dans
la prise DC IN 9 V.
Sources d’alimentation
• Utilisez trois piles LR6 (AA), le courant
secteur on une batterie rechargeable au
lithium ion.
• Si vous utilisez l’enregistreur chez
vous: Utilisez l’adaptateur secteur
fourni avec cet enregistreur. N’utilisez
aucune autre type d’adaptateur
secteur, qui risquerait de provoquer un
dysfonctionnement de l’enregistreur.
Polarité de
la fiche
• L’enregistreur n’est pas déconnecté de
la source d’alimentation secteur aussi
longtemps qu’il reste raccordé à la
prise murale, même si l’enregistreur
proprement dit a été mis hors tension.
• Si vous prévoyez de ne pas utiliser cet
enregistreur pendant une période
prolongée, déconnectez la source
d’alimentation (adaptateur secteur,
piles sèches, batterie rechargeable ou
batterie de voiture). Pour débrancher
l’adaptateur secteur de la prise murale,
saisissez l’adaptateur proprement dit;
ne tirez jamais sur le cordon.
Surchauffe interne
Une surchauffe interne risque de se
produire si vous utilisez l’enregistreur
pendant une période prolongée. Dans ce
cas, mettez l’enregistreur hors tension de
façon à le laisser refroidir.
38-F
Installation
• N’utilisez jamais l’enregistreur là où il
sera soumis à des conditions extrêmes
de luminosité, de température,
d’humidité ou de vibrations.
• N’enveloppez jamais l’enregistreur
dans quoi que ce soit lorsque vous
l’utilisez avec l’adaptateur secteur. Une
surchauffe interne risque d’entraîner
un dysfonctionnement de
l’enregistreur ou des dégâts.
Page 95

Casque d’écoute
Sécurité routière
N’utilisez pas le casque d’écoute pendant la
conduite d’une voiture, d’une bicyclette ou
de tout véhicule motorisé. L’utilisation d’un
casque d’écoute peut être dangereuse dans la
circulation et est illégale dans certains
endroits. Il peut également être dangereux
d’utiliser le casque d’écoute à volume élevé
en marchant, et plus particulièrement
lorsque vous franchissez un passage protégé.
Redoublez de vigilance ou interrompez
l’écoute dans des situations à risque.
Prévention des troubles de l’ouïe
Evitez d’utiliser le casque d’écoute à volume
très élevé. Les médecins déconseillent
l’écoute prolongée à volume élevé. Si vous
percevez un bourdonnement dans les
oreilles, réduisez le volume ou interrompez
l’écoute.
Respect d’autrui
Maintenez le volume à un niveau modéré.
Cela vous permettra d’entendre les sons
extérieurs et d’être attentif à votre entourage.
Cartouche des minidisques
• Ne forcez pas l’ouverture de
l’obturateur du disque.
• N’exposez pas le disque à la lumière, à
des températures extrêmes, à
l’humidité ou à de la poussière.
Entretien
•Nettoyez le boîtier de l’enregistreur à l’aide
d’un chiffon doux légèrement imprégné
d’eau ou d’une solution détergente neutre.
N’utilisez pas de tampon abrasif, de
poudre à récurer ou de solvant tel que de
l’alcool ou du benzène, qui risquent de
ternir le fini.
•Essuyez la cartouche du disque à l’aide
d’un chiffon sec pour en éliminer la
poussière.
•De la poussière sur l’objectif peut empêcher
l’appareil de fonctionner correctement.
Refermez le couvercle du compartiment à
disque après avoir introduit ou éjecté un
MD.
Remarques sur les piles
Une utilisation incorrecte des piles peut
entraîner une fuite d’électrolyte ou une
explosion des piles. Pour éviter de tels
accidents, appliquez les mesures de
précaution suivantes :
• Positionnez correctement les bornes +
et – des piles.
• N’installez pas simultanément des piles
neuves et usagées ou des piles de
différents types.
• Ne tentez pas de recharger des piles
sèches.
• Si vous prévoyez de ne pas utiliser
l’enregistreur pendant une période
prolongée, retirez-en les piles.
• Si une pile fuit, essuyez soigneusement
tout l’électrolyte qui s’est écoulé dans le
compartiment à piles avant d’installer
de nouvelles piles.
Remarques sur la pile au lithium
• Gardez la pile au lithium hors de la
portée des enfants. En cas d'ingestion,
consultez immédiatement un médecin.
• Essuyez la pile avec un chiffon sec de
façon à assurer un bon contact.
• Installez la pile en en respectant la
polarité.
• Ne saisissez pas la pile avec des pinces
métalliques, car vous risquez sinon de
provoquer un court-circuit.
• Ne brisez pas la pile et ne la jetez pas
au feu, car elle risquerait d'exploser.
Eliminez les piles usagées
conformément aux dispositions en la
matière.
ATTENTION
Danger d'explosion si la pile est
remplacée incorrectement.
Remplacez la pile uniquement par une pile
de type identique ou équivalent à celui
préconisé par le fabricant de l'appareil.
Eliminez les piles usagées conformément
aux instructions du fabricant.
Remarque sur les bruits
mécaniques
L’enregistreur produit des bruits
mécaniques lorsqu’il fonctionne. Ces
bruits sont causés par le système
d’économie d’énergie de l’enregistreur et
ne constituent pas un dysfonctionnement.
39-F
Page 96

Pour protéger un MD enregistré
1
2
Pour protéger un MD contre
l’enregistrement, faites coulisser le taquet
situé sur le côté du MD de façon à
dégager l’orifice. Dans cette position, le
MD ne peut être enregistré. Pour
réenregistrer sur ce MD, ramenez le
taquet dans sa position de départ de
manière à ce que le taquet soit à nouveau
visible.
Arrière du MD
Pour les clients en Europe
Elimination de la station
La station comporte deux piles internes au
nickel-cadmium qui servent à l'alimentation
du programmateur d'enregistrement/
lecture. Lorsque vous éliminez la station,
n'oubliez pas de retirer les piles internes en
appliquant la procédure suivante. Eliminez
ces piles conformément aux dispositions en
la matière (recyclez-les).
1 Débranchez l'adaptateur secteur.
Taquet
Protégé contre
l’enregistrement
Remarque sur l’enregistrement
numérique
Cet enregistreur utilise le système de
gestion de copie en série (Serial Copy
Management System) qui ne vous permet
de réaliser que des copies de première
génération d’informations
préenregistrées. Vous ne pouvez réaliser
de copies de MD enregistrés par vos soins
au moyen d’un raccordement analogique
(sortie de ligne).
Lecteur CD,
lecteur MD, etc.
Enregistrement numérique
MD
enregistré
par vos
soins
Si vous avez des questions ou des
difficultés au sujet de cet enregistreur,
consultez votre revendeur Sony.
Pas
d’enregistrement
numérique
MD
enregistrable
40-F
2 Retirez le bouton de commande REC
LEVEL.
3 Dévissez six vis à l'arrière de
l'appareil et démontez le boîtier.
4 Retirez les piles à l'aide d'un
tournevis négatif, etc.
Remarques
•Ne démontez en aucune circonstance le
boîtier de la station, sauf pour en éliminer
les piles.
•Ne court-circuitez pas les bornes positive et
négative des piles extraites.
Page 97

Dépannage
Si un problème quelconque persiste après avoir appliqué ces remèdes, demandez conseil
auprès de votre revendeur Sony.
Enregistreur
Symptôme
Fonctionnement
impossible.
Le couvercle ne
s'ouvre pas.
Enregistrement/
édition impossible.
Aucun son ne passe
par les écouteurs.
Station
Symptôme
Fonctionnement
impossible.
Cause/Solution
•La fonction HOLD s’active (“HOLD” apparaît dans la fenêtre
d’affichage lorsque vous appuyez sur une touche
d’exploitation sur l’enregistreur).
b
Désactivez HOLD en faisant coulisser le commutateur
HOLD dans le sens contraire de la flèche (page 32).
•La batterie rechargeable ou les piles sèches sont faibles ([/]
ou ”LoBATT” clignote sur l'écran d'affichage).
b
Rechargez la batterie rechargeable/remplacez les piles
sèches (pages 36, 37).
•La batterie rechargeable ou les piles sèches n'ont pas été
mises en place correctement.
b
Installez la ou les batterie(s) en respectant la polarité
(pages 36, 37).
•Le verrou du couvercle n'est pas débloqué.
b
Faites coulisser OPEN après avoir rechargé la batterie
rechargeable/remplacé les piles sèches ou fixé
l'enregistreur sur la station.
•Le microphone n'est pas raccordé (lors d'un enregistrement
avec l'enregistreur détaché de la station).
b
Branchez le microphone.
• Le niveau d'enregistrement est insuffisant (durant un
enregistrement manuel).
b
Réglez le niveau d'enregistrement (page 15).
•La fiche des écouteurs n'est pas raccordée fermement.
b
Enfoncez la fiche des écouteurs fermement dans la
télécommande. Enfoncez la fiche de la télécommande
fermement dans 2/REMOTE.
•La fiche de la télécommande est sale.
b
Nettoyez-la avec un chiffon.
•AVLS est activé.
b
Faites coulisser AVLS sur NORMAL (page 23).
Cause/Solution
•L'adaptateur secteur n'est pas correctement branché.
b
Branchez correctement l'adaptateur secteur sur la prise
DC IN 9V et sur la prise murale.
•L'enregistreur n'est pas fixé correctement à la station.
b
Fixez-le correctement (page 7).
41-F
Page 98

Symptôme
Impossible de
recharger la pile.
Enregistrement/
édition impossible.
Différents affichages
apparaissent l'un
après l'autre à
l'écran.
Généralités
Symptôme
Fonctionnement
impossible.
Cause/Solution
•L'adaptateur secteur n'est pas correctement raccordé.
b
Raccordez-le correctement.
•Le commutateur INPUT n'est pas réglé correctement.
b
Réglez le commutateur INPUT en fonction de la
connexion (page 8, 34).
• Le niveau d'enregistrement est insuffisant (durant un
enregistrement analogique).
b
Réglez le niveau d'enregistrement (page 16).
•Lors de l'enregistrement d'un lecteur CD portable avec une
connexion numérique, vous n'avez pas mis le lecteur CD
portable en mode de pause en premier lieu (”NO DIGITAL
SIGNAL” apparaît sur l'écran d'affichage).
b
Mettez le lecteur CD portable en mode de pause et puis
lancez l'enregistrement.
•Il n'y a pas de sortie numérique lors de la tentative
d'enregistrement numérique à partir d'un lecteur CD
portable.
b
Faites fonctionner le lecteur CD sur secteur et désactivez
la fonction anti-saut (comme ESP).
•L'enregistrement analogique a été réalisé au moyen d'un
câble de raccordement avec un atténuateur.
b
Utilisez un câble de raccordement sans atténuateur.
•La station est en mode de démonstration. (Vous appuyez sur
DISPLAY pendant 2 secondes ou plus lorsque la station est
hors service).
b
Appuyez de nouveau sur DISPLAY pendant 2 secondes
ou plus pour quitter le mode de démonstration.
Cause/Solution
•De l'humidité s'est condensée à l'intérieur de l'enregistreur.
b
Sortez le MD et laissez l'enregistreur dans un endroit
chaud pendant plusieurs heures jusqu'à ce que la
condensation s'évapore.
•Vous avez appuyé sur une touche pendant que l'indication
du disque tournait rapidement.
b
Attendez que l'indication tourne lentement.
•L'enregistreur a été exposé à un choc mécanique, à de
l'électricité statique excessive, à une tension anormale
provoquée par l'orage, etc., en cours de fonctionnement.
b
Recommencez comme suit.
1 Débranchez toutes les sources d'alimentation.
2 Laissez l'enregistreur pendant environ 30 secondes.
3 Branchez la source d'alimentation.
42-F
Page 99

Symptôme
Impossible de
commencer la
lecture à la première
plage
Le son saute
pendant la lecture.
Le son présente
beaucoup
d'interférence.
Enregistrement/
édition impossible.
Impossible de
trouver les repères
de plage.
Aucun son n'est
émis par les
écouteurs.
L'horloge ne
s'affiche pas (”--y-m--d” apparaît sur
l'écran d'affichage).
L'enregistreur ne
parvient pas à
enregistrer la date et
l'heure
d'enregistrement sur
le disque.
L'horloge retarde.
Cause/Solution
•La lecture a été interrompue au milieu du disque la dernière
fois.
b
Appuyez plusieurs fois sur = (tournez la commande
sur = de la télécommande) ou ouvrez et refermez le
couvercle une seule fois de sorte que l'endroit de départ
de la lecture revienne au début du disque.
•L'enregistreur est placé à un endroit soumis à des vibrations
permanentes.
b
Placez l'enregistreur à un endroit stable.
•Une plage très brève (telle qu'une narration ou une
introduction) peut provoquer un saut du son.
•Vous utilisez l'appareil à proximité d'une source de
magnétisme puissant, tel qu'un téléviseur.
b
Eloignez l'enregistreur de la source de magnétisme.
•Il y a eu une coupure de courant ou il y a eu une interruption
pendant l'enregistrement/l'édition.
b
L'enregistrement jusqu'à cet endroit sera effacé.
Recommencez l'enregistrement.
•Vous appuyez sur P après avoir appuyé sur = ou +.
b
Appuyez sur P avant d'appuyer sur = ou +.
•Le volume est trop bas.
b
Réglez le volume en appuyant sur VOL +/– (LEVEL de la
station).
•L'horloge n'a pas été réglée.
b
Réglez l'horloge (page 19).
•La batterie intégrée responsable de l'horloge est épuisée car
l'alimentation a été interrompue pendant une longue période.
b
Rechargez la batterie intégrée en fixant l'enregistreur sur
la station et enfoncez l'adaptateur secteur dans DC IN 9 V
de la station et dans la prise murale (page 19). Sachez que
l'horloge peut avancer ou retarder d'environ 2 minutes
par mois dans des conditions normales d'utilisation.
43-F
Page 100

Limites du système
Le système d’enregistrement de votre enregistreur MiniDisc est radicalement différent de
celui utilisé sur les platines à cassettes ou DAT et se caractérise par les limites décrites cidessous. Vous remarquerez cependant que ces limites sont dues à la nature même du
système d’enregistrement des MD et ne résultent pas de problèmes mécaniques.
Symptômes
“TRACK FULL” apparaît
avant que le disque ait
atteint la durée maximale
d’enregistrement (60 ou 74
minutes).
“TRACK FULL” apparaît
même avant que le disque
ait atteint le nombre
maximum de plages ou la
durée maximale
d’enregistrement.
Impossible d’effacer des
repères de plage.
La durée d’enregistrement
restante n’augmente pas
même après avoir effacé de
nombreuses plages de
courte durée.
La somme de la durée
totale enregistrée et de la
durée restante du disque ne
correspondent pas à la
durée totale
d’enregistrement du disque
(60 ou 74 minutes).
Les plages montées peuvent
entraîner des pertes de son
durant les opérations de
recherche.
Cause
L’indication “TRACK FULL” apparaît lorsque 254 plages
ont été enregistrées sur le disque, quelle que soit la durée
enregistrée totale. Il n’est pas possible d’enregistrer plus de
254 plages sur un minidisque. Pour poursuivre
l’enregistrement, effacez les plages jugées inutiles.
Un enregistrement et un effacement répétés peuvent
provoquer une fragmentation et un éparpillement des
données. Bien que ces données éparpillées puissent être
lues, chaque fragment est compté comme une plage. En
pareil cas, le nombre de plages peut atteindre la limite de
254 et il n’est plus possible d’enregistrer quoi que ce soit.
Pour poursuivre l’enregistrement, effacez les plages jugées
inutiles.
Si les données d’une plage sont fragmentées, le repère de
plage d’un fragment de moins de 12 secondes ne peut être
effacé. Vious ne pouvez pas combiner une plage
enregistrée en stéréo et une plage enregistrée en mono;
vous ne pouvez pas non plus combiner une plage
enregistrée au moyen d’une connexion numérique et
une plage enregistrée au moyen d’une connexion
analogique.
Les plages de moins de 12 secondes ne sont pas comptées,
de telle sorte que leur effacement peut ne pas augmenter la
durée d’enregistrement.
En principe, l'enregistrement s'effectue par unités
minimales de 2 secondes environ. Lorsque l'enregistrement
s'arrête, la dernière unité d'enregistrement utilise toujours
cette unité de 2 secondes même si l'enregistrement en cours
est plus court. De même, lorsque l'enregistrement
redémarre après l'arrêt, l'enregistreur introduira
automatiquement un blanc de 2 secondes avant
l'enregistrement suivant. (Ceci pour éviter un effacement
accidentel d'une plage précédente chaque fois qu'un nouvel
enregistrement débute). Par conséquent, le temps
d'enregistrement réel diminuera chaque fois qu'un
enregistrement est arrêté; un maximum de 6 secondes
comparé à la durée potentielle d'enregistrement pour
chaque arrêt.
La fragmentation des données peut entraîner une perte de
son en cours de recherche, car les plages sont reproduites
plus rapidement qu’en mode de lecture normale.
44-F
 Loading...