

Page 1
3-228-914-14(1)
Wireless Stereo
Headphone System
Operating Instructions
Manual de instrucciones
Istruzioni per l’uso
Manual de instruções
GB
ES
IT
PT
MDR-RF415RK
Sony Corporation © 2001 Printed in Korea
Page 2

WARNING
Welcome!
To prevent fire or shock hazard, do not
expose the unit to rain or moisture.
To avoid electrical shock, do not open the
cabinet. Refer servicing to qualified
personnel only.
This equipment complies with the essential
requirements of the Directive 1999/5/EC Radio
and Telecommunications Terminal Equipment
Directive.
This product is intended to be used in the
following country:
Italy
Thank you for purchasing the Sony
MDR-RF415RK Wireless Stereo Headphone
System. Before operating the unit, please read
this manual thoroughly and retain it for future
reference.
Some features are:
• Wireless system that allows you to listen to a
program free from the restriction of a cord
• High fidelity sound reproduction
•A compact transmitter with an AC power
adaptor (supplied) enables simple charging of
the headphone battery. Just by placing the
headphones on the transmitter, headphone
battery can be charged.
• Comfortable Supra-aural headphones with self
adjusting head band
• Automatic ON/OFF function on headphones
to preserve battery power
GB
2
Page 3

Notes on receiving
Table of contents
performance
The system for this equipment utilizes very high
frequency signals in the 400 MHz band so the
receiving performance may deteriorate due to the
surroundings. The following examples illustrate
conditions that may reduce the possible receiving
range or cause interference with reception.
• Inside a building with walls containing steel
beams.
• Area with many steel file cabinets, etc.
• Area with many electrical appliances capable
of generating electromagnetic noise.
• Transmitter is placed on a metal instrument.
• Area facing a roadway.
• Noise or interfering signals exist in the
surroundings due to radio transceivers in
trucks, etc.
• Noise or interfering signals exist in the
surroundings owing to wireless
communication systems installed along
roadways.
Getting started
Unpacking ............................................... 4
Setting up the transmitter ..................... 4
Charging the headphone battery ......... 6
Operating the system
Listening to a program .......................... 7
The effective areas of the transmitter .. 9
Replacing the ear pads .......................... 9
Additional information
Precautions ............................................ 10
Troubleshooting ................................... 10
Specifications ........................................ 11
GB
GB
3
Page 4
N Getting started
Setting up the
Unpacking
Check that you have the following items:
• The headphones
• The transmitter
• AC power adaptor
• Unimatch plug adaptor (stereo mini jack y
stereo phone plug)
transmitter
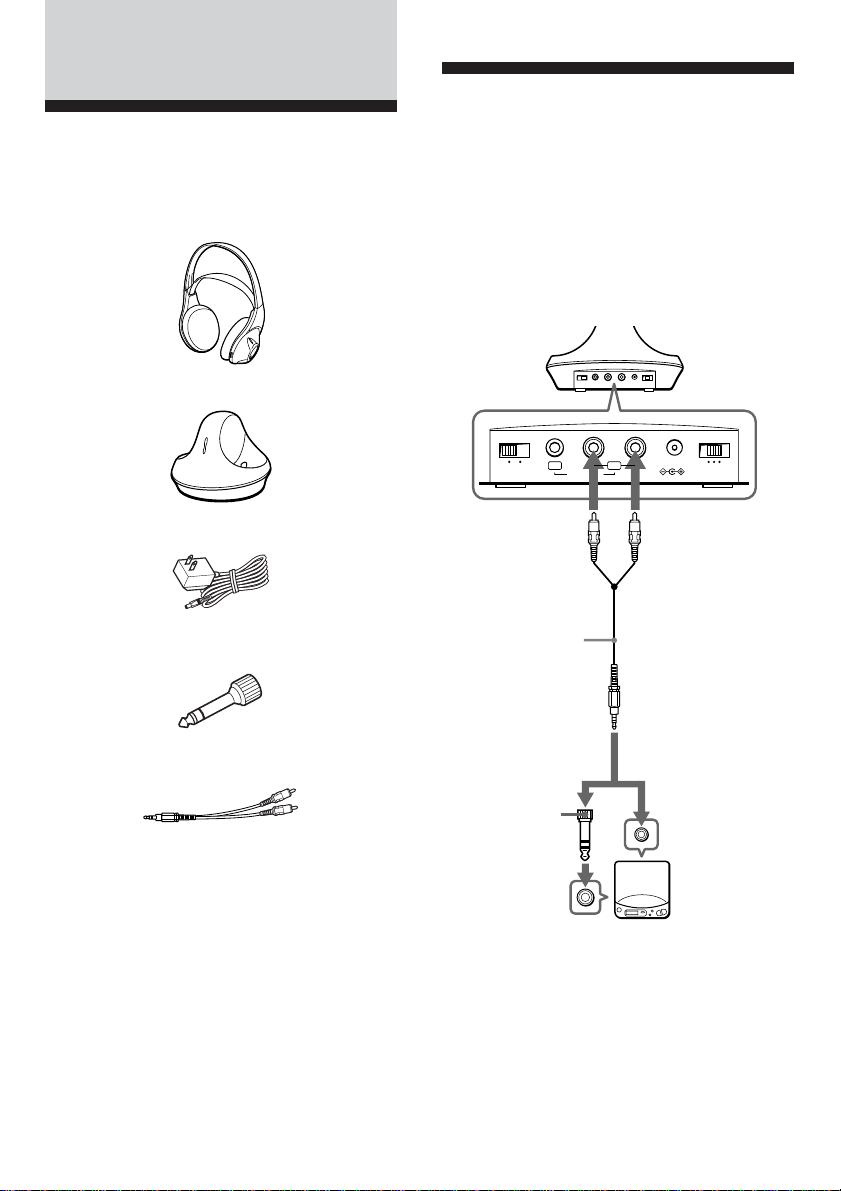
1 Connect the transmitter to audio/video
equipment. Select one of the hookups
below depending on the jack type:
A To connect to a headphones jack
Transmitter
OFF ON
FILTERNOISE
Right channel
(red)
Connecting cord
(supplied)
RBAL
AUDIO IN
to AUDIO IN
A jacks
DC IN 9V
123
CHANNEL
Left channel
(white)
• Connecting cord (phono plugs y stereo mini
plug), 1 m
GB
4
Unimatch plug
adaptor
(supplied)
to headphones
jack (stereo
phone jack)
* WALKMAN is a registered trademark of Sony
Corporation.
to headphones
jack (stereo
mini jack)
CD Walkman,
MD Walkman,
WALKMAN*,
VCR, etc.
Page 5
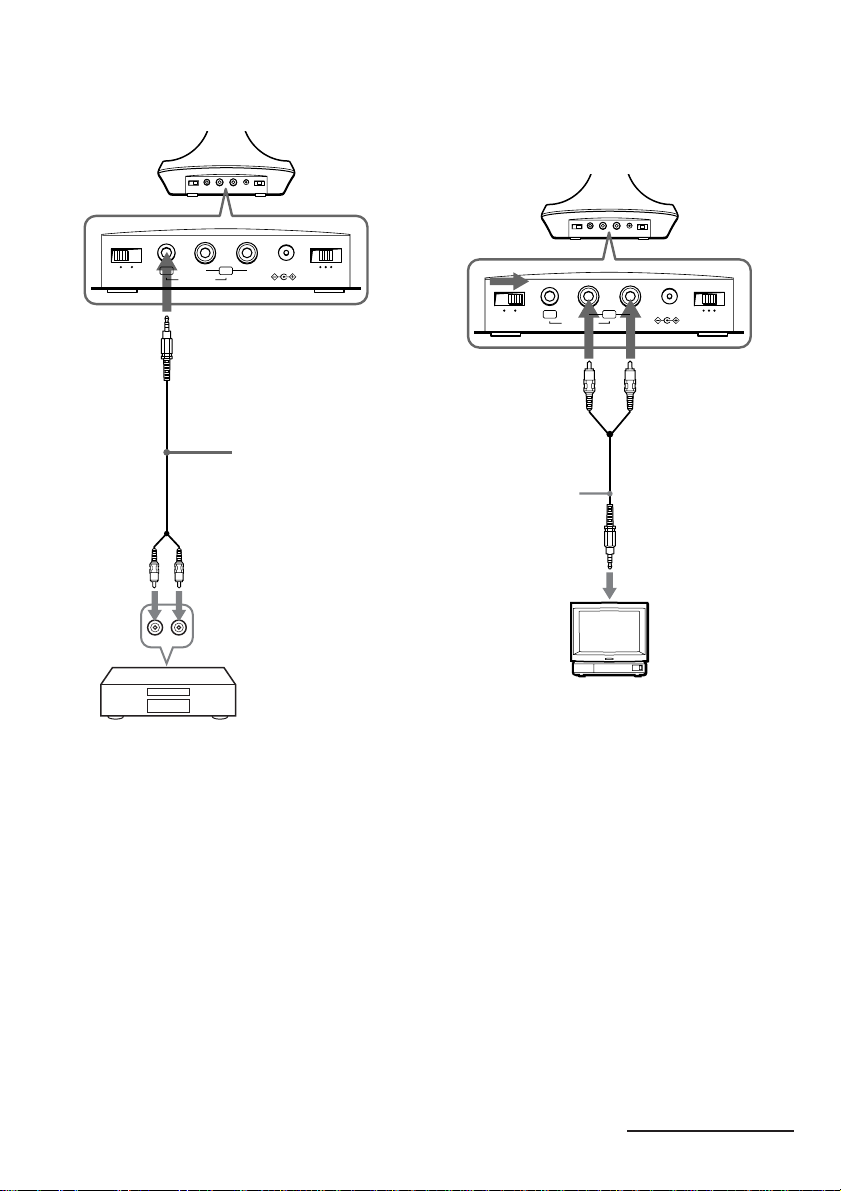
B To connect to LINE OUT or REC OUT
jacks
Transmitter
C To connect to TV, etc.
If noise occurs when the transmitter is
connected to your TV or VCR, set the
NOISE FILTER switch to ON.
to AUDIO IN
B jack
OFF ON
FILTERNOISE
Left channel
(white)
RBAL
AUDIO IN
Connecting cord
(supplied)
Right channel
(red)
to LINE OUT or REC
OUT jacks
Stereo system, VCR,
etc.
DC IN 9V
123
CHANNEL
Transmitter
to AUDIO IN
A jacks
OFF ON
FILTERNOISE
Right channel
(red)
Connecting cord
(supplied)
RBAL
AUDIO IN
DC IN 9V
123
CHANNEL
Left channel
(white)
to stereo mini jack
TV, etc.
Notes
• If you connect the transmitter to LINE OUT or
REC OUT jack of an audio reproducer such as an
MD player or CD player, do not set the NOISE
FILTER switch to ON. Otherwise, the volume will
be limited.
• The NOISE FILTER switch is active only in the
case of the connection shown in diagram A on
page 4 and C. In diagram B, the switch has no
effect.
• When the transmitter is placed on or near a TV, it
may pick up a noise.
In such case, place the transmitter away from the
TV.
continue to next page
GB
5
Page 6
Continued
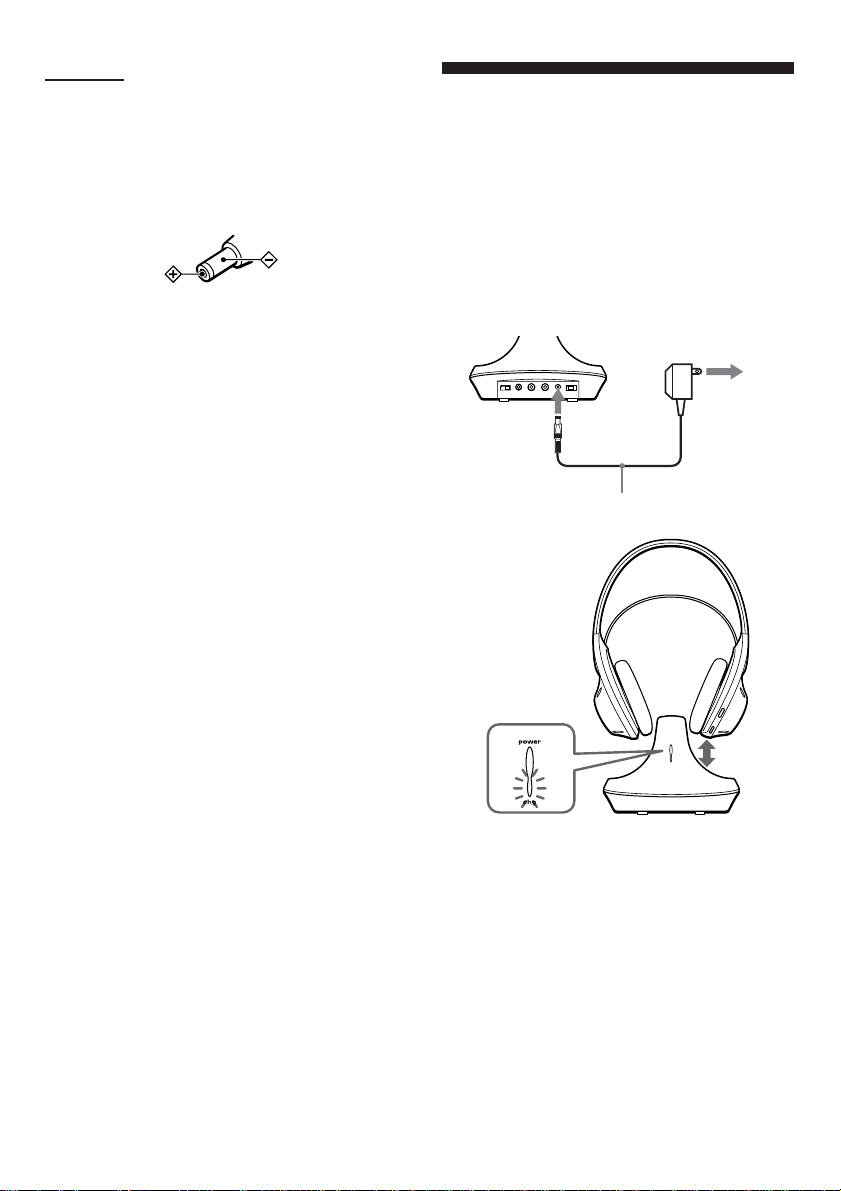
2 Connect the transmitter to an AC outlet
using the supplied AC power adaptor.
Notes
• Use only the supplied AC power adaptor. Do not use
any other AC power adaptor.
Polarity of the plug
• Keep the AC power adaptor cord as far away from the
transmitter as possible. If the cord is positioned near
the transmitter, noise may occur.
• When you connect the transmitter directly to a
monaural earphone jack, the audio signal will not be
output through the right channel. In such a case, use
the separately sold PC-236HG plug adaptor.
• If the connected equipment has the AVLS (Automatic
Volume Limiter System) function, be sure to turn the
function off when using the transmitter. Otherwise,
you will have to turn up the volume of the
headphones, and that may cause noise.
Charging the
headphone battery
Using the headphones for the first time
When you use the headphones for the first time,
charge the battery in the following manner.
1 Connect the transmitter to a power
source.
Transmitter
to an AC outlet
To DC IN
9 V jack
AC power adaptor
(supplied)
Place the headphone on the transmitter such that
the charging pins on the transmitter engage the
charging contacts on the bottom of the right-hand
housing.
The charge indicator on the transmitter will light
in green to indicate that the battery is being
charged.
GB
6
Page 7

To recharge the headphone battery after
use
Since little electric current is used for charging,
there is no need to worry about overcharging.
Charging and using hours
Approx. charging
hours
1
24**
* at 1 kHz, 1 mW + 1 mW output
** The hours required to fully charge empty batteries
Approx. using time*
55 minutes
23 hours
N Operating the system
Listening to a program
1 First turn on the audio/video
equipment and start playing.
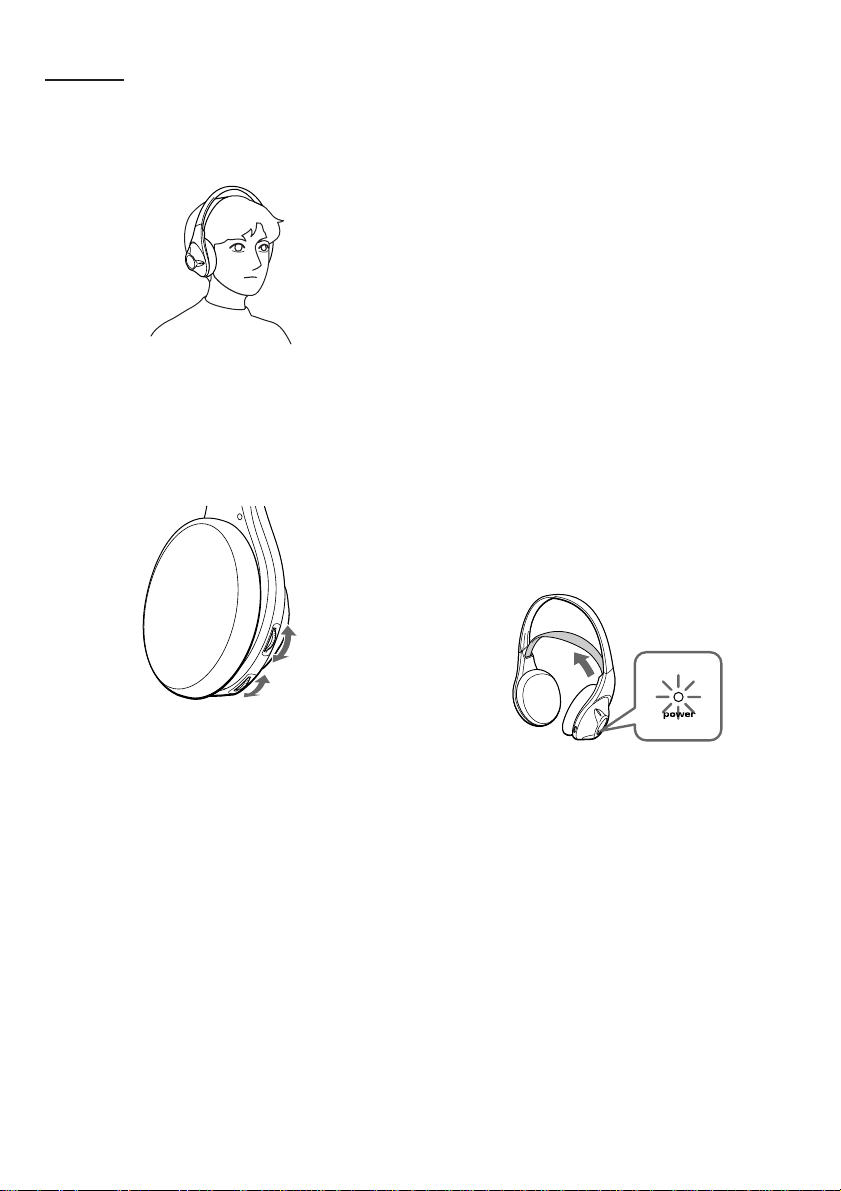
2 Remove the headphones from the
transmitter.
The transmitter’s power indicator will
light in red.
3 Select the radio frequency with the
CHANNEL selector switch.
123
CHANNEL
continue to next page
GB
7
Page 8
Continued
4 When you put on the headphones the
headphone power turns on
automatically.
5 Turn up the volume to a moderate level
with the VOL control, then tune the
headphones in to the frequency of the
transmitter with the TUNING control
until you can hear the audio signal
loud and clear.
TUNING
control
Sending RF signals from the Transmitter
The transmitter starts sending the RF signals
automatically, when it detects audio signals from
the equipment connected.
If it does not detect an audio signal for more than
approximately four minutes, the transmitter will
stop sending RF signals, and the power indicator
turns off.
When the transmitter receives an audio signal
again, it starts sending the RF signals, and the
power indicator will light in red again.
If the audio signal is very weak, the transmitter
does not send RF signals. If the transmitter is
connected to a headphone jack, make sure the
volume of the equipment connected is set to 5 – 6
or higher.
You may not hear the beginning of the sound
from the headphones until the transmitter starts
sending the RF signals after detecting an audio
signal.
Auto power on/off function
When you remove the headphones from your
head, the power turns off automatically. Do not
allow the self adjusting band to be pulled up,
otherwise the headphones will be switched on.
VOL control
Try the above steps 3 and 5 until the
receiving performance becomes better.
GB
8
The power turns on.
Note
If a hissing noise is heard, move closer to the
transmitter.
Page 9
The effective areas of
Replacing the ear pads
the transmitter
The optimum distance is up to approximately
100 m without the system picking up some
interference. However, the distance may vary
according to the surroundings and environment.
If the system picks up some noise while using it
within the above mentioned distance, reduce the
distance between the transmitter unit and the
headphones, or select the other channel.
Notes
• When you use the headphones inside the effective
areas of the transmitter, the transmitter can be placed
in any direction from the listener.
• Even within the signal reception area, there are some
spots (dead spot) where the RF signal can not be
received. This characteristics is inherent to RF signals,
and does not indicate malfunction. By slightly moving
the transmitter, location of the dead spot can be
changed.
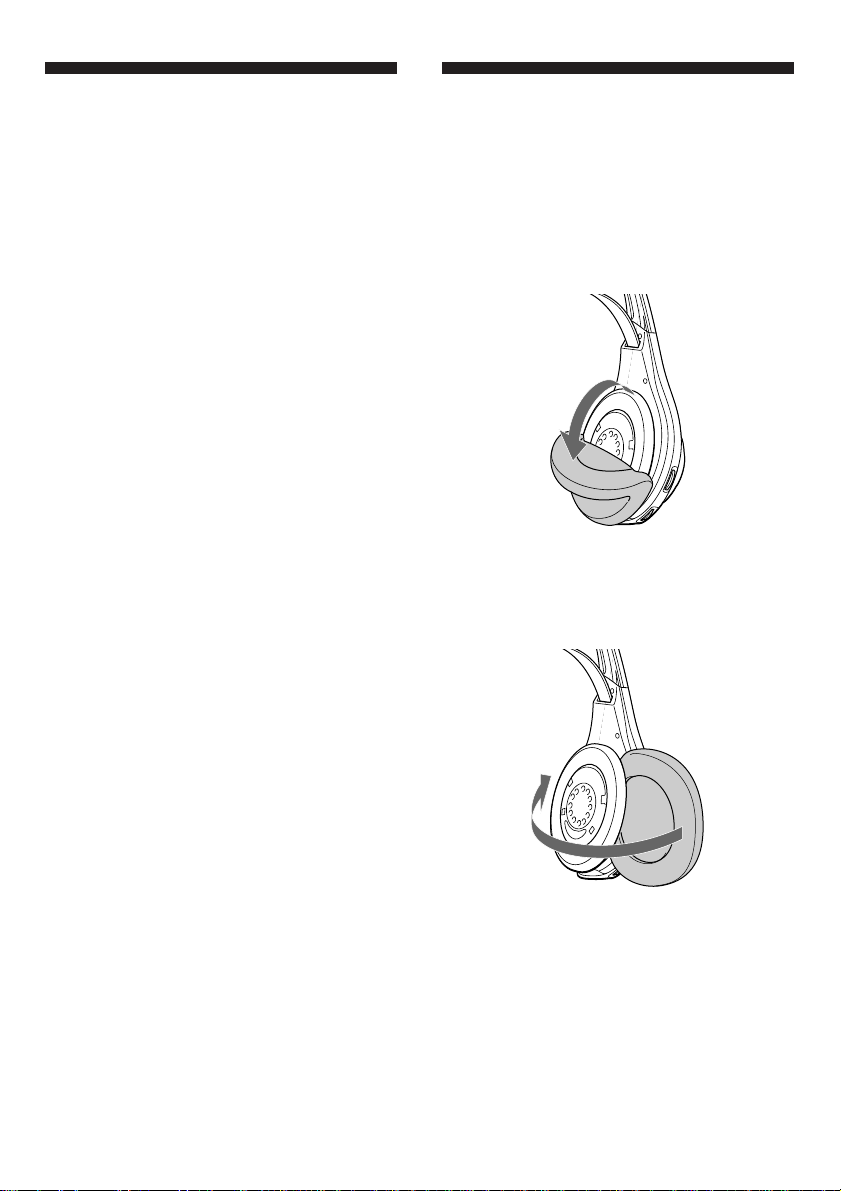
When the ear pads become dirty or damaged,
you can get replacements from your Sony dealer.
Replace them as illustrated below.
1 Remove the old ear pad by pulling it
out of the groove on the housing.
2 Place the new ear pad on the driver
unit and insert the edge of the pad into
the groove as illustrated.
Make sure that the entire edge of the ear pad is
securely inserted into the groove.
GB
9
Page 10
N Additional information
Precautions
• When the transmitter is not to be used for a
long period of time, disconnect the AC power
adaptor from the AC outlet holding the plug.
Do not pull on the cord.
• Do not leave the wireless stereo headphone
system in a location subject to direct sunlight,
heat or moisture.
Notes on headphones
Preventing hearing damage
Avoid using headphones at high volume.
Hearing experts advise against continuous, loud
and extended play. If you experience a ringing in
your ears, reduce the volume or discontinue use.
Caring for others
Keep the volume at a moderate level. This will
allow you to hear outside sounds and to be
considerate to the people around you.
If you have any questions or problems
concerning the system that are not covered in this
manual, please consult the nearest Sony dealer.
Be sure to bring the headphones and the
transmitter to the Sony dealer when requiring
repair work.
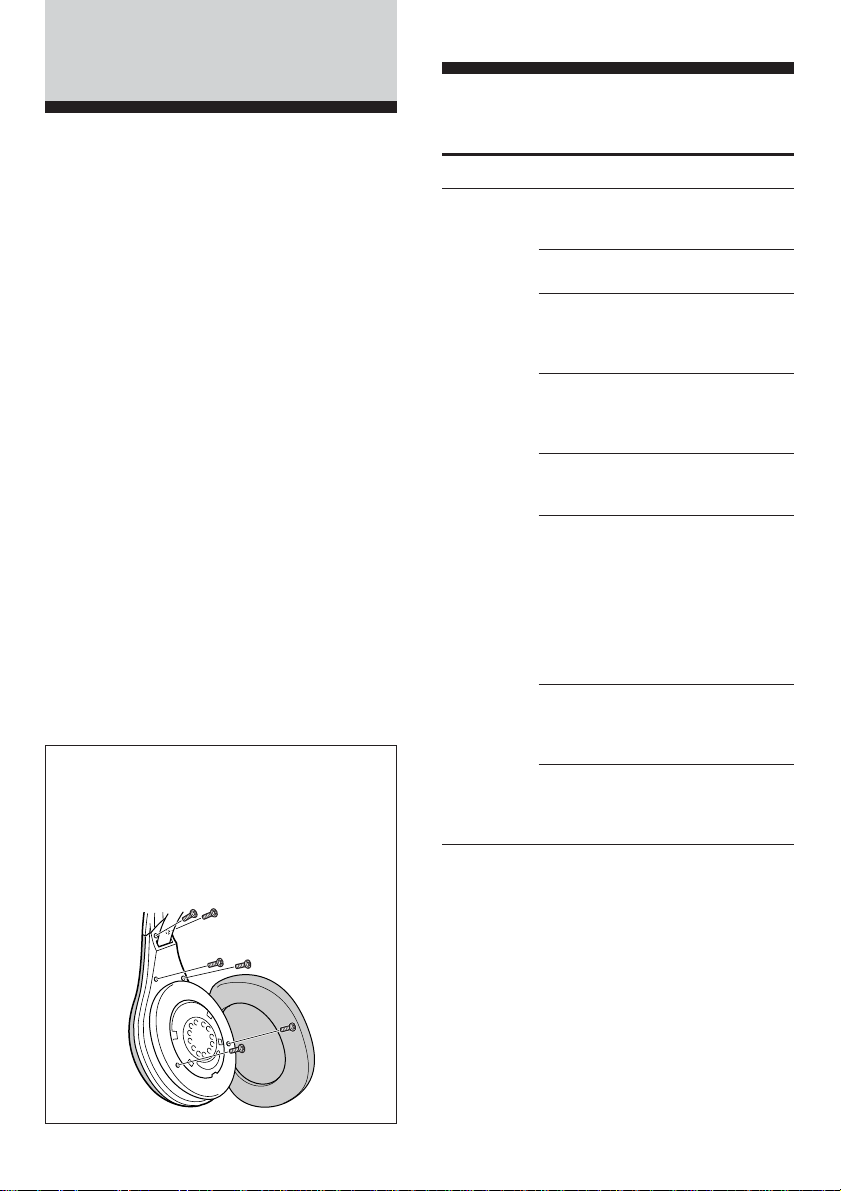
Disposing of the headphones
Be sure to remove the built-in rechargeable
batteries from the headphones before you
dispose of the headphones.
First remove the left headphone’s ear pad.
You will see six screws. Remove the six
screws and open the housing.
Troubleshooting
Problem
No sound/
Muffled
sound
Solution
Check the connection of the audio/
video equipment or the AC power
adaptor.
Check that the audio/video
equipment is turned on.
Turn up the volume on the connected
audio/video equipment, if the
transmitter is connected to the
headphones jack.
Change the radio frequency with the
CHANNEL selector on the
transmitter, then tune the headphones
with the TUNING control.
The mute function is activated.
Use the headphones near the
transmitter.
The headphones’ POWER indicator
light is weak or turned off.
•Charge the built-in rechargeable
battery or if the POWER indicator is
still off after charging the builtin rechargeable battery, take the
headphones to a Sony dealer for
replacement of the rechargeable
battery.
If you connect the transmitter to the
LINE OUT or REC OUT jack of an
audio reproducer, make sure that the
NOISE FILTER switch is set to OFF.
Make sure that the NOISE FILTER
switch is set to either ON or OFF (If
the switch gets stuck between ON and
OFF, the sound will be cut off).
10
GB
Page 11

Problem
Distortion
Loud
background
noise
Solution
If the transmitter is connected to the
headphones jack, turn down the
volume of the connected audio/video
equipment.
Change the radio frequency with the
CHANNEL selector on the
transmitter.
The headphones’ POWER indicator
light is weak or turned off.
•Charge the built-in rechargeable
battery or if the POWER indicator is
still off after charging the built-in
rechargeable battery, take the
headphones to a Sony dealer for
replacement of the rechargeable
battery.
If you connect the transmitter to LINE
OUT or REC OUT jack of an audio
reproducer, make sure that the NOISE
FILTER switch is set to OFF.
Move closer to the transmitter. As
you move away from the transmitter,
more noise is likely to be heard.
If the transmitter is connected to the
headphones jack, turn up the volume
of the connected audio/video
equipment.
Change the radio frequency with the
CHANNEL selector on the
transmitter, then tune the headphones
with the TUNING control.
The headphones’ POWER indicator
light is weak or turned off.
•Charge the built-in rechargeable
battery or if the POWER indicator is
still off after charging the built-in
rechargeable battery, take the
headphones to a Sony dealer for
replacement of the rechargeable
battery.
If you connect the transmitter to the
LINE OUT or REC OUT jack of an
audio reproducer, make sure that the
NOISE FILTER switch is set to OFF.
Move the AC power adaptor cord
away from the transmitter.
Specifications
General
Carrier frequency
433.5 – 434.5 MHz
Channel Ch1, Ch2, Ch3
Modulation FM stereo
Frequency response
20 – 20,000 Hz
Transmitter TMR-RF415R
Power source DC 9 V: supplied AC power
adaptor
Audio input phono jacks/stereo mini jack
Dimensions Approx. 150 mm dia × 108 mm
(6 × 4 1/3 in.) (w/h)
Mass Approx. 190 g (6.7 oz.)
Headphones MDR-RF415R
Power source DC 2.4 V: Built-in rechargeable
battery
Mass Approx. 240 g (8.5 oz.) incl.
built-in rechargeable battery
Built-in Ni-Cd rechargeable battery
Model name NC-AA
Voltage 1.2 V
Capacity 700 mAh
Optional accessory
Plug adaptor PC-236HG (stereo mini jack y
monaural mini plug)
Design and specifications are subject to change without
notice.
11
GB
Page 12

ADVERTENCIA
¡Bienvenido!
Para evitar incendios o el riesgo de
electrocución, no exponga la unidad a la
lluvia ni a la humedad.
Para evitar descargas eléctricas, no abra
la unidad. En caso de avería, solicite los
servicios de personal cualificado.
Este equipo cumple los requisitos esenciales de la
Directiva 1999/5/CE sobre equipos terminales
de telecomunicaciones y radio.
Este producto está destinado a utilizarse en el
siguiente país:
Italia
Muchas gracias por la adquisición del sistema de
auriculares estéreo inalámbrico
MDR-RF415RK Sony. Antes de utilizar el
sistema, lea detenidamente este manual y
consérvelo para futuras referencias.
Algunas de las características son:
• Sistema inalámbrico que le permitirá escuchar
un programa sin verse restringido por un cable
• Reproducción de sonido de alta fidelidad
• Transmisor compacto con adaptador de
alimentación de CA (suministrado) que
permite la carga fácil de la batería de los
auriculares. Al colocar simplemente los
auriculares sobre el transmisor se iniciará la
carga.
• Auriculares Supra-aurales cómodos con casco
autoajustable
• Función de conexión/desconexión de la
alimentación de los auriculares para conservar
la energía de las baterías o pilas
ES
2
Page 13

Notas sobre el
Índice
rendimiento de
recepción
El sistema para este equipo utiliza señales de
frecuencia muy alta de la banda de 400 MHz,
motivo por el que el rendimiento de la recepción
puede deteriorarse debido al medio ambiente.
En los ejemplos siguientes se indican las
condiciones que pueden reducir el alcance de la
recepción o causar interferencias en ella.
• Dentro de un edificio con paredes que
contengan vigas de acero.
• Área con muchos armarios archivadores de
acero, etc.
• Área con muchos aparatos eléctricos capaces
de generar ruido electromagnético.
• Transmisor colocado sobre un instrumento
metálico.
• Área encarada hacia carreteras.
• Ruido o señales de interferencia en los
alrededores debido a transceptores de radio de
camiones, etc.
• Ruido o señales de interferencia en los
alrededores debido a sistemas inalámbricos de
comunicaciones instalados a lo largo de
carreteras.
Preparativos
Desembalaje ............................................ 4
Preparación del transmisor................... 4
Carga de la batería de los
auriculares ........................................ 6
Utilización del sistema
Escucha de un programa....................... 7
Áreas efectivas del transmisor ............. 9
Reemplazo de las almohadillas de
auriculares ........................................ 9
Información adicional
Precauciones.......................................... 10
Solución de problemas ........................ 10
Especificaciones .................................... 11
ES
ES
3
Page 14

N Preparativos
Preparación del
Desembalaje
Compruebe si ha recibido lo siguiente:
• Auriculares
• Transmisor
• Adaptador de alimentación de CA
transmisor
1 Conecte el transmisor al equipo de
audio/vídeo. Seleccione una de las
conexiones siguientes dependiendo del
tipo de toma.
A Conexión a una toma para auriculares
Transmisor
OFF ON
FILTERNOISE
Canal
derecho (roja)
Cable conector
(suministrado)
RBAL
AUDIO IN
a las tomas
AUDIO IN A
DC IN 9V
123
CHANNEL
Canal izquierdo
(blanca)
• Adaptador de clavijas universal (minitoma
estéreo y clavija de entrada de línea estéreo)
• Cable conector (clavijas fono y miniclavija
estéreo), 1 m
ES
4
Adaptador
de clavijas
universal
(suministrado)
a la toma para
auriculares (toma
de entrada de
línea estéreo)
* WALKMAN es una marca registrada de Sony
Corporation.
a la toma para
auriculares
(minitoma estéreo)
CD Walkman, MD
Walkman,
WALKMAN*,
videograbadora, etc.
Page 15

B Conexión a las tomas LINE OUT o REC
OUT
Transmisor
a la toma
AUDIO IN B
C Conexión a un televisor, etc.
Si se produce ruido al conectar el
transmisor a su televisor o
videograbadora, ponga el interruptor
NOISE FILTER en ON.
Transmisor
OFF ON
Canal izquierdo
(blanca)
FILTERNOISE
RBAL
AUDIO IN
DC IN 9V
123
CHANNEL
OFF ON
FILTERNOISE
Canal derecho
(roja)
RBAL
AUDIO IN
a las tomas
AUDIO IN A
DC IN 9V
123
CHANNEL
Canal izquierdo
(blanca)
Cable conector
(suministrado)
Cable conector
(suministrado)
Canal derecho
(roja)
a las tomas LINE OUT
o REC OUT
a la minitoma
estéreo
Sistema estéreo,
videograbadora, etc.
Televisor,
etc.
Notas
• Si ha conectado el transmisor a la toma LINE OUT
o REC OUT de un reproductor de audio, de
minidiscos o de discos compactos, no ponga el
interruptor NOISE FILTER en ON. De lo
contrario, el volumen se limitaría.
• El interruptor NOISE FILTER solamente estará
activo en el cado de la conexión mostrada en el
diagrama A de la página 4 y C. En el diagrama
B, el interruptor no tendrá efecto.
• Si el transmisor esté colocado cerca de un
televisor, puede captar ruido.
En tal caso, colóquelo alejado del televisor.
Continúa en la página siguiente
ES
5
Page 16

continuación
2 Conecte el transmisor a un
tomacorriente de CA utilizando el
adaptador de alimentación de CA
suministrado.
Notas
• Utilice solamente el adaptador de alimentación de CA
suministrado. No utilice ningún otro tipo de
adaptador de alimentación de CA.
Polaridad de la clavija
• Mantenga el cable del adaptador de alimentación de
CA lo más alejado posible del transmisor. Si coloca el
cable cerca del transmisor, puede producirse ruido.
• Cuando haya conectado el transmisor directamente a
una toma monoaural para auriculares, la señal de
audio no saldrá a través del canal derecho. En tal
caso, utilice un adaptador de clavija PC-236HG
vendido aparte.
• Si el equipo conectado posee la función de sistema
limitador automático de volumen (AVLS), cerciórese
de desactivarla cuando utilice el transmisor. De lo
contrario, tendría que aumentar el volumen de los
auriculares, y esto podría causar ruido.
Carga de la batería de
los auriculares
Utilización de los auriculares por primera
vez
Antes de utilizar por primera vez los auriculares,
cargue la batería de la forma siguiente.
1 Conecte el transmisor a una fuente de
alimentación.
Transmisor
a la toma
DC IN 9 V
Adaptador de alimentación
de CA (suministrado)
a un tomacorriente
de CA
Coloque los auriculares en el transmisor de
forma que los contactos de carga del transmisor
queden en contacto con los de la parte inferior de
caja de la parte derecha.
El indicador de carga del transmisor se
encenderá en verde para indicar que la batería
está cargándose.
ES
6
Page 17

Para recargar la batería de los auriculares
después de haberla utilizado
Como para la carga se utiliza una corriente
eléctrica muy pequeña, no tendrá que
preocuparse por la sobrecarga.
N Utilización del sistema
Escucha de un programa
Horas de carga y tiempo de utilización
Horas aprox.
de carga
1
24**
* con salida de 1 kHz, 1 mW + 1 mW
** Horas requeridas para cargar completamente baterías
descargadas
Tiempo aprox. de
utilización*
55 minutos
23 horas
1 En primer lugar, conecte la
alimentación del equipo de audio/
vídeo e inicie la reproducción.
2 Tome los auriculares del transmisor. El
indicador de alimentación del
transmisor se encenderá en rojo.
3 Seleccione la frecuencia de
radiodifusión con el selector
CHANNEL.
123
CHANNEL
Continúa en la página siguiente
ES
7
Page 18

continuación
4 Cuando se coloque los auriculares, la
alimentación se conectará
automáticamente.
5 Aumente el volumen hasta un nivel
moderado con el control VOL, y
después sintonice los auriculares a la
frecuencia del transmisor con el control
TUNING hasta que oiga claramente la
señal de radiodifusión.
Control
TUNING
Transmisión de señales de RF desde el
transmisor
El transmisor comenzará a transmitir
automáticamente señales de RF cuando detecte
señales de audio procedentes del equipo de
audio.
Si no detecta una señal de audio durante más de
aproximadamente cuatro minutos, el transmisor
dejará de transmitir señales de RF, y el indicador
de alimentación se apagará.
Cuando el transmisor vuelva a recibir una señal
de audio, comenzará a transmitir señales de RF, y
el indicador de alimentación se volverá a
encender en rojo.
Si la señal de audio es muy débil, el transmisor
no emitirá señales de RF. Si el transmisor está
conectado a una toma para auriculares, cerciórese
de que el volumen del equipo conectado esté
ajustado a 5-6 o un nivel superior.
Es posible que usted no oiga el comienzo del
sonido a través de los auriculares hasta que el
transmisor comience a transmitir señales de RF
después de haber detectado una señal de audio.
Función de conexión/desconexión
automática de la alimentación
Cuando se quite los auriculares, su alimentación
se desconectará automáticamente. No tire de la
banda autoajustable hacia arriba, ya que de lo
contrario se conectaría la alimentación de los
mismos.
Control VOL
Pruebe los pasos 3 y 5 hasta obtener la
mejor recepción posible.
ES
8
La alimentación se conectará.
Nota
Si oye ruido de siseo, acérquese al transmisor.
Page 19

Áreas efectivas del
Reemplazo de las
transmisor
La distancia óptima es de aproximadamente 100
metros sin que el sistema capte interferencias.
Sin embargo, la distancia puede variar de
acuerdo con las condiciones ambientales. Si el
sistema capta ruido cuando lo esté utilizando
dentro de la distancia mencionada, reduzca la
distancia entre el transmisor y los auriculares, o
seleccione otro canal.
Notas
• Cuando utilice los auriculares dentro del área efectiva
del transmisor, éste podrá colocarse en cualquier
dirección con respecto al oyente.
• Incluso dentro del área de recepción de señales,
pueden existir algunos puntos (muertos) en los que no
se reciba la señal de RF. Esta característica es
inherente a las señales de RF, y no indica mal
funcionamiento. Moviendo ligeramente el transmisor
podrá cambiar la ubicación del punto muerto.
almohadillas de
auriculares
Cuando las almohadillas se ensucien o dañen,
adquiera otras en su proveedor Sony.
Reemplácelas como se muestra en la ilustración
siguiente.
1 Extraiga la almohadilla vieja sacándola
de la ranura del auricular.
2 Coloque la nueva almohadilla en el
auricular e inserte el borde de la misma
en la ranura, como se muestra en la
ilustración.
Cerciórese de que todo el borde de la almohadilla
haya quedado insertado con seguridad en la
ranura.
9
ES
Page 20

N Información adicional
Precauciones
• Cuando no vaya a utilizar el transmisor
durante mucho tiempo, desconecte el
adaptador de CA del tomacorriente de CA
sujetando el enchufe. No tire del cable.
• No deje el sistema de auriculares estéreo
inalámbrico en un lugar sometido a la luz solar
directa, al calor, ni a la humedad.
Notas sobre los auriculares
Cuidado de sus oídos
Evite utilizar los auriculares a gran volumen. Los
expertos en oídos aconsejan no utilizar los
auriculares para escuchar continuamente a gran
volumen. Si experimenta un silbido en sus oídos,
reduzca el volumen o deje de utilizar los
auriculares.
Respeto a los demás
Mantenga el volumen a un nivel moderado. Esto
le permitirá escuchar los sonidos del exterior y no
molestar a quienes se encuentren a su alrededor.
Si tiene alguna pregunta o problema en relación
con este sistema que el manual no pueda
resolver, póngase en contacto con su proveedor
Sony.
Cuando los auriculares o el transmisor necesiten
reparación, lleve ambos a su proveedor Sony.
Forma de deshacerse de los auriculares
Asegúrese de extraer las baterías recargables
incorporadas de los auriculares antes de
deshacerse de éstos.
Primero retire la almohadilla del auricular
izquierdo. Verá seis tornillos. Extraiga los seis
tornillos y abra el alojamiento.
Solución de problemas
Problema
Carencia de
sonido/
sonido
amortiguado
Solución
Compruebe la conexión del equipo de
audio/vídeo o del adaptador de
alimentación de CA.
Compruebe si la alimentación del
equipo de audio/vídeo está
conectada.
Si el transmisor está conectado a la
toma para auriculares de un equipo
de audio/vídeo, aumente el volumen
del mismo.
Elija la radiofrecuencia con el selector
CHANNEL del transmisor, y después
sintonice los auriculares con el control
TUNING.
La función de silenciamiento está
activada.
Utilice los auriculares cerca del
transmisor.
El indicador POWER de los
auriculares está iluminado débilmente
o apagado.
•Cargue la batería incorporada, o si
el indicador POWER permanece
apagado después de haberla
cargado, lleve los auriculares a su
proveedor Sony para que le
reemplace la batería.
Si ha conectado el transmisor a la
toma LINE OUT o REC OUT de un
reproductor de audio, cerciórese de
que el interruptor NOISE FILTER esté
en OFF.
Cerciórese de que el selector NOISE
FILTER esté en ON u OFF (si el
selector se queda entre ON y OFF, el
sonido se cortará).
10
ES
Page 21

Problema
Distorsión
Ruido fuerte
de fondo
Solución
Si el transmisor está conectado a una
toma para auriculares, reduzca el
volumen del equipo de audio/vídeo
conectado.
Elija la radiofrecuencia con el selector
CHANNEL del trasmisor.
El indicador POWER de los
auriculares está iluminado débilmente
o apagado.
•Cargue la batería incorporada, o si
el indicador POWER permanece
apagado después de haberla
cargado, lleve los auriculares a su
proveedor Sony para que le
reemplace la batería.
Si ha conectado el transmisor a la
toma LINE OUT o REC OUT de un
reproductor de audio, cerciórese de
que el interruptor NOISE FILTER esté
en OFF.
Acérquese al transmisor. A medida
que se aleje del transmisor, es posible
que se oiga más ruido.
Si el transmisor está conectado a una
toma para auriculares, aumente el
volumen del equipo de audio/vídeo
conectado.
Elija la radiofrecuencia con el selector
CHANNEL del transmisor, y después
sintonice los auriculares con el control
TUNING.
El indicador POWER de los
auriculares está iluminado débilmente
o apagado.
•Cargue la batería incorporada, o si
el indicador POWER permanece
apagado después de haberla
cargado, lleve los auriculares a su
proveedor Sony para que le
reemplace la batería.
Si ha conectado el transmisor a la
toma LINE OUT o REC OUT de un
reproductor de audio, cerciórese de
que el interruptor NOISE FILTER esté
en OFF.
Aleje el cable del adaptador de
alimentación de CA del transmisor.
Especificaciones
Generales
Frecuencia portadora
433,5 – 434,5 MHz
Canales Ch 1, Ch 2, Ch 3
Modulación FM estéreo
Respuesta en frecuencia
20 – 20.000 Hz
Transmisor TMR-RF415R
Fuente de alimentación
9 V CC: Adaptador de
alimentación de CA
(suministrado)
Entrada de audio
Tomas fono/minitoma estéreo
Dimensiones Aprox. 150 mm de diá. × 108 mm
(an/al)
Masa Aprox. 190 g
Auriculares MDR-RF415R
Fuente de alimentación
2,4 V CC: Batería incorporada
Masa Aprox. 240 g incluyendo la
batería incorporada
Batería de níquel-cadmio incorporada
Nombre del modelo
NC-AA
Tensión 1,2 V
Capacidad 700 mAh
Accesorio opcional
Adaptador de clavija
PC-236HG (minitoma estéreo y
miniclavija monoaural)
El diseño y las especificaciones están sujetos a cambio
sin previo aviso.
11
ES
Page 22

ATTENZIONE
Benvenuti!
Per evitare il pericolo di incendi o scosse
elettriche, non esporre l’apparecchio alla
pioggia o all’umidità.
Per evitare scosse elettriche, non aprire il
rivestimento. Per la manutenzione
rivolgersi esclusivamente a personale
qualificato.
Questo prodotto è conforme ai requisiti
fondamentali specificati nella direttiva
1999/5/EC (Direttiva R&TTE).
Questo prodotto è progettato per essere utilizzato
nel seguente paese:
Italia
Grazie per avere acquistato il sistema cuffie
stereo senza fili MDR-RF415RK Sony. Prima di
usare il sistema, leggere attentamente questo
manuale e conservarlo per riferimenti futuri.
Alcune caratteristiche sono:
• Sistema senza fili che permette di ascoltare un
programma senza l’ingombro di un filo.
• Riproduzione del suono ad alta fedeltà.
• Trasmettitore compatto con trasformatore CA
(in dotazione) per ricaricare in modo semplice
la pila delle cuffie. È sufficiente posizionare le
cuffie sul trasmettitore perché la carica della
pila venga avviata.
• Comode cuffie che coprono l’orecchio con
fascia a regolazione automatica.
• Funzione di accensione/spegnimento
automatici delle cuffie per conservare la carica
della pila.
IT
2
Page 23

Note sulle prestazioni
Indice
di ricezione
Il sistema di questo apparecchio impiega segnali
ad altissima frequenza nella banda a 400 MHz e
quindi le prestazioni di ricezione possono
risentirne a seconda dell’ambiente circostante. I
seguenti esempi mostrano condizioni in cui il
raggio di ricezione possibile può risultare ridotto
o possono essere causate interferenze nella
ricezione.
• All’interno di edifici con pareti contenenti
putrelle di acciaio.
• In aree con numerosi contenitori metallici, ecc.
• In aree con numerose apparecchiature
elettriche in grado di generare disturbi
elettromagnetici.
• Quando il trasmettitore è collocato sopra
oggetti metallici.
• In aree che fronteggiano strade.
• Quando disturbi o segnali di interferenza sono
presenti nei paraggi, a causa di
ricetrasmettitori a bordo di camion, ecc.
• Quando disturbi o segnali di interferenza sono
presenti nei paraggi, a causa di sistemi di
comunicazione senza fili installati lungo le
strade.
Preparativi
Disimballaggio........................................ 4
Preparazione del trasmettitore ............. 4
Carica della pila delle cuffie ................. 6
Uso del sistema
Ascolto di un programma ..................... 7
Raggio operativo del trasmettitore ...... 9
Sostituzione degli auricolari ................. 9
Altre informazioni
Precauzioni............................................ 10
Soluzione di problemi ......................... 10
Caratteristiche tecniche ....................... 11
IT
IT
3
Page 24

N Preparativi
Preparazione del
Disimballaggio
Controllare di aver ricevuto quanto segue:
• Cuffie
• Trasmettitore
• Trasformatore CA
trasmettitore
1 Collegare il trasmettitore ad un
apparecchio audio/video. Selezionare
uno dei seguenti collegamenti a
seconda del tipo di prese disponibili:
A Per collegare ad una presa cuffie
Trasmettitore
OFF ON
FILTERNOISE
Canale destro
(rosso)
Cavo di
collegamento
(in dotazione)
RBAL
AUDIO IN
alle prese
AUDIO IN A
DC IN 9V
123
CHANNEL
Canale sinistro
(bianco)
• Adattatore per spina universale (minipresa
stereo y spina phone stereo)
• Cavo di collegamento (spine fono y
minispina stereo), 1 m
IT
4
Adattatore per
spina universale
(in dotazione)
alla presa cuffie
(presa phone
stereo)
* WALKMAN è un marchio registrato di Sony
Corporation.
alla presa cuffie
(minipresa stereo)
Walkman per CD,
Walkman per MD,
WALKMAN*,
videoregistratore,
ecc.
Page 25

B Per collegare a prese LINE OUT o REC
OUT
Trasmettitore
alla presa
AUDIO IN B
C Per collegare ad un televisore, ecc.
Se si verificano disturbi quando il
trasmettitore è collegato al televisore o al
videoregistratore, regolare l’interruttore
NOISE FILTER su ON.
Trasmettitore
OFF ON
Canale sinistro
(bianco)
FILTERNOISE
RBAL
AUDIO IN
DC IN 9V
123
CHANNEL
OFF ON
FILTERNOISE
Canale destro
(rosso)
RBAL
AUDIO IN
alle prese
AUDIO IN A
DC IN 9V
123
CHANNEL
Canale sinistro
(bianco)
Cavo di
collegamento (in
dotazione)
Cavo di
collegamento
Canale destro
(rosso)
alle prese LINE OUT
o REC OUT
(in dotazione)
alla minipresa
stereo
Sistema stereo,
videoregistratore,
ecc.
Televisore, ecc.
Note
• Se si collega il trasmettitore alle prese LINE OUT o
REC OUT di un riproduttore audio come un
lettore MD o un lettore CD, non regolare
l’interruttore NOISE FILTER su ON. Altrimenti il
volume sarà limitato.
• L’interruttore NOISE FILTER è operativo solo con
i collegamenti illustrati negli schemi A, a pagina
4, e C. Con i collegamenti illustrati nello schema
B l’interruttore non ha alcun effetto.
• Quando il trasmettitore è collocato sopra o vicino
a un televisore, può captare disturbi.
In tali casi, allontanare il trasmettitore dal
televisore.
continua alla pagina successiva
5
IT
Page 26

Continuazione
2 Collegare il trasmettitore ad una presa
CA usando il trasformatore CA in
dotazione.
Note
• Usare solo il trasformatore CA in dotazione. Non
usare nessun altro trasformatore CA.
Polarità della spina
• Tenere il cavo dell’alimentatore CA il più lontano
possibile dal trasmettitore, onde evitare eventuali
disturbi.
• Quando si collega il trasmettitore direttamente ad una
presa per auricolare monoaurale, il segnale audio non
viene emesso dal canale destro. In tal caso, usare
l’adattatore per spina PC-236HG in vendita
separatamente.
• Se l’apparecchio collegato è dotato di funzione AVLS
(sistema di limitazione automatica del volume),
assicurarsi di disattivare la funzione quando si usa il
trasmettitore. Altrimenti sarà necessario alzare il
volume delle cuffie e questo può causare disturbi.
Carica della pila delle
cuffie
Quando si usano le cuffie la prima volta
Quando si usano le cuffie per la prima volta,
caricare la pila nel seguente modo.
1 Collegare il trasmettitore ad una fonte
di alimentazione.
Trasmettitore
a una presa CA
alla presa
DC IN 9 V
Trasformatore CA
(in dotazione)
Posizionare le cuffie sul trasmettitore in modo
che i piedini di ricarica del trasmettitore
corrispondano ai contatti per la ricarica nella
parte inferiore dell’alloggiamento di destra.
L’indicatore di carica del trasmettitore si illumina
in verde per indicare che la pila è in fase di
carica.
IT
6
Page 27

Per ricaricare la pila delle cuffie dopo
l’uso
Poiché la carica usa pochissima corrente, non è
necessario preoccuparsi di una carica eccessiva.
Ore di carica e di impiego
Ore di carica
approssimative
1
24**
*a 1 kHz, uscita 1 mW + 1 mW
** Ore necessarie per caricare completamente pile
scariche.
Tempo
approssimativo di
impiego*
55 minuti
23 ore
N Uso del sistema
Ascolto di un programma
1 Per prima cosa, accendere
l’apparecchio audio/video ed avviare
la riproduzione.
2 Rimuovere le cuffie dal trasmettitore.
L’indicatore di alimentazione del
trasmettitore si illumina in rosso.
3 Selezionare la frequenza radio con il
selettore CHANNEL.
123
CHANNEL
continua alla pagina successiva
IT
7
Page 28

Continuazione
4 Le cuffie si accendono
automaticamente non appena vengono
indossate.
5 Alzare il volume ad un livello
moderato con il comando VOL, quindi
sintonizzare le cuffie sulla frequenza
del trasmettitore con il comando
TUNING fino a che il segnale audio è
chiaramente udibile.
Comando
TUNING
Comando
VOL
Provare a eseguire i punti 3 e 5 sopra
fino a che la ricezione migliora.
Invio di segnali RF dal trasmettitore
Se vengono rilevati segnali audio
dall’apparecchio collegato, il trasmettitore inizia
ad inviare segnali RF automaticamente.
Se non viene rilevato alcun segnale audio per
oltre quattro minuti circa, il trasmettitore arresta
l’invio di segnali RF e l’indicatore di
alimentazione si spegne.
Non appena riceve di nuovo segnali audio, il
trasmettitore avvia l’invio di segnali RF e
l’indicatore di alimentazione si illumina di nuovo
in rosso.
Se il segnale audio è molto debole, il
trasmettitore non invia segnali RF. Se il
trasmettitore è collegato ad una presa cuffie,
assicurarsi che il volume dell’apparecchio
collegato sia regolato su 5 – 6 o superiore.
Può succedere che l’inizio del suono non sia
udibile con le cuffie fino a che il trasmettitore non
inizia ad inviare i segnali RF dopo aver
individuato un segnale audio.
Funzione di accensione/spegnimento
automatica
Quando si tolgono le cuffie dopo l’ascolto,
l’alimentazione viene disattivata
automaticamente. Assicurarsi che la fascia a
regolazione automatica non venga spostata verso
l’alto; in caso contrario le cuffie si accendono di
nuovo.
Le cuffie si accendono.
Nota
Nel caso in cui vengano uditi sibili, avvicinarsi al
trasmettitore.
IT
8
Page 29

Raggio operativo del
Sostituzione degli
trasmettitore
La distanza ottimale raggiunge i 100 m circa
senza che il sistema capti interferenze. Tuttavia,
la distanza può variare a seconda dell’ambiente
circostante. Se il sistema capta disturbi durante
l’uso nel raggio sopra indicato, ridurre la
distanza tra il trasmettitore e le cuffie o
selezionare un altro canale.
Note
• Quando si usano le cuffie all’interno del raggio
operativo del trasmettitore, il trasmettitore può
trovarsi in qualsiasi direzione rispetto all’ascoltatore.
• Anche all’interno dell’area di ricezione del segnale,
esistono alcuni punti (punti morti) in cui non è
possibile ricevere il segnale RF. Questa è una
caratteristica propria dei segnali RF e non un
problema di funzionamento. Spostando leggermente
il trasmettitore si può cambiare la posizione dei punti
morti.
auricolari
Quando gli auricolari diventano sporchi o
danneggiati, si possono acquistare dei ricambi
presso un rivenditore Sony. Sostituirli come
indicato sotto.
1 Rimuovere l’auricolare vecchio
tirandolo fuori dalla scanalatura
sull’alloggiamento.
2 Collocare il nuovo auricolare sull’unità
pilota e inserirne il bordo nella
scanalatura come illustrato.
Assicurarsi che l’intero bordo dell’auricolare sia
saldamente inserito nella scanalatura.
IT
9
Page 30

N Altre informazioni
Precauzioni
• Quando non si usa il trasmettitore per un
lungo periodo, scollegare il trasformatore CA
dalla presa CA afferrandone la spina. Non
tirare mai il cavo.
• Non lasciare il sistema cuffie stereo senza fili in
luoghi esposti alla luce solare diretta, calore o
umidità.
Note sulle cuffie
Prevenzione di danni all’udito
Evitare di usare le cuffie ad alto volume.
Gli esperti in materia di udito sconsigliano un
ascolto continuo ad alto volume per periodi
prolungati. Se si sentono ronzii alle orecchie,
abbassare il volume o cessare l’uso.
Rispetto per il prossimo
Tenere il volume ad un livello moderato. Questo
permette di udire i suoni esterni e non disturba le
persone circostanti.
In caso di interrogativi o problemi riguardanti il
sistema che non sono trattati in questo manuale,
consultare il proprio rivenditore Sony.
Assicurarsi di portare sia le cuffie che il
trasmettitore al rivenditore Sony quando si
richiedono riparazioni.
Conservazione delle cuffie
Prima di riporre le cuffie, assicurarsi di
rimuovere la pila ricaricabile incorporata.
Rimuovere prima l’auricolare sinistro delle
cuffie. Si noteranno sei viti, rimuoverle e
aprire l’alloggiamento.
Soluzione di problemi
Problema
Suono
assente/
Suono
attutito
Soluzione
Controllare il collegamento
dell’apparecchio audio/video o del
trasformatore CA.
Controllare che l’apparecchio audio/
video sia acceso.
Alzare il volume dell’apparecchio
audio/video, se il trasmettitore è
collegato alla presa cuffie.
Cambiare la frequenza radio con il
selettore CHANNEL del
trasmettitore, quindi sintonizzare le
cuffie con il comando TUNING.
Si è attivata la funzione di
silenziamento. Usare le cuffie più
vicino al trasmettitore.
La luce dell’indicatore POWER delle
cuffie è fioca o spenta.
•Caricare la pila ricaricabile
incorporata oppure, se l’indicatore
POWER è ancora disattivato una
volta completata la carica, portare le
cuffie da un rivenditore Sony per la
sostituzione della pila ricaricabile.
Se si collega il trasmettitore alle prese
LINE OUT o REC OUT di un
riproduttore audio, assicurarsi che
l’interruttore NOISE FILTER sia
regolato su OFF.
Assicurarsi che l’interruttore NOISE
FILTER sia regolato su ON o su OFF.
(Se l’interruttore si blocca tra ON e
OFF, il suono verrà interrotto.)
10
IT
Page 31

Problema
Distorsione
Forti disturbi
di sottofondo
Soluzione
Se il trasmettitore è collegato alla
presa cuffie, abbassare il volume
dell’apparecchio audio/video
collegato.
Cambiare la frequenza radio con il
selettore CHANNEL del
trasmettitore.
La luce dell’indicatore POWER delle
cuffie è fioca o spenta.
•Caricare la pila ricaricabile
incorporata oppure, se l’indicatore
POWER è ancora disattivato una
volta completata la carica, portare le
cuffie da un rivenditore Sony per la
sostituzione della pila ricaricabile.
Se si collega il trasmettitore alle prese
LINE OUT o REC OUT di un
riproduttore audio, assicurarsi che
l’interruttore NOISE FILTER sia
regolato su OFF.
Avvicinarsi al trasmettitore. Più ci si
allontana dal trasmettitore, più
facilmente sono udibili disturbi.
Se il trasmettitore è collegato alla
presa cuffie, alzare il volume
dell’apparecchio audio/video
collegato.
Cambiare la frequenza radio con il
selettore CHANNEL del
trasmettitore, quindi sintonizzare le
cuffie con il comando TUNING.
La luce dell’indicatore POWER delle
cuffie è fioca o spenta.
•Caricare la pila ricaricabile
incorporata oppure, se l’indicatore
POWER è ancora disattivato una
volta completata la carica, portare le
cuffie da un rivenditore Sony per la
sostituzione della pila ricaricabile.
Se si collega il trasmettitore alle prese
LINE OUT o REC OUT di un
riproduttore audio, assicurarsi che
l’interruttore NOISE FILTER sia
regolato su OFF.
Allontanare il cavo dell’alimentatore
CA dal trasmettitore.
Caratteristiche
tecniche
Generali
Frequenza portante
433,5 – 434,5 MHz
Canali Ch1, Ch2, Ch3
Modulazione Stereo FM
Risposta in frequenza
20 – 20.000 Hz
Trasmettitore TMR-RF415R
Alimentazione 9 V CC: trasformatore CA in
dotazione
Ingresso audio Prese fono/minipresa stereo
Dimensioni Circa 150 mm dia. × 108 mm
(l/a)
Massa Circa 190 g
Cuffie MDR-RF415R
Alimentazione 2,4 V CC : Pila ricaricabile
incorporata
Massa Circa 240 g inclusa la pila
ricaricabile incorporata
Pila ricaricabile Ni-Cd incorporata
Nome di modello
NC-AA
Tensione 1,2 V
Capacità 700 mAh
Accessori opzionali
Adattatore per spina
PC-236HG (minipresa stereo y
minispina monoaurale)
Design e caratteristiche tecniche sono soggetti a
modifiche senza preavviso.
11
IT
Page 32

ADVERTÊNCIA
Bem-vindo!
Para evitar riscos de incêndio ou choque
eléctrico, não exponha o aparelho a
chuva ou humidade.
Para evitar choque eléctrico, não abra o
aparelho. A manutenção deve ser feita
apenas por pessoal qualificado.
Este equipamento cumpre os requisitos
essenciais da directiva 1999/5/EC referente a
equipamento para terminais de telecomunicações
e rádio (Radio and Telecommunications Terminal
Equipment Directive).
Este produto é destinado para ser utilizado no
seguinte país:
Itália
Muito obrigado pela aquisição do Sistema de
Auscultadores Estéreo Sem Fio Sony
MDR-RF415RK. Antes de utilizar o aparelho, leia
atentamente este manual e guarde-o para futuras
consultas.
Eis algumas de suas características:
• Sistema sem fio que possibilita a audição de
programas livre das restrições de um cabo.
• Reprodução de som de alta fidelidade.
• Um transmissor compacto com um
transformador de CA (fornecido) que permite
um carregamento simples da bateria dos
auscultadores. Basta colocar os auscultadores
no transmissor para poder carregar a bateria.
• Confortáveis auscultadores do tipo supra-aural
com faixa de cabeça auto-ajustável.
• Função ON/OFF (activação/desactivação)
automática nos auscultadores para preservar a
carga da bateria.
PT
2
Page 33

Notas sobre o
Índice
desempenho na
recepção
Como o sistema deste equipamento utiliza sinais
de frequência muito altas na faixa dos
400 MHz, o desempenho na recepção pode
deteriorar-se em função do ambiente em que se
encontra. Os exemplos a seguir ilustram
condições que podem reduzir a gama de
recepção possível ou causar interferências na
recepção.
• Interior de um edifício com paredes de vigas
de aço.
• Zona com muitos móveis de aço, etc.
• Zona com muitos aparelhos eléctricos capazes
de gerar ruídos electromagnéticos.
• Transmissor localizado sobre um instrumento
metálico.
• Zona voltada para a estrada.
• Ruídos ou sinais de interferência presentes nos
arredores devido a emissores-receptores de
rádio em camiões, etc.
• Ruídos ou sinais de interferência presentes nos
arredores devido a sistemas de comunicação
sem fio instalados ao longo das estradas.
Preparativos
Desempacotamento................................ 4
Configuração do transmissor ............... 4
Carregamento da bateria dos
auscultadores ................................... 6
Funcionamento do sistema
Ouvir de um programa ......................... 7
As zonas de alcance eficaz do
transmissor ....................................... 9
Substituição das esponjas dos
auscultadores ................................... 9
Informações adicionais
Precauções ............................................. 10
Resolução de problemas...................... 10
Especificações ....................................... 11
PT
PT
3
Page 34

N Preparativos
Configuração do
Desempacotamento
Verifique se recebeu os seguintes itens:
• Os auscultadores
• O transmissor
• Transformador de CA
transmissor
1 Ligue o transmissor ao equipamento de
áudio/vídeo. Seleccione uma das
ligações abaixo, conforme o tipo da
tomada:
A Para ligar a uma tomada para
auscultadores
Transmissor
OFF ON
FILTERNOISE
Canal direito
(vermelho)
Cabo de ligação
(fornecido)
RBAL
AUDIO IN
às tomadas
AUDIO IN A
DC IN 9V
123
CHANNEL
Canal esquerdo
(branco)
• Adaptador de ficha universal (minitomada
estéreo y ficha universal estéreo)
• Cabo de ligação (fichas RCA y minificha
estéreo), 1 m
PT
4
Adaptador de
ficha universal
(fornecido)
à tomada para
auscultadores
(tomada universal
estéreo)
* WALKMAN é uma marca registada de Sony
Corporation.
à tomada para
auscultadores
(minitomada
estéreo)
Walkman de CDs,
Walkman de MDs,
WALKMAN*,
videogravador, etc.
Page 35

B Para ligar às tomadas LINE OUT ou
REC OUT
Transmissor
à tomada
AUDIO IN B
OFF ON
FILTERNOISE
RBAL
AUDIO IN
DC IN 9V
123
CHANNEL
C Para ligar a um televisor, etc.
Se ocorrerem ruídos quando o
transmissor for ligado ao seu televisor
ou videogravador, regule o interruptor
NOISE FILTER para ON.
Transmissor
à tomada
AUDIO IN A
Canal esquerdo
(branco)
Cabo de ligação
(fornecido)
Canal direito
(vermelho)
às tomadas LINE OUT
ou REC OUT
Sistema estéreo,
videogravador, etc.
OFF ON
FILTERNOISE
Canal direito
(vermelho)
RBAL
AUDIO IN
DC IN 9V
123
CHANNEL
Canal esquerdo
(branco)
Cabo de ligação
(fornecido)
à minitomada
estéreo
Televisor, etc.
Notas
• Caso ligue o transmissor à tomada LINE OUT ou
REC OUT de um reprodutor de áudio tal como
um leitor de MDs ou leitor de CDs, não regule o
interruptor NOISE FILTER para ON. Caso
contrário, o volume será limitado.
•O interruptor NOISE FILTER só fica activo no caso
da ligação representada no diagrama A, na
página 4, e C. No diagrama B, o interruptor não
tem efeito.
• Quando o transmissor for colocado sobre ou perto
de um televisor, poderá captar ruídos.
Em tal caso, coloque o transmissor distante do
televisor.
continua na próxima página
5
PT
Page 36

continuação
2 Ligue o transmissor a uma tomada da
rede CA, utilizando o transformador de
CA fornecido.
Notas
• Utilize apenas o transformador de CA fornecido. Não
utilize nenhum outro transformador de CA.
Polaridade da ficha
• Afaste o cabo do transformador de CA o mais possível
do transmissor. Se o colocar perto do transmissor pode
provocar interferências.
• Quando ligar o transmissor directamente a uma
tomada mono para auriculares, o sinal de áudio não
será exteriorizado através do canal direito. Em tal
caso, utilize o adaptador de ficha PC-236HG de venda
avulsa.
• Se o equipamento ligado possuir a função AVLS
(Sistema de Limitação Automática de Volume),
certifique-se de desligar tal função, quando utilizar o
transmissor. Caso contrário, será necessário aumentar
o volume dos auscultadores, o que poderá resultar em
ruídos.
Carregamento da
bateria dos
auscultadores
Utilização dos auscultadores pela
primeira vez
Quando utilizar os auscultadores pela primeira
vez, carregue a bateria da seguinte forma.
1 Ligue o transmissor a uma fonte de
alimentação.
Transmissor
À tomada
DC IN 9 V
Transformador de CA
(fornecido)
a uma tomada
da rede CA
Coloque os auscultadores no transmissor de
modo a que os pinos de carga do transmissor
encaixem nos contactos de carga existentes na
parte inferior do compartimento do lado direito.
O indicador de carga do transmissor acende a
verde para indicar que a bateria está a ser
carregada.
PT
6
Page 37

Para recarregar a bateria dos
auscultadores após a utilização
Visto que una pequena quantidade de corrente
eléctrica é utilizada para o carregamento, não há
necessidade de se preocupar com sobrecargas.
N
Funcionamento do sistema
Ouvir um programa
Carregamento e horas de utilização
Horas aprox. de
carregamento
1
24**
*a 1 kHz, 1 mW + 1 mW de saída
** As horas requeridas para carregar completamente
baterias vazias.
Tempo aprox. de
utilização*
55 minutos
23 horas
1 Em primeiro lugar, ligue o
equipamento de áudio/vídeo e inicie a
reprodução.
2 Retire os auscultadores do transmissor.
O indicador de corrente do transmissor
acende a vermelho.
3 Seleccione a frequência de rádio com o
selector CHANNEL.
123
CHANNEL
continua na próxima página
7
PT
Page 38

continuação
4 Quando colocar os auscultadores nos
ouvidos, a respectiva alimentação ligase automaticamente.
5 Aumente o volume a um nível
moderado com o controlo VOL e então
sintonize os auscultadores na
frequência do transmissor com o
controlo TUNING, até poder escutar o
sinal de áudio em bom nível e com
nitidez.
Envio de sinais RF a partir do transmissor
O transmissor começará a enviar os sinais RF
automaticamente, quando detectar sinais de
áudio provenientes do equipamento ligado.
Se não for detectado um sinal durante cerca de
quatro minutos, o transmissor pára de enviar
sinais RF e o indicador de corrente desliga-se.
Quando o transmissor receber novamente um
sinal de áudio, começa a enviar sinais RF e o
indicador de corrente acende novamente a
vermelho.
Se o sinal de áudio for muito fraco, o transmissor
não envia sinais RF. Se o transmissor estiver
ligado a uma tomada para auscultadores,
certifique-se de que o volume do equipamento
ligado está regulado para 5 – 6 ou mais.
Pode não ser possível escutar o início do som
proveniente dos auscultadores até que o
transmissor comece a enviar os sinais RF após
detectar um sinal de áudio.
Função de activação/desactivação
automática da alimentação
Quando os auscultadores forem removidos dos
ouvidos, a alimentação desligar-se-á
automaticamente. Não permita que a faixa autoajustável seja puxada para cima,
caso contrário, os auscultadores serão activados.
Controlo VOL
Experimente os passos 3 e 5 acima até
que o desempenho da recepção
melhore.
PT
8
Controlo
TUNING
A alimentação é ligada.
Nota
Se ouvir um ruído sibilante, aproxime-se do
transmissor.
Page 39

As zonas de alcance
Substituição das
eficaz do transmissor
A distância ideal é de até cerca de 100 m sem que
o sistema capte interferências. No entanto, tal
distância pode variar de acordo com o local e o
ambiente. Se o sistema captar algum ruído
durante o seu funcionamento dentro da distância
acima mencionada, reduza a distância entre o
transmissor e os auscultadores ou seleccione o
outro canal.
Notas
• Quando os auscultadores forem utilizados dentro das
zonas de alcance eficaz do transmissor, este poderá ser
colocado em qualquer direcção a partir do ouvinte.
• Mesmo dentro da área de recepção de sinal, há alguns
pontos (ponto morto) em que o sinal RF não pode ser
recebido. Esta característica é inerente aos sinais RF,
não caracterizando uma avaria. Com um ligeiro
movimento no transmissor, a localização do ponto
morto pode ser mudada.
esponjas dos
auscultadores
Quando as esponjas dos auscultadores ficarem
sujas ou estiverem danificadas, obtenha outras
para substituição no seu agente Sony. Troque-as
tal como ilustrado abaixo.
1 Remova a esponja a substituir da
ranhura do auscultador.
2 Coloque a nova esponja no respectivo
local e introduza a borda da esponja na
ranhura, como se mostra na figura.
Certifique-se de que a borda inteira da esponja
do auscultador fica bem encaixada na ranhura.
PT
9
Page 40

N Informações adicionais
Resolução de
Precauções
• Se o transmissor não for utilizado durante um
longo período, desligue o transformador de
CA da tomada da rede CA, segurando-o pela
ficha. Não puxe pelo cabo.
• Não deixe o sistema de auscultadores estéreo
sem fio sujeito à luz solar directa, calor ou
humidade.
Notas sobre os auscultadores
Prevenção contra danos na audição
Evite utilizar os auscultadores com volumes
elevados. Especialistas em audição advertem
contra a audição contínua, alta e prolongada com
auscultadores. Se escutar um som agudo, reduza
o volume ou interrompa a utilização dos
auscultadores.
Consideração por terceiros
Mantenha o volume com um nível moderado.
Isto permitir-lhe-á escutar os sons do exterior e
respeitar as pessoas ao seu redor.
Caso surjam quaisquer dúvidas ou problemas
relativamente ao sistema, que não estejam
abrangidos neste manual, consulte o agente Sony
mais próximo.
Quando se dirigir ao agente da Sony para
requisitar serviços de reparação, tem de levar o
transmissor e os auscultadores.
Deitar fora os auscultadores
Antes de deitar fora os auscultadores, retire a
bateria recarregável neles incorporada.
Primeiro, retire a esponja do auscultador
esquerdo. Encontrará seis parafusos.
Desaperte os seis parafusos e abra o
auscultador.
problemas
Problema
Ausência de
som/
Abafamento
de som
Solução
Verifique as ligações do equipamento
de áudio/vídeo ou do transformador
de CA.
Verifique se o equipamento de áudio/
vídeo está activado.
Aumente o volume do equipamento
de áudio/vídeo ligado, se o
transmissor estiver ligado à tomada
para auscultadores.
Mude de frequência de rádio com o
selector CHANNEL do transmissor e,
em seguida, sintonize os
auscultadores com o controlo
TUNING.
A função de silenciamento está
activada. Utilize os auscultadores
perto do transmissor.
O brilho do indicador POWER dos
auscultadores está fraco ou apagado.
•Recarregue a bateria recarregável
fornecida ou, se o indicador POWER
permanecer apagado depois de
recarregar a bateria, leve os
auscultadores a um agente Sony
para substitui-la.
Caso ligue o transmissor à tomada
LINE OUT ou REC OUT de um
reprodutor de áudio, certifique-se de
que o interruptor NOISE FILTER está
regulado para OFF.
Certifique-se de que o interruptor
NOISE FILTER está regulado para
ON ou OFF (se o interruptor ficar
encravado entre ON e OFF, o som é
cortado).
10
PT
Page 41

Problema
Distorção
Ruído de
fundo alto
Solução
Caso o transmissor esteja ligado à
tomada para auscultadores, reduza o
volume do equipamento de áudio/
vídeo ligado.
Mude de frequência de rádio com o
selector CHANNEL do transmissor.
O brilho do indicador POWER dos
auscultadores está fraco ou apagado.
•Recarregue a bateria recarregável
fornecida ou, se o indicador POWER
permanecer apagado depois de
recarregar a bateria, leve os
auscultadores a um agente Sony
para substitui-la.
Caso ligue o transmissor à tomada
LINE OUT ou REC OUT de um leitor
de áudio, certifique-se de que o
interruptor NOISE FILTER está
regulado para OFF.
Desloque-se para mais perto do
transmissor. À medida que se
distancia do transmissor, maior é a
probabilidade de se escutarem ruídos.
Se o transmissor estiver ligado à
tomada para auscultadores, aumente
o volume do equipamento de áudio/
vídeo ligado.
Mude de frequência de rádio com o
selector CHANNEL do transmissor e,
em seguida, sintonize os
auscultadores com o controlo
TUNING.
O brilho do indicador POWER dos
auscultadores está fraco ou apagado.
•Recarregue a bateria recarregável
fornecida ou, se o indicador POWER
permanecer apagado depois de
recarregar a bateria, leve os
auscultadores a um agente Sony
para substitui-la.
Caso ligue o transmissor à tomada
LINE OUT ou REC OUT de um leitor
de áudio, certifique-se de que o
interruptor NOISE FILTER está
regulado para OFF.
Afaste o cabo do transformador de
CA do transmissor.
Especificações
Generalidades
Frequência portadora
433,5 – 434,5 MHz
Canal Ch1, Ch2, Ch3
Modulação FM Estéreo
Resposta de frequência
20 – 20.000 Hz
Transmissor TMR-RF415R
Fonte de alimentação
9 V CC: transformador de CA
fornecido
Entrada de áudio
Tomadas RCA/minitomada
estéreo
Dimensões Aprox. 150 mm de diâm.
× 108 mm (l/a)
Peso Aprox. 190 g
Auscultadores MDR-RF415R
Fonte de alimentação
DC 2,4 V: Bateria recarregável
fornecida
Peso Aprox. 240 g incluindo a bateria
recarregável fornecida
Bateria recarregável de Ni-Cd fornecida
Nome do modelo
NC-AA
Tensão 1,2 V
Capacidade 700 mAh
Acessório opcional
Adaptador de ficha
PC-236HG (minitomada estéreo
y minificha mono)
O design e as especificações estão sujeitos a alterações
sem aviso prévio.
11
PT
Page 42

12
PT
Page 43

13
PT
Page 44

Sony Corporation Printed in Korea
 Loading...