

Sony Trinitron KV-E29MF1S, Trinitron KV-E29MH1, Trinitron KV-E29MH11, Trinitron KV-E29MF1, KV-E29MN11 Operating Instructions Manual
3-858-355-12 (1)
Trinitron Color TV
Operating Instructions
####
####
1996 by Sony Corporation
C1
C2
EN
KV-E29
MF, MH, MN
2
20 mm
3.8 mm
3
ENTERVIDEO
VIDEO 3 INPUT
S VIDEO
(MONO)
L–AUDIO–R MENU AUTO PROGR
AUTO PROGR
TV SYS: B / G
AUT O P ROGRAM
VHF L O W
PR: 0 1
123
456
789
1
4

Getting Started
-EN
5
WARNING Table of contents
• Dangerously high voltages are present inside the TV.
• Operate the TV only at 110-240 V AC.
• Do not open the cabinet and the rear cover of the TV.
Refer servicing to qualified personnel.
• To prevent fire or shock hazard, do not expose the TV
to rain or moisture.
• Do not operate the TV if any liquid or solid object
falls into it. Have it checked immediately by qualified
personnel only.
• Do not block the ventilation openings.
• Do not install the appliance in a confined space, such
as a bookcase or built-in cabinet.
• Do not install the TV in hot, humid or excessively
dusty places.
• Do not install the TV where it may be exposed to
mechanical vibrations.
• Do not keep the TV plugged in if you are not going to
use it for several days.
• Do not pull the power cord to disconnect the TV. Pull
it out by the plug.
• Use only the supplied screws (as shown on page 2) to
fasten the TV to the TV stand or to stabilize the TV
against a wall or a pillar. Use of other screws may
damage the TV.
Note on the remote commander
• The supplied remote commander is used on several models of
the TV. If you do not find instructions for some controls that
are on the remote commander, that means your TV does not
employ the features of those controls, e.g. TEXT.
Notes
• When you turn on the TV, you may hear the “boon” sound
that is caused by the demagnetization of the TV. This does not
indicate a malfunction.
• The picture color may become abnormal if you change the
direction of your TV. To obtain the normal picture color, press
MAIN POWER or POWER on the TV to turn off the TV for five
minutes and then turn it on again.
Getting Started
6 Connections
8 Getting to know the remote commander
9 Introducing the menus
10 Changing the menu language
11 Presetting channels
Operations
13 Watching the TV
16 Adjusting the picture and sound
18 Listening to the POWER BASSO sound
19 Listening to the surround sound (HYPER
SURROUND)
20 Selecting a stereo or bilingual program
21 Viewing multiple programs at the same time
(PROGRAM INDEX)
22 Displaying frame-by-frame pictures (STROBE)
22 Using the Picture-in-Picture (PIP) features
24 Viewing Teletext
26 Displaying Teletext on the PIP screen (PIP TEXT)
27 Viewing a video game screen (GAME MODE)
28 Customizing the TV
Additional Information
29 Troubleshooting
Back Specifications
cover
All contents are subject to change without notice.
Design and specifications are subject to change without
notice.
EN
Getting Started
6
-EN
VIDEO IN MON/TV
OUT
123
VIDEO
AUDIO
L
(MONO)
R
S VIDEO
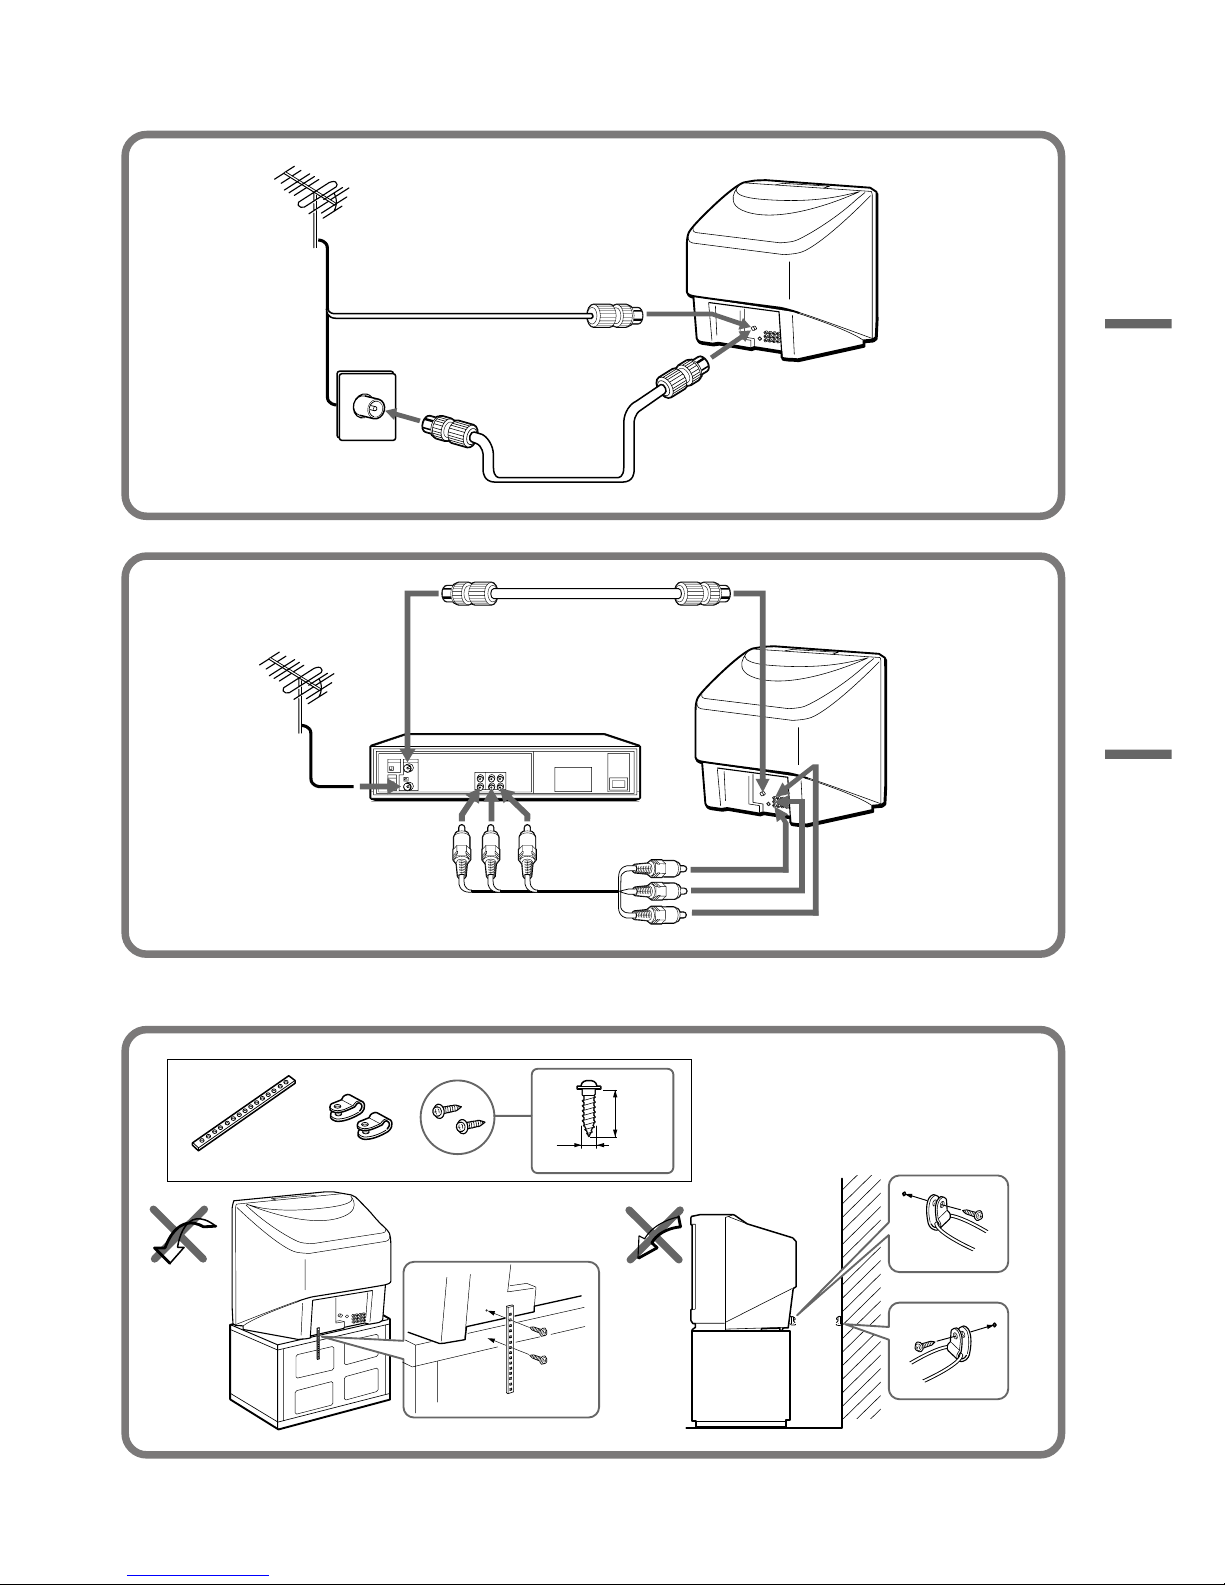
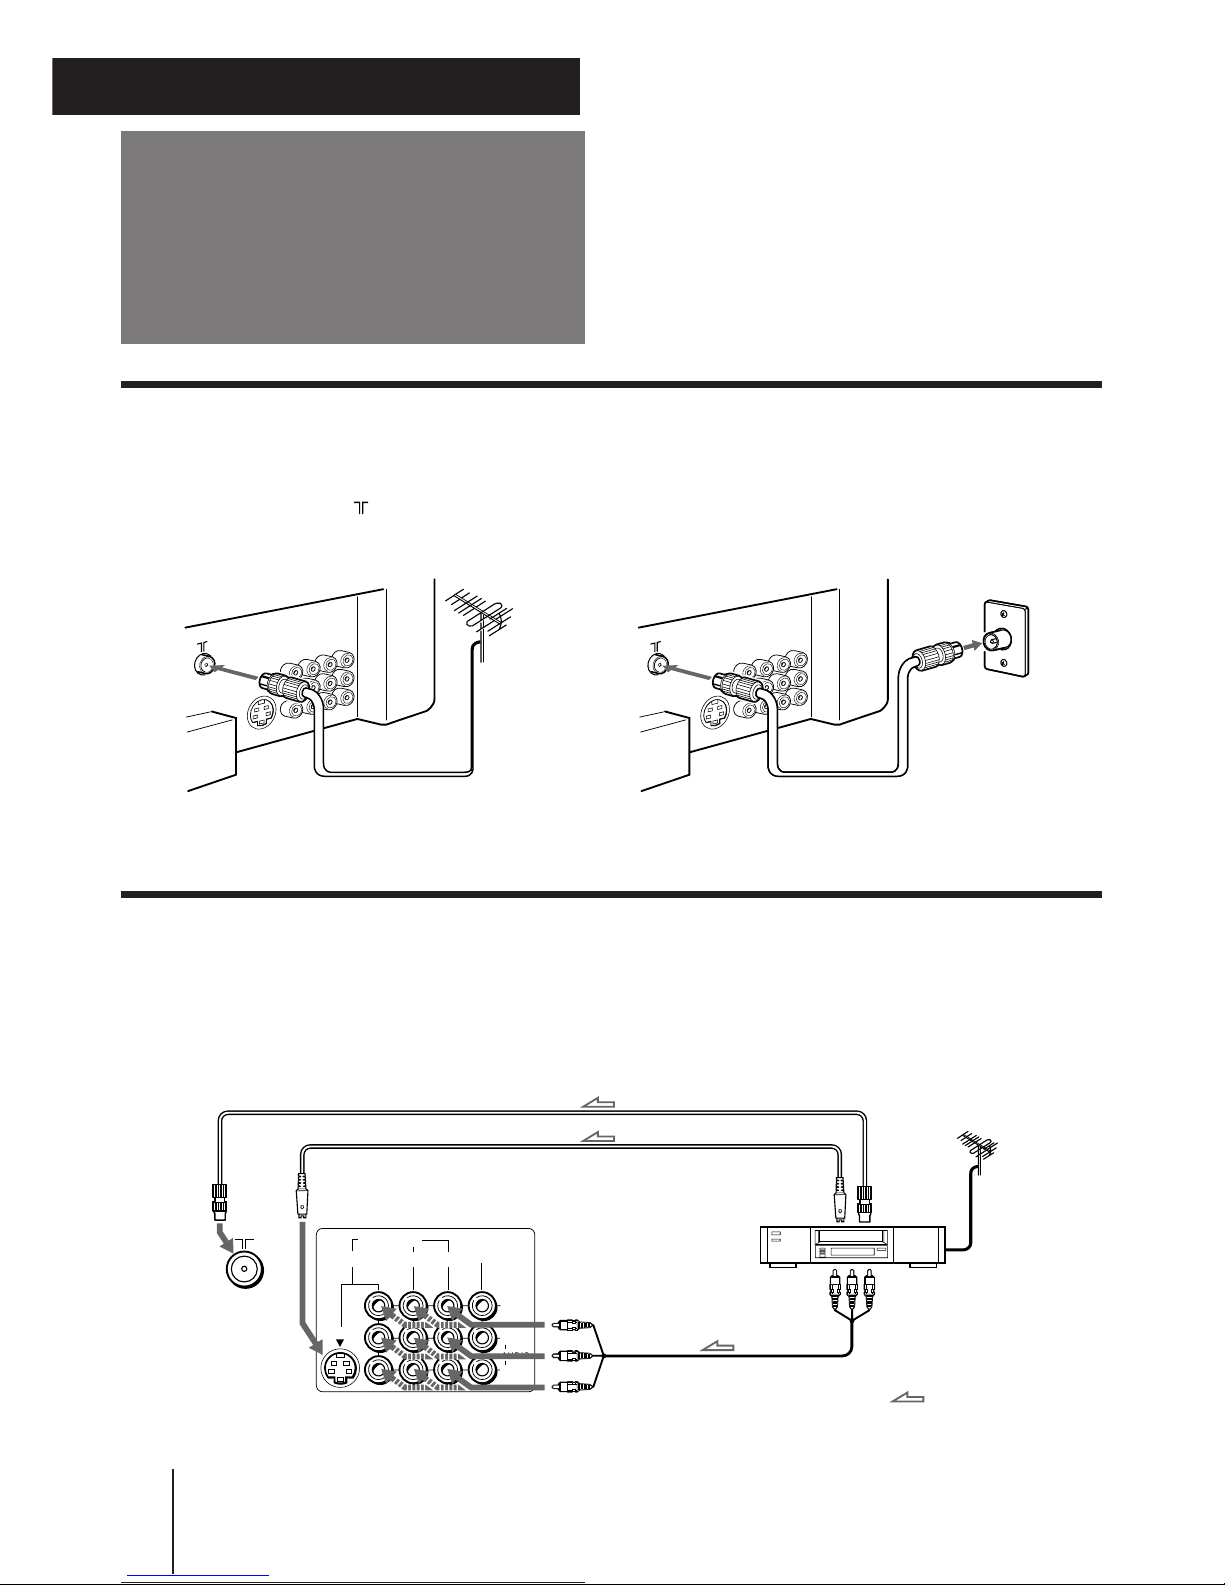
Connecting a VHF antenna or a combination VHF/UHF antenna
— 75-ohm coaxial cable (round)
Attach an optional IEC antenna connector to the 75-ohm coaxial cable.
Plug the connector into the (antenna) socket at the rear of the TV.
Connecting optional equipment
You can connect optional audio/video equipment to your TV such as a VCR, multi disc player, camcorder, video
game or stereo system.
Connecting video equipment using video input jacks
Connections
On a wall
Rear of TVRear of TV
or
Rear of TV
VIDEO (yellow)
AUDIO-L (white)
AUDIO-R (red)
VCR
to
S Video
output
to
antenna
output
to video and
audio outputs
: Signal flow
Getting Started
to
antenna
socket
to
S Video
input
Getting Started
-EN
7
VIDEO IN MON/TV
OUT
123
VIDEO
AUDIO
L
(MONO)
R
S VIDEO
When connecting a monaural VCR
Connect the yellow plug to VIDEO and the black plug to AUDIO-L (MONO).
When connecting video game equipment
Connect video game equipment to the VIDEO 3 INPUT jacks at the front of your TV or the VIDEO IN 3 jacks at the rear of your TV.
When connecting a VCR to the (antenna) terminal
Preset the signal output from the VCR to the program position 0.
When connecting video equipment to the VIDEO 3 INPUT jacks or the VIDEO IN 3 jacks
Do not connect video equipment to the VIDEO 3 INPUT jacks at the front and the VIDEO IN 3 jacks at the rear of your TV simultaneously;
otherwise the picture will not be displayed properly on the screen.
If both S Video and video signals are input simultaneously
The S Video input signal is selected. To view a video input signal, disconnect the S Video connection.
Note on the video input
When no signal is input, the screen becomes blue.
Connecting audio/video equipment using MON/TV OUT jacks
VIDEO
VIDEO 3 INPUT
S VIDEO
(MONO)
L–AUDIO–R
Front of TV
Camcorder
to S video output
to video and
audio outputs
: Signal flow
Rear of TV
VCR
to
antenna
output
to video and
audio inputs
VIDEO (yellow)
AUDIO-L (white)
AUDIO-R (red)
Audio system
to audio
inputs
: Signal flow
to
antenna
socket
or
Getting Started
8
-EN
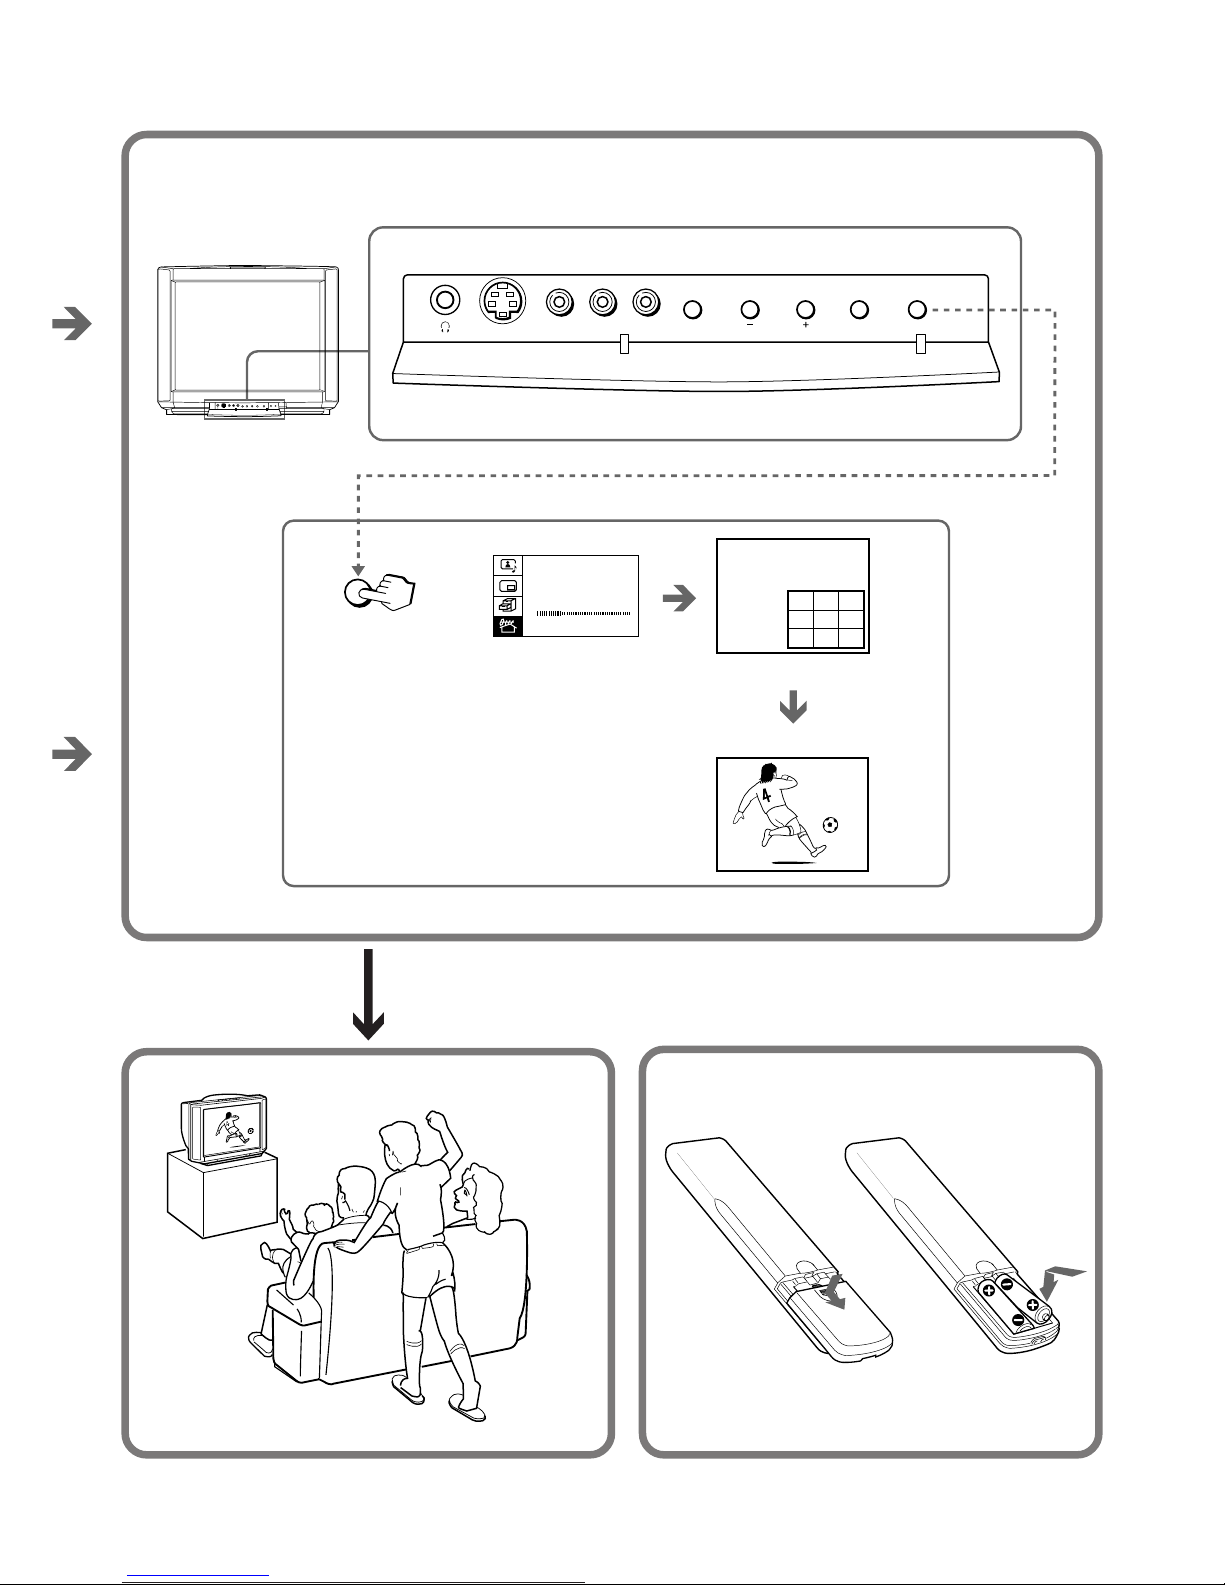
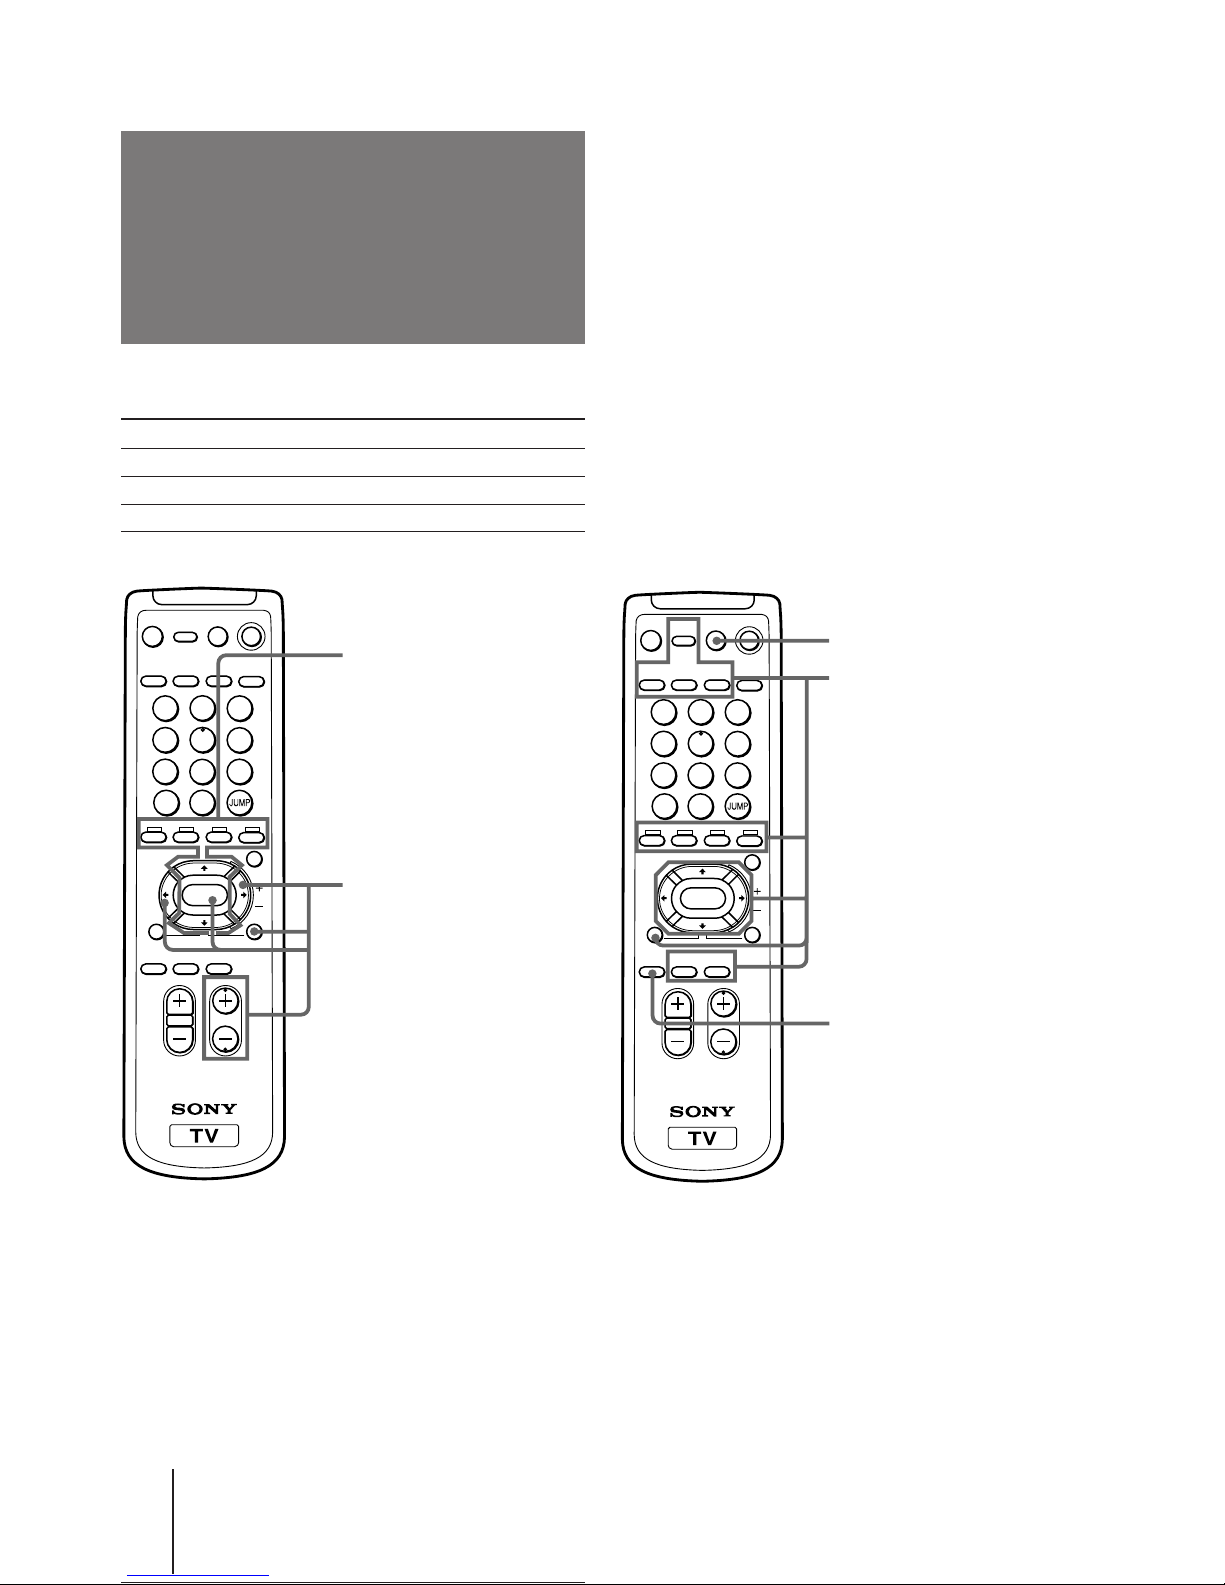
Names of buttons on the remote commander are indicated in different colors to represent the available functions.
Label color Button function
White For general TV operations.
Green For Teletext operations.
Yellow For PIP and PROGRAM INDEX operations.
Notes
• The Teletext operation buttons are used for KV-E29MH11 and KV-E29MN11 only.
• The A/B button is used for KV-E29MH1, KV-E29MH11 and KV-E29MN11 only.
PROGRVOL
MENU
PIP PROGR
TEXT
A/B
ENLARGE
DISPLAY
REVEAL
GAME
POWER
VIDEO
HOLD
TV
MUTING
PROGR
INDEX
PIP
TEXT
1
2
3
4
5
6
7
8
0
-/--
9
TV/VIDEO
FREEZE SWAP
PIP
POWER
BASSO
WAKE UP
INDEX
SLEEP
TEXT CLR
ENTER
Getting to know the
remote commander
PIP operation buttons
TV/VIDEO (page 22)
FREEZE (page 23)
SWAP (page 23)
PIP (page 22)
V/v/ENTER
– for PIP PROGR (page 22)
PROGRAM INDEX
operation buttons
PROGR INDEX (page 21)
V/b/v/B/ENTER (page 21)
PROGR +/– (page 21)
GAME (page 27)
Teletext operation buttons
TEXT (page 24, 25)
ENLARGE (page 25)
REVEAL (page 25)
HOLD (page 24)
[] – Red (page 24)
[] – Green (page 24)
[] – Yellow (page 24)
[] – Blue (page 24)
INDEX (page 24)
TEXT CLR (page 25)
PIP TEXT (page 26)
V/b/v/B/ ENTER (page 26)
POWER BASSO (page 18)
PROGRVOL
MENU
PIP PROGR
TEXT
A/B
ENLARGE
DISPLAY
REVEAL
GAME
POWER
VIDEO
HOLD
TV
MUTING
PROGR
INDEX
PIP
TEXT
1
2
3
4
5
6
7
8
0
-/--
9
TV/VIDEO
FREEZE SWAP
PIP
POWER
BASSO
WAKE UP
INDEX
SLEEP
TEXT CLR
ENTER
Getting Started
-EN
9
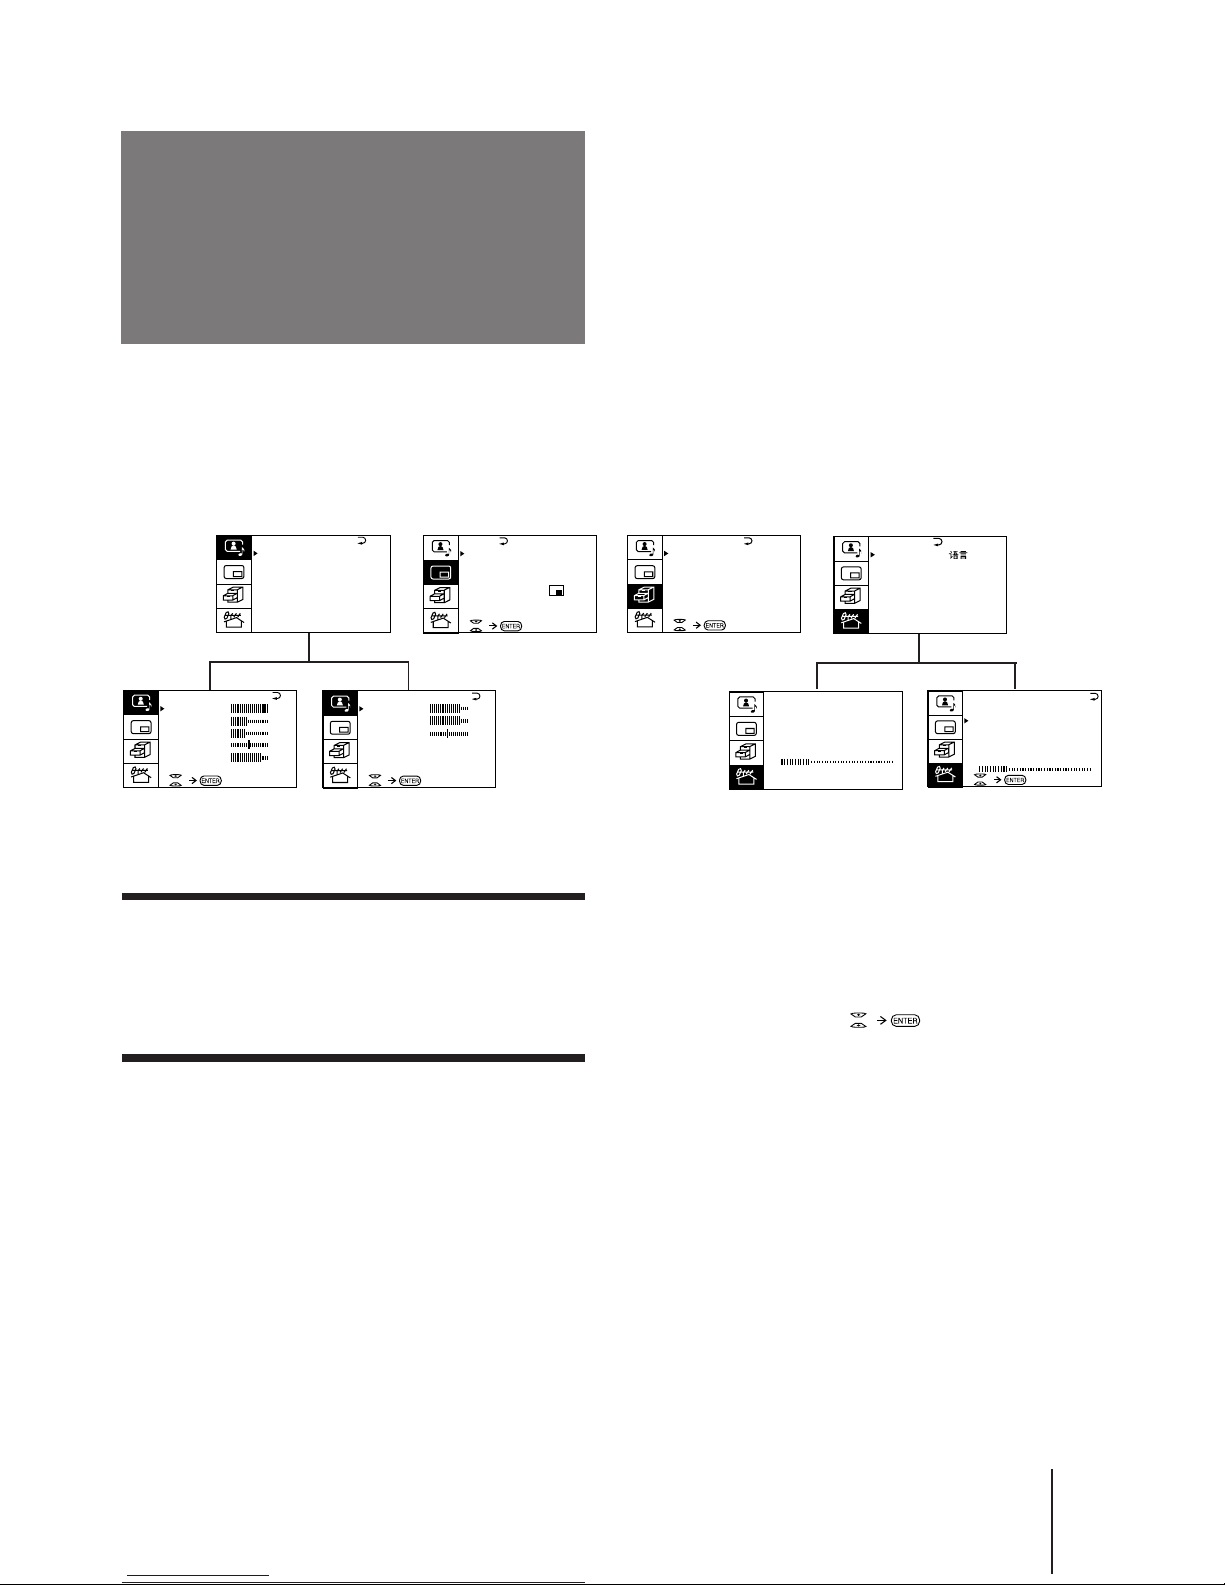
A/V CONTROL
PIP
FEATURES
Getting back to the previous menu
(except for AUTO PROGRAM)
Press V or v to move the cursor (z) to the first
line (N) of each menu, and press ENTER.
Cancelling the menu screen
Press MENU.
Notes (except for AUTO PROGRAM)
• When a menu is selected after pressing ENTER, the color of
both the menu and the menu symbol change and the cursor
(z) appears beside the first item of the menu.
• When an item on the menu is selected after pressing ENTER,
the color of the item changes.
• You can refer to the guide (
) at the bottom of the
menus (except for the A/V CONTROL and PRESET menus)
for the basic operations of the menu.
• If more than approximately 60 seconds elapse after you press a
button, the menu screen disappears automatically.
PIP
PIP: OFF
PIP TEXT
STRO BE
POS I TION:
PROGR I ND E X
PRESET
BASS
80
00
80
TREBLE
BALANCE
AUDIO ADJUST
Introducing the
menus
You can preset TV channels, adjust the picture and sound qualities, and select some settings using the on-screen
menus. You can use the buttons on both the remote commander and the TV to operate the menus.
A / V CONTROL
DYNAMIC
SOFT
STANDARD
PERSONAL
V I DEO ADJUST
AUDIO ADJUST
T I LT CORRECT: 0
PRESET
SKIP:
PR02 OFF
TV SYS: B /G
COL
SYS : AUTO
ENGL ISH
AUT O PROGRAM
MANUA L PROGRAM
L ANGUA GE /
:
P I C T URE
40
100
0
80
V I DEO ADJUST
COLOR
BR I GHT
HUE
SHARP
VM: HIGH
45
0
TV SYS: B /G
AUT O PROGRAM
VHF LO
W
PR: 01
TV SYS: B /G
VHF
LOW
PR: 01
AT T : OFF
MANUA L PROGRAM
GAME MODE
HYPER SURROUND:
OFF
MONITOR
AV OUT :
FEATURES
(∗ KV-E29MH11/E29MN11 only)
∗
 Loading...