

Page 1
SERVICE MANUAL
BG-3S
CHASSIS
MODEL COMMANDER DEST. CHASSIS NO.
KV-EF34M31
KV-EF34M61
KV-EF34M80
RM-951 OCE SCC-N99A-A
RM-951 GE SCC-U12D-A
RM-951 ME SCC-U16E-A
MODEL COMMANDER DEST. CHASSIS NO.
KV-EF34M90
KV-EF34M90
KV-EF34M91
RM-951 HK SCC-U17C-A
RM-951 JE SCC-P01A-A
RM-951 ME SCC-U16D-A
MICROFILM
TRINITRON® COLOR TV
Page 2
KV-EF34M31/EF34M61/EF34M80/EF34M90/EF34M91
RM-951
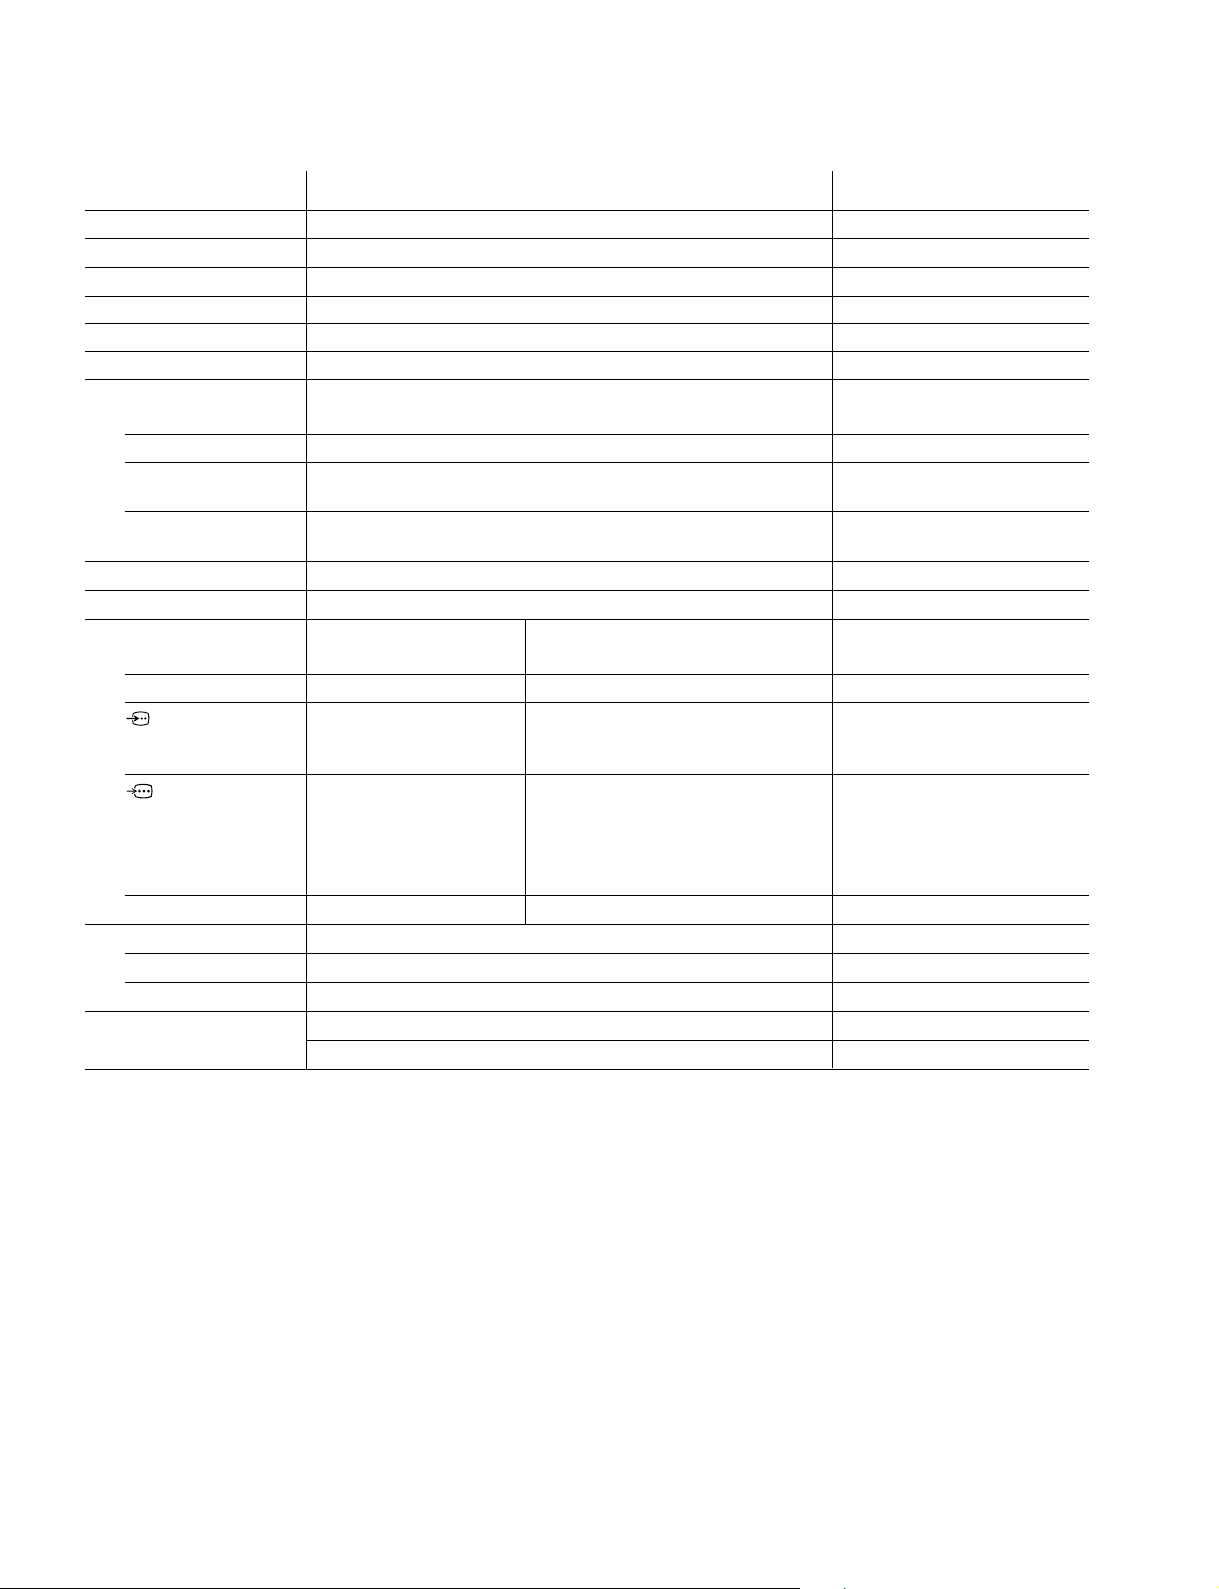
SPECIFICATIONS
Power requirements 110-240 V AC, 50/60 Hz
Power consumption (W) Indicated on the rear of the TV
Television system B/G, I, D/K, M
Color system PAL, PAL 60, SECAM, NTSC4.43, NTSC3.58
Stereo system NICAM Stereo B/G, I; A2 Stereo (German) B/G
Teletext language English, Arabic, French
Channel coverage
B/G VHF: E2 to E12 / UHF: E21 to E69 / CATV: S01 to S03, S1 to S41
I UHF: B21 to B68 / CATV: S01 to S03, S1 to S41
D/K VHF: C1 to C12, R1 to R12 / UHF: C13 to C57, R21 to R60
CATV: S01 to S03, S1 to S41, Z1 to Z39
M VHF: A2 to A13 / UHF: A14 to A79 /
CATV: A-8 to A-2, A to W+4, W+6 to W+84
˘ (Antenna) 75-ohm external terminal
Audio output (Speaker) 15W + 15W*
Number of terminal
D (Video) Input: 4 Output: 1 Phono jacks; 1 Vp-p, 75 ohms
≥ (Audio) Input: 4 Output: 1 Phono jacks; 500 mVrms
(S Video) Input: 2 Y : 1 Vp-p, 75 ohms,
(Component Input: 1 Phone jacks
Video) Y : 1 Vp-p, 75 ohms, sync negative
2 (Headphones) Output: 1 Stereo minijack
Picture tube 34 inch
Tube size (mm) 859 Measured diagonally
Screen size (mm) 800 Measured diagonally
Dimension (w/h/d, mm) 859 × 660.5 × 573.5
Mass (kg) 83
unbalanced, sync negative
C : 0.286 Vp-p, 75 ohms
C
: 0.7 Vp-p, 75 ohms
B
: 0.7 Vp-p, 75 ohms
C
R
Audio : 500 mVrms
Note
CAUTION
SHORT CIRCUIT THE ANODE OF THE PICTURE TUBE AND
THE ANODE CAP TO THE METAL CHASSIS, CRT SHIELD, OR
CARBON PAINTED ON THE CRT, AFTER REMOVING THE
ANODE.
* 10% distortion
Design and specifications are subject to change without notice.
SAFETY-RELATED COMPONENT WARNING!!
COMPONENTS IDENTIFIED BY SHADING AND MARK ! ON
THE SCHEMATIC DIAGRAMS, EXPLODED VIEWS AND IN THE
PARTS LIST ARE CRITICAL TO SAFE OPERATION. REPLACE
THESE COMPONENTS WITH SONY PARTS WHOSE PART
NUMBERS APPEAR AS SHOWN IN THIS MANUAL OR IN
SUPPLEMENTS PUBLISHED BY SONY.
– 2 –
Page 3

KV -EF34M31/EF34M61/EF34M80/EF34M90/EF34M91
TABLE OF CONTENTS
RM-951
Section Title Page
SELF DIAGNOSIS FUNCTION............................... 4
1. GENERAL ....................................................................... 8
2. DISASSEMBLY
2-1. Rear Panel Removal ................................................ 30
2-2. Speaker Box Removal ............................................. 30
2-3. Chassis Assy Removal ............................................ 30
2-4. Service Position ....................................................... 30
2-5. D1 and DH Boards Removal .................................. 31
2-6. J1 Board and RF Splitter Removal ......................... 31
2-7. V1 and P Boards Removal ...................................... 32
2-8. A and B Boards Removal ........................................ 32
2-9. H1 Board Removal .................................................. 32
2-10. Demagnetization Coil Removal .............................. 32
2-11. Top Switch Removal ............................................... 33
2-12. Picture Tube Removal ............................................. 33
3. SET-UP ADJUSTMENTS
3-1. Beam Landing Adjustment...................................... 35
3-2. Convergence Adjustment ........................................ 36
3-3. Focus Adjustment .................................................... 38
3-4. Neck Assy Twist Adjustment .................................. 38
3-5. G2 (Screen) and White Blance Adjustment............ 39
Section Title Page
5. DIAGRAMS
5-1. Block Diagrams ....................................................... 51
5-2. Frame Schematic Diagram ...................................... 61
5-3 Circuit Boards Location .......................................... 65
5-4. Schematic Diagrams and Printed Wiring Boards... 65
(1) Schematic Diagram of A Board .............................. 66
(2) Schematic Diagram of B Board .............................. 77
(3) Schematic Diagram of P Board............................... 85
(4) Schematic Diagrams of D2 and J1 Boards ............ 91
(5) Schematic Diagrams of H1 and F Boards .............. 95
(6) Schematic Diagrams of DH and VM2 Boards ....... 99
(7) Schematic Diagrams of C and B4 Boards .............. 103
(8) Schematic Diagram of V1 Board ............................107
5-5. Semiconductors ....................................................... 110
6. EXPLODED VIEWS
6-1. Picture Tube............................................................. 112
6-2. Chassis ..................................................................... 113
7. ELECTRICAL PARTS LIST...................................... 114
4. CIRCUIT ADJUSTMENTS
4-1. Adjustments with Commander ............................... 40
4-2. Adjustment Method ................................................. 41
4-3. Picture Quality Adjustments ................................... 48
4-4. A Board Adjustment After IC003 (Memory)
Replacement ............................................................ 49
4-5. Picture Distortion Adjustment................................. 50
– 3 –
Page 4

KV -EF34M31/EF34M61/EF34M80/EF34M90/EF34M91
RM-951
SELF DIAGNOSTIC FUNCTION
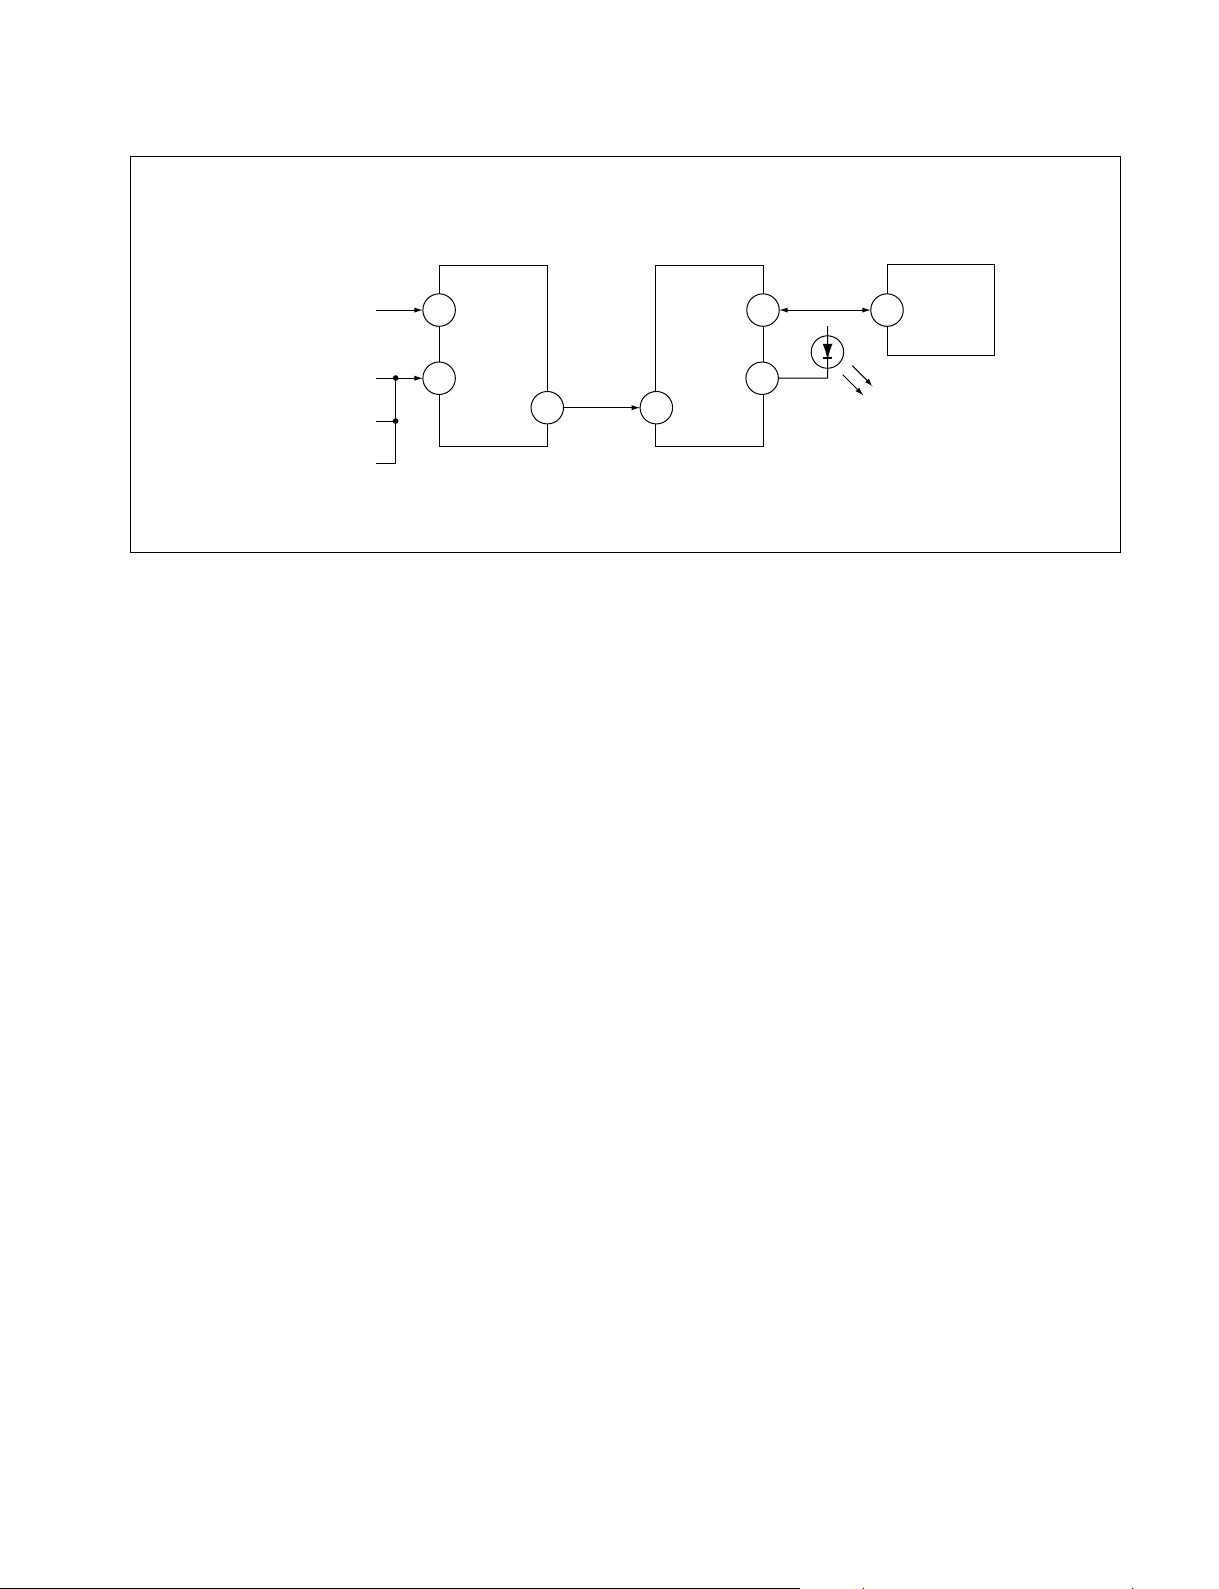
The units in this manual contain a self-diagnostic function. If an error occurs, the STANDBY/TIMER lamp will automatically
begin to flash.
The number of times the lamp flashes translates to a probable source of the problem. A definition of the STANDBY/TIMER
lamp flash indicators is listed in the instruction manual for the user’s knowledge and reference. If an error symptom cannot
be reproduced, the remote commander can be used to review the failure occurrence data stored in memory to reveal past
problems and how often these problems occur.
1. DIAGNOSTIC TEST INDICA TORS
When an errors occurs, the STANDBY/TIMER lamp will flash a set number of times to indicate the possible cause of the
problem. If there is more than one error, the lamp will identify the first of the problem areas.
Result for all of the following diagnostic items are displayed on screen. No error has occured if the screen displays a “0”.
Diagnostic
Item
Description
• Power does not
turn on
• +B overcurrent
(OCP) or
overvoltage
(OVP)
• Vertical deflection
stopped
• Horizontal
deflection
overdrive
• White balance
failure (no
PICTURE)
• Micro reset
No. of times
STANDBY/TIMER
lamp flashes
Does not light
2 times
5 times
—
Self-diagnostic
display/Diagnostic
result
—
002:000 or
002:001~255
003:001~255
004:001~255
at the same time
005:000 or
005:001~225
101:00 or
101:001~225
Probable
Cause
Location
• Power cord is not plugged
in.
• Fuse is burned out F4601
(F)
• H.OUT Q511 is shorted. (A
board)
• IC701 is shorted. (C board)
• -13V is not supplied. (A
board)
• IC 503 faulty (A board)
• G2 is improperly adjusted.
(Note 2)
• CRT problem.
• Video OUT IC701 is faulty.
(C board)
• IC301 is faulty. (A board)
• No connection A board to C
board.
• Discharge CRT (C Board)
• Static discharge
• External noise
Detected
Symptoms
• Power does not come on.
• No power is supplied to the
TV.
• AC power supply is faulty.
• Power does not come on.
• Load on power line is
shorted.
• Has entered standby state
after horizontal raster.
• Vertical deflection pulse is
stopped.
• Power line is shorted or
power supply is stopped.
• No raster is generated.
• CRT cathode current
detection reference pulse
output is small.
• Power is shut down shortly,
after this return back to
normal.
• Detect Micro latch up.
Note 1: If a + B overcurrent is detected, stoppage of the vertical deflection is detected simultaneously.
The symptom that is diagnosed first by the microcontroller is displayed on the screen.
Note 2: Refer to screen (G2) Adjustment in section 3-4 of this manual.
– 4 –
Page 5
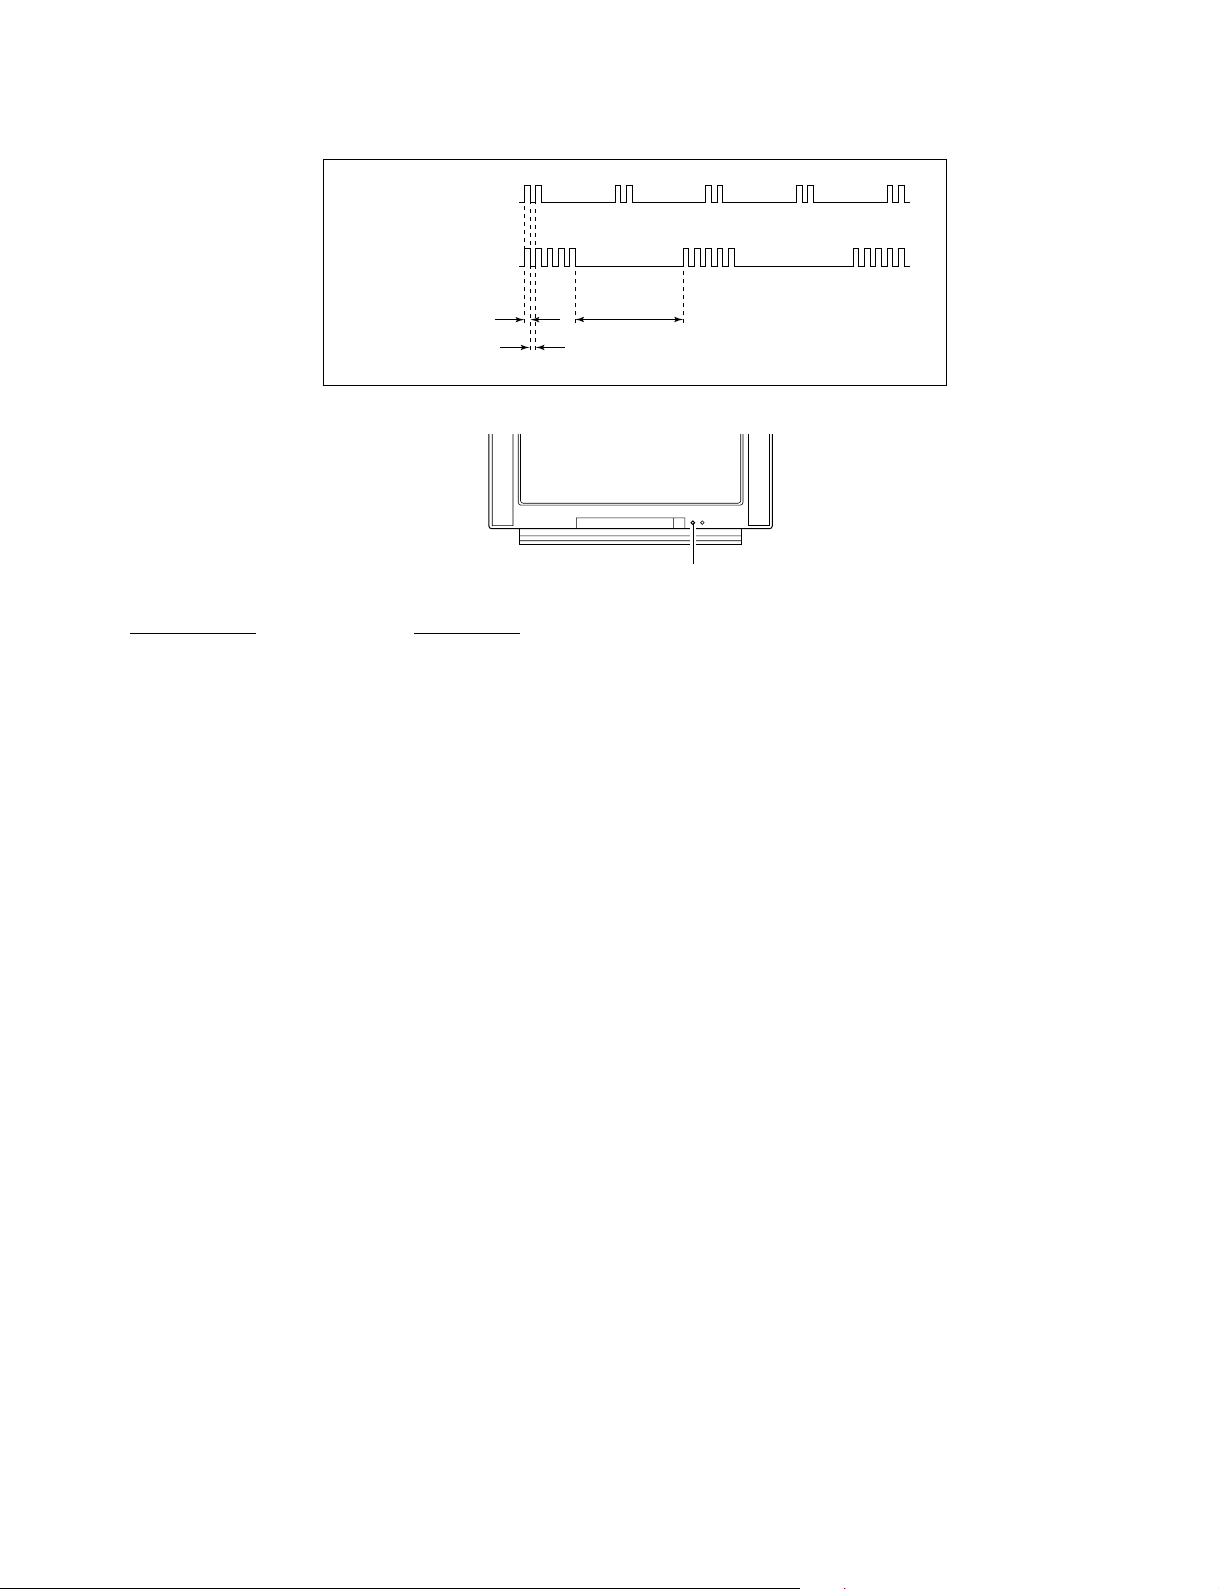
2. DISPLAY OF STANDBY/TIMER LIGHT FLASH COUNT
2 times
5 times
KV -EF34M31/EF34M61/EF34M80/EF34M90/EF34M91
RM-951
Lamp ON 0.3 sec.
Lamp OFF 0.3 sec.
Lamp OFF 3 sec.
STANDBY/SLEEP lamp
Diagnostic Item Flash Count*
+B overcurrent/overvoltage 2 times
Vertical deflection stopped
White balance failure 5 times
* One flash count is not used for self-diagnostic.
3. STOPPING THE STANDBY/TIMER FLASH
Turn off the power switch on the TV main unit or unplug the power cord from the outlet to stop the STANDBY/TIMER lamp
from flashing.
– 5 –
Page 6
KV -EF34M31/EF34M61/EF34M80/EF34M90/EF34M91
RM-951
4. SELF-DIAGNOSTIC SCREEN DISPLAY
For errors with symptoms such as “power sometimes shuts off” or “screen sometimes goes out” that cannot be confirmed, it
is possible to bring up past occurances of failure for confirmation on the screen:
[To Bring Up Screen Test]
In standby mode, press buttons on the remote commander sequentially in rapid succession as shown below:
[Screendisplay] / channel [5] / Sound volume [-] / Power ON
˘
Note that this differs from entering the service mode (mode volume [+]).
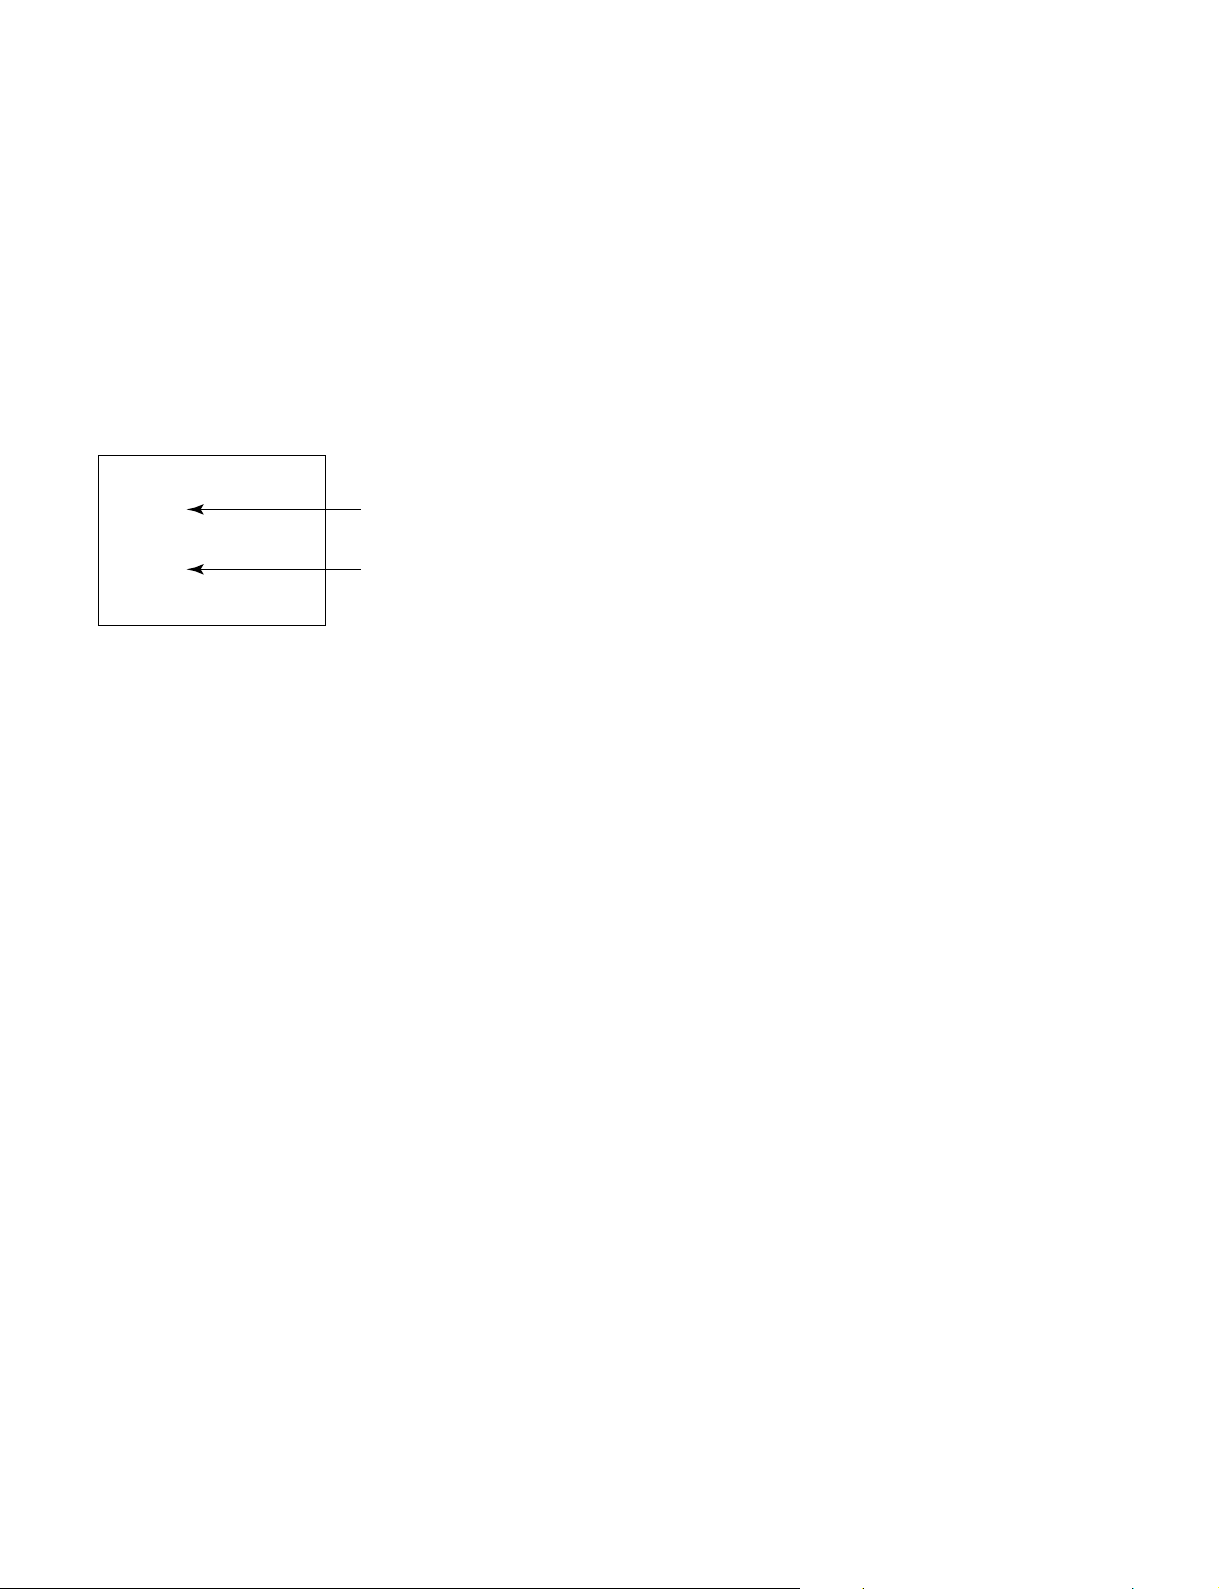
Self-Diagnosis screen display
SELF DIAGNOSTIC
002 : 000
003 : 000
004 : 000
005 : 001
101 : 000
Numeral "0" means that no fault has been detected.
Numeral "I" means a fault has been detected.
5. HANDLING OF SELF-DIAGNOSTIC SCREEN DISPLAY
Since the diagnostic results displayed on the screen are not automatically cleared, always check the self-diagnostic screen
during repairs. When you have completed the repairs, clear the result display to “0”.
Unless the result display is cleared to “0”, the self-diagnostic function will not be able to detect subsequent faults after
completion of the repairs.
[Clearing the result display]
To clear the result display to “0”, press buttons on the remote commander sequentially as shown below when the diagnostic
screen is being displayed.
Channel [8] / 0
[Quitting Self-diagnostic screen]
To quit the entire self-diagnostic screen, turn off the power switch on the remote commander or the main unit.
– 6 –
Page 7
6. SELF-DIAGNOSTIC CIRCUIT
KV -EF34M31/EF34M61/EF34M80/EF34M90/EF34M91
RM-951
FROM
CRT
FROM
[+B] Q604 C
[H] D526
[V] Q509/507
4635
IC001
SYSTEM
IO-8DAT
O-LED
IO-SDAT
IC301
Y/CHROMA JUNGLE
IK-IN
MP/
18 51
PROTECT
SDA
MEMORY
B-DAT
54521
IC003
[+BovercurrentªOCPº] Occurs when an overcurrent on the +B(135) line is detected by Q604(A board). If
Q604(A board) go to ON and the voltage to pin 18 of IC301(A board) should go down
when V.SYNC is more than seven verticals in a period, the unit will automatically turn off.
[Horizontaldeflectionoverdrive] Occurs when an overdrive on H drive line is detected by D526(A board). Power supply
will be shut down when detect it.
[Verticaldeflectionstopped] Occurs when an absence of the vertical deflection pulse is detected by Q509(A board)
and IC001(A board) shut down the power supply.
[Verticaldeflectionovercurrent] Occurs when an overcurrent on V drive line is detected by Q507(A board). Power supply
will be shut down when detect this by IC001(A board).
[Whitebalancefailure] If the RGB levels* do not balance or become low level within 5 seconds, this error will be
detected by IC301(A board). TV will stay on, but there will be no picture.
* (Refers to the RGB levels of the AKB detection Ref pulse that detects IK.)
– 7 –
Page 8

4
Using Your New TV
VIDEO
VIDEO IN
VIDEO OUT
AUDIO
123
L
(MONO)
R
Getting Started
Step 1
Connect the antenna
If you wish to connect a VCR, see the “Connecting a VCR” diagram below.
CAUTION
Do not connect the power cord until all other connections are complete;
otherwise, a minimal current leakage through the antenna and/or other
terminals to the ground could occur.
Connecting a VCR
To play a video tape, see page 10.
Using Your New TV
IEC connector
(not supplied)
To video and
audio outputs
VCR
(yellow)
-L (MONO) (white)
-R (red)
To S video
output
Antenna cable (not supplied)
Audio/Video cable
(not supplied)
S video cable
(not supplied)
: Signal flow
To
(S video input)
To antenna
output
To ˘
(antenna)
or
: Signal flow
Antenna cable (not supplied)
Antenna cable
(not supplied)
5
Using Your New TV
Using Your New TV
Notes
• If you connect a monaural VCR, connect the yellow plug to
(the
yellow jack) and the black plug to
-L (MONO) (the white jack).
• If you connect a VCR to the ˘ (antenna) terminal, preset the signal
output from the VCR to the program number 0 on the TV.
• Do not have concurrent connections of video equipment to the … 3 (video
input) jacks at the front and the … 3 (video input) jacks at the rear of your
TV; otherwise, the picture will not be displayed properly on the screen.
• When both the
(S video input) and … 1 (video input) are connected,
the
␣ (S video input) is automatically selected. To view the video input
to … 1 (video input), disconnect the S video cable.
Step 2
Insert the batteries
into the remote
Note
• Do not use old batteries or different types of batteries together.
Step 3
Preset the channels automatically
Tip
• To stop the automatic channel presetting, press MENU twice.
Now You Are Ready. . .
The channels are now automatically preset
in your TV. To preset the channels manually,
see page 37.
1
2
AUTO
PROGR
1
ONE-PUSH AUTOMATIC PROGRAMMING
AUTO PROGRAM
01
TV SYS : AUTO
VHF LOW
PR
:
SECTION1
GENERAL
The operating instructions mentioned here are partial abstracts from the
Operating Instruction Manual. The page numbers of the Operating Instruction Manual remein as in the manual.
– 8 –
Page 9

6
Using Your New TV
3
(
MONO
)
123
L
(MONO)
R
Connecting optional components
You can connect optional audio/video components, such as a VCR, multi disc player,
camcorder, video game, or stereo system. For operations of the connected equipment,
see pages 10 and 25.
Connecting a camcorder/video game equipment
using the … (video input) jacks
Notes
• You can also connect video equipment to the … 1, 2, or 3 (video input)
jacks at the rear of your TV.
• Do not have concurrent connections of video equipment to the … 3
(video input) jacks at the front and the … 3 (video input) jacks at the rear
of your TV; otherwise, the picture will not be displayed properly on the
screen.
• When both the
(S video input) and … 1 (video input) are connected,
the
␣ (S video input) is automatically selected. To view the video input
to … 1 (video input), disconnect the S video cable.
Connecting audio/video equipment using the Ú
(monitor output) jacks
Note
• When connecting a monaural VCR, connect the yellow plug to
(the
yellow jack) and the black plug to
-L (MONO) (the white jack).
To S video output
Front of TV
Camcorder
Video game
equipment
To video and
audio outputs
: Signal flow
To
(S video
input)
To… 3
(video input)
or
Audio/Video cable (not supplied)
S video cable (not supplied)
(yellow)
-L (MONO)
(white)
-R (red)
Rear of TV
To
antenna
output
To video and
audio inputs
or
Audio system
To
audio
inputs
VCR
: Signal flow
To Ú
(monitor
output)
Antenna cable (not supplied)
Audio/Video cable
(not supplied)
or
7
Using Your New TV
Using Your New TV
VIDEO
R-AUDIO-L
LINE OUT
123
L
(MONO)
R
Notes
• Some DVD player terminals may be labeled differently:
• Since the high quality pictures on a DVD disc contain a lot of information,
picture noise may appear. In this case, adjust the sharpness (“SHARP”) in the
PERSONAL ADJUST menu of the PICTURE MODE menu (see page 30).
• Connect your DVD player directly to your TV. Connecting the DVD player
through other video equipment will cause unwanted picture noise.
DVD player
Audio/Video cable
(not supplied)
DVD player
To
L (white)
R (red)
Audio cable
(not supplied)
To component
video output
Component
video cable
(not supplied)
(yellow)
-L (MONO) (white)
-R (red)
To … 1, 2, or 3
(video input)
: Signal flow
To audio
output
: Signal flow
To
(component
video input)
Connect To (on the DVD player)
Y (green) Y
CB (blue) C
b
, B-Y or P
B
CR (red) C
r
, R-Y or P
R
Connecting a DVD player
Connect … 1, 2, or 3 (video input)
/ (audio/video) connectors on your TV to
LINE OUT on your DVD player.
Connecting a DVD player with component video
output connectors
1 Connect R and L under
(component video input) on your TV to the LINE OUT,
AUDIO R and L output connectors on your DVD player.
2 Using a component video cable, connect Y, C
B, and C
R under (component video
input) on your TV to the COMPONENT VIDEO OUT Y, C
B, and CR output
connectors on your DVD player.
VIDEO
R-AUDIO-L
LINE OUT
Y
COMPONENT VIDEO OUT
S VIDEO OUT
CB CR
R L Y C
B
C
R
– 9 –
Page 10

8
Using Your New TV
20
mm
A
B
3.8mm
Securing the TV
To prevent the TV from falling, secure the TV using one of the following methods:
A
With the supplied screws, attach the stabilizer band to the TV stand and to
the rear of the TV using the provided hole.
OR
B
Pass a cord or chain through the clamps and secure them to the rear of the
TV and a wall or pillar.
Note
• Use only the supplied screws. Use of other screws may damage the TV.
OR
9
Using Your New TV
Using Your New TV
Number buttons
PROGR +/–
continued
1
2
3
4
5
6
7
8
0
-/--
9
u
231
564
897
0
JUMP
-/--
PIC MODE
PROGR
A/B
MENU
PIP PROGR
ZOOM
IN
LEFT
FAVORITE
PROGR
INDEX
ZOOM
IN
RIGHT
SURROUND
SOUND
MODE
PIP PROGR
VIDEO
TITLE
ENTER
Watching the TV
This section explains various functions
and operations used while watching the
TV. Most operations can be done using
the remote.
1
Press U to turn on the TV.
When the TV is in standby
mode (the u/Â/
indicator on the TV is lit
red), press u on the remote
or on the TV.
The PROGR +/–, . +/–,
and … indicators on the
TV light up.
2
Press PROGR +/– or the
number buttons to select
the TV channel.
For double digit numbers,
press ÷, then the number
(e.g., for 25, press ÷, then
2 and 5).
– 10 –
Page 11

10
Using Your New TV
To
Turn off temporarily
Turn off completely
Adjust the volume
Mute the sound
Watch the video input
(VCR, camcorder, etc.)
Jump back to the previous channel
Display the on-screen information*
Press
u.
The u/Â/
indicator on the TV lights up red.
U on the TV.
.+/–.
¤.
…
(or … on the TV) to select “VIDEO 1,”
“VIDEO 2,” “VIDEO 3,” or “DVD.”
To return to the TV screen, press ; (or … on the TV).
JUMP.
.
Additional tasks
Watching the TV (continued)
¤
u
…
;
JUMP
. +/–
PROGR +/–
* The picture, sound, and either the program number or video mode are
displayed. The on-screen display for the picture and sound information
disappears after about 3 seconds.
MENU
V/b/v/B/ENTER
231
564
897
0
JUMP
-/--
PIC MODE
PROGR
A/B
MENU
PIP PROGR
ZOOM
IN
LEFT
FAVORITE
PROGR
INDEX
ZOOM
IN
RIGHT
SURROUND
SOUND
MODE
PIP PROGR
VIDEO
TITLE
ENTER
11
Using Your New TV
Using Your New TV
Changing the menu language
You can change the menu language as well as the on-screen language. For details on
how to use the menu, see “Introducing the menu system” on page 27.
1
Press MENU.
2
Press V or v to select
,
then press ENTER.
3
Make sure LANGUAGE/
is selected
(highlighted), then press
ENTER.
4
Press V or v to select
,
then press ENTER.
The menu language
changes to Chinese.
To return to the normal screen
Press MENU.
b
b
continued
b
b
bb
Chinese OSD
ENTER
ENTER
ENTER
ENTER
ENTER
A / V CONTROL
:
DYNAMI C
SOUND MODE:DYNAMI C
SURROUND:OFF
PICTURE MODE
SET UP
:
ENGL I SH
CH I LD L OCK:PR0 1 OFF
P I C ROTAT ION
FAVOR I TE CH
INTELLIGENT VOL:ON
LANGUAGE/
SET UP
:
ENGL I SH
CH I LD L OCK
P I C ROTAT I
FAVOR I TE C
INTELLIGEN
LANGUAGE/
– 11 –
Page 12

12
Using Your New TV
Watching the TV (continued)
Selecting the picture mode
Press PIC MODE
repeatedly until the
desired picture mode is
selected.
Select
DYNAMIC
STANDARD
SOFT
PERSONAL
To
receive high contrast pictures.
receive normal contrast pictures.
receive mild contrast pictures.
receive the last adjusted picture setting from the ADJUST option in the
A/V CONTROL menu (see page 29).
Selecting the sound mode
Press SOUND MODE
repeatedly until the
desired sound mode is
selected.
Select
DYNAMIC
DRAMA
SOFT
PERSONAL
To
listen to dynamic and clear sound that emphasizes both the low and high
tones.
listen to sound that emphasizes voice and high tones.
receive soft sound.
receive the last adjusted sound setting from the ADJUST option in the
A/V CONTROL menu (see page 29).
b
b
PIC MODE
SOUND
MODE
≥
DYNAMIC
≥
DRAMA
≥
SOFT
≥
PERSONAL
Tip
• You can also set the picture and sound modes using the menu (see
“Changing the A/V CONTROL setting” on page 29).
PERSONAL
DYNAMIC
SOFT
STANDARD
13
Using Your New TV
Using Your New TV
Setting the Wake Up timer
1
Press
until the
desired period of time
appears.
2
Select the TV channel or
video mode you want to
wake up to.
3
Press u, or set the Sleep
timer if you want the TV
to turn off automatically.
The u/Â/
indicator on
the TV lights up orange.
To cancel the Wake Up timer
Press
until “WAKE UP TIMER: OFF” appears, or turn off the
TV’s main power.
Notes
• The Wake Up timer starts immediately after the on-screen display
disappears.
• If no buttons or controls are pressed for more than two hours after the TV
is turned on using the Wake Up timer, the TV automatically goes into
standby mode. To resume watching the TV, press any button or control on
the TV or the remote.
Setting the Sleep timer
Press
until the
desired period of time
appears.
To cancel the Sleep timer
Press until “SLEEP TIMER: OFF” appears, or turn the TV off.
WAKE UP TIMER:10M
WAKE UP TIMER:OFF
WAKE UP TIMER:12H00M
After 10 minutes
No Wake Up Timer After 12 hours
b
b
SLEEP TIMER:30M SLEEP TIMER:60M
SLEEP TIMER:OFF
SLEEP TIMER:90M
After 30 minutes
No Sleep Timer
After 60 minutes
After 90 minutes
– 12 –
Page 13

14
Advanced Operations
Viewing your
favorite channels
—FAVORITE CHANNEL
You can display seven “FAVORITE”
channels for quick and easy selection.
The last seven channels selected with
the number buttons are displayed in
AUTO mode. You can set up your own
“FAVORITE” channels in MANUAL
mode (see “Changing the favorite
channel setting” on page 35).
Selecting a favorite channel
1
Press FAVORITE.
The last seven channels
selected with the number
buttons appear.
2
Press either V, b, v, or B to
select the desired
channel, then press
ENTER.
3
Press ENTER again.
Note
• When you use your TV for the first time, seven factory set, random
channels appear.
Advanced Operations
V/b/v/B/ENTER
FAVORITE
b
b
b
897
0
JUMP
-/--
PROGR
MENU
PIP PROGR
ZOOM
IN
LEFT
FAVORITE
PROGR
INDEX
ZOOM
IN
RIGHT
SURROUND
SOUND
MODE
PIP PROGR
VIDEO
TITLE
TV
ENTER
FA V ORITE
ENTER
ENTER
4
1
3
4
12 10 8 6
b
FAVORITE CH
7.PR 12 6.PR 10 5.PR 08 4.PR 06
3.PR 04
2.PR 03
1.PR 01
8
ENTER
8
1
3
4
12 10 8 6
15
Advanced Operations
Watching two
programs at the
same time
—PIP, TWIN
With the Picture-in-Picture (PIP) or
TWIN pictures features, you can display
a different TV program or video within
or beside the main picture.
b
Advanced Operations
b
V/b/v/B
continued
Displaying the PIP screen
Press .
Displaying TWIN pictures
Press .
To return to the normal screen
Press (when in the PIP screen) or
(when in the TWIN picture
screen).
Tips
• You can also display the PIP screen or TWIN pictures using the menu (see
“Changing the MULTI PICTURE setting” on page 31).
• You can change the position of the PIP screen (see “Changing the MULTI
PICTURE setting” on page 31).
0
JUMP
-/--
PROGR
MENU
PIP PROGR
ZOOM
IN
LEFT
FAVORITE
PROGR
INDEX
ZOOM
IN
RIGHT
SURROUND
SOUND
MODE
PIP PROGR
VIDEO
TITLE
TV
ENTER
10 12
– 13 –
Page 14

16
Advanced Operations
Additional PIP/TWIN pictures tasks
To
change a TV program in the PIP
screen or in the right TWIN picture
swap pictures between the main
and PIP screens
freeze the PIP screen
swap the right and left pictures of
the TWIN pictures
change the screen size of the TWIN
pictures
Notes
• The
button does not function in the TWIN pictures mode.
• When you display a video input on the PIP screen at a faster/slower
speed, the picture may be disrupted depending on the VCR type.
• If you display different color systems on the main screen and the PIP
screen, the size of the PIP screen may be different and the PIP picture may
be disrupted. This does not indicate a malfunction of the TV.
• In the TWIN picture screen, you can only operate and hear the sound of
the main left screen (
appears on the screen).
• When the
button is pressed, the TV screen flickers or goes blank for
about one second before the TWIN pictures appear. This does not indicate
a malfunction of the TV.
Press
V or v. For a video input, press
.
To unfreeze the screen, press the button again.
ZOOM IN LEFT B to increase the left screen size.
ZOOM IN RIGHT b to increase the right screen size.
Watching two programs at the same time—PIP, TWIN (continued)
ENTER
ENTER
ZOOM
IN
LEFT
ZOOM
IN
RIGHT
17
Advanced Operations
Displaying
multiple
programs
—PROGRAM INDEX
The PROGRAM INDEX feature displays
all of the preset TV programs and the
video inputs on twelve or seven sub
screens for direct selection.
Press PROGR INDEX.
The first twelve preset
programs appear one by
one, clockwise from the
upper left corner.
When the number of the
preset TV programs is less
than seven, the first seven
preset programs appear
one by one, clockwise from
the upper right corner.
Tip
• When you press the PROGR INDEX button in the TWIN pictures mode,
the left picture appears as the main screen of the PROGRAM INDEX
mode.
PROGR INDEX
V/b/v/B/ENTER
b
PROGR +/–
Main screen
Main screen
Still sub screens
Still
sub
screens
continued
231
564
897
0
JUMP
-/--
PIC MODE
PROGR
A/B
MENU
PIP PROGR
ZOOM
IN
LEFT
FAVORITE
PROGR
INDEX
ZOOM
IN
RIGHT
SURROUND
SOUND
MODE
PIP PROGR
VIDEO
TITLE
ENTER
16
1 234
12 5
11 6
10987
16
1
2
3
7654
– 14 –
Page 15
18
Advanced Operations
To view the next or the previous twelve preset programs
This works only when the number of the preset TV programs is
more than twelve.
Press PROGR +/– on the remote or the TV.
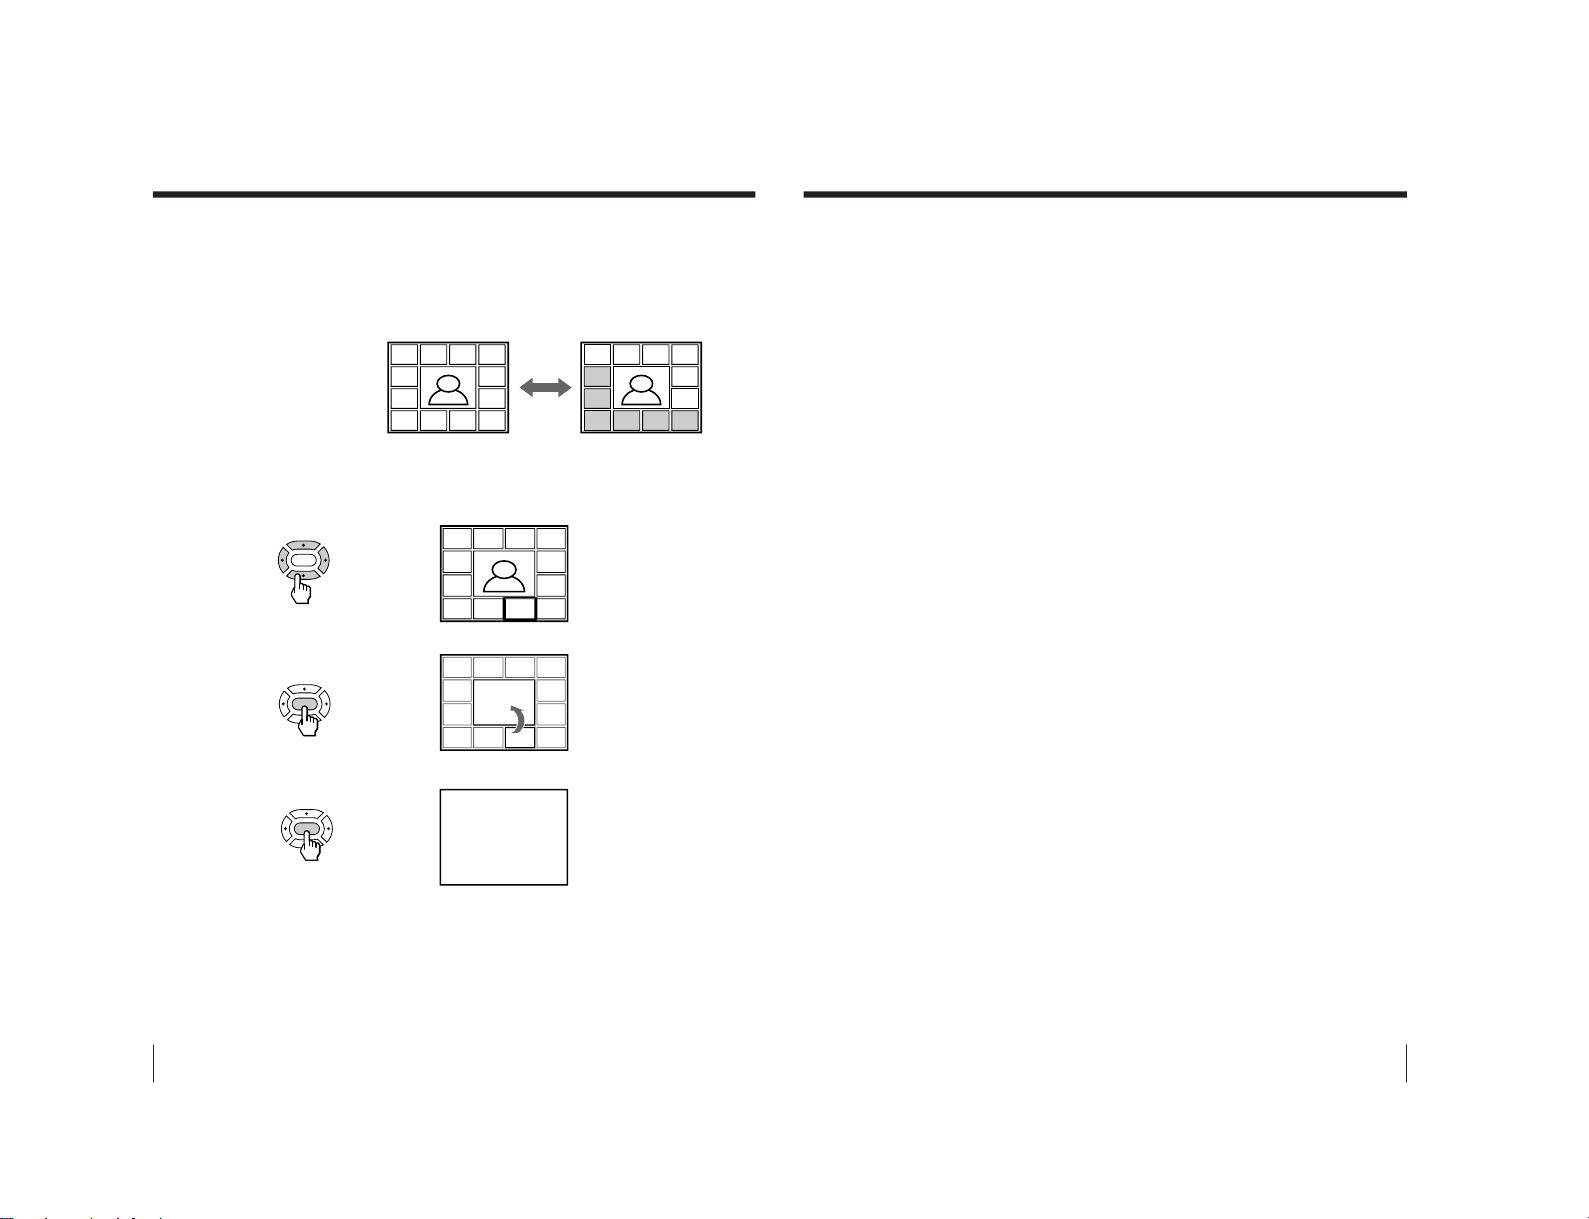
To select the desired program directly from the sub screens
1 Press either V, b, v, or B to move the frame to the screen of the
program you want to watch.
2 Press ENTER.
3 Press ENTER again.
Tips
• You can also move the frame by pressing the +/– buttons on the TV. Press
+ to move the frame clockwise; press – to move the frame
counterclockwise.
• Pressing the number buttons directly displays the program.
Displaying multiple programs—PROGRAM INDEX (continued)
16
1234
12 5
11 6
10987
8
1234
12 5
11 6
10 9 8 7
FAVORITE CH
7.PR 12 6.PR 10 5.PR 08 4.PR 06
3.PR 04
2.PR 03
1.PR 01
8
b
b
b
ENTER
ENTER
ENTER
16
1 234
12 5
11 6
10987
16
13 14 15 16
17
18
19
Advanced Operations
To return to the normal screen
Press PROGR INDEX again, or:
1 Select “PROGR INDEX” from the MULTI PICTURE menu.
2 Press ENTER.
Tip
• You can also display multiple programs using the menu (see “Changing
the MULTI PICTURE setting” on page 31).
Note
• When displaying multiple programs, only the sound of the main screen is
heard.
– 15 –
Page 16
20
Advanced Operations
Listening with
surround sound
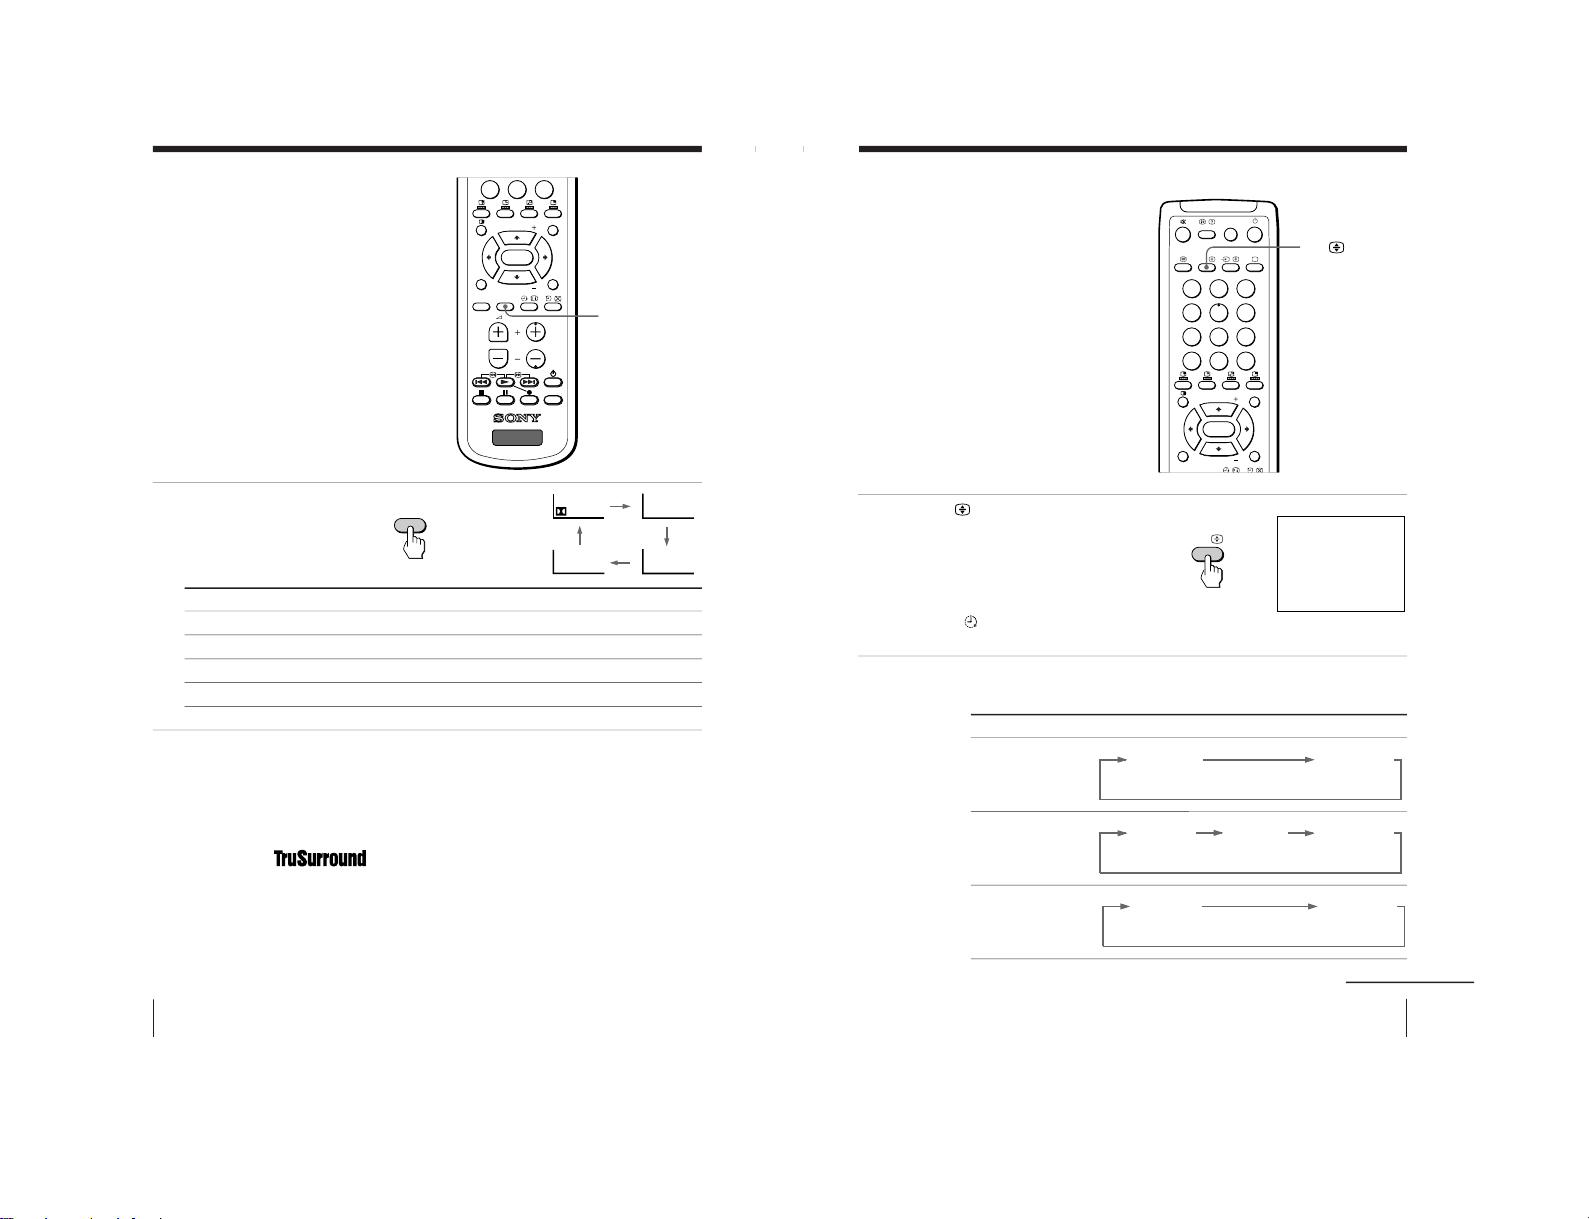
The surround feature enables you to
enjoy the sound effects of a concert hall
or movie theater.
Press SURROUND
repeatedly until you
receive the desired
surround sound.
The Virtual Dolby Surround of this model consists of Dolby Pro
Logic and TruSurround.
* Manufactured under license from Dolby Laboratories Licensing Corporation.
DOLBY, the double-D symbol a and “PRO LOGIC” are trademarks of
Dolby Laboratories Licensing Corporation.
“
TM
is a trademark of SRS Labs, Inc. SRS and the SRS
symbol are registered trademarks of SRS Labs, Inc. in the United
States and selected foreign countries. SRS and TruSurround are
incorporated under license from SRS Labs, Inc. and are protected
under United States Patent Nos.4,748,669 and 4,841,572 with
numerous additional issued and pending foreign patents.”
SURROUND
b
Select
a VIRTUAL
TruSurround
SIMULATED
OFF
0
JUMP
-/--
PROGR
MENU
PIP PROGR
ZOOM
IN
LEFT
FAVORITE
PROGR
INDEX
ZOOM
IN
RIGHT
SURROUND
SOUND
MODE
PIP PROGR
VIDEO
TITLE
TV
ENTER
SURROUND
OFF
SIMULATED
TruSurround
VIRTUAL
To
listen to Dolby* Surround encoded sound.
listen to the surround sound that spreads out to the rear of a room.
listen to monaural sound with a stereo-like effect.
turn off the surround sound.
• SIMULATED uses SRS (MONO).
21
Advanced Operations
Selecting a stereo
or bilingual
program
You can enjoy stereo sound or bilingual
programs of NICAM and A2 (German)
stereo systems.
Press A/B repeatedly
until you receive the
sound mode you want.
The on-screen display
changes to show the
selected sound mode and
the u/Â/
indicator on
the TV lights up red.
When receiving a NICAM program
A/B
Broadcasting On-screen display (Selected sound)
NICAM stereo
NICAM bilingual
NICAM monaural
b
231
564
897
0
JUMP
-/--
PIC MODE
A/B
MENU
PIP PROGR
ZOOM
IN
LEFT
FAVORITE
PROGR
INDEX
ZOOM
IN
RIGHT
SOUND
PIP PROGR
ENTER
A/B
NICAM
MONO
(Stereo sound)
(Regular sound)
NICAM
MAIN
MONO
(Main sound)
(Regular sound)
NICAM
SUB
(Sub sound)
NICAM
MAIN
MONO
(Main sound)
(Regular sound)
continued
STEREO
– 16 –
Page 17

22
Advanced Operations
When receiving an A2 (German) program
Receiving area for NICAM and A2 (German) programs
Notes
• If the signal is very weak, the sound becomes monaural automatically.
• If the stereo sound is noisy when receiving a NICAM program, select
“MONO.” The sound becomes monaural, but the noise is reduced.
If the sound is distorted or noisy when receiving a monaural
program through the ˘ (antenna) terminal
Press A/B
repeatedly until “MONO” appears on the screen.
To cancel the monaural sound setting, press A/B
again until
“AUTO” appears on the screen.
Notes
• The “MONO” or “AUTO” setting is memorized for each program
position.
• You cannot receive a stereo broadcast signal when the TV is in the
“MONO” setting. Normally, set the TV to “AUTO.”
Broadcasting On-screen display (Selected sound)
A2 (German) stereo
A2 (German) bilingual
System
NICAM
A2 (German)
Receiving area
Hong Kong, Singapore, New Zealand, Malaysia,
Thailand, etc.
Australia, Malaysia, Thailand, etc.
Selecting a stereo or bilingual program (continued)
STEREO
MONO
(Stereo sound)
(Regular sound)
MAIN
SUB
(Main sound)
(Sub sound)
MONO
AUTO
23
Advanced Operations
Viewing Teletext
Some TV stations broadcast an
information service called Teletext which
allows you to receive various
information, such as stock market
reports and news.
Displaying Teletext
1
Select a TV channel that
carries the Teletext
broadcast you want to
watch.
2
Press to display the
text.
A Teletext page (normally
the index page) is
displayed. If there is no
Teletext broadcast, “100” is
displayed at the top left
corner of the screen.
To turn off Teletext
Press ;.
…
b
;
A/B
231
564
897
0
JUMP
-/--
PIC MODE
PROGR
A/B
MENU
PIP PROGR
ZOOM
IN
LEFT
FAVORITE
PROGR
INDEX
ZOOM
IN
RIGHT
SURROUND
SOUND
MODE
PIP PROGR
VIDEO
TITLE
ENTER
P166 SECTEXT 166 FR1 MAR 03:59:09
Fom Singapore
To PARIS
To OSAKA
To ROMA
To SYDNEY
Day Dep/Arr Flight Alrcraft
1.6 220/0588 SQ28 747
2 2130/1225 PA115 L15
3 2115/1330 SQ26 747
2.7 2130/0745 SQ24
747
4 2300/0915 AZ487 747
2.5 1000/1715 SQ6 747
4.6 0930/2015 CX522 L10
1 2210/0610 SQ21A 747
2 2100/0835 SQ21A 747
continued
– 17 –
Page 18

24
Advanced Operations
Additional Teletext tasks
To
display a Teletext page on the TV
picture
check the contents of a Teletext service
select a Teletext page
hold (pause) a Teletext page
(stop the page from scrolling)
reveal concealed information
(e.g., an answer to a quiz)
enlarge the Teletext display
stand by for a Teletext page while watching
a TV program
* You can also select a Teletext page of any page number that appears in the
colored column at the bottom of the screen using the corresponding colorcoded button on the remote.
Using FASTEXT
This feature allows you to quickly access a Teletext page that uses
FASTEXT. When a FASTEXT program is broadcast, colored menus
appear at the bottom of the screen. The color of each menu
corresponds to the color-coded buttons on the remote (red
,
green
, yellow
, and blue ).
To access a FASTEXT menu
Press the color-coded button on the remote corresponding to the
menu you want. The menu page appears on the screen after a few
seconds.
Do this
Press
.
Each time you press
, the screen changes as
follows: Teletext n Teletext and TV n TV.
Press
.
An overview of the Teletext contents, including
page numbers, appears on the screen.
Press the number buttons to enter the three-digit
page number of the desired Teletext page.* If you
make a mistake, reenter the correct page number. To
access the next or previous page, press PROGR␣ +/–.
Press …
to display the symbol “j” at the top
left corner of the screen. To resume normal Teletext
viewing, press …
or
.
Press
.
To conceal the information, press the button again.
Press A/B
.
Each time you press A/B
, the Teletext display
changes as follows: Enlarge upper half n Enlarge
lower half n Normal size.
1 Enter the Teletext page number that you want to
refer to, then press
.
2 When the page number is displayed, press
to
show the text.
Viewing Teletext (continued)
25
Advanced Operations
Operating
optional
components
You can use the supplied remote to
operate Sony video equipment such as
Beta, 8mm, VHS, MDP, CD, or DVD.
Setting up the remote to work with other
connected equipment
While holding down
VIDEO u, press the
following number
combinations to enter the
equipment’s code number
(see the chart below).
Code numbers for Sony video equipment
Notes
• If your video equipment is furnished with a COMMAND MODE selector,
set this selector to the same position as the setting code.
• If the equipment does not have a certain function, the corresponding
button on the remote will not operate.
• When you remove the batteries, the code number may revert to the factory
setting.
Number buttons
Video equipment
operation buttons
VIDEO u
V/b/v/B/ENTER
b
To control
DVD
VTR1 (Beta)
VTR2 (8mm)
VTR3 (VHS)
MDP
CD
MD
For example, to operate a
Sony 8 mm VCR:
Hold down VIDEO u and press
00
01
02
03
04
06
07
VIDEO
0
2
+
MENU
231
564
897
0
JUMP
-/--
PROGR
MENU
PIP PROGR
ZOOM
IN
LEFT
FAVORITE
PROGR
INDEX
ZOOM
IN
RIGHT
SURROUND
SOUND
MODE
PIP PROGR
VIDEO
TITLE
ENTER
continued
– 18 –
Page 19

26
Advanced Operations
Operating optional components (continued)
Operating a VCR using the remote
Operating a DVD player using the remote
Operating an MDP using the remote
Operating a CD/MD using the remote
To
turn on/off
record
play
stop
fast forward
rewind the tape
pause
search the picture forward or
backward
Press
VIDEO u
( while pressing r.
(
p
)
0
P
Press again to resume normal playback.
) or 0 during playback.
Release to resume normal playback.
To
turn on/off
play
stop
pause
search the picture forward or
backward
Press
VIDEO u
(
p
P
Press again to resume normal playback.
) or 0 during playback.
Release to resume normal playback.
To
turn on/off
play
stop
pause
step through different tracks of an
audio disc
display the Title menu
display the menu
select the menu item
Press
VIDEO u
(
p
P
Press again to resume normal playback.
+ to step forward or = to step backward.
TITLE
MENU while holding down r.
V/v/B/b while holding down r.
To
turn on/off
play
stop
pause
go to the next/previous tracks
go forward/backward quickly in a
track
Press
VIDEO u
(
p
P
Press again to resume normal playback.
+ or =
) or 0 during playback.
Release to resume normal playback.
27
Adjusting Your Setup (MENU)
Level 1
A/V
CONTROL
MULTI
PICTURE
SET UP
CH. PRESET
Adjusting Your Setup (MENU)
Return icon
CH. PRESET icon
SET UP icon
MULTI PICTURE icon
Name of the current
menu
Adjusting Your Setup (MENU)
continued
* The BBE is manufactured by Sony Corporation under license from BBE Sound,
Inc. It is covered by U.S. Patent No. 4,638,258 and No. 4,482,866. The word
“BBE” and the BBE symbol are the trademarks of BBE Sound, Inc.
A/V CONTROL icon
Level 2
PICTURE MODE
ADJUST
SOUND MODE
ADJUST
SURROUND
PIP POSITION
PIP
SWAP
TWIN
PROGRAM INDEX
LANGUAGE/
CHILD LOCK
PIC ROTATION
FAVORITE CH
INTELLIGENT
VOL
AUTO PROGRAM
MANUAL
PROGRAM
SKIP
TV SYS
COL SYS
Level 3/Function
Select the picture mode: DYNAMIC n STANDARD n
SOFT n PERSONAL n ADJUST
Adjust the PERSONAL option: PICTURE n COLOR n
BRIGHT n HUE n SHARP
Select the sound mode: DYNAMIC n DRAMA n
SOFT n PERSONAL n ADJUST
Adjust the PERSONAL option: BASS n TREBLE n
BALANCE n BBE*
Select the surround mode: a VIRTUAL n TruSurround
n SIMULATED n OFF
Change the position of the sub screen.
Activate or deactivate the PIP feature.
Swap the pictures between the main and sub screens.
Display a TV program or video beside the main screen.
Display all the preset TV programs at the same time.
Change the menu language: ENGLISH ˜
(CHINESE)
Lock out specific channels.
Rotate the picture.
Set favorite channels.
Adjust the volume automatically.
Preset channels automatically.
Preset channels manually.
Skip unwanted or unused program numbers.
Select the TV system: AUTO n B/G n I n D/K n M
Select the color system: AUTO n PAL n SECAM n
NTSC3.58 n NTSC4.43
Introducing the menu system
The MENU button lets you open a menu and change the settings of your TV. The following is an
overview of the menu system.
Menu level 3
Menu level 2
Guide mark icon
Menu level 1
SET UP
:
ENGL I SH
CH I LD LOCK
P I C ROTAT I
FAVORI TE C
INTELLIGEN
LANGUAGE/
– 19 –
Page 20

28
Adjusting Your Setup (MENU)
How to use the menu
Introducing the menu system (continued)
Press V or v (or B/
b) to select the
desired item.
Press ENTER to
confirm the
selection and/or
go to the next
level.
Press MENU to
display the menu.
b
b
b
ENTER
To
Adjust the setting value
Move to the next/previous menu level
Cancel the menu
Other menu operations
Tips
• If you want to exit from Menu level 2 to Menu level 1, press V or v until
the return icon (N) is highlighted, then press ENTER.
• The MENU, ENTER, and +/– buttons on the TV can also be used for the
operations above.
Note
• If more than 60 seconds elapse between entries, the menu screen
automatically disappears.
ENTER
Press
V/B or v/b
b or B
MENU
MULT I P I CTURE
:
PIP:OFF
SWAP
TW I N:ON
PROGRAM I NDEX
PIP POSITION
0
JUMP
-/--
PROGR
MENU
PIP PROGR
ZOOM
IN
LEFT
FAVORITE
PROGR
INDEX
ZOOM
IN
RIGHT
SURROUND
SOUND
MODE
PIP PROGR
VIDEO
TITLE
TV
ENTER
A / V CONTROL
:
DYNAMI C
SOUND MODE:DYNAMI C
SURROUND:OFF
PICTURE MODE
A / V CONTROL
:
DYNAMI C
SOUND MODE:DYNAMI C
SURROUND:OFF
PICTURE MODE
29
Adjusting Your Setup (MENU)
Changing the A/V
CONTROL setting
The A/V CONTROL menu allows you
to adjust the picture and sound settings.
1
Press MENU.
2
Press V or v to select
, then press ENTER.
3
Press V or v to select
either PICTURE MODE,
SOUND MODE, or
SURROUND, then press
ENTER.
4
Press V or v to select
the desired option,
then press ENTER.
* When the PERSONAL mode is selected, the last adjusted picture/sound
settings from the ADJUST option are received (see next page).
b
MENU
V/b/v/B/ENTER
b
b
b
Tip
• For details on the options under the PICTURE/SOUND MODE and
SURROUND modes, see pages 12 and 20 respectively.
To return to the normal screen
Press MENU.
564
897
0
JUMP
-/--
MENU
PIP PROGR
ZOOM
IN
LEFT
FAVORITE
PROGR
INDEX
ZOOM
IN
RIGHT
SOUND
PIP PROGR
ENTER
ENTER
ENTER
ENTER
ENTER
b
b
ENTER
ENTER
For
PICTURE MODE
SOUND MODE
SURROUND
Select
either DYNAMIC, STANDARD, SOFT, PERSONAL*, or ADJUST.
either DYNAMIC, DRAMA, SOFT, PERSONAL*, or ADJUST.
either a VIRTUAL, TruSurround, SIMULATED, or OFF.
A / V CONTROL
:
DYNAMI C
SOUND MODE:DYNAMI C
SURROUND:OFF
PICTURE MODE
A / V CONTROL
DYNAMI C
SOUND MODE:DYNAMI C
SURROUND:OFF
:
PICTURE MODE
A / V CONTROL
DYNAMI C
SOUND MODE ST ANDARD
SURROUND:OSOFT
PERSONAL
ADJUST
PICTURE MODE
– 20 –
Page 21

30
Adjusting Your Setup (MENU)
Adjusting the ADJUST options under PICTURE MODE
1
Press V or v to select the
desired item (e.g.,
COLOR), then press
ENTER.
2
Adjust the value according to the following table, then press ENTER.
* You can adjust HUE for the NTSC color system only.
3
Repeat the above steps to adjust other items.
The adjusted settings will be received when you select PERSONAL.
Adjusting the ADJUST options under SOUND MODE
1
Press V or v to select the
desired item (e.g.,
BALANCE), then press
ENTER.
2
Adjust the value according to the following table, then press ENTER.
3
Repeat the above steps to adjust other items.
The adjusted settings will be received when you select PERSONAL.
Tip
• For details on the menu system and how to use the menu, refer to
“Introducing the menu system” on page 27.
For
PICTURE
COLOR
BRIGHT
HUE*
SHARP
Press V/b to
increase picture contrast
increase color intensity
brighten the picture
increase green picture tones
sharpen the picture
Press v/B to
decrease picture contrast
decrease color intensity
darken the picture
increase red picture tones
soften the picture
For
BASS
TREBLE
BALANCE
BBE
Press
v/B to decrease the bass, V/b to increase the bass
v/B to decrease the treble, V/b to increase the treble
v/B to increase the left speaker’s volume, V/b to increase the right
speaker’s volume
V/v to select HIGH, LOW, or OFF. BBE can produce clear sound,
emphasizing both low and high tones.
b
b
Changing the A/V CONTROL setting (continued)
b
b
ENTER
ENTER
ENTER
ENTER
COLOR
80
BALANCE 00
31
Adjusting Your Setup (MENU)
b
ENTER
ENTER
Changing the
MULTI PICTURE
setting
The MULTI PICTURE menu allows you
to use the Picture-in-Picture (PIP), TWIN
pictures, or PROGRAM INDEX features.
1
Press MENU.
2
Press V or v to select
,
then press ENTER.
MENU
V/b/v/B/ENTER
b
b
MULT I P I CTURE
PIP:OFF
SWAP
TWI N:ON
PROGRAM I NDEX
:
PIP POSITION
continued
231
564
897
0
JUMP
-/--
PIC MODE
A/B
MENU
PIP PROGR
ZOOM
IN
LEFT
FAVORITE
PROGR
INDEX
ZOOM
IN
RIGHT
SURROUND
SOUND
MODE
PIP PROGR
ENTER
PROGR INDEX
A / V CONTROL
:
DYNAMI C
SOUND MODE:DYNAMI C
SURROUND:OFF
PICTURE MODE
– 21 –
Page 22

32
Adjusting Your Setup (MENU)
Changing the MULTI PICTURE setting (continued)
ENTER
ENTER
b
3
Press V or v to select the
desired option (see the
table below), then press
ENTER.
To return to the normal screen
Press MENU.
Tip
• For details on the menu system and how to use the menu, see
“Introducing the menu system” on page 27.
Select
PIP POSITION
PIP
SWAP
TWIN
PROGRAM INDEX
To
change the position of the PIP screen.
Press V or v to select the desired position, then press ENTER.
display the PIP screen within the main picture.
Press V or v to select “ON,” then press ENTER.
To cancel, press
or select “OFF,” then press ENTER.
swap the main and PIP screens, or right and left pictures of the
TWIN pictures.
display a different TV program or video beside the main picture.
Press V or v to select “ON,” then press ENTER.
To cancel, press
or select “OFF,” then press ENTER.
view multiple programs on the sub-screens.
To cancel, press PROGR INDEX.
Changing the MULTI PICTURE setting (continued)
33
Adjusting Your Setup (MENU)
b
b
b
b
b
b
ENTER
ENTER
ENTER
ENTER
ENTER
231
564
897
0
JUMP
-/--
MENU
PIP PROGR
ZOOM
IN
LEFT
FAVORITE
PROGR
INDEX
ZOOM
IN
RIGHT
PIP PROGR
ENTER
MENU
V/b/v/B/ENTER
Number buttons
PIC ROTATION
ENTER
Changing the SET
UP setting
The SET UP menu allows you to:
change the menu language (see page 11),
block channels, adjust the picture
position, program your favorite
channels, and adjust the volume
automatically.
1
Press MENU.
2
Press V or v to select
,
then press ENTER.
3
Press V or v to select the
desired option, then press
ENTER.
To return to the normal screen
Press MENU.
Select
LANGUAGE/
CHILD LOCK
PIC ROTATION
FAVORITE CH
INTELLIGENT
VOL
To
change the menu language (see page 11).
block channels (see page 34).
adjust the picture position when it is not aligned with the TV screen.
Press V or b to adjust the position clockwise, then press ENTER.
Press v or B to adjust the position counterclockwise, then press ENTER.
select your favorite channels (see page 35).
adjust the volume of each TV program automatically.
Press V or v to select “ON,” then press ENTER.
To cancel, select “OFF,” then press ENTER.
continued
A / V CONTROL
:
DYNAMI C
SOUND MODE:DYNAMI C
SURROUND:OFF
PICTURE MODE
SET UP
:
ENGL I SH
CH I LD L OCK:PR0 1 OFF
P I C ROTAT ION
FAVOR I TE CH
INTELLIGENT VOL:ON
LANGUAGE/
– 22 –
Page 23

34
Adjusting Your Setup (MENU)
Blocking the channels (CHILD LOCK)
1
After selecting CHILD
LOCK, press either V or v,
or the number buttons (or
PROGR +/–) to select the
desired channel, then
press ENTER.
2
Press V or v to select ON,
then press ENTER.
To unlock the channel,
select OFF.
The lock symbol (
)
appears on the screen when
ON is selected.
If a locked channel is
selected, the lock symbol
appears on the screen.
3
Repeat steps 1 and 2 to
lock other channels.
To return to the normal screen
Press MENU.
Changing the SET UP setting (continued)
ENTER
1
2
3
4
5
6
7
8
0
-/--
9
ENTER
ENTER
b
b
or
b
b
ENTER
06
SET UP
:
CHILDLOCKPR02
P I C ROTAT I
FAVOR I TE C ON
INTELLIGEN
LANGUAGE/
OFF
SET UP
:
ENGL I SH
PR0 6 ON
P I C ROTAT ION
FAVOR I TE CH
INTELLIGENT VOL:ON
LANGUAGE/
CH I LD L OCK
:
35
Adjusting Your Setup (MENU)
Changing the favorite channel setting
1
After selecting FAVORITE
CH, make sure MODE is
selected, then press
ENTER.
2
Press V or v to select
MANUAL, then press
ENTER.
3
Press V or v to select the
program you want to
change, then press ENTER.
4
Press V or v to change the
number, then press
ENTER.
5
Repeat steps 3 and 4 to
set other channels.
To return to the normal screen
Press MENU.
Note
• If you press the PROGR +/– buttons or number buttons in step 4 above,
the TV will tune into the channel.
b
b
b
ENTER
ENTER
b
b
b
b
ENTER
ENTER
ENTER
ENTER
ENTER
FAVOR I TE CH
MODE:MANU A L
1.PR01 5.PR09
2.PR02 6.PR11
3.PR05 7.PR13
4.PR08
FAVOR I TE CH
MODE:MANU A L
1.PR01 5.PR09
2.PR02 6.PR11
3.PR06 7.PR13
4.PR08
FAVOR I TE CH
MODE:AUTO AUTO
1.PR01 MANUAL
2.PR02
3.PR06
4.PR08
FAVOR I TE CH
MODE:MANU A L
1.PR01 5.PR09
2.PR02 6.PR11
3.PR 7.PR13
4.PR08
06
– 23 –
Page 24
36
Adjusting Your Setup (MENU)
Changing the CH.
PRESET setting
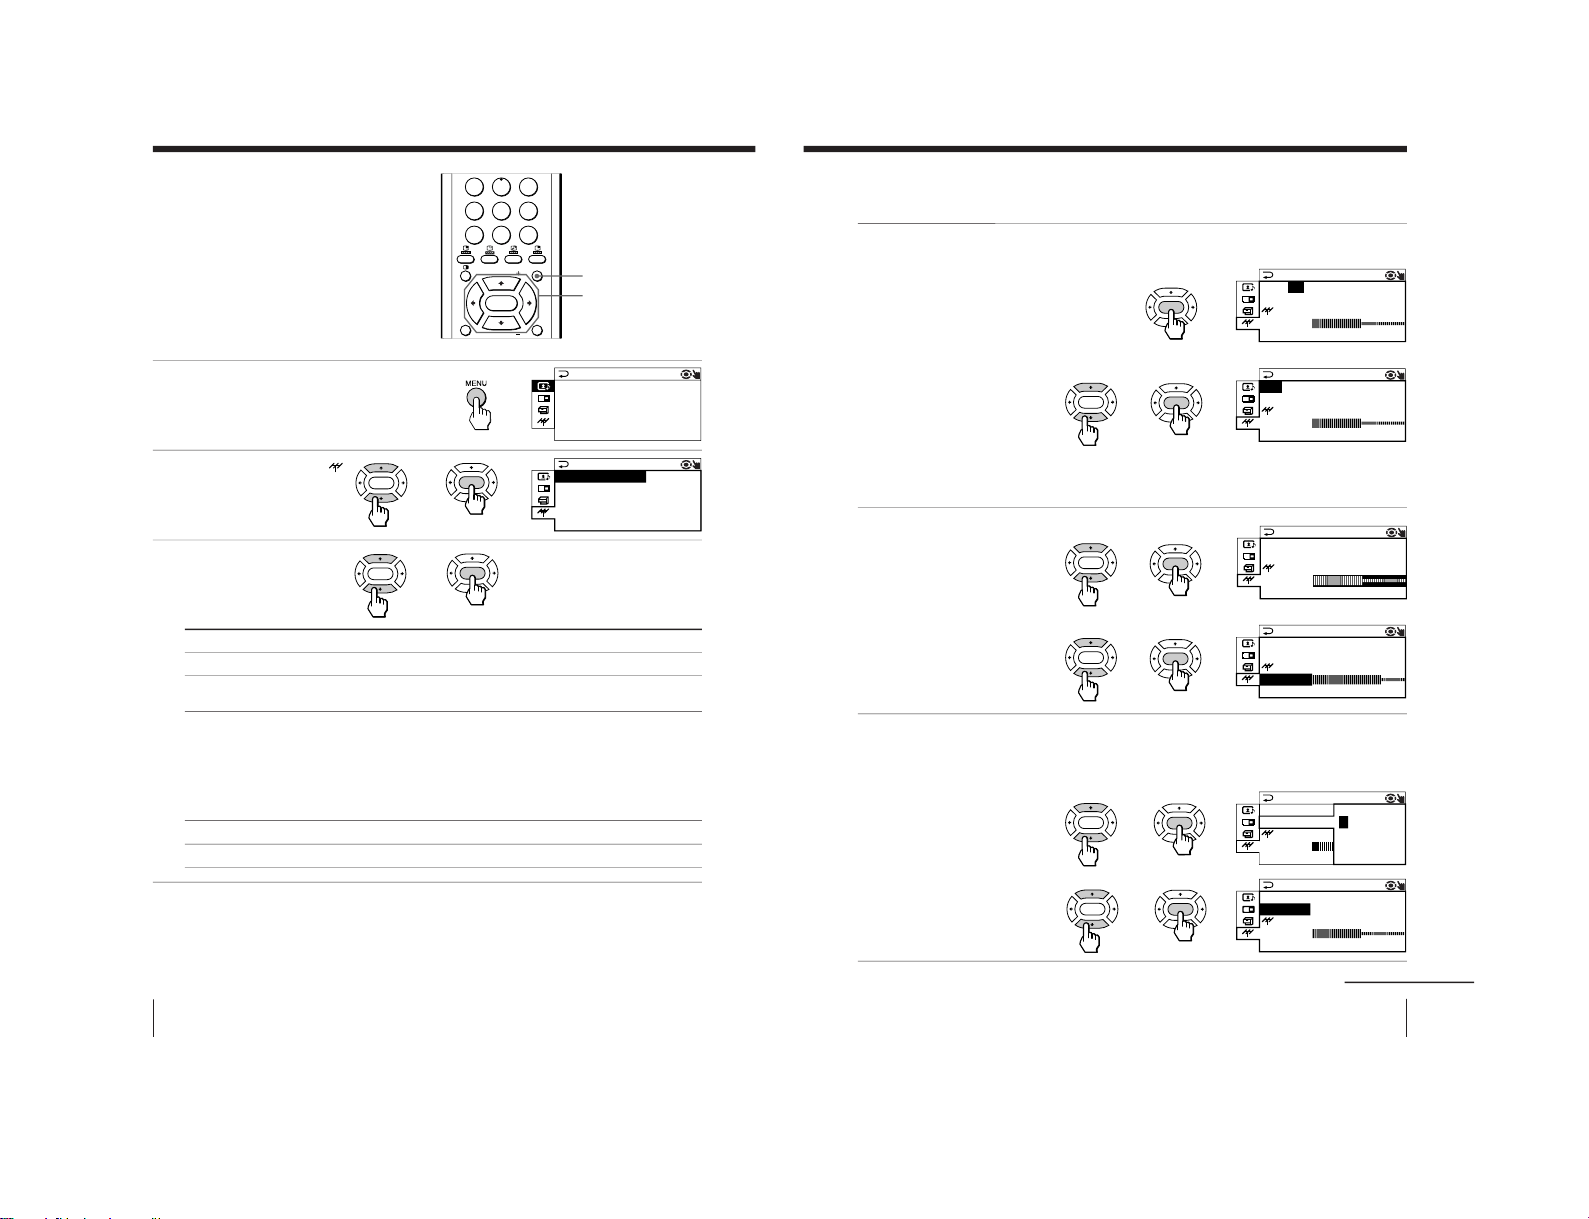
The CH. PRESET menu allows you to
adjust the setup of your TV. For
example, you can manually tune in a
channel with a weak signal that fails to
be tuned in by automatic presetting.
MENU
V/b/v/B/ENTER
b
b
b
ENTER
ENTER
ENTER
ENTER
564
897
0
JUMP
-/--
MENU
PIP PROGR
ZOOM
IN
LEFT
FAVORITE
PROGR
INDEX
ZOOM
IN
RIGHT
PIP PROGR
ENTER
b
A / V CONTROL
:
DYNAMI C
SOUND MODE:DYNAMI C
SURROUND:OFF
PICTURE MODE
CH. PRESET
MANUAL PROGRAM
SKIP:PR0 2 OFF
TV SYS:B/G
COL SYS:AUTO
AUTO PROGRAM
Select
AUTO PROGRAM
MANUAL PROGRAM
SKIP
TV SYS
COL SYS
To
preset channels automatically.
preset channels manually. See “Presetting channels
manually” on page 37.
skip unwanted or unused channel.
1 Press either V or v, or the number buttons (or PROGR
+/–) until the unused or unwanted channel number
appears, then press ENTER.
2 Select “ON,” then press ENTER.
3 To disable other channels, repeat steps 1 and 2.
To restore the skipped channel, select “OFF” in step 2.
select the TV system.
select the color system. Normally, set this to “AUTO.”
1
Press MENU.
2
Press V or v to select
,
then press ENTER.
3
Press V or v to select
the desired option, then
press ENTER.
To return to the normal screen
Press MENU.
Tip
• For details on the menu system and how to use the menu, refer to
“Introducing the menu system” on page 27.
37
Adjusting Your Setup (MENU)
b
b
b
b
b
Presetting channels manually
1
After selecting MANUAL
PROGRAM, select the
program number to
which you want to preset
a channel.
(1) Make sure “PR” is
selected, then press
ENTER.
(2) Press V or v until the
program number you
want to preset (e.g.,
program number 10)
appears on the menu,
then press ENTER.
Tip
• You can also select the program number with the PROGR +/– or number buttons.
2
Select the desired
channel.
(1) Press V or v to select
either VHF LOW, VHF
HIGH, or UHF, then
press ENTER.
(2) Press V or v until the
desired channel’s
broadcast appears on
the TV screen, then
press ENTER.
3
If the sound of the
desired channel is
abnormal, select the
appropriate TV system.
(1) Press V or v to select TV
SYS, then press ENTER.
(2) Press V or v until the
sound becomes normal,
then press ENTER.
b
b
b
ENTER
ENTER
ENTER
ENTER
ENTER
ENTER
ENTER
ENTER
ENTER
ENTER
ENTER
b
b
b
continued
MANUAL PROGRAM
PR:10
TV SYS:B/G
SENS:HIGH
VHF LOW
FINE:AUTO
MANUAL PROGRAM
PR:10
TV SYS:B/G
SENS:HIGH
VHF LOW
FINE:AUTO
MANUAL PROGRAM
PR:10
TV SYS:B/G
SENS:HIGH
VHF LOW
FINE:AUTO
MANUAL PROGRAM
PR:10
TV SYS:B/G
SENS:HIGH
VHF LOW
FINE:AUTO
MANUAL PROGRAM
PR:10
TV SYS:B/G
SENS:HIGH
VHF LOW
FINE:AUTO
MANUAL PROGRAM
PR:10 B/G
TV SYS:I
SENS:HIG D/K
VHF LOW M
FINE:AUTO
– 24 –
Page 25

38
Adjusting Your Setup (MENU)
4
If you are not satisfied
with the picture and
sound quality, you may be
able to improve them by
using the FINE tuning
feature.
(1) Press V or v to select
FINE, then press
ENTER.
(2) Press V or v to select
MANUAL, then press
ENTER.
(3) Press either V, b, v, or
B until the picture
and sound quality are
optimal, then press
ENTER.
The + or – icon on the
menu flashes while
tuning.
5
If the TV signal is too
strong and the picture is
distorted, you can adjust
the TV reception
sensitivity.
(1) Press V or v to select
SENS, then press
ENTER.
(2) Press V or v to select
LOW, then press
ENTER.
To return to the normal screen
Press MENU.
Notes
• The TV system (TV SYS) and the TV reception sensitivity (
SENS)
settings are memorized for each program number.
• If you preset a locked channel, that channel will be unlocked.
Changing the CH. PRESET setting (continued)
bb
b
b
b
ENTER
ENTER
ENTER
ENTER
ENTER
ENTER
ENTER
ENTER
b
b
b
ENTER
ENTER
MANUAL PROGRAM
PR:0 1 AUTO
TV SYS:I MANU A L
SENS:HIG
VHF LOW
FINE
:
MANUAL PROGRAM
PR:0 1 AUTO
TV SYS:I MANUAL
SENS:HIG
VHF LOW
FINE
:
MANUAL PROGRAM
PR:10 HIGH
TV SYS:ILOW
SENS
:
VHF LOW
FINE:AUTO
39
Additional Information
Additional Information
Troubleshooting
If you have any problem while viewing your TV, please check the following
troubleshooting guide. If the problem persists, contact your Sony dealer.
Additional Information
continued
Possible causeSymptom Solutions
• Check the antenna cable and connection
on the TV, VCR, and at the wall. (page 4)
• Display the CH. PRESET menu and
select “MANUAL PROGRAM” to
preset the channel again. (page 37)
• Check the antenna type (VHF/UHF).
Contact a Sony dealer for advice.
• Adjust the antenna direction. Contact a
Sony dealer for advice.
• Try using a booster.
• Display the CH. PRESET menu and
select “MANUAL PROGRAM.” Then,
select “
SENS: LOW.” (page 38)
• Turn off or disconnect the booster if it is
in use.
• If the sound of all the channels is noisy,
display the CH. PRESET menu and
select the appropriate TV system (TV
SYS), then select “AUTO PROGRAM”
to preset the channels again. (page 36)
• If the sound of some channels is noisy,
select the channel, then display the CH.
PRESET menu and select the
appropriate TV system (TV SYS).
(page 37)
• Check the power cord, antenna, and the
VCR connections.
• Press u (power).
• Press U (main power) on the TV to turn
off the TV for about five seconds, then
turn it on again.
Snowy picture
Noisy sound
Distorted picture
Noisy sound
Good picture
Noisy sound
No picture
No sound
• The connection is loose or
the cable is damaged.
• The channel presetting is
inappropriate or
incomplete.
• The antenna type is
inappropriate.
• The antenna direction
needs adjustment.
• Signal transmission is low.
• Broadcast signals are too
strong.
• The TV system setting is
inappropriate.
• The power cord, antenna,
or VCR is not connected.
• The TV is not turned on.
– 25 –
Page 26

40
Additional Information
Troubleshooting (continued)
Possible causeSymptom
Solutions
• Press ¸ + to increase the volume level.
• Press ¤ to cancel the muting.
• Press A/B
until better sound is
heard.
• Do not use a hair dryer or other
equipment near the TV.
• Adjust the antenna direction for
minimum interference. Contact a Sony
dealer for advice.
• Use a highly directional antenna.
• Adjust the antenna direction. Contact a
Sony dealer for advice.
• Turn off or disconnect the booster if it is
in use.
• Display the A/V CONTROL menu and
select “ADJUST” in PICTURE MODE,
then adjust the COLOR level. (page 30)
• Display the CH. PRESET menu and
check the color system (COL SYS)
setting (usually set this to AUTO).
(page 36)
• Adjust the antenna direction. Contact a
Sony dealer for advice.
• Locate external speakers or other
equipment away from the TV. Press U
(main power) on the TV to turn off the
TV for about five minutes, then turn it
on again.
• Press A/B
until “AUTO” appears on
the screen.
Good picture
No sound
Dotted lines or stripes
Double images or
“ghosts”
No color
Abnormal color patches
TV cannot receive stereo
broadcast signal.
• The volume level is too
low.
• The sound is muted.
• The broadcast signal has a
transmission problem.
• There is local interference
from cars, neon signs, hair
dryers, power generators,
etc.
• Broadcast signals are
reflected by nearby
mountains or buildings.
• The antenna direction
needs adjustment.
• Use of a booster is
inappropriate.
• The color level setting is
too low.
• The color system setting is
inappropriate.
• The antenna direction
needs adjustment.
• There is magnetic
disturbance from external
speakers or other
equipment.
• The stereo reception setting
is inappropriate.
41
Additional Information
Possible causeSymptom
Solutions
• Check the antenna cable and connection
on the TV, VCR, and on the wall.
• Adjust the antenna direction. Contact a
Sony dealer for advice.
• Press A/B
until better sound is
heard. (page 21)
—
• Check the antenna cable and connection
on the TV, VCR, and at the wall. (page 4)
• Adjust the antenna direction. Contact a
Sony dealer for advice.
• Try using a booster.
• Display the SET UP menu and adjust
“PIC ROTATION” so that the picture is
aligned to the TV screen. (page 33)
—
—
Stereo broadcast sound
switches on and off or is
distorted.
or
The sound switches
between stereo and
monaural frequently.
“100” appears on the top
of the screen and there is
no Teletext display.
Teletext display is
incomplete
(snowy picture or double
images).
Picture slant
TV cabinet creaks.
A small “boom” sound is
heard when the TV is
turned on.
• The connection is loose or
the cable is damaged.
• The antenna direction
needs adjustment.
• The broadcast signal has a
transmission problem.
• The channel carries no
Teletext broadcast.
• The connection is loose or
the cable is damaged.
• The antenna direction
needs adjustment.
• The signal transmission is
too low.
• Terrestrial magnetism is
affecting your TV set.
• Changes in room
temperature sometimes
make the TV cabinet
expand or contract,
causing a noise. This does
not indicate a malfunction.
• The TV’s demagnetizing
function is working. This
does not indicate a
malfunction.
– 26 –
Page 27

42
Additional Information
Troubleshooting shortcuts
For better viewing, check the following connections.
• Snowy • Distorted • Noisy/
picture picture distorted
sound
Wall antenna
terminal
UHF
VHF
Booster
VCR
Check the antenna direction.
Incorrect antenna direction may cause:
Check the
antenna type.
Wrong type of antenna
may cause:
• No picture
• Snowy picture
Check the connection
on the wall antenna
terminal.
Loose connection may
cause:
•
Snowy picture
• Distorted sound
Check if you need a
booster to increase
the signal level.
Too strong signal levels
may cause:
•
Distorted picture
• Noisy sound
Antenna connection
43
Additional Information
P166 SECTEXT 166 FR1 MAR 03:59:09
Fom Singapore
To PARIS
To OSAKA
To ROMA
To SYDNEY
Day Dep/Arr Flight Alrcraft
1.6 220/0588 SQ28 747
2 2130/1225 PA115 L15
3 2115/1330 SQ26 747
2.7 2130/0745 SQ24
747
4 2300/0915 AZ487 747
2.5 1000/1715 SQ6 747
4.6 0930/2015 CX522 L10
1 2210/0610 SQ21A 747
2 2100/0835 SQ21A 747
Connection
to TV
Check the
connection on the
VCR and on the TV.
Loose connection may
cause:
• Snowy picture
• Distorted sound
• No picture
For more information, refer to
“Troubleshooting” on page 39, or
consult your dealer for guidance.
AC Connection
Check the connection
on the AC socket.
Loose connection may cause:
•no power
•no picture with no sound
• Double image •Missing
picture Teletext
characters
– 27 –
Page 28
44
Additional Information
Self-diagnosis
function
Your TV is equipped with a self-diagnosis function. If there is a
problem with your TV, the u/Â/
(standby) indicator flashes
red. The number of times the u/Â/
indicator flashes indicates
the possible causes.
1
Check that the red flashes of the u/Â/
indicator are about 3 seconds per
interval.
2
Count the number of times the u/Â/
indicator flashes.
3
Press U (main power) to turn off your TV.
4
Inform your nearest Sony service center about the number of times the
u/Â/
indicator flashed.
Be sure to note the model name and serial number located on the rear of
your TV.
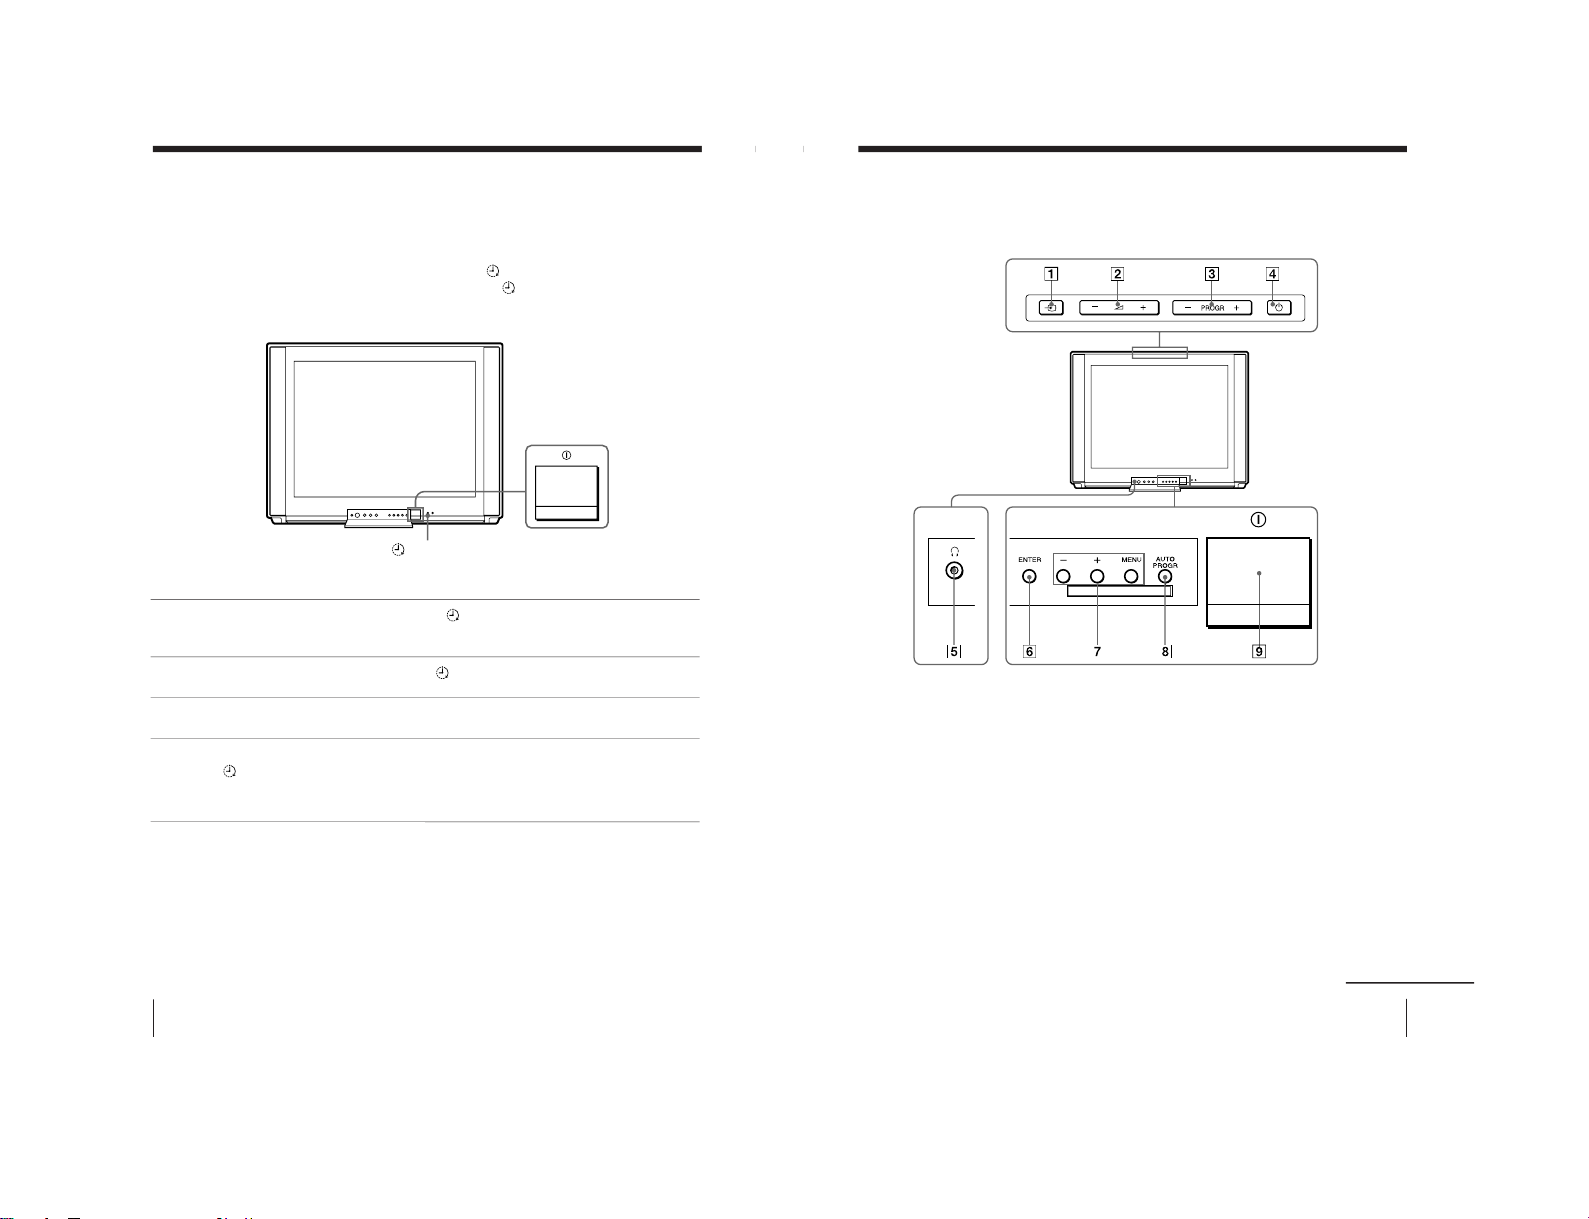
Front of TV
u/Â/ (standby) indicator
45
Additional Information
Identifying parts and controls
Refer to the pages indicated in parentheses ( ) for details.
Front panel
1 … (TV/video) button (10)
2 Á +/– (volume) buttons (10)
3 PROGR +/– (program) buttons (9)
4 u (power) button (9)
5 2 (headphones) jack
6 ENTER button (28)
7 MENU +/– buttons (28)
8 AUTO PROGR (program) button (5)
9 U (main power) button (9)
continued
ONE-PUSH AUTOMATIC PROGRAMMING
– 28 –
Page 29
46
Additional Information
Identifying parts and controls (continued)
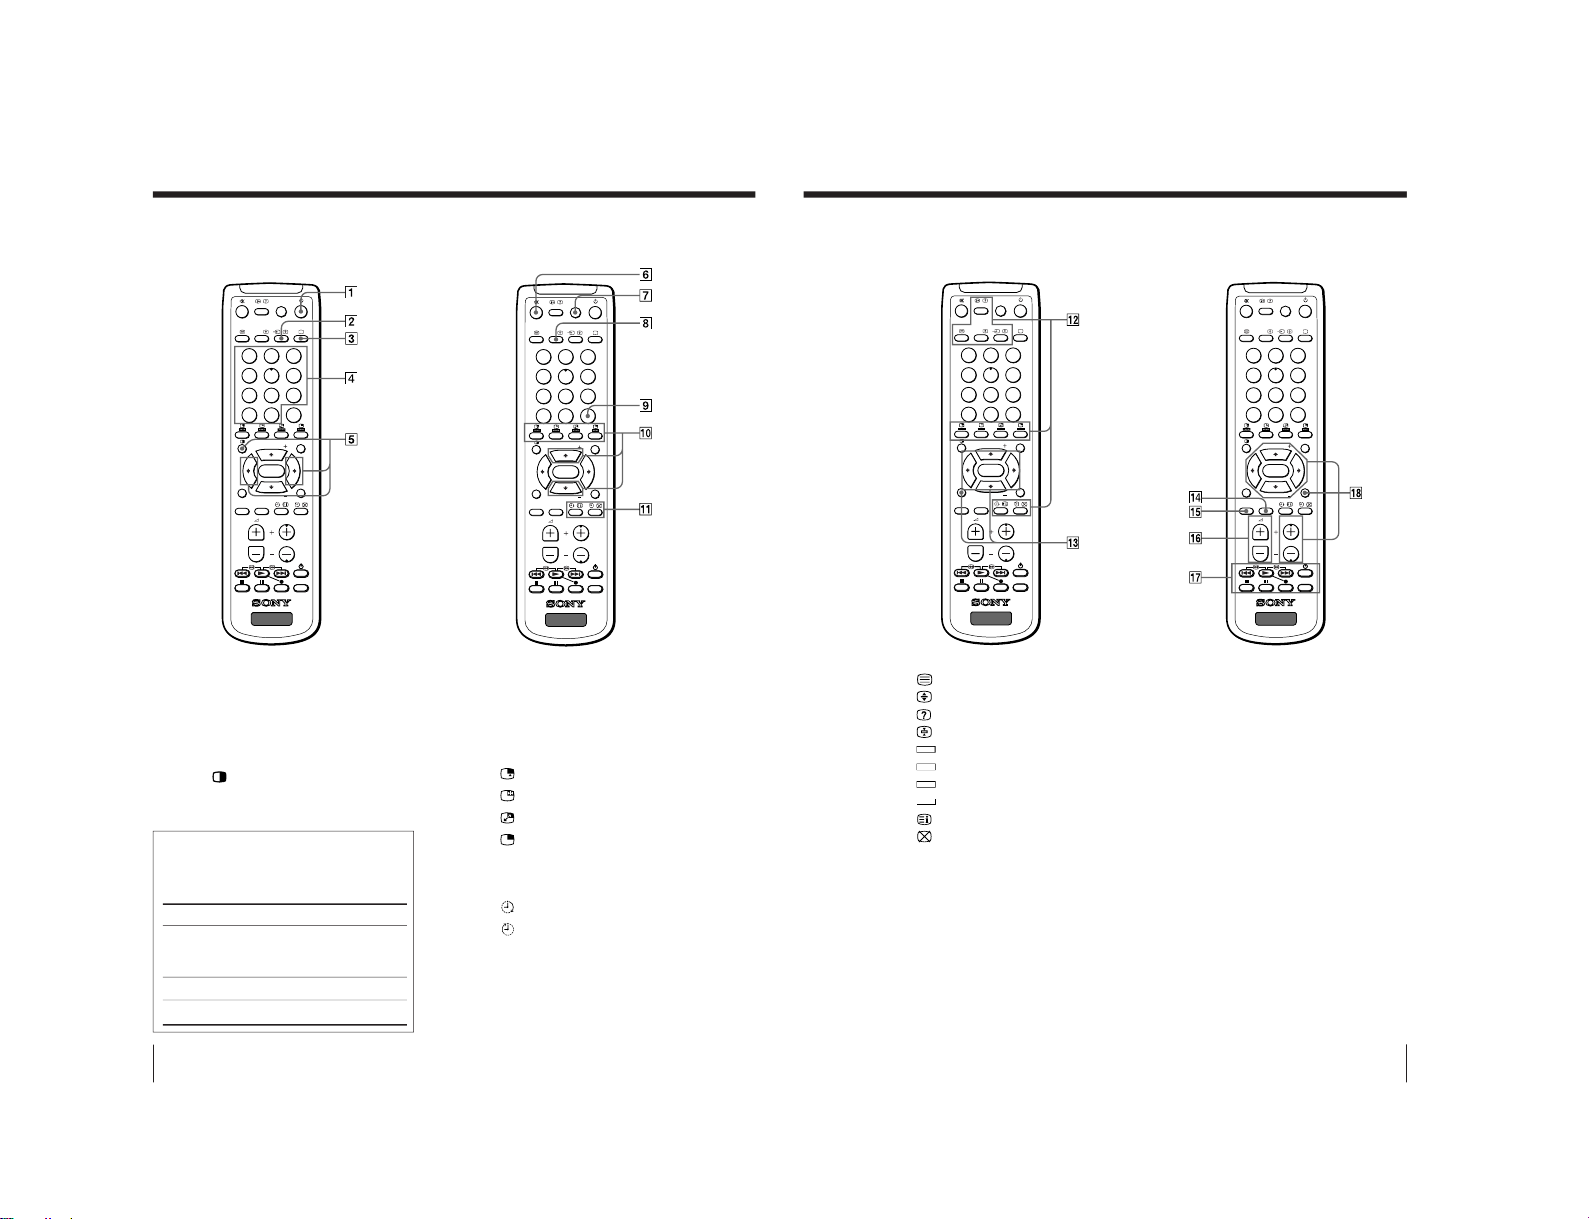
Remote control
The names/symbols of buttons on the
remote are indicated in different
colors to represent the available
functions.
Label color
White
Green
Yellow
1 u (power) button (9)
2 … (video) button (10)
3 ; (TV) button (10)
4 Number buttons (9)
5 TWIN pictures operation buttons
(15 – 16)
(TWIN)
ZOOM IN LEFT B
ZOOM IN RIGHT b
6 ¤ (muting) button (10)
7 PIC MODE button (12)
8 A/B button (21)
9 JUMP button (10)
!º PIP operation buttons (15 – 16)
(TV/video)
(freeze)
(swap)
(PIP)
V/v—for changing PIP PROGR
!¡ Timer setting buttons (13)
(wake up timer)
(sleep timer)
231
564
897
0
JUMP
-/--
PIC MODE
PROGR
A/B
MENU
PIP PROGR
ZOOM
IN
LEFT
FAVORITE
PROGR
INDEX
ZOOM
IN
RIGHT
SURROUND
SOUND
MODE
PIP PROGR
VIDEO
TITLE
TV
ENTER
231
564
897
0
JUMP
-/--
PIC MODE
PROGR
A/B
MENU
PIP PROGR
ZOOM
IN
LEFT
FAVORITE
PROGR
INDEX
ZOOM
IN
RIGHT
SURROUND
SOUND
MODE
PIP PROGR
VIDEO
TITLE
TV
ENTER
Button function
For general TV and
PROGRAM INDEX
operations
For Teletext operations
For PIP operations
47
Additional Information
!™ Teletext operation buttons (23– 24)
(text)
(enlarge)
(reveal)
(hold)
Red
Green
Yellow
Blue
(index)
(text clear)
!£ FAVORITE button (14)
V/b/v/B/ENTER
!¢ SURROUND button (20)
!∞ SOUND MODE button (12)
!§ . (volume) +/– buttons (10)
!¶ DVD, VCR, MDP, CD, MD operation
buttons (26)
+/# (fastforward/search
forward)
( (play)
=/3 (rewind/search
backward)
r (record)
p (stop)
P (pause)
VIDEO u (power)
TITLE
!• PROGRAM INDEX operation buttons
(17 – 19)
PROGR INDEX
V/b/v/B/ENTER
PROGR +/–
231
564
897
0
JUMP
-/--
PIC MODE
PROGR
A/B
MENU
PIP PROGR
ZOOM
IN
LEFT
FAVORITE
PROGR
INDEX
ZOOM
IN
RIGHT
SURROUND
SOUND
MODE
PIP PROGR
VIDEO
TITLE
TV
ENTER
231
564
897
0
JUMP
-/--
PIC MODE
PROGR
A/B
MENU
PIP PROGR
ZOOM
IN
LEFT
FAVORITE
PROGR
INDEX
ZOOM
IN
RIGHT
SURROUND
SOUND
MODE
PIP PROGR
VIDEO
TITLE
TV
ENTER
– 29 –
Page 30
KV -EF34M31/EF34M61/EF34M80/EF34M90/EF34M91
RM-951
SECTION 2
DISASSEMBLY
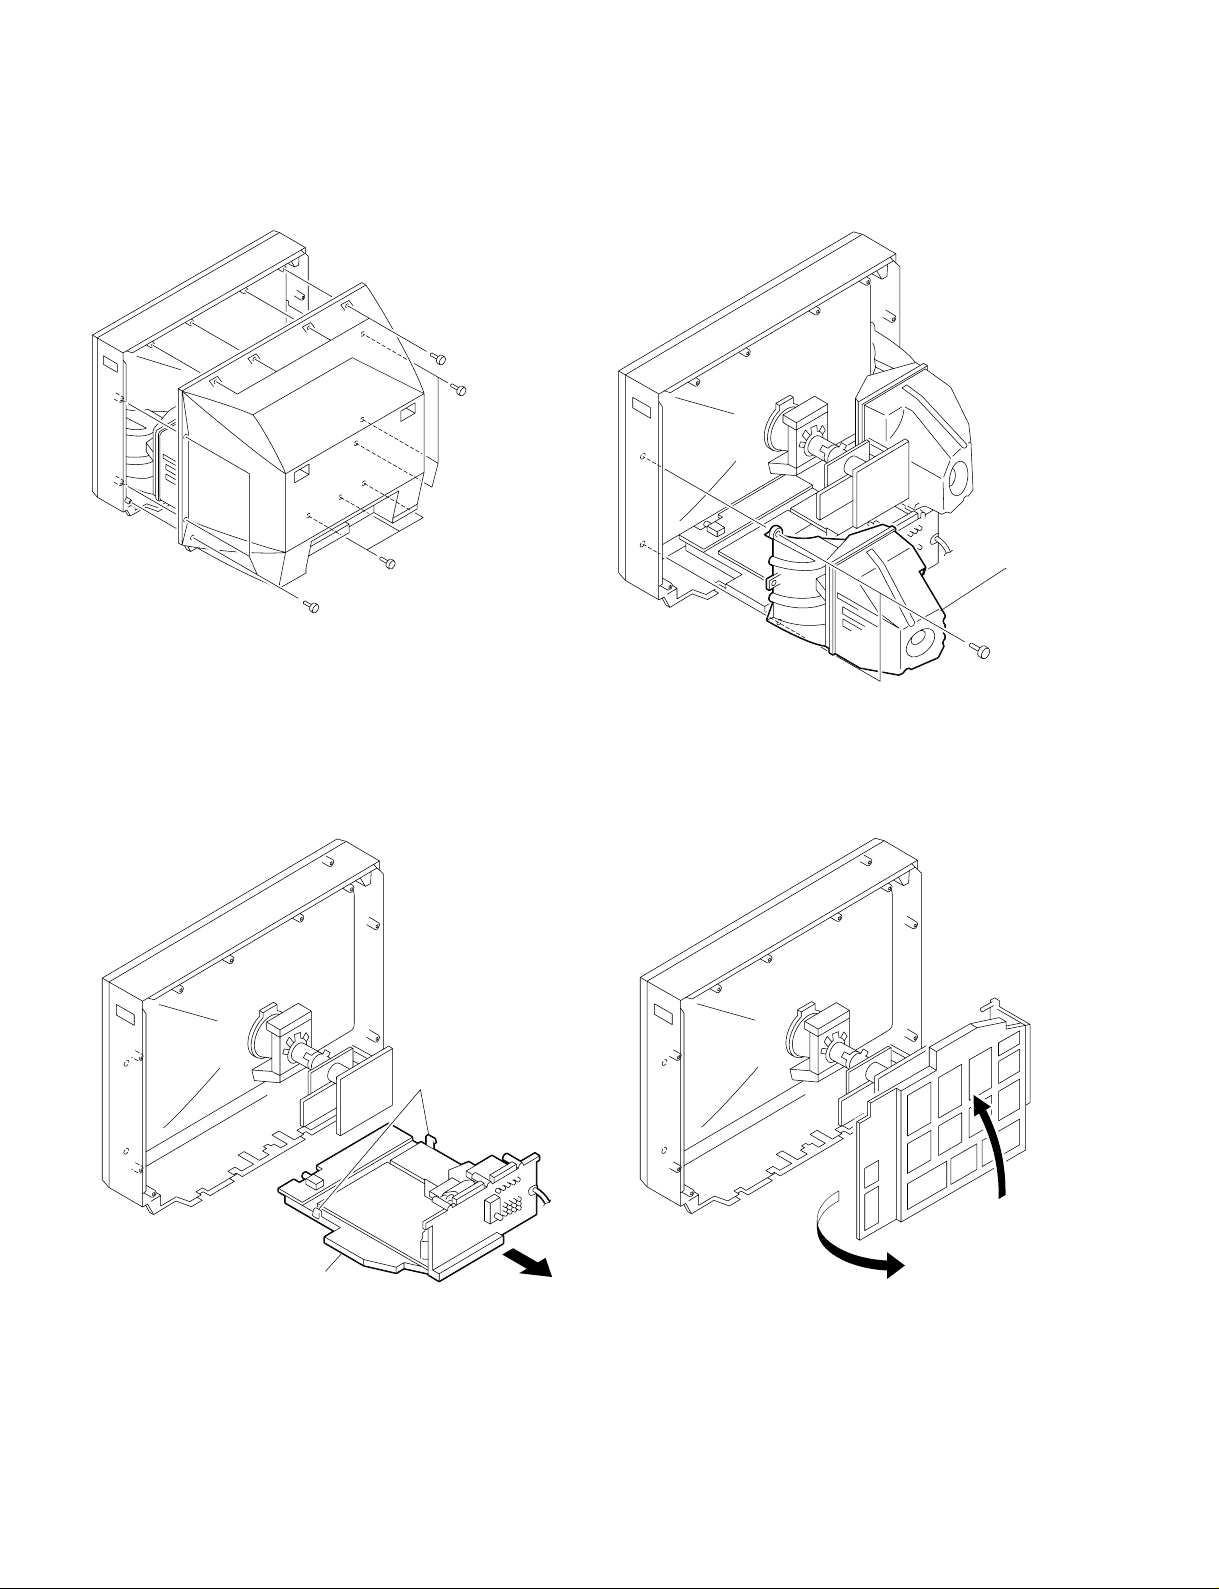
2-1. REAR PANEL REMOVAL
2Tree screws
(+BVTP 4X16)
2-2. SPEAKER BOX REMOVAL
4Four screws
(+BVTP 4X16)
3Tree screws
(+BVTP 4X16)
2SPEAKER BOX
L/R ASSEMBLY
1Tree screws
(+BVTP 4X16)
1Two screws
(TP + TWH 4X25)
2Chassis
2-4. SERVICE POSITION2-3. CHASSIS ASSY REMOVAL
1Two claws
2
1
– 30 –
Page 31
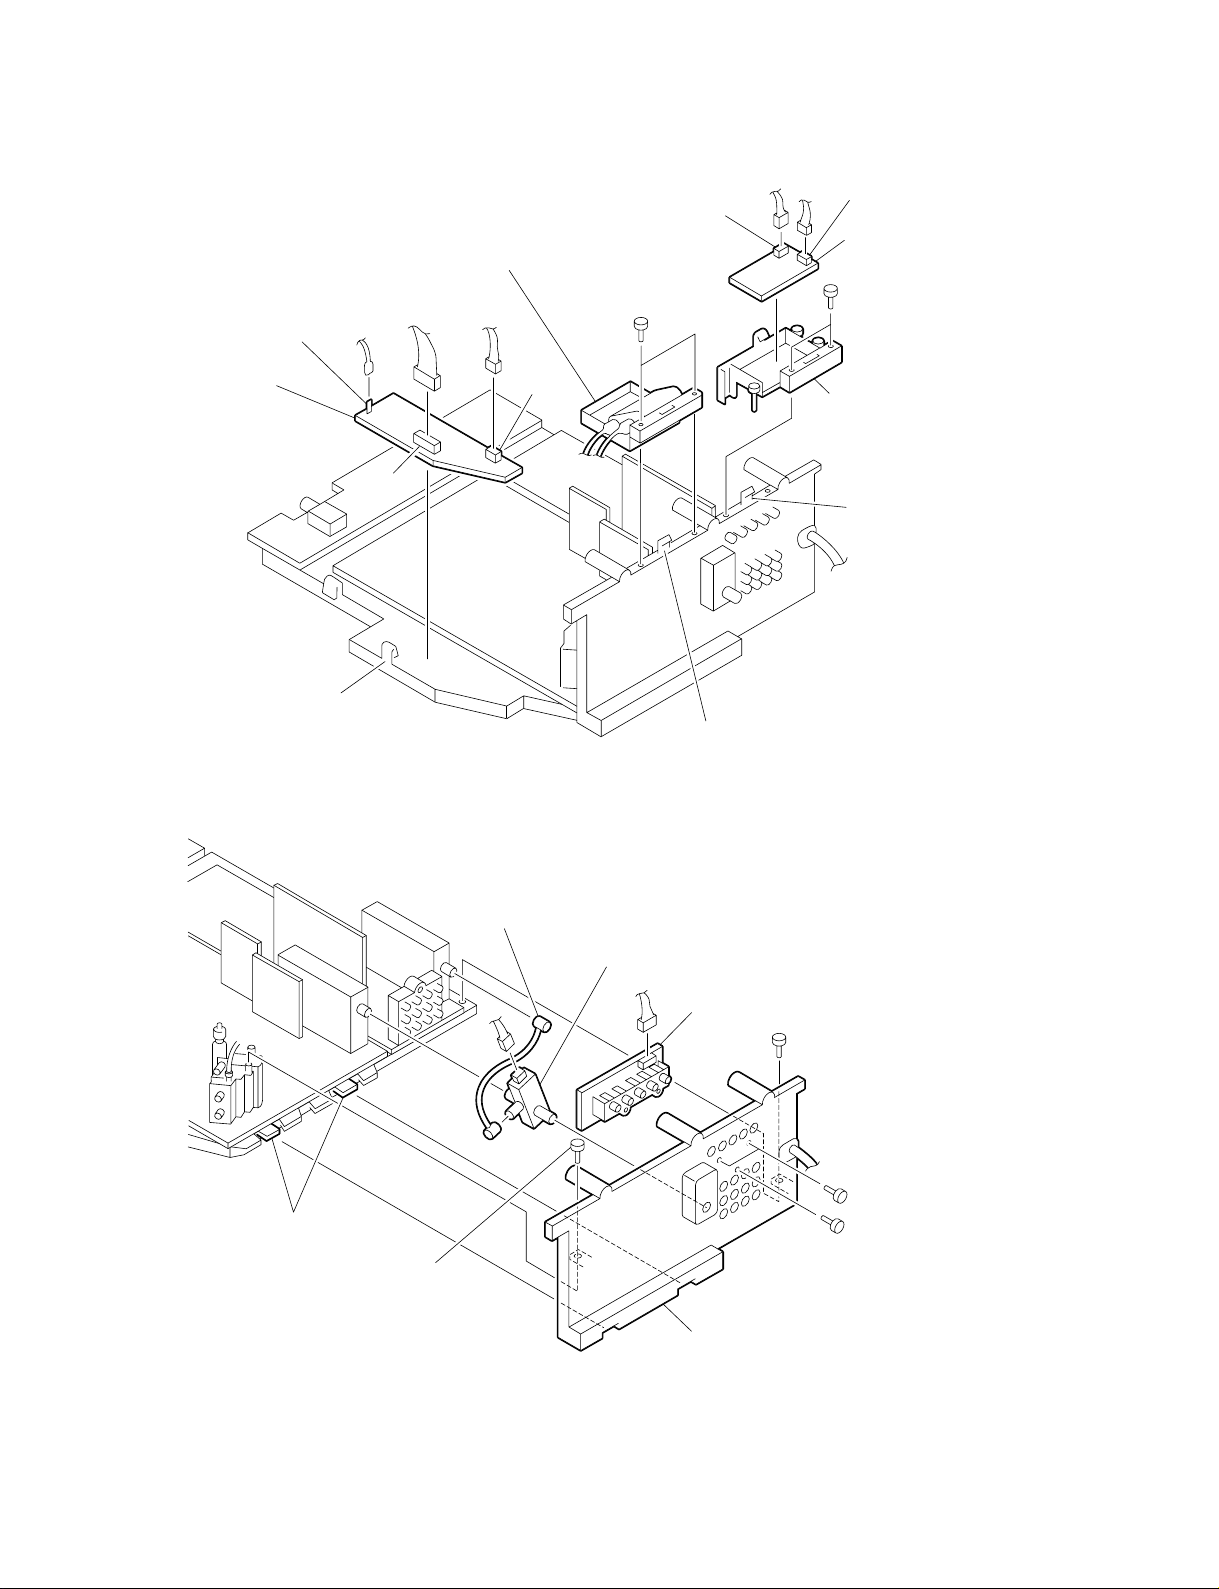
2-5. D1 AND DH BOARDS REMOVAL
KV -EF34M31/EF34M61/EF34M80/EF34M90/EF34M91
RM-951
2D1 board
CN4603
1Claw
CN4601
5HV block
CN4602
3Two screws
(+BVTP 3X12)
CN3803
4Claw
CN3802
9DH board
6Two screws
(+BVTP 3X12)
8Blacket
7Claw
2-6. J1 BOARD AND RF SPLITTER REMOVAL
7P-P cable
3Two claws
2screw
(+BVTP 3X12)
8RF splitter
6J1 board
1screw (+BVTP 3X12)
5Two screws
(+BVTP 3X12)
1screws (+BVTP 4X16)
4Terminal bracket
– 31 –
Page 32
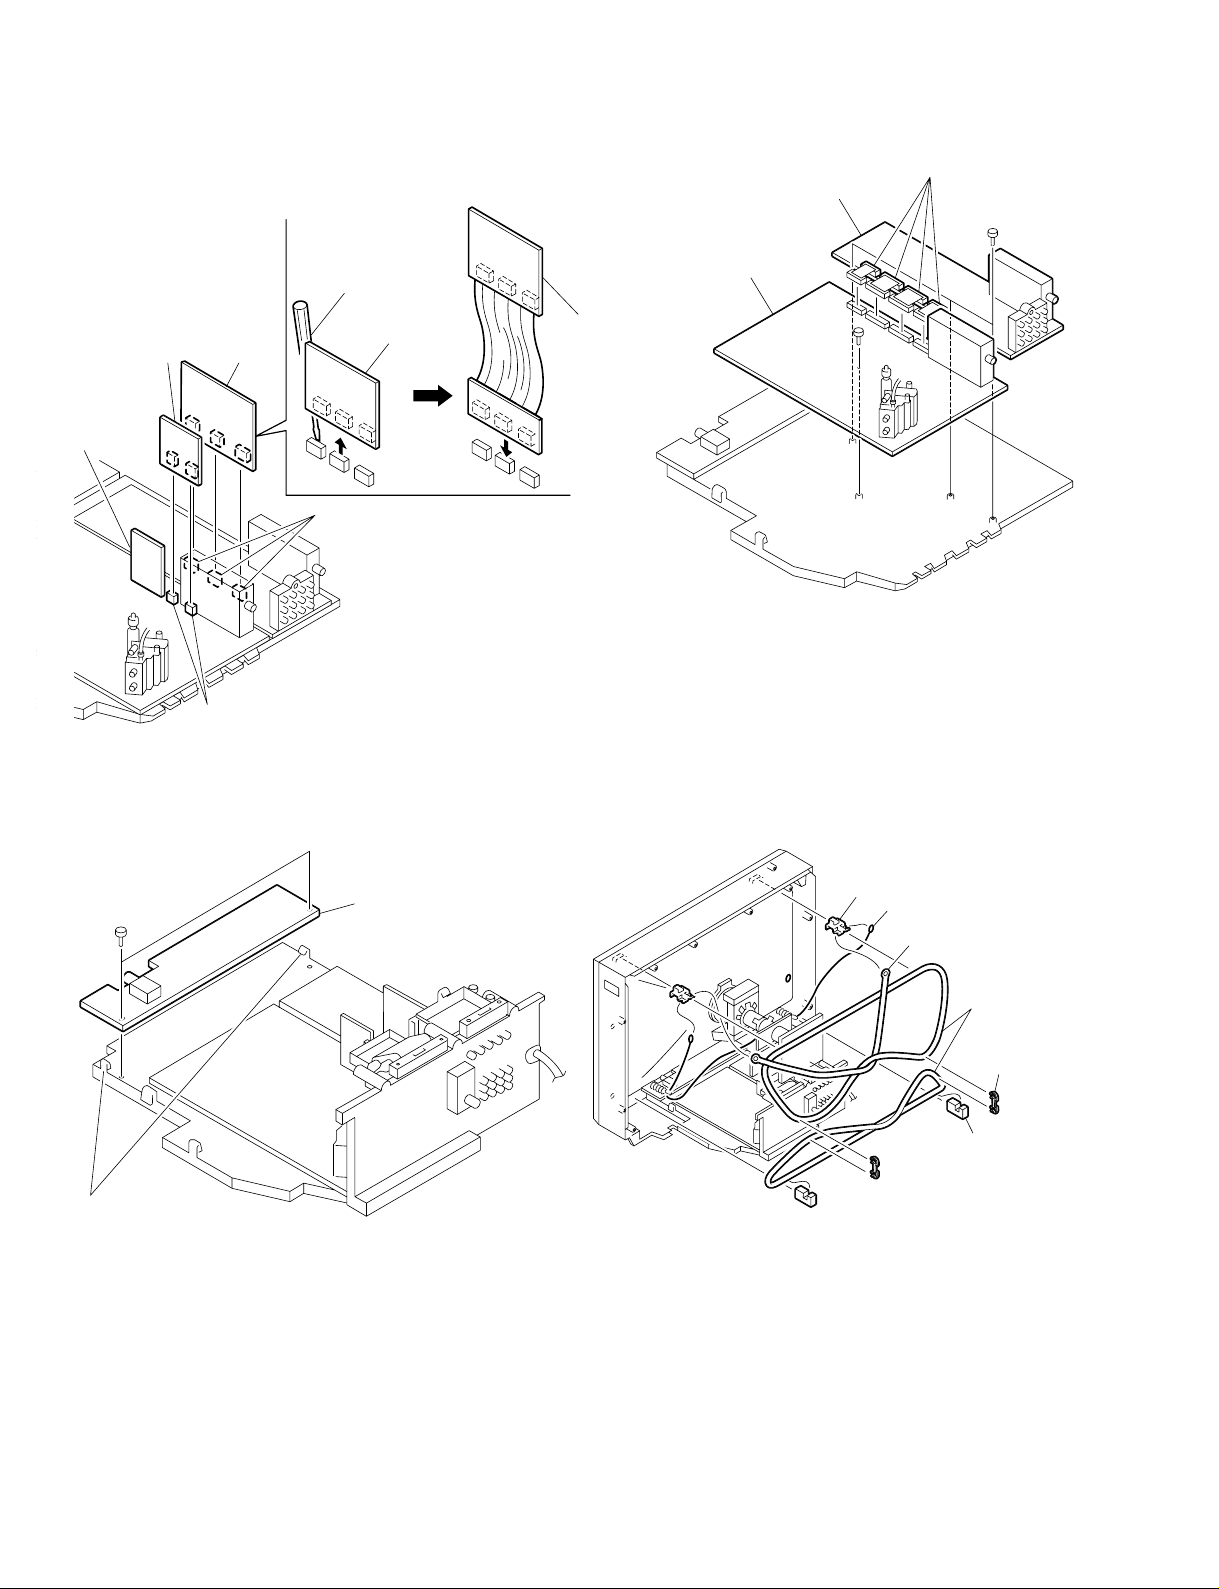
KV -EF34M31/EF34M61/EF34M80/EF34M90/EF34M91
RM-951
2-8. A AND B BOARDS REMOVAL2-7. V1 AND P BOARDS REMOVAL
2V1 board
SBX3005-01
board
Remove the P Board while take off
Connector's craw by tip of screwdriver,etc.
4P board
1Two connector
Driver
P board
3Three connector
P board
4A board
3B board
2Four connector
1Three screws
(+BVTAP 4X16)
2-9. H1 BOARD REMOVAL
1Two screws
(+BVTAP 3X12)
2Two claws
3H1 board
2-10. DEMAGNETIZATION COIL REMOVAL
6Two DGC holders
2Two hooks
3DGC band
5Demagnetization
coil
1Two DGC clips
4Two CRT supporter
– 32 –
Page 33
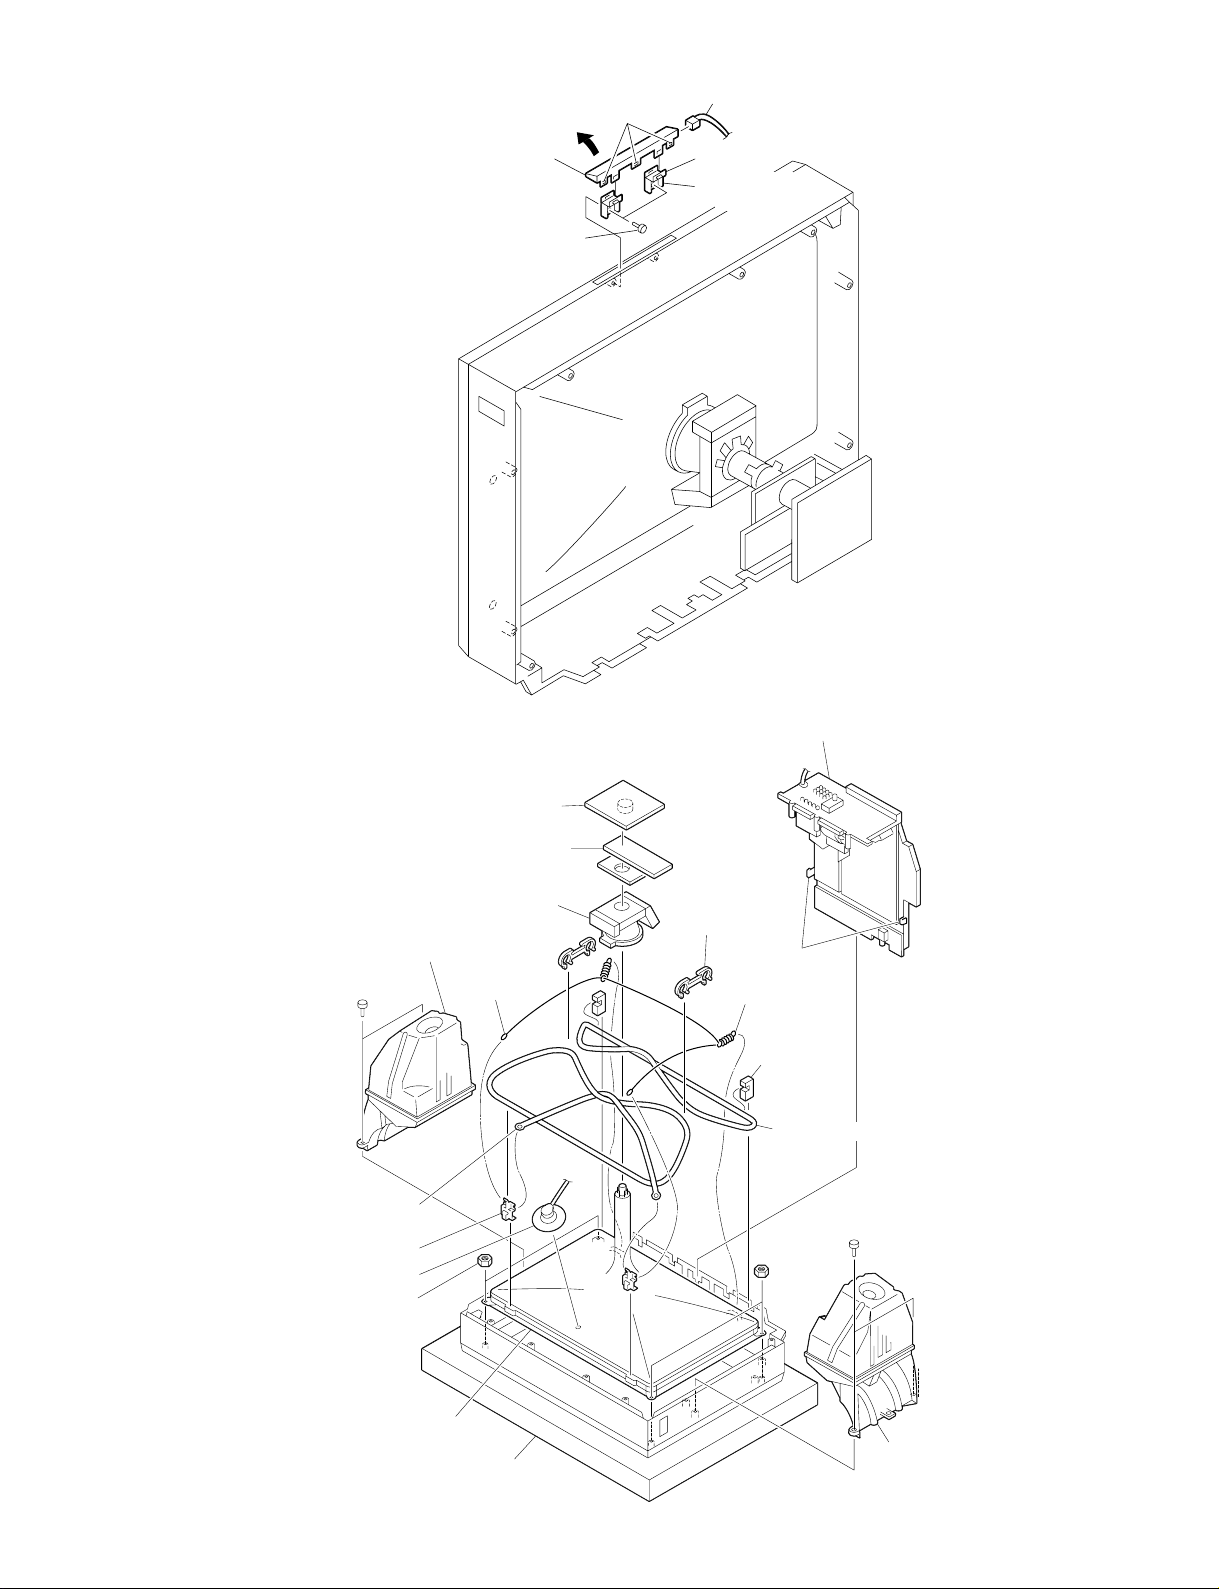
KV -EF34M31/EF34M61/EF34M80/EF34M90/EF34M91
RM-951
2-11. TOP SWITCH REMOVAL
4Top switch
(with top switch
holders)
1Two screws
(+BVTP 3X12)
6Three claws
6connector
4Two claws
5Two top switch
holders
2-12. PICTURE TUBE REMOV AL
2Speaker box(L)
assembly
æ5Two screws
(TP+TWH 4X25)
!]DGC band
!,Two DGC holder
!-Anode cap
!.Four nuts
8C board
9Neck assembly
0Deflection yoke
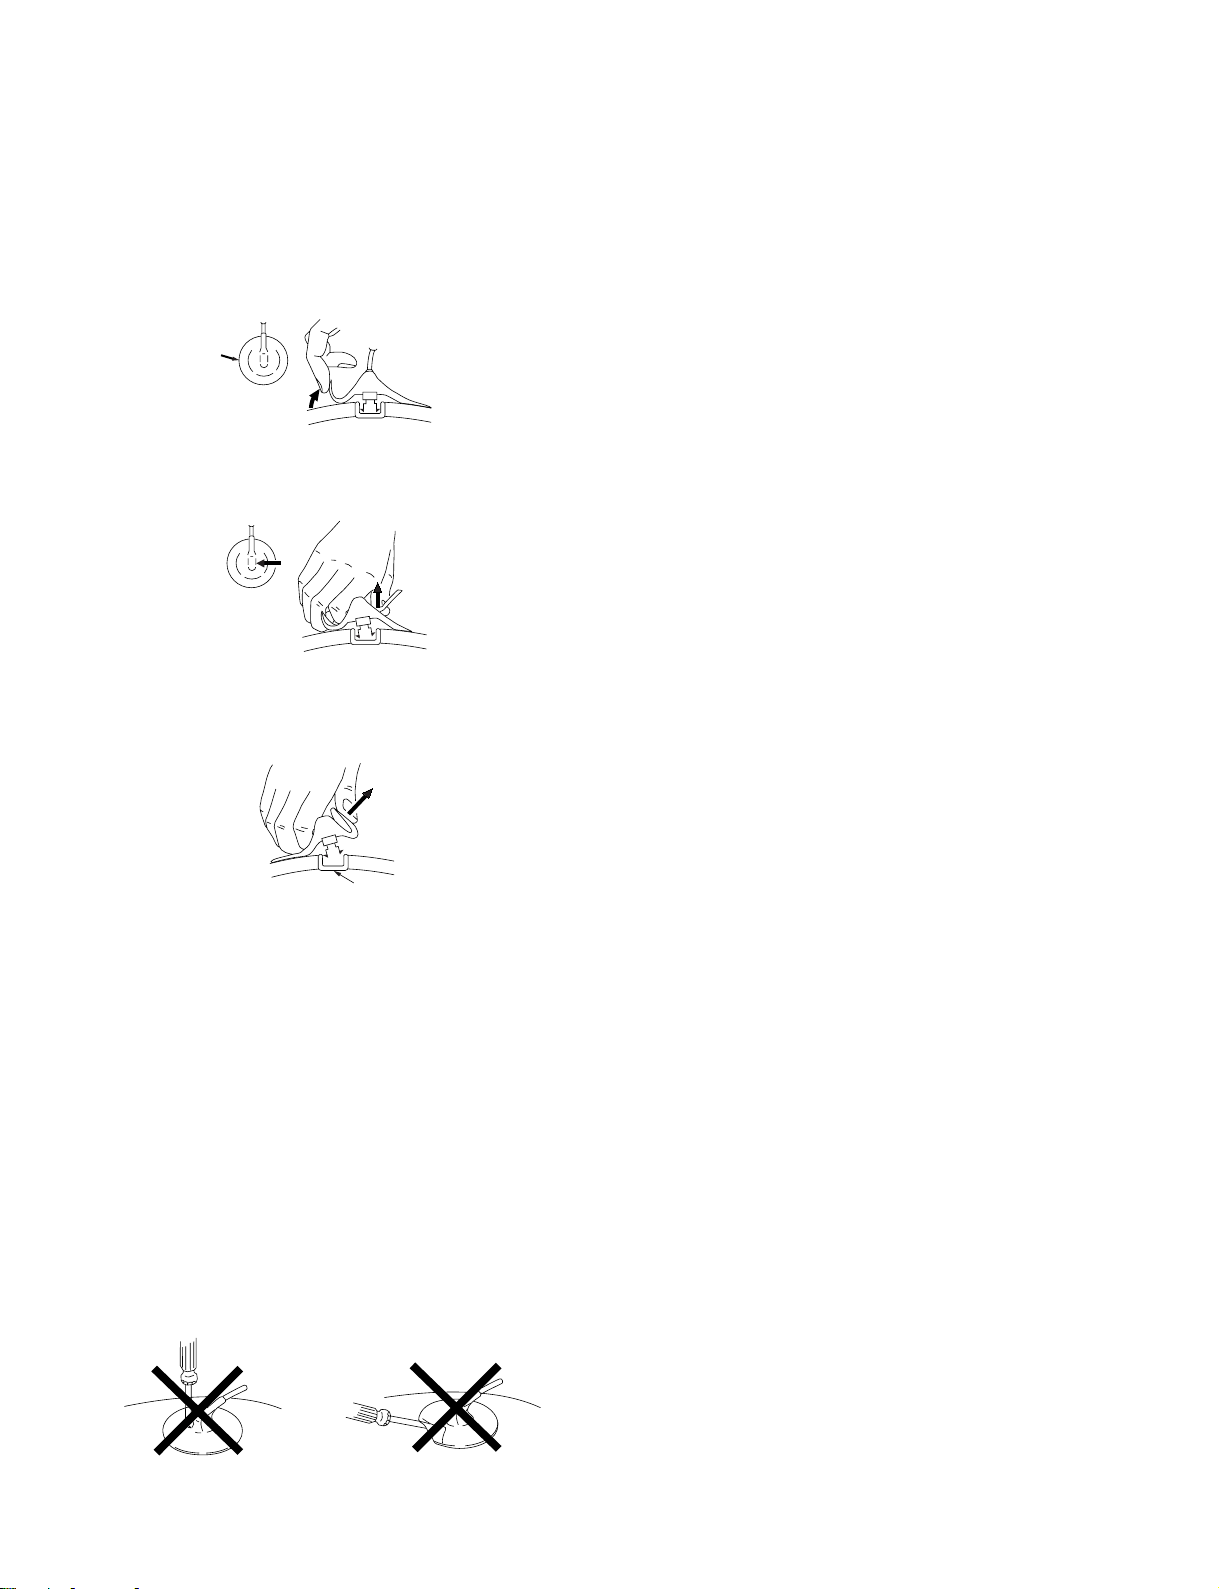
KV -EF34M31/EF34M61/EF34M80/EF34M90/EF34M91
RM-951
•REMOVAL OF ANODE-CAP
NOTE : After removing the anode, short circuit the anode of
the picture tube and the anode cap to the metal chassis, CRT shield or carbon paint on the CRT.
•REMOVING PROCEDURES
a
a
1 Turn up one side of the rubber cap in the direction indicated
by the arrow a.
b
b
2 Using a thumb pull up the rubber cap firmly in the direction
indicated by the arrow b.
c
Anode button
3 When one side of the rubber cap is separated from the
anode button, the anode-cap can be removed by turning up
the rubber cap and pulling it up in the direction of the arrow
c.
• HOW TO HANDLE AN ANODE-CAP
1 Do not damage the surface of anode-caps with sharp
shaped objects.
2 Do not press the rubber too hard so as not to damage the
inside of anode-cap.
A metal fitting called the shatter-hook terminal is built into
the rubber.
3 Do not turn the foot of rubber over too hard.
The shatter-hook terminal will stick out or damage the
rubber.
– 34 –
Page 35
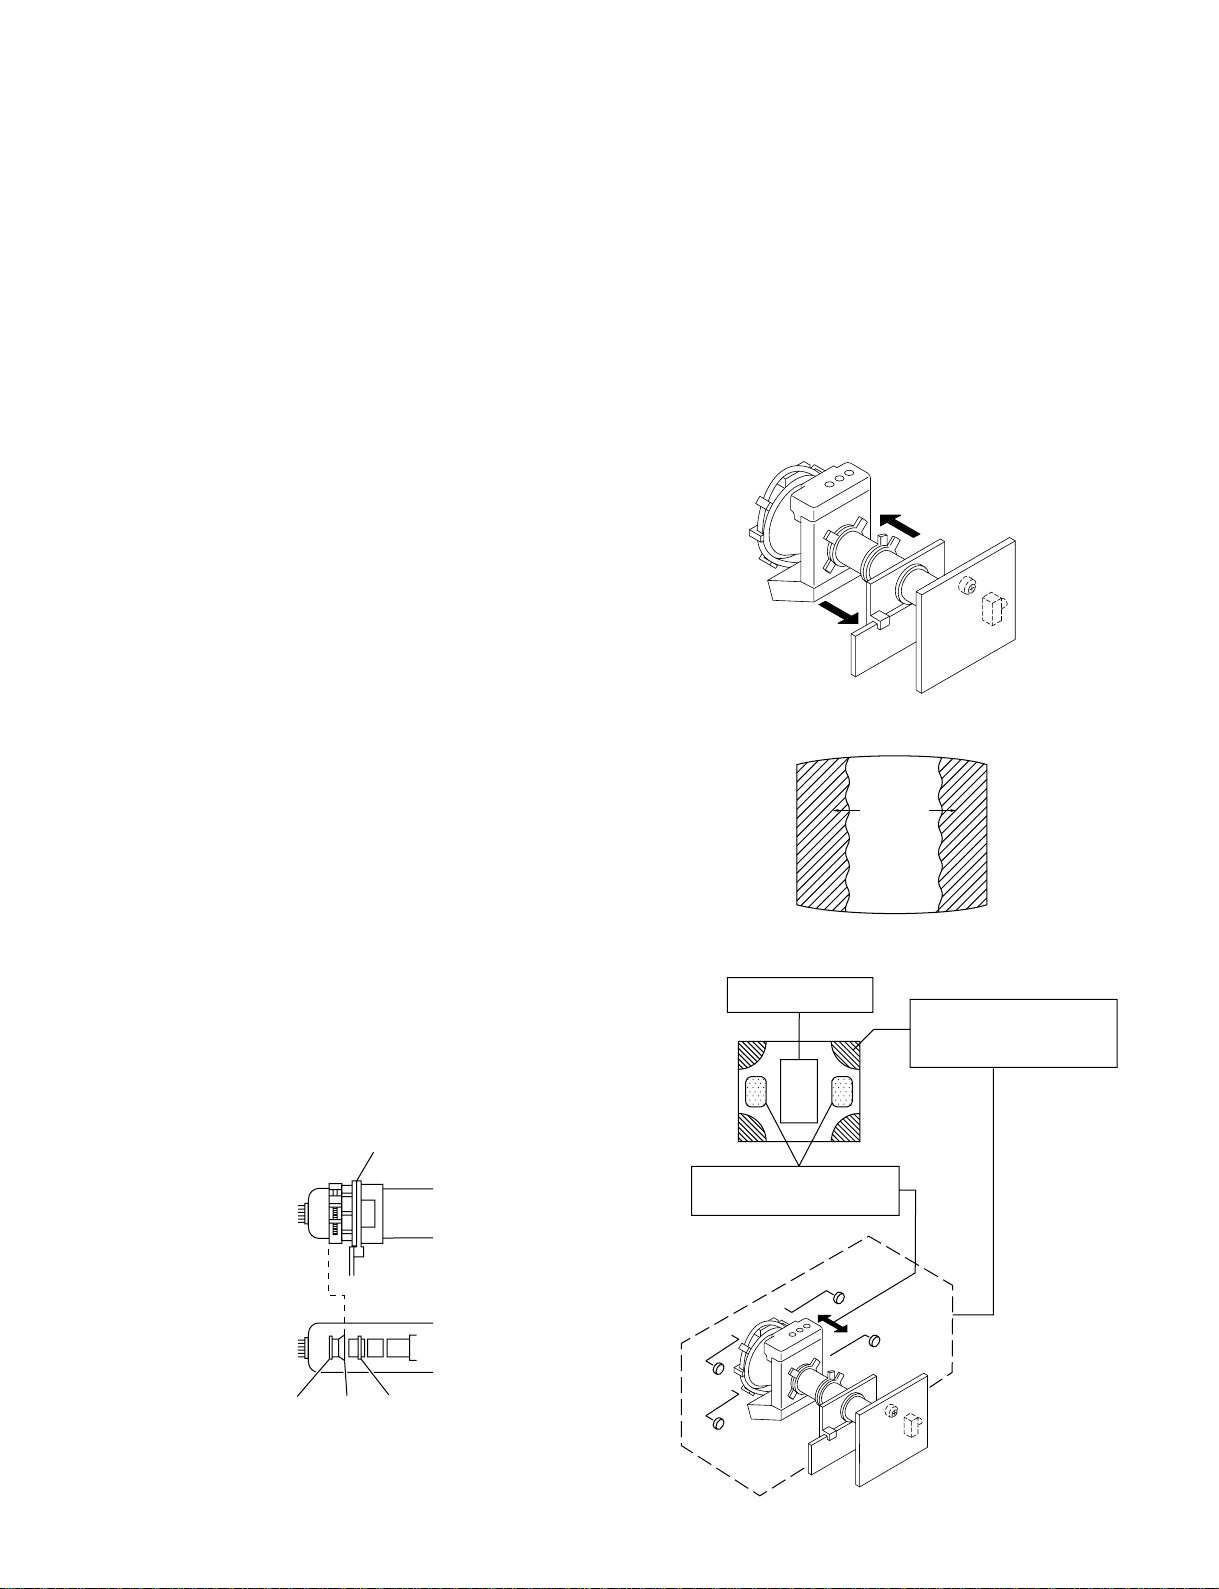
KV -EF34M31/EF34M61/EF34M80/EF34M90/EF34M91
Purity control
corrects this area.
Disk magnets or rotatable
disk magnets correct these
areas (a-d).
Deflection yoke positioning
corrects these areas.
a
b
b
c
c
d
d
a
SECTION 3
SET-UP ADJUSTMENTS
RM-951
• The following adjustments should be made when a complete
realignment is required or a new picture tube is installed.
• These adjustments should be performed with rated power
supply voltage unless otherwise noted.
Controls and switches should be set as follows unless otherwise noted:
PICTURE control........................................................... normal
BRIGHTNESS control................................................... normal
................................................................................................................................................................................................................................
Preparation :
• In order to reduce the influence of geomagnetism on the set's
picture tube, face it east or west.
• Switch on the set's power and degauss with the degausser.
3-1. BEAM LANDING ADJUSTMENT
1. Input a white signal with the pattern generator.
Contrast
Brightness
2. Position neck assy as shown in Fig3-1.
3. Set the pattern generator raster signal to a green raster.
4. Move the deflection yoke to the rear and adjust with the purity
control so that the green is at the center and the blue and the red
take up equally sized areas on each side.
(See Figures 3-1 through 3-3.)
5. Move the deflection yoke forward and adjust so that the entire
screen is green. (See Figure 3-2.)
6. Switch the raster signal to blue, then to green and verify the
condition.
7. When the position of the deflection yoke has been decided,
fasten the deflection yoke with the screws and DY spacers.
8. If the beam does not land correctly in all the corners, use a
magnet to adjust it.
(See Figure 3-4.)
normal
}
Neck assy
Perform the adjustments in the following order :
1. Beam Landing
2. Convergence
3. Focus
4. White Balance
Note : Test Equipment Required.
1. Color-bar/Pattern Generator
2. Degausser
3. Oscilloscope
Fig. 3-2
Blue
Red
Green
Fig. 3-3
Behind the G2 edge
G2G1 G3
Fig. 3-1
Fig. 3-4
– 35 –
Page 36
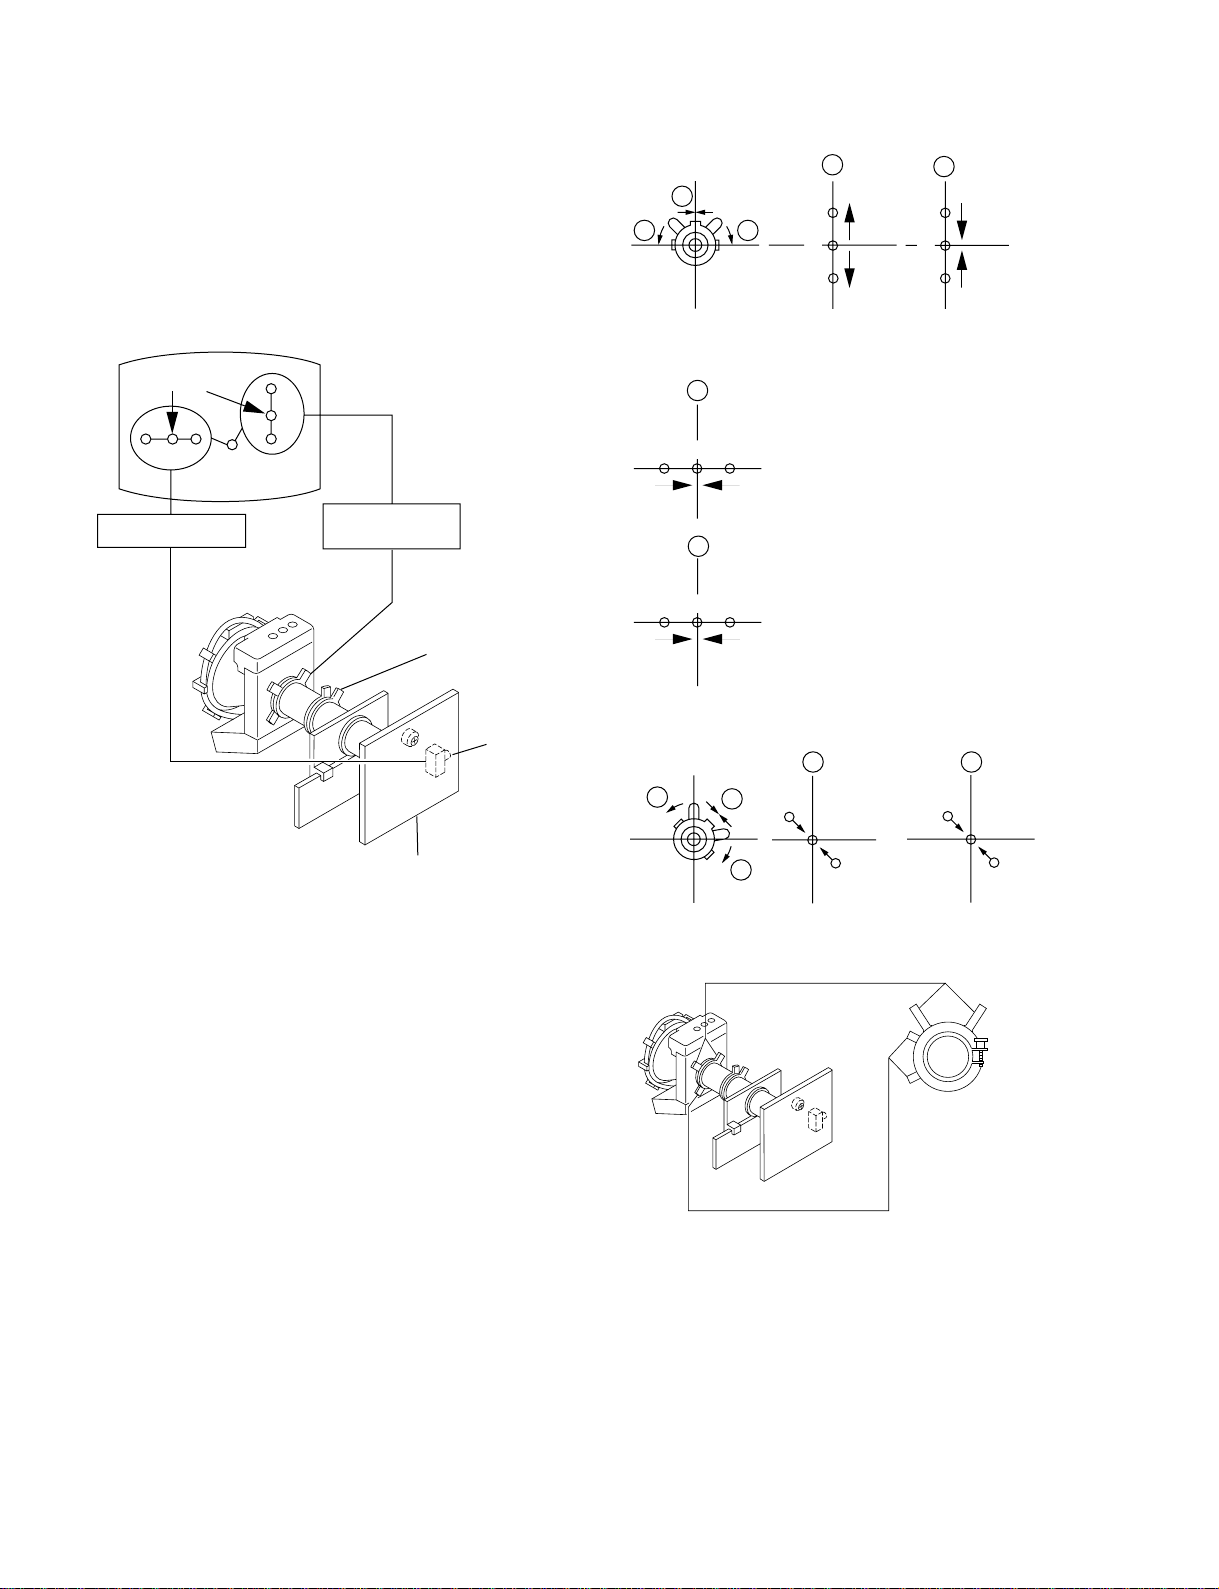
KV -EF34M31/EF34M61/EF34M80/EF34M90/EF34M91
RM-951
3-2. CONVERGENCE ADJUSTMENT
Preparation :
• Before starting this adjustment, adjust the focus, horizontal size
and vertical size.
• Set the PICTURE and BRIGHTNESS 50%.
• Cross hatch / Dot pattern.
(1) Horizontal and Vertical Static Convergence
Center dot
R G B
H. STAT VR
R
G
B
V. STAT
Magnet
Y magnet
1 V. STAT
a
b b
2 H. STAT VR
a
RGGBB
b
a
B
G
R
R
b
B
G
R
RV702
H. STAT
C Board
1. (Moving horizontally), adjust the H.STAT control so that the
red, green and blue dots are on top of each other at the center of
the screen.
2. (Moving vertically), adjust the V.STAT magnet so that the red,
green and blue dots are on top of each other at the center of the
screen.
3. If the H.STAT variable resistor cannot bring the red, green and
blue dots together at the center of the screen, adjust the
horizontal convergence with the H.STAT variable resistor and
the V.STAT magnet in the manner given below.
(In this case, the H.STAT variable resistor and the V.STAT
magnet influence each other, so be sure to perform adjustments
while tracking.)
3
a
b
a
R
b
B
Purity
V.STAT
b
B
GG
R
– 36 –
Page 37
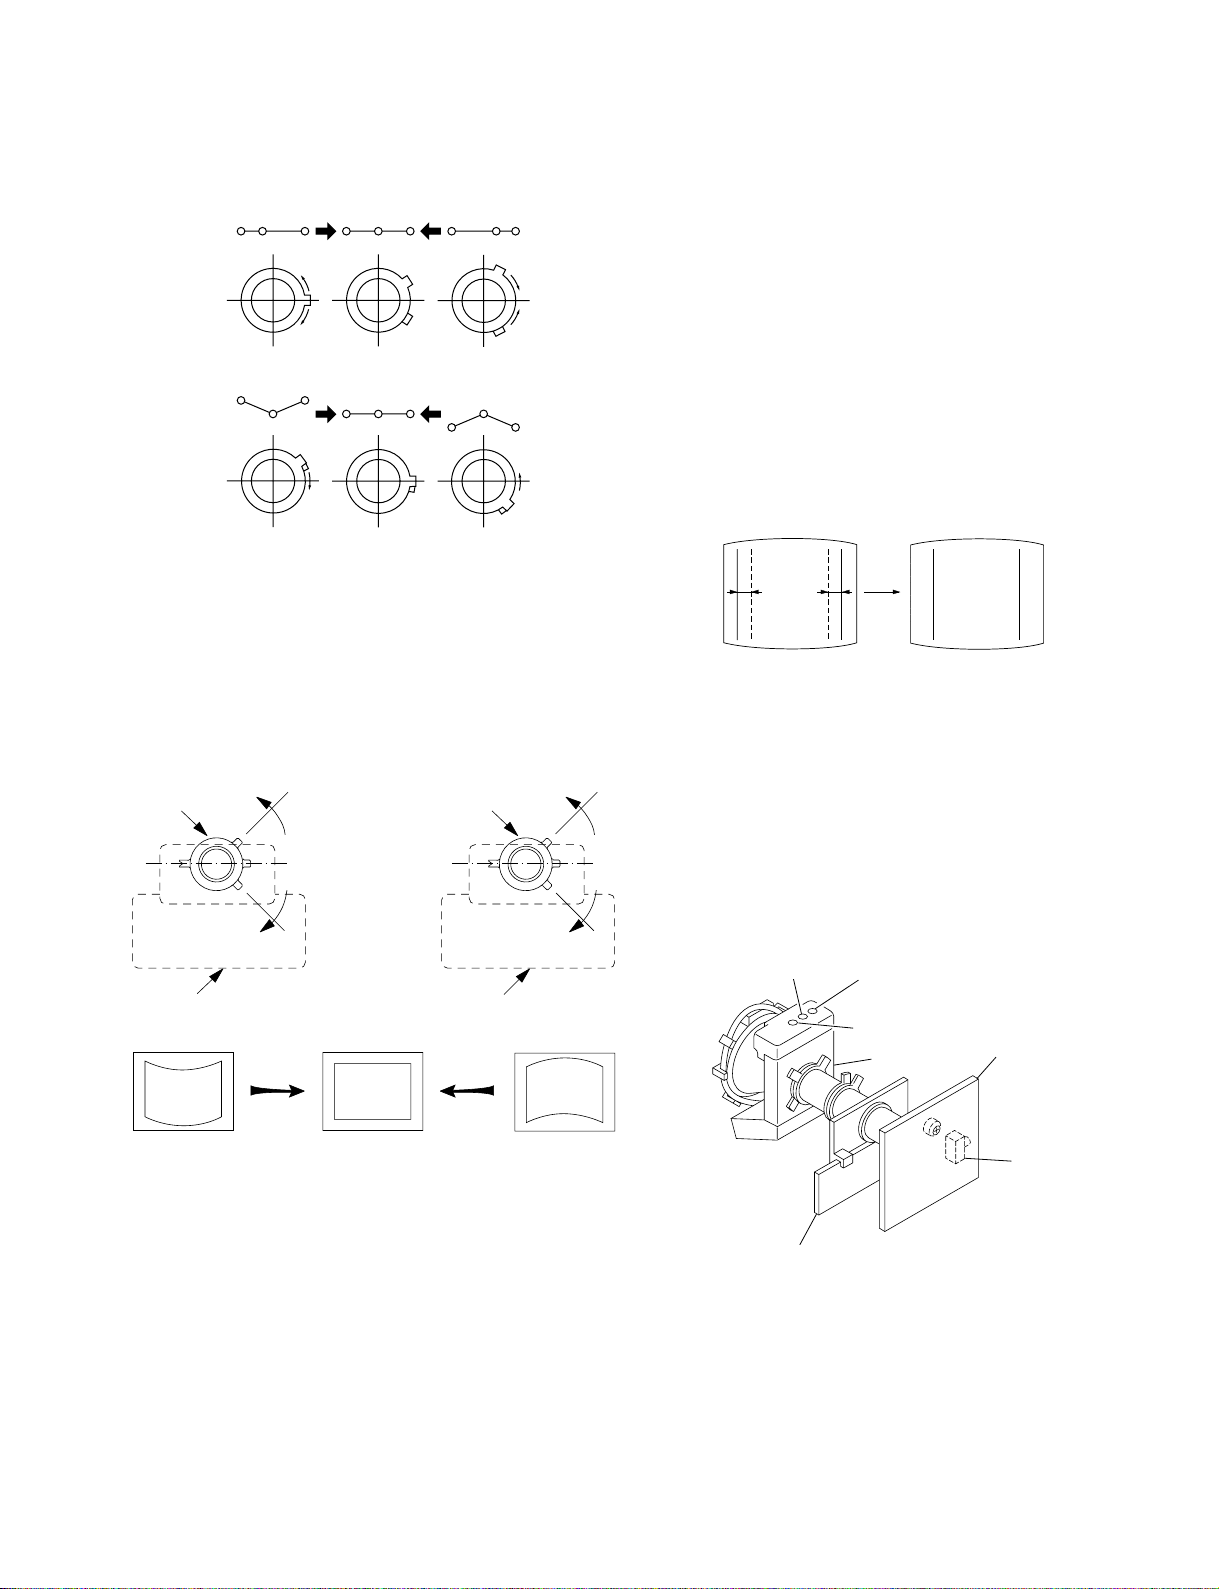
KV -EF34M31/EF34M61/EF34M80/EF34M90/EF34M91
RM-951
4 BMC (Hexapole) Magnet.
If the red, green and blue dots are not balanced or aligned, then
use the BMC magnet to adjust in the manner described below.
RG B R G B R GB
RB
G
RG
GB
RB
5 Y separation axis correction magnet adjustment.
1. Receive the cross-hatch signal and adjust [PICTURE] to [MIN]
and [BRIGHTNESS] to [STANDARD] .
2. Adjust the Y separation axis correction magnet on the neck
assembly so that the horizontal lines at the top and bottom of
the screen are straight.
Neck assy Neck assy
VM board
Blue
Red
VM board
Red
Blue
(2) Dynamic Convergence Adjustment
Preparation:
• Before starting this adjustment, adjust the horizontal static
convergence and the vertical static convergence
• Set the PICTURE and BRIGHTNESS to normal.
1. Adjust TLH. (TLH correction piece)
1 Receive the dot/hatch pattern signal and adjust picture quality
by the menu.
2 Correct horizontal mis-convergence of red and blue of both
sides on the X axis.
When red is outside insert BMC magnet to right side (THL+)
views from DY neck. And when blue is outside, insert it to left
side (THL–) and take both sides.
R
(B)B(R)
B
TLH +
R
(R)
(B)
TLH -
2. Adjust XCV core.
To able to become balance of XCV on the X axis well.
3. Adjust V-TIL T.
Correct the vertical mis-convergence of red and blue of vertically sides on the Y axis.
4. Adjust YCH.
Adjust horizontal mis-convergence of red and blue of vertically sides on the Y axis. Mentioned above steps 2 to 4 are
adjusting respectively perform minuteness tracking.
H-TRPYCH
TLV
BMC magnet
C board
Note
1. The Red and Blue magnets should be equally far from the
horizontal center line.
2. Do not separate the Red and Blue magnets too far. (Less than
8 mm)
RV702
VM board
– 37 –
Page 38
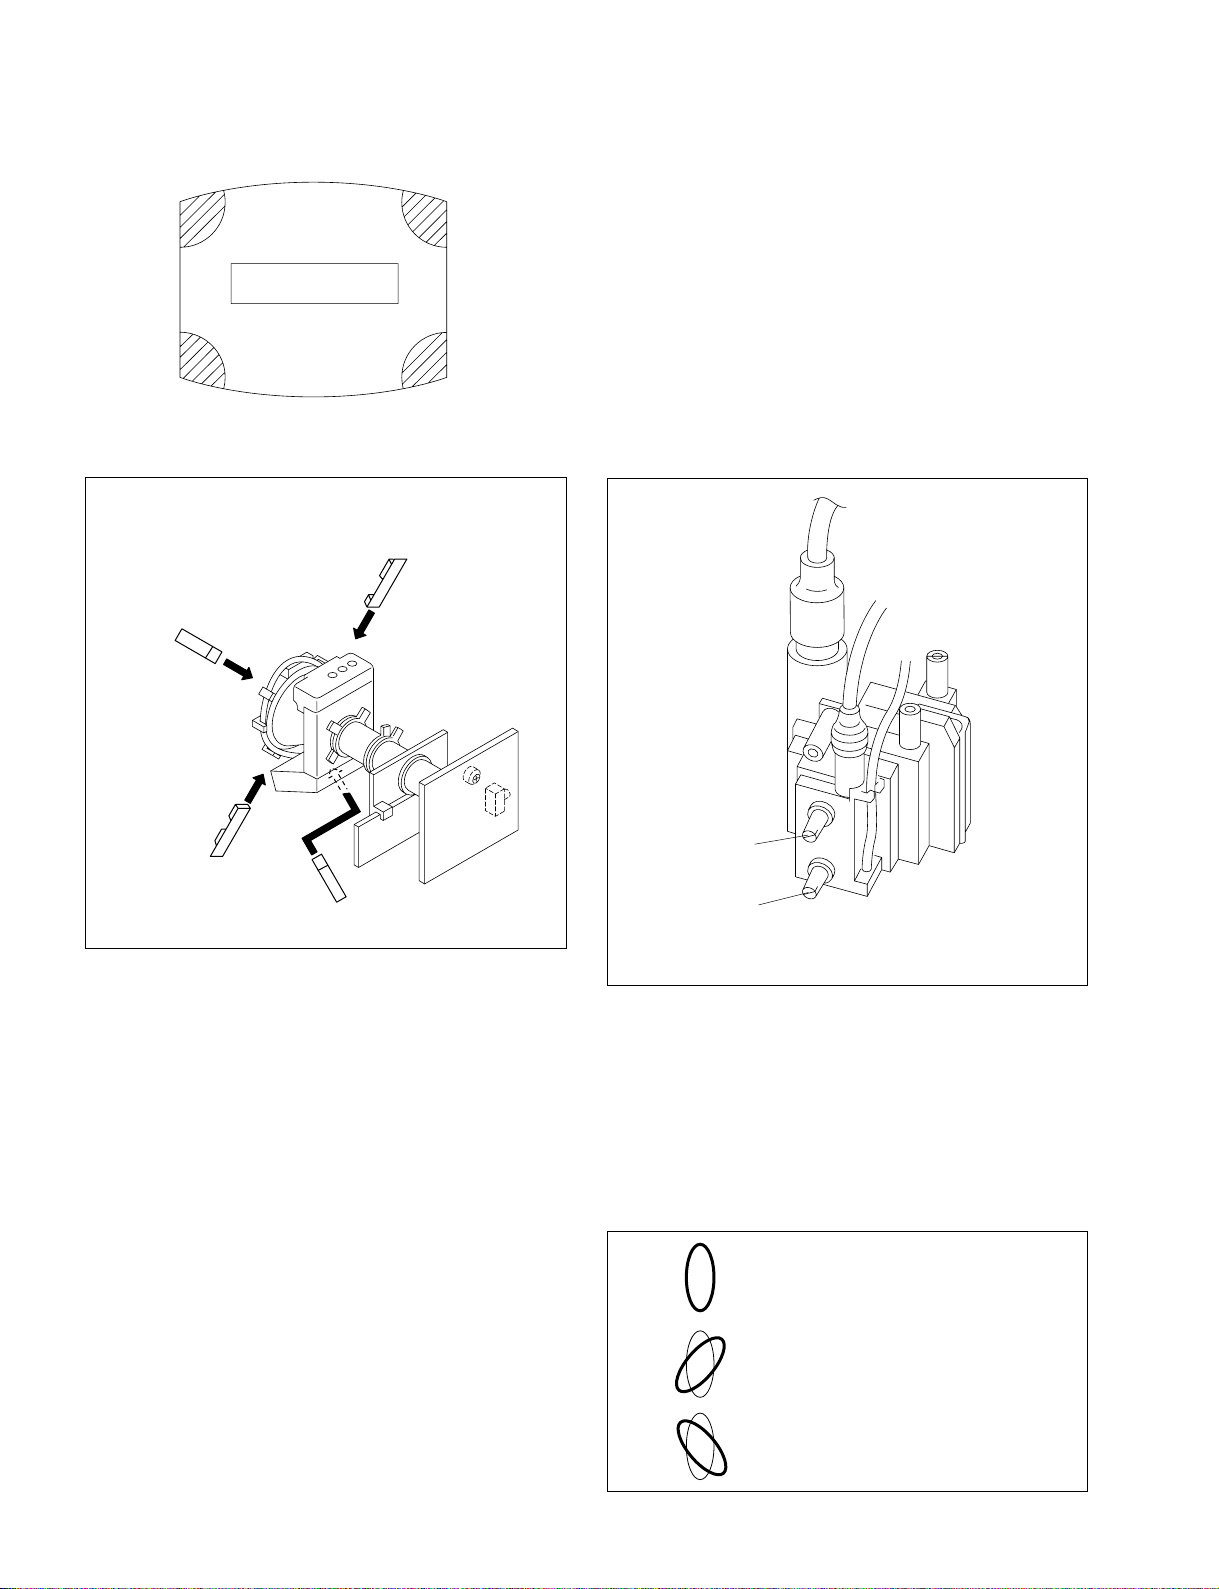
KV -EF34M31/EF34M61/EF34M80/EF34M90/EF34M91
RM-951
(3) Screen-corner Convergence
ba
a-d : screen-corner
misconvergence
cd
Fix a Permalloy assy corresponding to the misconverged
areas.
b
a
3-3. FOCUS ADJUSTMENT
Note
Focus adjustment should be completed before W/B adjustment.
(1) Receive digital monoscope pattern.
(2) Set "A/V CONTROL" to "STANDARD".
(3) Adjust FOCUS VR so that the center of the screen becomes
justfocus.
(4) Change the receiving signal to white pattern and blue back.
(5) Confirm MAGENTA RING should not be over the limit sam-
ple. In case MAGENTA RING is over the limit sample, adjust
FOCUS VR to take tracking of MAGENTA RING and FO-
CUS.
d
Permalloy assembly
Focus
c
Screen
FLYBACK TRANSFORMER (T503)
3-4. NECK ASSY TWIST ADJUSTMENT
(1) Receive dot/hatch pattern.
(2) Turn FOCUS VR fully counter-clockwise.
(3) Confirm the dot shape at the screen center. (Fig. 3-4)
(4) Resume FOCUS VR.
Note
In case of turning NECK ASSY, loosen the screw 3 turns. Do not
move the position.
OK
Turn NECK ASSY clockwise.
– 38 –
Turn NECK ASSY counter clockwise.
Fig. 3-4
Page 39
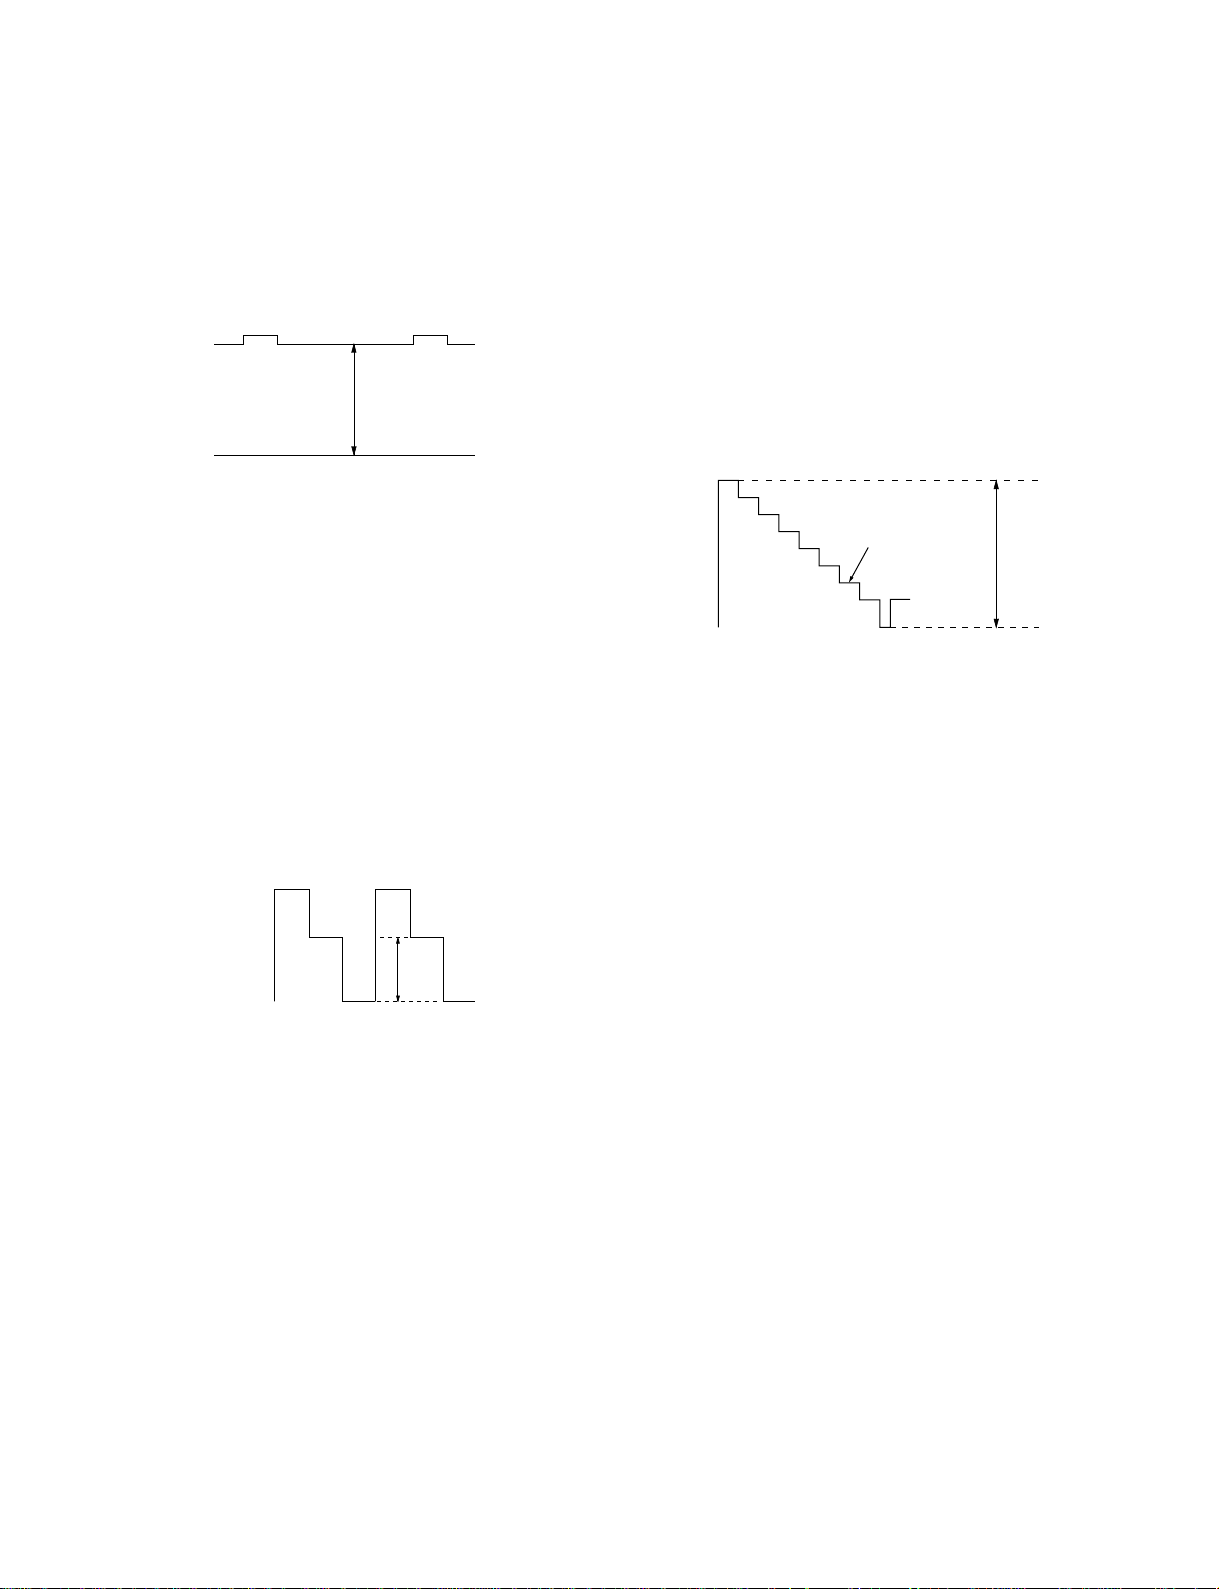
KV -EF34M31/EF34M61/EF34M80/EF34M90/EF34M91
RM-951
3-5. G2 (SCREEN) AND WHITE BALANCE
ADJUSTMENTS
1. G2 (SCREEN) ADJUSTMENT
1) Set the PICTURE and BRIGHTNESS to normal.
2) Put to VIDEO input mode without signals.
3) Connect R, G and B of the C board cathode to the oscilloscope.
4) Adjust G2 (Screen) volume to the value below.
175 V ± 2 (VDC)
0 V
2. DRIVE LEVEL ADJUSTMENT
1) Set to Service Mode (Refer Section 4-1: ADJUSTMENTS
WITH COMMANDER).
2) Input PAL Colorbar Signal.
3) Set to VP7 (Service Mode) "DYC" = 0.
4) Set VP22 GON to "0",VP23 BON to "0".
5) Set to A/V mode to "PERSONAL".
6) Connect an osilloscope to pin 2 of CN705 on the C board.
7) Set the picture to maximum and Brightness to minimum.
Enter into the Service Mode.
8) Using the
9) Using the
just until the oscilloscope waveform has an amplitude of 1.64
± 0.05Vp-p.
[1] and [4] buttons select SAJ0 "PMX".
[3] and [6] buttons on the Remote Commander ad-
4. SUB PICTURE BRIGHTNESS ADJUSTMENT
1) Set to service mode (Refer Section 4-1: ADJUSTMENTS WITH
COMMANDER).
2) Input a P AL RF colorbar signal through Sub TUNER (TU3301).
3) BRIGHTNESS....RESET.
PICTURE ............MINIMUM
4) A:Select SBR (WHB7) with
level with
is dimly lit.
B:Adjust RV5301 on B board so that the level of CN1310 0
pin is within spec.
White
[3] and [6] so that the second stripe from the right
A:
second from the right
[1] and [4], and adjust SBR (WHB7)
B:
0.68 ± 0.01Vp-p
Black
1.64 ± 0.05Vp-p
10) Reset to VP7 "DYC" = 1 and VP22 "GON" to 1, VP23 BON to
"1".
3. WHITE BALANCE ADJUSTMENT
1) Set to Service Mode (Refer Section 4-1: ADJUSTMENTS
WITH COMMANDER).
2) Input white raster signal.
3) Set the following condition.
PICTURE minimum, BRIGHTNESS 50%
4) Select GCT (WHB 4) and BCT (WHB 5) with
adjust the level with
5) Set the PICTURE to maximum.
6) Select GDR (WHB 1) and BDR (WHB 2) with [1] and [4], and
adjust the level with
7) Write into the memory by pressing
[3] and [6] for the best white balance.
[3] and [6] for the best white balance.
[MUTING] then [0].
[1] and [4], and
– 39 –
Page 40
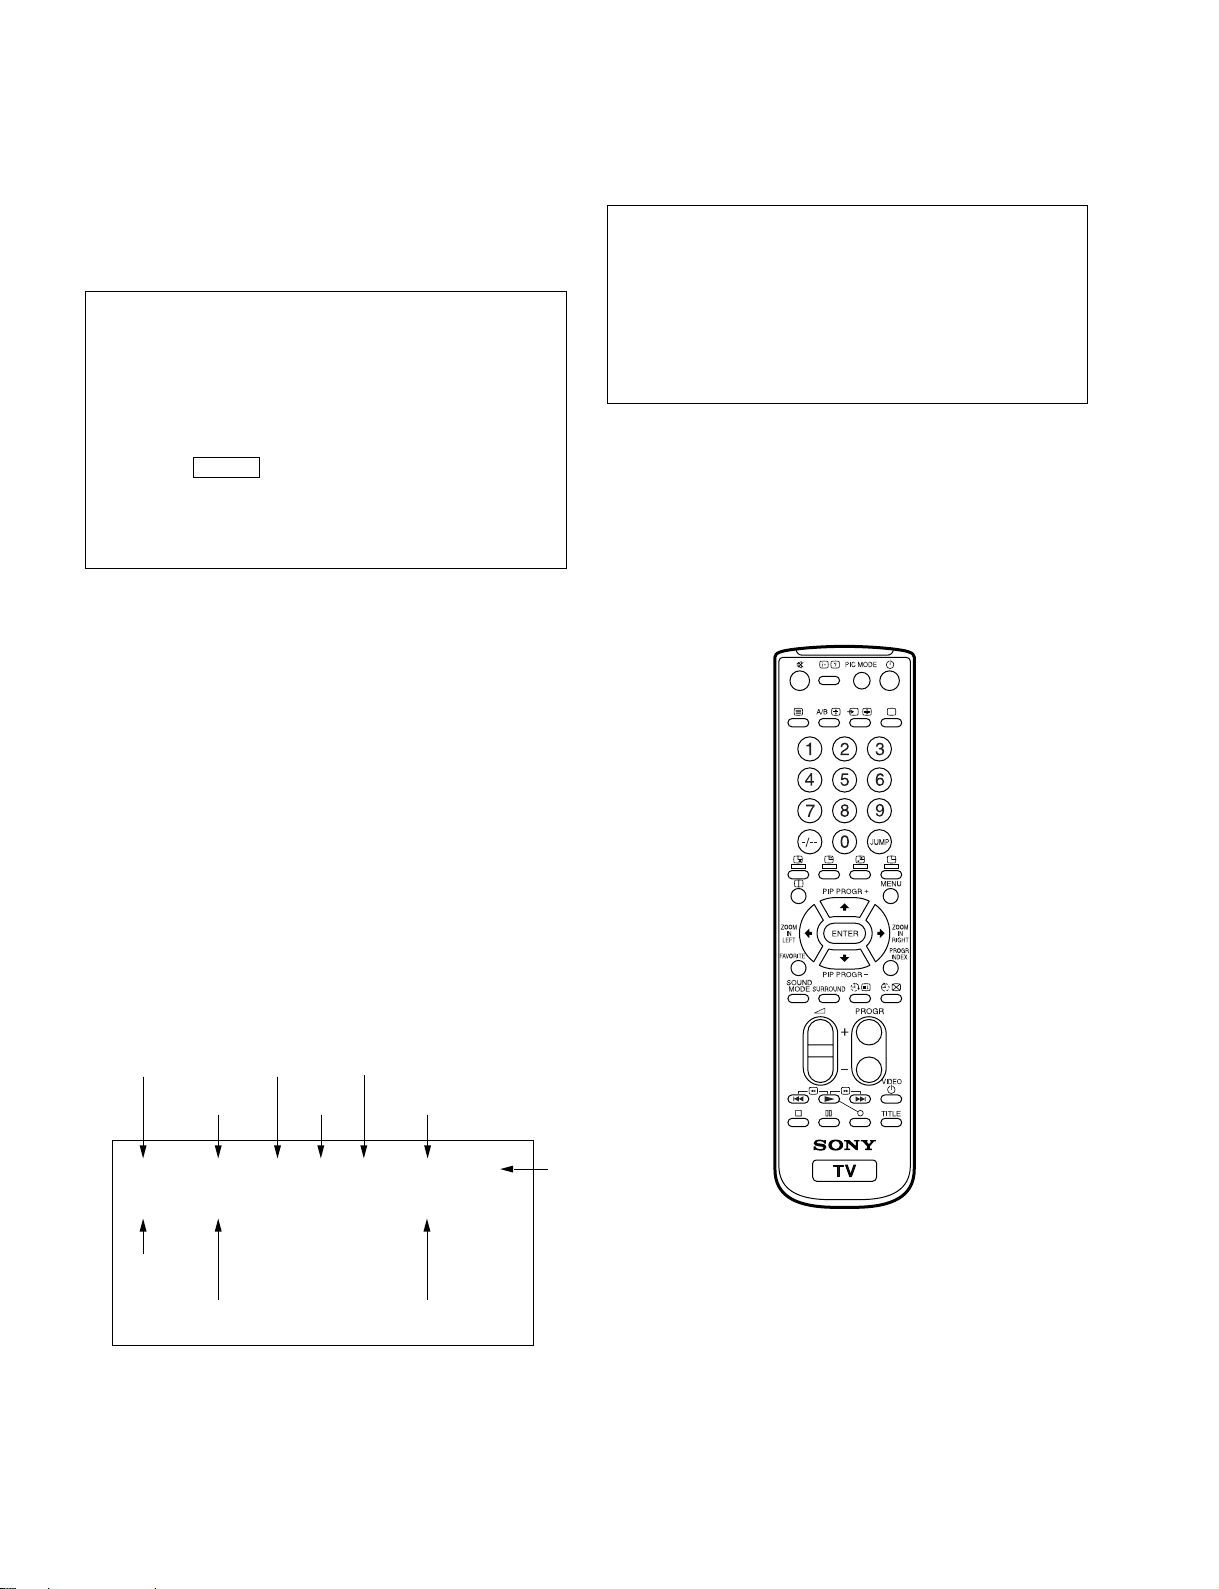
KV -EF34M31/EF34M61/EF34M80/EF34M90/EF34M91
RM-951
SECTION 4
CIRCUIT ADJUSTMENTS
4-1. ADJUSTMENTS WITH COMMANDER
Service adjustments are made with the RM-951 that comes with
this unit.
a. ENTERING SERVICE MODE
With the unit on standby
↓
[DISPLAY]
↓
5
↓
VOL (+)
↓
[POWER]
This operation sequence puts the unit into service mode.
b. METHOD OF CANCELLATION FROM SERVICE
MODE
Set the standby condition (Press [POWER] button on the commander),
then press [POWER] button again, hereupon it becomes TV mode.
1, 4 Select the adjustment item.
↓
3, 6 Raise/lower the data value.
↓
[MUTING] Writes.
↓
- Executes the writing.
7, - All the data becomes the values in memory.
8, - All user control goes to the standard state.
5, - Service data initialization (Be sure not to use
usually.)
2, - Write 50Hz adjustment data to 60Hz, or vice
versa.
c. METHOD OF WRITE INTO MEMORY
1) Set to Service Mode.
2) Press [1] (UP) and [4] (DOWN), select an item of adjustment.
3) Press [MUTING] button and it will indicate WRITE on the screen.
4) Press [0] button to write into memory.
d. MEMORY WRITE CONFIRMATION METHOD
1) After adjustment, pull out the plug from AC outlet, and then
plug into AC outlet again.
2) Turn the power switch ON and set to Service Mode.
3) Call the adjusted items again to confirm adjustments were made.
The screen display is :
Device Name
GEO
Suffix No
(OEM Code)
Software version
Item Name
Item No
00 HPS 1C SERVICE
1.0C 59 7F 000A0601S
Marking of virgin NVM
Data
Total Power-On time (hours)
Mode
p
50
PAL, SECAM : 50
NTSC : 60
RM-951
– 40 –
Page 41
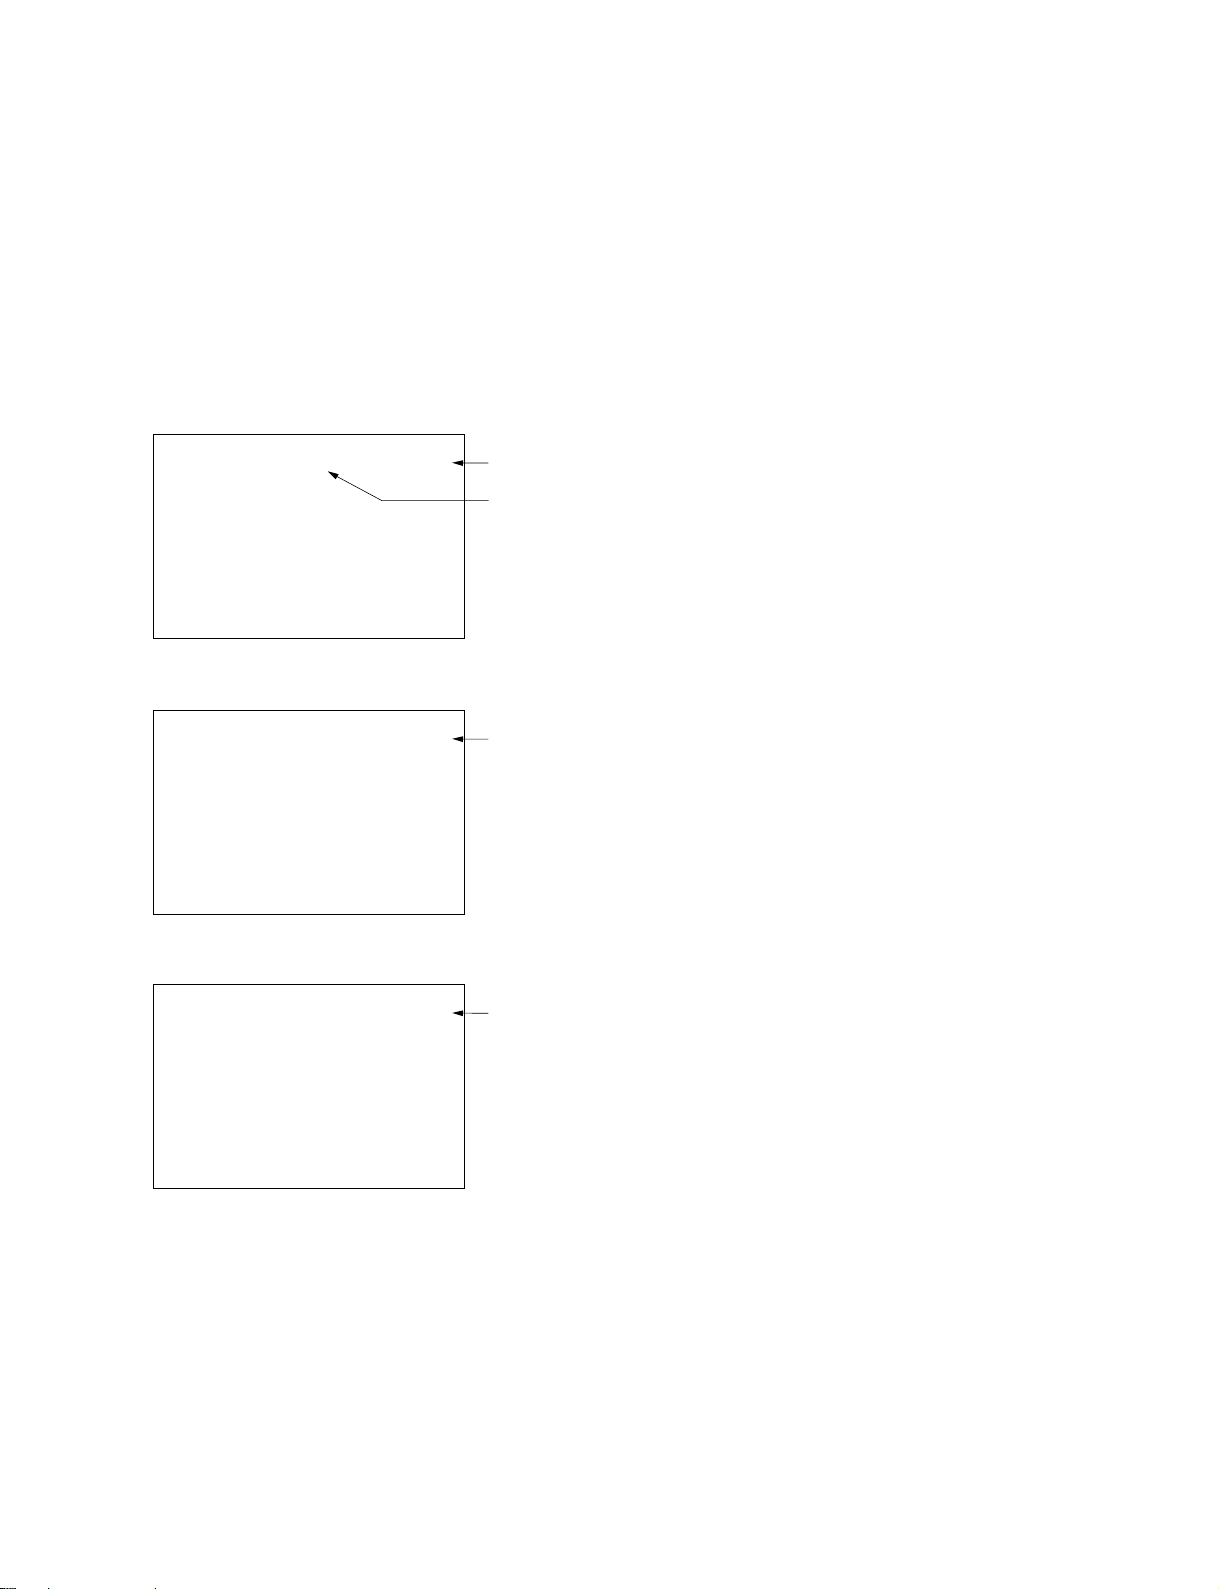
4-2. ADJUSTMENT METHOD
Item Number 00 of device GEO
This explanation uses H-Position as an example.
1. Select “GEO 00 HPS” with the 1 and 4 buttons.
2. Raise/lower the data with the 3 and 6 buttons.
3. Select the optimum state. (The standard is 1F for P AL reception.)
4. Write with the
WRITE.)
5. Execute the writing with the - button. (The WRITE
display will be changed to red color while excuting, and back
to SERVICE.)
[MUTING] button. (The display changes to
KV-EF34M31/EF34M61/EF34M80/EF34M90/EF34M91
Use the same method for all Items. Use 1 and 4 to select the
adjustment item, use 3 and 6 to adjust, write with
then execute the write with -.
Note : 1. In
[WRITE], the data for all items are written into memory
together.
2. For adjustment items that have different standard data
between 50Hz or 60Hz, be sure to use the respective
input signal after adjustment.
[MUTING],
RM-951
GEO 00
GEO 00
GEO 00
1F SERVICE 50HPS
7F 0 000A59601S 1.0C
1F WRITE 50HPS
7F 0 000A59601S 1.0C
Written with [MUTING]
1F SERVICE 50HPS
7F 0 000A59601S 1.0C
GREEN
Adjusted with [3]
and [6] buttons.
GREEN
RED
The WRITE display
then the display
returns to a green
SERVICE.
Write executed with [0]
– 41 –
Page 42
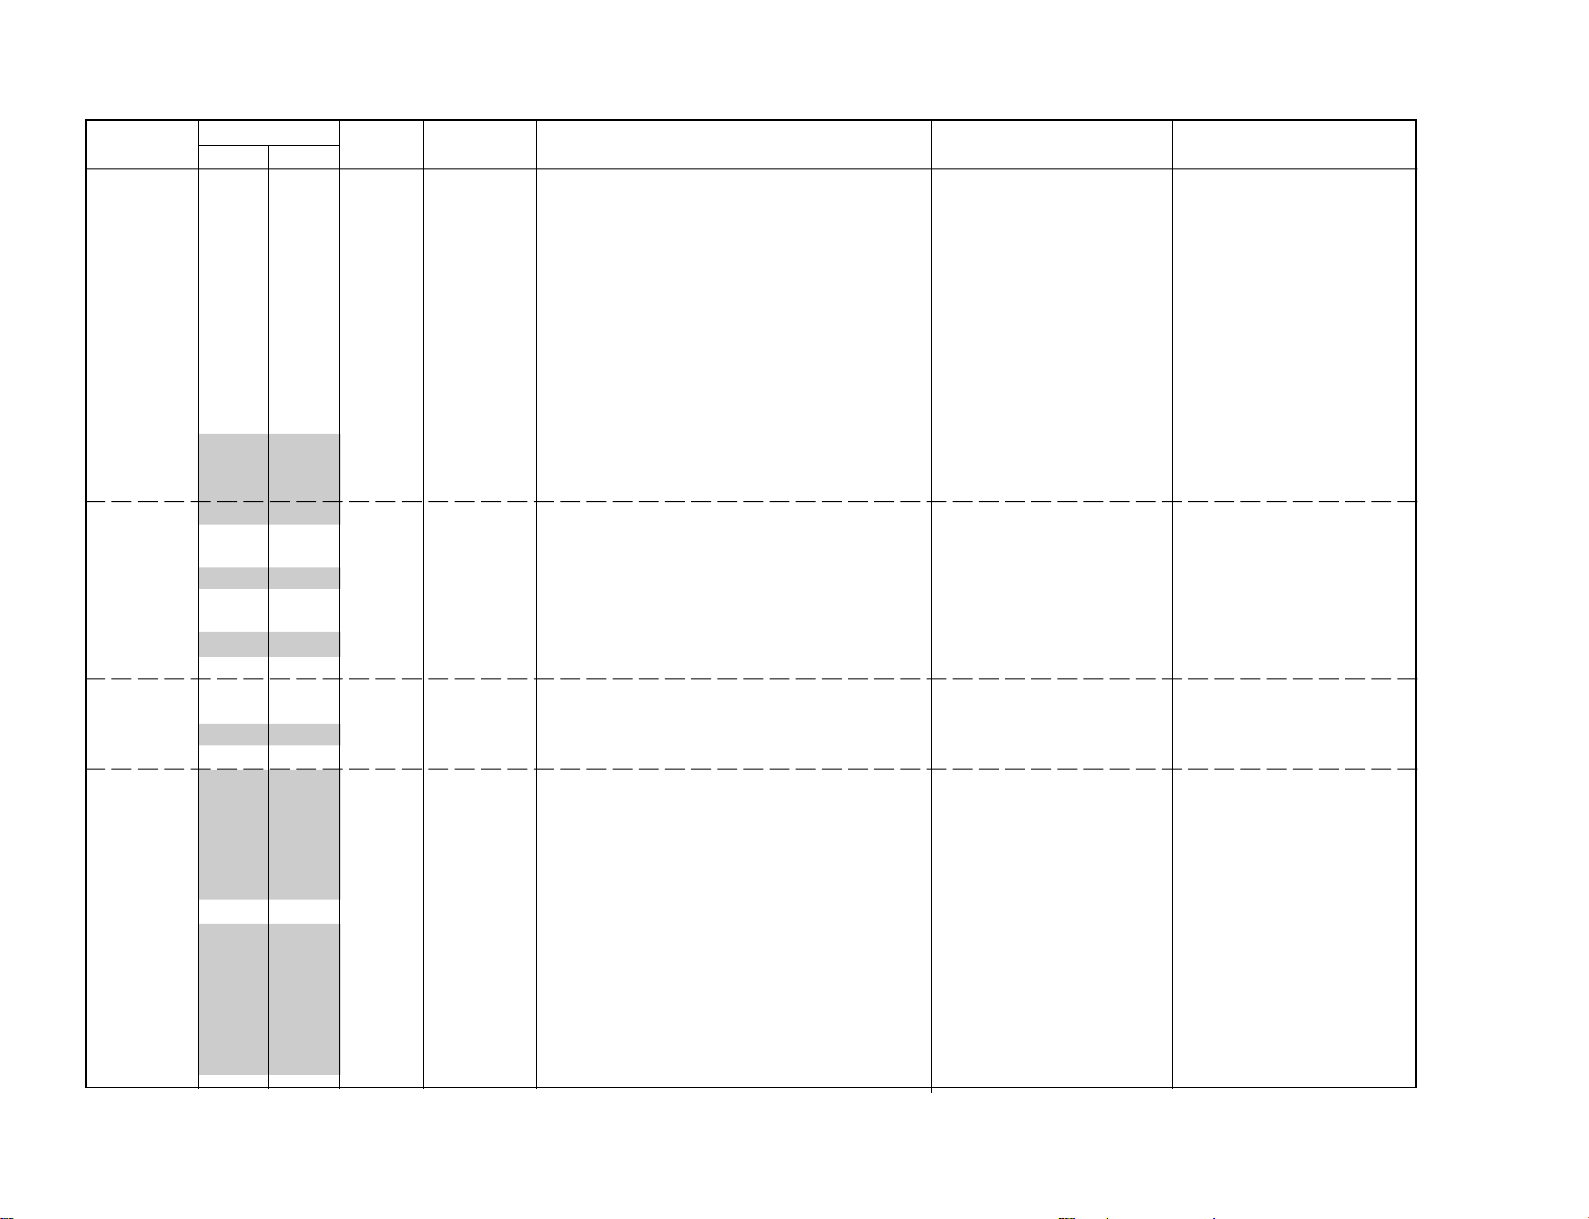
– 42 –
Adjustment Item Table
Device Functionality Note Data Range Function Note for Slava
Name No Name Different Data Address
GEO 0 HPS 13 3F H Position 50/60/MID50/MID60 CXA2130S(88H)
1 HSZ 26 3F H Size 50/60/MID50/MID60
2 PAP 22 3F Pin Amp 50/60Hz
3 TLT 6 0F Trapezium 50/60/MID50/MID60
4 VPS 25 3F V Position 50/60/MID50/MID60
5 VSZ 16 3F V Size 50/60/MID50/MID60
6 SCO 8 0F S Correction 50/60Hz
7 VLN 7 0F V Linearity 50/60Hz
8 BOW 8 0F AFC Bow 50/60Hz
9 AGL 8 0F AFC Angle 50/60Hz
0A UPN 25 3F Upper Pin 50/60Hz
0B LPN 25 3F Lower Pin 50/60Hz
0C HBL 0 1 H Blanking on/off
0D LBL 7 0F Left H Blanking 50/60Hz
0E RBL 7 0F Right H Blanking 50/60Hz
WHB 0 RDR 25 3F R Drive DYNAMIC/others CXA2130S(88H)
1 GDR 25 3F G Drive DYNAMIC/others
2 BDR 25 3F B Drive DYNAMIC/others
3 RCT 7 0F R Cutoff SECAM/others
4 GCT 7 0F G Cutoff SECAM/others
5 BCT 7 0F B Cutoff SECAM/others
6 BMN 18 1F Brightness Minimum Data
7 SBR 2E 3F Sub Brightness Control
SAJ 0 PMX 2B 3F Picture Maximum Data CXA2130S(88H)
1 SHU 0 0F Sub Hue Control TV/Video
2 SSH 4 0F Sub Sharpness Control TV/Video
3 SCL 20 3F Sub Color Control NTSC/others
VP 0 EHT 5 0F EHT Comp 50/60Hz CXA2130S(88H)
1 GMA 2 O3 Gamma Correction NTSC/others
(also separated for STANDARD)
2 YDL 0D 0F Y Delay PAL/SECAM/NTSC/DVD
3 SST 2 O3 SECAM ID Start Position
4 SSP 1 O3 SECAM ID Stop Position
5 SLV 1 O3 SECAM ID Level
6 SBF 22 3F SECAM BELL fO
7 DYC 1 1 Dynamic Color on/off
8 ABL 0 1 ABL Mode Switching (except STANDARD) except STANDARD
9 VTH 1 1 ABL Detection Vth Switching
0A SF0 1 1 FO Switching for Sharpness NTSC/others
0B DCX 1 1 DC Trans. Ratio Switching
0C SHT 1 1 Pre-/Overshoot ratio Switch NTSC/others
KV -EF34M31/EF34M61/EF34M80/EF34M90/EF34M91
RM-951
Page 43
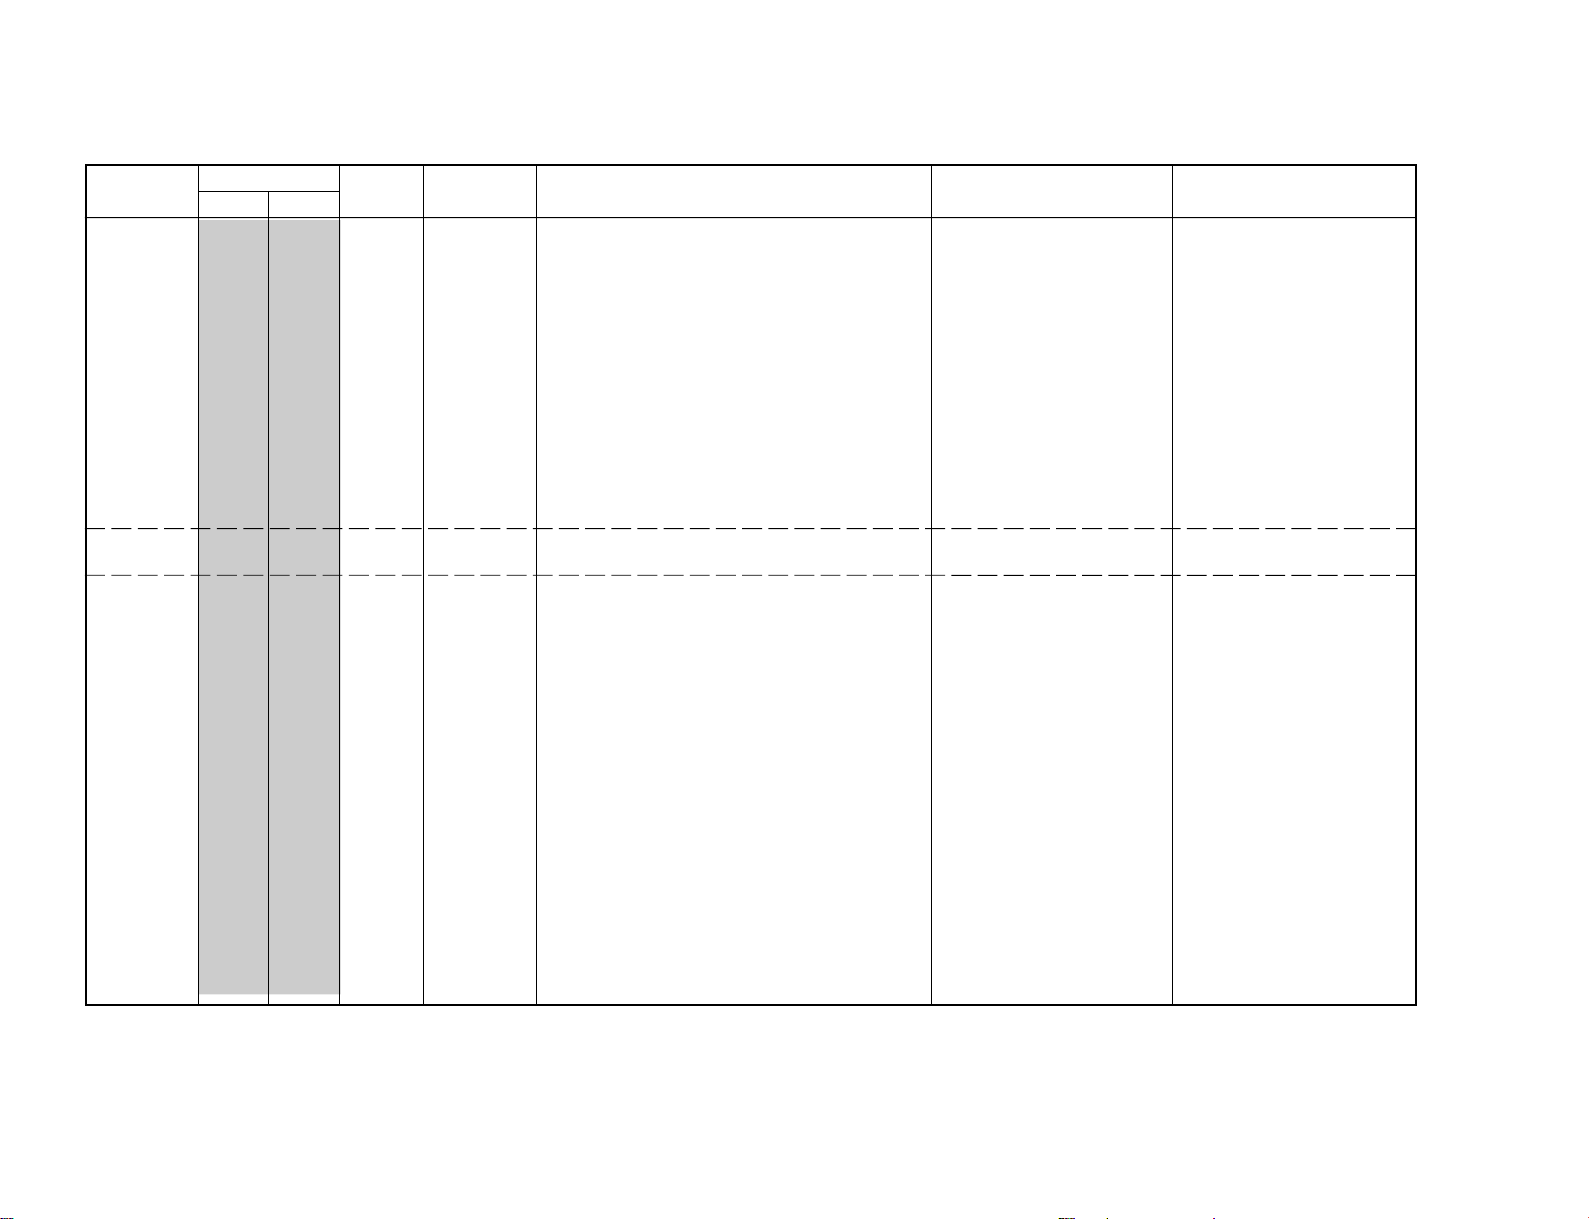
– 43 –
Adjustment Item Table
Device Functionality Note Data Range Function Note for Slava
Name No Name Different Data Address
VP 0D HDW 0 1 H Drive Pulse Width Switch CXA2130S(88H)
0E AFC 0 O3 AFC Gain Control TV/Video/Text
0F HOS 7 0F H Oscillation
10 HSS 0 1 Slice Level of H Sync Sep.
11 VSS 0 1 Slice Level of V Sync Sep.
12 HMS 1 1 Macro Vision C/m off/on 50/60Hz
13 YUV 0 1 YUV Switch Control
14 CDV 1 3 CD mode for Video Video only
15 RON 1 1 R ON not memorized
16 GON 1 1 G ON not memorized
17 BON 1 1 B ON not memorized
18 PON 1 1 P ON not memorized
19 BLK 0 1 BLK Off
1A VMC 1 1 VM Off
AP 0 BCS 1 3 Bass Center Shift TDA7315(80H)
1 TCS 1 3 Treble Center Shift
MSP 0 WST 15 FF W/G Stereo Threshold MSP3415D(84H)
1 WBT EA FF W/G Bilingual Threshold
2 WLL 5 FF W/G Monaural Threshold
3 WAC 1 0F W/G Agreement Count
4 WDL 30 FF W/G Search Delay
5 NDL 20 FF NICAM Search Delay
6 SDL 10 FF Stereo status Read Delay
7 AGC 1 1 AGC Switch Auto/Constant
8 REL 28 3F AGC Gain at Constant Mode
9 CRM 0 1 Carrier muting on/off
0A ACO 1 1 Audio Clock out on/off
0B FP 1B 7F FM Prescale for non-M system
0C FPM 32 7F FM Prescale for M system
0D FH 2D 7F FM Prescale for HDEV
0E FHM 65 7F FM Prescale for HDEV and M
0F WGP 2A 7F W/G Prescale
10 NIP 6D 7F NICAM Prescale
11 ERR 50 FF Auto FM switch Threshold
12 VOL FF FF Loud Speaker gain 0700h to 07FFh
KV-EF34M31/EF34M61/EF34M80/EF34M90/EF34M91
RM-951
Page 44
– 44 –
Adjustment Item Table
Device Functionality Note Data Range Function Note for Slava
Name No Name Different Data Address
LTI 0 LDH 1 1 Histogram Segment Selection TDA9178 (40H)
1 CFS 1 1 Contour Filter Selection
2 WLB 0 1 Letterbox Window Switch
3 VDC 1 1 Video Dependent Coring
4 DEM 0 1 Demonstration Mode
5 CDP 0 O7 Luminance Delay
6 OSP 1 1 Overrule Smart Peaking
7 WPO 0 1 White Point Stretch Off
8 DSK 0 1 Skin Tone Switch
9 ASK 0 1 Skin T one Angle Selection
0A WSK 0 1 Skin Tone Width Selection
0B SSK 0 1 Skin Tone Size Selection
0C DGR 1 1 Green Enhancement Switch
0D DGT 7 7 Threshold of Green Enhancement Switch
0E GGR 0 1 Green Enhancement Gain
` 0F WGR 0 1 Green Enhancement Width
10 SGR 0 1 Green Enhancement Size
11 DBL 0 1 Blue Stretch Switch
12 GBL 0 1 Blue Stretch Gain Selection
13 SBL 0 1 Blue Stretch Size Selection
14 CDS 1 1 Color Dependent Sharpness
15 CST 7 7 Threshold of Color Dependent Sharpness
16 CTI 0 1 Color Transient Improvement
17 BON 0 1 Black offset Compensation
18 BTD 0 3F Adaptive Black Strecth
19 NLD 15 3F Non-Linearity Amplifier
1A NLW 4 7 Step Width of Non-Linearity Amplifier
1B VGD 20 3F Variable Gamma
1C VGW 0 7 Step Width of Variable Gamma
1D PKD 1A 3F Peaking Amplitude
1E PKW 8 0F Step Width of Peaking Amplitude
1F SPD 1F 3F Steepness Correction
20 CRD 13 3F Coring Level
21 CRW 9 0F Step Width of Coring Level
22 LWD 1F 3F Line Width Correction
23 SNM 1 7 S/N Mode under unreliable S/N Condition
24 SNC 3 0F S/N Ratio Average Counter TV/Video
25 FMC 2 0F Feature Mode Matching Counter
KV -EF34M31/EF34M61/EF34M80/EF34M90/EF34M91
RM-951
Page 45
– 45 –
Adjustment Item Table
Device Functionality Note Data Range Function Note for Slava
Name No Name Different Data Address
MID 0 HAT 1C FF H Phase for A-ch in Twin mode CXP86332 (6EH)
1 HAX 21 FF H Phase for A-ch in Index mode
2 VPA 0C FF V Phase for A-ch (common)
3 DLA 3 O7 Chroma Delay for A-ch
4 VJA 0 O3 V-Jitter Reduction for A-ch
5 CYA 10 FF Y-Clamp Level for A-ch
6 CUA 80 FF U-Clamp Level for A-ch
7 CVA 80 FF V-Clamp Level for A-ch
8 DPA 0 7F Clamp Delay Position for A-ch
9 HBT 22 FF H Phase for B-ch in Twin mode
0A HBI 20 FF H Phase for B-ch in PinP mode
0B HBX 21 FF H Phase for B-ch in Index mode
0C VPB 0C FF V Phase for B-ch except in Index
0D VBX 9 FF V Phase for B-ch in Index mode
0E DLB 3 O7 Chroma Delay for B-ch
0F VJB 0 O3 V-Jitter Reduction for B-ch
10 CYB 10 FF Y-Clamp Level for B-ch
11 CUB 80 FF U-Clamp Level for B-ch
12 CVB 80 FF V-Clamp Level for B-ch
13 DPB 0 7F Clamp Delay Position for B-ch
14 VJC 3 3 V-Jitter Reduction for C-ch
15 DLC 4 7 Chroma Delay for C-ch
16 YSD 1 7 YS Delay
17 ADA 0 1 AD Switch for A-ch
18 ADB 0 1 AD Switch for B-ch
19 DCA 0 3 Digital Input Color Signal Phase for A-ch
1A DCB 0 3 Digital Input Color Signal Phase for B-ch
1B ACA 0 1 ADC on/off for A-ch
1C ACB 0 1 ADC on/off for B-ch
1D WIA 0 3 Write Interlace Correction for A-ch
1E RIA 0 3 Read Interlace Correction for A-ch
1F WIB 0 3 Write Interlace Correction for B-ch
20 RIB 0 3 Read Interlace Correction for B-ch
21 OEA 0 1 Odd/Even Selection for A-ch
22 EIA 0 3 Reverse Interlace Correction for A-ch
23 OEB 0 1 Odd/Even Selection for B-ch
24 EIB 0 3 Reverse Interlace Correction for B-ch
25 OEC 0 1 Odd/Even Selection for C-ch
26 OES 0 1 Option 1 for Euro model
27 OID 1 1 Option 2 for Field ID
28 OVF 0 1 Option 3 for V LPF
KV-EF34M31/EF34M61/EF34M80/EF34M90/EF34M91
RM-951
Page 46
– 46 –
Adjustment Item Table
Device Functionality Note Data Range Function Note for Slava
Name No Name Different Data Address
MID 29 OSH 1A 3F OSD H Position CXP86332 (6EH)
2A OSV 2C 3F OSD V Position
2B PHP 3 0F PinP H Position
2C PVP 4 0F PinP V Position
SVP 0 SBF 22 3F SECAM BELL f0 CXA2130S(8AH)
1 HOS 7 0F H Oscillation
2 SHU 6 0F Sub Hue Control TV/Video
3 SCL 1F 3F Sub Color Control NTSC/others
DSP 0 TS1 A5 FF TruSurround Effect 1 Virtual/TruSurr. TC9447F(32H)
1 TS2 5A FF TruSurround Effect 2 Virtual/TruSurr.
2 SR1 FF FF SRS Effect 1 TruSurr./Simulate
3 SR2 FF FF SRS Effect 2 TruSurr./Simulate
4 BH1 40 FF BBE Effect 1 for BBE High Off/Vir./Tru./Sim.
5 BH2 48 FF BBE Effect 2 for BBE High Off/Vir./Tru./Sim.
6 BL1 33 FF BBE Effect 1 for BBE Low Off/Vir./Tru./Sim.
7 BL2 33 FF BBE Effect 2 for BBE Low Off/Vir./Tru./Sim.
TXT 0 TXH 1 3 Teletext Horizontal Position SAA5261(58H)
1 TXV 1 7 Teletext Vertical Position
OPM 0 OSH 0C 3F OSD H Position Option-Misc. CXP750097(60H)
1 COM 2 O3 Comb Selection
2 APC 0 1 APC Switch
3 TSY 0 O3 TV Sys at Auto TV Sys
4 MUT 0 1 No Signal Mute
5 AFM 1 1 Auto FM switch
6 RFB 0 O3 C-BPF Control
7 TVO 3 7 Tilt to V-Angle offset
8 DBL 0 1 Disable Blueback Function
OPB 0 OP1 FF FF Optional Bits 1 (see below) Option-Bits. CXP750097(60H)
1 OP2 E7 FF Optional Bits 2 (see below)
2 OP3 32 FF Optional Bits 3 (see below)
KV -EF34M31/EF34M61/EF34M80/EF34M90/EF34M91
RM-951
NOTE
• Standard data listed on the Adjustment Item Table are reference values, therefore it may be different for each model and for each mode.
• Note for Different Data Those are the standard data values written on the microprocessor. Therefore, the data values of the modes and stored respectively in the
memory.
In case of a device replacement, adjustment by rewriting the data value is necessary for some items.
Page 47
ITEM INFORMATION.
No. OPB0 OP1
KV-EF34M31/EF34M61/EF34M80/EF34M90/EF34M91
RM-951
Item
Initial Data
No. OPB1 OP2
Item
Initial Data
AV Input 00 = no AV Input 01 = 1 AV Input
DVD Input Effective only when "AV Input" is set to 3 AV input
No. OPB2 OP3
Item
Initial Data
Auto PIC Auto Picture Improvement 0 = inactive, 1 = active
A-TVsys Auto TV System in Auto Program 0 = disabled, 1 = enabled
XT AL 4.43
1
DEST
Other
OCE
10 = 2 AV Input 11 = 3 AV Input
--0
XT AL 3.58
1
TOP
0
1
--0
SECAM
1
NICAM
1
1
Auto PIC
1
2nd. Lang
HDEV
1
1
A-Tvsys
1
Thai Bil.
1
0
0
B/G
1
US ST
0
--1
1
D/K
1
11 Key
1
AV Input
1
1
Color SW
M
1
1
1
0
I
1
DVD Input
0
0
2199
0
US ST USA Stereo 0 = disabled, 1 = enabled
11 Key Front Key Selection 0 = 7 key model, 1 = 11 key model
– 47 –
Page 48
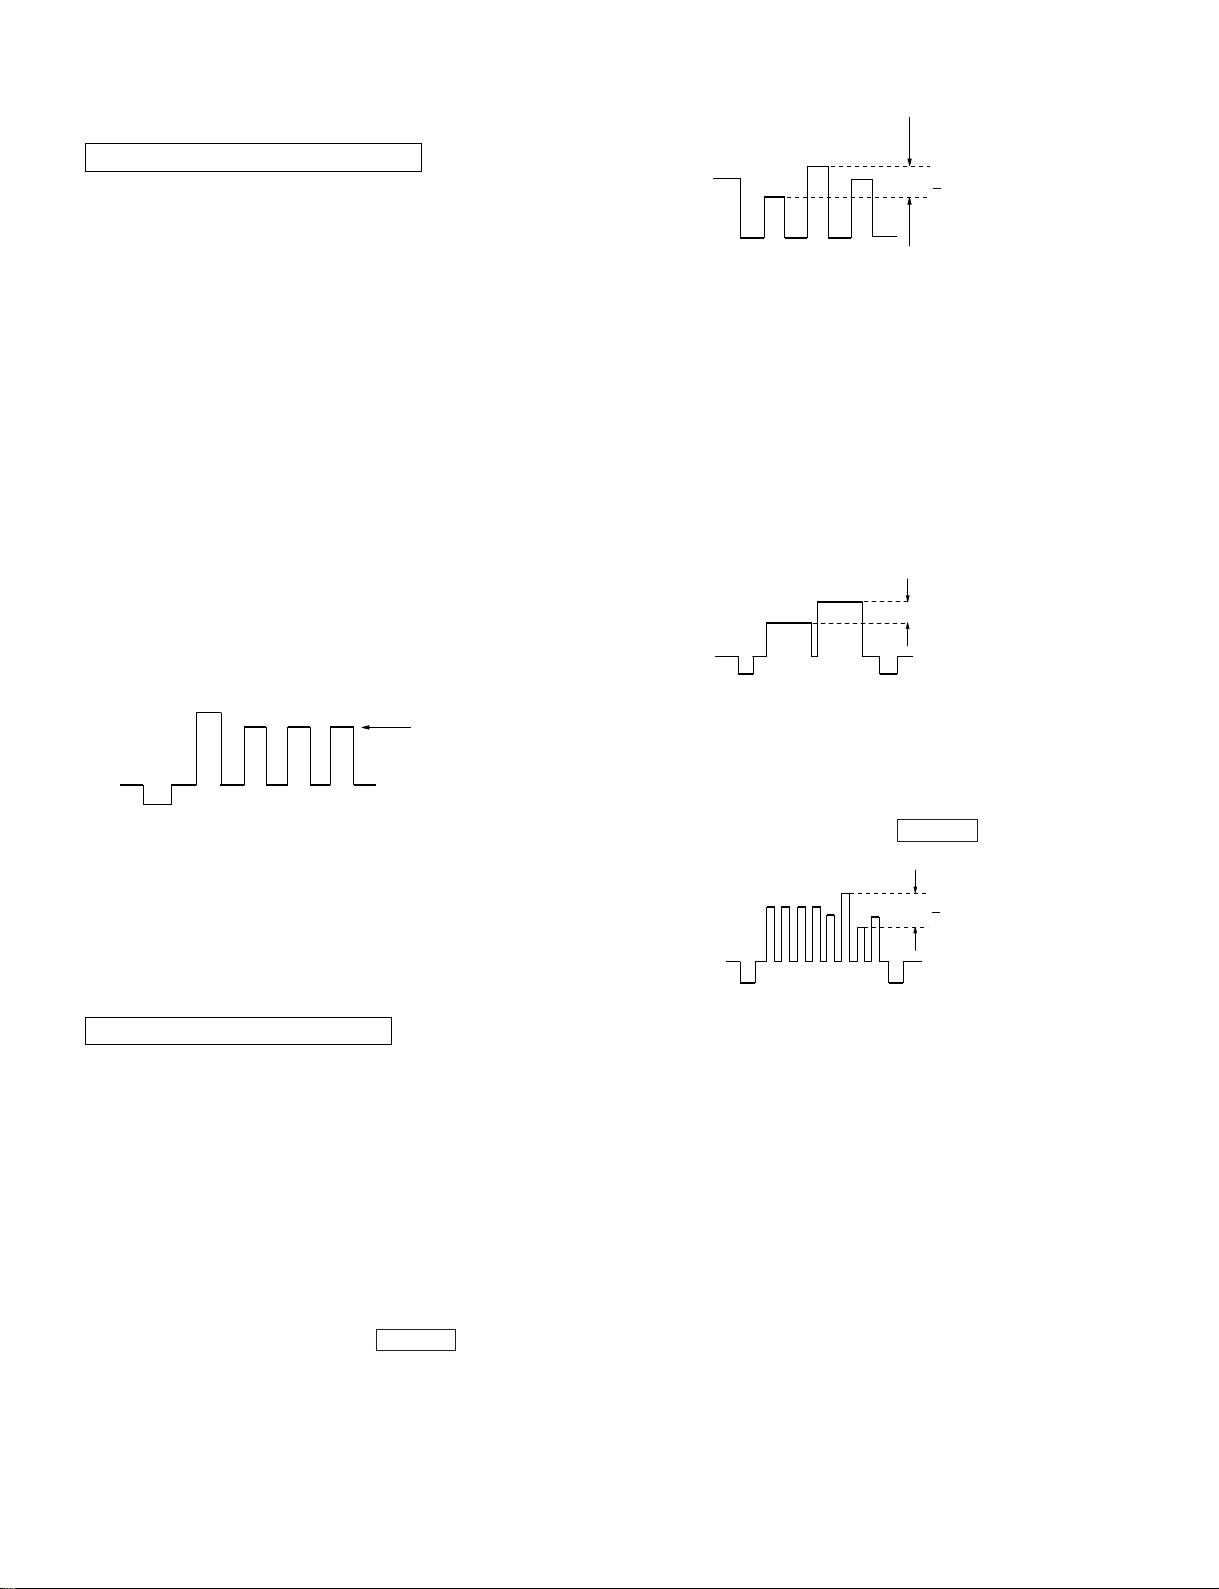
KV -EF34M31/EF34M61/EF34M80/EF34M90/EF34M91
RM-951
4-3. PICTURE QUALITY ADJUSTMENTS
SUB COLOR ADJUSTMENT (SCL)
1. Set to service mode.
2. Input RF PAL colorbar signal.
Set A/V control to PERSONAL.
3. Set to VP7 (Service mode) "DYC" = 0
4. Set the following condition.
Picture to 100%, Color to 0% and Bright to 0%.
5. Connect an oscilloscope to the pin 3 (BLUE) of CN705, C
board.
6. Using the 1 and 4 buttons select SAJ 3 (Service mode)
"SCL".
7. Using the 3 and 6 buttons on the Remote Commander to
adjust to VB2 = VB3 = VB4 with 3 and 6.
8. Write into the memory by pressing "MUTING" then "0".
9. Input NTSC colorbar signal to VIDEO1 and select VIDEO1
input.
10. Adjust as step 4. and 8. by receving NTSC colorbar.
11. Reset to VP 7 (Service mode) "DYC" = 1.
VB3VB2VB1 VB4
110mV
The highest level of VB1,VB2,VB4
will be aligned at the same line.
The ideal different level between VB2 and
VB3 is within ±110mV.
20. Select "TWIN PICTURE" mode. (MID)
21. Receive different RF PAL white signals in MAIN and SUB
picture.
22. Adjust RV5301 on B board so that the level at pin 2 (BLUE)
of CN705 on C board becomes within spec.
±20mV
VB1 VB2 VB3 VB4
same level
PAL :
VB2 = VB3 = VB4
(Difference is within 70mV)
NTSC :
VB1 = VB4
(Difference is within 70mV)
SUB HUE ADJUSTMENT (SHU)
12. Set to service mode.
13. Input NTSC colorbar signal to VIDEO1 and select VIDEO1
input.
14. Set to VP 7 (Service mode) "DYC" = 0
15. Connect an oscilloscope to the pin 3 (BLUE) of CN705, C
board.
16. Using the 1 and 4 buttons select SAJ 1 (Service mode) "SHU
(VIDEO)".
17. Using the 3 and 6 buttons on the Remote Commander to
adjust to VB2 = VB3 = VB4 with 3 and 6.
18. Write into the memory by pressing
19. Reset to VP 7 (Service mode) "DYC" = 1.
MUTING
then -.
23. Receive RF NTSC colorbar signal in MAIN picture and
VIDEO1 NTSC colorbar signal in SUB picture.
24. Adjust SVP2 (Service mode) "SHU (VIDEO)" so that the level
at pin 3 (BLUE) of CN705 on C board becomes within spec.
25. Write into the memory by pressing
26. Write SJA 3 (Service mode) "SCL (PAL)" +4 steps to SJA 3
(Service mode) "SCL (PAL)".
Write SJA 3 (Service mode) "SCL (NTSC)" +3 steps to SJA 3
(Service mode) "SCL (NTSC)".
Write SJA 1 (Service mode) "SHU (VIDEO)" +3 steps to SJA
1 (Service mode) "SHU (VIDEO)".
Write SJA 1 (Service mode) "SHU (VIDEO)" -5 steps to SJA 1
(Service mode) "SHU (TV)".
Write SVP 2 (Service mode) "SHU (VIDEO)" +3 steps to SVP
2 (Service mode) "SHU (VIDEO)".
Write SVP2 (Service mode) "SHU (VIDEO)" -2 steps to SVP
2 (Service mode) "SHU (TV)".
27. Reset to VP 7 (Service mode) "DYC" = 1
MUTING
then "0".
110mV
– 48 –
Page 49
KV-EF34M31/EF34M61/EF34M80/EF34M90/EF34M91
RM-951
Y LEVEL (SUB PICTURE) ADJUSTMENT
1. Input a PAL colorbar signal.
2. Set to TWIN PICTURE mode.
3. Connect an oscilloscope to pin 2 (R-out) of CN705 on the C
board.
4. Adjust VR5301 on B board so that white level of main picture
and sub picture becomes same level.
HUE LEVEL (SUB PICTURE) ADJUSTMENT
1. Input a NTSC colorbar VIDEO signal.
2. Set to TWIN PICTURE mode.
3. Connect an oscilloscope to pin 2 (R-out) of CN705 on the C
board.
4. Select SVP (02) SHU with 1 and 4 of the commander so
that waveform of main picture and sub picture become same
level.
5. Press
MUTING
with SVP (02) "SHU" Video mode and TV mode.
n - on the commander to write the data
H-TRAPIZIUM ADJUSTMENT
1. Input a cross hatch/dot signal.
2. Adjust RV1801 on C board to make H-Trapizoid distortion best.
FREQUENCY (FREE RUN) ADJUSTMENT
4-4. A BOARD ADJUSTMENT AFTER IC003
(MEMORY) REPLACEMENT
When replacing IC003 (MEMORY), be sure to change IC001 (µCOM) to the following new IC at the same time.
MODEL IC001 (µ-CON)
KV-EF34M31(OCE)
KV-EF34M61(GE)
KV-EF34M90(HK)
KV-EF34M90(JE)
KV-EF34M80(ME)
KV-EF34M91(ME)
1. Enter to Service Mode.
2. Press commander buttons 5 and - (Data Initialize), and 2
and - (Data Copy) to initialize the data.
3. Call each item number and check if the respective screen shows
the normal picture.
In cases where items are not well adjusted, rectify the items
with fine adjustment.
Write the data per each item number (
4. Select item numbers “OPB0” (OP1), “OPB1” (OP2) and
“OPB2” (OP3) and respectively set the bit per model with
command buttons 3 and 6.
CXP750097-001S
CXP750097-002S
[MUTING] +-).
1. Select Video 1 (no signal).
2. Connect a frequency counter across pin !ª (FH) IC301 of A
Board.
3. Select VP (OF) HOS with 1 and 4 of the commander then
adjust to 15.690kHz ± 25Hz using 3 and 6.
5. Press commander buttons 8 and - (Test Normal) to return
to the data that was set on the shipment from the factory.
(This will also cancel Service Mode.)
– 49 –
Page 50
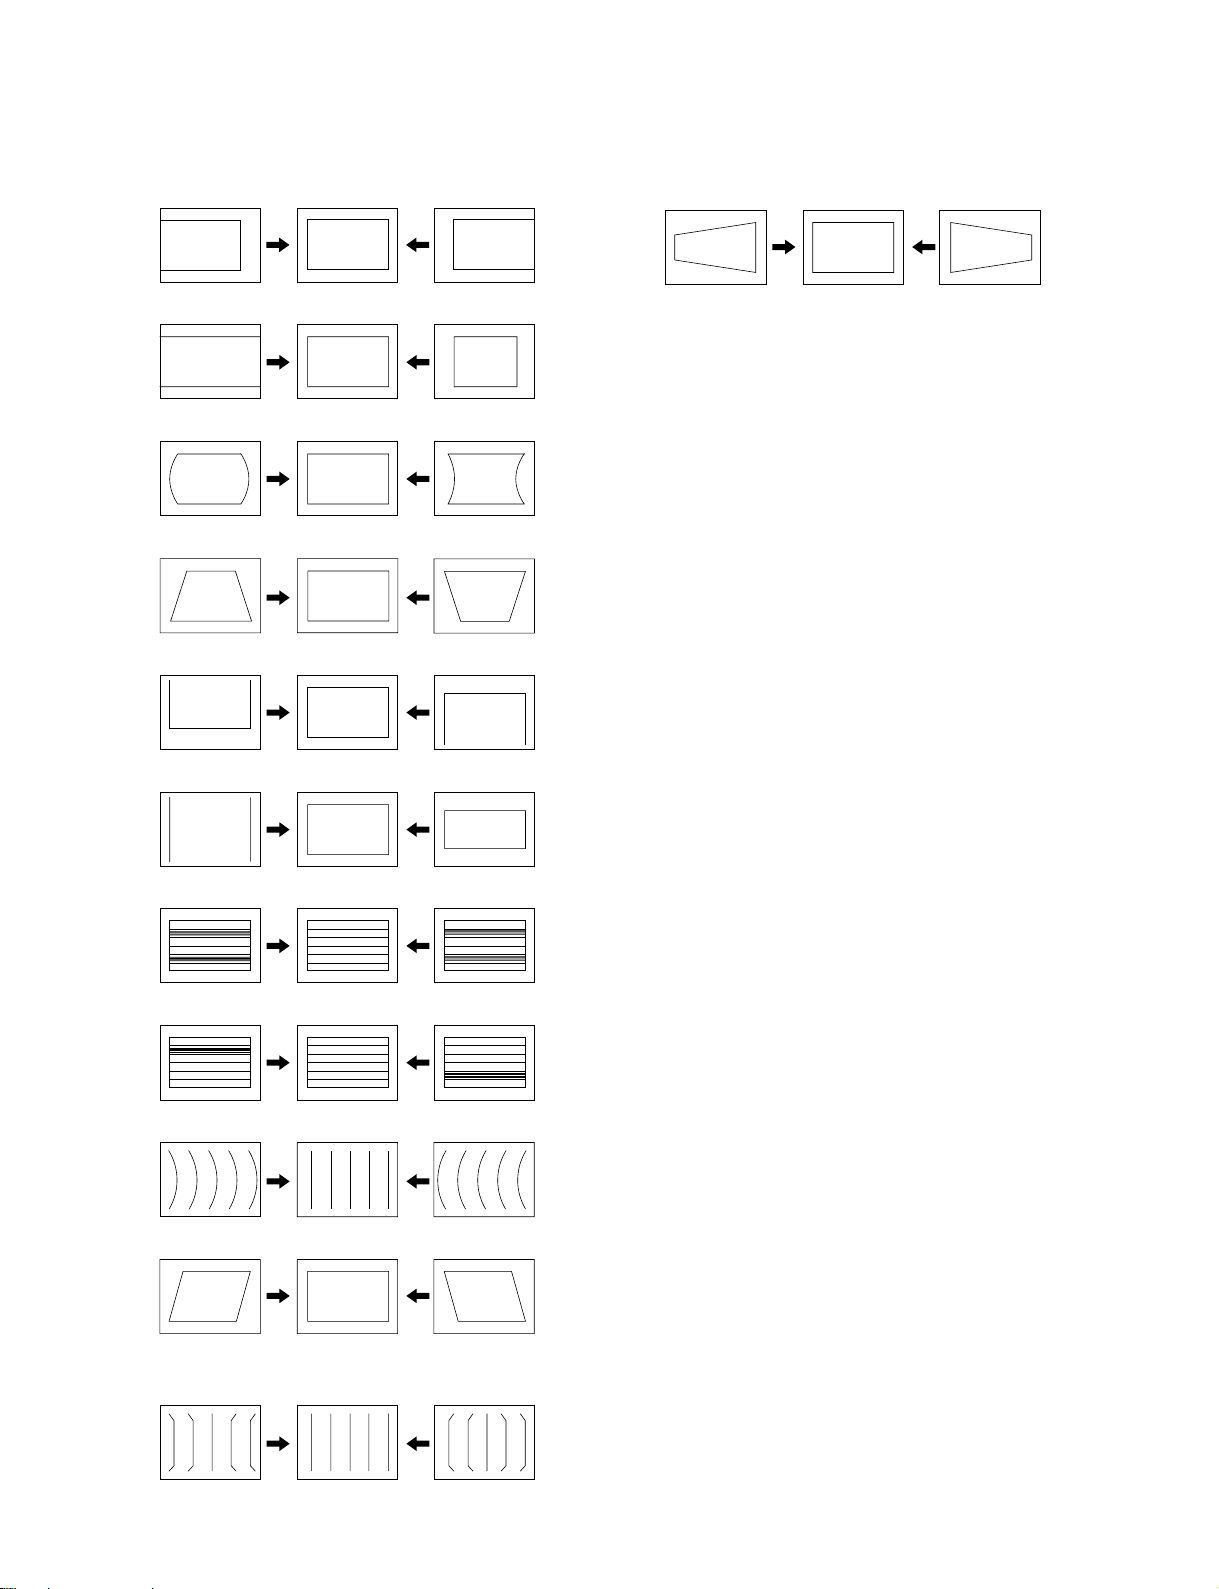
KV -EF34M31/EF34M61/EF34M80/EF34M90/EF34M91
RM-951
4-5. PICTURE DISTORTION ADJUSTMENT (1)
Item Number 00 – 11
GEO 0 HPS (H POSITION)
GEO 1 HSZ (H SIZE)
GEO 2 PAP (PIN AMP)
GEO 3 TLT (TRAPEZIUM)
GEO 4 VPS (V POSITION)
PICTURE DISTORTION ADJUSTMENT (2)
H-TRAPEZOID (Rotate RV1801, C board)
GEO 5 VSZ (V SIZE)
GEO 6 SCO (VERTICAL S-Correction)
GEO 7 VLN (V LINEARITY)
GEO 8 BOW (AFC.BOW)
GEO 9 AGL (AFC.ANGLE)
GEO 10 UPN (UPPER PIN)
GEO 11 LPN (LOWER PIN)
– 50 –
Page 51
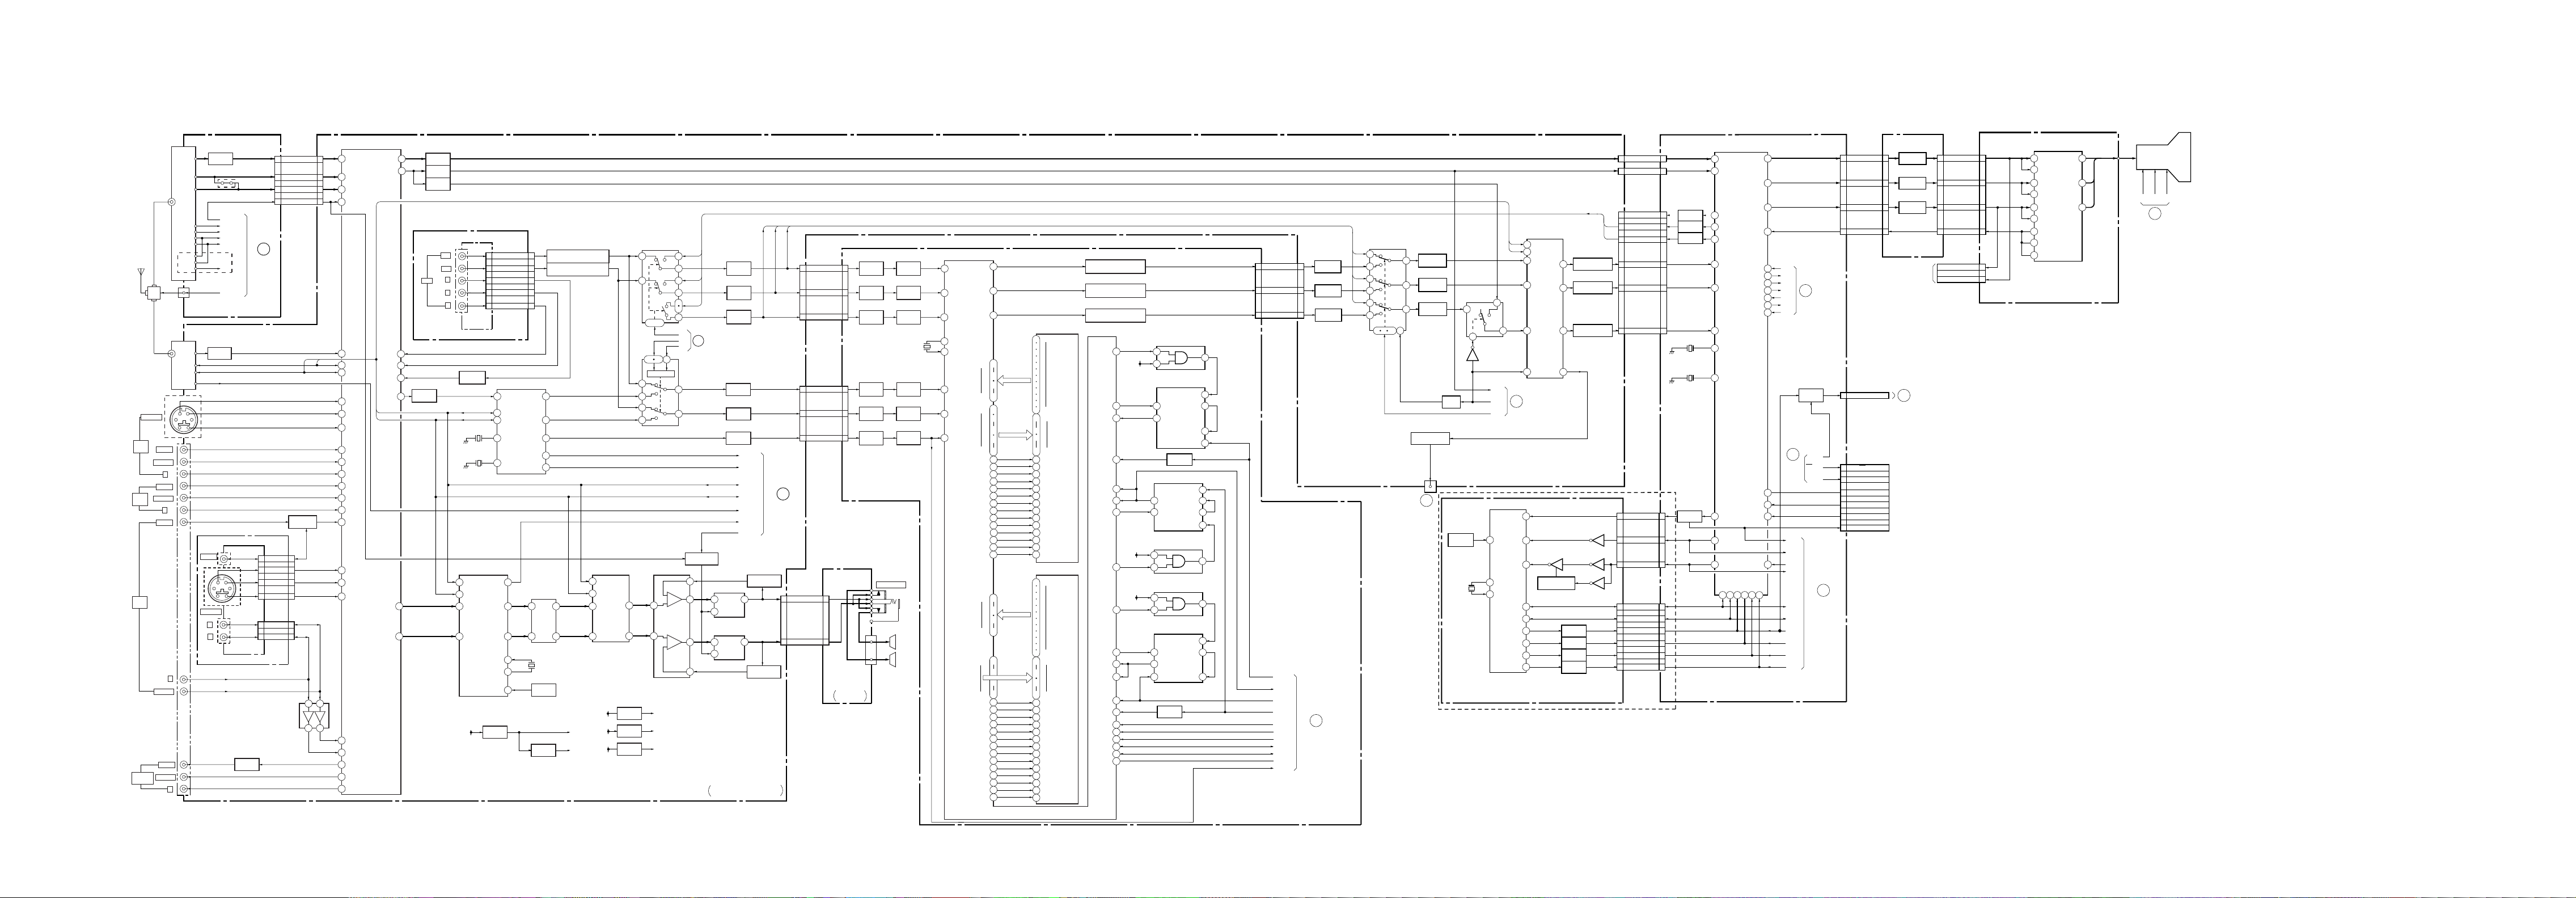
5-1. BLOCK DIAGRAM
SECTION 5
DIAGRAMS
RF IN
S-VIDEO
VIDEO
IN 1
VIDEO
IN 2
VIDEO
IN 3
MONITOR
OUT
ANT
SW
J3301
J3302
VIDEO
L/MONO
VIDEO
L/MONO
R
VIDEO
L/MONO
VIDEO
L/MONO
R
R
R
TU101
DET OUT
L OUT
R OUT
PLL_SW
AFT OUT
SCL
SDA
SCL
SDA
NC
CN103
2
A(1/4)(MAIN TUNER)
TU3301
DET OUT
SCL
SDA
AFT OUT
BUFFER
Q101
KV-EF34M80
EXCEPT
KV-EF34M80
BUFFER
Q3314
J1903
VIDEO
J1902
S-VIDEO
L
R
JR109
STBY MUTE
STERO
AFT
SCL
SDA
SAP
ATT.SW
H1(1/4)(VIDEO3)
CV OUT
Q3302
CN102
1
MODE/SYSTEM
CONTROL
BLOCK
CN1904
4
2
6
5
CN1903
3
1
AUDIO MIXER
2
6
4
8
CV
Y
C
SIN
L
R
IC3302
TV
TV L
TV R
STBY-MUTE
BUFF,AMP
Q3308,3309
CN1313
4
2
6
5
CN1201
3
1
CN1307
2
6
4
8
6
2
1
7
– 51 –
IC3303
A/V SWITCH
TV
47
48
46
RTV
34
MUTE
33
S TV
19
20
3
5
6
1
2
4
7
8
10
13
15
Y3
17
18
14
16
RV3
29
V OUT2
28
26
LTV
SCL
SDA
Y1
C1
S1
V1
LV1
RV1
V2
LV2
RV2
V3
C3
S3
LV3
L OUT2
R OUT2
C OUT1
Y OUT1
DVD R
DVD L
DVD Y
V OUT3
L OUT
R OUT
BUFFER
45
Q3304
BUFFER
43
Q3303
BUFFER
Q1345
IC1302
Y
B-Y
R-Y
CN1309
CN1310
3
MODE/SYSTEM
CONTROL
BLOCK
CN1204
1
4
10
L SP
R SP
2
M B-Y
1
4
MY
M R-Y
8
7
M B-Y
MY
CN1901
1
4
H1(2/4)
1
4
CN9503
8
7
10
CN1901
HEAD PHONE
SPEAKER
FL9505
FILTER
FL9504
FILTER
FL9506
FILTER
FL9503
FILTER
FL9502
FILTER
FL9501
CN9502
FILTER
2
M R-Y
HEAD PHONE
1
4
J1901
BUFFER
Q9522
BUFFER
Q9521
BUFFER
Q9520
X9508
27MHz
BUFFER
Q9554
BUFFER
Q9553
BUFFER
Q9552
SPEAKER
(L)
SPEAKER
(R)
71
169
166
161
79
78
204
199
196
OUT1
ADI3
OUT2
OUT3
MIA1
MIA2
MOA1
MOA12
WXIA
WEA
WRA
WADEA
WXADA
WCLKA
RXIA
RADEA
RXADA
RCLKA
MIB1
MIB12
MOB1
MOB12
WCLKB
WXADB
WADEB
WRB
WEB
WXIB
REB
RXIB
RRB
RADEB
RXADB
RCLKB
OEA
REA
RRA
OEB
IEA
IEB
76
77
115
108
DATA BUS
104
103
124
126
133
DATA BUS
135
137
95
96
97
99
100
101
102
117
118
119
120
121
122
123
58
51
DATA BUS
49
46
25
31
DATA BUS
33
37
38
39
40
42
43
44
45
60
61
62
63
64
65
66
IC9506
MULTI IMAGE DRIVER
IC9501
FIELD MEMORY
15
DO0
16
18
19
21
22
24
25
27
28
30
31
DO11
DIN0
7
2
44
39
DIN11
32
IE
33
WXINC
34
WE
35
WR/TR
76
WADE/RX
37
WXAD
38
WCLK
14
OE
13
RE
12
RXINC
11
RR
10
RADE/RX
9
RXAD
8
RCLK
IC9502
FIELD MEMORY
DO0
15
16
18
19
21
22
24
25
27
28
30
31
DO11
DIN0
7
2
44
39
DIN11
38
WCLK
37
WXAD
36
WADE/RX
35
WR/TR
34
WE
33
WXINC
32
IE
14
OE
13
RE
12
RXINC
11
RR
10
RADE/RX
9
RXAD
8
RCLK
ADI2
ADI1
XTLO
XTLI
ADI6
ADI5
ADI4
BUFFER,FILTER
Q9533,9558,9563,FL9608
BUFFER,FILTER
Q9517,9530,9562,FL9607
BUFFER,FILTER
Q9519,9523,9540,FL9604
DIV3
92
+5V
CKO3
80
91
CLK3
FIN3
88
CLK1
153
ADCK1
172
CKO1
174
+5V
DVI1
155
+5V
DVI2
133
CKO2
191
CLK2
5
ADCK2
193
FIN2
183
FIN1
182
154
FVI1
FVI2
4
FVI3
90
158
SDA
SCL
159
67
YS
2
1
2
3
3
2
1
2
1
2
2
3
4
VCO OUT
SEL
SEL
VCO OUT
FINA
IC9530
LEVEL SHIFT
IC9505
READ PLL
SEL
VCO OUT
BUFFER
Q9505
IC9504
A CH PLL
IC9532
LEVEL SHIFT
IC9531
LEVEL SHIFT
IC9503
BCH PLL
BUFFER
Q9568
PFD OUT
VCO IN
FINA
VCO IN
PFD OUT
FINB
FIN B
PFDOUT
VCO IN
FINB
FINA
4
5
6
12
4
4
12
6
5
4
4
5
6
12
CN9502
8
9
6
CN1309
8
R-Y
B-Y
Y
HD1
CLK1
SHSYNC
HD
FV1
SVSYNC
FVI3
SDA
SCL
YS
G
Q1318,1321
9
Q1329,1332
6
Q5300,5301
4
MODE/SYSTEM
CONTROL
BLOCK
P (1/2)(MULTI IMAGE DRIVER)
AMP
AMP
AMP
17
16
IC1310
+5V REG
IC5203
+5V REG
IC1305
+9V REG
IC1308
DVD SWITCH
13
3
9 - 11
10
9 11
LEVEL CONV
13
12
3
5
IC1309
SUB DVD SWITCH
IC1202
BASS BOOST
3
5
+5V
+5V
+9V
R-Y
12
14
B-Y
5
4
1
Y
2
15
2A
1B
0B
14
4
Q1205-1207
2
+
1
–
+
7
–
6
B(1/2)
BUFFER
Q3311
BUFFER
Q3312
BUFFER
Q3310
MODE/SYSTEM CONTROL
2
BLOCK
BUFFER
Q3305
BUFFER
Q3306
BUFFER
Q3313
MUTE
MUTE
IC1204
L AMP
9
OUTIN
10
MODE
IC1203
R AMP
OUTIN
9
10
MODE
AUDIO/VIDEO SIGNAL PROCESS,
A/V SWITCH
S-VTIM
S-SCP
SCL
SDA
AFT2
PROT
INDUCTOR,VOL
Q1203,1204
1
1
INDUCTOR,VOL
Q1201,1202
DVD R-Y
DVD B-Y
DVD Y
DVD R
CN1303
LPF,AMP,DELAY,BUFF
5
Q1314-1316,1320,1322,1323
LPF,AMP,DELAY,BUFF
3
Q1303,1305,1307,1309-1311
1
7
8
DVD
J2410
R-Y
B-Y
CN2410
5
3
Y
L
R
1
7 DVD L
8
J1(DVD)
32
31
9
BUFFER
23
Q3301
39
38
AMP
Q1301,1302
4
TV/CV BS1IN
34
SCLD
35
SDAD
X1302
3.58MHz
47
XTAL2
48
XTAL1
X1301
4.43MHz
IC5201
AUDIO DIGITAL SIGNAL PROCESS
D OUTIFCK
AOL
AOR
/RST
IC1303
+5V REG
45
5
10
98
XI
99
XO
57
73
74
IFDI
90
L IN
95
R IN
+5V
IC1301
SUB Y/C/J
31
R-Y
30
B-Y
32
Y
5
VTIM
17
SSCP
IC5204
AMP
5
L+
371
R+LORO
X5201
33.8688MHz
IC5202
RESET
IC1304
+3.3V REG
+5V
+3.3V
IC1201
TONE CONTROL
20
SCL
19
SDA
11
L IN
6
R IN
+7V
+7V
+11V
LOUT
ROUT
– 52 –
IC1307
MID THROGH SWITCH
R-Y
16
1
B-Y
9
8
Y
11
14
2 7 12
3
6
5
10
VM,DIFF,VM OUT
Q1313,1340
DEFLECTION
POWER
BLOCK
– 53 –
AMP,BUFF
Q5304,5305
AMP,BUFF
Q5306,5307
AMP,BUFF
Q5302,5303
SLICER
Q3307
VM
CN1301
A
RESET
Q803
X801
V1 (TELETEXT)
KV-EF34M31/EF34M61/EF34M91
IC1311
Y SWITCH
3
2
V-BLK
Q1342-1344
PICTURE IMPROVEMENT
1
716
CV/Y
SCP
5
FS
IC801
TELETEXT PROCESS
CVBS
RESET
43
VP
HP
X OUT
42
X IN
41
SCL
SDA
BLK
R OUT
G OUT
B OUT
SCL
11
SDA
14
-V IN
9
-V OUT
16
-U IN
8
MODE/SYSTEM CONTROL
23
37
36
49
50
35
34
33
32
Y IN
SC
17
-U OUT
Y OUT
19
SOUT
21
BLOCK
Q805
INVERTER
Q812,813,818
BUFFER
Q801
BUFFER
Q808
BUFFER
Q807
BUFFER
Q806
DELAY,INV,BUFF
Q1306,1326,5309
DELAY,INV,BUFF
Q1308,1325,5308
DELAY,BUFF
Q1304,1324
Q817
Q810
Q814
CN1305 CN101
6
CN1311
1
CN1306
R-Y
9
B-Y
10
Y
9
11R-Y
22B-Y
4
CN803
6
2
3
CN801
7
66SDA
4
11RED
22GREEN
3
CV/Y
CV BS
SCP
SCL
BLK
BLUE
6
C
CN106
1
CN808
R-Y
9
10
B-Y
9
Y
4
Y
CN301
6
2
VP
3
CN307
7
4
3
BUFFER
Q305
BUFFER
Q306
BUFFER
Q304
X802
3.58MHz
X801
4.43MHz
BUFFER
Q307
A (2/4)(Y/C/J)
C IN
2
Y1/CVBS
4
R2
31
B2
30
G2
32
ERYIN
30
EBYIN
31
EYIN
37
XTAL2
47
XTAL1
48
MONO OUT
6
5
VTIM
17
SSCP
SCLD
IC301
Y/C/J
EXT BLK
SDAD
253534 28 27
R OUT
G OUT
B OUT
ABL IN
AFC FIL
XTAL3
COMB Y
COMB C
YUW SW
EXT R
EV
VD+
VD-
HP
HD
EXT G
26
IK
EXT B
CN305
22
23
4
21
3
2
11B
5
CN8300
3
R
2
G
5
IK
BUFFER
Q8304,8305
BUFFER
Q8302,8303
BUFFER
Q8300,8301
CN8301
3
2
11B
5
CN703
3
R
2
G
5
IK
B4 (R/G/B BUFFER)
CN705
3
3
ABL
EW
11
VD+
13
14
18
19
20
46
9
7
12
VDHP
HD
AFC
7
MODE/
SYSTEM
CONTROL
BLOCK
VIDEO
VTIM
YS
SSCP
SCL
SDA
YS1
R
G
B
DEFLECTION/
POWER
6
BLOCK
BUFFER
Q811
VM
MUTE
NT/PAL
APCN
8
MODE/SYSTEM
CONTROL
BLOCK
CN806
4
CN304
10
11 APCN
9
1Y
4C
6
VM MUTE
NT/PAL
FSC
VIDEO
CHECK
DEFLECTION/
POWER
A
BLOCK
TO SBX-3005-01
(DIGITAL COMB FILTER)
B
2
R
C (1/2)(R/G/B OUT)
– 54 –
4
9
3
12
1
15
6
11
14
VIDEO AMP
R IN
RFB
G IN
GFB
B IN
BFB
RM
GM
BM
IC701
R OUT
G OUT
B OUT
R,G,B
7
10
13
V901
PICTURE TUBE
H1 FV HV
9
DEFLECTION/POWER
BLOCK
– 55 –
Page 52
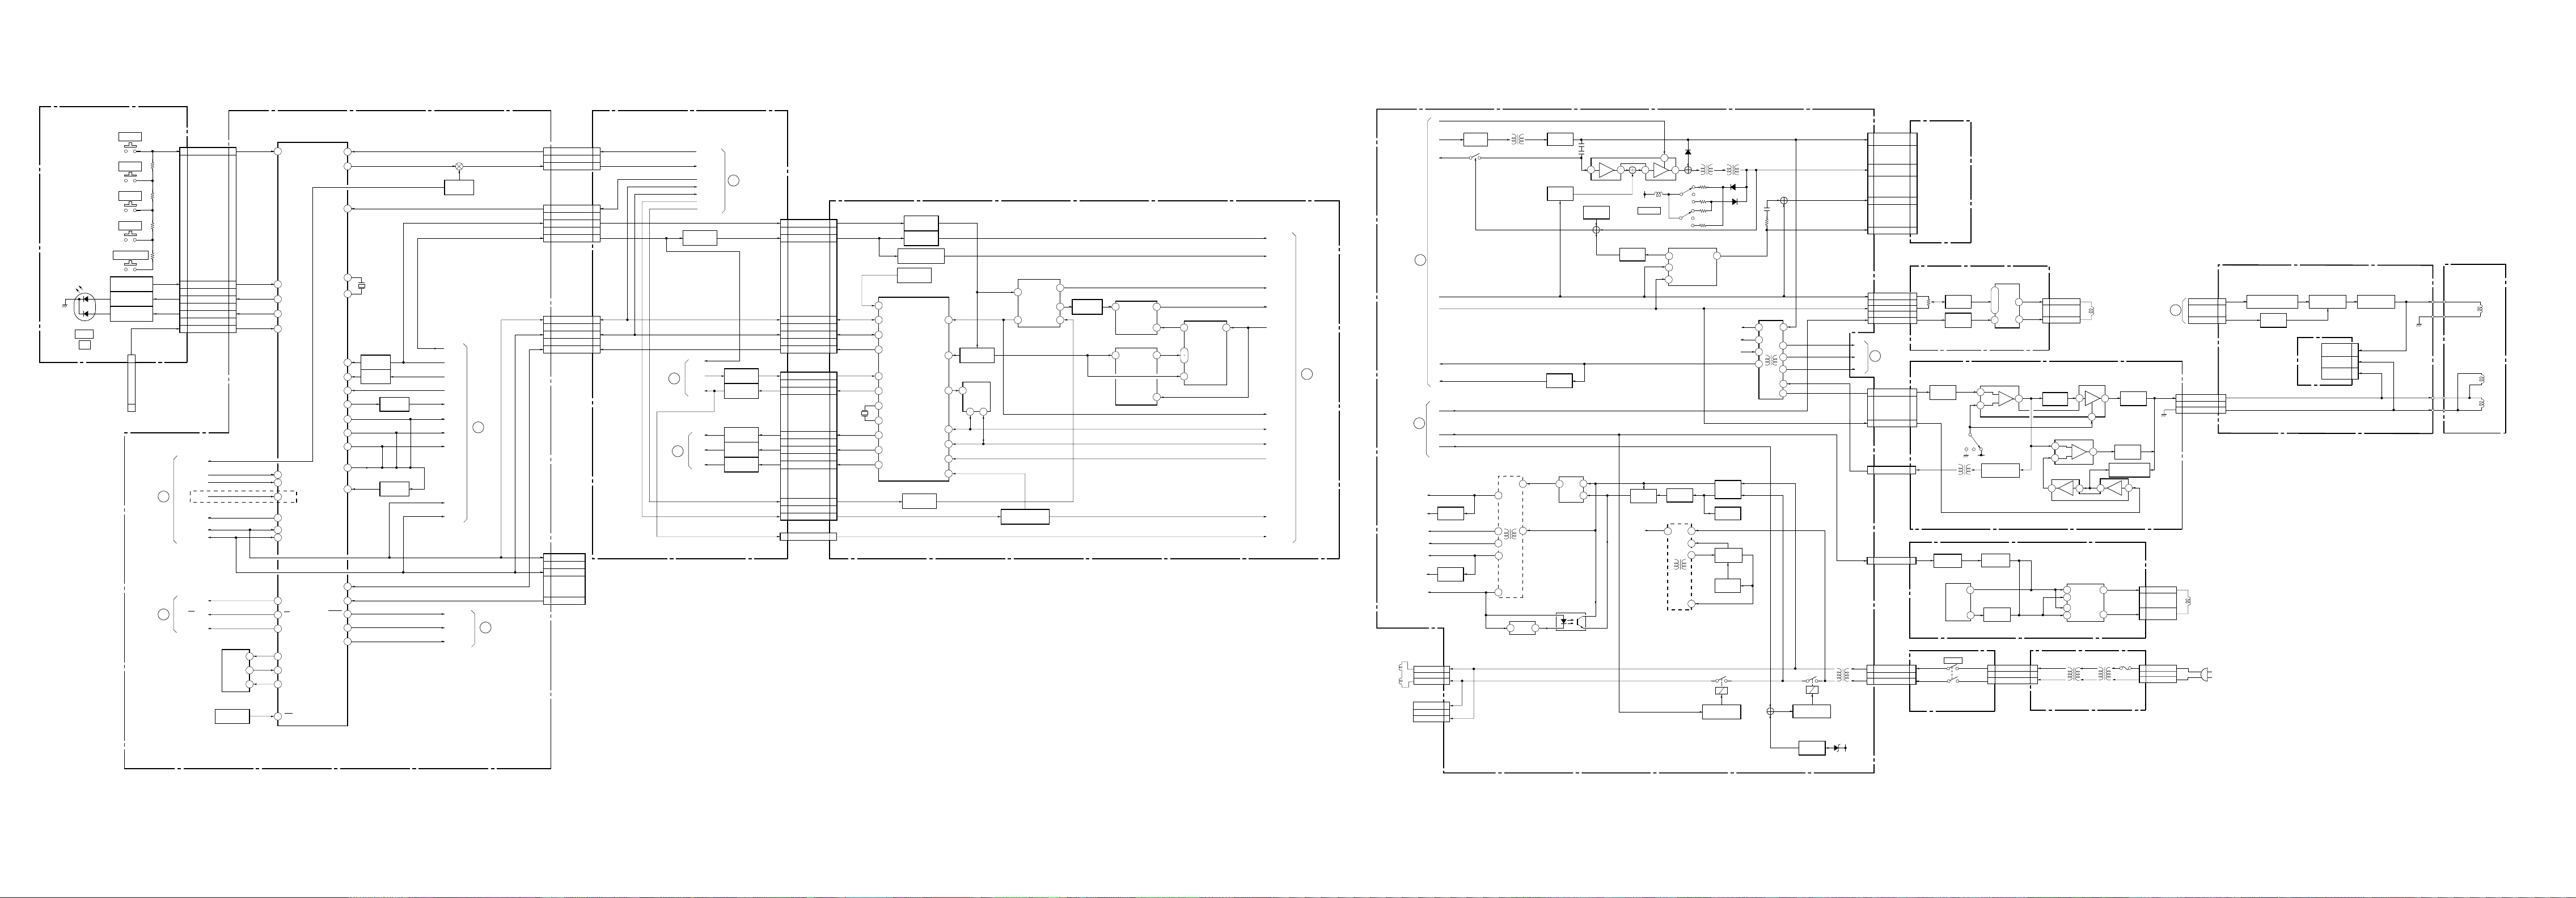
H1
(3/4)(FUNCTION SWITCH, REMOTE SENSOR)
S1902
ENTER
S1903
MENU–
S1904
MENU+
S1905
MENU
S1906
AUTO PRESET
IC1901
REMOTE SENSOR
LED DRIVER
LED DRIVER
D1906
STBY
ON
TO TOP SW
Q1902
Q1901
IC001
CN1905 CN904 CN201 CN1206
88KEY2
SIRCS
7
LED1
55
LED2
44
KEY1
9
CN1906
44KEY1
STBY MUTE
9
1
VM MUTE
NT/PAL
APCN
EXCEPT KV-EF34M80
IC003
EEPROM
IC002
RESET
AUDIO/VIDEO
BLOCK
AUDIO/VIDEO
BLOCK
7
15
2
52
51
16
27
19
28
43
48
46
17
18
6
447
455
476
11
SYSTEM u-COM
KEY2
SIRCS7
LED1
LED2
KEY1
STSTEREO
AFT1AFT
SAPSAP
ATT SWATT.SW
SCL0SCL
SDA0SDA
VM MUTE
NT/PAL
APCN
WPROTECT
SDA1
SCL1
RST
PROT
MUTE
AFT2
XTAL
EXTAL
VSYNC
B INT
ST-BY
3
29
MUTE
Q301, 313
20
13
X001
10MHz
14
INVERTER
10
Q003, 004
SYNC SEP
9
Q308
25
34
30
31
32
35
YM
33
I
24
S
21
7
22
50
BUFER
Q002
INVERTER
Q001
SSCP
VTIM
VIDEOHSYNC
YSYUV SW
YS1YS
RR
GG
BB
SCL
SDA
ST-BY
NS MUTENS MUTE
NS ROTNS ROT
8
AUDIO/VIDEO
BLOCK
9
DEFLECTION/POWER
CN302 CN1304
CN101 CN1305
BLOCK
33
PROT2
22
MUTE
AFT2
55
VTIM
77
SCP
66
SCL
33
SDA
22
S IN
55
SCL
1
SDA
2
3
CHECK
B-IN
5
AUDIO/VIDEO
BLOCK
AUDIO/VIDEO
BLOCK
2
PROT
MUTE
AFT2
SCL
SDA
S CAP
S-VTIM
AMP
Q3315, 3316
SCP
CV/Y
FS
0B
1B
2A
AUDIO/VIDEO
3
BLOCK
SYNC SEP
Q5310
MID SWITCH
Q3326
INVERTER
Q3325
INVERTER
Q3322
INVERTER
Q3321
B
(2/2)(SYNC SEP, INVERTER)
CN1308 CN9501
CN1310
CN1309 CN9502
VTIM
55
77
SCP
22
SCL
SDA
33
11
MID-B
SEL 0A
S VTIM
S SCP
CN9503
5
SYNC CNT
5
22
11SEL 0B
33SEL 1B
44SEL 2A
11 11
12 12
10 10FS
X9504
10MHz
9
50
48
19
1
16
11
12
17
15
14
RESET
SCL0
SDA0
MID BUSY
PD5
SEL 0A
XTAL
EXTAL
SEL 0B
SEL 1B
SEL 2A
INVERTER
Q9408
INVERTER
Q9403, 9407
SLICER, INVERTER
Q9405, 9406, 9410
IC9525
RESET
IC9527
MID u-COM
SVSYNC
MVSYNC
SCL1
SDA1
SHSYNC
INVERTER
Q9404
EW
IC604
+5V REG
IC603
+9V REG
CN604
13DGC
CN602
1
2
H DRIVE
Q506
H PROTECT
HD
HP
HD1
HD
IC9401
COUNTER
1Q
2
8
INVERTER
6
Q9501
IC9526
NVM
WP
20
7
WP
SCL SDA
6 5
49
47
33
G
7
5 10
SLICER, INVERTER
Q9401, 9402, 9411
13
1B
INVERTER
1Q
4 1 12
Q9502
2B
2Q
IC9511
SHIFT REGISTER
AQG
CLOCK
IC9510
COUNTER
9 15
LOAD
R.C.O
CLOCK
8 11
2
IC9509
COUNTER
CLOCK
2
QD
7
ENB
10
9
LOAD
FV1
FVI3
CLK1
SVSYNC
SCL
SDA
G
SHSYNC
YS
4
AUDIO/VIDEO
BLOCK
P
(2/2)(MID u-COM)
AUDIO/VIDEO
BLOCK
MODE/SYSTEM
CONTROL
BLOCK
DGC
CHECK
3D+VCC
3D–VCC
+11V
6
9
–7V
+5V
+9V
+B
DGC
DGC CHK
DGC CHK
VD–
VD+
ABL
AFC
NS
ROT
NS
MUTE
STBY
Q503
T603
PRT
14
18
17
13
11
1
SENSOR ERROR
T501
HDT
IC602
AMP
DY1
H OUT
Q511
3
AMP
Q501,502
PROTECT
Q507,604
AFC
Q512
IC601
OCP
4
5
8
2
3
D
OCP
PH600
ISOLATION
VIN
1
IC502
PIN CORR.
1
INVERTER
Q509
STBY+7V
+B
S501,502
H.CENT
DETECT
Q603
T505
5
6
7
S501
S502
IC503
V OUT
3
F.B-PLS
1
DRV IN
7
REF VOLT
DETECT
Q602
T604
STB
1
9
3
4
6
PMT
OUT PUT
5
+200V
D605
AC RECT
PC-SW
Q601
CONVERTER
Q605
CONTROL
Q606
RY600
RELAY DRIVE
Q600
T504
HLC
–15V
T503
FBT
1
7
4
+B
HV
2
FV
11
6
14
9
RY601
RELAY DRIVE
Q607
1
.
2
3
.
4
5
6
CN507 CN1801
3
1
5
HV
AUDIO/VIDEO
FV
9
H1
CN503
5
7
CN504
1
CN510
11
NS MUTE
T601
CN601
LFT
2
1
H+
H–
V–
V+
VD–
VD+
NS ROT
BLOCK
FBP
VD+
DF
AC
AC
DEFLECTION
YOKE
3
1
5
(2/2)(N/S DRIVE)
C
CN2822
BUFFER
5
Q2821
7
CN2823
1
(QUADRA POLE)
D2
CN3802
BUFFER
Q3807,3808
(N/S DRIVE,SENSOR)
DH
CN1602
2
1
(4/4)(POWER SWITCH)
H1
Q1800
PVM AMP
Q1802
T2801
IC3807
SENSOR
XOUT
S1601
POWER
IC1800
N/S DRIVE
4
.
6
.
7
8
IC2801
DF/DQP AMP
6
5
S2801
+15V
DF DRIVE/OUT
Q2805-2807
N/S MUTE
Q3809,3812
4
BUFFER
REF
3
Q3810,3811
CN1601
1
2
CN1802
3
CN4602
1
2
F
1
(AC IN)
N/S COIL+
N/S COIL–
BUFFER
Q2802
3
2
V PARA AMP
1
2
IC2806
COMPARATOR
+
–
IC2805
2
IC3805
N/S DRIVE
3
IN1–
4
IN1+
7
IN2–
6
IN2+
T4602
LFT
3
OUT1
OUT2
N/S COIL
1
T4601
1
AMP,DOP V MOD
Q2813,2822,2823
7
2
8
LFT
DQP DUT
Q2811
AMP,MOD
Q2824
6
CN3903
CN4601
F4601
AUDIO/VIDEO
BLOCK
N/S(B)
1
2
.
N/S(E)
3
AC IN
1
2
AC IN
CN2821
A
3
1
1
9
+
7
–
AC
AC
VM MUTE
QP–
QP+
N/S COIL
CN5901
14VM
CN2801
3
1
VM2
AC
IN
AMP
Q5901,5903,5908,5909
MUTE
Q5907
(VELOCITY MODULATION)
OPEN
BUFFER
Q5904,5909
VM DRIVE
Q5902,5906
CN5904
7
.
VM
8
3
.
QP+
4
1
.
QP–
2
VM
QP
QP
NECK ASSY
– 56 –
A
(3/4)(SYSTEM u-COM)
– 57 –
– 58 –
(4/4)(H/V,POWER SUPPLY)
A
– 59 –
QVP
Q608
STBY
+7V
– 60 –
Page 53
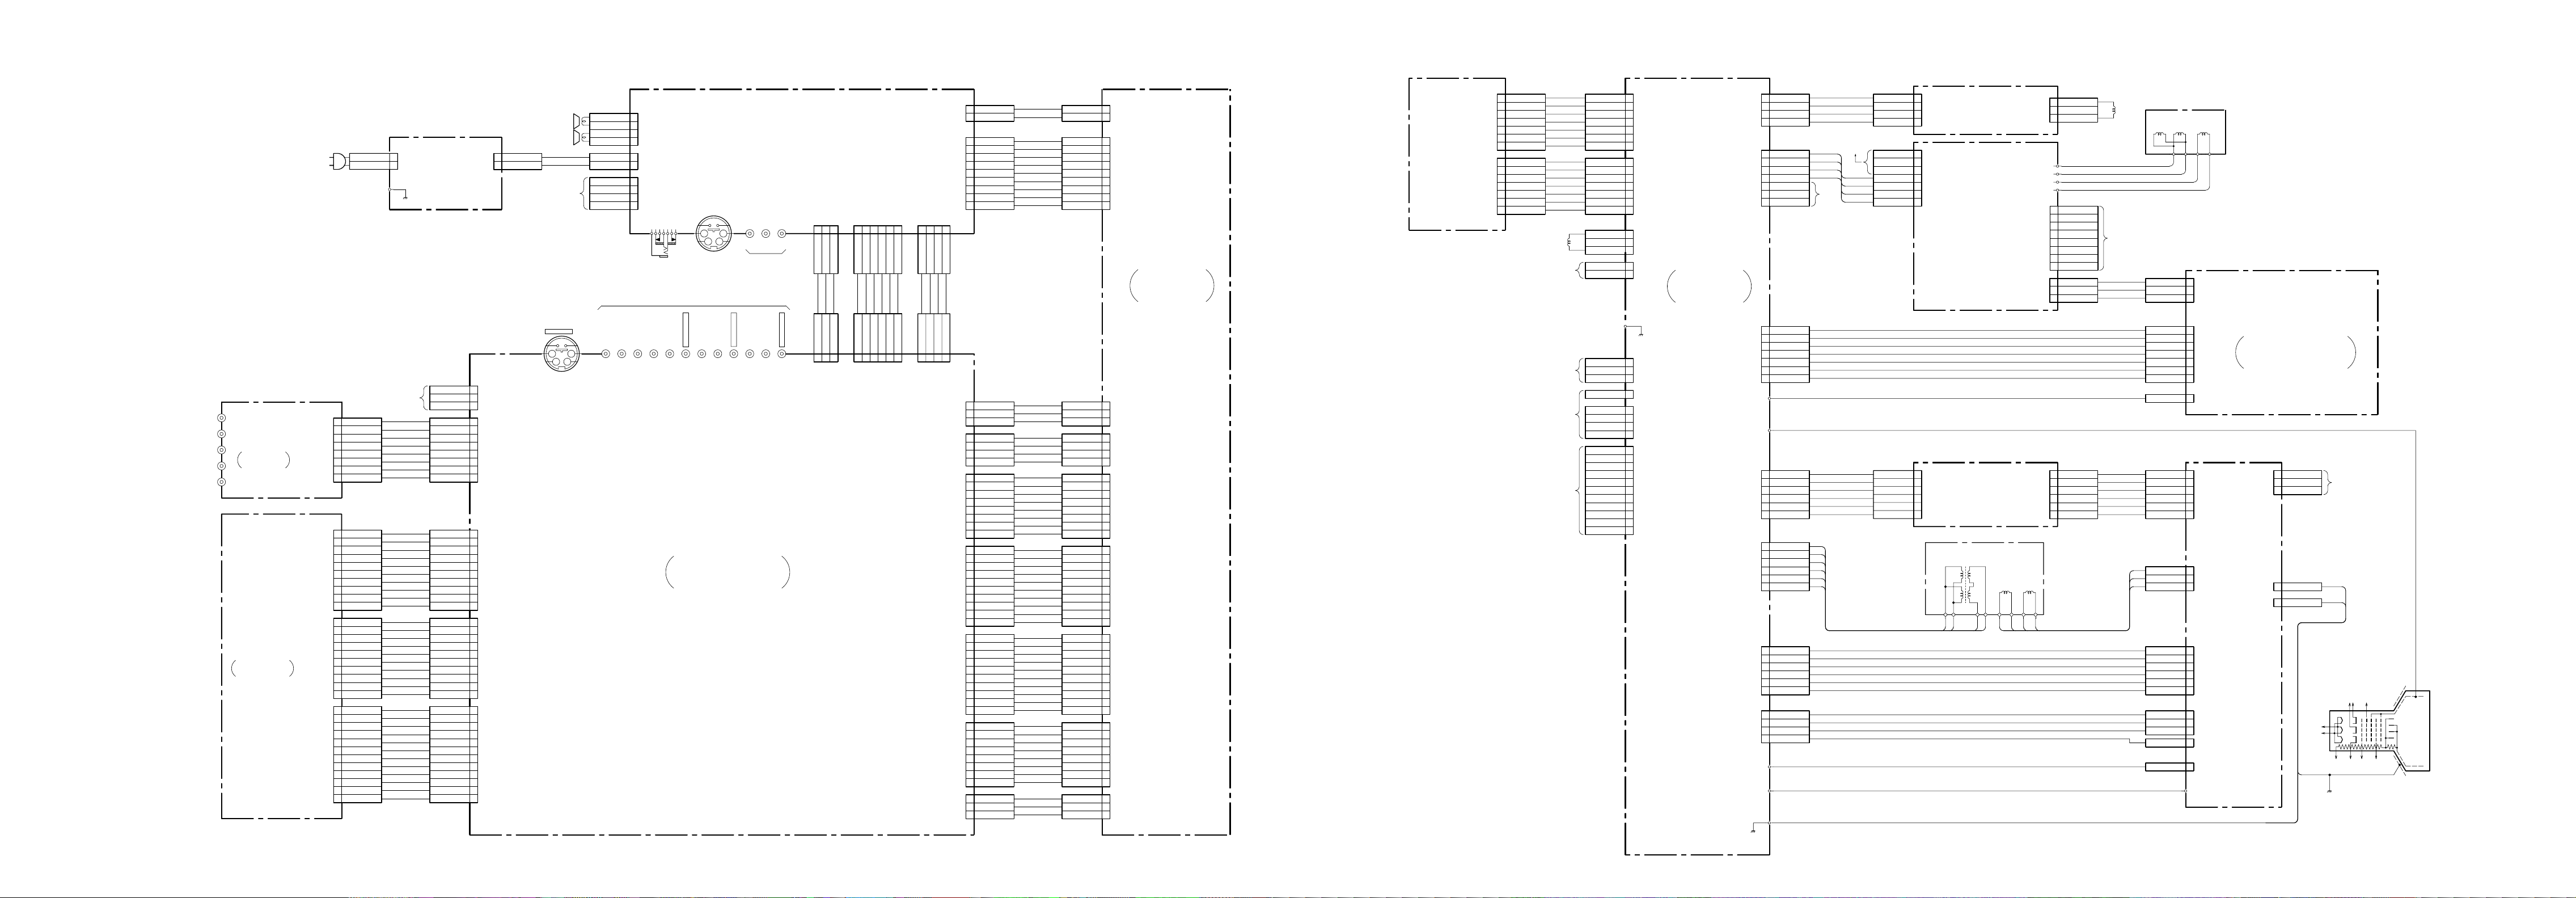
5-2. FRAME SCHEMATIC DIAGRAM
J3302
R-Y
B-Y
Y
L
R
J1
COMPONENT
VIDEO IN
P
MULTI IMAGE
DRIVER
CN2410
8P
WHT
:S-MICRO
CN9501
10P
:BTOB
CN9502
10P
:BTOB
CN9503
12P
:BTOB
AC IN
AC IN
1
DVD Y
2
GND
3
DVD BY
4
GND
5
DVD RY
6
GND
7
DVD L
8
DVD R
1
MID-B
2
SCL
3
SDA
4
GND
5
VTIM
6
GND
7
SCP
8
GND
9
3.3V
10
5V
1
M B-Y
2
M R-Y
3
GND
4
MY
5
GND
6
Y
7
GND
8
R-Y
9
B-Y
10
FS
1
SEL 0B
2
SEL 0A
3
SEL 1B
4
SEL 2A
5
SYNC CNT
6
GND
7
S B-Y
8
S R-Y
9
GND
10
SY
11
S VTIM
12
S SCP
CN4601
1
2P
:VH
2
TO
VM2 BOARD
CN5901
1-3pin
(AC IN)
CN4603
1P
:TAB
F
VM
GND
9V
DVD Y
GND
DVD BY
GND
DVD RY
GND
DVD L
DVD R
5V
3.3V
GND
SCP
GND
VTIM
GND
SDA
SCL
MID-B
M B-Y
M R-Y
GND
MY
GND
Y
GND
R-Y
B-Y
FS
SEL 0B
SEL 0A
SEL 1B
SEL 2A
SYNC CNT
GND
S B-Y
S R-Y
GND
SY
S VTIM
S SCP
CN4602
2P
:VH
CN1301
1
2
WHT
3
:S-MICRO
1
2
3
CN1303
4
WHT
5
:S-MICRO
6
7
8
1
2
3
4
CN1308
5
10P
6
BLK
:BTOB
7
8
9
10
1
2
3
4
CN1309
5
6
:BTOB-P
7
8
9
10
1
2
3
4
5
CN1310
12P
6
BLK
7
:BTOB-P
8
9
10
11
12
1
2
3P
8P
10P
BLK
AC OUT
AC OUT
TO SPEAKER
TO TOP
SWITCH
J3301
VIDEO IN 1
34
12
SP L OUT
SP L GND
SP R GND
SP R OUT
AC IN
AC IN
GND
5V OUT
7V OUT
KEY 1 IN
R
RADIO
1
CN1901
2
4P
3
BLK
:S-MICRO
4
1
CN1601
4P
2
:VH 9P
1
CN1906
2
4P
3
WHT
:S-MICRO
4
L/MONO
MONITER
R
VIDEO
J1901
RADIO
L/MONO
J1902
12
34
J3302
R
RADIO
VIDEO IN 3
L/MONO
(CONTROL SW,INPUT TERMINAL)
J1903
R
RADIO
L/MONO
VIDEO IN 2
H1
RLV
VIDEO IN 1
CN1903 CN1904
3P
RED-L
:S-MICRO
123
L IN
R IN
GND
R IN
L IN
GND
123
CN1201 CN1313 CN1204
3P
RED
:S-MICRO
6P
RED
:S-MICRO
12345
GND
GND
Y IN
GND
GND
Y IN
12345
6P
WHT
:S-MICRO
B
VIDEO SIGNAL PROCESSING
Y/C J.SWITCHER
PICTURE IMPROVEMENT
AUDIO AMP CONTROLER
S IN
CV IN
CV IN
S IN
6
C IN
C IN
6
CN1602
5P
:VH
CN1905
WHT
:S-MICRO
CN1902
4P
WHT
:S-MICRO
123
4
SP L IN
SP R IN
SP L GND
SP R GND
L SP
R SP
AUDIO GND
AUDIO GND
123
4
4P
WHT
:S-MICRO
CN1206
3P
:S-MICRO
CN1205
4P
RED
:S-MICRO
CN1304
8P
:BTOB
CN1305
10P
:BTOB
CN1306
10P
:BTOB
CN1307
8P
:BTOB
CN1311
3P
BLK
:S-MICRO
2
AC OUT
1
AC OUT
1
STBY+5V
2
GND
3
7V
4
LED 2
5
LED 1
6
GND
7
SIRCS
8
KEY 2
9
KEY 1
1
9V
2
MUTE
3
PROT
1
3D-VCC
2
3D GND
3
3D GND
4
3D+VCC
1
7V
2
GND
3
30V
4
GND
5
AFT2
6
SCP
7
VTIM
8
GND
1
11V
2
SDA
3
SCL
4
GND
SIN(MID-B)
5
6
C OUT
7
CV/Y OUT
8
GND
9
L OUT
10
R OUT
1
R-Y OUT
2
B-Y OUT
3
GND
4
Y OUT
5
YS OUT
6
GND
7
Y IN
8
GND
9
R-Y IN
10
B-Y IN
1
GND
2
TV IN
3
GND
4
TV R IN
5
GND
6
TV L IN
7
GND
8
STBY-MUTE
1
CV/Y OUT
2
GND
3
GND
AC IN
AC IN
STBY+5V
GND
7V
LED2
LED1
GND
SIRCS
KEY2
KEY1
9V
MUTE
PROT
3D-VCC
GND
GND
3D+VCC
7V
GND
30V
GND
AFT2
SCP
V TIM
GND
11V
SDA
SCL
GND
S IN
C IN
CV/Y IN
GND
L IN
R IN
R-Y IN
B-Y IN
GND
Y IN
YS IN
GND
Y OUT
GND
R-Y OUT
B-Y OUT
GND
TV OUT
GND
TV R OUT
GND
TV L OUT
GND
STBY-MUTE
CV/Y IN
GND
GND
CN601
1
2P
2
:VH
1
2
3
CN904
4
5
WHT
:S-MICRO
6
7
8
9
CN201
1
2
WHT
:S-MICRO
3
1
CN605
2
:S-MICRO
3
4
1
2
3
4
5
6
7
8
1
2
3
4
CN101
10P
5
:BTOB
6
7
8
9
10
1
2
3
4
CN303
5
10P
:BTOB
6
7
8
9
10
1
2
3
CN102
4
8P
:BTOB
5
6
7
8
CN106
1
2
BLK
:S-MICRO
3
9P
A
(1/2)
MAIN TUNER
VIF,SIF
AV SW,Y/C J.
Y/C J.DECDRDER
3P
4P
CN302
8P
:BTOB-
3P
CN801
7P
SB-J2908:BTOB
V1
(TELETEXT)
CN803
7P
SB-J2908:BTOB
1
RED
2
GREEN
3
BLUE
4
BLK
5
GND
6
SDA
7
SCL
1
GND
2
VP
SCP
3
GND
4
GND
5
6
CVBS
7
7.5V
DGC
NC
RF IN
NC
TO SBX3005-01
(DIGITAL COMB FILTER)
SCL
SDA
GND
BLK
BLUE
GREEN
RED
7V
CVBS
GND
GND
SCP
VP
GND
DGC
NC
DGC
DGC CHK
DGC CHK
9V
ATT.SW
GND
E
GND
B-INT
SDA
SCL
Y OUT
5V
GND
C OUT
GND
VIDEO
9V
GND
FSC
NT/PAL
APCN
1
2
3
4
5
6
7
1
2
3
4
5
6
7
1
2
3
1
2
1
2
3
1
1
2
3
4
1
2
3
4
5
6
7
8
9
10
11
CN307
7P
:BTOB
CN301
7P
:BTOB
CN604
3P
CN602
2P
:MINI
CN105
1P
CN103
3P
CN104
1P
CN202
4P
WHT
CN304
11P
:BTOB
CN510
4P
BLK
:S-MICRO
CN306
7P
:S-MICRO
(2/2)
A
MAIN TUNER
VIF,SIF
AV SW,Y/C J.
Y/C J.DECDRDER
CN503
7P
YEL
:S-MICRO
CN504
1P
:TAB
CN305
6P
WHT
:S-MICRO
DY1
WHT
:DY
CN507
6P
:S-MICRO
CN505
4P
:MINI
CN508
1P
:TAB
6P
1
2
3
4
1
2
3
4
5
6
7
1
2
3
4
5
6
7
DF
HV
1
2
3
4
5
6
1
2
3
4
5
6
1
2
3
4
5
6
1
2
3
4
G2
NS MUTE
GND
7V
11V
+B
NC
GND
VM MUTE
9V
GND
VM
VD+
15V
FBP
GND
GND
NC
135V
9V
IK
GND
R
G
B
H+
H+
HHVV+
VD+
GND
VD15V
NS ROT
NS MUTE
200V
GND
H1
GND
TO B BOARD
NC
CN1301
DEGAUSS
GND
7V
11V
VM
GND
9V
VM MUTE
GND
NC
+B
B
G
R
GND
IK
9V
1
CN3802
2
4P
BLK
3
:S-MICRO
4
(N/S COIL DRIVE)
1
2
3
CN5901
4
7P
:S-MICRO
5
6
7
1
2
CN8300
3
6P
:S-MICRO
4
5
6
(RGB BUFFER)
DY
H.DY H.DY V.DY V.DY
DH
VM2
(VM OUT)
B4
CY CY
CN3803
1
N/S(B)
3P
2
N/S(E)
WHT
:S-MICRO
3
N/S(E)
Q.P.Q.P.+
E
VM
1
QP-
2
QP-
3
6P
8P
QP+
4
QP+
5
E
6
E
7
VM
8
VM
1
QP+
2
NC
3
QP-
1
B
2
G
3
R
4
GND
5
IK
6
9V
CN5904
CN2801 CN2821
3P
BLK
:S-MICRO
CN8301
:S-MICRO
N/S
NECK ASSY
QP QP VM
NC
QP NC
QP +
VD+
15V
FBP
GND
GND
NC
135V
DF
B
G
R
GND
IK
9V
N/S COILNC
N/S COIL+
VD+OUT
GND
VD-OUT
15V
N/S ROT
N/S MUTE
200V
E
H1
GND
G2
1
3P
2
BLK
:S-MICRO
3
7
6
CN2822
5
7P
YEL
4
:S-MICRO
3
2
1
CN2823
1
1P
:TAB
1
2
CN703
3
6P
WHT
4
:S-MICRO
5
6
CN1802
1
3P
2
BLK
:S-MICRO
3
1
2
CN1801
3
6P
4
BLK
:S-MICRO
5
6
1
CN701
3P
2
:MINI
3
CN700
1
TAB(CONTACT)
CN702
1
1P
:TAB
FOCUSFOCUS
ROTAION CIRCUT
D2
V-PIN CORRECTION
PICTURE ROTAION CONTROL
V-PIN CONTROL
1
CN705
3P
WHT
:S-MICRO
C
(RGB OUT)
CN706
TAB(CONTACT)
CN704
TAB(CONTACT)
GND
2
R
3
B
1
GND
1
GND
H
NC
KG G2
KB
CV KR G1 G4
(CHASSIS)
HV
V901
PICTURE
TUBE
– 61 –
– 62 – – 63 –
– 64 –
Page 54
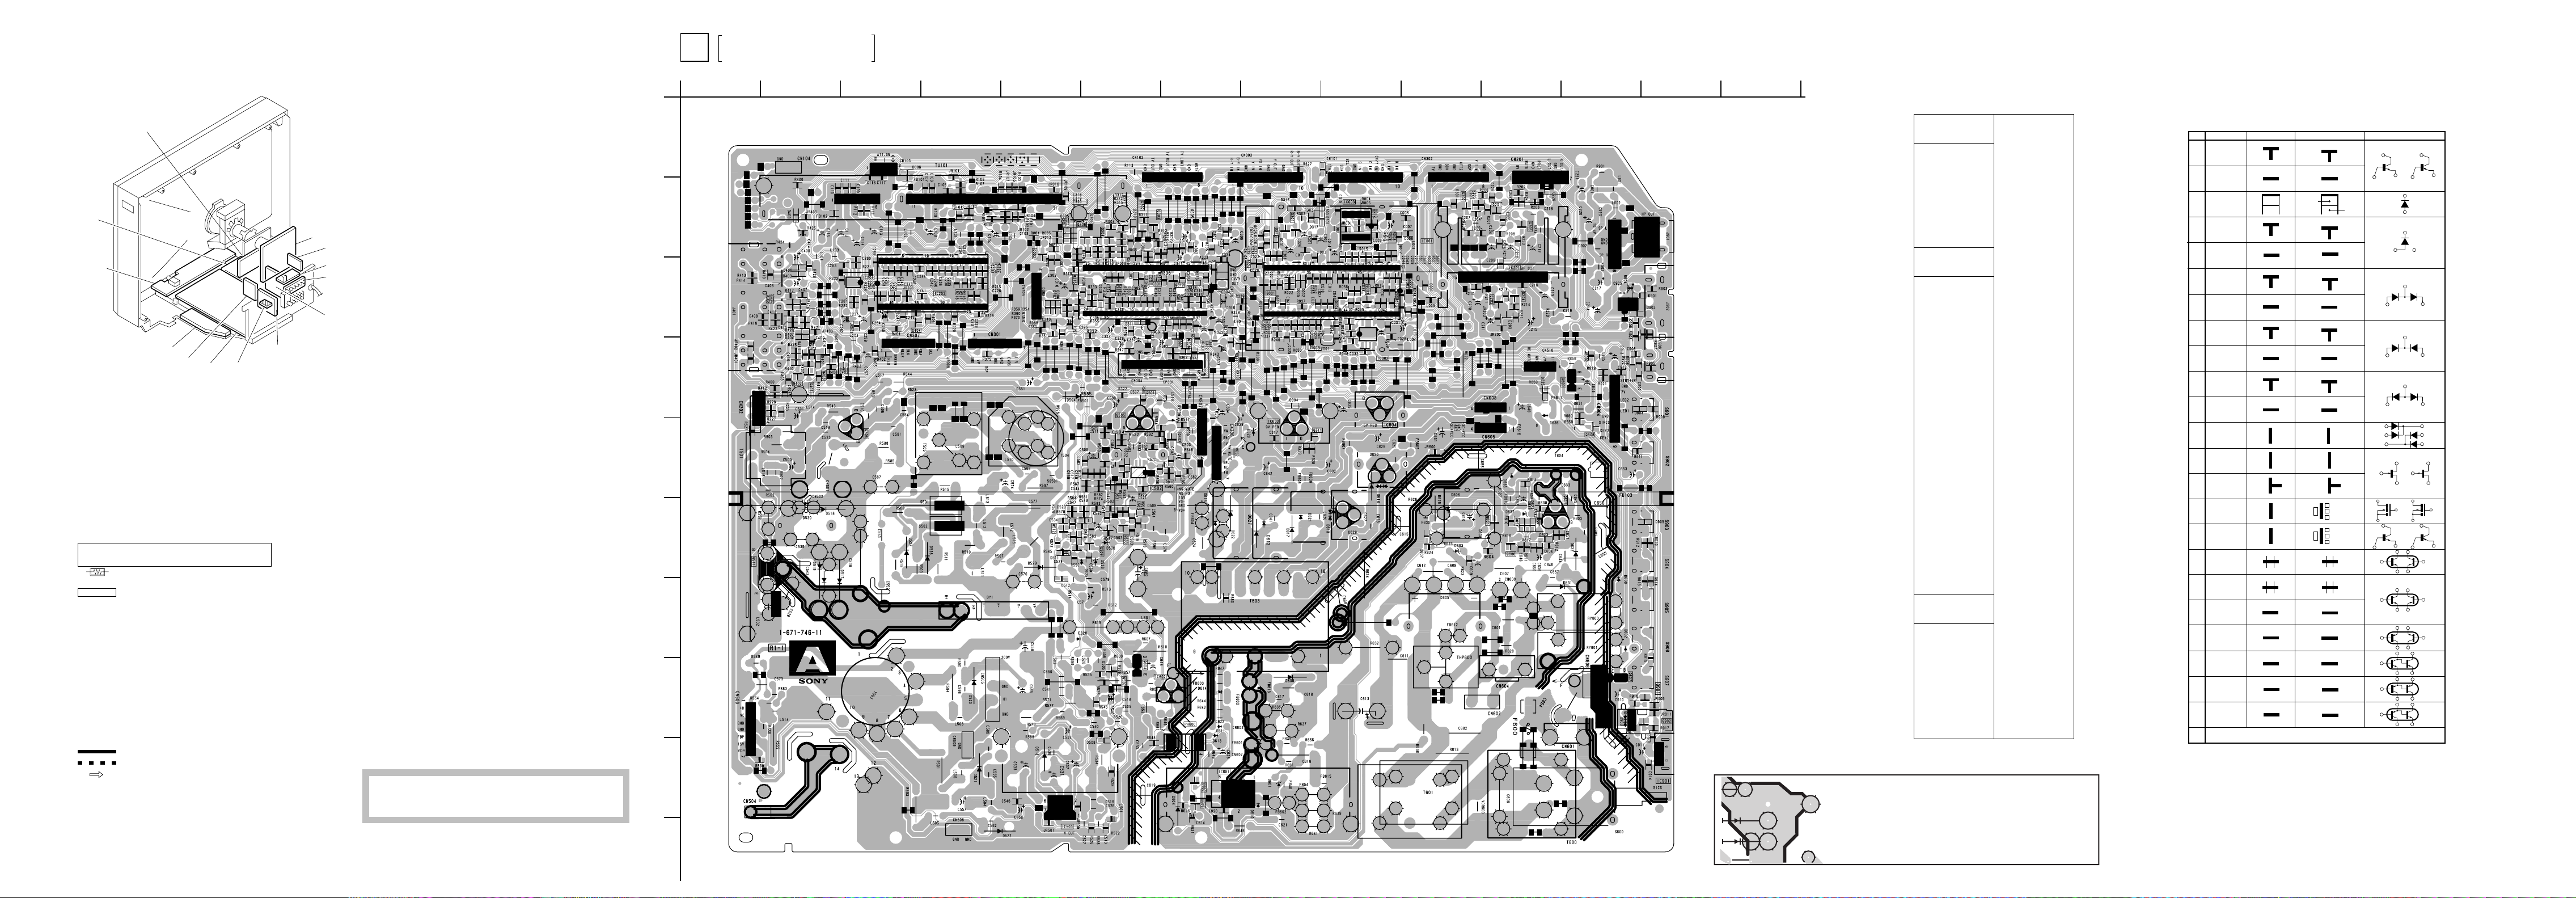
5-3. CIRCUIT BOARDS LOCATION
EY840 EY839
EY842
D2506
D2507
28
EY887
EY844
EY873
NOTE :
The circuit indicated as left contains high voltage of over
600Vp-p. Please pay attention while inspecting or reparing
it to prevent an electric shock.
A
MAIN TUNER, VIF, SIF, AW SW,
Y/C J, Y/C J. DECODER
VM2 board
B board
C board
H1 board
D2 board
SBX 3005-01
A board
VI board (KV-EF34M31(OCE))
B4 board
(KV-EF34M61(GE))
5-4. SCHEMATIC DIAGRAMS AND PRINTED WIRING BOARDS
Note:
• All capacitors are in µF unless otherwise noted.
• All electrolytic capacitors are rated at 50V unless otherwise noted.
• All resistors are in ohms.
kΩ = 100Ω, MΩ = 1000kΩ
• Indication of resistance, which does not have one for
rating electrical power, is as follows.
Pitch: 5 mm
Rating electrical power 1/4W (CHIP: 1/10W)
• : nonflammable resistor.
• ¢ : internal component.
• : panel designation, or adjustment for repair.
• All variable and adjustable resistors have characteristic curve
B, unless otherwise noted.
• Readings are taken with a color-bar signal input.
no mark : PAL
( ) : SECAM
[ ] : NTSC
• Readings are taken with a 10 MΩ digital multimeter.
• Voltage are dc with respect to ground unless otherwise noted.
• Voltage variations may be noted due to normal production toler-
ances.
• All voltages are in V.
• : Can not be measured.
*
• Circled numbers are waveform reference.
• : B + bus.
• : B – bus.
• : signal path.
– 65 –
F board
DH board
JI board
P board
Reference information
RESISTOR : RN METAL FILM
: RC SOLID
: FPRD NONFRAMMABLE CARBON
: FUSE NONFLAMMABLE FUSIBLE
: RS NONFLAMMABLE METAL OXIDE
: RB NONFLAMMABLE CEMENT
: RW NONFLAMMABLE WIREWOUND
: * ADJUSTMENT RESISTOR
COIL : LF-8L MICRO INDUCTOR
CAPACIT OR : TA TANTALUM
: PS STYROL
: PP POLYPROPYLENE
: PT MYLAR
: MPS METALIZED POLYESTER
: MPP METALIZED POLYPROPYLENE
: ALB BIPOLAR
: ALT HIGH TEMPERATURE
: ALR HIGH RIPPLE
Note:The component identified by shading and
!!
mark
! are critical for safety. Replace only
!!
with part number specified.
A
B
C
D
G
H
1234567891011 141312
A BOARD
– A BOARD –
IC
IC001 B-10
IC002 C-9
IC003 B-9
IC301 C-6
IC502 E-6
IC503 I-5
IC601 I-7
IC602 H-7
IC603 E-8
IC604 D-9
TRANSISTOR
Q001 C-8 2
Q002 B-5 1
Q003 C-9 1
Q004 C-9 1
Q101 B-4 2
Q301 B-8 1
Q304 B-6 1
Q305 B-6 1
Q306 B-6 2
Q307 D-7 1
Q308 D-7 1
Q311 E-8 1
Q313 B-8 1
Q315 C-5 1
Q501 D-6 2
Q502 E-7 1
Q503 F-6 1
E
Q505 D-6 Q506 E-3 Q507 H-6 1
Q509 F-6 1
Q511 F-2 Q600 D-12 Q601 F-11 2
Q602 I-7 1
F
Q603 I-7 1
Q604 H-6 Q605 F-11 Q606 F-11 1
Q607 H-12 Q608 E-12 1
DIODE
D001 B-8 3
D002 C-8 3
D003 D-8 3
D004 D-8 3
D005 C-8 3
D006 A-3 3
D300 B-8 3
D301 B-8 3
D303 B-5 3
D304 B-5 3
D305 B-5 3
D306 C-5 3
D307 C-5 3
D308 C-5 3
D309 C-6 3
D311 C-6 3
D312 C-7 3
D313 B-8 3
D317 B-8 3
D504 D-5 D505 H-6 3
D506 F-6 D507 F-6 3
D508 I-6 3
D509 F-6 3
D510 F-6 3
D511 F-5 3
D512 F-5 3
D513 I-5 D517 F-2 D520 F-5 3
D521 I-4 D522 J-4 D523 H-4 D525 F-5 D526 F-6 D527 F-3 D528 F-4 D529 F-5 D530 F-2 D531 E-6 3
D532 E-6 3
D600 F-12 D602 G-12 D603 F-10 D604 I-7 D605 G-10 3
D606 E-10 D607 F-10 3
D608 F-10 D609 H-8 D610 I-8 D611 H-7 D612 F-8 D613 H-7 D614 H-7 D620 E-8 D621 F-8 D622 F-7 D623 F-11 3
D624 F-11 3
D625 D-11 3
D628 G-5 D630 E-9 8
D631 G-11 D632 F-12 D633 E-11 D634 F-11 3
D635 F-11 3
D636 D-11 D637 F-11 D638 E-11 -
Terminal name of semiconductors in silk screen
printed circuit ( * )
Device Printed symbol Terminal name
Transistor
1
Transistor
2
3
Diode
4
Diode
Diode
5
Diode
6
Diode
7
8
Diode
Diode
9
Diode
0
Diode
!¡
Diode
!™
Transistor
!£
(FET)
Transistor
!¢
(FET)
Transistor
!∞
(FET)
Transistor
!§
Transistor
!¶
Transistor
!•
Transistor
!ª
Transistor
@º
Transistor
@¡
Transistor
@™
Transistor
@£
Discrete semiconductot
–
(Chip semiconductors that are not actually used are included.)
Collector
Base
Collector
Base
Cathode
Cathode
Anode
Cathode
Anode
Common
Anode
Common
Anode Cathode
Common
Anode
Common
Anode Anode
Common
Cathode
Common
Cathode
Anode
Anode
Cathode
Drain
Drain
B1 E1C2
B2 C1E2
B2 E2C1
B1 C2E1
B2 E2C1
B1 C2E1
B2 E2C1
B1 C2E1
E2
B1 E1
(B2)
E1
B1
(B2)
E1
E2
Emitter
Emitter
Anode
(NC)
(NC)
Cathode
Anode
Cathode
Cathode
Cathode
Anode
Anode
Source
Gate
Source
Gate
Source
Drain
Gate
Emitter
Collector
Base
C1(B2)C2
E2
C2C1
B1
C1C2
Circuit
D
G
D
S
B1
B1
B1
B1
B1
B1
D
G
S
S
D
G
C1
E1
C1
E1
E1
C1
E2
C1
C1
G
S
C2
B2
E2
C2
B2
E2
E2
B2
C2
C2C1(B2)
E2
E2E1(B2)
C2
C2E1(B2)
C2
Ver.1.5
I
J
– 66 – – 67 – – 68 –
Page 55
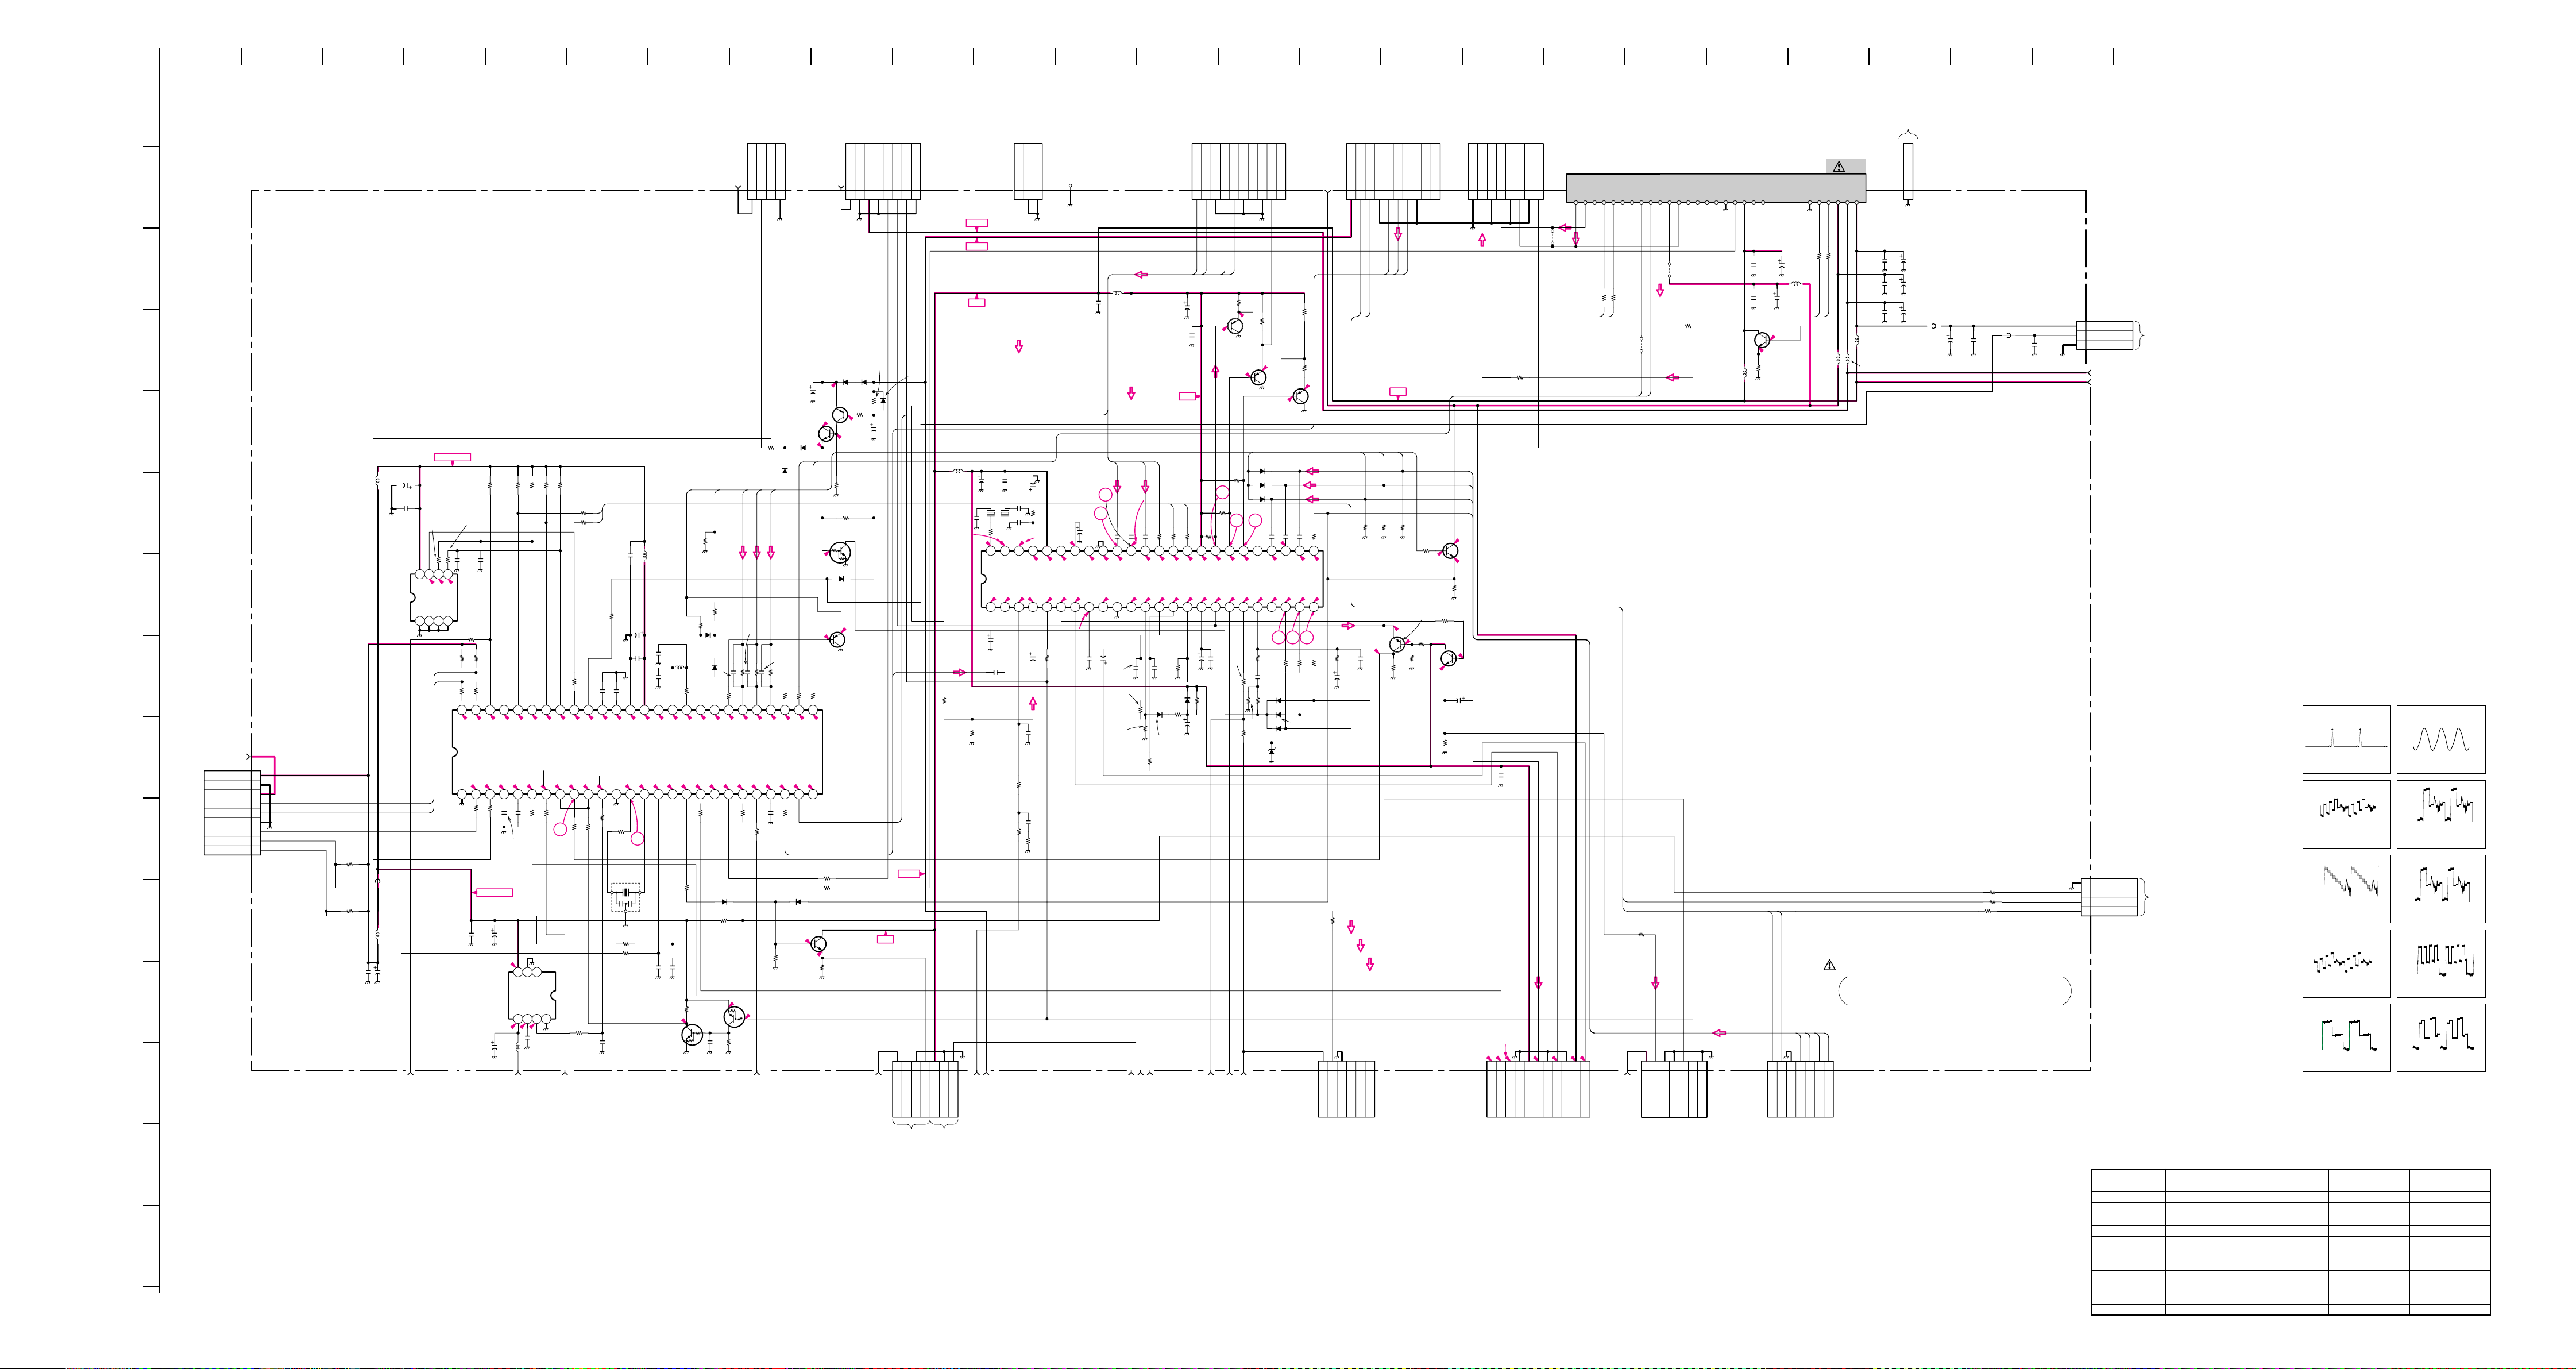
A
D
G
H
M
B
C
E
K
1234567891011 141312 15 16 17 18 19 20 21 22 23 24 25
NC
TO B BOARD CN1206 TO B BOARD CN1304
CN201
3P
WHT
:S-MICRO
9V
9V
MUTE
GND
PROT
123
4
C301
470
16V
Q313
2SC2712
AC OFF DET.
4.2
R331
STBY+5V
C007
L001
100
JW(5)
16V
C006
0.1
B:CHIP
F
IC003
AT24C08A
SV MEMORY
CN904
9P
I
J
7V
WHT
:S-MICRO
STBY+5V
GND
7V
LED2
LED1
GND
SIRCS
KEY2
KEY1
TO H1 BOARD
CN1905
1
2
3
4
5
6
7
8
9
R909
4.7k
:CHIP
R910
4.7k
:CHIP
C912
0.1
B:CHIP
L005
L905
10µH
C913
100
16V
R004
100
:CHIP
1 2 3 4
LED2
LED1
5.0
L
NS ROT
R008
4.7k
:CHIP
R005
100
:CHIP
C005
220p
B:CHIP
5678
C004
220p
B:CHIP
4.5
4.5
R003
10k
:CHIP
R021
10k
:CHIP
LED2
LED1
R019
10k :CHIP
R002
R001
100 :CHIP
0 :CHIP
0
0
LED1
LED2
4.7
1.7
SIRCS
1 2 3 4 5 6 7 8 9 10 11 12 13 14 15 16 17 18 19 20 21 22 23 24 25 26
R047
R066
O
1k
(FB)
:CHIP
:CHIP
0
2.0
NS ROT
(MODE) VOL
5.0
5.0
DPS ALIVE
C041
100p
CH:CHIP
4.7k :CHIP
R010
SCL0
4.5
IC001
*
TUNING
5.0
:CHIP
C042
100p CH:CHIP
4.7k :CHIP
4.7k :CHIP
R011
R012
SCL1
SDA0
4.5
4.5
CONTROLLER
4.0
4.7
APCN
ST-BY
R046
R054
1k
1k
:CHIP
1
4.7k :CHIP
R013
R016
SDA1
4.5
INT
100 :CHIP
0.3
R014
100
:CHIP
SCL
SDA
R015
100
:CHIP
C043
0
5.0
ATT SW
W PROTECT
5.0
4.7
HSYNC
VSYNC
R045
R044
0 :CHIP
B:CHIP
R017
1k
:CHIP
C013
0.01
B:CHIP
C044
100p CH:CHIP
100p CH:CHIP
1.5
VSS
RST
R043
100
:CHIP
R042
100 :CHIP
0
:CHIP
X001
CST10.0MTW
C015
0.001
C014
VSS
1.5
2.4
XTAL
47
0
2.2
2
L002
10µH
C017
68p
CH:CHIP
C016
47p
CH:CHIP
NC
VDD
5.0
5.1
EXTAL
KEY2
L003
3.3µH
5.0
5.1
R018
EXLC
2.7
KEY1
YM
220 :CHIP
0
YS
R053
1k
:CHIP
MA111-TX
R052
1.5k :CHIP
D005
MA111-TX
YM
0
XLC
2.7
/PAL
2.7
5.0(0)[0]
VM MUTE
NT
R038
1k :CHIP
R022
100
:CHIP
D002
C022
R023
YS
0
3.9
AFT1
STBY+5V
C031
0.1
16V
B:CHIP
MM1319AFBE
RESET SUREG
C019
100
25V
IC002
C030
22
5.0
7.5
L004
JW(5)
5 6 7
OUT
GND
REF
IN
C032
5.0
5.0
0.47
16V
B:CHIP
STBY 7V
NC
RESET
GND
1234
R048
10k
:CHIP
ST-BY
R040
100
:CHIP
R041
100
:CHIP
C028
0.022
B:CHIP
C027
0.1
B:CHIP
C026
0.1
B:CHIP
:CHIP
4.6
Q004
DTC114EKA
INV.
R039
1k
:CHIP
R055
10k
D003
MA111-TX MIX
R050
10k
:CHIP
C034
0.01
F:CHIP
0 :CHIP
D001
MA111-TX
MIX
B
G
B(TELETEXT)
G(TELETEXT)
10p
C023
CH:CHIP
R024
R025
10p CH:CHIP
3.9k :CHIP
3.9k :CHIP
1k :CHIP
I
B
G
0
5.0
5.0
0
AFT2
B.INT
NS MUTE
R035
100 :CHIP
R034
:CHIP
5.0
DTA114EKA-T146
4.6
R056
10k
:CHIP
NS MUTE
D313
MA111-TX
SAP
R
R(TELETEXT)
10p
C024
CH:CHIP
R026
3.9k
:CHIP
R027
R028
1k :CHIP
R
0
0
SAP
MUTE
5.0
5.0
TEXT
5.005.0
5.0
OSD/SYUU SW
R032
C047
100 :CHIP
100p CH:CHIP
1k
S IN
D004
MA111-TX MIX
0
R328
4.7k
:CHIP
Q003
INV.
7V
GND
30V
GND
7V
1234567
D301 D300
MA111-TX
MA111-TX
SW.
SW.
Q301
2SA1162
12.1
SW.
12.1
:CHIP
12.1
0
ST
R301
470k
:CHIP
R327
220 :CHIP
Q315
DTC114EKA
SW.
4.2
D006
0
:CHIP
0
4.4
Q001
2SA1162
SW.
*
R029
1k :CHIP
2728293031323334353637383940414243444546474849505152
ST
0
AUDIO SW (F MONO)
R036
100
:CHIP
R037
100 :CHIP
Q311
2SC2712
INV.
0
R329
470
:CHIP
AFT2
R303
47k
:CHIP
R302
C326
47k
10
YS
+9V
+B
CN306
7P
:S-MICRO
TO VM2 BOARD
CN5901 4pin 7pin
V TIM
SCP
C IN
+11V
6
7
+B
NC
CN302
:BTOB-
GND
8
SW.
D317
MA111-TX
GND
VM MUTE
8P
L301
100µH
C306
18p
CH:CHIP
0(0)[1.4}
2.9(2.5)[0]
IC301
CXA2130S
Y/C JUNGL
C
R326
150
:CHIP
1
2
345
VM
9V
GND
NC
TO B BOARD CN1311 TO B BOARD CN1306 TO B BOARD CN1305 TO B BOARD CN1307
CN106
3P
BLK
:S-MICRO
GND
GND
CV/Y IN
123
CN105
1P
CN303
10P
:BTOB
B-Y IN
R-Y IN
GND
Y IN
YS IN
GND
Y OUT
123456789
GND
+30V
+11V
Y
B-Y
C316
470
16V
B:CHIP
SDA
R309
100 :CHIP
4.7
3.6
R349
10k
D312
R376
22k
D311
C315
0.1
+9V
SDAD
4.5
3.6
VD-
SCL
SCLD
VMOUT
C327
C337
2.2µF
R-Y
R310
4.5
5.5
22
Y/R-Y/B-Y
L302
C317
+9V
0.01
F:CHIP
22µH
Y
R-Y
Y
C313
1 16V F:CHIP
5.1
ER-YIN
YB-Y
C314
1 16V F:CHIP
4.0
YS
5.1(5.1)[0]
R308
100 :CHIP
EYIN
YUVSW
4.7
2.3
VD+
C302
470p
B:CHIP
:CHIP
MA111-TX
RECTIFY
MA111-TX
RECTIFY
R332
220
:CHIP
C305
0.1
C304
B:CHIP
47
C307
C309
18p
CH:CHIP
X302
CH:CHIP
XTAL2
3.4
C1 IN
C308
220p
XTAL3
5.0
ABLIN
C331
10
:CHIP
1.8
:CHIP
0.22
R304
5.0
R340
10k
2.1(0)
VCC2
5.4
(APCFIL)
VTIM
Y1/CVBS1 IN
100
C311
4.7
6.5(6.5)[0]
8.9
5.1
ABLFIL
TV/C2 IN
4.7
4.4
COMBC IN
MONOUT
X301
R335
680
:CHIP
XTAL1APED
1 2 3 4 5 6 7 8 9 10 11 12 13 14 15 16 17 18 19 20 21 22 23 24
C332
4.7
C300
2.2
16V
:CHIP
Y
R339
220
:CHIP
R321
10k
:CHIP
C336
0.1
B:CHIP
R345
10k
:CHIP
C341
0.22
25V
B:CHIP
R320
4.7k
:CHIP
B-Y
4
3
C312
1 16V F:CHIP
0
GND2
5.1
EB-YIN
Y2/CVBS2 IN
5.0
3.2
YCLAMP
COMBY IN
GND1EVIREF
C329
22
C322
3.9(4.2)[0]
C330
470p
0.1
B:CHIP
B:CHIP
R322
220
:CHIP
R348
10k
:RN-CP
R315
1.5k
:CHIP
Q304
2SA1162
BUFFER
3.5
Y
5
R367
R368
10k
10k
:CHIP
:CHIP
100 :CHIP
VCC1
8.7
3.6
INT R2IN
0.9
7.7
REG
SSCP
C328
0.1
B:CHIP
R377
1M
YS
4.1
R316
1.5k
:CHIP
Q305
2SA1162
BUFFER
4.0
YM
MA111-TX
MA111-TX
R366
10k
D303
:CHIP
MA111-TX
76
C318
0.01
F:CHIP
4.1
4.1
INT BLK
INT G2IN
INT B2IN
3.3
3.7
HP/PROTECTHDAFCFIL
R351
R334
1k
4.7M
:CHIP
:CHIP
R306
33k
:CHIP
R333
27k
:CHIP
R350
2.2k :CHIP
3.8
C338
R-Y OUT
B-Y OUT
10
R318
1.5k
:CHIP
R378
4.6
0
:CHIP
Q306
2SA1162
SW.
4.0
D305
D304
C319
4.5(4.3)[0]
4.5
EXT R1IN
EXT G1IN
2.1
3.2
1KIN
ROUT
R359
220
:CHIP
4700p B:CHIP
D306
MA111-TX
MA111-TX
D308
MA111-TX
D309
RD5.1SB
PROTECT
CN101
10P
:BTOB
5V
4.6
B(TELETEXT)
G(TELETEXT)
R(TELETEXT)
C320
R319
0.01 F:CHIP
0.01 F:CHIP
100 :CHIP
252627282930313233343536373839404142434445464748
0
4.5
EXT BKL
EXT B1IN
2.1
2.1
GOUT
BOUT
220
:CHIP
MIX
V
R357
18k
:CHIP
C325
8910
R360 R370
220
:CHIP
D307
MIX
R358
R
1k
:CHIP
11V
SDA
SCL
GND
S IN
123456789
C IN
C
CV/Y1
S IN
C IN
SDA
SCL
+9V
B
G
R
R064R065
R063
470
470
:CHIP
:CHIP
470
:CHIP
2SA1162 HP OUT
0.9
0.2
R362
12k
:CHIP
R361
10k
:CHIP
1
C324
0.0047
B:CHIP
CV/Y IN
GND
L IN
R IN
10
YS
Q002
2SC2712
BUFFER
R061
0
0
:CHIP
R062
470
:CHIP
Q308
3.2
R363
18k
:CHIP
R364
0
:CHIP
2SC2712
HP OUT
3.6
C323
100
16V
R365
220
:CHIP
TV OUT
GND
1234567
TV
B
G
R
YS
5.0
0
4.3
Q307
G
B
1
2
3
4
5
6
B
G
ABL
11V
EW
VD+
VD-
HD
HP
9V
CN305
6P
WHT
:S-MICRO
TO B4 BOARD CN8300 TO V1 BOARD CN803 TO V1 BOARD CN801
9V
IK
GND
R
CN304
11P
:BTOB
CN102
:BTOB
GND
GND
GND
TV R OUT
B:CHIP
5.0
0
10
11
APCN
NT/PAL
TO SBX3005-01 PART
STBY-MUTE
TV L OUT
8
AUDIO(R)
JR109
*
R113
100
:CHIP
C335
0.1
2.2(0)[2.2]
3.7
7
8
9
9V
GND
GND
VIDEO
FSC
8P
L OUT
AUDIO(L)
3.2
2.5
5.1
456
5V
GND
C OUT
R OUT
SDA
NC
R101
*
SDA
SCL
RESET Q
NC
NC
NC
SCL
R102
*
JR107
*
DET OUT
PLL-SW
TV
NC
5V
(DEEM OUT)
JR102
0
:CHIP
R105
:CHIP
NC
NC
NC
NC
0
TV
SAP
ST
SDA
SCL
R375
*
VV
R/G/B(TELETEXT)
1
234
5
6
7V
7
7V
GND
CVBS
GND
VP
GND
SCP
CN301 CN307
**
123
Y OUT
GND
L101
10µH
9V
AFT OUT
RF AGC
VIF
C107
470p
B:CHIP
C103
0.1
B:CHIP
1.5
R109
470
:CHIP
SCL
C108
100
16V
L105
10µH
C104
100
16V
2.1
Q101
2SC2712
SW.
SDA
YS
5
6
7
GND
SDA
SCL
AS
R111
100
:CHIP
B
BLK
BLUE
CN104
GND
1
C112
100
16V
C113
47
C114
47
1P
FB102
0
:CHIP
C115
47
C116
0.1
B:CHIP
R226
R225
220
:CHIP
220 :CHIP
R227
220
:CHIP
0
:CHIP
SDA
SDA
SCL
R112
100 :CHIP
SCL
L102
10µH
TU101
*
9V
30V
5V
C110
470p
B:CHIP
C109
470p
B:CHIP
C111
470p
B:CHIP
L104
10µH
L103
10µH
(1/2)
A
MAIN TUNER,VIF.SIF,
AV SW Y/C DECODE JUNGLE
R
G
1
234
RED
GREEN
B-¥SS8700<GE.>-A-1
C117FB101
0.1
B:CHIP
1
9V
2
ATT.SW
3
GND
4
3
2
1
CN103
3P
30V
9V
GND
B-INT
SDA
SCL
CN202
4P
WHT
TO RF
NC
A (1/2) BOARD WAVEFORMS
12
4.7Vp-p (H) 5.6Vp-p
3
NTSC : 1.0Vp-p (H)
PAL : 1.6Vp-p (H)
SECAM : 1.0Vp-p (H)
4
NTSC : 0.9Vp-p (H)
PAL : 0.8Vp-p (H)
SECAM : 0.8Vp-p (H)
56
NTSC : 0.6Vp-p (H)
PAL : 0.8Vp-p(H)
SECAM : 0.7Vp-p(H)
7
1.3Vp-p (H)
9
3.8Vp-p (H) 3.9Vp-p (H)
0.9Vp-p (H)
8
3.8Vp-p (H)
0
N
O
– 69 –
– 70 – – 71 –
A BOARD * MARK LIST
Ref. No.
KV-EF34M61(GE)
KV-EF34M31(OCE) KV-EF34M90(JE)
KV-EF34M80(ME) KV-EF34M91(ME)
CN301 7P # 7P #
CN307 7P # 7P #
CN510 4P # 4P 4P
IC001 CXP750097-001S CXP750097-002S CXP750097-002S CXP750097-001S
JR107 0 : CHIP # 0 : CHIP 0 : CHIP
JR109 # 0 : CHIP # #
R028 1k : CHIP # 1k : CHIP 1k : CHIP
R101 100 : CHIP # 100 : CHIP 100 : CHIP
R102 100 : CHIP # 100 : CHIP 100 : CHIP
R375 100 : CHIP # 100 : CHIP #
TU101 BTF-WG442 BTF-LG434 BTF-WG442 BTF-WG442
KV-EF34M90(HK)
– 72 –
# : Not Used
Page 56
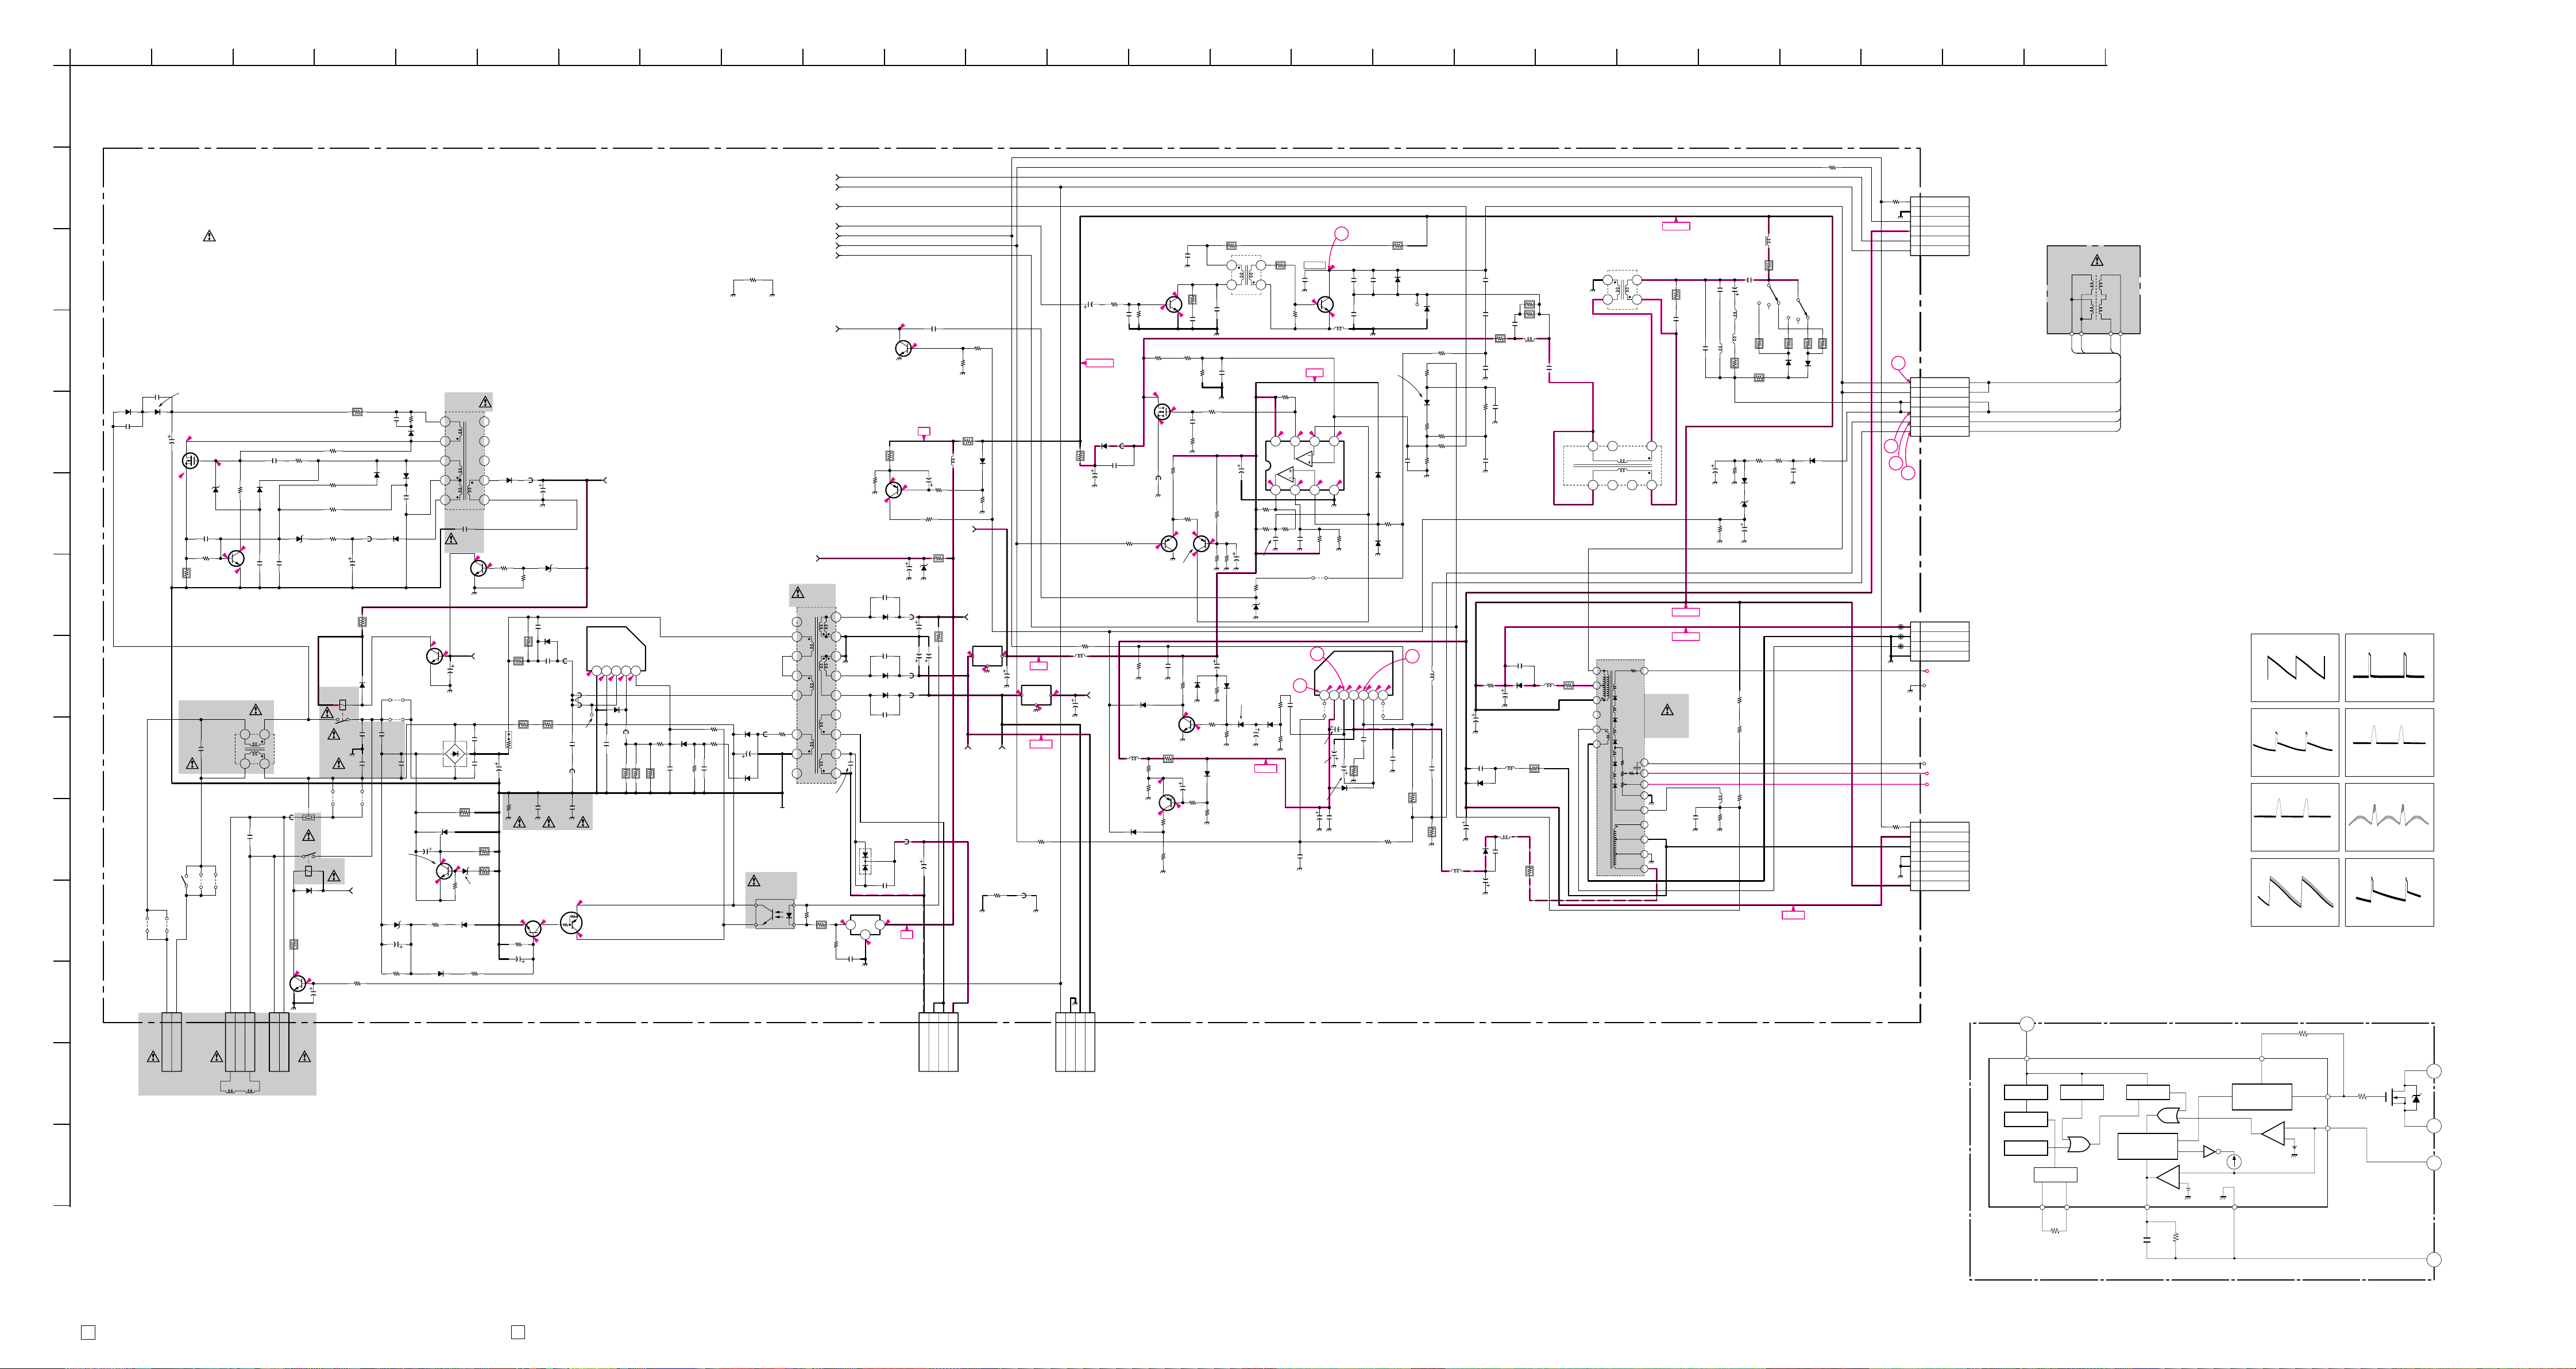
A
D
G
H
M
B
C
E
K
1234567891011 141312 15 16 17 18 19 20 21 22 23 24 25
1k :CHIP
R501
NS ROT
NS MUTE
EW
HD
30V
R647
3.3
PH600
2
3
4
5
8
7
9
:CHIP
1
2
VD+
VDABL
HP
T603
EER49L
C638
0.0047
500V
R648
2.2k
ERROR AMP
R661
4.7k
1W
:RS
Q604
2SA1091R-T
PE2
PROTECT
D622
FMU-G26S
+B RECT
11
10
12
13
14
16
15
18
17
B
IC602
SE135N
R649
1k
C633
0.1
200V
:PT
Q503
2SC2712
PROTECT
R657
220k
1/2W
0
C624
0.0015
2kV
C641
680p 500V B
D612
F5KQ60
D621
D5S6M
C626
680p
500V
B
D630
D5LC20U
12
3
0
:S-MICRO
3.6
R601
1k
:FPRD
134.8
134.8
C629
10
RD30ES-T1B1
FB604
1.1UH
C630
560µ
160V
C642
2200
25V
FB608
1.1UH
FB606
1.1UH
FB605
1.1UH
C631
2200
50V
C625
680p
500V
B
121136
+B
CN605
4P
C564
0.1
25V
F:CHIP
0
+B
L601
15µH
C643
100
16V
R607
4.7k
R600
56k
R652
22k
2W
:RS
D620
OVP
R653
4.7k
1W
:RS
12.2
C632
3300
16V
123
GND
GND
3D-VCC
TO B BOARD
CN1205
R518
100
R516
22k
:CHIP
R615
0.56
2W
:RS
D628
1SS119
DETECT
R619
270k
1/2W
9V
+B
IC603
L7809CV
+11V REG
IO
0
11V
4
3D+VCC
9.0
G
C634
220
16V
R599
JW(5MM)
-2
7V
FB616
JW(5MM)
:S-MICRO
7.5
+9V
L7805CV
5.0
IO
+9V REG
G
0
+11V
R520
10k
:RN
123
CN510
4P
BLK
NS MUTE
TO DH BOARD
CN3802
C551
1
+135V
RGP10GPKG23
R521
JW(15)
C506
33 160V
R522
10k :RN-CP
L518
47µH
IC604
5V
C635
100
10V
4
GND7V11V
R523
330
C510
1000p
B
D504
PIN OUT
FB501
1.1UH
C507
220p
500V
B
R561
1k
:CHIP
R526
7.5k
:RN-CP
1SS119-25T
:RN-CP
:RN-CP
D505
MA111-TX
PROTECT
Q506
2SC3209
H-DRIVE
R531
-1.2
3.3k
R525
1M
:RN-CP
26.5
S
FB502
1.1UH
Q501
2SA1162
AMP
3.5
C513
0.01
B:CHIP
D506
DETECT
Q509
2SC2712
V-PROTECT
L501
10µH
R529
220
R528
22k
12.7
0
R535
5.6k
:CHIP
88.4
0
R530
JW(5)
R537
8.2k
:RN-CP
Q505
IRF614
PIN OUT
6.2
C504
680p
0
B:CHIP
R532
10k
:CHIP
R517
4.7k
:RN-CP
R564
47k
:RN-CP
4.1
4.0
Q502
2SA1162
AMP
MA111-TX
R541
4.7k
:CHIP
R534
0.22
2W
:RS
Q507
2SA1162
PROTECT
12.2
:CHIP
R536
5.6k
:CHIP
C514
0.047
200V
:PT
R543
5.6k
1W
:RS
C519
820p
500V
B
R533
1k
4.3
2.3
R575
3.9k
D507
DETECT
R547
33k
:CHIP
0
R545
15k
:CHIP
0.6
C518
100
16V
R540
4.7k
R544
820
3W
:RS
1
T501
HDT
3 4
C523
1000p
500V
B
C517
0.0033
B:CHIP
C521
220
25V
R552
R548
2.2k
3.9k
:CHIP
:RN-CP
R505
470k
R592
:CHIP
100k
:RN-CP
C503
10
:RN-CP
C522
100
16V
D510
MA111-TX
DETECT
D511
MA111-TX
DETECT
R550
100k
:CHIP
D508
MA111-TX
DETECT
R546
15k
:CHIP
5
R557
0.22
2W
:RS
R562
1.2
1 2 3 4
R506
:CHIP
C502
0.0015
CH:CHIP
R551
2.2k
:CHIP
D509
RD5.6SB
IC503
TDA8172
V.OUT
R559
10k
D512
MA111-TX
DETECT
C524
47
+15V
-0.4
47
:CHIP
9.0
18k
D(E29)
C526
0.1
:PT
R558
3.3k
C527
330p
Q511
2SC4927
H-OUT
R560
10k
6.4
6.0
C530
0.022
1
C532
470
25V
(2/2)
A
(POWER SUPPLY,DEFLECTION)
C644
0.0022
C657
500V
E
1kV
C646
450V
D631
ERC04-06SE
AC-RECT
0.0022
F
I
J
JW610
L
CN601
2P
:VH
TO H1 BOARD
R
10
JW609
17.5MM
1
AC IN
CN1602
D632
ERC04-06S
AC-RECT
157.7
Q605
2SK2845
S
OVP
D623
-0.3
RD1SSB2-T1
C651
470p
CH:CHIP
2SC2712
R612
680
:CHIP
R616
6.8
1/2W
:FPRD
C600
0.1
250V
7.5MM
JW611
7.5MM
JW612
17.5MM
2
CN604
3P
AC IN
0.5
R617
22
Q606
0
-0.3
0.5
C636
0.047
B:CHIP
T601
LFT
1
23
4
C601
0.1
630V
321
1
2
3
NC
DGC
DGC
C647
R609
0.001
2.2k
CH:CHIP
:CHIP
D624
CONTROL
MA111-TX
D637
RD6.8ES-T1B1
CONTROL
C604
0.001
B:CHIP
2
1
4
3
FB612
1.1UH
THP600
1SS119-25T
DISCHARGE
12.2
12
1
2
CN602
2P
:MINI
DGC CHK
DGC CHK
R608
22M
1/2W
R610
10k
:CHIP
R611
47k :CHIP
R614
470
:CHIP
D602
1SS119-25T
DISCHARGE
DH5D1-0(M)
JW600 JW601
7.5MM 7.5MM
RY600
D600
R621
22
1W
Q600
:RS
2SC2785
DC RELAY
DRIVE
0
C603
47
R602
4.7
:FPRD
D634
MA111-TX
RECT.
C652
22
R650
22
2W
:RS
RY601
C605
470p
250V
B
C606
470p
250V
B
11V
R656
1k
R603
470k
C645
1/4W
0.01
:RN
250V
D633
ERA22-08TP3
SNBBER
MA111-TX
C650
0.001
CH:CHIP
D638
D1N20R-TR
RECT.
FB610
JW(5)
Q607
2SD2144S
READY DRIVE
JW604
7.5MM
JW605
7.5MM
C607
4700p
500V
E
C608
4700p
500V
E
Q601
2SD2114K
CONTROL
D603
RD33ESB2
DETECT
RGP02-17PKG23
R623
82k
:CHIP
D635
RECT.
D605
D4SB60L
AC RECT
TF541M
C610
10
-0.4
R624
47k
:CHIP
C609
100
D604
DETECT
0
D606
:CHIP
T604
STB
1
3
4
5
6 8
0.7
-0.3
R604
100k
2
10
11
9
C655
470p
250V
B
0.7
ST-BY
C653
47
C611
4700p
500V
E
C612
4700p
500V
E
R627
6.8 10W :RB
-1.9
D608
RD20ES-T1B2
DISCHARGE
D607
MA111-TX
DETECT
R626
1k
:CHIP
D636
D1NS4-TA2
STBY 7V.
RECT.
FB611
1.1UH
Q608
2SC2712
R659
1k
:CHIP
1W
C613
560
450V
R629
470
:FPRD
R630
10k
:FPRD
:CHIP
RD10SB-T1
R660
:CHIP
R637
82k
3W
:RS
R635
82k
3W
:RS
R636
15k
3W
:RS
R634
8.2M
1W
Q602
2SC2712
DETECT
0
R631
47k
C614
10
10k
0
R632
0.1
:RF
C649
330
25V
D625
10V OVP
C616
0.022
400V
D609
:PP
RU1P-V1
SNVBBER
FB613
1.1UH
C617
100p
1kV
FB600
0.45UH
CN603
1P
:MINI
R646
15k
3W
:RS
C615 C619
470p
250V
B
7.0
-0.3
STBY 7V
IC601
STR-F6656
MAIN SW TR.
GND
VIN
D
S
0
FB601
1.1UH
CN607
1P
C618
680p
2kV
:PP
FB615
1.1UH
470p
250V
9.4
DTA114EKA-T146
1.8
160
9.4
C620
470p
CH:CHIP
R639
0.22
2W
:RS
Q603
DETECT
0
OCP/FB
12345
1.0
D610
AK04V0
FB602
1.1UH
R654
R641
1
0.22
2W
:RS
:RS
2W
R640
680
C621
470p
D611
AU-01Z-V1
R642
1.5k
R643
3.3k
R644
1.5k
C622
0.0015
B
R527
10 :CHIP
D613
AU-01Z-V1
FB603
1.1UH
C623
100
25V
D614
AU-01Z-V1
DETECT
ON317-R
PHOTO COUPLER
4
3
4
36.7
H.OUT
C538
C528
0.023
680p
2kV
2kV
:PP
:PP
0
L502
0.68µH
+9V
2.4
5678
2.0
0
R570
R565
6.8k
3.3k
:CHIP
:CHIP
JR502
0
:CHIP
2
1.6
Vcc
DRV-IN
1 2 3 4 5 6 7
JR500
0
:CHIP
C531
2.2
C533
470
25V
D513
C537
GP08DPKG23
220
V.BOOST
C536
0.1
:MPS
D(E29)
0.051
2.0
IC502
12.9
-13.5
F.B.-PLS
Vee
R596
820
3W
:RS
D517
FMQ-G5FMS
DETECT
C543
680p
2kV
:PP
C539
400V
:PP
NJM2903M-T
-14.9
R568
1.5
:FPRD
CN501
D520
MA111-TX
SLICE
:CHIP
D531
PIN CONTROL
OUT-PUT
SLICE
MA111-TX
R542
100k
:CHIP
D532
MA111-TX
SLICE
13.0
1.5
0
Vcc(OUT)
REF-VOLT
JR501
0
:CHIP
C540
0.33
:MPS
C546
0.1
F:CHIP
R571
7.5k
:RN
D530
FMU-G26S
PIN DUMPER
R579
0 :CHIP
R584
4.7k
:CHIP
R582
R583
1.5M
:CHIP
:CHIP
C549
:RN-CP
4700p
B:CHIP
R580
100k
:RN-CP
3
D(E29)
L503
10µH
:LHL08
C550
0.1
100V
:MPS
R577
220
3W
:RS
R578
1
2W
:RS
C553
680p
2kV
B
C554
0.0056
100V
:PT
R587
620k
:RN-CP
0
R581
4.7k
C558
160V
C562
470p
500V
B
D2L20U-F
+15V RECT
C556
470
25V
D521
RGP10GPKG23
-15V.RECT
L504
10µH
:LHL08
:CHIP
R590
68k
:RN
C565
250V
33
:HR
D522
C552
680p
2kV
B
C561
0.0027
630V
:PP
R585
4.7
1/4W
:FPRD
B:CHIP
C559
#
47
:LHL08
L506
10µH
:LHL08
C560
470p
500V
C557
470
25V
C563
0.01
R589
100 2W :RS
R588
100
3W
:RS
14
L507
C567
0.75
200V
:PP
C566
220p
500V
B
L508
10µH
:LHL08
D523
RGP10GPKG23
200V.RECT
R593
0.47
L505
10µH
1/2W
:FPRD
B
R591
0.47
1/2W
:FPRD
R594
0.47
1/2W
:FPRD
+135V
HLC
T504
23
1
4
14
3
47
8
T505
9
PMT
10 7
1
10
R597
680
1/2W
:FPRD
+135V
+200V
C
200V
+B
H2
H1
4
2
3
6
5
HV1
T503
NX-4009//J1A4
FBT
14
FV
SV
13
ABL
11
-15V
10
E
9
8
15V
7
C568
470p
500V
B
C570
1.8
200V
:PP
C573
0.068
200V
:PT
C571
0.47
L514
JW(5)
R556
4.7k
:RN
C572
0.22
250V
:PP
L511
100µH
R512
18k
R598
56k
R549
18k
:RN
R553
22k
:RN
C577
C574
0.33
4.7
250V
160V
:PP
:HR
S501
SW
L513
1.0mmH
:LHL08
L512
1.0mmH
:LHL08
R510
39
1W
:RS
1SS119-25T
R554
22k
:RN
L515
10mH
:DCC
R507
4.7
:FPRD
S502
SW
R515
2.2
R508
1W
47
:RS
3W
:RS
R511
4.7
2W
:RS
D527
GP08DPKG23
H-POSI
R514
R513
560k
470k
:RN
:RN
D525
D526
RD33ES
-TIBP
ROTECT
C576
0.1
:PT
+15V
R509
82
3W
:RS
R519
15
3W
:RS
D528
GP08DPKG23
H-POSI
D529
RGP02-17
DETECT
C579
1000p
500V
E
B-¥SS8700<GE.>-A-2
R500
1k
5
6
7
R539
1k
:CHIP
CN507
6P
:S-MICRO
1
VD+
2
GND
3
VD-
4
15V
5
NS ROT
6
NS MUTE
TO C BOARD
CN1801
DY1
6P
WHT
:DY
1
H+
2
H+
3
H-
4
H-
5
V-
6
V+
8
CN505
4P
:MINI
TO C BOARD
CN700 & CN701
1
200V
2
GND
3
H1
4
GND
HV TO HV BLOCK
CN508
1P
TO COATING EARTH
:TAB
CN504
1P
:TAB
TO D2 BOARD CN2823
FOCUS TO C BOARD J701
G2 TO C BOARD CN702
7
VD+
6
15V
5
FBP
4
GND
3
GND
2
NC
1
135V
CN503
7P
YEL
:S-MICRO
TO D2 BOARD
CN2822
IC601 STR-F6656
V IN
4
START
DY
H.DY H.DY V.DY V.DY
A (2/2) BOARD WAVEFORMS
12
0.5Vp-p (V) 30.0Vp-p (V)
3
57.0Vp-p (V)
4
NTSC : 1160Vp-p (H)
PAL : 1220Vp-p (H)
SECAM : 1160Vp-p (H)
56
NTSC : 1160Vp-p (H)
PAL : 1220Vp-p (H)
SECAM : 1160Vp-p (H)
7
1.8Vp-p (V)
R3
LATCHO.V.P
DRIVE
286Vp-p (H)
8
57.5Vp-p (V)
3D
R4
N
Schematic diagram
A
? (1/2) board
– 73 –
Schematic diagram
A
(2/2) board /
– 74 –
REG.
T.S.D
O.V.C
Iconst
Vth(2)
R1
Rconst+
R2
Comp.2
Rconst-
C1
– 75 – – 76 –
Comp.1
Vth(1)
2S
1 O.C.P/F.B
5 GND
Page 57
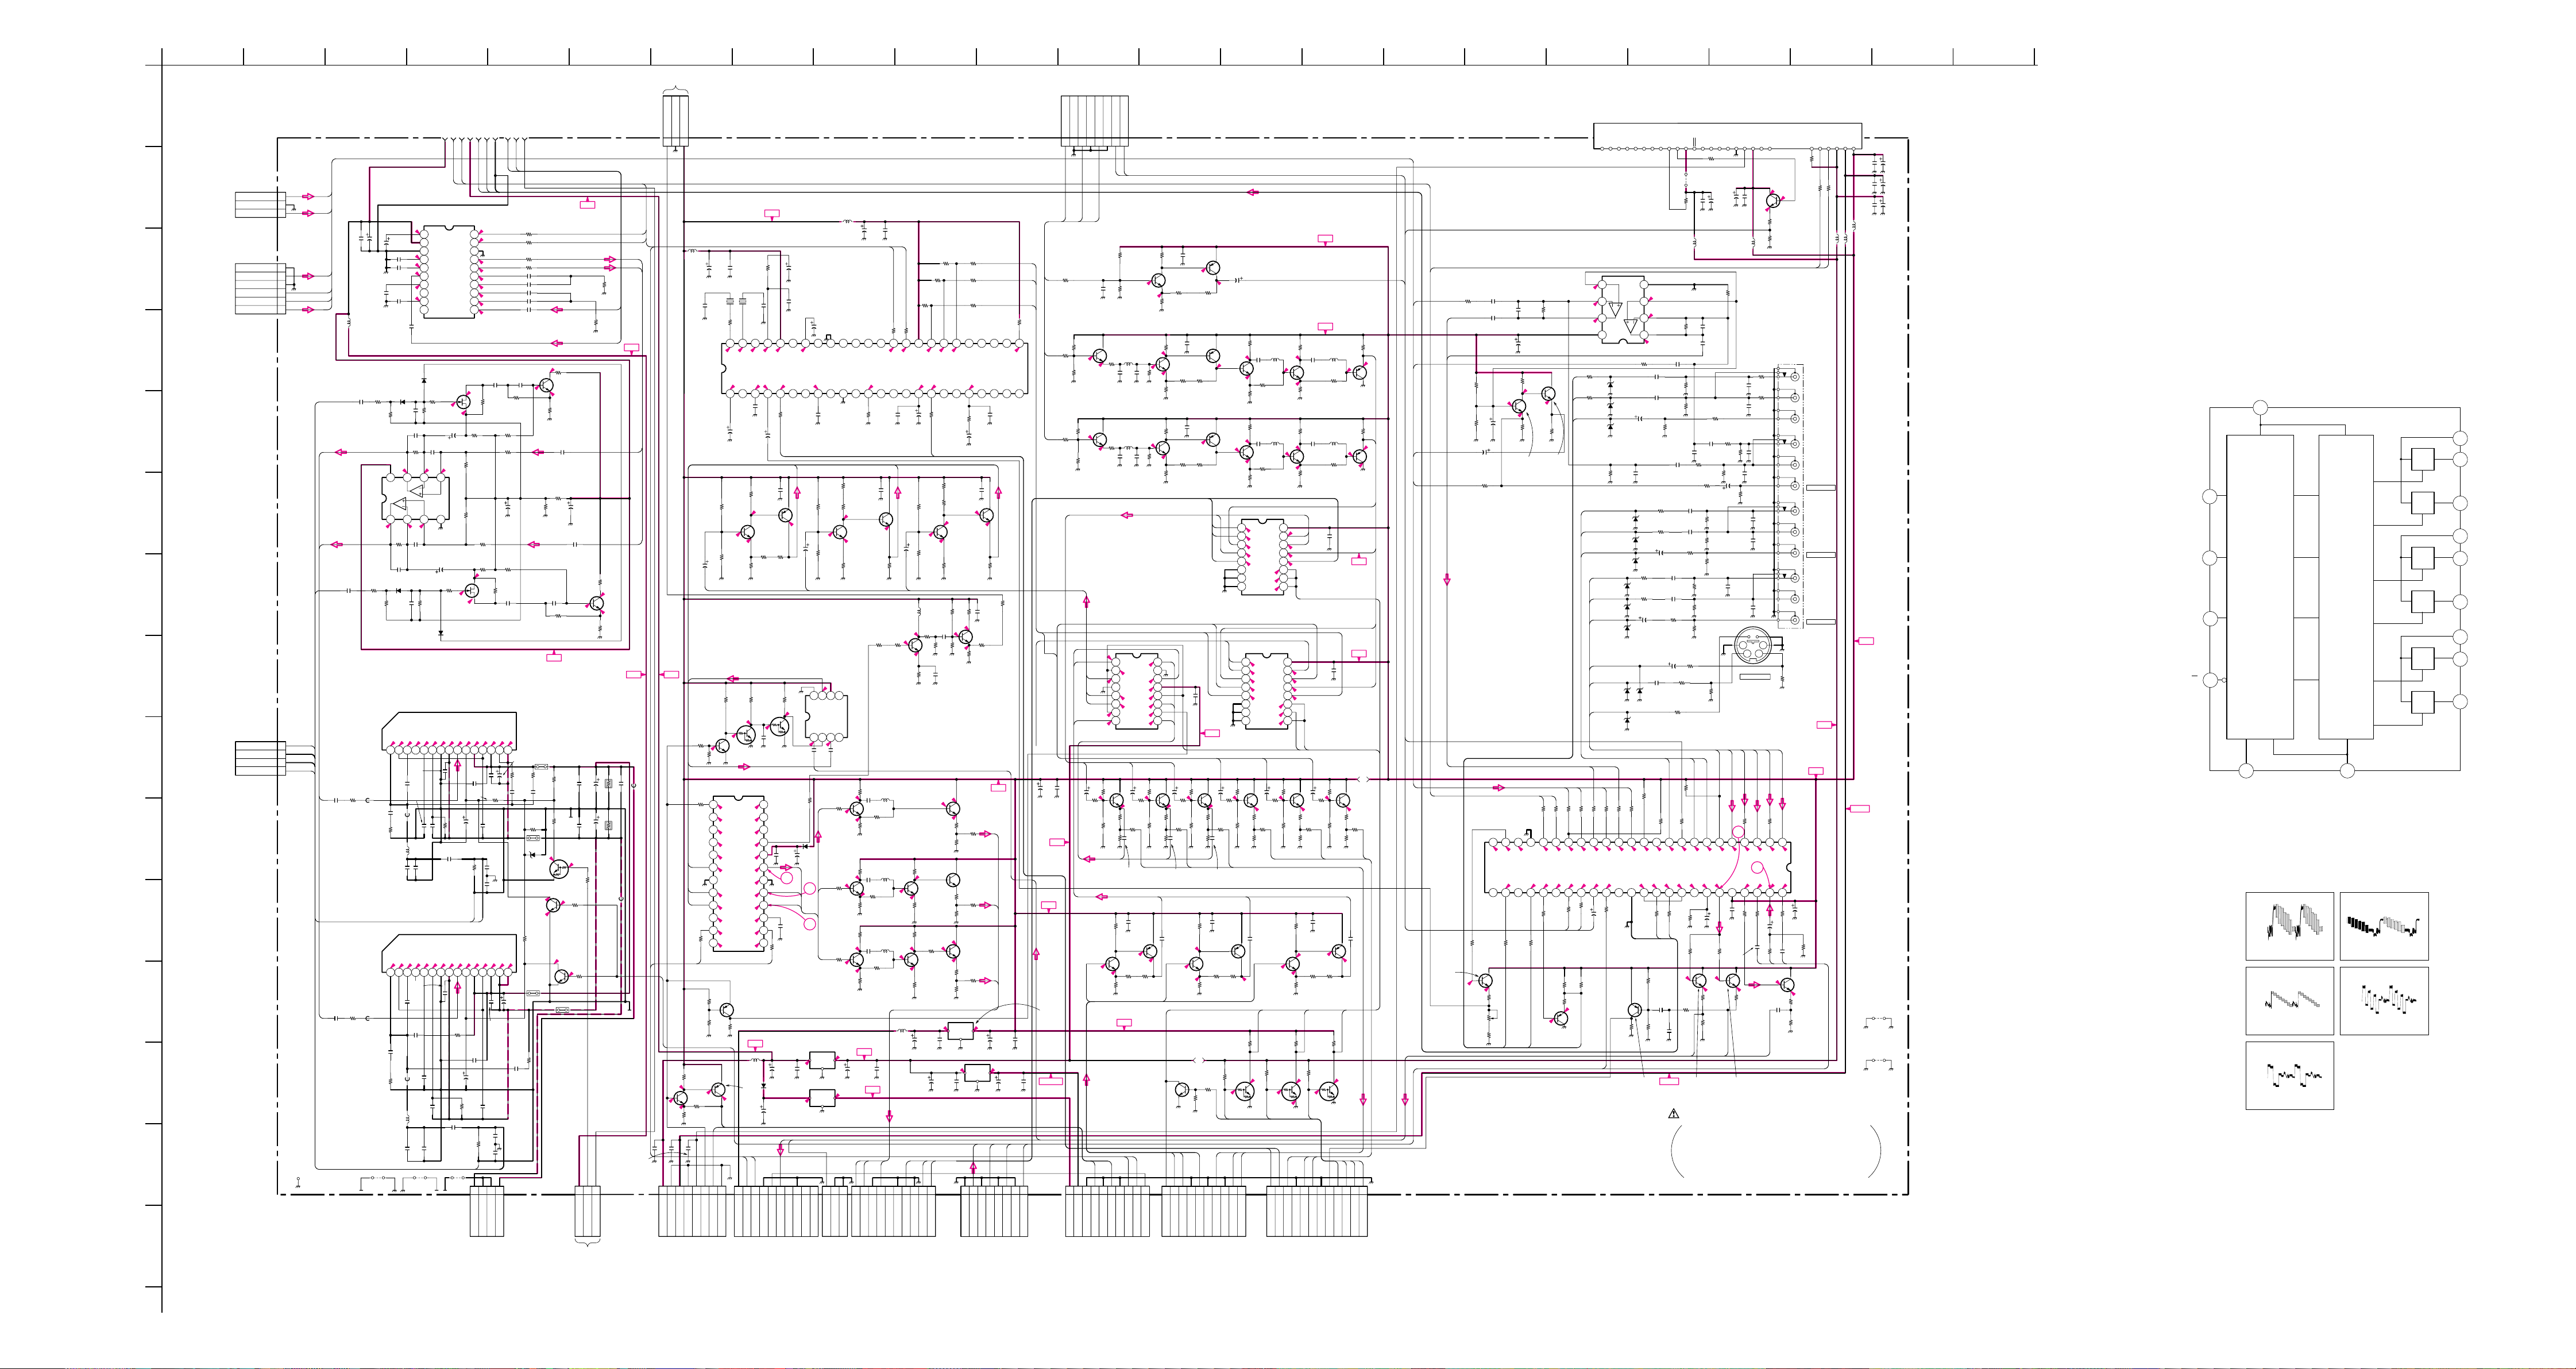
A
D
G
H
M
N
O
B
C
K
1234567891011 141312 15 16 17 18 19 20 21 22 23
TO VM2
CN5901 1,-3pin
CN1301
3P
WHT
:S-MICRO
L OUT
R OUT
7V
SCL
L
11 12 13 14 15 16 17 18 19 20
0.3
S
R1216
470k
:CHIP
R1218
100k
:CHIP
R1220
100k
:CHIP
R1223
2.2k
:CHIP
R1225
470k
:CHIP
S
R
4.3
4.5
4.4
4.4
4.4
4.4
4.4
4.4
4.4
C1222
R1211
100k
:CHIP
3.9
R1231
100k
:CHIP
GND
G
0.33
:MPS
L IN
L
R1212
3.3k
:CHIP
R1215
150k
:CHIP
R1217
2.2k
:CHIP
C1231
10
R1224
150k
:CHIP
C1239
0.33
:MPS
R IN
D OUT
R
R1202
R1201
R1279
R1278
C1213
0.1 16V B:CHIP
C1212
0.1 16V B:CHIP
C1211
0.1 16V B:CHIP
C1210
0.1 16V B:CHIP
C1209
2.2
16V
F:CHIP
C1223
0.033
25V
B:CHIP
220 :CHIP
220 :CHIP
220 :CHIP
220 :CHIP
AUDIO(L)
AUDIO(R)
R1214
8.7
390
:CHIP
2SC2712
INDUCTOR
4.0
3.4
R1213
6.8k
:CHIP
16V
F:CHIP
AUDIO(R)
R1222
10k
:CHIP
R1221
C1232
10k
100
:CHIP
16V
AUDIO(L)
C1240
0.033
25V
B:CHIP
R1232
3.3k
:CHIP
+7V
AUDIO(L)
AUDIO(R)
Q1202
1
C1234
1
16V
F:CHIP
3.9
R1234
390
:CHIP
R1204
5.6k
:CHIP
R1203
5.6k
:CHIP
Q1203
8.6
3.3
R1233
6.8k
:CHIP
SCL
SDA
L
R
L
R
+9V
R
L
2SC2712
INDUCTOR
9V
SDA
CN1201
3P
RED
:S-MICRO
TO H1 BOARD
CN1903
CN1313
:S-MICRO
TO H1 BOARD
CN1904
E
R IN
GND
L IN
6P
WHT
GND
Y IN
GND
CV IN
S IN
C IN
AUDIO(R)
1
2
AUDIO(L)
3
1
Y
2
3
4
5
C
6
CVF
R
R
L
Y
S
C
R
C1207
0.1
16V
B:CHIP
C1205
C1208
0.0022
47
CH:CHIP
C1201
0.1
16V
B:CHIP
L1201
47µH
C1224
1
16V
F:CHIP
R1208
:CHIP
AUDIO(R)
R1207
100k
:CHIP
100k
CH:CHIP
CH:CHIP
C1206
22
4.4
4.4
4.4
C1204
0.0022
4.4
4.4
C1202
0.1
16V
B:CHIP
D1202
MA111-TX
SW.
D1201
MA111-TX
RECTIFY
C1225
0.1
B:CHIP
C1226
47p
R1219
2.2k
:CHIP
4.4
4.4
C1203
2.2
16V
F:CHIP
SDA
SCL
IC1201
TDA7315D013TR
TONE CTRL
12345678910
SCL
CREF
SDA
9V
DGND
GND
LOUT
TRE(L)
ROUT
TRE(R)
RIN
BO(R)
LO(R)
BI(R)
NC
BO(L)
LO(L)
BI(L)
LIN
NC
Q1201
R1210
2SK246
100k
VOL.
:CHIP
3.9
R1209
1M
4.2
:CHIP
C1227
4.7
C1228
100p
CH:CHIP
4.4
4.3
5678
IC1202
NJM4558M
BASS BOOST
F
AUDIO(L)
L
C1237
1
16V
F:CHIP
L
1 2 3 4
4.4
C1235
47p
CH:CHIP
R1227
MA111-TX
100k
:CHIP
RECTIFY
R1228
100k
:CHIP
R1226
2.2k
:CHIP
D1203
C1238
0.1
B:CHIP
4.3
4.4
C1233
100p
CH:CHIP
R1229
:CHIP
1M
C1236
4.7
Q1204
2SK246
VOL.
R1230
4.2
100k
:CHIP
0.3
D1204
MA111-TX
SW.
+9V
+9V +7V
CN1204
4P
WHT
:S-MICRO
TO H1 BOARD
CN1902
L SP
I
AUDIO GND
AUDIO GND
R SP
L
1
G
2
G
3
R
4
C1246
B:CHIP
R
0.47
16V
R1264
470
:CHIP
FB1209
1.1UH
J
L
L
C1260
0.47
16V
B:CHIP
R1265
470
:CHIP
00000
-18.9
OUT
B/D
-19.1
NC
FREQ
F/C
GND
-VCC
12345678910 11 12 13 14 15
C1247
0.01
B:CHIP
C1243
0.1
B:CHIP
C1251
0.0047
B:CHIP
C1250
680p
B:CHIP
1.1UH
FB1208
R1235
150
:CHIP
L1202
CH:CHIP
65µH
C1254
1
:MPS
C1255
0.001
B:CHIP
0000000
-18.9
OUT
B/D
BOOT BOOT
1 2 3 4 5 6 7 8 9 10 11 12 13 14 15
C1273
0.01
B:CHIP
C1258
0.1
C1261
680p
B:CHIP
R1245
150
:CHIP
FB1207
L1203
65µH
C1266
1
:MPS
B:CHIP
C1270
680p
B:CHIP
1.1UH
C1263
CH:CHIP
FB1210
1.1UH
C1252
100p
NC
F/C
0.0047
B:CHIP
C1264
100p
C1267
0.001
B:CHIP
R1236
12k
:RN-CP
C1219
2.2
C1256
2200 25V :BP
-19.1
FREQ
GND
-VCC
R1260
150
:CHIP
C1268
2200
25V
:BP
18.5
-19.2
IN
MODE
C1242
B:CHIP
A(R)
R1237
:CHIP
R1244
:CHIP
-19.1
IN
MODE
A(L)
C1274
B:CHIP
R1246
12k
:RN-CP
-18.9
VCC
0.01
33k
10k
G
VCC
0.01
C1220
2.2
18.5
VREG
C1245
B:CHIP
C1253
B:CHIP
C1277
2200p
CH:CHIP
C1278
2200p
CH:CHIP
R
TDA7481
18.4
VREG
C1265
B:CHIP
R1252
10k
:CHIP
G
CN1312
1P
JR1205
0
:CHIP
JR1206
0
:CHIP
JR1209
0
123
:CHIP
3D-VCC
CN1205
:S-MICRO
TO A BOARD
CN605
3D GND
4P
RED
18.5
-18.9
-19.2
VCC
-VCC
0.1
0.1
IC1204
L-AMP
18.4
-18.9
-19.1
VCC
-VCC
C1215
C1259
0.1
B:CHIP
0.1
CH:CHIP
CH:CHIP
L
4
3D+VCC
3D GND
IC1203
TDA7481
R-AMP
-19.2
-VCC
PS1202
C1214
2.7A
470
R1280
R1261
150
150
:CHIP
:CHIP
C1276
C1271
680p
680p
B:CHIP
B:CHIP
R1238
22k
:CHIP
PS1204
2.7A
D1205
PROTECTOR
RD9.1SB-T1
Q1205
DTC144EKA-T146
6.0
0
R1247
33k
:CHIP
-19.1
-VCC
PS1201
2.7A
470
R1281
150
:CHIP
C1275
680p
B:CHIP
C1279
2200p
C1280
2200p
TO A BOARD
R1240
33k
:CHIP
C1281
0.1
B:CHIP
R1239
5.6k
:CHIP
C1282
0.1
B:CHIP
6.0
0
R1266
:CHIP
0
R1205
:CHIP
Q1206
2SC2712
MUTING
6.0
Q1207
2SC2712
MUTING
0
R1206
:CHIP
PS1203
2.7A
CN1206
3P
CN201
TO A BOARD
C1244
2200
C1248
2200
1k
47k
47k
123
9V
MUTE
CN201
R1241
470
2W
:RS
R1242
470
2W
:RS
FB1206
1.1UH
PROT
C1241
0.1
B:CHIP
C3358
1000p
B:CHIP
1.1UH
FB1205
C3356
0.022
B:CHIP
9V
VM
GND
123
C1325
0.1
25V
F:CHIP
C1323
47
R1336
10k
SCLD
VMOUT
22
R-Y
22k
R1327
100 :CHIP
10
C3375
5.5
:CHIP
R1332
10k
:CHIP
R1330
10k
:CHIP
VCC1
4.0
3.4
INT R2IN
0.8
7.7
REG
SSCP
R1333
100
:CHIP
S-SCP
R5396R5392
470
:CHIP
Q5306
2SC2712
0
R5339
10k
1.9
:CHIP
R5374
47k
:CHIP
C3370
1
R1364
16V
100
F:CHIP
:CHIP
R5370
R1365
22k
1k
:CHIP
:CHIP
R1358
C1350
470
47p
:CHIP
CH:CHIP
4.0
INT G2IN
HP/PROTECTHDAFCFIL
150
:CHIP
6.0
BY-BUFF.
R5397
470
:CHIP
R5375
:CHIP
SCL
SDA
IC1301
R5394 R5398
150
:CHIP
6.0
1.9
R5393
470
:CHIP
R1326
EYIN
YUVSW
ER-YIN
2.2
VD+
R1321
10k
:RN-CP
C5304
0.47
25V
F:CHIP
Q5305
2SC2712
RY-BUFF.
5.3
1k
:CHIP
JR1311
0
:CHIP
CV-SW
IC1311
MM1115XFBE
100 :CHIP
SDAD
4.4
4.4
VD-
C1330
C1327
0.1
16V
B:CHIP
-RY
R5329
:CHIP
BY
L1305
33µH
Q1313
2SC2712
VM-DIFF
8.8
6.2
R1357
100
:CHIP
R5356
:CHIP
R5358
:CHIP
INT B2IN
C5306
0.47
F:CHIP
6.0
Q5307
2SC2712
0
8.2
2.6
2.0
L1301
100H
R5325
:CHIP
C3373
10
YN
Q1342
2SC2712
SLICE
R1382
82k
:CHIP
R1383
47k
:CHIP
Y
C1316
4.7
Y2/CVBS2 IN
3.7
YCLAMP
C1318
0.1
16V
B:CHIP
L1303
22µH
CXA2130S
SUB YCJ
GND2
EB-YIN
COMBY IN
GND1EVIREF
+9V
R1304
10k
C1308
C1301
C1306
18p
CH:CHIP
R7305
680
:CHIP
0.1
25V
F:CHIP
X1301 X1302
C1311
CH:CHIP
XTAL1APED
XTAL2
2.0
2.3
3.3
C1 IN
:CHIP
18p
0
XTAL3
ABLIN
1 2 3 4 5 6 7 8 9 10 11 12 13 14 15 16 17 18 19 20 21 22 23 24
C1310
0.1
25V
F:CHIP
C1309C1229
4.7
C1313
10
4.4
2.8
8.7
(APCFIL)
5.0
Y1/CVBS1 IN
VCC2
4.8
VTIM
R1305
100
:CHIP
C1314
0.2247
C1315
220p
CH:CHIP
7.4
ABLFIL
COMBC IN
MONOUT TV/C2 IN
S-VTIM
Y
R5388
12k
Y
220
:CHIP
Q5302
2SC2712
Y-AMP
2.7
2.0
R5326
10k
:CHIP
C5302
0.47
25V
F:CHIP
6.5
Q5303
2SA1162
Y-AMP
R5390
R5391
270
:CHIP
:CHIP
R5389
470
:CHIP
0
5.8
Y
R5327
22k
:CHIP
RY
470
:CHIP
Q5304
2SC2712
RY-AMP
0
10
R5328
10k
:CHIP
C3374
Y
GND
YOUT
CVIN
SW
1 2 3 4
2.9
CV/Y2
2.2
5678
NC
VCC
NC
YIN
C1360
0.47
25V
F:CHIP
R1379
47k
:CHIP
Q1343
DTC144EKA-T146
0.2
4.6
R1380
R1381
100k
10k
:CHIP
:CHIP
LPF
6.5
0.0022
CH:CHIP
C1358
5.4
0.3
Q1344
DTC144EKA-T146
INV.
C1359
0.47
25V
F:CHIP
5.4
Y
R5338
C1303
470
R1302
:CHIP
M
R5316
1k
:CHIP
9.1
0.8
0.6
C3357
0.022 B:CHIP
R1301
1k
:CHIP
YN
-RY
100
SCL
R5324
18k
:CHIP
R5320
10k
:CHIP
Q3315
2SC2712
CSP
AMP.
R5317
470
9.1
:CHIP
R5318
470
:CHIP
1234567
SC
0.8
NC
ADEXT1
2.4
ADEXT2
2.4
ADEXT3
2.1
YIN
0
ADR
8
-UIN
0.4
-VIN
0.3
NC
10 91112
5.9
SCL
NC
0
PICTURE IN
R5319
10k
:CHIP
1.1
SCP
NC
0
NC
00
CF
2.0
SOUT
2.3
VCC
8.0
YOUT
2.9
VEE
2.6
-UOUT
2.7
-VOUT
2.7
DEC
5.0
SDA
4.54.5
NC
0
IC1302
TDA9178
Q3307
2SA1162
SLICER
+7V
L1302
100µH
Q3316
2SA1162
CSP
AMP.
R5300
0
:CHIP
D1302
MA111-TX
VOLTEG-DROP
C1321
0.1
C1324
25V
F:CHIP
Y
Y
3
-BY-BY
-RY
C1319
0.1
25V
F:CHIP
13 14 15 16 17 18 19 20 21 22 23 24
R1309
100
SDA
:CHIP
C1312
0.1
25V
F:CHIP
C1307
100
16V
D1306
GP08D
LIMITTER
C1356
2200
16V
Q1324
2SC2712
Y DELAY
Y
R1318
100
:CHIP
Y
47
Q1325
2SC2712
-BY DELAY
2.8
-BY
4
R1334
100
:CHIP
5
R1324
100
:CHIP
-RY
Q1326
2SC2712
-RY DELAY
IC1303
L7805CV
REG.
IO
G
7.26.3
C1317
100
16V
IO
G
:CHIP
4.1
8.1
0
R5359
470
:CHIP
R5369
470
:CHIP
7.1
R1373
470
:CHIP
R1310
470
:CHIP
7.1
2.8
2.1
R1370
470
:CHIP
5.0
5.0
IC1310
BA05T
REG.
CH:CHIP
C1304
47p
CH:CHIP
2.1
R5373
820
:CHIP
C1305
47p
CH:CHIP
+5V
C1320
0.1
25V
F:CHIP
+5V
47p
R5350
820
:CHIP
R1319
820
:CHIP
L1312
15µH
L1313
15µH
L1314
15µH
R5365
470
:CHIP
6.8
6.2
7.8
2.1
1.4
Q5309
2SC2712
-RY INV.
C1328
100 25V
L1304
100µH
Y
B-Y
R-Y
8.8
2.9
2.3
R1314 R5353
470
:CHIP
8.8
Q5308
2SC2712
-BY INV.
R5367
470
R1335
:CHIP
470
:CHIP
R5366
470
8.8
:CHIP
6.8
JR1305
0
:CHIP
6.1
R5368
470
:CHIP
R1325
470
:CHIP
11.8 8.8
C1331
0.1
25V
F:CHIP
5.0
C1329
C1326
0.1
100
25V
16V
F:CHIP
Q1304
2SC2712
Y-BUFFER
R1385
270
:CHIP
:CHIP
2SC2712
BY-BUFFER
R1396
68
:CHIP
2SC2712
BY-BUFFER
R1395
68
:CHIP
R5354
:CHIP
IO
G
IC1304
BA033T
C
Y
SDA
SCL
C
CV/Y
VTIM
SCP
8
GND
VTIM
123456789
11V
SDA
SCL
GND
GND
C OUT
SIN(MID-B)
CV/Y OUT
10P
:BTOB
123
10
GND
L OUT
R OUT
CV/Y OUT
CN1311
3P
BLK
:S-MICRO
TO A BOARD
CN106
1234567
7V
GND
30V
GND
AFT2
CN1304 CN1305
8P
:BTOB
CN302 CN101 CN303 CN102
Y
BY
RY
123456789
GND
GND
Y OUT
R-Y OUT
B-Y OUT
YS OUT
CN1306
10P
:BTOB
GND
GND
Y IN
RY
R-Y IN
BY
10
B-Y IN
TV
100
R5357
100
:CHIP
100
R1344
4.7k
:CHIP
INT BLK
EXT R1IN
EXT G1IN
EXT B1IN
3.8
ROUT
GOUT
IKIN
C1335
R1339
0.0047
18k
B:CHIP
:CHIP
C1332
1
-BY
25V
B-Y
5.3
R5399R5395
1k
:CHIP
R5376
C3372
100
0.1
:CHIP
25V
F:CHIP
Q1340
2SC2712
VM-OUT
R5372
0
:CHIP
R5371
470
:CHIP
+9V
Y
Y
100
Q1308
B-Y
B-Y
R5355
100
:CHIP
Q1306
R-Y
R-Y
100
C1336
0.1
C1333
25V
F:CHIP
100
16V
3.3
IO
G
C1334
100
16V
REG.
L
R
V
1234567
GND
GND
GND
TV IN
TV R IN
TV L IN
CN1307
8P
:BTOB
BY
RY
252627282930313233343536373839404142434445464748
7.5
EXT BKL
BOUT
C1337
0.1
25V
F:CHIP
M
8
GND
STBY-MUTE
TO J1 BOARD CN2410
CN1303
8P
WHT
:S-MICRO
GND
DVD L
GND
DVD RY
RY
L
DVD R
8
R
DVD Y
GND
DVD BY
1234567
Y
BY
2SC2712
R1307
22k
C5315
47p
CH:CHIP
5.4
4.8
5.9
5.2
R1351
22k
:CHIP
:CHIP
R1308
10k
:CHIP
2SC2712
BY-LPF
R1322
1k
:CHIP
C5319
82p
CH:CHIP
Q1314
2SC2712
RY-LPF
R1352
1k
:CHIP
C5325 C5326
82p
CH:CHIP
L1306
100µH
CH:CHIP
L1309
100µH
CH:CHIP
2.7
R1323
:CHIP
C5320
82p
R1353
1k
:CHIP
82p
2.0
1k
R1306
100
:CHIP
Y
Y
R1317
12k
:CHIP
R1316
100
:CHIP
BY
R1320 R1329 R1331
18k
:CHIP
R1349
12k
:CHIP
RY
R1348
100
:CHIP
Y/R-Y/B-Y
Y/R-Y/B-Y
Y
C3301
47
25V
+9V
Y
IC305
L7809CV
+3.3V
Y
F:CHIP
+5V
REG.
C3302
0.1
25V
2.9
RY
RY
Y
BY
BY
Y
C3360
47
25V
3.0
R3301
100
:CHIP
R5330
22k
:CHIP
Y/R-Y/B-Y
Q5301
2SC2712
Y-AMP
2.5
Y
Y/R-Y/B-Y
10
5V
GND
3.3V
12345678
X0
2.9
A
3.3
X
1.5
3.3
3.9 2.9
2SC2712
Y-BUFF.
Q3310
R5310
39k
:CHIP
R3302
0
:CHIP
R3303
1k
:CHIP
3.1
GND
5.0
Y
1.6
3.3
Z
1.5
3.0
C
1.0
Z0
RY
C3361 C3362
10 10
2.3
R3304
100
:CHIP
R5331
22k
:CHIP
R3383
100
:CHIP
Y
Y
C5312
1
16V
F:CHIP
Y/R-Y/B-Y
R5384
220
:CHIP
1.8
C5300
0.47
F:CHIP
Q5300
2SA1162
Y-AMP
8.2
R5385
2.3
470
:CHIP
R5387
470
:CHIP
+9V
SDA
SCL
VTIM
SCP
SCP
GND
GND
SDA
SCL
VTIM
CN1308
10P
BLK
:BTOB
X1
GND
Y0
VCC
B
Y1
CP
Z1
Q3311
2SC2712
RY-BUFF.
R5386
:CHIP
123456789
Q1301
Y-AMP
R1311
220
:CHIP
R1312
15
:CHIP
R1315
470
:CHIP
Q1305Q1303
2SC2712
BY-AMP
R1328
220
:CHIP
8.6
1.5k
:CHIP
2.4
1.7
R1337
470
:CHIP
Q1315
2SC2712
RY-AMP
R1354
220
:CHIP
7.6
R1356
1k
:CHIP
1.9
R1360
470
:CHIP
IC1307
BA7606F-T2
MID-THRO
RY
Y
Y
BY
9 10 11 12 13 14 15 16
BY
R5311
39k
:CHIP
3.03.0
R3307
100
2.3
:CHIP
R3305
47
R5332
:CHIP
22k
:CHIP
R3384
R3306
100
1k
:CHIP
:CHIP
RY
C5313
1
16V
F:CHIP
Y
C5309
1
16V
F:CHIP
Q1318
2SC2712
RY-AMP
2.7
0
RY
FS
Q3326
2SC2712
MID-SW
BY
10
FS
B-Y
MID-B
TO P BOARDTO P BOARDTO A BOARDTO A BOARDTO A BOARDTO A BOARD
AUDIO(L/R)
Q1302
2SA1162
Y-AMP
C5317
0.47
25V
F:CHIP
8.6
C5322
0.47
25V
F:CHIP
:CHIP
C5328
0.47
25V
F:CHIP
8.6
R1359
:CHIP
C1345
0.1
25V
F:CHIP
FS
2SC2712
BY-BUFF.
R5312
39k
:CHIP
R3308
330
:CHIP
R3309
:CHIP
RY
C5318
R1313
:CHIP
680
470
47
0
2.1
Q1307
2SC2712
2SA1162
BY-DEL.
BY-AMP
Q1316
2SA1162
RY-AMP
Y
Y
BY RY
R1338
470
:CHIP
6.7
3.1
BY
C5323 C5324
150p
CH:CHIP
2.5
R1341
:CHIP
2SC2712
RY-DEL.
R1361
470
:CHIP
8.8
4.9
C5329 C5330
150p
CH:CHIP
0
R1362R1363
1k
470
:CHIP
:CHIP
12345678
VDD
Y1
4.2
Y0
4.2
BY
Z1
5.0
BY
Z
4.6
Z0
4.6
INH
VEE
VSS
IC1308
HEF4053BTSWITCH
D+D-SW
AC
12345678
Y1
6.8
BC
Y0
6.8
BY
Z1
5.0
Z
4.0
Z0
4.1
INH
VEE
VSS
+5V
Q3313
Y
Q3312
1k
BY
C5314
16V
F:CHIP
SUB-BUFF.
C3363
47
25V
3.0
2.3
R3310
100
:CHIP
R5333
22k
:CHIP
R3399
100
:CHIP
BY
1
2SC2712
R5313
39k
:CHIP
R3311
0
:CHIP
R3312
1k
:CHIP
RY
2.3
R5321
100
:CHIP
R3313
:CHIP
R5334
:CHIP
RY
C1342
220
8.2
0.47
25V
F:CHIP
Q1321
2SA1162
RY-AMP
R1388
470
:CHIP
R1387
470
:CHIP
R1389
47
:CHIP
3.0
C5310
1
16V
F:CHIP
Q1329
2SC2712
BY-AMP
BY
R1386
:CHIP
2.1
2A
R5361
100k
5V
RY
:CHIP
R5383
R5336
100k
47k
:CHIP
:CHIP
0
R5337
47k
:CHIP
2A
0A
Q3321
DTC144EKA-T146
Y
Y
RY
0
1B
BY
123456789
R-Y
GNDYGNDMYGND
CN1309
10P
BLK
:BTOB-P
M R-Y
M B-Y
CN9502CN9501
+9V
2SC2712
+9V
BY-DEL.
R1342
470
:CHIP
L1307 L1308
7.5
47µH 47µH
2.4
68p
CH:CHIP
1.9
R1340
1k
R1345
:CHIP470
L1310
47µH
X1
X0
0
0
0
VDD
0
0
0
C3364
3.0
100
22k
Y
2.7
R5379
100k
:CHIP
DTC144EKA-T146
S-SCP
470
:CHIP
2SC2712
RY-DEL.
R1366
470
:CHIP
8.8
5.7
68p
CH:CHIP
5.0
R1368
470
:CHIP
4.2
Y
Y
X
A
B
C
Y
X
X1
X0
A
B
C
9 10 11 12 13 14 15 16
9 10 11 12 13 14 15 16
4.6
4.6
4.7
2A
RY
RY
6.8
4.0
4.6
4.1
C1354
0.1
25V
F:CHIP
RY
F:CHIP
HEF4053BT
SUB-DVD-SW
0B
1B
Q3305
BY
2SC2712
SUB-RY-BUFF.
R5314
C3365
39k
10
:CHIP
3.0
R3316
100
R3314
:CHIP
47
R5335
:CHIP
2.3
22k
:CHIP
R3315
R5322
1k
100
:CHIP
:CHIP
R1390
220
:CHIP
2.1
F:CHIP
Q1332
2SA1162
BY-AMP
8.28.2
R1392 R1393
680
:CHIP
R1391
470
:CHIP
1B
R5381
0
:CHIP
0
0
0B
R5364
:CHIP
100k
DTC144EKA-T146
R5362
:CHIP
0
100k
Q3322
Y
RY
BY
S-VTIM
10
11
12
SY
GND
S SCP
S R-Y
S B-Y
S VTIM
L1311
RYBY
C1353
0.1
25V
IC1309
SWITCH
SUB-BY-BUFF.
10
RY
C1352
0.47
25V
120
:CHIP
100k
GND
Q1311Q1310Q1309
2SA1162
BY-BUFF.
R1347
1k
:CHIP
1.8
R1343
1k
:CHIP
Q1323Q1322Q1320
2SA1162
RY-BUFF.
R1369
1k
:CHIP
47µH
5.2
R1367
1k
:CHIP
0
+9V
+9V
Q3306
2SC2712
R5315
39k
:CHIP
2.4
R3317
R5323
330
100
:CHIP
:CHIP
R3318
1k
:CHIP
BY
3.7
C5311
1
16V
F:CHIP
0B
0
Y/R-Y/B-Y
Q3325
INV.
2A1B0B
0A
SEL 2A
SEL 1B
SEL 0A
SYNC CNT
BY
0.2
RY
4.6
RY
RY
9V
BY
123456789
CN1310
SEL 0B
:BTOB-P
TO P BOARD
CN9503
12P
BLK
TU3301
BTF-LG434
R OUT
L OUT
NC
NC
SCL
SDA
NC
V
Y
L
L
R
R
R7300
0
:CHIP
0.1 25V B:CHIP
R3324
10k
:CHIP
C3308
R3327
3.9k
:CHIP
C3379
0.1
25V
B:CHIP
C3304
10
2.4
R3325
1k
:CHIP
1.7
R3332
470
:CHIP
IC3302
NJM4558M
AUDIO MIXER
R3329
C3306
100p
:CHIP
CH:CHIP
C3307
100
16V
5.2
4.5
R3321
2.2k
:CHIP
47k
5678
2.4
2.4
4.7
R
R3342
RD9.1SB-T1
1k
:CHIP
L
R3343
RD9.1SB-T1
1k
:CHIP
V
D3303
RD9.1SB-T1
PROTECT
R7301
D3301
PROTECT
D3302
PROTECT
C3313
470
16V
2.4
2.4
1 2 3 4
4.7
0 :CHIP
C3314
1
16V
F:CHIP
C3316
1
16V
F:CHIP
CV
Q3309 Q3308
C3303
2SC2712
1SC2712
CV-BUFFER
R3344
C3324
47k
:CHIP
CH:CHIP
R
D3310
RD9.1SB-T1
PROTECT
L
D3311
RD9.1SB-T1
PROTECT
V
D3312
RD9.1SB-T1
PROTECT
R
D3306
RD9.1SB-T1
PROTECT
L
D3307
RD9.1SB-T1
PROTECT
V
D3308
RD9.1SB-T1
PROTECT
Y
C
D3304
RD9.1SB-T1
PROTECT
S1
D3305
RD9.1SB-T1
PROTECT
100p
R3357
4.7k
:CHIP
R3358
4.7k
:CHIP
C3315
47
25V
R3350
4.7k
:CHIP
R3351
4.7k
:CHIP
C3312
47
25V
C3318
0.01
F:CHIP
D3309
RD9.1SB-T1
PROTECT
CVF
47
25V
R3348
910
:CHIP
AUDIO(L/R)
CV-BUFFER
PLL-SW
NC
R3362
:CHIP
C3380
B:CHIP
R3364
470k
:CHIP
R3365
470k
:CHIP
R3356
470k
:CHIP
C3327
CH:CHIP
C3328
B:CHIP
C3323
1
16V
F:CHIP
C3322
1
16V
F:CHIP
R3360
:CHIP
C3317
47
25V
R3367
2.2k
:CHIP
100
R3352
:CHIP
0.1
25V
100p
0.1
25V
C3325
1
16V
F:CHIP
0
R3366
0
:CHIP
NC5VDET OUT
R3374
JR1301
0
:CHIP
C3330
0.1
16V
B:CHIP
L3302
10µH
47k
B:CHIP
R3388
47k
:CHIP
R3378
:CHIP
C3326
1
16V
F:CHIP
R3372
0
:CHIP
R3369
:CHIP
R3370
:CHIP
R3371
:CHIP
R3373
0
:CHIP
R3377
75
:CHIP
DE-EM
C3333
0.1
25V
910
220k
220k
75
NCNCNC
0 :CHIP
C3336
C3331
100
16V
R3375
47k
:CHIP
C3319
100p
CH:CHIP
C3320
0.1
25V
B:CHIP
R3392
68
:CHIP
R3387
47k
:CHIP
R3300
220k
:CHIP
C3332
R3379
220k
:CHIP
R3380
220k
:CHIP
R3381
75
:CHIP
J3301
GND
NC
100
16V
C3338
470p
B:CHIP
L3303
10µH
C3340
470p
CH:CHIP
C3341
470p
CH:CHIP
C3342
CH:CHIP
R3385
220k
:CHIP
C3339
470p
CH:CHIP
47
25V
C3345
470p
CH:CHIP
C3346
470p
CH:CHIP
C3334
470p
CH:CHIP
C3343
470p
CH:CHIP
S
C
CV-BUFFER
3.9
R3396
470
:CHIP
R3397
470
:CHIP
470p
R3389
75
:CHIP
12
34
VIDEO IN 1
Q3314
2SC2712
8.7
R3394
180
:CHIP
R3395
220
:CHIP
Y
SUB TU VIF
RF AGC
VIF
9V
AFT OUT
R4
L4
V4
R3
L3
V3
R2
L2
V2
R1
L1
V1
4.6
R3335
:CHIP
75
R3320
10k
:CHIP
AS
R3323
100
:CHIP
SDA
J3302
12P
R
AUDIO
L/MONO
MONITOR
OUT
VIDEO
R
AUDIO
L/MONO
VIDEO IN 3
R
AUDIO
L/MONO
VIDEO IN 2
R
AUDIO
L/MONO
VIDEO IN 1
+5V
SDA
SCL
SCL
100 :CHIP
R3334
5V
10µH
L3304
30V
10µH
L3305
9V
C3350
470p
B:CHIP
C3351
470p
B:CHIP
C3352
470p
B:CHIP
L3306
10µH
+9V
C3353
100
16V
C3354
47
C3355
47
IC1308 HEF4053BT
VDD
16
11
SA
10
SB
LEVEL
CONVERSION
9
SC
6
E
14 ZA
13 Y1A
12 Y0A
15 ZB
1 Y1B
DECODERLOGIC
2 Y0B
4ZC
3 Y1C
5 Y0C
Y
L
R3361
100 :CHIP
S1
V
RL
YC
R3390
R3398
100 :CHIP
2
100 :CHIP
VIDEO
+9V
+30V
8
VSS
7
VEE
Y/C
SDA
R3330
100 :CHIP
SCL
S
R3333
100 :CHIP
C
R3336
100 :CHIP
R
R3338
100 :CHIP
Y
R3341
4.7k :CHIP
L
R3345
100 :CHIP
CV
R3347
4.7k :CHIP
R3349
:CHIP
R3355
R3354
:CHIP
100 :CHIP
10k
10k
R
R3363
10k :CHIP
V
L
Y
R
C
123456789101112131415161718192021222324
S1
V2
LV2
3.9
3.9
3.9
8.0
3.9
3.8
3.8
BIAS
Y OUT1
TRAP 1
R3368
C3329
33
Y
C3335
0.1
25V
R3382
F:CHIP
100
:CHIP
R1384
100
:CHIP
F:CHIP
3.8
3.1
R5360
180
:CHIP
R5382
220
:CHIP
CV/Y
CV/Y2
2SC2712
CV/Y BUFFER
Y1
C1
RV1
3.9
3.93.2
3.9
1
3.9
RTV
C OUT1
VCC
R3391
TV
R3393
100 :CHIP
5.6k :CHIP
C3344
0.47
25V
R
V
C
3.2
3.1
Q3304
R5306
2SC2712
33
:CHIP
C-BUFFER
C
2SC2712
CV/Y BUFFER
V1
LV1
3.9
3.9
LTV
TV
10
C3347
R5377
F:CHIP
820 :CHIP
L
C5308
0.1
25V
B:CHIP
3.93.9
R3386
R5378
1.2k
5.6k :CHIP
:CHIP
C3348
0.47
25V
2.6
R5308
:CHIP
R5307
:CHIP
C3349
100
16V
180
220
JR1207
0
:CHIP
JR1208
0
:CHIP
B (1/2) BOARD WAVEFORMS
12
0.8Vp-p (H) 1.8Vp-p (H)
3
1.0Vp-p (H)
4
1.7Vp-p (H)
5
Y/C
Q3301
2SC2712
SUV CV
BUFFER
L OUT3
C OUT2
3.9
3.8
V OUT3
3.9
R OUT2
3.9
R OUT3
Y OUT2
L OUT2 ADR
3.9
SDA
4.0
3.8
V OUT2
SCL
4.3
8.6
TRAP 2
S3
DVD L
8.0
3.9
C3
3.9
3.9
DVD R
RV3
S-TV
3.9
3.9
Y3
MUTE
3.9
0.2
LV3
3.9
C IN1
V3
GND
3.9
3.8
S2
8.0
3.9
Y IN1
RV2
3.9
3.9
DVD Y
3.9
3.8
V OUT1
L OUT1
R OUT1 C2
25 26 27 28 29 30 31 32 33 34 35 36 37 38 39 40 41 42 43 44 45 46 47 48
R3353
100 :CHIP
R1376
100k
:CHIP
C5331
0.047
B:CHIP
R1377
1M
:CHIP
C5332
220p
CH:CHIP
LRG
R3359
100 :CHIP
68k :CHIP
3.8
R1374
680
:CHIP
R3319
100
:CHIP
3.1
3.8
RV5301
100
R5302
180
:CHIP
R3326
100
:CHIP
R5301
180
:CHIP
R
R3328
100
:CHIP
L
R3331
100 :CHIP
3.8
R5303
470
:CHIP
R5304
0
:CHIP
R3337
4.7k :CHIP
L
4.5
R3339
4.7k :CHIP
R
R5309
470
:CHIP
Q3302
2SA1162
CV-OUT
V
R3346
220k
10
:CHIP
C3310
V
CXA1855S
IC3303
AV-SW
R1378
10k
:CHIP
M
Q5310 Q1345 Q3303
2SA1162
SYNC BUFFER
+30V
1.3Vp-p
(1/2)
B
VIDEO SIGNAL PROCESSING
Y/C J SWITCHER
PICTURE IMPRO VEMENT
AUDIO AMP CONTROLLER
B-¥SS8700<GE.>-B-1
– 77 –
– 78 – – 79 –
– 80 –
Page 58
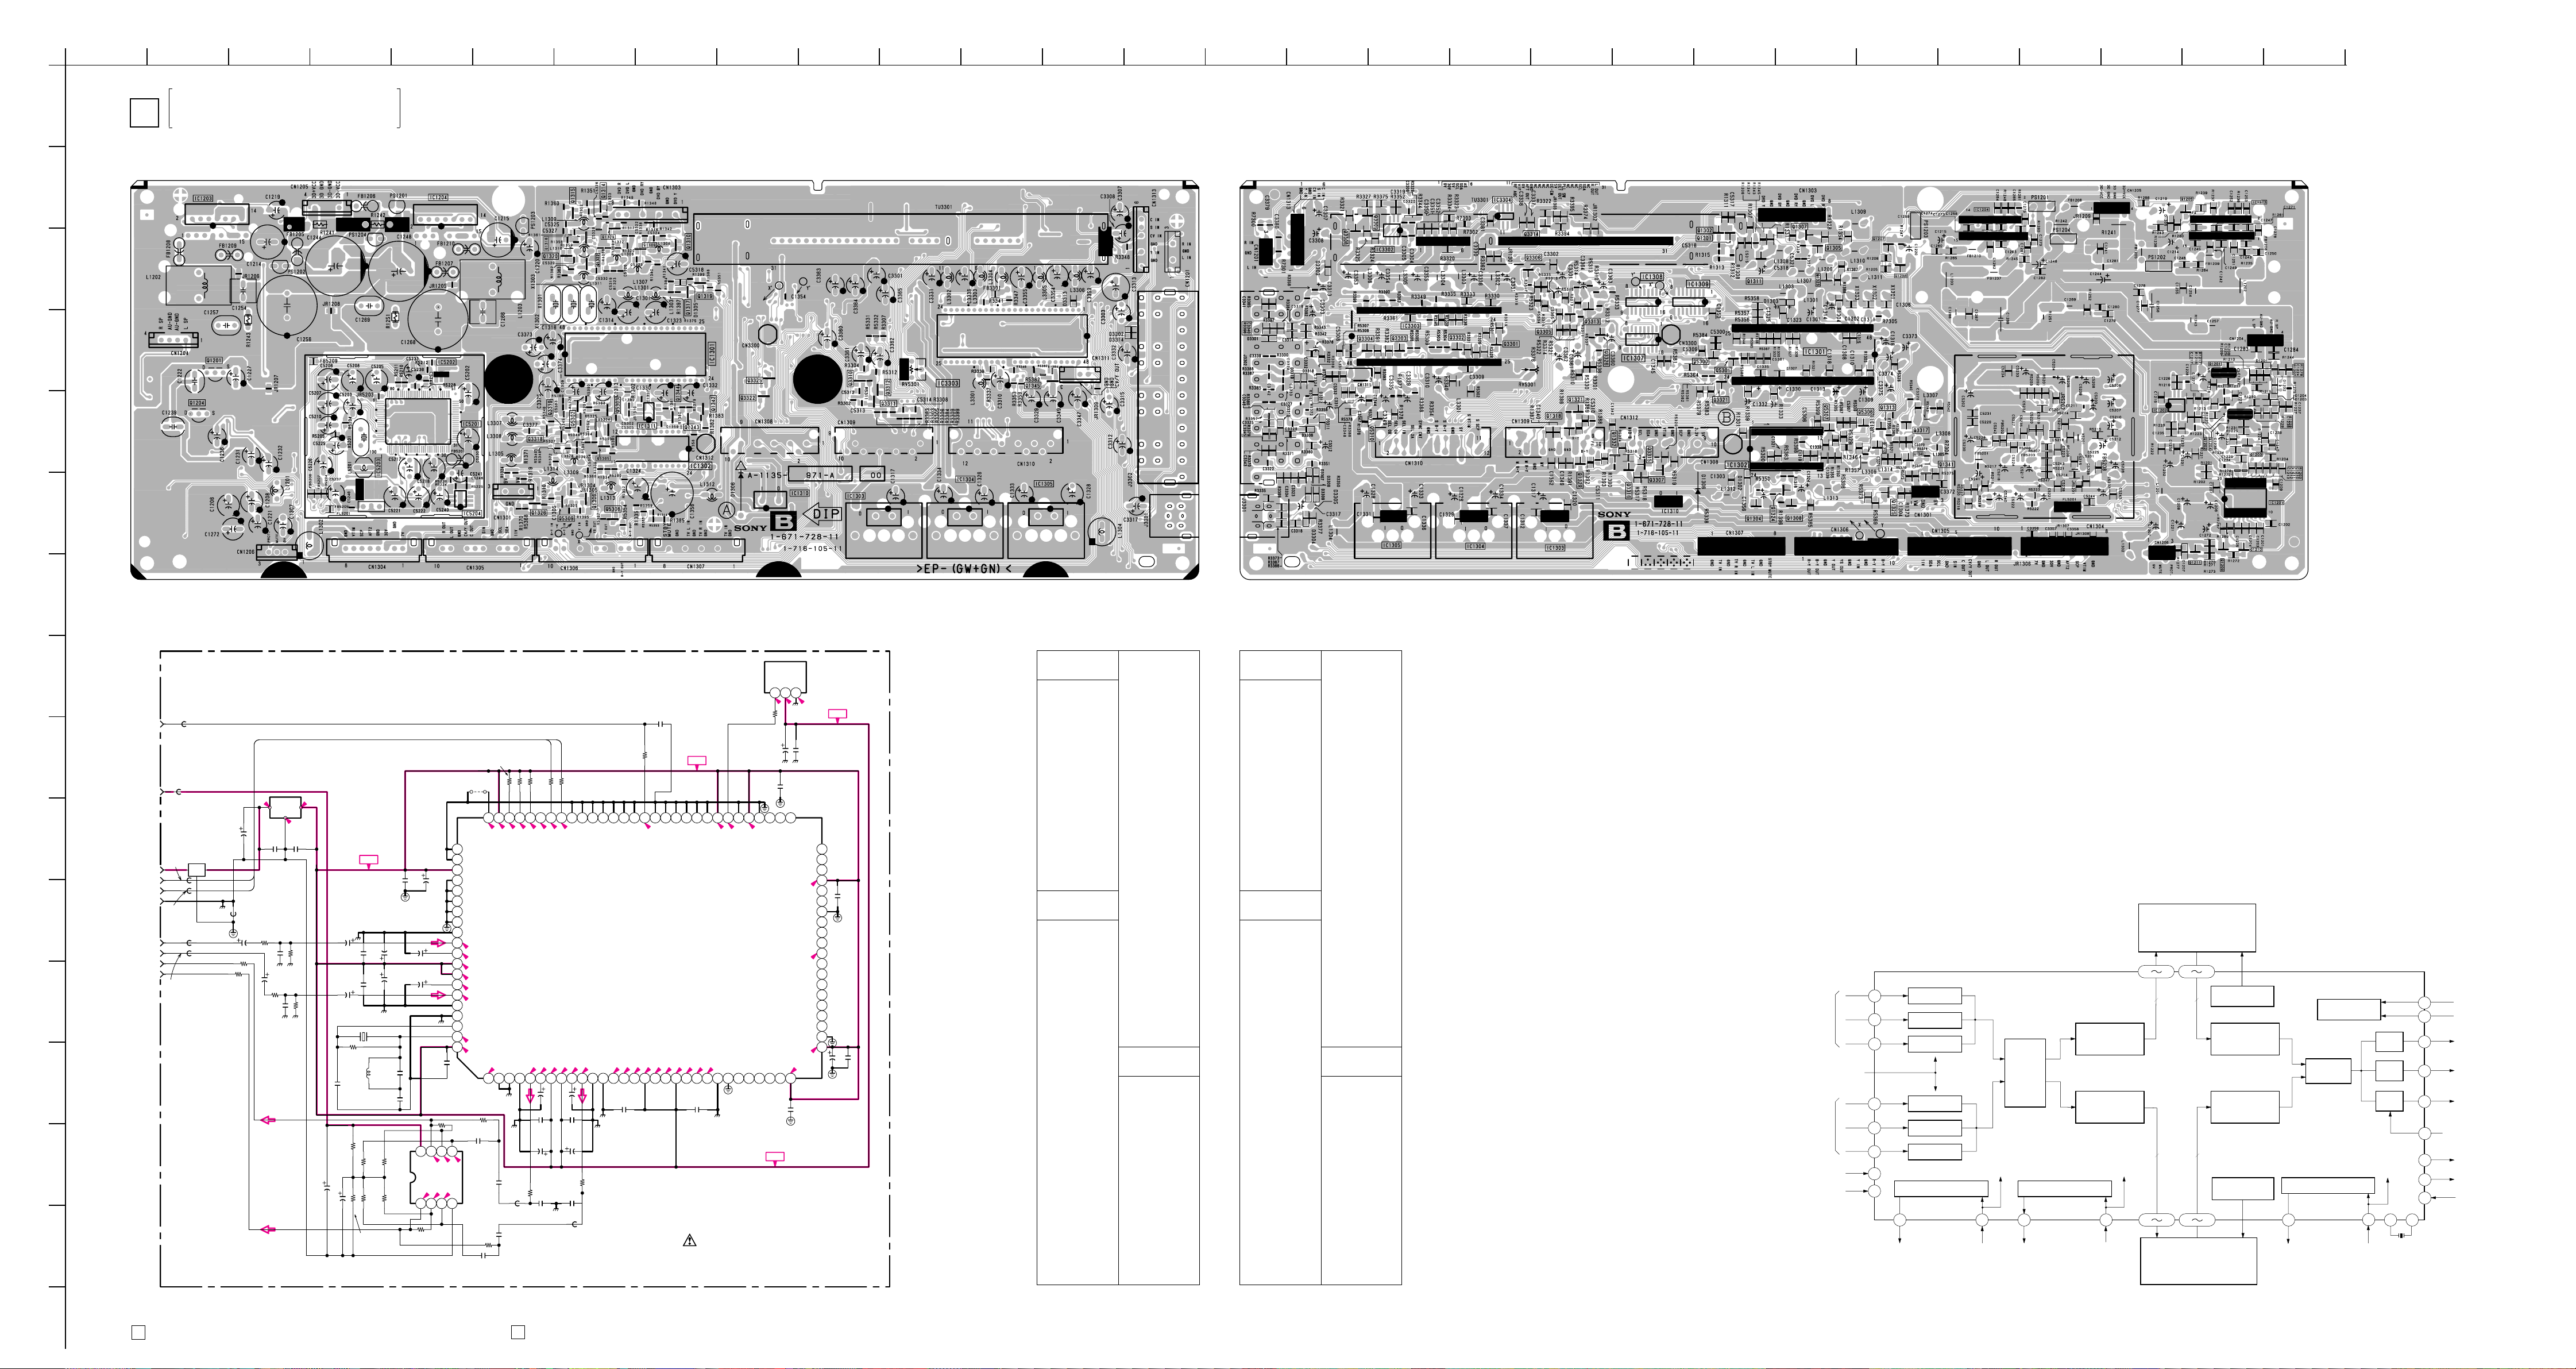
Down
Conversion
Down
Conversion
Input
Selector
A/D
A/D
A/D
y
B-Y
R-Y
Reference
voltage
for A/D
Y
B-Y
B-ch
Input
R-Y
fv (A-ch)
fv(B-ch)
161
166
169
196
154
155
153
3 5 25 37 46 58 92
1212
158
I
2
C BUS Decoder
I
2
C Bus
Data
159
103 115124
Frame Memory
137
91
Counter
Memory Control
78 79
90
94
93
Output
Clock
70
71
76
D/A
D/A
77D/A
Display
Control
Interpolation
Interpolation
Memory Control
4
199
204
A/D
A/D
A/D
1212
B-ch
Clock
A-ch
Clock
CounterCounter
f
H
out A-ch Clock fH out B-ch Clock
Frame memory
Out Clock
Output Fullscale
Control Voltage
Y out
B-Y out
R-Y out
Clock
f
H
out
f
v
out
f
v
in
X’tal
f
H
out
A-ch
Input
P BOARD
IC905 CXD2079Q
1234567891011 141312 15 16 17 18 19 20 21 22 23 24 25
26 27 28
A
D
B
C
VIDEO SIGNAL PROCESSING
Y/C J/ SWICTCHER, PICTURE IMPROVEMENT
B
AUDIO AMP CONTROLER
– B BOARD – <Component Side> <Conductor Side>
E
F
G
H
I
J
K
L
M
N
O
P
D OUT
L OUT
R OUT
L IN
R IN
9V
7V
SDA
SCL
GND
FB5209
OµH
:CHIP
FB5208
OµH
:CHIP
FB5207
OµH
:CHIP
FB5206
OµH
:CHIP
FB5204
OµH
:CHIP
FL5201
Schematic diagram
B
? (1/2) board
IC5203
NJM78M05DLA
REG.
7.2
IO
C5237 C5238 C5239
100
16V
0.1
16V
B:CHIP
G
0
0.1
16V
B:CHIP
5.1
+5V
EMI
FB5205
OµH
:CHIP
R5223
SDA
SCL
FB5201
1.1UH
C5225
4.7
100 :CHIP
R5222
100
:CHIP
R5204
C5211
3.3k
0.0022
:CHIP
CH:CHIP
R5214
3.3k
4.7
:CHIP
R5205
3.3k
:CHIP
C5226
C5212
0.0022
CH:CHIP
R5215
3.3k
:CHIP
AUDIO(L)
C5240
100
16V
C5203
4.7
C5209
0.1
16V
B:CHIP
C5210
4.7
X5201
R5206
:CHIP
C5213
CH:CHIP
R5216
1k
:CHIP
C5241
100
16V
C5204
0.1
16V
B:CHIP
33.8688M
2.2M
L5201
2.2µH
10p
R5224
10k
:CHIP
R5225
10k
:CHIP
C5201
0.1
16V
B:CHIP
C5205
47
C5208
47
C5215
47p
CH:CHIP
C5214
0.001
CH:CHIP
R5226
10k
:CHIP
R5227
10k
:CHIP
C5202
47
L
C5206
47
C5207
47
R
C5216
0.1
16V
B:CHIP
VDD
4.4
R0
1 2 3 4
AUDIO(R)
R5218
12k :CHIP
R5217
1k
:CHIP
– 81 –
JR5203
0 :CHIP
81
82
83
84
85
86
87
88
89
90
91
92
93
94
95
96
97
98
99
100
R5219
12k
:CHIP
5678
L-
L0
L+
4.4
4.4
4.4
4.4
4.4
R-
R+
GND
NJM4558M-T2
C5249
2200p
CH:CHIP
R5202 R5203
R5201
4.7k
4.7k
:CHIP
:CHIP
BOOT
BA0
BA1
VDD
TST0
TST1
TST2
TST3
GND
VSAL
LIN
2.4
AVRL
2.6
VDL
5.1
VDR
5.1
AVRR
2.5
RIN
2.5
VSAR
GNDX
XI
XO
2.5
VDX
5.1
ECKO
12345678910 11 12 13 14 15 16 17 18 19 20 21 22 23 24 25 26 27 28 29 30
R5221
10k
:CHIP
C5247
0.22
25V
B:CHIP
C5243
0.47
16V
B:CHIP
IC5204
AMP.
R5220
10k
:CHIP
C5248
0.22
25V
B:CHIP
:CHIP
0
I2CS
/ERR
/ACK
5.1
5.1
5.1
ECKI
GNDX
GNDAL
LR
R5207
270
:CHIP
FB5203
OµH
:CHIP
C5242
0.47
16V
B:CHIP
4.7k
R5211
220
:CHIP
0
IFOK
IFDO
4.8
2.5
AOL
VRL
C5219
0.1
16V
B:CHIP
C5221
47
C5223
0.0022
CH:CHIP
SCL
SDA
R5210
220
:CHIP
0
/CS
GND
IFDI
IFCK
4.5
4.5
5.1
5.1
2.6
2.5
VDAL
VDAR
VRR
AOR
47
47
C5217
C5218
C5220
0.1
16V
B:CHIP
C5222
47
C5224
0.0022
CH:CHIP
FB5202
OµH
:CHIP
(AUDIO DIGITAL SIGNAL PROCESSOR)
R5228
1k
:CHIP
EM1
IFF2
2.6
GNDAR
EM0
IFF1
IFF0
IC5201
TC9447F-003
AUDIO DIGITAL
SIGNAL PROCESSOR
2.5
2.6
2.5
AOCT
VRC
AOC
GNDAC
C5235
0.1
16V
B:CHIP
R5208
270
:CHIP
DIN
DOUT
5.1
5.1
VDAC
VRO
+5V
EBCI
EBCO
ELRI
2.5
2.6
5.1(5.1)[0]
VRI
VDAS
VRS
C5227
0.1
16V
B:CHIP
VDD
ELRO
SYNC
5.1
2.6
2.6
2.6
AOST
AOS
GNDAS
B
(2/2)
/RST
5.1
GND
STEP1
TP0
Schematic diagram
B
(2/2) board /
IC5202
S-80743AL
RESET
1 2 3
R5212
220
:CHIP
C5233
1
CKS
TP19
STEP0
5.1
TP1
TP2
TP3
+9V
0
5.1
5.1[0]
C5232
0.1
16V
B:CHIP
515253545556575859606162636465666768697071727374757677787980
TP18
TP17
TP4
VDD
+9V
C5234
0.1
16V
B:CHIP
TP16
50
TP15
49
TP14
48
B:CHIP
VDD
47
5.1
MCK
46
TP13
45
GND
44
CK01
43
CK00
42
FS
41
TP12
40
2.5
TP11
39
TP10
38
TP9
37
TP8
36
TP7
35
TP6
34
TP5
33
GNDR
32
VDDR
31
5.1
5.1
C5230
47
C5228
0.1
16V
B:CHIP
B-¥SS8700<GE.>-B-2
C5231
0.1
16V
C5229
0.1
16V
B:CHIP
– 82 –
B BOARD (COMPONENT SIDE)
IC
IC1201 IC1202 IC1203 B-2
IC1204 B-5
IC1301 D-8
IC1302 E-8
IC1303 F-10
IC1304 F-11
IC1305 F-12
IC1307 IC1308 IC1309 IC1310 F-9
IC1311 E-8
IC3302 IC3303 D-12
IC520 E-5
IC5202 D-5
IC5203 E-4
IC5204 F-5
TRANSISTOR
Q1201 D-2 Q1202 Q1203 Q1204 E-2 Q1205 Q1206 Q1207 Q1301 Q1302 Q1303 C-7 2
Q1304 Q1305 Q1306 F-7 2
Q1307 Q1308 Q1309 C-8 2
Q1310 C-8 2
Q1311 Q1312 Q1313 Q1314 B-7 2
Q1315 B-7 2
Q1316 C-7 2
Q1318 E-6 2
Q1320 C-7 2
Q1321 Q1322 C-7 2
Q1323 Q1324 Q1325 Q1326 F-6 2
Q1329 Q1332 Q1340 Q1341 -
Q1342 E-8 2
Q1343 E-8 2
Q1344 E-8 2
Q1345 D-12 2
Q3301 Q3302 Q3303 Q3304 Q3305 Q3306 Q3307 Q3308 Q3309 Q3310 D-10 2
Q3311 E-10 2
Q3312 D-10 2
Q3313 Q3314 Q3315 Q3316 Q3317 Q3318 E-6 2
Q3319 E-6 2
Q3321 Q3322 E-9 2
Q3325 D-9 2
Q3326 Q5300 Q5301 Q5302 E-7 2
Q5303 E-7 2
Q5304 E-7 2
Q5305 E-7 2
Q5306 Q5307 Q5308 F-7 2
Q5309 F-7 2
Q5310 -
DIODE
D1201 D1202 D1203 D1204 D1205 D1302 D1306 F-9 D3301 D3302 D-13 3
D3303 D3304 D3305 D3306 D3307 D3308 D3309 D3310 D3311 D3312 -
B BOARD (CONDUCTOR SIDE)
IC
IC1201 F-27
IC1202 E-26
IC1203 B-27
IC1204 B-24
IC1301 D-22
IC1302 E-21
IC1303 F-19
IC1304 F-18
IC1305 F-17
IC1307 D-20
IC1308 C-20
IC1309 C-20
IC1310 F-20
IC1311 IC3302 C-17
IC3303 D-17
IC520 IC5202 IC5203 IC5204 -
TRANSISTOR
Q1201 D-27 Q1202 E-27 1
Q1203 E-27 1
Q1204 E-27 Q1205 B-26 1
Q1206 C-23 1
Q1207 C-23 1
Q1301 C-21 1
Q1302 C-21 1
Q1303 Q1304 F-21 1
Q1305 C-22 1
Q1306 Q1307 B-22 1
Q1308 F-22 1
Q1309 Q1310 Q1311 C-21 Q1312 E-23 1
Q1313 E-23 1
Q1314 B-18 1
Q1315 Q1316 Q1318 E-19 1
Q1320 Q1321 E-19 1
Q1322 Q1323 C-22 1
Q1324 F-21 1
Q1325 F-23 1
Q1326 Q1329 E-19 1
Q1332 E-19 1
Q1340 E-23 2
Q1341 E-23 1
Q1342 Q1343 Q1344 Q1345 Q3301 D-18 1
Q3302 D-18 1
Q3303 D-17 1
Q3304 D-16 1
Q3305 D-19 1
Q3306 C-18 1
Q3307 E-20 1
Q3308 B-16 1
Q3309 B-16 1
Q3310 Q3311 Q3312 Q3313 D-19 1
Q3314 B-18 1
Q3315 E-20 1
Q3316 F-20 1
Q3317 E-23 1
Q3318 Q3319 Q3321 D-21 1
Q3322 Q3325 Q3326 D-19 1
Q5300 D-21 1
Q5301 D-21 1
Q5302 Q5303 Q5304 Q5305 Q5306 E-22 1
Q5307 E-22 1
Q5308 Q5309 Q5310 E-17 1
DIODE
D1201 D-27 3
D1202 D-28 3
D1203 E-27 3
D1204 E-27 3
D1205 B-26 3
D1302 F-21 3
D1306 F-20 D3301 D-15 3
D3302 D3303 C-16 3
D3304 F-16 3
D3305 F-16 3
D3306 F-16 3
D3307 F-16 3
D3308 E-16 3
D3309 F-16 3
D3310 E-15 3
D3311 E-16 3
D3312 E-16 3
– 83 – – 84 –
Page 59
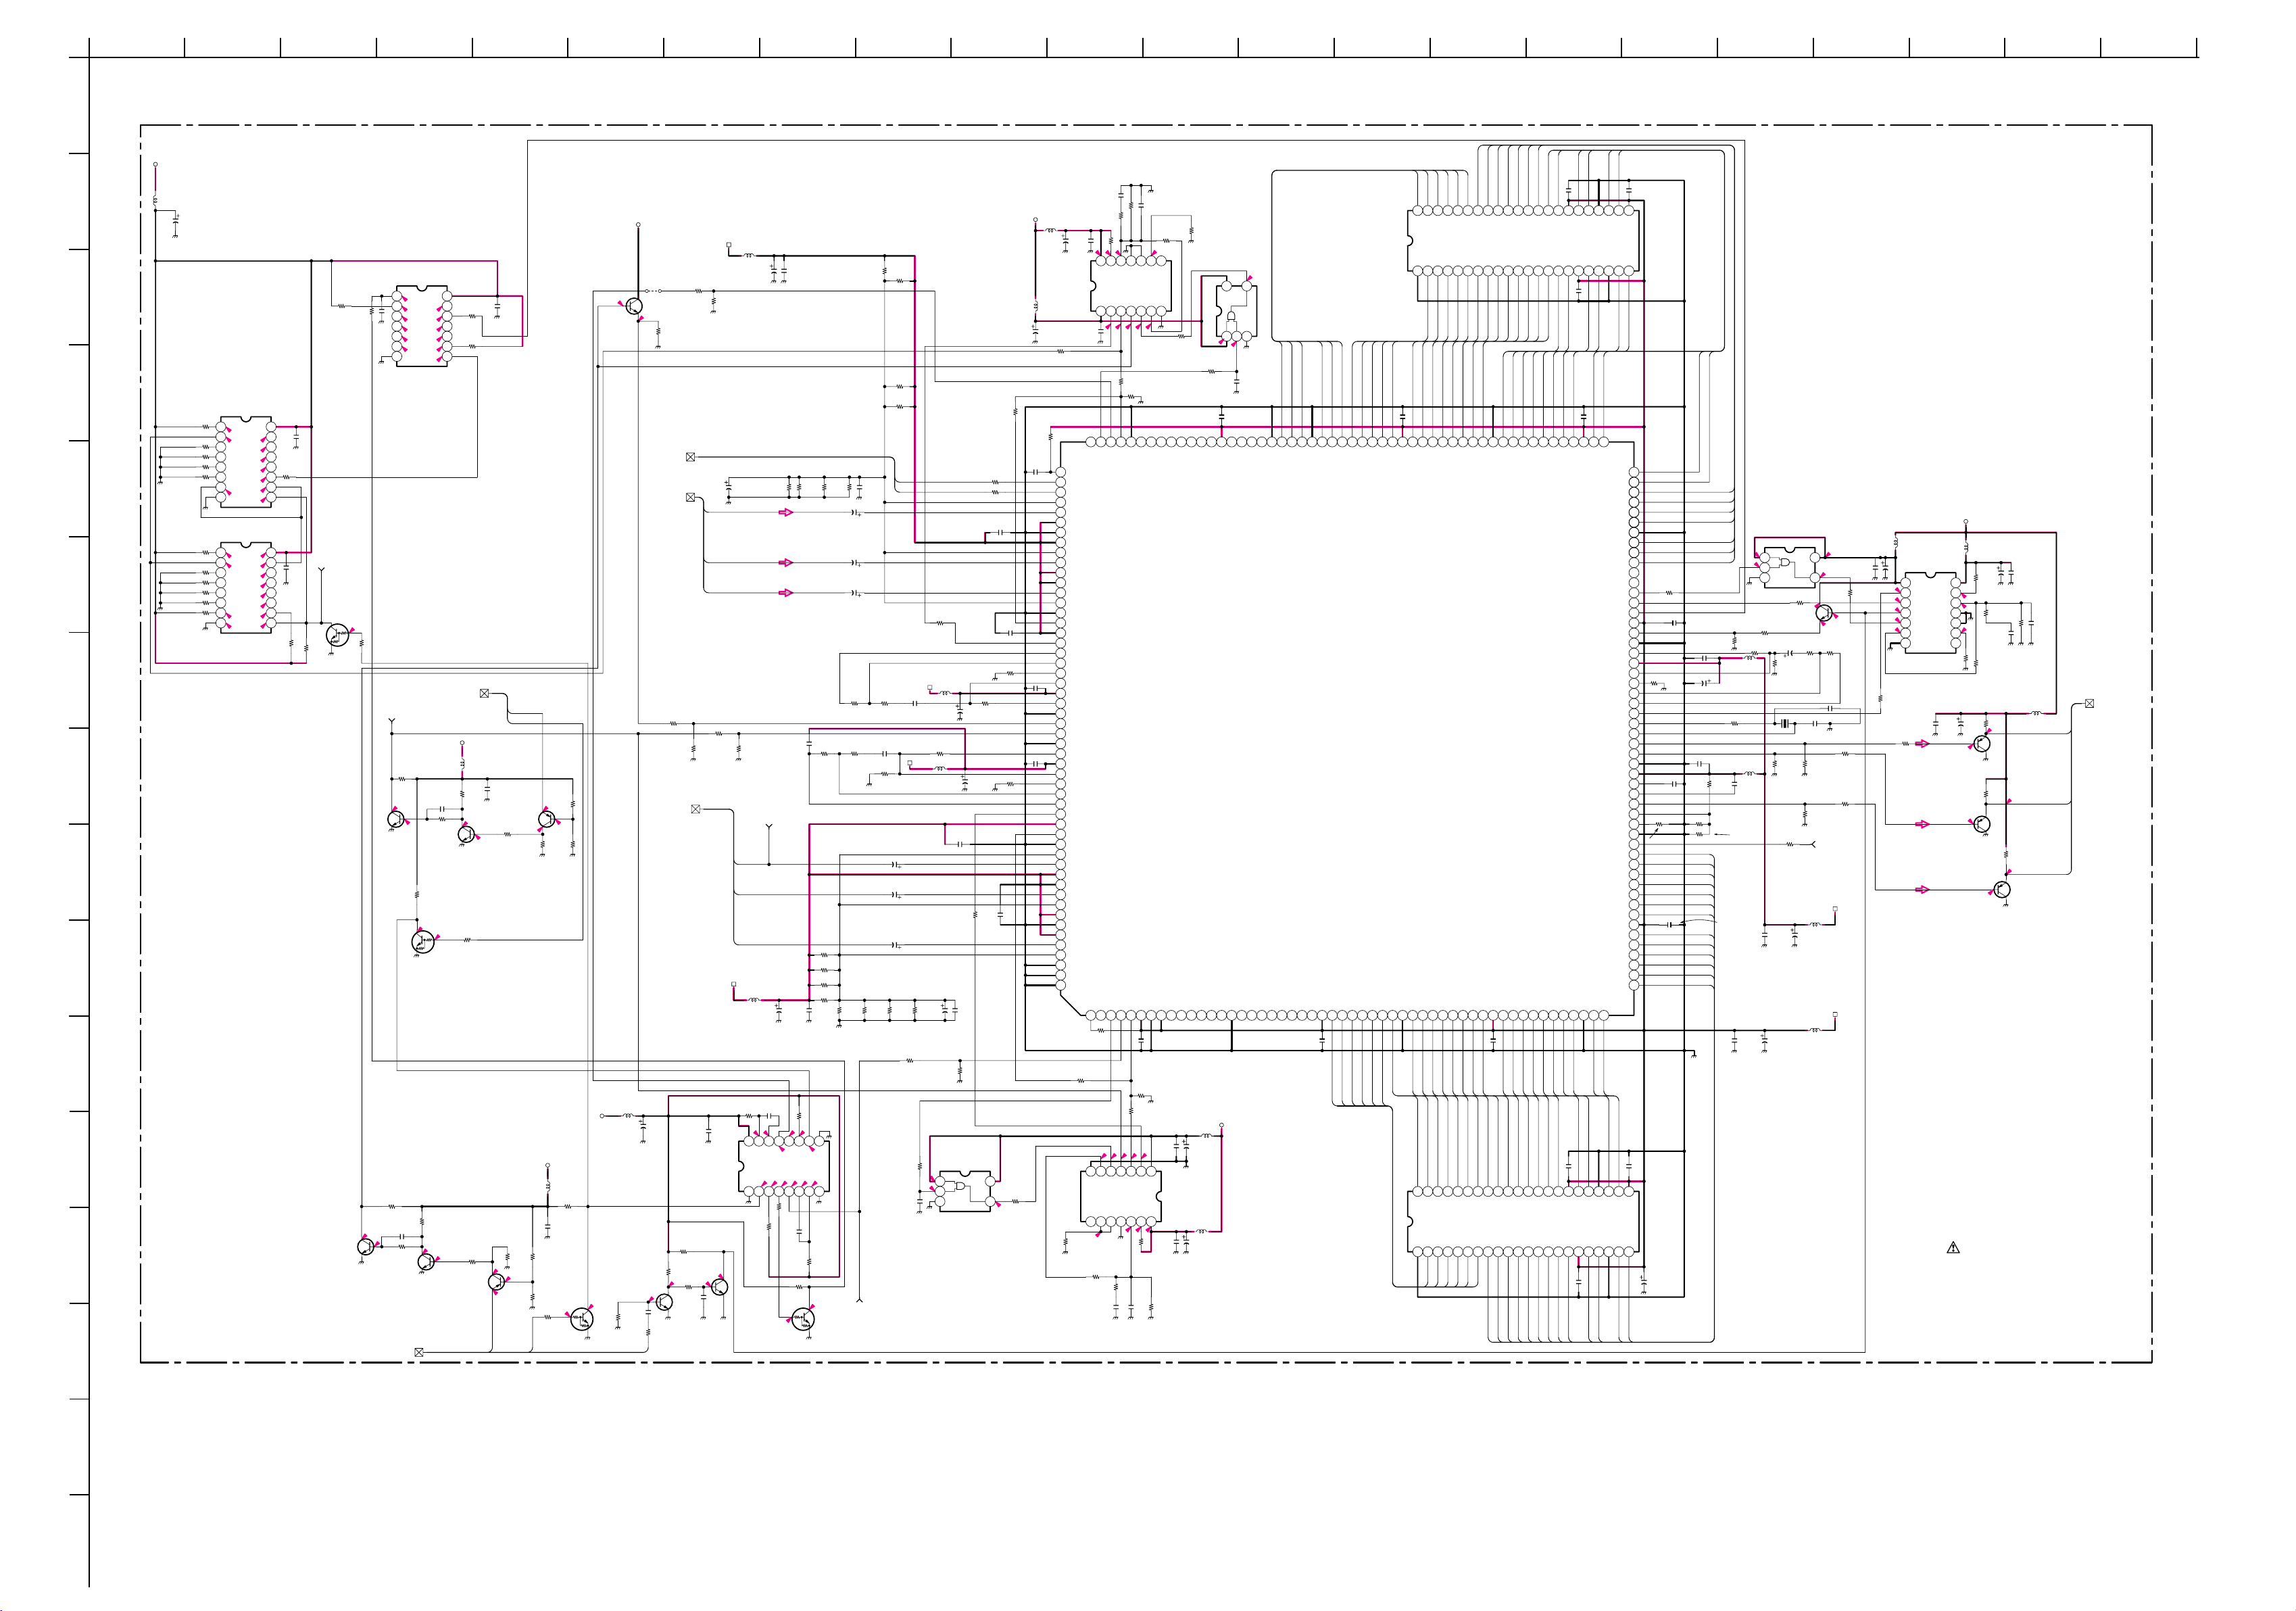
A
1234567891011 141312 15 16 17 18 19 20 21 22
B
C
D
G
H
K
M
N
5V
L9515
10µH
:CHIP
C9574
100
6.3V
:CHIP
C9576
1200p
R9818
CH:CHIP
1k
:CHIP
R9811
4.7k
:CHIP
IC9509
MC74F163AM-T2
1k :CHIP
R9591
0 :CHIP
R9592
0 :CHIP
R9593
0 :CHIP
R9594
0 :CHIP
R9595
E
1k :CHIP
R9596
0 :CHIP
R9597
0 :CHIP
F
R9598
R9599
R9801
R9802
0 :CHIP
0 :CHIP
1k :CHIP
COUNTOR
12345678
5.1
0.4
2.1
2.3
2.3
2.3
2.3
6.4
5.1
IC9510
5.1
0.4
2.3
2.3
2.3
2.2
5.1
5.1
9 10 11 12 13 14 15 16
C9579
0.01
B:CHIP
9 10 11 12 13 14 15 16
R9829
1k
:CHIP
0.4
MC74F163AM-T2
COUNTOR
12345678
5.1
2.1
0.4
5.1
C9578
0.01
B:CHIP
R9803
1k
:CHIP
R9804
4.7k
:CHIP
MV
INV.
Q9501
DTC144EKA-T146
0.1
R9805
10k
:CHIP
1234567
0.9
0.2
5.1
0.2
0.2
0.2
0.2
0.2
0.2
5.0
0.2
2.4
IC9511
SN74LS164NS-E05
SHIFT REGIST
100 :CHIP
R9819
8 9 10 11 12 13 14
R9823
1k :CHIP
C9577
0.01
B:CHIP
SUB SYNC
SHSYNC
HD
VD
5V
C9402
L9401
R9401
470
:CHIP
0.7
0.7
Q9401
2SC2712
INV.
C9401
68p
:CHIP
R9403
56k
:CHIP
100µH
:CHIP
R9402
2.2k
:CHIP
4.4
0.1
25V
F:CHIP
Q9402
2SC2712
INV.
0
Q9411
2SA1162
SLICER
R9404
22k
:CHIP
0.3
R9450
4.7k
:CHIP
R9448
18k
:CHIP
0.8
3.0
R9449
27k
:CHIP
I
R9407
1k
:CHIP
Q9404
DTC144EKA-T146
INV.
0
4.1
R9408
10k
:CHIP
J
5V
L
R9409
470
:CHIP
R9411
2.2k
C9406
:CHIP
68p
:CHIP
0.7
Q9405
2SC2712
INV.
0.5
R9410
56k
:CHIP
Q9406
2SC2712
INV.
MAIN SYNC
4.5
0
0
R9416
10k
:CHIP
Q9410
2SA1162
1.1
SLICER
HD
5V
L9605
100µH
:CHIP
C9623
F:CHIP
R9447
R9445
4.7k
18k
:CHIP
:CHIP
32
R9446
27k
:CHIP
4.0
R9420
10k
:CHIP
Q9408
DTC144EKA-T146
VD
INV.
R9421
1k
:CHIP
2.2
25V
0.7
2SC2712
BUFFER
0.2
R9433
4.7k
:CHIP
Q9568
L9402
100µH
:CHIP
Q9407
2SC2712
INV.
C9408
0.0033
CH:CHIP
5V
JR9401
0
:CHIP
0.5
R9435
3.3k
:CHIP
Y/U/V(ACH)
R9782
:CHIP
Y/U/V(BCH)
C9410
100
6.3V
:CHIP
R9440
4.7k
:CHIP
-0.9
R9455
1k
:CHIP
HD
BUS
1k
R9813
2.2k
:CHIP
R9456
:CHIP
R9773
0
:CHIP
R9774
2.2k
:CHIP
C9404
1
F:CHIP
1k
0.70.7
R9460
1k
:CHIP
C9420
330p
CH:CHIP
3.3V
C9507
47
16V
:HT-CP
Y(ACH)
B-Y(ACH)
R-Y(ACH)
R9812
2.2k
:CHIP
Y(BCH)
B-Y(BCH)
R-Y(BCH)
3.3V
R9405
18k
:CHIP
IC9401
SN74LS221
TIMING
PLUSE
EXPANDER
0.5
Q9403
2SC2712
L9504
10µH
:CHIP
C9504
C9503
:HT-CP
47
16V
0.1
25V
F:CHIP
R9491
68
:RN-CP
R9492
:RN-CP
Y
B-Y
R-Y
C9522
R9430
0.0047
5.6k
B:CHIP
:CHIP
G
R9483
330
:RN-CP
R9485
L9512
68
10µH
:RN-CP
:CHIP
C9568
C9567
0.1
47
25V
16V
F:CHIP
:HT-CP
C9409
0.033
B:CHIP
0.7
4.7
4.5
1Q
2Q
0
1RC
VCC
1CE
2CLR
4.7
3.5
0
0
2Q
2CE
1B
1Q
1CLR
1A
1 2 3 4 5 6 7 8
R9806
10k
R9418
:CHIP
1k
:CHIP
C9405
0.01
B:CHIP
R9807
1k
INV.
:CHIP
3.2
Q9502
DTC144EKA-T146
INV.
R9493
:RN-CP
68
R9520
:CHIP
R9486
:RN-CP
R9412
:CHIP
4.8
2B
0
4.7
0.7
2RC
R9417
:CHIP
0.2
68
2.2k
68
1k
910111213141516
2A
GND
18k
R9495 R9496
68
:RN-CP68:RN-CP
R9494
C9505
68
0.1
:RN-CP
25V
F:CHIP
C9515
10
10V
:AL-CP
C9516
10
10V
:AL-CP
C9517
10
10V
:AL-CP
R9519
0
:CHIP
0.47 16V F:CHIP 3.3k :CHIP
R9522
1.5k
:CHIP
10 10V :AL-CP
R9484
68
:RN-CP
R9487
R9553
68
:RN-CP
:RN-CP
R9551
68
:RN-CP
SVSYNC
R9497
68
:RN-CP
R9498
330
:RN-CP
SDA
SCL
C9523
R9521
:CHIP
R9558
680k
:CHIP
68
3.3V
0.47
1.5k
16V
F:CHIP
47 16V :HT-CP
C9524 R9524
3.3V
10µH :MLF2012
47 16V :HT-CP
C9527
10
10V
:AL-CP
C9528
C9529
10
10V
:AL-CP
R9488
68
:RN-CP
R9431
0
:CHIP
R9568
4.7k
RN:CHIP
C9570
1000p
CH:CHIP
R9517
0
:CHIP
L9513
10µH
:MLF2012
C9501
L9514
C9889
C9526
0.1
25V
F:CHIP
R9526
:CHIP
C9885
47
16V
:HT-CP
C9884
0.1
25V
F:CHIP
R9432
2.2k
:CHIP
5.0
123
1.7
GND
IC9531
TC7SET08FU
LEVEL SHIFT
R9505
:CHIP
R9753
100 :CHIP
100 :CHIP
R9772
C9518
0.1
25V
F:CHIP
C9519
0.1 25V F:CHIP
R9518
33k
:CHIP
C9520
0.1 25V F:CHIP
R9523
3.3k
:CHIP
C9525
0.1 25V F:CHIP
R9525
33k
:CHIP
C9566
0.1
0
25V
F:CHIP
VCC
4 5
2.5
0
R9569
:CHIP
L9503
100µH
:CHIP
C9512
47
16V
:AL-CP
0
L9502
5V
100µH
:CHIP
C9509
:AL-CP
R9506
1k
:CHIP
C9514
0.1
25V
F:CHIP
47
16V
100 :CHIP
R9554
:CHIP
IC9504
TLC2932IPW
A CH PLL
R9820
157
158
159
160
161
162
163
164
165
166
167
168
169
170
171
172
173
174
175
176
177
178
179
180
181
182
183
184
185
186
187
188
189
190
191
192
193
194
195
196
197
198
199
200
201
202
203
204
205
206
207
208
0
C9510
R9503
0.47
680k
16V
:CHIP
B:CHIP
R9502
1.2k
:CHIP
R9501
3.3k
:CHIP
C9508
0.1
25V
4.9
F:CHIP
VCOVDD
VDD
1 2 3 4 5 6 7
C9513
0.1
25V
F:CHIP
DVI1
BGP1
XRST
SDA
SCL
RB1
ADI1
RT1
ADVS1
ADVD1
RB2
ADI2
RT2
RT3
ADI3
RB3
ADDS1
ADCK1
ADDV1
CKO1
VC1
OPO1
BIS1
OPI1
PLVD1
CPO1
PLVS1
FIN1
FIN2
PLVS2
CPO2
PLVD2
OPI2
BIS2
OPO2
VC2
CKO2
ADDV2
ADCK2
ADDS2
RB4
ADI4
RT4
RT5
ADI5
RB5
ADVD2
ADVS2
RT6
ADI6
RB6
TST1
TST2
TST3 MIB6
PCKSL
BGP2
1 2 3 4 5 6 7 8 9 10 11 12 13 14 15 16 17 18 19 20 21 22 23 24 25 26 27 28 29 30 31 32 33 34 35 36 37 38 39 40 41 42 43 44 45 46 47 48 49 50 51 52
R9453
0
:CHIP
R9528
0
:CHIP
3.0
RBIAS
SEL
0
FVI1
DIV2
0
VCOIN
VCOGND
VCOOUT
FINA
0
0.6
R9515
220 :CHIP
VSS8
CLK1
FVI2
CLK2
C9530
F:CHIP
R9556
:CHIP
2.4
002.0
C9511
0.047
B:CHIP
VCOINH
FINB
0
2.4
R9512
330
:CHIP
DIN1
VDD1
0.1
25V
220
3.1
R9504
470
:CHIP
0
891011121314
NC
PFDINH
PFDOUT
GND
DIN3
DIN2
SASL1
IOSL2
R9555
330
:CHIP
C9533
0.1
25V
F:CHIP
R9566
0
:CHIP
RN:CHIP
DIN5
DIN4
BDMSK
HPOUT
:HT-CP
R9840
0
:CHIP
TC7SET08FU
LEVEL SHIFT
4.9
1.6
R9567
4.7k
C9565
0.1
25V
F:CHIP
DIN8
DIN7
DIN6
DOT12
DOT11
DOT10
L9505
5V
100µH
:CHIP
C9535
47
16V
IC9532
VCC
1 2 3
CH:CHIP
DIN9
VDD8
VSS1
DOT9
2.5
45
GND
C9569
1000p
DIN11
DIN10
DOT8
DOT7
MOA12
HPIN
MOA12
DIN12
DOT6
DOT5
DOT4
MOA9
MOA10
MOA11
MOA9
VSS7
MOA10
MOA11
IC9506
CXD2079Q
MULTI IMAGE
DRIVER
DOT3
DOT2
DOT1
VDD2
C9531
0.1
25V
F:CHIP
IC9501
MSM548331TS-K
FIELD MEMORY
MOA7
MOA8
MOA6
MOA5
MOA4
MOA5
MOA6
MOA7
MOA8
MOB1
MOB2
MOB3
MOB4
MOB1
MOB2
MOB3
MOB4
MOB5
MOA4
BOB5
MOA7
MOA8
MOA9
MOA10
MOA11
MOA12
DIN6
DIN7
DIN8
DIN9
DIN10
DIN11
VSS
DIN5
DIN4
DIN3
DIN2
MOA4
MOA5
RXADA
RADEA
RADEA
RXADA
MOB10
MOB11
MOB10
MOB11
MOB9
MOB10
MOA2
MOA3
RRA
RXIA
RRA
RXIA
MOB12
WCLKB
MOB12
WCLKB
MOB11
MOB12
DIN1
REA
REA
WXADB
WXADB
1 2 3 4 5 6 7 8 9 10 11 12 13 14 15 16 17 18 19 20 21 22
MOA6
MOA3
MOA2
MOA1
RCLKA
C9564
0.1
25V
F:CHIP
MOA1
VDD7
MOA2
MOA3
RCLKA
BOB6
MOB7
VSS2
MOB8
MOB9
MOB7
MOB8
MOB6
MOB9
MOB7
MOB8
1234567
GND
FINB
PFDOUT
NC
PFDINH
VCOINH
8 9 10 11 12 13 14
0
R9529
470
:CHIP
R9530
1.2k
:CHIP
C9537
0.47
16V
B:CHIP
FINA
VCOOUT
VCOIN
VCOGND
2.0
R9532
3.3k
:CHIP
C9538
0.047
B:CHIP
VDD
SEL
TLC2932IPW
B CH PLL
RBIAS
VCOVDD
C9534
5.0
5.0
0.1
25V
F:CHIP4716V
R9531
680k
:CHIP
IC9503
L9506
100µH
:CHIP
C9536
:HT-CP
DIN6
DIN7
DIN8
DIN9
DIN10
DIN11
VSS
DIN5
DIN4
DIN3
DIN2
MOB5
MOB4
MOB3
DIN1
MOB2
1 2 3 4 5 6 7 8 9 10 11 12 13 14 15 16 17 18 19 20 21 22
MOB6
WCLKA
WXADA
WCLK
WXAD
DIN0
RCLK
RCLKA
MOA1
OEA
OEA
WADEB
C9532
0.1
25V
F:CHIP
WADEB
WXADB
WCLKB
WCLK
WXAD
DIN0
RCLK
MOB1
RCLKB
WEA
WADEA
WRAEA
WR/TRWEWXINC
WADE/RX
RXAD
RADE/RXRRRXINCREOE
RRA
RADEA
RXADA
MIA1
MIA2
MIA2
MIA1
VSS6
VDD3
WRB
WEB
WRB
WEB
WEB
WRB
WADEB
WR/TRWEWXINC
WADE/RX
RXAD
RADE/RXRRRXINCREOE
RRB
RADEB
RXADB
WXIA
RXIA
MIA3
MIA4
MIA3
WXIB
WXIB
IEB
WXIB
RXIB
C9560
0.1
IEA
25V
MIA12
MIA11
F:CHIP
IE
DO11
DO10
DO0
F:CHIP
OEA
REA
MIA2
MIA1
MIA5
MIA6
MIA7
MIA7
MIA6
MIA5
MIA4
IEB
MIB12
MIB11
MIB10
MIB12
MIB11
MIB10
IEB
MIB11
MIB12
C9539
0.1
25V
F:CHIP
IE
DO11
DO10
MSM548331TS-K
FIELD MEMORY
DO0
MIB2
MIB1
OEB
REB
MIA10
VCC
DO9
DO1
VCC
C9562
0.1
25V
MIA8
C9563
0.1
25V
F:CHIP
MIA8
MIB9
MIB9
MIB10
VCC
DO9
IC9502
DO1
VCC
C9541
0.1
25V
F:CHIP
MIA9
DO8
DO2
MIA4
MIA3
MIA9
105106107108109110111112113114115116117118119120121122123124125126127128129130131132133134135136137138139140141142143144145146147148149150151152153154155156
MIA9
VDD6
VSS3
MIB8
MIB8
MIB9
DO8
DO2
MIB4
MIB3
MIA8
VSS
DO7
DO3
VSS
MIA10
MIA10
MIA11
MIA12
WCLKA
WXADA
WADEA
WRA
VSS5
WEA
WXIA
IEA
EXFV
EXFH
DIV3
CLK3
FVI3
VDD5
FIN3
PLVS3
CPO3
PLVD3
OPI3
BIS3
OPO3
VC3
CKO3
XTLO
XTLI
OUT3
OUT2
DAVS1
DAVD1
OUT1
VRF
IRF
VSS4
RCLKB
RXADB
RADEB
RRB
RXIB
REB
OEB
VDD4
MIB1
MIB2
MIB3
MIB4
MIB5
MIB7
MIB7
MIB8
VSS
DO7
DO3
VSS
MIA7
23242526272829303132333435363738394041424344
DO6
VCC
DO4
DO5
MIA6
MIA5
104
103
102
101
100
99
98
97
96
95
94
93
92
91
90
89
88
87
86
85
84
83
82
81
80
79
78
77
76
75
74
73
VB
72
VG
71
70
69
68
67
YS
66
65
64
63
62
61
60
59
58
57
56
55
54
53
MIB7
C9540
0.1
25V
F:CHIP
23242526272829303132333435363738394041424344
DO6
VCC
DO4
DO5
MIB6
MIB5
C9561
0.1
25V
F:CHIP
R9533
4.7k :RN-CP
C9605
100
6.3V
:AL-CP
R9570
0
:CHIP
R9540
33k
:CHIP
MIA11
C9549
0.1
25V
F:CHIP
C9548
0.1
25V
F:CHIP
C9545
0.1
25V
F:CHIP
RCLKB
RXADB
RADEB
RRB
RXIB
REB
OEB
MIB1
MIB2
MIB3
MIB4
MIB5
MIB6
MIA12
WCLKA
WXADA
WADEA
WRAEA
WEA
WXIA
IEA
R9542
2.2k
:CHIP
L9508
10µH
:MLF2012
C9886
47 16V :AL-CP
100 :CHIP
R9539
C9547
L9544
0.1
10µH
25V
:CHIP
F:CHIP
R9538
C9546
1k
0.1
:RN-CP
25V
F:CHIP
R9534
470
:RN-CP
R9727
3.3k
:RN-CP
C9544
0.1
25V
F:CHIP
0.1
25V
F:CHIP
IC9530
TC7SET08FU
LEVEL SHIFT
1.7
123
1.7
GND
R9543
470
:CHIP
R9510
R9541
680k
3.3k
:CHIP
:CHIP
C9883 C9894
0.1
25V
F:CHIP
C9591
100
:AL-CP
R9584
0 :CHIP
C9550
100
6.3V
:AL-CP
C9893
R9536
330
:RN-CP
R9560
1k
:CHIP
VCC
4.9
R9544
1.5k
:CHIP
X9508
27MHz
R9537
330
:RN-CP
R9535
:RN-CP
L9538
10µH
:CHIP
47
16V
:AL-CP
L9507C9542
10µH
:CHIP
5.0
2.6
4 5
Q9505
2SC2712
BUFFER
0.6
0.5
R9545
0
:CHIP
C9892
18p
CH:CHIP
15p CH:CHIP
R9563
100
:CHIP
R9564
100
:CHIP
330
YS
3.3V
3.3V
:AL-CP
C9552
0.1
25V
F:CHIP
R9571
0
:CHIP
C9554
47
16V
3.4
0.8
0.5
0
R9561
100
:CHIP
R9562
:CHIP
L9509
100µH
:CHIP
100
B-Y
R-Y
L9510
100µH
:CHIP
IC9505
TLC2932IPW
READ PLL
1234567
VDD
VCOVDD
SEL
RBIAS
VCOOUT
VCOIN
FINA
VCOGND
FINB
VCOINH
PFDOUT
PFDINH
GND
NC
R9559
:CHIP
C9626
0.1
C9629
25V
10
F:CHIP
16V
:AL-CP
Y
5V
R9546
3.3k
:CHIP
C9555
16V
:AL-CP
3.22.4
0
0
8 9 10 11 12 13 14
R9547
0
:CHIP
2SA1162
R9437
2.2k
:CHIP
47
R9548
1.2k
:CHIP
C9543
0.22
16V
B:CHIP
470
Q9519
BUFFER
0.9
C9553
0.1
25V
F:CHIP
R9549
680k
:CHIP
L9531
:CHIP
C9556
0.047
B:CHIP
10µH
MID OUT
MID-Y
0.6
R9438
2.2k
:CHIP
1.3
MID-B-Y
0.6
Q9517
2SA1162
BUFFER
R9439
2.2k
:CHIP
Q9558
2SA1162
BUFFER
1.3
MID-R-Y
0.7
(1/3)
P
(MULTI IMAG DRIVE)
B-¥SS8700>GE.>-P-1
O
P
– 85 –
– 86 –
– 87 –
Page 60
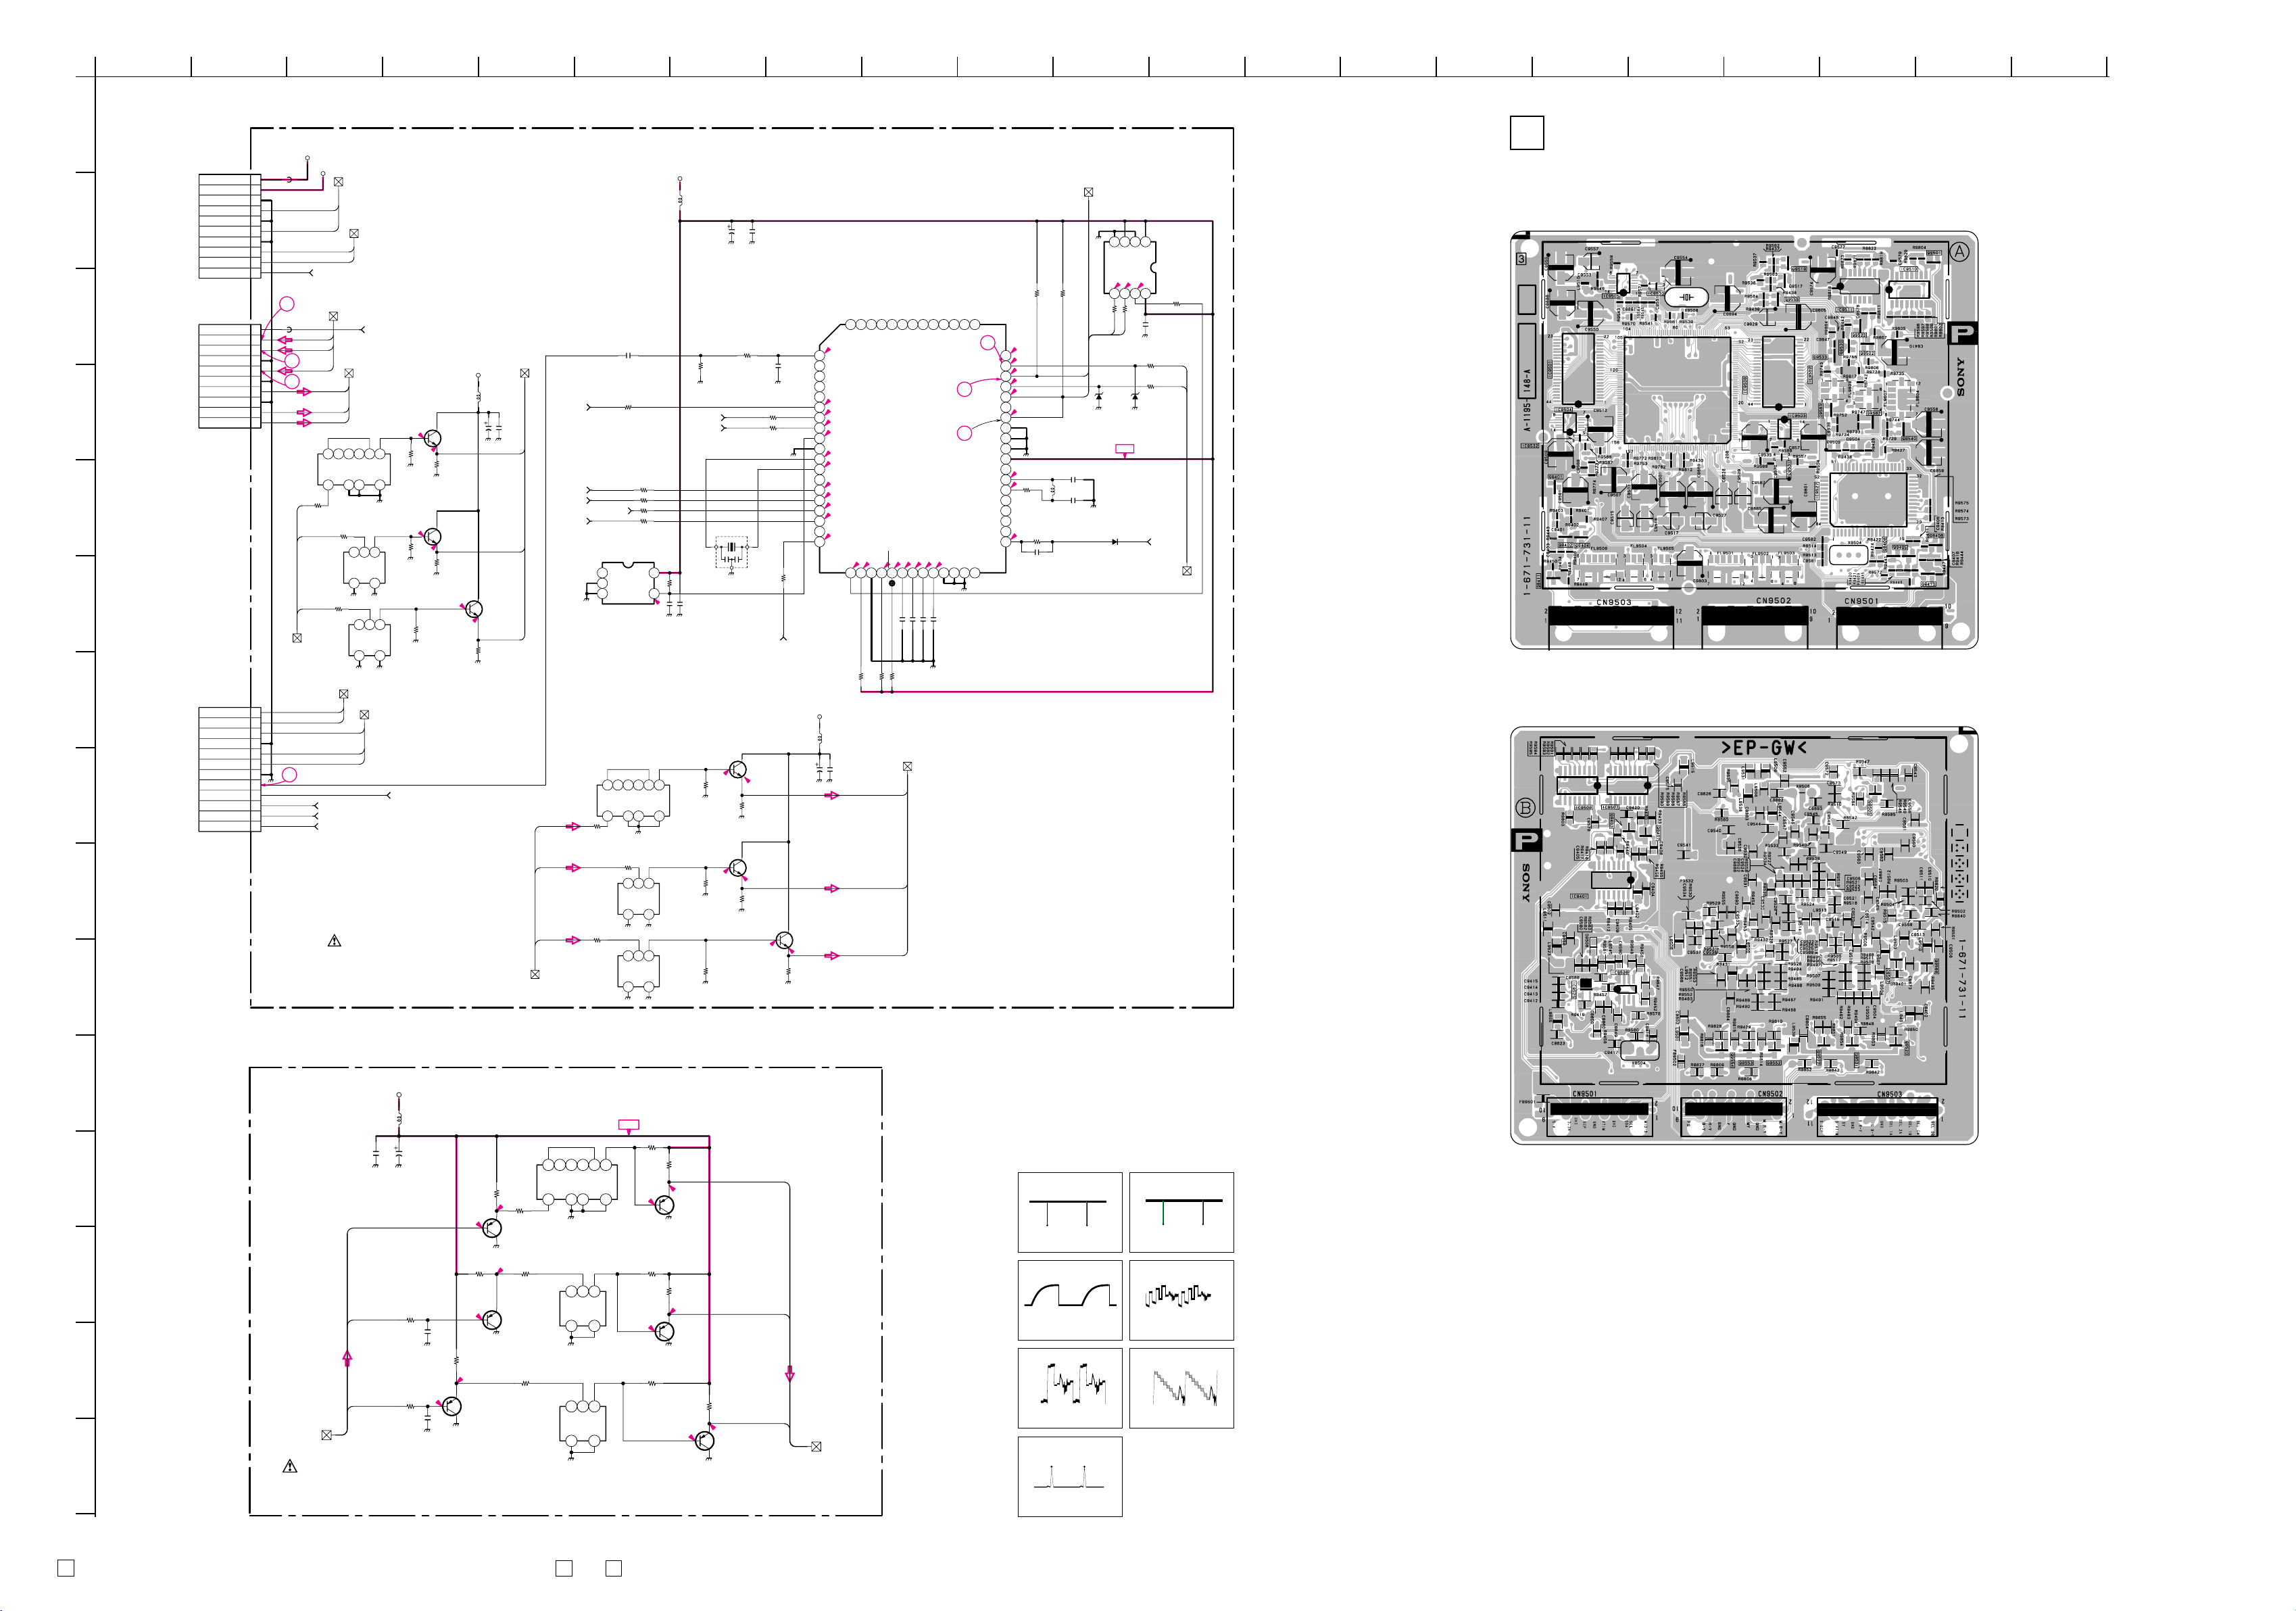
A
B
C
D
G
H
1234567891011 141312 15 16 17 18 19 20 21
P
CN9501
10P
:BTOB
10
5V
9
3.3V
8
GND
7
SCP
6
GND
5
VTIM
4
GND
3
SDA
2
SCL
1
MID-B
TO B BOARD
CN1308
CN9502
10P
:BTOB
10
FS
9
B-Y
8
R-Y
7
GND
6
Y
5
GND
4
MY
3
GND
2
M R-Y
1
M B-Y
TO B BOARD
CN1309
E
F
CN9503
12P
:BTOB
12
S SCP
11
S VTIM
10
SY
9
GND
8
S R-Y
7
S B-Y
6
GND
SEL 2A
SEL 1B
SEL 0A
SEL 0B
5
4
3
2
1
SYNC CNT
TO B BOARD
CN1310
I
J
5V
3.3V
FB9501
OµH
4
FB9502
5
6
SUB
MAIN SYNC
HD
IIC
VD
S-DAT
S-CLK
MID BUSY
BR OUT
OµH
CB OUT
CR OUT
MAIN
Y OUT
M(Y)
M(R-Y)
M(B-Y)
FL9501
H355LNK-7849
1 3 6
2 4 5
S(Y)
R9808
R9809
470
220
:RN-CP
:RN-CP
S(B-Y)
FL9502
H354LAI-7848
S(R-Y)
R9827
430
:RN-CP
SUB SYNC
HD
VD
S(Y)
S(R-Y)
S(B-Y)
YS
912
1 2 3
46
1 2 3
SUB
2.2
R9810
1.5
5.6k
:RN-CP
710
1.6
R9429
5.6k
1.0
:RN-CP
R9828
5.6k
:RN-CP
46
FL9503
H354LAI-7848
L9501
10µH
:CHIP
Q9552
2SC2712
BUFFER
R9814
1k
:CHIP
Q9553
2SC2712
BUFFER
R9815
1k
:CHIP
2.0
1.4
Y/U/V(BCH)
5V
C9801
47
16V
:AL-CP
Y(BCH)
B-Y(BCH)
Q9554
2SC2712
BUFFER
R-Y(BCH)
R9816
1k
:CHIP
7
SEL B
MID/THROUGH SW
SEL C
P
SEL 2A
(2/3)
(MULTI IMAGE DRIVE)
C9802
0.1
25V
F:CHIP
SEL 2A
SEL B
MID/THROUGH SW
SEL C
M(Y)
M(B-Y)
B-Y
M(R-Y)
R-Y
MAIN
C9581
16V
F:CHIP
MV
R9427
1k
:CHIP
123
IC9525
PST9143NL
RESET
FL9506
H355LNK-7849
1 3 6
2 4 5
Y
R9842
470
:RN-CP
R9843
220
:RN-CP
FL9504
H354LAI-7848
R9852
430
:RN-CP
FL9505
H354LAI-7848
1
R9424
R9422
R9458
R9441
912
1 2 3
1 2 3
100 :CHIP
100 :CHIP
100 :CHIP
100 :CHIP
R9419
10k
:CHIP
4 5
4.9
C9850
0.0022
B:CHIP
710
46
46
5V
L9523
10µH
:CHIP
C9849
0.0022
B:CHIP
R9850
5.6k
:RN-CP
R9849
5.6k
:RN-CP
10k
:CHIP
SHSYNC
SVSYNC
2.1
1.7
:RN-CP
C9859
100
6.3V
:AL-CP
X9504
10MHz
R9851
5.6k
C9858
0.1
25V
F:CHIP
R9514R9513
10k
:CHIP
R9579
R9580
2SC2712
BUFFER
1.5
R9853
1.5k
:CHIP
Q9521
2SC2712
BUFFER
1.1
R9854
1.5k
:CHIP
2SC2712
2.1
CH:CHIP
100 :CHIP
100 :CHIP
R9572
100
:CHIP
Q9520
Q9522
BUFFER
C9582
100p
MID BUSY
5V
C9803
47
16V
:AL-CP
1.5
R9855
1.5k
:CHIP
59
60
61
62
63
64
PD6
PD7
PC0
PC1
PC2
5.0
5.0
INT1
PB4
PB3
10k
Y(ACH)
B-Y(ACH)
R-Y(ACH)
PC3
IC9527
CXP86332-008Q
5.0
PG6
100p CH:CHIP
C9412
R9575
10k
:CHIP
Y/U/V(ACH)
0
12345678910111213141516171819
PD5
PD4
PD3
PD2
PD1
5.1
MVSYNC
0
SHSYNC
5.1
SVSYNC
5.1
RESET
VSS
2.4
XTAL
2.2
EXTAL
SEL1A
5.1
SEL2A
5.1
SEL1B
5.1
SEL0A
0
SEL0B
ACHSYNC
0
MID BUSY
5.1
WP
PB5
20212223242526272829303132
R9574
R9573
10k
:CHIP
:CHIP
L9539
10µH
:CHIP
C9804
0.1
25V
F:CHIP
Y
B-Y
R-Y
57
58
PC4
PC5
000
PG5
PG4
100p CH:CHIP
100p CH:CHIP
100p CH:CHIP
C9414
C9413
C9415
56
PC6
PG3
55
PC7
0
PB2
52
53
54
PF1/PWM1
PF2/PWM2
PF0/PWM0
PF3/PWM3
1
2
PB1
PB0
R
3
SCL0
SCL1
SDA0
SDA1
PE0
PE1
PE2
PE3
VSS
VDD
NC
EXLC
XLC
PE4
PE5
PE6
BUS
– P BOARD –
1234
A1
A2
VSS
4.8
5 6 7 8
R9451
100
:CHIP
SDA
02CZ6.2
PROTECT
SDA
SCL
D9505D9504
02CZ6.2
PROTECT
0
5.0
4.9
4.5
4.9
0
R9647
4.7k
:CHIP
R9648
4.7k
:CHIP
SCL
SDA
+5V
C9589
100p
R9581
220
:CHIP
R9582
680
:CHIP
C9580
47p
CH:CHIP
CH:CHIP
L9545
2.2µH
:CHIP
C9590
100p
CH:CHIP
D9506
MA111-TX
MIX
2.8
2.8
B
0
G
33 34 35 36 37 38 39 40 41 42 43 44 45 46 47 48 49 50 51
4.9
4.9
SCLWPVCC A0
R9452
100
:CHIP
R9436
:CHIP
R9428
100
:CHIP
100
IC9526
M24C02-MN6T
NVM
R9457
100
:CHIP
C9860
0.1
25V
F:CHIP
S-CLK
S-DAT
G
IIC
[MULTI IMAGE DRIVER
]
<Component Side>
<Conductor Side>
K
M
N
O
B-¥SS8700<GE.>-P-2
5V
L9511
10µH
:CHIP
C9502
0.1
25V
F:CHIP
L
MID-Y
MID-B-Y
C9558
47
16V
:AL-CP
Q9523
2SA1162
BUFFER
R9442
560
:RN-CP
C9846
150p
CH:CHIP
0.9
R9786
1k
:CHIP
1.3
R9817
1k
:CHIP
R9728
1k
:CHIP
1.5
R9735
150
:RN-CP
2.0
R9742
150
:RN-CP
Q9530
2SA1162
BUFFER
1 2 3 4 6
FL9604
TH355LNK-8473
1 2 3
H286LAI-8472
2.0
MID OUT
P
MID-R-Y
Y/R-Y/B-Y
(3/3)
R9864
560
:RN-CP
C9847
150p
CH:CHIP
1.3
Q9533
2SA1162
BUFFER
R9743
150
:RN-CP
1 2 3
+5V
5
791012
46
FL9607
2SA1162
BUFFER
46
FL9608
H286LAI-8472
R9744
1.5k
:RN-CP
1.8
2SA1162
R9747
1.5k
:RN-CP
2.2
Q9562
R9752
1.5k
:RN-CP
R9729
2.2k
:CHIP
2.5
Q9540
BUFFER
R9733
2.2k
:CHIP
2.9
Q9563
2SA1162
BUFFER
2.2
R9734
2.2k
:CHIP
2.9
Y OUT
CB OUT
CR OUT
BR OUT
P (2/3) BOARD WAVEFORMS
12
5.2Vp-p (V)
3
5.0Vp-p (V)
5.2Vp-p (V)
4
0.8Vp-p (H)
56
0.8Vp-p (H)
0.8Vp-p (H)
7
(MULTI IMAGE DRIVE)
8.0Vp-p (V)
B-¥SS8700<GE.>-P-3
Schematic diagram
P
? (1/3) board
– 88 –
Schematic diagram
P P
(2/3), (3/3) boards /
– 89 – – 90 –
Page 61
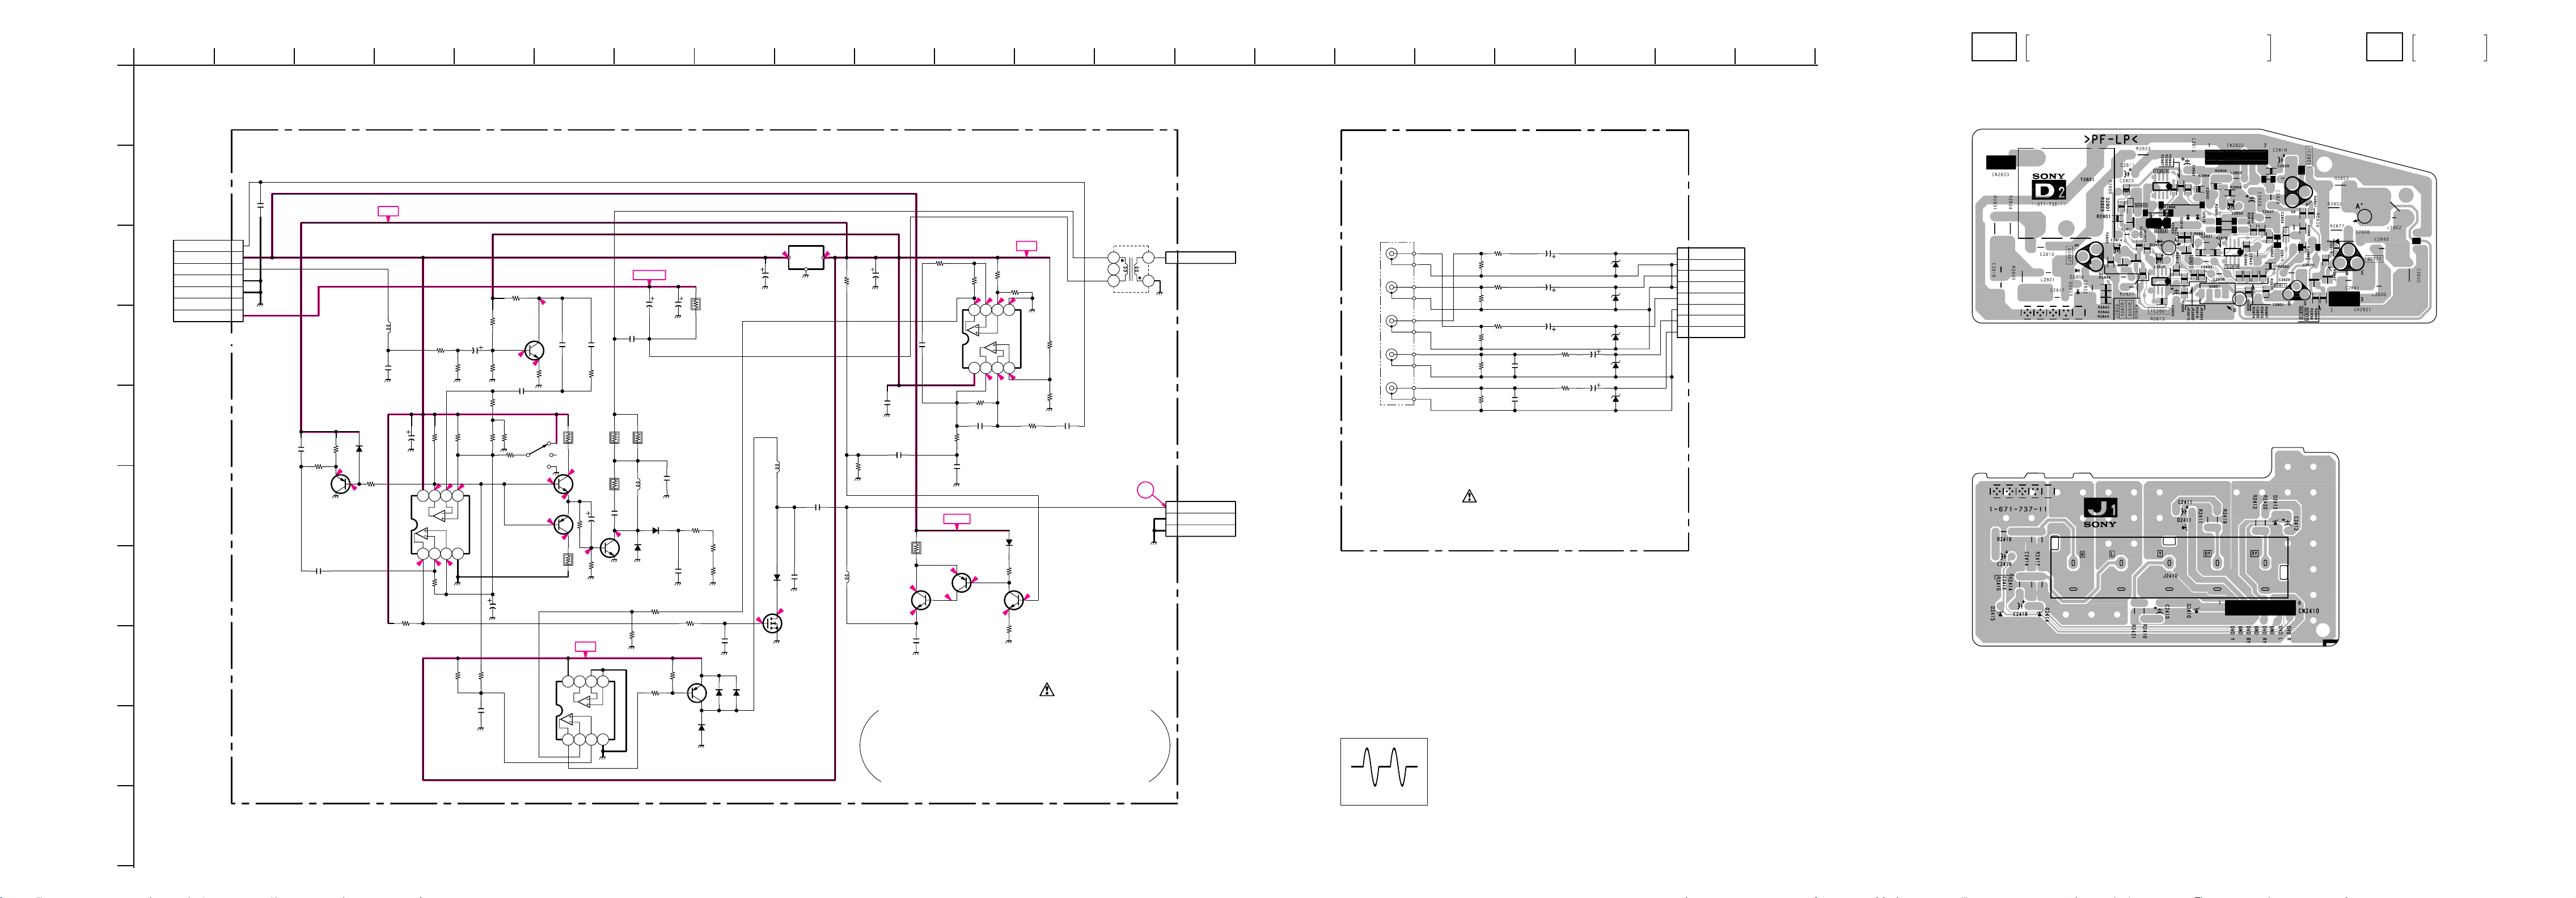
1234567891011 141312 15 16
17
18 19 20 21
D2
POTATION CIRCUIT, V-PIN CORRECTION
PICTURE ROTATION CONTROL, V-PIN CONTROL
J1
COMPONENT,
VIDEO IN
A
D
G
H
– D2 BOARD –
C2829
0.0022
B:CHIP
B
CN2822
7P
YEL
:S-MICRO
VD+
C
15V
FBP
GND
GND
NC
135V
TO A BOARD
CN503
E
F
7
6
5
4
3
2
1
C2803
680p
50V
:PT
R2803
2.2k
:CHIP
2.3
R2801
2.2k
:CHIP
Q2802
2SA1162
BUFFER
MA111-TX
DF/DQP.AMP
C2801
0.0047
:PT
I
+9V
D2801
BIAS
R2804
470
:CHIP
1.6
IC2801
NJM2903M
L2803
33mH
:LHL08
C2830
0.0068
50V
:PT
C2805
47
25V
5.7
R2806
2.2k
:CHIP
R2858
1.2k
:CHIP
R2859
2.2k
:CHIP
R2809
10k
:CHIP
0
1 2 3 4
6.3
R2812
100k
:CHIP
R2885
39k
:CHIP
0.0033
R2867
:CHIP
C2832
R2816
100k
:CHIP
R2813
47k
:CHIP
JR2815
:CHIP
6.4
6.3
5678
6.3
C2842
:PT
22k
Q2821
2SC2712
-0.6
1
R2866
10k
:CHIP
0.0047 400V :MPS
0
R2889
47k
:CHIP
DF.DRIVE
C2809
10
R2886
5.6k
:CHIP
R2872
2.2k
:CHIP
2SC2712
7.5
C2833
0.0022
AMP
2.3
R2871
2.2k
:CHIP
C2806
R2820
47k
:CHIP
S2801
1.6
Q2806
1.6
Q2805
2SA1162
DF.DRIVE
R2824
:FPRD
IC2806
NJM2903M
COMPARATOR
C2835
0
:CHIP
:PT
R2874
33k
:CHIP
R2821
:FPRD
8.1
R2825
:CHIP
1.6
10
+9V
1234
R2831
4.7k
1W
:RS
390
R2830
15k
2W
:RS
330
C2814
10
-0.3
2SC3840K
DF.OUT
R2827
470
:CHIP
5678
C2811
0.47
160V
C2810
470p
500V
C2817
220p
500V
B
00
Q2807
+135V
C2813
10
160V
B
R2834
4.7k
1W
:RS
L2801
10mmH
:LHL10
D2804
D1NL20U
DUMPER
D2803
DINL20U
DUMPER
R2883
5.6k
:CHIP
R2884
3.9k
:CHIP
R2887
1k
:CHIP
Q2824
JWB734-T
D2814
ERA82-004T
PROTECT
C2818
0.0027
630V
:PP
R2840
100k
:CHIP
C2822
0.022
250V
:MPS
R2837
3.9k
:CHIP
R2888
1k
:CHIP
R2833
3.9k
2W
:RS
R2844
100k
:CHIP
R2843
100k
:CHIP
C2821
680p
50V
:PT
D2815
1SS119-25T
12.9
C2819
47
25V
NJM78M09FA
L2802
10mH
RECT.CDI
D2806
RGP10G
5.55.7
S
D2816
1SS119-25T
8.8
IO
G
IC2803
9V-REG.
C2840
0.082
100V
:MPS
C2825
0.01
630V
:PP
Q2811
IRF614-LF
DQP.OUT
R2839
22k
:CHIP
C2837
0.01
R2838
10k
:CHIP
L2806
10mH
:LHL10
+9V
T2801
1
6
C2824
47
25V
B
10
16V
:BP
R2880
10k
:CHIP
C2843
10
16V
:BP
R2860
1.5k
:CHIP
C2826C2820
0.47
:MPS
R2882
1.8k
:CHIP
00
1234
R2869
470k
:CHIP
C2834
0.1
100V
:MPS
R2879
2.2k
:CHIP
0
5678
4.4
4.4
R2878
22k
:CHIP
0
IC2805
LM358DR
V.PARA AMP
4.4
R2861
270k
:CHIP
R2857
6.8k
:CHIP
R2862
270k
:CHIP
C2828
10
16V
:BP
3 4
2
1
1
3
2
1
R2877
12
1W
:RS
12.1
2.7
C2841
1.0
:MPS
+15V
MA111-TX
12.1
3.3
2SC4793
DQPVMOD.
2SA1162
Q2823
D2813
B1AS
11.5
Q2822
INV.
1.8
R2846
2.2k
:CHIP
R2847
1k
:CHIP
2.3
Q2813
2SC2712
AMP
D2
ROTATION CIRCUIT
V-PIN CORRECTION
PICTURE ROTATION CONTROL
CN2823
1P
:TAB
DF
TO A BOARD
CN504
CN2821
3P
BLK
:S-MICRO
QP NC
QP +
TO VM2 BOARD
CN2801
J2410
5P
R-Y
B-Y
R2410
R2411
Y
L
R
D2 BOARD WAVEFORM
1
D2410
RD9.1ES-T1B
PROTECTOR
75
75
R2421
220
R2419
220
R2420R2412
22075
R2414
220k
R2417
220k
C2413
330p
B
C2414
330p
B
C2410
47
C2411
RD9.1ES-T1B
47
PROTECTOR
C2412
RD9.1ES-T1B
47
PROTECTOR
R2415
100
R2418
100
D2411
D2412
C2418
1
RD9.1ES-T1B
C2419
1
D2415
RD9.1ES-T1B
PROTECTOR
D2414
J1
(COMPONENT VIDEO IN)
B-¥SS8700<GE.>-J1
CN2410
8P
WHT
:S-MICRO
TO B BOARD
CN1303
1
DVD Y
GND
2
3
DVD BY
4
GND
5
DVD RY
6
GND
7
DVD L
8
DVD R
– J1 BOARD –
V-PIN CONTROL
23.0Vp-p (V)
B-¥SS8700<GE.>-D2
J
– 91 –
– 92 – – 93 –
– 94 –
Page 62
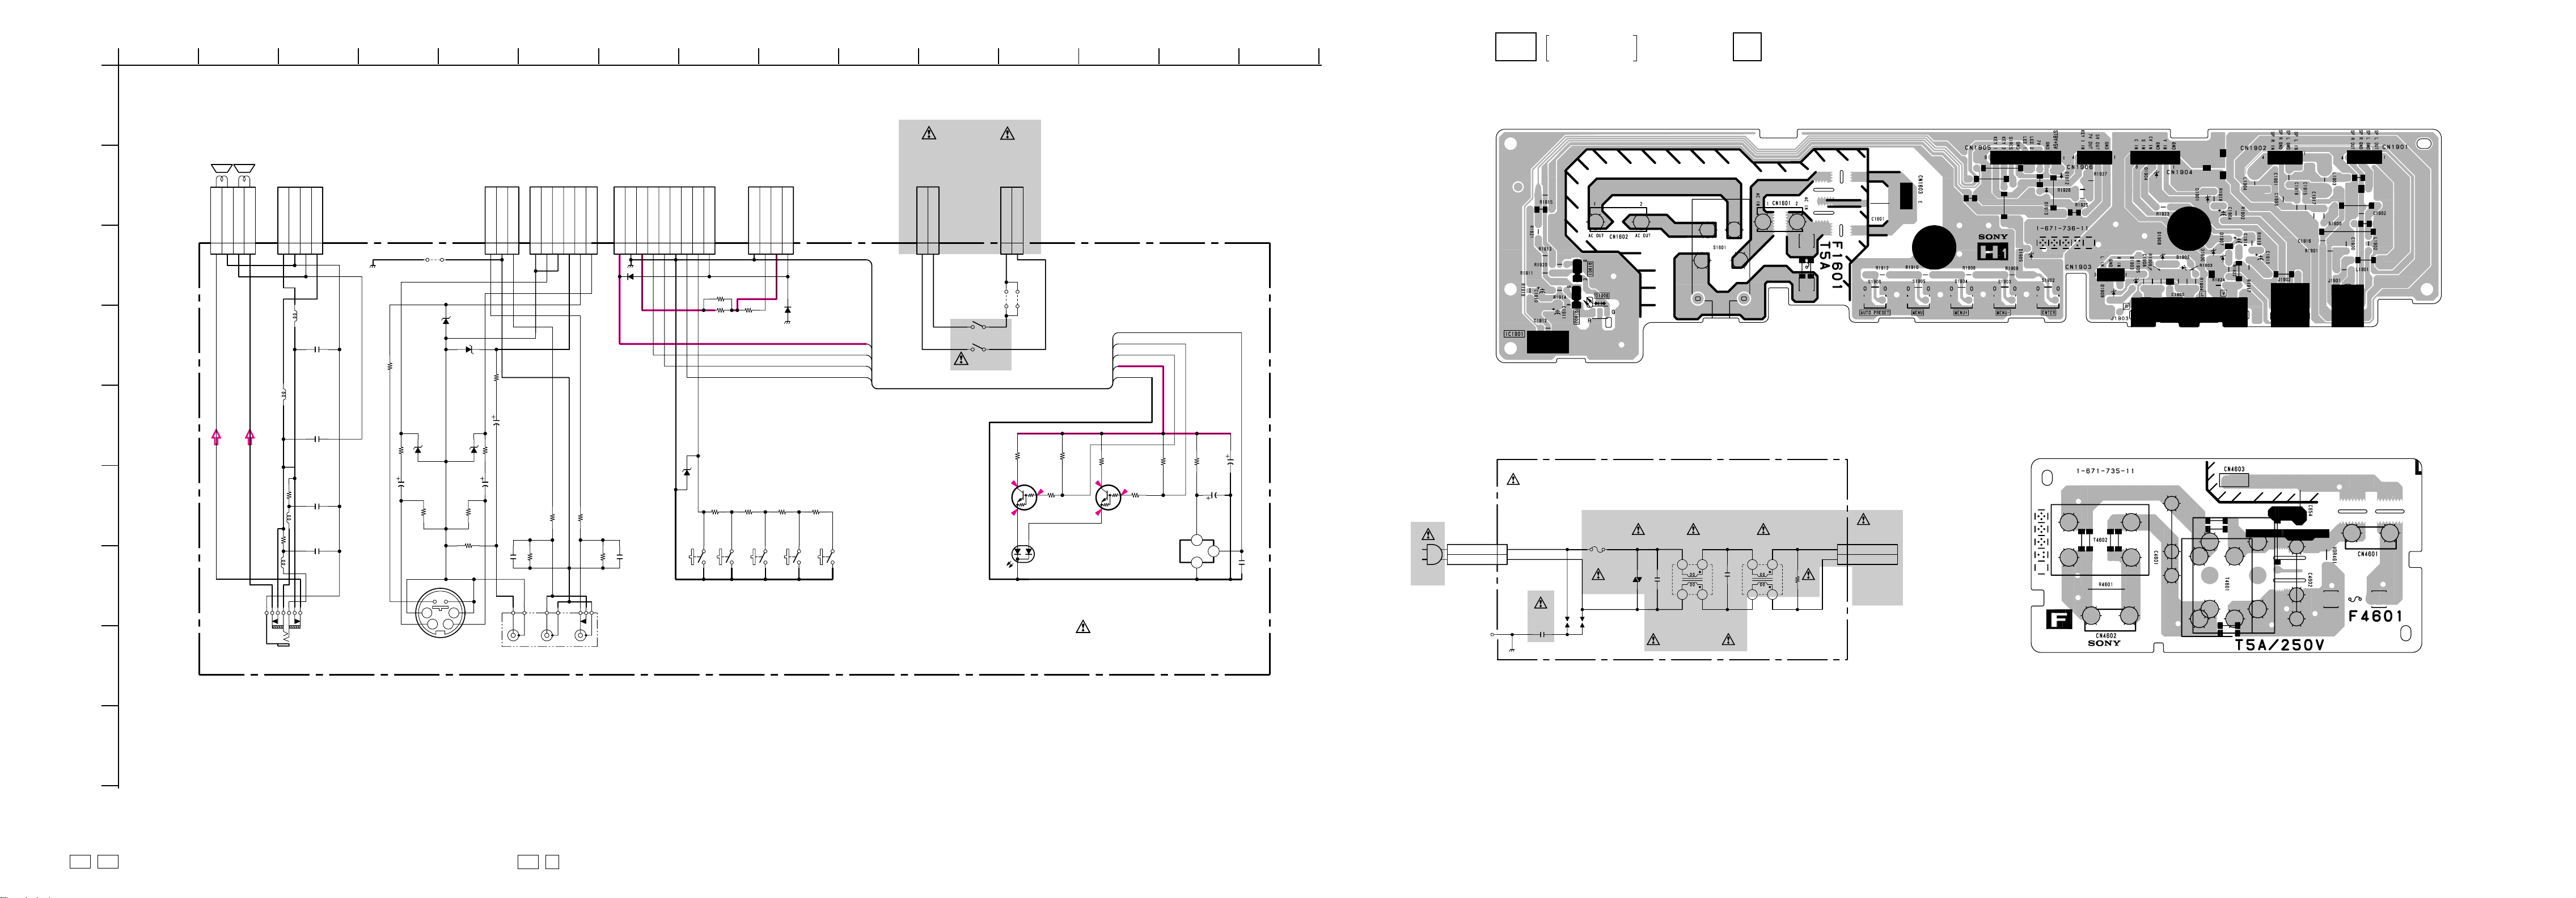
1234567891011 141312 15
1
2
1
2
1
2 3
4
1
2 3
4
F4601
VDR461
T4601 T4602
CN4603
CN4601
CN4602
C654
R4601
C4601
C4602
1P
:TAB
2P
:VH
2P
:VH
4700p
250V
T5A
250V
LFT LFT
1M
1/2W
0.47
250V
0.47
250V
AC IN
AC IN
AC OUT
AC OUT
F
GND
TO H1 BOARD
CN1601
B-¥SS8700<GE.>-F
(AC IN)
50/60Hz
110-240V
H1
CONTROL SW,
INPUT TERMINAL
F
[AC IN
]
A
B
C
D
G
H
– H1 BOARD –
CN1903
3P
RED-L
LR
CN1901
4P
BLK
:S-MICRO
SP L OUT
SP L GND
123
E
AUDIO(L)
F
TO B BOARD
SP R OUT
SP R GND
4
AUDIO(R)
R1901
330
L1901
10µH
:EL0606
R1900
330
L1902
10µH
:EL0606
J1901
CN1204
SP L IN
SP L GND
SP R GND
123
L1903
68µH
:LHL13
C1901
0.68
:MPS
L1904
68µH
:LHL13
C1903
0.68
:MPS
C1900
0.01
:MPS
C1902
0.01
:MPS
CN1902
4P
WHT
:S-MICRO
SP R IN
4
2.2k
R1922
JW(5MM)
R1918
C1904
S
Y
JW1920
5MM
D1900
RD9.1ES-T1B
PROTECTOR
D1904
PROTECTOR
RD9.1ES-T1B
D1901
PROTECTOR
RD9.1ES-T1B
22
R1902
R1917
75
12
34
J1902
:S-MICRO
TO B BOARD TO B BOARD TO F BOARD
GND
L IN
R IN
123
R1923
JW(5MM)
C1914
22
D1907
RD9.1ES-T1B
C1913
75
R1924
75
R1919
PROTECTOR
JW(5MM)
1
C1905
470p
CV
C
V
CN1904
6P
RED
:S-MICRO
GND
CV IN
GND
Y IN
12345
R1904
47k
R1903
100k
L
J1903
3P
S IN
R1905
R1906
100k
R
C IN
6
D1912
1SS119
PROTECTOR
47k
CN1905 CN1906
9P
WHT
:S-MICRO
CN904CN1313CN1201
KEY 2
STBY+5V
GND7VLED 2
LED 1
123456789
C1908
470p
KEY 1
GND
SIRCS
R1925
22
:RN
R1926
22
:RN
D1905
PROTECTOR
RD9.1ES-T1B
R1908 R1909 R1910 R1912
470 1k 1.8k 3.3k
S1902 S1903 S1904 S1905 S1906
ENTER MENU- MENU+ MENU AUTO PRESET
4P
WHT
:S-MICRO
GND
5V OUT
123
R1927
JW(5MM)
7V OUT
KEY 1 IN
4
D1913
1SS119
PROTECTOR
GND
STBY+5V
LED 2
LED 1
SIRCS
CN1602
5P
:VH
TO A BOARDTO TOP SWITCHTO A BOARD
AC OUT
2
AC OUT
1
CN1601
4P
:VH
CN4602CN601
AC IN
AC IN
1
2
JW1602 JW1601
10MM 10MM
41
23
S1601
AC-PUSH-SW
R1911
330
0.3
R1913
Q1901
DTC144ESA
5.0
LED DRIVER
G
R
SPB-26MVWF
10k
0
R1920 R1921
100 100
D1906
SIRCS
LED 1
LED 2
STBY+5V
GND
R1915R1914
Q1902
DTC144ESA
5.0
LED DRIVER
0
0
IC1901
SBX1981-11(12)
REMOTE SENSOR
R1916
C1910
C1911
2
3
47
47
16V
47
16V
1
C1912
470p
10k330
H1
(CONTROL SW,INPUT TERMINAL)
B-¥SS8700<GE.>-H1
– F BOARD –
Schematic diagram
? , boards
I
J1D2
– 95 –
Schematic diagram
H1 F
, boards
/
– 96 – – 97 – – 98 –
Page 63
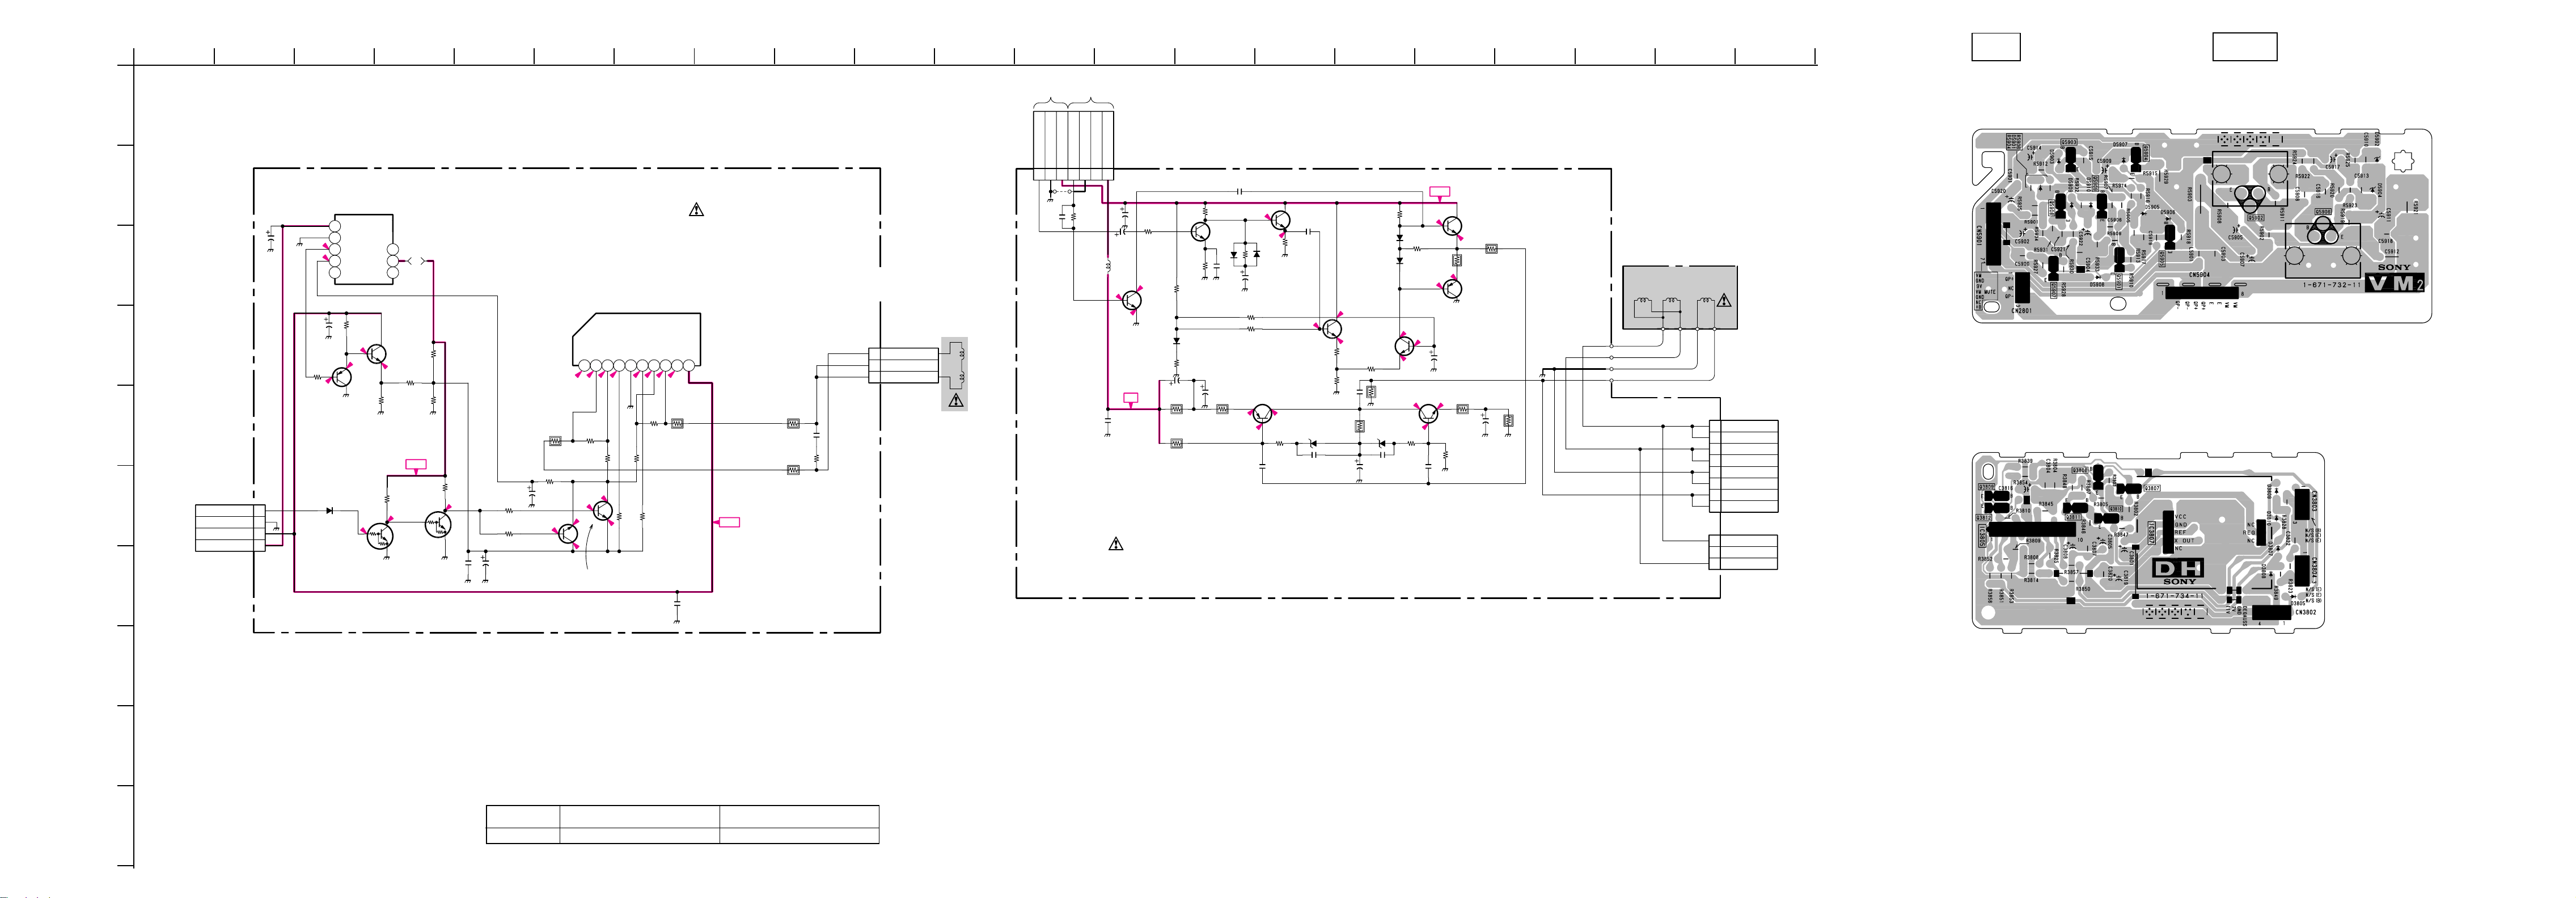
1234567891011 141312 15 16
17
18 19 20 21
DH
[
N/S COIL DRIVE
]
VM2
[VM OUT
]
A
D
G
TO B BOARD
CN1301
B
C3801
10
12345
VCC
C3805
10
R3847
100
2.5
Q3810
2SA1175
BUF
GND
REF
X OUT
NC
R3846
3.2
3.2
REG
1k
R3848
1k
2.6
1.7
C
E
D3805
F
DEGAUSS
GND
7V
11V
CN3802
4P
BLK
:S-MICRO
1
2
3
4
1SS119 SW
R3802 R3803
1k 1k
0
Q3807
DTC144ES
BUFFER
IC3807
SENSOR UNIT
MIU-102-N
NC
5V
6 7 8
NC
Q3811
2SC2785
BUFFER
R3805
1.8k
R3807
2.6
470
R3804
9.1k
+5V
5.1
Q3808
DTC144ES
BUFFER
VS1
OUT1
-IN1
1 2 3 4 5 6 7 8 9 10
3.1
3.1
2.4
R3852
R3851
JW(5MM)
00
C3804
0.01
B
C3819
R3839
10k
R3854
10k
C3816
10
R3814
1
330
0
Q3812
2SC2785
N/S DRIVE MUTE
100k
R3809
75k
1.7
1.6
2.4
Q3809
2SC2785
N/S DRIVE MUTE
TO A BOARD
CN510
DH
(N/S COIL DRIVE)
IC3805
LA6510
N/S DRIVE
+IN1
GND
+IN2
-IN2
OUT2
VS2
VCC
2.4
2.5
2.5
2.4
R3810
4.7k
2.4
R3825
1k
JW(5MM)
R3808
150k
R3845
4.7k
C3807
0.01
B
2.4
R3850
+7V
R3828
0.47
:FPRD
C3822
0.1
:MPS
R3823
15
R3849
0.47
:FPRD
B-¥SS8700<GE.>-DH
TO COILS
1
N/S(B)
2
N/S(E)
3
N/S(E)
CN3803
3P
WHT
:S-MICRO
TO A BOARD
CN306
CN5901
7P
:S-MICRO
GND
NC
R5927
820
+B
C5902
330
16V
:HT
R5901
C5920
47
5mm
L5901
47µH
0.6
0
0
Q5907
2SD2144S
+B
C5903
0.0047
500V
E
2SC2785
BUFFER
R5930
1.5k
R5931
470
R5907
1k
D5901
1SS119
TEMP-CORR
R5904
180
C5905
470
10V
R5903
22
1/2W
R5902
560
:FPRD
D5909
1SS119
C5921
47p
C5907
33
160V
R5908
1.5
:FPRD
C5919
0.001
:PT
2.7
D5910
1SS119
R5932
47k
C5922
10
16V
R5906
1k
R5905
1k
Q5902
2SA1837
VM.DRIVE.1
135.8
135.6
C5908
0.047
200V
Q5909Q5908
2SC2785
BUFFER
C5906
0.047
:PT
R5933
1k
2.1
Q5901
2SC2785
AMP
2.7
56.5
D5902
RD39ES-T1B
R5911
DC.BIAS
18k
C5910
0.001
:PT
R5910
R5909
:PT
9VEVM MUTE
GND
VM
1234567
JW5901
10MM
C5900
560p
VM2
(VELOCITY MODULATION)
68
220
8.1
2.0
C5912
0.1
200V
:PT
R5919
1k
:FPRD
C5911
2.2
160V
:HT
R5917
1.2k
D5906
R5918
33
10k
BIAS
D5907
33
BIAS
Q5903
2SC2785
R5914
68
RD39ES-T1B
4.2
AMP
2.0
R5921
270
3W
56.5
:RS
D5904
DC.BIAS
R5920
18k
C5913
C5916
0.001
0.047
:PT
:PT
+9V
5.6
4.9
4.2
2.7
C5914
100
16V
R5923
1.5
0
:FPRD
Q5906
2SC4793
0
VM.DRIVE.2
R5922
560
Q5905
2SC2785
BUFFER
R5924
22
:FPRD
4.9
R5929
5MM
Q5904
2SA1175
BUFFER
C5917
470
10V
R5925
22
NECK ASSY
QP QP VM
Q.P.Q.P.+
E
VM
1
2
3
4
5
6
7
8
3
2
1
B-¥SS8700<GE.>-VM2
CN5904
8P
QPQPQP+
QP+
E
E
VM
VM
TO D2 BOARD CN2821
QP-
NC
QP+
CN2801
3P
BLK
:S-MICRO
– VM2 BOARD –
– DH BOARD –
H
I
DH BOARD * MARK LIST
J
Ref. No.
R3805 1.8k 1/4W 2.7k 1/4W
– 99 –
KV-EF34M80(ME) KV-EF34M90(JE) KV-EF34M31(OCE)
KV-EF34M90(HK) KV-EF34M91(ME) KV-EF34M61(GE)
# : Not Used
– 100 – – 101 –
– 102 –
Page 64
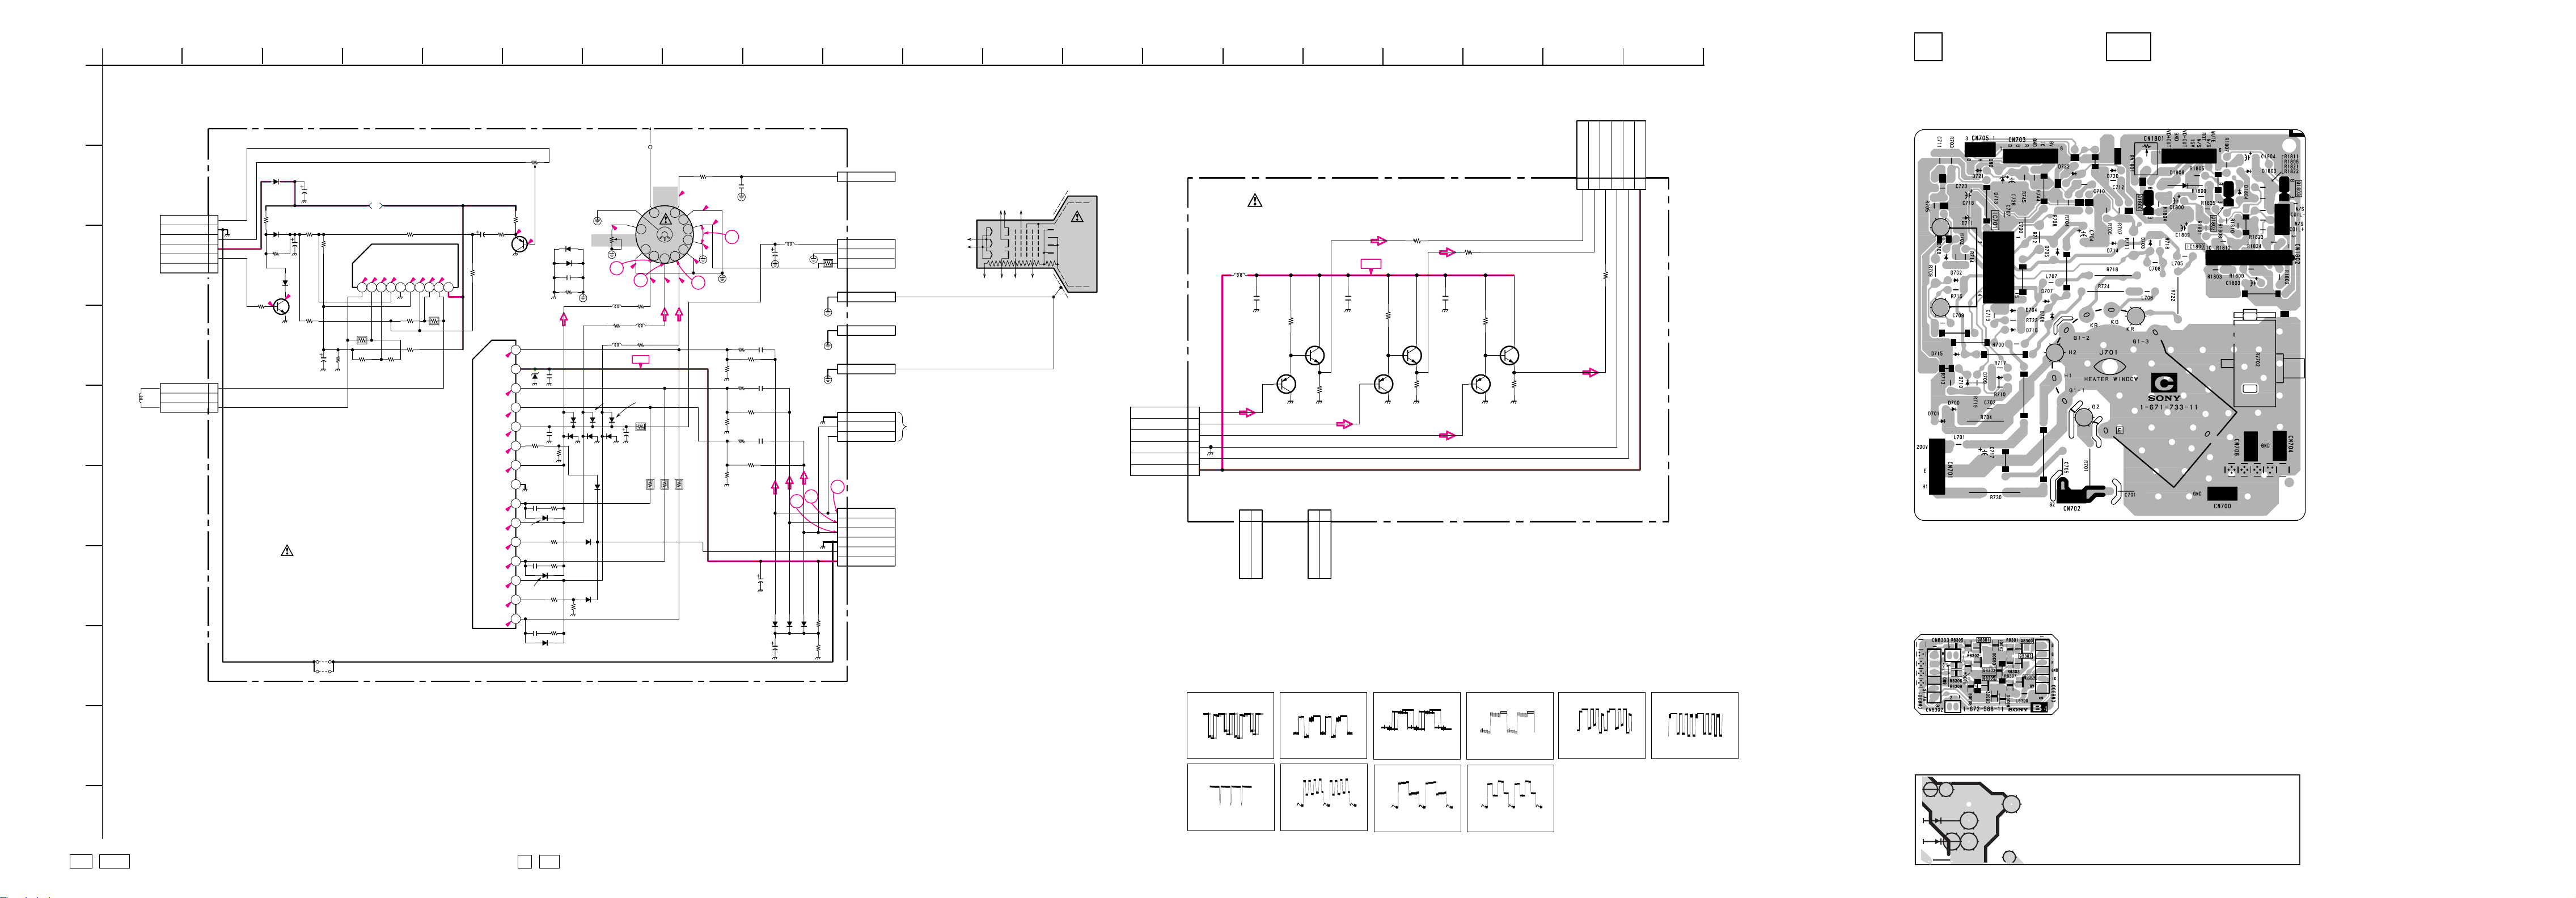
1234567891011 141312 15 16 17 18 19
20
C
[RGB OUT
]
B4
[RGB BUFFER
]
A
D
G
H
– C BOARD –
TO A BOARD T503 FV
CN702
1P
:TAB
TO A BOARD
T503 SV
G2
1
CN701
3P
:MINI
TO A BOARD
CN505
1
200V
2
E
3
H1
CN706
TAB(CONTACT)
GND
1
CN700
TAB(CONTACT)
GND
1
CN704
TAB(CONTACT)
GND
1
CN705
3P
WHT
:S-MICRO
1
GND
R
2
3
B
CN703
6P
WHT
5
:S-MICRO
TO B4 BOARD
CN8301
1
B
2
G
3
R
4
GND
5
IK
6
9V
TO A BOARD
CN505
NC
KG G2
H
CV KR G1 G4
KB
HV
A80LPD80X
V901
PICTURE
TUBE
B
G
R
GND
IK
9V
CN8300
6P
TO A BOARD
CN305
B4
(RGB BUFFER)
L8300
22µH
C8300
2.2
F:CHIP
Q8300
2SA1162
BUFFER
1
B
2
3
4
5
6
1
2
CN8302 CN8303
2P 2P
NC
NC
C BOARD WAVEFORMS
R8301
2.2k
:CHIP
2
NC
Q8301
2SC2712
BUFFER
R8302
:CHIP
G
1
NC
B
+9V
C8301
2.2
F:CHIP
2SA1162
BUFFER
R8305
100
:CHIP
G
R8306
100
:CHIP
C8302
2.2
F:CHIP
R8303 R8307
2.2k
:CHIP
Q8303
2SC2712
BUFFER
330
:CHIP330
Q8302
R
0
C704
10
250V
RCV
G1-3
0
2300V
SOCKET
G4
10
1
13
11
10
9
KR
8
2
R722
1k
1/2W
156.5
L706
33µH
R718
1k
1/2W
+9V
D707
HSS83TD
PROTECT
R700
10k
:FPRD
R709
68k
2W
:RS
R711
68k
2W
:RS
J701
9
KG
7
G
3
8
154
1
KB
6
G2
4
7
B
R712
284
2
G1-1
5
H1
H2
6
G1-2
5
153
68k
2W
:RS
R701
100k
1/2W
0
3
3
4
0
0
R705
0
R708
1k
1k
R706
1k
C701
0.0047
2kV
4
R720
JW(5MM)
R704
510
:RN
R721
JW(5MM)
R703
510
:RN
R728
JW(5MM)
R707
510
:RN
C716
100
1SS119
SLICE
E
L701
22µH
C717
4.7
250V
C710
24p
CH
C711
47p
CH
C712
68p
CH
G
B
D721
D722
C726
47
25V
B-¥SS8700<GE.>-C
R
6
7
D720
1SS119 PROTECT
1SS119 PROTECT
R745
360
:RN
R730
1.8
3W
:RS
R744
560
:RN
RV1801
47k
D1808
CN1801
B
C
6P
BLK
:S-MICRO
TO A BOARD
CN507
VD+OUT
GND
VD-OUT
15V
N/S ROT
N/S MUTE
CN1802
3P
BLK
:S-MICRO
N/S COIL-
NC
N/S COIL+
1
2
3
4
5
6
1
2
3
E
F
GP08DPKG23
R1806
4.7k
C1804
D1803
1SS119
R1808
4.7k
D1804
1SS119
0.4
R1805
10k
Q1802
2SC2785TP
PVM-AMP
C1809
1000
25V
R1822
R1802
1/4W
:FPRD
R1809
JW709
5MM
IC1800
LA6510
N/S DRV
33k
1 2 3 4 5 6 7 8 9 10
1.2
R1823
5.6k
33k
JW710
5MM
R1821
82k
10
4.7
R1811
82k
C1803
10
(RGB OUT)
C
9V
6.9
6.9
R1824
33k
6.5
R1825
3.3k
6.5
R1812
33k
R1810
33k
6.5
6.0
6.5
R1803
1.2
1/4W
:FPRD
6.0
R1800
1k
C1800
R1804
10
JW(5)
Q1800
2SA1175TP
R1801
5.6k
IC701
STV5112
VIDEO AMP
BIN
2.1
VCC
GIN
2.0
RIN
2.1
VDD
206
RM
0
ROUT
156
GND
RFB
156.4
GOUT
153.4
GM
7.2
GFB
154.2
BOUT
152.1
BM
8.5
BFB
153
C713
470p
500V
4.6
3.9
1SS119-25TD
D701
1SS119-25TD
C702
1000p
B
R734
100
1/2W
123456789101112131415
D711
RD11ES-T1B3
PROTECT
C707
0.1
:PT
D705
HSS83TD
PROTECT
C700
0.1
250V
R702
R714
100k
4.7k
:RN
C708
470p
500V
R716
B
470
D703
R717
1SS119
4.7k
C709
470p
R715
500V
470
B
D702
R719
4.7k
1SS119
R723
470
B
D704
1SS119
D700
R
SCREEN
MAX MIN
520 - 106
RV702
110M
D714
D715
HSS83TD
HSS83TD
D708
1SS119
D709
1SS119
D710
1SS119
R713
330k
:RN
1
L705
33µH
R724
1k
1/2W
L707
33µH
D706
HSS83TD
PROTECT
D716
HSS83TD
TO C BOARD
2.2k
:CHIP
Q8304
2SA1162
BUFFER
CN703
CN8301
:S-MICRO
Q8305
2SC2712
BUFFRE
R8308R8304
330
:CHIP
6P
BGR
12345
R8309
100
:CHIP
GND
IK
9V
6
R
B-¥SS8700<GE.>-B4
– B4 BOARD –
I
J
Schematic diagram
DH VM2
? , boards
– 103 –
Schematic diagram
C B4
, boards
/
11
NTSC : 15.7Vp-p (H) PAL/SECAM : 135V
4
23.0Vp-p (H) 3.3Vp-p (H)
5
2
NTSC : 13.6Vp-p (H)
6
3.3Vp-p (H) 3.3Vp-p (H)
2
PAL/SECAM : 135Vp-p (H)
7
33
NTSC : 15.0Vp-p (H)
PAL/SECAM : 144Vp-p (H)
EY840 EY839
D2506
D2507
28
EY887
EY842
EY844
NOTE :
The circuit indicated as left contains high voltage of over
600Vp-p. Please pay attention while inspecting or reparing
it to prevent an electric shock.
EY873
– 104 – – 105 – – 106 –
Page 65
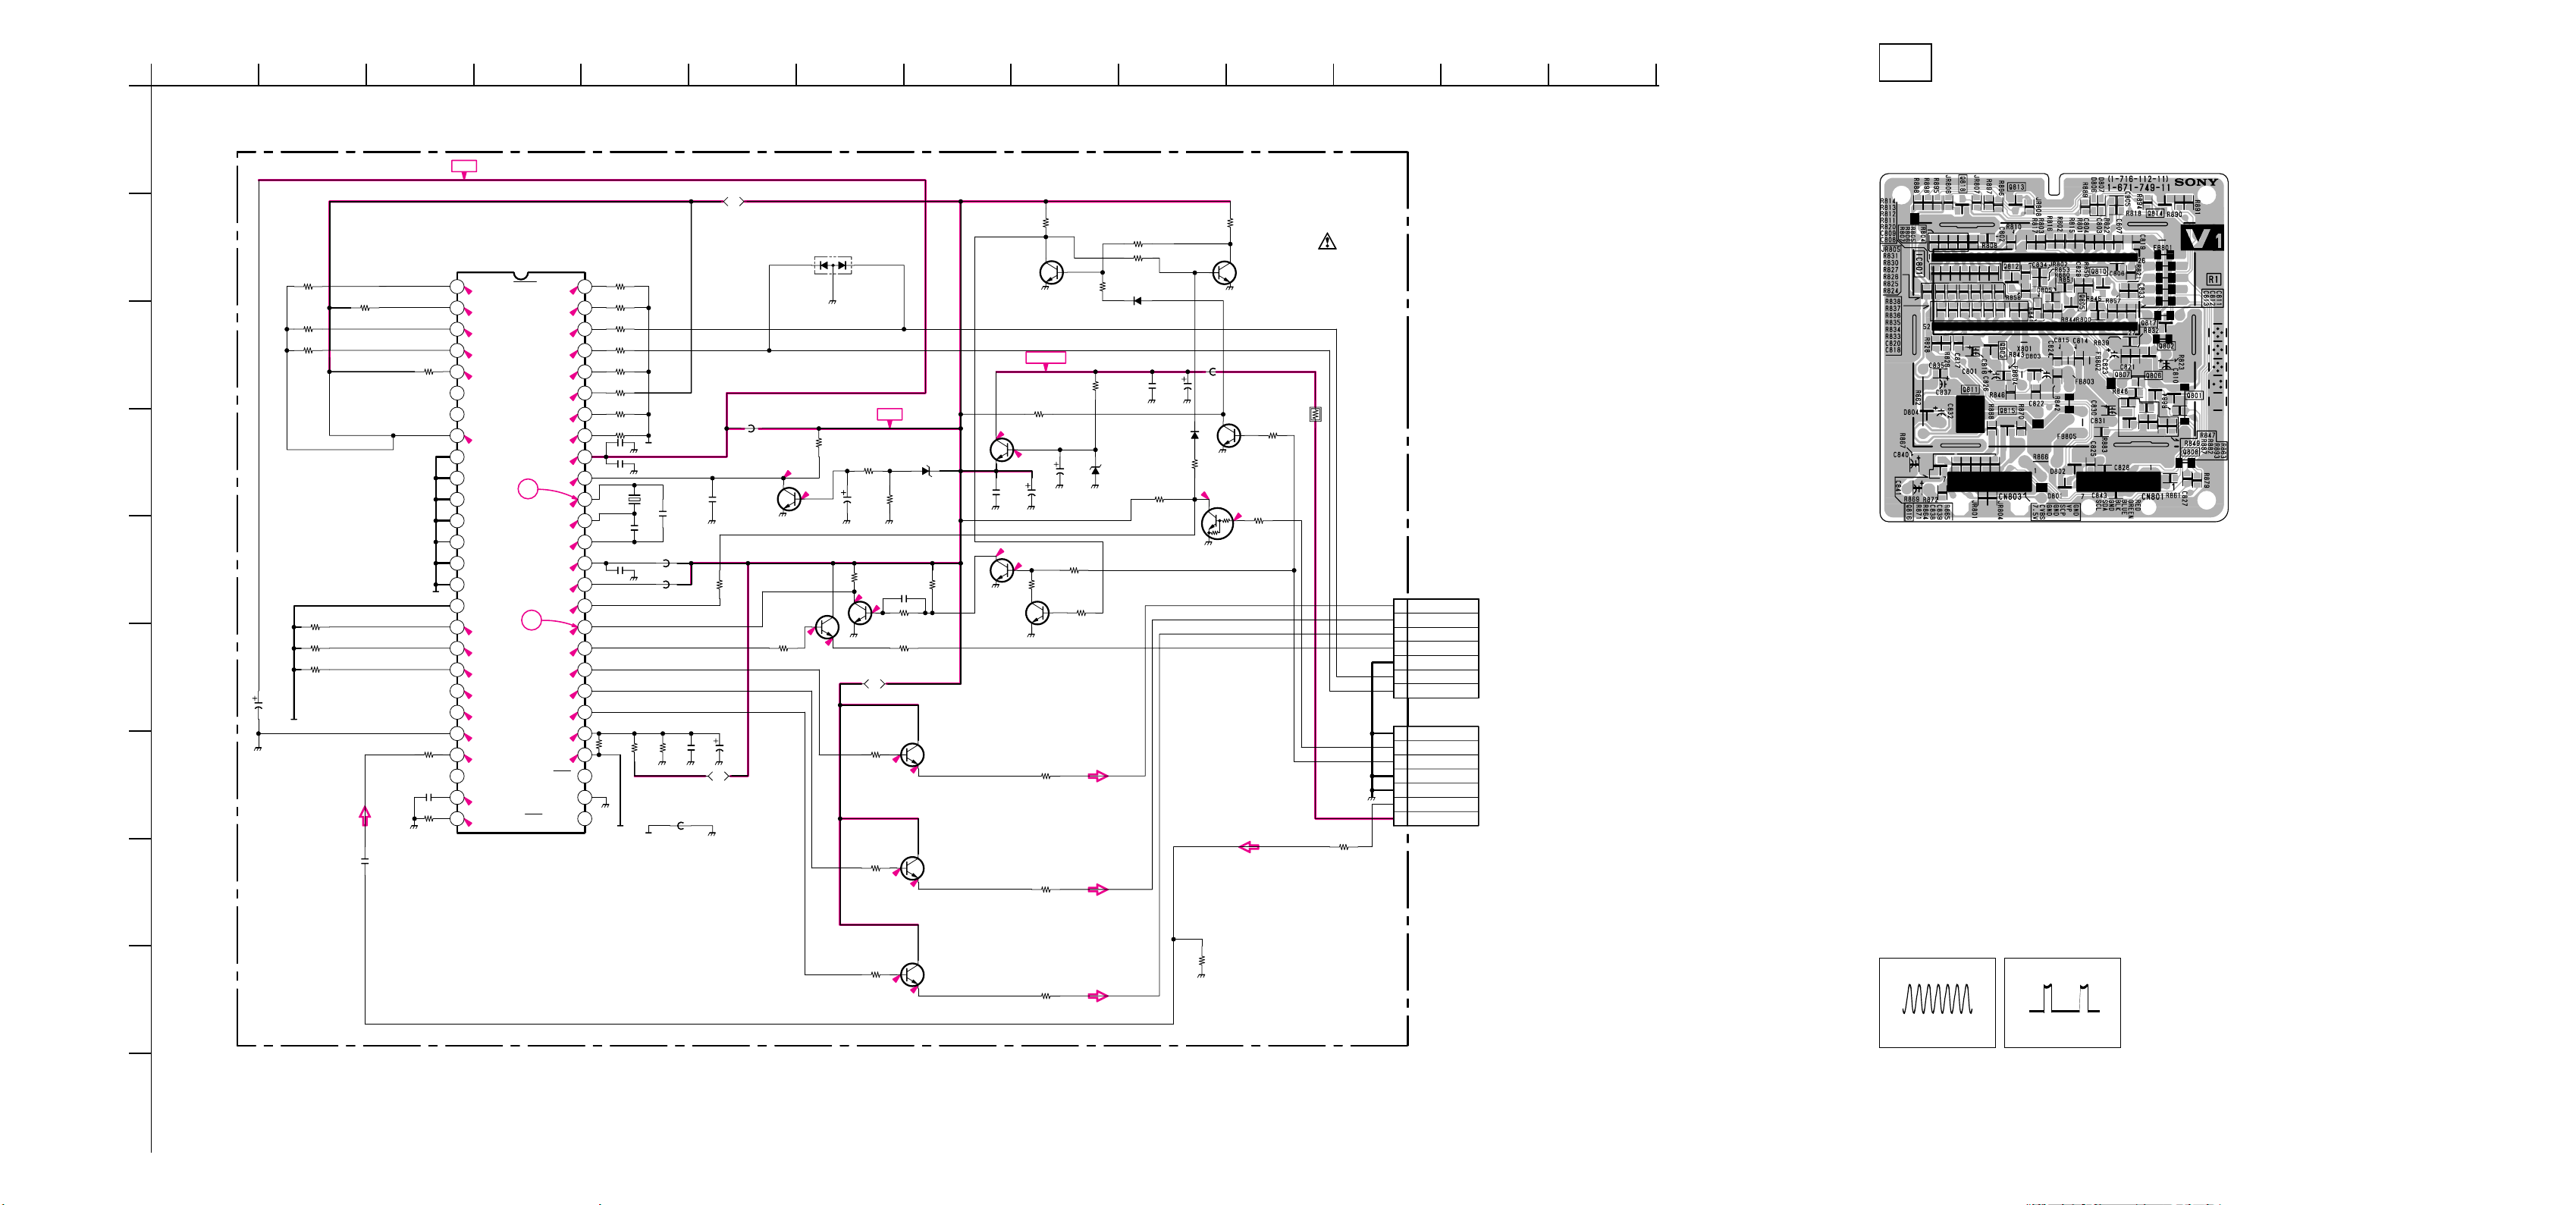
1234567891011 141312
V1
[
TELETEXT
]
A
B
C
D
G
H
KV-EF34M31(OCE)/EF34M61(GE)/EF34M91(ME)ONLY
– V1 BOARD –
+5V
5V
IC801
SAA5261
R807
0
:CHIP
0 :CHIP
R813
R805
0 :CHIP
R804
0
:CHIP
R820
10k :CHIP
E
R803
0
:CHIP
R802
100
:CHIP
C801
47
16V
R801
0
:CHIP
V
C806
0.1
25V
F:CHIP
C805
0.1
25V
F:CHIP
R822
100 :CHIP
R821
27k
:CHIP
F
TEXT DECORDER
1234567891011121314151617181920212223242526
0.0
EAST
2.2
0.1
4.8
0.2
2.2
0.3
4.5(4.5)[3.9]
2.2
1.0
4.9
1.1
1.2
1.3(PWM)
1.9
RES
RES
RES
RES
VSS D
CL(NVM)
DA(NVM)
SL ADDR
FIELD
0 1.5
HMD
0
VMD
0
PDI
2.3
PH.L
2.3
VSSA
0
CVBS
2.4
N.C
BLACK
2.1
I REF
2.4
1
ODD/EVEN
/WEST
0
8/30
0
SDA
4.5
SCL
LCB
0
PKTX/30
4.8
DSR
0
LIST
0
VDDM
4.7
RESET
0
X OUT
2.5
X IN
2.4
X GND
0
VDDT
4.9
VDDA
4.8
VP
0
2
HP
BLK
0
R OUT
0
G OUT
0
B OUT
0
RGB REF
2.4
PON
2.3
COR
VSSA
R831
0 :CHIP
R830
0 :CHIP
R829
100 :CHIP
R828
100 :CHIP
0 :CHIP
R827
R835
0 :CHIP
0 :CHIP
R825
R824
0 :CHIP
X801
157877421
C818
33p
:CHIP
C815
100p CH:CHIP
R800
10k :RN-CP
27 28 29 30 31 32 33 34 35 36 37 38 39 40 41 42 43 44 45 46 47 48 49 50 51 52
0.1 25V B:CHIP
C817
C816
2.2 16V F:CHIP
C820
33p
:CHIP
FB803
1.1UH
FB802
1.1UH
R839
R832
1.5k
2.2k
:RN-CP
:RN-CP
FB801
1.1UH
F:CHIP
C821
0.1
25V
C822
0.001
B:CHIP
R841
100
:CHIP
C823
100
16V
5V
FB804
470UH
:CHIP
D802
DAP202K-T-146
R842
4.7k
:CHIP
0
0.7
Q803
2SC2712
REST OUT
R844
2.2k
:CHIP
Q801
2SC2712
BLK OUT
R845
1k
0
0
+5V
R843
4.7k
:CHIP
C826
4.7
1.5
-0.7
Q805
2SC2712
HP
5V
R849
1k
:CHIP
0
R848
1k
:CHIP
0
D803
RD3.3M-T1B2
R846
1k
:CHIP
C829
R851
68p
R850
220k
:CHIP
R884
100
:CHIP
0
0
2.2k
:CHIP
Q808
2SC2712
R BUFFER
Q807
2SC2712
G BUFFER
:CHIP
R898
4.7k
:CHIP
Q813
2SC2712
BUFFER
6.4
3
1
5.4
2
C830
0.1
25V
F:CHIP
3.4
0
Q810
2SC2712
BUFFER
Q812
2SC2712
BUFFER
+7.5V
R862
470
R888
1/2W
4.7k
:CHIP
Q811
2SD2394
+5V REG.
C832
C831
100
16V
RD5.6M-T1B2
R853
R857
5.6k
22k
:CHIP
:CHIP
:CHIP
R861
1k
:CHIP
R882
1k
:CHIP
R889
10k
:CHIP
10
D804
R858
5.6k
R
G
R897
10k
:CHIP
R896
10k
:CHIP
D806
MA111-TX
C835
C837
0.1
100
25V
16V
F:CHIP
D807
MA111-TX
R880
470
:CHIP
R894
10k
:CHIP
R895
4.7k
:CHIP
2SC2712
FB805
1.1UH
2SC2712
BUFFER
Q817
0
DTC114EKA
VP
V
1
(TELETEXT)
Q818
BUFFER
Q814
4.2
R890
22k
:CHIP
R879
10k
:CHIP
V
R866
10
2W
:RS
R871
330
:CHIP
CN801
7P
SB-J2908:BTOB
TO A BOARD
CN307
1
RED
2
GREEN
3
BLUE
4
BLK
5
GND
6
SDA
7
SCL
1
GND
2
VP
SCP
3
GND
4
GND
5
6
CVBS
7
7.5V
CN803
7P
SB-J2908:BTOB
TO A BOARD
CN301
R847
1k
:CHIP
0
I
0
Q806
2SC2712
B BUFFER
R863
1k
:CHIP
B
R864
470
:CHIP
B-¥SS8700<GE.>-V1
V1 BOARD WAVEFORMS
12
5.5Vp-p (15MHz) 5.0Vp-p (H)
J
– 107 –
– 108 –
– 109 –
Page 66
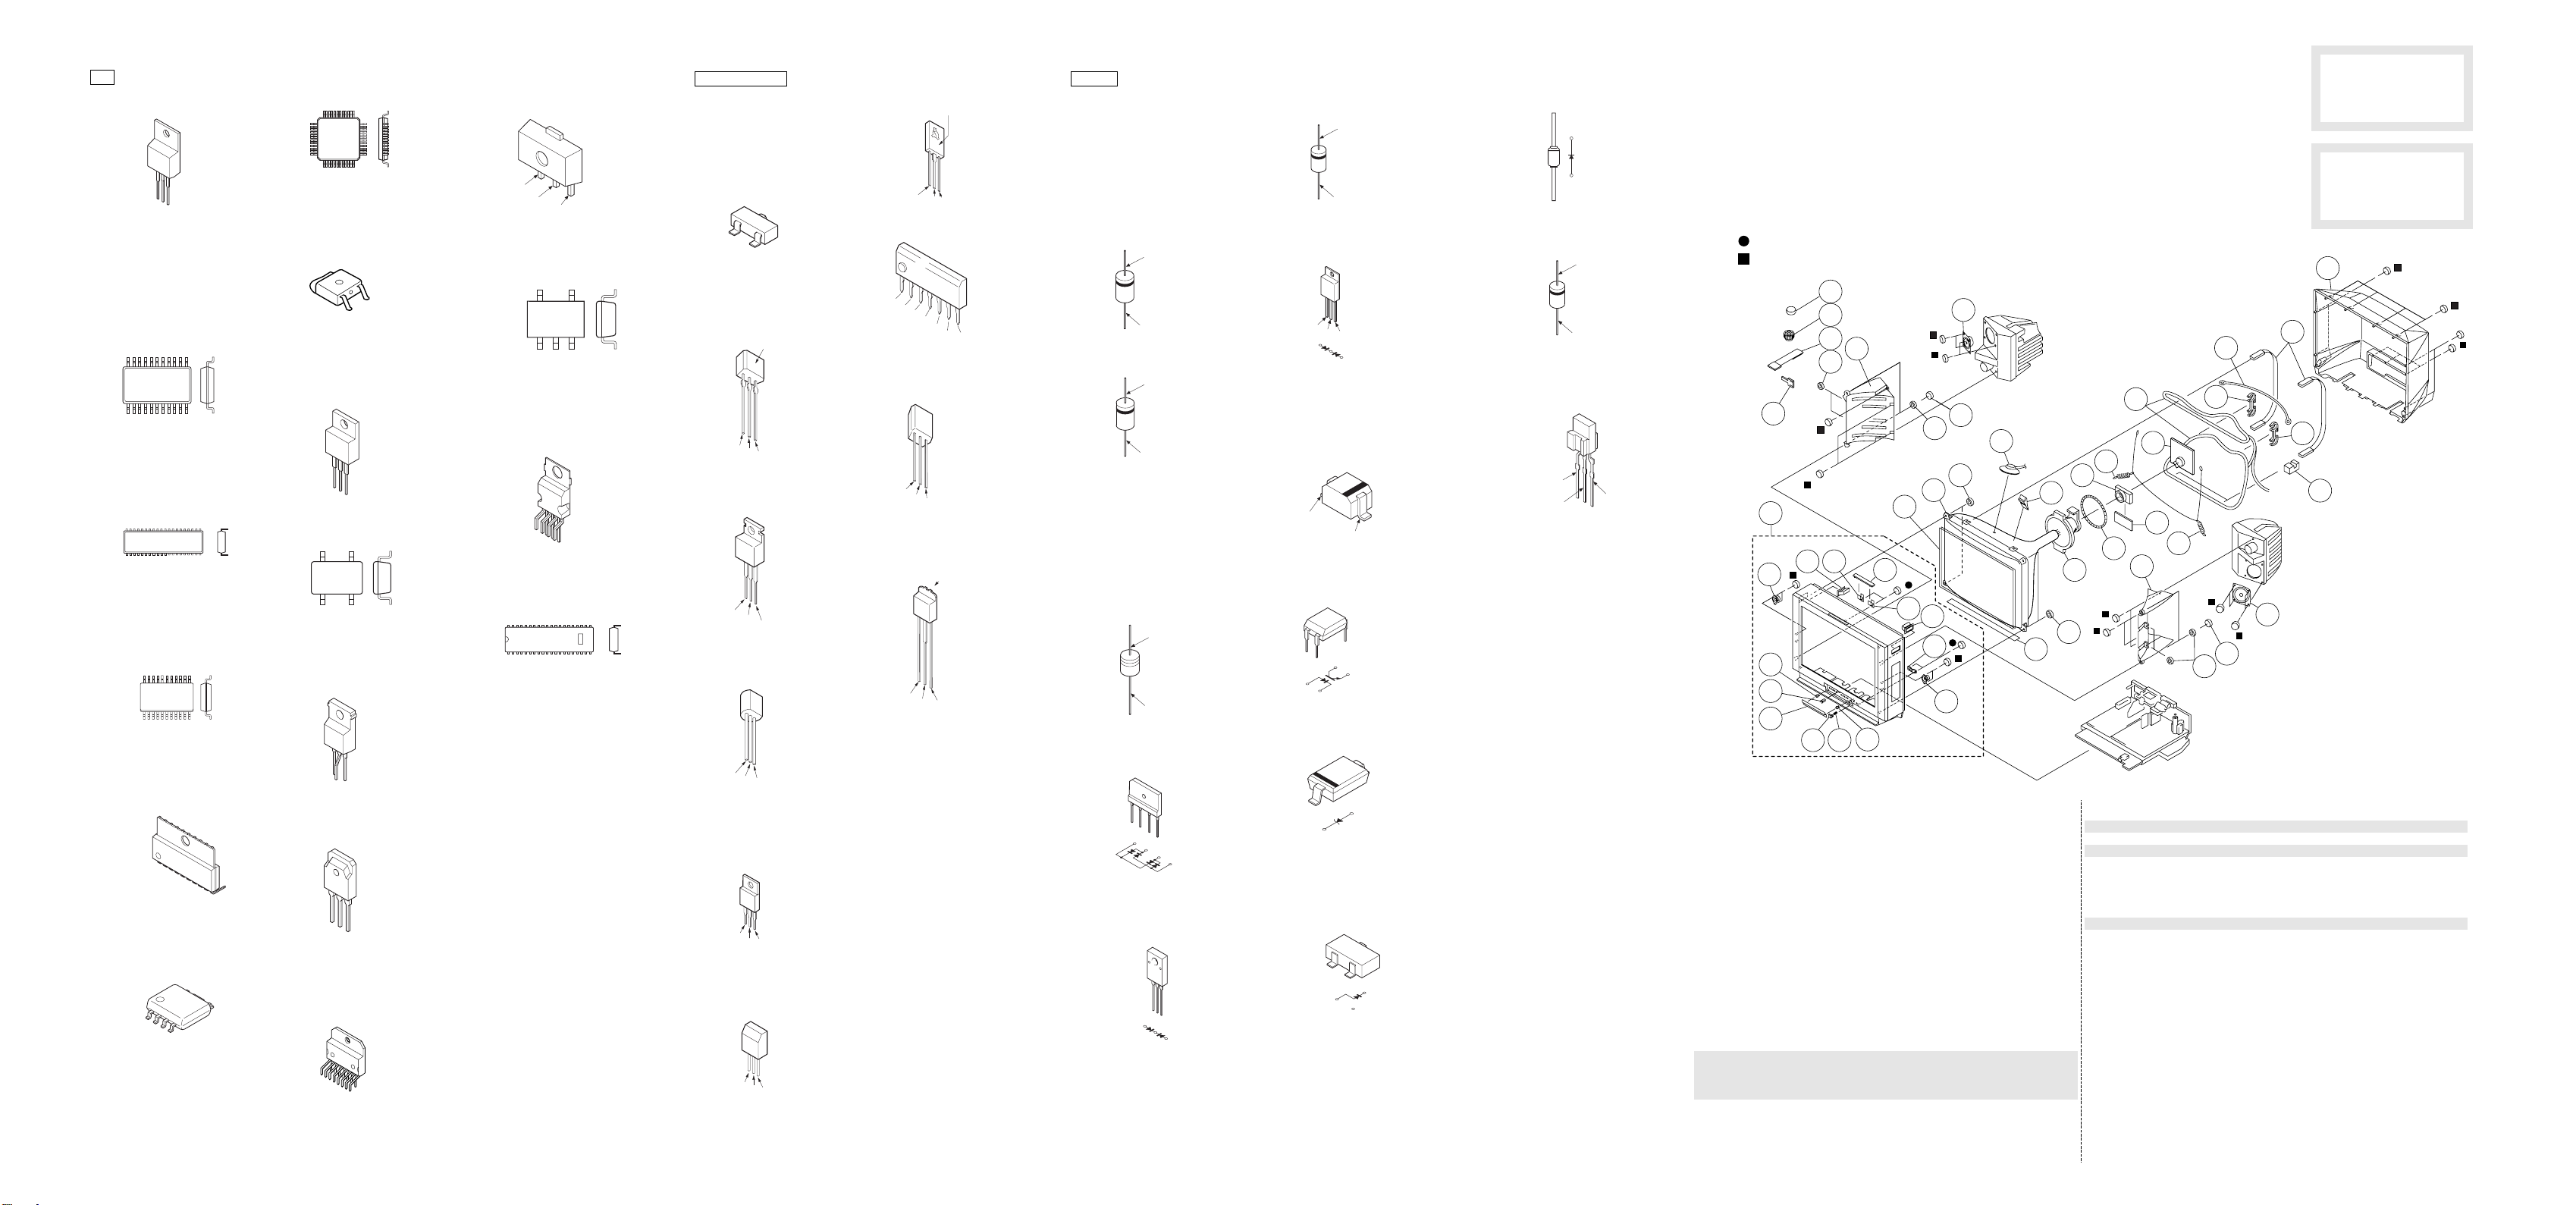
+
-
+
-
27
26
21
24
23
20
20
18
19
17
16
13
29
28
31
33
32
30
15
14
13
32
33
31
36
35
34
30
37
6
7
8
10
11
10
9
7
3
5
4
1
2
3
30
12
38
22
24
25
KV-EF34M31/EF34M61/EF34M80/EF34M90/EF34M91
5-5. SEMICONDUCTORS
IC
BA033T
MSM548331TS-K
S80743AL-A7-S
BA05T
1
TOP VIEW
Quad Flat L-leaded Package
1
3
2
Pin 20-996
1
2
3
BA7606F
LM358D
MC74F163AM
MM1115XFBF
NJM2903M
NJM78M05DLA(TE1)
2
TC7SET08FU
SN74LS164NS
SN74LS221NS
TDA7315D013TR
TLC29321PW
1. IN
2. GND
3. OUT
3
1
1
Chip Type
Pin 4-6
NJM78M09MA
1
TOP VIEW
Small Outline L-leaded Package
Pin 8-98
TDA8172
CXA1855S
ST24C08FB6
1
7
1
TOP VIEW
Dual In-line Package
Pin 6-98
PST9143NL
1
Chip Type
Pin 4-6
TDA9178
HFE4053BT
1
TOP VIEW
Small Outline L-leaded Package
Pin 8-98
LA6510
1
TOP VIEW
1
SE135N
STRF6656
Dual In-line Package
Pin 6-98
1
2
3
MM1319AFBE
1
2
3
10
7
6
5
4
STV5112
TDA7481
1
2
3
1
15
– 110 –
TRANSISTOR
DTA114EK-T146
DTC114EK
DTC114EKA
2SA1162-G
2SC2712-YG
2SC4973
2SD2114K
C
B
E
DTC144ESA
2SA1175-HFE
2SC2785-HFE
LETTER SIDE
E
C
B
IRF614
G
D
S
2SAS1091-0
E
C
B
2SA1837
2SD2394-EF
B
C
E
2SB734-34
2SD774-34
E
C
B
2SC3840
LETTER SIDE
E
C
B
2SC4927-01
D1
G1
S1
NC
S2
G2
2SD2144S-UWM
E
C
B
2SK2845-LB102
C
B
C
E
DIODE
AK04V1
AU01ZV1
EGP20G
EL1Z
ERA2208
GP08S
ERC04-06SE
S2LA20F
CATHODE
RD9.1ES-L2
NOTE:
• Items with no part number and no
description are not stocked because they
are seldom required for routine service.
EXPLODED VIEWS
HSS83TD
RD33EB3T
RGP02-17EL-6433
ANODE
6-1. PICTURE TUBE
CATHODE
D2
ANODE
DAP202K
CATHODE
FMUG26S
1
1
2
3
2
3
RU-1P
CATHODE
ANODE
SPB-26MVWF
MA111
RD10S-B
RD5.1SB-T2
RD5.6S-B
ANODE
D1N20R
D1US4
1SS119-25
RD11ES-B3
RD20ES-B2
RD9.1S-B
ANODE
CATHODE
ANODE
(GRN)
CATHODE
ANODE
(RED)
RD30ES-B2
RD39ES-B2
RD6.8ES-B1
11SQS04
D4SB60L
D5LC20U
CATHODE
ANODE
1
2
3
1
2
3
ON3171-R
4
3
1
2
4
1
3
2
RD155B2
1
1
RD3.3M-B2
RD5.6M-B2
02CZ6.2-TE85L
2
1
2
1
2
2
REF. NO. PART NO. DESCRIPTION REMARK
------------ ------------- ------------------- ------------ 1 X-4036-044-4 DOOR ASSY, CONTROL (EF34M61/EF34M91)
2 4-047-464-01 CATCHER, PUSH
3 4-045-250-21 DUMPER
4 4-062-942-01 BUTTON, POWER
5 4-036-405-01 SPRING, COMPRESSION
3
3
6 X-4036-045-1 BEZNET ASSY (EF34M61/EF34M91) 3-6
7 1-505-474-11 SPEAKER (5CM)
8 X-4035-873-4 HANDLE ASSY (LEFT)
9 X-4035-874-4 HANDLE ASSY (RIGHT)
10 *4-062-943-01 HOLDER, TOP SWITCH
11 1-771-360-11 SWITCH, TOP
12 ! 8-735-050-05 PICTURE TUBE (A80LPD80X) (EF34M61)
13 4-387-204-01 NUT, SPECIAL, CRT
14 1-526-981-71 CAP ASSY, HIGH-VOLTAGE
15 4-046-600-01 SPACER, DY
7-685-648-79 +BVTP 3X12
7-685-663-71 +BVTP 4X16
X-4036-266-1 DOOR ASSY, CONTROL (EF34M31)
X-4036-265-4 DOOR ASSY, CONTROL (EF34M80 )
X-4036-265-1 DOOR ASSY, CONTROL (EF34M90)
X-4036-270-1 BEZNET ASSY (EF34M31)
X-4036-268-1 BEZNET ASSY (EF34M80)
X-4036-269-1 BEZNET ASSY (EF34M90)
! 8-735-049-05 PICTURE TUBE (A80LPD80X)
! 8-735-055-05 PICTURE TUBE (A80LPD80X) (EF34M90(JE))
(except EF34M61/EF34M90(JE))
– 111 –
RM-951
SECTION 6
• The construction parts of an assembled
part are indicated with a collation number
in the remark column.
• Items marked " * " are not stocked since
they are seldom required for routine
service. Some delay should be
anticipated when ordering these items.
REF. NO. PART NO. DESCRIPTION REMARK
------------ ------------- ------------------- ------------16 ! 8-451-499-11 DEFLECTION YOKE (Y34RSN)
17 1-452-896-61 COIL, NA ROTATION (RT-200)
18 ! 8-453-007-31 NECK ASSEMBLY NA324-M3
19 *A-1342-440-A VM2 BOARD, COMPLETE
20 4-065-852-01 SPRING, EXTENSION
21 4-067-087-01 HOLDER (C), DGC
22 *A-1331-868-A C BOARD, COMPLETE
23 ! 1-416-757-11 COIL, DEMAGNETIC
24 4-067-221-01 CLIP, DGC
25 *4-062-938-02 SUPPORTER, CRT
26 4-067-455-01 BAND, DEGAUSSING COIL
27 4-066-040-01 COVER, REAR
28 *4-062-939-02 GUIDE, LIGHT
29 4-067-447-01 SHEET, BLOTTING
30 4-374-745-12 CUSHION (A)
31 4-066-041-01 DUCT, SPEAKER
32 4-064-929-02 SCREW, TP+TWH 4X25
33 1-505-473-11 SPEAKER (12CM)
34 4-051-734-12 PIECE B (120), CONV. CORRECT
4-051-734-22 PIECE B (120), CONV. CORRECT
35 1-452-094-00 CIRCULAR DISC MAGNET B
36 1-452-032-00 MAGNET, DISC ; 10mmø
37 2-163-920-11 PLATE, CORRECTION, TLV
38 1-416-871-03 COIL, LANDING CORRECTION
– 112 –
The components identified by
shading and mark ! are critical for safety.
Replace only with part number
specified.
Les composants identifies par
une trame et une marque !
sont critiques pour la securite.
Ne les remplacer que par une
piece portant le numero specifie.
Page 67
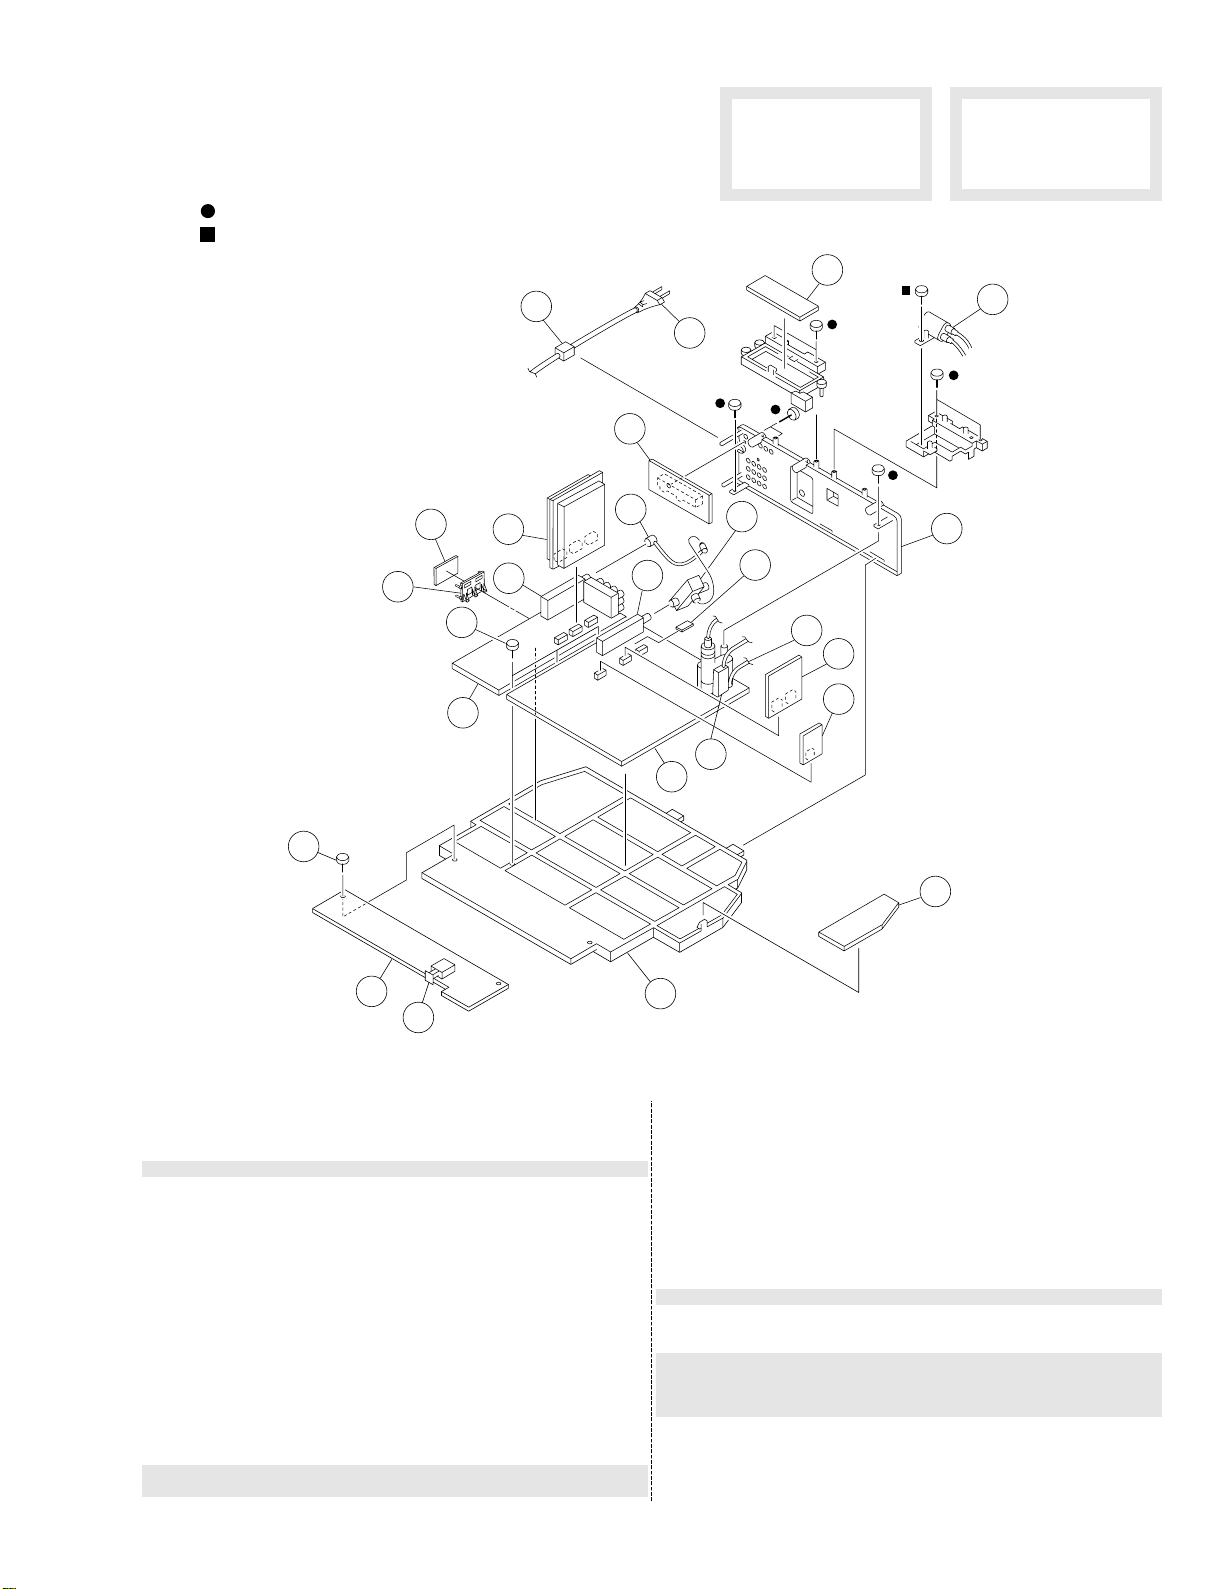
KV-EF34M31/EF34M61/EF34M80/EF34M90/EF34M91
RM-951
6-2. CHASSIS
7-685-648-79 +BVTP 3X12
7-685-663-71 +BVTP 4X16
76
75
51
54
55
73
57
58
59
Les composants identifies par
une trame et une marque !
sont critiques pour la securite.
Ne les remplacer que par une
piece portant le numero specifie.
74
60
69
63
70
68
The components identified by
shading and mark ! are critical for safety.
Replace only with part number
specified.
71
72
56
51
52
53
REF. NO. PART NO. DESCRIPTION REMARK
------------ ------------- ------------------- ------------51 4-046-797-01 SCREW (3X12), +BVTAP
52 *A-1372-556-A H1 BOARD, COMPLETE
53 ! 1-571-433-21 SWITCH, PUSH (AC POWER)
54 *A-1195-148-A P BOARD, COMPLETE
55 8-598-450-00 TUNER, FSS BTF-LG434
56 *A-1135-971-A B BOARD, COMPLETE
57 *A-1388-226-A J1 BOARD, COMPLETE
58 *1-555-110-00 CABLE, P-P
59 8-598-452-00 TUNER, FSS BTF-WG442 (except EF34M80)
60 1-251-658-21 SPLITTER RF
63 1-900-241-30 LEAD ASSY, G2 (except EF34M31)
64 *A-1298-745-A A BOARD, COMPLETE (EF34M61)
65 ! X-4036-321-1 TRANSFORMER ASSY, FLYBACK
8-598-450-00 S TUNER, FSS BTF-LG434 (EF34M80)
1-900-243-56 LEAD ASSY, G2 (EF34M31)
* A-1298-757-A A BOARD, COMPLETE (EF34M80)
* A-1298-756-A A BOARD, COMPLETE (EF34M91)
* A-1298-765-A A BOARD, COMPLETE (EF34M90 (JE))
* A-1298-764-A A BOARD, COMPLETE (EF34M90 (HK))
* A-1298-766-A A BOARD, COMPLETE (EF34M31)
(NX-4009//J1A4)
77
65
64
67
66
REF. NO. PART NO. DESCRIPTION REMARK
------------ ------------- ------------------- ------------66 *4-066-681-02 BRACKET, MAIN
67 *A-1343-584-A D2 BOARD, COMPLETE
68 *A-1342-452-A V1 BOARD, COMPLETE
69 *A-1131-391-A B4 BOARD, COMPLETE
70 *A-1343-609-A DH BOARD, COMPLETE (EF34M61)
* A-1343-585-A DH BOARD, COMPLETE
* A-1343-610-A DH BOARD, COMPLETE (EF34M31)
71 ! 1-467-525-22 CAP. BLOCK, HIGH-VOLTAGE
72 4-066-684-04 BRACKET, TERMINAL
73 4-022-115-00 HOLDER, AC CORD (EF34M91)
74 ! 1-574-062-12 CORD, POWER (WITH CONNECTOR)
! 1-769-609-21 CORD, POWER (WITH CONNECTOR)
75 *A-1241-340-A F BOARD, COMPLETE
76 *4-066-683-02 HOLDER, PWB
77 8-742-166-00 IC, SBX3005-01
(EF34M31/EF34M61/EF34M91)
(except EF34M31/EF34M61)
2.5A/250V (except EF34M90(HK))
(EF34M90(HK)
– 113 –
Page 68
KV -EF34M31/EF34M61/EF34M80/EF34M90/EF34M91
RM-951
SECTION 7
B
NOTE:
REF. NO. PART NO. DESCRIPTION REMARK
------------ ------------- ------------------- -------------
Les composants identifies par
une trame et une marque !
sont critiques pour la securite.
Ne les remplacer que par une
piece portant le numero specifie.
The components identified by
shading and mark ! are critical for safety.
Replace only with part number
specified.
• The components identified by in this manual have been
carefully factory-selected for each set in order to satisfy
regulations regarding X-ray radiation. Should replacement
be required, replace only with the value originally used.
• Items marked " * " are not stocked since they are seldom
required for routine service. Some delay should be
anticipated when ordering these items.
• All variable and adjustable resistors have characteristic
curve B, unless otherwise noted.
RESISTORS
• All resistors are in ohms
• F : nonflammable
ELECTRICAL PARTS LIST
Les composants identifies par
une trame et une marque !
sont critiques pour la securite.
Ne les remplacer que par une
piece portant le numero specifie.
------------------------------------------------------------------------------------------------------------------------------REF. NO. PART NO. DESCRIPTION REMARK
------------ ------------- ------------------- -------------
When indicating parts by reference number,
please include the board name.
• CAPACITORS
PF : µµ F
• There are some cases the reference number on one board
overlaps on the other board. Therefore, when ordering
parts by the reference number, please include the board
name.
The components identified by
shading and mark ! are criti-
cal for safety.
Replace only with part number
specified.
REF. NO. PART NO. DESCRIPTION REMARK
------------ ------------- ------------------- ------------*A-1135-971-A B BOARD, COMPLETE
*********************
4-382-854-11 SCREW (M3X10), P, SW (+)
<CAPACITOR>
C1201 1-107-725-11 CERAMIC CHIP 0.1MF 10% 16V
C1202 1-107-725-11 CERAMIC CHIP 0.1MF 10% 16V
C1203 1-164-505-11 CERAMIC CHIP 2.2MF 16V
C1204 1-115-419-11 CERAMIC CHIP 3300PF 5% 25V
C1205 1-115-419-11 CERAMIC CHIP 3300PF 5% 25V
C1206 1-126-965-11 ELECT 22MF 20% 50V
C1207 1-107-725-11 CERAMIC CHIP 0.1MF 10% 16V
C1208 1-126-023-11 ELECT 100MF 20% 16V
C1209 1-164-505-11 CERAMIC CHIP 2.2MF 16V
C1210 1-107-823-11 CERAMIC CHIP 0.47MF 10% 16V
C1211 1-164-492-11 CERAMIC CHIP 0.15MF 10% 16V
C1212 1-107-823-11 CERAMIC CHIP 0.47MF 10% 16V
C1213 1-164-492-11 CERAMIC CHIP 0.15MF 10% 16V
C1214 1-126-055-11 ELECT 470MF 20% 50V
C1215 1-126-055-11 ELECT 470MF 20% 50V
C1219 1-126-961-11 ELECT 2.2MF 20% 50V
C1220 1-126-961-11 ELECT 2.2MF 20% 50V
C1221 1-126-933-11 ELECT 100MF 20% 16V
C1222 1-136-171-00 FILM 0.33MF 5% 50V
C1223 1-163-989-11 CERAMIC CHIP 0.033MF 10% 25V
C1224 1-164-346-11 CERAMIC CHIP 1MF 16V
C1225 1-164-005-11 CERAMIC CHIP 0.47MF 25V
C1226 1-163-243-11 CERAMIC CHIP 47PF 5% 50V
C1227 1-126-963-11 ELECT 4.7MF 20% 50V
C1228 1-163-251-11 CERAMIC CHIP 100PF 5% 50V
C1229 1-164-346-11 CERAMIC CHIP 1MF 16V
C1231 1-126-964-11 ELECT 10MF 20% 50V
C1232 1-126-022-11 ELECT 47MF 20% 16V
C1233 1-163-251-11 CERAMIC CHIP 100PF 5% 50V
C1234 1-164-346-11 CERAMIC CHIP 1MF 16V
C1235 1-163-243-11 CERAMIC CHIP 47PF 5% 50V
C1236 1-126-963-11 ELECT 4.7MF 20% 50V
C1237 1-164-346-11 CERAMIC CHIP 1MF 16V
C1238 1-164-005-11 CERAMIC CHIP 0.47MF 25V
C1239 1-136-171-00 FILM 0.33MF 5% 50V
C1240 1-163-989-11 CERAMIC CHIP 0.033MF 10% 25V
C1241 1-115-339-11 CERAMIC CHIP 0.1MF 10% 50V
C1242 1-163-275-11 CERAMIC CHIP 0.001MF 5% 50V
C1243 1-115-339-11 CERAMIC CHIP 0.1MF 10% 50V
C1244 1-110-617-51 ELECT 2200MF 20% 50V
C1245 1-115-339-11 CERAMIC CHIP 0.1MF 10% 50V
C1246 1-107-823-11 CERAMIC CHIP 0.47MF 10% 16V
C1247 1-163-275-11 CERAMIC CHIP 0.001MF 5% 50V
C1248 1-110-617-51 ELECT 2200MF 20% 50V
C1251 1-163-017-00 CERAMIC CHIP 0.0047MF 10% 50V
C1252 1-163-251-11 CERAMIC CHIP 100PF 5% 50V
C1253 1-115-339-11 CERAMIC CHIP 0.1MF 10% 50V
REF. NO. PART NO. DESCRIPTION REMARK
------------ ------------- ------------------- -------------
C1254 1-136-177-00 FILM 1MF 5% 50V
C1255 1-163-009-11 CERAMIC CHIP 0.001MF 10% 50V
C1256 1-127-682-51 ELECT MELF 2200MF 20% 25V
C1258 1-115-339-11 CERAMIC CHIP 0.1MF 10% 50V
C1259 1-115-339-11 CERAMIC CHIP 0.1MF 10% 50V
C1260 1-107-823-11 CERAMIC CHIP 0.47MF 10% 16V
C1263 1-163-017-00 CERAMIC CHIP 0.0047MF 10% 50V
C1264 1-163-251-11 CERAMIC CHIP 100PF 5% 50V
C1265 1-115-339-11 CERAMIC CHIP 0.1MF 10% 50V
C1266 1-136-177-00 FILM 1MF 5% 50V
C1267 1-163-009-11 CERAMIC CHIP 0.001MF 10% 50V
C1268 1-127-682-51 ELECT MELF 2200MF 20% 25V
C1270 1-163-007-11 CERAMIC CHIP 680PF 10% 50V
C1271 1-163-007-11 CERAMIC CHIP 680PF 10% 50V
C1273 1-163-275-11 CERAMIC CHIP 0.001MF 5% 50V
C1274 1-163-275-11 CERAMIC CHIP 0.001MF 5% 50V
-------------------------------------------------------------------------------------------------------------------------------
C1275 1-163-007-11 CERAMIC CHIP 680PF 10% 50V
C1276 1-163-007-11 CERAMIC CHIP 680PF 10% 50V
C1277 1-164-690-91 CERAMIC CHIP 0.0022MF 5% 50V
C1279 1-164-690-91 CERAMIC CHIP 0.0022MF 5% 50V
C1281 1-115-339-11 CERAMIC CHIP 0.1MF 10% 50V
C1282 1-115-339-11 CERAMIC CHIP 0.1MF 10% 50V
C1283 1-164-690-91 CERAMIC CHIP 0.0022MF 5% 50V
C1284 1-164-690-91 CERAMIC CHIP 0.0022MF 5% 50V
C1301 1-126-967-11 ELECT 47MF 20% 50V
C1303 1-163-243-11 CERAMIC CHIP 47PF 5% 50V
C1304 1-163-243-11 CERAMIC CHIP 47PF 5% 50V
C1305 1-163-243-11 CERAMIC CHIP 47PF 5% 50V
C1306 1-163-233-11 CERAMIC CHIP 18PF 5% 50V
C1307 1-126-933-11 ELECT 100MF 20% 16V
C1308 1-163-038-91 CERAMIC CHIP 0.1MF 25V
C1309 1-126-963-11 ELECT 4.7MF 20% 50V
C1310 1-163-038-91 CERAMIC CHIP 0.1MF 25V
C1311 1-163-233-11 CERAMIC CHIP 18PF 5% 50V
C1312 1-163-038-91 CERAMIC CHIP 0.1MF 25V
C1313 1-126-964-11 ELECT 10MF 20% 50V
C1314 1-126-957-11 ELECT 0.22MF 20% 50V
C1315 1-163-259-91 CERAMIC CHIP 220PF 5% 50V
C1316 1-126-963-11 ELECT 4.7MF 20% 50V
C1317 1-126-933-11 ELECT 100MF 20% 16V
C1318 1-107-725-11 CERAMIC CHIP 0.1MF 10% 16V
C1319 1-163-038-91 CERAMIC CHIP 0.1MF 25V
C1320 1-163-038-91 CERAMIC CHIP 0.1MF 25V
C1321 1-163-038-91 CERAMIC CHIP 0.1MF 25V
C1323 1-126-967-11 ELECT 47MF 20% 50V
C1324 1-126-967-11 ELECT 47MF 20% 50V
C1325 1-163-038-91 CERAMIC CHIP 0.1MF 25V
C1326 1-126-933-11 ELECT 100MF 20% 16V
C1327 1-107-725-11 CERAMIC CHIP 0.1MF 10% 16V
------------------ C1328 1-104-665-11 ELECT 100MF 20% 25V
C1329 1-163-038-91 CERAMIC CHIP 0.1MF 25V
C1330 1-126-965-11 ELECT 22MF 20% 50V
C1331 1-163-038-91 CERAMIC CHIP 0.1MF 25V
– 114 –
Page 69

The components identified by
shading and mark ! are criti-
cal for safety.
Replace only with part number
specified.
REF. NO. PART NO. DESCRIPTION REMARK
------------ ------------- ------------------- ------------ C1332 1-126-960-11 ELECT 1MF 20% 50V
C1333 1-126-933-11 ELECT 100MF 20% 16V
C1334 1-126-933-11 ELECT 100MF 20% 16V
C1335 1-163-017-00 CERAMIC CHIP 0.0047MF 10% 50V
C1336 1-163-038-91 CERAMIC CHIP 0.1MF 25V
C1337 1-163-038-91 CERAMIC CHIP 0.1MF 25V
C1342 1-164-005-11 CERAMIC CHIP 0.47MF 25V
C1345 1-163-038-91 CERAMIC CHIP 0.1MF 25V
C1350 1-163-243-11 CERAMIC CHIP 47PF 5% 50V
C1352 1-164-005-11 CERAMIC CHIP 0.47MF 25V
C1353 1-163-038-91 CERAMIC CHIP 0.1MF 25V
C1354 1-163-038-91 CERAMIC CHIP 0.1MF 25V
C1356 1-126-768-11 ELECT 2200MF 20% 16V
C1358 1-164-690-91 CERAMIC CHIP 0.0022MF 5% 50V
C1359 1-164-005-11 CERAMIC CHIP 0.47MF 25V
C1360 1-164-005-11 CERAMIC CHIP 0.47MF 25V
C3301 1-104-664-11 ELECT 47MF 20% 25V
C3302 1-163-038-91 CERAMIC CHIP 0.1MF 25V
C3303 1-104-664-11 ELECT 47MF 20% 25V
C3304 1-164-004-11 CERAMIC CHIP 0.1MF 10% 25V
C3306 1-163-251-11 CERAMIC CHIP 100PF 5% 50V
C3307 1-126-933-11 ELECT 100MF 20% 16V
C3308 1-126-964-11 ELECT 10MF 20% 50V
C3310 1-126-964-11 ELECT 10MF 20% 50V
C3312 1-104-664-11 ELECT 47MF 20% 25V
C3313 1-126-935-11 ELECT 470MF 20% 16V
C3314 1-164-346-11 CERAMIC CHIP 1MF 16V
C3315 1-104-664-11 ELECT 47MF 20% 25V
C3316 1-164-346-11 CERAMIC CHIP 1MF 16V
C3317 1-104-664-11 ELECT 47MF 20% 25V
C3318 1-163-031-11 CERAMIC CHIP 0.01MF 50V
C3319 1-163-251-11 CERAMIC CHIP 100PF 5% 50V
C3320 1-164-004-11 CERAMIC CHIP 0.1MF 10% 25V
C3322 1-164-346-11 CERAMIC CHIP 1MF 16V
C3323 1-164-346-11 CERAMIC CHIP 1MF 16V
C3324 1-163-251-11 CERAMIC CHIP 100PF 5% 50V
C3325 1-164-346-11 CERAMIC CHIP 1MF 16V
C3326 1-164-346-11 CERAMIC CHIP 1MF 16V
C3327 1-163-251-11 CERAMIC CHIP 100PF 5% 50V
C3328 1-164-004-11 CERAMIC CHIP 0.1MF 10% 25V
C3329 1-126-966-11 ELECT 33MF 20% 50V
C3330 1-107-725-11 CERAMIC CHIP 0.1MF 10% 16V
C3331 1-126-933-11 ELECT 100MF 20% 16V
C3332 1-104-664-11 ELECT 47MF 20% 25V
C3333 1-164-004-11 CERAMIC CHIP 0.1MF 10% 25V
C3334 1-163-133-00 CERAMIC CHIP 470PF 5% 50V
C3335 1-163-038-91 CERAMIC CHIP 0.1MF 25V
C3336 1-126-933-11 ELECT 100MF 20% 16V
C3338 1-163-005-11 CERAMIC CHIP 470PF 10% 50V
C3339 1-163-133-00 CERAMIC CHIP 470PF 5% 50V
C3340 1-163-133-00 CERAMIC CHIP 470PF 5% 50V
C3341 1-163-133-00 CERAMIC CHIP 470PF 5% 50V
C3342 1-163-133-00 CERAMIC CHIP 470PF 5% 50V
C3343 1-163-133-00 CERAMIC CHIP 470PF 5% 50V
C3344 1-164-005-11 CERAMIC CHIP 0.47MF 25V
C3345 1-163-133-00 CERAMIC CHIP 470PF 5% 50V
C3346 1-163-133-00 CERAMIC CHIP 470PF 5% 50V
C3347 1-126-964-11 ELECT 10MF 20% 50V
C3348 1-164-005-11 CERAMIC CHIP 0.47MF 25V
C3349 1-126-933-11 ELECT 100MF 20% 16V
C3350 1-163-005-11 CERAMIC CHIP 470PF 10% 50V
C3351 1-163-005-11 CERAMIC CHIP 470PF 10% 50V
C3352 1-163-005-11 CERAMIC CHIP 470PF 10% 50V
C3353 1-126-933-11 ELECT 100MF 20% 16V
C3354 1-126-967-11 ELECT 47MF 20% 50V
C3355 1-126-967-11 ELECT 47MF 20% 50V
C3356 1-163-037-11 CERAMIC CHIP 0.022MF 10% 50V
C3357 1-163-037-11 CERAMIC CHIP 0.022MF 10% 50V
C3358 1-163-009-11 CERAMIC CHIP 0.001MF 10% 50V
Les composants identifies par
une trame et une marque !
sont critiques pour la securite.
Ne les remplacer que par une
piece portant le numero specifie.
KV -EF34M31/EF34M61/EF34M80/EF34M90/EF34M91
RM-951
B
------------------------------------------------------------------------------------------------------------------------------REF. NO. PART NO. DESCRIPTION REMARK
------------ ------------- ------------------- ------------ C3360 1-104-664-11 ELECT 47MF 20% 25V
C3361 1-126-964-11 ELECT 10MF 20% 50V
C3362 1-126-964-11 ELECT 10MF 20% 50V
C3363 1-104-664-11 ELECT 47MF 20% 25V
C3364 1-126-964-11 ELECT 10MF 20% 50V
C3365 1-126-964-11 ELECT 10MF 20% 50V
C3370 1-164-346-11 CERAMIC CHIP 1MF 16V
C3372 1-163-038-91 CERAMIC CHIP 0.1MF 25V
C3373 1-126-964-11 ELECT 10MF 20% 50V
C3374 1-126-964-11 ELECT 10MF 20% 50V
C3375 1-126-964-11 ELECT 10MF 20% 50V
C3379 1-164-004-11 CERAMIC CHIP 0.1MF 10% 25V
C3380 1-164-004-11 CERAMIC CHIP 0.1MF 10% 25V
C5201 1-107-725-11 CERAMIC CHIP 0.1MF 10% 16V
C5202 1-126-967-11 ELECT 47MF 20% 50V
C5203 1-126-963-11 ELECT 4.7MF 20% 50V
C5204 1-107-725-11 CERAMIC CHIP 0.1MF 10% 16V
C5205 1-127-532-11 ELECT 47MF 20% 6.3V
C5206 1-126-967-11 ELECT 47MF 20% 50V
C5207 1-127-532-11 ELECT 47MF 20% 6.3V
C5208 1-126-967-11 ELECT 47MF 20% 50V
C5209 1-107-725-11 CERAMIC CHIP 0.1MF 10% 16V
C5210 1-126-963-11 ELECT 4.7MF 20% 50V
C5211 1-164-690-91 CERAMIC CHIP 0.0022MF 5% 50V
C5212 1-164-690-91 CERAMIC CHIP 0.0022MF 5% 50V
C5213 1-163-227-11 CERAMIC CHIP 10PF 0.5PF 50V
C5214 1-163-275-11 CERAMIC CHIP 0.001MF 5% 50V
C5215 1-163-243-11 CERAMIC CHIP 47PF 5% 50V
C5216 1-107-725-11 CERAMIC CHIP 0.1MF 10% 16V
C5217 1-126-967-11 ELECT 47MF 20% 50V
C5218 1-126-967-11 ELECT 47MF 20% 50V
------------------------------------------------------------------------------------------------------------------------------ C5219 1-107-725-11 CERAMIC CHIP 0.1MF 10% 16V
C5220 1-107-725-11 CERAMIC CHIP 0.1MF 10% 16V
C5221 1-127-532-11 ELECT 47MF 20% 6.3V
C5223 1-164-690-91 CERAMIC CHIP 0.0022MF 5% 50V
C5224 1-164-690-91 CERAMIC CHIP 0.0022MF 5% 50V
C5225 1-126-963-11 ELECT 4.7MF 20% 50V
C5226 1-126-963-11 ELECT 4.7MF 20% 50V
C5227 1-107-725-11 CERAMIC CHIP 0.1MF 10% 16V
C5228 1-107-725-11 CERAMIC CHIP 0.1MF 10% 16V
C5229 1-107-725-11 CERAMIC CHIP 0.1MF 10% 16V
C5230 1-126-967-11 ELECT 47MF 20% 50V
C5231 1-107-725-11 CERAMIC CHIP 0.1MF 10% 16V
C5232 1-107-725-11 CERAMIC CHIP 0.1MF 10% 16V
C5233 1-126-960-11 ELECT 1MF 20% 50V
C5234 1-107-725-11 CERAMIC CHIP 0.1MF 10% 16V
C5235 1-107-725-11 CERAMIC CHIP 0.1MF 10% 16V
C5237 1-126-933-11 ELECT 100MF 20% 16V
C5238 1-107-725-11 CERAMIC CHIP 0.1MF 10% 16V
C5239 1-107-725-11 CERAMIC CHIP 0.1MF 10% 16V
C5240 1-126-933-11 ELECT 100MF 20% 16V
C5241 1-126-933-11 ELECT 100MF 20% 16V
C5242 1-164-346-11 CERAMIC CHIP 1MF 16V
C5243 1-164-346-11 CERAMIC CHIP 1MF 16V
C5247 1-107-823-11 CERAMIC CHIP 0.47MF 10% 16V
C5248 1-107-823-11 CERAMIC CHIP 0.47MF 10% 16V
C5249 1-164-690-91 CERAMIC CHIP 0.0022MF 5% 50V
C5300 1-164-005-11 CERAMIC CHIP 0.47MF 25V
C5302 1-164-005-11 CERAMIC CHIP 0.47MF 25V
C5304 1-164-005-11 CERAMIC CHIP 0.47MF 25V
C5306 1-164-005-11 CERAMIC CHIP 0.47MF 25V
C5308 1-164-004-11 CERAMIC CHIP 0.1MF 10% 25V
C5309 1-164-346-11 CERAMIC CHIP 1MF 16V
C5310 1-164-346-11 CERAMIC CHIP 1MF 16V
------------------ C5311 1-164-346-11 CERAMIC CHIP 1MF 16V
C5312 1-164-346-11 CERAMIC CHIP 1MF 16V
C5313 1-164-346-11 CERAMIC CHIP 1MF 16V
C5314 1-164-346-11 CERAMIC CHIP 1MF 16V
– 115 –
Page 70

KV -EF34M31/EF34M61/EF34M80/EF34M90/EF34M91
RM-951
B
REF. NO. PART NO. DESCRIPTION REMARK
------------ ------------- ------------------- ------------ C5315 1-163-243-11 CERAMIC CHIP 47PF 5% 50V
C5317 1-164-005-11 CERAMIC CHIP 0.47MF 25V
C5318 1-126-967-11 ELECT 47MF 20% 50V
C5319 1-163-249-11 CERAMIC CHIP 82PF 5% 50V
C5320 1-163-249-11 CERAMIC CHIP 82PF 5% 50V
C5322 1-164-005-11 CERAMIC CHIP 0.47MF 25V
C5323 1-163-121-00 CERAMIC CHIP 150PF 5% 50V
C5324 1-163-113-00 CERAMIC CHIP 68PF 5% 50V
C5325 1-163-249-11 CERAMIC CHIP 82PF 5% 50V
C5326 1-163-249-11 CERAMIC CHIP 82PF 5% 50V
C5328 1-164-005-11 CERAMIC CHIP 0.47MF 25V
C5329 1-163-121-00 CERAMIC CHIP 150PF 5% 50V
C5330 1-163-113-00 CERAMIC CHIP 68PF 5% 50V
C5331 1-104-760-11 CERAMIC CHIP 0.047MF 10% 50V
C5332 1-163-259-91 CERAMIC CHIP 220PF 5% 50V
<CONNECTOR>
CN1201 * 1-564-506-11 PLUG, CONNECTOR 3P
CN1204 * 1-564-507-11 PLUG, CONNECTOR 4P
CN1205 * 1-564-507-11 PLUG, CONNECTOR 4P
CN1301 * 1-564-506-11 PLUG, CONNECTOR 3P
CN1303 * 1-564-511-11 PLUG, CONNECTOR 8P
CN1304 * 1-779-891-11 CONNECTOR, BOARD TO BOARD 8P
CN1305 * 1-779-892-11 CONNECTOR, BOARD TO BOARD 10P
CN1306 * 1-779-892-11 CONNECTOR, BOARD TO BOARD 10P
CN1307 * 1-779-891-11 CONNECTOR, BOARD TO BOARD 8P
CN1308 * 1-573-296-21 CONNECTOR, BOARD TO BOARD 10P
CN1309 1-764-818-11 CONNECTOR, BOARD TO BOARD 10P
CN1310 1-764-820-11 CONNECTOR, BOARD TO BOARD 12P
CN1311 * 1-564-506-11 PLUG, CONNECTOR 3P
CN1312 * 1-508-784-21 PIN, CONNECTOR (5mm PITCH) 1P
CN1313 * 1-564-509-11 PLUG, CONNECTOR 6P
<DIODE>
D1201 8-719-404-49 DIODE MA111
D1202 8-719-404-49 DIODE MA111
D1203 8-719-404-49 DIODE MA111
D1204 8-719-404-49 DIODE MA111
D1205 8-719-158-35 DIODE RD9.1SB
D1302 8-719-404-49 DIODE MA111
D1306 8-719-908-03 DIODE GP08D
D3301 8-719-158-35 DIODE RD9.1SB
D3302 8-719-158-35 DIODE RD9.1SB
D3303 8-719-158-35 DIODE RD9.1SB
D3304 8-719-158-35 DIODE RD9.1SB
D3305 8-719-158-35 DIODE RD9.1SB
D3306 8-719-158-35 DIODE RD9.1SB
D3307 8-719-158-35 DIODE RD9.1SB
D3308 8-719-158-35 DIODE RD9.1SB
D3309 8-719-158-35 DIODE RD9.1SB
D3310 8-719-158-35 DIODE RD9.1SB
D3311 8-719-158-35 DIODE RD9.1SB
D3312 8-719-158-35 DIODE RD9.1SB
<FERRITE BEAD>
FB1205 1-410-397-21 FERRITE 1.1UH
FB1206 1-410-397-21 FERRITE 1.1UH
FB1207 1-410-397-21 FERRITE 1.1UH
FB1208 1-410-397-21 FERRITE 1.1UH
FB5201 1-410-397-21 FERRITE 1.1UH
FB5202 1-414-598-11 INDUCTOR CHIP 0UH
FB5203 1-414-598-11 INDUCTOR CHIP 0UH
FB5204 1-414-598-11 INDUCTOR CHIP 0UH
FB5205 1-414-598-11 INDUCTOR CHIP 0UH
FB5206 1-414-598-11 INDUCTOR CHIP 0UH
FB5207 1-414-598-11 INDUCTOR CHIP 0UH
Les composants identifies par
une trame et une marque !
sont critiques pour la securite.
Ne les remplacer que par une
piece portant le numero specifie.
------------------------------------------------------------------------------------------------------------------------------REF. NO. PART NO. DESCRIPTION REMARK
------------ ------------- ------------------- ------------ FB5208 1-414-598-11 INDUCTOR CHIP 0UH
FB5209 1-414-598-11 INDUCTOR CHIP 0UH
<FILTER>
FL5201 1-239-803-11 ENCAPSULATED COMPONENT
<IC>
IC1201 8-759-273-12 IC TDA7315D013TR
IC1202 8-759-100-96 IC uPC4558G2
IC1203 8-759-553-45 IC TDA7481
IC1204 8-759-553-45 IC TDA7481
IC1301 8-752-088-39 IC CXA2130S
IC1302 8-759-542-15 IC TDA9178
IC1303 8-759-231-53 IC TA7805S
IC1304 8-759-445-59 IC BA033T
IC1305 8-759-701-59 IC NJM78M09FA
IC1307 8-759-278-95 IC BA7606F
IC1308 8-759-439-64 IC HEF4053BT
IC1309 8-759-439-64 IC HEF4053BT
IC1310 8-759-450-47 IC BA05T
IC1311 8-759-337-26 IC MM1115XFBE
IC3302 8-759-100-96 IC uPC4558G2
IC3303 8-752-068-46 IC CXA1855S
IC5201 8-759-549-74 IC TC9447F-003
IC5202 8-759-042-02 IC S-80743AL-A7-S
IC5203 8-759-358-38 IC NJM78M05DLA(TE1)
IC5204 8-759-100-96 IC uPC4558G2
------------------------------------------------------------------------------------------------------------------------------ J3301 1-784-646-11 TERMINAL, S
J3302 1-778-387-11 JACK BLOCK, PIN 12P
JR1205 1-216-295-91 SHORT 0
JR1206 1-216-295-91 SHORT 0
JR1207 1-216-295-91 SHORT 0
JR1208 1-216-295-91 SHORT 0
JR1209 1-216-295-91 SHORT 0
JR1301 1-216-295-91 SHORT 0
JR1305 1-216-295-91 SHORT 0
JR1311 1-216-295-91 SHORT 0
JR5203 1-216-295-91 SHORT 0
L1201 1-414-187-11 INDUCTOR 47UH
L1202 1-416-857-11 INDUCTOR 65UH
L1203 1-416-857-11 INDUCTOR 65UH
L1301 1-414-189-31 INDUCTOR 100UH
L1302 1-412-537-31 INDUCTOR 100UH
L1303 1-414-185-41 INDUCTOR 22UH
L1304 1-412-537-31 INDUCTOR 100UH
L1305 1-414-186-31 INDUCTOR 33UH
L1306 1-414-857-11 INDUCTOR 100UH
L1307 1-414-187-11 INDUCTOR 47UH
L1308 1-414-187-11 INDUCTOR 47UH
L1309 1-414-857-11 INDUCTOR 100UH
L1310 1-414-187-11 INDUCTOR 47UH
L1311 1-414-187-11 INDUCTOR 47UH
L1312 1-414-856-11 INDUCTOR 10UH
L1313 1-414-856-11 INDUCTOR 10UH
------------------ L1314 1-414-856-11 INDUCTOR 10UH
L3302 1-414-856-11 INDUCTOR 10UH
L3303 1-414-856-11 INDUCTOR 10UH
L3304 1-414-856-11 INDUCTOR 10UH
<JACK>
<CHIP CONDUCTOR>
<COIL>
The components identified by
shading and mark ! are criti-
cal for safety.
Replace only with part number
specified.
– 116 –
Page 71

The components identified by
shading and mark ! are criti-
cal for safety.
Replace only with part number
specified.
REF. NO. PART NO. DESCRIPTION REMARK
------------ ------------- ------------------- ------------ L3305 1-414-856-11 INDUCTOR 10UH
L3306 1-414-856-11 INDUCTOR 10UH
L5201 1-408-595-31 INDUCTOR 2.2UH
PS1201 1-532-686-21 LINK, IC 2.7A/150V
PS1202 1-532-686-21 LINK, IC 2.7A/150V
PS1203 1-532-686-21 LINK, IC 2.7A/150V
PS1204 1-532-686-21 LINK, IC 2.7A/150V
Q1201 8-729-224-62 TRANSISTOR 2SK246-GR
Q1202 8-729-230-49 TRANSISTOR 2SC2712-YG
Q1203 8-729-230-49 TRANSISTOR 2SC2712-YG
Q1204 8-729-224-62 TRANSISTOR 2SK246-GR
Q1205 1-801-806-11 TRANSISTOR DTC144EKA-T146
Q1206 8-729-230-49 TRANSISTOR 2SC2712-YG
Q1207 8-729-230-49 TRANSISTOR 2SC2712-YG
Q1301 8-729-230-49 TRANSISTOR 2SC2712-YG
Q1302 8-729-216-22 TRANSISTOR 2SA1162-G
Q1303 8-729-230-49 TRANSISTOR 2SC2712-YG
Q1304 8-729-230-49 TRANSISTOR 2SC2712-YG
Q1305 8-729-230-49 TRANSISTOR 2SC2712-YG
Q1306 8-729-230-49 TRANSISTOR 2SC2712-YG
Q1307 8-729-216-22 TRANSISTOR 2SA1162-G
Q1308 8-729-230-49 TRANSISTOR 2SC2712-YG
Q1309 8-729-230-49 TRANSISTOR 2SC2712-YG
Q1310 8-729-230-49 TRANSISTOR 2SC2712-YG
Q1311 8-729-216-22 TRANSISTOR 2SA1162-G
Q1313 8-729-230-49 TRANSISTOR 2SC2712-YG
Q1314 8-729-230-49 TRANSISTOR 2SC2712-YG
Q1315 8-729-230-49 TRANSISTOR 2SC2712-YG
Q1316 8-729-216-22 TRANSISTOR 2SA1162-G
Q1318 8-729-230-49 TRANSISTOR 2SC2712-YG
Q1320 8-729-230-49 TRANSISTOR 2SC2712-YG
Q1321 8-729-216-22 TRANSISTOR 2SA1162-G
Q1322 8-729-230-49 TRANSISTOR 2SC2712-YG
Q1323 8-729-216-22 TRANSISTOR 2SA1162-G
Q1324 8-729-230-49 TRANSISTOR 2SC2712-YG
Q1325 8-729-230-49 TRANSISTOR 2SC2712-YG
Q1326 8-729-230-49 TRANSISTOR 2SC2712-YG
Q1329 8-729-230-49 TRANSISTOR 2SC2712-YG
Q1332 8-729-216-22 TRANSISTOR 2SA1162-G
Q1340 8-729-230-49 TRANSISTOR 2SC2712-YG
Q1342 8-729-230-49 TRANSISTOR 2SC2712-YG
Q1343 1-801-806-11 TRANSISTOR DTC144EKA-T146
Q1344 1-801-806-11 TRANSISTOR DTC144EKA-T146
Q1345 8-729-230-49 TRANSISTOR 2SC2712-YG
Q3301 8-729-230-49 TRANSISTOR 2SC2712-YG
Q3302 8-729-216-22 TRANSISTOR 2SA1162-G
Q3303 8-729-230-49 TRANSISTOR 2SC2712-YG
Q3304 8-729-230-49 TRANSISTOR 2SC2712-YG
Q3305 8-729-230-49 TRANSISTOR 2SC2712-YG
Q3306 8-729-230-49 TRANSISTOR 2SC2712-YG
Q3307 8-729-216-22 TRANSISTOR 2SA1162-G
Q3308 8-729-230-49 TRANSISTOR 2SC2712-YG
Q3309 8-729-230-49 TRANSISTOR 2SC2712-YG
Q3310 8-729-230-49 TRANSISTOR 2SC2712-YG
Q3311 8-729-230-49 TRANSISTOR 2SC2712-YG
Q3312 8-729-230-49 TRANSISTOR 2SC2712-YG
Q3313 8-729-230-49 TRANSISTOR 2SC2712-YG
Q3314 8-729-230-49 TRANSISTOR 2SC2712-YG
Q3315 8-729-230-49 TRANSISTOR 2SC2712-YG
Q3316 8-729-216-22 TRANSISTOR 2SA1162-G
Q3321 1-801-806-11 TRANSISTOR DTC144EKA-T146
Q3322 1-801-806-11 TRANSISTOR DTC144EKA-T146
Q3325 1-801-806-11 TRANSISTOR DTC144EKA-T146
Les composants identifies par
une trame et une marque !
sont critiques pour la securite.
Ne les remplacer que par une
piece portant le numero specifie.
<IC LINK>
<TRANSISTOR>
KV -EF34M31/EF34M61/EF34M80/EF34M90/EF34M91
RM-951
B
------------------------------------------------------------------------------------------------------------------------------REF. NO. PART NO. DESCRIPTION REMARK
------------ ------------- ------------------- ------------ Q3326 8-729-230-49 TRANSISTOR 2SC2712-YG
Q5300 8-729-216-22 TRANSISTOR 2SA1162-G
Q5301 8-729-230-49 TRANSISTOR 2SC2712-YG
Q5302 8-729-230-49 TRANSISTOR 2SC2712-YG
Q5303 8-729-216-22 TRANSISTOR 2SA1162-G
Q5304 8-729-230-49 TRANSISTOR 2SC2712-YG
Q5305 8-729-230-49 TRANSISTOR 2SC2712-YG
Q5306 8-729-230-49 TRANSISTOR 2SC2712-YG
Q5307 8-729-230-49 TRANSISTOR 2SC2712-YG
Q5308 8-729-230-49 TRANSISTOR 2SC2712-YG
Q5309 8-729-230-49 TRANSISTOR 2SC2712-YG
Q5310 8-729-216-22 TRANSISTOR 2SA1162-G
<RESISTOR>
R1201 1-216-033-00 RES,CHIP 220 5% 1/10W
R1202 1-216-033-00 RES,CHIP 220 5% 1/10W
R1203 1-216-067-00 RES,CHIP 5.6K 5% 1/10W
R1204 1-216-067-00 RES,CHIP 5.6K 5% 1/10W
R1205 1-216-089-91 RES,CHIP 47K 5% 1/10W
R1206 1-216-089-91 RES,CHIP 47K 5% 1/10W
R1207 1-216-049-91 RES,CHIP 1K 5% 1/10W
R1208 1-216-097-91 RES,CHIP 100K 5% 1/10W
R1209 1-216-121-91 RES,CHIP 1M 5% 1/10W
R1210 1-216-097-91 RES,CHIP 100K 5% 1/10W
R1211 1-216-097-91 RES,CHIP 100K 5% 1/10W
R1212 1-216-061-00 RES,CHIP 3.3K 5% 1/10W
R1213 1-216-069-00 RES,CHIP 6.8K 5% 1/10W
R1214 1-216-039-00 RES,CHIP 390 5% 1/10W
R1215 1-216-101-00 RES,CHIP 150K 5% 1/10W
R1216 1-216-113-00 RES,CHIP 470K 5% 1/10W
-------------------------------------------------------------------------------------------------------------------------------
R1217 1-216-057-00 RES,CHIP 2.2K 5% 1/10W
R1218 1-216-097-91 RES,CHIP 100K 5% 1/10W
R1219 1-216-057-00 RES,CHIP 2.2K 5% 1/10W
R1220 1-216-097-91 RES,CHIP 100K 5% 1/10W
R1221 1-216-073-00 RES,CHIP 10K 5% 1/10W
R1222 1-216-073-00 RES,CHIP 10K 5% 1/10W
R1223 1-216-057-00 RES,CHIP 2.2K 5% 1/10W
R1224 1-216-101-00 RES,CHIP 150K 5% 1/10W
R1225 1-216-113-00 RES,CHIP 470K 5% 1/10W
R1226 1-216-057-00 RES,CHIP 2.2K 5% 1/10W
R1227 1-216-049-91 RES,CHIP 1K 5% 1/10W
R1228 1-216-097-91 RES,CHIP 100K 5% 1/10W
R1229 1-216-121-91 RES,CHIP 1M 5% 1/10W
R1230 1-216-097-91 RES,CHIP 100K 5% 1/10W
R1231 1-216-097-91 RES,CHIP 100K 5% 1/10W
R1232 1-216-061-00 RES,CHIP 3.3K 5% 1/10W
R1233 1-216-069-00 RES,CHIP 6.8K 5% 1/10W
R1234 1-216-039-00 RES,CHIP 390 5% 1/10W
R1236 1-208-808-11 RES,CHIP 12K 0.50% 1/10W
R1237 1-216-085-00 RES,CHIP 33K 5% 1/10W
R1238 1-216-081-00 RES,CHIP 22K 5% 1/10W
R1239 1-216-067-00 RES,CHIP 5.6K 5% 1/10W
R1240 1-216-085-00 RES,CHIP 33K 5% 1/10W
R1241 1-215-890-11 METAL OXIDE 470 5% 2W F
R1242 1-215-890-11 METAL OXIDE 470 5% 2W F
R1244 1-216-073-00 RES,CHIP 10K 5% 1/10W
R1246 1-208-808-11 RES,CHIP 12K 0.50% 1/10W
R1247 1-216-085-00 RES,CHIP 33K 5% 1/10W
R1252 1-216-073-00 RES,CHIP 10K 5% 1/10W
R1260 1-216-029-00 RES,CHIP 150 5% 1/10W
R1261 1-216-029-00 RES,CHIP 150 5% 1/10W
R1264 1-216-041-00 RES,CHIP 470 5% 1/10W
R1265 1-216-041-00 RES,CHIP 470 5% 1/10W
R1266 1-216-049-91 RES,CHIP 1K 5% 1/10W
------------------ R1278 1-216-033-00 RES,CHIP 220 5% 1/10W
R1279 1-216-033-00 RES,CHIP 220 5% 1/10W
R1280 1-216-029-00 RES,CHIP 150 5% 1/10W
R1281 1-216-029-00 RES,CHIP 150 5% 1/10W
– 117 –
Page 72

KV -EF34M31/EF34M61/EF34M80/EF34M90/EF34M91
RM-951
B
REF. NO. PART NO. DESCRIPTION REMARK
------------ ------------- ------------------- ------------ R1301 1-216-049-91 RES,CHIP 1K 5% 1/10W
R1302 1-216-025-91 RES,CHIP 100 5% 1/10W
R1304 1-216-073-00 RES,CHIP 10K 5% 1/10W
R1305 1-216-025-91 RES,CHIP 100 5% 1/10W
R1306 1-216-025-91 RES,CHIP 100 5% 1/10W
R1307 1-216-081-00 RES,CHIP 22K 5% 1/10W
R1308 1-216-073-00 RES,CHIP 10K 5% 1/10W
R1309 1-216-025-91 RES,CHIP 100 5% 1/10W
R1310 1-216-041-00 RES,CHIP 470 5% 1/10W
R1311 1-216-033-00 RES,CHIP 220 5% 1/10W
R1312 1-216-005-00 RES,CHIP 15 5% 1/10W
R1313 1-216-295-91 SHORT 0
R1314 1-216-041-00 RES,CHIP 470 5% 1/10W
R1315 1-216-041-00 RES,CHIP 470 5% 1/10W
R1316 1-216-025-91 RES,CHIP 100 5% 1/10W
R1317 1-216-075-00 RES,CHIP 12K 5% 1/10W
R1318 1-216-025-91 RES,CHIP 100 5% 1/10W
R1319 1-216-045-00 RES,CHIP 680 5% 1/10W
R1320 1-216-079-00 RES,CHIP 18K 5% 1/10W
R1321 1-208-806-11 RES,CHIP 10K 0.50% 1/10W
R1322 1-216-049-91 RES,CHIP 1K 5% 1/10W
R1323 1-216-049-91 RES,CHIP 1K 5% 1/10W
R1324 1-216-025-91 RES,CHIP 100 5% 1/10W
R1325 1-216-041-00 RES,CHIP 470 5% 1/10W
R1326 1-216-025-91 RES,CHIP 100 5% 1/10W
R1327 1-216-025-91 RES,CHIP 100 5% 1/10W
R1328 1-216-033-00 RES,CHIP 220 5% 1/10W
R1329 1-216-053-00 RES,CHIP 1.5K 5% 1/10W
R1330 1-216-073-00 RES,CHIP 10K 5% 1/10W
R1331 1-216-045-00 RES,CHIP 680 5% 1/10W
R1332 1-216-073-00 RES,CHIP 10K 5% 1/10W
R1333 1-216-025-91 RES,CHIP 100 5% 1/10W
R1334 1-216-025-91 RES,CHIP 100 5% 1/10W
R1335 1-216-041-00 RES,CHIP 470 5% 1/10W
R1336 1-216-073-00 RES,CHIP 10K 5% 1/10W
R1337 1-216-041-00 RES,CHIP 470 5% 1/10W
R1338 1-216-041-00 RES,CHIP 470 5% 1/10W
R1339 1-216-079-00 RES,CHIP 18K 5% 1/10W
R1340 1-216-049-91 RES,CHIP 1K 5% 1/10W
R1341 1-216-041-00 RES,CHIP 470 5% 1/10W
R1342 1-216-041-00 RES,CHIP 470 5% 1/10W
R1343 1-216-049-91 RES,CHIP 1K 5% 1/10W
R1344 1-216-065-91 RES,CHIP 4.7K 5% 1/10W
R1345 1-216-041-00 RES,CHIP 470 5% 1/10W
R1347 1-216-049-91 RES,CHIP 1K 5% 1/10W
R1348 1-216-025-91 RES,CHIP 100 5% 1/10W
R1349 1-216-075-00 RES,CHIP 12K 5% 1/10W
R1351 1-216-081-00 RES,CHIP 22K 5% 1/10W
R1352 1-216-049-91 RES,CHIP 1K 5% 1/10W
R1353 1-216-049-91 RES,CHIP 1K 5% 1/10W
R1354 1-216-033-00 RES,CHIP 220 5% 1/10W
R1356 1-216-049-91 RES,CHIP 1K 5% 1/10W
R1357 1-216-025-91 RES,CHIP 100 5% 1/10W
R1358 1-216-041-00 RES,CHIP 470 5% 1/10W
R1359 1-216-041-00 RES,CHIP 470 5% 1/10W
R1360 1-216-041-00 RES,CHIP 470 5% 1/10W
R1361 1-216-041-00 RES,CHIP 470 5% 1/10W
R1362 1-216-049-91 RES,CHIP 1K 5% 1/10W
R1363 1-216-041-00 RES,CHIP 470 5% 1/10W
R1364 1-216-025-91 RES,CHIP 100 5% 1/10W
R1365 1-216-049-91 RES,CHIP 1K 5% 1/10W
R1366 1-216-041-00 RES,CHIP 470 5% 1/10W
R1367 1-216-049-91 RES,CHIP 1K 5% 1/10W
R1368 1-216-041-00 RES,CHIP 470 5% 1/10W
R1369 1-216-049-91 RES,CHIP 1K 5% 1/10W
R1370 1-216-041-00 RES,CHIP 470 5% 1/10W
R1373 1-216-041-00 RES,CHIP 470 5% 1/10W
R1374 1-216-045-00 RES,CHIP 680 5% 1/10W
Les composants identifies par
une trame et une marque !
sont critiques pour la securite.
Ne les remplacer que par une
piece portant le numero specifie.
------------------------------------------------------------------------------------------------------------------------------REF. NO. PART NO. DESCRIPTION REMARK
------------ ------------- ------------------- ------------ R1376 1-216-097-91 RES,CHIP 100K 5% 1/10W
R1377 1-216-121-91 RES,CHIP 1M 5% 1/10W
R1378 1-216-073-00 RES,CHIP 10K 5% 1/10W
R1379 1-216-089-91 RES,CHIP 47K 5% 1/10W
R1380 1-216-097-91 RES,CHIP 100K 5% 1/10W
R1381 1-216-073-00 RES,CHIP 10K 5% 1/10W
R1382 1-216-095-00 RES,CHIP 82K 5% 1/10W
R1383 1-216-089-91 RES,CHIP 47K 5% 1/10W
R1384 1-216-025-91 RES,CHIP 100 5% 1/10W
R1385 1-216-035-00 RES,CHIP 270 5% 1/10W
R1386 1-216-033-00 RES,CHIP 220 5% 1/10W
R1387 1-216-041-00 RES,CHIP 470 5% 1/10W
R1388 1-216-041-00 RES,CHIP 470 5% 1/10W
R1389 1-216-017-91 RES,CHIP 47 5% 1/10W
R1390 1-216-033-00 RES,CHIP 220 5% 1/10W
R1391 1-216-041-00 RES,CHIP 470 5% 1/10W
R1392 1-216-045-00 RES,CHIP 680 5% 1/10W
R1393 1-216-027-00 RES,CHIP 120 5% 1/10W
R1395 1-216-021-00 RES,CHIP 68 5% 1/10W
R1396 1-216-021-00 RES,CHIP 68 5% 1/10W
R3300 1-216-105-91 RES,CHIP 220K 5% 1/10W
R3301 1-216-025-91 RES,CHIP 100 5% 1/10W
R3302 1-216-295-91 SHORT 0
R3303 1-216-049-91 RES,CHIP 1K 5% 1/10W
R3304 1-216-025-91 RES,CHIP 100 5% 1/10W
R3305 1-216-017-91 RES,CHIP 47 5% 1/10W
R3306 1-216-049-91 RES,CHIP 1K 5% 1/10W
R3307 1-216-025-91 RES,CHIP 100 5% 1/10W
R3308 1-216-037-00 RES,CHIP 330 5% 1/10W
R3309 1-216-049-91 RES,CHIP 1K 5% 1/10W
R3310 1-216-025-91 RES,CHIP 100 5% 1/10W
-------------------------------------------------------------------------------------------------------------------------------
R3311 1-216-295-91 SHORT 0
R3312 1-216-049-91 RES,CHIP 1K 5% 1/10W
R3313 1-216-025-91 RES,CHIP 100 5% 1/10W
R3314 1-216-017-91 RES,CHIP 47 5% 1/10W
R3315 1-216-049-91 RES,CHIP 1K 5% 1/10W
R3316 1-216-025-91 RES,CHIP 100 5% 1/10W
R3317 1-216-037-00 RES,CHIP 330 5% 1/10W
R3318 1-216-049-91 RES,CHIP 1K 5% 1/10W
R3319 1-216-025-91 RES,CHIP 100 5% 1/10W
R3320 1-216-073-00 RES,CHIP 10K 5% 1/10W
R3321 1-216-057-00 RES,CHIP 2.2K 5% 1/10W
R3323 1-216-025-91 RES,CHIP 100 5% 1/10W
R3324 1-216-073-00 RES,CHIP 10K 5% 1/10W
R3325 1-216-049-91 RES,CHIP 1K 5% 1/10W
R3326 1-216-025-91 RES,CHIP 100 5% 1/10W
R3327 1-216-063-91 RES,CHIP 3.9K 5% 1/10W
R3328 1-216-025-91 RES,CHIP 100 5% 1/10W
R3329 1-216-089-91 RES,CHIP 47K 5% 1/10W
R3330 1-216-025-91 RES,CHIP 100 5% 1/10W
R3331 1-216-025-91 RES,CHIP 100 5% 1/10W
R3332 1-216-041-00 RES,CHIP 470 5% 1/10W
R3333 1-216-025-91 RES,CHIP 100 5% 1/10W
R3334 1-216-025-91 RES,CHIP 100 5% 1/10W
R3335 1-216-022-00 RES,CHIP 75 5% 1/10W
R3336 1-216-025-91 RES,CHIP 100 5% 1/10W
R3337 1-216-065-91 RES,CHIP 4.7K 5% 1/10W
R3338 1-216-025-91 RES,CHIP 100 5% 1/10W
R3339 1-216-065-91 RES,CHIP 4.7K 5% 1/10W
R3341 1-216-065-91 RES,CHIP 4.7K 5% 1/10W
R3342 1-216-049-91 RES,CHIP 1K 5% 1/10W
R3343 1-216-049-91 RES,CHIP 1K 5% 1/10W
R3344 1-216-089-91 RES,CHIP 47K 5% 1/10W
R3345 1-216-025-91 RES,CHIP 100 5% 1/10W
------------------ R3346 1-216-105-91 RES,CHIP 220K 5% 1/10W
R3347 1-216-065-91 RES,CHIP 4.7K 5% 1/10W
R3348 1-216-048-00 RES,CHIP 910 5% 1/10W
R3349 1-216-073-00 RES,CHIP 10K 5% 1/10W
The components identified by
shading and mark ! are criti-
cal for safety.
Replace only with part number
specified.
– 118 –
Page 73

The components identified by
shading and mark ! are criti-
cal for safety.
Replace only with part number
specified.
REF. NO. PART NO. DESCRIPTION REMARK
------------ ------------- ------------------- ------------ R3350 1-216-065-91 RES,CHIP 4.7K 5% 1/10W
R3351 1-216-065-91 RES,CHIP 4.7K 5% 1/10W
R3352 1-216-089-91 RES,CHIP 47K 5% 1/10W
R3353 1-216-025-91 RES,CHIP 100 5% 1/10W
R3354 1-216-025-91 RES,CHIP 100 5% 1/10W
R3355 1-216-073-00 RES,CHIP 10K 5% 1/10W
R3356 1-216-113-00 RES,CHIP 470K 5% 1/10W
R3357 1-216-065-91 RES,CHIP 4.7K 5% 1/10W
R3358 1-216-065-91 RES,CHIP 4.7K 5% 1/10W
R3359 1-216-025-91 RES,CHIP 100 5% 1/10W
R3360 1-216-295-91 SHORT 0
R3361 1-216-025-91 RES,CHIP 100 5% 1/10W
R3362 1-216-025-91 RES,CHIP 100 5% 1/10W
R3363 1-216-073-00 RES,CHIP 10K 5% 1/10W
R3364 1-216-113-00 RES,CHIP 470K 5% 1/10W
R3365 1-216-113-00 RES,CHIP 470K 5% 1/10W
R3366 1-216-295-91 SHORT 0
R3367 1-216-057-00 RES,CHIP 2.2K 5% 1/10W
R3368 1-216-093-00 RES,CHIP 68K 5% 1/10W
R3369 1-216-105-91 RES,CHIP 220K 5% 1/10W
R3370 1-216-105-91 RES,CHIP 220K 5% 1/10W
R3371 1-216-022-00 RES,CHIP 75 5% 1/10W
R3372 1-216-295-91 SHORT 0
R3373 1-216-295-91 SHORT 0
R3374 1-216-295-91 SHORT 0
R3375 1-216-089-91 RES,CHIP 47K 5% 1/10W
R3377 1-216-022-00 RES,CHIP 75 5% 1/10W
R3378 1-216-048-00 RES,CHIP 910 5% 1/10W
R3379 1-216-105-91 RES,CHIP 220K 5% 1/10W
R3380 1-216-105-91 RES,CHIP 220K 5% 1/10W
R3381 1-216-022-00 RES,CHIP 75 5% 1/10W
R3382 1-216-025-91 RES,CHIP 100 5% 1/10W
R3383 1-216-025-91 RES,CHIP 100 5% 1/10W
R3384 1-216-025-91 RES,CHIP 100 5% 1/10W
R3385 1-216-105-91 RES,CHIP 220K 5% 1/10W
R3386 1-216-067-00 RES,CHIP 5.6K 5% 1/10W
R3387 1-216-089-91 RES,CHIP 47K 5% 1/10W
R3388 1-216-089-91 RES,CHIP 47K 5% 1/10W
R3389 1-216-022-00 RES,CHIP 75 5% 1/10W
R3390 1-216-025-91 RES,CHIP 100 5% 1/10W
R3391 1-216-025-91 RES,CHIP 100 5% 1/10W
R3392 1-216-021-00 RES,CHIP 68 5% 1/10W
R3393 1-216-067-00 RES,CHIP 5.6K 5% 1/10W
R3394 1-216-031-00 RES,CHIP 180 5% 1/10W
R3395 1-216-033-00 RES,CHIP 220 5% 1/10W
R3396 1-216-041-00 RES,CHIP 470 5% 1/10W
R3397 1-216-041-00 RES,CHIP 470 5% 1/10W
R3398 1-216-025-91 RES,CHIP 100 5% 1/10W
R3399 1-216-025-91 RES,CHIP 100 5% 1/10W
R5201 1-216-065-91 RES,CHIP 4.7K 5% 1/10W
R5202 1-216-065-91 RES,CHIP 4.7K 5% 1/10W
R5203 1-216-065-91 RES,CHIP 4.7K 5% 1/10W
R5204 1-216-061-00 RES,CHIP 3.3K 5% 1/10W
R5205 1-216-061-00 RES,CHIP 3.3K 5% 1/10W
R5206 1-216-129-00 RES,CHIP 2.2M 5% 1/10W
R5207 1-216-035-00 RES,CHIP 270 5% 1/10W
R5208 1-216-035-00 RES,CHIP 270 5% 1/10W
R5210 1-216-033-00 RES,CHIP 220 5% 1/10W
R5211 1-216-033-00 RES,CHIP 220 5% 1/10W
R5212 1-216-033-00 RES,CHIP 220 5% 1/10W
R5214 1-216-061-00 RES,CHIP 3.3K 5% 1/10W
R5215 1-216-061-00 RES,CHIP 3.3K 5% 1/10W
R5216 1-216-049-91 RES,CHIP 1K 5% 1/10W
R5217 1-216-049-91 RES,CHIP 1K 5% 1/10W
R5218 1-216-075-00 RES,CHIP 12K 5% 1/10W
R5219 1-216-075-00 RES,CHIP 12K 5% 1/10W
R5220 1-216-073-00 RES,CHIP 10K 5% 1/10W
R5221 1-216-073-00 RES,CHIP 10K 5% 1/10W
R5222 1-216-025-91 RES,CHIP 100 5% 1/10W
Les composants identifies par
une trame et une marque !
sont critiques pour la securite.
Ne les remplacer que par une
piece portant le numero specifie.
KV -EF34M31/EF34M61/EF34M80/EF34M90/EF34M91
RM-951
B
------------------------------------------------------------------------------------------------------------------------------REF. NO. PART NO. DESCRIPTION REMARK
------------ ------------- ------------------- ------------ R5223 1-216-025-91 RES,CHIP 100 5% 1/10W
R5224 1-216-073-00 RES,CHIP 10K 5% 1/10W
R5225 1-216-073-00 RES,CHIP 10K 5% 1/10W
R5226 1-216-073-00 RES,CHIP 10K 5% 1/10W
R5227 1-216-073-00 RES,CHIP 10K 5% 1/10W
R5228 1-216-049-91 RES,CHIP 1K 5% 1/10W
R5300 1-216-295-91 SHORT 0
R5301 1-216-031-00 RES,CHIP 180 5% 1/10W
R5302 1-216-031-00 RES,CHIP 180 5% 1/10W
R5303 1-216-041-00 RES,CHIP 470 5% 1/10W
R5304 1-216-295-91 SHORT 0
R5306 1-216-013-00 RES,CHIP 33 5% 1/10W
R5307 1-216-033-00 RES,CHIP 220 5% 1/10W
R5308 1-216-031-00 RES,CHIP 180 5% 1/10W
R5309 1-216-041-00 RES,CHIP 470 5% 1/10W
R5310 1-216-689-11 RES,CHIP 39K 5% 1/10W
R5311 1-216-689-11 RES,CHIP 39K 5% 1/10W
R5312 1-216-689-11 RES,CHIP 39K 5% 1/10W
R5313 1-216-689-11 RES,CHIP 39K 5% 1/10W
R5314 1-216-689-11 RES,CHIP 39K 5% 1/10W
R5315 1-216-689-11 RES,CHIP 39K 5% 1/10W
R5316 1-216-049-91 RES,CHIP 1K 5% 1/10W
R5317 1-216-041-00 RES,CHIP 470 5% 1/10W
R5318 1-216-041-00 RES,CHIP 470 5% 1/10W
R5319 1-216-073-00 RES,CHIP 10K 5% 1/10W
R5320 1-216-073-00 RES,CHIP 10K 5% 1/10W
R5321 1-216-025-91 RES,CHIP 100 5% 1/10W
R5322 1-216-025-91 RES,CHIP 100 5% 1/10W
R5323 1-216-025-91 RES,CHIP 100 5% 1/10W
R5324 1-216-079-00 RES,CHIP 18K 5% 1/10W
R5325 1-216-075-00 RES,CHIP 12K 5% 1/10W
------------------------------------------------------------------------------------------------------------------------------ R5326 1-216-073-00 RES,CHIP 10K 5% 1/10W
R5327 1-216-081-00 RES,CHIP 22K 5% 1/10W
R5328 1-216-073-00 RES,CHIP 10K 5% 1/10W
R5329 1-216-081-00 RES,CHIP 22K 5% 1/10W
R5330 1-216-081-00 RES,CHIP 22K 5% 1/10W
R5331 1-216-081-00 RES,CHIP 22K 5% 1/10W
R5332 1-216-081-00 RES,CHIP 22K 5% 1/10W
R5333 1-216-081-00 RES,CHIP 22K 5% 1/10W
R5334 1-216-081-00 RES,CHIP 22K 5% 1/10W
R5335 1-216-081-00 RES,CHIP 22K 5% 1/10W
R5336 1-216-089-91 RES,CHIP 47K 5% 1/10W
R5337 1-216-089-91 RES,CHIP 47K 5% 1/10W
R5338 1-216-041-00 RES,CHIP 470 5% 1/10W
R5339 1-216-073-00 RES,CHIP 10K 5% 1/10W
R5350 1-216-045-00 RES,CHIP 680 5% 1/10W
R5353 1-216-025-91 RES,CHIP 100 5% 1/10W
R5354 1-216-025-91 RES,CHIP 100 5% 1/10W
R5355 1-216-025-91 RES,CHIP 100 5% 1/10W
R5356 1-216-025-91 RES,CHIP 100 5% 1/10W
R5357 1-216-025-91 RES,CHIP 100 5% 1/10W
R5358 1-216-025-91 RES,CHIP 100 5% 1/10W
R5359 1-216-041-00 RES,CHIP 470 5% 1/10W
R5360 1-216-031-00 RES,CHIP 180 5% 1/10W
R5361 1-216-097-91 RES,CHIP 100K 5% 1/10W
R5362 1-216-097-91 RES,CHIP 100K 5% 1/10W
R5364 1-216-097-91 RES,CHIP 100K 5% 1/10W
R5365 1-216-041-00 RES,CHIP 470 5% 1/10W
R5366 1-216-041-00 RES,CHIP 470 5% 1/10W
R5367 1-216-041-00 RES,CHIP 470 5% 1/10W
R5368 1-216-041-00 RES,CHIP 470 5% 1/10W
R5369 1-216-041-00 RES,CHIP 470 5% 1/10W
R5370 1-216-081-00 RES,CHIP 22K 5% 1/10W
R5371 1-216-041-00 RES,CHIP 470 5% 1/10W
------------------ R5372 1-216-295-91 SHORT 0
R5373 1-216-045-00 RES,CHIP 680 5% 1/10W
R5374 1-216-089-91 RES,CHIP 47K 5% 1/10W
R5375 1-216-295-91 SHORT 0
– 119 –
Page 74

KV -EF34M31/EF34M61/EF34M80/EF34M90/EF34M91
RM-951
B P
REF. NO. PART NO. DESCRIPTION REMARK
------------ ------------- ------------------- ------------ R5376 1-216-025-91 RES,CHIP 100 5% 1/10W
R5377 1-216-047-91 RES,CHIP 820 5% 1/10W
R5378 1-216-051-00 RES,CHIP 1.2K 5% 1/10W
R5379 1-216-097-91 RES,CHIP 100K 5% 1/10W
R5381 1-216-097-91 RES,CHIP 100K 5% 1/10W
R5382 1-216-033-00 RES,CHIP 220 5% 1/10W
R5383 1-216-097-91 RES,CHIP 100K 5% 1/10W
R5384 1-216-033-00 RES,CHIP 220 5% 1/10W
R5385 1-216-041-00 RES,CHIP 470 5% 1/10W
R5386 1-216-295-91 SHORT 0
R5387 1-216-041-00 RES,CHIP 470 5% 1/10W
R5388 1-216-033-00 RES,CHIP 220 5% 1/10W
R5389 1-216-041-00 RES,CHIP 470 5% 1/10W
R5390 1-216-035-00 RES,CHIP 270 5% 1/10W
R5391 1-216-295-91 SHORT 0
R5392 1-216-041-00 RES,CHIP 470 5% 1/10W
R5393 1-216-041-00 RES,CHIP 470 5% 1/10W
R5394 1-216-029-00 RES,CHIP 150 5% 1/10W
R5395 1-216-049-91 RES,CHIP 1K 5% 1/10W
R5396 1-216-041-00 RES,CHIP 470 5% 1/10W
R5397 1-216-041-00 RES,CHIP 470 5% 1/10W
R5398 1-216-029-00 RES,CHIP 150 5% 1/10W
R5399 1-216-049-91 RES,CHIP 1K 5% 1/10W
R7300 1-216-295-91 SHORT 0
R7301 1-216-295-91 SHORT 0
R7305 1-216-045-00 RES,CHIP 680 5% 1/10W
<VARIABLE RESISTOR>
RV5301 1-241-758-11 RES, ADJ, CARBON 100
<TUNER>
TU3301 8-598-450-00 TUNER, FSS BTF-LG434
<CRYSTAL>
X1301 1-781-134-21 VIBRATOR, CRYSTAL
X1302 1-781-132-21 VIBRATOR, CRYSTAL
X5201 1-579-834-11 VIBRATOR, CRYSTAL
*************************************************************
*A-1195-148-A P BOARD, COMPLETE
C9401 1-163-113-00 CERAMIC CHIP 68PF 5% 50V
C9402 1-163-038-91 CERAMIC CHIP 0.1MF 25V
C9404 1-164-346-11 CERAMIC CHIP 1MF 16V
C9405 1-163-021-91 CERAMIC CHIP 0.01MF 10% 50V
C9406 1-163-113-00 CERAMIC CHIP 68PF 5% 50V
C9408 1-115-419-11 CERAMIC CHIP 3300PF 5% 25V
C9409 1-115-185-11 CERAMIC CHIP 0.033MF 10% 50V
C9410 1-126-206-11 ELECT CHIP 100MF 20% 6.3V
C9412 1-162-569-11 CERAMIC CHIP 100PF 2% 50V
C9413 1-162-569-11 CERAMIC CHIP 100PF 2% 50V
C9414 1-162-569-11 CERAMIC CHIP 100PF 2% 50V
C9415 1-162-569-11 CERAMIC CHIP 100PF 2% 50V
C9420 1-163-263-11 CERAMIC CHIP 330PF 5% 50V
C9501 1-126-396-11 ELECT CHIP 47MF 20% 16V
C9502 1-163-038-91 CERAMIC CHIP 0.1MF 25V
C9503 1-126-396-11 ELECT CHIP 47MF 20% 16V
C9504 1-163-038-91 CERAMIC CHIP 0.1MF 25V
C9505 1-163-038-91 CERAMIC CHIP 0.1MF 25V
C9507 1-126-396-11 ELECT CHIP 47MF 20% 16V
C9508 1-163-038-91 CERAMIC CHIP 0.1MF 25V
*********************
<CAPACITOR>
Les composants identifies par
une trame et une marque !
sont critiques pour la securite.
Ne les remplacer que par une
piece portant le numero specifie.
------------------------------------------------------------------------------------------------------------------------------REF. NO. PART NO. DESCRIPTION REMARK
------------ ------------- ------------------- ------------ C9509 1-126-204-11 ELECT CHIP 47MF 20% 16V
C9510 1-107-823-11 CERAMIC CHIP 0.47MF 10% 16V
C9511 1-104-760-11 CERAMIC CHIP 0.047MF 10% 50V
C9512 1-126-204-11 ELECT CHIP 47MF 20% 16V
C9513 1-163-038-91 CERAMIC CHIP 0.1MF 25V
C9514 1-163-038-91 CERAMIC CHIP 0.1MF 25V
C9515 1-104-601-11 ELECT CHIP 10MF 20% 10V
C9516 1-104-601-11 ELECT CHIP 10MF 20% 10V
C9517 1-104-601-11 ELECT CHIP 10MF 20% 10V
C9518 1-163-038-91 CERAMIC CHIP 0.1MF 25V
C9519 1-163-038-91 CERAMIC CHIP 0.1MF 25V
C9520 1-163-038-91 CERAMIC CHIP 0.1MF 25V
C9522 1-163-017-00 CERAMIC CHIP 0.0047MF 10% 50V
C9523 1-164-005-11 CERAMIC CHIP 0.47MF 16V
C9524 1-164-005-11 CERAMIC CHIP 0.47MF 16V
C9525 1-163-038-91 CERAMIC CHIP 0.1MF 25V
C9526 1-163-038-91 CERAMIC CHIP 0.1MF 25V
C9527 1-104-601-11 ELECT CHIP 10MF 20% 10V
C9528 1-104-601-11 ELECT CHIP 10MF 20% 10V
C9529 1-104-601-11 ELECT CHIP 10MF 20% 10V
C9530 1-163-038-91 CERAMIC CHIP 0.1MF 25V
C9531 1-163-038-91 CERAMIC CHIP 0.1MF 25V
C9532 1-163-038-91 CERAMIC CHIP 0.1MF 25V
C9533 1-163-038-91 CERAMIC CHIP 0.1MF 25V
C9534 1-163-038-91 CERAMIC CHIP 0.1MF 25V
C9535 1-126-396-11 ELECT CHIP 47MF 20% 16V
C9536 1-126-396-11 ELECT CHIP 47MF 20% 16V
C9537 1-107-823-11 CERAMIC CHIP 0.47MF 10% 16V
C9538 1-104-760-11 CERAMIC CHIP 0.047MF 10% 50V
C9539 1-163-038-91 CERAMIC CHIP 0.1MF 25V
C9540 1-163-038-91 CERAMIC CHIP 0.1MF 25V
-------------------------------------------------------------------------------------------------------------------------------
C9541 1-163-038-91 CERAMIC CHIP 0.1MF 25V
C9542 1-163-038-91 CERAMIC CHIP 0.1MF 25V
C9543 1-164-489-11 CERAMIC CHIP 0.22MF 10% 16V
C9544 1-163-038-91 CERAMIC CHIP 0.1MF 25V
C9545 1-163-038-91 CERAMIC CHIP 0.1MF 25V
C9546 1-163-038-91 CERAMIC CHIP 0.1MF 25V
C9547 1-163-038-91 CERAMIC CHIP 0.1MF 25V
C9548 1-163-038-91 CERAMIC CHIP 0.1MF 25V
C9549 1-163-038-91 CERAMIC CHIP 0.1MF 25V
C9550 1-126-206-11 ELECT CHIP 100MF 20% 6.3V
C9552 1-163-038-91 CERAMIC CHIP 0.1MF 25V
C9553 1-163-038-91 CERAMIC CHIP 0.1MF 25V
C9554 1-126-204-11 ELECT CHIP 47MF 20% 16V
C9555 1-126-204-11 ELECT CHIP 47MF 20% 16V
C9556 1-104-760-11 CERAMIC CHIP 0.047MF 10% 50V
C9558 1-126-204-11 ELECT CHIP 47MF 20% 16V
C9560 1-163-038-91 CERAMIC CHIP 0.1MF 25V
C9561 1-163-038-91 CERAMIC CHIP 0.1MF 25V
C9562 1-163-038-91 CERAMIC CHIP 0.1MF 25V
C9563 1-163-038-91 CERAMIC CHIP 0.1MF 25V
C9564 1-163-038-91 CERAMIC CHIP 0.1MF 25V
C9565 1-163-038-91 CERAMIC CHIP 0.1MF 25V
C9566 1-163-038-91 CERAMIC CHIP 0.1MF 25V
C9567 1-126-204-11 ELECT CHIP 47MF 20% 16V
C9568 1-163-038-91 CERAMIC CHIP 0.1MF 25V
C9569 1-163-275-11 CERAMIC CHIP 0.001MF 5% 50V
C9570 1-163-275-11 CERAMIC CHIP 0.001MF 5% 50V
C9574 1-126-206-11 ELECT CHIP 100MF 20% 6.3V
C9576 1-163-143-00 CERAMIC CHIP 0.0012MF 5% 50V
C9577 1-163-021-91 CERAMIC CHIP 0.01MF 10% 50V
C9578 1-163-021-91 CERAMIC CHIP 0.01MF 10% 50V
C9579 1-163-021-91 CERAMIC CHIP 0.01MF 10% 50V
C9580 1-163-243-11 CERAMIC CHIP 47PF 5% 50V
C9581 1-164-346-11 CERAMIC CHIP 1MF 16V
------------------ C9582 1-163-251-11 CERAMIC CHIP 100PF 5% 50V
C9589 1-163-251-11 CERAMIC CHIP 100PF 5% 50V
C9590 1-163-251-11 CERAMIC CHIP 100PF 5% 50V
C9591 1-126-206-11 ELECT CHIP 100MF 20% 6.3V
The components identified by
shading and mark ! are criti-
cal for safety.
Replace only with part number
specified.
– 120 –
Page 75

The components identified by
shading and mark ! are criti-
cal for safety.
Replace only with part number
specified.
REF. NO. PART NO. DESCRIPTION REMARK
------------ ------------- ------------------- ------------ C9605 1-126-206-11 ELECT CHIP 100MF 20% 6.3V
C9623 1-164-505-11 CERAMIC CHIP 2.2MF 16V
C9626 1-163-038-91 CERAMIC CHIP 0.1MF 25V
C9629 1-124-779-00 ELECT CHIP 10MF 20% 16V
C9801 1-126-204-11 ELECT CHIP 47MF 20% 16V
C9802 1-163-038-91 CERAMIC CHIP 0.1MF 25V
C9803 1-126-204-11 ELECT CHIP 47MF 20% 16V
C9804 1-163-038-91 CERAMIC CHIP 0.1MF 25V
C9846 1-163-121-00 CERAMIC CHIP 150PF 5% 50V
C9847 1-163-121-00 CERAMIC CHIP 150PF 5% 50V
C9849 1-164-161-11 CERAMIC CHIP 0.0022MF 10% 50V
C9850 1-164-161-11 CERAMIC CHIP 0.0022MF 10% 50V
C9858 1-163-038-91 CERAMIC CHIP 0.1MF 25V
C9859 1-126-206-11 ELECT CHIP 100MF 20% 6.3V
C9860 1-163-038-91 CERAMIC CHIP 0.1MF 25V
C9883 1-163-038-91 CERAMIC CHIP 0.1MF 25V
C9884 1-163-038-91 CERAMIC CHIP 0.1MF 25V
C9885 1-126-396-11 ELECT CHIP 47MF 20% 16V
C9886 1-126-204-11 ELECT CHIP 47MF 20% 16V
C9889 1-126-396-11 ELECT CHIP 47MF 20% 16V
C9892 1-163-233-11 CERAMIC CHIP 18PF 5% 50V
C9893 1-163-231-11 CERAMIC CHIP 15PF 5% 50V
C9894 1-126-204-11 ELECT CHIP 47MF 20% 16V
CN9501 1-573-299-21 CONNECTOR, BOARD TO BOARD 10P
CN9502 1-764-811-11 CONNECTOR, BOARD TO BOARD 10P
CN9503 1-764-813-11 CONNECTOR, BOARD TO BOARD 12P
D9504 8-719-025-33 DIODE 02CZ6.2-TE85L
D9505 8-719-025-33 DIODE 02CZ6.2-TE85L
D9506 8-719-404-49 DIODE MA111
FB9501 1-414-233-22 INDUCTOR CHIP 0UH
FB9502 1-414-233-22 INDUCTOR CHIP 0UH
FL9501 1-233-505-21 FILTER, LOW PASS
FL9502 1-233-504-21 FILTER, LOW PASS
FL9503 1-233-504-21 FILTER, LOW PASS
FL9504 1-233-504-21 FILTER, LOW PASS
FL9505 1-233-504-21 FILTER, LOW PASS
FL9506 1-233-505-21 FILTER, LOW PASS
FL9604 1-233-945-21 FILTER, LOW PASS
FL9607 1-233-944-21 FILTER, LOW PASS
FL9608 1-233-944-21 FILTER, LOW PASS
IC9401 8-759-907-81 IC SN74LS221NS
IC9501 8-759-467-22 IC MSM548331TS-K
IC9502 8-759-467-22 IC MSM548331TS-K
IC9503 8-759-295-09 IC TLC2932IPW
IC9504 8-759-295-09 IC TLC2932IPW
IC9505 8-759-295-09 IC TLC2932IPW
IC9506 8-752-392-55 IC CXD2079Q
IC9509 8-759-030-52 IC MC74F163AM
IC9510 8-759-030-52 IC MC74F163AM
IC9511 8-759-930-57 IC SN74LS164NS
IC9525 8-759-352-91 IC PST9143NL
IC9526 8-759-527-74 IC M24C02-MN6T
IC9527 8-752-897-65 IC CXP86332-008Q
IC9530 8-759-485-79 IC TC7SET08FU(TE85L)
Les composants identifies par
une trame et une marque !
sont critiques pour la securite.
Ne les remplacer que par une
piece portant le numero specifie.
<CONNECTOR>
<DIODE>
<FERRITE BEAD>
<FILTER>
<IC>
KV -EF34M31/EF34M61/EF34M80/EF34M90/EF34M91
RM-951
P
------------------------------------------------------------------------------------------------------------------------------REF. NO. PART NO. DESCRIPTION REMARK
------------ ------------- ------------------- ------------ IC9531 8-759-485-79 IC TC7SET08FU(TE85L)
IC9532 8-759-485-79 IC TC7SET08FU(TE85L)
<CHIP CONDUCTOR>
JR9401 1-216-295-91 SHORT 0
<COIL>
L9401 1-414-757-11 INDUCTOR 100UH
L9402 1-414-757-11 INDUCTOR 100UH
L9501 1-414-754-11 INDUCTOR 10UH
L9502 1-414-757-11 INDUCTOR 100UH
L9503 1-414-757-11 INDUCTOR 100UH
L9504 1-414-754-11 INDUCTOR 10UH
L9505 1-414-757-11 INDUCTOR 100UH
L9506 1-414-757-11 INDUCTOR 100UH
L9507 1-414-754-11 INDUCTOR 10UH
L9508 1-412-006-31 INDUCTOR CHIP 10UH
L9509 1-414-757-11 INDUCTOR 100UH
L9510 1-414-757-11 INDUCTOR 100UH
L9511 1-414-754-11 INDUCTOR 10UH
L9512 1-414-754-11 INDUCTOR 10UH
L9513 1-412-006-31 INDUCTOR CHIP 10UH
L9514 1-412-006-31 INDUCTOR CHIP 10UH
L9515 1-414-754-11 INDUCTOR 10UH
L9523 1-414-754-11 INDUCTOR 10UH
L9531 1-414-754-11 INDUCTOR 10UH
L9538 1-414-754-11 INDUCTOR 10UH
L9539 1-414-754-11 INDUCTOR 10UH
-------------------------------------------------------------------------------------------------------------------------------
L9544 1-414-754-11 INDUCTOR 10UH
L9545 1-414-752-11 INDUCTOR 2.2UH
L9605 1-414-757-11 INDUCTOR 100UH
<TRANSISTOR>
Q9401 8-729-230-49 TRANSISTOR 2SC2712-YG
Q9402 8-729-230-49 TRANSISTOR 2SC2712-YG
Q9403 8-729-230-49 TRANSISTOR 2SC2712-YG
Q9404 1-801-806-11 TRANSISTOR DTC144EKA-T146
Q9405 8-729-230-49 TRANSISTOR 2SC2712-YG
Q9406 8-729-230-49 TRANSISTOR 2SC2712-YG
Q9407 8-729-230-49 TRANSISTOR 2SC2712-YG
Q9408 1-801-806-11 TRANSISTOR DTC144EKA-T146
Q9410 8-729-216-22 TRANSISTOR 2SA1162-G
Q9411 8-729-216-22 TRANSISTOR 2SA1162-G
Q9501 1-801-806-11 TRANSISTOR DTC144EKA-T146
Q9502 1-801-806-11 TRANSISTOR DTC144EKA-T146
Q9505 8-729-230-49 TRANSISTOR 2SC2712-YG
Q9517 8-729-216-22 TRANSISTOR 2SA1162-G
Q9519 8-729-216-22 TRANSISTOR 2SA1162-G
Q9520 8-729-230-49 TRANSISTOR 2SC2712-YG
Q9521 8-729-230-49 TRANSISTOR 2SC2712-YG
Q9522 8-729-230-49 TRANSISTOR 2SC2712-YG
Q9523 8-729-216-22 TRANSISTOR 2SA1162-G
Q9530 8-729-216-22 TRANSISTOR 2SA1162-G
Q9533 8-729-216-22 TRANSISTOR 2SA1162-G
Q9540 8-729-216-22 TRANSISTOR 2SA1162-G
Q9552 8-729-230-49 TRANSISTOR 2SC2712-YG
Q9553 8-729-230-49 TRANSISTOR 2SC2712-YG
Q9554 8-729-230-49 TRANSISTOR 2SC2712-YG
Q9558 8-729-216-22 TRANSISTOR 2SA1162-G
Q9562 8-729-216-22 TRANSISTOR 2SA1162-G
Q9563 8-729-216-22 TRANSISTOR 2SA1162-G
------------------ Q9568 8-729-230-49 TRANSISTOR 2SC2712-YG
<RESISTOR>
R9401 1-216-041-00 RES,CHIP 470 5% 1/10W
– 121 –
Page 76

KV -EF34M31/EF34M61/EF34M80/EF34M90/EF34M91
RM-951
P
REF. NO. PART NO. DESCRIPTION REMARK
------------ ------------- ------------------- ------------ R9402 1-216-057-00 RES,CHIP 2.2K 5% 1/10W
R9403 1-216-091-00 RES,CHIP 56K 5% 1/10W
R9404 1-216-081-00 RES,CHIP 22K 5% 1/10W
R9405 1-216-079-00 RES,CHIP 18K 5% 1/10W
R9407 1-216-049-91 RES,CHIP 1K 5% 1/10W
R9408 1-216-073-00 RES,CHIP 10K 5% 1/10W
R9409 1-216-041-00 RES,CHIP 470 5% 1/10W
R9410 1-216-091-00 RES,CHIP 56K 5% 1/10W
R9411 1-216-057-00 RES,CHIP 2.2K 5% 1/10W
R9412 1-216-049-91 RES,CHIP 1K 5% 1/10W
R9416 1-216-073-00 RES,CHIP 10K 5% 1/10W
R9417 1-216-079-00 RES,CHIP 18K 5% 1/10W
R9418 1-216-049-91 RES,CHIP 1K 5% 1/10W
R9419 1-216-073-00 RES,CHIP 10K 5% 1/10W
R9420 1-216-073-00 RES,CHIP 10K 5% 1/10W
R9421 1-216-049-91 RES,CHIP 1K 5% 1/10W
R9422 1-216-025-91 RES,CHIP 100 5% 1/10W
R9424 1-216-025-91 RES,CHIP 100 5% 1/10W
R9427 1-216-049-91 RES,CHIP 1K 5% 1/10W
R9428 1-216-025-91 RES,CHIP 100 5% 1/10W
R9429 1-208-800-11 RES,CHIP 5.6K 0.50% 1/10W
R9430 1-216-067-00 RES,CHIP 5.6K 5% 1/10W
R9431 1-216-295-91 SHORT 0
R9432 1-216-057-00 RES,CHIP 2.2K 5% 1/10W
R9433 1-216-065-91 RES,CHIP 4.7K 5% 1/10W
R9435 1-216-061-00 RES,CHIP 3.3K 5% 1/10W
R9436 1-216-025-91 RES,CHIP 100 5% 1/10W
R9437 1-216-057-00 RES,CHIP 2.2K 5% 1/10W
R9438 1-216-057-00 RES,CHIP 2.2K 5% 1/10W
R9439 1-216-057-00 RES,CHIP 2.2K 5% 1/10W
R9440 1-216-065-91 RES,CHIP 4.7K 5% 1/10W
R9441 1-216-025-91 RES,CHIP 100 5% 1/10W
R9442 1-208-776-11 RES,CHIP 560 0.50% 1/10W
R9445 1-216-079-00 RES,CHIP 18K 5% 1/10W
R9446 1-216-083-00 RES,CHIP 27K 5% 1/10W
R9447 1-208-798-11 RES,CHIP 4.7K 0.50% 1/10W
R9448 1-216-079-00 RES,CHIP 18K 5% 1/10W
R9449 1-216-083-00 RES,CHIP 27K 5% 1/10W
R9450 1-216-065-91 RES,CHIP 4.7K 5% 1/10W
R9451 1-216-025-91 RES,CHIP 100 5% 1/10W
R9452 1-216-025-91 RES,CHIP 100 5% 1/10W
R9453 1-216-295-91 SHORT 0
R9455 1-216-049-91 RES,CHIP 1K 5% 1/10W
R9456 1-216-049-91 RES,CHIP 1K 5% 1/10W
R9457 1-216-025-91 RES,CHIP 100 5% 1/10W
R9458 1-216-025-91 RES,CHIP 100 5% 1/10W
R9460 1-216-049-91 RES,CHIP 1K 5% 1/10W
R9483 1-208-770-11 RES,CHIP 330 0.50% 1/10W
R9484 1-208-754-11 RES,CHIP 68 0.50% 1/10W
R9485 1-208-754-11 RES,CHIP 68 0.50% 1/10W
R9486 1-208-754-11 RES,CHIP 68 0.50% 1/10W
R9487 1-208-754-11 RES,CHIP 68 0.50% 1/10W
R9488 1-208-754-11 RES,CHIP 68 0.50% 1/10W
R9491 1-208-754-11 RES,CHIP 68 0.50% 1/10W
R9492 1-208-754-11 RES,CHIP 68 0.50% 1/10W
R9493 1-208-754-11 RES,CHIP 68 0.50% 1/10W
R9494 1-208-754-11 RES,CHIP 68 0.50% 1/10W
R9495 1-208-754-11 RES,CHIP 68 0.50% 1/10W
R9496 1-208-754-11 RES,CHIP 68 0.50% 1/10W
R9497 1-208-754-11 RES,CHIP 68 0.50% 1/10W
R9498 1-208-770-11 RES,CHIP 330 0.50% 1/10W
R9501 1-216-061-00 RES,CHIP 3.3K 5% 1/10W
R9502 1-216-051-00 RES,CHIP 1.2K 5% 1/10W
R9503 1-216-117-00 RES,CHIP 680K 5% 1/10W
R9504 1-216-041-00 RES,CHIP 470 5% 1/10W
R9505 1-216-295-91 SHORT 0
R9506 1-216-049-91 RES,CHIP 1K 5% 1/10W
R9510 1-216-117-00 RES,CHIP 680K 5% 1/10W
R9512 1-216-037-00 RES,CHIP 330 5% 1/10W
Les composants identifies par
une trame et une marque !
sont critiques pour la securite.
Ne les remplacer que par une
piece portant le numero specifie.
------------------------------------------------------------------------------------------------------------------------------REF. NO. PART NO. DESCRIPTION REMARK
------------ ------------- ------------------- ------------ R9513 1-216-073-00 RES,CHIP 10K 5% 1/10W
R9514 1-216-073-00 RES,CHIP 10K 5% 1/10W
R9515 1-216-033-00 RES,CHIP 220 5% 1/10W
R9517 1-216-295-91 SHORT 0
R9518 1-216-085-00 RES,CHIP 33K 5% 1/10W
R9519 1-216-295-91 SHORT 0
R9520 1-216-057-00 RES,CHIP 2.2K 5% 1/10W
R9521 1-216-053-00 RES,CHIP 1.5K 5% 1/10W
R9522 1-216-053-00 RES,CHIP 1.5K 5% 1/10W
R9523 1-216-061-00 RES,CHIP 3.3K 5% 1/10W
R9524 1-216-061-00 RES,CHIP 3.3K 5% 1/10W
R9525 1-216-085-00 RES,CHIP 33K 5% 1/10W
R9526 1-216-295-91 SHORT 0
R9528 1-216-295-91 SHORT 0
R9529 1-216-041-00 RES,CHIP 470 5% 1/10W
R9530 1-216-051-00 RES,CHIP 1.2K 5% 1/10W
R9531 1-216-117-00 RES,CHIP 680K 5% 1/10W
R9532 1-216-061-00 RES,CHIP 3.3K 5% 1/10W
R9533 1-208-798-11 RES,CHIP 4.7K 0.50% 1/10W
R9534 1-208-774-11 RES,CHIP 470 0.50% 1/10W
R9535 1-208-770-11 RES,CHIP 330 0.50% 1/10W
R9536 1-208-770-11 RES,CHIP 330 0.50% 1/10W
R9537 1-208-770-11 RES,CHIP 330 0.50% 1/10W
R9538 1-208-782-11 RES,CHIP 1K 0.50% 1/10W
R9539 1-216-025-91 RES,CHIP 100 5% 1/10W
R9540 1-216-085-00 RES,CHIP 33K 5% 1/10W
R9541 1-216-061-00 RES,CHIP 3.3K 5% 1/10W
R9542 1-216-057-00 RES,CHIP 2.2K 5% 1/10W
R9543 1-216-041-00 RES,CHIP 470 5% 1/10W
R9544 1-216-053-00 RES,CHIP 1.5K 5% 1/10W
R9545 1-216-295-91 SHORT 0
-------------------------------------------------------------------------------------------------------------------------------
R9546 1-216-061-00 RES,CHIP 3.3K 5% 1/10W
R9547 1-216-041-00 RES,CHIP 470 5% 1/10W
R9548 1-216-051-00 RES,CHIP 1.2K 5% 1/10W
R9549 1-216-117-00 RES,CHIP 680K 5% 1/10W
R9551 1-208-754-11 RES,CHIP 68 0.50% 1/10W
R9553 1-208-754-11 RES,CHIP 68 0.50% 1/10W
R9554 1-216-295-91 SHORT 0
R9555 1-216-037-00 RES,CHIP 330 5% 1/10W
R9556 1-216-033-00 RES,CHIP 220 5% 1/10W
R9558 1-216-117-00 RES,CHIP 680K 5% 1/10W
R9559 1-216-295-91 SHORT 0
R9560 1-216-049-91 RES,CHIP 1K 5% 1/10W
R9561 1-216-025-91 RES,CHIP 100 5% 1/10W
R9562 1-216-025-91 RES,CHIP 100 5% 1/10W
R9563 1-216-025-91 RES,CHIP 100 5% 1/10W
R9564 1-216-025-91 RES,CHIP 100 5% 1/10W
R9566 1-216-295-91 SHORT 0
R9567 1-208-798-11 RES,CHIP 4.7K 0.50% 1/10W
R9568 1-208-798-11 RES,CHIP 4.7K 0.50% 1/10W
R9569 1-216-295-91 SHORT 0
R9570 1-216-295-91 SHORT 0
R9571 1-216-295-91 SHORT 0
R9572 1-216-025-91 RES,CHIP 100 5% 1/10W
R9573 1-216-073-00 RES,CHIP 10K 5% 1/10W
R9574 1-216-073-00 RES,CHIP 10K 5% 1/10W
R9575 1-216-073-00 RES,CHIP 10K 5% 1/10W
R9579 1-216-025-91 RES,CHIP 100 5% 1/10W
R9580 1-216-025-91 RES,CHIP 100 5% 1/10W
R9581 1-216-033-00 RES,CHIP 220 5% 1/10W
R9582 1-216-045-00 RES,CHIP 680 5% 1/10W
R9584 1-216-295-91 SHORT 0
R9591 1-216-049-91 RES,CHIP 1K 5% 1/10W
R9592 1-216-295-91 SHORT 0
R9593 1-216-295-91 SHORT 0
------------------ R9594 1-216-295-91 SHORT 0
R9595 1-216-295-91 SHORT 0
R9596 1-216-049-91 RES,CHIP 1K 5% 1/10W
R9597 1-216-295-91 SHORT 0
The components identified by
shading and mark ! are criti-
cal for safety.
Replace only with part number
specified.
– 122 –
Page 77

The components identified by
shading and mark ! are critical for safety.
Replace only with part number
specified.
REF. NO. PART NO. DESCRIPTION REMARK
------------ ------------- ------------------- ------------ R9598 1-216-295-91 SHORT 0
R9599 1-216-295-91 SHORT 0
R9647 1-216-065-91 RES,CHIP 4.7K 5% 1/10W
R9648 1-216-065-91 RES,CHIP 4.7K 5% 1/10W
R9727 1-208-794-11 RES,CHIP 3.3K 0.50% 1/10W
R9728 1-216-049-91 RES,CHIP 1K 5% 1/10W
R9729 1-216-057-00 RES,CHIP 2.2K 5% 1/10W
R9733 1-216-057-00 RES,CHIP 2.2K 5% 1/10W
R9734 1-216-057-00 RES,CHIP 2.2K 5% 1/10W
R9735 1-208-762-11 RES,CHIP 150 0.50% 1/10W
R9742 1-208-762-11 RES,CHIP 150 0.50% 1/10W
R9743 1-208-762-11 RES,CHIP 150 0.50% 1/10W
R9744 1-216-655-11 RES,CHIP 1.5K 0.50% 1/10W
R9747 1-216-655-11 RES,CHIP 1.5K 0.50% 1/10W
R9752 1-216-655-11 RES,CHIP 1.5K 0.50% 1/10W
R9753 1-216-025-91 RES,CHIP 100 5% 1/10W
R9772 1-216-025-91 RES,CHIP 100 5% 1/10W
R9773 1-216-295-91 SHORT 0
R9774 1-216-057-00 RES,CHIP 2.2K 5% 1/10W
R9782 1-216-049-91 RES,CHIP 1K 5% 1/10W
R9786 1-216-049-91 RES,CHIP 1K 5% 1/10W
R9801 1-216-295-91 SHORT 0
R9802 1-216-049-91 RES,CHIP 1K 5% 1/10W
R9803 1-216-049-91 RES,CHIP 1K 5% 1/10W
R9804 1-216-065-91 RES,CHIP 4.7K 5% 1/10W
R9805 1-216-073-00 RES,CHIP 10K 5% 1/10W
R9806 1-216-073-00 RES,CHIP 10K 5% 1/10W
R9807 1-216-049-91 RES,CHIP 1K 5% 1/10W
R9808 1-208-774-11 RES,CHIP 470 0.50% 1/10W
R9809 1-208-766-11 RES,CHIP 220 0.50% 1/10W
R9810 1-208-800-11 RES,CHIP 5.6K 0.50% 1/10W
R9811 1-216-065-91 RES,CHIP 4.7K 5% 1/10W
R9812 1-216-057-00 RES,CHIP 2.2K 5% 1/10W
R9813 1-216-057-00 RES,CHIP 2.2K 5% 1/10W
R9814 1-216-049-91 RES,CHIP 1K 5% 1/10W
R9815 1-216-049-91 RES,CHIP 1K 5% 1/10W
R9816 1-216-049-91 RES,CHIP 1K 5% 1/10W
R9817 1-216-049-91 RES,CHIP 1K 5% 1/10W
R9818 1-216-049-91 RES,CHIP 1K 5% 1/10W
R9819 1-216-049-91 RES,CHIP 1K 5% 1/10W
R9820 1-216-025-91 RES,CHIP 100 5% 1/10W
R9823 1-216-025-91 RES,CHIP 100 5% 1/10W
R9827 1-208-773-11 RES,CHIP 430 0.50% 1/10W
R9828 1-208-800-11 RES,CHIP 5.6K 0.50% 1/10W
R9829 1-216-049-91 RES,CHIP 1K 5% 1/10W
R9840 1-216-295-91 SHORT 0
R9842 1-208-774-11 RES,CHIP 470 0.50% 1/10W
R9843 1-208-766-11 RES,CHIP 220 0.50% 1/10W
R9849 1-208-800-11 RES,CHIP 5.6K 0.50% 1/10W
R9850 1-208-800-11 RES,CHIP 5.6K 0.50% 1/10W
R9851 1-208-800-11 RES,CHIP 5.6K 0.50% 1/10W
R9852 1-208-773-11 RES,CHIP 430 0.50% 1/10W
R9853 1-216-053-00 RES,CHIP 1.5K 5% 1/10W
R9854 1-216-053-00 RES,CHIP 1.5K 5% 1/10W
R9855 1-216-053-00 RES,CHIP 1.5K 5% 1/10W
R9864 1-208-776-11 RES,CHIP 560 0.50% 1/10W
Les composants identifies par
une trame et une marque !
sont critiques pour la securite.
Ne les remplacer que par une
piece portant le numero specifie.
KV -EF34M31/EF34M61/EF34M80/EF34M90/EF34M91
RM-951
P F B4
------------------------------------------------------------------------------------------------------------------------------REF. NO. PART NO. DESCRIPTION REMARK
------------ ------------- ------------------- -------------
*A-1241-340-A F BOARD, COMPLETE
*4-374-846-01 COVER, CAPACITOR, CAP TYPE
C654 ! 1-117-703-11 CERAMIC 0.0047MF 250V
C4601 ! 1-136-537-11 FILM 0.47MF 20% 250V
C4602 ! 1-136-537-11 FILM 0.47MF 20% 250V
CN4601 *1-580-843-11 PIN, CONNECTOR (POWER)
CN4602 *1-580-843-11 PIN, CONNECTOR (POWER)
CN4603 1-695-915-11 TAB (CONTACT)
F4601 ! 1-532-299-11 FUSE, TIME-LAG 5A/250V
R4601 ! 1-202-885-91 SOLID 1M 10% 1/2W
T4601 ! 1-431-536-11 TRANSFORMER, LINE FILTER
T4602 ! 1-431-182-11 TRANSFORMER, LINE FILTER
-------------------------------------------------------------------------------------------------------------------------------
VDR461!1-801-268-51 VARISTOR TNR14V471K660
*************************************************************
C8300 1-164-505-11 CERAMIC CHIP 2.2MF 16V
C8301 1-164-505-11 CERAMIC CHIP 2.2MF 16V
C8302 1-164-505-11 CERAMIC CHIP 2.2MF 16V
CN8300 1-785-714-11 PIN, CONNECTOR (PC BOARD) 6P
CN8301 *1-564-521-11 PLUG, CONNECTOR 6P
CN8302 1-785-715-11 PIN, CONNECTOR (PC BOARD) 2P
CN8303 1-785-715-11 PIN, CONNECTOR (PC BOARD) 2P
L8300 1-414-185-41 INDUCTOR 22UH
1-533-223-11 HOLDER, FUSE ; F4601
*A-1131-391-A B4 BOARD, COMPLETE
*********************
<CAPACITOR>
<CONNECTOR>
<FUSE>
<RESISTOR>
<TRANSFORMER>
<VARISTOR>
**********************
<CAPACITOR>
<CONNECTOR>
<COIL>
<CRYSTAL>
X9504 1-781-174-21 VIBRATOR, CERAMIC
X9508 1-767-262-31 VIBRATOR, CRYSTAL
*************************************************************
– 123 –
<TRANSISTOR>
Q8300 8-729-216-22 TRANSISTOR 2SA1162-G
Q8301 8-729-230-49 TRANSISTOR 2SC2712-YG
Q8302 8-729-216-22 TRANSISTOR 2SA1162-G
Q8303 8-729-230-49 TRANSISTOR 2SC2712-YG
Q8304 8-729-216-22 TRANSISTOR 2SA1162-G
------------------ Q8305 8-729-230-49 TRANSISTOR 2SC2712-YG
<RESISTOR>
R8301 1-216-057-00 RES,CHIP 2.2K 5% 1/10W
Page 78

KV -EF34M31/EF34M61/EF34M80/EF34M90/EF34M91
RM-951
B4 A
REF. NO. PART NO. DESCRIPTION REMARK
------------ ------------- ------------------- ------------ R8302 1-216-037-00 RES,CHIP 330 5% 1/10W
R8303 1-216-057-00 RES,CHIP 2.2K 5% 1/10W
R8304 1-216-037-00 RES,CHIP 330 5% 1/10W
R8305 1-216-025-91 RES,CHIP 100 5% 1/10W
R8306 1-216-025-91 RES,CHIP 100 5% 1/10W
R8307 1-216-057-00 RES,CHIP 2.2K 5% 1/10W
R8308 1-216-037-00 RES,CHIP 330 5% 1/10W
R8309 1-216-025-91 RES,CHIP 100 5% 1/10W
*************************************************************
*A-1298-745-A A BOARD, COMPLETE (KV-EF34M61)
*A-1298-756-A A BOARD, COMPLETE (KV-EF34M91)
*A-1298-757-A A BOARD, COMPLETE (KV-EF34M80)
*A-1298-764-A A BOARD, COMPLETE (KV-EF34M90(HK))
*A-1298-765-A A BOARD, COMPLETE (KV-EF34M90(JE))
*A-1298-766-A A BOARD, COMPLETE (KV-EF34M31)
1-900-243-55 CONNECTOR ASSY (LEAD)
4-382-854-11 SCREW (M3X10), P, SW (+)
4-382-854-21 SCREW (M3X14), P, SW (+)
C004 1-163-001-11 CERAMIC CHIP 220PF 10% 50V
C005 1-163-001-11 CERAMIC CHIP 220PF 10% 50V
C006 1-107-725-11 CERAMIC CHIP 0.1MF 10% 16V
C007 1-126-933-11 ELECT 100MF 20% 16V
C013 1-163-021-91 CERAMIC CHIP 0.01MF 10% 50V
C014 1-126-967-11 ELECT 47MF 20% 50V
C015 1-163-009-11 CERAMIC CHIP 0.001MF 10% 50V
C016 1-163-243-11 CERAMIC CHIP 47PF 5% 50V
C017 1-163-113-00 CERAMIC CHIP 68PF 5% 50V
C019 1-104-665-11 ELECT 100MF 20% 25V
C022 1-163-227-11 CERAMIC CHIP 10PF 0.5PF 50V
C023 1-163-227-11 CERAMIC CHIP 10PF 0.5PF 50V
C024 1-163-227-11 CERAMIC CHIP 10PF 0.5PF 50V
C026 1-107-725-11 CERAMIC CHIP 0.1MF 10% 16V
C027 1-107-725-11 CERAMIC CHIP 0.1MF 10% 16V
C028 1-163-037-11 CERAMIC CHIP 0.022MF 10% 50V
C030 1-126-965-11 ELECT 22MF 20% 50V
C031 1-107-725-11 CERAMIC CHIP 0.1MF 10% 16V
C032 1-107-823-11 CERAMIC CHIP 0.47MF 10% 16V
C034 1-163-031-11 CERAMIC CHIP 0.01MF 50V
C041 1-163-251-11 CERAMIC CHIP 100PF 5% 50V
C042 1-163-251-11 CERAMIC CHIP 100PF 5% 50V
C043 1-163-251-11 CERAMIC CHIP 100PF 5% 50V
C044 1-163-251-11 CERAMIC CHIP 100PF 5% 50V
C047 1-163-251-11 CERAMIC CHIP 100PF 5% 50V
C103 1-107-725-11 CERAMIC CHIP 0.1MF 10% 16V
C104 1-126-933-11 ELECT 100MF 20% 16V
C107 1-163-005-11 CERAMIC CHIP 470PF 10% 50V
C108 1-126-933-11 ELECT 100MF 20% 16V
C109 1-163-005-11 CERAMIC CHIP 470PF 10% 50V
C110 1-163-005-11 CERAMIC CHIP 470PF 10% 50V
C111 1-163-005-11 CERAMIC CHIP 470PF 10% 50V
C112 1-126-933-11 ELECT 100MF 20% 16V
C113 1-126-967-11 ELECT 47MF 20% 50V
C114 1-126-967-11 ELECT 47MF 20% 50V
C115 1-126-967-11 ELECT 47MF 20% 50V
*********************
*********************
*********************
*********************
*********************
*********************
<CAPACITOR>
Les composants identifies par
une trame et une marque !
sont critiques pour la securite.
Ne les remplacer que par une
piece portant le numero specifie.
------------------------------------------------------------------------------------------------------------------------------REF. NO. PART NO. DESCRIPTION REMARK
------------ ------------- ------------------- ------------ C116 1-107-725-11 CERAMIC CHIP 0.1MF 10% 16V
C117 1-107-725-11 CERAMIC CHIP 0.1MF 10% 16V
C300 1-164-505-11 CERAMIC CHIP 2.2MF 16V
C301 1-126-935-11 ELECT 470MF 20% 16V
C302 1-163-005-11 CERAMIC CHIP 470PF 10% 50V
C304 1-126-967-11 ELECT 47MF 20% 50V
C305 1-107-725-11 CERAMIC CHIP 0.1MF 10% 16V
C306 1-163-233-11 CERAMIC CHIP 18PF 5% 50V
C307 1-163-233-11 CERAMIC CHIP 18PF 5% 50V
C308 1-163-259-91 CERAMIC CHIP 220PF 5% 50V
C309 1-126-957-11 ELECT 0.22MF 20% 50V
C311 1-126-964-11 ELECT 10MF 20% 50V
C312 1-164-346-11 CERAMIC CHIP 1MF 16V
C313 1-164-346-11 CERAMIC CHIP 1MF 16V
C314 1-164-346-11 CERAMIC CHIP 1MF 16V
C315 1-107-725-11 CERAMIC CHIP 0.1MF 10% 16V
C316 1-126-935-11 ELECT 470MF 20% 16V
C317 1-163-031-11 CERAMIC CHIP 0.01MF 50V
C318 1-163-031-11 CERAMIC CHIP 0.01MF 50V
C319 1-163-031-11 CERAMIC CHIP 0.01MF 50V
C320 1-163-031-11 CERAMIC CHIP 0.01MF 50V
C322 1-163-005-11 CERAMIC CHIP 470PF 10% 50V
C323 1-126-933-11 ELECT 100MF 20% 16V
C324 1-163-017-00 CERAMIC CHIP 0.0047MF 10% 50V
C325 1-126-960-11 ELECT 1MF 20% 50V
C326 1-126-964-11 ELECT 10MF 20% 50V
C327 1-126-965-11 ELECT 22MF 20% 50V
C328 1-107-725-11 CERAMIC CHIP 0.1MF 10% 16V
C329 1-126-965-11 ELECT 22MF 20% 50V
C330 1-107-725-11 CERAMIC CHIP 0.1MF 10% 16V
C331 1-126-964-11 ELECT 10MF 20% 50V
-------------------------------------------------------------------------------------------------------------------------------
C332 1-126-963-11 ELECT 4.7MF 20% 50V
C335 1-107-725-11 CERAMIC CHIP 0.1MF 10% 16V
C336 1-107-725-11 CERAMIC CHIP 0.1MF 10% 16V
C337 1-126-961-11 ELECT 2.2MF 20% 50V
C338 1-163-017-00 CERAMIC CHIP 0.0047MF 10% 50V
C341 1-115-340-11 CERAMIC CHIP 0.22MF 10% 25V
C502 1-163-145-00 CERAMIC CHIP 0.0015MF 5% 50V
C503 1-126-964-11 ELECT 10MF 20% 50V
C504 1-163-007-11 CERAMIC CHIP 680PF 10% 50V
C506 1-107-638-11 ELECT 33MF 20% 160V
C507 1-102-244-00 CERAMIC 220PF 10% 500V
C510 1-102-074-00 CERAMIC 0.001MF 10% 50V
C513 1-163-021-91 CERAMIC CHIP 0.01MF 10% 50V
C514 1-106-383-00 MYLAR 0.047MF 10% 200V
C517 1-164-182-11 CERAMIC CHIP 0.0033MF 10% 50V
C518 1-126-933-11 ELECT 100MF 20% 16V
C519 1-102-212-00 CERAMIC 820PF 10% 500V
C521 1-104-666-11 ELECT 220MF 20% 25V
C522 1-126-933-11 ELECT 100MF 20% 16V
C523 1-162-318-11 CERAMIC 0.001MF 10% 500V
C524 1-126-967-11 ELECT 47MF 20% 50V
C526 1-130-495-00 MYLAR 0.1MF 5% 50V
C527 1-102-820-00 CERAMIC 330PF 5% 50V
C528 1-162-116-00 CERAMIC 680PF 10% 2KV
C530 1-137-372-11 FILM 0.022MF 5% 50V
C531 1-107-903-11 ELECT 2.2MF 20% 50V
C532 1-128-528-11 ELECT 470MF 20% 25V
C533 1-128-528-11 ELECT 470MF 20% 25V
C536 1-136-165-00 FILM 0.1MF 5% 50V
C537 1-107-911-11 ELECT 220MF 20% 50V
C538 1-136-544-11 FILM 0.023MF 3% 2KV
C539 1-130-118-91 FILM 0.051MF 5% 400V
C540 1-136-171-00 FILM 0.33MF 5% 50V
------------------ C543 1-162-116-00 CERAMIC 680PF 10% 2KV
C546 1-165-319-11 CERAMIC CHIP 0.1MF 50V
C549 1-163-017-00 CERAMIC CHIP 0.0047MF 10% 50V
C550 1-106-220-00 MYLAR 0.1MF 10% 100V
C551 1-126-960-11 ELECT 1MF 20% 50V
The components identified by
shading and mark ! are criti-
cal for safety.
Replace only with part number
specified.
– 124 –
Page 79

The components identified by
shading and mark ! are critical for safety.
Replace only with part number
specified.
REF. NO. PART NO. DESCRIPTION REMARK
------------ ------------- ------------------- ------------ C552 1-162-116-00 CERAMIC 680PF 10% 2KV
C553 1-162-116-00 CERAMIC 680PF 10% 2KV
C554 1-106-361-00 MYLAR 0.0056MF 10% 100V
C556 1-128-528-11 ELECT 470MF 20% 25V
C557 1-126-941-11 ELECT 470MF 20% 25V
C558 1-123-024-21 ELECT 33MF 160V
C560 1-102-228-00 CERAMIC 470PF 10% 500V
C561 1-129-928-00 FILM 0.0027MF 5% 630V
C562 1-102-228-00 CERAMIC 470PF 10% 500V
C563 1-163-021-91 CERAMIC CHIP 0.01MF 10% 50V
C564 1-163-038-91 CERAMIC CHIP 0.1MF 25V
C565 1-107-655-11 ELECT 47MF 20% 250V
C566 1-102-244-00 CERAMIC 220PF 10% 500V
C567 1-109-961-11 FILM 0.75MF 5% 250V
C568 1-102-228-00 CERAMIC 470PF 10% 500V
C570 1-117-674-71 FILM 1.8MF 5% 250V
C571 1-126-959-11 ELECT 0.47MF 20% 50V
C572 1-115-514-11 FILM 0.22MF 5% 250V
C573 1-106-387-00 MYLAR 0.068MF 10% 200V
C574 1-104-709-11 ELECT 4.7MF 0 160V
C576 1-130-495-00 MYLAR 0.1MF 5% 50V
C577 1-115-516-11 FILM 0.33MF 5% 250V
C579 1-102-038-00 CERAMIC 0.001MF 500V
C600 ! 1-104-705-11 FILM 0.1MF 20% 250V
C601 1-136-601-11 FILM 0.01MF 10% 630V
C603 1-126-967-11 ELECT 47MF 20% 50V
C604 1-163-009-11 CERAMIC CHIP 0.001MF 10% 50V
C605 ! 1-119-886-51 CERAMIC 470PF 10% 250V
C606 ! 1-119-886-51 CERAMIC 470PF 10% 250V
C607 ! 1-161-830-51 CERAMIC 0.0047MF 500V
C608 ! 1-161-830-51 CERAMIC 0.0047MF 500V
C609 1-126-968-11 ELECT 100MF 20% 50V
C610 1-126-964-11 ELECT 10MF 20% 50V
C611 1-161-830-00 CERAMIC 0.0047MF 500V
C612 1-161-830-00 CERAMIC 0.0047MF 500V
C613 1-125-906-11 ELECT 560MF 20% 450V
C614 1-126-964-11 ELECT 10MF 20% 50V
C615 ! 1-119-886-51 CERAMIC 470PF 10% 250V
C616 1-130-202-00 FILM 0.022MF 10% 400V
C617 1-107-792-11 CERAMIC 100PF 5% 1KV
C618 1-125-893-11 FILM 680PF 3% 1.5KV
C619 ! 1-119-886-51 CERAMIC 470PF 10% 250V
C620 1-163-133-00 CERAMIC CHIP 470PF 5% 50V
C621 1-102-824-00 CERAMIC 470PF 5% 50V
C622 1-102-119-00 CERAMIC 0.0015MF 10% 50V
C623 1-104-665-11 ELECT 100MF 20% 25V
C624 1-125-772-91 CERAMIC 1500PF 10% 2KV
C625 1-102-002-00 CERAMIC 680PF 10% 500V
C626 1-102-002-00 CERAMIC 680PF 10% 500V
C629 1-126-964-11 ELECT 10MF 20% 50V
C630 1-125-494-11 ELECT (BLOCK)560MF 20% 160V
C631 1-128-550-11 ELECT 2200MF 20% 50V
C632 1-126-936-11 ELECT 3300MF 20% 16V
C633 1-104-999-11 MYLAR 0.1MF 10% 200V
C634 1-126-934-11 ELECT 220MF 20% 16V
C635 1-104-665-11 ELECT 100MF 20% 10V
C636 1-104-760-11 CERAMIC CHIP 0.047MF 10% 50V
C638 1-161-830-00 CERAMIC 0.0047MF 500V
C641 1-102-002-00 CERAMIC 680PF 10% 500V
C642 1-107-890-11 ELECT 2200MF 20% 25V
C643 1-126-933-11 ELECT 100MF 20% 16V
C644 1-104-331-11 CERAMIC 0.0022MF 10% 1KV
C645 1-137-605-11 FILM 0.01MF 10% 250V
C646 1-107-679-91 ELECT 10MF 20% 450V
C647 1-163-275-11 CERAMIC CHIP 0.001MF 5% 50V
C649 1-126-940-11 ELECT 330MF 20% 25V
C650 1-163-275-11 CERAMIC CHIP 0.001MF 5% 50V
C651 1-163-133-00 CERAMIC CHIP 470PF 5% 50V
C652 1-126-965-11 ELECT 22MF 20% 50V
Les composants identifies par
une trame et une marque !
sont critiques pour la securite.
Ne les remplacer que par une
piece portant le numero specifie.
KV -EF34M31/EF34M61/EF34M80/EF34M90/EF34M91
RM-951
A
------------------------------------------------------------------------------------------------------------------------------REF. NO. PART NO. DESCRIPTION REMARK
------------ ------------- ------------------- ------------ C653 1-126-967-11 ELECT 47MF 20% 50V
C655 ! 1-119-886-51 CERAMIC 470PF 10% 250V
C657 1-101-821-00 CERAMIC 0.0022MF 500V
C912 1-107-725-11 CERAMIC CHIP 0.1MF 10% 16V
C913 1-126-933-11 ELECT 100MF 20% 16V
<CONNECTOR>
CN101 * 1-779-890-11 CONNECTOR, BOARD TO BOARD 10P
CN102 * 1-779-889-11 CONNECTOR, BOARD TO BOARD 8P
CN104 1-695-915-11 TAB (CONTACT)
CN105 * 1-508-784-21 PIN, CONNECTOR (5mm PITCH) 1P
CN106 * 1-564-506-11 PLUG, CONNECTOR 3P
CN201 * 1-564-506-11 PLUG, CONNECTOR 3P
CN202 * 1-785-608-11 PIN, CONNECTOR 4P
CN301 * 1-774-813-11 CONNECTOR, BOARD TO BOARD 7P
CN302 * 1-779-889-11 CONNECTOR, BOARD TO BOARD 8P
CN303 * 1-779-890-11 CONNECTOR, BOARD TO BOARD 10P
CN304 * 1-766-955-11 CONNECTOR, BOARD TO BOARD 11P
CN307 * 1-774-813-11 CONNECTOR, BOARD TO BOARD 7P
CN501 * 1-508-784-21 PIN, CONNECTOR (5mm PITCH) 1P
CN503 * 1-564-510-11 PLUG, CONNECTOR 7P
CN504 1-695-915-11 TAB (CONTACT)
CN505 1-508-766-00 PIN, CONNECTOR (5mm PITCH) 4P
CN508 1-695-915-11 TAB (CONTACT)
CN510 * 1-564-507-11 PLUG, CONNECTOR 4P (except EF34M80)
CN601 * 1-580-843-12 PIN, CONNECTOR (POWER)
CN602 * 1-508-786-00 PIN, CONNECTOR (5mm PITCH) 2P
CN603 * 1-508-784-21 PIN, CONNECTOR (5mm PITCH) 1P
-------------------------------------------------------------------------------------------------------------------------------
CN604 * 1-573-963-11 PIN, CONNECTOR (PC BOARD) 3P
CN605 * 1-564-507-11 PLUG, CONNECTOR 4P
CN607 * 1-508-784-21 PIN, CONNECTOR (5mm PITCH) 1P
CN904 * 1-564-512-11 PLUG, CONNECTOR 9P
<DIODE>
D001 8-719-404-49 DIODE MA111
D002 8-719-404-49 DIODE MA111
D003 8-719-404-49 DIODE MA111
D004 8-719-404-49 DIODE MA111
D005 8-719-404-49 DIODE MA111
D006 1-216-295-91 SHORT 0
D100 8-719-911-19 DIODE 1SS119-25
D300 8-719-404-49 DIODE MA111
D301 8-719-404-49 DIODE MA111
D303 8-719-404-49 DIODE MA111
D304 8-719-404-49 DIODE MA111
D305 8-719-404-49 DIODE MA111
D306 8-719-404-49 DIODE MA111
D307 8-719-404-49 DIODE MA111
D308 8-719-404-49 DIODE MA111
D309 8-719-159-10 DIODE RD5.1SB-T2
D311 8-719-404-49 DIODE MA111
D312 8-719-404-49 DIODE MA111
D313 8-719-404-49 DIODE MA111
D315 8-719-404-49 DIODE MA111
D316 8-719-158-39 DIODE RD10SB
D317 8-719-404-49 DIODE MA111
D504 8-719-302-43 DIODE EL1Z
D505 8-719-404-49 DIODE MA111
D506 8-719-911-19 DIODE 1SS119-25
D507 8-719-404-49 DIODE MA111
D508 8-719-404-49 DIODE MA111
------------------ D509 8-719-158-15 DIODE RD5.6SB
D510 8-719-404-49 DIODE MA111
D511 8-719-404-49 DIODE MA111
D512 8-719-404-49 DIODE MA111
(EF34M31/EF34M61/EF34M91)
(EF34M31/EF34M61/EF34M91)
– 125 –
Page 80

KV -EF34M31/EF34M61/EF34M80/EF34M90/EF34M91
RM-951
A
REF. NO. PART NO. DESCRIPTION REMARK
------------ ------------- ------------------- ------------ D513 8-719-908-03 DIODE GP08D
D517 8-719-061-21 DIODE FMQ-G5FMS
D520 8-719-404-49 DIODE MA111
D521 8-719-302-43 DIODE EL1Z
D522 8-719-028-45 DIODE D2L20U
D523 8-719-302-43 DIODE EL1Z
D525 8-719-911-19 DIODE 1SS119-25
D526 8-719-150-92 DIODE RD33EB3T
D527 8-719-908-03 DIODE GP08D
D528 8-719-908-03 DIODE GP08D
D529 8-719-028-72 DIODE RGP02-17EL-6433
D530 8-719-071-39 DIODE FMU-G26S
D531 8-719-404-49 DIODE MA111
D532 8-719-404-49 DIODE MA111
D600 8-719-911-19 DIODE 1SS119-25
D602 8-719-911-19 DIODE 1SS119-25
D603 8-719-150-92 DIODE RD33EB3T
D604 8-719-028-72 DIODE RGP02-17EL-6433
D605 8-719-510-53 DIODE D4SB60L
D606 8-719-108-18 THYRISTOR 5P6M
D607 8-719-404-49 DIODE MA111
D608 8-719-110-53 DIODE RD20ESB2
D609 8-719-311-31 DIODE RU-1P
D610 8-719-043-76 DIODE AK04V0
D611 8-719-046-74 DIODE AU-01Z-V1
D612 8-719-071-38 DIODE D5S6M
D613 8-719-046-74 DIODE AU-01Z-V1
D614 8-719-046-74 DIODE AU-01Z-V1
D620 8-719-110-72 DIODE RD30ESB2
D621 8-719-071-38 DIODE D5S6M
D622 8-719-071-39 DIODE FMU-G26S
D623 8-719-158-57 DIODE RD15SB2
D624 8-719-404-49 DIODE MA111
D625 8-719-158-39 DIODE RD10SB
D628 8-719-911-19 DIODE 1SS119-25
D630 8-719-510-37 DIODE D5LC20U
D631 8-719-068-00 DIODE ERC04-06SE
D632 8-719-068-00 DIODE ERC04-06SE
D633 8-719-948-45 DIODE ERA22-08
D634 8-719-404-49 DIODE MA111
D635 8-719-404-49 DIODE MA111
D636 8-719-510-02 DIODE D1NS4
D637 8-719-109-96 DIODE RD6.8ESB1
D638 8-719-510-48 DIODE D1N20R
<CONNECTOR>
DY1 *1-580-798-11 CONNECTOR PIN (DY) 6P
<FERRITE BEAD>
FB101 1-216-295-91 SHORT 0
FB102 1-216-295-91 SHORT 0
FB501 1-410-397-21 FERRITE 1.1UH
FB502 1-410-397-21 FERRITE 1.1UH
FB600 1-410-396-41 FERRITE 0.45UH
FB601 1-410-397-21 FERRITE 1.1UH
FB602 1-410-397-21 FERRITE 1.1UH
FB603 1-412-911-11 FERRITE 0UH
FB604 1-410-397-21 FERRITE 1.1UH
FB605 1-412-911-11 FERRITE 0UH
FB606 1-412-911-11 FERRITE 0UH
FB608 1-412-911-11 FERRITE 0UH
FB611 1-410-397-21 FERRITE 1.1UH
FB612 1-410-397-21 FERRITE 1.1UH
FB613 1-410-397-21 FERRITE 1.1UH
FB615 1-410-397-21 FERRITE 1.1UH
Les composants identifies par
une trame et une marque !
sont critiques pour la securite.
Ne les remplacer que par une
piece portant le numero specifie.
------------------------------------------------------------------------------------------------------------------------------REF. NO. PART NO. DESCRIPTION REMARK
------------ ------------- ------------------- -------------
<IC>
IC001 8-752-898-91 IC CXP750097-001S
IC001 8-752-898-92 IC CXP750097-002S (EF34M80/EF34M91)
IC002 8-759-371-21 IC MM1319AFBE
IC003 8-759-370-34 IC ST24C08FB6
IC100 8-759-042-02 IC S-80743AL-A7-S
IC301 8-752-088-39 IC CXA2130S
IC502 8-759-700-07 IC NJM2903M
IC503 8-759-980-58 IC TDA8172
IC601 8-749-014-48 IC STR-F6656
IC602 8-749-920-61 IC SE-135N
IC603 8-759-701-59 IC NJM78M09FA
IC604 8-759-231-53 IC TA7805S
<CHIP CONDUCTOR>
JR002 1-216-295-91 SHORT 0
JR003 1-216-295-91 SHORT 0
JR004 1-216-295-91 SHORT 0
JR005 1-216-295-91 SHORT 0
JR006 1-216-295-91 SHORT 0
JR007 1-216-295-91 SHORT 0
JR008 1-216-295-91 SHORT 0
JR009 1-216-295-91 SHORT 0
JR010 1-216-295-91 SHORT 0
JR011 1-216-295-91 SHORT 0
JR012 1-216-295-91 SHORT 0
JR014 1-216-295-91 SHORT 0
JR015 1-216-295-91 SHORT 0
JR016 1-216-295-91 SHORT 0
-------------------------------------------------------------------------------------------------------------------------------
JR102 1-216-295-91 SHORT 0
JR107 1-216-295-91 SHORT 0 (except EF34M80)
JR109 1-216-295-91 SHORT 0 (EF34M80)
JR301 1-216-295-91 SHORT 0
JR500 1-216-295-91 SHORT 0
JR501 1-216-295-91 SHORT 0
JR502 1-216-295-91 SHORT 0
JR600 1-216-295-91 SHORT 0
<COIL>
L002 1-414-856-11 INDUCTOR 10UH
L003 1-414-180-11 INDUCTOR 3.3UH
L005 1-414-233-22 INDUCTOR CHIP 0UH
L101 1-414-856-11 INDUCTOR 10UH
L102 1-414-856-11 INDUCTOR 10UH
L103 1-414-856-11 INDUCTOR 10UH
L104 1-414-856-11 INDUCTOR 10UH
L105 1-414-856-11 INDUCTOR 10UH
L301 1-414-189-31 INDUCTOR 100UH
L302 1-414-185-41 INDUCTOR 22UH
L501 1-412-525-31 INDUCTOR 10UH
L502 1-422-613-11 COIL, AIR CORE
L503 1-412-525-31 INDUCTOR 10UH
L504 1-412-525-31 INDUCTOR 10UH
L505 1-412-525-31 INDUCTOR 10UH
L506 1-412-525-31 INDUCTOR 10UH
L507 1-459-111-00 INDUCTOR 10mH
L508 1-412-525-31 INDUCTOR 10UH
L511 1-406-977-21 INDUCTOR 100UH
L512 1-412-549-11 INDUCTOR 1mH
L513 1-412-549-11 INDUCTOR 1mH
L515 1-459-104-00 COIL, WITH CORE
------------------ L518 1-408-611-31 INDUCTOR 47UH
L601 1-412-527-11 INDUCTOR 15UH
L905 1-414-856-11 INDUCTOR 10UH
The components identified by
shading and mark ! are criti-
cal for safety.
Replace only with part number
specified.
(EF34M31/EF34M61/EF34M90)
– 126 –
Page 81

The components identified by
shading and mark ! are critical for safety.
Replace only with part number
specified.
REF. NO. PART NO. DESCRIPTION REMARK
------------ ------------- ------------------- -------------
PH600 ! 8-749-924-35 PHOTO COUPLER ON3171-R
Q001 8-729-216-22 TRANSISTOR 2SA1162-G
Q002 8-729-230-49 TRANSISTOR 2SC2712-YG
Q003 8-729-027-23 TRANSISTOR DTA114EKA-T146
Q004 8-729-900-53 TRANSISTOR DTC114EK
Q101 8-729-230-49 TRANSISTOR 2SC2712-YG
Q301 8-729-216-22 TRANSISTOR 2SA1162-G
Q304 8-729-216-22 TRANSISTOR 2SA1162-G
Q305 8-729-216-22 TRANSISTOR 2SA1162-G
Q306 8-729-216-22 TRANSISTOR 2SA1162-G
Q307 8-729-230-49 TRANSISTOR 2SC2712-YG
Q308 8-729-216-22 TRANSISTOR 2SA1162-G
Q311 8-729-230-49 TRANSISTOR 2SC2712-YG
Q312 8-729-216-22 TRANSISTOR 2SA1162-G
Q313 8-729-230-49 TRANSISTOR 2SC2712-YG
Q315 8-729-900-53 TRANSISTOR DTC114EK
Q501 8-729-216-22 TRANSISTOR 2SA1162-G
Q502 8-729-216-22 TRANSISTOR 2SA1162-G
Q503 8-729-230-49 TRANSISTOR 2SC2712-YG
Q505 8-729-931-45 TRANSISTOR IRF614
Q506 8-729-140-96 TRANSISTOR 2SD774-34
Q507 8-729-216-22 TRANSISTOR 2SA1162-G
Q509 8-729-230-49 TRANSISTOR 2SC2712-YG
Q511 8-729-016-32 TRANSISTOR 2SC4927-01
Q600 8-729-119-78 TRANSISTOR 2SC2785-HFE
Q601 8-729-023-22 TRANSISTOR 2SD2114K
Q602 8-729-230-49 TRANSISTOR 2SC2712-YG
Q603 8-729-027-23 TRANSISTOR DTA114EKA-T146
Q604 8-729-200-17 TRANSISTOR 2SA1091-O
Q605 8-729-044-30 TRANSISTOR 2SK2845-LB102
Q606 8-729-230-49 TRANSISTOR 2SC2712-YG
Q607 8-729-922-37 TRANSISTOR 2SD2144S-UVW
Q608 8-729-230-49 TRANSISTOR 2SC2712-YG
R001 1-414-233-22 INDUCTOR CHIP 0UH
R002 1-216-025-91 RES,CHIP 100 5% 1/10W
R003 1-216-073-00 RES,CHIP 10K 5% 1/10W
R004 1-216-025-91 RES,CHIP 100 5% 1/10W
R005 1-216-025-91 RES,CHIP 100 5% 1/10W
R008 1-216-065-91 RES,CHIP 4.7K 5% 1/10W
R010 1-216-065-91 RES,CHIP 4.7K 5% 1/10W
R011 1-216-065-91 RES,CHIP 4.7K 5% 1/10W
R012 1-216-065-91 RES,CHIP 4.7K 5% 1/10W
R013 1-216-065-91 RES,CHIP 4.7K 5% 1/10W
R014 1-216-025-91 RES,CHIP 100 5% 1/10W
R015 1-216-025-91 RES,CHIP 100 5% 1/10W
R016 1-216-025-91 RES,CHIP 100 5% 1/10W
R017 1-216-049-91 RES,CHIP 1K 5% 1/10W
R018 1-216-033-00 RES,CHIP 220 5% 1/10W
R019 1-216-073-00 RES,CHIP 10K 5% 1/10W
R021 1-216-073-00 RES,CHIP 10K 5% 1/10W
R022 1-216-025-91 RES,CHIP 100 5% 1/10W
R023 1-216-049-91 RES,CHIP 1K 5% 1/10W
R024 1-216-063-91 RES,CHIP 3.9K 5% 1/10W
R025 1-216-063-91 RES,CHIP 3.9K 5% 1/10W
R026 1-216-063-91 RES,CHIP 3.9K 5% 1/10W
R027 1-216-049-91 RES,CHIP 1K 5% 1/10W
R028 1-216-073-00 RES,CHIP 10K 5% 1/10W
R029 1-216-049-91 RES,CHIP 1K 5% 1/10W
R031 1-216-049-91 RES,CHIP 1K 5% 1/10W
R032 1-216-025-91 RES,CHIP 100 5% 1/10W
Les composants identifies par
une trame et une marque !
sont critiques pour la securite.
Ne les remplacer que par une
piece portant le numero specifie.
<PHOTO COUPLER>
<TRANSISTOR>
<RESISTOR>
(except EF34M80)
KV -EF34M31/EF34M61/EF34M80/EF34M90/EF34M91
RM-951
A
------------------------------------------------------------------------------------------------------------------------------REF. NO. PART NO. DESCRIPTION REMARK
------------ ------------- ------------------- ------------ R034 1-216-049-91 RES,CHIP 1K 5% 1/10W
R035 1-216-025-91 RES,CHIP 100 5% 1/10W
R036 1-216-025-91 RES,CHIP 100 5% 1/10W
R037 1-216-025-91 RES,CHIP 100 5% 1/10W
R038 1-216-049-91 RES,CHIP 1K 5% 1/10W
R039 1-216-049-91 RES,CHIP 1K 5% 1/10W
R040 1-216-025-91 RES,CHIP 100 5% 1/10W
R041 1-216-025-91 RES,CHIP 100 5% 1/10W
R042 1-216-295-91 SHORT 0
R043 1-216-025-91 RES,CHIP 100 5% 1/10W
R044 1-216-025-91 RES,CHIP 100 5% 1/10W
R045 1-414-233-22 INDUCTOR CHIP 0UH
R046 1-216-049-91 RES,CHIP 1K 5% 1/10W
R047 1-414-233-22 INDUCTOR CHIP 0UH
R048 1-216-073-00 RES,CHIP 10K 5% 1/10W
R050 1-216-073-00 RES,CHIP 10K 5% 1/10W
R052 1-216-053-00 RES,CHIP 1.5K 5% 1/10W
R053 1-216-049-91 RES,CHIP 1K 5% 1/10W
R054 1-216-049-91 RES,CHIP 1K 5% 1/10W
R055 1-216-073-00 RES,CHIP 10K 5% 1/10W
R056 1-216-073-00 RES,CHIP 10K 5% 1/10W
R061 1-216-295-91 SHORT 0
R062 1-216-041-00 RES,CHIP 470 5% 1/10W
R063 1-216-041-00 RES,CHIP 470 5% 1/10W
R064 1-216-041-00 RES,CHIP 470 5% 1/10W
R065 1-216-041-00 RES,CHIP 470 5% 1/10W
R066 1-216-049-91 RES,CHIP 1K 5% 1/10W
R101 1-216-025-91 RES,CHIP 100 5% 1/10W
R102 1-216-025-91 RES,CHIP 100 5% 1/10W
-------------------------------------------------------------------------------------------------------------------------------
R105 1-216-295-91 SHORT 0
R109 1-216-041-00 RES,CHIP 470 5% 1/10W
R111 1-216-025-91 RES,CHIP 100 5% 1/10W
R112 1-216-025-91 RES,CHIP 100 5% 1/10W
R113 1-216-025-91 RES,CHIP 100 5% 1/10W
R225 1-216-033-00 RES,CHIP 220 5% 1/10W
R226 1-216-033-00 RES,CHIP 220 5% 1/10W
R227 1-216-033-00 RES,CHIP 220 5% 1/10W
R301 1-216-113-00 RES,CHIP 470K 5% 1/10W
R302 1-216-089-91 RES,CHIP 47K 5% 1/10W
R303 1-216-089-91 RES,CHIP 47K 5% 1/10W
R304 1-216-073-00 RES,CHIP 10K 5% 1/10W
R306 1-216-085-00 RES,CHIP 33K 5% 1/10W
R308 1-216-025-91 RES,CHIP 100 5% 1/10W
R309 1-216-025-91 RES,CHIP 100 5% 1/10W
R310 1-216-025-91 RES,CHIP 100 5% 1/10W
R315 1-216-053-00 RES,CHIP 1.5K 5% 1/10W
R316 1-216-053-00 RES,CHIP 1.5K 5% 1/10W
R318 1-216-053-00 RES,CHIP 1.5K 5% 1/10W
R319 1-216-025-91 RES,CHIP 100 5% 1/10W
R320 1-216-065-91 RES,CHIP 4.7K 5% 1/10W
R321 1-216-073-00 RES,CHIP 10K 5% 1/10W
R322 1-216-033-00 RES,CHIP 220 5% 1/10W
R326 1-216-029-00 RES,CHIP 150 5% 1/10W
R327 1-216-033-00 RES,CHIP 220 5% 1/10W
R328 1-216-065-91 RES,CHIP 4.7K 5% 1/10W
R329 1-216-041-00 RES,CHIP 470 5% 1/10W
R331 1-216-295-91 SHORT 0
R332 1-216-033-00 RES,CHIP 220 5% 1/10W
R333 1-216-083-00 RES,CHIP 27K 5% 1/10W
R334 1-208-291-11 RES,CHIP 4.7M 5% 1/10W
R335 1-216-045-00 RES,CHIP 680 5% 1/10W
R338 1-216-037-00 RES,CHIP 330 5% 1/10W
R339 1-216-033-00 RES,CHIP 220 5% 1/10W
------------------ R340 1-216-025-91 RES,CHIP 100 5% 1/10W
R345 1-216-073-00 RES,CHIP 10K 5% 1/10W
R348 1-208-806-11 RES,CHIP 10K 0.50% 1/10W
R349 1-216-073-00 RES,CHIP 10K 5% 1/10W
(except EF34M80)
(except EF34M80)
– 127 –
Page 82

KV -EF34M31/EF34M61/EF34M80/EF34M90/EF34M91
RM-951
A
REF. NO. PART NO. DESCRIPTION REMARK
------------ ------------- ------------------- ------------ R350 1-216-057-00 RES,CHIP 2.2K 5% 1/10W
R351 1-216-049-91 RES,CHIP 1K 5% 1/10W
R357 1-216-079-00 RES,CHIP 18K 5% 1/10W
R358 1-216-049-91 RES,CHIP 1K 5% 1/10W
R359 1-216-033-00 RES,CHIP 220 5% 1/10W
R360 1-216-033-00 RES,CHIP 220 5% 1/10W
R361 1-216-073-00 RES,CHIP 10K 5% 1/10W
R362 1-216-075-00 RES,CHIP 12K 5% 1/10W
R363 1-216-079-00 RES,CHIP 18K 5% 1/10W
R364 1-216-295-91 SHORT 0
R365 1-216-033-00 RES,CHIP 220 5% 1/10W
R366 1-216-073-00 RES,CHIP 10K 5% 1/10W
R367 1-216-073-00 RES,CHIP 10K 5% 1/10W
R368 1-216-073-00 RES,CHIP 10K 5% 1/10W
R370 1-216-033-00 RES,CHIP 220 5% 1/10W
R375 1-216-025-91 RES,CHIP 100 5% 1/10W
R376 1-216-081-00 RES,CHIP 22K 5% 1/10W
R377 1-216-121-91 RES,CHIP 1M 5% 1/10W
R378 1-216-295-91 SHORT 0
R500 1-249-417-11 CARBON 1K 5% 1/4W
R501 1-216-049-91 RES,CHIP 1K 5% 1/10W
R505 1-216-113-00 RES,CHIP 470K 5% 1/10W
R506 1-216-079-00 RES,CHIP 18K 5% 1/10W
R507 1-249-389-11 CARBON 4.7 5% 1/4W F
R508 1-215-909-11 METAL OXIDE 47 5% 3W F
R509 1-216-474-11 METAL OXIDE 82 5% 3W F
R510 1-216-424-11 METAL OXIDE 39 5% 1W F
R511 1-216-377-11 METAL OXIDE 4.7 5% 2W F
R512 1-249-432-11 CARBON 18K 5% 1/4W
R513 1-215-485-00 METAL 470K 1% 1/4W
R514 1-215-487-00 METAL 560K 1% 1/4W
R515 1-216-353-00 METAL OXIDE 2.2 5% 1W F
R516 1-216-081-00 RES,CHIP 22K 5% 1/10W
R517 1-208-798-11 RES,CHIP 4.7K 0.50% 1/10W
R518 1-247-807-31 CARBON 100 5% 1/4W
R519 1-215-906-11 METAL OXIDE 15 5% 3W F
R520 1-215-445-00 METAL 10K 1% 1/4W
R522 1-208-806-11 RES,CHIP 10K 0.50% 1/10W
R523 1-249-411-11 CARBON 330 5% 1/4W
R525 1-208-854-11 RES,CHIP 1M 0.50% 1/10W
R526 1-216-672-11 METAL CHIP 7.5K 0.50% 1/10W
R527 1-216-001-00 RES,CHIP 10 5% 1/10W
R528 1-208-814-11 RES,CHIP 22K 0.50% 1/10W
R529 1-208-766-11 RES,CHIP 220 0.50% 1/10W
R531 1-247-843-11 CARBON 3.3K 5% 1/4W
R532 1-216-073-00 RES,CHIP 10K 5% 1/10W
R533 1-249-417-11 CARBON 1K 5% 1/4W
R534 1-216-361-00 METAL OXIDE 0.22 5% 2W F
R535 1-216-067-00 RES,CHIP 5.6K 5% 1/10W
R536 1-216-067-00 RES,CHIP 5.6K 5% 1/10W
R537 1-208-804-11 RES,CHIP 8.2K 0.50% 1/10W
R539 1-216-049-91 RES,CHIP 1K 5% 1/10W
R540 1-216-065-91 RES,CHIP 4.7K 5% 1/10W
R541 1-216-065-91 RES,CHIP 4.7K 5% 1/10W
R542 1-216-097-91 RES,CHIP 100K 5% 1/10W
R543 1-216-437-00 METAL OXIDE 5.6K 5% 1W F
R544 1-216-480-11 METAL OXIDE 820 5% 3W F
R545 1-216-077-00 RES,CHIP 15K 5% 1/10W
R546 1-216-077-00 RES,CHIP 15K 5% 1/10W
R547 1-216-085-00 RES,CHIP 33K 5% 1/10W
R548 1-208-796-11 RES,CHIP 3.9K 0.50% 1/10W
R549 1-215-451-00 METAL 18K 1% 1/4W
R550 1-216-097-91 RES,CHIP 100K 5% 1/10W
R551 1-249-421-11 CARBON 2.2K 5% 1/4W
R552 1-216-057-00 RES,CHIP 2.2K 5% 1/10W
R553 1-215-453-00 METAL 22K 1% 1/4W
R554 1-215-453-00 METAL 22K 1% 1/4W
(except EF34M80/EF34M90)
Les composants identifies par
une trame et une marque !
sont critiques pour la securite.
Ne les remplacer que par une
piece portant le numero specifie.
------------------------------------------------------------------------------------------------------------------------------REF. NO. PART NO. DESCRIPTION REMARK
------------ ------------- ------------------- ------------ R556 1-215-437-00 METAL 4.7K 1% 1/4W
R557 1-216-361-00 METAL OXIDE 0.22 5% 2W F
R558 1-247-843-11 CARBON 3.3K 5% 1/4W
R559 1-249-429-11 CARBON 10K 5% 1/4W
R560 1-216-073-00 RES,CHIP 10K 5% 1/10W
R561 1-216-049-91 RES,CHIP 1K 5% 1/10W
R562 1-249-401-11 CARBON 47 5% 1/4W
R564 1-208-822-11 RES,CHIP 47K 0.50% 1/10W
R565 1-216-061-00 RES,CHIP 3.3K 5% 1/10W
R568 1-249-383-11 CARBON 1.5 5% 1/4W F
R570 1-216-069-00 RES,CHIP 6.8K 5% 1/10W
R571 1-215-442-00 METAL 7.5K 1% 1/4W
R575 1-208-796-11 RES,CHIP 3.9K 0.50% 1/10W
R577 1-215-913-11 METAL OXIDE 220 5% 3W F
R578 1-216-369-00 METAL OXIDE 1 5% 2W F
R579 1-216-295-91 SHORT 0
R580 1-208-830-11 RES,CHIP 100K 0.50% 1/10W
R581 1-208-798-11 RES,CHIP 4.7K 0.50% 1/10W
R582 1-216-295-91 SHORT 0
R583 1-216-125-00 RES,CHIP 1.5M 5% 1/10W
R584 1-216-065-91 RES,CHIP 4.7K 5% 1/10W
R585 1-249-389-11 CARBON 4.7 5% 1/4W
R587 1-208-849-11 RES,CHIP 620K 0.50% 1/10W
R588 1-215-911-11 METAL OXIDE 100 5% 3W F
R589 1-215-886-11 METAL OXIDE 100 5% 2W F
R590 1-215-465-00 METAL 68K 1% 1/4W
R591 1-260-288-11 CARBON 0.47 5% 1/2W F
R592 1-208-830-11 RES,CHIP 100K 0.50% 1/10W
R593 1-260-288-11 CARBON 0.47 5% 1/2W F
R594 1-260-288-11 CARBON 0.47 5% 1/2W F
R596 1-216-480-11 METAL OXIDE 820 5% 3W F
-------------------------------------------------------------------------------------------------------------------------------
R597 1-247-750-11 CARBON 680 5% 1/2W F
R598 1-249-438-11 CARBON 56K 5% 1/4W
R600 1-249-438-11 CARBON 56K 5% 1/4W
R601 1-249-417-11 CARBON 1K 5% 1/4W F
R602 1-249-389-11 CARBON 4.7 5% 1/4W F
R603 1-215-485-00 METAL 470K 1% 1/4W
R604 1-216-097-91 RES,CHIP 100K 5% 1/10W
R607 1-249-425-11 CARBON 4.7K 5% 1/4W
R608 1-240-205-91 CARBON 22M 5% 1/2W
R609 1-216-057-00 RES,CHIP 2.2K 5% 1/10W
R610 1-216-073-00 RES,CHIP 10K 5% 1/10W
R611 1-216-089-91 RES,CHIP 47K 5% 1/10W
R612 1-216-045-00 RES,CHIP 680 5% 1/10W
R614 1-216-041-00 RES,CHIP 470 5% 1/10W
R615 1-216-366-00 METAL OXIDE 0.56 5% 2W F
R616 1-249-484-11 CARBON 6.8 5% 1/2W F
R617 1-247-791-91 CARBON 22 5% 1/4W
R619 1-260-128-11 CARBON 270K 5% 1/2W
R621 1-215-859-00 METAL OXIDE 22 5% 1W F
R623 1-216-095-00 RES,CHIP 82K 5% 1/10W
R624 1-216-089-91 RES,CHIP 47K 5% 1/10W
R626 1-216-049-91 RES,CHIP 1K 5% 1/10W
R627 1-240-251-11 CMT,MELF 6.8 5% 10W
R629 1-247-747-11 CARBON 470 5% 1/2W F
R630 1-249-429-11 CARBON 10K 5% 1/4W F
R631 1-216-089-91 RES,CHIP 47K 5% 1/10W
R632 1-220-886-11 FUSIBLE 0.1 10% 1W F
R634 ! 1-218-265-91 METAL 8.2M 5% 1W
R635 1-216-492-11 METAL OXIDE 82K 5% 3W F
R636 1-215-924-00 METAL OXIDE 15K 5% 3W F
R637 1-216-492-11 METAL OXIDE 82K 5% 3W F
R639 1-216-361-00 METAL OXIDE 0.22 5% 2W F
R640 1-249-415-11 CARBON 680 5% 1/4W
------------------ R641 1-216-361-00 METAL OXIDE 0.22 5% 2W F
R642 1-249-419-11 CARBON 1.5K 5% 1/4W
R643 1-247-843-11 CARBON 3.3K 5% 1/4W
R644 1-249-419-11 CARBON 1.5K 5% 1/4W
R646 1-215-924-00 METAL OXIDE 15K 5% 3W F
The components identified by
shading and mark ! are critical for safety.
Replace only with part number
specified.
– 128 –
Page 83

The components identified by
shading and mark ! are critical for safety.
Replace only with part number
specified.
REF. NO. PART NO. DESCRIPTION REMARK
------------ ------------- ------------------- ------------ R647 1-249-387-11 CARBON 3.3 5% 1/4W
R648 1-216-057-00 RES,CHIP 2.2K 5% 1/10W
R649 1-249-417-11 CARBON 1K 5% 1/4W
R650 1-215-882-00 METAL OXIDE 22 5% 2W F
R652 1-215-900-11 METAL OXIDE 22K 5% 2W F
R653 1-215-873-00 METAL OXIDE 4.7K 5% 1W F
R654 1-216-369-00 METAL OXIDE 1 5% 2W F
R656 1-249-417-11 CARBON 1K 5% 1/4W
R657 1-260-127-11 CARBON 220K 5% 1/2W
R659 1-216-049-91 RES,CHIP 1K 5% 1/10W
R660 1-216-073-00 RES,CHIP 10K 5% 1/10W
R661 1-215-873-00 METAL OXIDE 4.7K 5% 1W F
R909 1-216-065-91 RES,CHIP 4.7K 5% 1/10W
R910 1-216-065-91 RES,CHIP 4.7K 5% 1/10W
RY600 ! 1-755-040-11 RELAY
RY601 ! 1-755-266-11 RELAY, AC POWER
Les composants identifies par
une trame et une marque !
sont critiques pour la securite.
Ne les remplacer que par une
piece portant le numero specifie.
<RELAY>
KV -EF34M31/EF34M61/EF34M80/EF34M90/EF34M91
RM-951
A C
------------------------------------------------------------------------------------------------------------------------------REF. NO. PART NO. DESCRIPTION REMARK
------------ ------------- ------------------- ------------ C713 1-102-228-00 CERAMIC 470PF 10% 500V
C716 1-126-968-11 ELECT 100MF 20% 50V
C717 1-107-651-11 ELECT 4.7MF 20% 250V
C726 1-104-664-11 ELECT 47MF 20% 25V
C1800 1-126-964-11 ELECT 10MF 20% 50V
C1803 1-126-964-11 ELECT 10MF 20% 50V
C1804 1-126-964-11 ELECT 10MF 20% 50V
C1809 1-126-942-61 ELECT 1000MF 20% 25V
<CONNECTOR>
CN700 1-695-915-11 TAB (CONTACT)
CN701 1-508-765-00 PIN, CONNECTOR (5mm PITCH) 3P
CN702 1-695-915-11 TAB (CONTACT)
CN703 * 1-564-509-11 PLUG, CONNECTOR 6P
CN704 1-695-915-11 TAB (CONTACT)
CN705 * 1-564-518-11 PLUG, CONNECTOR 3P
CN1801 *1-564-509-11 PLUG, CONNECTOR 6P
CN1802 *1-564-506-11 PLUG, CONNECTOR 3P
<SWITCH>
S501 1-572-707-11 SWITCH, LEVER
S502 1-572-707-11 SWITCH, LEVER
<TRANSFORMER>
T501 1-437-195-11 TRANSFORMER, HORIZONTAL DRIVE
T503 ! X-4036-321-1 TRANSFORMER ASSY, FLYBACK
T504 1-431-475-11 TRANSFORMER, HORIZONTAL LINEAR
T505 1-426-981-11 TRANSFORMER, FERRITE (PMT)
T601 ! 1-431-536-11 TRANSFORMER, LINE FILTER
T603 ! 1-431-946-11 TRANSFORMER, CONVERTER
T604 ! 1-431-852-11 TRANSFORMER, CONVERTER (SRT)
<THERMISTOR>
THP600 ! 1-809-827-21 THERMISTOR, POSITIVE
<TUNER>
TU101 8-598-450-00 TUNER, FSS BTF-LG434 (EF34M80)
TU101 8-598-452-00 TUNER, FSS BTF-WG442 (except EF34M80)
<CRYSTAL>
X001 1-781-174-21 VIBRATOR, CERAMIC
X301 1-781-134-21 VIBRATOR, CRYSTAL
X302 1-781-132-21 VIBRATOR, CRYSTAL
*************************************************************
*A-1331-868-A C BOARD, COMPLETE
4-382-854-11 SCREW (M3X10), P, SW (+)
C700 1-110-389-11 FILM MELF 0.1MF 5% 250V
C701 1-162-114-00 CERAMIC 0.0047MF 2KV
C702 1-102-074-00 CERAMIC 0.001MF 10% 50V
C704 1-107-652-11 ELECT 10MF 20% 250V
C707 1-137-399-11 MYLAR 0.1MF 5% 50V
C708 1-102-228-00 CERAMIC 470PF 10% 500V
C709 1-102-228-00 CERAMIC 470PF 10% 500V
C710 1-102-960-00 CERAMIC 24PF 5% 50V
C711 1-102-852-91 CERAMIC 47PF 5% 50V
C712 1-102-525-11 CERAMIC 68PF 5% 50V
**********************
<CAPACITOR>
(NX-4009//J1A4)
<DIODE>
D700 8-719-911-19 DIODE 1SS119-25
D701 8-719-911-19 DIODE 1SS119-25
D702 8-719-911-19 DIODE 1SS119-25
D703 8-719-911-19 DIODE 1SS119-25
D704 8-719-911-19 DIODE 1SS119-25
D705 8-719-051-85 DIODE HSS83TD
D706 8-719-051-85 DIODE HSS83TD
D707 8-719-051-85 DIODE HSS83TD
D708 8-719-911-19 DIODE 1SS119-25
D709 8-719-911-19 DIODE 1SS119-25
------------------------------------------------------------------------------------------------------------------------------ D710 8-719-911-19 DIODE 1SS119-25
D711 8-719-110-23 DIODE RD11ESB3
D714 8-719-051-85 DIODE HSS83TD
D715 8-719-051-85 DIODE HSS83TD
D716 8-719-051-85 DIODE HSS83TD
D720 8-719-911-19 DIODE 1SS119-25
D721 8-719-911-19 DIODE 1SS119-25
D722 8-719-911-19 DIODE 1SS119-25
D1803 8-719-911-19 DIODE 1SS119-25
D1804 8-719-911-19 DIODE 1SS119-25
D1808 8-719-908-03 DIODE GP08D
<IC>
IC701 8-759-561-28 IC STV5112
IC1800 8-759-822-38 IC LA6510
<JACK>
J701 ! 1-540-071-22 SOCKET, PICTURE TUBE
<COIL>
L701 1-410-667-31 INDUCTOR 22UH
L705 1-408-609-41 INDUCTOR 33UH
L706 1-408-609-41 INDUCTOR 33UH
L707 1-408-609-41 INDUCTOR 33UH
<TRANSISTOR>
Q1800 8-729-119-76 TRANSISTOR 2SA1175-HFE
Q1802 8-729-119-78 TRANSISTOR 2SC2785-HFE
-------------------
<RESISTOR>
R700 1-249-393-11 CARBON 10 5% 1/4W F
R701 1-249-496-11 CARBON 100K 5% 1/2W
R702 1-215-461-00 METAL 47K 1% 1/4W
– 129 –
Page 84

KV -EF34M31/EF34M61/EF34M80/EF34M90/EF34M91
RM-951
C VM2
REF. NO. PART NO. DESCRIPTION REMARK
------------ ------------- ------------------- ------------ R703 1-215-414-00 METAL 510 1% 1/4W
R704 1-215-414-00 METAL 510 1% 1/4W
R705 1-249-417-11 CARBON 1K 5% 1/4W
R706 1-249-417-11 CARBON 1K 5% 1/4W
R707 1-215-414-00 METAL 510 1% 1/4W
R708 1-249-417-11 CARBON 1K 5% 1/4W
R709 1-215-903-11 METAL OXIDE 68K 5% 2W F
R711 1-215-903-11 METAL OXIDE 68K 5% 2W F
R712 1-215-903-11 METAL OXIDE 68K 5% 2W F
R713 1-215-461-00 METAL 47K 1% 1/4W
R714 1-249-425-11 CARBON 4.7K 5% 1/4W
R715 1-249-413-11 CARBON 470 5% 1/4W
R716 1-249-413-11 CARBON 470 5% 1/4W
R717 1-249-425-11 CARBON 4.7K 5% 1/4W
R718 1-247-752-11 CARBON 1K 5% 1/2W
R719 1-249-425-11 CARBON 4.7K 5% 1/4W
R722 1-247-752-11 CARBON 1K 5% 1/2W
R723 1-249-413-11 CARBON 470 5% 1/4W
R724 1-247-752-11 CARBON 1K 5% 1/2W
R730 1-216-392-11 METAL OXIDE 1.8 5% 3W F
R734 1-247-739-11 CARBON 100 5% 1/2W
R744 1-215-415-00 METAL 560 1% 1/4W
R745 1-215-410-00 METAL 360 1% 1/4W
R1800 1-249-417-11 CARBON 1K 5% 1/4W
R1801 1-249-426-11 CARBON 5.6K 5% 1/4W
R1802 1-249-382-11 CARBON 1.2 5% 1/4W F
R1803 1-249-382-11 CARBON 1.2 5% 1/4W F
R1805 1-249-429-11 CARBON 10K 5% 1/4W
R1806 1-249-425-11 CARBON 4.7K 5% 1/4W
R1808 1-249-425-11 CARBON 4.7K 5% 1/4W
R1809 1-249-435-11 CARBON 33K 5% 1/4W
R1810 1-249-435-11 CARBON 33K 5% 1/4W
R1811 1-249-440-11 CARBON 82K 5% 1/4W
R1812 1-249-435-11 CARBON 33K 5% 1/4W
R1821 1-249-440-11 CARBON 82K 5% 1/4W
R1822 1-249-435-11 CARBON 33K 5% 1/4W
R1823 1-249-426-11 CARBON 5.6K 5% 1/4W
R1824 1-249-435-11 CARBON 33K 5% 1/4W
R1825 1-247-843-11 CARBON 3.3K 5% 1/4W
<VARIABLE RESISTOR>
RV702 ! 1-241-656-21 RES, ADJ, METAL FILM 110M
RV1801 1-223-241-11 RES, ADJ, CARBON 47K
*************************************************************
*A-1342-440-A VM2 BOARD, COMPLETE
4-382-854-11 SCREW (M3X10), P, SW (+)
C5900 1-102-115-00 CERAMIC 560PF 10% 50V
C5902 1-107-883-11 ELECT 330MF 20% 16V
C5903 1-161-830-00 CERAMIC 0.0047MF 500V
C5905 1-126-925-11 ELECT 470MF 20% 10V
C5906 1-130-491-00 MYLAR 0.047MF 5% 50V
C5907 1-107-638-11 ELECT 33MF 20% 160V
C5908 1-106-383-00 MYLAR 0.047MF 10% 200V
C5910 1-130-471-00 MYLAR 0.001MF 5% 50V
C5911 1-107-949-11 ELECT 2.2MF 20% 160V
C5912 1-104-999-11 MYLAR 0.1MF 10% 200V
C5913 1-130-471-00 MYLAR 0.001MF 5% 50V
C5914 1-126-933-11 ELECT 100MF 20% 16V
C5916 1-130-491-00 MYLAR 0.047MF 5% 50V
C5917 1-126-925-11 ELECT 470MF 20% 10V
*************************
<CAPACITOR>
Les composants identifies par
une trame et une marque !
sont critiques pour la securite.
Ne les remplacer que par une
piece portant le numero specifie.
------------------------------------------------------------------------------------------------------------------------------REF. NO. PART NO. DESCRIPTION REMARK
------------ ------------- ------------------- ------------ C5919 1-130-471-00 MYLAR 0.001MF 5% 50V
C5921 1-101-880-00 CERAMIC 47PF 10% 50V
C5922 1-107-714-11 ELECT 10MF 20% 16V
<CONNECTOR>
CN2801 *1-564-506-11 PLUG, CONNECTOR 3P
CN5901 *1-564-510-11 PLUG, CONNECTOR 7P
CN5904 *1-770-723-11 CONNECTOR, BOARD TO BOARD 8P
<DIODE>
D5901 8-719-911-19 DIODE 1SS119-25
D5902 8-719-110-88 DIODE RD39ESB2
D5904 8-719-110-88 DIODE RD39ESB2
D5906 1-249-399-11 CARBON 33 5% 1/4W
D5907 1-249-399-11 CARBON 33 5% 1/4W
D5909 8-719-911-19 DIODE 1SS119-25
D5910 8-719-911-19 DIODE 1SS119-25
<COIL>
L5901 1-414-187-11 INDUCTOR 47UH
<TRANSISTOR>
Q5901 8-729-119-78 TRANSISTOR 2SC2785-HFE
Q5902 8-729-017-05 TRANSISTOR 2SA1837
Q5903 8-729-119-78 TRANSISTOR 2SC2785-HFE
Q5904 8-729-119-76 TRANSISTOR 2SA1175-HFE
Q5905 8-729-119-78 TRANSISTOR 2SC2785-HFE
------------------------------------------------------------------------------------------------------------------------------ Q5906 8-729-017-06 TRANSISTOR 2SC4793
Q5907 8-729-922-37 TRANSISTOR 2SD2144S-UVW
Q5908 8-729-119-78 TRANSISTOR 2SC2785-HFE
Q5909 8-729-119-78 TRANSISTOR 2SC2785-HFE
<RESISTOR>
R5901 1-249-401-11 CARBON 47 5% 1/4W
R5902 1-249-414-11 CARBON 560 5% 1/4W F
R5903 1-247-731-11 CARBON 22 5% 1/2W F
R5904 1-249-408-11 CARBON 180 5% 1/4W
R5905 1-249-417-11 CARBON 1K 5% 1/4W
R5906 1-249-417-11 CARBON 1K 5% 1/4W
R5907 1-249-417-11 CARBON 1K 5% 1/4W
R5908 1-249-383-11 CARBON 1.5 5% 1/4W F
R5909 1-247-815-91 CARBON 220 5% 1/4W
R5910 1-249-403-11 CARBON 68 5% 1/4W
R5911 1-249-432-11 CARBON 18K 5% 1/4W
R5914 1-249-403-11 CARBON 68 5% 1/4W
R5917 1-249-418-11 CARBON 1.2K 5% 1/4W
R5918 1-249-429-11 CARBON 10K 5% 1/4W
R5919 1-249-417-11 CARBON 1K 5% 1/4W F
R5920 1-249-432-11 CARBON 18K 5% 1/4W
R5921 1-216-477-11 METAL OXIDE 270 5% 3W F
R5922 1-249-414-11 CARBON 560 5% 1/4W
R5923 1-249-383-11 CARBON 1.5 5% 1/4W F
R5924 1-249-397-11 CARBON 22 5% 1/4W F
R5925 1-249-397-11 CARBON 22 5% 1/4W F
R5927 1-249-416-11 CARBON 820 5% 1/4W
R5930 1-249-419-11 CARBON 1.5K 5% 1/4W
R5931 1-249-442-11 CARBON 510 5% 1/4W
R5932 1-249-437-11 CARBON 47K 5% 1/4W
R5933 1-249-417-11 CARBON 1K 5% 1/4W
-------------------
*************************************************************
The components identified by
shading and mark ! are critical for safety.
Replace only with part number
specified.
– 130 –
Page 85

The components identified by
shading and mark ! are criti-
cal for safety.
Replace only with part number
specified.
REF. NO. PART NO. DESCRIPTION REMARK
------------ ------------- ------------------- ------------*A-1342-452-A V1 BOARD, COMPLETE
C801 1-104-664-11 ELECT 47MF 20% 16V
C805 1-163-038-91 CERAMIC CHIP 0.1MF 25V
C806 1-163-038-91 CERAMIC CHIP 0.1MF 25V
C815 1-163-251-11 CERAMIC CHIP 100PF 5% 50V
C816 1-164-505-11 CERAMIC CHIP 2.2MF 16V
C817 1-164-004-11 CERAMIC CHIP 0.1MF 10% 25V
C818 1-163-239-11 CERAMIC CHIP 33PF 5% 50V
C820 1-163-239-11 CERAMIC CHIP 33PF 5% 50V
C821 1-163-038-91 CERAMIC CHIP 0.1MF 25V
C822 1-163-009-11 CERAMIC CHIP 0.001MF 10% 50V
C823 1-126-933-11 ELECT 100MF 20% 16V
C826 1-126-963-11 ELECT 4.7MF 20% 50V
C829 1-163-113-00 CERAMIC CHIP 68PF 5% 50V
C830 1-163-038-91 CERAMIC CHIP 0.1MF 25V
C831 1-126-933-11 ELECT 100MF 20% 16V
C832 1-126-964-11 ELECT 10MF 20% 50V
C835 1-163-038-91 CERAMIC CHIP 0.1MF 25V
C837 1-126-933-11 ELECT 100MF 20% 16V
CN801 * 1-774-812-11 CONNECTOR, BOARD TO BOARD 7P
CN803 * 1-774-812-11 CONNECTOR, BOARD TO BOARD 7P
D802 8-719-914-44 DIODE DAP202K
D803 8-719-105-46 DIODE RD3.3M-B2
D804 8-719-105-91 DIODE RD5.6M-B2
D806 8-719-404-49 DIODE MA111
D807 8-719-404-49 DIODE MA111
FB801 1-410-397-21 FERRITE 1.1UH
FB802 1-410-397-21 FERRITE 1.1UH
FB803 1-410-397-21 FERRITE 1.1UH
FB804 1-410-682-31 INDUCTOR 470UH
FB805 1-410-397-21 FERRITE 1.1UH
IC801 8-759-476-87 IC SAA5261
JR801 1-216-295-91 SHORT 0
JR802 1-216-295-91 SHORT 0
JR804 1-216-295-91 SHORT 0
JR805 1-216-295-91 SHORT 0
JR806 1-216-295-91 SHORT 0
JR807 1-216-295-91 SHORT 0
JR808 1-216-295-91 SHORT 0
Q801 8-729-230-49 TRANSISTOR 2SC2712-YG
Q803 8-729-230-49 TRANSISTOR 2SC2712-YG
Q805 8-729-230-49 TRANSISTOR 2SC2712-YG
Q806 8-729-230-49 TRANSISTOR 2SC2712-YG
Q807 8-729-230-49 TRANSISTOR 2SC2712-YG
Q808 8-729-230-49 TRANSISTOR 2SC2712-YG
Q810 8-729-230-49 TRANSISTOR 2SC2712-YG
Q811 8-729-019-01 TRANSISTOR 2SD2394-EF
Les composants identifies par
une trame et une marque !
sont critiques pour la securite.
Ne les remplacer que par une
piece portant le numero specifie.
**********************
<CAPACITOR>
<CONNECTOR>
<DIODE>
<FERRITE BEAD>
<IC>
<CHIP CONDUCTOR>
<TRANSISTOR>
(KV-EF34M31/EF34M61/EF34M91)
KV -EF34M31/EF34M61/EF34M80/EF34M90/EF34M91
RM-951
V1
------------------------------------------------------------------------------------------------------------------------------REF. NO. PART NO. DESCRIPTION REMARK
------------ ------------- ------------------- ------------ Q812 8-729-230-49 TRANSISTOR 2SC2712-YG
Q813 8-729-230-49 TRANSISTOR 2SC2712-YG
Q814 8-729-230-49 TRANSISTOR 2SC2712-YG
Q817 8-729-900-53 TRANSISTOR DTC114EK
Q818 8-729-230-49 TRANSISTOR 2SC2712-YG
<RESISTOR>
R800 1-208-806-11 RES,CHIP 10K 0.50% 1/10W
R801 1-216-295-91 SHORT 0
R802 1-216-025-91 RES,CHIP 100 5% 1/10W
R803 1-216-295-91 SHORT 0
R804 1-216-295-91 SHORT 0
R805 1-216-295-91 SHORT 0
R807 1-216-295-91 SHORT 0
R813 1-216-295-91 SHORT 0
R820 1-216-073-00 RES,CHIP 10K 5% 1/10W
R821 1-216-083-00 RES,CHIP 27K 5% 1/10W
R822 1-216-025-91 RES,CHIP 100 5% 1/10W
R824 1-216-295-91 SHORT 0
R825 1-216-295-91 SHORT 0
R827 1-216-295-91 SHORT 0
R828 1-216-025-91 RES,CHIP 100 5% 1/10W
R829 1-216-025-91 RES,CHIP 100 5% 1/10W
R830 1-216-295-91 SHORT 0
R831 1-216-295-91 SHORT 0
R832 1-208-790-11 RES,CHIP 2.2K 0.50% 1/10W
R835 1-216-295-91 SHORT 0
R839 1-216-655-11 RES,CHIP 1.5K 0.50% 1/10W
R841 1-216-025-91 RES,CHIP 100 5% 1/10W
R842 1-216-065-91 RES,CHIP 4.7K 5% 1/10W
-------------------------------------------------------------------------------------------------------------------------------
R843 1-216-065-91 RES,CHIP 4.7K 5% 1/10W
R844 1-216-057-00 RES,CHIP 2.2K 5% 1/10W
R845 1-216-049-91 RES,CHIP 1K 5% 1/10W
R846 1-216-049-91 RES,CHIP 1K 5% 1/10W
R847 1-216-049-91 RES,CHIP 1K 5% 1/10W
R848 1-216-049-91 RES,CHIP 1K 5% 1/10W
R849 1-216-049-91 RES,CHIP 1K 5% 1/10W
R850 1-216-105-91 RES,CHIP 220K 5% 1/10W
R851 1-216-057-00 RES,CHIP 2.2K 5% 1/10W
R853 1-216-067-00 RES,CHIP 5.6K 5% 1/10W
R857 1-216-081-00 RES,CHIP 22K 5% 1/10W
R858 1-216-067-00 RES,CHIP 5.6K 5% 1/10W
R861 1-216-049-91 RES,CHIP 1K 5% 1/10W
R862 1-260-095-11 CARBON 470 5% 1/2W
R863 1-216-049-91 RES,CHIP 1K 5% 1/10W
R864 1-216-041-00 RES,CHIP 470 5% 1/10W
R866 1-215-880-00 METAL OXIDE 10 5% 2W F
R871 1-216-037-00 RES,CHIP 330 5% 1/10W
R879 1-216-073-00 RES,CHIP 10K 5% 1/10W
R880 1-216-041-00 RES,CHIP 470 5% 1/10W
R882 1-216-049-91 RES,CHIP 1K 5% 1/10W
R884 1-216-025-91 RES,CHIP 100 5% 1/10W
R888 1-216-065-91 RES,CHIP 4.7K 5% 1/10W
R889 1-216-073-00 RES,CHIP 10K 5% 1/10W
R890 1-216-081-00 RES,CHIP 22K 5% 1/10W
R894 1-216-073-00 RES,CHIP 10K 5% 1/10W
R895 1-216-065-91 RES,CHIP 4.7K 5% 1/10W
R896 1-216-073-00 RES,CHIP 10K 5% 1/10W
R897 1-216-073-00 RES,CHIP 10K 5% 1/10W
R898 1-216-065-91 RES,CHIP 4.7K 5% 1/10W
------------------ X801 1-578-774-11 VIBRATOR, CRYSTAL
*************************************************************
<CRYSTAL>
– 131 –
Page 86

KV -EF34M31/EF34M61/EF34M80/EF34M90/EF34M91
RM-951
D2
REF. NO. PART NO. DESCRIPTION REMARK
------------ ------------- ------------------- ------------*A-1343-584-A D2 BOARD, COMPLETE
C2801 1-130-479-00 MYLAR 0.0047MF 5% 50V
C2803 1-136-357-11 FILM 680PF 5% 50V
C2805 1-104-664-11 ELECT 47MF 20% 25V
C2806 1-136-559-11 MYLAR 0.0047MF 10% 400V
C2809 1-126-964-11 ELECT 10MF 20% 50V
C2810 1-102-228-00 CERAMIC 470PF 10% 500V
C2811 1-107-938-11 ELECT 0.47MF 20% 160V
C2813 1-107-636-11 ELECT 10MF 20% 160V
C2814 1-126-964-11 ELECT 10MF 20% 50V
C2817 1-102-244-00 CERAMIC 220PF 10% 500V
C2818 1-129-928-00 FILM 0.0027MF 5% 630V
C2819 1-104-664-11 ELECT 47MF 20% 25V
C2820 1-107-714-11 ELECT 10MF 20% 16V
C2821 1-130-469-00 MYLAR 680PF 5% 50V
C2822 1-106-375-12 MYLAR 0.022MF 10% 250V
C2824 1-104-664-11 ELECT 47MF 20% 25V
C2825 1-136-601-11 FILM 0.01MF 5% 630V
C2826 1-137-194-81 FILM 0.47MF 5% 50V
C2828 1-107-714-11 ELECT 10MF 20% 16V
C2829 1-164-161-11 CERAMIC CHIP 0.0022MF 10% 50V
C2830 1-110-205-11 FILM 0.0068MF 5% 50V
C2832 1-126-960-11 ELECT 1MF 20% 50V
C2833 1-137-366-11 FILM 0.0022MF 5% 50V
C2834 1-106-220-00 MYLAR 0.1MF 10% 100V
C2835 1-216-295-91 SHORT 0
C2837 1-102-129-00 CERAMIC 0.01MF 10% 50V
C2840 1-110-174-71 MYLAR 0.082MF 5% 100V
C2841 1-136-177-00 FILM 1MF 5% 50V
C2842 1-130-477-00 MYLAR 0.0033MF 5% 50V
C2843 1-107-714-11 ELECT 10MF 20% 16V
CN2821 * 1-564-506-11 PLUG, CONNECTOR 3P
CN2822 * 1-564-510-11 PLUG, CONNECTOR 7P
CN2823 1-695-915-11 TAB (CONTACT)
D2801 8-719-404-49 DIODE MA111
D2803 8-719-063-73 DIODE D1NL20U-TR
D2804 8-719-063-73 DIODE D1NL20U-TR
D2806 8-719-302-43 DIODE EL1Z
D2813 8-719-404-49 DIODE MA111
D2814 8-719-210-21 DIODE 11EQS04
D2815 8-719-911-19 DIODE 1SS119-25
D2816 8-719-911-19 DIODE 1SS119-25
IC2801 8-759-700-07 IC NJM2903M
IC2803 8-759-701-59 IC NJM78M09FA
IC2805 8-759-998-98 IC LM358D
IC2806 8-759-700-07 IC NJM2903M
JR2803 1-216-295-91 SHORT 0
JR2804 1-216-295-91 SHORT 0
JR2805 1-216-295-91 SHORT 0
JR2815 1-216-295-91 SHORT 0
L2801 1-406-677-11 INDUCTOR 10mH
***********************
<CAPACITOR>
<CONNECTOR>
<DIODE>
<IC>
<CHIP CONDUCTOR>
<COIL>
Les composants identifies par
une trame et une marque !
sont critiques pour la securite.
Ne les remplacer que par une
piece portant le numero specifie.
------------------------------------------------------------------------------------------------------------------------------REF. NO. PART NO. DESCRIPTION REMARK
------------ ------------- ------------------- ------------ L2802 1-459-111-00 INDUCTOR 10mH
L2803 1-414-502-21 INDUCTOR 33mH
L2806 1-406-677-11 INDUCTOR 10mH
<TRANSISTOR>
Q2802 8-729-216-22 TRANSISTOR 2SA1162-G
Q2805 8-729-216-22 TRANSISTOR 2SA1162-G
Q2806 8-729-230-49 TRANSISTOR 2SC2712-YG
Q2807 8-729-043-95 TRANSISTOR 2SC3840(3)
Q2811 8-729-931-45 TRANSISTOR IRF614
Q2813 8-729-230-49 TRANSISTOR 2SC2712-YG
Q2821 8-729-230-49 TRANSISTOR 2SC2712-YG
Q2822 8-729-216-22 TRANSISTOR 2SA1162-G
Q2823 8-729-017-06 TRANSISTOR 2SC4793
Q2824 8-729-140-97 TRANSISTOR 2SB734-34
<RESISTOR>
R2801 1-216-057-91 RES,CHIP 2.2K 5% 1/10W
R2803 1-216-057-00 RES,CHIP 2.2K 5% 1/10W
R2804 1-216-041-00 RES,CHIP 470 5% 1/10W
R2806 1-216-057-00 RES,CHIP 2.2K 5% 1/10W
R2809 1-216-073-00 RES,CHIP 10K 5% 1/10W
R2812 1-216-097-91 RES,CHIP 100K 5% 1/10W
R2813 1-216-089-91 RES,CHIP 47K 5% 1/10W
R2816 1-216-097-91 RES,CHIP 100K 5% 1/10W
R2820 1-216-089-91 RES,CHIP 47K 5% 1/10W
R2821 1-249-412-11 CARBON 390 5% 1/4W F
R2824 1-249-393-11 CARBON 10 5% 1/4W F
R2825 1-216-037-00 RES,CHIP 330 5% 1/10W
R2827 1-216-041-00 RES,CHIP 470 5% 1/10W
-------------------------------------------------------------------------------------------------------------------------------
R2830 1-215-899-11 METAL OXIDE 15K 5% 2W F
R2831 1-215-873-00 METAL OXIDE 4.7K 5% 1W F
R2833 1-216-460-00 METAL OXIDE 3.9K 5% 2W F
R2834 1-215-873-00 METAL OXIDE 4.7K 5% 1W F
R2837 1-216-063-91 RES,CHIP 3.9K 5% 1/10W
R2838 1-216-675-00 RES,CHIP 10K 5% 1/10W
R2839 1-216-081-00 RES,CHIP 22K 5% 1/10W
R2840 1-216-097-91 RES,CHIP 100K 5% 1/10W
R2843 1-216-097-91 RES,CHIP 100K 5% 1/10W
R2844 1-216-097-91 RES,CHIP 100K 5% 1/10W
R2846 1-216-057-00 RES,CHIP 2.2K 5% 1/10W
R2847 1-216-049-91 RES,CHIP 1K 5% 1/10W
R2857 1-216-671-00 RES,CHIP 6.8K 5% 1/10W
R2858 1-216-051-00 RES,CHIP 1.2K 5% 1/10W
R2859 1-216-057-00 RES,CHIP 2.2K 5% 1/10W
R2860 1-216-053-00 RES,CHIP 1.5K 5% 1/10W
R2861 1-216-107-00 RES,CHIP 270K 5% 1/10W
R2862 1-216-107-00 RES,CHIP 270K 5% 1/10W
R2866 1-216-073-00 RES,CHIP 10K 5% 1/10W
R2867 1-216-081-00 RES,CHIP 22K 5% 1/10W
R2869 1-216-113-00 RES,CHIP 470K 5% 1/10W
R2871 1-216-057-00 RES,CHIP 2.2K 5% 1/10W
R2872 1-216-057-00 RES,CHIP 2.2K 5% 1/10W
R2874 1-216-085-00 RES,CHIP 33K 5% 1/10W
R2877 1-216-421-11 METAL OXIDE 12 5% 1W F
R2878 1-216-081-00 RES,CHIP 22K 5% 1/10W
R2879 1-216-057-00 RES,CHIP 2.2K 5% 1/10W
R2880 1-216-073-00 RES,CHIP 10K 5% 1/10W
R2882 1-216-657-00 RES,CHIP 1.8K 5% 1/10W
R2883 1-216-067-00 RES,CHIP 5.6K 5% 1/10W
R2884 1-216-063-91 RES,CHIP 3.9K 5% 1/10W
R2885 1-216-689-11 RES,CHIP 39K 5% 1/10W
R2886 1-216-067-00 RES,CHIP 5.6K 5% 1/10W
------------------ R2887 1-216-651-91 RES,CHIP 1K 5% 1/10W
R2888 1-216-049-91 RES,CHIP 1K 5% 1/10W
The components identified by
shading and mark ! are criti-
cal for safety.
Replace only with part number
specified.
– 132 –
Page 87

The components identified by
shading and mark ! are criti-
cal for safety.
Replace only with part number
specified.
REF. NO. PART NO. DESCRIPTION REMARK
------------ ------------- ------------------- -------------
S2801 1-572-707-11 SWITCH, LEVER
T2801 1-424-584-11 TRANSFORMER, DYNAMIC FOCUS
*************************************************************
*A-1343-585-A DH BOARD, COMPLETE
*A-1343-609-A DH BOARD, COMPLETE (KV-EF34M61)
*A-1343-610-A DH BOARD, COMPLETE (KV-EF34M31)
C3801 1-126-964-11 ELECT 10MF 20% 50V
C3804 1-102-129-00 CERAMIC 0.01MF 10% 50V
C3805 1-126-964-11 ELECT 10MF 20% 50V
C3807 1-102-129-00 CERAMIC 0.01MF 10% 50V
C3816 1-126-964-11 ELECT 10MF 20% 50V
C3819 1-126-960-11 ELECT 1MF 20% 50V
C3822 1-136-165-00 FILM 0.1MF 5% 50V
CN3802 * 1-564-507-11 PLUG, CONNECTOR 4P
CN3803 * 1-564-506-11 PLUG, CONNECTOR 3P
D3805 8-719-911-19 DIODE 1SS119-25
IC3805 8-759-822-38 IC LA6510
IC3807 1-475-556-11 SENSOR UNIT, MAGNETIC
Les composants identifies par
une trame et une marque !
sont critiques pour la securite.
Ne les remplacer que par une
piece portant le numero specifie.
<SWITCH>
<TRANSFORMER>
***********************
***********************
***********************
<CAPACITOR>
<CONNECTOR>
<DIODE>
<IC>
(except KV-EF34M31/EF34M61)
KV -EF34M31/EF34M61/EF34M80/EF34M90/EF34M91
RM-951
D2 DH H1
------------------------------------------------------------------------------------------------------------------------------REF. NO. PART NO. DESCRIPTION REMARK
------------ ------------- ------------------- ------------ R3828 1-249-377-11 CARBON 0.47 5% 1/4W F
R3839 1-249-429-11 CARBON 10K 5% 1/4W
R3845 1-249-425-11 CARBON 4.7K 5% 1/4W
R3846 1-249-417-11 CARBON 1K 5% 1/4W
R3847 1-247-807-31 CARBON 100 5% 1/4W
R3848 1-249-417-11 CARBON 1K 5% 1/4W
R3849 1-249-377-11 CARBON 0.47 5% 1/4W F
R3852 1-249-441-11 CARBON 100K 5% 1/4W
R3854 1-249-429-11 CARBON 10K 5% 1/4W
*************************************************************
*A-1372-556-A H1 BOARD, COMPLETE
*4-055-304-01 HOLDER, LED
C1900 1-136-153-00 FILM 0.01MF 5% 50V
C1901 1-136-175-00 FILM 0.68MF 5% 50V
C1902 1-136-153-00 FILM 0.01MF 5% 50V
C1903 1-136-175-00 FILM 0.68MF 5% 50V
C1904 1-126-965-11 ELECT 22MF 20% 50V
C1905 1-102-824-00 CERAMIC 470PF 5% 50V
C1908 1-102-824-00 CERAMIC 470PF 5% 50V
C1910 1-104-664-11 ELECT 47MF 20% 16V
C1911 1-104-664-11 ELECT 47MF 20% 16V
C1912 1-102-824-00 CERAMIC 470PF 5% 50V
C1913 1-126-960-11 ELECT 1MF 20% 50V
-------------------------------------------------------------------------------------------------------------------------------
C1914 1-126-965-11 ELECT 22MF 20% 50V
CN1601 *1-580-844-11 PIN, CONNECTOR (POWER)
CN1602 *1-695-292-11 PIN, CONNECTOR (POWER)
CN1901 *1-564-507-11 PLUG, CONNECTOR 4P
CN1902 *1-564-507-11 PLUG, CONNECTOR 4P
CN1903 *1-564-518-11 PLUG, CONNECTOR 3P
CN1904 *1-564-509-11 PLUG, CONNECTOR 6P
CN1905 *1-564-512-11 PLUG, CONNECTOR 9P
CN1906 *1-564-507-11 PLUG, CONNECTOR 4P
**********************
<CAPACITOR>
<CONNECTOR>
<TRANSISTOR>
Q3807 8-729-030-02 TRANSISTOR DTC144ESA
Q3808 8-729-030-02 TRANSISTOR DTC144ESA
Q3809 8-729-119-78 TRANSISTOR 2SC2785-HFE
Q3810 8-729-119-76 TRANSISTOR 2SA1175-HFE
Q3811 8-729-119-78 TRANSISTOR 2SC2785-HFE
Q3812 8-729-119-78 TRANSISTOR 2SC2785-HFE
<RESISTOR>
R3802 1-249-417-11 CARBON 1K 5% 1/4W
R3803 1-249-417-11 CARBON 1K 5% 1/4W
R3804 1-215-444-00 METAL 9.1K 1% 1/4W
R3805 1-249-420-11 CARBON 1.8K 5% 1/4W
R3805 1-249-422-11 CARBON 2.7K 5% 1/4W
R3807 1-215-413-00 METAL 470 1% 1/4W
R3808 1-247-883-00 CARBON 150K 5% 1/4W
R3809 1-247-876-11 CARBON 75K 5% 1/4W
R3810 1-249-425-11 CARBON 4.7K 5% 1/4W
R3814 1-249-411-11 CARBON 330 5% 1/4W
R3823 1-249-395-11 CARBON 15 5% 1/4W
R3825 1-249-417-11 CARBON 1K 5% 1/4W
(except EF34M31/EF34M61)
(EF34M31/EF34M61)
– 133 –
<DIODE>
D1900 8-719-121-26 DIODE RD9.1ESL2
D1901 8-719-121-26 DIODE RD9.1ESL2
D1904 8-719-121-26 DIODE RD9.1ESL2
D1905 8-719-121-26 DIODE RD9.1ESL2
D1906 8-719-045-19 DIODE SPB-26MVWF
D1907 8-719-121-26 DIODE RD9.1ESL2
D1912 8-719-911-19 DIODE 1SS119-25
D1913 8-719-911-19 DIODE 1SS119-25
<IC>
IC1901 8-742-041-12 HYB IC SBX1981-11(12)
<JACK>
J1901 1-770-786-11 JACK
J1902 1-784-646-11 TERMINAL, S
J1903 1-770-329-11 JACK, PIN 3P
-------------------
<COIL>
L1901 1-408-603-31 INDUCTOR 10UH
L1902 1-408-603-31 INDUCTOR 10UH
Page 88

KV -EF34M31/EF34M61/EF34M80/EF34M90/EF34M91
RM-951
H1 J1
REF. NO. PART NO. DESCRIPTION REMARK
------------ ------------- ------------------- ------------ L1903 1-416-857-11 INDUCTOR 65UH
L1904 1-416-857-11 INDUCTOR 65UH
<TRANSISTOR>
Q1901 8-729-030-02 TRANSISTOR DTC144ESA
Q1902 8-729-030-02 TRANSISTOR DTC144ESA
<RESISTOR>
R1900 1-249-411-11 CARBON 330 5% 1/4W
R1901 1-249-411-11 CARBON 330 5% 1/4W
R1902 1-247-804-11 CARBON 75 5% 1/4W
R1903 1-249-441-11 CARBON 100K 5% 1/4W
R1904 1-249-437-11 CARBON 47K 5% 1/4W
R1905 1-249-437-11 CARBON 47K 5% 1/4W
R1906 1-249-441-11 CARBON 100K 5% 1/4W
R1908 1-249-413-11 CARBON 470 5% 1/4W
R1909 1-249-417-11 CARBON 1K 5% 1/4W
R1910 1-249-420-11 CARBON 1.8K 5% 1/4W
R1911 1-249-411-11 CARBON 330 5% 1/4W
R1912 1-247-843-11 CARBON 3.3K 5% 1/4W
R1913 1-249-429-11 CARBON 10K 5% 1/4W
R1914 1-249-411-11 CARBON 330 5% 1/4W
R1915 1-249-429-11 CARBON 10K 5% 1/4W
R1916 1-249-401-11 CARBON 47 5% 1/4W
R1917 1-247-804-11 CARBON 75 5% 1/4W
R1920 1-247-807-31 CARBON 100 5% 1/4W
R1921 1-247-807-31 CARBON 100 5% 1/4W
R1922 1-249-421-11 CARBON 2.2K 5% 1/4W
R1924 1-247-804-11 CARBON 75 5% 1/4W
R1925 1-215-381-00 METAL 22 1% 1/4W
R1926 1-215-381-00 METAL 22 1% 1/4W
<SWITCH>
S1601 ! 1-571-433-21 SWITCH, PUSH (AC POWER)
S1902 1-692-431-21 SWITCH, TACTILE
S1903 1-692-431-21 SWITCH, TACTILE
S1904 1-692-431-21 SWITCH, TACTILE
S1905 1-692-431-21 SWITCH, TACTILE
S1906 1-692-431-21 SWITCH, TACTILE
*************************************************************
*A-1388-226-A J1 BOARD, COMPLETE
C2410 1-126-967-11 ELECT 47MF 20% 50V
C2411 1-126-967-11 ELECT 47MF 20% 50V
C2412 1-126-967-11 ELECT 47MF 20% 50V
C2413 1-102-112-00 CERAMIC 330PF 10% 50V
C2414 1-102-112-00 CERAMIC 330PF 10% 50V
C2418 1-126-960-11 ELECT 1MF 20% 50V
C2419 1-126-960-11 ELECT 1MF 20% 50V
*********************
<CAPACITOR>
Les composants identifies par
une trame et une marque !
sont critiques pour la securite.
Ne les remplacer que par une
piece portant le numero specifie.
------------------------------------------------------------------------------------------------------------------------------REF. NO. PART NO. DESCRIPTION REMARK
------------ ------------- ------------------- ------------ D2415 8-719-121-26 DIODE RD9.1ESL2
<JACK>
J2410 1-784-623-11 BLOCK, PIN JACK 5P
<RESISTOR>
R2410 1-247-804-11 CARBON 75 5% 1/4W
R2411 1-247-804-11 CARBON 75 5% 1/4W
R2412 1-247-804-11 CARBON 75 5% 1/4W
R2414 1-247-887-00 CARBON 220K 5% 1/4W
R2415 1-247-807-31 CARBON 100 5% 1/4W
R2417 1-247-887-00 CARBON 220K 5% 1/4W
R2418 1-247-807-31 CARBON 100 5% 1/4W
R2419 1-247-815-91 CARBON 220 5% 1/4W
R2420 1-247-815-91 CARBON 220 5% 1/4W
R2421 1-247-815-91 CARBON 220 5% 1/4W
*************************************************************
MISCELLANEOUS
*******************
1-251-658-21 SPLITTER RF
! 1-416-757-11 COIL, DEMAGNETIC
1-416-871-11 COIL, LANDING CORRECTION
1-452-032-00 MAGNET,DISK ; 10mmØ
1-452-094-00 CIRCULAR DISC MAGNET B
1-452-896-61 COIL, NA ROTATION (RT-200)
! 1-467-525-22 CAP BLOCK, HIGH-VOLTAGE
-------------------------------------------------------------------------------------------------------------------------------
*************************************************************
1-505-473-11 SPEAKER (12CM)
1-505-474-11 SPEAKER (5CM)
*1-555-110-00 P-P CABLE
! 1-574-062-12 CORD, POWER (WITH CONNECTOR)
! 1-769-609-21 CORD, POWER (WITH CONNECTOR)
1-771-360-11 SWITCH, TOP
1-900-241-30 LEAD ASSY, G2 (except EF34M31)
1-900-243-56 LEAD ASSY, G2 (EF34M31)
! 8-451-499-11 DEFLECTION YOKE (Y34RSN)
! 8-453-007-31 NECK ASSEMBLY NA324-M3
! 8-735-049-05 PICTURE TUBE (A80LPD80X)
! 8-735-050-05 PICTURE TUBE (A80LPD80X) (EF34M61)
! 8-735-055-05 PICTURE TUBE(A80LPD80X) (EF34M90(JE))
8-742-166-00 IC SBX3005-01
The components identified by
shading and mark ! are critical for safety.
Replace only with part number
specified.
2.5A/250V (except EF34M90(HK))
(EF34M90(HK))
(except EF34M61/EF34M90(JE))
<CONNECTOR>
CN2410 * 1-564-523-11 PLUG, CONNECTOR 8P
<DIODE>
D2410 8-719-121-26 DIODE RD9.1ESL2
D2411 8-719-121-26 DIODE RD9.1ESL2
D2412 8-719-121-26 DIODE RD9.1ESL2
D2414 8-719-121-26 DIODE RD9.1ESL2
-------------------
– 134 –
Page 89

The components identified by
shading and mark ! are criti-
cal for safety.
Replace only with part number
specified.
Les composants identifies par
une trame et une marque !
sont critiques pour la securite.
Ne les remplacer que par une
piece portant le numero specifie.
KV -EF34M31/EF34M61/EF34M80/EF34M90/EF34M91
RM-951
REF. NO. PART NO. DESCRIPTION REMARK
------------ ------------- ------------------- ------------ACCESSORIES AND PACKING MATERIALS
*****************************************
1-569-008-21 ADAPTOR, CONVERSION 2P
(except EF34M31/EF34M90(HK))
3-701-910-00 SCREW, SPECIAL (DIA. 3.8X20)
3-864-789-11 MANUAL, INSTRUCTION
(except EF34M90(HK)/EF34M90(JE))
3-864-789-31 MANUAL, INSTRUCTION
(EF34M80/EF34M90(JE)/EF34M91)
3-864-789-41 MANUAL, INSTRUCTION
(EF34M90(HK)/EF34M90(JE))
4-032-113-01 REINFORCEMENT
*4-067-102-01 INDIVIDUAL CARTON
*4-067-102-11 INDIVIDUAL CARTON (EF34M80/EF34M91)
*4-067-103-01 TRAY
*4-067-103-11 TRAY (EF34M80/EF34M91)
*4-067-104-01 CUSHION (UPPER) (ASSY)
*4-067-105-01 CUSHION (LOWER) (ASSY)
*4-384-101-21 BAG, PROTECTION
4-392-003-01 BAND, HOLD
4-392-004-01 CLIP
4-392-004-11 CLIP (except EF34M61)
*4-396-077-01 JOINT
REMOTE COMMANDER
**********************
1-418-039-11 REMOTE COMMANDER (RM-951)
4-978-977-01 POCKET, COVER (FOR RM-951)
------------------------------------------------------------------------------------------------------------------------------REF. NO. PART NO. DESCRIPTION REMARK
------------ ------------- ------------------- -------------
-------------------------------------------------------------------------------------------------------------------------------
-------------------
– 135 –
Page 90

KV -EF34M31/EF34M61/EF34M80/EF34M90/EF34M91
RM-951
Les composants identifies par
une trame et une marque !
sont critiques pour la securite.
Ne les remplacer que par une
piece portant le numero specifie.
The components identified by
shading and mark ! are criti-
cal for safety.
Replace only with part number
specified.
REF. NO. PART NO. DESCRIPTION REMARK
------------ ------------- ------------------- -------------
-------------------------------------------------------------------------------------------------------------------------------
REF. NO. PART NO. DESCRIPTION REMARK
------------ ------------- ------------------- -------------
-------------------------------------------------------------------------------------------------------------------------------
9-965-242-01
-------------------
Sony Ichinomiya Corporation
Quality Assurance Division
– 136 –
English
98JH08239-1
Printed in Japan
© 1998. 10
 Loading...