

Page 1
R
Trinitron Colour
Television
4-204-891-62
Instruction Manual
GB
GB
GB
This Instruction Manual has been produced using
Totally chlorine free (TCF) 100% Re-cycled paper
to comply with our commitment to the use of
environmentally friendly materials in our products.
KV-28DS20U
KV-32DS20U
© 1999 by Sony Corporation Printed in UK
Page 2

NOTICE FOR CUSTOMERS IN THE UNITED KINGDOM
A molded plug complying with BS1363 is fitted to this equipment for your safety and
convenience.
Should the fuse in the plug supplied need to be replaced, a 5 AMP fuse approved by ASTA
or BSI to BS 1362 (i.e. marked with or ) must be used.
When an alternative type of plug is used it should be fitted with a 5 AMP FUSE, otherwise
the circuit should be protected by a 5 AMP FUSE at the distribution board.
If the plug supplied with this equipment has a detachable fuse cover, be sure to attach the
fuse cover after you change the fuse. Never use the plug without the fuse cover. If you
should lose the fuse cover, please contact your nearest Sony service station.
How to replace the Fuse
Open the fuse compartment with a blade screwdriver, and replace the fuse.
• IMPORTANT
If the plug supplied is not suitable for the socket outlet in your home, it should be cut off
and an appropriate plug fitted in accordance with the following instructions:
The wires in this mains lead are coloured in accordance with the following code:
Blue Neutral
Brown Live
As the colours of the wires in the mains lead of this apparatus may not correspond with
the coloured markings identifying the terminals in your plug, proceed as follows:
The wire which is coloured blue must be connected to the terminal which is marked with
the letter N or coloured black. The wire which is coloured brown must be connected to
the terminal which is marked with the letter L or coloured red. Do not connect either wire
to the earth terminal in the plug which is marked by the letter E or by the safety earth
symbol or coloured green or green and yellow.
ASA
T
FUSE
WARNING
• To prevent shock hazard, do not insert the plug cut off from the mains lead into a socket
outlet. This plug cannot be used and should be destroyed.
• To prevent fire or shock hazard, do not expose the unit to rain or moisture.
• Dangerously high voltages are present inside the set. Do not open the cabinet. Refer
servicing to qualified personnel only.
Page 3

Instruction Manual
GB
1
Page 4

Safety Information
For your safety
All TVs operate on extremely high voltages. To prevent fire or electric shock, please follow the safety procedures indicated
below.
For General Safety
• Do not expose the TV set to rain or moisture.
• Do not remove the rear cover.
• For your protection, refer all servicing to qualified personnel only.
For Safe Installation
• Do not install the TV in hot, humid or excessively dusty places.
• Do not block or cover the ventilation openings. For ventilation, leave a space of at least
10 cm all around the set.
• Do not install the TV where it may be exposed to mechanical vibrations.
• Place the TV set only on a stable stand designed for the weight and dimensions of the
TV.
For Safe Operation
• Do not operate the TV set on anything other than a 220-240V AC, 50Hz supply.
• Do not operate the TV if any liquid or solid objects fall in through the ventilation slots.
Have it checked immediately.
• For environmental and safety reasons, it is recommended that the TV set is not left in
standby mode when not in use. Switch off at the mains.
• Do not disconnect the TV by pulling on the power cable. Disconnect by removing the
mains plug.
• In case of a thunderstorm, disconnect the TV set from the main supply and the aerial.
Otherwise the set may be damaged by a stroke of lightning.
For Maintenance
• When the TV is switched off, clean the TV screen with a soft dampened cloth. Do not
use any abrasive cleaners.
• Dust and nicotine deposits may cause heat accumulation inside the TV set. In the long
term this could be a safety risk and may shorten the lifetime of your TV set. Therefore
have your set serviced about every five years.
2
Page 5
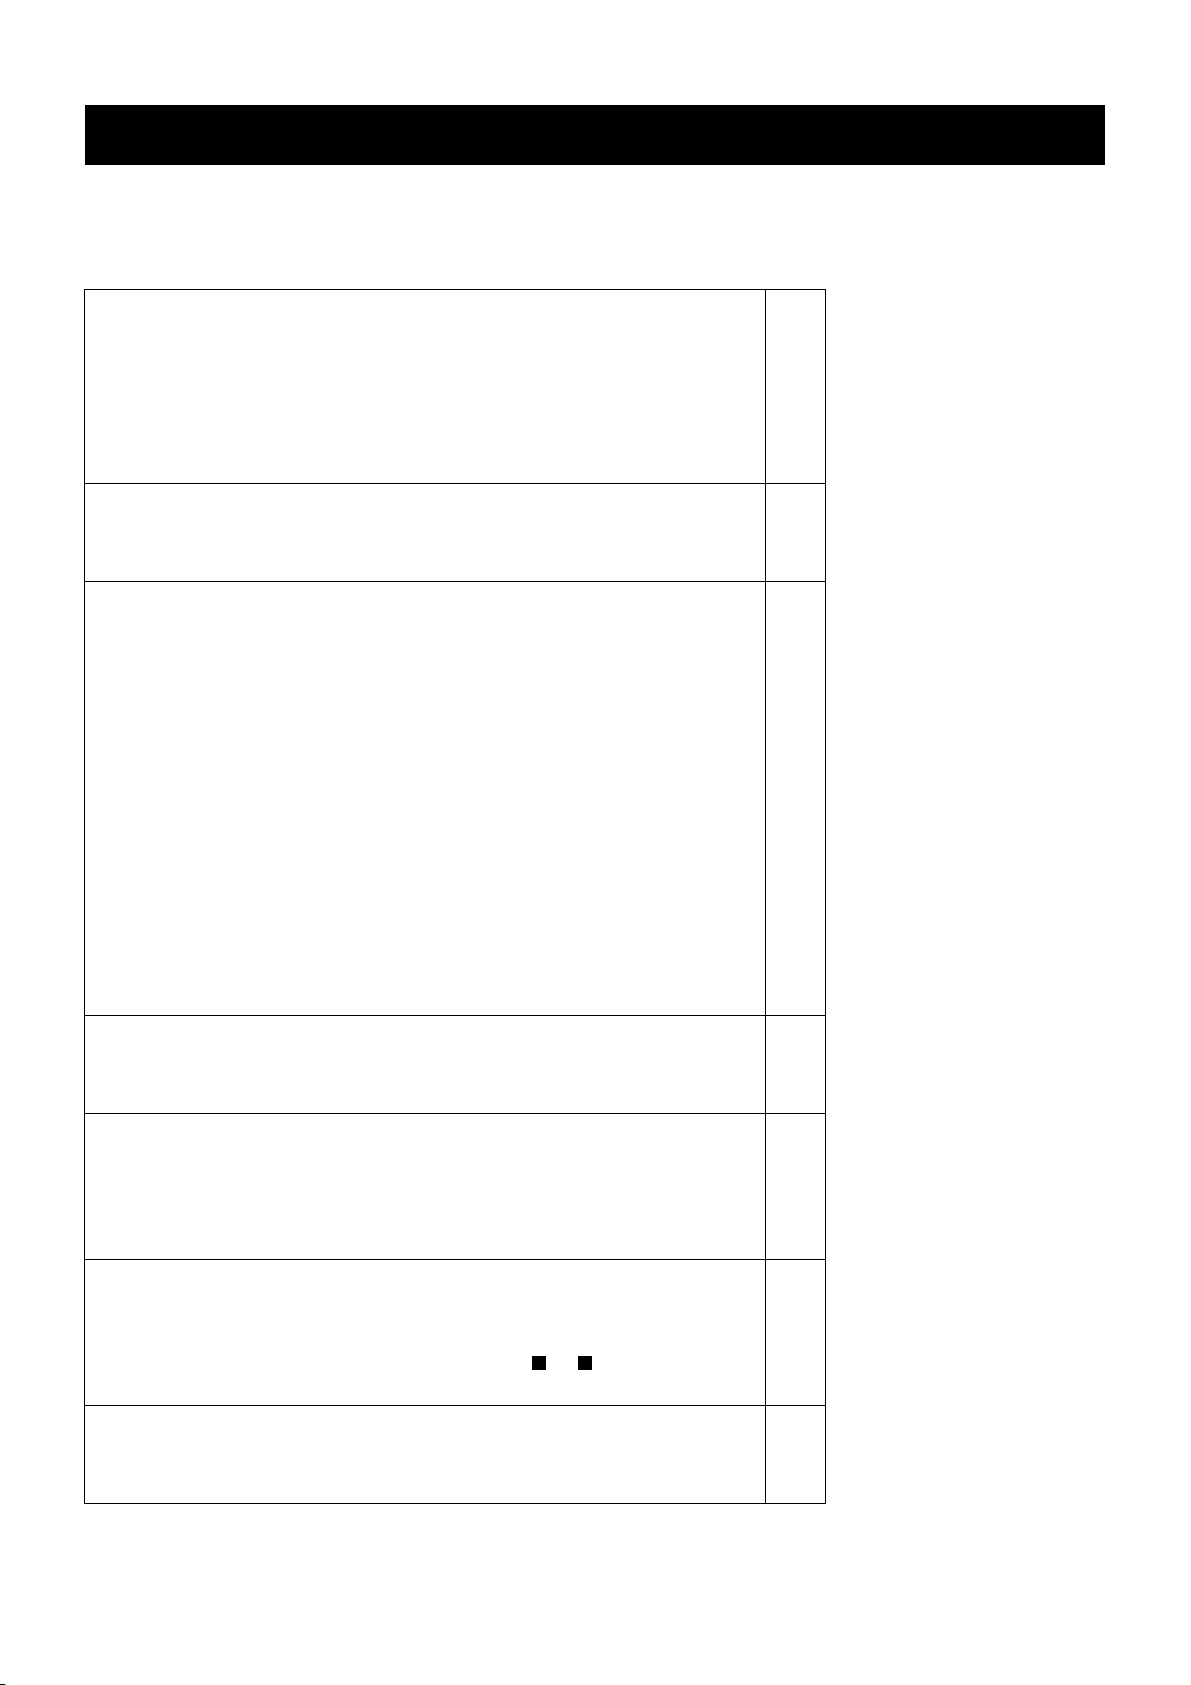
Table of Contents
Table of Contents
Quick Start Guide
Checking the accessories supplied
Inserting batteries into the remote control
Connecting the speakers
Connecting the aerial
Switching on the TV
Automatically tuning the TV
4
4
5
7
7
8
Overview
Overview of the TV set buttons
Overview of the remote control buttons
Additional TV Features
Choosing a language for the TV menu screens
Automatically tuning the TV
Re-arranging the TV channels
Adjusting the picture
Changing picture and sound modes quickly
Adjusting the sound
Setting up Dolby Pro Logic
Changing the screen mode
Displaying subtitles for digital channels
Using the ‘Further Programme Preset’ feature
Adjusting the picture rotation
Using the parental lock
Using the sleep timer
Manually tuning the TV
Skipping programme positions
Naming a channel
Teletext
Viewing standard teletext
Viewing digital teletext
9
10
11
12
13
14
14
15
16
17
18
19
20
21
22
23
24
25
26
27
Electronic Programme Guide (EPG)
Displaying the EPG
Viewing information on the EPG
Recording programmes
Setting the manual timer
Optional Equipment
Connecting equipment to the TV
Additional information when connecting equipment
Selecting the output source for the scart sockets or
Using the ‘AV Label Preset’ feature
G
Additional Information
Specifications
Troubleshooting
28
28
29
30
31
31
H
32
33
34
35
3
Page 6
Quick Start Guide
Follow steps 1-6 to: Check the accessories supplied
Insert batteries into your remote control
Connect the aerial to your TV
Plug in and switch on the TV
View programmes on your TV
1. Checking the accessories supplied
Surround Speakers
Centre Speaker
Batteries
Remote control
2. Inserting batteries into the remote control
Always remember to dispose of used batteries in an environmentally friendly way.
4
Page 7
Quick Start Guide
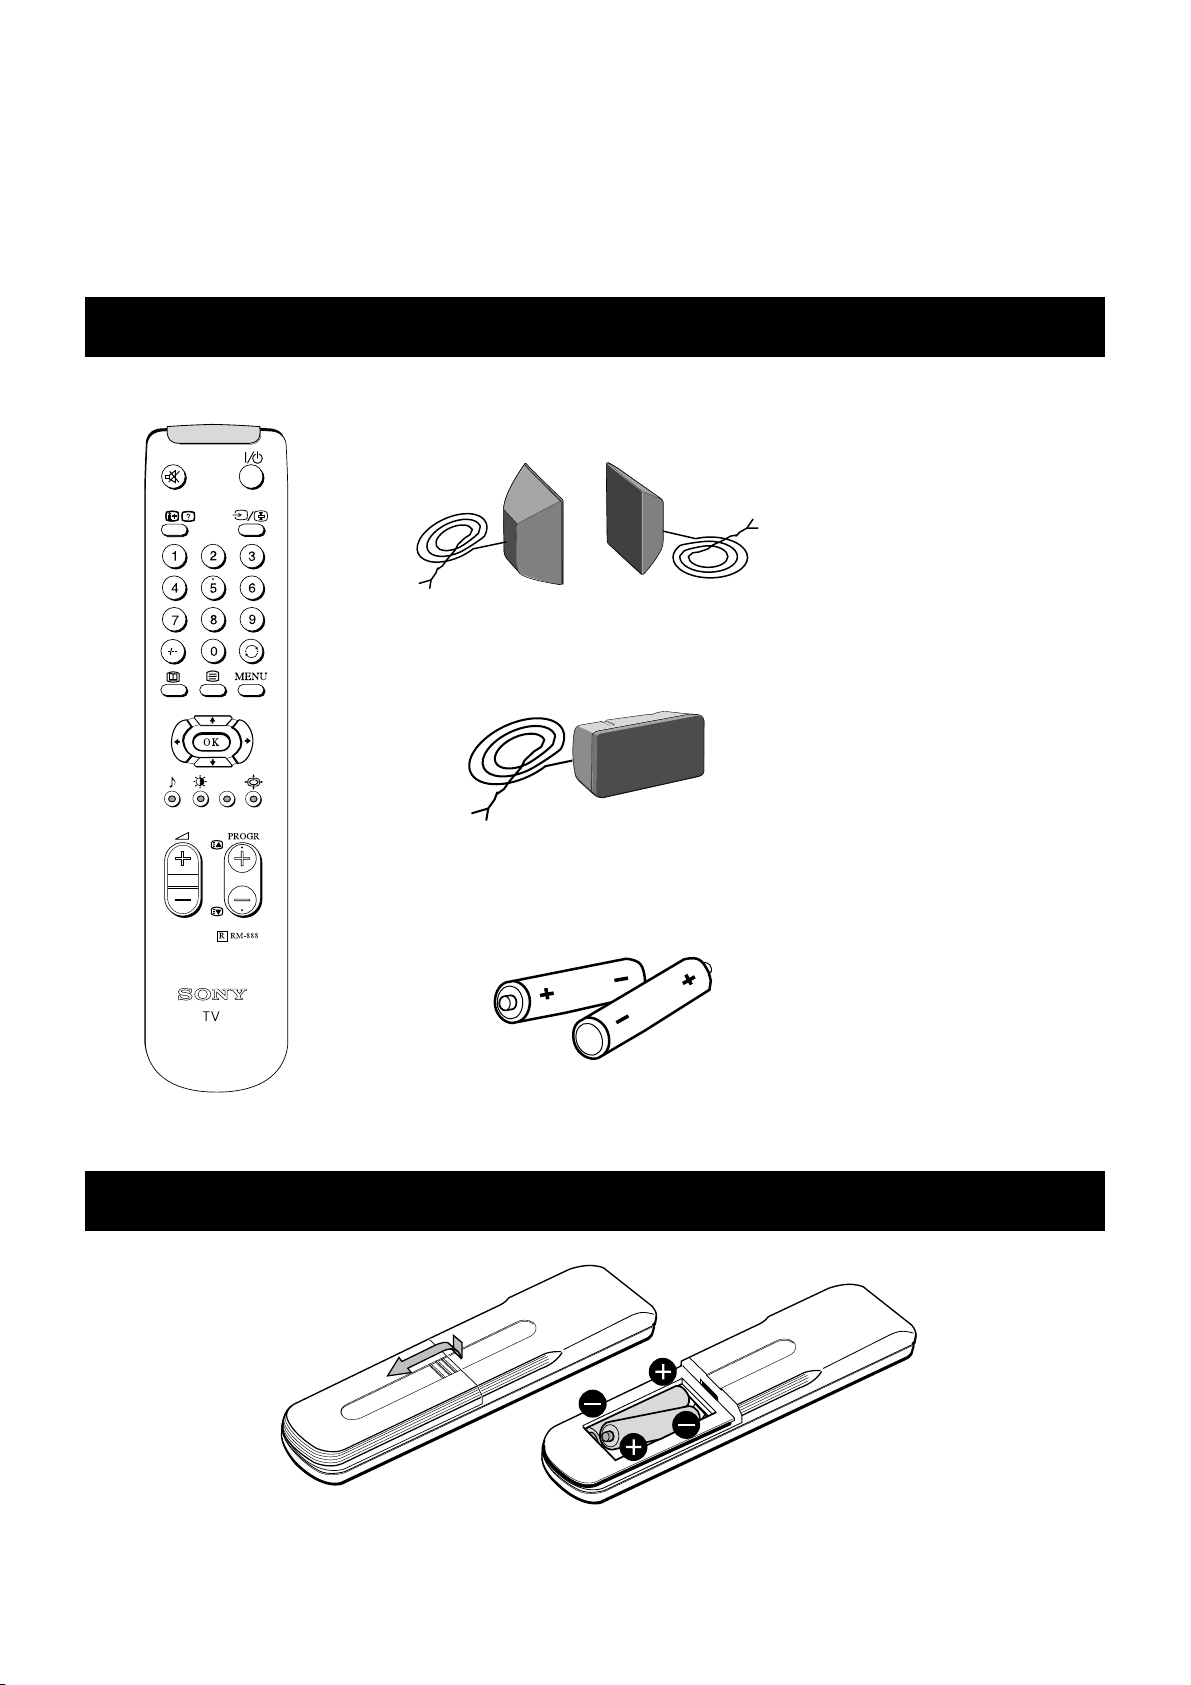
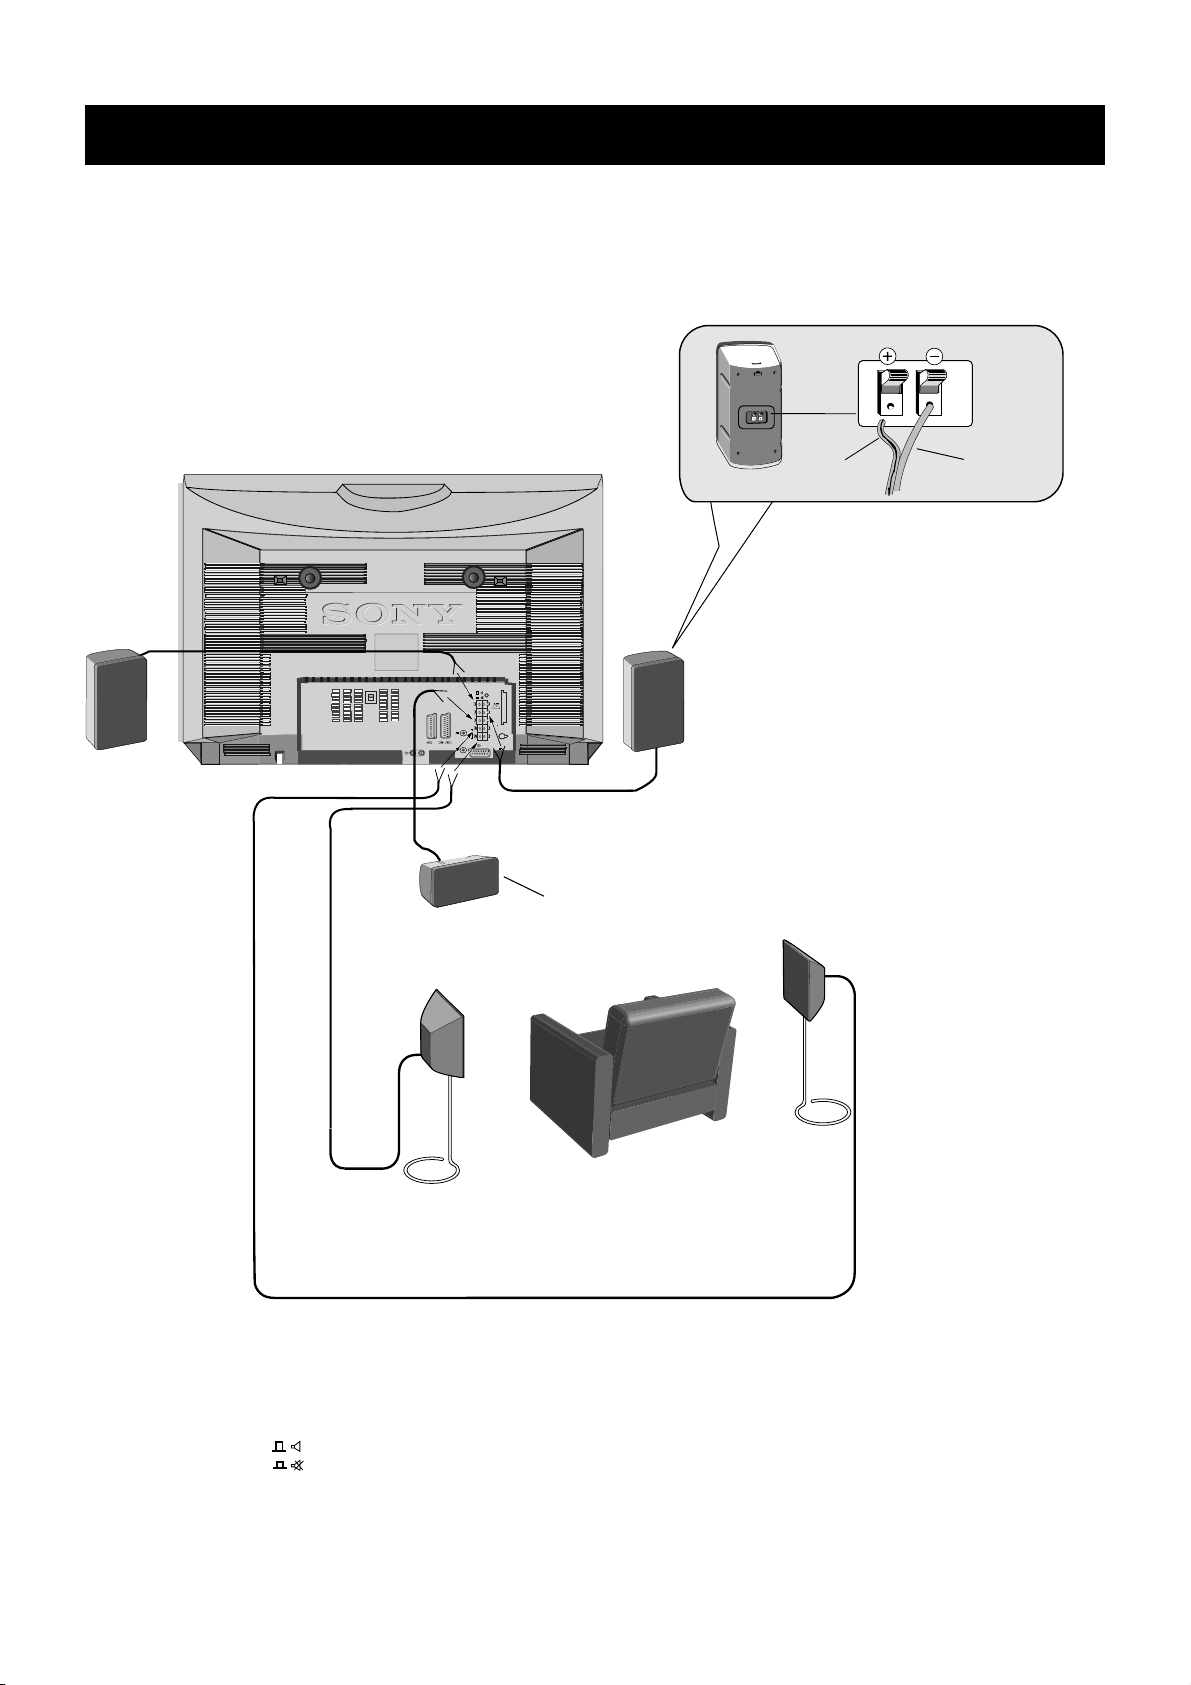
3.1. Connecting the speakers
Before switching on the TV, please connect the speakers to the TV using the leads provided. Connect the striped lead to the red
terminals and the black lead to the black terminals.
Dolby* ProLogic Surround normally requires 5 speakers:
Centre Speaker - to anchor the fixed sounds, like dialogues, to the screen.
Left and Right Front Speakers (incorporated in the TV) - for the normal two channel stereo or bilingual broadcasts.
Surround Speakers - for the special effects created by the surround channels.
To connect the speakers provided:
L/G/
S/I
R/D/
D/D
C
S
S
S
2
2
1
3
L/G/S/I
R/D/D/D
5V 200mA
Black
lead
Striped
lead
Centre Speaker
n
o
i
t
i
s
o
P
g
n
i
t
t
i
S
r
u
o
Y
Surround Speakers
* Manufactured under licence from Dolby laboratories Licensing Corporation. ‘Dolby’, ‘ProLogic’, and the double -D
symbol are trademarks of the Dolby Laboratories Licencing Corporation.
** For the best sound effects, place the surround speakers one meter above your listening position.
5
Page 8
Quick Start Guide
3.2. Connecting the speakers
To connect your own speakers (when using your own speakers, make sure they are at least 4 ohms impedance and magnetically
shielded)
Striped
lead
L/G/
S/I
R/D/
D/D
C
S
S
S
2
2
1
R/D/D/D L/G/S/I
3
5V 200mA
Black
lead
Centre speaker
n
o
i
t
i
s
o
p
g
n
i
t
t
i
s
r
u
o
y
Surround Speakers
Note: When you connect your own external left and right speakers you must mute the internal speakers by pressing in
the button marked on the rear of the TV.
6
Page 9

Quick Start Guide
4. Connecting the aerial
L/G/
S/I
R/D/
D/D
C
S
S
S
2
2
1
3
L/G/S/I
R/D/D/D
5V 200mA
Connect a conventional aerial to the socket
marked on the rear of the TV.
5. Switching on the TV
Connect the TV plug to the mains socket
(220-240V AC, 50Hz) and switch on.
Push in the on/off switch on the front of the TV.
7
Page 10
Quick Start Guide
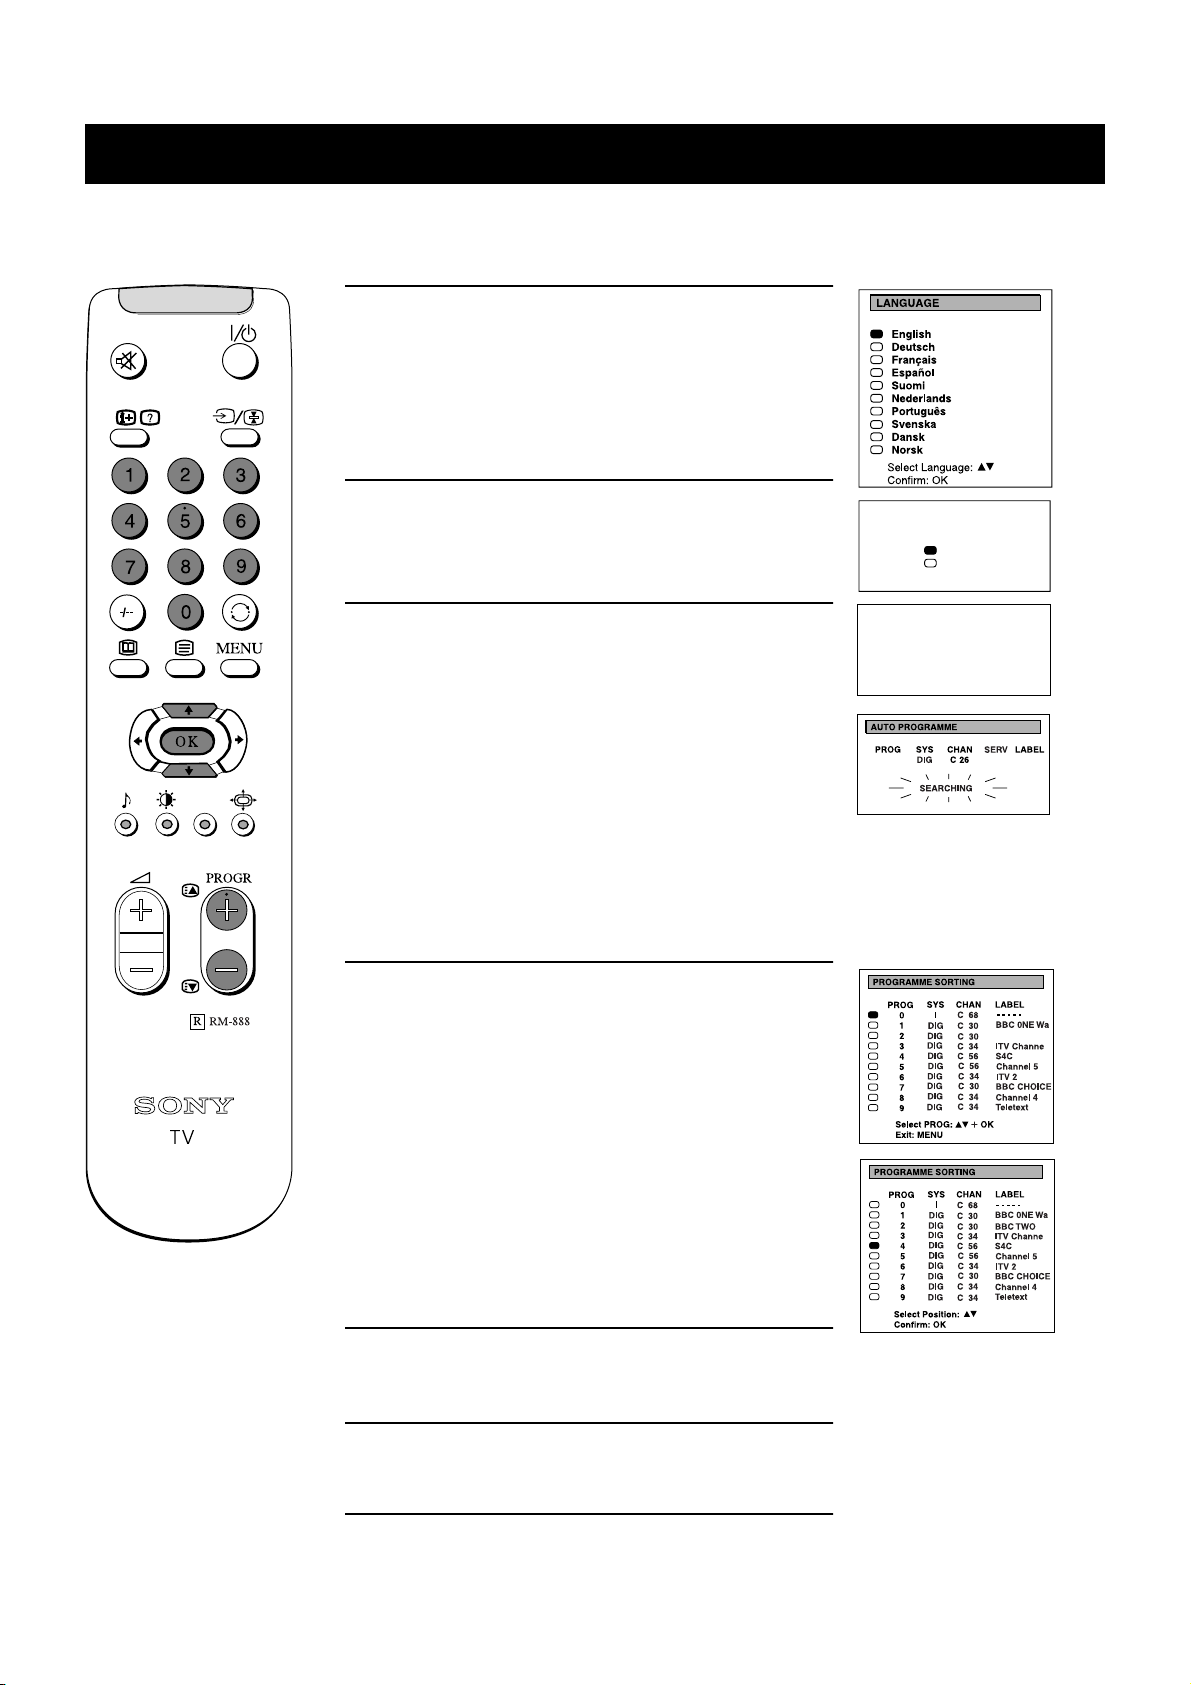
6. Automatically tuning the TV
When you first switch on the TV, the following sequence of menu screens appear on the TV enabling you to 1) choose a language
for the TV menu screens, 2) tune channels to the TV, 3) arrange the channels.
1. When switching on the TV for the first time, the
‘LANGUAGE’ menu appears automatically on the TV
screen enabling you to select in which language you wish
to read the TV menu screens. Press the
the remote control to select your chosen language then
press the OK button to confirm your selection.
V or v buttons on
2. The ‘AUTO TUNE’ menu appears on the TV screen in
your selected language. Press the
V or v buttons to select
‘YES’ then press the OK button to confirm.
3. Ensure the antenna is connected as instructed, then press
the OK button to confirm. The TV starts to automatically
search and store all available channels for you. Please be
patient and do not press any buttons.
The digital channels will be stored on programme
numbers 1-90 and the analogue channels on programme
numbers 91-99.
Note: If any digital channels are stored on programme
numbers 91-99 during the Automatic Tuning procedure,
then no analogue channels will be allocated. If this
happens, please refer to the section ‘Manually Tuning the
TV’ on page 23 of this manual to tune in and store the
analogue channels.
4. When the TV has finished tuning in all available
channels, the ‘PROGRAMME SORTING’ menu appears
on the TV screen enabling you to change the order of the
channels on your TV. If you wish to change the channel
order, press the
V or v buttons on your remote control to
select the channel you want to move, then press the OK
button. Press the
V or v buttons to select the new
programme number position for your selected channel
then press the OK button to confirm. The selected
channel now moves to its new programme position and
the other channels move accordingly. Repeat this
procedure if you wish to sort the order of other channels
on your TV.
Do you want to start
automatic tuning?
Yes
No
Confirm: OK
Please confirm that
antenna is connected
Confirm: OK
BBC TWO
5. Press the MENU button to remove the menu from the TV
screen.
6. Press the PROGR+/- or the numbered buttons on the
remote control to view the TV channels.
8
Page 11
Overview
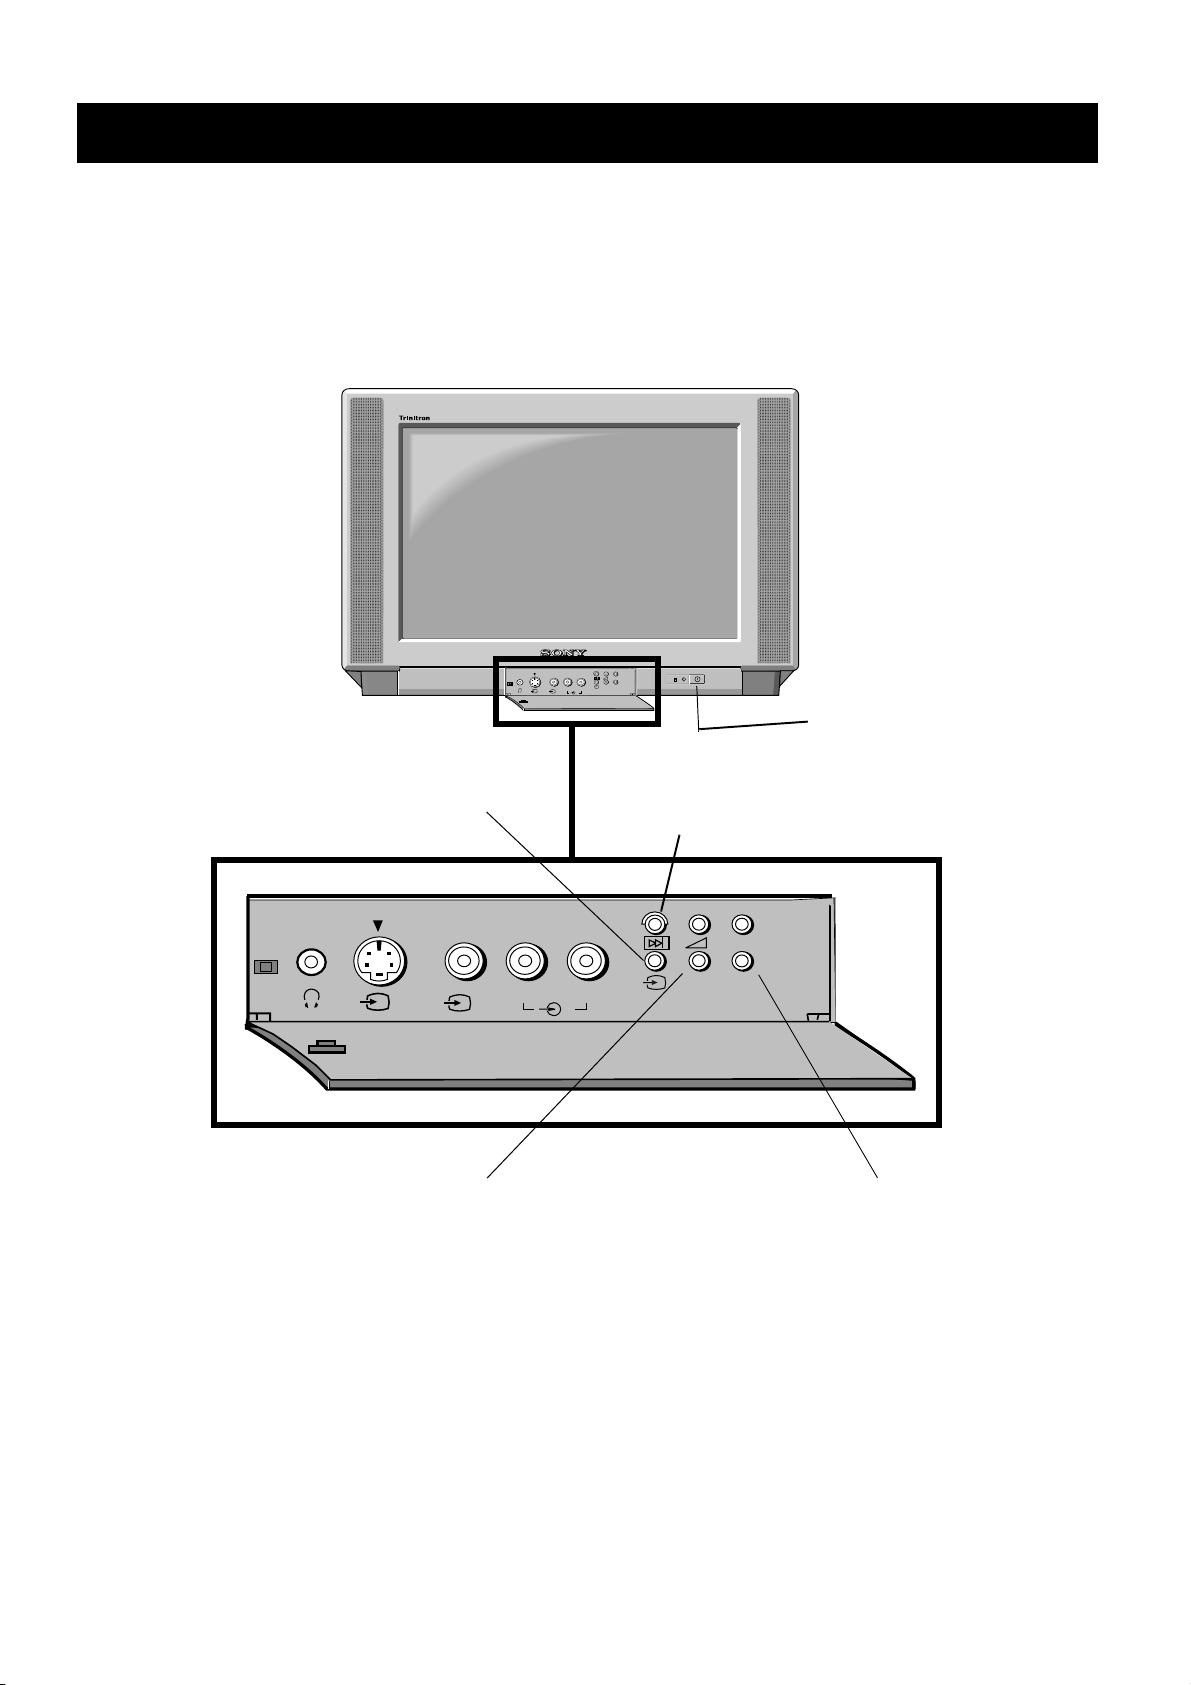
Overview of the TV set buttons
MONO
L/G/S/I R/D/D/D
s
2
2
++
__
P
On/Off switch.
Press to switch TV on and off.
Video input button.
Press to select the input
signals from VCR etc.
MONO
s
L/G/S/I R/D/D/D
2
Volume control buttons.
Press to increase(+)/decrease(-) volume.
Auto tune button.
Press to select the automatic
tuning function.
++
P
__
2
Programme Up(+) or Down(-) buttons.
Press to select TV channels.
9
Page 12
Overview
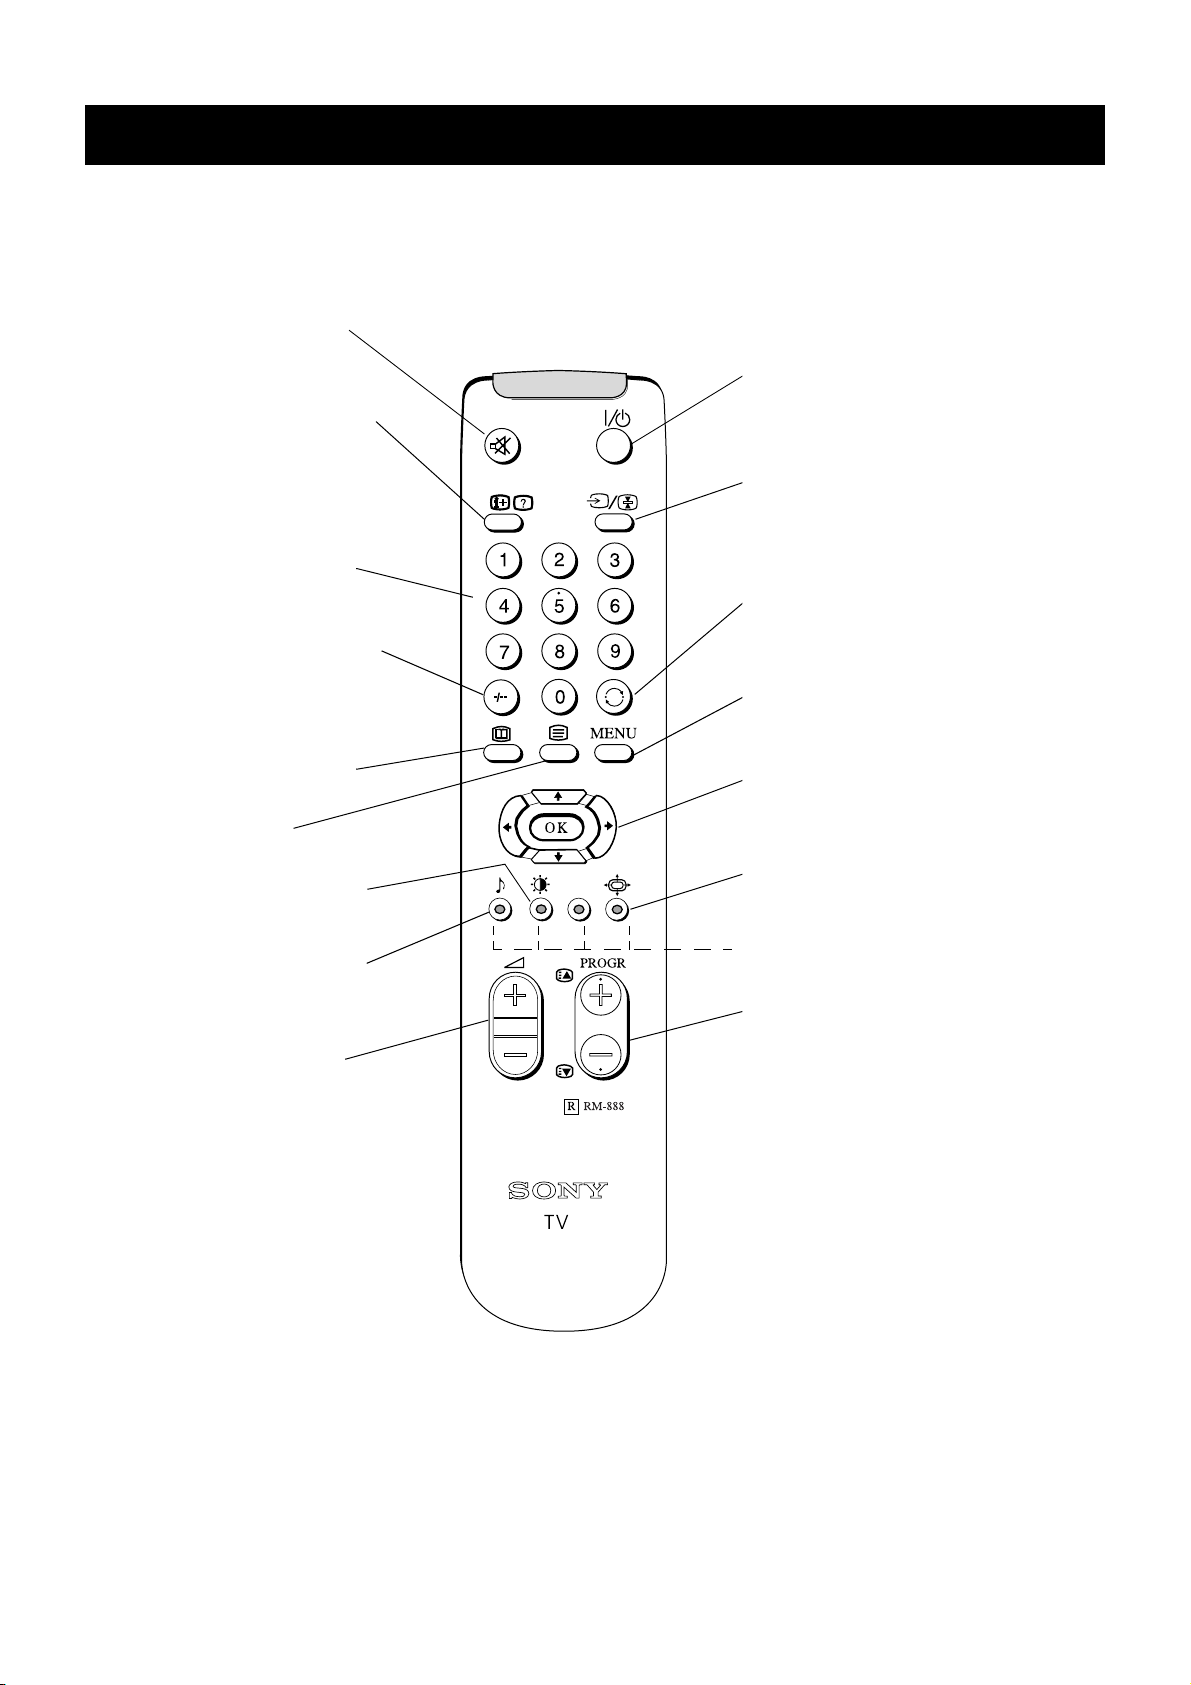
Overview of the remote control buttons
To mute sound
Press to mute TV sound. Press again to
restore the sound.
To reveal on screen information
Press to reveal all on-screen indications.
Press again to cancel. In teletext mode,
press to reveal concealed information (eg
answers to a quiz) then press again to
cancel.
To select channels
Press the numbered buttons to select
channels.
For double digit programme numbers,
e.g.23, press -/-- first, then the buttons 2 and
3. If you enter an incorrect first digit, select
-/-- button again to enter the programme
number of your choice.
To select EPG
Press to display the Electronic Programme
Guide. Press again to remove display.
To select Teletext
Press to switch on Teletext.
To temporarily switch off TV
Press to temporarily switch off TV. Press again to
switch on from standby mode. To save energy, we
recommend switching off completely when TV is not
in use.
NOTE: After 15-30 minutes without a TV signal and
without any button being pressed, the TV switches
automatically into standby mode.
To select input signal or freeze teletext
Press to select inputs from the TV sockets (see Using
Optional Equipment section). In teletext mode, press
to freeze the displayed page. Press once again to
cancel.
To return to previous channel
Press to return to the previous channel you were
watching. Note: This can be done only after watching
the present channel for 5 seconds.
To display the menu
Press if you wish to use the TV menu system. Press
again to remove the menu from the TV screen.
To select menu items
Use these buttons and the OK button to select the
options available in the menu system of this TV.
To display picture menu
Press to change the picture settings. Press
the OK button to remove the display.
To display sound menu
Press to change the sound settings. Press the
OK button to remove the display.
To adjust TV volume
Press to adjust the volume of the TV.
To change screen format
Press to change the size of the screen.
See Teletext section of manual for details.
To select channels
Press to select channels.
10
Page 13

Additional TV Features
Choosing a language for the TV menu screens
The TV consists of a menu system which can appear on screen in a variety of languages. Use the following feature to select the
language that best suits you.
1. Press the MENU button on the remote control to display
the menu on the TV screen.
2. Press the V or v buttons to select the symbol on the
menu screen then press the
‘PRESET’ menu.
3. Press the V or v buttons to select ‘Language’ on the
menu screen then press the
‘LANGUAGE’ menu.
b button to enter the
b button to enter the
4. Press the V or v buttons to select your chosen language.
5. Press the OK button to confirm your selection.
6. Press the MENU button to remove the display from the
TV screen.
11
Page 14

Additional TV Features
Automatically tuning the TV
You have already tuned in all available channels using the ‘Automatically tuning the TV’ section at the start of this manual. If
you need to repeat the tuning procedure however, follow the instructions below and the TV automatically searches and stores all
available channels for you.
1. Press the MENU button on the remote control to display
the menu on the TV screen.
2. Press the V or v buttons on the remote control to select
the symbol on the menu screen then press the
button to enter the ‘PRESET’’ menu.
3. Press the V or v buttons to select ‘Auto Programme’
then press the
b button to display the autotune menu.
4. Press the V or v buttons to select ‘YES’ then press the
OK button to confirm.
b
Do you want to start
automatic tuning?
Yes
No
Confirm: OK
5. Ensure the antenna is connected as instructed, then press
the OK button to confirm. The TV starts to automatically
search and store all available channels for you. Please be
patient and do not press any buttons.
The digital channels will be stored on programme
numbers 1-90 and the analogue channels on programme
numbers 91-99.
Note: If any digital channels are stored on programme
numbers 91-99 during the Automatic Tuning procedure,
then no analogue channels will be allocated. If this
happens, please refer to the section ‘Manually Tuning
the TV’ on page 23 of this manual to tune in and store
the analogue channels.
6. When the automatic tuning procedure is complete, the
menu disappears from the TV screen. Press the
PROGR+/- or the numbered buttons on the remote
control to view the TV channels.
Note: Press the MENU button if you wish to stop the
automatic tuning procedure.
Please confirm that
antenna is connected
Confirm: OK
12
Page 15

Additional TV Features
Re-arranging the TV channels
After tuning the TV, you can use this feature to change the channel order.
1. Press the MENU button on the remote control to display
the menu on the TV screen.
2. Press the V or v buttons on the remote control to select
the symbol on the menu screen then press the
button to enter the ‘PRESET’ menu.
3. Press the v buttons to select ‘Programme Sorting’ then
press the
SORTING’ menu.
b button to enter the ‘PROGRAMME
b
4. Press the V or v buttons to select the channel you want
to move then press the OK button to confirm.
5. Press the V or v buttons to select the new programme
position (eg PROG 4) for your selected channel then
press the OK button to confirm. The selected channel
now moves to its new programme position and the other
channels move accordingly.
6. Repeat steps 4 and 5 if you wish to sort other channels.
7. Press the MENU button to remove the menu from the TV
screen.
13
Page 16

Additional TV Features
Adjusting the picture
Although the picture is adjusted at the factory, you can modify it to suit your own taste.
1. Press the MENU button on the remote control to display the
menu on the TV screen.
2. Press the
enter the ‘PICTURE CONTROL’ menu.
3. Press the
wish to adjust then press the
description of the menu items and their effects, see the table
below.
4. If you selected ‘Picture Mode’ or ‘Format’ in step 3, press the
V or v buttons to select the item on the screen you wish to
adjust then press the
5. Press the
6. As soon as you have adjusted the item, press the OK button to
store the new setting.
7. If you selected ‘Picture Mode’ or ‘Format’ in step 3, press the
B buttons to return to the ‘PICTURE CONTROL’ menu.
8. Repeat steps 3-7 to adjust the other items.
9. Press the MENU button to remove the menu from the TV
screen.
V or v buttons on the remote control to select the
symbol on the menu screen then press the
b button to
V or v buttons to select the item on the screen you
b button to confirm. For a
b button to confirm.
b or B buttons to adjust your selected item.
Picture Mode Picture Modeb Personal (for individual settings)
Movie (for films)
B Live (for live broadcasts)
Brightness*
Colour*
Sharpness*
Hue**
Contrast
Reset Resets picture to factory preset levels
Format Format (refer to page 17 for details)
Scroll
Auto 16:9 b Off B On
Digital Signal *** Set to Composite or RGB. Choose the
option that gives you the picture quality
you prefer
*Only if you select ‘Personal’ in ‘Picture Mode’.
** Available for NTSC colour system only.
*** If you select the RGB option, any changes made to the Colour, Sharpness and
Hue levels will have no effect.
Changing picture and sound modes quickly
You can quickly change the Picture Mode or the Sound Effects
Mode without entering the ‘PICTURE CONTROL’ or the
‘SOUND CONTROL’ menu screens.
Personal
Movie
Live
14
1. Press the symbol on the remote control for picture modes
or the symbol for sound effect modes.
2. Press the
V or v buttons to select the desired mode.
3. Press the OK button to remove the display from the TV
screen.
Page 17

Additional TV Features
Adjusting the sound
Although the sound is adjusted at the factory, you can modify it to suit your own taste.
1. Press the MENU button on the remote control to display
the menu on the TV screen.
2. Press the
the symbol on the menu screen then press the
button to enter the ‘SOUND CONTROL’ menu.
3. Press the
you wish to adjust then press the
For a description of the menu items and their effects, see
the table below.
4. If you selected ‘Sound Mode’ in step 3, press the
buttons to select the item on the screen you wish to adjust
then press the
5. Press the
6. As soon as you have adjusted the item, press the OK
button to store the new setting.
7. If you selected ‘Sound Mode’ in step 3, press the
buttons to return to the ‘SOUND CONTROL’ menu.
8. Repeat steps 3-7 to adjust the other items.
9. Press the MENU button to remove the menu from the TV
screen.
V or v buttons on the remote control to select
V or v buttons to select the item on the screen
b button to confirm.
b button to confirm.
b or B buttons to adjust your selected item.
b
V or v
B
Sound Mode b Personal
Balance
Reset Resets sound to factory preset levels
Base Extension Boosts base by a fixed amount
Surround Mode Choose from the special sound effects:
Dual Sound StereoBbMono (for a stereo broadcast)
Volume Offset B The channel volume level can be b
Headphones
i Volume
i Dual Sound Stereo BbMono (for a stereo broadcast)
Rock
Jazz
B Pop
Pro Logic --> Pseudo Stereo --> Spatial --> Club
--> Theatre --> Hall --> Church --> Stadium --> Off
A for channel 1B b B for channel 2
(for a bilingual broadcast)
adjusted over a range of -12 to +12.
A for channel 1 B b B for channel 2
(for a bilingual broadcast)
Auto Surround Set to ‘On’ to automatically select Pro Logic
Surround sound when transmitted.
15
Page 18

Additional TV Features
Setting Up Dolby Pro Logic
Before listening to Dolby Pro Logic encoded programmes, you can adapt the Dolby features to suit your own taste. Normally this
is only required when you install the TV and the speakers, or when changing the speaker positions.
1. Press the MENU button on the remote control to display the
menu on the TV screen.
2. Press the
symbol on the menu screen then press the
‘PRESET’ menu.
3. Press the
menu screen then press the
LOGIC SETUP’ menu.
4. Press the
button to enter. Press the
following modes then press the OK button to store the chosen
mode:
Dolby Pro Logic: all 5 speakers are activated
Dolby 3 stereo: surround speakers are not used
5. Press the
button to enter. Press the
following modes then press the OK button to store the chosen
mode:
Normal: all 5 speakers are activated
Wide: wider bandwidth for centre speaker
Phantom: centre speaker is not used
v button on the remote control to select the
b button to enter the
v button to select ‘Dolby Pro Logic Setup’ on the
b button to enter the ‘DOLBY PRO
V or v buttons to select ‘Mode’, then press the b
b or B buttons to select one of the
v button to select ‘Centre Mode’, then push the b
b or B buttons to select one of the
6. Press the
to enter. Press the
OK button.
The test tone will cycle through all the speakers.
7. Press the
v button to select ‘Test Tone’ then push the b button
b or B buttons to select ‘On’, then press the
v button to select the ‘Left Speaker’, then press the
b button to confirm. The tone remains at the left speaker.
8. Press the
OK button.
9. Repeat steps 7 and 8 to select and adjust the ‘Centre’, ‘Right’,
and ‘Surround’ speakers, so that the sound output from all
speakers are balanced in relation to your sitting position.
10.Press the MENU button to remove the display from the TV
screen.
V or v buttons to alter the sound level, then press the
16
Page 19

Additional TV Features
rmat
Changing the screen mode
Using this Screen Mode feature you can change the aspect ratio of the screen.
1. Press the MENU button on the remote control to display the
menu on the TV screen.
2. Press the V or v buttons on the remote control to select the
symbol on the menu screen then press the
enter the ‘PICTURE CONTROL’ menu.
b button to
3. Press the v button to select ‘Format’ on the menu screen then
press the
b button to enter the ‘FORMAT’ menu.
4. Format
Press the
button to enter. Press the
V or v button to select ‘Format’ then press the b
b or B button repeatedly to select
one of the following modes then press the OK button to store
the chosen mode:
• smart - imitation of wide screen effect (16:9) for 4:3
broadcasts
• wide - for 16:9 broadcasts
• zoom - imitation of wide screen effect (16:9) for movies
broadcast in cinemascopic format
• 14:9 - compromise between 4:3 and 16:9 format - for
conventional 14:9 picture
• 4:3 - conventional 4:3 picture
5. Scroll
Press the
v button to select ‘Scroll’. If you selected zoom
mode, 14:9 mode or smart mode in step 4, you can use ‘Scroll’
to move the screen up- or downwards in order to see the cut-
off parts (eg to read subtitles). Press the
the options then press the
B or b buttons to adjust the screen
b button to highlight
position over a range of -5 to +5. Press the OK button to store.
6. Auto 16:9
Press the
button to enter. Press the
v button to select ‘Auto 16:9’ then press the b
B or b button to select ‘On’ if you
wish the TV set to switch automatically to wide format if a
16:9 broadcast is detected or ‘Off’ for normal mode. Press the
OK button to store.
FORMAT
Format
Scroll
Auto 16:9
Smart
Wide
Zoom
14:9
4:3
Wide
0
On
7. Press the MENU button to remove the menu from the TV
screen.
17
Page 20

Additional TV Features
Displaying subtitles for digital channels
With this feature you can view subtitles on the TV screen when watching digital channels.
When watching analogue channels you can view subtitles via the teletext menu (see the teletext section of this instruction manual
for details).
1. Press the MENU button on the remote control to display
the menu on the TV screen.
2. Press the v button to select the symbol on the menu
screen then press the
menu.
3. Press the v button to select ‘Digital Subtitles’ then press
the
b button to enter.
b button to enter the ‘PRESET’
4. Press the b or B buttons to select the language in which
you wish the subtitles to appear. You can choose from
English, Welsh or Gaelic (when transmitted by
broadcaster).
5. Press the OK button to confirm your selection.
6. Press the MENU button to remove the menu from the
TV screen.
7. When you wish to cancel subtitles, repeat steps 1 - 6 and
set to OFF in step 4.
18
Page 21

Additional TV Features
Using the further programme preset feature
With this feature you can a) manually fine-tune the TV to obtain a better picture reception if the picture is distorted or b) preset
the AV output for the programme positions of channels with scrambled signals (eg from a pay TV decoder). In this way a
connected VCR records the unscrambled signal.
1. Press the MENU button on the remote control to display
the menu on the TV screen.
2. Press the v button to select the symbol on the menu
screen then press the
menu.
b button to enter the ‘PRESET’
3. Press the v button to select ‘Further Programme Preset’
then press the
b button to enter the ‘FURTHER
PROGRAMME PRESET’ menu.
4. Press the V or v buttons to select the relevant
programme number then press the
b button repeatedly
to select a) AFT or b) DECODER. The selected item
changes colour.
Note: AFT will only be available on analoge channels.
5. a) AFT
Press the
V or v buttons to fine tune the channel
frequency over a range of -15 to +15. Press the OK
button to confirm. Repeat steps 4 and 5a if you wish to
fine tune other channels.
b) DECODER
Press the
V or v buttons to select AV1, AV2 or AV3 for
the programme position and press the OK button to
confirm. You can now attach a decoder to the AV1, AV2
or the AV3 socket on the back of the TV and the picture
from that decoder will appear on this programme
number. Repeat steps 4 and 5b to preset the AV output
for other programme positions.
FURTHER PROGRAMME PRESET
PROG
0
1
2
3
4
5
6
7
8
9
FURTHER PROGRAMME PRESET
PROG
0
1
2
3
4
5
6
7
8
9
AFT
On
On
On
On
On
On
On
On
On
On
AFT
On
On
On
On
On
On
10
On
On
On
DECODER
Off
Off
AV1
Off
AV2
Off
Off
Off
Off
Off
DECODER
Off
Off
AV1
Off
AV2
Off
Off
Off
Off
Off
6. Press the MENU button to remove the menu from the
TV screen.
19
Page 22

Additional TV Features
Adjusting the picture rotation
If, due to the earth’s magnetic field, the picture slants, you can use this feature to readjust the picture.
1. Press the MENU button on the remote control to display
the menu on the TV screen.
2. Press the v button to select the symbol on the menu
screen then press the
menu.
3. Press the v button to select ‘Picture Rotation’ then press
b button to highlight the 0 (zero) on the right of the
the
menu.
b button to enter the ‘PRESET’
4. Press the b or B buttons to adjust the picture rotation.
The adjusting range is -5 to +5.
5. Press the OK button to store the new range.
6. Press the MENU button to remove the menu from the
TV screen.
20
Page 23

Additional TV Features
Using the parental lock
This feature enables you to prevent undesirable broadcasts appearing on the TV.
1. Press the MENU button on the remote control to display
the menu on the TV screen.
2. Press the v button on the remote control to select the
symbol on the menu screen then press the
enter the ‘PRESET’ menu.
3. Press the v button to select ‘Parental Lock’ then press
the
b button to enter the ‘PAR ENTA L LOC K ’ menu.
b button to
4. Press the v button to select the channel you wish to
block then press the OK button to confirm your
selection. The
position to indicate this channel is now blocked. To
unblock the channel, press the OK button again. The
symbol disappears.
5. Repeat step 4 if you wish to block other channels.
6. Press the MENU button to remove the menu from the
TV screen.
symbol appears before the programme
21
Page 24

Additional TV Features
Using the sleep timer
The TV can be set to switch automatically to standby mode after a length of time chosen by you. You may set the time in 30
minute steps up to 4 hours.
1. Press the MENU button on the remote control to display
the menu on the TV screen.
2. Press the v button on the remote control to select the
symbol on the TV screen then press the
b button twice.
3. Press the b or B buttons repeatedly until the required
amount of time delay appears on the screen.
4. Once the time delay has been selected, press the OK
button to enter.
5. Press the MENU button to remove the menu from the
TV screen.
One minute before standby, the display shown appears
on the screen.
Notes:When watching TV, press the button if you wish
to see the time remaining.
TIMER
Sleep Timer Off
TIMER
Sleep Timer 1:00
0:01
22
To return to normal operation from standby mode,
press the button.
/
Page 25

Additional TV Features
Manually tuning the TV
You have already tuned the TV automatically using the instructions at the start of this manual. You can however carry out this
operation manually, adding channels to the TV, one at a time.
1. Press the MENU button on the remote control to display
the menu on the TV screen.
2. Press the v button to select the symbol on the TV
screen then press the
3. Press the v button to select ‘Manual Programme Preset’
on the menu screen then press the
‘MANUAL PROGRAMME PRESET’ menu.
b button to enter the PRESET menu.
b button to enter the
4. Press the V or v buttons to select an unused programme
number for your channel then press the
5. Press the V or v buttons to select the TV broadcast system
(I for analogue or DIG for digital) or a video input source
(AV1, AV2 ...) then press the
6. Select the first number digit of ‘CHAN’ (channel) then the
second number digit of ‘CHAN’ with the number buttons
on the remote control
or
Press the
channel.
7. If you wish to change the ‘SERV’ service number, select
each digit in turn and press the numbered buttons on the
remote control to change to your desired service
8. If you do not wish to store this channel on the programme
number you selected, press the
remote control to continue searching for the desired
channel.
V or v buttons to search for the next available
b button to confirm.
V or v buttons on the
b button to enter.
03
9. If this is the channel you wish to store, press the OK
button.
10. Repeat steps 4-8 if you wish to store more channels then
press the MENU button to remove the menu from the TV
screen.
NOTE: After manually tuning in the channels you require, you
can sort the channels into the order you prefer by following the
procedure ‘Re-arranging the TV channels’ on page 13.
23
Page 26

Additional TV Features
Skipping programme positions
This function enables you to skip unused programme positions when selecting them with the PROGR+/- buttons. However, by
using the number buttons you can still select the skipped programme position.
1. Press the MENU button on the remote control to display
the menu on the TV screen.
2. Press the v button on the remote control to select the
symbol on the menu screen then press the
enter the ‘PRESET’ menu.
3. Press the v button to select ‘Manual Programme Preset’
then press the
PROGRAMME PRESET’ menu.
b button to enter the ‘MANUAL
b button to
4. Press the V or v buttons to select the programme
position you want to skip then press the
enter the ‘SYS’ column.
5. Press the v button to select ‘---’ then press the OK
button to store.
6. Repeat steps 4 and 5 to skip other programme positions.
7. Press the MENU button to remove the menu from the
TV screen.
b button to
03
03
24
Page 27

Additional TV Features
Naming a channel (Analogue channels only)
Names for channels are usually taken automatically from Teletext if available. You can however name a channel or an input video
source using up to five characters (letters or numbers).
1. Press the MENU button on the remote control to display
the menu on the TV screen.
2. Press the v button to select the symbol on the menu
screen then press the
menu.
3. Press the v button to select ‘Manual Programme Preset’
then press the
PROGRAMME PRESET’ menu.
b button to enter the ‘PRESET’
b button to enter the ‘MANUAL
4. Press the V or v buttons to select the channel you wish
to name.
5. Press the b button repeatedly until the first element of
the ‘LABEL’ column is highlighted.
6. Press the V or v buttons to select a letter or number
(select ‘-’ for a blank) then press the
confirm. Select the other four characters in the same
way.
7. After selecting all the characters, press the OK button.
8. Repeat steps 4 to 7 if you wish to label other channels.
9. Press the MENU button to remove the menu from the
TV screen.
b button to
25
Page 28

Additional TV Features
Viewing Standard Teletext
Teletext is an information service transmitted by most TV stations.
Selecting Teletext
1. When viewing analogue channels press a numbered button on
the remote control to select the channel which carries the
teletext service you wish to receive.
2. Press the on the remote control to switch on teletext. Press
the button again if you wish to superimpose teletext on to
the TV screen.
3. Select your required page using the numbered buttons on the
remote control. If you make an error, complete the number, then
reenter the correct page number.
Using Other Standard Teletext Functions
To move to the next or preceding page
Press the or buttons to select the previous or next page.
To freeze a Teletext page
Press the button to freeze the page. Press again to cancel the
freeze.
Revealing concealed information (eg:answers to a quiz).
Press the button to reveal information. Press again to conceal the
information.
TELETEXT
Index
Programme
News
Sport
Weather
25
153
101
98
TELETEXT
Index
Programme
News
Sport
Weather
TELETEXT
Index
Programme
News
Sport
Weather
TELETEXT
Index
Programme
News
Sport
Weather
25
153
101
98
25
153
101
98
25
153
101
98
Using colour buttons to access pages (Fastext)
When the colour coded menu appears at the bottom of a page, press
the colour buttons (red, green, yellow or blue) on the control to
access the corresponding page.
Displaying TOP-Text (when available)
With TOP-Text you can access pages easily by selecting blocks or
groups of pages. The block is a category (for example Sports) which
includes the groups (for example Football). When TOP-Text is
broadcast, a colour coded menu appears at the bottom of the screen.
The colours of this menu correspond to the red, green, yellow and
blue buttons on the remote control. Press these coloured buttons to
displayed the desired pages.
1. Press the button to display teletext.
2. Press the coloured buttons to search for the page you desire:
Red: to go back to the previous page
Green: to proceed to the next page.
Yellow: to proceed to the first page of the next group.
Blue: to proceed to the first page of the next block.
Press the button twice to return to normal TV.
26
Page 29

Additional TV Features
Viewing Digital Teletext
Most of the digital TV channels broadcast information via teletext. This digital service includes high quality text and graphics as
well as advanced navigational options. Additionally, this television set has access to a dedicated digital teletext channel.
Selecting the dedicated digital
teletext channel
1. To view the dedicated digital teletext service, press the
numbered buttons on your remote control to select the relevant
channel number. If you do not know the channel number, press
the OK button to look for this channel in the channel table.
2. Once the teletext channel is displayed, follow the instructions
on-screen to display the teletext information, then press the
v, B or b buttons to guide the on-screen cursor to the required
area of the screen then press the OK button to display the chosen
information.
3. Alternatively, you can use the number and colour buttons on the
remote control to directly enter the page number required and to
display the various pages of text information.
V,
4. If when viewing the teletext pages, you are requested to select
‘OK’ or ‘Cancel’, press the OK button for ‘OK’ or the
button for ‘Cancel’.
5. When you have finished viewing teletext, press the button
or the PROG +/- buttons, and then select an alternative digital
channel.
Selecting teletext from the other
digital channels
Normal teletext services may also be available on other digital
channels. Sometimes this is indicated by a small symbol or text
display on your TV screen, superimposed on the channel you are
watching.
1. Press the
the OK button to display the chosen information.
2. Alternatively, you may be requested to use the number and
colour buttons on your remote control to display the various
pages of text information. If when viewing the teletext pages,
you are requested to select ‘OK’ or ‘Cancel’, press the OK
button for ‘OK’ or the button for ‘Cancel’.
3. Once the text information is displayed on screen, use the
B or b buttons, the colour buttons and/or the number buttons
to access the chosen information.
V, v, B or b buttons to select the symbol then press
V, v,
4. When you have finished viewing teletext, press the button
and then select an alternative digital channel.
On other channels there may be no on-screen symbol, but you can
see if there is a digital service as follows:
1. When watching a digital TV channel, press the button on
your remote control to display any text service which may be
available.
2. Press the number buttons to select the various pages of
information available and/or the colour buttons for the functions
shown on screen.
3. When you have finished using the text service, press the
button to return to normal TV.
27
Page 30

Additional TV Features
Electronic Programme Guide (EPG)
The Electronic Programme Guide (EPG) is a guide which provides programme information for all digital channels supporting
EPG.
Displaying the EPG
1. Press the button on the remote control to display the
programme guide on the TV screen. You may see the
message 'EPG INFORMATION IS TEMPORARILY
UNAVAILABLE' whilst waiting for the EPG to appear
on screen.
2. Press the V, v, B or b buttons on the remote control to
move the on-screen cursor around the guide.
3. Press the button again to remove the programme
guide from the TV screen.
Viewing Information on the EPG
You can alter the type of information presented on the EPG
by changing data in each of the EPG columns. You can for
example display information for all sports programmes being
shown tomorrow from 5.00pm onwards.
1. Press the button on the remote control to display the
EPG on the TV screen.
2. Press the B or b buttons to highlight the 'date' column
then press the
3. Press the B or b buttons to highlight the 'time' column
then press the
4. Press the b button or press the OK button. The EPG will
display programme information according to the date
and time you selected.
5. Press the b button to highlight the 'programme type'
column then press the
Films,
Education or Childrens Programmes.
V or v buttons to select your chosen date.
V or v button to select your chosen time.
V or v button to select News,
Sport, Entertainment, Lifestyle,
28
6. Press the B or b buttons or press the OK button to
update the programme information accordingly. If you
selected tomorrow's date, 17:00 and Sport, you should
now be able to view all the sports programmes being
shown tomorrow from 5.00 pm onwards.
7. Press the button on the remote control to remove the
EPG from the TV screen.
Page 31

Additional TV Features
d
Electronic Programme Guide (EPG)
Recording Programmes
1 Press the button on the remote control to display the
EPG on the TV screen.
2Press the
column then press the
desired programme.
3 Press the OK button. If the programme is currently being
broadcast, it will be displayed on your TV. If not, the
'TIMER' menu will be displayed on the TV screen.
4 At the bottom of the timer page you can see the symbols
5Press the
then press the OK button to confirm your selection. The
EPG appears on screen with the relevant icon appearing
next to the programme you selected in step 2.
6 If you wish to cancel a recording, select the relevant
programme and press the OK button. A menu is displayed
on screen requesting you to select 'Return' if you wish to
continue to record the programme or 'Delete' if you wish
to cancel the recording request.
7 After making your selection, press the OK button to
confirm. The record icon disappears from the EPG if
'Delete' was selected in step 6.
8 If you have finished viewing programmes on your TV,
press the button before the timer recording starts to
leave your TV in standby mode for the timer settings to
be activated. If, however, you wish to continue watching
other programmes after setting the timer, you can do so
by changing programmes in the normal way. If you are
watching another programme when the timer is due to
start, a display will appear on screen advising you that, if
you change channels, you automatically cancel the
recording.
9 If you do not wish to cancel or view the recording, press
the button whilst one of the displays are still on
screen to leave your TV in standby mode. The standby
indicator on the front of the TV will flash to show that the
timer record operation is active. If, however, you choose
to change programmes, you automatically cancel the
recording.
B or b buttons to highlight the 'programme'
V or v button to select your
(back to EPG), (to record a programme) or
(to set the programme to switch on automatically).
B or b buttons to select one of these symbols
/
/
Notes: If your video recorder (VCR) is not Smartlink-
compatible, you will need to set your VCR to switch
on and off automatically after setting the timer on
the EPG. If you want to change channel once a
digital programme has started recording, select the
channel by using the remote control buttons as
normal. The message 'STOP RECORDING' will be
displayed on screen. Either do nothing to allow the
recording to continue or select the required channel
once more while the message is still displayed on
screen. The recording will then be cancelled.
29
Page 32

Additional TV Features
Electronic Programme Guide (EPG)
Setting The Manual Timer
1 Press the button on the remote control to display the
EPG on the TV screen.
2 Press the
column then press the
3 Press the OK button to display a screen of 9 programme
slots, each one indicating that it is either free for
programming, or that it has a programme already stored
in it.
4 Press the
5 Press the
OK button to display the Set Timer screen. This screen
asks you to confirm the date, programme number, start
time and end time.
6 Press the
number buttons on the remote control to enter the date.
7 Press the
v button to select the month.
8 Press the
start time.
9 Press the number buttons to enter the time when you
want the timer to switch on, preferably several minutes
before you set your video recorder to start recording. If
you wish to switch on at 8.25 pm, enter 2025.
10 Press the
switch-off time.
11 Press the number buttons to enter the time you want the
timer to switch off, preferably after your video has
stopped recording. Again, you should enter 4 digits using
the 24 hour format.
12 Press the
programme number.
13 Press the OK button to save the settings then select
Timer Setup menu.
14 Select another available slot if you wish to record a
further programme. Otherwise, press the
enter the 'programme type' column then press the OK
button to return to the EPG.
15 If you have finished viewing programmes on your TV,
press the button before the timer recording starts to
leave your TV in standby mode for the timer settings to
be activated. If, however, you wish to continue watching
other programmes after setting a timer, you can do so by
changing programmes in the normal way. If you are
watching another programme when the timer is due to
start a display will appear on screen advising you that, if
you change channels now, you automatically cancel the
recording.
16 If you do not wish to cancel or view the recording, press
the button whilst the display is still on screen to leave
your TV in standby mode. The standby indicator on the
front of the TV will flash to show that the timer record
operation is active. If, however, you choose to change
programmes, you automatically cancel the recording.
30
B or b button to highlight the 'programme type'
v button to select the timer symbol
.
B button to enter the 'programme' column.
V or v button to select a free row then press the
V button to select the date area then press the
b button to confirm the date then press the V or
b button to confirm the month and to enter the
b button to confirm the entry and to enter the
b button to confirm the entry and to enter the
and press OK button to return to the Manual
/
/
b button to
Page 33

Optional Equipment
Connecting equipment to the TV
Using the following instructions, you can connect a wide range of optional equipment to your TV.
Connecting equipment to the TV
1. Connect your equipment to the designated TV socket.
2. Press the button repeatedly on the remote control until the correct input symbol for
your equipment appears on the TV screen:
Symbol Input signals
1
• Audio/video input signal through the scart connector
• RGB input signal through the scart connector
2
s
2
3
• Audio/video input signal through the scart connector or the
phono sockets and
C
D
• S video input signal through the scart connector or the phono
sockets and
D
B
• Audio/video input signal through the scart connector
F
F
G
G
H
3. Switch on the connected equipment.
4. To return to normal TV operation, keep pressing the button on the remote control
until the TV picture appears.
Note: To avoid picture distortion, do not connect equipment to the , , and
B
D
C
G
sockets at the same time.
++
MONO
P
__
L/G/S/I R/D/D/D
s
2
2
B
A
C
D
8mm/Hi8
camcorder
MONO
L/G/S/I R/D/D/D
s
2
2
++
P
__
S-VHS/Hi8
camcorder
Additional information when connecting equipment
Connecting a VCR
We recommend you connect your VCR to the socket using a scart lead. If you do not
have a scart lead, use the ‘Manually Tuning the TV’ section of this instruction manual to tune
in the VCR signal to TV programme number’0’.
Connecting headphones
Plug in your headphones to the socket on the front of the TV set.
A
Connecting to external audio equipment
Plug in your hi-fi equipment to the sockets on the rear of the TV if you wish to amplify
E
the audio output from the TV. The output level from the sockets can be varied by adjusting
the volume of the headphones (refer to the ‘Adjusting the sound’ section of this manual).
For mono equipment
Connect the phono plug to the L/G/S/I socket on the front of the TV and select the input
signal using the instructions on this page. Finally, refer to the ‘Adjusting the sound’ section
of this manual and select ‘A’ on the sound menu screen.
H
E
2
2
1
PlayStation
E
R/D/D/D
Hi-Fi
..
.
.
L/G/
S/I
R/D/
D/D
C
S
S
2
S
2
3
1
L/G/S/I
R/D/D/D
5V 200mA
G
F
2
S
2
1
L/G/S/I
H
..
.
.
L/G/
S/I
R/D/
D/D
C
S
S
3
5V 200mA
VCR
31
Page 34

Optional Equipment
Connecting equipment to the TV
Selecting the output source for the scart
socket or
G
H
1. Press the MENU button on the remote control to display the
menu on the TV screen.
2. Press the v button to select the symbol on the menu
screen then press the
b button to enter the ‘VIDEO
CONNECTION’ menu screen.
3. Press the v button to highlight ‘TV Screen’ (input source for the
TV screen) or ‘Output’ (output source for / or
socket) then press the
b button to confirm.
2
s
2
3
4. Press the B or b button to select the desired source (see below)
then press the OK button to confirm:
TV Screen TV, AV1, RGB, AV2, YC2, AV3
Output TV, AV1, AV2, YC2, AV3, AUTO
VIDEO CONNECTION
TV Screen
Output
TV
[TV - - - - -]
[AV 1 - - - - -]
AV1
5. Press the MENU button to remove the menu from the TV screen.
Smartlink
Smartlink is a direct link between your TV set and VCR.
For Smartlink you need:
• a VCR which supports Smartlink, NexTView Link or
Megalogic.
• A fully-wired 21-pin scart cable to connect your VCR to scart
connector .
The features of Smartlink are:
• tuning information such as the channel overview are
downloaded from the TV set to the VCR.
• direct TV recording : While watching TV you need to press just
one button on the VCR to record this programme.
For more information on Smartlink please refer to your VCR
instruction manual.
3
32
Page 35

Optional Equipment
Optional Equipment
Connecting equipment to the TV
Using the AV Label Preset feature
This function enables you to designate a name to the optional equipment you have connected to the sockets of this TV. This name
can be up to 5 characters (letters or numbers) and will appear on screen whenever the equipment is selected for use.
1. Press the MENU button on the remote control to display
the menu on the TV screen.
2. Press the v button to select the symbol on the menu
screen then press the
menu.
3. Press the v button to select ‘AV Label Preset’ then press
the
b button to enter the ‘AV LABEL PRESET’ menu.
b button to enter the ‘PRESET’
4. Press the V or v buttons to select the input source you
wish to name (eg AV2) then press the
highlight the first element of the ‘LABEL’ column.
5. Press the V or v buttons to select a letter or number
(select ‘-’ for a blank) then press the
confirm. Select the other four characters in the same
way.
6. After selecting all the characters, press the OK button.
7. Repeat steps 4 to 6 if you wish to label other input
sources.
8. Press the MENU button to remove the menu from the
TV screen.
b button to
b button to
33
Page 36

Additional Information
Specifications
TV system
I/DVB-T
Colour system
PAL
NTSC 3.58, 4.43 (only Video in)
Channel coverage
UHF:B21-B69
Picture tube
KV-28DS20U
FD Trinitron WIDE
Approx 71cm (28inches) (Approx 66cm picture measured diagonally), 102° deflection
KV-32DS20U
FD Trinitron WIDE
Approx 82cm (32 inches) (Approx 76cm picture measured diagonally), 102° deflection
Rear Terminals
1
21-pin Euro connector (CENELEC standard) including audio/video
input, RGB input, TV audio/video output.
s
/ 21-pin Euro connector (CENELEC standard) including audio/video
2
2
input, S-video input, selectable audio/video output.
3
21-pin Euro connector (CENELEC standard) including audio/video
input, selectable audio/video output.
Audio outputs - phono jacks
Modem connection
Front Terminals
2
2
s
Sound output
Left/Right: 2x20W (music power)
Centre: 10W (music power)
Sub woofer: 20W (music power)
Surround 2x5W (music power)
Power consumption
KV-28DS20U: 222W
KV-32DS20U: 209W
Dimensions (wxhxd)
KV-28DS20U: Approx. 761x496x525mm
KV-32DS20U: Approx. 874x563x571mm
Weight
KV-28DS20U: Approx. 44.0kg
KV-32DS20U: Approx. 62.0kg
Accessories supplied
RM-888 remote control (1)
IEC designated size AA battery (2)
Surround Speakers (2) Centre Speaker (1)
Video input -phono jack
Audio inputs - phono jacks
S video input - 4 pin DIN
Headphones jack - minijack stereo
Other features
Teletext
Dolby ProLogic Surround System
Smartlink
Design and specifications are subject to change without notice.
34
Page 37

Additional Information
Troubleshooting
Here are some simple solutions to problems which may affect the picture and sound.
Problem Cause
No picture , no sound
Poor or no picture (screen is dark), but good sound.
No picture on any channel after digital tuning.
Some channels are blank.
Standby indicator flashing.
Good Picture, no sound.
Poor picture quality
No colour on colour programmes.
Remote control does not function.
Distorted picture when changing programmes or
selecting Teletext.
Cause • Solution
Power off.
TV in standby.
Aerial disconnected
Picture level adjustment
No digital transmissions in your area.
No digital transmissions from the transmitter you
are currently using.
Unsuitable aerial.
Weak signal.
Scrambled/subscription-only channel.
Programme information without picture or sound.
Fault.
Volume control.
Wrong external mode selected.
Colour level setting.
• Power off.
• TV in standby.
• Aerial disconnected
• Picture preset level adjustment.
• No digital transmissions in your area.
• No digital transmissions from the transmitter you are currently using.
• Weak signal.
• Unsuitable aerial
• Scrambled/subscription-only channel.
• Programme used only for data (no picture or sound).
• Programme not being transmitted.
• Digital mode Timer Record active (regular flash).
• Fault (irregular flash).
• Vo lu me co n tr o l
• Wrong external mode selected on an RGB video source.
• Colour level setting.
• Batteries low.
• Inputs from external equipment not switched off.
• Plug in the TV.
• Press the button on the front of the TV
• If the indicator is on press the button or a numbered button on the
remote control.
• Check the aerial connection.
• Select on the TV menu system then adjust the brightness, picture and colour
balance levels
• Tune in the analogue channels available using the ‘Manually tuning the TV’
instruction in this manual, then contact a local installer to find out when digital
transmissions begin in your area.
• Contact a local installer to find out which transmitter you should be pointing
your aerial at.
• Change your aerial to to cover the channels used by digital programmes
(Contact a local installer)
• Ensure aerial is correctly aligned to transmitter.
• Ensure aerial is plugged directly into the TV (not through other equipment).
• Upgrade to a higher gain aerial.
• Subscribe to pay-per-view broadcaster.
• See ‘Skipping programme positions’ section.
• See ‘Re-arranging the TV channels’ section.
• Do not open the cabinet, refer to qualified personnel.
• Contact your nearest Sony Service Centre.
• Press the + button on the remote control.
• If is displayed on the screen, press the button on the remote control.
• Press the button repeatedly until the RGB symbol is displayed on
screen.
• Select on the TV menu system then adjust the colour setting
/
• If you continue to have these problems, have your TV serviced by qualified personnel or
you can contact the Sony UK Digital HelpLine on 0870 600 1717.
• NEVER open the casing yourself.
35
Page 38

36
 Loading...