

Page 1
2-055-142-61(2)
R
Colour Television
Operating Instructions
Before operating the TV, please read the “Safety Information”
section of this manual. Retain this manual for future reference.
Инструкции за използване
Преди да използвате телевизора, прочетете раздела
"Информация за безопасността" на това ръководство.
Запазете това ръководство за бъдещи справки.
Návod k použití
Před zapnutím televizoru si prosím pozorně přečtěte část
"Bezpečnostní upozornění" v tomto návodu. Návod si uschovejte
i pro budoucí potřebu.
Kezelési utasítás
Mielőtt elkezdené használni a televíziót, kérjük, olvassa el a jelen
kézikönyv Biztonsági tudnivalók c. szakaszát. Őrizze meg a
kézikönyvet későbbi használatra.
Instrukcja obsługi
Przed przystąpieniem do eksploatacji telewizora należy zapoznać się z
rozdziałem "Informacje dotyczące bezpieczeństwa" w niniejszej instrukcji.
Prosimy o zachowanie niniejszej instrukcji do wglądu w przyszłości.
Инструкция по эксплуатации
Перед тем как включить телевизор, просим Вас ознакомиться с
разделом "Общие правила техники безопасности" настоящей
инструкции. Сохраняйте настоящую инструкцию на будущее.
GB
BG
CZ
HU
PL
RU
KV-28CS70K
KV-32CS70K
©2004 by Sony Corporation
Page 2

Page 3
Introduction
Thank you for choosing this Sony FD Trinitron Colour Television.
Before operating the TV, please read this manual thoroughly and retain it for future reference.
• Symbols used in the manual:
• Important information.
• Information on a feature.
• 1,2... Sequence of instructions.
• Shaded buttons on the remote control show
you the buttons you have to press to follow
the sequence of the instructions.
• Informs you of the result of instructions.
Table of Contents
Introduction.............................................................................................................................................. 3
Safety Information.................................................................................................................................... 4
Overview
Overview of Remote Control Buttons....................................................................................................... 5
Overview of TV Buttons .......................................................................................................................... 6
Installation
Inserting Batteries into the Remote Control............................................................................................. 6
Connecting the Aerial and VCR .............................................................................................................. 6
First Time Operation
Switching On the TV and Automatically Tuning ...................................................................................... 7
GB
Menu system
Introducing and Using the Menu System................................................................................................. 9
Menu Guide:
Picture Adjustment.......................................................................................................................... 9
Sound Adjustment .......................................................................................................................... 10
Sleep Timer .................................................................................................................................... 11
Language/Country .......................................................................................................................... 11
Auto Tuning .................................................................................................................................... 11
Programme Sorting......................................................................................................................... 12
Programme Labels ......................................................................................................................... 12
AV Preset........................................................................................................................................ 12
Manual Programme Preset............................................................................................................. 13
Auto Format.................................................................................................................................... 15
Noise Reduction ............................................................................................................................. 16
AV3 Output ..................................................................................................................................... 16
TV Speakers................................................................................................................................... 16
RGB Centring ................................................................................................................................. 17
Picture Rotation .............................................................................................................................. 17
Teletext.................................................................................................................................................. 18
Additional Information
Connecting Optional Equipment .............................................................................................................. 19
Using Optional Equipment....................................................................................................................... 20
Specifications........................................................................................................................................... 21
Troubleshooting....................................................................................................................................... 22
Table of Contents 3
Page 4
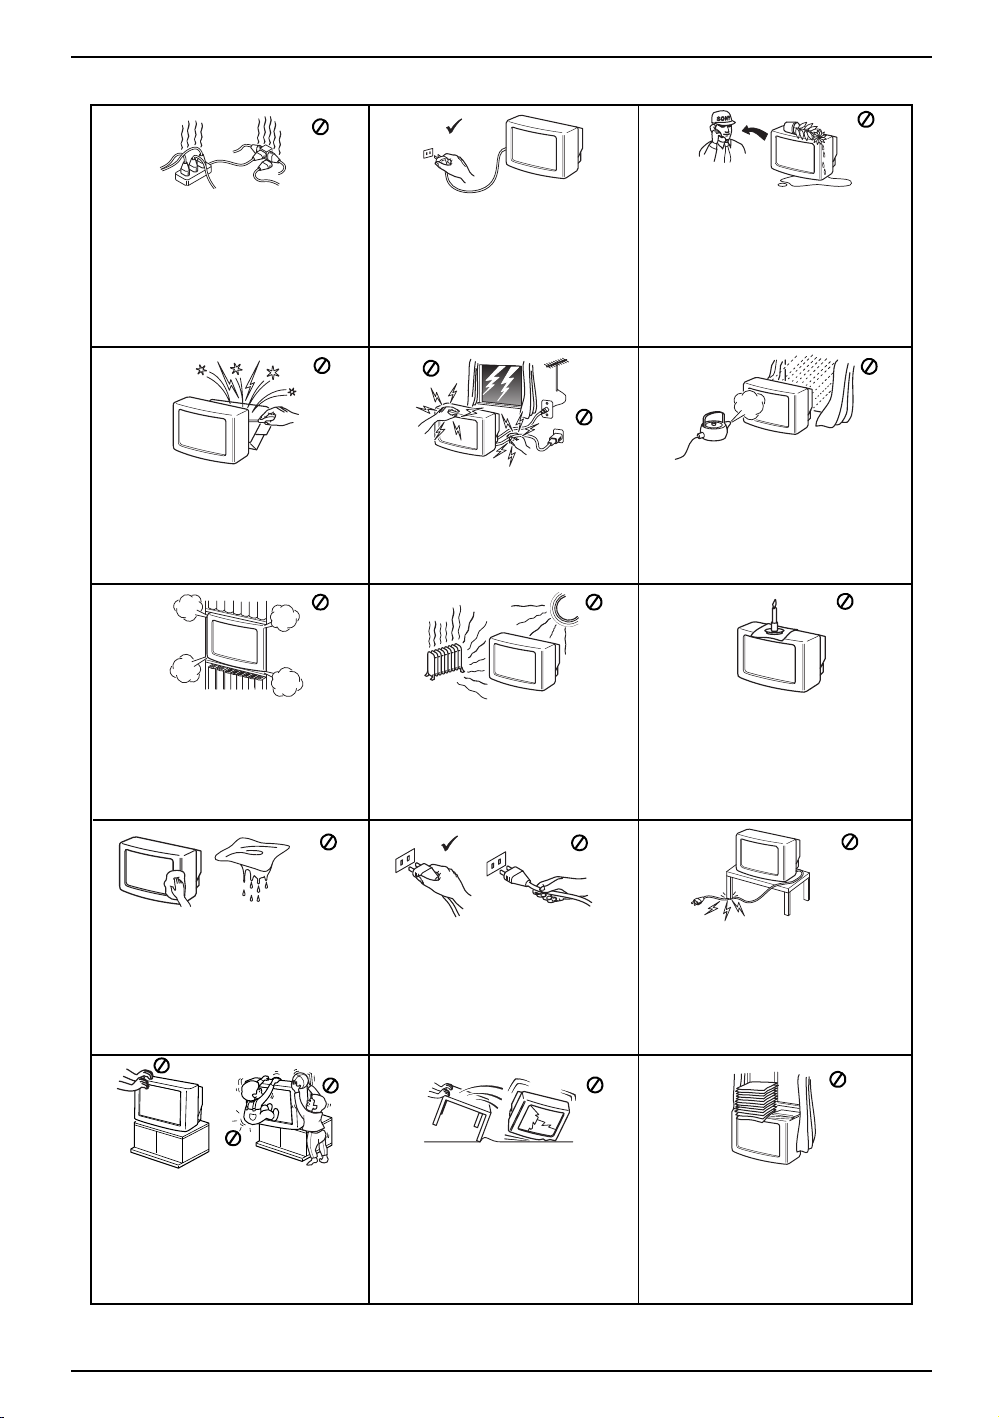
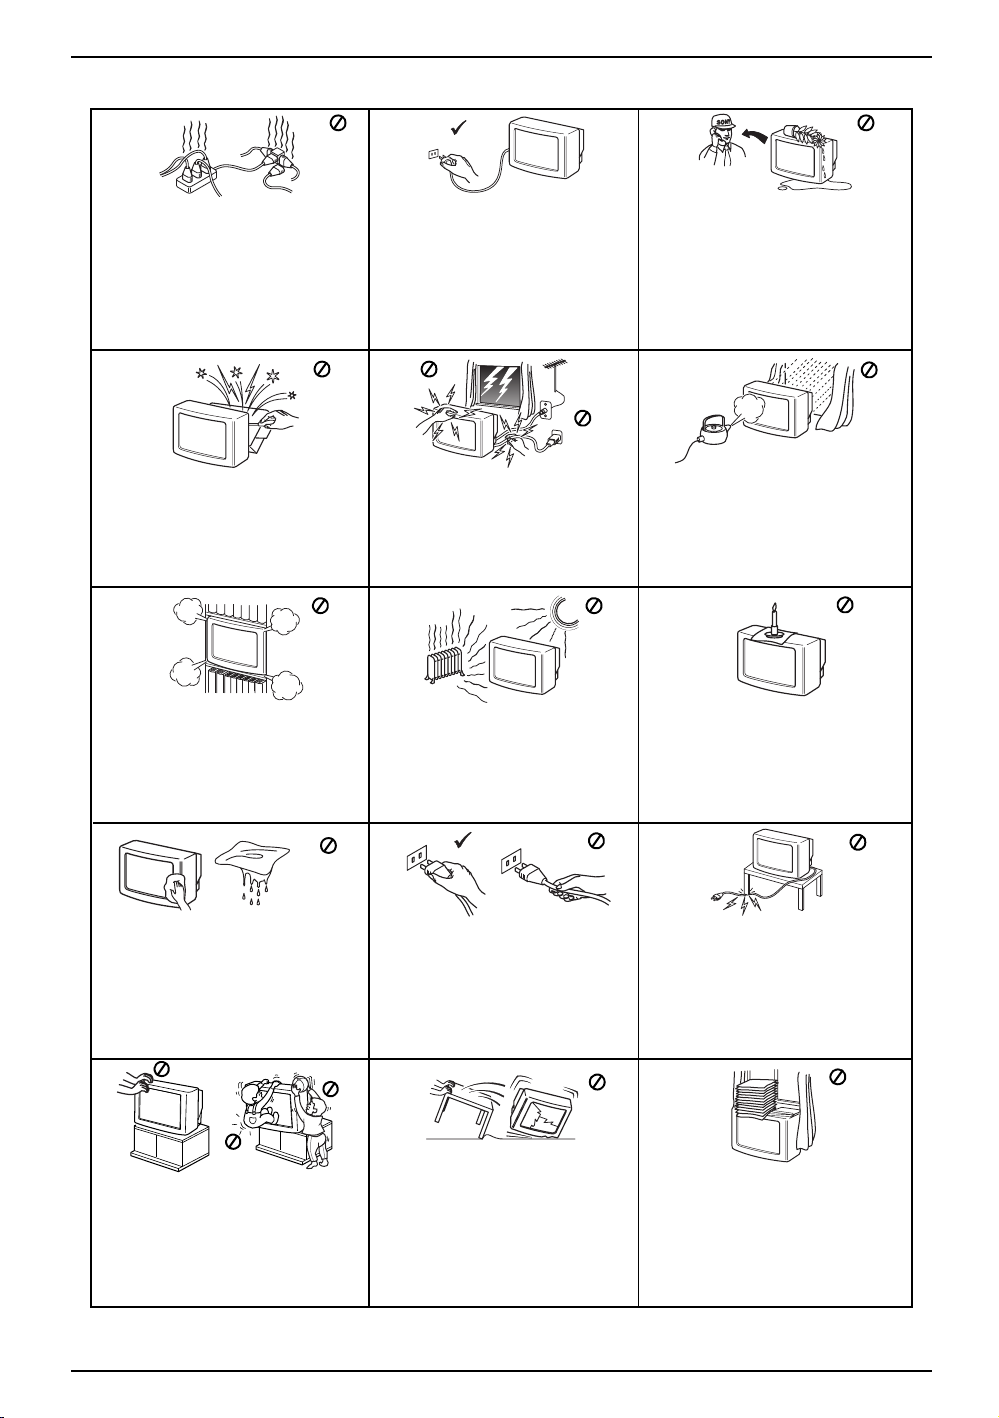
Safety Information
This set is to operate on a 220-240V AC
supply only. Take care not to connect
too many appliances to the same power
socket as this could result in fire or
electric shock.
Do not open the cabinet and the rear cover
of the TV. Refer to qualified service
personnel only.
Do not cover the ventilati on openings of
the TV For ventilation, leave a space of
at least 10cm all around the set.
For environmental and safety reasons, it
is recommended that the TV set is not
left in standby mode when not in use.
Disconnect from the mains. However,
some TVs may have features which
require they are left in standby. The
instructions in this manual will inform
you if this applies.
For your own safety, do not touch any
part of the TV, power lead or aerial lead
during lightning storms.
Never place the TV in hot, humid or
excessively dusty places. Do not
install the TV where it may be
exposed to mechanical vibrations.
Never push objects of any kind into the
set as this could result in a fire or electric
shock. Never spill liquid of any kind on
the set. If any liquid or solid object does
fall into the cabinet, do not operate the
TV. Have it checked immediately by
qualified personnel.
To prevent fire or shock hazard, do not
expose the TV to rain or moisture.
To prevent fire, keep inflammable
objects or naked lights (eg candles)
away from the TV.
Clean the screen and cabinet with a soft,
lightly dampened cloth. Do not use any type
of abrasive pad, alkaline cleaner, scouring
powder or solvent, such as alcohol or
benzine, or antistatic spray. As a safety
precaution, unplug the TV before cleaning
it.
Place the TV on a secure stable stand.
Never attempt to move the TV and stand
together -always move the TV and stand
separately. Do not place the TV on its
side or face up. Do not allow children to
climb on to it.
4 Safety Information
Pull out the power lead by the plug.
Do not pull on the power lead itself.
Unplug the power lead before moving
the TV. Avoid uneven surfaces, quick
steps or excessive force. If the set has
been dropped or damaged, have it
checked immediately by qualified
service personnel.
Take care not to place heavy objects
on the power lead as this could result
in damage.
We recommend you wind any excess
lead around the holders provided on
the rear of the TV.
Do not cover the ventilation
openings of the TV with items such
as curtains or newspapers etc.
Page 5
Overview of Remote Control Buttons
qj
qh
qg
qf
qd
qs
qa
1
2
3
4
5
6
7
8
9
q;
1 To temporarily switch off TV:
Press this button to temporarily switch off TV (the standby indicator
on TV lights up). Press again to switch on TV from standby mode.
To save energy we recommend switching off completely when TV is
not in use.
After 15 minutes without a signal and without any button being
pressed, the TV switches automatically into standby mode.
2 Selecting input source:
Press this button repeatedly until the desired input symbol of the
source appears on the TV screen.
3 Selecting channels:
Press these buttons to select channels.
For double-digit programme numbers, enter the second digit within
2.5 seconds.
4 Previous channel button:
Press this button to watch the last channel selected (provided you
watched it for at least 5 seconds).
5 This button only works in Teletext mode.
6 This button only works in Teletext mode.
7 Selecting Teletext:
Press this button to switch on teletext.
8 Control pad:
• When MENU is switched on, use these buttons to operate the
menu system. For details refer to “Using the Menu System” on
page 9.
• When MENU is switched off, press OK to show a channel
overview. Then press v or V to select the channel and then press
the OK button again to watch the selected channel.
GB
9 Selecting screen format:
Press this button repeatedly to change the screen
format. For more details refer to ‘Auto Format’ on
page 15.
q; Selecting channels:
Press this button to select the next or previous
broadcast channel.
qa Muting the Sound:
Press this button to mute TV sound. Press again
to restore the sound.
qs Adjusting TV volume:
Press this button to adjust the volume of the TV.
qd Displaying the menu system:
Press this button to display the menu on the TV
screen. Press again to remove the menu display
from the TV screen.
Besides the TV functions, all coloured and green symbol buttons are also used for Teletext operation. For
more details, please refer to “Teletext” section of this instruction manual.
qf Selecting TV mode:
Press this button to switch off teletext or video
input.
qg Selecting Sound effect:
Press this button repeatedly to change the sound
effect.
qh Selecting Picture mode:
Press this button repeatedly to change the picture
mode.
qj Displaying on Screen information:
Press this button to display all on-screen
indications. Press again to cancel.
Overview 5
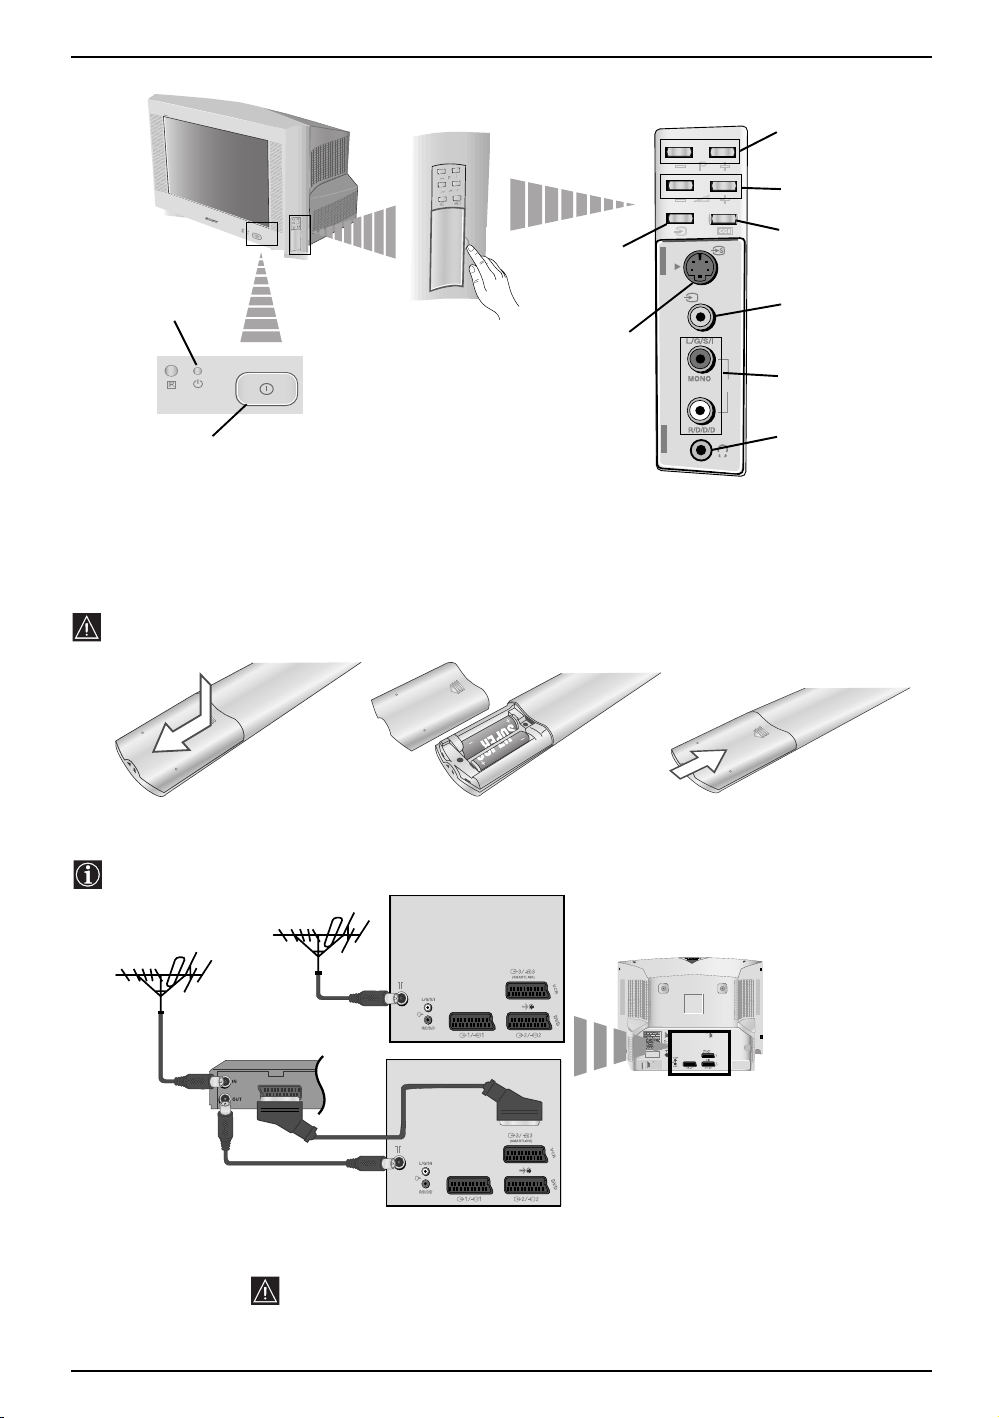
Page 6
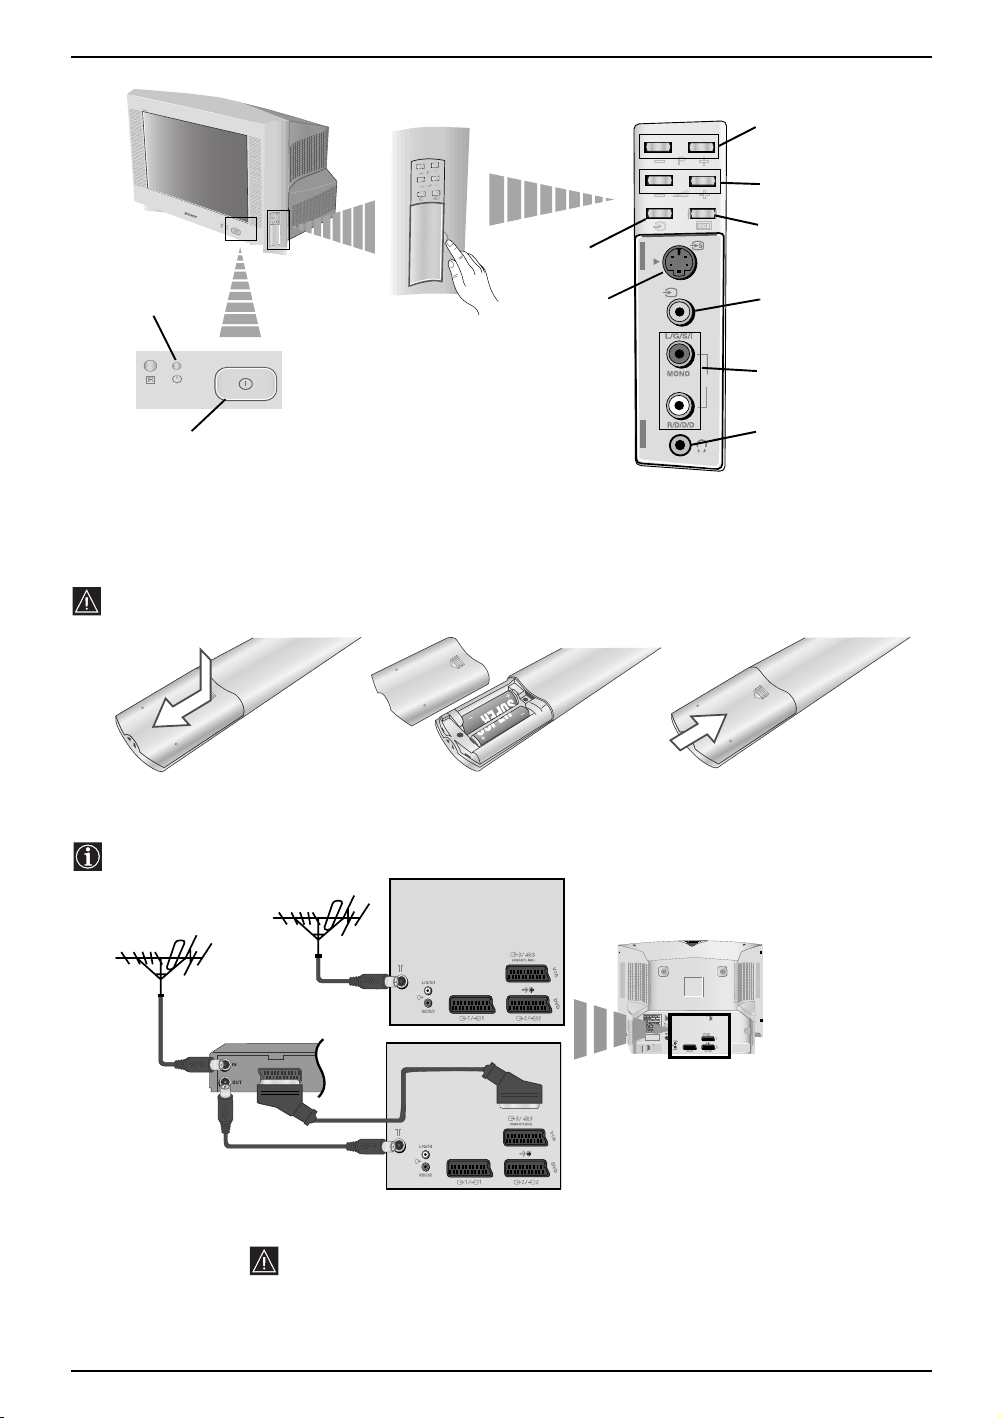
Overview of TV Buttons
Standby
indicator
Pull open the
door on the side of
the TV to reveal
the sockets
Selecting
Input source
S video Input
jack
Programme Up or Down
Buttons (Selects TV
channels)
Volume control
buttons
Auto Start Up
Button
4
4
Video Input
jack
Audio
o4
Input jacks
On/Off
switch
Inserting Batteries into the Remote Control
Make sure you insert the supplied batteries observing the correct polarities.
Always remember to dispose of used batteries in an environmental friendly way.
S
O
N
Y
C
O
R
P
O
R
A
T
I
O
N
J
A
P
A
N
/4
/4
PAN
TION JA
SONY CORPORA
Connecting the Aerial and VCR
Connecting cables are not supplied.
Headphones
jack
VCR
For more details of VCR connection, please refer to the section “Connecting
Optional Equipment” of this instruction manual.
6 Overview-Installation
or
Scart lead is optional
MANUFACTURED UNDER LICENCE
FROM DOLBY LABORATORIES
"DOLBY" AND THE DOUBLE - D
SYMBOL ARE TRADEMARKS OF
DOLBY LABORATORIES
Page 7
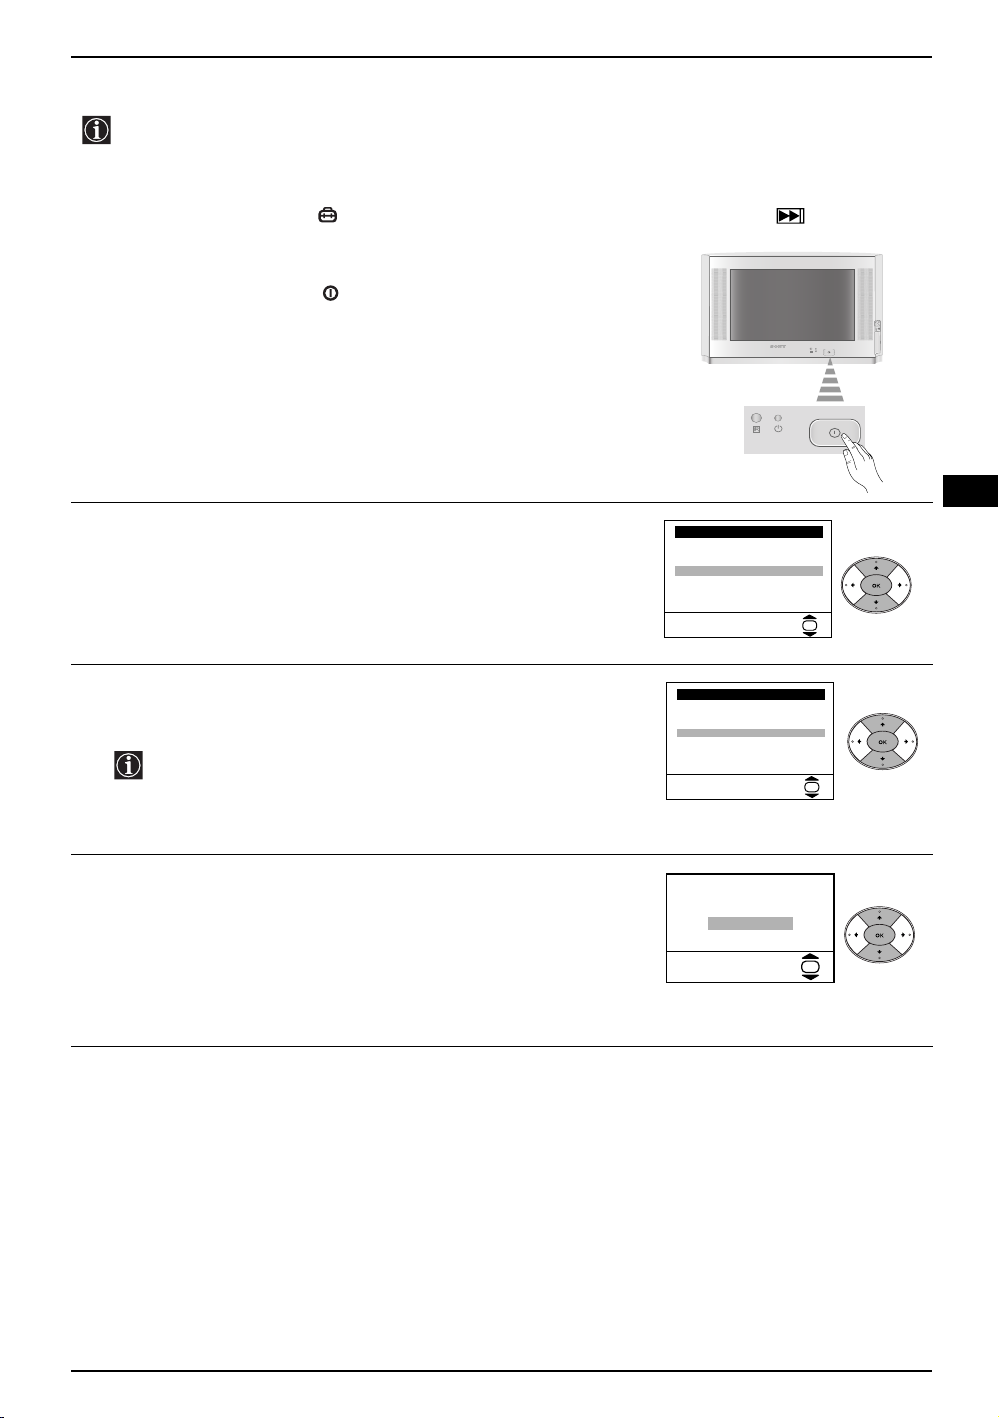
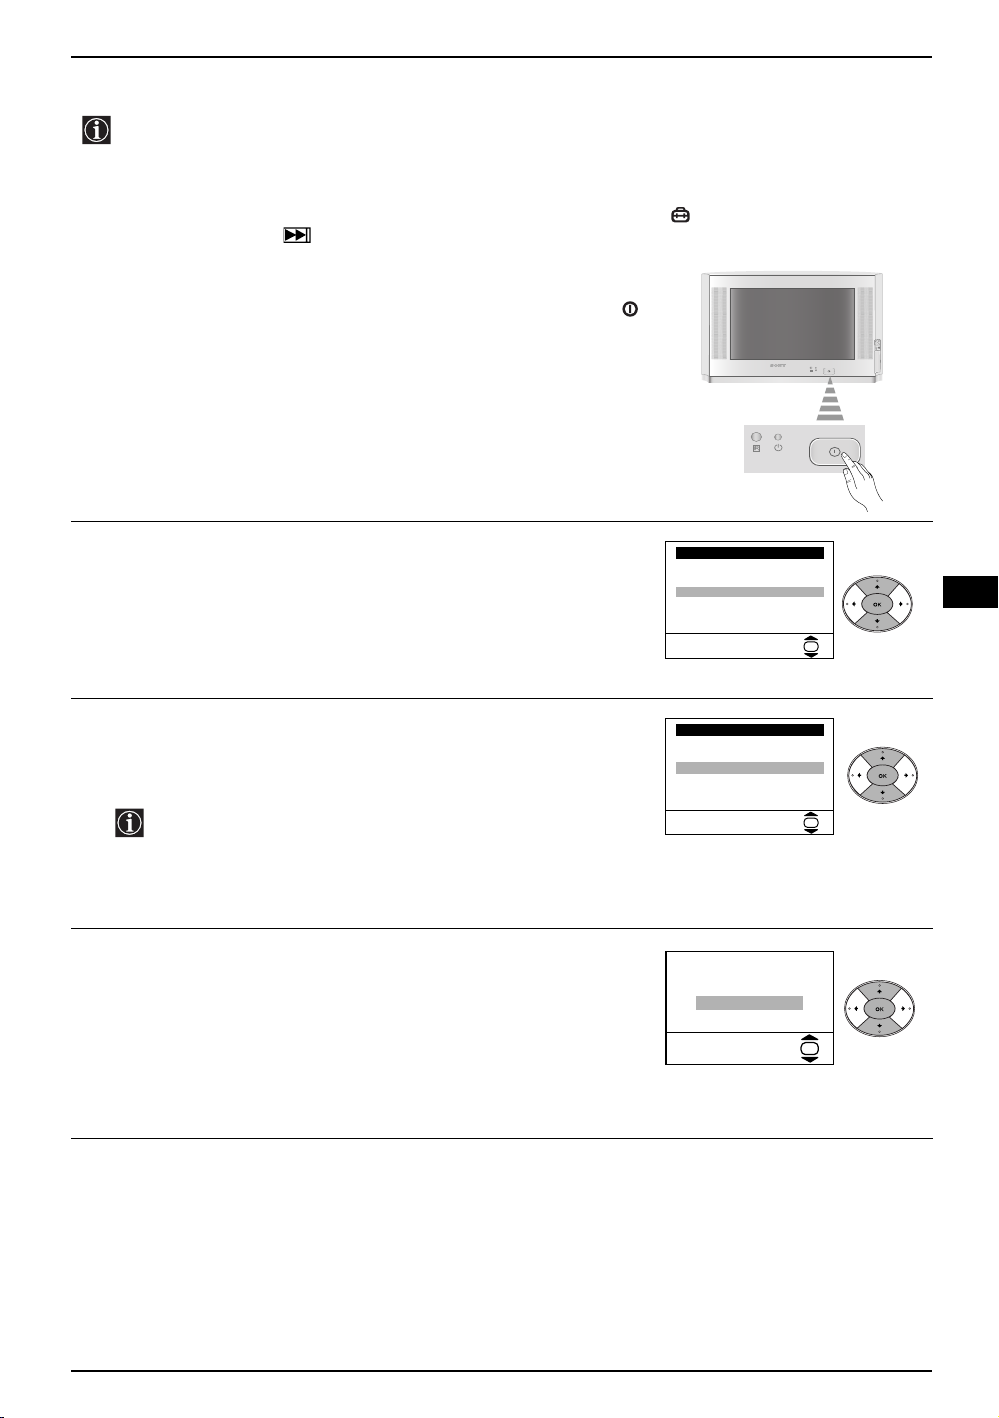
Switching on the TV and Automatically Tuning
The first time you switch on your TV, a sequence of menu screens appear on the TV enabling you to:
1) choose the language of the menu screen, 2) choose the country in which you wish to operate the TV,
3) adjust the picture slant 4) search for and store all available channels (TV Broadcasts) and 5) change
the order in which the channels (TV Broadcasts) appear on the screen.
However, if you need to change any of these settings at a later date, you can do that by selecting the
appropriate option in the (Set Up menu) or by pressing the Auto Start Up Button on the TV set.
Connect the TV plug to the mains socket (220-240V AC, 50Hz).
1
The first time that the TV set is connected, it is usually turned on.
If the TV is off, press the on/off button on the TV set to turn on
the TV.
The first time you switch on the TV, a Language menu appears
automatically on the TV screen.
Press the v or V button on the remote control to select the
2
language, then press the OK button to confirm your selection.
From now on all the menus will appear in the selected language.
Language
i
v
Svenska
Norsk
English
Nederlands
Français
Italiano
V
i
Select Language:
OK
GB
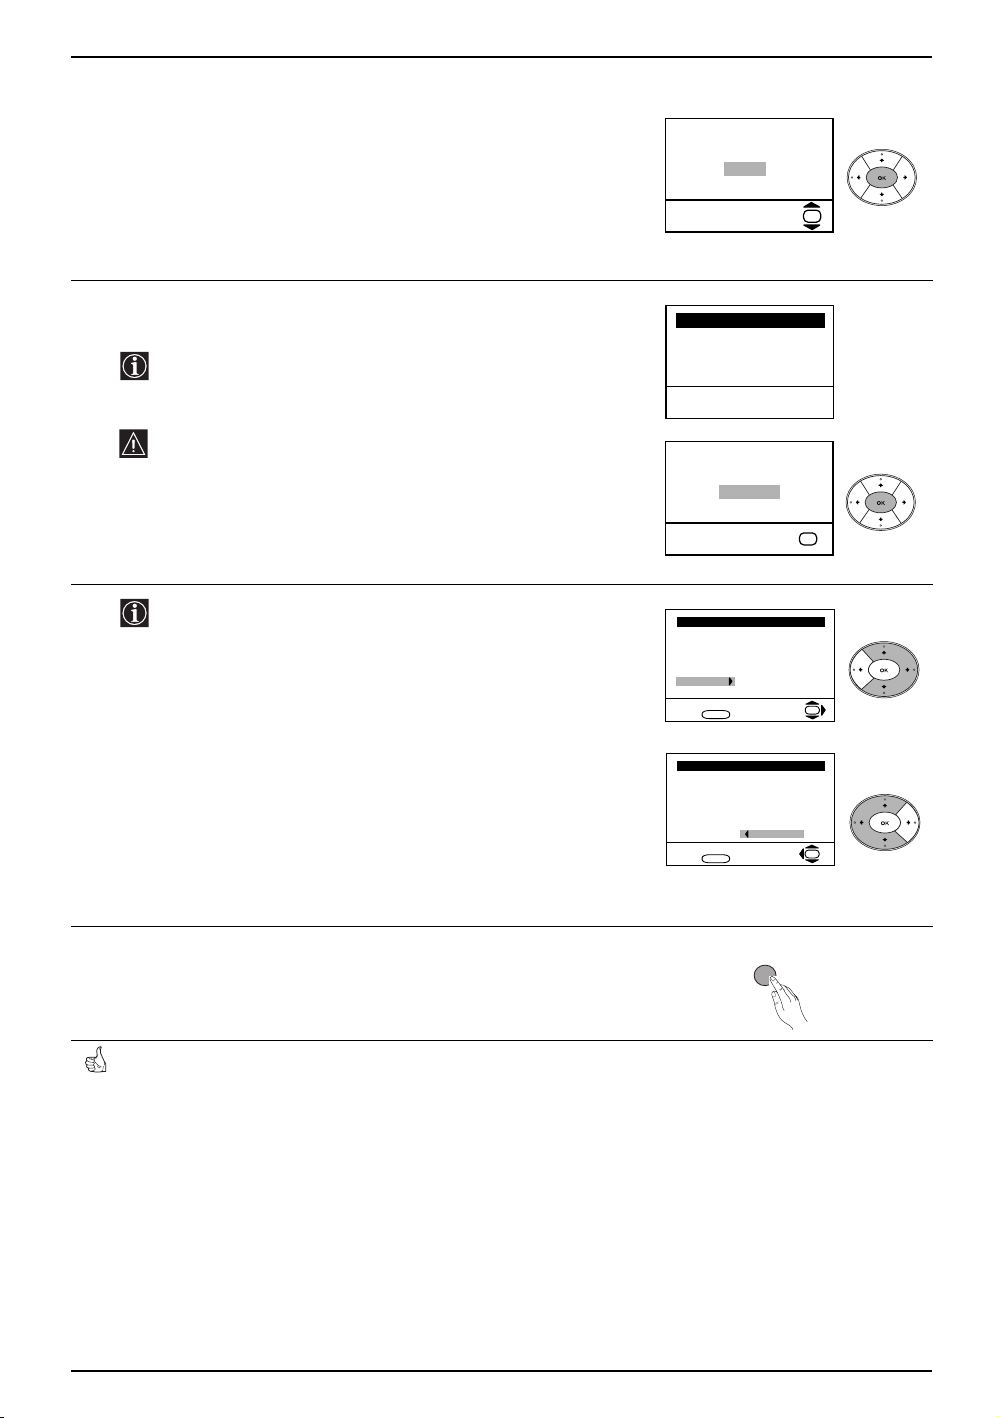
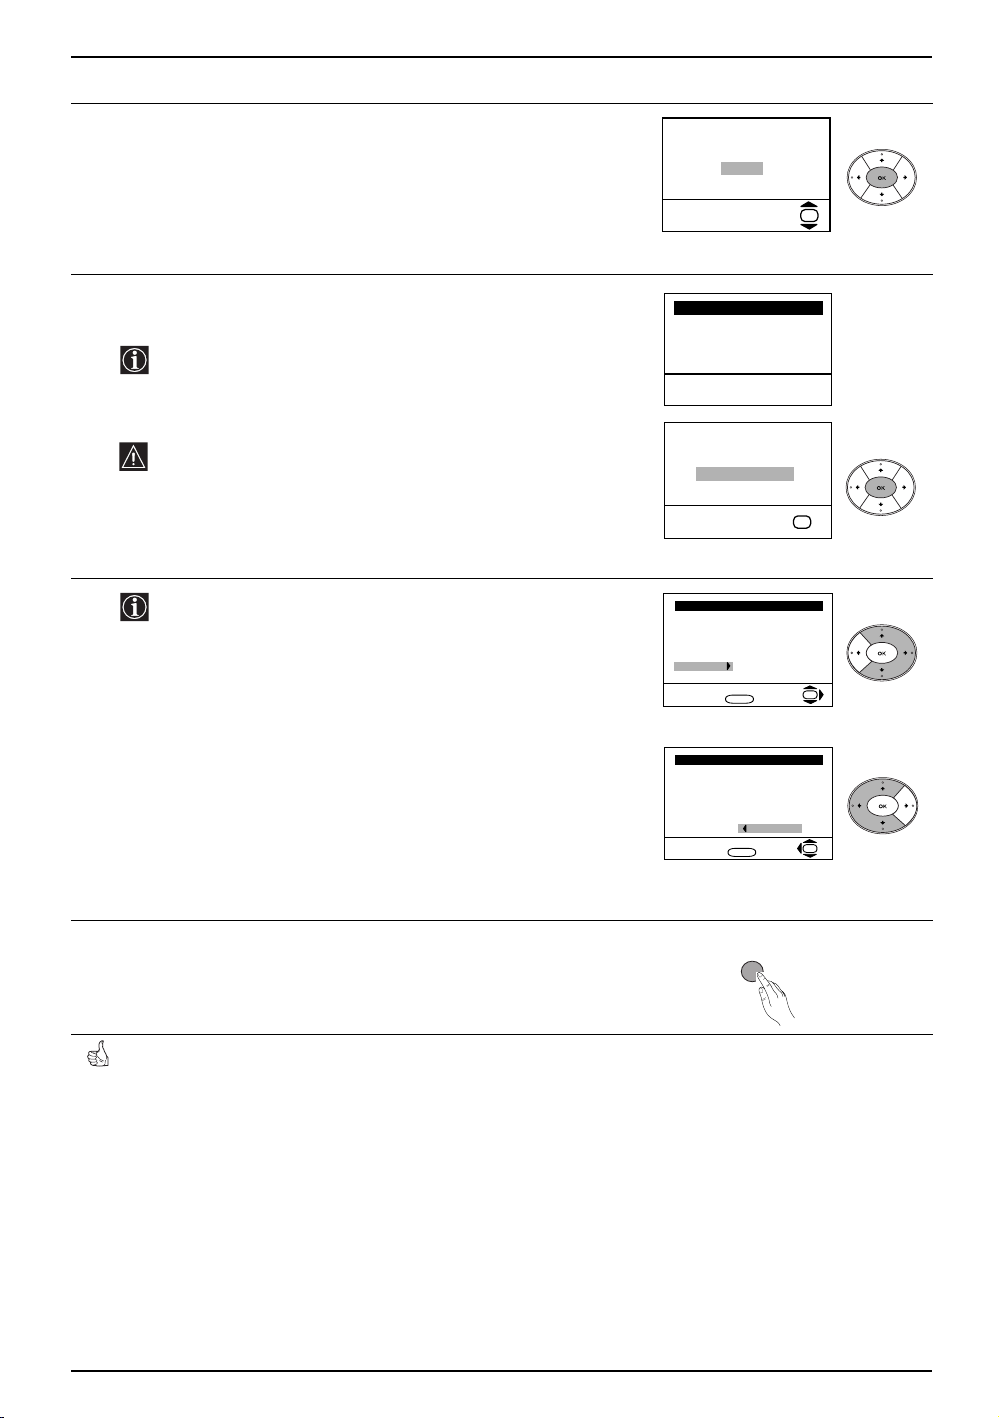
The Country menu appears automatically on the TV screen. Press
3
the v or V
button to select the country in which you will operate the
TV set, then press the OK button to confirm your selection.
• If the country in which you want to use the TV set does not
appear in the list, select “-” instead of a country.
• In order to avoid wrong teletext characters for Cyrillic
languages we recommend you select Russia as the country
if your own country does not appear in the list.
Because of the earth’s magnetism, the picture might slant. The
4
Picture Rotation menu allows you to correct the picture slant if it
is necessary.
a) If it is not necessary, press the v or V button to select Not
necessary and press OK.
b) If it is necessary, press the v or V button to select Adjust now,
then press OK and correct any slant of the picture between –5
and +5 by pressing the v or V button. Finally press OK to store.
Country
i
v
Sverige
Norge
Italia
Deutschland
Österreich
i
V
Select country:
If picture slants, please
adjust picture rotation
Not necessary
Adjust now
OK
OK
continued...
First Time Operation 7
Page 8
Switching on the TV and Automatically Tuning
The Auto Tuning menu appears on the screen. Press the OK
5
button to select Yes.
The TV starts to automatically search and store all available
6
broadcast channels for you.
Programme: 01
This procedure could take some minutes. Please be patient
and do not press any buttons, otherwise the automatic tuning
will not be completed.
If no channels were found during the auto tuning process then
a new menu appears automatically on the screen asking you
to connect the aerial. Please connect the aerial (see page 6)
and press OK. The auto tuning process starts again.
System: B/G
Channel: C21
Searching...
Do you want to start
automatic tuning?
Ye s
No
Auto Tuning
No channel found
Please connect aerial
Confirm
OK
OK
7
After all available channels are captured and stored, the
Programme Sorting menu appears automatically on the
screen enabling you to change the order in which the
channels appear on the screen.
a) If you wish to keep the broadcast channels in their tuned order,
go to step 7.
b) If you wish to store the channels in a different order:
1 Press the v or V button to select the programme number that
has the channel (TV Broadcast) you wish to rearrange, then
press the b
2 Press the v or V button to to select the new programme
number position for your selected channel (TV Broadcast),
then press B.
3 Repeat steps b)1 and b)2 if you wish to change the order of
the other channels.
Press the MENU button to remove the menu from the screen.
8
Your TV is now ready for use.
button.
Programme Sorting
Programme:
01 TVE
02 TVE2
03 TV3
04 C33
05 C27
06 C58
Select channel:
Exit:
MENU
Programme Sorting
Programme:
01 TVE
02 TVE2
03 TV3
04 C33
05 C27
06 C58 05 C27
Select new position:
Exit:
MENU
MENU
OK
OK
8 First Time Operation
Page 9
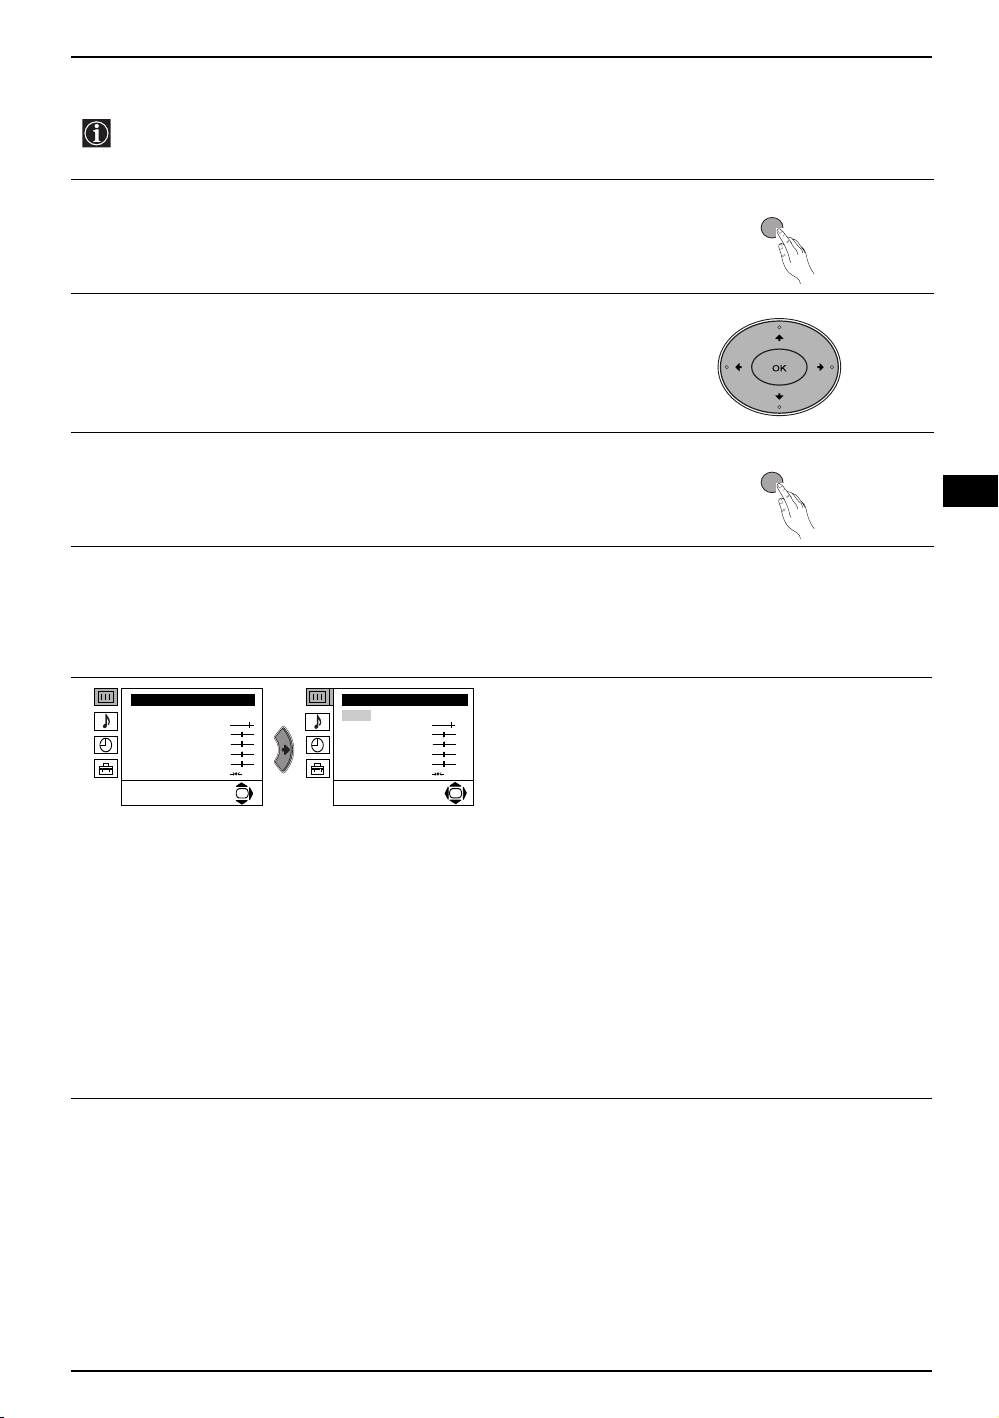
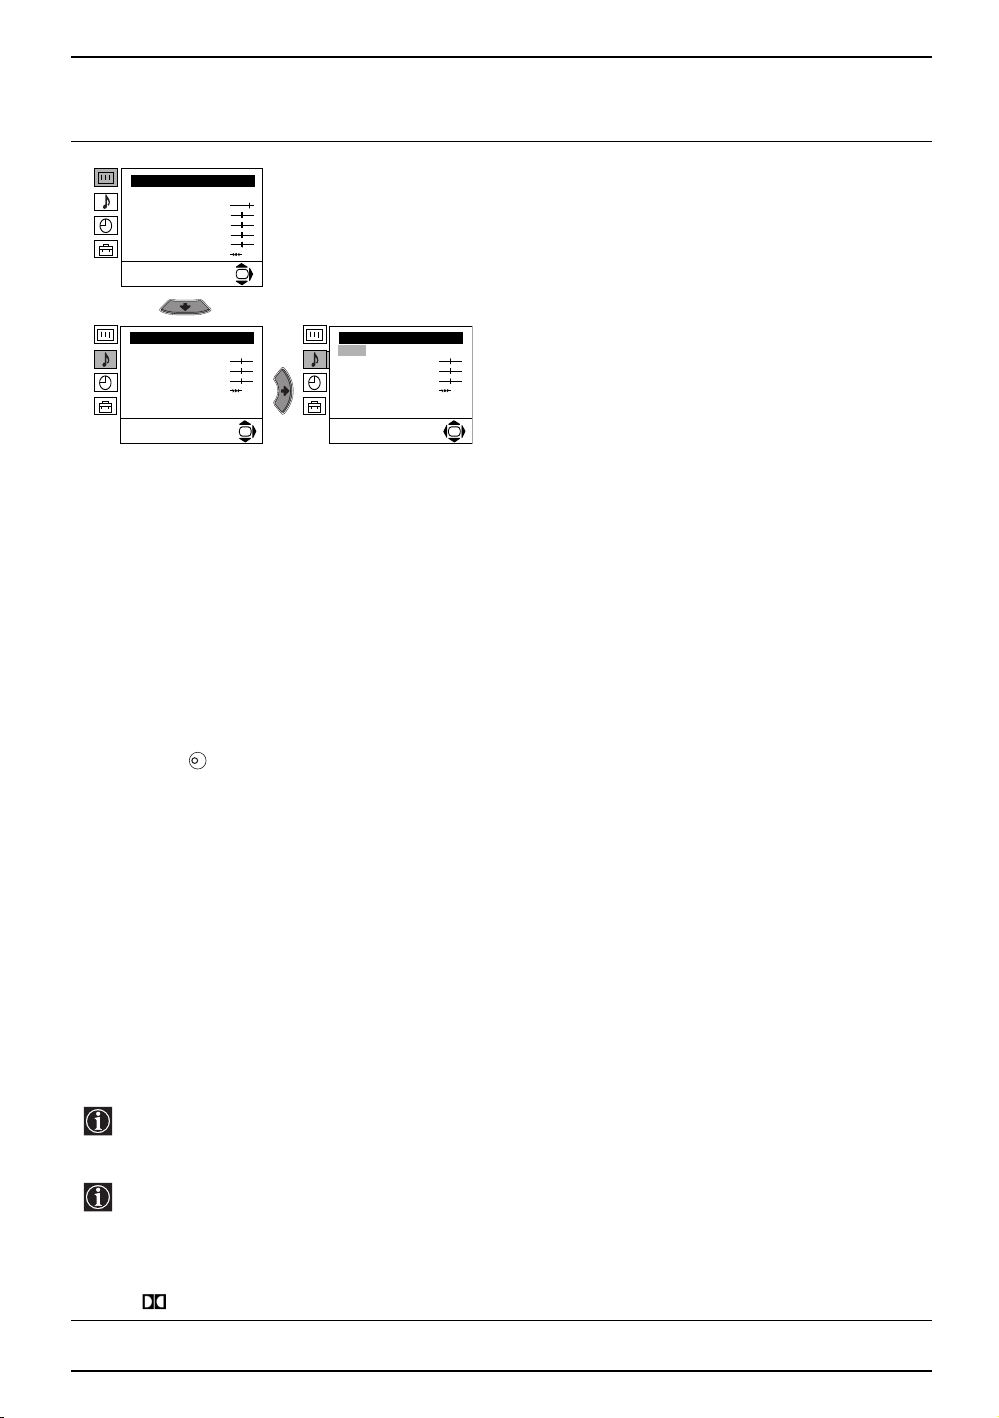
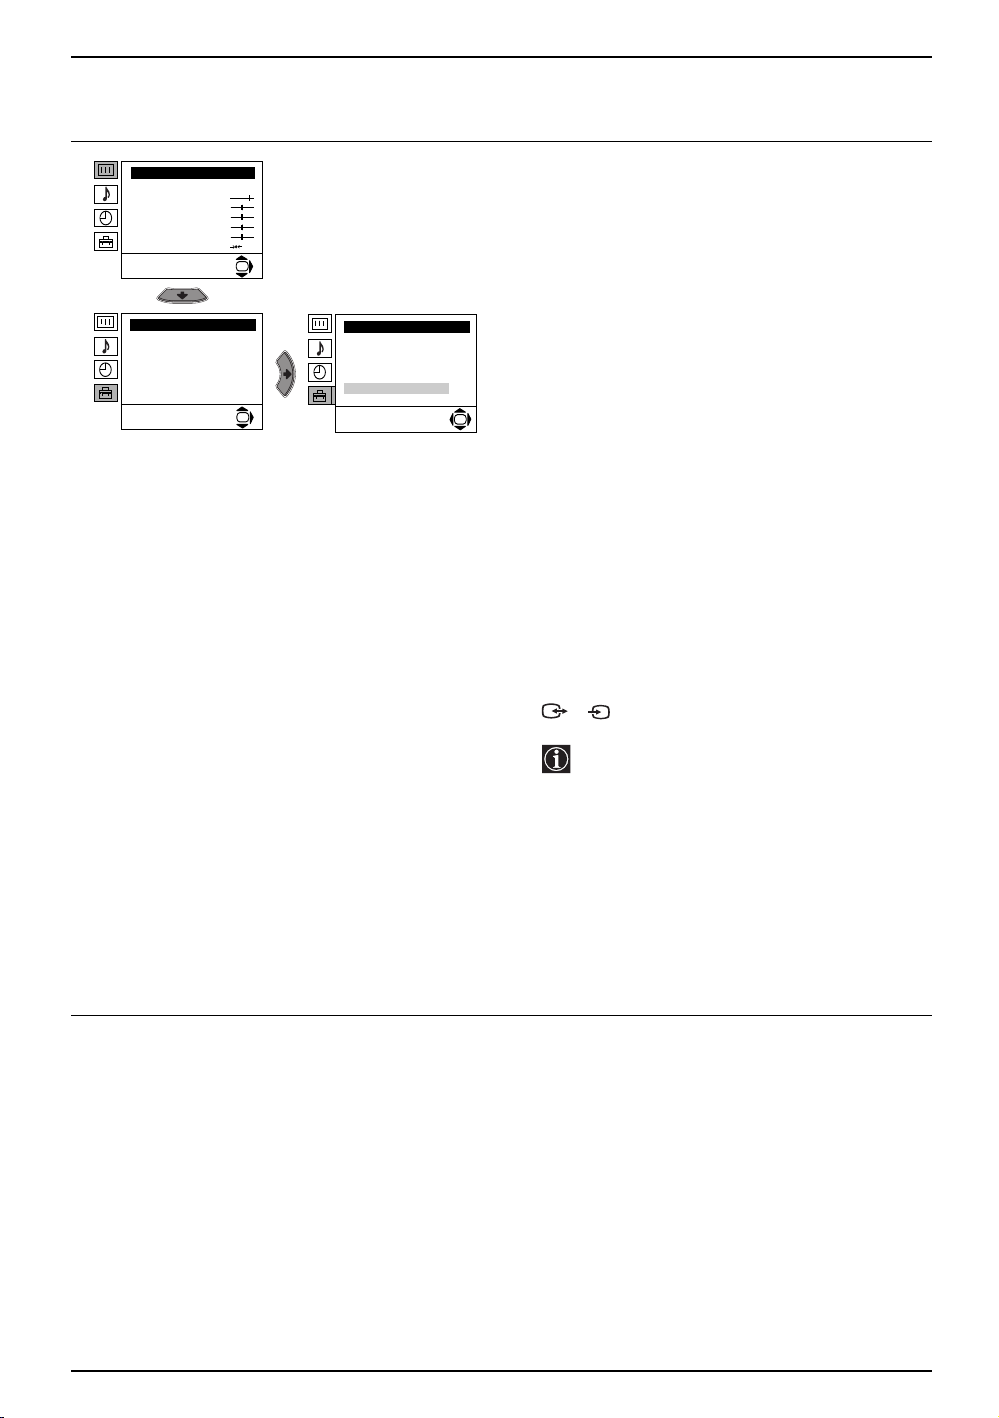
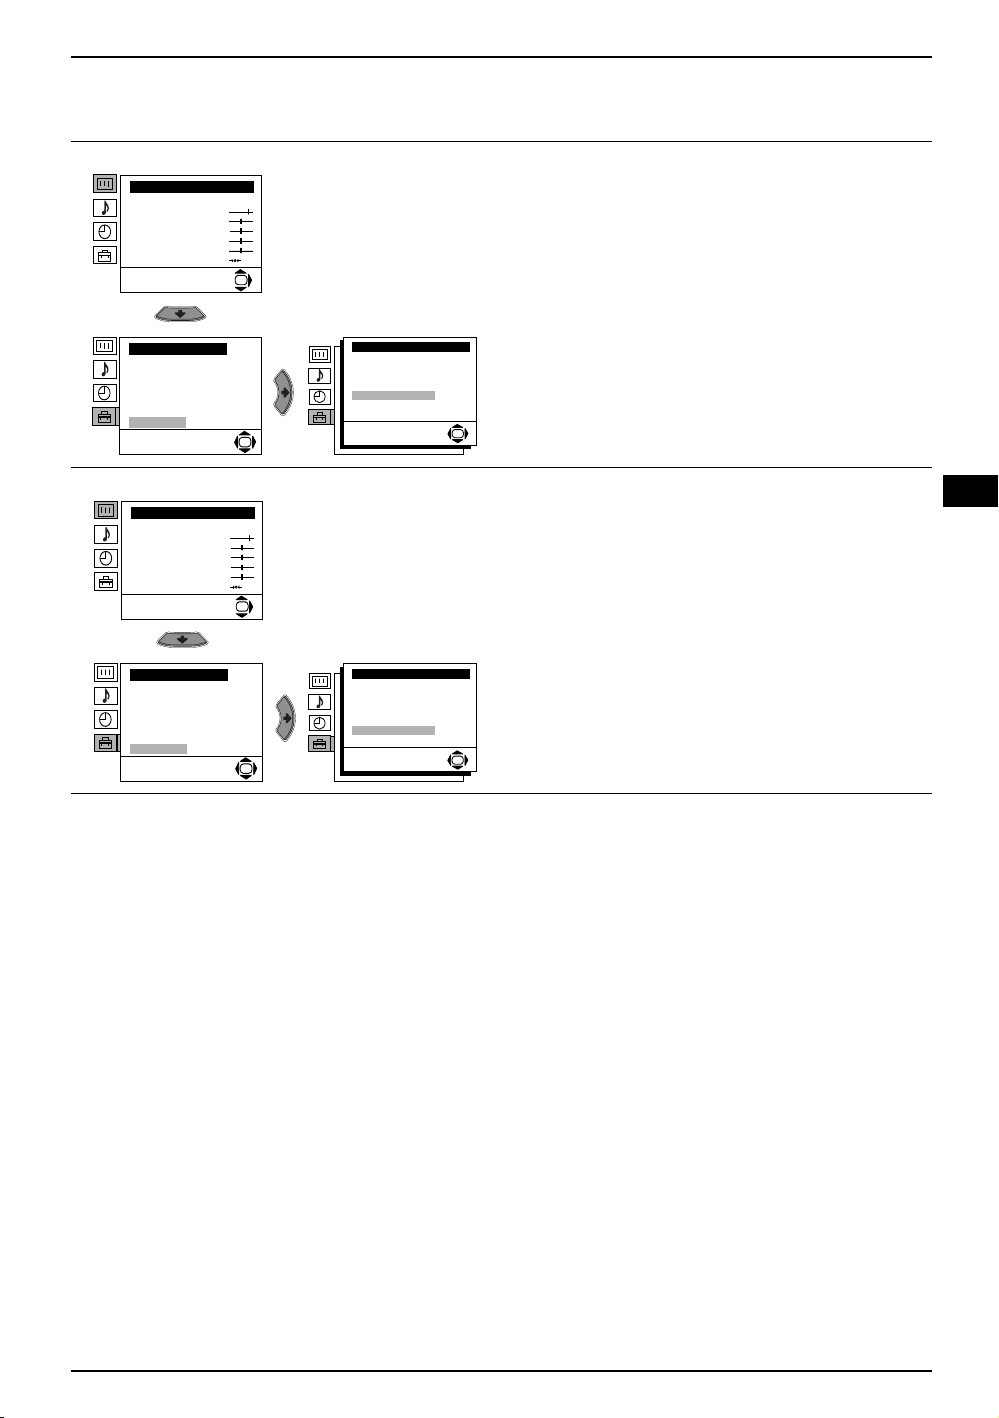
Introducing and Using the Menu System
Your TV uses an on-screen menu system to guide you through the operations. Use the following
buttons on the Remote Control to operate the menu system:
Press the MENU button to switch the first level menu on.
1
• To highlight the desired menu or option, press v or V button.
2
• To enter to the selected menu or option, press b.
• To return to the last menu or option, press B
• To alter the settings of your selected option, press v/V/B or b.
• To confirm and store your selection, press the OK button.
Press the MENU button to remove the menu from the screen.
3
.
MENU
MENU
GB
Menu Guide
Level 1 Level 2 Level 3 / Function
Picture Adjustment
Mode: Personal
Contrast
Brightness
Colour
Sharpness
Hue
Reset
OK
• Brightness, Colour and Sharpness can only be altered if “Personal” mode is selected.
• Hue is only available for NTSC colour signal (e.g: USA video tapes).
• Select Reset and press the OK button to return the picture settings to their factory preset levels.
Picture Adjustment
Mode: Personal
Contrast
Brightness
Colour
Sharpness
Hue
Reset
PICTURE ADJUSTMENT
The “Picture Adjustment” menu allows you to alter
the picture adjustments.
To do this:
OK
After selecting the item you want to alter press the b
button, then repeatedly press the v/V/B or b buttons
to make any adjustments and finally press the OK
button to store.
This menu also allows you to customise the picture
mode based on the programme you are watching:
v Personal (for individual settings).
v Live (for live broadcast programmes, DVD and
Digital Set Top Box receivers).
v Movie (for films).
continued...
Menu System 9
Page 10
Introducing and Using the Menu System
Level 1 Level 2 Level 3 / Function
Picture Adjustment
Mode: Personal
Contrast
Brightness
Colour
Sharpness
Hue
Reset
OK
The “Sound Adjustment” menu allows you to alter the
sound settings.
To do this:
After selecting the item you want to alter press the b
button, then repeatedly press the v/V/B or b buttons
to make any adjustments and finally press the OK
button to store.
SOUND ADJUSTMENT
Sound Adjustment
Effect: Natural
Treble
Bass
Balance
Reset
Dual Sound: Mono
Auto volume: On
OK
Sound Adjustment
Effect: Natural
Treble
Bass
Balance
Reset
Dual Sound: Mono
Auto volume: On
OK
Effect bvNatural: Enhances clarity, detail and presence of sound by using the “BBE
High Definition Sound system”*.
v Dynamic: “BBE High Definition Sound system”* intensifies clarity and presence
of sound for better intelligibility and musical realism.
v Dolby**Virtual: Simulates the sound effect of “Dolby Surround Pro Logic”.
v Off: Flat response.
Treble bBLess b More
Bass bBLess b More
Balance bBLeft b Right
Reset Resets the sound to the factory preset levels.
K
Dual Sound b • For a stereo broadcast:
v Mono.
v Stereo.
• For a bilingual broadcast:
v Mono (for mono channel if available).
v A (for channel 1).
v B (for channel 2).
Auto VolumebvOff: volume level changes according to the broadcast signal.
v On: volume level of the channels will stay the same, independent of the broadcast
signal (e.g. in the case of advertisements).
• If you are listening to the TV through headphones, the “Effect” option is automatically switched to “Off”.
• If you select “Dolby Virtual” in the “Effect” option, the “Auto Volume” option is automatically switched to
“Off” and vice versa.
*The “BBE High Definition Sound system” is manufactured by Sony Corporation under license from
BBE Sound, Inc. It is covered by U.S. Patent No. 4,638,258 and No. 4,482,866. The word “BBE” and
BBE Symbol are trademarks of BBE Sound, Inc.
**This TV has been designed to create the “Dolby Surround” sound effect by simulating the sound of
four speakers with only two speakers, when the broadcast audio signal is Dolby Surround encoded.
The sound effect can also be improved by connecting a suitable external amplifier (for details refer
to “Connecting to external audio Equipment” on page 20).
**Manufactured under license from Dolby Laboratories. “Dolby”, “Pro Logic” and the double-D symbol
are trademarks of Dolby Laboratories.
continued...
10 Menu System
Page 11
Introducing and Using the Menu System
Level 1 Level 2 Level 3 / Function
SLEEP TIMER
Picture Adjustment
Mode: Personal
Contrast
Brightness
Colour
Sharpness
Hue
Reset
Timer
Sleep Timer: Off
Picture Adjustment
Mode: Personal
Contrast
Brightness
Colour
Sharpness
Hue
Reset
Set Up
Language/Country
Auto Tuning
Programme Sorting
Progamme Labels
AV Preset
Manual Programme Preset
Detail Set Up
OK
OK
OK
OK
Timer
Sleep Timer: Off
Set Up
Language/Country
Auto Tuning
Programme Sorting
Progamme Labels
AV Preset
Manual Programme Preset
Detail Set Up
The “Sleep Timer” option in the “Timer” menu allows
you to select a time period for the TV to automatically
switch itself into the standby mode.
To do this:
After selecting the option, press the
press the v or V button to set the time period delay
(max. of 4 hours) and finally press the OK button to
store.
• While watching the TV, you can press the
button on the remote control to display the time
remaining.
• One minute before the TV switches itself into
OK
standby mode, the time remaining is displayed on
the TV screen automatically.
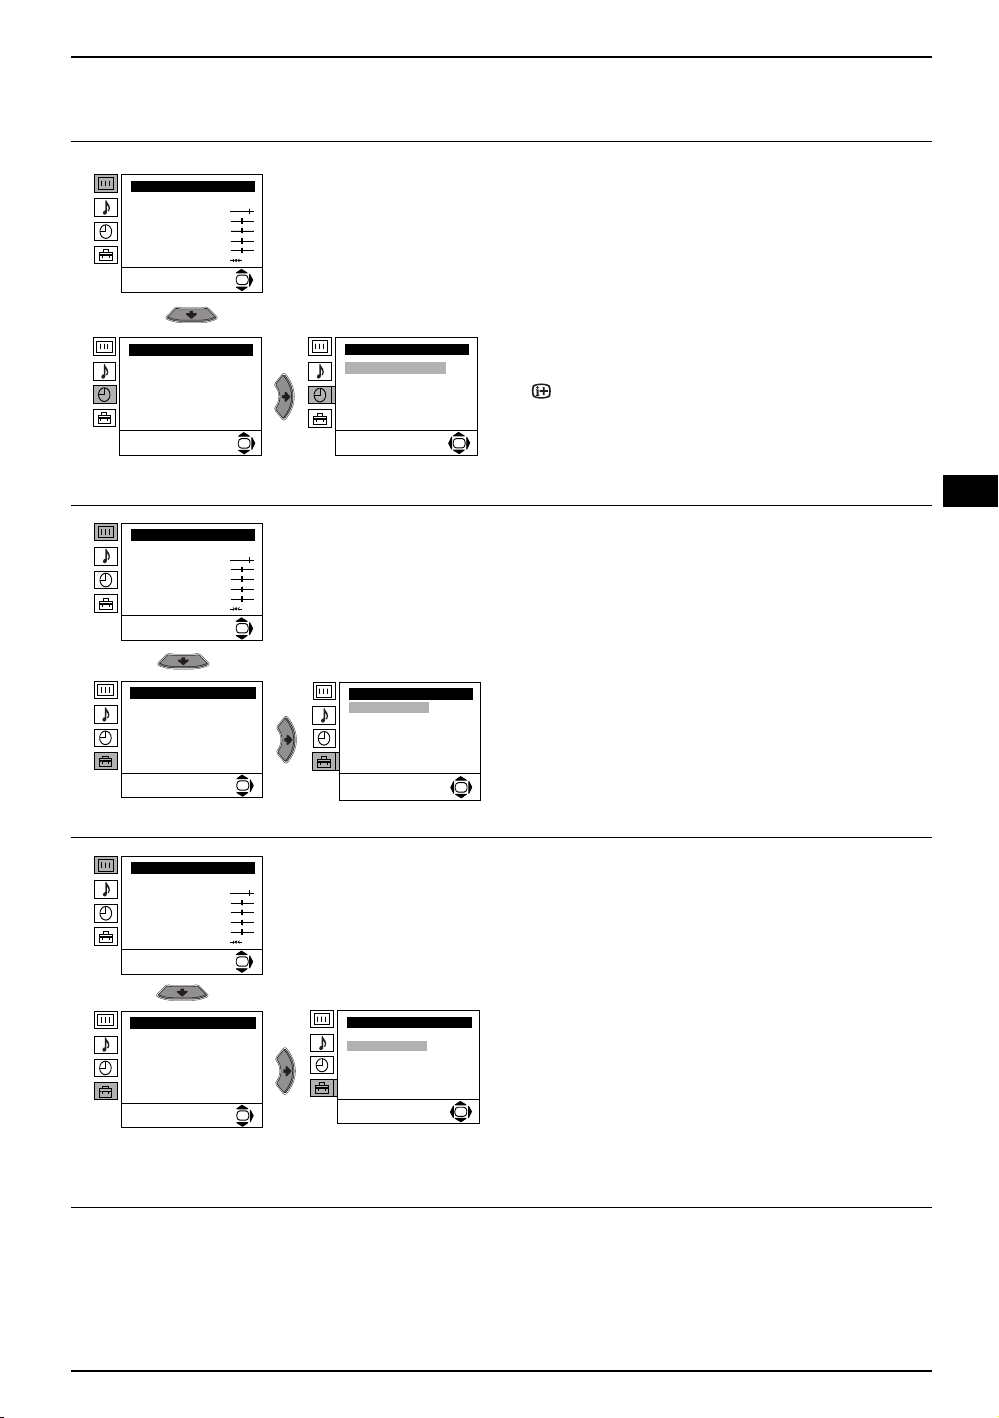
LANGUAGE / COUNTRY
The “Language/Country” option in the “Set Up” menu
allows you to select the language in which the menus
are displayed. It also allows you to select the country
in which you wish to operate the TV set.
To do this:
After selecting the option, press the
proceed in the same way as in the steps 2 and 3 of
the section “Switching On the TV and Automatically
Tuning” on page 7.
OK
b button then
GB
b button then
Picture Adjustment
Mode: Personal
Contrast
Brightness
Colour
Sharpness
Hue
Reset
Set Up
Language/Country
Auto Tuning
Programme Sorting
Progamme Labels
AV Preset
Manual Programme Preset
Detail Set Up
AUTO TUNING
The “Auto Tuning” option in the “Set Up” menu allows
you to automatically search for and store all available
TV channels.
OK
Set Up
Language/Country
Auto Tuning
Programme Sorting
Progamme Labels
AV Preset
Manual Programme Preset
Detail Set Up
OK
To do this:
After selecting the option, press the
proceed in the same way as in TV steps 5 and 6 of
the section “Switching On the TV and Automatically
Tuning” on page 8.
OK
Menu System 11
b button then
continued...
Page 12
Introducing and Using the Menu System
Level 1 Level 2 Level 3 / Function
PROGRAMME SORTING
Picture Adjustment
Mode: Personal
Contrast
Brightness
Colour
Sharpness
Hue
Reset
Set Up
Language/Country
Auto Tuning
Programme Sorting
Progamme Labels
AV Preset
Manual Programme Preset
Detail Set Up
OK
Set Up
Language/Country
Auto Tuning
Programme Sorting
Progamme Labels
AV Preset
Manual Programme Preset
OK
Detail Set Up
The “Programme Sorting” option in the “Set Up”
menu allows you to change the order in which the
channels (TV Broadcasts) appear on the screen.
To do this:
After selecting the option, press the
proceed in the same way as in step 7 b) of the section
“Switching On the TV and Automatically Tuning” on
page 8.
OK
b button then
Picture Adjustment
Mode: Personal
Contrast
Brightness
Colour
Sharpness
Hue
Reset
Set Up
Language/Country
Auto Tuning
Programme Sorting
Progamme Labels
AV Preset
Manual Programme Preset
Detail Set Up
Picture Adjustment
Mode: Personal
Contrast
Brightness
Colour
Sharpness
Hue
Reset
Set Up
Language/Country
Auto Tuning
Programme Sorting
Progamme Labels
AV Preset
Manual Programme Preset
Detail Set Up
PROGRAMME LABELS
The “Programme Labels” option in the “Set Up” menu
allows you to name a channel using up to five
characters (letters or numbers).
OK
Set Up
Language/Country
Auto Tuning
Programme Sorting
Progamme Labels
AV Preset
Manual Programme Preset
OK
Detail Set Up
To do this:
1 After selecting the option, press the b button, then
press the
v or V buttons to select the programme
number of the channel you wish to name.
2 Press b button. With the first element of the Label
column highlighted, press v or
V buttons to select
a letter or number (select “-“ for a blank), then
press the
OK
the other four characters in the same way. Finally
press the OK to store.
b button to confirm the character. Select
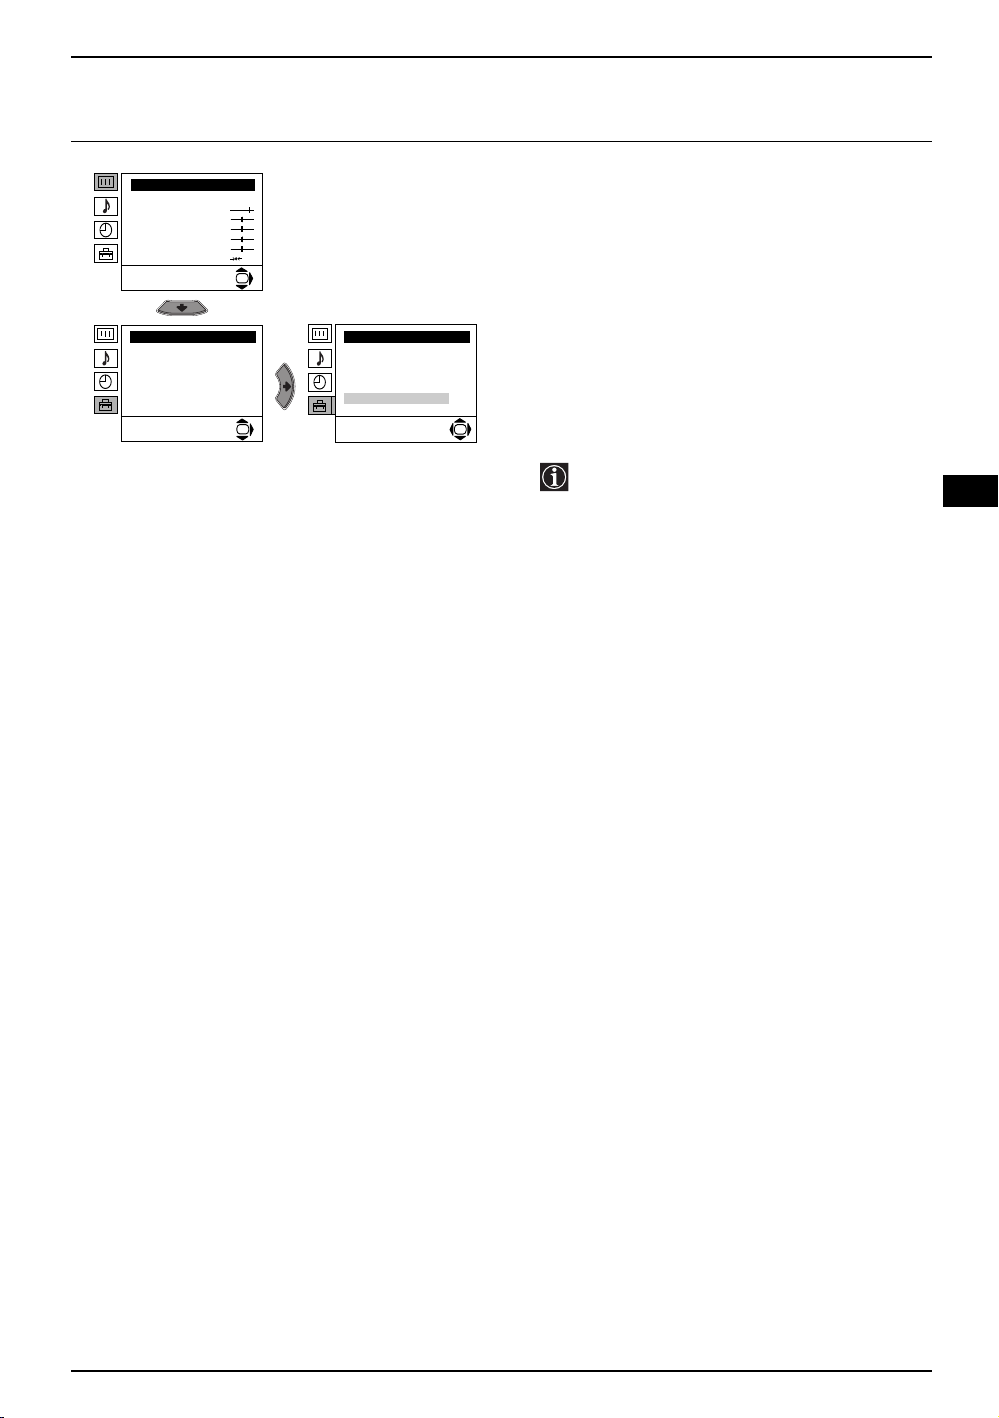
AV PRESET
The “AV Preset” option in the “Set Up” menu allows
you to designate a name to the external equipment
you have connected to the sockets of this TV.
To do this:
OK
1 After selecting the option, press the
press the v or
V buttons to select the input source
you wish to name (AV1, AV2 and AV3 represent
Set Up
Language/Country
Auto Tuning
Programme Sorting
Progamme Labels
AV Preset
Manual Programme Preset
OK
Detail Set Up
OK
the rear Scart sockets and AV4 is for the side
connectors). Then press the b button to confirm.
2 A predefined label automatically appears in the
label column:
a) If you want to use one of the 6 predefined
labels (CABLE, GAME, CAM, DVD, VIDEO or
SAT), press the v or
V buttons to select the
desired label, then press OK button to store.
b) If you want to set a different label, select Edit
and press b button. Then with the first element
highlighted, press the v or
a letter, number or “-“ for a blank, then press b
button to confirm the character. Select the
other four characters in the same way. Finally
press the OK button to store.
b button, then
V buttons to select
12 Menu System
continued...
Page 13
Introducing and Using the Menu System
Level 1 Level 2 Level 3 / Function
MANUAL PROGRAMME PRESET
Picture Adjustment
Mode: Personal
Contrast
Brightness
Colour
Sharpness
Hue
Reset
Set Up
Language/Country
Auto Tuning
Programme Sorting
Progamme Labels
AV Preset
Manual Programme Preset
Detail Set Up
OK
Set Up
Language/Country
Auto Tuning
Programme Sorting
Progamme Labels
AV Preset
Manual Programme Preset
Detail Set Up
OK
The “Manual Programme Preset” option in the “Set
Up” menu allows you to:
a) Preset channels or the VCR channel one by one
to the programme order of your choice.
To do this:
1 After selecting the ”Manual Programme Preset”
option, press the
option highlighted press the
Press the v or
programme number you want to preset the
OK
channel to (for VCR, select programme number
“0”). Then press the B button.
b button then with Programme
b button.
V buttons to select which
2 The availability of this option depends on
the country you have selected in the
“Language/Country” menu.
After selecting the System option, press the
button. Then press the v or
V buttons to select the
b
TV Broadcast system (B/G for western European
countries or D/K for eastern European countries).
Press the B button.
3 After selecting the Channel option, press the b
button. Then press the v or
V buttons to select the
channel tuning (“C” for terrestrial channels or “S”
for cable channels). Next press b button. After
that, press the numbered buttons to directly enter
the channel number of the TV Broadcast or the
VCR channel. If you do not know the channel
number, press the v or
V buttons to search for it.
When you have tuned to the desired channel,
press the OK button twice to store.
Repeat all the above steps to tune and store more
channels.
b) Label a channel using up to five characters.
To do this:
After highlighting the Programme option, press
the PROG +/- button to select the programme
number of the channel you wish to name. When
the programme you want to name appears on the
screen, select the Label option and press
button. Next press the v or
V buttons to select a
letter, number or “-“ for a blank. Press the
to confirm thecharacter. Select the other four
characters in the same way. After selecting all the
characters, press the OK button twice to store.
b
b button
GB
continued...
Menu System 13
Page 14
Introducing and Using the Menu System
Level 1 Level 2 Level 3 / Function
Picture Adjustment
Mode: Personal
Contrast
Brightness
Colour
Sharpness
Hue
Reset
Set Up
Language/Country
Auto Tuning
Programme Sorting
Progamme Labels
AV Preset
Manual Programme Preset
Detail Set Up
c) Manually fine tune the TV to obtain a better
picture reception if the picture is distorted.
Normally the automatic fine tuning (AFT) is in
operation, but you can alter it manually.
OK
To do this:
Whilst watching the channel (TV Broadcast) you
wish to fine tune, select the AFT option and press
Set Up
Language/Country
Auto Tuning
Programme Sorting
Progamme Labels
AV Preset
Manual Programme Preset
OK
Detail Set Up
OK
b button. Next press the v or
the fine tuning between -15 and +15. Finally
press the OK button twice to store.
d) Skip any unwanted programme numbers when
they are selected with the PROG +/- buttons.
V buttons to adjust
To do this:
After highlighting the Programme option, press
the PROG +/- button to select the programme
number you want to skip. When the programme
you want to skip appears on the screen, select
the Skip option and press the b button. Next
press the v or
V buttons to select Yes. Finally
press the OK button twice to confirm and store.
To cancel this function later on select “No”
instead of “Yes” in the step above.
e) View and record scrambled channels when using
a decoder connected directly to the Scart socket
S
3/ 3 or through a VCR.
The availability of this option depends on
the country you have selected in the
“Language/Country” menu.
To do this:
Select the Decoder option and press the b
button. Next press the v or
V buttons to select
On. Finally press the OK button twice to confirm
and store.
To cancel this function later on, select “Off”
instead of “On” in the step above.
continued...
14 Menu System
Page 15
Introducing and Using the Menu System
Level 1 Level 2 Level 3 / Function
Picture Adjustment
Mode: Personal
Contrast
Brightness
Colour
Sharpness
Hue
Reset
Set Up
Language/Country
Auto Tuning
Programme Sorting
Progamme Labels
AV Preset
Manual Programme Preset
Detail Set Up
OK
OK
Smart
4 : 3
Detail Set Up
Auto format:
Noise Reduction:
AV3 output:
TV speakers:
RGB Centring:
Picture Rotation
On
Auto
TV
On
0
0
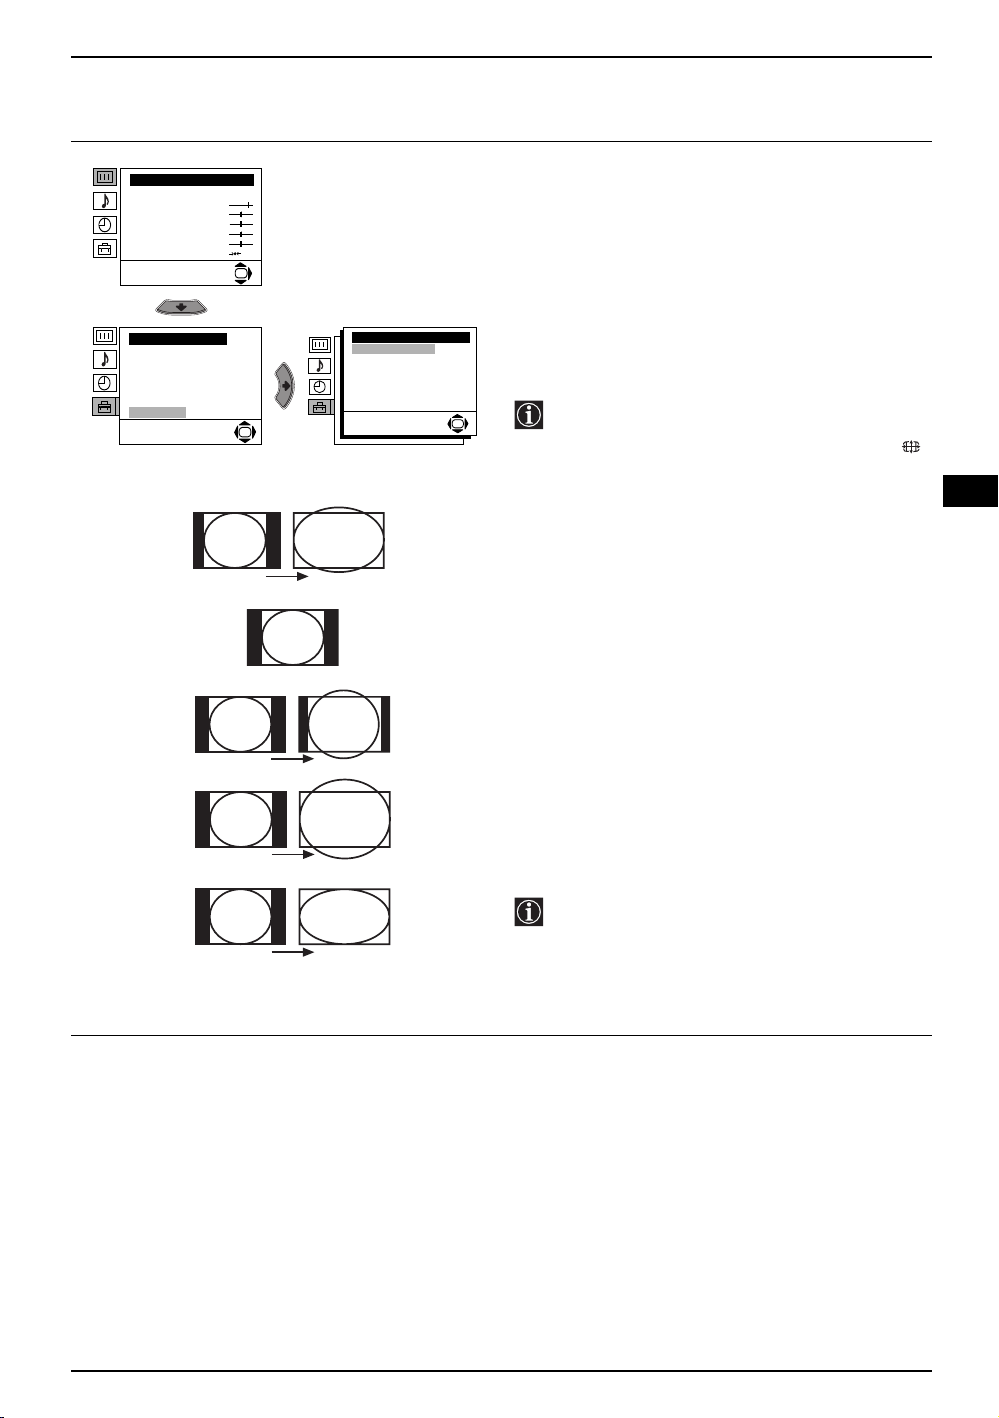
AUTO FORMAT
The “Auto Format” option in the “Detail Set Up” menu
allows you to automatically change the aspect ratio
of the screen.
To do this:
After selecting the option, press the b button. Then
press the v or
TV set to automatically switch to the screen format
used on the broadcast signal) or Off (if you wish to
keep your preference). Finally press the OK button to
store.
OK
Even if you have selected “On” or “Off” in the
“Auto Format” option, you can always modify
the format of the screen by pressing
repeatedly on the remote control to select one
of the following formats.
Smart: Imitation of wide screen effect for 4:3
4:3: Conventional 4:3 picture size, full picture
14:9: Compromise between 4:3 and 16:9 picture
V buttons to select On (if you wish the
broadcasts.
information.
size
GB
14 : 9
Zoom
Wide
Zoom: Widescreen format for letterbox movies
Wide: For 16:9 broadcast. Full picture information
In “Smart”, “Zoom” and “14:9” modes, a part
of of the top and bottom of the screen are cut
off. Press the v or
V buttons to adjust the
position of the image on the screen (to read
subtitles for example).
continued...
Menu System 15
Page 16
Introducing and Using the Menu System
Level 1 Level 2 Level 3 / Function
NOISE REDUCTION
Picture Adjustment
Mode: Personal
Contrast
Brightness
Colour
Sharpness
Hue
Reset
Set Up
Language/Country
Auto Tuning
Programme Sorting
Progamme Labels
AV Preset
Manual Programme Preset
Detail Set Up
Picture Adjustment
Mode: Personal
Contrast
Brightness
Colour
Sharpness
Hue
Reset
OK
Detail Set Up
Auto format:
Noise Reduction:
AV3 output:
TV speakers:
RGB Centring:
Picture Rotation
OK
OK
On
Auto
TV
On
0
0
The “Noise Reduction” option in the “Detail Set Up”
menu allows you to automatically reduce any picture
noise visible in the broadcast signal.
To do this:
After selecting the option, press the b button. Then
press the v or
the OK button to confirm and store.
To cancel this function later on, select “Off” instead of
“Auto” in the step above.
OK
AV3 OUTPUT
The “AV3 Output” option in the “Detail Set Up” menu
allows you to select the source to be output from the
Scart connector 3/ 3 so you can record from
this Scart any signal coming from the TV or from
external equipment connected to Scart connectors
1/ 1 or 2/ 2 or the side connectors
S
4 or 4 and 4.
V buttons to select Auto. Finally press
S
Set Up
Language/Country
Auto Tuning
Programme Sorting
Progamme Labels
AV Preset
Manual Programme Preset
Detail Set Up
Detail Set Up
Auto format:
Noise Reduction:
AV3 output:
TV speakers:
RGB Centring:
Picture Rotation
OK
On
Auto
TV
On
0
0
OK
If your VCR supports Smartlink, this procedure
is not necessary.
To do this:
After selecting the option, press the b button. Then
press the v or
V buttons to select the desired output
signal: TV, AV1, AV2, AV4, YC4 or AUTO.
If you select “AUTO”, the output signal will always be the same one that is displayed on the screen.
If you have connected a decoder to the Scart socket 3/ 3 or to a VCR connected to that Scart
S
socket, please remember to set the “AV3 Output” to “AUTO” or “TV” for correct unscrambling.
TV SPEAKERS
Picture Adjustment
Mode: Personal
Contrast
Brightness
Colour
Sharpness
Hue
Reset
Set Up
Language/Country
Auto Tuning
Programme Sorting
Progamme Labels
AV Preset
Manual Programme Preset
Detail Set Up
OK
Detail Set Up
Auto format:
Noise Reduction:
AV3 output:
TV speakers:
RGB Centring:
Picture Rotation
OK
On
Auto
TV
On
0
0
The “TV Speakers” option in the “Detail Set Up”
menu allows you to mute the TV speakers in order to
listen to the TV from an external amplifier connected
to the audio outputs on the rear of the TV set.
To do this:
After selecting the option, press the b button. Then
press the v or
V buttons to select Off. Finally press
the OK button to confirm and store.
To cancel this function later on, select “On” instead of
“Off” in the step above.
OK
16 Menu System
continued...
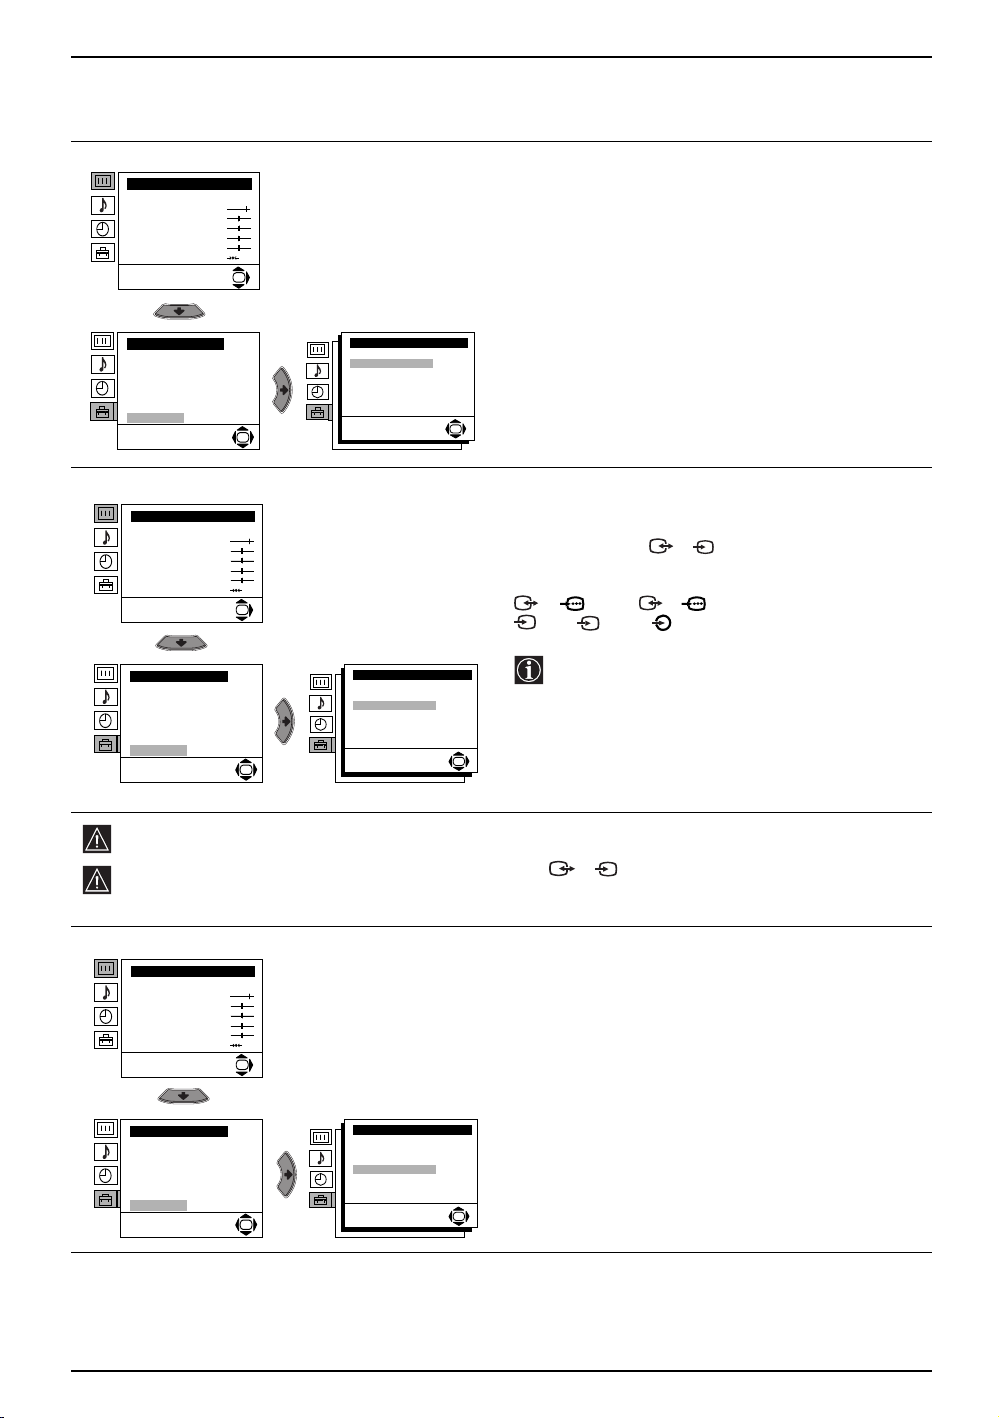
Page 17
Introducing and Using the Menu System
Level 1 Level 2 Level 3 / Function
RGB CENTRING
Picture Adjustment
Mode: Personal
Contrast
Brightness
Colour
Sharpness
Hue
Reset
Set Up
Language/Country
Auto Tuning
Programme Sorting
Progamme Labels
AV Preset
Manual Programme Preset
Detail Set Up
OK
Detail Set Up
Auto format:
Noise Reduction:
AV3 output:
TV speakers:
RGB Centring:
Picture Rotation
OK
On
Auto
TV
On
0
0
When connecting an RGB source, such as a
“PlayStation”, you may need to readjust the
horizontal position of the picture. In that case, you
can readjust it using the “RGB Centring” option in the
“Detail Set Up”.
To do this:
While watching an RGB source select the “RGB
Centring” option and press the b button. Then press
the v or
V buttons to adjust the centre of the picture
between –10 and +10. Finally press the OK button to
confirm and store.
OK
Picture Adjustment
Mode: Personal
Contrast
Brightness
Colour
Sharpness
Hue
Reset
Set Up
Language/Country
Auto Tuning
Programme Sorting
Progamme Labels
AV Preset
Manual Programme Preset
Detail Set Up
PICTURE ROTATION
Because of the earth’s magnetism, the picture might
GB
slant. If this is the case, you can correct the pictures
slant by using the option “Picture Rotation” in the
“Detail Set Up” menu.
OK
To do this:
After selecting the option, press the b button. Then
press the v or V buttons to correct any slant of the
Detail Set Up
Auto format:
Noise Reduction:
AV3 output:
TV speakers:
RGB Centring:
Picture Rotation
OK
On
Auto
TV
On
0
0
picture between -5 and +5 and finally press the OK
button to store.
OK
Menu System 17
Page 18

Teletext
Teletext is an information service transmitted by most TV stations. The index page of the teletext service
(usually page 100) gives you information on how to use the service. To operate teletext, use the remote
control buttons as indicated below.
Teletext errors may occur if you use a channel (TV Broadcast) with a weak signal.
To Switch on Teletext:
TELETEXT
TELETEXT
TELETEXT
TELETEXT
TELETEXT
TELETEXT
TELETEXT
After selecting the TV channel which carries the teletext service you wish
to view, press the button.
To Select a Teletext page:
Input the 3 digits of the page number, using the numbered buttons.
TELETEXT
Index
Index
Index
Index
Index
Index
Index
Index
Programme
Programme
Programme
Programme
Programme
Programme
Programme
Programme
News
News
News
News
News
News
News
News
Sport
Sport
Sport
Sport
Sport
Sport
Sport
Sport
Weather
Weather
Weather
Weather
Weather
Weather
Weather
Weather
153
153
153
153
153
153
153
153
101
101
101
101
101
101
101
101
25
25
25
25
25
25
25
25
98
98
98
98
98
98
98
98
• If you have made a mistake, retype the correct page number.
• If the counter on the screen continues searching, it is because the page is not
available.
In that case, input another page number.
To access the next or preceding page:
Press PROG + () or PROG - ( ) buttons.
To superimpose teletext onto the TV:
Whilst you are viewing teletext, press the button. Press again to cancel teletext mode.
To freeze a teletext page:
Press the / button. Press again to cancel freeze.
To reveal concealed information (e.g: answer to a quiz):
Press the / button. Press again to conceal the information.
To select a sub page:
A teletext page may consist of several sub pages. In this case the page number that appears on the upper left
corner changes colour from yellow to green, and one or more arrows will appear next to the page number.
Repeatedly press the B or b buttons on the remote control to watch the desired sub page.
To Switch Off Teletext:
Press button.
Fastext
The Fastext service lets you access pages with one button push.
While you are in Teletext mode and providing Fastext is broadcast, a colour coded menu appears at the
bottom of the teletext page. Press one of the coloured buttons (red, green, yellow or blue) to access the
corresponding page.
18 Teletext
Page 19
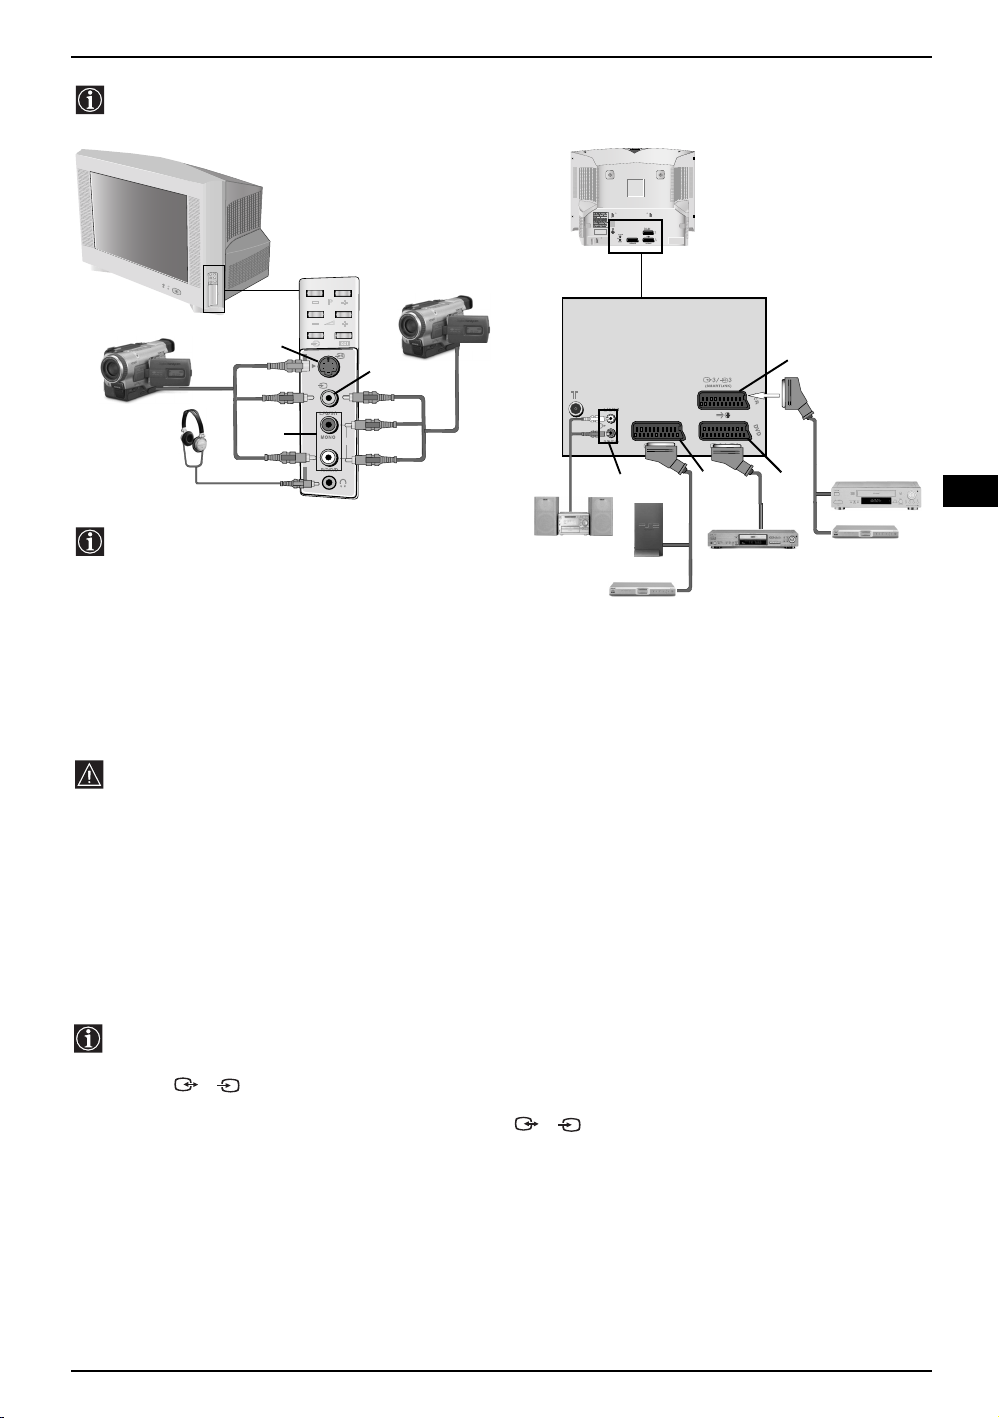
Connecting Additional Equipment
Using the following instructions you can connect a wide range of optional equipment to your TV set.
(Connecting cables are not supplied).
MANUFACTURED UNDER LICENCE
FROM DOLBY LABORATORIES
"DOLBY" AND THE DOUBLE - D
SYMBOL ARE TRADEMARKS OF
DOLBY LABORATORIES
G
S
O
N
S VHS/Hi8/
DVC
camcorder
8mm/Hi8/
Y
DVC
camcorder
A
4
B
4
C
When you connect the headphones,
the TV speakers will automatically be
muted.
o4
DF
Hi-Fi
“PlayStation”*
Decoder
E
DVD
* “PlayStation” is a product of Sony
Computer Entertainment, Inc.
VCR
Decoder
* “PlayStation” is a trademark of Sony
Computer Entertainment, Inc.
• To avoid picture distortion, do not connect external equipment to connectors A and B at the same
time.
• Do not connect a Decoder to the Scart connector F.
• Games that use a “gun” attachment to point at the screen do not work correctly due to the 100Hz
technology used in this television
Connecting a VCR:
To connect a VCR, please refer to the section “Connecting the aerial and VCR” of this instruction manual. We
recommend you connect your VCR using a Scart lead. If you do not have a Scart lead, tune in the VCR test
signal to the TV programme number “0” by using the “Manual Programme Preset” option. (for details of how
to manually programme these presets, see page 13, step a).
Refer to your VCR instruction manual to find out the output channel of your VCR.
Connecting a VCR that supports Smartlink:
Smartlink is a direct link between the TV set and the VCR. For more information on Smartlink, please
refer to the instruction manual of your VCR.
If you use a VCR that supports Smartlink, please connect the VCR by using a Scart lead to the Scart
socket 3/ 3 G.
S
If you have connected a decoder to the Scart 3/ 3 G or through a VCR connected to
S
this Scart:
Select the “Manual Programme Preset” option in the “Set Up” menu and after selecting the “Decoder**” option,
select “On” (by using
the v or V button). Repeat this procedure for each scrambled signal.
GB
** The availability of this option depends on the country you have selected in the “Language/Country” menu.
continued...
Additional Information 19
Page 20
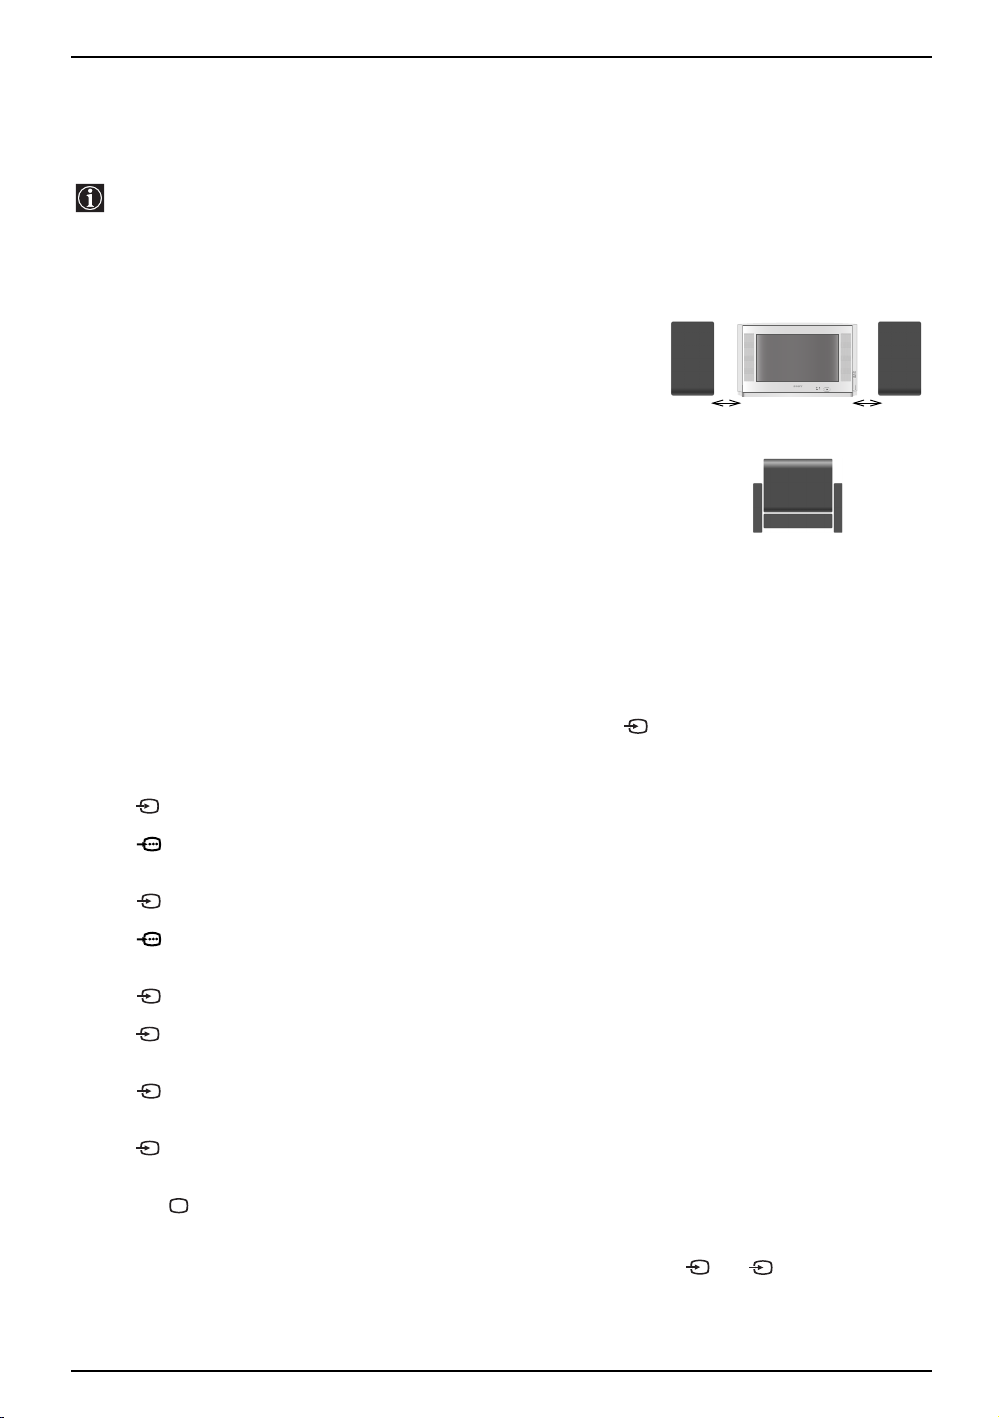
Connecting Additional Equipment
Connecting to external Audio Equipment:
Plug in your Hi-Fi equipment to the audio output sockets D if you wish to amplify the audio output from your
TV. Next, using the menu system, select the “Set Up” menu. Enter the “Detail Set Up” menu and set “TV
Speakers” to “Off”.
The audio level of the external speakers can be modified by pressing the volume buttons on the remote
control. Also, treble and bass settings can be modified through the “Sound Adjustment” menu.
To enjoy “Dolby Virtual” sound effect through your Hi-Fi equipment:
Place the speakers of your equipment in front of your sitting position
and besides the TV set, but keeping a distance of 50 cm from each
speaker to the TV set.
Then, using the menu system, select the menu “Sound Adjustment”,
and select “Dolby Virtual” on the “Effect” option.
Left Hi-Fi
speaker
50cm 50cm
Your sitting position
Right Hi-Fi
speaker
Using optional Equipment
Connect your equipment to the designated TV socket, as indicated in the previous page.
1
Switch on the connected equipment.
2
To watch the picture from the connected equipment, press the button repeatedly until the correct
3
input symbol appears on the screen.
Symbol
Press button on the remote control to return to the normal TV picture.
4
Input Signals
1
• Audio / video input signal through the Scart connector E.
1
• RGB input signal through the Scart connector E. This symbol appears only if a RGB
source has been connected.
2
• Audio / video input signal through the Scart connector F.
2
• RGB input signal through the Scart connector F. This symbol appears only if a RGB
source has been connected.
3
• Audio/video input signal through the Scart connector G.
S
3
• S Video Input signal through the Scart connector G. This symbol appears only if a S
Video source has been connected.
4
• Video input signal through the phono socket B and Audio input signal through phono
socket C.
S
4
• S Video Input signal through the front S Video input jack A and Audio signal through
phono socket C. This symbol appears only if a S Video source has been connected.
For Mono Equipment
Connect the phono plug to the L/G/S/I socket on the side of the TV and select 4 or 4 input signal using
the instructions above. Finally, refer to the “Sound Adjustment” section of this manual and select “Dual
Sound” “A” on the sound menu screen.
S
20 Additional Information
Page 21
TV system Depending on your country selection B/G/H, D/K, L , I
Specifications
Colour System PAL, SECAM
NTSC 3.58, 4.43 (Video In only)
Channel Coverage VHF: E2-E12
UHF: E21-E69
CATV: S1-S20
HYPER: S21-S41
D/K: R1-R12, R21-R69
Picture Tube Flat display FD Trinitron WIDE 28” (Approx. 71 cm measured diagonally)
32” (Approx. 82 cm measured diagonally)
Rear Terminals 1/ 1 21-pin Scart connector (CENELEC standard) including audio/
video input, RGB input, TV audio/video output
2/ 2 21-pin Scart connector (CENELEC standard) including audio/
video input, RGB input, monitor audio/video output
3/ 3 21-pin Scart connector (CENELEC standard) including audio/
(SMARTLINK) video input, S-video input, selectable audio/video output and
S
Smartlink interface
Audio outputs (Left/Right) - phono jacks
Side terminals 4 S Video input - 4 pin DIN
S
4 Video input - phono jack
4 Audio input - phono jacks
i Headphones jack
Sound Output 2 x 20W (Music Power), 2 x 10W (RMS)
Woofer: 30W (Music Power), 15W (RMS)
Power Consumption KV-28CS70 94W KV-32CS70 102W
GB
Standby Power
KV-28CS70 0.4W KV-32CS70 0.4W
Consumption
Dimensions (WxHxD) KV-28CS70 Approx. 844mm x 517mm x 548mm
KV-32CS70 Approx. 933mm x 562mm x 572mm
Weight KV-28CS70 Approx. 43.5Kg KV-32CS70 Approx. 60Kg
Accessories Supplied 1 Remote Control (RM-947), 2 batteries (IEC designated)
Other Features • 100Hz picture
• Teletext, Fastext, TOPtext (250 page TEXT memory)
• Sleep Timer
• Smartlink (direct link between your TV set and a compatible VCR. For more
information on Smartlink, please refer to the Instruction Manual of your VCR)
• TV system Autodetection
• Dolby Virtual
• BBE
• Autoformat
Design and specifications are subject to change without notice.
Additional Information 21
Page 22
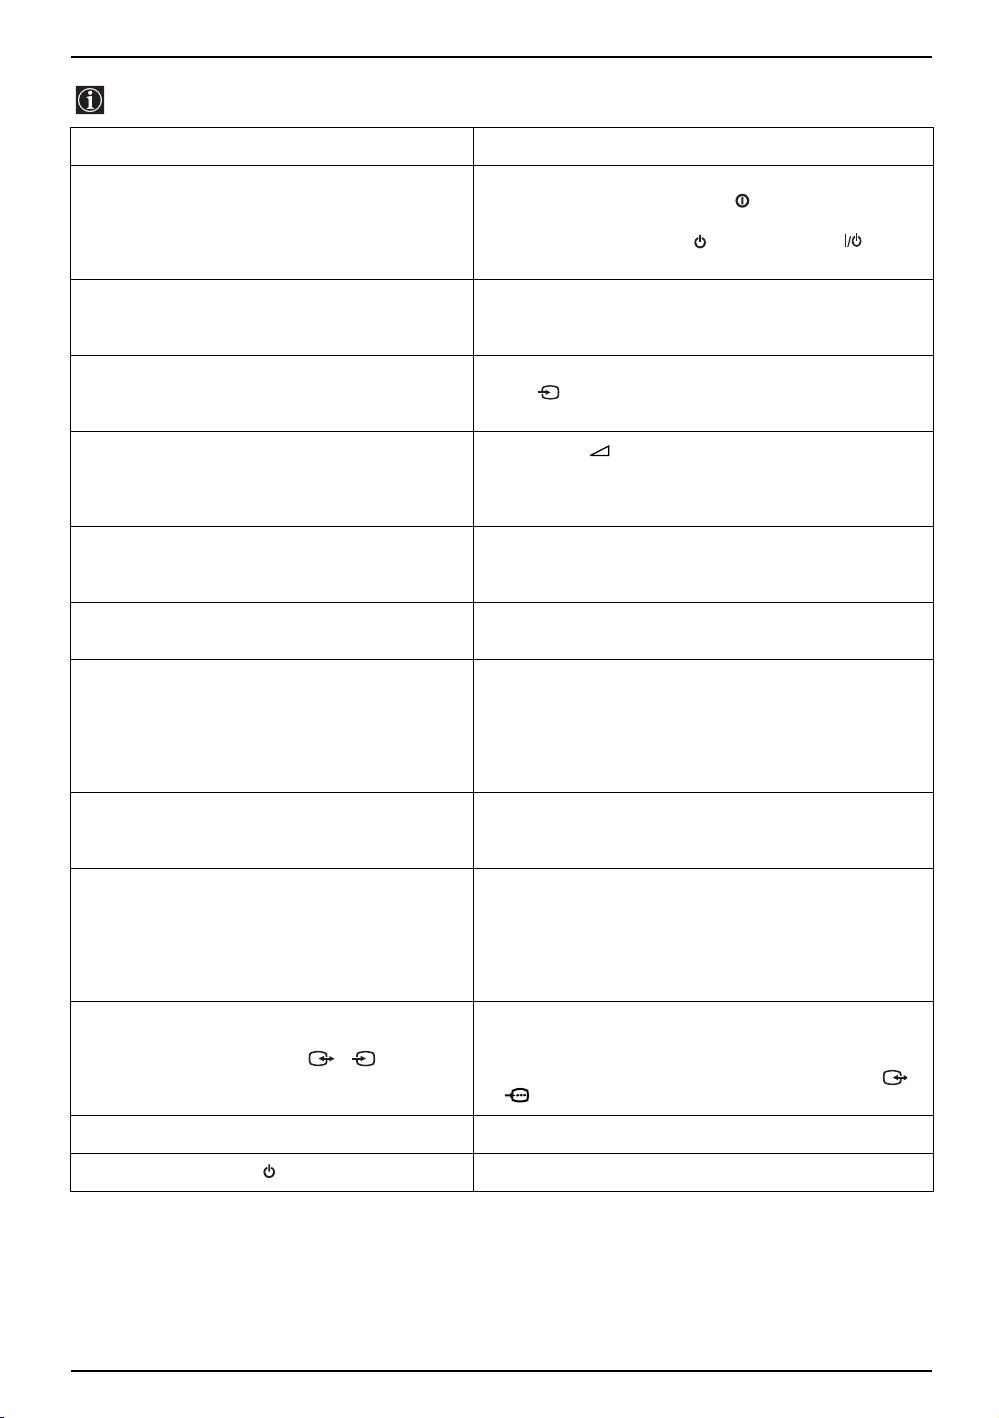
Troubleshooting
Here are some simple solutions to problems which may affect the picture and sound.
Problem Suggested Remedy
No picture (screen is dark), and no sound. • Check the aerial connection.
Poor or no picture (screen is dark), but good
sound.
No picture or menu information from equipment
connected to the Scart socket.
Good picture, no sound. • Press the button on the remote control.
No colour on colour programmes. • Using the MENU system, select the “Picture
Distorted picture when changing programmes or
selecting Teletext.
Wrong characters appear when viewing teletext. • Using the menu system, display the “Language/
• Plug the TV in and press the button on the front of
the TV.
• If the standby indicator is on press the button
or a numbered button on the remote control.
• Using the MENU system, select the “Picture
Adjustment“ display and select “RESET“ to return to
the factory settings.
• Check that the optional equipment is on, and press
the button of the remote control repeatedly until
the correct input symbol is displayed on screen.
• Check that “TV Speakers” is “On” in the “Detail Set
Up” menu.
• Check the Headphones are not connected.
Adjustment“ and select “RESET“ to return to the
factory settings.
• Turn off any equipment connected to the scart
connectors on the rear of the TV.
Country” menu and select the country in which you
are operating the TV set.
For Cyrillic languages, we recommend you select
Russian as the country if your own country does not
appear in the list.
Picture slanted. • Using the menu system, select the “Picture Rotation”
Snowy picture when viewing a TV channel. • Using the menu system, select the “Manual
No unscrambled picture whilst viewing un
unscrambled channel with a decoder connected
through the scart connector 3/ 3.
Remote control does not function. • Replace the batteries.
The standby indicator on the TV flashes. • Contact your nearest Sony service centre.
• If you continue to have problems, have your TV serviced by qualified personnel.
• NEVER open the casing yourself.
S
option in the “Detail Set Up” menu to correct the
picture slant.
Programme Preset” menu and adjust Fine Tuning
(AFT) to obtain better picture reception.
• Using the menu system, select the “Noise Reduction”
option in the “Detail Set Up” menu and select “Auto”
to reduce the noise in the picture.
• Using the menu system, display the “Set Up” menu.
Then select the “Detail Set Up” option and set “AV3
Output” to “TV”.
• Check that the decoder is not connected to the 2/
2 scart socket.
22 Troubleshooting
Page 23

Page 24

Page 25
Увод
Благодарим Ви за избора на този цветен телевизор Sony с плосък
екран FD Trinitron.
Преди използване на телевизора прочетете внимателно това ръководство за експлоатация и
го запазете за бъдещи изяснения.
• Символии използввани в това ръководство:
• Важна информация.
• Информация за функцията.
• 1,2... Последователност за следване на
инструкциите.
• Потьменените бутони на дистанционното
управление показват кои бутони трябва
да се натискат за изпълнението на
различните операции.
• Информация за резултата от
инструкциите.
Съдържание
Увод ........................................................................................................................................................ 3
Техника на безопасност........................................................................................................................ 4
Основно описание
Основно описание на бутоните на дистанционното управление......................................................5
Основно описание на бутоните на телевизора ................................................................................. 6
Инсталиране
Инсталиране на батериите в устройството за дистанционно управление ...................................... 6
Свързване на антената и видеото ...................................................................................................... 6
BG
Първоначално включване
Включване и автоматично настройване на телевизора ................................................................... 7
Ситема от менюта на екрана
Увод и боравене със системата от менюта ........................................................................................ 9
Водач на менютата:
Настройка на Картината.............................................................................................................. 9
Настройка на звука...................................................................................................................... 10
Автоматично Изключв ................................................................................................................. 11
Език / Държава ............................................................................................................................. 11
Автоматично Захващане.............................................................................................................. 11
Автоматично Захващане.............................................................................................................. 12
Надписване на програми ............................................................................................................. 12
Запаметени AV настройки ........................................................................................................... 12
Програмиа Ръчен Избор............................................................................................................... 13
Автоформат .................................................................................................................................. 15
Потискане на шума....................................................................................................................... 16
AV3 изход ...................................................................................................................................... 16
Телев. говорител .......................................................................................................................... 16
RGB Център .................................................................................................................................. 17
Въртене на Картината ................................................................................................................. 17
Телетекст ............................................................................................................................................ 18
Допълнителнаинформация
Свързване на допълнителни апарати ................................................................................................. 19
Боравене с допълнителни апарати...................................................................................................... 20
Характеристики..................................................................................................................................... 21
Отстраняване на неизправности ..........................................................................................................22
съдържание 3
Page 26
Техника на безопасност
Този телевизор може да работи само
на захранващо напрежение 220-240V.
Внимавайте да не включвате твърде
много уреди в един контакт, тъй
като това може да причини токов
удар.
Не отваряйте кутията и задния капак
на телевизора. Обръщайте се само
към квалифициран сервизен
персонал.
Не покривайте вентилационните
отвори на телевизора. Оставете наймалко 10 см. разтояние около
телевизора за вентилация.
По причини за безопасност и предпазване от
въздействие от природни явления е
препоръчително да не оставяте телевизора в
режим “stand by” когато не се използва.
Изключвайте от електрическата мрежа.
Някои телевизори имат функции, които за да
бъдат използвани, изискват уреда да бъде
оставен в режим “stand by”. Инструкциите в
това ръководство ще Ви информират дали
това е необходимо.
За Ваша собствена безопасност не
пипайте телевизора, кабела или
антената му по време на
гръмотевични бури.
Никога не поставяйте телевизора
на горещи, влажни или
изключително прашни места. Не
инсталирайте телевизора на места
където може да бъде изложен на
механични вибрации.
Никога не пъхайте каквито и да
било предмети в телевизора, тъй
като това може да причини пожар
или токов удар. Никога не
разливайте течности по телевизора.
В случай, че течност или твърд
предмет попаднат в телевизора го
изключете. Свържете се незабавно с
квалифицирани
За да предотвратите риска от токов
удар, не излагайте телевизора на
дъжд или влага.
За да избегнете пожар, дръжте
настрана от телевизора
възпламеними предмети и открити
източници на светлина /например
свещи/.
Почиствайте екрана и кутията с
мека, влажна кърпа. Не използвайте
абразивни кърпи, алкални
почистващи средства, изстъргващи
препарати или разтворители като
спирт или бензин, както и
антистатичен спрей.
Поставяйте телевизора на сигурна,
стабилна поставка. Никога не се
опитвайте да премествате телевизора и
поставката едновременно – винаги
премествайте телевизора и поставката
отделно. Не обръщайте телевизора
настрани или по “гръб”. Не позволявайте
на деца да се катерят по него.
4 Техника на безопасност
Когато изключвате телевизора,
дърпайте щепсела, а не кабелa.
Изключвайте кабела на
телевизора преди да го местите.
При преместването избягвайте
неравни повърхности и не правете
бързи крачки. Ако изпуснете или
нараните телевизора, незабавно се
консултирайте с квалифицирани
сервизни служители на Сони.
Не поставяйте тежки предмети
върху кабела, тъй като това може
да го повреди.
Препоръчваме ви да навиете
излишния захранващ кабел около
предназначените за целта
приспособления на задната страна
на телевизора.
Не покривайте
вентилационните отвори на
телевизора с предмети като
пердета, вестници и др.
Page 27
Основно описание на бутоните на дистанционното управление
1
2
3
qj
qh
qg
qf
qd
qs
qa
9 Избор на формат на екрана:
Натиснете този бутон няколко пъти, за да
смените формата на образа. За по-подробна
информация се консултирайте с глава
«Автоформат» на стр. 15.
q; Избор на канали:
Натиснете го за избор на преден или следващ
канал.
qa Елиминиране на канали:
Натиснете го за премахване на звука.
Натиснете го отново за възвръщане на звука.
qs Настройване на силата на звука:
Натиснете го за настройване на силата звука.
qd Активиране не системата от менюта:
Натиснете го за да видите менюто на екрана.
Натиснете го отново за премахване и връщане
на нормалния ТВ екран.
4
5
6
7
8
9
q;
1 временно изключване на телевизора :
натиснете го за временно изключване на телевизора
(индикаторът за режим на очакване) ще светне). Натиснете
го отново за да вклочите телевизора от режима на временно
изключване (standby).
За икономия на еп. енергия се препоръчва цялостното
изключване на телевизора когато не се използва.
Ако в продължение на 15 мин. няма TB сигнал и не се
натискат бутоните, телевизора ще мйне автоматично в
режим на временно изключване (standby).
2 Избор на входен сигнал:
Натиснете го няколко пъти, докато символа на желания входен
сигнал се появи на екрана.
3 Избор на канали:
Натиснете, за да въведете необходимия номер на канал.
видеокасетофон.
За двуцифрени погрмни номера натиснете втората цифра за
времетраене по-малко от 2.5 сек.
4 Бутон за предишен канал:
Натиснете го за да върнете последния избран канал (предният
канаи трябва да е бил изобразен в продължение на най-малко 5
сек.).
5 Този бутон функционира самно в режим на телетекст.
6 Този бутон функционира самно в режим на телетекст.
7 Телетекст:
Натиснете го за ииобраияване на телетекста.
8 Блок за управление:
•
Когато MENU е активирано,
предвижване през системата от менюта. За повече детайли
вижте в глава «Увод и боравене със системата от менюта
стр. 9
•
Когато MENU не е активирано,
визуализиране на генералния списък на настроените канала.
Изберете канала (TB предаване) натискайки
след това натиснете отново OK за да видите избрания канал.
използвайте
qf Избор на режим на телевизия:
Натиснете го за да изключите телетекста или
входа за видео.
qg Избор на звуков ефект:
Натиснете този бутон няколко пъти, за да
промените звуковия ефект.
qh Избор на режим на образа:
Натиснете го няколко пъти за смяна на
режима на образа .
qj Изобразяване на информация на екрана:
Натиснете го за изобразяване на всички
индикации на екрана. Натиснете го отново за
премахване.
тези бутони за
» на
натиснете OK за
v или V или и
BG
Освен телевизионните функции, всички цветни бутони се използват също така и за операциите
на телетекста. За повече информация вижте в главата «Телетекст», в това ръководство за
експлоатация.
Основно описание 5
Page 28
Основно описание на бутоните на телевизора
Бутон За
връщане към
Индикатор за режим
на временно
изключване (standby)
Отворете вратичката
отстрани на
телевизора за да
разкриете контактите
фабричната
настройка на
телевизора
Вход за S
video
4
o4
Бутон За избор на
предна/следваща
програма (избор на
TB предавания)
Бутони за контрол
на силата на
звука
Бутон за избор
4
на входен
сигнал
Букса за
видео
вход
Вход за
видео
Бутон за
включване/
изключване
Букса за
слушалки
Инсталиране на батериите в устройството за дистанционно
управление
Поставете приложените батерии с правилно разположени полюси.
Опазвайте околната среда и изхвърляйте използваните батерии в контейнерите за тази цел.
S
O
N
Y
C
O
R
P
O
R
A
T
IO
N
J
A
P
A
N
/4
Y CORPORATION JAPAN/4
SON
Свързване на антената и видеото
Кабелите за свързване не са приложени серийно.
видео
или
СвързванеточрезЕвроконектораеопция
Кабелите за свързване не са приложени серийно.За повече детайли за
свързването на видеото вижте в главата «Свързване на допълнителни
апарати», в това ръководство за експлоатация.
6 Основноописание - Инсталиране
MANUFACTURED UNDER LICENCE
FROM DOLBY LABORATORIES
"DOLBY" AND THE DOUBLE - D
SYMBOL ARE TRADEMARKS OF
DOLBY LABORATORIES
Page 29
Включване и автоматично настройване на телевизора
Когато включите за първи път телевизора, на екрана ще се появи последователност от менюта
чрез които ще можете да: 1) изберете езика на менютата, 2) изберете държавата в която
желаете да използвате апарата, 3) настроите наклона на картината, 4) тьрсите и запаметите
автоматично всички канали на разположение (TB предавания) и 5) смените реда на появяване
на каналите (TB предавания). Ако за в бъдеще желаете да измените някои от тези нагласи,
това може да се извърши избирайки съответната опция в (меню Инсталиране) или
натискайки бутона за фабрично програмираната настройка.
Включете кабела за захранването (220-240V AC, 50Hz).
1
Когато свържете телевизора за първи път в ел. мрежа, той се
включва автоматично. Ако не, натиснете бутона вкл./изкл.
на лицевия панел на телевизора, за да го включите.
Когато включите телевизора за първи път, на екрана
автоматично ще се появи менюто Language (Език).
Натиснете бутона v или V от дистанционното управление за
2
да изберете езика и после натиснете бутона OK за да
потвърдите избора. От този момент всички менюта ще се
появяват на избрания език.
Language
i
v
Svenska
Norsk
English
Nederlands
Français
Italiano
V
i
Select Language:
OK
BG
На екрана автоматично ще се появи менюто Държава.
3
Натиснете бутона v или V за избор на Държавата, където
желаете да използвате телевизора, след което натиснете
OK за потвърждаване на избора.
• Ако в списъка не фигурира държавата в която ще
използвате телевизора изберете «-» на мястото на
държава.
• За да бъдат правилни знаците на Кирилица в
Телетекста ви препоръчваме да изберете Русия, в
случаите когато Вашата страна не фигурира в списъка.
Възможно е, в резултат на земния магнетизъм, образа да се
4
появи наклонен. Мнюто Въртене на карт. позволява
настройването на образа, при необходимост.
a) Ако не е необходимо, натиснете v или V за избор на Не е
необходимо и натиснете OK.
б
) Ако е необходимо, натиснете v или V за избор на
Регулрай сега и натиснете OK. В последствие настройте
наклона на картината нагласяйки между -5 и +5
натискайки v или V.
Дъpжaвa
i
v
Sverige
Norge
Italia
Deutschland
Österreich
i
V
Избepи дъpжaвa:
Aкo кapт. нe e xopизoнт.
Peгyл. въpт. нa кapт.
He e нeoбxoдимo
Peгyлpaй ceгa
OK
OK
продължава...
Първоначално включване 7
Page 30
Включване и автоматично настройване на телевизора
Менюто Автоматично Захващане се появява на екрана.
5
Натиснете OK за да изберете Да.
Телевизора започва автоматично да търси и запаметява
6
всички канали (TB предавания) на разположение.
Този процес може да продължи няколко минути. Бъдете
търпеливи и не натискайте нито един бутон, докато
продължава процеса на настройване, в противнен
случай процеса няма да се завърши.
Жeлaeтe ли дa cтapтиpaтe
aвтoмaтичнa нacтpoйкa?
Дa
He
OK
Aвтoм. Зaxвaщaнe
Пpoгpaмa:
Cиcтемa:
Kaнaл:
Tъpcи...
01
B/G
C21
Ако телевизора не открие нито един канал
(телевизионно предаване) след завършване на
автоматичната настройка, на екрана ще се появи
съобщение искайки да включите антената. Моля
включете я така както е описано на стр. 6 в това
ръководство и натиснете OK. Процеса на автоматична
настройка започва отново.
7
След като телевизора се настрои и запамети всички
канали (TB предавания), на екрана автоматично ще се
появи менюто Подреждане на програми, за да можете
да смените реда на появяване на програмите на екрана.
a) Ако не желаете да смените реда на каналите,
отидетевстъпка 8.
б
) Ако желаете да смените реда на каналите:
1 Натиснете бутона v или V за да изберете номера на
програма на съответния канал (TB предаване), чиято
позиция желаете да смените и след това натиснете b.
2 Натиснете v или V за избор на новия номер на
програмата, на която желаете да запаметите избрания
канал (TB предаване), след което натиснете B.
3 Повторете стъпките б)1 и б)2 ако желаете да
преподредите други TB канали.
Натиснете бутона MENU, за връщанекъмнормален TB режим.
8
Џpoгpaмa нe e нaмepeнa
Пoля cвъpжeтe aнтeнa
Пoтвъpждeниe
OK
Пoдpeждaнe нa Пpoгpaми
Пpoгpaмa:
01 TVE
02 TVE2
03 TV3
04 C33
05 C27
06 C58
Избepи кaнaл:
Изпизaнe:
MENU
Пoдpeждaнe нa Пpoгpaми
Пpoгpaмa:
01 TVE
02 TVE2
03 TV3
04 C33
05 C27
06 C58 05 C27
Избop нa нoмep:
Изпизaнe:
MENU
OK
OK
MENU
Телевизора е готов за работа.
8 Първоначално включване
Page 31

Увод и боравене със системата от менюта
Този телевизор използва система от менюта на екрана за да Ви води при различните
операции. Използвайте следните бутони от дистанционното управление, за да се движите
през менютат:
Натиснете бутона MENU за поява на първото ниво от менюто
1
на екрана.
• За подчертаване на желаното меню или избор, натиснете v
2
или V
.
• За да влезете в избраното меню или избор, натиснете b.
• За връщане в предно меню или избор, натиснете B
• За промяна на настройката на желания избор натиснете v/
V/B или b.
• За одобряване и запаметяване на Вашият избор, натиснете
OK.
Натиснете бутона MENU, за връщане към нормален TB
3
режим.
.
MENU
MENU
BG
Водач на менютата
Ниво 1 Ниво 2 Ниво 3 / Функция
Hacтpoйкa нa Kapтинaтa
Peжим: Личeн
Koнтpacт
Яpкнocт
Цвeтнocт
Ocтpoтa
Toнaлнocт
Hyлиpaнe
OK
• Яркост, Цветност, Острота могат да се се изменят само при избор на режим на образ «Личен».
• Тоналност е само на разположение за цветната система NTSC (напр. американски видео
касети).
• За да вьзвьрнете фабрично нагласената настройка на образа, изберете Нулиране и натиснете
OK.
Hacтpoйкa нa звyкa
Peжим: Личeн
Koнтpacт
Яpкнocт
Цвeтнocт
Ocтpoтa
Toнaлнocт
Hyлиpaнe
НАСТРОЙКА НА КАРТИНАТА
Менюто «Настройка на Картината» Ви
позволява да промените настройката на образа.
За целта:
OK
Cлед като изберете опцията, която желаете да
промените, натиснете b. След което натиснете
няколко пъти v/V/B или b за промяна на
настройката и после натиснете OK за
запаметяване.
Това меню също Ви позволява да промените
режима на образа в зависимост от типа на
програмата която гледате:
v Личен (за индивидуални предпочитания).
v Наживо (за програми изльчвани на живо, DVD
и цифилми (зарово приемани програми).
v Филми (за филми).
продължава...
Система от менюта на екрана 9
Page 32

Увод и боравене със системата от менюта
Ниво 1 Ниво 2 Ниво 3 / Функция
НАСТРОЙКА НА ЗВУКА
Hacтpoйкa нa Kapтинaтa
Peжим: Личeн
Koнтpacт
Яpкнocт
Цвeтнocт
Ocтpoтa
Toнaлнocт
Hyлиpaнe
Hacтpoйкa нa звyкa
Eфeкт: Ecтecтвeн
Bиcoки
Hиcки
Бaлaнc
Hyлиpaнe
Cтepeoeфeкт: Moнo
Aвт. нивo звyк: Bkл
OK
Hacтpoйкa нa звyкa
Eфeкт: Ecтecтвeн
Bиcoки
Hиcки
Бaлaнc
Hyлиpaнe
Cтepeoeфeкт: Moнo
Aвт. нивo звyк: Bkл
OK OK
Ефект bvЕстествен: подобрява чистотата и подчертава на звука чрез системата
«BBE High Definition Sound system»*.
v динамичен: «BBE High Definition Sound system»* изчиства максимално
звука, придава усещана за реалност на гласа и на музиката.
v Dolby**Virtual: Симулра звуков ефект «Dolby Surround Pro Logic».
v Изкл: без специални акустични ефекти.
Менюто «Настройка на звука» позволява
промяна на нагласата на звука.
За целта:
Cлед избора на опцията, която желаете да
измените, натиснете b. В последствие натиснете
няколко пъти v/V/B или b за промени и накрая
натиснете OK за запаметяване.
Високи bBНамаляване b Повишаване
Ниски bBНамаляване b Повишаване
Баланс bBНаляво b Надясно
Нулиране Възстановява фабрично настроените нива на звука.
K
Cтерео-ефектb • За стерео предавания:
v Моно.
v Стерео.
• За предаване на два езика:
v Моно (За каналът моно ако е на разположение).
v A (за канал 1).
v B (за канал 2).
Авт. ниво звукbvИзкл: Силата на звука варира в зависимост от излъчения сигнал.
v On: Силата на звука се запазва независимо от излъчения сигнал (напр.
реклами).
• Когато слушате Телевизора със слушалки, опцията «Ефект» ще премине автоматично в позиция
«Изкл.».
• Ако настроите «Ефект» в «Dolby Virtual», опцията «Авт. ниво звук» ще се промени автоматично в
позиция «Изки» и обратно.
* «BBE High Definition Sound system» е произведена от Sony Corporation по лиценз на BBE
Sound, INC.и под закрила на USA N: 4,638,258 и 4,482,866. Думата «BBE» и символа «BBE»
са търговски марки на BBE Sound, Inc.
**Този телевизор е Разработен да предава ефекта «Dolby Surround», който само чрез двата
говорителя на телевизора симулира звук като от четири говорителя, винаги когато
излъчения сигнал от предавателната станния е «Dolby Surround». Също можете да
подобрите ефекта на звука включвайки допълнителен усилвател. За повече детайли вижте
в глава «Включване на външен аудио екип» на стр. 20.
**Произведено с позволение на Dolby Laboratories. «Dolby», «Pro Logic» и символа на двойното
D са търговски марки на Dolby Laboratories.
10 Система от менюта на екрана
продължава...
Page 33

Увод и боравене със системата от менюта
Ниво 1 Ниво 2 Ниво 3 / Функция
АВТОМАТИЧНО ИЗКЛЮЧВАНЕ
Hacтpoйкa нa Kapтинaтa
Peжим: Личeн
Koнтpacт
Яpкнocт
Цвeтнocт
Ocтpoтa
Toнaлнocт
Hyлиpaнe
Чacoвник
Aвтoм. Изключв:
Изкл
OK
Чacoвник
Aвтoм. Изключв:
OK
Изкл
OK
Опцията «Автом. изключв» в менюто
«Часовник» Ви позволява да изберете период от
време след който телевизора автоматично да
влезе в режим на временно изключване
(standby).
За целта:
Cлед като изберете тази опция, натиснете b.
След това натиснете v или V за да изберете
интервала от време (максимум 4 часа).
• Ако желаете, докато гледате TB, да видите
времето което остава до изключването,
натиснете бутона .
• Една минута преди телевизора да влезе в
режим на временно изключване, времето
което остава ще се появи наекрана.
Hacтpoйкa нa Kapтинaтa
Peжим: Личeн
Koнтpacт
Яpкнocт
Цвeтнocт
Ocтpoтa
Toнaлнocт
Hyлиpaнe
Инcтaлиpaнe
Eзик/Дъpжaвa
Aвтoм. Зaxвaщaнe
Пoдpeждaнe нa Пpoгpaми
HaДпиcвaнe нa пpoгpaми
Зaпaмeтeни AV нacтpoйки
Пpoгpaмa Pъчeн Избop
Пoдpoбнa нaчaлнa нacтp
Hacтpoйкa нa Kapтинaтa
Peжим: Личeн
Koнтpacт
Яpкнocт
Цвeтнocт
Ocтpoтa
Toнaлнocт
Hyлиpaнe
Инcтaлиpaнe
Eзик/Дъpжaвa
Aвтoм. Зaxвaщaнe
Пoдpeждaнe нa Пpoгpaми
HaДпиcвaнe нa пpoгpaми
Зaпaмeтeни AV нacтpoйки
Пpoгpaмa Pъчeн Избop
Пoдpoбнa нaчaлнa нacтp
OK
OK
OK
OK
Инcтaлиpaнe
Eзик/Дъpжaвa
Aвтoм. Зaxвaщaнe
Пoдpeждaнe нa Пpoгpaми
HaДпиcвaнe нa пpoгpaми
Зaпaмeтeни AV нacтpoйки
Пpoгpaмa Pъчeн Избop
Пoдpoбнa нaчaлнa нacтp
Инcтaлиpaнe
Eзик/Дъpжaвa
Aвтoм. Зaxвaщaнe
Пoдpeждaнe нa Пpoгpaми
HaДпиcвaнe нa пpoгpaми
Зaпaмeтeни AV нacтpoйки
Пpoгpaмa Pъчeн Избop
Пoдpoбнa нaчaлнa нacтp
ЕЗИК / ДЪРЖАВА
Опцията «Език / държава» в менюто
«Инсталиране», Ви позволява да изберете езика
на който желаете да се появят менютата на
екрана. Също Ви позволява да изберете
държавата където желаете да използвате
телевизора.
За целта:
Cлед като изберете тази опция, натиснете b,
след което постъпете така както се оказва в
главата «Включване и автоматично настройване
на телевизора» стъпки 2 и 3 на стр. 7.
OK
АВТОМАТИЧНО ЗАХВАЩАНЕ
Опцията «Автом. Захващане» в менюто
«Инсталиране» позволява на телевизора да
търси и запамети всички канали (TB
предавания) на разположение.
За целта:
Cлед като изберете тази опция, натиснете b,
след което постъпете така както се оказва в
главата «Включване и автоматично настройване
на телевизора» стъпки 5 и 6 на стр. 8.
OK
BG
продължава...
Система от менюта на екрана 11
Page 34

Увод и боравене със системата от менюта
Ниво 1 Ниво 2 Ниво 3 / Функция
ПОДРЕЖДАНЕ НА ПРОГРАМИ
Hacтpoйкa нa Kapтинaтa
Peжим: Личeн
Koнтpacт
Яpкнocт
Цвeтнocт
Ocтpoтa
Toнaлнocт
Hyлиpaнe
Инcтaлиpaнe
Eзик/Дъpжaвa
Aвтoм. Зaxвaщaнe
Пoдpeждaнe нa Пpoгpaми
HaДпиcвaнe нa пpoгpaми
Зaпaмeтeни AV нacтpoйки
Пpoгpaмa Pъчeн Избop
Пoдpoбнa нaчaлнa нacтp
Hacтpoйкa нa Kapтинaтa
Peжим: Личeн
Koнтpacт
Яpкнocт
Цвeтнocт
Ocтpoтa
Toнaлнocт
Hyлиpaнe
Инcтaлиpaнe
Eзик/Дъpжaвa
Aвтoм. Зaxвaщaнe
Пoдpeждaнe нa Пpoгpaми
HaДпиcвaнe нa пpoгpaми
Зaпaмeтeни AV нacтpoйки
Пpoгpaмa Pъчeн Избop
Пoдpoбнa нaчaлнa нacтp
OK
OK
OK
OK
Инcтaлиpaнe
Eзик/Дъpжaвa
Aвтoм. Зaxвaщaнe
Пoдpeждaнe нa Пpoгpaми
HaДпиcвaнe нa пpoгpaми
Зaпaмeтeни AV нacтpoйки
Пpoгpaмa Pъчeн Избop
Пoдpoбнa нaчaлнa нacтp
Инcтaлиpaнe
Eзик/Дъpжaвa
Aвтoм. Зaxвaщaнe
Пoдpeждaнe нa Пpoгpaми
HaДпиcвaнe нa пpoгpaми
Зaпaмeтeни AV нacтpoйки
Пpoгpaмa Pъчeн Избop
Пoдpoбнa нaчaлнa нacтp
Опцията «Подреждане на Програми» в менюто
«Инсталиране», Ви позволява да смените реда
на появяване на каналите (TB предавания) на
екрана.
За целта:
Cлед като изберете тази опция, натиснете b,
след което постъпете така както се оказва в
главата «Включване и автоматично настройване
на телевизора» стъпки 7б) на стр. 8.
OK
НАДПИСВАНЕ НА ПРОГРАМИ
Опцията «Надписване на програми» в менюто
«Инсталиране» позволява даване на име, от
максимум 5 знака, на един канал.
За целта:
1 След избора на опцията натиснете b, след
това натиснете v или V за избор на номера на
програмата, която желаете да обозначите.
2 Натиснете b. С подчертан първи елемент от
колоната Име натиснете v или V за избор на
буква, номер или “-“ за празно пространство
след което натиснете b за потвърждение на
съответния знак. Изберете оставащите 4
OK
знака по същия начин. Натиснете OK за
паметяване.
Hacтpoйкa нa Kapтинaтa
Peжим: Личeн
Koнтpacт
Яpкнocт
Цвeтнocт
Ocтpoтa
Toнaлнocт
Hyлиpaнe
Инcтaлиpaнe
Eзик/Дъpжaвa
Aвтoм. Зaxвaщaнe
Пoдpeждaнe нa Пpoгpaми
HaДпиcвaнe нa пpoгpaми
Зaпaмeтeни AV нacтpoйки
Пpoгpaмa Pъчeн Избop
Пoдpoбнa нaчaлнa нacтp
ЗАПАМЕТЕНИ AV НАСТРОЙКИ
Опцията «Запаметени AV настройки» от менюто
«Инсталиране» позволява даване на име на
апарат свързан към телевизора.
За целта:
OK
Инcтaлиpaнe
Eзик/Дъpжaвa
Aвтoм. Зaxвaщaнe
Пoдpeждaнe нa Пpoгpaми
HaДпиcвaнe нa пpoгpaми
Зaпaмeтeни AV нacтpoйки
Пpoгpaмa Pъчeн Избop
Пoдpoбнa нaчaлнa нacтp
OK
1 След избора на опцията натиснете b и след
това натиснете v или V за да изберете входа
който желаете да наименувате (AV1, AV2 и
AV3 за допълните лни апарати свързани към
Евроконекторите от задната страна на
телевизора и AV4 за предните съединители).
В последствие натиснете b.
2 В колоната «Име» автоматично ще се появи
OK
едно програмирано обозначение:
a) Ако желаете да използвате едно от
шестте програмирани обозначения
(CABLE, GAME, CAM, DVD, VIDEO или
SAT) натиснете v или V за избор и накрая
натиснете OK за запаметяване.
б) Ако желаете да създадете собствено
обозначение изберете Редак и натиснете
b. В последствие, с подчертан първи
елемент натиснете v или V за избор на
буква, цифра или «-» за празно
пространство и натиснете b за
удобряване. Изберете оставащите 4 знака
по същия начин и накрая натиснете OK за
запаметяване.
продължава...
12 Система от менюта на екрана
Page 35

Увод и боравене със системата от менюта
Ниво 1 Ниво 2 Ниво 3 / Функция
ПРОГРАМА РЪЧЕН ИЗБОР
Hacтpoйкa нa Kapтинaтa
Peжим: Личeн
Koнтpacт
Яpкнocт
Цвeтнocт
Ocтpoтa
Toнaлнocт
Hyлиpaнe
Инcтaлиpaнe
Eзик/Дъpжaвa
Aвтoм. Зaxвaщaнe
Пoдpeждaнe нa Пpoгpaми
HaДпиcвaнe нa пpoгpaми
Зaпaмeтeни AV нacтpoйки
Пpoгpaмa Pъчeн Избop
Пoдpoбнa нaчaлнa нacтp
OK
OK
Инcтaлиpaнe
Eзик/Дъpжaвa
Aвтoм. Зaxвaщaнe
Пoдpeждaнe нa Пpoгpaми
HaДпиcвaнe нa пpoгpaми
Зaпaмeтeни AV нacтpoйки
Пpoгpaмa Pъчeн Избop
Пoдpoбнa нaчaлнa нacтp
Опцията «Програма ръчен избор», в менюто
«Инсталиране», Ви позволява:
a) Да настроите един по един, и в желания
програмен ред, каналите (ТВ предавания) или
един видео вход.
За целта:
1 След като изберете опцията «Програма
Ръчен Избор», натиснете b. При опцията
Програма подчертана, натиснете b и след
това натиснете v и л и V за да изберете номера
OK
на програмата (позицията) на която искате да
настроите едно ТВ предаване или видео
канала (за видео канала Ви препоръчваме да
изберете програмен номер «0»). Натиснете B.
2 Следващата опция ще се появи в
зависимост от избраната държава в
менюто «Език/Държава».
След избора на опцията Система натиснете b
В последствие натиснете v или V за избор на
системата телевизия (B/G за западна Европа
или D/K за източна Европа). Натиснете B.
3 След като изберете опцията Канал,
натиснете b, и след това натиснете v или V за
да изберете типа на канала («C» за земни
канали или «S» за кабелни канали).
Натиснете b. След което натиснете
цифровите бутони за да вкарате директно
номера на канала на ТВ предаването или на
канала за видео сигнала. Ако не знаете
номера на канала, натиснете v или V за да го
потърсите. Когато намерите канала който
желаете да запаметите, натиснете два пъти
OK.
Повторете всички тези стъпки за да
настроите и запаметите повече канали.
б
) Наименуване на един канал, с максимум от
пет знака.
За целта:
Подчертавайки опцията Програма, натиснете
PROG + или - докато се появи програмния
номер, който желаете да наименувате.
Когато този номер се появи на екрана
изберете опцията Име, след което натиснете
b. Натиснете v или V за да изберете една
букеа, номер или «-» за празне пространство
и натиснете b за утвърждаване на този знак.
Изберете другите четири знака по същия
начин. След избора на всички знаци
натиснете два пъти OK за запаметяване.
BG
продължава...
Система от менюта на екрана 13
Page 36

Увод и боравене със системата от менюта
Ниво 1 Ниво 2 Ниво 3 / Функция
) Даже когато фината автоматична настройка
Hacтpoйкa нa Kapтинaтa
Peжим: Личeн
Koнтpacт
Яpкнocт
Цвeтнocт
Ocтpoтa
Toнaлнocт
Hyлиpaнe
Инcтaлиpaнe
Eзик/Дъpжaвa
Aвтoм. Зaxвaщaнe
Пoдpeждaнe нa Пpoгpaми
HaДпиcвaнe нa пpoгpaми
Зaпaмeтeни AV нacтpoйки
Пpoгpaмa Pъчeн Избop
Пoдpoбнa нaчaлнa нacтp
OK
OK
Инcтaлиpaнe
Eзик/Дъpжaвa
Aвтoм. Зaxвaщaнe
Пoдpeждaнe нa Пpoгpaми
HaДпиcвaнe нa пpoгpaми
Зaпaмeтeни AV нacтpoйки
Пpoгpaмa Pъчeн Избop
Пoдpoбнa нaчaлнa нacтp
в
(Ф. Наст.) е винаги активирана, за по-добро
приемане на образа, в случай че се пови
изкривен, тя може да бъде настроена ръчно.
За целта:
Докато гледате канала (ТВ предаване), на
който желаете да извършите фината
настройка, изберете опцията Ф. Н ас т. и сиед
това натиснете b. Натиснете v или V за да
нагласите нивото на честотата на канала
между -15 и +15. Накрая натиснете два пъти
OK за запаметяване.
OK
г) Пропускане на нежелани номера на
програми, при избор о бутоните PROG +/-.
За целта:
Подчертавайки опцията Програма,
натиснете PROG + или - докато се появи
номера на програмата, която желаете да
пропуснете. Когато този номер се появи на
екрана, изоерете опцията Пропусни и после
натиснете b. Натиснете v или V за да
изберете Да и накрая натиснете два пъти OK
за запаметяване.
Ако по-нататък желаете да премахнете тази
функция, изберете «Не» вместо «Да».
e) Тази опция позволява да видите и запишете
правипно един кодиран канал, при
използване на декодер включен към
Евроконектора 3/ 3 или използвайки
видео свързано към този Евроконектор.
Следващата опция ще се появи в
зависимост от избраната държава в
менюто «Език/Държава».
За целта:
Изберете опцията Декодер и натиснете b. В
последствие натиснете v или V за да
изберете Вкл. Натиспете OK два пъти за
запаметяване.
Ако в бъдеще желаете да премахнете тази
функция, изберете отново «Изки» вместо
«Вкл».
S
продължава...
14 Система от менюта на екрана
Page 37

Увод и боравене със системата от менюта
Ниво 1 Ниво 2 Ниво 3 / Функция
АВТОфОРМАТ
Hacтpoйкa нa Kapтинaтa
Peжим: Личeн
Koнтpacт
Яpкнocт
Цвeтнocт
Ocтpoтa
Toнaлнocт
Hyлиpaнe
Инcтaлиpaнe
Eзик/Дъpжaвa
Aвтoм. Зaxвaщaнe
Пoдpeждaнe нa Пpoгpaми
HaДпиcвaнe нa пpoгpaми
Зaпaмeтeни AV нacтpoйки
Пpoгpaмa Pъчeн Избop
Пoдpoбнa нaчaлнa нacтp
OK
OK
Smart
ПoДpoбнa нaчaлнa нacтp
Автмат.формат
Пoтиcкaнe нa Шyмa:
AV3 изxoД:
Teлeв. гoвopитeл:
RGB Цeнтъp:
Bъpтeнe нa Kapт.:
Опцията «Автмат.формат» от менюто
«Подробна начална настр» дава вазможност
телевизорът автоматично да сменя типа формат
на образа.
За целта:
Cлед като изберете опцията, натиснете b. След
това натиснете v или V, за да изберете Вкл (ако
желаете телевизора да смени автоматично
формата на образа според сигнала на
Bkл
Auto
излъчвателя) или изберте Изкл (ако желаете да
TV
Bkл
запазите формата на образа според вашите
0
0
предпочитания). Накрая натиснете OK, за да го
запазите в паметта.
OK
Независмо дали сте избрали Вкл или Изкл
в опцията «Автмат. формат», винаги
можете да промените формата на образа,
натискайки многократно бутона от
дистанционното управление. Можете да
изберете следните формати:
Smart: Имитация на широкоекранен формат за
емисии 4:3
BG
4:3
14:9
Лупa
Шиpoк
4:3: Нормален размер на образа. Цялостно
изображение.
14:9: Комбиниран формат между 4:3 и 16:9
Лупа: Широкоекранен формат за видео
филми
Широк: За емисии 16:9
При форматите «Smart», «Лупа» и «14:9»
образът се появява отрязан отгоре и
отдолу. Нтиснете v или V, за да нагласите
разположението на обарза на екрана
(например за четене на дублиран текст).
продължава...
Система от менюта на екрана 15
Page 38

Увод и боравене със системата от менюта
Ниво 1 Ниво 2 Ниво 3 / Функция
Hacтpoйкa нa Kapтинaтa
Peжим: Личeн
Koнтpacт
Яpкнocт
Цвeтнocт
Ocтpoтa
Toнaлнocт
Hyлиpaнe
Инcтaлиpaнe
Eзик/Дъpжaвa
Aвтoм. Зaxвaщaнe
Пoдpeждaнe нa Пpoгpaми
HaДпиcвaнe нa пpoгpaми
Зaпaмeтeни AV нacтpoйки
Пpoгpaмa Pъчeн Избop
Пoдpoбнa нaчaлнa нacтp
Hacтpoйкa нa Kapтинaтa
Peжим: Личeн
Koнтpacт
Яpкнocт
Цвeтнocт
Ocтpoтa
Toнaлнocт
Hyлиpaнe
Инcтaлиpaнe
Eзик/Дъpжaвa
Aвтoм. Зaxвaщaнe
Пoдpeждaнe нa Пpoгpaми
HaДпиcвaнe нa пpoгpaми
Зaпaмeтeни AV нacтpoйки
Пpoгpaмa Pъчeн Избop
Пoдpoбнa нaчaлнa нacтp
ПОТИСКАНЕ НА ШУМА
Опцията «Потискане на шума» в менюто
«Подробна начална настр» позволява
автоматичното потискане на шума на образа в
случай на слаби TB сигнали.
OK
За целта:
След като изберете тази опция, натиснете b.
ПoДpoбнa нaчaлнa нacтp
Автмат.формат
Пoтиcкaнe нa Шyмa:
AV3 изxoД:
Teлeв. гoвopитeл:
RGB Цeнтъp:
Bъpтeнe нa Kapт.:
OK
Bkл
Auto
TV
Bkл
0
0
След което натиснете v или V , за да изберете
Auto и накрая натиснете OK, за запаметяване.
Ако по-нататък желаете да премахнете тази
функция, изберете «Изкл.» вместо «Auto».
OK
AV 3 И ЗХО Д
Опцията «AV3 изход» в менюто «Подробна
начална настр» позволява избор на изхода на
Евроконетора 3/ 3 и дава възможност за
запис чрез този Евроконетор на който и да е
сигнал идващ от телевизора или от друг външен
OK
ПoДpoбнa нaчaлнa нacтp
Автмат.формат
Пoтиcкaнe нa Шyмa:
AV3 изxoД:
Teлeв. гoвopитeл:
RGB Цeнтъp:
Bъpтeнe нa Kapт.:
OK
Bkл
Auto
TV
Bkл
0
0
апарат свързан към Евроконектора 1/ 1
или 2/ 2 или от съединителите 4 или
4 и 4.
Ако видеото Ви разполага със Smartlink,
този процес не е необходим.
За целта:
OK
Cлед избора на опцията натиснете b. След това
натиснете v или V за избор на желания изходен
сигнал TV, AV1, AV2, AV4, YC4 или AUTO.
S
S
При избор на «AUTO» изходния сигнал винаги ще бъде еднакъв с този който е на екрана на
телевизора.
Ако сте свързали декодера към Евроконектора 3/ 3 или към видеото свързано към този
S
Евроконектор, трябва да изберете «AUTO» или «TV» при «AV3 изход» за правилно
декодиране.
ВИСОКОГОВОРИТЕЛИ
Hacтpoйкa нa Kapтинaтa
Peжим: Личeн
Koнтpacт
Яpкнocт
Цвeтнocт
Ocтpoтa
Toнaлнocт
Hyлиpaнe
Инcтaлиpaнe
Eзик/Дъpжaвa
Aвтoм. Зaxвaщaнe
Пoдpeждaнe нa Пpoгpaми
HaДпиcвaнe нa пpoгpaми
Зaпaмeтeни AV нacтpoйки
Пpoгpaмa Pъчeн Избop
Пoдpoбнa нaчaлнa нacтp
OK
ПoДpoбнa нaчaлнa нacтp
Автмат.формат
Пoтиcкaнe нa Шyмa:
AV3 изxoД:
Teлeв. гoвopитeл:
RGB Цeнтъp:
Bъpтeнe нa Kapт.:
OK
Bkл
Auto
TV
Bkл
0
0
Опцията «Телев.говорител» в менюто
«Подробна начална настр», ви позволява да
спрете звука през високоговорителите на
телевизора, за да го слушате само през вънщен
усилвател, включен към аудио-изходите
намиращи се на задния панел на телевизораt.
За целта:
Cлед като изберете тази опция, натиснете b.
След което натиснете v или V за да изберете
Изкл и накрая натиснете OK за запаметяване.
Ако по-нататък желаете да премахнете тази
OK
функция, изберете «Вкл.» вместо «Иакл».
16 Система от менюта на екрана
продължава...
Page 39

Увод и боравене със системата от менюта
Ниво 1 Ниво 2 Ниво 3 / Функция
RGB ЦЕНТЪР
Hacтpoйкa нa Kapтинaтa
Peжим: Личeн
Koнтpacт
Яpкнocт
Цвeтнocт
Ocтpoтa
Toнaлнocт
Hyлиpaнe
Инcтaлиpaнe
Eзик/Дъpжaвa
Aвтoм. Зaxвaщaнe
Пoдpeждaнe нa Пpoгpaми
HaДпиcвaнe нa пpoгpaми
Зaпaмeтeни AV нacтpoйки
Пpoгpaмa Pъчeн Избop
Пoдpoбнa нaчaлнa нacтp
Hacтpoйкa нa Kapтинaтa
Peжим: Личeн
Koнтpacт
Яpкнocт
Цвeтнocт
Ocтpoтa
Toнaлнocт
Hyлиpaнe
Инcтaлиpaнe
Eзик/Дъpжaвa
Aвтoм. Зaxвaщaнe
Пoдpeждaнe нa Пpoгpaми
HaДпиcвaнe нa пpoгpaми
Зaпaмeтeни AV нacтpoйки
Пpoгpaмa Pъчeн Избop
Пoдpoбнa нaчaлнa нacтp
OK
ПoДpoбнa нaчaлнa нacтp
Автмат.формат
Пoтиcкaнe нa Шyмa:
AV3 изxoД:
Teлeв. гoвopитeл:
RGB Цeнтъp:
Bъpтeнe нa Kapт.:
OK
OK
ПoДpoбнa нaчaлнa нacтp
Автмат.формат
Пoтиcкaнe нa Шyмa:
AV3 изxoД:
Teлeв. гoвopитeл:
RGB Цeнтъp:
Bъpтeнe нa Kapт.:
OK
Bkл
Auto
TV
Bkл
0
0
Bkл
Auto
TV
Bkл
0
0
При включване на източник на сигнали RGB, напр.
«PlayStation», може да е необходимо хоризонтално
центриране на образа. Настройването се извършва
избирайки опцията «RGB център» в менюто
«Подробна начална настр»
За целта:
Докато гледате входния сигнал на RGB,
изберете опцията «RGB център» и натиснете b.
След което натиснете v или V за да настроите
центъра на образа между -10 и +10. Накрая
натиснете OK за запаметяване.
OK
ВЪРТЕНЕ НА КАРТИНАТА
Възможно е, вследствие на земния магнетизъм,
образа да се появи наклонен. В този случай
настройването се извършва избирайки
«Въртене на Карт.» в менюто «Подробна
начална настр».
За целта:
Cлед като изберете тази опция, натиснете b.
След което натиснете v или V за да настроите
наклона на образа между -5 Л +5. Накрая
натиснете OK за запаметяване.
OK
.
BG
Система от менюта на екрана 17
Page 40

Телетекст
Телетекстът е информационна емисия, излъчвана от повечето ТВ предавания. В страницата на
съдържанието на телетекста (нормално страница 100) се дава информация за използването на
тази емисия. За боравене с телетекста използвайте бутоните на дистанционното управление,
така както е оказано в тази страница.
Използвайте ТВ предаване със силен сигнал, в противнен случай могат да се появят грешки в
телетекста.
TELETEXT
TELETEXT
TELETEXT
TELETEXT
TELETEXT
TELETEXT
TELETEXT
Избиране на Телетекст:
След избора на канала (ТВ предаване), излъчващ желаната мисия
на телетекст, натиснете .
Избор на страница от Телетекста:
Задайте трите цифри на номера на желаната от Вас страницата
чрез цифровите бутони на дистанционното управление.
• Ако сгрешите, вкарайте които и да три цифри, олед което вкарайте
отново номера на вярната страница.
• Ако броячът на страницата не спре, това е защото желаната страница
не е на разположение. Б този случай изберете друга страница.
Избор на предишна или следваща страница:
Натиснете PROG + ( ) или PROG - ( ).
Наслагване на Телетекст с TB образ:
Докато гледате телетекста, натиснете . Натиснете го отново за да излезете от режима на
телетекст.
TELETEXT
Index
Index
Index
Index
Index
Index
Index
Index
Programme
Programme
Programme
Programme
Programme
Programme
Programme
Programme
News
News
News
News
News
News
News
News
Sport
Sport
Sport
Sport
Sport
Sport
Sport
Sport
Weather
Weather
Weather
Weather
Weather
Weather
Weather
Weather
153
153
153
153
153
153
153
153
101
101
101
101
101
101
101
101
25
25
25
25
25
25
25
25
98
98
98
98
98
98
98
98
Задържане на една страница:
Натиснете / . Натиснете го отново за премахване на задържането.
Изобразяване на скрита информация (напр. отговори на TB загадки):
Натиснете / . Натиснете го отново за скриване на информацията.
Избор на подстраница:
Възможно е една страница от телетекста да бъде съставена от няколко подстраници. Б този случай
номерът на страницата, който се появява горе вляво, ще се промени от бяло в зелено и до него ще се
появят една или повече стрелки. Натиснете няколко пъти бутоните B или b от устройството за
дистанционно управление, за да видите желаната подстраниц.
Излизане от Телетекст:
Натиснете .
Fastext (Фастекст)
Фастекстът позволява достъп до страниците на телетекста, чрез натискането само на един
бутоп.
Когато сте избрали Телетекст, и в случаи на излъуване на сигнали на фастекст, на долната
страна на екрана ще се появи едно меню от цветни кодове, позволяващо Ви директен достъп
до една страница. За целта натиснете съотвтния цветен бутон (червен, зелен, жълт или син) от
дистанционното управление.
18 Телетекст
Page 41

Свързване на допълнителни апарати
Възможно е свързването на широка гама от допълнителни апарати към телевизора, така както
e показвано по-долу. (кабелите за свързване не се прилагат серийно).
MANUFACTURED UNDER LICENCE
FROM DOLBY LABORATORIES
"DOLBY" AND THE DOUBLE - D
SYMBOL ARE TRADEMARKS OF
DOLBY LABORATORIES
G
S
O
N
Y
S VHS/Hi8/
DVC
камера
A
8mm/Hi8/
DVC
камера
4
B
4
C
o4
Видео
DFE
Когато включите слушалките,
говорителите на телевизора ще
се изключат автоматично
.
Hi-Fi
“PlayStation”
*
DVD
Декодер
Декодер
* “PlayStation” е продукт на Sony
Computer Entertainment, Inc
* “PlayStation” регистрирана марка на
Sony Computer Entertainment, Inc
.
• За да се избягнат изкривявания на образа не включвайте наведнъж апарати към A и B.
• не включвайте никакъв Декодер в Евро-конектора F.
Свързване на видео:
За свързване на видео вижте в главата «Свързване на антената и видеото».
Препоръчва се свързването на видеото да се извърши чрез терминала Евроконектор.
Ако не използвате този терминал, е необходимо да настроите ръчно канала за видео сигнала чрез
менюто «Програма Ръчен Избор» (за това се консултирайте с точка а) на стр. 13). Консултирайте се
също така с ръководството за експлоатация на Вашето видео, за да видите как се намира канала за
видео сигнала.
Свързване на видео притежаващо функцията Smartlink:
Smartlink е свръзка между телевизор и видео екип, позволяваща директното преминаване на
определена информация. Ако Ви е нужна повече информация за Smartlink, вижте в инсрукциите
за експлоатация на Вашия видео екип. При използване на видео притежаващо Smartlink
използвайте Евроконекторен кабел и го включете към Евроконекторa 3/ 3 G.
S
Ако декодера е включен към евроконектора 3/ 3 G или към видео свързано към
S
този евроконектор:
Изберете опцията «Програма Ръчен Избор», в менюто «Инсталиране», и след като изберете опцията
«Декодер»** изберете «Вкл» (използвайки v или V) за всеки кодиран канал.
BG
** Тази опция е на разположение, в зависимост от държавата която сте избрали в менюто «Език/
Държава».
продължава
Допълнителна информация 19
...
Page 42

Свързване на допълнителни апарати
Свързване на допълнителен аудио екип:
Ако желаете да се насладите на звука от телевизора през говорителите на Вашия музикален екип,
свържете екипа към аудио изхода D и, чрез системата от менюта, изберете «Инсталиране». В
последствие влезте в опцията «Подробна начална настр.» и изберете «Изкл» в «Телев. говорител».
Силата на звука на допълнителните говорители може да се измени чрез бутоните за усилване
от пулта за дистанционно управление на телевизора. Също е възможна промяна на нивото на
ниските и високите честоти чрез менюто «Настройка на звука».
Също можете да се насладите на звуковия ефект «Dolby Virtual» чрез вашия
музикален екип:
За целта поставете говорителите на вашия музикален екип
от двате страни на телевизора отдалечавайки ги от него
на около 50 см. След като поставите говорителите, чрез
системата от менюта изберете менюто «Настройка на звука»
и след това изберете «Dolby Virtual» от опцията «Ефект».
Говорители на
вашия НI-FI екип
50cm 50cm
Оптимална позиция за Вас
Боравене с допълнителни апарати
Свържете допълнителния апарат към съотве тния вход на телевизора, така както е показано
1
по- горе.
Включете свързания апарат.
2
За визуализиране на образа на този допълнителен апарат, натиснете няколко пъти бутона ,
3
докато на екрана се появи съответния входен символ.
Cимвол
За връщане на нормалния TB образ натиснете бутона от дистанционното управление.
4
Входен сигнал
1
• Аудио/Видео входен сигнал чрез Евроконектора E.
1
• RGB входен сигал чрез Евроконектора E. Този символ ще се появи само ако е
свързан източник на RGB.
2
• Вход аудио/видео чрез Евроконектора F.
2
• Вход RGB чрез Евроконектора F. Този символ ще се появи само ако е свързан
източник на RGB.
3
• Аудио/Видео входен сигнал чрез Евроконектора G.
S
3
• S Video входен сигал чрез Евроконектора G. Този символ ще се появи само ако е
свързан източник на S Video.
4
• Входен Видео сигнал чрез буксата RCA B, и входен Аудио сигнал чрез C.
S
4
• Вход S video чрез буксата зa S video A и вход аудио чрез C. Този символ ще се
появи само ако е свързан източник на S Video.
За моно оборудване
Включете моно апаратурата към L/G/S/I куплунга на предния панел на телевизора и изберете
входен сигнал 4 или 4, като използвате по-горните инструкции. Консултирайте се със
секцията «Настройка на звука» в това упътване и изберете «Стерео-ефект» «А» в менюто за звук
S
20 Допълнителна информация
а.
Page 43

Система телевизия B зависимост от избора на държава: B/G/H, D/K
Цветна система PAL, SECAM, NTSC 3.58, 4.43 (само видео вход)
Характеристики
Обхват на каналите VHF: E2-E12
UHF: E21-E69
CATV: S1-S20
HYPER: S21-S41
D/K: R1-R12, R21-R69
Кинескои Плосък екран FD Trinitron WIDE
28 инча (Приблизителю 71cm Диагонал на изображението)
32 инча (Приблизителю 82cm Диагонал на изображението)
Задни терминали 1/ 1 Евроконектор с 21 крачета (норма CENELEC) включващ
Аудио/Видео вход, вход RGB, TB аудио / видео изходt
2/ 2 Евроконектор с 21 крачета (норма CENELEC) включващ
Аудио/Видео вход, вход RGB, Мoнитор аудио/видео изход
3/ 3 Евроконектор с 21 крачета (норма CENELEC) включващ
(SMARTLINK) вход за аудио/видео, вход за S video, изход за аудио/
S
видео по избор и Smartlink
Изходи аудио (ляво/дясно) - букси RCA
Предни клеми 4 Вход S video - DIN 4 крачета
S
4 Видео вход - букса RCA
4 Вход аудио - букси RCA
i Жак за слушалки
ИзхоД за звук 2 x 20W (музикална мощност), 2 x 10W (RMS)
Woofer: 30W (музикална мощност), 15W (RMS)
Енергийно
KV-28CS70 94W KV-32CS70 102W
потребление
Енергийно
KV-28CS70 0.4W KV-32CS70 0.4W
потребление в
режим на временно
изключване
(standby)
BG
Размери (Шир. x Вис.
x Дълб.)
KV-28CS70 Прибл. 844mm x 517mm x 548 mm
KV-28CS70 Прибл. 933mm x 566mm x 572 mm
ТеглоKV-28CS70Прибл. 43.5kg KV-32CS70 Прибл. 60kg
Серийно приложено
1 устройство за дистанционно управление (RM-947) 2 батерии, норма IEC
оборудване
Други
характеристики
• Картина на 100 Hz
• Телетекст, Фастекст, TOPtext (250 страници памет Телетекст)
• Автоматично изключване
• Смартлинк (директна комуникация между телевизора и видеото. Ако
Ви е необходима повече информация за функцията Смартлинк се
консултирайте в инструкциите за експлоатация на Вашето видео)
• Автоматично детектиране на Системата на телевизия
• Dolby Virtual
• BBE
• Автоформат
Дизайньт и характеристиките подлежат на промени без предварително съобщение.
Допълнителна информация 21
Page 44

Отстраняване на неизправности
По-долу са изброени някои прости разрешения при проблеми свързани с образа и звука.
Проблем Разрешение
Липса на образ (екрана е тъмен) и звук. • Проверете свързването на антената.
Образът е блед или несъществуващ нс
качеството на звука е добро.
Липса на образ или на информационното
меню от допълнителния апарат свързан към
TB чрез Евроконектора.
Добро качество на образа, но няма звук. • Натиснете бутона от дистанционното
Цветните предавания са без цвят. • Чрез системата от менюта влезте в менюто
Образът е изкривен при смяна на програмите
или при избор на телетекст.
Грешни знаци фигурират когато се гледа
телетекста.
• Включете телевизора и натиснете бутона от
лицевата страна на апарата.
• Ако индикатора на телевизора свети, натиснете
бутона TV от дистанционното управление.
• Чрез системата от менюта влезте в менюто
«Настройка на Картината» и изберете «Нулиране»
за възстановяване на фабричната настройка.
• Проверете дали сте включили допълнителния
апарат и натиснете няколко пъти бутона от
дистанционното управление, докато желания
входен символ се появи на екрана.
управление.
• Проверете дали опцията «Телев говорител» от
менюто «Подробна начална настр.» е избрана в
позиция «Вкл».
• Осигурете се, че слушалките са изключени.
«Настройка на Картината» и изберете «Нулиране»
за възстановяване на фабричната настройка.
• Изключете екипа свързан към телевизора чрез
Евроконектора с 21 крачета.
• Когато използате системата Меню, влезте в режим
“Език/Държава” изберете страната в която ще
използвате телевизора. За езици на Кирилица Ви
препоръчваме да изберете Русия в случаите когато
вашата държава не се появява в списъка.
Образът е наклонен. • Чрез системата от менюта изберете опцията
Образ с шум. • Чрез системата от менюта изберете опцията «Ф
Образа не е декодиран правилно въпреки че
декодера е включен към Евоконектора 3/
3.
S
Дистанционното управление не работи. • Сменете батериите.
Индикатора за временно изключване (standby)
на телевизора мига.
«Въртене на карт.», в менюто «Подробна начална
настр.», и регулирайте наклона.
Настр.»‚ в менюто «Програма Ръчен Избор», и
извършете ръчното настройване за по-добро
приемане на образа.
Чрез системата на менютата изберете опцията
•
«Потискане на Шума»‚
настр.», и изберете «Аuto» за
.
образа
• Чрез системата от менюта влезте в менюто
«Инсталиране». В последсвие влезте в опцията
«Подробна начална настр.» и изберете AV3 изхоД 2
в «TV».
• Уверете се, че Декодерът не е включен в Евроконектора 2/ 2.
• Влезта в контакт с най-близката сервизна база на
Sony.
в менюто «Подробна начална
намаляване на шума на
• В случай на повреда, изискайте телевизора да се провери от специализиран персонал.
• Никога не отваряйте апарата.
22 Допълнителна информация
Page 45

Page 46

Page 47

Úvod
Děkujeme Vám, že jste si vybrali televizor Sony s plochou obrazovkou FD
Trinitron.
Před použitím televizoru si pozorně přečtěte tento návod k obsluze a zachovejte ho pro budoucí
informaci.
• Znaky, které užíváme v tomto návodu k obsluze:
• Varování před možným nebezpečím.
• Důležitá informace.
• Informace o funkci.
• 1,2... Posloupnost ovládacích kroků.
• Šedá výplň tlačítek dálkového ovladače
označuje tlačítka, která je nutno/možno
stisknout v tomto kroku.
• Informace o výsledku pokynů.
Obsah
Úvod ........................................................................................................................................................ 3
Bezpečnostní opatření............................................................................................................................. 4
Všeobecný popis
Všeobecný přehled tlačítek dálkového ovladače .................................................................................... 5
Všeobecný přehled tlačítek televizoru .................................................................................................... 6
Instalace
Vložení baterií do dálkového ovladače .................................................................................................... 6
Připojení antény a videa ......................................................................................................................... 6
První zapojení televizoru
Zapnutí a automatické naladění TV ........................................................................................................ 7
Režim menu na obrazovce
Úvod a použití různých menu...................................................................................................................9
Průvodce po menu:
Nastavení Obrazu ............................................................................................................................9
Nastavení zvuku...............................................................................................................................10
Časovač Vypnutí..............................................................................................................................11
Jazyk/Země .................................................................................................................................... 11
Automatické Ladění........................................................................................................................ 11
Třídění Programů............................................................................................................................ 12
Označení programů........................................................................................................................ 12
AV předvolby .................................................................................................................................. 12
Ruční Ladění................................................................................................................................... 13
Autoformát...................................................................................................................................... 15
Redukce Šumu ............................................................................................................................... 16
Výstup AV3 ..................................................................................................................................... 16
TV reproduktory.............................................................................................................................. 16
RGB centrování .............................................................................................................................. 17
Otočení Obraz................................................................................................................................. 17
Teletext.................................................................................................................................................. 18
Doplňkové informace
Připojení přídavných zařízení................................................................................................................... 19
Použití přídavných zařízení ...................................................................................................................... 20
Technické údaje....................................................................................................................................... 21
Řešení problémů...................................................................................................................................... 22
CZ
Obsah 3
Page 48

Bezpečnostní opatření
Tento televizor pracuje pouze s
napětím 220-240V. V případě zapojení
příliš mnoha spotřebičů do jedné el.
zásuvky může dojít k úrazu el.
proudem či požáru.
Z bezpečnostních důvodů a důvodu
ochrany ivotního prostředí
doporučujeme nenechávat TV v
pohotovostním stavu (standby) kdy ji
nesledujete. Přesto by některé typy TV
měly být, vzhledem ke správné činnosti
svých funkcí, zapnuty v pohotovostním
stavu I kdy TV nesledujete. O
takovýchto případech jste informováni v
návodu k obsluze.
Nevkládejte žádné předměty do
televizoru, rovněž do televizoru nelijte
jakoukoliv tekutinu. V případě, že se
tak stane a již úmyslně či neúmyslně
televizor nezapínejte a sdělte tuto
skutečnost nejbliž ímu
autorizovanému servisu SONY, který
odborně televizor prověří.
Neotevírejte zadní kryt televizoru.
Toto přenechte pouze kvalifikovaným
odborníkům z autorizovaných servisů
SONY.
Nezakrývejte ventilační otvory
televizoru. Nechte kolem televizoru
alespoň 10 cm prostoru pro ventilaci
vzduchu.
Čistěte obrazovku a plastový kryt televize
pouze jemnou, lehce navlhčenou látkou.
Nepoužívejte žádné materiály s
povrchovou úpravou určenou k broušení,
nepoužívejte alkalické čističe, čistící a
brusné pasty, rozpouštědla jako je líh,
benzín, či ředidlo. Rovněž
nedoporučujeme používat antistatický
spray. Z bezpečnostních důvodů, před
mytím odpojte TV od el. proudu.
Nedotýkejte se během bouřky
jakékoliv části el. přívodního kabelu
ani anténního kabelu.
Neumis ujte televizor na horká,
mokrá či extrémně pra ná místa.
Televizor by neměl být vystaven
mechanickým vibracím.
Při vytahování el. přívodního kabelu
tahejte pouze za zástrčku, netahejte
za kabel.
Nevystavujte televizor de ti a vlhku,
předejdete tak případnému úrazu el.
proudem.
Hořlavé látky, či otevřený oheň
(svíčka) neumis ujte v těsné blízkosti
televizoru.
Abyste nepo kodili el. přívodní kabel
nepokládejte na něj žádné těžké
předměty. Doporučujeme
přebytečnou část el. přívodního
kabelu navinout kolem háčků na
zadní straně televizoru.
Postavte TV na bazpečný a stabilní
stolek. Nepřesunujte TV a stolek
najednou, v dy přesunujte TV a stolek
zvláš. TV nikdy nepokládejte na bok
či na zadní stranu přístroje. Nedovolte
dětem aby na TV lezly, sedaly, či si na
ní lehaly.
4 Bezpečnostní opatření
Před manipulací vypojte televizor z el.
sítě. Při manipulaci postupujte
opatrně abyste televizor nepo kodili.
Pokud vám televizor upadl, či byl
jiným způsobem po kozen nechte ho
prověřit odborným pracovníkem
autorizovaného servisu SONY.
Nezakrývejte ventilační otvory
televizoru novinami, časopisy ani
záclonami a závěsy.
Page 49

Všeobecný přehled tlačítek dálkového ovladače
1
2
3
qj
qh
qg
qf
qd
qs
qa
9 Výběr formátu zobrazení:
Stiskněte opakovaně toto tlačítko, abyste změnili
formát obrazu. Další podrobnosti najdete v
kapitole “Autoformát” na straně 15.
q; Volba kanálů:
Stiskněte pro volbu předchozího nebo
následujícího kanálu.
qa Vypnutí zvuku:
Pokud chcete zvuk vypnout, stiskněte tlačítko.
Zvuk se zapne opětovným stisknutím.
qs Nastavení hlasitosti:
Stisknutím se nastaví hlasitost televizoru.
qd Zapojení režimu menu::
Stiskněte jej a menu se objeví na obrazovce.
Opětovným stisknutím se vypne a objeví se
normální obrazovka.
4
5
6
7
8
9
q;
1 Dočasné vypnutí televizoru:
Stisknutím tlačítka se televize dočasně vypne (indikátor
pohotovostního stavu na televizi se rozsvítí). Opětovným
stisknutím tlačítka televizor opět zapnete. Doporučujeme televizor
vypnout úplně, pokud se nepoužívá - šetří se tím energie.
Televizor se automaticky vypne do pohotovostního režimu,
jestliže po dobu 15 minut ne žádné tlačítko, televizor se uvede
automaticky do klidového stavu.
2 Volba vstupního signálu:
Tiskněte jej opakovaně, až se na obrazovce objeví znaménko
zvoleného vstupního signálu.
3 Tlačítko pro výběr programů:
Stisknutím se zadá požadovaný kanál. video.
Pokud chcete zvolit program s dvoumístným číslem, stiskněte
druhou číslici po dobu menší než 2,5 vteřiny.
4 Tlačítko předchozího kanálu:
Stisknutím vyvoláte kanál, který jste naposledy sledovali po dobu
delší než 5 sekund.
5 Toto tlačítko lze použít pouze v režimu teletextu.
6 Toto tlačítko lze použít pouze v režimu teletextu.
7 Výběr z teletextu:
Stisknutím se zobrazí teletext.
8 Ovládací destička:
• Je-li MENU zobrazeno, používejte tato tlačítka pro přesun po
různých menu. Obsáhlejší informace najdete v kapitole “Úvod a
použití různých menu” na straně 9.
• Pokud není MENU zobrazeno, stisknutím OK se zobrazí přehled
naladěných kanálů. Stisknutím v nebo V zvolte požadovaný kanál
(televizní stanici), po stisknutí OK jej můžete sledovat.
CZ
qf Volba TV režimu:
Stisknutím se vypne teletext nebo vstup do videa.
qg Volba zvukového efektu:
Opakovaným stisknutím tohoto tlačítka lze změnit
zvukový efekt.
qh Výběr specifického obrazu:
Opakovaným stisknutím nastavíte specifický
obraz.
qj Zobrazení informace na obrazovce:
Stiskněte tlačítko a na obrazovce se objeví
veškeré údaje. Opětovným stisknutím tyto
informace z obrazovky zmizí.
Kromě těchto funkcí televizoru, všechna barevná tlačítka se používají také pro teletext. Obsáhlejší
informace je popsána v kapitole “Teletext” tohoto návodu k obsluze.
Všeobecný 5
Page 50

Všeobecný přehled tlačítek televizoru
Programová tlačítka
pro výběr následujícího
nebo předchozího
kanálu (pro volbu
televizních stanic)
Tlačítka pro ovládání
hlasitosti
Tlačítko pro inicializaci
televizoru
Ukazatel režimu
dočasného vypnutí
televizoru
(pohotovostní) režim
Tlačítko zapnuto/
vypnuto
Stlačením dvířek na
boku TV se otevře
panel s konektory
Tlačítko pro
volbu vnějšiho
vstupu
Vstup
videosignálu S
4
4
o4
Vstup
videosignálu
Zvukové
vstupy
Výstup pro
sluchátka
Vložení baterií do dálkového ovladače
Zkontrolujte, jestli jsou poskytnuté baterie ve správné pozici.
Berte ohled na životní prostředí a použitých baterií se zbavujte způsobem, který životní prostředí
nepoškozuje - odhazujte je do kontejnerů k tomu určených.
Připojení antény a videa
Přípojné kabely se nedodávají.
Videorekordér
Obsáhlejší informace o připojení videa najdete v kapitole “Připojení přídavných
zařízení” v tomto návodu k obsluzeě.
S
O
N
Y
C
O
R
P
O
R
A
T
IO
N
J
A
P
A
N
/4
TION JAPAN/4
RA
RPO
NY CO
SO
nebo
Připojení pomocí konektoru typu Euro záleží na Vaší volbě
6 Všeobecný popis - Instalace
Page 51

Zapnutí a automatické naladění TV
Po prvním zapnutí televizoru se na obrazovce objeví sekvence menu, pomocí kterých budete moci: 1)
zvolit jazyk menu; 2) zvolit zemi, ve které si přejete používat televizor; 3) seřídit nakloněný obraz, 4)
hledat a automaticky ukládat všechny kanály (televizní stanice), které jsou k dispozici a 5) změnit
pořadí, ve kterém se kanály (televizní stanice) objeví na obrazovce.
Pokud časem budete chtít změnit jakékoliv z těchto seřízení, proved te příslušnou volbu v (menu
Instalace), nebo stiskněte tlačítko pro inicializaci televizoru.
Zapojte televizor do elektrické sítě (220-240 V AC, 50Hz). Při
1
prvním zapojení televizoru by se měl televizor automaticky
zapnout. Pokud tomu tak není, stiskněte tlačítko zapnuto/vypnuto
na čelní části televizoru, aby se zapnul.
Po prvním zapnutí televizoru se na obrazovce automaticky objeví
menu Language (Jazyk).
Stiskněte tlačítko v nebo V dálkového ovladače pro volbu jazyka
2
a poté stiskněte tlačítko OK pro potvrzení volby. Od této chvíle
veškerá menu se objeví ve zvoleném jazyce.
Language
i
v
Svenska
Norsk
English
Nederlands
Français
Italiano
V
i
Select Language:
OK
Na obrazovce se automaticky objeví menu Země. Stiskněte
3
tlačítko v nebo V pro volbu země, ve které chcete používat
televizor a poté stiskněte tlačítko OK pro potvrzení volby.
• Jestliže v seznamu není ta země, ve které budetepoužívat
televizor, místo země zvolte “-”.
• Pokud se vaše země neobjeví v nabídce pro instalaci,
doporučujeme použít nastavení pro Rusko. Tímto
nastavením předejdete chybnému zobrazování znaků a
písmen charakteristických pro váš jazyk v teletextu.
Vzhledem k zemské přitažlivosti se může stát, že se obraz nakloní.
4
V tomto případě ho můžete seřídit použitím funkce Otočení
obrazu.
a) Pokud toho není třeba, stiskněte v nebo V pro volbu Není
potřeba a poté stiskněte OK.
b) Pokud toho je třeba, stiskněte v nebo V pro volbu Upravit ted’
a stiskněte OK. Poté upravte nakloněný obraz seřizováním v
rozmezí od -5 do +5, pomocí tlačítek v nebo V. Nakonec
stiskněte OK pro jeho uložení.
Země
i
v
Sverige
Norge
Italia
Deutschland
Österreich
i
V
Vyberte zemi:
Jestliže je obraz nakloněn
upravte pootočení obrazu.
Není potřeba
Upravit te
OK
OK
CZ
pokračuje...
První zapojení televizoru 7
Page 52

Zapnutí a automatické naladění TV
Menu Automatické Ladění se objeví na obrazovce. Stiskněte
5
tlačítko OK pro volbu Ano.
Televizor začne automaticky ladit a ukládat všechny kanály
6
(televizní stanice), které jsou k dispozici.
Tento proces může trvat několik minut. Mějte proto trpělivost
a po dobu trvání procesu ladění nestiskněte žádné tlačítko,
proces by se neuskutečnil.
Jestliže po vykonání automatického ladění televizor nenašel
žádný kanál (televizní stanici), na obrazovce se objeví zpráva,
která Vás žádá, abyste zapojili anténu. Při zapojení antény
postupujte tak, jak je uvedeno na str.6 tohoto návodu a poté
stiskněte OK. Proces automatického ladění se obnoví.
Přejete si spustit
automatické ladění?
Ano
Ne
Automatické ladění
Program:
Systém:
Kanál:
Vyhledávání...
Program nenalezen
Připojte prosím anténu
Potvrte
OK
01
B/G
C21
OK
7
Jakmile televizor ukončil ladění a uložil všechny kanály
(televizní stanice), na obrazovce se automaticky objeví menu
Třídění programů, pomocí kterého můžete změnit pořadí,
ve kterém se kanály objeví na obrazovce.
a) Nechcete-li změnit toto pořadí kanálů, přejděte na bod č. 8.
b) Chcete-li změnit pořadí kanálů:
1 Stiskněte tlačítko v nebo V pro volbu čísla programu s
kanálem (televizní stanicí), jehož pozici chcete změnit a
následovně stiskněte b.
2 Stiskněte v nebo V pro volbu nového čísla programu, ve
kterém si přejete uložit zvolený kanál (televizní stanici), a
následovně stiskněte B.
3 Zopakujte body b)1 a b)2, chcete-li změnit pořadí dalších
televizních kanálů.
Stiskněte tlačítko MENU a menu zmizí z obrazovky.
8
Televizor je připraven k funkci.
Třídění programů
Program:
01 TVE
02 TVE2
03 TV3
04 C33
05 C27
06 C58
Zvolte kanál:
Konec:
MENU
Třídění programů
Program:
01 TVE
02 TVE2
03 TV3
04 C33
05 C27
06 C58 05 C27
Zvolte novou pozici:
Konec:
MENU
MENU
OK
OK
8 První zapojení televizoru
Page 53

Úvod a použití různých menu
Tento televizor používá na obrazovce systém menu a tím Vám ukazuje různé operace. Pro přesun po
menu používejte tlačítka dálkového ovladače, která jsou následovně popsána:
Stiskněte tlačítko MENU a na obrazovce se objeví první stupeň
1
menu.
• Pro zvýraznění žádaného menu nebo funkce, stiskněte tlačítko
2
v nebo V
.
• Pro vstup do zvoleného menu nebo funkce, stiskněte b.
• Pro návrat do předchozího menu nebo funkce, stiskněte B
• Pro změnu nastavení zvolené funkce, stiskněte v/V/B nebo b.
• Pro potvrzení a uložení Vaší volby, stiskněte OK.
Stiskněte tlačítko MENU a menu zmizí z obrazovky.
3
.
MENU
MENU
Průvodce po menu
Stupeň 1 Stupeň 2 Stupeň 3 / Funkce
Nastavení obrazu
Režim: Osobní
Kontrast
Jas
Barevná sytost
Ostrost
Odstín
Reset
OK
Nastavení obrazu
Režim: Osobní
Kontrast
Jas
Barevná sytost
Ostrost
Odstín
Reset
OK
• Jas, Barevná Sytost a Ostrost jsou možné změnit pouze v případě, že změní te specifický obraz v režimu
“Osobní”.
• Odstín je dostupný pouze pro systém NTSC (např. videokazety z USA).
• Pro obnovení továrního nastavení obrazu, zvolte Reset a stiskněte tlačítko OK.
NASTAVENÍ OBRAZU
Menu “Nastavení obrazu” slouží k úpravě nebo
seřízení obrazu.
K tomu je třeba:
Po zvolení funkce, kterou si přejete změnit, stiskněte
tlačítko b. Poté opakovaně stiskněte v/V/B nebo b
pro změnu nastavení a nakonec stiskněte OK pro
jeho uložení.
Toto menu Vám také umožní změnit specifický obraz
podle toho, jaký program sledujete:
v Přímý přenos (používejte pro pořady v přímém
přenosu, DVD a při použití Set Top Boxů).
v Osobní (pro osobní požadavky).
v Film (pro filmy).
pokračuje...
CZ
Režim menu na obrazovce 9
Page 54

Úvod a použití různých menu
Stupeň 1 Stupeň 2 Stupeň 3 / Funkce
Nastavení obrazu
Režim: Osobní
Kontrast
Jas
Barevná sytost
Ostrost
Odstín
Reset
Nastaven zvuku
Efekt: Přirozený
Výšky
Hloubky
Vyvážení
Reset
Dvoukanál.zvuk: Mono
Aut. Hlasitost: Zap
OK
Nastaven zvuku
Efekt: Přirozený
Výšky
Hloubky
Vyvážení
Reset
Dvoukanál.zvuk: Mono
Aut. Hlasitost: Zap
OK OK
Efekt bvPřirozený: Odstraňuje šum, zajišuje přítomnost zvuku a provádí jeho ladění
pomocí systému “BBE High Definition Sound system”*.
v Dynamický: “BBE High Definition Sound system”* zintenzívňuje jasnost a
přítomnost zvuku vytvářením srozumitelnějšího hlasu a pronikavější
hudby.
v Dolby**Virtual: Napodobuje zvukový efekt “Dolby Pro Logic”.
v Vyp: Bez speciálních zvukových efektů.
Výšky bBMéně b Více
Hloubky bBMéně b Více
Vyvážení bBLevý b Pravý
Reset Obnoví tovární nastavení zvuku.
Dvoukanál. zvuk
K
b • Pro stereo vysílání:
v Mono.
v Stereo.
• Pro dvojjazyčné vysílání:
v Mono (určen pro kanál mono, je-li k dispozici).
v A (pro 1. kanál).
v B (pro 2. kanál).
Aut. HlasitostbvVyp: Hlasitost se mění v závislosti na vysílacím signálu.
v Zap: Hlasitost se udržuje nezávisle na vysílacím signálu (např. reklamní inzeráty).
Menu “Nastavení zvuku” Vám umožní změnit
nastavení zvuku.
K tomu je třeba:
Po zvolení funkce, kterou si přejete změnit, stiskněte
b. Poté opětovně tiskněte v/V/B nebo b pro změnu
nastavení a nakonec stiskněte OK pro jeho uložen.
NASTAVENÍ ZVUKU
• Pokud posloucháte zvuk televizoru přes sluchátka, funkce Efekt automaticky přejde na pozici “Vyp”.
• Pokud nastavíte “Efekt” v pozici “Dolby Virtual”, funkce “Aut. Hlasitost” se automaticky změní na pozici
“Vyp” a naopak.
* “BBE High Definition Sound system” je vyroben firmou Sony Corporation s licencí BBE Sound, Inc.
Je chráněn patentem USA č 4,638,258 a 4,482,866. Slovo “BBE” a symbol “BBE” jsou obchodní
značky BBE Sound, Inc.
**Tento televizor byl naržen tak aby dosáhl zvukového efektu “Dolby Surround” a napodobil tak zvuk
čtyř reproduktorů použitím pouze dvou reproduktoyů tohoto televizora, vždy kdy audio signál
vysílací stanice bude “Dolby Surround”. Kromě toho, můžete také zlepšit zvukový efekt zapojením
jednoho vnějšího zesilovače. Podrobnější informace najdete v kapitole “Připojení vnějšího
zvukového zařízení” na straně 20.
**Vyrobeno s oprávněním Dolby Laboratories. “Dolby”, “Pro Logic” a znak dvojitého D jsou
obchodní značky Dolby Laboratories.
pokračuje...
10 Režim menu na obrazovce
Page 55

Úvod a použití různých menu
Stupeň 1 Stupeň 2 Stupeň 3 / Funkce
ČASOVAČ VYPNUTÍ
Nastavení obrazu
Režim: Osobní
Kontrast
Jas
Barevná sytost
Ostrost
Odstín
Reset
Časovač
Časov. Vypnutí:
Nastavení obrazu
Režim: Osobní
Kontrast
Jas
Barevná sytost
Ostrost
Odstín
Reset
Instalace
Jazyk/Země
Automatické ladění
Třídění programů
Označení programů
AV předvolby
Ruční ladění
Prodrobnější nastavení
OK
Časovač
Vyp
OK
OK
OK
Časov. Vypnutí:
Instalace
Jazyk/Země
Automatické ladění
Třídění programů
Označení programů
AV předvolby
Ruční ladění
Prodrobnější nastavení
Vyp
Funkce “Časov. vypnutí” v režimu menu “Časovač”,
Vám umožní zvolit interval, po jehož uplynutí
televizor automaticky přejde do režimu dočasného
vypnutí (pohotovostní režim).
K tomu je třeba:
Po zvolení funkce, stiskněte tlačítko b. Poté
stiskněte v nebo V pro volbu časového intervalu
(max. 4 hodiny) a nakonec stiskněte OK pro jeho
uložení.
• Chcete-li vidět čas zbývající do vypnutí, zatímco
sledujete televizor, stiskněte tlačítko .
• Minutu před tím, než televizor přejde do režimu
OK
dočasného vypnutí, zbývající čas se objeví na
obrazovce.
JAZYK/ZEMĚ
Funkce “Jazyk/Země” v režimu menu “Instalace”
slouží k volbě jazyka, ve kterém chcete, aby se na
obrazovce objevily menu. Také Vám umožní zvolit
zemi, ve které si přejete televizor používat.
K tomu je třeba:
Po zvolení funkce, stiskněte tlačítko b. Poté
postupujte tak, jak je popsáno v kapitole “Zapnutí a
automatické naladění TV”, v bodě 2 a 3 na straně 7.
OK
CZ
Nastavení obrazu
Režim: Osobní
Kontrast
Jas
Barevná sytost
Ostrost
Odstín
Reset
Instalace
Jazyk/Země
Automatické ladění
Třídění programů
Označení programů
AV předvolby
Ruční ladění
Prodrobnější nastavení
AUTOMATICKÉ LADĚNÍ
Funkce “Automatické ladění” v režimu menu
“Instalace” slouží k tomu, aby televizor hledal a uložil
do paměti veškeré kanály (televizní stanice), které
jsou k dispozici.
OK
Instalace
Jazyk/Země
Automatické ladění
Třídění programů
Označení programů
AV předvolby
Ruční ladění
Prodrobnější nastavení
OK
K tomu je třeba:
Po zvolení funkce, stiskněte tlačítko b. Poté
postupujte tak, jak je popsáno v kapitole “Zapnutí a
automatické naladění TV”, v bodě 5 a 6 na straně 8.
OK
pokračuje...
Režim menu na obrazovce 11
Page 56

Úvod a použití různých menu
Stupeň 1 Stupeň 2 Stupeň 3 / Funkce
Nastavení obrazu
Režim: Osobní
Kontrast
Jas
Barevná sytost
Ostrost
Odstín
Reset
Instalace
Jazyk/Země
Automatické ladění
Třídění programů
Označení programů
AV předvolby
Ruční ladění
Prodrobnější nastavení
Nastavení obrazu
Režim: Osobní
Kontrast
Jas
Barevná sytost
Ostrost
Odstín
Reset
Instalace
Jazyk/Země
Automatické ladění
Třídění programů
Označení programů
AV předvolby
Ruční ladění
Prodrobnější nastavení
OK
Instalace
Jazyk/Země
Automatické ladění
Třídění programů
Označení programů
AV předvolby
Ruční ladění
Prodrobnější nastavení
OK
OK
Instalace
Jazyk/Země
Automatické ladění
Třídění programů
Označení programů
AV předvolby
Ruční ladění
Prodrobnější nastavení
OK
TŘÍDĚNÍ PROGRAMŇ
Funkce “Třídění programů” v režimu menu
“Instalace” slouží ke změně pořadí, ve kterém se
kanály (televizní stanice) objeví na obrazovce.
K tomu je třeba:
Po zvolení funkce, stiskněte tlačítko b. Poté
postupujte tak, jak je popsáno v kapitole “Zapnutí a
automatické naladění TV”, v bodě 7b) na straně 8.
OK
OZNAČENÍ PROGRAMŇ
Funkce “Označení programů“, v režimu menu
“Instalace”, Vám umožní přidělit jméno kanálu,
maximálně o pěti znacích. K tomu je třeba.
K tomu je třeba:
1 Po zvolení funkce, stiskněte tlačítko b a poté
stiskněte v nebo V pro volbu čísla programu,
který chcete pojmenovat.
2 Stiskněte b. Vyznačením prvního znaku ve
sloupci Etiqueta, stiskněte tlačítko v nebo V pro
volbu jednoho písmene, čísla, nebo “-” pro
mezeru a poté stiskněte b pro potvrzení tohoto
OK
znaku. Zbývající čtyři znaky zvolte stejným
způsobem. Nakonec stiskněte OK pro jejich
uložení.
Nastavení obrazu
Režim: Osobní
Kontrast
Jas
Barevná sytost
Ostrost
Odstín
Reset
Instalace
Jazyk/Země
Automatické ladění
Třídění programů
Označení programů
AV předvolby
Ruční ladění
Prodrobnější nastavení
OK
OK
12 Režim menu na obrazovce
Instalace
Jazyk/Země
Automatické ladění
Třídění programů
Označení programů
AV předvolby
Ruční ladění
Prodrobnější nastavení
AV PŘEDVOLBY
Funkce “AV předvolby”, v režimu menu “Instalace”,
Vám umožní přidělit jméno vnějšímu zařízení
připojenému k tomuto televizoru.
K tomu je třeba:
1 Po zvolení funkce, stiskněte tlačítko b a poté
stiskněte v nebo V pro volbu vnějšího vstupu,
který chcete pojmenovat (AV1, AV2, a AV3 pro
přídavná zařízení připojená ke konektorům typu
Euro na zadní části televizoru a AV4 pro přední
konektory). Poté stiskněte b.
2 Ve sloupci “Název” se automaticky objeví
OK
předurčené jméno:
a) Chcete-li použít jedno z těchto předurčených
jmen (CABLE, GAME, CAM, DVD, VIDEO
nebo SAT), stiskněte tlačítko v nebo V pro
volbu jednoho z nich a nakonec stiskněte OK
pro jeho uložení.
b) Chcete-li přidělit Vámi určené jméno, zvolte
Editar a stiskněte b. Poté, vyznačením prvního
znaku, stiskněte v nebo V pro volbu jednoho
písmene, čísla, nebo “-” pro mezeru a
stiskněte b pro potvrzení tohoto znaku.
Zbývající čtyři znaky zvolte stejným způsobem
a nakonec stiskněte OK pro jejich uložení.
pokračuje...
Page 57

Úvod a použití různých menu
Stupeň 1 Stupeň 2 Stupeň 3 / Funkce
RUČNÍ LADĚNÍ
Nastavení obrazu
Režim: Osobní
Kontrast
Jas
Barevná sytost
Ostrost
Odstín
Reset
Instalace
Jazyk/Země
Automatické ladění
Třídění programů
Označení programů
AV předvolby
Ruční ladění
Prodrobnější nastavení
OK
Instalace
Jazyk/Země
Automatické ladění
Třídění programů
Označení programů
AV předvolby
Ruční ladění
Prodrobnější nastavení
OK
Funkce “Ruční Ladění” v režimu menu “Instalace”
slouží pro:
a) Postupné ladění kanálů (televizních stanic) v
pořadí programu, které si přejete, nebo postupné
ladění video vstupu.
K tomu je třeba:
1 Po zvolení funkce “Ruční Ladění”, stiskněte
tlačítko b. S vyznačenou položkou Program
stiskněte b, a poté stiskněte v nebo V pro volbu
čísla programu (pozice), na kterém si přejete
naladit televizní stanici nebo kanál videa (pro
OK
kanál videa Vám doporučujeme vybrat číslo
programu 0 ). Stiskněte tlačítko B.
2 Dostupnost následující funkce závisí na
volbě země v režimu menu “Jazyk/Země”.
Po zvolení funkce Systém, stiskněte tlačítko b, a
poté stiskněte v nebo V pro volbu systému
televizní stanice (B/G pro Západní Evropu nebo
D/K pro Východní Evropu) Stiskněte B.
3 Po zvolení funkce Kanál, stiskněte tlačítko b a
poté stiskněte v nebo V pro volbu typu kanálu
(“C” pro pozemní vysílání nebo “S” pro kabelové
vysílání). Stiskněte tlačítko b. Posléze stiskněte
číselná tlačítka pro zavedení čísla kanálu televizní
stanice nebo znaménka kanálu videa. Neznáte-li
číslo kanálu, hledejte ho stisknutím tlačítka v
nebo V. Až najdete kanál, který chcete uložit,
stiskněte dvakrát tlačítko OK.
Zopakujte všechny tyto body pro naladění a
uložení ostatních kanálů.
b) Přidělit jméno kanálu, maximálně o pěti znacích.
K tomu je třeba:
Vyznačením funkce Program, stiskněte tlačítko
PROG + nebo -, až se objeví číslo programu,
který chcete pojmenovat. Po té, až se objeví na
obrazovce, zvolte funkci Pojmenování a
následovně stiskněte tlačítko b. Stiskněte v nebo
V pro volbu jednoho písmene, čísla nebo “-” pro
mezeru a stiskněte
Zbývající čtyři znaky zvolte stejným způsobem.
Po zvolení všech znaků, stiskněte dvakrát tlačítko
OK pro jejich uložení.
b pro potvrzení tohoto znaku.
CZ
pokračuje...
Režim menu na obrazovce 13
Page 58

Úvod a použití různých menu
Stupeň 1 Stupeň 2 Stupeň 3 / Funkce
Nastavení obrazu
Režim: Osobní
Kontrast
Jas
Barevná sytost
Ostrost
Odstín
Reset
Instalace
Jazyk/Země
Automatické ladění
Třídění programů
Označení programů
AV předvolby
Ruční ladění
Prodrobnější nastavení
c) Dokonce i v případě, že je normálně zapojeno
jemné automatické ladění kanálů (AFT), můžeme
obraz ručně doladit (jestliže je nejasný) a
dosáhnout jeho zlepšení.
K tomu je třeba:
OK
Zatímco sledujete kanál (televizní stanici), ve
kterém chcete provést jemné naladění, zvolte
funkci AFT, a poté stiskněte tlačítko b. Stiskněte
Instalace
Jazyk/Země
Automatické ladění
Třídění programů
Označení programů
AV předvolby
Ruční ladění
Prodrobnější nastavení
OK
OK
v nebo V pro doladění úrovně frekvence kanálu
v rozmezí od -15 do +15. Nakonec stiskněte
dvakrát tlačítko OK a tímto se nové doladění
uloží do paměti.
d) Vynechat čísla programů, které si nepřejete
sledovat a tím je přeskočit při jejich výběru
pomocí tlačítek PROG +/-.
K tomu je třeba:
Vynechat čísla programů, které si nepřejete
sledovat a tím je přeskočit při jejich výběru
pomocí tlačítek PROG +/-. Vyznačením funkce
Program, stiskněte tlačítko PROG + nebo -, až
se objeví číslo programu, který chcete vynechat.
Po té, až se objeví na obrazovce, zvolte funkci
Přeskočit a následovně stiskněte tlačítko b.
Stiskněte v nebo V pro volbu Ano a nakonec
stiskněte dvakrát tlačítko OK pro jeho uložení.
Jestliže časem chcete opět používat číslo
vynechaného programu, postupujte tak, jak je
výše uvedeno, ale místo “Ano” zvolte “Ne”.
e) Použitím dekodéru připojeného ke konektoru
typu Euro 3/ 3, nebo přes video připojené
ke zmíněnému Eurokonektoru, Vám tato funkce
umožní sledovat a správně nahrát kodifikovaný
kanál.
Dostupnost následující funkce závisí na
volbě země v režimu menu “Jazyk/Země”.
S
14 Režim menu na obrazovce
K tomu je třeba:
Po zvolení funkce Dekodér, stiskněte tlačítko b.
Poté stiskněte v nebo V pro volbu Zap. Nakonec
stiskněte dvakrát OK pro její uložení.
Jestliže časem budete chtít tuto funkci zrušit,
postupujte, jak je výše uvedeno, ale zvolte znovu
“Vyp” místo “Zap”.
pokračuje...
Page 59

Úvod a použití různých menu
Stupeň 1 Stupeň 2 Stupeň 3 / Funkce
AUTOFORMÁT
Nastavení obrazu
Režim: Osobní
Kontrast
Jas
Barevná sytost
Ostrost
Odstín
Reset
Instalace
Jazyk/Země
Automatické ladění
Třídění programů
Označení programů
AV předvolby
Ruční ladění
Prodrobnější nastavení
OK
OK
Smart
Prodrobnější nastavení
Autoformát:
Redukce šumu:
Výstup AV3:
TV reproduktory:
RGB centrování:
Otočení obrazu:
Zap
Auto
TV
Zap
0
0
Volba “Auto formát” v rámci menu “Prodrobnějši
nastaveni” umožňuje, že televizor mění automaticky
druh formátu obrazu.
K tomu je třeba:
Po nastavení volby, stiskněte b. Dále stiskněte v
nebo V abyste zvolili Zap (pokud si přejete, aby
televizor měnil formát obrazu automaticky podle
signálu vysílače) nebo zvolte Vyp (pokud si chcete
volit formát obrazu del svého přání a vkusu).
Nakonec stiskněte OK, abyste volbu uložili do
paměti.
OK
A jste zvolili “Zap” či “Vyp” ve volbě “Auto
formát”, stále máte možnost měnit druh
formátu obrazu, když stisknete opakovaně
tlačítko na dálkovém ovladači. Můžete volit
mezi níže uvedenými formáty:
Smart: Imitace horiziontální obrazovky pro vysílání
4:3.
4 : 3
14 : 9
Zoom
Wide
4:3: Velikost konvenčního obrazu: Vizualizace
kompletního obrazu
14:9: Druh obrazu, který se pohybuje v rozmezí
mezi formáty 4:3 a 16:9
Zoom: Formát horizontální obrazovky pro
videofilmy
Wide: Pro vysílaní 16:9
Ve formátech “Smart”, “Zoom” a “14:9” se
objeví obrazovka v horní i dolní části
zkrácená. Stiskněte v nebo V, abyste
zregulovali polohu obrazu na obrazovce
(např. při čtení titulků).
pokračuje...
CZ
Režim menu na obrazovce 15
Page 60

Úvod a použití různých menu
Stupeň 1 Stupeň 2 Stupeň 3 / Funkce
Nastavení obrazu
Režim: Osobní
Kontrast
Jas
Barevná sytost
Ostrost
Odstín
Reset
OK
REDUKCE ŠUMU
Funkce “Redukce šumu” v režimu menu
“Prodrobnějši nastaveni” slouží k redukci šumu
obrazu v případě slabých signálů televizoru.
K tomu je třeba:
Po zvolení funkce, stiskněte tlačítko b. Poté
stiskněte v nebo V, zvolte Auto a nakonec stiskněte
OK pro jeho uložení.
Instalace
Jazyk/Země
Automatické ladění
Třídění programů
Označení programů
AV předvolby
Ruční ladění
Prodrobnější nastavení
Prodrobnější nastavení
Autoformát:
Redukce šumu:
Výstup AV3:
TV reproduktory:
RGB centrování:
Otočení obrazu:
OK
Zap
Auto
TV
Zap
0
0
OK
Jestliže časem budete chtít tuto funkci zrušit,
postupujte tak, jak je výše uvedeno, ale zvolte “Vyp”
místo “Auto”.
VÝSTUP AV3
Nastavení obrazu
Režim: Osobní
Kontrast
Jas
Barevná sytost
Ostrost
Odstín
Reset
Instalace
Jazyk/Země
Automatické ladění
Třídění programů
Označení programů
AV předvolby
Ruční ladění
Prodrobnější nastavení
OK
Prodrobnější nastavení
Autoformát:
Redukce šumu:
Výstup AV3:
TV reproduktory:
RGB centrování:
Otočení obrazu:
OK
Zap
Auto
TV
Zap
0
0
OK
Pokud zvolíte funkci AUTO, výstupní signál bude vždy stejný jako ten, který se objeví na televizní
obrazovce.
Máte-li připojený dekodér ke konektoru typu Euro 3/ 3, nebo k videu připojenému k tomuto
Eurokonektoru, nezapomeňte znovu zvolit “Výstup AV3” v režimu “AUTO” nebo “TV” pro jeho
správnou dekodifikaci.
Funkce “Výstup AV3”, v režimu menu “Prodrobnějši
nastaveni”, Vám umožní zvolit vnější výstup
konektoru typu Euro 3/ 3, abyste z tohoto
S
Eurokonektoru mohli nahrát jakýkoliv signál
pocházející z televizoru, nebo z jiného vnějšího
zařízení připojeného k Eurokonektorůn 1/ 1
nebo 2/ 2, nebo k předním konektorům 4
nebo 4 and 4.
S
Má-li Váš videorekordér k dispozici Smartlink,
tento postup není třeba.
K tomu je třeba:
Po zvolení funkce, stiskněte tlačítko b. Poté
stiskněte v nebo V pro volbu požadovaného
výstupního signálu TV, AV1, AV2, AV4, YC4 nebo
AUTO.
S
Nastavení obrazu
Režim: Osobní
Kontrast
Jas
Barevná sytost
Ostrost
Odstín
Reset
Instalace
Jazyk/Země
Automatické ladění
Třídění programů
Označení programů
AV předvolby
Ruční ladění
Prodrobnější nastavení
OK
OK
16 Režim menu na obrazovce
Prodrobnější nastavení
Autoformát:
Redukce šumu:
Výstup AV3:
TV reproduktory:
RGB centrování:
Otočení obrazu:
Zap
Auto
TV
Zap
0
0
TV REPRODUKTORY
Volba funkce “TV reproduktory” v režimu menu
“Prodrobnějši nastaveni” Vám umožní zrušit zvuk z
reproduktorů televizoru a poslouchat ho pouze přes
vnější zesilovač, který je zapojený k výstupu zvuku
na zadní části televizoru.
K tomu je třeba:
Po zvolení funkce, stiskněte tlačítko b. Poté
stiskněte v nebo V, zvolte Vyp a nakonec stiskněte
OK pro jeho uložení.
Jestliže časem budete chtít tuto funkci zrušit,
OK
postupujte tak, jak je výše uvedeno, ale zvolte “Zap”
místo “Vyp”.
pokračuje...
Page 61

Úvod a použití různých menu
Stupeň 1 Stupeň 2 Stupeň 3 / Funkce
RGB CENTROVÁNÍ
Nastavení obrazu
Režim: Osobní
Kontrast
Jas
Barevná sytost
Ostrost
Odstín
Reset
Instalace
Jazyk/Země
Automatické ladění
Třídění programů
Označení programů
AV předvolby
Ruční ladění
Prodrobnější nastavení
Nastavení obrazu
Režim: Osobní
Kontrast
Jas
Barevná sytost
Ostrost
Odstín
Reset
Instalace
Jazyk/Země
Automatické ladění
Třídění programů
Označení programů
AV předvolby
Ruční ladění
Prodrobnější nastavení
OK
Prodrobnější nastavení
Autoformát:
Redukce šumu:
Výstup AV3:
TV reproduktory:
RGB centrování:
Otočení obrazu:
OK
OK
Prodrobnější nastavení
Autoformát:
Redukce šumu:
Výstup AV3:
TV reproduktory:
RGB centrování:
Otočení obrazu:
OK
Zap
Auto
TV
Zap
0
0
Zap
Auto
TV
Zap
0
0
OK
OK
Při zapojení vnějších signálů RGB, jako
“PlayStation”, je možné, že bude třeba seřídit
vodorovné centrování obrazu. V tomto případě se
seřizuje pomocí funkce “RGB centrování” v režimu
menu “Prodrobnějši nastaveni”.
K tomu je třeba:
Zatímco sledujete vstupní signál RGB, zvolte funkci
“RGB Centróvaní” a stiskněte tlačítko b. Poté
stiskněte v nebo V pro upravení centra obrazu
(seřizujte od - 10 do + 10). Nakonec stiskněte
tlačítko OK pro jeho uložení.
OTOČENÍ OBRAZU
Vzhledem k zemské přitažlivosti se může stát, že se
obraz nakloní. V tomto případě ho můžete upravit
použitím funkce “Otočení obrazu” v režimu menu
“Prodrobnějši nastaveni”..
K tomu je třeba:
Po zvolení funkce, stiskněte tlačítko b. Poté
stiskněte v nebo V pro seřízení otočení obrazu v
rozmezí od - 5 do + 5. Nakonec stiskněte tlačítko OK
pro jeho uložení.
CZ
Režim menu na obrazovce 17
Page 62

Tel et ext
Teletext je informační služba, kterou užívá většina televizních stanic. Na straně s obsahem služeb
teletextu (všeobecně je to strana 100) je poskytnuta informace o tom, jak se užívá tato služba. Pro práci
v teletextu používejte tlačítka dálkového ovladače tak, jak je uvedeno v této kapitole.
Zvolte televizní stanici se silným signálem, jinak může dojít v teletextu k
chybám.
TELETEXT
TELETEXT
TELETEXT
TELETEXT
TELETEXT
TELETEXT
TELETEXT
Vstup do teletextu:
Zvolte kanál (televizní stanici), který vysílá teletext, který si přejete
sledovat, stisknutím tlačítka .
Zvolení stránky teletextu:
Pomocí číselných tlačítek dálkového ovládače zadejte tři čísla
představující příslušné číslo stránky, kterou si přejete vidět.
• V případě, že se při volbě zmýlíte, zadejte jakákoliv tři čísla, a poté znovu zadejte správné číslo stránky.
• Jestliže se počítadlo stránek nezastaví, je to proto, že požadovaná stránka není k dispozici. V tomto
případě zadejte jiné číslo stránky.
Zvolení následující nebo předchozí stránky:
Stiskněte tlačítka PROG + ( ) nebo PROG - ( ).
Překrytí teletextu televizním obrazem:
Zatímco sledujete teletext, stiskněte tlačítko . Opětovným stisknutím se teletextový režim zruší.
TELETEXT
Index
Index
Index
Index
Index
Index
Index
Index
Programme
Programme
Programme
Programme
Programme
Programme
Programme
Programme
News
News
News
News
News
News
News
News
Sport
Sport
Sport
Sport
Sport
Sport
Sport
Sport
Weather
Weather
Weather
Weather
Weather
Weather
Weather
Weather
153
153
153
153
153
153
153
153
101
101
101
101
101
101
101
101
25
25
25
25
25
25
25
25
98
98
98
98
98
98
98
98
Zmrazení teletextové stránky:
Stiskněte tlačítko / . Opětovným stisknutím se zmrazení podstránky zruší.
Odhalení skrytých informací (např. soutěžních odpovědí):
Stiskněte tlačítko / . Opětovným stisknutím se informace opět ukryje.
Zvolení podstránky:
Jedna stránka teletextu se může skládat z několika podstran. V takovém případě číslo stránky, které se objeví
v horní levé části obrazovky, změní barvu ze bílé na zelenou a vedle něj se objeví jedna nebo několik šipek.
Opakovaně stiskněte tlačítka B nebo b na dálkovém ovladači a požadovaná podstránka se objeví.
Vystoupení z teletextu:
Stiskněte tlačítko .
Fastext
Služba Fastextu nám umožní přístup do požadované stránky teletextu stisknutím pouze jednoho
tlačítka.
Jste-li v teletextu a v případě, že se vysílají signály Fastextu, na spodní části obrazovky se objeví
nabídka barevných kódů, které umožňují přístup přímo k teletextové stránce. K zobrazení této nabídky
stiskněte tlačítko příslušné barvy (červené, zelené, žluté nebo modré) na dálkovém ovladači.
18 První zapojení televizoru
Page 63

Připojení přídavných zařízení
K televizoru je možné připojit různá další zařízení, jak je uvedeno níže. (Přípojné kabely se nedodávají).
MANUFACTURED UNDER LICENCE
FROM DOLBY LABORATORIES
"DOLBY" AND THE DOUBLE - D
SYMBOL ARE TRADEMARKS OF
DOLBY LABORATORIES
G
S
O
N
Y
S VHS/Hi8/
DVC
kamkordér
A
8mm/Hi8/
DVC
kamkordér
4
B
4
C
o4
Videorekordér
DFE
Při zapojení sluchátek se
reproduktory televizoru
automaticky vypnou
.
Hi-Fi
PlayStation
*
DVD
Dekodér
Dekodér
* “PlayStation” je výrobek Sony Computer
Entertainment, Inc
.
* “PlayStation” je značka registrovaná
jako Sony Computer Entertainment, Inc
• Aby se zabránilo zkreslení obrazu nepřipojujte zařízení ke konektorůn A a B současně.
• Nezapojujte žádný Dekodér k Eurokonektoru F.
Připojení videa:
Pro připojení videa, obsáhlejší informace najdete v kapitole “Připojení anteny a videa”. Doporučujeme Vám,
byste pro připojení videa použili kabel typu Eurokonektor. V případě, že nepoužijete tento kabel, budete muset
naladit kanál video signálu ručně pomocí menu “Ruční Ladění” (viz odst.a) na str.13).
Zkonzultujte také návod k obsluze Vašeho videa, kde se dozvíte, jak získáte kanál video signálu.
Připojení videorekordéru, které má k dispozici Smartlink:
Smartlink je přímé propojení mezi televizorem a videorekordérem, které umožňuje přenos určitých
informací. Podrobnější informace o Smartlinku najdete v návodu k obsluze Vašeho videorekordéru.
Jestliže používáte videorekordér, který je opatřen Smartlinkem, doporučujeme Vám, abyste ho připojili
ke konektoru typu Euro 3/ 3 G použitím kabelu typu Eurokonektor.
S
Pokud máte připojen dekodér ke konektoru typu Euro 3/ 3 G, nebo k videu, které je
S
připojeno ke zmíněnému Eurokonektoru:
Zvolte funkci “Ruční Ladění” v režimu menu “Instalace” a po zvolení funkce “Dekodér”**, zvolte “Zap”
(použitím v nebo V pro každý kódovaný kaná.
CZ
.
** Dostupnost této funkce závisí na volbě země v menu “Jazyk/Země”.
pokračuje...
Doplňkové informace 19
Page 64

Připojení přídavných zařízení
Připojení vnějšího zvukového zařízení:
Chcete-li poslouchat zvuk televizoru v reproduktorech Vaší Hi-Fi věže, připojte Hi-Fi věž k výstupu audio D
a, pomocí systému menu, zvolte “Instalace”. Poté vstupte do funkce “Podrobnější nastavení” a zvolte “Vyp”
v režimu “TV reproduktory”.
Hlasitost vnějších reproduktorů se může regulovat pomocí tlačítek pro nastavení hlasitosti na dálkovém
ovladači televizoru. Také je možné regulovat stupeň výšky a hloubky zvuku pomocí menu “Nastavení
zvuku”.
Také můžete dosáhnout zvukového efektu “Dolby Virtual” pomocí Vaší Hi-Fi věže:
K tomu je třeba umístit reproduktory Hi-Fi věže po obou stranách t
elevizoru tak, aby vzdálenost mezi televizorem a každým reproduktorem
byla přibližně 50cm.
Po umístění reproduktorů zvolte menu “Nastavení zvuku” pomocí
systému menu, a poté zvolte “Dolby Virtual” ve funkci “Efekt”.
Reproduktory
Vaší Hi-Fi věže
50cm 50cm
Optimální pozice pro uživatele
Použití přídavných zařízení
Připojte přídavné zařízení přes příslušný konektor televizoru tak, jak je uvedeno na předchozí straně.
1
Zapněte připojené zařízení.
2
Aby se objevil obraz připojeného zařízení, opakovaně tiskněte tlačítko , dokud se na obrazovce
3
neobjeví správný vstupní symbol.
Symbol
Aby se znovu objevil normální televizní obraz, stiskněte tlačítko na dálkovém ovladači.
4
Vstupní signály
1
• Vstupní audio/video signál přes konektor typu Euro E.
1
• Vstupní signál RGB přes konektor typu Euro E. Tento symbol se objeví pouze v případě,
že je připojen vstup RGB.
2
• Vstupní signál pro audio / video přes konektor typu Euro F.
2
• Vstupní signál RGB přes konektor typu Euro E. Tento symbol se objeví pouze v případě,
že je připojen vstup RGB.
3
• Vstupní audio/video signál přes konektor typu Euro G.
S
3
• Vstupní signál S video přes konektor typu Euro G. Tento symbol se objeví pouze v
případě, že je připojen vstup S video.
4
• Vstupní video signál přes konektor RCA B a vstupní audio signál přes C.
S
4
• Vstupní signál pro S video přes konektor S videa A a vstupní signál pro audio přes C.
Tento symbol se objeví pouze v případě, že je připojen vstup S video.
Připojení monofonních přístrojů
Zástrčku zvuku zapojte do zdířky L/G/S/I na čelním panelu televizoru a zvolte vstup 4 nebo 4
postupem popsaným výše. Poté nastavte kanál “Dvoukanál. zvuk” “A” ve zvukové nabidce dle částl
“Nastavení zvuku” tohoto návodu.
20 Doplňkové informace
S
Page 65

Systém TV Závisí na Vámi zvolené zemi: B/G/H, D/K
Technické údaje
Systém kódování
PAL, SECAM, NTSC 3.58, 4.43 (pouze pro video vstup)
barev
Rozložení kanálů VHF: E2-E12
UHF: E21-E69
CATV: S1-S20
HYPER: S21-S41
D/K: R1-R12, R21-R69
Televizní obrazovka Plochá obrazovka FD Trinitron WIDE 28 inches (přibližně 71 cm. v úhlopříčce)
32 inches (přibližně 82 cm. v úhlopříčce)
Vstupy na zadní
straně
1/ 1 21-pinový konektor typu EURO (norma CENELEC), včetně
vstupu pro audio/video, vstupu RGB, výstupu audio/video z
TV audio/video
2/ 2 21-pinový konektor typu EURO (norma CENELEC), včetně
vstupu pro audio/video, vstupu RGB, výstupu audio/video z
monitor audio/video
3/ 3 21-pinový konektor typu Euro (norma CELENEC), včetně
(SMARTLINK) vstupu pro audio/video, vstupu pro S video, volitelného
S
výstupu audio/video a připojení Smartlinku
Výstupy audio (levé/pravé) - konektory RCA
Konektory vpředu 4 Vstup pro S video - 4-pinový DIN
S
4 video vstup - konektor RCA
4 audio vstup - konektory RCA
i zdířka sluchátek
Výstupy zvuku 2 x 20W (hudební výkon), 2 x 10W (RMS)
Woofer: 30W (hudební výkon), 15W (RMS)
CZ
Příkon KV-28CS70 94W KV-32CS70 102W
Příkon v režimu
KV-28CS70 0.4W KV-32CS70 0.4W
časového vypnutí
(pohotovostní režim)
Rozměry (š x v x h) KV-28CS70 Přibližně. 844mm x 517mm x 548mm
KV-32CS70 Přibližně. 933mm x 566mm x 572mm
HmotnostKV-28CS70Přibližně. 43.5kg KV-32CS70 Přibližně. 60kg
Dodané příslušenství 1 dálkový ovládač typ RM-947, 2 baterie typu IEC
Další funkce • Obraz 100 Hz
• Teletext, Fastext, TOPtext (250 stran paměti Teletextu
• Automatické zapojení
• Smartlink (přímé propojení mezi televizorem a kompatibilním
videorekordérem. Podrobnější informace o Smartlinku najdete v návodu k
obsluze Vašeho videorekordéru)
• Automatické nalezení systému TV
• Dolby Virtual
• BBE
• Autoformát
Úpravy v designu a technických vlastnostech bez předchozího upozornění.
Doplňkové informace 21
Page 66

Řešení problémů
Zde jsou některá řešení problémů, které mohou ovlivnit obraz i zvuk.
Problém Řešení
Není obraz (černá obrazovka) a není zvuk. • Zkontrolujte zapojení antény.
Špatný nebo žádný obraz, ale zvuk je dobr. • Pomocí Režimu menu vstupte do “Nastavení
Není obraz nebo není informační menu
přídavného zařízení připojeného přes
Eurokonektor na zadní části televizoru.
Dobrý obraz, ale bez zvuku. • Stiskněte tlačítko +/- na dálkovém ovládači.
Barevné pořady nejsou barevné. • Pomocí Režimu menu vstupte do “Nastavení
Obraz je zkreslený při změně programu nebo při
zvolení teletextu.
Chybné zobrazování písmen a znaků se projeví
při sledování teletextu.
• Zapojte televizor do zásuvky a stiskněte tlačítko
na čelní straně aparátu.
• Pokud na televizoru svítí indikátor , stiskněte
tlačítko TV na dálkového ovladače.
obrazu” a zvolte “Reset” pro obnovení továrního
nastavení.
• Zkontrolujte zapojení přídavného zařízení a několikrát
stiskněte tlačítko na dálkovém ovladači, dokud
se správný vstupní symbol neobjeví na obrazovce.
• Přesvěčte se, zda funkce “TV reprodukotry”, režimu
menu “Podrobnější nastavení”, je zvolena v pozici
“Zap”.
• Zkontrolujte, jsou-li sluchátka odpojeny.
obrazu” a zvolte “Reset” pro obnovení továrního
nastavení.
• Na zadní straně televizoru vypněte zařízení připojené
přes 21-kolíkový Euro-konektor.
• Vstupem do nabídky Menu se dostanete až do
úrovně nastavení “Instalace/Jazyk/Země”, zde
zvolíte příslušný jazyk a zemi, kde je televizor
instalován a jejíž vysílání televizor přijíma. Pro země
kde se používají písmena a znaky z Cyrilice a jejich
název se nezobrazí v nabídce doporučujeme použít
nastavení televizoru pro Rusko. Takto se předejdete
chybnému zobrazování Cyrilichých písmen a znaků v
teletextu.
Obraz je nakloněný. •
Šum v obrazu. • Pomocí Režimu menu zvolte funkci “AFT” v režimu
Při sledování kanálu kodifikovaného pomocí
dekodéru, který je připojený k Eurokonektoru
je nestálý.
Dálkový ovládač nefunguje. • Vložte nové baterie.
Indikátor dočasného vypnutí televizoru
(pohotovostní režim) bliká.
S
3/ 3, obraz se správně nedekóduje nebo
• Pokud se závady nepodařilo odstranit, nechte televizor prověřit oprávněným odborníkem.
• Kryt NIKDY neodnímejte sami.
Pomocí Režimu menu zvolte funkci “Otočení obrazu”
v
režimu menu “Podrobnější nastavení” a upravte
naklonění.
menu “Ruční Ladění” a ručně dolade. Tak dosáhnete
lepšího příjmu obrazu.
• Pomocí Režimu menu zvolte funkci “Redukce
Šumu” v režimu menu “Pokročilé Vybavení” a zvolte
“Auto” pro zredukování šumu v obrazu.
• Pomocí systému menu, vstupte do režimu menu
“Instalace”. Poté vstupte do funkce “Prodrobnější
nastavení” a zvolte “Výstup AV3” v režimu “TV”.
• Přesvedčte se, že Dekodér není zapojený k
Eurokonektoru 2/ 2.
• Obrate se na nejbližší autorizovaný servis Sony.
22 Doplňkové informace
Page 67

Page 68

Page 69

Bevezetés
Köszönjük, hogy ezt a Sony FD Trinitron tökéletesen sík képernyős televíziót
választotta.
A televízió használata előtt figyelmesen olvassa el ezt az útmutatót és őrizze meg jövőbeni
referenciákhoz.
• Az útmutatóban használt jelképek:
• Fontos információ.
• Információ a funkcióról.
• 1,2... Követendő utasítás sor.
• A távvezérlő árnyékolt gombjai mutatják a
különböző utasítások végrehajtásához
megnyomandó gombokat.
• Információ az utasítások eredményéről.
Tartalomjegyzék
Bevezetés ................................................................................................................................................ 3
Biztonsági előírások................................................................................................................................. 4
Általános leírás
A távvezérlő gombjainak áttekintése....................................................................................................... 5
A televíziő gombjainak áttekintése ......................................................................................................... 6
Üzembehelyezés
Az elemek behelyezése a távvezérlőbe ................................................................................................... 6
Az antenna és a videomagnó csatlakoztatása ....................................................................................... 6
Első üzembehelyezés
A TV bekapcsolása és automatikus hangolás ........................................................................................ 7
A képernyőn megjelenő menürendszerek
Bevezetés a képernyő menürendszereibe és azok használata ............................................................... 9
Útmutató a menükhöz:
Képbeállítás.................................................................................................................................... 9
Hangszabályozás............................................................................................................................ 10
Kikapcsolás időzítő......................................................................................................................... 11
Nyelv/Ország .................................................................................................................................. 11
Automatikus hangolás .................................................................................................................... 11
Programhelyek átrendezése ........................................................................................................... 12
Programnevek ................................................................................................................................12
AV beállítás ..................................................................................................................................... 12
Kézi hangolás ................................................................................................................................. 13
Automatikus méret ......................................................................................................................... 15
Zajzár.............................................................................................................................................. 16
AV3 Kimenet................................................................................................................................... 16
TV hangszóró.................................................................................................................................. 16
RGB pocicionálás ........................................................................................................................... 17
Képelforgatás ................................................................................................................................. 17
Teletext.................................................................................................................................................. 18
Kiegészítő információ
Választható készülékek csatlakoztatása ................................................................................................. 19
Választható készülékek használata ......................................................................................................... 20
Műszaki jellemzők.................................................................................................................................... 21
Problémamegoldás...................................................................................................................................22
HU
Tartalomjegyzék 3
Page 70

Biztonsági előírások
Kizárólag 220-240 V-os hálózati
váltakozó feszültséggel üzemeltesse a
készüléket. Ne csatlakoztasson túl sok
készüléket ugyanahhoz az aljzathoz,
mert a túlterhelés tüzet okozhat.
Energiatakarékossági és biztonsági okok
miatt ne hagyja a készüléket készenléti
üzemmódban, amikor nem használja.
Hosszabb távollét esetén húzza ki a
hálózati csatlakozó vezetéket a fali
konnektorból. Ügyelni kell viszont arra,
hogy egyes készülékek bizonyos funkciói
csak a készenléti állapotban mûködnek.
A használati útmutató errõl egyértelmûen
tájékoztatást nyújt a késõbbi
fejezetekben.
Ne dugjon semmilyen tárgyat a
készülékbe, mert ezzel tüzet és
áramütést okozhat. Ha a szellőző
nyílásokon keresztül bármilyen szilárd
test, vagy folyadék kerül a készülék
belsejébe, húzza ki a hálózati csatlakozó
vezetéket. Azonnal ellenőriztesse
szakemberrel!
Soha ne nyissa ki a készülék hátsó
burkolatát. A javítást bízza
szakemberre.
A készülék szellőzőnyílásait hagyja
szabadon. A megfelelő szellőzés
érdekében a készülék minden
oldalánál hagyjon legalább 10 cm-es
szabad területet.
A tv készüléket puha, enyhén
megnedvesített ruhával tisztítsa. Ne
használjon karcoló eszközt, alkáli
anyagot tartalmazó tisztítószert,
súrolóport vagy oldószereket (hígitót
vagy benzint). Óvja a képernyőt a
karcolásoktól. Biztonsági okokból
húzza ki a készülék hálózati vezetékét,
mielőtt a tisztítást elkezdi.
Viharos időjárás, villámlás idején saját
biztonsága érdekében ne érintse meg
a készüléket, a hálózati csatlakozó
vezetéket és az antennakábelt.
Ne állítsa a készüléket szélsőségesen
meleg, párás vagy poros helyre, vagy
olyan helyre, ahol mechanikai
vibrációnak lehet kitéve.
A hálózati csatlakozó kihúzásánál a
csatlakozó dugót fogja meg, és ne a
vezetéket.
Az áramütés és a tűz veszélyének
elkerülése érdekében óvja a TV
készüléket esőtől és nedvességtől.
A tűz veszélyének elkerülése
érdekében ne tegyen a készülék
közelébe gyúlékony tárgyakat, ne
gyújtson nyílt lángot (ne égessen pl.
gyertyát).
Ne tegyen nehéz tárgyat a hálózati
vezetékre, mert megsérülhet.
Javasoljuk, hogy a felesleges
vezetéket csévélje fel a tv készülék
hátulján lévő tartóra.
A TV készüléket stabil állványra
helyezze. Soha se próbálja a
készüléket az állvánnyal együtt
mozgatni mindig külön mozgassa a
tévét és az állványt. Ne engedje, hogy a
gyerek felmásszon a TV-re. Ne
fordítsa a TV készüléket az oldalára,
vagy a képernyővel felfelé.
4 Biztonsági előírások
Mozgatás előtt húzza ki a hálózati
csatlakozót a konnektorból. A
készüléket óvatosan szállítsa, kerülje
a zötykölődős utcákat, óvja a
készüléket ütéstől, rázkódástól.
Ne takarja le a készülék
szellőzőnyílásait pl. függönnyel,
újsággal, stb.
Page 71

A távvezérlő gombjainak áttekintése
1
2
3
qj
qh
qg
qf
qd
qs
qa
9 A képernyő méret kiválasztása:
Többször egymás után nyomja meg ezt a gombot
a kép méretének megváltoztatásához. További
információt lásd az “Automatikus méret” c.
fejezetben a 15. oldalon.
q; Csatornaválasztás:
Nyomja meg az előző vagy a következő csatorna
kiválasztásához.
qa A hang elnémítása:
Nyomja meg a hang elnémításához. A hang
visszakapcsolásához nyomja meg újra.
qs Hangerő szabályozás:
Nyomja meg a televízió hangerejének
szabályozásához.
qd A menürendszer bekapcsolása:
Nyomja meg a menü képernyőn való
megjelenítéséhez. Nyomja meg újra annak
kikapcsolásához, a televízió normál
képernyőjéhez való visszatéréshez.
4
5
6
7
8
9
q;
1 A televízió ideiglenes kikapcsolása:
Nyomja meg a televízió ideiglenes kikapcsolásához (a készenléti
üzemmód jelző kigyullad). Nyomja meg újra a készenléti
üzemmódból (standby) való bekapcsoláshoz.
Az energiamegtakarítás érdekében ajánlatos a televíziót teljesen
kikapcsolni, ha azt nem használja.
Amennyiben 15 perc elteltével nincsen televíziójel és semmilyen
gombot nem nyomtak le, a televízió automatikusan készenléti
üzemmódba (standby) kapcsol.
2 A bemenő forrás kiválasztása:
Nyomja meg egymás után többször, amíg a kívánt bemenő forrás
jelképe megjelenik a képernyőn.
3 Csatornaválasztás:
Megnyomásukkal adja meg a kívánt programhelyeket. videomagnó.
Kétjegyű programszámok esetén 2,5 másodpercen belül nyomja
meg a második számjegyet.
4 Előző csatorna gomb:
Nyomja meg az utolsó választott csatornára való visszatéréshez (az
előző csatorna legalább 5 másodpercig kell képernyőn maradjon
előzőleg).
5 Ez a gomb csak teletext üzemmódban működik.
6 Ez a gomb csak teletext üzemmódban működik.
7 A teletext kiválasztása:
Nyomja meg a teletext megjelenítéséhez.
8 Vezérlőtárcsa:
• Amikor a MENU aktivált, használja ezeket a gombokat a
menürendszerben való mozgáshoz. További információt a 9.
oldalon, a “Bevezetés a képernyő menürendszereibe és azok
használata“ c. fejezetben talál.
• Amikor a MENU nem aktivált, nyomja meg OK-t a behangolt
csatornák listájának megjelenítéséhez. v vagy V megnyomásával
válassza ki a csatornát (televízióadót), majd ezt követően nyomja
meg OK-t a kiválasztott csatorna nézéséhez.
qf A TV üzemmód kiválasztása:
Nyomja meg a teletext vagy a videobemenet
kikapcsolásához.
qg A hangeffektus kiválasztása:
Nyomja meg többször egymás után ezt a gombot
a hangeffektus változtatásához.
qh A kép üzemmód kiválasztása:
Nyomja meg egymás után többször a kép
üzemmód kiválasztásához.
qj Információ megjelenítése a képernyőn:
Nyomja meg az összes utasítás képernyőn
történő megjelenítéséhez. Nyomja meg újra
annak törléséhez.
HU
A televízió funkcióin kívül, minden színes gomb használható a teletexttel történő műveletekhez is.
További információt a használati utasítás “Teletext” c. fejezetében talál.
Általános leírás 5
Page 72

A televízió gombjainak általános leírása
4
4
o4
Készenléti
üzemmód
(standby) jelző
Bekapcsolás /
Kikapcsolás
gomb
A TV oldalán található
fedelet megnyomva
tudja azt kinyitni a
csatlakozó aljzatok
használatához
A bemenő forrást
kiválasztó gomb
S Video
bemenet
Az elemek behelyezése a távvezérlőbe
Győződjön meg arról, hogy az elemeket a polaritásoknak megfelelő helyzetben helyezi be.
Óvja környezetünket! A használt elemeket az erre a célra kijelölt gyüjtőhelyen helyezze el.
A következő vagy az
előző program
kiválasztására szolgáló
gomb (a
csatornákat választja ki)
Hangerõ szabályozó
gombok
A televízió újbóli
beindítására
szolgáló gomb
Video
bemenet
Audio
bemenet
Fülhallgató
bemenet
televízió
S
O
N
Y
C
O
R
P
O
R
A
T
I
O
N
J
A
P
A
N
/4
/4
PAN
TION JA
SONY CORPORA
Az antenna és a videomagnó csatlakoztatása
A csatlakozó vezetékek nincsenek mellékelve.
MANUFACTURED UNDER LICENCE
Videomagnó
Vagy
Az eurocsatlakozóval történő csatlakoztatás választható
A videomagnó csatlakoztatására vonatkozó további részleteket lásd a használati
utasítás “Választható készülékek csatlakoztatása” c. fejezetében
FROM DOLBY LABORATORIES
"DOLBY" AND THE DOUBLE - D
SYMBOL ARE TRADEMARKS OF
DOLBY LABORATORIES
6 Általános leírás Üzembehelyezés
Page 73

A TV bekapcsolása és automatikus hangolás
A televízió első bekapcsolásakor menüsorok jelennek meg a képernyőn, melyekkel 1) kiválaszthatja a
menük nyelvét, 2) kiválaszthatja az országot, ahol a készüléket használni kívánja, 3) a képdőlés
beállítása, 4) automatikusan megkeresheti és tárolhatja az összes rendelkezésre álló csatornát
(televízióadót) és 5) megváltoztathatja a csatornák (televízióadók) képernyőn való megjelenésének
sorrendjét.
Mindazonáltal, ha a jövőben ezen beállítások bármelyikét módosítani kívánja, azt a megfelelő
opciójának kiválasztásával teheti (Beállítás menü) vagy a televízió újraindító gombjának
megnyomásával.
Csatlakoztassa a televízió csatlakozóját a hálózati aljzatba (220-
1
240 V váltakozó feszültség, 50Hz).
A televízió első bekapcsolásakor ez automatikusan kigyullad.
Amennyiben ez nem így van, nyomja meg az előlap
bekapcsolás/ kikapcsolás gombját ahhoz, hogy kigyulladjon.
A televízió első bekapcsolásakor a képernyőn automatikusan
megjelenik a Language (Nyelv) menü.
Nyomja meg a távvezérlő v vagy V gombját a nyelv
2
kiválasztásához, majd ezt követően nyomja meg az OK gombot a
választás megerősítésére. Ettől kezdve minden menü a választott
nyelven jelenik meg.
Language
i
v
Svenska
Norsk
English
Nederlands
Français
Italiano
V
i
Select Language:
OK
A képernyőn automatikusan megjelenik az Ország menü. Nyomja
3
meg a v vagy V gombot, majd ezt követően nyomja meg az OK
gombot a választás megerősítésére.
• Amennyiben a listán nem jelenik meg azon ország, ahol a
televíziót használni fogja, válassza “-“ -t az ország helyett.
• Annak érdekében, hogy a cirill betük helyesen jelenjenek
meg a képernyőn, az országok listájából válassza
Oroszországot (Russia), ha a lista nem tartalmazza az Ön
hazáját.
A földmágnesesség következtében előfordulhat, hogy a kép
4
ferdén jelenik meg. Szükség esetén a Képelforgatás lehetővé
teszi a kép beállítását.
a) Ha nem szükséges, nyomja meg v vagy V a nem szükséges
kiválasztásához, majd nyomja meg az OK-t.
b) Ha szükséges, nyomja meg a v vagy V a beállítás
kiválasztásához, majd nyomja meg az OK-t. Ezt követően
nyomja meg v vagy V a képdőlés 5 és +5 közötti
beállításához. Végezetül nyomja meg az OK-t a rögzítéshez.
Ország
i
v
Sverige
Norge
Italia
Deutschland
Österreich
i
V
Ország kivál:
Ha a kép ferde, kérjük
állítsa be a kellő pozíciót.
nem szükséges
beállítás
HU
OK
OK
folytatódik...
Első üzembeheyezés 7
Page 74

A TV bekapcsolása és automatikus hangolás
Az Automatikus hangolás menü megjelenik a képernyőn. Nyomja
5
meg az OK gombot az Igen kiválasztásához.
A televízió elkezdi automatikusan hangolni és rögzíteni az összes
6
rendelkezésre álló csatornát (televízióadót).
Ez a művelet eltarthat néhány percig. Legyen türelemmel és
ne nyomjon meg egyetlen gombot sem a hangolás folyamata
alatt, mivel ellenkező esetben a folyamat nem fejeződik be.
Ha a televízió nem talált egyetlen csatornát (televízióadót)
sem az automatikus hangolás végrehajtása után, a
képernyőn megjelenik egy üzenet, mely kéri, hogy
csatlakoztassa az antennát. Kérjük csatlakoztassa azt úgy,
ahogyan a kezelési útmutató 6. oldalán le van írva, majd
nyomja meg az OK-t. Az automatikus hangolás újból
megindul.
Szeretné elindítani az
automatikus hangolást?
Igen
Nem
OK
Automatikus hangolás
Hangolás:
Rendszer:
Csatorna:
Keresés...
Csatorna nem található.
Csatlakoztassa az antennát.
Megerősít
01
B/G
C21
OK
7
Miután a televízió hangolta és rögzítette az összes csatornát
(televízióadót), a képernyőn automatikusan megjelenik a
Programhely- átrendezés menü, hogy megváltoztathassa a
csatornák képernyőn történő megjelenésének sorrendjét.
a) Ha nem kívánja a csatornák sorrendjét megváltoztatni, menjen
a 8. lépéshez.
b) Ha meg kívánja változtatni a csatornák sorrendjét:
1 Nyomja meg a v vagy V gombot a programszám
kiválasztásához a csatornával(televízióadó), melynek helyét
meg kívánja változtatni, majd ezt követően nyomja meg a b.
2 Nyomja meg a v vagy a V az új programszám
kiválasztásához, melyen a kiválasztott csatornát
(televízióadót) rögzíteni kívánja, majd nyomja meg a B.
3 Ismételje meg a b1) és b2) lépést egyéb televíziócsatornák
újbóli átrendezéséhez.
Nyomja meg a MENU gombot a normális televízióképhez való
8
visszatéréshez.
A televízió működésre kész.
Programhely-átrendezés
Hangolás:
01 TVE
02 TVE2
03 TV3
04 C33
05 C27
06 C58
Csatorna választása:
Kilépés:
MENU
Programhely-átrendezés
Hangolás:
01 TVE
02 TVE2
03 TV3
04 C33
05 C27
06 C58 05 C27
Új programhely vál.:
Kilépés:
MENU
MENU
OK
OK
8 Első üzembeheyezés
Page 75

Bevezetés a képernyő menürendszereibe és azok használata
Ez a televízió egy a képernyőn megjelenő menürendszert alkalmaz a különböző műveletekben való
eligazodáshoz. Használja a távvezérlő következő gombjait a menükben történő mozgáshoz:
Nyomja meg a MENU gombot, hogy a menü első szintje
1
megjelenjen a képernyőn.
• A kívánt menü vagy opció kiemeléséhez nyomja meg v vagy V.
2
• A választott menübe vagy opcióba történő belépéshez nyomja
meg b.
• A menübe vagy az előző opcióhoz való visszatéréshez nyomja
meg B
.
• A választott opció beállításainak módosításához nyomja meg v/
V/B vagy b.
• Választásának megerősítésére és rögzítésére nyomja meg az
OK.
Nyomja meg a MENU gombot a normális televízióképhez való
3
visszatéréshez.
MENU
MENU
Útmutató a menükhöz
1. szint 2. szint 3. szint / funkció
KÉPBEÁLLÍTÁS
Képbeállítás
Üzemmód: Egyéni
Kontraszt
Fényerő
Színtelítetség
Képélesség
Színárnyalat
Törlés
OK
• A Fényerő, a Színtelítettség és a Képélesség csak akkor módosítható, ha az Egyéni képernyő
üzemmódot választotta ki.
• A Színárnyalat csak az NTSC színrendszerhez áll rendelkezésre (pl.: USA videokazetták).
• A gyárilag beállított képbeállítások visszaállításához válassza ki a Törlés-t majd nyomja meg az OK-t.
Képbeállítás
Üzemmód: Egyéni
Kontraszt
Fényerő
Színtelítetség
Képélesség
Színárnyalat
Törlés
A “Képbeállítás” menü a kép beállításainak
módosítását teszi lehetővé.
Ehhez:
Az Ön által módosítani kívánt opció kiválasztása
OK
után, nyomja meg a b. Ezt követően többször
egymás után nyomja meg a v/V/B vagy b a beállítás
módosításához, majd végezetül nyomja meg az OKt a rögzítéshe.
Ez a menü szintén lehetővé teszi a kép üzemmód
módosítását az Ön által nézett program típusának
megfelelően:
v Egyéni (egyéni ízléshez).
v Élő (élő televíziós közvetítéseknél, DVD és Digital
Set Top Box vevőegységnél).
v Mozi (filmekhez).
folytatódik...
HU
A képernyőn megjelenő menürendszerek 9
Page 76

Bevezetés a képernyő menürendszereibe és azok használata
1. szint 2. szint 3. szint / funkció
Képbeállítás
Üzemmód: Egyéni
Kontraszt
Fényerő
Színtelítetség
Képélesség
Színárnyalat
Törlés
Hangszabályozás
Effekt: Természetes
Magas hangszín
Mély hangszín
Balansz
Törlés
Kettős hang: Mono
Auto hangerő: Be
OK
Hangszabályozás
Effekt: Természetes
Magas hangszín
Mély hangszín
Balansz
Törlés
Kettős hang: Mono
Auto hangerő: Be
OK
OK
Effekt bvTermészetes: A “BBE High Definition Sound System” *-en keresztül kiemeli a hang
élességét, részleteit és jelenlétét.
v Dinamikus: A “BBE High Definition Sound System” * felerősíti a hang élességét
és jelenlétét, jobban kivehető hangot és valósabb zenét adva.
v Dolby**Virtual: A “Dolby Pro Logic Surround” hangját utánozza.
v Ki: Speciális hangeffektusok nélkü.
Magas hangszín
bBKevésbé b Több
Mély hangszínbBKevésbé b Több
Balansz bBBal b Jobb
Törlés Visszaállítja a gyárban beállított hangszinteket.
K
Kettős hang b • Sztereo adásokhoz:
v Mono.
v Stereo.
• Kétnyelvű adásokhoz:
v Mono (mono csatornához, ha rendelkezésre áll).
v A (az 1. csatornához).
v B (az 2. csatornához).
Auto hangerőbvKi: A hangerő a sugárzott jel függvényében változik.
v Be:A hangerő a sugárzott jeltől függetlenül ugyanaz marad (pl.: hírdetések).
A “Hangszabályozás” menü lehetővé teszi a
hangbeállítások módosítását.
Ehhez:
A a módosítani kívánt opció kiválasztása után,
nyomja meg a b gombot. Ezt követően nyomja meg
többször egymás után a v/V/B vagy b a beállítás
módosításához, majd végezetül nyomja meg az OK-t
a rögzítéshe.
HANGSZABÁLYOZÁS
• Ha fülhallgatón keresztül hallgatja a televíziót, az “Effekt” opció automatikusan Ki pozícióra vált.
• Ha az Dolby Virtual -ban beállítja a “Effekt” -t, az Auto hangerő automatikusan Ki pozícióba kapcsol
és fordítva.
* A BBE High Definition Sound System-et a Sony Corporation gyártja a BBE Sound, Inc. licence
alapján. Az 4,638,258 és No. 4,482,866 sz. USA szabadalommal védve. A “BBE” szó és “BBE”
jelkép a BBE Sound, Inc. kereskedelmi márkái.
**Ezt a televíziót a “Dolby Surround” hangeffektus kiadásához tervezték, mely 4 hangszóró hangját
utánozza a televízió két hangszórójával. Ez csak akkor lehetséges, ha az adó audio jele “Dolby
Surround”. Ezenkívül még javíthatja a hangeffektust egy külső erősítő csatlakoztatásával. További
információt a 20. oldalon, a “Külső” audio készülék csatlakoztatása c. fejezetben talál.
**Gyártva a Dolby Laboratories szabadalmi engedélye alapján. “Dolby” , “Pro Logic” és a dupla D
jelkép, a Dolby Laboratories védjegye.
folytatódik...
10 A képernyőn megjelenő menürendszerek
Page 77

Bevezetés a képernyő menürendszereibe és azok használata
1. szint 2. szint 3. szint / funkció
KIKAPCSOLÁS IDŐZÍTŐ
Képbeállítás
Üzemmód: Egyéni
Kontraszt
Fényerő
Színtelítetség
Képélesség
Színárnyalat
Törlés
Időzítő
Kikapcs. időzítő:
Képbeállítás
Üzemmód: Egyéni
Kontraszt
Fényerő
Színtelítetség
Képélesség
Színárnyalat
Törlés
Beállítás
Nyelv/Ország
Automatikus hangolás
Programhely-átrendezés
Programnevek
AV beállítás
Kézi hangolás
Részlet beállítása
OK
Ki
OK
OK
OK
Időzítő
Kikapcs. időzítő:
Beállítás
Nyelv/Ország
Automatikus hangolás
Programhely-átrendezés
Programnevek
AV beállítás
Kézi hangolás
Részlet beállítása
Ki
OK
Az “Időzítő ” menün belüli “Kikapcs. Időzítő ” opció
lehetővé teszi egy olyan időtartam kiválasztását,
melynek elteltével a televízió automatikusan
készenléti üzemmódba (standby) kapcsol.
Ehhez:
Az opció kiválasztása után nyomja meg b. Ezt
követően nyomja meg v vagy V az időtartam
kiválasztásához (legfeljebb 4 óra).
• Ha meg kívánja tekinteni a kikapcsolásig
fennmaradó időt miközben a televíziót nézi,
nyomja meg a gombot.
• Egy perccel a televízió készenléti üzemmódba
kapcsolása előtt a fennmaradó idő megjelenik a
képernyőn.
NYELV/ ORSZÁG
A “Beállítás ” menün belüli “Nyelv/ Ország” opció
lehetővé teszi a képernyőn megjelenő menük
nyelvének kiválasztását. Lehetővé teszi azon ország
kiválasztását is, ahol a televíziót használni kívánja.
Ehhez:
Az opció kiválasztása után nyomja meg b, majd ezt
követően járjon el a A TV bekapcsolása és
automatikus hangolás c. fejezet 2. és 3. (a 7.
oldalon) lépéseiben leírtak szerint.
OK
HU
Képbeállítás
Üzemmód: Egyéni
Kontraszt
Fényerő
Színtelítetség
Képélesség
Színárnyalat
Törlés
Beállítás
Nyelv/Ország
Automatikus hangolás
Programhely-átrendezés
Programnevek
AV beállítás
Kézi hangolás
Részlet beállítása
AUTOMATIKUS HANGOLÁS
A “Beállítás” menün belüli “Automatikus
hangolás” opció lehetővé teszi, hogy a televízió az
összes rendelkezésre álló csatornát (televízióadót)
megkeresse és elraktározza.
OK
Beállítás
Nyelv/Ország
Automatikus hangolás
Programhely-átrendezés
Programnevek
AV beállítás
Kézi hangolás
Részlet beállítása
OK
Ehhez:
Az opció kiválasztása után nyomja meg b, majd ezt
követően járjon el a “A TV bekapcsolása és
automatikus hangolás” c. fejezet 5. és 6. (a 8.
oldalon) lépéseiben leírtak szerint.
OK
folytatódik...
A képernyőn megjelenő menürendszerek 11
Page 78

Bevezetés a képernyő menürendszereibe és azok használata
1. szint 2. szint 3. szint / funkció
PROGRAMHELYEK ÁTRENDEZÉSE
Képbeállítás
Üzemmód: Egyéni
Kontraszt
Fényerő
Színtelítetség
Képélesség
Színárnyalat
Törlés
Beállítás
Nyelv/Ország
Automatikus hangolás
Programhely-átrendezés
Programnevek
AV beállítás
Kézi hangolás
Részlet beállítása
Képbeállítás
Üzemmód: Egyéni
Kontraszt
Fényerő
Színtelítetség
Képélesség
Színárnyalat
Törlés
Beállítás
Nyelv/Ország
Automatikus hangolás
Programhely-átrendezés
Programnevek
AV beállítás
Kézi hangolás
Részlet beállítása
OK
Beállítás
Nyelv/Ország
Automatikus hangolás
Programhely-átrendezés
Programnevek
AV beállítás
Kézi hangolás
Részlet beállítása
OK
OK
Beállítás
Nyelv/Ország
Automatikus hangolás
Programhely-átrendezés
Programnevek
AV beállítás
Kézi hangolás
Részlet beállítása
OK
A “Beállítás” menün belüli “Programhelyátrendezés” opció lehetővé teszi a csatornák
(televízióadók) televízión való megjelenési
sorrendjének megváltoztatását.
Ehhez:
Az opció kiválasztása után nyomja meg b, majd ezt
követően járjon el a “A TV bekapcsolása és
automatikus hangolás” c. fejezet 7. b) (a 8. oldalon)
lépésében leírtak szerint.
OK
PROGRAMNEVEK
A “Beállítás” menün belüli “Programnevek” opció
lehetővé teszi, hogy egy legfeljebb öt karakterből
álló névvel lásson el egy csatornát.
Ehhez:
1 Az opció kiválasztása után nyomja meg b, majd
ezt követően nyomja meg v vagy V az elnevezni
kívánt csatorna számának kiválasztásához.
2 Nyomja meg b. A Címke oszlop első elemének
kiemelésével nyomja meg v vagy V egy bet«,
szám kiválasztásához vagy “ -“ egy üres hely
kiválasztásához, majd ezt követően nyomja meg
b a karakter megerősítéséhez. A többi négy
OK
karaktert ugyanígy válassza ki. Végezetül nyomja
meg OK-t a rögzítéshez.
Képbeállítás
Üzemmód: Egyéni
Kontraszt
Fényerő
Színtelítetség
Képélesség
Színárnyalat
Törlés
Beállítás
Nyelv/Ország
Automatikus hangolás
Programhely-átrendezés
Programnevek
AV beállítás
Kézi hangolás
Részlet beállítása
OK
Beállítás
Nyelv/Ország
Automatikus hangolás
Programhely-átrendezés
Programnevek
AV beállítás
Kézi hangolás
Részlet beállítása
OK
OK
12 A képernyőn megjelenő menürendszerek
AV BEÁLLÍTÁS
A “Beállítás” menün belüli “AV beállítás” opció
lehetővé teszi, hogy elnevezzen egy, a televízióhoz
csatlakoztatott külső készüléket.
Ehhez:
1 Az opció kiválasztása után nyomja meg b, majd
ezt követően nyomja meg v vagy V az elnevezni
kívánt bemeneti forrás kiválasztásához (AV1,
AV2 vagy AV3 a televízió hátsó részén lévő
eurocsatlakozókhoz csatlakoztatott választható
készülékekhez és AV4 az elülső aljzatokhoz). Ezt
követően nyomja meg b.
2 A “Címke” oszlopban automatikusan megjelenik
egy előre meghatározott címke:
a) Ha az előre meghatározott hat címke (CABLE,
GAME, CAM, DVD, VIDEO vagy SAT)
valamelyikét akarja használni, nyomja meg v
vagy V annak kiválasztásához, majd végezetül
nyomja meg OK-t a rögzítéshez.
b) Ha saját címkét akar készíteni, válassza
Módosít-t és nyomja meg b. Ezt követően, az
első elem kiemelésével, nyomja meg b egy
betű, szám kiválasztásához vagy “-“ egy üres
hely kiválasztásához, majd ezt követően
nyomja meg b a karakter megerősítéséhez. A
többi négy karaktert ugyanígy válassza ki,
majd végezetül nyomja meg OK-t a
rögzítéshez.
folytatódik...
Page 79

Bevezetés a képernyő menürendszereibe és azok használata
1. szint 2. szint 3. szint / funkció
KÉZI HANGOLÁS
Képbeállítás
Üzemmód: Egyéni
Kontraszt
Fényerő
Színtelítetség
Képélesség
Színárnyalat
Törlés
Beállítás
Nyelv/Ország
Automatikus hangolás
Programhely-átrendezés
Programnevek
AV beállítás
Kézi hangolás
Részlet beállítása
OK
Beállítás
Nyelv/Ország
Automatikus hangolás
Programhely-átrendezés
Programnevek
AV beállítás
Kézi hangolás
Részlet beállítása
OK
A “Beállítás” menün belüli “Kézi hangolás” opció
lehetővé teszi:
a) A csatornák (televízióadók) egyenkénti és a
kívánt sorrendben történ ő beállítását valamint
egy videobemenet beállítását.
Ehhez:
1 A “Kézi hangolás” opció kiválasztása után
nyomja meg b. A“Hangolás” opció
kiemelésével nyomja meg b, majd ezt követően
nyomja meg v vagy V a programszám (hely)
OK
kiválasztásához, melyen a televízióadót vagy
videocsatornát beállítani kívánja (a
videocsatornához ajánlatos a “0” program
kiválasztása). Nyomja meg B.
2 A következő opció attól függően jelenik
meg, hogy az “Nyelv/Ország” menüben
melyik országot választotta.
A Rendszer opció kiválasztása után nyomja meg
b, majd ezt követően nyomja meg v vagy V a
televízió sugárzási rendszerének kiválasztásához
(B/G Nyugat-Európában vagy D/K KeletEurópában). Nyomja meg B.
3 A Csatorna opció kiválasztása után nyomja meg
b, majd ezt követően nyomja meg v vagy V a
csatorna típusának kiválasztásához ( “C”földi
csatornákhoz vagy “S” kábelcsatornákhoz).
Nyomja meg b. Ezt követően nyomja meg a
számgombokat a televízióadó csatorna vagy a
videocsatorna jel számának közvetlen
beviteléhez. Ha nem ismeri a csatornaszámot,
nyomja meg v vagy V annak megkereséséhez.
Amikor a rögzíteni kívánt csatornát megtalálta,
nyomja meg az OK-t kétszer.
Ismételje meg ezeket a lépéseket további
csatornák beállításához és rögzítéséhez.
b) Csatornák elnevezése legfeljebb öt karakterből
álló névvel.
Ehhez:
A Hangolás opció kiemelésével nyomja meg a
PROG +/- az elnevezni kívánt program számának
megjelenéséig. Amikor ez megjelenik a
képernyőn, válassza a Címke opciót, majd ezt
követően nyomja meg b. Nyomja meg v vagy V
egy betű, szám vagy “-“ egy bet«köz
kiválasztásához, majd nyomja meg b a karakter
megerősítéséhez. A további négy karaktert
ugyanilyen módon válassza ki. Az összes
karakter kiválasztása után nyomja meg kétszer az
OK-t a rögzítéshez.
folytatódik...
HU
A képernyőn megjelenő menürendszerek 13
Page 80

Bevezetés a képernyő menürendszereibe és azok használata
1. szint 2. szint 3. szint / funkció
Képbeállítás
Üzemmód: Egyéni
Kontraszt
Fényerő
Színtelítetség
Képélesség
Színárnyalat
Törlés
Beállítás
Nyelv/Ország
Automatikus hangolás
Programhely-átrendezés
Programnevek
AV beállítás
Kézi hangolás
Részlet beállítása
c) Annak ellenére, hogy az automatikus
finomhangolás (AFT) mindig be van kapcsolva,
azt kézileg is be tudja állítani a jobb képvétel
érdekében, amennyiben a kép torzítva jelenik
meg.
OK
Beállítás
Nyelv/Ország
Automatikus hangolás
Programhely-átrendezés
Programnevek
AV beállítás
Kézi hangolás
Részlet beállítása
OK
Ehhez:
Azon csatorna (televízióadó) nézése közben,
melyen a finomhangolást el kívánja végezni,
válassza ki az AFT opciót, majd ezt követően
nyomja meg b. Nyomja meg v vagy V a
csatornafrekvencia szintjének beállításához -15
és +15 között. Végezetül nyomja meg kétszer az
OK-t a rögzítéshez.
OK
d) A nem kívánt programakhelyek kihagyása a
PROG +/- gombokkal történő kiválasztáskor való
átugrással.
Ehhez:
A Hangolás opció kiemelésével nyomja meg a
PROG +/- a kihagyni kívánt program számának
megjelenéséig. Amikor ez megjelenik a
képernyőn, válassza az Ugrás opciót, majd ezt
követően nyomja meg b. Nyomja meg v vagy V
az Igen kiválasztásához, majd végezetül nyomja
meg kétszer az OK-t a rögzítéshez.
Ha a későbbiekben ezt a funkciót törölni kívánja,
válassza újból a “Nem” -et az “Igen” helyett.
e) Nézhet kódolt adást is a hármas 3/ 3
eurocsatlakozóhoz csatlakoztatott dekóderről
vagy az ahhoz csatlakoztatott videomagnóval
felvételt is készíthet.
S
A következő opció attól függően jelenik
meg, hogy az “Nyelv/Ország” menüben
melyik országot választotta.
Ehhez:
Válassza ki a Dekóder opciót és nyomja meg b.
Ezt követően nyomja meg v vagy V a Be
kiválasztásához. Végezetül nyomja meg kétszer
OK-t annak rögzítéséhez.
Ha a későbbiekban törölni akarja ezt a funkciót,
válassza újból a “Ki” -t “Be” helyett.
folytatódik...
14 A képernyőn megjelenő menürendszerek
Page 81

Bevezetés a képernyő menürendszereibe és azok használata
1. szint 2. szint 3. szint / funkció
AUTOMATIKUS MÉRET
Képbeállítás
Üzemmód: Egyéni
Kontraszt
Fényerő
Színtelítetség
Képélesség
Színárnyalat
Törlés
Beállítás
Nyelv/Ország
Automatikus hangolás
Programhely-átrendezés
Programnevek
AV beállítás
Kézi hangolás
Részlet beállítása
OK
OK
Smart
Részlet beállítása
Auto formátum
Zajzár:
AV3 kimenet:
TV hangszóró:
RGB pozionálás:
Képelforgatás:
Be
Auto
TV
Be
0
0
A “Részlet beállítása” menün belüli “Auto formátum”
opció lehetővé teszi, hogy a televízió automatikusan
változtassa a képméret típusát.
Ehhez:
Az opció kiválasztása után nyomja meg b. Ezt
követően nyomjabn meg v vagy V az Be
kiválasztásához (amennyiben azt kívánja, hogy a
televízió az adójel szerint változtassa automatikusan
a képméretet) vagy válassza Ki-t (ha az ízlése
szerinti képméretet kívánja megtartani). Végül
nyomja meg OK-t a rögzítéshez.
OK
Akár “Be”-t, akár Ki”-t választott az “Auto
formátum” opcióban, a képméret típusát
mindenkor változtathatja a távvezérlő
gombjának többszöri megnyomásával. Az
alábbi méretek közül választhat:.
Smart: A 4:3 kép közepe arányos, alsó és felső
része össze van nyomva
4 : 3
14 : 9
Zoom
Wide
4:3: Hagyományos képméret. A teljes kép
megjelenítése
14:9: 4:3 és 16:9 méretek közötti képtípus
Zoom: Vízszintes képernyőméret videofilmekhez
HU
Wide: 16:9 adásokhoz
A “Smart” , “Zoom” és 14:9”
formátumokban a képernyő úgy a felső mint
az alsó felén le van vágva. Nyomja meg v
vagy V a kép képernyőn való helyzetének
beállításához (pl. a feliratozások
olvasásához)
folytatódik...
A képernyőn megjelenő menürendszerek 15
Page 82

Bevezetés a képernyő menürendszereibe és azok használata
1. szint 2. szint 3. szint / funkció
ZAJZÁR
Képbeállítás
Üzemmód: Egyéni
Kontraszt
Fényerő
Színtelítetség
Képélesség
Színárnyalat
Törlés
Beállítás
Nyelv/Ország
Automatikus hangolás
Programhely-átrendezés
Programnevek
AV beállítás
Kézi hangolás
Részlet beállítása
Képbeállítás
Üzemmód: Egyéni
Kontraszt
Fényerő
Színtelítetség
Képélesség
Színárnyalat
Törlés
Beállítás
Nyelv/Ország
Automatikus hangolás
Programhely-átrendezés
Programnevek
AV beállítás
Kézi hangolás
Részlet beállítása
OK
Részlet beállítása
Auto formátum
Zajzár:
AV3 kimenet:
TV hangszóró:
RGB pozionálás:
Képelforgatás:
OK
OK
Részlet beállítása
Auto formátum
Zajzár:
AV3 kimenet:
TV hangszóró:
RGB pozionálás:
Képelforgatás:
OK
Be
Auto
TV
Be
0
0
OK
Be
Auto
TV
Be
0
0
OK
A “Részlet beállítása” menün belüli “Zajzár” opció
lehetővé teszi a kép zajszintjének automatikus
csökkentését gyenge TV jelek esetén.
Ehhez:
Az opció kiválasztása után nyomja meg b. Ezt
követően nyomja meg v vagy V a Auto
kiválasztásához, majd végezetül nyomja meg az
OK-t a rögzítéshez.
Ha a későbbiekben ezt a funkciót törölni kívánja,
válassza újból a “Ki” -t a Auto” helyett.
AV3 KIMENET
A “Részlet beállítása” menün belüli “AV3
kimenet” opció lehetővé teszi az 3/ 3
eurocsatlakozó kimeneti forrásának kiválasztását,
hogy ily módon rögzíthessen az eurocsatlakozóról
bármely, a televízióból vagy egyéb, az 1/ 1
vagy 2/ 2 eurocsatlakozóhoz vagy a 4
vagy 4 és
külső berendezésből érkező bármilyen jelet
felveheti.
Ha videomagnója rendelkezik Smartlinkkel, ez
az eljárás szükségtelen.
Ehhez:
Az opció kiválasztása után, nyomja meg b. Ezt
követően nyomja meg v vagy V a kívánt TV, AV1,
AV2, AV4, YC4 vagy AUTO kimeneti jel
kiválasztásához.
4 elülső aljzathoz csatlakoztatott
S
S
Ha az AUTO” -t választja, a kimeneti jel mindig megegyezik majd a TV képernyőjén megjelenővel.
Ha az 3/ 3 eurocsatlakozóhoz vagy egy, az eurocsatlakozóhoz csatlakoztatott videomagnóhoz
S
egy dekódert csatlakoztat, ne feledje az AUTO” -ban vagy a “TV” -ben az “AV3
kimenetet” kiválasztani a megfelelő dekódoláshoz.
TV HANGSZÓRÓI
Képbeállítás
Üzemmód: Egyéni
Kontraszt
Fényerő
Színtelítetség
Képélesség
Színárnyalat
Törlés
Beállítás
Nyelv/Ország
Automatikus hangolás
Programhely-átrendezés
Programnevek
AV beállítás
Kézi hangolás
Részlet beállítása
OK
Részlet beállítása
Zajzár:
AV3 kimenet:
TV hangszóró:
RGB pozionálás:
Képelforgatás:
PIP forrás AV1
PIP pozíciója:
OK
Auto
TV
Be
0
0
OK
A “Részlet beállítása” menün belüli “TV
hangszóró” opció lehetővé teszi,a televízió
hangszórói hangjának törlését, hogy így azt csak a
televízió hátlapján lévő audiokimenetekhez
csatlakoztatott külső erősítőn keresztül hallja.
Ehhez:
Az opció kiválasztása után nyomja meg b. Ezt
követően nyomja meg v vagy V a Ki
kiválasztásához, majd végezetül nyomja meg az
OK-t a rögzítéshez.
Ha a későbbiekben ezt a funkciót törölni kívánja,
válassza újból a “Be”-t a “Ki” helyett.
16 A képernyőn megjelenő menürendszerek
folytatódik...
Page 83

Bevezetés a képernyő menürendszereibe és azok használata
1. szint 2. szint 3. szint / funkció
RGB POCIONÁLÁS
Képbeállítás
Üzemmód: Egyéni
Kontraszt
Fényerő
Színtelítetség
Képélesség
Színárnyalat
Törlés
Beállítás
Nyelv/Ország
Automatikus hangolás
Programhely-átrendezés
Programnevek
AV beállítás
Kézi hangolás
Részlet beállítása
Képbeállítás
Üzemmód: Egyéni
Kontraszt
Fényerő
Színtelítetség
Képélesség
Színárnyalat
Törlés
Beállítás
Nyelv/Ország
Automatikus hangolás
Programhely-átrendezés
Programnevek
AV beállítás
Kézi hangolás
Részlet beállítása
OK
Részlet beállítása
Zajzár:
AV3 kimenet:
TV hangszóró:
RGB pozionálás:
Képelforgatás:
PIP forrás AV1
PIP pozíciója:
OK
OK
Részlet beállítása
Zajzár:
AV3 kimenet:
TV hangszóró:
RGB pozionálás:
Képelforgatás:
PIP forrás AV1
PIP pozíciója:
OK
Auto
TV
Be
0
0
OK
Auto
TV
Be
0
0
OK
RGB jelforrás csatlakoztatásakor, mint pl. egy
“Playstation” , előfordulhat, hogy szükséges a
vízszintes képközép beállítása. Ebben az esetben
ezt a Részlet beállítása” menün belüli “RGB
pozicionálás” opció használatával állíthatja be.
Ehhez:
Az RGB jelforrás nézése közben válassza ki az “RGB
Közép” opciót és nyomja meg
nyomja meg
v vagy V a képközepelés -10 és +10
b. Ezt követően
közötti beállításához. Végezetül nyomja meg az OK-t
a rögzítéshez.
KÉPELFORGATÁS
A földmágnesesség következtében előfordulhat,
hogy a kép ferdén jelenik meg. Ebben az esetben ezt
a “Részlet beállítása” menün belüli “Képelforgatás”
opció használatával állíthatja be.
Ehhez:
Az opciót kiválasztását után nyomja meg b. Ezt
követően nyomja meg v vagy V a képdőlés -5 és +5
közötti beállításához. Végezetül nyomja meg az OK-t
a rögzítéshez
HU
A képernyőn megjelenő menürendszerek 17
Page 84

Teletext
A teletext a legtöbb televízióadó által sugárzott információs szolgáltatás. A teletext tartalomjegyzék
oldala (általában a 100. oldal) nyújt a szolgáltatás használatára vonatkozó tájékoztatást. A teletexten
belül használja a távvezérlő gombjait az ezen az oldalon leírtak szerint.
Győződjön meg arról, hogy erős jellel rendelkező televízió csatornát használ, ellenkező esetben a
teletextben hibák adódhatnak.
TELETEXT
TELETEXT
TELETEXT
TELETEXT
TELETEXT
TELETEXT
TELETEXT
A Teletext szolgáltatásba való belépés:
Miután kiválasztotta azt a csatornát (televízióadót), mely az Ön által
nézni kívánt teletext szolgáltatást sugározza, nyomja meg .
Teletext oldal kiválasztása:
A távvezérlő gombjainak használatával vigye be az Ön által megtekintenikívánt
oldalszám három számjegyét.
• Ha eltéveszti, üssön be bármilyen három számjegyet, majd ezt követően
üsse be újra a helyes oldalszámot.
• Amennyiben az oldalszámláló nem áll le, ez azt jelenti, hogy a kért oldal nem áll rendelkezésre. Ebben az
esetben üssön be egy másik oldalszámot.
Az előző vagy a következő oldal kiválasztása:
Nyomja meg PROG + ( ) vagy PROG - ().
A teletext tévéképernyő elé történő helyezése:
A teletext nézése közben nyomja meg . Újfent nyomja meg azt a teletext üzemmódból való
visszatéréshez.
TELETEXT
Index
Index
Index
Index
Index
Index
Index
Index
Programme
Programme
Programme
Programme
Programme
Programme
Programme
Programme
News
News
News
News
News
News
News
News
Sport
Sport
Sport
Sport
Sport
Sport
Sport
Sport
Weather
Weather
Weather
Weather
Weather
Weather
Weather
Weather
153
153
153
153
153
153
153
153
101
101
101
101
101
101
101
101
25
25
25
25
25
25
25
25
98
98
98
98
98
98
98
98
Egy oldal kimerevítése:
Nyomja meg / . Újfent nyomja meg azt a kimerevítés törléséhez.
Rejtett információ láthatóvá tétele (pl.: fejtörők megoldásai):
Nyomja meg / . Újfent nyomja meg azt az információ elrejtéséhez.
Egy aloldal kiválasztásához:
Egy teletext oldal több aloldalból állhat. Ebben az esetben a bal felső részben megjelenő oldalszám fehérről
zöldre vált és egy vagy több nyíl jelenik meg az oldalszám mellett. Nyomja meg többször egymás után a
távvezérlő B vagy b gombját a kívánt aloldal nézéséhez.
A Teletext szolgáltatásból való kilépés:
Nyomja meg .
Fastext
A Fastext szolgáltatás lehetővé teszi, hogy egyetlen gomb lenyomásával hozzáférjen a teletext
oldalaihoz.
A teletext szolgáltatáson belül, amennyiben Fastext jeleket sugároznak, a képernyő alsó részén
megjelenik egy színkód menü, mely lehetővé teszi, hogy közvetlenül hozzáférjen egy oldalhoz. Ehhez
nyomja meg a távvezérlő megfelelő szín« gombját (piros, zöld, sárga vagy kék).
18 Teletext
Page 85

Választható készülékek csatlakoztatása
A televízióhoz választható készülékek széles skálája csatlakoztatható, a továbbiakban leírtak szerint. (A
csatlakozó kábelek nincsenek mellékelve.)
MANUFACTURED UNDER LICENCE
FROM DOLBY LABORATORIES
"DOLBY" AND THE DOUBLE - D
SYMBOL ARE TRADEMARKS OF
DOLBY LABORATORIES
G
S
O
N
Y
S VHS/Hi8/
DVC
kamera
A
8mm/Hi8/
DVC
kamera
4
B
4
C
o4
Videomagnó
DFE
Fülhallgató csatlakoztatásakor a
televízió hangszórói automatikusan
kikapcsolnak
.
Hi-Fi
“PlayStation”
*
DVD
Dekóder
Dekóder
* “PlayStation” a Sony Computer
Entertainment, Inc. terméke
.
* “PlayStation” a Sony Computer
Entertainment, Inc. védett márkaneve
• A kép torzulásának elkerülése érdekében egydejűleg ne csatlakoztasson készülékeket a A és B
csatlakozókba.
• Az F eurocsatlakozóhoz ne csatlakoztasson semmiféle dekódert.
Videomagnó csatlakoztatása:
Videomagnó csatlakoztatásához lásd “Az antenna és a videomagnó csatlakoztatása” c. fejezetet. A videot
ajánlatos eurocsatlakozó használatával csatlakoztatni. Amennyiben nem ezt a csatlakozót használja, a
videojel csatornát a “Kézi Hangolás“ menüben be kell állítsa (ehhez lásd a 13. oldal a) bekezdését).
Ezenkívül lásd a video használati utasítását a videojel csatorna beállításához.
Smartlinkkel rendelkező videomagnó csatlakoztatása:
A Smartlink egy olyan, a televízió és egy videokészülék közti kapcsolat, mely lehetővé teszi bizonyos
információk közvetlen átjuttatását. Amennyiben a Smartlinkről bővebb tájékoztatásra van szüksége,
keresse azt videokészüléke kezelési útmutatójában.
Ha egy Smartlinkkel rendelkező videomagnót használ, használjon eurocsatlakozót és csatlakoztassa
azt a
S
3/ 3 G eurocsatlakozóho.
Ha az 3/ 3 G eurocsatlakozóhoz vagy az említett eurocsatlakozóhoz csatlakoztatott
S
videomagnóhoz dekódert csatlakoztatott:
A “Beállítás” menüben válassza a “Kézi Hangolás” opciót, majd a “Dekóder”** opció kiválasztása után
válassza a “Be” -t (v vagy V használatával) a kódolt csatornához.
.
HU
** Ez az opció az “Ország” menüben kiválasztott ország szerint áll rendelkezésre.
Kiegészítő információ 19
folytatódik...
Page 86

Választható készülékek csatlakoztatása
Külső audio készülék csatlakoztatása:
Ha televíziójának hangját zenekészüléke hangszóróin keresztül akarja élvezni, csatlakoztassa a készüléket a
D audio kimenethez, majd a menürendszerben válassza a “Beállítás” -t. Ezt követően lépjen be a “Részlet
beállítása” opcióba és a “TV hangszóró” -ben válassza a Ki” -t.
A külső hangszórók hangereje a televízió távvezérlőjének hangerőszabályzó gombjaival állítható. A
magas és mély szinteket is változtathatja a “Hangszabályozás” menün keresztül.
Zenekészülékén keresztül is élvezheti a “Dolby Virtual” hangeffektust:
Ehhez helyezze el zenekészülékének hangszóróit a televízió mindkét
oldalán kb. 50 cm távolságot hagyva a televízió és a hangszórók között.
A hangszórók elhelyezése után, a menürendszerek segítségével,
válassza ki a “Hangszabályozás” menüt és ezt követően az Effekt”
opcióban válassza a “Dolby Virtual”-t.
A felhasználó optimális elhelyezkedése
Hi-Fi készülék
hangszórói
50cm 50cm
Választható készülékek használata
A választható készüléket csatlakoztassa a televízió megfelelő bemenetéhez, ahogyan az előző oldalon
1
le van írva.
Kapcsolja be a csatlakoztatott készüléket.
2
A csatlakoztatott készülék képének megtekintéséhez nyomja meg többször egymás után , amíg a
3
bemeneti jel helyes jelképe megjelenik a képernyőn.
Jelkép
Bemeneti jelek
1
• Eurocsatlakozón E keresztüli audio/video bemeneti jel.
1
• Eurocsatlakozón E keresztüli RGB bemeneti jel. Ez a jelkép csak abban az esetben
jelenik meg, ha csatlakoztatott RGB bemenetre.
2
• Audio bemeneti jel/az F eurocsatlakozón keresztüli videomagnó.
2
• Az F eurocsatlakozón keresztüli RGB bemeneti jel. Ez a jelkép csak abban az esetben
jelenik meg, ha csatlakoztatott RGB bemenetre.
3
• Eurocsatlakozón G keresztüli audio/video bemeneti jel.
S
3
• Eurocsatlakozón G keresztüli S Video bemeneti jel. Ez a jelkép csak abban az esetben
jelenik meg, ha csatlakoztatott S Video bemenetre.
4
• RCA B csatlakozón keresztüli video bemeneti jel és C-n keresztüli audio bemeneti jel.
S
4
• Az S video A csatlakozón keresztüli S video bemeneti jel és C keresztüli audio
bemeneti jel. Ez a jelkép csak abban az esetben jelenik meg, ha csatlakoztatott S Video
bemenetre.
Nyomja meg a távvezérlő gombját a normál tévéképernyőhöz való visszatéréshez.
4
Mono hangrendszerő készülékek használata
A hangfrecvenciás csatlakozó kábelt csatlakoztassa a TV készülék előlapján található L/G/S/I aljzatra és
válassza ki a 4 vagy 4 bemenet jelét, felhasználva a fenti utasításokat. Végül hivatkozva a jelen
használati utasítás “hangbeállítás” részére, válassza ki a hangbeállítás menükép “Kettős hang” “A” pontját.
S
20 Kiegészítő információ
Page 87

Műszaki jellemzők
MINŐSÉGTANÚSÍTÁS
A 291984. (III.10.) BkM-IpM együttes rendelet értelmében - mint forgalmazá - tanúsitjuk, hogy a SONY
(KV-28CS70K/32SC70K) tipusú szines televizió megfelel az alábbi műszaki értékeknek.
Érintésvédelmi osztály: II
Sugárzási szabvány A kiválasztott országtól függően: B/G/H, D/K
Szín szabvány PAL, SECAM
NTSC 3.58, 4.43 (csak videobemenet)
Fogható csatornák VHF: E2-E12
UHF: E21-E69
CATV: S1-S20
HYPER: S21-S41
D/K: R1-R12, R21-R69
Képcső FD Trinitron WIDE tökéletesen sík 28 (kb. 71 cm képcsőméret
tökéletesen sík 32 (kb. 82 cm képcsőméret)
Hátsó aljzatok 1/ 1 21 pólusú eurocsatlakozó (CENELEC szabvány) beleértve
audio/ video bemenet, RGB bemenet, TV audio/video kimenet
2/ 2 21 pólusú eurocsatlakozó (CENELEC szabvány) beleértve
audio/video bemenet, RGB bemenet, képernyő audio/video
kimenet
3/ 3 21 pólusú eurocsatlakozó (CENELEC szabvány) beleértve
(SMARTLINK) audio/ video bemenet, S video bemenet, választható audio/
S
video bemenet és Smartlink csatlakoztatás
Audio kimenetek (bal/ jobb) RCA aljzatok
Csatlakozók az
előlapon
S
4 S video bemenet 4 pólusú DIN
4
4
video bemenet - RCA csatlakozó
audio bemenet - RCA csatlakozó
i fülhallgató csatlakozó
Hangfrekvenciás
kimenőteljesítmény
2 x 20W (zenei teljesítmény), 2 x 10W (RMS)
Woofer: 30W (zenei teljesítmény), 15W (RMS)
Teljesítményfelvétel KV-28CS70 94W KV-32CS70 102W
HU
Teljesítményfelvétel
KV-28CS70 0.4W KV-32CS70 0.4W
készenléti
üzemmódban
(standby
Méretek (szél. x mag.
x mély.)
KV-28CS70 Kb. 844mm x 517mm x 548mm
KV-32CS70 Kb. 933mm x 566mm x 572mm
TömegKV-28CS70Kb. 43.5kg KV-32CS70 Kb. 60kg
Mellékelt tartozékok 1 db távvezérlő RM-947 modell, 2 db IEC szabvány szerinti elem
Egyéb jellemzők • 100 Hz-es kép
• Teletext, Fastext, TOPtext (250 oldalas teletext memória)
• Kikapcsolás Időzítő
• Smartlink (a televízió és egy kompatibilis videokészülék közötti közvetlen
kommunikáció. Ha további információra van szüksége a Smartlinkkel
kapcsolatosan, nézze meg videomagnója használati útmutatóját)
• A TV rendszer automatikus felmérése
• Dolby Virtual
• BBE
• Auto formátum
A design és a műszaki jellemzők előzetes bejelentés nélkül változhatnak.
Kiegészítő információ 21
Page 88

Problémamegoldás
Az alábbiakban ismertetünk néhány egyszerű megoldást arra az esetre, ha valamilyen kép- vagy
hangprobléma fordulna elő.
Probléma Megoldás
Nincs kép (a képernyő sötét) és nincs hang.•Ellenőrizze az antennacsatlakozást.
Gyenge a kép vagy nincs kép (a képernyő
sötét), de jó a hang.
A televízió hátlapján lévő eurocsatlakozóhoz
csatlakoztatott választható készüléknek nincs
képe vagy nincs információs menüje.
Jó képminőség, de nincs hang.•Nyomja meg a távvezérlő +/- gombját.
A színes műsorok nem láthatók színesben.•A menürendszerben válassza ki a “Képbeállítás“-t és
Programváltáskor vagy a teletext
kiválasztásakor a kép eltorzul.
A teletext adások vételekor helytelen karakterek
jelennek meg a képernyőn.
• Csatlakoztassa a készüléket a fali aljzathoz és
nyomjameg a gombot az előlapon.
• Ha a televízió jelzője világít, nyomja meg a
távvezérlő TV gombját.
• A menürendszerben válassza ki a “Képbeállítás“-t és
válassza a “Törlés“-t a gyárilag beállított értékek
visszanyeréséhez.
• Győzödjön meg arról, hogy a választható készüléket
bekapcsolta, majd nyomja meg többször a
távvezérlő gombját, amíg a helyes bemeneti
jelkép megjelenik a képernyőn.
• Ellenőrizze, hogy a “Részlet beállítása“ menün belüli
“TV hangszóró“ opció az “Be“ pozícióban legyen
kiválasztva.
• Győződjön meg arról, hogy a fülhallgatót
kikapcsolta-e.
válassza a “Törlés“-t a gyárilag beállított értékek
visszanyeréséhez.
• Kapcsolja ki a készülék hátlapján lévő 21 pólusú
eurocsatlakozóhoz csatlakoztatott készüléket.
• Ha a menürendszert használja, lépjen be a “Nyelv/
Ország“ menübe, és válassza azt az országot, ahol a
Készüléket m«ködteti. A cirill abc-t használó
nyelveknél válassza Oroszországot, ha a lista nem
tartalmazza azt az országot, ahol Ön a készüléket
használja.
Ferde a kép.•A menürendszerben a “Különleges Jellemzők“
Zajos kép.•A menürendszerben a “Kézi Hangolás “ menün belül
S
3/ 3 eurocsatlakozóhoz csatlakoztatott
dekóderen keresztül nézett kódolt csatorna
képe nem tökéletesen dekódolt vagy nem
stabil.
A távvezérlő nem működik.•Cserélje ki az elemeket.
A készenléti üzemmód (standby) jelzője villog.•Forduljon a legközelebbi Sony márkaszervízhez.
• Meghibásodás esetén a televíziót szakemberrel vizsgáltassa meg.
• Soha ne nyissa ki a készüléket.
menün belül válassza a “Képelforgatás“ opciót és
állítsa be a képdőlést.
válassza az “AFT“ opciót és állítsa be a hangolást a
jobb képvétel érdekében.
• A menürendszerben a “Különleges Jellemzők“
menün belül válassza az “Zajzár“ opciót és válassza
a “Auto“-t a kép zajának csökkentésére.
• A menürendszeben válassza a “Beállítás“-t. Ezt
követően lépjen be a “Részlet beállítása“ opcióba és
a “TV“-ben válassza a “AV3 kimenet“.
• Ellenőrizze, hogy a dekódert nem az 2/ 2
eurocsatlakozóhoz csatlakoztatta
22 Kiegészítő információ
Page 89

Page 90

Page 91

Wprowadzenie
Dziękujemy za wybór telewizora kolorowego Sony z Płaskim Ekranem FD
Trinitron.
Przed rozpoczęciem użytkowania telewizora, wskazane jest wnikliwe zapoznanie się z niniejszą
instrukcją obsługi i zachowanie jej do wykorzystania w przyszłości.
• Symbole używane w niniejszej instrukcji obsługi:
Ważna informacja.
• Informacja o działaniu.
• 1,2... Kolejność realizacji instrukcji.
• Zaznaczone na pilocie przyciski wskazują
przyciski, które należy nacisnąć w celu
wykonania poszczególnych funkcji.
• Informacja o wyniku operacji.
Spis treści
Wprowadzenie......................................................................................................................................... 3
Informacje dotyczące bezpieczeństwa.................................................................................................... 4
Opis ogólny
Ogólny przegląd przycisków pilota.......................................................................................................... 5
Ogólny przegląd przycisków telewizora ................................................................................................. 6
Podłączenie telewizora
Wkładanie baterii do pilota...................................................................................................................... 6
Podłączanie anteny i magnetowidu ........................................................................................................ 6
Pierwsze uruchomienie telewizora
Włączanie telewizora i automatyczne programowanie ........................................................................... 7
System menu na ekranie
Wprowadzenie do systemu menu na ekranie.......................................................................................... 9
Krótki przewodnik po systemie menu:
Regulacja obrazu ............................................................................................................................ 9
Regulacja dźwięku.......................................................................................................................... 10
Timer wyłączenia ............................................................................................................................ 11
Język/Kraj ....................................................................................................................................... 11
Autoprogramowanie ....................................................................................................................... 11
Sortowanie programów .................................................................................................................. 12
Nazwy Programów ......................................................................................................................... 12
Ustawienia AV................................................................................................................................. 12
Programowanie ręczne................................................................................................................... 13
Autoformatowanie .......................................................................................................................... 15
Redukcja zakłóceń.......................................................................................................................... 16
Wyjście AV3 .................................................................................................................................... 16
Głośniki TV...................................................................................................................................... 16
Centrowanie RGB........................................................................................................................... 17
Obrót obrazu................................................................................................................................... 17
Te le ga ze ta .............................................................................................................................................18
Informacje dodatkowe
Podłączanie dodatkowych urządzeń ....................................................................................................... 19
Zastosowanie dodatkowych urządzeń .................................................................................................... 20
Dane techniczne...................................................................................................................................... 21
Rozwiązywanie problemów ..................................................................................................................... 22
PL
Spis treści 3
Page 92

Informacje dotyczące bezpieczeństwa
Telewizor jest przystosowany do zasilania
tylko napięciem przemiennym 220 – 240 V.
Nie włączać zbyt dużej liczby urządzeń do
jednego gniazdka sieciowego gdyż grozi to
pożarem lub porażeniem prądem.
Nie otwierać obudowy ani nie zdejmować
pokrywy z tyłu telewizora. Naprawy
powierzać tylko wykwalifikowanym
osobom.
Nie zakrywać otworów wentylacyjnych na
telewizorze. Dla zapewnienia właściwej
wentylacji, pozostawić wokół telewizora
przynajmniej 10 cm wolnego miejsca.
Ze względu na bezpieczeństwo i ochronę
środowiska naturalnego zaleca się, aby
telewizor, który nie jest używany, był
odłączony od sieci. Nie należy pozostawiać
telewizora w trybie czuwania. Niektóre
telewizory mogą jednak mieć funkcje,
które wymagają pozostawienia telewizora
w trybie czuwania. W takim przypadku
instrukcja obsługi będzie zawierała
odpowiednią wzmiankę.
Dla własnego bezpieczeństwa, w czasie
burzy nie dotykać żadnych elementów
telewizora, jego przewodu zasilającego
ani przewodu antenowego.
Nigdy nie stawiać telewizora w
miejscach gorących, wilgotnych lub
nadmiernie zapylonych. Nie instalować
telewizora w miejscach, w których
będzie on narażony na wibracje
mechaniczne.
Nigdy nie wpychać do telewizora żadnych
przedmiotów. Grozi to pożarem lub
porażeniem prądem. Nigdy nie wylewać
na telewizor żadnych płynów. Jeśli do
wnętrza telewizora dostanie się jakiś płyn
lub przedmiot, nie używać urządzenia,
zanim nie zostanie ono skontrolowane
przez odpowiednio wykwalifikowaną
osobę.
Aby uniknąć ryzyka pożaru lub
porażenia prądem, nie wystawiać
telewizora na deszcz i chronić go przed
wilgocią.
Aby uniknąć pożaru, przechowywać
łatwopalne przedmioty z dala od
telewizora i nie zbliżać się do niego z
otwartym ogniem (na przykład świecą).
Do czyszczenia ekranu i obudowy używać
miękkiej, wilgotnej ściereczki. Nie używać
żadnych ściereczek, gąbek ani proszków
do szorowania, zasadowych środków
czyszczących, rozpuszczalników
(spirytusu, benzyny itp.) ani
antystatycznego aerozolu. Dla
bezpieczeństwa, przed czyszczeniem
telewizora wyłączyć go z sieci.
Ustawić telewizor na bezpiecznej,
stabilnej podstawie. Nigdy nie przenosić
telewizora razem ze stolikiem każdy
przedmiot trzeba przenosić osobno. Nie
kłaść telewizora na boku ani ekranem do
góry. Nie pozwalać, aby wspinały się na
niego dzieci.
Przy wyłączaniu przewodu zasilającego
z gniazdka sieciowego chwytać za
wtyczkę. Nie ciągnąć samego
przewodu.
Przed przenoszeniem telewizora
wyłączyć go z sieci. Unikać nierównych
powierzchni, szybkiego marszu i
używania nadmiernej siły. Jeśli telewizor
został upuszczony lub uszkodzony,
natychmiast zlecić jego kontrolę
odpowiednio wykwalifikowanej osobie z
serwisu.
4 Informacje dotyczące bezpieczeństwa
Uważać, aby nie stawiać na przewodzie
zasilającym ciężkich przedmiotów,
ponieważ mogą one uszkodzić przewód.
Zalecamy nawinięcie nadmiaru
przewodu na zaczepy znajdujące się z
tyłu telewizora.
Nie zakrywać otworów wentylacyjnych
na telewizorze takimi przedmiotami
jak zasłony czy gazety.
Page 93

Ogólny przegląd przycisków pilota
1
2
3
qj
qh
qg
qf
qd
qs
qa
9 Wybór formatu ekranu:
Naciśnij kilkakrotnie ten przycisk by zmienić
format obrazu. By uzyskać więcej informacji
skonsultuj rozdział “Autoformatowanie” na
stronie 15.
q; Wybór kanałów:
Naciśnij go by wybrać poprzedni lub następny
kanał.
qa Wyłączanie dźwięku:
Naciśnij go by wyłączyć dźwięk. Ponownie go
naciśnij by włączyć dźwięk.
qs Regulacja głośności:
Naciśnij go by naregulować głośność telewizora.
qd Wyświetlanie menu:
Naciśnij go by na ekranie pojawiło się menu
funkcji. Naciśnij go ponownie by usunąć menu z
ekranu i by pojawił się normalny obraz
telewizyjny.
4
5
6
7
8
9
q;
1 Czasowe wyłączenie telewizora:
Naciśnij go by czasowo wyłączyć telewizor (zostanie wyświetlony
wskaźnik trybu czuwania . Naciśnij go ponownie by włączyć
telewizor pozostający w trybie czuwania (standby).
Dla oszczędności energii wskazane jest całkowite wyłączenie
telewizora gdy się go nie używa.
Jeśli w ciągu 15 minut nie ma sygnału telewizyjnego ani też nie
zostanie naciśnięty żaden przycisk, telewizor automatycznie
przełączy się na tryb czuwania (standby).
2 Wybór sygnału wejściowego:
Naciskaj go aż symbol żądanego żródła sygnału pojawi się na
ekranie.
3 Wybór kanału:
Wciśnięcie przycisków powoduje wybranie żądanego numeru kanału.
W przypadku dwucyfrowych numerów kanałów, naciskaj przycisk
odpowiadający drugiej cyfrze nie dłużej niż 2,5 sekundy.
4 Wybór:
Naciśnij go by powrócić do poprzednio wybranego kanału (uprzednio
wybrany kanał powinien być wcześniej widoczny na ekranie przez
przynajmniej 5 sekund).
5 Przycisk ten działa wyłącznie w trybie telegazety.
6 Przycisk ten działa wyłącznie w trybie telegazety.
7 Wybór telegazety:
Naciśnij go by telegazeta pojawiła siś na ekranie.
8 Przyciski obsługi MENU:
• Gdy
przycisków by przemieszcza
opis znajduje si
ekranie” na stronie 9
• Gdy MENU nie jest wyświetlone na ekranie naciśnij OK by
zobaczyć ogólną listę zestrojonych kanałów. Wybierz kanał
(stację telewizyjną) naciskaj v lub V a następnie ponownie naciśnij
OK by oglądać wybrany kanał.
MENU jest wyświetlone na ekranie użyj niniejszych
ę
w rozdziale “Wprowadzenie do systemu menu na
.
qf Wybór Trybu TV:
Naciśnij go by telegazeta zniknęła z ekranu lub by
wyłączyć wejście wideo.
qg Wybór efektu dźwięku:
Kilkakrotnie naciśnij ten przycisk by zmienić efekt
dźwięku.
qh Wybór trybu obrazu:
Kilkakrotnie go naciśnij by zmienić tryb obrazu.
qj Wyświetlanie informacji na ekranie:
Naciśnij go by wszystkie wskaźniki pojawiły się na
ekranie. Ponownie go naciśnij by zniknęły.
ć
się po systemie menu. Szczegółowy
PL
Wszystkie przyciski kolorowe służą nie tylko do regulacji telewizora, ale też do obsługi telegazety.
Szersza informacja o ich funkcjach znajduje się w rozdziale
“
Telegazeta“ niniejszej instrukcji obsługi.
Opis ogólny 5
Page 94

Ogólny przegląd przycisków telewizora
Przyciski wyboru
następnego lub
poprzedniego
programu (wybór
stacji telewizyjnych)
Przyciski regulacji
głośności
Przycisk
włączenia
telewizora
Gniazdo
wejściowe
wideo
Gniazdo
wejściowe
audio
Gniazdo do
podłączenia
słuchawek
Wskaźnik trybu
czuwania (standby)
Wyłącznik
zasilania
włączony /
wyłączony
Pociągnij drzwiczki z
boku telewizora, aby je
otworzyć i odsłonić
gniazda.
Przycisk
wyboru źródła
wejściowego
Gniazdo
wejściowe
S Vídeo
4
4
o4
Wkładanie baterii do pilota
Upewnij się, że baterie umieszczone zostały zgodnie z ich biegunowością.
Szanując środowisko naturalne wyrzucaj zużyte baterie do specjalnie do tego przeznaczonych
pojemników.
S
O
N
Y
C
O
R
P
O
R
A
T
I
O
N
J
A
P
A
N
/4
SONY CORPORATION JAPAN/4
Podłączanie anteny i magnetowidu
Do urządzenia nie są załączone kable do tych podłączeń.
magnetowid
Szersza informacja o podłączaniu wideo znajduje się w rozdziale “Podłączanie
dodatkowych urządzeń
lub
Podłączenie do złącza EURO nie jest obowiązkowe
“
niniejszej instrukcji obsługi.
MANUFACTURED UNDER LICENCE
FROM DOLBY LABORATORIES
"DOLBY" AND THE DOUBLE - D
SYMBOL ARE TRADEMARKS OF
DOLBY LABORATORIES
6 Opis ogólny - Podłączenie telewizora
Page 95

Włączanie telewizora i automatyczne programowanie
Gdy telewizor zostanie włączony po raz pierwszy na ekranie pojawią się menu dzięki któremu można:
1) wybrać język w którym wyświetlane będą wszystkie menu, 2) wybrać kraj w którym używane będzie
urządzenie, 3) regulacja przechylenia obrazu, 4) odnaleźć i automatycznie zapisać wszystkie dostępne
kanały (stacje telewizyjne) i 5) zmienić kolejność w której kanały (stacje telewizyjne) pojawiają się na
ekranie.
Jeśli zaistnieje konieczność zmodyfikowania któregoś z ustawień, można to zrobić wybierając
odpowiednią opcję w (menu Ustawianie) lub naciskając przycisk ponownego włączenia
telewizora.
Włącz przewód zasilający telewizora do gniazdka
1
sieciowego (220-240V AC, 50Hz). Gdy podłącza się telewizor po
raz pierwszy włącza się on automatycznie. Jeśli to nie nastąpi
naciśnij przełącznik włączony/wyłączony z przodu urządzenia,
by włączyć telewizor.
Gdy telewizor zostanie włączony po raz pierwszy na ekranie
pojawi się automatycznie menu Language (Język).
Naciśnij przycisk v lub V na pilocie by wybrać język, a następnie
2
naciśnij przycisk OK by potwierdzić wybór. Od tego momentu
wszystkie menu będą wyświetlane w wybranym języku.
Language
i
v
Svenska
Norsk
English
Nederlands
Français
Italiano
V
i
Select Language:
OK
Na ekranie pojawi się automatycznie menu Kraj. Naciśnij przycisk
3
v lub V by wybrać kraj w którym będzie używany telewizor, a
następnie naciśnij przycisk OK by potwierdzić wybór.
• Jeśli na liście nie ma kraju w którym będzie używany
telewizor, wybierz “-” zamiast nazwy kraju.
Z powodu magnetyzmu ziemskiego istnieje możliwość, że obraz
4
będzie przechylony. Menu Obrót Obrazu pozwala wyregulować
obraz jeśli zajdzie taka konieczność.
a) Jeśli nie jest to konieczne, naciśnij v lub V by ustawić Bez
regulacji, następnie naciśnij OK.
b) Jeśli jest konieczne, naciśnij v lub V by ustawić opcję
Regulacja, następnie naciśnij OK. Następnie wyreguluj
przechylenie obrazu między -5 i +5 naciskając v lub V. Na
zakończenie naciśnij OK by zapisać ustawienie.
Kraj
i
v
Sverige
Norge
Italia
Deutschland
Österreich
i
V
Wybór kraju:
Jeśli obraz jest pochylony,
obrót obrazu.
Bez regulacji
Regulacja
OK
OK
PL
cd...
Pierwsze uruchomienie telewizora 7
Page 96

Włączanie telewizora i automatyczne programowanie
Menu Autoprogramowanie pojawi się na ekranie. Naciśnij przycisk
5
OK by wybrać opcję Tak.
Telewizor rozpoczyna programowanie i automatyczne
6
zapisywanie wszystkich dostępnych kanałów (stacji
telewizyjnych).
Proces dostrajania może potrwać kilka minut. Zachowaj
cierpliwość i nie naciskaj żadnych przycisków podczas jego
trwania, gdyż w przeciwnym wypadku nie zostałby on
zakończony.
Jeśli telewizor nie znalazł żadnego kanału (stacji telewizyjnej)
po dokonaniu autoprogramowania, na ekranie pojawi się
tekst z prośbą o podłączenie anteny. Należy wówczas ją
podłączyć tak jak jest to opisane na stronie 6 niniejszej
instrukcji obsługi a następnie nacisnąć OK. Ponownie
rozpocznie się wówczas proces autoprogramowania.
Czy chcesz rozpocz
automatyczne programowanie?
Tak
Nie
Autoprogramowanie
Program:
System:
Kanał:
Wyszukiwanie...
Nie znaleziono Kanalu
Podlącz antenę
Potwierdż
ąć
01
B/G
C21
OK
OK
7
Gdy telewizor zaprogramuje i zapisze wszystkie kanały
(stacje telewizyjne), na ekranie pojawi się automatycznie
menu Sortowanie Programów by można było zmienić
kolejność pojawiania się kanałów na ekranie.
a) Jeśli nie ma potrzeby zmiany kolejności programów, przejdź
do punktu 8.
b) Jeśli chcesz zmienić kolejność programów:
1 Naciśnij przycisk v lub V by wybrać numer programu kanału
(stacji telewizyjnej) którego pozycję chcesz zmienić, a
następnie naciśnij b.
2 Naciśnij przycisk v lub V by wybrać nowy numer programu
na którym chcesz zapisać wybrany kanał (stację
telewizyjną) a następnie naciśnij B.
3 Powtórz kroki b)1 i b)2 by przyporządkować pozostałe
kanały telewizyjne.
Naciśnij przycisk MENU by przywrócić normalny obraz
8
telewizyjny.
Telewizor jest gotowy do użytku.
Sortowanie Programów
Program:
01 TVE
02 TVE2
03 TV3
04 C33
05 C27
06 C58
Wybór kanału:
Wyjście:
MENU
Sortowanie Programów
Program:
01 TVE
02 TVE2
03 TV3
04 C33
05 C27
06 C58 05 C27
Lokalizacja prog.:
Wyjście:
MENU
MENU
OK
OK
8 Pierwsze uruchomienie telewizora
Page 97

Wprowadzenie do systemu menu na ekranie
Niniejszy telewizor dysponuje systemem menu wyświetlanym na ekranie by ułatwić ustawianie
poszczególnych funkcji. Używaj następujących przycisków na pilocie by poruszać się po
poszczególnych systemach menu:
Naciśnij przycisk MENU by został wyświetlony na ekranie
1
pierwszy poziom menu.
• By wybrać pożądaną pozycję lub opcję naciśnij przycisk v lub V.
2
• By wejść do wybranego menu lub jego opcji naciśnij przycisk b.
• By powrócić do poprzedniego menu lub jego opcji naciśnij
przycisk B
.
• By zmienić nastawienia wybranej opcji naciśnij przycisk v/V/B
lub b.
• By potwierdzić i zapisać wybór naciśnij OK.
Naciśnij przycisk MENU by przywrócić normalny obraz
3
telewizyjny.
MENU
MENU
Krótki przewodnik po systemie menu
Poziom 1 Poziom 2 Poziom 3 / Funkcja
Regulacja Obrazu
Tryb: Własny
Kontrast
Jasność
Kolor
Ostrość
Odcień
Zerowanie
OK
Regulacja Obrazu
Tryb: Własny
Kontrast
Jasność
Kolor
Ostrość
Odcień
Zerowanie
OK
• Jasność, Kolor i Ostrość mogą zostać zmienione wyłącznie gdy tryb obrazu zostanie nastawiony na
opcję “Własny”.
• Odcień jest dostępny wyłącznie dla systemu koloru NTSC (np. taśmy wideo z USA).
• By przywrócić nastawienia fabryczne wybierz Zerowanie i naciśnij OK.
REGULACJA OBRAZU
Menu “Regulacja obrazu” pozwala zmienić
nastawienia obrazu.
W tym celu:
Po wybraniu opcji którą chcesz zmienić naciśnij
przycisk b. Następnie kilkakrotnie naciśnij przycisk
v/V/B lub b by zmienić ustawienie i na zakończenie
naciśnij OK by zapisać nowe ustawienie.
Menu to pozwala również zmienić tryb obrazu
zgodnie z rodzajem oglądanego programu:
v Własny (dla indywidualnych upodobań).
v Żywy (dla programu na żywo, odtwarzacza DVD i
cyfrowego dekodera telewizji satelitarnej).
v Filmowy (dla filmów).
cd...
PL
System menu na ekranie 9
Page 98

Wprowadzenie do systemu menu na ekranie
Poziom 1 Poziom 2 Poziom 3 / Funkcja
REGULACJA DŻWIĘKU
Regulacja Obrazu
Tryb: Własny
Kontrast
Jasność
Kolor
Ostrość
Odcień
Zerowanie
Regulacja džwięku
Efekt: Naturalny
Tony wysokie
Tony niskie
Balans
Zerowanie
Podwój. Dźwięk: Mono
Aut. głośność: Wł.
OK
Regulacja džwięku
Efekt: Naturalny
Tony wysokie
Tony niskie
Balans
Zerowanie
Podwój. Dźwięk: Mono
Aut. głośność: Wł.
OK OK
Efekt bvNaturalny: Podkreśla jasność, szczegóły i obecność dźwięku dzięki
systemowi “BBE High Definition Sound system”*.
v Dynamiczny: “BBE Hig h Definiti on Sound syste m”* zwięks za jasność i obecność
dźwięku zapewniając czytelniejszy głos i muzykę bardziej
rzeczywistą.
v Dolby**Virtual: Symuluje efekt dźwięku “Dolby Pro Logic Surround”.
Menu “Regulacja dźwięku” pozwala zmieniać
ustawienia dźwięku.
W tym celu:
Po wybraniu opcji która ma zostać zmieniona,
naciśnij b. Następnie kilkakrotnie naciśnij v/V/B lub
b by zmieniç ustawienie i na zakończenie naciśnij
OK by zapisać ustawienie.
v Wył.: Bez specjalnych efektów akustycznych.
Tony wysokie bBMniej b Więcej
Tony niskie bBMniej b Więcej
Balans bBLewy b Prawy
Zerowanie Przywraca poziomy dźwięku nastawione fabrycznie.
K
Podwój. dźwiękb • Dla emisji stereo:
v Mono.
v Stereo.
• Dla emisji dwujęzycznych:
v Mono (dla kanału mono, jeśli jest dostępny).
v A (dla kanału 1).
v B (dla kanału 2).
Aut. głośność bvWył: Natężenie dźwięku zmienia się w zależności od sygnału stacji.
vWł: Natężenie dźwięku jest jednakowe niezależnie od sygnału stacji (np. w
przypadku reklam).
• Jeśli słuchasz dźwięk telewizora przez słuchawki, opcji “Efekt” automatycznie ulegnie ona przestawieniu
na “Wył.”.
• Jeśli nastawisz Efekt” w pozycji “Dolby Virtual” opcja “Aut. głośność” automatycznie przełączy się na
pozycję “Wył” i odwrotnie.
* “BBE High Definition Sound system” jest produktem Sony Corporation na licencji BBE Sound, Inc.
Zarejestrowany patentem w USA nr. 4,638,258 i 4,482,866. Słowo “BBE” i symbol “BBE” są
znakami firmowymi BBE Sound, Inc.
**Niniejszy telewizor jest tak zaprojektowany by stwarzać efekt dźwięku “Dolby Surround” który
symuluje dźwięk płynący z 4 głośników bez konieczności podłączania żadnego dodatkowego
głośnika. Symulacja ta jest możliwa zawsze gdy sygnał audio stacji nadawany jest w systemie
“Dolby Pro Logic Surround”. Można również zwiśkszyć efekt dźwięku podłączając zewnętrzny
wzmacniacz. Szczegółowy opis znajduje się w rozdziale “Podłączanie dodatkowego urządzenia
audio” na stronie 20.
**Wyprodukowano na podstawie licencji od Dolby Laboratories.“Dolby”, “Pro Logic” oraz symbol
podwójnej litery D są znakimi towarowymi Dolby Laboratories.
cd...
10 System menu na ekranie
Page 99

Wprowadzenie do systemu menu na ekranie
Poziom 1 Poziom 2 Poziom 3 / Funkcja
TIMER WYŁŃCZENIA
Regulacja Obrazu
Tryb: Własny
Kontrast
Jasność
Kolor
Ostrość
Odcień
Zerowanie
Timer
Timer wył.:
Regulacja Obrazu
Tryb: Własny
Kontrast
Jasność
Kolor
Ostrość
Odcień
Zerowanie
Ustawianie
Język/Kraj
Autoprogramowanie
Sortowanie Programów
Nazwy Programów
Ustawienia A/V
Programowanie Ręczne
Ustawienia szczegółów
OK
Wył.
OK
OK
OK
Timer
Timer wył.:
Ustawianie
Język/Kraj
Autoprogramowanie
Sortowanie Programów
Nazwy Programów
Ustawienia A/V
Programowanie Ręczne
Ustawienia szczegółów
Wył.
OK
Opcja “Timer wył.” w menu “Timer”, pozwala
wybrać okres czasu po upływie którego telewizor
automatycznie przełączy się na tryb czuwania
(standby).
W tym celu:
Po wybraniu opcji naciśnij przycisk b. Następnie
naciśnij v lub V by nastawić czas (najwyżej 4
godziny) i na zakończenie naciśnij OK by zapisać
ustawienie.
• By został wyświetlony czas pozostający do
wyłączenia, oglądając telewizję naciśnij przycisk
.
• Na minutę przed prezełączeniem się telewisora w
tryb czuwania, pozostający do tego momentu
czas zostanie automatycznie wyświetlony na
ekranie.
JĘZYK / KRAJ
Opcja “Język/Kraj” w menu “Ustawianie”, pozwala
wybrać język w którym wszystkie menu będą
wyświetlane na ekranie. Pozwala również wybrać
kraj w którym będzie używany telewizor.
W tym celu:
Po wybraniu opcji naciśnij przycisk b, a następnie
postępuj tak jak jest to opisane w rozdziale
“Włączanie telewizora i automatyczne
programowanie”, w punktach 2 i 3 na stronie 7.
OK
Regulacja Obrazu
Tryb: Własny
Kontrast
Jasność
Kolor
Ostrość
Odcień
Zerowanie
Ustawianie
Język/Kraj
Autoprogramowanie
Sortowanie Programów
Nazwy Programów
Ustawienia A/V
Programowanie Ręczne
Ustawienia szczegółów
AUTOPROGRAMOWANIE
Opcja “Autoprogramowanie” w menu “Ustawianie”,
pozwala by telewizor odszukał i zapisał wszystkie
dostępne kanały (stacje telewizyjne).
W tym celu:
OK
Po wybraniu opcji naciśnij przycisk b, a następnie
postępuj tak jak jest to opisane w rozdziale “Włączanie
telewizora i automatyczne programowanie”, w
Ustawianie
Język/Kraj
Autoprogramowanie
Sortowanie Programów
Nazwy Programów
Ustawienia A/V
Programowanie Ręczne
Ustawienia szczegółów
OK
punktach 5 i 6 na stronie 8.
OK
System menu na ekranie 11
PL
cd...
Page 100

Wprowadzenie do systemu menu na ekranie
Poziom 1 Poziom 2 Poziom 3 / Funkcja
Regulacja Obrazu
Tryb: Własny
Kontrast
Jasność
Kolor
Ostrość
Odcień
Zerowanie
Ustawianie
Język/Kraj
Autoprogramowanie
Sortowanie Programów
Nazwy Programów
Ustawienia A/V
Programowanie Ręczne
Ustawienia szczegółów
Regulacja Obrazu
Tryb: Własny
Kontrast
Jasność
Kolor
Ostrość
Odcień
Zerowanie
Ustawianie
Język/Kraj
Autoprogramowanie
Sortowanie Programów
Nazwy Programów
Ustawienia A/V
Programowanie Ręczne
Ustawienia szczegółów
SORTOWANIE PROGRAMÓW
Opcja “Sortowanie programów” w menu
“Ustawianie”, pozwala zmienić kolejność w jakiej
kanały (stacje telewizyjne) pojawiają się na ekranie.
OK
W tym celu:
Po wybraniu opcji naciśnij
b, a następnie postępuj
tak jak jest to opisane w rozdziale “Włączanie
Ustawianie
Język/Kraj
Autoprogramowanie
Sortowanie Programów
Nazwy Programów
Ustawienia A/V
Programowanie Ręczne
Ustawienia szczegółów
OK
telewizora i automatyczne programowanie”, w
punkcie 7 b) na stronie 8.
OK
NAZWY PROGRAMÓW
Opcja “Nazwy programów” w menu “Ustawianie”,
pozwala nadać kanałowi nazwć składającą się
maksymalnie z pięciu znaków.
OK
Ustawianie
Język/Kraj
Autoprogramowanie
Sortowanie Programów
Nazwy Programów
Ustawienia A/V
Programowanie Ręczne
Ustawienia szczegółów
OK
W tym celu:
1 Po wybraniu opcji naciśnij b, a następnie naciśnij
v lub V by wybrać numer programu któremu
chcesz nadać nazwę.
2 Naciśnij b. Gdy pierwszy element kolumny Nazwa
zostanie wyszczególniony naciśnij v lub V by
wybrać literę, numer lub “-“ puste miejsce, a
następnie naciśnij b by potwierdzić wybrany
OK
znak. W ten sam sposób wybierz pozostałe
cztery znaki. Na zakończenie naciśnij OK by
zapisać wybraną nazwę.
Regulacja Obrazu
Tryb: Własny
Kontrast
Jasność
Kolor
Ostrość
Odcień
Zerowanie
Ustawianie
Język/Kraj
Autoprogramowanie
Sortowanie Programów
Nazwy Programów
Ustawienia A/V
Programowanie Ręczne
Ustawienia szczegółów
USTAWIENIA AV
Opcja “Ustawienia AV” w menu “Ustawianie”
pozwala nadać nazwę urządzeniu podłączonemu do
telewizora.
W tym celu:
OK
Ustawianie
Język/Kraj
Autoprogramowanie
Sortowanie Programów
Nazwy Programów
Ustawienia A/V
Programowanie Ręczne
Ustawienia szczegółów
OK
1 Po nastawieniu opcji naciśnij b, a następnie
naciśnij v lub V by wybrać źródło wejściowe
któremu chcesz nadać nazwę (AV1, AV2 i AV3
dla dodatkowych urządzeń podłączonych do
złącz Euro z tyłu odbiornika telewizyjnego i AV4
dla złącz znajdujących się z przodu telewizora).
Następnie naciśnij b.
OK
2 W kolumnie “Nazwa” automatycznie pojawi się
wstępnie nastawiona nazwa:
a) Jesli chcesz użyć jedną z 6 wstępnie
nastawionych nazw (CABLE, GAME, CAM,
DVD, VIDEO lub SAT), naciśnij v lub V by
wybrać jedną z nich i na zakończenie naciśnij
OK by ją zapisać.
b) Jeśli chcesz stworzyć własną nazwę wybierz
Edycja i naciśnij b. Następnie, gdy pierwszy
element jest wybrany naciśnij v lub V by
wybrać literę, numer lub “-“ puste miejsce i
naciśnij b by potwierdzić wybór znaku. W ten
sam sposób wybierz pozostałe cztery znaki i
na zakończenie naciśnij OK by zapisać nazwę.
cd...
12 System menu na ekranie
 Loading...