

SONY.
Color Rear Video Projector
| Operating Instructions _ | EN |
|---|---|
| Manual de instrucciones | ES |
· IMPORTANT SAFETY INFORMATION: Please read the important safety information on page 2-EN.
INFORMACIÓN IMPORTANTE SOBRE SEGURIDAD: Lea la información importante sobre seguridad en la página 2-ES.
CONSIGNES DE SECURITE IMPORTANTES: Veuillez lire les informations concemant la sécurité à la page 2-EN.
KP-41T65 KP-41T65C KP-46C65 KP-48S65 KP-53S65 KP-53S65C KP-61S65 KP-61S65C
© 1998 by Sony Corporation

To prevent fire or shock hazard, do not expose the unit to rain or moisture.


This symbol is intended to alert the user to the presence of uninsulated "dangerous voltage" within the product's enclosure that may be of sufficient magnitude to constitute a risk of electric shock to persons.

This symbol is intended to alert the user to the presence of important operating and maintenance (servicing) instructions in the literature accompanying the appliance.
CAUTION
To prevent electric shock, do not use this polarized AC plug with an extension cord, receptacle or other outlet unless the blades can be fully inserted to prevent blade exposure.
CAUTION
When using TV games, computers, and similar products with your projection TV, keep the brightness and contrast functions at low settings. If a fixed (non-moving) pattern is left on the screen for long periods of time at a high brightness or contrast setting, the image can be permanently imprinted onto the screen. These types of imprints are not covered by your warranty because they are the result of misuse.
Note on Caption Vision
This television receiver provides display of television closed captioning in accordance with §15.119 of the FCC rules.
Note on CATV system installer
This reminder is provided to call the CATV system installer's attention to Article 820-40 of the NEC that provides guidelines for proper grounding and, in particular, specifies that the cable ground shall be connected to the grounding system of the building, as close to the point of cable entry as practical.
Use of this television receiver for other than private viewing of programs broadcast on UHF or VHF or transmitted by cable companies for the use of the general public may require authorization from the broadcaster, cable company and/or program owner.
Note on convergence adjustment
Before you use your projection TV, make sure to adjust convergence. For the procedure, see page 14 .
NOTIFICATION
This equipment has been tested and found to comply with the limits for a Class B digital device pursuant to Part 15 of the FCC Rules. These limits are designed to provide reasonable protection against harmful interference in a residential installation. This equipment generates, uses, and can radiate radio frequency energy and, if not installed and used in accordance with the instructions, may cause harmful inteference with radio communications. However, there is no guarantee that interference will not occur in a particular installation. If this equipment does cause harmful interference to radio or television reception, which can be determined by turning the equipment off and on, the user is encouraged to try to correct the interference by one or more of the following measures:
- Reorient or relocate the receiving antennas
- Increase the separation between the equipment and receiver.
- Connect the equipment into an outlet on a circuit different from that to which the receiver is connected.
- Consult the dealer or an experienced radio/TV technician for help.
You are cautioned that any changes or modifications not expressly approved in this manual could void your authority to operate this equipment.
This document is for the remote control RM-Y136A. MODELS: KP-41T65/41T65C/46C65/48S65/53S65/53S65C/ 61S65/61S65C.
Please keep this notice with the instruction manual.

As an ENERGY STAR Partner, Sony Corporation has determined that this product meets the ENERGY STAR guidelines for energy efficiency.
ATTENTION
Pour prévenir les chocs électriques, ne pas utiliser cette fiche polarisée avec un prolongateur, une prise de courant ou une autre sortie de courant, sauf si les lames peuvent être inserées à fond sans en laisser aucune partie à decouvert.
Table of contents
- 4 Welcome!
- 4 Precautions
Getting Started
- 5 Step 1: Installing the projection TV
- 6 Step 2: Hookup
- 13 Step 3: Setting up the remote control
- 14 Step 4: Setting up the projection TV automatically (AUTO SET UP)
- 18 Changing the menu language
Operations
- 19 Watching the TV
- 21 Watching two programs at one time—PIP
- 22 Freezing the picture (FREEZE)
- 23 Adjusting the picture (VIDEO)
- 24 Adjusting the color temperature (TRINITONE)
- 24 Selecting the video mode (VIDEO)
- 25 Adjusting the sound (AUDIO)
- 26 Using audio effect (SURROUND)
- 27 Selecting stereo or bilingual programs (MTS)
- 27 Setting the speaker switch (SPEAKER)
- 28 Setting audio out (AUDIO OUT)
- 29 Setting daylight saving time (DAYLIGHT SAVING)
- 29 Setting the clock (CURRENT TIME SET)
- 30 Setting the timer to turn the projection TV on and off (ON/OFF TIMER)
- 31 Customizing the channel names (CHANNEL CAPTION)
- 32 Blocking out a channel (CHANNEL BLOCK)
- 32 Setting your favorite channels (FAVORITE CHANNEL)
- 33 Setting video labels (VIDEO LABEL)
- 34 Setting Caption Vision (CAPTION VISION)
- 35 Operating video equipment
- 37 Operating a cable box or DBS receiver
Additional Information
- 38 Troubleshooting
- 39 Specifications
- 40 Index to parts and controls
42 Index
The captions in parentheses indicate menu names.
Owner's Record
The model and serial numbers are located at the rear of the projection TV. Record these numbers in the spaces provided below. Refer to them whenever you call upon your Sony dealer regarding this product.
Serial No.
Welcome!
Thank you for purchasing the Sony Color Rear Video Projection TV. Here are some of the features you will enjoy with your projection TV:
- On-screen menus that let you set the picture quality, sound, and other settings.
- Two tuner Picture-in-Picture (PIP) that allows you to watch another TV channel, video or cable image as a window picture.
- Surround mode that simulates the sound quality of a concert hall or movie theater.
- SAVA SPEAKER option of the AUDIO menu that lets you take advantage of the Sony SAVA series speaker system's surround sound and super woofer mode when you connect it to the projection TV.
About this manual
The instructions in this manual are for models KP-41T65, KP-41T65C, KP-46C65, KP-48S65, KP-53S65, KP-53S65C, KP-61S65, and KP-61S65C. Before you start reading this manual, please check your model number, located at the rear of the projection TV. Model KP-53S65 is used for illustration purposes in this manual. Any differences in operation are clearly indicated in the text, for example "KP-61T65 only." The differences in specifications are indicated in the text.
Instructions in this manual are based on use of the remote control. You can also use the controls on the projection TV if they have the same name as those on the remote control.
Precautions
This projection TV operates on extremely high voltage. To prevent fire or electric shock, please follow the precautions below.
Safety
- Operate the projection TV on 120 V AC (220 V AC for KP-41T65C/53S65C/61S65C) only.
- One blade of the plug is wider than the other for safety purposes and will fit into the power outlet only one way. If you are unable to insert the plug fully into the outlet, contact your dealer.
- Should any liquid or solid object fall into the cabinet, unplug the projection TV and have it checked by qualified personnel before operating it further.
- Unplug the projection TV from the wall outlet if you are not going to use it for several days or more. To disconnect the cord, pull it out by the plug. Never pull the cord itself.
For details concerning safety precautions, see the supplied leaflet "IMPORTANT SAFEGUARDS."
Note on cleaning
Clean the cabinet of the projection TV with a dry soft cloth. To remove dust from the screen, wipe it gently with a soft cloth using vertical strokes only. Stubborn stains may be removed with a cloth slightly dampened with solution of mild soap and warm water. Never use strong solvents such as thinner or benzine for cleaning. If the picture becomes dark after using the projection TV for a long period of time, it may be necessary to clean the inside of the projection TV. Consult qualified service personnel.
Installing
- To prevent internal heat build-up, do not block the ventilation openings.
- Do not install the projection TV in a hot or humid place, or in a place subject to excessive dust or mechanical vibration.
- Avoid operating the projection TV at temperatures below 5°C (41°F).
- If the projection TV is transported directly from a cold to a warm location, or if the room temperature has changed suddenly, the picture may be blurred or show poor color. This is because moisture has condensed on the mirror or lenses inside. If this happens, let the moisture evaporate before using the projection TV.
- To obtain the best picture, do not expose the screen to direct illumination or direct sunlight. It is recommended to use spot lighting directed down from the ceiling or to cover the windows that face the screen with opaque drapery. It is desirable to install the projection TV in a room where the floor and walls are not of reflecting material. If necessary, cover them with dark carpeting or wall paper.
Step 1: Installing the projection TV
For the best picture quality, install the projection TV within the areas shown below.
Optimum viewing area (Horizontal)

Optimum viewing area (Vertical)

Carrying your projection TV
■ KP-41T65/41T65C/46C65/48S65/53S65/53S65C only
Be sure to grasp the areas indicated when carrying the projection TV, and to use more than two people.

■ KP-61S65/61S65C only
Carry your projection TV by the casters.
Preparing for your projection TV
Before you use your projection TV, adjust convergence. For the procedure, see "Step 4: Setting up the projection TV automatically (AUTO SET UP)" on page 14 .
EN
Step 2: Hookup
Although you can use either an indoor or outdoor antenna with your projection TV, we recommend that you connect an outdoor antenna or a cable TV system to get better picture quality.
Connecting an antenna
Connect your antenna cable to the VHF/UHF antenna terminal. If you cannot connect your antenna cable directly to the terminal, follow one of the instructions below depending on your cable type.

Notes
- Most VHF/UHF combination antennas have a signal splitter. Remove the splitter before attaching the appropriate connector.
- If you use the U/V mixer, snow and noise may appear in the picture when viewing cable TV channels over 37.
Connecting an antenna/cable TV system without a VCR
To cable or antenna
(Rear of projection TV) VHF/UHF
To cable box
If your cable company requires you to connect a cable box, make the connection as follows:

To cable box and cable

Pay cable TV systems use scrambled or encoded signals requiring a cable box* in addition to the normal cable connection.
* The cable box will be supplied by the cable company.
Note
• You cannot watch the signal through an AUX connector as a window picture.
To cable and antenna

Note
• Do not connect anything to the TO CONVERTER connector in this case.
6-EN | Getting Started
Connecting an antenna/cable TV system with a VCR
For details on connection, see your VCR instruction manual.
Before making the connection, disconnect the AC power cords of the equipment to be connected.
To a conventional VCR
Notes
To connect a monaural VCR, connect the audio output of the VCR to AUDIO-L (MONO) of VIDEO 1/2/3 IN on the projection TV.
Without a cable box
After making these connections, you will be able to do the following:
- View the playback of video tapes
- Record one TV program while viewing another program
- Watch two TV programs at once using PIP

With a cable box

EN
To an S video equipped VCR
If your VCR has an S VIDEO output connector, make the following connections.
Whenever you connect the cable to the S VIDEO input connector, the projection TV automatically receives S video signals.
Without a cable box

With a cable box
(Rear of projection TV) -VHF/UHF Antenna cable VCR оит 向 AUDIO VIDEO SVIDEO S VIDEO -------AUDIO-L (white) Audio S video outputs output RK-74A (not supplie Cable box Antenna YC-15V/30V cable (not supplied) Ø d Solitte
(not supplied)
Note
Video signals are composed of Y (luminance) and C (chroma) signals. The S connection sends the two signals separately preventing degradation, and gives better picture quality compared to conventional connections.
8-EN | Getting Started
Connecting a DBS receiver
For details on connection, see the instruction manual of the DBS (Digital Broadcasting Satellites) receiver.
To a projection TV

Note
• You can use the S VIDEO connector or the composite video connector for the video connection.

VMC-8105/8205 (not supplied)
Getting Started | 9-EN
Cable or cable box
EN
Connecting a camcorder
Use this connection to view a camcorder picture.

Note
• To connect a monaural camcorder, connect the audio output of the camcorder to AUDIO-L (MONO) of VIDEO 2 INPUT on the projection TV.
Connecting an audio system
When connecting audio equipment, see page 28 for more information.

Stereo amplifier
Note
(page 26) or an MTS (Multichannel TV Sound) mode (page 27) with the supplied remote control.
Connecting two VCRs for tape editing using MONITOR OUT
You can record input images displayed on the screen. This type of connection should be used only when you connect from the line input of one VCR, and from the line output of a second VCR.

Notes
- Do not change the input signal while editing through MONITOR OUT, or the output signal will also change.
- You can use the S video jack to connect a VCR for playback and the composite video connector to connect a VCR for recording.
- When connecting a single VCR to the projection TV, do not connect the MONITOR OUT to the VCR's line input, while at the same time connecting from the projection TV's VIDEO IN connectors to the VCR's line output, as shown below.

Connecting a Sony SAVA series speaker system
If you have a Sony SAVA series speaker system, connect your speakers to the AUDIO (VAR/FIX) OUT jacks on the rear of the projection TV with the audio cable supplied with the speakers. You can take advantage of the speakers' Dolby Pro Logic* surround system and super woofer mode, and control them with the supplied remote control. When connecting a Sony SAVA series speaker system, see page 27 for more information.
* Manufactured under license from Dolby Laboratories Licensing Corporation. Additionally licensed under Canadian patent number 1,037,877. "Dolby," the double-D symbol DD and "Pro Logic" are trademarks of Dolby Laboratories Licensing Corporation.

Step 3: Setting up the remote control
Inserting batteries
Insert two size AA (R6) batteries (supplied) by matching the + and – on the battery to the diagram inside the battery compartment.

Notes
- Under normal conditions, batteries will last up to six months. If the remote control does not operate properly or the indicators of the buttons on the remote control do not light up, the batteries may be worn out. When replacing batteries, replace both of them with new ones.
- Do not mix old batteries with new ones or mix different types of batteries together.
- If the electrolyte inside the battery should leak, wipe the contaminated area of the battery compartment with a cloth and replace the old batteries with new ones. To prevent the electrolyte from leaking, remove the batteries when you don't plan to use the remote control for a long period of time.
- Do not handle the remote control roughly. Do not drop it, step on it, or let it get wet.
- Do not place the remote control in direct sunlight, near a heater, or where the humidity is high.
Getting to know buttons on the remote control
Names of buttons on the remote control are indicated in different colors to represent the available functions.
Button color
| Transparent | TV/VCR/DBS/Cable box function |
|---|---|
| (light up) | buttons. Press the appropriate |
| function button first to change the | |
| remote control's function. | |
| Green | Buttons relevant to power operations |
Label color
| White | TV/VCR/DBS/Cable box operation |
|---|---|
| buttons. | |
| Yellow | PIP operation buttons. |
| Blue | DBS operation buttons. |

Step 4: Setting up the projection TV automatically
(AUTO SET UP)
You can set up your projection TV easily by using the AUTO SET UP feature. It presets all the receivable channels, adjusts the convergence and changes the onscreen menu language. To set up the projection TV manually, see "Adjusting convergence" (page 16 ), "Setting cable TV on or off" (page 17 ), "Presetting channels" (page 18 ) and "Changing the menu language" (page 18 ).
If the projection TV is set to a video input, you cannot perform AUTO SET UP. Press TV/VIDEO so that a channel number appears.


1 Press POWER to turn the projection TV on.

2 Press SETUP on the front of the projection
AUTO SET UP screen appears.

|
ENGLISH : [CH+]
ESPAÑOL : [CH-] FRANÇAIS : [VOL-] AUTO SET UP : [VOL-] DEMO : [TV/VIDEO] |
|---|
| Press [SET UP] to exit. |
3 Press CHANNEL +/- or VOLUME + to select the on-screen menu language.
If you prefer Spanish or French to English, you can change the on-screen menu language.

All of the menus will be set to the factory preset condition in the selected language.
4 Press VOLUME – to start AUTO SET UP.

5 Press CHANNEL + to preset channels.

AUTO PROGRAM
"AUTO PROGRAM" appears on the screen and the TV starts scanning and presetting channels automatically. When all the receivable channels are stored, "AUTO PROGRAM" disappears and the following menu appears. If the projection TV receives cable TV channels, CABLE is set to ON automatically.
|
CONTINUE TO
CONVERGENCE? |
|
|---|---|
|
YES [CH+]
NO [CH-] |
|
To exit AUTO PROGRAM
Press any button.
6 Adjust convergence.
(1) Press CHANNEL +. The CONVERGENCE adjustment screen appears.


14-EN | Getting Started
(2) Press TV/VIDEO to select RED or BLUE.


(3) Using CHANNEL +/- or VOLUME +/-, move the line until it converges with the center green line.

To move horizontal line up/down, press CHANNEL +/-.
To move vertical line right/left, press VOLUME +/-.
(4) Repeat steps (2) and (3) to adjust the other lines until all three lines converge and are seen as a white cross.

Note
• Using the AUX connector, press ANT (black button) first and make sure that "AUX" is displayed beside the channel number on the screen. Then follow the steps 2 to 6 above to perform AUTO SET UP.
To preview the main functions (DEMO)
Press TV/VIDEO on the projection TV in step 4. The functions and menus are displayed one by one.
To exit DEMO
Press any button.
Erasing or adding channels
After AUTO SET UP, you can erase unnecessary channels or add the channels you want. Preset channels during the day rather than late at night, when some channels may not be broadcastin g.

1 Press TV (FUNCTION).

2 Press MENU.
The main menu appears.

EN
3 Press → or → to select 🖷, and press → .
The SET UP menu appears.

4 Press + or + to select CHANNEL ERASE/ADD,
and press 💮 .
The CHANNEL ERASE / ADD menu appears.

5 Erase and/or add channels:
To erase an unwanted channel
- (1) Make sure the cursor (▶) is beside ERASE
- (2) Press CH +/- or the 0 9 buttons to select the channel you want to erase, and press ENTER.

(3) Press 🕘 .
The "-" indication appears beside the channel number, showing that the channel is erased from the preset memory.

To add a channel that you want
- (1) Press riangle or riangle to move the cursor (►) to ADD.
- (2) Press the 0 9 buttons to select the channel you want to add, and press ENTER.


(3) Press 💿.
The "+" indication appears beside the channel number, showing that the channel is added to the preset memory.

6 To erase and/or add other channels, repeat step 5.
7 Press MENU to return to the original screen.

Notes
- If you erase or add a VHF or UHF channel, the cable TV channel with the same number is also erased or added, and vice versa.
- Erasing and adding channels is also available for the AUX input.
Adjusting convergence (CONVERGENCE)
The projection tube image appears on the screen in three layers (red, green and blue). If they do not converge, the color is poor and the picture blurs. To correct this, adjust convergence.
You do not have to do this procedure if you perform AUTO SET UP (page 14 ). Do this procedure only when you want to adjust it manually.
1 Press MENU.
2 Press + or + to select min , and press ilde{→}.
3 Press ★ or ★ to select CONVERGENCE, and press ⊕ .
The CONVERGENCE adjustment screen appears.

16-EN | Getting Started
4 Press ★ or ★ to move the cursor (►) to the symbol showing the line you want to adjust, and press ↔.


- +RED : Red vertical and horizontal line (left/right/up/ down adjustment)
- +BLUE : Blue vertical and horizontal line (left/right/up/ down adjustment)
- 5 Press ★, or ★ to move the line until it converges with the center green line, and press ⊕.

| To move | Press | ||
|---|---|---|---|
| Up | + | ||
| Down | + | ||
| Right | • | ||
| Left | + | - |
- 6 Repeat steps 4 and 5 to adjust the other lines until all three lines converge and are seen as a white cross.
- 7 Press MENU to return to the original screen.
Setting cable TV on or off
If you have connected the projection TV to a cable TV system, set CABLE to ON (the factory setting). If not, set CABLE to OFF.
You do not have to do this procedure if you perform AUTO SET UP (page 14 ). Do this procedure only when you want to set it manually.
1 Press MENU.
2 Press ← or ← to select 🕾, and press .
3 Set CABLE to ON or OFF:
- (1) Press ◆ or ◆ to move the cursor (►) to CABLE, and press
- (2) Press ♠ or ♥ to select ON or OFF, and press ④.

4 Press MENU to return to the original screen.
Note
• If CABLE appears in gray, the projection TV is set to a video input and you cannot select CABLE. Press ANT (black button) so that a channel number appears.
Presetting channels
You can preset TV channels easily by using the AUTO PROGRAM feature.
You do not have to do this procedure if you perform AUTO SET UP (page 14 ). Do this procedure only when you want to set it manually.
1 Press MENU.
- 2 Press + or + to select , and press ...................................
- 3 Press + or + to select AUTO PROGRAM, and press ⊕.


"AUTO PROGRAM" appears on the screen and the projection TV starts scanning and presetting channels automatically. When all the receivable channels are stored, "AUTO PROGRAM" disappears and the lowest numbered channel is displayed.
4 Press MENU to return to the original screen.
To exit AUTO PROGRAM
Press any button.
Notes
- If the AUTO PROGRAM menu appears in gray, the projection TV is set to a video input and you cannot select AUTO PROGRAM. Press ANT button so that a channel number appears.
- Presetting channels is also available for the AUX input.
Changing the menu language
If you prefer Spanish or French to English, you can change the menu language.
You do not have to do this procedure if you select the language during AUTO SET UP (page 14 ). Do this procedure only when you want to set it manually.
- 1 Press MENU.
- 2 Press + or + to select mess, and press →.
- 3 Press ★ or ★ to select LANGUAGE, and press .

4 Press ★ or ★ to select your favorite language, "ENGLISH", "ESPAÑOL," or "FRANÇAIS" and press ④.

5 Press MENU to return to the original screen.
Note
• Certain parts of the Spanish or French menus remain in English.
Operations
Watching the TV

1 Press TV (POWER) to turn on the projection TV.
The TIMER/STANDBY indicator flashes until the picture appears.
If "VIDEO" appears on the screen, press ANT so that a channel number appears.
2 Press TV (FUNCTION).

Once you press TV (FUNCTION), the projection TV function is set unless another function button is pressed.
3 Select the channel you want: To select a channel directly
Press the 0 – 9 buttons, and press ENTER. For example, to select channel 10, press 1, 0 and ENTER.

To scan through channels


The channel can also be selected without pressing ENTER.
4 Press VOL +/- to adjust the volume.
| VOL | |
|---|---|
| + | |
Switching quickly between two channels
You can use the JUMP button to switch or "jump" back and forth between two channels.
Press JUMP.

Pressing JUMP again switches the channel back to the one you selected last.
Note
• You cannot jump to channels you scanned through using the CH +/- buttons.
Muting the sound
Press MUTING.
"MUTING" appears on the screen.

To restore the sound, press MUTING again, or press VOL +. Operations | 19-EN
Downloaded from www.Manualslib.com manuals search engine
Displaying on-screen information
Press DISPLAY repeatedly until the desired display appears.
Each time you press DISPLAY, the display changes as follows:

- * Channel number, the current time, channel caption (if set), and MTS mode (if SAP is selected) are displayed. SAP indication disappears after three seconds.
- ** Some programs are broadcast with XDS (Extended Data Service) which shows a network name, program name, program type, program length, call letters, and time of the show. When you select XDS with the DISPLAY button, this information will be displayed on the screen if the broadcaster offers this service.
- *** Some programs are broadcast with Caption Vision. When you select Caption Vision with the DISPLAY button, Caption Vision will be displayed on the screen if the broadcaster offers this service. (See page 34 for selecting Caption Vision.)
To cancel the display, press DISPLAY repeatedly until "DISPLAY OFF" appears. "DISPLAY OFF" goes off after three seconds.
Setting the Sleep Timer
The projection TV stays on for the length of time you specify and then shuts off automatically.
Press SLEEP repeatedly until the time (minutes) you want appears.
Each time you press SLEEP, the time changes as follows:
30 → 60 → 90 → SLEEP OFF

To cancel the Sleep Timer, press SLEEP repeatedly until "SLEEP OFF" appears, or turn off the projection TV.
20-EN | Operations
Press TV/VIDEO repeatedly until the desired video input appears.
Watching a video input picture
Each time you press TV/VIDEO, the display changes as follows:
TV -> VIDEO 1 -> VIDEO 2 -> VIDEO 3

To return to the TV picture, press ANT so that a channel number appears.
Changing the VHF/UHF input to the AUX input
Press ANT.
"AUX" appears beside the channel number.

Pressing ANT again switches back to the VHF/UHF input.
Watching two programs at one time — PIP
The Picture-in-Picture (PIP) feature allows you to watch both the main picture and a window picture simultaneously.

Use the yellow labelled buttons for PIP operations.
Displaying a window picture
Press PIP.

Press PIP again to display a smaller window picture.


To remove the window picture, press PIP again.
Note
• The window picture may be affected by the condition of the main picture.
Changing the window picture input mode
Press TV/VIDEO (yellow labelled button) to select the input mode.
Each time you press TV/VIDEO (yellow labelled button), "TV", "VIDEO 1", "VIDEO 2", and "VIDEO 3" appear in sequence.


A window picture will appear in the same input mode as the last time you used PIP.
Note
• If you connect your VCR without a cable box, your PIP input source is a VCR. If you connect your VCR with a cable box, your PIP input source is a VCR or cable box.
Listening to the sound of the window picture
Press AUDIO.
The s display appears next to the PIP channel number for a few seconds, indicating that the window picture sound is being received.


The sound of the window picture is received.
To restore the main picture sound, press AUDIO again. The ♪ display moves to the main picture channel number.
Changing TV channels in the window picture
Press CH +/- (yellow labelled button).

Changing the position of the window picture
Press POSITION.
Each time you press POSITION, the window picture will move counterclockwise on the screen.

Swapping the main and window pictures
Press SWAP.
Each time you press SWAP, the images and sound from the main and window pictures switch places with another.

Note
• The channels being received through the AUX connector cannot be displayed as a window picture.
Freezing the picture (FREEZE)
The FREEZE feature is useful when you want to write down an information such as a recipe from a cooking program, a displayed address, or a phone number. The frozen picture changes as follows depending on whether the PIP function is used or not.

Press FREEZE.

When the PIP function is not being used


The frozen picture appears in the window picture.
To remove the frozen window picture, press FREEZE again.
When the PIP function is being used

To cancel the frozen window picture, press FREEZE again.
Adjusting the picture (VIDEO)
When watching TV programs, you can adjust the picture to suit your taste.
You can adjust the picture of video input(s) as well.

1 Press MENU.
2 Press + or + to select Ⅲ, and press ↔.


3 Select the item you want to adjust. For example:
(1) To adjust the brightness, press ▲ or ↓ to move the cursor (▶) to BRIGHTNESS.


(2) Press 🕘 .

4 Adjust the selected item:
(1) Press ♠, ♠, ♥, or ➡ to adjust the item.


(2) Press →.The new setting appears in the VIDEO menu.


EN
For details on each item, see "Description of adjustable items" below.
5 To adjust other items, repeat steps 3 and 4.
6 Press MENU to return to the original screen.
Description of adjustable items
| Item | Press + or + to | Press + or + to |
|---|---|---|
| PICTURE |
Decrease picture
contrast and give soft color. |
Increase picture
contrast and give vivid color. |
| HUE | Make picture tones become purplish. | Make picture tones become greenish. |
| COLOR | Decrease color intensity. | Increase color intensity. |
| BRIGHTNESS | 5 Darken the picture. | Brighten the picture. |
| SHARPNESS | Soften the picture. | Sharpen the picture. |
To restore the factory settings
Press RESET after displaying and selecting the VIDEO menu.
All of the settings are restored to the factory settings.
Adjusting the color temperature (TRINITONE)
The TRINITONE feature controls the color temperature, permitting white balance preference adjustment without affecting skin tones.

- 1 Press MENU.
- 2 Press + or + to select □ and press .
- 3 Press + or + to select TRINITONE and press ⊕.

4 Press ★ or ★ to select NTSC STD, MEDIUM, or HIGH and press ⊕ .

| Choose | То | |
|---|---|---|
| HIGH | a cool (bluish) white. | |
| MEDIUM | a neutral white. | |
| NTSC STD | a warm (reddish) white. |
Selecting the video mode (VIDEO)
The video mode feature allows you to choose three different modes of picture settings. Choose the one that best suits the type of program that you want to watch.
- 1 Press MENU.
- 2 Press + or + to select Ⅲ, and press ④.
- 3 Press + or + to select MODE, and press .
- 4 Press + or + to select STANDARD, MOVIE, or SPORTS mode, and press ⊕.

| Choose | То |
|---|---|
| STANDARD | Receive a standard picture. |
| MOVIE | Receive a finely detailed picture. |
| SPORTS | Receive a vivid, bright picture. |
5 Press MENU to return to the original screen.
Note
• The settings for these modes can be adjusted in the VIDEO menu.
24-EN | Operations
Adjusting the sound (AUDIO)
You can adjust the quality of the TV sound to suit your taste. You can adjust the sound of the video input(s) as well.

1 Press MENU.
2 Press ↑ or ↓ to select ↓ , and press ④.

3 Select the item you want to adjust. For example:
(1) To adjust bass, press ♦ or ♦ to move the cursor (►) to BASS.


(2) Press 💮 .


4 Adjust the selected item: (1) Press ♠. ♠. or ♠ to adjust the item

(2) Press (.). The new setting appears in the AUDIO menu.


EN
For details on each item, see "Description of adjustable items" below.
5 To adjust other items, repeat steps 3 and 4.
6 Press MENU to return to the original screen.
Description of adjustable items
| ltem | Press + or + to | Press + or + to |
|---|---|---|
| TREBLE | Decrease the treble response. | Increase the treble response. |
| BASS | Decrease the bass Increase the bass response. | |
| BALANCE | Emphasize the left speaker's volume. | Emphasize the right speaker's volume. |
To restore the factory settings
Press RESET after displaying and selecting the AUDIO menu.
All of the settings are restored to the factory settings.
Note
• When SPEAKER (page 27 ) is OFF and AUDIO OUT (page 28 ) is in the FIXED condition, the volume, TREBLE, BASS, and BALANCE cannot be adjusted.
The audio effect (SURROUND) feature simulates sound reproduction with the atmosphere of a movie theater or a concert hall. Audio effect is only effective for stereo programs.
Using the ② (audio effect) button

1 Press TV (FUNCTION).
2 Press ②.
Each time you press the D button, the display changes as follows:
SURROUND → SURROUND OFF


Using the menu to set audio effect

- 1 Press MENU.
- 2 Press + or + to select ♪, and press ④.
- 3 Press + or + to select EFFECT, and press ⊕.

4 Press + or + to select the audio effect mode, and press ⊕.

5 Press MENU to return to the original screen.
Selecting stereo or bilingual programs (MTS)
The Multichannel TV Sound (MTS) feature allows you to enjoy stereo sound or Second Audio Programs (SAP) of your choice. The initial setting is stereo sound (STEREO).

Press MTS repeatedly to select STEREO, SAP, or MONO.
| STEREO- | SAP- | →MC | NO |
|---|---|---|---|
| Ť |
| Choose | То | |
|---|---|---|
| STEREO |
Listen to stereo sound.
The STEREO indicator on the projection TV lights up when a stereo broadcast is received. |
|
| SAP |
Listen to bilingual programs.
There is no sound when the SAP signal is not broadcasting. |
|
| MONO |
Listen to monaural sound.
Reduce noise during stereo broadcasts. |
|
Note
• Stereo and SAP sounds are subject to program sources.
To set MTS using the menu
- 1 Press MENU.
- 2 Press ♦ or ♦ to select ♪ , and press ● .
- 3 Press ♦ or ♥ to select MTS, and press .
- 4 Press ♠ or ♦ to select STEREO, SAP, or MONO.
- 5 Press MENU to return to the original screen.
Setting the speaker switch (SPEAKER)
You may switch off the projection TV speakers when, for example, you want to listen to the sound through a stereo system.
If you connect the Sony SAVA series speaker system to the AUDIO (VAR/FIX) OUT connectors, you can take advantage of the speakers' surround sound and super woofer mode. After making the connections (page 12 ), set SPEAKER to SAVA SPEAKER, then adjust SURROUND MODE or SUPER WOOFER MODE.

- 1 Press MENU.
- 2 Press ↑ or ↓ to select > , and press →.
- 3 Press + or + to select SPEAKER, and press

4 Press ★ or ★ to select ON, OFF, or SAVA SP, and press .

5 Press MENU to return to the original screen.
EN
| Choose | То |
|---|---|
| ON | Listen to the sound from the |
| projection TV. | |
| OFF | Turn off the projection TV speaker |
| sound and listen to the projection | |
| TV's sound solely through the audio | |
| system speakers. | |
| SAVA SP | Turn off the projection TV speaker |
| sound and listen to the projection | |
| TV's sound through the Sony SAVA | |
| series speaker system. You can adjust | |
| volume, muting, surround modes, | |
| and super woofer mode with the | |
| remote control supplied with the | |
| projection TV. |
To select surround sound or super woofer mode of the SAVA speaker system
After setting SPEAKER to SAVA SP, follow the procedure below.
Press ★ or ★ to select SURROUND MODE or SUPER WOOFER MODE, and press .
For details on each option, refer to the operating instructions of the speaker system.

Note
This feature is only for Sony SAVA speaker system with an operation capability for KP-41T65, KP-41T65C, KP-46C65, KP-48S65, KP-53S65, KP-53S65C, KP-61S65, and KP-61S65C.
Setting audio out (AUDIO OUT)
You can change AUDIO OUT to VARIABLE or FIXED when SPEAKER is set to OFF. AUDIO OUT is variable when SPEAKER is set to ON.

- 1 Press MENU.
- 2 Press ↑ or ↓ to select > , and press ④.
- 3 Press + or + to select AUDIO OUT, and press

4 Press + or + to select VARIABLE or FIXED, and press ⊕.

VARIABLE: Sound output varied according to the projection-TV settings. You can adjust the volume, bass, treble, and balance. FIXED: Sound output is always fixed to a certain level. The volume, bass, treble, and balance
are also fixed to the factory settings.
5 Press MENU to return to the original screen.
Note
If AUDIO OUT appears in gray, set SPEAKER to OFF.
Setting daylight saving time (DAYLIGHT
SAVING)
If your area uses daylight saving time, change DAYLIGHT SAVING setting depending on the season, before setting the current time.
Daylight saving start
• After the first Sunday in April, set DAYLIGHT SAVING to YES. Current time setting (right column) automatically moves one hour ahead.
Daylight saving end
• After the last Sunday in October, set DAYLIGHT SAVING to NO. Current time setting automatically moves one hour back.

- 1 Press MENU.
- 2 Press + or + to select-⊕, and press .
- 3 Press + or + to select DAYLIGHT SAVING, and press ⊕.

4 Press ★ or ★ to select YES or NO, and press (+).

| Choose | То |
|---|---|
| YES 、 | Set for daylight saving start. |
| NO | Set for daylight saving end. |
5 Press MENU to return to the original screen.
Setting the clock
(CURRENT TIME SET)
Setting the clock enables you to turn the projection TV on and off with the timer. Make sure to set daylight saving time first.

- 1 Press MENU.
- 2 Press ↑ or ↓ to select ⊕, and press ⊕.
- 3 Press ★ or ★ to select CURRENT TIME SET, and press ④.


EN
4 Make sure the cursor (►) is to the left of "--:-- AM," and press .

-
5
Set the current day of the week and time.
- (1) Press ♠ or ♥ to set the day of the week, and press

(2) Set the hour and minutes in the same way as in step (1). When you press ( ) after setting the minutes, the clock starts.

δ Press MENU to return to the original screen.
Operations | 29-EN
Setting the timer to turn the projection TV on and off
(ON/OFF TIMER)
You can set the projection TV to turn on and off at the times you specify. Make sure the clock is set correctly. If it is not, set the clock first (page 29 ).

- 1 Press MENU.
- 2 Press + or + to select ⊕, and press →.
- 3 Press + or + to select ON/OFF TIMER, and press ⊕.

4 Press → and enter the ON/OFF TIMER setting.
(1) Press ♠ or ♥ to set the day(s), and press .
Each time you press ♠ or ➡, the days cycle as follows:
EVERY SUN-SAT→EVERY MON-FRI→ SUNDAY→...→SATURDAY→EVERY SUNDAY→...→EVERY SATURDAY


(2) Press ♦ or ♥ to set the time (hour then minutes) that you want to turn on the projection TV, and press (*).

(3) Press ♦ or ♥ to set the time duration, and press.
Each time you press ♠, the time duration increases by one hour up to a maximum of six hours.

(4) Press ♠ or ♥ to select the channel, and press .

The TIMER indicator on the projection TV lights up.
5 To set the other program, press →, and repeat step 4.
6 Press MENU to return to the original screen.
One minute before the projection TV turns off, the message "TV will turn off soon." is displayed on the screen.
To cancel the timer
In step 3 or 4, press RESET.
Note
• If you unplug the projection TV or a power interruption occurs, the ON/OFF TIMER setting will be erased. Reset the current time, then set the timer.
30-EN | Operations
You can add a caption for up to 12 channels. This feature allows you to easily identify which channel you are watching. You can make your own caption.

1 Press MENU.
2 Press ← or + to select , and press .

3 Press ★ or ★ to select CHANNEL CAPTION, and press ⊕.


4 Press ⊕ and press + or + to select the channel that you want to caption, and press ⊕.


5 Enter the letters (up to four) to caption the channel:
(1) Press • or • to select the first letter.
Each time you press ♠ or ♥, the letter changes as follows:


(2) Press 💿.


EN
(3) Repeat steps (1) and (2) to select the remaining letters, and press (-).
6 Repeat steps 4 and 5 to caption other channels.
7 Press MENU to return to the original screen.
After you customize the channel, the channel caption appears green.
To erase a caption
In step 5, press RESET.
Notes
- If the CHANNEL CAPTION menu appears in gray, the projection TV is set to a video input, and you cannot select CHANNEL CAPTION. Press TV (black button) so that a channel number appears.
- If more than 90 seconds elapse after you press a button, the menu disappears automatically.
- The channel caption feature is not available for the AUX input.
Blocking out a channel (CHANNEL BLOCK)
The channel block feature allows you to prevent children from watching unsuitable programs. You can block out two channels.

- 1 Press MENU.
- 2 Press ★ or ★ to select 🖻, and press .
- 3 Press + or + to select CHANNEL BLOCK, and press (+).


4 Press + or + to select program 1 or 2, and press ⊕.

5 Press ★ or ★ to select the channel which you want to block out, and press .

6 Press MENU to return to the original screen. When you select the blocked channel, the message "BLOCKED"
appears on the screen.
KED"
To cancel a CHANNEL BLOCK setting
In step 4 or 5, press RESET.
Note
• Once you use CHANNEL BLOCK, Caption Vision and XDS of the blocked channel and the selected channel output from MONITOR OUT are also blocked out.
32-EN | Operations
Setting your favorite channels
(FAVORITE CHANNEL)
The favorite channel feature allows your projection TV to memorize your favorite channels easily. If you set to AUTO, the last five channels you selected with the 0 – 9 buttons are automatically set as your favorite channels. If you want to input your own selection of channels, set to MANUAL.
Setting your favorite channels

- 1 Press MENU.
- 2 Press ← or + to select 🗠, and press ....
- 3 Press ★ or ★ to select FAVORITE CHANNEL, and press ④.


4 Press

| FAVORITE CHANNEL | |
|---|---|
| MODE: MANUAL | |
| 2 | |
| 4 | |
|
⊋MENU
Select a position. |
|
| Use 🕕 🕀 🗵 Exit 🕬 |
If you select AUTO, skip steps 5 and 6. The last five channels you selected with the 0 – 9 buttons are automatically set as your favorite channels.
If you select MANUAL, the favorite channel numbers become white, indicating that favorite channels can be entered.
5 Press ★ or ★ to select a favorite channel number, and press (-).

6 Press + or + to select the channel that you want to set as your favorite channel, and press ⊙.

7 Press MENU to return to the original screen.
Notes
- If the FAVORITE CHANNEL menu appears in gray, the projection TV is set to a video input and you cannot select FAVORITE CHANNEL.
- If more than 90 seconds elapse after you press another button, the menu disappears automatically.
- The favorite channel feature is not available for the AUX input.
Selecting your favorite channel

1 Press .
The FAVORITE CHANNEL menu appears.


2 Press ★ or ★ to select the favorite channel you want to watch, and press ⊕.
The selected channel appears on the screen.

To cancel the FAVORITE CHANNEL menu Press ♠ or ♥ to select "Exit," and press ...
Setting video labels
(VIDEO LABEL)
The video label feature allows you to label each input mode so that you can easily identify the connected equipment. For example, you can label VIDEO 1 as VHS.

- 1 Press MENU.
- 2 Press + or + to select ⊕, and press ⊕.
- 3 Press + or + to select VIDEO LABEL, and press ⊕.

4 Press ★ or ★ to select the input mode you want to label, and press .


. .


Each time you press ♠ or ♣, the label changes as follows:
VIDEO 1
VIDEO 1
VIDEO 2
VIDEO 2 ↔ VHS ↔ 8 mm ↔ BETA ↓ DBS ↔ DVD ↔ S VIDEO ↔ LD
VIDEO 3
VIDEO 3
6 Repeat steps 4 and 5 to label other input modes.
Note
• If more than 90 seconds elapse before you press another button, the menu disappears automatically.
Setting Caption Vision (CAPTION VISION)
Some programs are broadcast with Caption Vision. To display Caption Vision, select either CC1, CC2, CC3, CC4, TEXT1, TEXT2, TEXT3, or TEXT4 from the menu. CC1, CC2, CC3, or CC4 shows you on-screen version of the dialogue or sound effects of a program. (The mode should be set to CC1 for most programs.) TEXT1, TEXT2, TEXT3, or TEXT4 shows you on-screen information presented using either half or the whole screen. It is not usually related to the program.

1 Press MENU.
2 Press + or + to select CC, and press ⊕.

3 Press ★ or ★ to select the caption type, and press ⊕.


4 Press MENU to return to the original screen.
To display Caption Vision
Press DISPLAY. (See page 20 for details.)
Notes
• Poor reception of TV programs can cause errors in Caption Vision and XDS.
Captions may appear with a white box or other errors instead of a certain word.
- XDS, Caption Vision, and the status display cannot be used at the same time.
- For details on XDS, see page 20 .
34-EN | Operations
Operating video equipment
You can use the supplied remote control to operate Sony or non-Sony video equipment that has an infrared remote sensor. For this operation, set the manufacturer's code number.
Setting the manufacturer's code

Press the CODE SET, VTR (FUNCTION), and 0 – 9 buttons to enter the manufacturer's code number (see the chart on page 35-36), then press ENTER.
For example, to operate a Sony 8 mm VCR, press CODE SET, VTR (FUNCTION), 3, 0, 2, and ENTER.

VCR manufacturer code numbers
| Manufacturer | Code number |
|---|---|
| Sony | 301, 302, 303 |
| Aiwa | 338 |
| Audio Dynamic | 314, 337 |
| Bell & Howell (M. Wards) | 330, 343 |
| Brocsonic | 319 |
| Canon | 309, 308 |
| Citizen | 332 |
| Craig | 315, 302, 332 |
| Curtis Mathis | 304, 338, 309 |
| Daewoo | 341, 312, 309 |
| DBX | 314, 336, 337 |
| Dimensia | 304 |
| Emerson | 319, 320, 316, 317, 318 |
| Fisher | 330, 334, 335, 333 |
| Funai | 338 |
| General Electric | 329, 304, 309 |
| Goldstar | 332 |
| Hitachi | 306, 304, 305 |
| Instant Replay | 309, 308 |
| JC Penny | 309, 305, 304, 330, 314, |
| 336, 337 | |
| JVC | 314, 336, 337 |
| Kenwood | 314, 336, 332, 337 |
| LXI (Sears) |
332, 305, 333, 334, 330,
225 |
| Management | 335 |
| Magnavox |
308, 309
214 - 226 - 227 |
| Marta | 222 |
| Momorov | 309 335 |
| Minolta | 305, 304 |
| Miteubichi/MCA | 323 324 325 326 |
| Multitech | 325, 338, 321 |
| NFC | 314 336 337 |
| Olympic | 309, 308 |
| Panasonic | 308, 309, 306, 307 |
| Pentax | 305, 304 |
| Philco | 308, 309 |
| Philips | 308, 309 |
| Pioneer | 308 |
| Quasar | 308, 309 |
| RCA/PROSCAN | 304, 305, 308, 309, 311, |
| 312, 313 | |
| Realistic | 309, 330, 328, 335, 324, |
| 338 | |
| Sansui | 314 |
| Singer | 315 |
| Samsung | 322, 313, 321 |
| Sanyo | 330, 335 |
| Scott | 312, 313, 321, 335, 323, |
| 324, 325, 326 | |
| Sharp | 327, 328 |
| Shintom | 315 |
| Signature 2000 (M. Wards) | 338, 327 |
| Sylvania | 308, 309, 338 |
| Symphonic | 338 |
| Tashiro | 332 |
| Tatung | 314, 336, 337 |
| 1eac |
314, 336, 338, 337
200-208 |
| Technics |
307, 308
210-211 |
|
TOSHIDA
Marda |
314, 311
207 208 225 221 220 |
|
vvarus
Vamaha |
327, 320, 333, 331, 332
330, 314, 336, 327 |
|
Tanlalla
Zonith |
221 |
| 501 |
EN
MDP manufacturer code numbers
| Manufacturer | Code number |
|---|---|
| Sony | 701 |
| Kenwood | 707 |
| Magnavox | 703 |
| Maranz | 702 |
| Mitsubishi | 702 |
| Panasonic | 704 |
| Philips | 703 |
| Pioneer | 702 |
| RCA | 702 |
| Sanyo | 706 |
| Sharp | 705 |
| Yamaha | 703 |
Notes
- If more than one code number is listed, try entering them one by one, until you come to the correct code for your equipment.
- In some rare cases, you may not be able to operate your non-Sony video equipment with the supplied remote control. This is because your equipment may use a code that is not included with this remote control. In this case, please use the equipment's own remote control unit.
- The code numbers for Sony equipment are assigned at the factory as follows: VHS VCR 301 (preset code for the supplied
| VHS VCR |
301 (preset code for the suppl
remote control) |
|---|---|
| 8 mm VCR | 302 |
| Beta, ED Beta VCRs | - 303 |
Whenever you remove the batteries — to replace them, for example — if too much time is taken, the code number may revert to the factory setting and must be reset.
Operating video equipment

Use the video operating buttons on the remote control to operate the video equipment. Press VTR (FUNCTION) before operating the video equipment.
| Operating a VCR | Buttons on the remote control |
|---|---|
| To turn on or off | Press VTR (POWER). |
| To select a channel directly | Press the 0 – 9 buttons. |
| To change channels | Press CH +/ |
| To record | Press ► while pressing ●. First release ►, then release ●. |
| To play | Press ►. |
| To stop | Press . |
| To fast forward | Press 🍽. |
| To rewind the tape | Press < |
| To pause |
Press II.
To resume normal playback, press again. |
| To search the picture forward or backward |
Press ▶ or ◀◀ during playback.
To resume normal playback, release the button. |
| To change input mode | Press TV/VTR. |
| Operating an MDP | Buttons on the remote control |
|---|---|
| To turn on or off | Press VTR (POWER). |
| To play | Press ► |
| To stop | Press . |
| To pause |
Press II.
To resume normal playback, press again. |
|
To search the picture
forward or backward Dackward button. Keep pressing ►► or ◄◀ during playback. To resume normal playback, rele |
|
| To search the chapter forward and backward | Press CH +/ |
Note
If the video equipment does not have a certain function, the corresponding button on this remote control will not operate.
Operating a cable box or DBS receiver
You can program the supplied remote control to operate a cable box or DBS receiver. Follow the procedures below to set the manufacturer's code number in the remote control.

* The TV/DBS, GUIDE, DISPLAY, ◆/ →/ →, and MENU buttons can be used only with a DBS receiver.
1 Turn off the equipment you want to set up, and press DBS/CABLE (FUNCTION).

Press the CODE SET, DBS/CABLE (FUNCTION), and 0 – 9 buttons to enter the manufacturer's code number (see the chart on the right column), then press ENTER. For example, to program your remote control to operate a Sony DBS receiver, press CODE SET, DBS/CABLE (FUNCTION), 8, 0, 1, and
ENTER.

3 Press DBS/CABLE (POWER) to turn on the cable box or DBS receiver.

4 Use the cable box/DBS control buttons to check if the code number works.
For example, to operate a cable box or DBS receiver, you can use the DBS/CABLE (POWER), JUMP, CH +/-, 0 – 9 and ENTER buttons.
Note
If the cable box or DBS receiver does not have a certain function, the corresponding button on this remote control will not operate.
To operate the projection TV
Press TV (FUNCTION). Then use the projection TV control buttons to control the projection TV.
For more details on operating the cable box or DBS receiver
Refer to the operating instructions that come with the equipment.
EN
If the remote control doesn't work
• First, try repeating the setup procedures using the other codes listed for your equipment.
Manufacturer code numbers (cable box)
| Manufacturer | Code number |
|---|---|
| Hamlin / Regal | 222, 223, 224, 225, 226 |
| Jerrold/G. I. | 201, 202, 203, 204, 205, 206, 207, 208, 218 |
| Oak | 227, 228, 229 |
| Panasonic | 219, 220, 221 |
| Pioneer | 214, 215 |
| Scientific Atlanta | 209, 210, 211 |
| Tocom | 216, 217 |
| Zenith | 212, 213 |
Manufacturer code numbers (DBS receiver)
| Manufacturer | Code number | |
|---|---|---|
| Sony | 801 (preset code for the supplied remote control) | |
| RCA | 802 | |
Notes
- If more than one code number is listed, try entering them one by one until you come to the correct code for your equipment.
- If you enter a new code number, the code number you previously entered at that setting is erased.
- In some rare cases, your equipment may use a code that is not provided with this remote control and you may not be able to operate your equipment with the supplied remote control. In this case, use the equipment's own remote control unit.
- Whenever you remove the batteries to replace them, for example if too much time is taken, the code numbers may revert to the factory setting and must be reset.
Operations | 37-EN
Downloaded from www Manualslip com manuals search engine
Additional Information
Troubleshooting
If the problem persists after trying the methods below, contact your nearest Sony dealer.
No picture (screen not lit), no sound
- Make sure the power cord is connected securely.
- → Operate with the buttons on the projection TV.
- Insert the batteries in the remote control with the correct polarity.
- Replace the batteries with new ones if they are weak.
- Check to see if the TV/VIDEO setting is correct: when watching TV, set to TV, and when watching video tapes, set to VIDEO1, 2, or 3.
- → Try another channel. It could be station trouble. → Perform AUTO SET UP again using the SETUP button to return to the factory preset condition. (page 14)
Poor or no picture (screen lit), good sound
- Adjust PICTURE in the VIDEO menu. (page 23) Adjust BRIGHTNESS in the VIDEO menu. (page 23)
- → Adjust convergence. (page 16)
- → Check antenna/cable connections. (page 6)
- Perform AUTO SET UP again using the SETUP button to return to the factory preset condition. (page 14)
- Remove objects from the front of the projection TV.
Good picture, no sound
- Press MUTING so that "MUTING" disappears from the screen. (page 19)
- Check the MTS setting in the AUDIO menu. (page 27)
- Make sure SPEAKER is set to ON in the AUDIO menu. (page 27)
- Perform AUTO SET UP again using the SETUP button to return to the factory preset condition. (page 14)
No color
- → Adjust the COLOR in the VIDEO menu. (page 23)
- ➡ Confirm that black and white program is not being broadcast.
- Perform AUTO SET UP again using the SETUP button to return to the factory preset condition. (page 14)
Only snow and noise appear on the screen
- Check the CABLE setting in the SET UP menu. (page 17)
- → Check the antenna/cable connections. (page 6)
- Make sure the channel is broadcasting programs.
- ➡ Press ANT to change the input mode. (page 20)
Dotted lines or stripes
- ➡ Adjust the antenna.
- Move the projection TV away from noise sources such as cars, neon signs, and hairdryers.
Double images or ghosts
Use a highly directional outdoor antenna or a cable (when the problem is caused by reflections from nearby mountains or tall buildings).
Cannot operate menu
- If the item you want to choose appears in gray, you cannot select it. Press TV/VIDEO correctly.
- → Check the CABLE setting in the SET UP menu. (page 17)
Cannot receive upper channels (UHF) when using an antenna
- ➡ Make sure CABLE is OFF in the SET UP menu. (page 17)
- ➡ Use AUTO PROGRAM to add receivable channels that are not presently in projection TV memory. (pages 14, 18)
Cannot receive any channels when using cable TV
- → Make sure CABLE is ON in the SET UP menu. (page 17 )
- → Use AUTO PROGRAM to add receivable channels that are not presently in projection TV memory. (pages 14 , 18 )
Remote control does not operate
- Batteries could be weak. Replace the batteries. (page 13)
- Make sure the projection TV's power cord is connected securely to the wall outlet.
- Press TV (FUNCTION) when operating your projection TV.
- Are fluorescent lights too close to the projection TV? Move them at least 3-4 feet away from the projection TV.
Cannot gain enough volume when using a cable box
Increase the volume at the cable box. Then press TV (FUNCTION) and adjust the projection TV's volume.
The projection TV needs to be cleaned
Clean the projection TV with a soft dry cloth. Never use strong solvents such as thinner or benzine, which might damage the finish of the cabinet.
Specifications
| Projection system |
3 picture tubes, 3 lenses,
horizontal in-line system |
|---|---|
| Picture tube |
7 inch high-brightness
monochrome tubes (6.3 raster size), with optical coupling and liquid cooling system |
| Projection lenses | High performance, large- |
diameter hybrid lens F1.1
Screen size (measured diagonally)
| 41 inches |
| 41 inches |
| 46 inches |
| 48 inches |
| 53 inches |
| 53 inches |
| 61 inches |
| 61 inches |
Television system American TV standards
- Channel coverage VHF: 2 13 / UHF: 14 69 / CATV: 1 – 125
- Antenna 75 ohm external antenna terminal for VHF/UHF
Inputs/output
VIDEO IN 1 VIDEO IN 2 (VIDEO 2 INPUT) S VIDEO (4-pin mini DIN): Y: 1 Vp-p, 75-ohms unbalanced, sync negative C: 0.286 Vp-p (Burst signal) 75 ohms VIDEO (phono jack): 1 Vp-p, 75-ohms unbalanced, sync negative AUDIO (phono jacks): 500
mVrms (100% modulation) Impedance : 47 kilohms
VIDEO IN 3
VIDEO (phono jacks): 1 Vp-p, 75-ohms unbalanced, sync negative AUDIO (phono jacks): 500 mVrms (100% modulation) Impedance: 47 kilohms
MONITOR OUT
VIDEO (phono jack): 1 Vp-p, 75-ohms unbalanced, sync negative AUDIO (phono jacks): 500 mVrms (100% modulation), Impedance: 5 kilohms AUDIO OUT (phono jacks): 500 mVrms (100% modulation) Impedance: 5 kilohms
Speaker
Speaker output 12 W × 2
Power requirement
For KP-41T65C/53S65C/61S65C: 220 V AC, 50/60 Hz For other models: 120 V AC, 60 Hz
EN
Full range speaker 100 mm (3.9
Power consumption
165 W Standby mode: 2.5 W
inches) diameter
| Dimensions(W/H/D) | Mass | |
|---|---|---|
| KP-41T65 |
951 × 1,022 × 602 mm
(37 1 / 2 × 40 1 / 4 × 23 3 / 4 inches) |
55 kg
(121 lbs 4 oz) |
| KP-41T65C |
951 × 1,022 × 602 mm
(37 1 / 2 × 40 -1 / 4 × 23 3 / 4 inches) |
55 kg
(121 lbs 4 oz) |
| KP-46C65 |
1,066 × 1,306 × 563 mm
(42 × 51 -1 / 2 × 22 -1 / 4 inches) |
65 kg
(143 lbs 5 oz) |
| KP-48S65 |
1,106 × 1,337 × 571 mm
(43 5 /8 × 52 5 /8 × 22 1 /2 inches) |
67 kg
(147 lbs 11 oz) |
| KP-53S65 |
1,218 × 1,413 × 614 mm
(48 × 55 5 /8 × 24 1 /4 inches) |
69 kg
(152 lbs 1 oz) |
| KP-53S65C |
1,218 × 1,413 × 614 mm
(48 × 55 5 /8 × 24 1 /4 inches) |
69 kg
(152 lbs 1 oz) |
| KP-61S65 |
1,338 × 1,506 × 642 mm
(52 3 / 4 × 59 3 / 8 × 25 3 / 8 inches) |
122 kg
(268 lbs 15 oz) |
| KP-61S65C |
1,338 × 1,506 × 642 mm
(52 3 / 4 × 59 3 / 8 × 25 3 / 8 inches) |
122 kg
(268 lbs 15 oz) |
Supplied accessories
Remote control RM-Y136A (1) Size AA (R6) battery (2)
Optional accessories
U/V mixer EAC-66 Connecting cables RK-74A, VMC-810S/ 820S, YC-15V/30V, VMC-720M Stand SU-41T2 (For KP-41T65/KP-41T65C) High-contrast protective screen SCN-46X1 (For KP-46C65) SCN-48X2 (For KP-48S65) SCN-53X2 (For KP-53S65/KP-53S65C) SCN-61X2 (For KP-61S65/KP-61S65C)
Design and specifications are subject to change without notice.
Index to parts and controls
This section briefly describes the buttons and controls on the projection TV and on the Remote control. For more information, refer to the pages next to each description.
Projection TV — Front

- 1 TIMER/STANDBY indicator (pages 19, 30)
- 2 STEREO indicator (page 27 )
- 3 Remote sensor
- 4 POWER switch (page 14 )
- 5 CHANNEL +/- buttons (page 14 )
- 6 VOLUME +/- buttons (page 14)
- 7 TV/VIDEO button (page 14, 15)
- 8 SETUP button (page 14 )
- 9 S VIDEO/VIDEO 2 INPUT (VIDEO/AUDIO L(MONO)/R) jacks (page 10 )
40-EN | Additional Information
Remote control

- 1 VTR (POWER) switch (page 36 )
- 2 MUTING button (page 19 )
- 3 VTR (FUNCTION) button (page 35 )
- 4 FREEZE button (page 22 )
- TV/VTR CH +/- buttons (Yellow labelled button) (page 21)
- 6 POSITION button (page 22 )
- 7 DISPLAY button (page 20 )
- 8 SLEEP button (page 20 )
- 9 JUMP button (page 19 )
- 10 TV/DBS D button (page 26, 37)
- 11 RESET button (page 23 )
- 12 VOL (volume) +/- buttons (page 19)
- 13 CODE SET button (page 35 )
- 14 DBS/CABLE (POWER) switch (page 37 )
- 15 TV (POWER) switch (page 19 )
- 16 DBS/CABLE (FUNCTION) button (page 37 )
- TV (FUNCTION) button (pages 15, 19)
- 18 SWAP button (page 22 )
- 19 PIP button (page 21 )
- 20 TV/VIDEO button (yellow labelled button) (page 21)
- 21 AUDIO button (page 21)
- 22 TV/VIDEO button (page 20 )
- 23 ANT button (page 20 )
- 24 0 9 buttons (page 16 )
- 25 ENTER button (page 16 )
- 26 MTS/GUIDE button (page 27, 37)
-
Menu operation buttons (page 15)MENU button
- ♦/♦/♦/♦/ buttons
- button
- 28 CH (channel) +/- buttons (pages 16 , 19 )
Additional Information | 41-EN
EN
Index
Adjusting the convergence 16 the picture 23 the sound 25 Antenna 6 Audio effect D 26 Audio out 28 Auto program 18 Auto set up 14 Battery 13 Cable box 6 Cable TV 17 Caption Vision 34 Changing the menu language 18 Channel block 32 Channel caption 31 Current time set 29 Daylight savig time 29 DBS 9.37 DEMO 15 Erase/Add 15 Favorite channel 32 Hookup with a DBS receiver 9 with a VCR 7 with an antenna 6 with an audio system 10 without a VCR 6 Language 18 MTS (Multichannel TV Sound) 27 On/off timer 30 PIP (Picture-in-Picture) 21 Presetting channels 18 Remote control 13 SAP (Second Audio Program) 27 SAVA speaker 12, 28 Setting daylight saving time 29 the clock 29 Sleep timer 20 Speaker 27 STEREO indicator 27 Super woofer mode 28 Surround 26 Surround mode 28 TEXT 34 TIMER/STANDBY indicator 19, 30
Video label 33 Video mode 24 Watching TV 19 video tapes 20 XDS 20
Names of controls
( button 15 0 – 9 buttons 16, 19 ANT button 20 AUDIO button 21 AUDIO (VAR/FIX) OUT jacks 12 AUX antenna terminal 6 CHANNEL +/- buttons 14 CH (channel) +/- buttons 16. 19 CODE SET button 35 CONTROL S OUT jack 12 CONVERTER antenna terminal 6 DBS/CABLE (FUNCTION) button 37 DBS/CABLE (POWER) switch 37 DISPLAY button 20 ENTER button 16 FREEZE button 22 JUMP button 19 MENU button 15 MONITOR OUT jacks 11 MTS/GUIDE button 27, 37 MUTING button 19 PIP button 21 POSITION button 22 POWER switch 14 RESET button 23 SETUP button 14 S VIDEO input jack 8 S VIDEO/VIDEO 2 INPUT (VIDEO/AUDIO L (MONO)/R) jacks 10 SLEEP button 20 SWAP button 22 TV/DBS Ø button 26. 37 TV (FUNCTION) button 15, 19 TV (POWER) switch 19 TV/VIDEO button 14, 15 TV/VIDEO button (yellow labelled button) 21 TV/VTR CH +/- buttons (yellow labelled button) 21 VHF/UHF antenna terminal 6 VIDEO 1 IN jacks 7 VIDEO 3 IN jacks 7 VOLUME +/- buttons 14 VOL (volume) +/- buttons 19 VTR (FUNCTION) button 35
VTR (POWER) switch 36
42-EN | Additional Information
ADVERTENCIA
Para evitar incendios o el riesgo de electrocución, no exponga la uindad a la lluvia ni a la humedad.


Este símbolo sirve para indicar al usuario la presencia de "tensiones peligrosas" sin aislar dentro de la caja de este producto, que pueden ser de suficiente magnitud como para constituir un riesgo de electrocución.

2 -ES
Este símbolo sirve para indicar al usuario la presencia de instrucciones de operación y mantenimiento en la literatura que acompaña al producto.
PRECAUCION
Para evitar descargas electricas, no emplee esta clavija de alimentacion de CA polarizada con un cable prolongador, receptaculo u otro tomacorriente, a menos que las clavijas puedan insertarse completamente a fin de que no queden al descubierto.
PRECAUCION
Al utilizar juegos de televisión, ordenadores y productos similares con el televisor de proyección, mantenga a un nivel bajo los ajustes de brillo y contraste. Si se deja una imagen fija (inmóvil) en la pantalla durante un largo periodo de tiempo con un nivel alto de brillo o de contraste, la imagen puede permanecer en pantalla permanentemente. La garantía no ofrece cobertura para este tipo de problema, ya que se produce como resultado de un uso inadecuado.
Nota sobre la visualización de subtítulos
Este televisor de proyección posterior ofrece la visualización de subtítulos de televisión de acuerdo con el párrafo §15.119 de las normas de la FCC.
Nota para el instalador del sistema de cable
Esta nota tiene el propósito de llamar la atención del instalador del sistema de cable sobre el Artículo 820-40 de NEC, que contiene las directrices para la puesta a tierra y, en particular, especifica que el cable de puesta a tierra debe estar conectado al sistema de puesta a tierra de un edificio más cercano al de la entrada de cable.
El empleo de este televisor de proyección posterior para fines que no sean la visualización en privado de programas de televisión de UHF, VHF, o transmitidos por compañías de cablevisión para uso del público en general, puede requerir la autorización de la emisora/ compañía de cable y/o del propietario del programa.
Observación sobre el ajuste de convergencia
Antes de utilizar el televisor de proyección posterior, no se olvide de ajustar la convergencia. Para conocer el procedimiento, consulte la página 14 .
Observación sobre la limpieza
Limpie la unidad del televisor de proyección posterior con un paño seco y suave. Para quitar el polvo de la pantalla, pásele suavemente un paño de arriba a abajo solamente. Las manchas resistentes pueden limpiarse con un paño ligeramente humedecido en agua. Nunca emplee disolventes tales como diluidor de pintura o bencina. Si la imagen se oscurece al utilizar el televisor de proyección durante mucho tiempo, puede ser necesario limpiar su interior. Consulte a personal cualificado.

Como miembro de ENERGY STAR, Sony Corporation ha determinado que este producto cumple con las directrices de ENERGY STAR sobre eficacia energética.
Registro del propietario
Los números de serie y del modelo están situados en la parte trasera del televisor de proyección posterior. Escriba dichos números en los espacios que se proporcionan abajo. Consúltelos siempre que llame a su proveedor Sony en relación con este producto. N° modelo:
N° de serie: _____
Indice
- 4 ¡Bienvenido!
- 4 Precauciones
Preparativos
- 5 Paso 1: Instalación del TV de proyección
- 6 Paso 2: Conexión
- 13 Paso 3: Preparación del control remoto
- 14 Paso 4: Ajuste del TV de proyección automáticamente (AUTO AJUSTES)
- 18 Cambio del idioma de menú
Operaciones
- 19 Visión de programas de televisión
- 21 Visualización de dos programas a la vez-PIP
- 22 Congelación de la imagen (FREEZE)
- 23 Ajuste de la imagen (VIDEO)
- 24 Ajuste de la temperatura de color (TRINITONE)
- 24 Ajuste del modo de selección vídeo (VIDEO)
- 25 Ajuste del sonido (AUDIO)
- 26 Efecto sonoro (AMBIENTAL)
- 27 Selección de programas en estéreo o bilingües (MTS)
- 27 Selección de las bocinas (BOCINAS)
- 28 Selección de salida de audio (SALIDA)
- 29 Ajuste de la hora de verano (HORA DE VERANO)
- 29 Ajuste del reloj (FIJAR HORA ACTUAL)
- 30 Ajuste del temporizador para activar y desactivar el TV de proyección (ENCENDIDO/APAGADO)
- 31 Personalización de los nombres de los canales (NOMBRE DEL CANAL)
- 32 Bloqueo de canales (BLOQUEAR CANAL)
- 32 Ajuste de los canales preferidos (CANAL FAVORITO)
- 33 Etiquetado de vídeos (ETIQUETA DE VIDEO)
- 34 Ajuste de subtítulos (CAPTION VISION)
- 35 Uso de equipos de vídeo
- 37 Uso de un decodificador o receptor DBS
Información adicional
- 38 Solución de problemas
- 39 Especificaciones
- 40 Indice de partes y controles
Cubierta posterior Indice
Las indicaciones entre paréntesis corresponden a nombres de menú.
¡Bienvenido!
Gracias por adquirir el TV en color de proyección posterior de vídeo Sony. A continuación, se indican algunas de las funciones que ofrece este televisor:
- Menús en pantalla, que permiten ajustar la calidad de imagen, sonido, etc.
- Función de doble sintonizador PIP (Imagen en imagen), que permite ver como una imagen en ventana imágenes de otro canal, de vídeo o de televisión por cable.
- Modo de sonido periférico, que simula la calidad de sonido de una sala de conciertos.
- BOCINAS SAVA del ménu AUDIO que le permite aprovechar el sonido periférico del sistema de bocinas serie SAVA de Sony, y del modo de potenciación de graves si los conecta al TV de proyección.
Acerca de este manual
Las instrucciones de este manual corresponden a los modelos KP-41T65, KP-41T65C, KP-46C65, KP-48S65, KP-53S65, KP-53S65C, KP-61S65 y KP-61S65C. Antes de comenzar a leer el manual, verifique el número del modelo, ubicado en la parte posterior del TV de proyección. En este manual, se utiliza el modelo KP-53S65 para los ejemplos. Cualquier diferencia en el funcionamiento se indica claramente en el texto, por ejemplo, "sólo KP-61S65" . Las diferencias en las especificaciones también se indican en el texto.
Las instrucciones del manual se basan en la utilización del control remoto. También puede utilizar los controles en el TV de proyección si tienen el mismo nombre que los del control remoto.
Precauciones
Este TV de proyección emplea un voltaje extremadamente alto. Para evitar incendios o descargas eléctricas, siga cuidadosamente las indicaciones que se indican a continuación:
Seguridad
- Use la unidad de TV con 120 VCA (220 VCA para KP-41T65C/53S65C/61S65C) solamente.
- Una clavija del enchufe es más ancha que la otra por razones de seguridad y sólo podrá enchufarse en una posición. Si no consigue insertar completamente el enchufe en la toma, póngase en contacto con el proveedor Sony.
- Si dentro de la unidad cae algún objeto o se vierte líquido, desenchúfela de la red y haga que sea revisada por personal especializado antes de utilizarla nuevamente.
- Cuando no vaya a emplear la unidad durante varios días, desenchúfela de la toma de corriente. Para desconectar el cable de alimentación, tire del enchufe, nunca del propio cable.
Para obtener información detallada acerca de las medidas de seguridad, consulte el folleto suministrado "NORMAS IMPORTANTES SOBRE SEGURIDAD".
Instalación
- No bloquee los orificios de ventilación para evitar el recalentamiento interno.
- No sitúe la unidad en lugares muy cálidos o húmedos, ni la exponga a un exceso de polvo o de vibración mecánica.
- Evite utilizar la unidad a temperaturas por debajo de los 5°C (41°F).
- Si el TV de proyección pasa directamente de un ambiente frío a uno cálido, o si la temperatura de la habitación cambta repentinamente, la nitidez de la imagen puede desaparecer o los colores pueden perder intensidad. Ello se debe a una condensación de humedad en el espejo o lentes interiores. Si esto ocurre, deje que se evapore la humedad antes de utilizar el TV de proyección.
- Para obtener una mejor calidad de imagen, no exponga la pantalla a la luz directa del sol. Se recomienda utilizar una luz fija dirigida hacia abajo desde el techo o cubrir las ventanas situadas frente a la pantalla con tela opaca. Asimismo, se recomienda instalar el TV de proyección en una habitación cuyo suelo y paredes no sean de material reflectante. Si es necesario, cubra el suelo con moqueta oscura o empapele las paredes.
∆ -ES
Preparativos
Paso 1: Instalación del TV de proyección
Para la mejor calidad de imagen, instale el TV de proyección en las áreas indicadas a continuación.
Area de visualización óptima (Horizontal)

Area de visualización óptima (Vertical)

Transporte del TV de proyección
■ Sóło KP-41T65/41T65C/46C65/48S65/53S65/53S65C
Asegúrese de agarrar las áreas indicadas cuando transporte el TV de proyección, y que lo transporten más de dos personas.
(Parte posterior del TV de provección)
■ Sólo KP-61S65/61S65C
Transporte el TV de proyección por las ruedas.
Preparativos para el TV de proyección
ES
Antes de utilizar el TV de proyección, defina la convergencia. Para este procedimiento, consulte el "Paso 4: Ajuste del TV de proyección automáticamente (AUTO AJUSTES)" en la página 14 .
wnloaded from www Manualslib com manuals search engin
Paso 2: Conexión
Aunque es posible utilizar tanto una antena interior como exterior con el TV de proyección, se recomienda conectar una exterior o a un sistema de cable para obtener una mejor calidad de imagen.
Conexión de una antena
Conecte el cable de antena al terminal de antena de VHF/UHF. Si no puede conectar el cable directamente al terminal, siga una de las siguientes instrucciones, dependiendo del tipo de cable.

Notas
- La mayoría de las antenas combinadas de VHF/UHF tienen un separador de señales. Retírelo antes de instalar el conector adecuado.
- Si utiliza el mezclador de U/V, es posible que aparezcan nieve y ruido en la imagen de los canales de cable superiores al 37.
Conexión de una antena y un sistema de cable sin utilizar una videograbadora
A cable o antena
Cable
TV de proyección) VHF/UHF
(Parte posterior del
A decodificador
Si la compañía de cable precisa conectar un decodificador, realice las conexiones como se indica a continuación:

A decodificador y un sistema de cable

Los sistemas de televisión por cable de pago utilizan señales protegidas o codificadas que requieren el uso de un decodificador* además de las conexiones usuales de cable.
* La compañía de cable suministrará el decodificador.
Nota
No es posible ver como imagen en ventana la señal obtenida mediante el conector AUX.
A sistema de cable y antena

Nota
• No conecte nada al conector TO CONVERTER en este caso.
6-ES | Preparativos
Conexión de una antena y un sistema de cable con una videograbadora
Para obtener información detallada sobre la conexión, consulte el manual de instrucciones de su videograbadora.
Antes de realizar la conexión, desconecte los cables de alimentación de CA del equipo que va a conectar.
A una videograbadora convencional
Sin utilizar un decodificador
Una vez realizadas estas conexiones, podrá hacer lo siguiente:
- Visualizar la reproducción de cintas de vídeo
- Grabar un programa de televisión mientras ve otro
- Ver simultáneamente dos programas de televisión de proyección mediante la imagen en ventana (PIP)
Notas
Para conectar una videograbadora monofónica, conecte la salida de audio de la videograbadora a la toma AUDIO-L (MONO) del panel VIDEO 1/2/3 IN del TV de proyección.
ES

Con un decodificador

A una videograbadora provista de conector S vídeo
Si su videograbadora tiene un conector S VIDEO, realice las siguientes conexiones. Siempre que conecte el cable al conector S VIDEO, el TV
de proyección recibe automáticamente las señales de S vídeo.
Sin utilizar un decodificador

Con un decodificador

Nota
C (crominancia). La conexión S envía las dos señales por separado, lo que evita la degradación y proporciona mejor calidad de imagen que la conexión convencional.
R -ES Preparativos
Conexión de un receptor DBS
Para detalles sobre la conexión, consulte el manual de instrucciones del receptor DBS (Satélites de Emisión Digital).
A un TV de proyección

Cable o decodificador
Nota
• Es posible emplear el conector S VIDEO o el conector de vídeo compuesto para realizar la conexión de vídeo.
A un TV de proyección y una videograbadora

ES
Conexión a cámara de vídeo
Utilice esta conexión para visualizar imágenes de una cámara de vídeo.

Nota
Para conectar una cámara de vídeo monofónica, conecte la salida de audio de la cámara de vídeo al conector AUDIO-L (MONO) del panel VIDEO 2 INPUT del TV de proyección.
Conexión a un sistema de audio
Si desea conectar un equipo de audio, consulte la página 28 para obtener más información.

Nota
Puede definir los graves, agudos y balance, o seleccionar sonido periférico (página 26) o un modo MTS (Sonido de TV multicanal) (página 27) con el control remoto suministrado.
10-ES | Preparativos
Conexión de dos videograbadoras para la edición de cintas mediante MONITOR OUT
Puede grabar imágenes de entrada mostradas en la pantalla. Este tipo de conexión sólo debe utilizarse cuando se realice desde la entrada de línea de una videograbadora, y desde la salida de línea de otra videograbadora.

Notas
- No cambie la señal de entrada cuando edite a través de MONITOR OUT, ya que si lo hace cambiará también la señal de salida.
- Es posible utilizar el conector de S vídeo para conectar una videograbadora de reproducción, y el conector de vídeo compuesto para una videograbadora de grabación.
- Cuando conecte una sola videograbadora al TV de televisión, no conecte las tomas MONITOR OUT de la parte posterior del televisor a la entrada de línea de la videograbadora, si al mismo tiempo realiza la conexión de las tomas VIDEO IN del televisor a la salida de línea de la videograbadora como se muestra arriba a continuación.

NO REALICE LA CONEXION DE ESTA FORMA.
FS
Conexión a un sistema de bocinas serie SAVA de Sony
Si tiene un sistema de bocinas serie SAVA de Sony, conecte las bocinas a las tomas AUDIO (VAR/FIX) OUT en la parte posterior del TV de proyección, utilizando el cable de audio suministrado con las bocinas. Puede aprovechar el sistema de sonido periférico Dolby Pro Logic* y el modo de potenciación de graves de las bocinas, y controlarlos con el control remoto suministrado. Cuando conecte el sistema de bocinas de la serie SAVA de Sony, consulte la página 27 para más información.
-
* Fabricado bajo licencia de Dolby Laboratories Licensing Corporation.
- DOLBY, el símbolo de la doble D D y PRO LOGIC son marcas de Dolby Laboratories Licensing Corporation.

Paso 3: Preparación del control remoto
Inserción de las pilas
Inserte dos pilas tamaño AA (R6) (suministradas) de forma que las indicaciones + y – de las pilas coincidan con las del diagrama del interior del compartimiento de las pilas.

Notas
- En condiciones normales, las pilas durarán hasta seis meses. Si el control remoto no funciona adecuadamente o si los indicadores de las teclas de dicho control remoto no se iluminan, las pilas pueden estar agotadas. Cuando cambie las pilas, sustituya las dos por unas nuevas.
- No mezcle pilas usadas con nuevas ni mezcle diferentes tipos de pilas.
- En caso de producirse una fuga del electrólito de la pila, limpie la zona contaminada del compartimiento de las pilas con un paño y cambie las pilas viejas por otras nuevas. Para prevenir la fuga del electrólito, retire las pilas cuando no vaya a utilizar el control remoto durante un período largo de tiempo.
- Maneje el control remoto cuidadosamente. No lo pise, no lo deje caer, ni permita que se moje.
- No lo coloque bajo la luz solar directa, cerca de fuentes de calor o en lugares muy húmedos.
Teclas del control remoto
Los nombres de las teclas del control remoto están indicados en diferentes colores que representan las funciones disponibles.
Color de tecla
| Transparente | Teclas de función del televisor/ |
|---|---|
| (se ilumina) | videograbadora/DBS/ |
| decodificador. Oprima primero | |
| la tecla de función apropiada | |
| para cambiar la función del | |
| control remoto. | |
| Verde | Teclas correspondientes a |
| operaciones de alimentación. | |
Color de etiqueta
| Blanco | Teclas de funcionamiento del |
|---|---|
| televisor/videograbadora/DBS/ | |
| decodificador. | |
| Amarillo | Teclas de funcionamiento de PIP. |
| Azul | Teclas de funcionamiento de |
| DBS. |

ES
Paso 4: Ajuste del TV de proyección automáticamente (AUTO AJUSTES)
Es posible definir el TV de proyección con facilidad mediante la función AUTO AJUSTES. Programa todos los canales que se reciban y cambia el idioma del menú en la pantalla. Para definir el TV de proyección manualmente, consulte "Ajuste de la convergencia" (página 16), "Activación y desactivación del modo de cable" (página 17), "Programación de canales" (página 18) y "Cambio del idioma de menú" (página 18). Si el TV de proyección está ajustado en una entrada de vídeo, no puede ejecutarse AUTO AJUSTES. Oprima TV/VIDEO de forma que aparezca un número de canal.
(Parte frontal del TV de proyección)

Antes de utilizar la función AUTO AJUSTES, asegúrese de conectar la antena o cable al TV. (consulte la página 6).
1 Oprima POWER para encender el TV de proyección.

2 Oprima SETUP en la parte frontal del TV de proyección.
Aparece la pantalla de auto ajustes.


3 Oprima CHANNEL +/- o VOLUME + para seleccionar el idioma.
Si prefiere español o francés en vez de inglés, es posible cambiar los idiomas mostrados en la pantalla.

Todos los menús se definirán en sus valores de fábrica en el idioma seleccionado.
4 Oprima VOLUME – para iniciar AUTO AJUSTES.

5 Oprima CHANNEL + para programar canales.


"AUTO PROGRAMACION" aparece en la pantalla y el TV inicia la exploración y programación de canales de forma automática. Cuando se hayan almacenado todos los canales que se reciben, "AUTO PROGRAMACION" desaparece y aparece el siguiente menú. Si el TV de proyección recibe canales de televisión por cable, CABLE se ajusta automáticamente en SI.

Para salir de AUTO PROGRAMACION
Oprima cualquier teclã.
6 Ajuste la convergencia
Oprima CHANNEL +. Aparece la pantalla de ajuste de CONVERGENCIA.


14-ES | Preparativos
(2) Oprima TV/VIDEO Para seleccionar ROJO o AZUL.

(3) Con CHANNEL +/- o VOLUME +/-, mueva la línea hasta que converja con la línea verde central.

Para mover las líneas horizontales arriba/abajo, oprima CHANNEL +/-.
Para mover las líneas verticales derecha/ izquierda, oprima VOLUME +/-.
(4) Repita los pasos (2) y (3) para definir las otras líneas hasta que converjan las tres líneas y se muestren como una cruz de color blanco.

Nota
• Con el conector AUX, oprima primero ANT (tecla negra), y asegúrese de que "AUX" aparezca junto al número de canal en la pantalla. A continuación, siga los pasos 2 a 6 descritos anteriormente para realizar AUTO AJUSTES.
Para ver las funciones principales (DEMO)
Oprima TV/VIDEO en el televisor en el paso 4. Las funciones y menús se muestran de uno en uno.
Para salir del modo DEMO
Oprima cualquier tecla.
Borrado o añadido de canales
Una vez realizada la función AUTO AJUSTES, es posible borrar los canales innecesarios, o añadir aquellos que desee. Programe los canales durante el día, ya que algunos canales pueden no estarse transmitiendo durante la noche.

1 Oprima TV (FUNCTION).

2 Oprima MENU.
Aparece el menú principal.
MENU

3 Oprima + o + para seleccionar क़, y oprima
--------------------------------------
Aparece el menú PREFERENCIAS

ES
4 Oprima + o + para seleccionar BORRAR/ AÑADIR CANAL, y oprima 🕘.
Aparece el menú BORRAR/AÑADIR CANAL


5 Borre y/o añada el canal que desee: Para borrar el canal que no desee
- (1) Compruebe que el cursor (►) se encuentra junto a BORRAR.
- (2) Utilice las teclas CH +/- o 0 9 para seleccionar el canal que desee borrar, y oprima ENTER.

(3) Oprima 🕂 .
La indicación "-" aparece junto al número de canal para mostrar que el canal se ha borrado de la memoria programada.

Para añadir el canal que desee
- (1) Oprima ♠ o ♥ para desplazar el cursor (▶) hasta AÑADIR.
- (2) Utilice las teclas de 0 9 para seleccionar el canal que desee añadir, y oprima ENTER.


(3) Oprima 🕘 .
La indicación "+" aparece junto al número de canal para mostrar que el canal se ha añadido a la memoria programada.

- 6 Para borrar y/o añadir otros canales, repita el paso 5.
- 7 Oprima MENU para volver a la pantalla original.

Notas
- Si borra o añade un canal de VHF o UHF, el canal de televisión por cable con el mismo número también se borra o se añade, y
- También es posible disponer de la función de borrado v adición de canales para la entrada AUX.
Aiuste de la convergencia (CONVERGENCIA)
La imagen del tubo de proyección aparece en la pantalla en tres niveles (rojo, verde y azul). Si no convergen, el color será de poca calidad y la imagen será borrosa. Para corregir esto, defina la convergencia. No es necesario que realice este procedimiento si ejecuta AUTO AJUSTES (página 14). Realícelo si desea definir la convergencia manualmente.
Oprima MENU.
2 Oprima 🕇 o 🕈 para seleccionar 📇 , y oprima
Oprima 🕯 o 🕈 para seleccionar CONVERGENCIA, y oprima 💮 .
Aparece la pantalla de ajuste de CONVERGENCIA.

16-ES arativo
4 Oprima + o + para mover el cursor (►) al símbolo que muestra la línea que desea definir, y oprima ⊕.

- +RED: Línea roja vertical y horizontal (ajuste izquierda/derecha/arriba/abajo) +BLUE: Línea azul vertical y horizontal (ajuste izquierda/derecha/arriba/abajo)
- 5 Oprima +, o → para mover la línea hasta que converja con la línea verde central, y oprima →.

| Para desplazarse | Oprima | |
|---|---|---|
| Arriba | • | |
| Abajo | + | |
| Derecha | • | |
| Izquierda | • |
- 6 Repita los pasos 4 y 5 para definir las otras líneas hasta que las tres líneas converjan y se vean como una cruz blanca.
- 7 Oprima MENU para volver a la pantalla original.
Activación y desactivación del modo de cable
Si ha conectado el TV de proyección a un sistema de cable, ajuste CABLE en SI (ajuste de fábrica). En caso contrario, ajuste CABLE en NO.
No es necesario que siga este procedimiento si ejecuta AUTO AJUSTES (página 14 ). Realice este procedimiento sólo si desea ajustarlo de forma manual.
1 Oprima MENU.
2 Oprima ← o ← para seleccionar 🗁, y oprima ↔.
3 Ajuste CABLE en SI o NO:
- (1) Oprima ♦ o ♥ para desplazar el cursor (▶) hasta CABLE y oprima ⊕.
- (2) Oprima ★ o ★ para seleccionar SI o NO, y oprima ( +).

4 Oprima MENU para volver a la pantalla original.
Nota
Si CABLE aparece en gris, el TV de proyección se encuentra ajustado en una entrada de vídeo y no es posible seleccionar CABLE. Oprima ANT (tecla negra) para que aparezca un número de canal.
Programación de canales
Es posible programar canales de televisión con facilidad mediante la función AUTO PROGRAMACION. No es necesario que siga este procedimiento si ejecuta AUTO AJUSTES (página 14 ). Realice este
procedimiento sólo si desea ajustarlo de forma manual.
- 1 Oprima MENU.
- 2 Oprima ★ o ★ para seleccionar 🖶, y oprima ④
- 3 Oprima + o + para seleccionar AUTO PROGRAMACION, y oprima ⊕ .


"AUTO PROGRAMACION" aparece en la pantalla y el televisor inicia la exploración y programación de canales de forma automática. Una vez almacenados todos los canales que se reciben, "AUTO PROGRAMACION" desaparece y la pantalla muestra el canal de número inferior.
4 Oprima MENU para volver a la pantalla original.
Para salir de AUTO PROGRAMACION
Oprima cualquier tecla.
Notas
- Si el menú AUTO PROGRAMACION aparece en gris, el TV de proyección se encuentra en una entrada de vídeo y no es posible seleccionar AUTO PROGRAMACION. Oprima ANT para que aparezca un número de canal.
- La programación de canales también está disponible para la entrada AUX.
Cambio del idioma de menú
Es posible cambiar al idioma español, francés o inglés si lo prefiere .
No es necesario que realice este procedimiento si ejecuta AUTO AJUSTES (página 14 ). Realícelo sólo cuando desee hacerlo manualmente.
1 Oprima MENU.
- 2 Oprima + o + para seleccionar क़, y oprima ⊕.
- 3 Oprima ★ o + para seleccionar LENGUAJE, y oprima ⊕.


4 Oprima + o + para seleccionar el idioma que desee, "ENGLISH", "FRANÇAIS" o "ESPAÑOL", y oprima ⊕.

5 Oprima MENU para volver a la pantalla original.
Nota
Determinadas partes de los menús en español o francés permanecen en inglês.
Visión de programas de televisión

1 Oprima TV (POWER) para encender el TV de proyección.
El indicador TIMER/STANDBY parpadea hasta que aparece la imagen.
POWE
Si la pantalla muestra "VIDEO", oprima ANT de forma que aparezca un número de canal.
2 Oprima TV (FUNCTION).

Despuès de oprimir TV (FUNCTION), se ajusta la función de TV de proyección, a menos que oprima otra tecla de función.
3 Seleccione el canal que desee:
Para seleccionar un canal directamente
Utilice las teclas de 0 – 9, y oprima ENTER. Por ejemplo, para seleccionar el canal 10, oprima 1, 0 y ENTER.

Para explorar los canales
Oprima CH +/– hasta que aparezca el canal que desee.

También es posible seleccionar el canal sin oprimir ENTER.
4 Oprima VOL +/- para ajustar el volumen.

Cambio rápido entre dos canales
Puede utilizar JUMP para pasar o "saltar" de un canal a otro.
Oprima JUMP.

Si vuelve a oprimir JUMP, pasará al canal que ha seleccionado anteriormente.
Nota
No es posible pasar a los canales que ha explorado mediante las teclas CH +/-.
Eliminación del sonido
Oprima MUTING.
"MUTING" aparece en la pantalla.

Para restaurar el sonido, vuelva a oprimir MUTING, o oprima VOL +. Operaciones | 19-ES
wnloaded from www.Manualslib.com manuals search engine
Visualización de indicaciones en pantalla
Oprima DISPLAY varias veces hasta que aparezca la indicación que desee.
Cada vez que oprima DISPLAY, la indicación cambia de la siguiente forma:
Indicación de estado* → XDS ON** → [cc]1 ON***

- * Aparecen en pantalla el número de canal, la hora actual, el nombre o logotipo del canal (si está ajustado), así como el modo MTS (si se ha seleccionado SAP). La indicación SAP desaparece transcurridos tres segundos.
- ** Algunos programas se transmiten a través del servicio ampliado de datos (XDS), que muestra el nombre de la red, el nombre del programa, el tipo de programa, la duración del programa, el distintivo de llamada, y la duración del programa. Cuando haya seleccionado XDS con la tecla DISPLAY, esta información aparecerá en la pantalla si la emisora ofrece este servicio.
- *** Algunos programas se transmiten con el servicio "Caption Vision". Cuando haya seleccionado este servicio con la tecla DISPLAY, en la pantalla aparecerán las imágenes de "Caption Vision", si la emisora ofrece este servicio. (Con respecto a "Caption Vision", consulte la págtna 34 .)
Para cancelar la indicacion, vuelva a oprimir DISPLAY hasta que aparezca "DISPLAY OFF". "DISPLAY OFF" se desactiva después de tres segundos.
Empleo del apagado automático
El televisor permanece activado durante el espacio de tiempo especificado y, a continuación, se desactiva de forma automática.
Oprima SLEEP varias veces hasta que aparezca el espacio de tiempo (en minutos) que desee.
Cada vez que se oprime SLEEP, la indicación de tiempo cambia de la siguiente forma:

Para cancelar el apagado automático, oprima SLEEP varias veces hasta que aparezca "SLEEP OFF", o apague el TV de proyección.
20-ES | Operaciones
Visualización de la imagen de entrada de vídeo
Oprima TV/VIDEO varias veces hasta que aparezca la entrada de video que desee.
Cada vez que oprima TV/VIDEO, la indicación cambiará de la siguiente forma:
TV -> VIDEO 1 -> VIDEO 2 -> VIDEO 3

Para volver a la imagen del televisor, oprima ANT hasta que aparezca un número de canal.
Cambio de la entrada VHF/UHF a la entrada AUX
Oprima ANT.
"AUX" aparece junto al número de canal.

Si vuelve a oprimir ANT, cambiará a la entrada VHF/ UHF.
Visualización de dos programas a la vez — PIP
Esta función permite visualizar de forma simultánea la imagen principal y una imagen en ventana.

Utilice las teclas con etiqueta amarilla para realizar operaciones PIP.
Visualización de una imagen en ventana
Oprima PIP.

Modo de fuente de entrada o canal de televisión para la imagen en ventana
Modo de fuente de entrada o canal
de televisión para la imagen principal
Vuelva a oprimir PIP para mostrar una imagen en ventana más pequeña.

Modo de fuente de entrada o canal de televisión para la imagen en ventana
Para eliminar la imagen en ventana, vuelva a oprimir PIP.
Nota
• La imagen en ventana puede verse afectada por las condiciones de la imagen principal.
Cambio del modo de entrada de la imagen en ventana
Oprima TV/VIDEO (tecla con etiqueta amarilla) para seleccionar el modo de entrada.
Cada vez que oprima TV/VIDEO aparecerá de forma secuencial, (tecla con etiqueta amarilla), "TV", "VIDEO 1", "VIDEO 2", y "VIDEO 3" aparecerán de forma secuencial.


La imagen en ventana aparecerá en el mismo modo de entrada que la última vez que haya utilizado la función PIP.
Nota
• Si conecta la videograbadora sin un decodificador, la fuente de entrada de PIP es la videograbadora. Si conecta la videograbadora con un decodificador, la fuente de entrada de PIP es la videograbadora o el decodificador.
ES
Recepción del sonido de la imagen en ventana
Oprima AUDIO.
La indicación s aparece durante unos segundos, indicando que se recibe el sonido de la imagen en ventana.


Se recibirá el sonido de las imágenes de ventana.
Para restaurar el sonido de la imagen principal, vuelva a oprimir AUDIO.
La indicación J se desplaza hasta el número de canal de la imagen principal.
Cambio de los canales del televisor en la imagen en ventana
Oprima CH +/- (tecla con etiqueta amarilla).


Cambio de la posición de la imagen en ventana
Oprima POSITION.
Cada vez que oprima POSITION, la imagen en ventana se desplazará en la pantalla en sentido contrario a las agujas del reloj.


Intercambio de las imágenes principal y en ventana
Oprima SWAP.
Cada vez que oprime SWAP, las imágenes y el sonido de la imagen principal y de ventana intercambian su posición.

Nota
• No es posible mostrar como imagen en ventana los canales recibidos mediante la toma AUX.
Congelación de la imagen (FREEZE)
La función FREEZE resulta útil si desea anotar información, como recetas de un programa de cocina, direcciones en pantalla o números de teléfono. La imagen congelada cambia como se indica a continuación dependiendo de si se utiliza la función PIP o no.

Oprima FREEZE.

Si no se utiliza la función PIP


La imagen congelada aparece en la imagen de ventana.
Para eliminar la imagen de ventana congelada, vuelva a oprimir FREEZE.
Si se utiliza la función PIP

Para cancelar la congelación de la imagen de ventana, vuelva a oprimir FREEZE.
Ajuste de la imagen (VIDEO)
Mientras ve un programa de televisión, puede ajustar la calidad de la imagen según sus preferencias. Igualmente, es posible ajustar la imagen de la entrada o entradas de vídeo.

1 Oprima MENU.
2 Oprima ★ o ★ para seleccionar (III, y oprima ↔.

-
3
Seleccione la opción que desee ajustar. Por ejemplo:
- Para ajustar el brillo, Oprima ♦ o ♥ para desplazar el cursor (►) hasta BRILLO.


(2) Oprima 💮 .


4 Ajuste la opción seleccionada:
(1) Oprima ♠, ♠, ♥, o ♦ para ajustar la opción.


(2) Oprima (+).El nuevo ajuste aparece en el menú VIDEO.


ES
Para obtener información detallada sobre cada opción, consulte la sección "Descripción de opciones ajustables" que aparece a continuación.
5 Para ajustar otras opciones, repita los pasos 3 y 4.
6 Oprima MENU para volver a la pantalla original.
Descripción de opciones ajustables
| Opción | Oprima 🕈 o 🕈 para | Oprima → o + para |
|---|---|---|
| CONTRASTE |
Reducir el contraste
de la imagen y la intensidad del color. |
Aumentar el contraste
de la imagen e intensificar el color. |
| TINTE |
Que la imagen
adquiera un tono púrpura. |
Que la imagen
adquiera un tono más verdoso. |
| COLOR |
Reducir la
intensidad del color. |
Aumentar la
intensidad del color. |
| BRILLO |
Reducir el brillo de
la imagen. |
Aumentar el brillo de la imagen. |
| NITIDEZ |
Obtener una imagen
más suave. |
Aumentar la definición de la imagen. |
Para restaurar los ajustes de fábrica
Oprima RESET después de visualizar y seleccionar el menú VIDEO.
Todos los ajustes, recuperan los niveles ajustados de fábrica.
Ajuste de la temperatura de color (TRINITONE)
La función TRINITONE controla la temperatura de color, permitiendo un ajuste de preferencia del equilibrio del blanco sin afectar a los tonos de imagen de la piel.

1 Oprima MENU.
- 2 Oprima + o + para seleccionar Ⅲ y oprima ④.
- 3 Oprima + o + para seleccionar TRINITONE y oprima ⊕.

4 Oprima + o + para seleccionar NTSC STD, MEDIO o ALTO y oprima ⊕.


| Seleccione | Para | |
|---|---|---|
| ALTO | Un blanco frío (azulado). | |
| MEDIO | Un blanco neutro. | |
| NTSC STD | Un blanco cálido (rojizo). | |
Ajuste del modo de selección vídeo
(VIDEO)
La función de modo de vídeo permite elegir tres modos diferentes de ajustes de imagen. Elija el que mejor se ajuste al tipo de programa que desea ver.
- 1 Oprima MENU.
- 2 Oprima ← o + para seleccionar III, y oprima
- 3 Oprima + o + para seleccionar MODO, y oprima ⊕ .
- 4 Oprima + o + para seleccionar ESTANDAR, PELICULAS o DEPORTES y oprima ⊕.

| Seleccione | rala |
|---|---|
| ESTANDAR | Recibir una imagen estándar. |
| PELICULAS | Recibir una imagen de alta definición. |
| DEPORTES | Recibir una imagen con colores vivos y brillantes. |
5 Oprima MENU para volver a la pantalla original.
Nota
Los ajustes de estos modos pueden realizarse en el menú VIDEO.
Ajuste del sonido (AUDIO)
Es posible definir la calidad del sonido de televisión según sus preferencias. También puede ajustar el sonido de las entradas de vídeo.

1 Oprima MENU.
2 Oprima + o + para seleccionar ♪, y oprima ⊕.

3 Seleccione la opción que desee ajustar. Por ejemplo:
(1) Para ajustar los graves, oprima ♠ o ♦ para desplazar el cursor (►) hasta GRAVES.


(2) Oprima 💮 .


4 Ajuste la opción seleccionada:
(1) Oprima ♠, ♠, ♦ o ♦ para ajustar la opción.


(2) Oprima ( ).El nuevo ajuste aparece en el menú AUDIO.


Para obtener información detallada sobre cada opción, consulte la sección "Descripción de opciones ajustables" que aparece a continuación.
5 Para ajustar otras opciones, repita los pasos 3 y 4.
6 Oprima MENU para volver a la pantalla original.
Descripción de opciones ajustables
| Opción | Oprima 🕈 o 🗢 para | Oprima + o + para |
|---|---|---|
| AGUDOS | Reducir los agudos. | Aumentar los agudos. |
| GRAVES | Reducir los graves. | Aumentar los graves. |
| BALANCE |
Enfatizar el volumen de
la bocina izquierda. |
Enfatizar el volumen de la bocina derecha. |
Para restaurar los ajustes de fábrica
Oprima RESET después de visualizar y seleccionar el menú AUDIO.
Todos los ajustes, recuperan los niveles ajustados de fábrica.
Nota
Si la opción BOCINAS (página 27) se encuentra en la posición NO y SALIDA (página 28) se encuentra en la condición FIJA, no es posible ajustar el volumen, AGUDOS, GRAVES, ni BALANCE.
Efecto sonoro (AMBIENTAL)
La función de efecto sonoro (AMBIENTAL) simula la reproducción de sonido con el ambiente de un cine o una sala de conciertos. El efecto sonoro sólo funciona con programas estéreo.
Uso de la tecla de efecto sonoro 🕗

1 Oprima TV (FUNCTION).
2 Oprima D.
Cada vez que se oprime esta tecla ②, la indicación cambia de la siguiente forma:
AMBIENTAL → AMBIENTAL NO


Uso del menú para ajustar efecto sonoro

- 1 Oprima MENU.
- 2 Oprima + o + para seleccionar ♪, y oprima ⊕.
- 3 Oprima ♦ o ♦ para seleccionar EFECTO, y oprima ⊕.

4 Oprima + o + para seleccionar el modo de efecto sonoro, y oprima ⊕.


5 Oprima MENU para volver a la pantalla original.
Selección de programas en estéreo o bilingües (MTS)
La función MTS (Multichannel TV Sound) permite disfrutar de sonido estéreo o escuchar programas SAP (Second Audio Programs), según prefiera. El ajuste inicial es sonido estéreo (ESTEREO).

Oprima MTS varias veces para seleccionar STEREO, SAP o MONO.
ESTEREO→SAP→MONO
| Seleccione | Para · |
|---|---|
| ESTEREO |
Escuchar el sonido en estéreo.
El indicador ESTEREO del TV de proyección se ilumina durante la recepción de una emisión en estéreo. |
| SAP |
Escuchar programas bilingües.
No habrá sonido si la señal SAP no está transmitiéndose. |
| MONO |
Escuchar sonido monofónico.
Reducir el ruido durante emisiones en estéreo. |
Nota
• Los sonidos estéreo y SAP dependen de las fuentes de programa.
Para seleccionar MTS con el menú
- 1 Oprima MENU.
- 2 Oprima ♠ o ♥ pára seleccionar ♪, y oprima ④.
- 3 Oprima ♦ o ♥ para seleccionar MTS, y oprima ⊕. 4 Oprima ♦ o ♥ para seleccionar ESTEREO, SAP o
- MONO.
- 5 Oprima MENU para volver a la pantalla original.
Selección de las bocinas (BOCINAS)
Es posible desactivar las bocinas del TV de proyección si, por ejemplo, desea escuchar el sonido mediante un sistema estéreo.
Si se conecta el sistema de bocinas serie SAVA de Sony a los conectores AUDIO (VAR/FIX) OUT, podrá aprovechar el sonido periférico y el modo de potenciación de graves de las bocinas. Después de realizar las conexiones (página 12 ), defina BOCINAS en SAVA SP, y después defina MODO DE SURROUND o MODO SUPER WOOFER.

1 Oprima MENU.
2 Oprima ★ o ★ para seleccionar ♪, y oprima .
3 Oprima ↑ o + para seleccionar BOCINAS, y oprima ⊕.


4 Oprima + o + para seleccionar SI, NO o SAVA SP y oprima ⊕.


-
5
Oprima MENU para volver a la pantalla original.
- Operaciones | 27-ES
| Seleccione | Para |
|---|---|
| SI . |
Escuchar el sonido desde el TV de
proyección. |
| NO |
Desactivar el sonido de las bocinas del TV
de proyección y escuchar el sonido de éste sólo mediante las bocinas del sistema de audio. |
| SAVA SP |
Desactivar el sonido de las bocinas del TV
de proyección para que escuche el sonido de éste mediante el sistema de bocinas serie SAVA de Sony. Puede definir el volumen, cancelación de sonido, modo de sonido periférico o de potenciación de graves con el control remoto suministrado con el TV de proyección. |
Para seleccionar el modo de sonido periférico o de potenciación de graves del sistema de bocinas SAVA
Después de definir BOCINAS en SAVA SP, siga el procedimiento a continuación.
Oprima + o + para seleccionar MODO DE SURROUND o MODO SUPER WOOFER; y oprima ↔.
Para información detallada sobre cada opción, consulte las instrucciones de funcionamiento del sistema de bocinas.

Notạ _
Esta función sólo es para el sistema de bocinas SAVA de Sony con capacidad de funcionamiento para KP-41T65, KP-41T65C, KP-46C65, KP-48S65, KP-53S65, KP-53S65C, KP-61S65 y KP-61S65C.
Selección de salida de audio (SALIDA)
Es posible seleccionar SALIDA como VARIABLE o como FIJA si BOCINAS se ha definido en NO. SALIDA será variable si BOCINAS se define en SI.

- 1 Oprima MENU.
- 2 Oprima + o + para seleccionar ♪, y oprima ⊕.
- 3 Oprima + o + para seleccionar SALIDA, y oprima ⊕.

4 Oprima + o + para seleccionar VARIABLE o FIJA, y oprima ⊕.

- VARIABLE: La salida de sonido varía de acuerdo con los ajustes del televisor. Puede ajustar el volumen, los graves, los agudos y el balance.
- FIJA: La salida de sonido siempre se fija a un determinado nivel. El volumen, los graves, los agudos y el balance se fijan también según los ajustes de fábrica.
- 5 Oprima MENU para volver a la pantalla original.
Nota
• Si SALIDA aparece en gris, ajuste BOCINAS en NO.
Ajuste de la hora de verano (Hora de Verano)
Si en su zona se emplea el cambio de hora de verano, modifique el ajuste HORA DE VERANO en función de la estación antes de ajustar la hora actual.
Comienzo del cambio de hora
• Después del primer domingo de abril, seleccione SI en HORA DE VERANO. Los ajustes de hora actual (columna derecha) se desplazan automáticamente una hora adelante.
Finalización del cambio de hora
• Después del último domingo de octubre, seleccione NO en HORA DE VERANO. Los ajustes de hora actual se desplazan automáticamente una hora atrás.

- 1 Oprima MENU.
- 2 Oprima ★ o ★ para seleccionar ⊕, y oprima ④.
- 3 Oprima + o + para seleccionar HORA DE VERANO, y oprima ⊕.

4 Oprima + o + para seleccionar SI o NO, y oprima ⊕.

| Seleccion | e Para |
|---|---|
| SI | Ajustar el reloj a la hora de verano. |
| NO | Cancelar el ajuste de la hora de verano. |
5 Oprima MENU para volver a la pantalla original.
Ajuste del reloj (FIJAR
El ajuste del reloj permite activar y desactivar el TV de proyección con el temporizador. Asegúrese de ajustar la hora de verano en primer lugar.

- 1 Oprima MENU.
- 2 Oprima ★ o ★ para seleccionar ④, y oprima ⊕.
- 3 Oprima + o + para seleccionar FIJAR HORA ACTUAL, y oprima ⊕.


4 Compruebe que el cursor (►) se encuentra en la parte izquierda de "- -:- - AM", y oprima (↔).


-
5 Defina el día de la semana y la hora actual.
(1) Oprima ♦ o ♥ para definir el día de la semana, y
- oprima (*).


(2) Defina la hora y los minutos de la misma forma que en el paso (1). Si oprime - después de definir los minutos, el reloj se pondrá en funcionamiento.

6 Oprima MENU para volver a la pantalla original. Operaciones | 29-ES
wnloaded from www.Manualslib.com manuals search engine
Ajuste del temporizador para activar y desactivar el TV de proyección (ENCENDIDO/APAGADO)
Es posible programar la activación y desactivación del TV de proyección a las horas especificadas. Compruebe que ha ajustado el reloj correctamente. De no ser así, ajústelo en primer lugar (página 29 ).

- 1 Oprima MENU.
- 2 Oprima + o + para seleccionar ②, y oprima ⊕.
- 3 Oprima ★ o ★ para seleccionar ENCENDIDO/ APAGADO, y oprima ⊕.

-
4 Oprima →, e introduzca el ajuste ENCENDIDO/APAGADO.
- (1) Oprima ♠ o ♥ para definir el día o días, y oprima (+).
Cada vez que se oprime ♠ o ♣, los días aparecen cíclicamente como se muestra a continuación: CADA DOM-SAB→CADA LUN-VIE→ DOMINGO→...→SABADO→CADA DOMINGO→...→CADA SABADO


(2) Oprima ♦ o ♥ para definir la hora (hora y, a continuación, minutos) de activación del televisor, y oprima ⊕.

-
(3) Oprima
- Cada vez que oprima 4 , el espacio de tiempo aumentará en una hora hasta un máximo de seis.

(4) Oprima ♠ o ♥ para seleccionar el canal, y oprima ④.

El indicador TIMER del TV de proyección se ilumina.
5 Para definir el otro programa, oprima 💮, y repita el paso 4.
6 Oprima MENU para volver a la pantalla original.
Un minuto antes de la desactivación del TV de proyección, la pantalla mostrará el mensaje "El TV se apagará".
Para cancelar el temporizador
En el paso 3 o 4, oprima RESET.
Nota
• Si desenchufa el TV de proyección o si se produce un corte del suministro eléctrico, los ajustes ENCENDIDO/APAGADO se borrarán. Vuelva a definir la hora actual y, a continuación, ajuste el temporizador.
30-ES | Operaciones
Personalización de los nombres de los canales (NOMBRE DEL CANAL)
Es posible asignar un nombre a un máximo de 12 canales. Esta función permite identificar con facilidad el canal que esté visualizando. Puede crear sus propios nombres.

- 1 Oprima MENU.
- 2 Oprima ★ o ★ para seleccionar 🖻, y oprima ⊕.


3 Oprima + o + para seleccionar NOMBRE DEL CANAL, y oprima ⊕.


4 Oprima → y + o + para seleccionar el canal al que desee asignar nombre, y oprima →.


5 Introduzca las letras (máximo de cuatro) para asignar el nombre al canal:
(1) Oprima ♠ o ♥ para seleccionar la primera letra.
Cada vez que se oprime ♠ o ♣, la letra cambia de la siguiente forma:
0...9↔A...Z↔&,/,_(espacio en blanco)

(2) Oprima 🕘.


(3) Repita los pasos (1) y (2) para seleccionar las letras restantes, y oprima (+).
6 Repita para asignar nombre a otros canales, los pasos 4 y 5.
7 Oprima MENU para volver a la pantalla original.
Una vez personalizado el canal, el nombre de canal aparece en verde.
Para borrar un nombre
En el paso 5, oprima RESET.
Notas
- Si el menú NOMBRE DEL CANAL aparece en gris, significa que ha ajustado el TV de proyección en una entrada de vídeo, por lo que no es posible seleccionar NOMBRE DEL CANAL. Oprima TV (tecla negra) de forma que aparezca un número de canal.
- Si transcurren más de 90 segundos después de oprimir una tecla, el menú desaparecerá automáticamente.
- La función de nombre del canal no se encuentra disponible para la entrada AUX.
Bloqueo de canales (BLOQUEAR CANAL)
Mediante esta función se evita que los niños vean programas inadecuados. Es posible bloquear dos canales.

- 1 Oprima MENU.
- 2 Oprima ★ o ★ para seleccionar ఊ, y oprima ⊕.
- 3 Oprima + o + para seleccionar BLOQUEAR CANAL, y oprima ⊕.


4 Oprima + o + para seleccionar programa 1 o 2, y oprima ⊕.

5 Oprima + o + para seleccionar el canal que desee bloquear, y oprima ⊕.

6 Oprima MENU para volver a la pantalla original.
Si selecciona el canal bloqueado el mensaje "BLOQUEADO" aparece en pantalla.
| do, | |
|---|---|
| • • | BLOQUEADO |
Para cancelar un ajuste BLOQUEAR CANAL
En el paso 4 o 5, oprima RESET.
Nota
Cuando utilice la función BLOQUEAR CANAL, también quedarán bloqueadas las funciones de subtítulo y XDS del canal bloqueado, así como de la salida desde MONITOR OUT del canal seleccionado.
32-ES | Operaciones
Ajuste de los canales preferidos (CANAL FAVORITO)
Esta función permite que el TV de proyección memorice fácilmente sus canales preferidos. Si realiza el ajuste en AUTO, los últimos cinco canales seleccionados con las teclas de 0 – 9, quedarán memorizados como sus canales preferidos. Si desea introducir su propia selección de canales, realice el ajuste en MANUAL.
Programación de los canales preferidos

- 1 Oprima MENU.
- 2 Oprima + o + para seleccionar ఊ, y oprima ⊕.
- 3 Oprima + o + para seleccionar CANAL FAVORITO, y oprima ⊕.

4 Oprima → y + o + para seleccionar AUTO o MANUAL, y oprima →.


Si selecciona AUTO, omita los pasos 5 y 6. Los últimos cinco canales seleccionados con las teclas de 0 – 9 se definen automáticamente como sus canales preferidos.
Si selecciona MANUAL, los números de canal preferido aparecerán en color gris, que indica que pueden introducirse los canales preferidos.


6 Oprima ★ o ★ para seleccionar el canal que desea definir como canal preferido, y oprima ↔.

7 Oprima MENU para volver a la pantalla original.
Notas
- Si el menú CANAL FAVORITO aparece en gris, el TV de proyección está ajustado en una entrada de vídeo, y no es posible seleccionar CANAL FAVORITO.
- Si transcurren más de 90 segundos después de oprimir otra tecla, el menú desaparecerá automáticamente.
- La función de nombre/guía de canal no está disponible para la entrada AUX.
Selección de un canal preferido

1 Oprima ⊕.
Aparece el menú CANAL FAVORITO.


2 Oprima + o + para seleccionar el canal preferido que desee ver, y oprima ⊕.
El canal seleccionado aparecerá en la pantalla.

Para cancelar el menú CANAL FAVORITO
Oprima ♠ o ♥ para seleccionar "Salir", y, a continuación oprima (+).
Etiquetado de vídeos (ETIQUETA DE VIDEO)
Esta función permite asignar una etiqueta a cada modo de entrada para identificar con facilidad el equipo conectado. Por ejemplo, es posible asignar la etiqueta VHS a VIDEO 1.

- 1 Oprima MENU.
- 2 Oprima ← o ← para seleccionar , y oprima .
- 3 Oprima + o + para seleccionar ETIQUETA DE VIDEO, y oprima ⊕.


4 Oprima ★ o ★ para seleccionar el modo de entrada al que desee asignar una etiqueta, y oprima ⊕.


5 Oprima + o + para seleccionar la etiqueta, y

Cada vez que se oprime ♠ o ♣, la etiqueta cambia de la siguiente forma:
VIDEO 1
VIDEO 1 VHS 8 mm BETA DBS DVD 5 VIDEO LD
VIDEO 2
VIDEO 2 ↔ VHS ↔ 8 mm ↔ BETA DBS ↔ DVD ↔ S VIDEO ↔ LD
VIDEO 3
VIDEO 3 VHS 8 mm BETA DBS DVD LD
6 Repita los pasos 4 y 5 para asignar etiquetas a otros modos de entrada.
Nota
Si transcurren más de 90 segundos antes de oprimir otra tecla, el menú desaparecerá automáticamente.
Ajuste de subtítulos (CAPTION VISION)
Algunos programas se emiten con subtítulos. Para visualizarlos, seleccione CC1, CC2, CC3, CC4, TEXT1, TEXT2, TEXT3 o TEXT4 en el menú. Con CC1, CC2, CC3 o CC4 se mostrarán en la pantalla el diálogo o los efectos sonoros de un programa. (Debe seleccionarse CC1 para la mayoría de los programas.)
Con TEXT1, TEXT2, TEXT3 o TEXT4 se muestra una serie de información que puede ocupar la mitad de la pantalla o la pantalla completa. Generalmente, no está relacionado con el programa.

1 Oprima MENU.
2 Oprima + o + para seleccionar ∞, y oprima .

3 Oprima + o + para seleccionar el tipo de subtítulo, y oprima ⊕.

4 Oprima MENU para volver a la pantalla original.
Para que aparezcan los subtítulos
Oprima DISPLAY (para obtener información detallada, consulte la página 20 ).
Notas
- Una recepción de baja calidad de los programas de televisión puede causar errores en los subtítulos y en XDS. Los subtítulos pueden aparecer con un recuadro blanco u otros errores en lugar de una palabra determinada.
- Los subtítulos XDS y la indicación de estado no pueden utilizarse simultáneamente.
- Para obtener información detallada sobre los subtítulos XDS, consulte la página 20 .
Uso de equipos de vídeo
Es posible emplear el control remoto suministrado para controlar un equipo de vídeo Sony o de otra marca que disponga de un sensor remoto infrarrojo. Para emplearlo, ajuste el código del fabricante.
Ajuste del código de fabricante

Oprima las teclas CODE SET, VTR (FUNCTION) y 0 – 9 para introducir el código del fabricante (consulte la tabla en la páginas 35–36) y, a continuación, ENTER.
Por ejemplo, para utilizar una videograbadora Sony de 8 mm, oprima CODE SET, VTR (FUNCTION), 3, 0, 2, y ENTER.

Códigos de fabricantes de videograbadoras
| Fabricante | Código |
|---|---|
| Sony | 301, 302, 303 |
| Aiwa | 338 |
| Audio Dynamic | 314, 337 |
| Bell & Howell (M. Wards) | 330, 343 |
| Brocsonic | 319 |
| Canon | 309, 308 |
| Citizen | 332 |
| Craig | 315, 302, 332 |
| Curtis Mathis | 304, 338, 309 |
| Daewoo | 341, 312, 309 |
| DBX | 314, 336, 337 |
| Dimensia | 304 |
| Emerson | 319, 320, 316, 317, 318 |
| Fisher | 330, 334, 335, 333 |
| Funai | 338 |
| General Electric | 329, 304, 309 |
| Goldstar | 332 |
| Hitachi | 306, 304, 305 |
| Instant Replay | 309, 308 |
| JC Penny | 309, 305, 304, 330, 314, |
| - | 336, 337 |
| JVC | 314, 336, 337 |
| Kenwood | 314, 336, 332, 337 |
| LXI (Sears) | 332, 305, 333, 334, 330, |
| 335 | |
| Magnavox | 308, 309 |
| Marantz | 314, 336, 337 |
| Marta | 332 |
| Memorex | 309, 335 |
| Minolta | 305, 304 |
| Mitsubishi/MGA | 323, 324, 325, 326 |
| Multitech | 325, 338, 321 |
| NEC | 314, 336, 337 |
| Olympic | 309, 308 |
| Panasonic | 308, 309, 306, 307 |
| Pentax | 305, 304 |
| Philco | 308, 309 |
| Philips | 308, 309 |
| Pioneer | 308 |
| Quasar | 308, 309 |
| RCA/PROSCAN | 304, 305, 308, 309, 311, |
| 312, 313 | |
| Realistic | 309, 330, 328, 335, 324, |
| 338 | |
| Sansui | 314 |
| Singer | 315 |
| Samsung | 322, 313, 321 |
| Sanyo - | 330, 335 |
| Scott | 312, 313, 321, 335, 323, |
| المهم التروف مر | 324, 325, 326 |
| Sharp | 327, 328 |
| Shintom | 315 |
| Signaturė 2000 (M. Wards) | 338, 327 |
| Sylvania | 308, 309, 338 |
| Symphonic | 338 |
| Tashiro | 332 |
| Tatung | 314, 336, 337 |
| Teac | 314, 336, 338, 337 |
| Technics | 309, 308 |
| Toshiba | 312, 311 |
| Wards | 327, 328, 335, 331, 332 |
| Yamaha | 330, 314, 336, 337 |
| Zenith | 331 |
Número de código del fabricante de MDP
| Fabricante | Número de código |
|---|---|
| Sony | 701 |
| Kenwood | 707 |
| Magnavox | 703 |
| Maranz | 702 |
| Mitsubishi | 702 |
| Panasonic | 704 |
| Philips | 703 |
| Pioneer | 702 |
| RCA | 702 |
| Sanyo | 706 |
| Sharp | - 705 |
| Yamaha | 703 |
Notas
- Si aparece más de un código, introdúzcalos uno por uno hasta que localice el código adecuado para el equipo.
- En algunos casos excepcionales, puede no ser posible emplear este control remoto con un equipo de vídeo de marca diferente a Sony. Esto se debe a la posibilidad de que su equipo emplee un código que no se proporcione con este control remoto. En este caso, utilice la unidad de control remoto del equipo.
- Los códigos para los equipos Sony se asignan en fábrica de la siguiente forma: Videograbadoras VHS 301 (código programado
| Videograbadoras VHS | 301 | (código progran |
|---|---|---|
| para este contro | ||
| remote) |
Videograbadoras de 8 mm 302 Videograbadoras Beta, ED Beta 303
• Siempre que al extraer las pilas, por ejemplo para cambiarlas, tarde demasiado tiempo, los números de código cambiarán a los predefinidos en fábrica y será necesario volver a ajustarlos.
Uso de equipos de vídeo

Utilice las teclas de funcionamiento de vídeo del control remoto para emplear el equipo de vídeo.
Oprima VTR (FUNCTION) antes de emplear el equipo de vídeo.
|
Empleo de una
videograbadora |
Teclas del control remoto |
|---|---|
| Para activarlo o desactivarlo | Oprima VTR (POWER). |
|
Para seleccionar
directamente un canal |
Oprima teclas de 0 – 9. |
| Para cambiar los canales | Oprima CH +/ |
| Para grabar |
Oprima ► mientras oprime ●.
Por primera vez suelte ►, y después suelte ●. |
| Para reproducir | Oprima ►. |
| Para detención | Oprima 🔳. |
| Para avanzar rápidamente | Oprima 🍽. |
| Para rebobinar la cinta | Oprima ◀. |
| Para realizar pausa |
Oprima II.
Para reanudar la reproducción normal, vuelva a oprimirla. |
|
Para buscar una imagen
hacia delante o hacia atrás |
Oprima ►► o ◀◀ durante la
reproducción. Para reanudar la reproducción normal, suelte la tecla. |
|
Para cambiar el modo de
entrada |
Oprima TV / VTR. |
| Utilización de un MDP | Teclas del control remoto | ||
|---|---|---|---|
| Para activarlo o desactivarlo | Oprima VTR (POWER). | ||
| Para reproducir | Oprima ►. | ||
| Para detener | Oprima 🔳. | ||
| Para hacer pausa |
Oprima II.
Para vovler a la reproducción normal, vuelva a oprimirlo. |
||
|
Para buscar la imagen
adelante y atrás |
Siga oprimiendo ►► o ◄◄ durante la
reproducción. Para volver a la reproducción normal, suelte la tecla. |
||
|
Para buscar la el capítulo
adelante o atrás |
Oprima CH +/ | ||
Nota
Si el equipo de vídeo no dispone de una función determinada, la tecla correspondiente del control remoto no funcionará.
36-ES
Uso de un decodificador o receptor DBS
Es posible programar el control remoto suministrado para utilizar un decodificador o un receptor DBS. Siga los procedimientos que aparecen a continuación para ajustar el código del fabricante en el control remoto.

* Las teclas TV/DBS, GUIDE, DISPLAY, ♠/♣/♠/♠/⊕ y MENU sólo pueden utilizarse con un receptor DBS.
1 Apague el equipo que desee instalar, y oprima DBS/CABLE (FUNCTION).

2 Oprima las teclas CODE SET, DBS/CABLE (FUNCTION) y 0 – 9 para introducir el código del fabricante (consulte la tabla en la columma derecha) y, a continuación, ENTER. Por ejemplo, si desea programar el control remoto para emplear un receptor DBS Sony, oprima CODE SET, DBS/CABLE (FUNCTION), 8, 0, 1 y ENTER.

3 Oprima DBS/CABLE (POWER) para encender el decodificador o el receptor DBS.

4 Utilice las teclas de control del decodificador/DBS para comprobar si funciona el código.
Por ejemplo, para utilizar un decodificador o un receptor DBS, puede emplear las teclas DBS/ CABLE (POWER), JUMP, CH +/-, 0 – 9 y ENTER.
Nota
• Si el decodificador o el receptor de DBS no posee cierta función, la tecla correspondiente de este control remoto no funcionará.
Para utilizar el TV de proyección
Oprima TV (FUNCTION). A continuación, utilice las teclas de control del TV de proyección para controlarlo.
Para obtener más información sobre el uso del decodificador o del receptor DBS
Consulte el manual de instrucciones suministrado con el equipo.
Si el control remoto no funciona
• En primer lugar, repita los procedimientos de ajuste utilizando los otros códigos enumerados para el equipo.
Códigos de los fabricantes (decodificador)
| Fabricante | Código |
|---|---|
| Hamlin/Regal | 222, 223, 224, 225, 226 |
| Jerrold/G. I. | 201, 202, 203, 204, 205, 206, 207, 208, 218 |
| Oak | 227, 228, 229 |
| Panasonic | 219, 220, 221 |
| Pioneer | 214, 215 |
| Scientific Atlanta | 209, 210, 211 |
| Tocom | 216, 217 |
| Zenith | 212, 213 |
Códigos de los fabricantes (receptor DBS)
| Fabricante | Código | |
|---|---|---|
| Sony |
801 (código predefinido para el co
remoto suministrado) |
ntrol |
| RCA | 802 |
Notas
- Si aparece más de un código, introdúzcalos uno por uno hasta que localice el código adecuado para el equipo.
- Si introduce un nuevo código, el introducido anteriormente se borrará.
- En algunos casos excepcionales, es posible que el equipo emplee un código que no se proporcione con este control remoto y, por tanto, no será posible utilizar el equipo con el control remoto suministrado. En este caso, emplee el control remoto del equipo.
- Si—por ejemplo—emplea demasiado tiempo para sustituir las pilas, el código vuelve al ajuste de fábrica y será necesario volver a ajustarlo.
Información adicional
Solución de problemas
Si no consigue solucionar el problema tras intentar los métodos que aparecen a continuación, póngase en contacto con el proveedor Sony más próximo.
Ausencia de imagen (pantalla apagada) y de sonido
- Compruebe que ha conectado con firmeza el cable de alimentación.
- → Emplee las teclas del TV de proyección.
- Inserte las pilas en el control remoto con la polaridad correcta.
- Sustituya las pilas por otras nuevas si están agotadas.
- Compruebe que el ajuste TV/VIDEO es correcto. Cuando vea la televisión, ajústelo en TV, cuando vea cintas de video, ajústelo en VIDEO1, 2 o 3.
- Intente con otro canal, ya que puede deberse a un fallo de la emisora.
- Vuelva a realizar la función AUTO AJUSTES con la tecla SETUP para restaurar los ajustes de fábrica (página 14).
Ausencia de imagen o imagen de mala calidad (pantalla encendida), aunque buena calidad de sonido
- Ajuste CONTRASTE en el menú VIDEO (página 23).
- → Aiuste BRILLO en el menú VIDEO (página 23).
- → Ajuste CONVERGENCIA (página 16).
- Compruebe las conexiones de antena y de cable (página 6).
- Vuelva a realizar la función AUTO AJUSTES con la tecla SETUP para restaurar los ajustes de fábrica (página 14).
- Retire los objetos de la parte frontal del televisor.
Buena calidad de imagen y ausencia de sonido
- Oprima MUTING de forma que "MUTING desaparezca de la pantalla (página 19).
- Compruebe el ajuste MTS del menú AUDIO (página 27).
- Compruebe que BOCINAS está ajustado en SI en el menú AUDIO (página 27). Vuelva a realizar la función AUTO AJUSTES
- Vuelva a realizar la función AUTO AJUSTES con la tecla SETUP para restaurar los ajustes de fábrica (página 14).
Ausencia de color
- → Ajuste COLOR en el menú VIDEO (página 23).
- Confirme que no se está emitiendo un programa en blanco y negro. Vuelva a realizar la función AUTO AJUSTES
- Vuelva a realizar la función AUTO AJUSTES con la tecla SETUP para restaurar los ajustes de fábrica (página 14).
Sólo aparece nieve y ruido en la pantalla
- Compruebe el ajuste CABLE del menú AJUSTES (página 17).
- Compruebe las conexiones de antena y de cable (página 6).
- Asegúrese de que el canal está emitiendo programas.
- Oprima ANT para cambiar el modo de entrada (página 20).
Estrías o líneas con puntos
- ➡ Ajuste la antena.
- Aleje el TV de proyección de fuentes ruidosas como automóviles, letreros de neón y secadores de pelo.
Imágenes dobles o imágenes fantasma
Utilice una antena exterior altamente direccional o un cable (si el problema se debe a reflejos de montañas o edificios altos cercanos).
No es posible utilizar los menús
- Si la opción que desea seleccionar aparece en gris, no será posible seleccionarla. Oprima TV/ VIDEO correctamente.
- Compruebe el ajuste de CABLE en el menú PREFERENCIAS (página 17).
No es posible recibir canales superiores (UHF) si utiliza una antena
- Compruebe que CABLE se encuentra ajustado en NO en el menú PREFERENCIAS (página 17).
- Utilice AUTO PROGRAMACION para añadir canales recibibles que no se encuentren en la memoria del TV de proyección (páginas 14, 18).
No es posible recibir ningún canal al utilizar un sistema de cable
- Compruebe que CABLE se encuentra ajustado en SI en el menú PREFERENCIAS (página 17).
- Utilice AUTO PROGRAMACION para añadir canales recibibles que no se encuentren en la memoria del TV de proyección (páginas 14, 18).
El control remoto no funciona
- Las pilas podrían estar agotadas. Sustitúyalas (página 13). Compruebe que el cable de alimentación del TV
- Compruebe que el cable de alimentación del TV de proyección esté firmemente conectado a la toma mural.
- Oprima TV (FUNCTION) al utilizar el TV de proyección.
- Si hay lámparas fluorescentes demasiado cerca del TV de proyección, aléjelas del mismo al menos 3 a 4 pies.
No es posible aumentar el volumen suficientemente al emplear un decodificador
→ Aumente el volumen en el decodificador. A continuación, oprima TV (FUNCTION) y ajuste el volumen del TV de proyección.
Es necesario limpiar el TV de projección
Límpielo con un paño seco y suave. No utilice nunca disolventes concentrados, como diluyente o bencina, ya que pueden dañar el acabado.
Especificaciones
Sistema de proyección
objetivos, horizontal en línea. 5 terms de 3 tubos de imagen, 3
nəpemi əb oduT
Tubos monocromos de 7 pulgadas de
alto brillo (tamaño de la trama 6,3),
con acoplamiento óptico y sistema de
objetivos ópticos de proyección refrigeración por líquido.
Objetivo hibrido F1,1 de alto
τεπάιπιεπίο y gran diámetro
(efnemlenopeib ebibem) elletneq el eb oñemeT
sebegluq 1ð KP-61565C sebeglud 19 KD-61262 sebegind fo KP-53565C sepegind fo KP-53565 sepegind st KP-48565 sepegind 9<del>1</del> KP-46C65 sebegluq I4 KP-41T65C sebegluq 14 9117-dN
nòizivələt əb emətzi2
Normas americanas de televisión
Cobertura de canales
Ohmios para VHF/UHF l'erminal para antena exterior de Vo 6n9jnA VHF: 2-13/UHF: 14-69/CATV: 1-125
sebiles/sebertn3
lmpedancia: 47 kilohmios (noiselubom sb %001) smiVin 000 :(onong semot) OIUUA equilibrado, sincronismo negativo on soimho-27 (q-qV I :(onod smot) OdUIV souuuo c/ C: 0.286 Vp-p (señal de sincronismo) ovitegan ometionanie Y: 1 Vp-p, 75-ohmios no equilibrado, :(səuid 4 əp NIC inim) Odul v ΑΙDEO IN 5 (ΑΙDEO 5 ΙΝΕΟΙ) LIDEO IN J
AIDEO IN 3
ovitegan omeroris coberatiupa on VIDEO (tomas phono): 1 Vp-p, 75-ohmios
Diseno y especificaciones sujetos a cambio sin previo
(59587-4X bard) 2X87-NDS
SCN-46XI (para KP-46C65)
(JG9117-JN
Accesorios opcionales
KP-61565
KP-53565C
KP-53565
29587-JX
59097-dN
S9.LL1-dX
ownsuog
Bocina
seniood eb sbils2
sobertsinimus soirosecce
Mm 240 × 305.1 × 855.1 D238213-94
KP-41T65C 951×1.022×602 mm
Pantalla protectora de alto contraste
Soporte SU-4112 (para KP-41165)
Mezclador de U/V EAC-66
Control remoto RM-Y136A (1)
Pila tamaño AA (R6) (2)
(523/4×593/8×253/8 pulgadas)
(sepe3Ind $/$ 25 3/$ × 25 3/$ pulgadas)
(48 × 55 5 8 8 × 24 1/4 pulgadas)
(sepe3ind */ 1 42 × 8/ 5 22 × 84)
(sebegluq +/1 22 × 1/1 I2 × 24)
(43 5/8 × 52 5/8 × 22 1/2 pulgadas)
(371/2×401/4×233/4 pulgadas)
(sebeging +/2 × 401/1 × 23 3/1 7(3)
(hq/ls/ns) senoisnemid
W C,2 :619429 nd
220 ACY' 20/60 Hz
Alimentación Para KP-41T65C/53S65C/61S65C:
soimholia d
MONITOR OUT
Impedancia: 47 kilohmios (100% de modulación)
AUDIO (tomas phono): 500 mVrms
Para otros modelos: 120 VCA, 60 Hz
otteméib eb (sebegluq 9,6) mm 001 ab stalqmoo senseg ab senood
mVrms (100% de modulación) 002 :(onodq samot) TUO OIGUA
(100% de modulación), Impedancia: AUDIO (tomas phono): 500 mVrms
, ovilibrado, sincronismo negativo VIDEO (toma phono): I Vp-p, 75-ohmios
Impedancia: 5 kilohmios
mm 240 × 002.1 × 888.1
mm 410 × 514.1 × 812.1
mm 410 × 614.1 × 812.1
mm I72×788.1×801.1
mm £92 × 90£. I × 990. I
mm 200 × 220.1 × 170
M 591
Z × MZI
W072-DWA 'A02/ASI-DA 'S078
Cables conectores RK-74A, VMC-810S/
·osine
laformación adicional | 39-L5
SCN-61X2 (para KP-61565/KP-61565C) SCIN-53X7 (para KP-53565/KP-53565C)
(zo gl sdl 892)
(zo cī sdi 892)
(zo I sdl 2čl)
(zo I sdl 221)
(zo II sdI 741)
(zo 5 sdl 641)
(20 <del>f</del> sdl 121)
(20 4 sdl 121)
SE
8x 771
37 Kg
......................................
8x 69
8y 79
87 60
84 60
22 Kg
eseM
Indice de partes y controles
Esta sección describe de forma resumida las teclas y controles en el TV de proyección y el control remoto. Para más información, consulte las páginas junto a cada descripción.
Parte delantera del TV de proyección

- 1 Indicador TIMER/STANDBY (páginas 19, 30)
- 2 Indicador STEREO (página 27)
- 3 Sensor remoto
- 4 Interruptor POWER (página 14 )
- 5 Teclas CHANNEL +/- (página 14 )
- 6 Teclas VOLUME +/- (página 14 )
- 7 Tecla TV/VIDEO (páginas 14, 15)
- 8 Tecla SETUP (página 14)
- [9] Conector S VIDEO y tomas VIDEO 2 INPUT (VIDEO/AUDIO L (MONO)/R) (página 10)
40 -ES
Información adiciona
Control remoto

SE
53-Lt
intormacion adicional
(er , ar senigèq) -/+ (lenes) HD selseT
(cr angeq) sunam ab noisaraqo ab saisa i
Tecla TV/VIDEO (tecla con etiqueta amarilla)
Tecla TV (FUNCTION) (páginas 15, 19)
Tecla MTS/GUIDE (páginas 27, 31)
( əf anigad) ATTER (página 16 )
Tecla TV / VIDEO (pagina 20)
Tecla AUDIŲ (págīna z 1)
( df anigad) 9–0 salooT
(02 snigsq) TNA slost
(12 anigàq) III alosT
Tecla SWAP (página 22)
87
22
56
55
54
53
52
51
50
61
81
ZL
Tecla (+)
♦\♦\♦\♦ selas Teclas
Tecla MENU
(17 euiSed)
(12 eniged) (enireme Teclas TV/VTR CH+/- (teclas con etiqueta 9
Tecla DBS/CABLE (FUNCTION) (página 37)
Interruptor DBS/CABLE (POWER) (página 31)
Interruptor TV (POWER) (pagina 19)
(er snigsq) -/+ (nomulov) JOV sslooT
Tecla TV/DBS (página 26, 21)
Tecla CODE SET (página 35 )
Tecla RESET (página 23)
(er anigad) AMU( alooT
Tecla SLEEP (página 20)
Tecla DISPLAY (página 20)
Tecla POSITION (pagina 22)
- 4 Tecla FREEZE (página 22)
91
51
14
13
15
01
6
8
9
-
Tecla VTR (FUNCION) (página 35) 3
- 2 (er anigad) DNITUM (página 19)
-
Interruptor VTR (POWER) (página 36)
 Operating Instructions Manual")
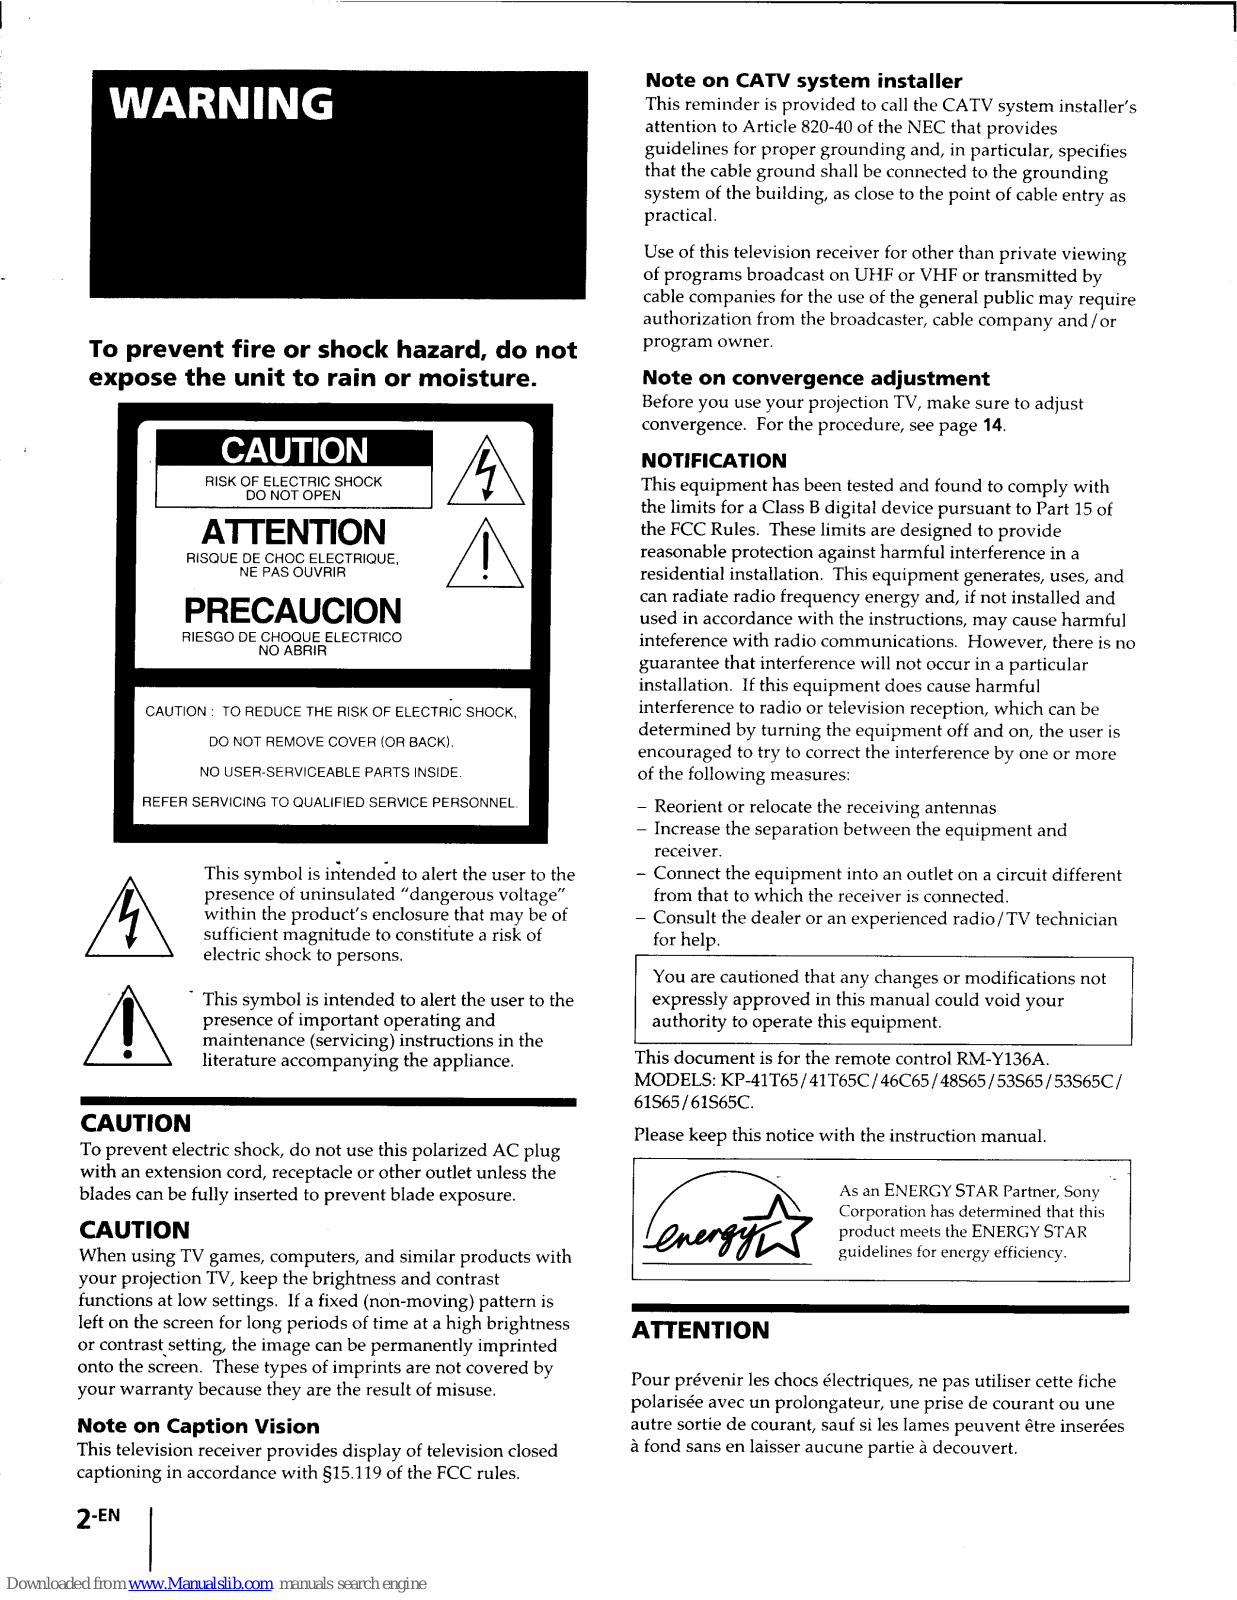
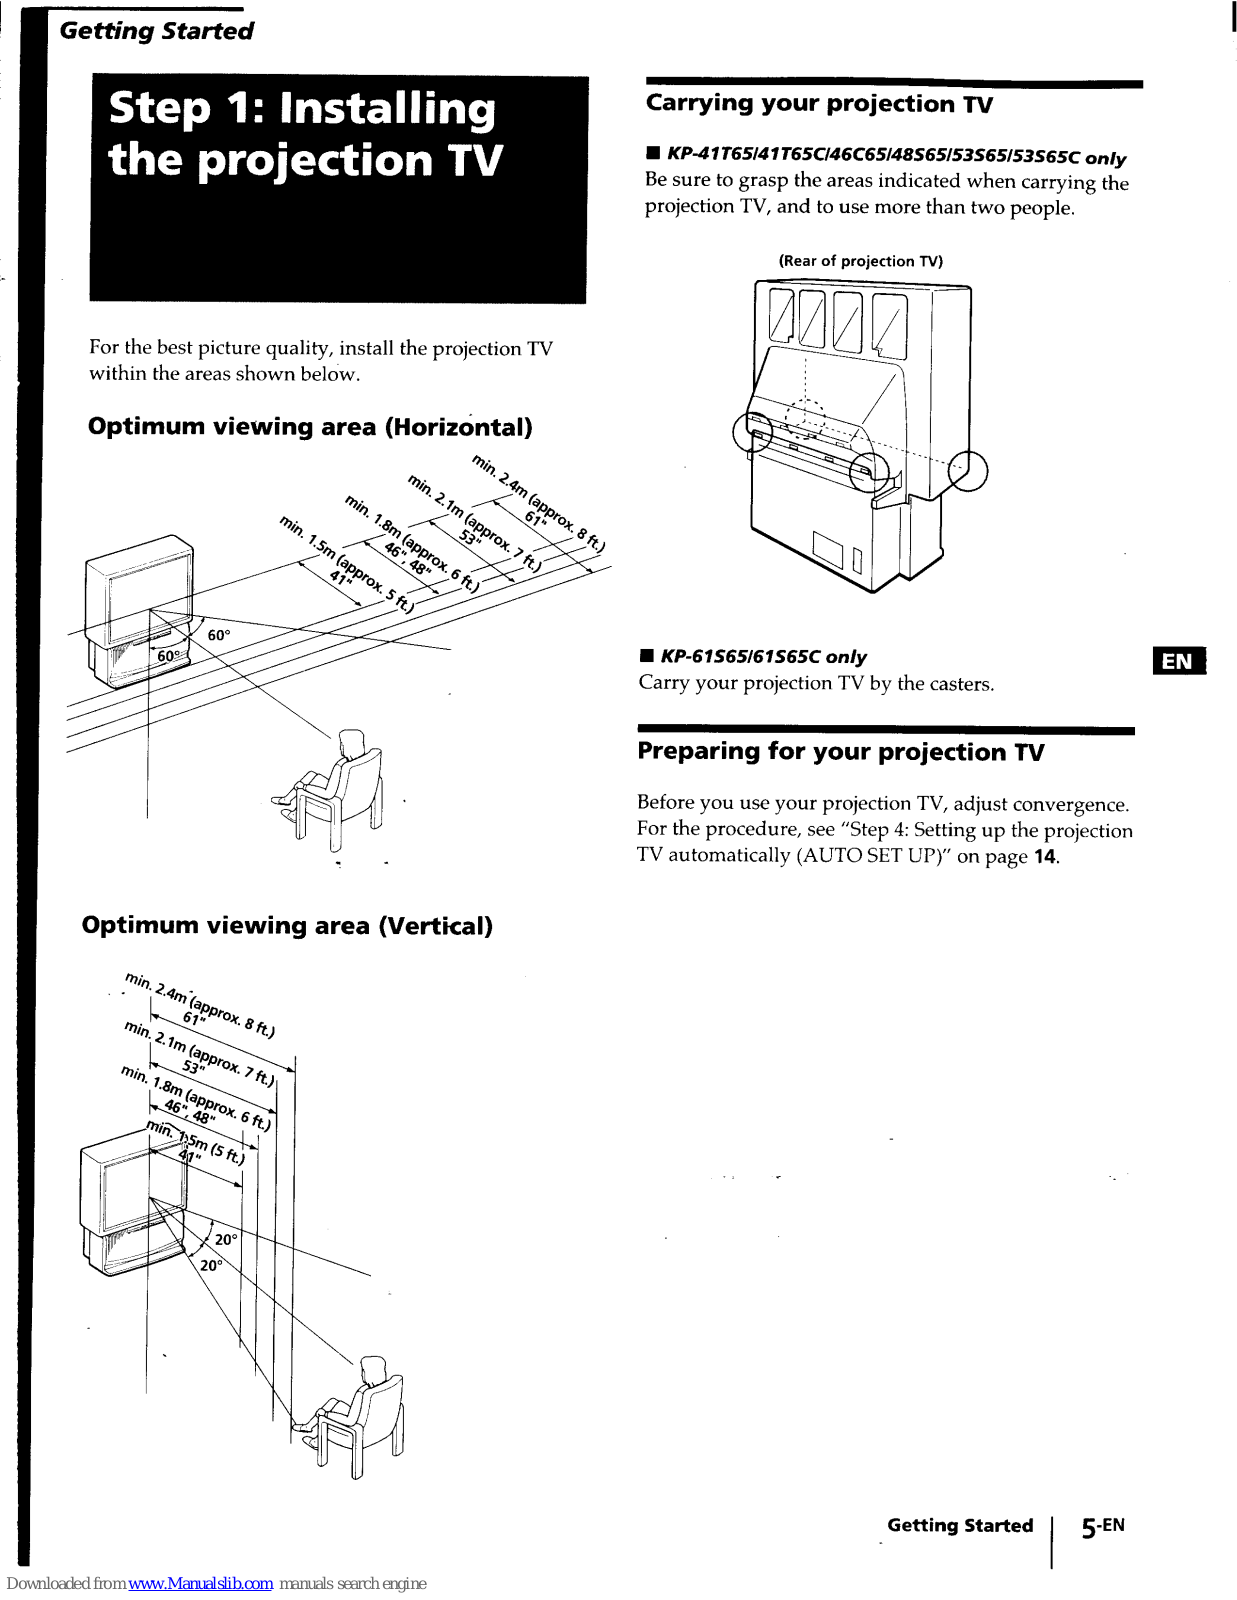


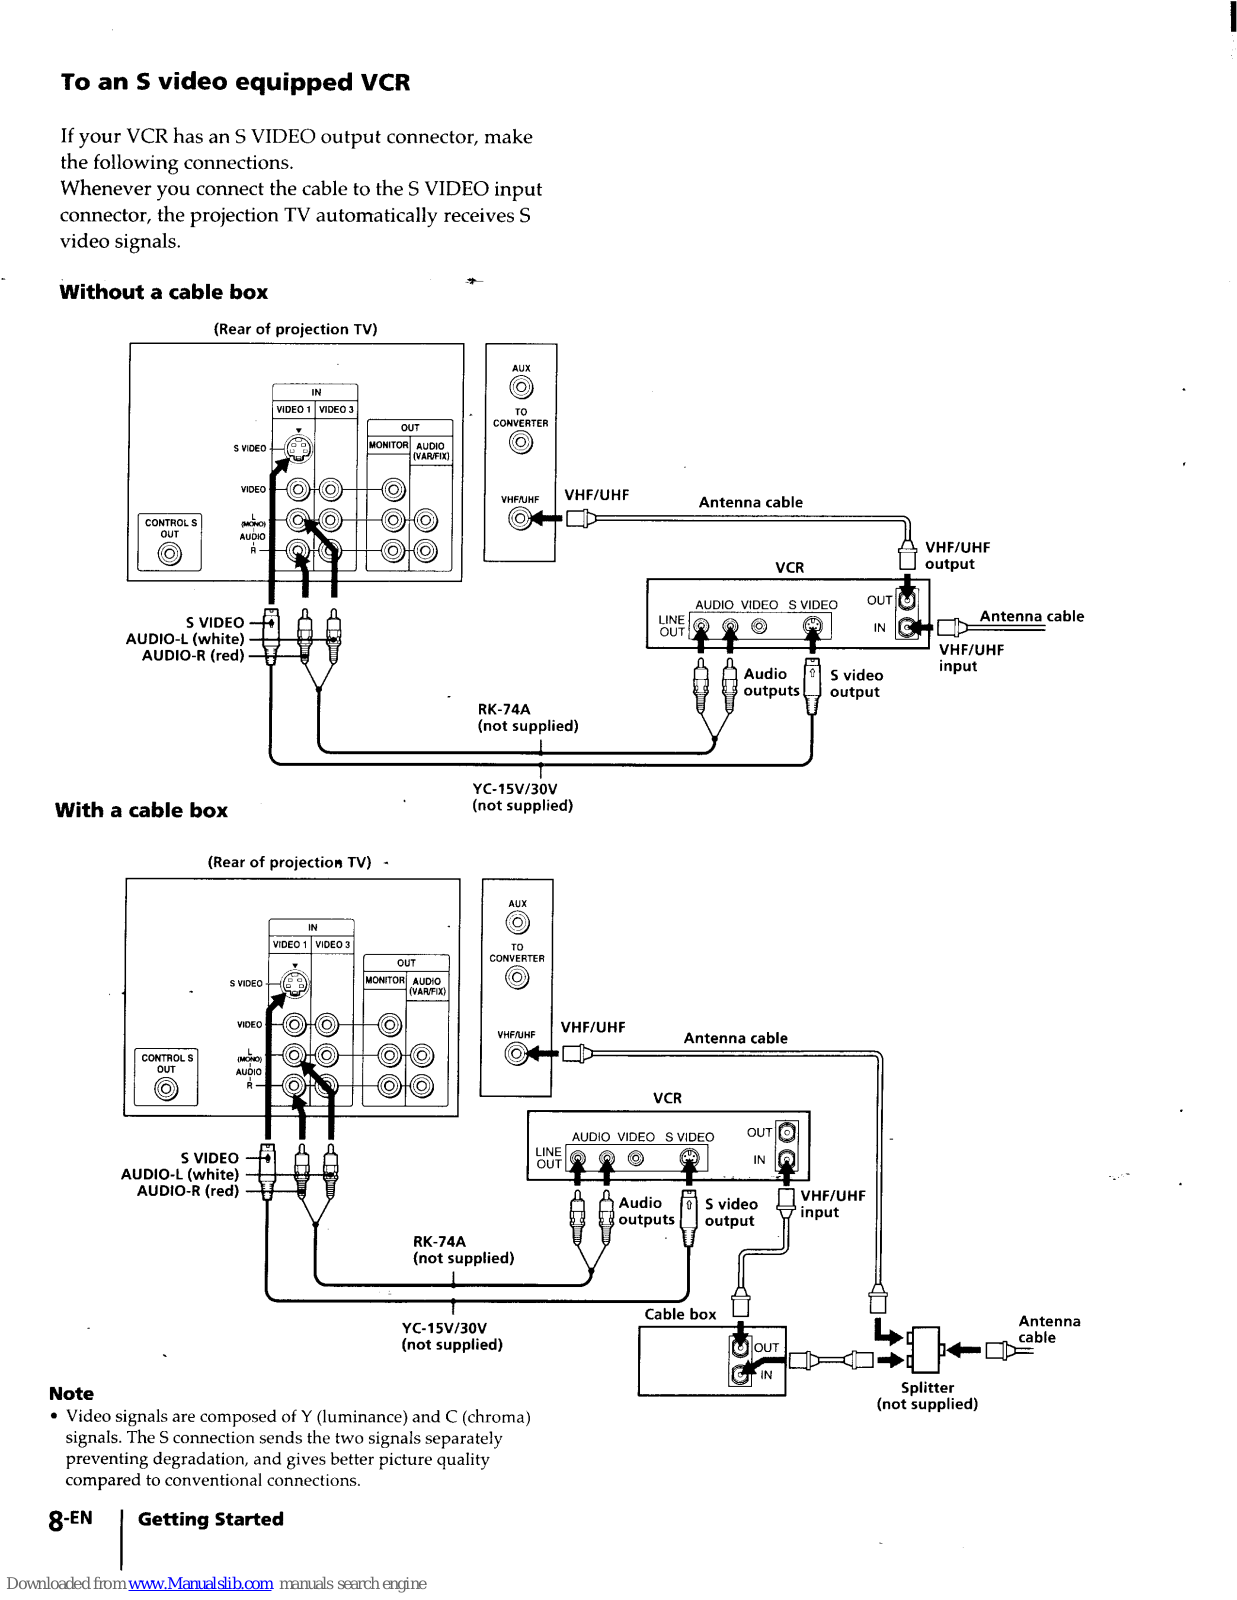
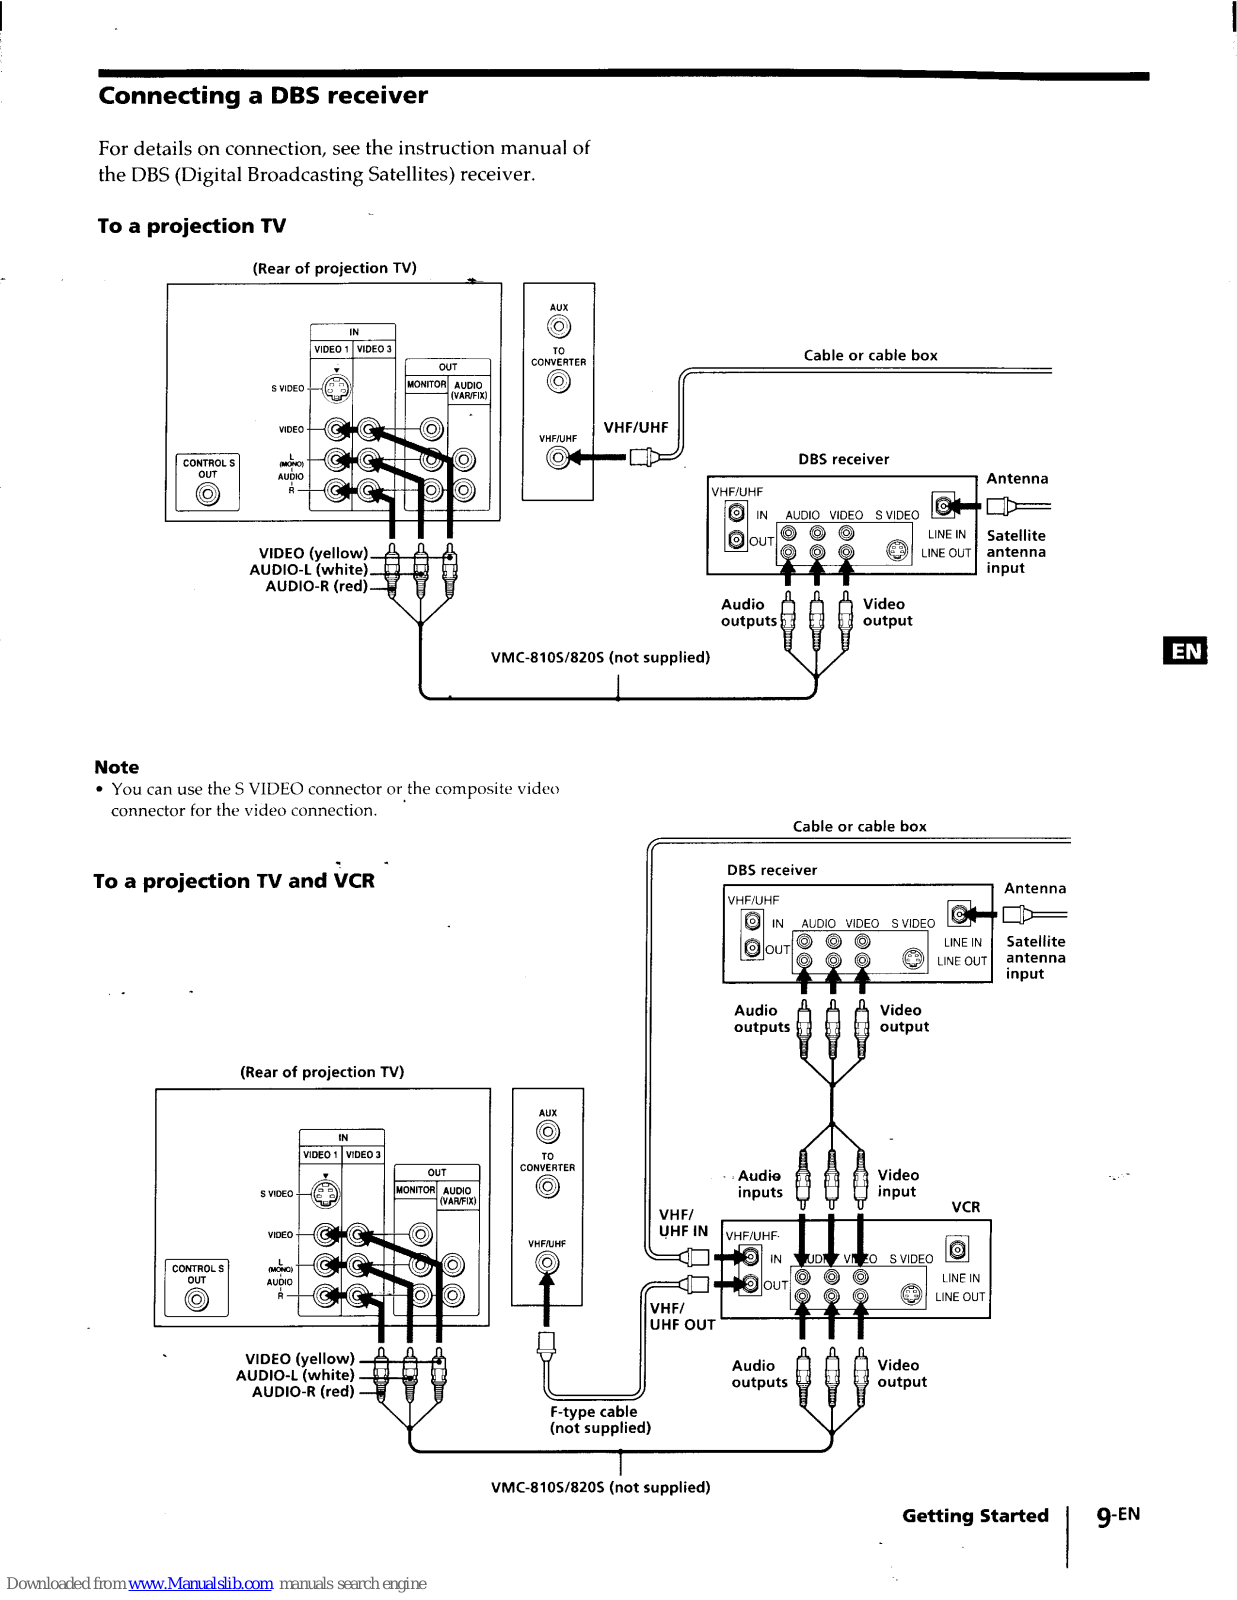
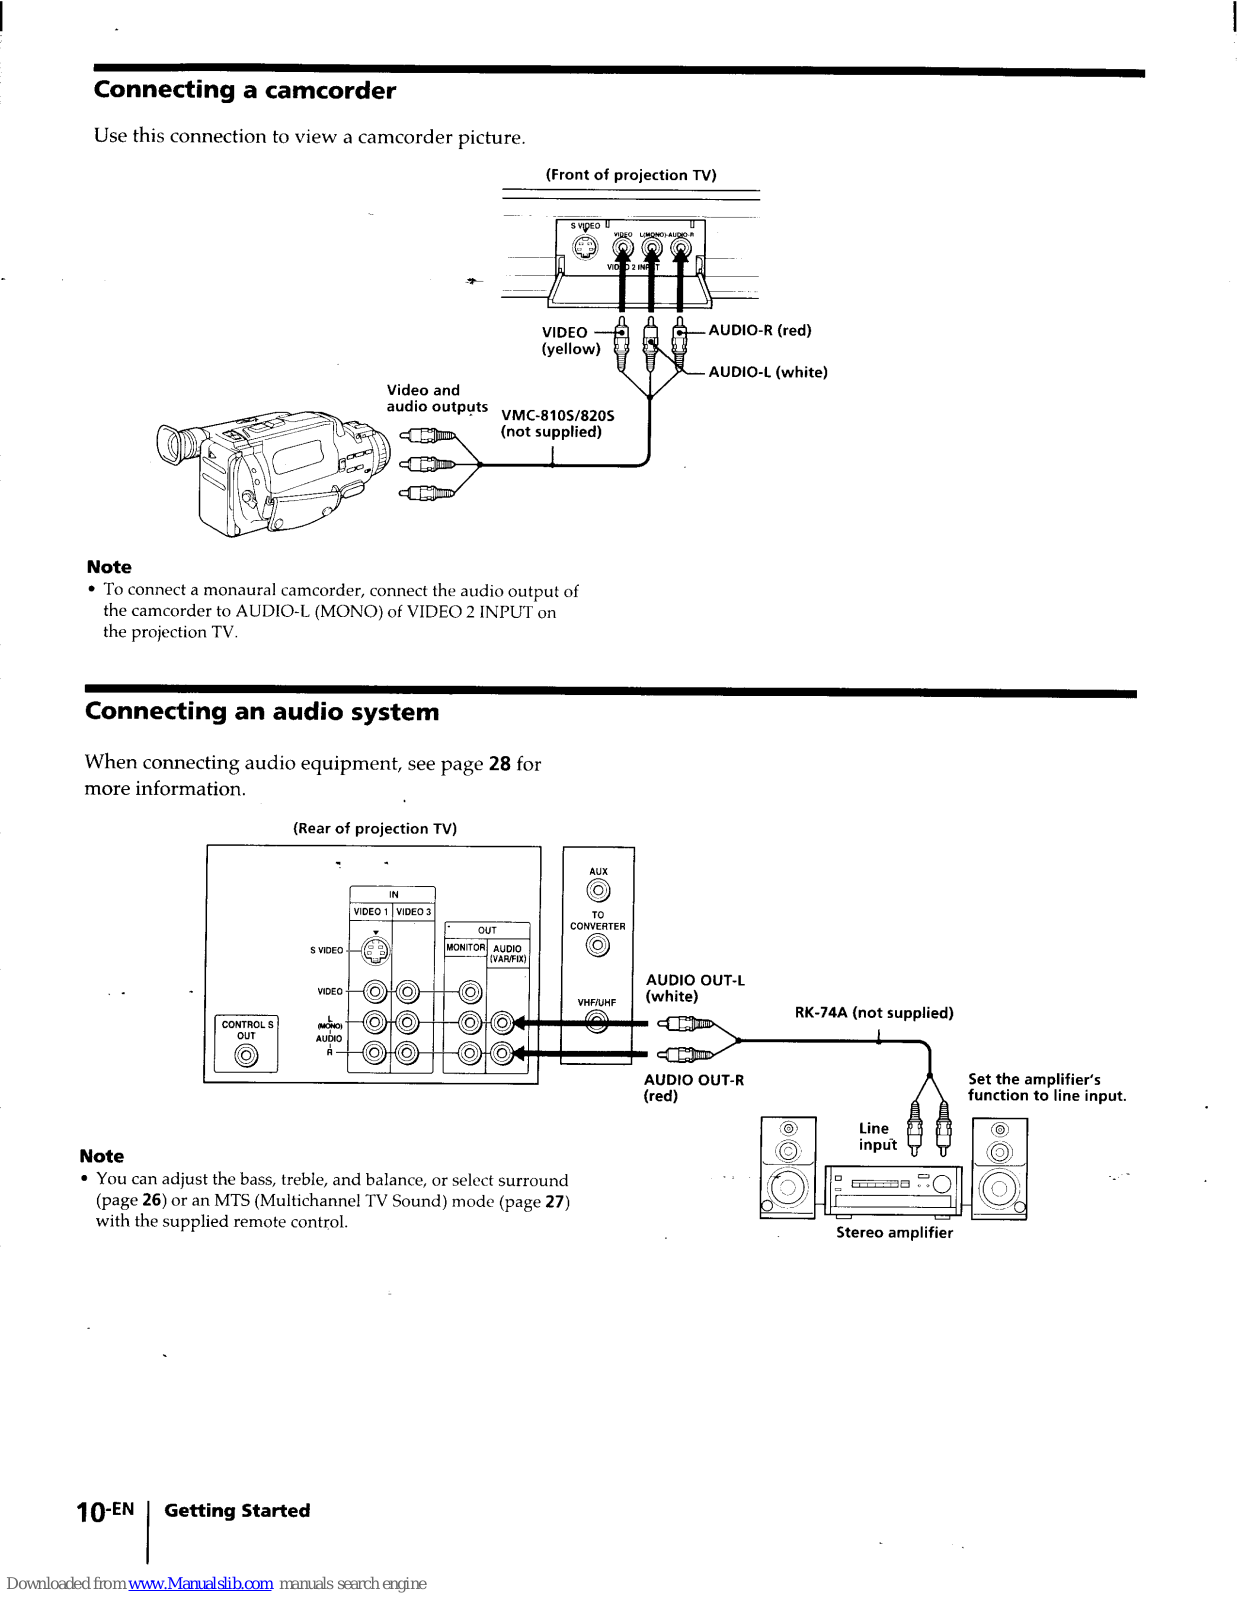
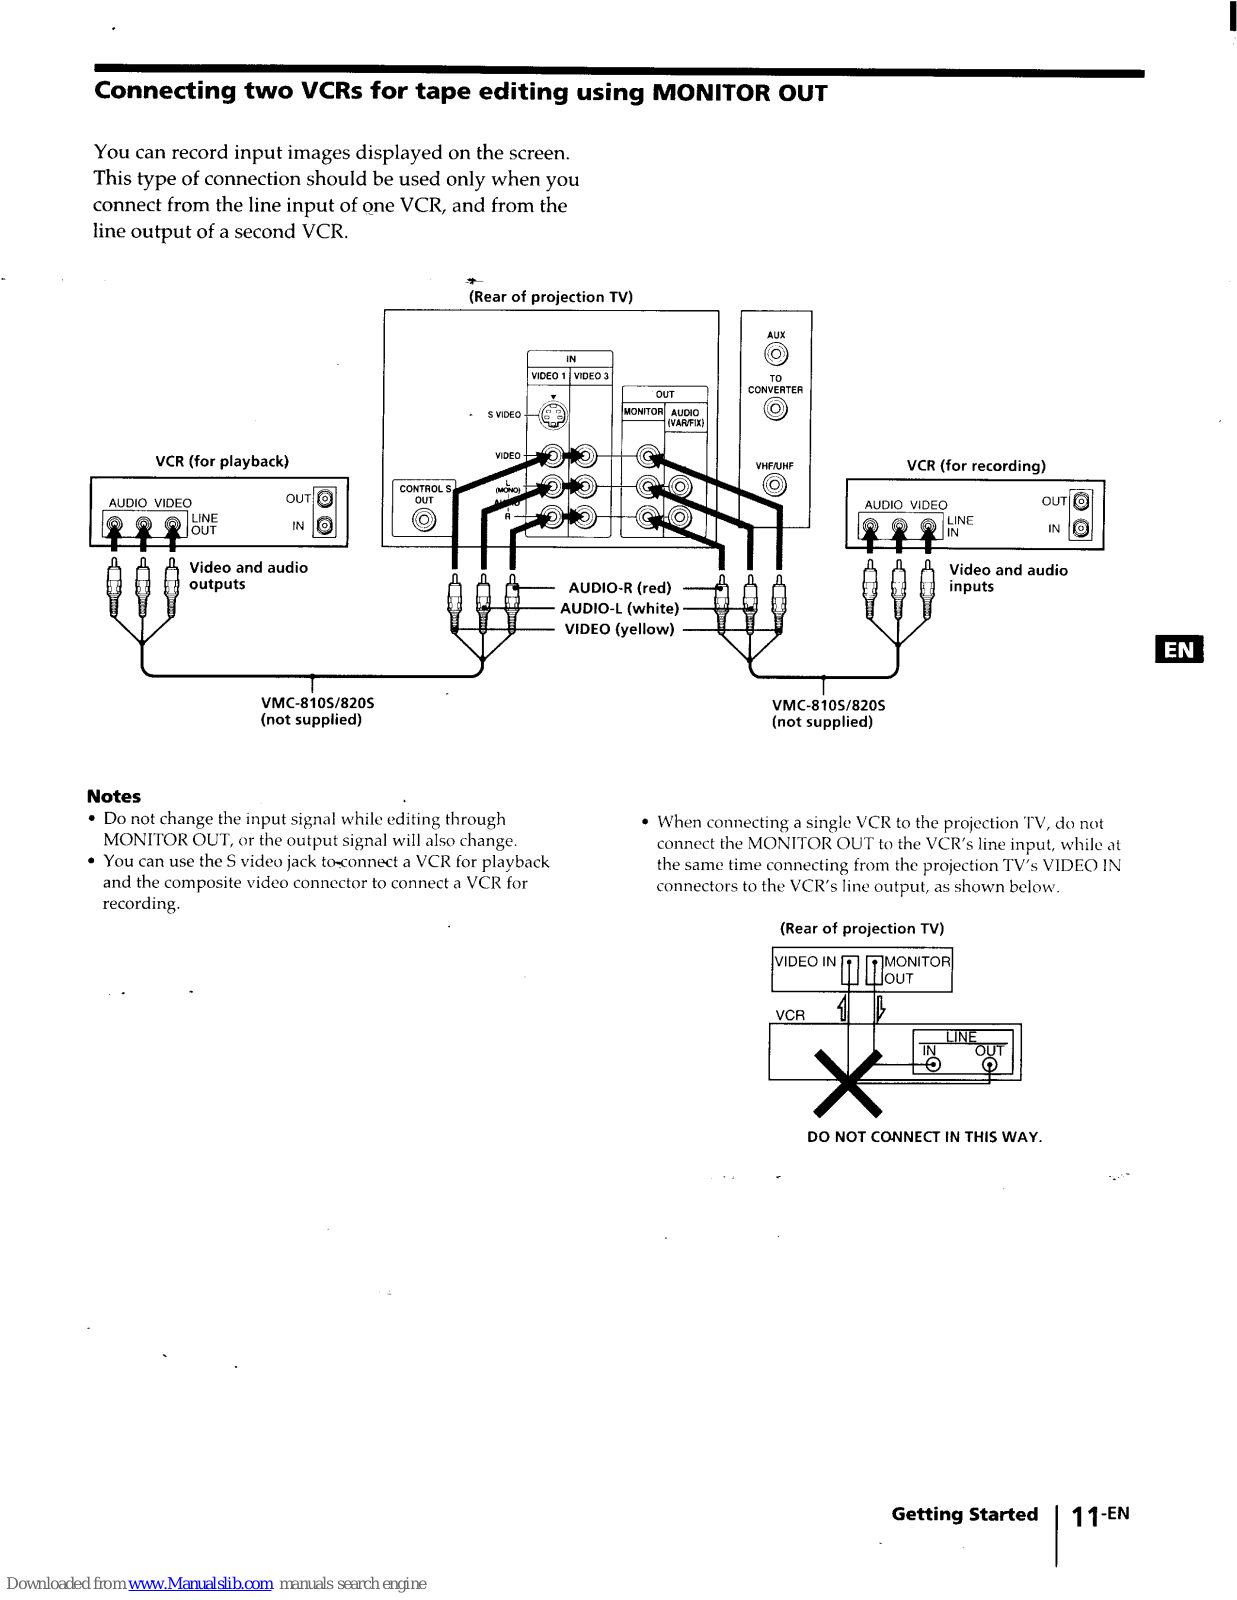
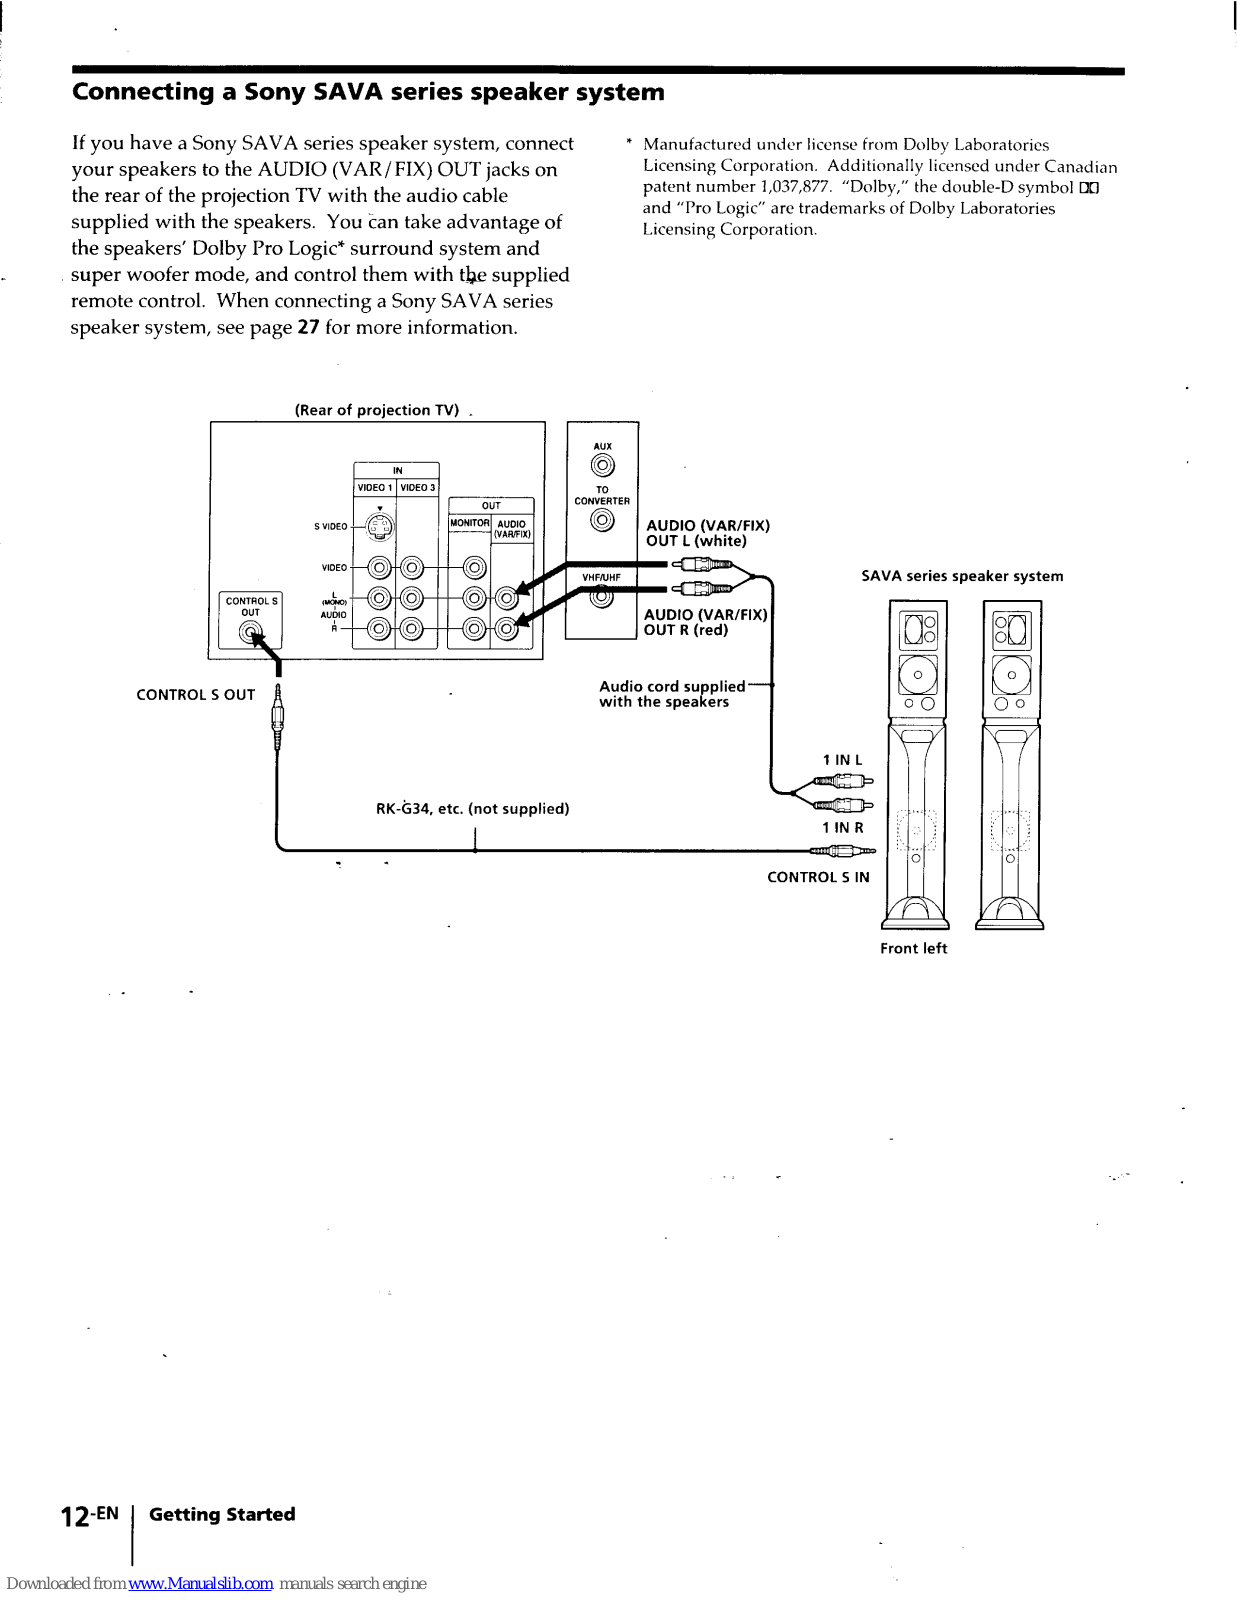
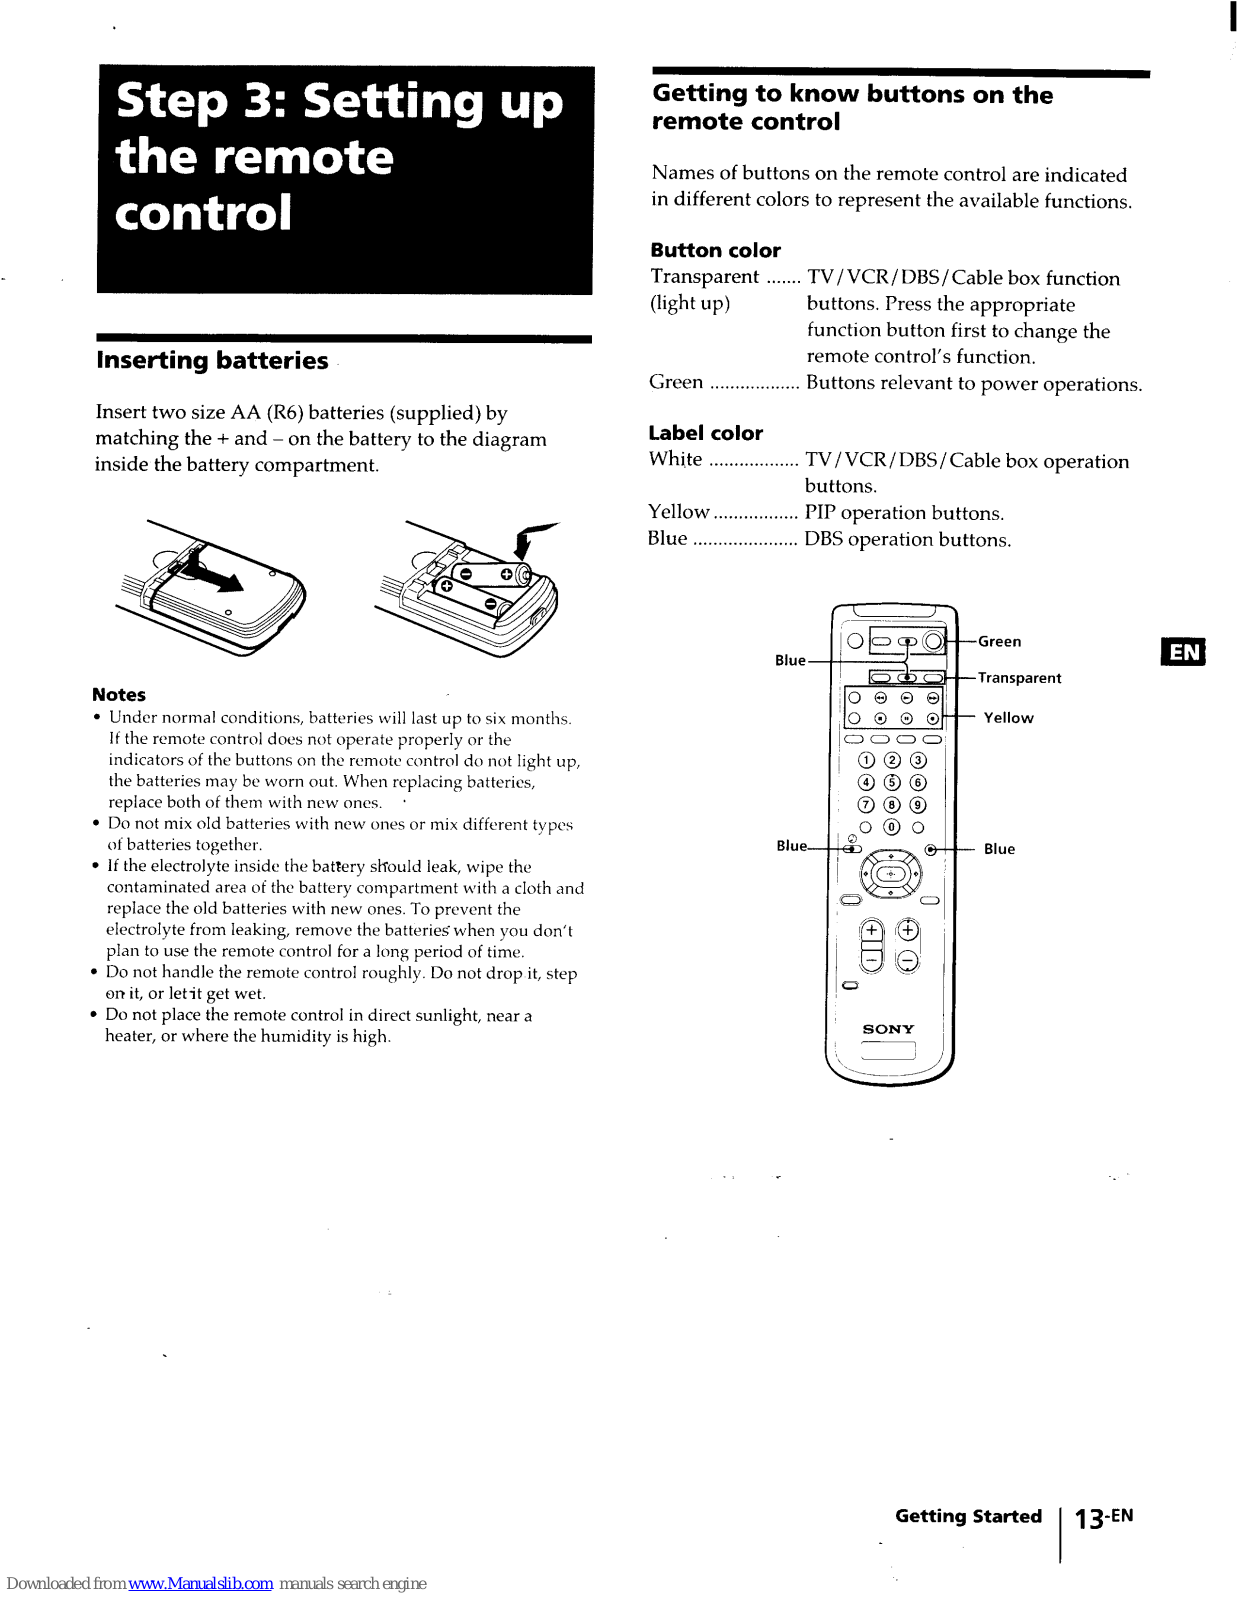
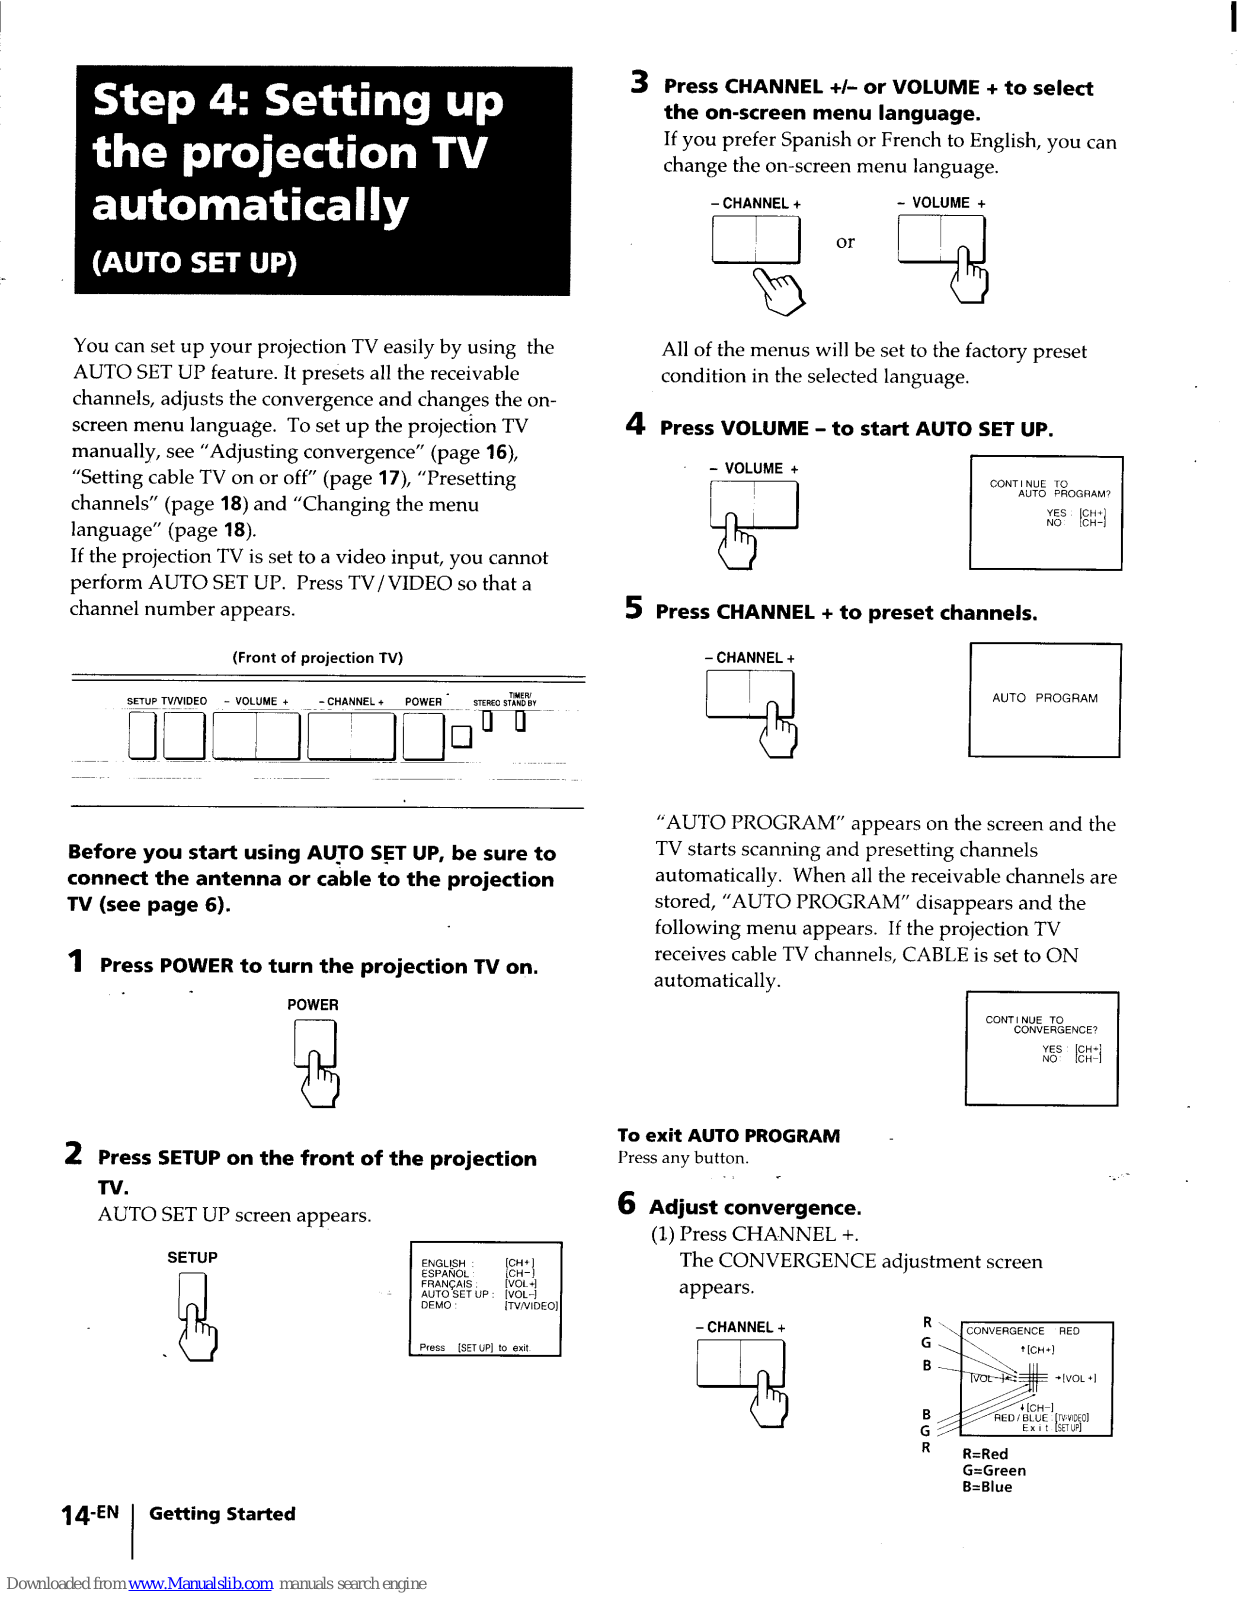

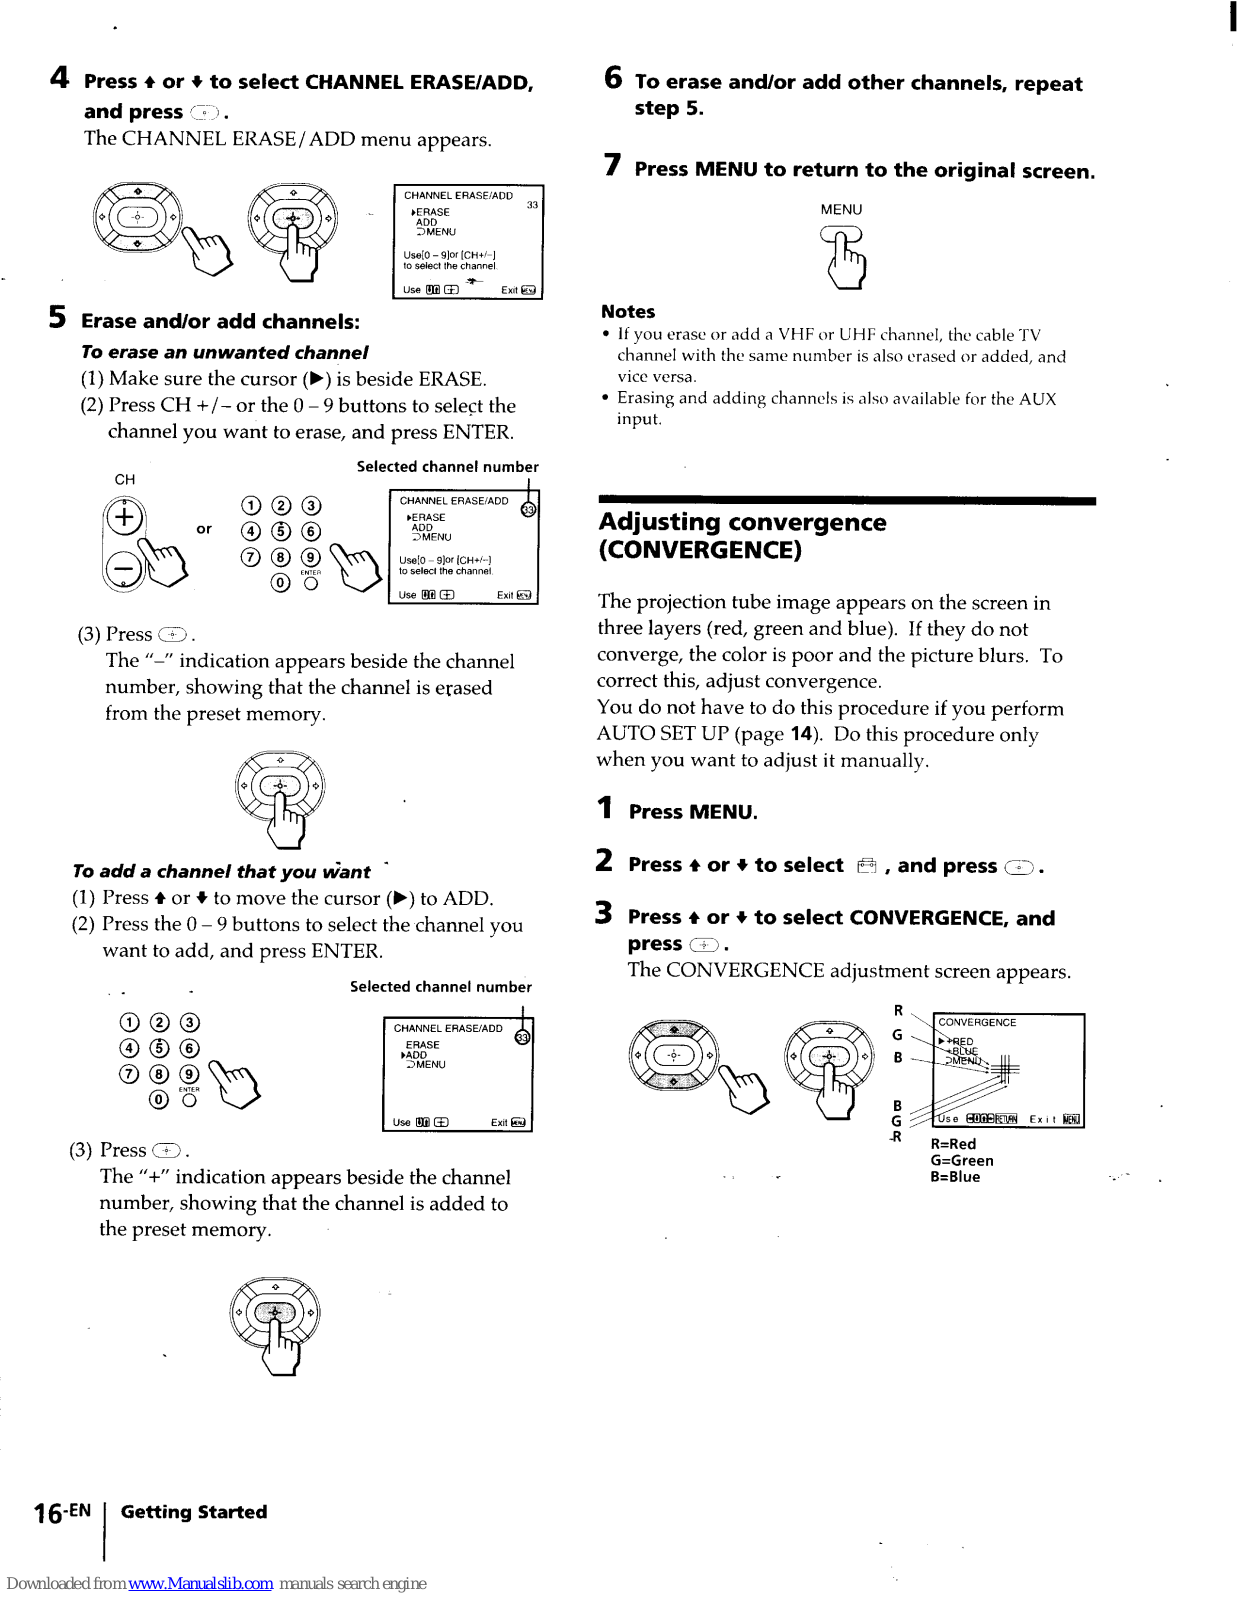
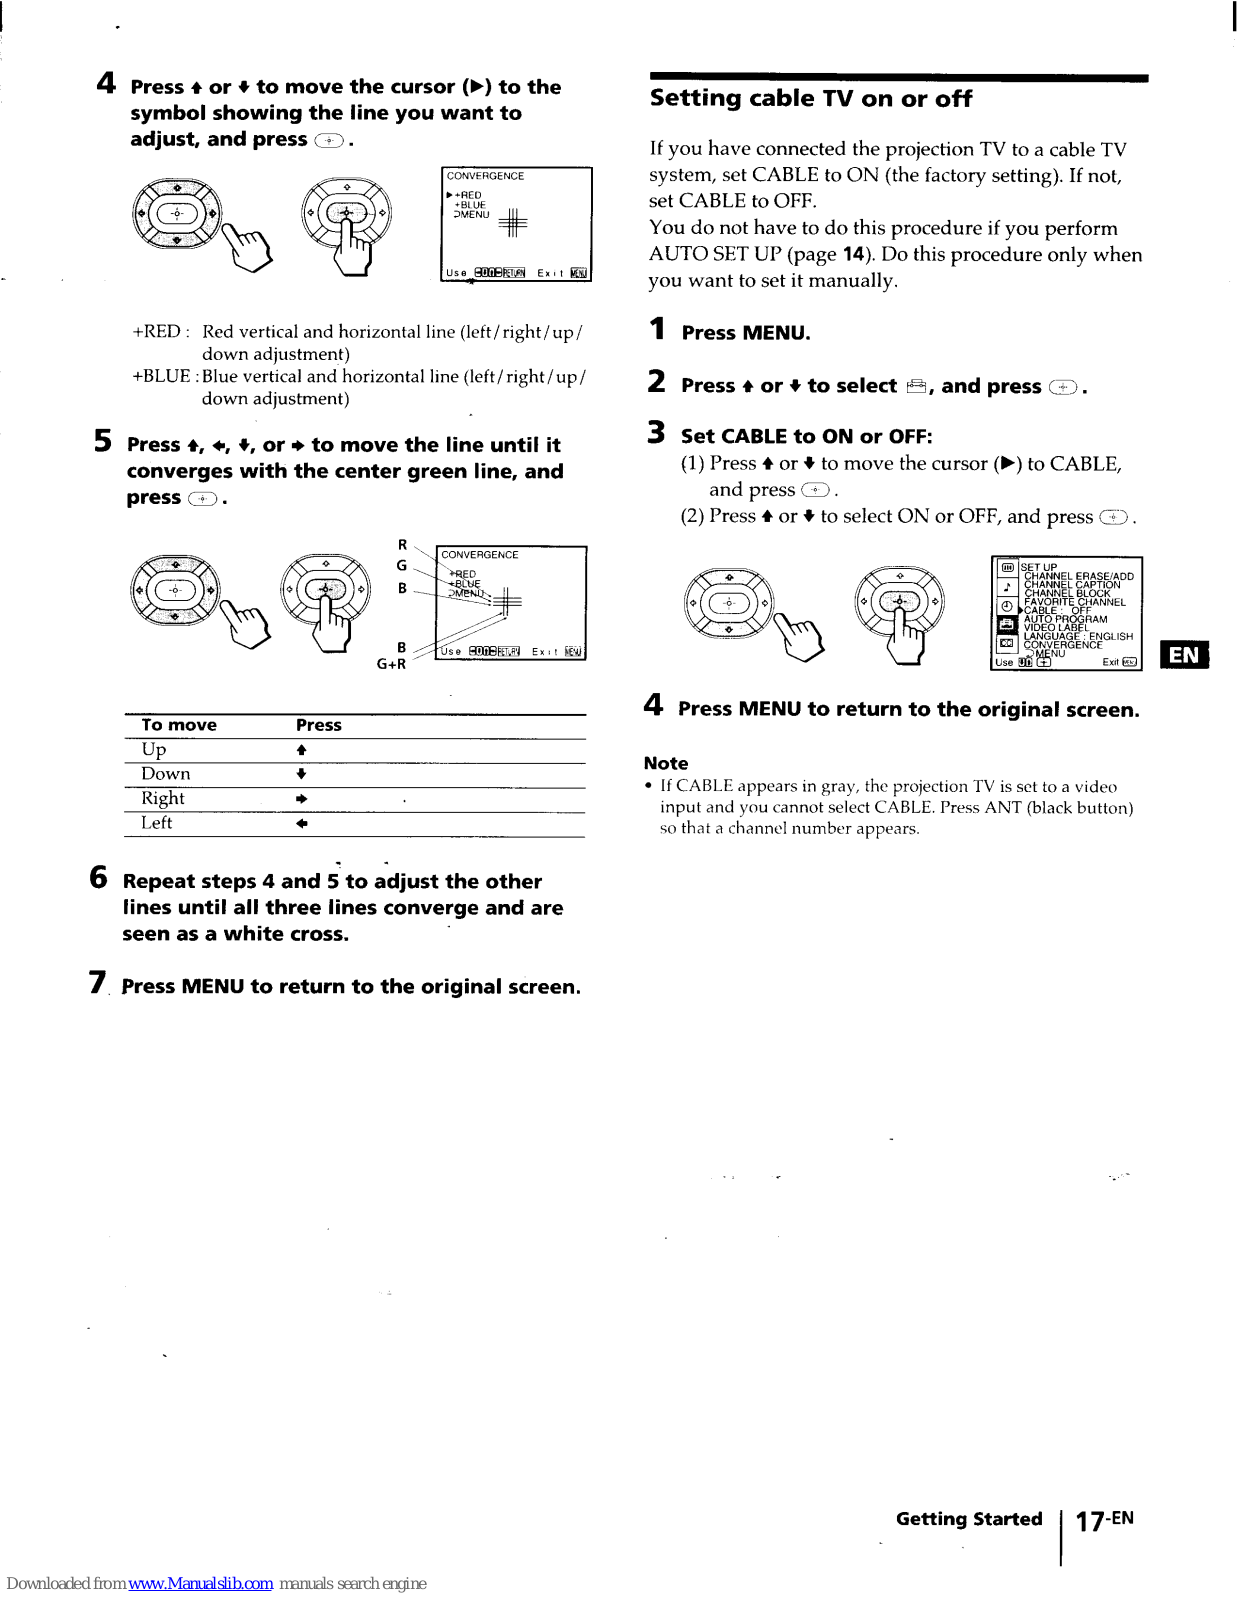
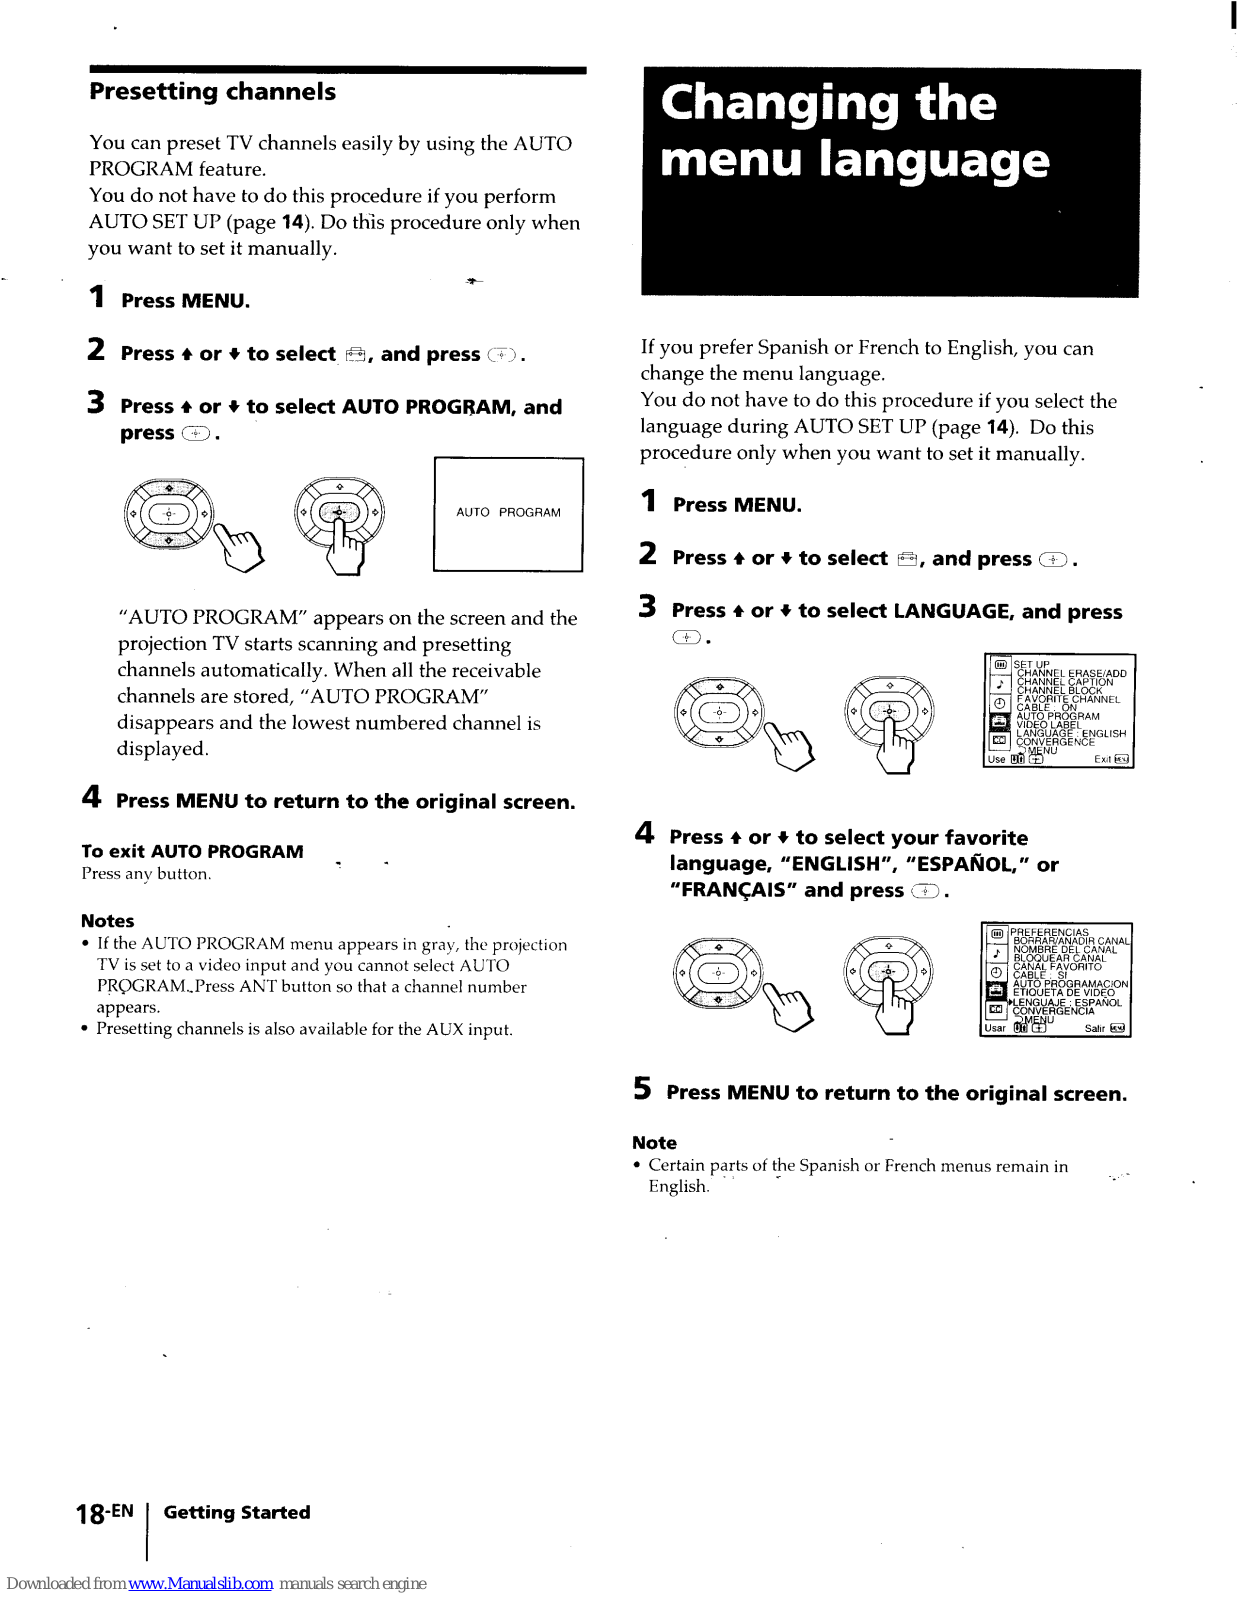
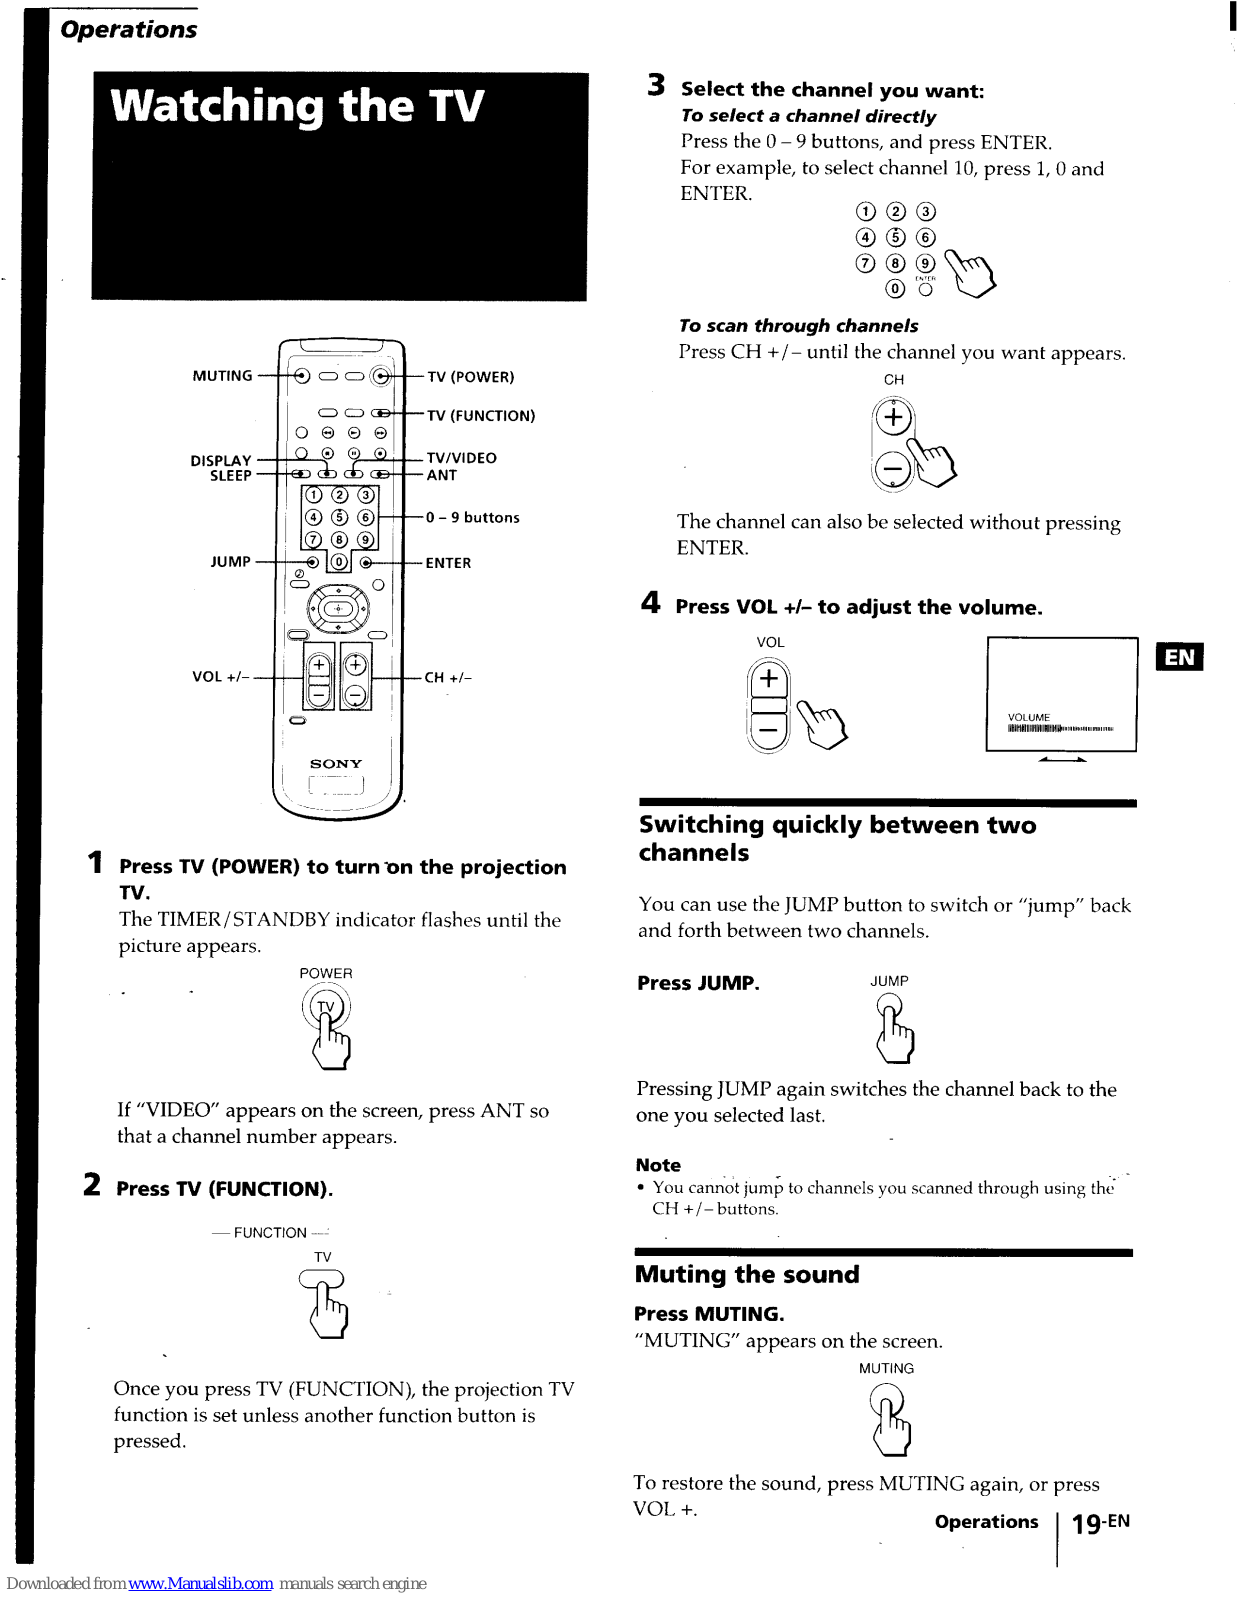

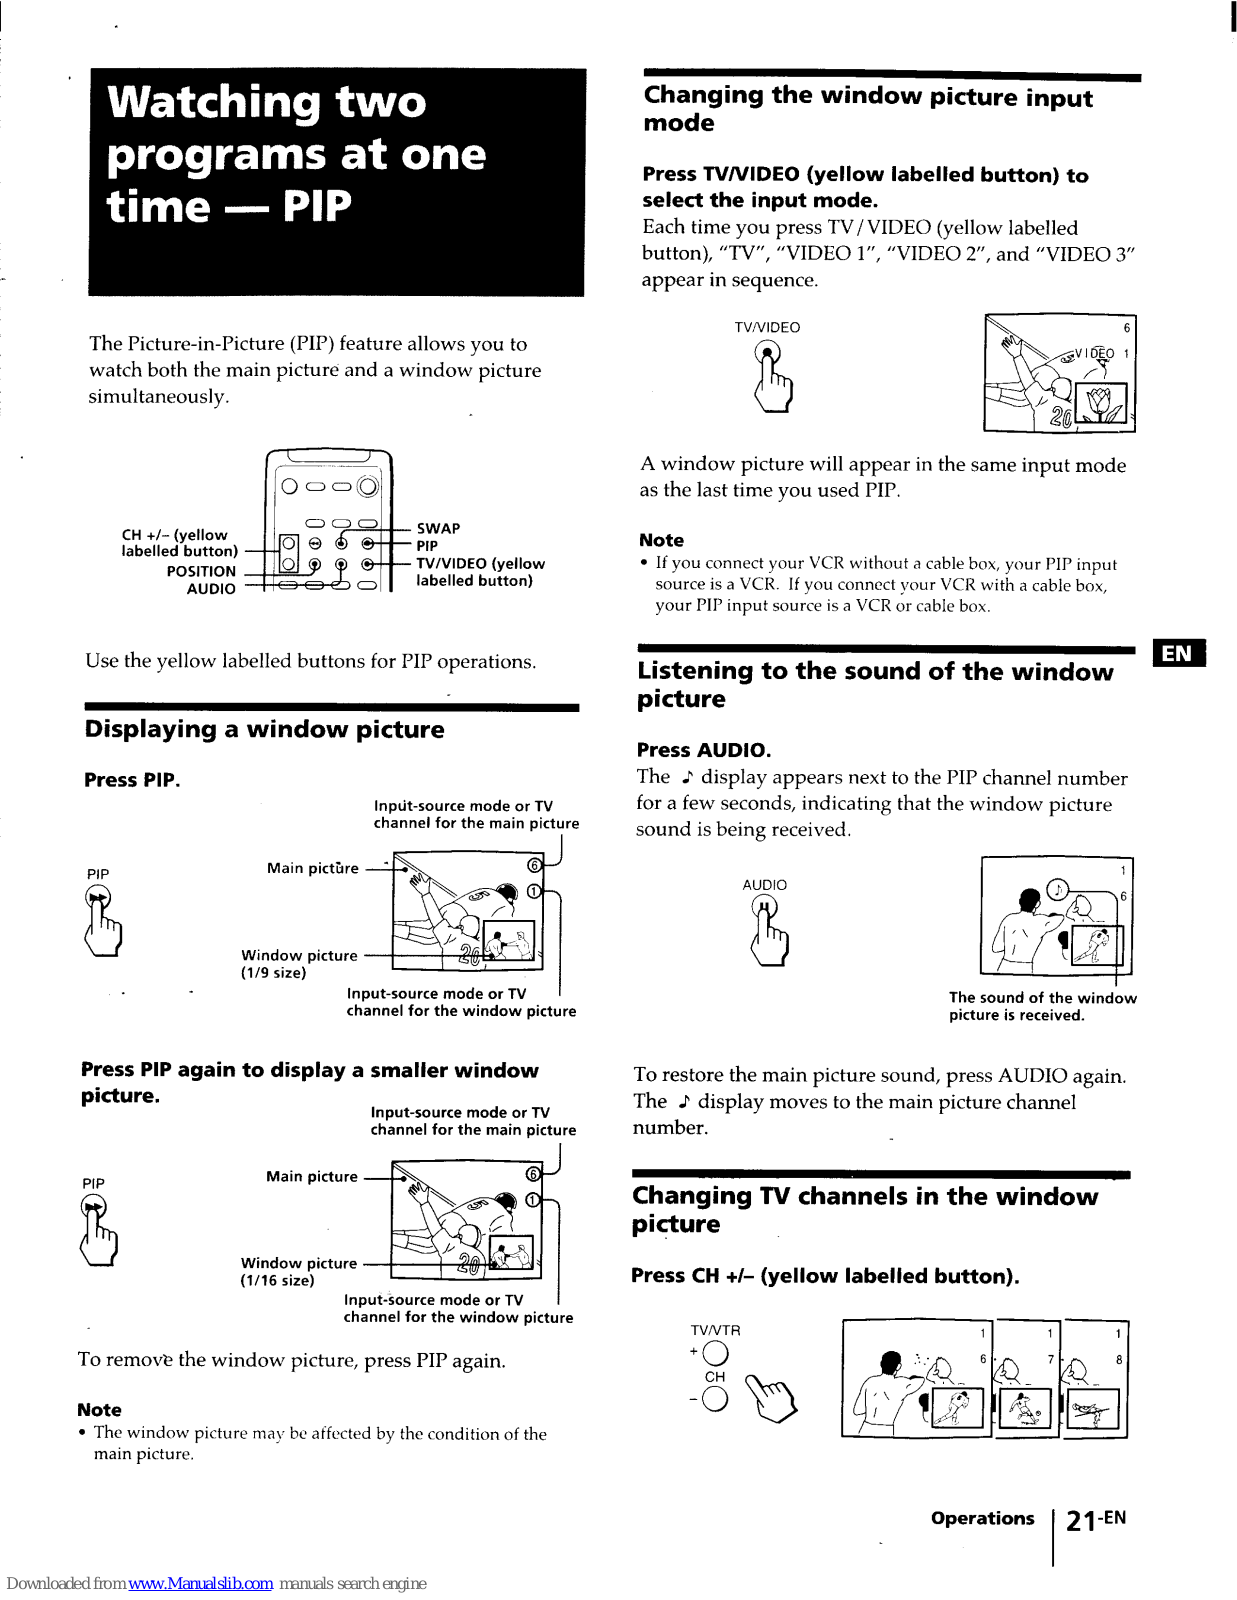

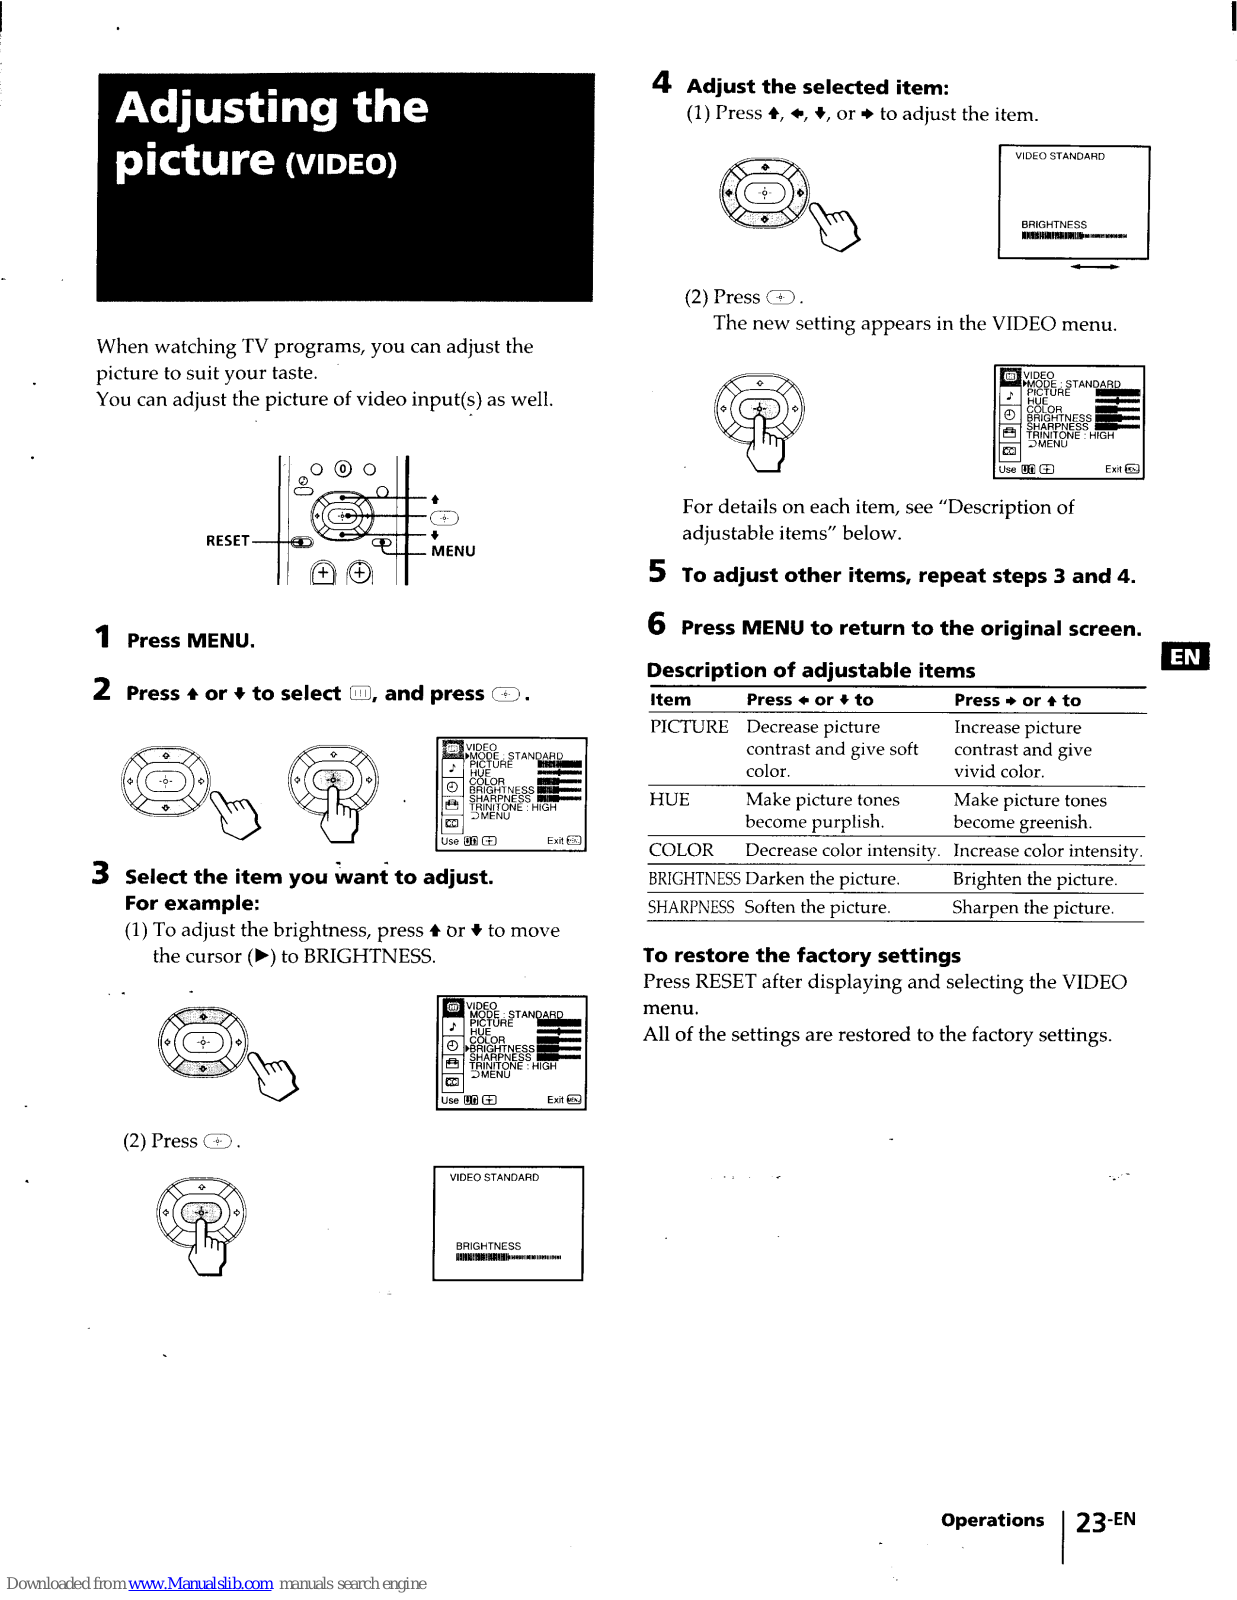
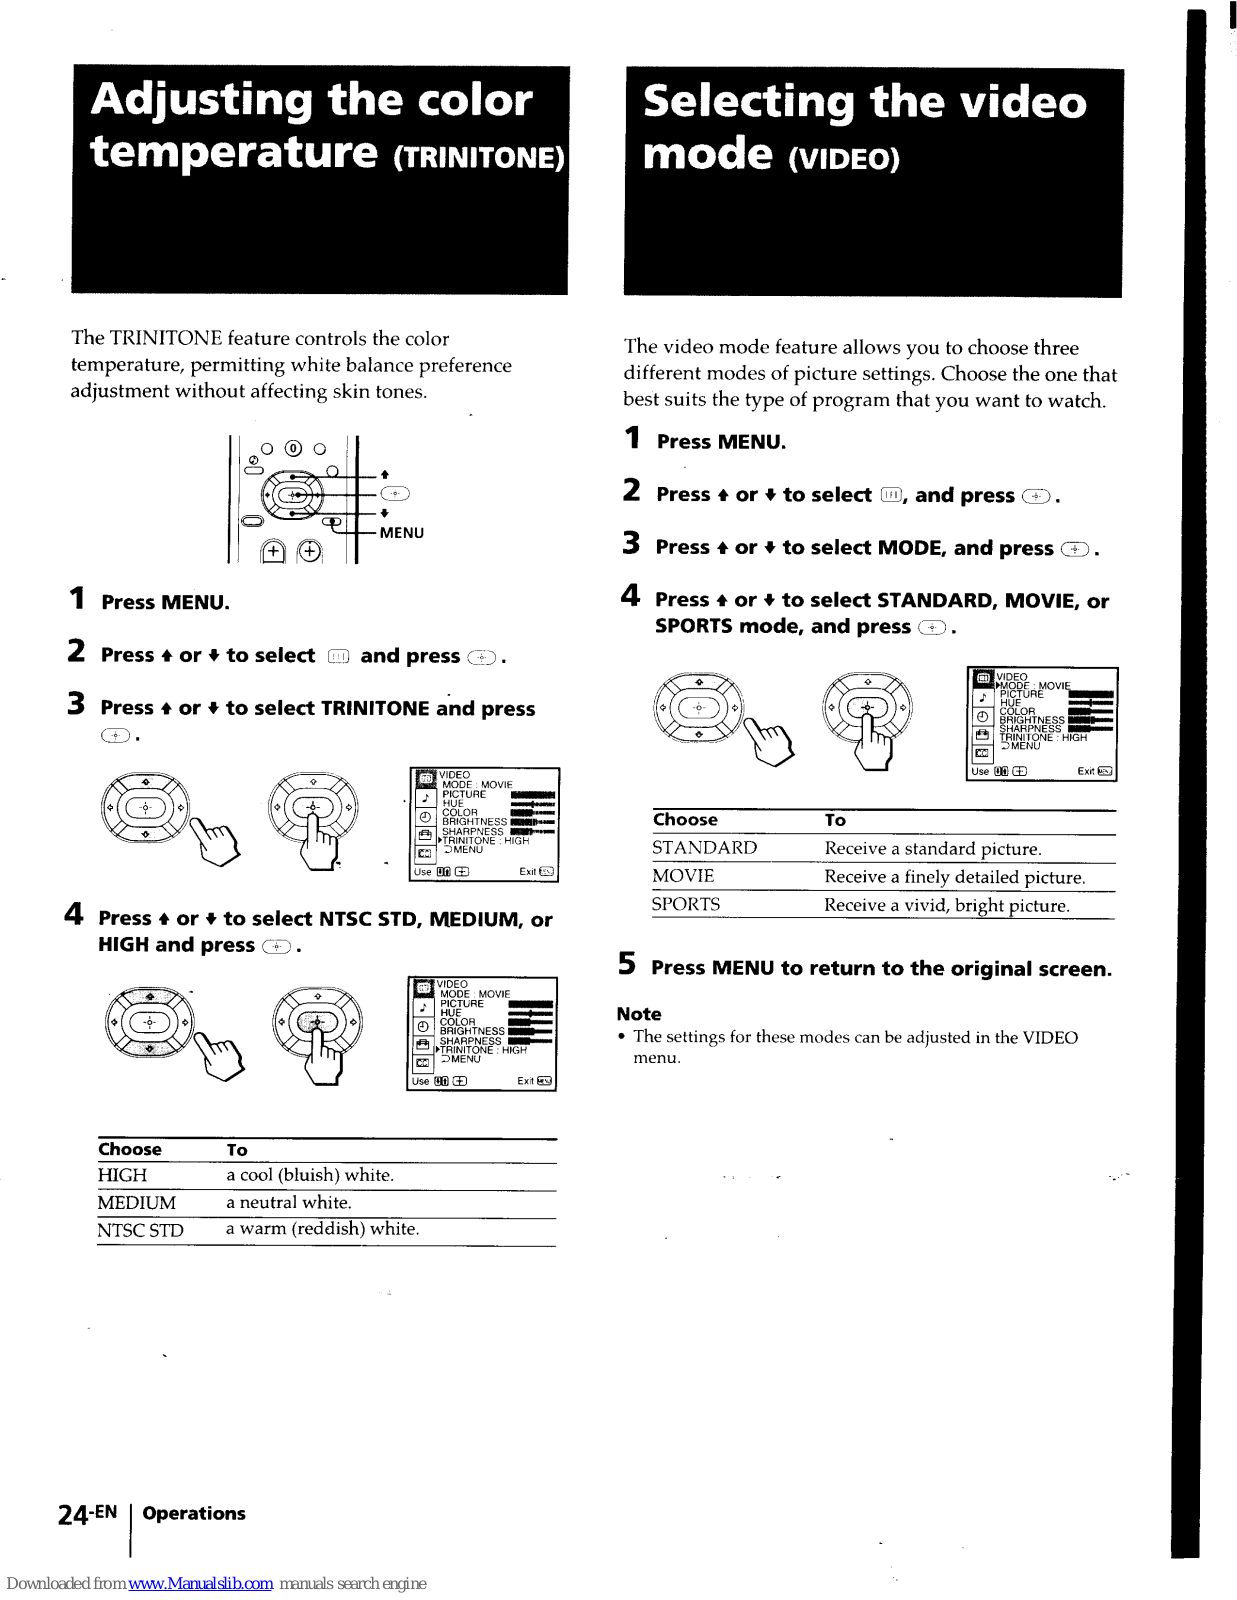


 Loading...