

Page 1
R
Projection TV
4-205-149-11(2)
Instruction Manual
Bedienungsanleitung
Manuale d’ Istruzioni
Οδηγίεσ Χρήσησ
GB
DE
IT
GR
KP-41PZ1D
©1999 by Sony Corporation Printed in Spain
Page 2

2
Page 3

Projection TV
Thank you for choosing this Sony projection TV.
Before operating the projection TV, please read this manual thoroughly and retain
it for future reference.
Reading and Understanding this Instruction Manual:
• Use Getting Started if you wish to install the projection TV set and to get familiar
with the basic functions.
• Use Advanced Operation if you wish to know more about the additional features
of the projection TV set.
• Symbols used in the manual:
• Informs you of possible hazards
Instruction Manual
GB
• Important information
• Information on a feature
• 1, 2 ... Sequence of instructions
MENU
• Shaded buttons on the remote control show the buttons you have to
K
press to follow the sequence of instructions.
• Informs you of the result of the instructions.
• The process continues on the next page to get final result.
3
Page 4

For Your Safety
WARNING
Safety Information
All TVs operate on extremely high voltages. To prevent fire or electric shock, please follow the safety
procedures indicated below.
For General Safety
• Do not expose the set to rain or moisture.
• Do not remove the rear cover.
• For your protection, refer all servicing to qualified
personnel only.
For Safe Installation
• Do not install the projection TV in hot, humid or
excessively dusty places.
• Do not block or cover the ventilation openings. For
ventilation, leave a space of at least 10 cm all around
the set.
• Do not install the projection TV where it may be
exposed to mechanical vibrations.
• To obtain a clear picture, do not expose the screen to
direct illumination or direct sunlight. If possible, use
spot lighting directed down from the ceiling.
• After transporting the projection TV directly from a
cold to a warm location, or if the room temperature
has changed suddenly, pictures may be blurred or
show poor colour over portions of the picture. This is
because moisture has condensed on the mirrors or
lenses inside the projection TV. Let the moisture
evaporate before using the projection TV.
For Safe Operation
• Do not operate the projection TV set on anything other
than a 220-240V AC, 50Hz supply.
• Do not operate the projection TV if any liquid or solid
objects fall in through the ventilation slots. Have it
checked immediately.
• For environmental and safety reasons, it is
recommended that the projection TV set is not left in
standby mode when not in use. Switch off at the
mains.
• Do not disconnect the projection TV by pulling on the
power cable. Disconnect by removing the mains plug.
• In case of a thunderstorm, disconnect the projection
TV set from the main supply and the aerial. Otherwise
the set may be damaged by a lighting strike.
• Displaying a still picture for long periods of time, for
instance, when operating a video game or personal
computer and viewing a programme in 4:3 mode, may
damage the picture tube. To avoid this, keep the
picture contrast level low.
For Maintenance
• Clean the projection TV screen and cabinet with a soft
dampened cloth. Do not use any abrasive cleaners. As
a safety precaution, unplug the set before cleaning it.
• Dust and nicotine deposits may cause heat
accumulation inside the projection TV set.
In the long term this could be a safety risk and may
shorten the lifetime of your projection TV set.
Therefore have your set serviced about every five
years.
• Avoid touching the screen, and take care not to scratch
the surface with hard objects.
4
For Your Safety
Page 5

Table of Contents
Table of Contents
Keys to read this Instruction Manual .................................................................................................. 3
For your Safety ........................................................................................................................................ 4
Getting Started
Overview
Checking the Accessories Supplied ......................................................................................... 6
Overview of TV Buttons ........................................................................................................... 6
Overview of Remote Control Buttons ..................................................................................... 7
First Time Operation
Step 1 - Installation
Inserting Batteries into the Remote Control ........................................................................... 8
Stabilizing the projection TV .................................................................................................... 8
Connecting the Aerial ................................................................................................................ 9
Switching on the projection TV ................................................................................................ 9
Step 2 - Basic Presetting
Selecting Language .................................................................................................................. 10
Automatically Tuning the TV using the Remote Control .................................................. 11
Changing the Programme Order of the TV channels ......................................................... 12
GB
Advanced Operation
Advanced Presetting
Adjusting colour Registration (Convergence) ..................................................................... 13
Automatically Tuning the TV ................................................................................................. 14
Manually Tuning the TV ......................................................................................................... 15
Using the “Further Programme Preset” function................................................................ 16
Locking Programmes............................................................................................................... 17
Skipping Programme positions ............................................................................................. 18
Labelling a channel .................................................................................................................. 19
Advanced TV Operation
Adjusting the Picture ............................................................................................................... 20
Changing the screen mode ..................................................................................................... 21
Adjusting the Sound ................................................................................................................ 22
Using the Sleep Timer ............................................................................................................. 24
Teletext
Viewing Teletext ....................................................................................................................... 25
Optional Connections
Connecting Optional Equipment ........................................................................................... 26
Using Optional Equipment .................................................................................................... 27
Smartlink ................................................................................................................................... 28
Remote Control of other Sony Equipment ........................................................................... 28
Selecting the output source for the Euro AV connectors .................................................... 29
Using the “AV Label Preset” function .................................................................................. 30
Additional Information
Optimum Viewing Area .......................................................................................................... 31
On Screen display Menus Guide ........................................................................................... 32
Specifications ............................................................................................................................ 33
Troubleshooting ........................................................................................................................ 34
Table of Contents
5
Page 6
Getting Started - Overview
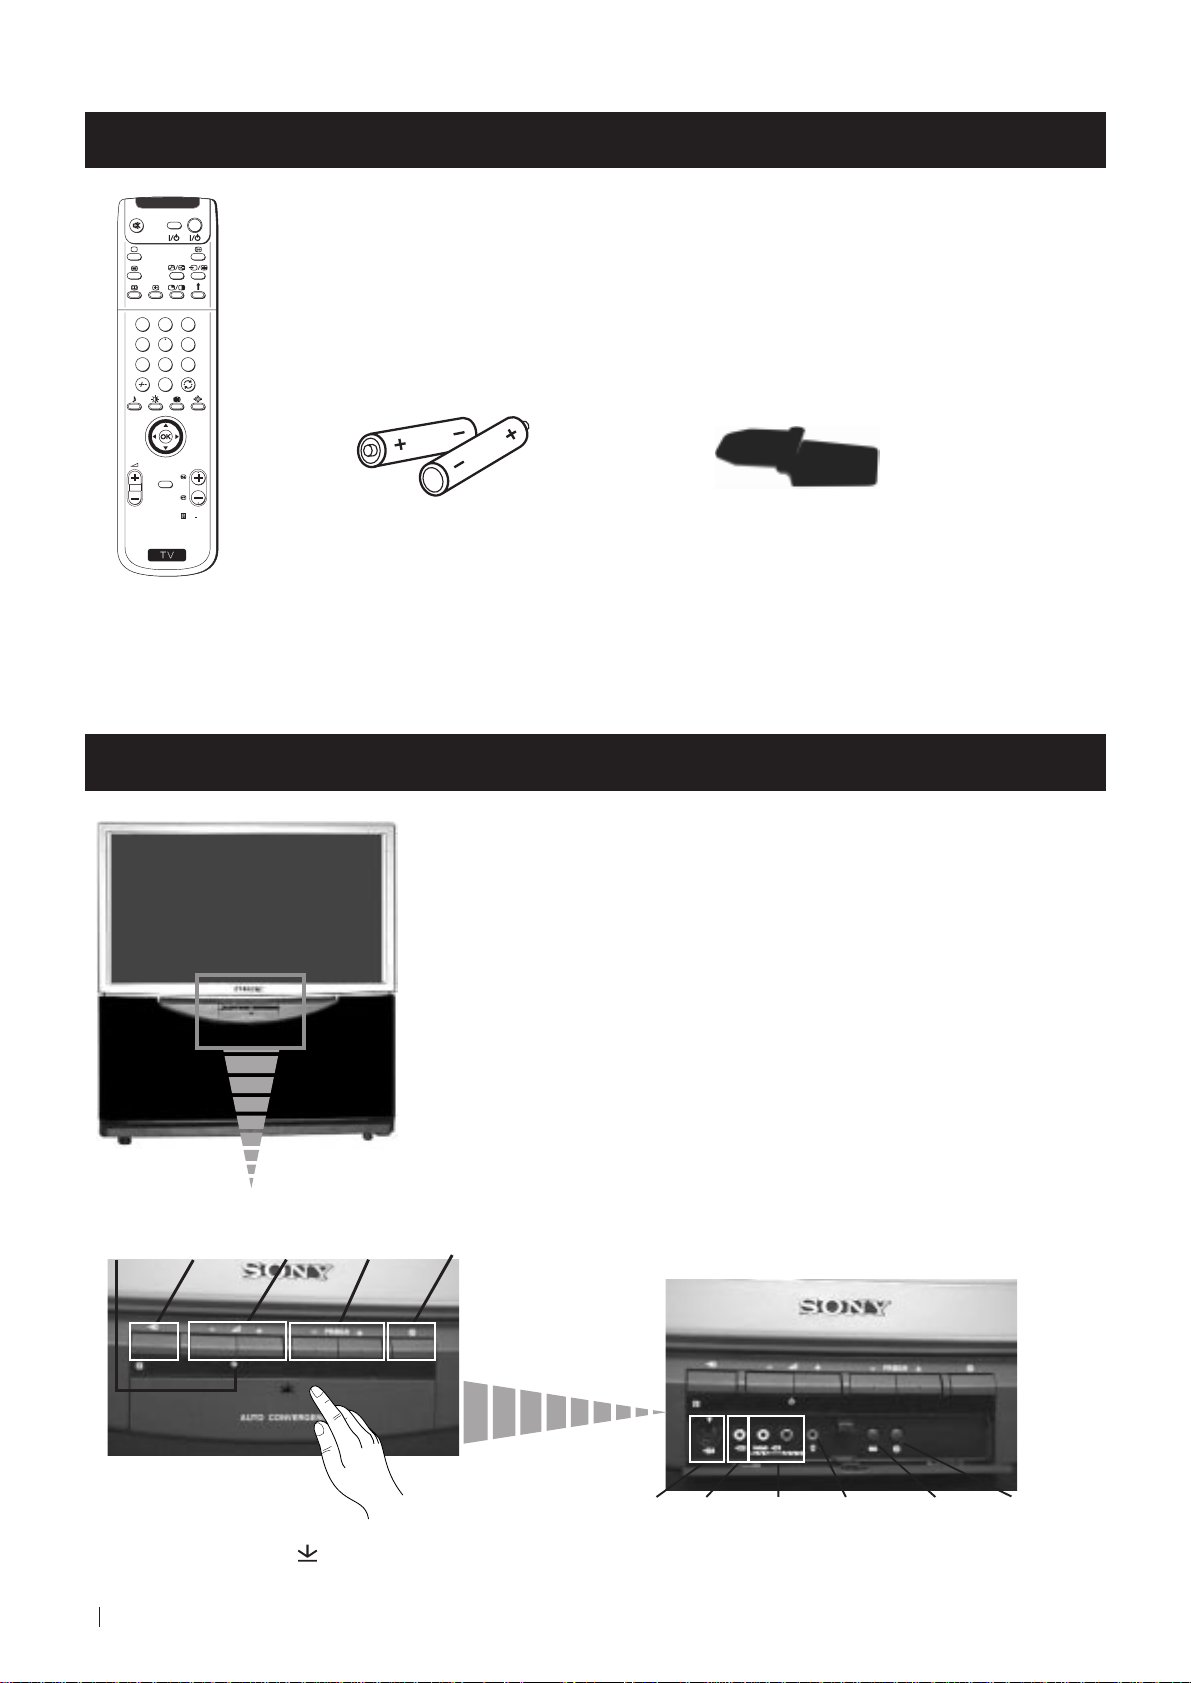
Checking the Accessories Supplied
VIDEO TV
1
2
3
4
5
6
7
8
9
0
PROGR
MENU
RM
892
S
One Remote Control
(RM-892)
Two batteries (R6 type)
One safety foot
Overview of Projection TV Buttons
Programme
up or down
buttons
(selects TV
channels)
On/Off
Switch
Standby
indicator
Selecting
input
source
Volume
control
buttons
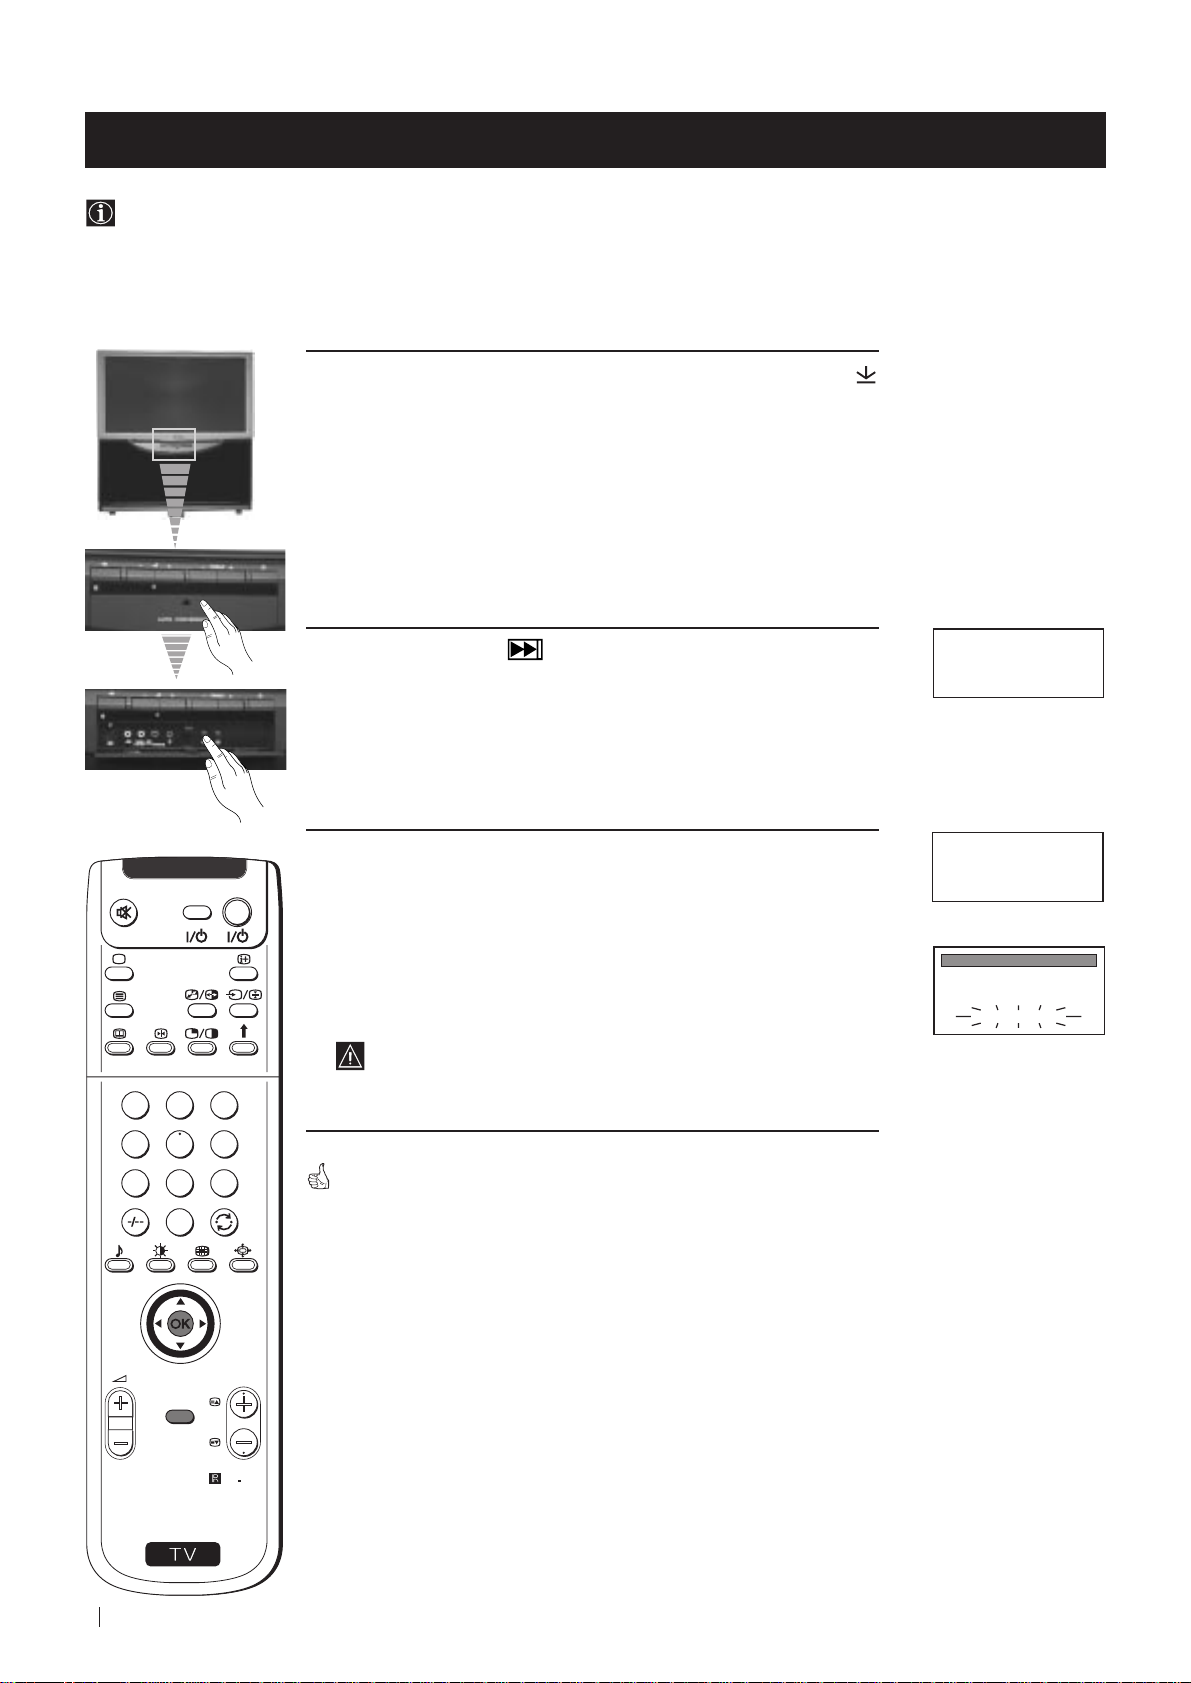
Press the flap on the
front of the projection TV
to reveal the front panel
(press on the mark )
6
Getting Started - Overview
S Video
Input
jack
Video
Input
jack
Audio
Input
jacks
Headphone
jack
Auto
Tune
button
Auto
Convergence
button
Page 7
Getting Started - Overview
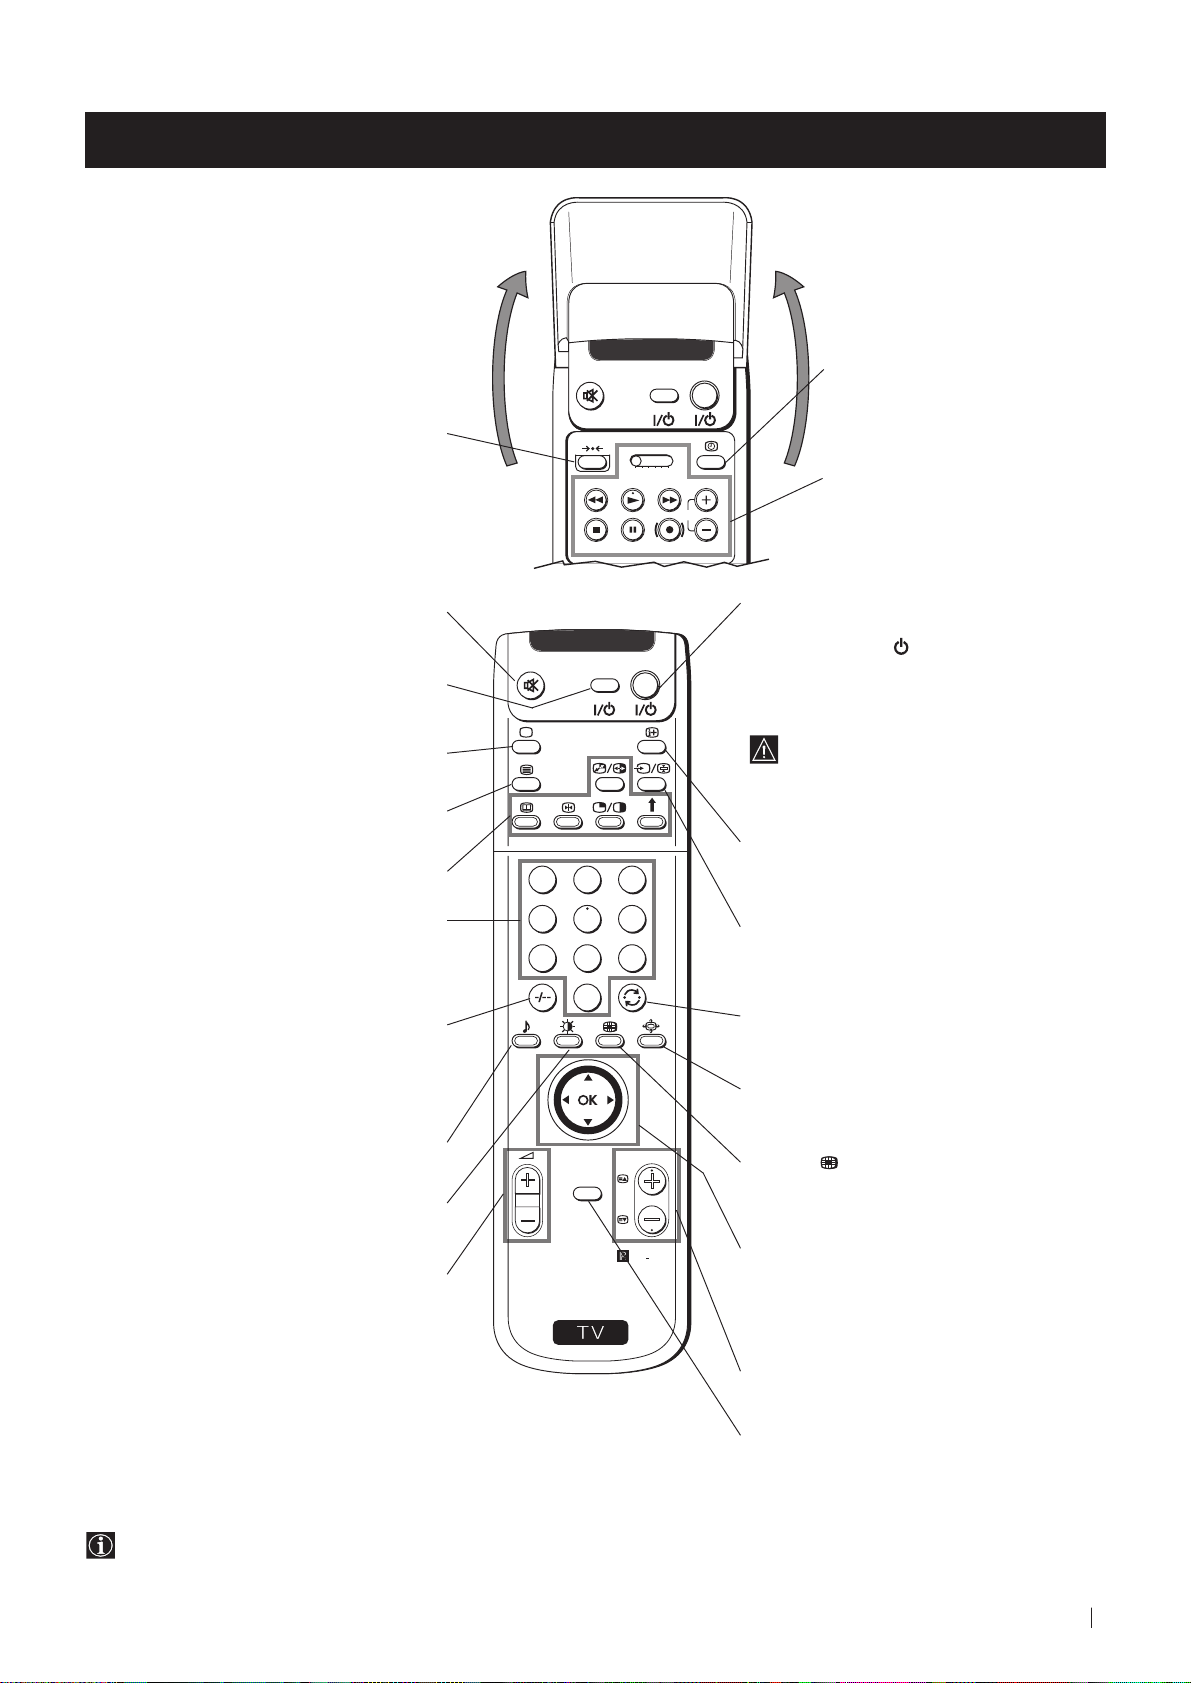
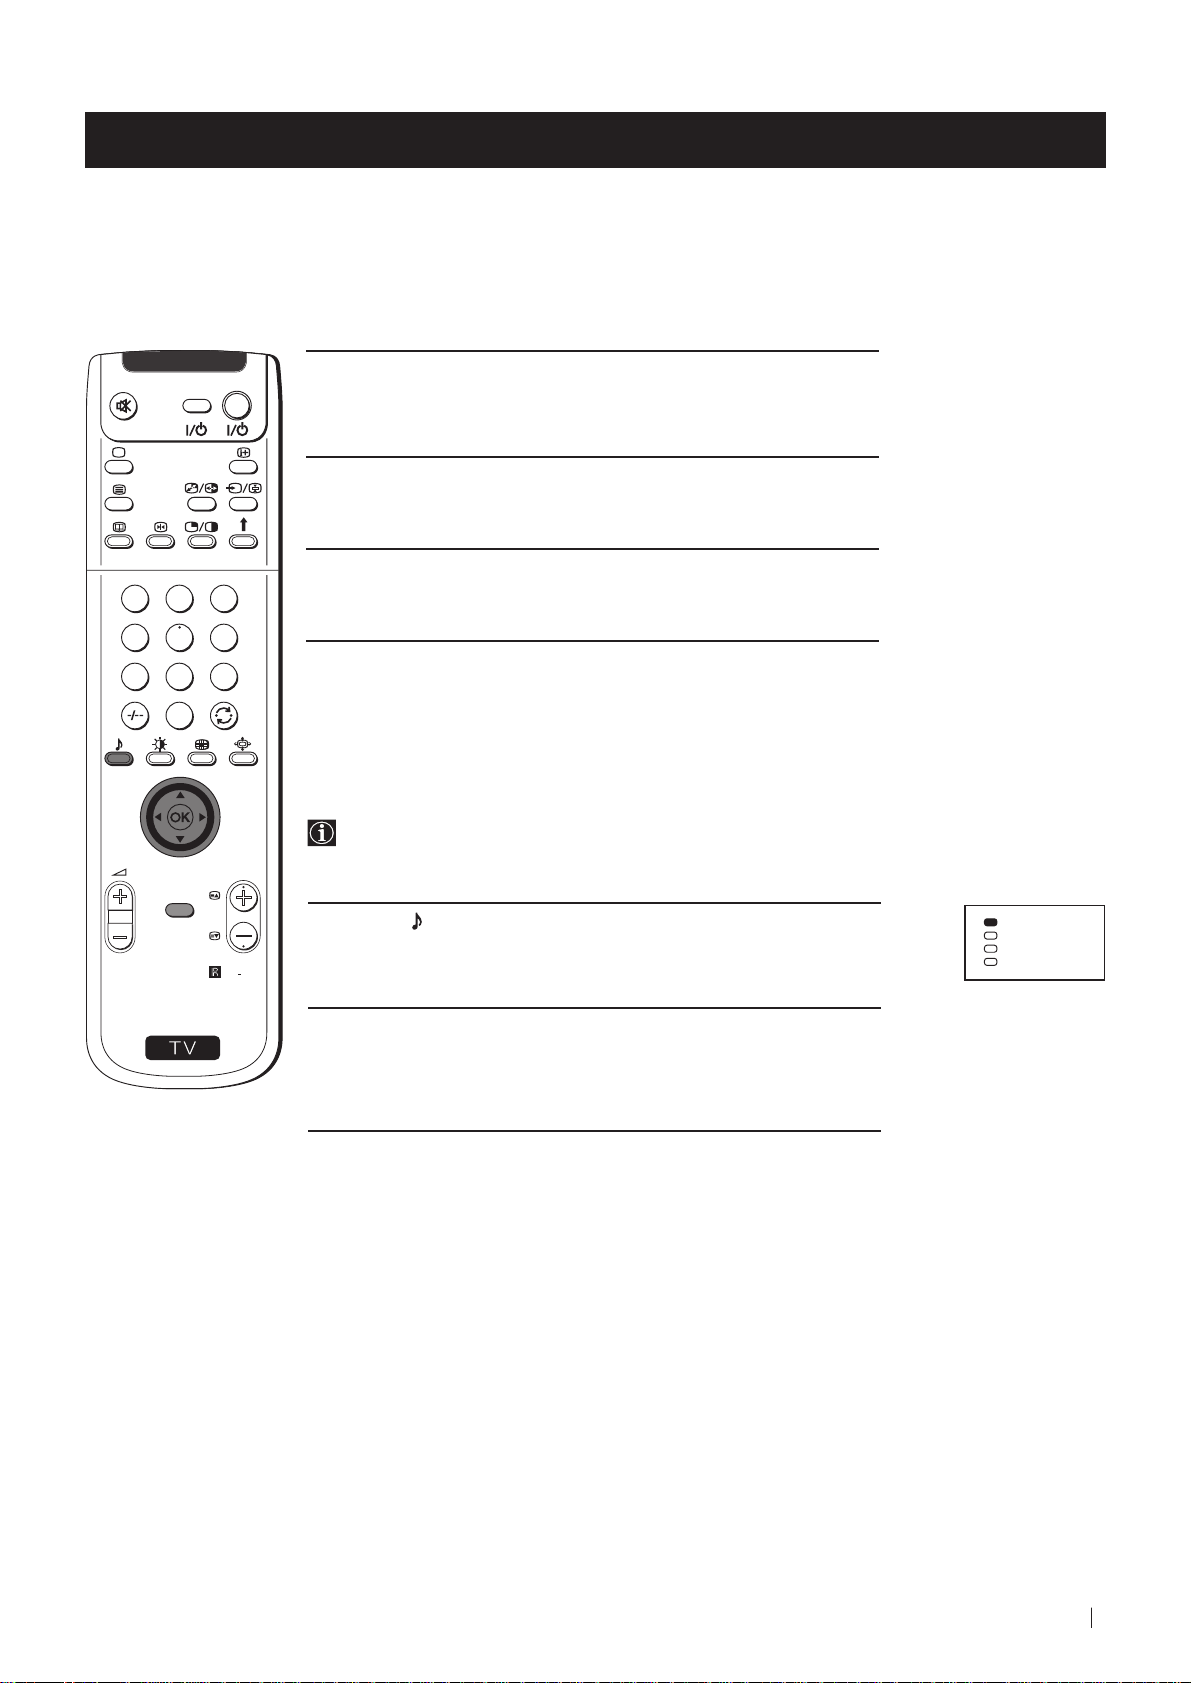
Overview of Remote Control Buttons
VIDEO TV
This button does not work on this set.
VTR 1 2 3 4 DVD
CH
Displaying the time
Press to switch the time on or off
(available only when teletext is
broadcast).
VCR operation
For more details, please refer to
the section "Remote Control of
other Sony Equipment"
Muting the Sound
Press to mute TV sound.
Press again to restore the sound.
VCR on/off
Press to switch your VCR on or off.
Selecting TV mode
Press to switch off Teletext or video input.
Selecting Teletext
Press to switch on Teletext.
These buttons do not work on this set.
Selecting channels
Press to select channels.
For double-digit programme numbers, e.g. 23,
press -/-- first, then the buttons 2 and 3.
If you enter an incorrect first digit, this should
be corrected by entering another digit (0-9)
and then selecting -/-- button again to enter
the programme number of your choice.
+++++++++++++++...
Selecting Sound mode
Press repeatedly to change the sound mode.
+++++++++++++++++...
Selecting Picture mode
Press repeatedly to change the picture mode.
+++++++++++++++++...
Adjusting TV Volume
Press to adjust the volume of the TV.
1
4
7
S
VIDEO TV
2
5
8
0
K
MENU
3
6
9
RM
PROGR
892
To Temporarily Switch Off projection
TV
Press to temporarily switch off TV (the
standby indicator
on projection TV lights
up). Press again to switch on TV from
standby mode.
To save energy we recommend switching off
completely when TV is not in use.
After 15-30 minutes without a
signal and without any button being
pressed, the projection TV switches
automatically into standby mode.
Displaying On Screen Information
Press to display all on-screen indications.
Press again to cancel.
Selecting Input source
Press repeatedly until the desired input
symbol of the source appears on the screen.
Back to the channel last watched
Press to watch the last channel selected
(watched for at least 5 seconds).
Selecting Screen format
Press repeteadly to change the format of the
screen.
This button only works in Teletext mode.
Function
associated to this button does not
work with this set.
Joystick for menu selection
4 Scroll Up
$ Scroll Down
Z Previous menu or selection
z Next menu or selection
OK Confirms your selection
Besides TV functions, all coloured buttons as well as green
symbols are also used for Teletext operation. For more details,
please refer to the "Teletext" section of this instruction manual.
Selecting channels
Press to select the next or previous channel.
Displaying the menu system
Press to display the menu on the screen.
Press again to remove the menu display
from the screen.
Getting Started - Overview
7
Page 8
First time Operation - Installation
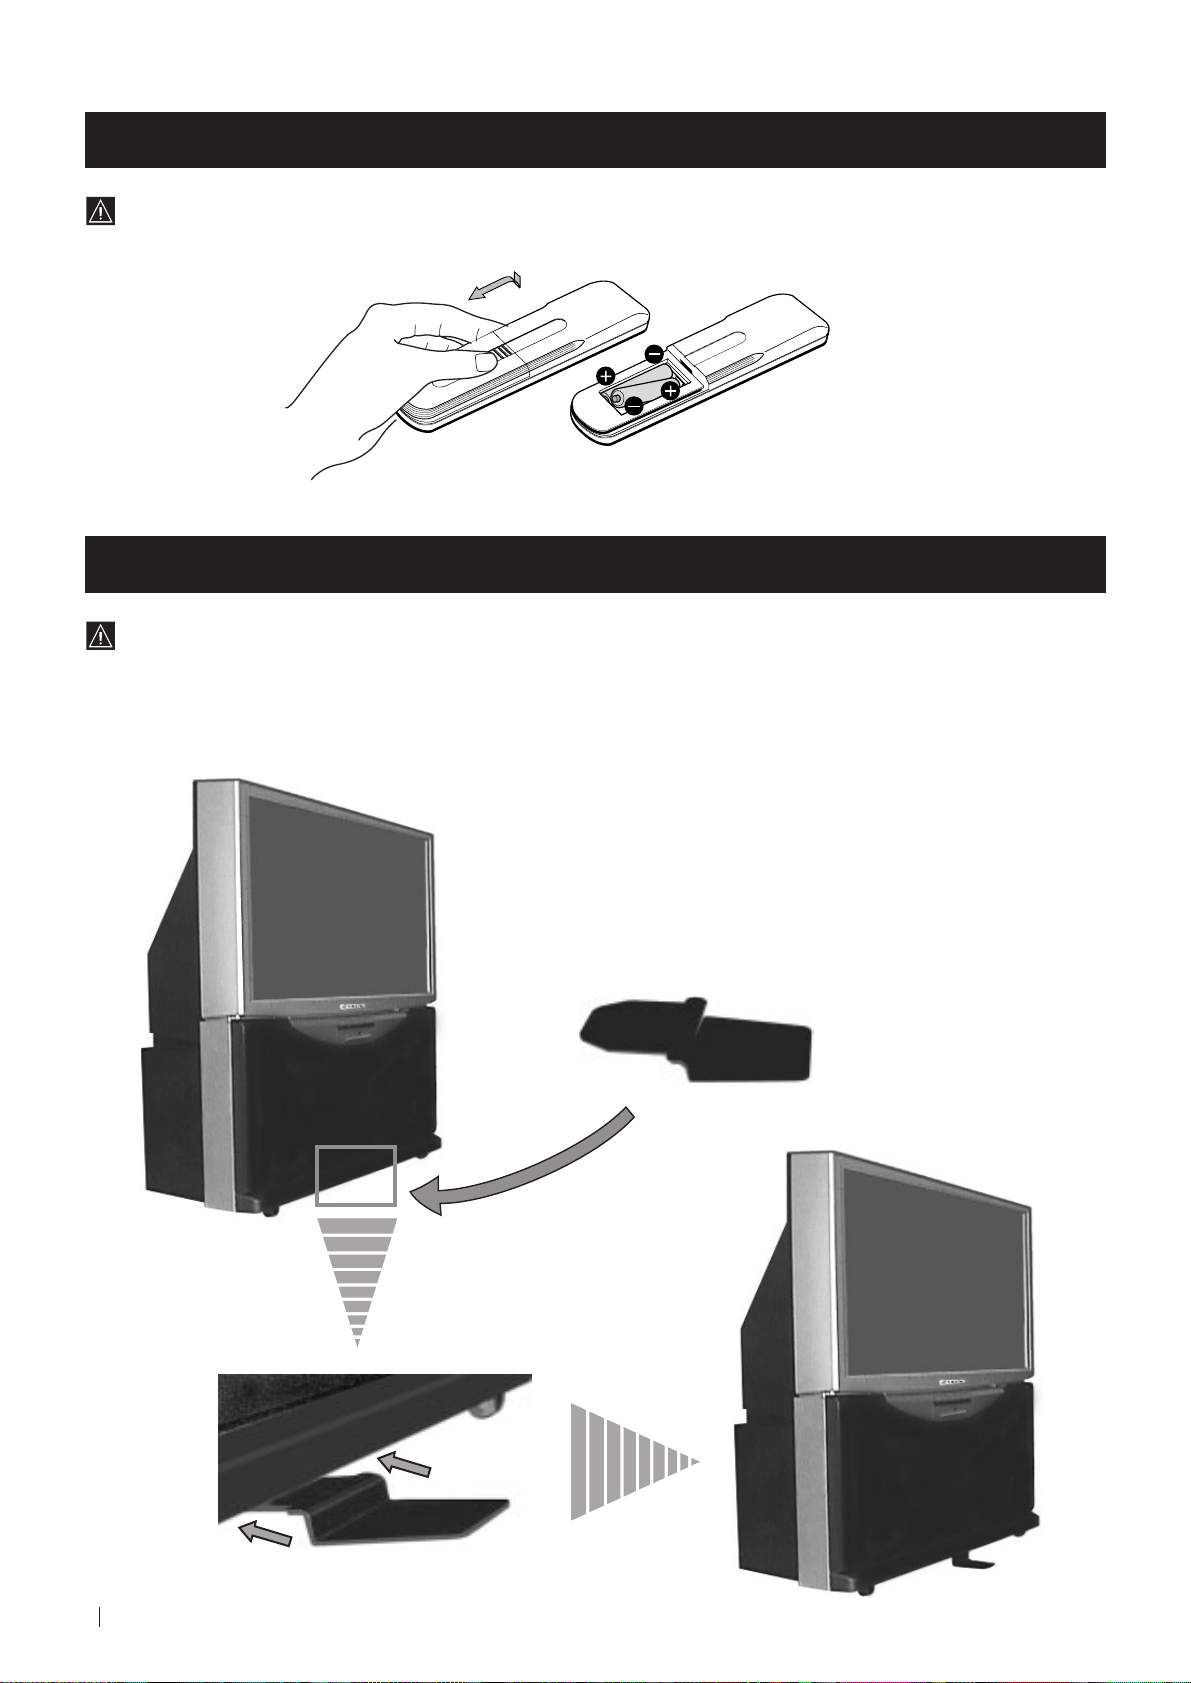
Inserting Batteries into the Remote Control
Make sure you insert the batteries using the correct polarities.
Always remember to dispose of used batteries in an environmental friendly way.
Stabilizing the Projection TV
For safety purposes, the projection TV can be stabilized with the supplied safety foot.
Fit the supplied safety foot in the support placed on the bottom of the set, as follows:
8
First time Operation - Installation
Page 9
First Time Operation - Installation
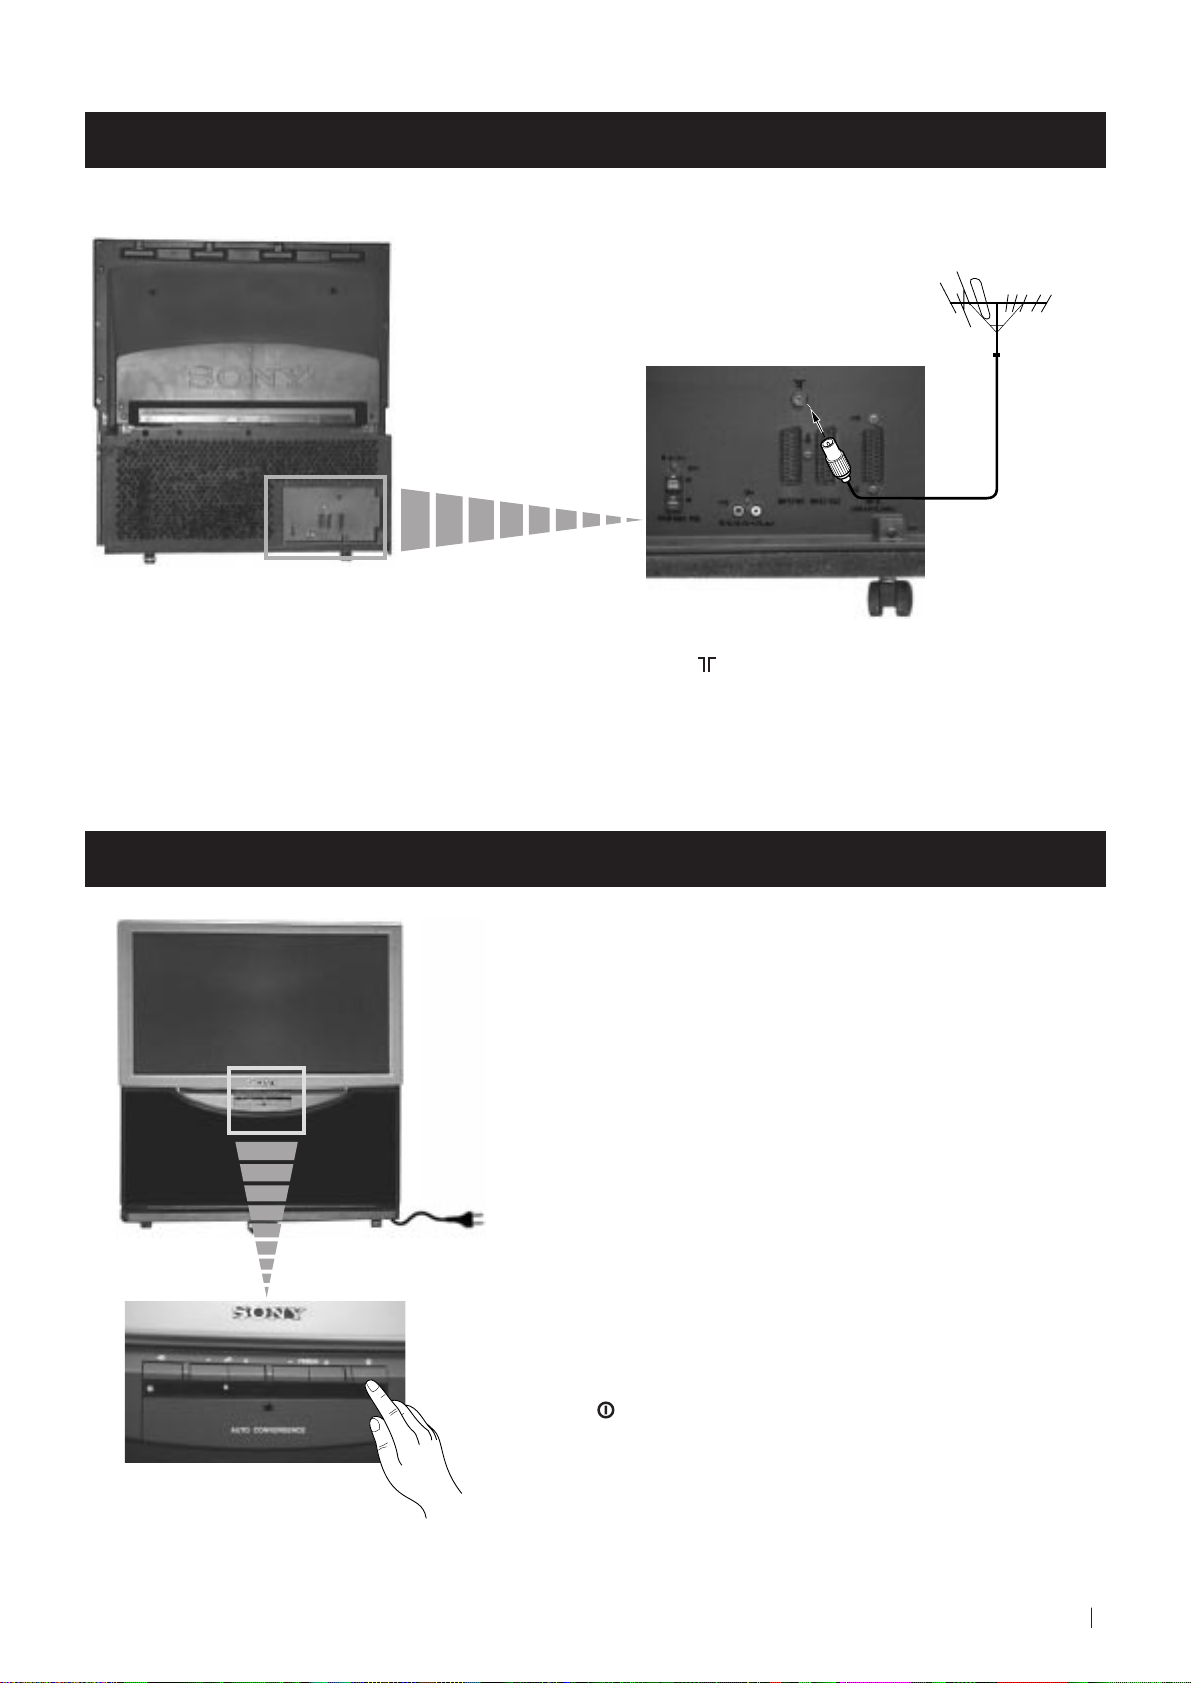
Connecting the Aerial
Connect a conventional aerial to the socket
marked on the rear of the projection TV.
Switching on the projection TV
Connect the projection TV plug to the
mains socket (220-240V AC, 50Hz).
Push in the On/Off switch on the front of the
projection TV.
First Time Operation - Installation
9
Page 10
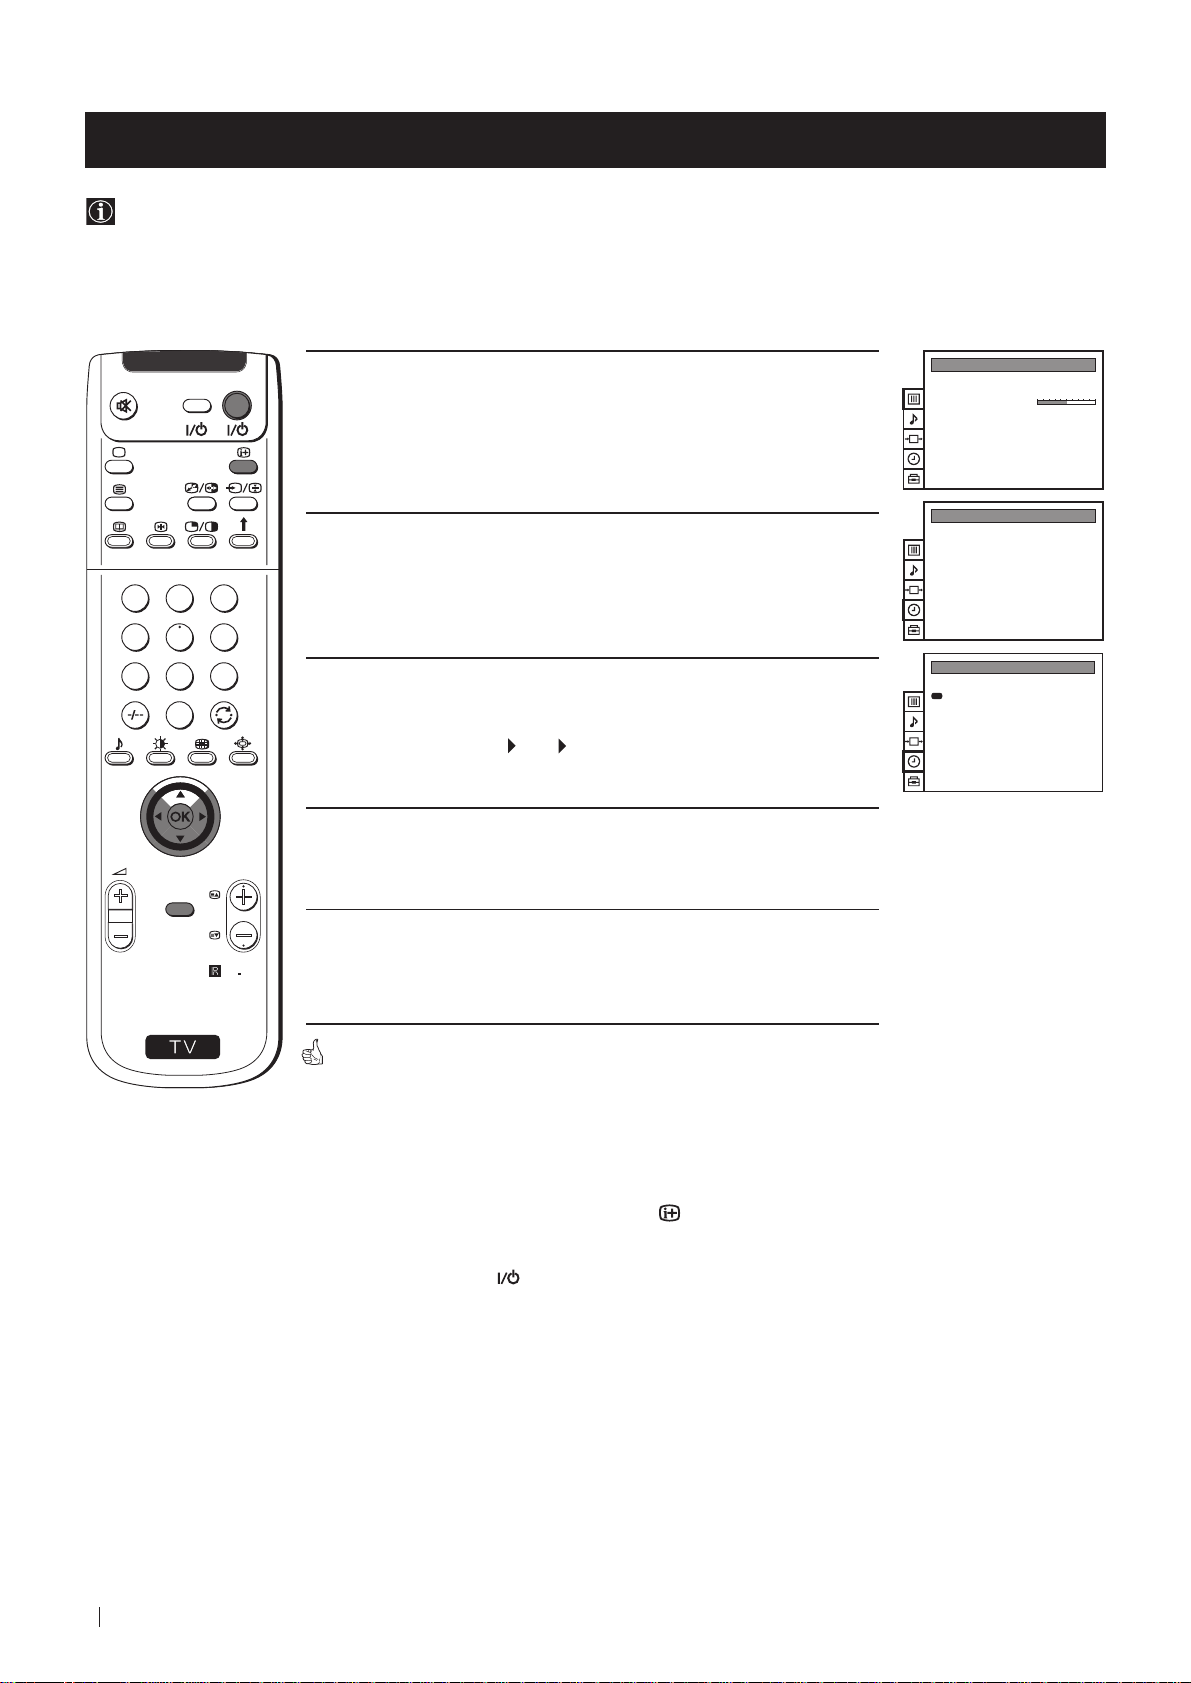
First Time Operation - Basic Presetting
Selecting Language
Use this function to change the language of the menu screens.
The first time that you switch on your projection TV, the LANGUAGE menu appears automatically.
However, if you need to change the language menu afterwards, select the menu Language in the
proceed in the same way as described below.
(PRESET) menu and
VIDEO TV
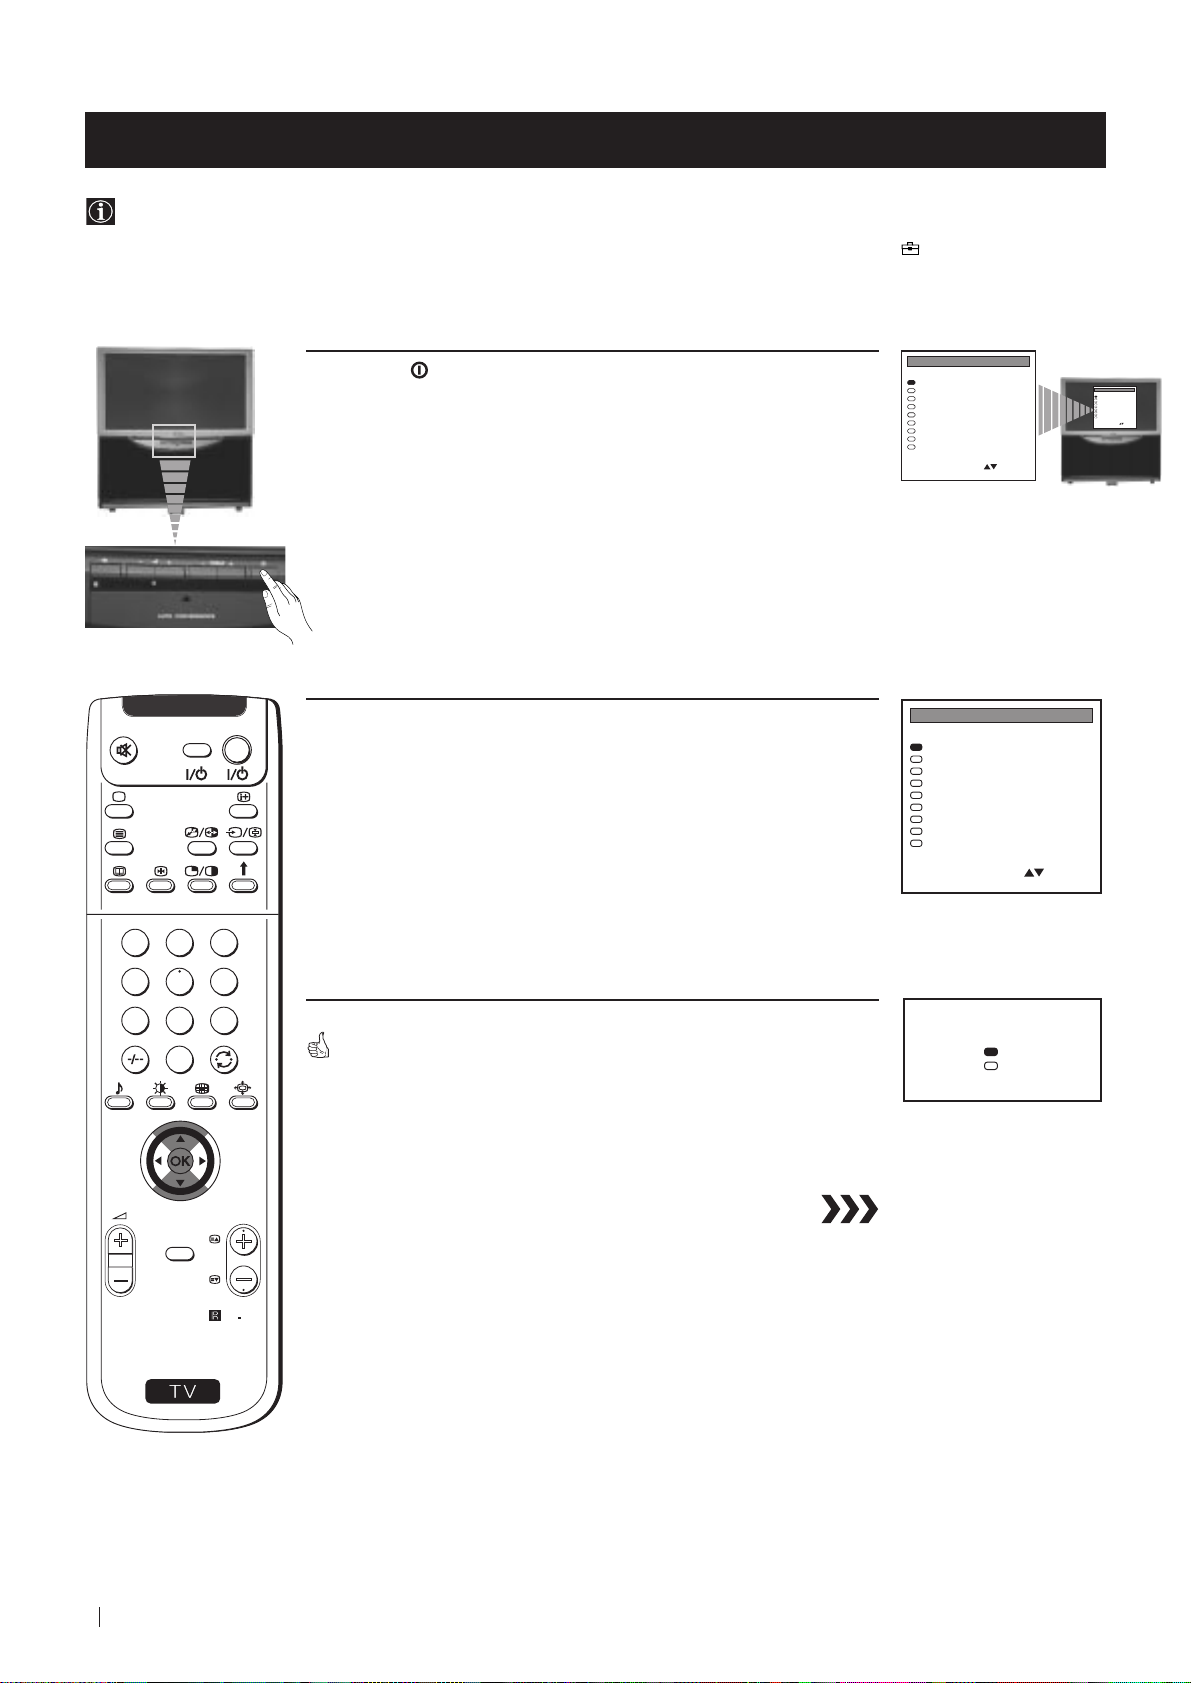
1 Press the on/off button on your projection TV set to switch on
your TV. The first time you press the on/off button on your TV set,
the language menu displays automatically on the TV screen.
2 Push the joystick on the remote control to $ or 4 to select the
language, then press OK to confirm your selection.
LANGUAGE
English
Deutsch
Français
Italiano
Nederlands
Polski
Česki
Magyar
Eλλnvιkά
Select Language:
Confirm: OK
LANGUAGE
English
Deutsch
Français
Italiano
Nederlands
Polski
Česki
Magyar
Eλλnvιkά
Select Language:
Confirm: OK
LANGUAGE
English
Deutsch
Français
Italiano
Nederlands
Polski
Česki
Magyar
Eλλnvιkά
Select Language:
Confirm: OK
1
4
7
S
MENU
2
3
5
6
8
9
0
The Auto Tuning menu appears on the projection TV screen in the selected
language.
PROGR
RM
892
Do you want to start
automatic tuning?
Yes
No
Confirm: OK
First Time Operation - Basic Presetting
10
Page 11
First Time Operation - Basic Presetting
Automatically Tuning the TV using the Remote Control
You need to tune the set to receive channels (TV Broadcast). By following the instructions below, this projection TV
automatically searches and stores all available channels for you.
After having selected the language, a new menu appears automatically on the projection TV screen asking you to
automatically tune the TV. However, if you need to change or repeat the tuning afterwards (e.g. when you move house),
select the menu Auto Programme in the
refer to the section "Automatically Tuning the TV" of this instruction manual.
(PRESET) menu and proceed in the same way as described below or, please
1
4
7
S
VIDEO TV
2
5
8
0
MENU
3
6
9
RM
PROGR
892
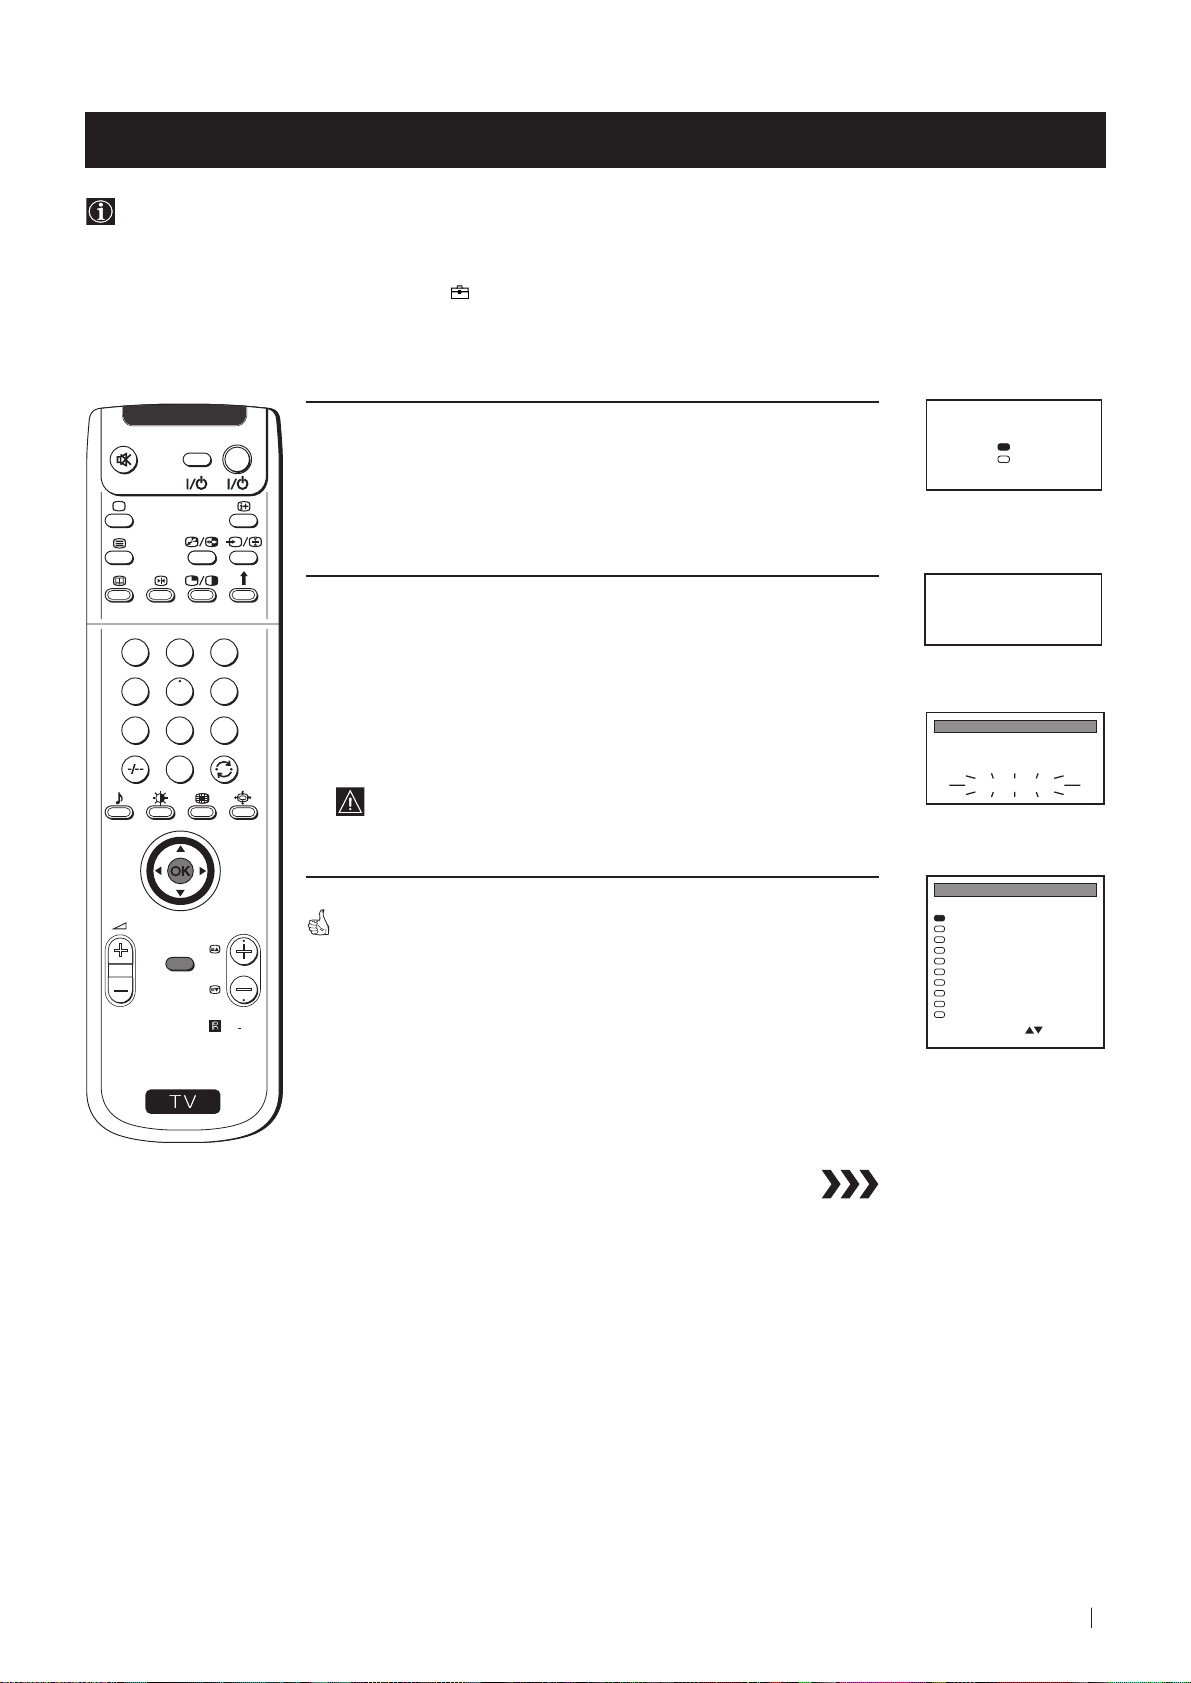
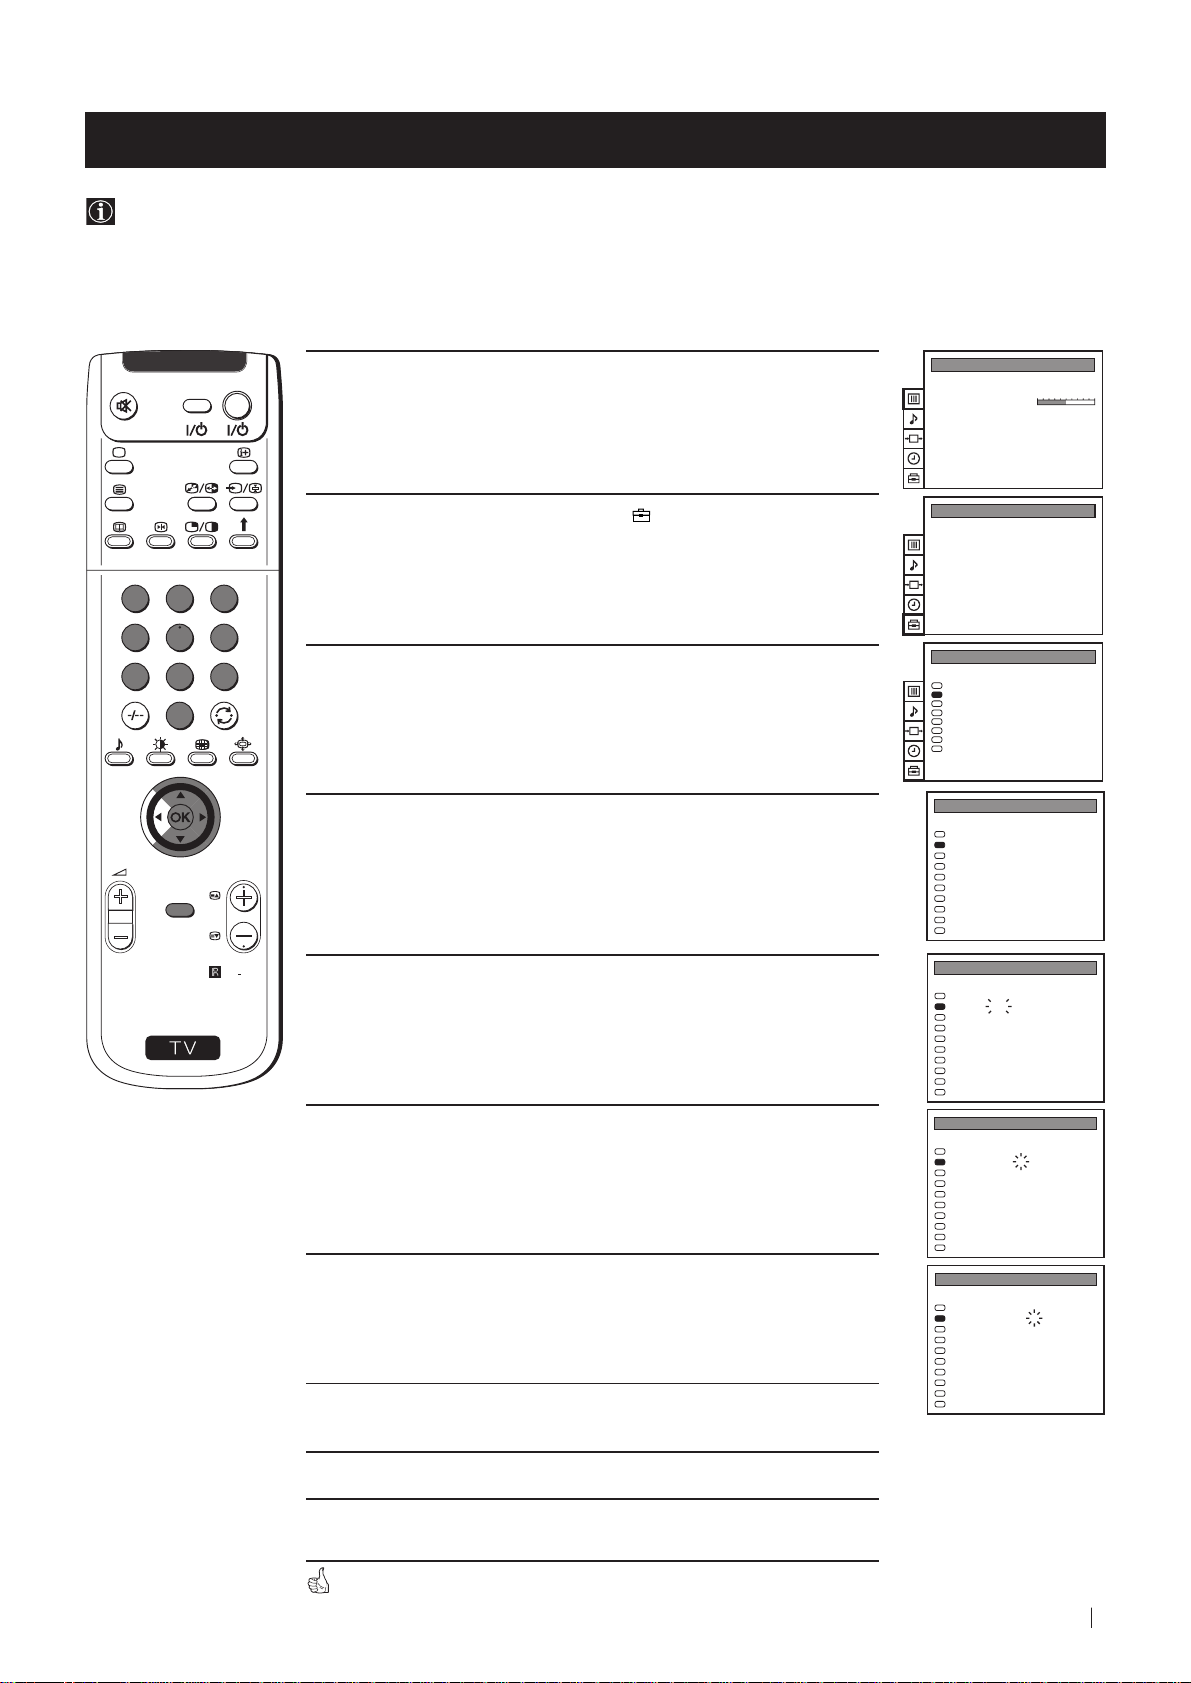
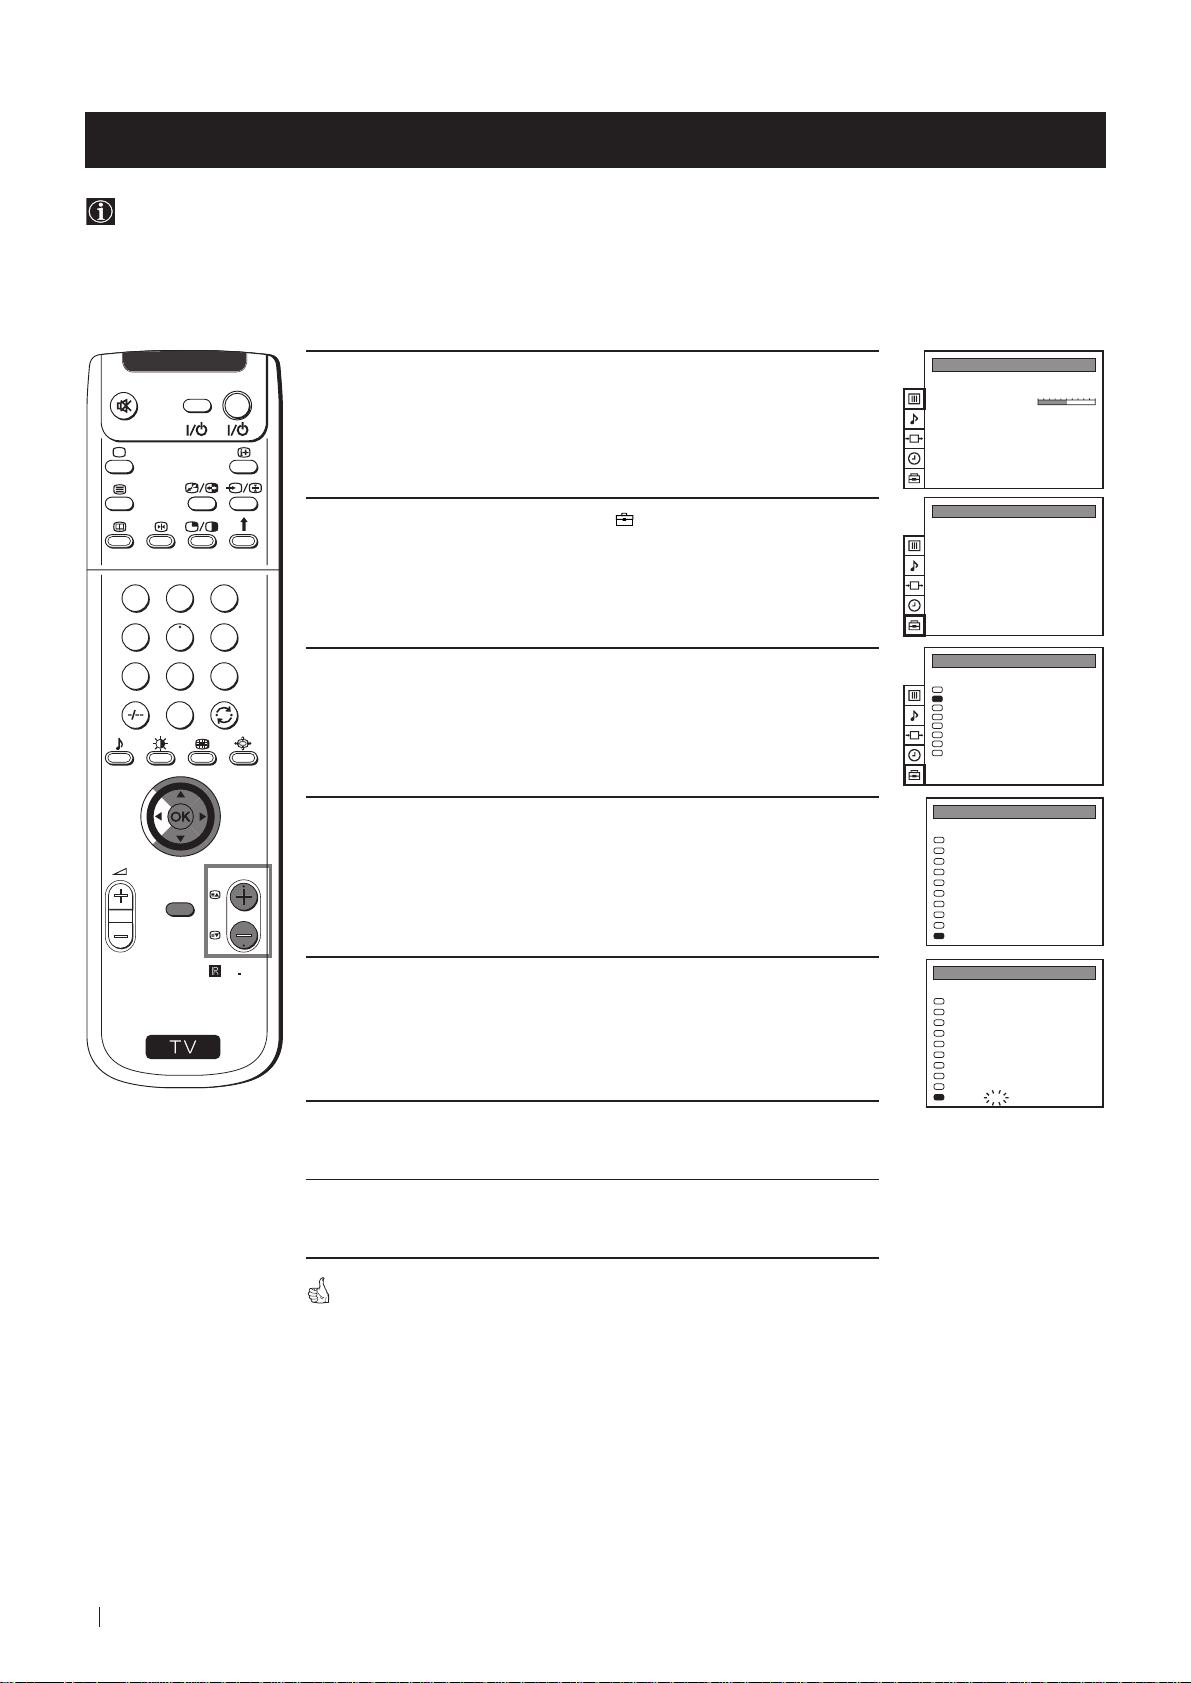
1 Press the OK button on the remote control to select YES.
A new menu appears automatically on the screen asking you to
check that the antenna is connected.
2 Confirm that the antenna is connected and then press the OK
button.
The automatic tuning starts and the message "AUTO
PROGRAMME" flashes on the screen.
This procedure could take some minutes. Please, be patient and
do not press any button.
When the automatic tuning is finished, the Programme Sorting menu
appears on the screen.
Notes: • To stop the automatic tuning, press the MENU button.
• If you stop the automatic tuning by pressing the MENU
button, the Programme Sorting menu does not appear
automatically on the screen.
Do you want to start
automatic tuning?
Yes
No
Confirm: OK
Please confirm that
antenna is connected
Confirm: OK
AUTO PROGRAMME
PROG
SYS
CHAN
1
B/G
C 26
AUTO PROGRAMME
PROGRAMME SORTING
PROG SYS CHAN LABEL
B/G
0
C 28
B/G
1
C 40
B/G
2
C 41
B/G
3
C 31
B/G
4
C 34
B/G
5
C 27
B/G
6
C 47
B/G
7
C 44
B/G
8
C 23
B/G
9
C 35
Select PROG: + OK
Exit: MENU
LABEL
- - - - -
BBC-W
MV-CH
TVE-1
TVE-2
ANT-3
TELE 5
C PLUS
- - - - -
- - - - CNN -
First Time Operation - Basic Presetting
11
Page 12

First Time Operation - Basic Presetting
Changing the Programme Order of the TV channels
After all available channels (TV Broadcast) are captioned and stored, a new menu appears automatically on the screen to
change the order in which the channels appear on the screen.
However, if you wish to rearrange the order of the channels afterwards, select the menu Programme Sorting in the
(PRESET) menu and proceed in the same way as described in the b) section of this chapter.
a) If you do not wish to change the channel order:
1
4
7
S
VIDEO TV
2
5
8
0
MENU
3
6
9
PROGR
RM
892
1 Press the MENU button on the remote control to exit and return to
the normal TV screen.
Your projection TV is now ready for use.
b) If you wish to change the channel order:
1 Push the joystick on the remote control to $ or 4 to select the
programme number with the channel (TV Broadcast) you wish to
rearrange, then press OK.
2 Push the joystick to $ or 4 to select the new programme number
position for your selected channel (TV Broadcast), then press
OK.
The selected channel now moves to its new programme
position and the other channels move accordingly.
PROGRAMME SORTING
PROG SYS CHAN LABEL
B/G
0
C 28
B/G
1
C 40
B/G
2
C 41
B/G
3
C 31
B/G
4
C 34
B/G
5
C 27
B/G
6
C 47
B/G
7
C 44
B/G
8
C 23
B/G
9
C 35
Select PROG: + OK
Exit: MENU
PROGRAMME SORTING
PROG SYS CHAN LABEL
B/G
0
C 28
B/G
1
C 40
B/G
2
C 41
B/G
3
C 31
B/G
4
C 34
B/G
5
C 27
B/G
6
C 47
B/G
7
C 44
B/G
8
C 23
B/G
9
C 35
Select PROG: + OK
Exit: MENU
PROGRAMME SORTING
SYS CHAN LABELPROG
B/G
0
C 40
B/G
1
C 41
B/G
2
C 31
B/G
3
C 34
B/G
4
C 27
B/G
5
C 47
B/G
6
C 44
B/G
7
C 23
B/G
8
C 35
B/G
9
C 28
Select Position:
Confirm: OK
BBC-W
MV-CH
TVE-1
TVE-2
ANT-3
TELE 5
C PLUS
- - - - -
- - - - CNN -
BBC-W
MV-CH
TVE-1
TVE-2
ANT-3
TELE 5
C PLUS
- - - - -
- - - - CNN -
MV-CH
TVE-1
TVE-2
ANT-3
TELE 5
C PLUS
- - - - -
- - - - CNN BBC-W
12
First Time Operation - Basic Presetting
3 Repeat steps 1 and 2 if you wish to change the order of the other
channels.
4 Press the MENU button to exit and return to the normal TV screen.
Your projection TV is now ready for use.
Page 13
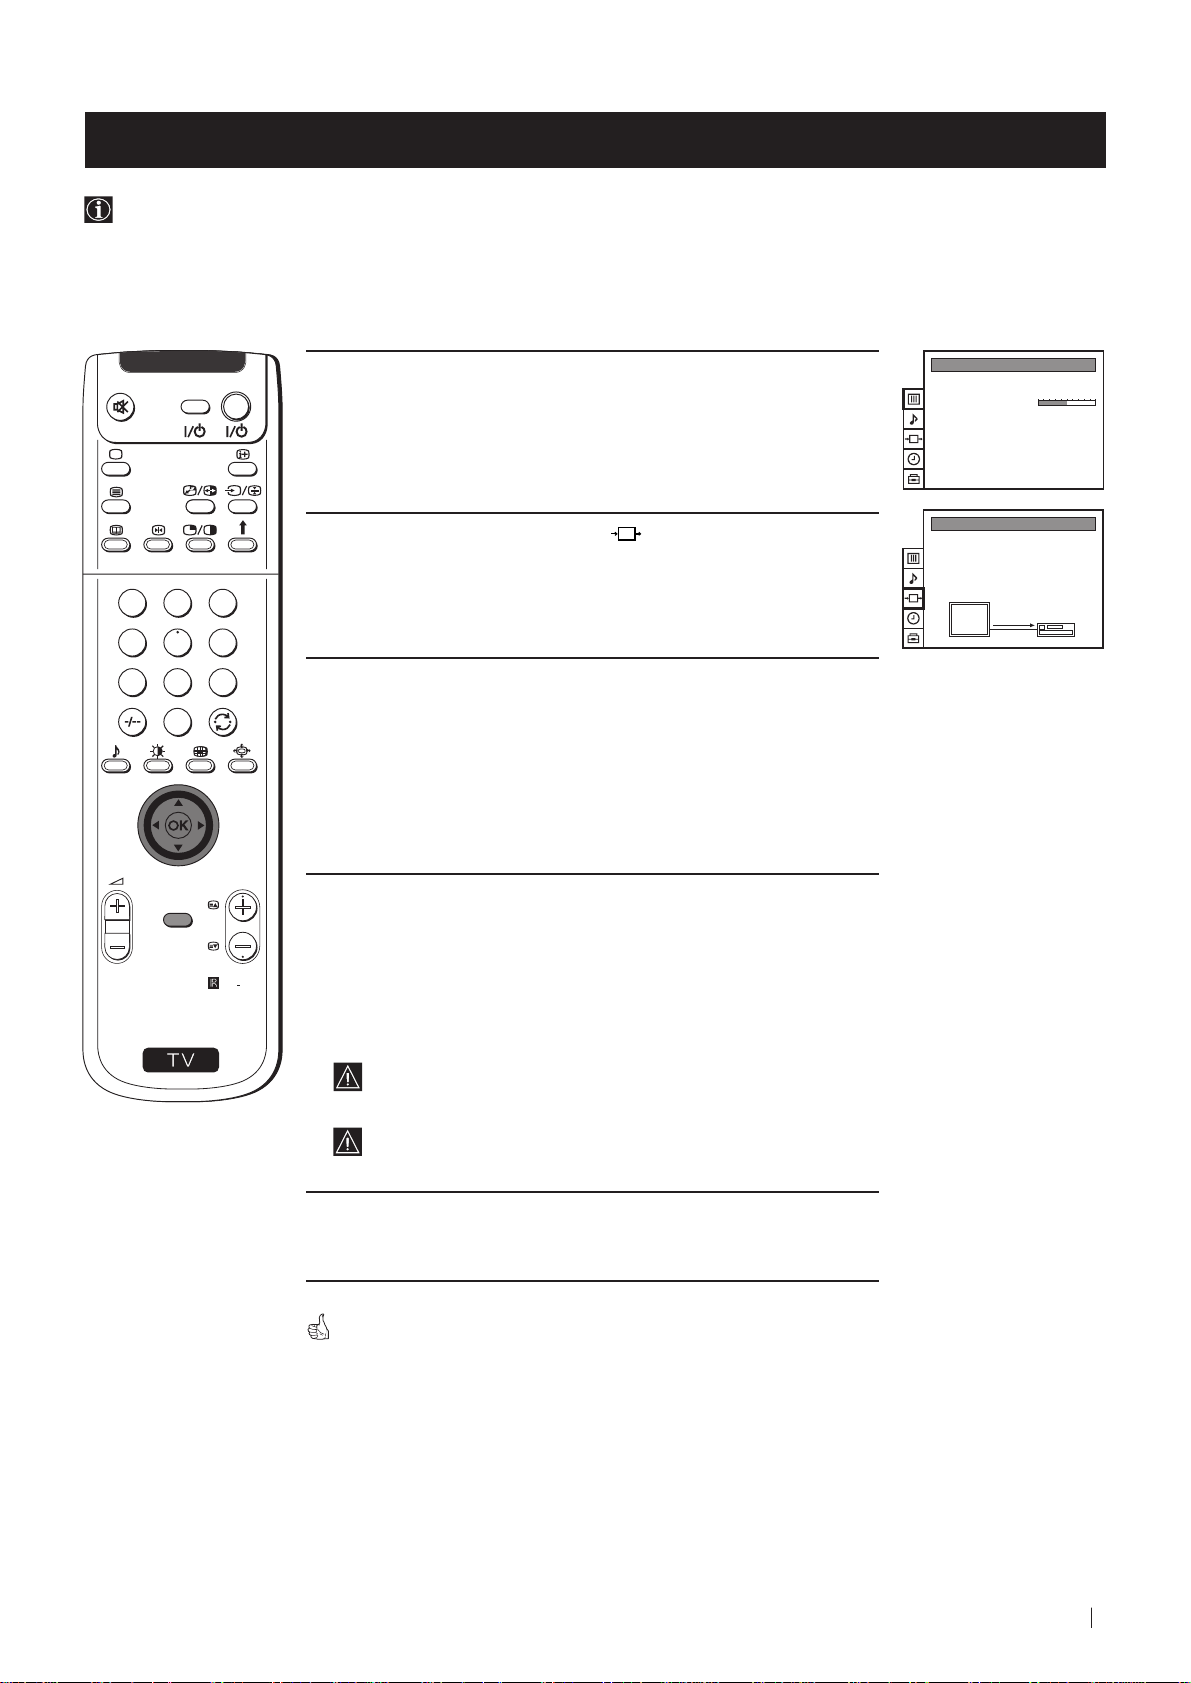
Advanced Operation - Advanced Presetting
Adjusting Colour Registration (Convergence)
Due to the earth’s magnetism, the picture might become undefined and you could see different colours on the outlines of
the images. In that case, proceed as follows:
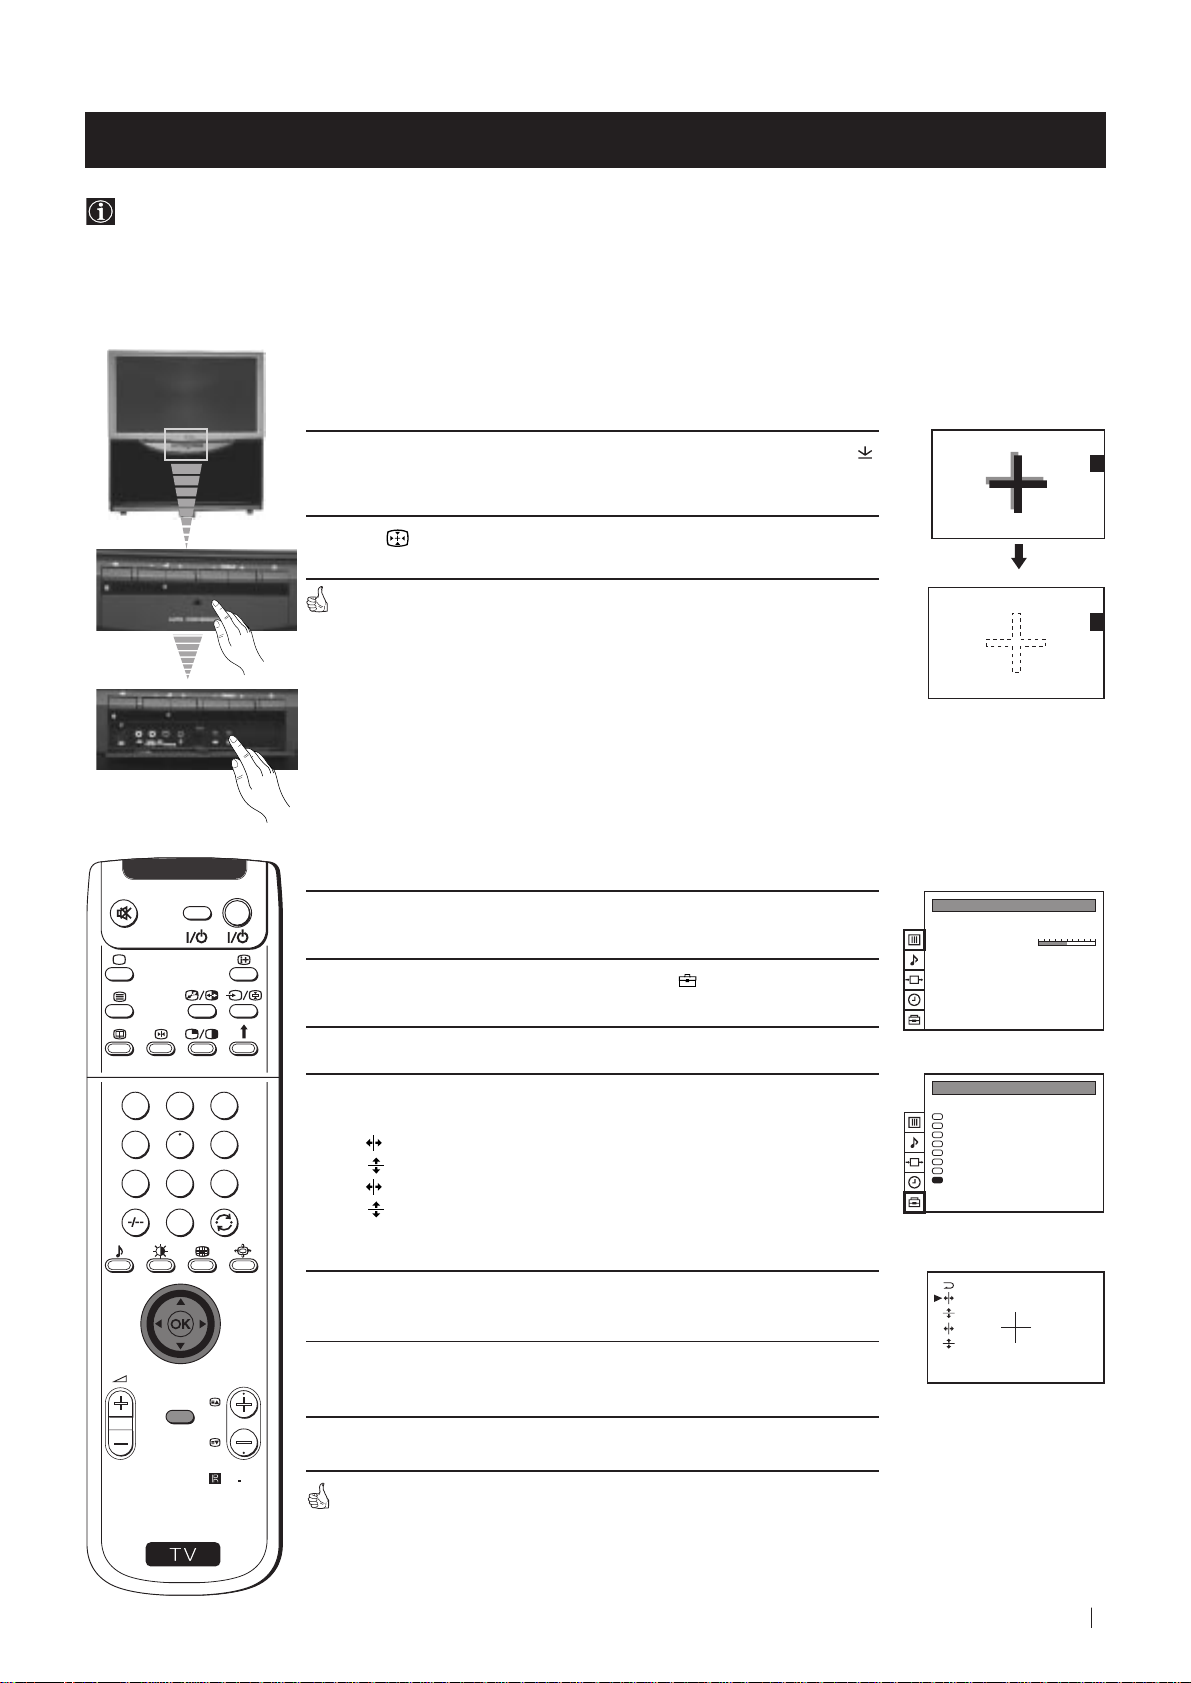
Auto converge the Red, Green, and Blue
Lines
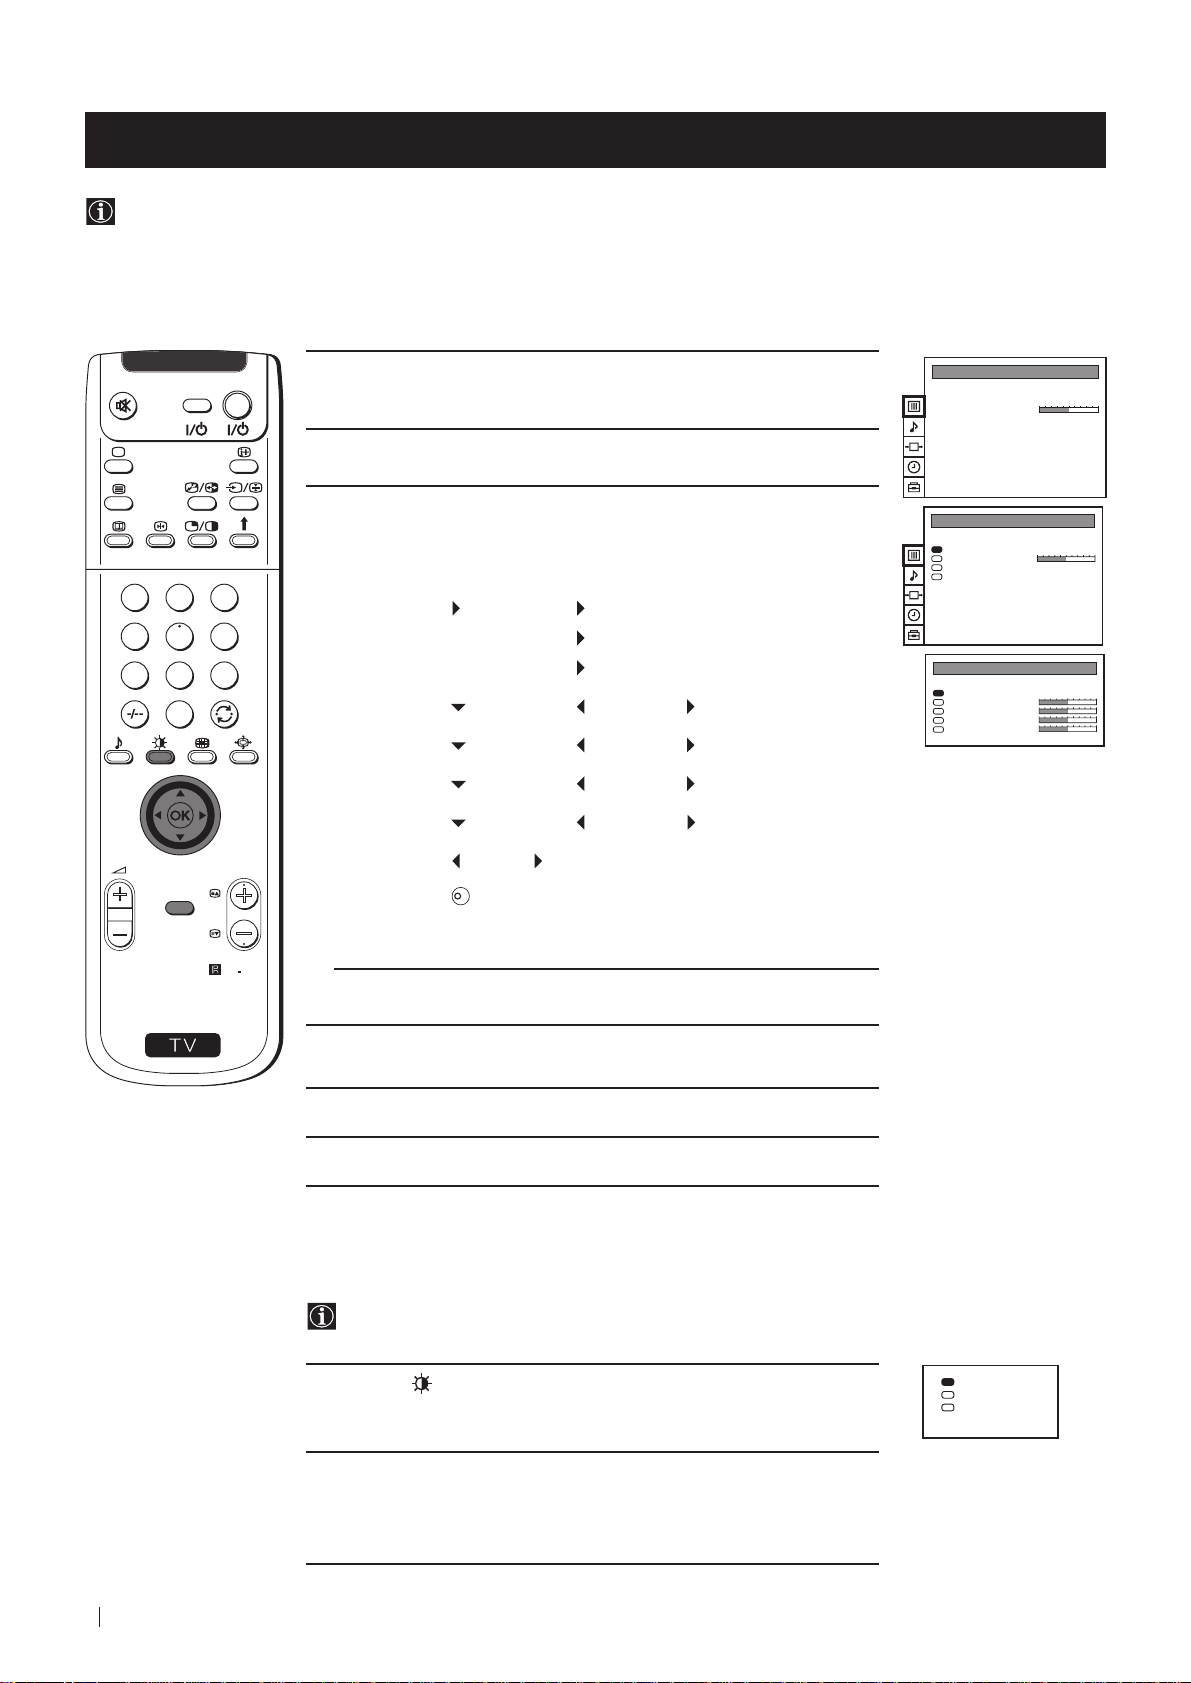
1 Press the flap on the front of the projection TV by pressing on the
mark to reveal the front control panel.
2 Press button on the projection TV.
The Auto Convergence function works for about 30 seconds. When the
white cross disappears from the screen, your projection TV is ready for use.
Notes:
The Auto Convergence function does not work:
• when no signal is input.
• when the input signal is weak.
• when the screen is exposed to spotlights or direct sunlight.
• when you watch the teletext broadcast.
If you wish a more accurate convergence
adjustment
VIDEO TV
1 Press the MENU button on the remote control to display the menu
on the screen.
PICTURE CONTROL
Picture Mode
Contrast
Reset
Format
Personal
Wide
2 Push the joystick to $ to select the symbol , then push to z to
enter to the PRESET menu.
3 Push the joystick to $ or 4 to select Convergence, then push to z.
1
2
3
4
5
6
4 Push the joystick to $ or 4 to select “the line” (vertical and
horizontal lines in red and blue) you want to adjust.
: red vertical line (left/right adjustment)
: red horizonta line (up/down adjustment)
7
8
9
: blue vertical line (left/right adjustment)
: blue horizontal line (up/down adjustment)
0
Then press the OK button.
PRESET
Auto Programme
Manual Programme Preset
Further Programme Preset
AV Label Preset
Programme Sorting
Parental Lock
Language
Convergence
5 Push the joystick repeatedly to $, 4, Z or z to converge the selected
line with the green line in the centre, then press OK to confirm.
PROGR
MENU
6 Repeat steps 4 and 5 to adjust the other lines, until all the lines have
overlapped to form a white cross.
S
7 Press the MENU button to exit and return to the normal TV screen.
RM
892
Your projection TV is ready for use.
Advanced Operation - Advanced Presetting
13
Page 14
Advanced Operation - Advanced Presetting
Automatically Tuning the TV
Besides the explanation in the section “Automatically Tuning the TV using the Remote Control“, by following the
instructions below, this projection TV also searches and stores automatically all available channels using just one button of
the projection TV set and one button of the remote control.
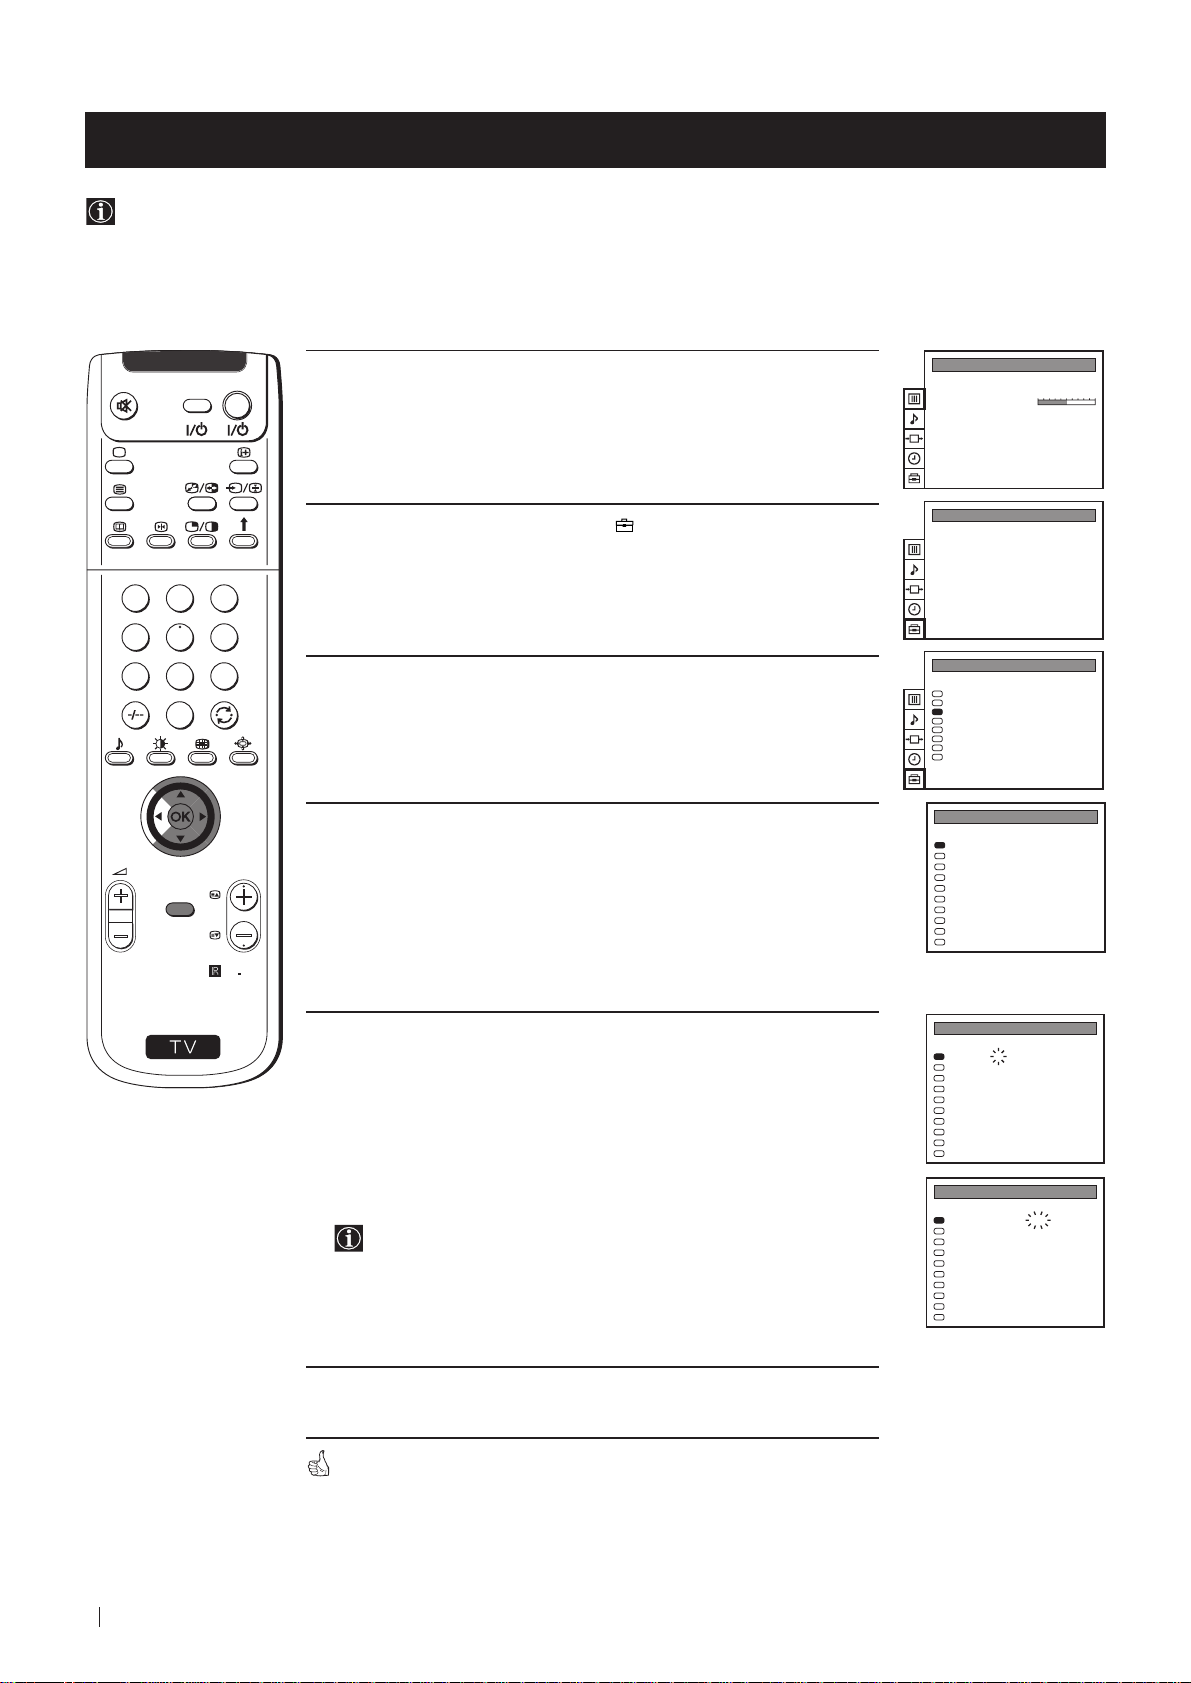
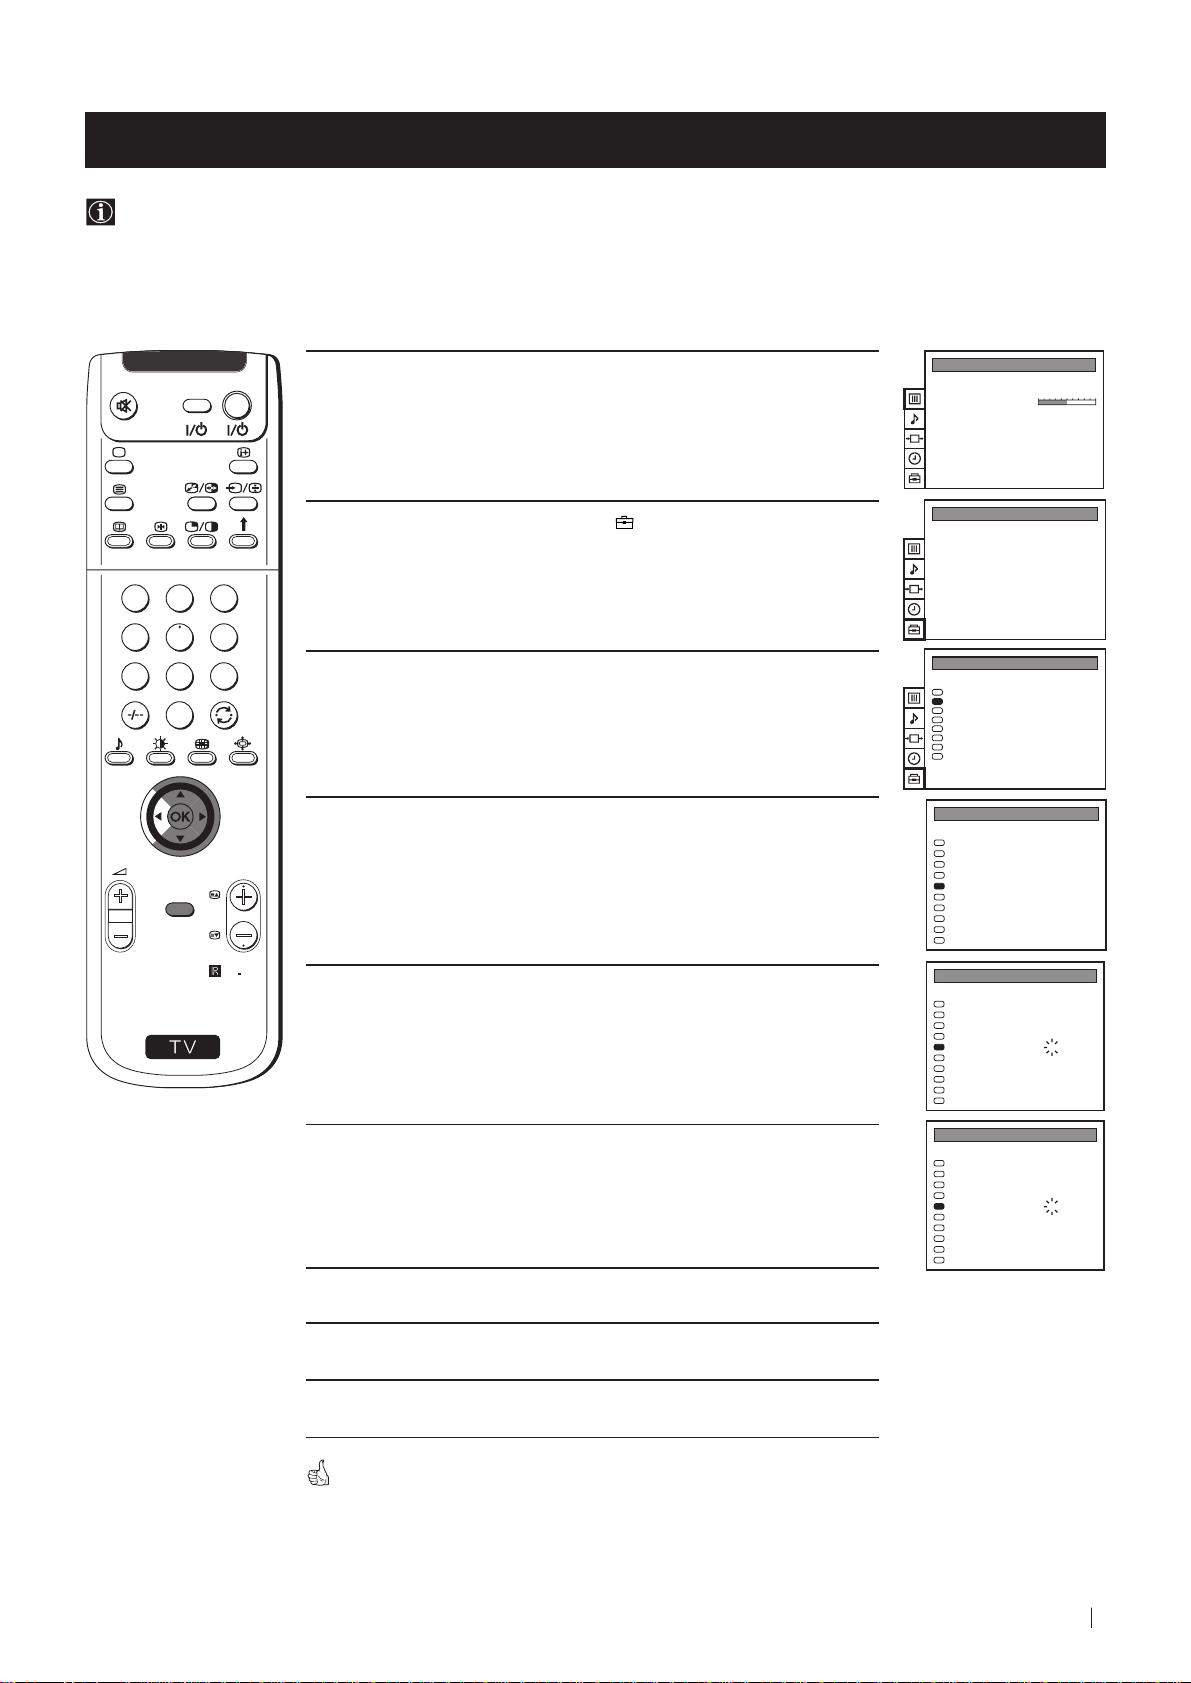
1 Press the flap on the front of the projection TV by pressing on the
mark to reveal the front control panel.
Please confirm that
antenna is connected
Confirm: OK
Please confirm that
antenna is connected
Confirm: OK
AUTO PROGRAMME
PROG
SYS
CHAN
1
B/G
C 26
AUTO PROGRAMME
LABEL
- - - - -
VIDEO TV
2 Press and hold in the button on the TV set for some seconds,
until a menu appears automatically on the screen asking you to
check that antenna is connected.
3 Confirm that the antenna is connected and then press the OK
button on the remote control.
The automatic tuning starts and the message "AUTO
PROGRAMME" flashes on the screen.
This procedure could take some minutes. Please, be patient and
do not press any button.
1
2
3
4
5
6
7
8
9
When the automatic tuning procedure is complete, the Programme Sorting
menu appears on the screen:
0
• If you do not wish to change the channel order, press the MENU button
on the remote control to exit and return to the normal TV screen.
• If you wish to change the channel order, proceed in the same way as
described in the chapter "Changing the Programme Order of the TV
channels", section b).
PROGR
MENU
RM
892
S
14
Advanced Operation - Advanced Presetting
Note: To stop the automatic tuning, press the MENU button on the
remote control.
Page 15
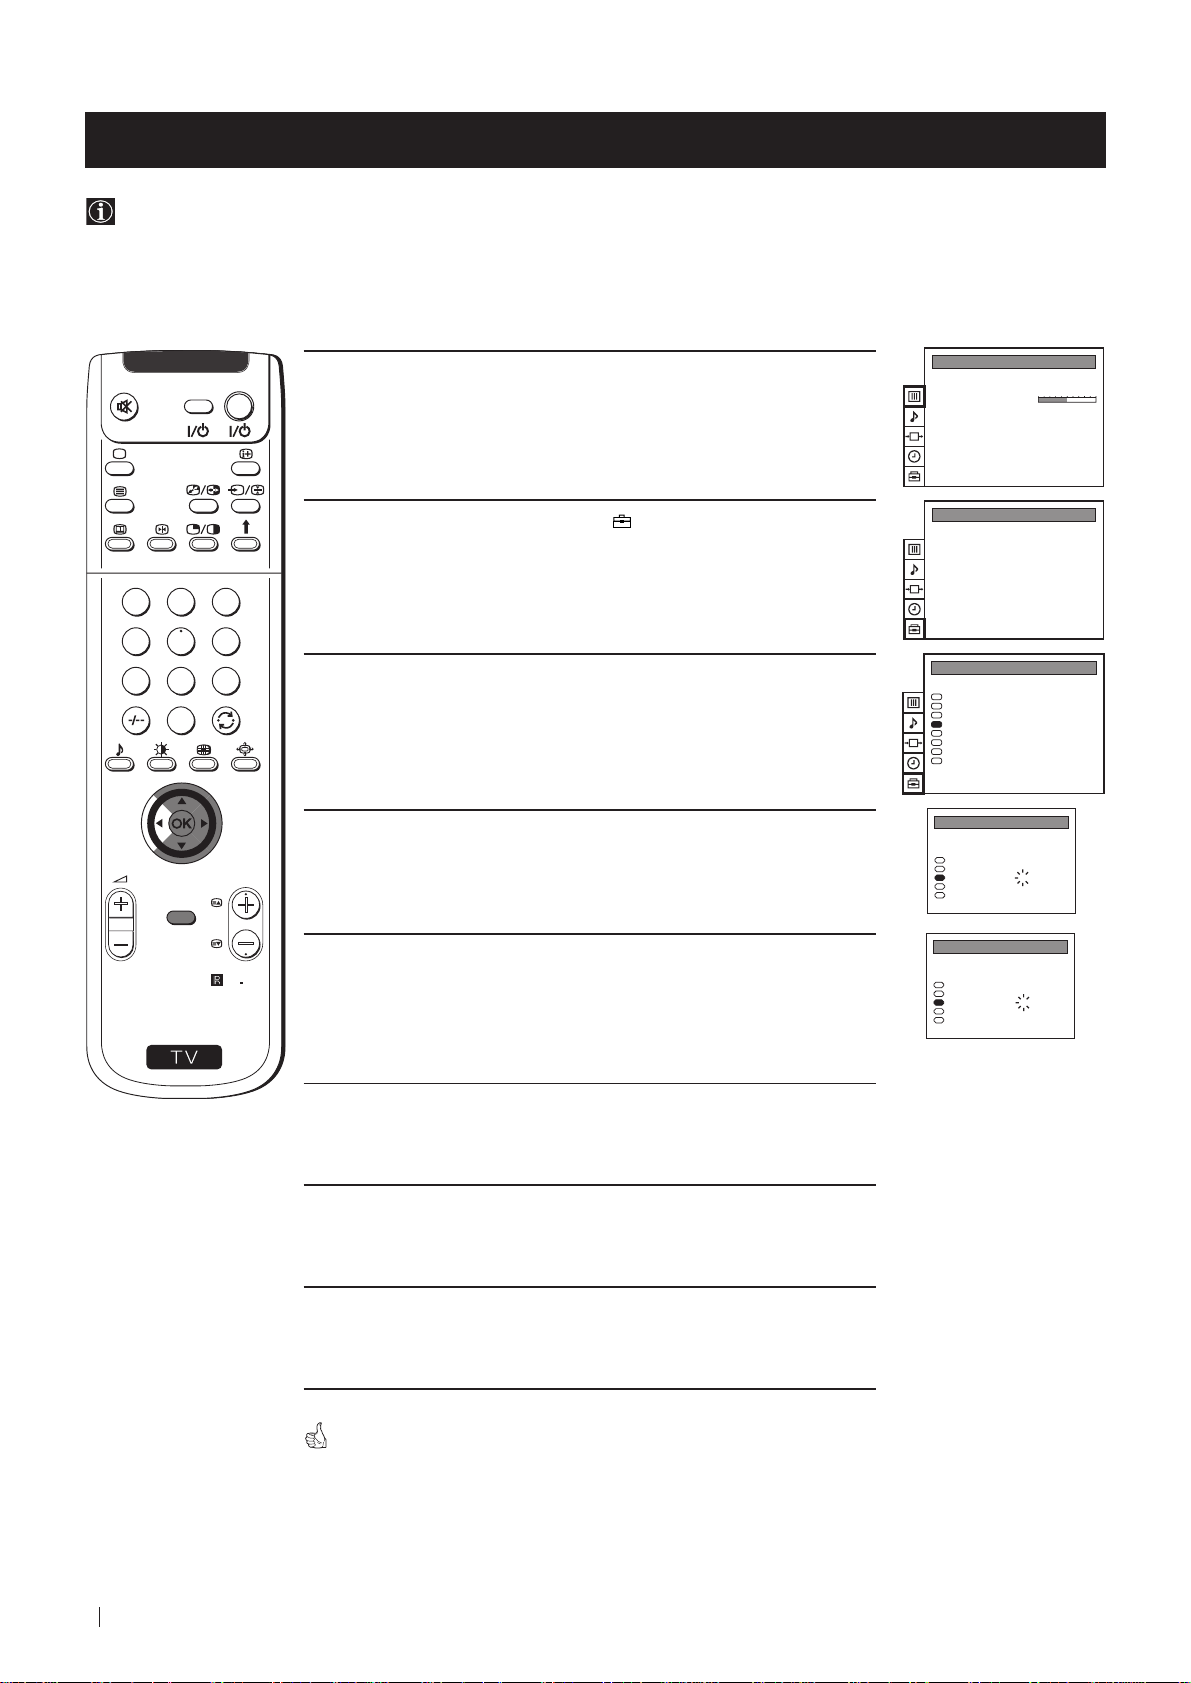
Advanced Operation - Advanced Presetting
Manually Tuning the TV
Use this function to preset channels or a video input source one by one to the programme order of your choice.
VIDEO TV
1 Press the MENU button on the remote control to display the
menu on the screen.
2 Push the joystick to $ to select the symbol, then push to z to
enter to the PRESET menu.
1
2
3
4
5
6
7
8
9
3 Push the joystick to $ or 4 to select Manual Programme Preset,
then push to z.
0
4 Push the joystick to $ or 4 to select on which programme number
you want to preset a channel, then push to z.
PROGR
MENU
PICTURE CONTROL
Picture Mode
Contrast
Reset
Format
PRESET
Auto Programme
Manual Programme Preset
Further Programme Preset
AV Label Preset
Programme Sorting
Parental Lock
Language
Convergence
PRESET
Auto Programme
Manual Programme Preset
Further Programme Preset
AV Label Preset
Programme Sorting
Parental Lock
Language
Convergence
MANUAL PROGRAMME PRESET
PROG SYS CHAN
0
1
2
3
4
5
6
7
8
9
Personal
Wide
LABEL
B/G
MV-CH
C 40
B/G
TVE-1
C 41
B/G
TVE-2
C 31
B/G
ANT-3
C 34
B/G
TELE 5
C 27
B/G
C PLUS
C 47
B/G
- - - - -
C 44
B/G
- - - - -
C 23
B/G
CNN -
C 35
B/G
BBC-W
C 28
S
RM
892
5 Push the joystick to $ or 4 to select the TV Broadcast system
(B/G for western european countries, D/K for eastern european
countries) or a video input source (AV1, AV2...), then push to z.
6 Push the joystick to $ or 4 to select the channel tuning, "C" for
terrestrial channels or "S" for cable channels, then push to z.
7 Press the number buttons to enter the channel number of the TV
Broadcast or push the joystick to 4 or $ to search for the next
available channel.
If you do not wish to store this channel, push the joystick to 4 or
$ to continue searching for the desired channel.
8 If this is the desired channel you wish to store, press the OK
MANUAL PROGRAMME PRESET
PROG SYS CHAN
0
1
2
3
4
5
6
7
8
9
MANUAL PROGRAMME PRESET
PROG SYS CHAN
0
1
2
3
4
5
6
7
8
9
MANUAL PROGRAMME PRESET
PROG SYS CHAN
0
1
2
3
4
5
6
7
8
9
LABEL
B/G
MV-CH
C 40
B/G
TVE-1
C 41
B/G
TVE-2
C 31
B/G
ANT-3
C 34
B/G
TELE 5
C 27
B/G
C PLUS
C 47
B/G
- - - - -
C 44
B/G
- - - - -
C 23
B/G
CNN -
C 35
B/G
BBC-W
C 28
LABEL
B/G
MV-CH
C 40
B/G
TVE-1
C 41
B/G
TVE-2
C 31
B/G
ANT-3
C 34
B/G
TELE 5
C 27
B/G
C PLUS
C 47
B/G
- - - - -
C 44
B/G
- - - - -
C 23
B/G
CNN -
C 35
B/G
BBC-W
C 28
LABEL
B/G
MV-CH
C 40
B/G
TVE-1
C 41
B/G
TVE-2
C 31
B/G
ANT-3
C 34
B/G
TELE 5
C 27
B/G
C PLUS
C 47
B/G
- - - - -
C 44
B/G
- - - - -
C 23
B/G
CNN -
C 35
B/G
BBC-W
C 28
button.
9 Repeat steps 4 to 8 if you wish to store more channels.
10 Press the MENU button to exit and return to the normal TV
screen.
Your projection TV is now ready for use.
Advanced Operation - Advanced Presetting
15
Page 16
Advanced Operation - Advanced Presetting
Using the "Further Programme Preset" function
With this feature you can:
a) Even normally the automatic fine tuning (AFT) is operating, however you can manually fine-tune the TV to obtain a
better picture reception if the picture is distorted or
b) preset the AV3 output for the programme positions of channels with scrambled signals (eg from a pay TV decoder). In
this way a connected VCR records the unscrambled signal.
VIDEO TV
1 Press the MENU button on the remote control to display the menu
on the screen.
2 Push the joystick to $ to select the symbol, then push to z to
enter to the PRESET menu.
1
2
3
4
5
6
7
8
9
0
3 Push the joystick to $ or 4 to select Further Programme Preset,
then push to z.
4 Push the joystick to $ or 4 to select the relevant programme
number, then push to z repeatedly to select:
PROGR
MENU
RM
892
a) AFT or
b) DECODER.
The selected item changes colour.
PICTURE CONTROL
Picture Mode
Contrast
Reset
Format
PRESET
Auto Programme
Manual Programme Preset
Further Programme Preset
AV Label Preset
Programme Sorting
Parental Lock
Language
Convergence
PRESET
Auto Programme
Manual Programme Preset
Further Programme Preset
AV Label Preset
Programme Sorting
Parental Lock
Language
Convergence
FURTHER PROGRAMME PRESET
PROG AFT DECODER
0
1
2
3
4
5
6
7
8
9
Personal
Wide
On
Off
On
Off
On
AV1
On
Off
On
AV2
On
Off
On
Off
On
Off
On
Off
On
Off
S
5 a) AFT
Push the joystick to $ or 4 to fine tune the channel frequency over a
range of -15 to +15, then press the OK button.
Repeat steps 4 and 5a) if you wish to fine tune other channels.
b) DECODER
Push the joystick to $ or 4 to select AV
3 and press the OK.
The picture from the decoder connected to the Euro AV :3 on
the back of the projection TV will appear on this programme
number.
Repeat steps 4 and 5b) to preset the AV3 output for other
programme positions.
6 Press the MENU button to exit and return to the normal TV screen.
Your projection TV is now ready for use.
FURTHER PROGRAMME PRESET
PROG AFT DECODER
2
0
1
2
3
4
5
6
7
8
9
FURTHER PROGRAMME PRESET
PROG AFT DECODER
0
1
2
3
4
5
6
7
8
9
Off
On
Off
On
Off
On
Off
On
Off
On
Off
On
Off
On
Off
On
Off
On
Off
On
AV3
On
Off
On
Off
On
Off
On
Off
On
Off
On
Off
On
Off
On
Off
On
Off
Advanced Operation - Advanced Presetting
16
Page 17
Advanced Operation - Advanced Presetting
Locking Programmes
This feature enables you to prevent undesirable broadcasts appearing on the screen. We suggest you use this function to
prevent children from watching programmes you consider unsuitable.
VIDEO TV
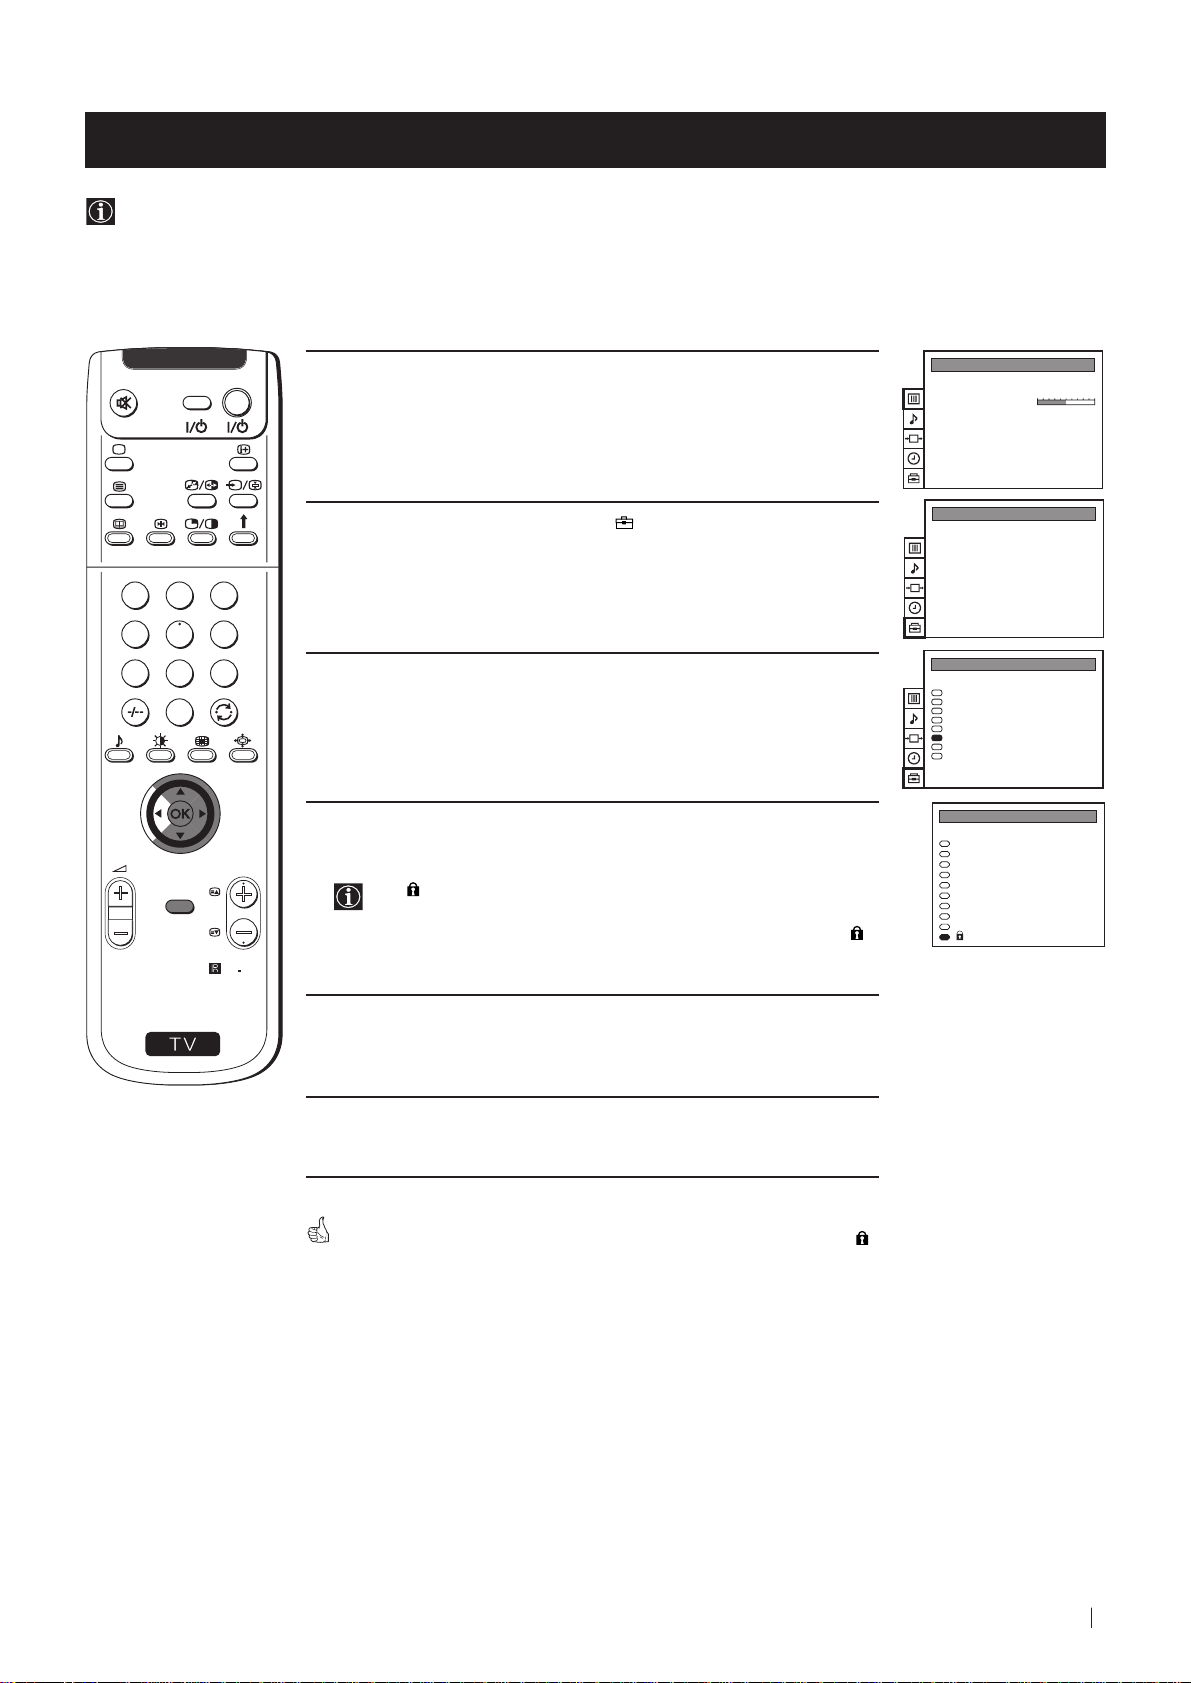
1 Press the MENU button on the remote control to display the menu
on the screen.
2 Push the joystick to $ to select the symbol, then push to z to
enter to the PRESET menu.
1
2
3
4
5
6
7
8
9
3 Push the joystick to $ or 4 to select Parental Lock, then push to z.
0
4 Push the joystick to $ or 4 to select the programme number with
the channel you wish to block, then press the OK button.
PROGR
The
MENU
RM
892
symbol appears before the programme position to
indicate this programme is now blocked.
To unblock the programme, press the OK button again. The
symbol disappears.
PICTURE CONTROL
Picture Mode
Contrast
Reset
Format
PRESET
Auto Programme
Manual Programme Preset
Further Programme Preset
AV Label Preset
Programme Sorting
Parental Lock
Language
Convergence
PRESET
Auto Programme
Manual Programme Preset
Further Programme Preset
AV Label Preset
Programme Sorting
Parental Lock
Language
Convergence
PARENTAL LOCK
PROG
SYS CHAN LABEL
B/G
0
B/G
1
B/G
2
B/G
3
B/G
4
B/G
5
B/G
6
B/G
7
B/G
8
B/G
9
C 40
C 41
C 31
C 34
C 27
C 47
C 44
C 23
C 35
C 28
Personal
Wide
MV-CH
TVE-1
TVE-2
ANT-3
TELE 5
C PLUS
- - - - -
- - - - CNN -
- - - - -
S
5 Repeat step 4 if you wish to block other channels.
6 Press the MENU button to exit and return to the normal TV screen.
When you select a blocked programme the screen appears in black, with
symbol.
17Advanced Operation - Advanced Presetting
Page 18
Advanced Operation - Advanced Presetting
Skipping Programme positions
You can programme this projection TV to skip any unwanted programme numbers when they are selected with the
PROGR +/- buttons. To cancel this function afterwards, proceed in the same way as described below by selecting the
appropriate TV system (B/G or D/K) instead of "- - -" in step 5.
VIDEO TV
1 Press the MENU button on the remote control to display the menu
on the screen.
2 Push the joystick to $ to select the symbol, then push to z to
enter to the PRESET menu.
1
2
3
4
5
6
7
8
9
3 Push the joystick to $ or 4 to select Manual Programme Preset,
then push to z.
0
4 Push the joystick to $ or 4 to select the programme position you
want to skip, then push to z to enter to the SYS column.
PROGR
MENU
PICTURE CONTROL
Picture Mode
Contrast
Reset
Format
PRESET
Auto Programme
Manual Programme Preset
Further Programme Preset
AV Label Preset
Programme Sorting
Parental Lock
Language
Convergence
PRESET
Auto Programme
Manual Programme Preset
Further Programme Preset
AV Label Preset
Programme Sorting
Parental Lock
Language
Convergence
MANUAL PROGRAMME PRESET
PROG SYS CHAN
0
1
2
3
4
5
6
7
8
9
Personal
Wide
LABEL
B/G
MV-CH
C 40
B/G
TVE-1
C 41
B/G
TVE-2
C 31
B/G
ANT-3
C 34
B/G
TELE 5
C 27
B/G
C PLUS
C 47
B/G
- - - - -
C 44
B/G
- - - - -
C 23
B/G
CNN -
C 35
B/G
BBC-W
C 28
S
RM
892
5 Push the joystick to $ to select “- - -”, then press the OK button to
store.
MANUAL PROGRAMME PRESET
PROG SYS CHAN
0
1
2
3
4
5
6
7
8
9
LABEL
B/G
MV-CH
C 40
B/G
TVE-1
C 41
B/G
TVE-2
C 31
B/G
ANT-3
C 34
B/G
TELE 5
C 27
B/G
C PLUS
C 47
B/G
- - - - -
C 44
B/G
- - - - -
C 23
B/G
CNN -
C 35
- - -
BBC-W
C 28
6 Repeat steps 4 and 5 to skip other unused programme positions.
7 Press the MENU button to exit and return to the normal TV screen.
When changing channels (TV Broadcasts) with the PROGR +/- buttons,
the skipped programme positions do not appear. You can, however, still
select them using the number buttons.
18
Advanced Operation - Advanced Presetting
Page 19
Advanced Operation - Advanced Presetting
Labelling a channel
Names for channels (TV Broadcasts) are usually taken automatically from Teletext if available. You can however name a
channel or an input video source using up to five characters (letters or numbers). Using this function, you can easily
identify which channel (TV Broadcasts) or video source you are watching.
1
4
7
S
VIDEO TV
2
5
8
0
MENU
3
6
9
RM
PROGR
892
1 Press the MENU button on the remote control to display the menu
on the screen.
2 Push the joystick to $ to select the symbol, then push to z to
enter to the PRESET menu.
3 Push the joystick to $ or 4 to select Manual Programme Preset,
then push to z.
4 Push the joystick to $ or 4 to select the programme number with
the channel you wish to name.
5 Push the joystick to z repeatedly until the first element of the
LABEL column is highlighted.
PICTURE CONTROL
Picture Mode
Contrast
Reset
Format
PRESET
Auto Programme
Manual Programme Preset
Further Programme Preset
AV Label Preset
Programme Sorting
Parental Lock
Language
Convergence
PRESET
Auto Programme
Manual Programme Preset
Further Programme Preset
AV Label Preset
Programme Sorting
Parental Lock
Language
Convergence
MANUAL PROGRAMME PRESET
PROG SYS CHAN LABEL
0
1
2
3
4
5
6
7
8
9
MANUAL PROGRAMME PRESET
PROG SYS CHAN LABEL
0
1
2
3
4
5
6
7
8
9
B/G
B/G
B/G
B/G
B/G
B/G
B/G
B/G
B/G
B/G
B/G
B/G
B/G
B/G
B/G
B/G
B/G
B/G
B/G
B/G
C 40
C 41
C 31
C 34
C 27
C 47
C 44
C 23
C 35
C 28
C 40
C 41
C 31
C 34
C 27
C 47
C 44
C 23
C 35
C 28
Personal
Wide
- - - - -
- - - - -
- - - - -
- - - - -
- - - - -
- - - - -
- - - - -
- - - - -
- - - - -
- - - - -
- - - - -
- - - - -
- - - - -
- - - - -
- - - - -
- - - - -
- - - - -
- - - - -
- - - - -
- - - - -
6 Push the joystick to $ or 4 to select a letter or number (select “-” for
a blank), then push to z to confirm this character. Select the other
four characters in the same way.
7 After selecting all the characters, press the OK button.
8 Repeat steps 4 to 7 if you wish to label other channels.
9 Press the MENU button to exit and return to the normal TV screen.
When you select a named channel, the name appears for a few seconds on
the screen.
Advanced Operation - Advanced Presetting
MANUAL PROGRAMME PRESET
PROG SYS CHAN LABEL
B/G
0
1
2
3
4
5
6
7
8
9
- - - - -
C 40
B/G
- - - - -
C 41
B/G
- - - - -
C 31
B/G
- - - - -
C 34
B/G
A- - - -
C 27
B/G
- - - - -
C 47
B/G
- - - - -
C 44
B/G
- - - - -
C 23
B/G
- - - - -
C 35
B/G
- - - - -
C 28
19
Page 20
Advanced Operation - Advanced TV Operation
Adjusting the Picture
Although the picture is adjusted at the factory, you can modify it to suit your own taste.
1
4
7
S
VIDEO TV
2
5
8
0
MENU
3
6
9
RM
PROGR
892
1 Press the MENU button on the remote control to display the menu
on the screen.
2 Push the joystick to z to enter the PICTURE CONTROL menu.
3 Push the joystick to $ or 4 to select the item you wish to change,
then push to z.
Refer to the table below to chose the item and for the effect of each
control:
Picture Mode
Contrast Less More
Reset Resets picture to the factory preset levels.
Format (for detalis refer to the section "Changing the
Picture Mode Personal (for individual settings)
Movie (for films)
Live (for live broadcast programmes)
Brightness* Darker Brighter
Colour* Less More
Sharpness* Softer Sharper
Hue** Greenish Reddish
K
Screen Mode")
* Can only be altered if Personal Mode is selected.
** Only avalaible for NTSC colour signal (e.g: USA video tapes).
4 Push the joystick to Z or z to alter the selected item, then press the
OK button to store the new adjustment.
PICTURE CONTROL
Picture Mode
Contrast
Reset
Format
PICTURE CONTROL
Picture Mode
Contrast
Reset
Format
PICTURE MODE
Picture Mode
Brightness
Colour
Sharpness
Hue
Personal
Wide
Personal
Wide
Personal
5 Repeat steps 3 and 4 to alter the other items.
6 Press the MENU button to exit and return to the normal TV screen.
Changing the Picture Mode Quickly
You can quickly change the Picture Mode without entering the
Picture Control menu screen.
1 Press the button on the remote control to directly access the
Picture Mode.
2 Push the joystick to $ or 4 to select your desired picture mode
(Personal, Movie or Live), then press the OK button to remove the
display from the screen.
20
Advanced Operation - Advanced TV Operation
Personal
Movie
Live
Page 21
Advanced Operation - Advanced TV Operation
Changing the screen mode
Using this Screen Mode feature you can change the aspect ratio of the screen.
VIDEO TV
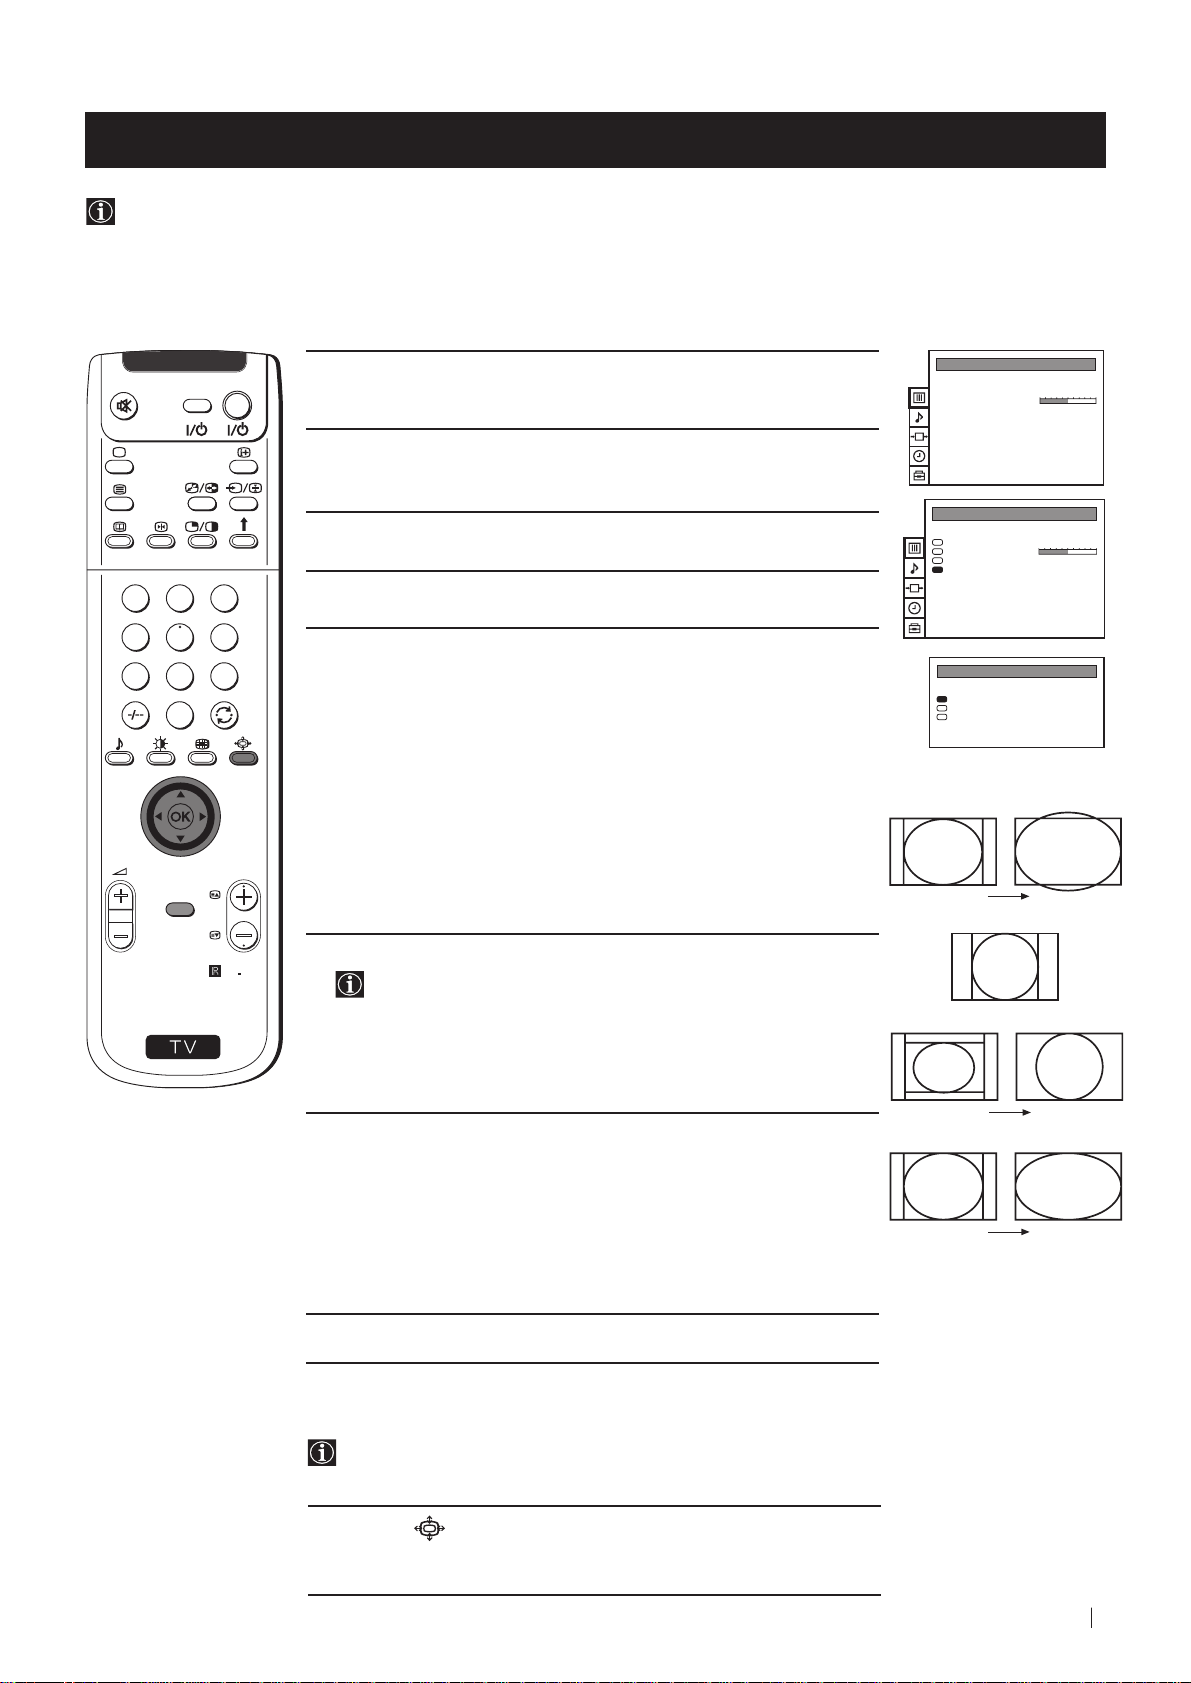
1 Press the MENU button on the remote control to display the menu
on the screen.
PICTURE CONTROL
Picture Mode
Contrast
Reset
Format
Personal
Wide
2 Push the joystick to z button to enter the PICTURE CONTROL
menu.
PICTURE CONTROL
3 Push the joystick to $ to select Format, then push to z.
1
2
3
4
5
6
7
8
9
0
4 Push the joystick to $ or 4 to select Format, Scroll or Auto 16:9.
5 Format
Push the joystick to z to enter to the menu, then push to Z or z
repeatedly to select one of the following modes:
Picture Mode
Contrast
Reset
Format
FORMAT
Format
Scroll
Auto 16:9
• Smart: imitation of wide screen effect (16:9) for 4:3 broadcasts.
• 4:3: conventional 4:3 picture.
• Zoom: imitation of wide screen effect (16:9) for movies broadcast
in cinemascopic format.
• Wide: for 16:9 broadcasts.
PROGR
MENU
Press the OK button.
Smart
Personal
Wide
Wide
0
On
S
RM
892
6 Scroll
You can use Scroll to move the screen up- or downwards in
order to see the cut-off parts. This function only works if you
selected Zoom mode or Smart mode in step 5.
4:3
Push the joystick to z to enter to the menu, then push to Z or z to
adjust the screen position over a range of -5 to +5. Press the OK
button.
7 Auto 16:9
Zoom
Push the joystick to z to enter to the menu, then push to Z or z to
select:
On: if you wish the TV set to switch automatically to wide format if
a 16:9 broadcast is detected or
Off: for normal mode.
Wide
Press the OK button.
8 Press the MENU button to exit and return to the normal TV screen.
Changing the Format Screen Quickly
You can quickly change the format screen without entering the
Picture Control menu screen.
1 Press the button on the remote control repeatedly to select your
desired format screen mode (Smart, 4:3, Zoom or Wide).
Advanced Operation - Advanced TV Operation
21
Page 22

Advanced Operation - Advanced TV Operation
Adjusting the Sound
Although the sound is adjusted at the factory, you can modify it to suit your own taste.
1
4
7
S
VIDEO TV
2
5
8
0
MENU
3
6
9
RM
PROGR
892
1 Press the MENU button on the remote control to display the menu
on the screen.
2 Push the joystick to $ to select the symbol, then push to z to enter
to the SOUND CONTROL menu.
3 Push the joystick to $ or 4 to select the item you wish to change,
then push to z.
Refer to the table below to chose the item and for the effect of each
control.
Sound Mode
Balance Left Right
Reset Resets picture to the factory preset levels.
Spatial On: acoustic sound effect
Dual Sound • For a stereo broadcast:
Mode Personal (for individual settings)
Rock
Jazz
Pop
Treble* Less More
Bass* Less More
K
Off: normal
Mono
Stereo
• For a bilingual broadcast:
Mono (for mono channel if available)
A (for channel 1)
B (for channel 2)
PICTURE CONTROL
Picture Mode
Contrast
Reset
Format
SOUND CONTROL
Sound Mode
Balance
Reset
Spatial
Dual Sound
Volume Offset
Volume
Dual Sound
Speaker
SOUND MODE
Mode
Treble
Bass
Personal
Wide
Personal
Off
Mono
0
Mono
Main
Personal
Volume Offset
Headphones:
ll
l Volume Less More
ll
ll
l Dual Sound • For a stereo broadcast:
ll
Speaker
* Can be only altered if "Personal" mode is selected.
22
Advanced Operation - Advanced TV Operation
-12 .......... +12
The channel volume level can be adjusted over a
range of -12 to +12.
Mono
Stereo
• For a bilingual broadcast:
Mono (for mono channel if available)
A (for channel 1)
B (for channel 2)
Main: sound from projection TV set
Centre in: sound from external amplifier
Page 23
Advanced Operation - Advanced TV Operation
VIDEO TV
4 Push the joystick to Z or z to alter the selected item, then press the
OK button to store the new adjustment.
5 Repeat steps 3 and 4 to alter the other items.
6 Press the MENU button to exit and return to the normal TV screen.
1
2
3
4
5
6
7
8
9
0
Changing Sound Mode Quickly
You can quickly change Sound mode without entering the Sound
Control menu screen.
1 Press the button on the remote control to directly access to the
Sound Mode.
Personal
Rock
Jazz
Pop
MENU
PROGR
RM
892
S
2 Push the joystick to $ or 4 to select your desired sound mode
(Personal, Rock, Jazz or Pop), then press the OK button to remove
the display from the screen.
Advanced Operation - Advanced TV Operation
23
Page 24
Advanced Operation - Advanced TV Operation
Using the Sleep Timer
You can select a time period for the TV to switch itself automatically into the standby mode.
VIDEO TV
1 Press the MENU button on the remote control to display the menu
on the screen.
2 Push the joystick to $ button to select the t symbol, then push to z
PICTURE CONTROL
Picture Mode
Contrast
Reset
Format
TIMER
Personal
Wide
OffSleep Timer
to enter to the TIMER menu.
1
2
3
4
5
6
7
8
9
0
3 Push the joystick to z, then push to Z or z repeatedly to set the
time period delay
Off
0:30 1:00..... 4:00 hours
TIMER
1:00Sleep Timer
4 Press the OK button.
PROGR
MENU
5 Press the MENU button to exit and return to the normal TV screen.
S
RM
892
One minute before the projection TV switches into standby mode, the
indication "0:01" is displayed on the screen automatically.
Notes: • When watching the TV, press the
button on the remote
control to display the time remaining.
• To return to normal operation from standby mode,
press the TV
button on the remote control.
24
Advanced Operation - Advanced TV Operation
Page 25

Teletext
Viewing Teletext
Teletext is an information service transmitted by most TV stations.
Make sure to use a TV channel with a strong signal, otherwise teletext errors may occur.
VIDEO TV
Selecting Teletext
1 Select the TV channel which carries the teletext service you wish to
view.
2 Press the button on the remote control to switch on the teletext.
1
2
3
4
5
6
7
8
9
3 Input three digits for the page number, using the numbered buttons
on the remote control. (if you have made a mistake, type in any
three digits and then, re-enter the correct page number).
TELETEXT
Index
Programme
News
Sport
Weather
TELETEXT
Index
Programme
25
153
101
98
25
News
153
Sport
101
Weather
98
0
4 Press the button to switch off teletext.
Using other Teletext functions
TO PRESS THE BUTTON
Access the next or preceding page for next page or
for the preceding page
MENU
PROGR
RM
892
S
Superimpose teletext on to the TV
Press again to cancel teletext
mode.
Freeze a teletext page
Press again to cancel the
freeze.
Reveal concealed information
(e.g. answer to a quiz) Press again to cancel.
Using Fastext
Fastext lets you access pages with one button stroke.
When Fastext is broadcast, a colour coded menu appears at the
bottom of the teletext page. Press the colour button (red, green,
yellow or blue) on the remote control to access the corresponding
page.
TELETEXT
Index
Programme
News
Sport
Weather
TELETEXT
Index
Programme
News
Sport
Weather
25
153
101
98
25
153
101
98
Teletext
25
Page 26
Optional Connections
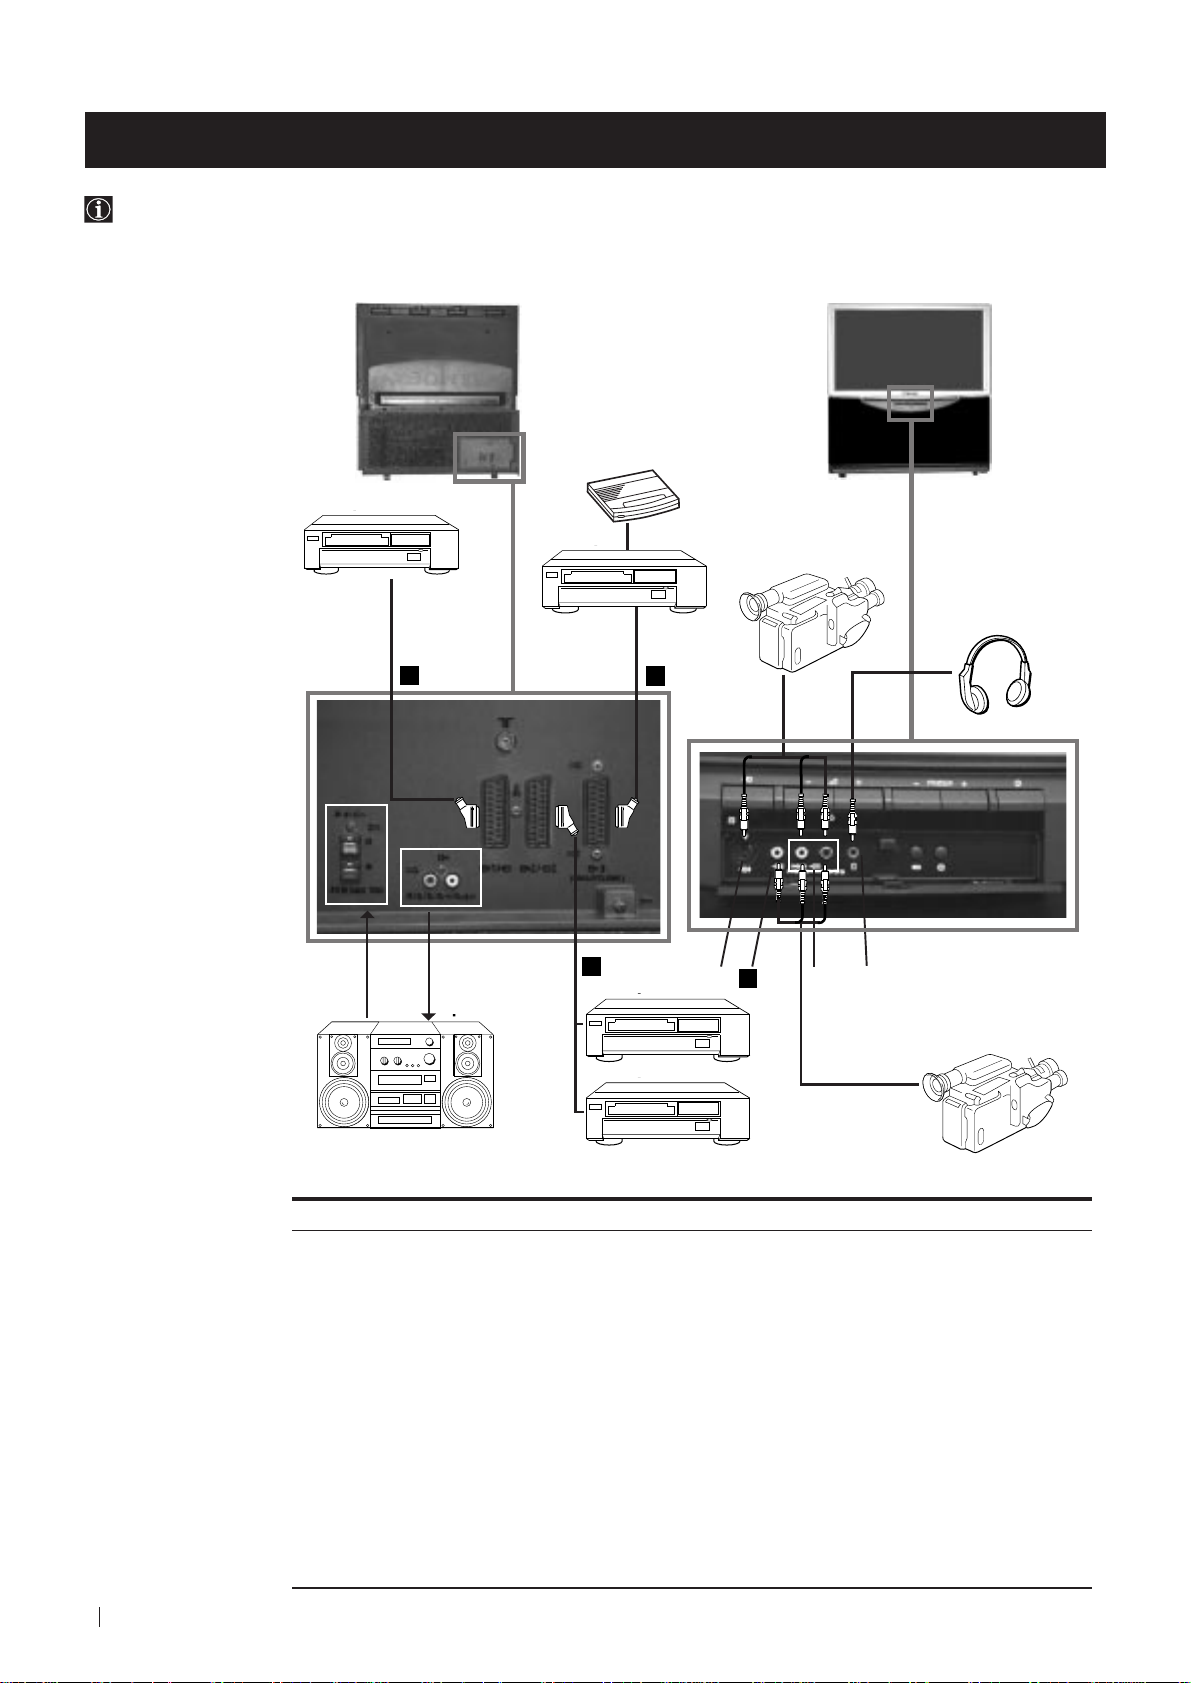
Connecting Optional Equipment
Using the following instructions, you can connect a wide range of optional equipment to your projection TV.
Rear of projection TV Front of projection TV
Decoder
S.VHS/Hi8
DVD
camcorder
To avoid picture
distortion:
• Do not connect
equipment to F
and G connectors
at the same time.
• Do not connect any
equipment on the
front connectors
together with D
connector.
A
C
B
Hi-Fi
VCR
E
D
F
G
HI
VCR
DVD
8mm/Hi8
camcorder
26
Optional Connections
Acceptable input signal
Centre speaker input
A
Set “Speaker” on the SOUND
CONTROL menu to “Centre in”.
B
No inputs
Audio/video and RGB signal
C
D
Audio/video and S video signal
E
Audio/video signal
F
S Video signal
G
Video signal
H
Audio signal
No input
I
Available output signal
No outputs
Audio signal
Video/audio from TV tuner
Video/audio from selected source
Video/audio from selected source (the same output
source as the :2/ q 2 connector)
No output
No output
No output
Audio signal to headphones
Page 27

Optional Connections
Using Optional Equipment
Additional Information when connecting equipment
Connecting a VCR
We recommend you connect your VCR to the
the “Manually Tuning the TV” section of this instruction manual to tune in the VCR signal to TV programme
number “0”.
If your video supports Smartlink please refer the "Smartlink" section of this instruction manual.
Connecting to External Audio Equipment
1 To listen to the audio of your projection TV on the Hi-Fi equipment:
Plug in your Hi-Fi equipment to the B sockets on the rear of the projection TV if you wish to amplify the audio
output from the TV.
The output level from B sockets can be varied by adjusting the volume of the headphones. Refer to the
“Adjusting the sound” section of this instruction manual to adjust the volume of the headphones.
2 To listen to the Hi-Fi equipment on the projection TV speakers:
Plug in your Hi-Fi equipment to the A socket on the rear of the projection TV if you wish to listen to the audio
output from your Hi-Fi on the projection TV speaker. If you have a Dolby amplifier, connect the centre output
from your amplifier to the A socket to use the projection TV as a centre speaker. Refer to the “Adjusting the
Sound” section of this instruction manual and set the option “Speaker” to “Centre in”.
or E socket using a scart lead. If you do not have a scart lead, use
D
For mono equipment
Connect the phono plug to the L/G/S/I socket on the front of the TV and select the
2 input signal using the
instructions on this page below. Finally, refer to the “Adjusting the sound” section of this manual and select “A” on
the sound menu screen.
Select and View the Input Signal
VIDEO TV
1
2
3
4
5
6
7
8
9
0
PROGR
MENU
1 Connect your equipment to the designated projection TV socket, as it is indicated on the
previous page.
2 Press
button repeatedly on your remote control until the correct input symbol
the
appears on the screen.
Symbol Input signals
k • Audio/video input signal through the Euro AV connector
K
q
• RGB input signal through the Euro AV connector
• Audio/Video input signal through the Euro AV connector
phono sockets H and
2
• Audio/S Video input signal through the Euro AV connector
G
.
C
C
D
D
or the
or the
sockets H and F.
K
3
• Audio/Video input signal through the Euro AV connector
E
3 Switch on the connected equipment.
S
4 To return to the normal TV picture, press the
RM
892
button on the remote control.
Optional Connections
27
Page 28
Optional Connections
VIDEO TV
VTR 1 2 3 4 DVD
CH
CH
VTR 1 2 3 4 DVD
Smartlink
Smartlink is a direct link between your projection TV set and a VCR.
For Smartlink you need:
• A VCR which supports Smartlink, NextView Link, Easy Link or Megalogic.
Megalogic is a trademark of Grundig Corporation.
EasyLink is a trademark of Philips Corporation.
• A fully-wired 21 pin SCART cable to connect your VCR to the Euro AV connector :3
(SMARTLINK) on the rear of the Projection TV.
The features of Smartlink are:
• Tuning information such as the channel overview are downloaded from the projection
TV set to the VCR.
• Direct projection TV recording: While watching TV you need to press just one button on
the VCR to record this programme.
Rear of projection TV
• Projection TV in standby mode: Press the "Play z" button on your VCR to switch the TV
automatically on.
If you have connected a decoder to a VCR which supports Smartlink feature, select
the menu Further Programme Preset in the (PRESET) menu and select DECODER
3 to each codified channel. For more details, please refer to the section "Using the
AV
Further Programme Preset function" of this instruction manual.
For more information on Smartlink, please refer to the Instruction Manual of your
VCR.
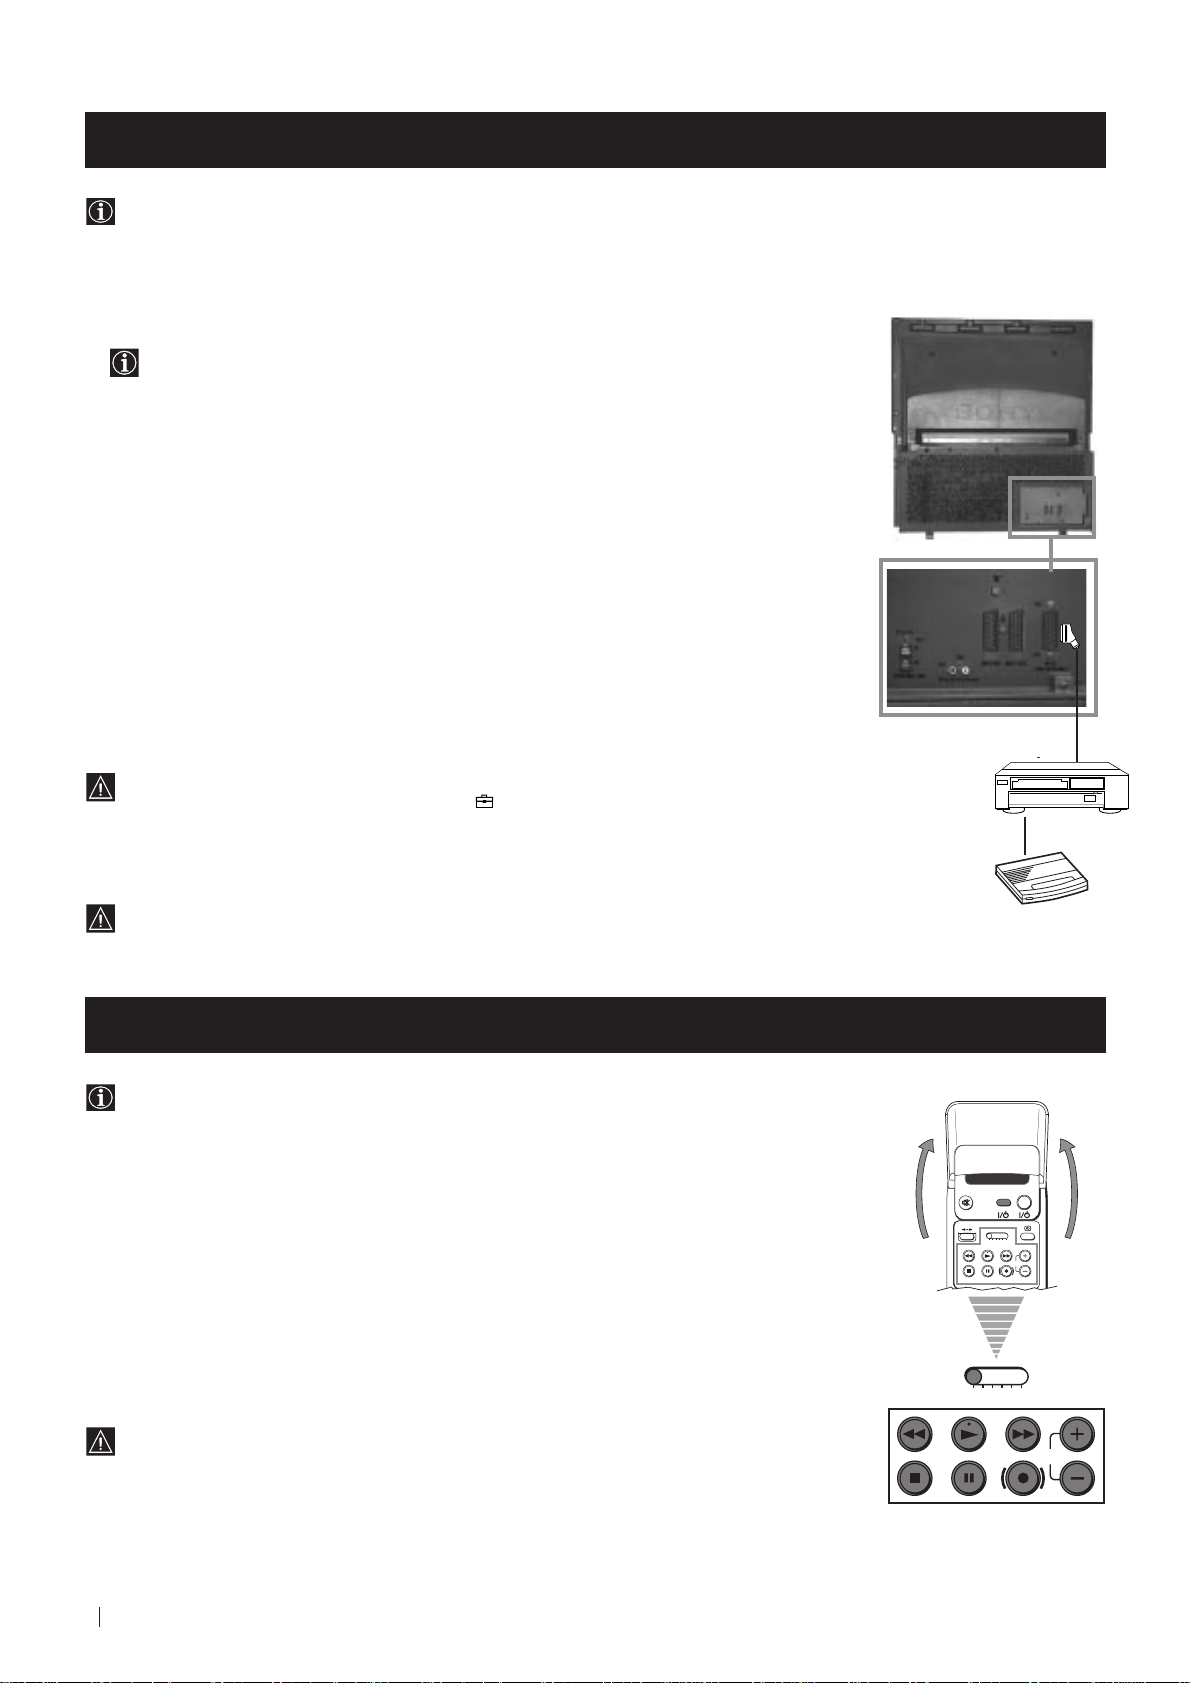
Remote Control of other Sony Equipment
Using the buttons underneath the cover of the remote control you can
control other Sony equipment.
1 Open the cover of the Remote Control.
2 Set the selector VTR 1234 DVD according to the equipment you want to control:
VTR 1 Beta VCR
VTR 2 8 mm VCR
VTR 3 VHS VCR
VTR 4 Digital Video (DCR-VX 1000/9000 E, VHR-1000)
DVD Digital Video Disk
3 Use the buttons underneath the cover on the remote control to operate the
equipment.
VCR
Decoder
• If your video equipment has a COMMAND MODE selector, set this
selector to the same position as the VTR 1234 DVD selector on the
TV Remote Control.
• If the equipment does not have a certain function, the corresponding
button on the remote control does not work.
28
Optional Connections
Page 29
Optional Connections
Selecting the output source for the Euro AV connectors
Using this function you can record on your VCR any signal coming from an external equipment connected to the Euro AV
connectors :2/q 2 or :3 placed on the rear of the projection TV.
In that case you have to select the output source as described below (if your VCR support Smartlink, this procedure is not
necessary).
VIDEO TV
1 Press the MENU button on the remote control to display the menu
on the screen.
2 Push the joystick to $ to select the symbol, then push to z
button to enter to the VIDEO CONNECTION menu screen.
1
2
3
4
5
6
7
8
9
0
3 Push the joystick to $ or 4 button to highlight:
TV Screen (input source for the TV screen) or
PICTURE CONTROL
Picture Mode
Contrast
Reset
Format
VIDEO CONNECTION
TV Screen
Output
TV
Personal
Wide
[TV - - - - - - -]
[AV1 - - - - - - -]
AV1
Output (output source available for :2/q 2 and :3 Euro
AV connectors).
Push the joystick to z to confirm.
PROGR
MENU
4 Push the joystick to Z or z repeteadly to select the desired source:
TV Screen TV, AV1, RGB, AV2, YC2 or AV 3
S
RM
892
Output TV, AV1, AV2, YC2, AV3 or AUTO
Then press the OK button to confirm.
If you select "AUTO", the output signal will always be the same
one that is displayed on the screen.
If you have connected a decoder, please remember to change
back the Output to "TV" for correct unscrambling.
5 Press the MENU button to exit and return to the normal TV screen.
The selected signal is available for your optional equipment connected to
the appropriate Euro AV connector.
Optional Connections
29
Page 30
Optional Connections
Using the AV Label Preset feature
This function enables you to designate a name to the optional equipment you have connected to the sockets of this
projection TV. This name can be up to 5 characters (letters or numbers).
VIDEO TV
1 Press the MENU button on the remote control to display the menu
on the screen.
2 Push the joystick to $ to select the symbol, then push to z to
enter to the PRESET menu screen.
1
2
3
4
5
6
7
8
9
3 Push the joystick to $ or 4 to select AV Label Preset, then push
to z.
0
4 Push the joystick to $ or 4 to select the input source you wish to
name (eg AV2), then push to z to highlight the first element of the
PROGR
MENU
LABEL column.
PICTURE CONTROL
Picture Mode
Contrast
Reset
Format
PRESET
Auto Programme
Manual Programme Preset
Further Programme Preset
AV Label Preset
Programme Sorting
Parental Lock
Language
Convergence
PRESET
Auto Programme
Manual Programme Preset
Further Programme Preset
AV Label Preset
Programme Sorting
Parental Lock
Language
Convergence
AV LABEL PRESET
INPUT LABEL
AV1
RGB
AV2
YC2
AV3
- - - - -
- - - - -
- - - - -
- - - - -
- - - - -
Personal
Wide
S
5 Push the joystick to $ or 4 to select a letter or number (select “-” for
RM
892
a blank) then push to z to confirm this character. Select the other
four characters in the same way.
AV LABEL PRESET
INPUT LABEL
AV1
RGB
AV2
YC2
AV3
- - - - -
- - - - A- - - -
- - - - -
- - - - -
6 After selecting all the characters, press the OK button.
7 Repeat steps 4 to 6 if you wish to label other input sources.
8 Press the MENU button to exit and return to the normal TV screen.
Whenever the equipment with the labeled input is selected for use, the
name appears for a few seconds on the screen.
30
Optional Connections
Page 31

Additional Information
Optimum Viewing Area
For the best picture quality, try to position the projection TV so that you can view the screen from within the areas
shown below.
Horizontal viewing area
4
(Minimum optimum
2.1m
distance)
4
75˚
75˚
Vertical viewing area
4
2.1m
(Minimum optimum
distance)
22.5˚
22.5˚
(Optimum viewing position)
4
(Optimum viewing position)
Additional Information
31
Page 32

Additional Information
On Screen display Menus Guide
PICTURE CONTROL
Picture Mode
Contrast
Reset
Format
SOUND CONTROL
Sound Mode
Balance
Reset
Spatial
Dual Sound
Volume Offset
Volume
Dual Sound
Speaker
VIDEO CONNECTION
TV Screen
Output
TV
TIMER
PRESET
Auto Programme
Manual Programme Preset
Further Programme Preset
AV Label Preset
Programme Sorting
Parental Lock
Language
Convergence
Personal
Wide
Personal
Off
Mono
0
Mono
Main
[TV - - - - - - -]
[AV1 - - - - - - -]
AV1
OffSleep Timer
PICTURE CONTROL
Picture Mode
Contrast
Reset
Format
SOUND CONTROL
Sound Mode
Balance
Reset
Spatial
Dual Sound
Volume Offset
Volume
Dual Sound
Speaker
VIDEO CONNECTION
TV Screen
Output
TV
TIMER
PRESET
Auto Programme
Manual Programme Preset
Further Programme Preset
AV Label Preset
Programme Sorting
Parental Lock
Language
Convergence
Personal
Wide
Personal
Off
Mono
0
Mono
Main
[TV - - - - - - -]
[AV1 - - - - - - -]
AV1
1:00Sleep Timer
Do you want to start
automatic tuning?
Yes
No
Confirm: OK
(For different adjustments, please refer to
the section "Adjusting the Picture")
(For different adjustments, please refer to
the section "Adjusting the Sound" )
(For more details, please refer to the
section "Selecting the output source for the
Euro AV connectors")
(For more details, please refer to the
section "Using the Sleep Timer")
(For more details, please refer to the
section "Automatically Tuning the TV
using the Remote Control")
PRESET
Auto Programme
Manual Programme Preset
Further Programme Preset
AV Label Preset
Programme Sorting
Parental Lock
Language
Convergence
PRESET
Auto Programme
Manual Programme Preset
Further Programme Preset
AV Label Preset
Programme Sorting
Parental Lock
Language
Convergence
PRESET
Auto Programme
Manual Programme Preset
Further Programme Preset
AV Label Preset
Programme Sorting
Parental Lock
Language
Convergence
PRESET
Auto Programme
Manual Programme Preset
Further Programme Preset
AV Label Preset
Programme Sorting
Parental Lock
Language
Convergence
PRESET
Auto Programme
Manual Programme Preset
Further Programme Preset
AV Label Preset
Programme Sorting
Parental Lock
Language
Convergence
MANUAL PROGRAMME PRESET
PROG SYS CHAN
FURTHER PROGRAMME PRESET
PROG AFT DECODER
LABEL
B/G
0
MV-CH
C 40
B/G
1
TVE-1
C 41
B/G
2
TVE-2
C 31
B/G
3
ANT-3
C 34
B/G
4
TELE 5
C 27
B/G
5
C PLUS
C 47
B/G
6
- - - - -
C 44
B/G
7
- - - - -
C 23
B/G
8
CNN -
C 35
B/G
9
BBC-W
C 28
On
0
Off
On
1
Off
On
2
AV1
On
3
Off
On
4
AV2
On
5
Off
On
6
Off
On
7
Off
On
8
Off
On
9
Off
AV LABEL PRESET
INPUT LABEL
AV1
- - - - -
RGB
- - - - -
AV2
- - - - -
YC2
- - - - -
AV3
- - - - -
PROGRAMME SORTING
PROG SYS CHAN LABEL
B/G
0
BBC-W
C 28
B/G
1
MV-CH
C 40
B/G
2
TVE-1
C 41
B/G
3
TVE-2
C 31
B/G
4
ANT-3
C 34
B/G
5
TELE 5
C 27
B/G
6
C PLUS
C 47
B/G
7
- - - - -
C 44
B/G
8
- - - - -
C 23
B/G
9
CNN -
C 35
PARENTAL LOCK
PROG
SYS CHAN LABEL
B/G
0
MV-CH
C 40
B/G
1
TVE-1
C 41
B/G
2
TVE-2
C 31
B/G
3
ANT-3
C 34
B/G
4
TELE 5
C 27
B/G
5
C PLUS
C 47
B/G
6
- - - - -
C 44
B/G
7
- - - - -
C 23
B/G
8
CNN -
C 35
B/G
9
- - - - -
C 28
(For more details, please refer to the
section "Manually Tuning the TV")
(For more details, please refer to the
section "Using the Further Programme
Preset function"
(For more details, please refer to the
section "Using the AV Label Preset
function")
(For more details, please refer to the
section "Changing the Programme
Order of the TV channels")
(For more details, please refer to the
section "Locking Programmes").
32
Additional Information
PRESET
Auto Programme
Manual Programme Preset
Further Programme Preset
AV Label Preset
Programme Sorting
Parental Lock
Language
Convergence
PRESET
Auto Programme
Manual Programme Preset
Further Programme Preset
AV Label Preset
Programme Sorting
Parental Lock
Language
Convergence
LANGUAGE
English
Deutsch
Français
Italiano
Nederlands
Polski
Česki
Magyar
Eλλnvιkά
(For more details, please refer to the
section "Selecting Language")
(For more details, please refer to the
section "Adjusting Colour Registration
(Convergence)".
Page 33

Additional Information
Specifications
TV system
B/G/H, D/K
Colour system
PAL, SECAM
NTSC 3.58, 4.43 (only Video In)
Channel coverage
VHF: E2-E12
UHF: E21-E69
CATV: S1-S20
HYPER: S21-S41
D/K: R1-R12, R21-R69
Projected picture size
41 inches
Approx. 103 cm measured diagonally
Rear Terminals
• Centre speaker input terminals (2
•
• :1/
• :2/q 2 21-pin Euro connector (CENELEC
• :3 21-pin Euro connector (CENELEC
Front Terminals
C
terminals)
(L,R) audio outputs (phono jacks)
21-pin Euro connector (CENELEC
standard) including audio/video input,
RGB input, TV audio/video output
standard) including audio/video input,
S video input, selectable audio/video
output
standard) including audio/video input,
selectable audio/video output (selectable
the same output source as :2/q2
connector)
k video input - phono jack
2
audio inputs - phono jacks
2
2
S video input - 4 pin DIN
q
2
Headphones jack - minijack stereo
Sound output
2 x 30 W (music power)
2 x 15 W (RMS)
Centre SP input
30 W (RMS) (using as the centre speaker)
Power consumption
145 W
Standby Power consumption
0.7 W
Dimensions (w x h x d)
Approx. 1020 x 1115 x 417 mm
Weight
Approx. 53 kg
Accessories supplied
1 Remote Control (RM-892)
2 Batteries (IEC designated)
1 Safety foot
Other features
Digital Comb filter (High resolution)
TELETEXT, Fastext, TOPtext
NICAM
Sleep Timer
Smartlink
Design and specifications are subject to change without notice.
Ecological Paper - Totally Chlorine Free
Additional Information
33
Page 34

Additional Information
Troubleshooting
Here are some simple solutions to the problems which may affect the picture and sound.
Problem Solution
No picture (screen is dark), no sound • Plug the projection TV in.
• Press the
• If the indicator is on, press TV button or a
programme number button on the remote control.
• Check the aerial connection.
• Check that the selected video source is on.
• Turn the projection TV off for 3 or 4 seconds and then turn it
on again using the
TV.
Poor or no picture (screen is dark), • Using the MENU system, select the Picture Adjustment
but good sound display.
Adjust the brightness, picture and colour balance levels.
• From the Picture Adjustment display select Reset to return
to the factory settings.
button on the front of the projection TV.
button on the front of the projection
Poor picture quality when watching a • Press the button repeatedly on the remote control until
RGB video source. the RGB symbol
Good picture, no sound • Press the +/– button on the remote control.
• If is displayed on the screen, press the button on the
remote control.
• Check that "Main" speaker is selected on the SOUND
CONTROL menu.
No colour on colour programmes • Using the MENU system, select the Picture Adjustment
display. Adjust the colour balance.
• From the Picture Adjustment display select Reset to return
to the factory settings.
Distorted picture when changing • Turn off any equipment connected to the 21 pin Euro
programmes or selecting teletext connector on the rear of the TV.
Noisy picture when viewing TV • Adjust Fine Tuning (AFT) to obtain better picture reception.
channel For details, please refer to the section "Using the Further
Programme Preset function"
Remote control does not function • Replace the batteries.
is displayed on the screen.
34
Additional Information
The standby indicator on the TV • Contact your nearest Sony service centre.
flashes.
• If you continue to have these problems, have your TV serviced by qualified personnel.
• NEVER open the casing yourself.
Page 35

RückprojektionsFernseher
Wir gratulieren Ihnen zum Kauf Ihres Sony Rückprojektions-Fernseher.
Lesen Sie bitte vor der Inbetriebnahme des Gerätes diese Anleitung sorgfältig
durch und bewahren Sie sie gut auf.
Über diese Bedienungsanleitung
• Verwenden Sie den Teil Inbetriebnahme beim Aufstellen und um sich mit den
Grundfunktionen des Gerätes vertraut zu machen.
• Verwenden Sie den Teil Zusatzfunktionen, falls Sie die Sonder- und
Zusatzfunktionen des Gerätes interessieren.
• In der Anleitung verwendete Symbole:
• Mögliche Gefahren
• Wichtiger Hinweis
Bedienungsanleitung
DE
• Information zu einer Funktion
• 1, 2 ... Eine Aufzählung von Bedienschritten
MENU
• Farblich hervorgehobene Tasten auf der Fernbedienung beziehen sich
K
auf die zu drückenden Tasten, um eine Bedienfolge auszuführen.
• Resultat einer Bedienung.
• Text geht auf der nächsten Seite weiter.
35
Page 36

Zu Ihrer Sicherheit
Zu Ihrer Sicherheit
Sicherheitshinweis
Rückprojektions-Fernseher arbeiten mit sehr hohen Spannungen. Um ein Feuer oder einen
elektrischen Schlag zu vermeiden, sollten Sie unbedingt die folgenden Sicherheitshinweise
beachten.
Allgemeine Hinweise
• Dieses Fernsehgerät ist zum Empfang und der
Wiedergabe von Audio- und Videosignalen bestimmt.
Jegliche andere Verwendung des Gerätes ist nicht
erlaubt.
• Setzen Sie das Gerät keinesfalls Regen oder sonstiger
Feuchtigkeit aus.
• Öffnen Sie nie selbst die Rückwand des Gerätes.
• Lassen Sie Reparaturen ausschließlich von
Fachpersonal ausführen!
Zur sicheren Installation
• Stellen Sie das Gerät nicht an einem heißen, feuchten
oder übermäßig staubigen Platz auf.
• Decken Sie die Lüftungsschlitze des Gerätes nicht ab.
Lassen Sie zur Belüftung mindestens 10 cm um das
Gerät frei (z.B. in einer Regalwand).
• Setzen Sie das Gerät keinen starken Erschütterungen
aus.
• Stellen Sie das Gerät nur auf einen stabilen TV-Stand,
der für das Gewicht und die Abmessungen des
Gerätes ausgelegt ist.
• Um ein scharfes Bild zu erzielen, setzen Sie den
Fernsehschirm nicht direkter Beleuchtung oder
direktem Sonnenlicht aus. Verwenden Sie, falls möglich,
von der Decke nach unten gerichtete Spotbeleuchtung.
• Wird das Rückprojektions-Fernseher direkt von einem
kalten in einen warmen Raum gebracht oder ändert
sich die Raumtemperatur sehr plötzlich, kann das Bild
unscharf sein oder in einigen Bereichen wenig Farbe
aufweisen. Dies ist darauf zurückzuführen, daß sich
Feuchtigkeit auf den Spiegeln oder Linsen im Inneren
des Rückprojektions-Fernseher niedergeschlagen hat.
Lassen Sie die Feuchtigkeit verdunsten, bevor Sie das
Rückprojektions-Fernseher benutzen.
Zum sicheren Betrieb
• Betreiben Sie das Gerät nur an 220 - 240 V AC, 50 Hz.
• Ziehen Sie sofort den Netzstecker, falls Flüssigkeiten
oder Gegenstände in das Gehäuse
gelangen. Lassen Sie das Gerät auf jeden Fall
überprüfen!
• Schalten Sie das Gerät normalerweise mit dem
Netzschalter ganz aus. Lassen Sie es nicht
unnötig im Bereitschaftsbetrieb. Ziehen Sie den
Netzstecker, falls Sie das Gerät längere Zeit nicht
verwenden.
• Ziehen Sie beim Ausstecken immer am Stecker selbst,
nicht am Kabel. Sie könnten ansonsten das Netzkabel
beschädigen.
• Ziehen Sie bei einem Gewitter Netz- und
Antennenkabel. Ansonsten kann das Gerät bei einem
Einschlag beschädigt werden.
• Wird ein Standbild für längere Zeit dargestellt, z.B. bei
Anschluß eines Videospiels oder eines Computers
oder bei 4:3 Ausstrahlungen, so kann die Bildröhre
beschädigt werden. Um dies zu vermeiden, sollten Sie
bei diesen Anwendungen den Bildkontrast niedrig
einstellen.
Zur Wartung
• Reinigen Sie den Bildschirm mit einem weichen,
feuchten Tuch. Verwenden Sie keine scharfen Reiniger.
Ziehen Sie aus Sicherheitsgründen vor dem Reinigen
den Netzstecker des Geräts aus der Netzsteckdose.
• Langfristig können Staub- und Nikotinablagerungen
zu einem Wärmestau im Gerät führen. Dies kann ein
Sicherheitsrisiko sein und die Lebensdauer Ihres
Rückprojektions-Fernseher verkürzen. Wie empfehlen
deshalb, das Gerät alle 5 Jahre warten zu lassen.
• Berühren Sie den Fernsehschirm möglichst nicht, und
achten Sie darauf, die Mattscheibe nicht mit scharfen
Gegenständen zu zerkratzen.
36
Zu Ihrer Sicherheit
Page 37

Inhaltsverzeichnis
Inhaltsverzeichnis
Über diese Bedienungsanleitung .......................................................................................................35
Zu Ihrer Sicherheit ................................................................................................................................36
Als erstes
Auf einen Blick
Überprüfen des mitgelieferten Zubehörs .............................................................................38
Auf einen Blick - Tasten am Gerät .........................................................................................38
Auf einen Blick - Fernbedienung ...........................................................................................39
Erstmalige Inbetriebnahme
Schritt 1- Installation
Einlegen der Batterien in die Fernbedienung ......................................................................40
Stabilisierung des Rückprojektions-Fernsehers...................................................................40
Anschluß der Antenne ............................................................................................................41
Einschalten des Fernsehgerätes ............................................................................................. 41
Schritt 2 - Abspeicherung - Grundfunktionen
Menüsprache wählen ..............................................................................................................42
Automatisches Abspeichern von Sendern mit der Fernbedienung ................................. 43
Ordnen der Programmspeicherplätze .................................................................................. 44
Weitere Funktionen
Abspeicherung - Zusatzfunktionen
Einstellung der Farbwiedergabe (Konvergenz) .................................................................. 45
Automatisches Abspeichern von Sendern ........................................................................... 46
Manuelles Abspeichern von Sendern ................................................................................... 47
Funktion der “Zusatzfunktionen” .........................................................................................48
Die Kindersicherung................................................................................................................49
Überspringen von Programmspeicherplätzen .................................................................... 50
Eingeben eines Namens für einen Kanal ..............................................................................51
Bedienung des Fernsehgerätes - Zusatzfunktionen
Einstellen des Bildes ................................................................................................................ 52
Einstellen des Bildschirmformats ..........................................................................................53
Einstellen des Tons ...................................................................................................................54
Die automatische Abschaltfunktion ......................................................................................56
Videotext
Verwenden von Videotext ......................................................................................................57
Anschlußmöglichkeiten
Anschluß von anderen Geräten .............................................................................................58
Anschluß von anderen Geräten .............................................................................................59
“Smartlink” ...............................................................................................................................60
Fernbedienen anderer Sony-Geräte.......................................................................................60
Wahl des Ausgangssignals der Eurobuchsen. ..................................................................... 61
Die Funktion “AV-Benennung” ............................................................................................. 62
DE
Weitere Informationen
Optimaler Sichtbereich ............................................................................................................ 63
Das Menüsystem ......................................................................................................................64
Technische Daten ..................................................................................................................... 65
Fehlersuche ............................................................................................................................... 66
Inhaltsverzeichnis
37
Page 38

Als erstes - Auf einen Blick
Überprüfen des mitgelieferten Zubehörs
VIDEO TV
1
2
3
4
5
6
7
8
9
0
PROGR
MENU
RM
892
S
Eine Fernbedienung
(RM-892)
Zwei Batterien (R6)
Ein Stabilisator
Auf einen Blick - Tasten am Gerät
Bereitschaftsanzeige
Taste zur
Wahl des
Videoeingangs
Lautstärkeregelung
Programmwahl
Netzschalter
(Ein/Aus)
Tasten am Gerät: Zum
Öffnen Markierung
auf Abdeckung vorne am
Gerät drücken.
Als erstes - Auf einen Blick
38
S-VideoEingangsbuchse
Cinchbuchse,
Videoeingang
Cinchbuchsen,
Audioeingang
KopfhörerBuchse
Taste für
automatische
Konvergenz-
Taste zur
einstellung
automatischen
Abspeicherung
von Sendern
Page 39

Als erstes - Auf einen Blick
Auf einen Blick - Fernbedienung
VIDEO TV
Taste ohne Funktion an diesem Gerät.
VTR 1 2 3 4 DVD
Zeitangabe
Drücken, um die Uhr ein- oder
auszublenden (sie funktioniert nur
wenn der Videotext eingeschaltet
ist)
Bedienung des Videorecorders
Ausführliche Information finden
CH
Sie im Kapitel “Fernbedienen
anderer Sony-Geräte“
Ton abschalten
Einmal drücken, um Fernsehton
auszuschalten. Nochmals
drücken, um Ton wieder
einzuschalten.
Ein-/Ausschalten des Videorecorders
Drücken, um den Videorecorder ein-
oder auszuschalten
aaaaaaaaaaaaaaaaaaall
TV-Modus
Drücken, um aus dem Videotext oder dem
Videoeingangsmodus in den TV-Modus
zurückzukehren.
Videotext
Drücken, um Videotext einzuschalten.
1
4
7
Tasten ohne Funktion an diesem Gerät
Programmwahl
Mit den Zahlentasten das gewünschte
Programm wählen.
Bei zweistelligen Programmnummern wie
z.B. 23 zuerst -/--, dann die Tasten 2 und 3
drücken. Bei einer Fehleingabe die
Ziffernfolge beliebig ergänzen und
nochmals -/-- und die zwei richtigen
Ziffern drücken.
Ton-Modus
Drücken, um den Ton-Modus
umzuschalten.
+++++++++++++++++...
S
Bild-Modus
Drücken, um den Bild-Modus
umzuschalten.++
+++++++++++++++...
Lautstärkeregelung
Mit + oder - die Lautstärke regeln.
Alle farbigen Tasten und die Symbole in grün haben sowohl im TVBetrieb als auch im Videotext eine Funktion. Informationen über
Videotext finden Sie im entsprechenden Abschnitt dieser
Bedienungsanleitung.
VIDEO TV
2
5
8
0
K
MENU
3
6
9
RM
PROGR
892
Kurzzeitiges Ausschalten
Drücken, um Gerät in den
Bereitschaftsbetrieb zu schalten.
Bereitschaftsanzeige
leuchtet am Gerät.
Taste nochmals drücken, um Gerät wieder
einzuschalten.
Um Energie zu sparen, sollte das Fernsehgerät
normalerweise vollständig ausgeschaltet werden.
Das Gerät schaltet sich automatisch in
den Bereitschaftsbetrieb, wenn 30
Minuten kein Fernsehsignal empfangen
wird und keine Taste gedrückt wird.
Informationsanzeige im Bildschirm
Einmal drücken, um alle Anzeigen im
Bildschirm einzublenden. Nochmals
drücken, um die Anzeigen auszublenden.
Videoeingangs-Modus
Mehrmals drücken, bis das Symbol der
gewünschten Eingangsquelle auf dem
Bildschirm erscheint.
Zurück zum zuletzt betrachteten
Programm
Drücken, um zum zuletzt für mindestens 5
sec. betrachteten Programm zurückzukommen
Einstellen des Bildschirmformats
Wechsel des Bildschirmformats
Mehrmals drücken, um das
Bildschirmformat zu ändern.
Die Fucktion
kann an diesem Fernseher im
Zusammenhang mit dieser Taste nicht
angewendet werden.
Joystick zum Wählen des Menüs
4 Cursor nach oben bewegen
$ Cursor nach unten bewegen
Z Zurück zum vorherigen Menü oder zur
vorherigen Auswahl
z Nächstes Menü oder nächste Auswahl
OK Auswahl bestätigen
Programmwahl
Drücken, um das nächste oder vorherige
Programm zu wählen
Menü-System
Drücken, um das Bildschirm-Menü
einzublenden. Nochmals drücken, um das
Menü wieder auszublenden.
Als erstes - Auf einen Blick
39
Page 40

Erstmalige Inbetriebnahme - Installation
Einlegen der Batterien in die Fernbedienung
Die mitgelieferten Batterien polaritätsrichtig einlegen.
Entsorgen Sie die verbrauchten Batterien bitte umweltgerecht.
Stabilisierung des Rückprojektions-Fernsehers
Als Sicherheitsmaßnahme können Sie den Rückprojektions-Fernseher mit dem gelieferten Stabilisator festigen.
Stecken Sie den Stabilisator in die Öffnung am Unterteil des Gerätes, wie es anschließend angegeben wird.
40
Erstmalige Inbetriebnahme - Installation
Page 41

Erstmalige Inbetriebnahme - Installation
Anschluß der Antenne
Ein Antennenkabel, das den einschlägigen
Vorschriften entspricht, in die
Antennenbuchse
einstecken.
Einschalten des Rückprojektions-Fernseher
Das Gerät an das Netz anschließen (220-240 V. AC, 50 Hz).
Den Netzschalter Ein/Aus am Gerät drücken.
Erstmalige Inbetriebnahme - Installation
41
Page 42

Erstmalige Inbetriebnahme - Abspeicherung - Grundfunktionen
Menüsprache wählen
Mit dieser Funktion können Sie die Sprache wählen, in der die Menübilder erscheinen sollen. Beim erstmaligen Einschalten
des Gerätes erscheint das Menü LANGUAGE (SPRACHE) automatisch auf dem Bildschirm. Sollten Sie die Sprache zu
einem späteren Zeitpunkt ändern wollen, das Menü Sprache im Menü
Schritt 2 gehen.
(SENDERABSPEICHERUNG) wählen und zu
1 Das Gerät mit dem Netzschalter Ein/Aus einschalten. Nun
erscheint beim erstmaligen Einschalten automatisch das Menü
LANGUAGE (SPRACHE) auf dem Bildschirm.
2 Mit dem Joystick auf $ oder 4 die gewünschte Sprache auswählen.
Mit der OK-Taste bestätigen.
VIDEO TV
1
2
3
4
5
6
7
8
9
Nun erscheint das Menü Automatisch Abspeichern in der gewählten
Sprache.
LANGUAGE
English
Deutsch
Français
Italiano
Nederlands
Polski
Česki
Magyar
Eλλnvιkά
Select Language:
Confirm: OK
SPRACHE
English
Deutsch
Français
Italiano
Nederlands
Polski
Česki
Magyar
Eλλnvιkά
Sprache bestätigen:
Bestätigen: OK
Automatisches Abspeichern
jetzt starten?
Ja
Nein
Bestätigen: OK
LANGUAGE
English
Deutsch
Français
Italiano
Nederlands
Polski
Česki
Magyar
Eλλnvιkά
Select Language:
Confirm: OK
0
PROGR
MENU
RM
892
S
42
Erstmalige Inbetriebnahme - Abspeicherung - Grundfunktionen
Page 43

Erstmalige Inbetriebnahme - Abspeicherung - Grundfunktionen
Automatisches Abspeichern von Sendern mit der
Fernbedienung
Bevor Sie fernsehen können, müssen Sie Sender auf Programmspeicherplätze abspeichern. Mit den folgenden Schritten
sucht und speichert Ihr Fernsehgerät automatisch alle zur Verfügung stehenden Sender.
Nach Auswahl der gewünschten Sprache erscheint automatisch ein neues Menü auf dem Bildschirm, das Sie fragt, ob Sie
jetzt automatisch abspeichern möchten. Wenn Sie jedoch das Menü zu einem späteren Zeitpunkt aufrufen möchten (z.B.
nach einem Umzug), finden Sie das Menü Automatisch Abspeichern im Menü
können auch mit einem Tastendruck am Gerät selbst abspeichern. Siehe dazu «Automatisches Abspeichern von Sendern».
(SENDERABSPEICHERUNG). Sie
1
4
7
S
VIDEO TV
2
5
8
0
MENU
3
6
9
PROGR
RM
1 Mit der OK-Taste auf der Fernbedienung Ja auswählen.
Nun erscheint automatisch ein neues Menü auf dem Bildschirm, das
Sie bittet, den Antennenanschluß zu überprüfen.
2 Überprüfen Sie, ob die Antenne korrekt angeschlossen ist und
bestätigen Sie mit der OK-Taste.
Automatisches Abspeichern
jetzt starten?
Ja
Nein
Bestätigen: OK
Ist die Antenna
angeschlossen
Bestätigen: OK
Der automatische Suchlauf startet nun und die Meldung
“AUTOMATISCH ABSPEICHERN” blinkt während der Dauer des
Suchlaufes.
Der Suchlauf kann mehrere Minuten dauern. Haben Sie
AUTOMATISCH ABSPEICHERN
PROG
NORM
1
AUTOMATISCH ABSPEICHERN
B/GKAC 26
NAME
- - - - -
Geduld und drücken Sie keine Taste während der Dauer der
Feinabstimmung.
PROGRAMME ORDNEN
PROG NORM KA NAME
B/G
0
Sobald der Suchlauf beendet ist, erscheint das Menü Programme ordnen
auf dem Bildschirm.
892
1
2
3
4
5
6
7
8
9
Auswählen PROG: + OK
Abbrechen: MENU
BBC-W
C 28
B/G
MV-CH
C 40
B/G
TVE-1
C 41
B/G
TVE-2
C 31
B/G
ANT-3
C 34
B/G
TELE 5
C 27
B/G
C PLUS
C 47
B/G
- - - - -
C 44
B/G
- - - - -
C 23
B/G
CNN -
C 35
Anmerkungen: • Sie können den Suchlauf mit der MENU-Taste
unterbrechen.
• Falls Sie den Suchlauf mit der MENU-Taste
unterbrochen haben, erscheint das Menü
Programme ordnen nicht automatisch auf dem
Bildschirm.
Erstmalige Inbetriebnahme - Abspeicherung - Grundfunktionen
43
Page 44

Erstmalige Inbetriebnahme - Abspeicherung - Grundfunktionen
Ordnen der Programmspeicherplätze
Nachdem alle zur Verfügung stehenden Sender abgespeichert sind, erscheint automatisch ein neues Menü auf dem
Bildschirm, in dem Sie die Reihenfolge der Sender ändern können.
Falls Sie die Reihenfolge zu einem späteren Zeitpunkt ändern möchten, finden Sie das Menü Programme Ordnen in dem
Menü
(SENDERABSPEICHERUNG). Beginnen Sie dann bei Abschnitt b) dieses Kapitels.
a)
Sie möchten die Reihenfolge der Sender beibehalten
VIDEO TV
1 Die MENU-Taste drücken, um in den normalen TV-Betrieb
zurückzukehren.
PROGRAMME ORDNEN
PROG NORM KA NAME
B/G
0
B/G
1
B/G
2
B/G
3
B/G
4
B/G
5
B/G
6
B/G
7
B/G
8
B/G
9
Auswählen PROG: + OK
Abbrechen: MENU
C 28
C 40
C 41
C 31
C 34
C 27
C 47
C 44
C 23
C 35
BBC-W
MV-CH
TVE-1
TVE-2
ANT-3
TELE 5
C PLUS
- - - - -
- - - - CNN -
1
4
7
S
2
0
MENU
3
5
6
8
9
PROGR
RM
892
Ihr Gerät ist jetzt betriebsbereit.
b) Sie möchten die Reihenfolge der Sender ändern
1 Mit dem Joystick der Fernbedienung auf $ oder 4 gehen, um die
Programm- Nummer mit dem Kanal (Fernsehsender) auszuwählen,
dessen Stellung geändert werden soll, und anschließend auf OK
drücken.
2 Mit dem Joystick auf $ oder 4 gehen, um die neue
Programmspeichernummer einzustellen, mit der der gewählte
Kanal gespeichert werden soll, und anschließend auf OK drücken.
Der gewählte Kanal stellt sich um auf den neuen
Programmspeicherplatz, und die übrigen Kanäle werden
entsprechend verschoben.
PROGRAMME ORDNEN
PROG NORM KA NAME
B/G
0
C 28
B/G
1
C 40
B/G
2
C 41
B/G
3
C 31
B/G
4
C 34
B/G
5
C 27
B/G
6
C 47
B/G
7
C 44
B/G
8
C 23
B/G
9
C 35
Auswählen PROG: + OK
Abbrechen: MENU
PROGRAMME ORDNEN
NORM KA NAMEPROG
B/G
0
C 40
B/G
1
C 41
B/G
2
C 31
B/G
3
C 34
B/G
4
C 27
B/G
5
C 47
B/G
6
C 44
B/G
7
C 23
B/G
8
C 35
B/G
9
C 28
Position wählen:
Bestätigen: OK
BBC-W
MV-CH
TVE-1
TVE-2
ANT-3
TELE 5
C PLUS
- - - - -
- - - - CNN -
MV-CH
TVE-1
TVE-2
ANT-3
TELE 5
C PLUS
- - - - -
- - - - CNN BBC-W
3 Falls Sie weitere Sender ordnen möchten, die Schritte 1 und 2
wiederholen.
4 Die MENU-Taste drücken, um in den normalen TV-Betrieb
zurückzukehren.
Ihr Gerät ist jetzt betriebsbereit.
Erstmalige Inbetriebnahme - Abspeicherung - Grundfunktionen
44
Page 45

Weitere Funktionen - Abspeicherung - Zusatzfunktionen
Einstellung der Farbwiedergabe (Konvergenz)
Auf Grund des Erdmagnetismus kann das Bild verschwommen erscheinen, indem sich verschiedene Farben in den
Bildumrissen mischen. In diesem Fall gehen Sie so vor, wie nachfolgend erläutert ist.
Automatische Konvergenz der Linien
in rot, grün und blau.
1 Drücken Sie auf die Markierung der vorderen Abdeckung des
Rückprojektions-Fernsehers, um das vordere Bedienfeld zu öffnen.
2 Drücken Sie auf die Taste des Rückprojektions-Fernsehers.
Die etwa 30 Sekunden lange Funktion zur automatischen Konvergenz
beginnt. Sobald das weiße Kreuz auf Ihrem Bildschirm verschwindet ist Ihr
Gerät jetzt betriebsbereit.
Anmerkungen:
Die Funktion Automatische Konvergenz funktioniert nicht:
• wenn kein Eingangssignal anliegt
• wenn das Eingangssignal schwach ist
• wenn der Bildschirm Spotbestrahlung oder direktem Sonnenlicht
ausgesetzt ist
• wenn Videotext verwendet wird
1
4
7
S
VIDEO TV
2
5
8
0
MENU
3
6
9
PROGR
RM
Wenn Sie die Konvergenz genauer
einstellen wollen
1 MENU drücken, um das Menü einzublenden.
2 Mit dem Joystick auf $ gehen, um das Symbol aufzurufen, und
anschließend auf z gehen, zur Einblendung des Menüs
SENDERABSPEICHERUNG.
BILD - MENÜ
Bild - Modus
Kontrast
Normwerte
Format
Anwender
Breitbild
3 Mit dem Joystick auf $ oder 4 gehen, zur Konvergenzeinstellung
und anschließend auf z gehen.
4 Mit dem Joystick auf $ oder 4 gehen, um die “Linie” (vertikale und
horizontale Linien in rot und blau), die eingestellt werden soll,
auszuwählen:
: rote vertikale Linie (Einstellung links/rechts)
: rote horizontale Linie (Einstellung oben/unten)
: blaue vertikale Linie (Einstellung links/rechts)
SENDERABSPEICHERUNG
Automatisch Abspeichern
Manuell Abspeichern
Zusatzfunktionen
AV - Benennung
Programme Ordnen
Kindersicherung
Sprache
Konvergenz
: blaue horizontale Linie (Einstellung oben/unten)
Drücken auf OK.
5 Mit dem Joystick mehrmals auf $, 4, Z oder z gehen, um die
gewählte Linie mit der grünen Linie in der Mitte abzustimmen.
Zum Bestätigen auf OK drücken.
6 Die Schritte 4 und 5 wiederholen, um die anderen Linien so
einzustellen, dass die Linien sich zu einem weißen Kreuz
überschneiden.
892
7 Die MENÜ-Taste drücken, um in den normalen TV-Betrieb
zurückzukehren.
Ihr Gerät ist jetzt betriebsbereit.
Weitere Funktionen - Abspeicherung - Zusatzfunktionen
45
Page 46

Weitere Funktionen - Abspeicherung - Zusatzfunktionen
Automatisches Abspeichern von Sendern
Als Alternative zum automatischen Abspeichern mit der Fernbedienung können Sie auch mit nur einem Tastendruck am
Gerät und der OK-Taste auf der Fernbediening alle zur Verfügung stehenden Sender automatisch abspeichern lassen.
1 Drücken Sie die Markierung vorne am Gerät, um die Abdeckung
des Bedienteils zu öffnen.
Ist die Antenna
angeschlossen
Bestätigen: OK
Ist die Antenna
angeschlossen
Bestätigen: OK
AUTOMATISCH ABSPEICHERN
PROG
NORM
1
AUTOMATISCH ABSPEICHERN
B/GKAC 26
NAME
- - - - -
VIDEO TV
2 Die Taste so lange gedrückt halten, bis automatisch ein neues
Menü auf dem Bildschirm erscheint, das Sie bittet, den
Antennenanschluß zu überprüfen.
3 Überprüfen Sie, ob die Antenne korrekt angeschlossen ist und
bestätigen Sie mit der OK-Taste auf der Fernbedienung.
Der automatische Suchlauf startet nun und die Meldung
“AUTOMATISCH ABSPEICHERN” blinkt während der Dauer des
Suchlaufes.
Der Suchlauf kann mehrere Minuten dauern. Haben Sie
1
2
3
4
5
6
7
8
9
Geduld und drücken Sie keine Taste während der Dauer der
Feinabstimmung.
0
Sobald der Suchlauf beendet ist, erscheint das Menü Programme ordnen
auf dem Bildschirm.
• Möchten sie die Reihenfolge der Sender beibehalten, drücken Sie die
MENU-Taste um in den normalen TV-Betrieb zurückzukehren.
• Möchten sie die Reihenfolge der sender ändern, beginnen Sie dann bei
im Kapitel "Ordnen der Programmspeicherplätze", Abschnitt b).
PROGR
MENU
Anmerkungen: Sie können den Suchlauf mit der MENU-Taste
RM
892
S
Weitere Funktionen - Abspeicherung - Zusatzfunktionen
46
unterbrechen.
Page 47

Weitere Funktionen - Abspeicherung – Zusatzfunktionen
Manuelles Abspeichern von Sendern
Verwenden Sie diese Funktion um einen Sender nach dem anderen in der gewünschten Programmreihe einzustellen, sowie
die Kanäle (Fernsehsender) oder einen Anschluß eines Videorecorders.
VIDEO TV
1 MENU drücken, um das Menü einzublenden.
2 Mit dem Joystick auf $ gehen, um das Symbol aufzurufen,
und anschließend drücken Sie auf z, um das Menü
SENDERABSPEICHERUNG aufzurufen.
1
2
3
4
5
6
3 Mit dem Joystick auf $ oder 4 gehen, um Manuell Abspeichern
7
8
9
aufzurufen, und anschließend gehen Sie auf z.
0
4 Mit dem Joystick auf $ oder 4 gehen, um die Programmnummer
(Position) zu wählen unter der Sie einen Kanal (Fernsehsender)
PROGR
MENU
abspeichern wollen, und anschließend gehen Sie auf z, um die
Spalte NORM aufzurufen.
BILD - MENÜ
Bild - Modus
Kontrast
Normwerte
Format
SENDERABSPEICHERUNG
Automatisch Abspeichern
Manuell Abspeichern
Zusatzfunktionen
AV - Benennung
Programme Ordnen
Kindersicherung
Sprache
Konvergenz
SENDERABSPEICHERUNG
Automatisch Abspeichern
Manuell Abspeichern
Zusatzfunktionen
AV - Benennung
Programme Ordnen
Kindersicherung
Sprache
Konvergenz
MANUELL ABSPEICHERN
PROG NORM KA
0
1
2
3
4
5
6
7
8
9
Anwender
Breitbild
B/G
C 40
B/G
C 41
B/G
C 31
B/G
C 34
B/G
C 27
B/G
C 47
B/G
C 44
B/G
C 23
B/G
C 35
B/G
C 28
NAME
MV-CH
TVE-1
TVE-2
ANT-3
TELE 5
C PLUS
- - - - -
- - - - CNN BBC-W
S
RM
892
5 Mit dem Joystick auf $ oder 4 gehen, um das
Fernsehübertragungs-System abzuspeichern (B/G für die
westeuropäischen Länder oder D/K für die osteuropäischen
Länder) oder ein Eingangssignal eines Videorecorders (AV1,
AV2...) und, anschließend, gehen Sie auf z, um die Spalte KA
aufzurufen.
6 Mit dem Joystick auf $ oder 4 gehen, um den Kanaltyp
abzuspeichern (“C” für Kanäle auf dem Landwege oder “S” für
Kabelkanäle) und, anschließend, gehen Sie auf z.
7 Drücken Sie die Nummerntasten, um direkt die Nummer des
Kanals des Fernsehsenders einzugeben, oder mit dem Joystick auf
$ oder 4 gehen, um den nächsten verfügbaren Kanal zu suchen.
Wenn Sie diesen Kanal nicht abspeichern wollen, gehen Sie mit
dem Joystick auf $ oder 4, um einen anderen Kanal zu suchen.
8 Wenn das der Kanal ist, den Sie abspeichern wollen, drücken Sie
auf OK.
MANUELL ABSPEICHERN
PROG NORM KA
B/G
0
C 40
B/G
1
C 41
B/G
2
C 31
B/G
3
C 34
B/G
4
C 27
B/G
5
C 47
B/G
6
C 44
B/G
7
C 23
B/G
8
C 35
B/G
9
C 28
MANUELL ABSPEICHERN
PROG NORM KA
B/G
0
C 40
B/G
1
C 41
B/G
2
C 31
B/G
3
C 34
B/G
4
C 27
B/G
5
C 47
B/G
6
C 44
B/G
7
C 23
B/G
8
C 35
B/G
9
C 28
MANUELL ABSPEICHERN
PROG NORM KA
B/G
0
C 40
B/G
1
C 41
B/G
2
C 31
B/G
3
C 34
B/G
4
C 27
B/G
5
C 47
B/G
6
C 44
B/G
7
C 23
B/G
8
C 35
B/G
9
C 28
NAME
MV-CH
TVE-1
TVE-2
ANT-3
TELE 5
C PLUS
- - - - -
- - - - CNN BBC-W
NAME
MV-CH
TVE-1
TVE-2
ANT-3
TELE 5
C PLUS
- - - - -
- - - - CNN BBC-W
NAME
MV-CH
TVE-1
TVE-2
ANT-3
TELE 5
C PLUS
- - - - -
- - - - CNN BBC-W
9 Wiederholen Sie die Schritte 4 bis 8, um weitere Kanäle
einzustellen und abzuspeichern.
10 Die MENU-Taste drücken, um in den normalen TV-Betrieb
zurückzukehren.
Ihr Gerät ist jetzt betriebsbereit
Weitere Funktionen - Abspeicherung - Zusatzfunktionen
47
Page 48

Weitere Funktionen - Abspeicherung - Zusatzfunktionen
Funktion der “Zusatzfunktionen“
Mit dieser Funktion können Sie:
a) das Fernsehgerät außerdem manuell feineinstellen, um einen besseren Bildempfang zu erzielen, wenn das Bild verzerrt
ist, auch wenn normalerweise die automatische Feinabstimmung (AFT) eingeschaltet ist, oder
b) den AV3-Ausgang voreinstellen für die Programmpositionen von Kanälen mit verschlüsselten Signalen, wie z. B. von
einem Pay-TV-Decoder. Auf diese Weise kann ein angeschlossener Videorecorder das unverschlüsselte Signal
aufnehmen.
1
4
7
S
VIDEO TV
2
5
8
0
MENU
3
6
9
PROGR
RM
1 MENU drücken, um das Menü einzublenden.
2 Mit dem Joystick auf z gehen, um das Symbol zu wählen, und
anschließend gehen Sie auf z und wechseln in das Menü
SENDERABSPEICHERUNG.
3 Mit dem Joystick auf $ oder 4 gehen, um die Option
Zusatzfunktionen auszuwählen, und anschließend gehen Sie auf z.
4 Mit dem Joystick auf $ oder 4 gehen, um die entsprechende
Programmnummer auszuwählen, und anschließend gehen Sie so oft
auf z, bis zum Auswählen von.:
a) AFT, oder
b) DEKODER
892
BILD - MENÜ
Bild - Modus
Kontrast
Normwerte
Format
SENDERABSPEICHERUNG
Automatisch Abspeichern
Manuell Abspeichern
Zusatzfunktionen
AV - Benennung
Programme Ordnen
Kindersicherung
Sprache
Konvergenz
SENDERABSPEICHERUNG
Automatisch Abspeichern
Manuell Abspeichern
Zusatzfunktionen
AV - Benennung
Programme Ordnen
Kindersicherung
Sprache
Konvergenz
ZUSATZFUNKTIONEN
PROG AFT DEKODER
0
1
2
3
4
5
6
7
8
9
Anwender
Breitbild
Ein
Aus
Ein
Aus
Ein
AV1
Ein
Aus
Ein
AV2
Ein
Aus
Ein
Aus
Ein
Aus
Ein
Aus
Ein
Aus
Die Farbe der ausgewählten Option wechselt.
5 a) AFT
Mit dem Joystick auf $ oder 4 gehen, um die Kanalfrequenz auf –
15 und + 15 fein einzustellen, und anschließend bestätigen mit der
Taste OK.
Gehen Sie vor wie in Schritt 4 und 5a) erläutert, wenn Sie weitere
Kanäle feineinstellen wollen.
ZUSATZFUNKTIONEN
PROG AFT DEKODER
2
0
Ein
1
Ein
2
Ein
3
Ein
4
Ein
5
Ein
6
Ein
7
Ein
8
Ein
9
Aus
Aus
Aus
Aus
Aus
Aus
Aus
Aus
Aus
Aus
b) DEKODER
Mit dem Joystick auf $ oder 4 gehen, um AV 3 auzuwählen und
anschließend bestätigen Sie mit der Taste OK.
Sie können nun einen Decoder an die Eurobuchse :3 an der
Rückseite des Rückprojektions-Fernsehers anschließen, und das
Bild von diesem Decoder erscheint unter dieser
Programmnummer.
Gehen Sie vor, wie unter Schritt 4 und 5b) erläutert, um den
AV3-Ausgang für weitere Programmpositionen voreinzustellen.
6 Die MENU-Taste drücken, um in den normalen TV-Betrieb
zurückzukehren.
Ihr Gerät ist jetzt betriebsbereit.
48
Weitere Funktionen - Abspeicherung - Zusatzfunktionen
ZUSATZFUNKTIONEN
PROG AFT DEKODER
Ein
0
Ein
1
Ein
2
Ein
3
Ein
4
Ein
5
Ein
6
Ein
7
Ein
8
Ein
9
AV3
Aus
Aus
Aus
Aus
Aus
Aus
Aus
Aus
Aus
Page 49

Weitere Funktionen - Abspeicherung – Zusatzfunktionen
Die Kindersicherung
Mit dieser Funktion können Sie verhindern, dass unerwünschte Sendungen auf dem Fernsehbildschirm angezeigt werden.
VIDEO TV
1 MENU drücken, um das Menü einzublenden.
BILD - MENÜ
Bild - Modus
Kontrast
Normwerte
Format
Anwender
Breitbild
2 Mit dem Joystick auf $ gehen, um das Symbol auzuwählen,
und anschließend gehen Sie auf z, um in das Menü
SENDERABSPEICHERUNG zu wechseln.
1
2
3
4
5
6
7
8
9
3 Mit dem Joystick auf $ oder 4 gehen, um Kindersicherung
auszuwählen und anschließend gehen Sie auf z.
0
SENDERABSPEICHERUNG
Automatisch Abspeichern
Manuell Abspeichern
Zusatzfunktionen
AV - Benennung
Programme Ordnen
Kindersicherung
Sprache
Konvergenz
SENDERABSPEICHERUNG
Automatisch Abspeichern
Manuell Abspeichern
Zusatzfunktionen
AV - Benennung
Programme Ordnen
Kindersicherung
Sprache
Konvergenz
4 Mit dem Joystick auf $ oder 4 gehen, um die Programmnummer
KINDERSICHERUNG
PROG
NORM KA NAME
B/G
0
C 40
B/G
1
C 41
B/G
2
C 31
B/G
3
C 34
B/G
4
C 27
B/G
5
C 47
B/G
6
C 44
B/G
7
C 23
B/G
8
C 35
B/G
9
C 28
MV-CH
TVE-1
TVE-2
ANT-3
TELE 5
C PLUS
- - - - -
- - - - CNN -
- - - - -
MENU
PROGR
RM
des Kanals auszuwählen, den Sie sperren wollen, und anschließend
bestätigen Sie mit OK.
Das Symbol
erscheint vor der Programmposition, um
anzuzeigen, dass dieses Programm gesperrt ist. Wenn Sie die
Sperre des Kanals wieder aufheben wollen, drücken Sie erneut
892
die Taste OK. Das Symbol
wird ausgeblendet.
S
5 Gehen Sie wie in Schritt 4 erläutert vor, wenn Sie weitere Kanäle
sperren wollen.
6 Die MENU-Taste drücken, um in den normalen TV-Betrieb
zurückzukehren.
Wenn Sie eine Programmnummer auswählen, die gesperrt ist, erscheint
der Bildschirm in schwarz mit dem Symbol
.
Weitere Funktionen - Abspeicherung - Zusatzfunktionen
49
Page 50

Weitere Funktionen - Abspeicherung - Zusatzfunktionen
Überspringen von Programmspeicherplätzen
Mit dieser Funktion können Sie nicht benötigte Programmspeicherplätze überspringen, wenn Sie die Tasten PROGR +/benutzen. Wenn Sie zu einem späteren Zeitpunkt die übersprungene Programmnummer zurückgewinnen wollen, gehen
Sie wie anschließend erläutert vor, aber wählen Sie das richtige TV-System aus (B/G oder D/K), anstatt “---“ bei Schritt Nr.
5
VIDEO TV
1 MENU drücken, um das Menü einzublenden.
2 Mit dem Joystick auf $ gehen, um das Symbol auszuwählen,
und anschließend auf gehen z, um das Menü
SENDERABSPEICHERUNG aufzurufen.
1
2
3
4
5
6
7
8
9
3 Mit dem Joystick auf $ oder 4 gehen, um die Option Manuell
Abspeichern auszuwählen und anschließen auf z gehen.
0
4 Mit dem Joystick auf $ gehen oder auf 4, um die
Programmposition auszuwählen, die übersprungen werden soll,
PROGR
MENU
und anschließend wechseln Sie auf z, um in die Spalte NORM zu
gelangen.
BILD - MENÜ
Bild - Modus
Kontrast
Normwerte
Format
SENDERABSPEICHERUNG
Automatisch Abspeichern
Manuell Abspeichern
Zusatzfunktionen
AV - Benennung
Programme Ordnen
Kindersicherung
Sprache
Konvergenz
SENDERABSPEICHERUNG
Automatisch Abspeichern
Manuell Abspeichern
Zusatzfunktionen
AV - Benennung
Programme Ordnen
Kindersicherung
Sprache
Konvergenz
MANUELL ABSPEICHERN
PROG NORM KA
0
1
2
3
4
5
6
7
8
9
Anwender
Breitbild
NAME
B/G
MV-CH
C 40
B/G
TVE-1
C 41
B/G
TVE-2
C 31
B/G
ANT-3
C 34
B/G
TELE 5
C 27
B/G
C PLUS
C 47
B/G
- - - - -
C 44
B/G
- - - - -
C 23
B/G
CNN -
C 35
B/G
BBC-W
C 28
S
RM
892
5 Mit dem Joystick auf $ gehen, um “---“ auszuwählen und
anschließend mit der Taste OK bestätigen.
MANUELL ABSPEICHERN
PROG NORM KA
B/G
0
C 40
B/G
1
C 41
B/G
2
C 31
B/G
3
C 34
B/G
4
C 27
B/G
5
C 47
B/G
6
C 44
B/G
7
C 23
B/G
8
C 35
- - -
9
C 28
NAME
MV-CH
TVE-1
TVE-2
ANT-3
TELE 5
C PLUS
- - - - -
- - - - CNN BBC-W
6 Gehen Sie vor, wie in Schritt 4 und 5 erläutert, wenn Sie weitere
Programmpositionen auslassen wollen.
7 Die MENU-Taste drücken, um in den normalen TV-Betrieb
zurückzukehren.
Wenn Sie mit der Taste PROGR +/- einen Kanal (Fernsehsender)
auswählen erscheint dieser nicht. Dieser Kanal kann jedoch gewählt
werden durch Drücken der entsprechenden Programmnummer auf den
Nummerntasten.
50
Opérations ultérieures - Autres fonctions
Page 51

Weitere Funktionen - Abspeicherung - Zusatzfunktionen
Eingeben eines Namens für einen Kanal
Die Namen der Kanäle werden in der Regel automatisch vom Videotext übernommen, falls vorhanden. Sie können aber
auch einen Namen für einen Kanal oder eine Videoeingangsquelle eingeben und dafür bis zu fünf Zeichen (Buchstaben
oder Zahlen) verwenden. Auf diese Weise können Sie auf einfache Weise den Kanal (Fernsehsender) oder die Videoquelle
identifizieren, die auf dem Bildschirm erscheint.
1
4
7
S
VIDEO TV
2
5
8
0
MENU
3
6
9
PROGR
RM
1 MENU drücken, um das Menü einzublenden.
2 Mit dem Joystick auf $ gehen, um das Symbol auszuwählen
und anschließend auf z gehen, um das Menü
SENDERABSPEICHERUNG aufzurufen.
3 Mit dem Joystick auf $ oder 4 gehen, um die Option Manuell
Abspeichern auszuwählen und anschließend auf z gehen.
BILD - MENÜ
Bild - Modus
Kontrast
Normwerte
Format
SENDERABSPEICHERUNG
Automatisch Abspeichern
Manuell Abspeichern
Zusatzfunktionen
AV - Benennung
Programme Ordnen
Kindersicherung
Sprache
Konvergenz
SENDERABSPEICHERUNG
Automatisch Abspeichern
Manuell Abspeichern
Zusatzfunktionen
AV - Benennung
Programme Ordnen
Kindersicherung
Sprache
Konvergenz
Anwender
Breitbild
4 Mit dem Joystick auf $ oder 4 gehen, um den Kanal auszuwählen,
für den Sie einen Namen eingeben wollen.
892
5 Mit dem Joystick so oft auf z gehen bis die erste Stelle der Spalte
NAME hervorgehoben ist.
6 Mit dem Joystick auf $ oder 4 gehen, um einen Buchstaben oder
eine Zahl auszuwählen (wählen Sie “-“ bei einem Leerzeichen) und
anschließend gehen Sie auf z, um diese Auswahl zu bestätigen.
Wählen Sie die restlichen vier Zeichen genauso aus.
MANUELL ABSPEICHERN
PROG NORM KA NAME
B/G
0
C 40
B/G
1
C 41
B/G
2
C 31
B/G
3
C 34
B/G
4
C 27
B/G
5
C 47
B/G
6
C 44
B/G
7
C 23
B/G
8
C 35
B/G
9
C 28
MANUELL ABSPEICHERN
PROG NORM KA NAME
B/G
0
C 40
B/G
1
C 41
B/G
2
C 31
B/G
3
C 34
B/G
4
C 27
B/G
5
C 47
B/G
6
C 44
B/G
7
C 23
B/G
8
C 35
B/G
9
C 28
MANUELL ABSPEICHERN
PROG NORM KA NAME
B/G
0
C 40
B/G
1
C 41
B/G
2
C 31
B/G
3
C 34
B/G
4
C 27
B/G
5
C 47
B/G
6
C 44
B/G
7
C 23
B/G
8
C 35
B/G
9
C 28
- - - - -
- - - - -
- - - - -
- - - - -
- - - - -
- - - - -
- - - - -
- - - - -
- - - - -
- - - - -
- - - - -
- - - - -
- - - - -
- - - - -
- - - - -
- - - - -
- - - - -
- - - - -
- - - - -
- - - - -
- - - - -
- - - - -
- - - - -
- - - - A- - - -
- - - - -
- - - - -
- - - - -
- - - - -
- - - - -
7 Wenn Sie alle Zeichen eingegeben haben, drücken Sie die Taste OK.
8 Gehen Sie wie in Schritt 4 bis 7 erläutert vor, wenn Sie Namen für
weitere Kanäle eingeben wollen.
9 Die MENU-Taste drücken, um in den normalen TV-Betrieb
zurückzukehren.
Wenn Sie einen Kanal mit eingegebenem Namen auswählen, erscheint der
Name einige Sekunden lang auf dem Bildschirm.
Weitere Funktionen - Abspeicherung - Zusatzfunktionen
51
Page 52

Bedienung des Fernsehgerätes – Zusatzfunktionen
Einstellen des Bildes
Die Bildqualität ist zwar werkseitig eingestellt. Sie können sie aber Ihren Wünschen gemäß ändern.
VIDEO TV
1 MENU drücken, um das Menü einzublenden.
2 Mit dem Joystick auf z gehen, zum Wechseln in das Menü BILD-
MENÜ.
BILD - MENÜ
Bild - Modus
Kontrast
Normwerte
Format
Anwender
Breitbild
3 Mit dem Joystick auf $ oder 4 gehen, um die Option auzuwählen,
die geändert werden soll, und gehen Sie anschließend auf z
In der folgenden Tabelle finden Sie weitere Informationen zu den
einzelnen Funktionen:
Bild-Modus Bild-Modus Anwender (individuelle
1
2
3
4
5
6
7
8
9
0
Kontrast Weniger Mehr
Normwerte
PROGR
MENU
Format (ausführliche Information finden Sie im Kapitel über
Helligkeit
Farbe* Weniger Mehr
Bildschärfe
Farbton**
K
Setzt das Bild auf die werkseitigen Einstellung
zurück.
“Wechsel des Bildschirmformats” dieser
Bedienungsanleitung).
Einstellungen)
Spielfilm (für Spielfilme)
Live (für Live-Sendungen)
* Dunkler Heller
* Weicher Schärfer
Günlich Rötlich
* Kann nur geändert werden, wenn Sie “Anwender” im “Bild-
Modus”auswählen.
RM
892
** Steht nur bei NTSC-Farbsystem zur Verfügung (z. B.
nordamerikanische Videofilme )
BILD - MENÜ
Bild - Modus
Kontrast
Normwerte
Format
BILD - MODUS
Bild - Modus
Helligkeit
Farbe
Bildschärfe
Farbton
Anwender
Breitbild
Anwender
S
4 Mit dem Joystick auf Z oder z gehen, um die Einstellung der
gewählten Option zu ändern, und anschließend auf die Taste OK
drücken, um die neue Einstellung abzuspeichern.
5 Zur Änderung weiterer Einstellungen gehen Sie so vor, wie in dem
Schritt 3 und 4 erläutert.
6 Die MENU-Taste drücken, um in den normalen TV-Betrieb
zurückzukehren.
Schnelles Ändern von
Bildeinstellungen
Sie können den Bildmodus rasch ändern, ohne den
Menübildschirm “Bild-Menü” aufzurufen.
1 Drücken Sie die Taste der Fernbedienung, um direkten Zugang
zu den Optionen des Bildmodus zu haben.
2 Mit dem Joystick auf $ oder 4 gehen, um den gewünschten Bild-
Modus auszuwählen (Anwender, Spielfilm oder Live) und
anschließend die Taste OK drücken, damit das Menü auf dem
Bildschirm ausgeblendet wird.
Anwender
Spielfilm
Live
52
Weitere Funktionen - Bedienung des Fernsehgerätes - Zusatzfunktionen
Page 53

Weitere Funktionen - Bedienung des Fernsehgerätes – Zusatzfunktionen
Einstellen des Bildschirmformats
Diese Funktion ermöglicht das Bildschirmformat zu ändern.
1
4
7
S
VIDEO TV
2
5
8
0
MENU
3
6
9
PROGR
RM
1 MENU drücken, um das Menü einzublenden.
2 Mit dem Joystick auf z gehen, um das Menü BILD-MENÜ
BILD - MENÜ
Bild - Modus
Kontrast
Normwerte
Format
Anwender
Breitbild
aufzurufen.
3 Mit dem Joystick auf $ oder 4 gehen, um Format auszuwählen,
und anschließend auf z gehen, um Zugang zu haben zu dem
besagten Menü.
4 Mit dem Joystick auf $ oder 4, um auszuwählen: Format, Oben/
Unten oder Auto 16:9.
BILD - MENÜ
Bild - Modus
Kontrast
Normwerte
Format
Anwender
Breitbild
5 Format
Mit dem Joystick auf z gehen, um das besagte Menü einzublenden
und anschließend so oft auf Z oder z drücken bis einer der
folgenden Modi ausgewählt ist:
• Smart: Nachahmung des Breitbildeffekts (16:9) für
Sendungen im Format 4:3.
• 4:3: herkömmliches Bild im Format 4:3.
• Zoom: Nachahmung des Breitbildeffekts (16:9) für
Spielfilme im Cinemascope-Format.
• Breitbild: für Sendungen im Format 16:9
Drücken Sie die Taste OK.
6 Oben/Unten
Diese Funktion erlaubt es auf dem Bildschirm hinauf- oder
hinunterzufahren, um die nicht sichtbaren Bereiche sehen zu
können; diese Option funktioniert nur, wenn Sie bei Schritt 5
892
das Format Zoom oder Smart ausgewählt haben.
Mit dem Joystick auf z gehen, um das besagte Menü einzublenden
und anschließend so oft auf Z oder z gehen bis die
Bildschirmposition zwischen –5 y +5 eingestellt ist und
anschließend die Taste OK drücken.
FORMAT
Format
Oben / Unten
Auto 16:9
Smart
4:3
Breitbild
0
Ein
7 Auto 16:9
Mit dem Joystick auf z gehen, um das besagte Menü einzublenden
und anschließend so oft auf Z oder z gehen zum Auswählen von:
Ein: wenn Sie wollen, dass der Bildschirm bei einer Sendung im
Format 16:9 automatisch auf das horizontale Format wechselt,
oder
Aus:
für den normalen Modus.
Drücken Sie auf die Taste OK.
8 Die MENU-Taste drücken, um in den normalen TV-Betrieb
zurückzukehren.
Schnelles Ändern von Bildeinstellungen
Sie können den Bildmodus rasch ändern, ohne den
Menübildschirm “Bild-Menü” aufzurufen.
1 Drücken Sie mehrmals auf die Taste der Fernbedienung, um
die Option des Bildschirmformats auszuwählen (Smart, 4:3, Zoom
oder Breitbild).
Weitere Funktionen - Bedienung des Fernsehgerätes - Zusatzfunktionen
Zoom
Breitbild
53
Page 54

Weitere Funktionen - Bedienung des Fernsehgerätes – Zusatzfunktionen
Einstellen des Tons
Die Tonwerte sind werkseitig auf Normwerte eingestellt. Im Ton-Menü können Sie jedoch das Bild individuell einstellen.
1
4
7
S
VIDEO TV
2
5
8
0
MENU
3
6
9
PROGR
RM
1 MENU drücken, um das Menü einzublenden.
2 Mit dem Joystick auf $ gehen, um das Symbol auszuwählen und
anschließend auf z gehen, um das TON-MENÜ aufzurufen.
BILD - MENÜ
Bild - Modus
Kontrast
Normwerte
Format
Anwender
Breitbild
3 Mit dem Joystick auf $ oder 4 gehen um die Option einzustellen,
die geändert werden soll, und anschließend auf z gehen.
In der folgenden Tabelle finden Sie weitere Informationen zu den
einzelnen Funktionen:
Ton-Modus Modus Anwender (für individuelle
Höhen* Weniger Mehr
Tiefen* Weniger Mehr
Balance Links Rechts
Normwerte
Setzt das Bild auf die werkseitigen Einstellungen
K
zurück
Raumklang Ein: spezieller klangeffekt
Aus: normal
Zweikan.-Ton • Bei einer Stereosendung:
892
Mono
Stereo
• Für zweisprachige Sendungen:
Mono (Für den Mono-Kanal, falls dieser zur
Verfügung steht)
A (für den Kanal 1)
B (für den Kanal 2)
Einstellungen)
Rock
Jazz
Pop
TON - MENÜ
Ton - Modus
Balance
Normwerte
Raumklang
Zweikan - Ton
Indiv. Lautst.
Lautstärke
Zweikan - Ton
Lautsprecher
TON - MODUS
Modus
Höhen
Tiefen
Anwender
Aus
Mono
0
Mono
Haupt - LS
Anwender
Indiv. Lautst. -12 .......... +12
(Die Lautstärke des Kanals kann individuell
eingestellt werden zwischen –12 und +12)
Kopfhörer
ll
l Lautstärke Weniger Mehr
ll
ll
l
Zweikan.-Ton
ll
• Bei Stereosendungen:
Mono
Stereo
• Für zweisprachige Sendungen:
Mono (für den Mono-Kanal, falls dieser zur
Verfügung steht)
A (für den Kanal 1)
B (für den Kanal 1)
Lautsprecher Haupt-LS: Ton des Rückprojektions-Fernsehers
Mittlerer LS: Ton des Außenverstärkers
* Nur einstellbar, wenn im “Ton-Modus“ “Anwender” eingestellt ist.
54
Weitere Funktionen - Bedienung des Fernsehgerätes - Zusatzfunktionen
Page 55

Weitere Funktionen - Bedienung des Fernsehgerätes - Zusatzfunktionen
VIDEO TV
4 Mit dem Joystick auf Z oder z gehen, um die Einstellung der
ausgewählten Option zu ändern, und anschließend drücken Sie auf
die Taste OK, um die neue Einstellung abzuspeichern.
5 Wiederholen Sie den Schritt 3 und 4, um andere Einstellungen zu
ändern.
1
2
3
4
5
6
7
8
9
6 Die MENU-Taste drücken, um in den normalen TV-Betrieb
zurückzukehren.
0
Schnelles Ändern von Toneinstellungen
Sie können den Ton-Modus rasch ändern, ohne den
Menübildschirm “Ton-Menü” aufzurufen.
1 Drücken Sie die Taste der Fernbedienung, um direkten Zugang
zu haben zu den Optionen des Ton-Modus.
Anwender
Rock
Jazz
Pop
MENU
PROGR
RM
892
S
2 Mit dem Joystick auf $ oder 4 gehen, um den gewünschten Ton-
Modus auszuwählen (Anwender, Rock, Jazz oder Pop), und
anschließend drücken Sie auf die Taste OK zum Ausblenden des
Menüs auf dem Bildschirm.
Weitere Funktionen - Bedienung des Fernsehgerätes - Zusatzfunktionen
55
Page 56

Weitere Funktionen - Bedienung des Fernsehgerätes – Zusatzfunktionen
Die automatische Abschaltfunktion
Mit dieser Funktion schaltet sich das Gerät nach der gewählten Zeit selbst in Bereitschaftsbetrieb (Standby)
VIDEO TV
1 MENU drücken, um das Menü einzublenden.
2 Mit dem Joystick auf $ gehen, um das Symbol t auszuwählen, und
anschließend gehen Sie auf z, um das Menü TIMER aufzurufen.
1
2
3
4
5
6
7
8
9
3 Mit dem Joystick auf z und anchließend so oft auf Z oder z gehen,
bis auf dem Bildschirm die gewünschte Abschaltzeit erscheint.
BILD - MENÜ
Bild - Modus
Kontrast
Normwerte
Format
TIMER
TIMER
Anwender
Breitbild
AusAbschaltzeit
1:00Abschaltzeit
0
Aus z 0:30 z 1:00..... 4:00 Uhr
4 Drücken Sie auf die Taste OK.
PROGR
MENU
5 Die MENU-Taste drücken, um in den normalen TV-Betrieb
zurückzukehren.
RM
892
S
Eine Minute bevor das Gerät sich in Bereitschaftsbetrieb schaltet, wird
automatisch 0:01 Restzeit eingeblendet.
Anmerkungen: • Drücken Sie die Taste
, wenn Sie während Sie
fernsehen die verbleibende Restzeit einblenden
möchten.
• Drücken Sie die Taste TV der Fernbedienung,
wenn Sie das Gerät aus dem Bereitschaftsbetrieb
wieder einschalten möchten.
56
Weitere Funktionen - Bedienung des Fernsehgerätes - Zusatzfunktionen
Page 57

Videotext
Verwenden von Videotext
Videotext ist ein Informationsservice, der von den meisten Sendern angeboten wird.
Verwenden Sie bitte einen Sender mit einem starken Empfangssignal, da es ansonsten zu Fehlern in der Wiedergabe des
Videotextes kommen kann.
VIDEO TV
Wählen von Videotext
1 Den Sender auswählen, auf dem der gewünschte Videotext-Service
ausgestrahlt wird.
2 Die Taste auf der Fernbedienung drücken, um den Videotext
einzuschalten.
1
2
3
4
5
6
7
8
9
0
3 Mit den Zahlentasten die gewünschte dreistellige Seitenzahl
eingeben.
Bei einer Fehleingabe, die dreistellige Zahl beliebig ergänzen, dann
die richtige Seitenzahl eingeben.
TELETEXT
Index
Programme
News
Sport
Weather
TELETEXT
Index
Programme
25
153
101
98
25
News
153
Sport
101
Weather
98
4 Die Taste drücken, um den Videotext auszuschalten.
Verwenden anderer Videotext-Funktionen
PROGR
MENU
RM
892
FUNKTION DIE FOLGENDE TASTE DRÜCKEN
Seitenweises Umblättern für die vorherige Seite
für die nachfolgende Seite
S
Einblenden des Videotextes
über das Fernsehbild nochmals drücken, um den
Videotext auszuschalten.
Automatischen Seitenwechsel bei
Unterseiten stoppen nochmals drücken, um zum
normalen Seitenwechsel
zurückzukehren.
Verborgene Informationen
(z.B. Antwort auf ein Quiz) nochmals drücken, um die
sichtbarmachen Informationen wieder zu
verdecken.
Verwenden von TOP-Text
Mit TOP-Text können Sie bequem eine bestimmte Seite aufrufen.
Bei Ausstrahlung von TOP-Text erscheint unten im Bildschirm
eine Farbleiste. Die entsprechende farbige Taste (rot, grün, gelb
oder blau) drücken, um die dazugehörige Seite aufzurufen.
TELETEXT
Index
Programme
News
Sport
Weather
TELETEXT
Index
Programme
News
Sport
Weather
25
153
101
98
25
153
101
98
57Videotext
Page 58

Anschlußmöglichkeiten
Anschluß von anderen Geräten
Anhand der folgenden Anweisungen können Sie viele verschiedene Zusatzgeräte an den Rückprojektions-Fernseher
anschließen:
Um Bildstörungen
zu vermeiden:
•
Nie gleichzeitig Geräte
an die Buchsen F und
G anschließen.
• Nie gleichzeitig Geräte
an die vorderen
Buchsen und die
Eurobuchse D
anschließen.
Rückseite des Geräts Vorderseite des Geräts
Dekoder
S-VHS/Hi8
Camcorder
DVD
Videorecorder
C
E
A
B
Hi-Fi
Zugelassene Eingangssignale
Eingangssignal des Zentrallautsprechers
A
Im Menü “Ton-Menü”, “Mittlerer LS”
einstellen in der Option “Lautsprecher”
Ohne Eingangssignale
B
Audio-/Videoeingangssignale und RGB
C
D
Audio-/Videoeingangssignale und
Video S
E
Audio-/Videoeingangssignale
F
Videoeingangssignal S
G
Videoeingangssignal
H
Audioeingangssignal
I
Ohne Eingangssignal
D
F
G
Videorecorder
HI
DVD
8mm/Hi8
Camcorder
Zur Verfügung stehende Ausgangssignale
Ohne Ausgangssignal
Audio-Ausgangssignal
Vídeo-/Audioausgangssignale des TV-Abstimmers
Vídeo-/Audioausgangssignale der ausgewählten
Quelle
Vídeo-/Audioausgangssignale der ausgewählten
Quelle (die selbe Ausgangsquelle wie die der Buchse
:2/ q 2 )
Ohne Ausgangssignal
Ohne Ausgangssignal
Ohne Ausgangssignal
Audioausgangssignal der Kopfhörer
58
Anschlußmöglichkeiten
Page 59

Anschlußmöglichkeiten
Anschluß von anderen Geräten
Zusätzliche Informationen
Anschluß eines Videorecorders
Wir empfehlen Ihnen den Videorecorder über ein Scart kabel an die Eurobuchsen D oder E anzuschließen. Haben
Sie kein Scart kabel, legen Sie das Signal des Videorecorders auf Programmspeicherplatz “0“ ab. Lesen Sie dazu
“Manuelles Abspeichern von Sendern“ in dieser Bedienungsanleitung.
Unterstützt Ihr Video Smartlink, lesen Sie bitte das kapitel "Smartlink" in dieser Bedienungsanleitung.
Anschluß an externe Audiogeräte
1 Wenn Sie die Tonwiedergabe des Rückprojektions-Fernsehers für die Hi-Fi –Anlage verwenden
möchten:
Schließen Sie die Hi-Fi – Anlage an die Anschlüsse B hinten am Rückprojektions-Fernseher an, wenn Sie das
Audio-Ausgangssignal verstärken möchten. Die Lautstärke der an B angeschlossenen Anlage kann geändert
werden durch Einstellen der Kopfhörer-Lautstärke. Lesen Sie dazu das Kapitel „Einstellen des Tons“ dieser
Bedienungsanleitung.
2 Wenn Sie die Tonwiedergabe der Hi-Fi - Anlage für den Rückprojektions-Fernseher verwenden
möchten:
Schließen Sie die Hi-Fi –Anlage an die Anschlüsse A hinten am Fernseher an, wenn Sie die Tonwiedergabe der
Hi-Fi –Anlage für die Lautsprecher des Fernsehgerätes verwenden möchten. Wenn Sie einen Dolby-Verstärker
zur Verfügung haben, schließen Sie das Zentral-Ausgangssignal des Verstärkers an die besagten Anschlüsse an,
damit der Dolby-Verstärker die Funktion des Zentral-Lautsprechers übernimmt. Lesen Sie dazu das Kapitel
“Einstellen des Tons” und wählen Sie “Mittlerer LS” aus in der Option “Lautsprecher”.
Anschluß einer Mono-Anlage
Schließen Sie das Audio-Kabel an die Buchse L/G/S/I vorne am Rückprojektions-Fernseher an, und wählen Sie das
Eingangssignal
Menü "Einstellen des Tons".
2, indem Sie die unten angegebenen Erläuterungen befolgen. Anschließen wählen Sie "A" aus im
Auswählen und Sehen des Eingangssignals
VIDEO TV
1 Das Zusatzgerät, wie auf der vorhergehenden Seite erläutert , an die entsprechende Buchse des
Rückprojektions-Fernsehers anschließen.
2 Die Taste der Fernbedienung so oft drücken, bis das gewünschte Eingangssymbol auf dem
Bildschirm angezeigt wird.
Symbol Eingangssignale
1
2
3
4
5
6
7
8
9
0
k • Audio-/Videoeingangssignal von der Eurobuchse
K
q
K
• Eingangssignal RGB von der Eurobuchse
• Audio-/Videosignal von der Eurobuchse
G
2
3
• Audio-/Videosignal S von der Eurobuchse
F
• Audio-/Videosignal von der Eurobuchse
C
D
E
C
oder den Buchsen RCA H und
oder den Buchsen RCA H und
D
MENU
S
PROGR
RM
3 Das angeschlossene Zusatzgerät einschalten
4 Die Taste auf der Fernbedienung drücken, um in den normalen TV-Betrieb zurückzukehren.
.
892
Anschlußmöglichkeiten
59
Page 60

Anschlußmöglichkeiten
VIDEO TV
VTR 1 2 3 4 DVD
CH
CH
VTR 1 2 3 4 DVD
Smartlink
Mit Smartlink kann Ihr Rückprojektions-Fernseher mit einem angeschlossenen Videorecorder “kommunizieren”.
Bedingungen dafür sind:
• Ein Videorecoder der Smartlink, NexTView link, Easy Link oder Megalogic unterstützt.
Megaloic ist ein Markenzeichen von Grundig
EasyLink ist ein Markenzeichen von Philips
• Der Anschluß eines vollständig verdrahteten 21-poligen Scartkabels an die Euro-AV-Buchse
:3 (SMARTLINK).
Smartlink kann u.a.:
• Abspeicherinformation, wie z.B. die Sendertabelle vom Rückprojektions-Fernseher an den
angeschlossenen Videorecorder weitergeben.
• Direkte Aufnahme: Während Sie fernsehen reicht ein Tastendruck am Videorecorder, um die
laufende Sendung aufzunehmen.
• Rückprojektions-Fernseher ist in Bereitschaftsbetrieb: Die Play-Taste z am Videorecorder
drücken, um das Fernsehgerät einzuschalten.
Falls Sie einen Decoder an einem Smartlink-fähigen Videorecorder angeschlossen haben, im
Menü
Sender DEKODER AV3 wählen.
(SENDERABSPEICHERUNG) Zusatzfunktionen wählen und für jeden kodierten
Rückseite des Geräts
Videorecorder
Ausführliche Information über Smartlink finden Sie in der Bedienungsanleitung Ihres
Videorecorders.
Fernbedienen anderer Sony-Geräte
Mit den Tasten unter der Abdeckung Ihrer Fernbedienung können Sie andere A/VGeräte bedienen.
1 Die Abdeckung der Fernbedienung öffnen.
2 Den Schalter VTR 1234 DVD in die gewünschte Position bringen:
VTR 1 Beta Videorecorder
VTR 2 8 mm Videorecorder
VTR 3 VHS Videorecorder
VTR 4 Digital Video (z.B. DCR-VX 1000/9000E, VHR-1000)
DVD Video Disk Player
3 Verwenden Sie die Tasten der Fernbedienung unter der Abdeckung, um die Anlage zu
bedienen.
• Falls das Zusatzgerät einen COMMAND MODE-Schalter hat, diesen Schalter
in die gleiche Position wie beim VTR 1234 DVD-Schalter an der Fernbedienung des Fernsehgerätes stellen.
• Falls das Zusatzgerät eine bestimmte Funktion nicht besitzt, funktioniert die
entsprechende Taste auf der Fernbedienung auch nicht.
Dekoder
60
Anschlußmöglichkeiten
Page 61

Anschlußmöglichkeiten
Wahl des Ausgangssignals der Eurobuchsen
Verwenden Sie diese Funktion, wenn Sie Eingangssignale von einem Außen-Gerät mit Ihrem an die Eurobuchsen :2/
2 oder :3 hinten am Fernseher angeschlossenen Videorecorder aufnehmen wollen.
q
Sie müssen dazu die Ausgangssignal-Quelle auswählen, wie in der Folge erläutert ist. (Wenn Ihr Videorecorder Smartlink
zulässt, ist diese Vorgehensweise nicht notwendig).
1
4
7
S
VIDEO TV
2
5
8
0
MENU
3
6
9
PROGR
RM
892
1 MENU drücken, um das Menü einzublenden.
2 Mit dem Joystick auf $ gehen, um das Symbol auszuwählen,
und anschließend auf z gehen, um das Menü VIDEOANSCHLUSS aufzurufen.
3 Mit dem Joystick auf $ oder 4 gehen zur Hervorhebung.
Bildschirm: Für das Eingangssignal des TV-Bildschirms oder,
Ausgang: für das Ausgangssignal des Rückprojektions-
Fernsehers, der für die Eurobuchsen :2/q2 und
:3 zur Verfügung steht.
Mit dem Joystick auf z gehen zur Bestätigung:
4 Mit dem Joystick so oft auf Z oder z gehen bis das entsprechende
Signal ausgewählt ist:
Bildschirm: TV, AV1, RGB, AV2, YC2 oder AV3
Ausgang: TV, AV1, AV2, YC2, AV3 oder AUTO
BILD - MENÜ
Bild - Modus
Kontrast
Normwerte
Format
VIDEO - ANSCHLUSS
Bildschirm
Ausgang
TV
Anwender
Breitbild
[TV - - - - - - -]
[AV1 - - - - - - -]
AV1
Nach der Wahl des Signals, drücken Sie die Taste OK zur
Bestätigung.
Wenn Sie AUTO auswählen, ist das Ausgangssignal immer
gleich wie das auf dem Bildschirm.
Wenn Sie einen Decoder haben, denken Sie bitte daran wieder
das Ausgangssignal in “TV” zu wählen, zu einer korrekten
Dekodierung.
5 Die MENU-Taste drücken, um in den normalen TV-Betrieb
zurückzukehren.
Das ausgewählte Signal steht für die Anlage der Option zur Verfügung,
die an die entsprechende Eurobuchse angeschlossen ist.
Anschlußmöglichkeiten
61
Page 62

Anschlußmöglichkeiten
Die Funktion “AV-Benennung”
Mit dieser Funktion können Sie einen Namen für zusätzliche Geräte eingeben, die Sie an die Buchsen dieses
Fernsehgerätes angeschlossen haben. Dieser Name kann aus bis zu 5 Zeichen (Buchstaben oder Zahlen) bestehen und
erscheint auf dem Fernsehschirm, wenn das Gerät ausgewählt wird.
VIDEO TV
1 MENU drücken, um das Menü einzublenden.
2 Mit dem Joystick auf $ gehen, um das Symbol auszuwählen
und anschließend gehen Sie auf z, um in das Menü
SENDERABSPEICHERUNG zu wechseln.
1
2
3
4
5
6
7
8
9
3 Mit dem Joystick auf $ oder 4 gehen, um in das Menü AV-
Benennung zu wechseln und anschließend auf z gehen.
0
4 Mit dem Joystick auf $ oder 4 gehen, um die Eingangsquelle
auszuwählen für die Sie einen Namen eingeben wollen (z.B. AV2) ,
und anschließend gehen Sie auf z zur Hervorhebung der ersten
PROGR
MENU
Stelle der Spalte NAME.
BILD - MENÜ
Bild - Modus
Kontrast
Normwerte
Format
SENDERABSPEICHERUNG
Automatisch Abspeichern
Manuell Abspeichern
Zusatzfunktionen
AV - Benennung
Programme Ordnen
Kindersicherung
Sprache
Konvergenz
SENDERABSPEICHERUNG
Automatisch Abspeichern
Manuell Abspeichern
Zusatzfunktionen
AV - Benennung
Programme Ordnen
Kindersicherung
Sprache
Konvergenz
AV - BENENNUNG
EINGANG NAME
AV1
RGB
AV2
YC2
AV3
- - - - -
- - - - -
- - - - -
- - - - -
- - - - -
Anwender
Breitbild
S
5 Mit dem Joystick auf $ oder 4 gehen, um einen Buchstaben oder
RM
892
eine Zahl auszuwählen ( wählen Sie “-“ bei einem Leerzeichen), und
anschließend gehen Sie auf z, um dieses Zeichen zu bestätigen.
Wählen Sie die restlichen vier Zeichen genauso aus.
AV - BENENNUNG
EINGANG NAME
AV1
RGB
AV2
YC2
AV3
- - - - -
- - - - A- - - -
- - - - -
- - - - -
6 Wenn Sie alle Zeichen eingegeben haben, drücken Sie die Taste OK.
7 Gehen Sie wie in Schritt 4 bis 6 erläutert vor, wenn Sie für weitere
Eingangsquellen einen Namen eingeben wollen.
8 Die MENU-Taste drücken, um in den normalen TV-Betrieb
zurückzukehren.
Immer wenn Sie das Gerät auswählen, für deren Eingangsquelle Sie einen
Namen eingegeben haben, wird dieser Name einige Sekunden lang auf
dem Bildschirm erscheinen.
Anschlußmöglichkeiten
62
Page 63

Weitere Informationen
Optimaler Sichtbereich
Um das Bild in bester Qualität sehen zu können, sollten Sie versuchen, das Rückprojektions-Fernseher so zu stellen, daß
Sie innerhalb des unten dargestellten Bereichs auf den Fernsehschirm schauen können.
Horizontaler Sichtbereich
4
(Optimaler
2.1m
Mindestabstand)
75˚
75˚
4
Vertikaler Sichtbereich
2.1m
4
(Optimale Sichtposition)
(Optimaler
Mindestabstand)
4
22.5˚
22.5˚
(Optimale Sichtposition)
Weitere Informationen
63
Page 64

Weitere Informationen
Das Menüsystem
BILD - MENÜ
Bild - Modus
Kontrast
Normwerte
Format
TON - MENÜ
VIDEO - ANSCHLUSS
TIMER
SENDERABSPEICHERUNG
Automatisch Abspeichern
Manuell Abspeichern
Zusatzfunktionen
AV - Benennung
Programme Ordnen
Kindersicherung
Sprache
Konvergenz
Ton - Modus
Balance
Normwerte
Raumklang
Zweikan - Ton
Indiv. Lautst.
Lautstärke
Zweikan - Ton
Lautsprecher
Bildschirm
Ausgang
TV
Anwender
Aus
Mono
0
Mono
Haupt - LS
[TV - - - - - - -]
[AV1 - - - - - - -]
AV1
AusAbschaltzeit
Anwender
Breitbild
BILD - MENÜ
Bild - Modus
Kontrast
Normwerte
Format
TON - MENÜ
Ton - Modus
Balance
Normwerte
Raumklang
Zweikan - Ton
Indiv. Lautst.
Lautstärke
Zweikan - Ton
Lautsprecher
VIDEO - ANSCHLUSS
Bildschirm
Ausgang
TV
TIMER
SENDERABSPEICHERUNG
Automatisch Abspeichern
Manuell Abspeichern
Zusatzfunktionen
AV - Benennung
Programme Ordnen
Kindersicherung
Sprache
Konvergenz
Anwender
Breitbild
Anwender
Aus
Mono
0
Mono
Haupt - LS
[TV - - - - - - -]
[AV1 - - - - - - -]
AV1
1:00Abschaltzeit
Automatisches Abspeichern
jetzt starten?
Ja
Nein
Bestätigen: OK
Ausführliche Information finden Sie im
Kapitel “Einstellen des Bildes”
Ausführliche Information finden Sie im
Kapitel “Einstellen des Tons”
Ausführliche Information finden Sie im
Kapitel “Wahl des Ausgangssignals der
Eurobuchsen”
Ausführliche Information finden Sie im
Kapitel “Die automatische
Abschaltfunktion”
Ausführliche Information finden Sie im
Kapitel “Automatisches Abspeichern von
Sendern mit den Tasten am Gerät”
SENDERABSPEICHERUNG
Automatisch Abspeichern
Manuell Abspeichern
Zusatzfunktionen
AV - Benennung
Programme Ordnen
Kindersicherung
Sprache
Konvergenz
SENDERABSPEICHERUNG
Automatisch Abspeichern
Manuell Abspeichern
Zusatzfunktionen
AV - Benennung
Programme Ordnen
Kindersicherung
Sprache
Konvergenz
SENDERABSPEICHERUNG
Automatisch Abspeichern
Manuell Abspeichern
Zusatzfunktionen
AV - Benennung
Programme Ordnen
Kindersicherung
Sprache
Konvergenz
SENDERABSPEICHERUNG
Automatisch Abspeichern
Manuell Abspeichern
Zusatzfunktionen
AV - Benennung
Programme Ordnen
Kindersicherung
Sprache
Konvergenz
SENDERABSPEICHERUNG
Automatisch Abspeichern
Manuell Abspeichern
Zusatzfunktionen
AV - Benennung
Programme Ordnen
Kindersicherung
Sprache
Konvergenz
SENDERABSPEICHERUNG
Automatisch Abspeichern
Manuell Abspeichern
Zusatzfunktionen
AV - Benennung
Programme Ordnen
Kindersicherung
Sprache
Konvergenz
MANUELL ABSPEICHERN
PROG NORM KA
B/G
0
C 40
B/G
1
C 41
B/G
2
C 31
B/G
3
C 34
B/G
4
C 27
B/G
5
C 47
B/G
6
C 44
B/G
7
C 23
B/G
8
C 35
B/G
9
C 28
ZUSATZFUNKTIONEN
PROG AFT DEKODER
Ein
0
Aus
Ein
1
Aus
Ein
2
AV1
Ein
3
Aus
Ein
4
AV2
Ein
5
Aus
Ein
6
Aus
Ein
7
Aus
Ein
8
Aus
Ein
9
Aus
AV - BENENNUNG
EINGANG NAME
AV1
- - - - -
RGB
- - - - -
AV2
- - - - -
YC2
- - - - -
AV3
- - - - -
PROGRAMME ORDNEN
PROG NORM KA NAME
B/G
0
C 28
B/G
1
C 40
B/G
2
C 41
B/G
3
C 31
B/G
4
C 34
B/G
5
C 27
B/G
6
C 47
B/G
7
C 44
B/G
8
C 23
B/G
9
C 35
KINDERSICHERUNG
PROG
NORM KA NAME
B/G
0
C 40
B/G
1
C 41
B/G
2
C 31
B/G
3
C 34
B/G
4
C 27
B/G
5
C 47
B/G
6
C 44
B/G
7
C 23
B/G
8
C 35
B/G
9
C 28
SPRACHE
English
Deutsch
Français
Italiano
Nederlands
Polski
Česki
Magyar
Eλλnvιkά
NAME
MV-CH
TVE-1
TVE-2
ANT-3
TELE 5
C PLUS
- - - - -
- - - - CNN BBC-W
BBC-W
MV-CH
TVE-1
TVE-2
ANT-3
TELE 5
C PLUS
- - - - -
- - - - CNN -
MV-CH
TVE-1
TVE-2
ANT-3
TELE 5
C PLUS
- - - - -
- - - - CNN -
- - - - -
Ausführliche Information finden Sie im
Kapitel “Manuelles Abspeichern von
Sendern”
Ausführliche Information finden Sie im
Kapitel “Funktion der “Zusatzfunktionen”
Ausführliche Information finden Sie im
Kapitel “Die Funktion “AV-Benennung””
Ausführliche Information finden Sie im
Kapitel “Ordnen der
Programmspeicherplätze”
Ausführliche Information finden Sie im
Kapitel “Die Kindersicherung”
Ausführliche Information finden Sie im
Kapitel “Menüsprache wählen”
64
Weitere Informationen
SENDERABSPEICHERUNG
Automatisch Abspeichern
Manuell Abspeichern
Zusatzfunktionen
AV - Benennung
Programme Ordnen
Kindersicherung
Sprache
Konvergenz
Ausführliche Information finden Sie im
Kapitel “Einstellung der Farbwiedergabe
(Konvergenz)”
Page 65

Weitere Informationen
Technische Daten
Fernsehnorm
B/G/H, D/K
Farbsystem
PAL, SECAM
NTSC 3.58, 4.43 (nur über Videoeingang)
Kanalbereiche
VHF: E2-E12
UHF: E21-E69
CATV: S1-S20
HYPER: S21-S41
D/K: R1-R12, R21-R69
Bildröhre
41 Zoll
(ca. 103 cm diagonal gemessen)
Anschlüsse, hinten am Gerät
• Eingangsanschlüsse für mittleren
C
Lautsprecher 2 Anschlüsse
•
•:1/
•:2/
q2
• :3 21-poliger Euro-AV-Anschluss (Scart),
Audio-Eingänge (Cinchbuchsen)
21-poliger Euro-AV-Anschluss (Scart),
Eingang von Audio- und Videosignalen,
RGB-Signalen, Ausgang von TV-Audiound Videosignalen
21-poliger Euro-AV-Anschluss (Scart),
Eingang von Audio- und Videosignalen,
S-Video-Signalen, Ausgang von
wählbar-Audio- und Videosignalen
Eingang von Audio-und Videosignalen,
Ausgang von TV-Audio- und
Videosignalen (wählbar, entspricht der
Ausgangsquelle, die an der Buchse
:2/q2 anliegt)
Anschlüsse, vorne am Gerät
2
k Eingang von Videosignalen - Cinchbuchse
Eingang von Audiosignalen - Cinchbuchsen
C
2
Eingang von S-Videosignalen - 4 polig DIN
q
2
Kopfhörerbuchse - Stereominibuchse
Tonausgang:
2 x 30 W (Musikleistung)
2 x 15 W (RMS)
Mittlerer Lautsprechereingang
30 W (RMS) (bei Verwendung als mittlerer Lautsprecher)
Leistungsaufnahme
145 W
Leistungsaufnahme im Bereitschaftsbetrieb
0.7 W
Abmessungen (B x H x T)
ca. 1020 x 1115 x 417 mm
Gewicht
ca. 53 kg
Mitgeliefertes Zubehör
1 Fernbedienung (RM-892)
2 Batterien (R6)
Ein Stabilisator
Weitere Merkmale
Digitaler kammfilter (hohe Auflösung)
Videotext, Fastext, TOP-Text
NICAM
Automatische Abschaltfunktion
Smartlink
Änderungen, die dem technischen Fortschritt dienen, bleiben
vorbehalten.
Recyceltes Papier, chlorfrei
Weitere Informationen
65
Page 66

Weitere Informationen
Fehlersuche
Im folgenden finden Sie Hinweise zum Beheben möglicher Bild- und Tonstörungen.
Problem Lösung
Kein Bild (dunkler Bildschirm), kein Ton • Rückprojektions-Fernseher anschließen.
• Taste
• Falls die Anzeige
Zahlentaste auf der Fernbedienung drücken.
• Antennenanschluß überprüfen.
• Angeschlossenes Zusatzgerät einschalten.
• Das Rückprojektions-Fernseher mit dem Netzschalter
kurz aus- und wieder einschalten.
Schlechtes oder kein Bild (dunkler • MENU drücken. Bild-Menü wählen. Kontrast,
Bildschirm), aber guter Ton Helligkeit und Farbe einstellen.
• Im Bild-Menü Normwerte wählen.
vorne am Gerät drücken.
leuchtet, TV oder eine
Schlechte Bildqualität bei Betrachten • Die Taste auf der Fernbedienung so oft drücken, bis
einer RGB-Videosignalquelle das Symbol
Gutes Bild, kein Ton • Die Taste +/– auf der Fernbedienung drücken.
• Falls
• Überprüfen Sie im Ton-Menü, ob der Hauptlautsprecher
gewählt ist.
Keine Farbe bei Farbsendungen • MENU drücken. Bild-Menü wählen. Farbe einstellen.
• Im Bild-Menü Normwerte wählen.
Verzerrtes Bild, wenn Sie umschalten oder • Das Gerät, das an der Euro-AV-Buchse hinten am Gerät
Videotext wählen angeschlossen ist, ausschalten.
Verrauschtes Bild im TV-Betrieb bei einem • Im Menü Manuelles Abspeichern AFT AUS wählen und
bestimmten Sender den Kanal feinabstimmen.
Fernbedienung funktioniert nicht • Batterien austauschen.
Bereitschaftsanzeige am Gerät blinkt • Wenden Sie sich bitte an Ihren nächstgelegenen Sony-
Service.
auf dem Bildschirm eingeblendet ist, die Taste
auf der Fernbedienung drücken.
auf dem Bildschirm eingeblendet wird.
66
Weitere Informationen
• Falls die Probleme weiterhin bestehen sollten, das Fernsehgerät durch einen Fachmann reparieren
lassen.
• Öffnen Sie keinesfalls die Rückwand des Fernsehgerätes!
Page 67

67
Page 68

Page 69

TV a
Retroproiezione
Grazie per aver scelto questo TV a retroproiezione Sony.
Prima di utilizzare l’apparecchio, legga questo manuale attentamente e lo conservi
per ulteriori dubbi.
Legenda per questo Manuale di Istruzioni:
• Usi Procedura Iniziali se desidera mettere in funzione l’apparecchio e conoscerne
le prestazioni di base.
• Usi Operazioni Avanzate se desidera conoscere meglio le caratteristiche
complementari dell’apparecchio.
• Simboli usati in questo manuale:
• Rischi potenziali.
• Informazione importante.
• Informazione sulla funzione.
• 1, 2 ... Sequenza delle istruzioni da seguire
MENU
• I bottoni ombreggiati del telecomando mostrano i tasti che si devono
K
premere per seguire le varie istruzioni.
Manuale d’ Istruzioni
IT
• Informazione sul risultato delle istruzioni.
• Il processo per ottenere il risultato finale continua alla pagina seguente.
69
Page 70

Norme di sicurezza
AVVERTENZA
Informazioni di sicurezza
Tutti i TV a retroproiezione operano a voltaggi estremamente elevati. Per prevenire il rischio di
incendi o scosse elettriche, seguire le procedure di sicurezza sotto indicate.
Precauzioni di sicurezza generali
• Non esporre l’apparecchio alla pioggia o all’umidità.
• Non rimuovere il pannello posteriore.
• Per tutte le operazioni di assistenza e riparazione,
rivolgersi solo a personale qualificato.
Precauzioni per l’installazione
• Non installare l’apparecchio in luoghi caldi, umidi o
molto polverosi.
• Non ostruire le aperture di ventilazione. Per
un’adeguata ventilazione, lasciare uno spazio di
almeno 10 cm intorno all’apparecchio.
• Non installare l’apparecchio in un luogo esposto a
vibrazioni meccaniche.
• Posizionare l’apparecchio esclusivamente su un
supporto stabile e in grado di sopportare il suo peso
l’apparecchio.
• Per ottenere un’immagine nitida, non esporre lo
schermo ad illuminazione o luce solare diretta. Se
possibile, utilizzare un riflettore rivolto verso il basso
dal soffitto.
• Se l’apparecchio viene trasferito da un ambiente caldo
ad uno freddo o nel caso di sbalzi di temperatura
repentini, le immagini possono apparire sfuocate o
possono presentare zone poco colorate. Cio è dovuto
alla condensa formatasi sugli specchi e sulle lenti
interni dell’apparecchio. Prima di usare l’apparecchio,
attendere che l’umidità interna sia evaporata.
Precauzioni per l’utilizzo
• Usare l’apparecchio solo con un’alimentazione a 220240V AC, 50Hz.
• Non usare l’apparecchio qualora sostanze liquide o
solide siano penetrate nelle aperture di ventilazione.
Contattare immediatamente l’assistenza.
• Per ragioni ambientali e di sicurezza, si raccomanda di
non lasciare l’apparecchio in modalità standby quando
non è in uso. Spegnerlo utilizzando l’interruttore
generale.
• Non scollegare il televisore tirando il cavo di
alimentazione. Rimuovere la spina dalla presa di
corrente.
• In caso di temporale, staccare dall‘alimentazione di
rete e scollegare l‘antenna. Se collegato, l‘apparecchio
potrebbe essere danneggiato da un fulmine.
• La visualizzazione prolungata di un’immagine fissa
(ad esempio, utilizzando l’apparecchio con un
videogioco o con un computer e visionando
programmi nel formato 4:3) può danneggiare il
cinescopio. Per evitare questo problema, utilizzare un
livello basso di contrasto.
Manutenzione
• Pulire lo schermo con un panno morbido e umido.
Non utilizzare detergenti abrasivi. Per precauzione,
scollegare l’apparecchio dalla presa di corrente a muro
prima di procedere alla pulizia.
• I depositi di polvere e nicotina possono provocare un
accumulo di calore all‘interno
dell‘apparecchio. A lungo termine, ciò potrebbe
rappresentare un rischio per la sicurezza
e ridurre la durata dell’apparecchio. Pertanto, eseguire
la manutenzione ogni cinque anni.
• Evitare di toccare lo schermo e di graffiarne la
superficie con oggenti duri.
70
Norme di sicurezza
Page 71

Indice
Indice
Legenda per questo manuale d’istruzioni. ....................................................................................... 69
Norme di sicurezza .............................................................................................................................. 70
Procedura iniziale
Descrizione generale
Verifica degli accessori forniti ................................................................................................72
Descrizione generale dei tasti dell’apparecchio .................................................................. 72
Descrizione generale dei tasti del telecomando .................................................................. 73
Operazioni preliminari
Passo 1 - Istallazione
Inserimento delle pile nel telecomando ................................................................................ 74
Stabilizzazione dell’apparecchio ........................................................................................... 74
Allacciamento all’antenna ...................................................................................................... 75
Accensione dell’apparecchio .................................................................................................. 75
Passo 2 - Programmazione di base
Selezione della lingua .............................................................................................................. 76
Sintonia automatica del televisore, usando il telecomando............................................... 77
Riordinamento dei numeri di programma dei canali TV .................................................. 78
Operazioni avanzate
Programmazione avanzata
Regolazione Allineamento Colori (Convergenza) .............................................................. 79
Sintonia automatica della TV ................................................................................................. 80
Sintonia manuale della TV ..................................................................................................... 81
Funzione di “Preselezione (Continuaz.)” ............................................................................. 82
Bloccaggio dei programmi...................................................................................................... 83
Omissione di posizioni di programma ................................................................................. 84
Identificazione individuale delle emittenti .......................................................................... 85
Operazioni avanzate della TV
Regolazione dell’ immagine ................................................................................................... 86
Selezione del tipo di formato dello schermo ........................................................................ 87
Regolazione del suono ............................................................................................................ 88
Funzione di spegnimento automatico .................................................................................. 90
Teletext
Visualizzazione del Teletext ................................................................................................... 91
IT
Collegamenti opzionali
Collegamento di apparecchiature opzionali ........................................................................ 92
Uso di apparecchiature opzionali .......................................................................................... 93
“Smartlink” ............................................................................................................................... 94
Controllo a distanza di un altro apparecchio Sony ............................................................. 94
Selezione del segnale d’uscita dei connettori Euro AV ....................................................... 95
Uso della funzione “Selez. Nome Ingressi” ......................................................................... 96
Informazioni aggiuntive
Area di visione ottimale ....................................................................................................... 97
Guida rapida per muoversi attraverso i menù ................................................................. 98
Specifiche ................................................................................................................................ 99
Soluzione di problemi .......................................................................................................... 100
Indice
71
Page 72

Procedura iniziali - Descrizione generale
Verifica degli accessori forniti
VIDEO TV
1
2
3
4
5
6
7
8
9
0
PROGR
MENU
RM
892
S
Un telecomando
(RM-892)
Due pile (tipo R6)
Uno stabilizzatore
Descrizione generale dei tasti dell’appa recchio
Tasti di selezione
Indicatore di
modalità di
spegnimento
temporaneo
(standby)
Tasto di
selezione
della
fonte
d’ingresso
Tasti di
controllo
del
volume
per i programmi
successivi o
precedenti
(selezionano canali
televisivi)
Interruttore di
accensione/
spegnimento
Prema il coperchietto
frontale dell’apparecchio
(prema sul simbolo
) per
aprire il pannello di
controllo frontale.
Procedura iniziali - Descrizione generale
72
Presa
d’ingresso
S video
Presa
d’ingresso
video
Presa
d’ingresso
audio
Presa
per
cuffie
Tasto di
sintonia
automatica
Tasto di
convergenza
automatica
Page 73

Procedura iniziali - Descrizione generale
Descrizione generale dei tasti del telecomando
Vedere l’orario
VIDEO TV
Tasto senza fuzione in questo apparecchio
Premere per attivare o disattivare
l’orologio (funziona unicamente
quando vi è trasmissione di
televideo)
Eliminazione dell’audio
Premerlo per eliminare l’audio.
Premerlo di nuovo per ripristinarlo.
Accensione/spegnimento del video
Premere per accendere o spegnere
il video.aaaaaaaaaaaaaaaiaaaaaaa
Selezione della modalità TV
Premerlo per spegnere il teletext o
l’ingresso video.
Selezione di teletext
Premerlo per visualizzare il teletext.
Tasti senza funzione in quest’apparecchio
1
4
7
Selezione dei canali
Premerli per selezionare i canali.
Per numeri di programmi di due cifre, per
esempio 23, premere innanzitutto -/-- e
quindi i tasti 2 e 3.
Se ci si sbaglia ad introdurre la prima cifra,
continuare ad introdurre la seconda (dallo
0 al 9) e quindi ripetere l’operazione. ++++
Selezione della modalità audio
Premerlo per cambiare la modalità
del suono.
+++++++++++++++++...
Selezione della modalità
d’immagine
Premerlo per cambiare la modalità
d’immagine.
Regolazione del volume
Premerlo per regolare il volume.
Oltre alle funzioni di televisione, tutti i tasti colorati ed i simboli
di colore verde si usano anche per le operazioni di teletext. Per
ulteriori informazioni, far riferimento al capitolo su «Teletext» di
questo manuale d’istruzioni.
VIDEO TV
2
5
8
0
K
MENU
S
VTR 1 2 3 4 DVD
3
6
9
PROGR
RM
892
Uso del video
Per maggiori informazioni,
CH
consulti il capitolo sul
“Telecomando di altri apparecchi
Sony”
Spegnere temporaneamente il TV a
retroproiezione
Premerlo per spegnere temporaneamente il
televisore (l’indicatore di modalità d’attesa
s’illuminerà). Premerlo di nuovo per
accendere l’apparecchio dalla modalità di
spegnimento temporaneo (standby).
Per risparmiare energia, raccomandiamo di
spegnere del tutto l’apparecchio quando non
viene visto.
Se dopo 15-30 minuti non c’è segnale di
televisione o non si preme nessun tasto,
l’apparecchio entrerà automaticamente
nella modalità di spegnimento
temporaneo (standby).
Mostrare informazione sullo schermo
Premerlo per mostrare tutte le indicazioni sullo
schermo. Premerlo di nuovo per eliminarle.
Selezione della fonte d’ingresso
Premerlo più volte finché il simbolo della
fonte d’ingresso desiderata non appaia sullo
schermo.
Ritorno all’ultimo canale selezionato
Premerlo per rivedere l’ultimo canale
selezionato (il canale precedente deve essere
stato visto per almeno 5 secondi)
Selezione del formato dello schermo
Selezione del tipo di formato dello schermo
Premere più volte per cambiare il formato
dello schermo.
Questo tasto funziona solo nella modalità
teletext. La funzione
associata a questo
pulsante, non funziona in questo apparecchio.
Joystick per la selezione del menù
4 salire di un livello
$ scendere di un livello
Z andare al menù o selezione precedente
z andare al menù o selezione successiva
OK confermare la selezione
Selezione di canali
Premerlo per selezionare il canale
successivo o precedente.
Messa in funzione del sistema di
menù
Premerlo per vedere il menù sullo schermo.
Ripremerlo per spegnerlo e per vedere
l’immagine televisiva normale.
Procedura iniziali - Descrizione generale
73
Page 74

Operazioni preliminari - Istallazione
Inserimento delle pile nel telecomando
Assicuratevi di sistemare le pile con le polarità in posizione corretta
Nel rispetto dell’ambiente, depositare le batterie scariche negli appositi contenitori adibiti alla raccolta differenziata.
Stabilizzazione dell’apparecchio
Come misura di sicurezza, è possibile fissare l’apparecchio con lo stabilizzatore in dotazione.
Collocare lo stabilizzatore nella scanalatura situata nella parte inferiore dell’apparecchio, come indicato a seguito.
Operazioni preliminari - Istallazione
74
Page 75

Operazioni preliminari - Istallazione
Allacciamento dell’antenna
Inserire il connettore dell’antenna nella
presa contrassegnata con sul retro
dell’apparecchio.
Accensione dell’apparecchio
Inserire la spina del televisore nella presa di rete
(220-240V AC, 50Hz).
Premere l’interruttore generale di accensione/
spegnimento posto sul frontale dell’apparecchio.
Operazioni preliminari - Istallazione
75
Page 76

Operazioni preliminari - Programmazione di base
Selezione della lingua
Questa funzione permette di selezionare la lingua degli schermi di menù..
La prima volta che si accende il televisore, il menù LANGUAGE (LINGUA) apparirà automaticamente sullo schermo.
Nonostante ciò, se dopo un certo tempo avete bisogno di cambiare di nuovo la lingua dei menù, selezionate di
nuovo il menù LINGUA in
(PRESELEZIONE) e procedete come indicato di seguito:
VIDEO TV
1 Premere l’interruttore di accensione/spegnimento del televisore.
La prima volta che si preme il tasto d’accensione/spegnimento del
televisore, il menù LANGUAGE (LINGUA) apparirà
automaticamente sullo schermo.
2 Spingere il joystick del telecomando verso $ o 4 per selezionare la
lingua, quindi premere OK per confermare la scelta.
LANGUAGE
English
Deutsch
Français
Italiano
Nederlands
Polski
Česki
Magyar
Eλλnvιkά
Select Language:
Confirm: OK
LINGUA
English
Deutsch
Français
Italiano
Nederlands
Polski
Česki
Magyar
Eλλnvιkά
Selezionare Lingua:
Conferma: OK
LANGUAGE
English
Deutsch
Français
Italiano
Nederlands
Polski
Česki
Magyar
Eλλnvιkά
Select Language:
Confirm: OK
1
4
7
S
MENU
2
3
5
6
Il menù di Preselezione Automatica appare sullo schermo dell’apparecchio
nella lingua scelta.
8
9
Si desidera iniziare
la presel. autom.?
Si
No
Conferma: OK
0
PROGR
RM
892
76
Operazioni preliminari - Programmazione di base
Page 77

Operazioni preliminari - Programmazione di base
Sintonia automatica dell’apparecchio, usando il
telecomando
È necessario sintonizzare l’apparecchio per poter di ricevere i vari canali (emittenti televisive). Si attenga alle seguenti
istruzioni affinché il televisore cerchi e conservi automaticamente tutti i canali disponibili.
Dopo aver scelto la lingua, sullo schermo appare un nuovo menù domandando se si desidera sintonizzare
automaticamente il televisore. Ciononostante, se dopo un certo tempo si volesse ripetere la sintonia dei canali (per es. in
caso di trasloco), selezionare il menù Preselezione Automatica dentro
viene indicato qui di seguito o fare riferimento al capitolo «Sintonia automatica della TV».
VIDEO TV
1 Premerer il tasto OK del telecomando per selezionare Si.
Sullo schermo appare un nuovo menù, per far in modo di verificare
che l’antenna sia stata collegata.
(PRESELEZIONE) e procedere esattamente come
Si desidera iniziare
la presel. autom.?
Conferma: OK
Si
No
1
4
7
S
MENU
2 Verificare che l’antenna sia stata collegata e quindi premere il tasto
OK.
2
3
5
6
8
9
0
La sintonia automatica comincia, e mentre si stanno sintonizzando
tutti i canali (appaiono una alla volta tutte le emittenti televisive),
sullo schermo lampeggia il messaggio «PROGRAMMAZIONE
AUTOMATICA».
Controllare che
l'antenna sia collegata
Conferma: OK
PROGRAMMAZIONE AUTOMATICA
PROG
SIS
CAN
B/G
C 26
NOME
- - - - -
1
PROGRAMMAZIONE AUTOMATICA
Questo processo può durare alcuni minuti. Abbia pazienza e
non prema alcun tasto mentre si realizza il processo di
sintonizzazione.
ORDINAMENTO CANALI
PROG SIS CAN NOME
B/G
PROGR
RM
0
1
2
3
Una volta terminato il processo di sintonia automatica, il menù di
Ordinamento Canali appare sullo schermo.
892
4
5
6
7
8
9
Selezionare PROG: + OK
Uscita: MENU
BBC-W
C 28
B/G
MV-CH
C 40
B/G
TVE-1
C 41
B/G
TVE-2
C 31
B/G
ANT-3
C 34
B/G
TELE 5
C 27
B/G
C PLUS
C 47
B/G
- - - - -
C 44
B/G
- - - - -
C 23
B/G
CNN -
C 35
Nota bene: • Se si desidera arrestare il procedimento di sintonia
automatica, premere il tasto MENU del telecomando.
• Se si arresta il processo di sintonia automatica
premendo il tasto MENU il menù di Ordinamento
Canali non apparirà automaticamente sullo schermo.
Operazioni preliminari - Programmazione di base
77
Page 78

Operazioni preliminari - Programmazione di base
Riordinamento dei nº di programma dei canali TV.
Dopo la sintonia di tutti i canali (emittenti televisive) disponibili, sullo schermo appare automaticamente un nuovo menù
domandando se si desidera cambiare l’ordine di apparizione dei canali in televisione.
Ciononostante, se dopo un certo periodo di tempo si desidera cambiare di nuovo l’ordine dei canali, selezionare il menù
Ordinamento Canali dentro
(PRESELEZIONE) e procedere seguendo gli stessi passi del punto b) di questo capitolo.
VIDEO TV
1 Premere il tasto MENU del telecomando per far riapparire
l’immagine televisiva normale
1
2
3
4
5
6
7
8
9
L’apparecchio è pronto per funzionare.
ORDINAMENTO CANALI
PROG SIS CAN NOME
B/G
0
C 28
B/G
1
C 40
B/G
2
C 41
B/G
3
C 31
B/G
4
C 34
B/G
5
C 27
B/G
6
C 47
B/G
7
C 44
B/G
8
C 23
B/G
9
C 35
Selezionare PROG: + OK
Uscita: MENU
BBC-W
MV-CH
TVE-1
TVE-2
ANT-3
TELE 5
C PLUS
- - - - -
- - - - CNN -
b) Se si desidera cambiare l’ordine dei canali:
0
a) Se no desidera cambiare l’ordine dei canali:
1 Spingere il joystick del telecomando verso $ o 4 per selezionare il
numero di programma con il canale (emittente di televisione) che
desidera cambiare di posizione, e quindi premere il tasto OK.
PROGR
MENU
ORDINAMENTO CANALI
PROG SIS CAN NOME
B/G
0
C 28
B/G
1
C 40
B/G
2
C 41
B/G
3
C 31
B/G
4
C 34
B/G
5
C 27
B/G
6
C 47
B/G
7
C 44
B/G
8
C 23
B/G
9
C 35
Selezionare PROG: + OK
Uscita: MENU
BBC-W
MV-CH
TVE-1
TVE-2
ANT-3
TELE 5
C PLUS
- - - - -
- - - - CNN -
S
RM
892
2 Spingere il joystick verso $ o 4 per selezionare il nuovo numero di
programma con il quale si desidera memorizzare il canale prescelto,
e quindi premere il tasto OK.
Il canale prescelto cambia secondo la sua nuova posizione di
programma, ed i rimanenti canali cambiano di conseguenza.
ORDINAMENTO CANALI
SIS CAN NOMEPROG
B/G
0
C 40
B/G
1
C 41
B/G
2
C 31
B/G
3
C 34
B/G
4
C 27
B/G
5
C 47
B/G
6
C 44
B/G
7
C 23
B/G
8
C 35
B/G
9
C 28
Selezionare Posizione:
Conferma: OK
MV-CH
TVE-1
TVE-2
ANT-3
TELE 5
C PLUS
- - - - -
- - - - CNN BBC-W
3 Ripetere i passi 1 e 2 se si desidera riordinare altri canali televisivi.
4 Premere il tasto MENU per far riapparire l’immagine televisiva
normale.
L’apparecchio è pronto per funzionare.
78 Operazioni preliminari - Programmazione di base
Page 79

Operazioni avanzate - Programmazione avanzata
Regolazione Allineamento Colori (Convergenza)
A causa del magnetismo terrestre, l’immagine può apparire indefinita, e vari colori si potranno mischiare nel contorno
delle immagini. In questo caso, si renderà necessario procedere come indicato a seguito.
Autoconvergenza delle linee rossa,
verde e blu
1 esercitare una pressione in corrispondenza del segno del
coperchio della parte frontale dell’apparecchio per aprire il pannello
del controllo frontale.
2 Premere il tasto dell’apparecchio.
Ha inizio la funzione di autoconvergenza, che durerà circa 30 secondi.
Quando la croce bianca sparisce dallo schermo, l’apparecchio è pronto per
funzionare.
Nota bene:
La funzione di autoconvergenza non funziona:
• quando non vi è un segnale d’entrata
• quando il segnale d’entrata è debole
• quando lo schermo è esposto ad una fonte di luce potente o alla
luce solare diretta
• quando si sta visualizzando il televideo
Se si desidera una regolazione più pre-
VIDEO TV
cisa della convergenza
1 Premere il tasto MENU del telecomando per far apparire il menù
sullo schermo.
REGOLAZIONE IMMAGINE
Modalità Immagine
Contrasto
Ripristino
Formato
Utente
Allargato
2 Spingere il joystick verso $ per selezionare il simbolo , e quindi
spingerlo verso z per entrare nel menù PRESELEZIONE.
3 Spingere il joystick verso $ o 4 per selezionare Convergenza e
1
2
3
4
5
6
7
8
9
0
quindi spingerlo verso z.
4 Spingere il joystick verso $ o 4 per selezionare la “linea” (linee
verticali e orizzontali dei colori rosso e blu) che si desidera regolare:
: linea verticale rossa (regolazione sinistra/destra)
: linea orizzontale rossa (regolazione superiore/inferiore)
: linea verticale blu: (regolazione sinistra/destra)
: linea orizzontale blu (regolazione superiore/inferiore)
PRESELEZIONE
Preselezione Automatica
Preselezione Manuale
Preselezione (Continuaz.)
Selez. Nome Ingressi
Ordinamento Canali
Blocco Programma
Lingua
Convergenza
MENU
S
PROGR
RM
Premere il tasto OK.
5 Spingere il joystick verso $, 4, Z o z più volte per far convergere la
linea prescelta con la linea verde del centro e quindi premere il tasto
OK per confermare.
6 Per regolare le linee rimanenti, si renderà necessario ripetere i passi
4 e 5 finché tutte le linee si vengano a sovrapporre e formino una
892
croce bianca.
7 Premere il tasto MENU per far riapparire l’immagine televisiva
normale.
L’apparecchio è pronto per funzionare.
Operazioni avanzate - Programmazione avanzata
79
Page 80

Operazioni avanzate - Programmazione avanzata
Sintonia automatica della TV
Oltre a poter sintonizzare l’apparecchio in maniera automatica, così come indicato nel capitolo di “Sintonia automatica
dell’apparecchio, usando il telecomando”, si può anche sintonizzare e memorizzare in maniera automatica tutti i canali
(emittenti di televisione) disponibili premendo solamente un tasto dell’apparecchio ed un altro del telecomando.
1 Premere sul simbolo del coperchietto della parte frontale dell’
apparecchio per aprire il pannello di controllo frontale.
Controllare che
l'antenna sia collegata
Conferma: OK
Controllare che
l'antenna sia collegata
Conferma: OK
PROGRAMMAZIONE AUTOMATICA
PROG
SIS
CAN
1
PROGRAMMAZIONE AUTOMATICA
NOME
B/G
C 26
- - - - -
VIDEO TV
2 Premere il tasto e mantenerlo premuto per alcuni secondi,
finché sullo schermo appare un nuovo menú, per far in modo di
verificare che l’antenna sia stata collegata.
3 Verificare che l’antenna sia stata collegata e quindi premere il tasto
OK del telecomando.
La sintonia automatica comincia, e mentre si stanno sintonizzando
tutti i canali (appaiono una alla volta tutte le emittenti televisive),
sullo schermo lampeggia il messaggio «PROGRAMAZIONE
AUTOMATICA».
1
2
3
4
5
6
7
8
9
Questo processo può durare alcuni minuti. Abbia pazienza e
non prema alcun tasto mentre si realizza il processo di
sintonizzazione.
0
Una volta terminato il processo di sintonia automatica, il menù di
Ordinamento Canali appare sullo schermo:
• Se no desidera cambiare l’ordine dei canali, premere il tasto MENU del
telecomando per far riapparire l’immagine televisiva normale.
• Se si desidera cambiare l’ordine dei canali, procedere seguento gli stessi
PROGR
MENU
passi del punto b) del capitolo “Riordinamento dei nº di programma dei
canali TV”.
Nota bene: Se si desidera arrestare il processo di sintonizzazione
RM
892
S
80
Operazioni avanzate - Programmazione avanzata
automatica, premere il tasto MENU del telecomando.
Page 81

Operazioni avanzate - Programmazione avanzata
Sintonia manuale della TV
Usare questa funzione per sintonizzare uno a uno, e nell’ordine di programma che si desideri, i canali (emittenti di
televisione) o un’entrata di video.
1
4
7
S
VIDEO TV
2
5
8
0
MENU
3
6
9
PROGR
RM
1 Premere il tasto MENU del telecomando per far apparire il menù
sullo schermo
2 Spingere il joystick verso $ per selezionare il simbolo e quindi
spingerlo verso z per entrare nel menù PRESELEZIONE.
3 Spingere il joystick verso $ o 4 per selezionare Preselezione
Manuale e quindi spingerlo verso z.
4 Spingere il joystick verso $ o 4 per selezionare il numero di
programma (posizione) nel quale si desidera sintonizzare un
canale (emittente di televisione) e quindi spingerlo verso z per
accedere alla colonna SIS.
892
5 Spingere il joystick verso $ o 4 per selezionare il sistema di
trasmissione di TV (B/G per in paesi dell’Europa occidentale o
D/K per i paesi dell’Europa orientale) o un segnale d’entrata di
video (AV1, AV2...) e quindi spingerlo verso z per accedere alla
colonna CAN.
REGOLAZIONE IMMAGINE
Modalità Immagine
Contrasto
Ripristino
Formato
PRESELEZIONE
Preselezione Automatica
Preselezione Manuale
Preselezione (Continuaz.)
Selez. Nome Ingressi
Ordinamento Canali
Blocco Programma
Lingua
Convergenza
PRESELEZIONE
Preselezione Automatica
Preselezione Manuale
Preselezione (Continuaz.)
Selez. Nome Ingressi
Ordinamento Canali
Blocco Programma
Lingua
Convergenza
PRESELEZIONE MANUALE
PROG SIS CAN
0
1
2
3
4
5
6
7
8
9
PRESELEZIONE MANUALE
PROG SIS CAN
0
1
2
3
4
5
6
7
8
9
B/G
B/G
B/G
B/G
B/G
B/G
B/G
B/G
B/G
B/G
B/G
B/G
B/G
B/G
B/G
B/G
B/G
B/G
B/G
B/G
C 40
C 41
C 31
C 34
C 27
C 47
C 44
C 23
C 35
C 28
C 40
C 41
C 31
C 34
C 27
C 47
C 44
C 23
C 35
C 28
Utente
Allargato
NOME
MV-CH
TVE-1
TVE-2
ANT-3
TELE 5
C PLUS
- - - - -
- - - - CNN BBC-W
NOME
MV-CH
TVE-1
TVE-2
ANT-3
TELE 5
C PLUS
- - - - -
- - - - CNN BBC-W
6 Spingere il joystick verso $ o 4 per selezionare il tipo di canale
(“C” per i canali terrestri o “S” per i canali via cavo) e quindi
spingerlo verso z.
7 Premere i pulsanti numerici per introdurre direttamente il
numero del canale dell’emittente di televisione, o spingere il
joystick verso $ o 4 per cercare il seguente canale disponibile.
Se non si desidera memorizzare questo canale, spingere il joystick
verso $ o 4 per cercare un altro canale.
8 Si questo è il canale che si desidera memorizzare, premere su OK.
9 Ripetere i passi dal 4 al 8 per sintonizzare e memorizzare più
canali.
10 Premere il tasto MENU per far riapparire l’immagine televisiva
normale.
L’apparecchio è pronto per funzionare.
Operazioni avanzate - Programmazione avanzata
PRESELEZIONE MANUALE
PROG SIS CAN
0
1
2
3
4
5
6
7
8
9
PRESELEZIONE MANUALE
PROG SIS CAN
0
1
2
3
4
5
6
7
8
9
B/G
B/G
B/G
B/G
B/G
B/G
B/G
B/G
B/G
B/G
B/G
B/G
B/G
B/G
B/G
B/G
B/G
B/G
B/G
B/G
C 40
C 41
C 31
C 34
C 27
C 47
C 44
C 23
C 35
C 28
C 40
C 41
C 31
C 34
C 27
C 47
C 44
C 23
C 35
C 28
NOME
MV-CH
TVE-1
TVE-2
ANT-3
TELE 5
C PLUS
- - - - -
- - - - CNN BBC-W
NOME
MV-CH
TVE-1
TVE-2
ANT-3
TELE 5
C PLUS
- - - - -
- - - - CNN BBC-W
81
Page 82

Operazioni avanzate - Programmazione avanzata
Funzione di “Preselezione (Continuaz.)
Questa funzione consente di realizzare le seguenti operazioni:
a)Sebbene normalmente la sintonizzazione fine automatica (AFT) sia attivata, è anche possibile effettuare la
sintonizzazione in forma manuale per ottenere una migliore ricezione dell’immagine, nel caso in cui questa appaia
distorta, o
b)Sintonizzare l’uscita di AV3 per le posizioni di programma con segnali codificati, come, per esempio, di un decodificatore
di televisione a pagamento. In questa maniera, un apparecchio di video collegato all’apparecchio potrà registrare il
segnale decodificato.
1
4
7
S
VIDEO TV
2
5
8
0
MENU
3
6
9
PROGR
RM
1 Premere il tasto MENU del telecomando per far apparire il menù
sullo schermo
2 Spingere il joystick verso $ per selezionare il simbolo e quindi
spingerlo verso z per entrare nel menù PRESELEZIONE.
3 Spingere il joystick verso $ o 4 per selezionare Preselezione
(Continuaz.) e quindi spingerlo verso z.
4 Spingere il joystick verso $ o 4 per selezionare il numero di
programma corrispondente e quindi spingerlo verso z più volte per
selezionare:
a) AFT, o
892
b) DECODER
REGOLAZIONE IMMAGINE
Modalità Immagine
Contrasto
Ripristino
Formato
PRESELEZIONE
Preselezione Automatica
Preselezione Manuale
Preselezione (Continuaz.)
Selez. Nome Ingressi
Ordinamento Canali
Blocco Programma
Lingua
Convergenza
PRESELEZIONE
Preselezione Automatica
Preselezione Manuale
Preselezione (Continuaz.)
Selez. Nome Ingressi
Ordinamento Canali
Blocco Programma
Lingua
Convergenza
PRESELEZIONE (CONTINUAZ.)
PROG AFT DECODER
0
1
2
3
4
5
6
7
8
9
Utente
Allargato
Si
No
Si
No
Si
AV1
Si
No
Si
AV2
Si
No
Si
No
Si
No
Si
No
Si
No
L’elemento selezionato cambia colore
5 a) AFT
Spingere il joystick verso $ o 4 per regolare il livello della
frequenza del canale tra –15 e +15 e quindi premere il tasto OK.
Ripetere i passi 4 e 5 a) per effettuare la sintonizzazione fine di altri
canali.
PRESELEZIONE (CONTINUAZ.)
PROG AFT DECODER
2
0
1
2
3
4
5
6
7
8
9
No
Si
No
Si
No
Si
No
Si
No
Si
No
Si
No
Si
No
Si
No
Si
No
b) DECODER
Spingere il joystick verso $ o 4 per selezionare AV 3 e quindi
premere il tasto OK.
Quando si collega un decodificatore ad un video collegato al
connettore Euro AV :3 situato nella parte posteriore
dell’apparecchio, l’immagine di questo decodificatore apparirà
in quel numero di programma.
Ripetere i passi 4 e 5 b) per sintonizzare l’uscita di AV3 in altre
posizioni di programma.
6 Premere il tasto MENU per far riapparire l’immagine televisiva
normale.
L’apparecchio è pronto per funzionare.
82
Operazioni avanzate - Programmazione avanzata
PRESELEZIONE (CONTINUAZ.)
PROG AFT DECODER
Si
0
1
2
3
4
5
6
7
8
9
AV3
Si
No
Si
No
Si
No
Si
No
Si
No
Si
No
Si
No
Si
No
Si
No
Page 83

Operazioni avanzate - Programmazione avanzata
Bloccaggio dei programmi
Questa funzione consente d’impedire la visualizzazione sullo schermo di emittenti di televisione non desiderate. L’uso di
questa funzione è consigliabile, per esempio, onde evitare che i bambini possano guardare dei programmi di televisione
non appropriati.
VIDEO TV
1 Premere il tasto MENU del telecomando per far apparire il menù
sullo schermo
2 Spingere il joystick verso $ per selezionare il simbolo e quindi
spingerlo verso z per entrare nel menù PRESELEZIONE.
1
2
3
4
5
6
7
8
9
3 Spingere il joystick verso $ o 4 per selezionare Blocco Programma
e quindi spingerlo verso z.
0
4 Spingere il joystick verso $ o 4 per selezionare il numero di
programma con il canale che si desidera bloccare, e quindi premere
MENU
PROGR
RM
892
il tasto OK.
Il simbolo
appare davanti alla posizione di programma per
indicare che adesso questo programma è bloccato. Per
sbloccarlo, si renderà necessario premere di nuovo su OK, e
quindi il simbolo
sparirà.
REGOLAZIONE IMMAGINE
Modalità Immagine
Contrasto
Ripristino
Formato
PRESELEZIONE
Preselezione Automatica
Preselezione Manuale
Preselezione (Continuaz.)
Selez. Nome Ingressi
Ordinamento Canali
Blocco Programma
Lingua
Convergenza
PRESELEZIONE
Preselezione Automatica
Preselezione Manuale
Preselezione (Continuaz.)
Selez. Nome Ingressi
Ordinamento Canali
Blocco Programma
Lingua
Convergenza
BLOCCO PROGRAMMA
PROG
0
1
2
3
4
5
6
7
8
9
Utente
Allargato
SIS CAN NOME
B/G
MV-CH
C 40
B/G
TVE-1
C 41
B/G
TVE-2
C 31
B/G
ANT-3
C 34
B/G
TELE 5
C 27
B/G
C PLUS
C 47
B/G
- - - - -
C 44
B/G
- - - - -
C 23
B/G
CNN -
C 35
B/G
- - - - -
C 28
S
5 Ripetere il passo 4 se si desidera bloccare altri programmi.
6 Premere il tasto MENU per far riapparire l’immagine televisiva
normale.
Quando si seleziona un numero di programma che è bloccato, lo schermo
appare in nero con il simbolo .
Operazioni avanzate - Programmazione avanzata
83
Page 84

Operazioni avanzate - Programmazione avanzata
Omissione di posizioni di programma
È possibile programmare quest’apparecchio in maniera tale che ometta i numeri di programma che non si desiderino
quando questi vengano selezionati per mezzo dei pulsanti PROGR +/-. Se in seguito si desidera recuperare il numero del
programma omesso, si renderà necessario procedere di nuovo così come indicato a seguito, ma selezionando il sistema di
TV appropriato (B/G o D/K) al posto di “---“ come nel passo numero 5.
VIDEO TV
1 Premere il tasto MENU del telecomando per far apparire il menù
sullo schermo.
2 Spingere il joystick verso $ per selezionare il simbolo e quindi
spingerlo verso z per entrare nel menù PRESELEZIONE.
1
2
3
4
5
6
7
8
9
3 Spingere il joystick verso $ o 4 per selezionare Preselezione
Manuale e quindi spingerlo verso z.
0
4 Spingere il joystick verso $ o 4 per selezionare la posizione di
programma che si desidera omettere e quindi spingerlo verso z per
PROGR
MENU
accedere alla colonna SIS.
REGOLAZIONE IMMAGINE
Modalità Immagine
Contrasto
Ripristino
Formato
PRESELEZIONE
Preselezione Automatica
Preselezione Manuale
Preselezione (Continuaz.)
Selez. Nome Ingressi
Ordinamento Canali
Blocco Programma
Lingua
Convergenza
PRESELEZIONE
Preselezione Automatica
Preselezione Manuale
Preselezione (Continuaz.)
Selez. Nome Ingressi
Ordinamento Canali
Blocco Programma
Lingua
Convergenza
PRESELEZIONE MANUALE
PROG SIS CAN
0
1
2
3
4
5
6
7
8
9
Utente
Allargato
NOME
B/G
MV-CH
C 40
B/G
TVE-1
C 41
B/G
TVE-2
C 31
B/G
ANT-3
C 34
B/G
TELE 5
C 27
B/G
C PLUS
C 47
B/G
- - - - -
C 44
B/G
- - - - -
C 23
B/G
CNN -
C 35
B/G
BBC-W
C 28
S
RM
892
5 Spingere il joystick verso $ per selezionare “- - -” e quindi premere
il tasto OK.
PRESELEZIONE MANUALE
PROG SIS CAN
0
1
2
3
4
5
6
7
8
9
NOME
B/G
MV-CH
C 40
B/G
TVE-1
C 41
B/G
TVE-2
C 31
B/G
ANT-3
C 34
B/G
TELE 5
C 27
B/G
C PLUS
C 47
B/G
- - - - -
C 44
B/G
- - - - -
C 23
B/G
CNN -
C 35
- - -
BBC-W
C 28
6 Ripetere i passi 4 e 5 per omettere altre posizioni di programma.
7 Premere il tasto MENU per far riapparire l’immagine televisiva
normale.
Quando si seleziona il canale (emittente di televisione) per mezzo del tasto
PROGR +/-, questo non apparirà. Ciò nonostante, il suddetto canale
potrà essere selezionato premendo il numero di programma corrispondente
per mezzo dei pulsanti numerici.
84
␣ Operazioni avanzate - Programmazione avanzata
Page 85

Operazioni avanzate - Programmazione avanzata
Identificazione individuale delle emittenti
Normalmente, i nomi dei canali (emittenti di televisione), si ottengono automaticamente per mezzo del televideo, se questo
è disponibile. In ogni caso, è possibile assegnare un nome di un massimo di cinque caratteri (lettere o numeri) a un canale o
a un segnale d’entrata di video. In questa maniera, si potrà identificare facilmente il canale (emittente di televisione) o la
fonte di video che appare sullo schermo.
1
4
7
S
VIDEO TV
2
5
8
0
MENU
3
6
9
RM
PROGR
892
1 Premere il tasto MENU del telecomando per far apparire il menù
sullo schermo.
2 Spingere il joystick verso $ per selezionare il simbolo e quindi
spingerlo verso z per entrare nel menù PRESELEZIONE.
3 Spingere il joystick verso $ o 4 per selezionare Preselezione
Manuale e quindi spingerlo verso z.
4 Spingere il joystick verso $ o 4 per selezionare il numero di
programma con il canale cui si desidera dare un nome.
5 Spingere il joystick verso z più volte fino a mettere in risalto il
primo elemento della colonna NOME.
REGOLAZIONE IMMAGINE
Modalità Immagine
Contrasto
Ripristino
Formato
PRESELEZIONE
Preselezione Automatica
Preselezione Manuale
Preselezione (Continuaz.)
Selez. Nome Ingressi
Ordinamento Canali
Blocco Programma
Lingua
Convergenza
PRESELEZIONE
Preselezione Automatica
Preselezione Manuale
Preselezione (Continuaz.)
Selez. Nome Ingressi
Ordinamento Canali
Blocco Programma
Lingua
Convergenza
PRESELEZIONE MANUALE
PROG SIS CAN NOME
0
1
2
3
4
5
6
7
8
9
PRESELEZIONE MANUALE
PROG SIS CAN NOME
0
1
2
3
4
5
6
7
8
9
B/G
B/G
B/G
B/G
B/G
B/G
B/G
B/G
B/G
B/G
B/G
B/G
B/G
B/G
B/G
B/G
B/G
B/G
B/G
B/G
C 40
C 41
C 31
C 34
C 27
C 47
C 44
C 23
C 35
C 28
C 40
C 41
C 31
C 34
C 27
C 47
C 44
C 23
C 35
C 28
Utente
Allargato
- - - - -
- - - - -
- - - - -
- - - - -
- - - - -
- - - - -
- - - - -
- - - - -
- - - - -
- - - - -
- - - - -
- - - - -
- - - - -
- - - - -
- - - - -
- - - - -
- - - - -
- - - - -
- - - - -
- - - - -
6 Spingere il joystick verso $ o 4 per selezionare una lettera o un
numero (selezioni “-“ per uno spazio in bianco) e quindi spingerlo
verso z per confermare il carattere prescelto. Selezioni gli altri
quattro caratteri nella stessa maniera.
7 Una volta selezionati tutti i caratteri, premere il tasto OK.
8 Ripetere i passi dal 4 al 7 se si desidera dare un’etichetta ad altri
canali.
9 Premere il tasto MENU per far riapparire l’immagine televisiva
normale.
Quando si seleziona un canale etichettato, il nome dello stesso appare
durante alcuni secondi sullo schermo.
Operazioni avanzate - Programmazione avanzata
PRESELEZIONE MANUALE
PROG SIS CAN NOME
B/G
0
1
2
3
4
5
6
7
8
9
B/G
B/G
B/G
B/G
B/G
B/G
B/G
B/G
B/G
C 40
C 41
C 31
C 34
C 27
C 47
C 44
C 23
C 35
C 28
- - - - -
- - - - -
- - - - -
- - - - A- - - -
- - - - -
- - - - -
- - - - -
- - - - -
- - - - -
85
Page 86

Operazioni avanzate - Operazioni avanzate della TV
Regolazione dell’immagine
Sebbene l’immagine venga regolata in fabbrica, è possibile modificarla secondo le preferenze dell’utente.
1
4
7
S
VIDEO TV
2
5
8
0
MENU
3
6
9
RM
PROGR
892
1 Premere il tasto MENU del telecomando per far apparire il menù
sullo schermo
2 Spingere il joystick verso z per entrare nel menù REGOLAZIONE
IMMAGINE.
3 Spingere il joystick verso $ o 4 per selezionare l’elemento che si
desidera modificare e quindi spingerlo verso
Consulti la seguente tavola per poter scegliere e vedere l’effetto di
ogni elemento:
Modalità Modalità
Immagine Immagine Utente (per regolazioni individuali)
Film (per film)
Live (per programmi in diretta)
Luminosità
Colore* meno più
Nitidezza* più soave più nitida
Tonalità**
Contrasto meno più
Ripristino
Formato (per maggiori informazioni, consulti il capitolo su
Ripristina le regolazioni d’immagine prestabilite i
K
fabbrica
“Selezione del tipo di formato dello schermo“ di questo
manuale delle istruzioni).
* Si potrà modificare solo se seleziona “Utente“ in “Modalità
Immagine“.
** Disponibile solo per il sistema di colore NTSC (p. es., videocassette
statunitensi)
* più scuro più chiaro
verdastra rossiccia
REGOLAZIONE IMMAGINE
Modalità Immagine
Contrasto
Ripristino
Formato
REGOLAZIONE IMMAGINE
Modalità Immagine
Contrasto
Ripristino
Formato
MODALITÀ IMMAGINE
Modalità Immagine
Luminosità
Colore
Nitidezza
Tonalità
Utente
Allargato
Utente
Allargato
Utente
4 Spingere il joystick verso Z o z per modificare la regolazione
dell’elemento prescelto e quindi premere il tasto OK per
memorizzare la nuova regolazione.
5 Ripetere i passi 3 e 4 per modificare le altre regolazioni.
6 Premere il tasto MENU per far riapparire l’immagine televisiva
normale.
Cambio rapido della modalità
d'immagine
La modalità d’immagine potrà essere cambiata in maniera rapida
senza bisogno di accedere al menù di “Regolazione Immagine”
1 Premere il tasto del telecomando per accedere direttamente alle
opzioni della modalità d’immagine.
2 Spingere il joystick verso $ o 4 per selezionare la modalità
d’immagine che si desidera (Utente, Film o Live) e quindi premere
il tasto OK affinché il menù sparisca dallo schermo.
86
Operazioni avanzate - Programmazione avanzata
Utente
Film
Live
Page 87

Operazioni avanzate - Operazioni avanzate della TV
Selezione del tipo di formato dello schermo
Questa funzione consente di modificare il tipo di formato dello schermo.
1
4
7
S
VIDEO TV
2
5
8
0
MENU
3
6
9
PROGR
RM
1 Premere il tasto MENU del telecomando per far apparire il menù
sullo schermo
2 Spingere il joystick verso z per entrare nel menù REGOLAZIONE
REGOLAZIONE IMMAGINE
Modalità Immagine
Contrasto
Ripristino
Formato
Utente
Allargato
IMMAGINE.
3 Spingere il joystick verso $ o 4 per selezionare Formato e quindi
spingerlo verso z per entrare nel suddetto menù.
4 Spingere il joystick verso $ o 4 per selezionare: Formato, Scorrere o
Auto 16:9.
REGOLAZIONE IMMAGINE
Modalità Immagine
Contrasto
Ripristino
Formato
Utente
Allargato
5 Formato
Spingere il joystick verso z per entrare nel suddetto menù e quindi
spingerlo verso Z o z più volte per selezionare una delle seguenti
modalità:
• Esteso: imita l’effetto di schermo allargato (16:9) per
emissioni in 4:3.
• 4:3: immagine 4:3 standard.
• Zoom: imita l’effetto di schermo allargato (16:9) per film
emessi in formato di cinemascope.
• Allargato: per emissioni in 16:9
Premere il tasto OK.
6 Scorrere
Questa funzione consente di muoversi verso l’alto o verso il
basso sullo schermo allo scopo di poter vedere le parti
892
incomplete; questa opzione funziona solo se nel passo 5 è stato
selezionato il tipo di formato Zoom o Esteso.
Spingere il joystick verso z per entrare nel suddetto menù e quindi
spingerlo verso Z o z più volte per regolare la posizione dello
schermo tra –5 e + 5 e quindi premere il tasto OK.
FORMATO
Formato
Scorrere
Auto 16:9
Esteso
4:3
Allargato
0
Si
7 Auto 16:9
Spingere il joystick verso z per entrare nel suddetto menù e quindi
spingerlo verso Z o z per selezionare:
Si: se si desidera che lo schermo cambi automaticamente secondo
il tipo di formato orizzontale quando rilevi un’emissione in
16:9, o
No:
per mantenere la modalità normale.
Premere il tasto OK.
8 Premere il tasto MENU per far riapparire l’immagine televisiva
normale.
Cambio rapido del tipo di formato
dello schermo
La modalità di formato dello schermo può essere cambiata in
forma rapida senza necessità di accedere al menù di “Regolazione
Immagine”.
1 Premere più volte il tasto del telecomando per selezionare il
tipo di formato dello schermo (Esteso, 4:3, Zoom u Allargato)
Operazioni avanzate - Operazioni avanzate della TV
Zoom
Allargato
87
Page 88

Operazioni avanzate - Operazioni avanzate della TV
Regolazione del suono
Sebbene l’audio venga regolato in fabbrica, è possibile modificarlo secondo le sue preferenze.
1
4
7
S
VIDEO TV
2
5
8
0
MENU
3
6
9
RM
PROGR
892
1 Premere il tasto MENU del telecomando per far apparire il menù
sullo schermo.
2 Spingere il joystick verso $ per selezionare il simbolo e quindi
spingerlo verso z per entrare nel menù REGOLAZIONE AUDIO.
3 Spingere il joystick verso $ o 4 per selezionare l’elemento che si
desidera modificare e quindi spingerlo verso z.
Consulti la seguente tavola per poter scegliere e vedere l’effetto di
ogni elemento:
Modalità Audio
Bilanciamento
Ripristino
Aud. Spaziale Si: speciale effetto acustico
Doppio Audio• Per emissioni in stereofonia:
Modalità Utente (per regolazioni individuali)
Rock
Jazz
Pop
Acuti* meno più
Bassi* meno più
sinistro destro
K
Ripristina le regolazioni d’immagine prestabilite in
fabbrica
No: normale
Mono
Stereo
• Per emissioni bilingue:
Mono (per il canale mono, se è disponibile)
A (per il canale 1)
B (per il canale 2)
REGOLAZIONE IMMAGINE
Modalità Immagine
Contrasto
Ripristino
Formato
REGOLAZIONE AUDIO
Modalità Audio
Bilanciamento
Ripristino
Aud. Spaziale
Doppio Audio
Volume Pers.
Volume
Doppio Audio
Diffusore
MODALITÁ AUDIO
Modalità
Acuti
Bassi
Utente
Allargato
Utente
No
Mono
0
Mono
Principale
Utente
Volume Pers. -12 .......... +12
Cuffia:
ll
l Volume meno più
ll
ll
l
Doppio Audio
ll
Diffusore Principale: suono dell’apparecchio
* Si può modificare solo se si seleziona “Utente” in “Modalità Audio”.
Operazioni avanzate - Operazioni avanzate della TV
88
(il volume del canale può essere regolato individual
mente tra i livelli –12 e +12)
• Per emissioni in stereofonia:
Mono
Stereo
• Per emissioni bilingue:
Mono (per il canale mono, se è disponibile)
A (per il canale 1)
B (per il canale 2)
Central: suono dell’amplificato esterno.
Page 89

Operazioni avanzate - Operazioni avanzate della TV
VIDEO TV
4 Spingere il joystick verso Z o z per modificare la regolazione
dell’elemento selezionato e quindi premere il tasto OK per
memorizzare la nuova regolazione.
5 Ripetere i passi 3 e 4 per modificare le altre regolazioni.
1
2
3
4
5
6
7
8
9
0
6 Premere il tasto MENU per far riapparire l’immagine televisiva
normale.
Cambio rapido della modalità di suono
La modalità di suono può essere cambiata rapidamente senza
necessità di accedere al menù di “Regolazione Audio””
1 Premere il tasto del telecomando per accedere direttamente alle
opzioni della modalità di suono.
Personnel
Rock
Jazz
Pop
MENU
PROGR
RM
892
S
2 Spingere il joystick verso $ o 4 per selezionare la modalità di suono
che si desidera (Utente, Rock, Jazz o Pop) e quindi premere il tasto
OK per far sparire il menù dallo schermo.
Operazioni avanzate - Operazioni avanzate della TV
89
Page 90

Operazioni avanzate - Operazioni avanzate della TV
Funzione di spegnimento automatico
Può selezionare un intervallo di tempo, dopo il quale desidera che il televisore entri automaticamente nella modalità di
spegnimento temporaneo (standby).
VIDEO TV
1 Premere il tasto MENU del telecomando per far apparire il menù
sullo schermo.
2 Spingere il joystick verso $ per selezionare il simbolo t e quindi
spingerlo verso z para entrare nel menù TIMER.
1
2
3
4
5
6
3 Spingere il joystick verso z e quindi spingerlo verso Z o z più volte
7
8
9
0
fino a far apparire sullo schermo l’intervallo di tempo dopo il quale
si desidera che si spenga il televisore.
REGOLAZIONE IMMAGINE
Modalità Immagine
Contrasto
Ripristino
Formato
TIMER
Timer Spegnimento
TIMER
Timer Spegnimento
Utente
Allargato
1:00
1:00
No z 0:30 z 1:00..... 4:00 ore
4 Premere il tasto OK.
PROGR
MENU
5 Premere il tasto MENU per far riapparire l’immagine televisiva
RM
892
normale.
S
Un minuto prima che il televisore entri nella modalità di spegnimento
temporaneo (standby), apparirà automaticamente sullo schermo
l’indicazione 0:01.
Nota bene: • Mentre si guarda la televisione, premere il tasto
per vedere il tempo rimasto prima dello spegnimento.
• Per riaccendere il televisore nella modalità di
spegnimento temporaneo, premere il tasto TV
telecomando.
del
90
Operazioni avanzate - Operazioni avanzate della TV
Page 91

Teletext
Visualizzazione del Teletext
Teletext è un servizio d’informazione che la maggior parte delle emittenti televisive propone agli utenti.
Faccia in modo di usare un canale televisivo con un segnale forte, altrimenti ci potrebbero essere errori nel teletext.
1
4
7
S
VIDEO TV
2
5
8
0
MENU
3
6
9
RM
PROGR
892
Selezione del teletext
1 Selezionare il canale televisivo che trasmette il servizio di teletext
che si desidera consultare.
2 Premere il tasto del telecomando per visualizzare il servizio di
teletext.
3 Introdurre le tre cifre del numero di pagina che si desidera
consultare, usando i tasti numerici del telecomando (se si commette
un errore, introdurre tre cifre a caso e quindi ripetere il numero di
pagina corretto).
4 Premere il tasto per terminare l’uso del servizio di teletext e
ripristinare la modalità televisione.
Uso di altre funzioni del teletext
PER PREMERE IL TASTO
Accedere alla pagina successiva per la pagina successiva o
o precedente per la pagina precedente
Sovrapporre teletext alla
immagine televisiva Premere di nuovo per
annullare la modalità di teletext
Bloccare una pagina del teletext
Premere di nuovo per rilasciare
la pagina
Mostrare un’informazione nascosta
(per es. risposta ad un quiz) Premere di nuovo per
nasconderla.
TELETEXT
Index
Programme
News
Sport
Weather
TELETEXT
Index
Programme
News
Sport
Weather
25
153
101
98
TELETEXT
Index
Programme
News
Sport
Weather
25
153
101
98
TELETEXT
Index
Programme
25
News
153
Sport
101
Weather
98
25
153
101
98
Uso del Fastext
Fastext permette di accedere alle pagine del teletext premendo un
solo tasto.
Quando il Fastext viene trasmesso, sulla parte inferiore della
pagina di teletext appare un menù di codici di colore. Premere il
tasto colorato (rosso, verde, giallo o blu) del telecomando per
accedere alla pagina corrispondente.
Teletext
91
Page 92

Collegamenti opzionali
Collegamento di apparecchiature opzionali
È possibile collegare all’apparecchio una vasta gamma di apparecchiature, come indicato a seguito:
Per evitare
distorsioni
dell’immagine:
Non bisogna collegare
•
simultaneamente delle
apparecchiature ai
connettori F e G.
• Non bisogna collegare
simultaneamente
alcuna
apparecchiatura ai
connettori frontali ed
al connettore Euro AV
D.
Retro de l’apparecchio
DVD
C
Frontale de l’apparecchio
Decoder
Videocamera
8 mm/Hi8
VCR
E
A
B
Hi-Fi
Segnali d’entrata ammessi
Entrata del diffusore centrale Nel menù di
A
“Regolazione Audio”, regolazione
“Centrale” nell’ambito dell’opzione
“Diffusore”
B
Senza entrate
Segnali audio/video e RGB
C
D
Segnali audio/video e video S
Segnale audio/video
E
Segnale video S
F
Segnale video
G
Segnale audio
H
I
Senza entrata
D
F
G
VCR
DVD
HI
Videocamera
8 mm/Hi8
Segnali d’uscita disponibili
Senza uscita
Segnale audio
Video/audio del sintonizzatore di TV
Video/audio della fonte selezionata
Video/audio della fonte selezionata (stessa fonte
d’uscita di quella del connettore :2/ q 2 )
Senza uscita
Senza uscita
Senza uscita
Segnale audio della cuffia
92
Collegamenti opzionali
Page 93

Collegamenti opzionali
Uso di apparecchiature opzionali
Maggiori informazioni per il collegamento di un’apparecchiatura
Collegamento del videoregistratore
Consigliamo di collegare il videoregistratore al connettore Euro AV D o E situato nella parte posteriore dell’apparecchio.
Nel caso in cui si disponga di un connettore Euro AV, si consiglia di sintonizzare il segnale video nel numero di
programma TV “0”; per realizzare questa operazione, consulti la sezione “Sintonizzazione manuale del televisore” di
questo manuale delle istruzioni.
Se il suo videoregistratore ammette Smartlink, consulti il capitolo “Smartlink” di questo manuale delle istruzioni.
Collegamento di un’apparecchiatura audio esterna
1 Per ascoltare il suono dell’apparecchio per mezzo dell’impianto Hi-Fi:
Se desidera amplificare l’uscita audio dell’apparecchio, può collegare l’impianto Hi-Fi alle prese B della parte
posteriore dell’apparecchio. Il volume dell’impianto collegato alle prese B si può modificare variando la regolazione
del volume delle cuffie. Per realizzare questa operazione, consulti il capitolo “Regolazione del suono” di questo
manuale delle istruzioni.
2 Per ascoltare il suono dell’impianto Hi-Fi per mezzo dell’apparecchio:
Se desidera ascoltare il suono dell’impianto Hi-Fi dai diffusori dell’apparecchio, può collegare l’impianto Hi-Fi alle
prese A della parte posteriore dell’apparecchio. Se possiede un amplificatore Dolby, colleghi l’uscita centrale
dell’amplificatore alle suddette prese in maniera tale che questo svolga la funzione di diffusore centrale. Per realizzare
questa operazione, consulti il capitolo “Regolazione del suono” e selezioni “Centrale” nell’ambito dell’opzione
“Diffusore”.
Collegamento di apparecchi Mono
Colleghi il cavo dell’audio al connettore L/G/S/I situato nella parte anteriore dell’apparecchio e selezioni il segnale
d’entrata
2, seguendo le istruzioni indicate a seguito. Dopo, selezioni “A” nel menù di “Regolazione del volume”.
Selezione e visualizzazione del segnale d’entrata
VIDEO TV
1 Collegare l’apparecchiatura opzionale al connettore adeguato dell’apparecchio, così come
indicato nella pagina precedente.
2 Premere più volte il tasto del telecomando fino a far apparire sullo schermo il simbolo
d’entrata corretto.
Simbolo Segnali d’entrata
k • Segnale d’entrata audio / video mediante il connettore Euro AV
1
2
3
4
5
6
7
8
9
0
K
q
K
2
3
• Segnale d’entrata RGB mediante il connettore Euro AV
• Segnale d’entrata audio / video mediante il connettore Euro AV
connettori RCA H e
• Segnale d’entrata audio / video S mediante il connettore Euro AV
connettori H e F.
• Segnale d’entrata audio/video mediante il connettore Euro AV
G
.
C
3 Accendere l’apparecchiatura collegata.
PROGR
MENU
4 Per ripristinare l’immagine normale della televisione, si renderà necessario premere il tasto
del telecomando.
C
o i
D
o i
D
.
E
S
RM
892
Collegamenti opzionali
93
Page 94

Collegamenti opzionali
VIDEO TV
VTR 1 2 3 4 DVD
CH
CH
VTR 1 2 3 4 DVD
Smartlink
Smartlink è un collegamento diretto fra il TV a retroproiezione e un VCR.
Per utilizzare Smartlink occorre:
• Un VCR che supporti le funzioni Smartlink, NexTView Link, Easy Link o Megalogic.
Megalogic è un marchio registrato Grundig Corporation.
EasyLink è un marchio Philips Corporation.
• Un cavo SCART a 21 poli idoneo al collegamento del VCR al connettore Scart :3
(SMARTLINK) sul retro de l’apparecchio.
Smartlink offre:
• Informazioni sulla sintonia come ad esempio la tabella dei canali che può essere trasferita dal
TV a retroproiezione al VCR.
• Registrazione TV diretta: mentre si guarda un programma è sufficiente premere un solo
pulsante del VCR per registrarlo.
• TV a retroproiezione sulla modalità di spegnimento temporaneo (standby): Premere il tasto
“Play z” del video ed il televisore s’accenderà automaticamente.
Se è stato attaccato un decoder ad un video che accetta Smartlink, selezionare il menù
Preselezione (Continuaz.) in
posizione AV 3 per ogni canale codificato.
(INSTALLAZIONE) e selezionare DECODER sulla
Retro de l’apparecchio
VCR
Per maggiori informazioni su Smartlink, consultare il manuale d‘uso del VCR.
Controllo a distanza di un altro apparecchio Sony
Utilizzando i tasti posti sotto la copertura del telecomando, è possibile pilotare un altro
apparecchio Sony.
1 Aprire la copertura del telecomando.
2 Scegliere la posizione del selettore VTR 1234 DVD a seconda dell‘apparecchio
da pilotare:
VTR 1 VCR Beta
VTR 2 VCR 8 mm
VTR 3 VCR VHS
VTR 4 video digitale (DCR-VX 1000/9000 E, VHR-1000)
DVD lettore di videodischi
3 Utilizzi i tasti del telecomando situati sotto il coperchietto per maneggiare l’apparecchio.
• Se l‘apparecchio video ha un selettore per MODALITA‘ COMANDO,
predisporlo nella stessa posizione del VTR 1234 DVD sul telecomando del
televisore.
• Se l‘apparecchio che si vuole pilotare non dispone di una determinata
funzione, il corrispondente tasto sul telecomando del TV non ha effetto.
Decoder
94
Collegamenti Opzionali
Page 95

Collegamenti opzionali
Selezione del segnale d’uscita dei connettori Euro AV
Usare questa funzione se si desidera registrare sul videoregistratore (collegato ai connettori Euro AV :2/q2 o :3
situati nella parte posteriore dell’apparecchio) qualunque segnale proveniente da un’apparecchiatura esterna.
Per realizzare questa operazione, si renderà necessario selezionare la fonte d’uscita come descritto a seguito (se il suo
videoregistratore ammette Smartlink, questo procedimento non è necessario):
VIDEO TV
1 Premere il tasto MENU del telecomando per far apparire il menù
sullo schermo
2 Spingere il joystick verso $ per selezionare il simbolo e quindi
spingerlo verso z per entrare nel menù COLLEGAMENTI VIDEO.
1
2
3
4
5
6
7
8
9
0
3 Spingere il joystick verso $ o 4 per marcare:
Schermo TV: per il segnale d’entrata per lo schermo TV o,
REGOLAZIONE IMMAGINE
Modalità Immagine
Contrasto
Ripristino
Formato
COLLEGAMENTI VIDEO
Schermo TV
Uscita TV
TV
Utente
Allargato
[TV - - - - - - -]
[AV1 - - - - - - -]
AV1
Uscita AV: per il segnale d’uscita dell’apparecchio, disponibile
per i connettori Euro AV :2/q2 e :3.
Spingere il joystick verso z per confermare.
PROGR
MENU
4 Spingere il joystick verso Z o z più volte per selezionare il segnale
adeguato:
S
Schermo TV: TV, AV1, RGB, AV2, YC2 ou AV3
RM
892
Uscita AV: TV, AV1, AV2, YC2, AV3 ou AUTO
Dopo aver selezionato il tipo di segnale, premere il tasto OK per
confermare.
Se si seleziona AUTO, il segnale d’uscita sarà sempre lo stesso
che appare sullo schermo.
Si possiede un decodificatore, si prega ricordare di riselezionare
l’Uscita AV in “TV” per una corretta decodificazione.
5 Premere il tasto MENU per far riapparire l’immagine televisiva
normale.
Il segnale selezionato è disponibile per l’apparecchiatura opzionale
collegata al connettore Euro AV appropriato.
Collegamenti opzionali
95
Page 96

Collegamenti opzionali
Uso della funzione “Selez. Nome Ingressi”
Questa funzione consente di assegnare un nome di cinque caratteri al massimo (lettere o numeri) all’apparecchiatura
opzionale collegata alle prese dell’apparecchio.
VIDEO TV
1 Premere il tasto MENU del telecomando per far apparire il menù
sullo schermo.
2 Spingere il joystick verso $ per selezionare il simbolo e quindi
spingerlo verso z per entrare nel menù PRESELEZIONE.
1
2
3
4
5
6
7
8
9
3 Spingere il joystick verso $ o 4 per selezionare Selez. Nome
Ingressi e quindi spingerlo verso z.
0
4 Spingere il joystick verso $ o 4 per selezionare il segnale d’entrata
cui si desidera dare un nome (per esempio. AV2) e quindi spingerlo
PROGR
MENU
verso z per mettere in risalto il primo elemento della colonna
NOME.
REGOLAZIONE IMMAGINE
Modalità Immagine
Contrasto
Ripristino
Formato
PRESELEZIONE
Preselezione Automatica
Preselezione Manuale
Preselezione (Continuaz.)
Selez. Nome Ingressi
Ordinamento Canali
Blocco Programma
Lingua
Convergenza
PRESELEZIONE
Preselezione Automatica
Preselezione Manuale
Preselezione (Continuaz.)
Selez. Nome Ingressi
Ordinamento Canali
Blocco Programma
Lingua
Convergenza
SELEZ. NOME INGRESSI
INGR NOME
AV1
RGB
AV2
YC2
AV3
- - - - -
- - - - -
- - - - -
- - - - -
- - - - -
Utente
Allargato
S
RM
5 Spingere il joystick verso $ o 4 per selezionare una lettera o numero
892
(“-“ per lo spazio in bianco) e quindi spingerlo verso z per
confermare il carattere prescelto. Selezionare gli altri quattro
caratteri seguendo lo stesso procedimento.
SELEZ. NOME INGRESSI
INGR NOME
AV1
RGB
AV2
YC2
AV3
- - - - -
- - - - A- - - -
- - - - -
- - - - -
6 Una volta selezionati tutti i caratteri, premere il tasto OK.
7 Ripetere i passi dal 4 al 6 se si desidera etichettare altri segnali
d’entrata.
8 Premere il tasto MENU per far riapparire l’immagine televisiva
normale.
Quando verrà selezionato l’apparecchiatura per la quale sia stato
assegnato un nome al segnale d’entrata, il suddetto nome apparirà sullo
schermo per alcuni secondi.
Collegamenti opzionali
96
Page 97

Informazioni aggiuntive
Area di visione ottimale
Per ottenere la migliore qualità d’immagine, posizionare il TV a retroproiezione in modo che sia possibile vederne lo
schermo entro le aree illustrate nelle figure seguenti.
Area di visione orizzontale
4
(distanza minima
2.1m
ottimale)
4
75˚
75˚
Area di visione verticale
2.1m
4
Posizione di visione ottimale
(distanza minima
ottimale)
4
22.5˚
22.5˚
Posizione di visione ottimale
Informazioni aggiuntive
97
Page 98

Informazioni aggiuntive
Guida rapida per muoversi attraverso i menù
REGOLAZIONE IMMAGINE
Modalità Immagine
Contrasto
Ripristino
Formato
REGOLAZIONE AUDIO
Modalità Audio
Bilanciamento
Ripristino
Aud. Spaziale
Doppio Audio
Volume Pers.
Volume
Doppio Audio
Diffusore
COLLEGAMENTI VIDEO
Schermo TV
Uscita TV
TIMER
Timer Spegnimento
PRESELEZIONE
TV
Preselezione Automatica
Preselezione Manuale
Preselezione (Continuaz.)
Selez. Nome Ingressi
Ordinamento Canali
Blocco Programma
Lingua
Convergenza
[TV - - - - - - -]
[AV1 - - - - - - -]
AV1
Utente
Allargato
Utente
No
Mono
0
Mono
Principale
1:00
CONTROLE DE L'IMAGE
Réglage Image
Contraste
Raz
Ratio
REGOLAZIONE AUDIO
Modalità Audio
Bilanciamento
Ripristino
Aud. Spaziale
Doppio Audio
Volume Pers.
Volume
Doppio Audio
Diffusore
COLLEGAMENTI VIDEO
Schermo TV
Uscita TV
TV
TIMER
Timer Spegnimento
PRESELEZIONE
Preselezione Automatica
Preselezione Manuale
Preselezione (Continuaz.)
Selez. Nome Ingressi
Ordinamento Canali
Blocco Programma
Lingua
Convergenza
Personnel
Plein
Utente
No
Mono
0
Mono
Principale
[TV - - - - - - -]
[AV1 - - - - - - -]
AV1
1:00
Si desidera iniziare
la presel. autom.?
Si
No
Conferma: OK
(Per ulteriori informazioni riguardo alle
varie regolazioni d’immagine, far
riferimento al capitolo su “Regolazione
dell’Immagine”)
(Per ulteriori informazioni riguardo alle
varie regolazioni del suono, far riferimento
al capitolo su “Regolazione del suono”)
(Per ulteriori informazioni, far riferimento al
capitolo su “Selezione del segnale d’uscita
dei connettori Euro AV”)
(Per ulteriori informazioni, far riferimento al
capitolo su “Funzione di spegnimento
automatico”)
(Per ulteriori informazioni, far riferimento al
capitolo su «Sintonia automatica della TV,
usando il telecomando”)
PRESELEZIONE
Preselezione Automatica
Preselezione Manuale
Preselezione (Continuaz.)
Selez. Nome Ingressi
Ordinamento Canali
Blocco Programma
Lingua
Convergenza
PRESELEZIONE
Preselezione Automatica
Preselezione Manuale
Preselezione (Continuaz.)
Selez. Nome Ingressi
Ordinamento Canali
Blocco Programma
Lingua
Convergenza
PRESELEZIONE
Preselezione Automatica
Preselezione Manuale
Preselezione (Continuaz.)
Selez. Nome Ingressi
Ordinamento Canali
Blocco Programma
Lingua
Convergenza
PRESELEZIONE
Preselezione Automatica
Preselezione Manuale
Preselezione (Continuaz.)
Selez. Nome Ingressi
Ordinamento Canali
Blocco Programma
Lingua
Convergenza
PRESELEZIONE
Preselezione Automatica
Preselezione Manuale
Preselezione (Continuaz.)
Selez. Nome Ingressi
Ordinamento Canali
Blocco Programma
Lingua
Convergenza
PRESELEZIONE MANUALE
PROG SIS CAN
PRESELEZIONE (CONTINUAZ.)
PROG AFT DECODER
NOME
B/G
0
MV-CH
C 40
B/G
1
TVE-1
C 41
B/G
2
TVE-2
C 31
B/G
3
ANT-3
C 34
B/G
4
TELE 5
C 27
B/G
5
C PLUS
C 47
B/G
6
- - - - -
C 44
B/G
7
- - - - -
C 23
B/G
8
CNN -
C 35
B/G
9
BBC-W
C 28
Si
0
No
Si
1
No
Si
2
AV1
Si
3
No
Si
4
AV2
Si
5
No
Si
6
No
Si
7
No
Si
8
No
Si
9
No
SELEZ. NOME INGRESSI
INGR NOME
- - - - -
AV1
- - - - -
RGB
- - - - -
AV2
- - - - -
YC2
- - - - -
AV3
PRESELEZIONE MANUALE
PROG SIS CAN NOME
B/G
0
BBC-W
C 28
B/G
1
MV-CH
C 40
B/G
2
TVE-1
C 41
B/G
3
TVE-2
C 31
B/G
4
ANT-3
C 34
B/G
5
TELE 5
C 27
B/G
6
C PLUS
C 47
B/G
7
- - - - -
C 44
B/G
8
- - - - -
C 23
B/G
9
CNN -
C 35
BLOCCO PROGRAMMA
PROG
SIS CAN NOME
B/G
0
MV-CH
C 40
B/G
1
TVE-1
C 41
B/G
2
TVE-2
C 31
B/G
3
ANT-3
C 34
B/G
4
TELE 5
C 27
B/G
5
C PLUS
C 47
B/G
6
- - - - -
C 44
B/G
7
- - - - -
C 23
B/G
8
CNN -
C 35
B/G
9
- - - - -
C 28
(Per ulteriori informazioni, far riferimento al
capitolo su “Sintonia manuale della TV”)
(Per ulteriori informazioni, far riferimento al
capitolo su “Funzione di “Preselezione
(Continuaz.)”)
(Per ulteriori informazioni, far riferimento al
capitolo su “Uso della funzione “Selez.
Nome Ingressi””)
(Per ulteriori informazioni, far riferimento al
capitolo su “Riordinamento dei numeri di
programma dei canali TV”)
(Per ulteriori informazioni, far riferimento al
capitolo su ”Bloccaggio dei programmi”)
98
Informazioni aggiuntive
PRESELEZIONE
Preselezione Automatica
Preselezione Manuale
Preselezione (Continuaz.)
Selez. Nome Ingressi
Ordinamento Canali
Blocco Programma
Lingua
Convergenza
PRESELEZIONE
Preselezione Automatica
Preselezione Manuale
Preselezione (Continuaz.)
Selez. Nome Ingressi
Ordinamento Canali
Blocco Programma
Lingua
Convergenza
LINGUA
English
Deutsch
Français
Italiano
Nederlands
Polski
Česki
Magyar
Eλλnvιkά
(Per ulteriori informazioni, far riferimento al
capitolo su “Selezione della lingua”)
(Per ulteriori informazioni, far riferimento al
capitolo su “Regolazione Allineamento
Colori (Convergenza)”)
Page 99

Informazioni aggiuntive
Specifiche
Sistema televisivo
B/G/H, D/K
Sistema colore
PAL, SECAM Est
NTSC 3.58, 4.43 (solo ingresso video)
Copertura canale
VHF: E2-E12
UHF: E21-E69
CATV: S1-S20
HYPER: S21-S41
D/K: R1-R12, R21-R69
Cinescopio
41 pollici
Circa 103 cm in diagonale
Terminali sul pannello posteriore
• Terminali d'ingresso diffusore centrale, 2
C
•
• :1/
• :2/q 2 Euro Connettore 21 poli (standard
• :3 Euro Connettore 21 poli (standard
terminale
Uscita audio - connettori Phono RCA
Euro Connettore 21 poli (standard
CENELEC) con ingresso per segnali
audio e video, ingresso per RGB, uscita
per segnali TV audio e video
CENELEC) con ingresso per segnali
audio e video, ingresso per S-video,
Uscita audio/video (selezionabili)
CENELEC) con ingresso per segnali
audio e video, uscita per segnali audio e
video (selezionabile, la medesima
sorgente in uscita del connettore
:2/q2)
Terminali sul pannello frontale
k ingresso video - presa fono
2
ingressi audio - presa fono
2
2
ingresso S vidéo - presa DIN 4 poli
q
2
Presa cuffia - minijack stereo
Uscita audio:
2 x 30 W (potenza della musica)
2 x 15 W (RMS)
Ingresso SP centrale:
30W (RMS) (utilizzato come diffusore centrale)
Potenza assorbita
145 W
Consumo in standby
0.7 W
Dimensioni (largh. x alt. x prof.)
Circa 1020 x 1115 x 417 mm
Peso
Circa 53 kg
Accessori in dotazione
Telecomando RM-892 (1)
Pile IEC (2)
Uno stabilizzatore
Altre funzioni
Filtro a pettine digitale (alta risoluzione)
Teletext, Fastext
NICAM
Spegnimento automatico
"Smartlink"
Progetto e caratteristiche tecniche sono soggetti a cambiamenti
senza preavviso.
Carta Ecologica - Senza cloro 100%
Informazioni aggiuntive
99
Page 100

Informazioni aggiuntive
Soluzione di problemi
Ecco alcuni semplici rimedi ai problemi che possono influenzare immagine e suono.
Problema Soluzione
Assenza di immagine (schermo scuro), • Inserire bene la spina dell'apparecchio.
assenza di suono • Premere il tasto
• Se l’indicatore è acceso, premere TV
numero di programma sul telecomando.
• Controllare il collegamento dell’antenna.
• Controllare che la sorgente video selezionata sia accesa.
• Spegnere il apparecchio per 3 o 4 secondi, poi
riaccenderlo utilizzando il tasto
Immagine scadente o assente (schermo • Usando il MENU, selezionare la videata di regolazione
scuro), ma buon audio. dell’immagine e regolare i livelli di luminosità, contrasto
e colore.
• Dalla videata di regolazione dell’immagine,
selezionare Ripristino per ripristinare le
impostazioni di fabbrica.
dell'apparecchio.
oppure un
.
Immagine di qualità scadente quando • Premere ripetutamente il tasto fino
si guarda una sorgente video RGB. a quando compare il simbolo RGB
Immagine buona ma assenza di audio. • Premere il tasto del telecomando.
• Se viene visualizzato il simbolo
sul telecomando.
• Verificare che il Diffusore "Principale" è selezionato sul
menu REGOLAZIONE AUDIO.
Assenza di colore nei programmi • Usando il tasto MENU, selezionare la videata di
a colori regolazione dell’immagine e regolare il bilanciamento
dei colori.
• Dalla videata di regolazione dell’imma gine, selezionare
Ripristino per ripristinare le impostazioni di
fabbrica.
Immagine distorta quando si cambia • Spegnere le apparecchiature collegate all’Euro
programma o si seleziona il teletext connettore 21 poli sul retro dell'apparecchio.
Immagine buona ma audio scadente • Regolare la “Sintonia fine dei canali” per ottenere una
qualità d’immagine e audio migliori, per ulteriori
informazioni, far riferimento al capitolo su ”Funzione di
“Preselezione (Continuaz.)”.
Il telecomando non funziona • Sostituire le batterie.
L’indicatore della modalità d’attesa • Contattare il più vicino centro di assistenza tecnica
(standby) posto sul frontale del TV lampeggia autorizzato Sony.
anche se il Timer per la "Sveglia" non è stato
attivato.
/
.
, premere il tasto
100
Informazioni aggiuntive
• Se i problemi persistono, far riparare il televisore da personale tecnico qualificato.
• Non aprire mai da soli il televisore.
 Loading...