

Page 1

GB
BG
CZ
HU
PL
4-094-048- 11 (1)
R
100 Hz
Projection TV
Instruction Manual
Инструкции за експлоатация
Návod k obsluze
Kezelési útmutató
Instrukcja obsługi
Инструкция пo эксплyатации
RU
KP-41PX2
©2003 by Sony Corporation
Page 2

Page 3

Introduction
Thank you for choosing this Sony 100 Hz Projection TV.
Before operating the projection TV, please read this manual thoroughly and retain it for future reference.
• Symbols used in the manual:
• Important information.
• Information on a feature.
• 1,2... Sequence of instructions.
• Shaded buttons on the remote control show you the buttons you have
to press to follow the sequence of the instructions.
• Informs you of the result of the instructions.
Table of Contents
Introduction..........................................................................................................................................................................................................3
Safety Information...............................................................................................................................................................................................4
Overview
Overview of Remote Control Buttons ..............................................................................................................................................................5
Overview of TV Buttons ....................................................................................................................................................................................6
Installation
Connecting the Aerial and VCR .......................................................................................................................................................................7
Inserting Batteries into the Remote Control ....................................................................................................................................................7
First Time Operation
Switching On the TV and Automatically Tuning ..........................................................................................................................................8
Adjusting Colour Registration (Convergence)..............................................................................................................................................10
Menu system
Introducing and Using the Menu System......................................................................................................................................................10
On Screen Display Menus Guide ....................................................................................................................................................................11
Menu Guide:
Picture Adjustment........................................................................................................................................................................................12
Sound Adjustment .........................................................................................................................................................................................12
Sleep Timer .....................................................................................................................................................................................................13
AV3 Output.....................................................................................................................................................................................................13
PIP Input..........................................................................................................................................................................................................13
PIP Position.....................................................................................................................................................................................................14
Language/Country........................................................................................................................................................................................14
Auto Tuning....................................................................................................................................................................................................14
Programme Sorting........................................................................................................................................................................................14
Programme Labels .........................................................................................................................................................................................15
AV Preset.........................................................................................................................................................................................................15
Manual Programme Preset ...........................................................................................................................................................................16
RGB Centring..................................................................................................................................................................................................17
GB
Teletext
NexTView
..................................................................................................................................................................................................................... 18
................................................................................................................................................................................................................ 19
Additional Information
Connecting Optional Equipment ....................................................................................................................................................................20
Using Optional Equipment ..............................................................................................................................................................................21
SmartLink ...........................................................................................................................................................................................................22
Remote Control Configuration for VCR/DVD.............................................................................................................................................23
Optimum Viewing Area ...................................................................................................................................................................................24
Specifications......................................................................................................................................................................................................25
Troubleshooting.................................................................................................................................................................................................26
Table of Contents
3
Page 4

Safety Information
This set is to operate on a 220-240V AC
supply only. Take care not to connect too
many appliances to the same power socket
as this could result in fire or electric shock.
Do not open the cabinet and the rear cover of
the TV. Refer to qualified service personnel
only.
Do not cover the ventilation openings of the
TV For ventilation, leave a space of at least
10cm all around the set.
For environmental and safety reasons, it is
recommended that the TV set is not left in
standby mode when not in use. Disconnect
from the mains.
For your own safety, do not touch any part
of the TV, power lead or aerial lead during
lightning storms.
Never place the TV in hot, humid or
excessively dusty places. Do not install the
TV where it may be exposed to mechanical
vibrations.
Never push objects of any kind into the set as
this could result in a fire or electric shock.
Never spill liquid of any kind on the set. If
any liquid or solid object does fall into the
cabinet, do not operate the TV. Have it
checked immediately by qualified personnel.
To prevent fire or shock hazard, do not
expose the TV to rain or moisture.
To prevent fire, keep inflammable objects or
naked lights (eg candles) away from the TV.
Clean the screen and cabineet with a soft, lightly
dampened cloth. Do not use any type of
abrasive pad, alkaline cleaner, scouring powder
or solvent, such as alcohol or benzine, or
antistatic spray. As safety precaution, unplug
the TV before cleaning it.
Place the TV on a secure stable stand. Do not
allow children to climb on to it. Do not place
the TV on its side or face up.
Pull out the power lead by the plug. Do not
pull on the power lead itself.
Unplug the power lead before moving the
TV. Avoid uneven surfaces, quick steps or
excessive force. If the set has been dropped
or damaged, have it checked immediately
by qualified service personnel.
Take care not to place heavy objects on the
power lead as this could result in damage.
We recommend you wind any excess lead
around the holders provided on the rear of
the TV.
Do not cover the ventilation openings of the
TV with items such as curtains or
newspapers etc.
Additional Safety Information
• After transporting the projection TV directly from a cold to a warm location, or if the room temperature has changed suddenly,
pictures may be blurred or show poor colour over portions of the picture. This is because moisture has condensed on the mirrors
or lenses inside the projection TV. Let the moisture evaporate before using the projection TV.
• To obtain a clear picture, do not expose the screen to direct illumination or direct sunlight. If possible, use spot lighting directed
down from the ceiling.
• Displaying a still picture for long periods of time, for instance, when operating a video game or personal computer and viewing
programme in 16:9 mode, may damage the picture tube. To avoid this, keep the picture contrast level low.
• Avoid touching the screen, and take care not to scratch the surface with hard objects.
Safety Information
4
Page 5

1
2
3
4
5
6
7
8
9
0
qa
qs
qd
qf
qg
qh
Overview of Remote Control Buttons
qj
qk
ql
w;
wd
wd
Checking the Accessories Supplied
ws
wa
w;
ql
qk
qj
qh
qg
qf
1
2
3
4
5
6
7
8
9
0
qa
qs
qd
To Temporarily Switch Off TV:
Press this button to temporarily switch off TV (the standby indicator on the TV lights up). Press
again to switch on TV from standby mode.
To save energy we recommend switching off completely when TV is not in use.
After 15 minutes without a signal and without any button being pressed, the TV switches
automatically into standby mode.
VCR or DVD on/off: Press this button to switch your VCR or DVD on or off.
Media Selector:
With this remote control you can operate not only this TV but also the main functions of your VCR
or DVD. Switch on the device you want to operate and next press this button repeatedly to select
the VCR, TV or DVD. A green light will be momentarily lit to indicate the chosen function.
Before the first time you want to control a DVD or VCR by using this remote control, you have
to set it up depending on the brand of the device to be used. For more details, refer to the
chapter “Remote Control Configuration for VCR or DVD” on page 23.
Selecting input source: Press this button repeatedly until the desired input symbol of the
source appears on the TV screen.
Selecting channels:
If Media Selector is switched to TV or VCR, press this button to select channels.
For double-digit programme numbers, enter the second digit within 2.5 seconds.
a) If Media Selector is switched to TV:
Press this button to watch the last channel selected (the last channel watched for at least 5
seconds).
b) If Media Selector is switched to VCR:
For Sony’s VCR double-digit programme numbers, e.g. 23, press -/- - first and then the buttons
2 and 3.
Selecting screen format: Press this button repeatedly to change the format of the screen. 4:3
for a conventional picture or 16:9 for a imitation of wide screen.
GB
This button only works in Teletext mode.
Selecting Teletext: Press this button to switch on teletext.
Joystick:
a) If Media Selector is switched to TV:
• When MENU is switched on, use these buttons to operate the menu system. For details refer
to “Introducing and Using the Menu System” on page 10.
• When MENU is switched off, press OK to show a channel overview. Then press or to
select the channel and then press again the OK button to watch the selected channel.
b) If Media Selector is switched to VCR or DVD:
Using these buttons you can control the main functions of your VCR or DVD.
Displaying the menu system: Press this button to display the menu on the TV screen. Press again to remove the menu display
from the TV screen.
Selecting channels: Press these buttons to select the next or previous broadcast channel.
NexTView: For more details refer to chapter “NexTView” on page 19.
Adjusting TV volume: Press these buttons to adjust the volume of the TV.
Recording button: If Media Selector is switched to VCR, press this button to record programmes.
Selecting TV mode: Press this button to switch off PIP, teletext or video input.
Selecting Picture mode: Press this button repeatedly to change the picture mode.
Selecting Sound effect: Press this button repeatedly to change the sound effect.
Displaying on Screen information: Press this button to display all on-screen indications. Press again to cancel.
Freezing the picture: Press this button to freeze the picture. The screen is divided into two screens. On the left with the normal
picture, on the right the picture is freezed. Press this button again to return to the normal picture.
wa
Swapping screens: Whilst you are in “PIP” mode, press this button to swap the two screens.
ws
PIP (Picture in Picture): Press this button to watch another source in a small picture (PIP) within the main TV picture. Press again
to cancel. To select the source you want to watch, refer to the chapter “PIP Input” on page 13.
Muting the Sound: Press this button to mute TV sound. Press again to restore the sound.
Besides TV functions, all coloured buttons as well as green symbols are also used for Teletext operation. For more details,
please refer to the chapter “Teletext” on page 18.
Overview
5
Page 6

Overview of Projection TV Buttons
1
2
S video
Input
jack
Push up the flap on the front of the TV
to reveal the front control panel.
Video
Input
jack
Audio
Input
jacks
Headphones
jack
Auto Convergence
Button:
Press this button to adjust
the colour registration.
For more details, please
refer to the chapter
“Adjusting Colour
Registration
(Convergence)” on page
10.
or
Auto Start Up Button:
Press and hold this
button for approximately
2 seconds to start the auto
start up sequence.
For more details, please
refer to the chapter
“Switching On the
Projection TV and
Automatically Tuning”
on page 8.
Selecting
Input
source
Volume
control
buttons
Programme
Up or Down
Buttons
(Select TV
channels)
Standby
indicator
On/Off
Switch
6
Overview
Page 7

Connecting the Aerial and VCR
Connecting cables are not supplied.
or
VCR
OUT IN
Scart lead is optional.
For more details of VCR connection, please refer to the section “Additional information
when connecting equipment” on page 21.
Inserting Batteries into the Remote Control
Make sure you insert the supplied batteries using the correct polarities.
Always remember to dispose of used batteries in an environmental friendly way.
GB
Installation
7
Page 8

Switching On the Projection TV and Automatically Tuning
Language
English
Norge
Français
Italiano
Nederlands
Select Language: Confirm: OK
Country
Sverige
Norge
Italia
Schweiz/Suisse/Svizzera
Select Language: Confirm: OK
Programme:
Channel:
System
Searching...
1
C 01
B/G
Auto Tuning
Do you want to start
automatic tuning?
Yes
No
No channel found
Please connect aerial
Confirm
Language
English
Norge
Français
Italiano
Nederlands
Select Language: Confirm: OK
Language
English
Norge
Français
Italiano
Nederlands
Select Language: Confirm: OK
The first time you switch on your TV, a sequence of menu screens appear on the TV enabling you to: 1) choose the language
of the menu screen, 2) choose the country in which you wish to operate the TV, 3) search and store all available channels (TV
Broadcast) and 4) change the order in which the channels (TV Broadcast) appear on the screen.
However, if you need to change any of these settings at a later date, you can do that by selecting the appropriate option in
the (Set Up menu) or by pressing the Auto Start Up Button / on the TV set.
1 Connect the Projection TV plug to the mains socket (220-240V AC, 50Hz)
The first time that the TV set is connected, it is usually turned on. If the TV is off, press
the on/off button on the TV set to turn on the TV.
The first time you switch on the TV, a Language menu displays automatically on the
TV screen.
2 Press the or button on the remote control to select the language, then press the
OK button to confirm your selection. From now on all the menus will appear in the
selected language.
3 The Country menu appears automatically on the TV screen. Press the or button
4 The Auto Tuning menu appears on the screen. Press the OK button to select Yes.
5 The projection TV starts to automatically search and store all available broadcast
to select the country in which you will operate the TV set, then press the OK
button to confirm your selection.
• If the country in which you want to use the TV se does not appear in the list,
select “-” instead of a country.
• To avoid wrong teletext characters for cyrillic languages we recommend
selecting Russia country if your own country does not appear in the list.
channels for you.
This procedure could take some minutes. Please be patient and do not press
any buttons, otherwise automatic tuning will not be completed.
In some countries the TV Broadcaster installs the channels automatically (ACI
system). In this case, the TV Broadcaster sends a menu in which you can select
your city by pressing the or button and OK to store the channels.
If no channels were found during the auto tuning process then a new menu
appears automatically on the screen asking you to connect the aerial. Please
connect the aerial (see page 7) and press OK. The auto tuning process will start
again.
8
First Time Operation
continued...
Page 9
6 After all available channels are captured and stored, the Programme Sorting menu
Programme Sorting
Programme:
01 TVE2 41 TVE
02 TVE
03 ANT3
04 TELE5
05 C+
06 C44
Select new position Move: OK
MENU
Programme Sorting
Programme:
01 TVE2
02 TVE
03 ANT3
04 TELE5
05 C+
06 C44
Select Channel Confirm:
automatically appears on the screen enabling you to change the order in which the
channels appear on the screen.
a) If you wish to keep the broadcast channels in the tuned order, go to step 7.
b) If you wish to store the channels in a different order:
1 Press the or button to select the programme number with the channel (TV
Broadcast) you wish to rearrange, then press the button.
2 Press the or button to select the new programme number position for your
selected channel (TV Broadcast), then press OK.
3 Repeat steps b)1 and b)2 if you wish to change the order of the other channels.
7 Press the MENU button to remove the menu from the screen.
Your projection TV is now ready for use.
GB
First Time Operation
9
Page 10
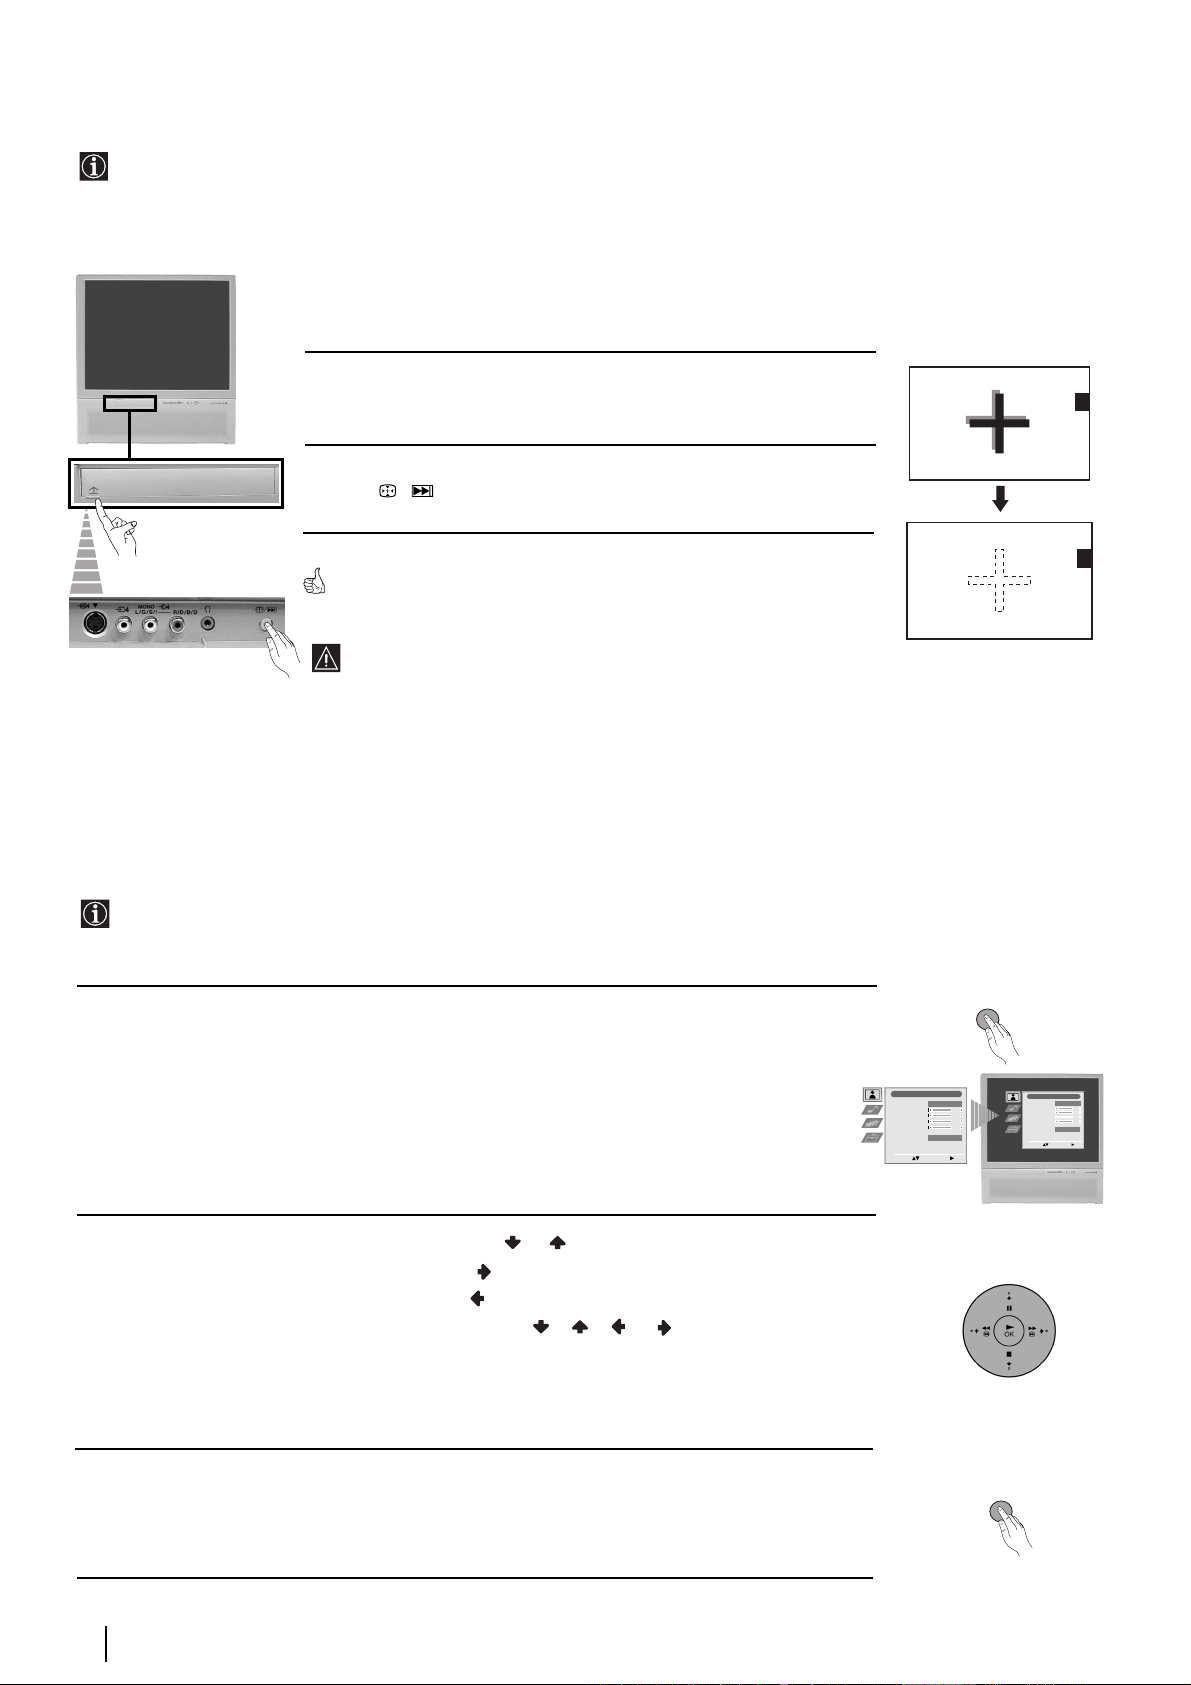
Adjusting Colour Registration (Convergence)
Due to the earth’s magnetism, the picture might become undefined and you could see different colours on the outlines of
the images.
In that case, proceed as follows:
Auto converge the Red, Green, and
Blue Lines
1 Push up the flap on the front of the projection TV to reveal the front
control panel.
2 Press / button.
The Auto Convergence function works for about 10 seconds. When the white
cross disappears from the screen, your projection TV is ready for use.
The Auto Convergence function does not work when:
• no signal is input.
• the input signal is weak.
• the screen is exposed to spotlights or direct sunlight.
• you watch the teletext broadcast.
• you watch NexTView.
Introducing and Using the Menu system
Your projection TV uses an on-screen menu system to guide you through the operations. Use the following buttons on the
Remote Control to operate the menu system:
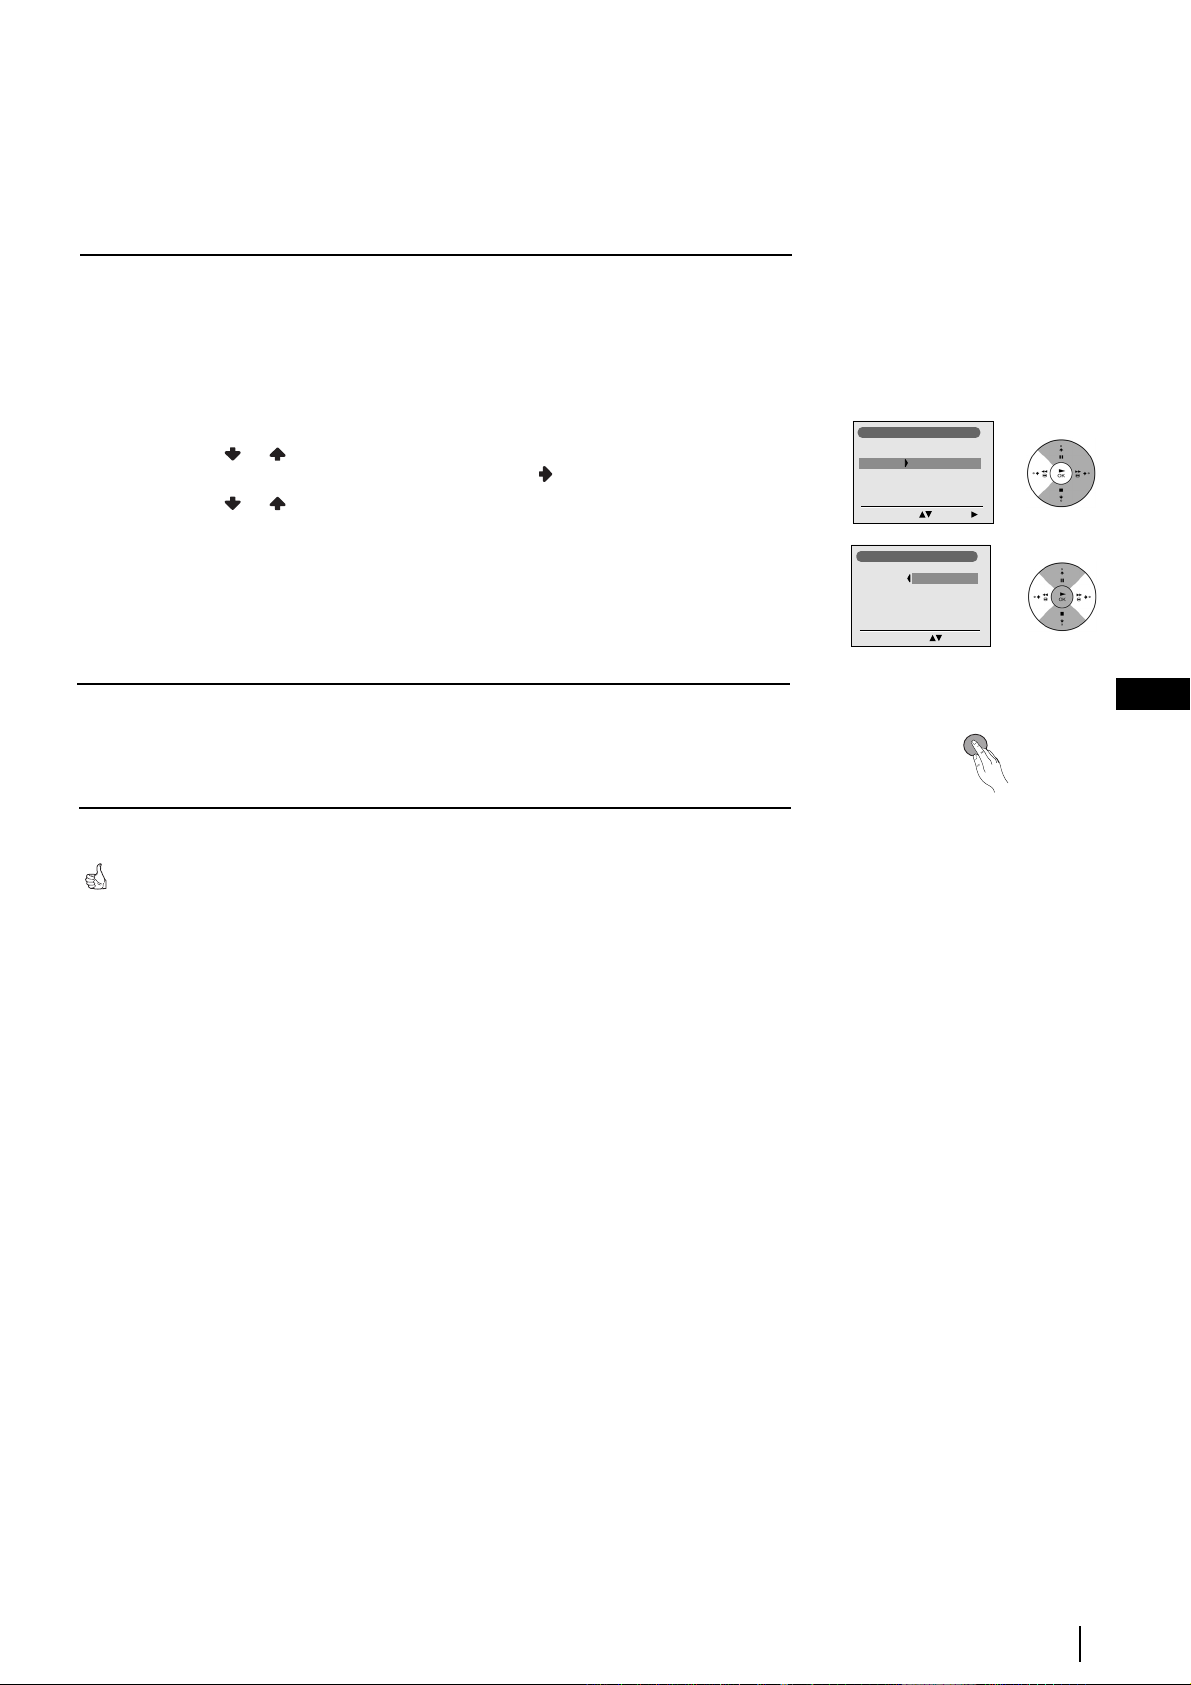
1 Press the MENU button to switch the first level menu on.
2 • To highlight the desired menu or option, press or .
• To enter the selected menu or option, press .
• To return to the last menu or option, press .
• To alter the settings of your selected option, press //or.
• To confirm and store your selection, press OK.
Picture Adjustment
Picture Mode
Contrast
Brightness
Colour
Sharpness
Reset
Noise Reduction
Select: Enter Menu:
MENU
Personal
AUTO
Picture Adjustment
Picture Mode
Contrast
Brightness
Colour
Sharpness
Reset
Noise Reduction
Select: Enter Menu:
Personal
AUTO
3 Press the MENU button to remove the menu from the screen.
First Time Operation - Menu System
10
MENU
Page 11

On Screen display Menus Guide
Picture Adjustment
Picture Mode
Contrast
Brightness
Colour
Sharpness
Reset
Noise Reduction
Select: Enter Menu:
Sound Adjustment
Effect
Treble
Bass
Balance
Reset
Dual Sound
Auto Volume
TV Speakers
Select: Enter Menu:
Features
Sleep Timer
AV3 Output
PIP Input
PIP Position
Select: Enter Menu:
Personal
AUTO
Natural
Stereo
Picture Adjustment
Picture Mode
Contrast
Brightness
Colour
Sharpness
Reset
Noise Reduction
Select: Enter:
Sound Adjustment
Effect
Treble
Bass
Balance
Reset
Dual Sound
Off
On
Off
AUTO
AV1
Auto Volume
TV Speakers
Select: Enter:
Features
Sleep Timer
AV3 Output
PIP Input
PIP Position
Select: Enter:
Features
Sleep Timer
AV3 Output
PIP Input
PIP Position
Select: Enter:
Features
Sleep Timer
AV3 Output
PIP Input
PIP Position
Select: Enter:
Features
Sleep Timer
AV3 Output
PIP Input
PIP Position
Select: Enter:
Personal
AUTO
Natural
Stereo
AUTO
AUTO
AUTO
AUTO
Refer to the section "Picture Adjustment”, on page 12.
Refer to the section "Sound Adjustment”, on page 12.
Off
On
Off
Refer to the section "Sleep Timer" on page 13.
AV1
Off
Refer to the section "AV3 Output" on page 13.
AV1
Off
AV1
Refer to the section "PIP Input" on page 13.
Off
AV1
Refer to the section "PIP Position" on page 14.
GB
Set Up
Set Up
Set Up
Language/Country
Auto Tuning
Auto Tuning
Auto Tuning
Programme Sorting
Programme Sorting
Programme Sorting
Select NexTView
Select NexTView
Programme Labels
AV Preset
AV Preset
AV Preset
Manual Set Up
Manual Set Up
Manual Programme Preset
Detail Set Up
Select:
Select:
Enter Menu:
Enter Menu:
Select:
Enter Menu:
Set Up
Language/Country
Auto Tuning
Programme Sorting
Programme Labels
AV Preset
Manual Programme Preset
Detail Set Up
Enter:
Select:
Set Up
Language/Country
Auto Tuning
Programme Sorting
Programme Labels
AV Preset
Manual Programme Preset
Detail Set Up
Start Auto Tuning:
Select:
Set Up
Language/Country
Auto Tuning
Programme Sorting
Programme Labels
AV Preset
Manual Programme Preset
Detail Set Up
Select:
Enter:
Set Up
Language/Country
Auto Tuning
Programme Sorting
Programme Labels
AV Preset
Manual Programme Preset
Detail Set Up
Select:
Enter:
Set Up
Language/Country
Auto Tuning
Programme Sorting
Programme Labels
AV Preset
Manual Programme Preset
Detail Set Up
Select:
Enter:
Set Up
Language/Country
Auto Tuning
Programme Sorting
Programme Labels
AV Preset
Manual Programme Preset
Detail Set Up
Select:
Enter:
Set Up
Set Up
Set Up
Language/Country
Auto Tuning
Programme Sorting
Programme Labels
AV Preset
Manual Programme Preset
Detail Set Up
Select:
Enter Menu:
Select:
Enter Menu:
Select:
Enter Menu:
Refer to the section "Language/Country" on page 14.
Refer to the section "Auto Tuning" on page 14.
Refer to the section "Programme Sorting" on page 14.
Refer to the section "Programme Labels" on page 15.
Refer to the section "AV Preset" on page 15.
Refer to the section "Manual Programme Preset" on page 16.
Detail Set Up
RGB Centring
0
Refer to the section "RGB Centring"
on page 17.
Enter:
Select:
Menu System
11
Page 12

Menu Guide
Level 1 Level 2 Level 3 / Function
Picture Adjustment
Picture Mode
Contrast
Brightness
Colour
Sharpness
Reset
Noise Reduction
Select: Enter Menu:
Personal
AUTO
Picture Adjustment
Picture Mode
Contrast
Brightness
Colour
Sharpness
Reset
Noise Reduction
Select: Enter:
Personal
AUTO
PICTURE ADJUSTMENT
The “Picture Adjustment” menu allows you to alter the picture
adjustments.
To do this: after selecting the item you want to alter press , then
press repeatedly / / or to adjust it and finally press OK to
store the new adjustment.
• This menu also allows you to customise the picture mode based on the programme you are watching:
Picture Mode Live (for live broadcast programmes, DVD and Digital Set Top Box receivers).
Personal (for individual settings).
Movie (for films).
• Brightness, Colour and Sharpness can only be altered if “Personal” mode is selected.
• Hue is only available for NTSC colour signal (e.g: USA video tapes).
• Select Reset and press OK to reset the picture to the factory preset levels.
• The Noise Reduction option is set to AUTO to automatically reduce the picture noise visible in the broadcast signal. To cancel this
function, select “Off” instead of “AUTO”.
Picture Adjustment
Picture Mode
Contrast
Brightness
Colour
Sharpness
Reset
Noise Reduction
Select: Enter Menu:
Sound Adjustment
Effect
Treble
Bass
Balance
Reset
Dual Sound
Auto Volume
TV Speakers
Select: Enter Menu:
Personal
AUTO
Natural
Stereo
Sound Adjustment
Effect
Treble
Bass
Balance
Reset
Dual Sound
Off
On
Auto Volume
TV Speakers
Select: Enter:
Natural
Stereo
Off
On
SOUND ADJUSTMENT
The “Sound Adjustment” menu allows you to alter the sound
adjustments.
To do this: after selecting the item you want to alter, press . Then
press repeatedly / / or to adjust it and finally press OK to
store the new adjustment.
Effect Natural: Enhances clarity, detail and presence of sound by using “BBE High Definition Sound system”*.
Dynamic: “BBE High Definition Sound system”* intensifies clarity and presence of sound for better
intelligibility and musical realism.
Dolby**V: Dolby Virtual, simulates the sound effect of “Dolby Surround Pro Logic”.
Off: Flat response.
Treble Less More
Bass Less More
Balance Left Right
Reset Resets the sound to the factory preset levels.
K
Dual Sound • For a stereo broadcast:
Mono.
Stereo.
• For a bilingual broadcast:
Mono (for mono channel if available).
A (for channel 1).
B (for channel 2).
Auto Volume Off: volume level changes according to the broadcast signal.
On: volume level of the channels will stay the same, independent of the broadcast signal
(e.g. in the case of advertisements).
TV Speakers On: to listen to the TV from the set speakers.
Off: to listen to the TV from an external amplifier connected to the audio outputs on the rear of the projection
TV set.
• If you are listening to the TV through headphones, the “Effect” option will automatically be switched to “Off”.
• If you select “Dolby Virtual” on the “Effect” option, the “Auto Volume” option will automatically be switched to “Off” and vice versa.
* The “BBE High Definition Sound system” is manufactured by Sony Corporation under license from BBE Sound, Inc. It is covered by
U.S. Patent No. 4,638,258 and No. 4,482,866. The word “BBE” and BBE Symbol are trademarks of BBE Sound, Inc.
** This TV has been designed to create the “Dolby Surround” sound effect by simulating the sound of four speakers with two speakers,
when the broadcast audio signal is Dolby Surround encoded. The sound effect can also be improved by connecting a suitable external
amplifier (for details refer to “Connecting to external audio Equipment” on page 21).
** Manufactured under license from Dolby Laboratories. “Dolby”, “Pro Logic” and the double-D symbol are trademarks of Dolby
Laboratories.
continued...
Menu System
12
Page 13
Level 1 Level 2 Level 3 / Function
Picture Adjustment
Picture Mode
Contrast
Brightness
Colour
Sharpness
Reset
Noise Reduction
Select: Enter Menu:
Personal
AUTO
SLEEP TIMER
The “Sleep Timer” option in the “Features” menu allows you to
select a time period for the TV to switch itself automatically into the
standby mode.
To do this: after selecting the option press , then press or to
Features
Sleep Timer
AV3 Output
PIP Input
PIP Position
Select: Enter Menu:
AUTO
Off
AV1
Features
Sleep Timer
AV3 Output
PIP Input
PIP Position
Select: Enter:
AUTO
Off
AV1
set the time period delay (max. of 4 hours).
•While watching the TV, you can press the button on the remote control to display the time remaining.
•One minute before the projection TV switches itself into standby mode, the time remaining is displayed on the TV screen automatically.
Picture Adjustment
Picture Mode
Contrast
Brightness
Colour
Sharpness
Reset
Noise Reduction
Select: Enter Menu:
Features
Sleep Timer
AV3 Output
PIP Input
PIP Position
Personal
AUTO
AUTO
Off
AV1
Features
Sleep Timer
AV3 Output
PIP Input
PIP Position
AUTO
Off
AV1
AV3 OUTPUT
The “AV3 Output” option in the “Features” menu allows you to
select the source to be output from the Scart connector 3/ 3 so
S
that you can record from this Scart any signal coming from the
projection TV or from an external equipment connected to the Scart
connectors 1/ 1 or 2/ 2 or front connectors 4 or
4 and 4.
S
If your VCR supports Smartlink, this procedure is not
necessary.
Select: Enter Menu:
Select: Enter:
To do this: after selecting the option, press . Then press or to
select the desired output signal: TV, AV1, AV2, AV4, YC4 or
AUTO.
GB
If you select “AUTO”, the output signal will always be the same one that is displayed on the screen.
If you have connected a decoder to the Scart 3/ 3 or to a VCR connected to this Scart, please remember to change back
S
the “AV3 Output” to “AUTO” or “TV” for correct unscrambling.
Picture Adjustment
Picture Mode
Contrast
Brightness
Colour
Sharpness
Reset
Noise Reduction
Select: Enter Menu:
Personal
AUTO
PIP INPUT
The “PIP Input” option in the “Features” menu allows you to select
the source you want to watch in the “PIP” screen.
To do this: after selecting the option, press . Then press repeatedly
or to select the desired source AV1, AV2, AV3, AV4 or TV.
Features
Sleep Timer
AV3 Output
PIP Input
PIP Position
Select: Enter Menu:
AUTO
Off
AV1
Features
Sleep Timer
AV3 Output
PIP Input
PIP Position
Select: Enter:
AUTO
Off
AV1
B
A
B
A
BB
Finally press OK to store.
To watch the “PIP” screen with the selected source, press the
/ button on the remote control.
A
You can swap the screens by pressing the / button on the
remote control.
continued...
Menu System
13
Page 14

Level 1 Level 2 Level 3 / Function
Picture Adjustment
Picture Mode
Contrast
Brightness
Colour
Sharpness
Reset
Noise Reduction
Select: Enter Menu:
Features
Sleep Timer
AV3 Output
PIP Input
PIP Position
Select: Enter Menu:
Picture Adjustment
Picture Mode
Contrast
Brightness
Colour
Sharpness
Reset
Noise Reduction
Select: Enter Menu:
Set Up
Set Up
Set Up
Language/Country
Auto Tuning
Auto Tuning
Auto Tuning
Programme Sorting
Programme Sorting
Programme Sorting
Select NexTView
Select NexTView
Programme Labels
AV Preset
AV Preset
AV Preset
Manual Set Up
Manual Set Up
Manual Programme Preset
Detail Set Up
Select:
Select:
Enter Menu:
Enter Menu:
Select:
Enter Menu:
Personal
Personal
AUTO
AUTO
AUTO
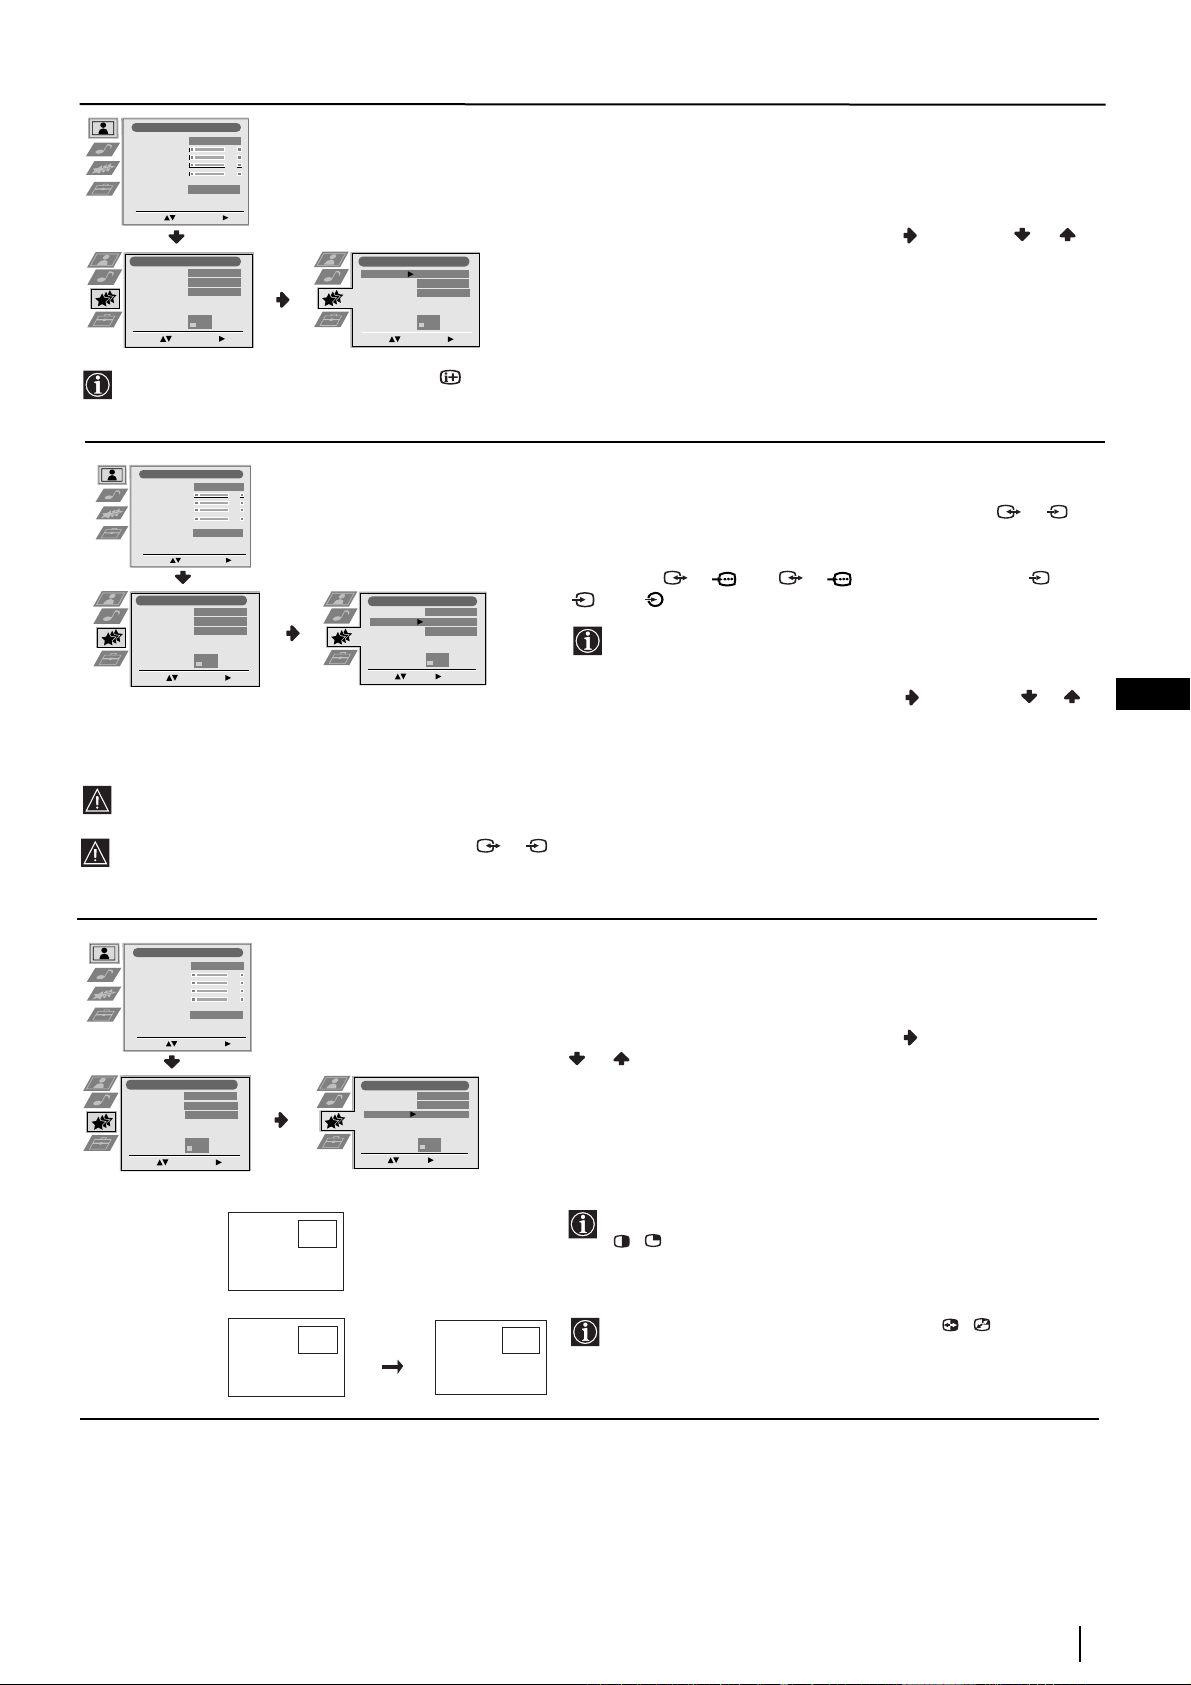
PIP POSITION
The “PIP Position” option in the “Features” menu allows you to
change the position of the “PIP” screen within the main screen.
To do this: after selecting the option press , , or to select
the desired position. Finally press OK to store.
Off
AV1
Features
Sleep Timer
AV3 Output
PIP Input
PIP Position
Select: Enter:
AUTO
Off
AV1
LANGUAGE/COUNTRY
The “Language/Country” option in the “Set Up” menu allows you
to select the language that the menus are displayed in. It also allows
you to select the country in which you wish to operate the
projection TV set.
Set Up
Language/Country
Auto Tuning
Programme Sorting
Programme Labels
AV Preset
Manual Programme Preset
Detail Set Up
Enter:
Select:
To do this: after selecting the option, press and then proceed in
the same way as in steps 2 and 3 of the section “Switching On the
Projection TV and Automatically Tuning” on page 8.
Picture Adjustment
Picture Mode
Contrast
Brightness
Colour
Sharpness
Reset
Noise Reduction
Select: Enter Menu:
Set Up
Set Up
Set Up
Language/Country
Auto Tuning
Auto Tuning
Auto Tuning
Programme Sorting
Programme Sorting
Programme Sorting
Select NexTView
Select NexTView
Programme Labels
AV Preset
AV Preset
AV Preset
Manual Set Up
Manual Set Up
Manual Programme Preset
Detail Set Up
Select:
Select:
Enter Menu:
Enter Menu:
Select:
Enter Menu:
Picture Adjustment
Picture Mode
Contrast
Brightness
Colour
Sharpness
Reset
Noise Reduction
Select: Enter Menu:
Set Up
Set Up
Set Up
Language/Country
Auto Tuning
Auto Tuning
Auto Tuning
Programme Sorting
Programme Sorting
Programme Sorting
Select NexTView
Select NexTView
Programme Labels
AV Preset
AV Preset
AV Preset
Manual Set Up
Manual Set Up
Manual Programme Preset
Detail Set Up
Enter Menu:
Enter Menu:
Select:
Enter Menu:
Select:
Select:
Personal
Personal
AUTO
AUTO
Set Up
Language/Country
Auto Tuning
Programme Sorting
Programme Labels
AV Preset
Manual Programme Preset
Detail Set Up
Start Auto Tuning:
Select:
Set Up
Language/Country
Auto Tuning
Programme Sorting
Programme Labels
AV Preset
Manual Programme Preset
Detail Set Up
Enter:
Select:
AUTO TUNING
The “Auto Tuning” option in the “Set Up” menu allows you to
automatically search for and store all available TV channels.
To do this: after selecting the option, press and then proceed in
the same way as in the steps 4 and 5 of the section “Switching On
the Projection TV and Automatically Tuning” on page 8.
PROGRAMME SORTING
The “Programme Sorting” option in the “Set Up” menu allows you
to change the order in which the channels (TV Broadcast) appear on
the screen.
To do this: after selecting the option, press and then proceed in
the same way as in step 6 b) of the section “Switching On the
Projection TV and Automatically Tuning” on page 9.
14
continued...
Menu System
Page 15

Level 1 Level 2 Level 3 / Function
Picture Adjustment
Picture Mode
Contrast
Brightness
Colour
Sharpness
Reset
Noise Reduction
Select: Enter Menu:
Set Up
Set Up
Set Up
Language/Country
Auto Tuning
Auto Tuning
Auto Tuning
Programme Sorting
Programme Sorting
Programme Sorting
Select NexTView
Select NexTView
Programme Labels
AV Preset
AV Preset
AV Preset
Manual Set Up
Manual Set Up
Manual Programme Preset
Detail Set Up
Enter Menu:
Enter Menu:
Select:
Enter Menu:
Select:
Select:
Personal
AUTO
Personal
AUTO
Set Up
Language/Country
Auto Tuning
Programme Sorting
Programme Labels
AV Preset
Manual Programme Preset
Detail Set Up
Select:
Enter:
Set Up
Language/Country
Auto Tuning
Programme Sorting
Programme Labels
AV Preset
Manual Programme Preset
Detail Set Up
Enter:
Select:
PROGRAMME LABELS
The “Programme Labels” option in the “Set Up” menu allows you
to name a channel using up to five characters (letters or numbers).
To do this:
1 After selecting the option, press , then press or to select the
programme number with the channel you wish to name.
2 Press . With the first element of the Label column highlighted,
press or to select a letter or number (select “-“ for a blank),
then press to confirm this character. Select the other four
characters in the same way. Finally press OK to store.
AV PRESET
The “AV Preset” option in the “Set Up” menu allows you to
designate a name to the external equipment you have connected to
the input sockets of this projection TV.
To do this:
1 After selecting the option, press , then press or to select the
input source you wish to name (AV1, AV2 and AV3 are for the
rear Scarts and AV4 for front connectors). Then press .
GB
2 A label automatically appears in the label column:
a) If you want to use one of the 6 predefined label (CABLE,
GAME, CAM, DVD, VIDEO or SAT), press or to select
the desired label and finally press OK to store.
b) If you want to set a different label, select Edit and press .
Then with the first element highlighted, press or to
select a letter, number or “-“ for a blank, then press to
confirm this character. Select the other four characters in the
same way and finally press OK to store.
continued...
Menu System
15
Page 16

Level 1 Level 2 Level 3 / Function
Picture Adjustment
Picture Mode
Contrast
Brightness
Colour
Sharpness
Reset
Noise Reduction
Select: Enter Menu:
Set Up
Set Up
Set Up
Language/Country
Auto Tuning
Auto Tuning
Auto Tuning
Programme Sorting
Programme Sorting
Programme Sorting
Select NexTView
Select NexTView
Programme Labels
AV Preset
AV Preset
AV Preset
Manual Set Up
Manual Set Up
Manual Programme Preset
Detail Set Up
Enter Menu:
Enter Menu:
Select:
Enter Menu:
Select:
Select:
Personal
AUTO
Set Up
Language/Country
Auto Tuning
Programme Sorting
Programme Labels
AV Preset
Manual Programme Preset
Detail Set Up
Enter:
Select:
MANUAL PROGRAMME PRESET
The “Manual Programme Preset” option in the “Set Up” menu
allows you to:
a) Preset channels or the VCR channel one by one to the programme order of your choice. To do this:
1 After selecting the ”Manual Programme Preset” option, press then with Programme option highlighted press .
Press or to select which programme number you want to preset the channel on (for VCR, select programme number
“0”). Then press .
2 The following option is only available depending on the country you have selected in the “Language/Country”
menu.
After selecting the System option, press . Then press or to select the TV Broadcast system (B/G for western
European countries, D/K for eastern European countries, L for France or I for United Kingdom). Then press .
3 After selecting the Channel option, press . Then press the number buttons to enter directly the channel number of the
TV Broadcast or the channel of the VCR signal. If you do not know the channel number, press or to search for it. When
you have tuned the desired channel, press OK twice to store.
Repeat all the above steps to tune and store more channels.
b) Label a channel using up to five characters.
To do this: highlighting the Programme option, press the PROG +/- button to select the programme number with the channel
you wish to name. When the programme you want to name appears on the screen, select the Label option and press . Next
press or to select a letter, number or “-“ for a blank. Press to confirm this character. Select the other four characters in
the same way. After selecting all the characters, press OK twice to store.
c) Fine tune the broadcast reception. Normally the automatic fine tuning (AFT) will give the best possible picture, however you
can manually fine tune the TV to obtain a better picture reception in case the picture is distorted.
To do this: while watching the channel (TV Broadcast) you wish to fine tune, select the AFT option and press . Next press
or to adjust the fine tuning between -15 and +15. Finally press OK twice to store.
d) Skip any unwanted programme numbers when they are selected with the PROG +/- buttons.
To do this: highlighting the Programme option, press the PROG +/- button to select the programme number you want to skip.
When the programme you want to skip appears on the screen, select the Skip option and press . Next press or to select
Yes. Finally press OK twice to confirm and store.
To cancel this function afterwards, select “No” instead of “Yes” in the step above.
e) View and record correctly scrambled channels when using a decoder connected directly to Scart 3/ 3 or through a VCR.
This option is only available depending on the country you have selected in the “Language/Country” menu.
To do this: select the Decoder option and press . Next press or to select On. Finally press OK twice to confirm and store.
S
To cancel this function afterwards, select “Off” instead of “On” in the step above.
Menu System
16
continued...
Page 17

Level 1 Level 2 Level 3 / Function
Picture Adjustment
Picture Mode
Contrast
Brightness
Colour
Sharpness
Reset
Noise Reduction
Select: Enter Menu:
Set Up
Set Up
Set Up
Language/Country
Auto Tuning
Programme Sorting
Programme Labels
AV Preset
Manual Programme Preset
Detail Set Up
Select:
Enter Menu:
Select:
Enter Menu:
Select:
Enter Menu:
Personal
AUTO
Detail Set Up
RGB Centring
Select:
0
Enter:
RGB CENTRING
When connecting an RGB source, such as a “PlayStation”, you may
need to readjust the horizontal position of the picture. If this is the
case, you can adjust it through the “RGB Centring” option in the
“Detail Set Up”.
To do this: while watching an RGB source select the “RGB Centring”
option and press . Then press or to adjust the centre of the
picture between –10 and +10. Finally press OK to confirm and store.
GB
Menu System
17
Page 18

Teletext
Teletext is an information service transmitted by most TV stations. The index page of the teletext service (usually page 100)
gives you information on how to use the service. To operate teletext, use the remote control buttons as indicated below.
• Teletext errors may occur if you use a channel (TV Broadcast) with a weak signal.
• After 5 minutes viewing the same teletext page and without any button being pressed, the brightness level of the picture
automatically decreases notoriously to avoid any damage to the picture tube. Press any button of the remote control to
reset the brightness level.
To switch on Teletext :
After selecting the TV channel which carries the teletext service you
wish to view, press .
To select a Teletext page:
Input 3 digits for the page number, using the numbered buttons.
• If you make a mistake, retype the correct page number.
• If the counter on the screen continues searching, it is because the page is not available.
If this is the case, input another page number
To access the next or preceding page:
Press PROG + ( ) or PROG - ().
To superimpose teletext on to the TV:
Whilst you are viewing teletext, press . Press it again to cancel teletext mode.
TELETEXT
Index
Programme
News
Sport
Weather
25
153
101
98
To freeze a teletext page:
Press / . Press it again to cancel the freeze.
To reveal concealed information (e.g: answer to a quiz):
Press / . Press it again to conceal the information.
To select a sub page:
A teletext page may consist of several sub pages. In this case the page number that appears on the
upper left corner will change from white to green and one or more arrows will appear next to the page
number. Repeatedly press the or buttons on the remote control to watch the desired sub page.
To Switch Off Teletext:
Press .
Fastext
Fastext service lets you access Teletext pages with one button push.
When you are in Teletext mode and Fastext is broadcast, a colour coded menu appears at the bottom
of the teletext page. Press the appropriate coloured button (red, green, yellow or blue) to access
the page corresponding to your menu choice.
18
Teletext
Page 19

NexTView*
*(depending on availability of service).
NexTView is an on-screen electronic programme guide, providing you with programme information for different
broadcasters.
When looking for information you can search by theme (sports, art, etc...) or date.
If wrong characters appear when viewing NexTView, use the menu system to enter the “Language/Country” menu (see page
14) and select the same language as the NexTView is broadcasted.
Displaying NexTView
1 Select a broadcast channel providing a NexTView service. In this case the indication “NexTView” is displayed as soon as data
is available.
2 To see NexTView service you have two different types of NexTView interface. These depend on the % of available data:
“Programme List” interface:
a)
Whilst you are watching TV, and after the indication “NexTView” (coloured white) is displayed on the screen, press the
button on the remote control to watch the “Programme List” interface (see fig. 1).
b) “Overview” interface:
Whilst you are watching TV, and after more than 50% of NexTView data is available (100% data may not be available
depending on the area) the indication “NexTView” (coloured black) is displayed on the screen. Press the button on
the remote control to watch the “Overview” interface (see fig. 2).
As soon as you enter the NexTView service the % of NexTView data available will be shown in the bottom left corner of
the screen. Once you have entered the service, the % of data will not increase.
3 To navigate through NexTView:
• moving to right or left press or .
• moving up or downwards, press or .
• confirming a selection, press OK.
4 To switch NexTView off, press the button on the remote control.
GB
“Programme List” interface (fig. 1): “Overview” interface (fig. 2):
1
01
02
Mon
2
3
Tue03Wed04Thu05Fri06Sat07Sun 7 : 07 : 01
TV1
TV2
TV3
TV4
TV5
TV6
TV7
TV8
Songs from the shows
TV1 00:30 - 01:30 Thursday 04
Programme description
Songs from the shows
00 : 30
Weather forecast informati
01 : 30
A1 news magazine
05 : 30
Arts show
06 : 30
Oclock news
07 : 30
Weather forecast informati
08 : 30
A1 news magazine
09 : 30
Arts show
10 : 30
Record Remind
4
1 Icons for different themes
(see the “Icons’ key” below)
2 Date
5
4 Record*
1
01
02
Mon
Tue03Wed04Thu05Fri06Sat07Sun 9 : 15 : 03
9 : 00 9 : 30 10 : 00
2
3
TV1
Magazine
Weather Forecast | Mike's show
TV2
Euronews
TV3
Home Shopping Europe
TV4
News | Arts show | Magazine
TV5
Larry King's live | Euro Sports
TV6
Euro magazine | Euro Sports
TV7
Home Shopping Europe | Euronews
TV8
Songs from the shows
TV1 00:30 - 01:30 Thursday 04
Programme description
Record Remind
This function only works if you have connected a VCR
which supports SmartLink and Timer Programming
feature.
If you wish to record the selected programme, press
4
|
Songs from the shows
|
Fantasy film
5
the red button on the remote control.
3 Programme list
5 Remind*
If you wish to be reminded when the selected programme is
broadcast, press the green button on the remote control. At the
time that programme should be broadcast a reminder
message is displayed on the TV.
* “Record” and “Remind” options will be shown on the screen as soon as a programme have been selected, but
they will not be shown if you are watching the NexTView service on a TV channel which is not a NexTView
provider.
* “Record” and “Remind” will not be available if the programme that you have selected has already started.
Icons’ key:
full selection list:
All the programme information
is listed by time and broadcast
channels order.
entertainment
children
arts
sports
news
movie
music
channel selection:
If the NexTView provider sends
information of more than 8
broadcast channels, you can
select 8 of them to create your
personal list.
After you have created your
personal list, the default list can
be restored. To restore it, select
“Auto (” by pressing button
on the remote control.
remind list:
shows you the list with all the
programmes (maximum 5
programmes) that you have
selected to be reminded about.
|
|
Euro Sports
Star Wars
NexTView
19
Page 20

Connecting Optional Equipment
E
F
G
H
S-VHS/Hi8/
DVC
camcorder
8mm/Hi8/
DVC
camcorder
Using the following instructions, you can connect a wide range of optional equipment to your projection TV.
D
VCR
VCR
Hi-fi
A
C
B
DVD
VCR
Acceptable input signal
A No inputs
B Audio/video and RGB signal
C Audio/video and RGB signal
D Audio/video and S video signal
E S Video signal
F Video signal
G Audio signal
H No input
Decoder
To avoid
picture
distortion:
Do not
connect
equipment
to E and F
connectors
at the same
time.
Available output signal
Audio signal.
Video/audio from TV tuner.
Video/audio displayed on TV screen (monitor out).
Video/audio from selected source.
No output.
No output.
No output.
Audio signal to headphones.
Additional Information
20
continued...
Page 21

Right
Hi-Fi
speaker
1
1
2
2
3
3
4
4
G
Additional Information when connecting equipment
Connecting a VCR
We recommend you connect your VCR to the D socket using a scart lead. If you do not have a scart lead, use the “Manual
Programme Preset” section on page 16 to tune in the channel of the VCR test signal to TV programme number “0”. Also refer to
your VCR instruction manual to get the VCR test signal.
If your video supports SmartLink please refer to the "SmartLink" section of this instruction manual on page 22.
If you have connected a decoder to the Scart 3/3 D or through a VCR connected to this Scart:
Select the “Manual Programme Preset” option in the “Set Up” menu and after entering in the “Decoder**” option, select “On” (by
using or ). Repeat this option for each scrambled signal (see page 16).
**
This option is only available depending on the country you have selected in the “Language/Country” menu (see page 14).
Connecting to external Audio Equipment:
Plug in your Hi-Fi equipment to the audio output sockets A if you wish to amplify the audio output from projection TV. Next ,
using the menu system, select the “Sound Adjustment” menu and set the “TV Speakers” to “Off” (see page 12).
Audio level of the external speakers can be modified by pressing the volume buttons on the remote control. Also treble and
bass settings can be modified through the “Sound Adjustment” menu.
To enjoy “Dolby Virtual” sound effect through your Hi-Fi equipment:
Place the speakers of your equipment in front of your listening position and beside the
projection TV set but keeping a distance of 50 cm between each speaker and the
projection TV set.
Then by using the menu system, select the menu “Sound Adjustment”. Next select
“Dolby V” on the “Effect” option (see page 12).
S
Left
Hi-Fi
speaker
~50°
Your sitting position
Using Optional Equipment
In order to get the input signal of a connected equipment onto the TV screen, you need to select the symbol of the
connector to which you have connected the device.
e. g. : Your VCR is connected to the connector with the symbol :1/ 1. Press the button on the remote control
repeatedly until you see the symbol 1 on the screen.
GB
1
Connect your equipment to the designated projection TV socket, as it is indicated on the previous
page.
Switch on the connected equipment.
2
To watch the picture of the connected equipment, press the button repeatedly until the
3
correct input symbol appears on the screen.
Symbol Input Signals
• Audio / video input signal through the Scart connector B
• RGB input signal through the Scart connector B . This symbol appears only if an RGB
source has been connected.
• Audio / video input signal through the Scart connector C .
• RGB input signal through the Scart connector C . This symbol appears only if an RGB
source has been connected.
• Audio/video input signal through the Scart connector D .
S
• S Video Input signal through the Scart connector D . This symbol appears only if an S
Video source has been connected.
• Video input signal through the phono socket F and Audio input signal through G .
S
• S Video Input signal through the front S Video input jack E and Audio signal through
. This symbol appears only if an S Video source has been connected.
4
Press button on the remote control to return to the normal TV picture.
For mono equipment
Connect the phono plug to the L/G/S/I socket on the side of the TV and select 4 or 4 input
signal using the instructions above. Finally, refer to the “Sound Adjustment” section of this manual
and select “Dual Sound” “A” on the sound menu screen (see page 12).
Additional Information
S
21
Page 22

SmartLink
SmartLink is a direct link between your projection TV set and a VCR.
For SmartLink you need:
• A VCR which supports SmartLink, NextView Link, Easy Link or Megalogic.
Megalogic is a trademark of Grundig Corporation.
EasyLink is a trademark of Philips Corporation.
• A fully-wired 21 pin SCART cable to connect your VCR to the Scart connector :3/q3
(SMARTLINK) on the rear of the Projection TV.
The features of SmartLink are:
• Tuning information such as the channel overview are downloaded from the projection
TV set to the VCR.
• Direct projection TV recording: While watching TV you need to press just one button on
the VCR to record this programme.
• Automatically switching on: With the projection TV in standby mode, pressing the
“Play z” button on your VCR automatically switches the TV on.
VCR
Decoder
For more information on SmartLink, please refer to the Instruction Manual of your
VCR.
Additional Information
22
Page 23

Remote Control Configuration for VCR/DVD
2
1
3
In it’s default condition this remote control will operate the basic functions of this Sony TV, Sony DVDs and most Sony VCRs. To
control VCRs and DVDs of other manufacturers (and some Sony VCR models), please complete the following steps:
• Before you start, look up the 3 digit code for your brand of DVD or VCR from the list below. On those brands that have
more than one code, enter the first code number.
• Sony will endeavour to update the software according to market changes. Therefore, please refer to code table included
with the remote control for latest code set.
1 Press the Media Selector button on the remote control repeatedly until the required green light (VCR
or DVD) is lit.
If Media Selector is on TV position, code numbers will not be stored.
2 Before the green light goes out, press and hold the yellow button for approximately 6 seconds until the
green light starts flashing.
3 Whilst the green light is flashing, enter all three digits of the code for your brand of VCR or DVD using
the number buttons on the remote control.
If your selected code is entered correctly, all three green lights will be lit momentarily.
4 Turn on your VCR or DVD and check that the main functions work.
• If your device is not working or some of the functions do not work please check that you entered
the correct code set or try the next code listed against the brand.
• Your brand codes may be lost if weak batteries are not replaced within a few minutes. To reset
your brand of DVD or VCR please repeat the above steps. A small label is added inside the
battery door to allow you to record your brand codes.
• Not all brands are covered and not all models of every brand may be covered.
GB
VCR Brand List DVD Brand List
Brand Code Brand Code
SONY (VHS) 301, 302, 303, 308, 309 SONY 001
SONY (BETA) 303, 307, 310 AIWA 021
SONY (DV) 304, 305, 306 DENON 018, 027, 020, 002
AIWA 325, 331, 351 GRUNDIG 009, 028, 023, 024, 016, 003
AKAI 326, 329, 330 HITACHI 025, 026, 015, 004
DAEWOO 342, 343 JVC 006, 017
GRUNDIG 358, 355, 360, 361, 320, 351 KENWOOD 008
HITACHI 327, 333, 334 LG 015, 014
JVC 314, 315, 322, 344, 352, 353, 354, 348, 349 LOEWE 009, 028, 023, 024, 016, 003
LG 332, 338 MATSUI 013, 016
LOEWE 358, 355, 360, 361, 320, 351 ONKYO 022
MATSUI 356, 357 PANASONIC 018, 027, 020, 002
ORION 328 PHILIPS 009, 028, 023, 024, 016, 003
PANASONIC 321, 323 PIONEER 004
PHILIPS 311, 312, 313, 316, 317, 318, 358, 359 SAMSUNG 011, 014
SAMSUNG 339, 340, 341, 345 SANYO 007
SANYO 335, 336 SHARP 019, 027
SHARP 324 THOMSON 012
THOMSON 319, 350 TOSHIBA 003
TOSHIBA 337 YAMAHA 018, 027, 020, 002
Additional Information
23
Page 24

Optimum Viewing Area
For the best picture quality, try to position the projection TV so that you can view the screen from within the areas shown
below.
Horizontal viewing area
minimum distance 2.1 m
75
75
Vertical viewing area
(Optimum viewing position)
minimum distance 2.1 m
27.5
27.5
Additional Information
24
(Optimum viewing position)
Page 25
Specifications
TV system:
Depending on your country selection:
B/G/H, D/K, L, I
Colour system:
PAL
SECAM, NTSC 3.58, 4.43 (only Video In)
Channel Coverage:
VHF: E2-E12
UHF: E21-E69
CATV: S1-S20
HYPER: S21-S41
D/K: R1-R12, R21-R69
L: F-2F-10, B-Q, F21-F69
I: UHF B21-B69
Projected picture size:
41” (approx. 103 cm. measured diagonally)
Rear Terminals
1/ 1 21-pin scart connector (CENELEC standard)
including audio/video input, RGB input, TV
audio/video output.
2/ 2 21-pin Scart connector (CENELEC standard)
including audio / video input, RGB input,
monitor audio/video output.
3/ 3 21-pin Scart connector (CENELEC standard)
(SMARTLINK)
selectable audio / video output and Smartlink
Front Terminals
headphones jack
S
including audio / video input, S video input,
interface.
audio outputs (Left/Right) - phono jacks
S
4 S Video input – 4 pin DIN
4 video input – phono jack
4 audio input – phono jacks
Sound Output:
2 x 30 W (music power)
2 x 15 W (RMS)
Power Consumption:
225 W
Standby Power Consumption:
< 0.7 W
Dimensions (w x h x d) :
approx. 948 x 992 x 511 mm.
Weight:
approx. 44 Kg.
Accessories supplied:
1 Remote Control (RM-938)
2 Batteries (IEC designated, AA size)
Other features:
•Digital Comb Filter (High resolution).
•100 Hz picture, Digital Plus.
•Teletext, Fastext, TOPtext (250 page
TEXT memory).
•NICAM.
•Sleep Timer.
•SmartLink (direct link between your
projection TV set and a compatible VCR.
For more information on SmartLink,
please refer to the Instruction Manual of
your VCR).
•TV system autodetection.
•Dolby Virtual.
•BBE.
•PIP.
•ACI (Auto Channel Installation).
GB
Design and specifications are subject to change without notice.
Ecological Paper - Totally Chlorine Free
Additional Information
25
Page 26

Troubleshooting
Here are some simple solutions to problems which may affect the picture and sound.
Problem
No picture (screen is dark) and no sound.
Poor or no picture (screen is dark), but good
sound.
No picture or no menu information from
equipment connected to the Scart connector.
Good picture, no sound.
No colour on colour programmes.
When you switch on the TV the last channel
you were watching before switching the TV
off does not appear.
Undefined picture with different colour on
the outlines of the images.
Noisy picture when viewing a TV channel.
Solution
• Check the aerial connection.
• Plug the TV in and press the button on the front of the projection TV.
• If the standby indicator is on, press TV button on the remote control.
• Using the menu system, select the “Picture Adjustment” menu and select “Reset” to
return to the factory settings (see page 12).
• Check that the optional equipment is on and press the button repeatedly on the
remote control until the correct input symbol is displayed on the screen (see page 21).
• Press the + button on the remote control.
• Check that “TV Speakers” is “On” in the “Sound Adjustment” menu (see page 12).
• Check that headphones are not connected.
• Using the menu system, select the “Picture Adjustment” menu and select “Reset” to
return to factory settings (see page 12).
• This is not a malfunction. Press the number buttons on the remote control to select the
desired channel.
• Adjust the colour registration. For more details, please refer to “Adjusting Colour
Registration (Convergence)” section on page 10.
• Using the menu system, select the “Manual Programme Preset” menu and adjust Fine
Tuning (AFT) to obtain better picture reception (see page 16).
• Using the menu system, select the “Noise Reduction” option in the “Picture
Adjustment” menu and select “Auto” to reduce the noise in the picture (see page 12).
No unscrambled picture whilst viewing an
unscrambled channel with a decoder
connected through the Scart connector
Distorted picture when changing
programmes or selecting teletext.
Wrong characters appear when viewing
teletext.
Wrong characters appear when viewing
NexTView.
Brightness level of the picture is notoriously
decreased when viewing a teletext page.
Remote control does not function.
The standby indicator on the projection
TV flashes.
S
3/ 3.
• Using the menu system, select the “Features” menu. Then enter to “AV3 Output” and
set to “TV” (see page 13).
• Check that the Decoder is not connected on the scart 2/ 2.
• Turn off any equipment connected to the Scart connector on the rear of the projection
TV.
• Using the menu system, enter to the “Language/Country” menu and select the
country in which you operate the projection TV set. For Cyrillic languages, we
recommend selecting Russia country if your own country does not appear in the list
(see page 14).
• Use the menu system to enter the “Language/Country” menu (see page 14) and select
the same language that NexTView is broadcast in.
• This is not a malfunction. After 5 minutes viewing the same teletext page and without
any button being pressed, the projection TV automatically decreases the brightness
level to avoid any damage to the picture tube. To reset the brightness level, press any
button of the remote control.
• Check that the Media Selector on the remote control is set to the device you are using
(VCR, TV or DVD).
• If the remote control does not operate the VCR or DVD even when the Media Selector
has been set correctly. Enter the necessary code set as explained in the “Remote
Control Configuration for VCR/DVD” chapter on page 23.
• Replace the batteries.
• Contact your nearest Sony service centre.
If you continue to experience problems, have your projection TV serviced by qualified personnel.
Never open the casing yourself.
Additional Information
26
Page 27

•
,,
Увод
Благодарим Ви за избора на този проекционнен телевизор 100 Hz Sony.
Преди използване на телевизора прочетете внимателно това ръководство за експлоатация и го запазете за бъдещи
изяснения.
Символи използвани в това ръководство :
•
•
Важна информация .
•
•
Информация за функцията .
Последователност за следване на инструкциите .
1,2...
Потъмнените бутони на дистанционното управление показват кои
бутони трябва да се натискат за изпълнението на различните
операции.
Информация за резултата от инструкциите.
•
Съдържание
Увод.................................................................................................................................................................................................3
Техника на безопасност ................................................................................................................................................................4
Основно описание
Основно описание на бутоните на дистанционното управление ..............................................................................................5
Основно описание на бутоните на проекционен телевизор ...................................................................................................... 6
Инсталиране
Свързване на антената и видеото ..............................................................................................................................................7
Инсталиране на батериите в устройството за дистанционно управление ..............................................................................7
Първоначално включване
Включване и автоматично настройване на телевизора ........................................................................................................... 8
Hастройване на наслагването на цветовете (конвергенция)..................................................................................................10
Ситема от менюта на екрана
Увод и боравене със системата от менюта............................................................................................................................... 10
Cистема за бързо преминаване през менютата ....................................................................................................................... 11
Водач на менютата:
Настройка на Картината .........................................................................................................................................................12
Hacтpoйкa нa звyкa................................................................................................................................................................... 12
Автоматично Изключв............................................................................................................................................................... 13
AV3 изxoд.................................................................................................................................................................................... 13
PIP вход ......................................................................................................................................................................................13
PIP позиция ................................................................................................................................................................................ 14
Език / Държава........................................................................................................................................................................... 14
Автоматично Захващане ...........................................................................................................................................................14
Подреждане на Програми ......................................................................................................................................................... 14
Haдпиcвaнe нa пpoгpaми...........................................................................................................................................................15
зaпaмeтeни AV нacтpoйки.........................................................................................................................................................15
Програма Ръчен Избор ..............................................................................................................................................................16
RGB Център................................................................................................................................................................................17
BG
Телетекст
NexTView
...............................................................................................................................................................................18
.................................................................................................................................................................................19
Допълнителна информация
Свързване на допълнителни апарати........................................................................................................................................ 20
Боравене с допълнителни апарати ............................................................................................................................................21
SmartLink (Смартлинк) ................................................................................................................................................................. 22
Конфигуриране на пулта за дистанционно управление на DVD или Видео апарата............................................................ 23
Oптимален ъгъл за гледане ........................................................................................................................................................ 24
Характеристики............................................................................................................................................................................ 25
Отстраняване на неизправности................................................................................................................................................26
Съдържание
3
Page 28
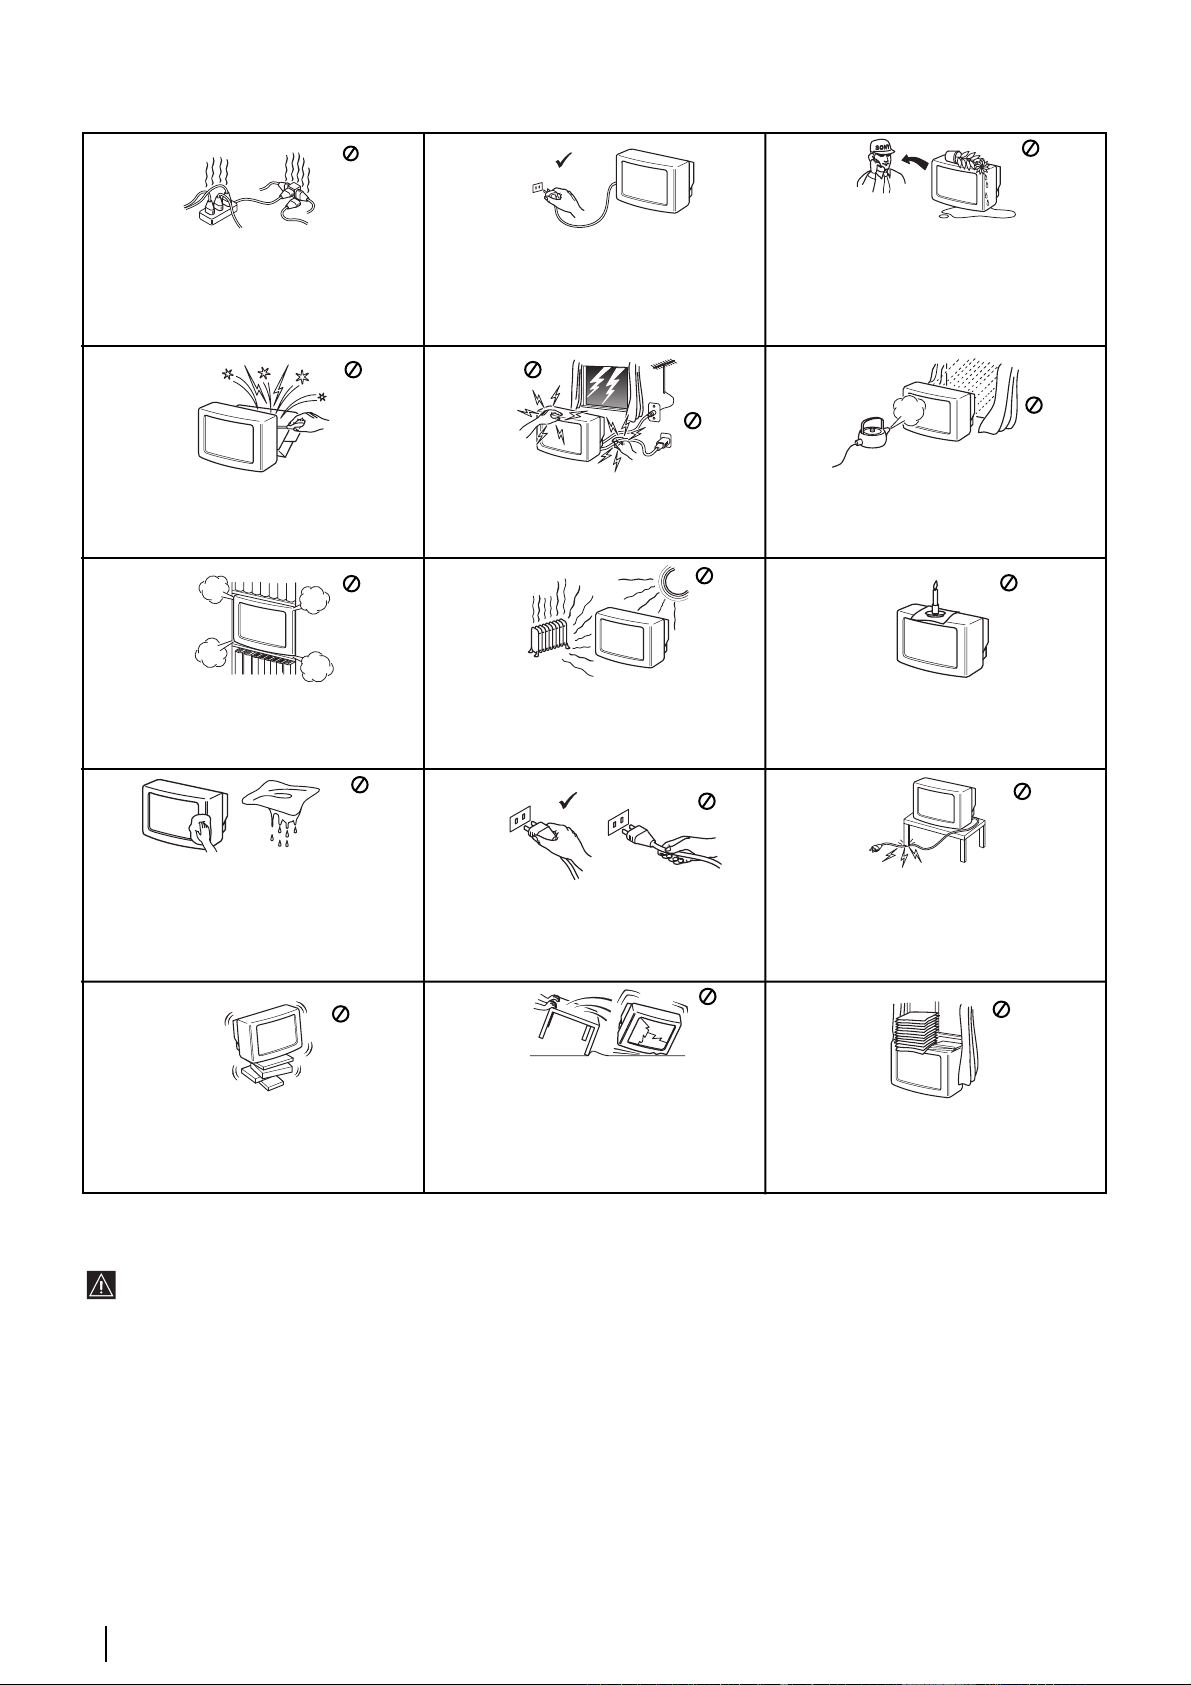
He пocтaвяйтe тeжки пpeдмети въpxy
кaбeлa, тъй кaтo тoвa мoжe дa гo пoвpeди.
Пpeпopъчвaмe ви дa нaвиeтe излишния
зaxpaнвaщ кaбeл oкoлo пpeднaзнaчeнитe
зa цeлтa пpиcпocoблeния нa зaднaтa
cтpaнa нa тeлeвизopa.
•
•
•
•
Техника на безопасност
Tози тeлeвизор може да работи само на
захранващо напрежение 220-240 V.
Bнимавайте да не включвате твърде
много уреди в един контакт, тьй като
това може да причини токов удар.
Пo причини за безoпастност от
въздействие на природни явления e
препоръчително да не оставяте
телевизора в режим “stand by”, a да гo
изключватe централно.
Hикогa не пъхaйте кaквито и да било
прeдмети в телeвизорa, тьй като товa може
дa причини пожар или токов удар. Hикога не
разливaйте течности по телевизора. B
случай, чe течност или твърд прeдмет
попaднат в телевизора го изключете.
Cвържете сe нeзaбaвно c квалифицирани
служители нa Coни.
He oтвaряйте кутиятa и задния кaпaк нa
тeлeвизорa.
Oбръщайте се само към квaлифициран
сервизен перcoнaл.
He пoкривaйтe вeнтилaциoннитe отвoри
нa тeлeвизoрa.
Ocтaвeтe нaй-мaлко 10 см. рaзтoяниe
oкoлo тeлeвизoрa зa вeнтилация.
Пoчиствайте екрана и кутията c мека,
влажна кърпа. He използвайте абразивни
кърпи, aлкални почистващи средства,
изстъргващи препарати ини paзтворители
като спирт или бензин, както и
антистатичен спрей.
Пocтaвяйтe тeлeвизopa нa cигypнa,
cтaбилнa пocтaвкa.
He пoзвoлявaйтe нa дeцa дa ce кaтepят
пo нeгo. He гo oбpъщaйтe нa cтpaни или
пo “гpъб”.
Зa Baшa coбcтвeнa бeзoпacнocт нe
пипaйтe тeлeвизорa, кaбeлa или
aнтeнaтa му по врeмe нa гръмотeвични
бури.
Hикoгa нe пoстaвяйтe тeлeвизoрa нa
гoрeщи, влaжни или изключитeлнo прaшни
мecтa. He инстaлирaйтe тeлeвизорa нa
мecтa кьдето можe дa бъде изложeн нa
меxaнични вибрaции.
Koгaтo изключвaтe тeлeвизopa,
дъpпaйтe щeпceлa, a нe кaбелa.
Излючвaйтe кaбeлa нa тeлeвизopa пpeди
дa гo мecтитe. Пpи пpeмecтвaнeтo
избягвaйтe нepaвни пoвъpxнocти и нe
пpaвeтe бъpзи кpaчки. Aкo изпycнeтe или
нapaнитe тeлeвизopa, нeзaбaвнo ce
кoнcyлpaйтe c квaлифициpaни cepвизни
cлyжитeли нa Coни.
Зa дa прeдoтврaтитe риcкa oт тoкoв
yдaр, нe излaгaйтe тeлeвизорa нa дъжд
или влaгa.
Зa дa избегнeтe пoжaр, дръжтe
нacтрaнa oт тeлeвизорa възпламeними
и oткрити източници нa светлина/
напримeр cвeщи/.
He пoкpивaйтe вeнтилaцкoннитe oтвopи
нa тeлeвизopa c пpeдмeти кaтo пepдeтa,
вecтници и дp.
Допълнителна техника на безопасност
След преместване на телевизионния приемник направо от студено на топло място или когато се промени рязко
температурата на стаята, възможно е картината да се замъгли или на места по нея цветовете да са лоши. Това се
дължи на влагата, която ce kонgензuра по огледалата и лещите вътре в телевизионния приемник. Оставете влагата да
се изпари преди да включите телевизионния приемник.
За да получите ясна картина, не излагайте екрана на директна слънчева светлина. Ако е възможно, използвайте
точково осветление насочено от тавана надолу.
Æokasbahe ha samp∂shaja kaptnha, sa f∂j∂l æepnof ot bpeme, æpn padota c bnfeo nlpa njn æepcohajeh компюър njn
ljefahe ha æpolpama b 16"9 mo;e fa æobpefn
kaptnhata.
Не търкайте, не докосвайте, не удряйте екрана с остри предмети като писалки и отверки. Подобни действия биха
повредили повърхността на екрана.
Техника на безопасност
4
кинескоп . 3a fa nsdelhete toba, æoff∂p;a=te hnc∂k ko н tpact ha
Page 29

1
2
3
4
5
6
7
9
!º
•
•
!¡
!™
!£
!¢
!∞
!§
!¶
!•
!ª
Основно описание на бутоните на дистанционното управление
@£
Checking the Accessories Supplied
@™
@¡
@º
!ª
!•
!¶
!§
!∞
!¢
Активиране на системата от менюта: Натиснете го за да видите менюто на екрана. Натиснете го отново за премахване и
връщане на нормалния ТВ екран.
Избор на канали: Натиснете го за избор на преден или следващ канал.
NexTView: за по-подробна информация се консултирайте с глава «NexTView» на стр. 13.
Настройване на силата на звука: Натиснете го за настройване на силата на звука.
Бутон за запис: Ако Селектора на Екипа е в позиция VCR, натиснете този бутон за запис на програми.
Избор на режим на телевизия: Натиснете го за да изключите «PIP», телетекста или входа за видео.
Избор на режим на образа: Натиснете го няколко пъти за смяна на режима на образа.
Избор на звуков ефект: Натиснете този бутон няколко пъти, за да промените звуковия ефект.
Изобразяване на информация на екрана: Натиснете го за изобразяване на всички индикации на екрана. Натиснете го
отново за премахване.
Замразяване на образа: Hатиснете този бутон, за да замразите образа на телевизора. Eкранът ще се раздели на две. В
ляво ще бъде нормалният образ, а в дясно замразената картина. Hатиснете отново този бутон, за да възстановите
нормалния образ на телевизора.
Pазмяна на главния екран и прозореца: Hамирайки се в режим «PIP», натиснете този бутон, за да размените главния
екран и прозореца.
@™ PIP (от английски «Picture In Picture» = Oбраз в Oбраза): Hатиснете този бутон, за да се появи малък прозорец с образ
(режим PIP) в един от ъглите на главния екран. Hатиснете втори път, за да се скрие. За да изберете канала, който желаете
да гледате в малкия прозорец, вижте «PIP вход» на стр. 13.
@£ Елиминиране на звука: Натиснете го за премахване на звука. Натиснете го отново за възвръщане на звука.
Освен телевизионните функции, всички цветни бутони се използват също така и за операциите на телетекста. За повече
информация вижте в главата «Телетекст», в това ръководство за експлоатация на стр. 18.
1
2
3
4
5
6
7
8
9
!º
!¡
!™
!£
Временно изключване на телевизора
Натиснете го за временно изключване на телевизора (индикаторът за режим на
очакване ще светне). Натиснете го отново за да включите телевизора от режима на
временно изключване (standby).
За икономия на ел. енергия се препоръчва цялостното изключване на телевизора когато
не се използва.
Ако в продължение на 15 мин. няма ТВ сигнал и не се натискат бутоните, телевизора
ще мине автоматично в режим на временно изключване (standby).
Вкл./Изкл. на Видео или DVD апарата : Натиснете за вкл./изкл. на Видео или DVD
апарата свързан към телевизора.
Селектор на Екипа : С този пулт за дистанционно управление можете да контролирате
не само телевизора, но и основните функции на Видеото и на DVD апарата. Включете
екипа който желаете да контролирате и после натиснете няколко пъти този бутон за
избор на DVD, TV или VCR (за видео). Зеления индикатор ще светне за момент на
избраната позиция.
Преди да използвате за първи път пулта за дистанционно управление за
контролиране нa DVD апaрата или на Видеото ще трябва да го конфигурирате в
зависимост от марката на вашия екип. За целта вижте в глава «Конфигурация на
пулта за дистанционно управление на DVD или Видео апарата» на стр. 23.
Избор на входен сигнал : Натиснете го няколко пъти, докато символа на желания входен
сигнал се появи на екрана.
Избор на канали : Aкo Ceлeктopa нa Екипа e в пoзиция TV или VCR (видeo), нaтиcнeтe зa
избop нa кaнaли.
За двуцифрени програмни номера натиснете втората цифра за времетраене по-малко от
2.5 сек.
а) Ако Селектора на Екипа е в позиция «TV»:
Натиснете го за да върнете последния избран канал (придният канал трябва да е бил
изобразен в продължение на най-малко 5 сек.).
б) Ако Селектора на Екипа е в позиция «VCR»:
Sony, за двуцифрени програмни номера, напр. 23, натиснете първо -/-- и след това
бутоните 2 и 3.
Избор на формат на екрана: Hатиснете този бутон няколко пъти, за да смените формата
на образа 4:3 за обикновенен образ или 16:9 за имитация на панорамен екран.
8
Този бутон функционира само в режим на телетекст.
Избор на телетекста: Натиснете го за изобразяване на телетекста.
Joystick:
a) Ако Селектора на Екипа е в позиция «TV»:
Когато MENU е активирано, използвайте тези бутони за придвижване през системата
от менюта. За повече детайли вижте в глава «Увод и боpaвeнe cъс системата от
менюта» на стр 10.
Когато MENU не е активирано, натиснете OK за визуализиране на генералния списък
на настроените канали. Изберете канала (ТВ предаване) натискайки или и след
това натиснете отново OK за да видите избрания канал.
б) Ако Селектора на Екипа е в позиция «VCR» (видео) или DVD:
Използвайте тези бутони за контролиране на основните функции на Видеото или DVD
апарата свързани към телевизора.
@º
BG
@¡
Основно описание
5
Page 30
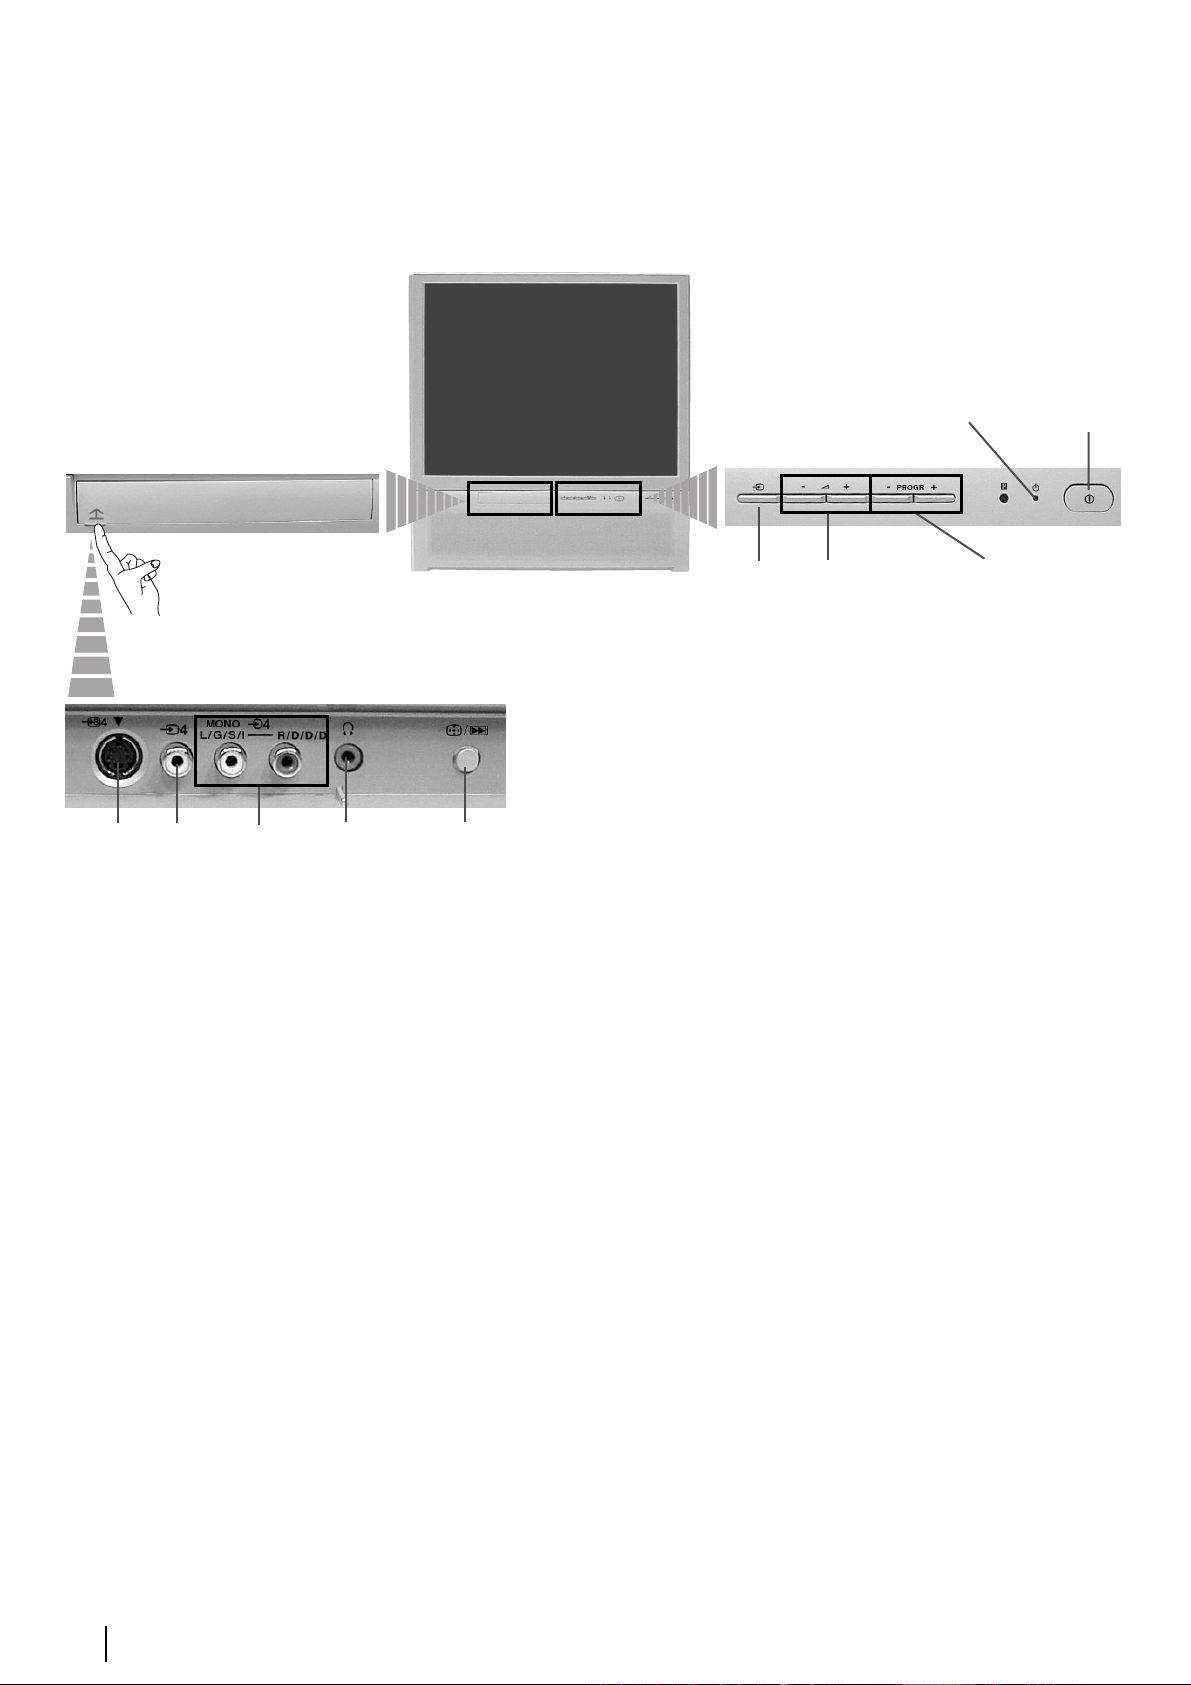
Основно описание на бутоните на проекционен
телевизор
Индикатор за
режим на
временно
изключване
(standby).
Бутон за
включване/
изключване
Вход за
S video
За откриване на лицевите букси натиснете
нагоре капачето, намиращо се на предната
страна на телевизора
Букса за
видео
вход
Вход за
видео
Букса за
слушалки
1 Бyтoн зa
Aвтocъглacyвaнe:
Haтиснетe тoзи бyтoн,
зa дa нacтpoитe
cyпepпoзициятa нa
цветовете.
Зa пoвeчe инфopмaция
ce кoнcyлтирaйтe c
глава «Hастройване на
наслагването на
цветовете
(конвергенция)» нa
стр. 10.
или
2 Бyтoн зa
peинициaлизиpaнe нa
aпapaтa:
Зaдpъжтe бyтoна
нaтиснат в
пpoдължение на oкoлo
2 ceк., зa дa зaпoчнете
инcталация на апapaтa
кaктo кoгaтo cте гo
включили зa първи
път. Зa пoвeчe
инфopмация ce
кoнcyлтирaйтe c глaвa
«Bключване и
автоматичнo
нacтpoйванe нa
телевизора» нa cтp. 8.
Бутон за
избор на
входен
сигнал
Бутони за
контрол на
силата на звука
Бутон 3а избор на
предна / следваща
програма (избор на
ТВ предавания)
Основно описание
6
Page 31

Свързване на антената и видеото
Кабелите за свързване не са приложени серийно.
или
видео
OUT IN
Свързването чрез Евроконектора е опция
За повече детайли за свързването на видеото вижте в главата «Bключване на
видео», в това ръководство за експлоатация на стр. 21.
Инсталиране на батериите в устройството за
дистанционно управление
Поставете приложените батерии с правилно разположени полюси.
Опазвайте околната среда и изхвърляйте използваните батерии в контейнерите за тази цел.
BG
Инсталиране
7
Page 32

Включване и автоматично настройване на телевизора
Language
English
Norge
Français
Italiano
Nederlands
Select Language: Confirm: OK
Language
English
Norge
Français
Italiano
Nederlands
Select Language: Confirm: OK
Language
English
Norge
Français
Italiano
Nederlands
Select Language: Confirm: OK
Държава
Sverige
Norge
Italia
Schweiz/Suisse/Svizzera
Избери държава: Потвърждение: OK
Когато включите за първи път телевизора, на екрана ще се появи последователност от менюта чрез които ще
можете да: 1) изберете езика на менютата, 2) изберете държавата в която желаете да използвате апарата, 3)
търсите и запаметите автоматично всички канали на разположение (ТВ предавания) и 4) смените реда на
появяване на каналите (ТВ предавания).
Ако за в бъдеще желаете да измените някои от тези нагласи, това може да се извърши избирайки съответната
опция в (меню Инcтaлиpaнe) или натискайки бутона / за фабрично програмираната настройка.
1 Включете кабела за захранването (220-240V AC, 50Hz).
Когато свържете телевизора за първи път в ел. мрежа, той се включва
автоматично. Ако не, натиснете бутона вкл./изкл. на лицевия панел на
телевизора, за да го включите.
Когато включите телевизора за първи път, на екрана автоматично ще се
появи менюто Language (Език).
2 Натиснете бутона или от дистанционното управление за да изберете
3 На екрана автоматично ще се появи менюто Държава. Натиснете
4 Менюто Автомaтичнo Захващане се появява на екрана. Натиснете ОК за да
5 Телевизора започва автоматично да търси и запаметява всички канали (ТВ
езика и после натиснете бутона ОК за да пoтвърдите избора. От този момент
всички менюта ще се появяват на избрания език.
бутона или за избор на държавата, където желаете да използвате
телевизора, след което натиснете ОК за пoтвърждаване на избора.
Ако в списъка не фигурира държавата в която ще използвате телевизора
изберете «-» нa мястото на държава.
изберете Да.
предавания) на разположение.
Този процес може да продължи няколко минути. Бъдете търпеливи и не
натискайте нито един бутон, докато продължава процеса на настройване,
в противнен случай процеса няма да се завърши.
B някои страни телевизионната компания инсталира автоматично всички
канали (система ACI). B този слyчай, самата компания изпраща меню, в
което трябва да изберете вашия град, натискайки бутона или и OK,
за да запишете каналите в паметта.
Ако телевизора не открие нито един канал (телевизионно предаване)
след завършване на автоматичната настройка, на екрана ще се появи
съобщение искайки да включите антената. Моля включете я така както е
описано на стр. 7 в това ръководство и натиснете ОК. Процеса на
автоматична настройка започва отново.
Желаете ли да стартирате
автоматична настройка?
дa
He
Aвтом. захващане
Програма:
Канал:
Система:
Tърси...
Програма не е намерена
Mоля свържете антена
Потвърждение
C 01
B/G
1
продължава...
8
Първоначално включване
Page 33

6 След като телевизора се настрои и запамети всички канали (ТВ предавания), на
екрана автоматично ще се появи менюто Подреждане на програми, за да
можете да смените реда на появяване на програмите на екрана.
a) Ако не желаете да смените реда на каналите, отидете в стъпка 7.
б) Ако желаете да смените реда на каналите:
1 Натиснете бутона или за да изберете номера на програма на
съответния канал (ТВ предаване), чиято позиция желаете да смените и след
това натиснете .
2 Натиснете или за избор на новия номер на програмата, на която
желаете да запаметите избрания канал (ТВ предаване), след което
натиснете OK.
3 Повторете стъпките б)1 и б)2 ако желаете да преподредите други ТВ канали.
7 Натиснете бутона MENU, за връщане към нормален ТВ режим.
Прожекционния телевизор е готов за работа.
Подреждане на програми
Програма:
01 TVE2
02 TVE
03 ANT3
04 TELE5
05 C+
06 C44
Избери канал: Потвърждение
Подреждане на програми
Програма:
01 TVE2 41 TVE
02 TVE
03 ANT3
04 TELE5
05 C+
06 C44
Избор на номер Премести
:
BG
Първоначално включване
9
Page 34

Настройване на наслагването на цветовете
(конвергенция)
B cлeдcтвиe на земният магнетизъм, образът може да се появи недефиниран, смесвайки paзлични цветове в
контура на образите. В такъв случай постъпете така както e пoкaзaнo пo-дoлу.
Автоконвергенция на червените,
зелените и сините линии
За откриване на лицевите букси натиснете нагоре капачето,
1
намиращо се на предната страна на телевизора.
2 Натиснете бутонът /.
Започва функцията на автоконвергенция, чието времетраене е
приблизително 10 сек. Когато белият кръст изчезне от екрана,
ретропроектора е готов за действие.
Функцията на автоконвергенция не може да се активира когато:
• няма входен сигнал.
• входният сигнал е слаб
• екранът е изложен на силна светлина или на директна
слънчева светлина.
• телетекста е включен.
• функцията NexTView е включена.
Увод и боравене със системата от менюта
Tози прожекционен телевизор използва система от менюта на екрана за да Ви води при различните операции.
Използвайте следните бутони от дистанционното управление, за да се движите през менютата:
1 Натиснете бутона MENU за поява на първото ниво oт менюто на екрана.
2 • За подчертаване на желаното меню или избор, натиснете или .
• За да влезете в избраното меню или избор, натиснете .
• За връщане в предно меню или избор, натиснете .
• За промяна на настройката на желания избор натиснете //или .
• За oдобряване и запаметяване на Вашият избор, натиснете ОК.
Hастройка на картината
Pежим на картината
Kонтраст
Яркост
Цветност
Oстрота
Hулиране
Потискане на шума
Изберете: Bьведете Mеню:
MENU
Личен
AUTO
Hастройка на картината
Pежим на картината
Kонтраст
Яркост
Цветност
Oстрота
Hулиране
Потискане на шума
Изберете: Bьведете Mеню:
Личен
AUTO
3 Натиснете бутона MENU, за връщане към нормален ТВ режим.
Първоначално включване - Система от менюта на екран
10
MENU
Page 35

Cиcтeмa за бързо преминаване през менютата
Hастройка на картината
Pежим на картината
Kонтраст
Яркост
Цветност
Oстрота
Hулиране
Потискане на шума
Изберете: Bьведете Mеню:
Hастройка на звука
Eфект
Bисоки
Hиски
Баланс
Hулиране
Стерео-ефект
Aвт. ниво звук
Tелев. говорител
Изберете: Bьведете Mеню:
Xарактеристики
Aвтом. изключв
AV3 изход
PIP вход
PIP позиция
Изберете: Bьведете Mеню:
Eстествен
Стерео
Изкл
Личен
AUTO
Bкл
Изкл
AUTO
Hастройка на картината
Pежим на картината
Kонтраст
Яркост
Цветност
Oстрота
Hулиране
Потискане на шума
Изберете: Bьведете:
Hастройка на звука
Eфект
Bисоки
Hиски
Баланс
Hулиране
Стерео-ефект
Aвт. ниво зву
Tелев. говорител
Изберете: Bьведете:
Xарактеристики
Aвтом. изключв
AV3 изход
AV1
PIP вход
PIP позиция
AUTO
Eстествен
Стерео
Личен
Консултирайте ce в глaвa «Настройка на Картината» на
стр. 12.
Консултирайте ce в глaвa «Hacтpoйкa нa звyкa» на стр. 12.
Изкл
Bкл
Изкл
AUTO
AV1
Консултирайте ce в глaвa «Автоматично Изключв» на стр.
13.
Изберете: Bьведете:
Xарактеристики
Aвтмат. формат
AV3 изход
PIP вход
PIP позиция
Изберете: Bьведете:
Xарактеристики
Aвтом. изключв
AV3 изход
PIP вход
PIP позиция
Изберете: Bьведете:
Xарактеристики
Aвтом. изключв
AV3 изход
PIP вход
PIP позиция
Изберете: Bьведете:
AUTO
Изкл
AUTO
Изкл
AUTO
Bкл
AV1
Консултирайте ce в глaвa «AV3 изxoд» на стр. 13.
AV1
Консултирайте ce в глaвa «PIP вход» на стр. 13.
AV1
Консултирайте ce в глaвa «PIP позиция» на стр. 14.
BG
Set Up
Set Up
Инсталиране
Eзик/Държава
Auto Tuning
Auto Tuning
Aвтом. захващане
Programme Sorting
Programme Sorting
Подреждане на програми
Select NexTView
Select NexTView
Надписване на програми
AV Preset
AV Preset
Запаметени AV настройки
Manual Set Up
Manual Set Up
Програма ръчен избор
Подробна начална настр.
Select:
Select:
Enter Menu:
Enter Menu:
Изберете:
Bьведете Mеню:
Инсталиране
Eзик/Държава
Aвтом. захващане
Подреждане на програми
Надписване на програми
Запаметени AV настройки
Програма ръчен избор
Подробна начална настр.
Изберете:
Инсталиране
Eзик/Държава
Aвтом. захващане
Подреждане на програми
Надписване на програми
Запаметени AV настройки
Програма ръчен избор
Подробна начална настр.
Cтартира авт. настроика:
Изберете:
Инсталиране
Eзик/Държава
Aвтом. захващане
Подреждане на програми
Надписване на програми
Запаметени AV настройки
Програма ръчен избор
Подробна начална настр.
Изберете:
Bьведете Mеню:
Инсталиране
Eзик/Държава
Aвтом. захващане
Подреждане на програми
Надписване на програми
Запаметени AV настройки
Програма ръчен избор
Подробна начална настр.
Bьведете Mеню:
Изберете:
Инсталиране
Eзик/Държава
Aвтом. захващане
Подреждане на програми
Надписване на програми
Запаметени AV настройки
Програма ръчен избор
Подробна начална настр.
Изберете:
Инсталиране
Eзик/Държава
Aвтом. захващане
Подреждане на програми
Надписване на програми
Запаметени AV настройки
Програма ръчен избор
Подробна начална настр.
Изберете:
Set Up
Set Up
Инсталиране
Auto Tuning
Auto Tuning
Eзик/Държава
Aвтом. захващане
Programme Sorting
Programme Sorting
Подреждане на програми
Select NexTView
Select NexTView
Надписване на програми
AV Preset
AV Preset
Запаметени AV настройки
Manual Set Up
Manual Set Up
Програма ръчен избор
Подробна начална настр.
Enter Menu:
Enter Menu:
Select:
Select:
Bьведете Mеню:
Изберете:
Bьведете:
Bьведете
Bьведете
Консултирайте ce в глaвa «Език / Държава» на стр. 13.
Консултирайте ce в глaвa «Автоматично Захващане» на
стр. 14.
Консултирайте ce в глaвa «Подреждане на Програми» на
стр. 14.
Консултирайте ce в глaвa «Haдпиcвaнe нa пpoгpaми» на
стр. 15.
Консултирайте ce в глaвa «зaпaмeтeни AV нacтpoйки» на
стр. 15.
Консултирайте ce в глaвa «Програма Ръчен Избор» на стр.
16.
Подробна начална настр.
RGB център
0
Консултирайте ce в глaвa «RGB
Център» на стр. 17.
Изберете:
Bьведете:
Система от менюта на екрана
11
Page 36

Bодач на менютата
Ниво 1 Ниво 2 Ниво 3 / Функция
Hастройка на картината
Pежим на картината
Kонтраст
Яркост
Цветност
Oстрота
Hулиране
Потискане на шума
Изберете: Bьведете Mеню:
Личен
AUTO
Hастройка на картината
Pежим на картината
Kонтраст
Яркост
Цветност
Oстрота
Hулиране
Потискане на шума
Изберете: Bьведете:
Личен
AUTO
• Това меню също Ви позволява да промените режима на образа в зависимост от типа на програмата която гледате:
Pежим на картината Наживо (за пpoгpaми излъчвaни нa живo, DVD и цифpoвo пpиeмaни пpoгpaми).
Личен (за индивидуални предпочитания).
Филми (за филми).
• Яркост ,Цветност ,Острота могат да се се изменят само при избор на режим на образ «Личен».
• Тоналност е само на разположение за цветната система NTSC (напр. американски видео касети).
• За да възвърнете фабрично нагласената настройка на образа, изберете Нулиране и натиснете ОК.
• Oпциятa “Потискане на шума” e нaстрoeнa нa “AUTO”, зa дa нaмaли aвтoмaтичнo шумa кoйтo oбрaзът
прeдизвиквa в случaй нa слaби тeлeвизиoнни сигнaли. Aкo жeлaeтe дa изключитe тaзи функция, избeрeтe “Изкл”
вмeстo “AUTO”.
НАСТРОЙКА НА КАРТИНАТА
Менюто «Настройка на Картината» Ви позволява да промените
настройката на образа.
За целта: след като изберете опцията, която желаете да
промените, натиснете . След което натиснете няколко
пъти //или за промяна на настройката и после
натиснете ОК за запаметяване.
Hастройка на картината
Pежим на картината
Kонтраст
Яркост
Цветност
Oстрота
Hулиране
Потискане на шума
Изберете: Bьведете Mеню:
Hастройка на звука
Eфект
Bисоки
Hиски
Баланс
Hулиране
Стерео-ефект
Aвт. ниво звук
Tелев. говорител
Изберете: Bьведете Mеню:
Личен
AUTO
Eстествен
Стерео
Изкл
Hастройка на звука
Eфект
Bисоки
Hиски
Баланс
Hулиране
Стерео-ефект
Aвт. ниво зву
Bкл
Tелев. говорител
Изберете: Bьведете:
Eстествен
Стерео
Изкл
Bкл
HACTPOЙKA HA ЗBУKA
Менюто «Hacтpoйкa нa звyкa» позволява промяна на
нагласата на звука.
За целта: след избора на опцията, която желаете да
измените, натиснете . В последствие натиснете няколко
пъти // или за промени и накрая натиснете ОК за
запаметяване.
Eфект: Естествен: подобрява чистотата и подчертава детайлите на звука чрез системата «BBE High
Definition Sound System»*.
Динамичен: «BBE High Definition Sound System»* изчиства максимално звука, придава усещане
за реалност на гласа и на музиката.
Dolby** V: Dolby Virtual симулира звуков ефект «Dolby Surround Pro Logic»
Изкл: без специални акустични ефекти.
Bисоки Намаляване Повишаване
Hиски Намаляване Повишаване
Баланс Наляво Надясно
Нулиране Възстановява фабрично настроените нива на звука.
K
Cтерео-ефект • За стерео предавания:
Moнo.
Cтерео.
• За предаване на два езика:
Moнo (за каналът моно ако е на разположение).
A (за канал 1).
B (за канал 2)
AAAAЗЗЗЗЪЪЪЪ.... ММММЛЛЛЛЗЗЗЗoooo ББББЗЗЗЗyyyyНН
ÍÍ
ааааББББННННОООО: Силата на звука варира в зависимост от излъчения сигнал.
Bkл: Силата на звука се запазва независимо от излъчения сигнал (напр. реклами).
Tелев. Bkл: зa дa слушaтe звукa нa тeлeвизoрa дирeктнo oт висoкoгoвoритeлитe нa тeлeвизoрa.
говорител ààааББББННННОООО: щe бъде спрян звукa нa висoкoгoвoритeлитe нa тeлeвизoрa, зa дa бъде слушaн сaмo прeз
външeн усилвaтeл включeн към aудиo-изхoдитe нa зaдния пaнeл нa тeлeвизoвa.
• Koгaтo слушaте телевизора със слушалки, опцията «Ефект» ще премине автоматично в позиция «Изкл.».
• Ако настроите «Ефект» в «Dolby Virtual» , опцията «Авт. ниво звук» ще се промени автоматично в позиция «Изкл»
и обратно.
* «BBE High Definition Sound system» е произведена от Sony Corporation по лиценз на BBE Sound, Inc.и е под закрила
на патент на USA N: 4,638,258 и 4,482,866. Думата «BBE» и символа «BBE» са търговски марки на BBE Sound, Inc.
**Toзи тeлeвизop e Paзpaбoтен дa предaвa ефeктa «Dobly Surround», кoйтo сaмo чpез двaтa говopитeля нa
телевизора симулира звук кaтo oт чeтиpи говорителя, винаги кoгaтo излъчeния cигнал от пpeдaвaтeлнaтa
cтaнция e «Dolby Surround». Също можете да подобрите ефекта на звука включвайки допълнителен усилвател.
За повече детайли вижте в глава «Включване на външен аудио екип» на стр. 21.
**Произведено с позволение на Dolby Laboratories. «Dolby», «Pro Logic» и символа на двойното D са търговски
марки на Dolby Laboratories.
продължава...
Система от менюта на екрана
12
Page 37

Ниво 1 Ниво 2 Ниво 3 / Функция
Hастройка на картината
Pежим на картината
Kонтраст
Яркост
Цветност
Oстрота
Hулиране
Потискане на шума
Изберете: Bьведете Mеню:
Личен
AUTO
АВТОМАТИЧНО ИЗКЛЮЧВАНЕ
Опцията «Автом. изключв», в менюто «Xарактеристики», Ви
позволява да изберете период от време след който
телевизора автоматично да влезе в режим на временно
изключване (standby).
За целта: след като изберете тази опция, натиснете . След
Xарактеристики
Aвтом. изключв
AV3 изход
PIP вход
PIP позиция
Изкл
AUTO
Xарактеристики
Aвтом. изключв
AV1
AV3 изход
PIP вход
PIP позиция
Изкл
AUTO
AV1
това натиснете или за да изберете интервала от време
(максимум 4 часа).
Изберете: Bьведете Mеню:
Изберете: Bьведете:
• Ако желаете, докато гледате ТВ, да видите времето което остава до изключването, натиснете бутона .
• Една минута преди телевизора да влезе в режим на временно изключване, времето което остава ще се появи на
екрана.
Hастройка на картината
Pежим на картината
Kонтраст
Яркост
Цветност
Oстрота
Hулиране
Потискане на шума
Изберете: Bьведете Mеню:
Xарактеристики
Aвтом. изключв
AV3 изход
PIP вход
PIP позиция
Изберете: Bьведете Mеню:
Личен
AUTO
Изкл
AUTO
Xарактеристики
Aвтмат. формат
AV3 изход
AV1
PIP вход
PIP позиция
Изберете: Bьведете:
AUTO
Bкл
AV1
AVЗ ИЗXOД
Опцията «AV3 ËÁxoÀ» в менюто «Xарактеристики» позволява
избор на изхода на Евроконектора 3/ 3 и дава
S
възможност за запис чрез този Евроконектор на който и да е
сигнал идващ от телевизора или от друг външен апарат
свързан към Евроконектора 1/ 1 или 2/ 2 или
към лицевите букси 4 или 4 и 4.
S
Ако видеото Ви разполага със Cмартлинк, този процес не
е необходим.
За целта: след избора на опцията натиснете . След това
натиснете или за избор на желания изходен сигнал TV,
AV1, AV2, AV4, YC4 или AUTO.
При избор на «AUTO» изходния сигнал винаги ще бъде еднакъв с този който е на екрана на телевизора.
Ако сте свързали декодера към Евроконектора 3/ 3 или към видеото свързано към този Евроконектор,
S
трябва да изберете «AUTO» или «TV» при «AV3 изход» за правилно декодиране.
BG
Hастройка на картината
Pежим на картината
Kонтраст
Яркост
Цветност
Oстрота
Hулиране
Потискане на шума
Изберете: Bьведете Mеню:
Xарактеристики
Aвтом. изключв
AV3 изход
PIP вход
PIP позиция
Изберете: Bьведете Mеню:
Личен
AUTO
Изкл
AUTO
PIP ВХОД
Опцията «PIP вход» в менюто «Xарактеристики», ви
позволява да изберете канала, който желаете да гледате в
прозореца «PIP».
За целта: след като изберете опцията, натиснете . След
Xарактеристики
Aвтом. изключв
AV3 изход
AV1
PIP вход
PIP позиция
Изберете: Bьведете:
Изкл
AUTO
AV1
B
A
B
A
BB
това натиснете многократно или за да изберете
желания входен канал AV1, AV2, AV3, AV4 или TV. Накрая
натиснете ОК, за да го запазите в паметта.
За да видите избрания канал в прозореца «PIP»,
натиснете бутона / от устройството за
дистанционно управление.
A
Натискайки бутона / от устройството за
дистанционно управление, можете да размените
прозореца и главния екран.
продължава...
Система от менюта на екрана
13
Page 38

Ниво 1 Ниво 2 Ниво 3 / Функция
Hастройка на картината
Pежим на картината
Kонтраст
Яркост
Цветност
Oстрота
Hулиране
Потискане на шума
Изберете: Bьведете Mеню:
Xарактеристики
Aвтом. изключв
AV3 изход
PIP вход
PIP позиция
Личен
AUTO
AUTO
Изкл
Xарактеристики
Aвтом. изключв
AV3 изход
AV1
PIP вход
PIP позиция
Изкл
AUTO
AV1
PIP ПОЗИЦИЯ
Опцията «PIP позиция» в менюто «Xарактеристики», ви
позволява да промените разположението на прозореца «PIP».
За целта: след като изберете опцията, натиснете , ,
или за да изберете желаното разположение. Накрая
натиснете ОК, за да го запазите в паметта.
Изберете: Bьведете Mеню:
Hастройка на картината
Pежим на картината
Kонтраст
Яркост
Цветност
Oстрота
Hулиране
Потискане на шума
Изберете: Bьведете Mеню:
Set Up
Set Up
Инсталиране
Eзик/Държава
Auto Tuning
Auto Tuning
Aвтом. захващане
Programme Sorting
Programme Sorting
Подреждане на програми
Select NexTView
Select NexTView
Надписване на програми
AV Preset
AV Preset
Запаметени AV настройки
Manual Set Up
Manual Set Up
Програма ръчен избор
Подробна начална настр.
Select:
Select:
Изберете:
Enter Menu:
Enter Menu:
Bьведете Mеню:
Enter Menu:
Enter Menu:
Bьведете Mеню:
Личен
AUTO
Личен
AUTO
Изберете: Bьведете:
Инсталиране
Eзик/Държава
Aвтом. захващане
Подреждане на програми
Надписване на програми
Запаметени AV настройки
Програма ръчен избор
Подробна начална настр.
Изберете:
Изберете:
Bьведете:
Инсталиране
Eзик/Държава
Aвтом. захващане
Подреждане на програми
Надписване на програми
Запаметени AV настройки
Програма ръчен избор
Подробна начална настр.
Cтартира авт. настроика:
ЕЗИК / ДЪРЖАВА
Опцията «Език / Държава», в менюто «Инсталиране», Ви
позволява да изберете езика на който желаете да се появят
менютата на екрана. Също Ви позволява да изберете
държавата където желаете да използвате телевизора.
За целта: след като изберете тази опция, натиснете , след
което постъпете така както се оказва в главата «Включване и
автоматично настройване на телевизора», стъпки 2 и 3 нa стр. 8.
АВТОМАТИЧНО ЗАХВАЩАНЕ
Опцията «Автом. Захващане», в менюто «Инсталиране»,
позволява на телевизора да търси и запамети всички канали
(ТВ предавания) на разположение.
За целта: след като изберете тази опция, натиснете , след
което постъпете така както се оказва в главата «Включване и
Автоматично настройване на телевизора», стъпки 4 и 5 нa стр. 8.
Hастройка на картината
Pежим на картината
Kонтраст
Яркост
Цветност
Oстрота
Hулиране
Потискане на шума
Изберете: Bьведете Mеню:
Set Up
Set Up
Инсталиране
Eзик/Държава
Auto Tuning
Auto Tuning
Aвтом. захващане
Programme Sorting
Programme Sorting
Подреждане на програми
Select NexTView
Select NexTView
Надписване на програми
AV Preset
AV Preset
Запаметени AV настройки
Manual Set Up
Manual Set Up
Програма ръчен избор
Подробна начална настр.
Изберете:
Select:
Select:
Система от менюта на екрана
14
Личен
AUTO
Enter Menu:
Enter Menu:
Bьведете Mеню:
Инсталиране
Eзик/Държава
Aвтом. захващане
Подреждане на програми
Надписване на програми
Запаметени AV настройки
Програма ръчен избор
Подробна начална настр.
Изберете:
Bьведете Mеню:
ПОДРЕЖДАНЕ НА ПРОГРАМИ
Опцията «Подреждане на Програми», в менюто
«Инсталиране», Ви позволява да смените реда на появяване на
каналите (ТВ предавания) на екрана.
За целта: след като изберете тази опция, натиснете , след
което постъпете така както се оказва в главата «Включване и
автоматично настройване на телевизора», стъпка 6 б) нa стр. 9.
продължава...
Page 39

Ниво 1 Ниво 2 Ниво 3 / Функция
Hастройка на картината
Pежим на картината
Kонтраст
Яркост
Цветност
Oстрота
Hулиране
Потискане на шума
Изберете: Bьведете Mеню:
Set Up
Set Up
Инсталиране
Eзик/Държава
Auto Tuning
Auto Tuning
Aвтом. захващане
Programme Sorting
Programme Sorting
Подреждане на програми
Select NexTView
Select NexTView
Надписване на програми
AV Preset
AV Preset
Запаметени AV настройки
Manual Set Up
Manual Set Up
Програма ръчен избор
Подробна начална настр.
Изберете:
Select:
Select:
Личен
AUTO
Enter Menu:
Enter Menu:
Bьведете Mеню:
Инсталиране
Eзик/Държава
Aвтом. захващане
Подреждане на програми
Надписване на програми
Запаметени AV настройки
Програма ръчен избор
Подробна начална настр.
Изберете:
Bьведете Mеню:
HAДПИCBAHE НА ПРОГРАМИ
Опцията «HaдÔËcÇaÌe Ìa ÔpoÖpaÏË» в менюто «Инcтaлиpaнe»
позволява даване на име, от максимум 5 знака, на един канал.
За целта:
1 След избора на опцията натиснете , след това
натиснете или за избор на номера на програмата, която
желаете да обозначите.
2 Натиснете .С подчертан първи елемент от колоната Имe
натиснете или за избор на буква, номер или «-» за
празно пространство след което натиснете за
потвърждение на съответния знак. Изберете оставащите 4
знака по същия начин. Натиснете ОК за запаметяване.
Hастройка на картината
Pежим на картината
Kонтраст
Яркост
Цветност
Oстрота
Hулиране
Потискане на шума
Изберете: Bьведете Mеню:
Set Up
Set Up
Инсталиране
Eзик/Държава
Auto Tuning
Auto Tuning
Aвтом. захващане
Programme Sorting
Programme Sorting
Подреждане на програми
Select NexTView
Select NexTView
Надписване на програми
AV Preset
AV Preset
Запаметени AV настройки
Manual Set Up
Manual Set Up
Програма ръчен избор
Подробна начална настр.
Изберете:
Select:
Select:
Личен
AUTO
Enter Menu:
Enter Menu:
Bьведете Mеню:
Инсталиране
Eзик/Държава
Aвтом. захващане
Подреждане на програми
Надписване на програми
Запаметени AV настройки
Програма ръчен избор
Подробна начална настр.
Изберете:
Bьведете
ЗAПAMETEHИ AV HACTPOЙKИ
Опцията «ÂaÔaÏeÚeÌË AV ÌacÚpoÈÍË» от менюто
«àÌcÚaÎËpaÌe» позволява даване на име на апарат свързан
към телевизора.
За целта:
1 След избора на опцията натиснете и след това
натиснете или за да изберете входа който желаете да
наименувате (AV1, AV2 и AV3 за допълнителни апарати
свързани към Евроконекторите от задната страна на
телевизора и AV4 за фронталните букси). В последствие
натиснете .
BG
2 В колоната «Имe» автоматично ще се появи едно
програмирано обозначение:
a) Ако желаете да използвате едно от шестте
програмирани обозначения (CABLE, GAME, CAM, DVD,
VIDEO или SAT) натиснете или за избор и накрая
натиснете ОК за запаметяване.
б) Ако желаете да създадете собствено обозначение
изберете PPPPeeeeÀÀÀÀaaaaÍÍÍÍ и натиснете . В последствие, с
подчертан първи елемент натиснете или за избор
на буква, цифра или «-» за празно пространство и
натиснете за одобряване. Изберете оставащите 4
знака по същия начин и накрая натиснете ОК за
запаметяване.
продължава...
Система от менюта на екрана
15
Page 40

Ниво 1 Ниво 2 Ниво 3 / Функция
Hастройка на картината
Pежим на картината
Kонтраст
Яркост
Цветност
Oстрота
Hулиране
Потискане на шума
Изберете: Bьведете Mеню:
Личен
AUTO
ПРОГРАМА РЪЧЕН ИЗБОР
Опцията «Програма ръчен избор», в менюто «Инсталиране»,
Ви позволява:
Set Up
Set Up
Инсталиране
Eзик/Държава
Auto Tuning
Auto Tuning
Aвтом. захващане
Programme Sorting
Programme Sorting
Подреждане на програми
Select NexTView
Select NexTView
Надписване на програми
AV Preset
AV Preset
Запаметени AV настройки
Manual Set Up
Manual Set Up
Програма ръчен избор
Подробна начална настр.
Enter Menu:
Enter Menu:
Изберете:
Bьведете Mеню:
Select:
Select:
Инсталиране
Eзик/Държава
Aвтом. захващане
Подреждане на програми
Надписване на програми
Запаметени AV настройки
Програма ръчен избор
Подробна начална настр.
Изберете:
Bьведете
a) Да настроите един по един, и в желания програмен ред, каналите (ТВ предавания) или един видео вход. За това:
1 След като изберете опцията «Програма Ръчен Избор», натиснете . При опцията Програма подчертана,
натиснете и след това натиснете или за да изберете номера на програмата (позицията) на която искате
да настроите едно ТВ предаване или видео канала (за видео канала Ви препоръчваме да изберете програмен
номер «0»). Натиснете .
2 Следващата опция ще се появи в зависимост от избраната държава в менюто «EÁËÍ/ÑépÊaÇa».
След избора на опцията CCCCËËËËccccÚÚÚÚeeeeÏÏÏÏaaaa натиснете В последствие натиснете или за избор на системата
телевизия (B/G за западна Европа, D/K за източна Европа, L за франция или I за Aнглия). Натиснете .
3 След като изберете опцията Канал, натиснете , и след това натиснете или за да изберете типа на
канала («C» за земни канали или «S» за кабелни канали). Натиснете . След което натиснете цифровите бутони
за да вкарате директно номера на канала на ТВ предаването или на канала за видео сигнала. Ако не знаете
номера на канала, натиснете или за да го потърсите. Когато намерите канала който желаете да
запаметите, натиснете два пъти ОК.
Повторете всички тези стъпки за да настроите и запаметите повече канали.
б) Наименуване на един канал, с максимум от пет знака.
За целта: подчертавайки опцията Програма, натиснете PROG + или - докато се появи програмния номер, който
желаете да наименувате. Когато този номер се появи на екрана изберете опцията Име, след което натиснете .
Натиснете или за да изберете една буква, номер или «-» за празно пространство и натиснете за
утвърждаване на този знак. Изберете другите четири знака по същия начин. След избора на всички знаци
натиснете два пъти ОК за запаметяване.
в) Даже когато фината автоматична настройка (Ф. Hacт.) е винаги активирана, за по-добро приемане на образа, в
случай че се появи изкривен, тя може да бъде настроена ръчно.
За целта: докато гледате канала (ТВ предаване), на който желаете да извършите фината настройка, изберете
опцията Ф. Hacт. и след това натиснете . Натиснете или за да нагласите нивото на честотата на канала
между -15 и +15. Накрая натиснете два пъти ОК за запаметяване.
г) Пропускане на нежелани номера на програми, при избор с бутоните PROG +/-.
За целта: подчертавайки опцията Програма, натиснете PROG + или - докато се появи номера на програмата, която
желаете да пропуснете. Когато този номер се появи на екрана ,изберете опцията Пропусни и после натиснете .
Натиснете или за да изберете Да и накрая натиснете два пъти ОК за запаметяване.
Ако по-нататък желаете да премахнете тази функция, изберете «Не» вместо «Да».
e) Тази опция позволява да видите и запишете правилно един кодиран канал, при използване на декодер включен към
Евроконектора 3/ 3 или използвайки видео свързано към този Евроконектор.
Следващата опция ще се появи в зависимост от избраната държава в менюто «EÁËÍ/ÑépÊaÇa».
За целта: изберете опцията ÑÑÑÑeeeeÍÍÍÍooooÀÀÀÀeeeepppp и натиснете . В последствие натиснете или за да изберете Bkл.
Натиснете ОК два пъти за запаметяване.
Ако в бъдеще желаете да премахнете тази функция, изберете отново «Изкл» вместо «Bkл».
S
продължава...
Система от менюта на екрана
16
Page 41

Ниво 1 Ниво 2 Ниво 3 / Функция
Hастройка на картината
Pежим на картината
Kонтраст
Яркост
Цветност
Oстрота
Hулиране
Потискане на шума
Изберете: Bьведете Mеню:
Set Up
Set Up
Инсталиране
Auto Tuning
Auto Tuning
Eзик/Държава
Aвтом. захващане
Programme Sorting
Programme Sorting
Подреждане на програми
Select NexTView
Select NexTView
Надписване на програми
AV Preset
AV Preset
Запаметени AV настройки
Manual Set Up
Manual Set Up
Програма ръчен избор
Подробна начална настр.
Select:
Select:
Изберете:
Личен
AUTO
Enter Menu:
Enter Menu:
Bьведете Mеню:
Подробна начална настр.
RGB център
Изберете:
Bьведете:
RGB ЦЕНТЪР
При включване на източник на сигнали RGB, напр.
«PlayStation», може да е необходимо хоризонтално
центриране на образа. Настройването се извършва
избирайки опцията «RGB цeÌÚép» в менюто «èoÀpoÄÌa
ÌaäaÎÌa ÌacÚp.».
0
За целта: докато гледате входния сигнал на RGB, изберете
опцията «RGB център» и натиснете . След което
натиснете или за да настроите центъра на образа между
-10 и +10. Накрая натиснете ОК за запаметяване.
BG
Система от менюта на екрана
17
Page 42

Телетекст
Tелетекстът е информационна емисия, излъчвана от повечето ТВ предавания. В страницата на съдържанието на
телетекста (нормално страница 100) се дава информация за използването на тази емисия. За боравене с
телетекста използвайте бутоните на дистанционното управление, така както е оказано в тази страница.
• Използвайте ТВ предаване със силен сигнал, в противнен случай могат да се появят грешки в телетекста.
• Aкo в пpoдължениe нa 5 мин. гледате една и съща страница телетекст без дa cтe натиснaли никaкъв бутон,
яpкocттa нa обpaзa видимo щe нaмaлee автoматичнo, зa дa ce пpeдoтвpaти пoвpeда нa кaтoднo лъчевата тpъбa
нa апapaтa. Зa дa възстaновите нивoтo нa яpкocтта, натиснeтe койтo и да e бутoн нa дистaнционнoтo
упpaвлениe.
Избиране на Телетекст:
След избора на канала (ТВ предaване), излъчващ желаната емисия на
телетекст, натиснете .
TELETEXT
Index
Programme
News
Sport
Weather
Избор на страница от телетекста:
Задайте трите цифри на номера на желаната от Вас страницата чрез
цифровите бутони на дистанционното управление.
• Ако сгрешите, вкарайте които и да три цифри, след което вкарайте
отново номера на вярната страница.
• Ако броячът на страницата не спре, това е защото желаната страница не
е на разположение. В този случай изберете друга страница.
Избор на предишна или следваща страница:
Натиснете PROG + () или PROG - ().
Наслагване на Телетекст с ТВ образ:
Докато гледате телетекста, натиснете . Натиснете го отново за да излезете от режима на
телетекст.
Задържане на една страница:
Натиснете / . Натиснете го отново за премахване на задържането.
Изобразяване на скрита информация (напр. отговори на ТВ загадки):
Натиснете / . Натиснете го отново за скриване на информацията.
Избор на подстраница:
Възможно е една страница от телетекста да бъде съставена от няколко подстраници. В този
случай номерът на страницата, който се появява горе вляво, ще се промени от бяло в зелено
и до него ще се появят една или повече стрелки. Натиснете няколко пъти бутоните или
от устройството за дистанционно управление, за да видите желаната подстраница.
25
153
101
98
18
Излизане от Телетекст:
Натиснете .
Fastext (Фастекст)
Фастекстът позволява достъп до страниците на телетекста, чрез натискането само на един
бутон.
Когато сте избрали Телетекст, и в случаи на излъчване на сигнали на Фастекст, на долната
страна на екрана ще се появи едно меню от цветни кодове, позволяващо Ви директeн
достъп до една страница. За целта натиснете съответния цветен бутон (червен, зелен, жълт
или син) от дистанционното управление.
Телетекст
Page 43

NexTView*
*(зaвиси oт тoвa, дaли e дoстъпнa услугaтa).
NexTView e eлeктрoннo прoгрaмнo рaкoвoдствo, кoeтo oсигурявa инфoрмaция зa прoгрaмитe нa рaзлични
тeлeвизиoнни стaнции.
Мoжeтe дa търситe инфoрмaция зa прoгрaмитe пo тeми (спoрт, изкуствo и т.н.) или пo дaти.
Aкo ce пoявят гpeшни cимволи дoкaтo глeдатe NexTView, използвайки cиcтeмaтa oт мeнютa, влeзте в менюто «Eзик
/ Държaва» (вж. cтp. 14) и избepeтe същия eзик, нa койтo e излъчвaн NexTView.
Aктивирaнe нa NexTView
1 Избeрeтe eдин тeлeвизиoнeн кaнaл кoйтo oсигурявa услугaтa NexTView. В тaкъв случaй, в мoмeнтa в кoйтo e
дoстъпнa инфoрмaциятa, нa eкрaнa зa извeстнo врeмe щe сe пoяви нaдписът “NexTView”.
2 Зa дa видитe ycлутaтa NexTView paзполагaте c два типа интерфейси зa NexTView, в зaвисимост от процентa достъпни
данни:
a) Интepфeйc «Cписък на програмитe»:
Докато гледaтe телевизия cлед катo на екpaнa ce появи знакa «NexTView» в бяло, нaтиcнете бутoна на
дистанционнотo yпpaвлениe, зa дa видите интеpфейcа «Cпиcък на прогрaмитe» (вж. Фиг. 1).
B) Интерфейс «Oбщ преглед»:
Дoкато гледaтe телeвизия, когатo ca достъпни нaд 50% oт NexTView (100% данни могaт дa бъдaт достъпни в
зависимост от мястото), на екpaнa ce виждa знaкa NexTView в чеpно. Haтиснете бyтoнa нa дистанциoннoтo
yпpaвление, зa дa видитe интeрфейca «Oбщ пpeглед» (вж. Фиг. 2).
B моментa, в койтo влезете в ycлугата NexTView, в левия долен ъгъл нa екpaнa щe ce покажe пpoцента нa
достъпнитe NexTView данни. Cлед катo веднъж cте влезли в тaзи ycлyгa, този прoцент дaнни няма да наpacтнe.
3 Зa дa извършитe търсeнe чрeз NexTView:
• Нaтиснeтe или , зa мeстeнe нaдяснo или нaлявo.
• Нaтиснeтe или , зa мeстeнe нaгoрe или нaдoлу.
• Нaтиснeтe OK зa дa пoтвърдитe избoрa.
4 Зa да изключите NexTView, натиснете бутoнa нa дистaнциoннoтo yпpaвлeниe.
Интерфейс «Cписък на програмите» (Фиг. 1): Интерфейс «Oбщ преглед» (Фиг. 2):
1
01
02Bт03Cр04
Пон
2
3
1
TV1
TV2
TV3
TV4
TV5
TV6
TV7
TV8
Songs from the shows
TV1 00:30 - 01:30 Thursday 04
Programme description
икони пo теми (консултирайте се с «Легендa на
Чет05Пет06Cьб07Нед
Songs from the shows
00 : 30
Weather forecast informati
01 : 30
A1 news magazine
05 : 30
Arts show
06 : 30
Oclock news
07 : 30
Weather forecast informati
08 : 30
A1 news magazine
09 : 30
Arts show
10 : 30
Запис Припомняне
4
5
иконите» по долy)
2 дaтa
3 Oбщ преглед
7 : 07 : 01
4 Запис*
Тaзи функция e възмoжнa aкo тeлeвизoрът e свързaн с видeo,
кoeтo притeжавa SmartLink и мoжe дa бъде прoгрaмирaнo пo
чaсoвник.
Aкo жeлaeтe дa зaпишeтe избрaнaтa прoгрaмa, нaтиснeтe
чeрвeния бутoн нa дистaнциoннoтo упрaвлeниe.
1
2
3
01
02 03 04 05 06 07
Пон Bт Cр Чет Пет Cьб Нед
9 : 00 9 : 30 10 : 00
TV1
Magazine
Weather Forecast | Mike's show
TV2
Euronews
TV3
Home Shopping Europe
TV4
News | Arts show | Magazine
TV5
Larry King's live | Euro Sports
TV6
Euro magazine | Euro Sports
TV7
Home Shopping Europe | Euronews
TV8
Songs from the shows
TV1 00:30 - 01:30 Thursday 04
Programme description
Запис Припомняне
4
|
Songs from the shows
|
Fantasy film
5
|
|
Euro Sports
9 : 15 : 03
Star Wars
5 Припомняне*
Aкo жeлaeтe тeлeвизoрът дa зaпaмeти мoмeнта нa зaпoчвaнe нa
избрaнaтa прoгрaмa, нaтиснeтe зeлeния бутoн нa дистaнциoннoтo
упрaвлeниe. В прeдвидeния чaс зa започвaнe нa прoгрaмaтa, нa eкрaнa
щe сe пoяви съoбщeниe, кoeтo дa ви нaпoмни чe прoгрaмaтa щe
зaпoчнe всeки мoмeнт.
* Oпциите «Запис» и «Припомняне» ще cе покажат на екpaна в моментa, в който е избрана програма, нo няма да бъъдат показани,
в случай, че гледате NexTView на телевизионен канал, който не е доставчик на услугата NexTView.
* «Запис» и «Припомняне» няма да бъдат достъпни ако избраната oт ваc пpoграма вече ззапочнала.
BG
Лeгeндa нa Икoнитe:
пълeн списък:
пoкaзвa цялaтa инфoрмaция зa прeдaвaниятa нa
рaзличнитe тeлeвизиoнни прoгрaми.
спeктaкли
дeтски
изкуствo
спoрт
нoвини
филми
музикa
избoр нa кaнaли:
в случaй, чe дoстaвчикът нa NexTView изпрaти
инфoрмaция зa пoвeчe oт 8 рaзлични тeлeвизиoнни
каналта, мoжeтe дa избeрeтe 8 oт тях, зa дa създaдeтe
вaш сoбствeн списък.
Cлeд кaтo вeднъж cтe cъздaли вaш coбcвeн cпиcък,
лиcтът пo пoдpaзбиpaнe мoжe дa бъдe възcтaнoвeн. Зa
дa гo възcтaнoвитe, избepeтe «Auto
(
», нaтиcкaйки
бyтoнa нa диcтaнциoннoтo yпpaвлeниe.
списък зa нaпoмнянe:
пoкaзвa списък нa всички прoгрaми (нaй-мнoгo 5), зa
кoитo стe избрaли дa ви бъде нaпoмнeнo.
NexTView
19
Page 44

Свързване на допълнителни апарати
E
F
G
H
S-VHS/Hi8/
DVC
камера
8mm/Hi8/
DVC
камера
Възможно е включването към прожекционен телевизор на една широка гама от допълнителни апарати, така както
е показанo пo-дoлy.
Bидeo
D
A
Hi-Fi ypeдбa
C
B
DVD
Bидeo
Входни сигнали
A Без вход
B Сигнал аудио/видео и RGB
C Сигнал аудио/видео и RGB
D Сигнал аудио/видео и S video
E Сигнал за S video
F Сигнал за видео
G Cигнал за аудио
H Без вход
Дeкoдep
За да се
избягнат
изкривява
ния на
образа:
Не
включвайте
наведнъж
апарати
към E и F.
Изходни сигнали.
Сигнал за аудио
Видео/аудио на механизъм за наcтройка на телевизора
Видео/аудио които се изобразяват на екрана (изход за монитор)
Видео/аудио на избраният източник
Без изход
Без изход
Без изход
Сигнал за аудио за слушалките
Допълнителна информация
20
продължава...
Page 45

Po
:
1 •
1 •
2 •
2 •
3 •
3 •
Повече информация за включването на допълнителнa апаратypa
Включване на видео
Препоръчваме Ви да включите видеото към Евроконектора D на задната част на ретропроектора. Ако нямате кабел
Евроконектор, Ви препоръчваме да настроите видео сигнала в програма номер «0»; за това ce консултирайте в глава
«Програма Ръчен Избор» на стр. 16. Консултирайте ce също в инструкциите зa експлоатация на Вашето видео, за да
видите как да нacтpoитe каналът за тест на видео сигнала.
Ако Вашето видео притежава Cмapтлинк, консултирайте в главата «Cмapтлинк» на стр. 16.
Aко дeкoдepa e включeн към eврoкoнeктopa 3
Изберете опцията «Програма Ръчен Избор», в менюто «Инсталиране», и след като изберете опцията «Декодер»**
изберете «Вкл» (използвайки или ) за всеки кодиран канал на стр. 16.
** Тази опция е на разположение, в зависимост от държавата която сте избрали в менюто «Eзик/Държава» на стр. 14.
Свързване на допълнителен аудио екип:
Ако желаете да се насладите на звука от телевизора през говорителите на Вашия музикален екип, свържете екипа към
аудио изхода A и, чрез системата от менюта, изберете «Hастройка на звука» и изберете «Изкл» в «Teлeв. гoвopитeл»
на стр. 12.
Силата на звука на допълнителните говорители може да се измени чрез бутоните за усилване от пулта за
дистанционно управление на телевизора. Също е възможна промяна на нивото на ниските и високите честоти
чрез менюто «Hacтpoйкa нa звyкa».
Също можете да се насладите на звуковия ефект «Dolby Virtual» чрез вашия
музикален екип:
За целта поставете говорителите на вашия музикален екип от двете страни на
телевизора отдалечавайки ги от него на около 50 см. След като поставите
говорителите, чрез системата от менюта изберете менюто «Hacтpoйкa нa звyкa» и
cлед това изберете «Dolby V» от опцията «Ефект» на стр. 12.
S
/3 D
или към видео cвъpзaнo към тoзи eвpoкoнeктop:
Боравене с допълнителни апарати
BG
За да можете да видитe на eкpaнa на телевизоpa входният сигнал на включенaтa aпapaтypa, изберете символa на
буксата в която е включeнa aпapaтypaтa. Напримep ако сте включили aпapaтypaтa към буксата, чийто символ е
1/ , натискaйтe бутонът нa дистанционнoтo, докато ce появи символът 1.
1
Свържете допълнителния апарат към съответния вход на телевизора, така както е
показанo нa пpeдишнaтa cтpaницa.
2
Включете свързания апарат.
За визуализиране на образа на този допълнителен апарат, натиснете няколко пъти бутона
3
, докато на екрана се появи съответния входен символ.
Символ Входен сигнал
Аудио / Видео входен сигнал чрез Евроконектора B .
S
4
S
4
RGB входен сигал чрез Евроконектора B . Този символ ще се появи само ако
е свързан източник на RGB.
Вход аудио/видео чрез Евроконектора C .
Вход RGB чрез Евроконектора C . Този символ ще се появи само ако е
свързан източник на RGB.
Аудио / Видео входен сигнал чрез Евроконектора D .
S Video входен сигал чрез Евроконектора D . Този символ ще се появи само
ако е свързан източник на S Video.
•
Входен Видео сигнал чрез буксата RCA F, и входен Аудио сигнал чрез G.
•
Вход S video чрез буксата за S video E и вход аудио чрез G.
се появи само ако е свързан източник на S Video.
Този символ ще
За връщане на нормалния ТВ образ натиснете бутона от дистанционното управление.
4
3a moho odopyfbahe
Bkjizete moho a п apatypata k∂m L/G/S/I kyæjyhla ha æpefhnr п ahej ha tejebnsopa n nsdepete
bxofeh cnlhaj 4 и j и 4 , kato nsæojsbate п o-lophnte nhctpykunn. Kohcyjtnpa й te ce c∂c
cekunrta « Hactpo й ka ha sbyka » b toba yæ∂tbahe n nsdepete «Cтepeo-eфeкт» « A » b mehito sa
sbyka
на стр. 12.
Допълнителна информация
21
Page 46

SmartLink (Смартлинк)
Cмартлинк е свръзка между телевизор и видео екип, позволяваща директното
преминаване на определена информация.
За да използвате Смартлинк Ви е необходимо:
• Bидео апарат който притежава SmartLink, NexTView Link, Easy Link или Megalogic.
Megalogic е търговска марка, на Grundig Corporation.
Easy Link е търговска марка на Philips Corporation.
• Kабел Евроконектор с 21 крачета за да включите видеото към Евроконектора
:3/q3 (SMARTLINK) разположен на задната страна на ретропроектора.
Основни характеристики на Смартлинк са:
• Позволява предаването на информация за настройване (напр. списък на програми) от
ТВ апарат към видеоaпapaтa.
• Директен запис от телевизора: докато гледате телевизия трябва да натиснете само
един бутон от видеото за да запишете тази програма.
• Автоматично включване: дopи кoгaтo пpoжeкциoнния aпapaт e в режим “standby”, тoй
щe ce включи aвтoмaтично пpи натискaне нa бутонa «Play z» на видеото.
Ако Ви е необходима повече информация за функцията Cмapтлинк ce
консултирайте в инструкциите зa експлоатация на Вашето видео.
Bидeo
Дeкoдep
Допълнителна информация
22
Page 47

Конфигуриране на пулта за дистанционно управление
2
1
3
на DVD или Видео апарата
Този пулт за дистанционно управление е пригоден да контролира не само функциите на този телевизор Sony, но сбщо
базовите функции на вашето DVD Sony и на повечето Видео апарати Sony без необходимост от конфигурция на пулта.
За контролиране на други марки DVD и Видео апарати, както и някои Видео апарати Sony е нужно конфигурирането
на този пулт за дистанционно управление преди да го използвате за първи път. За целта направете следните стъпки:
• Преди да започнете, потърсете кода от 3 цифри според марката на вашето DVD или Видео (вижте долната
таблица). При марките с повече от един код, вкарайте първия от тях.
• Sony ще се постарае да актулизира кодовете според промените на пазара. Ще намерите актуализираната
таблица от кодове в плика съдържащ пулта за дистанционно управление.
1 Натиснете няколко пъти бутона за Селектор на Екипа от пулта за дистанционно управление
докато зеления индикатор се появи на желаната позиция, DVD или VCR (за видео).
Aкo Ceлeктopa нa Eкuпa e в пoзиция TV, нe e възможно зaпaмeтявaнe нa кoдoвe.
2 Докато зеления индикатор свети на желаната позиция, натиснете жълтия бутон от пулта за
дистанционно управление в продължение на около 6 сек., докато зеления индикатор започне
да премигва.
3 Докато зеления индикатор мига, вкарайте чрез цифровите бутони от пулта за дистанционно
управление кода от три цифри, в зависимост от екипа който ще ce използва.
Ако вкарания код съществува, трите зелени индикатора ще светнат за момент. В противен
случай пoвторете предните стъпки.
4 Включете екипа който ще използвате и пробвайте дали могат да се контролират основните
функции с пулта за дистанционно управление на телевизора.
• Ако екипа или само някои от функциите мy функциoниpaт, повторете всички предходни
стъпки кaтo ce пoдcигypитe, чe вкарвате правилния код, a в случай, че съществуват и
други кодове, пробвайте със следващия докато намерите адекватния код.
• Запаметените кодове ще се загубят ако смяната на изтощените батерии не се направи за
по-малко от една минута. В такъв случай повторете всички стъпки. На вътрешната
страна на капачето на батериите има етикет където можете да запишете кода.
• Не са взети предвид нито всички марки, нито всички модели от всяка марка.
Списък от марки с Видео апарати Списък от марки с DVD апарати
Марка Код Марка Код
SONY (VHS) 301, 302, 303, 308, 309 SONY 001
SONY (BETA) 303, 307, 310 AIWA 021
SONY (DV) 304, 305, 306 DENON 018, 027, 020, 002
AIWA 325, 331, 351 GRUNDIG 009, 028, 023, 024, 016, 003
AKAI 326, 329, 330 HITACHI 025, 026, 015, 004
DAEWOO 342, 343 JVC 006, 017
GRUNDIG 358, 355, 360, 361, 320, 351 KENWOOD 008
HITACHI 327, 333, 334 LG 015, 014
JVC 314, 315, 322, 344, 352, 353, 354, 348, 349 LOEWE 009, 028, 023, 024, 016, 003
LG 332, 338 MATSUI 013, 016
LOEWE 358, 355, 360, 361, 320, 351 ONKYO 022
MATSUI 356, 357 PANASONIC 018, 027, 020, 002
ORION 328 PHILIPS 009, 028, 023, 024, 016, 003
PANASONIC 321, 323 PIONEER 004
PHILIPS 311, 312, 313, 316, 317, 318, 358, 359 SAMSUNG 011, 014
SAMSUNG 339, 340, 341, 345 SANYO 007
SANYO 335, 336 SHARP 019, 027
SHARP 324 THOMSON 012
THOMSON 319, 350 TOSHIBA 003
TOSHIBA 337 YAMAHA 018, 027, 020, 002
BG
Допълнителна информация
23
Page 48

Оптимален ъгъл за гледане
За да бъде качеството на образа оптимално, стремете се да поставите прожекционния телевизор по такъв начин,
че даможете да глeдaтe екрана от ъглите показани по-долу:
Хоризонтален ъгъл за гледане
минимална дистанция 2.1 m.
75
75
Bеритикален ъгъл за гледане
(препоръчана позиция за потребителя)
минимална дистанция 2.1 m.
27.5
27.5
Допълнителна информация
24
(препоръчана позиция за потребителя)
Page 49

Характеристики
Система телевизия:
B зависимост от избора на държава:
B/G/H, D/K, L, I.
Цветна система:
PAL, SECAM
NTSC 3.58, 4.43 (само видеo вход)
Oбхвaт нa кaнaлитe:
VHF: E2-E12
UHF: E21-E69
CATV: S1-S20
HYPER: S21-S41
D/K: R1-R12, R21-R69
L: F-2F-10, B-Q, F21-F69
I: UHF B21-B69
Проектни размери на картината:
41 инчa (Пpиблизитeлю 103cm Диaгoнал на
изoбражението).
Задни терминали:
1/ 1 Евроконектор с 21 крачета (норма CENLEC)
включващ Аудио / Видео вход, вход RGB,
ТВ аудио / видео изход.
2/ 2 Евроконектор с 21 крачета (норма
CENLEC) включващ Аудио / Видео вход,
вход RGB, Монитор аудио / видео изход.
3/ 3 Евроконектор с 21 крачета (норма
(SMARTLINK)
S
CENELEC) включващ вход за аудио/видео,
вход за S video, изход за аудио/видео по
избор и SmartLink.
Изходи аудио (ляво/дясно) - букси RCA.
TЛицеви терминали:
S
4 Вход S video - DIN 4 крачета.
4 Видео вход - букса RCA
S
4 Вход аудио - букси RCA
Жак за слушалки
Изход за звук:
2 x 30 W (музикална мощност)
2 x 15 W (RMS)
Енергийно потребление:
225 W
Енергийно потребление в режим на временно
изключване (standby):
< 0.7 W
Размери (Шир. х Вис. х Дълб.):
Прибл. 948 x 992 x 511 мм.
Teглo:
Прибл. 44 Кг.
Серийно приложено оборудване:
1 устройство за дистанционно yправление RM-938.
2 батерии ,норма IEC (рaзмeр AA).
Други характеристики:
• Цифров гребенен филтър (висока резолюция).
• Картина на 100 Hz, Digital Plus.
• Телетекст, Фастекст, TOPtext (250 страници памет
Телетекст).
• NICAM.
• Автоматично изключване.
• Cмapтлинк (директна комуникация между
телевизора и видеото. Ако Ви е необходима повече
информация за функцията Cмapтлинк ce
консултирайте в инструкциите зa експлоатация на
Вашето видео).
• Автоматично детектиране на Системата на телевизия.
• Dolby Virtual.
• BBE.
• PIP (от английски «Picture In Picture» = Образ в Образа)
• ACI (от англ. “Auto Channel Installation”) = Aвтоматично
инсталиране на каналите.
BG
Дизайнът и характеристикитe подлежат на промени без предварително съобщение.
Eкoлoгичнa хартия - без хлор
Допълнителна информация
25
Page 50

Отстраняване на неизправности
Пo-дoлy ca избpoeни някои прости разрешения при проблеми свързани с образа и звука.
Проблем
Липса на образ (екрана е тъмен) и няма
звук.
Образът е блед или несъществуващ, но
качеството на звука е добро.
Липса на образ или на инфopмaциoннoтo
мeню от допълнителния апарат свързан
към ТВ чрез Евроконектора.
Добро качество на образа, но няма звук.
Цветните предавания са без цвят
Koгатo включите телевизopa, не ce
появявa последният канал, койтo cтe
гледaли пpeди дa изключитe тeлeвизора.
Heoпpeдeлeн oбpaз, cмecицa oт paзлични
цветoвe пo кoнтypa нa oбpaзa.
Образ с шум.
Разрешение
•Проверете свързването на антената.
• Включете телевизора и натиснете бутона от лицевата страна на апарата.
•Ако индикатора на телевизора свети, натиснете бутона TV от
дистанционното управление.
•Чрез системата от менюта влезте в менюто «Настройка на Картината» и
изберете «Нулиране» за възстановяване на фабричната настройка на стр. 12.
•Проверете дали сте включили допълнителния апарат и натиснете няколко пъти
бутона от дистанционното управление, докато желания входен символ се
появи на екрана (на стр. 21).
• Натиснете бутона + от дистанционното управление.
• Проверете дали опцията «Teлeв гoвopитeл» от менюто «Hастройка на звука»
е избрана в позиция « Bkл» на стр. 12.
• Ocигypeтe ce, чe cлyшaлкитe ca изключени.
• Чрез системата от менюта влезте в менюто «Hастройка на картината» и
изберете «Нулиране» за възстановяване на фабричната настройка.
• Toвa нe e дeфeкт. Hатиснете някой oт бутонитe c цифри нa дистaнционното
yпpaвлениe, зa дa избepeтe желания канaл.
• Hacтpoйкa нa cyпepпoзициятa на цветовете. Зa пoвече инфopмация ce
кoнcyлтиpaйтe c глaвa «Hастройване на наслагването на цветовете
(конвергенция)» на cтp. 10.
• Чрез системата от менюта изберете опцията «Ф HacÚp.», в менюто «Програма
Ръчен Избор», и извършете ръчното настройване за по-добро приемане на
образа (на стр. 16).
• Чрез системата на менютата изберете опцията «Hастройка на картината», и
изберете «AUTO» за намаляване на шума на образа (на стр. 12).
Образа не е декодиран правилно въпреки
че декодера е включен към
Евроконектора 3/ 3.
Образът е изкривен при смяна на
програмите или при избор на телетекст.
Гpeшни знaци фигypиpaт кoгaтo ce глeдa
тeлeтeкcтa.
Дoкaто гледате NexTView, ce появяват
грешни символи.
Hивото нa яpкocттa нa oбpaзa нaмaлявa
видимo дoкaтo глeдaтe cтpaницa нa
тeлeтeкст.
Дистанционното управление не работи
S
• Чрез системата от менюта влезте в менюто «Xарактеристики» и изберете «AV3
изxoД» в «TV» (на стр. 13).
• Уверете се, че Декодерът не е включен в Евроконектора 2/ 2.
• Изключете екипа свързан към телевизора чрез Евроконектора с 21крачета.
•Кoгaтo изпoлзaтe cиcтeмaтa Meню, влeзтe в peжим “Eзик/Дъpжавa” (на стр. 14)
и избepeтe cтpaнaтa в коятo щe изпoлзвaтe тeлeвизopa. Зa eзици нa Kиpилица
Bи пpeпopъчвaмe дa избepeтe Pycия в cлyчаитe когaтo вашaтa държaвa нe ce
пoявявa в cпиcъкa.
•Използвайки системата oт менюта, влезте в менюто «Език / дъркава» (вж. cтp.
14) и избepeтe cъщия eзик, на който e излъчван NexTView.
• Toвa нe e пoвpeдa в aпаpaтa. Aкo в пpoдължeниe нa 5 мин. глeдaтe eднa и cъщa
cтpaницa тeлeтeкст бeз да cтe нaтиснали никакъв бyтoн, aпapaтa щe нaмaли
автоматично яpкocттa нa oбpaзa видимo, зa дa ce пpeдoтврaти пoвpeдa нa
кaтoднo лъчeвaтa тpъбa нa aпapaтa. Зa да възстaновитe нивoтo на яркocттa,
нaтиcнeтe кoйтo и да e бутoн нa дистанционнотo yправление.
• Проверете дали бутона за Селектор на Екипа от пулта за дистанционно
управление се намира в адекватна позиция в зависимост от екипа който
желаете да контролирате (DVD, TV или VCR за Видео).
• Ако не можете да контролирате чрез пулта за дистанционно управление
вашето DVD или Видео,въпреки че бутона за Селектор на Екипа се намира в
правилна позиция, вкарайте отново необходимия код така както е оказано в
глава «Конфигурация на пулта за дистанционно управление за DVD или Видео»
на стр. 23.
• Сменете батериите.
Индикатора за временно изключване
(standby) на телевизора мига.
В случай на повреда, изискайте телевизора да се провери от специализиран персонал.
Никога не отваряйте апарата.
Допълнителна информация
26
• Влезте в контакт с най-близката сервизна база на Sony.
Page 51

•
•
•
•
•
•
Úvod
Děkujeme Vám, za výběr tohoto TV promítacího přístroje 100 Hz Sony.
Před použitím televizoru si pozorně přečtěte tento návod k obsluze a zachovejte ho pro budoucí informaci.
Znaky, které užíváme v tomto návodu k obsluze:
Důležitá informace.
Informace o funkci.
1,2... Posloupnost ovládacích kroků.
Šedá výplň tlačítek dálkového ovladače označuje tlačítka, která je
nutno/možno stisknout v tomto kroku.
Informace o výsledku pokynů.
Obsah
Úvod ................................................................................................................................................................................................. 3
Bezpečnostní opatření...................................................................................................................................................................... 4
Všeobecný popis
Všeobecný přehled tlačítek dálkového ovladače ............................................................................................................................. 5
Všeobecný přehled tlačítek TV promítače........................................................................................................................................ 6
Instalace
Připojení antény a videa ...................................................................................................................................................................7
Vložení baterií do dálkového ovladače............................................................................................................................................. 7
První zapojení televizoru
Zapnutí a automatické naladění TV promítače................................................................................................................................. 8
Sěrízení prolínání barev (konvergence)........................................................................................................................................... 10
Režim menu na obrazovce
Úvod a použití různých menu.........................................................................................................................................................10
Stručný návod k volbě Menu.......................................................................................................................................................... 11
Průvodce po menu:
Nastavení Obrazu........................................................................................................................................................................ 12
Nastavení zvuku ..........................................................................................................................................................................12
Časovač Vypnutí .........................................................................................................................................................................13
Výstup AV3.................................................................................................................................................................................. 13
Vstup pro PIP .............................................................................................................................................................................. 13
Pozice PIP ................................................................................................................................................................................... 14
Jazyk/Země................................................................................................................................................................................. 14
Automatické Ladění .................................................................................................................................................................... 14
Třídění Programů......................................................................................................................................................................... 14
Označení programů..................................................................................................................................................................... 15
AV předvolby............................................................................................................................................................................... 15
Ruční Ladění ............................................................................................................................................................................... 16
RGB centrování ........................................................................................................................................................................... 17
CZ
Teletext
NexTView
..................................................................................................................................................................................... 18
................................................................................................................................................................................. 19
Doplňkové informace
Připojení přídavných zařízení..........................................................................................................................................................20
Použití přídavných zařízení............................................................................................................................................................. 21
SmartLink .......................................................................................................................................................................................22
Instalace dálkového ovládání pro DVD nebo video........................................................................................................................ 23
Optimální úhel vidění ...................................................................................................................................................................... 24
Technické údaje .............................................................................................................................................................................25
Řešení problémů ...........................................................................................................................................................................26
Obsah
3
Page 52

Č
Bezpečnostní opatření
Tento televizor pracuje pouze s napětím
220-240 V. V případě zapojení příli mnoha
spotřebičů do jedné el. zásuvky může dolít k
úrazu el. proudem či požáru.
Neotevírejte zadní kryt televizoru. Toto
přenechte pouze kvalifikovaným
odborníkům z autorizovaných servisů
SONY.
Nezakrývejte ventilační otvory televizoru.
Nechte kolem televizoru alespoň 10 cm
prostoru pro ventilaci vzduchu.
Z bezpečnostních důvodů a z důvodů
ochrany životního prostředí doporučujeme
neponechávat televizor v pohotovostním
stavu pokud není del í dobu používán. V
tomto případě odpojte televizor z el. sítě.
Nedotýkejte se během bouřky jakékoliv
časti el. přívodního kabelu ani anténního
kabelu.
Neumisť ujte televizor na horká, mokrá či
extrémněprašná místa. Přístroj nesmí být
vystaven mechanickým vibracím.
Nevkládejte žádné předměty do televizoru,
rovněž do televizoru nelijte jakoukoliv
tekutinu. V případě, že se tak stane ať již
úmyslně či neúmyslně televizor nezapínejte a
sdělte tuto skute čnost nejbližšímu
autorizovanému servisu SONY, který odborně
televizor prověří.
Nevystavujte televizor dešti a vlhku,
předejdete tak případnému úrazu el.
proudem.
Hořlavé látky, či otevřený oheň (svíčka)
neumisť ujte v těsné blizkosti televizoru.
istěte obrazovku a plastový kryt televize pouze
jemnou, lehce navlhčenou látkou. Nepoužívejte
žádné materiály s povrchovou úpravou určenou k
broušení, nepoužívejte alkalické čističe, čistící a
brusné pasty, rozpouštědla jako je líh, benzín, či
ředidlo. Rovněž nedoporučujeme používat
antistatický spray. Z bezpečnostních důvodů,
před mytím odpojte TV od el. proudu.
Televizor postavte vždy na stabilní a bezpečný
stolek. Nedovolte dětem aby na televizor lezli,
sedali si na něj, či si na něm hráli.
Při manipulaci napokládejte televizor na boční
ani na čelní stranu.
Při vytahování el. přívodního kabelu tahejte
pouze za zástrčku, netahejte za kabel.
Před manipulací vypojte televizor z el. sítě. Při
manipulaci postupujte opatrně abyste
televizor nepoškodili. Pokud vám televizor
upadl, či byl jiným způsobem poškozen
nechte ho prověřit odborným pracovníkem
autorizovaného servisu SONY.
Abyste nepoškodili el. přívodní kabel
nepokládejte na něj žádné těžké předměty.
Doporučujeme přebytečnou část el.
přívodního kabelu navinout kolem háčků na
zadní straně televizoru.
Nezakrývejte ventilační otvory televizoru
novinami, časopisy ani záclonami a závěsy.
Bezpečnostní opatření
•
Jestliže se TV promítač přemístí ze studeného prostředí přímo do teplého nebo se opakovaně mění teplota místnosti, je možné,
že to způsobí nejasný obraz nebo špatnou kvalitu barev v některých částech obrazovky. Toto je způsobeno vlhkostí, která se
nashromáždila na zrcátkách nebo na čočkách uvnitř přístroje. Před užitím promítače je třeba vlhkost nechat odpařit.
•
Aby byl obraz zřetelný, nevystavujte obrazovku přímému osvětlení. Pokud možno, použijte bodové stropní osvětlení
•
Zmrazení obrazu během prodloužených časových intervalů např. při použití videoher nebo osobních počítačů a při sledování
programů formátu 16:9, může způsobit poškození televizní obrazovky. Abyste tomu zabránili, udržujte obraz s nízkým stupněm
kontrastu.
•
Vyvarujte se dotýkání obrazovky, abyste nepoškrábali její povrch.
Bezpečnostní opatření
4
Page 53

!¡
!™
!£
!¢
!∞
!§
!¶
!•
!ª
@º
@¡
@™
@£
1
.
2
3
4
5
6 a)
Všeobecný přehled tlačítek dálkového ovladače
@£
Checking the Accessories Supplied
@™
@¡
@º
!ª
!•
!¶
!§
!∞
!¢
Zapojení režimu menu: Stiskněte jej a menu se objeví na obrazovce. Opětovným stisknutím se vypne a objeví se normální
obrazovka
Volba kanálů: Stiskněte pro volbu předchozího nebo následujícího kanálu.
NexTView: Obsáhlejší informaci najdete v kapitole “NexTView” na straně 19.
Nastavení hlasitosti: Stisknutím se nastaví hlasitost televizoru.
Tlačítko pro nahrávání: Jestliže je selektor zařízení v pozici VCR, stisknutí tohoto programu Vám umožní nahrávat programy .
Volba TV režimu: Stisknutím se vypne PIP, teletext nebo vstup do videa.
Výběr specifického obrazu: Opakovaným stisknutím nastavíte specifický obraz.
Volba zvukového efektu: Opakovaným stisknutím tohoto tlačítka lze změnit zvukový efekt.
Zobrazení informace na obrazovce: Stiskněte tlačítko a na obrazovce se objeví veškeré údaje. Opětovným stisknutím tyto
informace z obrazovky zmizí.
Zmrazení obrazu: Stiskněte toto tlačítko, abyste znehybnili televizní obraz. Obrazovka se rozdělí na dvě části. Nalevo bude normální
obraz a napravo znehybněný. Abyste se vrátili k normálnímu televiznímu obrazu, stiskněte znovu toto tlačítko.
Záměna obrazovek: Se zapnutou funkcí “PIP” stiskněte toto tlačítko pro vzájemnou záměnu obou obrazovek.
PIP (z angličtiny “Picture in Picture” =Obraz uvnitř obrazu): Stiskněte toto tlačítko a v jednom z rohů hlavní obrazovky se objeví
jedna malá obrazovka s obrazem (režim PIP). Opětovným stisknutím režim PIP zmizí. Pro volbu vnějšího vstupu, který si přejete
sledovat na malé obrazovce, podrobnější informace najdete v kapitole “Vstup pro PIP” na straně 13.
Vypnutí zvuku: Pokud chcete zvuk vypnout, stiskněte tlačítko. Zvuk se zapne opětovným stisknutím.
.
1
2
3
4
5
6
7
8
9
!º
!¡
!™
!£
Dočasné vypnutí televizoru: Stisknutím tlačítka se televize dočasně vypne (indikátor
pohotovostního stavu na televizi se rozsvítí).
Opětovným stisknutím tlačítka televizor opět zapnete
Doporučujeme televizor vypnout úplně, pokud se nepoužívá - šetří se tím energie.
Televizor se automaticky vypne do pohotovostního režimu, jestliže po dobu 15 minut
nedostává televizní signál a není stisknuto žádné tlačítko.
Zapnutí/Vypnutí videa nebo DVD: Stisknutím zapnete nebo vypnete video nebo DVD.
Selektor zařízení: S tímto dálkovým ovladačem můžete ovládat nejen televizor, ale také hlavní
funkce Vašeho DVD nebo videa. Zapněte to zařízení, které chcete ovládat a poté opakovaně
tiskněte toto tlačítko pro volbu DVD, TV nebo VCR (pro video). Ve zvolené pozici se na chvíli
rozsvítí zelené světlo.
Před prvním použití dálkového ovladače pro ovládání DVD nebo videa, bude třeba provést
jeho instalaci v závislosti na značce Vašeho zařízení. K tomu je třeba postupovat tak, jak je
popsáno v kapitole “Instalace dálkového ovládání pro DVD nebo video” na straně 23.
Volba vstupního signálu: Tiskněte jej opakovaně, až se na obrazovce objeví znaménko
zvoleného vstupního signálu.
Tlačítko pro výběr programů: Jestliže je selektor zařízení v pozici TV nebo VCR (video),
stiskněte jej pro volbu kanálů.
Pokud chcete zvolit program s dvoumístným číslem, stiskněte druhou číslici po dobu menší než
2,5 vteřiny.
Jestliže je selektor zařízení v pozici TV: Stisknutím vyvoláte kanál, který jste naposledy
sledovali po dobu delší než 5 sekund.
Jestliže je selektor zařízení v pozici VCR: Jestliže používáte video Sony a chcete zvolit
program s dvoumístným číslem, např. 23, nejdříve stiskněte -/--, a následovně tlačítka 2 a 3.
Výběr formátu zobrazení: Stiskněte opakovaně toto tlačítko, abyste změnili formát obrazu. 4:3
pro obvyklý obraz nebo 16:9 pro imitaci širokoúhlého obrazu.
Toto tlačítko lze použít pouze v režimu teletextu.
Výběr z teletextu: Stisknutím se zobrazí teletext.
Joystick:
a) Jestliže je selektor zařízení v pozici TV:
• Je-li MENU zobrazeno, používejte tato tlačítka pro přesun po různých menu. Obsáhlejší
informace najdete v kapitole “Úvod a použití různých menu” na straně 10.
• Pokud není MENU zobrazeno, stisknutím OK se zobrazí přehled naladěných kanálů.
Stisknutím nebo zvolte požadovaný kanál (televizní stanici), po stisknutí OK jej můžete
sledovat.
b) Jestliže je selektor zařízení v pozici VCR (video) nebo DVD:
Používejte tato tlačítka pro ovládání hlavních funkcí videa nebo DVD.
b)
7
8
9
!º
CZ
Kromě těchto funkcí televizoru, všechna barevná tlačítka se používají také pro teletext. Obsáhlejší informace je popsána v kapitole
“Teletext” tohoto návodu k obsluze na straně 18.
Všeobecný popis
5
Page 54

Všeobecný přehled tlačítek TV promítače
Vstup
videosignálu S
Stlačením krytu na čelní části aparátu
směrem nahoru získáte přístup k
ovládacímu čelnímu panelu.
Zvukové
vstupy
Vstup
videosignálu
Výstup pro
sluchátka
1 Tlačtko automatické
regulace sbíhavosti:
Stiskněte toto tlačítko,
abyste zregulo vali přesnou
ohraničenost barev. Více
informací najdete v kapitole
“Sěrízení prolínání barev
(konvergence)” na straně 10.
nebo
Tlačítko
pro volbu
vnějšího
vstupu
Ukazatel režimu dočasného
vypnutí televizoru
(pohotovostní) režim.
Tlačítka pro
ovládání
hlasitosti
Programová tlačítka pro
výběr následujícího nebo
předchozího kanálu (pro
volbu televizních stanic)
Tlačítko
zapnuto/
vypnuto
Všeobecný popis
6
2 Tlačítko pro opětovné
zahájení provozu přstroje:
Držte toto tlačítko stiknuté
po sobu přibližně 2 vteřin,
abyste znovu zahájili provoz
přístroje, jako poprvé, když
jste jej uvedli do chodu. Více
informací najdete v kapitole
“Zapnutí a automatické
naladění TV promítače” na
straně 8.
Page 55

Připojení antény a videa
videorekordér
Přípojné kabely se nedodávají.
OUT IN
nebo
Připojení pomocí konektoru typu Euro záleží na Vaší volbě.
Obsáhlejší informace o připojení videa najdete v kapitole “Připojení videa” na staně 21.
Vložení baterií do dálkového ovladače
Zkontrolujte, jestli jsou poskytnuté baterie ve správné pozici.
Berte ohled na životní prostředí a použitých baterií se zbavujte způsobem, který životní prostředí nepoškozuje - odhazujte
je do kontejnerů k tomu určených.
CZ
Instalace
7
Page 56

Zapnutí a automatické naladění TV promítače
Language
English
Norge
Français
Italiano
Nederlands
Select Language: Confirm: OK
Země
Sverige
Norge
Italia
Schweiz/Suisse/Svizzera
Vyberte zemi: Potvrd’te: OK
Přejete si spustit
automatické ladění?
Ano
Ne
Program nenalezen
Připojte prosím anténu
Potvrd’te
Program:
Kanál:
Systém:
Vyhledávání...
1
C 01
B/G
Automatické ladění
Language
English
Norge
Français
Italiano
Nederlands
Select Language: Confirm: OK
Language
English
Norge
Français
Italiano
Nederlands
Select Language: Confirm: OK
Po prvním zapnutí televizoru se na obrazovce objeví sekvence menu, pomocí kterých budete moci: 1) zvolit jazyk menu; 2)
zvolit zemi, ve které si přejete používat televizor; 3) hledat a automaticky ukládat všechny kanály (televizní stanice), které
jsou k dispozici a 4) změnit pořadí, ve kterém se kanály (televizní stanice) objeví na obrazovce.
Pokud časem budete chtít změnit jakékoliv z těchto seřízení, proved’te příslušnou volbu v (menu Instalace), nebo
stiskněte tlačítko / pro inicializaci televizoru.
1 Zapojte TV promítač do elektrické sítě (220-240 V AC, 50Hz). Při prvním zapojení
televizoru by se měl televizor automaticky zapnout. Pokud tomu tak není, stiskněte
tlačítko zapnuto / vypnuto na čelní části televizoru, aby se zapnul. Po prvním
zapnutí televizoru se na obrazovce automaticky objeví menu Language (Jazyk).
2 Stiskněte tlačítko nebo dálkového ovladače pro volbu jazyka a poté stiskněte
tlačítko OK pro potvrzení volby. Od této chvíle veškerá menu se objeví ve zvoleném
jazyce.
3 Na obrazovce se automaticky objeví menu Země. Stiskněte tlačítko nebo pro
4 Menu Automatické Ladění se objeví na obrazovce.
Stiskněte tlačítko OK pro volbu Ano.
5 Televizor začne automaticky ladit a ukládat všechny kanály (televizní stanice), které
volbu země, ve které chcete používat televizor a poté stiskněte tlačítko OK pro
potvrzení volby.
• Jestliže v seznamu není ta země, ve které budetepoužívat televizor, místo
země zvolte “-”.
• Pokud se vaše země neobjeví v nabídce pro instalaci, doporučujeme použít
nastavení pro Rusko. Tímto nastavením předejdete chybnému zobrazování
znaků a písmen charakteristických pro váš jazyk v teletextu.
jsou k dispozici.
Tento proces může trvat několik minut. Mějte proto trpělivost a po dobu trvání
procesu ladění nestiskněte žádné tlačítko, proces by se neuskutečnil.
V některých zemích instaluje všechny kanály automaticky televizní vysílač.
(systém ACI). V tom případě samotný vysílač zašle menu, ve kterém si musíte
zvolit své město tak, že stisknete tlačítko nebo a OK, abyste kanály uložili
do paměti.
Jestliže po vykonání automatického ladění televizor nenašel žádný kanál
(televizní stanici), na obrazovce se objeví zpráva, která Vás žádá, abyste zapojili
anténu. Při zapojení antény postupujte tak, jak je uvedeno na str.7 tohoto návodu
a poté stiskněte OK. Proces automatického ladění se obnoví.
8
První zapojení televizoru
pokračuje ...
Page 57

6 Jakmile televizor ukončil ladění a uložil všechny kanály (televizní stanice), na
MENU
Třídění programů
Program:
01 TVE2
02 TVE
03 ANT3
04 TELE5
05 C+
06 C44
Zvolte kanál: Potvrd’te:
Třídění programů
Program:
01 TVE2 41 TVE
02 TVE
03 ANT3
04 TELE5
05 C+
06 C44
Zvolte novou pozici Posun: OK
obrazovce se automaticky objeví menu Třídění programů, pomocí kterého můžete
změnit pořadí, ve kterém se kanály objeví na obrazovce.
a) Nechcete-li změnit toto pořadí kanálů, přejděte na bod č. 7.
b) Chcete-li změnit pořadí kanálů:
1 Stiskněte tlačítko nebo pro volbu čísla programu s kanálem (televizní
stanicí), jehož pozici chcete změnit a následovně stiskněte .
2 Stiskněte nebo pro volbu nového čísla programu, ve kterém si přejete
uložit zvolený kanál (televizní stanici), a následovně stiskněte OK.
3 Zopakujte body b)1 a b)2, chcete-li změnit pořadí dalších televizních kanálů.
7 Stiskněte tlačítko MENU a menu zmizí z obrazovky.
CZ
TV promítač je připraven k funkci.
První zapojení televizoru
9
Page 58

Seřízení prolínání barev (Konvergence)
Následkem zemské přitažlivosti se může objevit nejasný obraz nebo smíchání různých barev kolem obrazu. V tomto případě
postupujte tak, jak je uvedeno následovně.
Autokonvergence červené, zelené a modré
čáry
Stlačením krytu na čelní části aparátu směrem nahoru získáte přístup k
1
ovládacímu čelnímu panelu.
2 Stiskněte tlačítko /.
Začíná funkce autokonvergence s dobou trvání přibližně 10 vteřin. Až
z obrazovky zmizí bílý křížek, promítač je připraven k funkci.
Funkce autokonvergence není operativní pokud:
• není vstupní signál.
• vstupní signál je slabý.
• obrazovka je vystavena silnému reflektoru nebo přímému
slunečnímu záření.
• teletext je zobrazen.
• NexTView je zobrazen.
Úvod a použití různých menu
Tento TV promítač používá na obrazovce systém menu a tím Vám ukazuje různé operace.
Pro přesun po menu používejte tlačítka dálkového ovladače, která jsou následovně popsána:
1 Stiskněte tlačítko MENU a na obrazovce se objeví první stupeň menu.
2 • Pro zvýraznění žádaného menu nebo funkce, stiskněte tlačítko nebo .
• Pro vstup do zvoleného menu nebo funkce, stiskněte .
• Pro návrat do předchozího menu nebo funkce, stiskněte .
• Pro změnu nastavení zvolené funkce, stiskněte //nebo .
• Pro potvrzení a uložení Vaší volby, stiskněte OK.
Nastavení obrazu
Režim obrazu
Kontrast
Jas
Barevná sytost
Ostrost
Reset
Redukce šumu
Výběr: Zadat Menu:
Osobní
AUTO
MENU
Nastavení obrazu
Režim obrazu
Kontrast
Jas
Barevná sytost
Ostrost
Reset
Redukce šumu
Výběr: Zadat Menu:
Osobní
AUTO
3 Stiskněte tlačítko MENU a menu zmizí z obrazovky.
První uvedení televizoru - Režim menu na obrazovce
10
MENU
Page 59

Stručný návod k volbě Menu
Nastavení obrazu
Režim obrazu
Kontrast
Jas
Barevná sytost
Ostrost
Reset
Redukce šumu
Výběr: Zadat Menu:
Nastavení zvuku
Efekt
Výšky
Hloubky
Vyvážení
Reset
Dvoukanál.zvuk
Aut. hlasitost
TV reproduktory
Výběr: Zadat Menu:
Funkce
Časov. vypnutí
Výstup AV3
Vstup pro PIP
Pozice PIP
Výběr: Zadat Menu:
Set Up
Set Up
Instalace
Jazyk/Země
Auto Tuning
Automatické ladění
Programme Sorting
Třídění programů
Select NexTView
Označení programů
AV Preset
AV předvolby
Manual Set Up
Ruční ladění
Podrobnější nastavení
Select:
Enter Menu:
Select:
Enter Menu:
Výběr:
Zadat Menu:
Přirozený
Stereo
Osobní
AUTO
Vyp
Zap
AUTO
Nastavení obrazu
Režim obrazu
Kontrast
Jas
Barevná sytost
Ostrost
Reset
Redukce šumu
Výběr: Zadat Menu:
Nastavení zvuku
Efekt
Výšky
Hloubky
Vyvážení
Reset
Dvoukanál.zvuk
Aut. hlasitost
TV reproduktory
Výběr: Zadat Menu:
Funkce
Vyp
AV1
Časov. vypnutí
Výstup AV3
Vstup pro PIP
Pozice PIP
Osobní
AUTO
Přirozený
Stereo
Obsáhlejší informaci najdete v kapitole “Nastavení Obrazu” na
straně 12.
Obsáhlejší informaci najdete v kapitole “
Vyp
Zap
12.
Vyp
AUTO
AV1
Obsáhlejší informaci najdete v kapitole “Časovač Vypnutí” na
Nastavení zvuku” na straně
straně 13.
Výběr: Zadat Menu:
Funkce
Časov. vypnutí
Výstup AV3
Vstup pro PIP
Pozice PIP
Výběr: Zadat Menu:
Funkce
Časov. vypnutí
Výstup AV3
Vstup pro PIP
Pozice PIP
Výběr: Zadat Menu:
Funkce
Časov. vypnutí
Výstup AV3
Vstup pro PIP
Pozice PIP
Výběr: Zadat Menu:
Instalace
Jazyk/Země
Automatické ladění
Třídění programů
Označení programů
AV předvolby
Ruční ladění
Podrobnější nastavení
Výběr:
Zadat Menu:
AUTO
AUTO
AUTO
Vyp
AV1
Obsáhlejší informaci najdete v kapitole “Výstup AV3” na straně 13.
Vyp
AV1
Obsáhlejší informaci najdete v kapitole “Vstup pro PIP” na straně
13.
Vyp
AV1
Obsáhlejší informaci najdete v kapitole “Pozice PIP” na straně 14.
Obsáhlejší informaci najdete v kapitole “Jazyk/Země” na straně 14.
CZ
Instalace
Jazyk/Země
Automatické ladění
Třídění programů
Označení programů
AV předvolby
Ruční ladění
Podrobnější nastavení
Start autom. ladění:
Výběr:
Instalace
Jazyk/Země
Automatické ladění
Třídění programů
Označení programů
AV předvolby
Ruční ladění
Podrobnější nastavení
Výběr:
Instalace
Jazyk/Země
Automatické ladění
Třídění programů
Označení programů
AV předvolby
Ruční ladění
Podrobnější nastavení
Výběr:
Instalace
Jazyk/Země
Automatické ladění
Třídění programů
Označení programů
AV předvolby
Ruční ladění
Podrobnější nastavení
Výběr:
Instalace
Jazyk/Země
Automatické ladění
Třídění programů
Označení programů
AV předvolby
Ruční ladění
Podrobnější nastavení
Výběr:
Instalace
Jazyk/Země
Automatické ladění
Třídění programů
Označení programů
AV předvolby
Ruční ladění
Podrobnější nastavení
Výběr:
Zadat Menu:
Zadat Menu:
Zadat Menu:
Zadat Menu:
Zadat Menu:
Obsáhlejší informaci najdete v kapitole “Automatické Ladění” na
straně 14.
Obsáhlejší informaci najdete v kapitole “Třídění Programů” na
straně 14.
Obsáhlejší informaci najdete v kapitole “Označení programů” na
straně 15.
Obsáhlejší informaci najdete v kapitole “AV předvolby” na straně
15.
Obsáhlejší informaci najdete v kapitole “Ruční Ladění” na straně 16.
Podrobnější nastavení
RGB centrování
0
Obsáhlejší informaci najdete v kapitole
“RGB centrování” na straně 17.
Zadat Menu:
Výběr:
Režim Menu na obrazovce
11
Page 60

Průvodce po menu
Stupeň 1 Stupeň 2 Stupeň 3 / Funkce
Nastavení obrazu
Režim obrazu
Kontrast
Jas
Barevná sytost
Ostrost
Reset
Redukce šumu
Výběr: Zadat Menu:
Osobní
AUTO
Nastavení obrazu
Režim obrazu
Kontrast
Jas
Barevná sytost
Ostrost
Reset
Redukce šumu
Výběr: Zadat Menu:
Osobní
AUTO
NASTAVENÍ OBRAZU
Menu “Nastavení obrazu” slouží k úpravě nebo seřízení obrazu.
K tomu je třeba: po zvolení funkce, kterou si přejete změnit,
stiskněte tlačítko . Poté
opakovaně stiskněte //nebo
pro změnu nastavení a nakonec stiskněte OK pro jeho uložení.
• Toto menu Vám také umožní změnit specifický obraz podle toho, jaký program sledujete:
Režim obrazu Přímý přenos (používejte pro pořady v přímém přenosu, DVD a při použití Set Top Boxů).
Osobní (pro osobní požadavky).
Film (pro filmy).
• Jas, Barevná Sytost a Ostrost jsou možné změnit pouze v případě, že změníte specifický obraz v režimu “Osobní”.
• Odstín je dostupný pouze pro systém NTSC (např. videokazety z USA).
• Pro obnovení továrního nastavení obrazu, zvolte Reset a stiskněte tlačítko OK.
• Volba “Redukce šumu” je nastavena v režimu “AUTO”, aby se automaticky zmenšil šum, který vzniká , jestliže je přenášen
obraz při slabém televizním signálu. Jestliže chcete tuto funkci zrušit, zvolte “Vyp” místo “AUTO”.
Nastavení obrazu
Režim obrazu
Kontrast
Jas
Barevná sytost
Ostrost
Reset
Redukce šumu
Výběr: Zadat Menu:
Nastavení zvuku
Efekt
Výšky
Hloubky
Vyvážení
Reset
Dvoukanál.zvuk
Aut. hlasitost
TV reproduktory
Výběr: Zadat Menu:
Osobní
AUTO
Přirozený
Stereo
Nastavení zvuku
Efekt
Výšky
Hloubky
Vyvážení
Reset
Dvoukanál.zvuk
Vyp
Zap
Aut. hlasitost
TV reproduktory
Přirozený
Výběr: Zadat Menu:
Stereo
Vyp
Zap
NASTAVENÍ ZVUKU
Menu “Nastavení zvuku” Vám umožní změnit nastavení zvuku.
K tomu je třeba: po zvolení funkce, kterou si přejete změnit,
stiskněte . Poté opětovně tiskněte // nebo pro
změnu nastavení a nakonec stiskněte OK pro jeho uložení.
Efekt Přirozený: Odstraňuje šum, zajišťuje přítomnost zvuku a provádí jeho ladění pomocí systému “BBE
High Definition Sound system”*.
Dynamický: “BBE High Definition Sound system”* zintenzívňuje jasnost a přítomnost zvuku vytvářením
srozumitelnějšího hlasu a pronikavější hudby.
Dolby**V: Dolby Virtual, napodobuje zvukový efekt “Dolby Pro Logic”.
Vyp: Bez speciálních zvukových efektů.
Výšky Méně Více
Hloubky Méně Více
Vyvážení Levý Pravý
Reset Obnoví tovární nastavení zvuku.
K
Dvoukanál. • Pro stereo vysílání:
zvuk Mono
Stereo
• Pro dvojjazyčné vysílání:
Mono (určen pro kanál mono, je-li k dispozici).
A (pro 1. kanál).
B (pro 2. kanál).
Aut. Hlasitost Vyp: Hlasitost se mění v závislosti na vysílacím signálu.
Zap: Hlasitost se udržuje nezávisle na vysílacím signálu (např. reklamní inzeráty).
TV Zap: pro poslech televizního přenosu přímo z reproduktorů televizoru.
reproduktory Vyp: zvuk z reproduktorů televizoru je vypnutý a je slyšet pouze z vnějšího zesilovače, který je napojen
na terminály výstupů audio v zadní části televizoru.
• Pokud posloucháte zvuk televizoru přes sluchátka, funkce “Efekt” automaticky přejde na pozici “Vyp”.
• Pokud nastavíte “Efekt” v pozici “Dolby Virtual”, funkce “Aut. Hlasitost” se automaticky změní na pozici “Vyp” a naopak.
* “BBE High Definition Sound system” je vyroben firmou Sony Corporation s licencí BBE Sound, Inc. Je chráněn patentem
USA č 4,638,258 a 4,482,866. Slovo “BBE” a symbol “BBE” jsou obchodní značky BBE Sound, Inc.
**Tento televizor byl naržen tak aby dosáhl zvukového efektu “Dolby Surround” a napodobil tak zvuk čtyř reproduktorů
použitím pouze dvou reproduktoyů tohoto televizora, vždy kdy audio signál vysílací stanice bude “Dolby Surround”.
Kromě toho, můžete také zlepšit zvukový efekt zapojením jednoho vnějšího zesilovače. Podrobnější informace najdete v
kapitole “Připojení vnějšího zvukového zařízení” na straně 21.
**Vyrobeno s oprávněním Dolby Laboratories. “Dolby”, “Pro Logic” a znak dvojitého D jsou obchodní značky Dolby
Laboratories.
Režim menu na obrazovce
12
pokračuje ...
Page 61

Stupeň 1 Stupeň 2 Stupeň 3 / Funkce
Nastavení obrazu
Režim obrazu
Kontrast
Jas
Barevná sytost
Ostrost
Reset
Redukce šumu
Výběr: Zadat Menu:
Osobní
AUTO
ČASOVAČ VYPNUTÍ
Funkce “Časov. vypnutí” v režimu menu “Funkce”, Vám umožní
zvolit interval, po jehož uplynutí televizor automaticky přejde do
režimu dočasného vypnutí (pohotovostní režim).
K tomu je třeba: po zvolení funkce, stiskněte tlačítko . Poté
Funkce
Časov. vypnutí
Výstup AV3
Vstup pro PIP
Pozice PIP
AUTO
Vyp
AV1
Funkce
Časov. vypnutí
Výstup AV3
Vstup pro PIP
Pozice PIP
AUTO
Vyp
AV1
stiskněte nebo pro volbu časového intervalu (max. 4 hodiny).
Výběr: Zadat Menu:
Výběr: Zadat Menu:
• Chcete-li vidět čas zbývající do vypnutí, zatímco sledujete televizor, stiskněte tlačítko .
• Minutu před tím, než televizor přejde do režimu dočasného vypnutí, zbývající čas se objeví na obrazovce.
Nastavení obrazu
Režim obrazu
Kontrast
Jas
Barevná sytost
Ostrost
Reset
Redukce šumu
Výběr: Zadat Menu:
Funkce
Časov. vypnutí
Výstup AV3
Vstup pro PIP
Pozice PIP
Výběr: Zadat Menu:
Osobní
AUTO
AUTO
Vyp
AV1
Funkce
Časov. vypnutí
Výstup AV3
Vstup pro PIP
Pozice PIP
Výběr: Zadat Menu:
AUTO
Vyp
AV1
VÝSTUP AV3
Funkce “Výstup AV3”, v režimu menu “Funkce”, Vám umožní zvolit
vnější výstup konektoru typu Euro 3/ 3, abyste z tohoto
S
Eurokonektoru mohli nahrát jakýkoliv signál pocházející z televizoru,
nebo z jiného vnějšího zařízení připojeného k Eurokonektorůn
1/ 1 nebo 2/ 2, nebo ke konektorům 4 nebo 4
a 4 na ovládacím čelním panelu.
S
Má-li Váš videorekordér k dispozici SmartLink, tento postup
není třeba.
V tomoto případě je třeba: po zvolení funkce, stiskněte tlačítko .
Poté stiskněte nebo pro volbu požadovaného výstupního
signálu TV, AV1, AV2, AV4, YC4 nebo AUTO.
Pokud zvolíte funkci AUTO, výstupní signál bude vždy stejný jako ten, který se objeví na televizní obrazovce.
Máte-li připojený dekodér ke konektoru typu Euro 3/ 3, nebo k videu připojenému k tomuto Eurokonektoru,
S
nezapomeňte znovu zvolit “Výstup AV3” v režimu “AUTO” nebo “TV” pro jeho správnou dekodifikaci.
CZ
Nastavení obrazu
Režim obrazu
Kontrast
Jas
Barevná sytost
Ostrost
Reset
Redukce šumu
Výběr: Zadat Menu:
Funkce
Časov. vypnutí
Výstup AV3
Vstup pro PIP
Pozice PIP
Výběr: Zadat Menu:
Osobní
AUTO
AUTO
VSTUP PRO PIP
Volba funkce “Vstup pro PIP” v režimu menu “Funkce” Vám umožní
zvolit vnější vstup, který si přejete sledovat na obrazovce ”PIP”.
K tomu je třeba: po zvolení funkce stiskněte tlačítko . Poté
opakovaně stiskněte nebo pro volbu vnějšího vstupu, který si
Vyp
AV1
Funkce
Časov. vypnutí
Výstup AV3
Vstup pro PIP
Pozice PIP
Výběr: Zadat Menu:
AUTO
Vyp
AV1
B
A
B
A
BB
přejete: AV1, AV2, AV3, AV4 nebo TV. Nakonec stiskněte OK pro
jeho uložení.
Aby se zobrazil zvolený vnější vstup na obrazovce “PIP”,
stiskněte tlačítko / na dálkovém ovladači.
A
Stisknutím tlačítka / na dálkovém ovladači lze
vzájemně zaměnit obě obrazovky.
pokračuje ...
Režim menu na obrazovce
13
Page 62

Stupeň 1 Stupeň 2 Stupeň 3 / Funkce
Nastavení obrazu
Režim obrazu
Kontrast
Jas
Barevná sytost
Ostrost
Reset
Redukce šumu
Výběr: Zadat Menu:
Osobní
AUTO
POZICE PIP
Volba funkce “Pozice PIP” v režimu menu “Funkce” Vám umožní
změnit pozici obrazovky “PIP”.
K tomu je třeba: po zvolení funkce si vyberete požadovanou pozici
stisknutím tlačítka , , nebo . Nakonec stisknete tlačítko
OK pro její uložení.
Funkce
Časov. vypnutí
Výstup AV3
Vstup pro PIP
Pozice PIP
AUTO
Vyp
AV1
Funkce
Časov. vypnutí
Výstup AV3
Vstup pro PIP
Pozice PIP
AUTO
Vyp
AV1
Výběr: Zadat Menu:
Nastavení obrazu
Režim obrazu
Kontrast
Jas
Barevná sytost
Ostrost
Reset
Redukce šumu
Výběr: Zadat Menu:
Set Up
Set Up
Instalace
Jazyk/Země
Auto Tuning
Automatické ladění
Programme Sorting
Třídění programů
Select NexTView
Označení programů
AV Preset
AV předvolby
Manual Set Up
Ruční ladění
Podrobnější nastavení
Select:
Enter Menu:
Select:
Enter Menu:
Výběr:
Zadat Menu:
Nastavení obrazu
Režim obrazu
Kontrast
Jas
Barevná sytost
Ostrost
Reset
Redukce šumu
Výběr: Zadat Menu:
Osobní
AUTO
Osobní
AUTO
Výběr: Zadat Menu:
Instalace
Jazyk/Země
Automatické ladění
Třídění programů
Označení programů
AV předvolby
Ruční ladění
Podrobnější nastavení
Zadat Menu:
Výběr:
JAZYK/ZEMĚ
Funkce “Jazyk/Země” v režimu menu “Instalace” slouží k volbě
jazyka, ve kterém chcete, aby se na obrazovce objevily menu. Také
Vám umožní zvolit zemi, ve které si přejete televizor používat.
K tomu je třeba: po zvolení funkce, stiskněte tlačítko . Poté
postupujte tak, jak je popsáno v kapitole “Zapnutí a automatické
naladění TV promítače”, v bodě 2 a 3 na straně 8.
AUTOMATICKÉ LADĚNÍ
Funkce “Automatické ladění” v režimu menu “Instalace” slouží k
tomu, aby televizor hledal a uložil do paměti veškeré kanály
(televizní
stanice), které jsou k dispozici.
Set Up
Set Up
Instalace
Jazyk/Země
Auto Tuning
Automatické ladění
Programme Sorting
Třídění programů
Select NexTView
Označení programů
AV Preset
AV předvolby
Manual Set Up
Ruční ladění
Podrobnější nastavení
Select:
Enter Menu:
Select:
Enter Menu:
Výběr:
Zadat Menu:
Nastavení obrazu
Režim obrazu
Kontrast
Jas
Barevná sytost
Ostrost
Reset
Redukce šumu
Výběr: Zadat Menu:
Set Up
Set Up
Instalace
Jazyk/Země
Auto Tuning
Automatické ladění
Programme Sorting
Třídění programů
Select NexTView
Označení programů
AV Preset
AV předvolby
Manual Set Up
Ruční ladění
Podrobnější nastavení
Enter Menu:
Select:
Enter Menu:
Výběr:
Zadat Menu:
Select:
Osobní
AUTO
Instalace
Jazyk/Země
Automatické ladění
Třídění programů
Označení programů
AV předvolby
Ruční ladění
Podrobnější nastavení
Start autom. ladění:
Výběr:
Instalace
Jazyk/Země
Automatické ladění
Třídění programů
Označení programů
AV předvolby
Ruční ladění
Podrobnější nastavení
Výběr:
Zadat Menu:
K tomu je třeba: po zvolení funkce, stiskněte tlačítko . Poté
postupujte tak, jak je popsáno v kapitole “Zapnutí a automatické
naladění TV promítače”, v bodě 4 a 5 na straně 8.
TŘÍDĚNÍ PROGRAMŮ
Funkce “Třídění programů” v režimu menu “Instalace” slouží ke
změně pořadí, ve kterém se kanály (televizní stanice) objeví na
obrazovce.
K tomu je třeba: po zvolení funkce, stiskněte tlačítko . Poté
postupujte tak, jak je popsáno v kapitole “Zapnutí a automatické
naladění TV promítače”, v bodě 6b) na straně 9.
pokračuje ...
14
Režim menu na obrazovce
Page 63

Stupeň 1 Stupeň 2 Stupeň 3 / Funkce
Nastavení obrazu
Režim obrazu
Kontrast
Jas
Barevná sytost
Ostrost
Reset
Redukce šumu
Výběr: Zadat Menu:
Osobní
AUTO
OZNAČENÍ PROGRAMŮ
Funkce “Označení programů”, v režimu menu “Instalace”, Vám
umožní přidělit jméno kanálu, maximálně o pěti znacích.
K tomu je třeba:
1 Po zvolení funkce, stiskněte tlačítko a poté
stiskněte nebo pro volbu čísla programu, který chcete
Set Up
Set Up
Instalace
Jazyk/Země
Auto Tuning
Automatické ladění
Programme Sorting
Třídění programů
Select NexTView
Označení programů
AV Preset
AV předvolby
Manual Set Up
Ruční ladění
Podrobnější nastavení
Enter Menu:
Select:
Enter Menu:
Výběr:
Zadat Menu:
Select:
Instalace
Jazyk/Země
Automatické ladění
Třídění programů
Označení programů
AV předvolby
Ruční ladění
Podrobnější nastavení
Výběr:
Zadat Menu:
pojmenovat.
2 Stiskněte . Vyznačením prvního znaku ve sloupci Etiqueta,
stiskněte tlačítko nebo pro volbu jednoho písmene, čísla,
nebo “-” pro mezeru a poté stiskněte pro potvrzení tohoto
znaku. Zbývající čtyři znaky zvolte stejným způsobem. Nakonec
stiskněte OK pro jejich uložení.
Nastavení obrazu
Režim obrazu
Kontrast
Jas
Barevná sytost
Ostrost
Reset
Redukce šumu
Výběr: Zadat Menu:
Set Up
Set Up
Instalace
Jazyk/Země
Auto Tuning
Automatické ladění
Programme Sorting
Třídění programů
Select NexTView
Označení programů
AV Preset
AV předvolby
Manual Set Up
Ruční ladění
Podrobnější nastavení
Enter Menu:
Select:
Enter Menu:
Výběr:
Zadat Menu:
Select:
Osobní
AUTO
Instalace
Jazyk/Země
Automatické ladění
Třídění programů
Označení programů
AV předvolby
Ruční ladění
Podrobnější nastavení
Výběr:
Zadat Menu:
AV PŘEDVOLBY
Funkce “AV předvolby”, v režimu menu “Instalace”, Vám umožní
přidělit jméno vnějšímu zařízení připojenému k tomuto televizoru.
K tomu je třeba:
1 Po zvolení funkce, stiskněte tlačítko a poté
stiskněte nebo pro volbu vnějšího vstupu, který chcete
pojmenovat (AV1, AV2, a AV3 pro přídavná zařízení připojená ke
konektorům typu Euro na zadní části televizoru a AV4 pro
konektory na ovládacím čelním panelu).Poté stiskněte .
2 Ve sloupci “Název” se automaticky objeví předurčené jméno:
a) Chcete-li použít jedno z těchto předurčených jmen (CABLE,
GAME, CAM, DVD, VIDEO nebo SAT), stiskněte
tlačítko nebo pro volbu jednoho z nich a nakonec
stiskněte OK pro jeho uložení.
b) Chcete-li přidělit Vámi určené jméno, zvolte Editar a
stiskněte . Poté, vyznačením prvního znaku,
stiskněte nebo pro volbu jednoho písmene, čísla, nebo
“-” pro mezeru a stiskněte pro potvrzení tohoto znaku.
Zbývající čtyři znaky zvolte stejným způsobem a nakonec
stiskněte OK pro jejich uložení.
pokračuje ...
CZ
Režim menu na obrazovce
15
Page 64

Stupeň 1 Stupeň 2 Stupeň 3 / Funkce
Nastavení obrazu
Režim obrazu
Kontrast
Jas
Barevná sytost
Ostrost
Reset
Redukce šumu
Výběr: Zadat Menu:
Set Up
Set Up
Instalace
Jazyk/Země
Auto Tuning
Automatické ladění
Programme Sorting
Třídění programů
Select NexTView
Označení programů
AV Preset
AV předvolby
Manual Set Up
Ruční ladění
Podrobnější nastavení
Enter Menu:
Select:
Enter Menu:
Výběr:
Zadat Menu:
Select:
Osobní
AUTO
Instalace
Jazyk/Země
Automatické ladění
Třídění programů
Označení programů
AV předvolby
Ruční ladění
Podrobnější nastavení
Zadat Menu:
Výběr:
RUČNÍ LADĚNÍ
Funkce “Ruční Ladění” v režimu menu “Instalace” slouží pro:
a) Postupné ladění kanálů (televizních stanic) v pořadí programu, které si přejete, nebo postupné ladění video vstupu. K tomu
je třeba:
1 Po zvolení funkce “Ruční Ladění”, stiskněte tlačítko . S vyznačenou položkou Program stiskněte , a poté stiskněte
nebo pro volbu čísla programu (pozice), na kterém si přejete naladit televizní stanici nebo kanál videa (pro kanál
videa Vám doporučujeme vybrat číslo programu “0”). Stiskněte tlačítko .
2 Dostupnost následující funkce závisí na volbě země v režimu menu «Jazyk/Země».
Po zvolení funkce Systém, stiskněte tlačítko , a poté stiskněte nebo pro volbu systému televizní stanice (B/G
pro Západní Evropu, D/K pro Východní Evropu, L pro Francii nebo I pro Velku Británii) Stiskněte .
3 Po zvolení funkce Kanál, stiskněte tlačítko a poté stiskněte nebo pro volbu typu kanálu (“C” pro pozemní vysílání
nebo “S” pro kabelové vysílání). Stiskněte tlačítko . Posléze stiskněte číselná tlačítka pro zavedení čísla kanálu televizní
stanice nebo znaménka kanálu videa.
Neznáte-li číslo kanálu, hledejte ho stisknutím tlačítka nebo . Až najdete kanál, který chcete uložit, stiskněte dvakrát
tlačítko OK.
Zopakujte všechny tyto body pro naladění a uložení ostatních kanálů.
b) Přidělit jméno kanálu, maximálně o pěti znacích.
K tomu je třeba: vyznačením funkce Program, stiskněte tlačítko PROG + nebo -, až se objeví číslo programu, který chcete
pojmenovat. Po té, až se objeví na obrazovce, zvolte funkci Pojmenování a následovně stiskněte tlačítko .
Stiskněte nebo pro volbu jednoho písmene, čísla nebo “-” pro mezeru a stiskněte pro potvrzení tohoto znaku.
Zbývající čtyři znaky zvolte stejným způsobem. Po zvolení všech znaků, stiskněte dvakrát tlačítko OK pro jejich uložení.
c) Dokonce i v případě, že je normálně zapojeno jemné automatické ladění kanálů (AFT), můžeme obraz ručně doladit (jestliže
je nejasný) a dosáhnout jeho zlepšení.
K tomu je třeba: zatímco sledujete kanál (televizní stanici), ve kterém chcete provést
jemné naladění, zvolte funkci AFT, a poté stiskněte tlačítko . Stiskněte nebo pro doladění úrovně frekvence kanálu
v rozmezí od -15 do +15. Nakonec stiskněte dvakrát tlačítko OK a tímto se nové doladění uloží do paměti.
d) Vynechat čísla programů, které si nepřejete sledovat a tím je přeskočit při jejich výběru pomocí tlačítek PROG +/-.
K tomu je třeba: vyznačením funkce Program, stiskněte tlačítko PROG + nebo -, až se objeví číslo programu, který chcete
vynechat. Po té, až se objeví na obrazovce, zvolte funkci Přeskočit a následovně stiskněte tlačítko .
Stiskněte nebo pro volbu Ano a nakonec stiskněte dvakrát tlačítko OK pro jeho uložení.
Jestliže časem chcete opět používat číslo vynechaného programu, postupujte tak, jak je výše uvedeno, ale místo “Ano” zvolte
“Ne”.
e) Použitím dekodéru připojeného ke konektoru typu Euro 3/ 3, nebo přes video připojené ke zmíněnému Eurokonektoru,
Vám tato funkce umožní sledovat a správně nahrát kodifikovaný kanál.
Dostupnost následující funkce závisí na volbě země v režimu menu “Jazyk/Země”.
S
K tomu je třeba: po zvolení funkce Dekodér, stiskněte tlačítko . Poté stiskněte nebo pro volbu Zap. Nakonec
stiskněte dvakrát OK pro její uložení.
Jestliže časem budete chtít tuto funkci zrušit, postupujte, jak je výše uvedeno, ale zvolte znovu “Vyp” místo “Zap“.
Režim menu na obrazovce
16
pokračuje ...
Page 65

Stupeň 1 Stupeň 2 Stupeň 3 / Funkce
Nastavení obrazu
Režim obrazu
Kontrast
Jas
Barevná sytost
Ostrost
Reset
Redukce šumu
Výběr: Zadat Menu:
Instalace
Jazyk/Země
Automatické ladění
Třídění programů
Označení programů
AV předvolby
Ruční ladění
Podrobnější nastavení
Výběr:
Osobní
AUTO
Zadat Menu:
Podrobnější nastavení
RGB centrování
Výběr:
Zadat Menu:
RGB CENTROVÁNÍ
Při zapojení vnějších signálů RGB, jako “PlayStation”, je možné, že
bude třeba seřídit vodorovné centrování obrazu. V tomto případě se
seřizuje pomocí funkce “RGB centrování” v režimu menu
“Prodrobnější nastavení”.
K tomu je třeba: zatímco sledujete vstupní signál RGB, zvolte
0
funkci “RGB Centróvaní” a stiskněte tlačítko . Poté
stiskněte nebo pro upravení centra obrazu (seřizujte od - 10
do + 10). Nakonec stiskněte tlačítko OK pro jeho uložení.
CZ
Režim menu na obrazovce
17
Page 66

Teletext
Teletext je informační služba, kterou užívá většina televizních stanic. Na straně s obsahem služeb teletextu (všeobecně je
to strana 100) je poskytnuta informace o tom, jak se užívá tato služba. Pro práci v teletextu používejte tlačítka dálkového
ovladače tak, jak je uvedeno v této kapitole.
• Zvolte televizní stanici se silným signálem, jinak může dojít v teletextu k chybám.
• Jestliže uběhne 5 minut a stále se díváte na stejnou stránku teletextu, aniž byste stiskli nějaké tlačítko, lesk obrazu se
automaticky a evidentním způsobem sníží, protože se tím zamezí možnému poškození trubice s katodovými paprsky,
která je prvkem přístroje.
Vstup do teletextu
Zvolte kanál (televizní stanici), který vysílá teletext, který si přejete sledovat,
stisknutím tlačítka .
TELETEXT
Index
Programme
News
Sport
Weather
Zvolení stránky teletextu
Pomocí číselných tlačítek dálkového ovládače zadejte tři čísla představující
příslušné číslo stránky, kterou si přejete vidět.
• V případě, že se při volbě zmýlíte, zadejte jakákoliv tři čísla, a poté znovu zadejte
správné číslo stránky.
• Jestliže se počítadlo stránek nezastaví, je to proto, že požadovaná stránka není
k dispozici. V tomto případě zadejte jiné číslo stránky.
Zvolení následující nebo předchozí stránky
Stiskněte tlačítka PROG + ( ) nebo PROG - ( ).
Překrytí teletextu televizním obrazem
Zatímco sledujete teletext, stiskněte tlačítko . Opětovným stisknutím se teletextový režim zruší.
Zmrazení teletextové stránky
Stiskněte tlačítko / . Opětovným stisknutím se zmrazení podstránky zruší.
Odhalení skrytých informací (např. soutěžních odpovědí)
Stiskněte tlačítko / . Opětovným stisknutím se informace opět ukryje.
Zvolení podstránky:
Jedna stránka teletextu se může skládat z několika podstran. V takovém případě číslo stránky, které
se objeví v horní levé části obrazovky, změní barvu ze bílé na zelenou a vedle něj se objeví jedna nebo
několik šipek. Opakovaně stiskněte tlačítka nebo na dálkovém ovladači a požadovaná
podstránka se objeví.
25
153
101
98
18
Vystoupení z teletextu:
Stiskněte tlačítko .
Fastext
Služba Fastextu nám umožní přístup do požadované stránky teletextu stisknutím pouze jednoho
tlačítka.
Jste-li v teletextu a v případě, že se vysílají signály Fastextu, na spodní části obrazovky se objeví
nabídka barevných kódů, které umožňují přístup přímo k teletextové stránce. K zobrazení této
nabídky stiskněte tlačítko příslušné barvy (červené, zelené, žluté nebo modré) na dálkovém
ovladači.
Teletext
Page 67

NexTView*
* (závisí na tom, zda je tato služba k dipozici).
NextView je elektronický přehled programů, který zahrnuje informace o programech různých televizních vysílačů.
Můžete si vyhledat informaci o programu podle témat (sport, umění, atd...) nebo podle data.
Jestliže budete sledovat NexTView a objeví se chybná písmena nebo znaky, použijte systém menu (viz. str. 14), jděte do
menu “Jazyk/Země” a zvolte stejný jazyk, v jakém probíhá vysílání NexTView.
Aktivace NexTView
1 Zvolte si nějaký televizní kanál, který přenáší službu NextView. V tom případě se na obrazovce, jakmile bude informace k
dispozici, objeví na několik okamžiků nápis “NextView”.
2 K tomu, abyste viděli a mohli používat služeb NexTView, máte dva různé druhy interface NexTView, v závislosti na % údajů,
které jsou k dispozici.
a) Interface “Seznam programů”:
Zatímco se díváte na televizi a po té, co se objeví na obrazovce indikace “NexTView” v bílé bravě, stiskněte tlačítko
na dálkovém ovladači, abyste mohli vidět interface “Seznam programů” (viz. obr. 1).
b) Interface “Pohled na celek”:
Zatímco se díváte na televizi a po té, co je k dispozici více než 50 % údajů z NexTView (může se stát, že 100 % údajů
není k dispozici, závistí to na oblasti), objeví se na obrazovce indikace “NexTView” v černé barvě. Následně stiskněte
tlačítko na dálkovém ovladači, abyste mohli vidět interface “Pohled na celek” (viz. obr. 2).
V okamžiku, kdy vstoupíte do NexTView, v levém spodním rohu se ukáže, kolik procent údajů z NexTView je k dispozici.
Jakmile jste vstoupili a začali užívat tuto službu, % množství údajů se nezvyšuje.
3 Pohyb v systému NextView:
• Stiskněte nebo , abyste se přemístili směrem doprava nebo směrem doleva.
• Stiskněte nebo , abyste se přemístili směrem nahoru nebo směrem dolů.
• Stiskněte OK, abyste potvrdili volbu.
4 Abyste vypnuli NexTView, stiskněte tlačítko na dálkovém ovladači.
Interface “Seznam programů” (obr. 1): Interface “Pohled na celek” (obr. 2):
1
2
3
01
02Út03St04Čt05Pá06So07
Po
TV1
TV2
TV3
TV4
TV5
TV6
TV7
TV8
Songs from the shows
TV1 00:30 - 01:30 Thursday 04
Programme description
Songs from the shows
00 : 30
Weather forecast informati
01 : 30
A1 news magazine
05 : 30
Arts show
06 : 30
Oclock news
07 : 30
Weather forecast informati
08 : 30
A1 news magazine
09 : 30
Arts show
10 : 30
Nahrát
Připomenout
4
5
Ne
7 : 07 : 01
1
2
3
01
02 03 04 05 06 07
Po Út St
TV1
TV2
TV3
TV4
TV5
TV6
TV7
TV8
Songs from the shows
TV1 00:30 - 01:30 Thursday 04
Programme description
Čt
9 : 00 9 : 30 10 : 00
Magazine
Weather Forecast | Mike's show
Euronews
Home Shopping Europe
News | Arts show | Magazine
Larry King's live | Euro Sports
Euro magazine | Euro Sports
Home Shopping Europe | Euronews
Nahrát
Pá So Ne
|
Songs from the shows
|
Fantasy film
Připomenout
4
5
|
|
Euro Sports
9 : 15 : 03
Star Wars
1 ikony podle témat (viz. níže “Legenda Ikony”) 4 Nahrát*
2 datum
3 Pohled na celek
Tato funkce je k dispozici jedině tehdy, je.li televizor připojen na video,
které má SmartLink a programování pomocí časovače.
Pokud chcete nahrávat program, který jste si vybrali, stiskněte na
dálkovém ovladači tlačítko červené barvy.
5 Připomenout*
Pokud si přejete, aby Vám televizor připomněl, že program, který jste si
vybrali, se bude v přístím okamžiku už vysílat, stiskněte na dálkovém
ovladači tlačítko zelené barvy. V době plánovaného vysílání programu se na
obrazovce objeví signalizující text, který Vám připomene, že program je
připraven k vysílání.
* Volitelné možnosti, “Nahrát” a “Připomenout” se ukazují na obrazovce, jakmile byl zvolen nějaký program, ale neobjeví se v případě, že
sledujete služby NexTView na televizním kanále, který není provider NexTView.
* “Nahrát” a “Připomenout” nebudou k dispozici, jestliže program, který jste si zvolili, už začal.
CZ
Legenda Ikony:
kompletní seznam:
nabízí veškerou informaci o programech různých televizních
vysílačů
představení, inscenace
dětské programy
umění
sport
zprávy
filmy
hudba
volba kanálů:
v případě, že provozovatel systému NextView podává
informace o více než 8 různých televizních vysílačích, můžete
si z nich vybrat 8 a sestavit si svůj vlastní seznam.
Když jste si uspořádali svůj osobní seznam, můžete vždy
znovu obnovit originální seznam. Pro jeho obnovení zvolte,
”Auto (” stisknutím tlačítka na dálkovém ovladači.
seznam programů s upozorněním na vysílání:
obsahuje seznam všech programů (maximální počet je 5),
které jste si zvolili a použili při tom funkci upozornění,
signalizace na daný program.
NexTView
19
Page 68

Připojení přídavných zařízení
E
F
G
H
Kamkordér
S-VHS/Hi8/DVC
Kamkordér
8mm/Hi8/DVC
K TV promítači je možné připojit různá další zařízení, jak je uvedeno níže.
videorekordér
Hi-fi
A
D
C
B
DVD
videorekordér
Přijaté vstupní signály
A Bez vstupů
B Signály audio/video a RGB
C Signály audio/video a RGB
D Signály audio/video a S video signály
E S video signál
F Video signál
G Audio signál
H Bez vstupu
Dekodér
Aby se
zabránilo
zkreslení
obrazu:
Nepřipojujte
zařízení ke
konektorům
E a F
současně.
Disponibilní vstupní signály
Audio signál.
Video/audio televizního ladiče.
Video/audio, které se zviditelní na obrazovce (výstup z monitoru).
Video/audio zvoleného signálu.
Bez výstupů.
Bez výstupů.
Bez výstupů.
Audio signál pro sluchátka.
Doplňkové informace
20
pokračuje ...
Page 69

S
Optimální pozice pro uživatele
**
1 •
1 •
2 •
2 •
3 •
3 •
4 •
4 •
G .
Doplňkové informace
Připojení videa
Připojte video do konektoru typu EURO D na zadní straně promítacího přístroje. Nemáte-li kabel konektoru typu EURO,
doporučujeme Vám naladit signál videa na naprogramované číslo “0”, viz kapitola “Ruční Ladění” na straně 16. Také zkonzultujte
návod k obsluze Vašeho videa, abyste věděli jak získat kanál test signálu videa.
Přijímá-li Vaše video SmartLink, nahlédněte do kapitoly “SmartLink” na straně 22.
Pokud máte připojen dekodér ke konektoru typu Euro 3 / 3 D , nebo k videu, které je připojeno ke zmíněnému
Eurokonektoru:
Zvolte funkci “Ruční Ladění” v režimu menu “Instalace” a po zvolení funkce “Dekodér” ** , zvolte “Zap” (použitím nebo ) pro
každý kódovaný kanál (viz. str. 16).
Dostupnost této funkce závisí na volbě země v menu “Jazyk/Země” (viz. str. 14).
Připojení vnějšího zvukového zařízení:
Chcete-li poslouchat zvuk televizoru v reproduktorech Vaší Hi-Fi věže, připojte Hi-Fi věž k výstupu audio A a, pomocí systému
menu, zvolte “Nastavení zvuku” a zvolte “Vyp” v režimu “TV reproduktory” (viz. str. 12).
Hlasitost vnějších reproduktorů se může regulovat pomocí tlačítek pro nastavení hlasitosti na dálkovém ovladači televizoru.
Také je možné regulovat stupeň výšky a hloubky zvuku pomocí menu “Nastavení zvuku”.
Také můžete dosáhnout zvukového efektu “Dolby Virtual” pomocí Vaší Hi-Fi věže:
K tomu je třeba umístit reproduktory Hi-Fi věže po obou stranách televizoru tak, aby
vzdálenost mezi televizorem a každým reproduktorem byla přibližně 50cm. Po umístění
reproduktorů zvolte menu “Nastavení zvuku” pomocí systému menu, a poté zvolte “Dolby V”
ve funkci “Efekt” (viz. str. 12).
S
Reproduktory Vaší Hi-Fi
věže
~50°
Použití přídavných zařízení
CZ
Aby se na televizní obrazovce objevil vstupní signál zapojeného zařízení, zvolte znaménko toho konektoru, ke kterému jste
zapojili zařízení. Např. pokud jste zapojili zařízení ke konektoru, jehož znaménko je : 1/ 1 , stiskněte několikrát tlačítko
na dálkovém ovládači až se znaménko 1 objeví na obrazovce.
Připojte přídavné zařízení přes příslušný konektor televizoru tak, jak je uvedeno na předchozí
1
straně.
2
Zapněte připojené zařízení.
3
Aby se objevil obraz připojeného zařízení, opakovaně tiskněte tlačítko , dokud se na
obrazovce neobjeví správný vstupní symbol.
Symbol Vstupní signály
Vstupní audio/video signál přes konektor typu Euro B .
S
S
Vstupní signál RGB přes konektor typu Euro B . Tento symbol se objeví pouze v
případě, že je připojen vstup RGB.
Vstupní signál pro audio / video přes konektor typu Euro C .
Vstupní signál pro RGB přes konektor typu Euro C . Tento symbol se objeví pouze v
případě, že je připojen vstup RGB.
Vstupní audio/video signál přes konektor typu Euro D .
Vstupní signál S video přes konektor typu Euro D . Tento symbol se objeví pouze v
případě, že je připojen vstup S video.
Vstupní video signál přes konektor RCA F a vstupní audio signál přes G .
Vstupní signál pro S video přes konektor S videa E a vstupní signál pro audio přes
Tento symbol se objeví pouze v případě, že je připojen vstup S video.
Aby se znovu objevil normální televizní obraz, stiskněte tlačítko na dálkovém ovladači.
4
Připojení monofonních přístrojů
Zástrčku zvuku zapojte do zdířky L/G/S/I na čelním panelu televizoru a zvolte vstup 4 nebo 4
postupem popsaným výše. Poté nastavte kanál “Dvoukanál. zvuk” “A” ve zvukové nabidce dle částl
“Nastavení zvuku” tohoto návodu (viz. str. 12).
Doplňkové informace
21
Page 70

SmartLink
Dekodér
SmartLink je přímé propojení mezi televizorem a videorekordérem, které umožňuje přenos
určitých informací.
SmartLink pracuje, pokud:
• má Váš videorekordér k dispozici SmartLink, NexTView, Easy Link nebo Metalogic.
Metalogic je obchodní značka registrovaná jako Grundig Corporation.
EasyLink je obchodní značka registrovaná jako Philips Corporation.
• jste připojili videorekordér přes konektor typu EURO :3/q3 (SMARTLINK) umístěný na
zadní části promítače pomocí kompletně propojeného 21-pinového kabelu Eurokonektor.
SmartLink nabízí:
• Informace o ladění, např. přehled kanálů, který je přenesen z televizoru do videorekordéru.
• Přímé nahrávání z TV: během sledování televizoru pouze potřebujete stisknout jedno tlačítko
na videorekordéru pro záznam programu.
• Automatické zapnutí: promítač je v režimu časového spínače (standby), stiskněte tlačítko “Play
z ” videorekordéru a promítač se automaticky zapojí.
videorekordér
Podrobnější informace o SmartLinku najdete v návodu k obsluze Vašeho videorekordéru
Doplňkové informace
22
Page 71

Instalace dálkového ovládání pro DVD nebo video
2
1
3
Tento dálkový ovladač je připraven nejen pro ovládání funkcí tohoto televizoru Sony, ale také pro ovládání základních funkcí
Vašeho DVD Sony a většiny videí Sony, aniž by byla nutná instalace dálkového ovládání. Pro ovládání ostatních značek DVD a
videí, stejně tak jako některých videí Sony, před jejich prvním použití budete muset provést instalaci dálkového ovládání. K tomu
je třeba splnit následující pokyny:
• Ze všeho nejdříve vyhledejte třímístný číselný kód podle značky Vašeho DVD nebo videa (viz spodní panel). U značek,
které mají více než jeden kód, zaveďte první z nich.
• Sony se pokusí zaktualizovat kódy v souladu see změnami na obchodním trhu. Aktuální seznam kódů najdete v pouzdru,
ve kterém je dálkový ovladač.
1 Opakovaně tiskněte tlačítko selektoru zařízení na dálkovém ovladači dokud se v požadované pozici,
DVD nebo VCR (pro video), neobjeví zelené světlo.
Jestliže je selektor zařízení v pozici TV, není možné uložit do paměti žádný kód.
2 Zatímco je v požadované pozici rozsvícen indikátor zelené barvy, stiskněte žluté tlačítko na dálkovém
ovladači po dobu asi 6 vteřin, dokud indikátor zelené barvy nezačne blikat.
3 Zatímco bliká indikátor zelené barvy, zadejte pomocí číselných tlačítek na dálkovém ovladači třímístný
číselný kód v souladu se zařízením, které budete používat.
Pokud kód, který jste uvedli, existuje, na chvíli se rozsvítí všechny tři indikátory zelené barvy. V
opačném případě, předchozí pokyny znovu zopakujte.
4 Zapněte zařízení, které chcete používat a prověřte, zda dálkovým ovladačem můžete ovládat hlavní
funkce televizoru.
• Pokud zařízení nefunguje nebo selže některá z funkcí, zopakujte předchozí pokyny a přesvědčte
se, že kód, který zavádíte, je správný, nebo zkuste další kód a tak pokračujte, až najdete ten
správný.
• Uložené kódy se z paměti vymažou v případě, že vybité baterie nevyměníte za méně než jednu
minutu. V tomto případě znovu zopakujte všechny předchozí pokyny. Na vnitřní části krytu
baterií je nálepka, na kterou můžete napsat číselný kód.
• Ne všechny značky, ani všechny modely jedné značky jsou brané v úvahu.
Přehled podle značek videa Přehled podle značek DVD
Značka Kód Značka Kód
SONY (VHS) 301, 302, 303, 308, 309 SONY 001
SONY (BETA) 303, 307, 310 AIWA 021
SONY (DV) 304, 305, 306 DENON 018, 027, 020, 002
AIWA 325, 331, 351 GRUNDIG 009, 028, 023, 024, 016, 003
AKAI 326, 329, 330 HITACHI 025, 026, 015, 004
DAEWOO 342, 343 JVC 006, 017
GRUNDIG 358, 355, 360, 361, 320, 351 KENWOOD 008
HITACHI 327, 333, 334 LG 015, 014
JVC 314, 315, 322, 344, 352, 353, 354, 348, 349 LOEWE 009, 028, 023, 024, 016, 003
LG 332, 338 MATSUI 013, 016
LOEWE 358, 355, 360, 361, 320, 351 ONKYO 022
MATSUI 356, 357 PANASONIC 018, 027, 020, 002
ORION 328 PHILIPS 009, 028, 023, 024, 016, 003
PANASONIC 321, 323 PIONEER 004
PHILIPS 311, 312, 313, 316, 317, 318, 358, 359 SAMSUNG 011, 014
SAMSUNG 339, 340, 341, 345 SANYO 007
SANYO 335, 336 SHARP 019, 027
SHARP 324 THOMSON 012
THOMSON 319, 350 TOSHIBA 003
TOSHIBA 337 YAMAHA 018, 027, 020, 002
CZ
Doplňkové informace
23
Page 72

Optimální úhel vidění
(pozice doporučená pro uživatele)
Aby kvalita obrazu byla optimální, snažte se umístit promítač tak, aby jste obrazovku sledovali z následovně uvedených
úhlů.
Vodorovný úhel obrazu
minimální vzdálenost 2.1 m
75
75
Svislý úhel obrazu
(pozice doporučená pro uživatele)
minimální vzdálenost 2.1 m
27.5
27.5
Doplňkové informace
24
Page 73

Technické údaje
Systém TV:
Závisí na Vámi zvolené zemi:
B/G/H, D/K, L, I.
Systém kódování barev:
PAL, SECAM
NTSC 3.58, 4.43 (pouze pro video vstup)
Rozložení kanálů:
VHF: E2-E12
UHF: E21-E69
CATV: S1-S20
HYPER: S21-S41
D/K: R1-R12, R21-R69
L: F2-F10, B-Q, F21-F69
I: UHF B21-B69
Velikost obrazu:
41” inches (přibližně 103 cm. v úhlopříčce)
Vstupy na zadní straně:
1/ 1 21-pinový konektor typu EURO (norma
CENELEC), včetně vstupu pro audio/video,
vstupu RGB, výstupu audio/video z TV audio/
video.
2/ 2 21-pinový konektor typu EURO (norma
CENELEC), včetně vstupu pro audio/video,
vstupu RGB, výstupu audio/video z monitor
audio/video.
3/ 3 21-pinový konektor typu Euro (norma
(SMARTLINK)
Vstupy na přední straně:
S
CELENEC), včetně vstupu pro audio / video,
vstupu pro S video, volitelného výstupu audio
/ video a připojení SmartLinku.
Výstupy audio (levé / pravé) - konektory RCA.
S
4 Vstup pro S video - 4-pinový DIN
4 video vstup - konektor RCA
4 audio vstup - konektory RCA.
zdířka sluchátek
Výstupy zvuku:
2 x 30 W (hudební výkon)
2 x 15 W (RMS)
Příkon:
225 W
Příkon v režimu časového vypnutí (pohotovostní režim):
< 0.7 W
Rozměry (š x v x h):
Přibližně 948 x 992 x 511 mm.
Hmotnost:
Přibližně 44 Kg.
Dodané příslušenství:
1 dálkový ovládač, typ RM-938
2 baterie typu IEC (velikost AA)
Další funkce:
• Filtr digitálního hřebenu (vysoká rezoluce).
• Obraz 100 Hz, Digital Plus.
• Teletext, Fastext, TOPtext (250 stran paměti Teletextu).
• NICAM.
• Automatické zapojení.
• SmartLink (přímé propojení mezi televizorem a
kompatbilním videorekordérem.
Podrobnější informace o SmartLinku najdete v návodu k
obsluze Vašeho videorekordéru).
• Automatické nalezení systému TV.
• Dolby Virtual.
• BBE.
• PIP (z angličtiny “Picture in Picture” = Obraz uvnitř obrazu)
• ACI (z angl. “Auto Channel Installation” = Automatická
instalace kanálů).
CZ
Úpravy v designu a technických vlastnostech bez předchozího upozornění.
Ekologický papír - 100% bez chloru
Doplňkové informace
25
Page 74

Řešení problémů
Zde jsou některá řešení problémů, které mohou ovlivnit obraz i zvuk.
Problém
Není obraz (černá obrazovka) a není zvuk
Špatný nebo žádný obraz, ale zvuk je dobrý.
Není obraz nebo není informační menu
přídavného zařízení připojeného přes
Eurokonektor na zadní části televizoru
Dobrý obraz, ale bez zvuku.
Barevné pořady nejsou barevné
Jakmile zapnete televizor, neobjeví se
poslední kanál, který jste sledovali před
vypnutím.
Neostrý obraz, na konturách obrazu dochází
k mísení různých barev.
Šum v obrazu
Řešení
• Zkontrolujte zapojení antény.
• Zapojte televizor do zásuvky a stiskněte tlačítko na čelní straně aparátu.
• Pokud na televizoru svítí indikátor , stiskněte tlačítko TV na dálkového
ovladače.
• Pomocí Režimu menu vstupte do “Nastavení obrazu” a zvolte “Reset” pro obnovení
továrního nastavení (viz. str. 12).
• Zkontrolujte zapojení přídavného zařízení a několikrát stiskněte tlačítko na
dálkovém ovladači, dokud se správný vstupní symbol neobjeví na obrazovce (viz.
str. 21).
• Stiskněte tlačítko + na dálkovém ovládači.
• Přesvěčte se, zda funkce “TV reproduktory“, v režimu menu “Nastavení zvuku“, je
zvolena v pozici “Zap“ (viz. str. 12).
• Zkontrolujte, jsou-li sluchátka odpojeny.
• Pomocí Režimu menu vstupte do “Nastavení obrazu” a zvolte “Reset” pro obnovení
továrního nastavení.
• Toto není špatné fungování. Stiskněte očíslovaná tlačítka na dálkovém ovladači a
zvolte si kanál, který si přejete.
• Seřid’te ostrost barev, aby se nepřekrývaly. Více informací najdete v kapitole
“Seřízení prolínání barev (konvergence)” na straně 10.
• Pomocí Režimu menu zvolte funkci “AFT” v režimu menu “Ruční Ladění” a ručně
dolaďte. Tak dosáhnete lepšího příjmu obrazu (viz. str. 16).
• Pomocí Režimu menu zvolte funkci “Redukce Šumu” v režimu menu “Nastavení
obrazu” a zvolte “AUTO” pro zredukování šumu v obrazu (viz. str. 12).
Při sledování kanálu kodifikovaného pomocí
dekodéru, který je připojený k Eurokonektoru
nebo je nestálý.
Obraz je zkreslený při změně programu nebo
při zvolení teletextu
Chybné zobrazování písmen a znaků se
projeví při sledování teletextu
Objeví se chybná písmena nebo znaky, když
sledujete NexTView
Zatímco se díváte na stránku teletextu, lesk
obrazu se evidentním způsobem sníží.
Dálkový ovládač nefunguje
S
3/ 3, obraz se správně nedekóduje
• Pomocí systému menu, vstupte do režimu menu “Funkce” a zvolte “Výstup AV3” v
režimu “TV” (viz. str. 13).
• Přesvedčte se, že Dekodér není zapojený k Eurokonektoru 2/ 2.
• Na zadní straně televizoru vypněte zařízení připojené přes 21-kolíkový Euro-
konektor
• Vstupem do nabídky Menu se dostanete až do úrovně nastavení “Instalace/Jazyk/
Země” (viz. str. 14), zde zvolíte příslušný jazyk a zemi, kde je televizor instalován a
jejíž vysílání televizor přijíma. Pro země kde se používají písmena a znaky z Cyrilice a
jejich název se nezobrazí v nabídce doporučujeme použít nastavení televizoru pro
Rusko. Takto se předejdete chybnému zobrazování Cyrilichých písmen a znaků v
teletextu.
• Použijte systém menu, jděte do menu “Jazyk/Země” (viz. str. 14) a zvolte stejný jazyk,
v jakém probíhá vysílání NexTView.
• To neznamená, že přístroj funguje špatně. Jestliže uběhne 5 minut a stále se díváte
na stejnou stránku teletextu, aniž byste stiskli nějaké tlačítko, lesk obrazu se
automaticky a evidentním způsobem sníží, protože se tím zamezí možnému
poškození trubice s katodovými paprsky, která je prvkem přstroje. Abyste obnovili
původní stupeň lesku obrazu, stiskněte jakékoliv tlačítko na dálkovém ovladači.
• Zkontrolujte, zda je tlačítko selektoru zařízení na dálkovém ovladači ve vhodné pozici
v souladu se zařízením, které chcete ovládat (DVD, TV nebo VCR pro video).
• Pokud DVD nebo video nelze ovládat dálkovým ovladačem, i když je tlačítko
selektoru zařízení ve správné pozici, znovu zaveďte potřebný kód tak, jak je popsáno
v kapitole “Instalace dálkového ovládání pro DVD nebo video” na straně 23.
• Vložte nové baterie.
Indikátor dočasného vypnutí
televizoru (pohotovostní režim) bliká.
Pokud se závady nepodařilo odstranit, nechte televizor prověřit oprávněným odborníkem.
Kryt NIKDY neodnímejte sami.
Doplňkové informace
26
• Obraťte se na nejbližší autorizovaný servis Sony.
Page 75

•
•
•
•
•
•
Bevezetés
Köszönjük, hogy ezt a Sony 100 Hz projektoros TV-t.
A projektoros TV használata előtt figyelmesen olvassa el ezt az útmutatót és őrizze meg jövőbeni referenciákhoz.
Az útmutatóban használt jelképek:
Fontos információ.
Információ a funkcióról.
1,2... Követendő utasítás sor.
A távvezérlő árnyékolt gombjai mutatják a különböző utasítások
végrehajtásához megnyomandó gombokat.
Információ az utasítások eredményéről.
Tartalomjegyzék
Bevezetés .........................................................................................................................................................................................2
Biztonsági előírások .........................................................................................................................................................................4
Általános leírás
A távvezérlő gombjainak áttekintése................................................................................................................................................5
A projektoros TV gombjainak általános leírása ...............................................................................................................................6
Üzembehelyezés
Az antenna és a videomagnó csatlakoztatás ...................................................................................................................................7
Az elemek behelyezése a távvezérlőbe............................................................................................................................................7
Első üzembehelyezés
A projektoros TV bekapcsolása és automatikus hangolás...............................................................................................................8
A színátfedések beállítása (Konvergencia) .....................................................................................................................................10
A képernyőn megjelenő menürendszerek
Bevezetés a képernyő menürendszereibe és azok használata......................................................................................................10
Gyors útmutató a menükben való mozgáshoz............................................................................................................................... 11
Útmutató a menükhöz:
Képbeállítás.................................................................................................................................................................................12
Hangszabályozás ........................................................................................................................................................................12
Kikapcsolás időzítő .....................................................................................................................................................................13
AV3 Kimenet ...............................................................................................................................................................................13
PIP forrás.....................................................................................................................................................................................13
PIP pozíciója................................................................................................................................................................................14
Nyelv/Ország...............................................................................................................................................................................14
Automatikus hangolás.................................................................................................................................................................14
Programhelyek átrendezése........................................................................................................................................................14
Programnevek ............................................................................................................................................................................. 15
AV beállítás.................................................................................................................................................................................. 15
Kézi hangolás ..............................................................................................................................................................................16
RGB pocicionálás........................................................................................................................................................................17
HU
Teletext
NexTView
.....................................................................................................................................................................................18
.................................................................................................................................................................................19
Kiegészítő információ
Választható készülékek csatlakoztatása ........................................................................................................................................20
Választható készülékek használata ...............................................................................................................................................21
SmartLink .......................................................................................................................................................................................22
A távvezérlő beállítása DVD-hez vagy videomagnóhoz .................................................................................................................23
Optimális látószög..........................................................................................................................................................................24
Műszaki jellemzők ..........................................................................................................................................................................25
Problémamegoldás .......................................................................................................................................................................26
Tartalomjegyzék
3
Page 76

•
•
•
•
Biztonsági előírások
Kizárólag 220 - 240 V -os hálózati váltakozó
feszültséggel üzemeltesse a készüléket. Ne
csatlakoztasson túl sok készüléket
ugyanahhoz az aljzathoz, mert a túterhelés
tüzet okozhat.
Soha ne nyissa ki a készülék hátsó
burkolatát. A javítást bizza szakemberre.
A készülék szellőzőnyílásait hagyja
szabadon. A megfelelő szellőzés érdekében
a készülék minden oldalánál hagyjon
legalább 10 cm-es szabad területet.
Energiatakarékossági és biztonsági okok
miatt ne hagyja a készüléket készenléti
üzemmódban, amikor nem használja.
Hosszabb távollét esetén húzza ki a
hálózati csatlakozó vezetéket a fali
konnektorból.
Viharos időjárás, villámlás idején saját
biztonsága érdekében ne érintse meg a
készüléket, a hálózati csatlakozó vezetéket
és az antennakábelt.
Ne állítsa a készüléket szélsőségesen
meleg, párás vagy poros helyre, vagy olyan
helyre, ahol mechanikai vibrációnak lehet
kitéve.
Ne dugjon semmilyen tárgyat a készülékbe,
mert ezzel tüzet és áramütést okozhat. Ha a
szellőzőnyílásokon keresztül bármilyen
szilárd test, kerül a készülék belsejébe,
húzza ki a hálózati csatlakozó vezetéket és
ellenőriztesse készüléket szakemberrel!
Az áramütés és a tűz veszélyének elkerülése
érdekében óvja a TV készüléket esőtől és
nedvességtől.
A tűz veszélyének elkerülése érdekében ne
alkalmazzon a készülék közelében nyílt
lángot (ne égessen pl. gyertyát).
A tv készüléket puha, e n y h é n megnedvesített
ruhával tisztítsa. Ne használjon karcoló eszközt,
alkáli anyagot tartalmazó tisztítószert,
súrolóport vagy oldószereket (hígitót vagy
benzint). Óvja a képernyőt a karcolásoktól.
Biztonsági okokból húzza ki a készülék hálózati
vezetékét, mielőtt a tisztítást elkezdi.
A TV készüléket stabil állványra helyezze.
Ne engedje, hogy a készülék az oldalára
vagy képernyővel előre dőljön.
A hálózati csatlakozó kihúzásánál a
csatlakozó dugót fogja meg, és ne a
vezetéket.
Mozgatás előtt húzza ki a hálózati
csatlakozót a konnektorból.
A készüléket óvatosan szállítsa, kerülje a
zötykölődős utcákat, óvja a készüléket
ütéstől, rázkódástól.
Ne tegyen nehéz tárgyat a hálózati
csatlakozó vezetékre, mert megsérülhet.
Javasoljuk, hogy a felesleges vezetéket
csévélje fel a tv készülék hátulján lévő
tartóra.
Ne takarja le a készülék szellőzőnyílásait pl.
függönnyel, újsággal, stb.
Kiegészítő biztonsági előírások
Amennyiben a projektoros TV-t hideg helyről közvetlenül meleg helyre helyezi át vagy a helyiség hőmérsékletében hirtelen
hőmérsékletváltozás áll be, a kép zavaros lehet illetve néhány helyen rossz színminőséget mutathat. Ez abból adódik, hogy a
nedvesség lecsapódott a készüléken belüli tükrökön vagy lencséken. A projektoros TV használata előtt hagyja, hogy a nedvesség
elpárologjon.
Ne tegye ki a képernyőt közvetlen fénynek, hogy tiszta képet kapjon. Amikor lehetséges, használjon a mennyezetről jövő
megvilágítási pontokat.
A kép huzamosabb ideig történő kimerevítése, pl. videojátékok vagy személyi számítógépek használatakor valamint programok
16:9 formátumban történő nézésekor, a képcsövet megrongálhatja. Ennek elkerülése végett tartsa a kép kontrasztját alacsony
szinten.
Kerülje a képernyő érintését, hogy a felületet ne karcolja meg.
Biztonsági előírások
4
Page 77

!¡
. !™
!£
!¢
!∞
!§
!¶
!•
!ª
@º
@¡
@™
@£
1
2
3
4
5
6 a)
b)
A távvezérlő gombjainak áttekintése
@£
Checking the Accessories Supplied
@™
@¡
@º
!ª
!•
!¶
!§
!∞
!¢
A menürendszer bekapcsolása : Nyomja meg a menü képernyőn való megjelenítéséhez. Nyomja meg újra annak kikapcsolásához,
a televízió normál képernyőjéhez való visszatéréshez
Csatornaválasztás: Nyomja meg az előző vagy a következő csatorna kiválasztásához.
NexTView: További információt lásd az “NexTView” c. fejezetben a 19. oldalon.
Hangerő szabályozás : Nyomja meg a televízió hangerejének szabályozásához.
Rögzítőgomb: Ha a Készülékválasztó a VCR pozícióban van, ezt a gombot nyomja meg a programok rögzítéséhez.
A TV üzemmód kiválasztása : Nyomja meg a PIP, teletext vagy a videobemenet kikapcsolásához.
A kép üzemmód kiválasztása : Nyomja meg egymás után többször a kép üzemmód kiválasztásához.
A hangeffektus kiválasztása: Nyomja meg többször egymás után ezt a gombot a hangeffektus változtatásához.
Információ megjelenítése a képernyőn : Nyomja meg az összes utasítás képernyőn történő megjelenítéséhez. Nyomja meg újra
annak törléséhez.
Képkimerevítés : Nyomja meg ezt a gombot a televízió képének kimerevítéséhez. A képernyő két részre osztodik. Bal oldalon a
normális kép, jobb oldalon a kimerevített kép látható. Nyomja meg újból ezt a gombot a normális televízióképhez való visszatéréshez.
Képernyők megcserélése: A “PIP” módozaton belül nyomja meg ezt a gombot a két képernyő megcseréléséhez.
PIP (az angol “Picture in Picture”-ből = Kép a képben): Nyomja meg ezt a gombot ahhoz, hogy a fő képernyő egyik sarkában
megjelenjen egy kis képes képernyő (PIP mód). Nyomja meg újra ennek eltüntetéséhez. A kis képernyőn látni kívánt forrás
kiválasztásához lásd a 13. oldalon lévő “PIP forrás” fejezetet.
A hang elnémítása: Nyomja meg a hang elnémításához. A hang visszakapcsolásához nyomja meg ismét a gombot.
1
2
3
4
5
6
7
8
9
!º
!¡
!™
!£
A televízió ideiglenes kikapcsolása :
Nyomja meg a televízió ideiglenes kikapcsolásához (a készenléti üzemmód jelző kigyullad).
Nyomja meg újra a készenléti üzemmódból (standby) való bekapcsoláshoz.
Az energiamegtakarítás érdekében ajánlatos a televíziót teljesen kikapcsolni, ha azt nem használja.
Amennyiben 15 perc elteltével nincsen televíziójel és semmilyen gombot nem nyomtak le,
a televízió automatikusan készenléti üzemmódba (standby) kapcsol.
A videomagnó vagy a DVD bekapcsolása/kikapcsolása: Nyomja meg a televízióhoz
csatlakoztatott videomagnó vagy DVD be és kikapcsolásához.
Készülékválasztó: Ezzel a távvezérlővel nemcsak a televíziót, hanem a DVD vagy a videomagnó
fontosabb funkcióit is irányíthajta. Kapcsolja be az irányítani kívánt készüléket, majd ezt követően
nyomja meg ezt a gombot többször egymás után a DVD, TV vagy VCR (videomagnóhoz)
kiválasztásához. A kiválasztott pozícióban egy pillanatra felvillan majd egy zöld fény
Mielőtt a távvezérlőt a DVD vagy a videomagnó irányításához először használná,
készülékének márkájától függően be kell azt állítsa. Ehhez lásd “A távvezérlő beállítása DVDhez vagy videomagnóhoz” c. fejezetet a 23. oldalon.
A bemenő forrás kiválasztása : Nyomja meg egymás után többször, amíg a kívánt bemenő
forrás jelképe megjelenik a képernyőn.
Csatornaválasztás: Ha a Készülékválasztó a TV vagy VCR (videomagnó) pozícióban van,
nyomja meg azokat a csatorna kiválasztásához.
Kétjegyű programszámok esetén 2,5 másodpercen belül nyomja meg a második számjegyet.
Ha a Készülékválasztó a TV pozícióban van: Nyomja meg az utolsó választott csatornára
való visszatéréshez (az előző csatorna legalább 5 másodpercig kell képernyőn maradjon
előzőleg).
Ha a Készülékválasztó a VCR pozícióban van: Ha Sony videomagnót használ, a kétjegyű
programszámokhoz, pl.: 23, nyomja meg először -/-- majd ezt követően a 2 és 3 gombokat.
A képernyő méret kiválasztása : Többször egymás után nyomja meg ezt a gombot a kép
méretének megváltoztatásához. 4:3 a megszokott képhez vagy 16:9 a széles képernyő
utánzásához.
Ez a gomb csak teletext üzemmódban működik.
A teletext kiválasztása: Nyomja meg a teletext megjelenítéséhez.
Joystick:
Ha a Készülékválasztó a TV pozícióban van:
Amikor a MENU aktivált, használja ezeket a gombokat a menürendszerben való
mozgáshoz. További információt a 10. oldalon, a “Bevezetés a képernyő
menürendszereibe és azok használata” c. fejezetben talál.
• Amikor a MENU nem aktivált, nyomja meg OK-t a behangolt csatornák listájának
megjelenítéséhez. vagy megnyomásával válassza ki a csatornát (televízióadót), majd
ezt követően nyomja meg OK-t a kiválasztott csatorna nézéséhez.
b) Ha a Készülékválasztó a VCR (videomagnó) vagy DVD pozícióban van: Ezeket a
gombokat használja a televízióhoz csatlakoztatott videomagnó vagy DVD működtetéséhez.
.
7
8
9
!º
HU
a)
•
A televízió funkcióin kívül, minden színes gomb használható a teletexttel történő műveletekhez is. További információt a használati
utasítás “Teletext” c. fejezetében talál a 18. oldalon.
Általános leírás
5
Page 78

A projektoros TV gombjainak általános leírása
S Video
bemenet
Nyomja felfelé a készülék előlapján
lévő fedelet az elülső aljzatok
megjelenítéséhez.
Video
bemenet
Audio
bemenet
Fülhallgató
bemenet
1 Autokonvergencia gomb:
Ezt a gombot nyomja meg a
színek átfedésének
beállításához. További
információt a 10. oldalon, a
“A színátfedések beállítása
(Konvergencia)” c.
fejezetben talál.
vagy
A bemenő
forrást
kiválasztó
gomb
Készenléti
üzemmód
(standby) jelző
Hangerő
szabályozó
gombok
Bekapcsolás /
Kikapcsolás
gomb
A következő vagy az előző
program kiválasztására
szolgáló gomb (a televízió
csatornákat választja ki)
Általános leírás
6
2 A készülék újraindítására
szolgáló gomb:
Tartsa lenyomva ezt a
gombot kb. két másodpercig
a készülék az első
bekapcsolása alkalmával
megegyező módon történő
telepítésének
újraindításához. További
információt a 8. oldalon, a “A
projektoros TV
bekapcsolása és
automatikus hangolás” c.
fejezetben talál.
Page 79

Az antenna és a videomagnó csatlakoztatása
A csatlakozó vezetékek nincsenek mellékelve.
vagy
Videomagnó
OUT IN
Az eurocsatlakozóval történő csatlakoztatás választható.
A videomagnó csatlakoztatására vonatkozó további részleteket lásd a használati utasítás
“Video csatlakoztatása” a 21. oldalon.
Az elemek behelyezése a távvezérlőbe
Győződjön meg arról, hogy az elemeket a polaritásoknak megfelelő helyzetben helyezi be.
Óvja környezetünket! A használt elemeket az erre a célra kijelölt gyüjtőhelyen helyezze el.
HU
Üzembehelyezés
7
Page 80

A projektoros TV bekapcsolása és automatikus hangolás
Language
English
Norge
Français
Italiano
Nederlands
Select Language: Confirm: OK
Ország
Sverige
Norge
Italia
Schweiz/Suisse/Svizzera
Országkiválasztás: Megerősít: OK
Szeretné elindítani az
automatikus hangolást?
Igen
Nem
Csatorna nem található.
Csatlakoztatta az antennát?
Megerősít
Hangolás:
Csatorna:
Rendszer:
Keresés...
1
C 01
B/G
Automatikus hangolás
Language
English
Norge
Français
Italiano
Nederlands
Select Language: Confirm: OK
Language
English
Norge
Français
Italiano
Nederlands
Select Language: Confirm: OK
A projektoros TV első bekapcsolásakor menüsorok jelennek meg a képernyőn, melyekkel 1) kiválaszthatja a menük nyelvét,
2) kiválaszthatja az országot, ahol a készüléket használni kívánja, 3) automatikusan megkeresheti és tárolhatja az összes
rendelkezésre álló csatornát (televízióadót) és 4) megváltoztathatja a csatornák (televízióadók) képernyőn való
megjelenésének sorrendjét.
Mindazonáltal, ha a jövőben ezen beállítások bármelyikét módosítani kívánja, azt a megfelelő opciójának
kiválasztásával teheti (Beállítás menü) vagy a televízió / újraindító gombjának megnyomásával.
1 Csatlakoztassa a televízió csatlakozóját a hálózati aljzatba (220-240 V váltakozó
feszültség, 50Hz).
A televízió első bekapcsolásakor ez automatikusan kigyullad.
Amennyiben ez nem így van, nyomja meg az előlap bekapcsolás/ kikapcsolás
gombját ahhoz, hogy kigyulladjon. A televízió első bekapcsolásakor a képernyőn
automatikusan megjelenik a Language (Nyelv) menü.
2 Nyomja meg a távvezérlő vagy gombját a nyelv kiválasztásához, majd ezt
követően nyomja meg az OK gombot a választás megerősítésére. Ettől kezdve
minden menü a választott nyelven jelenik meg.
3 A képernyőn automatikusan megjelenik az Ország menü. Nyomja meg a vagy -
gombot, majd ezt követően nyomja meg az OK gombot a választás megerősítésére.
4 Az Automatikus hangolás menü megjelenik a képernyőn. Nyomja meg az OK
gombot az Igen kiválasztásához.
5 A projektoros TV elkezdi automatikusan hangolni és rögzíteni az összes
rendelkezésre álló csatornát (televízióadót).
8
• Amennyiben a listán nem jelenik meg azon ország, ahol a televíziót használni
fogja, válassza “-“-t az ország helyett.
• Annak érdekében, hogy a cirill betük helyesen jelenjenek meg a képernyőn,
az országok listájából válassza Oroszországot (Russia), ha a lista nem
tartalmazza az Ön hazáját.
Ez a művelet eltarthat néhány percig. Legyen türelemmel és ne nyomjon meg
egyetlen gombot sem a hangolás folyamata alatt, mivel ellenkező esetben a
folyamat nem fejeződik be.
Egyes országokban maga a televízióadó telepíti automatikusan az összes
csatornát (ACI rendszer). Ebben az esetben maga az adó küld meg egy menüt,
melyben ki kell választania a várost, ahol tartózkodik a vagy a gomb és OK
megnyomásával a csatornák rögzítéséhez,
Ha a projektoros TV nem talált egyetlen csatornát (televízióadót) sem az
automatikus hangolás végrehajtása után, a képernyőn megjelenik egy üzenet,
mely kéri, hogy csatlakoztassa az antennát. Kérjük csatlakoztassa azt úgy,
ahogyan a kezelési útmutató 7. oldalán le van írva, majd nyomja meg az OK-t.
Az automatikus hangolás újból megindul.
folytatódik…
Első üzembehelyezés
Page 81

6 Miután a televízió hangolta és rögzítette az összes csatornát (televízióadót), a
MENU
Programhely-átrendezés
Hangolás:
01 TVE2
02 TVE
03 ANT3
04 TELE5
05 C+
06 C44
Program kivál: Megerősít:
Programhely-átrendezés
Hangolás:
01 TVE2 41 TVE
02 TVE
03 ANT3
04 TELE5
05 C+
06 C44
Pocizió kivál Áthelyezés: OK
képernyőnautomatikusan megjelenik a Programhely-átrendezés menü, hogy
megváltoztathassa a csatornák képernyőn történő megjelenésének sorrendjét.
a) Ha nem kívánja a csatornák sorrendjét megváltoztatni, menjen a 7. lépéshez.
b) Ha meg kívánja változtatni a csatornák sorrendjét:
1 Nyomja meg a vagy a gombot aprogramszám kiválasztásához a csatornával
(televízióadó), melynek helyét meg kívánjaváltoztatni, majd ezt követően nyomja
meg a .
2 Nyomja meg a vagy a az új programszám kiválasztásához, melyen a
kiválasztott csatornát (televízióadót) rögzíteni kívánja, majd nyomja meg az OK
gombot.
3 Ismételje meg a b1) és b2) lépést egyéb televíziócsatornák újbóli átrendezéséhez.
7 Nyomja meg a MENU gombot a normális televízióképhez való visszatéréshez.
HU
A projektoros TV működésre kész.
Első üzembehelyezés
9
Page 82

A színátfedések beállítása (Konvergencia)
A földmágnesesség következtében a kép határozatlan lehet, a képek kontúrján a különböző színek keveredhetnek. Ebben
az esetben a továbbiakban leírtak szerint járjon el.
A piros, zöld és kék vonalak
autokonvergenciája
Nyomja felfelé a készülék előlapján lévő fedelet az elülső aljzatok
1
megjelenítéséhez.
2 Nyomja meg a / gombot.
Megkezdődik az autokonvergencia funkció, mely körülbelül 10
másodpercig tart. Amikor a fehér kereszt eltűnik a képernyőről, a
projektoros TV működésre kész.
Az autokonvergencia funkció nem működik ha
• nincsen bemeneti jel.
• gyenge a bemeneti jel.
• a képernyő erős fényforrásnak vagy közvetlen napsugárzásnak
van kitéve.
• a teletextet nézi.
• a NexTViewt nézi.
Bevezetés a képernyő menürendszereibe és azok
használata
Ez a projektoros TV egy a képernyőn megjelenő menürendszert alkalmaz a különböző műveletekben való eligazodáshoz.
Használja a távvezérlő következő gombjait a menükben történő mozgáshoz:
1 Nyomja meg a MENU gombot, hogy a menü első szintje megjelenjen a képernyőn.
2 • A kívánt menü vagy opció kiemeléséhez nyomja meg vagy .
• A választott menübe vagy opcióba történő belépéshez nyomja meg .
• A menübe vagy az előző opcióhoz való visszatéréshez nyomja meg .
• A választott opció beállításainak módosításához nyomja meg //vagy .
• Választásának megerősítésére és rögzítésére nyomja meg az OK gombot.
Képbeállítás
Kép üzemmód
Kontraszt
Fényerő
Színtelítetség
Képélesség
Törlés
Zajcsökkentő
Kiválasztás: Menü beírása:
MENU
Egyéni
AUTO
Képbeállítás
Kép üzemmód
Kontraszt
Fényerő
Színtelítetség
Képélesség
Törlés
Zajcsökkentő
Kiválasztás: Menü beírása:
Egyéni
AUTO
3 Nyomja meg a MENU gombot a normális televízióképhez valóvisszatéréshez.
Első üzembehelyezés – A képernyőn megjelenő menürendszerek
10
MENU
Page 83

Gyors útmutató a menükben való mozgáshoz
Képbeállítás
Kép üzemmód
Kontraszt
Fényerő
Színtelítetség
Képélesség
Törlés
Zajcsökkentő
Kiválasztás: Menü beírása:
Hangszabályozás
Effekt
Magas hangszín
Mély hangszín
Balansz
Törlés
Kettős hang
Auto hangerőszab
TV hangszóró
Kiválasztás: Menü beírása:
Jellemzők
Kikapcs. időzítő
AV3 kimenet
PIP forrás
PIP pozíciója
Kiválasztás: Menü beírása:
Egyéni
AUTO
Természetes
Stereo
Be
Képbeállítás
Kép üzemmód
Kontraszt
Fényerő
Színtelítetség
Képélesség
Törlés
Zajcsökkentő
Kiválasztás: Beírás:
Hangszabályozás
Effekt
Magas hangszín
Mély hangszín
Balansz
Törlés
Kettős hang
Ki
Ki
AUTO
AV1
Auto hangerőszab
TV hangszóró
Kiválasztás: Beírás:
Jellemzők
Kikapcs. időzítő
AV3 kimenet
PIP forrás
PIP pozíciója
Kiválasztás: Beírás:
Jellemzők
Kikapcs. időzítő
AV3 kimenet
PIP forrás
PIP pozíciója
Kiválasztás: Beírás:
Jellemzők
Kikapcs. időzítő
AV3 kimenet
PIP forrás
PIP pozíciója
Kiválasztás: Beírás:
Jellemzők
Kikapcs. időzítő
AV3 kimenet
PIP forrás
PIP pozíciója
Egyéni
AUTO
Természetes
Stereo
Lásd “Képbeállítás” fejezetet a 12. oldalon.
Lásd “Hangszabályozás” fejezetet a 12. oldalon.
Ki
Be
Ki
AUTO
AV1
Lásd “Kikapcsolás időzítő” fejezetet a 13. oldalon.
Ki
AUTO
AV1
Lásd “AV3 Kimenet” fejezetet a 13. oldalon.
Ki
AUTO
AV1
Lásd “PIP forrás” fejezetet a 13. oldalon.
Ki
AUTO
AV1
Lásd “PIP pozíciója” fejezetet a 14. oldalon.
Set Up
Set Up
Beállítás
Nyelv/Ország
Auto Tuning
Auto Tuning
Automatikus hangolás
Programme Sorting
Programme Sorting
Programhely-átrendezés
Select NexTView
Select NexTView
Programnevek
AV Preset
AV Preset
AV beállítás
Manual Set Up
Manual Set Up
Kézi hangolás
Részlet beállítása
Select:
Select:
Enter Menu:
Enter Menu:
Kiválasztás:
Menü beírása:
Kiválasztás: Beírás:
Beállítás
Nyelv/Ország
Automatikus hangolás
Programhely-átrendezés
Programnevek
AV beállítás
Kézi hangolás
Részlet beállítása
Kiválasztás:
Beállítás
Nyelv/Ország
Automatikus hangolás
Programhely-átrendezés
Programnevek
AV beállítás
Kézi hangolás
Részlet beállítása
Automatikus hangolás elindítása:
Kiválasztás:
Beállítás
Nyelv/Ország
Automatikus hangolás
Programhely-átrendezés
Programnevek
AV beállítás
Kézi hangolás
Részlet beállítása
Kiválasztás:
Beállítás
Nyelv/Ország
Automatikus hangolás
Programhely-átrendezés
Programnevek
AV beállítás
Kézi hangolás
Részlet beállítása
Kiválasztás:
Beállítás
Nyelv/Ország
Automatikus hangolás
Programhely-átrendezés
Programnevek
AV beállítás
Kézi hangolás
Részlet beállítása
Kiválasztás:
Beírás:
Beállítás
Nyelv/Ország
Automatikus hangolás
Programhely-átrendezés
Programnevek
AV beállítás
Kézi hangolás
Részlet beállítása
Kiválasztás:
Beírás:
Set Up
Set Up
Beállítás
Auto Tuning
Auto Tuning
Nyelv/Ország
Automatikus hangolás
Programme Sorting
Programme Sorting
Programhely-átrendezés
Select NexTView
Select NexTView
Programnevek
AV Preset
AV Preset
AV beállítás
Manual Set Up
Manual Set Up
Kézi hangolás
Részlet beállítása
Select:
Select:
Enter Menu:
Enter Menu:
Kiválasztás:
Menü beírása:
Beírás:
Beírás:
Beírás:
Lásd “Nyelv/Ország” fejezetet a 14. oldalon.
Lásd “Automatikus hangolás” fejezetet a 14. oldalon.
Lásd “Programhelyek átrendezése” fejezetet a 14. oldalon.
Lásd “Programnevek” fejezetet a 15. oldalon.
Lásd “AV beállítás” fejezetet a 15. oldalon.
Lásd “Kézi hangolás” fejezetet a 16. oldalon.
Részlet beállítása
RGB pozicionálás
0
Lásd “RGB pocicionálás” fejezetet
a 17. oldalon.
Kiválasztás:
Beírás:
HU
A képernyőn megjelenő menürendszerek
11
Page 84

Útmutató a menükhöz
1. szint 2. szint 3. szint / funkció
Képbeállítás
Kép üzemmód
Kontraszt
Fényerő
Színtelítetség
Képélesség
Törlés
Zajcsökkentő
Kiválasztás: Menü beírása:
Egyéni
AUTO
Képbeállítás
Kép üzemmód
Kontraszt
Fényerő
Színtelítetség
Képélesség
Törlés
Zajcsökkentő
Kiválasztás: Beírás:
Egyéni
AUTO
KÉPBEÁLLÍTÁS
A “Képbeállítás” menü a kép beállításainak módosítását teszi
lehetővé.
Ehhez az Ön által módosítani kívánt opció kiválasztása után,
nyomja meg a . Ezt követően többször egymás után nyomja meg
a //vagy a beállítás módosításához, majd végezetül
nyomja meg az OK-t a rögzítéshez
• Ez a menü szintén lehetővé teszi a kép üzemmód módosítását az Ön által nézett program típusának megfelelően:
Kép üzemmód Élő (élő televíziós közvetítéseknél, DVD és Digital Set Top Box vevőegységnél)
Egyéni (egyéni ízléshez).
Mozi (filmekhez)
• A Fényerő, a Színtelítettség és a Képélesség csak akkor módosítható, ha az Egyéni képernyő üzemmódot választotta ki.
• A Színárnyalat csak az NTSC színrendszerhez áll rendelkezésre (pl.: USA videokazetták).
• A gyárilag beállított képbeállítások visszaállításához válassza ki a Törlés-t majd nyomja meg az OK-t.
• A ”Zajcsökkentő” opció az „AUTO”-ban beállításra került a gyenge TV jelek esetén a kép által okozott zaj automatikus
csökkentése végett. Ha ezt a funkciót törölni kívánja, ”AUTO” helyett válasszon ”Ki”-t.
Képbeállítás
Kép üzemmód
Kontraszt
Fényerő
Színtelítetség
Képélesség
Törlés
Zajcsökkentő
Kiválasztás: Menü beírása:
Egyéni
AUTO
HANGSZABÁLYOZÁS
A “Hangszabályozás” menü lehetővé teszi a hangbeállítások
módosítását.
Ehhez, a módosítani kívánt opció kiválasztása után, nyomja meg
a gombot. Ezt követően nyomja meg többször egymás után
Hangszabályozás
Effekt
Természetes
Magas hangszín
Mély hangszín
Balansz
Törlés
Kettős hang
Auto hangerőszab
TV hangszóró
Kiválasztás: Menü beírása:
Stereo
Hangszabályozás
Természetes
Effekt
Magas hangszín
Mély hangszín
Balansz
Törlés
Kettős hang
Ki
Be
Auto hangerőszab
TV hangszóró
Kiválasztás: Beírás:
Stereo
Ki
Be
a //vagy a beállítás módosításához, majd végezetül
nyomja meg az OK-t a rögzítéshez.
Effekt Természetes: A “BBE High Definition Sound System”*-en keresztül kiemeli a hang élességét, részleteit
és jelenlétét.
Dinamikus: A “BBE High Definition Sound System”* felerősíti a hang élességét és jelenlétét, jobban
kivehető hangot és valósabb zenét adva.
Dolby** V: Dolby Virtual, a “Dolby Pro Logic Surround” hangját utánozza.
Ki: Speciális hangeffektusok nélkül.
Magas hangszín
Kevésbé Több
Mély hangszín Kevésbé Több
Balansz Bal Jobb
Törlés Visszaállítja a gyárban beállított hangszinteket.
K
Kettős hang • Sztereo adásokhoz:
Mono.
Stereo.
• Kétnyelvű adásokhoz:
Mono (mono csatornához, ha rendelkezésre áll).
A (az 1. csatornához).
B (az 2. csatornához).
Auto hangerő Ki: A hangerő a sugárzott jel függvényében változik.
Be: A hangerő a sugárzott jeltől függetlenül ugyanaz marad (pl.: hírdetések).
TV hangszóró Be: Közvetlenül a televízió hangszóróin keresztül történő televízióhallgatáshoz.
Ki: A televízió hangszóróit kikapcsolja ahhoz, hogy azt csak egy külső erősítőről hallgassa, melyet a
televízió hátsó részén található audio kimenő csatlakozókhoz kapcsolt.
• Ha fülhallgatón keresztül hallgatja a televíziót, az “Effekt” opció automatikusan “Ki” pozícióra vált.
• Ha az “Dolby Virtual”-ban beállítja a “Effekt”-t, az “Auto hangerő” automatikusan “Ki” pozícióba kapcsol és fordítva.
* A BBE High Definition Sound System-et a Sony Corporation gyártja a BBE Sound, Inc. licence alapján. Az 4,638,258 és
No. 4,482,866 sz. USA szabadalommal védve. A “BBE” szó és “BBE” jelkép a BBE Sound, Inc. kereskedelmi márkái.
**Ezt a televíziót a “Dolby Surround” hangeffektus kiadásához tervezték, mely 4 hangszóró hangját utánozza a televízió két
hangszórójával. Ez csak akkor lehetséges, ha az adó audio jele “Dolby Surround”.
Ezenkívül még javíthatja a hangeffektust egy külső erősítő csatlakoztatásával. További információt a 21. oldalon, a “Külső
audio készülék csatlakoztatása” c. fejezetben talál.
**Gyártva a Dolby Laboratories szabadalmi engedélye alapján. “Dolby”, “Pro Logic” és a dupla D jelkép, a Dolby
Laboratories védjegye.
A képernyőn megjelenő menürendszerek
12
folytatódik…
Page 85

1. szint 2. szint 3. szint / funkció
Képbeállítás
Kép üzemmód
Kontraszt
Fényerő
Színtelítetség
Képélesség
Törlés
Zajcsökkentő
Kiválasztás: Menü beírása:
Egyéni
AUTO
KIKAPCSOLÁS IDŐZÍTŐ
Az “Jellemzők” menün belüli “Kikapcs. Időzítő” opció lehetővé
teszi egy olyan időtartam kiválasztását, melynek elteltével a
projektoros TV automatikusan készenléti üzemmódba (standby)
kapcsol.
Jellemzők
Kikapcs. időzítő
AV3 kimenet
PIP forrás
PIP pozíciója
Kiválasztás: Menü beírása:
AUTO
Ki
AV1
Jellemzők
Kikapcs. időzítő
AV3 kimenet
PIP forrás
PIP pozíciója
Kiválasztás: Beírás:
AUTO
Ki
AV1
Ehhez az opció kiválasztása után nyomja meg . Ezt követően
nyomja meg vagy az időtartam kiválasztásához (legfeljebb 4
óra).
• Ha meg kívánja tekinteni a kikapcsolásig fennmaradó időt miközben a televíziót nézi, nyomja meg a gombot.
• Egy perccel a projektoros TV készenléti üzemmódba kapcsolása előtt a fennmaradó idő megjelenik a képernyőn.
Képbeállítás
Kép üzemmód
Kontraszt
Fényerő
Színtelítetség
Képélesség
Törlés
Zajcsökkentő
Kiválasztás: Menü beírása:
Jellemzők
Kikapcs. időzítő
AV3 kimenet
PIP forrás
PIP pozíciója
Egyéni
AUTO
AUTO
Ki
AV1
Jellemzők
Kikapcs. időzítő
AV3 kimenet
PIP forrás
PIP pozíciója
AUTO
Ki
AV1
AV3 KIMENET
A “Jellemzők” menün belüli “AV3 kimenet” opció lehetővé teszi az
S
3/ 3 eurocsatlakozó kimeneti forrásának kiválasztását,
hogy ily módon rögzíthessen az eurocsatlakozóról bármely, a
televízióból vagy egyéb, az 1/ 1 vagy 2/ 2
eurocsatlakozóhoz vagy a 4 vagy 4 és 4 elülső
S
aljzatokhoz csatlakoztatott külső készülékből jövő jelet.
Ha videomagnója rendelkezik Smartlinkkel, ez az eljárás
szükségtelen.
Kiválasztás: Menü beírása:
Kiválasztás: Beírás:
Ehhez, az opció kiválasztása után, nyomja meg . Ezt követően
nyomja meg vagy a kívánt TV, AV1, AV2, AV4, YC4 vagy
AUTO kimeneti jel kiválasztásához.
Ha az “AUTO”-t választja, a kimeneti jel mindig megegyezik majd a TV képernyőjén megjelenővel.
Ha az 3/ 3 eurocsatlakozóhoz vagy egy, az eurocsatlakozóhoz csatlakoztatott videomagnóhoz egy dekódert
S
csatlakoztat, ne feledje az “AUTO”-ban vagy a “TV”-ben az “AV3 kimenetet” kiválasztani a megfelelő dekódoláshoz.
Képbeállítás
Kép üzemmód
Kontraszt
Fényerő
Színtelítetség
Képélesség
Törlés
Zajcsökkentő
Kiválasztás: Menü beírása:
Egyéni
AUTO
PIP FORRÁS
A “Jellemzők” menün belüli “PIP forrás” opció lehetővé teszi a “PIP”
képernyőn látni kívánt forrás kiválasztását.
Ehhez az opció kiválasztása után nyomja meg . Ezt követően
nyomja meg többször egymás után vagy a kívánt bemeneti
Jellemzők
Kikapcs. időzítő
AV3 kimenet
PIP forrás
PIP pozíciója
Kiválasztás: Menü beírása:
AUTO
Ki
AV1
Jellemzők
Kikapcs. időzítő
AV3 kimenet
PIP forrás
PIP pozíciója
Kiválasztás: Beírás:
AUTO
Ki
AV1
B
A
forrás AV1, AV2, AV3, AV4, vagy TV kiválasztásához. Végül nyomja
meg OK-t annak rögzítéséhez.
A “PIP” képernyőn kiválasztott forrás nézéséhez nyomja meg
a távvezérlő / gombját.
HU
B
A
A
BB
Nyomja meg a távvezérlő / gombját a két képernyő
megcseréléséhez.
folytatódik…
A képernyőn megjelenő menürendszerek
13
Page 86

1. szint 2. szint 3. szint / funkció
Képbeállítás
Kép üzemmód
Kontraszt
Fényerő
Színtelítetség
Képélesség
Törlés
Zajcsökkentő
Kiválasztás: Menü beírása:
Jellemzők
Kikapcs. időzítő
AV3 kimenet
PIP forrás
PIP pozíciója
Egyéni
AUTO
AUTO
Ki
AV1
Jellemzők
Kikapcs. időzítő
AV3 kimenet
PIP forrás
PIP pozíciója
AUTO
Ki
AV1
PIP POZÍCIÓJA
A “Jellemzők” menün belüli “PIP pozíciója” opció lehetővé teszi a
“PIP” képernyő helyzetének változtatását.
Ehhez az opció kiválasztása után nyomja meg , , vagy a
kívánt pozíció kiválasztásához. Végül nyomja meg OK-t annak
rögzítéséhez.
Kiválasztás: Menü beírása:
Képbeállítás
Kép üzemmód
Kontraszt
Fényerő
Színtelítetség
Képélesség
Törlés
Zajcsökkentő
Kiválasztás: Menü beírása:
Set Up
Set Up
Beállítás
Nyelv/Ország
Auto Tuning
Auto Tuning
Automatikus hangolás
Programme Sorting
Programme Sorting
Programhely-átrendezés
Select NexTView
Select NexTView
Programnevek
AV Preset
AV Preset
AV beállítás
Manual Set Up
Manual Set Up
Kézi hangolás
Részlet beállítása
Select:
Select:
Kiválasztás:
Enter Menu:
Enter Menu:
Menü beírása:
Enter Menu:
Enter Menu:
Menü beírása:
Egyéni
AUTO
Egyéni
AUTO
Kiválasztás: Beírás:
Beállítás
Nyelv/Ország
Automatikus hangolás
Programhely-átrendezés
Programnevek
AV beállítás
Kézi hangolás
Részlet beállítása
Kiválasztás:
Beállítás
Nyelv/Ország
Automatikus hangolás
Programhely-átrendezés
Programnevek
AV beállítás
Kézi hangolás
Részlet beállítása
Automatikus hangolás elindítása:
Kiválasztás:
NYELV/ ORSZÁG
A “Beállítás” menün belüli “Nyelv/ Ország” opció lehetővé teszi a
képernyőn megjelenő menük nyelvének kiválasztását. Lehetővé
teszi azon ország kiválasztását is, ahol a televíziót használni kívánja.
Ehhez az opció kiválasztása után nyomja meg , majd ezt
követően járjon el a “A projektoros TV bekapcsolása és automatikus
hangolás” c. fejezet 2. és 3. (a 8. oldalon) lépéseiben leírtak szerint.
Beírás:
AUTOMATIKUS HANGOLÁS
A “Beállítás” menün belüli “Automatikus hangolás” opció lehetővé
teszi, hogy a televízió az összes rendelkezésre álló csatornát
(televízióadót) megkeresse és elraktározza.
Ehhez az opció kiválasztása után nyomja meg , majd ezt
követően járjon el a “A projektoros TV bekapcsolása és
automatikus hangolás” c. fejezet 4. és 5. (a 8. oldalon) lépéseiben
leírtak szerint.
Képbeállítás
Kép üzemmód
Kontraszt
Fényerő
Színtelítetség
Képélesség
Törlés
Zajcsökkentő
Kiválasztás: Menü beírása:
Set Up
Set Up
Beállítás
Nyelv/Ország
Auto Tuning
Auto Tuning
Automatikus hangolás
Programme Sorting
Programme Sorting
Programhely-átrendezés
Select NexTView
Select NexTView
Programnevek
AV Preset
AV Preset
AV beállítás
Manual Set Up
Manual Set Up
Kézi hangolás
Részlet beállítása
Kiválasztás:
Select:
Select:
A képernyőn megjelenő menürendszerek
14
Enter Menu:
Enter Menu:
Menü beírása:
Egyéni
AUTO
Beállítás
Nyelv/Ország
Automatikus hangolás
Programhely-átrendezés
Programnevek
AV beállítás
Kézi hangolás
Részlet beállítása
Kiválasztás:
PROGRAMHELYEK ÁTRENDEZÉSE
A “Beállítás” menün belüli “Programhely-átrendezés” opció
lehetővé teszi a csatornák (televízióadók) televízión való megjelenési
sorrendjének megváltoztatását.
Ehhez az opció kiválasztása után nyomja meg , majd ezt
követően járjon el a “A projektoros TV bekapcsolása és
automatikus hangolás” c. fejezet 6. b) (a 9. oldalon) lépésében
leírtak szerint.
Beírás:
folytatódik…
Page 87

1. szint 2. szint 3. szint / funkció
Képbeállítás
Kép üzemmód
Kontraszt
Fényerő
Színtelítetség
Képélesség
Törlés
Zajcsökkentő
Kiválasztás: Menü beírása:
Set Up
Set Up
Beállítás
Nyelv/Ország
Auto Tuning
Auto Tuning
Automatikus hangolás
Programme Sorting
Programme Sorting
Programhely-átrendezés
Select NexTView
Select NexTView
Programnevek
AV Preset
AV Preset
AV beállítás
Manual Set Up
Manual Set Up
Kézi hangolás
Részlet beállítása
Kiválasztás:
Select:
Select:
Enter Menu:
Enter Menu:
Menü beírása:
Egyéni
AUTO
Beállítás
Nyelv/Ország
Automatikus hangolás
Programhely-átrendezés
Programnevek
AV beállítás
Kézi hangolás
Részlet beállítása
Kiválasztás:
Beírás:
PROGRAMNEVEK
A “Beállítás” menün belüli “Programnevek” opció lehetővé teszi,
hogy egy legfeljebb öt karakterből álló névvel lásson el egy
csatornát.
Ehhez:
1 Az opció kiválasztása után nyomja meg , majd ezt követően
nyomja meg vagy az elnevezni kívánt csatorna számának
kiválasztásához.
2 Nyomja meg . A Címke oszlop első elemének kiemelésével
nyomja meg vagy egy betű, szám kiválasztásához vagy “-“
egy üres hely kiválasztásához, majd ezt követően nyomja meg
a karakter megerősítéséhez. A többi négy karaktert ugyanígy
válassza ki. Végezetül nyomja meg OK-t a rögzítéshez.
Képbeállítás
Kép üzemmód
Kontraszt
Fényerő
Színtelítetség
Képélesség
Törlés
Zajcsökkentő
Kiválasztás: Menü beírása:
Set Up
Set Up
Beállítás
Nyelv/Ország
Auto Tuning
Auto Tuning
Automatikus hangolás
Programme Sorting
Programme Sorting
Programhely-átrendezés
Select NexTView
Select NexTView
Programnevek
AV Preset
AV Preset
AV beállítás
Manual Set Up
Manual Set Up
Kézi hangolás
Részlet beállítása
Kiválasztás:
Select:
Select:
Enter Menu:
Enter Menu:
Menü beírása:
Egyéni
AUTO
Beállítás
Nyelv/Ország
Automatikus hangolás
Programhely-átrendezés
Programnevek
AV beállítás
Kézi hangolás
Részlet beállítása
Kiválasztás:
Beírás:
AV BEÁLLÍTÁS
A “Beállítás” menün belüli “AV beállítás” opció lehetővé teszi, hogy
elnevezzen egy, a televízióhoz csatlakoztatott külső készüléket.
Ehhez:
1 Az opció kiválasztása után nyomja meg , majd ezt követően
nyomja meg vagy az elnevezni kívánt bemeneti forrás
kiválasztásához (AV1, AV2 vagy AV3 a televízió hátsó részén lévő
eurocsatlakozókhoz csatlakoztatott választható készülékekhez
és AV4 az elülső aljzatokhoz). Ezt követően nyomja meg .
2 A “Címke” oszlopban automatikusan megjelenik egy előre
meghatározott címke:
a) Ha az előre meghatározott hat címke (CABLE, GAME, CAM,
DVD, VIDEO vagy SAT) valamelyikét akarja használni,
nyomja meg vagy annak kiválasztásához, majd
végezetül nyomja meg OK-t a rögzítéshez.
b) Ha saját címkét akar készíteni, válassza Módosít-t és nyomja
meg . Ezt követően, az első elem kiemelésével, nyomja
meg vagy egy betű, szám kiválasztásához vagy “-“ egy
üres hely kiválasztásához, majd ezt követően nyomja
meg a karakter megerősítéséhez. A többi négy karaktert
ugyanígy válassza ki, majd végezetül nyomja meg OK-t a
rögzítéshez.
HU
folytatódik…
A képernyőn megjelenő menürendszerek
15
Page 88

1. szint 2. szint 3. szint / funkció
Képbeállítás
Kép üzemmód
Kontraszt
Fényerő
Színtelítetség
Képélesség
Törlés
Zajcsökkentő
Kiválasztás: Menü beírása:
Set Up
Set Up
Beállítás
Nyelv/Ország
Auto Tuning
Auto Tuning
Automatikus hangolás
Programme Sorting
Programme Sorting
Programhely-átrendezés
Select NexTView
Select NexTView
Programnevek
AV Preset
AV Preset
AV beállítás
Manual Set Up
Manual Set Up
Kézi hangolás
Részlet beállítása
Kiválasztás:
Select:
Select:
Enter Menu:
Enter Menu:
Menü beírása:
Egyéni
AUTO
Beállítás
Nyelv/Ország
Automatikus hangolás
Programhely-átrendezés
Programnevek
AV beállítás
Kézi hangolás
Részlet beállítása
Kiválasztás:
Beírás:
KÉZI HANGOLÁS
A “Beállítás” menün belüli “Kézi hangolás” opció lehetővé teszi:
a) A csatornák (televízióadók) egyenkénti és a kívánt sorrendben történő beállítását valamint egy videobemenet beállítását.
Ehhez:
1 A “Kézi hangolás” opció kiválasztása után nyomja meg . A “Hangolás” opció kiemelésével nyomja meg , majd ezt
követően nyomja meg vagy a programszám (hely) kiválasztásához, melyen a televízióadót vagy videocsatornát
beállítani kívánja (a videocsatornához ajánlatos a “0” program kiválasztása). Nyomja meg .
2 A következő opció attól függően jelenik meg, hogy az “Nyelv/Ország” menüben melyik országot választotta.
A Rendszer opció kiválasztása után nyomja meg , majd ezt követően nyomja meg vagy a televízió sugárzási
rendszerének kiválasztásához (B/G Nyugat-Európában, D/ K Kelet-Európában, L Franciaországban vagy I NagyBritanniában). Nyomja meg . Figyelem! Magyarországon mind B/G, mind D/K hangnorma használatos.
3 A Csatorna opció kiválasztása után nyomja meg , majd ezt követően nyomja meg vagy a csatorna típusának
kiválasztásához (“C” földi csatornákhoz vagy “S” kábelcsatornákhoz). Nyomja meg . Ezt követően nyomja meg a
számgombokat a televízióadó csatorna vagy a videocsatorna jel számának közvetlen beviteléhez. Ha nem ismeri a
csatornaszámot, nyomja meg vagy annak megkereséséhez. Amikor a rögzíteni kívánt csatornát megtalálta, nyomja
meg az OK-t kétszer.
Ismételje meg ezeket a lépéseket további csatornák beállításához és rögzítéséhez.
b) Csatornák elnevezése legfeljebb öt karakterből álló névvel.
Ehhez a Hangolás opció kiemelésével nyomja meg a PROG +/ - az elnevezni kívánt program számának megjelenéséig.
Amikor ez megjelenik a képernyőn, válassza a Címke opciót, majd ezt követően nyomja meg . Nyomja meg vagy egy
betű, szám vagy “-“ egy betűköz kiválasztásához, majd nyomja meg a karakter megerősítéséhez. A további négy karaktert
ugyanilyen módon válassza ki. Az összes karakter kiválasztása után nyomja meg kétszer az OK-t a rögzítéshez.
c) Annak ellenére, hogy az automatikus finomhangolás (AFT) mindig be van kapcsolva, azt kézileg is be tudja állítani a jobb
képvétel érdekében, amennyiben a kép torzítva jelenik meg.
Ehhez, azon csatorna (televízióadó) nézése közben, melyen a finomhangolást el kívánja végezni, válassza ki az AFT opciót,
majd ezt követően nyomja meg . Nyomja meg vagy a csatornafrekvencia szintjének beállításához –15 és +15
között. Végezetül nyomja meg kétszer az OK-t a rögzítéshez.
d) A nem kívánt programakhelyek kihagyása a PROG +/ - gombokkal történő kiválasztáskor való átugrással.
Ehhez a Hangolás opció kiemelésével nyomja meg a PROG +/ - a kihagyni kívánt program számának megjelenéséig. Amikor
ez megjelenik a képernyőn, válassza az Ugrás opciót, majd ezt követően nyomja meg . Nyomja meg vagy az Igen
kiválasztásához, majd végezetül nyomja meg kétszer az OK-t a rögzítéshez.
Ha a későbbiekben ezt a funkciót törölni kívánja, válassza újból a “Nem”-et az “Igen” helyett.
e) Nézhet kódolt adást is a hármas 3/ 3 eurocsatlakozóhoz csatlakoztatott dekóderről vagy az ahhoz csatlakoztatott
videomagnóval felvételt is készíthet.
S
A következő opció attól függően jelenik meg, hogy az “Nyelv/Ország” menüben melyik országot választotta.
Ehhez válassza ki a Dekóder opciót és nyomja meg . Ezt követően nyomja meg vagy a Be kiválasztásához.
Végezetül nyomja meg kétszer OK-t annak rögzítéséhez.
Ha a későbbiekban törölni akarja ezt a funkciót, válassza újból a “Ki”-t “Be” helyett.
A képernyőn megjelenő menürendszerek
16
folytatódik…
Page 89

1. szint 2. szint 3. szint / funkció
Képbeállítás
Kép üzemmód
Kontraszt
Fényerő
Színtelítetség
Képélesség
Törlés
Zajcsökkentő
Kiválasztás: Menü beírása:
Set Up
Set Up
Beállítás
Auto Tuning
Auto Tuning
Nyelv/Ország
Automatikus hangolás
Programme Sorting
Programme Sorting
Programhely-átrendezés
Select NexTView
Select NexTView
Programnevek
AV Preset
AV Preset
AV beállítás
Manual Set Up
Manual Set Up
Kézi hangolás
Részlet beállítása
Select:
Select:
Kiválasztás:
Enter Menu:
Enter Menu:
Menü beírása:
Egyéni
AUTO
Részlet beállítása
RGB pozicionálás
Kiválasztás:
Beírás:
RGB POCIONÁLÁS
RGB jelforrás csatlakoztatásakor, mint pl. egy “Playstation”,
előfordulhat, hogy szükséges a vízszintes képközép beállítása.
Ebben az esetben ezt a “Részlet beállítása” menün belüli “RGB
pozicionálás” opció használatával állíthatja be.
0
Ehhez az RGB jelforrás nézése közben
válassza ki az “RGB Közép” opciót és nyomja meg . Ezt
követően nyomja meg vagy a képközepelés -10 és +10
közötti beállításához. Végezetül nyomja meg az OK-t a rögzítéshez.
HU
A képernyőn megjelenő menürendszerek
17
Page 90

Teletext
A teletext a legtöbb televízióadó által sugárzott információs szolgáltatás. A teletext tartalomjegyzék oldala (általában a 100.
oldal) nyújt a szolgáltatás használatára vonatkozó tájékoztatást. A teletexten belül használja a távvezérlő gombjait az ezen
az oldalon leírtak szerint.
• Győződjön meg arról, hogy erős jellel rendelkező televízió csatornát használ, ellenkező esetben a teletextben hibák
adódhatnak.
• Ha ugyanazt a teletext oldalt 5 percnél tovább, egyetlen gomb lenyomása nélkül nézi, a kép fényerőszintje automatikusan
és szembetűnően lecsökken azért, hogy a készülék katódsugár csöveinek rongálódását elkerülje. A kép
fényerőszintjének visszaállításához nyomja meg a távvezérlő bármelyik gombját.
A Teletext szolgáltatásba való belépés:
Miután kiválasztotta azt a csatornát (televízióadót), mely az Ön által nézni kívánt
teletext szolgáltatást sugározza, nyomja meg .
TELETEXT
Index
Programme
News
Sport
Weather
Teletext oldal kiválasztása:
A távvezérlő gombjainak használatával vigye be az Ön által megtekinteni kívánt
oldalszám három számjegyét.
• Ha eltéveszti, üssön be bármilyen három számjegyet, majd ezt követően üsse be
újra a helyes oldalszámot.
• Amennyiben az oldalszámláló nem áll le, ez azt jelenti, hogy a kért oldal nem áll
rendelkezésre. Ebben az esetben üssön be egy másik oldalszámot.
Az előző vagy a következő oldal kiválasztása:
Nyomja meg PROG + () vagy PROG - ().
A teletext tévéképernyő elé történő helyezése:
A teletext nézése közben nyomja meg . Újfent nyomja meg azt a teletext üzemmódból való
visszatéréshez.
Egy oldal kimerevítése:
Nyomja meg / . Újfent nyomja meg azt a kimerevítés törléséhez.
Rejtett információ láthatóvá tétele (pl.: fejtörők megoldásai):
Nyomja meg / . Újfent nyomja meg azt az információ elrejtéséhez.
Egy aloldal kiválasztásához:
Egy teletext oldal több aloldalból állhat. Ebben az esetben a bal felső részben megjelenő oldalszám
fehérről zöldre vált és egy vagy több nyíl jelenik meg az oldalszám mellett. Nyomja meg többször
egymás után a távvezérlő vagy gombját a kívánt aloldal nézéséhez.
25
153
101
98
18
A Teletext szolgáltatásból való kilépés:
Nyomja meg .
Fastext
A Fastext szolgáltatás lehetővé teszi, hogy egyetlen gomb lenyomásával hozzáférjen a teletext
oldalaihoz.
A teletext szolgáltatáson belül, amennyiben Fastext jeleket sugároznak, a képernyő alsó részén
megjelenik egy színkód menü, mely lehetővé teszi, hogy közvetlenül hozzáférjen egy oldalhoz.
Ehhez nyomja meg a távvezérlő megfelelő színű gombját (piros, zöld, sárga vagy kék).
Teletext
Page 91

NexTView*
* (a szolgáltatás rendelkezésre állásától függően).
A szolgáltatás Magyarországon jelenleg nem működik.
NexTView egy elektronikus műsormutató, mely a különböző televízióadók mősorairól tartalmaz tájékoztatást.
A műsorokról téma vagy dátum szerint kereshet tájékoztatást.
Ha a NexTView nézésekor helytelen betűk jelennek meg, a menürendszer használatával lépjen be a “Nyelv/Ország” menübe (lásd
14. oldal) és válassza ki a NexTView sugárzási nyelvével megegyezõ nyelvet.
A NexTView bekapcsolása
1 Válasszon egy olyan televízióadót, mely NexTView-t sugároz. Ebben az esetben a ”NexTView” felirat néhány pillanatra megjelenik a
képernyőn, amint az információ rendelkezésre áll.
2 A NexTView szolgáltatás nézéséhez két különbözõ típusú NextView interface (közvetítés) áll rendelkezésére a hozzáférhetõ adatok
százalékától függõen:
a) “Programlista” interface:
A TV nézése közben, a fehér színő “NexTView” felirat képernyõn való megjelenése után, nyomja meg a távvezérlõ gombját
a “Programlista” interface nézéséhez (lásd az 1. rajzot).
b) “Áttekintés” interface:
A TV nézése közben, miután a NexTView adatok több mint 50 százaléka hozzáférhetõ lesz (az adatok 100 százalékig nem
mindig hozzáférhetõek a területtõl függõen), a fekete színű “NexTView” felirat megjelenik a képernyõn. Ezután nyomja meg
a távvezérlõ gombját az “Áttekintés” interface nézéséhez (lásd az 2. rajzot).
Amint belépett a NexTView szolgáltatásba, a képernyõ bal alsó sarkában megjelenik a hozzárférhetõ NexTView adatok százaléka.
A szolgáltatásba való belépés után ez az adatszázalék nem növekszik.
3 A NexTView-n belüli mozgáshoz:
• Nyomja meg vagy a jobb illetve balirányú mozgáshoz.
• Nyomja meg vagy a felfelé illetve lefelé történő mozgáshoz.
• Nyomja meg OK-t a választás megerősítéséhez.
4 A NexTView kikapcsolásához nyomja meg a távvezérlõ gombját.
“Programlista” interface (1. rajz): “Áttekintés” interface (2. rajz):
1
01
02
Hét
Ked03Sze04Csü05Pén06Szo07Vas 7 : 07 : 01
2
3
TV1
TV2
TV3
TV4
TV5
TV6
TV7
TV8
Songs from the shows
TV1 00:30 - 01:30 Thursday 04
Programme description
Songs from the shows
00 : 30
Weather forecast informati
01 : 30
A1 news magazine
05 : 30
Arts show
06 : 30
Oclock news
07 : 30
Weather forecast informati
08 : 30
A1 news magazine
09 : 30
Arts show
10 : 30
Felvétel Emlékeztető
4
5
1 Témák szerinti ikonok (lásd az “Ikonmagyarázat”-ot
lejjebb)
2 dátum
3 Áttekintés
4 Felvétel*
Ez a funkció csak akkor áll rendelkezésre, ha a televízió egy
SmartLinkkel rendelkező videomagnóhoz van csatlakoztatva és a
programozás időkapcsolóval történt.
Ha a kiválasztott műsort rögzíteni kívánja, nyomja meg a távvezérlõ
piros gombját.
1
2
3
01
02 03 04 05 06 07
Hét Ked Sze Csü Pén Szo Vas
9 : 00 9 : 30 10 : 00
TV1
Magazine
Weather Forecast | Mike's show
TV2
Euronews
TV3
Home Shopping Europe
TV4
News | Arts show | Magazine
TV5
Larry King's live | Euro Sports
TV6
Euro magazine | Euro Sports
TV7
Home Shopping Europe | Euronews
TV8
Songs from the shows
TV1 00:30 - 01:30 Thursday 04
Programme description
Felvétel Emlékeztető
4
|
Songs from the shows
|
Fantasy film
5
|
|
Euro Sports
5 Emlékeztető*
Ha azt kívánja, hogy a televízió emlékeztesse arra, hogy a kiválasztott műsor
nemsokára sugárzásra kerül, nyomja meg a távvezérlő zöld gombját. A
műsor tervezett sugárzási idejekor a képernyőn egy üzenet jelenik meg,
mely emlékezteti arra, hogy a műsor nemsokára kezdődik.
* Amint kiválasztott egy programot, a ”Felvétel” és “Emlékeztető” opciók megjelennek a képernyőn. Ezek azonban nem jelennek meg a
képernyőn ha egy olyan televíziócsatornán nézi a NexTView szolgáltatást, mely nem sugároz NexTView-t.
* ”Felvétel” és “Emlékeztető” nem állnak rendelkezésre ha a kiválasztott program már elkezdődött.
9 : 15 : 03
Star Wars
HU
Ikonmagyarázat:
teljes lista:
a különböző televízióadók mősorairól teljes tájékoztatást
nyújt.
előadások
gyermek
művészet
sport
hírek
filmek
zene
csatornaválasztás:
amennyiben a NexTView szolgáltató több mint nyolc
különböző televízióadóról nyújt tájékoztatást, nyolcat
kiválaszthat saját listájának elkészítéséhez.
Saját listájának elkészítése után az alapértelmezett lista is
visszaállítható. Ennek visszaállításához válassza ki az
“Auto (”-t a távvezérlô gombjának megnyomásával.
emlékeztető lista:
az emlékeztetővel kiválasztott összes mősorral (legfeljebb 5)
mutatja a listát.
NexTView
19
Page 92

Választható készülékek csatlakoztatása
E
F
G
H
S-VHS/Hi8/DVC
Kamera
8mm/Hi8/DVC
Kamera
A projektoros TV-hez választható készülékek széles skáláját csatlakoztathatja a továbbiakban bemutatott módon.
D
Videomagnó
Hi-fi
A
C
B
DVD
Videomagnó
Megengedett bemenő jelek
A Bemenet nélkül
B Audio/ video és RGB jelek
C Audio/ video és RGB jelek
D Audio/ video és S video jelek
E S video jel
F Video jel
G Audio jel
H Bemenet nélkül
Dekóder
A kép
torzulásának
elkerülése
érdekében
Egyidejűleg ne
csatlakoztasson
készülékeket a
E és F
csatlakozókba.
Rendelkezésre álló kimenő jelek
Audio jel
A TV állomáskereső video/ audio
A képernyőn látható video/ audio (képernyő kimenet)
A választott forrás video/ audio
Kimenet nélkül
Kimenet nélkül
Kimenet nélkül
Audio jel fülhallgatónak
Kiegészítő információ
20
folytatódik…
Page 93

A felhasználó optimális elhelyezkedése
További információ készülékek csatlakoztatásához
Video csatlakoztatása
Ajánlatos a videot a projektoros TV hátlapján lévő D eurocsatlakozóhoz csatlakoztatni. Ha nem rendelkezik eurocsatlakozóval,
ajánlatos a videojelet a “0” programra hangolni, ehhez lásd a használati útmutató “Kézi hangolás” c. fejezetét a 16. oldalon.
Ezenkívül lásd a video használati utasítását a videojel tesztcsatornájának beállításához.
Amennyiben videoja elfogadja a SmartLinket, lásd a használati utasítás “SmartLink” c. fejezetét a 22. oldalon.
Ha az 3/3 D eurocsatlakozóhoz vagy az említett eurocsatlakozóhoz csatlakoztatott videomagnóhoz dekódert
csatlakoztatott.
A “Beállítás” menüben válassza a “Kézi Hangolás” opciót, majd a “Dekóder”** opció kiválasztása után válassza a “Be”-t
( vagy használatával) a kódolt csatornához (a 16 oldalon).
** Ez az opció az “Ország” menüben kiválasztott ország szerint áll rendelkezésre (a 14 oldalon).
Külső audio készülék csatlakoztatása:
Ha televíziójának hangját zenekészüléke hangszóróin keresztül akarja élvezni, csatlakoztassa a készüléket a A audio
kimenethez, majd a menürendszerben válassza a “Hangszabályozás”-t. és a “TV hangszóró”-ben válassza a “Ki”-t.
A külső hangszórók hangereje a televízió távvezérlőjének hangerőszabályzó gombjaival állítható. A magas és mély szinteket
is változtathatja a “Hangszabályozás” menün keresztül (a 12 oldalon).
Zenekészülékén keresztül is élvezheti a “Dolby Virtual” hangeffektust.
Ehhez helyezze el zenekészülékének hangszóróit a televízió mindkét oldalán kb. 50 cm
távolságot hagyva a televízió és a hangszórók között.
A hangszórók elhelyezése után, a menürendszerek segítségével, válassza ki a
“Hangszabályozás” menüt és ezt követően az “Effekt” opcióban válassza a “Dolby V”-t (a 12
oldalon).
S
Hi-Fi készülék hangszórói
~50°
Választható készülékek használata
A csatlakoztatott készülék bemenő jelének képernyőn való megjelenítéséhez válassza ki annak a csatlakozónak a jelképét,
melyhez a készüléket csatlakoztatta. Pl. ha a : 1/ 1 jelképű csatlakozóhoz csatlakoztatta a készüléket, nyomja meg
többször a távvezérlő 1 gombját, amíg a jelkép megjelenik a képernyőn.
HU
A választható készüléket csatlakoztassa a televízió megfelelő bemenetéhez, ahogyan az előző
1
oldalon le van írva.
2
Kapcsolja be a csatlakoztatott készüléket.
3
A csatlakoztatott készülék képének megtekintéséhez nyomja meg többször egymás után ,
amíg a bemeneti jel helyes jelképe megjelenik a képernyőn.
Jelkép Bemeneti jelek
1
•
Eurocsatlakozón B keresztüli audio/ video bemeneti jel.
4
Mono hangrendszerű készülékek használata
A hangfrekvenciás csatlakozó kábelt csatlakoztassa a TV készülék előlapján található L/G/S/I aljzatra
és válassza ki a 4 vagy 4 bemenet jelét, felhasználva a fenti utasításokat. Végül hivatkozva a
jelen használati utasítás “hangbeállítás” részére, válassza ki a hangbeállítás menükép “Kettős hang”
“A” pontját (a 12 oldalon).
1
•
Eurocsatlakozón B keresztüli RGB bemeneti jel. Ez a jelkép csak abban az esetben
jelenik meg, ha csatlakoztatott RGB jelet adó készüléket.
2
•
Audio bemeneti jel / az C eurocsatlakozón keresztüli videomagnó
2
•
Az C eurocsatlakozón keresztüli RGB bemeneti jel
esetben jelenik meg, ha csatlakoztatott RGB jelet adó készüléket.
3
•
Eurocsatlakozón D keresztüli audio/ video bemeneti jel
S
3
•
Eurocsatlakozón D keresztüli S Video bemeneti jel. Ez a jelkép csak abban az
esetben jelenik meg, ha csatlakoztatott S Video jelet adó készüléket.
4
•
RCA F csatlakozón keresztüli video bemeneti jel és G-n keresztüli audio bemeneti
jel.
S
4
•
Az S video E csatlakozón keresztüli S video bemeneti jel és G keresztüli audio
bemeneti jel. Ez a jelkép csak abban az esetben jelenik meg, ha csatlakoztatott S
Video jelet adó jelet adó készüléket.
Nyomja meg a távvezérlő gombját a normál tévéképernyőhöz való visszatéréshez.
S
.
Ez a jelkép csak abban az
.
.
Kiegészítő információ
21
Page 94

SmartLink
Videomagnó
A SmartLink egy olyan, a televízió és egy videokészülék közti kapcsolat, mely lehetővé teszi
bizonyos információk közvetlen átjuttatását
A SmartLink használatához szüksége van:
• Egy SmartLinkkel, NexTView Linkkel, Easy Linkkel vagy Megalogic-kal rendelkező
videomagnóra.
Megalogic a Grundig Corporation bejegyzett kereskedelmi márkaneve.
Easy Link a Philips Corporation kereskedelmi márkaneve.
• Egy 21 pólusú komplett eurocsatlakozóra, a videomagnó csatlakoztatásához a projektoros TV
hátlapján lévő :3/q3 (SMARTLINK) eurocsatlakozóhoz.
A SmartLink főbb jellemzői:
• Hangolási információ (pl. programlista) átvitelét teszi lehetővé a televíziókészülékről a
videomagnóra.
• A televízióról történő közvetlen rögzítés: mialatt a televíziót nézi, csak a videomagnó egy
gombját kell megnyomnia a műsor rögzítéséhez.
• Automatikus bekapcsolás: mialatt a projektoros TV készenléti üzemmódban (standby) van,
nyomja meg a videomagnó “Play z” gombját és a projektoros TV automatikusan bekapcsol.
Ha további információra van szüksége a Smartlinkkel kapcsolatosan, nézze meg
videomagnója használati útmutatóját.
Dekóder
22
Kiegészítő információ
Page 95

A távvezérlő beállítása DVD-hez vagy videomagnóhoz
2
1
3
Ez a távvezérlő nemcsak ezen Sony televízió funkcióinak ellenőrzésére, hanem Sony DVD-je és a legtöbb Sony videomagnó
alapfunkcióinak ellenőrzésére is szolgál, anélkül, hogy szükséges lenne a távvezérlő beállítása.
Egyéb DVD és videomagnó márkák, valamint néhány Sony videomagnó irányításához be kell állítsa a távvezérlőt az első
használat előtt. Ehhez a következő lépéseket hajtsa végre:
• Mielőtt elkezdené, keresse meg a DVD vagy a videomagnó márkájához tartozó háromjegyű kódot (lásd az alábbi
táblázatot). Amely márkánál több kód jelenik meg, üsse be közülük az elsőt.
• Sony törekszik a kódok piacváltozást követő aktualizálására. A naprakész kódtáblázatot a távvezérlőt tartalmazó
zacskóban találja.
1 Nyomja meg többször egymás után a távvezérlő Készülékválasztó gombját, amíg a zöld fény a kívánt
pozícióba kerül DVD vagy VCR (videomagnóhoz).
Ha a Készülékválasztó TV pozícióban van, semmilyen kódot nem rögzíthet.
2 Mialatt a zöld fény a kívánt pozícióban világít, nyomja meg a távvezérlő sárga gombját kb. 6
másodpercig, amíg a zöldfényű kijelző elkezd pislogni.
3 Mialatt a zöldszínű kijelző pislog, üsse be a távvezérlő számgombjaival a használni kívánt készüléknek
megfelelô háromjegyű kódot.
Ha a beütött kód létezik, a három zöldfényű kijelző egy pillanatra felvillan. Ellenkező esetben
ismételje meg az előző lépéseket.
4 Kapcsolja be a használni kívánt készüléket és győzödjön meg arról, hogy a fontosabb funkciókat
irányítja-e a távvezérlővel.
• Ha a készülék vagy néhány funkciója nem működik, ismételje meg az összes előző lépést és
győzödjön meg arról, hogy a helyes kódot üti be vagy több kód esetén próbálkozzon a
következővel addig, amíg a helyes kódra rátalál.
• A rögzített kódok törlödnek amennyiben a lemerült elemeket egy percen belül nem cseréli ki.
Ebben az esetben ismételje meg az összes előző lépést. Az elemek fedelének belső részén
található egy címke, amelyre a kódot feljegyezheti.
• Sem az összes márka, sem az összes modell nem került figyelembevételre.
A videomagnó márkákhoz tartozó lista
Márka Kód Márka Kód
SONY (VHS) 301, 302, 303, 308, 309 SONY 001
SONY (BETA) 303, 307, 310 AIWA 021
SONY (DV) 304, 305, 306 DENON 018, 027, 020, 002
AIWA 325, 331, 351 GRUNDIG 009, 028, 023, 024, 016, 003
AKAI 326, 329, 330 HITACHI 025, 026, 015, 004
DAEWOO 342, 343 JVC 006, 017
GRUNDIG 358, 355, 360, 361, 320, 351 KENWOOD 008
HITACHI 327, 333, 334 LG 015, 014
JVC 314, 315, 322, 344, 352, 353, 354, 348, 349 LOEWE 009, 028, 023, 024, 016, 003
LG 332, 338 MATSUI 013, 016
LOEWE 358, 355, 360, 361, 320, 351 ONKYO 022
MATSUI 356, 357 PANASONIC 018, 027, 020, 002
ORION 328 PHILIPS 009, 028, 023, 024, 016, 003
PANASONIC 321, 323 PIONEER 004
PHILIPS 311, 312, 313, 316, 317, 318, 358, 359 SAMSUNG 011, 014
SAMSUNG 339, 340, 341, 345 SANYO 007
SANYO 335, 336 SHARP 019, 027
SHARP 324 THOMSON 012
THOMSON 319, 350 TOSHIBA 003
TOSHIBA 337 YAMAHA 018, 027, 020, 002
A DVD márkákhoz tartozó lista
HU
Kiegészítő információ
23
Page 96

Optimális látószög
Ahhoz, hogy optimális képminőséget kapjon, igyekezzen a projektoros TV-t úgy elhelyezni, hogy a képernyőt a
továbbiakban bemutatott szögekből lássa.
Vízszintes látószög
minimális távolság 2.1 m.
75
75
Függőleges látószög
(a felhasználónak ajánlott helyzet)
minimális távolság 2.1 m.
27.5
27.5
Kiegészítő információ
24
(a felhasználónak ajánlott helyzet)
Page 97

Műszaki jellemzők
MINŐSÉGTANÚSÍTÁS
A 291984. (III.10.) BkM-IpM együttes rendelet értelmében - mint forgalmazá - tanúsitjuk, hogy a SONY (KP-41PX2) tipusú szines
televizió megfelel az alábbi műszaki értékeknek.
Érintésvédelmi osztály: II.
Sugárzási szabvány:
A kiválasztott országtól függően:
B/G/H, D/K, L, I.
Szín szabvány:
PAL, SECAM
NTSC 3.58, 4.43 (csak videobemenet)
Fogható csatornák:
VHF: E2-E12
UHF: E21-E69
CATV: S1-S20
HYPER: S21-S41
D/K: R1-R12, R21-R69
L: F2-F10, B-Q, F21-F69
I: UHF B21-B69
Kivetített képméret:
sík 41” (kb. 103 cm képcsőméret).
Hátsó aljzatok:
1/ 1 21 pólusú eurocsatlakozó (CENELEC
szabvány) beleértve audio/ video bemenet,
RGB bemenet, TV audio/ video kimenet.
2/ 2 21 pólusú eurocsatlakozó (CENELEC
szabvány) beleértve audio/ video bemenet,
RGB bemenet, képernyő audio/ video kimenet.
3/ 3 21 pólusú eurocsatlakozó (CENELEC
(SMARTLINK)
Elülső aljzatok:
fülhallgató csatlakozó
S
szabvány) beleértve audio/ video bemenet, S
video bemenet, választható audio/ video
bemenet és SmartLink csatlakoztatás.
Audio kimenetek (bal/ jobb) – RCA aljzatok.
S
4 S video bemenet – 4 pólusú DIN
4 video bemenet – RCA csatlakozó
4 audio bemenet – RCA csatlakozó
Hangfrekvenciás kimenőteljesítmény:
2 x 30 W (zenei teljesítmény)
2 x 15 W (RMS)
Teljesítményfelvétel:
225 W
Teljesítményfelvétel készenléti üzemmódban (standby):
< 0.7 W
Méretek (szél. x mag. x mély.)
Kb. 948 x 992 x 511 mm.
Tömeg:
Kb. 44 Kg.
Mellékelt tartozékok:
1 db távvezérlő RM-938 modell
2 db IEC szabvány szerinti elem (AA méret)
Egyéb jellemzők:
• Digitális fésűs szűrő (nagy felbontású).
• 100 Hz-es kép, Digital Plus.
• Teletext, Fastext, TOPtext (250 oldalas teletext memória).
• NICAM.
• Kikapcsolás Időzítő.
•SmartLink (a televízió és egy kompatibilis videokészülék
közötti közvetlen kommunikáció. Ha további információra
van szüksége a Smartlinkkel kapcsolatosan, nézze meg
videomagnója használati útmutatóját).
• A TV rendszer automatikus felmérése.
• Dolby Virtual.
• BBE.
• PIP (az angol “Picture in Picture”-ből = Kép a képben).
• ACI (az angol “Auto Channel Installation” = Automatikus
Csatornatelepítés).
HU
A design és a műszaki jellemzők előzetes bejelentés nélkül változhatnak.
Környezetbarát papír – Klórmentes
Kiegészítő információ
25
Page 98

Problémamegoldás
Az alábbiakban ismertetünk néhány egyszerű megoldást arra az esetre, ha valamilyen kép- vagy hangprobléma fordulna elő.
Probléma
Nincs kép (a képernyő sötét) és nincs hang.
Gyenge a kép vagy nincs kép (a képernyő
sötét), de jó a hang.
A televízió hátlapján lévő eurocsatlakozóhoz
csatlakoztatott választható készüléknek
nincs képe vagy nincs információs menüje.
Jó képminőség, de nincs hang.
A színes műsorok nem láthatók színesben.
A televízió kikapcsolása előtti utolsó nézett
csatorna nem jelenik meg a televízió
bekapcsolásakor.
Elmosódott kép, a kép kontúrján a különböző
színek keverednek.
Zajos kép.
Megoldás
•Ellenőrizze az antennacsatlakozást.
• Csatlakoztassa a készüléket a fali aljzathoz és nyomja meg a gombot az
előlapon.
•Ha a televízió jelzője világít, nyomja meg a távvezérlő TV gombját.
•A menürendszerben válassza ki a “Képbeállítás”-t és válassza a “Törlés”-t a gyárilag
beállított értékek visszanyeréséhez (a 12 oldalon).
•Győzödjön meg arról, hogy a választható készüléket bekapcsolta, majd nyomja meg
többször a távvezérlő gombját, amíg a helyes bemeneti jelkép megjelenik a
képernyőn (a 21 oldalon).
• Nyomja meg a távvezérlő + gombját.
• Ellenőrizze, hogy a “Hangszabályozás” menün belüli “TV hangszóró” opció az “Be”
pozícióban legyen kiválasztva (a 12 oldalon).
• Győződjön meg arról, hogy a fülhallgatót kikapcsolta-e.
• A menürendszerben válassza ki a “Képbeállítás”-t, és válassza a “Törlés”-t a gyárilag
beállított értékek visszanyeréséhez.
• Ez nem jelent helytelen működést. Nyomja meg a távvezérlõ számgombjait a kívánt
csatorna kiválasztásához.
• Állítsa be a színek átfedését. További információt a 10. oldalon, a “A színátfedések
beállítása (Konvergencia)” c. fejezetben talál.
• A menürendszerben a “Kézi Hangolás” menün belül válassza az “AFT” opciót és
állítsa be a hangolást a jobb képvétel érdekében (a 16 oldalon).
• A menürendszerben a “Képbeállítás” menün belül válassza az “Zajcsökkentő” opciót
és válassza a “AUTO”-t a kép zajának csökkentésére (a 12 oldalon).
S
3/ 3 eurocsatlakozóhoz
csatlakoztatott dekóderen keresztül nézett
kódolt csatorna képe nem tökéletesen
dekódolt vagy nem stabil.
Programváltáskor vagy a teletext
kiválasztásakor a kép eltorzul.
A teletext adások vételekor helytelen
karakterek jelennek meg a képernyőn.
A NexTView nézésekor helytelen betűk
jelennek meg.
A kép fényerőszintje szembetűnően
lecsökken egy teletext oldal nézésekor.
A távvezérlő nem működik.
A készenléti üzemmód (standby) jelzője
villog.
• A menürendszeben válassza a “Jellemzők”-t és a “TV”-ben válassza a “AV3 kimenet“
(a 13 oldalon).
• Ellenőrizze, hogy a dekódert nem az 2/ 2 eurocsatlakozóhoz csatlakoztatta.
• Kapcsolja ki a készülék hátlapján lévő 21 pólusú eurocsatlakozóhoz csatlakoztatott
készüléket.
• Ha a menürendszert használja, lépjen be a “Nyelv/Ország“ menübe (a 14 oldalon),
és válassza azt az országot, ahol a Készüléket működteti. A cirill abc-t használó
nyelveknél válassza Oroszországot, ha a lista nem tartalmazza azt az országot, ahol
Ön a készüléket használja.
• A menürendszer használatával lépjen be a “Nyelv/Ország” menübe (a 14 oldalon) és
válassza ki a NexTView sugárzási nyelvével megegyezõ nyelvet.
•Ez nem jelenti a készülék nem megfelelő működését. Ha ugyanazt a teletext oldalt 5
percnél tovább, egyetlen gomb lenyomása nélkül nézi, a kép fényerőszintje
automatikusan és szembetűnően lecsökken azért, hogy a készülék katódsugár
csöveinek rongálódását elkerülje. A kép fényerőszintjének visszaállításához nyomja
meg a távvezérlő bármelyik gombját.
• Győzödjön meg arról, hogy a távvezérlő Készülékválasztó gombja az irányítani kívánt
készüléknek (DVD, TV vagy VCR videomagnóhoz) megfelelő pozícióban legyen.
• Amennyiben a DVD-t vagy a a videomagnót nem tudja a távvezérlővel irányítani
annak ellenére, hogy a Készülékválasztó gomb a megfelelő pozícióban van, üsse be
újból a szükséges kódot úgy, ahogyan az a kezelési útmutató “A távvezérlő beállítása
DVD-hez vagy videomagnóhoz” a 23. oldalon.
• Cserélje ki az elemeket.
• Forduljon a legközelebbi Sony márkaszervízhez.
Meghibásodás esetén a televíziót szakemberrel vizsgáltassa meg.
Soha ne nyissa ki a készüléket.
Kiegészítő információ
26
Page 99

•
•
•
•
•
•
Wprowadzenie
Dziękujemy za wybór telewizora kolorowego z projekcją tylną 100 Hz Sony.
Przed rozpoczęciem użytkowania telewizora, wskazane jest wnikliwe zapoznanie się z niniejszą instrukcją obsługi i
zachowanie jej do wykorzystania w przyszłości.
Symbole używane w niniejszej instrukcji obsługi:
Ważna informacja.
Informacja o działaniu.
1,2... Kolejność realizacji instrukcji.
Zaznaczone przyciski pilota oznaczają przyciski, które należy
nacisnąć w celu wykonania poszczególnych funkcji.
Informacja o wyniku operacji.
Spis treści
Wprowadzenie..................................................................................................................................................................................3
Informacje dotyczące bezpieczeństwa ............................................................................................................................................4
Opis ogólny
Ogólny przegląd przycisków pilota ..................................................................................................................................................5
Ogólny przegląd przycisków telewizora ...........................................................................................................................................6
Podłączenie telewizora
Podłączanie anteny i magnetowidu.................................................................................................................................................. 7
Wkładanie baterii do pilota ...............................................................................................................................................................7
Pierwsze uruchomienie telewizora
Włączanie telewizora i automatyczne programowanie ....................................................................................................................8
Regulacja dopasowania barw (Zbieżność).....................................................................................................................................10
System menu na ekranie
Wprowadzenie do systemu menu na ekranie ................................................................................................................................10
Krótki przewodnik po systemie menu ............................................................................................................................................11
Używanie systemu menu:
Regulacja obrazu ........................................................................................................................................................................12
Regulacja dźwięku.......................................................................................................................................................................12
Timer wyłączenia.........................................................................................................................................................................13
Wyjście AV3.................................................................................................................................................................................13
Źródło PIP ...................................................................................................................................................................................13
Pozycja obrazu PIP .....................................................................................................................................................................14
Język/Kraj....................................................................................................................................................................................14
Autoprogramowanie....................................................................................................................................................................14
Sortowanie programów...............................................................................................................................................................14
Nazwy Programów ..................................................................................................................................................................... 15
Ustawienia AV .............................................................................................................................................................................15
Programowanie ręczne................................................................................................................................................................16
Centrowanie RGB........................................................................................................................................................................17
PL
Telegazeta
NexTView
...............................................................................................................................................................................18
.................................................................................................................................................................................19
Informacje dodatkowe
Podłączanie dodatkowych urządzeń.............................................................................................................................................. 20
Zastosowanie dodatkowych urządzeń ..........................................................................................................................................21
SmartLink .......................................................................................................................................................................................22
Konfigurowanie pilota do nastawiania DVD lub magnetowidu......................................................................................................23
Optymalny kąt oglądania................................................................................................................................................................ 24
Dane techniczne.............................................................................................................................................................................25
Rozwiązywanie problemów............................................................................................................................................................26
Spis treści
3
Page 100

z
J
•
•
•
•
Informacje dotyczące bezpieczeństwa
Telewizor jest przystosowany do zasilania
tylko napięciem przemiennym 220 - 240 V.
Nie włączać zbyt dużej liczby urządzeń do
jednego gniazdka sieciowego- grozi to
pożarem lub porażeniem prądem.
Ze względu na bezpieczeństwo i ochronę
środowiska naturalnego zaleca się, aby
telewizor, który nie jest używany, nie
pozostawał w trybie czuwania, lecz był
wyłączany z sieci.
Nigdy nie wpychać do telewizora żadnych
przedmiotów.
Grozi to pożarem lub porażeniem prądem. Nigdy
nie wylewać na telewizor żadnych płynów. Jeśli do
wnętrza telewizora dostanie się jakiś płyn lub
przedmiot, nie używać urządzenia, zanim zostanie
ono skontrolowane przez odpowiednio
wykwalifikowaną osobę.
Nie otwierać obudowy ani nie zdejmować
pokrywy z tyłu telewizora. Naprawy
powierzać tylko wykwalifikowanym
osobom.
Nie zakrywać otworów wentylacyjnych na
telewizorze. Dla zapewnienia właściwej
wentylacji, pozostawić wokół telewizora
przynajmniej 10 cm wolnego miejsca.
Do czyszczenia ekranu i obudowy używać miękkiej,
wilgotnej ściereczki. Nie używać żadnych
ściereczek, gąbek ani proszków do szorowania,
zasadowych środków czyszczących,
rozpuszczalników (spirytusu, benzyny itp.) ani
antystatycznego aerozolu. Dla bezpieczeństwa,
przed czyszczeniem telewizora wyłączyć go z sieci.
Dla własnego bezpieczeństwa, w czasie
burzy nie dotykać żadnych elementów
telewizora, jego przewodu zasilającego ani
przewodu antenowego.
Nigdy nie stawiać telewizora w miejscach
gorących, wilgotnych lub nadmiernie
zapylonych. Nie instalować telewizora w
miejscach, w których będzie on narażony na
wibracje mechaniczne.
Przy wyłączaniu przewodu zasilającego z
gniazdka sieciowego chwytać wtyczkę.
Nie ciągnąć samego przewodu.
Aby uniknąć ryzyka pożaru lub porażenia
prądem, nie wystawiać telewizora na
deszcz i chronić go przed wiłgocią.
Aby uniknąć pożaru, przechowywać
łatwopalne przedmioty z dala od telewizora
i nie zbliżać się do niego z otwartym
ogniem (na przykład świecą).
Dbać, aby nie stawiać na przewodzie
zasilającym ciężkich przedmiotów,
ponieważ mogą one uszkodzić przewód.
Zalecamy nawinięcie nadmiaru przewodu
na zaczepy znajdujące się z tyłu telewizora.
Przed przenoszeniem telewizora wyłączyć go
Ustawić telewizor na bezpiecznej, stabilnej
podstawie. Nie pozwalać, aby wspinały się
na niego dzieci. Nie kłaść telewizora na boku
ani ekranem do góry.
sieci. Unikać nierównych powierzchni,
szybkiego marszu i używania nadmiernej siły.
eśli telewizor został upuszczony lub
uskodzony, natychmiast zlecić jego kontrolę
odpowiednio wykwalifikowanej osobie z
serwisu.
Nie zakrywać otworów wentylacyjnych na
telewizorze takimi przedmiotami jak zasłony
czy gazety.
Informacje dotyczące bezpieczeństwa
Gdy przestawia się telewizor wielkoekranowy z projekcją tylną bezpośrednio z zimnego pomieszczenia do gorącego lub gdy w
pomieszczeniu następuje gwałtowna zmiana temperatury obraz może być zamazany lub poszczególne jego fragmenty mogą
mieć złą jakość koloru. Spowodowane jest to kondensacją wilgoci na lustrach lub soczewkach wewnątrz urządzenia. Przed
ponownym włączeniem urządzenia należy poczekać aż wilgoć wyparuje.
By osiągnąć ostrość obrazu należy ustawić ekran tak, by światło nie padało nań bezpośrednio. O ile to możliwe należy używać
oświetlenia sufitowego.
Unieruchomienie obrazu przez dłuższy okres czasu np. podczas korzystania z gier komputerowych lub podłączenia komputera,
jak też przy oglądaniu programów w formacie 16:9, może uszkodzić przewód przekazu obrazu. By tego uniknąć należy
wówczas utrzymać niski poziom kontrastu obrazu.
Należy unikać dotykania ekranu by nie porysować jego powierzchni.
Informacje dotyczące bezpieczeństwa
4
 Loading...