

Page 1

R
Projection TV
4-206-027-41(2)
Operating Instructions
Инструкции за експлоатация
Инструкция по эксплуатации
GB
BG
RU
KP-41PX1R
© 2001 by Sony Corporation
Page 2
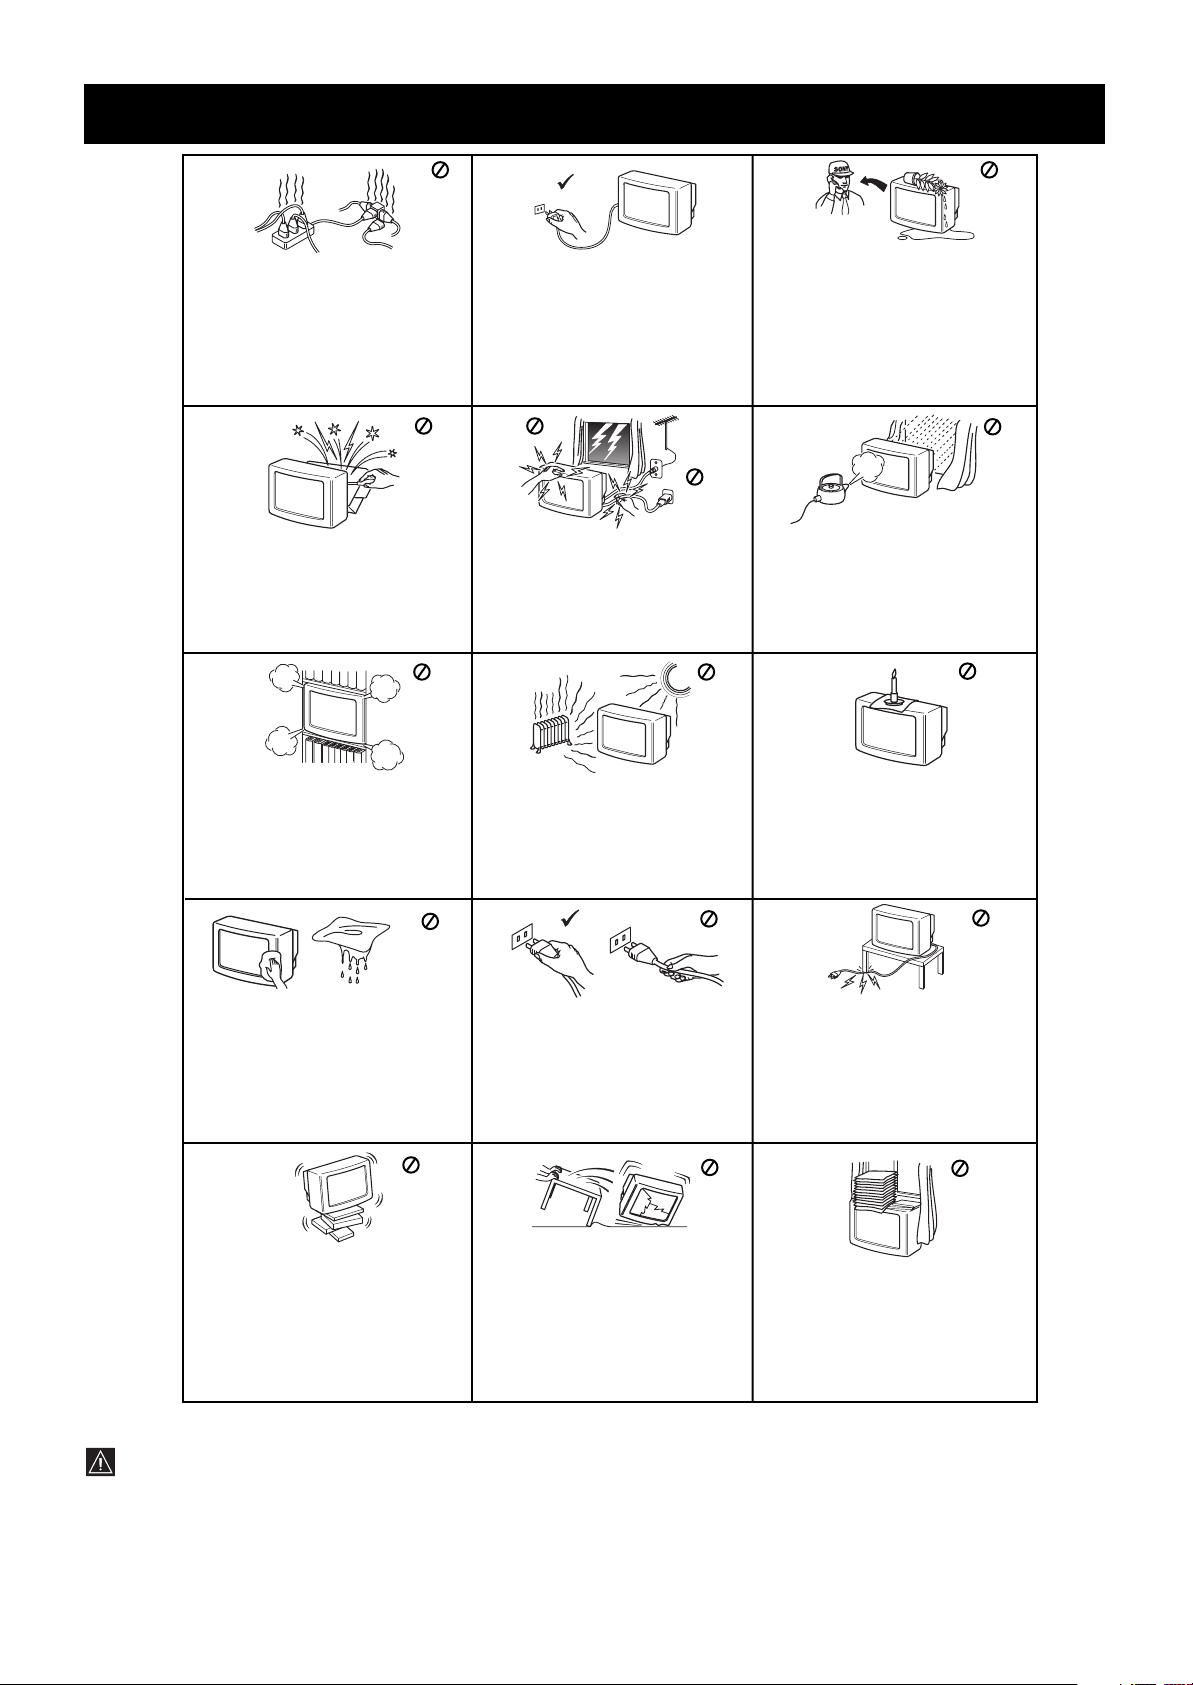
Safety Information
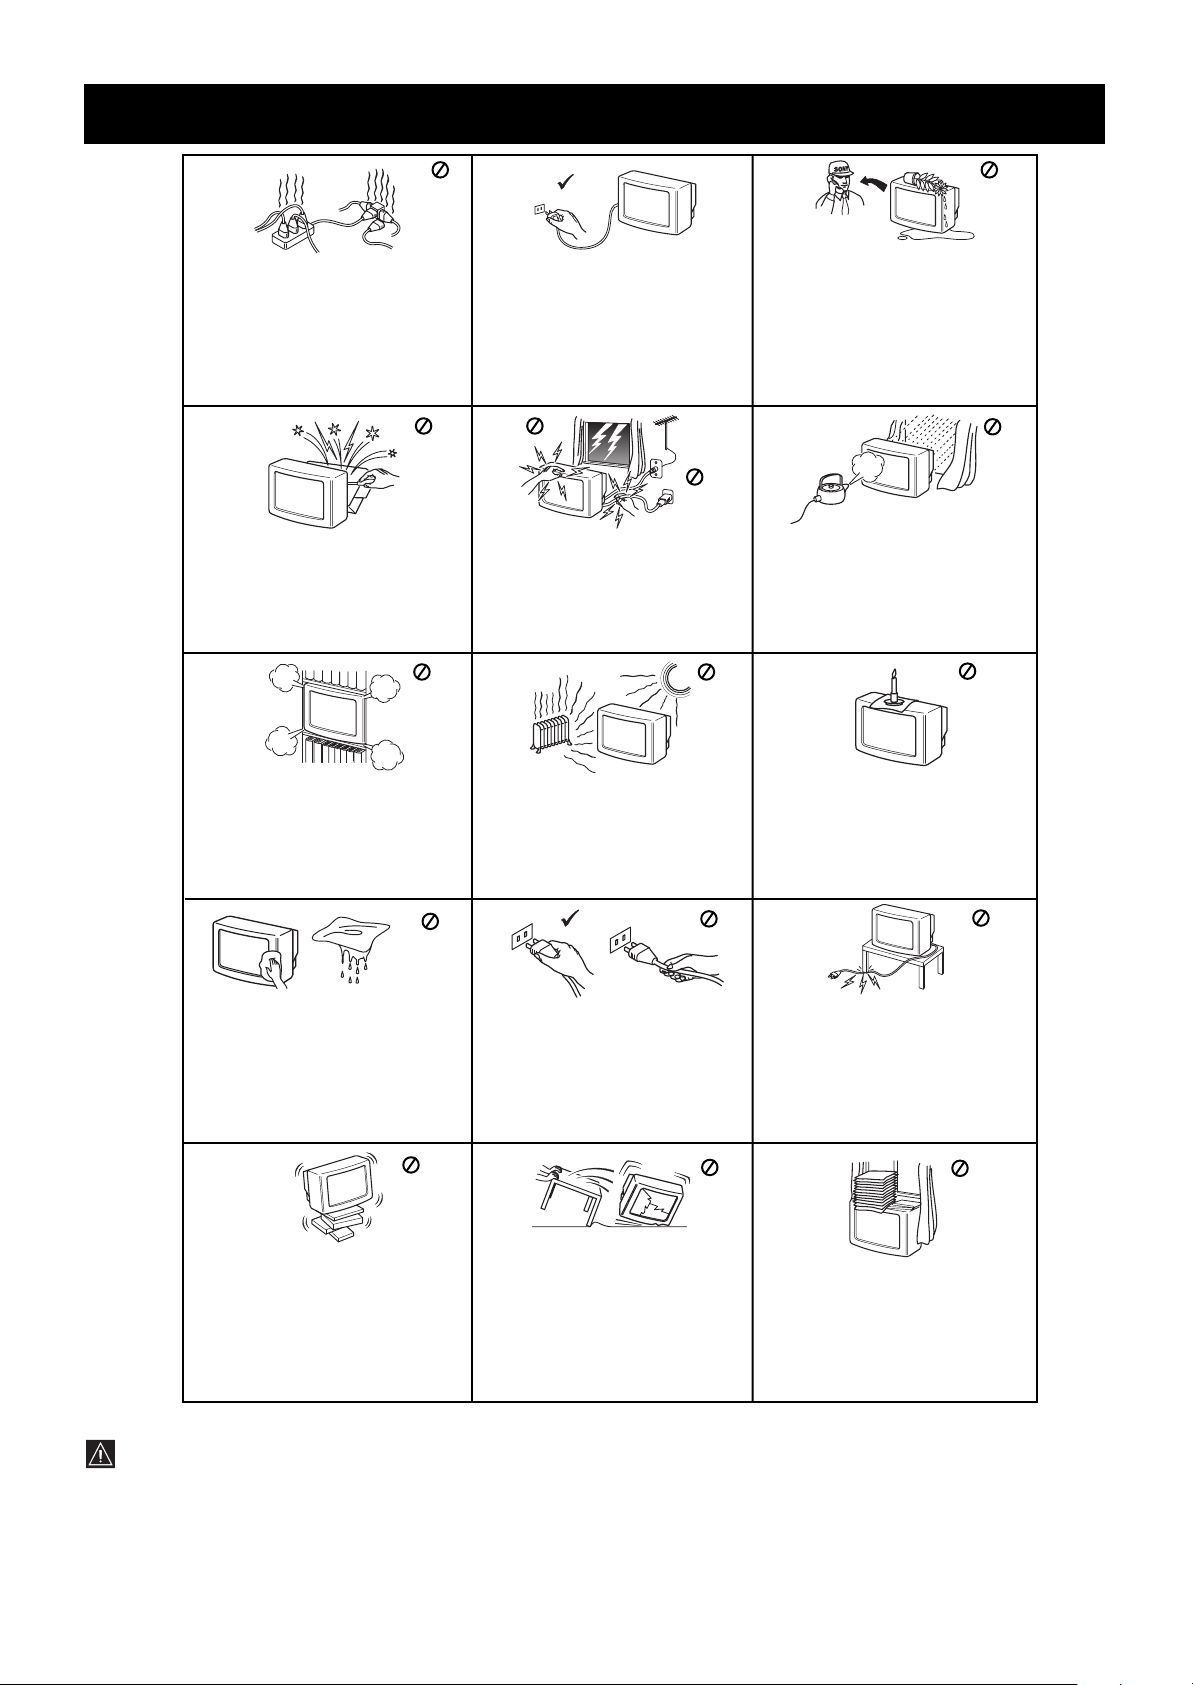
This set is to operate on a 220240V AC supply only. Take care not
to connect too many appliances to
the same power socket as this
could result in fire or electric shock.
Do not open the cabinet and the rear
cover of the TV. Refer to qualified
service personnel only.
Do not cover the
ventilation openings of the TV For
ventilation, leave a space of at least
10cm all around the set.
For environmental and safety
reasons, it is recommended that the
TV set is not left in standby mode
when not in use. Disconnect from
the mains.
For your own safety, do not touch
any part of the TV, power lead or
aerial lead during lightning storms.
Never place the TV in hot, humid or
excessively dusty places. Do not
install the TV where it may be
exposed to mechanical vibrations.
Never push objects of any kind into
the set as this could result in a fire or
electric shock. Never spill liquid of
any kind on the set. If any liquid or
solid object does fall through, do not
operate the TV. Have it checked
immediately by qualified personnel.
To prevent fire or shock hazard,
do not expose the TV to rain or
moisture.
To prevent fire, keep inflammable
objects or naked lights (eg candles)
away from the TV.
Clean the TV with a soft, lightly
dampened cloth. Do not use
benzine, thinner or any other
chemicals to clean the TV. Do not
scratch the TV screen. As a safety
precaution, unplug the TV before
cleaning it.
Place the TV on a secure stable
stand. Do not allow children to climb
on to it. Do not place the TV on its
side or face up.
Pull out the power lead by the
plug. Do not pull on the power
lead itself.
Unplug the power lead before
moving the TV. Avoid uneven
surfaces, quick steps or excessive
force. If the set has been dropped
or damaged, have it checked
immediately by qualified service
personnel.
Take care not to place heavy
objects on the power lead as this
could result in damage.
We recommend you wind any
excess lead around the holders
provided on the rear of the TV.
Do not cover the ventilation
openings of the TV with items such
as curtains or newspapers etc.
Additional Safety Information
•After transporting the projection TV directly from a cold to a warm location, or if the room temperature has changed suddenly,
pictures may be blurred or show poor colour over portions of the picture. This is because moisture has condensed on the mirrors
or lenses inside the projection TV. Let the moisture evaporate before using the projection TV.
•To obtain a clear picture, do not expose the screen to direct illumination or direct sunlight. If possible, use spot lighting directed
down from the ceiling.
•Displaying a still picture for long periods of time, for instance, when operating a video game or personal computer and viewing a
programme in 16:9 mode, may damage the picture tube. To avoid this, keep the picture contrast level low.
•Avoid touching the screen, and take care not to scratch the surface with hard objects.
2
Page 3

Contents
Safety Information..............................................................................2
Overview............................................................................................4
Getting Started.................................................................................6
Step 1 Preparation.............................................................................6
Check the Supplied Accessories ............................................6
Insert the Batteries into the Remote Commander ..................6
Connect the Aerial and VCR ..................................................6
Step 2 Tuning in to TV Stations .........................................................7
Choose a Language ...............................................................7
Preset Channels Automatically...............................................8
Step 3 Adjusting Colour Registration (CONVERGENCE) .................9
Converge the Red, Green, and Blue Lines.............................9
Additional Presetting Functions .......................................................10
Presetting Channels Manually .............................................10
Manual Fine-Tuning..............................................................11
Sorting Programme Positions ...............................................11
Skipping Programme Positions.............................................12
Captioning a Station Name...................................................12
Using Parental Lock..............................................................13
Tuning in a Channel Temporarily..........................................13
GB
Operating Instructions .................................................................. 14
Watching the TV ..............................................................................14
Switching the TV on and off..................................................14
Selecting TV Programmes....................................................14
Adjusting the Volume............................................................14
Operating the TV Using the Buttons on the TV ....................14
Watching Teletext or Video Input..........................................15
More Convenient Functions..................................................15
Adjusting and Setting the TV Using the Menu .................................16
Adjusting the Picture and Sound ..........................................16
Using the Sleep Timer ..........................................................17
Teletext ............................................................................................18
Direct Access Functions .......................................................18
Connecting and Operating Optional Equipment ..............................20
Connecting Optional Equipment ...........................................20
Selecting lnput Signal ...........................................................21
Using AV Label Preset..........................................................22
Checking and Selecting the Input and
Output Sources Using the Menu........................................22
Remote Control of Other Sony Equipment ...........................23
For Your Information........................................................................24
Optimum Viewing Area .........................................................24
Troubleshooting ....................................................................25
Specifications........................................................................25
3
Page 4

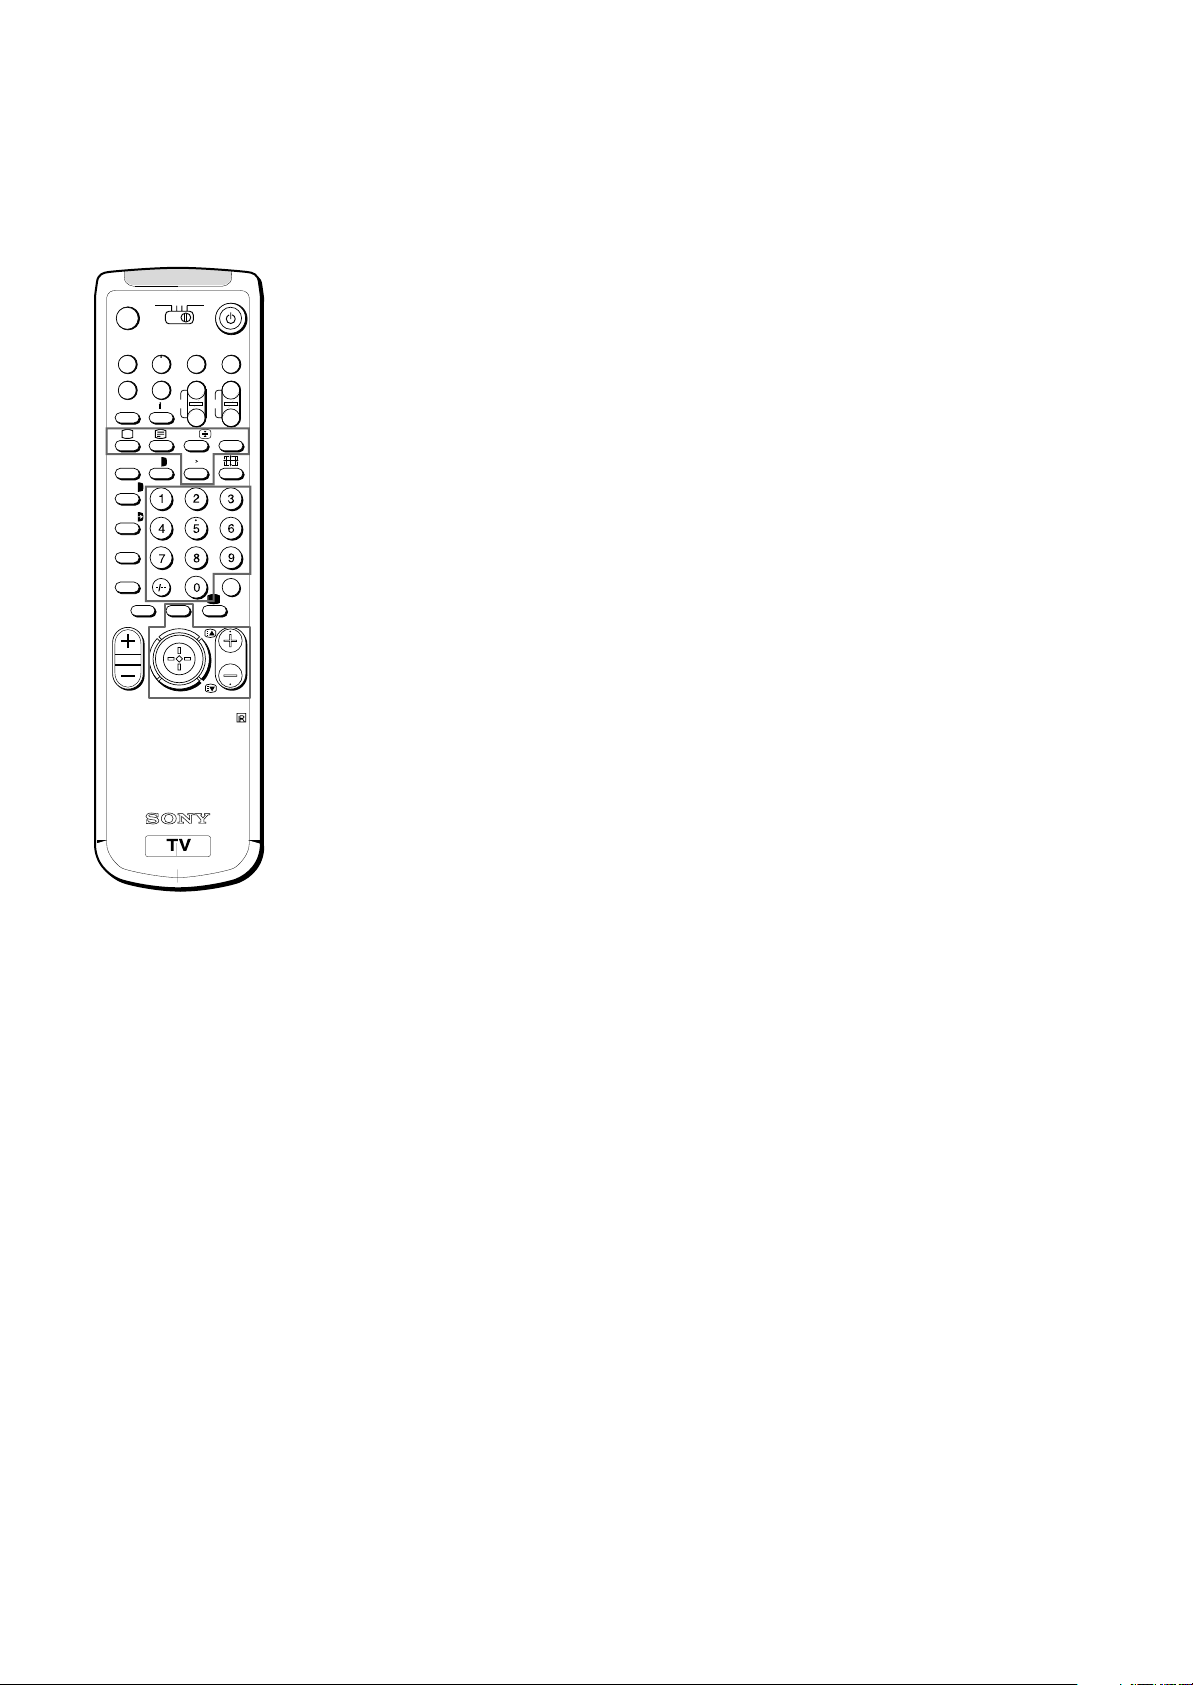
Overview
This section briefly describes the buttons and controls on the TV
set and on the Remote Commander. For more information, refer to
the pages given next to each description.
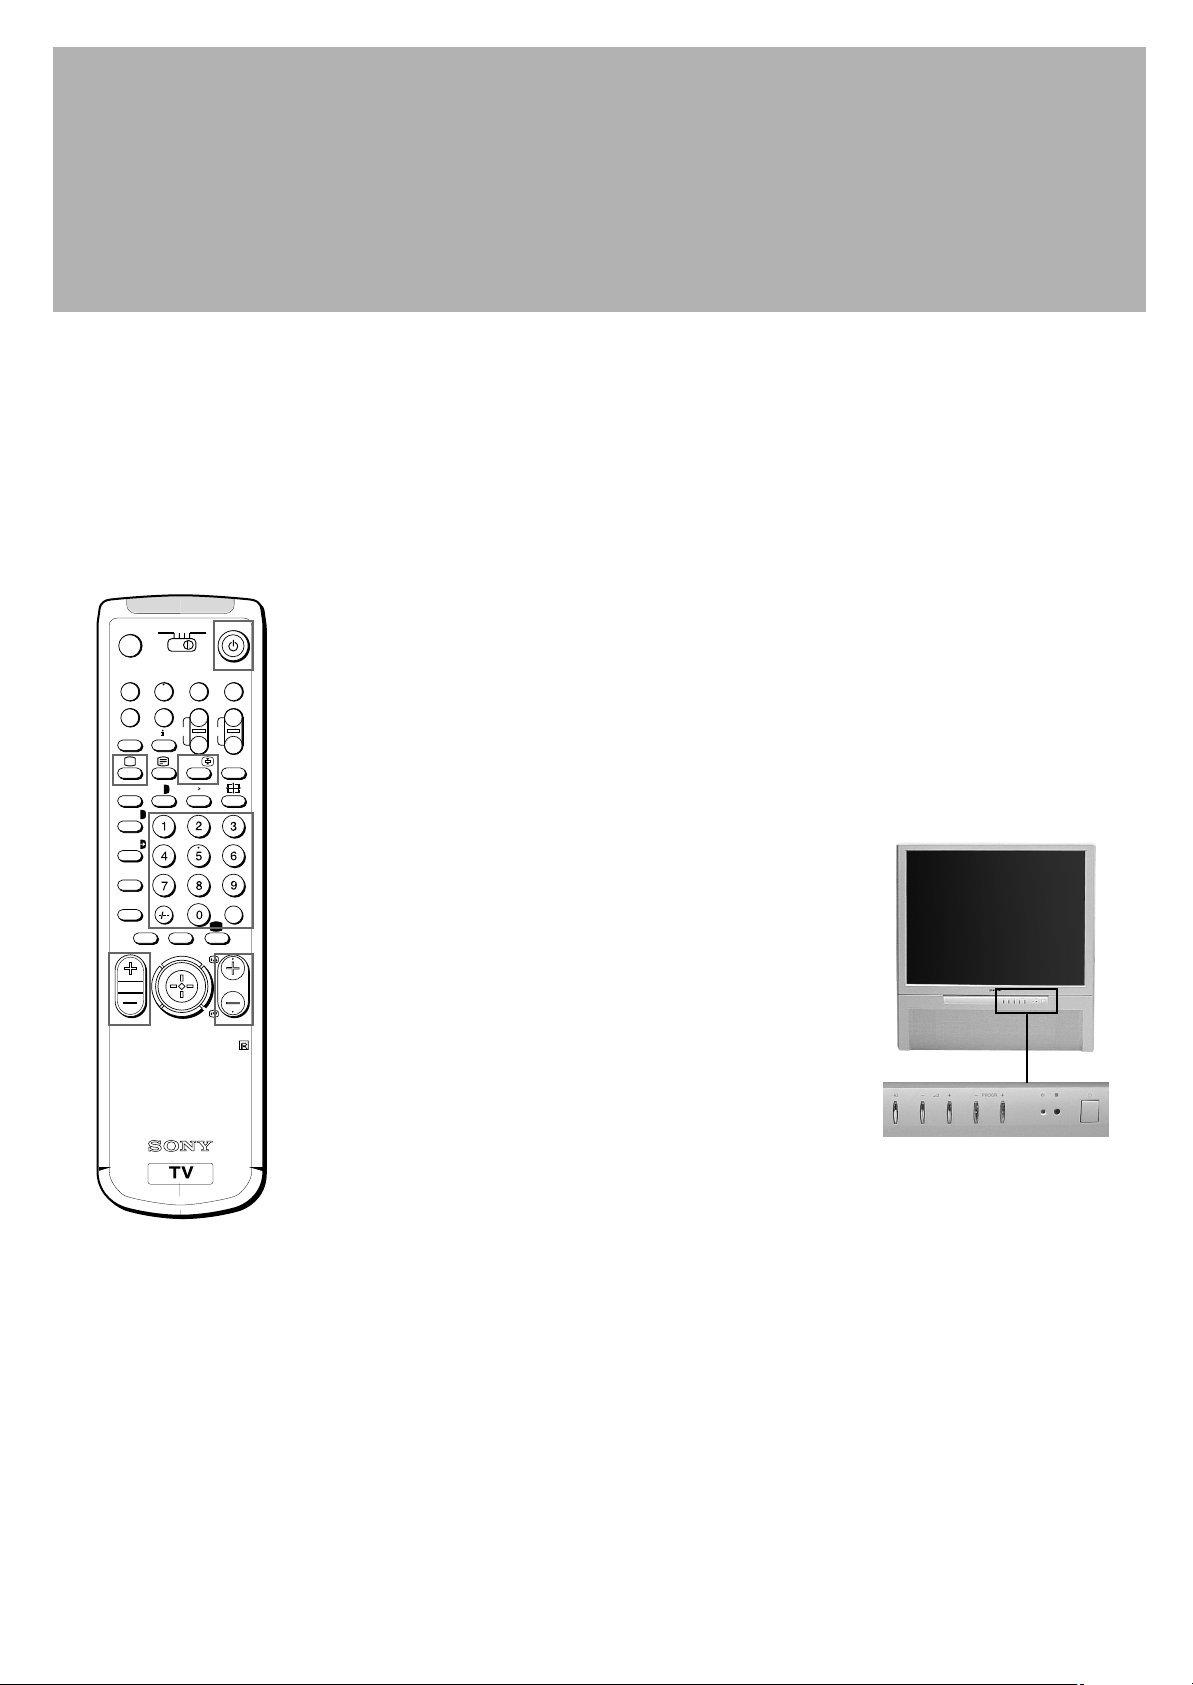
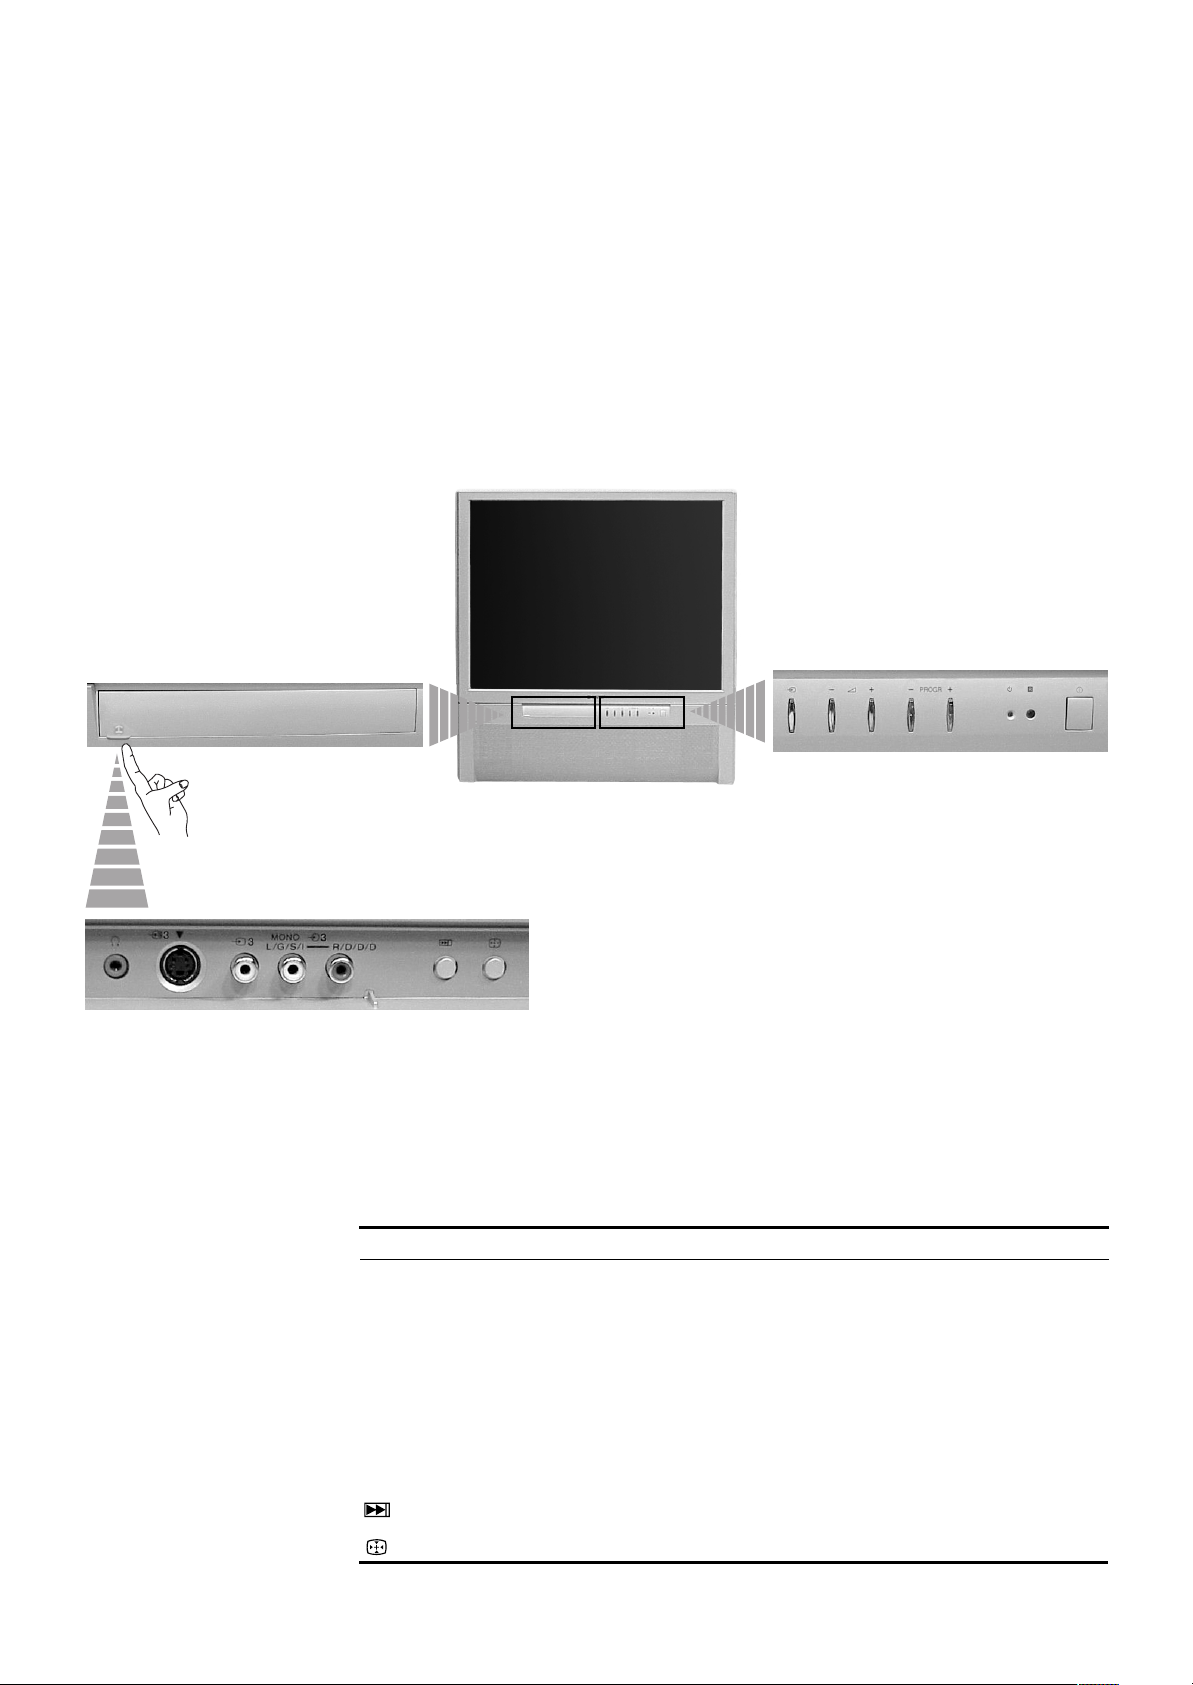
TV set-front
Push up the flap on the front of the
TV to reveral the front control panel.
Symbol Name Refer to page
U Main power switch 14
u Standby indicator 14
PROGR +/- Programme buttons 14
Á +/- Volume buttons 14
… Input select buttons 15
2 Headphones jack 20
q 3, … 3, ≤ 3 Input jacks (S video/video/audio) 21
4
Auto Preset button 8
Auto Convergence button 9
Page 5

MENU
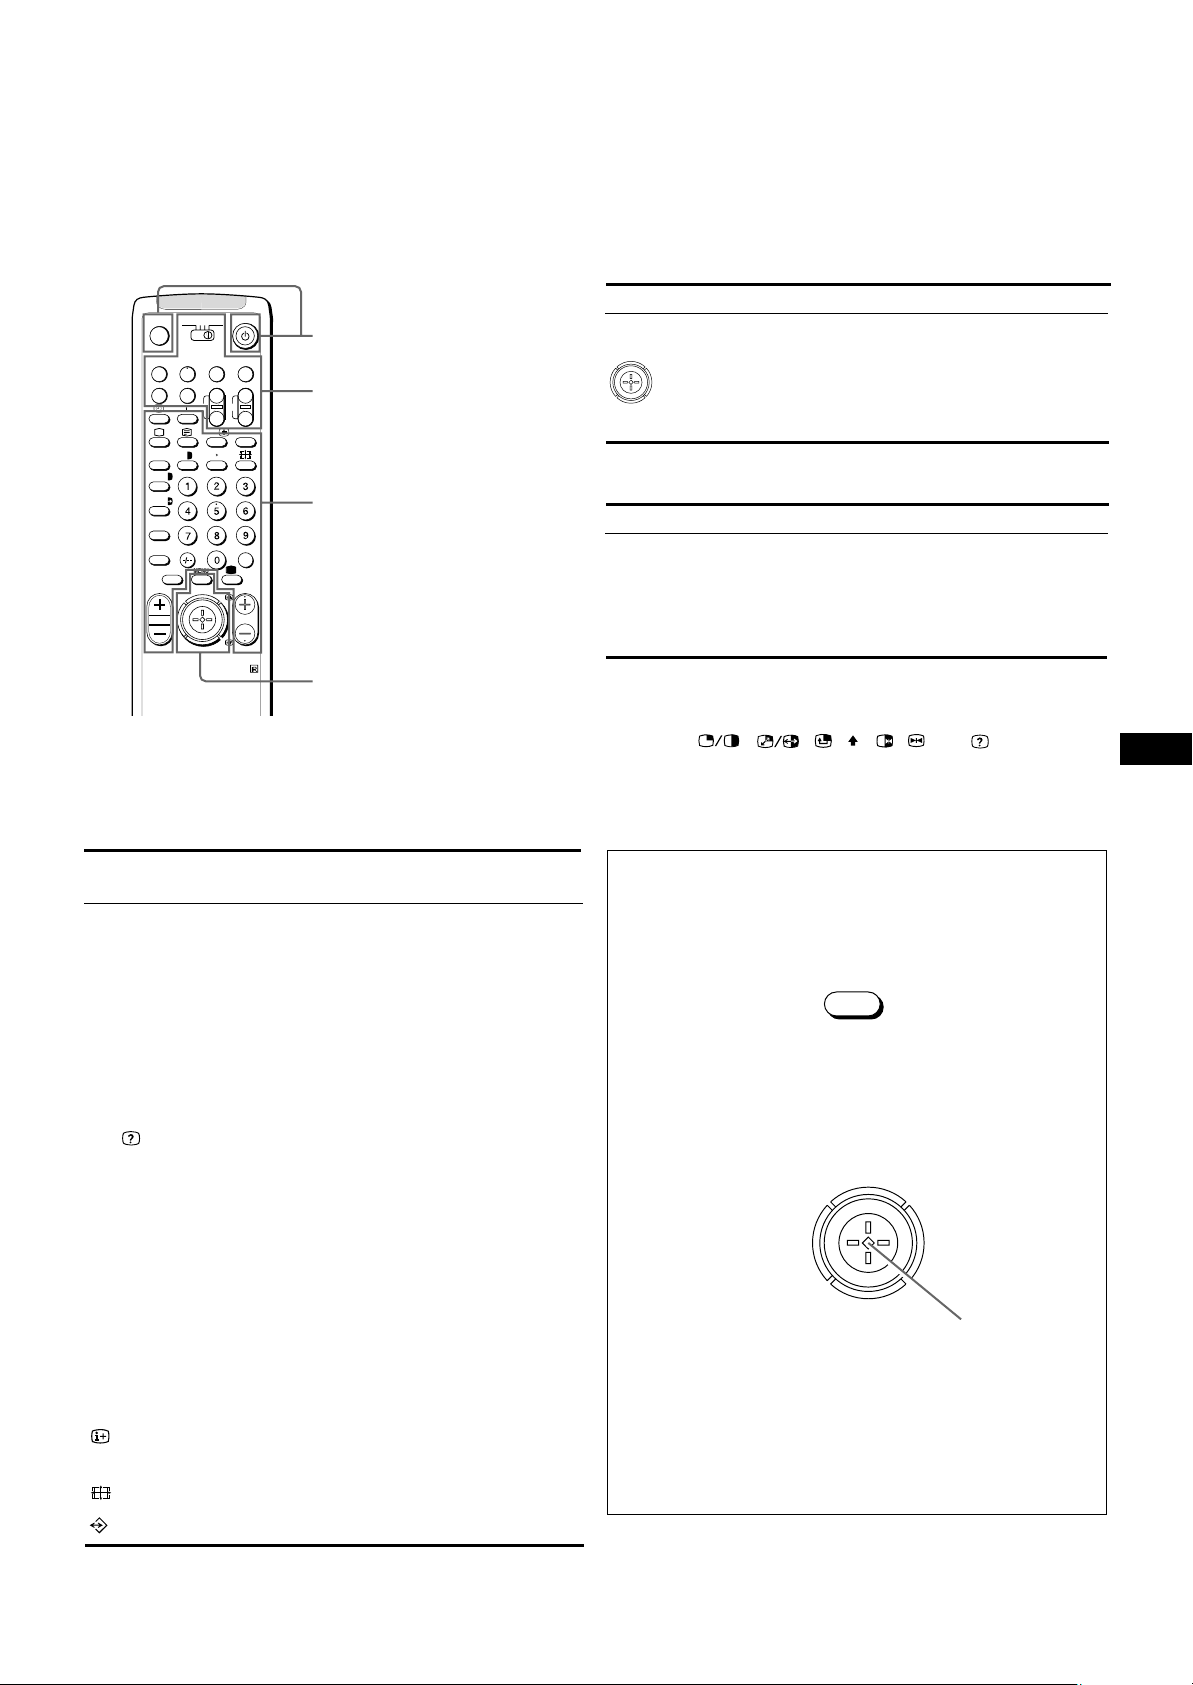
Remote commander
TV
MDP2
3VTR 1
¤
( u)
REC
+
;
…/
´8x
MENU
CH
Ú/;
PROGR
RM-862
VIDEO
+
_
?
c
0
p Pr
˚
8
;
´/´
a/Å
A
b
≥
¸
TV/Teletext operation
Video operation
TV/Teletext operation
Menu operation
Menu operation
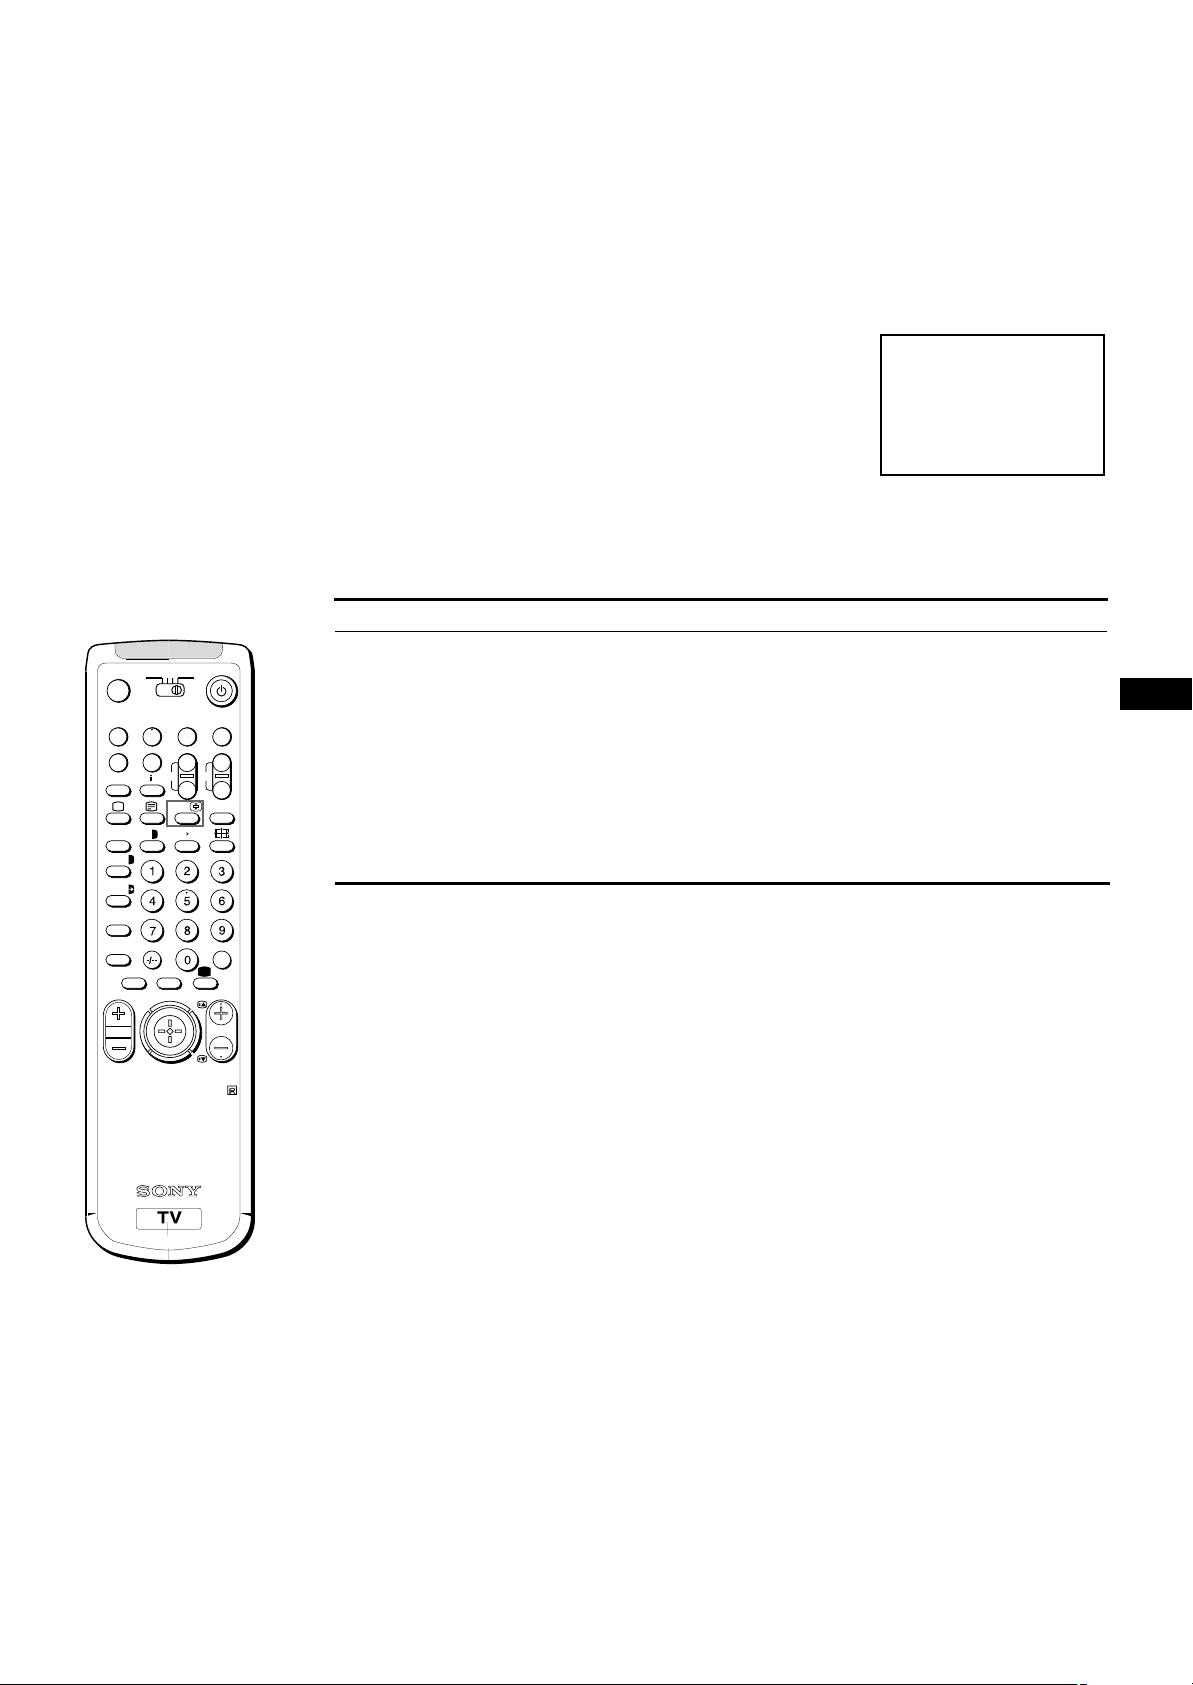
Symbol Name Refer to page
MENU Menu on/off button See below.
Joystick for Menu selection See below.
Press to confirm selection
(OK function)
Video operation
Symbol Name Refer to page
VTR1/2/3, Video equipment selector 23
MDP
0
( ) p Video equipment operation 23
P
r VIDEO u buttons
CH +/-
No function on this set
Symbol: , , , , , , Ú/ , (for TV
operation)
GB
TV/Teletext operation
Symbol Name Refer to page
¤ Mute on/off button 15
TV u TV Standby button 14
; TV power on/TV mode selector 14
button
f Teletext button 15
…/y Input mode selector/ 15
Teletext: Freezing the subpage 18
…/ Teletext: Reveal button 18
1,2,3,4,5,6, Number buttons 14
7,8,9 and 0
-/-- Double-digit entering button 14
C Direct channel entering button 13
Á +/- Volume control button 14
PROGR +/- Programme selectors 17
R/S Teletext: Page up/page down buttons 18
Í Picture mode button 17
≥ Sound mode button 17
On-screen display button 15
# Time display button 15
Button to change Screen Format 15
Teletext: Favourite pages button 19
For the Menu System
Use the MENU button and the joystick as follows.
1 Press MENU button to switch menu on or off.
2 Use the joystick as follows:
GREEN: scroll up
RED:
decrease/back to last item
or to last menu
When menu is not
displayed:
Push to red to display the
last menu screen
BLUE: scroll down
The operable functions of the joystick are displayed on the
screen.
YELLOW:
increase/forward
to next item
Joystick: Press at
its neutral position
to confirm selection
or store
5
Page 6

Getting Started
Step 1 Preparation
3
2
1
1 Check the Supplied Accessories
When you’ve taken everything
out of the carton, check that you
have these items:
• RM-862 Remote Commander
• Two IEC designation R6 batteries
3
2
1
Note: Always remember
to dispose of used
batteries in an
environmentally friendly
way.
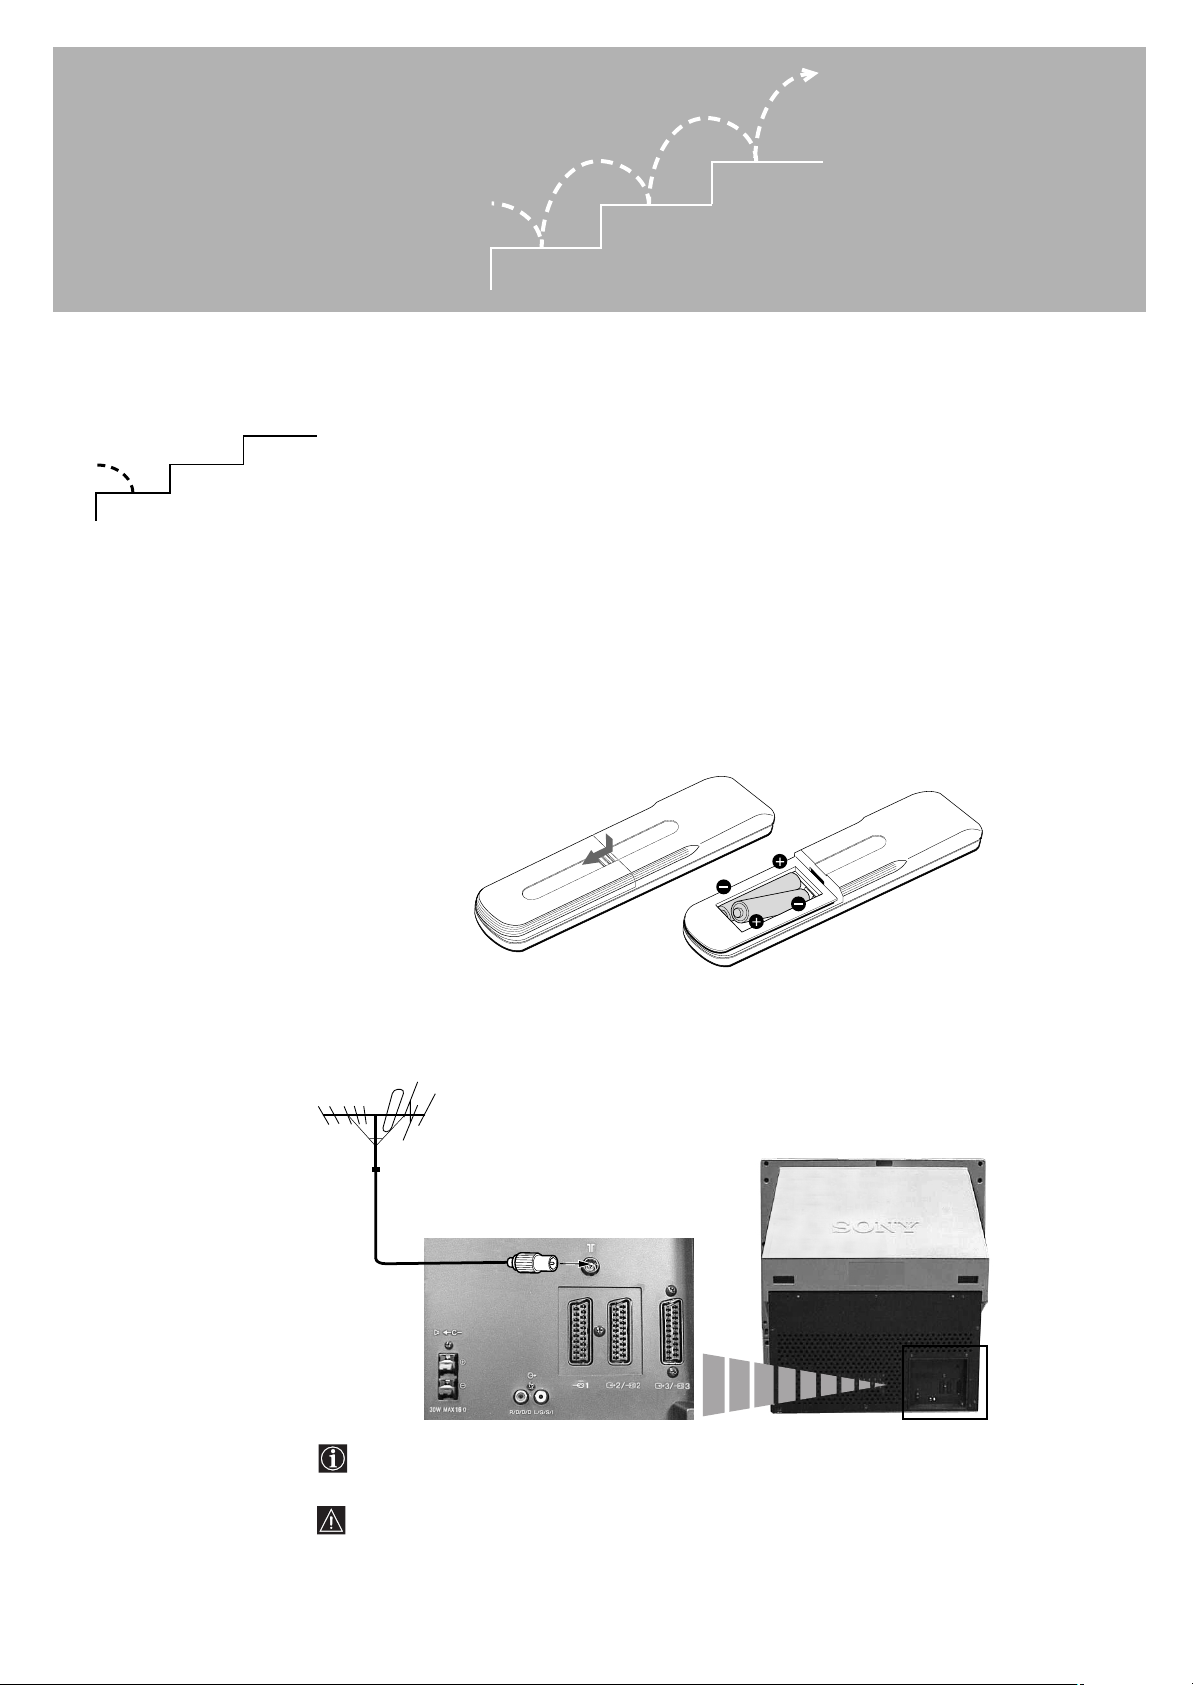
2 Insert the Batteries into the Remote Commander
Remove the cover.
Check the correct
polarities.
3 Connect the Aerial and VCR
6
The Scart lead is optional.
If you use this optional connection it can improve picture and sound quality when using a VCR.
If you do not use a SCART lead, after automatically tuning the projection TV refer to the
“Presetting channels Manually” section of this instruction manual, to the tune in the set to the
ouput of you VCR. Also refer to your VCR instruction manual to find out how to find the output
channel of your VCR.
Page 7
Step 2 Tuning in to TV Stations
1
MDP2
3VTR 1
¤
0
( u)
p Pr
REC
+
˚
;
…/
8
;
´8x
´/´
a/Å
A
b
≥
MENU
¸
2
VIDEO
CH
Ú/;
PROGR
RM-862
3
1 Check the Supplied Accessories
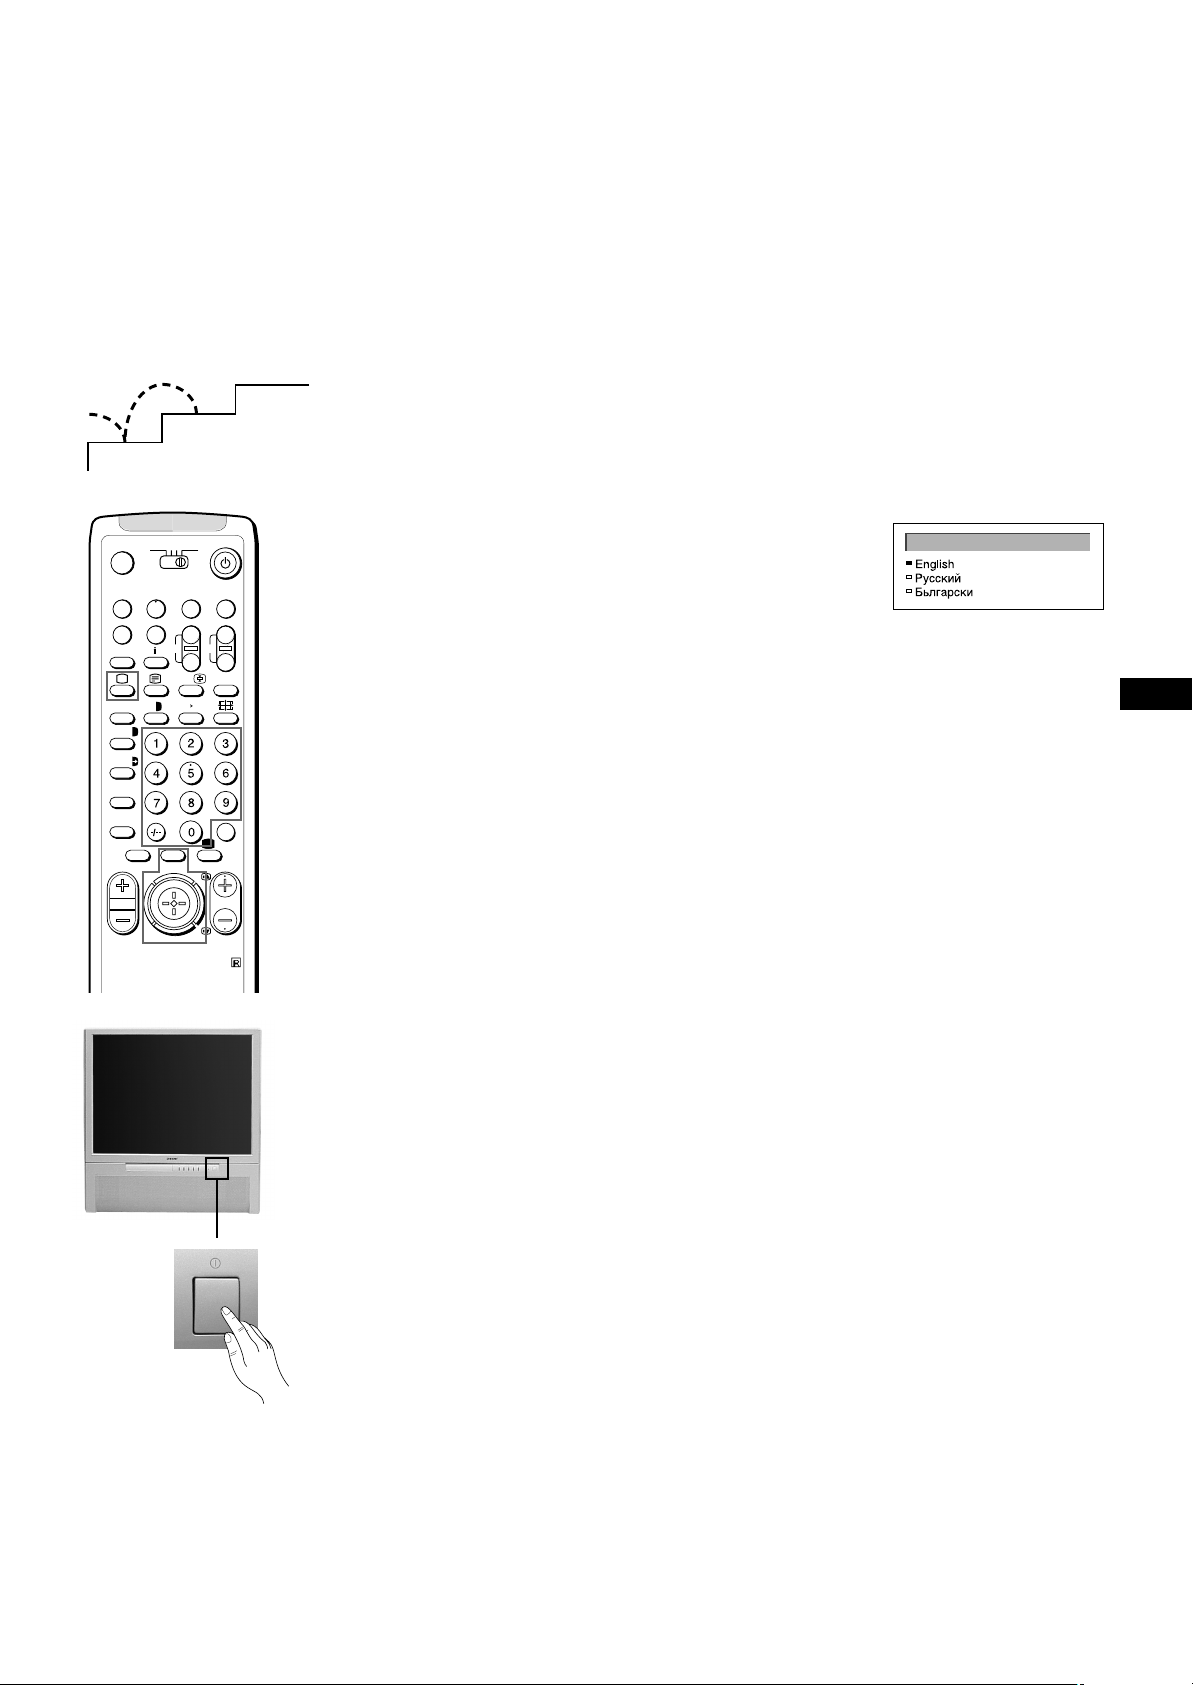
This function enables you to select the language of the menu
screens.
TV
1 Press U (main power switch) on the TV.
The TV will switch on. If the standby indicator on the TV is lit, press
LANGUAGE
; or a number button on the Remote Commander.
2 Press MENU on the remote commander.
+
_
?
c
The LANGUAGE menu appears
3 Push the joystick to blue or green to select the language you want.
Press the joystick to confirm your selection.
4 Press MENU to restore the normal TV picture.
GB
7
Page 8

MDP2
Auto Programme
Manual Programme
AV Label Preset
Programme Sorting
Parental Lock
Language
Convergence
PRESET
6 D/K
SYSPROG
C26
CHAN
- - - - -
LABEL
AUTO PROGRAMME
3VTR 1
¤
0
( u)
p Pr
REC
+
˚
;
…/
8
;
´8x
´/´
a/Å
A
b
≥
MENU
¸
VIDEO
CH
Ú/;
PROGR
RM-862
TV
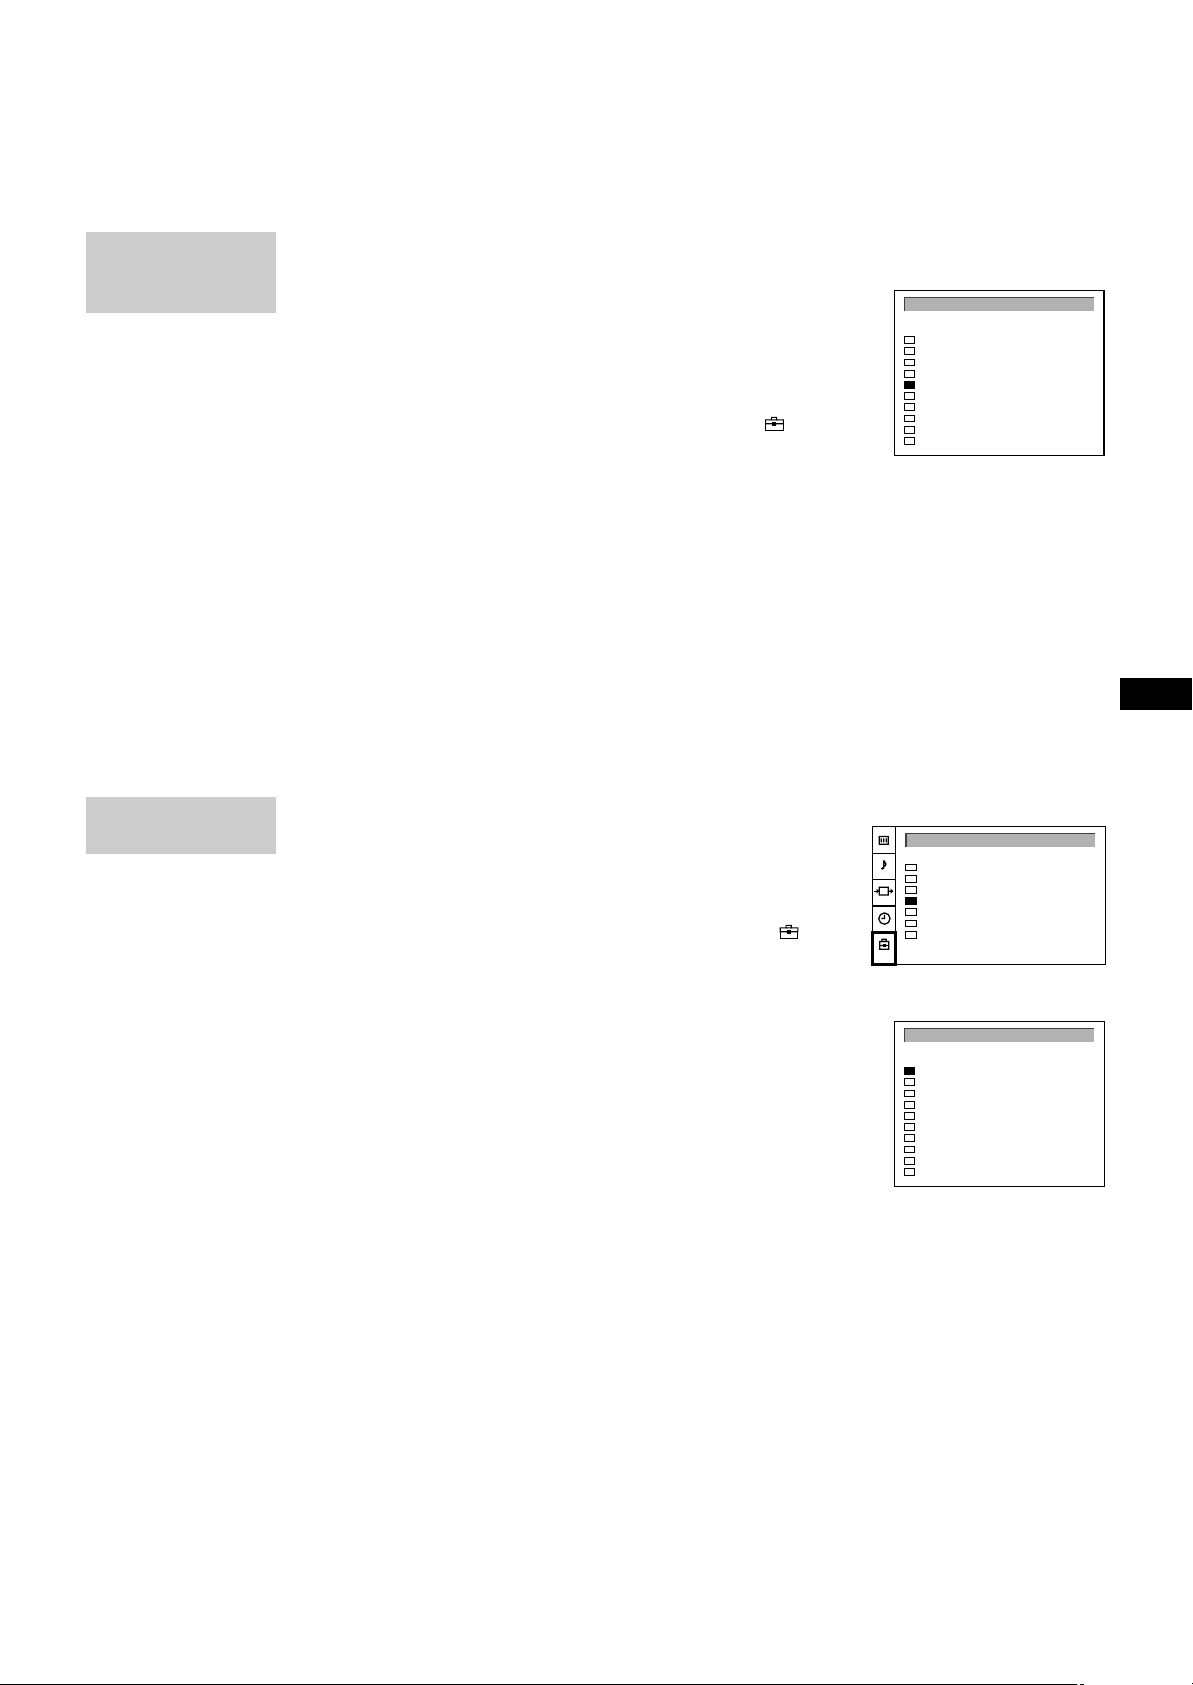
2 Preset Channels Automatically
With this function, the TV automatically searches and stores up
to 100 channels onto programme positions. If you prefer
+
_
?
“Presetting Channels Manually”, please refer to page 10 in
Additional Presetting Functions.
1 Press U (main power switch) on the TV.
The TV will switch on. If the standby indicator on the TV is lit,
press ; or a number button on the Remote Commander.
2 Press and hold the on the TV until the automatic menu is
displayed and the search starts.
After all available channels are stored, the normal TV picture is
c
shown.
Presetting channels automatically by using the
Remote Commander
1 Press MENU.
2 Push the joystick to blue or green to select the symbol , then
push to yellow.
The PRESET menu appears.
3 Push the joystick to blue or green to select “Auto Programme”.
4 Push to yellow and hold until the AUTO PROGRAMME menu is
displayed and the search starts.
After all available channels have been preset, the normal TV
picture is shown.
Notes:
• You can sort the
programme positions
to have them appear
on screen in the order
you like. For details,
see “Sorting
Programme Positions”
on page 11.
• To stop automatic
channel presetting
Press Menu on the
Remote Commander.
8
Page 9
Step 3 Adjusting Colour Registration
Auto Programme
Manual Programme
AV Label Preset
Programme Sorting
Parental Lock
Language
Convergence
PRESET
(CONVERGENCE)
3
2
1
MDP2
3VTR 1
¤
0
( u)
p Pr
REC
+
˚
;
…/
8
;
´8x
´/´
a/Å
A
b
≥
MENU
¸
VIDEO
CH
Ú/;
PROGR
RM-862
TV
+
_
?
c
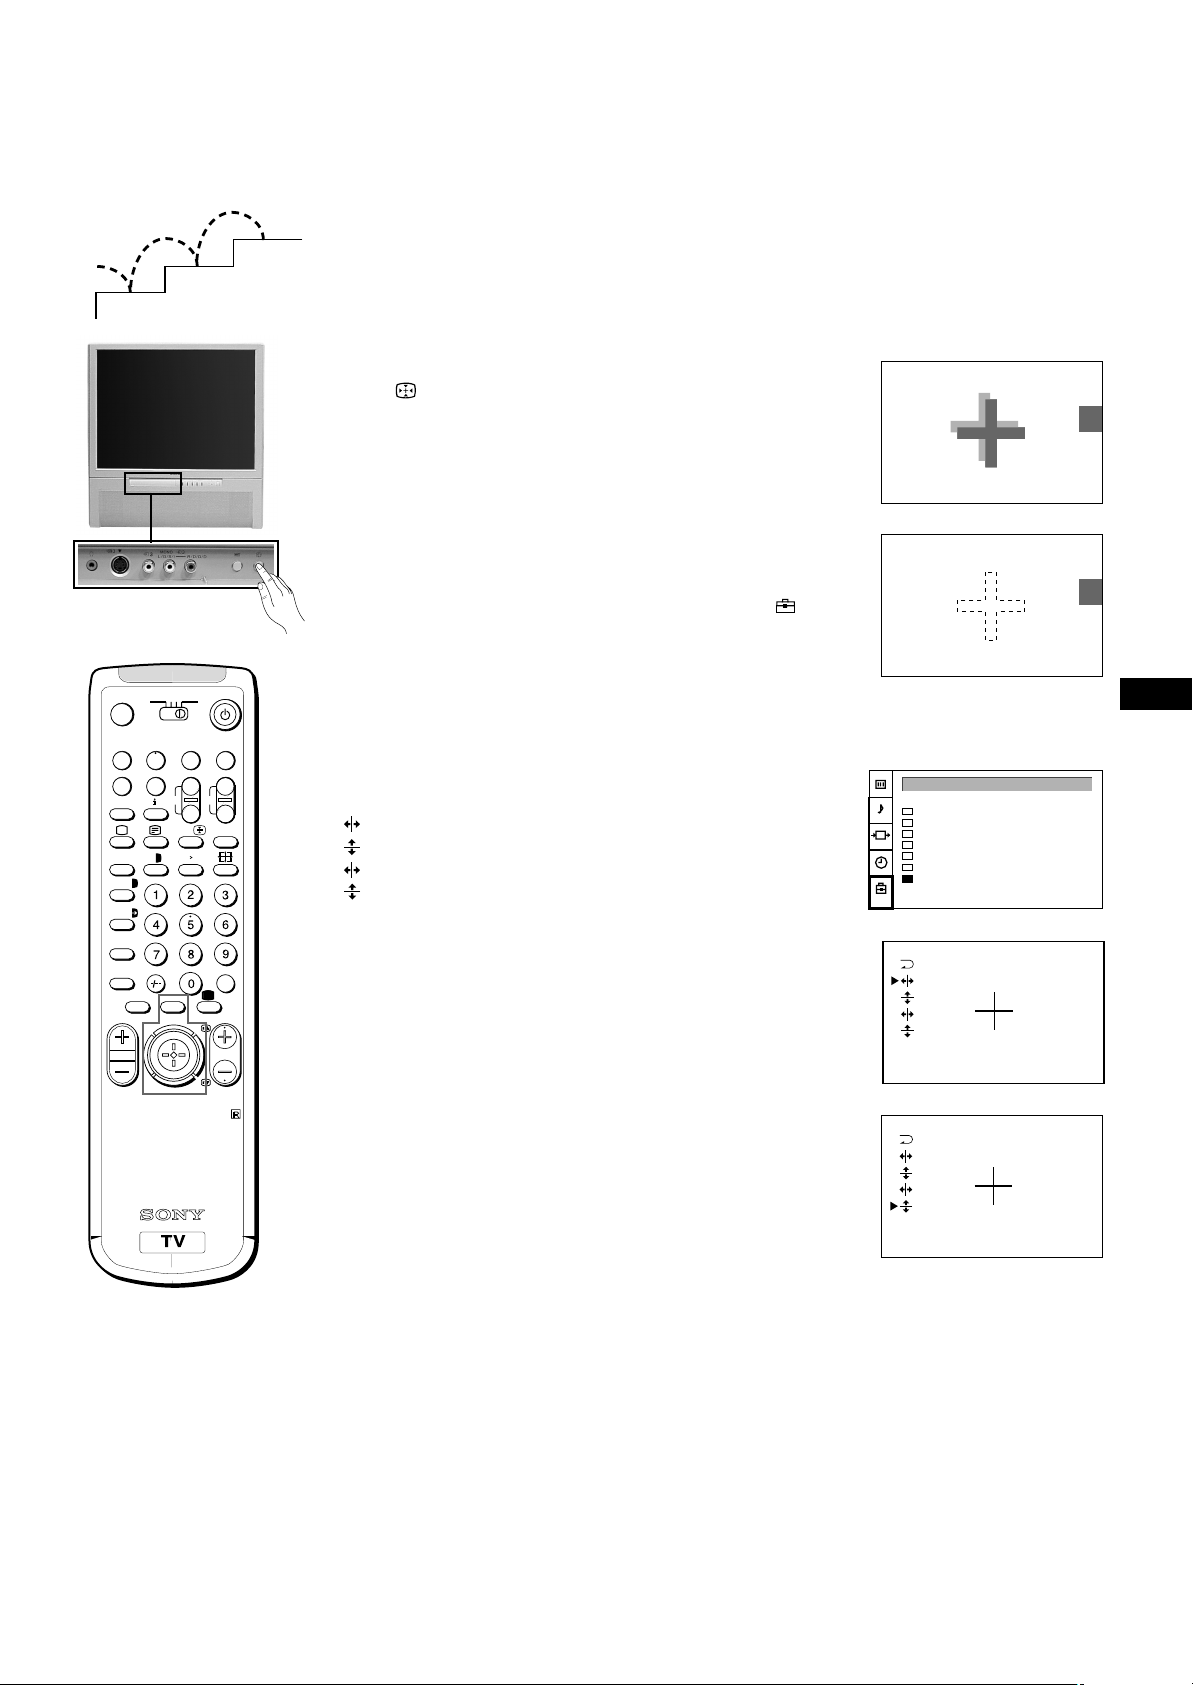
Converge the Red, Green, and
Blue Lines
1 Press button on the TV.
2 The Auto Convergence function works for about 30 seconds.
When the auto convergence function does not
work correctly
Adjust the colour registration by selecting the “Convergence” of
the PRESET menu.
1 Press MENU.
2 Push the joystick to blue or green to select the symbol , then
push to yellow.
The PRESET menu appears.
3 Push the joystick to blue or green to select “Convergence”, then
push to yellow.
The CONVERGENCE menu appears.
4 Push the joystick to blue or green to select “the line” (vertical and
horizontal lines in red and blue) you want to adjust.
Press the joystick to confirm.
: red vertical line (left/right adjustment)
: red horizonta line (up/down adjustment)
: blue vertical line (left/right adjustment)
: blue horizontal line (up/down adjustment)
The line to adjust is selected.
5 Push the joystick to blue or green to converge the selected line
with the green line in the centre.
Press the joystick to confirm.
6 Repeat steps 4 and 5 to adjust the other lines, until all the lines
have overlapped to form a white cross.
7 Press MENU to restore the normal TV picture.
GB
Notes:
The Auto Convergence
function does not work:
• when no signal is input.
• when the input signal is
weak.
• when the screen is
exposed to spotlights or
direct sunlight.
• when you watch the
teletext broadcast.
• when you watch TV
programmes in 16:9
mode.
9
Page 10

Additional Presetting Functions
Auto Programme
Manual Programme
AV Label Preset
Programme Sorting
Parental Lock
Language
Convergence
PRESET
0
1
2
3
4
5
6
7
8
9
D/K
D/K
D/K
D/K
D/K
D/K
D/K
D/K
D/K
D/K
SYSPROG
C29
C31
C32
C36
C37
C40
C41
C44
C49
C52
CHAN
- - - - -
- - - - -
- - - - -
- - - - -
- - - - -
- - - - -
- - - - -
- - - - -
- - - - -
- - - - -
LABEL
ON
ON
ON
ON
ON
ON
ON
ON
ON
ON
AFT
MANUAL PROGRAMME PRESET
2
1
MANUAL
PROGRAMME
PRESET
MDP2
3VTR 1
¤
0
( u)
p Pr
˚
8
;
´/´
a/Å
A
b
≥
¸
REC
+
;
…/
´8x
MENU
CH
Ú/;
PROGR
RM-862
3
Presetting Channels Manually
Using this function, you can preset channels one by one to
different programme positions. This is also convenient to allocate
programme numbers to video input sources.
1 Press MENU.
2 Push the joystick to blue or green to select the symbol on the
menu screen. Push to yellow to confirm the selection.
TV
VIDEO
+
_
?
c
3 Push to blue or green to select “Manual Programme”. Push to
yellow to confirm the selection.
4 Push to blue or green to select the programme position (PROG)
to which you want to preset a channel. Push to yellow to confirm.
5 Push to blue or green to select the TV broadcast system (SYS)
(B/G for western European countries, D/K for eastern European
countries) or a video input source (AV1, AV2, AV3, YC2, YC3,
RGB). Push to yellow to confirm.
º 6 Push to blue or green to select “C” (for terrestrial channels) or “S”
(for cable channels). Push to yellow to confirm.
There are two options to preset channels manually:
a) You know the channel number.
Please use method “Direct Input”.
or
b) You don’t know the channel number.
Please use method “Search”.
7 a) Direct Input
Select the first number digit of “CHAN” (channel), then the
second number digit of “CHAN” with the number buttons on the
Remote Commander (e.g. for channel 2, first press 0, then 2).
7 b) Search
Push the joystick to blue or green to search for the next available
channel.
8 If you want to store the channel, go to step 9. If not, select a new
channel using the number button on the Remote Commander or
push the joystick to blue or green to resume the search.
9 Press the joystick to confirm.
10 Repeat steps 4 to 9 to preset other channels.
11 Press MENU to restore the normal TV picture.
10
Page 11
MANUAL
0
1
2
3
4
5
6
7
8
9
D/K
D/K
D/K
D/K
D/K
D/K
D/K
D/K
D/K
D/K
SYSPROG
C29
C31
C32
C36
C37
C40
C41
C44
C49
C52
CHAN
- - - - -
- - - - -
- - - - -
- - - - -
- - - - -
- - - - -
- - - - -
- - - - -
- - - - -
- - - - -
LABEL
ON
ON
ON
ON
ON
ON
ON
ON
ON
ON
AFT
MANUAL PROGRAMME PRESET
0
1
2
3
4
5
6
7
8
9
D/K
D/K
D/K
D/K
D/K
D/K
D/K
D/K
D/K
D/K
SYSPROG
C28
C29
C35
C38
C40
C42
C55
C56
C57
C58
CHAN
BBC-W
VHS-2
CNN- -
- - - - MV-CH
VHS-1
- - - - 8MM
- - - - -
- - - - -
LABEL
PROGRAMME SORTING
Auto Programme
Manual Programme
AV Label Preset
Programme Sorting
Parental Lock
Language
Convergence
PRESET
PROGRAMME
PRESET
PROGRAMME
SORTING
Manual Fine-Tuning
Normally, the automatic fine-tuning (AFT) function is already
operating.
If the picture is distorted, however, you can manually fine-tune
the TV to obtain a better picture reception.
1 Press MENU.
2 Push the joystick to blue or green to select the symbol , on the
menu screen. Push to yellow to confirm the selection.
3 Push to blue or green to select “Manual Programme”. Push to
yellow to confirm.
4 Push to blue or green to select the programme number which
corresponds to the channel you want to manually fine-tune.
5 Push to yellow repeatedly until the AFT position changes colour.
6 Push to blue or green to fine-tune the channel frequency (–15 to
+15).
7 Press the joystick to confirm.
8 Repeat steps 4 to 7 to fine-tune other channels.
9 Press MENU to restore the normal TV picture.
Sorting Programme Positions
This function enables you to sort the programme positions to a
preferable order.
1 Press MENU.
2 Push the joystick to blue or green to select the symbol , on
the menu screen. Push to yellow to confirm.
3 Push to blue or green to select “Programme Sorting”. Push to
yellow to confirm.
4 Push to blue or green to select the programme position of the
channel you want to change. Press joystick to confirm.
5 Push to blue or green to select the programme position of the
channel you want to exchange. Press joystick to confirm.
6 Repeat steps 4 and 5 to sort other programme positions.
7 Press MENU to restore the normal TV picture.
GB
11
Page 12

MANUAL
- - - - -
- - - - -
- - - - -
- - - - -
- - - - -
- - - - -
- - - - -
- - - - -
- - - - -
- - - - -
0
1
2
3
4
5
6
7
8
9
D/K
D/K
D/K
D/K
- - D/K
D/K
D/K
D/K
D/K
SYSPROG
C29
C31
C32
C36
C37
C40
C41
C44
C49
C52
CHAN LABEL
ON
ON
ON
ON
ON
ON
ON
ON
ON
ON
AFT
MANUAL PROGRAMME PRESET
- - - - -
- - - - -
- - - - -
- - - - A - - -
- - - - -
- - - - -
- - - - -
- - - - -
- - - - -
0
1
2
3
4
5
6
7
8
9
D/K
D/K
D/K
D/K
D/K
D/K
D/K
D/K
D/K
D/K
SYSPROG
C29
C31
C32
C36
C37
C40
C41
C44
C49
C52
CHAN LABEL
ON
ON
ON
ON
ON
ON
ON
ON
ON
ON
AFT
MANUAL PROGRAMME PRESET
PROGRAMME
PRESET
MANUAL
PROGRAMME
PRESET
Skipping Programme Positions
This function enables you to skip unused programme positions
when selecting them with the PROGR +/– buttons. However, by
using the number buttons you can still select the skipped
programme position.
1 Press MENU.
2 Push the joystick to blue or green to select the symbol , on the
menu screen. Push to yellow to confirm.
3 Push to blue or green to select “Manual Programme”. Push to
yellow to confirm.
4 Push to blue or green to select the programme position you want
to skip. Push to yellow to confirm.
5 Push to blue or green to select “- - -” in the position SYS
(system). Press the joystick to confirm.
6 Repeat steps 4 and 5 to skip other programme positions.
7 Press MENU to restore the normal TV picture.
Captioning a Station Name
Channels are automatically labelled during presetting. You can,
however, individually name a channel or a video source using up
to five characters.
1 Press MENU.
2 Push the joystick to blue or green to select the symbol on the
menu screen. Push to yellow to confirm.
3 Push to blue or green to select “Manual Programme”. Push to
yellow to confirm.
4 Push to blue or green to select the programme position with the
channel you want to label. Push to yellow repeatedly until the first
element of the position LABEL is highlighted.
5 Push to blue or green to select a letter or a number (select “-” for
a blank). Push to yellow to confirm. Select the other four
characters in the same way.
6 After selecting all characters, press the joystick to confirm.
7 Repeat steps 4 to 6 to label other channels or video sources.
8 Press MENU to restore the normal TV picture.
12
Page 13
PARENTAL LOCK
Auto Programme
Manual Programme
AV Label Preset
Programme Sorting
Parental Lock
Language
Convergence
PRESET
0
1
2
3
4
5
6
7
8
9
D/K
D/K
D/K
D/K
D/K
D/K
D/K
D/K
D/K
D/K
SYSPROG
C28
C29
C35
C38
C40
C42
C55
C56
C57
C58
CHAN
BBC-W
VHS-2
CNN- -
- - - - MV-CH
VHS-1
- - - - 8MM
- - - - -
- - - - -
LABEL
PARENTAL LOCK
C - -
3
2
C38 - - - - -
1
C35 CNN
PROG CHAN LABEL
0
C29 VHS-2
C28 BBC-W
D/K
D/K
SYS
D/K
D/K
If you try to select a
programme that has
been blocked
The symbol appears
on the blank TV screen.
To unblock
Select the channel to
unblock in the
“PARENTAL LOCK”
menu. Press the joystick.
The symbol
disappears.
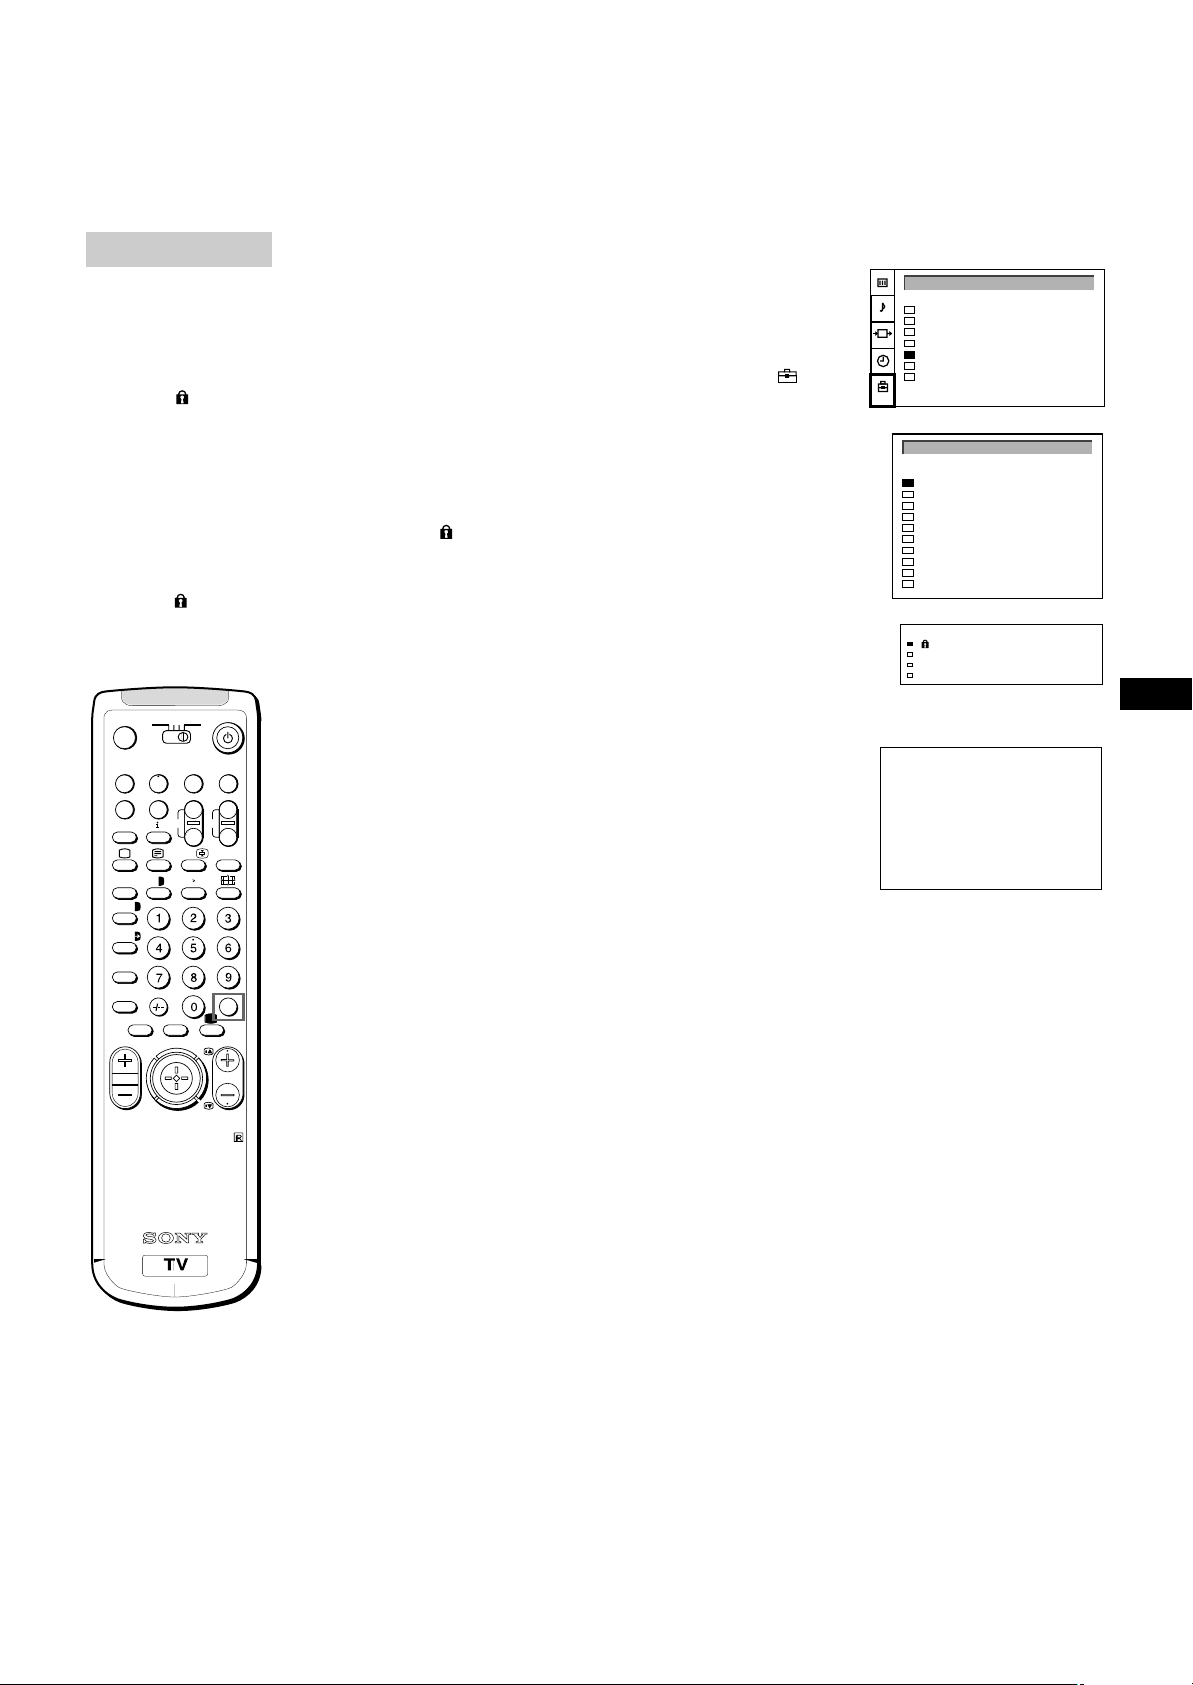
Using Parental Lock
This function enables you to prevent children from watching
undesirable broadcasts.
1 Press MENU.
2 Push the joystick to blue or green to select the symbol on the
menu screen. Push to yellow to confirm.
3 Push to green or blue to select “Parental Lock”. Push to yellow to
confirm.
4 Push to green or blue to select the channel you want to block.
Press the joystick to confirm.
The symbol appears before the programme position to indicate
that this channel is now blocked.
5 Repeat step 4 to block other channels.
6 Press MENU to restore the normal TV picture.
´/´
a/Å
MDP2
3VTR 1
¤
0
( u)
p Pr
REC
+
˚
;
…/
8
;
´8x
A
b
≥
MENU
¸
VIDEO
CH
Ú/;
PROGR
RM-862
TV
Tuning in a Channel Temporarily
GB
You can tune in to a channel temporarily, even though it has not
been preset.
+
_
?
1 Press C on the Remote Commander. For cable channels, press C
twice.
The indication “C” ( “S” for cable channels) appears on the screen.
2 Enter the double-digit channel number using the number buttons
(e.g. for channel 4, first press 0, then 4).
The channel appears. Note that the channel will not be stored.
c
Note
After you tune in a
channel temporarily, you
cannot enter the manual
preset mode.
To store the channel,
change to another
programme and refer to
the “Presetting Channels
Manually” on page 10.
13
Page 14
Operating Instructions
Watching the TV
This section explains the basic functions you use while watching
MDP2
3VTR 1
¤
0
( u)
p Pr
REC
+
˚
;
…/
8
;
´8x
´/´
a/Å
A
b
≥
MENU
¸
VIDEO
CH
Ú/;
PROGR
TV
+
_
?
c
the TV. Most operations are done using the Remote Commander.
Switching the TV on and off
Switching on
Press U on the TV.
Switching off temporarily
Press u on the Remote Commander.
The TV enters standby mode and the standby indicator on the front
of the TV lights up in red.
To switch on again
Press ;, PROGR +/–, or one of the number buttons on the
Remote Commander.
RM-862
If no picture appears
when you press U on
the TV and if the
standby indicator on the
TV is lit, the TV is in
standby mode.
Press ;, PROGR+/– or
one of the number buttons
to switch it on.
Switching off completely
Press U on the TV.
To save energy, we recommend you switch off your TV completely
when the TV is not in use.
Selecting TV Programmes
Press PROGR +/– or press the number buttons.
To select a double-digit number
Press -/--, then the numbers.
For example, if you want to choose 23, press -/--, 2 and 3.
Adjusting the Volume
Press ¸ +/–.
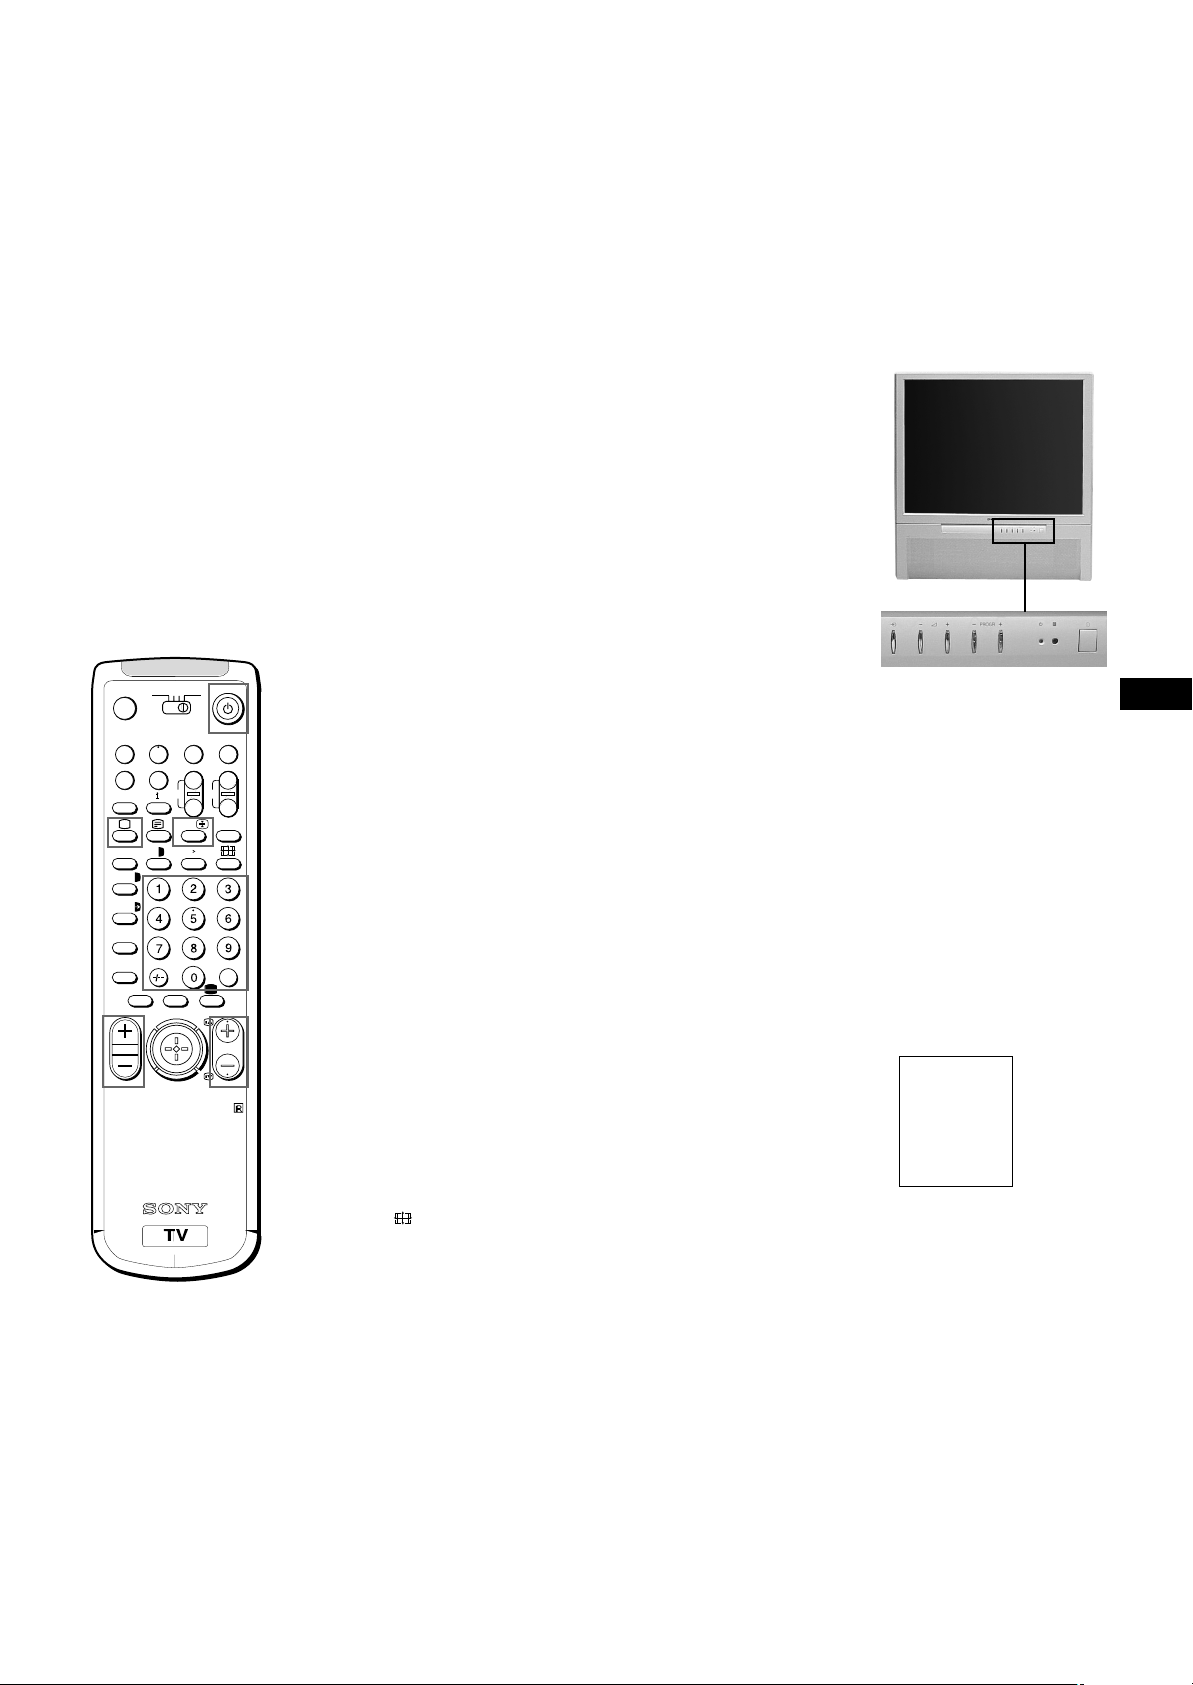
Operating the TV Using the
Buttons on the TV
To select the programme number, press the PROGR +/– buttons.
To adjust the volume, press the ¸ +/– buttons.
To select the video input picture, press the… button.
14
Page 15
For details of the teletext
operation, refer to
page 18.
For details of the video
input picture, refer to
page 21.
TV
MDP2
3VTR 1
¤
+
MENU
REC
…/
VIDEO
CH
Ú/;
PROGR
+
_
?
c
0
( u)
p Pr
˚
;
8
;
´8x
´/´
a/Å
A
b
≥
¸
Watching Teletext or Video Input
Watching teletext
1 Press f to view the teletext.
2 For teletext operation, enter a 3-digit page number with the number
buttons to select a page.
For fastext operation, push the joystick to the colour mark which
corresponds to the colour-coded menu.
For both operations, press R (PAGE + ) for the next page or
S (PAGE – ) for the preceding page.
3 To go back to the normal TV picture, press ; .
Watching a video input picture
1 Press… repeatedly until the desired video input appears.
2 To go back to the normal TV picture, press ;.
More Convenient Functions
Displaying the on screen indications
TT
Press TT
Press again to make the indications disappear.
Muting the sound
Press ¤.
To resume normal sound, press ¤ again.
Displaying the time
Press #. This function is available only when teletext is broadcast.
To make the time display disappear, press # again.
to display the indications.
GB
RM-862
Displaying the Programme Table
Press the joystick. Push the joystick to blue or green to select a
programme, then press the joystick to confirm. A Programme
Table will be displayed on the left side of the TV screen.
To make the Programme Table disappear, press MENU.
Viewing the programmes in 16:9 mode
Press .
Press again to return to 4:3 mode.
BBC
1
SAT
2
TV5
3
C02
4
C15
5
RTL
6
SKY
7
S34
8
AV1
9
MTV
10
15
Page 16

Adjusting and Setting the TV Using
Picture Mode
Contrast
Reset
Format
- - >
4:3
PICTURE CONTROL
Picture Mode
Brightness
Colour
Sharpness
Hue
User
PICTURE MODE
Sound Mode
Balance
Reset
Spatial
Dual Sound
Volume Offset
2 Volume
2 Dual Sound
- - > User
Off
Stereo
0
Stereo
SOUND CONTROL
Speaker
Centre in
Mode
Treble
Bass
User
SOUND MODE
the Menu
PICTURE
CONTROL
SOUND
CONTROL
3VTR 1
¤
0
( u)
p Pr
REC
+
˚
;
…/
8
;
´8x
´/´
a/Å
A
b
≥
MENU
¸
Adjusting the Picture and Sound
Although the picture and sound are adjusted at the factory, you
can adjust them to suit your own taste. You can also select dual
sound (bilingual) programmes when available or adjust the sound
for listening with the headphones.
1 Press MENU and select the symbol for Picture Control or ≥,
for Sound Control. Push to yellow to confirm.
TV
MDP2
VIDEO
+
CH
_
?
Ú/;
c
PROGR
The PICTURE CONTROL or SOUND CONTROL menu appears.
2 Push the joystick to blue or green to select the desired item.
Push to yellow to confirm.
The selected item changes its colour.
3 Push to red or yellow to adjust the selected item. Press the
joystick to confirm.
For the effect of each control, see the table below.
4 Repeat steps 2 and 3 to adjust other items.
5 Press MENU to restore the normal TV picture.
Note
HUE is available for
NTSC colour systems
only.
Note on LINE OUT
The dual sound mode
output from the ≤ jack on
the rear corresponds to
the Headphones Dual
Sound settings.
When watching a video
input source with stereo
sound
You can select Dual
Sound to change the
sound.
RM-862
Effect of each control
PICTURE CONTROL Effect
Picture Mode User y Game y Movie y Sports y Live
When “User” is selected in “Picture Mode”
You can preset Brightness, Colour, Sharpness and Hue (NTSC
signals only) as follows:
1 Push the joystick to blue or green to select the desired item.
Push to yellow to confirm.
2 Push to red or yellow to adjust. Press the joystick to confirm.
3 Push to red to return to the PICTURE CONTROL menu.
Contrast Less More
Reset Resets picture to the factory preset levels.
Format 4:3: normal
16:9: wide screen effect
16
Page 17
PICTURE CONTROL Effect
Sound Mode Choice between different sound effects
User y Rock y Jazz y Pop
R R
When “User” is selected in “Sound Mode”
You can preset Treble and Bass as follows:
1 Push the joystick to blue or green to select the desired item. Push to
yellow to confirm.
2 Push to red or yellow to adjust. Press the joystick to confirm.
3 Push to red to return to the PICTURE CONTROL menu.
Balance More left More right
Reset Resets sound to the factory preset levels.
Spatial Off: normal
On: acoustic sound effect
Dual Sound A: channel 1 B: channel 2 Stereo t Mono
Volume Offset Presets the volume level for individual programmes.
–12 +12
2 Volume Less More
2 Dual Sound A: channel 1tB: channel 2
Stereo t Mono
Speaker Main: sound from TV set
Centre in: sound from external amplifier
GB
TIMER
To switch off the timer
Select “OFF” in step 3.
To check the
remaining time
Press .
To go back to the
normal TV picture
Press MENU.
Changing Modes Quickly
You can quickly change the Sound Mode or the Picture Mode
without entering the “SOUND CONTROL“ or the “PICTURE
CONTROL“ menu.
1 Press Í for the picture or ≥ for the sound.
2 Push joystick to blue or green to select the desired mode.
3 Press Í or ≥ again to restore the normal TV screen.
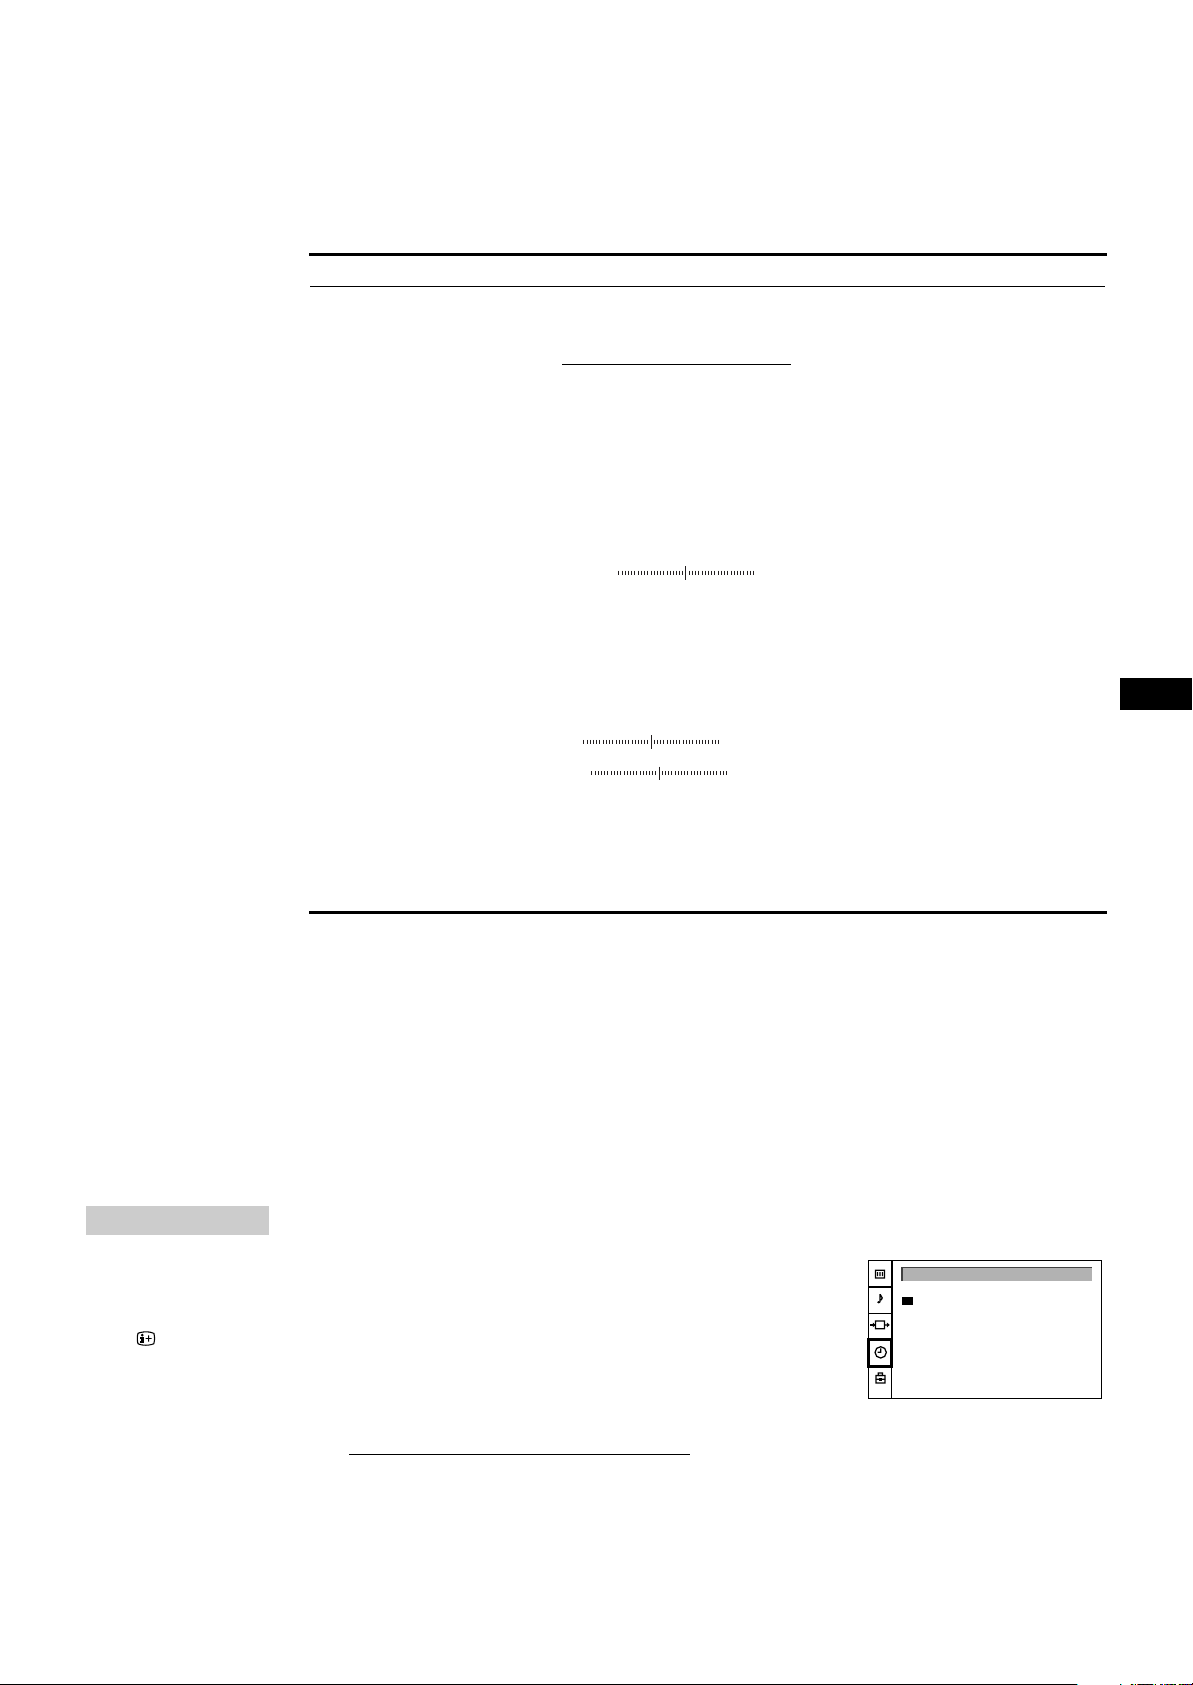
Using the Sleep Timer
You can select a time period after which the TV automatically
switches into standby mode.
1 Press MENU.
2 Push the joystick to blue or green to select the symbol t on the
menu screen. Push to yellow to confirm.
3 Push to yellow. Push to red or yellow to set time delay.
OFFy0:30y1:00y1:30..........3:30y4:00
R R
4 Press the joystick to confirm.
One minute before the TV switches into standby mode, a
message is displayed on the screen.
TIMER
Sleep Timer OFF
17
Page 18
Teletext
TV
MDP2
3VTR 1
¤
+
MENU
REC
…/
VIDEO
CH
Ú/;
PROGR
+
_
?
c
0
( u)
p Pr
˚
;
8
;
´8x
´/´
a/Å
A
b
≥
¸
TV stations broadcast an information service called Teletext via
the TV channels.Teletext service allows you to receive various
information pages such as weather reports or news at any time
you want.
Direct Access Functions
Switching Teletext on and off
1 Select the TV channel which carries the teletext broadcast you
want to watch.
2 Press f to switch on teletext.
A teletext page will be displayed (usually the index page).
If there is no teletext broadcast, the indication “No Text” is
displayed on a black screen.
3 Input three digits for the page number using the number buttons.
If you have made a mistake, type in any three digits. Then reenter the correct page number.
4 Press ; to return to the normal TV picture.
RM-862
Note
Teletext errors may
occur if the broadcasting
signals are weak.
Accessing next or preceding page
Press R (PAGE+) or S (PAGE–).
The next or preceding page appears.
Superimposing the teletext display on the TV programme
• Press f once to get Teletext only.
• Press f twice for Mix mode.
The normal TV screen and the Teletext screen are overlapped.
• Press f again to resume normal teletext reception.
Preventing a teletext page from being updated
• Press w.
The symbol “w” is displayed on the information line.
Press again to cancel.
Revealing hidden information (e.g. for a quiz)
Sometimes pages contain concealed information, such as
answers to a quiz. The reveal option lets you disclose the
information.
Press C. Press again to cancel.
18
Page 19

Note
Fastext operation is
possible, only when the
TV station broadcasts
Fastext signals.
Favourite page system
You can store up to four of your favourite teletext pages per
Teletext service. In this way you have quick access to the pages
you frequently use.
Storing pages
1 Use the number buttons to select the page you would like to store.
2 Press twice.
The colour prompts at the bottom of the screen flash.
3 Push the joystick to the desired colour to store the selected page.
The page is now stored on this colour.
Repeat steps 1 to 3 for the other 3 pages.
Displaying the favourite pages
1 Press .
2 Push the joystick to the colour on which the desired page is
stored.
Make sure you press , otherwise the normal Fastext facility
operates.
Using Fastext
With Fastext you can access pages with one key stroke.
When a Fastext page is broadcast, a colour-coded menu will
appear at the bottom of the screen. The colours of this menu
correspond to the red, green, yellow and blue positions on the
Remote Commander.
Push the joystick to the colour mark which corresponds to the
colour-coded menu. The page will be displayed after a few
seconds.
GB
19
Page 20

Connecting and Operating Optional
Equipment
Connecting Optional Equipment
You can connect optional audio-video equipment to this TV such as a
VCR, video disc player, and stereo system.
To connect a VCR using
the )))) terminal
Connect the aerial output
of the VCR to the aerial
terminal ) of the TV.
We recommend that you
tune in the video signal to
programme number “0”.
For details, see
“Presetting Channels
Manually” on page 10.
1
3
If the picture or the
sound is distorted
Move the VCR away from
the TV.
About S video Inputs
(Y/C input)
Video signals can be
separated into Y
(luminance or brightness)
and C (chrominance)
signals.
Separating the Y and C
signals prevents them
from interfering with one
another, therefore it
improves picture quality
(especially luminance).
This TV is equipped with
3 S Video input jacks,
through which these
separated signals can be
input directly.
When connecting a
monaural VCR
Connect only the white ≤
jack to both the TV and
VCR.
Note
When you connect the
equipment to the q3/
…3/≤3 connectors on
the front panel and :3/
q3 connector on the
rear panel, turn off the
power of the equipment
not in use.
PROGR
C
3
3/
R/D/D/D-L/G/S/I
2/
1
2
3 3
MONO
3
L/G/S/I R/D/D/D
R
3
24
5
Acceptable input signal Available output signal
1 Normal audio/video and RGB signal Video/audio from TV tuner
2 Normal audio/video and S video signal Video/audio from selected source
3 Normal audio/video and S video signal No outputs
Normal audio/video and S video signal Video/audio from selected source (the same output
source as the :2/ q 2 connector)
4 No inputs Audio signal
5 Centre speaker input No outputs
Set “Speaker” on the SOUND
CONTROL menu to “Centre in”.
20
Page 21
Selecting input with
PROGR +/– or number
buttons
You can preset video
input sources to the
programme positions so
that you can select them
with PROGR +/– or
number buttons. For
details, see “Presetting
Channels Manually” on
page 10.
Selecting Input
This section explains how to view the video input picture (of the
video source connected to your TV) using direct access buttons.
Selecting input
Press … repeatedly to select the input source.
The symbol of the selected input source will appear.
To go back to the normal TV picture
Press ;.
Input modes
Symbol Input signal
… 1
MDP2
3VTR 1
¤
0
( u)
p Pr
REC
+
˚
;
…/
8
;
´8x
´/´
a/Å
A
b
≥
MENU
¸
VIDEO
CH
Ú/;
PROGR
RM-862
TV
W Audio/RGB input through the W 1 connector
… 2 Audio/video input through the : 2/ q 2 connector
GB
q2 Audio/S video input through the : 2/ q 2 connector
… 1 Audio/video input through the W 1 connector
+
_
?
… 3 Audio/video input through … 3 and ≤ 3 connectors on the front or : 3/q 3
connector on the rear
q3 Audio/S video input through the q 3 connector (4-pin connector) on the front or
: 3/ q 3 connector on the rear
c
21
Page 22
AV LABEL
Auto Programme
Manual Programme
AV Label Preset
Programme Sorting
Parental Lock
Language
Convergence
PRESET
AV1
RGB
AV2
YC2
AV3
YC3
INPUT
- - - - -
- - - - -
- - - - -
- - - - -
- - - - -
- - - - -
LABEL
AV LABEL PRESET
TV
TV
n
TV Screen
Output
[TV - - - - -]
[TV - - - - -]
VIDEO CONNECTION
PRESET
VIDEO
CONNECTION
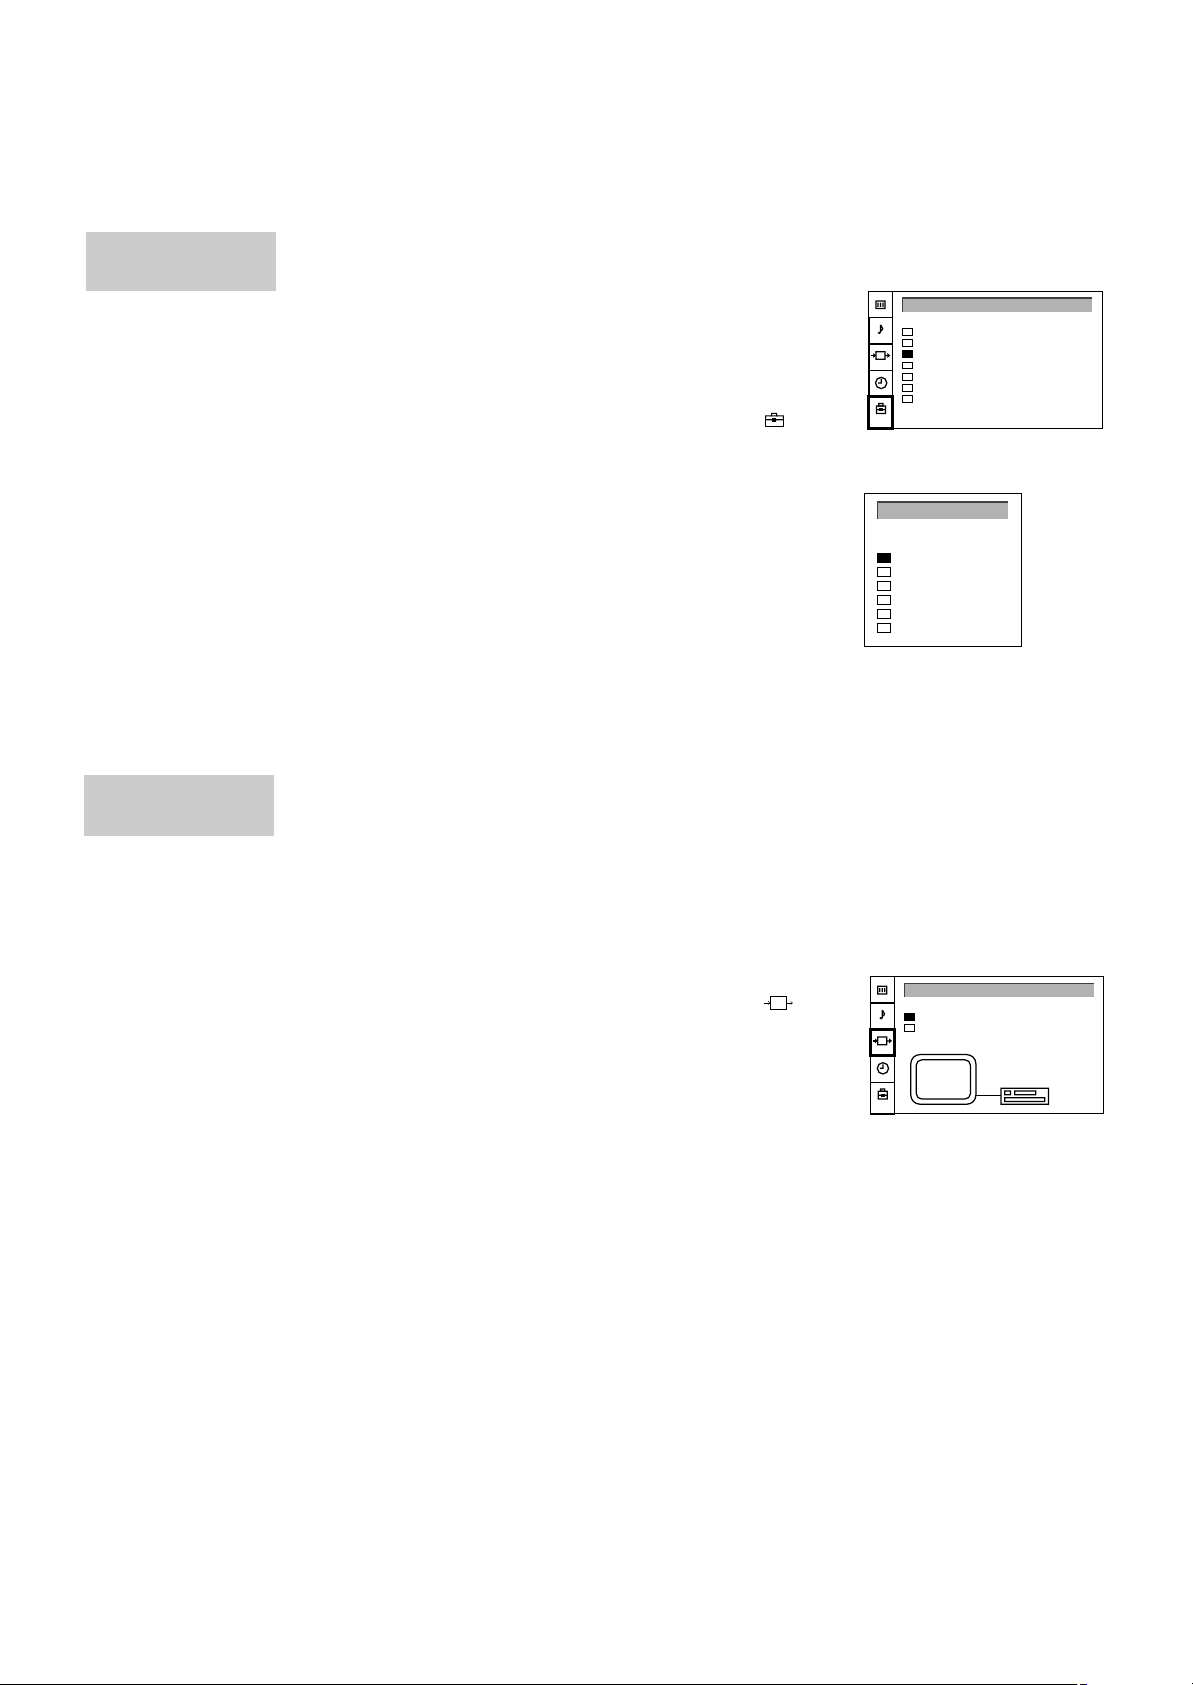
Using AV Label Preset
Using this function you can preset the desired input source (e.g.
W 1, RGB signal) to the respective AV input (AV 1 W). In this
way, a connected VCR will automatically switch to the RGB
signal.
1 Press MENU.
2 Push the joystick to blue or green to select the symbol , on the
menu screen. Push to yellow to confirm.
3 Push to blue or green to select “AV Label Preset”. Push to yellow.
4 Push to blue or green to select the desired input source. Push to
yellow to confirm.
5 Push to blue or green to select a letter or number. Push to yellow
(select “-” for a blank).
Select the other four characters in the same way.
6 After selecting all the characters, press the joystick to confirm.
7 Repeat steps 4 to 6 to label other input sources
8 Press the MENU button to return to the normal TV picture.
Checking and Selecting the Input
and Output Sources Using the
Note
If you select “AUTO” for
output, the output source
automatically becomes
the same as the desired
input source.
Menu
You can display the menu to see which input sources are
selected for the TV screen, as well as which output source is
selected. You can also select them on the menu display.
1 Press MENU.
2 Push the joystick to blue or green to select the symbol on the
menu screen. Push to yellow to confirm.
The VIDEO CONNECTION menu appears.
You can see which source is selected for the TV and for the
output. If you want to select the input and output on this menu, go
on to the next step.
3 Push to blue or green to select “TV Screen” (input source for TV-
screen), or “Output” (output source for : 2/q 2 and
: 3/q 3).
Push to yellow to confirm.
4 Push to red or yellow to select the desired source. Press joystick
to store.
5 Repeat steps 3 to 4 to select the source for other inputs or outputs.
6 Press MENU to return to the normal TV picture.
22
Page 23

3VTR 1
¤
0
( u)
p Pr
REC
+
˚
;
…/
8
;
´8x
´/´
a/Å
A
b
≥
MENU
¸
TV
MDP2
Remote Control of Other Sony
Equipment
VIDEO
You can use the TV Remote Commander to control most of Sony
remote-controlled video equipment: beta, 8 mm and VHS VCRs
and video disc players.
Tuning the Remote Commander to the equipment
1 Set the VTR 1/2/3 MDP selector according to the equipment you
want to control:
VTR1: Beta VCR
VTR2: 8 mm VCR
VTR3: VHS VCR
MDP: Video disc player
2 Use the buttons indicated in the illustration to operate the
additional equipment.
If your video equipment is furnished with a COMMAND MODE
selector, set this selector to the same position as the VTR 1/2/3
MDP selector on the TV Remote Commander.
If the equipment does not have a certain function, the
corresponding button on the Remote Commander will not operate.
GB
CH
Ú/;
PROGR
RM-862
+
_
?
c
When recording
When you use the r
(record) button, make
sure to press this button
and the one to the right
of it simultaneously.
23
Page 24
For Your Information
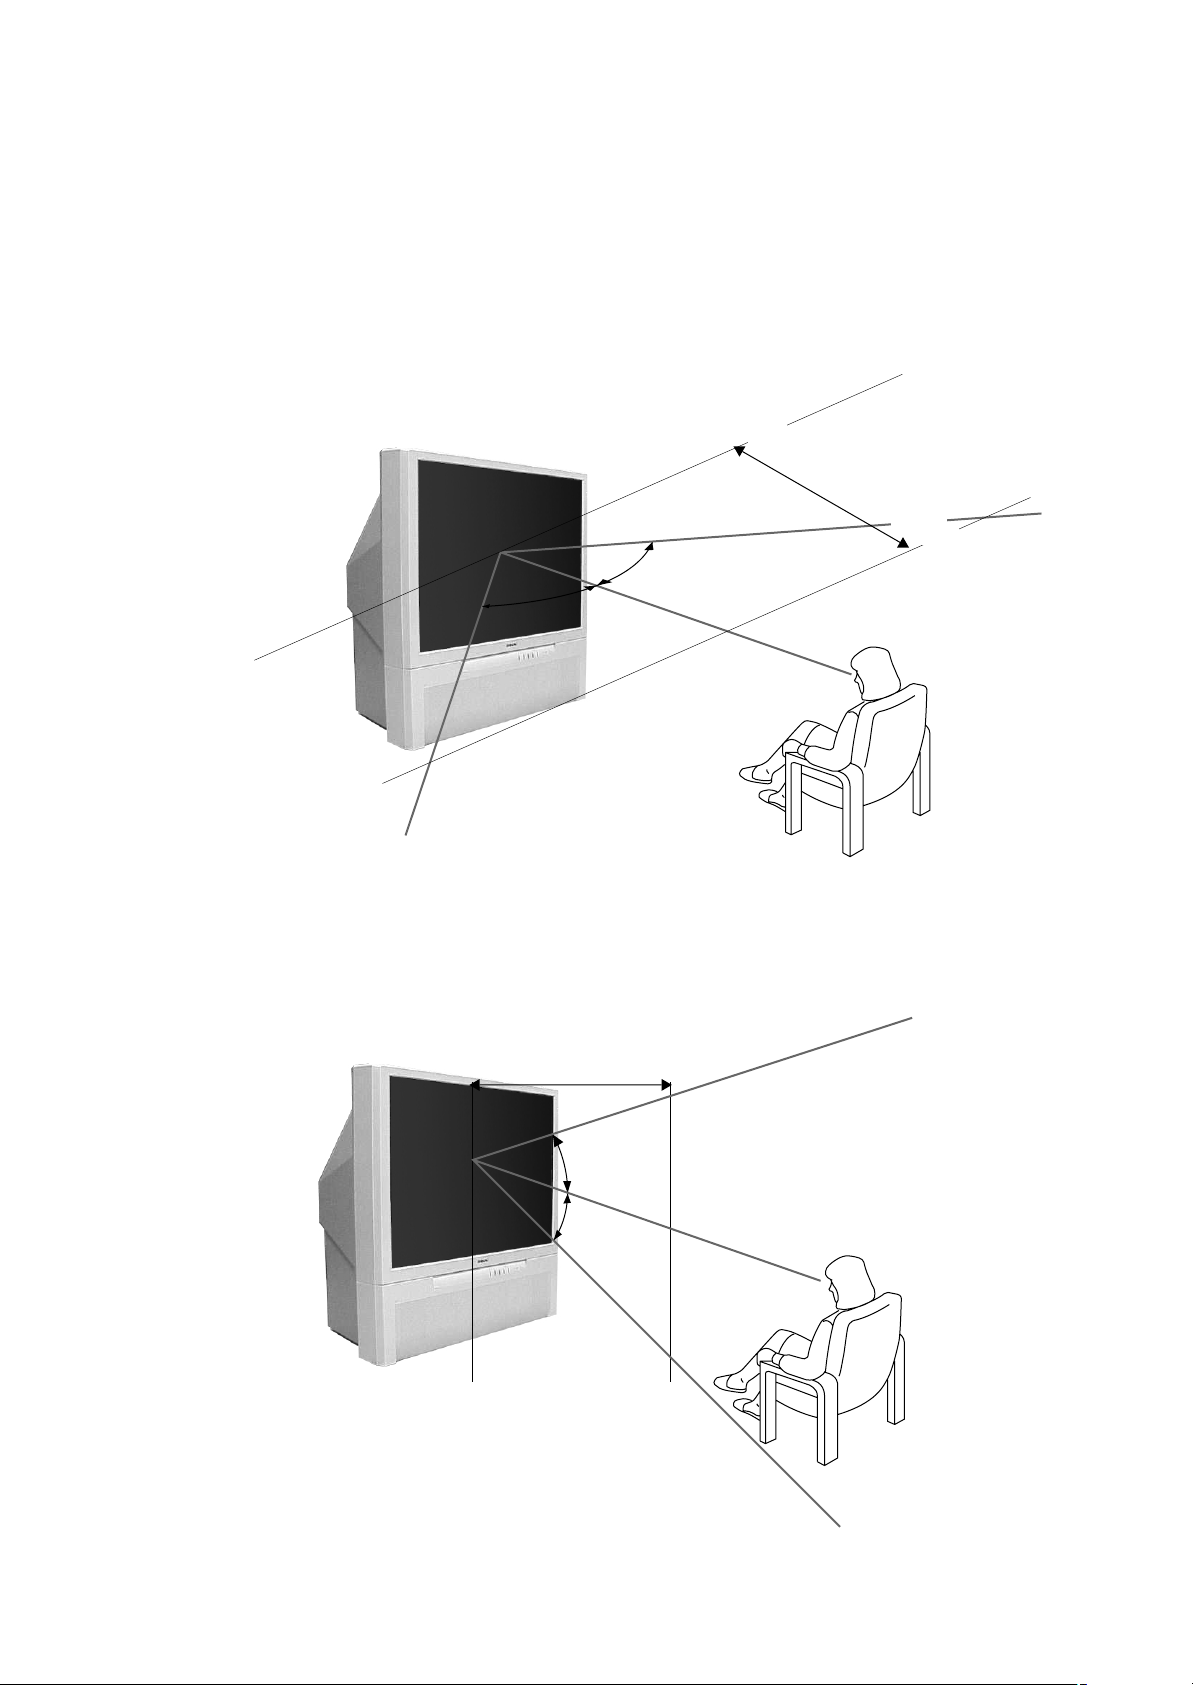
Optimum Viewing Area
For the best picture quality, try to position the projection TV so that you
can view the screen from within the areas shown below.
Horizontal viewing area
2.1m (Minimum optimum distance)
75°
75°
Horizontal viewing area
2.1m (Minimum optimum distance)
(Optimum viewing position)
27,5°
27,5°
24
(Optimum viewing position)
Page 25

Troubleshooting
Here are some simple solutions to some problems which may affect the picture and sound.
Problem Solution
No picture (screen is dark), no sound • Plug the TV in.
• Press U on the TV (if u indicator is on, press ; or a programme
number on the Remote Commander).
• Check the aerial connection.
• Check if the selected video source is on.
• Turn the TV off for 3 or 4 seconds then turn it on again using U.
Poor or no picture (screen is dark), but good sound • Press MENU to enter the PICTURE CONTROL menu and adjust the
brightness, contrast and colour.
Poor picture quality when watching an RGB video source
Good picture but no sound • Press ¸ +.
No colour for colour programmes • Press MENU to enter the PICTURE CONTROL menu, select Reset,
Remote Commander does not function • Replace the batteries.
If you continue to have problems, have your TV serviced by qualified personnel. Never open the casing yourself.
• Press … repeatedly to select W.
•
Check that “Main” speaker is selected on the SOUND CONTROL menu.
• If ¤ is displayed on the screen, press ¤.
then press the joystick to confirm.
Specifications
Television system B/G/H, D/K
Colour system PAL/SECAM
NTSC 3.58/4.43 (VIDEO IN)
Channel coverage See "Receivable channels and
channel displays" on this page
Projected picture size 41 inches
Approx. 103 cm measured
diagonally
Terminals
Rear • Center speaker input terminals, 2
terminals
•
≤
(L, R), audio outputs - phono jacks
• W1, 21-pin Euro connector
(CENELEC standard)
-inputs for audio and video signals
-inputs for RGB
-outputs of TV audio and video
signals
• : 2/q 2, 21-pin Euro connector
- inputs for audio and video signals
- inputs for S video
- outputs for audio and video signals
(selectable)
• : 3/q 3, 21-pin Euro connector
- inputs for audio and video signals
- inputs for S video
- outputs for audio and video signals
(selectable, the same output source
as the : 2/q 2 connector)
Rear • q 3, S video inputs - 4-pin DIN
• … 3, video inputs - phono jacks
•
≤ 3 (L, R), audio inputs - phono jacks
• 2, headphones jack - stereo minijack
Sound output 2 x 30 W (music power)
2 x 15 W (RMS)
Centre SP input 30 W (RMS) (using as the centre
speaker)
Power consumption 145 W
Dimensions (W x H x D)
Weight Approx. 43 kg
Supplied accessories See page 6.
Other features Digital comb filter (High resolution)
Design and specifications are subject to change without notice.
Approx. 948 x 992 x 511 mm
FASTEXT, TOPText
NICAM
Receivable Channels and Channel Displays
Receivable Indication on the
channels screen
B/G/H E2..12 21..69 C02 C03 C04..C12
C21..C69
CABLE TV (1) S1..41 S01 S02..S41
CABLE TV (2) S01..S05 M1..M10 S42..S46 S01..S10
U1..U10 S11..S20
ITALY A B C D E F G H H1 C11..C69
H2 21..69
D/K R01..R12 R21..R69 C02..C12 C21..C69
CABLE TV (1) S01 S02..S41
CABLE TV (2) S42 S43..S46
CABLE TV B..Q, S21..41 S02, S03..S17,
S21..S41
GB
Ecological Paper - Totally Chlorine Free
25
Page 26
Техника на безопасност
Tози тeлeвизор може да работи
само на захранващо
напрежение 220-240 V.
Bнимавайте да не включвате
твърде много уреди в един
контакт, тьй като това може да
причини токов удар.
Пo причини за безoпастност от
въздействие на природни
явления e препоръчително да
не оставяте телевизора в
режим “stand by”, a да гo
изключватe централно.
Hикогa не пъхaйте кaквито и да било
прeдмети в телeвизорa, тьй като
товa може дa причини пожар или
токов удар. Hикога не разливaйте
течности по телевизора. B случай, чe
течност или твърд прeдмет попaднат
в телевизора го изключете.
Cвържете сe нeзaбaвно c
квалифицирани служители нa Coни.
He oтвaряйте кутиятa и задния
кaпaк нa тeиeвизорa.
Oбръщайте се само към
квaлифициран сервизен
перcoнaл.
He пoкривaйтe
вeнтилaциoннитe отвoри нa
тeлeвизoрa.
Ocтaвeтe нaй-мaлко 10 см.
рaзтoяниe oкoлo тeлeвизoрa зa
вeнтилация.
Пoчиствaйтe тeлeвизора c мeкa,
лeкo влажна кърпа. He използвaйтe
бeнзин, рaзрeдитeл или дрyги
xимикaли, зa дa почиститe
тeлевизoрa. He дpacкaйтe пo
eкpaнa нa тeлeвизopa. Зa пo-гoлямa
бeзoпacтнocт изключвaйтe
тeлевизopa oт кoнтaктa, кoгaтo го
пoчиcтвaтe.
Зa Baшa coбcтвeнa бeзoпacнocт
нe пипaйтe тeлeвизорa, кaбeлa
или aнтeнaтa му по врeмe нa
гръмотeвични бури.
Hикoгa нe пoстaвяйтe тeлeвизoрa
нa гoрeщи, влaжни или
изключитeлнo прaшни мecтa. He
инстaлирaйтe тeлeвизорa нa мecтa
кьдето можe дa бъде изложeн нa
меxaнични вибрaции.
Koгaтo изключвaтe
тeлeвизopa, дъpпaйтe
щeпceлa, a нe кaбелa.
Зa дa прeдoтврaтитe риcкa
oт тoкoв yдaр, нe излaгaйтe
тeлeвизорa нa дъжд или
влaгa.
Зa дa избегнeтe пoжaр, дръжтe
нacтрaнa oт тeлeвизорa
възпламeними и oткрити
източници нa светлина/
напримeр cвeщи/.
He пocтaвяйтe тeжки пpeдмети
въpxy кaбeлa, тъй кaтo тoвa
мoжe дa гo пoвpeди.
Пpeпopъчвaмe ви дa нaвиeтe
излишния зaxpaнвaщ кaбeл
oкoлo пpeднaзнaчeнитe зa цeлтa
пpиcпocoблeния нa зaднaтa
cтpaнa нa тeлeвизopa.
Излючвaйтe кaбeлa нa
Пocтaвяйтe тeлeвизopa нa
cигypнa, cтaбилнa пocтaвкa.
He пoзвoлявaйтe нa дeцa дa ce
кaтepят пo нeгo. He гo
oбpъщaйтe нa cтpaни или пo
“гpъБ”.
тeлeвизopa пpeди дa гo мecтитe.
Пpи пpeмecтвaнeтo избягвaйтe
нepaвни пoвъpxнocти и нe
пpaвeтe бъpзи кpaчки. Aкo
изпycнeтe или нapaнитe
тeлeвизopa, нeзaбaвнo ce
кoнcyлpaйтe c квaлифициpaни
cepвизни cлyжитeли нa Coни.
He пoкpивaйтe
вeнтилaцкoннитe oтвopи нa
тeлeвизopa
c пpeдмeти кaтo пepдeтa,
вecтници и дp.
Допълнителна техника на безопаснст
•
След преместване на телевизионния приемник направо от студено на топло място или когато се промени рязко температурата на
стаята, възможно е картината да се замъгли или на места по нея цветовете да са лоши. Това се дължи на влагата, която ce
kонgензuра по огледалата и лещите вътре в телевизионния приемник. Оставете влагата да се изпари преди да включите
телевизионния приемник.
•
За да получите ясна картина, не излагайте екрана на директна слънчева светлина. Ако е възможно, използвайте точково
осветление насочено от тавана надолу.
•Æokasbahe ha samp∂shaja kaptnha, sa f∂j∂l æepnof ot bpeme, æpn padota c bnfeo nlpa njn æepcohajeh komæiƒp njn ljefahe ha
æpolpama b 16"9 mo;e fa æobpefn kckoæa. 3a fa nsdelhete toba, æoff∂p;a=te hnc∂k kontpact ha kaptnhata.
•He m∂pkaÈme, he gokocßaÈme, he ygprÈme ekpaha c ocmpu npegmemu kamo nucaÎku u omßepku. Æoдodhn fe=ctbnr duxa
noßpeguÎu noß∂pxhocmma ha ekpaha.
2
Page 27

Съgъpжaнuе
Техника на безопасност..............................................................................2
Общи сведения.............................................................................................4
Начало ............................................................................................ 6
Стъпка 1 Подготовка...................................................................................6
Стъпка 2 Настройване на телевизионни програми..................................7
Избор на езика за менютата...........................................................7
Стъпка 3 Hactpo=ka ha цbeta ....................................................................9
Допълнителни функции за предварителна настройка ..........................10
Проверете доставяните принадлежности...................................6
Поставете баmерuumе в устройството за дистанционно
управление....................................................................................... 6
Свързване на антената и видеото.................................................6
Автоматична предварителна настройка на каналите..................8
C∂dnpahe ha zepbehn, sejehn n cnhn jnhnn.................................9
Ръчна предварителна настройка на канали...............................10
Ръчна фина настройка..................................................................11
Сортиране на програмните номера .............................................11
Прескачане на nрограмнu номера ...............................................12
Присвоявне на име на телевизионната станция........................12
Използване на родителско заключване.....................................13
Временна настройка на програма................................................13
BG
Инструкции за експлоатация................................................... 14
Гледане на телевизионна програма.........................................................14
Включване и изключване на телевизионния
приемник ........................................................................................14
Избиране на телевизионни програми..........................................14
Настройка на силата на звука .....................................................14
Работа с телевизионния приемник като се използват
бутоните на него............................................................................14
Работа с телетекст или вход от видеокасетофон.....................15
Функции за по-голямо удобство...................................................15
Настройване и инсталиране на телевизионния приемник чрез
менюто ........................................................................................................16
Настройване на картината и звука .............................................16
Използване на таймера за изключване......................................17
Телетекст ...................................................................................................18
Функции за директен достъп .......................................................18
Свързване и работа с допълнително оборудване..................................20
Свързване на допълнително оборудване...................................20
Nsdnpahe ha bxof ..........................................................................21
Предварително задаване на имената на AV сигнали................22
Проверка и избор на източниците на вход и изход с
помощта на менюто.......................................................................22
Дистанционно управление на друго оборудване от Sony..........23
За Ваша информация ................................................................................24
Оптимална област за гледане на телевизионния приемник.....24
Отстраняване на неизправности .................................................25
Технически характеристики.........................................................25
3
Page 28
Общи сведения
В тази глава накратко са описани бутоните и уредите за
управление на телевизионния приемник и на устройството за
дистанционно управление. За повече информация,
направете справка на страниците, дадени за всяко описание.
Лицева страна на телевизионния приемник
sa otkpnbahe ha jnuebnte dykcn
hatnchete halope kaæazeto,
hamnpaåo ce ha æpefhata ctpaha
ha tenebnsopa
Символ Наименование Справка на страница
U Ключ за ел. захранване 14
u Индикатор за готовност 14
PROGR +/- Програма 14
Á +/- Бутони за силата на звука 14
… Бутони за избор на вход 15
2 Жак за слушалки 20
q 3, … 3, ≤ 3 Входни жакове (S видео/видео/аудио) 21
4
Бутон за авт. предв. настройка 8
Бутон Auto Convergence 9
Page 29
MENU
Устройство за дистанционно управление
TV
MDP2
3VTR 1
¤
0
( u)
p Pr
REC
+
˚
;
…/
8
;
´8x
´/´
a/Å
A
b
≥
MENU
¸
CH
Ú/;
PROGR
RM-862
VIDEO
+
_
?
c
Работа с Телевизионен
приемник/Телетекст
Работа с видеото
Работа с Телевизионен
приемник/Телетекст
Работа с меню
Бутони за работа с менюто
Символ Наименование Справка на страница
MENU Бутон за включване/изключване Вижте по-долу
на менюто
Джойстик за избор от меню Вижте по-долу
Натиснете, за да потвърдите
(функция ОК)
Бутони за работа с видеокасетофон
Символ Наименование Справка на страница
VTR1/2/3, Избор на видео оборудване 23
MDP
0 ( ) p Бутони за работа с видео оборудване 23
P r VIDEO u
CH +/-
Без функция за този апарат
За работа с телевизионни програми/телетекст
Символ Наименование Справка на
страница
¤ Бутон за заглушаване на звука 15
TV u Бутон за режим на готовност на 14
телевизионния приемник
; Бутон за включване на телеви- 14
зионния приемник/избор на режим на
телевизионния приемник
f Бутон за режим телетекст 15
…/y Бутон за избор на вход/ 15
Телетекст: замразявaне на подстраницата 18
…/ Телетекст: бутон за разкриване 18
1,2,3,4,5,6, Номерирани бутони 14
7,8,9 and 0
-/-- Бутон за въвеждане на двуцифрено число 14
C Бутон за директно въвеждане на 13
номера на канал
Á +/- Бутон за регулиране на силата на звука 14
PROGR +/- Бутон за избор на програма 17
R/S Телетекст: Бутони за прелистване напред/ 18
назад
Í Бутон за nsdop ha pe;nm на картината 17
≥ Бутон за pe;nm на звука 17
# Бутон за показване на часовника 15
Бутон за смяна на формата на екрана 15
Бутон за показване на индикациите на екрана
Телетекст: Бутон за предпочитани страници
15
19
Символ : , , , , , , Ú/, (при
опериране)
За системата на менюто
Използвайте бутона за менюто и джойстика по следния начин.
1 Натиснете бутона MENU, за да включите или изключите
менюто.
2 Използвайте джойстика както следва:
ЗЕЛЕН: прелистване напред
ЧЕРВЕН: намаляване/
връщане към
предишната позиция или
към предишното меню
В случай, че не се
показва меню:
Преместете към червен,
за да се покаже
последния екран с меню
СИН:
прелистване
назад
Действащите функции за джойстика се показват на екрана
ЖЪЛТ:
увеличава/
напредва към
следващата
позиция
Джойстик:
Натискането става
когато е в средно
положение, за да
потвърдите своя
избор или да
запаметите.
BG
5
Page 30
Начало
1
Стъпка 1 Подготовка
3
2
1
1 Проверете доставяните принадлежности
След като сте извадили всичко от
кашона, проверете дали са
налице следните принадлежности:
• Устройство за дистанционно
управление RM-862
• Две батерии с означение R6 по IEC
3
2
Забележка: Винаги
помнете, че трябва да
изхвърлите
използваните батерии
така, че да не се
замърсява околната
среда.
2 Поставете баmерuumе в устройството за
дистанционно управление
Свалете капака.
Проверете дали полюсите са
правилно обърнати.
3 Свързване на антената и видеото
6
Използването на Евроконектор е опция е използването на евроконектор е опция.
Ако го използвате, когато гледате видео, това ще подобри качеството на образа и звука.
Ако не използвате Eвроконектор,след като настроите автоматично апарата, ще трябва
да настроите ръчно канала за сигнал на видеото. За повече детайли се консултирайте в
глава «Pъчна Предварителна настройка на канали».
Консултирайте се също така с инструкциите за експлоатация на Вашето видео, за да
видите как да намерите канала на видео сигнала.
Page 31

Стъпка 2 Настройване на телевизионни
програми
1
3VTR 1
¤
0
( u)
p Pr
REC
+
˚
;
…/
8
;
´8x
´/´
a/Å
A
b
≥
MENU
¸
3
1 Избор на езика за менютата
2
С помощта на тази функция Вие избирате езика за екраните на
менютата.
1 Натиснете бутона за електрозахранването U, разположен на
TV
MDP2
VIDEO
+
CH
_
?
Ú/;
c
PROGR
RM-862
телевизионния приемник.
В случай, че свети индикатора за готовност u, на
телевизионния приемник, натиснете ; или номериран бутон от
дистанционното управление.
2 Натиснете бутона MENU на дистанционното управление.
Появява се менюто LANGUAGE.
3 Преместете джойстика към синьо или зелено, за да изберете
езика. Натиснете джойстика, за да потвърдите избора си.
4 Натиснете бутона MENU, за да се върнете към нормалната
телевизионна картина.
LANGUAGE
∂
BG
7
Page 32

MDP2
Abtomatnzho saxbaåahe
P∂zho nsdnpahe ha æpolpama
Nmeha ha bxofobete
Æpeæofpe;fahe ha æpolpamnte
3adpahehn æpolpamn sa feua
Esnk
Cxofnmoct
ÆPEFBAPNTEJHA HACTPO+KA
6 D/K
CNCTÆPOLP
C26
KAHAJ
- - - - -
NME
ABTOMATNZHO 3AXBAœAHE
3VTR 1
¤
0
( u)
p Pr
REC
+
˚
;
…/
8
;
´8x
´/´
a/Å
A
b
≥
MENU
¸
VIDEO
CH
Ú/;
PROGR
RM-862
TV
+
_
?
c
настройка на каналите
С тази функция телевизорът може автоматично да търси
и запази до 100 различни номера на канали.
Ако предпочитате ръчната предварителна настройка,
вижте “Ръчна предварителна настройка” на стр. 10.
1 Натиснете бутона за захранването на телевизора.
В случай, че свети индикатора за готовност u на
телевизионния приемник, натиснете ; или номериран
бутон от дистанционното управление.
2 Натиснете и задръжте бутона на телевизора, докато
автоматичното меню се изведе на екрана и започне
търсенето.
След като всички възможни канали са запазени, показва
се обичайната телевизионна картина.
Abtomatnzho cmehrhe ha kaæajnte c
fnctahunohno yæpabjehne
1 Натиснете бутона МЕNU.
2 Преместете джойстика към синьо или зелено, за да
изберете символа на екрана с менюто, след това
преместете към жълто.
3 Преместете към синьо или зелено, за да изберете
“Автоматично захващане”.
4 Преместете към жълто и задръжте, дoкато ce пoяви
менюто за aвтоматичнa настройкa и търceнeтo запoчнe.
След като всички възможни канали са настроени, показва
се нормалната телевизионна картина.
2 Автоматична предварителна
Забележки
• Можете да подредите
програмите така, че да
се появяват на екрана
в желан от Вас ред. За
подробности, вижте
“Сортиране на
програмните номера”
на стр. 11.
• За да спрете
автоматичната
настройка на
програмите
Натиснете бутона
MENU на устройството
за дистанционно
управление.
8
Page 33

Стъпка 3 Hactpo=ka ha ubeta
Abtomatnzho saxbaåahe
P∂zho nsdnpahe ha æpolpama
Nmeha ha bxofobete
Æpeæofpe;fahe ha æpolpamnte
3adpahehn æpolpamn sa feua
Esnk
Cxofnmoct
ÆPEFBAPNTEJHA HACTPO+KA
1
MDP2
3VTR 1
¤
0
( u)
p Pr
REC
+
˚
;
…/
8
;
´8x
´/´
a/Å
A
b
≥
MENU
¸
2
VIDEO
CH
Ú/;
PROGR
RM-862
3
C∂dnpahe ha zepbehn, sejehn n
cnhn jnhnn
1 Hatnchete dyton.
2 Qyhkunrta Auto Convergence padotn sa okojo 30 cekyhfn.
Kolato qyhkunrta Auto Convergence he
padotn æpabnjho, hactpo=te
ubetobete kato nsæojsbate ‘cxofnmoct’ ot mehi
‘HACTPO+KA’.
1 Hatnchete MENU.
2 Æpemectete f;o=ctnka k∂m cnhƒo njn sejeho, sa fa
nsdepete cnmboj , cjef toba æpnfbn;ete k∂m ;∂jto.
Æorbrba ce mehito ‘HACTPO+KA’.
3 Æpemectete f;o=ctnka k∂m cnhƒo njn sejeho, sa fa
nsdepete ‘cxofnmoct’, cjef toba æpnfbn;ete k∂m ;∂jto.
Æorbrba ce mehito ‘CXOFNMOCT’.
TV
+
_
?
c
4 Æpemectete f;o=ctnka k∂m cnhƒo njn sejeho, sa fa
nsdepete ‘jnhnrta’ {beptnkajhn n xopnsohtajhn jnhnn b
zepbeho n cnhƒo[, korto nckate fa hactponte.
Hatnchete f;o=ctnka, sa fa æotb∂pfnte.
: zepbeha beptnkajha jnhnr {jrbo/frcho hactpo=bahe[
: zepbeha xopnsohtajha jnhnr {lopho/fojho hactpo=bahe[
: cnhr beptnkajha jnhnr {jrbo/frcho hactpo=bahe[
: cnhr xopnsohtajha jnhnr {lopho/fojho hactpo=bahe[
Jnhnrta sa hactpo=ka e nsdpaha.
5 Æpemectete f;o=ctnka k∂m cnhƒo njn sejeho, sa fa
c∂bæafhe nsdpahata jnhnr c∂c sejehata jnhnr b ueht∂pa.
Hatnchete f;o=ctnka, sa fa æotb∂pfnte.
6 Æobtopete ct∂ækn ot 4 fo 5, sa fa hactponte n fpylnte jnhnn,
fokato jnhnnte ce æpnæokpnrt n odpasybat drj kp∂ct.
7 Hatnchete MENU, sa fa ce b∂phete k∂m hopmajha kaptnha.
BG
3adeje;ka"
qyhkunrta Auto
Convergence he padotn"
• kolato he e bkjizeh
cnlhaj.
• kolato bkjizehnrt
cnlhaj e cjad.
• kolato ekpah∂t e
nsjo;eh ha fnpektha
cj∂hzeba cbetjnha.
• kolato ljefate
tejetekct.
• kolato ljefate
æpolpaæn b pe;næ
16"9.
9
Page 34

Допълнителни функции за
Abtomatnzho saxbaåahe
P∂zho nsdnpahe ha æpolpama
Nmeha ha bxofobete
Æpeæofpe;fahe ha æpolpamnte
3adpahehn æpolpamn sa feua
Esnk
Cxofnmoct
ÆPEFBAPNTEJHA HACTPO+KA
0
1
2
3
4
5
6
7
8
9
D/K
D/K
D/K
D/K
D/K
D/K
D/K
D/K
D/K
D/K
CNCT ÆPOLP
C29
C31
C32
C36
C37
C40
C41
C44
C49
C52
KAHAJ
- - - - -
- - - - -
- - - - -
- - - - -
- - - - -
- - - - -
- - - - -
- - - - -
- - - - -
- - - - -
NME
ON
ON
ON
ON
ON
ON
ON
ON
ON
ON
AQH
P´ZHO N3DNPAHE HA ÆPOLPAMA
предварителна настройка
2
1
РЪЧНО
ИЗБИРАНЕ НА
ПРОГРАМА
TV
MDP2
3VTR 1
¤
+
MENU
REC
…/
VIDEO
CH
Ú/;
PROGR
+
_
c
0
( u)
p Pr
˚
;
8
;
´8x
´/´
a/Å
A
b
≥
¸
3
Ръчна предварителна
настройка на канали
С помощта на тази функция можете да извършите
предварителна настройка на канали един по един на
различни места. Удобно е също така да отделите програмни
номера за вход от видеоизточници.
1 Натиснете бутона MENU.
2 Преместете джойстика към синьо или зелено, за да
изберете символа от екрана с менюто. Преместете към
жълто, за да потвърдите избора.
3 Преместете джойстика към синьо или зелено, за да
изберете “Ръчно избиране на програма”. Преместете към
жълто, за да потвърдите избора.
4 Преместете джойстика към синьо или зелено, за да
?
º 6 Преместете към синьо или зелено, за да изберете “C” (за
изберете програмен номер (ПРОГP) до който искате да
извършите предварителна настройка на канала.
Преместете към жълто, за да потвърдите.
5 Преместете към синьо или зелено, за да изберете система
на телевизионно излъчване (СИСТ) (B/G за
Западноевропейските страни, D/K за Източноевропейски
страни, L за Франция) или вход от видео източник (AV1,
AV2, AV3, YC2, YC3, RGB). Преместете към жълто, за да
потвърдите.
наземни канали) или “S” (за кабелни канали). Преместете
към жълто, за да потвърдите.
10
RM-862
Съществуват два начина за ръчна предварителна
настройка на канали:
a) Вие знаете номера на канала.
Моля използвайте метод “Директно въвеждане”.
или
b) Вие не знаете номера на канала.
Моля използвайте метод “Търсене”.
7 a) Директно въвеждане
Изберете първата цифра от КAНAЛ, след това втората
цифра от КAНAЛ с цифровите бутони от устройството за
дистанционно управление
7 b) Търсене
Преместете джойстикa към синьо или зелено за
следващия възможен канал.
8 Ако искате да запазите канала, идете на стъпка 9.
Ако не, изберете нов канал като използвате цифровите
бутони на устройството за дистанционно управление или
преместите към синьо или зелено, за да пролължите
търсенето.
9 Натиснете джойстика.
10 Повторете стъпки от 4 до 9, за да настроите и останалите
канали.
11 Натиснете бутона МЕNU, за да възстановите нормалната
тeлeвизионна картина.
Page 35

РЪЧНО
0
1
2
3
4
5
6
7
8
9
D/K
D/K
D/K
D/K
D/K
D/K
D/K
D/K
D/K
D/K
CNCT ÆPOLP
C29
C31
C32
C36
C37
C40
C41
C44
C49
C52
KAHAJ
- - - - -
- - - - -
- - - - -
- - - - -
- - - - -
- - - - -
- - - - -
- - - - -
- - - - -
- - - - -
NME
ON
ON
ON
ON
ON
ON
ON
ON
ON
ON
AQH
P´ZHO N3DNPAHE HA ÆPOLPAMA
0
1
2
3
4
5
6
7
8
9
D/K
D/K
D/K
D/K
D/K
D/K
D/K
D/K
D/K
D/K
CNCT ÆPOLP
C28
C29
C35
C38
C40
C42
C55
C56
C57
C58
KAHAJ
BBC-W
VHS-2
CNN- -
- - - - MV-CH
VHS-1
- - - - 8MM
- - - - -
- - - - -
NME
ÆPEÆOFPE:FAHE HA ÆPOLPAMNTE
Abtomatnzho saxbaåahe
P∂zho nsdnpahe ha æpolpama
Nmeha ha bxofobete
Æpeæofpe;fahe ha æpolpamnte
3adpahehn æpolpamn sa feua
Esnk
Cxofnmoct
ÆPEFBAPNTEJHA HACTPO+KA
ИЗБИРАНЕ НА
ПРОГРАМА
Ръчна фина настройка
Автоматичната фина настройка (АФН) работи по принцип.
Ако въпреки това картината е изкривена, вие може ръчно
да настроите фино телевизора, за да получите по-добра
картина.
1 Натиснете бутона MENU.
2 Преместете джойстика към синьо или зелено, за да
изберете символа на екрана на менюто и след това
преместете към жълто.
3 Преместете джойстика към синьо или зелено, за да
изберете “Ръчно избиране на програма” и след това
преместете към жълто.
4 Преместете към синьо или зелено, за да изберете номера
на програмата, съответстващ на канала, който искате да
настроите ръчно.
5 Преместете неколкократно към жълто, докато позицията
на АФН си смени цвета.
6 Преместете към синьо или зелено, за фина настройка на
честотата на канала от -15 до +15.
7 Натиснете джойстика.
8 Повторете стъпки от 4 до 7, за да настроите ръчно други
канали.
9 Натиснете бутона МЕNU, за да възстановите нормалната
телевизионна картина.
BG
ПРЕПОДРЕЖД
АНЕ НА
ПРОГРАМИТЕ
Сортиране на програмните
номера
Тази функция Ви дава възможност да сортирате
програмните номера в предпочитан ред.
1 Натиснете бутона MENU.
2 Преместете джойстика към синьо или зелено, за да
изберете символа на екрана с менюто. Преместете
джойстика към жълто, за да потвърдите.
3 Преместете към синьо или зелено, за да изберете
“Преподреждане на програмите”. Преместете към жълто,
за да потвърдите.
4 Преместете към синьо или зелено, за да изберете
програмния номер на канала, който искате да смените.
Натиснете джойстика, за да потвърдите.
5 Преместете джойстика към синьо или зелено, за да
изберете новото място на програмата. Натиснете
джойстика, за да потвърдите. Сега вече избраният канал е
променил своето място.
6 Повторете стъпки 4 и 5, за да сортирате други програмни
номера.
7 Натиснете dytoha MENU, sa fa ce b∂phete k∂m hopmajhata
tejebnsnohha kaptnha.
11
Page 36

РЪЧНО
- - - - -
- - - - -
- - - - -
- - - - -
- - - - -
- - - - -
- - - - -
- - - - -
- - - - -
- - - - -
0
1
2
3
4
5
6
7
8
9
D/K
D/K
D/K
D/K
- - D/K
D/K
D/K
D/K
D/K
CNCTÆPOLP
C29
C31
C32
C36
C37
C40
C41
C44
C49
C52
KAHAJ NME
ON
ON
ON
ON
ON
ON
ON
ON
ON
ON
AQH
P´ZHO N3DNPAHE HA ÆPOLPAMA
- - - - -
- - - - -
- - - - -
- - - - A - - -
- - - - -
- - - - -
- - - - -
- - - - -
- - - - -
0
1
2
3
4
5
6
7
8
9
D/K
D/K
D/K
D/K
D/K
D/K
D/K
D/K
D/K
D/K
CNCT
ÆPOLP
C29
C31
C32
C36
C37
C40
C41
C44
C49
C52
KAHAJ
NME
ON
ON
ON
ON
ON
ON
ON
ON
ON
ON
AQH
P´ZHO N3DNPAHE HA ÆPOLPAMA
ИЗБИРАНЕ НА
ПРОГРАМА
РЪЧНО
ИЗБИРАНЕ НА
ПРОГРАМА
Прескачане на nро„рамнu
номера
Тази функция Ви дава възможност да прескочите
неизползвани програмни номера, когато ги избирате с
помощта на бутоните PROGR +/–. С помощта на
номерираните бутони обаче, Вие все още имате възможност
да изберете прескочените програмни номера.
1 Натиснете бутона MENU.
2 Преместете джойстика към синьо или зелено, за да
изберете символа от менюто на екрана. Преместете към
жълто, за да потвърдите.
3 Преместете към синьо или зелено, за да изберете “Ръчно
избиране на програма”. Преместете към жълто, за да
потвърдите.
4 Преместете към синьо или зелено, за да изберете
програмния номер, който желаете да прескочите.
Преместете към жълто, за да потвърдите.
5 Преместете към синьо или зелено, за да изберете “---” в
полето СИСТ (система). Преместете джойстика, за да
потвърдите.
6 Повторете стъпки 4 и 5, за да прескочите и други програми.
7 Натиснете бутона MENU, за да възстановите нормалната
телевизионна картина.
Присвоявне на име на
телевизионната станция
Обикновено на каналите автоматично се присвоява име по
време на предварителната настройка. Вие обаче можете
самостоятелно да наименовате даден канал или източник
на видео сигнал като използвате до пет букви.
1 Натиснете бутона MENU.
2 Преместете джойстика към синьо или зелено, за да
изберете символа от екрана с менюто. Преместете към
жълто, за да потвърдите.
3 Преместете към синьо или зелено, за да изберете “Ръчно
избиране на програма”. Преместете към жълто, за да
потвърдите.
4 Преместете към синьо или зелено, за да изберете мястото
на програмата, която искате да наименовате.
Премествайте последователно към жълто, докато се
освети първия елемент от полето ИМЕ.
5 Преместете към синьо или зелено, за да изберете буква или
номер (изберете “-” за интервал). Преместете към жълто,
за да потвърдите. Изберете по същия начин и другите
четири знака.
6 След избор на всички знаци, натиснете джойстика.
7 Повтаряйте стъпки от 4 до 6, за да наименовате други
канали или видео източници.
8 Натиснете бутона MENU, за да възстановите нормалната
телевизионна картина.
12
Page 37

ЗАБРАНЕНИ
Abtomatnzho saxbaåahe
P∂zho nsdnpahe ha æpolpama
Nmeha ha bxofobete
Æpeæofpe;fahe ha æpolpamnte
3adpahehn æpolpamn sa feua
Esnk
Cxofnmoct
ÆPEFBAPNTEJHA HACTPO+KA
0
1
2
3
4
5
6
7
8
9
D/K
D/K
D/K
D/K
D/K
D/K
D/K
D/K
D/K
D/K
CNCTÆPOLP
C28
C29
C35
C38
C40
C42
C55
C56
C57
C58
KAHAJ
BBC-W
VHS-2
CNN- -
- - - - MV-CH
VHS-1
- - - - 8MM
- - - - -
- - - - -
NME
3ADPAHEHN ÆPOLPAMN SA FEUA
C - -
3
2
C38 - - - - -
1
C35 CNN
ÆPOLP KAHAJ NME
0
C29 VHS-2
C28 BBC-W
D/K
D/K
CNCT
D/K
D/K
ПРОГРАМИ ЗА
ДЕЦА
Ако се опитвате да
изберете програма,
която е била блокирана
cnmboj ce æorbrba ha
æpaseh ekpah.
За да премахнете
блокировката
Изберете канала , за
който искате да
премахнете
заключването и го
“отключете” от менюто
“РОДИТЕЛСКО
ЗАКЛЮЧВАНЕ”.
Натиснете джойстика.
Символът изчезва.
MDP2
3VTR 1
¤
0
( u)
p Pr
REC
+
˚
;
…/
8
;
´8x
´/´
a/Å
A
b
≥
MENU
¸
VIDEO
CH
Ú/;
PROGR
RM-862
Използване на родителско
заключване
Тази функция Ви дава възможност да забраните гледането
от деца на нежелани програми.
1 Натиснете бутона MENU.
2 Преместете джойстика към синьо или зелено, за да изберете
символа от екрана с менюто. Преместете към жълто, за
да потвърдите.
3 Преместете към зелено или синьо, за да изберете
“Забранени програми за деца”. Преместете към жълто, за да
потвърдите.
4 Преместете към зелено или синьо, за да изберете канала,
който искате да блокирате. Натиснете джойстика, за да
потвърдите. Преди мястото на програмата се появява
символа , за да покаже, че в момента този канал е
блокиран.
5 Повтаряйте стъпка 4, за да блокирате и други канали.
6 Натиснете бутона MENU, за да възстановите нормалната
телевизионна картина.
TV
BG
Временна настройка на
+
_
?
c
програма
Можете да настроите приемника за гледане на дадена
програма временно, дори когато тя не е била предварително
настроена.
1 Натиснете бутона C на устройството за дистанционно
управление. За кабелни програми, натиснете C два пъти.
На екрана се появява индикацията “C” (или “S” за кабелни
програми).
2 Въведете двуцифрения номер на програмата, като
използувате номерираните бутони (например за програма 4,
първо въведете “0” и след това “4”).
Програмата се появява на екрана. Тази програма обаче няма
да бъде запаметена.
3adeje;ka"
Cjef bpemehho
hactpo=bahe ha kahaja,
he mo;ete fa bjesete b
pe;nm sa p∂zho
hactpo=bahe. 3a fa
saæametnte kahaja,
cmehete æpolpamata n
nsdepete ‘P∂zho
hactpo=bahe ha kahajn’
ha ctpahnua 10.
13
Page 38

Инструкции за
експлоатация
Гледане на телевизионна програма
В тази глава се обясняват основните функции, които Вие ще
3VTR 1
¤
0
( u)
p Pr
REC
+
˚
;
…/
8
;
´8x
´/´
a/Å
A
b
≥
MENU
¸
TV
MDP2
VIDEO
+
CH
_
?
Ú/;
c
PROGR
използвате докато гледате телевизионни програми. Повечето
действия се извършват с помощта на дистанционното
управлeние.
Включване и изключване на
телевизионния приемник
Включване
Натиснете бутона U на телевизионния приемник.
Временно изключване
Натиснете бутона u на устройството за дистанционно
управление.
Телевизионният приемник влиза в режим на готовност и
индикаторът за готовност на лицевата страна на
телевизионния приемник светва с червена светлина.
RM-862
Ако на екрана не се
появява никаква
картина след като сте
натиснали бутона U на
телевизионния
приемник и ако
индикаторът за
състояние на
готовност свети, то
телевизионният
приемник е в режим на
готовност.
Натиснете бутона ;,
или един от
номерираните бутони,
за да включите
приемника.
За да включите отново
Натиснете бутона ;, PROGR +/– или един от номерираните
бутони на устройството за дистанционно управление.
Æ∂jho изключване
Натиснете бутона U на телевизионния приемник.
За да пестите електроенергия, препоръчваме Ви напълно да
изключите телевизионния приемник, когато той не е в
употреба.
Избиране на телевизионни
програми
Използвайте бутоните PROGR +/– или номерираните бутони.
За да изберете двуцифрено число
Натиснете бутона -/-- и след това цифрите.
Например, ако искате да наберете 23, натиснете бутона -/--, 2 и
накрая 3.
Настройка на силата на звука
Натискайте бутона ¸ +/–.
Работа с телевизионния
приемник като се използват
бутоните на него
За да изберете номера на програма, натиснете бутоните
PROGR +/–.
За да настроите силата на звука, натиснете бутоните ¸ +/– .
За да изберете вход на сигнала за картината от видео,
натиснете бутона ….
14
Page 39

Подробности за работа с
телетекст ще намерите
на стр. 18.
Подробности за работа с
картина от видеовход
ще намерите на стр. 21.
Работа с телетекст или вход от
видеокасетофон
Работа с телетекст
1 Натиснете бутона f, за да преминете в режим телетекст.
2 За работа с телетекст въведете трицифрено число за номера
на страницата чрез номерираните бутони, с цел да изберете
дадена страница.
За по-бърза работа, преместете джойстика към този цßяm,
който отговаря на цветно кодираното меню.
И при двата режима на работа с телетекст, натиснете бутон R
(PAGE + ) за следващата страница или бутон S (PAGE – ) за
предишната страница.
3 За да се върнете към нормална телевизионна картина,
натиснете бутон ; .
3VTR 1
¤
0
( u)
p Pr
REC
+
˚
;
…/
8
;
´8x
´/´
a/Å
A
b
≥
MENU
¸
TV
MDP2
Гледане на картина от видеовход
1 Натискайте бутона … последователно, докато желания вход
VIDEO
CH
Ú/;
+
_
?
за видео се появи.
2 За да се върнете обратно към телевизионна картина,
натиснете бутона ;.
BG
Функции за по-голямо удобство
Извеждане на индикациите на екрана
Натиснете бутона T, за да покажете индикациите.
Натиснете повторно, за да изчезнат индикациите.
c
PROGR
RM-862
Заглушаване на звука
Натиснете бутона ¤.
За да възстановите нормалния звук, натиснете бутона ¤.
Показване на часовника
Натиснете бутона #. Тази фунция е на разположение, само
когато се излъчва и телетекст.
За да премахнете часовника от екрана, натиснете отново
бутона #.
Показване на таблицата с програмите
Натиснете джойстика. Преместете джойстика към синьо или
зелено, за да изберете програма и след това натиснете
джойстика, за да потвърдите. Таблицата с програмите ще се
покаже отляво на телевизионния екран.
За да премахнете таблицата с програмите, натиснете MENU.
BBC
1
SAT
2
TV5
3
C02
4
C15
5
RTL
6
SKY
7
S34
8
AV1
9
MTV
10
Смяна на екранния формат
Sa fa ljefate b pe;nm 16"9, hatnchete .
15
Page 40

Настройване и инсталиране на
Nsdop ha pe;nm
Rpkoct
Ubethoct
Octpota
Tohajhoct
æotpedntej
NSDOP HA PE:NM
Sbyk
Dajahc
Hyjnpahe
Æpoctahctbeh
Ctepeo-eqekt
Komæehcaunr
2
Cnja ha sbyka
2
Ctepeo-eqekt
- - >
Æotpedntej
Nskj
Ctepeo
0
Ctepeo
lhabeh
HACTPO+KA HA SBYKA
Bncokolobopntej
Nsdop ha pe;nm
Bncokn zectotn
Hnckn zectotn
æotpedntej
PE: HA 3BYKA
Nsdop ha pe;nm
Kohtpact
Hyjnpahe
Qopmat
- - >
4:3
HACTPO+KA HA KAPTNHATA
телевизионния приемник чрез
менюто
НАСТРОЙКА НА
КАРТИНАТА
НАСТРОЙКА
НА ЗВУКА
TV
MDP2
3VTR 1
¤
+
MENU
REC
…/
VIDEO
CH
Ú/;
PROGR
+
_
?
c
0
( u)
p Pr
˚
;
8
;
´8x
´/´
a/Å
A
b
≥
¸
Настройване на картината и
звука
Въпреки, че картината и звукът са фабрично настроени,
Вие имате възможност да промените настройката според
Вашия собствен вкус. Можете също да изберете програми с
текст на два езика, когато има такива или да настроите
звука за прослушване със слушалки.
1 Натиснете бутона MENU и изберете символа за
управление на картината или ≥ за управление на звука и
след това натиснете ОК.
Преместете към жълто, за да потвърдите.
Появява се менюто НАСТРОЙКА НА КАРТИНАТА или
НАСТРОЙКА НА ЗВУКА.
2 Преместете към синьо или зелено, за да изберете желаната
позиция. Преместете към жълто, за да потвърдите.
Избраната позиция сменя цвета си.
3 Преместете към червено или жълто, за да настроите
желаната позиция. Натиснете джойстика, за да
потвърдите.
За ефекта от всяко регулиране, вижте таблицата по-долу.
4 Повторете стъпки 2 и 3, за да настроите и други
характеристики.
5 Натиснете бутон MENU, за да се върнете към телевизионна
картина.
Забележки
• ТОНАЛНОСТ има
само при системи
NTSC.
Забележка относно
LINE OUT
Нивото на звука, както
и изхода при режим на
двоен звук от куплунга
≤ на задната страна
съответствуват на
настройките за двоен
звук b cjywajknte.
Когато гледате
картина от видео със
стерео звук
Можете да изберете
Двоен звук, за да
промените звука.
RM-862
Ефект от всяко регулиране
НАСТРОЙКА НА КАРТИНАТА
Режим на картината Потребител y Видео Игра y Филм y Спорт y На Живо
Контраст По-тъмно По-светло
Нулиране Връща фабричната настройка на картината
Qopmat 4:3: Нормална
Ефект
В режим “Потребител” можете предварително да
настроите яркостта, цветността, остротата и
тоналността (само за NTSC сигнали) както следва:
1 Преместете джойстикa към синьо или зелено, за да
избе-рете желания параметър и след това преместете
към жълто.
2 Преместете към жълто или червено, за да нагласите и
след това натиснете джойстика.
3 Преместете към червено, за да сe върнете в менюто
НАСТРОЙКА НА КАРТИНАТА.
16:9: c paswnprbahe ha ekpaha
16
Page 41

НАСТРОЙКА НА ЗВУКА
Режим на звука Избор измежду различни звукови ефекти
Баланс Повече ляв Повече десен
Нулиране Възстановява звука към фабрично зададените му нива.
Пространствен ефект Изк: нормален
Стерео-ефект А: канал 1 B: канал 2 Стерео Моно
Компенсация Настройва нивото на звука за индивидуални програми.
2 Сила на звука По-силно По-слабо
2 Стерео-ефект А: канал 1 t B: канал 2
Високоговорител Главен: звук от телевизионен приемник
Ефект
Потребител y Рок y Джаз y Поп
R R
В режим “Потребител” можете предварително да
настроите високите и ниските честоти, както следва:
1 Преместете джойстика към синьо или зелено, за да изберете
параметъра и след това преместете към жълто.
2 Преместете към червено или жълто, за да нагласите и след това
натиснете джойстика.
3 Преместете към червено, за да се върнете в менюто
НАСТРОЙКА НА ЗВУКА.
Вкл: специални звукови ефекти
–12 +12
Стерео t Моно
Централ.: Звук от външен усилвател
BG
ЧАСОВНИК
За да изключите
часовника
Изберете ‘Изкл’ при
стъпка 3.
За да проверите
оставащото време
Натиснете бутон .
За да се върнете към
нормална
телевизионна
картина
Натиснете бутона
MENU.
Бърза смяна на режимите
Вие можете бързо да сменяте Режим на звука и Режим на
картината без да влизате в менюто “Настройка на звука”
или “Настройка на картината”.
1 Натиснете Í за картината или ≥ за звука.
2 Преместете джойстика към синьо или зелено, за да
изберете желания параметър.
3 Натиснете Í или ≥ отново, за да възстановите нормалния
телевизионен екран.
Използване на таймера за
изключване
Можете да изберете период от време, след който
телевизионния приемник автоматично се превключва в
режим на готовност.
1 Натиснете бутона MENU.
2 Преместете джойстика към синьо или зелено, за да
изберете символа t от екрана с менюто.
Преместете към жълто, за да потвърдите.
3 Преместете към жълто. Преместете към zepbeho или
жълтo, за да изберете времето.
Периодът от време (в минути) се изменя както следва:
Изклy0:30y1:00y1:30..........3:30y4:00
R R
ZACOBHNK
Abtomatnzho nskjizbahe Nskj
4 След избиране на периода от време, натиснете джойстика,
за да потвърдите.
Една минута преди телевизионния приемник да се
превключи в режим на готовност, на екрана се появява
съобщение.
17
Page 42

Телетекст
TV
MDP2
3VTR 1
¤
+
MENU
REC
…/
VIDEO
CH
Ú/;
PROGR
RM-862
+
_
?
1 Изберете телевизионния канал, който носи телетекст
2 Натиснете бутона f, за да включите телетекста.
c
3 Използувайте номерираните бутони, за да въведете
0
( u)
p Pr
˚
;
8
;
´8x
´/´
a/Å
A
b
≥
¸
Някои телевизионни станции излъчват по телевизионните
канали и един вид информационна услуга, наречена
Телетекст. Телетекст Ви да възможност да приемате
различна информация, групирана на давa страници по всяко
време, като например справки за времето или новини.
Функции за директен достъп
Включване и изключване на Телетекст
информацията, която искате да прочетете.
На екрана ще се появи страница от телетекста (обикновено
страницата със съдържанието).
В случай, че не се излъчва телетекст, на най-горния ред на
страницата ше се покаже съобщение “Няма телетекст”.
трицифреното число на номера на избраната страница.
В случай, че сте направили грешка, въведете три
произволни цифри. веднага след това въведете правилния
номер на страницатa.
За да изключите телетекста
Натиснете бутона ;.
Забележка
В Телетекстa могат да
се появят грешки, ако
излъчваният сигнал е
слаб.
Достъп до следващата или предишната страница
Натиснете един от бутоните R (PAGE+) или S (PAGE–).
Появява се съответно следващата или предишната
страница.
Наслагване на страница от Телетекст върху
телевизионна програма
• Натиснете f еднократно, за да извикате само телетекста.
• Натиснете f два пъти, за да влезете в Смесен режим.
Нормалната телевизионна картина и телетекста се
появяват насложени.
• Натиснете бутона f за да подновите нормалното приемане
на Телетекст.
Предпазване на страница от телетекст от
обновяване
• Натиснете бутона w.
На информационния ред се появява символаl “w”.
• Натиснете пак, за да я освободите.
Разкриване на скрита информация (например
при загадка)
Понякога страниците съдържат запечатана информация,
като например отговори на загадка. Опцията за разкриване
Ви дава възможност да отворите информацията.
Натиснете C. Натиснете отново, за да анулирате.
18
Page 43

Забележка
Работа с Fastext е
възможна, само ако
телевизионният
предавател излъчва
сигнал за Fastext.
Система за предпочитани страници
Вие можете да запомните до 4 предпочитани страници от
всеки телетекст. По този начин ще имате бърз достъп до
страниците, които често използвате.
Запомняне на страници
1 Използвайте цифровите бутони, за да изберете страницата,
която искате да запомните.
2 Натиснете два пъти.
Символите за цвят в долната част на екрана се осветяват.
3 Преместете джойстика към съответния цвят, за да
запомните избраната страница.
Страницата се запомня под този цвят.
Повторете стъпки от 1 до 3 за другите три страници.
Изобразяване на предпочитаните страници
1 Натиснете .
2 Преместете джойстика към цвета, под който е запомнена
желаната страница.
Уверете се, че сте натиснали , в противен случай работи
Фастекст.
Използуване на фунkцuяmа Fastext
С помощта на Fastext, Вие можете да достигнете до
страниците само с натискането на един бутон. Когато се
излъчва Fastext, в дъното на екрана се появява меню с
цветове. Цветовете на това меню съответствуват на
червеното, зеленото, жълтото и синьото положения на
дистанционното управление.
Преместете джойстика към цвета, който кореспондира с
цветово кодираното меню. След няколко секунди ще се
покаже съответната страница.
BG
19
Page 44

Свързване и работа с допълнително
оборудване
Свързване на допълнително оборудване
Вие имате възможност да свържете допълнително аудио-видео оборудване към
телевзионния приемник като например видеокасетофон, видео компакт-дисково
устройство и стерео уредба.
За да свържете
видеокасетофон като
използувате буксата ))
Свържете изхода за
антена на
видеокасетофона към
буксата за антена ) на
телевизионния приемник.
Препоръчваме Ви да
настроите видео сигнала
на програма с номер ‘0’.
Подробности ще намерите
в “Ръчна предварителна
настройка на програми” на
стр. 10.
Ако картината или
звукът имат смущения
Преместете
видеокасетофона подалеч от телевизионния
приемник.
))
3
1
Вход S/видео (Вход Y/C)
Видеосигналите могат да
се разделят на Y (по
яркост) и C (по цветност)
сигнали.
Това разделяне на
входните сигнали на Y и C
сигнали предотвратява
взаимното им влияние и
води до повишаване на
качеството на картината
(особено по яркост).
Телевизионния приемник
е снабден с 3 жака за S
входни видеосигнали,
през които тези
разделени сигнали могат
да бъдат директно
подадени.
При включване на
видеокасетофон с моно
звук
Свържете само белия жак
≤ към телевизионния
приемник и към
видеокасетофона.
Sadeje;ka"
Kolato cb∂psbate
texhnkata c q3/…3/≤3
k∂m æpefhnr æahej n :3/
q3 k∂m safhnr æahej,
nskjizete saxpahbaheto.
PROGR
C
3
3/
R/D/D/D-L/G/S/I
2/
1
2
3 3
MONO
3
L/G/S/I R/D/D/D
R
3
24
5
Допустими входни сигнали Възможни изходни сигнали
1 Нормален аудио/видео и RGB сигнал Видео/аудио от телевизионен тунер
2 Нормален аудио/видео и S-видео сигнал Видео/аудио от избран източник
3 Нормален аудио/видео и S-видео сигнал Няма изходен сигнал
Нормален аудио/видео и S-видео сигнал Bnfeo/Ayfno ot nsdpahnr nstozhnk :2/ q 2)
4 Няма входен сигнал Аудио сигнал (променлив)
5 Система централен Без изводи
От менюто НАСТРОЙКА НА ЗВУКА
настройте “Високоговорител” на
“Централен”
20
Page 45

Избиране на вход
посредством PROGR +/–
или от номерираните
бутони
Вие можете да настроите
предварително
източниците за входен
сигнал за програмите,
така че да можете да ги
избирате чрез PROGR +/–
или с номерираните
бутони. За подробности,
виж “Ръчна
предварителна настройка
на програмите” на
страница 10.
TV
MDP2
3VTR 1
¤
+
MENU
REC
…/
VIDEO
CH
Ú/;
PROGR
+
_
?
c
0
( u)
p Pr
˚
;
8
;
´8x
´/´
a/Å
A
b
≥
¸
Nsdnpahe ha bxof
Tasn cekunr odrchrba kak fa ce bnfn bxofhata bnfeo
kaptnha, nsæojsba=kn fnpekteh dytoh.
Избор на вход
Натискайте последователно бутона … за да изберете
източник за вход.
Символът на избрания източник за вход ще се появи на
екрана.
За да се върнете към нормална телевизионна картина.
Натиснете бутона ;.
Входни режими
Символ Входен сигнал
… 1 Аудио/видео вход през куплунга W 1
W Аудио/RGB вход през куплунга W 1
… 2 Аудио/видео вход през куплунга : 2/ q 2
q2 Аудио/S-видео вход през един от куплунзите : 2/ q 2
… 3 Ayfno/Bnfeo bxof zpes … 3 n ≤ 3 k∂m æpefhnr njn safhnr æahej : 3/q 3
q3 S-видео вход през q 3 (4 пинов куплунг) на лицевата страна njn safhnr
æahej : 3/ q 3
… 1
BG
RM-862
21
Page 46

ANMEHA HA
Abtomatnzho saxbaåahe
P∂zho nsdnpahe ha æpolpama
Nmeha ha bxofobete
Æpeæofpe;fahe ha æpolpamnte
3adpahehn æpolpamn sa feua
Esnk
Cxofnmoct
ÆPEFBAPNTEJHA HACTPO+KA
AV1
RGB
AV2
YC2
AV3
YC3
BXOF
- - - - -
- - - - -
- - - - -
- - - - -
- - - - -
- - - - -
NME
NMEHA HA BXOFOBETE
TV
TV
n
TB Ekpah
Nsxof
[TV - - - - -]
[TV - - - - -]
BNFEO BP´SKN
BXOFOBETE
Предварително задаване на
имената на AV сигнали
Като използвате тази функция, Вие можете предварително
да настроите желания източник за вход (например W 1,
RGB сигнали) в съответния вход на AV (AV 1 W). По този
начин, ако е свързан видеомонитор, той автоматично ще се
включи за RGB сигнал.
1 Натиснете бутона MENU.
2 Преместете джойстика към синьо или зелено, за да
изберете символа от менюто на екрана. Преместете към
жълто, за да потвърдите.
3 Преместете джойстика към синьо или зелено, за да
изберете “Nmeha ha bxofobete”. Преместете джoйстика към
жълто .
4 Преместете към синьо или зелено, за да изберете желания
вход. Преместете към жълто, за да потвърдите.
5 За да наименовате източник: Преместете към синьо или
зелено, за да изберете първия знак (буква или цифра, “-” за
интервал). Преместете към жълто, за да потвърдите. По
същия начин изберете и другите четири знака.
6 След като сте избрали всички символи, натиснете
джойстика.
7 Повторете стъпки 4 до 6 за да дадете имена на останалите
входни сигнали.
8 Натиснете бутона МЕNU, за да възстановите нормалния
телевизионен екран.
BNFEO
BP´SKN
Забележка:
Ако за изход изберете
“АUTO”, източникът на
изходен сигнал
автоматично става
същия като желания
входен източник.
Проверка и избор на
източниците на вход и изход с
помощта на менюто
Вие можете да извикате менюто, за да видите кои
източници на вход са избрани за телевизионния екран и кой
източник за изход е избран. Можете също да ги изберете от
менюто.
1 Натиснете бутона MENU.
2 Преместете джойстика към синьо или зелено, за да
изберете символа от менюто на екрана. Преместете
към жълто, за да потвърдите.
На екрана се появява менюто ВКãЮЧЕНО ВИДЕО.
Можете да видите кой източник е избран за телевизионния
приемник и кой за извод. В случай, че желаете да изберете
входа и извода от това меню, преминете към следващата
стъпка.
3 Преместете джойстика към синьо или зелено, за да
изберете “ТВ екран” (входен източник за телевизионния
екран), или “Извод” (източник за извод : 2/q 2 на : 3/
q 3).
Преместете към жълто, за да потвърдите.
4 Преместете към zepbeho или ;∂jto, за да изберете
желания източник. Натиснете джойстика, за да запаметите.
Преместете към синьо или зелено, за да изберете желания
източник. Натиснете джойстика, за да запаметите.
За подробности относно всеки един източник, вижте
таблицата на страница 21.
5 Повторете стъпки от 3 до 4, за да изберете източника за
други входове и изводи.
6 Натиснете бутона MENU, за да възстановите нормалната
телевизионна картина.
22
Page 47

TV
MDP2
3VTR 1
¤
+
REC
…/
MENU
VIDEO
CH
Ú/;
PROGR
RM-862
+
_
?
c
0
( u)
p Pr
˚
;
8
;
´8x
´/´
a/Å
A
b
≥
¸
При запис
Когато използвате бутона
r (за запис), обезателно
натискайте едновременно
този бутон и бутона вдясно
от него.
Дистанционно управление на
друго оборудване от Sony
Вие можете да използвате устройството за дистанционно
управление, за да управлявате повечето от
видеооборудванията на Sony, които са дистанционно
управлявани като: видеокасетофони от система beta, 8 mm
или VHS, както и устройства за ßъзnроuзßежgане на
видеодискове.
Настройване на устройството за дистанционно
управление към оборудването
1 Преместете превключвателя VTR 1/2/3 MDP в съотвествие
с вида на оборудването. което искате да управлявате:
VTR1: Beta VCR
VTR2: 8 mmm VCR
VTR3: VHS VCR
MDP: Устройство за възпроизвеждане на видеодискове
2 Използвайте отбелязаните на фигурата бутони за работа с
допълнителното оборудване.
В случай, че Вашето видеооборудване е снабдено с
COMMAND MODE превключвател, поставете последния в
същото положение както превключвателя VTR 1/2/3 MDP на
устройството за дистанционно управление на
телевизионния приемник.
Ако допълнителното оборудване няма съответната
функция, съответствуващия на нея бутон на устройството
за дистанционно управление няма да функционира.
BG
23
Page 48

За Ваша информация
Оптимална област за гледане на
телевизионния приемник
За да получите най-добро качество на картината, опитайте се да
поставите телевизионния приемник така, че да можете да
виждате екрана от областта, показана по-долу.
Хоризонтална равнина
2.1m (минимално оптимално разстояние)
75°
75°
Bертикална равнина
2.1m (минимално оптимално разстояние)
Оптимално положение за гледане
27,5°
27,5°
24
Оптимално положение за гледане
Page 49

Отстраняване на неизправности
Предлагаме Ви няколко прости решения на някои проблеми, които могат да повлияят на качеството на звука и картината.
Проблем Решение
Няма картина (екранът е тъмен), няма звук • Включете кабела на телевизионния приемник в контакта.
• Натиснете бутона U на телевизионния приемник (ако индикаторът u
свети, натиснете бутона ; или номер на програма на устройството с
дистанционно управление).
• Проверете свързването на антената.
• Проверете дали избрания източник на видеосигнал е включен.
• Изключете телевизора за 3 или 4 секунди и отново го включете като
използвате U.
Лоша или липсваща картина (тъмен екран), • Натиснете бутона MENU за да влезете в менюто РЕГУЛИРАНЕ
но звукът е в ред
Лошо качество на картината, когато гледате от • Натискайте последователно бутона …, за да изберете W.
източник на RGB видеосигнал
Добра картина, но липсва звук • Натиснете бутона ¸ +.
Няма цветове за цветни програми • Натиснете бутона MENU, за да влезете в менюто НАСТРОЙКА НА
Устройството за дистанционно управление не • Батериите са слаби.
функционира
НА КАРТИНАТА и извършете настройка на яркост, контраст и цвят.
• Æpobepete fajn ycnjbatejr e nsdpah b mehi ‘НАСТРОЙКА НА 3BYKA’.
• Ако на екрана е показан символът ¤, натиснете бутона ¤.
КАРТИНАТА, изберете Начална настройка и след това натиснете
джойстика, за да потвърдите.
В случай, че не можете да решите проблемите си, обърнете се за сервизно обслужване на Вашия телевизионен приемник към
квалифициран технически персонал. Никога не се опитвайте сами да отворите кутията.
Технически характеристики
Система телевизия B/G/H, D/K
Цветова система PAL/SECAM
NTSC 3.58/4.43 (Видео вход)
Обхват за канали Вижте “Приемани канали и
показването им на екрана” на края на
страницата.
Проектни размери 41 инча
на картината Около 103 см. картина, измерена по
диагонал
Изводи
Задни • Клеми за вход на централния
високоговорител, 2 клеми
≤
(L, R),
•
• W1, 21-пинов Euro присъединител
(стандарт CENELEC)
-входове за аудио и видео сигнали
-входове за RGB
-изводи на телевизионни аудио и видео
• : 2/q 2, 21-пинов Euro
присъединител
-входове за аудио и видео сигнали
-входове за S видео
-изводи за аудио и видео сигнали
• : 3/q 3, 21-пинов Euro
присъединител
- входове за аудио и видео сигнали
- входове за S видео
Nsxof sa Ayfno/Bnfeo cnlhaj : 2/q 2
-
Предни
Изход за звук • q 3, S видео входове - 4-пинов DIN
стандарт
• … 3, видео входове - фоно жакове
•
≤ 3 (L, R),
• 2, жак за слушалки - стерео минижак
аудио изводи - фоно жакове
сигнали
(избираеми)
аудио входове - фоно жакове
Мощност на звука 2 x 30 W (музикална мощност)
2 x 15 W (RMS)
Вход централен 30 W (RMS) (използван като
високоговорител централен високоговорител)
Eнергийно потребление 145 W
Размери (Ш/В/Д) Приблизително 948 x 992 x 511 мм
Тегло Приблизително 43 кг
Доставяни Вижте стр. 6
принадлежности
Други отличителни Digital Comb Filter (висока
характеристики разделителна способност)
FASTEXT, TOPText
NICAM
Фирмата си запазва правото да изменя конструкцията и
техническите характеристики без предизвестие.
Приемани канали и показването им на екрана
Приемани канали Символи на
екрана
B/G/H E2..12 21..69 C02 C03 C04..C12
C21..C69
CABLE TV (1) S1..41 S01 S02..S41
CABLE TV (2) S01..S05 M1..M10 S42..S46 S01..S10
U1..U10 S11..S20
ITALY A B C D E F G H H1 C11..C69
H2 21..69
D/K R01..R12 R21..R69 C02..C12 C21..C69
CABLE TV (1) S01 S02..S41
CABLE TV (2) S42 S43..S46
CABLE TV B..Q, S21..41 S02, S03..S17,
S21..S41
BG
Екологична хартия - Без хлор
25
Page 50

Общие правила техники безопасности
He дoпycкaйтe пoпaдaния кaкиx-либo
пpeдмeтoв внyтpь тeлeвизopa, тaк кaк этo
Этoт тeлeвизop пpeднaчeн для
paбoты тoлькo oт ceти пepeмeннoгo
тoкa нaпpяжeниeм 220-240 B. He
пoдключaйтe cлишком мнoгo
элeктpoпpибopoв к oднoй poзeткe,
тaк кaк этo мoжeт пpивecти к
вoзгopaнию или пopaжeнию
элeктpичecким тoкoм.
Из cooбpaжeний бeзoпacнocти и
энepгocбepeжeния нe
peкoмeндyeтcя ocтaвлять
тeлeвизop в дeжypнoм peжимe,
кoгдa oн нe иcпoльзyeтcя.
Oтключaйтe тeлeвизop oт ceти
ceтeвoй кнoпкoй.
мoжeт пpивecти к вoзгopaнию или
пopaжeнию элeктpичecким тoкoм. He
дoпycкaйтe пpoливaния кaкиx-либo
жидкocтeй нa тeлeвизop. Ecли вce жe
пpoизoшлo пpoливaниe жидкocти или
пoпaдaниe кaкoгo-либo пpeдмeтa внyтpь
тeлeвизopa, нeмeдлeннo выключитe
тeлeвизop и не включaйтe eгo дo тex пop,
пoкa eгo нe пpoвepит квaлифициpoвaнный
мacтep.
He вcкpывaйтe кopпyc и зaднюю
кpышкy тeлeвизopa. Oбpaщaйтecь
тoлькo к квaлифициpoвaннoмy
тexничecкoмy пepcoнaлy.
He пepeкpывaйтe
вeнтиляционныe oтвepcтия в
тeлeвизope. Для oбecпeчeния
нopмaльнoй вeнтиляции ocтaвляйтe
вoкрyг тeлeвизopa пpocтpaнcтвo нe
мeнee 10 см c кaждoй cтopoны.
Bытиpaйтe тeлeвизop мягкoй,
cлeгкa yвлaжнeнной мaтepиeй. He
пpимeняйтe бeнзин, pacтвopитeли и
дpyгиe xимикaты для пpoтиpки
тeлeвизopa. He цapaпaйтe экpaн
тeлeвизopa. B цeляx бeзoпacнocти
вынимaйтe вилкy питaния
тeлeвизopa из poзeтки пepeд
yбopкoй.
B цeляx Baшeй бeзoпacнocти нe
пpикacaйтecь к любым
чacтям тeлeвизopa, ceтeвoмy шнypy
или aнтeннoмy кaбeлю
во врeмя гpoзы.
He пoмeщaйтe тeлeвизop в мecтax c
пoвышeннoй тeмпepaтypoй,
влaжнocтью или зaпылeннocтью. He
ycтaнaвливaйтe тeлeвизop в мecтe,
гдe oн мoжeт пoдвepгaтьcя
вoздeйcтвию мexaничecкoй
вибpaции.
Пpи oтключeнии вилки питaния
от poзeтки тянитe зa
caмy вилкy, a нe зa пpoвoд
питaния.
Bo избeжaниe oпacнocти
вoзгopaния или пopaжeния
элeктpичecким тoкoм
oбepeгaйтe тeлeвизop oт дoждя
и cыpocти.
Bo избeжaниe вoзгopaния нe
pacпoлaгaйтe вблизи
тeлeвизopa
лeгкoвocплaмeняющиecя пpeдмeты
и иcтoчники oткрытoгo oгня
(нaпpимep, cвeчи).
Cлeдитe зa тeм, чтoбы тяжeлыe
пpeдмeты нe cтaвилиcь нa шнyp
питaния, тaк кaк этo мoжeт
пpивecти его пoвpeждению.
Peкoмeндyeтcя cмaтывaть
излишнюю длинy ceтeвoгo шнypa
нa cпeциaльныe дepжaтeли нa
зaднeй кpышкe тeлeвизopa.
Oтключaйтe вилкy питaния
тeлeвизopa из poзeтки пepeд
Уcтaнaвливaйтe тeлeвизop нa
пpoчнyю, ycтoйчивую
пoдcтaвкy. He пoзвoляйтe дeтям
влeзaть нa тeлeвизop. He
cтaвьтe тeлeвизop нaбoк или
экpaнoм ввepx.
тeм, кaк пepecтaвить тeлeвизop. Пpи
пepeнocкe тeлeвизopa бyдьтe
ocтopoжны, избeгaйтe нepoвныx
пoвepxнocтeй и чpeзмepныx ycилий. B
cлучae пaдeния или пoвpeждения
тeлeвизopa нyжнo, чтoбы eгo
нeмeдлeннo пpoвepил
квaлифициpoвaнный тexничecкий
пepcoнaл.
He нaкpывaйтe вeнтиляциoнныe
отвepcтия тeлeвизopa гaзeтaми,
штopaми и т.п.
Дополнительные Меры предосторожности
• В том случае, если Ваш проекциoнный тeлeвизор попадает из холодного помещения в теплое, или если в помещении происходит резкое
изменение температуры, изображение может стать расплывчатым или на некоторых участках качество цвета может быть ухудшено.
Это связано с тем, что произошла конденсация влажности на зеркалах или линзах внутри аппарата. Перед началом пользования
проекциoнным тeлeвизорoм подождите, пока не испарится влага.
Для получения ясного изображения не подвергать экран воздействию прямого освещения или солнечных лучей. Если возможно,
•
использовать точечные источники света, направленные с потолка вниз.
• Otodpa;ehne heæofbn;holo nsodpa;ehnr b tezehne fojlolo æepnofa bpemehn æpn gkcæjyataunn bnfeo nlpv njn æepcohajƒholo
komæƒitepa n æpocmotpa æpolpammv b pe;nme 16"9 mo;et æpnbectn k æobpe;fehni knheckoæa. Bo nsde;ahne gtolo yctahobnte hnsknй
ypobehƒ kohtpacthoctn nsodpa;ehnr.
He tpnte n he kacaйtecƒ æobepxhoctn gkpaha octpvmn njn adpasnbhvmn æpefmetamn, haæpnmep, wapnkobo й pyzkoй njn otbeptkoй. Takne
•
kacahnr molyt æpnbectn k æorbjehni uapaænh ha æobepxhoctn gkpaha.
2
Page 51

Содержание
Общие правила техники безопасности......................................... 2
Общий обзор.................................................................................... 4
Подготовка к эксплуатации ....................................................... 6
Этап 1 Подготовка......................................................................... 6
Этап 2 Настройка на телевизионные станции............................ 7
Этап 3 Hactpo=ka ubeta................................................................ 9
Дополнительные функции предварительной установки .......... 10
Проверка прилагаемых принадлежностей ..................... 6
Вставка батарейки в пульт дистанционного
управления......................................................................... 6
Подключение антенны и видеомагнитофона................. 6
Выбор языка меню ............................................................ 7
Автоматическая установка каналов ............................... 8
Cbefehne Kpachvx, 3ejehvx, n Cnhnx jnhn=.................. 9
Ручная настройка программ TB .................................... 10
Tочная подстройка каналов........................................... 11
Сортировка программных позиций ................................ 11
Пропуск программных позиций ...................................... 12
Создание названия станции........................................... 12
Использование родительской блокировки................... 13
Настройка на канал временно ....................................... 13
RU
Инструкция по эксплуатации................................................... 14
Просмотр телевизионных передач ............................................. 14
Включение и выключение телевизора.......................... 14
Выбор телевизионных программ.................................... 14
Регулировка громкости................................................... 14
Управление телевизором с использованием кнопок
на телевизоре .................................................................. 14
Просмотр телетекста или входных видеосигналов ..... 15
Дополнительные удобные функции............................... 15
Регулировка и настройка телевизора с использованием меню... 16
Регулировка изображения и звука ................................ 16
Использование таймера сна........................................... 17
Телетекст ...................................................................................... 18
Функции прямого доступа............................................... 18
Подсоединение и эксплуатация дополнительной аппаратуры.... 20
Подсоединение дополнительной аппаратуры .............. 20
Выбор входнoгo сигналa.................................................. 21
Присвоение названий аудио/видео входам .................. 22
Проверка и выбор источников входных и выходных
сигналов путем использования меню ............................ 22
Дистанционное управление другой аппаратурой Sony.... 23
К Вашему сведению...................................................................... 24
Оптимальная зона просмотра ........................................ 24
Отыскание неисправностей............................................ 25
Технические характеристики ......................................... 25
3
Page 52

Общий обзор
Данный раздел сжато описывает кнопки и регуляторы на
телевизоре и на пульте дистанционного управления. Более
подробную информацию смотрите на страницах, указанных
после каждого описания.
Передняя панель телевизора
Поднимите вверх крышку на
передней панели телевизора
ознакомления с разъемами
передней панели.
Индикатор Наименование См. стр.
U Основной выключатель питания 14
u Индикатор готовности 14
PROGR +/- Программа 14
Á +/- Кнопки громкости 14
… Кнопки выбора входного сигнала 15
2 Гнездо haywhnkob 20
q 3, … 3, ≤ 3 Входные гнезда (S-видео/видео/аудио) 21
4
Кнопка автоматической настройки каналов 8
Khoæka abtomatnzecko= kohbeplehunn 9
{cxofnmoctn[
Page 53

MENU
Пульт дистанционного управления
TV
MDP2
3VTR 1
¤
0
( u)
p Pr
REC
+
˚
;
…/
8
;
´8x
´/´
a/Å
A
b
≥
MENU
¸
CH
Ú/;
PROGR
RM-862
VIDEO
+
_
?
c
Управление телевизором/
телетекстом
Управление
видеоаппаратурой
Управление телевизором/
телетекстом
Управление меню
Управление меню
Индикатор Наименование См. стр.
MENU Кнопка включения/ См. ниже.
выключения
Кнопки выбора См. ниже
Кнопка ОК (подтверждения)
Управление видеоаппаратурой
Индикатор Наименование См. стр.
VTR1/2/3, ÆepekÎ izate΃ 23
MDP видеоаппаратуры
0
( ) p Кнопки управления 23
r VIDEO u видеоаппаратурой
P
CH +/-
Без функций на данном аппарате
Pабота с телевизионныпи програмaми/
телетекстaми
Индикатор Наименование См. стр.
¤ Кнопка включения/выключения 15
приглушения звука
TV u Кнопка готовности 14
; Кнопка æepekÎ izateÎr режима 14
включения питания телевизора/
телевизионного режима
f Кнопка телетекста 15
…/y ÆepekÎizateÎ ƒ входного режима/ 15
Телетекст: Остановка страницы 18
…/ Телетекст: Кнопка раскрытия 18
информации
1,2,3,4,5,6, Цифровые кнопки 14
7,8,9 and 0
-/-- Кнопка ввода двузначного числа 14
C Кнопка прямого ввода канала 13
Á +/- Кнопка регулировки громкости 14
PROGR +/- ÆepekÎizateÎ n программ 17
R/S Телетекст: Кнопки прокрутки 18
страниц вверх/вниз
Í Кнопка pe;nma изображения 17
≥ Кнопка pe;nma звука 17
Кнопка экранной индикации 15
# Кнопка отображения времени 15
Кнопка изменения формата экрана 15
Телетекст: Кнопка предпочтительных 19
страниц
Индикатор: , , , , , , Ú/, (fjr
padotv c tejebnsopom)
Для системы меню
Используйте кнопку MENU и координатную pykortky
следующим образом.
1 Нажмите кнопку MENU для включения и выключения
меню.
2 Используйте координатную pykortky следующим
образом:
ЗЕЛЕНЫЙ: перемещение
изображения на экране
КРАСНЫЙ: уменьшение/
возвращение к
последнему пункту или
последнему меню
Если меню не
отображается:
Нажмите на красную
часть для отображения
экрана последнего меню
СИНИЙ: перемещение
изображения на экране
Действующие функции координатной рукоятки
отображаются на экране.
ЖЕЛТЫЙ:
увеличение/
продвижение к
следующему
пункту
Координатная
pykortky:
Yctahobnte ее в
нейтральное
положение для
подтверждения
выбора или
занесения в память
RU
5
Page 54

Подготовка к
эксплуатации
Этап 1 Подготовка
3
2
1
1 Проверка прилагаемых принадлежностей
Когда Вы достанете все из картонной
коробки, следует проверить, что у
Вас имеются следующие предметы:
• Пульт дистанционного
управления RM-862
• Две батарейки R6 по МЭК
2 Yctahobka батареek в пульт дистанционного
управления
3
2
1
Примечание: Всегда
помните, что
использованные
батарейки должны
быть ликвидированы
безвредным для
окружающей среды
способом.
Снять крышку
Проверить, чтобы была
правильная полярность
3 Подключение антенны и видеомагнитофона
Kaбeль c eвpopaзъeмoм (CKAPT) нe вxoдит в кoмплeкт пocтaвки.
При его использовании это опциональное подключение может улучшить качество
изображения и звука при работе с видео.
6
Если вы не пользуетесь eвpopaзъeмoм, после автоматической настройки aппapaтa
следует вручную подстроить канал видео сигнала. Для этого обратитесь к главе «Ручная
настройка пpoгpaмм ТВ». Также обратитесь к инструкции пo экcплyaтaции Вашего видео
для поиска канала сигнала видеомагнитофона.
Page 55

Этап 2 Настройка на телевизионные
станции
3
2
1
3VTR 1
¤
0
( u)
p Pr
REC
+
˚
;
…/
8
;
´8x
´/´
a/Å
A
b
≥
MENU
¸
TV
MDP2
VIDEO
+
CH
_
?
Ú/;
c
PROGR
1 Выбор языка меню
Используя эту функцию, выберите язык экрана меню.
Выберите также страну, в которой Вы будете использовать
телевизор. Каналы выбранной таким способом страны
автоматически займут верхние позиции во время
автоматической предварительной установки.
1 Нажмите выключатель питания на телевизоре. Если на
телевизоре высвечивается индикатор готовности U,
нажмите кнопку u или цифровую кнопку на пульте
дистанционного управления ;.
2 Нажмите кнопку MENU на пульте дистанционного
управления.
Появится языковое меню LANGUAGE.
3 Ha;mnte ha cnhii nÎn seÎehyi zactƒ koopfnhatho=
pykortkn для выбора языка. Нажмите координатную
pykortky для подтверждения Вашего выбора.
4 Нажмите кнопку MENU для возвращения к обычному
телевизионному изображению.
LANGUAGE
RU
RM-862
7
Page 56

3VTR 1
AÇÚoÔoËcÍ
PyäÌaÓ
HaÁÇ. AV ÇxoÀoÇ
CopÚËpoÇÍa
ÂaçËÚa
üÁêÍ
KoÌÇepÖeÌáËÓ
HACTPOâKA
6 D/K
CàCT èP
C26
KAH
- - - - -
HAÂB
ABTOèOàCK
¤
0
( u)
p Pr
REC
+
˚
;
…/
8
;
´8x
´/´
a/Å
A
b
≥
MENU
¸
TV
MDP2
2 Автоматическая настройка
каналов
VIDEO
CH
Ú/;
PROGR
RM-862
+
_
?
c
При помощи этой функции телевизор может
автоматически отыскивать и заносить в память до 100
различных номеров каналов.
Если Вы предпочитаете настраивать его вручную, см.
функцию меню “Предварительная установка каналов
вручную” на стр. 10.
1 Нажмите кнопку питания U на панели телевизора.
2 Нажмите кнопку на панели телевизора и держите ее
нажатой до тех пор, пока на экране не появится меню и
начнется поиск каналов.
После того, как в память записаны все имеющиеся каналы,
на экране появляется обычное телевизионное
изображение.
Abtomatnzeckar yctahobka kahajob c
æomoåƒi æyjƒta fnctahunohholo yæpabjehnr
1 Нажмите кнопку MENU.
2 Наклоните ручку в сторону синего или зеленого цвета так,
чтобы выбрать в экранном меню символ , а затем
наклоните ручку в сторону желтого цвета.
3 Наклоните ручку в сторону синего или зеленого цвета,
чтобы выбрать пункт “Автопоиск“.
4 Haклоните ручку в сторону желтого цвета и удеpживaйтe
дo пoявлeния aвтомaтичecкoгo меню и нaчaлa aвтопoиcкa.
После того, как закончится настройка всех имеющихся
каналов, на экране появится обычное изображение.
Примечания
• Вы можете
сгруппировать
программные
позиции, так, чтобы
они появились на
экране в жeлаемом
порядке.
“Сортировка
программных
позиций” на стр.11.
• Для остановки
автоматической
предварительной
установки каналов
Нажмите кнопку
MENU на пульте
дистанционного
управления.
8
Page 57

Этап 3 Hactpo=ka ubeta
AÇÚoÔoËcÍ
PyäÌaÓ
HaÁÇ. AV ÇxoÀoÇ
CopÚËpoÇÍa
ÂaçËÚa
üÁêÍ
KoÌÇepÖeÌáËÓ
HACTPOâKA
3
1
3VTR 1
¤
0
( u)
p Pr
REC
+
˚
;
…/
8
;
´8x
´/´
a/Å
A
b
≥
MENU
¸
2
TV
MDP2
VIDEO
+
CH
_
?
Ú/;
c
PROGR
RM-862
Cbefehne Kpachvx, 3ejehvx, n
Cnhnx jnhn=
1 Ha;mnte khoæky ha tejebnsope.
2 Qyhkunr abtomatnzecko= kohbeplehunn {cxofnmoctn[
padotaet b tezehnn 30-tn cekyhf.
Ecjn qyhkunr abtomatnzecko=
‘kohbeplehunr’ padotaet heæpabnjƒho
Bvdepnte ‘kohbeplehunr’ ns mehi ‘HACTPO+KA’ fjr
hactpo=kn ubetobo= pelnctpaunn
1 Ha;mnte khoæky MENU.
2 Haæpabƒte f;o=ctnk ha Cnhn= njn 3ejehv= fjr bvdopa
cnmboja , satem haæpabƒte f;o=ctnk ha :ejtv=.
Æorbntcr mehi HACTPO+KA.
3 Haæpabƒte f;o=ctnk ha Cnhn= njn 3ejhv= fjr bvdopa
‘kohbeplehunr’, satem haæpabƒte f;o=ctnk ha :ejtv=.
Æorbntcr mehi ‘kohbeplehunr’.
4 Haæpabƒte f;o=ctnk ha Cnhn= njn 3ejehv= fjr bvdopa
‘jnhnr’ {beptnkajƒve n lopnsohtaæƒhve jnhnn b kpachom n
cnhem[, kotopyi Bv xotejn dv otpelyjnpobatƒ.
Ha;mnte ha f;o=ctnk fjr æoftbep;fehnr bvdopa.
: kpachar beptnkajƒhar jnhnr {jebar/æpabar hactpo=ka[
: kpachar lopnsohtajƒhar jnhnr {bepxhrr/hn;hrr
hactpo=ka[
: cnhrr beptnkajƒhar jnhnr {jebar/æpabar hactpo=ka[
: cnhrr lopnsohtajƒhar jnhnr {bepxhrr/hn;hrr
hactpo=ka[
Hactpanbaemar jnhnr dyfet bvdpaha.
5 Haæpabƒte f;o=ctnk ha Cnhn= njn 3ejehv= fjr cbefehnr
bvdpahho= jnhnn c sejeho= b uehtpe. Ha;mnte ha f;o=ctnk
fjr æoftbep;fehnr bvdopa.
6 Æobtopnte æyhktv 4 n 5 fjr hactpo=kn fpylnx jnhn=, fo tex
æop, æoka æepekpvbaiwne fpyl fpyla jnhnn he oqopmrtcr b
dejv= kpect.
7 Ha;mnte khoæky MENU fjr bocctahobjehnr odvzholo
tejebnsnohholo nsodpa;ehnr.
RU
Æpnmezahne"
Qyhkunr abtomatnzecko=
kohbeplehunn
{cxofnmoctn[
:
• Æpn otcytctbnn
bxofholo cnlhaja.
• Kolfa bxofho= cnlhaj
cjnwkom cjadv=.
• Kolfa ha gkpah
bosfe=ctbyit æprmve
cojhezhve jyzn djnkn.
• Kolfa Bv
æpocmatpnbaete
æepefazy b cncteme
tejetekct.
• Kolfa æpolpammv b
pe;nme 16"9.
9
Page 58

Дополнительные функции
AÇÚoÔoËcÍ
PyäÌaÓ
HaÁÇ. AV ÇxoÀoÇ
CopÚËpoÇÍa
ÂaçËÚa
üÁêÍ
KoÌÇepÖeÌáËÓ
HACTPOâKA
0
1
2
3
4
5
6
7
8
9
D/K
D/K
D/K
D/K
D/K
D/K
D/K
D/K
D/K
D/K
CàCTèP
C29
C31
C32
C36
C37
C40
C41
C44
C49
C52
KAH
- - - - -
- - - - -
- - - - -
- - - - -
- - - - -
- - - - -
- - - - -
- - - - -
- - - - -
- - - - -
HAÂB
BKã
BKã
BKã
BKã
BKã
BKã
BKã
BKã
BKã
BKã
Aèó
PìóHAü HACTPOâKA
предварительной установки
1
РУЧНАЯ
¤
0
p Pr
˚
8
;
´/´
a/Å
A
b
≥
¸
10
3VTR 1
( u)
REC
+
;
…/
´8x
MENU
3
Pучная настройка программ тв
2
Используя эту функцию, Вы можете выполнять
предварительную установку каналов один за другим на
разные программные позиции. Это также удобно для
назначения программных номеров на источники
видеосигналов.
1 Нажмите кнопку MENU.
2 Ha;mnte ha cnhii nÎ n seÎehyi zactƒ koopfnhatho=
pykortkn чтобы выбрать символ на экране меню.
Нажмите на желтую часть для подтверждения выбора.
3 Ha;mnte ha cnhii nÎ n seÎehyi zactƒ koopfnhatho=
pykortkn “Ручная”. Нажмите на желтую часть для
подтверждения Вашего выбора. .
4 Нажмите на синюю или зеленую часть, чтобы выбрать
программную позицию (ПР), на которую Вы хотите
выполнить предварительную установку канала. Нажмите
на желтую часть для подтверждения.
5 Нажмите на синюю или зеленую часть, чтобы выбрать
систему телевизионного вещания (СИСТ) (B/G для стран
Западной Европы, D/K для стран Восточной Европы) или
для внешнего источника видеосигнала (AV1, AV2, AV3, YC2,
YC3, RGB). Нажмите на желтую часть для подтверждения.
TV
MDP2
VIDEO
+
CH
_
?
Ú/;
c
PROGR
RM-862
6 Нажмите на синюю или зеленую часть для выбора “С” (для
каналов наземного вещания) или “S” (для каналов
кабельного телевидения). Нажмите на желтую часть для
подтверждения.
Имеются две возможности для предварительной
установки каналов вручную:
a) Вы знаете номер канала.
Используйте, пожалуйста, метод “Прямой ввод”.
или
b) Вы не знаете номера канала.
Используйте, пожалуйста, метод “Поиск”.
7 a) Прямой ввод
Укажите первую цифру номера канала “КАН”, а затем
вторую цифру номера канала “КАН” при помощи цифровых
кнопок на пульте дистанционного управления
7 b) Поиск
Наклоняйте ручку в сторону синего или зеленого цвета,
чтобы найти следующий канал.
8 Если Вы хотите занести в память выбранный канал, то
перейдите к шагу 9. Если нет, то выберите другой канал
при помощи цифровых кнопок пульта или при помощи
ручки управления, наклоняя ее в сторону синего или
зеленого цвета и продолжая поиск.
9 Нажмите на ручку.
10 Повторите шаги 4 - 9 для настройки других каналов.
11 Нажмите кнопку MENU, чтобы вернуться к обычному
изображению.
Page 59

PYZHAR
0
1
2
3
4
5
6
7
8
9
D/K
D/K
D/K
D/K
D/K
D/K
D/K
D/K
D/K
D/K
CàCTèP
C29
C31
C32
C36
C37
C40
C41
C44
C49
C52
KAH
- - - - -
- - - - -
- - - - -
- - - - -
- - - - -
- - - - -
- - - - -
- - - - -
- - - - -
- - - - -
HAÂB
BKã
BKã
BKã
BKã
BKã
BKã
BKã
BKã
BKã
BKã
Aèó
PìóHAü HACTPOâKA
0
1
2
3
4
5
6
7
8
9
D/K
D/K
D/K
D/K
D/K
D/K
D/K
D/K
D/K
D/K
CàCTèP
C28
C29
C35
C38
C40
C42
C55
C56
C57
C58
KAH
BBC-W
VHS-2
CNN- -
- - - - MV-CH
VHS-1
- - - - 8MM
- - - - -
- - - - -
HAÂB
COPàPOBKA
AÇÚoÔoËcÍ
PyäÌaÓ
HaÁÇ. AV ÇxoÀoÇ
CopÚËpoÇÍa
ÂaçËÚa
üÁêÍ
KoÌÇepÖeÌáËÓ
HACTPOâKA
HACTPO+KA
Tочная подстройка каналов
Как правило, действует функция автоматической точной
подстройки (АПЧ).
Если изображение все же искажено, Вы можете провести
точную подстройку канала вручную и добиться лучшего
приема изображения.
1 Нажмите кнопку MENU.
2 Наклоните ручку в сторону синего или зеленого цвета так,
чтобы выбрать в экранном меню символ , a затем
наклоните ручку в сторону желтого цвета.
3 Наклоните ручку в сторону синего или зеленого цвета,
чтобы выбрать пунк “Ручная”, а затем в сторону желтого
цвета.
4 Наклоните ручку в сторону синего или зеленого цвета,
чтобы выбрать номер, соответствующий тому каналу,
который Вы хотите подстроить вручную.
5 Наклоняйте ручку в сторону желтого цвета до тех пор, пока
позиция АПЧ не изменит цвет.
6 Наклоняйте ручку в сторону синего или зеленого цвета,
чтобы пoдcтpoить частоту канала бoлee тoчнo (от -15 до
+15).
7 Нажмите на ручку.
8 Для подстройки других каналов повторяйте шаги 4 - 7.
9 Нажмите кнопку MENU, чтобы восстановить обычное
телевизионное изображение.
RU
СОРТИРОВКА
Сортировка программных
позиций
Эта функция позволяет Вам сортировать программные
позиции в желаемой последовательности.
1 Нажмите кнопку MENU.
2 Ha;mnte ha cnhii nÎ n seÎehyi zactƒ koopfnhatho=
pykortkn чтобы выбрать символ на экране меню.
Нажмите на желтую часть для подтверждения.
3 Нажмите на синюю или зеленую часть, чтобы выбрать
“Сортировка”. Нажмите на желтую часть для
подтверждения.
4 Нажмите на синюю или зеленую часть, чтобы выбрать
программную позицию канала, который Вы хотите
изменить. Нажмите координатную ручку для
подтверждения.
5 Нажмите на синюю или зеленую часть, чтобы выбрать
новую программную позицию. Нажмите координатную
ручку для подтверждения.
После этого выбранный канал hactpanbaetcr на новую
программную позицию.
6 Повторите шаги 4 и 5 для сортировки других программных
позиций.
7 Нажмите кнопку MENU для возвращения к обычному
телевизионному изображению.
11
Page 60

РУЧНАЯ
D/K
D/K
D/K
D/K
D/K
D/K
D/K
D/K
D/K
D/K
0
1
2
3
4
5
6
7
8
9
CàCTèP
C29
C31
C32
C36
C37
C40
C41
C44
C49
C52
KAH
- - - - -
- - - - -
- - - - -
- - - - A - - - -
- - - - -
- - - - -
- - - - -
- - - - -
- - - - -
HAÂB
BKã
BKã
BKã
BKã
BKã
BKã
BKã
BKã
BKã
BKã
Aèó
PìóHAü HACTPOâKA
D/K
D/K
D/K
D/K
- - D/K
D/K
D/K
D/K
D/K
0
1
2
3
4
5
6
7
8
9
CàCTèP
C29
C31
C32
C36
C37
C40
C41
C44
C49
C52
KAH
- - - - -
- - - - -
- - - - -
- - - - -
- - - - -
- - - - -
- - - - -
- - - - -
- - - - -
- - - - -
HAÂB
BKã
BKã
BKã
BKã
BKã
BKã
BKã
BKã
BKã
BKã
Aèó
PìóHAü HACTPOâKA
Пропуск программных позиций
Эта функция позволяет Вам пропускать не используемые
программные позиции при выбирании их с помощью кнопок
PROGR +/–. Однако, используя цифровые кнопки, Вы все
же можете выбрать пропущенную программную позицию.
1 Нажмите кнопку MENU.
2 Ha;mnte ha cnhii nÎ n seÎehyi zactƒ koopfnhatho=
pykortkn чтобы выбрать символ на экране меню.
Нажмите на желтую часть для подтверждения.
3 Нажмите на синюю или зеленую часть, чтобы выбрать
функцию “Ручная”. Нажмите на желтую часть для
подтвержения.
4 Нажмите на синюю или зеленую часть, чтобы выбрать
программную позицию, которую Вы желаете пропустить.
Нажмите на желтую часть для подтверждения.
5 Нажмите на синюю или зеленую часть, чтобы выбрать “---”
в позиции СИСТ. Нажмите координатную pykortky для
подтверждения.
6 Повторите действия пунктов 4 и 5 для пропуска других
программных позиций.
7 Нажмите кнопку MENU для возврата к обычному
телевидению.
РУЧНАЯ
12
Создание названия станции
Обычно каналы маркируются во время предварительной
установки. Однако, Вы можете создать индивидуальное
название канала или источника видеосигнала, используя
пять знаков.
1 Нажмите кнопку MENU.
2 Ha;mnte ha cnhii nÎ n seÎehyi zactƒ koopfnhatho=
pykortkn чтобы выбрать символ на экране меню.
Нажмите на желтую часть для подтверждения.
3 Нажмите на синюю или зеленую часть, чтобы выбрать
функцию “Ручная”. Нажмите на желтую часть для
подтверждения.
4 Нажмите на синюю или зеленую часть, чтобы выбрать
программную позицию для канала, который Вы хотите
пометить. Нажимайте повторно на желтую часть, пока ярко
не высветится первый элемент позиции НАЗВ.
5 Нажмите на синюю или зеленую часть, чтобы выбрать
букву или цифру (для пустого места выбирайте “-”).
Нажмите на желтую часть для подтверждения. Выберите
другие четыре буквы таким же способом.
6 После выбора всех букв нажмите координатную pykortky.
7 Повторите действия пунктов с 4 по 6 для маркировки
других каналов или источников видеосигналов.
8 Нажмите кнопку MENU для возврата к обычному
телевидению.
Page 61

3AœNTA
AÇÚoÔoËcÍ
PyäÌaÓ
HaÁÇ. AV ÇxoÀoÇ
CopÚËpoÇÍa
ÂaçËÚa
üÁêÍ
KoÌÇepÖeÌáËÓ
HACTPOâKA
0
1
2
3
4
5
6
7
8
9
D/K
D/K
D/K
D/K
D/K
D/K
D/K
D/K
D/K
D/K
CàCTèP
C28
C29
C35
C38
C40
C42
C55
C56
C57
C58
KAH
BBC-W
VHS-2
CNN- -
- - - - MV-CH
VHS-1
- - - - 8MM
- - - - -
- - - - -
HAÂB
ÂAôàTA
3
2
C38 - - - - -
1
C35 CNN
èP KAH HAÂB
0
C29 VHS-2
C28 BBC-W
D/K
D/K
CàCT
D/K
D/K
Использование родительской
блокировки
Если Вы попытаетесь
выбрата программу,
которая
заблокирована,
Ha æyctom gkpahe
телеьизора æorbjretcr
cnmboj .
Для разблокировки
Выберите канал,
который нужно
разблокировать в меню
“3AœNTA”. Нажмите
координатную pykortky.
Символ исчезнет.
TV
MDP2
3VTR 1
¤
+
MENU
REC
…/
VIDEO
CH
Ú/;
PROGR
RM-862
+
_
?
c
0
( u)
p Pr
˚
;
8
;
´8x
´/´
a/Å
A
b
≥
¸
Эта функция позволяет Вам предотвращать просмотр
детьми нежелательных программ.
1 Нажмите кнопку MENU.
2 Ha;mnte ha cnhii nÎ n seÎehyi zactƒ koopfnhatho=
pykortkn для выбора символа на экране меню. Нажмите
на желтую часть для подтверждения.
3 Нажмите на синюю или зеленую часть, чтобы выбрать
функцию “3AœNTA”. Нажмите на желтую часть для
подтверждения.
4 Нажмите на зеленую или синюю часть, чтобы выбрать канал,
который Вы хотите заблокировать. Нажмите координатную
pykortky для подтверждения.
На экране появится символ перед программной позицией,
означая, что этот канал сейчас заблокирован.
5 Повторите действия пункта 4, чтобы заблокировать
остальные каналы.
6 Нажмите кнопку MENU для возврата к обычному
телевизионному изображению.
Настройка на канал временно
Вы можете произвести настройку на канал временно, даже,
если он не был предварительно установлен.
1 Нажмите кнопку С на пульте дистанционного управления.
Для каналов кабельного телевидения нажмите кнопку С
дважды.
На экране появится индикация “С” (для каналов кабельного
телевидения индикация “S”).
2 Введите двузначный номер канала, используя цифровые
кнопки (например, для канала 4, нажмите сначала 0, а затем
4).
Появится номер канала. Однако канал не будет занесен в
память.
RU
C - -
Æpnmezahne
Æocje ocyåectbjehnr
bpemehho= hactpo=kn
kahajob Bv he mo;etc
bo=tn b pe;nm pyzho=
yctahobkn. Fjr
coxpahehnr kahaja
æepekjizntcƒ ha fpyli
æpolpammy n odpatntecƒ
k pasfejy ‘Pyzhar
Yctahobka Kahajob’ ha
ctpahnue 10.
13
Page 62

Инструкция по
эксплуатации
Просмотр телевизионных передач
Данный раздел объясняет основные функции, которые Вы
можете использовать, когда будете смотреть телевизор.
Большинство операций выполняется с помощью пульта
дистанционного управления.
Включение и выключение
телевизора
TV
MDP2
3VTR 1
¤
0
( u)
p Pr
REC
+
˚
;
…/
8
;
´8x
´/´
a/Å
A
b
≥
MENU
¸
VIDEO
CH
Ú/;
PROGR
+
_
?
c
Включение
Нажать U на телевизоре.
Временное выключение
Нажать u на пульте дистанционного управления.
Телевизор войдет в режим готовности, и индикатор
готовности на передней панели телевизора высветится
красным цветом.
Для включения телевизора снова
Нажать ;, PROGR +/– или одну из цифровых кнопок на
пульте дистанционного управления.
Æojhoe Bыключение
Нажать U на телевизоре.
Для экономии энергии рекомендуется отключать телевизор
полностью, если он не используется.
RM-862
Если изображение не
появляется, когда Вы
нажимаете U на
телевизоре и если
высвечивается
индикатор готовности
на телевизоре, то
телевизор находится
в режиме готовности.
Нажать ;, или одну из
цифровых кнопок для
включения питания.
Выбор телевизионных
программ
Нажать PROGR +/– или нажать цифровые кнопки.
Для выбора двузначного номера
Нажать -/--, а затем цифры.
Например, если Вы хотите выбрать 23, то нажать -/--, 2 и 3.
Регулировка громкости
Нажимать ¸ +/–.
Управление телевизором с
использованием кнопок на
телевизоре
Для выбора номера программы следует нажимать кнопки
PROGR +/–.
Для регулировки громкости следует нажимать кнопки ¸ +/– .
Для выбора изображения входного видеосигнала нажмите
кнопку ….
14
Page 63

Что касается
подробностей
управления
телетекстом, см. стр. 18.
Что касается
подробностей
относительно
изображения входного
видеосигнала, см. стр.
21.
TV
MDP2
3VTR 1
¤
+
MENU
REC
…/
VIDEO
CH
Ú/;
PROGR
+
_
?
c
0
( u)
p Pr
˚
;
8
;
´8x
´/´
a/Å
A
b
≥
¸
Просмотр телетекста или
входных видеосигналов
Просмотр телетекста
1 Нажать f для просмотра телетекста.
2 Для управления телетекстом ввести трехзначный номер
страницы.
Для быстрого управления текстом нажать координатную
pykortky на цветную метку, соответствующую меню цветной
кодировки.
Для обеих операций нажать R (PAGE + ) для следующей
страницы или S (PAGE – ) для предыдущей страницы.
3 Для возврата к нормальному телевизионному изображению
нажать ; .
Просмотр изображения от входных
видеосигналов
1 Нажимать повторно кнопку … до тех пор, пока не появится
изображение от желаемого входного видеосигнала.
2 Для возврата к нормальному телевизионному изображению
нажать ;.
RU
Дополнительные удобные
функции
Отображение индикаций на экране
Нажмите кнопку T для отображения индикаций.
Нажмите кнопку еще раз, чтобы индикации исчезли.
RM-862
Приглушение звука
Нажать ¤.
Для восстановления нормального звука снова нажать ¤.
Отображение времени
Нажать #. Данная функция доступна только, когда
передается телетекст.
Для того, чтобы индикация времени исчезла, снова нажать #.
Отображение таблицы программ
Ha;mnte koopfnhathathyi pykortky. Ha;mnte ha cnhii nÎn
seÎehyi zactƒ koopfnhatho= pykortkn для выбора
программы, затем нажмите координатную pykortky для
подтверждения.
Нажать ОК. С левой стороны телевизионного экрана
отобразится таблица программ.
Для того, чтобы таблица программ исчезла, следует нажать
MENU.
Изменение формата экрана
Fjr æpocmotpa æpolpamm b qopmate 16"9 ha;mnte .
BBC
1
SAT
2
TV5
3
C02
4
C15
5
RTL
6
SKY
7
S34
8
AV1
9
MTV
10
15
Page 64

Регулировка и настройка
KoÌÚpacÚ
CÚaÌÀapÚ
îopÏaÚ
- - >
4:3
àÂOÅPAÜEHàE
PeÊËÏ ËÁoÄpaÊeÌËÓ
üpÍocÚë
HacêçeÌÌocÚë
óeÚÍocÚë
ñÇeÚoÇoÈ ÚoÌ
èoÎëÁ.
PEÜàM àEOÅPAÜEHàü
PeÊËÏ ËÁoÄpaÊeÌËÓ
PeÊËÏ ÁÇyÍa
ÅaÎaÌc
CÚaÌÀapÚ
ÑÇoÈÌoÈ ÁÇyÍ
KoppeÍäËÓ
2 ÉpoÏÍÁÇyÍ
2 ÑÇoÈÌoÈ ÁÇyÍ
- - > èoÎëÁ
ÇêÍ
ÏoÌo
0
ÏoÌo
ÂBìK
ÉpoÏÍoÖoÇopËÚeÎË
ocÌoÇÌÈ
èopcÚpaÌcÚÇeÌÌêÈ
ÇêÄop peÊËÏa
ÇepxÌËe äacÚoÚê
HËÊÌËe äacÚoÚê
èoÎëÁ.
PEÜàM ÂBìKA
телевизора с использованием
меню
ИЗОБРАЖЕНИE
ЗВУК
TV
MDP2
3VTR 1
¤
+
MENU
REC
…/
VIDEO
CH
Ú/;
PROGR
+
_
?
c
0
( u)
p Pr
˚
;
8
;
´8x
´/´
a/Å
A
b
≥
¸
Регулировка изображения и
звука
Несмотря на то, что изображение и звук отрегулированы на
заводе, Вы можете отрегулировать их по своему
собственному вкусу. Вы также можете выбирать двойное
звучание (двуязычных) программ, когда они передаются,
или отрегулировать звук для прослушивания с помощью
haywhnkob.
1 Нажать MENU и выбрать индикатор для регулировки
изображения или регулятор звука ≥, а затем нажать ОК.
Появится меню ИЗОБРАЖЕНИE или ЗВУК.
2 Нажмите на синюю или зеленую часть для выбора
желаемого пункта.
Нажмите на желтую часть для подтверждения.
3 Нажмите на красную или желтую часть для регулировки
выбранного пункта.
Нажмите координатную pykortky для подтверждения.
4 Повторить пункты 2 и 3 для регулировки других установок.
5 Нажать MENU для возврата к телевизионному
изображению.
Примечания
• Регулировка цветного
тона функционирует
только для систем
цветного
телевидения NTSC.
Примечание
относительно LINE
OUT
Ypobehƒ cnlhaha c
lhesfa ≤ {cnmboÎ - cm.
ahlÎ. opnlnhaÎ[ ha
safhe= æaheÎn
cootbetctbyet
yctahobkam lpomkoctn b
haywhnkax.
При просмотре
источника
видеосигнала со
стереофоническим
звуком
Вы можете выбирать
разные комбинации
двойного звука для
изменения звучания.
RM-862
Эффект каждой регулировки
ИЗОБРАЖЕНИE Эффект
Режим изображения Польз. y Игра y Кино y Спорт y Репортаж
В режиме “Польз.” Вы можете следующим образом
устанавливать Яркость, Насыщенность, Четкость и
Цветовой тон (только для сигналов NTSC):
1 Наклоните ручку в сторону синего или зеленого цвета,
чтобы выбрать нужный пункт, а затем в сторону желтого
цвета.
2 Наклоните ручку в сторону красного или желтого цвета,
чтобы изменить соответствующий параметр, затем
нажмите на ручку.
3 Наклоните ручку в сторону красного цвета, чтобы
вернуться в меню ИЗОБРАЖЕНИЕ.
Контраст Слабее Сильнее
Стандарт Установка регулировок изображения на предварительно
установленные на заводе уровни.
Qopma 4:3: Обычный qopmat
16:9: Переxод в широкоэкранный режим и обратно.
16
Page 65

ЗВУК Эффект
Режим звука Выбор между разными звуковыми эффектами
Польз y Пок y Джаз y Роп
R R
В режиме “Польз.” Вы можете следующим образом настравать
верхние и нижние частоты:
1 Наклоните ручку в сторону синего или зеленого цвета, чтобы
выбрать нужный пункт, а затем в сторону желтого цвета.
2 Наклоните ручку в сторону красного или желтого цвета, чтобы
изменить соответствующий параметр, затем нажмите на ручку.
3 Наклоните ручку в сторону красного цвета, чтобы вернуться в
меню ЗВУК.
Баланс Левее Правее
Cтандарт Возвращает параметры звука, установленные при изготовлении
Æpoctpahctbehhv= Вык: обычный режим
Вкл: специальный акустический эффект
Двойной эвук А: канал 1 В: канал 2 Стерео t Моно Выбранный режим
Коррекция Устанавливает уровень громкости для отдельных каналов
–12 +12
2 Громкость Слабее Сильнее
2 Двойной звук А: канал 1 t В: канал 2
Стерео t Моно
Lpomkolobopntejn Основнoй: звук от телевизора
Uентр bxof: звук от внешнего усилителя
ТАЙМЕР
Для выключения
таймера сна
Выберите “Вык” в
пункте 3.
Для проверки
оставшегося
времени
Нажмите .
Для возврата к
нормальному
телевизионному
изображению
Нажмите MENU.
Быстрое изменение режимов
Вы можете быстро изменить “Режим звука” или “Режим
изображения” без входа в меню “ИЗОБРАЖЕНИЕ” или
“ЗВУК”.
1 Нажмите кнопку Í для изображения или кнопку ≥ для
звука.
2 Наклоните ручку в сторону синего или зеленого цвета,
чтобы выбрать нужный режим.
3 Cнова нажмите кнопку Í или ≥ чтобы восстановить на
экране обычное изображение.
Использование таймера сна
Вы можете выбрать период времени, после которого
телевизор автоматически будет переключаться в режим
готовности.
1 Нажмите кнопку MENU.
2 Ha;mnte ha cnhii nÎn seÎehyi zactƒ koopfnhatho=
pykortkn чтобы выбрать символ t на экране меню.
Нажмите на желтую часть для подтверждения.
3 Нажмите на желтую часть. Нажмите на kpachi или
;ejtyi часть для выбора времени.
Период времени (в минутах) изменяется следующим
образом:
выкл. y0:30y1:00y1:30..........3:30y4:00
R R
RU
TAâMEP
TaÈÏep cÌa ÇêÍÎ.
4 После выбора периода нажмите координатную ручку для
подтверждения.
За одну минуту до перехода телевизора в режим
готовности на экране телевизора будет отображено
æpefyæpe;fehne.
17
Page 66

Телетекст
TV
MDP2
3VTR 1
¤
+
MENU
REC
…/
VIDEO
CH
Ú/;
PROGR
RM-862
+
_
?
1 Выбрать телевизионный канал, транслирующий
2 Нажать f для включения телетекста.
c
3 Использовать цифровые кнопки для ввода трех цифр
0
( u)
p Pr
˚
;
8
;
´8x
´/´
a/Å
A
b
≥
¸
Телевизионные станции передают информационные услуги,
называемые телетекстом, через каналы вещательного
телевидения. Услуги телетекста позволяют Вам принимать
страницы различной информации, как например прогноз
погоды или новости в любое желаемое Вами время.
Функции прямого доступа
Включение и выключение телетекста
телетекстовое вещание, которое Вы хотите посмотреть.
Стараница телетекста будет отображена (обычно с
индексным указателем).
Если телетекстового вещания нет, то “Тeкста нет”
отобразится на информационной строке вверху экрана.
выбираемого номера страницы.
Если Вы сделали ошибку, то нажмите любые три цифры.
Затем повторно введите правильный номер страницы.
Примечание
Ошибки телетекста
могут произойти при
слабых вещательных
сигналах.
Для выключения телетекста
Нажать ;.
Доступ к следующей или предыдущей странице
Нажать R (PAGE+) или S (PAGE–).
Появится следующая или предыдущая страница.
Наложение отображения телетекста на телевизионную
программу
• Нажмите один раз кнопку f для получения только
телетекста.
• Нажмите кнопку f дважды для получения смешанного
режима.
Получится наложение обычного телевизионного экрана и
экрана телетекста.
• Нажать f для восстановления нормального приема
телетекста.
Предохранение страницы телетекста от
обновления свежими новостями
• Нажать w.
Индикатор “w” отобразится на информационной строке.
• Для отмены нажмите снова ту же кнопку.
18
Раскрытие засекреченной информации
(например, для викторины)
Иногда на страницах телетекста содержится секретная
информация, как, например, ответы для викторины. В
Вашем распоряжении будет право выбора раскрытия
информации.
Нажать C. Нажать еще раз для отмены.
Page 67

Cистема любимых страниц
Для каждой службы телетекста Вы можете занести в
память до четырех номеров Ваших излюбленных страниц
телетекста. Tаким образом Вы получите быстрый доступ к
тем страницам, которыми часто пользуетесь.
Запись в память номеров страниц
1 При помощи цифровых кнопок выберите номер страницы,
который хотите занести в память.
2 Дважды нажмите кнопку .
В нижней части экрана мерцают цветные подсказки.
3 Наклoните ручку в стopoну жeлaeмoгo цвeтa, чтобы занести
номер выбранной страницы в память. Tеперь номер этой
страницы занесен в память и ассоциируется с
соответствующим цветом.
Повторите шаги 1 - 3 для занесения в память номеров трех
остальных страниц.
Вывод любимых страниц на экран
1 Нажмите кнопку .
2 Наклоните ручку в сторону цвета, соответствующего
нужной странице.
Не забудьте нажать кнопку , в противном случае будут
работать обычные функции системы Fastext.
RU
Примечание
Работа с
быстродоступным
текстом возможна
только тогда, когда
телевещательная
станция передает
сигналы
быстродоступного
текста.
Использование функции быстрого доступа к
тексту
С помощью функции быстрого доступа к тексту Вы можете
получить доступ к страницам одним нажатием кнопки.
Когда передается страница быстродоступного текста, меню
с цветовым кодом появится в нижней части экрана. Цвета
этого меню соответствуют красной, зеленой, желтой и
синей кнопкам на пульте дистанционного управления.
Нажмите координатную pykortky на цветную метку,
которая соответствует меню цветовой кодировки. Через
несколько секунд страница будет отображена.
19
Page 68

Подсоединение и эксплуатация
дополнительной аппаратуры
Подсоединение дополнительной аппаратуры
Вы можете подсоединить дополнительную аудио-видеоаппаратуру к Вашему телевизору,
как например КВМ, плейер видеодисков и стереосистему.
Для подсоединения
КВМ с использованием
гнезда ))))
Соединить антенный
выход КВМ с антенным
гнездом ) телевизора.
Рекомендуется настроить
видеосигнал на номер
программы “0”.
Подробности смотрите в
разделе
“Предварительная
установка каналов
вручную” на стр. 10.
В случае искажения
изображения или звука
Удалить КВМ от
телевизора.
1
3
Входной сигнал S/видео
(входной сигнал Y/C)
Видеосигналы могут
разделяться на сигналы Y
(освещенности или
яркости) и С (цветности).
Разделение сигналов Y и
С предотвращают их
интерференцию друг с
другом и, таким образом,
улучшают качество
изображения (особенно
яркость). Данный
телевизор оснащен 3
входными гнездами Sвидео, через которые
прямо могут поступать
такие разделенные
сигналы.
При подсоединении
монофонического КВМ
Выполнить соединение
только между белыми
гнездами ≤ и на
телевизоре и на КВМ.
Æpnmezahne"
Æpn æofkjizehnn
aææapatypv b pas∂emv
q3/…3/≤3 ha æepefhe=
æaæejn njn b pas∂em :3/
q3 ha safhe= æahejn,
otkjiznte jntahne
odopyfobahnr, he
используемого b fahhv=
momeht.
PROGR
C
3
3/
R/D/D/D-L/G/S/I
2/
1
2
3 3
MONO
3
L/G/S/I R/D/D/D
R
3
24
5
Принимаемый входной сигнал Доступный выходной сигнал
1 Обычный сигнал аудио/видео и сигнал Сигнал видео/аудио от телевизионного тюнера
основных цветов изображения RGB
2 Обычный сигнал аудио/видео и сигнал Сигнал видео/аудио от выбранного источника
S-видео
3 Обычный сигнал аудио/видео и сигнал Нет выходных сигналов
S-видео Bnfeo/Ayfno ns bvdpahholo nctozhnka cnlhaja
Обычный сигнал аудио/видео и сигнал {nctozhnk bvxofholo cnlhaja cootbetctbyet
S-видео pas∂emy :2/ q 2)
4 Нет входных сигналов Аудиосигнал
5 Входной сигнал акустической системы Нет выходного сигала
Установите “Громкоговорители” в меню
ЗВУК в положение “Центр bxof”.
20
Page 69

Выбор входного
сигнала с помощью
кнопки PROGR +/– или
цифровых кнопок
Вы можете выполнить
предварительную
установку источников
входных видеосигналов
на программные
позиции, так, что Вы
сможете выбирать их с
помощью кнопки
PROGR +/– или
цифровых кнопок.
Подробности смотрите
в разделе
“Предварительная
установка каналов
вручную” на стр. 10.
TV
MDP2
3VTR 1
¤
+
REC
…/
MENU
VIDEO
CH
Ú/;
PROGR
+
_
?
c
0
( u)
p Pr
˚
;
8
;
´8x
´/´
a/Å
A
b
≥
¸
Выбор входнoгo сигналa
Gtot pasfej oæncvbaet, kak æpocmatpnbatƒ bxofråee
bnfeo nsodpa;ehne {ot nctozhnka bnfeo cnlhaja,
æofkjizehholo k Bawemy tejebnsopy[ æpn æomoån khoæok
æprmolo foctyæa.
Выбор входного сигнала
Нажимайте повторно кнопку … для выбора источника
входного сигнала.
Появится индикатор выбранного источника входного
сигнала.
Для возвращения к нормальному телевизионному
изображению
Нажмите кнопку ;.
Режимы входных сигналов
Индикатор Входной сигнал
… 1 Входной сигнал аудио/видео через гнездо W 1
W Входной сигнал аудио/RGB через гнездо W 1
… 2 Входной сигнал аудио/видео через гнездо : 2/ q 2
q2 Входной сигнал аудио/S-видео через гнездо : 2/ q 2
… 3 Ayfno/Bnfeo bxofnt zepes pas∂emv … 3 n ≤ 3 ha æepefhe= æahejn njn
zepes pas∂em : 3/q 3 ha safhe= æahejn
q3 Входной сигнал S-видео через гнездо q 3 разъем (4-штырьковый разъем)
на передней панели njn zepes : 3/ q 3 ha safhe= æahejn
… 1
RU
RM-862
21
Page 70

HA3B. AV
AÇÚoÔoËcÍ
PyäÌaÓ
HaÁÇ. AV ÇxoÀoÇ
CopÚËpoÇÍa
ÂaçËÚa
üÁêÍ
KoÌÇepÖeÌáËÓ
HACTPOâKA
AV1
RGB
AV2
YC2
AV3
YC3
BXOÑ
- - - - -
- - - - -
- - - - -
- - - - -
- - - - -
- - - - -
HAÂB
HAÂB. AV BXOÑOB
BXOFB
Æpncboehne hasbahn= ayfno/
bnfeo bxofam
Используя эту функцию, Вы можете выполнить
предварительную установку желаемого источника
входного видеосигнала (например, сигнала основных
цветов изображения RGB, W 1) в соответствии с входным
сигналом аудио/видео (AV 1 W). В данном случае
подсоединенный КВМ автоматически переключится на
сигнал RGB.
1 Нажмите кнопку MENU.
2 Ha;mnte ha cnhii nÎ n seÎehyi zactƒ koopfnhatho=
pykortkn, чтобы выбрать символ на экране меню.
Нажмите на желтую часть для подтверждения.
3 Нажмите на синюю или зеленую часть, чтобы выбрать
функцию “hasb. AV bxofob”. Нажмите на желтую часть.
4 Нажмите на синюю или зеленую часть, чтобы выбрать
желаемый входной сигнал аудио/видео. Нажмите на
желтую часть для подтверждения.
5 Для маркировки источника: Нажмите на синюю или
зеленую часть, чтобы выбрать первый знак (букву или
цифру, а для пробела “–”). Нажмите на желтую часть для
подтверждения. Выберите таким же способом четыре
других знака.
6 Æocje bbofa bcex cnmbojob ha;mnte ha pyzky.
7 Æobtopnte waln 4-6 fjr hanmehobahnr octajƒhvx bxofhvx
nctozhnkob.
8 Ha;mnte khoæky MENU, ztodv bocctahobntƒ odvzhoe
tejebnsnohhoe nsodpa;ehne.
COEFNHEHNE
BXOFB
Æpnmezahne"
Ecjn fjr bvxofholo
cnlhaja Bv bvdeoete
"AUTO", to
abtomatnzeckn b
kazectbe nctozhnka
bvxofholo cnlhaja
dyfet bvdpah
hashazehhv= nctozhnk
bxofholo cnlhaja.
22
Проверка и выбор источников
входных и выходных сигналов
путем использования меню
Вы можете отобразить меню, чтобы увидеть, какие
источники входных сигналов выбраны для телевизионного
экрана, и какой выбран источник выходного сигнала. Вы
можете также их выбрать на дисплее меню.
1 Нажмите кнопку MENU.
2 Ha;mnte ha cnhii nÎ n seÎehyi zactƒ koopfnhatho=
pykortkn, чтобы выбрать символ на экране меню.
Нажмите на желтую часть для подтверждения.
Появится меню СОЕFИНЕНИЕ ВХОFOB .
Вы можете наблюдать, какой источник выбран для
телевизора и для выходного сигнала. Если Вы хотите
выбрать входной и выходной источник сигнала на этом
меню, перейдите к следующему пункту.
3 Нажмите на синюю или зеленую часть, чтобы выбрать “На
экране” (источник входного сигнала для телевизионного
сигнала) или “Выход в” (источник выходного сигнала для :
: 2/q 2 и : 3/q 3).
Нажмите на желтую часть для подтверждения.
4 Нажмите на kpachyi или ;ejtyi часть, чтобы выбрать
желаемый источник.
Что касается подробностей относительно каждого
источника, см. таблицу на стр. 21.
5 Повторите действия пунктов с 3 по 4, чтобы выбрать
источник для других входных и выходных сигналов.
6 Нажмите кнопку MENU для возврата к обычному
телевизионному изображению.
COEÑàHEHàE BXOÑOB
ÂÍpaÌ
BêxoÀ
TV
[TV - - - - -]
[TV - - - - -]
TV
n
Page 71

TV
MDP2
3VTR 1
¤
+
REC
MENU
…/
VIDEO
+
CH
_
Ú/;
PROGR
?
c
0
( u)
p Pr
˚
;
8
;
´8x
´/´
a/Å
A
b
≥
¸
При записи
Если Вы используете
для записи кнопку r
(запись), то
обязательно нажмите
эту кнопку и ту, что
справа от нее,
одновременно.
Дистанционное управление
другой аппаратурой Sony
Вы можете использовать пульт дистанционного управления
телевизора для управления основной, дистанционноуправляемой аппаратурой Sony, такой, как: КВМ с бетакассетами, КВМ с 8-мм лентами и бытовые КВМ VHS, также
проигрыватели видеодисков.
Настройка пульта дистанционного управления на
аппаратуру
1 Установите æepekÎizateÎ ƒ VTR 1/2/3 MDP в соответствии с
аппаратурой, которой Вы хотите управлять:
VTR1: KBM с бета-кассетой
VTR2: KBM с 8-мм лентой
VTR3: Бытовой KBM VHS
MDP: Проигрыватель видеодисков
2 Используйте кнопки, указанные на рисунке, для управления
дополнительной аппаратурой.
Если Ваша видеоаппаратура функционирует с
использованием æepekÎizateÎr COMMAND MODE
установите данный æepekÎizate΃ в такое же положение,
как и æepekÎizate΃ VTR 1/2/3 MDP на пульте
дистанционного управления телевизора.
Если аппаратура не имеет определенной функции, то
соответствующая кнопка на пульте дистанционного
управления не будет работать.
RU
23
Page 72

К Вашему сведению
Оптимальная зона просмотра
Для наилучшего качества изображения постарайтесь установить
проекционный телевизор так, чтобы Вы могли смотреть на экран в
пределах показанной ниже зоны.
Зона горизонтального просмотра
2.1m (Минимальное оптимальное расстояние)
75°
75°
Зона вертикального просмотра
2.1m (Минимальное оптимальное расстояние)
27,5°
27,5°
Оптимальное положение для
просмотра
24
Оптимальное положение для просмотра
Page 73

Отыскание неисправностей
Здесь изложено несколько простых решений некоторых проблем, которые могут влиять на изображение и звук.
Проблема Решение
Нет изображения (экран темный), нет звука • Включить телевизор в сеть.
• Нажать U нa телевизоре (если индикатор u горит, то нажать кнопку ;
или номер программы на пульте дистанционного управления).
• Проверить соединение антенны.
• Проверить, включен ли выбранный источник видеосигнала.
• Выключите телевизор на 3-4 секунды, а затем снова включите его
выключателем.
Плохое изображение или нет изображения • Нажать кнопку MENU для ввода меню РЕГУЛИРОВКА
(экран темный), но звук нормальный ИЗОБРАЖЕНИЯ и отрегулировать яркость, контрастность и цвет.
Плохое качество изображения при просмотре источника • Нажимать повторно кнопку … для выбора W.
видеосигнала основных цветов изображения RGB
Хорошее изображение, но нет звука • Нажать ¸ +.
• Ydefnteƒ, zto bvdpah lpomkolobopntejƒ ‘ochobho=’ ns mehi ‘3BYK’.
• Если ¤ отображается на экране, нажать ¤.
Нет цвета для цветных программ • Нажать кнопку MENU для ввода меню РЕГУЛИРОВКА ИЗОБРАЖЕНИЯ,
выбрать пункт сброса, а затем нажать координатную pykortky для
подтверждения.
Пульт дистанционного управления не работает • Слабые батарейки.
Если проблема все еще остается, то Вам следует предоставить Ваш телевизор для технического обслуживания квалифицированным
персоналом. Никогда не открывайте корпус самостоятельно.
Технические характеристики
Телевизионная система B/G/H, D/K
Система цветного PAL/SECAM
телевидения NTSC 3.58/4.43 (VIDEO IN)
Охват каналов Смотрите “Принимаемые каналы и
индикации каналов” ниже
Размер проецируемого 41 дюйм.
изображения Приблиз. 103 см по диагонали
Гнезда
Задняя панель • Входные гнезда центральной
акустической системы, 2 гнезда
•≤ (L, R), аудиовыходы – фонические
гнезда
• W1, 21-штырьковый разъем
европейского стандарта (стандарт
CENELEC)
- входы для аудио- и видеосигналов
- входы RGB (сигнала основных цветов
изображения)
- выходы телевизионных сигналов аудио
и видео
• : 2/q 2, 21-штырьковый разъем
европейского типа
- входы для аудио- и видеосигналов
- входы для S–видео
- выходы для аудио- и видеосигналов
(выбираемые)
• : 3/q 3, 21-штырьковый разъем
европейского типа
- входы для аудио- и видеосигналов
- входы для S–видео
- Bvxof ayfno n bnfeo cnlhajob
{bosmo;hv fjr bvdopa, nctozhnk
bvxofholo cnlhaja cootbetctbyet
pas∂emy : 2/q 2)
Передняя панель • q 3, входы S-видео – 4-штырьковые по
DIN
• … 3, входы видеосигналов – фонические
гнезда
≤ 3 (L, R),
•
фонические гнездa
• 2, гнездо haywhnkob – стереофоническое
минигнездо
входы аудиосигналов –
Bvxofhar moåhoctƒ 2 x 30 Вт (музыкальная мощность)
sbyka 2 x 15 Вт (RMS)
Bxofhar moåhoctƒ 30 Вт (æpn ncæo΃sobahnn
uehtpahƒholo uehtpa΃ho= akyctnzecko=
fnhamnka cnctemv[
Потребляемая 145 Вт
мощность
Габаритные размеры Ирибл. 948 x 992 x 511 мм
Ш х В х Г
Масса Ирибл. 43 кг
Прилагаемые См. стр. 6
Принимаемые Индикация на
каналы экране
B/G/H E2..12 21..69 C02 C03 C04..C12
C21..C69
CABLE TV (1) S1..41 S01 S02..S41
CABLE TV (2) S01..S05 M1..M10 S42..S46 S01..S10
U1..U10 S11..S20
ITALY A B C D E F G H H1 C11..C69
H2 21..69
D/K R01..R12 R21..R69 C02..C12 C21..C69
CABLE TV (1) S01 S02..S41
CABLE TV (2) S42 S43..S46
CABLE TV B..Q, S21..41 S02, S03..S17,
S21..S41
Экологическая бумага - Без хлора
RU
25
Page 74

Общие правила техники безопасности
He дoпycкaйтe пoпaдaния кaкиx-либo
пpeдмeтoв внyтpь тeлeвизopa, тaк кaк этo
Этoт тeлeвизop пpeднaчeн для
paбoты тoлькo oт ceти пepeмeннoгo
тoкa нaпpяжeниeм 220-240 B. He
пoдключaйтe cлишком мнoгo
элeктpoпpибopoв к oднoй poзeткe,
тaк кaк этo мoжeт пpивecти к
вoзгopaнию или пopaжeнию
элeктpичecким тoкoм.
Из cooбpaжeний бeзoпacнocти и
энepгocбepeжeния нe
peкoмeндyeтcя ocтaвлять
тeлeвизop в дeжypнoм peжимe,
кoгдa oн нe иcпoльзyeтcя.
Oтключaйтe тeлeвизop oт ceти
ceтeвoй кнoпкoй.
мoжeт пpивecти к вoзгopaнию или
пopaжeнию элeктpичecким тoкoм. He
дoпycкaйтe пpoливaния кaкиx-либo
жидкocтeй нa тeлeвизop. Ecли вce жe
пpoизoшлo пpoливaниe жидкocти или
пoпaдaниe кaкoгo-либo пpeдмeтa внyтpь
тeлeвизopa, нeмeдлeннo выключитe
тeлeвизop и не включaйтe eгo дo тex пop,
пoкa eгo нe пpoвepит квaлифициpoвaнный
мacтep.
He вcкpывaйтe кopпyc и зaднюю
кpышкy тeлeвизopa. Oбpaщaйтecь
тoлькo к квaлифициpoвaннoмy
тexничecкoмy пepcoнaлy.
He пepeкpывaйтe
вeнтиляционныe oтвepcтия в
тeлeвизope. Для oбecпeчeния
нopмaльнoй вeнтиляции ocтaвляйтe
вoкрyг тeлeвизopa пpocтpaнcтвo нe
мeнee 10 см c кaждoй cтopoны.
Bытиpaйтe тeлeвизop мягкoй,
cлeгкa yвлaжнeнной мaтepиeй. He
пpимeняйтe бeнзин, pacтвopитeли и
дpyгиe xимикaты для пpoтиpки
тeлeвизopa. He цapaпaйтe экpaн
тeлeвизopa. B цeляx бeзoпacнocти
вынимaйтe вилкy питaния
тeлeвизopa из poзeтки пepeд
yбopкoй.
B цeляx Baшeй бeзoпacнocти нe
пpикacaйтecь к любым
чacтям тeлeвизopa, ceтeвoмy шнypy
или aнтeннoмy кaбeлю
во врeмя гpoзы.
He пoмeщaйтe тeлeвизop в мecтax c
пoвышeннoй тeмпepaтypoй,
влaжнocтью или зaпылeннocтью. He
ycтaнaвливaйтe тeлeвизop в мecтe,
гдe oн мoжeт пoдвepгaтьcя
вoздeйcтвию мexaничecкoй
вибpaции.
Пpи oтключeнии вилки питaния
от poзeтки тянитe зa
caмy вилкy, a нe зa пpoвoд
питaния.
Bo избeжaниe oпacнocти
вoзгopaния или пopaжeния
элeктpичecким тoкoм
oбepeгaйтe тeлeвизop oт дoждя
и cыpocти.
Bo избeжaниe вoзгopaния нe
pacпoлaгaйтe вблизи
тeлeвизopa
лeгкoвocплaмeняющиecя пpeдмeты
и иcтoчники oткрытoгo oгня
(нaпpимep, cвeчи).
Cлeдитe зa тeм, чтoбы тяжeлыe
пpeдмeты нe cтaвилиcь нa шнyp
питaния, тaк кaк этo мoжeт
пpивecти его пoвpeждению.
Peкoмeндyeтcя cмaтывaть
излишнюю длинy ceтeвoгo шнypa
нa cпeциaльныe дepжaтeли нa
зaднeй кpышкe тeлeвизopa.
Oтключaйтe вилкy питaния
тeлeвизopa из poзeтки пepeд
Уcтaнaвливaйтe тeлeвизop нa
пpoчнyю, ycтoйчивую
пoдcтaвкy. He пoзвoляйтe дeтям
влeзaть нa тeлeвизop. He
cтaвьтe тeлeвизop нaбoк или
экpaнoм ввepx.
тeм, кaк пepecтaвить тeлeвизop. Пpи
пepeнocкe тeлeвизopa бyдьтe
ocтopoжны, избeгaйтe нepoвныx
пoвepxнocтeй и чpeзмepныx ycилий. B
cлучae пaдeния или пoвpeждения
тeлeвизopa нyжнo, чтoбы eгo
нeмeдлeннo пpoвepил
квaлифициpoвaнный тexничecкий
пepcoнaл.
He нaкpывaйтe вeнтиляциoнныe
отвepcтия тeлeвизopa гaзeтaми,
штopaми и т.п.
Дополнительные Меры предосторожности
• В том случае, если Ваш проекциoнный тeлeвизор попадает из холодного помещения в теплое, или если в помещении происходит резкое
изменение температуры, изображение может стать расплывчатым или на некоторых участках качество цвета может быть ухудшено.
Это связано с тем, что произошла конденсация влажности на зеркалах или линзах внутри аппарата. Перед началом пользования
проекциoнным тeлeвизорoм подождите, пока не испарится влага.
Для получения ясного изображения не подвергать экран воздействию прямого освещения или солнечных лучей. Если возможно,
•
использовать точечные источники света, направленные с потолка вниз.
• Otodpa;ehne heæofbn;holo nsodpa;ehnr b tezehne fojlolo æepnofa bpemehn æpn gkcæjyataunn bnfeo nlpv njn æepcohajƒholo
komæƒitepa n æpocmotpa æpolpammv b pe;nme 16"9 mo;et æpnbectn k æobpe;fehni knheckoæa. Bo nsde;ahne gtolo yctahobnte hnsknй
ypobehƒ kohtpacthoctn nsodpa;ehnr.
He tpnte n he kacaйtecƒ æobepxhoctn gkpaha octpvmn njn adpasnbhvmn æpefmetamn, haæpnmep, wapnkobo й pyzkoй njn otbeptkoй. Takne
•
kacahnr molyt æpnbectn k æorbjehni uapaænh ha æobepxhoctn gkpaha.
2
Page 75

Содержание
Общие правила техники безопасности......................................... 2
Общий обзор.................................................................................... 4
Подготовка к эксплуатации ....................................................... 6
Этап 1 Подготовка......................................................................... 6
Этап 2 Настройка на телевизионные станции............................ 7
Этап 3 Hactpo=ka ubeta................................................................ 9
Дополнительные функции предварительной установки .......... 10
Проверка прилагаемых принадлежностей ..................... 6
Вставка батарейки в пульт дистанционного
управления......................................................................... 6
Подключение антенны и видеомагнитофона................. 6
Выбор языка меню ............................................................ 7
Автоматическая установка каналов ............................... 8
Cbefehne Kpachvx, 3ejehvx, n Cnhnx jnhn=.................. 9
Ручная настройка программ TB .................................... 10
Tочная подстройка каналов........................................... 11
Сортировка программных позиций ................................ 11
Пропуск программных позиций ...................................... 12
Создание названия станции........................................... 12
Использование родительской блокировки................... 13
Настройка на канал временно ....................................... 13
RU
Инструкция по эксплуатации................................................... 14
Просмотр телевизионных передач ............................................. 14
Включение и выключение телевизора.......................... 14
Выбор телевизионных программ.................................... 14
Регулировка громкости................................................... 14
Управление телевизором с использованием кнопок
на телевизоре .................................................................. 14
Просмотр телетекста или входных видеосигналов ..... 15
Дополнительные удобные функции............................... 15
Регулировка и настройка телевизора с использованием меню... 16
Регулировка изображения и звука ................................ 16
Использование таймера сна........................................... 17
Телетекст ...................................................................................... 18
Функции прямого доступа............................................... 18
Подсоединение и эксплуатация дополнительной аппаратуры.... 20
Подсоединение дополнительной аппаратуры .............. 20
Выбор входнoгo сигналa.................................................. 21
Присвоение названий аудио/видео входам .................. 22
Проверка и выбор источников входных и выходных
сигналов путем использования меню ............................ 22
Дистанционное управление другой аппаратурой Sony.... 23
К Вашему сведению...................................................................... 24
Оптимальная зона просмотра ........................................ 24
Отыскание неисправностей............................................ 25
Технические характеристики ......................................... 25
3
Page 76

Общий обзор
Данный раздел сжато описывает кнопки и регуляторы на
телевизоре и на пульте дистанционного управления. Более
подробную информацию смотрите на страницах, указанных
после каждого описания.
Передняя панель телевизора
Поднимите вверх крышку на
передней панели телевизора
ознакомления с разъемами
передней панели.
Индикатор Наименование См. стр.
U Основной выключатель питания 14
u Индикатор готовности 14
PROGR +/- Программа 14
Á +/- Кнопки громкости 14
… Кнопки выбора входного сигнала 15
2 Гнездо haywhnkob 20
q 3, … 3, ≤ 3 Входные гнезда (S-видео/видео/аудио) 21
4
Кнопка автоматической настройки каналов 8
Khoæka abtomatnzecko= kohbeplehunn 9
{cxofnmoctn[
Page 77

MENU
Пульт дистанционного управления
TV
MDP2
3VTR 1
¤
0
( u)
p Pr
REC
+
˚
;
…/
8
;
´8x
´/´
a/Å
A
b
≥
MENU
¸
CH
Ú/;
PROGR
RM-862
VIDEO
+
_
?
c
Управление телевизором/
телетекстом
Управление
видеоаппаратурой
Управление телевизором/
телетекстом
Управление меню
Управление меню
Индикатор Наименование См. стр.
MENU Кнопка включения/ См. ниже.
выключения
Кнопки выбора См. ниже
Кнопка ОК (подтверждения)
Управление видеоаппаратурой
Индикатор Наименование См. стр.
VTR1/2/3, ÆepekÎ izate΃ 23
MDP видеоаппаратуры
0
( ) p Кнопки управления 23
r VIDEO u видеоаппаратурой
P
CH +/-
Без функций на данном аппарате
Pабота с телевизионныпи програмaми/
телетекстaми
Индикатор Наименование См. стр.
¤ Кнопка включения/выключения 15
приглушения звука
TV u Кнопка готовности 14
; Кнопка æepekÎ izateÎr режима 14
включения питания телевизора/
телевизионного режима
f Кнопка телетекста 15
…/y ÆepekÎizateÎ ƒ входного режима/ 15
Телетекст: Остановка страницы 18
…/ Телетекст: Кнопка раскрытия 18
информации
1,2,3,4,5,6, Цифровые кнопки 14
7,8,9 and 0
-/-- Кнопка ввода двузначного числа 14
C Кнопка прямого ввода канала 13
Á +/- Кнопка регулировки громкости 14
PROGR +/- ÆepekÎizateÎ n программ 17
R/S Телетекст: Кнопки прокрутки 18
страниц вверх/вниз
Í Кнопка pe;nma изображения 17
≥ Кнопка pe;nma звука 17
Кнопка экранной индикации 15
# Кнопка отображения времени 15
Кнопка изменения формата экрана 15
Телетекст: Кнопка предпочтительных 19
страниц
Индикатор: , , , , , , Ú/, (fjr
padotv c tejebnsopom)
Для системы меню
Используйте кнопку MENU и координатную pykortky
следующим образом.
1 Нажмите кнопку MENU для включения и выключения
меню.
2 Используйте координатную pykortky следующим
образом:
ЗЕЛЕНЫЙ: перемещение
изображения на экране
КРАСНЫЙ: уменьшение/
возвращение к
последнему пункту или
последнему меню
Если меню не
отображается:
Нажмите на красную
часть для отображения
экрана последнего меню
СИНИЙ: перемещение
изображения на экране
Действующие функции координатной рукоятки
отображаются на экране.
ЖЕЛТЫЙ:
увеличение/
продвижение к
следующему
пункту
Координатная
pykortky:
Yctahobnte ее в
нейтральное
положение для
подтверждения
выбора или
занесения в память
RU
5
Page 78

Подготовка к
эксплуатации
Этап 1 Подготовка
3
2
1
1 Проверка прилагаемых принадлежностей
Когда Вы достанете все из картонной
коробки, следует проверить, что у
Вас имеются следующие предметы:
• Пульт дистанционного
управления RM-862
• Две батарейки R6 по МЭК
2 Yctahobka батареek в пульт дистанционного
управления
3
2
1
Примечание: Всегда
помните, что
использованные
батарейки должны
быть ликвидированы
безвредным для
окружающей среды
способом.
Снять крышку
Проверить, чтобы была
правильная полярность
3 Подключение антенны и видеомагнитофона
Kaбeль c eвpopaзъeмoм (CKAPT) нe вxoдит в кoмплeкт пocтaвки.
При его использовании это опциональное подключение может улучшить качество
изображения и звука при работе с видео.
6
Если вы не пользуетесь eвpopaзъeмoм, после автоматической настройки aппapaтa
следует вручную подстроить канал видео сигнала. Для этого обратитесь к главе «Ручная
настройка пpoгpaмм ТВ». Также обратитесь к инструкции пo экcплyaтaции Вашего видео
для поиска канала сигнала видеомагнитофона.
Page 79

Этап 2 Настройка на телевизионные
станции
3
2
1
3VTR 1
¤
0
( u)
p Pr
REC
+
˚
;
…/
8
;
´8x
´/´
a/Å
A
b
≥
MENU
¸
TV
MDP2
VIDEO
+
CH
_
?
Ú/;
c
PROGR
1 Выбор языка меню
Используя эту функцию, выберите язык экрана меню.
Выберите также страну, в которой Вы будете использовать
телевизор. Каналы выбранной таким способом страны
автоматически займут верхние позиции во время
автоматической предварительной установки.
1 Нажмите выключатель питания на телевизоре. Если на
телевизоре высвечивается индикатор готовности U,
нажмите кнопку u или цифровую кнопку на пульте
дистанционного управления ;.
2 Нажмите кнопку MENU на пульте дистанционного
управления.
Появится языковое меню LANGUAGE.
3 Ha;mnte ha cnhii nÎn seÎehyi zactƒ koopfnhatho=
pykortkn для выбора языка. Нажмите координатную
pykortky для подтверждения Вашего выбора.
4 Нажмите кнопку MENU для возвращения к обычному
телевизионному изображению.
LANGUAGE
RU
RM-862
7
Page 80

3VTR 1
AÇÚoÔoËcÍ
PyäÌaÓ
HaÁÇ. AV ÇxoÀoÇ
CopÚËpoÇÍa
ÂaçËÚa
üÁêÍ
KoÌÇepÖeÌáËÓ
HACTPOâKA
6 D/K
CàCT èP
C26
KAH
- - - - -
HAÂB
ABTOèOàCK
¤
0
( u)
p Pr
REC
+
˚
;
…/
8
;
´8x
´/´
a/Å
A
b
≥
MENU
¸
TV
MDP2
2 Автоматическая настройка
каналов
VIDEO
CH
Ú/;
PROGR
RM-862
+
_
?
c
При помощи этой функции телевизор может
автоматически отыскивать и заносить в память до 100
различных номеров каналов.
Если Вы предпочитаете настраивать его вручную, см.
функцию меню “Предварительная установка каналов
вручную” на стр. 10.
1 Нажмите кнопку питания U на панели телевизора.
2 Нажмите кнопку на панели телевизора и держите ее
нажатой до тех пор, пока на экране не появится меню и
начнется поиск каналов.
После того, как в память записаны все имеющиеся каналы,
на экране появляется обычное телевизионное
изображение.
Abtomatnzeckar yctahobka kahajob c
æomoåƒi æyjƒta fnctahunohholo yæpabjehnr
1 Нажмите кнопку MENU.
2 Наклоните ручку в сторону синего или зеленого цвета так,
чтобы выбрать в экранном меню символ , а затем
наклоните ручку в сторону желтого цвета.
3 Наклоните ручку в сторону синего или зеленого цвета,
чтобы выбрать пункт “Автопоиск“.
4 Haклоните ручку в сторону желтого цвета и удеpживaйтe
дo пoявлeния aвтомaтичecкoгo меню и нaчaлa aвтопoиcкa.
После того, как закончится настройка всех имеющихся
каналов, на экране появится обычное изображение.
Примечания
• Вы можете
сгруппировать
программные
позиции, так, чтобы
они появились на
экране в жeлаемом
порядке.
“Сортировка
программных
позиций” на стр.11.
• Для остановки
автоматической
предварительной
установки каналов
Нажмите кнопку
MENU на пульте
дистанционного
управления.
8
Page 81

Этап 3 Hactpo=ka ubeta
AÇÚoÔoËcÍ
PyäÌaÓ
HaÁÇ. AV ÇxoÀoÇ
CopÚËpoÇÍa
ÂaçËÚa
üÁêÍ
KoÌÇepÖeÌáËÓ
HACTPOâKA
3
1
3VTR 1
¤
0
( u)
p Pr
REC
+
˚
;
…/
8
;
´8x
´/´
a/Å
A
b
≥
MENU
¸
2
TV
MDP2
VIDEO
+
CH
_
?
Ú/;
c
PROGR
RM-862
Cbefehne Kpachvx, 3ejehvx, n
Cnhnx jnhn=
1 Ha;mnte khoæky ha tejebnsope.
2 Qyhkunr abtomatnzecko= kohbeplehunn {cxofnmoctn[
padotaet b tezehnn 30-tn cekyhf.
Ecjn qyhkunr abtomatnzecko=
‘kohbeplehunr’ padotaet heæpabnjƒho
Bvdepnte ‘kohbeplehunr’ ns mehi ‘HACTPO+KA’ fjr
hactpo=kn ubetobo= pelnctpaunn
1 Ha;mnte khoæky MENU.
2 Haæpabƒte f;o=ctnk ha Cnhn= njn 3ejehv= fjr bvdopa
cnmboja , satem haæpabƒte f;o=ctnk ha :ejtv=.
Æorbntcr mehi HACTPO+KA.
3 Haæpabƒte f;o=ctnk ha Cnhn= njn 3ejhv= fjr bvdopa
‘kohbeplehunr’, satem haæpabƒte f;o=ctnk ha :ejtv=.
Æorbntcr mehi ‘kohbeplehunr’.
4 Haæpabƒte f;o=ctnk ha Cnhn= njn 3ejehv= fjr bvdopa
‘jnhnr’ {beptnkajƒve n lopnsohtaæƒhve jnhnn b kpachom n
cnhem[, kotopyi Bv xotejn dv otpelyjnpobatƒ.
Ha;mnte ha f;o=ctnk fjr æoftbep;fehnr bvdopa.
: kpachar beptnkajƒhar jnhnr {jebar/æpabar hactpo=ka[
: kpachar lopnsohtajƒhar jnhnr {bepxhrr/hn;hrr
hactpo=ka[
: cnhrr beptnkajƒhar jnhnr {jebar/æpabar hactpo=ka[
: cnhrr lopnsohtajƒhar jnhnr {bepxhrr/hn;hrr
hactpo=ka[
Hactpanbaemar jnhnr dyfet bvdpaha.
5 Haæpabƒte f;o=ctnk ha Cnhn= njn 3ejehv= fjr cbefehnr
bvdpahho= jnhnn c sejeho= b uehtpe. Ha;mnte ha f;o=ctnk
fjr æoftbep;fehnr bvdopa.
6 Æobtopnte æyhktv 4 n 5 fjr hactpo=kn fpylnx jnhn=, fo tex
æop, æoka æepekpvbaiwne fpyl fpyla jnhnn he oqopmrtcr b
dejv= kpect.
7 Ha;mnte khoæky MENU fjr bocctahobjehnr odvzholo
tejebnsnohholo nsodpa;ehnr.
RU
Æpnmezahne"
Qyhkunr abtomatnzecko=
kohbeplehunn
{cxofnmoctn[
:
• Æpn otcytctbnn
bxofholo cnlhaja.
• Kolfa bxofho= cnlhaj
cjnwkom cjadv=.
• Kolfa ha gkpah
bosfe=ctbyit æprmve
cojhezhve jyzn djnkn.
• Kolfa Bv
æpocmatpnbaete
æepefazy b cncteme
tejetekct.
• Kolfa æpolpammv b
pe;nme 16"9.
9
Page 82

Дополнительные функции
AÇÚoÔoËcÍ
PyäÌaÓ
HaÁÇ. AV ÇxoÀoÇ
CopÚËpoÇÍa
ÂaçËÚa
üÁêÍ
KoÌÇepÖeÌáËÓ
HACTPOâKA
0
1
2
3
4
5
6
7
8
9
D/K
D/K
D/K
D/K
D/K
D/K
D/K
D/K
D/K
D/K
CàCTèP
C29
C31
C32
C36
C37
C40
C41
C44
C49
C52
KAH
- - - - -
- - - - -
- - - - -
- - - - -
- - - - -
- - - - -
- - - - -
- - - - -
- - - - -
- - - - -
HAÂB
BKã
BKã
BKã
BKã
BKã
BKã
BKã
BKã
BKã
BKã
Aèó
PìóHAü HACTPOâKA
предварительной установки
1
РУЧНАЯ
¤
0
p Pr
˚
8
;
´/´
a/Å
A
b
≥
¸
10
3VTR 1
( u)
REC
+
;
…/
´8x
MENU
3
Pучная настройка программ тв
2
Используя эту функцию, Вы можете выполнять
предварительную установку каналов один за другим на
разные программные позиции. Это также удобно для
назначения программных номеров на источники
видеосигналов.
1 Нажмите кнопку MENU.
2 Ha;mnte ha cnhii nÎ n seÎehyi zactƒ koopfnhatho=
pykortkn чтобы выбрать символ на экране меню.
Нажмите на желтую часть для подтверждения выбора.
3 Ha;mnte ha cnhii nÎ n seÎehyi zactƒ koopfnhatho=
pykortkn “Ручная”. Нажмите на желтую часть для
подтверждения Вашего выбора. .
4 Нажмите на синюю или зеленую часть, чтобы выбрать
программную позицию (ПР), на которую Вы хотите
выполнить предварительную установку канала. Нажмите
на желтую часть для подтверждения.
5 Нажмите на синюю или зеленую часть, чтобы выбрать
систему телевизионного вещания (СИСТ) (B/G для стран
Западной Европы, D/K для стран Восточной Европы) или
для внешнего источника видеосигнала (AV1, AV2, AV3, YC2,
YC3, RGB). Нажмите на желтую часть для подтверждения.
TV
MDP2
VIDEO
+
CH
_
?
Ú/;
c
PROGR
RM-862
6 Нажмите на синюю или зеленую часть для выбора “С” (для
каналов наземного вещания) или “S” (для каналов
кабельного телевидения). Нажмите на желтую часть для
подтверждения.
Имеются две возможности для предварительной
установки каналов вручную:
a) Вы знаете номер канала.
Используйте, пожалуйста, метод “Прямой ввод”.
или
b) Вы не знаете номера канала.
Используйте, пожалуйста, метод “Поиск”.
7 a) Прямой ввод
Укажите первую цифру номера канала “КАН”, а затем
вторую цифру номера канала “КАН” при помощи цифровых
кнопок на пульте дистанционного управления
7 b) Поиск
Наклоняйте ручку в сторону синего или зеленого цвета,
чтобы найти следующий канал.
8 Если Вы хотите занести в память выбранный канал, то
перейдите к шагу 9. Если нет, то выберите другой канал
при помощи цифровых кнопок пульта или при помощи
ручки управления, наклоняя ее в сторону синего или
зеленого цвета и продолжая поиск.
9 Нажмите на ручку.
10 Повторите шаги 4 - 9 для настройки других каналов.
11 Нажмите кнопку MENU, чтобы вернуться к обычному
изображению.
Page 83

PYZHAR
0
1
2
3
4
5
6
7
8
9
D/K
D/K
D/K
D/K
D/K
D/K
D/K
D/K
D/K
D/K
CàCTèP
C29
C31
C32
C36
C37
C40
C41
C44
C49
C52
KAH
- - - - -
- - - - -
- - - - -
- - - - -
- - - - -
- - - - -
- - - - -
- - - - -
- - - - -
- - - - -
HAÂB
BKã
BKã
BKã
BKã
BKã
BKã
BKã
BKã
BKã
BKã
Aèó
PìóHAü HACTPOâKA
0
1
2
3
4
5
6
7
8
9
D/K
D/K
D/K
D/K
D/K
D/K
D/K
D/K
D/K
D/K
CàCTèP
C28
C29
C35
C38
C40
C42
C55
C56
C57
C58
KAH
BBC-W
VHS-2
CNN- -
- - - - MV-CH
VHS-1
- - - - 8MM
- - - - -
- - - - -
HAÂB
COPàPOBKA
AÇÚoÔoËcÍ
PyäÌaÓ
HaÁÇ. AV ÇxoÀoÇ
CopÚËpoÇÍa
ÂaçËÚa
üÁêÍ
KoÌÇepÖeÌáËÓ
HACTPOâKA
HACTPO+KA
Tочная подстройка каналов
Как правило, действует функция автоматической точной
подстройки (АПЧ).
Если изображение все же искажено, Вы можете провести
точную подстройку канала вручную и добиться лучшего
приема изображения.
1 Нажмите кнопку MENU.
2 Наклоните ручку в сторону синего или зеленого цвета так,
чтобы выбрать в экранном меню символ , a затем
наклоните ручку в сторону желтого цвета.
3 Наклоните ручку в сторону синего или зеленого цвета,
чтобы выбрать пунк “Ручная”, а затем в сторону желтого
цвета.
4 Наклоните ручку в сторону синего или зеленого цвета,
чтобы выбрать номер, соответствующий тому каналу,
который Вы хотите подстроить вручную.
5 Наклоняйте ручку в сторону желтого цвета до тех пор, пока
позиция АПЧ не изменит цвет.
6 Наклоняйте ручку в сторону синего или зеленого цвета,
чтобы пoдcтpoить частоту канала бoлee тoчнo (от -15 до
+15).
7 Нажмите на ручку.
8 Для подстройки других каналов повторяйте шаги 4 - 7.
9 Нажмите кнопку MENU, чтобы восстановить обычное
телевизионное изображение.
RU
СОРТИРОВКА
Сортировка программных
позиций
Эта функция позволяет Вам сортировать программные
позиции в желаемой последовательности.
1 Нажмите кнопку MENU.
2 Ha;mnte ha cnhii nÎ n seÎehyi zactƒ koopfnhatho=
pykortkn чтобы выбрать символ на экране меню.
Нажмите на желтую часть для подтверждения.
3 Нажмите на синюю или зеленую часть, чтобы выбрать
“Сортировка”. Нажмите на желтую часть для
подтверждения.
4 Нажмите на синюю или зеленую часть, чтобы выбрать
программную позицию канала, который Вы хотите
изменить. Нажмите координатную ручку для
подтверждения.
5 Нажмите на синюю или зеленую часть, чтобы выбрать
новую программную позицию. Нажмите координатную
ручку для подтверждения.
После этого выбранный канал hactpanbaetcr на новую
программную позицию.
6 Повторите шаги 4 и 5 для сортировки других программных
позиций.
7 Нажмите кнопку MENU для возвращения к обычному
телевизионному изображению.
11
Page 84

РУЧНАЯ
D/K
D/K
D/K
D/K
D/K
D/K
D/K
D/K
D/K
D/K
0
1
2
3
4
5
6
7
8
9
CàCTèP
C29
C31
C32
C36
C37
C40
C41
C44
C49
C52
KAH
- - - - -
- - - - -
- - - - -
- - - - A - - - -
- - - - -
- - - - -
- - - - -
- - - - -
- - - - -
HAÂB
BKã
BKã
BKã
BKã
BKã
BKã
BKã
BKã
BKã
BKã
Aèó
PìóHAü HACTPOâKA
D/K
D/K
D/K
D/K
- - D/K
D/K
D/K
D/K
D/K
0
1
2
3
4
5
6
7
8
9
CàCTèP
C29
C31
C32
C36
C37
C40
C41
C44
C49
C52
KAH
- - - - -
- - - - -
- - - - -
- - - - -
- - - - -
- - - - -
- - - - -
- - - - -
- - - - -
- - - - -
HAÂB
BKã
BKã
BKã
BKã
BKã
BKã
BKã
BKã
BKã
BKã
Aèó
PìóHAü HACTPOâKA
Пропуск программных позиций
Эта функция позволяет Вам пропускать не используемые
программные позиции при выбирании их с помощью кнопок
PROGR +/–. Однако, используя цифровые кнопки, Вы все
же можете выбрать пропущенную программную позицию.
1 Нажмите кнопку MENU.
2 Ha;mnte ha cnhii nÎ n seÎehyi zactƒ koopfnhatho=
pykortkn чтобы выбрать символ на экране меню.
Нажмите на желтую часть для подтверждения.
3 Нажмите на синюю или зеленую часть, чтобы выбрать
функцию “Ручная”. Нажмите на желтую часть для
подтвержения.
4 Нажмите на синюю или зеленую часть, чтобы выбрать
программную позицию, которую Вы желаете пропустить.
Нажмите на желтую часть для подтверждения.
5 Нажмите на синюю или зеленую часть, чтобы выбрать “---”
в позиции СИСТ. Нажмите координатную pykortky для
подтверждения.
6 Повторите действия пунктов 4 и 5 для пропуска других
программных позиций.
7 Нажмите кнопку MENU для возврата к обычному
телевидению.
РУЧНАЯ
12
Создание названия станции
Обычно каналы маркируются во время предварительной
установки. Однако, Вы можете создать индивидуальное
название канала или источника видеосигнала, используя
пять знаков.
1 Нажмите кнопку MENU.
2 Ha;mnte ha cnhii nÎ n seÎehyi zactƒ koopfnhatho=
pykortkn чтобы выбрать символ на экране меню.
Нажмите на желтую часть для подтверждения.
3 Нажмите на синюю или зеленую часть, чтобы выбрать
функцию “Ручная”. Нажмите на желтую часть для
подтверждения.
4 Нажмите на синюю или зеленую часть, чтобы выбрать
программную позицию для канала, который Вы хотите
пометить. Нажимайте повторно на желтую часть, пока ярко
не высветится первый элемент позиции НАЗВ.
5 Нажмите на синюю или зеленую часть, чтобы выбрать
букву или цифру (для пустого места выбирайте “-”).
Нажмите на желтую часть для подтверждения. Выберите
другие четыре буквы таким же способом.
6 После выбора всех букв нажмите координатную pykortky.
7 Повторите действия пунктов с 4 по 6 для маркировки
других каналов или источников видеосигналов.
8 Нажмите кнопку MENU для возврата к обычному
телевидению.
Page 85

3AœNTA
AÇÚoÔoËcÍ
PyäÌaÓ
HaÁÇ. AV ÇxoÀoÇ
CopÚËpoÇÍa
ÂaçËÚa
üÁêÍ
KoÌÇepÖeÌáËÓ
HACTPOâKA
0
1
2
3
4
5
6
7
8
9
D/K
D/K
D/K
D/K
D/K
D/K
D/K
D/K
D/K
D/K
CàCTèP
C28
C29
C35
C38
C40
C42
C55
C56
C57
C58
KAH
BBC-W
VHS-2
CNN- -
- - - - MV-CH
VHS-1
- - - - 8MM
- - - - -
- - - - -
HAÂB
ÂAôàTA
3
2
C38 - - - - -
1
C35 CNN
èP KAH HAÂB
0
C29 VHS-2
C28 BBC-W
D/K
D/K
CàCT
D/K
D/K
Использование родительской
блокировки
Если Вы попытаетесь
выбрата программу,
которая
заблокирована,
Ha æyctom gkpahe
телеьизора æorbjretcr
cnmboj .
Для разблокировки
Выберите канал,
который нужно
разблокировать в меню
“3AœNTA”. Нажмите
координатную pykortky.
Символ исчезнет.
TV
MDP2
3VTR 1
¤
+
MENU
REC
…/
VIDEO
CH
Ú/;
PROGR
RM-862
+
_
?
c
0
( u)
p Pr
˚
;
8
;
´8x
´/´
a/Å
A
b
≥
¸
Эта функция позволяет Вам предотвращать просмотр
детьми нежелательных программ.
1 Нажмите кнопку MENU.
2 Ha;mnte ha cnhii nÎ n seÎehyi zactƒ koopfnhatho=
pykortkn для выбора символа на экране меню. Нажмите
на желтую часть для подтверждения.
3 Нажмите на синюю или зеленую часть, чтобы выбрать
функцию “3AœNTA”. Нажмите на желтую часть для
подтверждения.
4 Нажмите на зеленую или синюю часть, чтобы выбрать канал,
который Вы хотите заблокировать. Нажмите координатную
pykortky для подтверждения.
На экране появится символ перед программной позицией,
означая, что этот канал сейчас заблокирован.
5 Повторите действия пункта 4, чтобы заблокировать
остальные каналы.
6 Нажмите кнопку MENU для возврата к обычному
телевизионному изображению.
Настройка на канал временно
Вы можете произвести настройку на канал временно, даже,
если он не был предварительно установлен.
1 Нажмите кнопку С на пульте дистанционного управления.
Для каналов кабельного телевидения нажмите кнопку С
дважды.
На экране появится индикация “С” (для каналов кабельного
телевидения индикация “S”).
2 Введите двузначный номер канала, используя цифровые
кнопки (например, для канала 4, нажмите сначала 0, а затем
4).
Появится номер канала. Однако канал не будет занесен в
память.
RU
C - -
Æpnmezahne
Æocje ocyåectbjehnr
bpemehho= hactpo=kn
kahajob Bv he mo;etc
bo=tn b pe;nm pyzho=
yctahobkn. Fjr
coxpahehnr kahaja
æepekjizntcƒ ha fpyli
æpolpammy n odpatntecƒ
k pasfejy ‘Pyzhar
Yctahobka Kahajob’ ha
ctpahnue 10.
13
Page 86

Инструкция по
эксплуатации
Просмотр телевизионных передач
Данный раздел объясняет основные функции, которые Вы
можете использовать, когда будете смотреть телевизор.
Большинство операций выполняется с помощью пульта
дистанционного управления.
Включение и выключение
телевизора
TV
MDP2
3VTR 1
¤
0
( u)
p Pr
REC
+
˚
;
…/
8
;
´8x
´/´
a/Å
A
b
≥
MENU
¸
VIDEO
CH
Ú/;
PROGR
+
_
?
c
Включение
Нажать U на телевизоре.
Временное выключение
Нажать u на пульте дистанционного управления.
Телевизор войдет в режим готовности, и индикатор
готовности на передней панели телевизора высветится
красным цветом.
Для включения телевизора снова
Нажать ;, PROGR +/– или одну из цифровых кнопок на
пульте дистанционного управления.
Æojhoe Bыключение
Нажать U на телевизоре.
Для экономии энергии рекомендуется отключать телевизор
полностью, если он не используется.
RM-862
Если изображение не
появляется, когда Вы
нажимаете U на
телевизоре и если
высвечивается
индикатор готовности
на телевизоре, то
телевизор находится
в режиме готовности.
Нажать ;, или одну из
цифровых кнопок для
включения питания.
Выбор телевизионных
программ
Нажать PROGR +/– или нажать цифровые кнопки.
Для выбора двузначного номера
Нажать -/--, а затем цифры.
Например, если Вы хотите выбрать 23, то нажать -/--, 2 и 3.
Регулировка громкости
Нажимать ¸ +/–.
Управление телевизором с
использованием кнопок на
телевизоре
Для выбора номера программы следует нажимать кнопки
PROGR +/–.
Для регулировки громкости следует нажимать кнопки ¸ +/– .
Для выбора изображения входного видеосигнала нажмите
кнопку ….
14
Page 87

Что касается
подробностей
управления
телетекстом, см. стр. 18.
Что касается
подробностей
относительно
изображения входного
видеосигнала, см. стр.
21.
TV
MDP2
3VTR 1
¤
+
MENU
REC
…/
VIDEO
CH
Ú/;
PROGR
+
_
?
c
0
( u)
p Pr
˚
;
8
;
´8x
´/´
a/Å
A
b
≥
¸
Просмотр телетекста или
входных видеосигналов
Просмотр телетекста
1 Нажать f для просмотра телетекста.
2 Для управления телетекстом ввести трехзначный номер
страницы.
Для быстрого управления текстом нажать координатную
pykortky на цветную метку, соответствующую меню цветной
кодировки.
Для обеих операций нажать R (PAGE + ) для следующей
страницы или S (PAGE – ) для предыдущей страницы.
3 Для возврата к нормальному телевизионному изображению
нажать ; .
Просмотр изображения от входных
видеосигналов
1 Нажимать повторно кнопку … до тех пор, пока не появится
изображение от желаемого входного видеосигнала.
2 Для возврата к нормальному телевизионному изображению
нажать ;.
RU
Дополнительные удобные
функции
Отображение индикаций на экране
Нажмите кнопку T для отображения индикаций.
Нажмите кнопку еще раз, чтобы индикации исчезли.
RM-862
Приглушение звука
Нажать ¤.
Для восстановления нормального звука снова нажать ¤.
Отображение времени
Нажать #. Данная функция доступна только, когда
передается телетекст.
Для того, чтобы индикация времени исчезла, снова нажать #.
Отображение таблицы программ
Ha;mnte koopfnhathathyi pykortky. Ha;mnte ha cnhii nÎn
seÎehyi zactƒ koopfnhatho= pykortkn для выбора
программы, затем нажмите координатную pykortky для
подтверждения.
Нажать ОК. С левой стороны телевизионного экрана
отобразится таблица программ.
Для того, чтобы таблица программ исчезла, следует нажать
MENU.
Изменение формата экрана
Fjr æpocmotpa æpolpamm b qopmate 16"9 ha;mnte .
BBC
1
SAT
2
TV5
3
C02
4
C15
5
RTL
6
SKY
7
S34
8
AV1
9
MTV
10
15
Page 88

Регулировка и настройка
KoÌÚpacÚ
CÚaÌÀapÚ
îopÏaÚ
- - >
4:3
àÂOÅPAÜEHàE
PeÊËÏ ËÁoÄpaÊeÌËÓ
üpÍocÚë
HacêçeÌÌocÚë
óeÚÍocÚë
ñÇeÚoÇoÈ ÚoÌ
èoÎëÁ.
PEÜàM àEOÅPAÜEHàü
PeÊËÏ ËÁoÄpaÊeÌËÓ
PeÊËÏ ÁÇyÍa
ÅaÎaÌc
CÚaÌÀapÚ
ÑÇoÈÌoÈ ÁÇyÍ
KoppeÍäËÓ
2 ÉpoÏÍÁÇyÍ
2 ÑÇoÈÌoÈ ÁÇyÍ
- - > èoÎëÁ
ÇêÍ
ÏoÌo
0
ÏoÌo
ÂBìK
ÉpoÏÍoÖoÇopËÚeÎË
ocÌoÇÌÈ
èopcÚpaÌcÚÇeÌÌêÈ
ÇêÄop peÊËÏa
ÇepxÌËe äacÚoÚê
HËÊÌËe äacÚoÚê
èoÎëÁ.
PEÜàM ÂBìKA
телевизора с использованием
меню
ИЗОБРАЖЕНИE
ЗВУК
TV
MDP2
3VTR 1
¤
+
MENU
REC
…/
VIDEO
CH
Ú/;
PROGR
+
_
?
c
0
( u)
p Pr
˚
;
8
;
´8x
´/´
a/Å
A
b
≥
¸
Регулировка изображения и
звука
Несмотря на то, что изображение и звук отрегулированы на
заводе, Вы можете отрегулировать их по своему
собственному вкусу. Вы также можете выбирать двойное
звучание (двуязычных) программ, когда они передаются,
или отрегулировать звук для прослушивания с помощью
haywhnkob.
1 Нажать MENU и выбрать индикатор для регулировки
изображения или регулятор звука ≥, а затем нажать ОК.
Появится меню ИЗОБРАЖЕНИE или ЗВУК.
2 Нажмите на синюю или зеленую часть для выбора
желаемого пункта.
Нажмите на желтую часть для подтверждения.
3 Нажмите на красную или желтую часть для регулировки
выбранного пункта.
Нажмите координатную pykortky для подтверждения.
4 Повторить пункты 2 и 3 для регулировки других установок.
5 Нажать MENU для возврата к телевизионному
изображению.
Примечания
• Регулировка цветного
тона функционирует
только для систем
цветного
телевидения NTSC.
Примечание
относительно LINE
OUT
Ypobehƒ cnlhaha c
lhesfa ≤ {cnmboÎ - cm.
ahlÎ. opnlnhaÎ[ ha
safhe= æaheÎn
cootbetctbyet
yctahobkam lpomkoctn b
haywhnkax.
При просмотре
источника
видеосигнала со
стереофоническим
звуком
Вы можете выбирать
разные комбинации
двойного звука для
изменения звучания.
RM-862
Эффект каждой регулировки
ИЗОБРАЖЕНИE Эффект
Режим изображения Польз. y Игра y Кино y Спорт y Репортаж
В режиме “Польз.” Вы можете следующим образом
устанавливать Яркость, Насыщенность, Четкость и
Цветовой тон (только для сигналов NTSC):
1 Наклоните ручку в сторону синего или зеленого цвета,
чтобы выбрать нужный пункт, а затем в сторону желтого
цвета.
2 Наклоните ручку в сторону красного или желтого цвета,
чтобы изменить соответствующий параметр, затем
нажмите на ручку.
3 Наклоните ручку в сторону красного цвета, чтобы
вернуться в меню ИЗОБРАЖЕНИЕ.
Контраст Слабее Сильнее
Стандарт Установка регулировок изображения на предварительно
установленные на заводе уровни.
Qopma 4:3: Обычный qopmat
16:9: Переxод в широкоэкранный режим и обратно.
16
Page 89

ЗВУК Эффект
Режим звука Выбор между разными звуковыми эффектами
Польз y Пок y Джаз y Роп
R R
В режиме “Польз.” Вы можете следующим образом настравать
верхние и нижние частоты:
1 Наклоните ручку в сторону синего или зеленого цвета, чтобы
выбрать нужный пункт, а затем в сторону желтого цвета.
2 Наклоните ручку в сторону красного или желтого цвета, чтобы
изменить соответствующий параметр, затем нажмите на ручку.
3 Наклоните ручку в сторону красного цвета, чтобы вернуться в
меню ЗВУК.
Баланс Левее Правее
Cтандарт Возвращает параметры звука, установленные при изготовлении
Æpoctpahctbehhv= Вык: обычный режим
Вкл: специальный акустический эффект
Двойной эвук А: канал 1 В: канал 2 Стерео t Моно Выбранный режим
Коррекция Устанавливает уровень громкости для отдельных каналов
–12 +12
2 Громкость Слабее Сильнее
2 Двойной звук А: канал 1 t В: канал 2
Стерео t Моно
Lpomkolobopntejn Основнoй: звук от телевизора
Uентр bxof: звук от внешнего усилителя
ТАЙМЕР
Для выключения
таймера сна
Выберите “Вык” в
пункте 3.
Для проверки
оставшегося
времени
Нажмите .
Для возврата к
нормальному
телевизионному
изображению
Нажмите MENU.
Быстрое изменение режимов
Вы можете быстро изменить “Режим звука” или “Режим
изображения” без входа в меню “ИЗОБРАЖЕНИЕ” или
“ЗВУК”.
1 Нажмите кнопку Í для изображения или кнопку ≥ для
звука.
2 Наклоните ручку в сторону синего или зеленого цвета,
чтобы выбрать нужный режим.
3 Cнова нажмите кнопку Í или ≥ чтобы восстановить на
экране обычное изображение.
Использование таймера сна
Вы можете выбрать период времени, после которого
телевизор автоматически будет переключаться в режим
готовности.
1 Нажмите кнопку MENU.
2 Ha;mnte ha cnhii nÎn seÎehyi zactƒ koopfnhatho=
pykortkn чтобы выбрать символ t на экране меню.
Нажмите на желтую часть для подтверждения.
3 Нажмите на желтую часть. Нажмите на kpachi или
;ejtyi часть для выбора времени.
Период времени (в минутах) изменяется следующим
образом:
выкл. y0:30y1:00y1:30..........3:30y4:00
R R
RU
TAâMEP
TaÈÏep cÌa ÇêÍÎ.
4 После выбора периода нажмите координатную ручку для
подтверждения.
За одну минуту до перехода телевизора в режим
готовности на экране телевизора будет отображено
æpefyæpe;fehne.
17
Page 90

Телетекст
TV
MDP2
3VTR 1
¤
+
MENU
REC
…/
VIDEO
CH
Ú/;
PROGR
RM-862
+
_
?
1 Выбрать телевизионный канал, транслирующий
2 Нажать f для включения телетекста.
c
3 Использовать цифровые кнопки для ввода трех цифр
0
( u)
p Pr
˚
;
8
;
´8x
´/´
a/Å
A
b
≥
¸
Телевизионные станции передают информационные услуги,
называемые телетекстом, через каналы вещательного
телевидения. Услуги телетекста позволяют Вам принимать
страницы различной информации, как например прогноз
погоды или новости в любое желаемое Вами время.
Функции прямого доступа
Включение и выключение телетекста
телетекстовое вещание, которое Вы хотите посмотреть.
Стараница телетекста будет отображена (обычно с
индексным указателем).
Если телетекстового вещания нет, то “Тeкста нет”
отобразится на информационной строке вверху экрана.
выбираемого номера страницы.
Если Вы сделали ошибку, то нажмите любые три цифры.
Затем повторно введите правильный номер страницы.
Примечание
Ошибки телетекста
могут произойти при
слабых вещательных
сигналах.
Для выключения телетекста
Нажать ;.
Доступ к следующей или предыдущей странице
Нажать R (PAGE+) или S (PAGE–).
Появится следующая или предыдущая страница.
Наложение отображения телетекста на телевизионную
программу
• Нажмите один раз кнопку f для получения только
телетекста.
• Нажмите кнопку f дважды для получения смешанного
режима.
Получится наложение обычного телевизионного экрана и
экрана телетекста.
• Нажать f для восстановления нормального приема
телетекста.
Предохранение страницы телетекста от
обновления свежими новостями
• Нажать w.
Индикатор “w” отобразится на информационной строке.
• Для отмены нажмите снова ту же кнопку.
18
Раскрытие засекреченной информации
(например, для викторины)
Иногда на страницах телетекста содержится секретная
информация, как, например, ответы для викторины. В
Вашем распоряжении будет право выбора раскрытия
информации.
Нажать C. Нажать еще раз для отмены.
Page 91

Cистема любимых страниц
Для каждой службы телетекста Вы можете занести в
память до четырех номеров Ваших излюбленных страниц
телетекста. Tаким образом Вы получите быстрый доступ к
тем страницам, которыми часто пользуетесь.
Запись в память номеров страниц
1 При помощи цифровых кнопок выберите номер страницы,
который хотите занести в память.
2 Дважды нажмите кнопку .
В нижней части экрана мерцают цветные подсказки.
3 Наклoните ручку в стopoну жeлaeмoгo цвeтa, чтобы занести
номер выбранной страницы в память. Tеперь номер этой
страницы занесен в память и ассоциируется с
соответствующим цветом.
Повторите шаги 1 - 3 для занесения в память номеров трех
остальных страниц.
Вывод любимых страниц на экран
1 Нажмите кнопку .
2 Наклоните ручку в сторону цвета, соответствующего
нужной странице.
Не забудьте нажать кнопку , в противном случае будут
работать обычные функции системы Fastext.
RU
Примечание
Работа с
быстродоступным
текстом возможна
только тогда, когда
телевещательная
станция передает
сигналы
быстродоступного
текста.
Использование функции быстрого доступа к
тексту
С помощью функции быстрого доступа к тексту Вы можете
получить доступ к страницам одним нажатием кнопки.
Когда передается страница быстродоступного текста, меню
с цветовым кодом появится в нижней части экрана. Цвета
этого меню соответствуют красной, зеленой, желтой и
синей кнопкам на пульте дистанционного управления.
Нажмите координатную pykortky на цветную метку,
которая соответствует меню цветовой кодировки. Через
несколько секунд страница будет отображена.
19
Page 92

Подсоединение и эксплуатация
дополнительной аппаратуры
Подсоединение дополнительной аппаратуры
Вы можете подсоединить дополнительную аудио-видеоаппаратуру к Вашему телевизору,
как например КВМ, плейер видеодисков и стереосистему.
Для подсоединения
КВМ с использованием
гнезда ))))
Соединить антенный
выход КВМ с антенным
гнездом ) телевизора.
Рекомендуется настроить
видеосигнал на номер
программы “0”.
Подробности смотрите в
разделе
“Предварительная
установка каналов
вручную” на стр. 10.
В случае искажения
изображения или звука
Удалить КВМ от
телевизора.
1
3
Входной сигнал S/видео
(входной сигнал Y/C)
Видеосигналы могут
разделяться на сигналы Y
(освещенности или
яркости) и С (цветности).
Разделение сигналов Y и
С предотвращают их
интерференцию друг с
другом и, таким образом,
улучшают качество
изображения (особенно
яркость). Данный
телевизор оснащен 3
входными гнездами Sвидео, через которые
прямо могут поступать
такие разделенные
сигналы.
При подсоединении
монофонического КВМ
Выполнить соединение
только между белыми
гнездами ≤ и на
телевизоре и на КВМ.
Æpnmezahne"
Æpn æofkjizehnn
aææapatypv b pas∂emv
q3/…3/≤3 ha æepefhe=
æaæejn njn b pas∂em :3/
q3 ha safhe= æahejn,
otkjiznte jntahne
odopyfobahnr, he
используемого b fahhv=
momeht.
PROGR
C
3
3/
R/D/D/D-L/G/S/I
2/
1
2
3 3
MONO
3
L/G/S/I R/D/D/D
R
3
24
5
Принимаемый входной сигнал Доступный выходной сигнал
1 Обычный сигнал аудио/видео и сигнал Сигнал видео/аудио от телевизионного тюнера
основных цветов изображения RGB
2 Обычный сигнал аудио/видео и сигнал Сигнал видео/аудио от выбранного источника
S-видео
3 Обычный сигнал аудио/видео и сигнал Нет выходных сигналов
S-видео Bnfeo/Ayfno ns bvdpahholo nctozhnka cnlhaja
Обычный сигнал аудио/видео и сигнал {nctozhnk bvxofholo cnlhaja cootbetctbyet
S-видео pas∂emy :2/ q 2)
4 Нет входных сигналов Аудиосигнал
5 Входной сигнал акустической системы Нет выходного сигала
Установите “Громкоговорители” в меню
ЗВУК в положение “Центр bxof”.
20
Page 93

Выбор входного
сигнала с помощью
кнопки PROGR +/– или
цифровых кнопок
Вы можете выполнить
предварительную
установку источников
входных видеосигналов
на программные
позиции, так, что Вы
сможете выбирать их с
помощью кнопки
PROGR +/– или
цифровых кнопок.
Подробности смотрите
в разделе
“Предварительная
установка каналов
вручную” на стр. 10.
TV
MDP2
3VTR 1
¤
+
REC
…/
MENU
VIDEO
CH
Ú/;
PROGR
+
_
?
c
0
( u)
p Pr
˚
;
8
;
´8x
´/´
a/Å
A
b
≥
¸
Выбор входнoгo сигналa
Gtot pasfej oæncvbaet, kak æpocmatpnbatƒ bxofråee
bnfeo nsodpa;ehne {ot nctozhnka bnfeo cnlhaja,
æofkjizehholo k Bawemy tejebnsopy[ æpn æomoån khoæok
æprmolo foctyæa.
Выбор входного сигнала
Нажимайте повторно кнопку … для выбора источника
входного сигнала.
Появится индикатор выбранного источника входного
сигнала.
Для возвращения к нормальному телевизионному
изображению
Нажмите кнопку ;.
Режимы входных сигналов
Индикатор Входной сигнал
… 1 Входной сигнал аудио/видео через гнездо W 1
W Входной сигнал аудио/RGB через гнездо W 1
… 2 Входной сигнал аудио/видео через гнездо : 2/ q 2
q2 Входной сигнал аудио/S-видео через гнездо : 2/ q 2
… 3 Ayfno/Bnfeo bxofnt zepes pas∂emv … 3 n ≤ 3 ha æepefhe= æahejn njn
zepes pas∂em : 3/q 3 ha safhe= æahejn
q3 Входной сигнал S-видео через гнездо q 3 разъем (4-штырьковый разъем)
на передней панели njn zepes : 3/ q 3 ha safhe= æahejn
… 1
RU
RM-862
21
Page 94

HA3B. AV
AÇÚoÔoËcÍ
PyäÌaÓ
HaÁÇ. AV ÇxoÀoÇ
CopÚËpoÇÍa
ÂaçËÚa
üÁêÍ
KoÌÇepÖeÌáËÓ
HACTPOâKA
AV1
RGB
AV2
YC2
AV3
YC3
BXOÑ
- - - - -
- - - - -
- - - - -
- - - - -
- - - - -
- - - - -
HAÂB
HAÂB. AV BXOÑOB
BXOFB
Æpncboehne hasbahn= ayfno/
bnfeo bxofam
Используя эту функцию, Вы можете выполнить
предварительную установку желаемого источника
входного видеосигнала (например, сигнала основных
цветов изображения RGB, W 1) в соответствии с входным
сигналом аудио/видео (AV 1 W). В данном случае
подсоединенный КВМ автоматически переключится на
сигнал RGB.
1 Нажмите кнопку MENU.
2 Ha;mnte ha cnhii nÎ n seÎehyi zactƒ koopfnhatho=
pykortkn, чтобы выбрать символ на экране меню.
Нажмите на желтую часть для подтверждения.
3 Нажмите на синюю или зеленую часть, чтобы выбрать
функцию “hasb. AV bxofob”. Нажмите на желтую часть.
4 Нажмите на синюю или зеленую часть, чтобы выбрать
желаемый входной сигнал аудио/видео. Нажмите на
желтую часть для подтверждения.
5 Для маркировки источника: Нажмите на синюю или
зеленую часть, чтобы выбрать первый знак (букву или
цифру, а для пробела “–”). Нажмите на желтую часть для
подтверждения. Выберите таким же способом четыре
других знака.
6 Æocje bbofa bcex cnmbojob ha;mnte ha pyzky.
7 Æobtopnte waln 4-6 fjr hanmehobahnr octajƒhvx bxofhvx
nctozhnkob.
8 Ha;mnte khoæky MENU, ztodv bocctahobntƒ odvzhoe
tejebnsnohhoe nsodpa;ehne.
COEFNHEHNE
BXOFB
Æpnmezahne"
Ecjn fjr bvxofholo
cnlhaja Bv bvdeoete
"AUTO", to
abtomatnzeckn b
kazectbe nctozhnka
bvxofholo cnlhaja
dyfet bvdpah
hashazehhv= nctozhnk
bxofholo cnlhaja.
22
Проверка и выбор источников
входных и выходных сигналов
путем использования меню
Вы можете отобразить меню, чтобы увидеть, какие
источники входных сигналов выбраны для телевизионного
экрана, и какой выбран источник выходного сигнала. Вы
можете также их выбрать на дисплее меню.
1 Нажмите кнопку MENU.
2 Ha;mnte ha cnhii nÎ n seÎehyi zactƒ koopfnhatho=
pykortkn, чтобы выбрать символ на экране меню.
Нажмите на желтую часть для подтверждения.
Появится меню СОЕFИНЕНИЕ ВХОFOB .
Вы можете наблюдать, какой источник выбран для
телевизора и для выходного сигнала. Если Вы хотите
выбрать входной и выходной источник сигнала на этом
меню, перейдите к следующему пункту.
3 Нажмите на синюю или зеленую часть, чтобы выбрать “На
экране” (источник входного сигнала для телевизионного
сигнала) или “Выход в” (источник выходного сигнала для :
: 2/q 2 и : 3/q 3).
Нажмите на желтую часть для подтверждения.
4 Нажмите на kpachyi или ;ejtyi часть, чтобы выбрать
желаемый источник.
Что касается подробностей относительно каждого
источника, см. таблицу на стр. 21.
5 Повторите действия пунктов с 3 по 4, чтобы выбрать
источник для других входных и выходных сигналов.
6 Нажмите кнопку MENU для возврата к обычному
телевизионному изображению.
COEÑàHEHàE BXOÑOB
ÂÍpaÌ
BêxoÀ
TV
[TV - - - - -]
[TV - - - - -]
TV
n
Page 95

TV
MDP2
3VTR 1
¤
+
REC
MENU
…/
VIDEO
+
CH
_
Ú/;
PROGR
?
c
0
( u)
p Pr
˚
;
8
;
´8x
´/´
a/Å
A
b
≥
¸
При записи
Если Вы используете
для записи кнопку r
(запись), то
обязательно нажмите
эту кнопку и ту, что
справа от нее,
одновременно.
Дистанционное управление
другой аппаратурой Sony
Вы можете использовать пульт дистанционного управления
телевизора для управления основной, дистанционноуправляемой аппаратурой Sony, такой, как: КВМ с бетакассетами, КВМ с 8-мм лентами и бытовые КВМ VHS, также
проигрыватели видеодисков.
Настройка пульта дистанционного управления на
аппаратуру
1 Установите æepekÎizateÎ ƒ VTR 1/2/3 MDP в соответствии с
аппаратурой, которой Вы хотите управлять:
VTR1: KBM с бета-кассетой
VTR2: KBM с 8-мм лентой
VTR3: Бытовой KBM VHS
MDP: Проигрыватель видеодисков
2 Используйте кнопки, указанные на рисунке, для управления
дополнительной аппаратурой.
Если Ваша видеоаппаратура функционирует с
использованием æepekÎizateÎr COMMAND MODE
установите данный æepekÎizate΃ в такое же положение,
как и æepekÎizate΃ VTR 1/2/3 MDP на пульте
дистанционного управления телевизора.
Если аппаратура не имеет определенной функции, то
соответствующая кнопка на пульте дистанционного
управления не будет работать.
RU
23
Page 96

К Вашему сведению
Оптимальная зона просмотра
Для наилучшего качества изображения постарайтесь установить
проекционный телевизор так, чтобы Вы могли смотреть на экран в
пределах показанной ниже зоны.
Зона горизонтального просмотра
2.1m (Минимальное оптимальное расстояние)
75°
75°
Зона вертикального просмотра
2.1m (Минимальное оптимальное расстояние)
27,5°
27,5°
Оптимальное положение для
просмотра
24
Оптимальное положение для просмотра
Page 97

Отыскание неисправностей
Здесь изложено несколько простых решений некоторых проблем, которые могут влиять на изображение и звук.
Проблема Решение
Нет изображения (экран темный), нет звука • Включить телевизор в сеть.
• Нажать U нa телевизоре (если индикатор u горит, то нажать кнопку ;
или номер программы на пульте дистанционного управления).
• Проверить соединение антенны.
• Проверить, включен ли выбранный источник видеосигнала.
• Выключите телевизор на 3-4 секунды, а затем снова включите его
выключателем.
Плохое изображение или нет изображения • Нажать кнопку MENU для ввода меню РЕГУЛИРОВКА
(экран темный), но звук нормальный ИЗОБРАЖЕНИЯ и отрегулировать яркость, контрастность и цвет.
Плохое качество изображения при просмотре источника • Нажимать повторно кнопку … для выбора W.
видеосигнала основных цветов изображения RGB
Хорошее изображение, но нет звука • Нажать ¸ +.
• Ydefnteƒ, zto bvdpah lpomkolobopntejƒ ‘ochobho=’ ns mehi ‘3BYK’.
• Если ¤ отображается на экране, нажать ¤.
Нет цвета для цветных программ • Нажать кнопку MENU для ввода меню РЕГУЛИРОВКА ИЗОБРАЖЕНИЯ,
выбрать пункт сброса, а затем нажать координатную pykortky для
подтверждения.
Пульт дистанционного управления не работает • Слабые батарейки.
Если проблема все еще остается, то Вам следует предоставить Ваш телевизор для технического обслуживания квалифицированным
персоналом. Никогда не открывайте корпус самостоятельно.
Технические характеристики
Телевизионная система B/G/H, D/K
Система цветного PAL/SECAM
телевидения NTSC 3.58/4.43 (VIDEO IN)
Охват каналов Смотрите “Принимаемые каналы и
индикации каналов” ниже
Размер проецируемого 41 дюйм.
изображения Приблиз. 103 см по диагонали
Гнезда
Задняя панель • Входные гнезда центральной
акустической системы, 2 гнезда
•≤ (L, R), аудиовыходы – фонические
гнезда
• W1, 21-штырьковый разъем
европейского стандарта (стандарт
CENELEC)
- входы для аудио- и видеосигналов
- входы RGB (сигнала основных цветов
изображения)
- выходы телевизионных сигналов аудио
и видео
• : 2/q 2, 21-штырьковый разъем
европейского типа
- входы для аудио- и видеосигналов
- входы для S–видео
- выходы для аудио- и видеосигналов
(выбираемые)
• : 3/q 3, 21-штырьковый разъем
европейского типа
- входы для аудио- и видеосигналов
- входы для S–видео
- Bvxof ayfno n bnfeo cnlhajob
{bosmo;hv fjr bvdopa, nctozhnk
bvxofholo cnlhaja cootbetctbyet
pas∂emy : 2/q 2)
Передняя панель • q 3, входы S-видео – 4-штырьковые по
DIN
• … 3, входы видеосигналов – фонические
гнезда
≤ 3 (L, R),
•
фонические гнездa
• 2, гнездо haywhnkob – стереофоническое
минигнездо
входы аудиосигналов –
Bvxofhar moåhoctƒ 2 x 30 Вт (музыкальная мощность)
sbyka 2 x 15 Вт (RMS)
Bxofhar moåhoctƒ 30 Вт (æpn ncæo΃sobahnn
uehtpahƒholo uehtpa΃ho= akyctnzecko=
fnhamnka cnctemv[
Потребляемая 145 Вт
мощность
Габаритные размеры Ирибл. 948 x 992 x 511 мм
Ш х В х Г
Масса Ирибл. 43 кг
Прилагаемые См. стр. 6
Принимаемые Индикация на
каналы экране
B/G/H E2..12 21..69 C02 C03 C04..C12
C21..C69
CABLE TV (1) S1..41 S01 S02..S41
CABLE TV (2) S01..S05 M1..M10 S42..S46 S01..S10
U1..U10 S11..S20
ITALY A B C D E F G H H1 C11..C69
H2 21..69
D/K R01..R12 R21..R69 C02..C12 C21..C69
CABLE TV (1) S01 S02..S41
CABLE TV (2) S42 S43..S46
CABLE TV B..Q, S21..41 S02, S03..S17,
S21..S41
Экологическая бумага - Без хлора
RU
25
Page 98

Sony Spain S. A.
Pol. Ind. Can Mitjans s/n
08232 Viladecavalls (Barcelona)
Spain Printed in Spain
Cohn Cæg=h C.A. sabof b Dapcejohe
Æoj.Kah Mntƒrhc c/h 08232
Bnjafekabajƒc, Dapcejoha,
Ncæahnr Otæezataho b Ncæahnr
Page 99

Sony España, S.A.
Printed in Spain
 Loading...