

Page 1
R
Projection TV
4-206-027-31(1)
Instruction Manual
Návod k obsluze
Kezelési útmutató
Instrukcja obsługi
GB
CZ
HU
PL
KP-41PX1K
© 2001 by Sony Corporation
Page 2
Projection TV
Thank you for choosing this Sony projection TV.
Before operating the projection TV, please read this manual thoroughly and retain
it for future reference.
Reading and Understanding this Instruction Manual:
•
Use
Getting Started
with the basic functions.
•
Use
Advanced Operati
of the projection TV set.
•
Symbols used in the manual:
if you wish to install the projection TV set and to get familiar
if you wish to know more about the additional features
Instruction Manual
GB
• I
• Important information.
• Information on a feature.
•
1,2...
• Shaded buttons on the remote control show the buttons you have to press
• Informs you of the result of the instructions.
• The process continues on the next page to get final result.
nforms you of possible hazards.
Sequence of instructions.
MENU
K
to follow the sequence of instructions.
3
Page 3
Safety Information
This set is to operate on a 220-240V
AC supply only. Take care not to
connect too many appliances to the
same power socket as this could
result in fire or electric shock.
Do not open the cabinet and the rear
cover of the TV. Refer to qualified
service personnel only.
Do not cover the
ventilation openings of the TV For
ventilation, leave a space of at least
10cm all around the set.
For environmental and safety
reasons, it is recommended that the
TV set is not left in standby mode
when not in use. Disconnect from
the mains.
For your own safety, do not touch
any part of the TV, power lead or
aerial lead during lightning storms.
Never place the TV in hot, humid or
excessively dusty places. Do not
install the TV where it may be
exposed to mechanical vibrations.
Never push objects of any kind into
the set as this could result in a fire or
electric shock. Never spill liquid of
any kind on the set. If any liquid or
solid object does fall through, do not
operate the TV. Have it checked
immediately by qualified personnel.
To prevent fire or shock hazard,
do not expose the TV to rain or
moisture.
To prevent fire, keep inflammable
objects or naked lights (eg candles)
away from the TV.
Clean the TV with a soft, lightly
dampened cloth. Do not use
benzine, thinner or any other
chemicals to clean the TV. Do not
scratch the TV screen. As a safety
precaution, unplug the TV before
cleaning it.
Place the TV on a secure stable
stand. Do not allow children to
climb on to it. Do not place the TV
on its side or face up.
Pull out the power lead by the
plug. Do not pull on the power
lead itself.
Unplug the power lead before
moving the TV. Avoid uneven
surfaces, quick steps or excessive
force. If the set has been dropped or
damaged, have it checked
immediately by qualified service
personnel.
Take care not to place heavy
objects on the power lead as this
could result in damage.
We recommend you wind any
excess lead around the holders
provided on the rear of the TV.
Do not cover the ventilation
openings of the TV with items
such as curtains or newspapers
etc.
Additional Safety Information
•After transporting the projection TV directly from a cold to a warm location, or if the room temperature has changed suddenly,
pictures may be blurred or show poor colour over portions of the picture. This is because moisture has condensed on the mirrors
or lenses inside the projection TV. Let the moisture evaporate before using the projection TV.
•To obtain a clear picture, do not expose the screen to direct illumination or direct sunlight. If possible, use spot lighting directed
down from the ceiling.
•Displaying a still picture for long periods of time, for instance, when operating a video game or personal computer and viewing a
programme in 16:9 mode, may damage the picture tube. To avoid this, keep the picture contrast level low.
•Avoid touching the screen, and take care not to scratch the surface with hard objects.
4
Safety Information
Page 4

Table of Content
Table of Contents
Keys to read this Instruction Manual ............................................................................................3
For your Safety..................................................................................................................................4
Getting Started
Overview
Checking the Accessories Supplied...................................................................................6
Overview of TV Buttons......................................................................................................6
Overview of Remote Control Buttons...............................................................................7
Installation
Inserting Batteries into the Remote Control.....................................................................8
Connecting the Aerial and VCR.........................................................................................8
Switching on the projection TV..........................................................................................8
First Time Operation
S
electing Language...............................................................................................................9
Automatically Tuning the TV using the Remote Control ............................................10
Changing the Programme Order of the TV channel.....................................................11
Adjusting colour Registration (Convergence) ...............................................................12
On Screen display Menus Guide .....................................................................................13
GB
Advanced Operation
Advanced Presetting
Automatically Tuning the TV ..........................................................................................14
Manually Tuning the TV...................................................................................................15
Using the “Further Programme Preset” function..........................................................16
Locking Programmes.........................................................................................................17
Skipping Programme positions........................................................................................18
Labelling a channel ............................................................................................................19
Advanced TV Operation
Adjusting the Picture.........................................................................................................20
Changing the screen mode ...............................................................................................21
Adjusting the Sound ..........................................................................................................22
Using the Sleep Timer........................................................................................................24
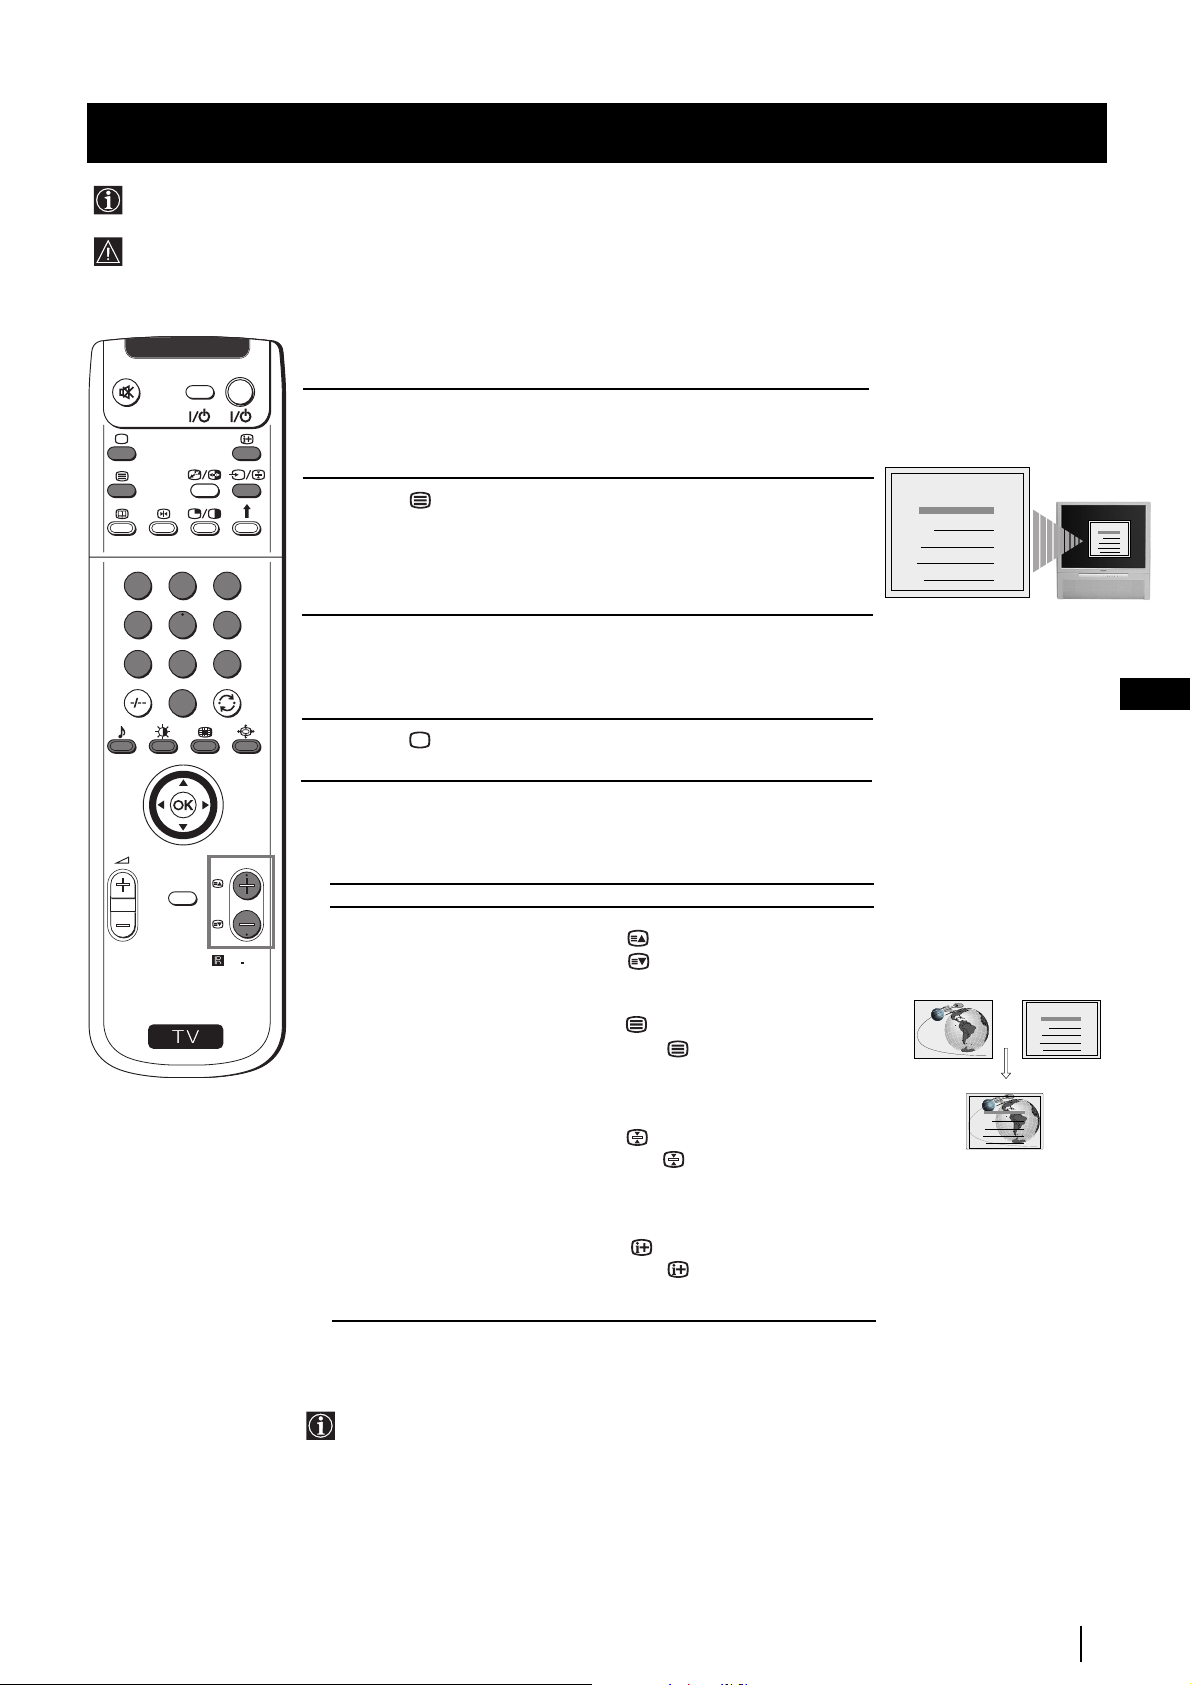
Teletext
Viewing Teletext.................................................................................................................25
Optional Connections
Connecting Optional Equipment.....................................................................................26
Using Optional Equipment...............................................................................................27
Smartlink .............................................................................................................................28
Remote Control of other Sony Equipment .....................................................................28
Selecting the output source for the Euro AV connectors .............................................29
Using the “AV Label Preset” function ............................................................................30
Additional Information
Optimum Viewing Area....................................................................................................31
Specifications ......................................................................................................................32
Troubleshooting .................................................................................................................33
Table of Contents
5
Page 5
Getting Started - Overview
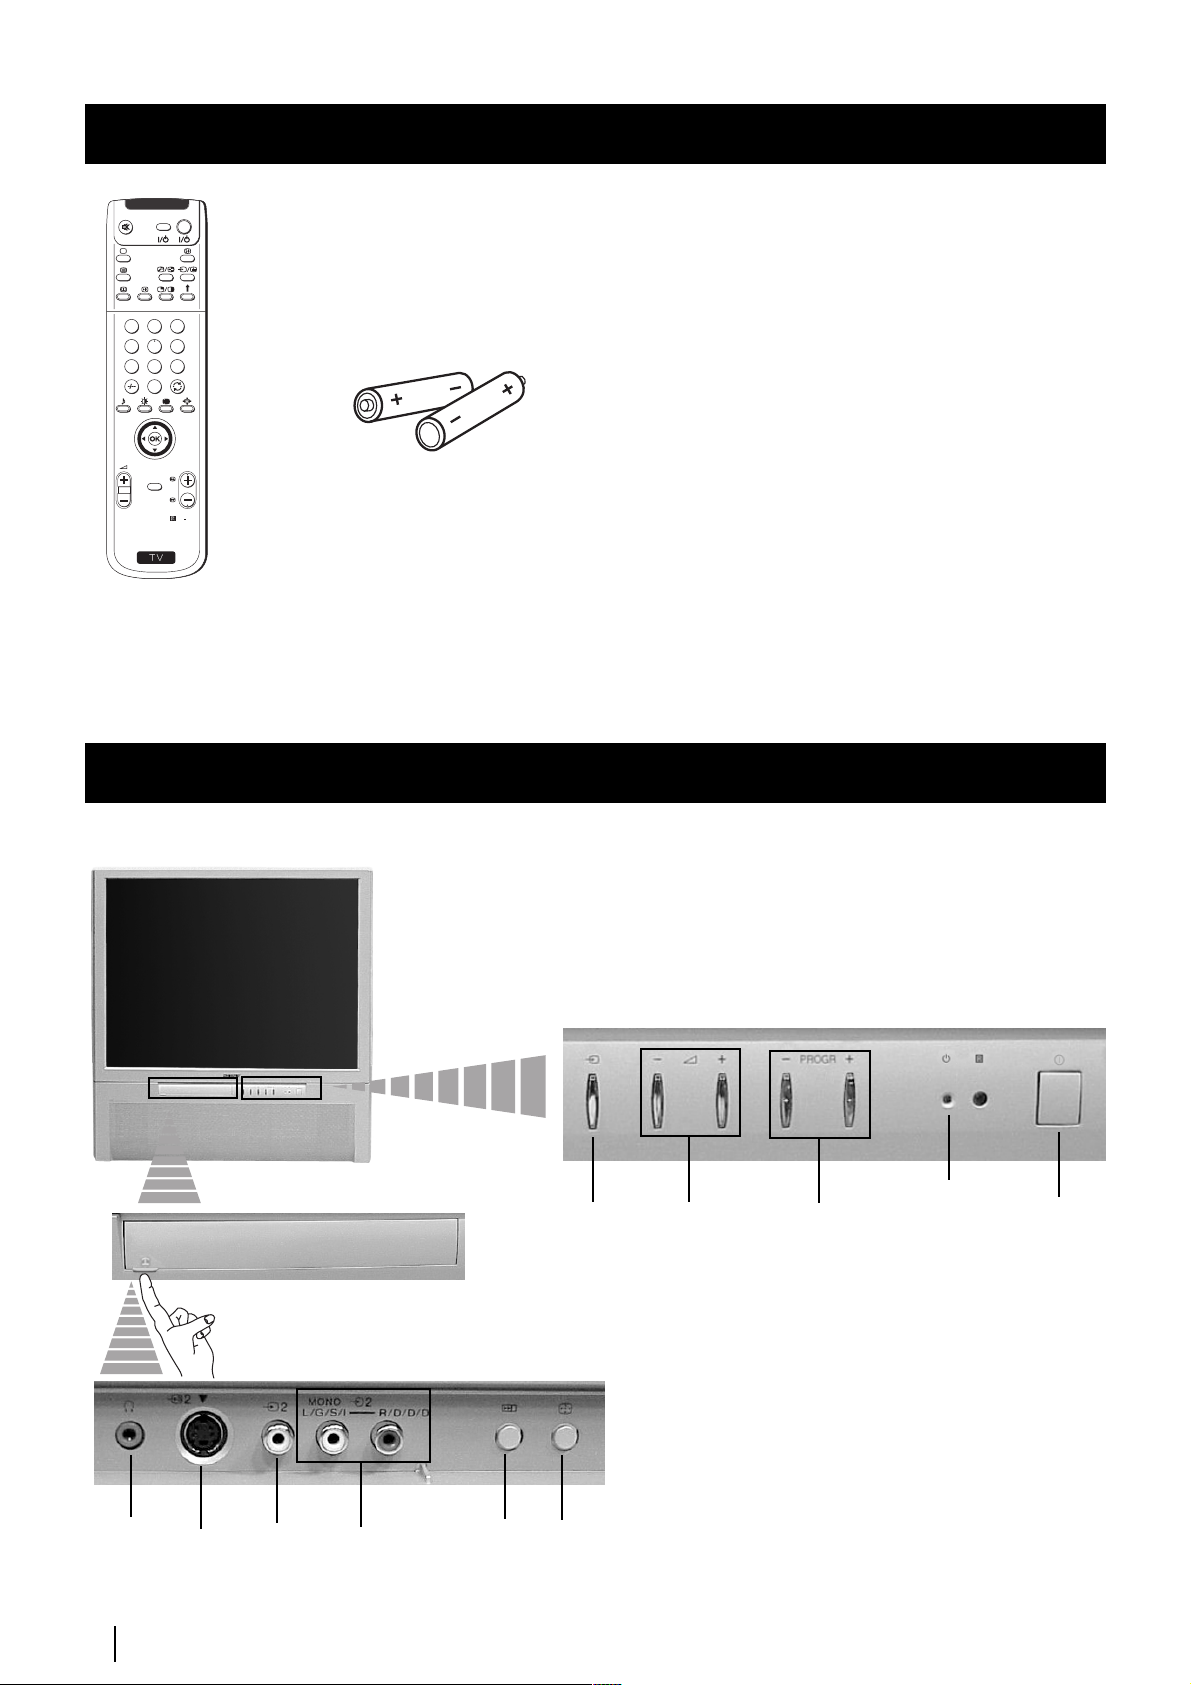
Checking the Accessories Supplied
VIDEO TV
Checking the Accessories Supplied
1
2
3
4
5
6
7
8
9
0
PROGR
MENU
RM
892
S
One Remote Control
(RM-892)
Two batteries (R6 type)
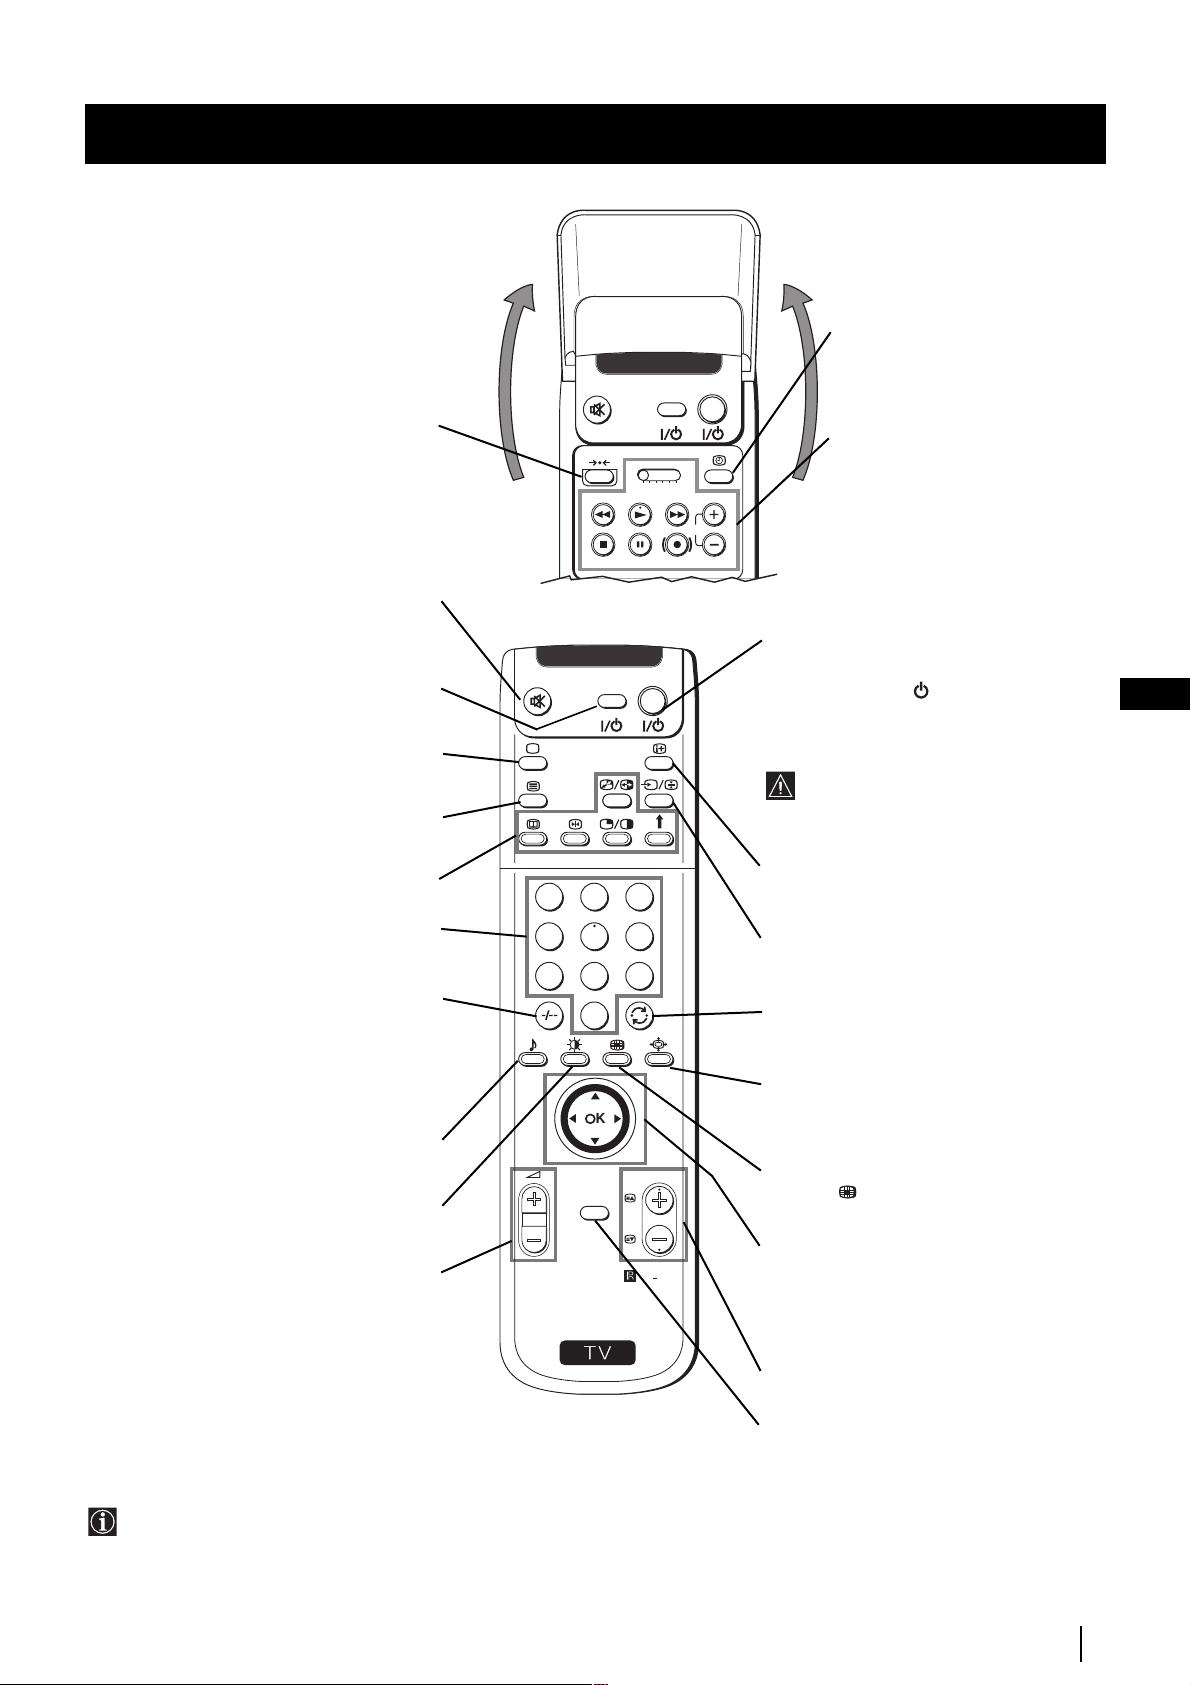
Overview of Projection TV Buttons
Selecting
input
source
Push up the flap on the
front of the projection TV
to reveal the front panel.
Volume
control
buttons
Programme
up or down
buttons
(selects TV
channels)
Standby
indicator
On/Off
Switch
Headphone
jack
S Video
Input
jack
6
Getting Started - Push up
Video
Input
jack
Audio
Input
jacks
Auto
Start up
button
Auto
Convergence
button
Page 6
Getting Started - Overview
Overview of Remote Control Buttons
Checking the Accessories Supplied
VIDEO TV
Displaying the time
Press to switch the time on or off
(available only when teletext is
broadcast).
This button does not work on this set.
Muting the Sound
Press to mute TV sound.
Press again to restore the sound.
VCR on/off
Press to switch your VCR on or off.
Selecting TV mode
Press to switch off Teletext or video input.
Selecting Teletext
Press to switch on Teletext.
These buttons do not work on this set.
Selecting channels
Press to select channels.
For double-digit programme numbers, e.g.
23, press -/-- first, then the buttons 2 and 3.
If you enter an incorrect first digit, this
should be corrected by entering another digit
(0-9) and then selecting -/-- button again to
enter the programme number of your choice.
Selecting Sound mode
Press repeatedly to change the sound mode.
Selecting Picture mode
Press repeatedly to change the picture mode.
Adjusting TV Volume
Press to adjust the volume of the TV.
1
4
7
S
VIDEO TV
2
5
8
0
K
MENU
VTR 1 2 3 4 DVD
3
6
9
PROGR
RM
892
VCR operation
For more details, please refer to the
section "Remote Control of other
Sony Equipment".
CH
To Temporarily Switch Off projection
TV
Press to temporarily switch off TV (the
standby indicator
red). Press again to switch on TV from
on the set lights up in
GB
standby mode.
To save energy we recommend switching off
completely when TV is not in use.
After 15-30 minutes without a signal
and without any button being pressed,
the set switches automatically into
standby mode.
Displaying On Screen Information
Press to display all on-screen indications.
Press again to cancel.
Selecting Input source
Press repeatedly until the desired input
symbol of the source appears on the screen.
Back to the channel last watched
Press to watch the last channel selected
(watched for at least 5 seconds).
Selecting Screen format
Press repeteadly to change the format of
the screen (for more details, please refer to
the section “Changing the Screen format”).
This button only works in Teletext mode.
associated to this button does not
Function
work with this set.
Joystick for menu selection
4
Scroll Up
$
Scroll Down
Z
Previous menu or selection
z
Next menu or selection
OK
Confirms your selection
Besides TV functions, all coloured buttons as well as green
symbols are also used for Teletext operation. For more details,
please refer to the "Teletext" section of this instruction manual.
Selecting channels
Press to select the next or previous channel.
Displaying the menu system
Press to display the menu on the screen.
Press again to remove the menu display
from the screen.
Getting Started - Overview
7
Page 7
Getting Started - Installation
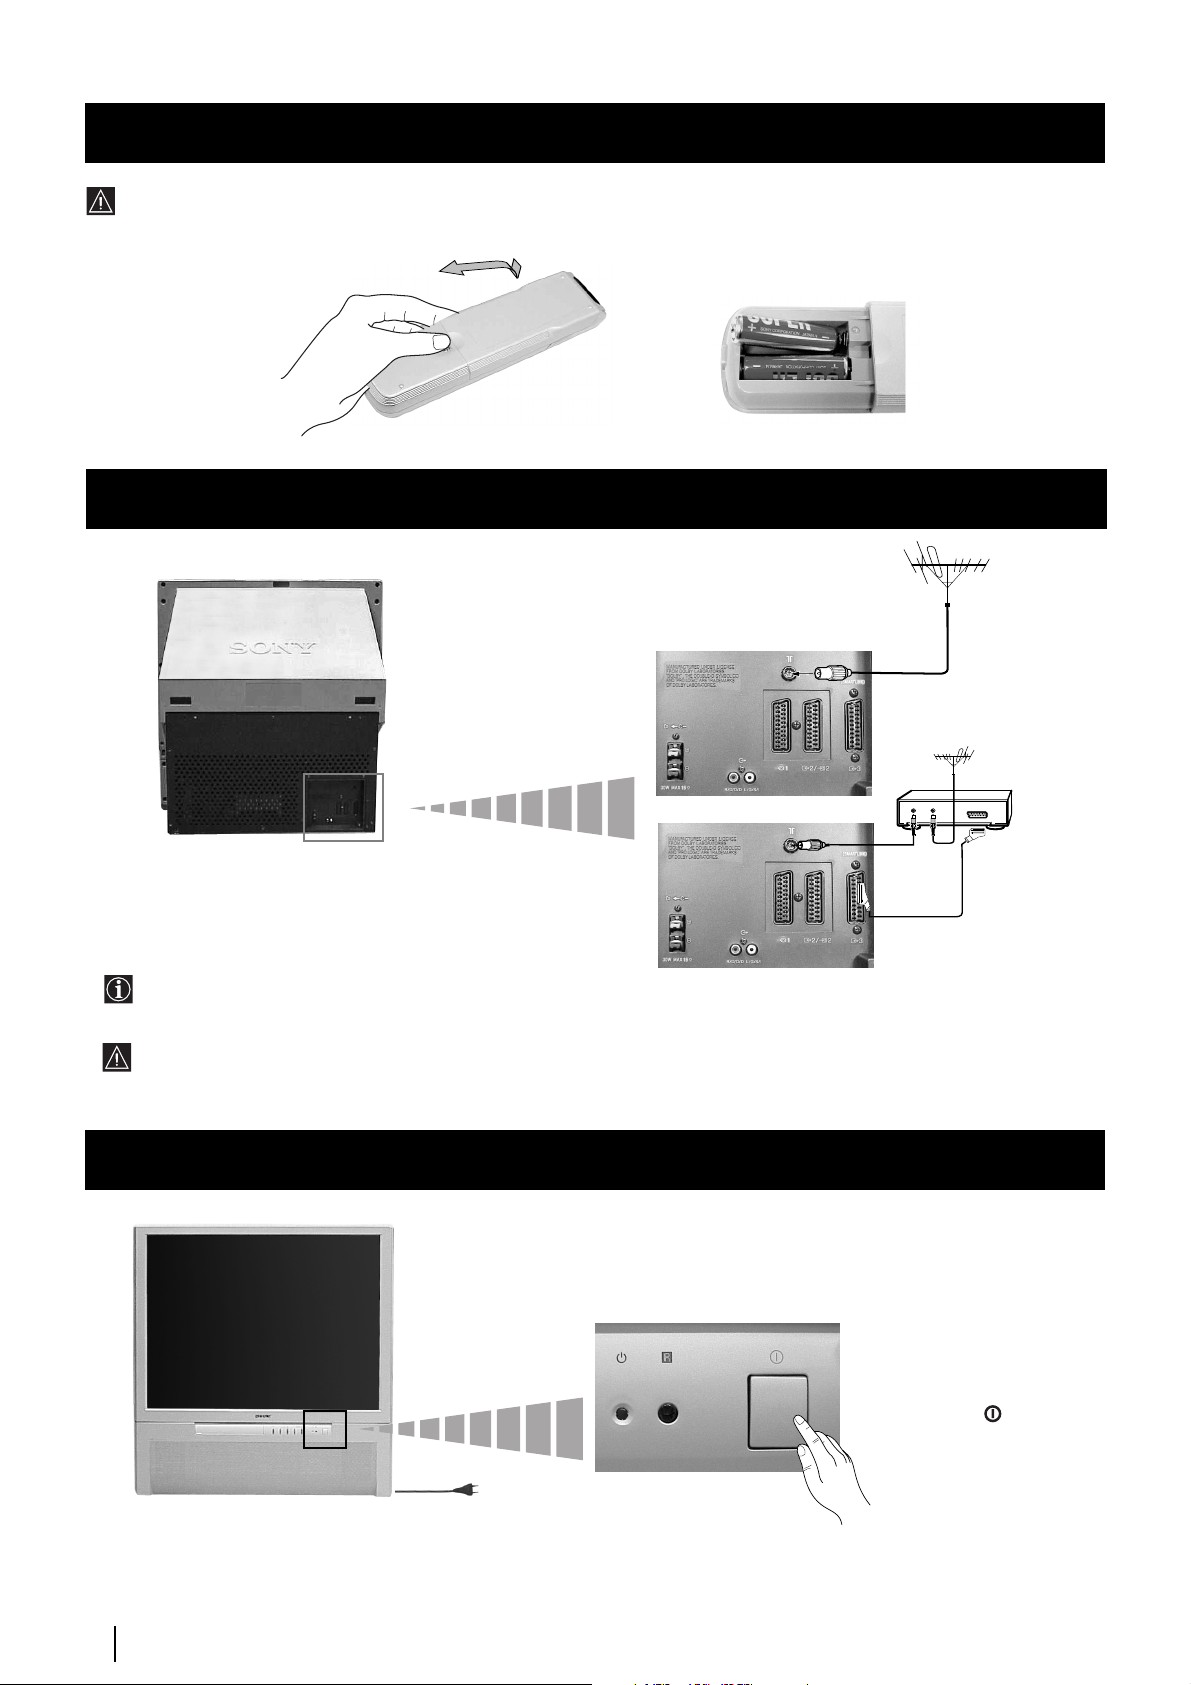
Inserting Batteries into the Remote Control
Make sure you insert the batteries using the correct polarities.
Always remember to dispose of used batteries in an environmental friendly way.
Connecting the Aerial and VCR
VCR
or
The Scart lead is optional.
If you use this optional connection it can improve picture and sound quality when using a VCR.
If you do not use a SCART lead, after automatically tuning the projection TV refer to the “Manually Tuning the TV” section
of this instruction manual, to the tune in the set to the ouput of you VCR. Also refer to your VCR instruction manual to
find out how to find the output channel of your VCR.
OUT IN
Switching on the projection TV
Push in the
switch on the front of the
projection TV.
Connect the projection
TV plug to the
mains socket (220240V AC, 50Hz).
8
Getting Started - Installation
On/Off
Page 8
Getting Started - First Time Operation
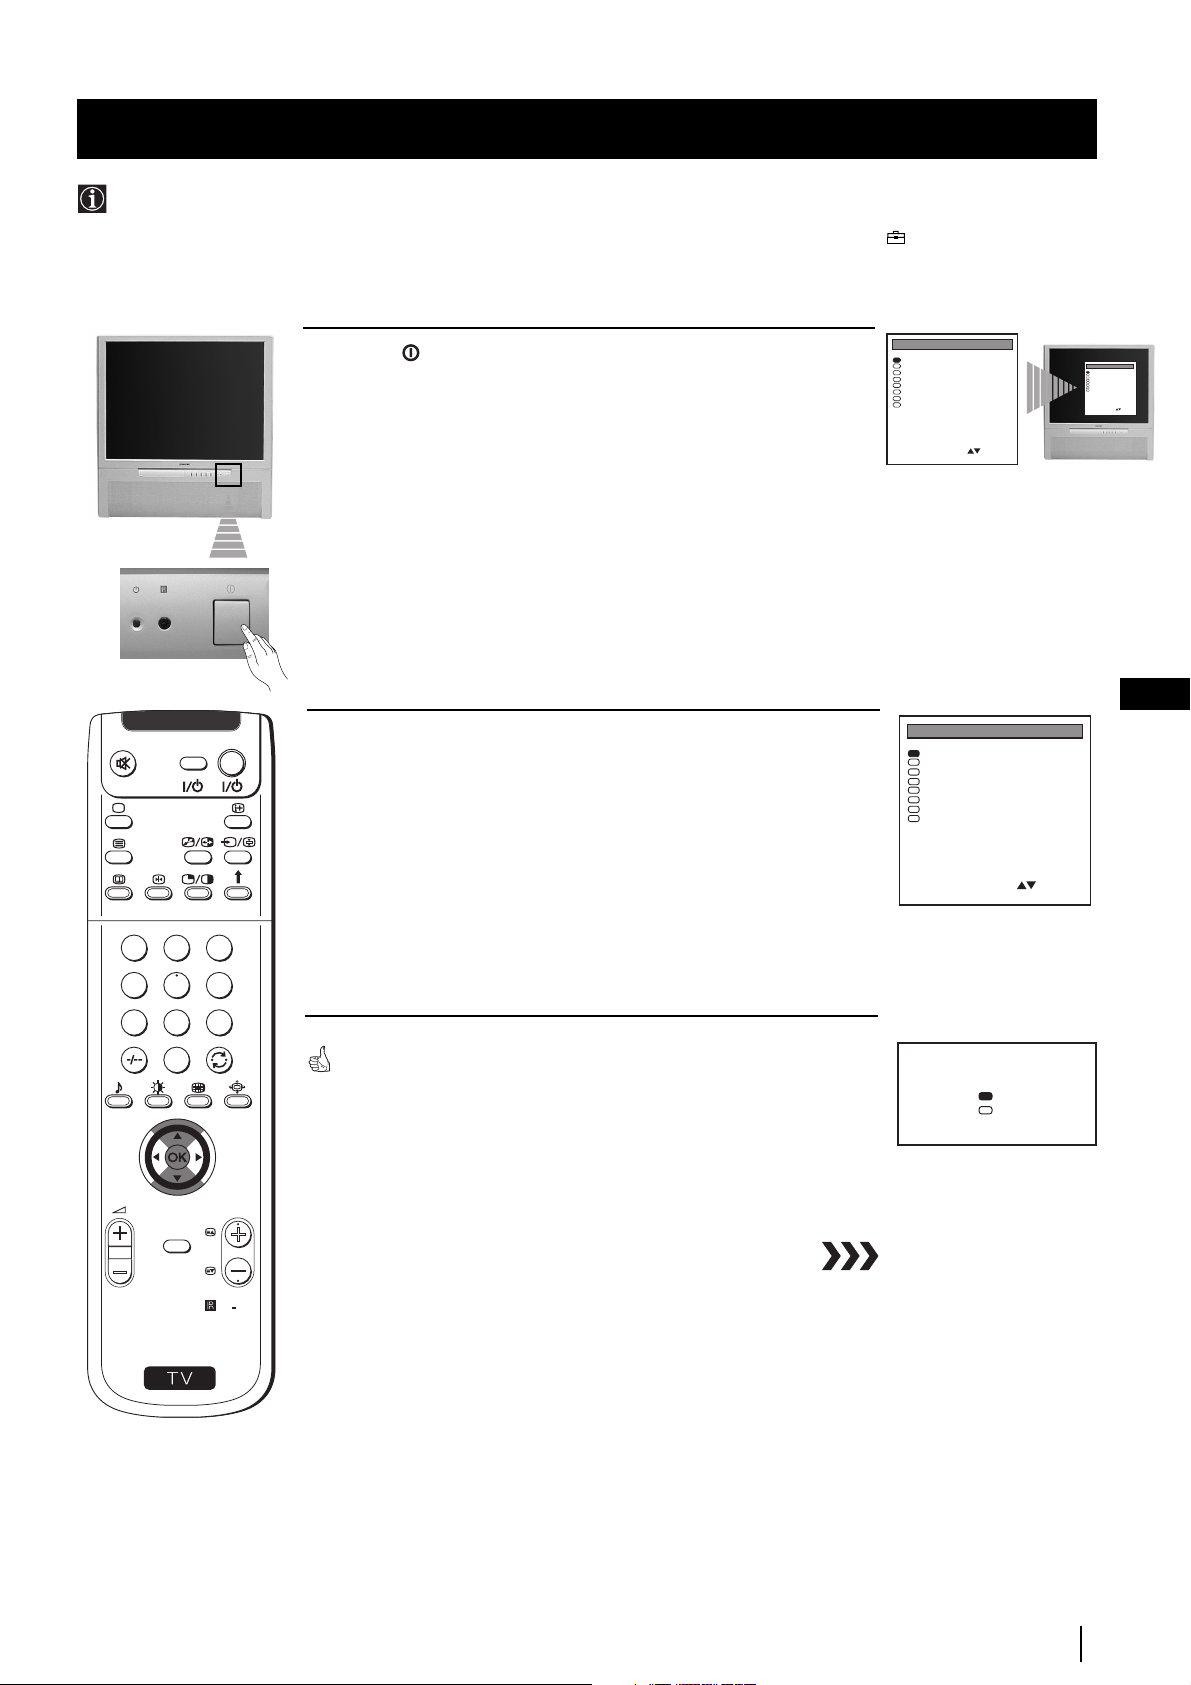
Selecting Language
Use this function to change the language of the menu screens.
The first time that you switch on your projection TV, the Language menu appears automatically.
However, if you need to change the language menu afterwards, select the menu Language in the (PRESET) menu and
proceed in the same way as described below.
VIDEO TV
Press the
1
on/off
button on your projection TV set to switch on your
TV. The first time you press the on/off button on your TV set, the
language menu displays automatically on the TV screen.
Push the joystick on the remote control $ or 4 to select the language,
2
then press OK to confirm your selection.
LANGUAGE
English
Deutsch
Français
Italiano
Nederlands
Polski
Česki
Magyar
Select Language:
Confirm: OK
LANGUAGE
English
Deutsch
Français
Italiano
Nederlands
Polski
Česki
Magyar
Select Language:
Confirm: OK
LANGUAGE
English
Deutsch
Français
Italiano
Nederlands
Polski
Česki
Magyar
Select Language:
Confirm: OK
GB
1
4
7
S
MENU
2
3
5
6
8
9
0
The Auto Tuning menu appears on the projection TV screen in the selected
language.
PROGR
RM
892
Do you want to start
automatic tuning?
Yes
No
Confirm: OK
Getting Started - First Time Operation
9
Page 9
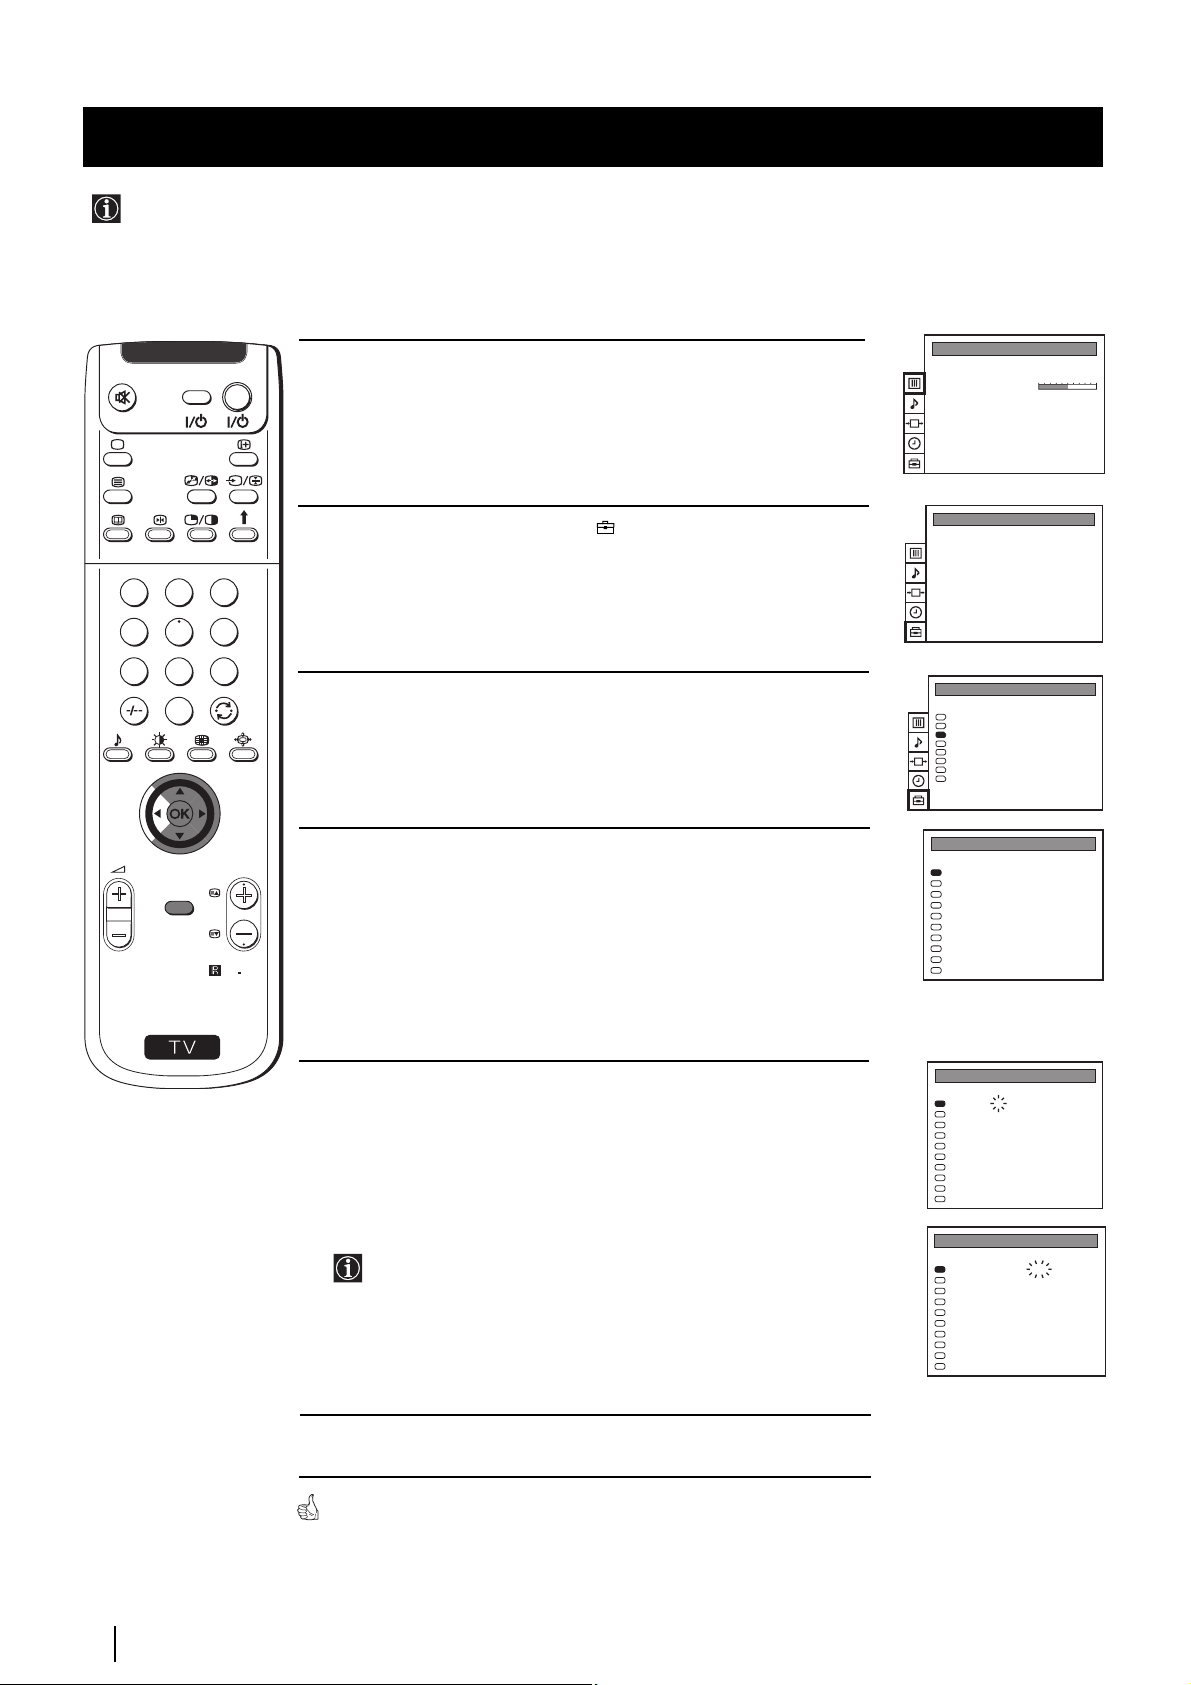
Getting Started - First Time Operation
G
O
Automatically Tuning the TV using the Remote Control
You need to tune the set to receive channels (TV Broadcast). By following the instructions below, this projection TV
automatically searches and stores all available channels for you.
After having selected the language, a new menu appears automatically on the projection TV screen asking you to
automatically tune the TV. However, if you need to change or repeat the tuning afterwards (e.g. when you move house), select
the menu Auto Programme in the (PRESET) menu and proceed in the same way as described below or, please refer to the
section "Automatically Tuning the TV" of this instruction manual.
1
4
7
S
VIDEO TV
2
5
8
0
MENU
3
6
9
RM
PROGR
892
Press the
1
OK
button on the remote control to select
YES
. A new menu
appears automatically on the screen asking you to check that the
antenna is connected.
Confirm that the antenna is connected and then press the OK button.
2
The automatic tuning starts and the message "AUTO
PROGRAMME" flashes on the screen.
This procedure could take some minutes. Please, be patient and
do not press any button, otherwise the automatic tuning will
not be completed.
When the automatic tuning is finished, the Programme Sorting menu
appears on the screen.
Notes:
• To stop the automatic tuning, press the MENU button.
• If you stop the automatic tuning by pressing the MENU
button, the Programme Sorting menu does not appear
automatically on the screen.
Do you want to start
automatic tuning?
Yes
No
Confirm: OK
Please confirm that
antenna is connected
Confirm: OK
AUTO PROGRAMME
PROG
SYS
1
PROGRAMME SORTING
PROG SYS CHAN LABEL
0
1
2
3
4
5
6
7
8
9
Select PROG: + OK
Exit: MENU
CH
B/G
C 26
AUTO PROGRAMME
B/G
C 28
B/G
C 40
B/G
C 41
B/G
C 31
B/G
C 34
B/G
C 27
B/G
C 47
B/G
C 44
B/G
C 23
B/G
C 35
LABEL
- - - - -
BBC-W
MV-CH
TVE-1
TVE-2
ANT-3
TELE 5
C PLUS
- - - - -
- - - - CNN -
10
Getting Started - First Time Operation
Page 10
Getting Started - First Time Operation
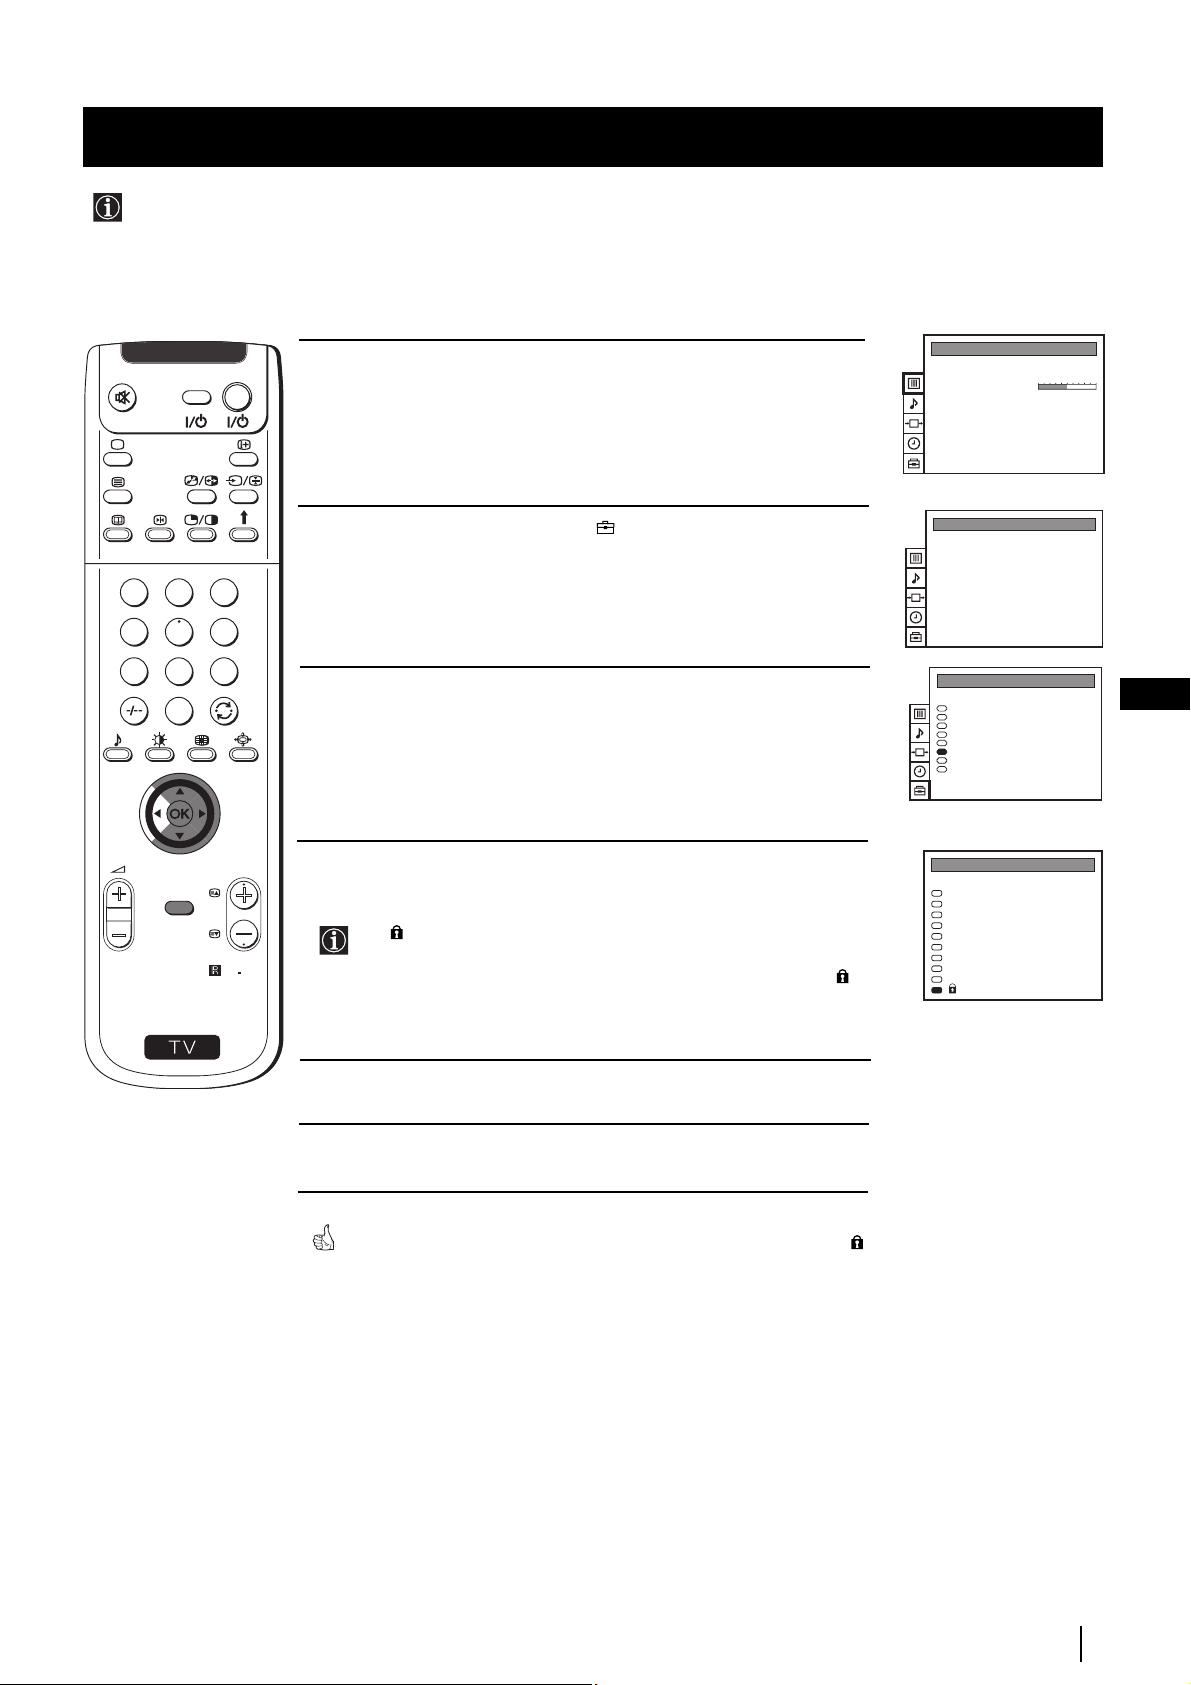
Changing the Programme Order of the TV channels
After all available channels (TV Broadcast) are captioned and stored, a new menu appears automatically on the screen to
change the order in which the channels appear on the screen.
However, if you wish to rearrange the order of the channels afterwards, select the menu Programme Sorting in the
(PRESET) menu and proceed in the same way as described in the b) section of this chapter.
1
4
7
S
VIDEO TV
2
5
8
0
MENU
3
6
9
RM
PROGR
892
a) If you do not wish to change the channel order:
1
Press the
MENU
button on the remote control to exit and return to the
normal TV screen.
When the automatic tuning is finished, the Programme Sorting menu
appears on the screen.
b) If you wish to change the channel order:
Push the joystick on the remote control to $ or 4 to select the
1
programme number with the channel (TV Broadcast) you wish to
rearrange, then press OK.
2 Push the joystick to $ or 4 to select the new programme number
position for your selected channel (TV Broadcast), then press OK.
The selected channel now moves to its new programme position
and the other channels move accordingly.
PROGRAMME SORTING
PROG SYS CHAN LABEL
B/G
0
1
2
3
4
5
6
7
8
9
Select PROG: + OK
Exit: MENU
PROGRAMME SORTING
PROG SYS CHAN LABEL
0
1
2
3
4
5
6
7
8
9
Select PROG: + OK
Exit: MENU
PROGRAMME SORTING
0
1
2
3
4
5
6
7
8
9
Select Position:
Confirm: OK
SYS CHAN LABELPROG
B/G
B/G
B/G
B/G
B/G
B/G
B/G
B/G
B/G
B/G
B/G
B/G
B/G
B/G
B/G
B/G
B/G
B/G
B/G
B/G
B/G
B/G
B/G
B/G
B/G
B/G
B/G
B/G
B/G
C 28
C 40
C 41
C 31
C 34
C 27
C 47
C 44
C 23
C 35
C 28
C 40
C 41
C 31
C 34
C 27
C 47
C 44
C 23
C 35
C 40
C 41
C 31
C 34
C 27
C 47
C 44
C 23
C 35
C 28
BBC-W
MV-CH
TVE-1
TVE-2
ANT-3
TELE 5
C PLUS
- - - - -
- - - - CNN -
BBC-W
MV-CH
TVE-1
TVE-2
ANT-3
TELE 5
C PLUS
- - - - -
- - - - CNN -
MV-CH
TVE-1
TVE-2
ANT-3
TELE 5
C PLUS
- - - - -
- - - - CNN BBC-W
GB
3 Repeat steps 1 and 2 if you wish to change the order of the other
channels.
4 Press the MENU button to exit and return to the normal TV screen.
Your projection TV is now ready for use.
Getting Started - First Time Operation
11
Page 11
Getting Started - First Time Operation
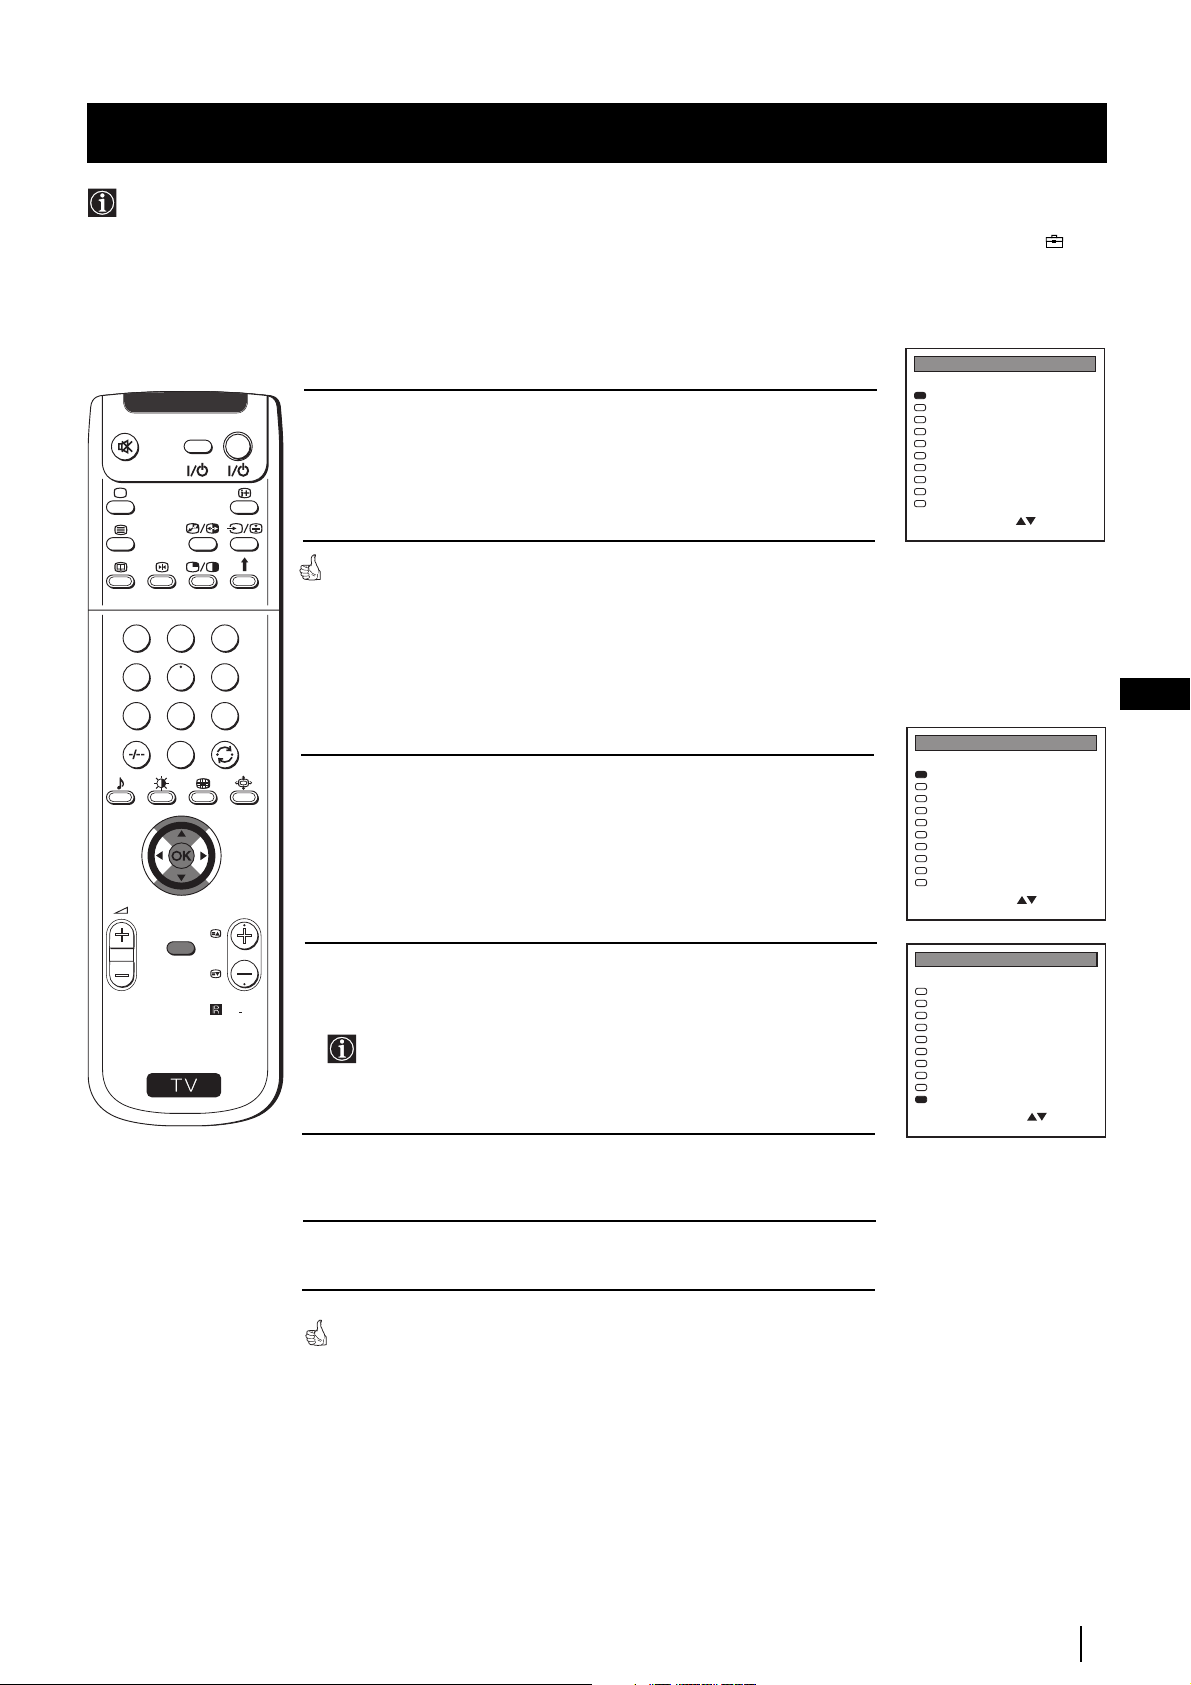
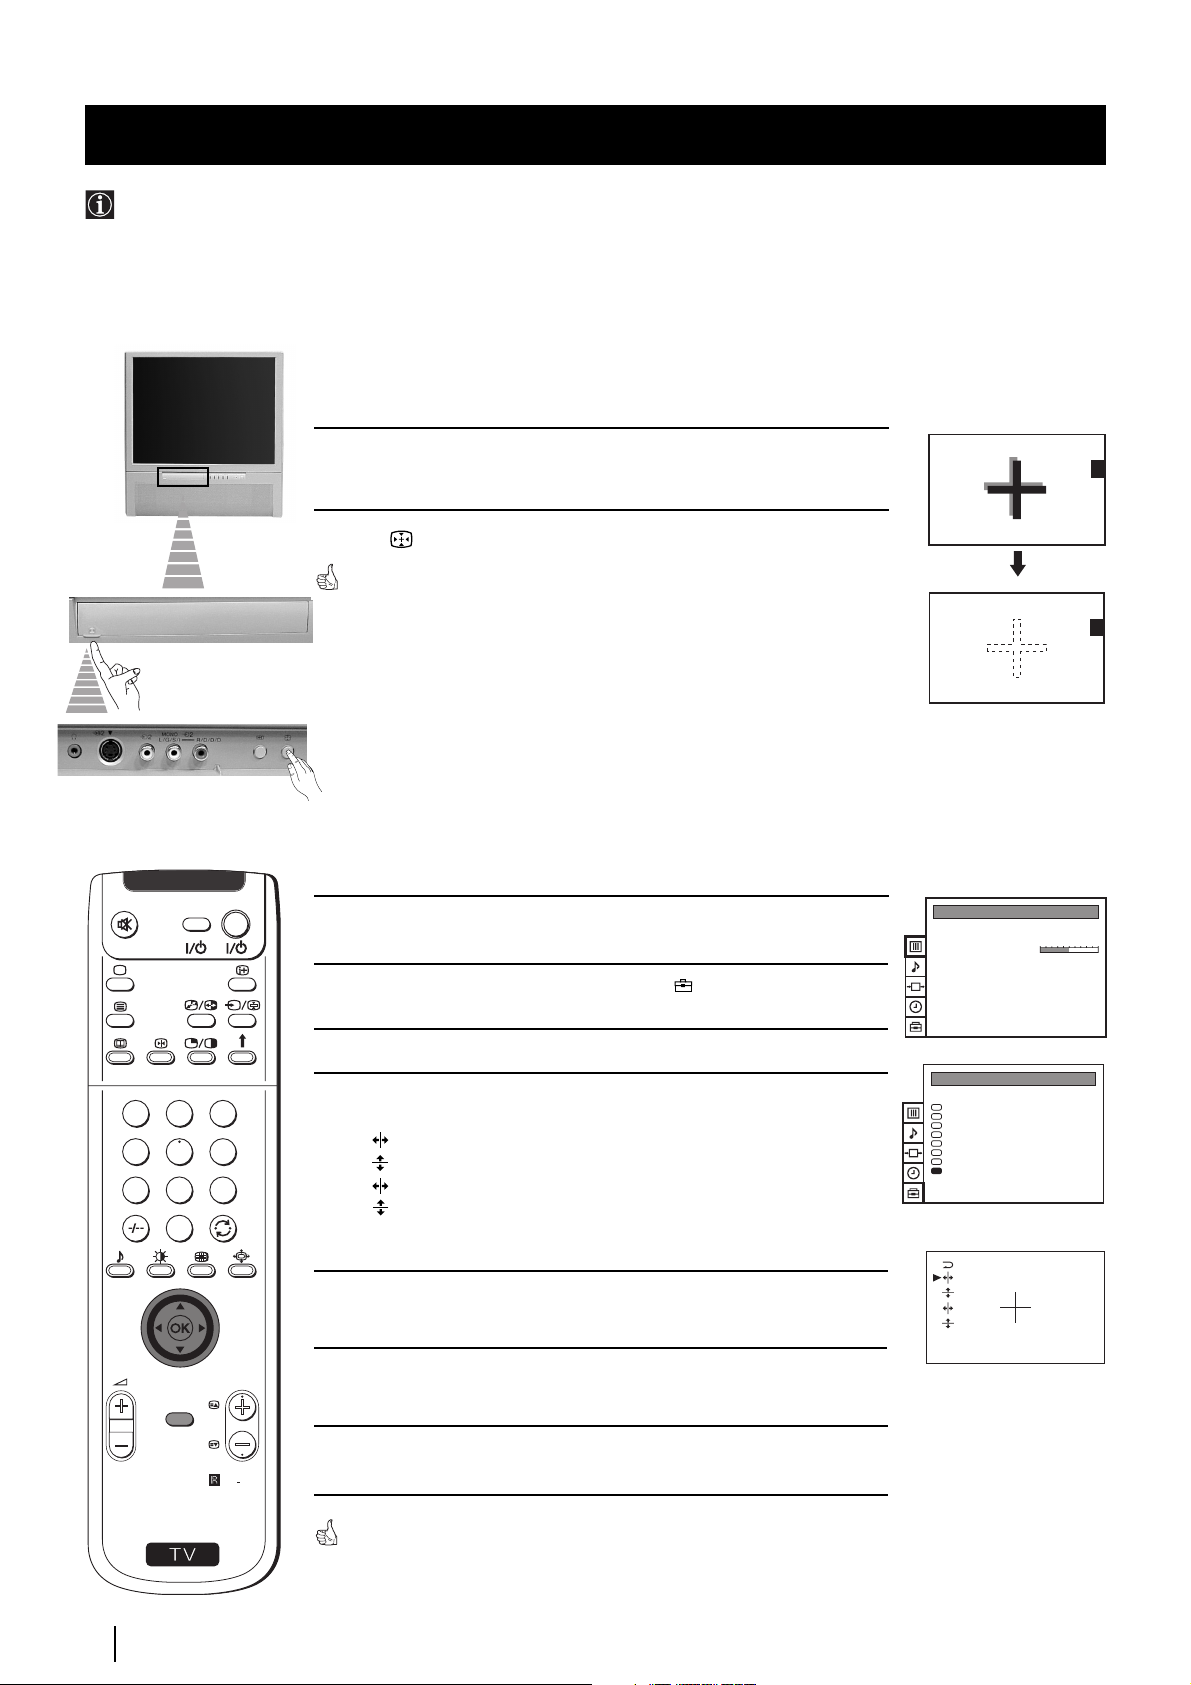
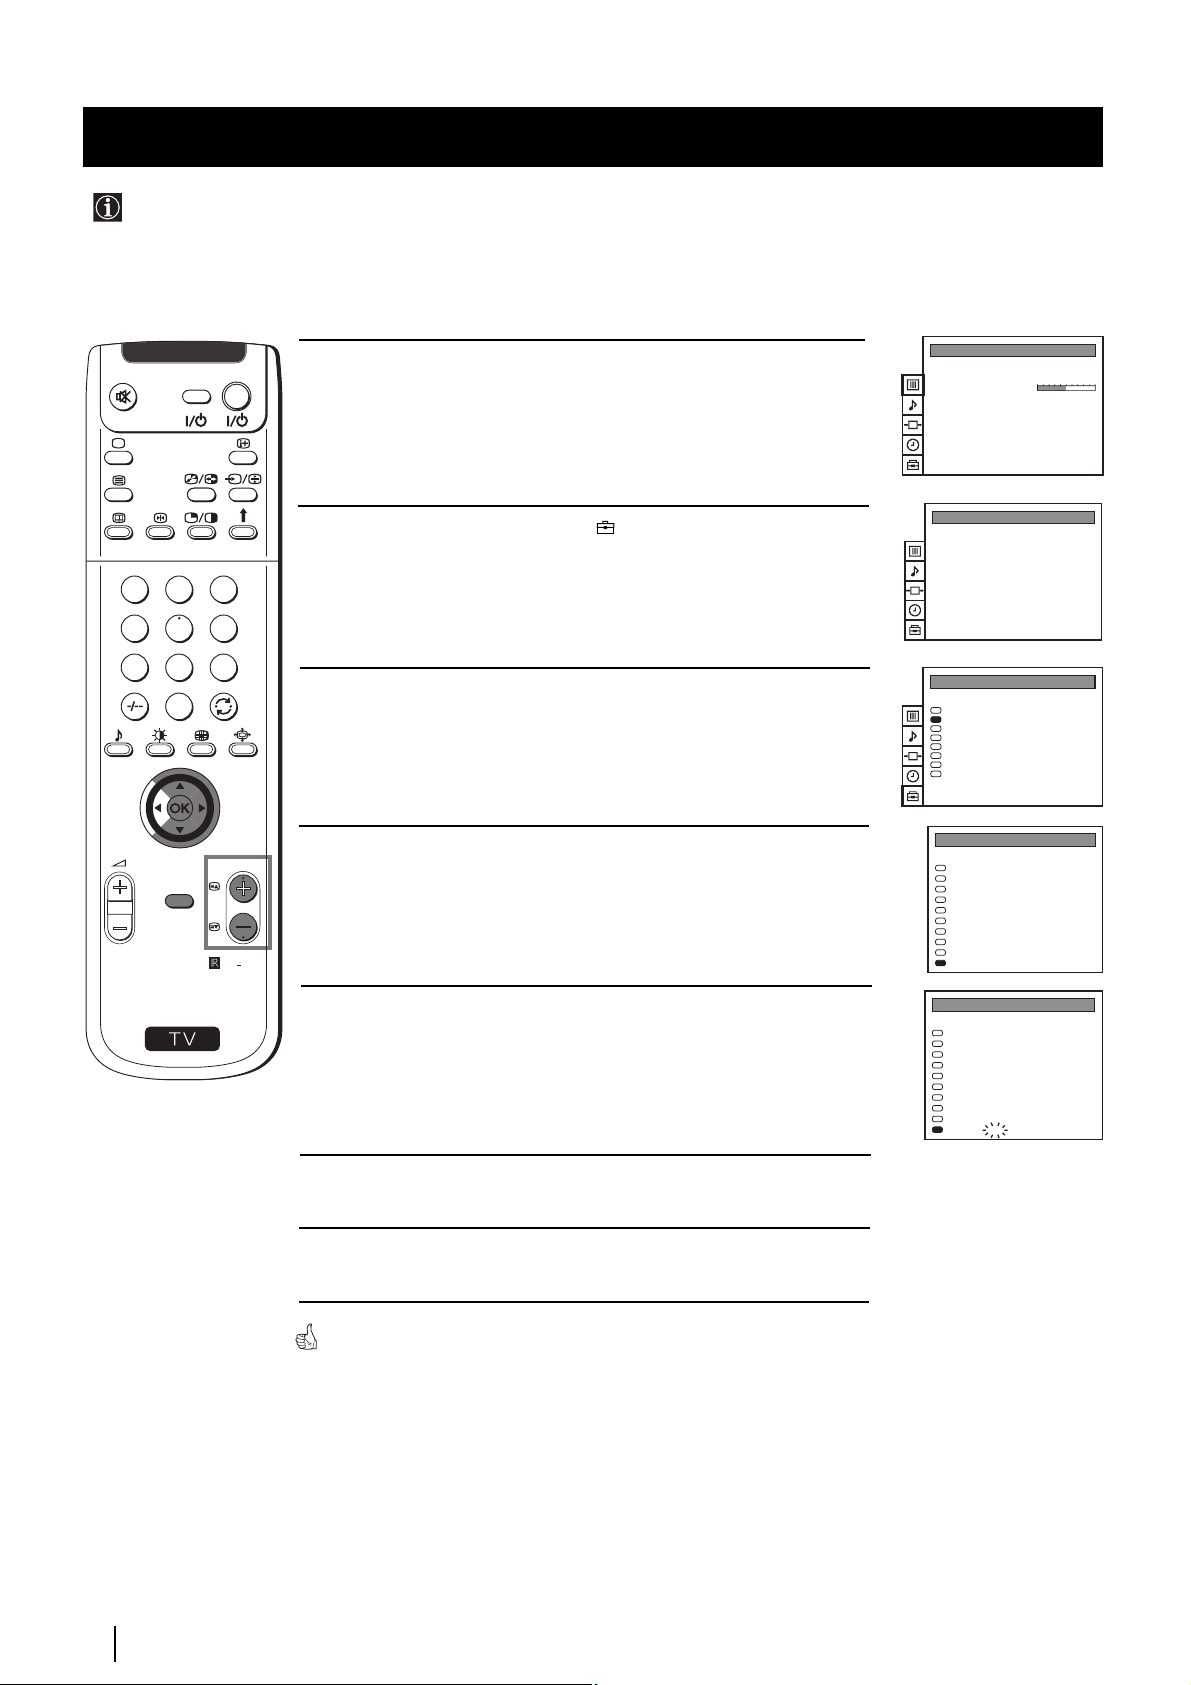
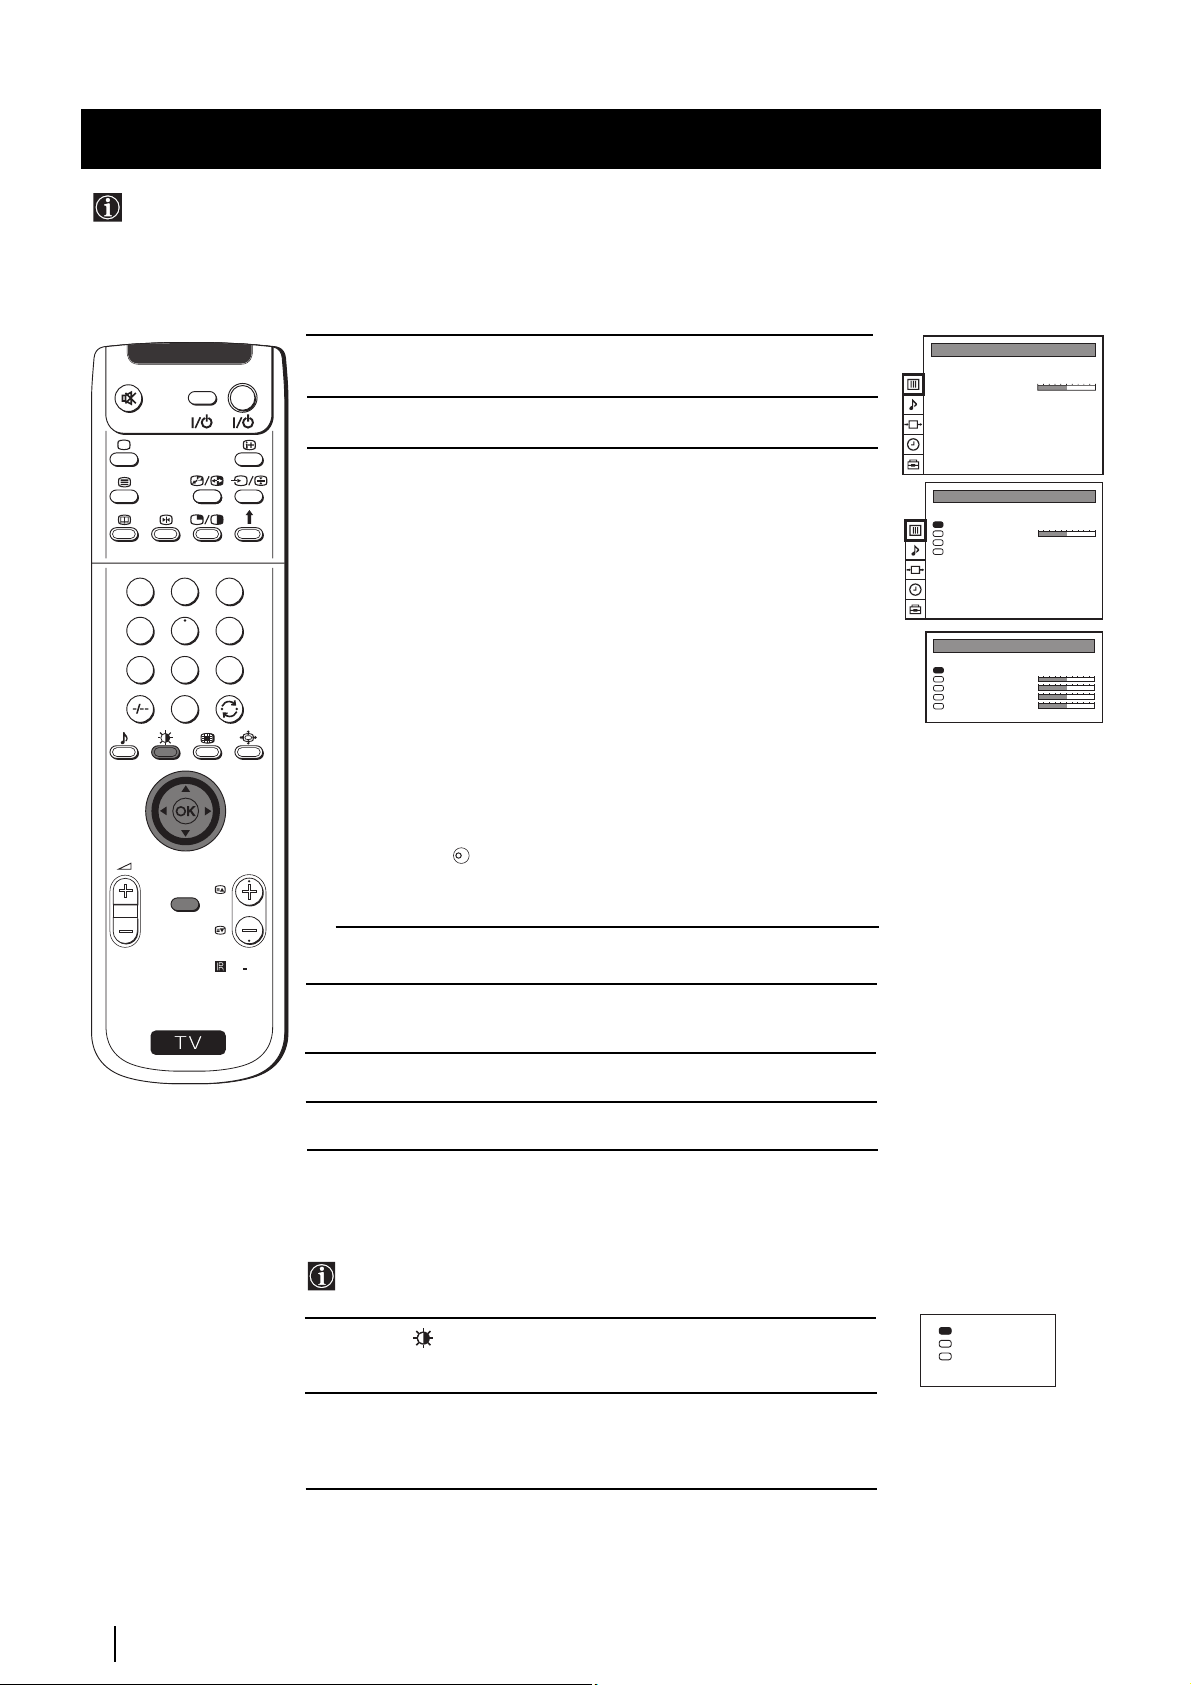
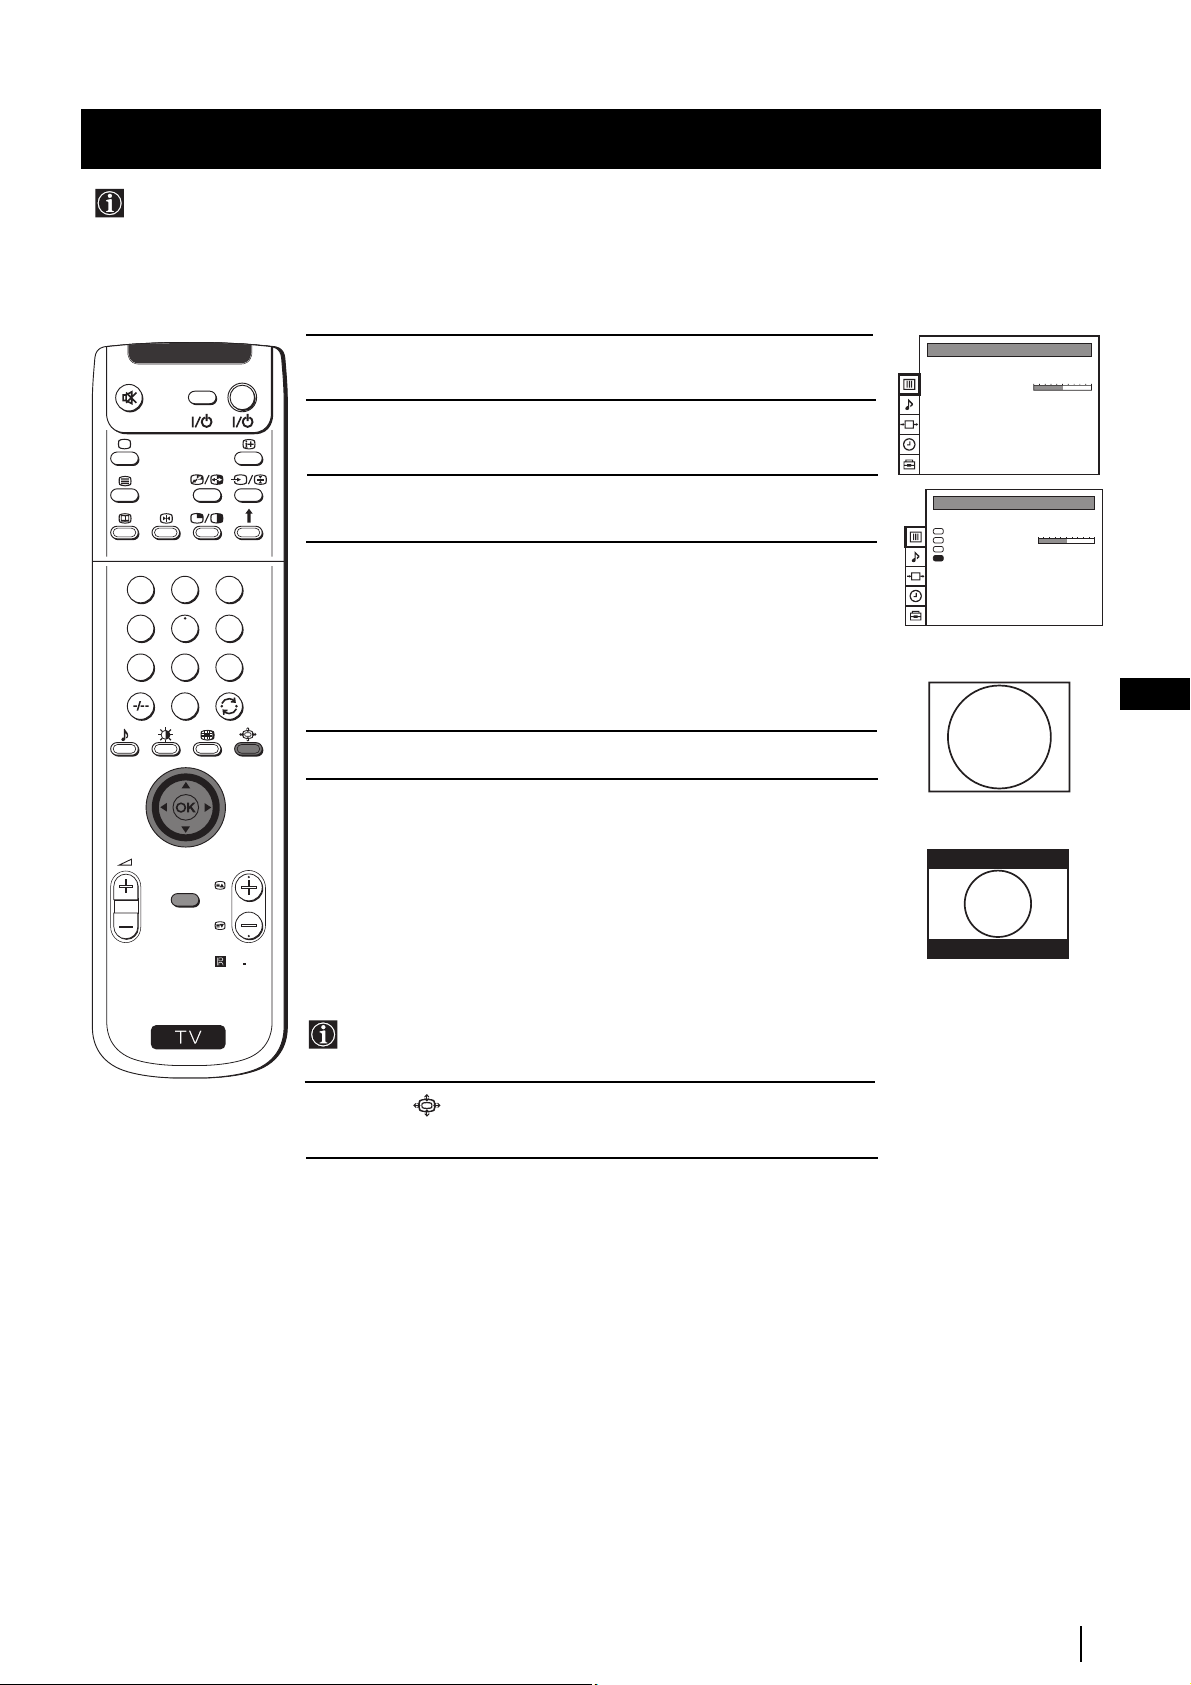
Adjusting Colour Registration (Convergence)
Due to the earth’s magnetism, the picture might become undefined and you could see different colours on the outlines of the
images. In that case, proceed as follows:
Auto converge the Red, Green, and Blue
Lines
1
Push up the flap on the front of the projection TV to reveal the front
control panel.
2 Press button on the projection TV.
The Auto Convergence function works for about 30 seconds. When the white
cross disappears from the screen, your projection TV is ready for use.
Notes:
The Auto Convergence function does not work:
• when no signal is input.
• when the input signal is weak.
• when the screen is exposed to spotlights or direct sunlight.
• when you watch the teletext broadcast.
If you wish a more accurate
convergence adjustment
VIDEO TV
Press the MENU button on the remote control to display the menu on
1
the screen.
PICTURE CONTROL
Picture Mode
Contrast
Reset
Format
Personal
4:3
2 Push the joystick to $ to select the symbol , then push to z to enter
to the PRESET menu.
3 Push the joystick to $ or 4 or 4 to select Convergence, then push to z.
3
4
5
6
7
8
9
0
lines in red and blue) you want to adjust.
: red vertical line (left/right adjustment)
: red horizonta line (up/down adjustment)
: blue vertical line (left/right adjustment)
: blue horizontal line (up/down adjustment)
Then press the OK button.
1
4 Push the joystick to $ or 4 to select “the line” (vertical and horizontal
2
PRESET
Auto Programme
Manual Programme Preset
Further Programme Preset
AV Label Preset
Programme Sorting
Parental Lock
Language
Convergence
5 Push the joystick repeatedly to $ , 4 , Z or z to converge the selected
line with the green line in the centre, then press OK to confirm.
PROGR
MENU
6 Repeat steps 4 and 5 to adjust the other lines, until all the lines have
overlapped to form a white cross.
RM
892
S
12
Getting Started - First Time Operation
7 Press the MENU button to exit and return to the normal TV screen.
Your projection TV is ready for use.
Your projection TV is ready for use.
Page 12
Getting Started - First Time Operation
Adjusting Colour Registration (Convergence)
MENU
Press the MENU button on the remote control to display the menu on the screen.
PICTURE CONTROL
Picture Mode
Contrast
Reset
Format
Personal
4:3
PICTURE CONTROL
Picture Mode
Contrast
Reset
Format
Personal
4:3
(For different adjustments, please refer to
the section "Adjusting the Picture")
SOUND CONTROL
Sound Mode
Balance
Reset
Dolby Virtual
Dual Sound
Volume Offset
Volume
Dual Sound
Speaker
VIDEO CONNECTION
TV Screen
Output
TV
TIMER
Sleep Timer
PRESET
Auto Programme
Manual Programme Preset
Further Programme Preset
AV Label Preset
Programme Sorting
Parental Lock
Language
Convergence
Personal
Off
Mono
0
Mono
Main
[TV - - - - - - -]
[AV1 - - - - - - -]
AV1
Off
SOUND CONTROL
Sound Mode
Balance
Reset
Dolby Virtual
Dual Sound
Volume Offset
Volume
Dual Sound
Speaker
VIDEO CONNECTION
TV Screen
Output
TV
TIMER
Sleep Timer
PRESET
Auto Programme
Manual Programme Preset
Further Programme Preset
AV Label Preset
Programme Sorting
Parental Lock
Language
Convergence
PRESET
Auto Programme
Manual Programme Preset
Further Programme Preset
AV Label Preset
Programme Sorting
Parental Lock
Language
Convergence
Personal
Off
Mono
0
Mono
Main
[TV - - - - - - -]
[AV1 - - - - - - -]
AV1
1:00
Do you want to start
automatic tuning?
Yes
No
Confirm: OK
MANUAL PROGRAMME PRESET
PROG SYS CHAN
LABEL
B/G
0
MV-CH
C 40
B/G
1
TVE-1
C 41
B/G
2
TVE-2
C 31
B/G
3
ANT-3
C 34
B/G
4
TELE 5
C 27
B/G
5
C PLUS
C 47
B/G
6
- - - - -
C 44
B/G
7
- - - - -
C 23
B/G
8
CNN -
C 35
B/G
9
BBC-W
C 28
(For different adjustments, please refer to
the section "Adjusting the Sound")
(For more details, please refer to the
section "Selecting the output source for the
Euro AV connectors")
(For more details, please refer to the
section "Using the Sleep Timer")
(For more details, please refer to the
section "Automatically Tuning the TV
using the Remote Control")
(For more details, please refer to the
section "Manually Tuning the TV")
GB
PRESET
Auto Programme
Manual Programme Preset
Further Programme Preset
AV Label Preset
Programme Sorting
Parental Lock
Language
Convergence
PRESET
Auto Programme
Manual Programme Preset
Further Programme Preset
AV Label Preset
Programme Sorting
Parental Lock
Language
Convergence
PRESET
Auto Programme
Manual Programme Preset
Further Programme Preset
AV Label Preset
Programme Sorting
Parental Lock
Language
Convergence
PRESET
Auto Programme
Manual Programme Preset
Further Programme Preset
AV Label Preset
Programme Sorting
Parental Lock
Language
Convergence
PRESET
Auto Programme
Manual Programme Preset
Further Programme Preset
AV Label Preset
Programme Sorting
Parental Lock
Language
Convergence
FURTHER PROGRAMME PRESET
PROG AFT DECODER
On
0
Off
On
1
Off
On
2
AV1
On
3
Off
On
4
AV2
On
5
Off
On
6
Off
On
7
Off
On
8
Off
On
9
Off
AV LABEL PRESET
INPUT LABEL
- - - - -
AV1
- - - - -
RGB
- - - - -
AV2
- - - - -
YC2
- - - - -
AV3
PROGRAMME SORTING
PROG SYS CHAN LABEL
B/G
0
BBC-W
C 28
B/G
1
MV-CH
C 40
B/G
2
TVE-1
C 41
B/G
3
TVE-2
C 31
B/G
4
ANT-3
C 34
B/G
5
TELE 5
C 27
B/G
6
C PLUS
C 47
B/G
7
- - - - -
C 44
B/G
8
- - - - -
C 23
B/G
9
CNN -
C 35
PARENTAL LOCK
PROG
SYS CHAN LABEL
B/G
0
MV-CH
C 40
B/G
1
TVE-1
C 41
B/G
2
TVE-2
C 31
B/G
3
ANT-3
C 34
B/G
4
TELE 5
C 27
B/G
5
C PLUS
C 47
B/G
6
- - - - -
C 44
B/G
7
- - - - -
C 23
B/G
8
CNN -
C 35
B/G
9
- - - - -
C 28
LANGUAGE
English
Deutsch
Français
Italiano
Nederlands
Polski
Česki
Magyar
(For more details, please refer to the
section "Using the Further Programme
Preset function")
(For more details, please refer to the
section "Using the AV Label Preset
function")
(For more details, please refer to the
section "Changing the Programme
Order of the TV channels")
(For more details, please refer to the
section "Locking Programmes")
(For more details, please refer to the
section "Selecting Language")
PRESET
Auto Programme
Manual Programme Preset
Further Programme Preset
AV Label Preset
Programme Sorting
Parental Lock
Language
Convergence
(For more details, please refer to the
section "Adjusting Colour Registration
Convergence)"
Getting Started - First Time Operation
13
Page 13
Advanced Operation - Advanced Presetting
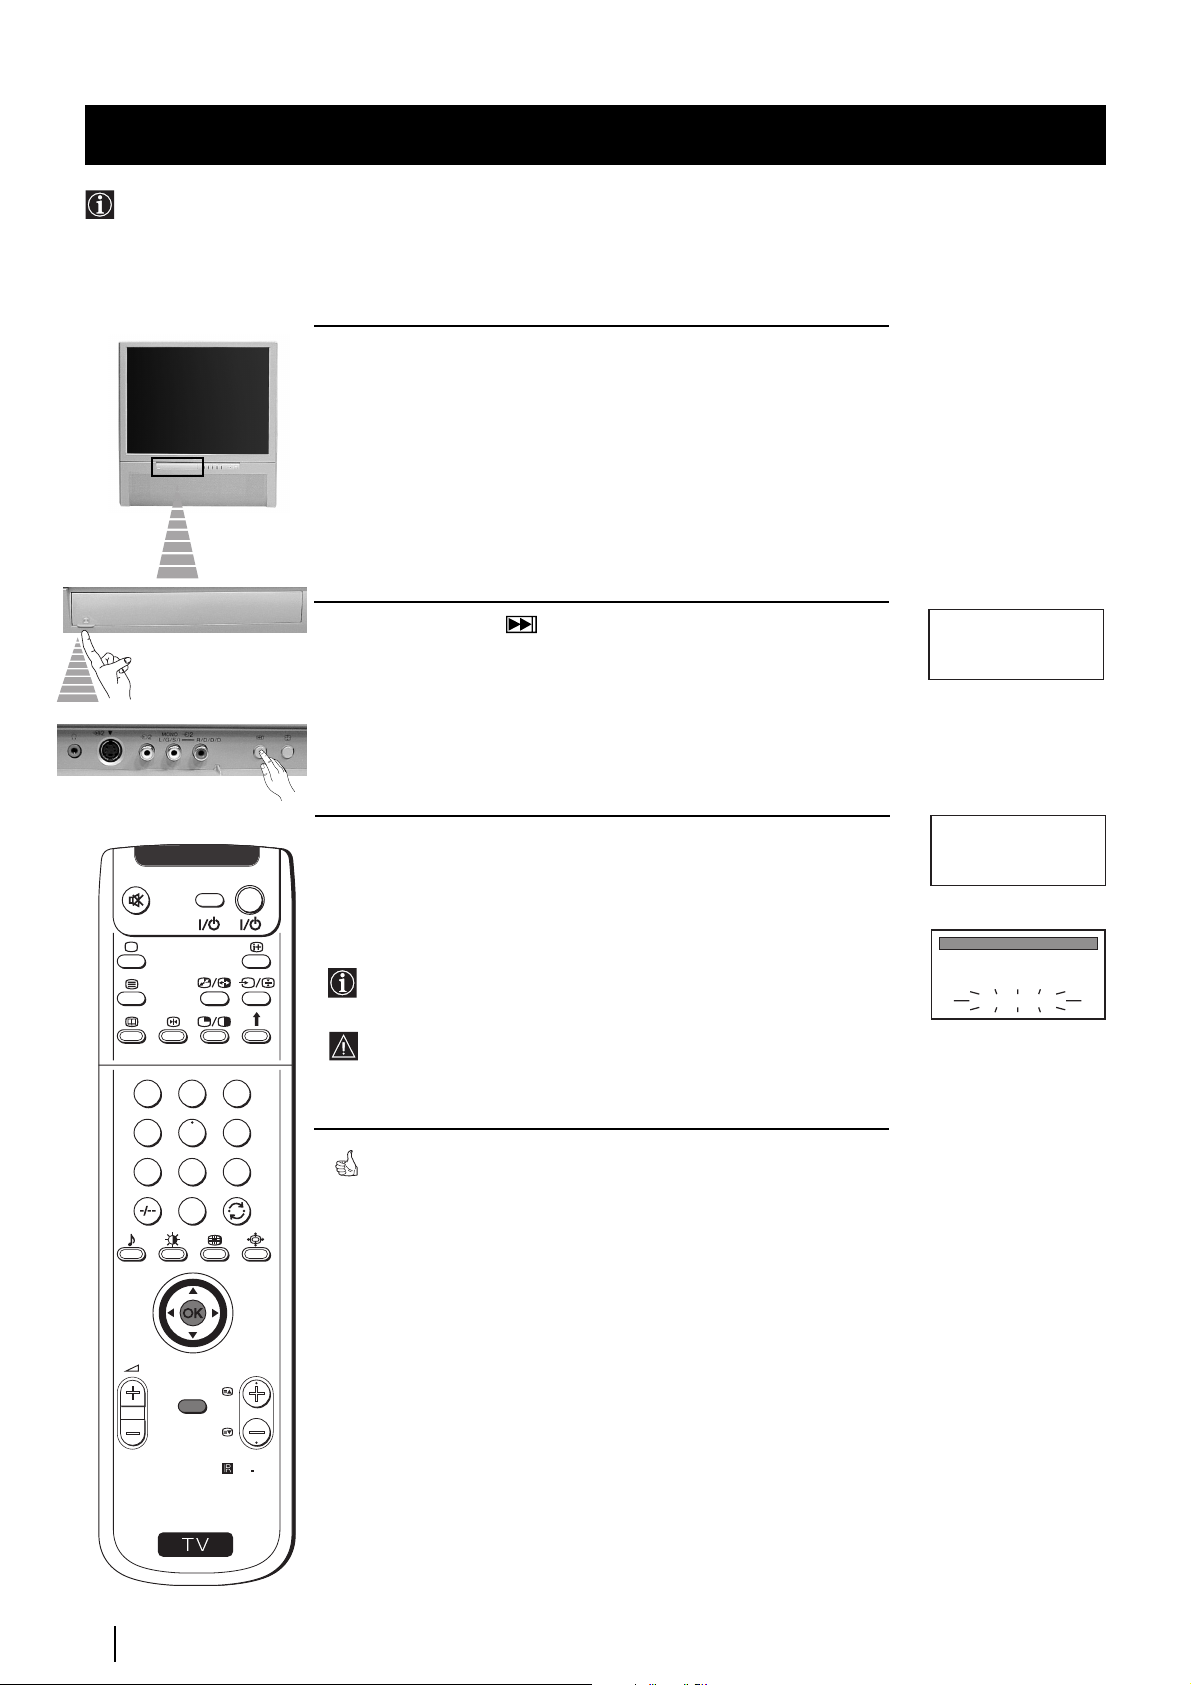
Automatically Tuning the TV
Besides the explanation in the section “Automatically Tuning the TV using the Remote Control“, by following the
instructions below, this projection TV also searches and stores automatically all available channels using just one button of
the projection TV set and one button of the remote control.
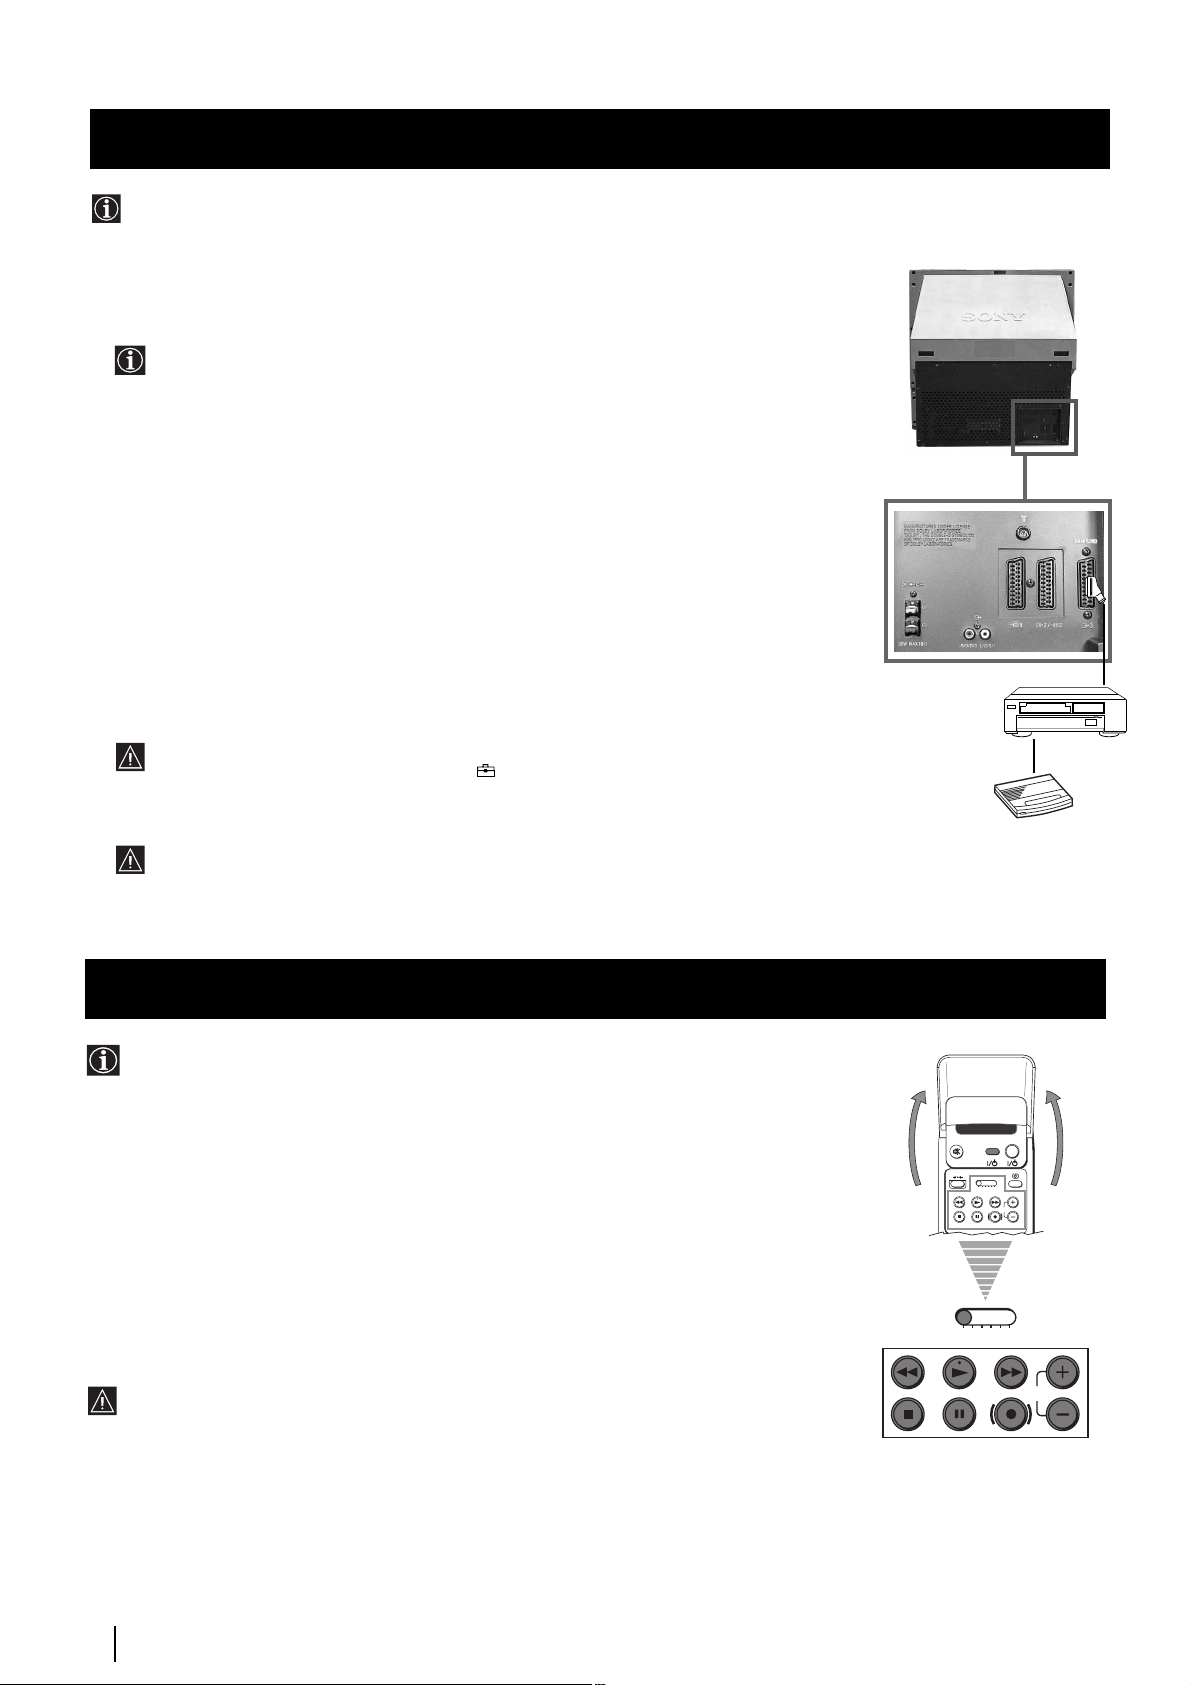
1 Push up the flap on the front of the projection TV to reveal the front
control panel.
Please confirm that
antenna is connected
Confirm: OK
Please confirm that
antenna is connected
Confirm: OK
AUTO PROGRAMME
PROG
SYS
CH
1
B/G
C 26
AUTO PROGRAMME
LABEL
- - - - -
VIDEO TV
2 Press and hold in the button on the TV set for some seconds, until
a menu appears automatically on the screen asking you to check that
antenna is connected.
3 Confirm that the antenna is connected and then press the OK button
on the remote control.
The automatic tuning starts and the message "AUTO
PROGRAMME" flashes on the screen.
This procedure could take some minutes. Please, be patient and
do not press any button, otherwise the automatic tuning will not
1
2
3
4
5
6
7
8
9
be completed.
When the automatic tuning procedure is complete, the Programme
Sorting menu appears on the screen:
0
• If you do not wish to change the channel order, press the MENU
button on the remote control to exit and return to the normal TV
screen.
• If you wish to change the channel order, proceed in the same way as
described in the chapter "Changing the Programme Order of the TV
channels", section b).
PROGR
MENU
RM
892
S
14
Advanced Operation - Advanced Presetting
Note: To stop the automatic tuning, press the MENU button on the
remote control.
Page 14

Advanced Operation - Advanced Presetting
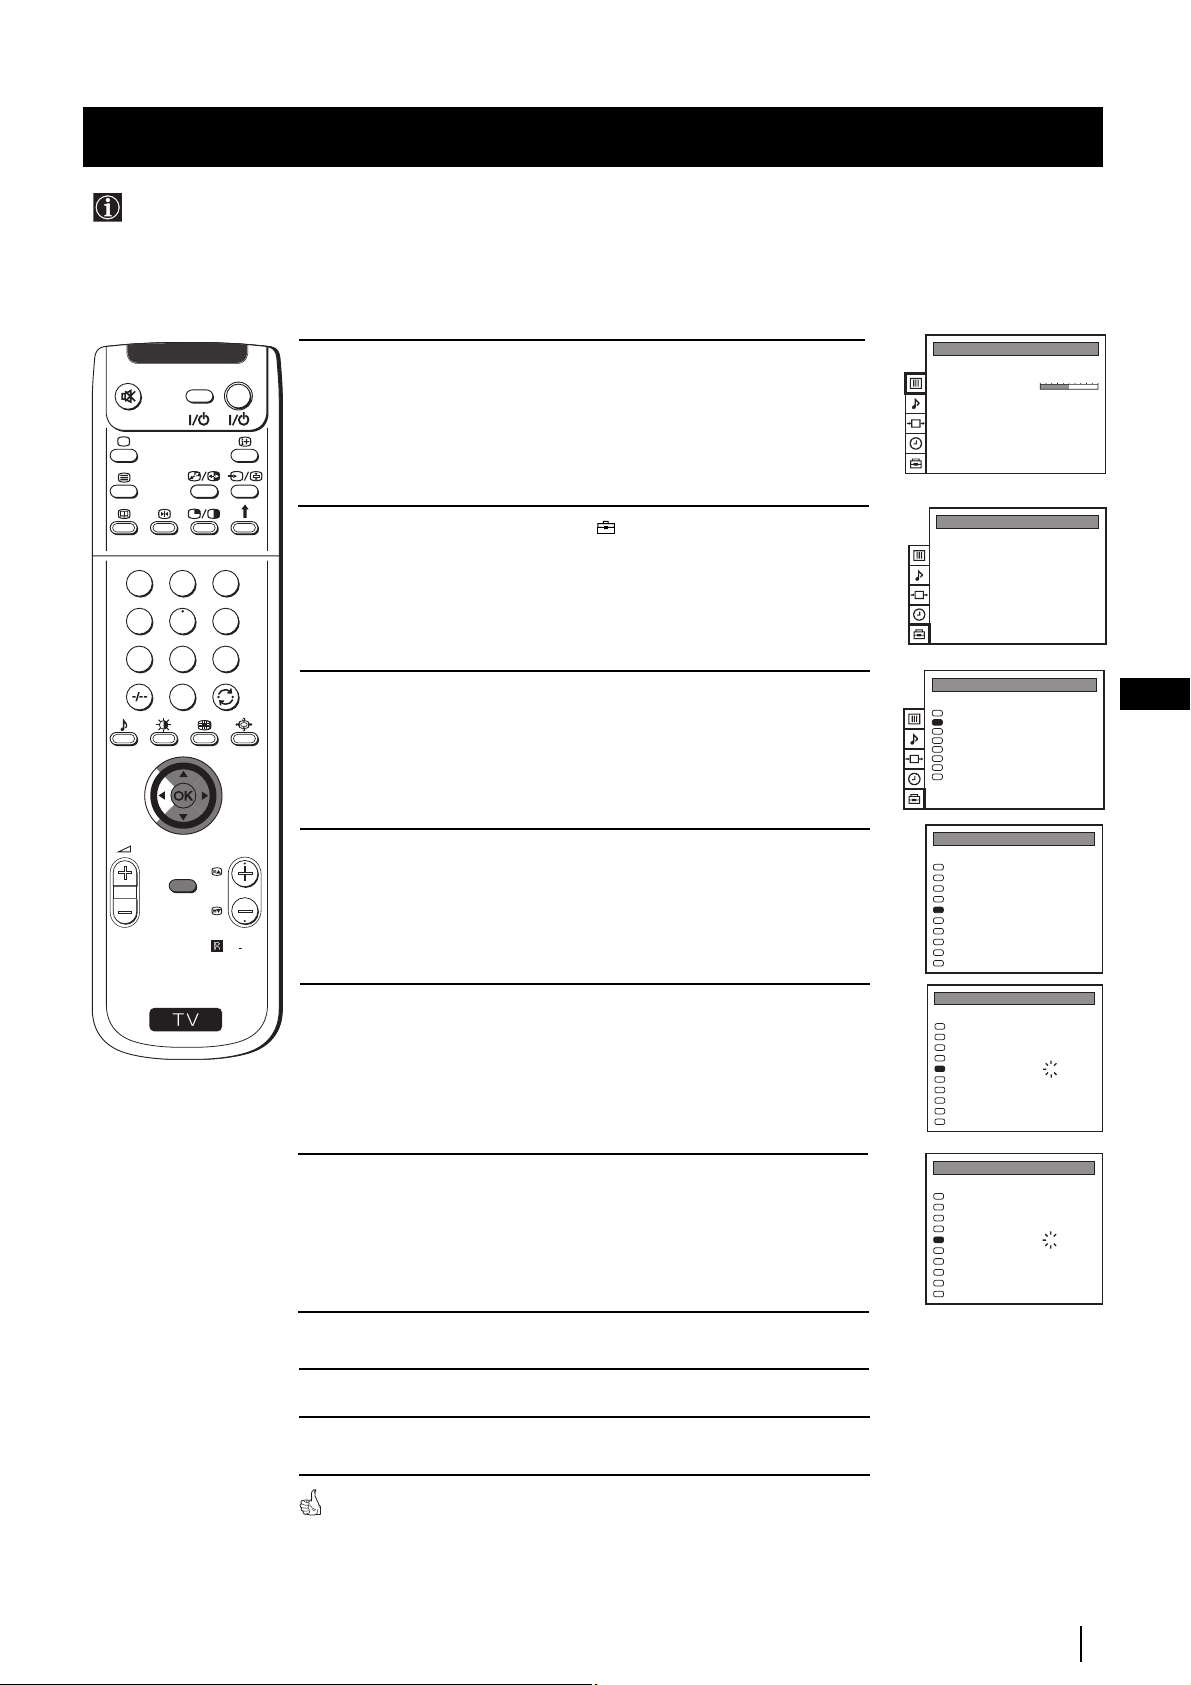
Manually Tuning the TV
Use this function to preset channels or a video input source one by one to the programme order of your choice.
1
4
7
S
VIDEO TV
2
5
8
0
MENU
3
6
9
RM
PROGR
892
1 Press the MENU button on the remote control to display the
menu on the screen.
2 Push the joystick to $ to select the symbol, then push to z to
enter to the PRESET menu.
Push the joystick to $ or 4 to select Manual Programme Preset,
3
then push to z .
Push the joystick to $ or 4 to select on which programme number
4
you want to preset a channel, then push to z.
Push the joystick to $ or 4 to select the TV Broadcast system (B/G
5
for western european countries or D/K for eastern european
countries) or a video input source (AV1, AV2...), then push to z.
PICTURE CONTROL
Picture Mode
Contrast
Reset
Format
PRESET
Auto Programme
Manual Programme Preset
Further Programme Preset
AV Label Preset
Programme Sorting
Parental Lock
Language
Convergence
PRESET
Auto Programme
Manual Programme Preset
Further Programme Preset
AV Label Preset
Programme Sorting
Parental Lock
Language
Convergence
MANUAL PROGRAMME PRESET
PROG SYS CHAN
0
1
2
3
4
5
6
7
8
9
MANUAL PROGRAMME PRESET
PROG SYS CHAN
0
1
2
3
4
5
6
7
8
9
Personal
4:3
LABEL
B/G
MV-CH
C 40
B/G
TVE-1
C 41
B/G
TVE-2
C 31
B/G
ANT-3
C 34
B/G
TELE 5
C 27
B/G
C PLUS
C 47
B/G
- - - - -
C 44
B/G
- - - - -
C 23
B/G
CNN -
C 35
B/G
BBC-W
C 28
LABEL
B/G
MV-CH
C 40
B/G
TVE-1
C 41
B/G
TVE-2
C 31
B/G
ANT-3
C 34
B/G
TELE 5
C 27
B/G
C PLUS
C 47
B/G
- - - - -
C 44
B/G
- - - - -
C 23
B/G
CNN -
C 35
B/G
BBC-W
C 28
GB
6 Push the joystick to $ or 4 to select the channel tuning, "C" for
terrestrial channels or "S" for cable channels, then push to z.
Press the number buttons to enter the channel number of the TV
7
Broadcast or push the joystick to 4 or $ to search for the next
available channel.
If you do not wish to store this channel, push the joystick to 4 or $
to continue searching for the desired channel.
8 If this is the desired channel you wish to store, press the OK button.
9 Repeat steps 4 to 8 if you wish to store more channels.
10 Press the MENU button to exit and return to the normal TV screen.
Your projection TV is now ready for use.
Advanced Operation - Advanced Presetting
MANUAL PROGRAMME PRESET
PROG SYS CHAN
0
1
2
3
4
5
6
7
8
9
MANUAL PROGRAMME PRESET
PROG SYS CHAN
0
1
2
3
4
5
6
7
8
9
LABEL
B/G
MV-CH
C 40
B/G
TVE-1
C 41
B/G
TVE-2
C 31
B/G
ANT-3
C 34
B/G
TELE 5
C 27
B/G
C PLUS
C 47
B/G
- - - - -
C 44
B/G
- - - - -
C 23
B/G
CNN -
C 35
B/G
BBC-W
C 28
LABEL
B/G
MV-CH
C 40
B/G
TVE-1
C 41
B/G
TVE-2
C 31
B/G
ANT-3
C 34
B/G
TELE 5
C 27
B/G
C PLUS
C 47
B/G
- - - - -
C 44
B/G
- - - - -
C 23
B/G
CNN -
C 35
B/G
BBC-W
C 28
15
Page 15
Advanced Operation - Advanced Presetting
Using the "Further Programme Preset" function
With this feature you can:
a) Even normally the automatic fine tuning (AFT) is operating, however you can manually fine-tune the TV to obtain a
better picture reception if the picture is distorted or
b) preset the AV3 output for the programme positions of channels with scrambled signals (eg from a pay TV decoder). In
this way a connected VCR records the unscrambled signal.
VIDEO TV
1 Press the MENU button on the remote control to display the menu on
the screen.
2 Push the joystick to $ to select the symbol, then push to z to enter
to the PRESET menu.
1
2
3
4
5
6
7
8
9
3 Push the joystick to $ or 4 to select Further Programme Preset, then
0
push to z .
4 Push the joystick to $ or 4 to select the relevant programme number,
MENU
PROGR
RM
892
then push to z repeatedly to select:
a) AFT or
b) DECODER.
PICTURE CONTROL
Picture Mode
Contrast
Reset
Format
PRESET
Auto Programme
Manual Programme Preset
Further Programme Preset
AV Label Preset
Programme Sorting
Parental Lock
Language
Convergence
PRESET
Auto Programme
Manual Programme Preset
Further Programme Preset
AV Label Preset
Programme Sorting
Parental Lock
Language
Convergence
FURTHER PROGRAMME PRESET
PROG AFT DECODER
0
1
2
3
4
5
6
7
8
9
Personal
4:3
On
Off
On
Off
On
AV1
On
Off
On
AV2
On
Off
On
Off
On
Off
On
Off
On
Off
S
The selected item changes colour.
5 a) AFT
Push the joystick to $ or 4 to fine tune the channel frequency over a
range of -15 to +15, then press the OK button.
Repeat steps 4 and 5a) if you wish to fine tune other channels.
b) DECODER
Push the joystick to $ or 4 to select AV3 and press the OK.
The picture from the decoder connected to the Euro AV :3 on
the back of the projection TV will appear on this programme
number.
Repeat steps 4 and 5b) to preset the AV3 output for other
programme positions.
6 Press the MENU button to exit and return to the normal TV screen.
Your projection TV is now ready for use.
FURTHER PROGRAMME PRESET
PROG AFT DECODER
2
0
1
2
3
4
5
6
7
8
9
FURTHER PROGRAMME PRESET
PROG AFT DECODER
0
1
2
3
4
5
6
7
8
9
Off
On
Off
On
Off
On
Off
On
Off
On
Off
On
Off
On
Off
On
Off
On
Off
On
AV3
On
Off
On
Off
On
Off
On
Off
On
Off
On
Off
On
Off
On
Off
On
Off
Advanced Operation - Advanced Presetting
16
Page 16
Advanced Operation - Advanced Presetting
Locking Programmes
This feature enables you to prevent undesirable broadcasts appearing on the screen. We suggest you use this function to
prevent children from watching programmes you consider unsuitable.
1
4
7
S
VIDEO TV
2
5
8
0
MENU
3
6
9
PROGR
RM
1 Press the MENU button on the remote control to display the menu on
the screen.
2 Push the joystick to $ to select the symbol, then push to z to enter
to the PRESET menu.
3 Push the joystick to $ or 4 to select Parental Lock, then push to z .
4 Push the joystick to $ or 4 to select the programme number with the
channel you wish to block, then press the OK button.
The symbol appears before the programme position to indicate
892
this programme is now blocked.
To unblock the programme, press the OK button again. The
symbol disappears.
PICTURE CONTROL
Picture Mode
Contrast
Reset
Format
PRESET
Auto Programme
Manual Programme Preset
Further Programme Preset
AV Label Preset
Programme Sorting
Parental Lock
Language
Convergence
PRESET
Auto Programme
Manual Programme Preset
Further Programme Preset
AV Label Preset
Programme Sorting
Parental Lock
Language
Convergence
PARENTAL LOCK
SYS CHAN LABEL
PROG
B/G
0
C 40
B/G
1
C 41
B/G
2
C 31
B/G
3
C 34
B/G
4
C 27
B/G
5
C 47
B/G
6
C 44
B/G
7
C 23
B/G
8
C 35
B/G
9
C 28
Personal
4:3
MV-CH
TVE-1
TVE-2
ANT-3
TELE 5
C PLUS
- - - - -
- - - - CNN -
- - - - -
GB
5 Repeat step 4 if you wish to block other channels.
6 Press the MENU button to exit and return to the normal TV screen.
When you select a blocked programme the screen appears in black, with
symbol.
Advanced Operation - Advanced Presetting
17
Page 17
Advanced Operation - Advanced Presetting
Skipping Programme positions
You can programme this projection TV to skip any unwanted programme numbers when they are selected with the PROGR
+/- buttons. To cancel this function afterwards, proceed in the same way as described below by selecting the appropriate
TV system (B/G or D/K) instead of "- - -" in step 5.
VIDEO TV
1 Press the MENU button on the remote control to display the menu on
the screen.
2 Push the joystick to $ to select the symbol, then push to z to enter
to the PRESET menu.
1
2
3
4
5
6
7
8
9
3 Push the joystick to $ or 4 to select Manual Programme Preset, then
0
MENU
PROGR
RM
892
push to z .
4 Push the joystick to $ or 4 to select the programme position you want
to skip, then push to z to enter to the SYS column.
PICTURE CONTROL
Picture Mode
Contrast
Reset
Format
PRESET
Auto Programme
Manual Programme Preset
Further Programme Preset
AV Label Preset
Programme Sorting
Parental Lock
Language
Convergence
PRESET
Auto Programme
Manual Programme Preset
Further Programme Preset
AV Label Preset
Programme Sorting
Parental Lock
Language
Convergence
MANUAL PROGRAMME PRESET
PROG SYS CHAN
0
1
2
3
4
5
6
7
8
9
Personal
4:3
LABEL
B/G
MV-CH
C 40
B/G
TVE-1
C 41
B/G
TVE-2
C 31
B/G
ANT-3
C 34
B/G
TELE 5
C 27
B/G
C PLUS
C 47
B/G
- - - - -
C 44
B/G
- - - - -
C 23
B/G
CNN -
C 35
B/G
BBC-W
C 28
S
5 Push the joystick to $ to select “- - -”, then press the OK button to
store.
6 Repeat steps 4 and 5 to skip other unused programme positions.
7 Press the MENU button to exit and return to the normal TV screen.
When changing channels (TV Broadcasts) with the PROGR +/- buttons,
the skipped programme positions do not appear. You can, however, still select
them using the number buttons.
MANUAL PROGRAMME PRESET
PROG SYS CHAN
0
1
2
3
4
5
6
7
8
9
LABEL
B/G
MV-CH
C 40
B/G
TVE-1
C 41
B/G
TVE-2
C 31
B/G
ANT-3
C 34
B/G
TELE 5
C 27
B/G
C PLUS
C 47
B/G
- - - - -
C 44
B/G
- - - - -
C 23
B/G
CNN -
C 35
- - -
BBC-W
C 28
Advanced Operation - Advanced Presetting
18
Page 18
Advanced Operation - Advanced Presetting
Labelling a channel
Names for channels (TV Broadcasts) are usually taken automatically from Teletext if available. You can however name a
channel or an input video source using up to five characters (letters or numbers). Using this function, you can easily
identify which channel (TV Broadcasts) or video source you are watching.
1
4
7
S
VIDEO TV
2
5
8
0
MENU
3
6
9
RM
PROGR
892
1 Press the MENU button on the remote control to display the menu on
the screen.
2 Push the joystick to $ to select the symbol, then push to z to enter
to the PRESET menu.
3 Push the joystick to $ or 4 to select Manual Programme Preset, then
push to z.
4 Push the joystick to $ or 4 to select the programme number with the
channel you wish to name.
5 Push the joystick to z repeatedly until the first element of the LABEL
column is highlighted.
PICTURE CONTROL
Picture Mode
Contrast
Reset
Format
PRESET
Auto Programme
Manual Programme Preset
Further Programme Preset
AV Label Preset
Programme Sorting
Parental Lock
Language
Convergence
PRESET
Auto Programme
Manual Programme Preset
Further Programme Preset
AV Label Preset
Programme Sorting
Parental Lock
Language
Convergence
MANUAL PROGRAMME PRESET
PROG SYS CHAN LABEL
0
1
2
3
4
5
6
7
8
9
MANUAL PROGRAMME PRESET
PROG SYS CHAN LABEL
0
1
2
3
4
5
6
7
8
9
Personal
4:3
B/G
- - - - -
C 40
B/G
- - - - -
C 41
B/G
- - - - -
C 31
B/G
- - - - -
C 34
B/G
- - - - -
C 27
B/G
- - - - -
C 47
B/G
- - - - -
C 44
B/G
- - - - -
C 23
B/G
- - - - -
C 35
B/G
- - - - -
C 28
B/G
- - - - -
C 40
B/G
- - - - -
C 41
B/G
- - - - -
C 31
B/G
- - - - -
C 34
B/G
- - - - -
C 27
B/G
- - - - -
C 47
B/G
- - - - -
C 44
B/G
- - - - -
C 23
B/G
- - - - -
C 35
B/G
- - - - -
C 28
GB
6 Push the joystick to $ or 4 to select a letter or number (select “-” for
a blank), then push to z to confirm this character. Select the other four
characters in the same way.
7 After selecting all the characters, press the OK button.
Repeat steps 4 to 7 if you wish to label other channels.
8
9 Press the MENU button to exit and return to the normal TV screen.
When you select a named channel, the name appears for a few seconds on the
screen.
Advanced Operation - Advanced Presetting
MANUAL PROGRAMME PRESET
PROG SYS CHAN LABEL
B/G
0
1
2
3
4
5
6
7
8
9
B/G
B/G
B/G
B/G
B/G
B/G
B/G
B/G
B/G
C 40
C 41
C 31
C 34
C 27
C 47
C 44
C 23
C 35
C 28
- - - - -
- - - - -
- - - - -
- - - - A- - - -
- - - - -
- - - - -
- - - - -
- - - - -
- - - - -
19
Page 19
Advanced Operation - Advanced TV Operation
Adjusting the Picture
Although the picture is adjusted at the factory, you can modify it to suit your own taste.
PICTURE CONTROL
Picture Mode
Contrast
Reset
Format
Personal
4:3
VIDEO TV
1 Press the MENU button on the remote control to display the menu
on the screen.
2 Push the joystick z to enter the PICTURE CONTROL menu.
3 Push the joystick to $ or 4 to select the item you wish to change,
then push to z.
Refer to the table below to chose the item and for the effect of
each control:
1
2
3
4
5
6
Picture Mode z Picture Mode z Personal (for individual settings)
z Movie (for films)
z Live (for live broadcast programmes)
7
8
9
0
$ Brightness* Z Darker z Brighter
$ Colour* Z Less z More
$ Sharpness* Z Softer z Sharper
$ Hue** Z Greenish z Reddish
Contrast Z Less z More
K
Mode")
MENU
PROGR
Reset Resets picture to the factory preset levels.
Format (for detalis refer to the section "Changing the Screen
* Can only be altered if Personal Picture Mode is selected.
RM
892
** Only avalaible for NTSC colour signal (e.g: USA video tapes).
PICTURE CONTROL
Picture Mode
Contrast
Reset
Format
PICTURE MODE
Picture Mode
Brightness
Colour
Sharpness
Hue
Personal
4:3
Personal
S
4 Push the joystick to Z or z to alter the selected item, then
press the OK button to store the new adjustment.
5 Repeat steps 3 and 4 to alter the other items.
6 Press the MENU button to exit and return to the normal TV screen.
Changing the Picture Mode Quickly
You can quickly change the Picture Mode without entering the
Picture Control menu screen.
1 Press the button on the remote control to directly access the
Picture Mode.
2 Push the joystick to $ or 4 to select your desired picture mode
(Personal, Movie or Live), then press the OK button to remove the
display from the screen.
Personal
Movie
Live
Advanced Operation - Advanced TV Operation
20
Page 20
Advanced Operation - Advanced TV Operation
Changing the screen mode
Using this Screen Mode feature you can change the aspect ratio of the screen.
PICTURE CONTROL
Picture Mode
Contrast
Reset
Format
Personal
4:3
VIDEO TV
1 Press the MENU button on the remote control to display the menu
on the screen.
2 Push the joystick to z button to enter the PICTURE CONTROL
menu.
3 Push the joystick to $ to select Format.
4 Push the joystick to z repeatedly to select:
1
2
3
4
5
6
• 4:3: conventional 4:3 picture.
PICTURE CONTROL
Picture Mode
Contrast
Reset
Format
Personal
4:3
• 16:9: for 16:9 broadcasts.
7
8
9
0
Press rhe OK button.
GB
5 Press the MENU button to exit and return to the normal TV screen.
4:3
PROGR
MENU
S
RM
892
Changing the Picture Mode Quickly
16:9
You can quickly change the Picture Mode without entering the
Picture Control menu screen.
1 Press the button on the remote control repeatedly to select your
desired format screen mode (4:3 or 16:9).
Advanced Operation - Advanced TV Operation
21
Page 21
Advanced Operation - Advanced TV Operation
Adjusting the Sound
Although the sound is adjusted at the factory, you can modify it to suit your own taste.
PICTURE CONTROL
Picture Mode
Contrast
Reset
Format
Personal
4:3
VIDEO TV
1 Press the MENU button on the remote control to display the menu
on the screen.
2 Push the joystick to $ to select the symbol, then push to z to enter
to the SOUND CONTROL menu.
3 Push the joystick $ or 4 to select the item you wish to change, then
push to z.
Refer to the table below to chose the item and for the effect of
each control.
1
2
3
Sound Mode z Mode z Personal (for individual settings)
4
5
6
7
8
9
0
$ Treble* Z Less z More
z Rock
z Jazz
z Pop
$ Bass* Z Less z More
Balance Z Left z Right
K
z On: Simulates the sound effect of Dolby Pro Logic
surround.
MENU
PROGR
Reset Resets sound to the factory preset levels.
Dolby** Virtual z Off: Normal
SOUND CONTROL
Sound Mode
Balance
Reset
Dolby Virtual
Dual Sound
Volume Offset
Volume
Dual Sound
Speaker
SOUND MODE
Mode
Treble
Bass
Personal
Off
Mono
0
Mono
Main
Personal
S
RM
892
Dual Sound • For a stereo broadcast:
z Mono
z Stereo
• For a bilingual broadcast:
z Mono (for mono channel if available)
z A (for channel 1)
z B (for channel 2)
Volume Offset Z -12 .......... z +12
The channel volume level can be adjusted over a range
of -12 to +12.
Headphones:
Volume Z Less z More
Dual Sound • For a stereo broadcast:
z Mono
z Stereo
• For a bilingual broadcast:
z Mono (for mono channel if available)
z A (for channel 1)
z B (for channel 2)
Speaker
z Main: sound from projection TV set
z Centre in: sound from external amplifier
* Can be only altered if "Personal" mode is selected.
Advanced Operation - Advanced TV Operation
22
Page 22

Advanced Operation - Advanced TV Operation
VIDEO TV
press the OK button to store the new adjustment.
5 Repeat steps 3 and 4 to alter the other items.
6 Press the MENU button to exit and return to the normal TV screen.
1
2
4 Push the joystick Z or z to alter the selected item, then
3
4
5
6
7
8
9
0
PROGR
MENU
**This TV has been designed to create “Dolby Surround” sound
effect simulating the sound of four speakers with two speakers,
in case the broadcasted audio signal is a Dolby Surround
encoded programme. Besides that, the sound effect can also be
improved by connecting your external amplifier (for details
refer to “Connecting to external audio Equipment” on page 27).
** Manufactured under license from Dolby Laboratories. “Dolby”,
“Pro Logic” and the double-D symbol are trademarks of
Dolby Laboratories.
GB
S
RM
892
Changing Sound Mode Quickly
You can quickly change Sound mode without entering the Sound
Control menu screen.
1 Press the button on the remote control to directly access to the
Sound Mode.
2 Push the joystick to $ or 4 to select your desired sound mode
(Personal, Rock, Jazz or Pop), then press the OK button to remove
the display from the screen.
Personal
Rock
Jazz
Pop
Advanced Operation - Advanced TV Operation
23
Page 23
Advanced Operation - Advanced TV Operation
Using the Sleep Timer
This function provides an overview of some of the features available on this set.
VIDEO TV
on the screen.
2 Push the joystick to $ button to select the t symbol, then push to z
to enter to the TIMER menu.
1
2
3
4
5
6
7
8
1 Press the MENU button on the remote control to display the menu
9
0
3 Push the joystick to z, then push to Z or z repeatedly to set the time
period delay
PICTURE CONTROL
Picture Mode
Contrast
Reset
Format
TIMER
Sleep Timer
TIMER
Sleep Timer
Personal
4:3
Off
1:00
Off z 0:30 z 1:00..... 4:00 hours
4 Press the OK button.
PROGR
MENU
S
5 Press the MENU button to exit and return to the normal TV screen.
RM
892
One minute before the projection TV switches into standby mode, the
indication "0:01" is displayed on the screen automatically.
Notes: • When watching the TV, press the button on the remote
control to display the time remaining.
• To return to normal operation from standby mode, press the
TV button on the remote control.
Advanced Operation - Advanced TV Operation
24
Page 24
Teletext
Viewing Teletext
Teletext is an information service transmitted by most TV stations.
Make sure to use a TV channel with a strong signal, otherwise teletext errors may occur.
VIDEO TV
Select the TV channel which carries the teletext service you wish to
1
view.
2 Press the button on the remote control to switch on the teletext.
1
2
3
4
5
6
7
8
9
0
3 Input three digits for the page number, using the numbered buttons
on the remote control. (if you have made a mistake, type in any three
digits and then, re-enter the correct page number).
TELETEXT
Index
Programme
News
Sport
Weather
25
153
101
98
TELETEXT
Index
Programme
News
Sport
Weather
25
153
101
98
GB
4 Press the button to switch off teletext.
Using other Teletext functions
PROGR
Selecting Teletext
MENU
TO PRESS THE BUTTON
S
Access the next or preceding page for next page or
RM
892
for the preceding page
Superimpose teletext on to the TV
Press again to cancel teletext
TELETEXT
Index
Programme
News
Sport
Weather
25
153
101
98
mode.
TELETEXTTELETEXT
Index
Programme
25
News
153
Sport
Freeze a teletext page
Weather
101
98
Press again to cancel the
freeze.
Reveal concealed information
(e.g. answer to a quiz) Press again to cancel.
Using Fastext
Fastext lets you access pages with one button stroke.
When Fastext is broadcast, a colour coded menu appears at the
bottom of the teletext page. Press the colour button (red, green,
yellow or blue) on the remote control to access the corresponding
page.
Teletext
25
Page 25
Optional Connections
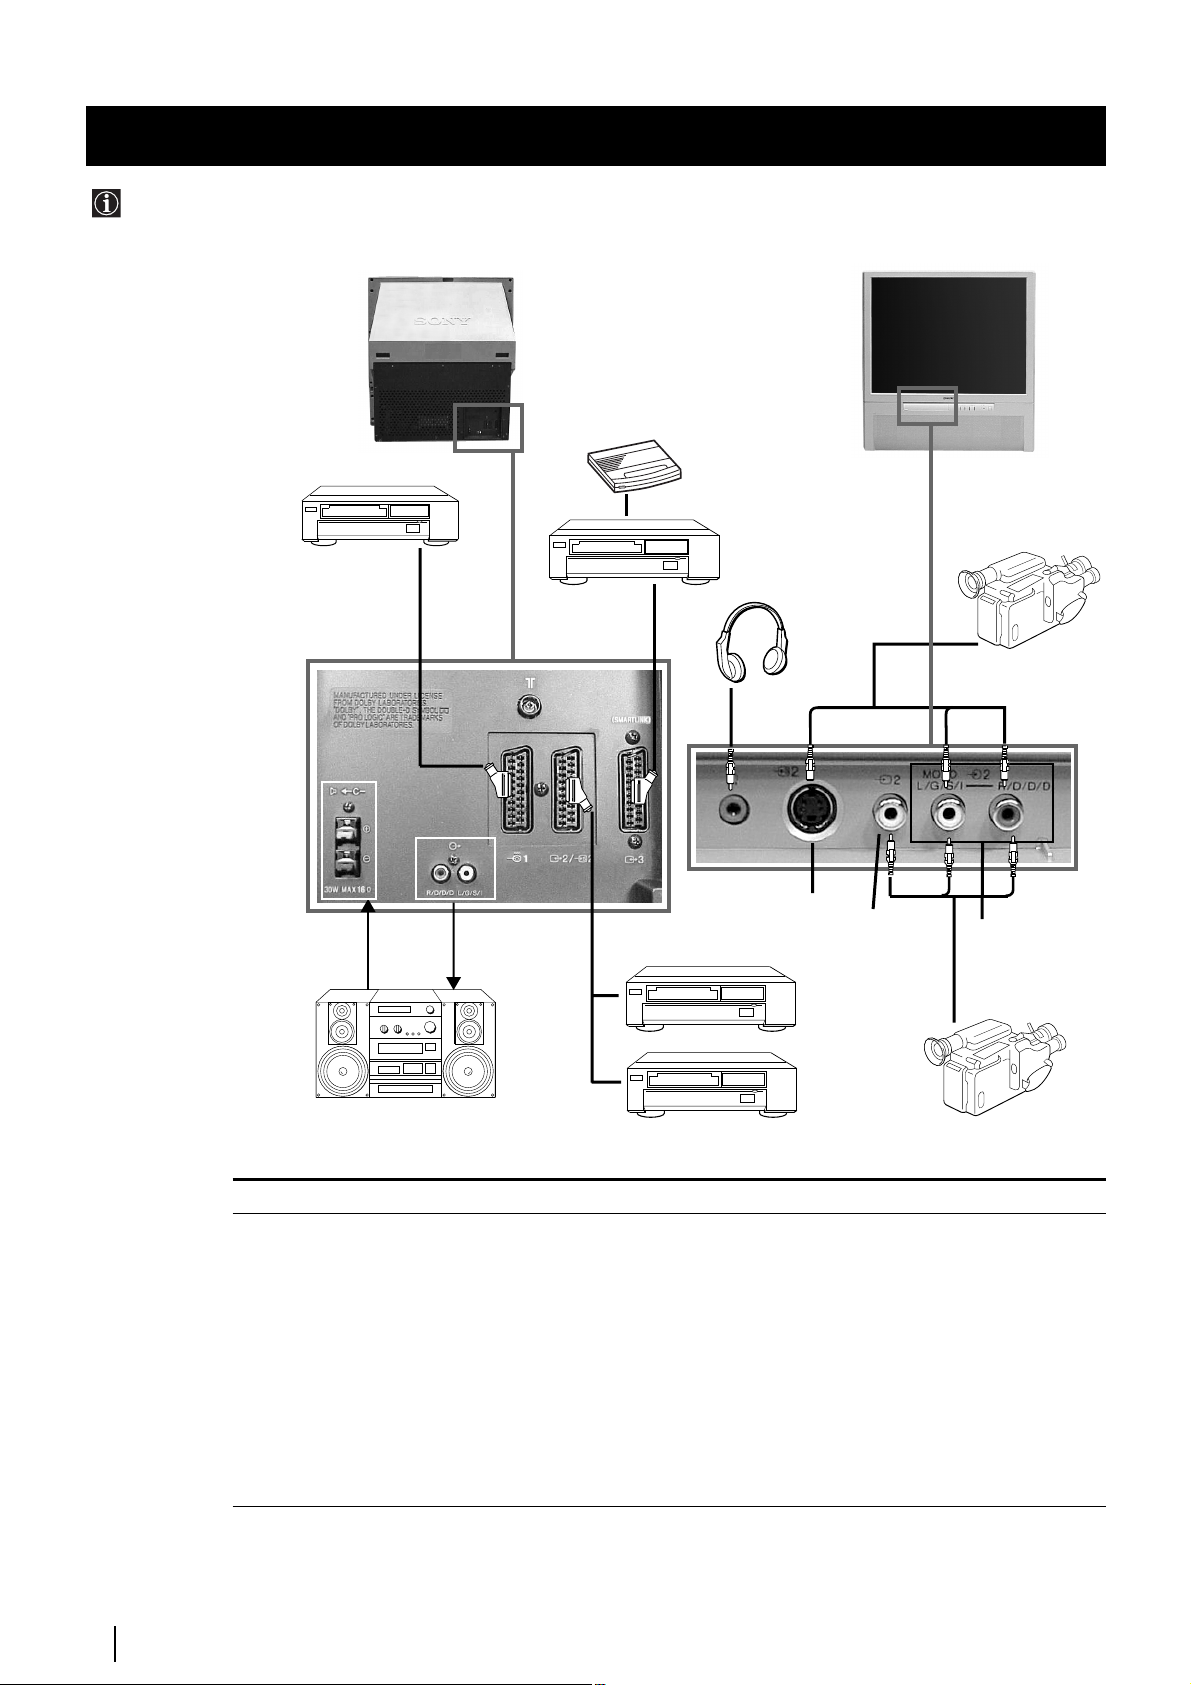
Connecting Optional Equipment
Using the following instructions, you can connect a wide range of optional equipment to your projection TV.
Rear of projection TV Front of projection TV
Decoder
DVD
VCR
To avoid picture
distortion:
• Do not connect
equipment to F
and Gconnectors
at the same time.
• Do not connect any
equipment on the
front connectors
together with D
connector.
Acceptable input signal
A Centre speaker input.
B No inputs
C Audio/video and RGB signal
D Audio/video and S video signal
E Audio/video signal
F S Video signal
G Video signal
H Audio signal
C
A
Set “Speaker” on the SOUND
CONTROL menu to “Centre in”.
B
Hi-Fi
E
S VHS/Hi8
camcorder
F
D
VCR
DVD
G
H
8mm/Hi8
camcorder
Available output signal
No outputs
Audio signal.
Video/audio displayed on TV tuner.
Video/audio from selected source.
Video/audio from selected source (the same output source as
the :2/q 2 connector)
No output.
No output.
No output.
26
Optional Connections
Page 26
Optional Connections
Using Optional Equipment
Additional Information when connecting equipment
Connecting a VCR
We recommend you connect your VCR to the D or E socket using a scart lead. If you do not have a scart lead, use the “Manually
Tuning the TV” section of this instruction manual to tune in the VCR signal to TV programme number “0”.
If your video supports Smartlink please refer the "Smartlink" section of this instruction manual.
Connecting to External Audio Equipment
1 To listen to the audio of your projection TV on the Hi-Fi equipment:
Plug in your Dolby Prologic system decoder amplifier to the B sockets on the rear of the projection TV if you wish to amplify
the audio output from the TV.
The output level from B sockets can be varied by adjusting the volume of the headphones. Refer to the “Adjusting the sound”
section of this instruction manual to adjust the volume of the headphones.
Right Hi-Fi
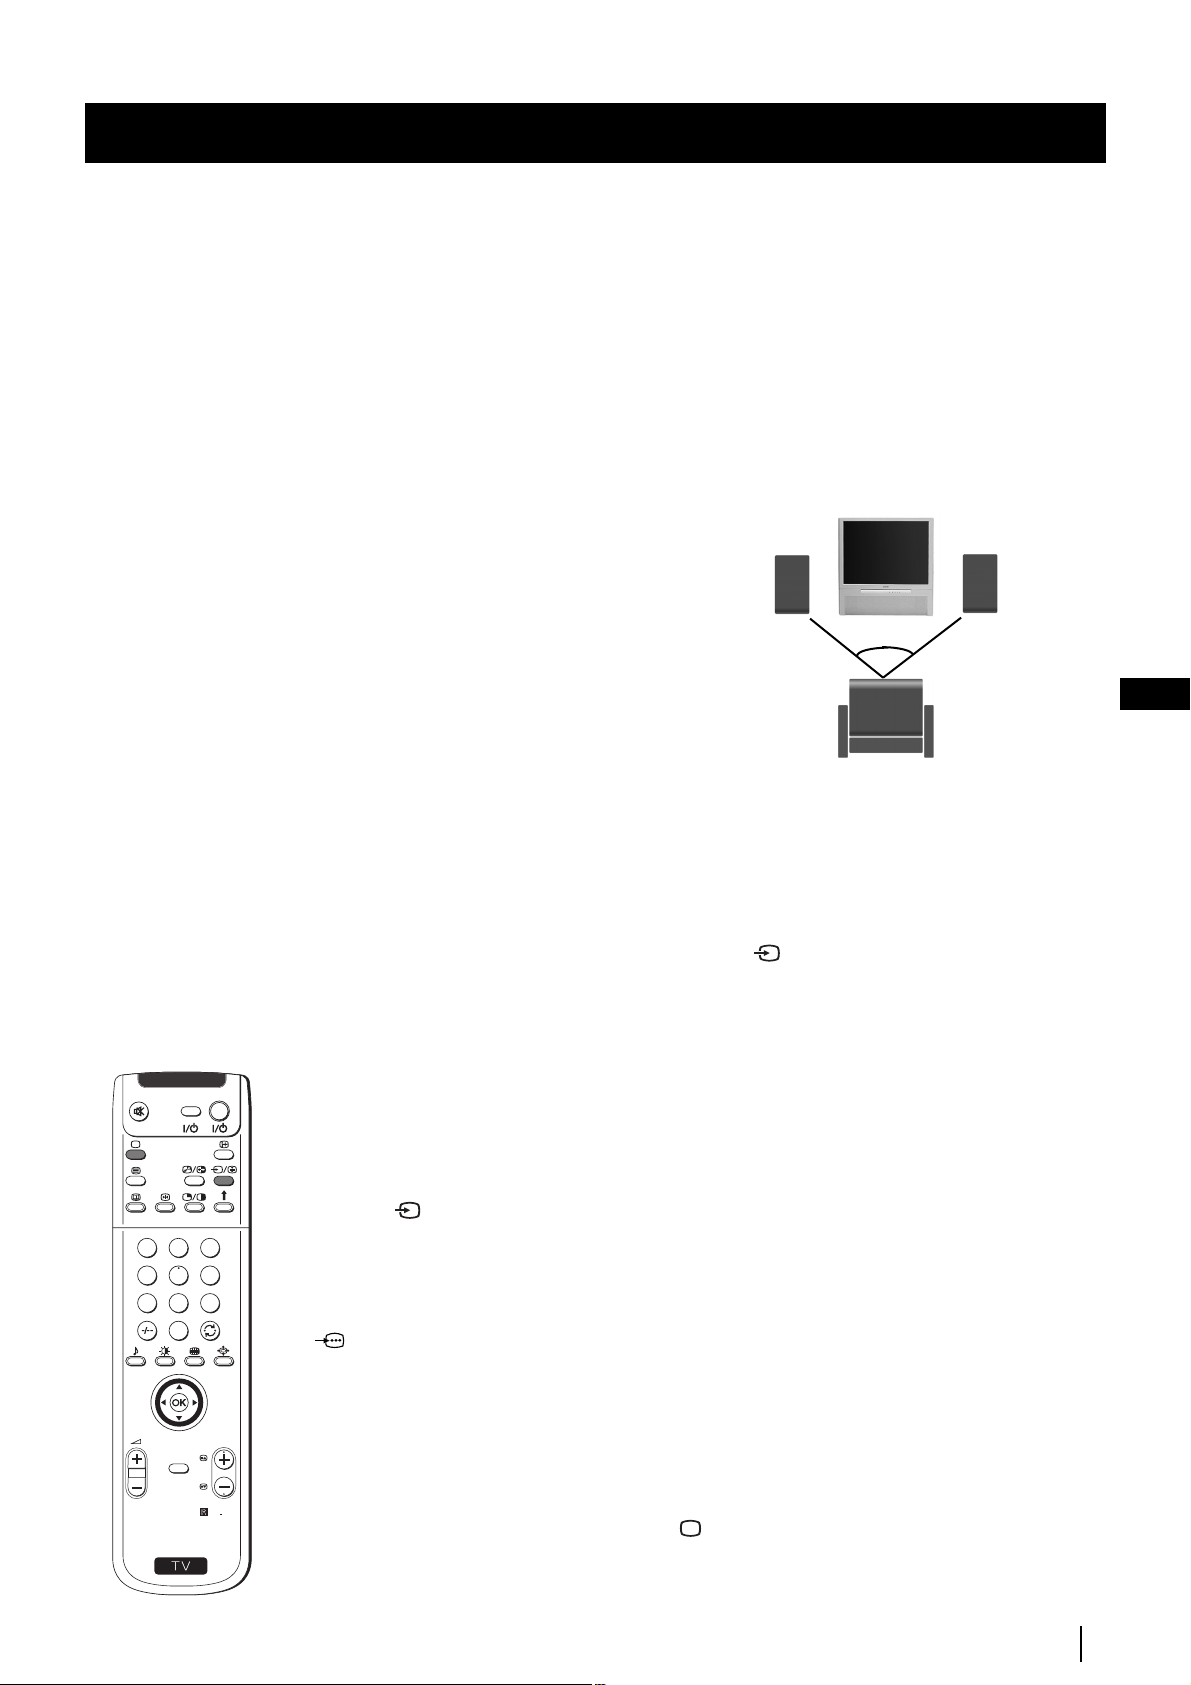
Speaker
To enjoy “Dolby Virtual” sound effect through
your Hi-Fi equipment:
Place the speakers of your equipment in front of
your sitting place and besides the TV set but
keeping a distance of 50 cm from each speaker to
the TV set.
Then by using the menu system, select the menu “Sound
Control” and set “Dolby Virtual” to “On”.
Left Hi-Fi
Speaker
~50º
GB
2 To listen to the Dolby amplifier equipment on the projection TV speakers:
Your sitting position
Plug in your Hi-Fi equipment to the A socket on the rear of the projection TV
if you wish to listen to the audio output from your Hi-Fi on the projection TV
speaker. If you have a Dolby amplifier, connect the centre output from your amplifier
to the A socket to use the projection TV as a centre speaker. Refer to the “Adjusting the Sound”
section of this instruction manual and set the option "Speaker" to "Centre in".
For mono equipment
Connect the phono plug to the L/G/S/I socket on the front of the TV and select the 2 input signal using the instructions on
this page below.
Select and View the Input Signal
VIDEO TV
1 Connect your equipment to the designated projection TV socket, as it is indicated on the
previous page.
2 Switch on the connected equipment.
3 Press the button repeatedly on your remote control until the correct input symbol
1
2
3
4
5
6
7
8
9
0
appears on the screen.
Symbol Input signals
kkkk • Audio/video input signal through the Euro AV connector C
• RGB input signal through the Euro AV connector C
KK
KK
• Audio/Video input signal through the Euro AV connector D or the
phono sockets H and G.
MENU
S
PROGR
RM
qqqq
2 • Audio/S Video input signal through the Euro AV connector D or the
sockets H and F.
…………
3 • Audio/Video input signal through the Euro AV connector E.
892
4 To return to the normal TV picture, press the button on the remote control.
Optional Connections
27
Page 27
Optional Connections
VCR
Decoder
Smartlink
Smartlink is a direct link between your projection TV set and a VCR.
For Smartlink you need:
• A VCR which supports Smartlink, NextView Link, Easy Link or Megalogic.
Megalogic is a trademark of Grundig Corporation.
EasyLink is a trademark of Philips Corporation.
• A fully-wired 21 pin SCART cable to connect your VCR to the Euro AV connector :3
(SMARTLINK) on the rear of the Projection TV.
The features of Smartlink are:
• Tuning information such as the channel overview are downloaded from the Projection TV set
to the VCR.
• Direct projection TV recording: While watching TV you need to press just one button on the
VCR to record this programme.
Rear of projection TV
• Projection TV in standby mode: Press the "Play z" button on your VCR to switch the TV
automatically on.
If you have connected a decoder to a VCR which supports Smartlink feature, select the
menu Further Programme Preset in the (PRESET) menu and select DECODER AV3
to each codified channel. For more details, please refer to the section "Using the Further
Programme Preset function" of this instruction manual.
For more information on Smartlink, please refer to the Instruction Manual of your
VCR.
Remote Control of other Sony Equipment
Using the buttons underneath the cover of the remote control you can
control other Sony equipment.
1 Open the cover of the Remote Control.
2 Set the selector VTR 1234 DVD according to the equipment you want to control:
VTR 1 Beta VCR
VTR 2 8 mm VCR
VTR 3 VHS VCR
VTR 4 Digital Video (DCR-VX 1000/9000 E, VHR-1000)
DVD Digital Video Disk
VIDEO TV
VTR 1 2 3 4 DVD
CH
3 Use the buttons underneath the cover on the remote control to operate the
equipment.
• If your video equipment has a COMMAND MODE selector, set this
selector to the same position as the VTR 1234 DVD selector on the
TV Remote Control.
• If the equipment does not have a certain function, the corresponding
button on the remote control does not work.
Optional Connections
28
VTR 1 2 3 4 DVD
CH
Page 28
Optional Connections
Selecting the output source for the Euro AV connectors
Using this function you can record on your VCR any signal coming from an external equipment connected to the Euro AV
connectors :2/q 2 or :3 placed on the rear of the projection TV.
In that case you have to select the output source as described below (if your VCR support Smartlink, this procedure is not
necessary).
VIDEO TV
1 Press the MENU button on the remote control to display the menu on
the screen.
2 Push the joystick to $ to select the symbol, then push to z button
to enter to the VIDEO CONNECTION menu screen.
1
2
3
4
5
6
7
8
9
0
3 Push the joystick to $ or 4 button to highlight:
TV Screen (input source for the TV screen) or
PICTURE CONTROL
Picture Mode
Contrast
Reset
Format
VIDEO CONNECTION
TV Screen
Output
TV
Personal
4:3
[TV - - - - - - -]
[AV1 - - - - - - -]
AV1
GB
Output (output source available for :2/q 2 and :3 Euro
AV connectors).
Push the joystick to z to confirm.
PROGR
MENU
4 Push the joystick to Z or z repeteadly to select the desired source:
S
RM
892
TV Screen TV, AV1, RGB, AV2, YC2 or AV3
Output TV, AV1, AV2, YC2, AV3 or AUTO
Then press the OK button to confirm.
If you select "AUTO", the output signal will always be the same
one that is displayed on the screen.
If you have connected a decoder, please remember to change
back the Output to "TV" for correct unscrambling.
5 Press the MENU button to exit and return to the normal TV screen.
The selected signal is available for your optional equipment connected to
the appropriate Euro AV connector.
Optional Connections
29
Page 29
Optional Connections
Using the AV Label Preset feature
This function enables you to designate a name to the optional equipment you have connected to the sockets of this
projection TV. This name can be up to 5 characters (letters or numbers).
1
4
7
S
VIDEO TV
2
5
8
0
MENU
3
6
9
RM
PROGR
892
1 Press the MENU button on the remote control to display the menu on
the screen.
2 Push the joystick to $ to select the symbol, then push to z to
enter to the PRESET menu screen.
3 Push the joystick to $ or 4 to select AV Label Preset, then push
to z.
4 Push the joystick to $ or 4 select the input source you wish to name
(eg AV2), then push to z to highlight the first element of the LABEL
column.
5 Push the joystick to $ or 4 to select a letter or number (select “-” for
a blank) then push to z to confirm this character. Select the other four
characters in the same way.
PICTURE CONTROL
Picture Mode
Contrast
Reset
Format
PRESET
Auto Programme
Manual Programme Preset
Further Programme Preset
AV Label Preset
Programme Sorting
Parental Lock
Language
Convergence
PRESET
Auto Programme
Manual Programme Preset
Further Programme Preset
AV Label Preset
Programme Sorting
Parental Lock
Language
Convergence
AV LABEL PRESET
INPUT LABEL
AV1
RGB
AV2
YC2
AV3
AV LABEL PRESET
INPUT LABEL
AV1
RGB
AV2
YC2
AV3
- - - - -
- - - - -
- - - - -
- - - - -
- - - - -
- - - - -
- - - - A- - - -
- - - - -
- - - - -
Personal
4:3
Optional Connections
30
6 After selecting all the characters, press the OK button.
7 Repeat steps 4 to 6 if you wish to label other input sources.
8 Press the MENU button to exit and return to the normal TV screen.
Whenever the equipment with the labeled input is selected for use, the
name appears for a few seconds on the screen.
Page 30
Additional Information
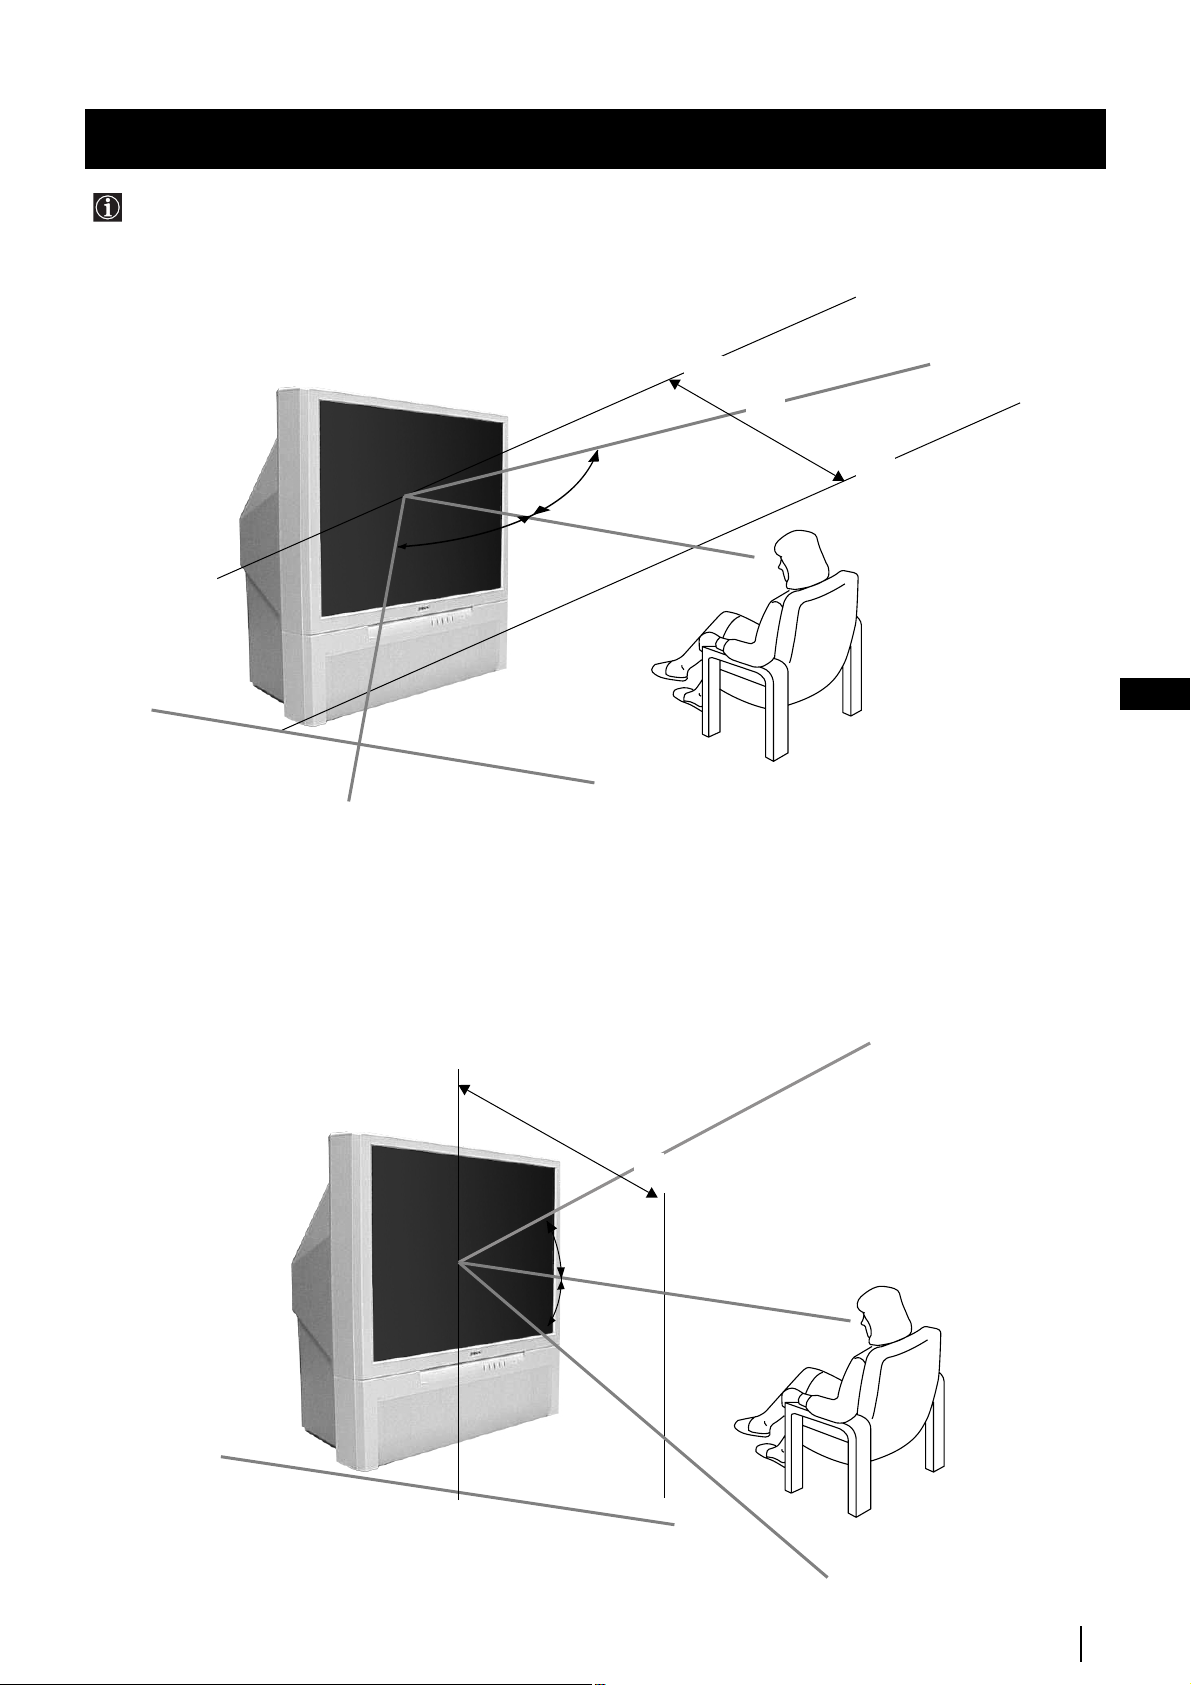
Optimum Viewing Area
For the best picture quality, try to position the projection TV so that you can view the screen from within the areas
shown below.
Horizontal viewing area
2.1m (Minimum optimum distance)
75º
75º
GB
(Optimum viewing position)
Vertical viewing area
2.1m (Minimum optimum distance)
27.5°
27.5°
(Optimum viewing position)
Additional Information
31
Page 31

Additional Information
Specifications
TV system
B/G/H, D/K
Colour system
PAL, SECAM
NTSC 3.58, 4.43 (only Video In)
Channel coverage
VHF: E2-E12
UHF: E21-E69
CATV: S1-S20
HYPER: S21-S41
D/K: R1-R12, R21-R69
Projected picture size
41 inches
Approx. 130 measured diagonally
Rear Terminals
• Centre speaker input terminals (2
• (L, R) audio outputs (phono jacks)
• :1/ 21-pin Euro connector (CENELEC
• :2/q 2 21-pin Euro connector (CENELEC
(SMARTLINK)
Front Terminals
C
terminals)
standard) including audio/video
input, RGB input, TV audio/video
output.
standard) including audio/video
input, S video input, selectable
audio/video output
• :3 21-pin Euro connector (CENELEC
standard) including audio/video
input, selectable audio / video
output (selectable the same output
source as :2/q 2 connector) and
Smartlink interface
…2 video input - phono jack
2
audio inputs - phono jacks
q2 S video input - 4 pin DIN
Headphones jack - minijack stereo
Sound output
2 x 30 W (music power)
2 x 15 W (RMS)
Centre SP input
30 W (RMS) (using as the centre speaker)
Power consumption
145 W
Standby Power consumption
0.7 W
Dimensions (w x h x d)
Approx. 948 x 992 x 511 mm
Weight
Approx. 43 kg
Accessories supplied
1 Remote Control (RM-892)
2 Batteries (IEC designated)
Other features
Digital Comb filter (High resolution)
TELETEXT, Fastext, TOPtext
NICAM
Sleep Timer
Smartlink
Dolby Virtual
Design and specifications are subject to change without notice.
Ecological Paper - Totally Chlorine Free
Additional Information
32
Page 32

Additional Information
Troubleshooting
Here are some simple solutions to the problems which may affect the picture and sound.
Problem
No picture (screen is dark), no sound.
Poor or no picture (screen is dark),
but good sound.
Poor picture quality when watching a
RGB video source.
Good picture, no sound
Solution
• Plug the projection TV in.
• Press the
• If the indicator is on, press TV button or a programme
number button on the remote control.
• Check the aerial connection.
• Turn the projection TV off for 3 or 4 seconds and then turn it
on again using the
TV.
• Using the MENU system, select the Picture Adjustment
display.
Adjust the brightness, picture and colour balance levels.
• From the Picture Adjustment display select Reset to return
to the factory settings.
• Press the button repeatedly on the remote control until
the RGB symbol is displayed on the screen.
• Press the +/- button on the remote control.
• If is displayed on the screen, press the button on the
control.
• Check that "Main" speaker is selected on the SOUND
CONTROL menu.
button on the front of the projection TV.
button on the front of the projection
GB
No colour on colour programmes
Distorted picture when changing
programmes or selecting teletext
Noisy picture when viewing TV channel
Remote control does not function
The standby indicator on the set
flashes.
• If you continue to have these problems, have your TV serviced by qualified personnel.
• NEVER open the casing yourself.
• Using the MENU system, select the Picture Adjustment
display. Adjust the colour balance.
• From the Picture Adjustment disply select Reset to return to
the factory settings.
• Turn off any equipment connected to the 21 pin Euro
connectors on the rear of the TV.
• Adjust Fine Tuning (AFT) to obtain better picture reception.
For details, please refer to the section "Using the Further
Programme Preset function"
• Replace the batteries.
• Contact your nearest Sony service centre.
Additional Information
33
Page 33

Projection TV
Děkujeme Vám, že jste si vybrali tento aparát SONY.
Před použitím tohoto aparátu si pozorně přečtěte tento návod k obsluze a
zachovejte ho pro budoucí informaci.
Kódy pro užívání tohoto návodu k obsluze:
•
Použijte
jeho základními funkcemi.
•
Použijte
doplňkovými charakteristikami aparátu.
•
Znaky, které užíváme v tomto návodu k obsluze:
•
•
“Počáteční postupy”
“Pokročilé operace”
Varování před možným nebezpečím.
Důležité informace.
, jestliže si přejete zapnout aparát a seznámit se s
, jestliže si přejete seznámit se podrobněji s
Návod k obsluze
CZ
•
•
•
•
•
1,2...
MENU
K
Informace o funkci.
Posloupnost ovládacích kroků.
Šedá výplň tlačítek dálkového ovladače označuje tlačítka, která je nutno/
možno stisknout v tomto kroku.
Informace o výsledku pokynů.
Postup nutný pro dosažení konečného výsledku pokračuje na následující
straně.
3
Page 34

Bezpečnostní opatřeníní
Tento televizor pracuje pouze s
napětím 220-240 V. V případě
zapojení příli mnoha spotřebičů do
jedné el. zásuvky může dolít k
úrazu el. proudem či požáru.
Neotevírejte zadní kryt televizoru.
Toto přenechte pouze
kvalifikovaným odborníkům z
autorizovaných servisů SONY.
Nezakrývejte ventilační
otvory televizoru. Nechte kolem
televizoru alespoň 10 cm prostoru
pro ventilaci vzduchu.
Z bezpečnostních důvodů a z
důvodů ochrany životního prostředí
doporučujeme neponechávat
televizor v pohotovostním stavu
pokud není del í dobu používán. V
tomto případě odpojte televizor
z el. sítě.
Nedotýkejte se během bouřky
jakékoliv časti el. přívodního
kabelu ani anténního kabelu.
Neumisť ujte televizor na horká,
mokrá či extrémněprašná místa.
Přístroj nesmí být vystaven
mechanickým vibracím.
Nevkládejte žádné předměty do
televizoru, rovněž do televizoru
nelijte jakoukoliv tekutinu. V
případě, že se tak stane ať již
úmyslně či neúmyslně televizor
nezapínejte a sdělte tuto skute
čnost nejbližšímu autorizovanému
servisu SONY, který odborně
Nevystavujte televizor dešti a
vlhku, předejdete tak
případnému úrazu el. proudem.
Hořlavé látky, či otevřený oheň
(svíčka) neumisť ujte v těsné
blizkosti televizoru.
š
Televizor můžete čistit pouze jemnou,
lehce navlhčenou látkou. Nepoužívejte
benzín, ředidlo ani jiné chemikálie,
rovněž nepoužvejte čistící prostředky s
brusnými účinky. Nepoškrábejte povrch
obrazovky. Pro vaši bezpečnost
doporučujeme televizor před čištěním
vždy odpojit od el. sítě.
Televizor postavte vždy na stabilní a
bezpečný stolek. Nedovolte dětem
aby na televizor lezli, sedali si na
něj, či si na něm hráli.
Při manipulaci napokládejte
televizor na boční ani na čelní
stranu.
Při vytahování el. přívodního
kabelu tahejte pouze za
zástrčku,
netahejte za kabel.
Před manipulací vypojte televizor z
el. sítě. Při manipulaci postupujte
opatrně abyste televizor
nepoškodili. Pokud vám
televizor upadl, či byl jiným
způsobem poškozen nechte ho
prověřit odborným pracovníkem
autorizovaného servisu SONY.
Abyste nepo
kabel nepokládejte na něj žádné
těžké předměty . Doporučujeme
přebytečnou část el. přívodního
kabelu navinout kolem háčků na
zadní straně televizoru.
Nezakrývejte ventilační otvory
televizoru novinami, časopisy
ani záclonami a závěsy.
kodili el. přívodní
Bezpečnostní opatření
Jestliže se TV promítač přemístí ze studeného prostředí přímo do teplého nebo se opakovaně mění teplota místnosti, je možné,
•
že to způsobí nejasný obraz nebo špatnou kvalitu barev v některých částech obrazovky. Toto je způsobeno vlhkostí, která se
nashromáždila na zrcátkách nebo na čočkách uvnitř přístroje. Před užitím promítače je třeba vlhkost nechat odpařit.
•
Aby byl obraz zřetelný, nevystavujte obrazovku přímému osvětlení. Pokud možno, použijte bodové stropní osvětlení
Zmrazení obrazu během prodloužených časových intervalů např. při použití videoher nebo osobních počítačů a při sledování
•
programů formátu 16:9, může způsobit poškození televizní obrazovky. Abyste tomu zabránili, udržujte obraz s nízkým stupněm
kontrastu.
•
Vyvarujte se dotýkání obrazovky, abyste nepoškrábali její povrch.
4
Bezpečnostní opatřeníní
Page 35

Obsah
Obsah
Kódy pro užívání tohoto návodu k obsluze
Bezpečnostní opatření
.....................................................................................................................4
Počáteční postupy
Všeobecný popis
Kontrola přídavných doplňků
Přehled tlačítek aparátu
Přehled tlačítek dálkového ovladače
.............................................................................................6
......................................................................................................6
Instalace
Vložení baterií do dálkového ovladače
Připojení antény a videa
Zapnutí aparátu
....................................................................................................................8
......................................................................................................8
První uvedení do chodu
Volba jazyku
Automatické ladění TV dálkovým ovladačem
Nové pořadí programových pozic TV kanálů
Seřízení prolínání barev (Konvergence)
Stručný návod k volbě menu
..........................................................................................................................9
............................................................................................13
Pokročilé operace
Pokročilé programování
Automatické ladění TV
Ruční ladění TV
Použití funkce “Rozšířené Předvolby”
Zablokování programů
Vynechávání programových pozic
Identifikace jednotlivých vysílacích stanic
.......................................................................................................14
...................................................................................................................15
......................................................................................................17
..................................................................................3
................................................................................7
.............................................................................8
................................................................10
.................................................................11
..........................................................................12
CZ
............................................................................16
..................................................................................18
......................................................................19
Pokročilé operace TV
Seřízení obrazu
Výběr formátu zobrazení
Seřízení zvuku
Funkce časového vypnutí
...................................................................................................................20
.....................................................................................................................22
Teletext
Zobrazení teletextu
............................................................................................................25
Přídavná zařízení
Připojení přídavných zařízení
Použití přídavných zařízení
“Smartlink”
Dálkové ovládání jiných zařízení Sony
Volba výstupního signálu Eurokonektorů
Použití funkce “Název Předvolby”
...........................................................................................................................28
Doplňkové informace
Optimální úhel vidění
Technické údaje
Řešení problémů
.........................................................................................................31
..................................................................................................................32
...............................................................................................................33
...................................................................................................21
.................................................................................................24
............................................................................................26
..............................................................................................27
............................................................................28
.......................................................................29
...................................................................................30
Obsah
5
Page 36

Počáteční postupy - Všeobecný popis
Kontrola přídavných doplňků
VIDEO TV
Checking the Accessories Supplied
1
2
3
4
5
6
7
8
9
0
PROGR
MENU
RM
892
S
Dálkový ovladač
(RM-892)
Dvě baterie (typ R6)
Přehled tlačítek aparátu
Stlačením krytu na čelní části aparátu
směrem nahoru získáte přístup k
ovládacímu čelnímu panelu.
Tlačítka
pro volbu
vnějšího
vstupu
Tlačítka
pro
ovládání
hlasitosti
Programová
tlačítka pro
výběr
následujícího
nebo
předchozího
kanálu (pro
volbu
televizních
stanic)
Ukazatel
režimu
dočasného
vypnutí
televizoru
(pohotovostní
režim)
Tlačítko
zapnuto/
vypnuto
Výstup pro
sluchátka
6
Počáteční postupy - Všeobecný popis
Vstup
videosignálu
S
Vstup
videosignálu
Zvukový
vstup
Tlačítko pro
automatické
ladění
Tlačítko
“Autokonvergence”
Page 37

Počáteční postupy - Všeobecný popis
Přehled tlačítek dálkového ovladače
Checking the Accessories Supplied
VIDEO TV
Funkce tohoto tlačítka nelze použít
pro tento aparát.
VTR 1 2 3 4 DVD
CH
Vypnutí zvuku
Pokud chcete zvuk vypnout, stiskněte tlačítko.
Zvuk se zapne opětovným stisknutím.
Zapnutí/Vypnutí videa
VIDEO TV
Stisknutím se video zapne nebo vypne.
Volba TV režimu
Stisknutím se vypne teletext nebo
vstup do videa.
Výběr z teletextu
Stisknutím se zobrazí teletext.
1
2
Nefunguje na tomto přístroji.
Tlačítko pro výběr kanálů
Stisknutím lze zvolit žádaný kanál.
Pokud chcete zvolit program s dvoumístným
číslem, např. 23, nejdříve stiskněte
-/--
, a
4
7
3
5
6
8
9
0
následovně tlačítka 2 a 3.
Jestliže jste se stisknutím prvního čísla
zmýlili, stiskněte znovu tlačítko (od 0 do 9) a
poté zopakujte znovu celou operaci.
Výběr specifického zvuku
Opakovaným stisknutím nastavíte
specifický zvuk.
K
PROGR
MENU
Výběr specifického obrazu
Opakovaným stisknutím nastavíte
specifický obraz.
Nastavení hlasitosti
S
RM
892
Stisknutím se nastaví hlasitost.
Zobrazení času
Stisknutím zapnete nebo vypnete
hodiny (funguje pouze při vysílání
z teletextu).
Ovládání videa
Podrobnější informace najdete v
kapitole “Dálkové ovládání jiných
zařízení Sony”.
Dočasné vypnutí aparátu
Stisknutím tlačítka se aparát dočasně
vypne (indikátor pohotovostního stavu
se rozsvítí). Opětovným stisknutím tlačítka
aparát opět zapnete.
Doporučujeme aparát vypnout úplně,
pokud se nepoužívá - šetří se tím energie.
Aparát se automaticky vypne do
pohotovostního režimu, jestliže po
dobu 15-30 minut nedostává televizní
signál a není stisknuto žádné tlačítko.
Zobrazení informace na obrazovce
Stisknutím se na obrazovce objeví všechny
údaje.
Zmizí opětovným stisknutím tohoto
tlačítka.
Výběr vstupního signálu
Stiskněte opakovaně, až se na obrazovce
objeví znaménko zvoleného vstupního
signálu.
Návrat k poslednímu sledovanému
kanálu
Stisknutím vyvoláte kanál, který jste
naposledy sledovali po dobu delší, než 5
vteřin.
Výběr formátu zobrazení
Opakovaným stisknutím změníte formát
zobrazení.
Toto tlačítko lze použít pouze v režimu
teletextu. Funkci
spojenou s tímto
tlačítkem nelze použít pro tento aparát.
Ovládání menu
4
Nahoru
$
Dolů
Z
Předchozí nabídka či volba
z
Další nabídka či volba
OK
Potvrdit volbu
CZ
Kromě těchto funkcí televizoru, všechna barevná tlačítka a znaky
zelené barvy se používají také pro teletext. Podrobnější informace
je popsána v kapitole “Teletext” tohoto návodu k obsluze.
Volba kanálů
Stiskněte pro volbu předchozího nebo
následujícího kanálu.
Zapojení režimu menu
Stisknutím se menu objeví na obrazovce.
Opětovným stisknutím menu z obrazovky
zmizí.
Počáteční postupy - Všeobecný popis
7
Page 38

Počáteční postupy - Instalace
Vložení baterií do dálkového ovladače
Zkontrolujte, jestli jsou poskytnuté baterie ve správné pozici.
Berte ohled na životní prostředí a použitých baterií se zbavujte způsobem, který životní prostředí nepoškozuje - odhazujte
je do kontejnerů k tomu určených.
Připojení anteny a videa
VCR
nebo
Konektor typu EURO je přídavné zařízení.
Jeho použitím můžete zlepšit kvalitu obrazu a zvuku při použití videa.
Jestliže nepoužijete konektor typu EURO, po automatickém naladění promítače bude ještě třeba ručně doladit signální
kanál videa. Podrobnější informace najdete v kapitole “Ruční ladění TV”. Také můžete zkonzultovat Návod k obsluze
Vašeho videa, kde se dozvíte, jak získat kanál signálu videa.
OUT IN
Zapnutí aparátu
Stiskněte tlačítko
zapnuto/vypnuto na
čelní části aparátu.
Zapojte aparát do
elektrické sítě
(220-240V CA, 50 Hz).
8
Počáteční postupy - Instalace
Page 39

Počáteční postupy - První uvedení chodu
a
Volba jazyku
Tato funkce slouží k volbě jazyku, ve kterém chcete, aby se na obrazovce objevily menu.
Po prvním zapnutí aparátu se na obrazovce automaticky objeví menu LANGUAGE (JAZYK). Jestliže po nějaké době chcete
opět změnit jazyk, zvolte menu Jazyk, které se nachází v LADĚNÍ a postupujte podle následujících instrukcí.
VIDEO TV
Na čelní části aparátu stiskněte tlačítko
1
zapnuto/vypnuto
prvním stisknutí tohoto tlačítka se na obrazovce automaticky objeví
menu LANGUAGE (JAZYK).
Stlačte páčku směrem $ nebo 4 pro volbu jazyku a poté stiskněte
2
tlačítko OK pro potvrzení volby.
. Po
LANGUAGE
English
Deutsch
Français
Italiano
Nederlands
Polski
Česki
Magyar
Select Language:
Confirm: OK
LANGUAGE
English
Deutsch
Français
Italiano
Nederlands
Polski
Česki
Magyar
Select Language:
Confirm: OK
LANGUAGE
English
Deutsch
Français
Italiano
Nederlands
Polski
Česki
Magyar
Select Language:
Confirm: OK
CZ
1
4
7
S
MENU
2
3
5
6
8
9
0
Menu Automatického Ladění se na obrazovce aparátu objeví ve
zvoleném jazyku.
PROGR
RM
892
Prějete si spustit
automatické ladění ?
Ano
Ne
Potvrzení: OK
Počáteční postupy - První uvedení do chodu
9
Page 40

Počáteční postupy - První uvedení do chodu
O
O
O
N
ý
p
P
Automatické ladění TV dálkovým ovladačem
Aparát je třeba naladit tak, abyste mohli užívat různé kanály (televizní stanice). Postupujte podle následujících pokynů pro
automatickou volbu a pro uložení všech kanálů, které jsou k dispozici.
Po zvolení jazyku se na obrazovce objeví nové menu, kde se táže, chcete-li kanály naladit automaticky. Jestliže si po nějaké
době přejete znovu naladit kanály (např. v případě stěhování), zvolte menu Automatické Ladění, které se nachází v
LADĚNÍ a dále postupujte tak, jak je uvedeno následovně, nebo se obrat’te na kapitolu “Automatické ladění TV”.
1
4
7
S
VIDEO TV
2
5
8
0
MENU
3
6
9
RM
PROGR
892
1 Stiskněte tlačítko OK na dálkovém ovladači pro volbu Ano.
Na obrazovce se objeví nové menu, které Vás žádá, aby jste se
přesvědčili, že je zapojená anténa.
2 Zkontrolujte, zda je anténa zapojená a poté stiskněte tlačítko OK.
Automatické ladění začíná a zatímco se na obrazovce ladí
všechny kanály (objevují se televizní stanice), na obrazovce
bliká “AUTOMATICKÉ LADĚNÍ”.
Tento proces může trvat několik minut. Mějte proto trpělivost
a po dobu trvání procesu ladění nestiskněte žádné tlačítko,
proces by se neuskutečnil.
Jakmile aparát ukončil automatické ladění, na obrazovce se objeví
Třídění Programů.
Poznámka: • Chcete-li zastavit proces automatického ladění, stiskněte
na dálkovém ovladači tlačítko MENU.
• Přerušíte-li proces automatického ladění pomocí tlačítka
MENU, menu Třídění Programů se na obrazovce
automaticky neobjeví.
Prějete si spustit
automatické ladění ?
Ano
Ne
Potvrzení: OK
Poturd’te, prosím, že
anténa je pfiipojena
Potvrzení: OK
AUTOMATICKÉ LADùNÍ
PROG SYS K. NÁZEV
1
B/G C 26 - - - - -
AUTOMATICKÉ LADĚNÍ
T¤ÍDùNÍ PROGRAMÒ
PROG SYS K. NÁZEV
B/G
0
B/G
1
B/G
2
B/G
3
B/G
4
B/G
5
B/G
6
B/G
7
B/G
8
B/G
9
Výber PROGR: OK
Zpût. MENU
C 28
C 40
C 41
C 31
C 34
C 27
C 47
C 44
C 23
C 35
BBC-W
MV-CH
TVE-1
TVE-2
ANT-3
TELE 5
C PLUS
- - - - -
- - - - CNN -
10
Počáteční postupy - První uvedení do chodu
Page 41

Počáteční postupy - První uvedení do chodu
R
D
D
R
Nové pořadí programových pozic TV kanálů
Po naladění všech kanálů (televizních stanic), které jsou k dispozici, se na obrazovce automaticky objeví nové menu, kde
se táže, chcete-li změnit pořadí, ve kterém se kanály objeví na obrazovce. Jestliže po čase potřebujete změnit toto pořadí
kanálů, zvolte menu Třídění Programů v LADĚNÍ a dále postupujte stejným způsobem, jak je uvedeno v oddělení b) této
kapitoly.
1
4
7
S
VIDEO TV
2
5
8
0
MENU
3
6
9
RM
PROGR
892
a) Nechcete-li změnit pořadí kanálů:
1 Stiskněte tlačítko MENU a menu zmizí z obrazovky.
Aparát je připraven k funkci.
b) Chcete-li změnit pořadí kanálů:
1 Stlačte páčku směrem $ nebo 4 pro volbu čísla programu s kanálem
(televizní stanicí), jehož pozici chcete změnit a následovně stiskněte
tlačítko OK.
2 Stlačte páčku směrem $ nebo 4 pro volbu nového čísla programu,
ve kterém si přejete uložit zvolený kanál (televizní stanici) a
následovně stiskněte OK.
Zvolený kanál přejde na svou novou pozici programu. Ve shodě
s touto pozicí se mění i ostatní kanály.
T¤ÍDùNÍ PROGRAMÒ
PROG SYS K. NÁZEV
B/G
0
1
2
3
4
5
6
7
8
9
Výber PROGR: OK
Zpût. MENU
T¤ÍDùNÍ PROGRAMÒ
PROG SYS K. NÁZEV
0
1
2
3
4
5
6
7
8
9
Výber PROGR: OK
Zpût. MENU
T¤ÍDùNÍ PROGRAMÒ
PROG SYS K. NÁZEV
0
1
2
3
4
5
6
7
8
9
Výbûr umistûní
Potvrzení: OK
B/G
B/G
B/G
B/G
B/G
B/G
B/G
B/G
B/G
B/G
B/G
B/G
B/G
B/G
B/G
B/G
B/G
B/G
B/G
B/G
B/G
B/G
B/G
B/G
B/G
B/G
B/G
B/G
B/G
C 28
C 40
C 41
C 31
C 34
C 27
C 47
C 44
C 23
C 35
C 28
C 40
C 41
C 31
C 34
C 27
C 47
C 44
C 23
C 35
C 40
C 41
C 31
C 34
C 27
C 47
C 44
C 23
C 35
C 28
BBC-W
MV-CH
TVE-1
TVE-2
ANT-3
TELE 5
C PLUS
- - - - -
- - - - CNN -
BBC-W
MV-CH
TVE-1
TVE-2
ANT-3
TELE 5
C PLUS
- - - - -
- - - - CNN -
MV-CH
TVE-1
TVE-2
ANT-3
TELE 5
C PLUS
- - - - -
- - - - CNN BBC-W
CZ
3 Zopakujte body 1 a 2, chcete-li změnit pozici dalších televizních
kanálů.
4 Stiskněte tlačítko MENU a menu zmizí z obrazovky.
Aparát je připraven k funkci.
Počáteční postupy - První uvedení do chodu
11
Page 42

Počáteční postupy - První uvedení do chodu
Seřízení prolínání barev (Konvergence)
Vzhledem k zemské přitažlivosti se může stát, že je obraz nejasný následkem prolínání barev kolem jednotlivých obrazů.
Autokonvergence červené, zelené a modré
linie
Stlačením krytu na čelní straně aparátu směrem nahoru získáte
1
přístup k ovládacímu čelnímu panelu.
2 Stiskněte tlačítko aparátu.
Začíná proces autokonvergence s dobou trvání přibližně 30 vteřin.
Až z obrazovky zmizí bílý křížek, aparát je připraven k funkci.
Poznámka:
Funkce autokonvergence není operativní pokud:
• není vstupní signál.
• vstupní signál je slabý.
• obrazovka je vystavena silnému reflektoru nebo přímému
slunečnímu záření.
• teletext je zobrazen.
Přejete-li si přesnější seřízení konvergence
VIDEO TV
Stiskněte tlačítko MENU na dálkovém ovladači a menu se objeví na
1
obrazovce.
2 Stlačte páčku směrem $ a zvolte znaménko , poté ji stlačte
směrem z a vstoupíte do menu LADĚNÍ.
NASTAVENÍ OBRAZU
Režim obrazu Osobní
Kontrast
Reset
Formát 4:3
3 Stlačte páčku směrem $ nebo 4 a zvolte Konvergence, poté ji
stlačte směrem z.
LADùNÍ
1
2
3
4
5
6
7
8
9
4 Stlačte páčku směrem $ nebo 4 a zvolte “linie” (svislé a vodorovné
linie červené a modré barvy), kterou chcete seřídit:
: červená svislá linie (seřízení doleva/doprava)
: červená vodorovná linie (seřízení nahoru/dolů)
: modrá svislá linie (seřízení doleva/doprava)
Antomatické ladûní
Ruční ladûní
Rozšífiené Pfiedvolby
Název Pfiedvolby
Tfiídûní ProgramÛ
Rodičovský zámek
Jazyk
Konvergence
: modrá vodorovná linie (seřízení nahoru/dolů)
0
Stiskněte tlačítko OK.
5 Opakovaně stlačte páčku směrem $ , 4 , Z nebo z a tím dosáhnete
konvergenci zvolené linie se zelenou linií v centru. Poté stiskněte
tlačítko OK pro potvrzení.
PROGR
MENU
6 Pro seřízení zbývajících linií zopakujte body 4 a 5, až se překryjí
všechny linie a objeví se bílý křížek.
RM
892
S
12
Počáteční postupy - První uvedení do chodu
7 Stiskněte tlačítko MENU a menu zmizí z obrazovky.
Aparát je připraven k funkci.
Page 43

Počáteční postupy - První uvedení do chodu
Stručný návod k volbě menu
MENU
Stiskněte tlačítko MENU na dálkovém ovladači a vstoupíte de systému menu.
NASTAVENÍ OBRAZU
Režim obrazu Osobní
Kontrast
Reset
Formát 4:3
NASTAVENÍ OBRAZU
Režim obrazu Osobní
Kontrast
Reset
Formát 4:3
(Podrobnější informace o různých seřízení
obrazu najdete v kapitole “Seřízení
obrazu”)
NASTAVENÍ ZVUKU
Zvukový režim
Vyvážení
Reset
Dolby Virtual
Dvoukan. Zvuk
Vyrov. hlas.
Hlasitost
Dvoukan. zvuk
Reproduktor
TV / VIDEO
TV Obraz
Výstup
TV
ČASOVÝ SPÍNAČ
Casovač vypnutí
LADùNÍ
Antomatické ladûní
Ruční ladûní
Rozšífiené Pfiedvolby
Název Pfiedvolby
Tfiídûní ProgramÛ
Rodičovský zámek
Jazyk
Konvergence
Osobní
Vyp
Mono
0
Mono
Hlavní
[TV - - - - - - -]
[AV1 - - - - - - -]
AV1
Vyp
NASTAVENÍ ZVUKU
Zvukový režim
Vyvážení
Reset
Dolby Virtual
Dvoukan. Zvuk
Vyrov. hlas.
Hlasitost
Dvoukan. zvuk
Reproduktor
TV / VIDEO
TV Obraz
Výstup
TV
ČASOVÝ SPÍNAČ
Casovač vypnutí
LADùNÍ
Antomatické ladûní
Ruční ladûní
Rozšífiené Pfiedvolby
Název Pfiedvolby
Tfiídûní ProgramÛ
Rodičovský zámek
Jazyk
Konvergence
LADùNÍ
Antomatické ladûní
Ruční ladûní
Rozšífiené Pfiedvolby
Název Pfiedvolby
Tfiídûní ProgramÛ
Rodičovský zámek
Jazyk
Konvergence
Osobní
Vyp
Mono
0
Mono
Hlavní
[TV - - - - - - -]
[AV1 - - - - - - -]
AV1
1:00
Prějete si spustit
automatické ladění ?
Ano
Ne
Potvrzení: OK
RUČNÍ LADENÍ
PROG SYS K. NÁZEV
C 40
0
B/G
C 41
1
B/G
C 31
2
B/G
C 34
3
B/G
C 27
4
B/G
C 47
5
B/G
C 44
6
B/G
C 23
7
B/G
C 35
8
B/G
C 28
9
B/G
MV-CH
TVE-1
TVE-2
ANT-3
TELE 5
C PLUS
- - - - -
- - - - CNN BBC-W
(Podrobnější informace o různých seřízení
zvuku najdete v kapitole “Seřízení zvuku”)
(Podrobnější informace najdete v kapitole
“Volba výstupního signálu
Eurokonektorů”)
(Podrobnější informace najdete v kapitole
“Funkce časového vypnutí”)
(Podrobnější informace najdete v kapitole
“Automatické ladění TV dálkovým
ovladačem”)
(Podrobnější informace najdete v kapitole
“Ruční ladění TV”)
CZ
LADùNÍ
Antomatické ladûní
Ruční ladûní
Rozšífiené Pfiedvolby
Název Pfiedvolby
Tfiídûní ProgramÛ
Rodičovský zámek
Jazyk
Konvergence
LADùNÍ
Antomatické ladûní
Ruční ladûní
Rozšífiené Pfiedvolby
Název Pfiedvolby
Tfiídûní ProgramÛ
Rodičovský zámek
Jazyk
Konvergence
LADùNÍ
Antomatické ladûní
Ruční ladûní
Rozšífiené Pfiedvolby
Název Pfiedvolby
Tfiídûní ProgramÛ
Rodičovský zámek
Jazyk
Konvergence
LADùNÍ
Antomatické ladûní
Ruční ladûní
Rozšífiené Pfiedvolby
Název Pfiedvolby
Tfiídûní ProgramÛ
Rodičovský zámek
Jazyk
Konvergence
LADùNÍ
Antomatické ladûní
Ruční ladûní
Rozšífiené Pfiedvolby
Název Pfiedvolby
Tfiídûní ProgramÛ
Rodičovský zámek
Jazyk
Konvergence
ROZŠÍ¤ENÉ P¤EDVOLBY
PROG AFT DEKODÉR
0
On
Off
1
On
Off
2
On
AV1
3
On
Off
4
On
AV2
5
On
Off
6
On
Off
7
On
Off
8
On
Off
9
On
Off
NÁZEV P¤EDVOULBY
VSTUP NÁZEV
AV1
RGB
AV2
YC2
AV3
T¤ÍDùNÍ PROGRAMÒ
PROG SYS K. NÁZEV
B/G
0
C 28
B/G
1
C 40
B/G
2
C 41
B/G
3
C 31
B/G
4
C 34
B/G
5
C 27
B/G
6
C 47
B/G
7
C 44
B/G
8
C 23
B/G
9
C 35
Výber PROGR: OK
Zpût. MENU
RODIČOVSKÝ ZÁMEK
PROG SYS K. NÁZEV
C 40
0
B/G
C 41
1
B/G
C 31
2
B/G
C 34
3
B/G
C 27
4
B/G
C 47
5
B/G
C 44
6
B/G
C 23
7
B/G
C 35
8
B/G
C 28
9
B/G
LANGUAGE
English
Deutsch
Français
Español
Suomi
Nederlands
Português
Suenska
Dansk
Norsk
Italiano
Česki
Magyar
Eλλnvιkά
- - - - -
- - - - -
- - - - -
- - - - -
- - - - -
BBC-W
MV-CH
TVE-1
TVE-2
ANT-3
TELE 5
C PLUS
- - - - -
- - - - CNN -
MV-CH
TVE-1
TVE-2
ANT-3
TELE 5
C PLUS
- - - - -
- - - - CNN -
- - - - -
(Podrobnější informace najdete v kapitole
“Použití funkce ‘Rozšířené Předvolby’ “)
(Podrobnější informace najdete v kapitole
“Použití funkce ‘Název Předvolby’ “)
(Podrobnější informace najdete v kapitole
“Nové pořadí programových pozic TV
kanálů”)
(Podrobnější informace najdete v kapitole
“Zablokování programů”)
(Podrobnější informace najdete v kapitole
“Volba jazyku”)
LADùNÍ
Antomatické ladûní
Ruční ladûní
Rozšífiené Pfiedvolby
Název Pfiedvolby
Tfiídûní ProgramÛ
Rodičovský zámek
Jazyk
Konvergence
(Podrobnější informace najdete v kapitole
“Seřízení prolínání barev (Konvergence)”).
Počáteční postupy - První uvedení do chodu
13
Page 44

Pokročilé operace - Pokročilé programování
Automatické ladění TV
Nejen že můžete aparát naladit automaticky, jak je popsáno v kapitole “Automatické ladění TV dálkovým ovladačem”, ale
také je možné automaticky naladit a uložit všechny kanály (televizní stanice), které jsou k dispozici, stisknutím pouze jednoho
tlačítka na televizoru a druhého na dálkovém ovladači.
1 Stlačením krytu na čelní straně aparátu směrem nahoru získáte
přístup k ovládacímu čelnímu panelu.
2 Stiskněte tlačítko a mějte je na několik vteřin stisknuté,dokud se
na obrazovce neobjeví nové menu, které Vám oznámí, zdali je
zapojená anténa.
Poturd’te, prosím, že
anténa je pfiipojena
Potvrzení: OK
3 Přesvědčte se, že je anténa zapojená a stiskněte tlačítko OK.
VIDEO TV
Automatické ladění začíná a zatímco se na obrazovce ladí
všechny kanály (objevují se televizní stanice), na obrazovce bliká
“AUTOMATICKÉ LADĚNÍ”.
Poturd’te, prosím, že
anténa je pfiipojena
Potvrzení: OK
AUTOMATICKÉ LADùNÍ
PROG SYS K. NÁZEV
1
B/G C 26 - - - - -
AUTOMATICKÉ LADĚNÍ
Tento proces může trvat několik minut. Mějte proto trpělivost a po
dobu trvání procesu ladění nestiskněte žádné tlačítko, proces by
1
2
3
4
5
6
7
8
9
se neuskutečnil.
Jakmile aparát ukončil automatické ladění, na obrazovce se objeví
menu Třídění Programů:
0
• Jestliže nechcete změnit pořadí kanálů, stiskněte tlačítko MENU
a menu zmizí z obrazovky.
• Jestliže chcete změnit pořadí kanálů, postupujte stejným
způsobem, jak je uvedeno v kapitole “Nové pořadí
programových pozic TV kanálů”, v oddělení b).
PROGR
MENU
Poznámka: Jestliže si přejete zastavit proces automatického ladění,
stiskněte tlačítko MENU na dálkovém ovladači.
RM
892
S
14
Pokročilé operace - Pokročilé programování
Page 45

Pokročilé operace - Pokročilé programování
Ruční ladění TV
Tato funkce slouží pro postupné ladění kanálů (televizních stanic) v pořadí programu, které si přejete, nebo pro postupné
ladění vstupu do videa.
1 Stiskněte tlačítko MENU na dálkovém ovladači a menu se objeví na
VIDEO TV
televizní obrazovce.
2 Stlačte páčku směrem $ a zvolte znaménko , poté stlačte páčku
směrem z a vstoupíte do menu LADĚNÍ.
1
2
3
4
5
6
7
8
9
Stlačte páčku směrem $ nebo 4 a zvolte Ruční Ladění, poté
3
stlačte páčku směrem z.
0
Stlačte páčku směrem $ nebo 4 pro volbu čísla programu (pozice),
4
na kterém si přejete naladit kanál (televizní stanici) a poté stlačte
PROGR
MENU
páčku směrem z pro volbu SYS.
NASTAVENÍ OBRAZU
Režim obrazu Osobní
Kontrast
Reset
Formát 4:3
LADùNÍ
Antomatické ladûní
Ruční ladûní
Rozšífiené Pfiedvolby
Název Pfiedvolby
Tfiídûní ProgramÛ
Rodičovský zámek
Jazyk
Konvergence
LADùNÍ
Antomatické ladûní
Ruční ladûní
Rozšífiené Pfiedvolby
Název Pfiedvolby
Tfiídûní ProgramÛ
Rodičovský zámek
Jazyk
Konvergence
RUČNÍ LADENÍ
PROG SYS K. NÁZEV
C 40
0
B/G
C 41
1
B/G
C 31
2
B/G
C 34
3
B/G
C 27
4
B/G
C 47
5
B/G
C 44
6
B/G
C 23
7
B/G
C 35
8
B/G
C 28
9
B/G
MV-CH
TVE-1
TVE-2
ANT-3
TELE 5
C PLUS
- - - - -
- - - - CNN BBC-W
CZ
S
RM
892
Stlačte páčku směrem $ nebo 4 pro volbu systému televizní
5
stanice (B/G pro Západní Evropu nebo D/K pro Východní Evropu),
nebo signálu video vstupu (AV1, AV2...). Poté stlačte páčku
směrem z pro volbu K.
6 Stlačte páčku směrem $ nebo 4 pro volbu typu kanálu (“C” pro
pozemní vysílání nebo “S” pro kabelové vysílání). Poté stlačte
páčku směrem z.
Stisknutím číselných tlačítek zadáte přímo číslo kanálu televizní
7
stanice, nebo stlačte páčku směrem $ nebo 4 a vyhledáte
následující volný kanál. Jestliže nechcete uložit tento kanál, stlačte
páčku směrem $ nebo 4 pro vyhledání jiného kanálu.
8 Jestliže je to ten kanál, který si přejete uložit, stiskněte tlačítko OK.
9 Opakujte body 4 až 8 pro všechny další kanály, které si přejete
uložit a naladit.
RUČNÍ LADENÍ
PROG SYS K. NÁZEV
B/G
0
C 40
B/G
1
C 41
B/G
2
C 31
B/G
3
C 34
B/G
4
C 27
B/G
5
C 47
B/G
6
C 44
B/G
7
C 23
B/G
8
C 35
B/G
9
C 28
RUČNÍ LADENÍ
PROG SYS K. NÁZEV
RUČNÍ LADENÍ
PROG SYS K. NÁZEV
C 40
B/G
0
C 41
B/G
1
C 31
B/G
2
C 34
B/G
3
C 27
B/G
4
C 47
B/G
5
C 44
B/G
6
C 23
B/G
7
C 35
B/G
8
C 28
B/G
9
C 40
0
B/G
C 41
1
B/G
C 31
2
B/G
C 34
3
B/G
C 27
4
B/G
C 47
5
B/G
C 44
6
B/G
C 23
7
B/G
C 35
8
B/G
C 28
9
B/G
MV-CH
TVE-1
TVE-2
ANT-3
TELE 5
C PLUS
- - - - -
- - - - CNN BBC-W
MV-CH
TVE-1
TVE-2
ANT-3
TELE 5
C PLUS
- - - - -
- - - - CNN BBC-W
MV-CH
TVE-1
TVE-2
ANT-3
TELE 5
C PLUS
- - - - -
- - - - CNN BBC-W
10 Stiskněte tlačítko MENU a menu zmizí z obrazovky.
Aparát je připraven k funkci.
Pokročilé operace - Pokročilé programování
15
Page 46

Pokročilé operace - Pokročilé programování
Použití funkce “Rozšířené Předvolby”
Tato funkce umožňuje:
a) Dokonce i v případě, že jemné automatické doladění kanálů (AFT) je normálně zapojeno, je možné obraz doladit ručně
(jestliže je nejasný) a dosáhnout jeho zlepšení.
b) Naladit výstup z AV3 u pozic programů s kodifikovanými signály (jako např. dekodér placené televize). Tímto způsobem
videorekordér připojený k aparátu nahrává dekodifikovaný signál.
VIDEO TV
1 Stiskněte tlačítko MENU na dálkovém ovladači a menu se objeví na
televizní obrazovce.
2 Stlačte páčku směrem $ a zvolte znaménko , poté stlačte páčku
směrem z a vstoupíte do menu LADĚNÍ.
1
2
3
4
5
6
7
8
9
3 Stlačte páčku směrem $ nebo 4 pro volbu Rozšířené Předvolby,
0
MENU
PROGR
RM
892
poté stlačte páčku směrem z.
4 Stlačte páčku směrem $ nebo 4 a zvolte odpovídající číslo
programu, poté opakovaně stlačte páčku směrem z pro volbu:
a) AFT nebo
b) DEKODÉR
NASTAVENÍ OBRAZU
Režim obrazu Osobní
Kontrast
Reset
Formát 4:3
LADùNÍ
Antomatické ladûní
Ruční ladûní
Rozšífiené Pfiedvolby
Název Pfiedvolby
Tfiídûní ProgramÛ
Rodičovský zámek
Jazyk
Konvergence
LADùNÍ
Antomatické ladûní
Ruční ladûní
Rozšífiené Pfiedvolby
Název Pfiedvolby
Tfiídûní ProgramÛ
Rodičovský zámek
Jazyk
Konvergence
ROZŠÍ¤ENÉ P¤EDVOLBY
PROG AFT DEKODÉR
0
On
1
2
3
4
5
6
7
8
9
Off
On
Off
On
AV1
On
Off
On
AV2
On
Off
On
Off
On
Off
On
Off
On
Off
S
Zvolená položka mění barvu.
5 a) AFT
Stlačte páčku směrem $ nebo 4 pro seřízení úrovně frekvence
kanálu v rozmezí -15 až +15 a poté stiskněte OK.
Opakujte body 4 a 5 a) pro jemné doladění dalších kanálů.
b) DEKODÉR
Stlačte páčku směrem $ nebo 4 a zvolte výstup AV3 a poté stiskněte
OK.
Po zapojení dekodéru k videu zapojenému k Eurokonektoru
:3, který je umístěn na zadní straně aparátu, obraz tohoto
dekodéru se objeví na tomto čísle programu.
Opakujte body 4 a 5 b) pro naladění výstupu AV3 v ostatních
programových pozicích.
6 Stiskněte tlačítko MENU a menu zmizí z obrazovky.
Aparát je připraven k funkci.
ROZŠÍ¤ENÉ P¤EDVOLBY
PROG AFT DEKODÉR
2
0
1
2
3
4
5
6
7
8
9
ROZŠÍ¤ENÉ P¤EDVOLBY
PROG AFT DEKODÉR
0
1
2
3
4
5
6
7
8
9
Off
On
Off
On
Off
On
Off
On
Off
On
Off
On
Off
On
Off
On
Off
On
Off
On
AV3
On
Off
On
Off
On
Off
On
Off
On
Off
On
Off
On
Off
On
Off
On
Off
Pokročilé operace - Pokročilé programování
16
Page 47

Pokročilé operace - Pokročilé programování
Zablokování programů
Tato funkce umožňuje zabránit zobrazení nežádoucích televizních stanic na obrazovce. Doporučujeme ji u nevhodných
filmů pro děti.
1
4
7
S
VIDEO TV
2
5
8
0
MENU
3
6
9
PROGR
RM
892
Stiskněte tlačítko
1
MENU
na dálkovém ovladači a menu se objeví na
televizní obrazovce.
2
Stlačte páčku směrem $ a zvolte znaménko , poté stlačte páčku
směrem z a vstoupíte do menu
3
Stlačte páčku směrem $
nebo 4
LADĚNÍ
a zvolte
.
Rodičovský Zámek
stlačte páčku směrem z .
Stlačte páčku směrem $ nebo 4 pro volbu čísla programu s kanálem,
4
který chcete zablokovat a poté stiskněte tlačítko OK.
Znaménko
, které se zobrazí před číslem programu, označuje,
že je program zablokován. Zpětným stisknutím tlačítka OK se
zruší zablokování a znaménko
zmizí.
, poté
NASTAVENÍ OBRAZU
Režim obrazu Osobní
Kontrast
Reset
Formát 4:3
LADùNÍ
Antomatické ladûní
Ruční ladûní
Rozšífiené Pfiedvolby
Název Pfiedvolby
Tfiídûní ProgramÛ
Rodičovský zámek
Jazyk
Konvergence
LADùNÍ
Antomatické ladûní
Ruční ladûní
Rozšífiené Pfiedvolby
Název Pfiedvolby
Tfiídûní ProgramÛ
Rodičovský zámek
Jazyk
Konvergence
RODIČOVSKÝ ZÁMEK
PROG SYS K. NÁZEV
C 40
0
B/G
C 41
1
B/G
C 31
2
B/G
C 34
3
B/G
C 27
4
B/G
C 47
5
B/G
C 44
6
B/G
C 23
7
B/G
C 35
8
B/G
C 28
9
B/G
MV-CH
TVE-1
TVE-2
ANT-3
TELE 5
C PLUS
- - - - -
- - - - CNN -
- - - - -
CZ
Zopakujte bod 4, jestliže chcete zablokovat další programy.
5
Stiskněte tlačítko
6
MENU
a menu zmizí z obrazovky.
Po zvolení čísla zablokovaného programu se objeví černá
obrazovka se znaménkem .
Pokročilé operace - Pokročilé programování
17
Page 48

Pokročilé operace - Pokročilé programování
Vynechávání programových pozic
Tato funkce umožňuje naprogramovat aparát tak , aby vynechal nežádoucí čísla programů, pokud se při jejich výběru
použije tlačítka PROGR +/-. Jestliže časem chcete opět používat číslo vynechaného programu, postupujte tak, jak je
následovně popsáno, ale zvolte příslušný TV systém (B/G, nebo D/K) místo
"- - -"
v bodě č. 5.
Stiskněte tlačítko
VIDEO TV
1
televizní obrazovce.
2
Stlačte páčku směrem $
směrem z
1
2
3
4
5
6
7
8
9
3
0
MENU
PROGR
RM
892
Stlačte páčku směrem $
páčku směrem z
Stlačte páčku směrem $
4
chcete vynechat a poté stlačte páčku směrem z
MENU
na dálkovém ovladači a menu se objeví na
a zvolte znaménko , poté stlačte páčku
a vstoupíte do menu
nebo 4 a zvolte
.
nebo 4 pro volbu čísla programu, který
LADĚNÍ
.
Ruční Ladění
pro volbu
, poté stlačte
SYS
.
NASTAVENÍ OBRAZU
Režim obrazu Osobní
Kontrast
Reset
Formát 4:3
LADùNÍ
Antomatické ladûní
Ruční ladûní
Rozšífiené Pfiedvolby
Název Pfiedvolby
Tfiídûní ProgramÛ
Rodičovský zámek
Jazyk
Konvergence
LADùNÍ
Antomatické ladûní
Ruční ladûní
Rozšífiené Pfiedvolby
Název Pfiedvolby
Tfiídûní ProgramÛ
Rodičovský zámek
Jazyk
Konvergence
RUČNÍ LADENÍ
PROG SYS K. NÁZEV
B/G
0
C 40
B/G
1
C 41
B/G
2
C 31
B/G
3
C 34
B/G
4
C 27
B/G
5
C 47
B/G
6
C 44
B/G
7
C 23
B/G
8
C 35
B/G
9
C 28
MV-CH
TVE-1
TVE-2
ANT-3
TELE 5
C PLUS
- - - - -
- - - - CNN BBC-W
S
5
Stlačte páčku směrem $ pro volbu
OK
.
Zopakujte body 4 a 5 pro vynechání dalších čísel programu.
6
7
Stiskněte tlačítko
MENU
a menu zmizí z obrazovky.
Po zvolení kanálu (televizní stanice) tlačítkem
“- - -”
, a poté stiskněte tlačítko
PROGR +/-
neobjeví, ale může být zvolen stisknutím odpovídajícího čísla
programu pomocí číselných tlačítek.
, kanál se
RUČNÍ LADENÍ
PROG SYS K. NÁZEV
B/G
0
C 40
B/G
1
C 41
B/G
2
C 31
B/G
3
C 34
B/G
4
C 27
B/G
5
C 47
B/G
6
C 44
B/G
7
C 23
B/G
8
C 35
- - - -
9
C 28
MV-CH
TVE-1
TVE-2
ANT-3
TELE 5
C PLUS
- - - - -
- - - - CNN BBC-W
Pokroãilé operace - Pokroãilé programování
18
Page 49

Pokročilé operace - Pokročilé programování
Identifikace jednotlivých vysílacích stanic
Obyčejně, kanály (televizní stanice) dostanou název automaticky prostřednictvím teletextu, je-li k dispozici.
Nicméně, můžete stanovit název kanálu nebo vstupního signálu videa Vy sami. Tento název může mít maximálně 5 znaků
(čísla nebo písmena). Tímto způsobem budete moci jednoduše zjistit totožnost kanálu (televizní stanice) nebo signálu
videa, který se objeví na obrazovce.
1
4
7
S
VIDEO TV
2
5
8
0
MENU
3
6
9
RM
PROGR
892
Stiskněte tlačítko
1
MENU
na dálkovém ovladači a menu se objeví na
televizní obrazovce.
2
Stlačte páčku směrem $
směrem z
3
Stlačte páčku směrem $ nebo 4 a zvolte
páčku směrem z
Stlačte páčku směrem $
4
a vstoupíte do menu
.
a zvolte znaménko , poté stlačte páčku
nebo 4 pro volbu čísla programu s
kanálem, který chcete pojmenovat.
5
Opakovaně stlačte páčku směrem z
LADĚNÍ
.
Ruční Ladění
pro volbu funkce
, poté stlačte
NÁZEV
.
NASTAVENÍ OBRAZU
Režim obrazu Osobní
Kontrast
Reset
Formát 4:3
LADùNÍ
Antomatické ladûní
Ruční ladûní
Rozšífiené Pfiedvolby
Název Pfiedvolby
Tfiídûní ProgramÛ
Rodičovský zámek
Jazyk
Konvergence
LADùNÍ
Antomatické ladûní
Ruční ladûní
Rozšífiené Pfiedvolby
Název Pfiedvolby
Tfiídûní ProgramÛ
Rodičovský zámek
Jazyk
Konvergence
RUČNÍ LADENÍ
PROG SYS K. NÁZEV
RUČNÍ LADENÍ
PROG SYS K. NÁZEV
C 40
0
B/G
C 41
1
B/G
C 31
2
B/G
C 34
3
B/G
C 27
4
B/G
C 47
5
B/G
C 44
6
B/G
C 23
7
B/G
C 35
8
B/G
C 28
9
B/G
C 40
0
B/G
C 41
1
B/G
C 31
2
B/G
C 34
3
B/G
C 27
4
B/G
C 47
5
B/G
C 44
6
B/G
C 23
7
B/G
C 35
8
B/G
C 28
9
B/G
- - - - -
- - - - -
- - - - -
- - - - -
- - - - -
- - - - -
- - - - -
- - - - -
- - - - -
- - - - -
- - - - -
- - - - -
- - - - -
- - - - -
- - - - -
- - - - -
- - - - -
- - - - -
- - - - -
- - - - -
CZ
Stlačte páčku směrem $
6
nebo
“-”
pro mezeru, poté stlačte páčku směrem z
nebo 4 pro volbu jednoho písmene, čísla
pro potvrzení
tohoto znaku. Zbývající čtyři znaky zvolte stejným způsobem.
7
Po zvolení všech znaků stiskněte tlačítko OK.
Opakujte body 4 až 7, jestli si přejete pojmenovat další kanály.
8
9 Stiskněte tlačítko MENU a menu zmizí z obrazovky.
Po zvolení názvu kanálu, název se objeví na obrazovce na několik
vteřin.
Pokročilé operace - Pokročilé programování
RUČNÍ LADENÍ
PROG SYS K. NÁZEV
B/G
0
C 40
B/G
1
C 41
B/G
2
C 31
B/G
3
C 34
B/G
4
C 27
B/G
5
C 47
B/G
6
C 44
B/G
7
C 23
B/G
8
C 35
B/G
9
C 28
- - - - -
- - - - -
- - - - -
- - - - A - - -
- - - - -
- - - - -
- - - - -
- - - - -
- - - - -
19
Page 50

Pokročilé operace - Pokročilé operace TV
Seřízení obrazu
Ačkoliv je obraz seřízen již v továrně, lze jej přizpůsobit Vašim specifickým požadavkům.
NASTAVENÍ OBRAZU
Režim obrazu Osobní
Kontrast
Reset
Formát 4:3
VIDEO TV
1 Stiskněte tlačítko MENU na dálkovém ovladači a menu se objeví na
televizní obrazovce.
2 Stlačte páčku směrem z a vstoupíte do menu NASTAVENÍ
OBRAZU.
3 Stlačte páčku směrem $ nebo 4 pro volbu položky, kterou si přejete
upravit, poté stlačte páčku směrem
Přečtěte si následující tabulku, která informuje o obsahu každé
položky:
1
2
3
4
5
6
7
8
9
0
Režim z Režim z Osobní (pro osobní požadavky)
obrazu obrazu
$ Jas* Z tmavší z světlejší
$
Barev. sytost*
Z méně z více
$ Ostrost* Z jemnější z ostřejší
$ Barevný tón** Z zelenější z červenější
Kontrast Z méně z více
K
zobrazení” v tomto návodu).
MENU
PROGR
Reset Obnoví tovární nastavení obrazu
Formát (podrobnější informace naleznete v kapitole “Výběr formátu
* Může se upravit pouze, jestliže zvolíte “Osobní” v “Režimu obrazu”.
RM
892
** Dostupný pouze pro systém NTSC (např. videokazety z USA).
z.
z Film (pro filmy)
z Přímý přenos (pro programy v přímém
přenosu)
NASTAVENÍ OBRAZU
Režim obrazu Osobní
Kontrast
Reset
Formát 4:3
REŽIM OBRAZU
Režim obrazu Osobní
Jas
Barev. sytost
Ostrost
Barevný tón
S
4 Stlačte páčku směrem Z nebo z pro úpravu seřízení zvolené položky
a poté stiskněte tlačítko OK. Tímto se nové seřízení uloží.
5 Opakujte body 3 a 4 pro úpravu dalších seřízení.
6 Stiskněte tlačítko MENU a menu zmizí z obrazovky.
Rychlá změna režimu obrazu
Režim obrazu je možné změnit, aniž byste vstoupili do menu
NASTAVENÍ OBRAZU.
1 Stiskněte tlačítko na dálkovém ovladači a vstoupíte přímo do
režimu obrazu.
2 Stlačte páčku směrem $ nebo 4 pro volbu režimu obrazu, který si
přejete (Osobní, Film nebo Přímý přenos) a poté stiskněte tlačítko
OK a menu zmizí z obrazovky.
Osobní
Film
Pfiímý pfienos
Pokročilé operace - Pokročilé operace TV
20
Page 51

Pokročilé operace - Pokročilé operace TV
Výběr formátu zobrazení
Tato funkce umožňuje upravit formát zobrazení.
NASTAVENÍ OBRAZU
Režim obrazu Osobní
Kontrast
Reset
Formát 4:3
VIDEO TV
1 Stiskněte tlačítko MENU na dálkovém ovladači a menu se objeví na
televizní obrazovce.
2 Stlačte páčku směrem z a vstoupíte do menu NASTAVENÍ
OBRAZU.
3 Stlačte páčku směrem $ nebo 4 pro volbu Formát.
4 Opakuvaně stiskněte z pro volhu jednoho z těchto režimů:
1
2
3
4
5
6
• 4:3: běžný obraz 4:3
NASTAVENÍ OBRAZU
Režim obrazu Osobní
Kontrast
Reset
Formát 4:3
• 16:9: napodobuje efekt širokého zobrazení (16:9) při vysílání
7
8
9
formátu 4:3
0
Stiskněte tlačítko OK.
CZ
5 Stiskněte tlačítko MENU a menu zmizí z obrazovky.
PROGR
MENU
4:3
S
RM
892
16:9
Rychlá změna formátu zobrazení
Režim formátu zobrazení je možné změnit, aniž byste vstoupili do
menu NASTAVENÍ OBRAZU.
1 Opakovaně stiskněte tlačítko na dálkovém ovladači pro volbu
formátu zobrazení (4:3 nebo 16:9).
Pokročilé operace - Pokročilé operace TV
21
Page 52

Pokročilé operace - Pokročilé operace TV
Seřízení zvuku
Ačkoliv je zvuk seřízen již v továrně, lze jej přizpůsobit Vašim specifickým požadavkům.
1
4
7
S
VIDEO TV
2
5
8
0
MENU
3
6
9
RM
PROGR
892
1 Stiskněte tlačítko MENU na dálkovém ovladači a menu se objeví na
televizní obrazovce.
2 Stlačte páčku směrem $ a zvolte znaménko , poté stlačte páčku
směrem z a vstoupíte do menu NASTAVENÍ ZVUKU.
3 Stlačte páčku směrem $ nebo 4 pro volbu položky, kterou si přejete
upravit, poté stlačte páčku směrem z.
Přečtěte si následující tabulku, která informuje o obsahu každé
položky:
Zvukový režim z Režim z Osobní (pro osobní požadavky)
z Rock
z Jazz
z Pop
$ Výšky* Z méně z více
$ Hloubky* Z méně z více
Vyvážení Z levé z pravé
Reset Obnoví tovární nastavení zvuku
Dolby** Virtual z Vyp: Normální
Dvoukan. zvuk • Pro vysílání stereo:
K
z Zap: Napodobuje zvukový efekt “Dolby Pro Logic”
z Mono
z Stereo
• Pro dvoujazyčné vysílání:
z Mono (určen pro kanál mono, je-li k dispozici)
z A (pro 1.kanál)
z B (pro 2.kanál)
NASTAVENÍ OBRAZU
Režim obrazu Osobní
Kontrast
Reset
Formát 4:3
NASTAVENÍ ZVUKU
Zvukový režim
Vyvážení
Reset
Dolby Virtual
Dvoukan. Zvuk
Vyrov. hlas.
Hlasitost
Dvoukan. zvuk
Reproduktor
ZVUKOVÝ REŽIM
Režim
Výšky
Hloubky
Osobní
Vyp
Mono
0
Mono
Hlavní
Osobní
Pokročilé operace - Pokročilé operace TV
22
Vyrovn. hlas. Z -12 .......... z +12
Hlasitost kanálu je možné seřídit jednotlivě v rozmezí
od -12 do +12
Sluchátka:
Hlasitost Z méně z více
Dvoukan. zvuk
• Pro vysílání stereo:
z Mono
z Stereo
• Pro dvoujazyčné vysílání:
z Mono (určen pro kanál mono, je-li k dispozici)
z A (pro 1.kanál)
z B (pro 2.kanál)
Reproduktor z Hlavní: zvuk z aparátu
z Středový: zvuk z vnějšího zesilovače
* Může se upravit pouze, jestli zvolíte “Osobní” v “Režimu zvuku”.
Page 53

Pokročilé operace - Pokročilé operace TV
VIDEO TV
položky a poté stiskněte tlačítko OK a nové seřízení se uloží do
paměti.
5 Opakujte body 3 a 4 pro úpravu dalších seřízení.
6 Stiskněte tlačítko MENU a menu zmizí z obrazovky.
1
2
3
4 Stlačte páčku směrem Z nebo z pro úpravu seřízení zvolené
4
5
6
7
8
9
0
PROGR
MENU
** Tento televizor byl naržen tak aby dosáhl zvukového efektu
"Dolby Surround" a napodobil tak zvuk čtyř reproduktorů
použitím pouze dvou reproduktoyů tohoto televizora, vždy kdy
audio signál vysílací stanice bude "Dolby Surround". Kromě
toho, můžete také zlepšit zvukový efekt zapojením jednoho
vnějšího zesilovače. Podrobnější informace najdete v kapitole
"Připojení vnějšího zvukového zařízení" na straně 27.
CZ
** Vyrobeno s oprávněním Dolby Laboratories. “Dolby”, “Pro
Logic” a znak dvojitého D jsou obchodní značky Dolby
Laboratories.
S
RM
892
Rychlá změna režimu zvuku
Režim zvuku je možné rychle změnit, aniž byste vstoupili do menu
NASTAVENÍ ZVUKU.
1 Stiskněte tlačítko na dálkovém ovladači a vstoupíte přímo do
režimu zvuku.
Osobní
Rock
Jazz
Pop
2 Stlačte páčku směrem $ nebo 4 pro volbu režimu zvuku, který si
přejete (Osobní, Rock, Jazz nebo Pop) a poté stiskněte tlačítko OK
a menu zmizí z obrazovky.
Pokročilé operace - Pokročilé operace TV
23
Page 54

Pokročilé operace - Pokročilé operace TV
Funkce časového vypnutí
Tato funkce Vám umožní zvolit interval,po jehož uplynutí televizor automaticky přejde do režimu dočasného vypnutí
(pohotovostní režim).
VIDEO TV
televizní obrazovce.
2 Stlačte páčku směrem $ a zvolte znaménko t, poté stlačte páčku
směrem z a vstoupíte do menu ČASOVÝ SPÍNAČ.
1
2
3
4
5
6
7
8
1 Stiskněte tlačítko MENU na dálkovém ovladači a menu se objeví na
9
0
3 Stlačte páčku směrem z, poté ji opakovaně stlačte směrem Z nebo
z dokud se na obrazovce neobjeví interval, po jehož uplynutí chcete,
NASTAVENÍ OBRAZU
Režim obrazu Osobní
Kontrast
Reset
Formát 4:3
ČASOVÝ SPÍNAČ
Casovač vypnutí
ČASOVÝ SPÍNAČ
Casovač vypnutí
Vyp
1:00
aby se vypnul televizor.
Vyp z 0:30 z 1:00..... 4:00 hodiny
PROGR
MENU
4 Stiskněte tlačítko OK.
S
RM
892
5 Stiskněte tlačítko MENU a menu zmizí z obrazovky.
inutu před tím, než televizor přejde do režimu dočasného vypnutí
(pohotovostní režim), na obrazovce se automaticky objeví 0:01.
Poznámka: • Zatímco sledujete televizor, stiskněte tlačítko na
dálkovém ovladači a čas zbývající do vypnutí se objeví na
obrazovce.
• Chcete-li znovu zapnout televizor z režimu dočasného
vypnutí, stiskněte tlačítko TV na dálkovém ovladači.
Pokročilé operace - Pokročilé operace TV
24
Page 55

Teletext
Zobrazení teletextu
Teletext je informační služba, kterou užívá většina televizních stanic.
Zvolte televizní stanici se silným signálem, jinak by mohlo dojít v teletextu k chybám.
VIDEO TV
Volba teletextu
Zvolte televizní kanál, který vysílá teletext, který si přejete sledovat.
1
2 Stisknutím tlačítka na dálkovém ovladači se objeví teletext.
1
2
3
4
5
6
7
8
9
3 Pomocí číselných tlačítek dálkového ovladače zadejte tři čísla
představující příslušné číslo stránky, kterou si přejete vidět (v
případě, že se při volbě zmýlíte, zadejte jakákoliv tři čísla a poté
TELETEXT
Index
Programme
News
Sport
Weather
TELETEXT
25
153
101
98
TELETEXT
Index
Programme
News
Sport
Weather
25
153
101
98
znovu zadejte správné číslo stránky).
0
MENU
PROGR
4 Stisknutím tlačítka vystoupíte z teletextu a vrátíte se do
televizního režimu.
Další funkce teletextu
PRO STISKNĚTE TLAČÍTKO
CZ
S
Zvolení následující nebo pro následující stránku nebo
RM
892
předchozí stránky. pro předchozí stránku
Překrytí teletextu televizním obrazem.
Opětovným stisknutím
TELETEXT
Index
Programme
News
Sport
Weather
25
153
101
98
vystoupíte z režimu teletextu.
TELETEXTTELETEXT
Index
Programme
25
News
153
Sport
Zmrazení teletextové stránky.
Weather
101
98
Opětovným stisknutím se
zmrazení stránky zruší.
Fastext
Služba Fastextu Vám umožní přístup k požadované stránce
teletextu stisknutím pouze jednoho tlačítka.
Při vysílání Fastextu se na spodní části teletextové stránky objeví
nabídka barevných kódů. Stisknutí barevného tlačítka (červeného,
zeleného, žlutého nebo modrého) na dálkovém ovladači Vám
umožní přístup k odpovídající stránce.
Teletext
25
Page 56

Přídavná zařízení
Připojení přídavných zařízení
K aparátu je možné připojit různá další zařízení, jak je níže uvedeno
Zadní část aparátu Přední část aparátu
DVD
Videorekordér
Decoder
Aby se zabránilo
zkreslení obrazu:
• Nezapojujte
zařízení ke
konektorům F a
Gsoučasně.
• Nezapojujte žádné
zařízení k čelním
konektorům a
Eurokonektoru D
současně.
Přijaté vstupní signály
A Vstup středového reproduktoru. V
B Bez vstupů
C Audio/video a RGB signály
D Audio/video a S video signály
E Audio/video signál
F S video signál
G Video signál
H Audio signál
C
A
menu NASTAVENÍ ZVUKU nastavte
“Středový” ve funkci “Reproduktor”.
B
Hi-Fi věž
E
S. VHS/Hi8
Videokamera
F
D
Disponibilní výstupní signály
Bez výstupů
Audio signál
Audio/video televizního ladiče
Zvolený výstup z audio/video
Zvolený výstup z audio/video (stejný vnější výstup jako u
konektoru :2/q 2 connector)
Bez výstupu
Bez výstupu
Bez výstupu
G
Videorekordér
DVD
H
8mm/Hi8
Videokamera
26
Přídavná zařízení
Page 57

Přídavná zařízení
Optimální pozice pro uživatele
Reproduktory Vaší
Hi-Fi věže
Použití přídavných zařízení
Doplňkové informace
Zapojení videa
Zapojte video ke konektoru typu EURO D nebo E na zadní straně aparátu. Nemáte-li kabel pro Eurokonektor, doporučujeme
Vám naladit signál videa na televizním programu č.0; viz kapitola “Ruční ladění TV” v tomto návodu k obsluze.
Pokud Vaše video přijímá Smartlink, v kapitole “Smartlink” tohoto návodu najdete podrobnější informace.
Zapojení vnějšího audia
1 Pro poslech aparátu přes Hi-Fi věž:
Jestli chcete zesílit výstup z audia, zapojte Hi-Fi věž do zdířek B na zadní straně aparátu. Hlasitost přístroje zapojeného do
zdířek B je možné regulovat střídáním seřízení hlasitosti zvuku ve sluchátkách. Viz kapitola “Seřízení zvuku” v tomto návodu
k obsluze.
Také můžete dosáhnout zvukového efektu “Dolby Virtual” pomocí Vaší
Hi-Fi věže:
K tomu je třeba umístit reproduktory Hi-Fi věže po obou stranách televizoru
tak, aby vzdálenost mezi televizorem a každým reproduktorem byla
přibližně 50cm. Po umístění reproduktorů zvolte menu “Nastavení zvuku”
pomocí systému menu, a zvolte “Dolby Virtual” v pozici “Zap”.
~50º
2 Pro poslech zesilovače Dolby přes aparát:
Jestli chcete slyšet zvuk Hi-Fi věže v reproduktorech aparátu, zapojte Hi-Fi
věž do zdířek A na zadní straně aparátu. Máte-li zesilovač Dolby, zapojte
středový výstup zesilovače do těchto zdířek, čímž zesilovač uvede do chodu
středový reproduktor. Zkonzultujte kapitolu “Seřízení zvuku” a zvolte “Středový”
ve funkci “Reproduktor”.
Zapojení systémů Mono
Zapojte kabel audia ke konektoru L/G/S/I umístěném na přední části aparátu a zvolte vstupní signál 2, dále postupujte podle
níže uvedených instrukcí.
Volba a zobrazení vstupního signálu
VIDEO TV
1 Zapojte přídavné zařízení k příslušnému konektoru v aparátu tak, jak je uvedeno na předchozí
straně.
2 Zapněte zapojené zařízení.
3 Opakovaně stiskněte tlačítko na dálkovém ovladači, dokud se na obrazovce neobjeví správné
1
2
3
4
5
6
7
8
9
0
MENU
S
PROGR
RM
892
vstupní znaménko.
Znaménko Vstupní signály
kkkk •Vstupní signál audio/video přes konektor typu EURO C
• Vstupní signál RGB přes konektor typu EURO C
KK
KK
•Vstupní signál audio/video přes konektor typu EURO D nebo konektory RCA H a
G.
qqqq
2 •Vstupní signál audio/video přes konektor typu EURO D nebo konektory RCA H a
F.
…………
3 • Vstupní signál audio/video přes konektor typu EURO E.
4 Pokud se chcete vrátit do běžného režimu zobrazení, stiskněte tlačítko na dálkovém ovladači.
CZ
Přídavná zařízení
27
Page 58

Přídavná zařízení
Smartlink
Smartlink je přímé propojení mezi televizorem a videorekordérem.
Pro použití Smartlinku je třeba:
• Videorekordér, který přijímá Smartlink, NexTView Link, Easy Link nebo Megalogic.
Megalogic je registrovaná obchodní značka firmy Grundig Corporation.
Easy Link je obchodní značka firmy Philips Corporation.
• Kompletní 21-pinový kabel SCART pro zapojení videa k Eurokonektoru :3 (SMARTLINK)
umístěném na zadní straně aparátu.
Smartlink nabízí:
• Informace o ladění, např. přehled kanálů, který je přenesen z televizoru do videorekordéru.
• Přímé nahrávání z TV: zatímco sledujete TV, stačí stisknout pouze jedno tlačítko na
videorekordéru pro záznam programu.
• Aparát v režimu dočasného vypnutí (pohotovostní režim): stiskněte tlačítko "Play z" na
videorekordéru a aparát se automaticky uvede do chodu.
Přední část aparátu
Jestliže máte zapojený dekodér k videu, na který se může zapojit Smartlink, zvolte menu
Rozšířené Předvolby LADĚNÍ a zvolte DEKODÉR v pozici AV3 pro každý
kodifikovaný kanál. Podrobnější informace najdete v kapitole “Použití funkce ‘Rozšířené
Předvolby’ ”.
Podrobnější informace o Smartlinku najdete v návodu k obsluze Vašeho videa.
Dálkové ovládání jiných zařízení Sony
Tlačítky, které jsou pod krytem dálkového ovladače, můžete ovládat i jiné zařízení Sony.
1 Otevřete kryt dálkového ovladače.
2 Nastavte VTR 1234 DVD vzhledem k zařízení, které chcete ovládat.
VTR 1 Video Beta
VTR 2 Video 8mm
VTR 3 Video VHS
VTR 4 Digitální video (DCR-VX 1000/9000 E, VHR-1000)
DVD Digitální reproduktor videokazet
Videorekordér
Dekodér
VIDEO TV
VTR 1 2 3 4 DVD
CH
3 Pro ovládání daného zařízení používejte tlačítka, která jsou pod krytem dálkového ovladače.
• Má-li Váš videorekordér k dispozici selektor COMMAND MODE, nastavte ho na stejnou
pozici, v jaké je selektor VTR 1234 DVD na dálkovém ovladači televizoru.
• Pokud by zařízení nemělo k dispozici některou z funkcí, příslušné tlačítko na dálkovém
ovladači nebude fungovat.
Přídavná zařízení
28
VTR 1 2 3 4 DVD
CH
Page 59

Přídavná zařízení
Volba výstupního signálu Eurokonektorů
Tato funkce Vám umožní nahrát na Váš videorekordér (připojený k Eurokonektorům :2/q 2 nebo :3 umístěných na
zadní straně aparátu) jakýkoliv signál pocházející z vnějšího zařízení.
K tomu je třeba: zvolit vnější výstup tak, jak je následovně uvedeno (jestliže Váš videorekordér přijímá Smartlink, tento
postup není třeba):
VIDEO TV
1 Stiskněte tlačítko MENU na dálkovém ovladači a menu se objeví na
televizní obrazovce.
2 Stlačte páčku směrem $ a zvolte znaménko , poté stlačte páčku
směrem z a vstoupíte do menu TV/VIDEO.
1
2
3
4
5
6
7
8
9
0
3 Stlačte páčku směrem $ nebo 4 pro volbu:
TV obraz (pro vstupní signál pro televizní obrazovku), nebo
Výstup (pro vstupní signál aparátu, který je k dispozici pro
NASTAVENÍ OBRAZU
Režim obrazu Osobní
Kontrast
Reset
Formát 4:3
TV / VIDEO
TV Obraz
Výstup
TV
[TV - - - - - - -]
[AV1 - - - - - - -]
AV1
CZ
Eurokonektory :2/q 2 i :3).
Stlačte páčku směrem z pro potvrzení.
PROGR
MENU
4 Opakovaně stlačte páčku směrem Z nebo z pro volbu vhodného
signálu:
S
RM
892
TV obraz TV, AV1, RGB, AV2, YC2 nebo AV3
Výstup TV, AV1, AV2, YC2, AV3 nebo AUTO
Po zvolení typu signálu stiskněte tlačítko OK pro potvrzení volby.
Jestliže zvolíte AUTO, výstupní signál se bude vždy shodovat
s tím, který se objeví na obrazovce.
Jestliže máte dekodér, nezapomeňte znovu zvolit Výstup v
režimu “TV” pro správnou dekodifikaci.
5 Stiskněte tlačítko MENU a menu zmizí z obrazovky.
Zvolený signál je k dispozici pro přídavné zařízení zapojené k
příslušnému Eurokonektoru.
Přídavná zařízení
29
Page 60

Přídavná zařízení
Použití funkce “Název Předvolby”
Tato funkce Vám umožní přidělit jméno (maximálně o pěti znacích - písmena nebo čísla) přídavnému zařízení zapojenému
do zdířek aparátu.
1
4
7
S
VIDEO TV
2
5
8
0
MENU
3
6
9
RM
PROGR
892
1 Stiskněte tlačítko MENU na dálkovém ovladači a menu se objeví na
televizní obrazovce.
2 Stlačte páčku směrem $ a zvolte znaménko , poté stlačte páčku
směrem z a vstoupíte do menu LADĚNÍ.
3 Stlačte páčku směrem $ nebo 4 a zvolte Název Předvolby, poté
stlačte páčku směrem z.
4 Stlačte páčku směrem $ nebo 4 pro volbu vstupního signálu, který
chcete pojmenovat (např. AV2) a poté stlačte páčku směrem z pro
volbu funkce NÁZEV.
5 Stlačte páčku směrem $ nebo 4 pro volbu jednoho písmene, čísla
nebo “-” pro mezeru, poté stlačte páčku směrem z pro potvrzení
tohoto znaku. Zbývající čtyři znaky zvolte stejným způsobem.
NASTAVENÍ OBRAZU
Režim obrazu Osobní
Kontrast
Reset
Formát 4:3
LADùNÍ
Antomatické ladûní
Ruční ladûní
Rozšífiené Pfiedvolby
Název Pfiedvolby
Tfiídûní ProgramÛ
Rodičovský zámek
Jazyk
Konvergence
LADùNÍ
Antomatické ladûní
Ruční ladûní
Rozšífiené Pfiedvolby
Název Pfiedvolby
Tfiídûní ProgramÛ
Rodičovský zámek
Jazyk
Konvergence
NÁZEV P¤EDVOULBY
VSTUP NÁZEV
AV1
RGB
AV2
YC2
AV3
NÁZEV P¤EDVULBY
VSTUP NÁZEV
AV1
RGB
AV2
YC2
AV3
- - - - -
- - - - -
- - - - -
- - - - -
- - - - -
- - - - -
- - - - -
A - - - -
- - - - -
- - - - -
Přídavná zařízení
30
6 Po zvolení všech znaků stiskněte tlačítko OK.
7 Opakujte body 4 až 6, jestli si přejete pojmenovat další vstupní
signály.
8 Stiskněte tlačítko MENU a menu zmizí z obrazovky.
Po každém zvolení zařízení, jehož vstupní signál jste pojmenovali,
název se objeví na obrazovce na několik vteřin.
Page 61

Doplňkové informace
Optimální úhel vidění
Aby kvalita obrazu byla optimální, snažte se aparát umístit tak, abyste obrazovku sledovali z těchto úhlů:
Vodorovný úhel vidění
2.1m (minimální vzdálenost)
75º
75º
Svislý úhel vidění
CZ
(Pozice doporučená pro uživatele)
2.1m (minimální vzdálenost)
27.5°
27.5°
(Pozice doporučená pro uživatele)
Doplňkové informace
31
Page 62

Doplňkové informace
Technické údaje
Televizní systém
B/G/H, D/K
Systém kódování barev
PAL, SECAM
NTSC 3.58, 4.43 (pouze video vstup)
Rozložení kanálů
VHF: E2-E12
UHF: E21-E69
CATV: S1-S20
HYPER: S21-S41
D/K: R1-R12, R21-R69
Obrazovka
41 palců, přibliž. 103 cm v úhlopříčce
Vstupy na zadní stranû
• Vstupy středového reproduktoru (2
C
vstupy)
• Výstupy z audia - konektory RCA
• :1/ 21-pinový Eurokonektor (norma
CELENEC), včetně vstupu pro audio/
video, vstupu RGB, výstupu audio/
video z TV
• :2/q 2 21-pinový Eurokonektor (norma
CELENEC), včetně vstupu pro audio/
video, vstupu pro S video, zvoleného
výstupu z audio/video
• :3 21-pinový Eurokonektor (norma
(SMARTLINK)
Vstupy na přední straně
…2 vstup pro video - konektor RCA
2
vstupy pro audio - konektory RCA
q2 vstup pro S video - 4-pinový DIN
zdířka sluchátek - minizdířka stereo
CELENEC), včetně vstupu pro audio/
video, zvoleného výstupu z audio/
video (stejný vnější výstup jako u
konektoru :2/q 2) a připojení
Smartlinku.
Výstupy zvuku
2 x 30 W (hudební výkon)
2 x 15 W (RMS)
Vstup Středový Reproduktor
30 W (RMS)
Příkon
145 W
Příkon v režimu časového vypnutí (pohotovostní režim)
0.7 W
Rozměry (š x v x h)
Přibl. 948 x 992 x 511 mm
Hmotnost
Přibl. 43 kg
Dodané příslušenství
1 dálkový ovladač RM-892
2 baterie typu IEC
Další funkce
Filtr digitálního hřebenu (vysoká resoluce)
TELETEXT, Fastext
NICAM
Automatické vypnutí
Smartlink
Dolby Virtual
Úpravy v designu a technických vlastnostech bez předchozího upozornění.
Ekologický papír - 100% bez chloru
Doplňkové informace
32
Page 63

Doplňkové informace
Řešení problémů
Zde jsou některá řešení problémů, která mohou ovlivnit obraz i zvuk.
Problém
Není obraz (černá obrazovka) a není
zvuk.
Špatný nebo žádný obraz (tmavá
obrazovka), ale zvuk je dobrý.
Obraz má špatnou kvalitu při sledování
video zdroje RGB.
Dobrý obraz, ale bez zvuku.
Řešení
• Zapojte aparát do zásuvky.
• Stiskněte tlačítko na čelní straně televizoru.
• Pokud je indikátor na TV rozsvícen, stiskněte tlačítko TV
nebo číselné programové tlačítko na dálkovém ovladači.
• Zkontrolujte zapojení antény.
• Vypněte televizor na 3 až 4 vteřiny a znovu jej zapněte
pomocí tlačítka na jeho čelní straně.
• Pomocí režimu MENU zvolte Seřízení obrazu
Seřid’te hladiny kontrastu, barevné sytosti a jasu.
• V režimu Seřízení obrazu zvolte Reset pro obnovení
továrního nastavení obrazu.
• Několikrát stiskněte tlačítko na dálkovém ovladači, až se
na obrazovce objeví znaménko RGB .
• Stiskněte tlačítko +/- na dálkovém ovladači.
• Pokud se na obrazovce objeví , stiskněte tlačítko na
dálkovém ovladači.
• Přesvědčte se, zda je reproduktor “Hlavní” zvolen v režimu
menu NASTAVENÍ ZVUKU.
CZ
Barevné pořady nejsou barevné.
Obraz je zkreslený při změně programu
nebo při zvolení teletextu.
Šum v obrazu.
Dálkový ovladač nefunguje.
Indikátor dočasného vypnutí televizoru
(pohotovostní režim) bliká.
• Pokud se závady nepodařilo odstranit, nechte televizor prověřit oprávněným odborníkem.
• Kryt NIKDY neodnímejte sami.
• Pomocí režimu MENU zvolte Seřízení obrazu a seřid’te
barevnou sytost.
• V režimu Seřízení obrazu zvolte Reset pro obnovení
továrního nastavení obrazu.
• Na zadní straně televizoru vypněte zařízení připojené přes
21-pinový Eurokonektor.
• Pomocí jemného doladění kanálů (AFT) dosáhnete lepšího
příjmu obrazu. Podrobnější informace najdete v kapitole
“Použití funkce ‘Rozšířené Předvolby’ “.
• Vložte nové baterie.
• Obrat’te se na nejbližší autorizovaný servis Sony.
Doplňkové informace
33
Page 64

Projekciós TV
Köszönjük, hogy ezt a Sony projekciós TV-t választotta.
A készülék használata előtt figyelmesen olvassa el ezt az útmutatót és őrizze
meg jövőbeni referenciákhoz.
Kulcsok a kezelési útmutató használatához:
•
Használja a
alapvető funkcióihoz.
•
Használja a
jellemzőinek alaposabb megismeréséhez.
•
Az útmutatóban használt jelképek:
•
•
•
Bevezető eljárásokat
Magasabbrendű műveleteket
Lehetséges kockázatok
Fontos információ.
Információ a funkcióról.
a projekciós TV üzembehelyezéséhez és
a projekciós TV kiegészítő
Kezelési útmutató
HU
•
1,2...
Követendő utasítás sor
MENU
K
•
•
•
folytatódik.
A távvezérlő árnyékolt gombjai mutatják a különböző utasítások
végrehajtásához megnyomandó gombokat.
Információ az utasítások eredményéről.
A végeredmény eléréséhez szükséges eljárás a következő oldalon
3
Page 65

Biztonsági előírások
Kizárólag 220 - 240 V -os hálózati
váltakozó feszültséggel
üzemeltesse a készüleket. Ne
csatlakoztasson túl sok készüléket
ugyanahhoz az aljzathoz, mert a
túterhelés tüzet okozhat.
Energiatakarékossági és
biztonsági okok miatt ne hagyia
a készüléket készenléti
üzemmódban, amikor nem
használja. Hosszabb távollét
esetén húzza ki a hálózati
csatlakozó vezetéket a fali
konnektorból.
Ne dugion semmilyen tárgat a
készülekbe, mert ezzel tüzet és
áramütést okozhat.Ha a szellőző
nyíasokon keresztül bármilyen
szilárd test, vagy folyadék kerüll a
készülek belsejébe, húzza ki a
hálozaki csatlakozó vezetéket.
Azonnal ellenőriztesse
szakemberrel!
Soha ne nyissa ki a készülék hátsó
burkolatát. A javítást bizza
szakemberre.
A készülek szellőzőnyílásait hagyja
szabadon. A megfelelő
szellőzés érdekében a készülék
minden oldalánál hagyjon legalább
10 cm-es szabad területet.
A képernyőt enyhén
megnedvesített ruhával tisztíthatja
meg.
Ne használjon a tisztításhoz
benzint, higítót, súrolószert.
Tisztítás előtt húzza ki a hálózati
csatlakozót a konnektorból.
Vihaos időjárás, villámlás idején
saját biztonsága érdekében
ne érintse meg a készüléket,
ahálózati csatlakozó vezetéket
és az antennakábelt.
Ne állítsa a készüléket
szélsőségesen meleg, párás vagy
poros helyre, vagy olyan helyre,
ahol mechanikai vibrációnak lehet
kitéve.
A hálózati csatlakozó
kihúzásánál a cstlakozó
dugót forgia meg, és ne a
vezetéket.
Az áramütés és a tűz
veszélyének elkerülése
érdekében óvja a TV
készüléket esőtől és
nedvességtől.
A tűz veszélyének elkerülése
érdekében ne alkalmazzon a
készülek közelében nyílt lángot (ne
égessen pl. gyertyát).
Ne tegyen nehéz tárgyat a
hálózati vezetékré, mert
megsérülhet.
Javasoljuk, hogy a felesleges
vezetéket csévélje fel a tv
készülék hátuljan lévő tartóra.
A TV készüléket stabil állványra
helyezze. Ne engedje, hogy a
készülék az oldalára vagy
képernyővel előre dőljön.
Mozgatás előtt húzza ki a hálózati
csatlakozót a konnektorból.
A készüléket óvatosan szállítsa,
kerülje a zötykölődős utcákat,
óvja a készüléket ütéstől,
rázkódástól.
Ne takarja le a készülék
szellőzőnyílásait pl. függönnyel,
újsággal, stb.
Kiegészítő biztonsági előírások
•
Amennyiben a projekciós TV-t hideg helyről közvetlenül meleg helyre helyezi át vagy a helyiség hőmérsékletében hirtelen
hőmérsékletváltozás áll be, a kép zavaros lehet illetve néhány helyen rossz színminőséget mutathat. Ez abból adódik, hogy a
nedvesség lecsapódott a készüléken belüli tükrökön vagy lencséken. A projekciós TV használata előtt hagyja, hogy a nedvesség
elpárologjon
•
Ne tegye ki a képernyőt közvetlen fénynek, hogy tiszta képet kapjon. Amikor lehetséges, használjon a mennyezetről jövő
megvilágítási pontokat.
•
A kép huzamosabb ideig történő kimerevítése, pl. videojátékok vagy személyi számítógépek használatakor valamint programok
16:9 formátumban történő nézésekor, a képcsövet megrongálhatja. Ennek elkerülése végett tartsa a kép kontrasztját alacsony
szinten.
•
Kerülje a képernyő érintését, hogy a felületet ne karcolja meg.
4
Biztonsága érdekében
.
Page 66

Tartalomjegyzék
Tartalomjegyzék
Kulcsok a kezelési útmutató használatához
Biztonsági előírások
.........................................................................................................................4
Bevezető eljárások
Általános leírás
A mellékelt tartozékok ellenőrzése
A projekciós TV gombjainak általános leírása
A távvezérlő gombjainak általános leírása
Beüzemelés
Az elemek behelyezése a távvezérlőbe
Az antenna és a video csatlakoztatása
A projekciós TV bekapcsolása
...........................................................................................8
Első üzembehelyezés
Nyelvválasztás
A TV automatikus hangolása a távvezérlő használatával
A TV csatornák programszámainak átrendezése
A színátfedések beállítása (Konvergencia)
Gyors útmutató a menükben való mozgáshoz
......................................................................................................................9
Magasabbrendű műveletek
Magasabbrendű programozás
A TV automatikus hangolása
A TV kézi hangolása
A “További programok tárolása” funkció használata
Programzárolás
Programhelyek figyelmen kívül hagyása
Az adók egyéni beazonosítása
...........................................................................................................15
...................................................................................................................17
...........................................................................................14
........................................................................................19
................................................................................3
....................................................................................6
.................................................................6
.......................................................................7
............................................................................8
............................................................................8
............................................10
.........................................................11
.....................................................................12
..............................................................13
HU
...................................................16
........................................................................18
A TV magasabbrendű műveletei
A kép beállítása
A képernyő képarányának kiválasztása
A hang beállítása
Az automatikus kikapcsolás funkció
..................................................................................................................20
................................................................................................................22
Teletext
A teletext megjelenítése
....................................................................................................25
Választható csatlakozások
Választható készülékek csatlakoztatása
Választható készülékek használata
Smartlink
Egyéb Sony készülékek távvezérlő
Az eurocsatlakozók kimeneti jelének kiválasztása
Az “AV címkézés” funkció használata
..............................................................................................................................28
Kiegészítő információ
Optimális látószög
Műszaki jellemzők
Problémamegoldás................................................................................................ 33
..............................................................................................................31
..............................................................................................................32
..........................................................................21
...............................................................................24
........................................................................26
.................................................................................27
.................................................................................28
.......................................................29
............................................................................30
Tartalomjegyzék
5
Page 67

Bevezető eljárások - Általános leírás
A mellékelt tartozékok ellenőrzése
VIDEO TV
Checking the Accessories Supplied
1
2
3
4
5
6
7
8
9
0
PROGR
MENU
RM
892
S
Egy távvezérlő
(RM-892)
Két darab elem (R6 típus)
A projekciós TV gombjainak általános leírása
Programhely
léptető gombok
(a televízió
csatornákat
választja ki)
Nyomja felfelé a készülék előlapján
lévő fedelet az elülső aljzatok
megjelenítéséhez.
A bemenő
forrást
kiválasztó
gomb
Hangerő
szabályoz
ó gombok
Készenléti
üzemmód
(standby)
jelző
Bekapcsolás/
Kikapcsolás
gomb
Fülhallgató
Videobemenet
kimenet
S videobemenet
6
Bevezető eljárások - Általános leírás
Audio
bemenet
Automatikus
hangolás
gomb
“Autokonvergencia”
gomb
Page 68

Bevezető eljárások - Általános leírás
A távvezérlő gombjainak általános leírása
Checking the Accessories Supplied
VIDEO TV
Ezen a készüléken ez a gomb nem
rendelkezik funkcióval.
VTR 1 2 3 4 DVD
CH
Az óra megjelenítése
Nyomja meg az óra
megjelenítéséhez és
eltüntetéséhez (csak teletext
közvetítéskor működik).
A video működtetése
További részleteket az “Egyéb
Sony készülékek távvezérlői”
fejezetben talál.
A hang elnémítása
Nyomja meg a hang elnémításához.
A hang visszakapcsolásához nyomja meg
újra
.
A video Bekapcsolása/ Kikapcsolása
Nyomja meg a video be- és
kikapcsolásához.
A TV üzemmód kiválasztása
Nyomja meg a teletext vagy a videobemenet
kikapcsolásához.
A teletext kiválasztása
Nyomja meg a teletext megjelenítéséhez.
Ezen a készüléken ezek a gombok nem
rendelkeznek funkcióval.
Csatornaválasztás
Nyomja meg a csatornák kiválasztásához.
Kétjegyű programhelyek, pl. 23,
kiválasztásához nyomja meg először a -/--
gombot, majd a 2-es és a 3-as gombokat.
Ha eltéveszti az első számjegyet, üsse be a
második számjegyet (0-tól 9-ig), majd ezt
követően hajtsa végre újra a műveletet.
A hang üzemmód kiválasztása
Nyomja meg a hang üzemmód
változtatásához.
A kép üzemmód kiválasztása
Nyomja meg a kép üzemmód
változtatásához.
Hangerő szabályozás
Nyomja meg a hangerő szabályozásához.
A televízió funkcióin kívül, minden színes gomb és zöld színű
jelkép használható a teletexttel történő műveletekhez is.
További információt a használati utasítás “Teletext”
fejezetében talál.
1
4
7
S
VIDEO TV
2
5
8
0
K
MENU
3
6
9
RM
PROGR
892
A televízió ideiglenes kikapcsolása
Nyomja meg a televízió ideiglenes
kikapcsolásához (a készenléti üzemmód
kigyullad). Nyomja meg újra a
jelző
készenléti üzemmódból (standby) való
bekapcsoláshoz
.
Az energiamegtakarítás érdekében
ajánlatos a televíziót teljesen kikapcsolni,
ha azt nem használja.
Amennyiben 15-30 perc elteltével
nincsen televíziójel és semmilyen
gombot nem nyomtak le, a televízió
automatikusan készenléti
üzemmódba (standby) kapcsol.
Információ megjelenítése a képernyőn
Nyomja meg az összes utasítás képernyőn
történő megjelenítéséhez. Nyomja meg
újra annak törléséhez.
A bemenő forrás kiválasztása
Nyomja meg egymás után többször, amíg
a kívánt bemenő forrás jelképe megjelenik
a képernyőn.
Az utolsó választott csatornára való
visszatérés
Nyomja meg az utolsó választott
csatornára való visszatéréshez (az előző
csatorna legalább 5 másodpercig kell
képernyőn maradjon előzőleg).
A képernyő képarányának kiválasztása
Nyomja meg többször egymás után a
képernyő képarányának változtatásához.
Ez a gomb csak teletext üzemmódban
működik. A gombhoz tartozó
funkció
nem működik ezen a készüléken.
Joystick menüválasztáshoz
4
Egy szinttel feljebb
$
Egy szinttel lejebb
Z
Az előző menübe vagy választásba
való belépés
z
A következő menübe vagy
választásba való belépés
OK
A választás megerősítése
Csatornakiválasztás
Nyomja meg az előző vagy a következő
csatorna kiválasztásához.
A menürendszer bekapcsolása
Nyomja meg, hogy a menü megjelenjen a
képernyőn. Nyomja meg újra a
kikapcsoláshoz, hogy normális televízió
képernyőt lásson.
HU
Getting Started - Overview
7
Page 69

Videomagnó
Bevezető eljárások - Beüzemelés
Az elemek behelyezése a távvezérlőbe
Győződjön meg arról, hogy az elemeket a polaritásoknak megfelelő helyzetben helyezi be.
Óvja környezetünket! A használt elemeket az erre a célra kijelölt gyüjtőhelyen helyezze el.
Az antenna és a video csatlakoztatása
vagy
Az eurocsatlakozó választható.
Ezen választható csatlakozó használatával javíthatja a kép- és hangminőséget a video használatakor.
Amennyiben nem használ eurocsatlakozót, a projekciós TV automatikus hangolása után a videojel csatornát kézileg kell
hangolja. Lásd a “A TV kézi hangolása” fejezetet. Ezenkívül lásd a video használati utasítását a videojel csatorna
megtalálásának módjához.
OUT IN
A projekciós TV bekapcsolása
8
Bevezető eljárások - Beüzemelés
Csatlakoztassa a projekciós
TV csatlakozóját a hálózati
aljzatba (220-240 V váltakozó
feszültség, 50Hz).
Nyomja meg a
projekciós TV
előlapjának
bekapcsolás/
kikapcsolás
gombját.
Page 70

z
t
Bevezető eljárások - Első üzembehelyezés
Nyelvválasztás
Ez a funkció lehetővé teszi a menüképernyők nyelvének kiválasztását.
A projekciós TV első bekapcsolásakor a LANGUAGE/ NYELV menü automatikusan megjelenik a képernyőn. Mindazonáltal,
ha a későbbiekben szükségessé válik a menük nyelvének újbóli megváltoztatása, a
menüt és a továbbiakban leírt módon járjon el.
HANGOLÁS-ban válassza a Nyelv
VIDEO TV
Nyomja meg a projekciós TV
1
gombját. A készülék
Bekapcsolás/ Kikapcsolás
Bekapcsolás/ Kikapcsolás
gombjának első
megnyomásakor LANGUAGE (NYELV) menü automatikusan
megjelenik a projekciós TV képernyőjén.
2
Nyomja a távvezérlő joystickjét $ vagy 4 felé a nyelv kiválasztásához,
majd ezt követően nyomja meg az OK gombot a választás
megerősítésére.
LANGUAGE
English
Deutsch
Français
Italiano
Nederlands
Polski
Česki
Magyar
Select Language:
Confirm: OK
LANGUAGE
English
Deutsch
Français
Italiano
Nederlands
Polski
Česki
Magyar
Select Language:
Confirm: OK
LANGUAGE
English
Deutsch
Français
Italiano
Nederlands
Polski
Česki
Magyar
Select Language:
Confirm: OK
HU
1
4
7
S
MENU
2
3
5
6
8
9
Az automatikus hangolás menü a választott nyelven jelenik meg a
projekciós TV képernyőjén
0
PROGR
RM
892
Szeretné elinditani az
automatikus hangolást ?
Igen
Nem
Igazolás: OK
Bevezető eljárások - Első üzembehelyezés
9
Page 71

Bevezető eljárások - Első üzembehelyezés
S
u
G
O
O
R
z
:
é
e
A TV automatikus hangolása a távvezérlő használatával
A különböző csatornák (televízióadók) vételéhez szükséges a készülék hangolása. Kövesse a következő utasításokat ahhoz,
hogy a készülék automatikusan megkeresse és rögzítse a rendelkezésre álló összes csatornát.
A nyelv kiválasztása után a képernyőn megjelenik egy új menü, mely megkérdezi, hogy kívánja-e a csatornák automatikus
hangolását. Mindazonáltal, ha a későbbiekben szükségessé válik a csatornák újbóli hangolása (pl. költözködés esetén),
válassza az “Automatikus hangolás” menüt a HANGOLÁS-ban és a továbbiakban leírt módon járjon el vagy lásd “A TV
automatikus hangolása” c. fejezetet.
1
4
7
S
VIDEO TV
2
5
8
0
MENU
3
6
9
RM
PROGR
892
1 Nyomja meg a távvezérlő OK gombját az IGEN kiválasztásához. A
képernyőn megjelenik egy új menü az antenna csatlakoztatásának
ellenőrzéséhez.
2 Ellenőrizze, hogy az antenna csatlakoztatva van-e, majd nyomja meg
az OK gombot.
Az automatikus hangolás megkezdődik, mialatt az összes
csatorna behangolódik (a televízióadók sorra megjelennek), a
képernyőn az “AUTOMATIKUS HANGOLÁS” üzenet villog.
Ez a művelet eltarthat néhány percig. Legyen türelemmel és ne
nyomjon meg egyetlen gombot sem a hangolás folyamata
alatt.
Az automatikus hangolás befejeződése után a képernyőn megjelenik
a Programáthelyezés menü.
Megjegyzés: • Amennyiben meg kívánja állítani az automatikus
hangolási folyamatot, nyomja meg a távvezérlő MENU
gombját.
• Ha az automatikus hangolási folyamatot a MENU
gomb megnyomásával megállítja, a
Programáthelyezés menü nem jelenik meg
automatikusan a képernyőn.
Szeretné elinditani az
automatikus hangolást ?
Igen
Nem
Igazolás: OK
Kérem igazolja, hogy az
antenna csatlakoztatva van.
Igazolás: OK
AUTOMATIKUS HANGOLÁS
PROG. NORMA CS NÉV
B/G C 26 - - - - -
1
AUTOMATIKUS HANGOLÁS
PROGRAMÁTHELYEZÉS
PROG. NORMA CS NÉV
B/G
0
B/G
1
B/G
2
B/G
3
B/G
4
B/G
5
B/G
6
B/G
7
B/G
8
B/G
9
Kiválasztás PROGR: OK
Kilépés: MENU
C 28
C 40
C 41
C 31
C 34
C 27
C 47
C 44
C 23
C 35
BBC-W
MV-CH
TVE-1
TVE-2
ANT-3
TELE 5
C PLUS
- - - - -
- - - - CNN -
10
Bevezető eljárások - Első üzembehelyezés
Page 72

Bevezető eljárások - Első üzembehelyezés
a
é
R
a
é
G
o
R
A TV csatornák programszámainak átrendezése
Az összes rendelkezésre álló csatorna (televízióadó) hangolása után a képernyőn automatikusan megjelenik egy új menü,
mely megkérdezi Öntől, hogy meg kívánja-e változtatni a csatornák megjelenési sorrendjét.
Mindazonáltal, ha a későbbiekben meg kívánja változtatni a csatornák sorrendjét, válassza a “Programáthelyezés” menüt a
HANGOLÁS-ban és a jelen fejezet b) bekezdésében leírtak szerint járjon el.
1
4
7
S
VIDEO TV
2
5
8
0
MENU
3
6
9
RM
PROGR
892
a) Ha nem kívánja a csatornák sorrendjét megváltoztatni:
1 Nyomja meg a MENU gombot a normális televízióképhez való
visszatéréshez.
A projekciós TV működésre kész.
b) Ha meg kívánja változtatni a csatornák sorrendjét:
1 Nyomja a joysticket $ vagy 4 felé azon csatorna (televízióadó)
programszámának kiválasztásához, melynek helyét meg kívánja
változtatni, majd ezt követően nyomja meg az OK-t.
2 Nyomja a joysticket $ vagy 4 felé az új programszám
kiválasztásához, melyen a kiválasztott csatornát (televízióadót)
rögzíteni kívánja, majd nyomja meg az OK-t.
A választott csatorna új programhelyre kerül és a többi csatornák
is ennek megfelelően változnak.
PROGRAMÁTHELYEZÉS
PROG. NORMA CS NÉV
B/G
0
1
2
3
4
5
6
7
8
9
Kiválasztás PROGR: OK
Kilépés: MENU
PROGRAMÁTHELYEZÉS
PROG. NORMA CS NÉV
Kiválasztás PROGR: OK
Kilépés: MENU
PROGRAMÁTHELYEZÉS
PROG. NORMA CS NÉV
0
1
2
3
4
5
6
7
8
9
Kiválasztás Vál. új pr. helyete:
Igazolás: OK
C 28
B/G
C 40
B/G
C 41
B/G
C 31
B/G
C 34
B/G
C 27
B/G
C 47
B/G
C 44
B/G
C 23
B/G
C 35
B/G
0
1
2
3
4
5
6
7
8
9
B/G
B/G
B/G
B/G
B/G
B/G
B/G
B/G
B/G
B/G
B/G
B/G
B/G
B/G
B/G
B/G
B/G
B/G
B/G
C 28
C 40
C 41
C 31
C 34
C 27
C 47
C 44
C 23
C 35
C 40
C 41
C 31
C 34
C 27
C 47
C 44
C 23
C 35
C 28
BBC-W
MV-CH
TVE-1
TVE-2
ANT-3
TELE 5
C PLUS
- - - - -
- - - - CNN -
BBC-W
MV-CH
TVE-1
TVE-2
ANT-3
TELE 5
C PLUS
- - - - -
- - - - CNN -
MV-CH
TVE-1
TVE-2
ANT-3
TELE 5
C PLUS
- - - - -
- - - - CNN BBC-W
HU
3 Ismételje meg az 1. és a 2. lépést további televíziócsatornák
átrendezéséhez.
4 Nyomja meg a MENU gombot a normális televízióképhez való
visszatéréshez.
A projekciós TV működésre kész.
Bevezető eljárások - Első üzembehelyezés
11
Page 73

Bevezető eljárások - Első üzembehelyezés
A színátfedések beállítása (Konvergencia)
A földmágnesesség következtében a kép határozatlan lehet, a képek kontúrján a különböző színek keveredhetnek. Ebben
az esetben a továbbiakban leírtak szerint járjon el.
A piros, zöld és kék vonalak
autokonvergenciája
Nyomja felfelé a projekciós TV elülső fedőlapját az elülső
1
vezérlőpanel kinyitásához.
2 Nyomja meg a projekciós TV gombját.
Megkezdődik az autokonvergencia funkció, mely körülbelül 30
másodpercig tart. Amikor a fehér kereszt eltűnik a képernyőről, a
projekciós TV működésre kész.
Megjegyzés:
Az autokonvergencia funkció nem működik ha:
• nincsen bemeneti jel.
• gyenge a bemeneti jel.
• a képernyő erős fényforrásnak vagy közvetlen napsugárzásnak
van kitéve.
• a teletextet nézi.
A konvergencia pontosabb beállításához
Nyomja meg a távvezérlő MENU gombját a menü képernyőn történő
VIDEO TV
1
megjelenítéséhez.
2 Nyomja a joysticket $ felé a jelkép kiválasztásához, majd ezt
követően nyomja azt z felé a HANGOLÁS menübe történő
KÉPBEÁLLÍTÁS
Képbeállitás Egyéni
Kontraszt
Gyárí beállitás
Képarány
4:3
belépéshez.
3 Nyomja a joysticket $ vagy 4 felé a Konvergencia kiválasztásához,
majd ezt követően nyomja azt z felé.
1
2
3
4 Nyomja a joysticket $ vagy 4 felé a beállítani kívánt “vonal” (piros és
kék színű vízszintes és függőleges vonalak) kiválasztásához:
4
5
6
7
8
9
0
: függőleges piros vonal (bal/ jobb beállítás)
: vízszintes piros vonal (felső/ alsó beállítás)
: függőleges kék vonal (bal/ jobb beállítás)
: vízszintes kék vonal (felső/ alsó beállítás)
Nyomja meg az OK-t.
HANGOLÁS
Automatikus hangolás
Manuálís Hangolás
További programok tárolósa
AV címkézés
Programáthelyezés
Gyermekzár
Nyelv
Konvergencia
5 Többször egymás után nyomja a joysticket $ , 4 , Z vagy z felé
ahhoz, hogy a kiválasztott vonal a közép zöld vonalával összetartson,
majd ezt követően nyomja meg az OK-t a megerősítéshez.
PROGR
MENU
6 A többi vonal beállításához ismételje meg a 4. és 5. lépéseket, amíg
a vonalak átfedik egymást és egy fehér keresztet alkotnak.
RM
892
S
12
Bevezető eljárások - Első üzembehelyezés
7 Nyomja meg a MENU gombot a normális televízióképhez való
visszatéréshez.
A projekciós TV működésre kész.
Page 74

Kiegészítő információ
Gyors útmutató a menükben való mozgáshoz
MENU
Nyomja meg a távvezérlő MENU gombját a menürendszerbe való belépéshez.
KÉPBEÁLLÍTÁS
Képbeállitás Egyéni
Kontraszt
Gyárí beállitás
Képarány
4:3
KÉPBEÁLLÍTÁS
KÉPBEÁLLÍTÁS
Képbeállitás Egy
Képbeállitás Egyéni
Kontraszt
Kontraszt
Gyárí beállitás
Gyárí beállitás
Képarány
Képarány 4:3
(A kép különböző beállításairól szóló
további információt lásd “A kép
beállítása” c. fejezetben)
HANGSZABÁLYOZÁS
Hangszabályozás
Balansz
Gyári beállitás
Dolby Virtual
KettŒs hang
Hangkigyenlítés
HangerŒ
KettŒs hang
Hangszóró
VIDEO CSATLAKOZÁS
TV KépernyŒ
Kimenet
TV
IDÃKAPCSOLÓ
Elalváskapcsoló
HANGOLÁS
Automatikus hangolás
Manuálís Hangolás
További programok tárolósa
AV címkézés
Programáthelyezés
Gyermekzár
Nyelv
Konvergencia
Egyéni
Ki
Moho
0
Moho
FŒ
[TV - - - - - - -]
[AV1 - - - - - - -]
AV1
Ki
HANGSZABÁLYOZÁS
Hangszabályozás
Balansz
Gyári beállitás
Dolby Virtual
KettŒs hang
Hangkigyenlítés
HangerŒ
KettŒs hang
Hangszóró
VIDEO CSATLAKOZÁS
TV KépernyŒ
Kimenet
TV
IDÃKAPCSOLÓ
Elalváskapcsoló
HANGOLÁS
Automatikus hangolás
Manuálís Hangolás
További programok tárolósa
AV címkézés
Programáthelyezés
Gyermekzár
Nyelv
Konvergencia
HANGOLÁS
Automatikus hangolás
Manuálís Hangolás
További programok tárolósa
AV címkézés
Programáthelyezés
Gyermekzár
Nyelv
Konvergencia
Egyéni
Ki
Mono
0
Mono
FŒ
[TV - - - - - - -]
[AV1 - - - - - - -]
AV1
1:00
Szeretné elinditani az
automatikus hangolást ?
Igen
Nem
Igazolás: OK
MANUALÍS HANGOLÁS
PROG. NORMA CS NÉV
C 40
0
B/G
C 41
1
B/G
C 31
2
B/G
C 34
3
B/G
C 27
4
B/G
C 47
5
B/G
C 44
6
B/G
C 23
7
B/G
C 35
8
B/G
C 28
9
B/G
MV-CH
TVE-1
TVE-2
ANT-3
TELE 5
C PLUS
- - - - -
- - - - CNN BBC-W
(A hang különböző beállításairól szóló
további információt lásd “A hang
beállítása” c. fejezetben)
(További információért lásd “Az
eurocsatlakozók kimeneti jelének
kiválasztása” c. fejezetet)
(További információért lásd “Az
automatikus kikapcsolás funkció” c.
fejezetet)
(További információért lásd “A TV
automatikus hangolása a távvezérlő
használatával” c. fejezetet)
HU
(További információért lásd “A TV kézi
hangolása” c. fejezetet)
HANGOLÁS
Automatikus hangolás
Manuálís Hangolás
További programok tárolósa
AV címkézés
Programáthelyezés
Gyermekzár
Nyelv
Konvergencia
HANGOLÁS
Automatikus hangolás
Manuálís Hangolás
További programok tárolósa
AV címkézés
Programáthelyezés
Gyermekzár
Nyelv
Konvergencia
HANGOLÁS
Automatikus hangolás
Manuálís Hangolás
További programok tárolósa
AV címkézés
Programáthelyezés
Gyermekzár
Nyelv
Konvergencia
HANGOLÁS
Automatikus hangolás
Manuálís Hangolás
További programok tárolósa
AV címkézés
Programáthelyezés
Gyermekzár
Nyelv
Konvergencia
HANGOLÁS
Automatikus hangolás
Manuálís Hangolás
További programok tárolósa
AV címkézés
Programáthelyezés
Gyermekzár
Nyelv
Konvergencia
TOVÁBBI PROGRAMOK TÁROLÁSA
PROG AFT DEKODER
0
Be
Ki
1
Be
Ki
2
Be
AV1
3
Be
Ki
4
Be
AV2
5
Be
Ki
6
Be
Ki
7
Be
Ki
8
Be
Ki
9
Be
Ki
AV CÍMKÉZÉS
BEMENŐJEL NÉV
AV1
- - - - -
RGB
- - - - -
AV2
- - - - -
YC2
- - - - -
AV3
- - - - -
PROGRAMÁTHELYEZÉS
PROG. NORMA CS NÉV
B/G
0
BBC-W
C 28
B/G
1
MV-CH
C 40
B/G
2
TVE-1
C 41
B/G
3
TVE-2
C 31
B/G
4
ANT-3
C 34
B/G
5
TELE 5
C 27
B/G
6
C PLUS
C 47
B/G
7
- - - - -
C 44
B/G
8
- - - - -
C 23
B/G
9
CNN -
C 35
Kiválasztás PROGR: OK
Kilépés: MENU
GYERMEKZÁR
PROG. NORMA CS NÉV
C 40
MV-CH
0
B/G
C 41
TVE-1
1
B/G
C 31
TVE-2
2
B/G
C 34
ANT-3
3
B/G
C 27
TELE 5
4
B/G
C 47
C PLUS
5
B/G
C 44
- - - - -
6
B/G
C 23
- - - - -
7
B/G
C 35
CNN -
8
B/G
C 28
- - - - -
9
B/G
NYELV
English
Deutsch
Français
Italiano
Nederlands
Polski
Česki
Magyar
(További információért lásd “A “További
programok tárolása” funkció használata”
c. fejezetet)
(További információért lásd “A “További
programok tárolása” funkció használata”
c. fejezetet)
(További információért lásd “A TV
csatornák programszámainak
átrendezése” c. fejezetet)
(További információért lásd a
“Programzárolás” c. fejezetet)
(További információért lásd a
“Nyelvválasztás” c. fejezetet)
HANGOLÁS
Automatikus hangolás
Manuálís Hangolás
További programok tárolósa
AV címkézés
Programáthelyezés
Gyermekzár
Nyelv
Konvergencia
(További információért lásd “A
színátfedések beállítása (Konvergencia)”
c. fejezetet)
Kiegészítő információ
13
Page 75

Magasabbrendű műveletek – Magasabbrendű programozás
A TV automatikus hangolása
A projekciós TV “A TV automatikus hangolása a távvezérlő használatával” c. fejezetben leírtak szerint végrehajtható
automatikus hangolásának lehetőségén kívül, az összes rendelkezésre álló csatorna (televízióadó) automatikus
hangolása és rögzítése csupán a projekciós TV egyik és a távvezérlő egy másik gombjának megnyomásával szintén
lehetséges.
1 Nyomja felfelé a projekciós TV elülső fedőlapját az elülső
vezérlőpanel kinyitásához.
2 Nyomja meg a gombot és tartsa azt benyomva néhány
másodpercig, amíg a képernyőn meg nem jelenik az antenna
csatlakoztatását ellenőrző menü.
Kérem igazolja, hogy az
antenna csatlakoztatva van.
Igazolás: OK
Kérem igazolja, hogy az
antenna csatlakoztatva van.
Igazolás: OK
AUTOMATIKUS HANGOLÁS
PROG. NORMA CS NÉV
1
B/G C 26 - - - - -
AUTOMATIKUS HANGOLÁS
VIDEO TV
3 Ellenőrizze az antenna csatlakoztatását, majd ezután nyomja meg
a távvezérlő OK gombját.
Az automatikus hangolás megkezdődik, mialatt az összes
csatorna behangolódik (a televízióadók sorra megjelennek), a
képernyőn az “AUTOMATIKUS HANGOLÁS” üzenet villog.
Ez a művelet eltarthat néhány percig. Legyen türelemmel és ne
1
2
3
4
5
6
7
8
9
nyomjon meg egyetlen gombot sem a hangolás folyamata alatt.
Az automatikus hangolás befejeződése után a képernyőn
megjelenik a Programáthelyezés menü.
0
• Ha nem kívánja a csatornák sorrendjét megváltoztatni, nyomja
meg a MENU gombot a normális televízióképhez való
visszatéréshez.
• Ha meg kívánja változtatni a csatornák sorrendjét, járjon el “A TV
csatornák programszámainak átrendezése” c. fejezet b)
bekezdésében leírtak szerint.
PROGR
MENU
Megjegyzés: Amennyiben meg kívánja állítani az automatikus
hangolási folyamatot, nyomja meg a távvezérlő MENU
gombját.
RM
892
S
14
Magasabbrendű műveletek – Magasabbrendű programozás
Page 76

Magasabbrendű műveletek – Magasabbrendű programozás
A TV kézi hangolása
Ezt a funkciót abban az esetben használja, ha a csatornákat (televízióadókat) vagy videobemenetet egyesével, a kívánt
programszámmal akarja hangolni.
1 Nyomja meg a távvezérlő MENU gombját, hogy a menü
VIDEO TV
megjelenjen a képernyőn.
2 Nyomja a joysticket $ felé a jelkép kiválasztásához, majd ezt
követően nyomja azt z felé a HANGOLÁS menübe való
belépéshez.
1
2
3
4
5
6
7
8
9
0
Nyomja a joysticket $ vagy 4 felé a Manuális Hangolás
3
kiválasztásához, majd ezt követően nyomja azt z felé.
KÉPBEÁLLÍTÁS
Képbeállitás Egyéni
Kontraszt
Gyárí beállitás
Képarány
HANGOLÁS
Automatikus hangolás
Manuálís Hangolás
További programok tárolósa
AV címkézés
Programáthelyezés
Gyermekzár
Nyelv
Konvergencia
HANGOLÁS
Automatikus hangolás
Manuálís Hangolás
További programok tárolósa
AV címkézés
Programáthelyezés
Gyermekzár
Nyelv
Konvergencia
4:3
MANUALÍS HANGOLÁS
PROG. NORMA CS NÉV
C 40
0
B/G
C 41
1
B/G
C 31
2
B/G
C 34
3
B/G
C 27
4
B/G
C 47
5
B/G
C 44
6
B/G
C 23
7
B/G
C 35
8
B/G
C 28
9
B/G
MV-CH
TVE-1
TVE-2
ANT-3
TELE 5
C PLUS
- - - - -
- - - - CNN BBC-W
HU
MENU
PROGR
Nyomja a joysticket $ vagy 4 felé annak a programszámnak
4
(pozíció) a kiválasztásához, melyre a csatornát (televízióadót)
hangolni kívánja, majd ezt követően nyomja azt z felé a NORMA
oszlopba való belépéshez.
S
RM
892
5 Nyomja a joysticket $ vagy 4 felé a televízió sugárzási rendszer
(B/G Nyugat-Európában, vagy D/K Kelet-Európában) vagy video
bemeneti jel (AV1, AV2,…) kiválasztásához. Ezt követően nyomja a
joysticket z felé a CS oszlopba való belépéshez.
6 Nyomja a joysticket $ vagy 4 felé a csatornatípus kiválasztásához,
(“C” földi csatornákhoz vagy “S” kábelcsatornákhoz). Ezt követően
nyomja a joysticket z felé.
7
7 Használja a számgombokat a televízióadó csatornaszámának
közvetlen beviteléhez vagy nyomja a joysticket $ vagy 4 felé a
következő rendelkezésre álló csatorna megkereséséhez.
Ha nem kívánja rögzíteni ezt a csatornát, nyomja a joysticket $
vagy 4 felé egy másik csatorna kereséséhez.
8 Ha ez az Ön által rögzíteni kívánt csatorna, nyomja meg az OK-t.
9 A többi csatorna hangolásához és rögzítéséhez ismételje meg a
4-től a 8. lépéseket.
MANUALÍS HANGOLÁS
PROG. NORMA CS NÉV
B/G
0
C 40
B/G
1
C 41
B/G
2
C 31
B/G
3
C 34
B/G
4
C 27
B/G
5
C 47
B/G
6
C 44
B/G
7
C 23
B/G
8
C 35
B/G
9
C 28
MANUALÍS HANGOLÁS
PROG. NORMA CS NÉV
B/G
0
C 40
B/G
1
C 41
B/G
2
C 31
B/G
3
C 34
B/G
4
C 27
B/G
5
C 47
B/G
6
C 44
B/G
7
C 23
B/G
8
C 35
B/G
9
C 28
MANUALÍS HANGOLÁS
PROG. NORMA CS NÉV
C 40
0
B/G
C 41
1
B/G
C 31
2
B/G
C 34
3
B/G
C 27
4
B/G
C 47
5
B/G
C 44
6
B/G
C 23
7
B/G
C 35
8
B/G
C 28
9
B/G
MV-CH
TVE-1
TVE-2
ANT-3
TELE 5
C PLUS
- - - - -
- - - - CNN BBC-W
MV-CH
TVE-1
TVE-2
ANT-3
TELE 5
C PLUS
- - - - -
- - - - CNN BBC-W
MV-CH
TVE-1
TVE-2
ANT-3
TELE 5
C PLUS
- - - - -
- - - - CNN BBC-W
10 Nyomja meg a MENU gombot a normális televízióképhez való
visszatéréshez.
A projekciós TV működésre kész.
Magasabbrendű műveletek – Magasabbrendű programozás
15
Page 77

Magasabbrendű műveletek – Magasabbrendű programozás
A “További programok tárolása” funkció használata
Ez a funkció lehetővé teszi:
a) Annak ellenére, hogy általában az automata finomhangolás (AFT) be van kapcsolva, lehetséges a finomhangolás kézi
elvégzése a jobb képvétel érdekében, ha a kép eltorzulva jelenik meg.
b) Az AV3 kimenet hangolása a kódolt jelű programhelyekre, mint pl. egy fizető televízió dekódere. Így a projekciós TV-hez
csatlakoztatott videokészülék rögzíti a dekódolt jelet.
VIDEO TV
1 Nyomja meg a távvezérlő MENU gombját, hogy a menü megjelenjen
a képernyőn.
2 Nyomja a joysticket $ felé a jelkép kiválasztásához, majd ezt
követően nyomja azt z felé a HANGOLÁS menübe való belépéshez.
1
2
3
4
5
6
7
8
9
3 Nyomja a joysticket $ vagy 4 felé a További programok tárolása
0
kiválasztásához, majd ezt követően nyomja azt, z felé.
4 Nyomja a joysticket $ vagy 4 felé a megfelelő programszám
MENU
PROGR
RM
892
kiválasztásához, majd ezt követően többször egymás után nyomja
azt z felé, hogy kiválassza
a) AFT vagy
b) DEKÓDER (dekóder).
KÉPBEÁLLÍTÁS
Képbeállitás Egyéni
Kontraszt
Gyárí beállitás
Képarány
HANGOLÁS
Automatikus hangolás
Manuálís Hangolás
További programok tárolósa
AV címkézés
Programáthelyezés
Gyermekzár
Nyelv
Konvergencia
HANGOLÁS
Automatikus hangolás
Manuálís Hangolás
További programok tárolósa
AV címkézés
Programáthelyezés
Gyermekzár
Nyelv
Konvergencia
TOVÁBBI PROGRAMOK TÁROLÁSA
PROG AFT DEKODER
4:3
0
Be
1
2
3
4
5
6
7
8
9
Ki
Be
Ki
Be
AV1
Be
Ki
Be
AV2
Be
Ki
Be
Ki
Be
Ki
Be
Ki
Be
Ki
S
A kiválasztott elem színt változtat.
5 a) AFT
Nyomja a joysticket $ vagy 4 felé a csatorna frekvenciaszintjének
beállításához –15 és +15 között, majd ezt követően nyomja meg az
OK gombot. Ismételje meg a 4. és 5. lépéseket a többi csatorna
finomhangolásának elvégzéséhez.
b) DEKÓDER
Nyomja a joysticket $ vagy 4 felé AV3 kiválasztásához, majd ezt
követően nyomja meg az OK gombot.
A projekciós TV hátlapján lévő :3 eurocsatlakozóhoz
csatlakoztatott videohoz kötött dekóder esetén, ennek a
dekódernek a képe ezen a programszámon jelenik meg.
Ismételje meg a 4. és 5. lépéseket az AV3 kimenet
kiválasztásához egyéb programhelyeken.
6 Nyomja meg a MENU gombot a normális televízióképhez való
visszatéréshez.
A projekciós TV működésre kész.
TOVÁBBI PROGRAMOK TÁROLÁSA
PROG AFT DEKODER
2
0
1
2
3
4
5
6
7
8
9
TOVÁBBI PROGRAMOK TÁROLÁSA
PROG AFT DEKODER
0
1
2
3
4
5
6
7
8
9
Ki
Be
Ki
Be
Ki
Be
Ki
Be
Ki
Be
Ki
Be
Ki
Be
Ki
Be
Ki
Be
Ki
Be
AV3
Be
Ki
Be
Ki
Be
Ki
Be
Ki
Be
Ki
Be
Ki
Be
Ki
Be
Ki
Be
Ki
Magasabbrendű műveletek – Magasabbrendű programozás
16
Page 78

Magasabbrendű műveletek – Magasabbrendű programozás
Programzárolás
Ez a funkció lehetővé teszi a nem kívánatos televízióadók képernyője megjelenítésének megakadályozását. Ez a funkció
például annak megelőzésére ajánlott, hogy a gyermekek nem nekik való televízióműsorokat nézzenek.
1
4
7
S
VIDEO TV
2
5
8
0
MENU
3
6
9
PROGR
RM
1 Nyomja meg a távvezérlő MENU gombját, hogy a menü megjelenjen
a képernyőn.
2 Nyomja a joysticket $ felé a jelkép kiválasztásához, majd ezt
követően nyomja azt z felé a HANGOLÁS menübe való belépéshez.
3 Nyomja a joysticket $ vagy 4 felé a Gyermekzár kiválasztásához,
majd ezt követően nyomja azt z felé.
4 Nyomja a joysticket $ vagy 4 felé a zárolni kívánt csatorna
programszámának kiválasztásához, majd ezt követően nyomja meg
az OK-t.
892
A jelkép megjelenik a programhely előtt annak jelzésére, hogy
a program jelenleg zárolva van. A zárlat feloldásához nyomja meg
újfent az OK-t, ekkor a jelkép eltűnik.
KÉPBEÁLLÍTÁS
Képbeállitás Egyéni
Kontraszt
Gyárí beállitás
Képarány
HANGOLÁS
Automatikus hangolás
Manuálís Hangolás
További programok tárolósa
AV címkézés
Programáthelyezés
Gyermekzár
Nyelv
Konvergencia
HANGOLÁS
Automatikus hangolás
Manuálís Hangolás
További programok tárolósa
AV címkézés
Programáthelyezés
Gyermekzár
Nyelv
Konvergencia
GYERMEKZÁR
PROG. NORMA CS NÉV
4:3
C 40
0
B/G
C 41
1
B/G
C 31
2
B/G
C 34
3
B/G
C 27
4
B/G
C 47
5
B/G
C 44
6
B/G
C 23
7
B/G
C 35
8
B/G
C 28
9
B/G
MV-CH
TVE-1
TVE-2
ANT-3
TELE 5
C PLUS
- - - - -
- - - - CNN -
- - - - -
HU
5 Ismételje meg a 4. lépést további programok zárolásához.
6 Nyomja meg a MENU gombot a normális televízióképhez való
visszatéréshez.
Zárolt program számának kiválasztásakor a képernyő feketén
jelenik meg a jelképpel.
Magasabbrendű műveletek – Magasabbrendű programozás
17
Page 79

Magasabbrendű műveletek – Magasabbrendű programozás
Programhelyek figyelmen kívül hagyása
Ezt a projekciós TV-t beprogramozhatja úgy, hogy PROGR +/- gombokkal történő csatornaválasztás közben a nem kívánt
programhelyeket figyelmen kívül hagyja. Ha a későbbiekben a figyelmen kívül hagyott programhelyeket vissza kívánja
nyerni, a továbbiakban leírt módon járjon el, azonban az 5. lépésben “---“ helyett válassza a megfelelő TV rendszert (B/G
vagy D/K).
VIDEO TV
1 Nyomja meg a távvezérlő MENU gombját, hogy a menü megjelenjen
a képernyőn.
2 Nyomja a joysticket $ felé a jelkép kiválasztásához, majd ezt
követően nyomja azt z felé a HANGOLÁS menübe való belépéshez.
1
2
3
4
5
6
7
8
9
3 Nyomja a joysticket $ vagy 4 felé a Manuális Hangolás
0
MENU
PROGR
RM
892
kiválasztásához, majd ezt követően nyomja azt z felé.
4 Nyomja a joysticket $ vagy 4 felé annak a programszámnak (pozíció)
a kiválasztásához, melyre a csatornát (televízióadót) hangolni kívánja,
majd ezt követően nyomja azt z felé a NORMA oszlopba való
belépéshez.
KÉPBEÁLLÍTÁS
Képbeállitás Egyéni
Kontraszt
Gyárí beállitás
Képarány
HANGOLÁS
Automatikus hangolás
Manuálís Hangolás
További programok tárolósa
AV címkézés
Programáthelyezés
Gyermekzár
Nyelv
Konvergencia
HANGOLÁS
Automatikus hangolás
Manuálís Hangolás
További programok tárolósa
AV címkézés
Programáthelyezés
Gyermekzár
Nyelv
Konvergencia
MANUALÍS HANGOLÁS
PROG. NORMA CS NÉV
4:3
B/G
0
C 40
B/G
1
C 41
B/G
2
C 31
B/G
3
C 34
B/G
4
C 27
B/G
5
C 47
B/G
6
C 44
B/G
7
C 23
B/G
8
C 35
B/G
9
C 28
MV-CH
TVE-1
TVE-2
ANT-3
TELE 5
C PLUS
- - - - -
- - - - CNN BBC-W
S
5 Nyomja a joysticket $ felé “---“ kiválasztásához, majd ezt követően
nyomja meg az OK gombot.
6 Ismételje meg a 4. és 5. lépéseket további programhelyek figyelmen
kívül hagyásához.
7 Nyomja meg a MENU gombot a normális televízióképhez való
visszatéréshez.
A PROGR +/- gombbal történő csatornaválasztáskor ez a csatorna
nem jelenik meg. Mindazonáltal, az említett csatornát ki lehet
választani a számgombok közül a csatornának megfelelő szám
megnyomásával.
MANUALÍS HANGOLÁS
PROG. NORMA CS NÉV
B/G
0
C 40
B/G
1
C 41
B/G
2
C 31
B/G
3
C 34
B/G
4
C 27
B/G
5
C 47
B/G
6
C 44
B/G
7
C 23
B/G
8
C 35
- - -
9
C 28
MV-CH
TVE-1
TVE-2
ANT-3
TELE 5
C PLUS
- - - - -
- - - - CNN BBC-W
Magasabbrendű műveletek – Magasabbrendű programozás
18
Page 80

Magasabbrendű műveletek – Magasabbrendű programozás
Az adók egyéni beazonosítása
Normál esetben a csatornanevek (televízióadók) a teletexten keresztül automatikusan lehívhatók, amennyiben az
rendelkezésre áll. Mindazonáltal egy legfeljebb öt karakterből (betűk vagy számok) álló nevet adhat egy csatornának vagy
videobemenetnek. Ezáltal könnyen beazonosíthatja a képernyőn megjelenő csatornát (televízióadót) vagy videoforrást.
1
4
7
S
VIDEO TV
2
5
8
0
MENU
3
6
9
RM
PROGR
892
1 Nyomja meg a távvezérlő MENU gombját, hogy a menü megjelenjen
a képernyőn.
2 Nyomja a joysticket $ felé a jelkép kiválasztásához, majd ezt
követően nyomja azt z felé a HANGOLÁS menübe való belépéshez.
3 Nyomja a joysticket $ vagy 4 felé a Manuális Hangolás
kiválasztásához, majd ezt követően nyomja azt z felé.
4 Nyomja a joysticket $ vagy 4 felé az elnevezni kívánt csatorna
programszámának kiválasztásához.
5 Nyomja a joysticket többször egymást követően z felé, amíg a NÉV
oszlop első elemét kiemelte.
KÉPBEÁLLÍTÁS
Képbeállitás Egyéni
Kontraszt
Gyárí beállitás
Képarány
HANGOLÁS
Automatikus hangolás
Manuálís Hangolás
További programok tárolósa
AV címkézés
Programáthelyezés
Gyermekzár
Nyelv
Konvergencia
HANGOLÁS
Automatikus hangolás
Manuálís Hangolás
További programok tárolósa
AV címkézés
Programáthelyezés
Gyermekzár
Nyelv
Konvergencia
MANUALÍS HANGOLÁS
PROG. NORMA CS NÉV
MANUALÍS HANGOLÁS
PROG. NORMA CS NÉV
4:3
C 40
0
B/G
C 41
1
B/G
C 31
2
B/G
C 34
3
B/G
C 27
4
B/G
C 47
5
B/G
C 44
6
B/G
C 23
7
B/G
C 35
8
B/G
C 28
9
B/G
C 40
0
B/G
C 41
1
B/G
C 31
2
B/G
C 34
3
B/G
C 27
4
B/G
C 47
5
B/G
C 44
6
B/G
C 23
7
B/G
C 35
8
B/G
C 28
9
B/G
- - - - -
- - - - -
- - - - -
- - - - -
- - - - -
- - - - -
- - - - -
- - - - -
- - - - -
- - - - -
- - - - -
- - - - -
- - - - -
- - - - -
- - - - -
- - - - -
- - - - -
- - - - -
- - - - -
- - - - -
HU
6 Nyomja a joysticket $ vagy 4 felé egy betű vagy szám (“-” egy üres
hely) kiválasztásához, majd ezt követően nyomja azt z felé a karakter
megerősítéséhez. A többi négy karaktert ugyanilyen módon válassza
ki.
7 Miután kiválasztotta az összes karaktert, nyomja meg az OK
gombot.
Ismételje meg a 4-től a 7. lépéseket további csatornák
8
felcímzéséhez.
9 Nyomja meg a MENU gombot a normális televízióképhez való
visszatéréshez.
Egy címkézett csatorna kiválasztásakor, annak neve néhány
másodpercig megjelenik a képernyőn
Magasabbrendű műveletek – Magasabbrendű programozás
MANUALÍS HANGOLÁS
PROG. NORMA CS NÉV
B/G
0
C 40
B/G
1
C 41
B/G
2
C 31
B/G
3
C 34
B/G
4
C 27
B/G
5
C 47
B/G
6
C 44
B/G
7
C 23
B/G
8
C 35
B/G
9
C 28
- - - - -
- - - - -
- - - - -
- - - - A- - - -
- - - - -
- - - - -
- - - - -
- - - - -
- - - - -
19
Page 81

Magasabbrendű műveletek – A TV magasabbrendű műveletei
A kép beállítása
Bár a kép gyárilag be van állítva, azt ízlése szerint módosíthatja.
1
4
7
S
VIDEO TV
2
5
8
0
MENU
3
6
9
RM
PROGR
892
1 Nyomja meg a távvezérlő MENU gombját, hogy a menü megjelenjen
a képernyőn.
2 Nyomja a joysticket z felé a KÉPBEÁLLÍTÁS menübe való
belépéshez.
3 Nyomja a joysticket $ vagy 4 felé a módosítani kívánt jellemző
kiválasztásához, majd ezt követően nyomja azt z felé.
Nézze meg a következő táblázatot a választáshoz és az egyes
jellemzőkre vonatkozó eredmény megtekintéséhez.
Képbeállítás z Képbeállítás z Egyéni (egyéni beállításokhoz)
z Mozi (filmekhez)
z Élő (élő programokhoz)
$ Fényerő* Z Sötétebb z Világosabb
$
Szín telítettség*
Z Kevesebb z Több
$ Képélesség* Z Finomabb z Élesebb
$ Színárnyalat** Z Zöldes z Pirosas
Kontraszt Z Kevesebb z Több
Gyári beállítás
Képarány (további információt lásd a kezelési útmutató “A képernyő
K
Visszaállítja a gyári képbeállítást.
képarányának kiválasztása” c. fejezetében)
* Csak a “Képbeállítás” “Egyéni” kiválasztásával módosítható.
** Csak NTSC színrendszerekhez áll rendelkezésre (pl. USA videokazetták)
4 Nyomja a joysticket Z vagy z felé a kiválasztott jellemző
beállításának módosításához, majd ezt követően nyomja meg az
OK gombot az új beállítás rögzítéséhez.
KÉPBEÁLLÍTÁS
Képbeállitás Egyéni
Kontraszt
Gyárí beállitás
Képarány
KÉPBEÁLLÍTÁS
KÉPBEÁLLÍTÁS
Képbeállitás Egy
Képbeállitás Egyéni
Kontraszt
Kontraszt
Gyárí beállitás
Gyárí beállitás
Képarány
Képarány 4:3
KÉPBEÁLLÍTÁS
Képbeállitás Egyéni
FényerŒ
Szín Telítettség
Képélesség
Színárnyalat
4:3
5 Ismételje meg a 3. és 4. lépéseket egyéb beállítások módosításához.
6 Nyomja meg a MENU gombot a normális televízióképhez való
visszatéréshez.
A kép üzemmód gyors változtatása
A kép üzemmód gyorsan változtatható a “Képbeállítás” menübe
történő belépés nélkül.
1 Nyomja meg többször egymást követően a távvezérlő gombját a
képbeállítás opcióihoz való közvetlen hozzáféréshez.
2 Nyomja a joysticket $ vagy 4 felé a kívánt képüzemmód
kiválasztásához (Egyéni, Mozi vagy Élő), majd ezt követően nyomja
meg az OK gombot ahhoz, hogy a menü eltünjön a képernyőről.
Magasabbrendű műveletek – A TV magasabbrendű műveletei
20
Egyéni
Mozi
Éló
Page 82

Magasabbrendű műveletek – A TV magasabbrendű műveletei
A képernyő képarányának kiválasztása
Ez a funkció lehetővé teszi a képarány típusának változtatását.
KÉPBEÁLLÍTÁS
Képbeállitás Egyéni
Kontraszt
Gyárí beállitás
Képarány
4:3
VIDEO TV
1 Nyomja meg a távvezérlő MENU gombját, hogy a menü megjelenjen
a képernyőn.
2 Nyomja a joysticket z felé a KÉPBEÁLLÍTÁS menübe való
belépéshez.
3 Nyomja a joysticket $ vagy 4 felé a Képarány kiválasztásához, majd
ezt követően nyomja azt z felé az említett menübe való belépéshez.
1
2
3
4
5
6
7
8
9
0
4 Nyomja a joysticket többször egymás után z felé a következő
módok egyikének kiválasztásához:
• 4:3: hagyományos 4:3 képméret.
• 16:9: szélesvásznú hatás imitálása (16:9 műsorokhoz).
Nyomja meg az OK-t.
5 Nyomja meg a MENU gombot a normális televízióképhez való
visszatéréshez.
PROGR
MENU
KÉPBEÁLLÍTÁS
KÉPBEÁLLÍTÁS
Képbeállitás Egy
Képbeállitás Egyéni
Kontraszt
Kontraszt
Gyárí beállitás
Gyárí beállitás
Képarány
Képarány 4:3
4:3
HU
S
RM
892
16:9
A képernyő képarányának gyors
változtatása
A képernyő képaránya gyorsan változtatható a “Képbeállítás”
menübe történő belépés nélkül.
1 Nyomja meg többször egymást követően a távvezérlő gombját
a képernyő képaránytípusának kiválasztásához (4:3 vagy 16:9).
Magasabbrendű műveletek – A TV magasabbrendű műveletei
21
Page 83

Magasabbrendű műveletek – A TV magasabbrendű műveletei
A hang beállítása
Bár a hang gyárilag be van állítva, azt ízlése szerint módosíthatja.
KÉPBEÁLLÍTÁS
Képbeállitás Egyéni
Kontraszt
Gyárí beállitás
Képarány
4:3
VIDEO TV
1 Nyomja meg a távvezérlő MENU gombját, hogy a menü
megjelenjen a képernyőn.
2 Nyomja a joysticket $ felé a HANGSZABÁLYOZÁS menübe való
belépéshez.
3 Nyomja a joysticket $ vagy 4 felé a módosítani kívánt jellemző
kiválasztásához, majd ezt követően nyomja azt z felé.
Nézze meg a következő táblázatot a választáshoz és az egyes
jellemzőkre vonatkozó eredmény megtekintéséhez.
1
2
3
4
5
6
7
8
9
Hangszabályozás
z Űzemmód z Egyéni (egyéni beállításokhoz)
z Rock
z Jazz
z Pop
0
$ Magas hangszín* Z Kevesebb z Több
$ Mély hangszín* Z Kevesebb z Több
Balansz Z Bal z Jobb
K
z Be: A “Dolby Pro Logic Surround” hangját
MENU
PROGR
Gyári beállítás Visszaállítja a gyári hangbeállítást.
Dolby* Virtual:** z Ki: Normális.
utánozza.
HANGSZABÁLYOZÁS
Hangszabályozás
Balansz
Gyári beállitás
Dolby Virtual
KettŒs hang
Hangkigyenlítés
HangerŒ
KettŒs hang
Hangszóró
HANGSZABÁLYOZÁS
Ùzemmód
Magas hangszín
Mély hangszín
Egyéni
Ki
Mono
0
Mono
FŒ
Egyéni
S
RM
892
z Mono
z Sztereo
Kettős hang • Sztereo adásokhoz:
• Kétnyelvű adásokhoz:
z Mono (mono csatornához, ha rendelkezésre áll)
z A (az 1. csatornához)
z B (a 2. csatornához)
HangkiegyenlítésZ -12 .......... z +12
a csatorna hangereje egyedileg szabályozható –12 és +12
szintek között.
Fülhallgató:
Hangerő Z Kevesebb z Több
Kettős hang • Sztereo adásokhoz:
z Mono
z Sztereo
• Kétnyelvű adásokhoz:
z Mono (mono csatornához, ha rendelkezésre áll
z A (az 1. csatornához)
z B (a 2. csatornához)
Hangszóró z Fő: a projekciós TV hangja
z Középső be: a külső erősítő hangja
* Csak az “Egyéni” “Hangszabályozás”-ban való kiválasztásával
módosítható.
Magasabbrendű műveletek – A TV magasabbrendű műveletei
22
Page 84

Magasabbrendű műveletek – A TV magasabbrendű műveletei
VIDEO TV
beállításának módosításához, majd ezt követően nyomja meg az
OK gombot az új beállítás rögzítéséhez.
5 Ismételje meg a 3. és 4. lépéseket egyéb beállítások
módosításához.
1
2
4 Nyomja a joysticket Z vagy z felé a kiválasztott jellemző
3
4
5
6
7
8
9
0
PROGR
MENU
6 Nyomja meg a MENU gombot a normális televízióképhez való
visszatéréshez.
Ezt a televíziót a “Dolby Surround” hangeffektus kiadásához tervezték,
**
mely 4 hangszóró hangját utánozza a televízió két hangszórójával. Ez csak
akkor lehetséges, ha az adó audio jele “Dolby Surround”.
Ezenkívül még javíthatja a hangeffektust egy külső erősítő
csatlakoztatásával. További információt a 27. oldalon, a “Külső audio
készülék csatlakoztatása” c. fejezetben talál.
**
Gyártva a Dolby Laboratories szabadalmi engedélye alapján. “Dolby”,
“Pro Logic” és a dupla D
jelkép, a Dolby Laboratories védjegye.
HU
S
RM
892
A hang üzemmód gyors változtatása
A hang üzemmód gyorsan változtatható a “Hangszabályozás”
menübe történő belépés nélkül.
1 Nyomja meg többször egymást követően a távvezérlő gombját a
hangszabályozás opcióihoz való közvetlen hozzáféréshez.
Egyéni
Rock
Jazz
Pop
2 Nyomja a joysticket $ vagy 4 felé a kívánt hangüzemmód
kiválasztásához (Egyéni, Rock, Jazz vagy Pop), majd ezt követően
nyomja meg az OK gombot ahhoz, hogy a menü eltünjön a
képernyőről.
Magasabbrendű műveletek – A TV magasabbrendű műveletei
23
Page 85

Magasabbrendű műveletek – A TV magasabbrendű műveletei
Az automatikus kikapcsolás funkció
Beállíthatja azt az időtartamot, melynek elteltével a készülék automatikusan készenléti üzemmódba (standby) kapcsol.
KÉPBEÁLLÍTÁS
Képbeállitás Egyéni
Kontraszt
Gyárí beállitás
Képarány
IDÃKAPCSOLÓ
Elalváskapcsoló
4:3
Ki
VIDEO TV
1 Nyomja meg a távvezérlő MENU gombját, hogy a menü
megjelenjen a képernyőn.
2 Nyomja a joysticket $ felé a t jelkép kiválasztásához, majd ezt
követően nyomja azt z felé az IDőKAPCSOLÓ menübe való
belépéshez.
1
2
3
4
5
6
7
8
9
0
3 Nyomja a joysticket z felé, majd ezt követően nyomja azt többször
egymás után $ vagy 4 felé, mindaddig, amíg a kikapcsolásig
IDÃKAPCSOLÓ
Elalváskapcsoló
1:00
kívánt időtartam meg nem jelenik a képernyőn.
Ki z 0:30 z 1:00..... 4:00 óra
PROGR
MENU
4 Nyomja meg az OK-t.
S
RM
5 Nyomja meg a MENU gombot a normális televízióképhez való
892
visszatéréshez.
Egy perccel azelőtt, hogy a projekciós TV készenléti üzemmódba
(standby) kapcsolna, a képernyőn automatikusan megjelenik a 0:01
kijelzés.
Megjegyzések: • Televíziónézés közben nyomja a távvezérlő
gombját a kikapcsolásig fennmaradó idő
megtekintésére.
• A televízió készenléti üzemmódból történő
bekapcsolásához nyomja meg a távvezérlő TV
gombját.
Magasabbrendű műveletek – A TV magasabbrendű műveletei
24
Page 86

Teletext
A teletext megjelenítése
A teletext a legtöbb TV állomás által sugárzott információs szolgáltatás.
Győződjőn meg arról, hogy egy erős bemeneti jellel rendelkező TV csatornát használ, mivel ellenkező esetben
a teletextben hibák fordulhatnak elő.
VIDEO TV
Válassza ki azt a TV csatornát, mely a megtekinteni kívánt teletext
1
szolgáltatást sugározza.
2 Nyomja meg a távvezérlő gombját a teletext szolgáltatás
megjelenítéséhez.
1
2
3
4
5
6
7
8
9
3 A távvezérlő számgombjainak használatával adja meg a kívánt
oldalszám három számjegyét (amennyiben elhibázná, üssön be
TELETEXT
Index
Programme
News
Sport
Weather
25
153
101
98
TELETEXT
Index
Programme
News
Sport
Weather
25
153
101
98
három bármilyen számjegyet, majd ezt követően üsse be újra a
0
helyes oldalszámot).
4 Nyomja meg a gombot a teletext szolgáltatás kikapcsolásáho
A teletext kiválasztása
MENU
PROGR
z és a TV üzemmódba való visszatéréshez.
A teletext egyéb funkcióinak használata
AHHOZ, HOGY NYOMJA MEG A GOMBOT
HU
S
RM
892
A következő vagy az előző a következő oldalra vagy
oldalra jusson az előző oldalra
TELETEXT
Index
Programme
25
News
153
Sport
101
Weather
A teletext rávetítése a TV képre
98
Nyomja meg újra a teletext
üzemmód kikapcsolásához
TELETEXTTELETEXT
Index
Programme
News
Sport
Weather
25
153
101
98
Egy teletext oldal rögzítése
Nyomja meg újra a rögzítés
megszüntetéséhez.
A Fastext használata
Fastext lehetővé teszi a teletext oldalaihoz való hozzáférést
egyetlen gomb megnyomásával.
Fastext sugárzásakor a teletext oldal alsó részén megjelenik egy
színkód menü. Nyomja meg a távvezérlő színes gombját (piros,
zöld, sárga vagy kék) a megfelelő laphoz való hozzáféréshez.
Teletext
25
Page 87

Választható csatlakozások
Választható készülékek csatlakoztatása
A projekciós TV-hez választható készülékek széles skáláját csatlakoztathatja a továbbiakban bemutatott módon.
A projekciós TV hátlapja A projekciós TV előlapja
Dekóder
DVD
Videomagnó
A kép torzulásának
elkerülése
érdekében
• Egyidejűleg ne
csatlakoztasson
készülékeket az F
és G
csatlakozókba.
• Egyidejűleg ne
csatlakoztasson
semmiféle
készüléket az
elülső
csatlakozókba és a
D
eurocsatlakozóba.
Megengedett bemenő jelek
A A Központi hangszóró bemenet
B Bemenet nélkül
C Audio/ video és RGB jelek
D Audio/ video és S video jelek
E Audio/ video jelek
F S video jel
G G Video jel
H H Audio jel
C
A
Hi-Fi készülék
A “HANGSZABÁLYOZÁS” menü
“Hangszóró” opciójában válassza
“Középső be”-t.
B
E
S VHS/Hi8
videokamera
F
D
Rendelkezésre álló kimenő jelek
Kimenet nélkül
Audio jel
A TV állomáskereső video/ audio
A választott forrás video/ audio
A választott forrás video/ audio (ugyanaz a kimeneti forrás,
mint a :2/q 2 csatlakozóé)
Kimenet nélkül
Kimenet nélkül
Kimenet nélkül
G
Videomagnó
DVD
H
8mm/Hi8
videokamera
26
Választható csatlakozások
Page 88

Választható csatlakozások
Választható készülékek használata
További információ készülékek csatlakoztatásához
Video csatlakoztatása
Ajánlatos a videot a projekciós TV hátlapján lévő D vagy E eurocsatlakozóhoz csatlakoztatni. Ha nem rendelkezik
eurocsatlakozóval, ajánlatos a videojelet a “0” TV programszámra hangolni, ehhez lásd a kezelési útmutató “A TV kézi
hangolása” c. fejezetét. Ezenkívül lásd a video használati utasítását a videojel tesztcsatornájának beállításához. Amennyiben
videoja elfogadja a Smartlinket, lásd a használati utasítás “Smartlink” c. fejezetét.
Külső audio készülék csatlakoztatása
1 A projekciós TV hangja a Hi-Fi készüléken keresztül hallatszódjon:
Ha erősíteni kívánja a projekciós TV audio kimenetét, csatlakoztassa a Hi-Fi készüléket a projekciós TV hátlapján lévő B
aljzatokba. A B aljzatokba csatlakoztatott készülék hangerejét a fülhallgató hangerejének szabályozásával lehet
változtatni. Ehhez lásd a használati útmutató “A hang beállítása” c. fejezetét
Zenekészülékén keresztül is élvezheti a “Dolby Virtual”
Hi-Fi készülék hangszórói
hangeffektust.
Ehhez helyezze el zenekészülékének hangszóróit a televízió mindkét
oldalán kb. 50 cm távolságot hagyva a televízió és a hangszórók között.
A hangszórók elhelyezése után, a menürendszerek segítségével,
válassza ki a “Hangszabályozás” menüt, és “Dolby Virtual”-t az “Be”
pozícióban.
~50º
A felhasználó optimális elhelyezkedése
2 Dolby erõsítõ hallgatása a projekciós TV hangszóróján keresztül:
Ha Hi-Fi készüléke hangját a projekciós TV hangszóróin keresztül kívánja hallgatni, csatlakoztassa a Hi-Fi készüléket a
projekciós TV hátlapján lévő A aljzatokba. Ha Dolby erősítővel rendelkezik, csatlakoztassa az erősítő központi kimenetét
az említett aljzatokhoz, hogy ez központi hangszóróként működjön. Ehhez lásd a kezelési útmutató “A hang beállítása” c.
fejezetét és válassza ki “Középső be”-t a “Hangszóró” opcióban.
Mono készülékek csatlakoztatása
Az audio csatlakozóját csatlakoztassa a projekciós TV előlapján lévő L/G/S/I csatlakozóba, majd válassza ki a 2 bemenő jelet
az alábbi útmutatásokat követve.
A bemenő jel kiválasztása és megtekintése
1 Csatlakoztassa a választható készüléket a projekciós TV megfelelő csatlakozójához, ahogyan az
VIDEO TV
az előző oldalon le van írva.
HU
1
4
7
S
2 Kapcsolja be a csatlakoztatott készüléket.
3 Nyomja meg többször a távvezérlő gombját, amíg a megfelelő bemeneti jelkép megjelenik a
képernyőn.
2
3
5
6
8
9
0
Jelkép Bemenő jel
kkkk •C eurocsatlakozón keresztüli audio/ video bemenő jel
• C eurocsatlakozón keresztüli RGB bemenő jel
KK
KK
•eurocsatlakozón vagy H és G RCA csatlakozókon keresztüli audio/ video
bemenő jel.
qqqq
PROGR
MENU
RM
892
2 •Deurocsatlakozón vagy H és F RCA csatlakozókon keresztüli audio/ S video
bemenő jel.
…………
3 • E eurocsatlakozón keresztüli audio/ video bemenő jel.
4 A televízió normális képéhez való visszatéréshez nyomja meg a távvezérlő gombját.
Választható csatlakozások
27
Page 89

Választható csatlakozások
Videomagnó
Dekóder
Smartlink
Smartlink a televízió és egy videomagnó közötti közvetlen összeköttetés.
A Smartlink használatához szüksége van:
• Egy Smartlinket, NexTViewt, Easy Linket vagy Megalogicot elfogadó videomagnóra.
Megalogic a Grundig Corporation bejegyzett kereskedelmi márkaneve.
Easy Link a Philips Corporation kereskedelmi márkaneve.
• Egy 21 pólusú komplett SCART zsinórra, a videomagnó csatlakoztatásához a projekciós TV
hátlapján lévő :3 (SMARTLINK) eurocsatlakozóhoz.
A Smartlink főbb jellemzői:
• Hangolási információ (pl. programlista) átvitelét teszi lehetővé a televíziókészülékről a
videomagnóra.
• A televízióról történő közvetlen rögzítés: mialatt a televíziót nézi, csak a videomagnó egy
gombját kell megnyomnia a műsor rögzítéséhez.
A projekciós TV hátlapja
• Készenléti üzemmódban (standby) lévő projekciós TV: nyomja meg a videomagnó “Play z”
gombját és a projekciós TV automatikusan bekapcsol.
Ha a Smartlinket elfogadó videomagnóhoz dekóder van csatlakoztatva, válassza a
(További programok tárolása)-t a (HANGOLÁS) menüben, majd válassza
DEKÓDER-t (dekóder) az AV3 pozícióban mindenegyes kódolt csatornához. További
információért lásd a kezelési útmutató “A “További programok tárolása” funkció
használata” c. fejezetét.
Ha további információra van szüksége a Smartlinkkel kapcsolatosan, nézze meg
videomagnója használati útmutatóját.
Egyéb Sony készülékek távvezérlői
A távvezérlő fedele alatt található gombokkal egyéb Sony készülékek is irányíthatók.
1 Nyissa ki a távvezérlő fedelét.
2 Állítsa be a VTR 1234 DVD váltót az irányítani kívánt készüléknek megfelelően:
VTR1 Beta videomagnó
VTR2 8 mm-es videomagnó
VTR3 VHS videomagnó
VTR4 Digitális videomagnó (DCR-VX 1000/9000 E, VHR-1000)
DVD Digitális videolemez játszó
VIDEO TV
VTR 1 2 3 4 DVD
CH
3 Használja a távvezérlő fedél alatti gombjait a készülék irányítására.
távvezérlőjének VTR 1234 DVD váltójáéval megegyező helyzetbe.
gombja nem működik.
28
• Ha készüléke rendelkezik COMMAND MODE váltóval, állítsa azt a projekciós TV
• Ha a készülék nem rendelkezik valamelyik funkcióval, a távvezérlő annak megfelelő
Választható csatlakozások
VTR 1 2 3 4 DVD
CH
Page 90

Választható csatlakozások
Az eurocsatlakozók kimeneti jelének kiválasztása
Ezt a funkciót egy külső készülékről jövő bármilyen jel videomagnóján történő rögzítéséhez használja (a videomagnó a
projekciós TV hátlapján lévő :2/q 2vagy :3 eurocsatlakozóhoz csatlakoztatott).
Ehhez az alábbiakban leírt módon kell kiválasztania a kimeneti forrást (ez az eljárás szükségtelen ha videomagnója
elfogadja a Smartlinket).
1
4
7
S
VIDEO TV
2
5
8
0
MENU
3
6
9
RM
PROGR
892
1 Nyomja meg a távvezérlő MENU gombját, hogy a menü
megjelenjen a képernyőn.
2 Nyomja a joysticket $ felé a jelkép kiválasztásához, majd ezt
követően nyomja azt z felé az VIDEO CSATLAKOZÁS menübe
való belépéshez.
3 Nyomja a joysticket $ vagy 4 felé, hogy kiemelje:
TV Képernyőt (a TV képernyőhöz való bemeneti jelhez) vagy
Kimenetet (a projekciós TV kimeneti jele, melye :2/q 2
vagy :3 eurocsatlakozóhoz áll rendelkezésre).
A megerősítéshez nyomja a joysticket z felé.
4 Nyomja a joysticket Z vagy z felé többször egymás után a
megfelelő jel kiválasztásához:
TV Képernyő TV, AV1, RGB, AV2, YC2 vagy AV3
Kimenet TV, AV1, AV2, YC2 AV3 vagy AUTO
KÉPBEÁLLÍTÁS
Képbeállitás Egyéni
Kontraszt
Gyárí beállitás
Képarány
VIDEO CSATLAKOZÁS
TV KépernyŒ
Kimenet
4:3
TV
[TV - - - - - - -]
[AV1 - - - - - - -]
AV1
HU
A jel típusának kiválasztása után nyomja meg az OK-t a
megerősítéshez.
Ha AUTO-t választ, a kimeneti jel mindig meg fog egyezni a
képernyőn megjelenő jellel.
Ha dekóderrel rendelkezik, kérjük ne feledje a Kimenetben
“TV”-t választani a megfelelő dekódolás érdekében.
5 Nyomja meg a MENU gombot a normális televízióképhez való
visszatéréshez.
A kiválasztott jel a megfelelő eurocsatlakozóhoz csatlakoztatott
választható készülékhez áll rendelkezésre.
Választható csatlakozások
29
Page 91

Választható csatlakozások
Az “AV címkézés” funkció használata
Ez a funkció lehetővé teszi, hogy egy legfeljebb öt karakterből (betűk vagy számok) álló nevet adjon a projekciós TV
aljzataihoz csatlakoztatott választható készüléknek.
1
4
7
S
VIDEO TV
2
5
8
0
MENU
3
6
9
RM
PROGR
892
1 Nyomja meg a távvezérlő MENU gombját, hogy a menü megjelenjen
a képernyőn.
2 Nyomja a joysticket $ felé a jelkép kiválasztásához, majd ezt
követően nyomja azt z felé a HANGOLÁS menübe való belépéshez.
3 Nyomja a joysticket $ vagy 4 felé az AV címkézés kiválasztásához,
majd ezt követően nyomja azt z felé.
4 Nyomja a joysticket $ vagy 4 felé az elnevezni kívánt bemeneti jel
kiválasztásához (pl.: AV2), majd ezt követően nyomja azt z felé a
NÉV oszlop első elemének kiemeléséhez.
5 Nyomja a joysticket $ vagy 4 felé egy betű vagy szám (“-” egy üres
hely) kiválasztásához, majd ezt követően nyomja azt z felé a karakter
megerősítéséhez. A többi négy karaktert ugyanilyen módon válassza
ki.
KÉPBEÁLLÍTÁS
Képbeállitás Egyéni
Kontraszt
Gyárí beállitás
Képarány
HANGOLÁS
Automatikus hangolás
Manuálís Hangolás
További programok tárolósa
AV címkézés
Programáthelyezés
Gyermekzár
Nyelv
Konvergencia
HANGOLÁS
Automatikus hangolás
Manuálís Hangolás
Tov ábbi programok tárolósa
AV c ímkézés
Programáthelyezés
Gyermekzár
Nyelv
Konvergencia
AV C ÍMKÉZÉS
BEMENŐJEL NÉV
AV1
RGB
AV2
YC2
AV3
AV C ÍMKÉZÉS
4:3
- - - - -
- - - - -
- - - - -
- - - - -
- - - - -
BEMENŐJEL NÉV
AV1
RGB
AV2
YC2
AV3
- - - - -
- - - - -
A - - - -
- - - - -
- - - - -
Választható csatlakozások
30
6 Miután kiválasztotta az összes karaktert, nyomja meg az OK gombot.
7 Ismételje meg a 4-től a 6. lépéseket a többi bemeneti jel
felcímzéséhez.
8 Nyomja meg a MENU gombot a normális televízióképhez való
visszatéréshez.
Egy cimkézett bemeneti jellel ellátott készülék kiválasztásakor
annak neve néhány másodpercig megjelenik a képernyőn.
Page 92

Kiegészítő információ
Optimális látószög
Ahhoz, hogy optimális képminőséget kapjon, igyekezzen a projekciós TV-t úgy elhelyezni, hogy a képernyőt a
továbbiakban bemutatott szögekből lássa.
Vízszintes látószög
75º
75º
2.1m (ajánlott minimális távolság)
(a felhasználónak ajánlott
helyzet)
HU
Függőleges látószög
2.1m (ajánlott minimális távolság)
27.5°
27.5°
(a felhasználónak ajánlott helyzet)
Kiegészítő információ
31
Page 93

Kiegészítő információ
Műszaki jellemzők
MINŐSÉGTANÚSÍTÁS
A 2/1984. (III.10.) BkM-IpM együttes rendelet értelmében - mint forgalmazá - tanúsitjuk, hogy a SONY (KP-41PX1K) tipusú
szines televizió megfelel az alábbi műszaki értékeknek.
Érintésvédelmi osztály: II.
Sugárzási szabvány
B/G/H, D/K
Szín szabvány
PAL, SECAM
NTSC 3.58, 4.43 (csak videobemenet)
Fogható csatornák
VHF: E2-E12
UHF: E21-E69
CATV: S1-S20
HYPER: S21-S41
D/K: R1-R12, R21-R69
Képcső
41 hüvelyk (kb. 103 cm átmérő)
Hátsó aljzatok
• Középső hangszóró bemeneti
• Audio kimenetek – RCA csatlakozók
• :1/ 21 pólusú eurocsatlakozó
• :2/q 2 21 pólusú eurocsatlakozó
Elülső aljzatok
C
aljzatok (2 db aljzat)
(CENELEC szabvány) beleértve
audio/ video bemenet, RGB
bemenet, TV audio/ video kimenet
(CENELEC szabvány) beleértve
audio/ video bemenet, S video
bemenet, választható audio/ video
kimenet
• :3 21 pólusú eurocsatlakozó
(SMARTLINK)
…2 video bemenet – RCA csatlakozó
2
audio bemenetek – RCA csatlakozók
q2 S video bemenet - 4 pólusú DIN
fülhallgató csatlakozó – sztereo minialjzat
(CENELEC szabvány)
beleértve audio/ video bemenet,
választható audio/ video kimenet
(kiválasztható ugyanaz a kimeneti
forrás, mint :2/q 2 csatlakozón)
és Smartlink csatlakoztatás.
Hangfrekvenciás kimenőteljesítmény
2 x 30 W (zenei teljesítmény)
2 x 15 W (RMS)
Középső hangszóró bemenet
30 W (RMS) (ha középső hangszóróként használják)
Teljesítményfelvétel
145 W
Teljesítményfelvétel készenléti üzemmódban (standby)
0.7 W
Méretek (szélesség x magasság x mélység)
kb. 948 x 992 x 511 mm
Tömeg
kb. 43 kg
Mellékelt tartozékok
1 db távvezérlő RM-892 modell
2 db IEC szabvány szerinti elem
Egyéb jellemzők
Digitális fésűs szűrő (nagy felbontású)
TELETEXT, Fastext
NICAM
Automatikus kikapcsolás
Smartlink
Dolby Virtual
A design és a műszaki jellemzők előzetes bejelentés nélkül változhatnak.
Környezetbarát papír – Klórmentes
Kiegészítő információ
32
Page 94

Kiegészítő információ
Problémamegoldás
Az alábbiakban ismertetünk néhány egyszerű megoldást arra az esetre, ha valamilyen kép- vagy hangprobléma
fordulna elő.
Probléma
Nincs kép (a képernyő sötét) és nincs
hang.
Gyenge a kép vagy nincs kép (a
képernyő sötét), de jó a hangminőség.
RGB videoberendezés nézésekor
gyenge a képminőség.
Jó képminőség, de nincs hang.
Megoldás
• Csatlakoztassa a projekciós TV-t a fali aljzathoz.
• Nyomja meg a
• Ha a TV jelzője világít, nyomja meg a távvezérlő TV
gombját vagy egyik programszám gombját.
• Ellenőrizze az antennacsatlakozást.
• Ellenőrizze, hogy a választott videoforrás be van-e
kapcsolva.
• Kapcsolja ki 3-4 másodpercre a készüléket, majd ismét
kapcsolja be az előlapján lévő
• A MENU rendszerben válassza ki a “Képbeállítás”-t, majd
állítsa be újra a “Kontraszt”-ot, “Színárnyalat”-ot és
“Fényerő”-t.
• A “Képbeállítás”-ban válassza a “Gyári beállítás”-t a gyári
értékek visszállítására.
• Nyomja meg többször a távvezérlő gombját, amíg az
RGB jelkép megjelenik a képernyőn.
• Nyomja meg a távvezérlő +/- gombját.
• Ha jelenik meg a képernyőn, nyomja meg a távvezérlő
gombját.
• Győződjön meg arról, hogy a “HANGSZABÁLYOZÁS”
menüben a “Fő” hangszóró legyen kiválasztva.
gombot a TV előlapján.
gombbal.
HU
A színes műsorok nem láthatók
színesben.
Programváltáskor vagy a teletext
kiválasztásakor a kép eltorzul.
Zajos kép.
A távvezérlő nem működik.
A TV Standby (készenléti üzemmód)
jelzője villog .
• Ha a problémát nem tudja megoldani, forduljon szakemberhez.
• SOHA ne nyissa ki a készüléket.
• A MENU rendszerben válassza ki a “Képbeállítás”-t, majd
állítsa be újra a színt.
• A “Képbeállítás”-ban válassza a “Gyári beállítás”-t a gyári
értékek visszállítására.
• Kapcsolja ki a készülék hátlapján lévő 21 pólusú
eurocsatlakozóhoz csatlakoztatott készüléket.
• Állítsa be a csatornák finomhangolását (AFT) a jobb képvétel
érdekében. Ehhez lásd “A “További programok tárolása”
funkció használata” c. fejezetet.
• Cserélje ki az elemeket.
• Forduljon a legközelebbi Sony márkaszervízhez.
Kiegészítő információ
33
Page 95

Projektor TV
Dziękujemy za wybór niniejszego Projektor TV Sony.
Przed rozpoczęciem użytkowania telewizora wskazane jest wnikliwe
zapoznanie się z niniejszą instrukcją obsługi i zachowanie jej do wykorzystania
w przyszłości.
Klucz do używania niniejszej instrukcji obsługi
•
Zastosuj się do instrukcji
telewizor i nastawić podstawowe jego funkcje
•
Zastosuj się do instrukcji
dodatkowe możliwości techniczne telewizora.
Postępowania Wstępnego
Funkcji Zaawansowanych
jeśli chcesz podłączyć
jeśli chcesz lepiej poznać
Instrukcja obsługi
PL
•
Symbole używane w niniejszej instrukcji obsługi
•
•
•
•
•
•
•
Potencjalne niebezpieczeństwo
Ważna informacja.
Informacja o działaniu
1,2...
Kolejność realizacji instrukcji.
MENU
K
Zaznaczone na na pilocie przyciski wskazują przyciski które należy
nacisnąć w celu wykonania poszczególnych funkcji
Informacja odnośnie wyniku operacji
Opis postępowania które należy przeprowadzić by osiągnąć końcowy
wynik kontynuowany jest na następnej stronie.
3
Page 96

Informacje dotyczące bezpieczeństwa
Telewizor jest przystosowany do
zasilania tylko napięciem
przemiennym 220 - 240 V. Nie
włączać zbyt dużej liczby urządzeń
do jednego gniazdka sieciowegogrozi to pożarem lub porażeniem
prądem.
Ze względu na bezpieczeństwo i
ochronę środowiska
naturalnego zaleca się, aby
telewizor, który nie jest używany, nie
pozostawał w trybie czuwania, lecz
był wyłączany z sieci.
Nigdy nie wpychać do telewizora
żadnych przedmiotów.
Grozi to pożarem lub porażeniem
prądem. Nigdy nie wylewać na
telewizor żadnych płynów. Jeśli do
wnętrza telewizora dostanie się jakiś
płyn lub przedmiot, nie używać
urządzenia, zanim zostanie ono
skontrolowane przez odpowiednio
wykwalifikowaną osobę.
Nie otwierać obudowy ani nie
zdejmować pokrywy z tyłu
telewizora. Naprawy powierzać tylko
wykwalifikowanym osobom.
Nie zakrywać otworów
wentylacyjnych na telewizorze. Dla
zapewnienia właściwej wentylacji,
pozostawić wokół telewizora
przynajmniej 10 cm wolnego
miejsca.
Do czyszczenia telewizora używać
miękkiej, lekko zwilżonej
ściereczki. Nie czyścić telewizora
benzyną, rozcieńczalnikiem
ani innymi środkami chemicznymi.
Nie rysować ekranu telewizora.
Dla bezpieczeństwa, przed
czyszczeniem telewizora wyłączyć go
z sieci.
Dla własnego bezpieczeństwa, w
czasie burzy nie dotykać
żadnych elementów telewizora,
jego przewodu zasilającego ani
przewodu antenowego.
Nigdy nie stawiać telewizora w
miejscach gorących, wilgotnych
lub nadmiernie zapylonych. Nie
instalować telewizora w
miejscach, w których będzie on
narażony na wibracje
mechaniczne.
Przy wyłączaniu przewodu
zasilającego z gniazdka
sieciowego chwytać wtyczkę.
Nie ciągnąć samego przewodu.
Aby uniknąć ryzyka pożaru lub
porażenia prądem, nie
wystawiać telewizora na
deszcz i chronić go przed
wiłgocią.
Aby uniknąć pożaru,
przechowywać łatwopalne
przedmioty z dala od telewizora i
nie zbliżać się do niego z otwartym
ogniem (na przykład świecą).
Dbać, aby nie stawiać na
przewodzie zasilającym ciężkich
przedmiotów, ponieważ mogą
one uszkodzić przewód.
Zalecamy nawinięcie nadmiaru
przewodu na zaczepy znajdujące
się z tyłu telewizora.
Przed przenoszeniem telewizora
Ustawić telewizor na bezpiecznej,
stabilnej podstawie. Nie
pozwalać, aby wspinały się na niego
dzieci. Nie kłaść telewizora na boku
ani ekranem do góry.
wyłączyć go z sieci. Unikać
nierównych powierzchni,
szybkiego marszu i używania
nadmiernej siły. Jeśli telewizor
został upuszczony lub uskodzony,
natychmiast zlecić jego kontrolę
odpowiednio wykwalifikowanej
osobie z serwisu.
Informacje dotyczące bezpieczeństwa
Gdy przestawia się telewizor wielkoekranowy z projekcją tylną bezpośrednio z zimnego pomieszczenia do gorącego lub gdy
•
w pomieszczeniu następuje gwałtowna zmiana temperatury obraz może być zamazany lub poszczególne jego fragmenty mogą
mieć złą jakość koloru. Spowodowane jest to kondensacją wilgoci na lustrach lub soczewkach wewnątrz urządzenia. Przed
ponownym włączeniem urządzenia należy poczekać aż wilgoć wyparuje.
•
By osiągnąć ostrość obrazu należy ustawić ekran tak, by światło nie padało nań bezpośrednio. O ile to możliwe należy używać
oświetlenia sufitowego.
•
Unieruchomienie obrazu przez dłuższy okres czasu np. podczas korzystania z gier komputerowych lub podłączenia
komputera, jak też przy oglądaniu programów w formacie 16:9, może uszkodzić przewód przekazu obrazu. By tego uniknąć
należy wówczas utrzymać niski poziom kontrastu obrazu.
•
Należy unikać dotykania ekranu by nie porysować jego powierzchni.
4
Informacje dotyczące bezpieczeństwa
Nie zakrywać otworów
wentylacyjnych na telewizorze
takimi przedmiotami jak zasłony
czy gazety.
Page 97

Spis treści
Spis treści
Klucz do używania ninejszej instrukcji obsługi
Informacje dotyczęce bezpieczeństwa
........................................................................................4
Postępowanie wstępne
Opis ogólny
Sprawdzanie dostarczonych akcesoriów
Przegląd przycisków urządzenia
Przegląd przycisków pilota do zdalnego sterowania
.......................................................................................6
Podłączenie telewizora
Wkładanie baterii do pilota
Podłączanie anteny i magnetowidu
Pierwsze uruchomienie telewizora
.................................................................................................8
.................................................................................8
....................................................................................8
Pierwsze uruchomienie telewizora
Wybór języka
Automatyczne programowanie telewizora przy użyciu pilota
Zmiana kolejności zapisanych kanałów telewizyjnych
Regulacja nałożenia obrazów (Zbieżność)
Krótki przewodnik po systemie menu
.........................................................................................................................9
Funkcje zaawansowane
Programowanie zaawansowane
Automatyczne programowanie telewizora
Ręczne programowanie telewizora
Stosowanie funkcji “Dalsze nastawianie”
Blokowanie programów
Pomijanie numerów programów
Identyfikacja poszczególnych kanałów
....................................................................................................17
.................................................................................15
.....................................................................................18
............................................................................3
.........................................................................6
.....................................................7
.....................................10
.................................................11
.....................................................................12
.............................................................................13
....................................................................14
.....................................................................16
..........................................................................19
PL
Funkcje zaawansowane telewizor
Regulacja obrazu
Wybór formatu ekranu
Regulacja dźwięku
Funkcja automatycznego wyłączenia
................................................................................................................20
.......................................................................................................21
.............................................................................................................22
Telegazeta
Wyświetlanie Telegazety
..................................................................................................25
Dodatkowe podłączenia
Podłączanie dodatkowych urządzeń
Zastosowanie dodatkowych urządzeń
«Smartlink»
Pilot innych urządzeń SONY
Wybór sygnału wyjściowego ze złączy Euro
Stosowanie funkcji “AV Nazwa”
..........................................................................................................................28
............................................................................................28
......................................................................................30
Informacje dodatkowe
Optymalny kąt oglądania
Dane techniczne
Rozwiązywanie problemów
.................................................................................................................32
................................................................................................31
..............................................................................................33
a
.............................................................................24
..............................................................................26
...........................................................................27
.................................................................29
Spis treści
5
Page 98

Postępowanie wstępne - Opis Ogólny
Sprawdzanie dostarczonych akcesoriów
VIDEO TV
Checking the Accessories Supplied
1
2
3
4
5
6
7
8
9
0
PROGR
MENU
RM
892
S
Pilot do zdalnego
sterowania (RM-892)
Dwie baterie (typ R6)
Przegląd przycisków urządzenia
Przycisk
wyboru
źródła
wejściowego
Należy nacisnąć do góry pokrywkę
z przodu urządzenia by zobaczyć
przednie złącza
Przyciski
regulacji
dźwięku
Przyciski
wyboru
następnego lub
poprzedniego
programu
(wybór kanałów
telewizyjnych)
Wskaźnik
trybu
czasowego
wyłączenia
(standby)
Przełącznik
włączony /
wyłączony
Złącze do
podłączenia
słuchawek
6
Złącze
wejścia
S Video
Postępowanie wstępne - Opis Ogólny
Złącze
wejścia
video
Złącza
wejść
audio
Przycisk
autoprogr
amowania
Przycisk
“Zbieżność
automatyczna”
Page 99

Postępowanie wstępne - Opis ogólny
Przegląd przycisków pilota do zdalnego sterowania
Checking the Accessories Supplied
Wyświetlanie godziny
Należy go nacisnąć by włączyć lub
wyłączyć zegar (działa tylko
podczas transmisji telegazety)
Obsługa video
W celu uzyskania szczegółów
należy przeczytać rozdział “Pilot
innych urządzeń SONY”
Jeśli w ciągu 15-30 minut nie ma sygnału
telewizyjnego ani też nie zostanie
naciśnięty żaden przycisk, telewizor
automatycznie przełączy się na tryb
czuwania (standby)
Przejść na wyższy poziom
Przejść na niższy poziom
Przejść do poprzedniego menu lub
poprzedniej opcji
Przejść do następnego menu lub
następnej opcji
Potwierdzić wybór opcji
Przycisk nie odpowiadający żadnej funkcji
niniejszego urządzenia
Wyłączanie dźwięku
Należy go nacisnąć by wyłączyć dźwięk
Należy go ponownie nacisnąć by włączyć
dźwięk.
Włączanie / Wyłączanie video
Należy go nacisnąć by włączyć lub wyłączyć
video.
Wybór trybu TV
Należy go nacisnąć by telegazeta zniknęła z
ekranu lub by wyłączyć wejście video.
Wybór telegazety
Należy go nacisnąć by telegazeta pojawiła się
na ekranie.
Przycisk nie odpowiadający żadnej funkcji
niniejszego urządzenia.
Wybór kanału
Należy je przyciskać by wybrać odpowiedni
kanał.
W przypadku kanałów o numerze
dwucyfrowym np. 23, należy najpierw nacisnąć
-/— , a następnie przyciski numeryczne 2 i 3.
W przypadku popełnienia pomyłki podczas
wprowadzania pierwszej cyfry należy
kontynuować operację wprowadzania drugiej
(od 0 do 9), a następnie powtórzyć całą
operację.
Wybór trybu dźwięku
Należy go nacisnąć by zmienić nastawienie
trybu dźwięku.
Wybór trybu obrazu
Należy go nacisnąć by zmienić ustawienia
obrazu.
Regulacja głośności
Należy go nacisnąć by nastawić głośność.
1
4
7
S
VIDEO TV
2
5
8
0
K
MENU
VIDEO TV
VTR 1 2 3 4 DVD
3
6
9
PROGR
RM
892
CH
Czasowe wyłączenie telewizora
Należy go nacisnąć by czasowo wyłączyć
telewizor (zostanie wyświetlony czerwony
wskaźnik trybu czasowego wyłączenia ).
Należy go ponownie nacisnąć by włączyć
telewizor pozostający w trybie czasowego
wyłączenia (standby).
Dla oszczędności energii wskazane jest
całkowite wyłączanie telewizora gdy się go nie
używa.
Wyświetlanie informacji na ekranie
Należy go nacisnąć by na ekranie wyświetlone
zostały wszystkie wskazówki. Należy go
ponownie nacisnąć by wskazówki zniknęły z
ekranu.
Wybór źródła wejściowego
Należy go naciskać do momentu gdy symbol
żądanego źródła sygnału pojawi się na ekranie.
Powrót do ostatniego wybranego kanału
Umożliwia powrót do poprzednio wybranego
kanału (uprzednio wybrany kanał powinien
być wcześniej widoczny na ekranie przez
przynajmniej 5 sekund )
Wybór formatu ekranu
Należy go kilkarotnie nacisnąć by zmienić
format ekranu.
Przycisk działa jedynie w trybie Telegazety.
Funkcja odpowiadająca symbolowi
przycisku nie działa w niniejszym urządzeniu
Joystick opcji menu
4
$
Z
z
OK
PL
Wszystkie kolorowe przyciski służą nie tylko do regulacji
telewizora, ale też do obługi telegazety. Szersza informacja o ich
funkcjach znajduje się w rozdziale poświęconym telegazecie.
Wybór kanałów
Należy go nacisnąć by wybrać następny lub
poprzedni kanał.
Włączanie systemu menu
Należy go nacisnąć by menu pojawiło się na
ekranie. Należy go ponownie nacisnąć by
menu zniknęło i pojawił się normalny ekran
telewizyjny.
Postępowanie wstępne - Opis Ogólny
7
Page 100

Postępowanie wstępne - Podłączenie telewizora
Wkładanie baterii do pilota
Należy upewnić się, że baterie umieszczone zostały zgodnie z ich biegunowością.
Szanując środowisko naturalne należy wyrzucać zużyte baterie do specjalnie do tego przeznaczonych pojemników.
Podłączanie anteny i magnetowidu
magnetowid
lub
Podłączenie do złącza EURO jest fakultatywne.
Jeśli się stosuje fakultatywne podłączenie do złącza EURO może ono podnieść jakość obrazu i dźwięku podczas
używania magnetowidu.
Jeśli się nie używa podłączenia do złącza EURO, po automatycznym zaprogramowaniu telewizora, należy ręcznie
zaprogramować kanał sygnału video. W tym celu należy przeczytać rozdział “Ręczne programowanie telewizora“. Należy
również przeczytać instrukcje obsługi magnetowidu by zorientować się jak odnaleźć kanał sygnału video.
OUT IN
Włączanie telewizora
Naciśnij przycisk
włączony/wyłączony
znajdujący się z przodu
urządzenia by je włączyć.
projection TV.
Włącz przewód zasilający
urządzenia do gniazdka
sieciowego (220-240V AC,
50HZ).
8
Postępowanie wstępne - Podłączenie telewizora
 Loading...