

Page 1

3-861-278-12 (1)
LCD Projection
Data Monitor
Operating Instructions
Mode démploi
Manual de instrucciones
________
KL-W7000
KL-W9000
I 1997 by Sony Corporation
Page 2
WARNING
To prevent fire or shock hazard, do not
expose the unit to rain or moisture.
Dangerously high voltages are present
inside the set. Do not open the cabinet.
Refer servicing to qualified personnel
only.
NOTIFICATION
This equipment has been tested and found to comply with
the limits for a Class B digital device, pursuant to Part 15 of
the FCC Rules. These limits are designed to provide
reasonable protection against harmful interference in a
residential installation. This equipment generates, uses, and
can radiate radio frequency energy and, if not installed and
used in accordance with the instructions, may cause harmful
interference to radio communications. However, there is no
guarantee that interference will not occur in a particular
installation. If this equipment does cause harmful
interference to radio or television reception, which can be
determined by turning the equipment off and on, the user is
encouraged to try to correct the interference by one or more
of the following measures:
- Reorient or relocate the receiving antenna.
- Increase the separation between the equipment and
receiver.
- Connect the equipment into an outlet on a circuit different
from that to which the receiver is connected.
- Consult the dealer or an experienced radio/TV technician
for help.
CAUTION
RISK OF ELECTRIC SHOCK
DO NOT OPEN
ATTENTION
RISQUE DE CHOC ELECTRIQUE,
NE PAS OUVRIR
PRECAUCION
RIESGO DE CHOQUE ELECTRICO
CAUTION : TO REDUCE THE_ RISK OF ELECTRIC SHOCK,
REFER SERVICING TO QUALIFIED SERVICE PERSONNEL.
NO ABRIR
DO NOT REMOVE COVER (OR BACK).
NO USER-SERVICEABLE PARTS INSIDE.
This symbol is intended to alert the user to the
presence of uninsulated "dangerous voltage"
within the product's enclosure that may be of
sufficient magnitude to constitute a risk of
electric shock to persons.
This symbol is intended to alert the user to the
presence of important operating and
maintenance (servicing) instructions in the
literature accompanying the appliance.
You are cautioned that any changes or modifications not
expressly approved in this manual could void your authority
to operate this equipment.
This document is for the remote control RM-Y980.
MODELS; KL-W7000/W9000.
Please keep this notice with the instruction manual.
Warning on power connection
Use an appropriate power cord for your local power supply.
For the customers in the U.S.A.
If you do not use the appropriate cord, this monitor will not
conform to mandatory FCC standards.
Examples of plug types
for 100 V to 120 VAC
The socket-outlet should be installed near the equipment
and be easily-accessible.
CAUTION
To prevent electric shock, do not use this polarized AC plug
with an extension cord, receptacle or other outlet unless the
blades can be fully inserted to prevent blade exposure.
2-EN
Owner's Record
The model and serial numbers are located at the rear of the
monitor. Record these numbers in the spaces provided
below. Refer to them whenever you call upon your Sony
dealer regarding this product.
Model No.
Serial No.
____________________________
_____________________________
Page 3

Table of contents
About this manual
The instructions in this manual are for models KLW7000 and KL-W9000. Before you start reading this
manual, please check your model number, located at
the rear of the projection morutor.
Model KL-W9000 is used for illustration purposes in
this manual. Any differences in operation are clearly
indicated in the text, for example "■ for KL-W9000."
The differences in specifications are indicated in the
text.
4 Precautions
Getting Started
5 Step 1: Installing the projection morutor
7 Step 2: Hookup
11 Step 3: Setting up the remote control
11 Changing the menu language
Operations
12 Projecting the picture
13 Watching the picture in wide picture mode
16 Adjusting the computer picture
18 Selecting the preset picture viewing mode
19 Adjusting the picture (av memory)
21 Adjusting the sound (av memory)
22 Selecting the audio effect (effect)
23 Turning the power off automatically (auto shut
off)
• DDC™is a trademark of Video Electronics Standard
Association.
• IBM PC/ AT and VGA are registered trademarks of
International Business Machines Corporation of the
U.S.A.
• Macintosh is a trademark licensed to Apple
Computer, Inc,, registered in the U.S.A. and other
countries.
• VESA is a trademark of Video Electronics Standard
Association.
• Windows® is a registered trademark of Microsoft
Corporation in the United States and other
countries.
• All other product names mentioned herein may be
the trademarks or registered trademarks of their
respective companies.
• Furthermore, "™" and "®" are not mentioned in
each case in this manual.
Additionai Information
24 Cleaning the air filter
25 Replacing a lamp
26 Troubleshooting
28 Specifications
30 Identifying the parts
32 Index
The captions in parentheses indicate menu names.
t-EN
Page 4

Precautions
This projection monitor operates on extremely high
voltage. To prevent fire or electric shock, please follow
the precautions below.
On safety
• Operate the monitor only on 100 V to 120 V AC.
• One blade of the plug is wider than the other for
safety purposes and will fit into the power outlet
only one way. If you are unable to insert the plug
fully into the outlet, contact your dealer.
• Should any liquid or solid object fall into the
cabinet, unplug the monitor and have it checked by
qualified personnel before operating it further.
• Unplug the monitor from the wall outlet if you are
not going to use it for several days or more. To
disconnect the cord, pull it out by the plug. Never
pull the cord itself.
• The fans inside the monitor continue working for a
while even after the monitor has been turned off.
Do not unplug the monitor from the AC outlet
while the fans are working.
On installation
• To prevent internal heat build-up, do not block the
ventilation openings.
• Do not install the monitor in a hot or humid place,
or in a place subject to excessive dust or mechanical
vibration.
On screen
The screen surface is easily scratched. Do not rub,
touch or tap it with sharp or abrasive objects.
Be especially careful when transporting the monitor.
On LCD panel
• Do not expose the screen to direct sunlight. It may
damage the LCD panel.
• When the monitor is used in a cold place, the image
may look lengthened. This is not a malfunction. The
image will become normal when the temperature
rises.
• When the same static picture has been displayed
continuously, an afterimage impression of that
picture may remain on the screen. This will
disappear after a certain time.
4-EN
If you turn on the monitor immediately after power
has been restored at an interruption, an LCD burn
may occur. This is not a malfunction. The image will
become normal after a certain time.
On blanking around the pciture
The monitor displays black masks between the picture
and the screen vessel because the monitor under-scans
to obtain the necessary space on the screen to display
the picture. This is called blanking. Note that the black
masks on each vessel are not uniform.
The blanking on the video picture will be wider to
optimize picture.
Blanking
Picture
• Screen vessel
On moisture condensation
If the projection monitor is transported directly from a
cold to a warm location, or if the room temperature
has changed suddenly, the picture may be blurred or
show poor color. This is because moisture has
condensed on the lenses inside. If this happens, let the
moisture evaporate before using the monitor.
On cleaning
• Clean the cabinet of the monitor with a dry soft
cloth. Stubborn stains may be removed with a cloth
slightly dampened with solution of mild soap and
water, then wipe it with a dry soft cloth.
Do not use any type of solvent such as alcohol,
benzine, thinner or insecticide. Such solvent may
damage the finish of the monitor or erase the
indications on the panel.
• Wipe the screen with a dust remover (supplied)
occasionally, as the screen easily catches dust. The
dust remover is washable. Wash it with warm water
or mild detergent solution.
• Stubborn stains on the screen may be removed with
a soft cloth slightly dampened with solution of mild
soap and water.
• If the picture becomes dark after using the monitor
for a long period of time, it may be necessary to
clean the inside of the monitor. Consult qualified
service personnel.
Page 5

Getting Started
Step 1: Installing the projection monitor
Optimum viewing area
For the best picture quality, install the monitor within
the areas shown below.
■ for KL-W7000
Vertical viewing area (side view)
Horizontal viewing area (top view)
■ for KL-W9000
Vertical viewing area (side view)
Horizontal viewing area (top view)
Getting Started 5'
-EN
Page 6

Carrying your monitor
Be sure to grasp the areas indicated by the arrows
when carrying the monitor, and to use more than two
people. Never grasp the front panel.
2 Pass a strong cord or a chain through each
bracket mounted in step 1, and then secure
it to a wall or a pillar, etc.
Using the buckle
You can also use the supplied buckle to secure the
monitor to the stand.
for KL-W9000
Stabilizing the monitor Using the brackets
After setting up, secure the monitor to a wall, etc. with
the supplied brackets.
1 Mount the two supplied brackets with the
screws to the upper rear sides of the
monitor.
1 Attach the buckle to the stand on which the
monitor is mounted.
Tighten the supplied screw firmly.
2 Insert the buckle until it clicks.
3 Pull the belt to fasten.
6-EN
Getting started
Page 7

step 2: Hookup
Before making the connection, turn off the power and
disconnect the AC power cords of the monitor and the
equipment to be connected. Refer to the instruction
manual of the equipment you connect.
Connecting to an IBM PC/AT or compatible computer
Connect the RGB 2 IN connector on the front or the
RGB 1 IN connector at the rear of the monitor to the
video/audio outputs of the computer using the
supplied RGB signal cable (D-sub 15 pin ► D-sub 15
pin).
Using the rear RGB 1 IN connector
Rear of the monitor
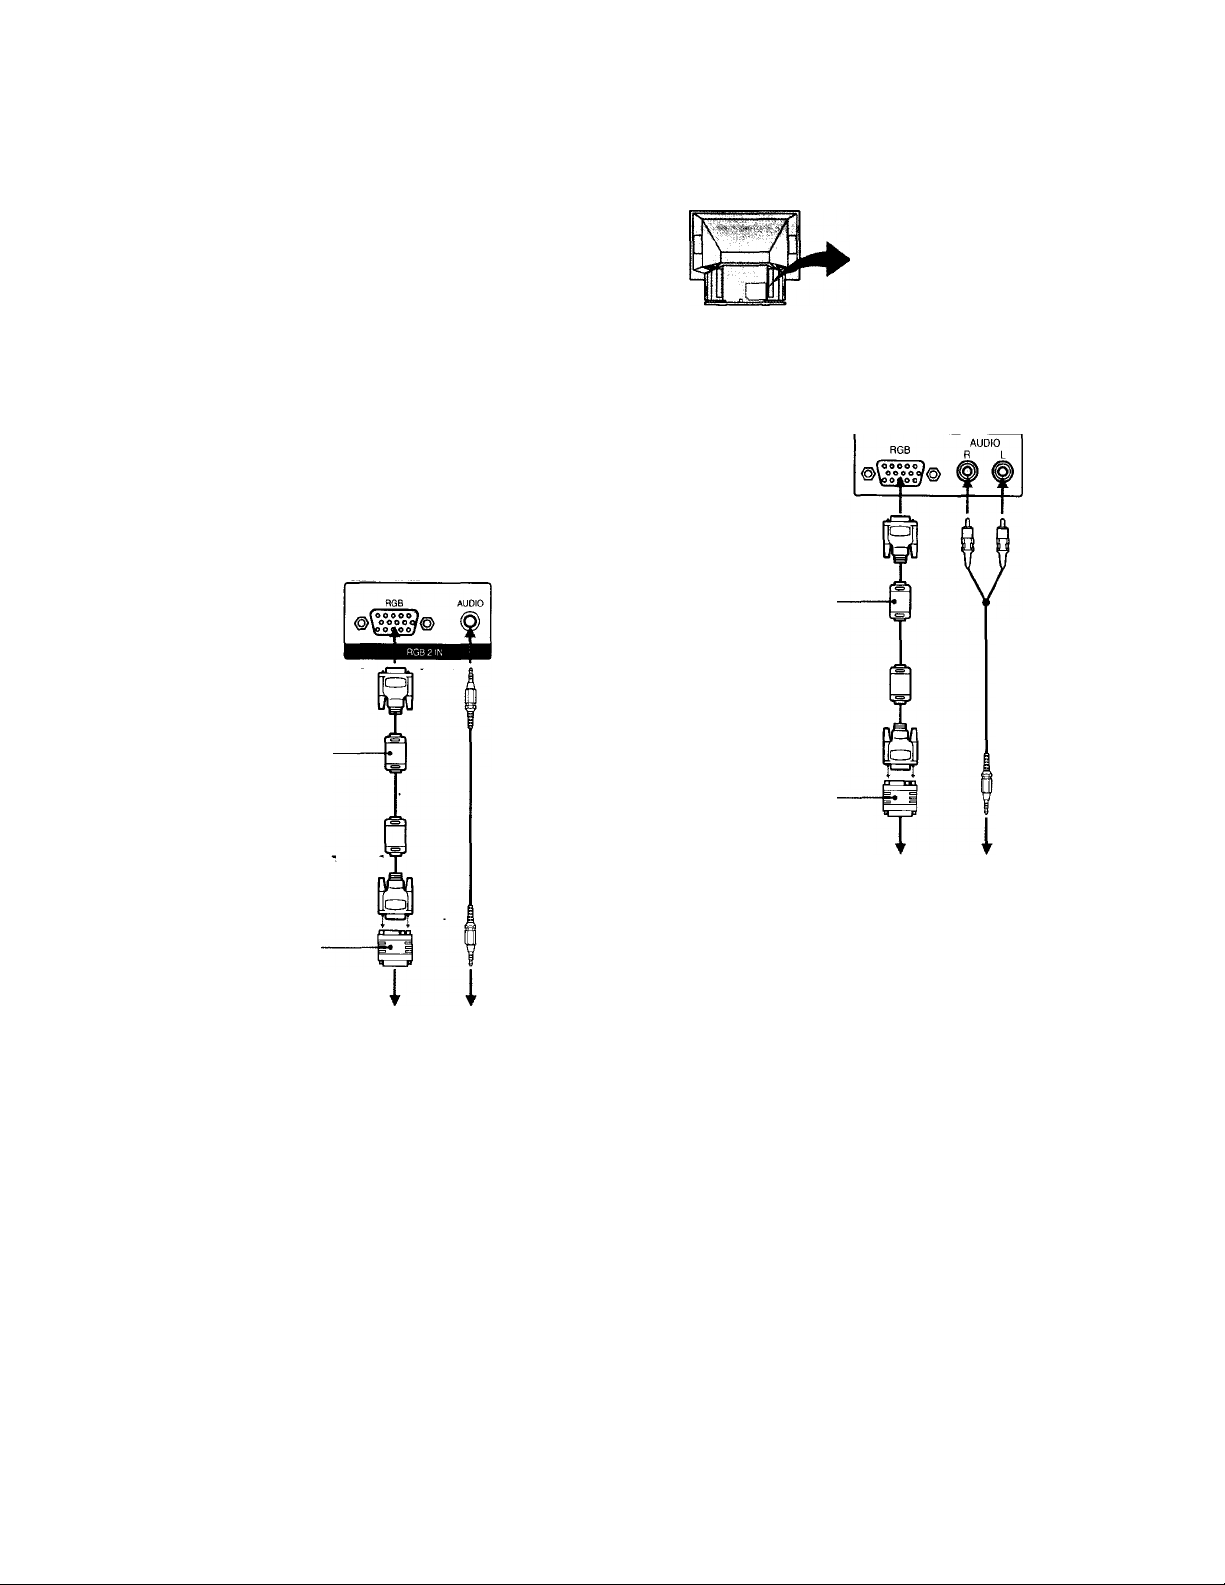
Using the front RGB 2 IN connector
Front of the monitor
RGB AUDIO
RGB 2 IN
- fl -
RGB signal cable
(supplied) V.
HD15-HD15 adaptor
(supplied)*
Male side
(without the No.9 pin)
to video output
____
Audio connecting
cord
(stereo minijack »—
stereo minijack)
(not supplied)
to audio output
* The HD15-HD15 adaptor (supplied) may be needed for some
models. The male side (without the No. 9 pin) of the adaptor
should be connected to the computer.
For customers using the supplied HD15-HD15 adaptor
This monitor uses a No. 9 pin in the video signal
connector for,DDCl and DDC2B compatibility.
Some PC systems which are not compatible with either
DDCl or DDC2B may not accept the No. 9 pin. If you
are not sure whether your PC system accepts the No. 9
pin or not, use the HD15 (Female) - HD15 (Male
without the No. 9 pin) adapter (supplied).
IBM PC/AT or compatible
computer
Getting Started
7-EN
Page 8
Connecting to a Macintosh or compatible computer
Connect the RGB 2 IN connector on the front or the
RGB 1 IN connector at the rear of the monitor to the
video/audio outputs of the computerising the
supplied RGB signal cable (D-sub 15 pin ♦ D-sub 15
pin) and the supplied Macintosh adaptor.
Using the front RGB 2 IN connector
Front of the monitor
3^
Using the rear RGB 1 IN connector
Rear of the monitor
V
t.
RGB signal cable
(supplied)
Audio connecting
cord
(phono plug X 2
stereo minijack)
(not supplied)
RGB signal cable
(supplied)
Macintosh adaptor
(supplied)
to video output
Audio connecting
cord
(stereo minijack «stereo minijack)
(not supplied)
to audio output
Macintosh or compatible
computer
Macintosh adaptor
(supplied)
to video output
Macintosh or compatible
computer
to audio output
About the supplied Macintosh adaptor
The supplied Macintosh adaptor is compatible with
Macintosh LC, Performa, Quadra and Power
Macintosh series computers. Macintosh II series and
some version of PowerBook models may need an
another adaptor with micro switches (not supplied).
EN
8
Getting Started
Page 9

Preset and user modes Preset modes
The monitor has nine factory preset modes for the most
popular industry standards as shown below.
No. Resolution
(dots X
lines)
1 640 x 400 31.468 70.086 VGA mode
2
640 X 480
800 X 600 37.879 60.317 SVGA VESA
3
4 800 X 600 46.875 75.000
1024 X 768 48.363 60.004
5
6 864 X 480 31.469 59.94 Sony
7
1072 X 600
8 1376 X 768
9 832 X 624
* For the timirtg chart of the signals, see page 29.
Horizontal
frequency
(kHz)
31.468 59.94
37.879
48.363 60.004
49.727
Vertical
frequency
(Hz)
60.317 Sony
74.553
Graphics
mode
(Text)
VGA mode
(Graphics)
SVGA VESA
VESA
Wide Resolution*
Wide Resolution*
Sony
Wide Resolution*
Macintosh 16" color
User modes
when using a video mode that is not one of the preset
modes, some fine tuning may be required to optimize
the display to your preference. Simply adjust the
monitor according to the adjustments instructions on
pages 16 and 17. The adjustments will be stored
automatically and recalled whenever that mode is
used.
A total of 15 user-defined modes can be stored in
memory. If a 16th mode is entered,'it will replace the
first.
Plug & Play
This monitor complies with the DDCtn'I and DDC2B
which are the Display Data Channel (DDC) standards
of VESA.
When a DDCl host system is connected, the monitor
synchronizes with the V. CLK in accordance with the
VESA standards and outputs the EDID (Extended
Display Identification Data) to the data line.
When a DDC2B host system is connected, the monitor
automatically switches to each communication.
For customers using Windows 95
Install the new model informahon from the "Windows
95 Monitor Information Disk" into your PC. (To install
the file, refer to the supplied "About the Windows 95
Monitor Information Disk/File.")
This monitor complies with the "VESA DDC"
Plug&Play standard. If your PC/video card complies
with DDC, select "Plug and Play Monitor (VESA
DDC)" as "Monitor type" from "Control Panel" in
Windows 95. Some PC/video cards do not comply
with DDC. Even if your computer complies with DDC,
it may have some problems connecting with this
monitor. In this case, select this monitor's model name
(KL-W7000 or KL-W9000) as "Monitor type" in
Windows 95.
Recommended horizontal timing conditions
Horizontal sync width should be more than 1.0 fisec.
Horizontal blanking width should be more than 3.6
}isec.
When "OUT OF SCAN RANGE" appears on the screen
The monitor receives a signal whose frequency range is not
within that specified for the monitor.
Notes
• When projecting any of the three Wide Resolution signals (864
X 480, 1072 X 600, 1376 x 768), set the picture mode to FULL. In
NORMAL mode, the picture with aspect ratio 16:9 will be
compressed to aspect ratio 4:3 and appear lengthened
vertically. For details, see page 15.
• The monitor does not accept an interlace mode signal.
Getting Started
g-EN
Page 10

Connecting to video equipment
Connecting two VCRs for editing
To a VCR not equipped with an S video connector
Rear of the monitor
U/'
V£5'
to VIDEO 1 IN or
VIDEO 3 IN
AUDIO
VMC-810S/820S
(not supplied)
VCR
9HBB!!iSi!!s3uu3
to video/audio outputs
You can also use the VIDEO 2 IN jacks on the front of
the monitor for the video/audio connections.
#
tO'; ,
The monitor outputs signals from the VIDEO IN jacks
through the VIDEO OUT jacks. With two VCRs
connected to the VIDEO IN and VIDEO OUT jacks, you
can edit the tape.
Note
For the RGB signal input from the RGB 1 / 2 IN
connectors, the monitor outputs only the audio signal.
Rear of the monitor
1 3
■r
< z :y
to VIDEO 1 IN
or VIDEO 3 IN
VMC-810S/
820S
(not supplied)
AUDIO
<
to video/audio
outputs
1
to VIDEO OUT
VMC-810S/820S
(not supplied)
to video/
audio
inputs
To an S video equipped VCR
Note
• When you connect the cable to both the VIDEO jack and the S
VIDEO connector, the picture from the S VIDEO connector is
displayed on the monitor screen.
VCR for playback VCR for recording
Connecting the AC power cord
Connect the supplied power cord to the AC IN socket
of the monitor and to a wall AC outlet.
Rear of the monitor
'I Q-EN Getting Started
Page 11

step 3: Setting up
Changing the menu
the remote
control
Inserting batteries
Insert two size AA (R6) batteries (supplied) by
matching the + and - on the battery to the diagram
inside the battery compartment.
Notes
• Under normal conditions, batteries will last up to six months.
If the remote control does not operate properly, the batteries
may be worn out. When replacing batteries, replace both of
them with new ones.
• Do not mix old batteries with new ones or mix different types
of batteries together.
• If the electrolyte inside the battgry should leak, wipe the
contaminated area of the battery compartment with a cloth and
replace the old batteries with new ones. To prevent the
electrolyte from leaking, remove the batteries when you don't
plan to use the remote control for a long period of time.
• Do not handle the remote control roughly. Do not drop it, step
on it, or let it get wet.
• Domot place the remote control in direct sunlight, near a
heater, or where the humidity is high.
language
e
© ©
©
MENU .
O
EKTER
O
If you prefer Spanish or French to English, you can
change the menu language.
1 Press MENU.
2 Press 4 or to select OPTION, and press
ENTER.
©
<y ©
3 Press 4 or 4 to select LANGUAGE, and press
ENTER.
©
ENTER
©
ENTER
OPTION =>
AUTO SHUT off:OFF
LANGUAGE: ENGLISH
DOT phase: 16
4 Press 4, 4, 4 or 4 to select your favorite
language, "ENGLISH," "FRANÇAIS (French)"
or "ESPAÑOL (Spanish)."
■ ©
©X©
<y (i)
5 Press MENU to return to the original
screen.
Notes
• You can operate the menu using the buttons on the monitor.
The VOLUME + button functions the same as ♦ and ♦ , and
VOLUME - as ♦ and ♦ .
• You cannot use the AUTO SHUT OFF function for the input
from VIDEO IN. (See page 23.)
Getting Started ^^-EN
Page 12
Operations
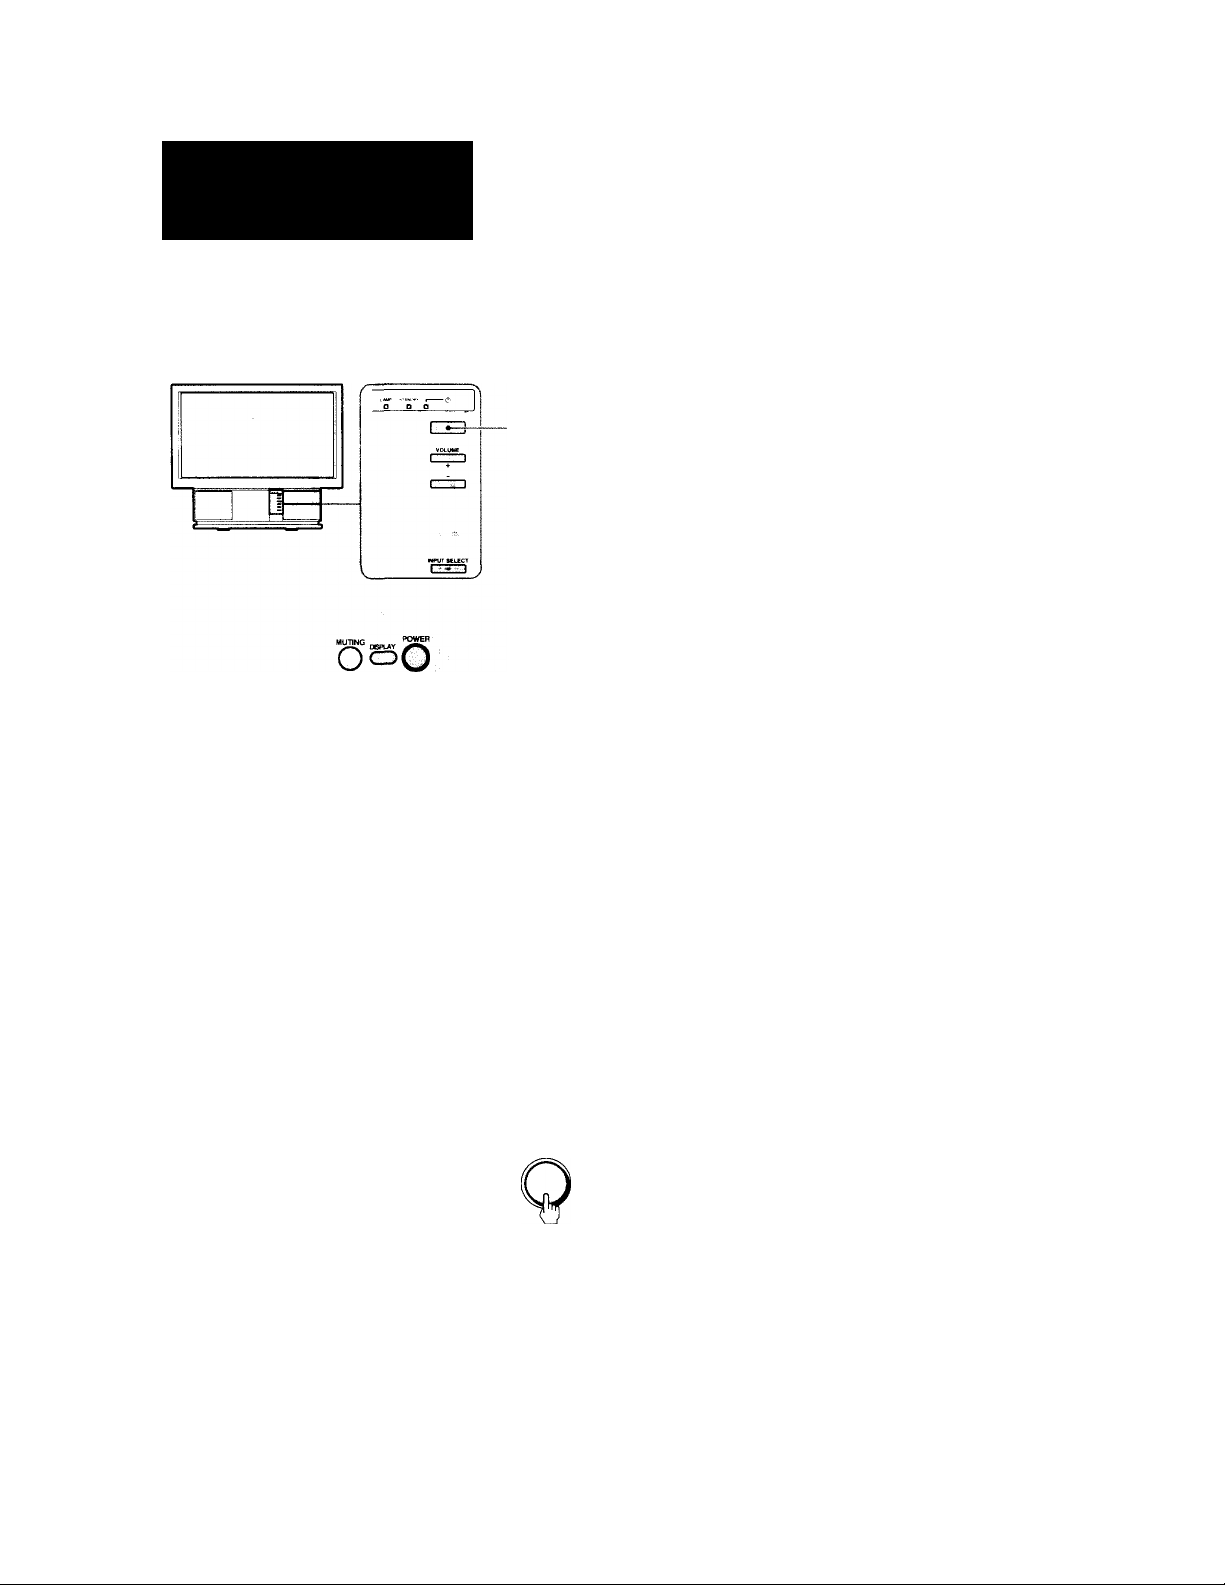
Projecting the
2 Turn on the power of the connected
equipment.
picture
VOL
©
0
Power switch
(green)
3 Press RGB or VIDEO to select the input you
want to watch.
The selected input indication is displayed on the
screen.
To watch a computer picture input from the
RGB IN connector
Each time you press RGB, the display changes as
follows;
RGB 1 RGB 2
To watch a video picture input from the
VIDEO IN jacks
Each time your press VIDEO, the display changes
as follows:
VIDEO 1
• VIDEO 2 VIDEO 3
t___
You can also select the input by pressing INPUT
SELECT on the monitor.
Each time you press INPUT SELECT, the display
changes as follows:
RGB 1 —► RGB 2 -► VIDEO 1 -► VIDEO 2 -► VIDEO 3
t
_________________________
INPUT SELECT
I
1 If the STANDBY indicator on the front of the
monitor is lit in orange, press POWER on the
remote control to turn on the power.
POWER
LAMP STANDBY I--------- ----------- ---- (!)
□ ■ □
Press the power switch (green) on the monitor if the
STANDBY indicator is not lit.
]
The green (!) (power) indicator flashes, then lights
up.
^ 2"EN Operations
fT
The input signal indication will automatically
disappear.
4 Press VOL +/- (VOLUME +/-) to adjust the
volume.
Remote control
VOL
Monitor
VOLUME
B
Page 13

To turn off the monitor
Press POWER on the remote control. The monitor
enters standby mode and the STANDBY indicator
lights up. To turn off the main power, press the power
switch (green) on the monitor.
Note
• To protect the lamp mounted as a source of light, if you try to
turn on the power within about 30 minutes after the power has
been turned off, the (!) (power) indicator flashes and the
picture does not appear.
Muting the sound
Press MUTING.
"MUTING" appears on the screen.
To restore the sound, press MUTING again, or press
VOL+.
Displaying on-screen information
Press DISPLAY to display the following information on
the screen.
Current input
signal
Watching the
picture in wide
picture mode
O
Watching the video picture in wide mode
You can enjoy a variety of wide mode picture.
______
Current input
Picture mode
(page 14)
*fh: Horizontal frequency
fv: Vertical frequency
"OUT OF SCAN RANGE" appears if the scanning
frequency range is not within the acceptable
limits. (See page 9.)
To make the on-screen information disappear, press
DISPLAY again.
— signal frequency
' when the RGB
signal* is input
Press WIDE until the mode you want appears on the screen.
Each time you press WIDE, the mode changes as
follows;
NORMAL -* FULL -► ZOOM -► SUB TITLE -► WIDE ZOOM
t____________________________________I
WIDE
(continued)
Operations ^ 3'^^
Page 14

Recommended picture mode
When watching a picture with normai aspect
ratio 4:3
Select NORMAL.
4
The picture with normal
ratio 4:3 is displayed as it is.
Select WIDE ZOOM.
4
The picture Is enlarged horizontally and vertically and the upper
and lower portions of the picture are compressed to the screen size.
When watching a picture recorded after a 16:9
picture has been compressed to aspect ratio
4:3
When watching a movie or software with
subtities (with subtitles outside the picture)
Select SUB TITLE.
m
1
•bye.Jane,
•bye.
Goococ
The wide-format picture is enlarged and the subtitle area is
compressed so that the picture is aligned with the screen size.
Note
• You can also change the picture mode by using the menu.
Notes on wide picture modes
• Select a picture mode taking into account that one which
changes the aspect ratio of the original picture will provide an
appear different from that of the original image,
• If the monitor is used for profit or for public viewing,
modifying the original picture by changing picture modes may
constitute an infringement of the rights of authors or producers
which are legally protected by laws.
• When a normal 4:3 picture is watched in WIDE ZCXDM mode,
the surrounding portions may be cut off or modified. The
original picture can be viewed in NORMAL mode.
Select FULL.
m
The picture compressed to aspect ratio 4:3 is enlarged horizontally
to the screen size.
When watching a wide-format movie or
software with black bands and subtitles (with
subtitles inside the picture)
Select ZOOM.
The wide-format picture is enlarged horizontally and vertically to
the screen size.
The picture with aspect ratio 16:9 is enlarged to the screen size as it
Operations
Page 15

Adjusting the vertical position of the
video picture
MENU
ENTER
•' 9
t
m
k
I (§
1 ! :®
1 = # '
Watching the computer picture in wide
picture mode
( - i'N
EWTEH
You can scroll the picture up or down-when:
• the upper or lower portions of the picture in WIDE
ZOOM mode are cut off.
• you want to move the picture in ZOOM mode as
you like.
• subtitles are lost from the screen in SUB TITLE
mode.
Scrolling the picture functions on the WIDE
ZOOM, ZOOM and SUB TITLE modes only.
1 Press MENU.
MENU
2 Press 4 or to select ASPECT, and press
ENTER.
©
O’©
ENTER
fiSPECT
►ASPECT: ZOOM
U scroll: 0
3 Press 4 or 4 to select V
ENTER.
If you set the picture mode to FULL when any of the
three Wide Resolution signals (864 x 480,1072 x 600,
1376 X 768) is received, you can watch the picture with
aspect ratio 16:9 as it is. The Wide Resolution signals
(864 X 480,1072 x 600,1376 x 768) are independently
standardized by Sony. When you use the signals with
the timing chart on page 29, you can obtain an effective
wide mode picture.
Press WIDE to display FULL or NORMAL on the
screen.
Each time your press WIDE, you can select FULL and
NORMAL alternately.
WIDE
When the Wide Resolution signals (864 x 480,
1072 X 600, 1376 X 768) are received
NORMAL mode
The picture with aspect ratio 16:9 is enlarged to the screen size.
FULL mode
©
<y ©
ENTER
4 Press 4 or 4 to adjust the vertical position
of the picture.
to move the picture up
©-
to move the picture down
Note
• You can operate the menu using the buttons on the monitor.
The VOLUME + button functions the same as ♦ and ♦ , and
VOLUME - as ♦ and ♦ .
When a conventional VGA, SVGA or XGA signal
is received
NORMAL mode
The picture with -aspect ratio 4:3 is enlarged horizontally to the
screen size.
Adjusting the position of a computer
picture
You can move the picture up, down, right or left to
make it easy to watch by using the SIZE/CENTER
button. For details, see page 16.
If you watch the Wide Resolution signals (864 x 480,
1072 X 600, 1376 x 768) in NORMAL mode
A 16:9 picture will be compressed horizontally to a 4:3 picture.
Operations ^ 5'^^
Page 16

Adjusting the
computer picture
Adjusting the position (CENTER)
. *
@ i
o
After projecting the picture from a computer, you may
need to adjust the position of the picture to fit the
monitor screen. You can also move the picture as you
like. The setting is only for the input signal displayed
on the screen.
The CENTER adjustment screen automatically
disappears after about 10 seconds if you do not press
any button. You can also erase the CENTER adjustment
screen by pressing CENTER/SIZE again.
To reset to the factory preset setting
Press RESET on the monitor. At the same time, the
picture size (page 17) and video/audio settings (pages
18 to 22) are also reset to the factory preset levels.
Note
• You can adjust the position by using the CENTER/SIZE and
o/O/O/iC» buttons on the monitor.
1 Press CENTER/SIZE until the CENTER
adjustment screen appears.
CENTER
K CENTER
CENTER/
SIZE
U CENTER
------------
2 Press 4>, 4^, 4 or to adjust the position.
For horizontal adjustment press
CENTER)
to move the picture right
0 0“
For vertical adjustment press ♦ or ♦ . (V CENTER)
0
to move the picture left
to move the picture up
V, to move the picture down
4
or 4. (H
0
]«
^ 5'^^ Operations
Page 17

Adjusting the picture size (SIZE)
©
© ®
©
O
After projecting the picture from a computer, you may
need to adjust the picture size to fit the monitor screen.
The setting is only for the input signal displayed on the
screen.
Adjusting the clarity of the picture
(DOT PHASE)
©
© ©
©
MENU
G3
ENTER
CD
If the computer picture flickers or blurs, or horizontal
noise appears on the screen, adjust DOT PHASE to get
a clearer picture.
1 Press CENTER/SIZE until the SIZE adjustment
screen appears.
CENTER/
SIZE
_________________________
SIZE
H SIZE
911^^
U SIZE
2 Press 4 or f to adjust the picture size.
For horizontal adjustment press or 4. (H SIZE)
to increase horizontal size
® ©■«
For vertical adjustment press 4 or 4. (V SIZE)
©
to decrease horizontal size
to increase vertical size
to decrease vertical size
©
The SIZE adjustment screen automatically disappears
after about 10 seconds if you do not press any button.
You can also erase the SIZE adjustment screen by
pressing CENTER/SIZE again.
1 Press MENU.
2 Press 4 or 4 to select OPTION, and press bm
ENTER. E2I
ENTER
<T
©
©
3 Press 4 or 4 to select DOT PHASE, and press
ENTER.
ENTER
OPTION ^
AUTO SHUT OFF:OFF
language: ENGLISH
DOT phase: 16
<T
©
©
4 Press 4, 4, 4 or 4 to adjust the level to
obtain a clear picture.
To reset to the factory preset setting
Press RESET on the monitor. At the same time, the
picture position (page 16) and video/audio settings
(pages 18 to 22) are also reset to the factory preset
levels.
Notes
• For a picture with resolution of 640 x 350, 640 x 400 or 640 x
480, the vertical size cannot be increased from the size that was
projected the first time.
• You can adjust the size using the CENTER/SIZE and o/O/O/
s> buttons on the monitor.
®o®
5 Press MENU to return to the original screen.
Note
• You cannot use this function for the input from VIDEO IN.
Operations 1 y-EN
Page 18

Selecting the preset
picture viewing
mode
The video/audio mode feature allows you to choose
four different modes of picture/sound settings. Choose
the one that best suits the type of program that you
want to watch.
© ©
0 — I
I
MENU
CD
s
1 Press MENU.
To reset to the factory preset setting
Press RESET on the monitor.
When watching a computer picture, the mode resets to
PRESENTATION. When watching a video picture, the
mode resets to STANDARD. At the same time, the
position and size of a computer picture (pages 16 and
17) are also reset to the factory preset levels. The
settings in AV MEMORY do not reset.
Note
• You cannot adjust the settings in modes other than AV
MEMORY.
2 Press 4 or to select VIDEO/AUDIO, and
press ENTER.
ENTER
& ©
UI DEO/AUDIO
►PRESENTATION
STANDARD
MQUIE
AU MEMORY
UIDEO ADJUST
AUDIO ADJUST
3 Press 4 or 4 to select the desired item, and
press ENTER.
ENTER
©
Choose To
PRESENTATION
STANDARD Watch the picture input from video
MOVIE Watch a movie.
AV MEMORY
Watch the picture input from a
computer.
equipment.
Adjust the quality of the picture / sound
to suit your taste. (For details, see pages
19 to 22.)
4 Press MENU to return to the original screen.
^g-EN Operations
Page 19
Adjusting the
picture (AV MEMORY)
You can adjust the quality of the picture to suit you
taste and store the settings into AV MEMORY.
© ©
0
(2) Press ENTER.
ENTER
eg)
UIDEO ADJUST
BRIGHTNESS
imimiinmimi
5 Adjust the selected item.
Press 4, 4 or ♦ to adjust the item, and press
ENTER.
©
enter
.
EWTHR
СЭ
1 Press MENU.
2 Press 4 or to select VIDEO/AUDIO, and
press ENTER.
©
ENTER
<y ©
3 Press 4 or 4 to select VIDEO ADJUST, and
press ENTER.
UIDEO ADJUST
MENU =3
©
ENTER
►CONTRAST •НИИ111ИИ..
BRIGHTNESS H«Hii
COLOR ними
HUE
SHARPNESS
RESET ®
.............
...............
.......I.......
......
<Y ©
4 Select the item you want to adjust.
For example:
(1) To adjust the brightness, press 4 or 4 to move
the cursor (► ) to BRIGHTNESS.
........
Item
CONTRAST
BRIGHTNESS Darken the picture.
COLOR
HUE
SHARPNESS
6 To adjust other items, repeat steps 4 and 5.
Press 4 or ♦ to
Decrease picture
contrast.
Decrease color
intensity.
Make picture tones
become purplish.
Soften the picture.
Press 4 or 4 to
Brighten the picture.
Brighten the picture.
Increase color intensity.
Make picture tones
become greenish.
Sharpen the picture.
7 Press MENU to return to the original screen.
To reset to the factory preset setting
Move the cursor (► ) to RESET at the bottom of the
VIDEO ADJUST menu, and press ENTER.
.....
Notes
• When the RGB signal is input, COLOR and HUE cannot be
adjusted.
• You can adjust the items in AV MEMORY for each input from
VIDEO 1, 2 and 3, and RGB 1 IN and RGB 2 IN.
• You can operate the menu using the buttons on the monitor.
VOLUME + functions the same as 4 and ♦ , and VOLUME - as
♦ and ♦ .
©
& ©
Operations \ 9'
-EN
Page 20

Adjusting the picture in more details
You can adjust the picture with the NR (noise
reduction), H-WHITE and COLOR TEMP
(temperature) options.
6 Press 4 or 4 to adjust the item, then press
ENTER.
0
©
0 0
0
MENU
CD
ENTER
CD
1 Press MENU. 2 Press 4 or to select VIDEO/AUDIO, and
press ENTER.
3 Press 4 or 4 to select VIDEO ADJUST, and
press ENTER.
UIDEO ADJUST
©
ENTER
<y 0
4 Press 4 or 4 to move the cursor (►) to
RESET, then press 4 again.
MENU ^
►CONTRAST
..............
BRIGHTNESS H««Mi
COLOR Mi«iM
HUE
SHARPNESS iH«Hi
RESET 5
............
............
.......I........
................
G? 0
Choose To
NR (Noise Reduction) Reduce picture noise. You can choose
LOW or HIGH position.
H-WHITE Emphasize the white color with the
ON position.
COLOR TEMP (Color Make the white color warm (reddish)
temperature) with the LOW position. Make it cool
(bluish) with the HIGH position.
7 To adjust other items, repeat steps 5 and 6.
8 Press MENU to return to the original screen.
To reset to the factory preset setting
Move the cursor (► ) to RESET at the bottom of the
.
...
VIDEO ADJUST menu, and press ENTER.
Notes
• You can adjust the items in AV MEMORY for each input from
VIDEO 1, 2 and 3, and RGB 1 IN and RGB 2 IN.
• You can operate the menu using the buttons on the monitor.
VOLUME + functions the same as ♦ and ♦ , and VOLUME - as
♦ and ♦ .
UIOEO ADJUST
©
MENU a
►nr; off
H-UJHITE: on
COLOR temp;
RESET
MEDIUM
<y 0
5 Select the desired item with 4 or 4, then
press ENTER.
0
ENTER
0
20'EN Operations
Page 21

Adjusting the sound
(AV MEMORY)
5 Adjust the selected item.
Press ♦ , ♦ or to adjust the item, and press
ENTER.
You can adjust the quality of the sound to suit you taste
and store the settings into AV MEMORY.
©
0 0
(S)
"^emur' '
d>
1 Press MENU.
2 Press 4 or to select VIDEO/AUDIO, and
press ENTER.
©
ENTER
©
3 Press 4 or 4 to select AUDIO ADJUST, and
press ENTER.
©
Item
TREBLE
BASS
BALANCE
6 To adjust other items, repeat steps 4 and 5.
Press 4 or 4 to
Decrease the treble
response.
Decrease the bass
response.
Emphasize the left
speaker's volume.
ENTER
Press 4 or 4 to
Increase the treble
response.
Increase the bass
response.
Emphasize the right
speaker's volume.
7 Press MENU to return to the original screen.
To reset to the factory preset setting
Move the cursor (► ) to RESET at the bottom of the
AUDIO ADJUST menu, and press ENTER.
Notes
• You can adjust the items in AV MEMORY for each input from
VIDEO 1, 2 and 3, and RGB 1 IN and RGB 2 IN.
• You can operate the menu using the buttons on the monitor.
VOLUME + functions the same as ♦ and ♦ , and VOLUME - as
4 and ♦ .
AUDIO ADJUST
©
ENTER
MENU ^
►TREBLE
BASS .................
BALANCE
EFFECT:
RESET
............
..............
OFF
...............
.......
<y ©
4 Select the item you want to adjust.
For example:
(1) To adjust the bass, press 4 or 4 to move the
cursor (► ) to BASS.
©
<y ©
(2) Press ENTER.
ENTER
........
I
...
Operations 21'^^
Page 22

Selecting the audio
5 Press 4 or 4 to select the desired item, and
press ENTER.
effect (EFFECT)
Audio effect mode allows you to enjoy dynamic sound
with surround-like effect.
©
©
S I
L
1 Press MENU. 2 Press 4 or to select VIDEO/AUDIO, and
press ENTER.
0
©
1 1
'entw' '
cz>
f
Ì
ENTER
0
-►<5*
O’0
Choose
HALL SURROUND 1
HALL SURROUND 2
SIMULATED STEREO
OFF
6 Press MENU to return to the original screen.
To reset to the factory preset setting
Move the cursor (► ) to RESET at the bottom of the
AUDIO ADJUST menu, and press ENTER.
Notes
• You can adjust the items in AV MEMORY for each input from
VIDEO 1, 2 and 3, and RGB 1 IN and RGB 2 IN.
• You can operate the menu using the buttons on the monitor.
VOLUME + functions the same as ♦ and and VOLUME - as
♦ and ♦ .
To
Receive dynamic threedimensional sound.
Watch a movie.
Receive monaural sound with
surround-like effect.
Cancel audio effect.
O’
0
3 Press 4 or 4 to select AUDIO ADJUST, and
press ENTER.
ftUDIQ ADJUST
MENU
►TREBLE
.........................
BASS ......
BALANCE ..............•
EFFECT:
OFF
RESET
.....
O’
0
0
ENTER
4 Press 4 or 4 to select EFFECT, and press
ENTER.
0
O’
0
22'^^ Operations
ENTER
Page 23

Turning the power off automatically
(AUTO SHUT OFF)
4 Press > or ♦ to select 60 (minutes), 90
(minutes) or 120 (minutes), and press
ENTER.
ENTER
0'0
You can set the monitor to turn off when the time you
specify has passed after the input of the sync signal
from the computer shut off.
i © :
© ©
I ENTER :
1 Press MENU.
MENU
2 Press 4 or ♦ to select OPTION, and press
ENTER.
0
ENTER
a 0
5 Press MENU to return to the original screen.
After the time you specify in step 4 has passed after
cancellation of the input of the sync signal, the power
turns off and the STANDBY indicator and the (!)
indicator will light up.
The power turns on if you press POWER on the remote
control or a signal is input from the computer again.
Note
• You cannot use this function for the input from VIDEO IN. m
3 Press 4 or 4 to select AUTO SHUT OFF, and
press ENTER.
0
<y 0
ENTER
OPTION
fiUTO SHUT OFF:OFF
LPNGUflGE: ENGLISH
DOT phase; 16
Operations 23'^*'*
Page 24

Additional Information
Cleaning the air filter
The air filter should be cleaned once a month. When it
becomes difficult to remove the dust, replace the filter
with a new one. To clean the filter, follow the steps
below.
1 Turn off the power switch on the monitor
and unplug the power cord.
2 Remove the front panel from the monitor.
Remove the dust from the filter with a
vacuum cleaner.
5 Attach a new filter to the monitor.
Fit the six projections securely.
Pull the panel towards you, holding its left
end. Be careful not to damage your nails.
3 Pull the air filter upwards to remove.
6 Mount the front panel.
Be careful not to injure the speakers.
Notes
• Clean the air filter periodically. Otherwise, the temperature
inside the monitor may rise abnormally.
• Do not use a torn filter. Fit the six projections on the filter to the
monitor securely. Dust inside the monitor may cause distorted
picture and also fire.
• Be sure to attach the air filter securely. Otherwise, the monitor
will not turn on.
• Contact your Sony dealer for a new filter.
24EN
Additional Information
Page 25

Replacing a lamp
3 Untighten the screw with a coin or similar
object to remove the lamp cover.
If the screen becomes dark, the color looks unusual, or
the LAMP indicator on the front of the monitor flashes,
it is time to replace the lamp with a new one.
Before replacement
• Be sure to use the Sony XL-IOOU lamp unit (not supplied) for
replacement. Use of other lamps causes damage to the
monitor.
• Do not remove the lamp for any purpose other than
replacement.
• Before replacement, be sure to turn off the monitor and unplug
the power cord.
• When replacing the lamp, let it cool down completely, as the
surface of the lamp remains hot for at least 30 minutes after the
power has been switched off.
• Do nof leave the removed lamp near the inflammable
maferials.
• Do not pour water onto the removed lamp, nor put any object
inside the lamp.
• Do not put inflammable maferials and metal objects inside the
lamp receptacle on the monitor, after removing the lamp. Do
not touch the receptacle.
• Fit the new lamp securely, otherwise the screen may become
dark, or it may cause fire.
1 Turn off the power switch on the monitor
and unplug the power cord.
Wait at least 30 minutes to allow the lamp to cool
down before replacing it.
2 Remove the front panel.
4 Loosen the two screws that secure the
lamp, then pull out the lamp.
The lamp is very hot immediately after use. Never
touch the front glass of the lamp or the
surrounding parts.
Loosen the two screws with the hexagon
head wrench (supplied with the lamp).
Puli out straight towards you by holding the
handle.
Replace the removed lamp into the empty box of
the replacement lamp.
m
Hold the monitor tightly.
Pull the panel towards you, holding its right
end. Be careful not to damage your nails.
5 Mount the new lamp and tighten the two
screws securely.
6 Mount the lamp cover and tighten the
screw.
7 Mount the front panel.
Be careful not to damage the speakers of the
monitor.
Notes
• Do not touch the front glass of a new lamp or the glass of the
lamp receptacle. This may reduce picture quality or lamp life.
• Be sure to attach the lamp securely. Otherwise, the monitor
will not turn on.
• A laud sound may be heard when the lamp bums. This is not
dangerous.
• Consult your Sony dealer for the XL-IOOU lamp unit.
Additional Information
25-en
Page 26

Troubleshooting
If the problem persists after trying the methods below,
contact your nearest Sony dealer.
No picture
^ Check that the power cord is connected
firmly.
^ Is the power of the monitor turned on?
^ Is the air filter mounted securely? (page 24)
^ Is the lamp cover attached securely? (page
25)
Check that the power of the connected
equipment is turned on.
^ Try to press any key on the connected
computer.
^ Check that the RGB signal cable or audio /
video cords are properly connected. (The
supplied HD15-HD15 adaptor may be
needed for some models of IBM PC / AT or
compatible computers. For a Macintosh or
compatible computer use the supplied
Macintosh adaptor.)
^ Make sure that no pins on the HD15
connectors are bent.
^ Check that the video card is seated
completely in the proper bus slot.
^ Check that the frequency range of the input
signal is within that specified for the
monitor. (If not, "OUT OF SCAN RANGE"
appears on the screen.)
^ The monitor does not accept an interlace
mode signal.
^ For customers using Windows 95 — If "KL-
W7000" or "KL-W9000" is not displayed as
"Monitor type" when selecting "SONY" as
"Manufacturer" from the device select
screen in Windows 95, select "Standard
monitor" as "Manufacturer" and "Plug and
Play monitor (VESA DDC)" as "Monitor
type," or select "SONY Corporation" as
"Manufacturer" and "KL-W7000" or "KLW9000" as "Monitor type."
Picture and sound output are delayed
^ When the green (1) (power) indicator on the
front is flashing, the monitor is warming
up.
^ It will take 30 minutes for the monitor to
display the picture again after the monitor
is switched off.
Screen lit and cannot see the picture
Be sure that you are watching the monitor
within the optimum viewing area, (page 5)
Good picture, no sound
Press VOL+ (VOLUME+).
Press MUTING so that "MUTING"
disappears from the screen, (page 13)
Fuzzy picture
^ Set the NR option in the VIDEO ADJUST
menu to LOW or HIGH.
If you use the monitor in a cold place,
moisture condensation may have occurred.
Leave the monitor as it is to let moisture
evaporate.
Dark picture
^ Replace the lamp for the light source with a
new one. (page 25)
No color, abnormal color
Adjust the picture in the VIDEO ADJUST
menu, (page 19)
Double images
Use of an extension cable, excessive cable
length or loose connection can produce this
symptom.
Computer picture not centered or sized properly
^ Adjust the centering and size so that the
picture fits the screen, (pages 16 and 17)
Distorted picture
^ Check your video card manual for proper
monitor setting.
^ Check that the frequency and the graphic
mode at which you are trying to input is
within the acceptable range, (page 9)
Even within the proper range some video
cards may have a sync pulse that is too
narrow for the monitor to sync correctly.
No picture, no sound from the connected
equipment
^ Are all the connecting cables connected?
Try to press the RGB or VIDEO button oh
the remote control, (page 12)
The remote control does not function.
^ Are the batteries worn out?
The humming noise of fans is heard even after
the monitor has been turned off.
^ The fans installed inside the monitor are
working to prevent internal heat build-up.
They will stop about 2 minutes later.
26-EN
Additional Information
Page 27

What flashing of the indicators on the front of the monitor means
The (!) (power) (green), STANDBY (orange) and/or
LAMP (red) indicators indicate the conditions of the
monitor and warnings by lighting or flashing, as
follows.
The (!) indicator lights.
The power of the monitor is on.
The STANDBY indicator lights.
The monitor is in standby mode. The
monitor is turned on by pressing POWER
on the remote control.
The LAMP, STANDBY and (!) indicators flash.
The temperature inside the monitor has
risen abnormally, or the fans have stopped.
Check that the air filter is not clogged and
the ventilation holes are not blocked. After
a while turn on the monitor, (page 24)
If the monitor is not recovered after correcting the
problems, contact with qualified Sony persormel.
The (!) and STANDBY indicators light.
“► The Auto Shut Off function works. The
monitor has been turned off when the time
you specify has passed after the input of
the computer is cut off. ■
The (!) indicator flashes.
^ The lamp for the light source is ready to
turn on. Within 30 minutes the picture is
displayed on the screen.
The LAMP and STANDBY indicators flash.
^ The air filter or the lamp cover is not
attached securely. When you correct, the
STANDBY lamp lights up and the monitor
enters the standby mode, (pages 24 and 25)
The LAMP indicator flashes.
^ The lamp for the light source burns out.
Replace it with new one. (page 25)
Additional Information
27EN
Page 28

Specifications
Acceptable signal
Projection system
LCD panel
Lamp
Lens
Screen size (measured diagonally)
Viewable image size (for RGB input)
Deflection frequency
Inputs/outputs
VIDEO 1, 2 and 3 IN
VIDEO OUT
NTSC video signal, RGB signal
(For details, see'page 9.)
3 LCD panels, 1 lens projection
system
1.35-inch TFT LCD panel
Approx. 1.54 million dots
(512,880 pixels)
1068.5 X 480 dots x 3 panels
XL-IOOU: HID lamp, 100 W
Large diameter hybrid lens F2.4
KL-W7000: 37 inches (942 mm)
KL-W9000: 50 inches (1,272 mm)
KL-W7000: Approx. 36.3 inches
(921 mm) (diagonally)
Approx. 803 X 452 mm (w/h)
KL-W9000'. Approx. 49.1 inches
(1247 mm) (diagonally)
Approx. 1087 X 611 mm (w/h)
Horizontal: 31.5 to 50 kHz
Vertical: 50 to 85 Hz
S VIDEO (VIDEO 1, 3 IN only)
(4-pin mini-DIN):
Y: 1 Vp-p, 75 ohms
unbalanced, sync negative
C: 0.286 Vp-p (burst signal), 75
ohms
VIDEO (phono jacks):
1 Vp-p, 75 ohms unbalanced,
sync negative
AUDIO (phono jacks):
2 channels, 500 mVrms
Impedance: more than 47
kohms
S VIDEO (4-pin mini-DIN):
Y: 1 Vp-p, 75 ohms
unbalanced, sync negative
C: 0.286 Vp-p (burst signal), 75
ohms
VIDEO (phono jack):
1 Vp-p, 75 ohms unbalanced,
sync negative
AUDIO (phono jacks):
2 channels, 500 mVrms
Impedance: less than 5 kohms
RGB 1, 2 IN
Speaker output
VIDEO (D-sub 15-pin, female):
R, G, B: 0.7 Vp-p, positive, 75
ohms terminated
Sync on Green: 0.286 Vp-p
SYNC/HD: Composite sync:
TTL, high impedance,
sync positive/negative
Horizontal sync: TTL, high
impedance, sync positive/
negative
VD: Vertical sync: TTL, high
impedance, sync positive/
negative
AUDIO (RGB 1 IN) (phono
jacks)
2 channels, 500 mVrms
Impedance: more than 47 kohms
AUDIO (RGB 2 IN) (stereo
minijack)
500 mVrms
Impedance: more than 47 kohms
Front:5 Wx2(L/R)
Woofer: 20 W
phono jacks, 2 channels,
0 to 500 mVrms (audio out
variable, 100% modulation)
Impedance: less than 5 kohms
Power requirement
Power consumption
100 to 120 VAC, 50/60 Hz
190 W (MAX)
Dimensions
Mass
Standby mode: 2 W
KL-W7000: 920 x 825 x 390 mm
(36t / 4x321/2x153/8 inches)
(w/h/d)
KL-W9000: 1,228 x 1,055 x 565 mm
(483 / 8 X 415 / 8 X 221 / 4 inches)
(w/h/d)
KL-W7000: Approx. 30 kg
(68 lbs 2 oz)
KL-W9000: Approx. 43 kg
(106 lbs 8 oz)
Supplied accessories
Remote control RM-Y980 (1)
Size AA (R6) batteries (2)
AC power cord (1)
RGB signal cable (D-sub 15-pin
•«—► D-sub 15-pin) (1)
HD15-HD15 (male, without the
No. 9 pin) adaptor (1)
Macintosh adaptor (1)
Windows 95 Monitor
Information Disk (1)
Brackets (2)
Screws for brackets (2)
Buckle (1)
Hexagon head wrench (1)
Dust remover (1)
Optional accessories
Lamp unit XL-IOOU
Design and specifications are subject to change without
notice.
28EN
Additional Information
Page 29

Timing chart for the Wide Resolution
signals
Wide Resolution
864 X 480 1072 x 600 1376 x 768
Pixel Clock (MHz) 34.238
Idol (nsec) 29.207
IH {¡ise c) 31.777
H-Active (iise c) 25.235
H-Blank (ftse c) 6.542 6.526 4.94
H-Front porch (ftse c)
H-Sync (ftse c) 3.738
H-Back porch (ftse c) 2.103 2.373 2.47
H-Sync Polarity
V-TTI Time (Lines)
V-Addr Time (Lines)
V-Blank Start (Lines)
V-Blank Time (Lines) 29
V-Sync Start (Lines) 490
V Bottom Border
(Lines)
V Front Porch (Lines) 2 1
Ver Sync Time (Lines) 2
V Back Porch (Lines) 25
V Top Border (Lines)
V-Sync Polarity
0.701
24
(dots)
(dots)
128 176 184
(dots) 72
525
480
488 600
8
8
+
53.9^ 87.44
18.539
26.4
19.874 15.736
0.89’
48 32
3.263
128
- 628
600
28 38
601
0 0
4 6
23 29
0 0
+ +
11.436
20.676
0.366
2.104
216
806
768
768
771
3
m
Additional Information
29EN
Page 30

Identifying the parts
This section briefly describes the buttons and controls
on the monitor and on the remote control. For more
information, refer to the pages next to each description.
Projection monitor — Front
With the front panel attached
With the front. panel removed
in Remote sensor
n LAMP indicator (pages 25, 27)
n STANDBY indicator (pages 12, 23, 27)
[4] CENTER/SIZE button (pages 16, 17)
n O/O/o/o buttons (pages 16, 17)
[6] VIDEO 2 IN jacks (page 10)
[7] RGB 2 IN connector (pages 7, 8)
Front panel
[si (!) (power) indicator (pages 12, 23, 27)
[9] Power switch (page 12)
ITOl VOLUME +/-buttons (page 12)
Si] MENU button (page 11)
SI ENTER button (page 11)
SI INPUT SELECT button (page 12)
Sll
RESET button (pages 16-18)
30-EN
Additional Information
Page 31

Remote control
Q] DISPLAY button (page 13)
[2] MUTING button (page 13)
in VIDEO button (page 12)
[4] CENTER/SIZE button (pages 16, 17)
m VOL (volume) +/ - buttons (page 12)
[6] POWER button (page 12)
[7l WIDE button (pages 13, 15)
m RGB button (page 12)
m buttons (pages 11, 16, 17)
fiOl MENU button (page 11)
ITi] ENTER button (page 11)
m
Additional Information
31
-EN
Page 32

Adjusting
the audio effect 22
the color temperature 20
the picture 19
the clarity of the picture 17
the picture in more detailed items 20
the picture position 16
the picture size 17
the sound 21 •
Air filter 24
ASPECT 15
AUDIO ADJUST 21
Audio effect 22
AUTO SHUT OFF 23
AV MEMORY 19,21
CENTER adjustment 16
Changing the menu language 11
DOT PHASE 17
Dust remover 4
FULL 14, 15
Graphic mode 9
Hookups
to a computer 7, 8
to the AC outlet 10
- to video equipment 10
Horizontal frequency 9
IBM PC/AT computer 7
Identifying the parts 30
Installing the monitor 5
Lamp
flashing 27
replacement 25
LAMP indicator 25, 27
Macintosh or compatible computer 8
Muting 13
NORMAL 14, 15
OPTION 11,23
OUT OF SCAN RANGE 9, 13
Preset mode 9
Remote control
identifying the parts 31
inserting batteries 11
Plug & Play 9
(1) (power) indicator 12, 27
Selecting the preset picture viewing mode 18
SIZE adjustment 17
STANDBY indicator 12, 27
SUBTITLE 14
Surround 22
SVGA 9, 15
User mode 9
Vertical frequency 9
VGA 9, 15
VIDEO ADJUST 19,20
VIDEO/AUDIO 18,21
Viewing area 5
V SCROLL 15
Watching
the picture 12
the picture in wide picture mode 13
Wide picture mode 13-15
WIDE ZOOM 14
Wide Resolution 9, 15, 29
XGA 9, 15
ZOOM 14
32-EN
Additional Information
Page 33

Page 34

AVERTISSEMENT
Afin d'éviter tout risque d'incendie ou
d'électrocution, ne pas exposer cet
appareil à la pluie ou à l'humidité.
CAUTION
RISK OF ELECTRIC SHOCK
DO NOT OPEN
ATTENTION
RISQUE DE CHOC ELECTRIQUE,
NE PAS OUVRIR
PRECAUCION
RIESGO DE CHOQUE ELECTRICO
NO ABRIR
ATTENTION
Pour prévenir les chocs électriques, ne pas utiliser cette
fiche polarisée avec un prolongateur, une prise de
courant ou une autre sortie de courant, sauf si les lames
peuvent être insérées à fond sans en laisser aucune
partie à découvert.
Avertissement sur le raccordement à la source d'alimentation
Utilisez un cordon d'alimentation approprié en
fonction de votre alimentation secteur locale.
Exemples de fiches
pour 100 à 120V CA
La prise murale doit être installée à proximité de
l'équipement et être aisément accessible.
: ATTENTION : PUOR REDUIRE LE RISQUE DE DECHARGE ELECTRIQUE.
! NE PAS OUVRIR LE COUVERCLE (OU LE PANNEAU ARRIERE),
COMPORTE DES PIECES NE POUVANT ETRE
ENTRETENUES PAR L'UTILISATEUR.
CONFIER L’ENTRETIEN A DES TECHNICIENS QUALIFIES.
Ce sigle vise à signaler à l'utilisateur la
présence d'une "tension' dangereuse" non
isolée au sein de l'appareil, dont la puissance
peut être suffisante pour provoquer un risque
d'électrocution.
Ce sigle vise à signaler à l'utilisateur la
présence d'une documentation importante
concernant les instmctions de fonctionnement
et d'entretien de cet appareil.
2P
Page 35

Table des matières
A propos de ce mode d'emploi
Les instructions reprises dans ce mode d'emploi
concernent les modèles KL-W7000 et KL-W9000. Avant
de lire ce mode d'emploi, veuillez vérifier le numéro de
votre modèle indiqué à l'arrière du moniteur de
projection.
Pour illustrer les instructions de ce mode d'emploi,
nous avons utilisé le modèle KL-W9000. Toute
différence de foiictionnement est clairement signalée
dans le texte, par exemple "■ pour KL-W9000". Les
différences de spécifications sont indiquées dans le
texte.
4 Précautions
Installation
5 Etape 1: Installation du moniteur de projection
7 Etape 2: Raccordement
11 Etape 3: Réglage de la télécommande
11 Modification de la langue de menu
Utilisation
12 Projection de l'image
13 Visionnage de l'image en mode grand écran
16 Réglage de l'image d'un ordinateur
18 Sélection du mode de visionnage d'image
présélectionné
19 Réglage de l'image (av mémoire)
21 Réglage du son (av mémoire)
22 Sélection de l'effet audio (effet)
23 Mise hors tension automatique (coupure auto)
' DDC™est une marque de commerce de Video
Electronics Standard Association.
’ IBM PC/AT et VGA sont des marques de
commerce de International Business Machines
Corporation déposées aux Etats-Unis.
' Macintosh est une marque de commerce brevetée
d'Apple Computer Inc., déposée aux Etats-Unis et
dans d'autres pays.
> VESA est une marque déposée de Video Electronics
Standard Association.
' Windows® est une marque de commerce de
Microsoft Corporation déposée aux Etats-Unis et
dans d'autres pays.
• Tous les autres noms de produits mentionnés dans
ce document peuvent être des marques de
commerce ou des marques de commerce déposées
de leurs sociétés respectives.
> Par ailleurs, "™" et "®" ne sont pas repris à chaque
fois dans ce manuel.
Informations complémentaires
24 Nettoyage du filtre à air
25 Remplacement de la lampe
26 Guide de dépannage
28 Spécifications
30 Identification des composants
32 Index
Les termes entre parenthèses correspondent à des noms de
menus.
3-F
Page 36

Précautions
• Lorsque la même image statique a été affichée en
permanence, une image rémanente peut rester
imprimée à l'écran. Elle disparaîtra après un certain
temps.
• Si vous rallumez le moniteur après le rétablissement
du courant suite à une panne d'électricité, une
brûlure LCD peut se produire. Il ne s'agit pas d'un
dysfonctionnement. L'image redeviendra normale
après quelques temps.
Ce moniteur de projection fonctionne sur une très
haute tension. Veuillez vous conformer aux
précautions ci-dessous afin d'éviter tout risque
d'incendie ou d'électrocution.
Sécurité
• Faites uniquement fonctionner le téléviseur de
projection sur une tension CA de 100 V à 120 V.
• L'une des lames de la fiche est plus large que les
autres pour des raisons de sécurité et ne s'adapte
dans la prise que dans un seul sens. Si vous ne
parvenez pas à introduire complètement la fiche
dans la prise, prenez contact avec votre distributeur.
• Si un objet liquide ou solide pénètre à l'intérieur du
châssis, débranchez le téléviseur de projection et
faites-le contrôler par un personnel qualifié avant
de le remettre en service.
• Débranchez le cordon de la prise si vous prévoyez
de ne pas utiliser le téléviseur de projection pendant
une période de temps prolongée. Pour débrancher
le cordon, tirez-le par la fiche, jamais par le cordon.
• Les ventilateurs à l'intérieur du moniteur
continuent à tourner pendant un certain temps,
même après que le moniteur est mis hors tension.
Ne débranchez pas le moniteur de la prise secteur
lorsque les ventilateurs tournent.
Installation
• Veillez à assurer une circulation d'air adéquate afin
d'éviter la surchauffe de l'appareil.
• N'installez pas le téléviseur de projection dans un
endroit chaud ou humide ou exposé à une poussière
excessive ou à des vibrations mécaniques.
A propos de l'écran
La surface de l'écran se raye facilement. Ne pas frotter,
heurter ou tapoter l'écran avec des objets pointus ou
abrasifs.
Faites particulièrement attention lors du transport du
moniteur.
A propos du panneau LCD
• N'exposez pas l'écran au rayonnement direct du
soleil. 11 peut endommager le panneau LCD.
• Lorsque vous utilisez le moniteur dans un endroit
frais, il est possible que l'image apparaisse étirée. 11
ne s'agit pas d'un dysfonctionnement. L'image
redeviendra normale lorsque la température
augmente.
4-F
A propos de la suppression
Le moniteur affiche des bandes noires entre l'image et
les bords de l'écran parce que le moniteur procède à un
sous-balayage pour obtenir l'espace nécessaire sur
l'écran à l'affichage de l'image. Ce phénomène
s'appelle suppression. Sachez que les bandes noires sur
chaque bord de l'écran ne sont pas uniformes.
La suppression sur l'image vidéo sera plus large pour
optimiser l'image.
Suppression
Image
Bord de l'écran
A propos de la condensation d'humidité
Si le moniteur de projection est transporté directement
d'une pièce froide à une pièce chaude, ou si la
température ambiante varie brusquement, l'image
pourra être floue ou présenter une altération des
couleurs. La raison en est que l'humidité se condense
sur le miroir ou sur les objectifs intérieurs. Le cas
échéant, laissez l'humidité s'évaporer avant de faire
fonctionner le moniteur de projection.
A propos du nettoyage
• Nettoyez le châssis du moniteur au moyen d'un
chiffon sec et doux. Les taches tenaces peuvent être
éliminées au moyen d'un chiffon légèrement
humidifié avec une solution d'eau et de savon non
corrosif, puis passez avec un chiffon sec et doux.
N'utilisez aucun type de solvants tels que l'alcool, le
benzène, les diluants et'les insecticides. Ces solvants
peuvent endommager la finition du moniteur ou
effacer les indications du panneau.
• Frottez l'écran avec un chasse-poussières (fourni) de
temps en temps étant donné que l'écran accumule
facilement la poussière. Le chasse-poussières est
lavable. Nettoyez-le avec de l'eau chaude ou une
solution détergente douce.
• Les taches tenaces de l'écran peuvent être éliminées
au moyen d'un chiffon doux légèrement humidifié
avec une solution d'eau et de savon non corrosif.
• Si l'image s'assombrit après avoir utilisé le moniteur
pendant une période prolongée, il sera peut-être
nécessaire de nettoyer l'intérieur du moniteur.
Adressez-vous à un personnel d'entretien qualifié.
Page 37

Installation
Etape 1: Installation du moniteur de projection
Zone de visionnage optimale
Pour assurer une qualité d'image optimale, placer le
moniteur dans les zones indiquées ci-dessous.
■ pour KL-W7000
Zone de visionnage verticale (vue de côté)
Zone de visionnage horizontale (vue du
dessus)
■ pour KL-W9000
Zone de visionnage verticale (vue de côté)
Zone de visionnage horizontale (vue du
dessus)
Installation ;-F
Page 38

Transport de votre moniteur
Saisissez les zones indiquées par les flèches pour
transporter le moniteur et demandez de l'aide à
plusieurs personnes. Ne saisissez jamais le panneau
avant.
■ pour KL-W7000
I pour KL-W9000
Utilisation de la boucle
Vous pouvez également utiliser la boucle fournie pour
fixer le moniteur sur le support.
1 Fixez la boucle sur le support sur lequel est
monté le moniteur.
Serrez fermement la vis fournie.
Stabilisation du moniteur
Utilisation des supports
Aprè« l'installation, fixez le moniteur contre un mur,
etc. au moyen des supports fournis.
1 Placez les deux supports fournis au moyen
des vis dans les coins supérieurs à i'arrière
du moniteur.
2 Insérez la boucle jusqu'au déclic.
3 Tirez sur la boucle pour la serrer.
2 Passez une grosse corde ou une chaîne à
travers chaque support monté à l'étape 1,
puis fixez-la à un mur ou à une colonne, etc.
Installation
Page 39

Etape 2:
Utilisation du connecteur RGB 1 IN arrière
Raccordement
Avant d'effectuer les raccordements, mettez l'appareil
hors tension et débranchez les cordons d'alimentation
du moniteur et de l'équipement à raccorder. Se reporter
au mode d'emploi de l'équipement que vous raccordez.
Raccordement à un ordinateur IBM PC
AT ou compatible
Branchez le cormecteur RGB 2 IN situé à l'avant ou le
cormecteur RGB 1 IN situé à l'arrière du moniteur aux
sorties vidéo/audio de l'ordinateur au moyen du câble
de signal RVB fourni (D-sub à 15 broches •»—*• D-sub à
15 broches).
Utilisation du connecteur RGB 2 IN avant
Avant du moniteur
Arrière du moniteur
Câble de signal —tRVB (fourni)
Adaptateur HD15-HD15
(fourni)*
Cordon de
raccordement
audio
(fiche phono x 2
•<—► miniprise
stéréo)
(non fourni)
rrm
Câble de signal
RVB (fourni)
Adaptateur
HD15-HD15 (fourni)
Côté mâle
(sans la broche n°9)
vers la sortie vidéo
Cordon de
raccordement audio
(miniprise stéréo
miniprise stéréo)
(non fourni)
vers la sortie audio
Ordinateur IBM PC/AT ou
compatible
Côté mâle
(sans la broche n°9)
vers la sortie vidéo
Ordinateur IBM PC/AT ou
compatible
* L'adaptateur HD15-HD15 (fourni) sera peut-être nécessaire sur
certains modèles. Le côté mâle (sans la broche n°9) de
l'adaptateur devra être raccordé à l'ordinateur.
vers la sortie audio
Pour les utilisateurs de l'adaptateur HD15HD15 fourni
Ce moniteur utilise une broche n°9 dans le connecteur
du signal vidéo pour la compatibilité DDCl et DDC2B.
Certains ordinateurs non compatibles avec DDCl ou
DDC2B peuvent ne pas accepter la broche n°9. Si vous
ne savez pas si votre ordinateur accepte la broche n°9
ou non, utilisez l'adaptateur HD15 (femelle) - HD15
(mâle sans broche n°9) (fourni).
Installation
7 F
Page 40

Raccordement à un Macintosh ou ordinateur compatible
Utilisation du connecteur RGB 1 IN arrière
Branchez le connecteur RGB 2 IN situé à l'avant ou le
connecteur RGB 1 IN situé à l'arrière du moniteur aux
sorties vidéo/audio de l'ordinateur au’^oyen du câble
de signal RVB fourni (D-sub à 15 broches •<—► D-sub à
15 broches) et de l'adaptateur Macintosh fourni.
Utilisation du connecteur RGB 2 IN avant
Avant du moniteur
Arrière du moniteur
Câble de signal
RVB (fourni)
fo" (ß'- 0^.
'-¿Î .9. ^
.'/1' (O
Cordon de
raccordement
audio
(fiche phono x 2 <miniprise stéréo)
(non fourni)
Adaptateur Macintosh
(fourni)
vers la sortie vidéo
Cordon de
raccordement audio
(miniprise stéréo «—►
miniprise stéréo)
(non fourni)
' vers la sortie audio
Macintosh ou ordinateur
compatible
Adaptateur Macintosh
(fourni)
vers la sortie vidéo
Macintosh ou ordinateur
compatible
i vers la
sortie audio
A propos de l'adaptateur Macintosh fourni
L'adaptateur Macintosh fourni est compatible avec les
ordinateurs des séries Macintosh LC, Performa, Quadra
and Power Macintosh. La série Macintosh II et
certaines versions des modèles PowerBook peuvent
nécessiter un autre adaptateur avec
microcommutateurs (non fourni).
8 F
Installation
Page 41

Mode de présélection et mode utilisateur
Modes de présélection
Le moniteur comprend neuf modes de présélection par
défaut correspondant aux normes industrielles les plus
populaires décrites ci-dessous.
Résolution
N"
(points X
lignes)
640 X 400 31,468 70,086 Mode VGA
1
2 640 X 480 31,468
3 800 X 600
4 800 X 600 46,875 75,000
1024 X 768 48,363
5
864 X 480
6
7 1072 X 600
1376 X 768 48,363
8
832 X 624
9
’ Pour le chronogramme des signaux, reportez-vous à la page 29.
Fréquence Fréquence
horizontale verticale
(kHz) (Hz)
59,94 Mode VGA
37,879 60,317 SVGA VESA
60,004 VESA
31,469 59,94 Wide Resolution
37,879
49,727
60,317 Wide Resolution
60,004 Wide Resolution
74,553
Mode
graphique
(texte)
(graphique)
SVGA VESA
Sony*
Sony*
Sony*
Macintosh 16"
couleur
Modes utilisateur
Si vous utilisez un mode vidéo qui n'est pas l'un des
modes par défaut, il est possible que vous deviez
syntoniser finement le moniteur de façon à obtenir la
qualité d'affichage vôulue.'Il vous suffit pour cela de
régler le moniteur suivant les instructions de réglage
des pages
automatiquement et rappelés chaque fois que le mode
afférent est activé.
La mémoire permet de sauvegarder 15 modes
utilisateur. Si vous mémorisez un 16ème mode, il
remplace le premier mode sauvegardé.
16 et 17. Les réglages sont mémorisés
Fonction Plug & Play
Ce moniteur satisfait aux normes DDC™1 et DDC2B
qui sont les normes Display Data Channel (DDC) de
VESA.
Si un serveur DDCl est connecté, le moniteur se
syncronise avec V. CLK suivant les normes VESA et
envoie les données EDID (Extended Display
Identification Data) par la ligne de données.
Si un serveur DDC2B est raccordé, le moniteur
commute automatiquement à chaque communication.
Pour les clients utilisant Windows 95
Installez les informations relatives au nouveau modèles
contenues sur la disquette "Windows 95 Monitor
Information Disk" dans votre ordinateur. (Pour
installer le fichier, reportez-vous à "About the
Windows 95 Monitor Information Disk/File" fourni.)
Ce moniteur satisfait à la norme Plug&Play "VESA
DDC". Si votre carte mère/graphique satisfait à la
norme DDC, sélectionnez "Plug and Play Monitor
(VESA DDC)" dans "Monitor type" du panneau de
commande de Windows 95. Certaines cartes mère/
graphiques ne satisfont pas à la norme DDC. Même si
votre ordinateur satisfait à la norme DDC, il se peut
qu'il y ait quelques problèmes à le raccorder à ce
moiüteur. Dans ce cas, sélectionnez le nom du modèle
de ce moniteur (KL-W7000 ou KL-W9000) dans
"Monitor type" de Windows 95.
Conditions de synchronisation
horizontale préconisées
Largeur de synchronisation horizontale de plus de 1,0
}iS .
Largeur de neutralisation horizontale de plus 3,6 fis.
Lorsque "HORS PLAGE DE BALAYAGE" apparaît à l'écran
Ce message indique que le moniteur reçoit un signal dont la
plage de fréquence n'est pas comprise dans les spécifications
pour ce moniteur.
Remarques
• Lors de la projection de l'un des trois signaux Wide Resolution
(864 X 480, 1072 x 600,1376 x 768), mettez le mode d'image sur
PLEIN. En mode NORMAL, l'image au rapport hauteur/
largeur 16:9 sera comprimée en image 4:3 et apparaîtra
allongée verticalement. Pour plus de détails, reportez-vous à la
page 15.
• Le moniteur n'accepte pas un signal en mode d'entrelacement.
Installation
9-F
Page 42

Raccordement à un équipement vidéo
A un magnétoscope non équipé d'un
connecteur S vidéo
Arrière du moniteur
Raccordement de deux magnétoscopes
pour le montage
Le moniteur émet des signaux entrés par les prises
VIDEO IN via les prises VIDEO OUT. Lorsque deux
magnétoscopes sont raccordés aux prises VIDEO IN et
VIDEO OUT, vous pouvez effectuer le montage d'une
cassette.
Remarque
Pour le signal RVB entré par les connecteurs RGB 1/2
IN, le moniteur émet uniquement le signal audio.
Arrière du moniteur
m
T
@
vers VIDEO 1 IN
ou VIDEO 3 IN
<
#-
AUDIO
vers VIDEO OUT
Vous pouvez utiliser les prises VIDEO 2 IN situées à
l'avant du moniteur pour effectuer les raccordements
vidéo/audio.
Vers un magnétoscope équipé d'un connecteur S vidéo
Arrière du monitear
VMC-810S/
820S
(non fourni)
vers les sorties
vidèo/audio
Raccordement du cordon d'alimentation secteur
Branchez le cordon d'alimentation fourni à la prise AC
IN du moniteur et à la prise, secteur au mur.
Arrière du moniteur
Remarque
• Lorsque vous raccordez le câble à la fois à la prise VIDEO et au
connecteur S VIDEO, l'image du connecteur S VIDEO s'affiche
sur l'écran du moniteur.
-F
10
Installation
Page 43

Etape 3: Réglage de
Modification de la
la télécommande
Mise en place des piles
Insérez deux piles de format AA (R6) (fournies) en
respectant les polarités illustrées par le diagramme
situé à l'intérieur du logement.
Remarques
• En condition normale d'utilisation, les piles ont une autonomie
de 6 mois. Si la télécommande ne fonctionne plus correctement
il est possible que les piles soient épuisées.
Lorsque vous remplacez les piles, remplacez-les toutes les
deux à la fois.
• Ne mélangez pas de vieilles piles avec des nouvelles ou
différents types de piles ensemble.
• Si de l'électrolyte s'échappe de la pile, nettoyez la zone affectée
du compartiment des piles avec un chiffon et remplacez les
vieilles piles par des nouvelles. Afin d'empêcher toute perte
d'électrolyte, retirez les piles en cas d'inutilisation prolongée
de la télécommande.
• Ne manipulez pas la télécommande avec brutalité. Veillez à ne
pas la soumettre à des chocs ni à l'humidité.
• N'exposez pas la télécommande au rayonnement solaire direct
et ne la laissez pas à proximité de sources de chaleur ni dans
un endroit excessivement humide.
langue de menu
© ©
©
ENTER
CD
Si vous préférez l'espagnol ou le français à l'anglais,
vous pouvez modifier la langue des menus.
1 Appuyez sur MENU.
MENU
Appuyez sur 4 ou pour sélectionner
OPTION et appuyez sur ENTER.
©
ENTER
©
Appuyez sur 4 ou 4 pour sélectionner
LANGUE et appuyez sur ENTER.
©
(y
©
4 Appuyez sur 4,4,4 ou 4 pour sélectionner
votre langue préférée, "ENGLISH",
"FRANÇAIS" ou "ESPAÑOL".
ENTER
OPTION
-J
COUPURE AUTO;NON
LONGUE : FRANÇAIS
PHOSE:
16
®o®
(£)
5 Appuyez sur MENU pour revenir à l'écran
principal.
Remarques
• Vous pouvez exploiter le menu à l'aide des touches du
moniteur. La touche VOLUME + fonctionne de la même façon
que les touches ♦ et ♦ et VOLUME -, que les touches ♦ et ♦ .
• Vous ne pouvez pas utiliser la fonction COUPURE AUTO pour
le signal entré via VIDEO IN (voir page 23).
Installation 11'^
Page 44

utilisation
Projection de l'image
MUTING POWm
O
D6PUAY
oO
Commutateur
d'alimentation
(vert)
2 Mettez l'équipement raccordé sous tension.
3 Appuyez sur RGB ou VIDEO pour
sélectionner i'entrée que vous désirez
regarder.
L'indication de l'entrée sélectionnée s'affiche à
l'écran.
Pour regarder l'image d'un ordinateur
entrée par le connecteur RGB IN
Chaque fois que vous appuyez sur RGB, l'affichage
change comme suit:
RGB 1RGB 2
Pour visionner une image vidéo entrée par
les prises VIDEO IN
Chaque fois que vous appuyez sur VIDEO,
l'affichage change comme suit:
VIDEO 1
î
_____
VIDEO 2 -► VIDEO 3
RGB
VQL
â
O
1 Si ie voyant STANDBY situé à i'avant du
moniteur est aiiumé en orange, appuyez sur
POWER sur la télécommande pour mettre
l'appareil sous tension.
POWER
LAMP STANDBY |—
□ ■ □
Appuyez sur le commutateur d'alimentation (vert)
du moniteur si le voyant STANDBY n'est pas
allumé.
■CD
Vous pouvez également sélectionner l'entrée en
appuyant sur INPUT SELECT à l'avant du
moniteur.
Chaque fois que vous appuyez sur INPUT SELECT,
l'affichage change comme suit:
RGB 1 —► RGB 2 ■
î
_______
L'indication du signal entré disparaîtra
automatiquement.
■ VIDEO 1 VIDEO 2 -► VIDEO 3
INPUT SELECT
D
4 Appuyez sur VOL +/- (VOLUME +I-) pour
régler le volume.
Télécommande
VOL
Moniteur
VOLUME
S
tr
Le voyant vert Ci) (alimentation) clignote, puis
s'allume.
12 -F I Ut lisation
Page 45

Pour mettre le moniteur hors tension
Appuyez sur POWER de la télécommande. Le
moniteur passe en mode de veille et le voyant
STANDBY s'allume. Pour mettre le moniteur tout à fait
hors tension, appuyez sur le commutateur
d'alimentation (vert) du moniteur. ^
Remarque
• Pour protéger la lampe monté e comme source de lumière, si
vous essayez de mettre le moniteur sous tension dans les 30
minutes après l'avoir mis hors tension, le voyant (1)
(alimentation) clignote et l'image n'apparaît pas.
Visionnage de
l'image en mode
grand écran
Suppression du son
Appuyez sur MUTING.
"MUTING" apparaît à l'écran.
Pour restaurer le son, appuyez de nouveau sur
MUTING ou appuyez sur VOL+.
Affichage des informations sur écran
Appuyez sur DISPLAY pour afficher les informations
suivantes à l'écran.
Signal d'entrée
en cours
Mode d'image
(page 14)
Pour faire disparaître les informations sur écran,
appuyez de nouveau sur DISPLAY.
-----
IRSB ii
Fréquence du signal
d'entrée en cours
lorsque le signal
RVB* est entré
• fh: fréquence horizontale
fv: fréqu,ence verticale
"HORS PLAGE DE BALAYAGE" apparaît si la
fréquence de balayage n'est pas comprise dans les
limites acceptables. (Voir page 9.)
ô
Visionnage de l'image vidéo en mode grand écran
Vous pouvez bénéficier d'une grande variété de modes
grand écran.
Appuyez sur WIDE jusqu'à ce que le mode désiré apparaisse à l'écran.
Chaque fois que vous appuyez sur WIDE, le mode
change comme suit:
NORMAL —► PLEIN -► ZOOM -+ SOUS-TITRE
t------------- ZOOM LARGE •<
WIDE
-------------
1
utilisation
(suivante)
13 f
Page 46

Mode d'image recommandé
Lors du visionnage d'une image au rapport
iargeur/hauteur 4:3 normai
Sélectionnez NORMAL.
Lors du visionnage d'un film ou d'un logiciel
avec sous-titres (sous-titres hors de l'image)
Sélectionnez SOUS-TITRE.
L'image au format grand écran est élargie et la zone de sous-titre
est comprimée pour que l'image soit alignée sur la taille de l'écran.
L'image au rapport 4:3
normal apparaît telle quelle.
Sélectionnez ZOOM LARGE.
4
L'image est élargie horizontalement et verticalement et les portions
supérieure et inférieure de l'image sont ramenées à la taille de
l'écran par compression.
Lors du visionnage d'une image enregistrée
après qu'une image 16:9 a été comprimée au
rapport 4:3
Sélectionnez PLEIN.
m
L'image comprimée au rapport 4:3 est élargie horizontalement pour
s'adapter à la taille de l'écran.
Remarque
• Vous pouvez également modifier le mode d'image à l'aide du
menu.
Remarques sur les modes d'image grand écran
• Sélectionnez un mode d'image en tenant compte du fait qu'une
image qui a modifié le rapport hauteur/largeur de l'image
originale offrira un aspect différent de celui de l'image
originale.
• Si le moniteur est utilisé à des fins lucratives ou pour une
diffusion publique, la modification de l'image originale dû au
changement du mode d'image peut constituer une infraction
aux droits d'auteurs ou de producteurs qui sont protégés par
des lois.
• Lorsqu'une image au rapport 4:3 normal est visionnée en mode
ZOOM LARGE, les portions à l'entour peuvent être coupées ou
modifiées. L'image originale peut être visionnée en mode
NORMAL.
Lors du visionnage d'un film au format grand
écran ou d'un logiciel avec des bandes noires
et des sous-titres (sous-titres dans l'image)
Sélectionnez ZOOM.
L'image au format grand écran est élargie horizontalement et
verticalement pour s'adapter à la taille de l'écran.
L'image au rapport 16:9 est élargie telle quelle pour s'adapter à la
taille de l'écran.
14-F I Utilisation
Page 47

Réglage de la position verticale de l'image vidéo
Visionnage d'une image d'ordinateur
en mode grand écran
0
© ©
©
CD
Vous pouvez faire défiler l'image vers le haut ou vers
le bas lorsque:
• les portions supérieures ou inférieures de l'image en
mode ZOOM LARGE sont coupées;
• vous désirez déplacer l'image en mode ZOOM
comme vous le souhaitez;
• des sous-titres sont perdus en mode SOUS-TITRE.
Le défilement de l'image fonctionne en modes
ZOOM LARGE, ZOOM et SOUS-TITRE
uniquement.
1 Appuyez sur MENU.
MENU
2 Appuyez sur 4 ou ♦ pour sélectionner
FORMAT et appuyez sur ENTER.
im
CD
Si vous réglez le mode d'image sur PLEIN lorsque l'un
des trois signaux Wide Resolution (864 x 480,1072 x
600,1376 X 768) est reçu, vous pouvez visionner l'image
selon un rapport 16:9 telle quelle. Les signaux Wide
Resolution (864 x 480,1072 x 600,1376 x 768) sont
normalisés indépendamment par Sony. Lorsque vous
utilisez le signal avec le tableau de synchronisation de
la page 29, vous pouvez obtenir l'image en mode large
effectif.
Appuyez sur WIDE pour afficher PLEIN ou
NORMAL à l'écran.
Chaque fois que vous appuyez sur WIDE, vous pouvez
sélectionner PLEIN et NORMAL alternativement.
WIDE
cg)
Lorsque les signaux Wide Resolution (864 x
480, 1072 X 600, 1376 x 768) sont reçus
Mode NORMAL Mode PLEIN
©
^ ^ S?
(y (i)
ENTER
FORMAT
►FORMAT ; ZOOM
DEFILEMENT U; 0
3 Appuyez sur 4 ou 4 pour sélectionner
DEFILEMENT V et appuyez sur ENTER.
©
ENTER
©
4 Appuyez sur 4 ou 4 pour régler la position
verticale de l'image.
©—'
©-
Remarque
• Vous pouvez exploiter le menu à l'aide des touches du
moniteur. La touche VOLUME + fonctionne de la même façon
que les touches ♦ et ♦ et VOLUME -, que les touches ♦ et ♦ .
- pour déplacer l'image vers le haut
pour déplacer l'image vers le bas
L'image au rapport hauteur/largeur 16:9 est élargie pour s'adapter à
la taille de l'écran.
Lorsqu'un signal VGA, SVGA ou XGA
conventionnel est reçu
Mode NORMAL Mode PLEIN
L'image au rapport hauteur/largeur 4:3 est élargie horizontalement
pour s'adapter à la taille de l'écran.
Réglage de la position d'une image d'ordinateur
Vous pouvez déplacer l'image vers le haut, vers le bas,
vers la droite et vers la gauche pour faciliter le
visionnage, en utilisant la touche SIZE/CENTER.
Pour plus de détails, reportez-vous à la page 16.
Si vous visionnez les signaux Wide Resolution (864 x
480, 1072 X 600, 1376 x 768) en mode NORMAL
Une image 16:9 sera comprimée horizontalement en image 4:3.
Utilisation I 15-F
Page 48

Réglage de I'image d'un ordinateur
Réglage de la position (CENTRAGE)
® ©
©
® :•
Après la projection de l'image d'un ordinateur, il se
peut que vous deviez régler la position de l'image pour
l'adapter à l'écran du moniteur. Vous pouvez
également déplacer l'image comme vous le désirez. Le
réglage concerne uniquement le signal d'entrée affiché
à l'écran.
L'écran de réglage CENTRAGE disparaît
automatiquement après environ 10 secondes si vous
n'appuyez sur aucune touche entre-temps. Vous
pouvez également faire disparaître l'écran de réglage
CENTRAGE en appuyant de nouveau sur la touche
CENTER/SIZE.
Pour revenir au réglage par défaut
Appuyez sur RESET du moniteur. Simultanément, la
taille de l'image (page 17) et les réglages audio/ vidéo
(pages 18 à 22) sont également ramenés aux réglages
par défaut.
Remarque
• Vous pouvez régler la position à l'aide des touches CENTER/
SIZE eto/O/O/c-du moniteur.
1 Appuyez sur CENTER/SIZE jusqu'à ce que
l'écran de réglage CENTRAGE apparaisse.
CENTRAGE
Q:>
CENTER/
SIZE
CENTRAGE H
CENTRAGE U
2 Appuyez sur 4 ou pour régler la
position.
Pour un réglage horizontal, appuyez sur •* ou '
(CENTRAGE H)
pour déplacer l'image vers la droite
© ©:
<y
Pour un réglage vertical, appuyez sur 4 ou 4.
(CENTRAGE V)
©
: pour déplacer l'image vers la gauche
4: pour déplacer l'image vers le haut
pour déplacer l'Image vers le bas
IQ
0
16 F I utilisation
Page 49

Réglage de la taille de l'image (TAILLE)
f 0 I
© ©
©
O
œnBf
9ZE
Après avoir projeté l'image d'un ordinateur, il se peut
que vous deviez régler la taille de l'image pour
l'adapter à l'écran du moniteur.
Le réglage concerne uniquement le signal d'entrée
affiché à l'écran.
1 Appuyez sur CENTER/SIZE jusqu'à ce que
l'écran de réglage TAILLE apparaisse.
Réglage de la clarté de l'image (PHASE)
• *-% »■ »>■ >= ' t
©
© ©
©
MENU
CD
ENTER
C3
Si l'image de l'ordinateur scintille ou est floue, ou
encore si des interférences horizontales apparaissent
sur l'écran, réglez PHASE de façon à obtenir une
image plus claire.
TfiILLE
0>
CENTER/
SIZE
2 Appuyez sur 4 ou 'f pour régler la taille
de l'image.
Pour un réglage de la taille horizontale, appuyez
sur 4 ou 4. (TAILLE H)
: pour augmenter la taille horizontale
© ©‘
Cf
Pour un réglage de la taille verticale, appuyez sur 4
ou 4. (TAILLE V)
©
pour diminuer la taille horizontale
4; pour augmenter la taille verticale
4; pour réduire la taille verticale
<y ©
L'écran de réglage TAILLE disparaît automatiquement
après environ 10 secondes si vous n'appuyez sur
aucune touche entre-temps. Vous pouvez également
faire disparaître l'écran de réglage TAILLE en
appuyant de nouveau sur la touche CENTER/SIZE.
Pour revenir au réglage par défaut
Appuyez sur RESET du moniteur. Simultanément, la
position de l'image (page Î6) et les réglages audio/
vidéo (pages 18 à 22) sont également ramenés aux
réglages par défaut.
Remarques
• Pour une image d'une résolution de 640 x 350, de 640 x 400 ou
de 640 X 480, la taille verticale ne peut être augmentée par
rapport à la taille qui a été projetée la première fois.
• Vous pouvez modifier la taille à l'aide des touches CENTER/
SIZE et<t’/'û/6/"C>du moniteur.
1 Appuyez sur MENU.
2 Appuyez sur 4 ou 4 pour sélectionner
OPTION et appuyez sur ENTER.
©
<y 0
ENTER
3 Appuyez sur 4 ou 4 pour sélectionner
PHASE et appuyez sur ENTER.
©
ENTER
O
OPTION
COUPURE AUTO : NON
LANGUE :
phase;
FRANÇAIS
16
4 Appuyez sur 4, 4, 4 ou 4 pour régler le
niveau afin d'obtenir une image claire.
®o®
5 Appuyez sur MENU pour revenir à l'écran
principal.
Remarque
• Vous ne pouvez pas utiliser cette fonction pour l'entrée de
VIDEO IN.
Utilisation
17-F
Page 50

Sélection du mode
4 Appuyez sur MENU pour revenir à l'écran
principal.
de visionnage
d'image
présélectionné
Le fonction de mode vidéo/audio vous permet de
choisir entre quatre différents modes de réglage de
l'image et du son. Choisissez celui qui correspond le
mieux au type de programme que vous désirez
regarder.
© © '
© Î
MENU
CD
ENTtR
1 Appuyez sur MENU.
2 Appuyez sur « ou pour sélectionner
VIDEO/AUDIO et appuyez sur ENTER.
Pour revenir au réglage par défaut
Appuyez sur RESET du moniteur.
Lors du visionnage d'une image d'ordinateur, le mode
revient sur PRESENTATION. Lors du visionnage d'une
image vidéo, le mode revient à STANDARD.
Simultanément, la position et la taille d'une image
d'ordinateur (pages 16 et 17) sont également ramenés
aux réglages par défaut. Les réglages de AV MEMOIRE
ne sont pas réinitialisés.
Remarque
• Vous ne pouvez pas effectuer de réglages des modes autres
que AV MEMOIRE.
0
ENTER
UIDEO/PUDIQ -
►PRESENTPTION
STANDPRO
FILM
OU MEMOIRE
.REGL UIDEO
REGL ÛUDÎO
<y ©
3 Appuyez sur 4 ou pour sélectionner le
paramètre désiré et appuyez sur ENTER.
©
ENTER
©
Choisissez Pour
PRESENTATION Regarder l'image entrée d'un
ordinateur.
STANDARD Regarder l'image entrée d'un
équipement vidéo.
FILM
AV MEMOIRE
Regarder un film.
Régler la qualité de l'image/son en
fonction de vos affinités. (Pour plus de
détails, reportez-vous aux pages 19 à
22.)
18 F
utilisation
Page 51

Réglage de l'image
(AV MEMOIRE)
Vous pouvez régler la qualité de l'image en fonction de
vos desiderata et conserver les réglages dans AV
MEMOIRE.
0
© ©
ËWTtR
CD
1 Appuyez sur MENU.
2 Appuyez sur 4 ou pour sélectionner
VIDEO/AUDIO et appuyez sur ENTER.
ENTER
(2) Appuyez sur ENTER,
ENTER
REGL UIDEO
LUMINOSITE
itiHdiiiiMimiM
......
5 Réglez le paramètre sélectionné.
Appuyez sur 4, ♦ , 4 ou ♦ pour régler le paramètre
et appuyez sur ENTER.
©
Paramètre
CONTRASTE
LUMINOSITE Assombrir l'image. Eclaircir l'image.
COULEUR
TEINTE
NETTETE
Appuyez sur ♦ ou
pour
Diminuer le
contraste et adoucir
les couleurs.
Diminuer l'intensité
des couleurs.
Rendre les tons de
l’image plus rouges.
Adoucir l'image.
ENTER
Appuyez sur
pour
Augmenter le contraste
et Téclat des couleurs.
Augmenter l'intensité
des couleurs.
Rendre les tons de
l'image plus verts.
Améliorer la netteté de
l'image.
<T
©
3 Appuyez sur 4 ou 4 pour sélectionner REGL
■ VIDEO et appuyez sur ENTER.
REGL U IDEO
©
ENTER
MENU ^
►CONTRASTE
LUMINOSITE
COULEUR
TEINTE
NETTETE
RESET
IIIIIIMHHIIHIIIMI
.....
miim
........
.......I........
MIIIHI
.....
W,
Cf ©
4 Sélectionnez le paramètre que vous désirez
régler.
Par exemple:
(1) Pour régler la luminosité, appuyez sur 4 ou 4
pour déplacer le curseur (► ) sur LUMINOSITE.
©
©
6 Pour régler d'autres paramètres, répétez les
étapes 4 et 5.
7 Appuyez sur MENU pour revenir à l'écran
principal.
Pour revenir au réglage par défaut
Déplacez le curseur (► ) sur RESET au bas du menu
REGL VIDEO et appuyez sur ENTER.
Remarques
• Lorsque le signal RVB est entré, COULEUR et TEINTE ne
peuvent pas être réglés.
• Vous pouvez régler les paramètres de AV MEMOIRE pour
chaque entrée de VIDEO 1, 2 et 3 et RGB 1 IN et RGB 2 IN.
• Vous pouvez exploiter le menu à l'aide des touches du
moniteur. VOLUME + présente la même fonction que ♦ et ♦ et
VOLUME -, que ♦ et ♦ .
Utilisation
19-F
Page 52

Réglage de l'image plus en détails
Appuyez sur 4 ou 4 pour régler le
paramètre, puis appuyez sur ENTER.
Vous pouvez régler l'image avec les options NR
(réduction des parasites), H-BLANC et TEMP
(température) COULEUR.
©
0 ©
©
MENU
CD
ENTCH
CD
1 Appuyez sur MENU.
2 Appuyez sur 4 ou ♦ pour sélectionner
VIDEO/AUDIO et appuyez sur ENTER.
3 Appuyez sur 4 ou 4 pour sélectionner REGL
VIDEO et appuyez sur ENTER.
REGL UIDEO
©
ENTER
MENU ^
►CONTRASTE
LUMINOSITE
COULEUR
TEINTE
NETTETE
RESET
IIHIMIHHIItmiHi
........
HIIHII
......
........I
.........
ï
<y ©
© ©
Choisissez Pour
NR (réduction des
parasites)
H-BLANC
TEMP COULEUR
(température des
couleurs)
7 Pour régler d'autres paramètres, répétez les
étapes 5 et 6.
8 Appuyez sur MENU pour revenir à l'écran
principal.
Pour revenir au réglage par défaut
Déplacez le curseur (► ) sur RESET au bas du menu
REGL VIDEO et appuyez sur ENTER.
Réduire les parasites d'image. Vous
pouvez choisir entre la position BAS
ou VIF.
Augmenter la couleur du blanc en
choisissant la position OUI.
Rendre la couleur des blancs plus
chaleureuse (plus rougeâtre) en
choisissant la position BAS. Rendezla plus fraîche (bleuâtre) en
choisissant la position VIF.
4 Appuyez sur 4 ou 4 pour déplacer le curseur
{>) sur RESET, puis appuyez de nouveau sur
4.
REGL UIDEO
©
MENU ^
►NR: NON
H-BLPNC: NON
TEMP COULEUR:
RESET
MOYEN
©
5 Sélectionnez le paramètre désiré avec 4 ou
4, puis appuyez sur ENTER.
©
ENTER
©
20 F
utilisation
Remarques
• Vous pouvez régler les paramètres de AV MEMOIRE pour
chaque entrée de VIDEO 1, 2 et 3 et RGB 1 IN et RGB 2 IN.
• Vous pouvez exploiter le menu à Taide des touches du
moniteur. VOLUME + présente la même fonction que 4 et ♦ et
VOLUME -, que ♦ et ♦ .
Page 53

Réglage du son
(AV MEMOIRE)
Vous pouvez régler la qualité du son à votre gré et
conserver ces réglages dans AV MEMOIRE.
©
0 ©
©
CD
CD
1 Appuyez sur MENU.
2 Appuyez sur 4 ou pour sélectionner
VIDEO/AUDIO et appuyez sur ENTER.
©
<T
©
3 Appuyez sur 4 ou 4 pour sélectionner REGL
AUDIO et appuyez sur ENTER.
ENTER
(2) Appuyez sur ENTER.
REGL PUDIO
ENTER
5 Réglez le paramètre sélectionné.
Appuyez sur 4, 4, 4 ou 4 pour régler le paramètre
et appuyez sur ENTER.
©
Paramètre
AIGUS
GRAVE
BALANCE
6 Pour régler d'autres paramètres, répétez les
étapes 4 et 5.
Appuyez sur ^ ou
« pour
Diminuer la
reproduction des
aiguës.
Diminuer la
reproduction des
graves.
Intensifier le
volume du hautparleur gauche.
V ENTER
Appuyez syr ♦ ou
pour
Augmenter la
reproduction des
aiguës.
Augmenter la
reproduction des
graves.
Intensifier le volume du
haut-parleur droit.
7 Appuyez sur MENU pour revenir à l'écran
principal.
REGL PUDIO
■©
©
ENTER
MENU -
►PI GUS
GRPUE
BPLPNCE
EFFET:
RESET
..............
NON
I-
4 Sélectionnez le paramètre que vous désirez
régler.
Par exemple:
(1) Pour régler les graves, appuyez sur 4 ou ♦ pour
déplacer le curseur (► ) sur GRAVE.
©
(y ©
Pour revenir au réglage par défaut
Déplacez le curseur (► ) sur RESET au bas du menu
REGL AUDIO et appuyez sur ENTER.
Remarques
• Vous pouvez régler les paramètres de AV MEMOIRE pour
chaque entrée de VIDEO 1, 2 et 3 et RGB 1 IN et RGB 2 IN.
• Vous pouvez exploiter le rfienu à l'aide des touches du
moniteur. VOLUME + présente la même fonction que 4 et ♦ et
VOLUME V que ♦ et ♦ .
Utilisation
21-F
Page 54

Sélection de l'effet
5 Appuyez sur 4 ou « pour sélectionner le
paramètre désiré et appuyez sur ENTER.
audio (EFFET)
Le mode d'effet audio vous permet de profiter d'un son
dynamique reproduisant un effet ambiophonique.
©
© ©
©
MENU
O
ENTER
CD
1 Appuyez sur MENU.
2 Appuyez sur 4 ou 4 pour sélectionner
VIDEO/AUDIO et appuyez sur ENTER.
©
ENTER
<y ©
ENTER
©
Choisissez Pour
AMBIOPHONIE
SALLE 1
AMBIOPHONIE
SALLE 2
SIMULATION STEREO
NON Annuler l'effet audio.
b Appuyez sur MENU pour revenir à l'écran
principal.
Pour revenir au réglage par défaut
Déplacez le curseur (► ) sur RESET au bas du menu
REGL AUDIO et appuyez sur ENTER.
Remarques
• Vous pouvez régler les paramètres de AV MEMOIRE pour
chaque entrée de VIDEO 1,2 et 3 et RGB 1 IN et RGB 2 IN.
• Vous pouvez exploiter le menu à l'aide des touches du
moniteur. VOLUME + présente la même fonction que ♦ et et
VOLUME - que 4 et ♦ .
Recevoir un son dynamique
tridimensionnel.
Regarder un film.
Recevoir un son en mono avec un
effet ambiophonique.
3 Appuyez sur 4 ou 4 pour sélectionner REGL
AUDIO et appuyez sur ENTER.
REGL AUDIO
MENU
►AIGUS
GRAUE »■■»■• ••
BALANCE
..............
EFFET :
NON
RESET
1-
<y
ENTER
©
4 Appuyez sur 4 ou 4 pour sélectionner EFFET
et appuyez sur ENTER.
©
ENTER
c?” ©
22 F
utilisation
Page 55

Mise hors tension
automatique
(COUPURE AUTO)
4 Appuyez sur 4 ou 4 pour sélectionner 60
(minutes), 90 (minutes) ou 120 (minutes) et
appuyez sur ENTER.
<T
Vous pouvez régler le moniteur pour qu'il se mette
hors tension lorsque le délai que vous avez spécifié
s'est écoulé après que l'entrée du signal de synchro de
l'ordinateur s'est interrompue.
©
0
'CS
1 Appuyez sur MENU.
MENU
2 Appuyez sur «'OU '^pour sélectionner
OPTION et appuyez sur ENTER.
©
ENTER
5 Appuyez sur MENU pour revenir à l'écran
principal.
Une fois le délai spécifié à l'étape 4 écoulé après
l'interruption de l'entrée du signal de synchro, le
moniteur se met hors tension et le voyant STANDBY et
l'indicateur Ô s'allument.
Le moniteur se mettra sous tension si vous appuyez sur
POWER de la télécommande ou si un signal est entré
de l'ordinateur à nouveau.
Remarque
• Vous ne pouvez pas utiliser cette fonction pour l'entrée de
VIDEO IN.
0
3 Appuyez sur 4 ou 4^ pour sélectionner
COUPURE AUTO et appuyez sur ENTER.
©
©
ENTER
OPTION
COUPURE AUTO;NON
langue: FRANÇAIS
PHASE ; 1 6
Utilisation
23
Page 56

Informations complémentaires
Nettoyage du filtre
à air
Il convient de nettoyer le filtre à air une fois par mois.
Lorsqu'il devient difficile de retirer la-poussière,
remplacez le filtre par un neuf. Pour nettoyer le filtre,
suivez les étapes ci-dessous.
1 Appuyez sur le commutateur
d'alimentation du moniteur pour l'éteindre
complètement et débranchez le cordon
d'alimentation.
2 Retirez le panneau frontal du moniteur.
4 Eliminez la poussière du filtre à l'aide d'un
aspirateur.
5 Placez un filtre neuf dans le moniteur.
Adaptez convenablement les six ergots.
Maintenez le moniteur fermement.
Tirez le panneau vers vous tout en maintenant son
extrémité gauche. Veillez à ne pas abîmer vos
ongles.
3 Tirez le filtre à air vers le haut pour
l'enlever.
6 Remontez le panneau frontal.
Faites attention de ne pas endommager les hautparleurs.
Remarques
• Nettoyez le filtre à air régulièrement. Faute de quoi, la
température à l'intérieur du moniteur peut augmenter
anormalement.
• N'utilisez pas de filtre usagé. Adaptez convenablement les six
ergots du filtre sur le moniteur. La poussière accumulée à
l'intérieur du moniteur peut générer des images distordues et
provoquer un incendie.
• Veillez à bien disposer le filtre à air. Sinon, le moniteur ne se
mettra pas sous tension.
• Adressez-vous à votre revendeur Sony pour obtenir un
nouveau filtre.
24 F I Informations complémentaires
Page 57

Remplacement de
la lampe
3 Desserrez les vis au moyen d'une pièce de
monnaie ou d'un objet similaire pour
retirer ie couvercle de la lampe.
Si l'écran s'assombrit, les couleurs n'ont pas l'air
normales ou le voyant LAMP à l'avant du moniteur
clignote, il est temps de remplacer la lampe.
Avant de procéder au remplacement
• Veillez à utiliser une lampe Sony XL-lOOU (non fournie) en
remplacement. L'utilisation d'un autre type de lampe peut
endommager le moniteur.
• Ne retirez pas la lampe à d'autres fins que le remplacement.
• Avant le remplacement, veillez à éteindre le moniteur et à
débrancher le cordon d'alimentation.
• Lors du remplacement de la lampe, laissez-la refroidir
complètement, étant donné que la surface de la lampe reste
brûlante pendant au moins 30 minutes après la mise hors
tension.
• N'abandonnez pas une lampe que vous venez de retirer à
proximité de matériaux inflammables.
• Ne versez pas d'eau sur une lampe que vous venez de retirer
et ne placez pas d'objets à l'intérieur de la lampe.
• Ne placez pas de matériaux inflammables et d'objets
métalliques à l'intérieur de la douille de la lampe du moniteur
après avoir retiré la lampe. Ne touchez pas la douille.
• Installez la nouvelle lampe correctement, sinon l'écran risque
de s'assombrir, ou elle risque de provoquer un incendie.
1 Appuyez sur le commutateur
d'alimentation du moniteur pour l'éteindre
complètement et débranchez le cordon
d'alimentation.
Attendez au moins 30 minutes avant de remplacer
la lampe pour permettre à la lampe de refroidir.
2 Retirez le panneau frontal.
Desserrez les deux vis de fixation de la
lampe, puis sortez la lampe.
La lamp est brûlante après son utilisation. Ne
touchez pas la vitre avant de la lampe ou les pièces
avoisinantes.
Desserrez les deux vis au moyen de la clé
hexagonale (fournie avec la lampe).
Tirez droit vers vous en maintenant la
poignée.
Replacez la lampe que vous venez de retirer dans le
carton vide de la lampe de remplacement.
5 Mettez la nouvelle lampe en place et serrez
les deux vis à fond.
Maintenez ie moniteur
fermement.
Tirez ie panneau vers vous tout en maintenant son
extrémité droite. Veillez à ne pas abîmer vos ongles.
6 Remettez le couvercle de la lampe et serrez
la vis.
7 Mettez le panneau frontal en place.
Faites attention de ne pas abîmer les haut-parleurs
du moniteur.
Remarques
• Ne touchez pas la vitre avant de la nouvelle lampe ou la vitre
de la douille de la lampe. Cela pourrait nuire à la qualité de
l'image ou réduire la durée de vie de la lampe.
• Veillez à fixer la lampe correctement. Sinon, le moniteur ne se
mettra pas sous tension.
• Un bruit sourd peut se produire lorsque la lampe brûle. Ce
n'est pas dangereux.
• Adressez-vous à votre revendeur Sony pour obtenir la lampe
XL-lOOU.
Informations complémentaires
25
-F
Page 58

Guide de dépannage
Si le problème persiste après avoir appliqué les
méthodes ci-dessous, adressez-vous à-votre revendeur
Sony.
Absence d'image
^ Assurez-vous que le cordon d'alimentation
est bien raccordé.
^ Le moniteur est-il sous tension?
^ Le filtre à air est-il monté correctement?
(page 24)
^ Le couvercle de la lampe est-il fixé
correctement? (page 25)
Assurez-vous que l'équipement raccordé
est bien sous tension.
Essayez en appuyant sur n'importe quelle
toucne de l'ordinateur raccordé.
^ Vérifiez si le câble de signal RVB ou les
cordons audio/vidéo sont bien raccordés.
(L'adaptateur HD15-HD15 fourni sera
peut-être nécessaire pour certains modèles
d'ordinateur IBM PC/AT ou compatibles.
Pour un ordinateur compatible Macintosh
ou ordinateur compatible, utilisez
l'adaptateur Macintosh fourni.)
^ Assurez-vous qu'aucune broche des
connecteurs HD15 n'est pliée.
^ Assurez-vous que la carte vidéo est bien
introduite dans la fente de bus adéquate.
Assurez-vous que la plage de fréquence du
signal d'entrée correspond à celle spécifiée
pour le moniteur. (Dans le cas contraire,
"HORS PLAGE DE BALAYAGE" apparaît
à l'écran.)
Le moniteur n'accepte pas un signal en
mode d'entrelacement.
^ Pour les utilisateurs de Windows 95 - Si
"KL-W7000" ou "KL-W9000" n'est pas
affiché comme "Monitor type (type de
moniteur)" lors de la sélection de "SONY"
comme "Manufacturer (fabricant)" dans
l'écran de sélection d'appareil sous
Windows 95, sélectionnez "Standard
monitor" comme "Manufacturer" et "Plug
and Play monitor (VESA DDC)" comme
"Monitor type" ou sélectionnez "SONY
Corporation" comme "Manufacturer" et
"KL-W7000" ou ''KL-W9000" comme
"Monitor type".
L'image et le son sont décalés
^ Lorsque le voyant vert Cl) (alimentation)
situé à l'avant clignote, c'est que moniteur
s'échauffe.
^ Il faudra 30 minutes au moniteur pour
afficher à nouveau l'image après la mise
hors tension du moniteur.
26'^ Informations complémentaires
Ecran éclairé, mais impossible de voir l'image
Assurez-vous que vous regardez le
moniteur dans la zone de visionnage
optimale, (page 5)
Bonne image, pas de son
^ Appuyez sur VOL-f (VOLUME-t-).
^ Appuyez sur MUTING pour faire
disparaître "MUTING" de l'écran, (page
13)
Image floue
^ Mettez l'opHon NR du menu REGL VIDEO
sur BAS ou VIF.
^ Si vous utilisez le moniteur dans un endroit
frais, de la condensation peut s'être formée.
Laissez le moniteur et attendez que
l'humidité s'évapore.
Image sombre
“é Remplacez la lampe chargée de la source
lumineuse par une neuve, (page 25)
Absence de couleur, couleur anormale
^ Réglez l'image dans le menu REGL VIDEO,
(page 19)
Images doubles
^ L'utilisation d'un câble d'extension, une
longueur excessive du câble ou une
connexion lâche peuvent être à l'origine de
ce symptôme.
L'image de l'ordinateur n'est pas centrée ou
dimensionnée correctement
“+• Réglez le centrage et la taille de sorte que
l'image s'adapte à l'écran, (pages 16 et 17)
Image distordue
^ Vérifiez le mode d'emploi de la carte vidéo
pour effectuer un réglage correct du
moniteur.
^ Assurez-vous que la fréquence et le mode
graphique que vous utilisez comme entrée
correspond à la plage acceptable, (page 9)
Même dans la plage adéquate, il peut
arriver que certaines cartes vidéo affichent
une impulsion de synchro qui est trop
étroite pour que le moniteur synchronise
correctement.
Absence d'image, de son de l'équipement
raccordé
^ Tous les câbles de raccordement sont-ils
branchés?
^ Essayez en appuyant sur la touche RGB ou
VJDEO de la télécommande, (page 12)
La télécommande ne fonctionne pas.
Les piles sont-elles encore chargées?
Le sifflement des ventilateurs s'entend encore
après la mise hors tension du moniteur.
Les ventilateurs montés à l'intérieur du
moniteur empêchent l'accumulation
interne de chaleur. Ils s'arrêtent environ 2
minutes plus tard.
Page 59

Que signifie le clignotement des
voyants à l'avant du moniteur?
Les voyants Cl) (alimentation)(vert), STANDBY
(orange) et/ou LAMP (rouge) s'allument ou clignotent
pour indiquer l'état du morüteur et les avertissements
comme suit.
Le voyant (!) s'allume.
^ Le moniteur est sous tension.
Le voyant STANDBY s'allume.
^ Le moniteur est en mode de veille. Le
moniteur s'allume en appuyant sur la
touche POWER de la télécommande.
Les voyants LAMP, STANDBY et Ô clignotent.
^ La température à l'intérieur du moniteur a
augmenté anormalement ou les
ventilateurs se sont arrêtés.
Vérifiez que le filtre à air n'est pas obstrué
et que les orifices de ventilation ne sont pas
bouchés. Remettez le moniteur sous
tension après quelques temps, (page 24)
Si le moniteur ne fonctionne toujours pas correctement
après avoir remédié aux problèmes, adressez-vous à un
personnel Sony qualifié.
Les voyants Ô et STANDBY s'allument.
La fonction de coupure automatique s'est
enclenchée. Le moniteur s'est mis hors
tension lorsque le délai que vous avez
spécifié est écoulé après l'interruption de
l'entrée de l'ordinateur.
Le voyant (!) clignote.
La lampe assurant la source lumineuse est
prête à s'allumer. Dans les 30 minutes,
l'image sera affichée à l'écran.
Les voyants LAMP et STANDBY clignotent.
—► Le filtre à air ou le couvercle de la lampe
n'est pas fixé correctement. Une fois le
problème corrigé, le voyant STANDBY
s'allume et le moniteur passe en mode de
veille, (pages 24 et 25)
Le voyant LAMP clignote.
La lampe assurant la source lumineuse est
brûlée. Remplacez-la par une neuve, (page
25)
Informations complémentaires 27'^
Page 60

Spécifications
Signaux acceptés Signal vidéo NTSC, signal RVB
Système de projection
Panneau LCD Panneau LCD TFT de 1,35 pouce
Lampe XL-lOOU: lampe HID, 100 W
Objectif Objectif hybride à large diamètre
Taille de l'écran (mesurée en diagonale)
Taille de l'image visionnable (pour l'entrée RVB)
Fréquence de déflexion
Entrées/sorties
VIDEO 1, 2 et 3 IN S VIDEO (VIDEO 1, 3 IN
VIDEO OUT
-F
28
Informations complémentaires
(Pour plus de détails, voir page 9.)
3 panneaux LCD, 1 système de
projection par objectif
Approx. 1,54 millions de points
(512.880 pixels)
1068,5 X 480 de points x 3
panneaux
F2.4
KL-W7000: 37 pouces (942 mm)
KL-W9000: 50 pouces (1.272
mm)
KL-W7000; Approx. 36,3 pouces
(921 mm) (en diagonale)
Approx. 803 X 452 mm (1/h)
.KL-W9000: Approx. 49,1 pouces
(1247 mm) (en diagonale)
Approx. 1087 X 611 mm (1/h)
Horizontale : 31,5 à 50 kHz
Verticale : 50 à 85 Hz
uniquement) (mini-DIN à 4
broches)
Y: 1 Vcc, 75 ohms asymétrique,
synchro négative
C: 0,286 Vcc (salve), 75 ohms
VIDEO (prises phono):
1 Vcc, 75 ohms asymétrique,
synchro négative
AUDIO (prises phono):
2 canaux, 500 mVrms
Impédance: supérieure à 47
kohms
S VIDEO (mini-DIN à 4
broches):
Y: UVcc, 75 ohms asymétrique,
synchro négative
C: 0,286 Vcc (salve), 75 ohms
VIDEO (prise phono):
1 Vcc, 75 ohms asymétrique,
synchro négative
AUDIO (prises phono):
2 canaux, 500 mVrms
Impédance: inférieure à 5
kohms
RGB 1, 2 IN VIDEO (D-sub à 15 broches,
femelle):
R, V, B: 0,7 Vcc, positif,
terminaison à 75 ohms
Synchronisation sur le vert :
0,286 Vp-p
SYNC/HD: Synchro
composite: TTL, haute
impédance, synchro positive /
négative
Synchro horizontale: TTL,
haute impédance,
synchropositive / négative
VD: synchro verticale: TTL,
haute impédance, sync
positive / négative
AUDIO (RGB 1 IN) (prises
phono)
2 canaux, 500 mVrms
Impédance: supérieure à 47
kohms
AUDIO (RGB 2 IN) (miniprise
stéréo)
500 mVrms
Impédance: supérieure à 47
kohms
Puissance haut-parleur
Avant:5Wx2(G/D)
Woofer : 20 W
prises phono, 2 canaux,
0 à 500 mVrms (sortie audio
variable, modulation 100 %)
Impédance : moins de 5 kohms
Puissance de raccordement
100 à 120 VGA, 50/60 Hz
Consommation 190 W (max.)
Mode veille : 2 W
Dimensions KL-W7000: 920 x 825 x 390 mm
(36^ / 4 X 32V 2 X 153 / 8 pouces)
0/h/p)
KL-W9000: 1.228 x 1.055 x 565
mm (483/8 x 415/8 x 22'/4
pouces) (1/h/p)
Poids KL-W7000: Approx. 30 kg
(68 livres 2 onces)
KL-W9000: Approx. 43 kg
(106 livres 8 onces)
Accessoires fournis
Télécommande RM-Y980 (1)
Pile AA (R6) (2)
Cordon d'alimentation (1)
Câble de signal RVB (D-sub à 15
broches«—► D-sub à 15
broches) (1)
Adaptateur HD15-HD15 (mâle,
sans broche n°9) (1)
Adaptateur Macintosh (1)
Windows 95 Moniteur
Information Disk (1)
Support (2)
Vis pour le support (2)
Boucle (1)
Clé hexagonale (1)
Chasse-poussières (1)
Accessoires en option
Lampe XL-lOOU
La conception et les spécifications sont sujettes à
modifications sans préavis.
Page 61

Chronogramme des signaux Wide Resolution (864 x 480, 1072 x 600, 1376 X 768)
Wide Resolution
864 X 480 1072TX 600
Horloge pixel (MHz)
1 point (nsec)
IH (;< sec)
H-Actif {¡ise c)
H-suppressipn (/isec) 6,542
H-Palier avant (/isec)
(points) 24
H-Sync (/tsec) 3,738
(points) 128
H-Palier du noir
(ftse c)
(points) 72
H-Polarité de
synchronisation
V-Délai TTI (Lignes)
V-Délai d'adr (Lignes) 480
V-Départ suppression
(Lignes)
V-Délai suppression
(Lignes)
V-Départ synchro
(Lignes)
Bord V inférieur
(Lignes)
Palier V avant (Lignes) 2
Délai de synchro V
(Lignes)
Palier du noir V
(Lignes)
Bord V supérieur
(Lignes)
V-Polarité de
synchronisation
34,238 53,94 87,44
29,207
31,777
25,235
0,701 0,89
2,103
-
525 628 806
488 600 768
29
490
8
2 4 .
25
8
+ + +
18,539 11,436
26,4
19,874
6,526
48 32
3,263
176 184
2,373
128 216
-
600 768
28 38
601
0 0
1
23 29
0 0
1376 X 768
20,676
15,736
4,94
0,366
2,104
2,47
-
771
3
6
Informations complémentaires 29'^
Page 62

Identification des composants
Cette section décrit brièvement les touches et
commandes du moniteur et de la télécommande. Pour
plus d'informations, reportez-vous aux pages
indiquées en regard de chaque description.
Moniteur de projection - Avant
Avec le panneau
frontal installé
Avec le panneau frontal détaché
Filtre à air
(page 24)
m Capteur de télécommande
Voyant LAMP (pages 25, 27)
[3] Voyant STANDBY (pages 12, 23, 27)
[4] Touche CENTER/SIZE (pages 16, 17)
[s] Touches (pages 16, 17)
[U
Prises VIDEO 2 IN (page 10)
[tI Connecteur RGB 2 IN (pages 7, 8)
Panneau frontal
Lampe
(page 25)
Î8l Voyant d) (alimentation) (pages 12, 23, 27)
Commutateur d'alimentation (page 12)
[ÎÔl Touches VOLUME + !- (page 12)
[Tï] Touche MENU (page 11 )
01 Touche ENTER (page 11)
01 Touche INPUT SELECT (page 12)
04| Touche RESET (pages 16-18)
30'^ Informations complémentaires
Page 63

Télécommande
[H Touche DISPLAY (page 13)
Touche MUTING (page 13)
[3] Touche VIDEO (page 12)
g] Touche CENTER/SIZE (pages 16, 17)
g] Touches VOL (volume) +/- (page 12)
f6l Touche POWER (page 12)
[7] Touche WIDE (pages 13, 15)
Touche RGB (page 12)
[9] Touches ♦ /♦ /♦ /♦ (pages 11, 16,17)
[ÏÔI Touche MENU (page 11)
ITÏ] Touche ENTER (page 11)
Informations complémentaires
31
-F
Page 64

AV MEMOIRE 19,21
Chasse-poussière 4
COUPURE AUTO 23
DEFILEMENT V 15
Effet ambiophonique 22
Effet audio 22
Filtre à air 24
FORMAT 15
Fréquence horizontale 9
Fréquence verticale 9
HORS PLAGE DE BALAYAGE 9,13
Identification des composants 30
Installation du moniteur 5
Mode de présélection 9
Mode grand écran 13-15
Mode utilisateur 9
NORMAL 14, 15
OPTION 11,23
Ordinateur IBM ou compatible 7
Ordinateur Macintosh pu compatible 8
PHASE 17
PLEIN 14, 15
Plug & Play 9
Raccordement
à un équipement vidéo 10
à un ordinateur 7, 8
à une prise secteur 10
REGL AUDIO 21
Réglage
de la clarté de Timage 17
de la position de Timage 16
de la taille de l'image 17
de la température de couleur 20
de l'effet audio 22
de Timage 19
de Timage plus en détails 20
du son 21
Réglage CENTRAGE 16
Réglage TAILLE 17
REGL VIDEO 19,20
Sélection du mode vidéo/audio 18
SOUS-TITRE 14
Suppression du son 13
SVGA 9, 15
Télécommande
identification des composants 31
mise en place des piles 11
VGA 9, 15
VIDEO/AUDIO 18, 21
Visionner
Timage 12
Timage en mode grand écran 13
Voyant
clignotement 27
remplacement 25
Voyant (!) (alimentation) 12, 27
Voyant LAMP 25, 27
Wide Resolution 9, 15, 29
XGA 9, 15
Zone de visionnage 5
ZOOM 14
ZOOM LARGE 14
32
-F
Informations complémentaires
Page 65

Page 66

ADVERTENCIA
Para evitar incendios o el riesgo de
electrocución, no exponga la unidad a
la lluvia ni a la humedad. Dentro de la
unidad, hay tensiones altas peligrosas.
No abra la unidad. Solicite asistencia
técnica sólo a personal cualificado.
CAUTION
RISK OF ELECTRIC SHOCK
DO NOT OPEN
ATTENTION
RISQUE DE CHOC ELECTRIQUE,
NE PAS OUVRIR
NOTIFICACIÓN
Este aparato ha sido debidamente probado, comprobándose
que cumple con los límites impuestos a dispositivos digitales
Clase B de acuerdo con la Sección 15 de las normas de la FCC.
Estos límites se establecieron para ofrecer protección
razonable contra interferencias perjudiciales en las
instalaciones residenciales. Este aparato genera, usa y puede
emitir energía radioeléctrica. De no instalarse y utilizarse de
acuerdo con las instrucciones correspondientes podría
producir interferencias perjudiciales en las
radiocomunicaciones. No obstante, no puede garantizarse
que no se produzcan estas interferencias en una instalación
determinada. Si este aparato llega a interferir en la recepción
por radio o televisión, lo que podría comprobarse
encendiendo y apagando el aparato, se recomienda al usuario
intentar corregir la interferencia mediante una o más de las
siguientes medidas:
- Reoriente o cambie de lugar las antenas receptoras.
- Aumente la distancia que separa este aparato y el receptor
afectado.
- Enchufe el aparato en una toma de corriente de un circuito
distinto al que esté enchufado el receptor afectado.
- Consulte con el distribuidor o solicite los servicios de un
técnico capacitado en radio y televisión.
Cualquier cambio o modificación que no se detalla
expresamente en el presente manual podría invalidar su
autorización para emplear este aparato.
Este documento se refiere al control remoto RM-Y980
MODELOS: KL-W7000/W9000
Conserve esta nota con el manual de instrucciones.
PRECAUCION
RIESGO DE CHOQUE ELECTRICO
PRECAUCION: PARA EVITAR DESCARGAS ELÉCTRICAS,
I N0 HAY PARTES EN EL INTERIOR QUE PUEDA REPARAR EL USUARIO.
SOLICITE ASISTENCIA TÉCNICA A PERSONAL ESPECIALIZADO.
PRECAUCION
Para evitar descargas eléctricas, rio emplee esta clavija de
alimentación de CA polarizada con un cable prolongador,
receptáculo u otra toma de corriente, a menos que las clavijas
puedan insertarse completamente a fin de que no queden al
descubierto.
NO ABRIR
NO RETIRE LA CUBIERTA (0 LA PARTE TRASERA).
Este símbolo sirve para indicar al usuario la
presencia de "tensiones peligrosas" sin aislar
dentro de la caja de este producto, que pueden
ser de suficiente magnitud como para
constituir un riesgo de electrocución.
Este símbolo sirve para indicar al usuario la
presencia de instrucciones de funcionamiento
y mantenimiento en la documentación que
acompaña al producto.
Aviso sobre la conexión de
alimentación
Emplee un cable de alimentación adecuado al suministro de
alimentación local.
Para los usuarios en EE.UU.
Si no utiliza el cable adecuado, este monitor no cumplirá las
normas FCC obligatorias.
Ejemplos de tipos de enchufe
para 100 a 120 V CA
La toma de corriente debe instalarse cerca de la unidad en
una zona accesible.
Registro del propietario
Los nrimeros de serie y del modelo están situados en la parte
trasera del monitor. Escriba dichos números en los espacios
que se proporcionan abajo. Consúltelos siempre que llame a
su proveedor Sony en relación con este producto.
N" modelo:
№ de serie:
_____________________
_____________________
-ES
Page 67

Acerca de este manual
Las instrucciones de este manual corresponden a los
modelos KL-W7000 y KL-W9000, Antes de comenzar a
leer el manual, verifique el número del modelo,
ubicado en la parte posterior del monitor de
proyección. En este manual, se utiliza el modelo KLW9000 para los ejemplos. Cualquier diferencia en el
funcionamiento se indica claramente en el texto, por
ejemplo, "■ para el KL-W9000". Las diferencias en las
especificaciones también se indican en el texto.
4 Precauciones
Preparativos
5 Paso 1: Instalación del monitor de proyección
7 Paso 2: Conexión
11 Paso 3: Ajuste del control remoto
11 Cambio del idioma de menú
Operaciones
12 Proyección de la imagen
13 Visualización de la imagen en modo panorámico
16 Ajuste de la imagen de la computadora
18 Selección del modo predeñiüdo de visualización de
imágenes
19 Ajuste de la imagen (av memoria)
21 Ajuste del sonido (av memoria)
22 Selección del efecto de audio (efecto)
23 Desactivación automática de la alimentación (auto
apagado)
• DDC™ es una marca comercial de Video Electronics
Standard Association.
• IBM PC/AT y VGA son marcas comerciales
registradas de International Business Machines
Corporation, de los Estados Unidos.
• Macintosh es una marca comercial concedida bajo
licencia a Apple Computer, Inc., registrada en los
Estados Unidos y en otros países.
• VESA es una marca comercial de Video Electronics
Standard Association.
• Windows® es una marca comercial registrada de
Microsoft Corporation, en los Estados Unidos y en
otros países.
• Todos los demás nombres de productos aquí
mencionados pueden ser marcas comerciales o
marcas comerciales registradas de sus respectivas
compañías.
‘ Además, "®" no se mencionan en todos los
casos en este manual.
Información adicional
24 Limpieza del filtro de aire
25 Sustitución de la lámpara
26 Solución de problemas
28 Especificaciones
30 Identifícación de los componentes
Cubierta posterior Indice alfabetico
Las indicaciones entre paréntesis corresponden a nombres de
menú.
3-ES
Page 68

Precauciones
Este monitor de proyección funciona con alta tensión.
Para evitar incendios o descargas eléctricas, tenga en
cuenta las precauciones que aparecen a continuación.
Seguridad
• Emplee el monitor sólo a 100 V a 120 V CA.
• Una clavija del enchufe es más ancha que la otra por
razones de seguridad y sólo podrá enchufarse en
una posición. Si no consigue insertar
completamente el enchufe en la toma, póngase en
contacto con el proveedor Sony.
• Si dentro de la unidad cae algún objeto o se vierte
líquido, desenchúfela de la red y haga que sea
revisada por personal especializado antes de
utilizarla nuevamente.
• Cuando no vaya a emplear la unidad durante varios
días, desenchúfela de la toma de corriente. Para
desconectar el cable de alimentación, tire del
enchufe, nunca del propio cable.
• Los ventiladores del interior'del monitor siguen en
funcionamiento durante unos instantes incluso
después de habera apagado dicho monitor. No
desenchufe éste de lá toma de CA mientras los
ventiladores se encuentren en funcionamiento.
Instalación
• No bloquee los orificios de ventilación para evitar el
recalentamiento interno.
• No sitúe la unidad en lugares muy cálidos o
húmedos, ni la exponga a un exceso de polvo o de
vibración mecánica.
Pantalla
La superficie de la pantalla se ralla con facilidad. No la
frote, toque o golpee con objetos afilados ni productos
corrosivos.
Tenga especial cuidado al transportar el monitor.
Panel LCD
• No exponga la pantalla a la luz solar directa, ya que
daña el panel LCD.
• Si utiliza el monitor en un lugar frío, es posible que
la imagen aparezca prolongada. Esto no es un fallo
de funcionamiento. La imagen volverá a ser normal
al aumentar la temperatura.
• Si se ha mostrado la misma imagen de manera
continua, es posible que permanezca en pantalla
una impresión de dicha imagen, que desaparecerá
después de un cierto tiempo.
• Si enciende el monitor después de restaurarse la
alimentación tras un corte, es posible que se
produzcan quemaduras en la pantalla LCD. Esto no
es un fallo de funcionamiento. La imagen volverá a
ser normal tras un espacio de tiempo.
Acerca de la supresión alrededor de la imagen
El monitor muestra partes enmascaradas en negro
entre la imagen y los encuadres de la pantalla debido a
que dicho monitor realiza una subexploración para
obtener el espacio necesario en la pantalla y mostrar la
imagen. Esto se denomina supresión. Observe que las
partes enmascaradas en negro de los encuadres no son
uniformes.
La supresión en las imágenes de video será más ancha
para optimizar la imagen.
Supresión
Imagen
Encuadre de la
pantalla
Condensación de humedad
Si el monitor de proyección pasa directamente de un
ambiente frío a uno cálido, o si la temperatura de la
habitación cambia repentinamente, la nitidez de la
imagen puede desaparecer o los colores pueden perder
intensidad. Ello se debe a una condensación de
humedad en las lentes interiores. Si esto ocurre, deje
que se evapore la humedad antes de utilizar el monitor.
Limpieza
• Limpie el exterior del monitor con un paño seco y
suave. Las manchas persistentes pueden eliminarse
con un paño ligeramente humedecido con una
solución de jabón poco concentrado y agua; a
continuación, séquelo con un paño seco y suave.
No utilice rúngún tipo de disolventes, como alcohol,
bencina, diluyentes o insecticidas. Estos disolventes
pueden dañar el acabado del monitor o borrar las
indicaciones del panel.
• Limpie ocasionalmente la pantalla con un
eliminador de polvo (suministrado), ya que ésta
acumula polvo con facilidad. El eliminador de
polvo se puede lavar. Lávelo con agua templada o
con una solución de detergente suave.
• Las manchas persistentes de la pantalla se pueden
eliminar con un paño suave ligeramente
humedecido en una solución de jabón suave y agua.
• Si la imagen se oscurece después de utilizar el
monitor durante mucho tiempo, es posible que sea
necesario limpiar el interior de éste. Póngase en
contacto con personal de servicio técnico
especializado.
4-ES
Page 69

Preparativos
Paso 1: Instalación del monitor de proyección
Area de visualización óptima
Para obtener la mejor calidad de imagen, instale el
monitor dentro de las áreas que se muestran a
continuación.
■ para el KL-W7000
Area de visualización vertical (vista lateral)
Area de visualización horizontal (vista
superior)
■ para el KL-W9000
Area de visualización vertical (vista lateral)
Area de visualización horizontal (vista
superior)
Page 70

Transporte del monitor
Asegúrese de agarrar las partes indicadas por flechas al
transportar el monitor, y de hacerlo entre más de dos
personas. No lo agarre nunca por el panel frontal.
I para el KL-W7000
2 Pase una cuerda fuerte o una cadena por
cada soporte montado en el paso 1 y, a
continuación, fíjelo a una pared o un pilar,
etc.
Uso de la hebilla
Puede utilizar también la hebilla suministrada para
fijar el monitor al soporte.
I para el KL-W9000
Fijación del monitor
Uso de las abrazaderas
Una vez instalado, fije el monitor a una pared, etc., con
las abrazaderas suministradas
1 Monte las dos abrazaderas suministradas
con los tornillos en los laterales superiores
posteriores del monitor.
1 Acople la hebilla al soporte en el que se
encuentre el monitor.
Apriete firmemente el tornillo suministrado.
2 Inserte la hebilla hasta que oiga un
chasquido.
3 Tire de la,correa para apretarla.
0-ES Preparativos
Page 71

Paso 2: Conexión
Antes de realizar la conexión, desactive la alimentación
y desconecte los cables de alimentacióti de CA del
monitor y del equipo que vaya a conectar. Consulte el
manual de instrucciones del equipo que desee conectar.
Conexión a una computadora IBM PC/ AT o compatible
Conecte el conector RGB 2 IN de la parte frontal o el
conector RGB 1 IN de la parte posterior del monitor a
las salidas de video/audio de la computadora; para
ello, emplee el cable de señal RGB suministrado (D-sub
de 15 pines ■ *—► D-sub de 15 pines).
Uso del conector RGB 1 IN posterior
Parte posterior del monitor
'ÍTw vS' ^
yO' (§3
Uso del conector RGB 2 IN frontal
Parte frontal del monitor
* El adaptador HD15-HD15 (suministrado) puede ser necesario
para ciertos modelos. El lado macho (sin el pin n° 9) del
adaptador debe conectarse a la computadora.
Para los usuarios que utilicen el adaptador HD15-HD15 suministrado
Este monitor emplea un pin n° 9 en el conector de señal
de video destinado a la compatibilidad de DDCl y
DDC2B.
Ciertos sistemas de PC que no sean compatíbles con
DDCl o con DDC2B pueden no aceptar el pin n° 9. Si
no está seguro de si su sistema de PC acepta dicho pin
o no, emplee el adaptador HD15 (hembra) - HD15
(macho sin el pin n° 9) (suministrado).
Preparativos
7-ES
Page 72

Conexión a una computadora
Macintosh o compatible
Conecte el conector RGB 2 IN de la parte frontal o el
conector RGB 1 IN de la parte posterior del monitor a
las salidas de video/audio de la computadora; para
ello, emplee el cable de señal RGB suministrado (D-sub
de 15 pines ► D-sub de 15 pines) y el adaptador
Macintosh también suministrado.
Uso del conector RGB 1 IN posterior
Parte posterior del monitor
Ipi lyi
Uso del conector RGB 2 IN frontal
Parte frontal dei monitor
mrj
Cable de señal RGB
(suministrado)
Adaptador Macintosh
(suministrado)
a la salida de video
Computadora Macintosh o
compatible
Cable de conexión
de audio
(minitoma estéreo
•«—» minitoma
estéreo)
(no suministrado)
I salida de audio
(ím
Cable de señal RGB
(suministrado)
Adaptador Macintosh
(suministrado)
a la salida de video
Computadora Macintosh o
compatible
Cable de conexión
de audio
(enchufe
fonográfico x 2
•*—V minitoma
estéreo)
(no suministrado)
I salida de audio
Acerca del adaptador Macintosh suministrado
El adaptador Macintosh suministrado es compatible
con las computadoras de la serie Macintosh LC,
Performa, Quadra y Power Macintosh. La serie
Macintosh II y determinadas versiones de los modelos
PowerBook pueden necesitar otro adaptador con
microinterruptores (no suministrado).
8ES
Preparativos
Page 73

Modos predefinidos y de usuario Modos predefinidos
El monitor dispone de nueve modos predefinidos de
fábrica para los estándares más comunes del sector
como se muestra a continuación.
№ Reolución
(puntos X
líneas)
1
640 X 400
2 640 X 480 31.468
3 800 X 600
4 800 X 600 46.875 75.000 SVGA VESA
1024 X 768
5
864 X 480 31.469 59.94 Sony "Wide
6
7 1072 X 600 37.879
1376 X 768 48.363 60.004 Sony "Wide
8
832 X 624 49,727
9
* Con respecto a la tabla de sincronización de las señales,
consulte la página 29.
Frecuencia
horizontal
(kHz)
31.468 70.086 Modo VGA
37.879 60.317 SVGA VESA
48.363
Frecuencia
vertical
(Hz)
59.94
60.004 VESA
60.317
74,553
Modo
gráfico
(Texto)
Modo VGA
(Gráfico)
Resolution"*
Sony "Wide
Resolution"*
Resolution"*
Macintosh 16" color
Modos del usuario
Al utilizar un modo de vídeo distinto de los
predefinidos, es posible que necesite realizar algunos
ajustes de precisión para optimizar la visualización
según sus preferencias. Sim_plemente ajuste el monitor
de acuerdo con las instrucciones de ajuste que aparecen
en las páginas 16 y 17. Los ajuste se almacenarán
automáticamente y se recuperarán -siempre que se
utilice ese modo.
Es posible guardar en la memoria un total de 15 modos
definidos por el usurario. Si se introducen 16, el último
sustituirá al primero.
Función Plug & Play
Este monitor cumple DDC™1 y DDC2B, las normas de
Canal de Datos de Visualización (DDC) de VESA.
Cuando se conecta un sistema central DDCl, el monitor
se sincroniza con V. CLK de acuerdo con las normas
VESA y transmite los Datos de Identificación de
Visualización Exterdidos (EDID) a la línea de datos.
Cuando se conecta un sistema central DDC2B, el
monitor conmuta automáticamente a cada una de las
comunicaciones.
Para los usuarios que utilicen Windows
95
Instale en el PC la información del nuevo modelo que
se encuentra en el disquete "Windows 95 Monitor
Information Disk". (Para instalar el archivo, consulte el
documento adjunto "About the Windows 95 Monitor
Information Disk/File".)
Este monitor cumple con la norma Plug&Play "VESA
DDC". Si la tarjeta de PC/gráfica cumple con DDC,
seleccione "Plug and Play Monitor (VESA DDC)" como
"Monitor type" (tipo de monitor) en "Control Panel"
(panel de control) en Windows 95. Ciertas tarjetas de
Pcx/gráficas no cumplen con DDC. Aunque su
computadora cumpla con DDC, es posible que tenga
problemas para conectarse con este moiütor. En este
caso, seleccione el nombre de modelo de este monitor
(KL-W7000 o KL-W9000) como "Monitor type" (tipo de
monitor) en Windows 95.
Condiciones de sincronización
horizontal recomendadas
El ancho de sincronización horizontal debe ser superior
a 1,0 }isec.
La supresión horizontal debe ser superior a 3,6 físec.
Cuando "FUERA DE RANGO EXPLORACION" aparece en pantalla
El monitor recibe una señal cuyo rango de frecuencias no se
encuentra dentro del especificado para el monitor.
Notas
• Al proyectar una de las tres señales "Wide Resolution" (864 x
480, 1072 X 600,1376 x 768), ajuste el modo de imagen en
COMPLETO. En modo NORMAL, la imagen con relación de
aspecto 16:9 se comprimirá a una relación de aspecto de 4.3 y
aparecerá alargada verticalmente. Para más información,
consulte la página 15.
• El monitor no acepta señales de modo entrelazado.
Preparativos
9ES
Page 74

Conexión a un equipo de video
A una videograbadora desprovista de
conector de S video
Parte posterior del monitor
. 3 mSSm
\
■s '
1
a VIDEO 1 IN o
VIDEO 3 IN
VMC-810S/820S
(no suministrado)
vt-
AUDIO
Conexión de dos videograbadoras para editar
El monitor envía señales introducidas desde las tomas
VIDEO IN a través de las tomas VIDEO OUT. Con dos
videogradaboras conectadas a las tomas VIDEO IN y
VIDEO OUT, podrá editar la cinta.
Nota
Para la señal RGB introducida desde los conectores
RGB 1/2 IN, el monitor envía sólo la señal de audio.
Parte posterior del monitor
w
n
a las salidas de video/audio
Videograbadora
Es posible utilizar las tomas VIDEO 2 IN de la parte
frontal del monitor para realizar las conexiones de
video/audio.
A una videograbadora equipada con S video
Parte posterior del monitor
a VIDEO 1 IN
o VIDEO 3 IN
VMC-810S/820S
(no suministrado)
Videograbadora para
la reproducción
AUDIO
a las salidas de
video/audio
#■
#
a VIDEO OUT
VMC-810S/820S
(no suministrado)
Conexión del cable de alimentación de
CA
Conecte el cable de alimentación suministrado a la
clavija AC IN del monitor y a la toma mural de CA.
Parte posterior del monitor
Nota
• Al conectar el cable a la toma VIDEO y al conector S VIDEO, la
imagen del conector S VIDEO aparecerá en la pantalla del
monitor.
10 -ES I Preparativos
alimentación de
CA (suministrado)
Page 75

Paso 3: Ajuste del
Cambio del idioma
control remoto
Inserción de las pilas
Inserte dos pilas tamaño AA (R6) (suministradas) de
forma que las indicaciones + y - de las pilas coincidan
con las del diagrama del interior del compartimiento de
las pilas.
Notas
• En condiciones normales, las pilas durarán hasta seis meses. Si
el control remoto no funciona adecuadamente, las pilas pueden
estar agotadas. Cuando cambie las pilas, sustituya las dos por
unas nuevas.
• No mezcle pilas usadas con nuevas ni mezcle diferentes tipos
de pilas.
• En caso de producirse una fuga del electrólito de la pila, limpie
la zona contaminada del compartimiento de las pilas con un
paño y cambie las pilas viejas por otras nuevas. Para prevenir
la fuga del electrólito, retire las pilas cuando no vaya a utilizar
el control remoto durante un período largo de tiempo.
• Maneje el control remoto cuidadosamente. No lo pise, no lo
deje caer, ni permita que se moje.
• No lo coloque bajo la luz solar directa, cerca de fuentes de calor
o en lugares muy húmedos.
de menú
©
© ©
©
EKTgn
CD
Si prefiere español o francés en vez de inglés, puede
cambiar el idioma de menú.
1 Presione MENU.
Presione 4 o para seleccionar OPCION y
presione ENTER.
©
MENU
ENTER
0
Presione 4 o 4 para seleccionar LENGUAJE y
presione ENTER.
©
rTi ^
O’ i*)
4 Presione 4, 4, 4 o 4 para seleccionar el
idioma que prefiera: "ENGLISH",
"FRANÇAIS" o "ESPAÑOL".
ENTER
OPCION
fiUTO fiPPGPDOiNO
LENGUAJE : ESPAÑOL
FASE PUNTO; 16
m
®o®
<y (í)
5 Presione MENU para recuperar la pantalla
original.
Notas
• Es posible utilizar el menú con las teclas del monitor. La tecla
VOLUME + funciona igual que ♦ y ♦ , y VOLUME - igual que
♦ y 4.
• No es posible utilizar la función AUTO APAGADO para la
entrada de VIDEO IN. (Consulte la página 23.)
Preparativos 11‘ES
Page 76

Operaciones
2 Active la alimentación del equipo
conectado.
3 Presione RGB o VIDEO para seleccionar la
entrada que desee ver.
La indicación de la entrada seleccionada aparece en
pantalla.
Para ver la imagen de la computadora
introducida desde el conector RGB IN
Cada vez que presione RGB, la indicación cambia
de la siguiente forma:
UirriNfí POWER
DBPLAY
Oc=»0
VOL
/í=T%
O
Si el indicador STANDBY de la parte frontal
del monitor está iluminado en naranja,
presione POWER en el control remoto para
activar la alimentación.
POWER
LAMP STANDBY f—
□ ■ □
•Ô
RGB 1
RGB 2
Para ver la imagen de video introducida
desde las tomas VIDEO IN
Cada vez que presione VIDEO, la indicación
cambia de la siguiente forma:
VIDEO 1
Î
_____
También es posible seleccionar la entrada
presionando INPUT SELECT en el monitor.
Cada vez que presione INPUT SELECT, la
indicación cambia de la siguiente forma:
RGBl
La indicación de señal de entrada desaparecerá
automáticamente.
• VIDEO 2 -*■ VIDEO 3
■ RGB 2 —► VIDEO 1 VIDEO 2 -*• VIDEO 3
INPUT SELECT
D
4 Presione VOL +/- (VOLUME +/-) para ajustar
el volumen.
Control remoto
VOL
Monitor
VOLUME
Presione el interruptor de alimentación (verde) del
monitor si el indicador STANDBY está apagado.
]
tr
El indicador C¡) (alimentación) verde parpadea y, a
continuación, se ilumina.
12 ES
Operaciones
T>
Page 77

Para apagar ie monitor
Presione POWER en el control remoto. El monitor
entrará en el modo de espera y el indicador STANDBY
se iluminará. Para desactivar la alimentación principal,
presione el interruptor de alimentación (verde) del
monitor. ^
Nota
• Para proteger la lámpara instalada como fuente de
iluminación, si intenta activar la alimentación en un espacio de
unos 30 minutos después de haber desactivado dicha
alimentación, el indicador Cl) (alimentación) parpadeará y la
imagen no aparecerá.
Desactivación del sonido
Presione MUTING.
"MUTING" aparece en pantalla.
Para recuperar el sonido, vuelva a presionar MUTING
o presione VOL+.
Visualización de la
imagen en modo
panorámico
O
Visualización de información en pantalla
Presione DISPLAY para mostrar en pantalla la
siguiente información.
Señal de entrada
actual
Modo de imagen
(página 14)
Para que desaparezca la información en pantalla,
vuelva a presionar DISPLAY.
-----
IRGB II
Frecuencia de
señal de entrada
actual al
recibirse la señal
RGB*
*fh: frecuencia horizontal
fv: frecuencia vertical
Aparecerá "FUERA DE RANGO EXPLORACION" si
el rango de frecuencia de exploración no se
encuentra dentro de los limites aceptables
(consulte la página 9).
Visualización de la imagen de video en
modo panorámico
Es posible disfrutar de varios modos de imagen
panorámica.
Presione WIDE hasta que aparezca en pantalla
el modo que desee.
Cada vez que presione WIDE, el modo cambia de la
siguiente forma:
NORMAL -► COMPLETO -► ZOOM -► SUBTITULO
^
-----------------
ZOOM AMPLI ■ <
WIDE
------
1
(continúa)
Operaciones '13~ES
Page 78

Modo de imagen recomendado
Al visualizar ia imagen con ia relación de
aspecto 4:3 normal
Seleccione NORMAL.
Al ver una película o software con subtítulos
(con éstos fuera de la imagen)
Seleccione SUBTITULO.
La imagen de formato panorámico se amplia, mientras que el área
de los subtítulos se comprime para que la imagen se alinee con el
tamaño de la pantalla.
TLa imagen con la relación
4:3 normal aparece tal y
como es.
Seleccione ZOOM AMPLI.
La imagen se amplía horizontal y verticalmente, mientras que las
partes superior e inferior de la misma se comprimen hasta ocupar la
pantalla.
Al ver la imagen grabada después de
comprimir una imagen de 16:9 a la relación de
aspecto 4:3
Seleccione COMPLETO.
La imagen comprimida a la relación de aspecto 4:3 se amplía hasta
ocupar el ancho de la pantalla.
Nota
• También es posible cambiar el modo de imagen mediante el
menú.
Notas sobre los modos de imagen panorámica
• Seleccione el modo de imagen teniendo en cuenta que aquél
que cambie la relación de aspecto de la imagen original
proporcionará un aspecto diferente con respecto al de la
imagen original.
• Si el monitor se emplea con fines lucrativos o para uso público,
la modificación de la imagen original mediante el cambio de los
modos de imagen puede constituir una infracción de los
derechos de autor o productor, legalmente protegidos por la
ley.
• Al ver una imagen 4:3 normal en el modo ZCX)M AMPLI, es
posible que las partes circundantes aparezcan cortadas o
modificadas. Es posible ver la imagen original en el modo
NORMAL.
Al ver una película de formato panorámico o
software con bandas negras y subtítulos (con
éstos dentro de la imagen)
Seleccione ZOOM.
La imagen de formato panorámico se amplía hasta ocupar el ancho
y alto de la pantalla.
La imagen con relación de aspecto 16:9 se amplía tal como es hasta
ocupar la pantalla.
14-ES
Operaciones
Page 79

Ajuste de la posición vertical de la
imagen de video
© ©
©
ENTER
CD
Visualización de la imagen de la computadora en el modo panorámico
! MENU
j(g~>
ENTER
O
Es posible desplazar la imagen hacia arriba o hacia
abajo en los siguientes casos:
• Si la parte superior o inferior de la imagen en el
modo ZOOM AMPLl aparece cortada.
• Si desea desplazar la imagen en el modo ZOOM
según sus preferencias.
• Si los subtítulos desaparecen de la pantalla en el
modo SUBTITULO.
El desplazamiento de imágenes funciona sólo
en los modos ZOOM AMPLl, ZOOM y
SUBTITULO.
1 Presione MENU.
2 Presione 4 0 4’ para seleccionar ASPECTO, y
presione ENTER.
©
<y ©
ENTER
ClSPECTO
►tìSPECTO; 2Q0M
DESPLftZfìM U: O
3 Presione 4 o 4 para seleccionar DESPLAZAM
V, y presione ENTER.
©
ENTER
Si ajusta el modo de imagen en COMPLETO, al
recibirse una de las tres señales "Wide Resolution" (864
X 480,1072 X 600,1376 x 768), podrá ver la imagen con
la relación de aspecto 16:9 tal como es. Las señales
"Wide Resolution" (864 x 480,1072 x 600,1376 x 768)
han sido estandarizadas independientemente por Sony.
Si utiliza la señal con la tabla de sincronización de la
página 29, puede obtener la imagen de modo
panorámico efectivo.
Presione WIDE para mostrar COMPLETO o
NORMAL en la pantalla.
Cada vez que presione WIDE, podrá seleccionar
COMPLETO y NORMAL alternativamente.
Si se reciben las señales "Wide Resolution"
(864 X 480, 1072 x 600, 1376 x 768)
La imagen con relación de aspecto 16:9 se amplía hasta ocupar la
pantalla.
Si se recibe una señal VGA, SVGA o XGA
convencional
WIDE
Modo NORMAL Modo COMPLETO
Modo NORMAL
Modo COMPLETO
<y ©
4 Presione 4 o 4 para ajustar la posición
vertical de la imagen.
para desplazar la imagen hacía arriba
©-
Q)
Nota
• Es posible utilizar el menú con las teclas del monitor. La tecla
VOLUME + funciona igual que ♦ y y VOLUME - igual que
♦ y*.
para desplazar la imagen hacia abajo
--
OQO
La imagen con relación de aspecto 4:3 se amplia hasta ocupar el
ancho de la pantalla.
Ajuste de la posición de imágenes de la computadora
Es posible desplazar la imagen hacia arriba, abajo,
derecha o izquierda para facilitar su visualización; para
ello, emplee la tecla SIZE/CENTER. Para más
información, consulte la página 16.
Si visualiza las señales "Wide Resoiution" (864 x
480, 1072 X 600, 1376 x 768) en el modo NORMAL
La imagen de 16:9 se comprimirá horizontalmente para adoptar
la forma de imagen de 4:3. Operaciones ^ 5'^^
Page 80

Ajuste de la imagen de la computadora
Ajuste de la posición (CENTRADO)
©
© ©
©
O
Después de proyectar la imagen procedente de una
computadora, es posible que sea necesario ajustar la
posición de la misma para adaptarla a la pantalla del
monitor. También es posible desplazar la imagen como
desee. El ajuste sólo se aplica a la señal de entrada
mostrada en pantalla.
La pantalla de ajuste CENTRADO desaparecerá
automáticamente transcurridos 10 segundos
aproximadamente si no presiona ninguna tecla.
También es posible eliminar la pantalla de ajuste
CENTRADO volviendo a presionar CENTER/SIZE.
Para recuperar el ajuste de fábrica
Presione RESET en el monitor. Simultáneamente, los
ajustes de tamaño de imagen (página 17) y de vídeo /
audio (páginas 18 a 22) también recuperan los niveles
ajustados de fábrica.
Nota
• Es posible ajustar la posición con las teclas CENTER/SIZE y
o / ó / ó /1;> del monitor.
1 Presione CENTER/SIZE hasta que aparezca la
pantalla de ajuste CENTRADO.
CENTRADO
C-ENTRADO H
CENTER/
SIZE
Presione 4 o* para ajustar la posición.
Para realizar el ajuste horizontal, presione ♦ o (H
CENTRADO).
: para desplazar la imagen a la
derecha
© ©::
<y
Para realizar el ajuste vertical, presione ♦ o ♦ . (V
CENTRADO)
©
<y
©
para desplazar la imagen a la
izquierda
*: para desplazar la imagen hacia
arriba
*: para desplazar la imagen hacia
abajo
CENTRADO
0 ^mm m
u
_______
16 ES
Operaciones
Page 81

Ajuste del tamaño de la imagen
(TAMAÑO)
© 0
©
O
Tras proyectar la imagen procedente de una
computadora, es posible que sea necesario ajustar el
tamaño de dicha imagen para adaptarla a la pantalla
del monitor. El ajuste sólo se aplica a la señal de
entrada mostrada en pantalla.
1 Presione CENTER/SIZE hasta que aparezca la
Ajuste de la nitidez de la imagen (FASE
PUNTO)
Si la imagen de la computadora parpadea o aparece
borrosa, o si la pantalla presenta ruido horizontal,
ajuste EASE PUNTO para obtener una imagen más
ngítida.
pantalla de ajuste TAMAÑO.
1 Presione MENU.
©>
CENTER/
SIZE
f , r, .
©
© ©
©
MENU
MENU
O
ENTER
O
2 Presione para ajustar el tamaño
de la imagen.
Para realizar el ajuste de tamaño horizontal,
presione o (TAMAÑO H).
para aumentar el tamaño horizontal
© 0-
Para realizar el ajuste de tamaño vertical, presione
♦ o ♦ (TAMAÑO V).
©
<7
©
La pantalla de ajuste TAMAÑO desaparecerá
automáticamente transcurridos 10 segundos
aproximadamente si no presiona ninguna tecla.
También es posible eliminar la pantalla de ajuste
TAMAÑO volviendo a presionar CENTER/SIZE.
par9 disminuir el tamaño horizontal
*: para aumentar el tamaño vertical
*: para disminuir el tamaño vertical
4 Presione 4, 4, 4 o 4 para ajustar ei nivel de
Para recuperar el ajuste de fábrica
Presione RESET en el monitor. Simultáneamente, los
ajustes de posición de imagen (página 16) y de vídeo/
audio (páginas 18 a 22) también recuperan los niveles
ajustados de fábrica.
Notas
• En el caso de una imagen con resolución de 640 x 350, 640 x
400 o 640 X 480, no se puede aumentar el tamaño vertical con
respecto a la imagen que se proyectó por primera vez.
• Es posible ajustar el tamaño con las teclas CENTER/SIZE y o/
ó/■ (>/<> del monitor.
2 Presione 4 o para seleccionar OPCION y
presione ENTER.
ENTER
<5>
<7
©
3 Presione 4 o 4 para seleccionar FASE PUNTO
y presione ENTER.
©
<y
©
manera que obtenga una imagen nítida.
5 Presione MENU para recuperar la pantalla
original.
Nota
• No es posible utilizar esta función para la entrada procedente
de VIDEO IN.
ENTER
®o®
<7©
OPCIQN =3
PUTD PPPGfìOOlNO
LENGUPJE: ESPPNOL
FPSE PUNTO: 16
Operaciones 7'^^
Page 82

Selección del modo
4 Presione MENU para recuperar la pantalla
original.
predefinido de
visualización de
imágenes
La función de modo video / audio permite seleccionar
cuatro modos diferentes de ajustes de imagen y sonido.
Elija el que mejor se adapte al tipo de programa que
desee ver.
: <mm tm . |
© ^
© ©
©
MENU ;
EKTER
1 Presione MENU.
2 Presione t o 4^ para seleccionar VIDEO/
AUDIO, y presione ENTER.
Para recuperar el ajuste de fábrica
Presione RESET en el monitor.
Al ver la imagen de la computadora, el modo se
reajusta en PRESENTACION. Al ver imágenes de
video, el modo se reajusta en ESTANDAR.
Simultáneamente, la posición y tamaño de una imagen
de una computadora (páginas 16 y 17) también
recuperan los niveles ajustados de fábrica. Los ajustes
de AV MEMORIA no se reajustan.
Nota
• No es posible definir los ajustes en modos diferentes a AV
MEMORIA.
O’
©
©
ENTER
UIDED/PUDIO ^
►PRESENTfiCION
ESTPNDPR
PEL ICULPS
AU MEMORIA
AJUSTE UIOEO
AJUSTE AUDIO
3 Presione 4 o 4 para seleccionar el elemento
que desee, y presione ENTER.
©
Elija
PRESENTACION Ver la imagen recibida desde una
ESTANDAR
PELICULAS
AV MEMORIA Ajustar la calidad de imagen/sonido
Para
computadora.
Ver la imagen recibida desde un equipo
de video.
Ver películas.
según sus preferencias. (Para más
información, consulte las páginas 19 a
22.)
ENTER
18 -ES I Operaciones
Page 83

Ajuste de la imagen
(AV MEMORIA)
Es posible ajustar la calidad de la imagen según sus
preferencias y almacenar los ajustes en AV MEMORIA.
f '
!í , 0
■ ©
1
1 Presione MENU.
2 Presione 4 o para seleccionar VIDEO/
AUDIO, y presione ENTER.
0
©
i MENU '
CD
ENTER
cz>
ENTER
(2) Presione ENTER.
PJUSTE UIDEO
ENTER
BRILLO
miiitiiiiiimiiM.--
5 Ajuste el elemento seleccionado.
Presione 4, 4, 4 o 4 para ajustar el elemento, y
presione ENTER.
Opción
CONTRASTE
BRILLO
COLOR
TONALIDAD
NITIDEZ
0
Presione 4 o 4 para
Reducir el contraste
de la imagen.
Reducir el brillo de la
imagen.
Reducir la intensidad
del color.
Que la imagen
adquiera un tono
púrpura.
Obtener una imagen
más suave.
\ ENTER
Presione 4 o 4 para
Aumentar el brillo de
la imagen.
Aumentar el brillo de
la imagen.
Aumentar la
intensidad del color.
Que la imagen
adquiera un tono
verdoso.
Aumentar la definición
de la imagen.
0
3 Presione 4 o 4 para seleccionar AJUSTE
VIDEO, y presione ENTER.
ftJUSTE UIDEO
0
ENTER
MENU
►CONTRASTE
BRILLO
COLOR
TONALIDAD
NITIDEZ
RESET
IIHIHIIHIII-
tmiHi
........
IIHIHI
......
IHHin
.......
æ
0
4 Seleccione el elemento que desee ajustar.
Por ejemplo:
(1) Para ajustar el brillo, presione 4 o 4 para
desplazar el cursor (► ) hasta BRILLO.
0^
0
6 Para ajustar otros elementos, repita los
pasos 4 y 5.
7 Presione MENU para recuperar la pantalla
original.
Para recuperar el ajuste de fábrica
Desplace el cursor (► ) hasta RESET en la parte inferior
del menú AJUSTE VIDEO, y presione ENTER.
Notas ., ,
• Cuando se introduce la señal RGB, no se pueden ajustar
COLOR y TONALIDAD.
• Es posible ajustar los elementos en AV MEMORIA para cada
entrada de VIDEO 1, 2 y 3, y RGB 1 IN y RGB 2 IN.
• Es posible emplear el menú con las teclas del monitor.
VOLUME + funciona igual que ♦ y ♦ , y VOLUME - igual que
♦ y*.
Operaciones ^ 0-ES
Page 84

Ajuste de la imagen en detalle
Es posible ajustar la imagen con las opciones NR
(reducción de ruido), BLANCO-H y TEMP
(temperatura) COLOR.
0
©
©
MENU
CD
ENTER
CD
1 Presione MENU.
6 Presione 4 o 4 para ajustar el elemento, y
presione ENTER.
ENTER
©
Elija Para
NR (Reducción de
ruido)
BLANCO-H
TEMP COLOR
(Temperatura del
color)
Reducir el ruido de imagen. Puede
elegir la posición BAJO o ALTO.
Enfatizar el color blanco con la
posición SI.
Hacer que el color blanco sea cálido
(rojizo) con la posición BAJO o frío
(azulado) con la posición ALTO.
2 Presione 4^0 * para seleccionar VIDEO/
AUDIO, y presione ENTER.
3 Presione 4 o* para seleccionar AJUSTE
VIDEO, y presione ENTER.
AJUSTE UIDEO
©
ENTER
MENU
►CONTRASTE
BRILLO
COLOR
TONALIOAD
N ITIDE2
RESET
©
4 Presione « o ^ para desplazar el cursor (P-)
hasta RESET, y vuelva a presionar 4^.
AJUSTE UIOEO
©
■ 1
<T
©
5 Seleccione el elemento que desee con 4 o 4^,
y presione ENTER.
MENU I
►NR; N0
BLANCO-H:N0
TEMP COLOR:
RESET
MEDIO
7 Para ajustar otros elementos, repita los
pasos 5 y 6.
8 Presione MENU para recuperar la pantalla
original.
Para recuperar el ajuste de fábrica
Desplace el cursor (► ) hasta RESET en la parte inferior
del menú AJUSTE VIDEO, y presione ENTER.
Notas
• Es posible ajustar los elementos en AV MEMORIA para cada
entrada de VIDEO 1, 2 y 3, y RGB 1 IN y RGB 2 IN.
• Es posible emplear el menú con las teclas del monitor.
VOLUME + funciona igual que 4 y ♦ , y VOLUME - igual que
*y*.
©
•cf ©
20 -ES I Operaciones
ENTER
<5^
Page 85

Ajuste del sonido
(AV MEMORIA)
5 Ajuste el elemento seleccionado.
Presione ♦ o ♦ para ajustar el elemento, y
presione ENTER.
ENTER
®o®
(y(*)
Es posible ajustar la calidad de sonido según sus
preferencias y almacenar los ajustes eh AV MEMORIA.
©
0 ©
MENU
ENTER
O
1 Presione MENU.
2 Presione 4 0 4^ para seleccionar VIDEO/
AUDIO, y presione ENTER.
©
ENTER
Cf ©
3 Presione 4 o 4 para seleccionar AJUSTE
AUDIO, y presione ENTER.
AJUSTE AUDIO
MENU ^
►AGUDOS "«'«"•
6RAUES «mui-
BALANCE
....
efecto:
NO
RESET
I-
<y 0
©
ENTER
<5*
Opción
AGUDOS
GRAVES
BALANCE
6 Para ajustar otros elementos, repita los
pasos 4 y 5.
Presione * o ■* para
Reducir los agudos.
Reducir los graves.
Enfatizar el volumen
del altavoz izquierdo.
Presione 4 o ♦ para
Aumentar los agudos.
Aumentar los graves
Enfatizar el volumen
del altavoz derecho.
7 Presione MENU para recuperar la pantalla
original.
Para recuperar el ajuste de fábrica
Desplace el cursor (► ) hasta RESET en la parte inferior
del menú AJUSTE AUDIO, y presione ENTER.
Notas
• Es posible ajustar los elementos en AV MEMORIA para cada
entrada de VIDEO 1, 2 y 3, y RGB 1 IN y RGB 2 IN.
• Es posible emplear el menú con las teclas del monitor.
VOLUME + funciona igual que ♦ y ♦ , y VOLUME - igual que
4y^.
4 Seleccione el elemento que desee ajustar.
Por ejemplo:
(1) Para ajustar los graves, presione 4 o 4 para
desplazar el cursor (► ) hasta GRAVES.
©
©
(2) Presione ENTER.
ENTER
AJUSTE AUDIO
GRAUES
HIIMMIHMIIIIHIII—
Operaciones 21"^^
Page 86

Selección del efecto
5 Presione e o para seleccionar el elemento
deseado, y presione ENTER.
de audio (efecto)
El modo de efecto de audio permite obtener un sonido
dinámico con efecto Surround simulado.
t ©
© ©
MENU
CD
ENTER
CD
1 Presione MENU.
2 Presione 4 o 4^ para seleccionar VIDEO/
AUDIO, y presione ENTER.
©
ENTER
<y ©
0
ENTER
0
Elija
SALA SURROUND 1
SALA SURROUND 2
ESTEREO SIMULADO Recibir sonido monoaural con
NO
6 Presione MENU para recuperar ia pantalla
originai.
Para recuperar el ajuste de fábrica
Desplace el cursor (► ) hasta RESET en la parte inferior
del menú AJUSTE AUDIO, y presione ENTER.
Notas
• Puede ajustar los elementos en AV MEMORIA para cada
entrada de VIDEO 1, 2 y 3, y RGB 1 IN y RGB 2 IN.
• Es posible emplear el menú con las teclas del monitor.
VOLUME + funciona igual que ♦ y y VOLUME - igual que
♦ y*.
Para
Recibir sonido dinámico
tridimensional.
Ver películas.
efecto Surround simulado.
Cancelar el efecto de audio.
3 Presione 4 o 4 para seleccionar AJUSTE
AUDIO, y presione ENTER.
PJUSTE AUDIO
©
ENTER
*5*
MENU rj
►AGUDOS
GRAUES
BALANCE
EFECTQ:
RESET
........
........
....
NO
I..
<y ©
4 Presione 4 o ♦ para seleccionar EFECTO, y
presione ENTER.
©
ENTER
<y ©
22'^^ Operaciones
Page 87

Desactivación automática de la alimentación
(AUTO APAGADO)
4 Presione o ♦ para seleccionar 60
(minutos), 90 (minutos) o 120 (minutos), y presione ENTER.
ENTER
0 '0
Es posible ajustar el monitor para que se apague una
vez transcurrido el espacio de tiempo especificado
después de cancelarse la entrada de la señal de
sincronización de la computadora.
0
# ©
©
CD
s
1 Presione MENU.
MENU
■
2 Presione ♦ o para seleccionar OPCION, y
presione ENTER.
0
ENTER
5 Presione MENU para recuperar la pantalla
original.
Una vez transcurrido el espacio de tiempo especificado
en el paso 4 después de la cancelación de la entrada de
la señal de sincronización, la alimentación se
desactivará y los indicadores STANDBY y Ó se
iluminarán.
La alimentación se activará si presiona POWER en el
control remoto o si vuelve a introducir una señal desde
la computadora.
Nota
• No es posible utilizar esta función para la entrada procedente
de VIDEO IN.
0
3 Presione ^ o * para seleccionar AUTO
APAGADO, y presione ENTER.
0
<y 0
ENTER
OPCION iiftUTO ftPOGftOO-.NQ
LENGUPJE: español
FPSE PUNTO: 16
Operaciones 23"^®
Page 88

Información adicional
Limpieza del filtro
de aire
El filtro de aire debe limpiarse una vez al mes. Si
resulta difícil eliminar el polvo, sustituya el filtro por
otro nuevo. Para limpiarlo, siga los pasos que aparecen
a continuación.
1 Desactive el interruptor de alimentación
del monitor y desenchufe el cable de
alimentación.
2 Extraiga el panel frontal del monitor.
4 Elimine el polvo del filtro con una
aspiradora.
5 Fije un filtro nuevo al monitor.
Encaje firmemente los seis salientes.
Agarre firmemente el monitor.
Tire del panel hacia fuera, sujetando su extremo
izquierdo. Tenga cuidado de no dañarse los
dedos.
3 Tire del filtro de aire hacia arriba para
extraerlo.
6 Instale el panel frontal.
Tenga cuidado de no dañar los altavoces.
Notas
• Limpie el filtro de aire periódicamente. De lo contrario, es
posible que la temperatura interna del monitor se eleve de un
modo anormal.
• No utilice un filtro deteriorado. Encaje firmemente las seis
proyecciones del filtro en el monitor. Si existe polvo en el
interior del monitor, es posible que la imagen se distorsione y
que se produzcan incendios.
• Asegúrese de fijar el filtro de aire firmemente. En caso
contrario, el monitor no se encenderá.
• Póngase en contacto con un proveedor Sony para obtener un
filtro nuevo.
24-es
Información adicional
Page 89

Sustitución de la
lámpara
3 Afloje el tornillo con una moneda o un
objeto similar para extraer la cubierta de la
lámpara.
Si la pantalla se oscurece, el color es extraño o si el
indicador LAMP de la parte frontal del monitor
parpadea, significa que es necesario sustituir la
lámpara por otra nueva.
Antes de la sustitución
• Asegúrese de utilizar la unidad de lámpara XL-IOOU de Sony
(no suministrada) para realizar la sustitución. El empleo de
otro tipo de lámparas dañará al monitor.
« No extraiga la lámpara si no es para sustituirla.
• Antes de la sustitución, asegúrese de apagar el monitor y de
desenchufar el cable de alimentación.
• Al sustituir la lámpara, espere hasta que se enfríe por
completo, ya que su superficie permanece caliente durante al
menos 30 minutos una vez desactivada la alimentación.
• No deje la lámpara extraída cerca de materiales inflamables.
• No vierta agua sobre la lámpara extraída, ni coloque objetos en
su interior.
• No coloque materiales inflamables ni objetos metálicos en el
receptáculo para la lámpara del monitor después de extraer
ésta. No toque dicho receptáculo.
• Encaje la lámpara nueva firmemente, ya que en caso contrario
es posible que la pantalla se oscurezca o que se produzca un
incendio.
1 Desactive el interruptor de aiimentación
del monitor y desenchufe el cable de
alimentación.
Espere al menos 30 minutos antes de reemplazar la
lámpara para que se enfríe la superficie de la
misma.
2 Extraiga ei panel frontal.
Afloje los dos tornillos que fijan ia iámpara
y, a continuación, saque ésta.
La lámpara está muy caliente inmediatamente
después del uso. No toque nunca el vidrio frontal
de la lámpara ni las partes circundantes.
Afloje los dos tornillos con la llave de
cabeza hexagonal (suministrada con la
lámpara).
Coloque la lámpara extraída en la caja vacía de la
lámpara de sustitución.
Tire del panel hacía fuera, agarrando su
extremo derecho. Tenga cuidado de no
dañarse los dedos.
5 Instale la lámpara nueva y apriete ios dos
tornillos firmemente.
6 Instaie ia cubierta de la lámpara y apriete el
tornillo.
7 Mónte él panel frontal.
Tenga cuidado de no dañar los altavoces del
monitor.
Notas
• No toque el vidrio frontal de una lámpara nueva ni el vidrio
del receptáculo para la lámpara, ya que si lo hace puede
reducirse la calidad de imagen o la duración de la lámpara.
• Asegúrese de fijar la lámpara con firmeza. En caso contrario, el
monitor no se encenderá.
• Es posible que se escuche un fuerte sonido si la lámpara se
funde. Esto no es peligroso.
• Póngase en contacto con un proveedor Sony para obtener la
lámpara XL-IOOU.
Información adicional
25ES
Page 90

Solución de problemas
Si el problema no se soluciona después de intentar las
soluciones que aparecen a continuación, póngase en
contacto con el proveedor Sony más próximo.
Ausencia de imagen
^ Compruebe que el cable de alimentación esté
firmemente conectado.
¿Está activada la alimentación del monitor?
^ ¿Ha instalado firmemente el filtro de aire?
(página 24)
^ ¿Ha fijado la cubierta de la lámpara
firmemente? (página 25)
^ Compruebe que la alimentación del equipo
conectado está activada.
^ Presione cualquier tecla de la computadora
conectada.
^ Compruebe que ha conectado correctamente
el cable de señal RGB o los cables de audio /
video. (El adaptador HD15-HD15
suministrado puede ser necesario para
ciertos modelos de computadoras IBM PC/
AT o compatibles. Para computadoras
Macintosh o compatible, emplee el adaptador
Macintosh suministrado.)
Compruebe que los pines de los conectores
HD15 no están doblados.
^ Compruebe que la tarjeta de video está
insertada por completo en la ranura bus
adecuada.
^ Asegúrese de que el rango de frecuencia de
la señal de entrada se encuentra dentro del
especificado para el monitor. (En caso
contrario, el mensaje "FUERA DE RANGO
EXPLORACION" aparecerá en la pantalla.)
^ El monitor no acepta señales de modo
entrelazado.
^ Para los usuarios que utilicen Windows 95 —
Si "KL-W7000" o "KL-W9000" no aparece
como "Monitor type" (tipo de monitor) al
seleccionar "SONY" como "Manufacturer"
(fabricante) en la pantalla de selección de
dispositivo de Windows 95, seleccione
"Standard monitor" como "Manufacturer" y
"Plug and Play monitor (VESA DDC)" como
"Monitor type", ó seleccione "SONY
Corporation" como "Manufacturer" y "KL-
W7000" o "KL-W9000" como "Monitor
type".
26ES
Información adicional
La salida de imagen y sonido se demora
^ Si el indicador Ó (alimentación) verde de la
parte frontal parpadea, significa que el
monitor está calentándose.
^ El monitor tardará 30 minutos en volver a
mostrar la imagen después de apagarlo.
La pantalla está iluminada y la imagen no
puede verse
Asegúrese de que ve el monitor dentro del
área de visualización óptima (página 5).
Buena calidad de imagen, pero ausencia de
sonido
^ Presione VOL+ (VOLUME+).
^ Presione MUTING para que "MUTING"
desaparezca de la pantalla (página 13).
La imagen es borrosa
Ajuste la opción NR del menú AJUSTE
VIDEO en BAJO o ALTO.
^ Si utiliza el monitor en un lugar frío, es
posible que se haya condensado humedad.
Déjelo tal como se encuentra para que la
humedad se evapore.
La imagen aparece oscura
Sustituya la lámpara (fuente de iluminación)
por otra nueva (página 25).
Ausencia de color o color anormal
^ Ajuste la imagen en el menú AJUSTE VIDEO
(página 19).
Aparecen imágenes dobles
El empleo de un cable prolongador, un cable
demasiado largo o una conexión floja puede
producir este problema.
La imagen de la computadora no aparece
centrada o el tamaño es incorrecto
^ Ajuste el centrado y el tamaño de forma que
la imagen se adapte a la pantalla (páginas 16
y 17).
La imagen aparece distorsionada
^ Consulte el manual de la tarjeta de video
para obtener información sobre el ajuste
adecuado del monitor.
^ Compruebe que la frecuencia y el modo
gráfico que intenta introducir se encuentran
dentro del rango aceptable (página 9).
Incluso dentro del rango adecuado, ciertas
tarjetas de video pueden tener un impulso de
sincronización demasiado estrecho para que
el monitor se sincronice correctamente.
Ausencia de imagen y sonido del equipo
conectado
¿Están todos los cables de conexión
conectados?
Presione la tecla RGB o VIDEO del control
remoto (página 12).
El control remoto no funciona.
¿Están las pilas gastadas?
Se oye un ruido zumbante de los ventiladores
incluso después de haber apagado el monitor.
^ Los ventiladores instalados en el interior del
monitor funcionan para evitar el
calentamiento interno. Se detendrán
transcurridos 2 minutos.
Page 91

Significado del parpadeo de los indicadores de la parte frontal del monitor
Los indicadores (1) (alimentación) (verde), STANDBY
(naranja) y/o LAMP (rojo), al encenderse o parpadear,
indican el estado del monitor y advertencias del
siguiente modo:
El indicador (!) se ilumina.
La alimentación del monitor está activada.
El indicador STANDBY se ilumina.
^ El monitor se encuentra en el modo de
espera, y se encenderá al presionar POWER
en el control remoto.
Los indicadores LAMP, STANDBY y Ó parpadean.
^ La temperatura del interior del monitor ha
aumentado anormalmente, o los
ventiladores se han detenido.
Compruebe que el filtro de aire no está
obstruido y que los orificios de ventilación
no están bloqueados. Encienda el monitor
transcurridos unos instantes (página 24).
Si el monitor no se recupera una vez corregidos los
problemas, póngase en contacto con personal Sony
especializado.
Los indicadores Ó y STANDBY se iluminan.
^ La función de apagado automático está
activada. El monitor se ha apagado una vez
transcurrido el espacio de tiempo
especificado después de cancelarse la
entrada de la computadora.
El indicador (!) parpadea.
^ La lámpara (fuente de iluminación) está
preparada para encenderse. La imagen
aparecerá en pantalla dentro de un espacio
de tiempo de 30 minutos.
Los indicadores LAMP y STANDBY parpadean.
^ El filtro de aire o la cubierta de la lámpara
no están instalados con firmeza. Al
corregirlo, el indicador STANDBY se
iluminará y el monitor entrará en el modo
de espera (páginas 24 y 25).
El indicador LAMP parpadea.
^ La lámpara (fuente de iluminación) se ha
fundido. Sustituyala por otra nueva
(página 25).
Información adicional
27ES
Page 92

Especificaciones
Señal aceptable Señal de video NTSC, señal RGB
Sistema de proyección
Panel LCD 1,35 pulgadas, TFT
Lámpara XL-IOOU: HID, 100 W
Objetivo Híbrido de gran diámetro, F2,4
Tamaño de pantalla (medida diagonal)
Tamaño de la imagen visualizable (para entrada RGB)
Frecuencia de deflexión
Entradas/salidas
VIDEO 1, 2 y 3 IN
VIDEO OUT
28ES
Información adicional
(Para más información, consulte la
página 9.)
3 paneles LCD, 1 objetivo
1,54 millones de puntos
aproximadamente (512.880 píxeles)
1068,5 X 480 puntos x 3 paneles
KL-W7000: 37 pulgadas (942 mm)
KL-W9000: 50 pulgadas (1.272 mm)
KL-W7000: Aprox. 36,pulgadas (921
mm) (en diagonal)
Aprox. 803 X 452 mm (an/al)
KL-W9000: Aprox. 49,1 pulgadas
(1247 mm) (en diagonal)
Aprox. 1087 X 611 mm (an/al)
Horizontal: 31,5 a 50 kHz
Verfical: 50 a 85 Hz
S VIDEO (sólo VIDEO 1, 3 IN)
(4 pines mini-DIN)
Y; 1 Vp-p, 75 ohmios
desbalanceado, sincronización
negativa
C: 0,286 Vp-p (señal de
sincronización), 75 ohmios
VIDEO (tomas fonográficas):
1 Vp-p, 75 ohmios
desbalanceado, sincronización
negativa
AUDIO (tomas fonográficas):
2 canales, 500 mVrms
Impedancia: más de 47
kiloohmios
S VIDEO (4 pines mini-DIN):
Y: 1 Vp-p, 75 ohmios
desbalanceado, sincronización
negativa
C: 0,286 Vp-p (señal de
sincronización), 75 ohmios
VIDEO (toma fonográfica):
1 Vp-p, 75 ohmios
desbalanceado, sincronización
negativa
AUDIO (tomas fonográficas):
2 canales, 500 mVrms
Impedancia: menos de 5
kiloohmios
RGB 1, 2 IN VIDEO (D-sub de 15 pines,
hembra):
R, G, B: 0,7 Vp-p, positiva,
terminación de 75 ohmios
Sincronización de verde: 0,286
Vp-p
SYNC/HD: Sincronización
compuesta: TTL, alta
impedancia,
sincronización positiva/
negativa
Sincronización horizontakTTL,
alta impedancia,
sincronización positiva/
negativa
VD: Sincronización vertical:
TTL, alta impedancia,
sincronización positiva/
negativa
AUDIO (RGB 1 IN) (tomas
fonográficas)
2 canales, 500 mVrms
Impedancia: más de 47
kiloohmios
AUDIO (RGB 2 IN) (minitoma
estéreo)
500 mVrms
Impedancia: más de 47
kiloohmios
Salida de bocina Frontal: 5 W x 2 (D/I)
Bocina para graves: 20 W
tomas fonográficas, 2 canales,
0 a 500 mVrms (salida de audio
variable, modulación 100%)
Impedancia: menos de 5
kiloohmios
Requisitos de alimentación
100 Va 120 VGA, 50/60 Hz
Consumo de energía
190 W (MAX)
En espera: 2 W
Dimensiones KL-W7000: 920 x 825 x 390 mm
(36' / 4 X 32* / 2 X IS" / 8 pulgadas)
(an/al/prf)
KL-W9000:1.228 x 1.055 x 565
mm (48V8 x 41V» x 22*/4
pulgadas) (an/al/prf)
Masa KL-W7000: Aprox. 30 kg (68 Ibs
2 oz)
KL-W9000: Aprox. 43 kg (106 Ibs
8 oz)
Accesorios suministrados
Control remoto RM-Y980 (1)
Pilas tamaño AA (R6) (2)
Cable de alimentación de CA (1)
Cable de señal RGB (D-sub de 15
pines -*—► D-sub de 15 pines) (1)
Adaptador HD15-HD15 (macho,
sin el pin n° 9) (1)
Adaptador Macintosh (1)
Windows 95 Monitor
Information Disk (1)
Abrazaderas (2)
Tornillos para las abrazaderas (2)
Hebilla (1)
Llave de cabeza hexagonal (1)
Eliminador de polvo (1)
Accesorios opcionales
Unidad de lámpara XL-IOOU
Diseño y especificaciones sujetos a cambios sin previo aviso.
Page 93

Tabla de sincronización de las señales
"Wide Resolution" (864 x 480, 1072 x
600, 1376 X 768)
"Wide Resolution"
864x480 1072^00 1376x768
Reloj de píxeles
(MHz)
1 punto (nseg) 29,207
lH(/<seg)
Activo H (//seg)
Supresión H (;<seg) 6,542
Pórtico frontal (;/seg) 0,701 0,89
H (puntos) 24
Sincronización (fise g)
H (puntos) 128 176
Pórtico posterior (ftse g) 2 ,10 3
H (puntos) 72
Polaridad de
sincronización H
Tiempo V-TTI
(Líneas)
Tiempo adición V
(Líneas)
Inicio supresión V
(Líneas)
Tiempo supresión
V (Líneas)
Inicio sincronización 490
V (Líneas)
Borde inferior V
(Líneas)
Pórtico frontal V
(Líneas)
Tiempo
sincronización
Ver (Líneas)
Pórtico posterior V
(Líneas)
Borde superior V
(Líneas)
Polaridad de
sincronización V
34,238
31,777
25,235 19,874,
3,738
53,94 87,44
18,539
26,4
6,526 4,94
48
3,263 2,104
2,373 2,47
128 216
- -
525
480
488
29
8
2
2 4
25 23 29
8 0
+
628 806
600
600 768
■ 28
601
0
1
+
11,436
20,676
15,736
0,366
32
184
-
768
38
771
0
3
6
0
+
Información adicional
29ES
Page 94

Identificación de los componentes
En esta sección se describen brevemente las teclas y los
controles del monitor y del control remoto. Para más
información, consulte las páginas indicadas junto a
cada descripción.
Monitor de proyección — Parte frontal
Con el panel frontal fijado
Con el panel frontaj
extraído
(página 24) (página 25)
m Sensor de control remoto
[2] Indicador LAMP (páginas 25, 27)
Indicador STANDBY (páginas 12, 23, 27)
g] Tecla CENTER/SIZE (páginas 16, 17)
in Teclas ■ O/O/o/o (páginas 16, 17)
Í6l Tomas VIDEO 2 IN (página 10)
ÍTI Conectar RGB 2 IN (páginas 7, 8)
Í8l Indicador (!) (alimentación) (páginas 12, 23,
27)
[9] Interruptor de alimentación (página 12)
M Tedas VOLUME +/- (página 12)
[Ti] Tecla MENU (página 11)
lÜ Tecla ENTER (página 11)
M Tecla INPUT SELECT (página 12)
IT4| Tecla RESET (páginas 16-18)
30
-ES
Información adicional
Page 95

Control remoto
in Teda DISPLAY (pàgina 13)
Teda MUTING (página 13)
[3] Teda VIDEO (pagina 12)
g] Teda CENTER/SIZE (páginas 16, 17)
Í5l Tedas VOL (volumen) +/- (página 12)
[6] Teda POWER (página 12)
[7] Teda WIDE (páginas 13, 15)
[8] Teda RGB (página 12)
[9] Tedas ♦ /♦ /♦ /♦ (páginas 11, 16, 17)
ES Teda MENU (página 11 )
BJ] Teda ENTER (página 11)
Información adicional
31-ES
Page 96

Indice Alfabetico
Ajuste
de la nitidez de la imagen 17
efecto de audio 22
imagen 19
imagen con elementos más detallados 20
posición de la imagen 16
sonido 21
tamaño de la imagen 17
temperatura del color 20
AJUSTE AUDIO 21
Ajuste CENTRADO 16
Ajuste TAMAN0 17
AJUSTE VIDEO
Area de visualizadón 5
ASPECTO 15
AUTO APAGADO 23
AV MEMORIA 19,21
Cambio del idioma del menú 11
COMPLETO 14, 15
Computadora IBM PC/AT 7
Computadora Macintosh o compatible 8
Conexiones
a una computadora 7, 8
a una toma de C A 10
■ a un equipo de video 10
Control remoto
identificación de los componentes 31
inserción de las pilas 11
DESPLAZAMV 15
FASE PUNTO 17
Efecto de audio 22
Filtro de aire 24
Eliminador de polvo 4
Frecuencia horizontal 9
Frecuencia vertical 9
FUERA DE RANGO EXPLORACION 9, 13
Identificación de los componentes 29
Indicador (1) (alimentación) 12, 27
Indicador LAMP 25, 27
Indicador STANDBY 12,27
Instalación del monitor 5
19,20
Lámpara
parpadeo 27
sustitución 25
Modo de imagen panorámica 13-15
Modo de usuario 9
Modo gráfico 9
Modo predefinido 9
NORMAL 14, 15
OPCION 11,23
Plug & Play 9
Selección del modo de video/audio 18
Silenciamiento 13
SUBTITULO 14
Surround 22
SVGA 9, 15
VGA 9, 15
VIDEO/AUDIO 18, 21
Visualizadón
de la imagen 12
de la imagen en modo panorámico 13
"Wide Resolution" 9, 15, 29
XGA 9, 15
ZOOM 14
ZOOM AMPLI 14
Sony Corporation Printed in Japan
 Loading...