

Page 1
REVISION HISTORY
TG1 (GA)
CHASSIS
MODEL
KLV-26T400A
KLV-26T400G
KLV-32T400A
NO. SUFFIX DATE SUPP / CORR DESCRIPTION
1 -01 2008/08 _ _ 1st Issue
PA RT NO.: 9-888-100-01
Page 2
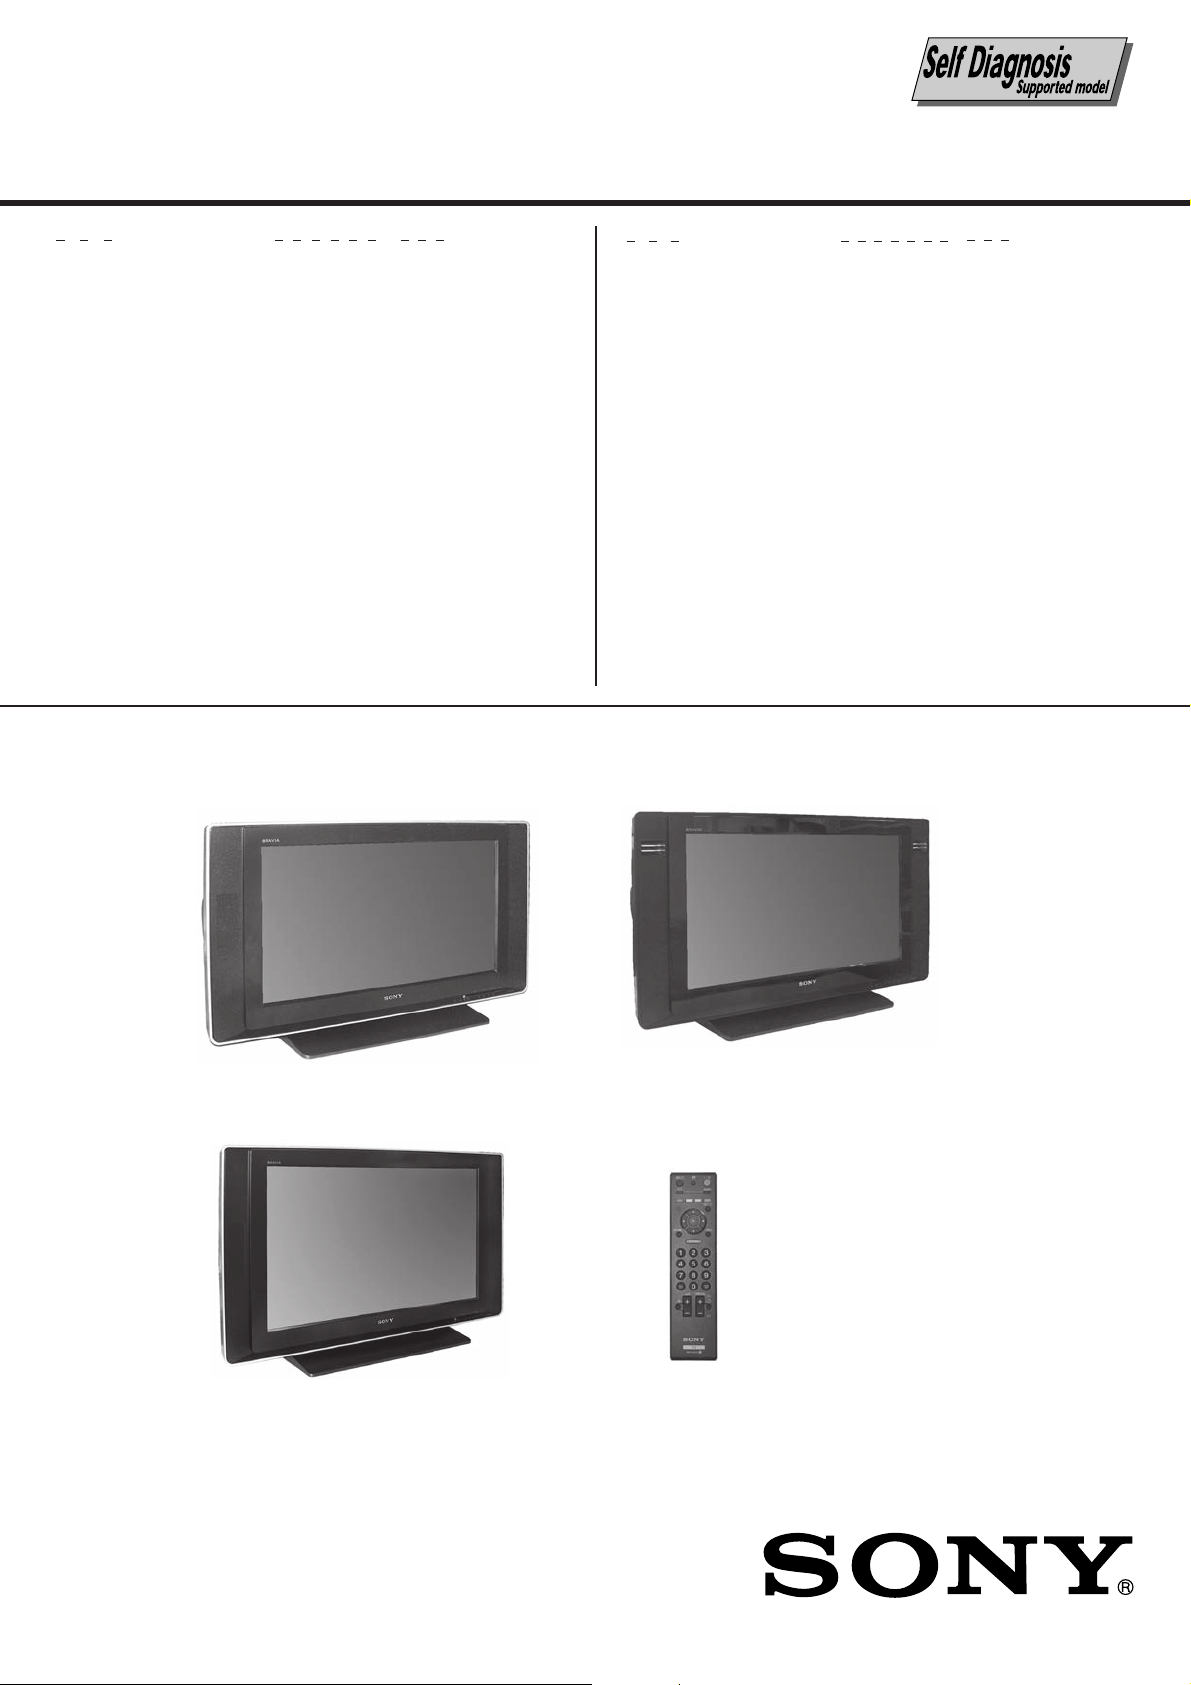
SERVICE MANUAL
TG1 (GA)
CHASSIS
MODEL COMMANDER DEST.
KLV-26T400A
KLV-26T400G
KLV-32T400A
RM-GA013 E, GE, India, ME,
New Zealand,
South Africa
RM-GA013 E, GE, India, ME,
RM-GA013 E, GE, India, ME,
Thailand, South Africa
MODEL COMMANDER DEST.
KLV-26T400A
RM-GA013
KLV-32T400A
KLV-26T400G
LCD COLOR TV
Page 3

KLV-26T400A, T400G, 32T400A
RM-GA013
TABLE OF CONTENTS
Section Title Page
1. SAFETY NOTES
1-1. Caution Handling of LCD Panel ..................................... 3
1-2. Safety Check Out ............................................................. 3
1-3. Leakage Test .................................................................... 3
1-4. WARNING ! .................................................................... 3
1-5. Lead Free Information ..................................................... 4
2. SELF DIAGNOSTIC FUNCTION
2-1. Overview of Control Buttons .......................................... 5
2-2. LED Display Specification.............................................. 5
2-3. LED Display Control ....................................................... 5
2-4. LED Pattern ..................................................................... 5
2-5. Viewing the Service Diagnosis Display .......................... 5
2-6. Standby LED Error Display ............................................ 6
3. DISASSEMBLY
3-1. Stand Assy Removal ........................................................ 7
3-2. Rear Cover Removal........................................................ 7
3-3. GPT Board and Bracket Removal ................................... 7
3-4. BT Board and Bracket Removal ..................................... 8
3-5. Vesa Frame Removal ....................................................... 8
3-6. HT Board and Speaker Removal..................................... 8
3-7. LCD Panel and Bezel Assy Removal .............................. 9
Section Title Page
6. DIAGRAMS
6-1. Block Diagram ............................................................... 23
6-2. Connector Diagram ....................................................... 23
6-3. Circuit Board Location .................................................. 25
6-4. Schematic Diagram ....................................................... 25
6-5. Printed Wiring Boards ................................................... 25
6-6. Semiconductor ............................................................... 25
7. EXPLODED VIEWS
7-1. (KLV-26T400)
7-1-1. Rear Cabinet ...................................................... 26
7-1-2. Power Cord, AC Cord Holder ........................... 27
7-1-3. BT, HT, GPT ...................................................... 28
7-1-4. Speaker, Bezel Assy and LCD Panel ................ 29
7-2. (KLV-32T400)
7-2-1. Rear Cabinet ...................................................... 30
7-2-2. Power Cord, AC Cord Holder ........................... 31
7-2-3. BT, HT, GPT ...................................................... 32
7-2-4. Speaker, Bezel Assy and LCD Panel ................ 33
8. ELECTRICAL PARTS LIST .............................................. 34
OPERATING INSTRUCTIONS
4. WIRE DRESSING
4-1. (KLV-26T400) ............................................................... 10
4-2. (KLV-32T400) ............................................................... 15
5. SERVICE ADJUSTMENTS
5-1. Accessing Diagnostic Menu .......................................... 20
5-2. Viewing the Service Mode Display ..............................20
5-3. Control Keys Via Remote Commander......................... 20
5-4. Adjustment Method ....................................................... 20
5-5. Table 1 ............................................................................ 22
5-6. Board & Panel Replacement ......................................... 22
– 2 –
Page 4
SECTION 1
SAFETY NOTES
KLV-26T400A, T400G, 32T400A
RM-GA013
1-1. Caution Handling of LCD Panel
When installing the LCD Panel, make sure you are grounded
with a wrist band.
When installing the LCD Panel on the wall, the panel must be
secured using the 4 mounting holes on the rear cover.
1) Do not press the panel or frame edge to avoid the risk of
electric shock.
2) Do not scratch or press on the panel with any sharp
objects.
3) Do not leave the module in high temperature or in areas of
high humidity for an extended period of time.
4) Do not expose the LCD panel to direct sunlight.
5) Avoid contact with water. It may cause short circuit within
the module.
6) Disconnect the AC adapter when replacing the backlight
(CCFL) or inverter circuit. (High voltage occurs at the inverter
circuit at 650Vrms)
7) Always clean the LCD panel with a soft cloth material.
8) Use care when handling the wires or connectors of the
inverter circuit. Damaging the wires may cause a short circuit.
9) Protect the panel from ESD to avoid damaging the electronic circuit (C-MOS).
1-2. Safety Check-Out
After correcting the original service problem, perform the
following safety checks before releasing the set to the
customer:-
1-3. Leakage Test
The AC leakage from any exposed metal part to earth
ground and from all exposed metal parts to any exposed
metal part having a return to chassis must not exceed 0.5mA
(500 microamperes). Leakage current can be measured by
any one of the three methods:-
1. A commercial leakage tester such as the SIMPSON 229 or
RCA WT-540A. Follow the manufacturers instructions to use
those instructions.
2. A battery-operated AC milliampmeter. The DATA
PRECISION 245 digital multimeter is suitable for this job.
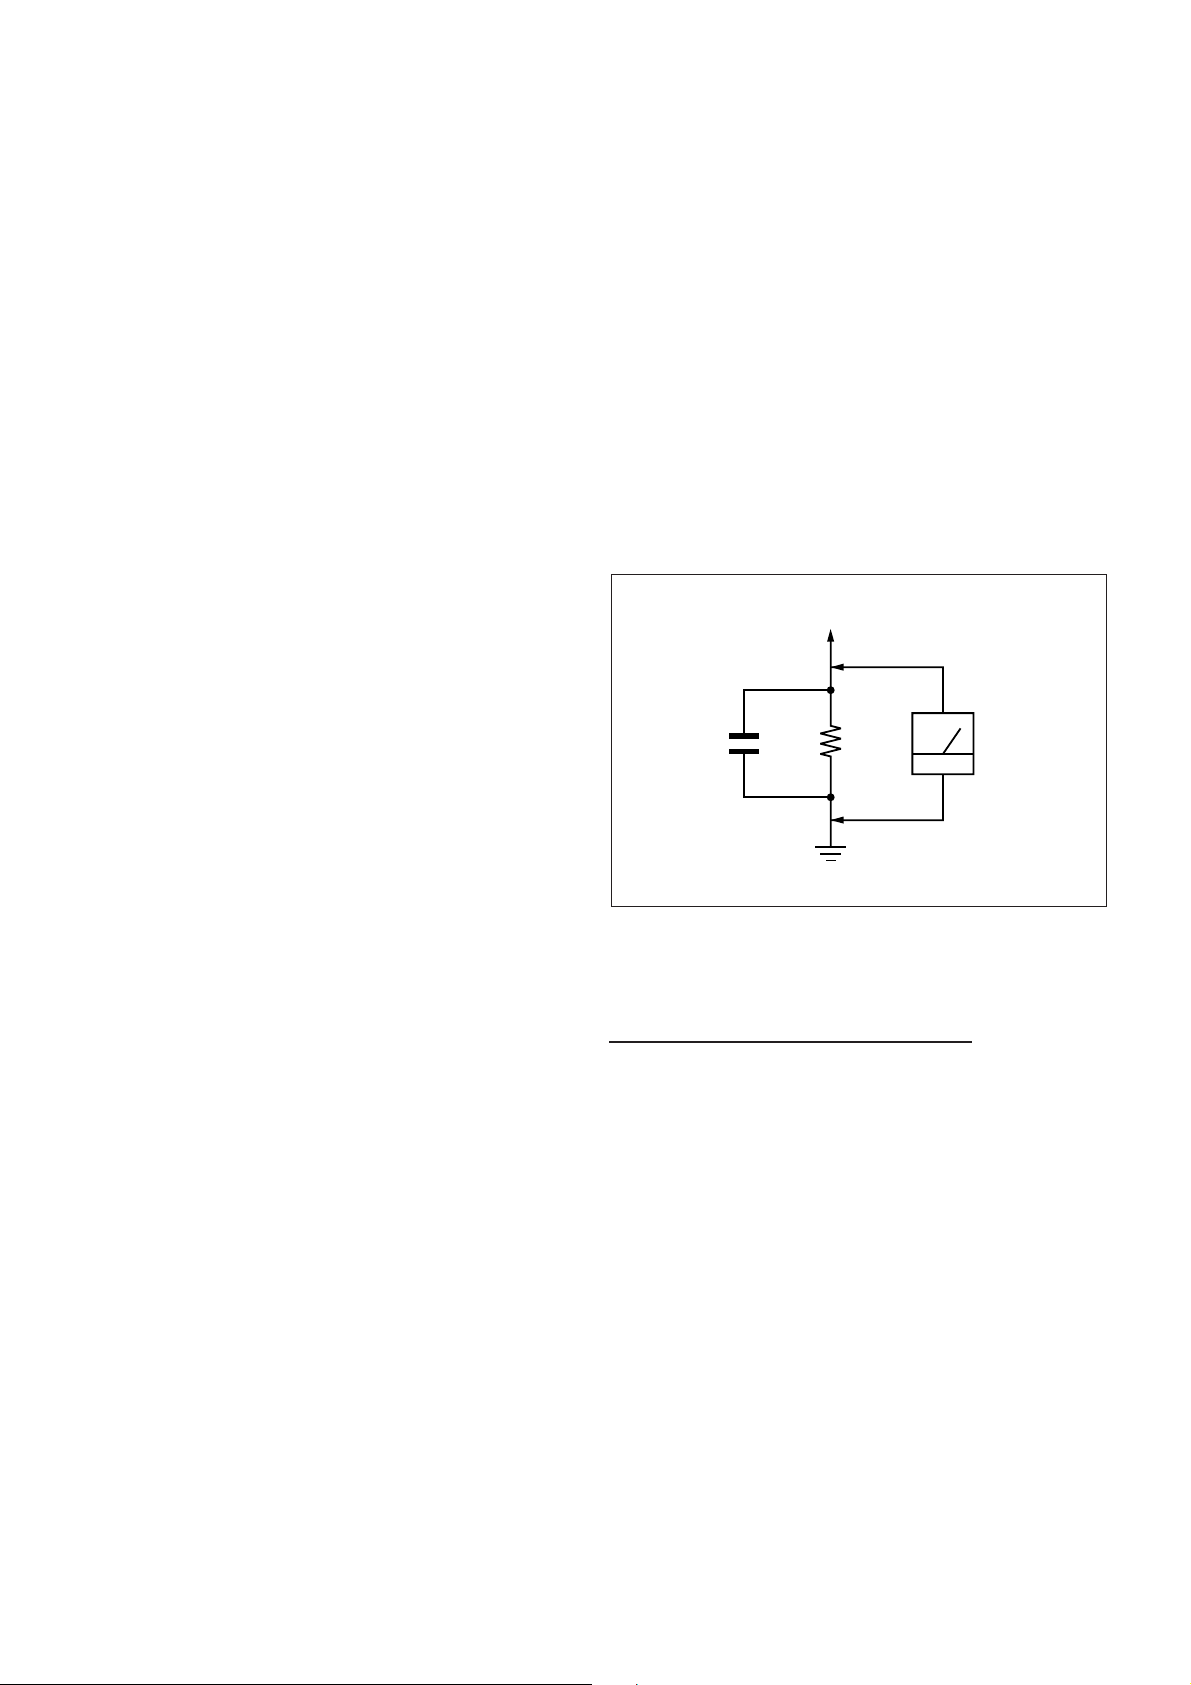
3. Measuring the voltage drop across a resistor by means of
a VOM or battery operated AC voltmeter. The 'limit' indication
is 0.75V so analog meters must have an accurate low voltage
scale. The SIMPSON'S 250 and SANWA SH-63TRD are
examples of passive VOMs that are suitable. Nearly all battery
operated digital multimeters that have a 2 VAC range are
suitable. (see Figure 1.)
To Exposed Metal
Parts on Set
0.15 µF
1.5 k
Ω
AC
Voltmeter
(0.75 V)
1) Check the area of your repair for unsoldered or poorly
soldered connections. Check the entire board surface for
solder splashes and bridges.
2) Check the interboard wiring to ensure that no wires are
"pinched" or contact high-wattage resistors.
3)Check all control knobs, shields, covers, ground straps and
mounting hardware have been replaced. Be absolutely certain
you have replaced all the insulators.
4) Look for unauthorized replacement parts, particularly
transistors that were installed during a previous repair. Point
them out to the customer and recommend their replacement.
5) Look for parts which, though functioning show obvious
signs of deterioration. Point them out to the customer and
recommend their replacement.
6) Check the line cords for cracks and abrasion.
Recommend the replacement of any such line cord to the
customer.
7) Check the antenna terminals, metal trim, "metallized"
knobs, screws and all other exposed metal parts for AC
leakage. Check leakage test as described next.
Earth Ground
Figure 1. AC voltmeter to check AC leakage
1-4. WARNING !
SAFETY-RELATED COMPONENT WARNING!
COMPONENTS IDENTIFIED BY SHADING AND MARK !
ON THE EXPLODED VIEWS ARE CRITICAL FOR SAFE
OPERATION. REPLACE THESE COMPONENTS WITH
SONY PARTS WHOSE PART NUMBERS APPEAR AS
SHOWN IN THIS MANUAL OR IN SUPPLEMENTS
PUBLISHED BY SONY. CIRCUIT ADJUSTMENTS THAT ARE
CRITICAL FOR SAFE OPERATION ARE IDENTIFIED IN
THIS MANUAL. FOLLOW THESE PROCEDURES
WHENEVER CRITICAL COMPONENTS ARE REPLACED
OR IMPROPER OPERATION IS SUSPECTED.
– 3 –
Page 5
KLV-26T400A, T400G, 32T400A
RM-GA013
1-5. Lead Free Information
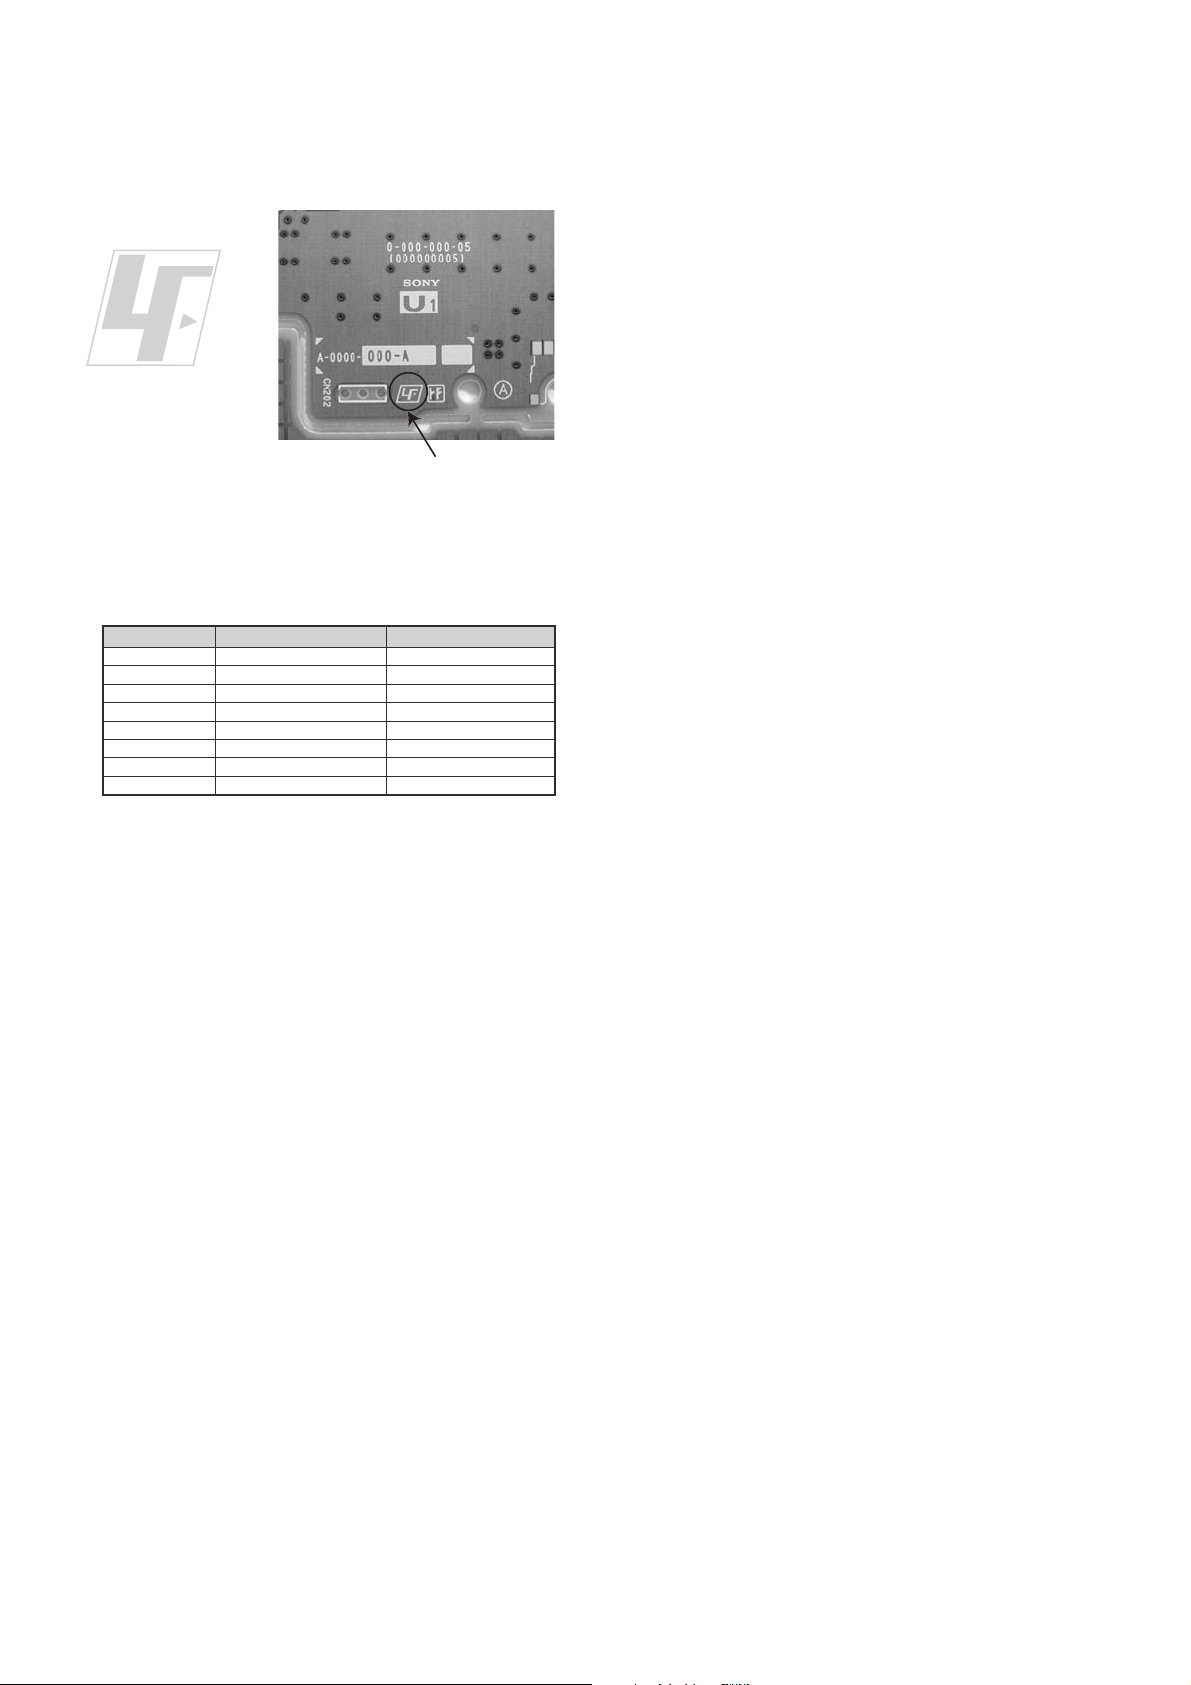
The circuit boards used in these models have been processed
using Lead Free Solder. The boards are identified by the LF
logo located close to the board designation.
Figure 2: LF logo
Figure 3: LF logo on circuit board
The servicing of these boards requires special precautions. It
is strongly recommended to use Lead Free Solder material in
order to guarantee optimal quality of new solder joints. Lead
Free Solder is available under the following part numbers:-
rebmuntraP retemaiD skrameR
7
91-500-046-mm
02-500-046-7m4.0Kg05.0
12-500-046-7m5.0Kg05.0
22-500-046-7m6.0Kg52.0
32-500-046-7m8.0Kg00.1
42-500-046-7m0.1Kg00.1
52-500-046-7m2.1Kg00.1
62-500-046-7m6.1Kg00.1
3.0Kg52.0
m
m
m
m
m
m
m
Due to high melting point of Lead Free Solder, the soldering
iron tip temperature needs to be set to 370 degrees
centigrade. This requires soldering equipment capable of
accurate temperature control coupled with a good heat
recovery characteristics.
For more information on the use of Lead Free Solder,
please refer to
http://www.sony-training.com
– 4 –
Page 6
SECTION 2
SELF DIAGNOSTIC FUNCTION
KLV-26T400A, T400G, 32T400A
RM-GA013
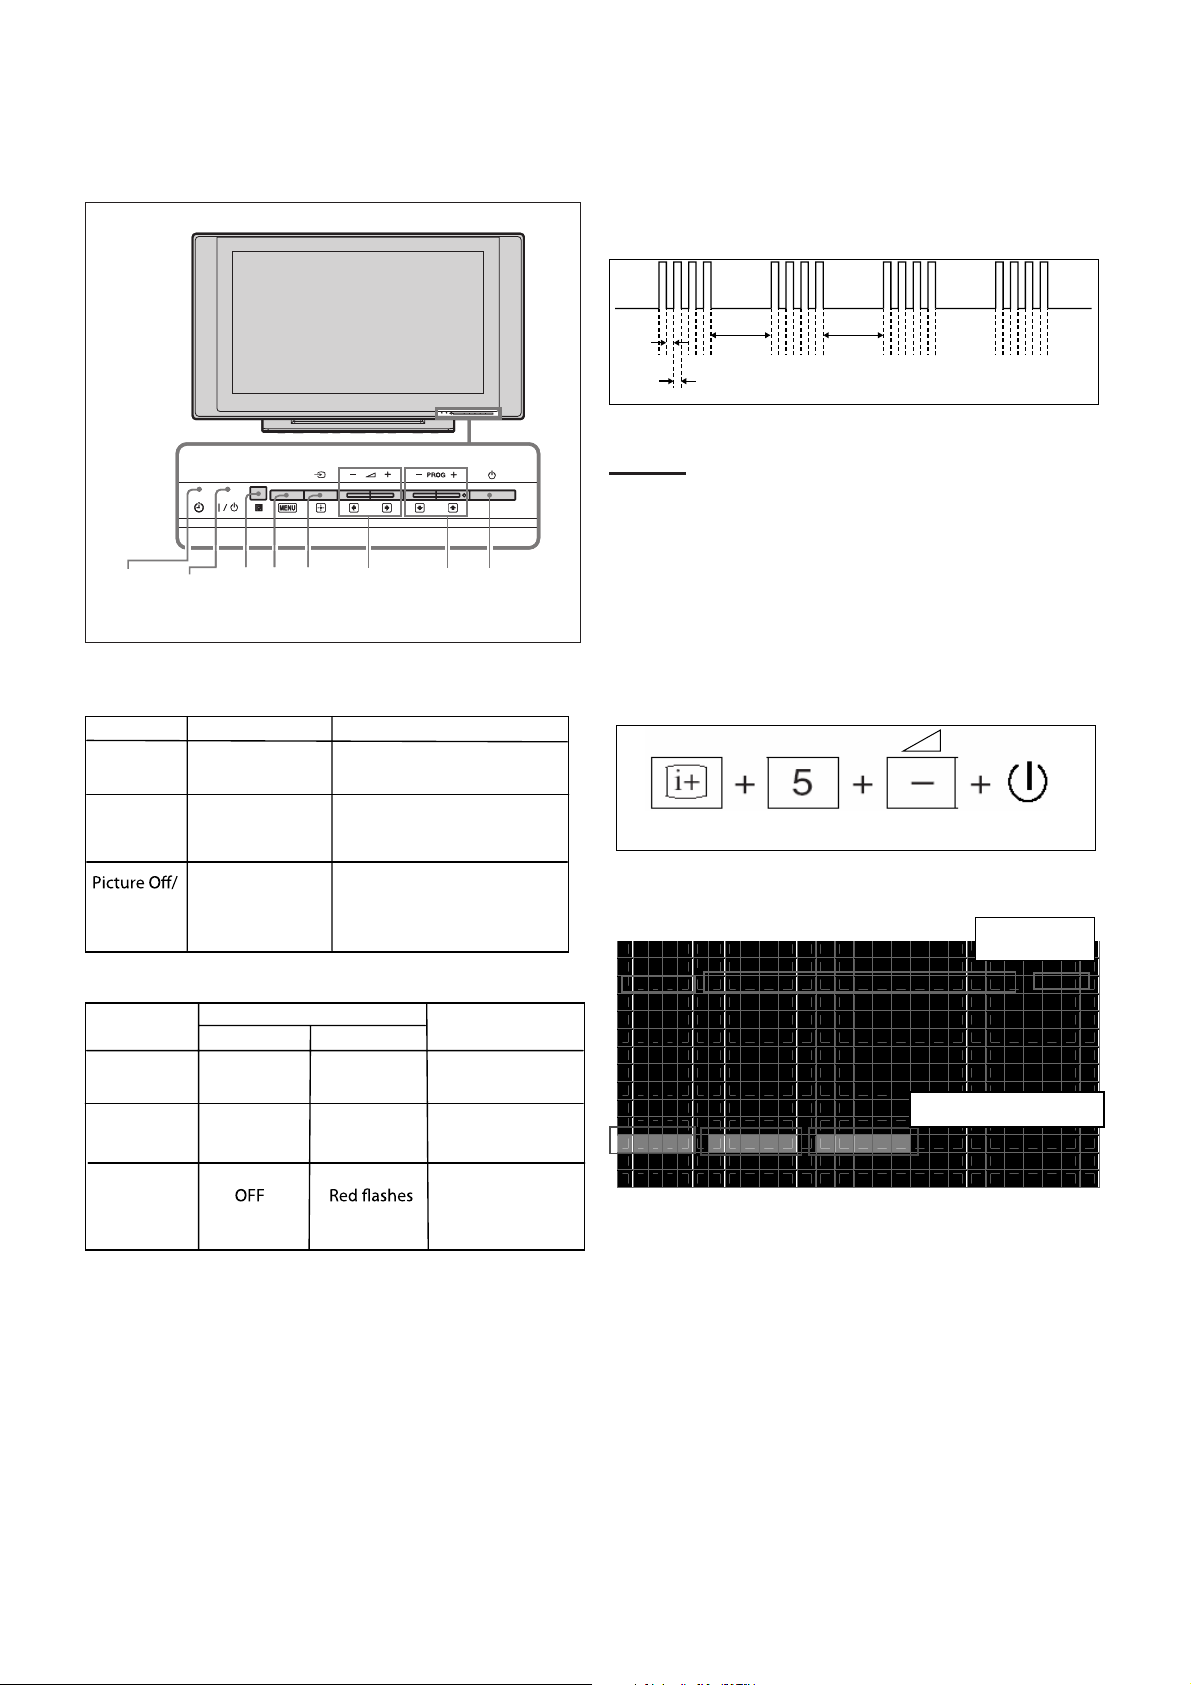
2-1. Overview of Control Buttons
Timer
Indicator
Power
Standby
Indicat
Sensor
MenuRemote
TV/
Video
2-2. LED Display Specification
LED Type Description
Volume
Channel
Remark
Power
2-4. LED Pattern
When safety shutdown occurs, Standby LED display reports the
cause by using the blinking patterns as indicated below.
0.3 sec
0.3 sec
2.0 sec 2.0 sec
Example:
The figure above shows LED display when
SHUTDOWN is caused by audio failure. It repeats
flashing for a specified number of times in 0.3sec/
cycle and has a 2 seconds interval of lighting off.
Please note that a 2 seconds interval of lighting off
is fixed regardless of abnormal state types.
2-5. Viewing the Service Diagnosis Display
1. While TV on standby mode, press the following sequence on
the Remote commander.
POWER Green: One LED
Green lights at power ON.
STANDBY Red: One LED Red lights during standby.
Green lights during Picture
OFF and amber lights
Timer
Green/Amber
: Two LEDs
during Timer activation.
2-3. LED Display Control
Status
Power LED
POWER ON Green lights OFF
STANDBY
Display
Standby LED
OFF Red lights
Remark
Microcomputer is
in a normal state.
Microcomputer is
in a sleep state.
Classify the
Failure
trouble causes by
the no. of red
blinking.
On screen
display
Channel 5
Volume (-)
POWER
(if wrong key is pressed or passed 3 seconds during each
process, cancel entering the self-diagnosis display.)
S E L F C H E C K
0 0 2 M A I N _ P O W E R _ E R R O R 0 0
0 0 3 5 V _ P O W E R _ E R R O R 0 0
0 0 4 A U D I O _ E R R O R 0 0
0 0 5 B A C K _ L I G H T _ E R R O R 0 0
0 0 6 T E M P _ E R R O R 0 0
1 2 3 4 5 - 0 9 8 7 6 - 0 1 2 3 4
12345: Total operation time by hour (0-65535)
09876: Boot count (0-65535)
01234: Panel operation time by hour (0-65535)
002: LED blinking times
MAIN_POWER_ERROR:
Detection name
00: Error Count (00-99)
2. To Exit, press the <I/1> key.
– 5 –
Page 7
KLV-26T400A, T400G, 32T400A
RM-GA013
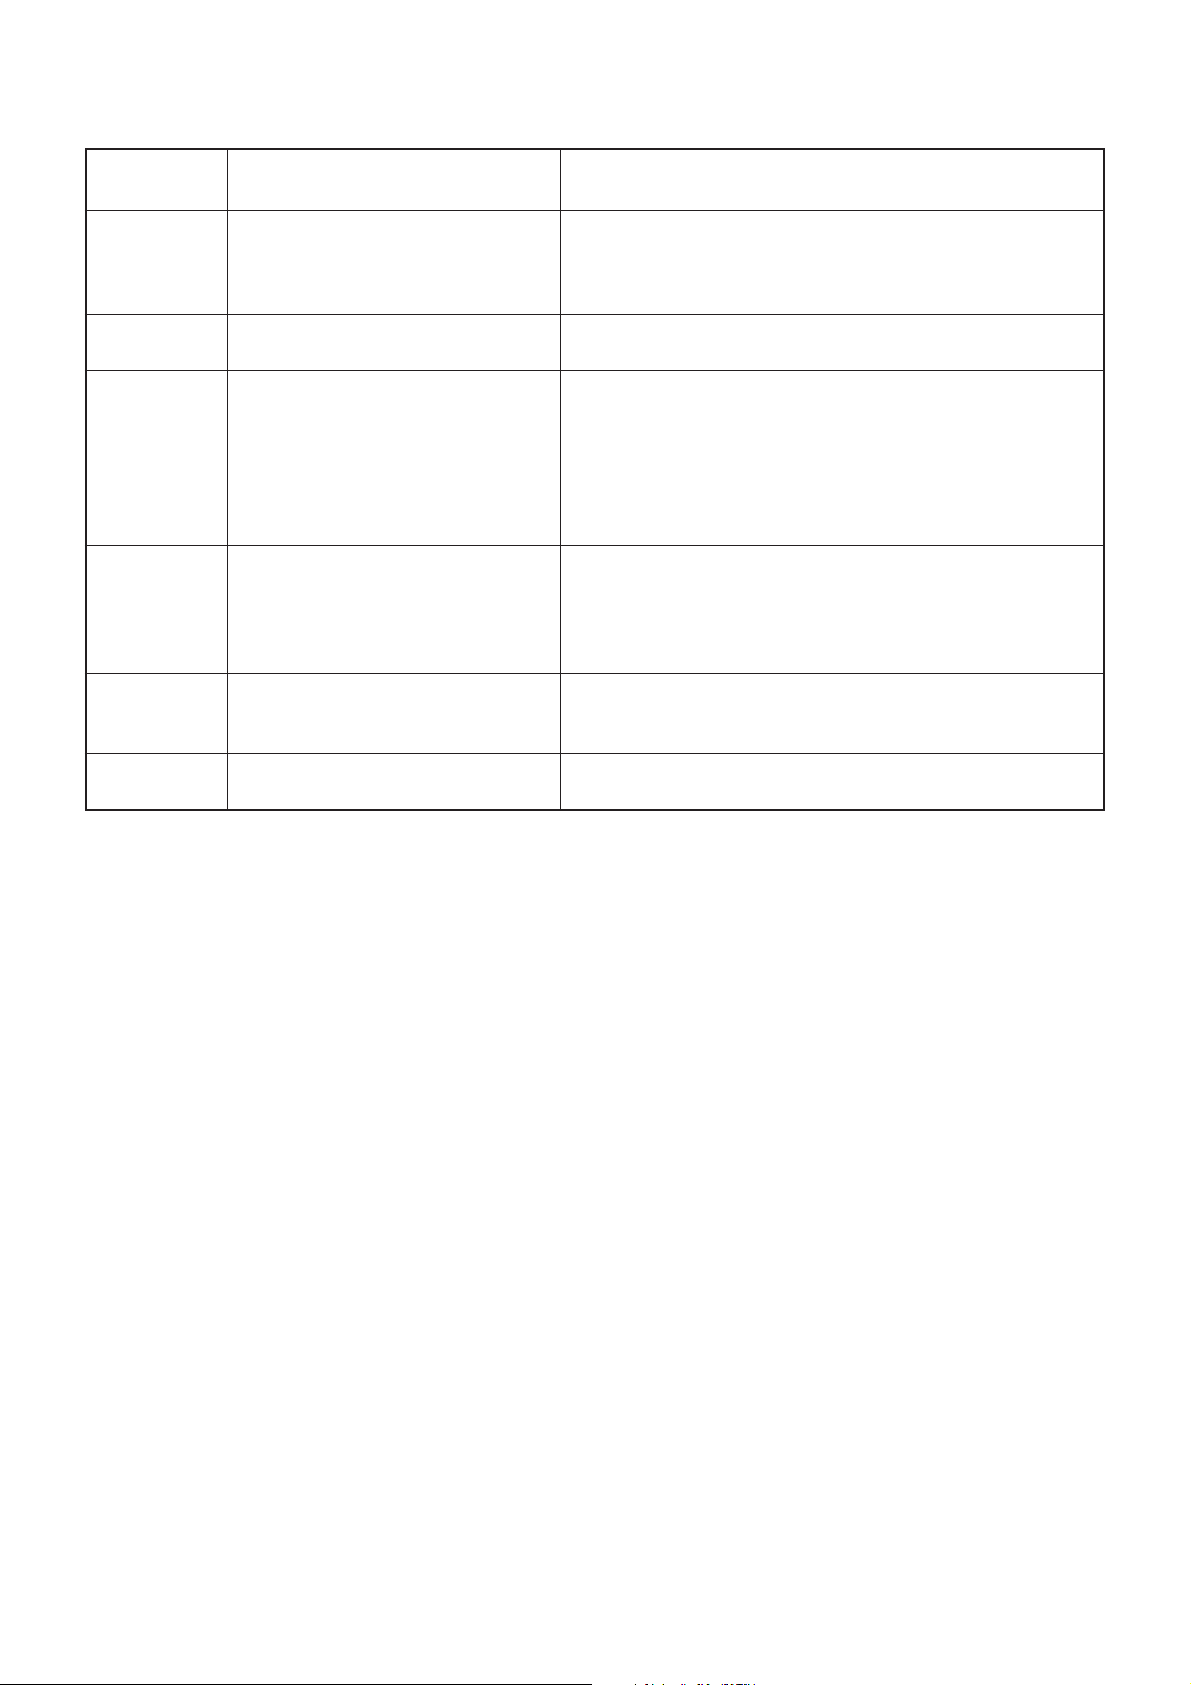
2-6. STANDBY LED ERROR DISPLAY
Blinking times Detection items Countermeasure
2 Main power failure Replace either/both z BT board
3 5V power failure Replace BT board.
4Audio failure Replace either/board.
5 Back light failure Replace either/board.
z GT board (19”)
z GPT board (26”/32”)
z BT board
z GT board (19”)
z GPT board (26”/32”)
z Speaker
z Woofer
z BT board
z GT board (19”)
z GPT board (26”/32”)
6 Internal temperature Replace GT board (19”)/ GPT Board (26”/ 32”)
failure
7 SMIC error Replace BT Board
Note: Each of the above blinking repeats every 2 seconds.
– 6 –
Page 8
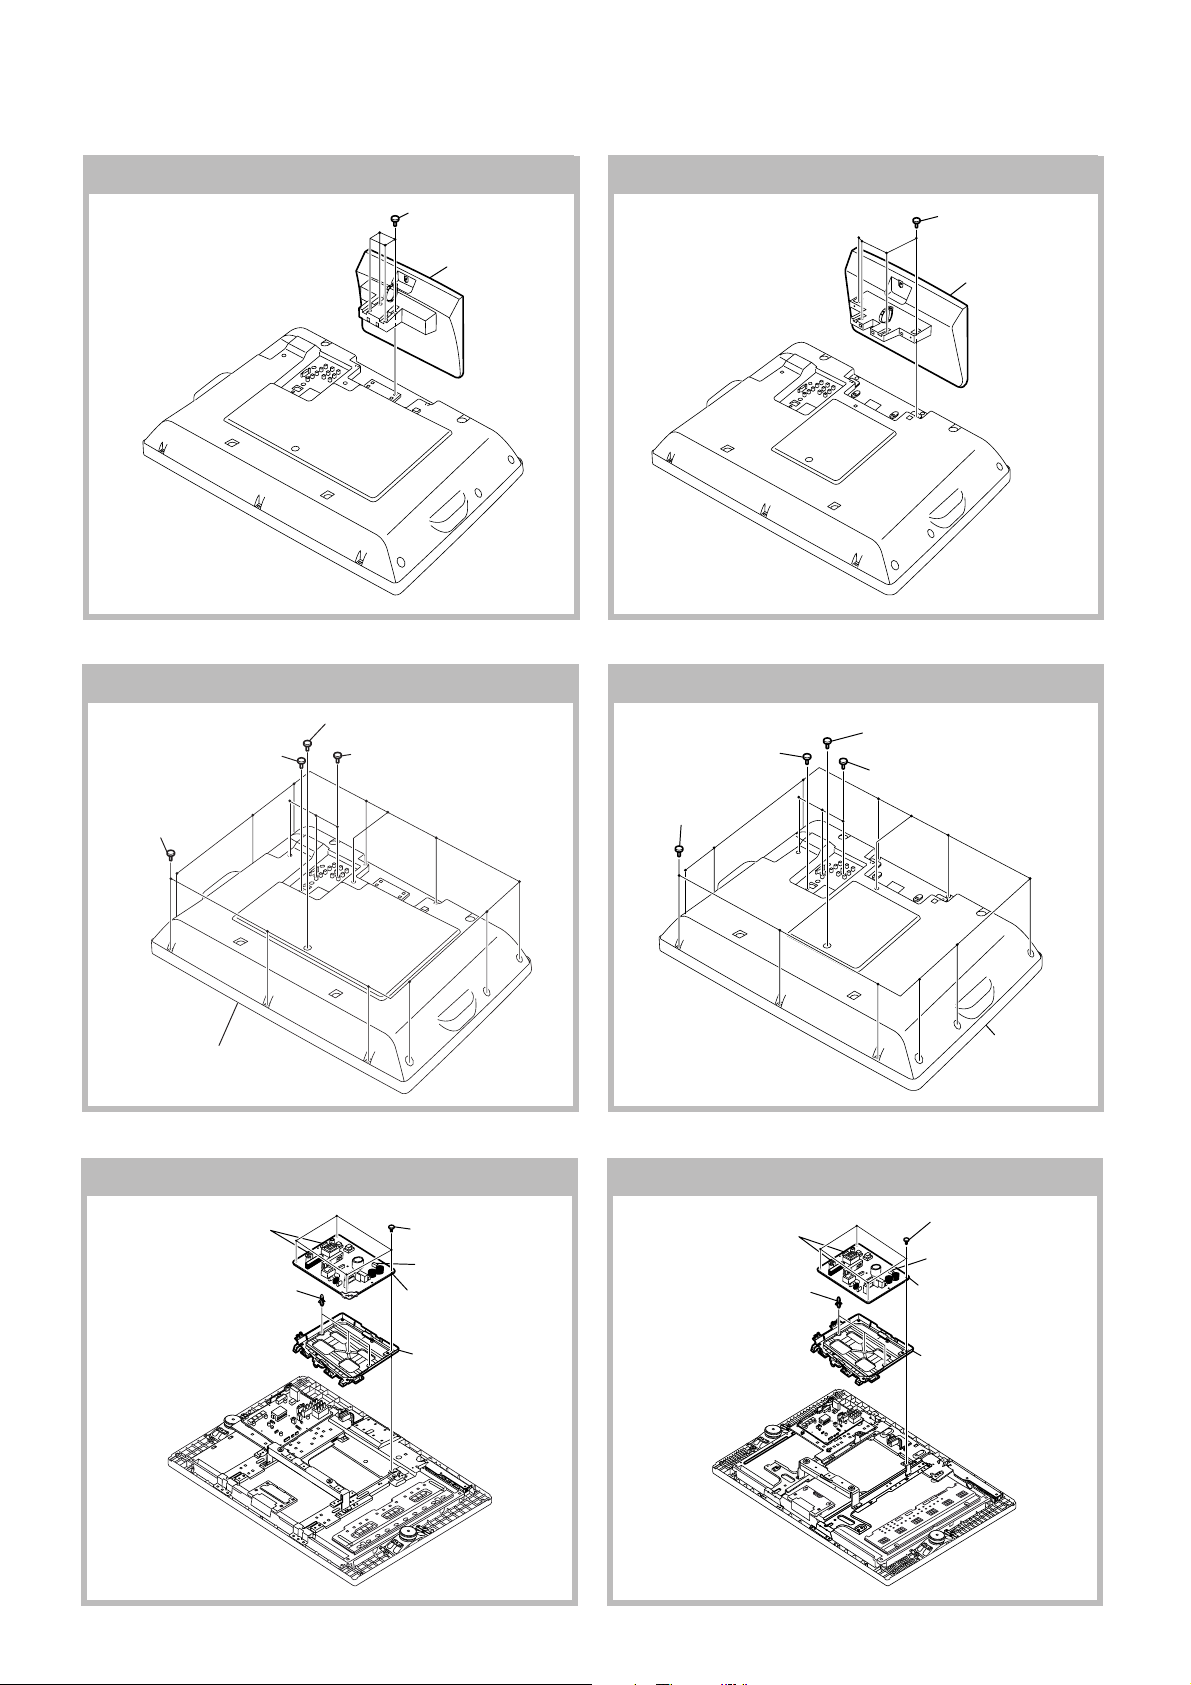
3-1. Stand Assy Removal
KLV-26T400A, T400G, 32T400A
RM-GA013
SECTION 3
DISASSEMBLY
(KLV-32T400)(KLV-26T400)
1 Four screws
(+PSW 5 X 16)
2 Stand assy
3-2. Rear Cover Removal
(KLV-26T400) (KLV-32T400)
3 One screw
2 One screw
(+PSW M3 X 5)
1 Twelves screws
(BVTP2 4 X 16)
(PSW 5 X 8)
4 Three screws
(+BVTP 3 X 12)
2 One screw
(+PSW M3 X 5)
1 Twelves screws
(BVTP2 4 X 16)
1 Four screws
(+PSW 5 X 16)
3 One screw
(PSW 5 X 8)
4 Three screws
(+BVTP 3 X 12)
2 Stand assy
5 Lift to remove Rear Cover
3-3. GPT Board and Bracket Removal
(KLV-26T400) (KLV-32T400)
2 Tw o connectors
CN6201 and CN6202
5 Three holder
PC board
1 Four screws
(+PSW 3SG)
3 One connector
CN6102
4 GPT board
6 GPT bracket
2 Two connectors
CN6201 and CN6202
5 Three holder
PC board
5 Lift to remove
Rear Cover
1 Four screws
(+PSW 3SG)
3 One connector
CN6102
4 GPT board
6 GPT bracket
– 7 –
Page 9
KLV-26T400A, T400G, 32T400A
RM-GA013
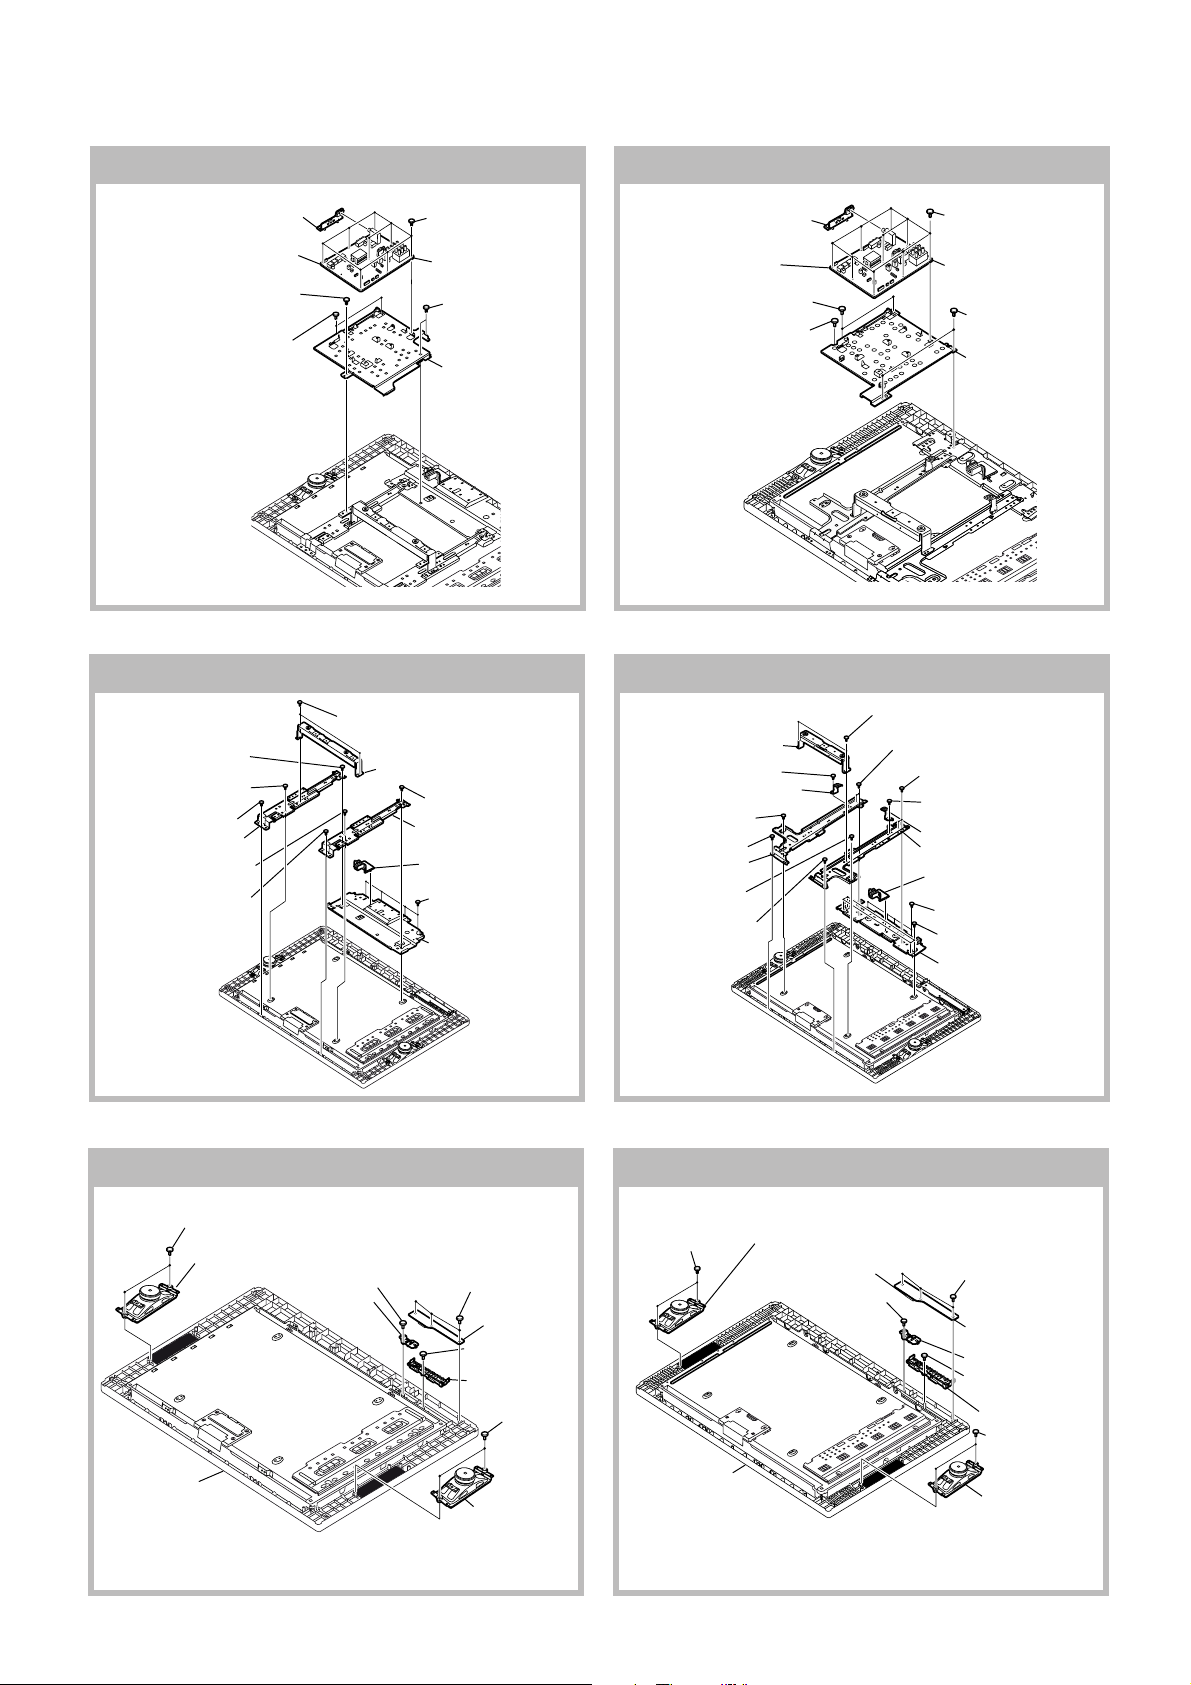
3-4. BT Board and Bracket Removal
(KLV-32T400)(KLV-26T400)
4 Side Jack Bracket Assy
2 Five connectors
CN2000, CN2004, CN3000,
CN3003, CN7000
6 One screw
(+PSW M4 X 8)
7 Tw o screws
(BVTP2 4 X 16)
1 Nine screws
(+BVST 3 X 8)
3 BT board
5 Tw o screws
(+BVST 3 X 8)
8 Main Bracket
4 Side Jack Bracket Assy
2 Six connectors
CN2000, CN2004, CN3000,
CN3003, CN7000
7 Two screws
(BVTP2 4 X 16)
6 One screw
(+PSW M4 X 8)
3-5. Vesa Frame Removal
(KLV-26T400) (KLV-32T400)
1 Tw o screws
3 One screw
(+PSW M4 X 8)
4 One screw
(+PSW M4 X 8)
5 One screw
(BVTP2 4 X 16)
6 Frame, spine (L)
8 One screw
(+PSW M4 X 8)
9 One screw
(BVTP2 4 X 16)
(+PSW M4 X 8)
2 Vesa top
q; Frame Spine (R)
qa Bracket AC
7 One screw
(+PSW M4 X 8)
qs Four screws
(BVTP2 4 X 16)
qd Frame Bottom
3 One screw
(+PSW M4 X 8)
4 Vesa Frame (Bottom) (32L)
6 One screw
(+PSW M4 X 8)
7 One screw
(BVTP2 4 X 16)
8 Frame, spine (L)
qs One screw
(+PSW M4 X 8)
qd One screw
(BVTP2 4 X 16)
2 Vesa top
1 Nine screws
(+BVST 3 X 8)
3 BT board
5 Two screws
(+BVST 3 X 8)
8 Main Bracket
1 Tw o screws
(+PSW M4 X 8)
5 Tw o screws
(+PSW M4 X 8)
qa Tw o screws
(+PSW M4 X 8)
9 One screw
(+PSW M4 X 8)
q; Vesa Frame (Bottom) (32R)
qf Frame Spine (R)
qg Bracket AC
qh Four screws
(BVTP2 4 X 16)
qj Four screws
(+PSW M4 X 8)
qk Frame Bottom
3-6. HT Board and Speaker Removal
(KLV-26T400) (KLV-32T400)
1 Tw o screws
(BVTP2 4 X 16)
qa Bezel assy
2 Loudspeaker
(5.5 X 12cm)
7 One screw
(BVTP2 3 X 12)
8 Guide Light
5 Three screws
(BVTP2 3 X 12)
6 HT board
9 One screw
(BVTP2 3 X 12)
0 Control Button
3 Tw o screws
(BVTP2 4 X 16)
4 Loudspeaker
(5.5 X 12cm)
1 Tw o screws
(BVTP2 4 X 16)
qs Bezel assy
– 8 –
2 Loudspeaker
(5.5 X 12cm)
6 One connector
8 One screw
(BVTP2 3 X 12)
5 Three screws
(BVTP2 3 X 12)
7 HT board
9 Guide Light
q; One screw
(BVTP2 3 X 12)
qa Control Button
3 Tw o screws
(BVTP2 4 X 16)
4 Loudspeaker
(5.5 X 12cm)
Page 10
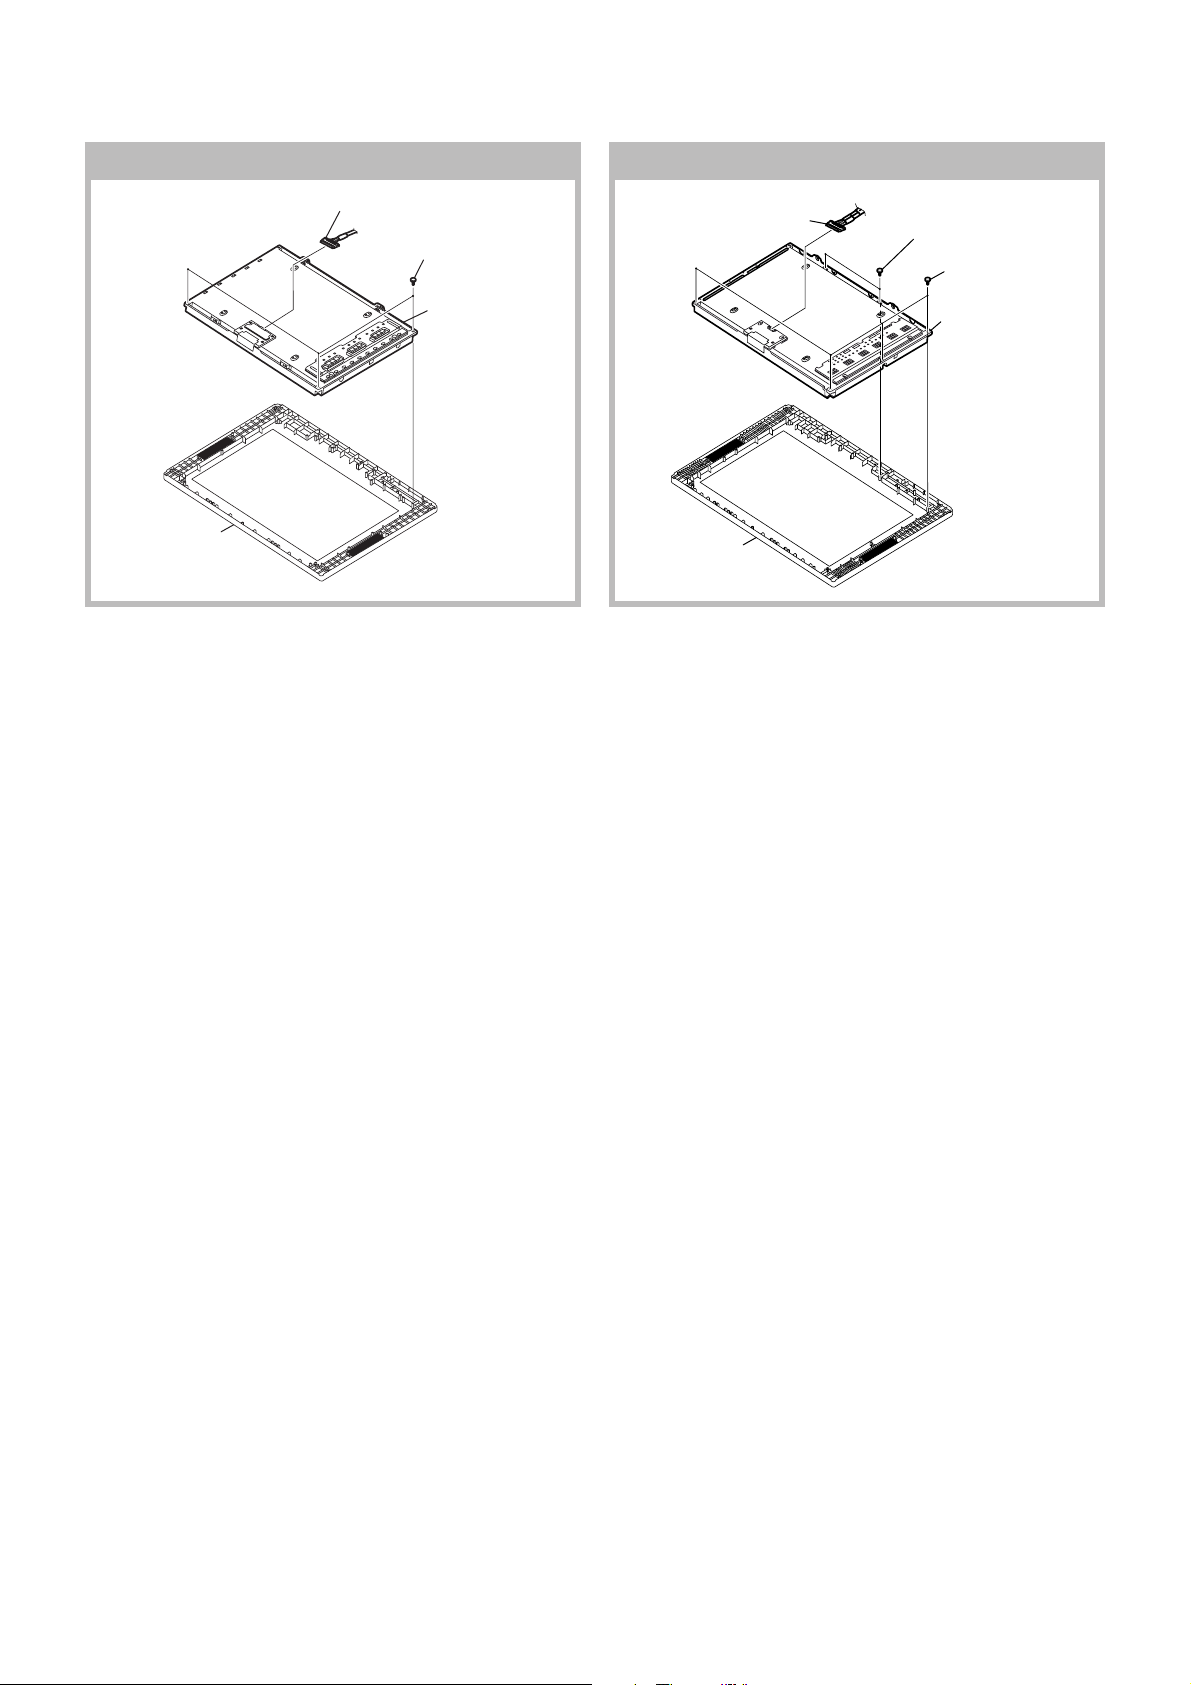
3-7. LCD Panel and Bezel Assy Removal
KLV-26T400A, T400G, 32T400A
RM-GA013
(KLV-32T400)(KLV-26T400)
4 Bezel assy
2 Harness
with connector
1 Three screws
(BVTP2 4 X 16)
3 LCD panel
3 Harness
with connector
5 Bezel assy
1 Two screws
(BVTP2 4 X 16)
2 Four screws
(BVTP2 4 X 16)
4 LCD panel
– 9 –
Page 11
KLV-26T400A, T400G, 32T400A
RM-GA013
SECTION 4
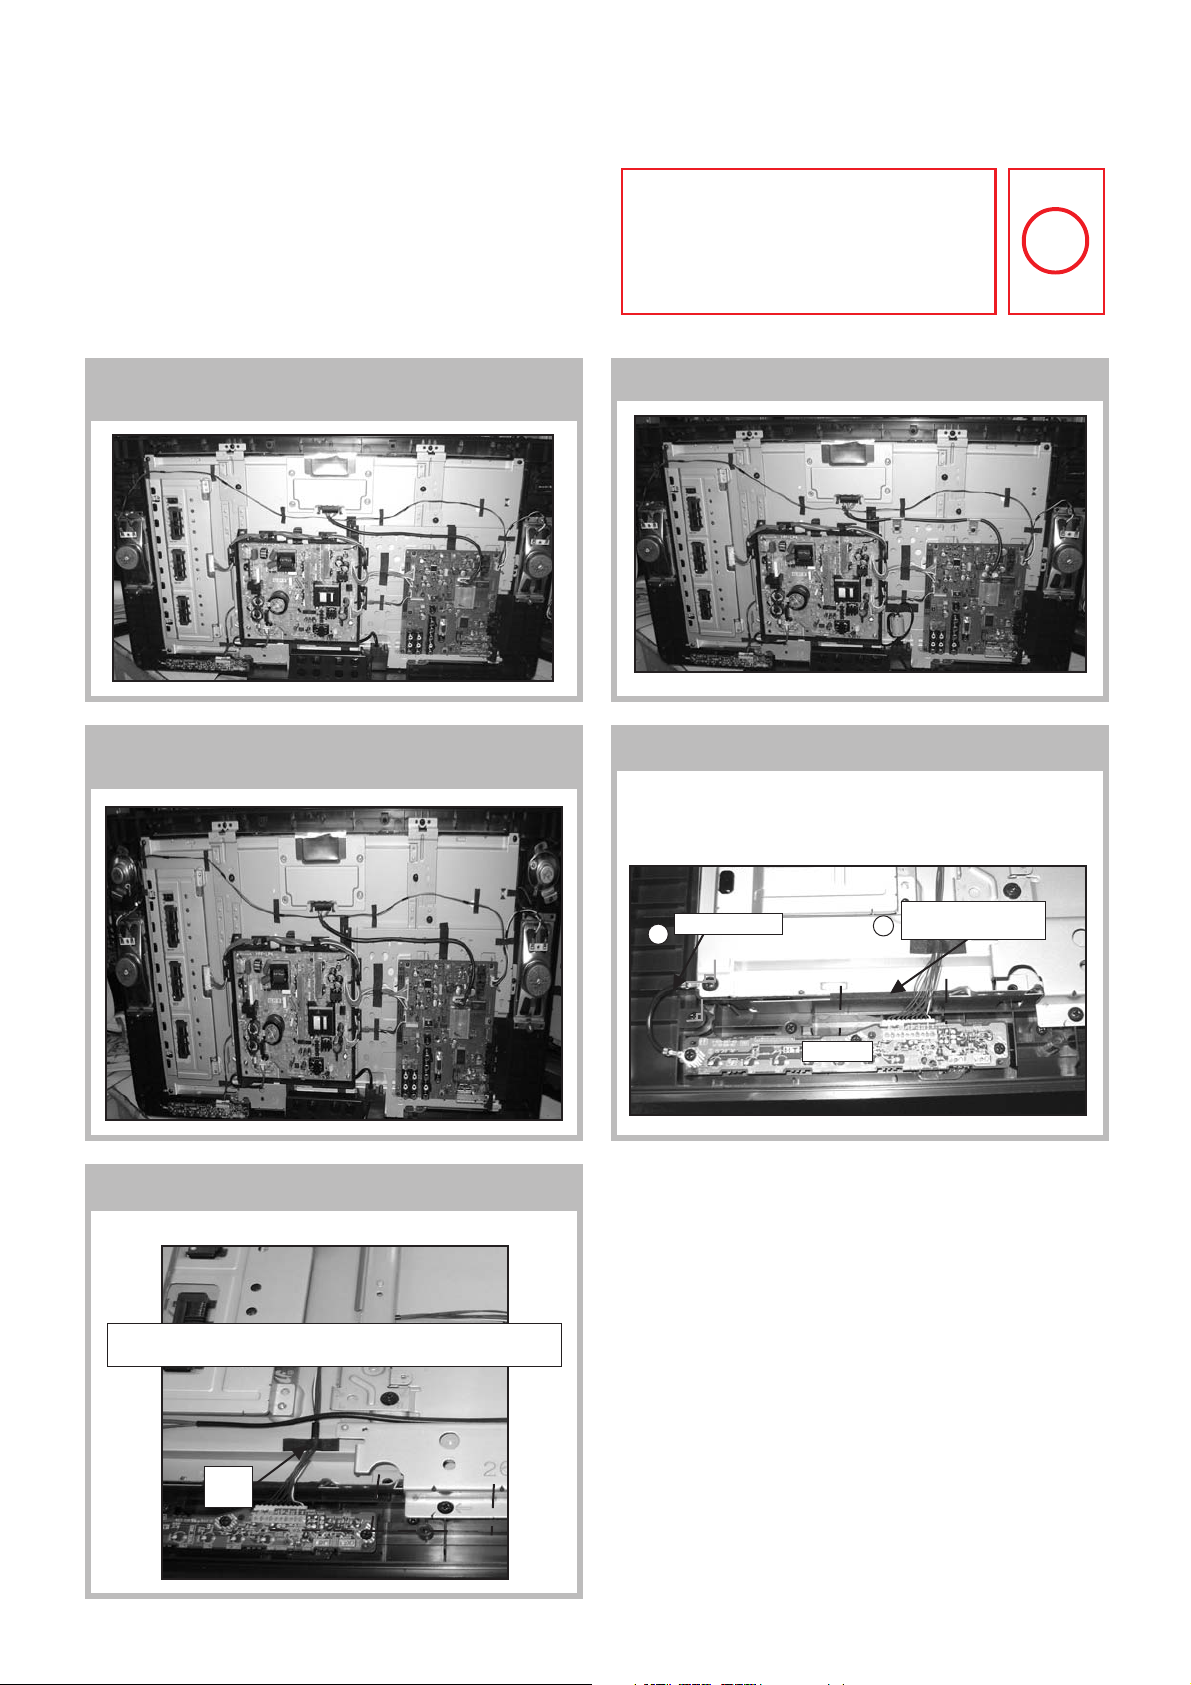
WIRE DRESSING
4.1 (KLV-26T400)
4-1-1. Wire Dressing overview for
Non-CISPR model.
4-1-3. Wire Dressing overview for 26T400G
model.
CAUTION :
1. Do not overpull the wires during dressing
Legend:
--> avoid disconnection of wires.
2. Make sure wires are kept away from
sharp edges, heatsinks & other
high-temperature parts.
Hook
4-1-2. Wire Dressing overview for CISPR model.
4-1-4. Dressing of Connector Assy 1P
1) Insert Connector Assy 1P to HT PWB's screw hole and panel's
screw hole as shown.
2) Attach Sheet Core, C (X1) to panel at location of Connector
Assy 10P.
4-1-5. Dressing of Connector Assy 10P
Attach Tape, LCD (X1) to Connector Assy 10P as shown.
Use datum lines shown as an indication for attaching Tape,
LCD to Connector Assy 10P
Tape,
LCD
Conn Assy 1P
1
HT PWB
Attach Sheet Core,
2
C to panel
– 10 –
Page 12
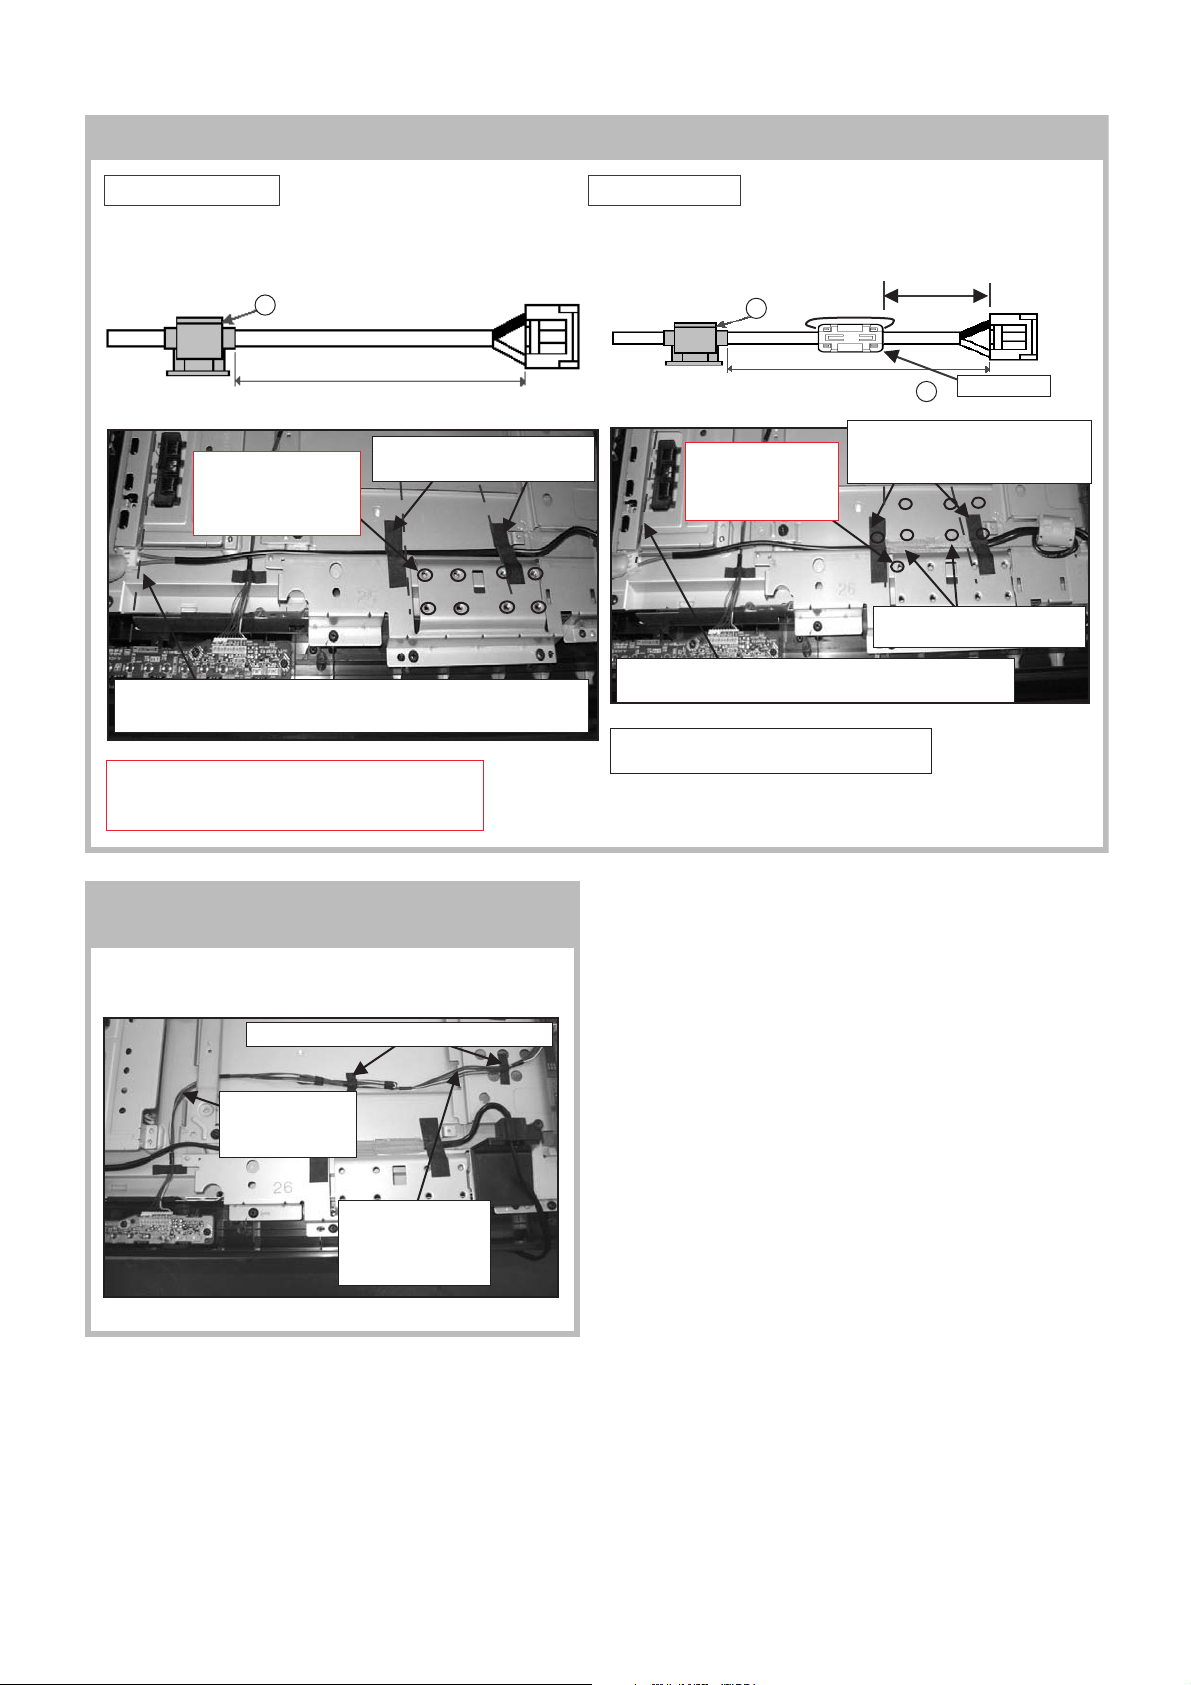
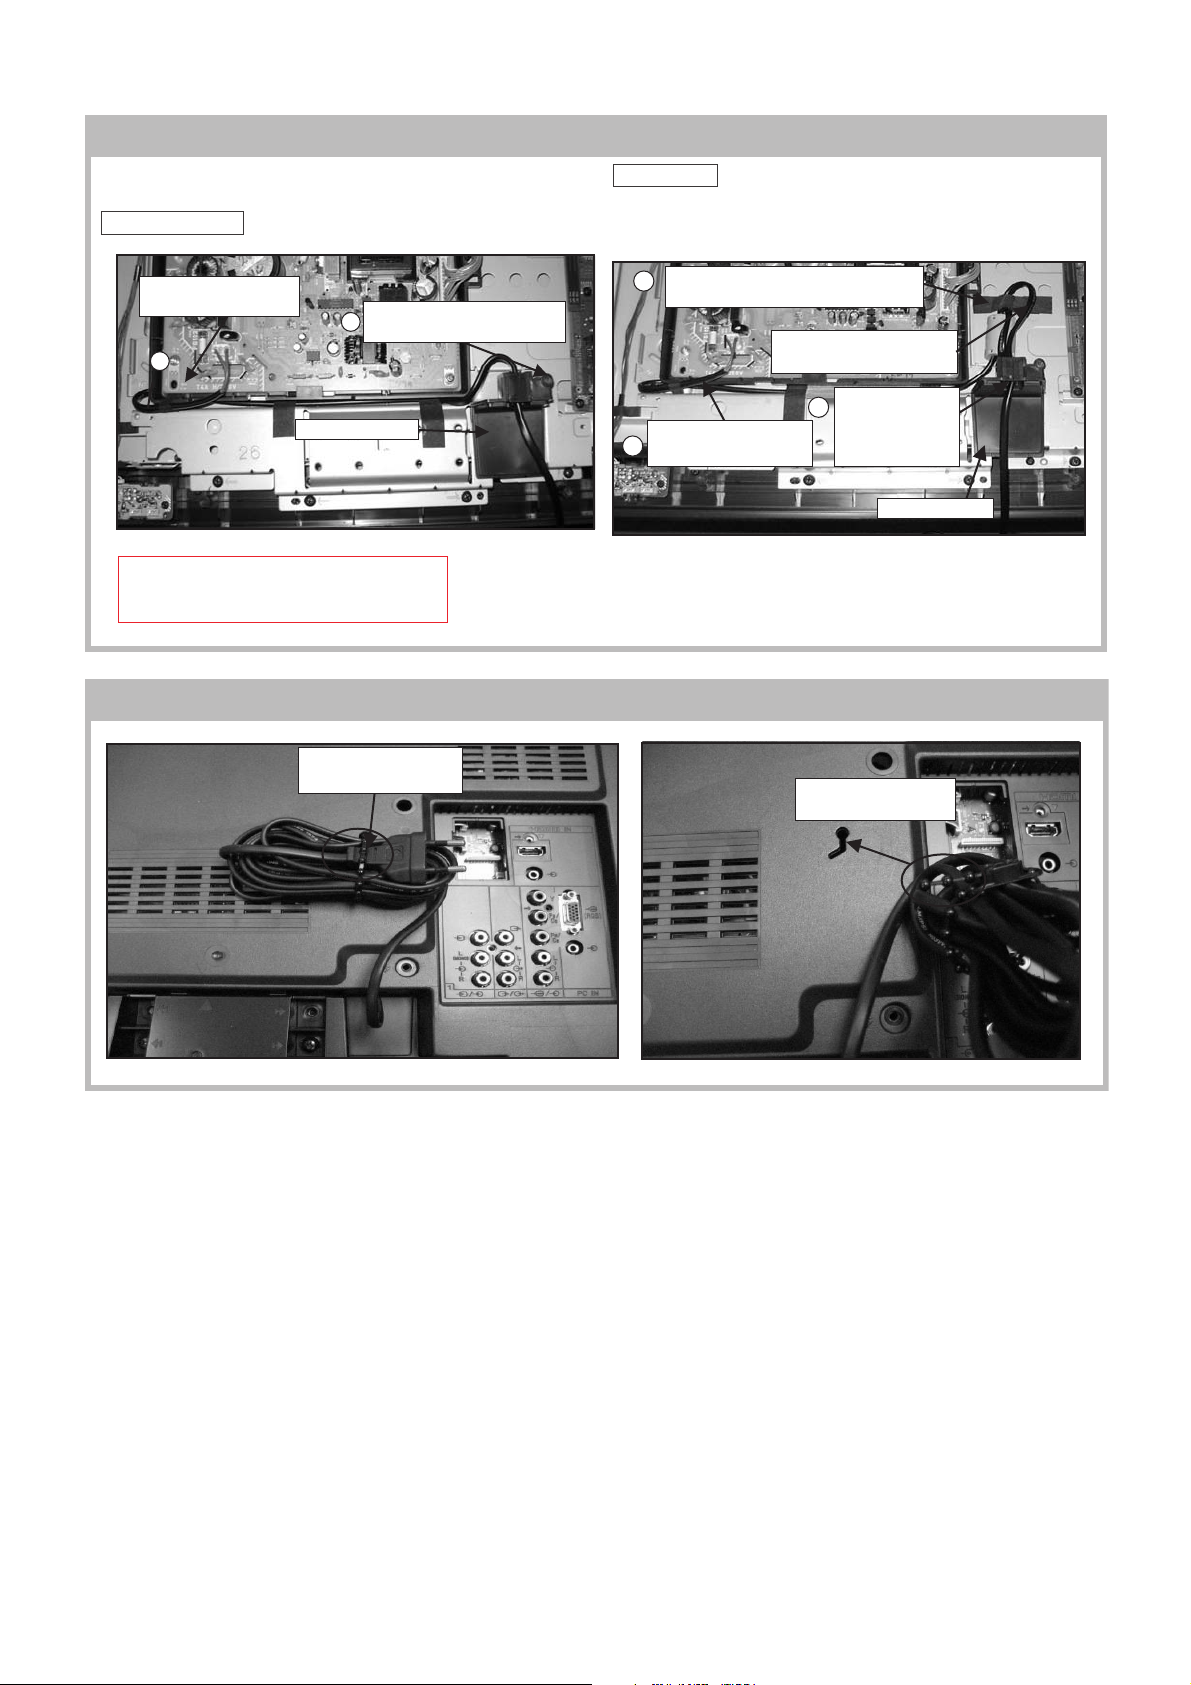
4-1-6. AC Power Cord Wire Dressing (Before installing G1 Bracket with GPT PWB)
Non-CISPR model CISPR model
1) Install AC cord holder to AC power cord at specified position
as shown.
AC Cord Holder
1
1) Install Ferrite core to AC power cord at specified position as shown
2) Next, install AC cord holder to AC power cord at specified position.
AC Cord Holder
2
KLV-26T400A, T400G, 32T400A
RM-GA013
360± 5mm
400 ± 5mm
Caution:
Do not cover the
screw holes
with the Sheet Core, C
Use edge of Inverter board's cover and AC power cord connector
as a guideline for placement of power cord
CAUTION:
1. Ensure that AC power cord is not stressed whilst
inserting it into AC cord bracket.
Attach Sheet Core, C (X2) to
AC Power Cord
4-1-7. Conn Assy 10P Dressing (Before installing
G1 Bracket with GPT PWB)
510 ± 5mm
2. Attach Sheet Core, C (X2) to
Caution:
Do not cover the
screw holes with the
Sheet Core, C
Use edge of Inverter board's cover and AC power cord
connector as a guideline for placement of power cord
CISPR models only
Attach Tape, Shield to AC Power Cord (X2)
AC Power Cord. Make sure both
Sheet Core, C overlaps the two
1. Attach Tape, Shield to AC
Ferrite Core
1
Power Cord (X2)
Dress Conn Assy 10P below Spine, Frame.
Next, attach Tape, LCD (X2) to Conn Assy 10P as shown.
Attach Tape, LCD (X2) to Conn Assy 10P
Dress Conn Assy
10P underneath
Spine, Frame
Ensure Conn Assy
10P passes through
the slot on main
bracket
– 11 –
Page 13
KLV-26T400A, T400G, 32T400A
RM-GA013
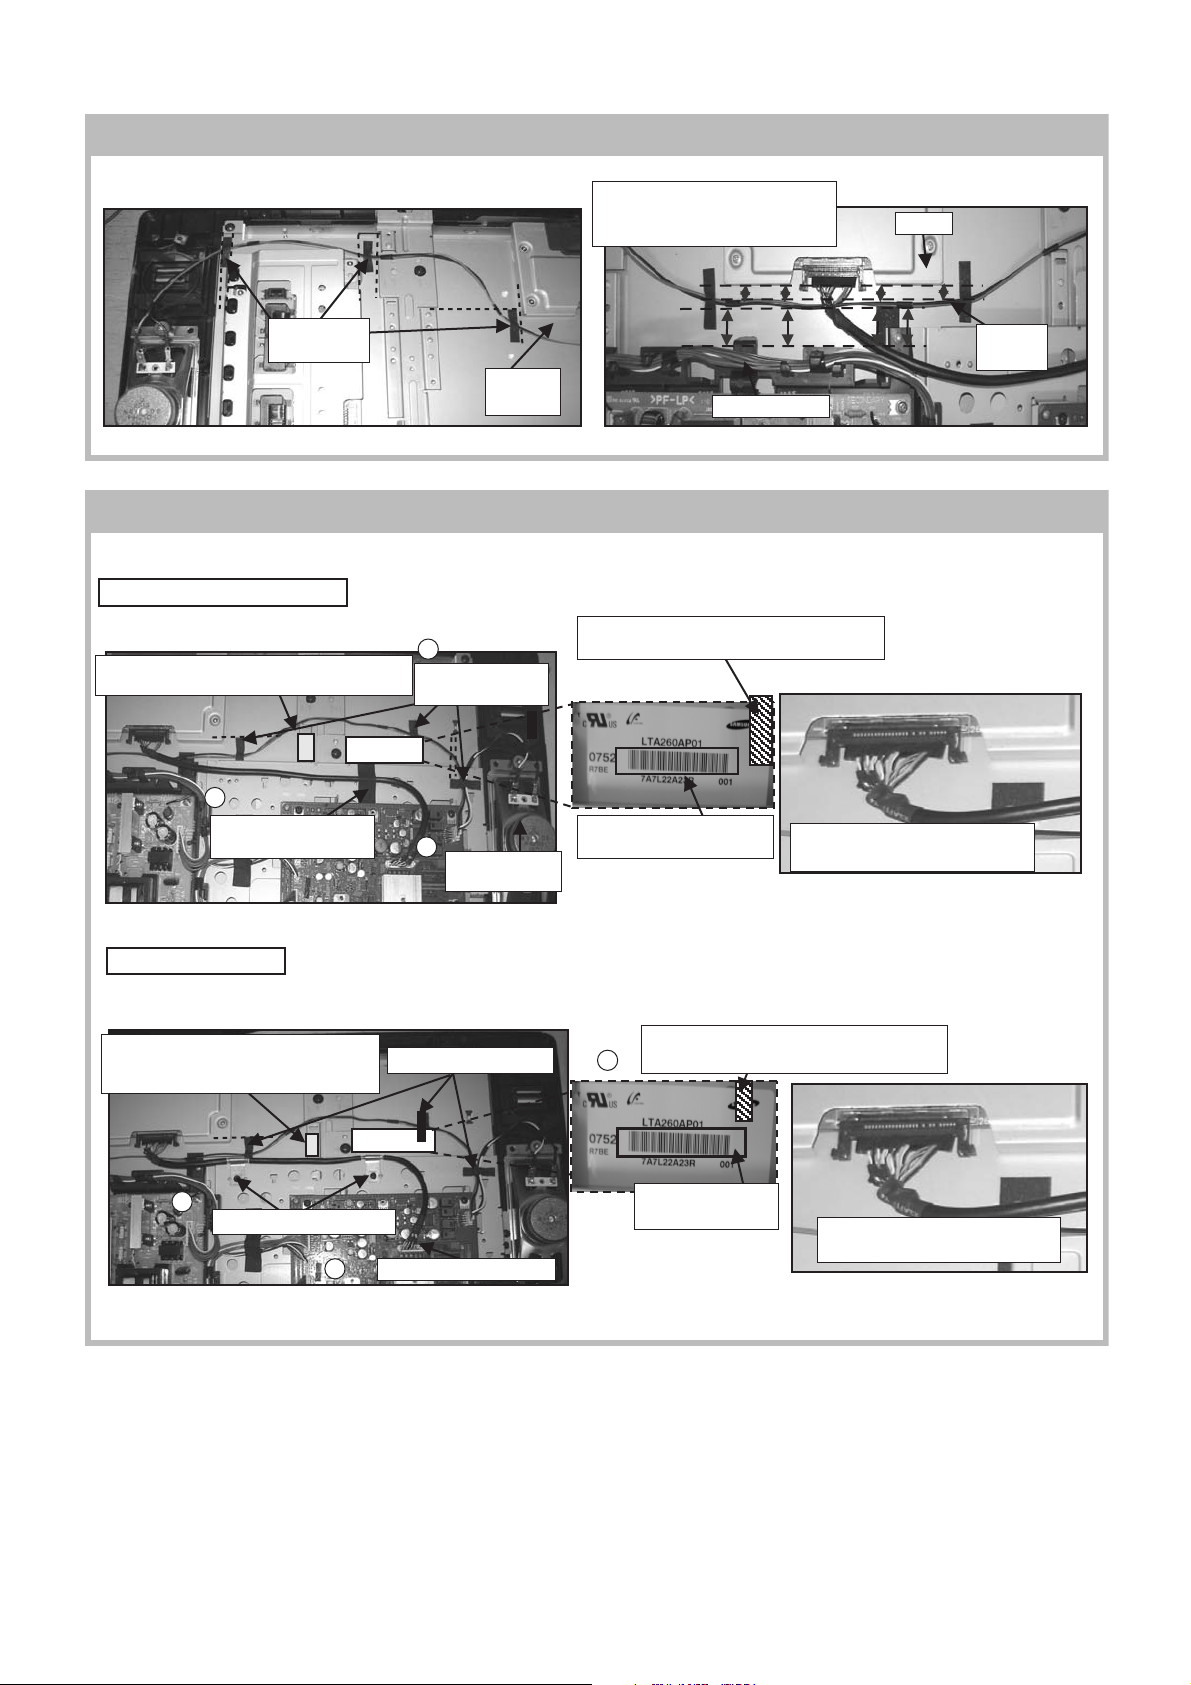
4-1-7. SP Connector Assy 4P Dressing for 26T400A
SP Connector Assy 4P wire dressing for 26T400A model as below.
Attach Tape,
LCD (3X)
SP Conn
Assy 4P
Keep distance between SP Conn
T-CON, Conn Assy 14P
4-1-8. LVDS Harness and SP Connector Assy 4P Dressing
See steps below for LVDS harness and SP Connector Assy 4P wire dressing.
KLV-26T400A Non-CISPR model
When attaching Tape, LCD, ensure that it
Make sure SP Conn Assy 4P is above this
area as Vesa Frame will be assembled later
1
Attach Tape, LCD
(X3)
covers and hides the SAMSUNG logo
Assy 4P and:
Conn Assy 14P
T-CON
SP Conn
Assy 4P
3
Attach Sheet Core, C
to LVDS harness
26T400A CISPR model
See steps below for LVDS harness and SP Connector Assy 4P wire dressing.
Make sure SP Conn Assy 4P is above
this area as Vesa Frame will be
assembled later
3
Screw earth clamps (X2)
2
2
Connect LVDS
harness
Attach Tape LCD (X3)
Connect LVDS harness
Be careful not to cover the
1
cover the bar code
Note: When inserting LVDS harness to panel, make sure it is fully
inserted and in the correct direction as shown.
bar code
Note: When inserting LVDS harness to panel,
make sure it is fully inserted and in the correct
direction as shown.
When attaching Tape, LCD, ensure that it
covers and hides the SAMSUNG logo
Be careful not to
Make sure LVDS harness is fully
inserted in direction as shown
Make sure LVDS harness is fully
inserted with direction as shown
– 12 –
Page 14
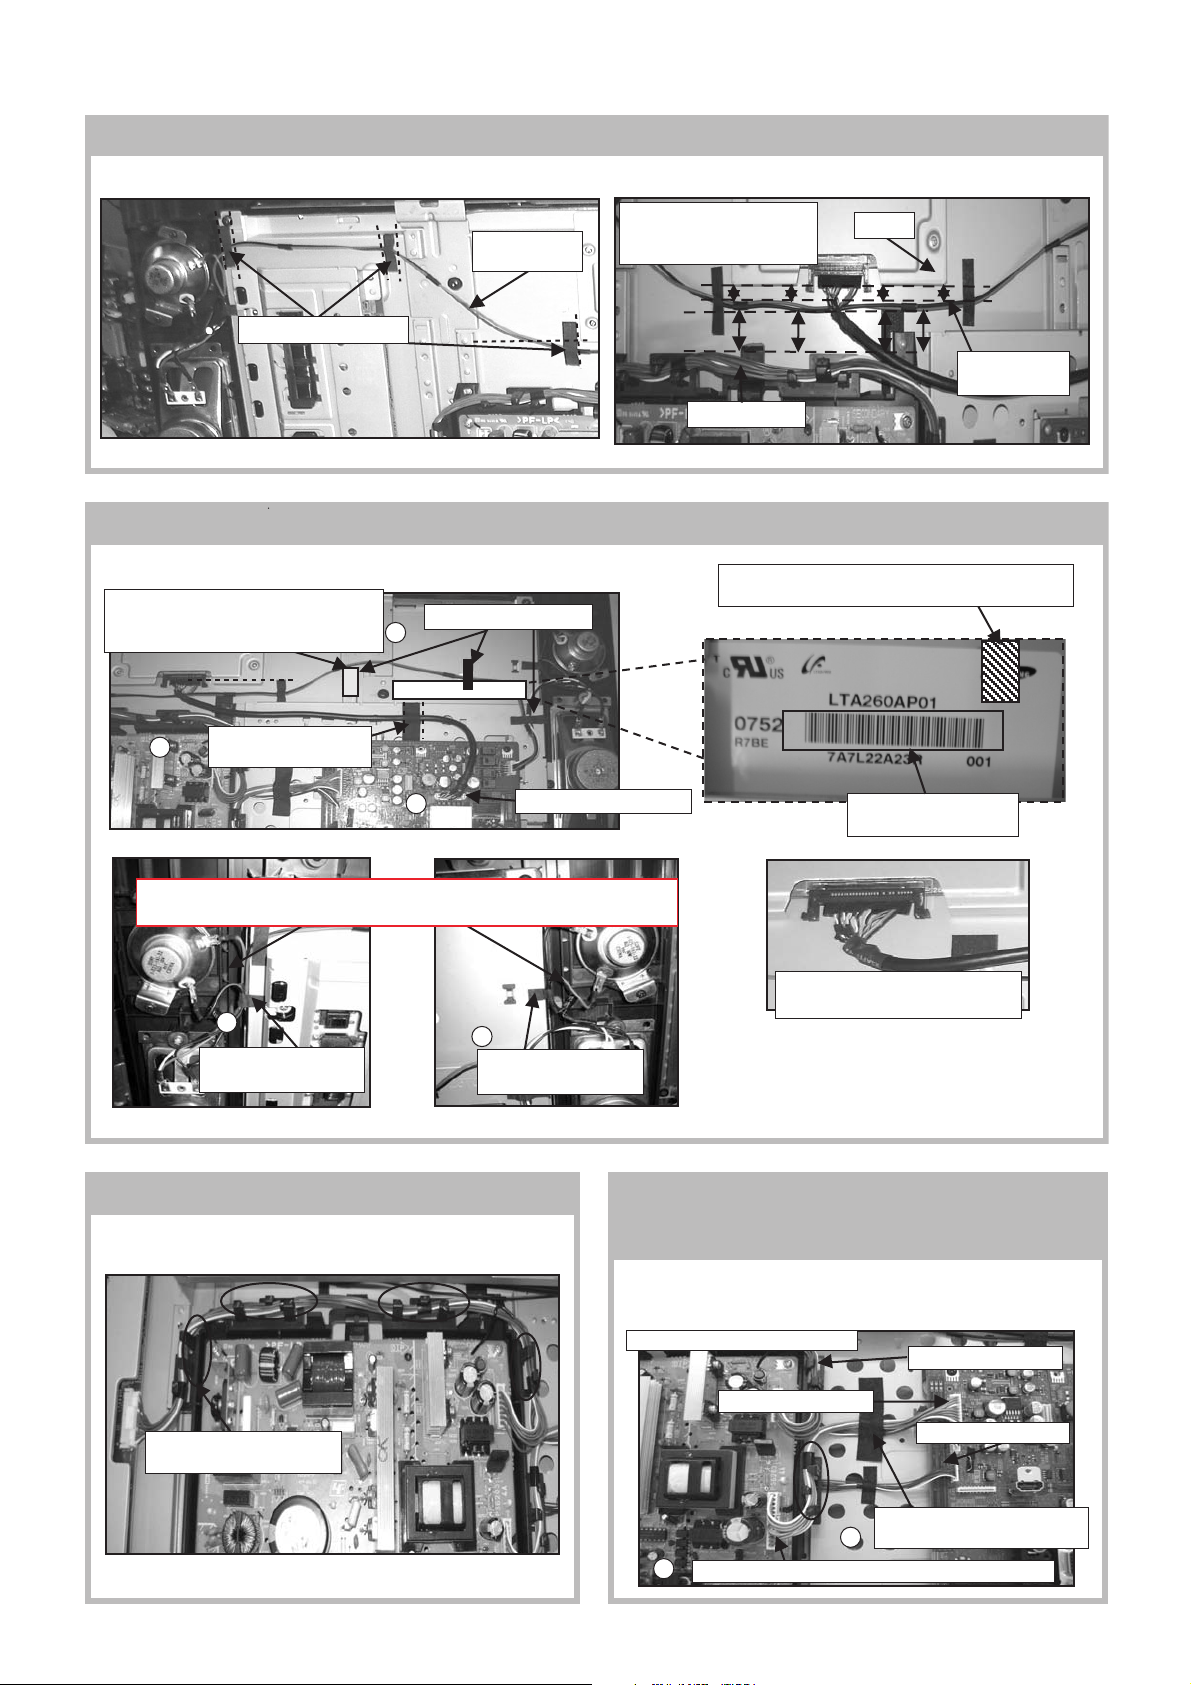
4-1-9. SP Connector Assy 4P Dressing for KLV-26T400G
SP Connector Assy 4P wire dressing for 26T400G model as below.
KLV-26T400A, T400G, 32T400A
RM-GA013
Keep distance between SP
SP Conn Assy
4P
Attach Tape, LCD (3X)
Conn Assy 4P and:
T-CON, Conn Assy 14P
Conn Assy 14P
4-1-10 LVDS Harness and SP Connector Assy 4P Dressing for KLV-26T400G
See steps below for LVDS harness and SP Connector Assy 4P wire dressing.
Make sure SP Conn Assy 4P is above
this area as Vesa Frame will be
assembled later
Attach Sheet Core, C
3
to LVDS harness
Attach Tape LCD (X3)
1
When attaching Tape, LCD, ensure that it covers
and hides the SAMSUNG logo
T-CON
SP Conn Assy
4P
2
Caution: Dress wires downward towards the panel and bezel.
Ensure capacitor does not touch tweeter or any conductive parts.
4
Attach Tape LCD (X1)
to wire and panel
Connect LVDS harness
5
Attach Tape LCD (X1)
to wire and panel
Be careful not to cover
the bar code
Make sure LVDS harness is fully
inserted with direction as shown
Note: When inserting LVDS harness to panel,
make sure it is fully inserted and in the
correct direction as shown.
4-1-11. Dressing of Connector Assy 14P 4-1-12. Dressing of Connector Assy 14P,
Dress Connector Assy 14P into G1 bracket's hook (4X) as shown.
Connector
Assy 10P
1) Dress Connector Assy 13P into G1 bracket's hook as shown.
2) Align Connector Assy 14P and Connector Assy 13P together
and dress them using Sheet Core, C.
Common for all 26T400 models
Assy 13P and Connector
Connector Assy 14P
Dress Conn Assy 14P into
G1 bracket's hook (4X)
– 13 –
Connector Assy 13P
Connector Assy 10P
Dress Conn Assy 14P and
Conn Assy 13P using Sheet,
2
1
Dress Conn Assy 13P into G1 bracket's hook (1X)
Page 15
KLV-26T400A, T400G, 32T400A
RM-GA013
4-1-13. AC Power Cord Wire Dressing
1) Install the AC power cord with holder into AC cord bracket.
2) Dress the AC power cord wire pin, wire A6101.
Non-CISPR model
Dress AC power cord
with pin, wire A6101
2
AC cord bracket
CAUTION:
1. Ensure that AC power cord is not stressed
whilst inserting it into AC cord bracket.
Install AC power cord with
1
holder into AC cord bracket
4-1-14. AC Power Cord Wire Dressing at Rear Cover
CISPR model
1) Install the AC power cord with holder into AC cord bracket.
2) Dress the AC power cord using Sheet Core, C on to main bracket.
3) Dress the AC power cord wire pin, wire A6101.
Dress AC Power Cord using Sheet
2
Core, C on to Main Bracket
No need to attach Sheet
Core, C here
Install AC power
1
Dress AC power cord
3
with pin, wire A6101
cord with holder
into AC cord
bracket
AC cord bracket
Tie the root of the AC
plug.
Hook the AC-band to
the rear cover.
– 14 –
Page 16
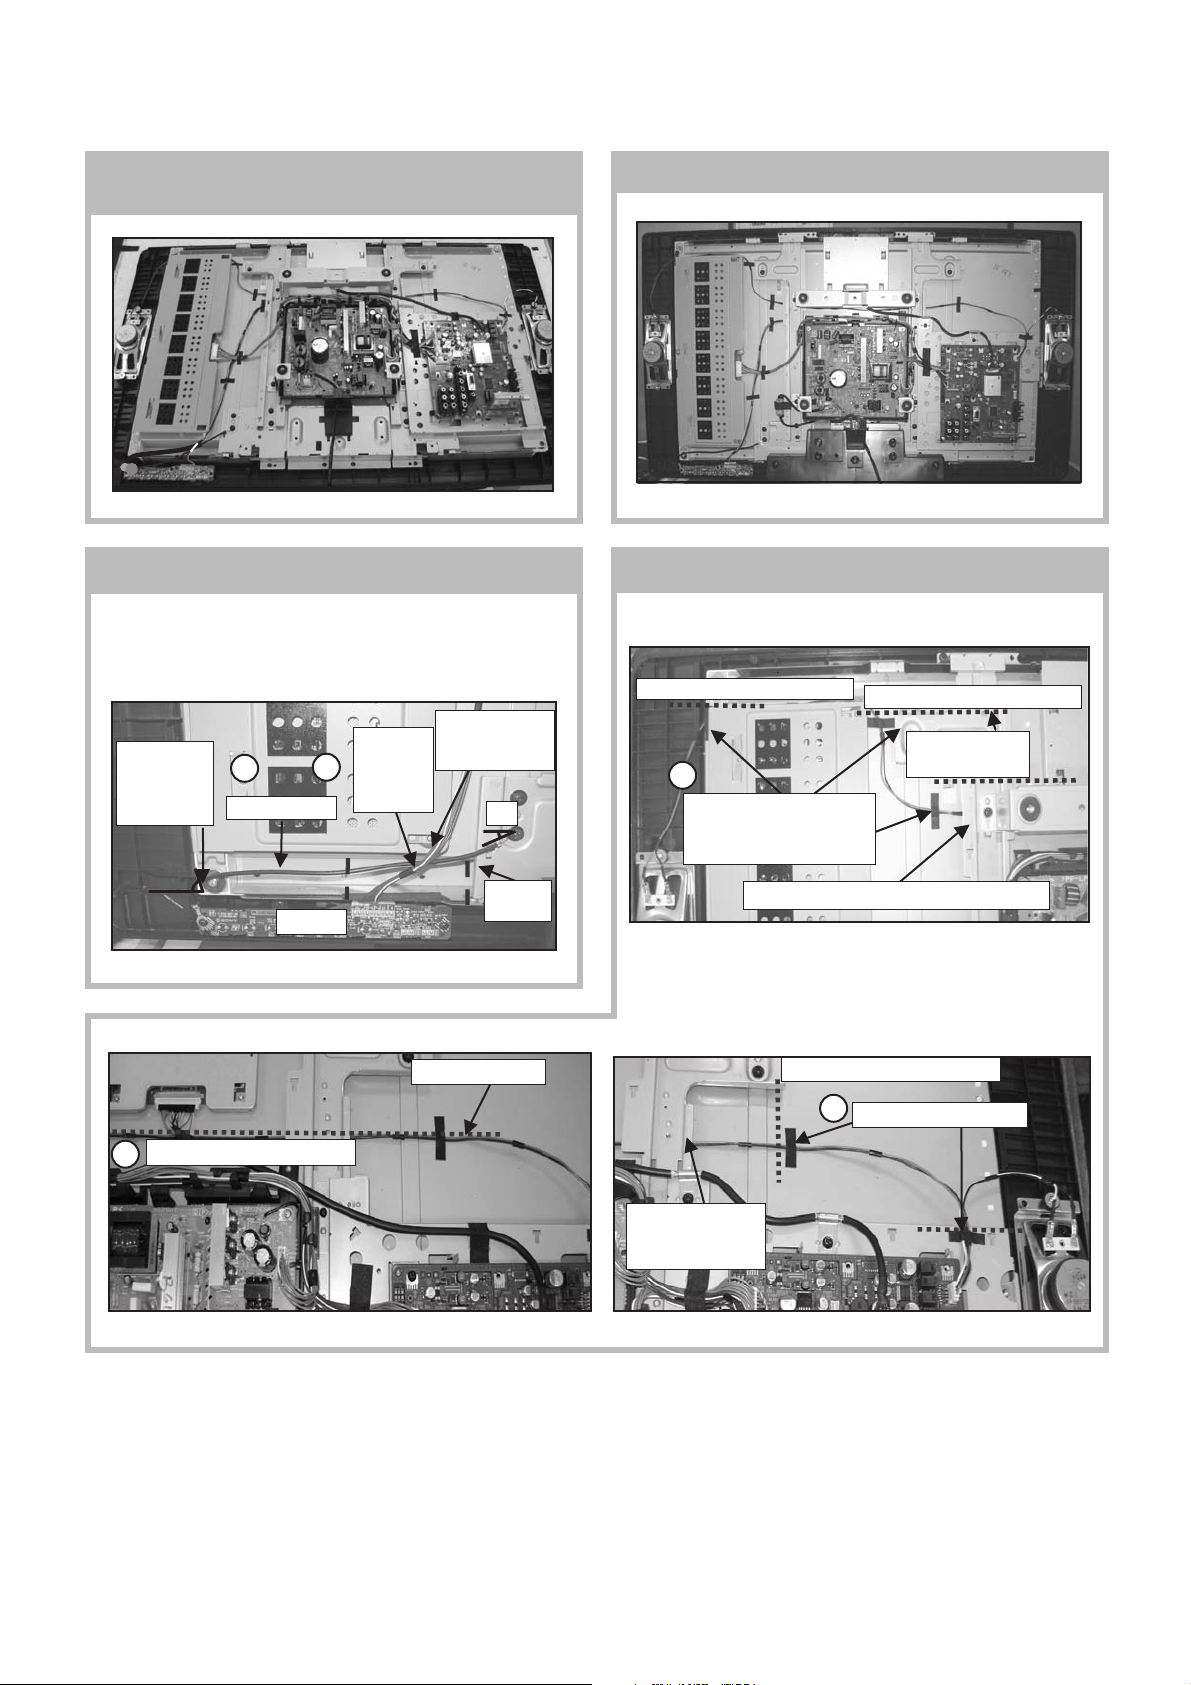
4.2 (KLV-32T400)
KLV-26T400A, T400G, 32T400A
RM-GA013
4-2-1. Wire Dressing overview for
Non-CISPR model.
4-2-3. Dressing of Connector Assy 1P
1) Insert Connector Assy 1P to HT PWB's screw hole and bracket
bottom's screw hole as shown.
2) Attach Sheet Core, C (X1) to panel at location of Connector
Assy 10P.
Conn Assy 10P
Use dowel
as guide to
attach Conn
Assy 1P
1
Conn Assy 1P
2
Attach
Sheet
Core, C to
pane
is above Conn
Assy 1P
45º
4-2-2. Wire Dressing overview for CISPR model.
4-2-4. SP Connector Assy 4P Dressing
1) See steps 1 ~ 3 below for SP Connector Assy 4P wire dressing.
Use datum lines as reference
1
Attach Tape, LCD (3X).
Ensure wires go around
inverter board.
Use datum lines as reference
Use datum lines
as reference
Use datum line as reference
2
HT PWB
Bracket,
Bottom
SP Conn Assy 4P
SP Conn Assy 4P
is below Frame,
Spine
SP Conn Assy 4P is below Frame, Spine
Use datum lines as reference
3
Attach Tape, LCD (2X)
– 15 –
Page 17
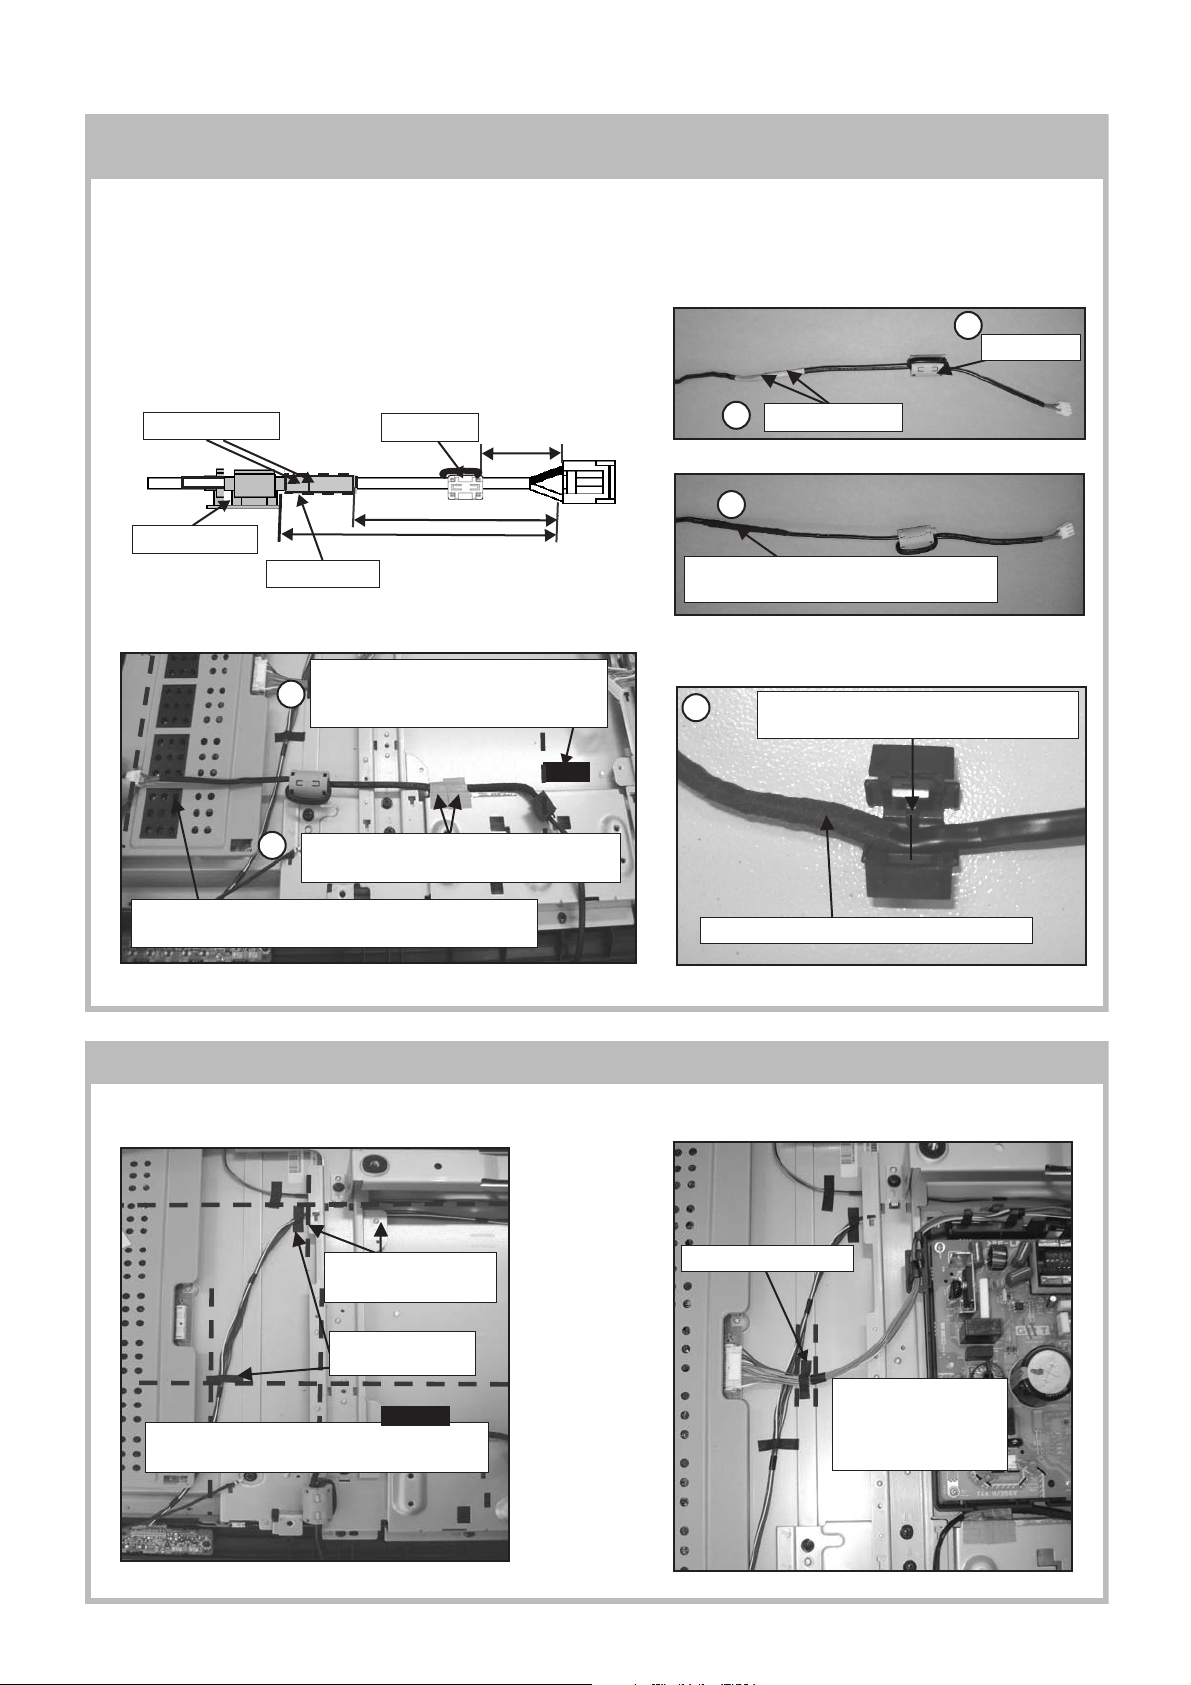
KLV-26T400A, T400G, 32T400A
RM-GA013
4-2-5. AC Power Cord Wire Dressing (Before
installing G1 Bracket with GPT PWB) for CISPR Models.
1) Install Ferrite core to AC power cord at specified position as shown.
2) Attach Tape, Shield (X2) on to specified position.
3) Next, wrap Sheet Core, E around area of Tape, Shield on AC power cord, to cover it.
4) Finally, install AC cord holder to AC power cord at specified position.
5) Attach Tape, Shield to AC power cord (X2) at specified position.
6) Attach Sheet Core, C to overlap the two Tape, Shields.
This is to prevent the Tape, Shields from peeling off.
Tape, Shield (X2)
Ferrite Core
140± 5mm
2
Tape, Shield (X2)
1
Ferrite Core
285± 5mm
AC Cord Holder
Sheet Core, E
6
Make sure it overlaps the Tape, Shields.
5
Attach Tape, Shield to AC Power Cord (X2)
Use edge of Inverter board's cover and AC power cord
connector as a guideline for placement of power cord
360 ± 5mm
CISPR models only
Attach Sheet Core, C to Tape, Shields.
CISPR models only
4-2-6. Dressing of Connector Assy 10P and 14P
3
Wrap Sheet Core, E around area of Tape,
Shield on AC Power Cord, to Cover it
4
When installing AC cord holder, make sure
the Sheet Core, E area is clamped as well
Portion of AC Power Cord with Sheet Core, E
Attach Tape, LCD to Connector Assy 10P and Connector Assy 14P as shown.
Dress Conn Assy 10P
below Frame, Spine
Attach Tape, LCD
(2X)
Use datum lines as an indication for attaching
Tape, LCD to Connector Assy 10P
– 16 –
Attach Tape, LCD (1X)
Use datum lines as an
indication for attaching
Tape, LCD to
Connector Assy 14P
Page 18
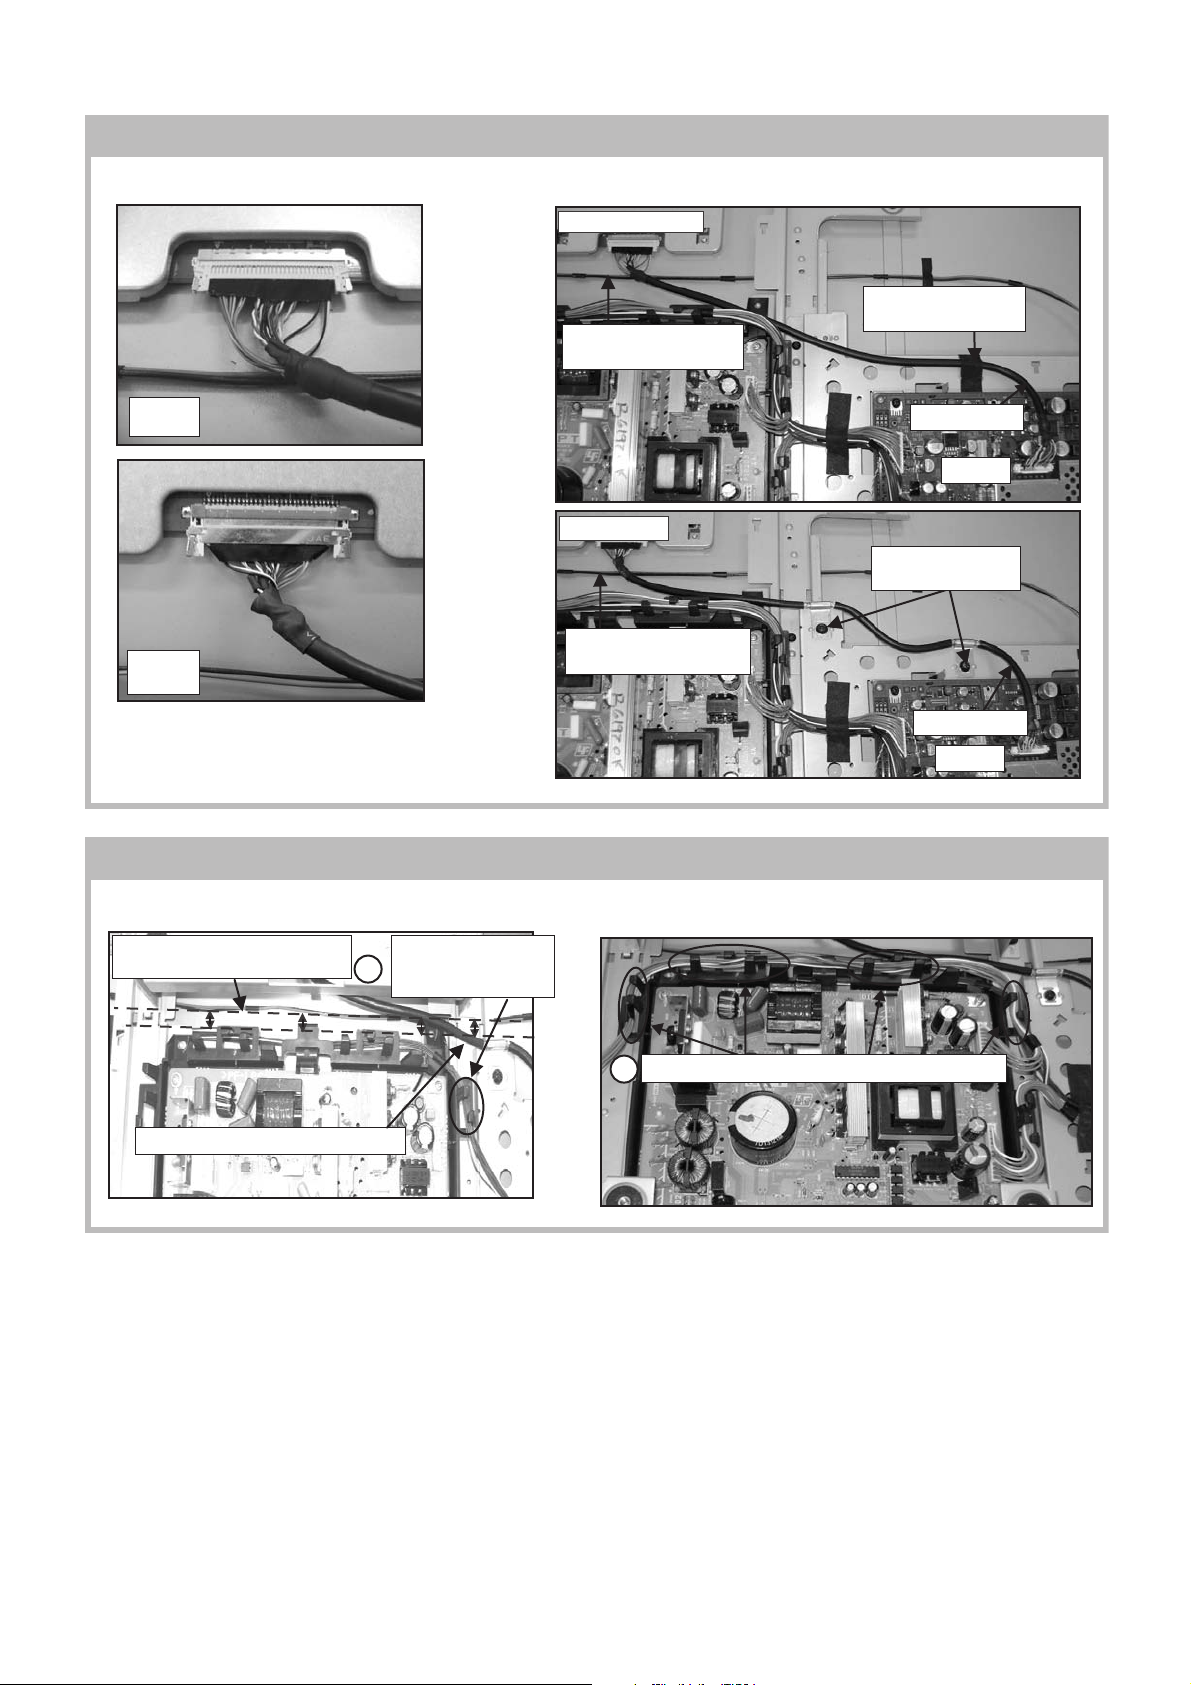
4-2-7. LVDS Harness Dressing
See steps below for LVDS harness and SP Connector Assy 4P wire dressing.
Non-CISPR model
SP Conn Assy 4P below
LVDS harness
KLV-26T400A, T400G, 32T400A
RM-GA013
Attach Sheet Core, C
to LVDS harness.
OK
CISPR model
SP Conn Assy 4P below
LVDS harness
LVDS harness
CN3000
Screw earth clamps
(2X)
NG
Note: When inserting LVDS harness to panel, make sure it is
fully inserted and in the correct direction as shown.
4-2-8. Dressing of Connector Assy 10P and Connector Assy 14P on G1 Bracket
1) Dress Connector Assy 10P into G1 bracket's hook (1X) as shown. 2) Next, dress Connector Assy 14P into G1 bracket's hook (4X).
Keep distance between Conn
Assy 10P and SP Conn Assy 4P
Dress Conn Assy
10P into G1 bracket's
1
hook (1X)
LVDS harness
CN3000
Conn Assy 10P is below G1 bracket
– 17 –
Dress Conn Assy 14P into G1 bracket's hook (4X)
2
Page 19
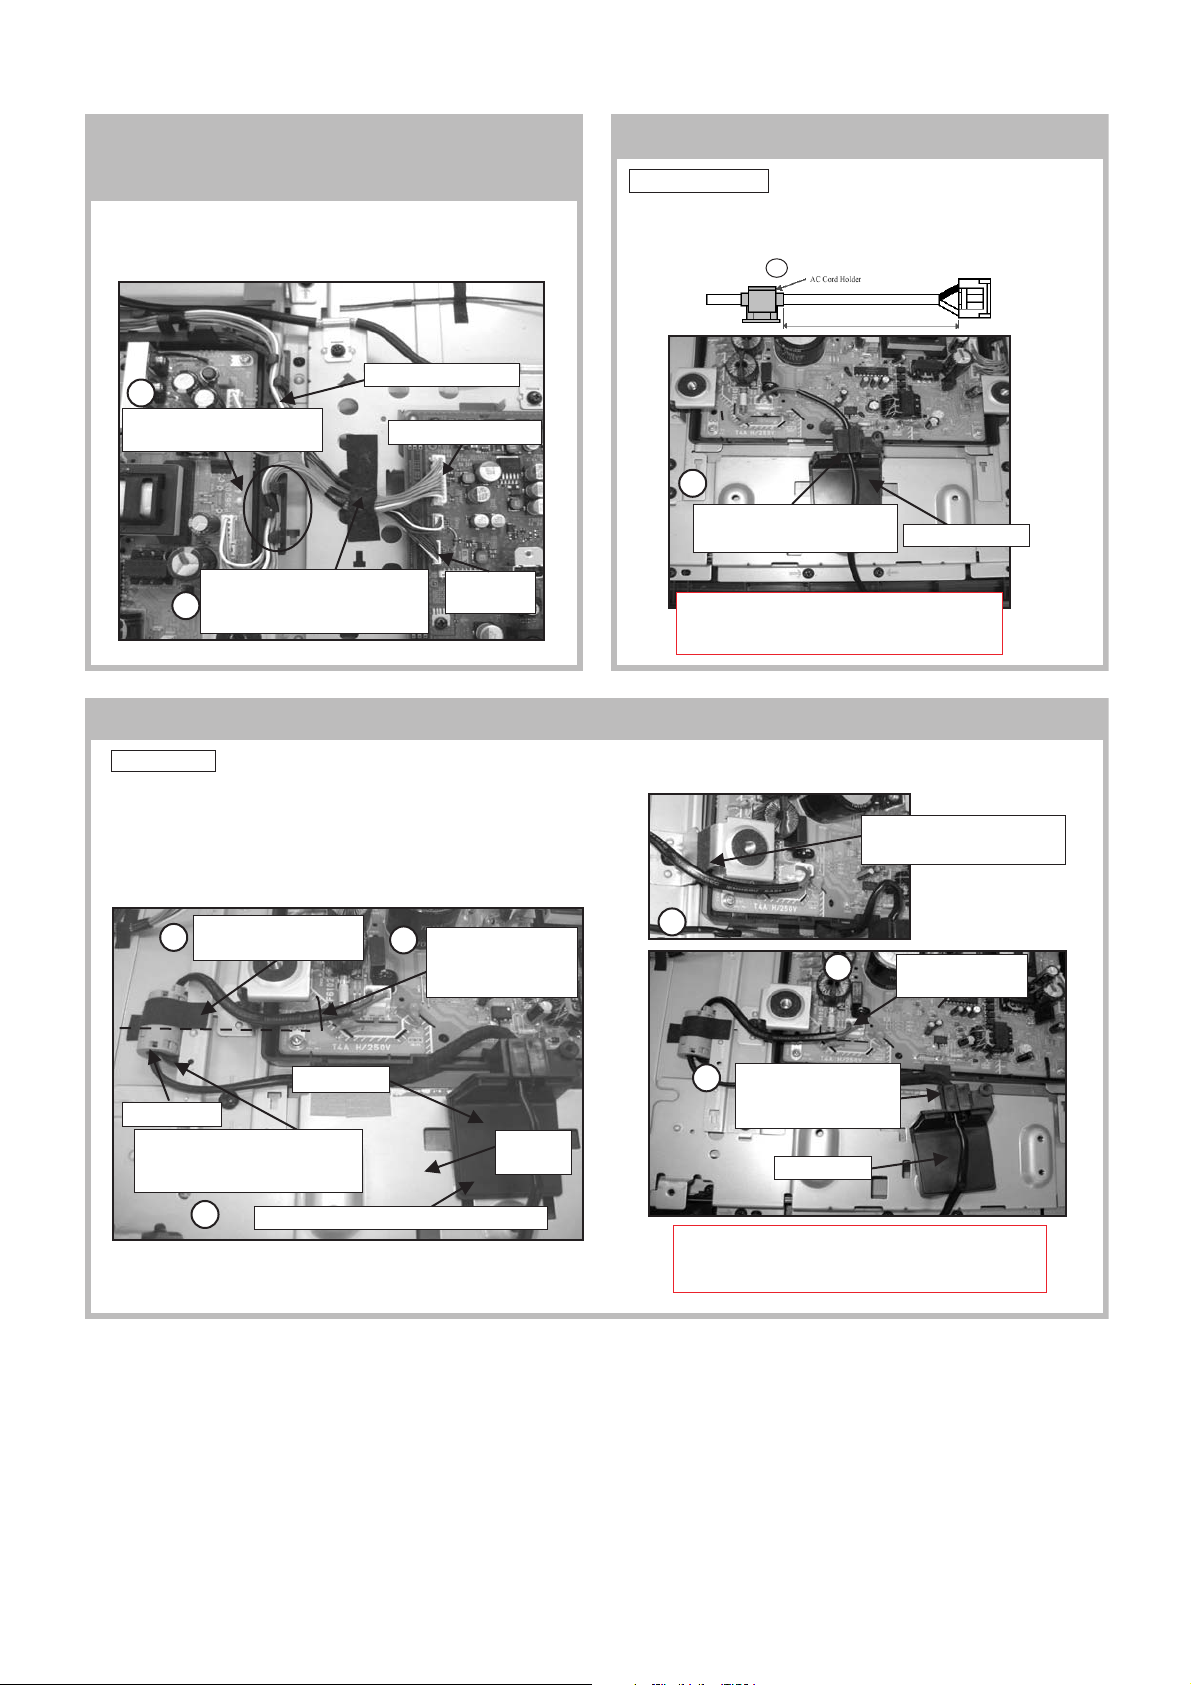
KLV-26T400A, T400G, 32T400A
RM-GA013
4-2-9. Dressing of Connector Assy 14P,
Connector Assy 13P and Connector
Assy 10P
1) Dress Connector Assy 13P into G1 bracket's hook as shown.
2) Align Connector Assy 14P, Connector Assy 10P and Connector
Assy 13P together and dress them using Sheet Core, C.
1
Dress Conn Assy 13P into
G1 bracket's hook (1X)
Dress Conn Assy 14P, Conn
Assy, 10P and Conn Assy 13P
2
using Sheet, Core, C
Connector Assy 14P
Connector Assy 13P
Connecto
Assy 10P
4-2-10. AC Power Cord Wire Dressing
Non-CISPR model
1) Install AC cord holder to AC power cord at specified position as
shown.
2) Then install the AC power cord with holder into AC cord bracket.
80 ± 5mm
2
Install AC power cord with
holder into AC cord bracket
CAUTION:
1. Ensure that AC power cord is not stressed
whilst inserting it into AC cord bracket.
AC cord bracket
4-2-11. AC Power Cord Wire Dressing
CISPR model
1) Attach Sheet Core, C to Vesa Frame Bottom (32).
2) Insert AC power cord into CN6102.
3) Install the AC power cord with holder into Bracket, AC.
4) Then, install Bracket, AC into Bracket, Bottom.
5) Attach Sheet Core, C to Ferrite Core.
6) Lastly, dress AC power cord using pin, wire A6101 as shown.
Attach Sheet Core, C
5
to Ferrite Core
Bracket, AC
Ferrite, Core
AC Cord that is looped around
Ferrite Core is inserted under
Frame, Spine
4
Install Bracket, AC into Bracket, Bottom
6
Dress AC power
cord using pin, wire
A6101
Bracket,
Bottom
Attach Sheet Core, C
to Vesa Frame Bottom (32)
1
2
Install AC power cord
3
CAUTION:
1. Ensure that AC power cord is not stressed whilst
inserting it into AC Cord bracket.
with holder into
Bracket, AC
Bracket, AC
Insert AC power
cord to CN6102.
– 18 –
Page 20
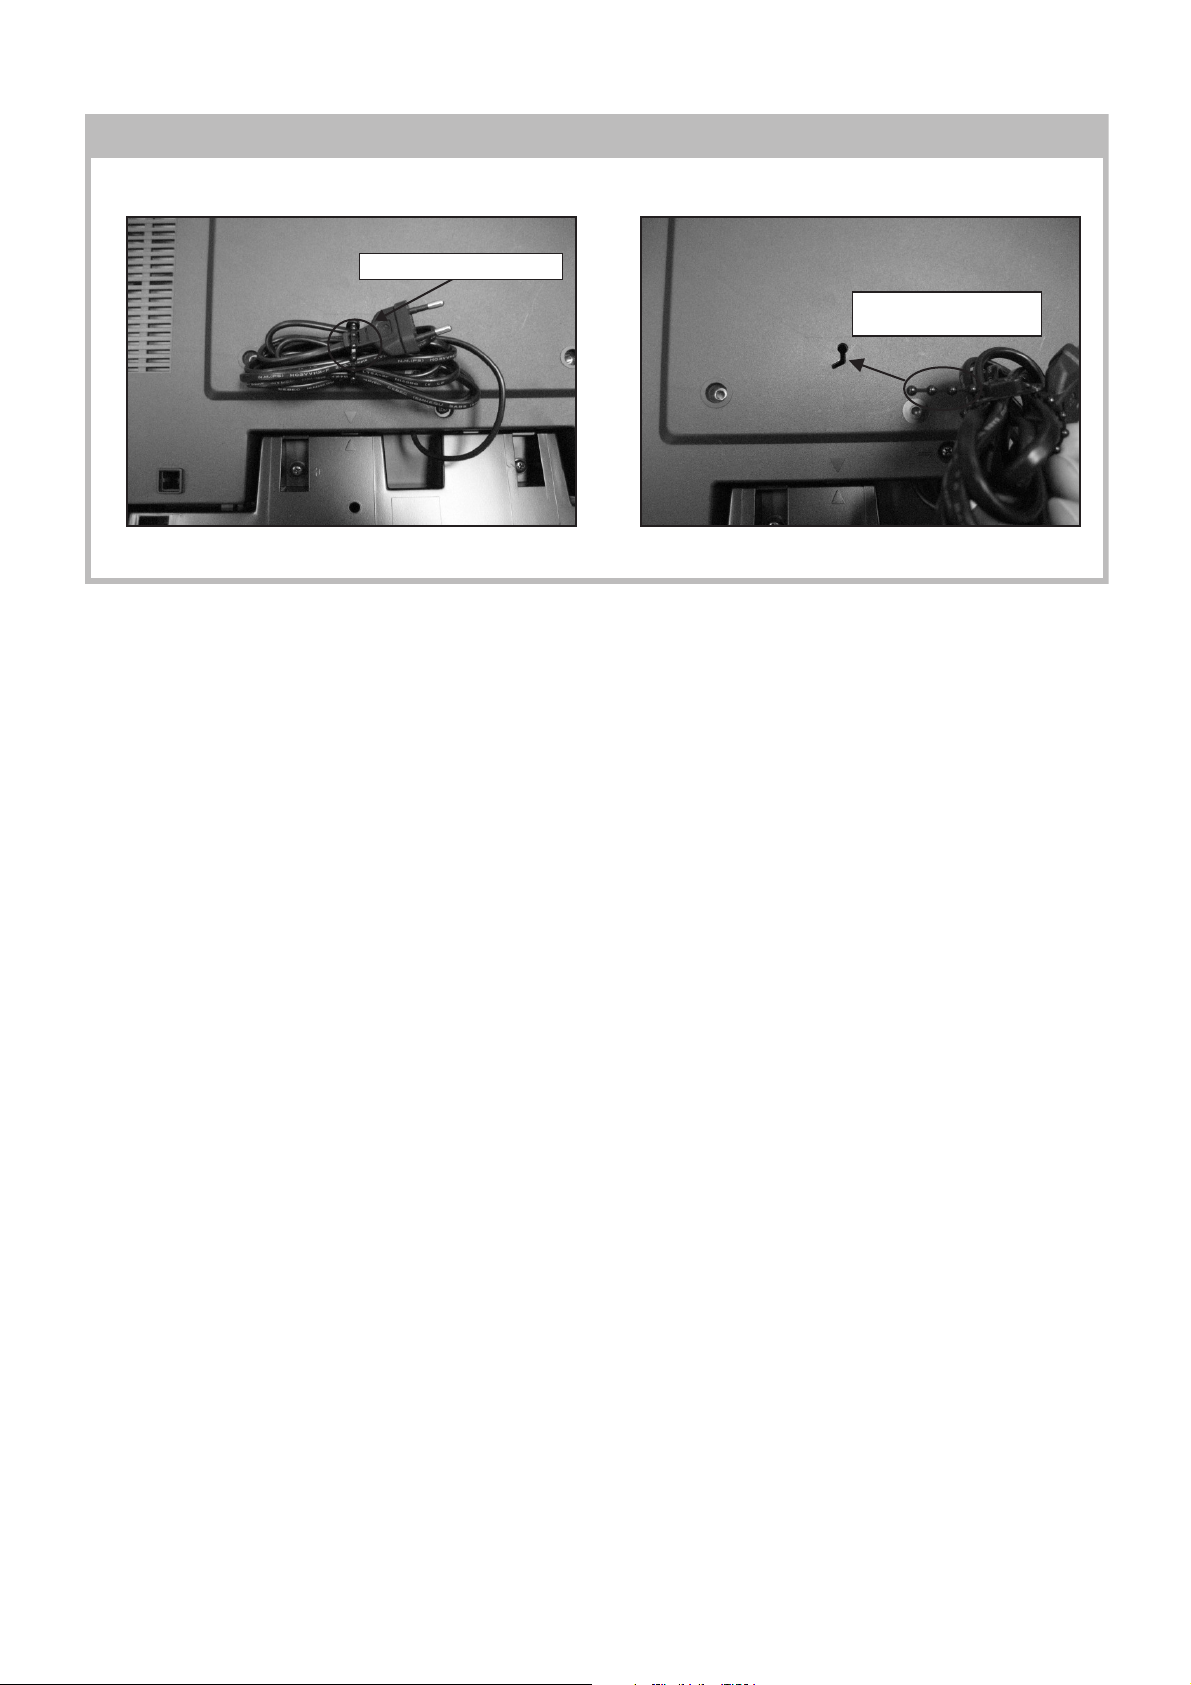
4-2-12. AC Power Cord Wire Dressing at Rear Cover
Tie the root of the AC plug.
KLV-26T400A, T400G, 32T400A
RM-GA013
Hook the AC-band to the
rear cover.
– 19 –
Page 21
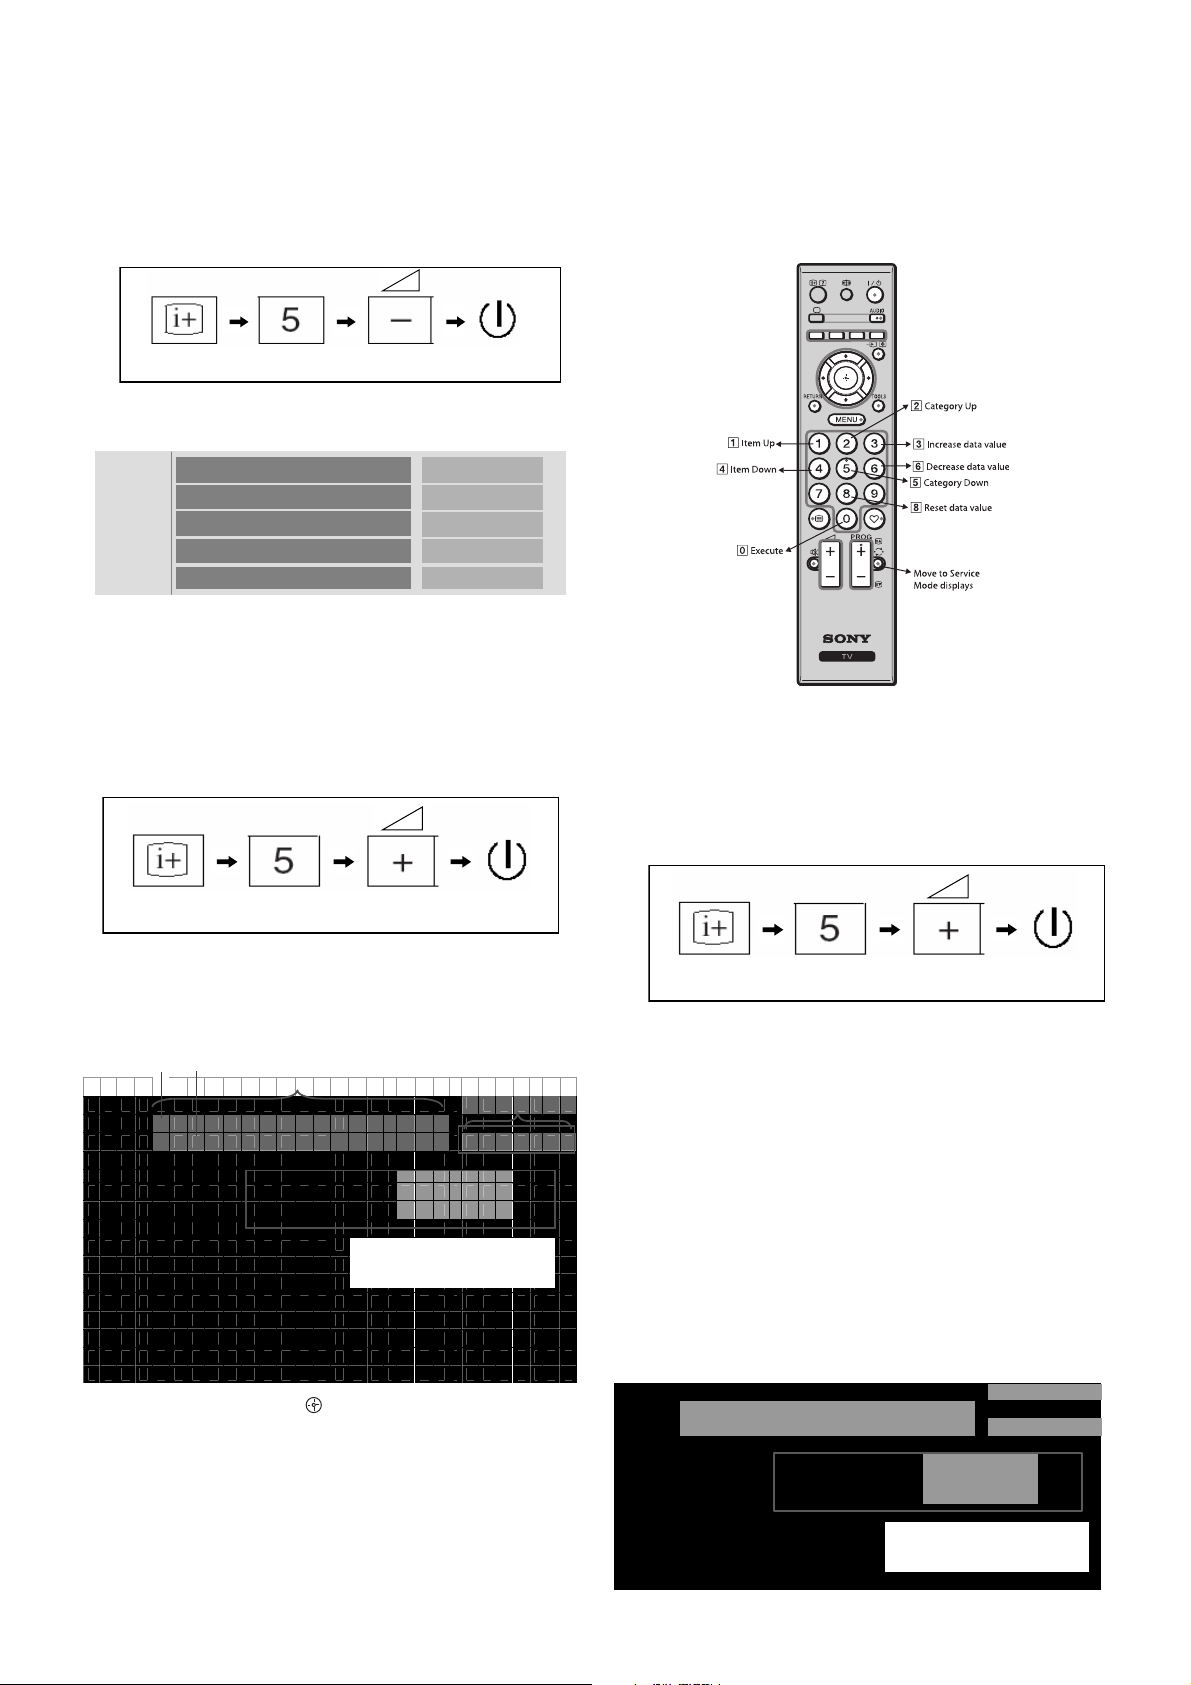
KLV-26T400A, T400G, 32T400A
n
RM-GA013
SECTION 5
SERVICE ADJUSTMENTS
5-1. Accessing Diagnostic Menu
1. While TV set on standby, press the following sequence on
the Remote commander (RMGA013).
On screen
display
Channel 5
Volume (-)
POWER
The following menu will appear on the screen
MAIN_POWER_ERROR
5V_POWER_ERROR
AUDIO_ERROR
BALK_LIGHT_ERROR
TEMP_ERROR
0
0
0
0
0
Figure 1
2. To quit the diagnostic menu, turn off and on the set.
5-2. Viewing the Service Mode Display
1. While TV on standby mode, press the following sequence
on the Remote commander.
5-3. Control keys via Remote Commander.
Buttons on the Remote Commander to access the service
menu items and adjust the data values.
5-4. Adjustment Method
5-4-1. Aging
On screen
display
Channel 5 Volume (+)
POWER
(if wrong key is pressed or passed 3 seconds during each
process, cancel entering the self-diagnosis display.)
Example on screen display:
T V S E R V I C E
0 0 0 B M E
0 0 0 W P R _ 2 5 5
L O C T O P P R O G R A M :
G T V : M R 1 . 0 . 2
N V M : T D 0 . 1 0 0
Categry Item
[Category/Item name] Withi n 17
characters
W
W
[Data] Within 7 characters
C
TM0 . 0 7 0
PROGRAM: Show the Application version
GTV: Show the GTV Library version
NVM: Show the NVM version in the NVM data
(4bytes ASCII data)
2. To reset, press 8 – 0 – .
3. To Exit, press the <I/1> key .
1. While TV on standby mode, press the following sequence
on the Remote commander.
On screen
display
Channel 5 Volume (+)
POWER
2. Select AGING with 2 or 5 On the Remote Commander.
3. Select AGING MODE with 1 or 4 On the Remote
Commander.
4. Select data value with 3 or 6 On the Remote
Commander to 1 to enable. Refer to Service Items
(Table 1) page 17
5. Press <I/1> to exit.
6. When exit it will have the new data value and start aging.
7. Aging condition:
a) Supply voltage : Rating
b) Time: More than 20 minutes
c) Ambient Temp: 22-28 degrees
d) Input : Set no signal except digital and analog
RF(Video/Component/PC)
Example on screen display:
T V
0 0 0
0 0 0
L O C T O P
A G I N G
A G I N G
M O D E
P R O G R A M :
G T V :
N V M :
T M 0 . 0 7 0
M R 1 . 0 . 2
T D 0 . 1 0 0
S E R V I C E
1
PROGRAM: Show the Application versio
GTV: Show the GTV Library version
NVM: Show the NVM version in the NVM data
(4bytes ASCII data)
– 20 –
Page 22
KLV-26T400A, T400G, 32T400A
n
n
RM-GA013
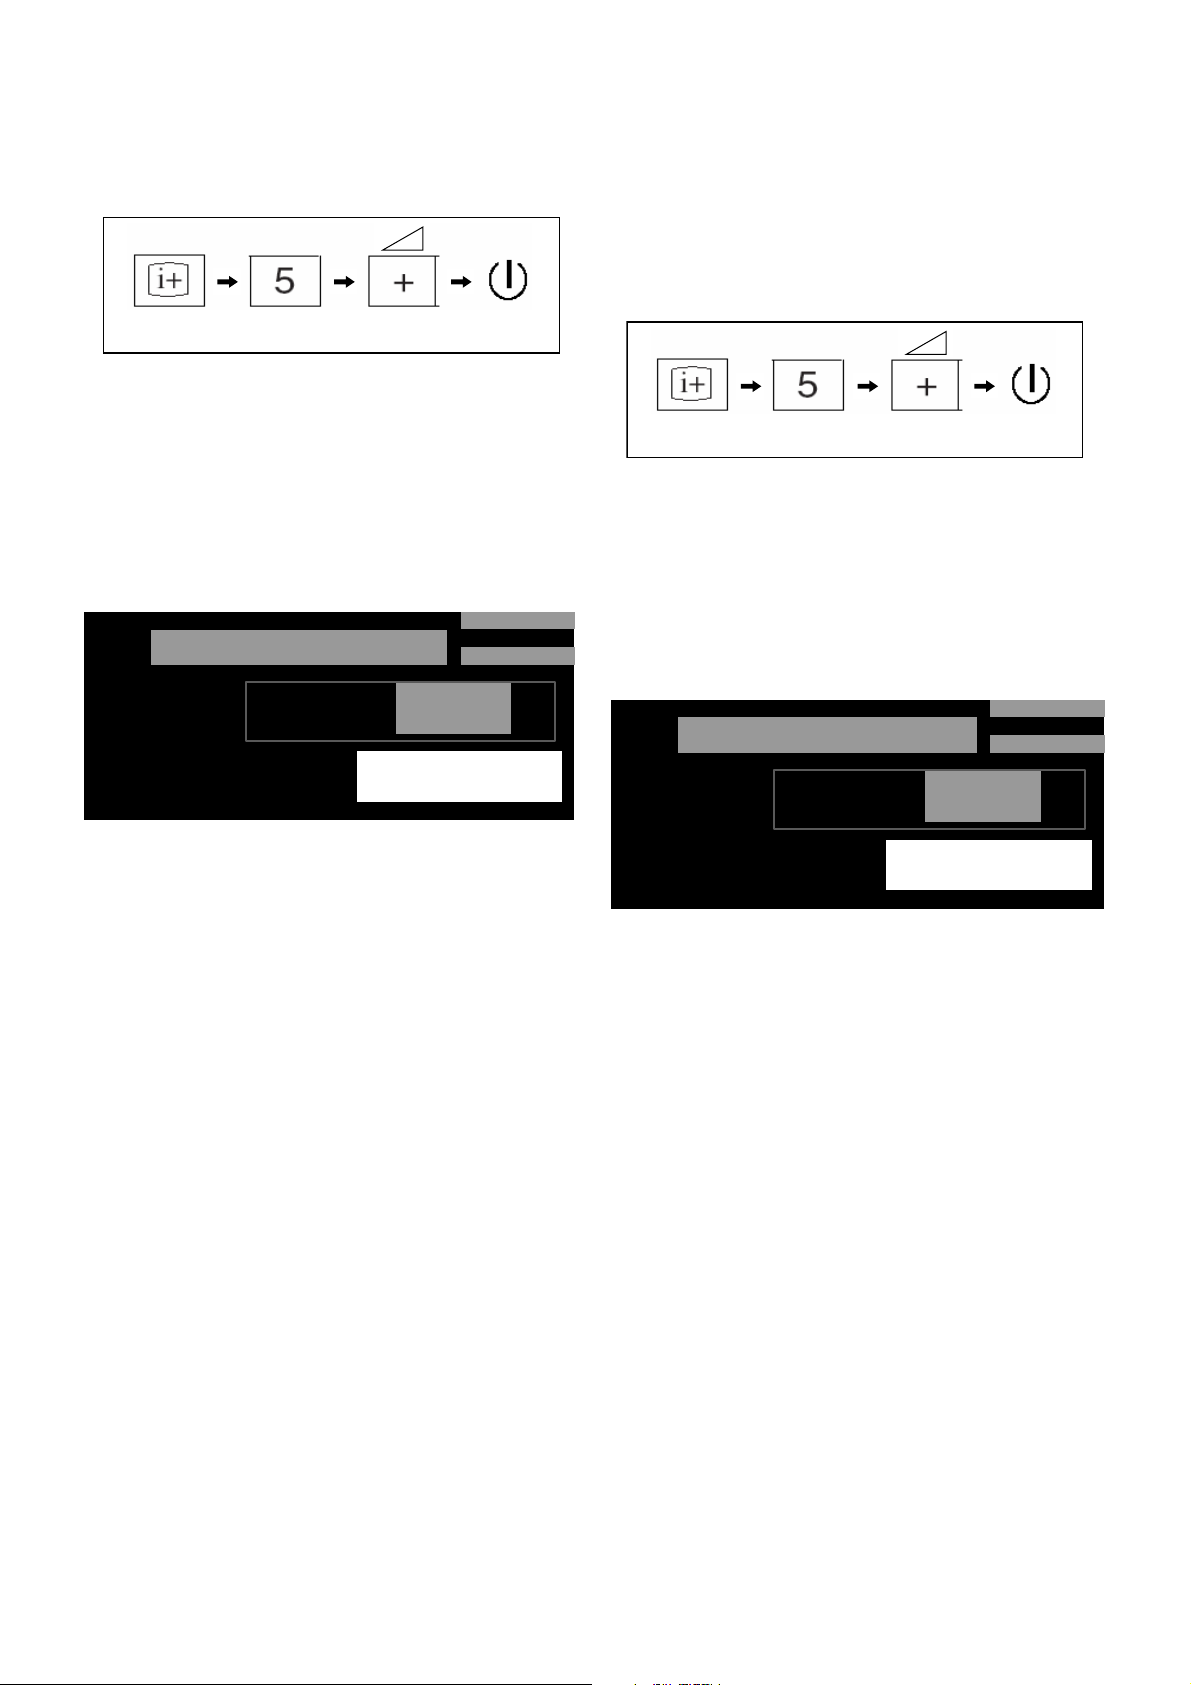
5-4-2. Resetting the User Menu- Factory Reset
1. While TV on standby mode, press the following sequence
on the Remote commander.
On screen
display
Channel 5 Volume (+)
POWER
2. Select SERVICE with 2 or 5 On the Remote
Commander.
3. Select AUTO SET FACTORY with 1 or 4 On the Remote
Commander.
4. Select data value with 3 or 6 On the Remote
Commander to 0 to current condition. Refer to
Service Items (Table 1) page 17
5. Press <I/1> to exit.
Example on screen display:
T V
0 0 0
0 0 0
L O C T O P
S E R V I C E
A U T O G S E T F A C T O R Y
P R O G R A M :
G T V :
N V M :
T M 0 . 0 7 0
M R 1 . 0 . 2
T D 0 . 1 0 0
PROGRAM: Show the Application versio
GTV: Show the GTV Library version
NVM: Show the NVM version in the NVM data
(4bytes ASCII data)
S E R V I C E
0
5-4-3. White Balance Adjustment
Test Pattern:
a) Connect video signal of white to video input
b) Restort to original value : Color temp=0,
Picture=Max,Brightness=50,Backlight=max
1. While TV on standby mode, press the following sequence
on the Remote commander.
On screen
display
Channel 5 Volume (+)
POWER
2. Select WB with 2 or 5 On the Remote Commander.
3. Select WPR_C with 1 or 4 On the Remote Commander.
4. Select data value with 3 or 6 On the Remote
Commander.
5. Press <I/1> to exit.
Note: Refer to Service Items (Table 1) page 17 for other item
and data value.
Example on screen display:
T V
0 0 0
0 0 0
L O C T O P
W B
W P R _ C
P R O G R A M :
G T V :
N V M :
T M 0 . 0 7 0
M R 1 . 0 . 2
T D 0 . 1 0 0
S E R V I C E
2 5 5
PROGRAM: Show the Application versio
GTV: Show the GTV Library version
NVM: Show the NVM version in the NVM data
(4bytes ASCII data)
– 21 –
Page 23
KLV-26T400A, T400G, 32T400A
RM-GA013
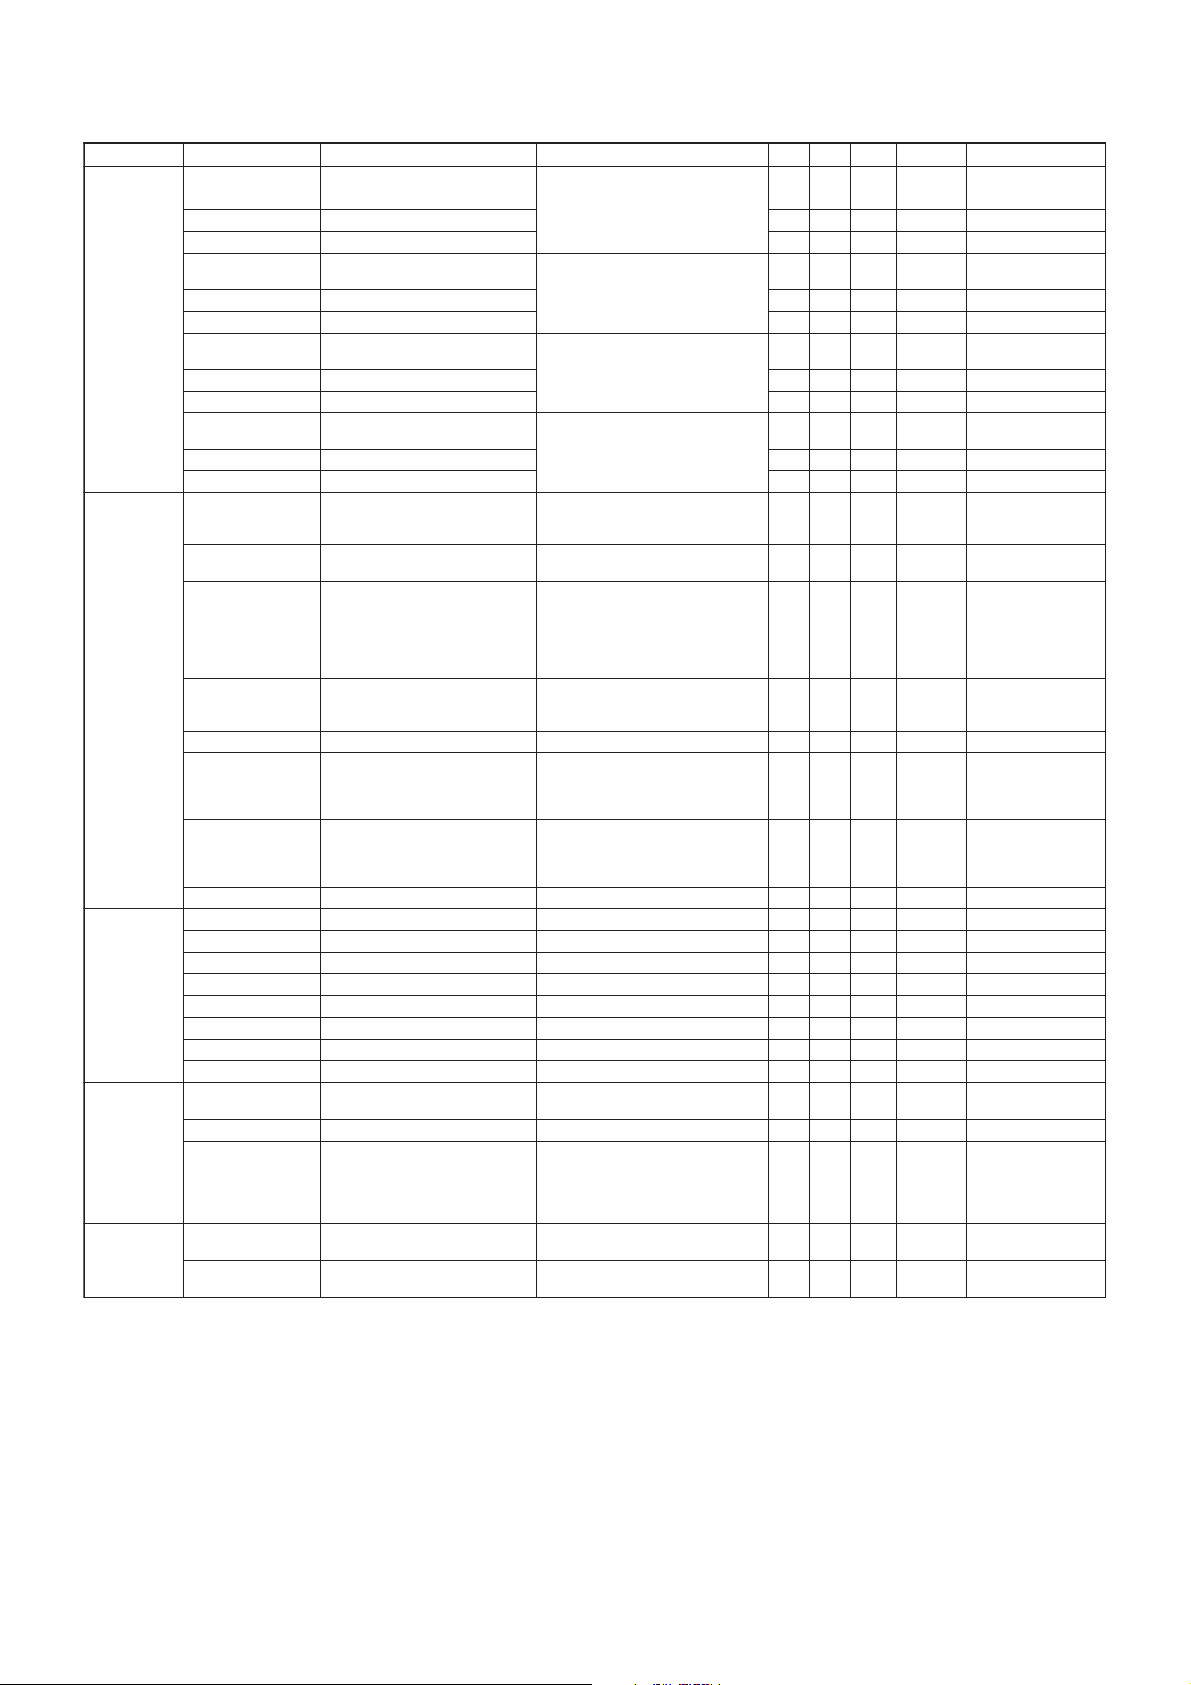
5-5. Table 1
yrogetaCmetInoitpircseDskrameRtibniMxaMlaitinI
CRPWlooCroftnemtsujdaRB/W
CGPWlooCroftnemtsujdaGB/W 80 552eulavJDA
CBPWlooCroftnemtsujdaBB/W 80 552eulavJDA
NRPWlooCroftnemtsujdaRB/W
NGPWlooCroftnemtsujdaGB/W 80 552eulavJDA
BW
ECIVRES
GNIGA
SUTATS
NBPWlooCroftnemtsujdaBB/W 80 552eulavJDA
1WRPW1mraWroftnemtsujdaRB/W
1WGPW1mraWroftnemtsujdaGB/W 80 552eulavJDA
1WBPW1mraWroftnemtsujdaBB/W 80 552eulavJDA
2WRPW2mraWroftnemtsujdaRB/W
2WGPW2mraWroftnemtsujdaGB/W 80 552eulavJDA
2WBPW2mraWroftnemtsujdaBB/W 80 552eulavJDA
METSYSGNINUT
ETUMLANGISON
YROTCAFTESOTUA
CGACIMSfo)nip66(TUOCGAfolortnoC
D2decroF"tnerruC"dna"D2"tceleS 10 10x00 D2:1,tnerruC:0
TPADAMVOnoitatpadanoitarudom-revoMF
WBTLIF.htiwdnabretlifreirracdnuoS
CDAnoitarbilacotuaDA.laCDA1010x00 CDAotuatratS:1
1RES1rebmuNlaireS XEDNI1RAHCONNOISREVYNOS80FFx0eulavJDA
2RES2rebmuNlaireS XEDNI2RAHCONNOISREVYNOS80FFx0eulavJDA
3RES3rebmuNlaireS XEDNI3RAHCONNOISREVYNOS80FFx0eulavJDA
4RES4rebmuNlaireS XEDNI4RAHCONNOISREVYNOS80FFx0eulavJDA
NOITCUDORP
5RES5rebmuNlaireS XEDNI5RAHCONNOISREVYNOS80FFx0eulavJDA
6RES6rebmuNlaireS XEDNI6RAHCONNOISREVYNOS80FFx0eulavJDA
7RES7rebmuNlaireS XEDNI7RAHCONNOISREVYNOS80FFx0eulavJDA
8RES8rebmuNlaireS XEDNI8RAHCONNOISREVYNOS80FFx0eulavJDA
EDOMGNIGAedomgnigAXEDNI_ELBANE_GNIGA_VRPA1010
EMITGNIGAemiteripxegnigAXEDNIEMITGNIGAVRPA80FFx00
ROLOCGNIGArolocgnigAXEDNI_RUOLOC_GNIGA_VRPA80FFx00
PMET"ERUTAREPMET"retsiserdaeRedomecivresPXNsaemaS80FFx0
VEL_RETSOOB_GISlevellangisFRroftropD/AdaeR1NIRAS:tropD/A80FFx0
80 552eulavJDA
looCoterutarepmetrolocegnahC
80 552eulavJDA
lartuaeNoterutarepmetrolocegnahC
80 552eulavJDA
1mraWoterutarepmetrolocegnahC
80 552eulavJDA
2mraWoterutarepmetrolocegnahC
.XIFmetsys"VT"
.etumoiduafoFFO/NO
.langis
"M"ro"I"ro"KD"ro"GB"ro"otuA"
tceles,langisonsiFRnehW
yrotcafteserpdna,yrotcafatceleS
revOekaTCGA
siatadlaitinI
1:I/KD/GB
0:M
1:oidaR
siatadlaitinI
1:I/KD/GB
0:M
1:oidaR
teehsdnasgniwollofehtotrefeR
"YROTCAFTESOTUA"
.eulavtnemtsujdasieulavlaitinI
30 80x00
10 1 0 NO:1,FFO:0
30 80x00
.noitcudorpybtsujdasieulavsihT
80 FFx0eulavJDA
10 10x0
20 30x0
,M:4,I:3
TTS:3
VSS:4
esuoN:-5
tnerruc
noitidnoc
tnerruc
noitidnoc
tnerruc
noitidnoc
tnerruc
noitidnoc
elbasiD:0
elbanE:1
worraN:0
muideM:2
ediW:3
elbasiD:0
elbanE:1
kcalB:0
etihW:1
deR:2
neerG:3
eulB:4
,KD:2,GB:1,otuA:0"
"esuoN:_5
noitidnoctnerruc:0
)HTRON(MEOS:1
)HTUOS(MEOS:2
ediwartxE:1
5-6. Board & Panel Replacement
When replacing the BT board and Panel readjust
the W/B.
– 22 –
Page 24
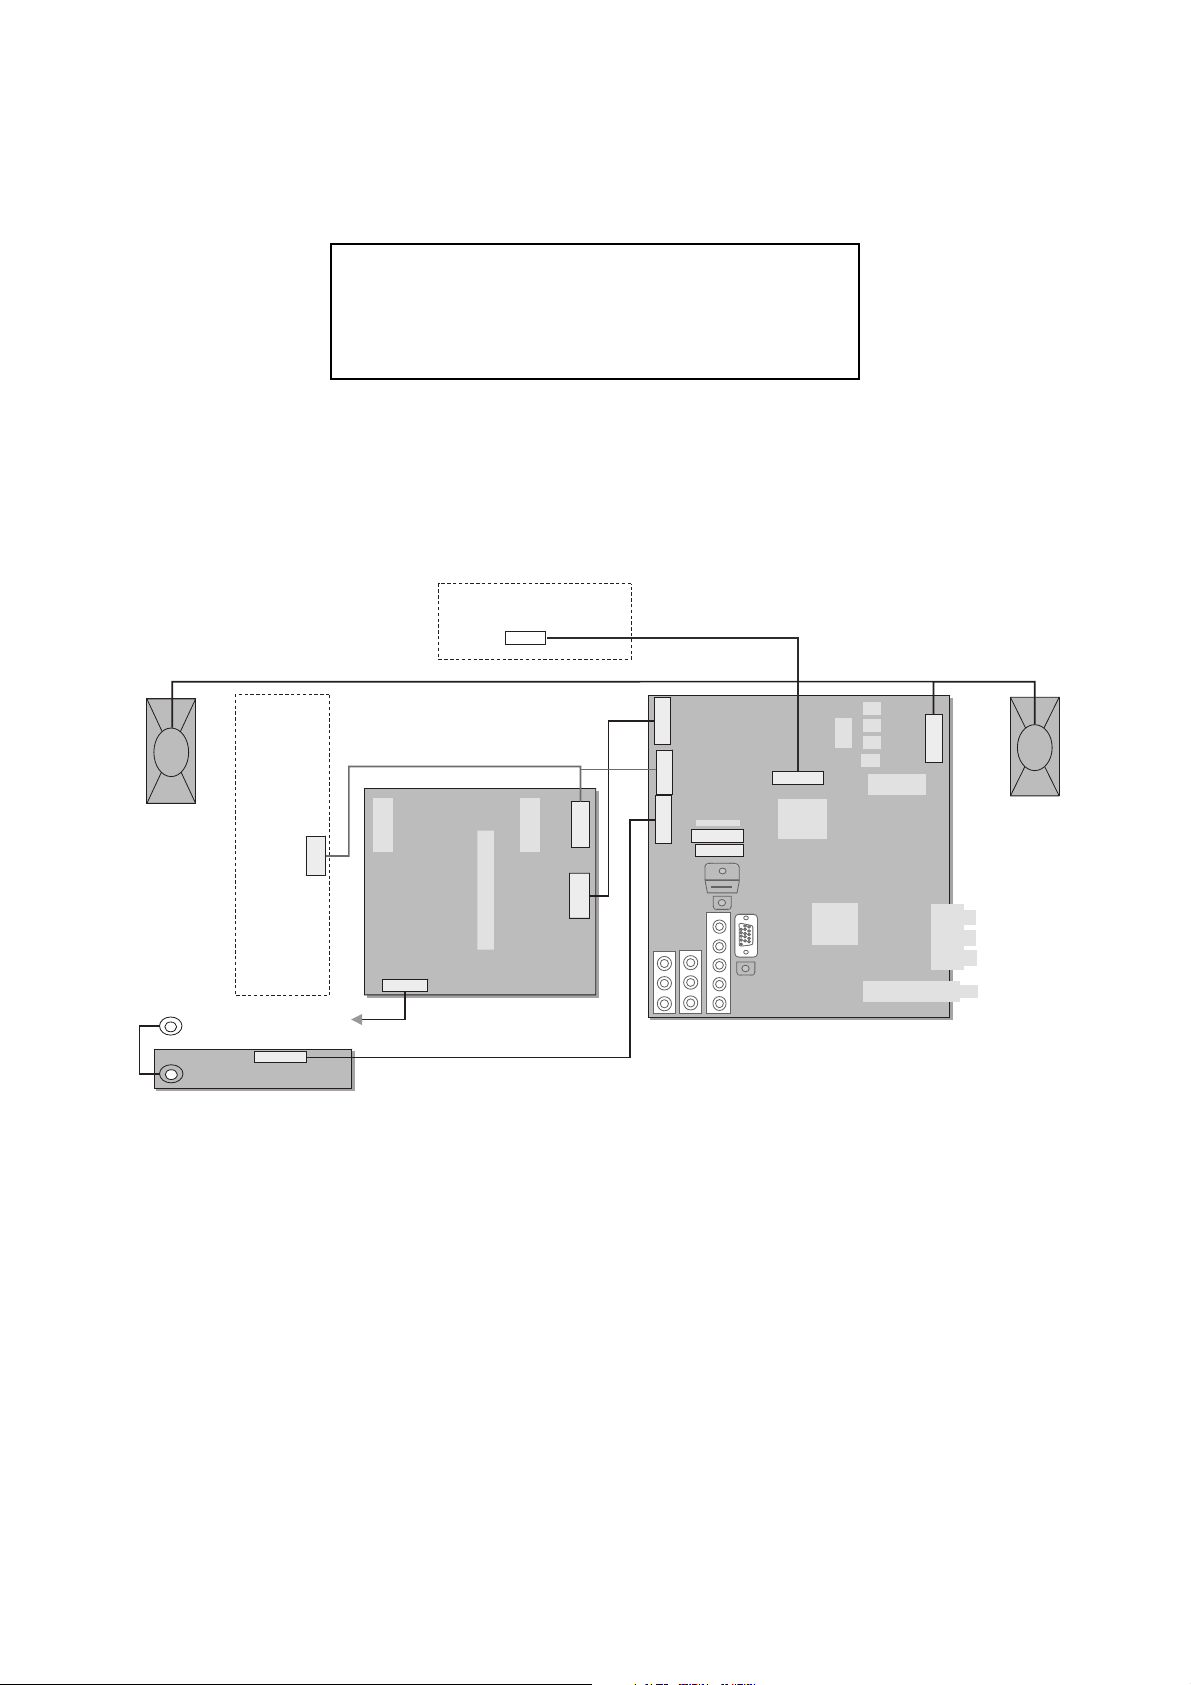
6-1. BLOCK DIAGRAM
CN6202(13
)
R
Due to complexity of the board, performing
component level field repairs are not recommended.
Complete board replacement is required if service is
necessary.
6-2. CONNECTOR DIAGRAM
6-2-1 (KLV-26T400)
T-CON
CNF1(40)
KLV-26T400A, T400G, 32T400A
RM-GA013
SECTION 6
DIAGRAMS
LVDS
Speaker R
Ground
INVERTE
AC Power
CN1000(10)
CN1(14)
HT
GPT
CN6102(3)
Key, SIRCS, LED
Power, Standby, Audio VCC, Main VCC
24V, Inv Err, BL, Dimmer
Speaker L, R
CN7000(11)
CN7001(4)
CN6201(8)
CN3001(10)
ECS
CN3002(18)
CN3003(4)
BT
CN2000(4)
CN3000(40)
Speaker L
– 23 –
Page 25
KLV-26T400A, T400G, 32T400A
R
RM-GA013
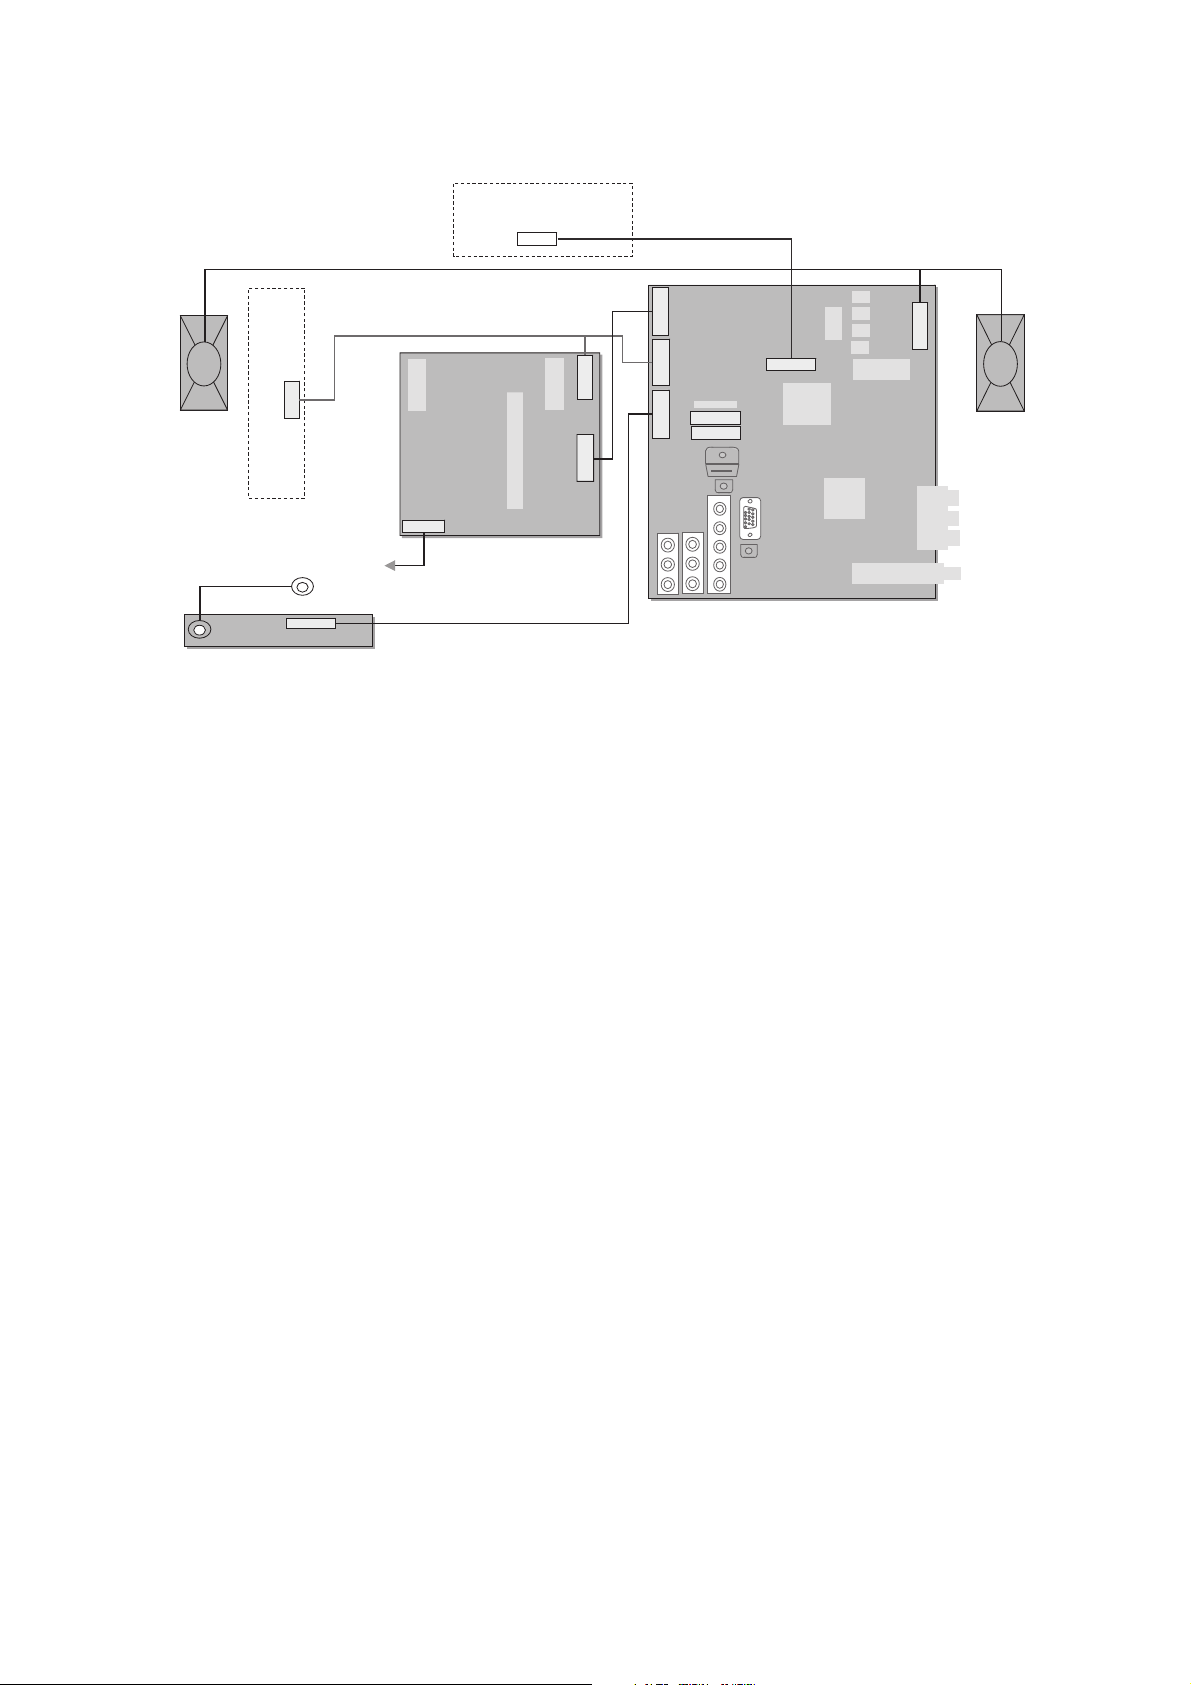
6-2-2 (KLV-32T400)
Speaker R
CN1(14)
INVERTE
24V, Inv Err, BL, Dimmer
GPT
CN6102(3)
T-CON
CNF1(40)
Power, Standby, Audio VCC, Main VCC
CN6201(8)
13)
CN6202(
Speaker L, R
CN7000(11)
CN7001(4)
CN3001(10)
LVDS
ECS
CN3002(18)
CN3003(4)
BT
CN2000(4)
CN3000(40)
Speaker L
Ground
CN1000(10)
AC Power
Key, SIRCS, LED
HT
– 24 –
Page 26
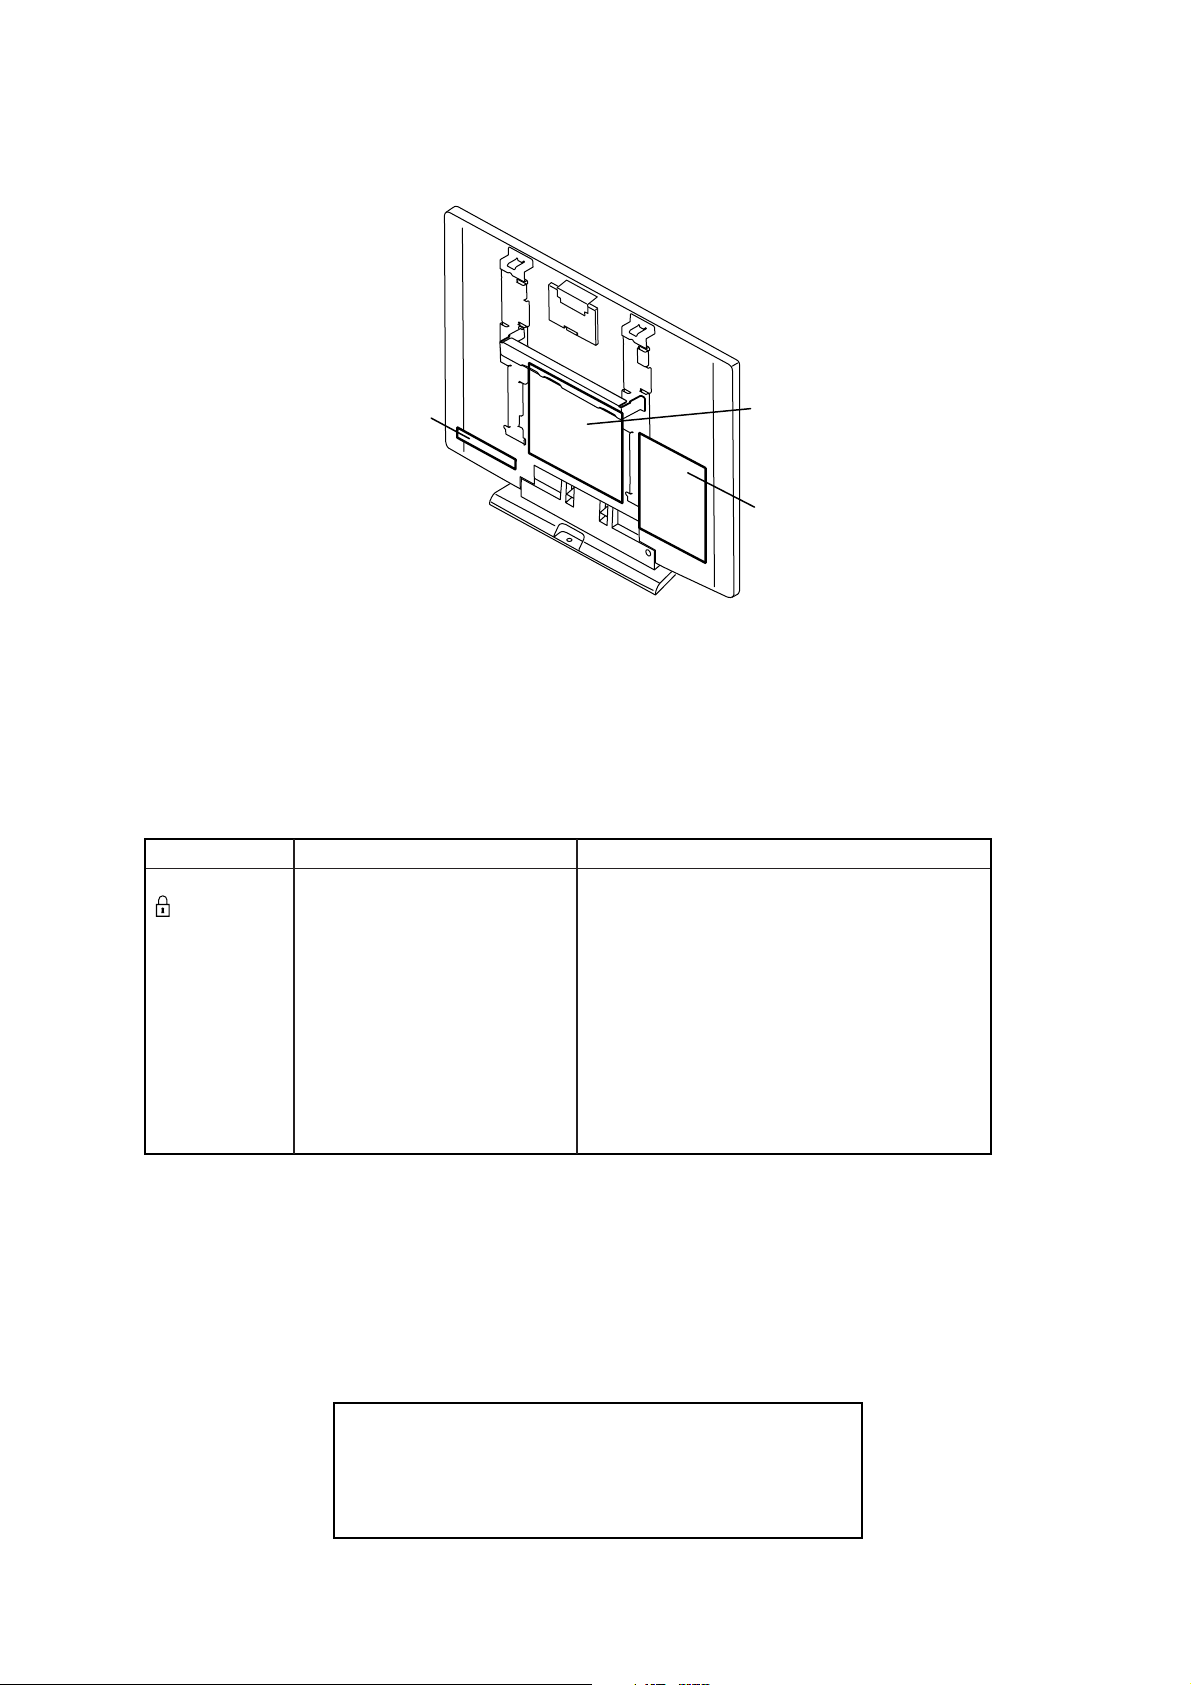
6-3. CIRCUIT BOARD LOCATION
(KLV-26T400, 32T400)
KLV-26T400A, T400G, 32T400A
RM-GA013
HT Board
GPT Board
BT Board
6-4. SCHEMATIC DIAGRAM 6-5. PRINTED WIRING BOARDS
Board Function Note
BT
GPT
I/O, AV INPUT/OUTPUT, HDMI,
PC,I, HP/AUDIO/LOC TOP/DDR/
POWER DC/ TUNER.FM.IF/
AV SWITCH.SMIC
Power Supply
Due to complexity of the board, performing
component level field repairs are not
recommended. Complete board
replacement is required if service is
necessary.
Therefore schematic diagrams and
HT
Key / LED / SIRCS
printed wiring boards are not included.
For part number information, refer to
Exploded View or Electrical Parts List
section in this manual.
6-6. SEMICONDUCTOR
Due to complexity of the board, performing
component level field repairs are not recommended.
Complete board replacement is required if service is
necessary.
– 25 –
Page 27
KLV-26T400A, T400G, 32T400A
RM-GA013
SECTION 7
EXPLODED VIEWS
• Components not identified by a part
number or description are not stocked
because they are not required for routine
service.
NOTE: The components identified by shading and ! mark are
critical for safety. Replace only with part number specified.
Note: The components identified by mark contain
confidential information. Strictly follow the instructions
whenever the components are repaired and /or replaced.
• The component parts of an assembly
are indicated by the reference numbers
in the far right column of the part list and
within the dotted lines of the diagram.
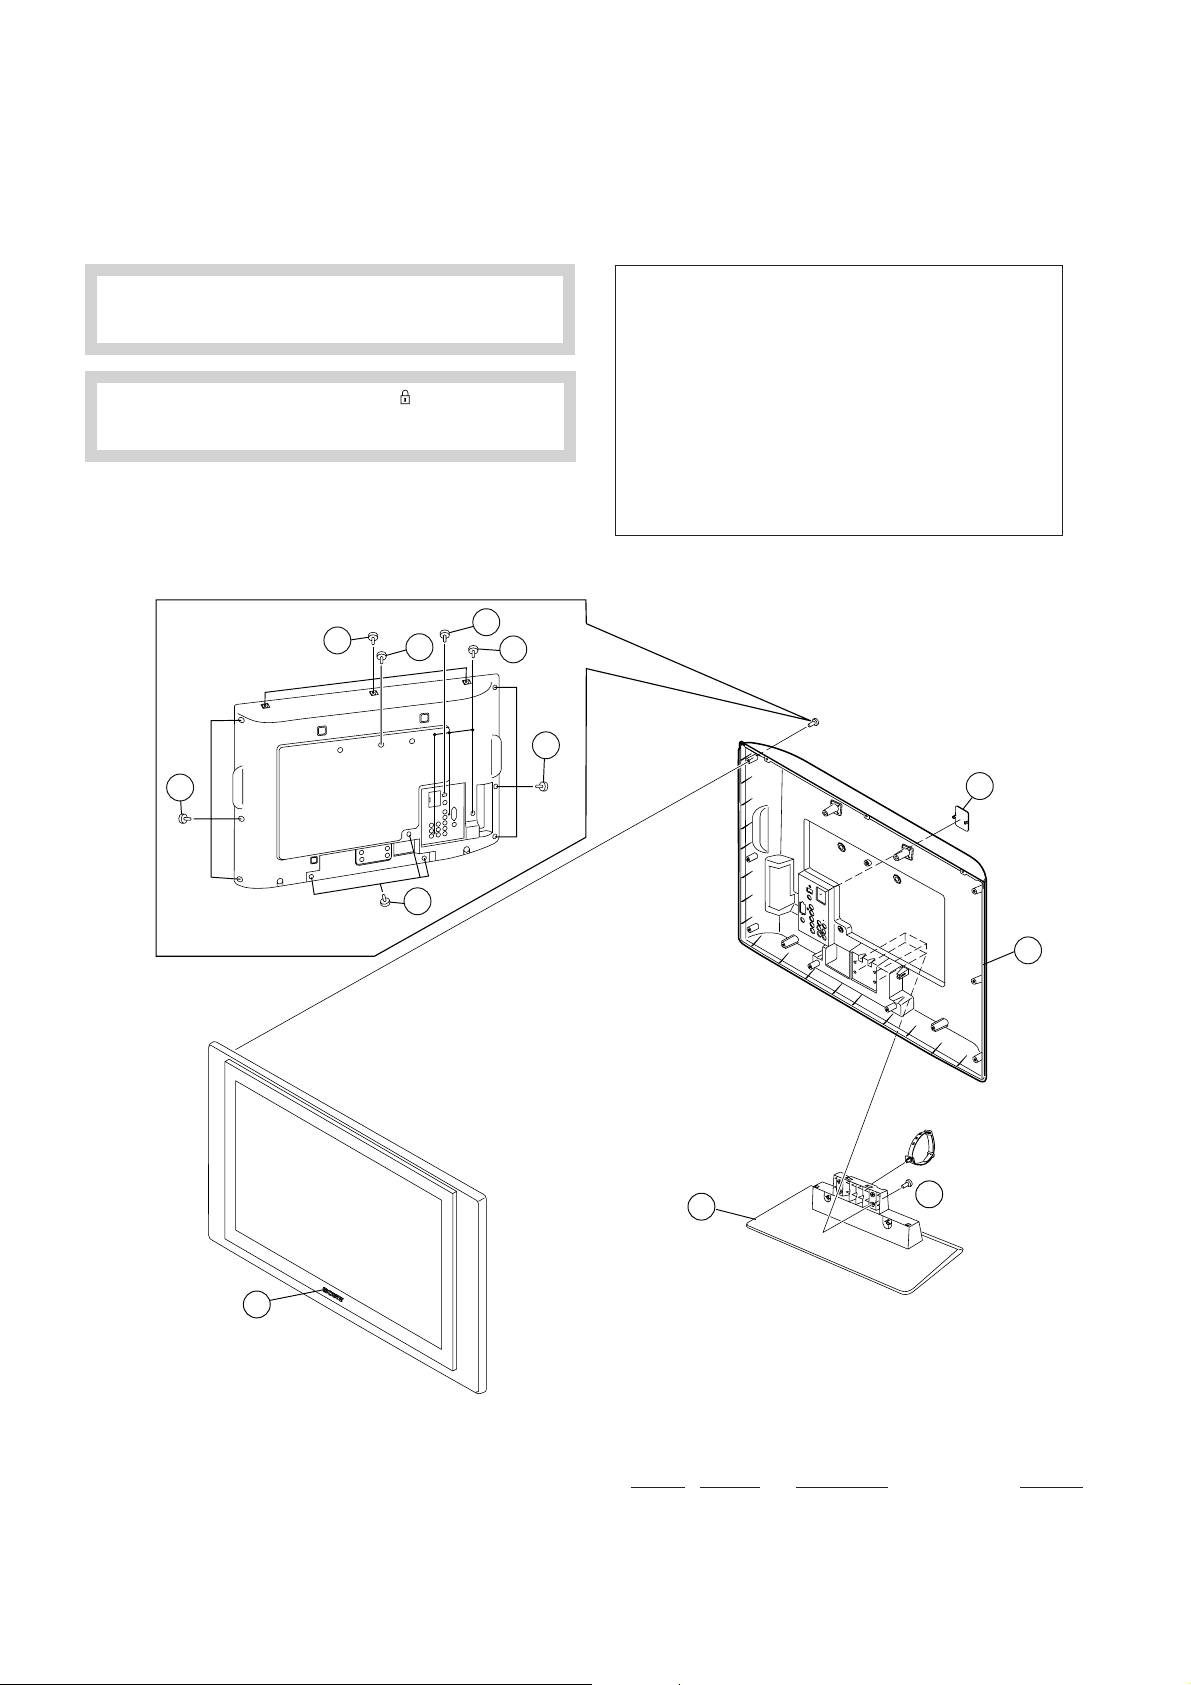
(KLV-26T400)
7-1-1. REAR CABINET
a
f
b
• Item marked with an asterisk (*) are not
stocked since they are seldom required
for routine service. Some delay should
be anticipated when ordering these
components.
a 2-580-591-01 SCREW, +PSW M3X5
b 2-580-600-01 SCREW, +PSW M4X8
c 2-580-608-01 SCREW, +PSW M5X16
d 2-580-626-01 SCREW, SP 4-4O UNC
e 2-580-629-01 SCREW, +BVST 3X8
f 2-580-640-01 SCREW, +BVTP2 4X16
g 2-580-644-01 SCREW, +KTP2 3X8
h 2-580-649-01 SCREW, +PWTP2 3X12
i 2-580-650-01 SCREW, +PWHTP2 3X16
j 2-580-654-01 SCREW, +PWTP2 4X16
k 2-674-965-31 SCREW, +PSW 3SG
l 4-046-797-01 SCREW (3X12), (+)BVTAP
m 7-685-648-79 SCREW +BVTP 3X12 TYPE2 IT-3
m
f
f
2
f
1
3
i
4
– 26 –
REF. NO. PART NO. DESCRIPTION REMARK
1 X-2190-757-1 REAR COVER (TG26) ASSY (26A)
X-2320-128-1 REAR COVER ASSY (26G)
2*3-106-086-01 COVER, ECS
3 X-2190-754-1 STAND (M) ASSY
4 4-103-599-21 EMBLEM, SONY NO.7
Page 28
7-1-2. POWER CORD, AC CORD HOLDER
!
!
KLV-26T400A, T400G, 32T400A
RM-GA013
52
51
50
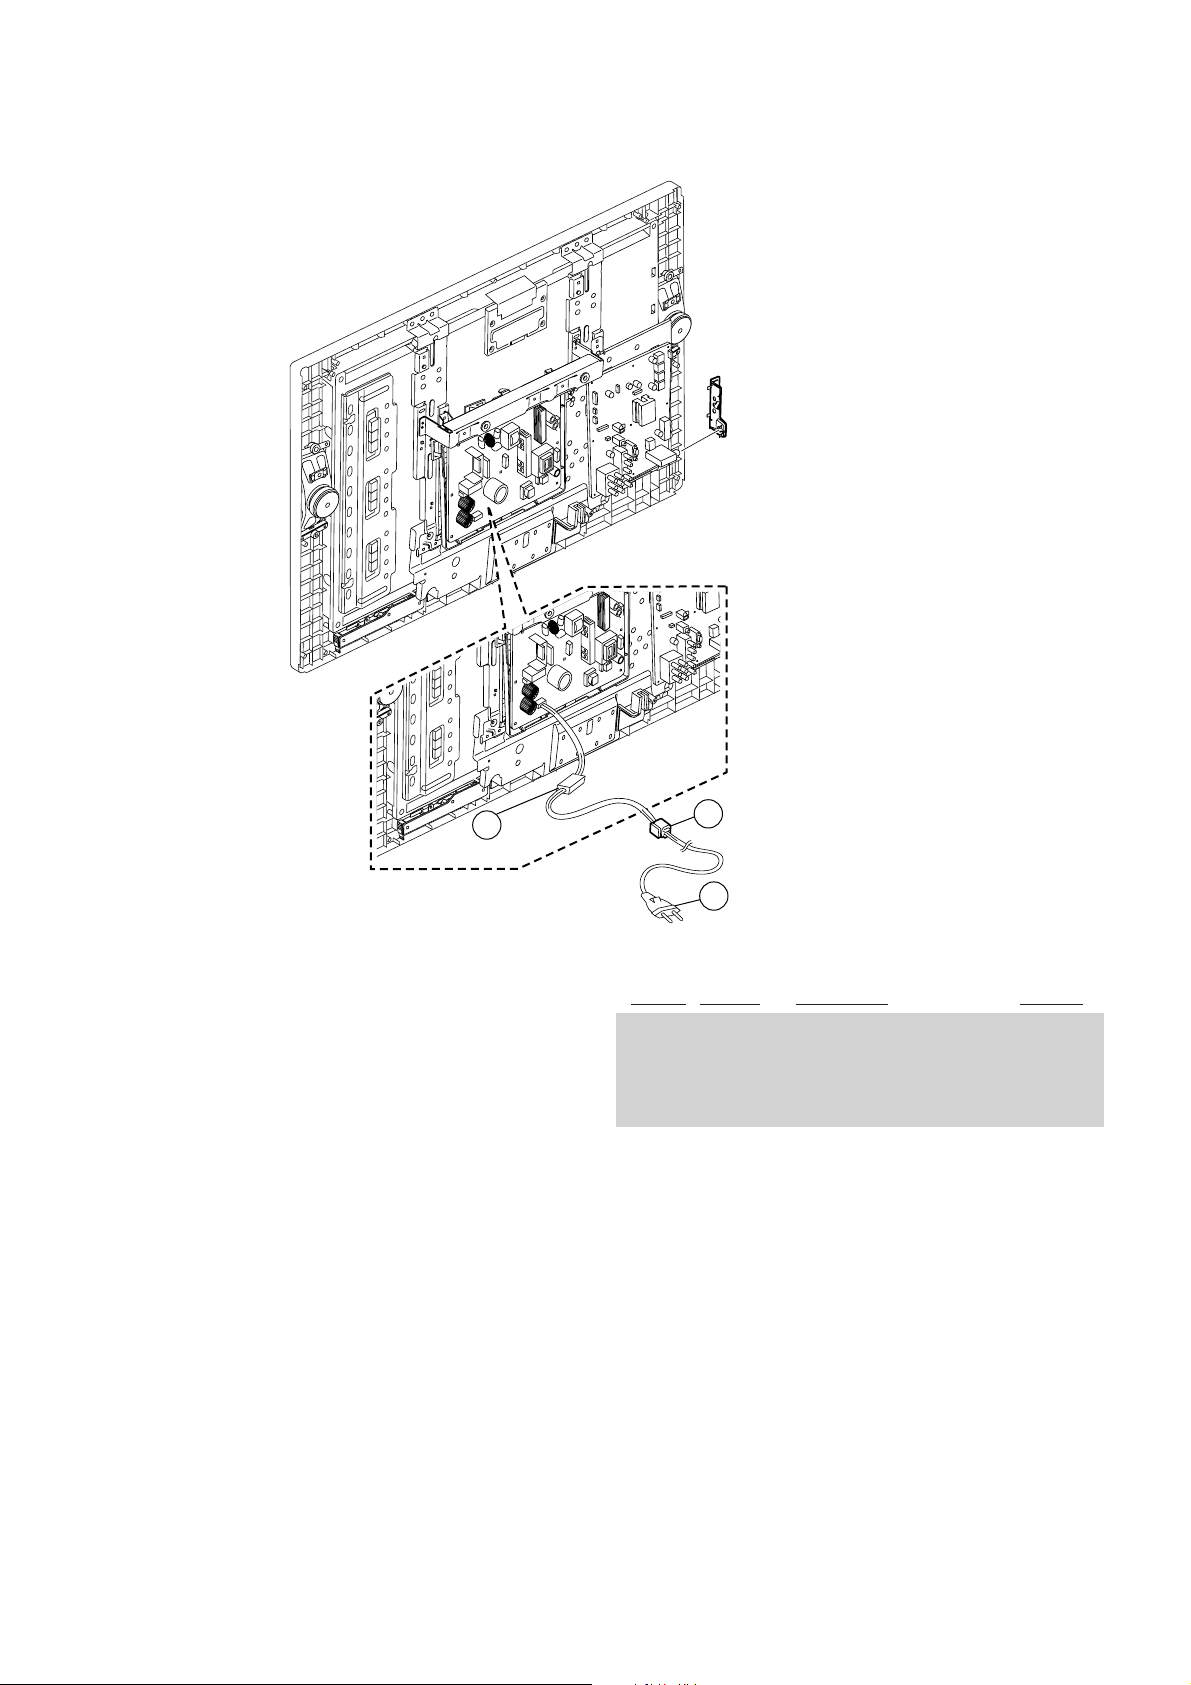
REF. NO. PART NO. DESCRIPTION REMARK
50 ! 1-835-128-11 POWER SUPPLY CORD
(WITH CONNEC (26A (NZ))
1-835-136-11 POWERSUPPLYCORD(WITHCONNECTER)
(26A (E,GE,ME,SAF), 26G (E, GE, ME))
1-835-280-11 POWERSUPPLYCORD(WITHCONNECTOR)
(26A (ID), 26G (ID))
51 4-022-115-00 HOLDER, AC CORD
52 1-500-386-11 FILTER, CLAMP (26A (NZ))
– 27 –
Page 29
KLV-26T400A, T400G, 32T400A
RM-GA013
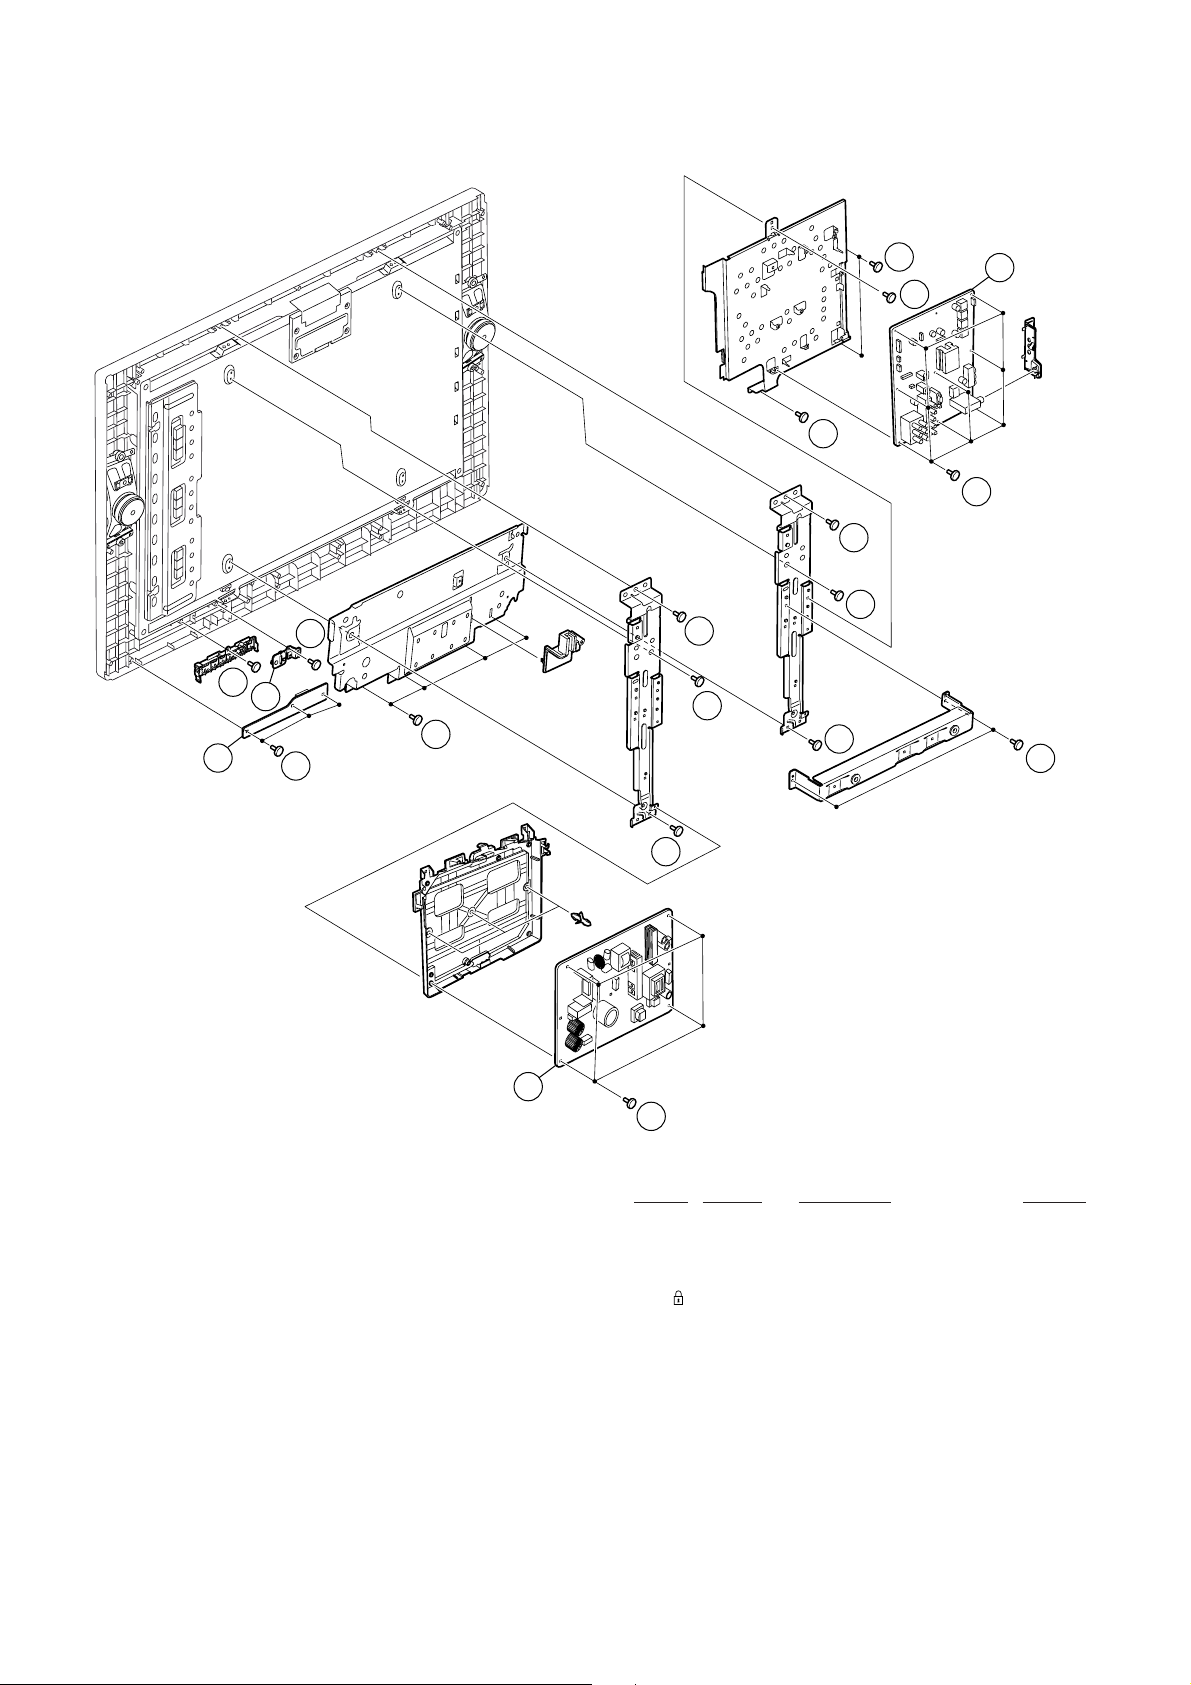
7-1-3. BT, HT, GPT BOARD
m
102
103
m
m
f
104
b
e
e
f
b
f
b
f
b
b
101
b
k
REF. NO. PART NO. DESCRIPTION REMARK
101 A-1553-047-A GPT COMPLETE
102 A-1550-333-A HT MOUNT
103 3-452-787-01 GUIDE,LIGHT
104 A-1558-681-A BT MOUNT (SERVICE)
– 28 –
Page 30
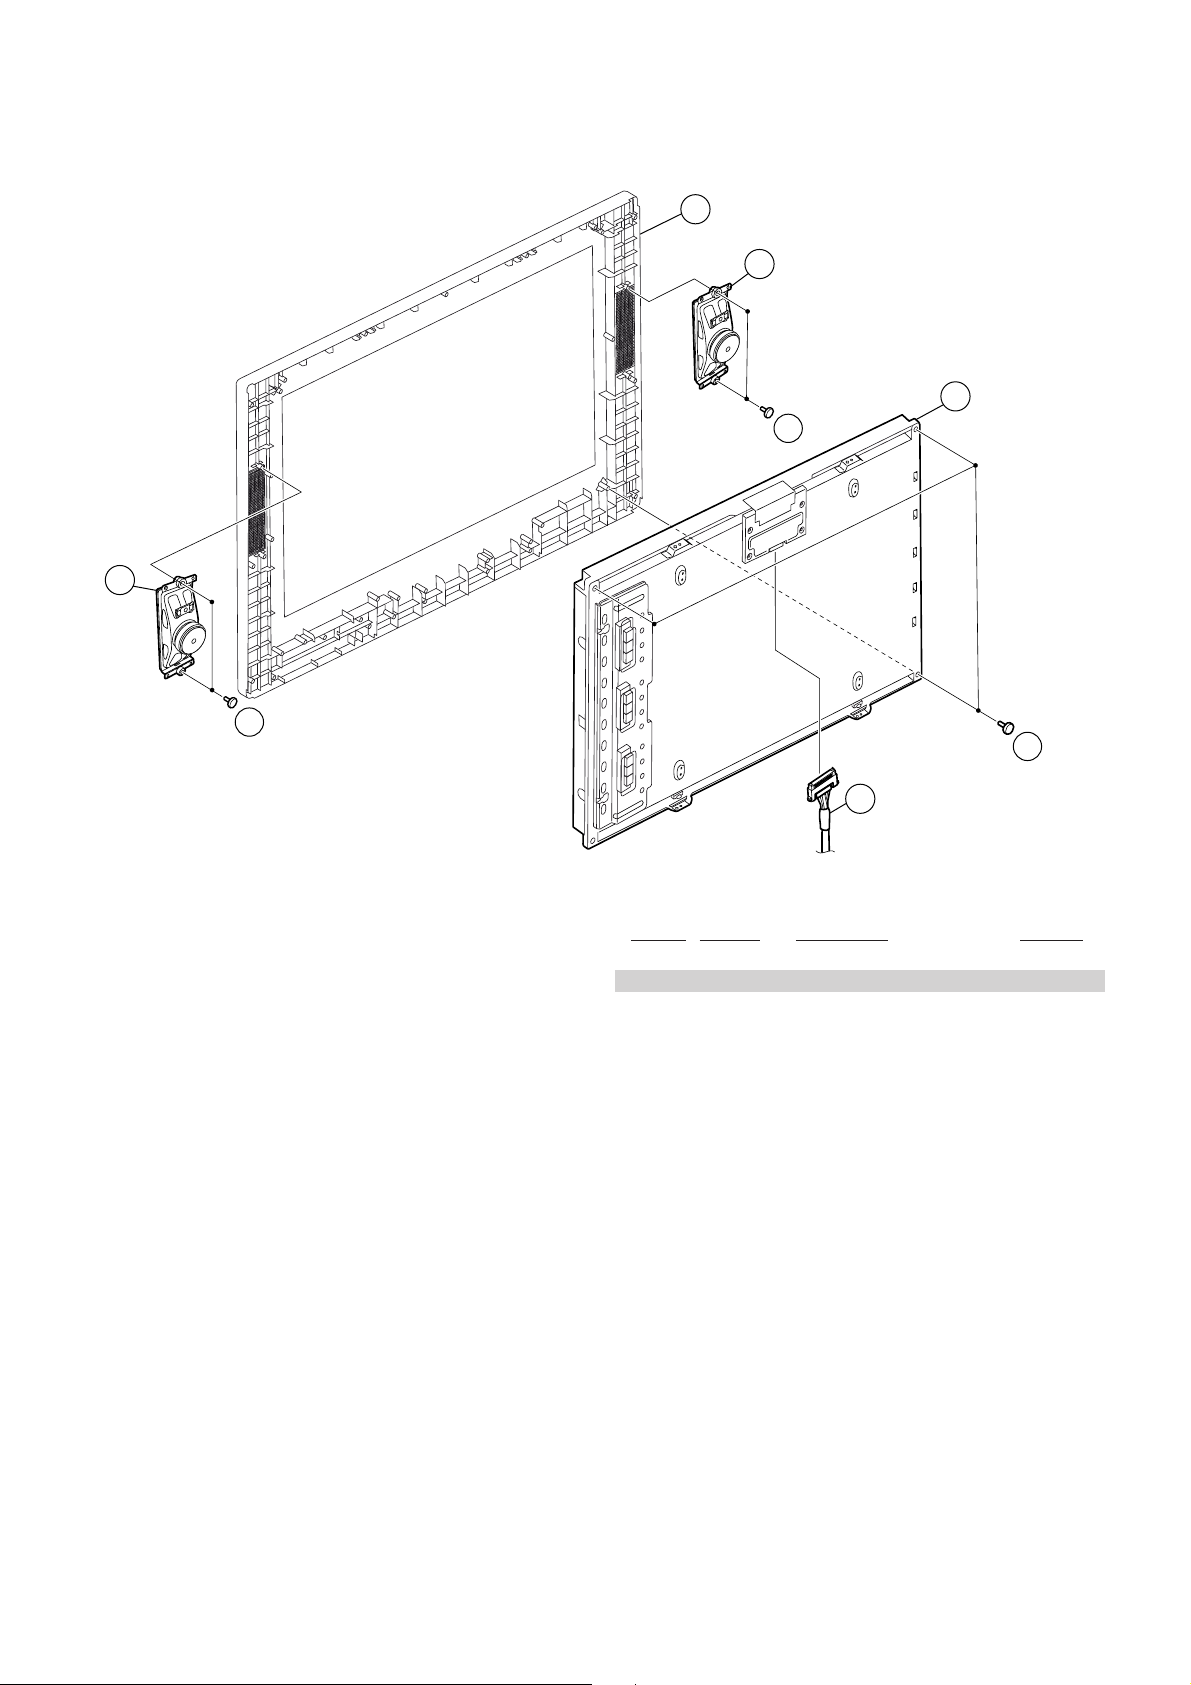
7-1-4. SPEAKER, BEZEL ASSY AND LCD PANEL
150
KLV-26T400A, T400G, 32T400A
RM-GA013
153
150
151
f
f
f
152
REF. NO. PART NO. DESCRIPTION REMARK
150 1-858-037-11 LOUDSPEAKER (13X5.5CM)
151 ! 1-802-706-11 LCD PANEL (26 INCH WXGA TFT)
152 * 1-835-793-11 HARNESS WITH CONNECTOR (LVDS) (26A (NZ))
* 1-835-722-11 HARNESS WITH CONNECTOR (LVDS)
153 X-2190-755-1 BEZEL (TG26) ASSY (26A)
X-2319-390-1 FRONT PANEL (TG26) ASSY (26G)
(except 26A(NZ))
– 29 –
Page 31
KLV-26T400A, T400G, 32T400A
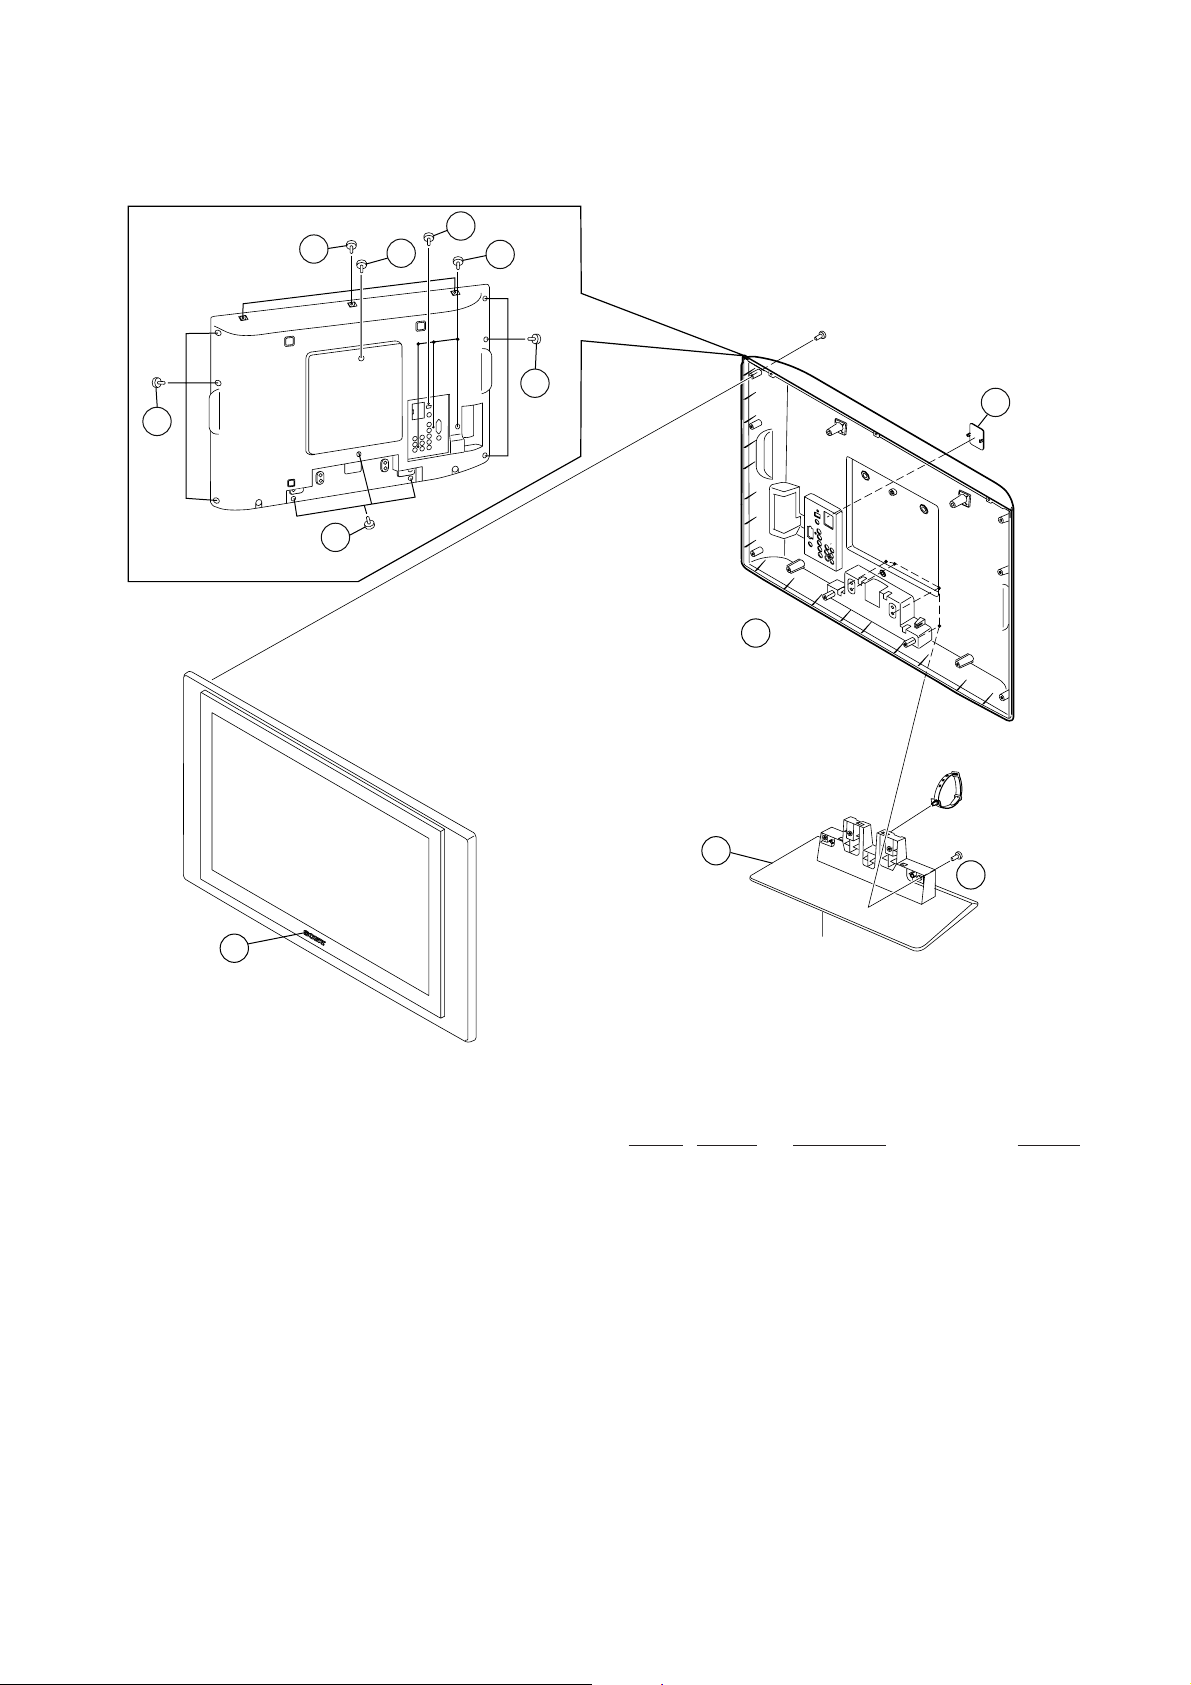
4 3-452-784-01 COVER, REAR(32)
RM-GA013
(KLV-32T400)
7-2-1 REAR CABINET
f
a
b
m
f
1
f
f
4
2
c
3
REF. NO. PART NO. DESCRIPTION REMARK
1 *3-106-086-01 COVER, ECS
2 X-2190-761-1 STAND (L) ASSY
3 4-103-642-21 EMBLEM, SONY NO.8
– 30 –
Page 32
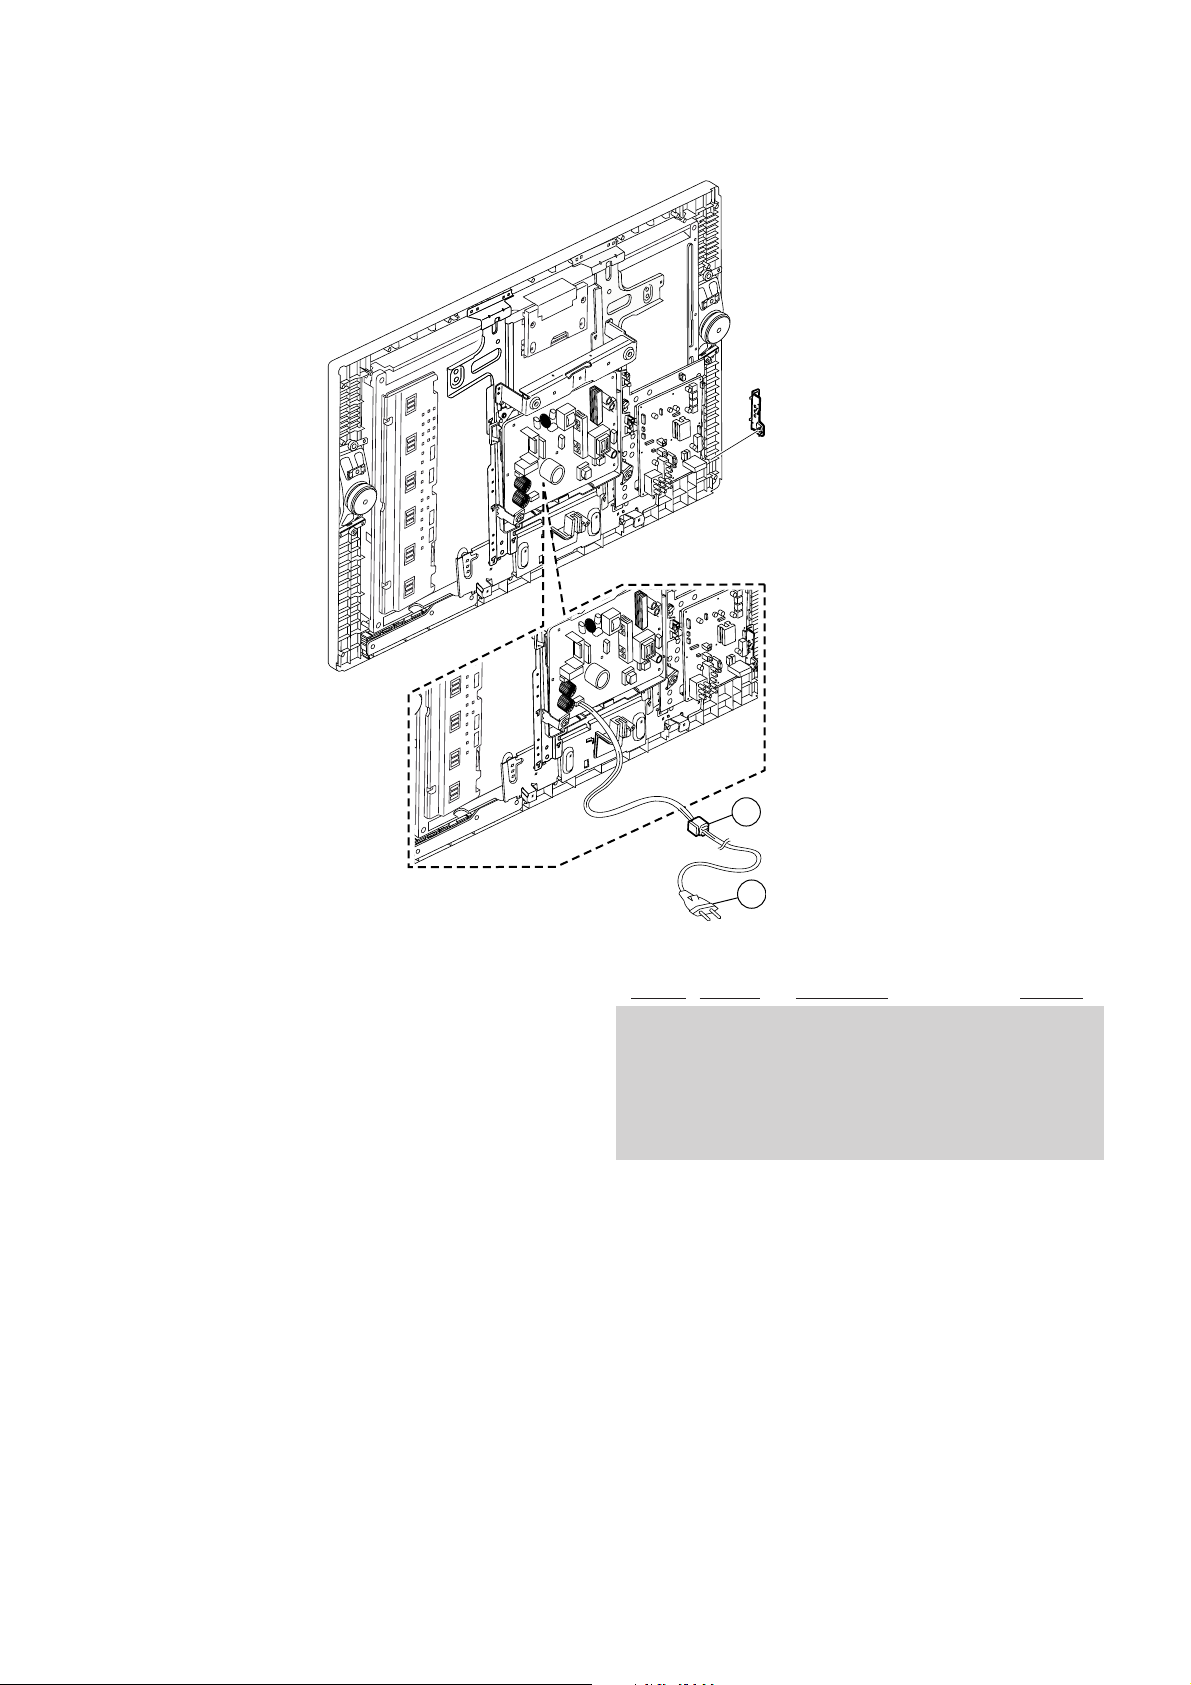
7-2-2. POWER CORD, AC CORD HOLDER
!
!
!
KLV-26T400A, T400G, 32T400A
RM-GA013
51
50
REF. NO. PART NO. DESCRIPTION REMARK
50 ! 1-835-128-11 POWER SUPPLY CORD (WITH CONNEC)
1-835-127-11 POWERSUPPLYCORD (WITHCONNECTER)
1-835-136-11 POWERSUPPLYCORD (WITHCONNECTER)
1-835-280-11 POWERSUPPLYCORD (WITHCONNECTOR)
51 4-022-115-00 HOLDER, AC CORD
(32 (NZ))
(32 (S))
(32 (E, GE, ME, SAF))
(32 (ID))
– 31 –
Page 33
KLV-26T400A, T400G, 32T400A
RM-GA013
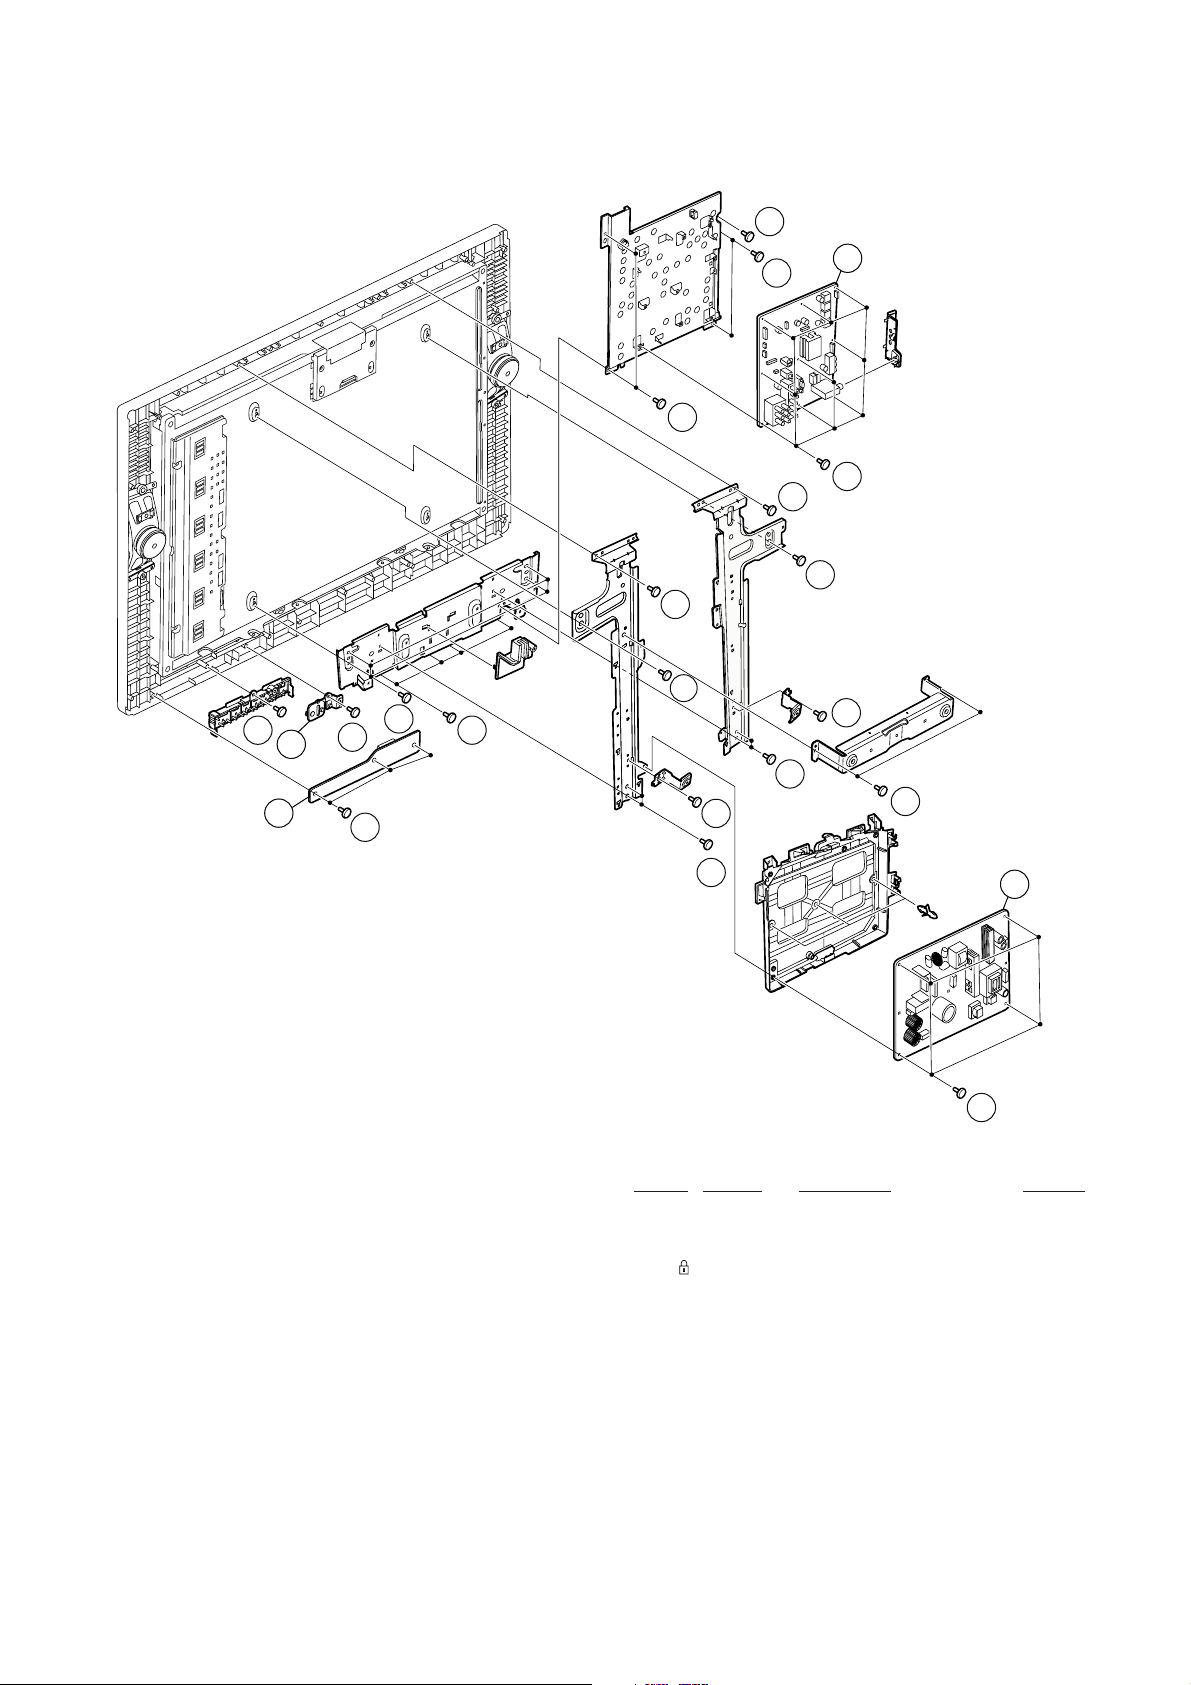
7-2-3. BT, HT, GPT BOARD
b
m
103
102
m
m
f
104
e
e
f
b
f
b
b
f
b
b
b
b
b
101
k
REF. NO. PART NO. DESCRIPTION REMARK
101 * A-1554-645-A GPT COMPLETE
102 A-1550-333-A HT MOUNT
103 3-452-787-01 GUIDE,LIGHT
104 A-1555-116-A BT MOUNT (SERVICE)
– 32 –
Page 34
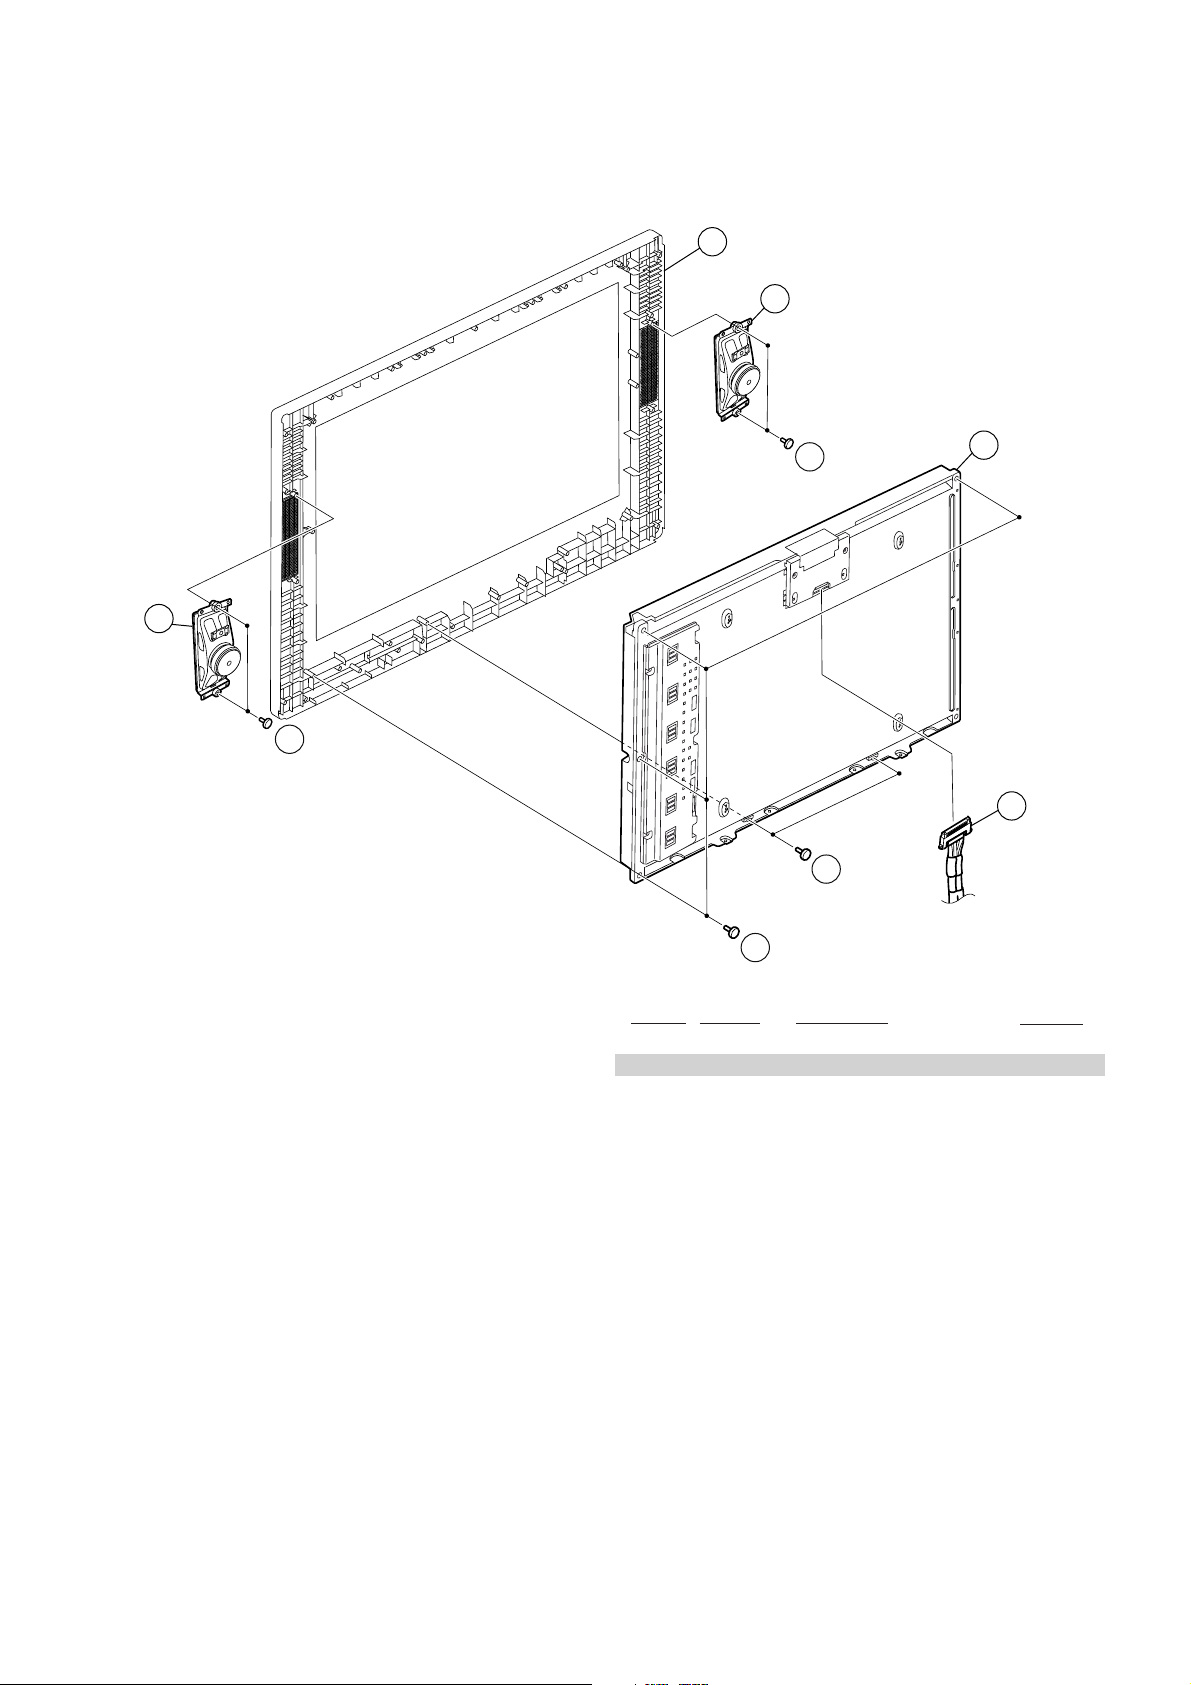
7-2-4. SPEAKER, BEZEL ASSY AND LCD PANEL
153
X-2190-762-1
KLV-26T400A, T400G, 32T400A
RM-GA013
153
150
150
f
151
f
152
f
f
REF. NO. PART NO. DESCRIPTION REMARK
150 1-858-037-11 LOUDSPEAKER (13X5.5CM)
151 ! 1-802-653-12 LCD PANEL (32 WXGA TFT)
152 1-835-723-11 HARNESS WITH CONNECTOR (LVDS)
BEZEL (TG32) ASSY
– 33 –
Page 35
KLV-26T400G, 32T400G
A-1558-681-A BT MOUNT (SERVICE)(26)
A-1555-116-A BT MOUNT (SERVICE)(32)
A-1553-047-A GPT COMPLETE (26)
A-1554-645-A GPT COMPLETE (32)
* 1-910-047-60 SP CONNECTOR ASSY 4P (26A)
CN2000(BT)-SP(1)
1-569-008-33 ADAPTOR, CONVERSION 2P (26A E (Manufactured in STT),
26G (E), 32 E (Manufactured in STT))
1-770-019-71 ADAPTOR, CONVERSION PLUG 3P (26A E(Manufactured
in SOEM), 32 E (Manufactured in SOEM) )
1-821-926-11 PLUG CONVERSION ADAPTOR (26A (South Africa), 32
(South Africa) )
3-874-045-01 INDIVIDUAL CARTON (26A (E (Manufactured in SOEM),
India, ME, New Zealand))
4-112-071-01 INDIVIDUAL CARTON (26A (E (Manufactured in Thailand),
GE, South Africa))
4-113-685-01 INDIVIDUAL CARTON (26G)
3-874-048-01 INDIVIDUAL CARTON (32 (E (Manufactured in SOEM),
India, ME)_
4-112-076-01 INDIVIDUAL CARTON (32 (E (Manufactured in STT), GE,
Thailand, South Africa))
3-874-044-01 CUSHION, LOWER(26) (26A (E(Manufactured in
SOEM),India,ME, New Zealand), 26G (E, GE, India, ME))
4-112-070-01 CUSHION, LOWER (26) (26A(E (Manufactured in STT),
GE, South Africa))
3-874-047-01 CUSHION LOWER (32) (32 (E (Manufactured in SOEM),
India, ME))
4-112-075-01 CUSHION LOWER (32) (32 (E (Manufactured in STT),
GE, South Africa, Thailand))
4-112-069-01 CUSHION, UPPER (26) (26A(E (Manufactured in STT),
GE, South Africa))
3-874-043-01 CUSHION, UPPER (26) (26A (E(Manufactured in
SOEM),India,ME, New Zealand), 26G (E, GE, India, ME))
3-874-046-01 CUSHION UPPER (32) (32 (E (Manufactured in SOEM),
India, ME))
4-112-074-01 CUSHION UPPER (32) (32 (E (Manufactured in STT),
GE, South Africa, Thailand))
32 E (Manufactured in SOEM))
****************************************************************************
*
*****
*
*
***
*
*
RM-GA013
NOTE:
The components identified by mark contain
confidential information. Strictly follow the
instructions whenever the components are
repaired and /or replaced.
REF NO. PART NO. DESCRIPTION REMARK REF NO. PART NO. DESCRIPTION REMARK
SECTION 8
ELECTRICAL PARTS LIST
• Items marked " ∗ " are not stocked since
they are seldom required for routine
service. Some delay should be anticipated when ordering these items.
• All variable and adjustable resistors have
characteristic curve B, unless otherwise
noted.
REF NO. PART NO. DESCRIPTION REMARKREF NO. PART NO. DESCRIPTION REMARK
<ACCESSORIES AND PACKING MATERIALS>
*****************************************
• All resistors are in ohms
• F : nonflammable
CAPACITORS
• MF : µF, PF : µµF
COILS
• MMH : mH, UH : µH
A-1550-333-A HT MOUNT
***********
Due to complexity of the board, performing component level field
repairs are not recommended.
Complete board replacement is required if service is necessary.
For part number information refer to the Exploded View or
Electrical Parts List section of this Service Manual.
**********************************************************************
CONNECTORS
**************
* 1-910-047-57 CONNECTOR ASSY 10P
(26)
CN3001(BT)-CN1000(HT)(1)
* 1-910-047-67 CONNECTOR ASSY 10P
(32)
CN3001(BT)-CN1000(HT)(1)
* 1-910-047-58 CONNECTOR ASSY 13P
CN6202(GPT)-CN7000(BT)(1)
1-910-047-59 CONNECTOR ASSY 14P
(26)
INV-CN6201(GPT)(1),INV-CN7001(BT)(0)
1-910-047-68 CONNECTOR ASSY 14P
(32)
INV-CN6201(GPT)(1) INV-CN7001(BT)(0)
4-000-037-11 MANUAL, INSTRUCTION
(26A (India, ME), 26G (E, India
, ME
), 32 (India, ME))
4-000-037-21 MANUAL, INSTRUCTION
(26A (ME), 26G (ME), 32 (ME))
4-000-037-31 MANUAL, INSTRUCTION
(26A (ME), 26G (ME), 32 (ME))
4-107-685-11 MANUAL, INSTRUCTION
(26A (GE, South Africa), 32 (GE))
4-107-685-21 MANUAL, INSTRUCTION (32 (Thailand))
4-107-685-31 MANUAL, INSTRUCTION (26 (GE) ,32 (GE))
4-110-401-11 MANUAL, INSTRUCTION
(26 (E (Manufactured in SOEM), New Zealand, 26G (GE),
4-110-401-21 MANUAL, INSTRUCTION (26 E (Manufactured in SOEM),
26G (GE), 32 E (Manufactured in SOEM))
4-110-401-31 MANUAL, INSTRUCTION (26A E(Manufactured in STT),
32 E (Manufactured in STT))
4-000-037-11 MANUAL, INSTRUCTION (26A (ME))
***********************************************************************
3-293-042-12 SUPPLEMENT (WALL MOUNT)
(except 26A (E, GE, South Africa))
3-293-042-21 SUPPLEMENT (WALL MOUNT)
(26A (E, GE, South Africa))
– 34 –
Page 36

KLV-26T400G, 32T400G
REF NO. PART NO. DESCRIPTION REMARK REF NO. PART NO. DESCRIPTION REMARK
MISCELLENOUS
****************
2-650-770-11 SLIDE,CLAMP
1-858-077-11 LOUDSPEAKER (5cm) (26G(E, GE, ME))
**********************************************************************
REMOTE COMMANDER
**********************
1-480-905-11 REMOTE COMMANDER (RM-GA013)
9-885-123-43 REMOTE COMMANDER BATTERY COVER
RM-GA013
9-888-100-01
Sony Corporation
Sony EMCS (Malaysia) Sdn. Bhd.
TV Operations of Pan Asia
– 35 –
English
2008.8
Page 37
LCD Colour TV
Operating Instructions
KLV-32T400A
KLV-26T400A
KLV-26T400G
KLV-19T400A
KLV-19T400G
KLV-19T400W
© 2008 Sony Corporation 4-000-037-11(1)
Page 38
Introduction Trademark information
Thank you for choosing this Sony product.
Before operating the TV, please read this manual
thoroughly and retain it for future reference.
The illustrations used in this manual are of the
KLV-32T400A unless otherwise stated.
• HDMI, the HDMI logo and High-Definition Multimedia
Interface are trademarks or registered trademarks of
HDMI Licensing LLC.
• “BRAVIA” and are trademarks of Sony
Corporation.
GB
2
Page 39

Table of Contents
Start-up Guide 4
Checking the accessories ...........................4
Inserting batteries into the remote...............4
1: Attaching the 3D WOOFER and stand....4
Attaching the stand................................... 4
Attaching the 3D WOOFER and stand ..... 6
2: Connecting an antenna/cable/VCR .........7
3: Preventing the TV from toppling over......7
4: Bundling the cables .................................8
5: Performing the initial set-up ....................8
Selecting the language............................. 8
Auto-tuning the TV .................................... 9
Watching TV ............................................ 10
Detaching the Table-Top Stand from the
TV..............................................................10
Safety information .....................................11
Precautions ...............................................13
Overview of the remote ..........................14
Using the Tools menu ............................. 16
Overview of the TV buttons and
indicators .................................................17
18
Using Optional Equipment
32
Additional Information
Specifications ........................................... 32
Troubleshooting ........................................ 33
Connecting optional equipment................. 18
Viewing pictures from the connected
equipment .................................................19
20
Using MENU Functions
Navigating through menus ........................20
Listening to the FM Radio .........................21
Listening to preset stations..................... 21
Listening to non-preset stations.............. 21
Settings adjustment...................................22
Picture menu........................................... 24
Sound menu............................................ 25
Screen menu........................................... 25
Set-up menu ........................................... 26
PC Settings menu ................................... 28
Channel Set-up menu ............................. 29
GB
3
Page 40
Start-up Guide
Checking the
accessories
Stand (1) and screws (4)
3D WOOFER (1) and screws (4) (KLV-19T400W)
Remote RM-GA013 (1)
Size AA batteries (R6 type) (2)
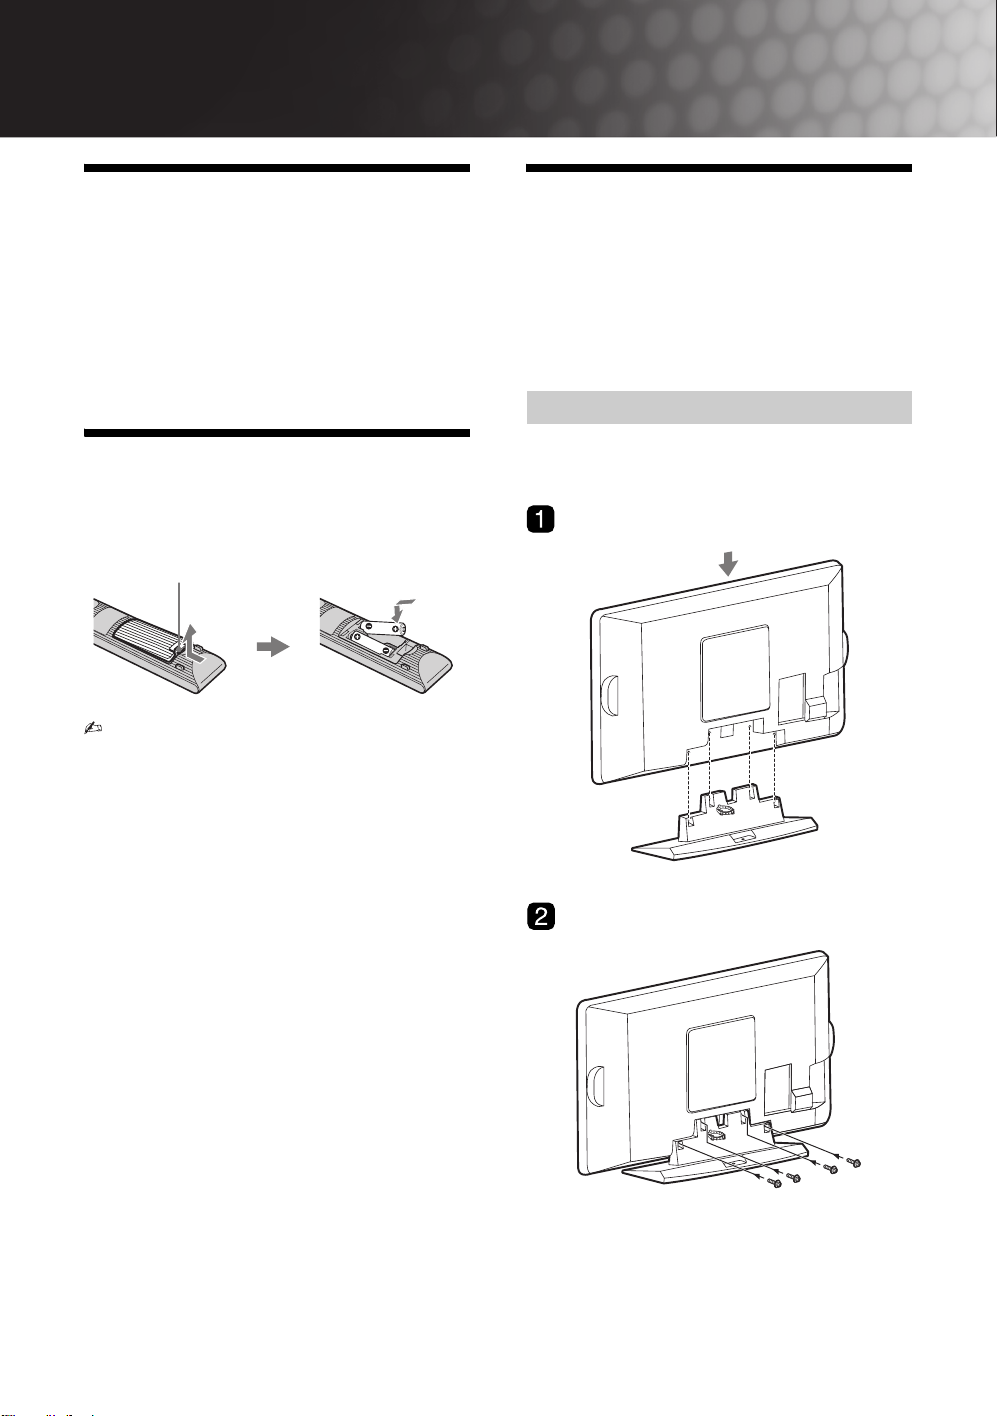
Inserting batteries into
the remote
Push and lift the cover to open.
• Observe the correct polarity when inserting
batteries.
• Do not use different types of batteries together or
mix old and new batteries.
• Dispose of batteries in an environmentally
friendly way. Certain regions may regulate the
disposal of batteries. Please consult your local
authority.
• Handle the remote with care. Do not drop or step
on it, or spill liquid of any kind onto it.
• Do not place the remote in a location near a heat
source, a place subject to direct sunlight, or a
damp room.
1: Attaching the 3D
WOOFER and stand
Please ensure the AC power cord is away from the
3D WOOFER/stand installation location before you
attach below 3D WOOFER/stand.
3D WOOFER is only available for KLV-19T400W.
Attaching the stand
– Except for KLV-19T400W
B KLV-32T400A
GB
4
Page 41
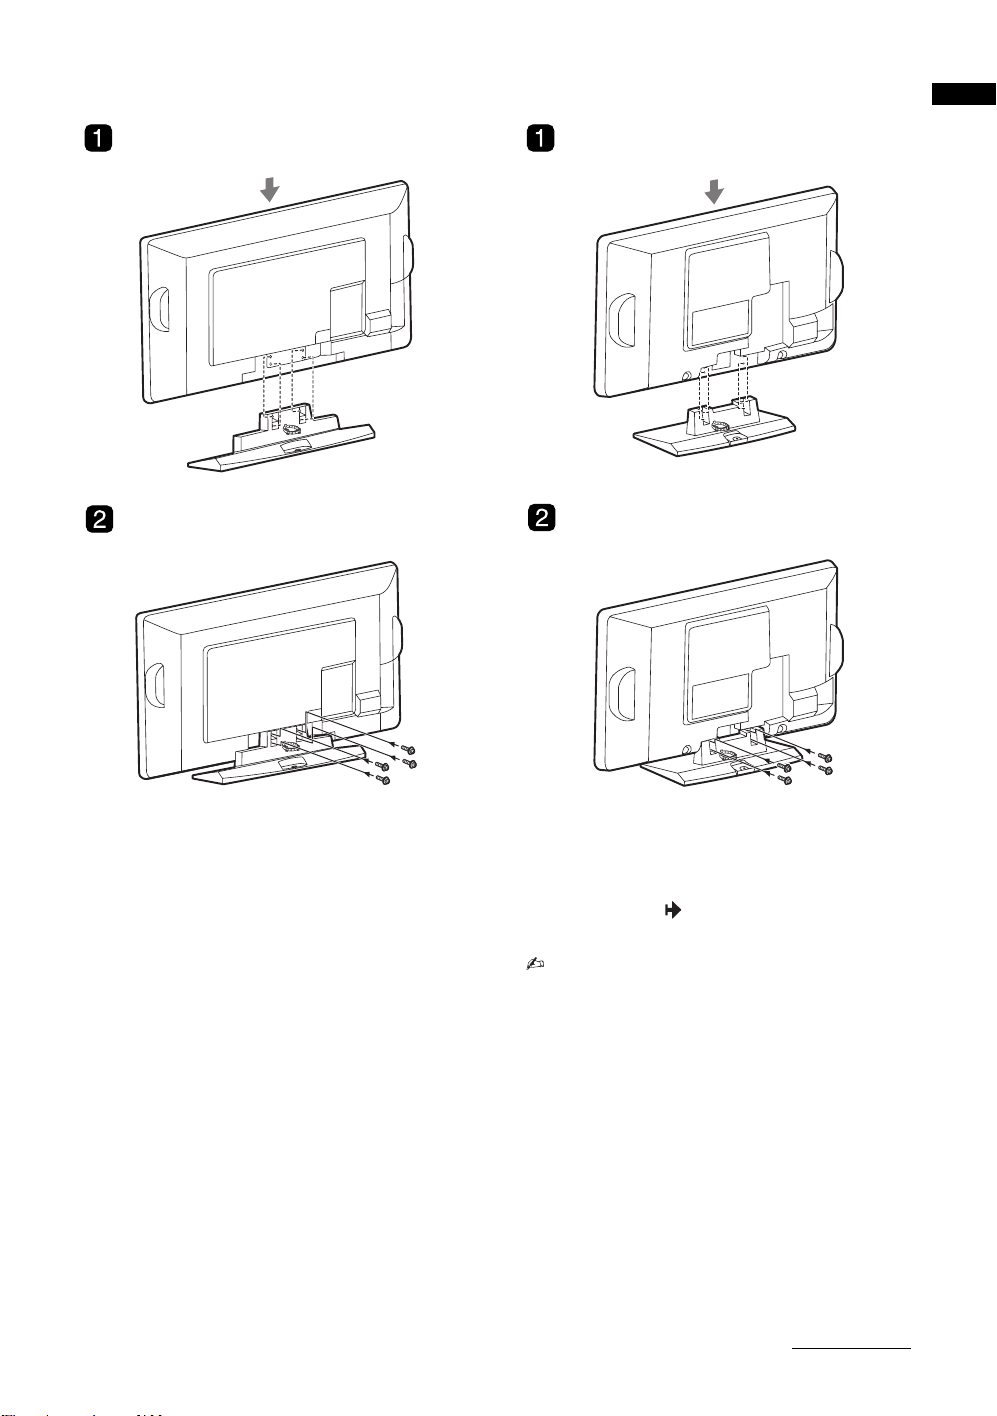
B KLV-26T400A/26T400G B KLV-19T400A/19T400G
Start-up Guide
1 Place the TV onto the stand by aligning the
screw hole alignment lines over the stand
as shown.
2 Fix the TV to the stand according to the
arrow marks that guide the screw holes
using the supplied screws.
• This TV is very heavy, so two or more people
should place the TV onto the stand.
• If using an electric screwdriver, set the tightening
torque at approximately 1.5N·m (15kgf·cm).
• Ensure the AC power cord is away from screw
holes during stand installation to avoid damage to
the AC power cord.
Continued
5
GB
Page 42
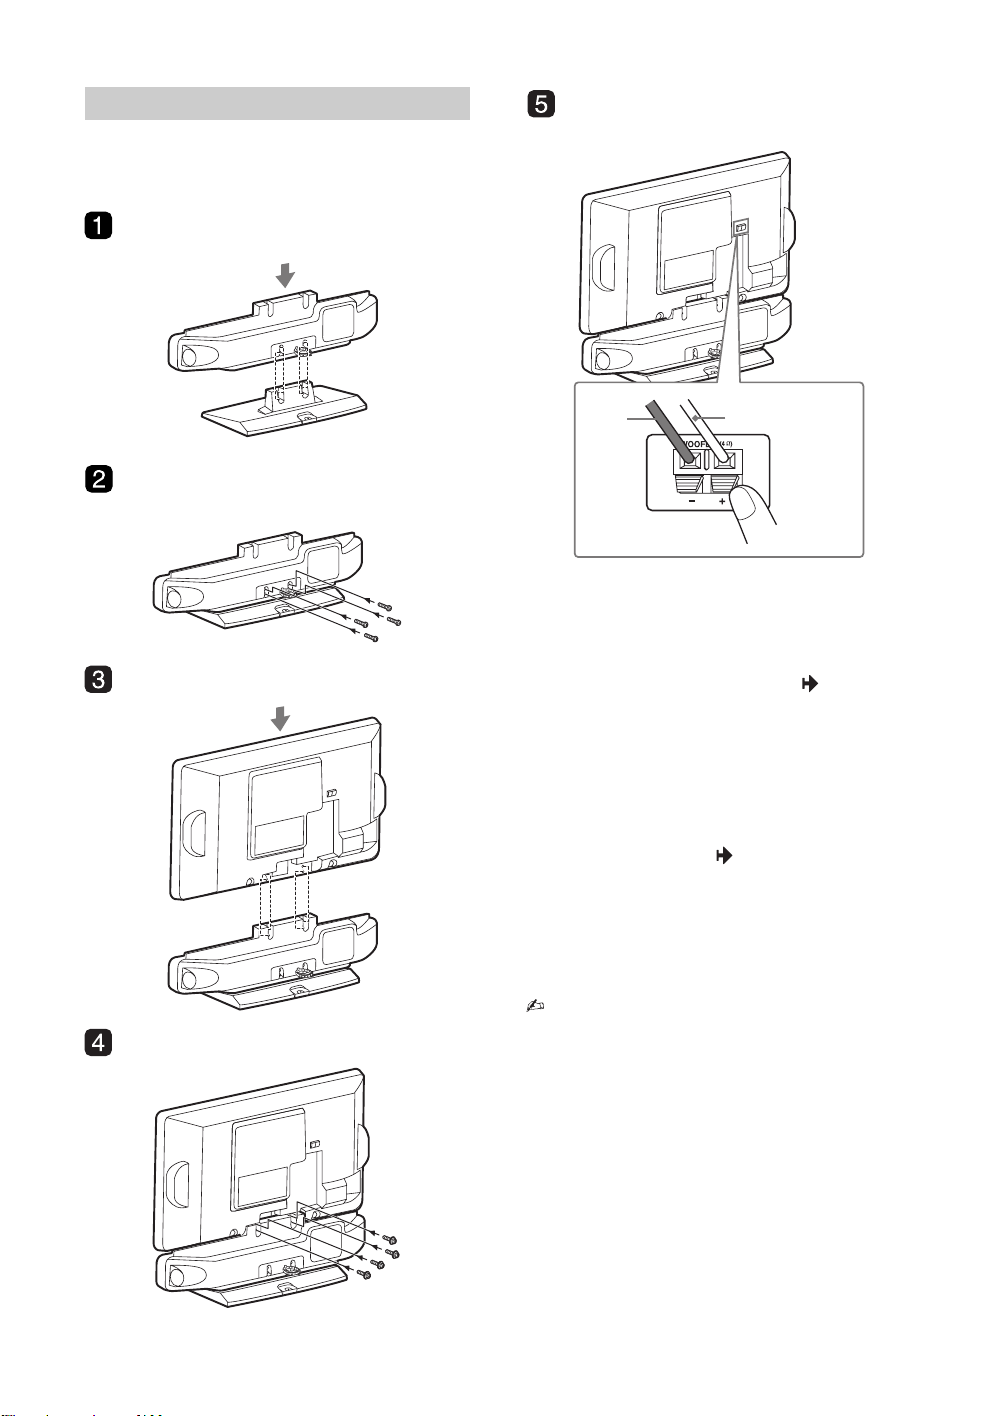
Attaching the 3D WOOFER and stand
You can enjoy high quality sound by attaching the 3D
WOOFER as follows:
B KLV-19T400W
Black
wire
Red wire
1 Place the 3D WOOFER onto the stand by
aligning the screw hole alignment lines
over the stand as shown.
2 Fix the 3D WOOFER to the stand
according to the arrow marks that guide
the screw holes using the supplied screws
(+BVTP2 4x16).
3 Place the TV onto the 3D WOOFER by
aligning the screw hole alignment lines
over the 3D WOOFER as shown.
4 Fix the TV to the 3D WOOFER according
to the arrow marks that guide the screw
holes using the supplied screws (+PSW
M5x16).
5 Connect using only the supplied 3D
WOOFER; otherwise your TV may
malfunction.
• If using an electric screwdriver, set the tightening
torque at approximately 1.2N·m (12kgf·cm) when
attaching the stand. However, set the tightening
torque at approximately 1.5N·m (15kgf·cm) when
attaching the TV to the 3D WOOFER.
• Ensure the AC power cord is away from screw
holes during stand installation to avoid damage to
the AC power cord.
GB
6
Page 43
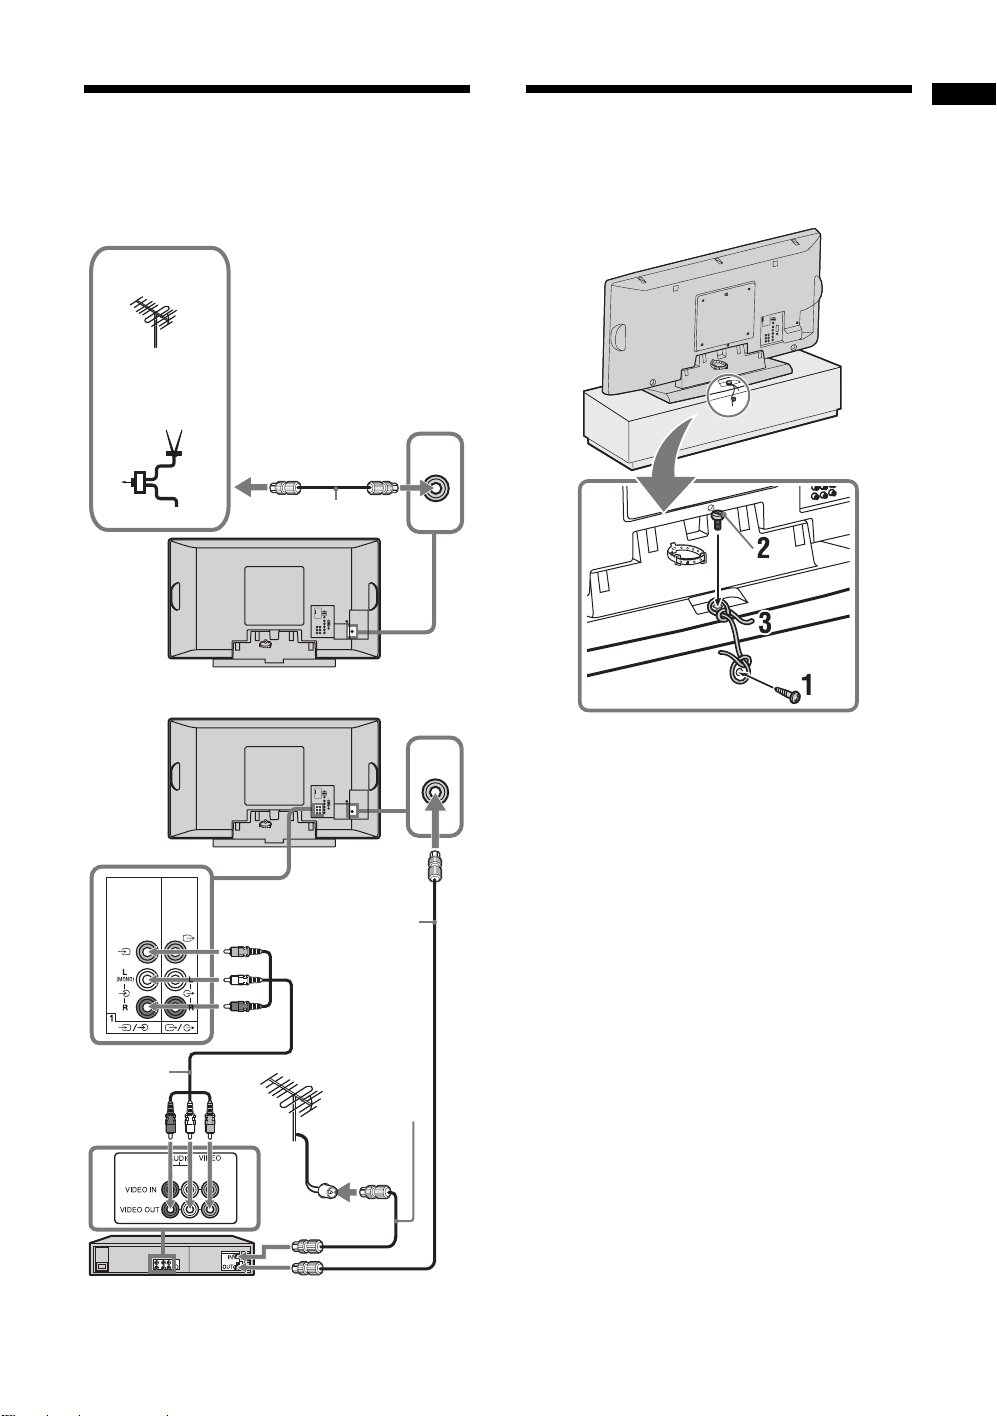
2: Connecting an
3: Preventing the TV
Start-up Guide
antenna/cable/VCR
Connecting an antenna/cable
TV, CATV,
Satellite
or
If cannot
receive FM
signal
Antenna
selector
TV signal
Connecting an antenna/cable and VCR
FM
signal
Antenna cable
(not supplied)
8
8
8
8
from toppling over
1 Install a wood screw (4 mm in diameter, not
supplied) in the TV stand.
2 Install a machine screw (M6 x 12, not
supplied) into the screw hole of the TV.
3 Tie the wood screw and the machine screw
with a strong cord.
Audio/Video
cable (not
supplied)
VCR
Antenna cable
(not supplied)
Antenna cable
(not supplied)
GB
7
Page 44
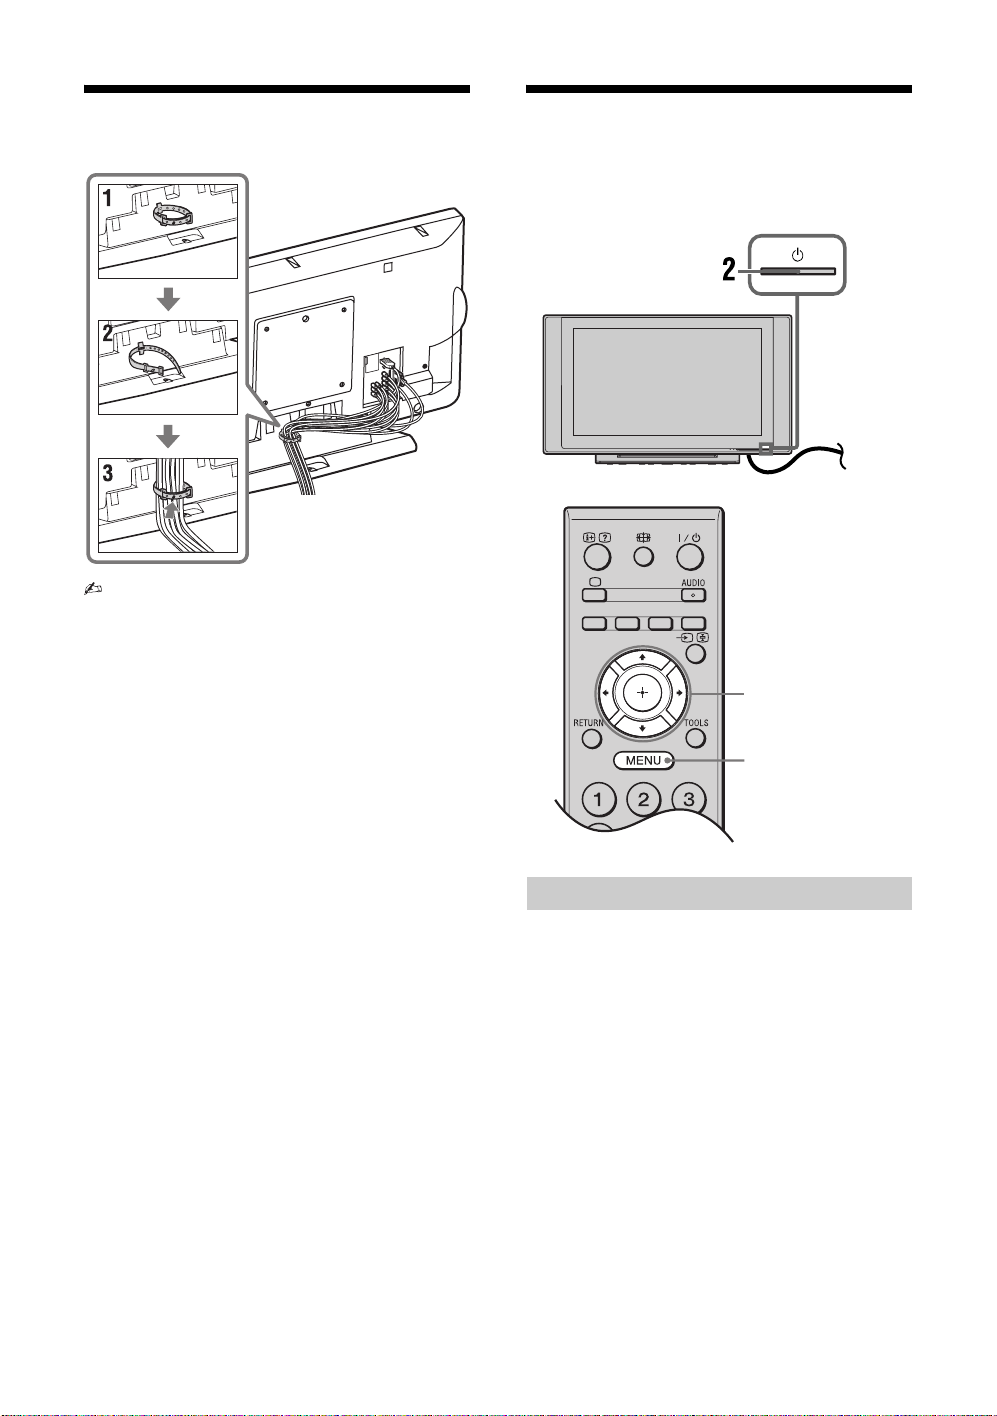
4: Bundling the cables
• Cable holder is located at 3D WOOFER for
KLV-19T400W.
5: Performing the initial
set-up
, 1
3, 4, 5, 6, 9
8
Selecting the language
1 Connect the TV to your AC power outlet
(110-240 V AC, 50/60 Hz).
2 Press 1 on the TV.
When the TV is in standby mode (the 1 (standby)
indicator on the TV front panel is red), press "/1
on the remote to turn on the TV.
When you turn on the TV for the first time, the
“Language” menu appears on the screen.
GB
8
Page 45
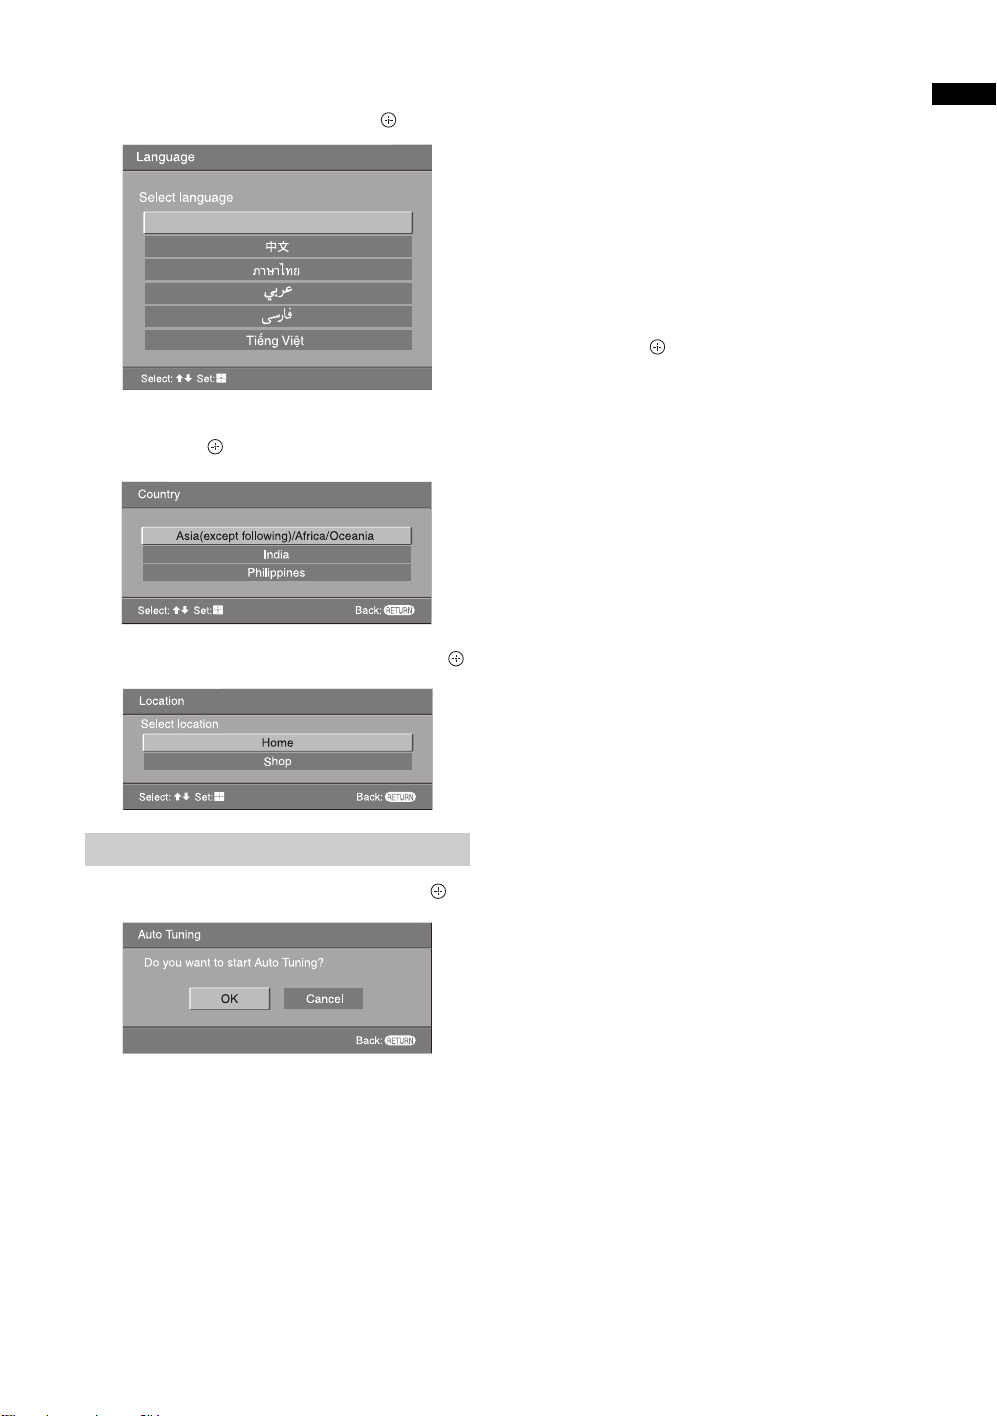
3
Press F/f to select the language displayed
on the menu screens, then press .
English
4 Press F/f to select the country/region,
then press .
Select country
5 Press F/f to select “Home”, then press .
7 When the “Programme Sorting” menu
appears on the screen, follow the steps of
“Programme Sorting” (page 29).
If you do not want to change the order in which the
channels are stored on the TV, go to step 8.
8 Press MENU to exit.
The TV has now tuned in all the available
channels.
9 Press G/g to select the desired setting in
“Display this menu next time?” dialogue,
then press
z • If “Yes” is selected and the TV is turned off by
pressing 1 on the TV, or is disconnected from
the AC power outlet, the initial set-up
procedure restarts the next time the TV is
turned on.
to exit.
Start-up Guide
Auto-tuning the TV
6 Press G/g to select “OK”, then press .
The TV starts searching for all available channels.
This may take some time, please be patient and do
not press any buttons on the TV or remote.
If a message appears for you to confirm the
antenna connection
No programmes found. Please connect antenna
(aerial) and select “Confirm” to start auto-tuning
again. If 200 channels are found, auto-tuning is
stopped.
GB
9
Page 46
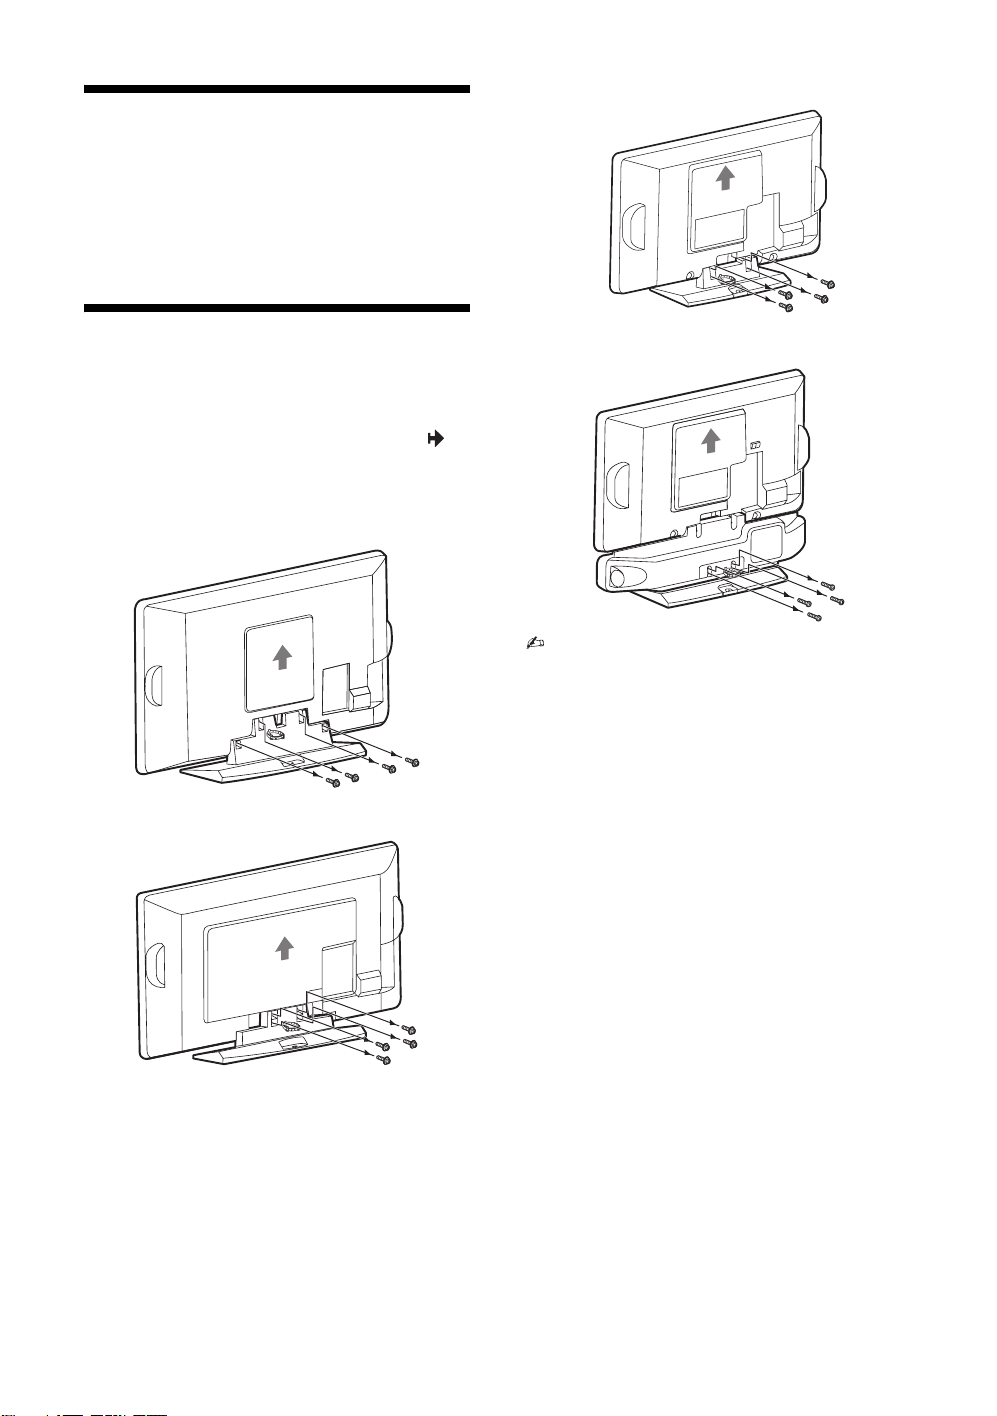
Watching TV
1 Press 1 on the TV to turn on the TV.
2 Press the number buttons or PROG +/– to
select a TV channel.
3 Press 2 +/– to adjust the volume.
B KLV-19T400A/19T400G
Detaching the TableTop Stand from the TV
Remove the screws guided by the arrow marks of
the TV.
Do not remove the Table-Top Stand for any reason
other than to wall-mount the TV.
B KLV-32T400A
B KLV-26T400A/26T400G
B KLV-19T400W
• For bracket installation, refer to the instruction
guide provided by the Wall-Mount Bracket model
for your TV. Sufficient expertise is required in
installing this TV, especially to determine the
strength of the wall for withstanding the TV’s
weight. For product protection and safety
reasons, Sony strongly recommends that you
use the Wall-Mount Bracket model designed
for your TV and the wall-mounting of your TV
should be performed by Sony dealers or
licensed contractors.
10
GB
Page 47
Safety information
Installation/Set-up
Install and use the TV set in accordance with the
instructions below in order to avoid any risk of fire,
electrical shock or damage and/or injuries.
Installation
• The TV set should be installed near an easily accessible
AC power outlet.
• Place the TV set on a stable, level surface to avoid it from
falling down and cause personal injury or damage to the
TV.
• Only qualified service personnel should carry out wall
installations.
• For safety reasons, it is strongly recommended that you
use Sony accessories, including:
– KLV-32T400A:
Wall-mount bracket SU-WL500 or SU-WL50B
– KLV-26/19T400A/26/19T400G/19T400W:
Wall-mount bracket SU-WL100
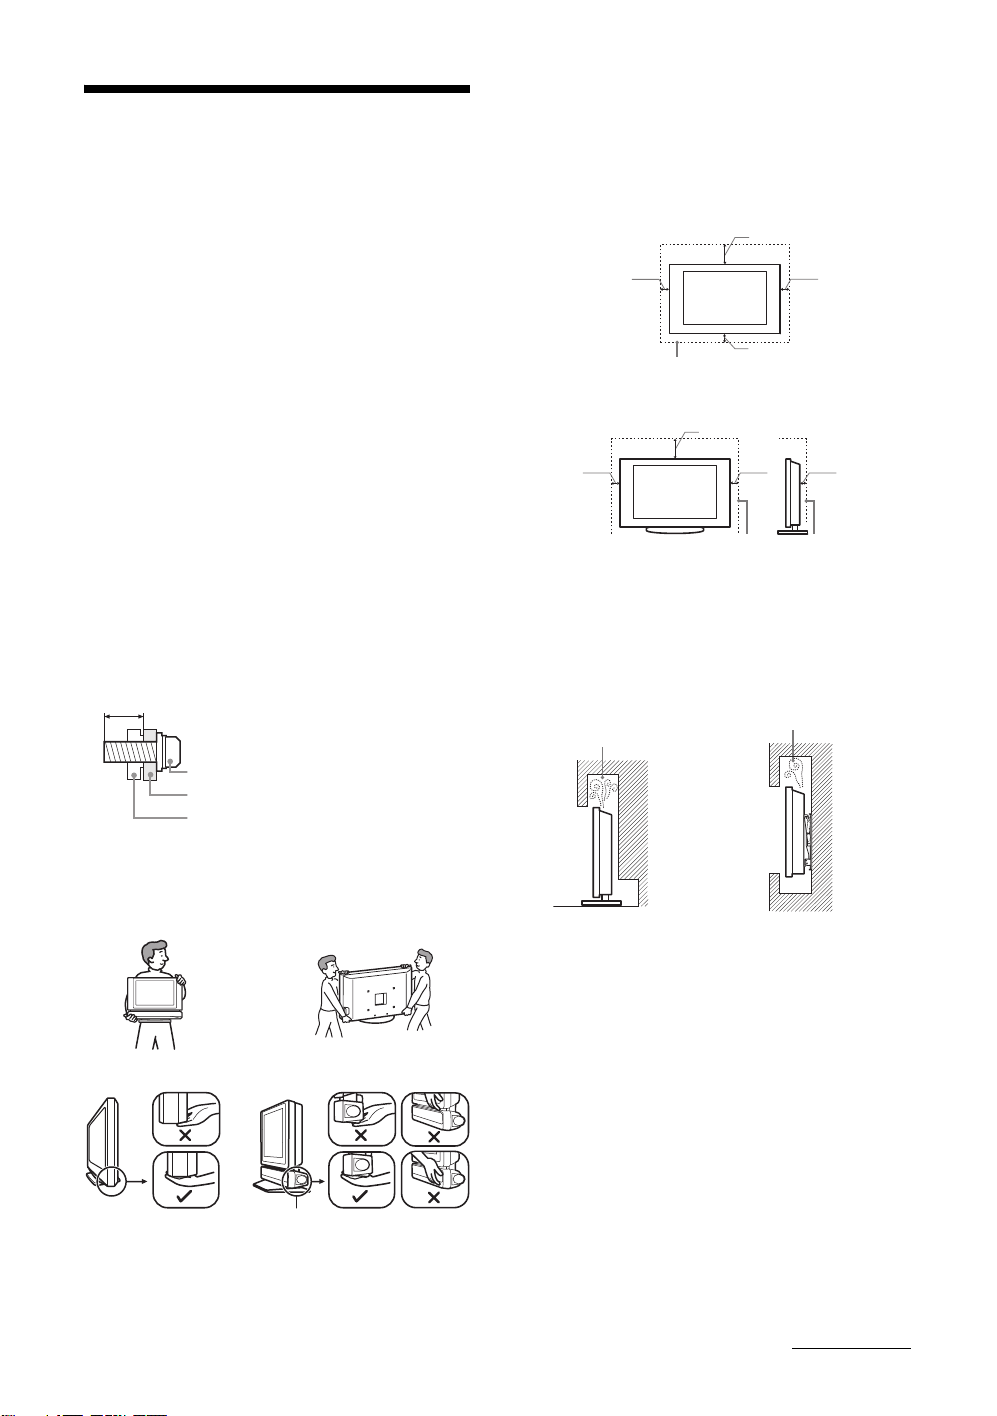
• Be sure to use the screws supplied with the Wall-mount
bracket when attaching the mounting hooks to the TV set.
The supplied screws are designed so that they are 8 mm to
12 mm in length when measured from the attaching
surface of the mounting hook.
The diameter and length of the screws differ depending on
the Wall-mount bracket model.
Use of screws other than those supplied may result in
internal damage to the TV set or cause it to fall, etc.
8mm - 12mm
Screw (supplied with the Wall-mount
bracket)
Mounting Hook
Hook attachment on rear of TV set
Transporting
• Before transporting the TV set, disconnect all cables.
• Two or more people are needed to transport a large TV set.
• When transporting the TV set by hand, hold it as shown.
Do not put stress on the LCD panel.
KLV-19T400A/
19T400G/19T400W
Do not handle with dent area.
• When lifting or moving the TV set, hold it firmly from the
bottom.
• When transporting the TV set, do not subject it to jolts or
excessive vibration.
• When transporting the TV set for repairs or when moving,
pack it using the original carton and packing material.
KLV-32/26T400A/
26T400G
Ventilation
• Never cover the ventilation holes or insert anything in the
cabinet.
• Leave space around the TV set as shown below.
• It is strongly recommended that you use a Sony wallmount bracket in order to provide adequate air-circulation.
Installed on the wall
30 cm
10 cm 10 cm
10 cm
Leave at least this space around the set.
Installed with stand
30 cm
10 cm 10 cm 6 cm
Leave at least this space around the set.
• To ensure proper ventilation and prevent the collection of
dirt or dust:
– Do not lay the TV set flat, install upside down,
backwards, or sideways.
– Do not place the TV set on a shelf, rug, bed or in a closet.
– Do not cover the TV set with a cloth, such as curtains,
or items such as newspapers, etc.
– Do not install the TV set as shown below.
Air circulation
Air circulation is blocked.
is blocked.
Wall
Wall
AC power cord
Handle the AC power cord and outlet as follows in
order to avoid any risk of fire, electrical shock or
damage and/or injuries:
– Use only Sony supplied AC power cords, not those of
other brands.
– Insert the plug fully into the AC power outlet.
– Operate the TV set on a 110-240 V AC supply only.
– When wiring cables, be sure to unplug the AC power
cord for your safety and take care not to catch your feet
on the cables.
– Disconnect the AC power cord from the AC power
outlet before working on or moving the TV set.
– Keep the AC power cord away from heat sources.
– Unplug the AC power plug and clean it regularly. If the
plug is covered with dust and it picks up moisture, its
insulation may deteriorate, which could result in a fire.
Continued
11
GB
Page 48

Notes
• Do not use the supplied AC power cord on any other
equipment.
• Do not pinch, bend, or twist the AC power cord
excessively. The core conductors may be exposed or
broken.
• Do not modify the AC power cord.
• Do not put anything heavy on the AC power cord.
• Do not pull on the AC power cord itself when
disconnecting the AC power cord.
• Do not connect too many appliances to the same AC
power outlet.
• Do not use a poor fitting AC power outlet.
Prohibited Usage
Do not install/use the TV set in locations,
environments or situations such as those listed below,
or the TV set may malfunction and cause a fire,
electrical shock, damage and/or injuries.
Location:
Outdoors (in direct sunlight), at the seashore, on a ship or
other vessel, inside a vehicle, in medical institutions,
unstable locations, near water, rain, moisture or smoke.
Environment:
Places that are hot, humid, or excessively dusty; where
insects may enter; where it might be exposed to mechanical
vibration, near flammable objects (candles, etc). The TV
shall not be exposed to dripping or splashing and no objects
filled with liquids, such as vases, shall be placed on the TV.
Situation:
Do not use when your hands are wet, with the cabinet
removed, or with attachments not recommended by the
manufacturer. Disconnect the TV set from AC power outlet
and antenna during lightning storms.
If the following problems occur...
Turn off the TV set and unplug the AC power cord
immediately if any of the following problems occur.
Ask your dealer or Sony service centre to have it
checked by qualified service personnel.
When:
– AC power cord is damaged.
– Poor fitting of AC power outlet.
– TV set is damaged by being dropped, hit or having
something thrown at it.
– Any liquid or solid object falls through openings in the
cabinet.
Broken pieces:
• Do not throw anything at the TV set. The screen glass may
break by the impact and cause serious injury.
• If the surface of the TV set cracks, do not touch it until you
have unplugged the AC power cord. Otherwise electric
shock may result.
When not in use
• If you will not be using the TV set for several days, the TV
set should be disconnected from the AC power for
environmental and safety reasons.
• As the TV set is not disconnected from the AC power
when the TV set is just turned off, pull the plug from the
AC power outlet to disconnect the TV set completely.
• However, some TV sets may have features that require the
TV set to be left in standby to work correctly.
For children
• Do not allow children to climb on the TV set.
• Keep small accessories out of the reach of children, so that
they are not mistakenly swallowed.
12
GB
Page 49

Precautions
Viewing the TV
• View the TV in moderate light, as viewing the TV in poor
light or during long period of time, strains your eyes.
LCD Screen
• Although the LCD screen is made with high-precision
technology and 99.99% or more of the pixels are effective,
black dots may appear or bright points of light (red, blue,
or green) may appear constantly on the LCD screen. This
is a structural property of the LCD screen and is not a
malfunction.
• Do not push or scratch the front filter, or place objects on
top of this TV set. The image may be uneven or the LCD
screen may be damaged.
• If this TV set is used in a cold place, a smear may occur in
the picture or the picture may become dark. This does not
indicate a failure. These phenomena disappear as the
temperature rises.
• Ghosting may occur when still pictures are displayed
continuously. It may disappear after a few moments.
• The screen and cabinet get warm when this TV set is in
use. This is not a malfunction.
• The LCD screen contains a small amount of liquid crystal.
Mercury is sometimes contained depending on the kind of
fluorescent tubes. Follow your local ordinances and
regulations for disposal.
Handling and cleaning the screen surface/cabinet of
the TV set
Be sure to unplug the AC power cord connected to the TV set
from AC power outlet before cleaning.
To avoid material degradation or screen coating degradation,
observe the following precautions.
• To remove dust from the screen surface/cabinet, wipe gently
with a soft cloth. If dust is persistent, wipe with a soft cloth
slightly moistened with a diluted mild detergent solution.
• Never use any type of abrasive pad, alkaline/acid cleaner,
scouring powder, or volatile solvent, such as alcohol,
benzene, thinner or insecticide. Using such materials or
maintaining prolonged contact with rubber or vinyl
materials may result in damage to the screen surface and
cabinet material.
• When adjusting the angle of the TV set, move it slowly so
as to prevent the TV set from moving or slipping off from
its table stand.
Optional Equipment
Keep optional components or any equipment emitting
electromagnetic radiation away from the TV set. Otherwise
picture distortion and/or noisy sound may occur.
13
GB
Page 50
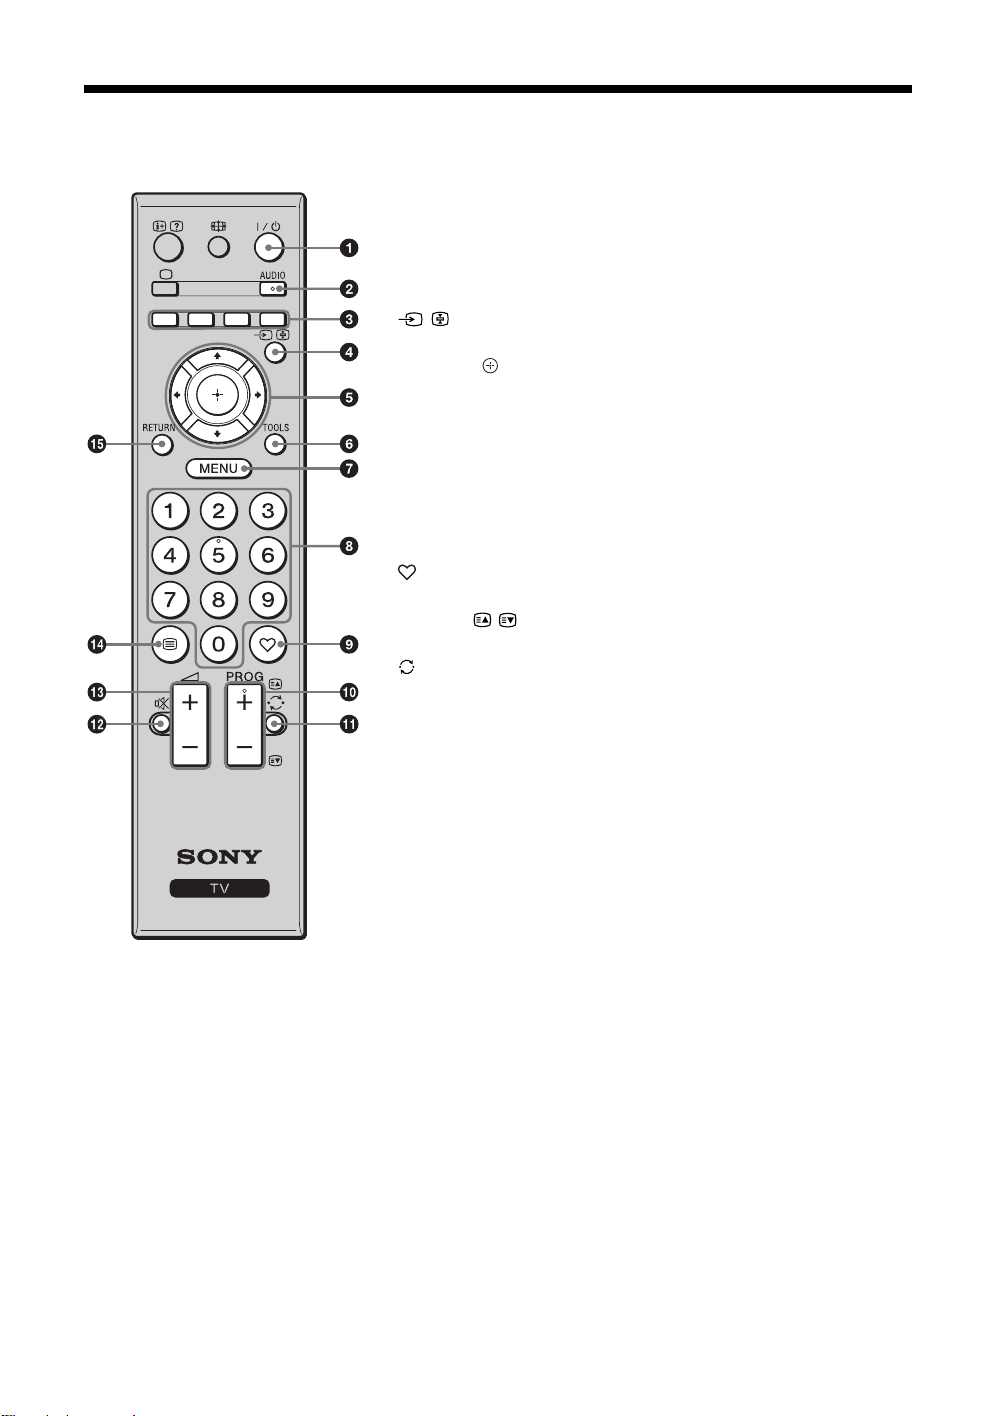
Overview of the remote
1 "/1 – TV standby
Turns the TV on and off from standby mode.
2 AUDIO – Dual Sound (page 25)
3 Coloured buttons
These buttons have no function for this TV.
4 / – Input select
Displays the connected equipment list and selects the input source (page 19).
5 F/f/G/g/ – Item select / OK
• Selects or adjusts items.
• Confirms selected items.
6 TOOLS (page 16)
7 MENU
Displays or cancels the menu.
8 Number buttons
Selects channels. For channel numbers 10 and above, enter the next digit
quickly (page 29).
9 – Favourite list
This button has no function for this TV.
q; PROG +/–/ /
Selects the next (+) or previous (-) channel.
qa – Previous channel
Returns to the previous channel watched (for more than five seconds).
qs % – Mute
Press to mute the sound. Press again to restore the sound.
z • In standby mode, if you want to turn on the TV without sound, press this
button.
qd 2 +/– – Volume
Adjusts volume.
qf / – Text
This button has no function for this TV.
qg RETURN
Returns to the previous screen of any displayed menu.
• The number 5, PROG + and
AUDIO buttons have tactile dots.
Use the tactile dots as references
when operating the TV.
GB
14
Page 51
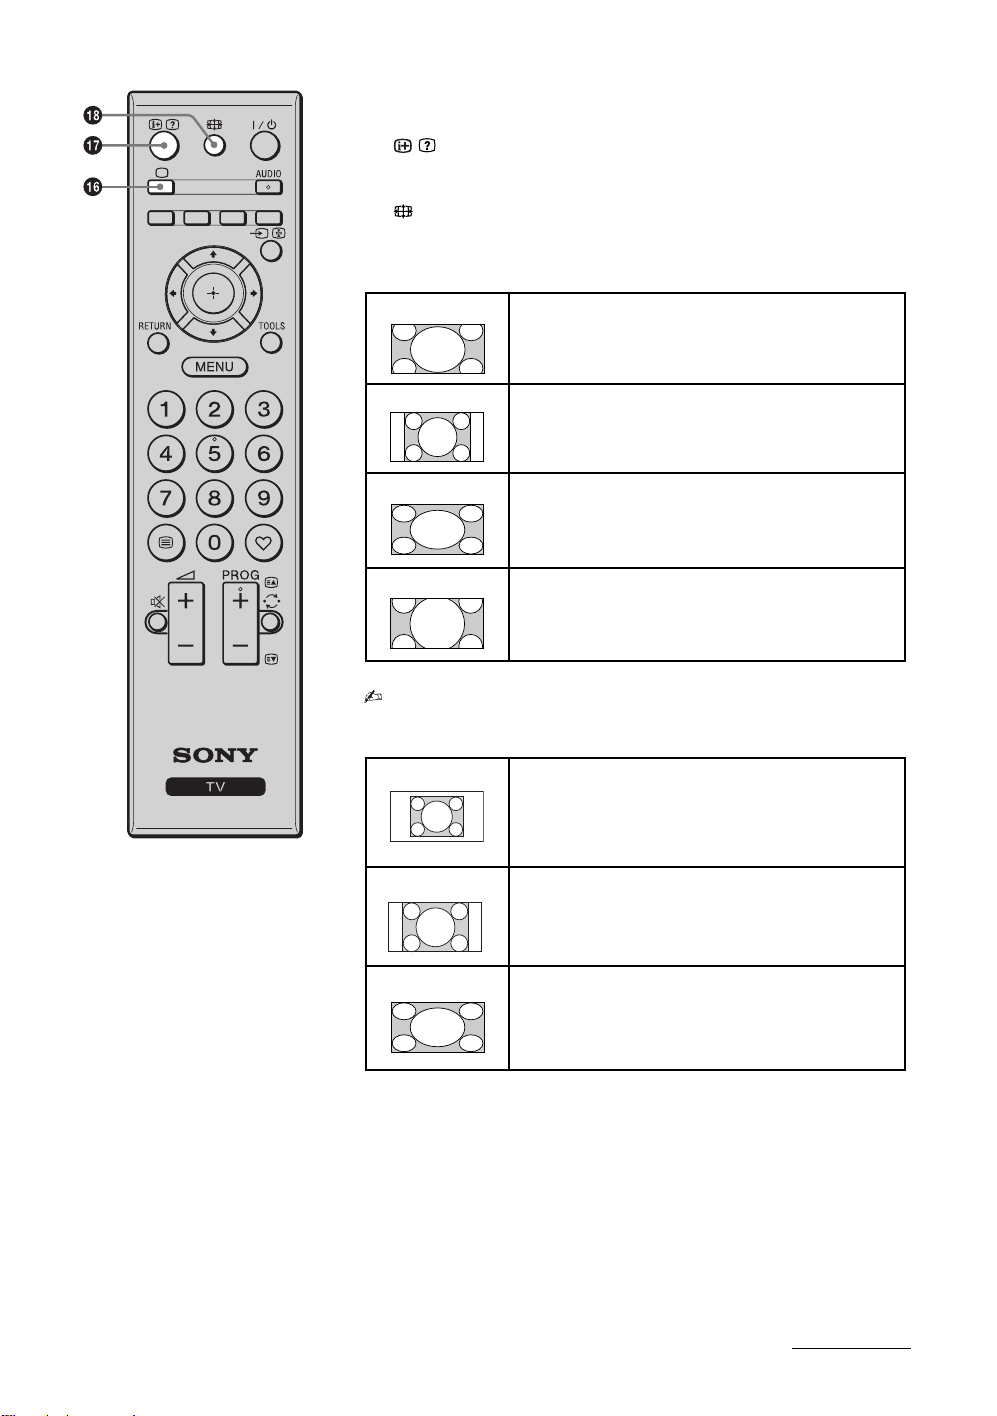
qh a – TV mode
Switches to a TV display when displaying external input.
qj / – Info
Displays information. Press once to display current channel number and
screen mode. Press again to remove the display from the screen.
qk – Wide Mode
Changes the picture size. Press repeatedly to select the desired wide mode.
For TV, Video, HD/DVD or HDMI (except PC input)
Wide Zoom* Enlarges the centre portion of the picture. The left and
right edges of the picture are stretched to fill the 16:9
screen.
Normal Displays the 4:3 picture in its original size. Side bars are
shown to fill the 16:9 screen.
Full Stretches the 4:3 picture horizontally to fill the 16:9
screen (KLV-32/26T400A/26T400G) and the 16:10
screen (KLV-19T400A/19T400G/19T400W).
Zoom* Displays cinemascopic (letter box format) broadcasts in
the correct proportions.
* Parts of the top and bottom of the picture may be cut off.
• You cannot select “Normal” for HD signal source pictures.
For PC Input
Normal Displays the picture in its original pixel size. Bars are
shown at the top, bottom, and both sides for small
picture.
Full 1 Stretches the original picture to fill the screen vertically.
Full 2 Stretches the Full 1 picture horizontally to fill the 16:9
screen (KLV-32/26T400A/26T400G) and the 16:10
screen (KLV-19T400A/19T400G/19T400W).
Continued
15
GB
Page 52
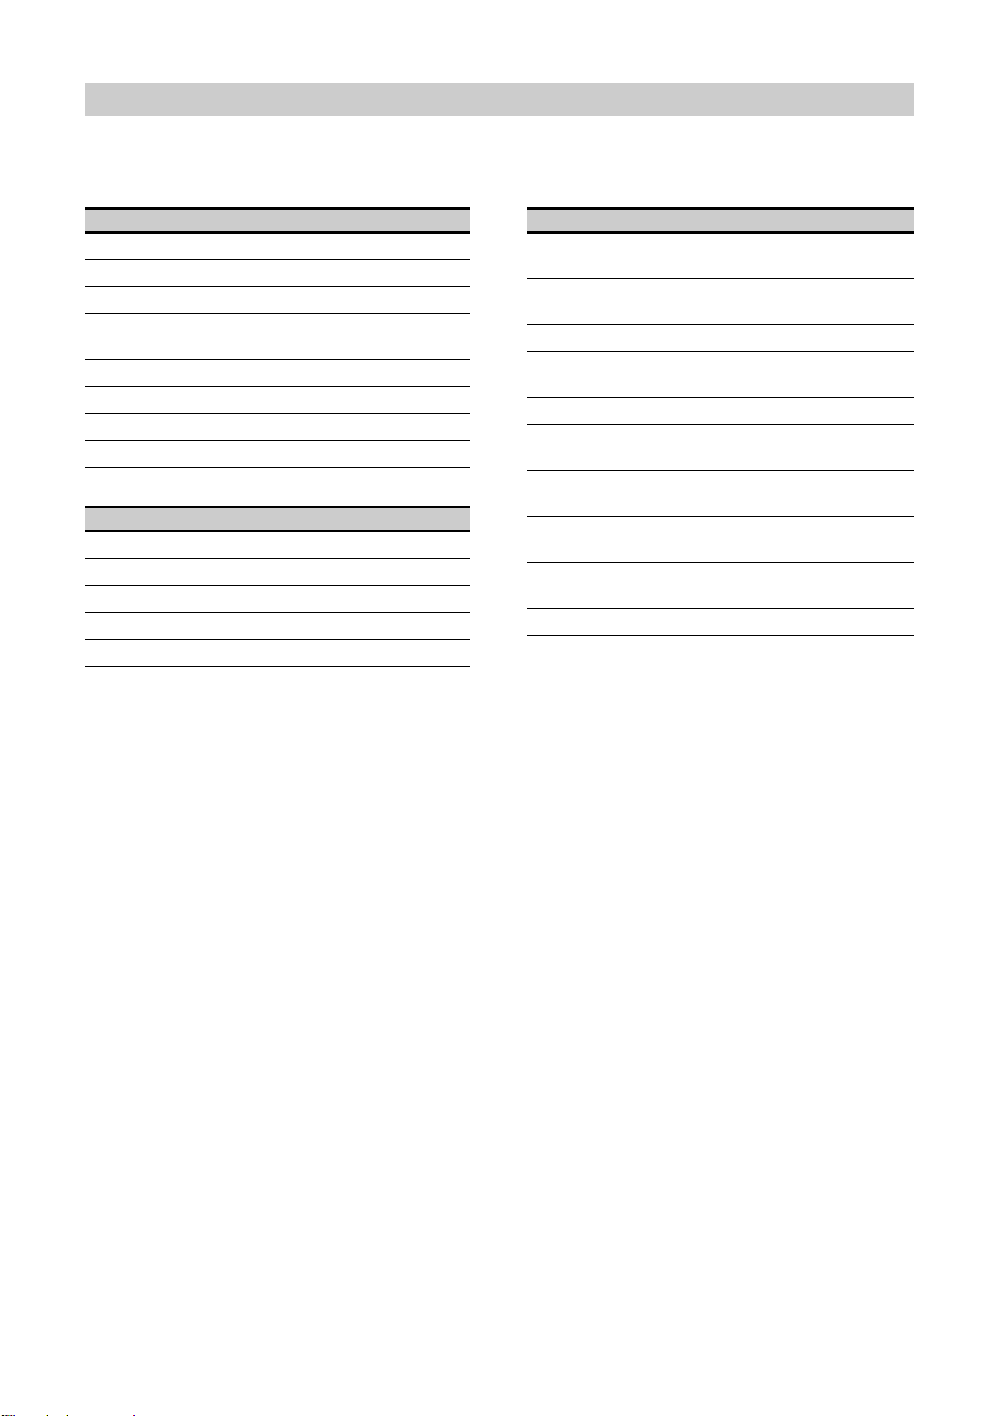
Using the Tools menu
Press TOOLS enables you to access various options and change/make adjustments according to the source and
screen mode. The options displayed vary depending on the input source.
Viewing TV programme
Options Description
Picture Mode See page 24.
Sound Mode See page 25.
Intelligent Picture See page 29.
MPEG Noise
Reduction
Speaker See page 27.
Sleep Timer See page 27.
Wake Up Timer See page 27.
Power Saving See page 27.
See page 24.
Listening FM Radio
Options Description
Sound Mode See page 25.
Speaker See page 27.
Sleep Timer See page 27.
Wake Up Timer See page 27.
Power Saving See page 27.
Viewing connected equipment
Options Description
Picture Mode (except PC
input mode)
Display Mode (in PC input
mode only)
Sound Mode See page 25.
MPEG Noise Reduction
(except PC input mode)
Speaker See page 27.
Auto Adjustment (in PC
input mode only)
Horizontal Shift (in PC
input mode only)
Sleep Timer (except PC
input mode)
Wake Up Timer (except PC
input mode)
Power Saving See page 27.
See page 24.
See page 24.
See page 24.
See page 28.
See page 28.
See page 27.
See page 27.
16
GB
Page 53
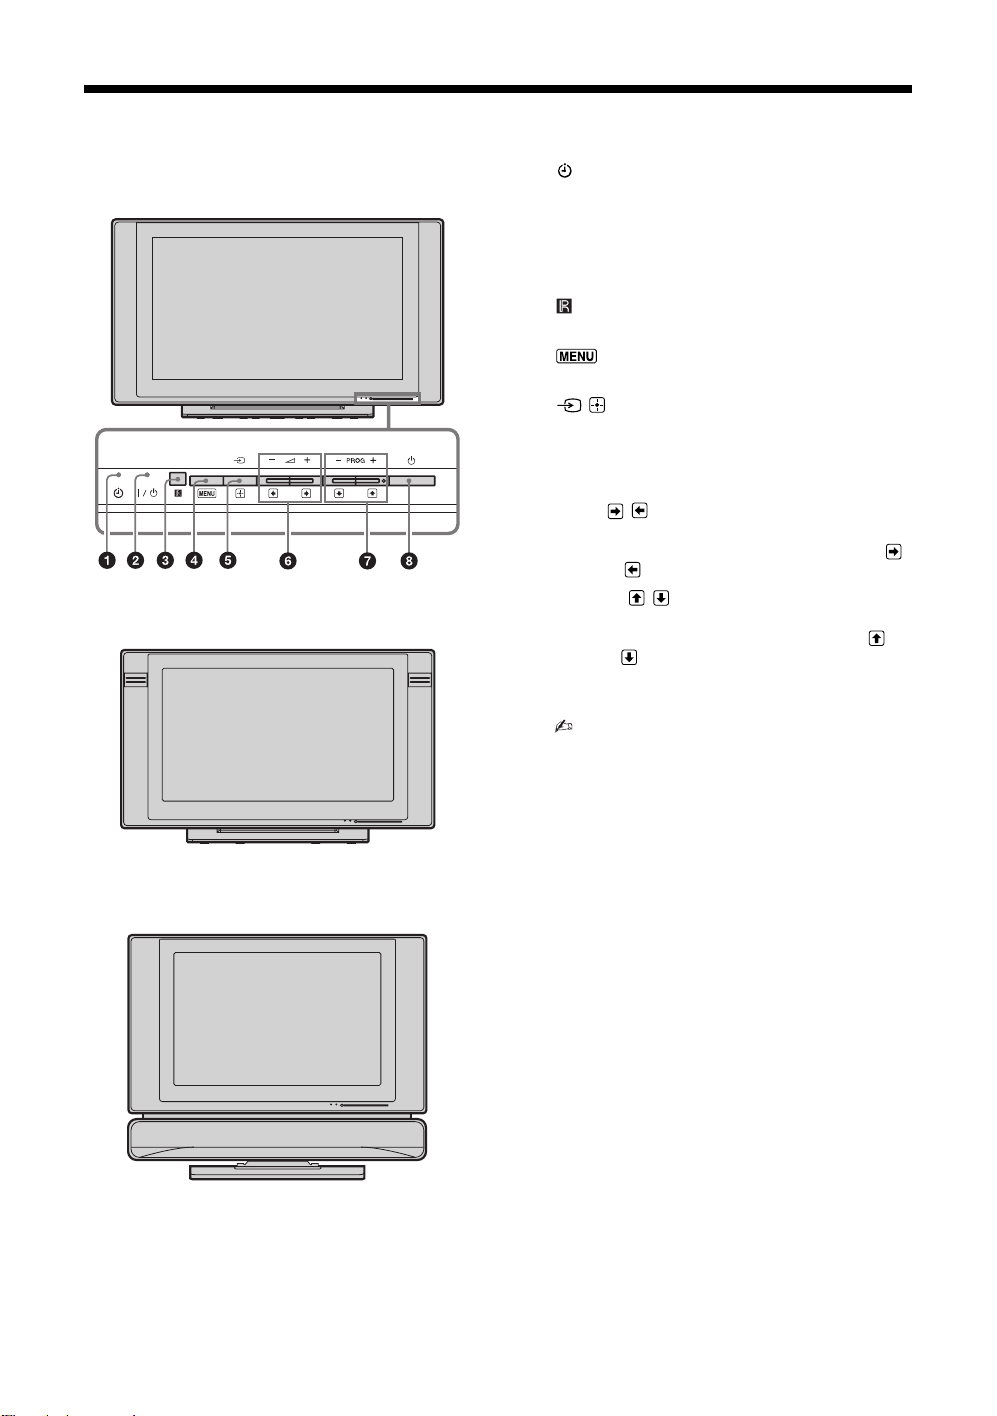
Overview of the TV buttons and indicators
B KLV-32/26/19T400A
B KLV-26/19T400G
1 – Timer indicator
Lights up in amber when the timer is set (page 27).
2 "/1 – Power indicator / Standby indicator
• Lights up in green when the TV is turned on.
• Flashes while the remote is being operated.
• Lights up in red when the TV is in standby mode.
3 – Remote sensor
Receives IR signals from the remote.
4
Displays or cancels the menu.
5 / – Input select / OK
• Displays the connected equipment list and selects
the input source (page 19).
• In TV menu: Selects the menu or option, and
confirms the setting.
6 2 +/-/ /
• Increases (+) or decreases (-) the volume.
• In TV menu: Moves through the options right ( )
or left ( ).
7 PROG +/-/ /
• Selects the next (+) or previous (-) channel.
• In TV menu: Moves through the options up ( ) or
down ( ).
8 1 – Power
Turns the TV on or off.
• To disconnect the TV from the AC power
completely, pull the plug from the AC power
outlet.
B KLV-19T400W
17
GB
Page 54
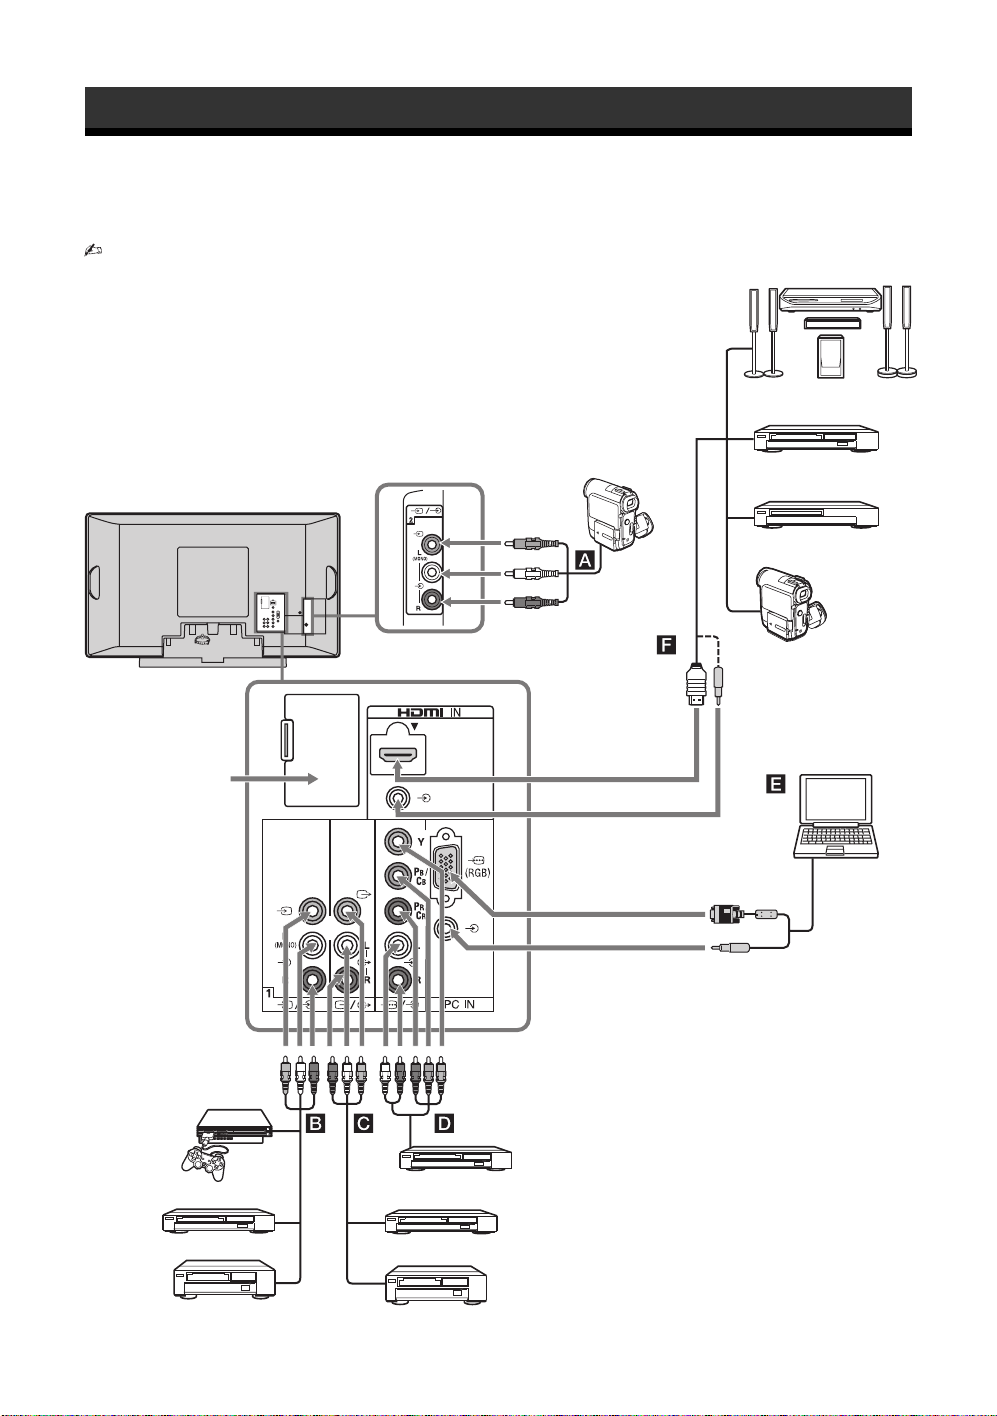
Using Optional Equipment
Connecting optional equipment
You can connect a wide range of optional equipment to your TV.
• The below terminals vary depending on TV models.
8
Home theatre system
DVD player with HDMI output
Blu-ray disc player
S VHS/Hi8/
DVC
camcorder
Digital video camcorder
For service use only
Video game equipment
DVD player without component
video output
VCR
PC
DVD player with component video output
DVD recorder
VCR
18
GB
Page 55
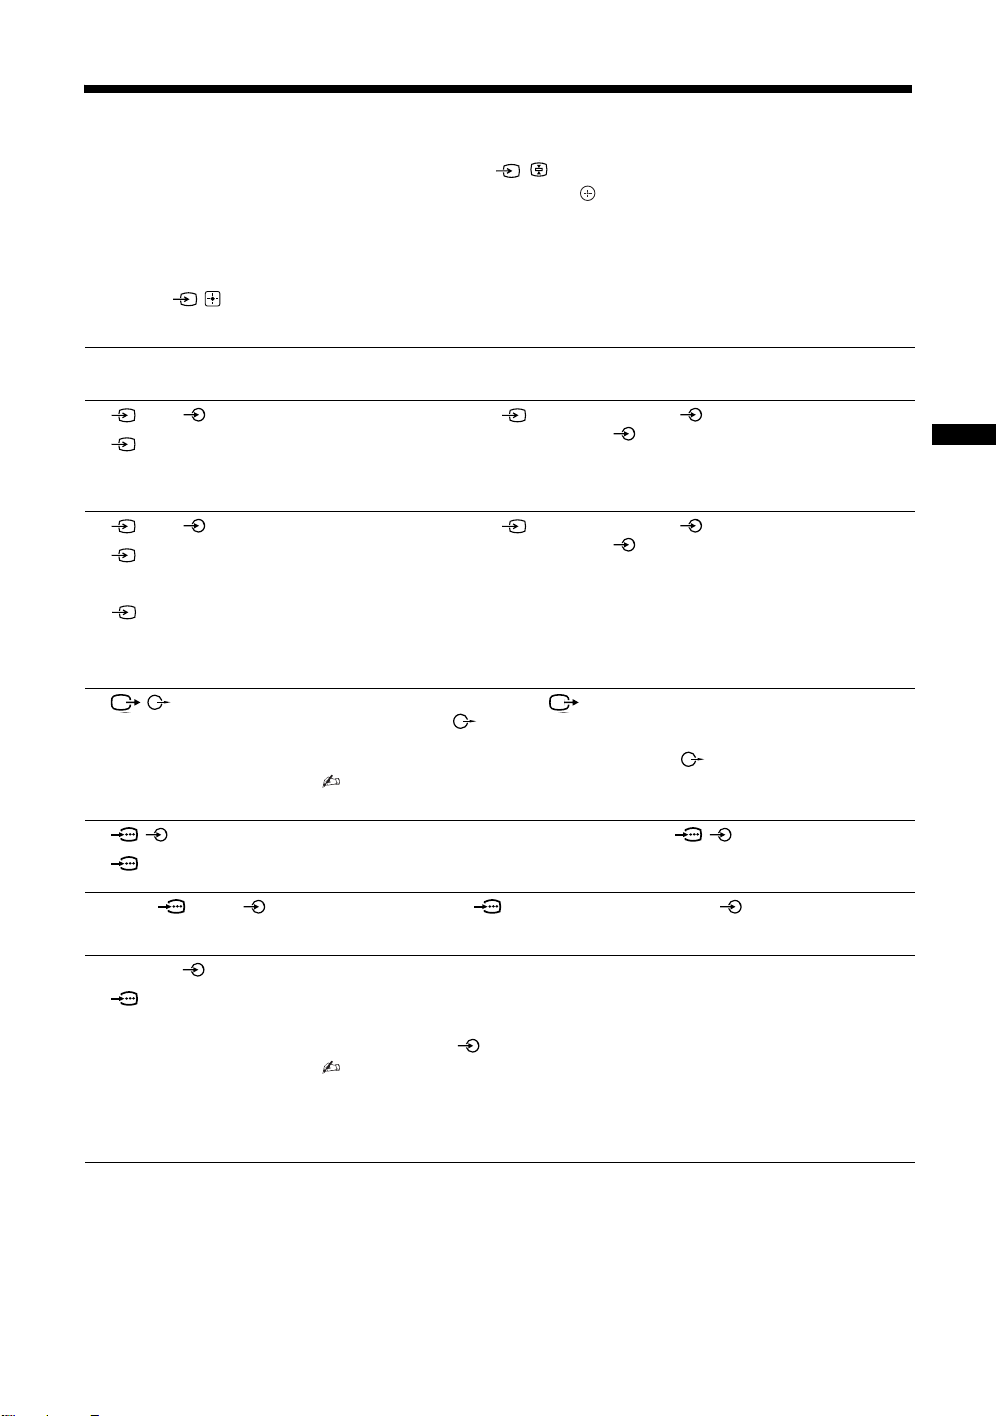
Viewing pictures from the connected equipment
Turn on the connected equipment, then press / to display the connected equipment list.
Press F/f to select the desired input source, then press . (The highlighted item is selected if
2 seconds pass without any operation after pressing F/f.) When the input source is set to “Skip”
in the “Video Labels” under the “AV Set-up” menu (page 27), that input does not appear in the
list.
z • Press / on the TV to display the connected equipment list and select the desired input source. You can also
press F/f to select the desired input source. Then wait for 2 seconds to display the selected input source.
Jacks/
Description
Input symbol on screen
A 2, and 2
Video 2
(KLV-32/26T400A/
26T400G only)
B 1, and 1
Video 1
(KLV-32/26T400A/
26T400G)
Vid e o
(KLV-19T400A/
19T400G/
19T400W)
C / Connect to the video output jack to record the image from the TV. Connect to the
D /
HD/DVD
E PC IN (RGB)/
PC
Connect to the video jack 2, and the audio jacks 2. If you connect mono
equipment, connect to the L(MONO) jack 2.
Connect to the video jack 1, and the audio jacks 1. If you connect mono
equipment, connect to the L(MONO) jack 1.
audio output jacks to record the sound from the TV on DVD recorder or VCR. To
turn off the sound of the TV speakers, set “Speaker” to “Audio System” (page 27). If
you connect mono equipment, connect to the L jack .
• The monitor output jacks cannot support HD/DVD, HDMI and PC signals source
pictures, also digital audio signal for sound.
Connect to the component jacks and the audio jacks / . For better picture quality,
component connection is recommended if your DVD player has a component video
output.
Connect to the PC IN (RGB) jack and the audio jack . It is recommended to
use a PC cable with ferrite core.
Using Optional Equipment
F HDMI IN/
HDMI
Connect to the HDMI IN jack if the equipment has an HDMI jack. The digital video
and audio signals are input from the equipment.
For equipment with DVI jack, connect the DVI jack to the HDMI IN jack using a DVIHDMI adaptor interface (not supplied). Then, connect the equipment’s audio out jack
to the audio in jack of the HDMI IN.
• The HDMI jack only support the following video inputs: 480i, 480p, 576i, 576p,
720p (50/60 Hz), 1080i (50/60 Hz) and 1080p (50/60 Hz).
• Be sure to use only an HDMI cable that bears the HDMI logo (recommended
Sony HDMI cable).
• To connect a PC, use the PC IN jack.
19
GB
Page 56
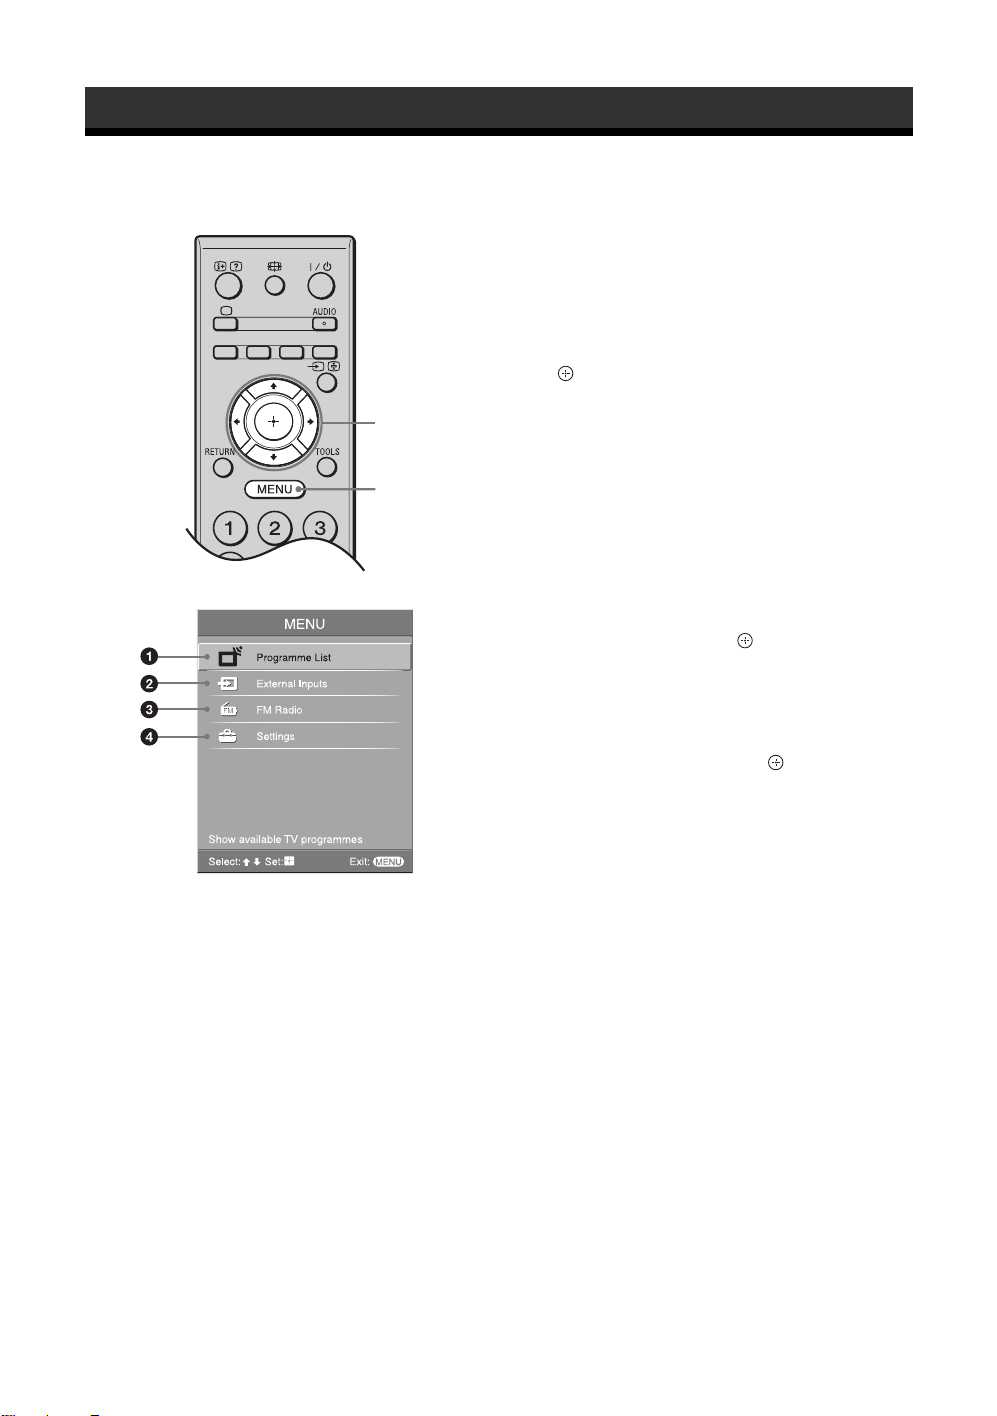
Using MENU Functions
Navigating through menus
2
1
“MENU” allows you to enjoy various convenient
features of this TV. You can easily select channels or
inputs sources, preset FM radio stations and change
the settings for your TV.
1 Press MENU.
2 Press F/f to select an option, then press
.
To exit the menu, press MENU.
1 Programme List
Displays available TV channels.
• To watch the desired channel, select the
channel, then press .
• To assign a label to a channel, select “Edit
Programme Labels”, then see page 29.
2 External Inputs
Selects equipment connected to your TV.
• To watch the desired external input, select the
input source, then press .
• To assign a label to an external input, select
“Edit Video Labels”, then see page 27.
3 FM Radio
Listens to the FM Radio (page 21).
4 Settings
Displays the “Settings” menu where most of the
advanced settings and adjustments are performed.
For details about settings, see page 22 to 23.
20
GB
Page 57
Listening to the FM
Radio
You are able to listen to the FM radio stations using
your TV by connecting an antenna (page 7). FM
Radio tuning range is from 87.5-108.0 MHz.
To access to FM Radio mode:
Press MENU and select “FM Radio” (page 20).
To exit from FM Radio mode:
Press MENU, select the desired items: “Programme
List” or “External Inputs”, then press . Select the
desired TV channels or external inputs and press .
Listening to preset stations
1 Access to FM Radio mode.
2 Press MENU and select “Settings”. Preset
the desired FM radio stations and its labels
in “FM Radio Set-up” from “Channel Setup” menu (page 31).
3 Exit from “Channel Set-up” menu by
pressing MENU. The selected preset FM
radio station number and label will appear
on the screen. To select the desired preset
FM radio station, press PROG +/–.
• You can also use the 1-9 buttons on the remote to
directly select the desired preset FM radio
station.
Using MENU Functions
Listening to non-preset stations
1 Access to FM Radio mode.
2 Press F/f to automatically search for the
desired FM radio station.
• You can also manually search for the desired FM
radio station by pressing G/g.
• The available radio frequency is only for
temporary listening pleasure and cannot be
stored in the memory.
• If the message “Please set-up FM Radio”
appears, display the “Channel Set-up” menu and
select “FM Radio Set-up” to preset the desired
FM radio stations (page 31).
• If the station has a noisy sound, you may be able to
improve the sound quality by pressing G/g.
21
GB
Page 58
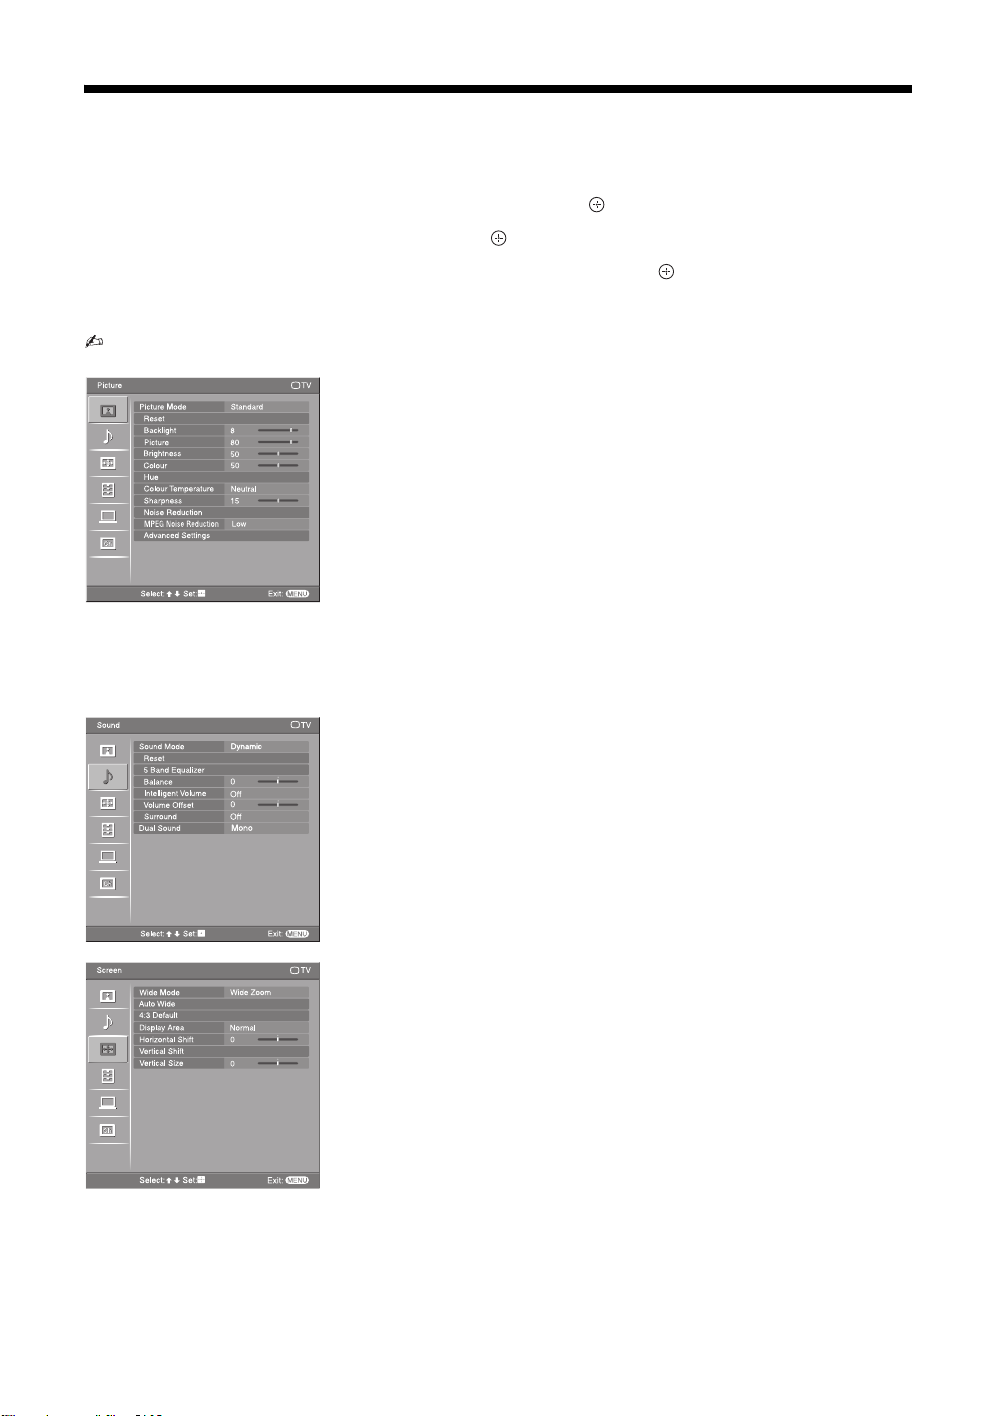
Settings adjustment
You are able to change the settings of your TV from “Settings” menu.
1 Press MENU. Press F/f to select “Settings”, then press .
2 Press F/f to select a menu icon, then press .
3 Press F/f/G/g to select an option or adjust a setting, then press .
The following is an overview of the items that can be adjusted.
• The options you can adjust vary depending on the situation. Unavailable options are greyed out or not displayed.
Picture TV
Standard
8
80
50
50
Neutral
15
Low
Set: Exit:
Dynamic
0
Off
0
Off
Mono
Set: Exit:
MENU
MENU
Sound
Picture Mode
Reset
Backlight
Picture
Brightness
Colour
Hue
Colour Temperature
Sharpness
Noise Reduction
MPEG Noise Reduction
Advanced Settings
Select:
Sound Mode
Reset
5 Band Equalizer
Balance
Intelligent Volume
Volume Offset
Surround
Dual SoundDual Sound
Select:
Picture menu (page 24)
“Picture Mode”: “Vivid” t “Standard” t “Cinema”
“Display Mode”: “Video” t “Text”
“Reset”
“Backlight”
“Picture”
“Brightness”
“Colour”
“Hue”
“Colour Temperature”: “Cool” t “Neutral” t “Warm 1” t “Warm 2”
“Sharpness”
“Noise Reduction”: “High” t “Medium” t “Low” t “Off”
“MPEG Noise Reduction”: “High” t “Medium” t “Low” t “Off”
“Advanced Settings”: “Reset”, “Adv. Contrast Enhancer”, “Gamma”, “Clear
White”, “Live Colour”
TV
Sound menu (page 25)
“Sound Mode”: “Dynamic” t “Standard” t “Clear Voice”
“Reset”
“5 Band Equalizer”: “Adjust”, “Reset”
“Balance”
“Intelligent Volume”: “On” t “Off”
“Volume Offset”
“Surround”: “On” t “Simulated Stereo” t “Off”
“Dual Sound”
22
Screen
GB
Wide Mode
Auto Wide
4:3 Default
Display Area
Horizontal Shift
Vertical Shift
Vertical Size
Select:
Wide Zoom
Normal
0
0
TV
Screen menu (page 25)
“Wide Mode”: “Wide Zoom” t “Normal” t “Full” t “Zoom”
“Auto Wide”: “On” t “Off”
“4:3 Default”: “Wide Zoom” t “Normal” t “Off”
“Display Area”: “Normal” t “-1” t “-2”
“Horizontal Shift”
“Vertical Shift”
“Vertical Size”
Set:
Exit:
MENU
Page 59
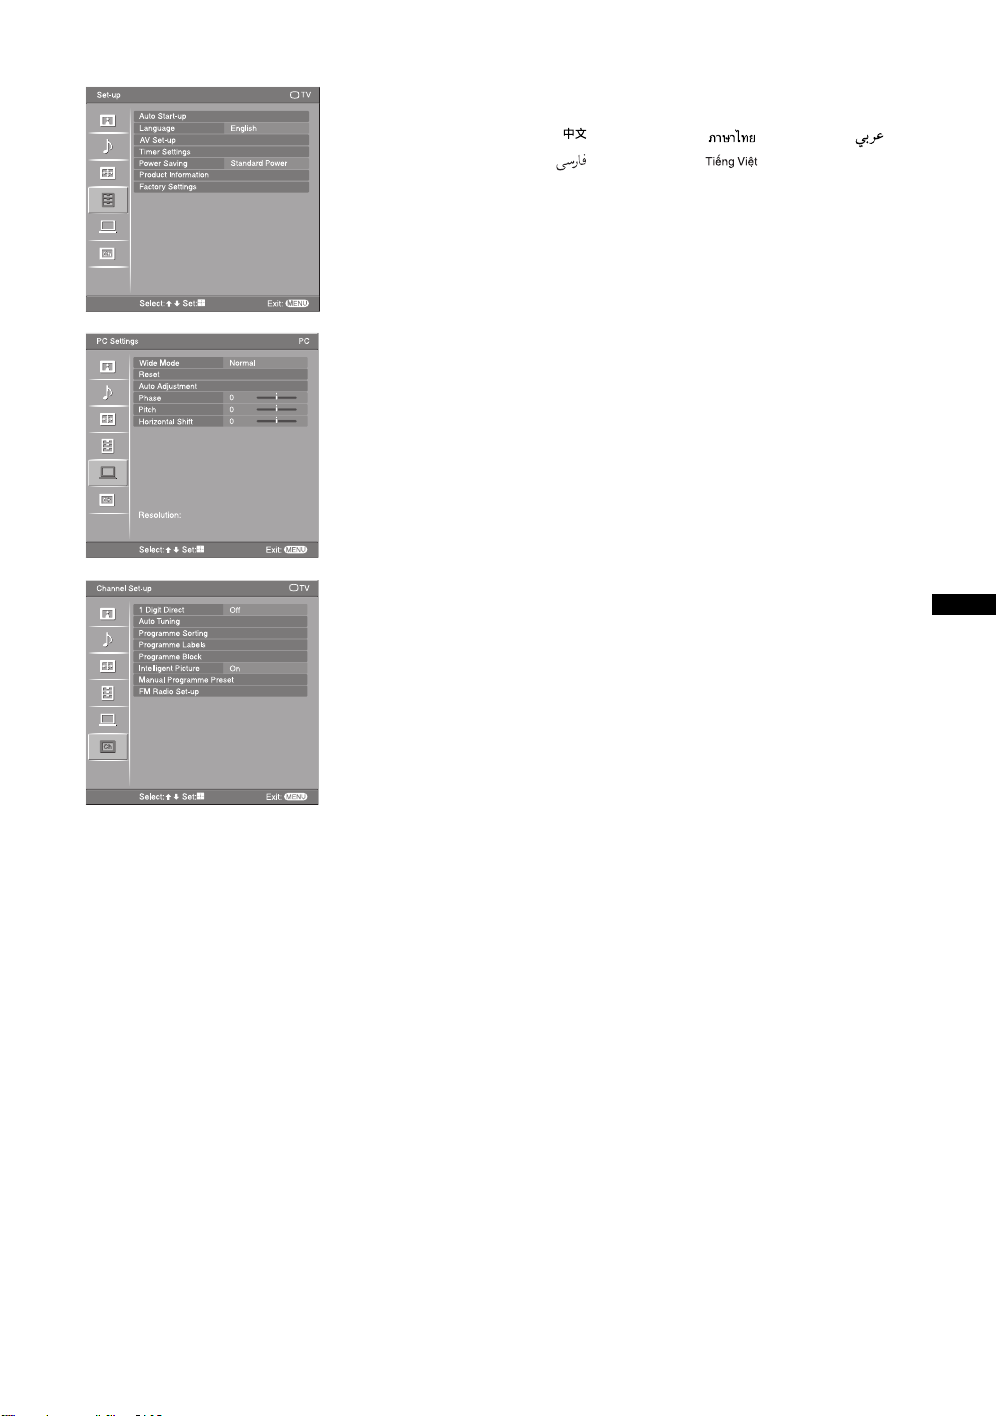
Set-up
Auto Start-up
Language
AV Set-up
Timer Settings
Power Saving
Product Information
Factory Settings
Set:
Select:
English
Standard Power
Exit:
MENU
TV
Set-up menu (page 26)
“Auto Start-up”
“Language”: “English” t “ ” (Chinese) t “” (Thai) t “”
(Arabic) t “ ” (Persian) t “ ” (Vietnamese)
“AV Set-up”: “Video Labels”, “Speaker”, “Colour System”
“Timer Settings”: “Sleep Timer”, “Wake Up Timer”
“Power Saving”: “Standard Power” t “Reduced Power”
“Product Information”
“Factory Settings”
PC Settings
Channel Set-up
Wide Mode
Reset
Auto Adjustment
Phase
Pitch
Horizontal Shift
Resolution:
Set:
Select:
1 Digit Direct
Auto Tuning
Programme Sorting
Programme Labels
Programme Block
Intelligent Picture
Manual Programme Preset
FM Radio Set-up
Set:
Select:
Normal
0
0
0
Off
On
Exit:
Exit:
MENU
MENU
PC
PC Settings menu (page 28)
“Wide Mode”: “Normal” t “Full 1” t “Full 2”
“Reset”
“Auto Adjustment”
“Phase”
“Pitch”
“Horizontal Shift”
TV
Channel Set-up menu (page 29)
“1 Digit Direct”: “On” t “Off”
“Auto Tuning”
Using MENU Functions
“Programme Sorting”
“Programme Labels”
“Programme Block”
“Intelligent Picture”: “On with Indicator”t “On”t “Off”
“Manual Programme Preset”: “Programme”, “TV System”, “VHF Low”/ “VHF
High”/ “UHF”, “Label”, “AFT”, “Skip”, “Colour
System”, “Signal Booster”, “Signal Level”
“FM Radio Set-up”
23
GB
Page 60
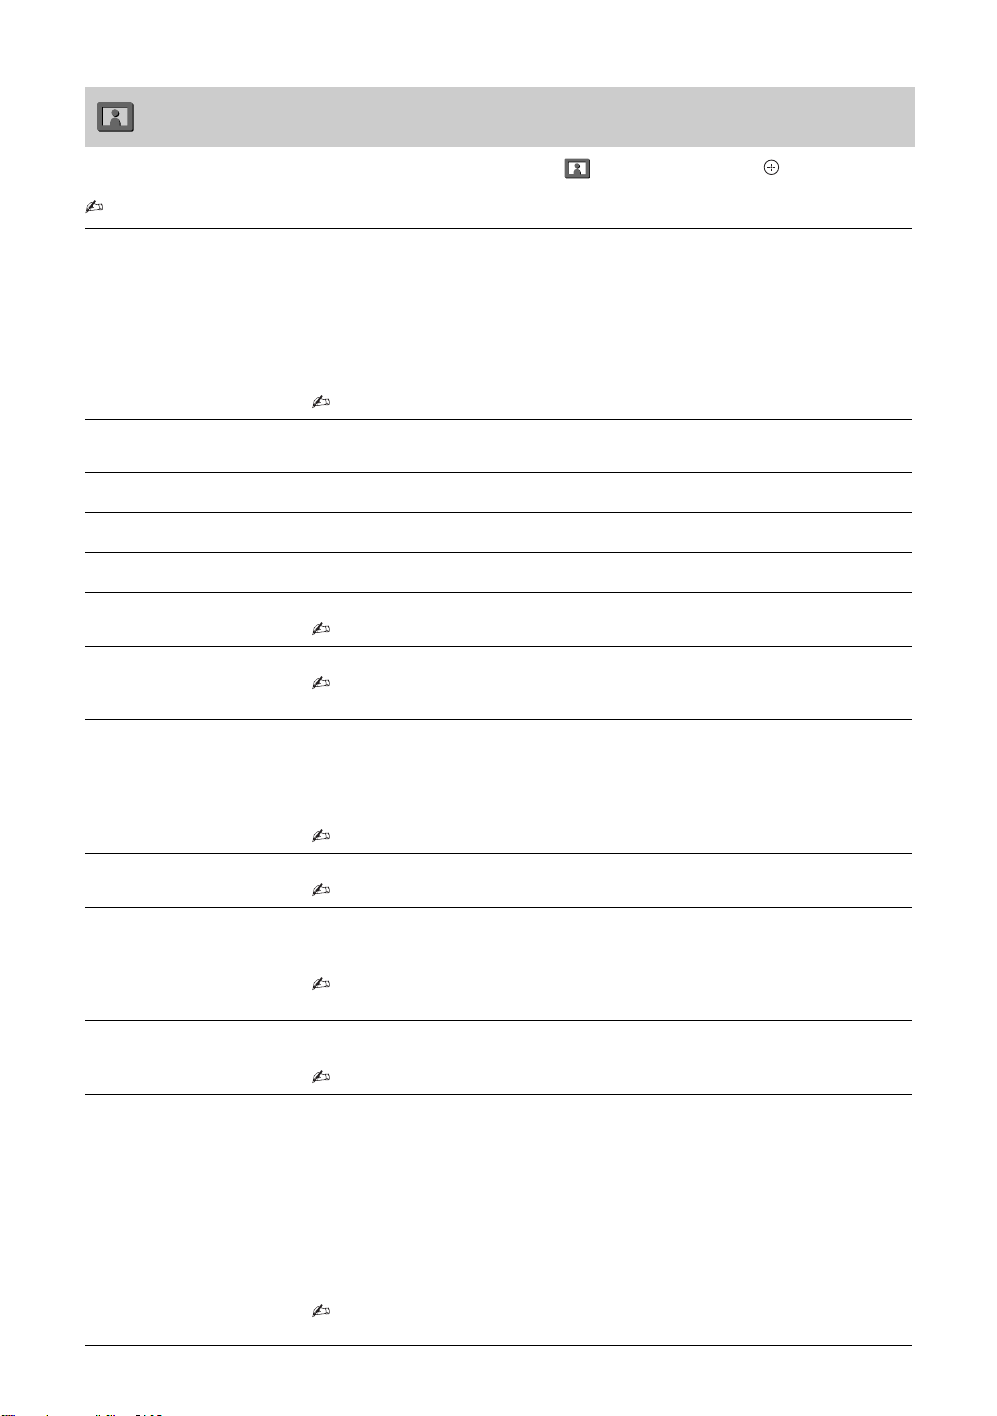
Picture menu
Press MENU and select “Settings”. Make sure the “Picture” icon ( ) is selected, then press .
• “Picture” menu is not available for FM Radio mode.
Picture Mode
Display Mode
Reset
Backlight
Picture
Brightness
Colour
Hue
Colour Temperature
Sharpness
Noise Reduction
MPEG Noise Reduction
Advanced Settings
Selects the picture mode except for PC input source.
“Vivid”: For enhanced picture contrast and sharpness.
“Standard”: For standard picture. Recommended for home entertainment.
“Cinema”: For optimum picture quality of film videos.
Selects the display mode for PC input source.
“Video”: For video images.
“Text”: For text, charts or tables.
• The options displayed vary depending on the input source.
Resets all the “Picture” settings except “Picture Mode” and “Display Mode” to the
factory settings.
Adjusts the brightness of the backlight.
Increases or decreases picture contrast.
Brightens or darkens the picture.
Increases or decreases colour intensity.
• “Colour” is not available for a PC input source.
Increases or decreases the green tones and red tones.
• “Hue” can only be adjusted for an NTSC colour system (e.g. U.S.A. video tapes).
• “Hue” is not available for PC input, component and HDMI input source.
Adjusts the whiteness of the picture.
“Cool”: Gives the white colours a blue tint.
“Neutral”: Gives the white colours a neutral tint.
“Warm 1”/“Warm 2”: Gives the white colours a red tint. “Warm 2” gives a redder
tint than “Warm 1”.
• “Warm 1” and “Warm 2” are not available when “Picture Mode” is set to “Vivid”.
Sharpens or softens the picture.
• “Sharpness” is not available for a PC input source.
Reduces the picture noise (snowy picture) in a weak broadcast signal.
“High”/“Medium”/“Low”: Modifies the effect of the noise reduction.
”: Turns off the “Noise Reduction” feature.
“Off
• “Noise Reduction” can only be adjusted when “Intelligent Picture” is set to “Off”.
• “Noise Reduction” is not available for a PC input source.
Reduces the picture noise in MPEG-compressed video.
Choose either “High”, “Medium”, “Low” or “Off
• “MPEG Noise Reduction” is not available for a PC input source.
Customises the “Picture” function in more detail. When you set “Picture Mode” to
“Standard” or “Cinema”, you can set/change these settings.
“Reset”: Resets all the advanced settings to the factory settings.
“Adv. Contrast Enhancer”: Automatically adjusts “Backlight” and “Picture” to
the most suitable settings judging from the brightness of the screen. This setting is
especially effective for dark images scenes. It will increase the contrast distinction
of the darker picture scenes.
“Gamma”: Adjusts the balance between bright and dark areas of the picture.
“Clear White”: Emphasises white colours.
“Live Colour”: Makes colours more vivid.
• “Advanced Settings” is not available for a PC input source or when “Picture Mode”
is set to “Vivid”.
”.
24
GB
Page 61
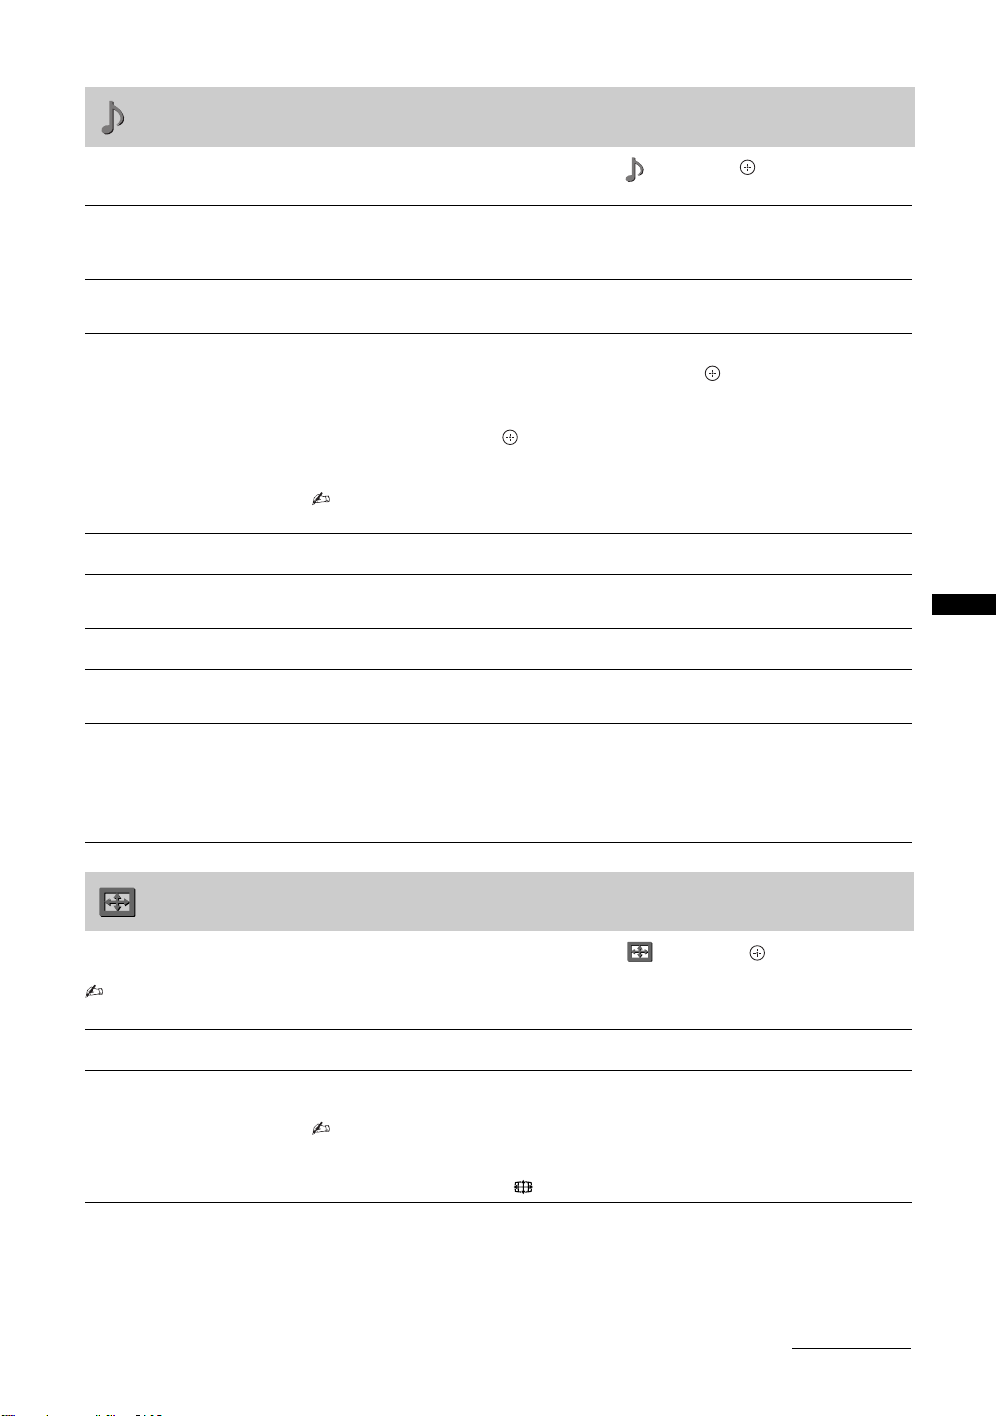
Sound menu
Press MENU and select “Settings”. Press F/f to select the “Sound” icon ( ), then press .
Sound Mode
Reset
5 Band Equalizer
Balance
Intelligent Volume
Volume Offset
Surround
Dual Sound
“Dynamic”: Enhances treble and bass. Recommended for home entertainment.
“Standard”: For standard sound.
“Clear Voice”: Makes voice sound clearer.
Resets all the “Sound” settings except “Sound Mode” and “Dual Sound” to the
factory settings.
Adjusts sound frequency settings.
1 Make sure that “Adjust” is selected, then press .
Selecting “Reset” will set your TV to the factory settings.
2 Press G/g to select the desired sound frequency, then press F/f to adjust
the setting and press .
The adjusted settings will be received when you select “Sound Mode”
options.
• Adjusting higher frequency will affect higher pitched sound and adjusting lower
frequency will affect lower pitched sound.
Emphasises left or right speaker balance.
Keeps a constant volume level even when volume level gaps occur (e.g. adverts tend
to be louder than programmes).
Adjusts the volume level of the current input relative to other inputs.
Choose either “On” (surround), “Simulated Stereo” (stereo-like monaural sound) or
“Off”.
Choose either “Stereo”, “Main” or “Sub” when you select optional equipment
connected to the TV.
z • When the optional equipment connected to the HDMI jack is selected, “Dual
Sound” is fixed to “Stereo”, except HDMI IN with DVI analogue sound input.
• “Dual Sound” is fixed to “Mono” for TV programmes and for FM Radio mode.
Using MENU Functions
Screen menu
Press MENU and select “Settings”. Press F/f to select the “Screen” icon ( ), then press .
• “Screen” menu is not available for FM Radio mode and PC input mode. When receiving PC signal, you can use “PC
Settings” menu to perform related settings (page 28).
Wide Mode
Auto Wide
For details about the wide mode, see page 15.
Automatically changes the wide mode according to the input signal from an external
equipment. To keep your setting, select “Off”.
• “Auto Wide” is only available when watching programmes from video input and
HDMI input.
z • Even if “Auto Wide” is set to “On” or “Off”, you can always modify the format of
the screen by pressing repeatedly.
Continued
25
GB
Page 62
4:3 Default
Display Area
Selects the default screen mode for use with 4:3 broadcasts.
“Wide Zoom”: Displays conventional 4:3 broadcasts with an imitation wide screen
effect.
“Normal”: Displays conventional 4:3 broadcasts in the correct proportions.
“Off”: Keeps the current “Wide Mode” setting when the channel or input is
changed.
• “4:3 Default” is available only if “Auto Wide” is set to “On”.
• “4:3 Default” is not available when watching TV programmes, component input
or for HD input signal.
Adjusts the screen area for displaying the picture.
“Normal”: Displays the picture in the original size.
“-1”/“-2”: Enlarges the picture to hide the edge of the picture.
Horizontal Shift
Vertical Shift
Vertical Size
Adjusts the horizontal position of the picture.
Adjusts the vertical position of the picture when “Wide Mode” is set to “Zoom”.
Adjusts the vertical size of the picture when “Wide Mode” is set to “Wide Zoom” or
“Zoom”.
Set-up menu
Press MENU and select “Settings”. Press F/f to select the “Set-up” icon ( ), then press .
Auto Start-up
Language
Starts the initial set-up procedure.
Usually, you do not need to do this operation because it was done when the TV was
first installed (page 8).
However, this option allows you to repeat the process (e.g. to retune the TV after
moving house, or to search for new channels that have been launched by
broadcasters).
Selects the language in which the menus are displayed.
26
GB
Page 63
AV Set-up
Video Labels
Assigns a name to any equipment connected to the side (refer A in page 18) and rear
jacks. The name will be displayed briefly on the screen when the equipment is
selected. You can skip input signals from connected equipment that you do not want
displayed on the screen.
1 Press
2 Press
Speaker
Turns on/off the TV’s internal speakers.
“TV Speaker”: The TV speakers are turned on in order to listen to the TV’s sound
through the TV speakers.
“Audio System”: The TV speakers are turned off in order to listen to the TV’s sound
only through your external audio equipment connected to the audio output jacks.
Colour System
Selects the colour system (“Auto”, “PAL”, “SECAM”, “NTSC3.58”, “NTSC4.43”
or “PAL60”) according to the composite video signal from the input source.
F/f to select the desired input source, then press .
F/f to select the desired option below, then press .
Equipment labels: Uses one of the preset labels to assign a name to connected
equipment.
“Edit:”: Creates your own label. Follow steps 2 to 4 of “Programme Labels”
(page 29).
“Skip”: Skips an unnecessary input source.
• All items in “Sound” menu except “Dual Sound” are not available when “Speaker”
is set to “Audio System”.
Timer Settings
Power Saving
Product Information
Factory Settings
Sets the timer to turn on/off the TV.
Sleep Timer
Sets a period of time after which the TV automatically switches itself into standby
mode.
When the “Sleep Timer” is activated, the (Timer) indicator on the TV front panel
lights up in amber.
z • If you turn off the TV and turn it on again, “Sleep Timer” is reset to “Off”.
• A notification message appears on the screen one minute before the TV switches
to standby mode.
Wake Up Timer
Sets the desired period of time to turn on the TV from standby mode.
“Time”: Sets the desired period of time to turn on the TV.
“Duration”: Selects the time period after which the TV automatically switches to
standby mode again.
z • A notification message “TV has been turned on by Wake Up Timer” appears on
the screen when the TV is turned on using the wake up timer.
Selects the power saving mode to reduce the power consumption of the TV.
Choose either “Standard Power” or “Reduced Power”.
Displays your TV’s product information.
Resets all settings to factory settings other than “Programme Block”, programme
preset data and the FM Radio preset data. After completing this process, the initial
set-up screen is displayed the next time you turn on the TV. Completing auto tuning
in initial set-up will reset these settings (except the FM Radio preset data). To keep
them, select “Cancel” in the auto tuning confirmation dialogue.
• Be sure not to turn the TV off during this period (it takes about 30 seconds) or press
any buttons.
Using MENU Functions
27
GB
Page 64
PC Settings menu
Press MENU and select “Settings”. Press F/f to select the “PC Settings” icon ( ), then press .
Wide Mode
Selects a screen mode for displaying input from your PC, see page 15.
“Normal”: Displays the picture in its original size.
“Full 1”: Enlarges the picture to fill the display area, keeping its original horizontal-
to-vertical aspect ratio.
“Full 2”: Enlarges the picture to fill the display area.
Reset
Auto Adjustment
Resets all the “PC Settings” except “Wide Mode” to the factory settings.
Automatically adjusts the display position and phase of the picture when the TV
receives an input signal from the connected PC.
z • “Auto Adjustment” may not work well with certain input signals. In such cases,
manually adjust “Phase” and “Horizontal Shift”.
Phase
Pitch
Horizontal Shift
Adjusts the phase when the screen flickers.
Adjusts the pitch when the picture has unwanted vertical stripes.
Adjusts the horizontal position of the picture.
PC Input Signal Reference Chart for supported signals and “Resolution:” value displayed
Signals Horizontal (Pixel) Vertical (Line)
VGA 640
640
720
SVGA 800
800
XGA 1024
1024
1024
WXGA 1280
1280
1360
• This TV’s PC input does not support Sync on Green or Composite Sync.
• This TV’s PC input does not support interlaced signals.
• If input signal is not shown in above chart, then this signal may not be displayed properly or cannot be displayed
according to your settings.
z • For the best picture quality, it is recommended to use the signals (boldfaced) in the above chart with a 60 Hz vertical
frequency from a personal computer. In plug and play, signals with a 60 Hz vertical frequency will be selected
automatically.
480
480
400
600
600
768
768
768
768
768
768
Horizontal
frequency
(kHz)
31.5
37.5
31.5
37.9
46.9
48.4
56.5
60
47.4
47.8
47.7
Ver tic al
frequency
(Hz)
60
75
70
60
75
60
70
75
60
60
60
Standard
VGA
VESA
VGA-T
VESA Guidelines
VESA
VESA Guidelines
VESA
VESA
VESA
VESA
VESA
28
GB
Page 65
Channel Set-up menu
Press MENU and select “Settings”. Press F/f to select the “Channel Set-up” icon ( ), then press .
• All the items in “Channel Set-up” menu except “FM Radio Set-up” are not available for FM Radio mode.
1 Digit Direct
Auto Tuning
Programme Sorting
Programme Labels
Programme Block
Intelligent Picture
When “1 Digit Direct” is set to “On”, you can select a channel using one preset
number button (0 - 9) on the remote.
• When “1 Digit Direct” is set to “On”, you cannot select channel numbers 10 and
above entering next digit using the remote.
Tunes in all the available channels.
This option allows you to retune the TV after moving house, or to search for new
channels that have been launched by broadcasters.
Changes the order in which the channels are stored on the TV.
1 Press
2 Press F/f to select the new position for your channel, then press .
Assigns a channel name of your choice up to five letters or numbers. The name will
be displayed briefly on the screen when the channel is selected.
1 Press F/f to select the channel you want to name, then press .
2 Press F/f to select the desired letter or number (“_” for a blank space),
3 Repeat the procedure in step 2 until the name is completed.
4 Select “OK”, then press .
Blocks an individual channel from being watched.
1 Press
2 Press
“On with Indicator”: Automatically reduces the picture noise. The signal level bar
is displayed when the channel is changed or the display is changed from an input
screen to a TV programme.
“On”: Automatically reduces the picture noise.
“Off”: Turns off the “Intelligent Picture” feature.
F/f to select the channel you want to move to a new position, then
press .
then press
If you input a wrong character
Press G/g to select the wrong character. Then, press F/f to select the correct
character.
To delete all the characters
Select “Reset”, then press .
g.
F/f to select the channel you want to block, then press .
F/f to select “Block”, then press .
To watch the channel, select “Allow”.
Using MENU Functions
Continued
29
GB
Page 66

Manual Programme
Preset
Before selecting “Label”/“AFT”/“Skip”/“Colour System”/“Signal Booster”, press
PROG +/- to select the programme number with the channel. You cannot select a
programme number that is set to “Skip” (page 30).
Programme/TV System/VHF or UHF
Presets programme channels manually.
1 Select “Programme”, then press .
2 Press
3 Press
4 Press F/f to select your TV broadcast systems, then press .
5 Press
6 Tune the channels as follows:
Repeat the procedure above to preset other channels manually.
Label
Assigns a name of your choice, up to five letters or numbers, to the selected channel.
This name will be displayed briefly on the screen when the channel is selected.
To input characters, follow steps 2 to 4 of “Programme Labels” (page 29).
AFT
Allows you to fine-tune the selected programme number manually if you feel that a
slight tuning adjustment will improve the picture quality.
You can adjust the fine tuning over a range of -15 to +15. When “On” is selected, the
fine tuning is performed automatically.
F/f to select the programme number you want to manually tune
(if tuning a VCR, select channel 000), then press RETURN.
F/f to select “TV System”, then press .
F/f to go to the frequency range indication (“VHF Low”, “VHF
High” or “UHF”), then press .
Press G/g to search for the next available channel. When a channel has been found,
the search will stop. To continue searching, press
G/g.
Skip
Skips unused channels when you press PROG +/- to select channels. (You can still
select a skipped channel using the number buttons.)
Colour System
Selects the colour system (“Auto”, “PAL”, “SECAM”, “NTSC3.58”, “NTSC4.43”
or “PAL60”) according to the channel.
Signal Booster (Intelligent Signal Booster)
Improves the picture quality if the TV signal is too strong or weak.
Press
F/f to select either “Off” if the signal is too strong (picture distorted; picture
with lines; signal interference) or “Auto” if the signal is weak (snowy picture), then
press .
Signal Level
Displays the signal level for programme currently being watched.
red
(weak)
amber
(average)
green
(good)
30
GB
Page 67
FM Radio Set-up
Preset up to nine FM radio stations.
You can manually preset each FM radio station that can be received in your area and
then store the radio frequency of the desired FM radio stations.
1 Press
2 Press
3 You may edit the FM radio station label. Press F/f to select
4 Repeat steps 1 to 3 to preset other FM radio stations.
F/f to select the desired FM radio station position, then press .
F/f to search the FM radio stations.
Searching stops automatically when a station is tuned in.
If the station has a noisy sound, you may be able to improve the sound
quality by pressing
Press to store the FM radio station.
alphanumeric characters for the label, then press .
• “FM Radio Set-up” can only be adjusted in FM Radio mode. To enable this feature,
access to FM Radio mode by using MENU (page 20), then preset your desired FM
radio stations according to the steps mentioned above.
G/g.
Using MENU Functions
31
GB
Page 68
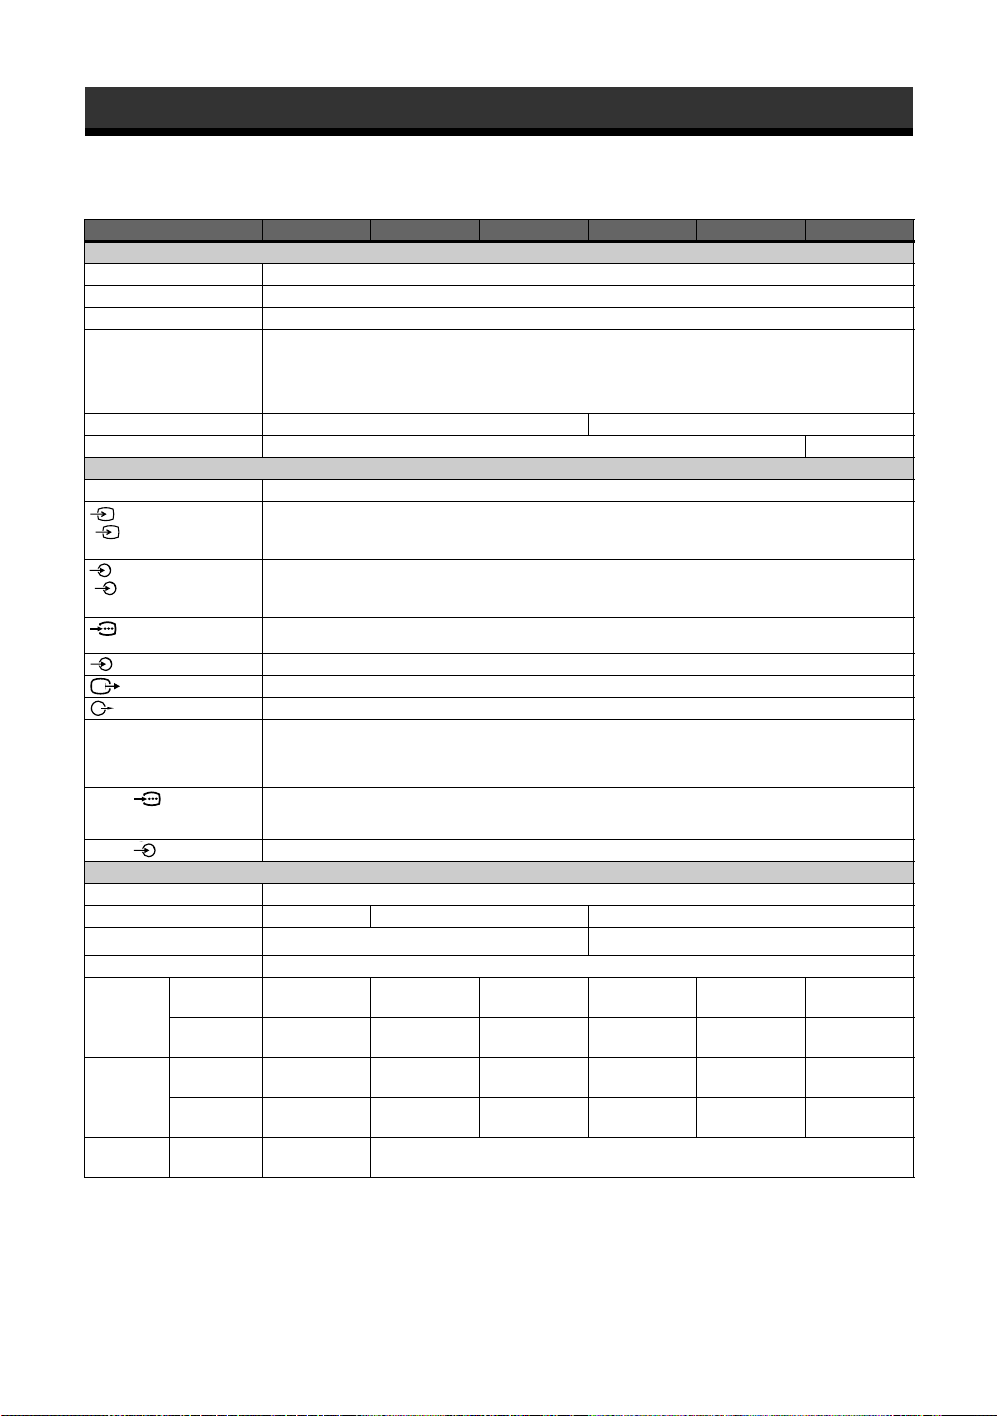
Additional Information
Specifications
Model name
System
Panel System
TV System
Colour System
Channel Coverage
Sound Output
3D WOOFER
Input/Output jacks
Antenna
1, 2
( 2: KLV-32/26T400A/
26T400G only)
1, 2
( 2: KLV-32/26T400A/
26T400G only)
HDMI IN
PC IN (RGB)
PC IN
Power and others
Power Requirements
Screen Size (inches)
Display Resolution
Power Consumption
Dimensions
(w × h × d)*
with stand
(mm)
without stand
(mm)
Mass* with stand
(kg)
without stand
(kg)
Optional
Accessories
Wall-Mount
bracket
KLV-32T400A KLV-26T400A KLV-26T400G KLV-19T400A KLV-19T400G KLV-19T400W
LCD (Liquid Crystal Display) Panel
B/G, I, D/K, M
PAL, PAL60, SECAM, NTSC4.43, NTSC3.58
B/G: VHF: E2 to E12/ UHF: E21 to E69/ CATV: S01 to S03, S1 to S41
I: UHF: B21 to B69/ CATV: S01 to S03, S1 to S41
D/K: VHF: C1 to C12, R1 to R12/ UHF: C13 to C57, R21 to R60/ CATV: S01 to S03, S1 to S41,
Z1 to Z39
M: VHF: A2 to A13/ UHF: A14 to A79/ CATV: A-8 to A-2, A to W+4, W+6 to W+84
10 W + 10 W 5 W + 5 W
– 15 W
75 ohm external terminal
Video input (phono jack)
Audio input (phono jacks): 500 mVrms, Impedance: 47 kilohms
Supported formats: 1080p (50/60 Hz), 1080i (50/60 Hz), 720p (50/60 Hz), 576p, 576i, 480p, 480i
Y: 1 Vp-p, 75 ohms, 0.3V sync negative/P
Audio input (phono jacks): 500 mVrms, Impedance: 47 kilohms
Video output (phono jack)
Audio output (phono jacks)
Video: 1080p (50/60 Hz), 1080i (50/60 Hz), 720p (50/60 Hz), 576p, 576i, 480p, 480i
Audio: Two channel linear PCM
32, 44.1 and 48 kHz, 16, 20 and 24 bits
Analogue audio input (minijack): 500 mVrms, Impedance: 47 kilohms
PC Input (D-sub 15-pin) (see page 28)
G: 0.7 Vp-p, 75 ohms, non Sync on Green/B: 0.7 Vp-p, 75 ohms/
R: 0.7 Vp-p, 75 ohms/HD: 1-5 Vp-p/VD: 1-5 Vp-p
PC audio input (minijack)
110–240 V AC, 50/60 Hz
32 26 19
1,366 pixels (horizontal)
Indicated on the rear of the TV.
929 × 558 × 208 789 × 486 × 180 789 × 486 × 180 595 × 379 × 159 595 × 379 × 159 595 × 477 × 190
929 × 520 × 109 789 × 448 × 105 789 × 448 × 105 595 × 348 × 93 595 × 348 × 93 595 × 449 × 94
13.9 10.1 10.3 5.9 6.1 7.4
13.0 9.5 9.7 5.6 5.8 7.0
SU-WL500 or
SU-WL50B
× 768 lines (vertical) 1,680 pixels (horizontal) × 1,050 lines (vertical)
B/CB: 0.7 Vp-p, 75 ohms/PR/CR: 0.7 Vp-p, 75 ohms
SU-WL100
* Dimensions and mass are approximate values.
Design and specifications are subject to change without notice.
GB
32
Page 69
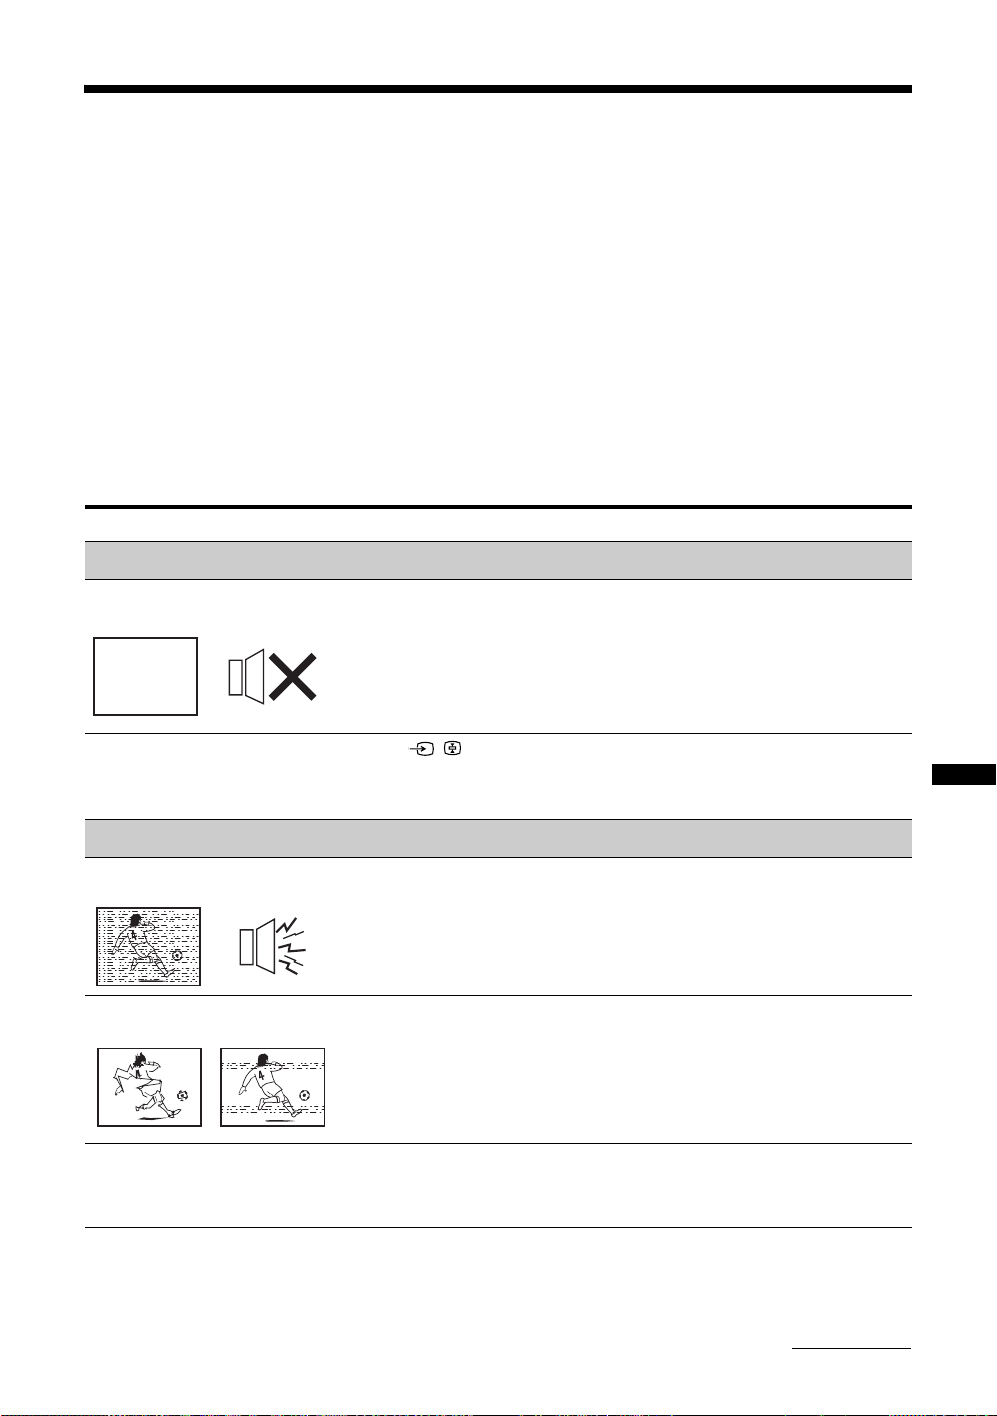
Troubleshooting
If you find any problem while viewing your TV, you can either check the Troubleshooting guide below or
use the “Factory Settings” function (page 27). If the problem persists, contact your Sony dealer.
Check whether the 1 (standby) indicator is flashing in red.
When it is flashing
The self-diagnosis function is activated.
1 Count how many times the 1 (standby) indicator flashes between each two second break.
For example, the indicator flashes three times, then there is a two second break, followed by another three flashes, etc.
2 Press 1 on the TV to turn it off, disconnect the AC power cord, and inform your dealer or Sony
service centre of how the indicator flashes (number of flashes).
When it is not flashing
1 Check the items listed below.
2 If the problem still persists, have your TV serviced by qualified service personnel.
Problem Cause/Remedy
No Picture
No picture (screen is dark) and
no sound
• Check the antenna/cable connection.
• Connect the TV to the AC power outlet, and press 1 on the TV.
•If the 1 (standby) indicator lights up in red, press "/1.
No picture or no menu
information from equipment
connected to the video input
jack
Poor Picture
Only snow and noise appear
on the screen
Distorted picture (dotted lines
or stripes)
Picture or sound noise when
viewing a TV channel
• Press / to display the connected equipment list, then select the desired
input.
• Check the connection between the optional equipment and the TV.
• Check if the antenna is broken or bent.
• Check if the antenna has reached the end of its serviceable life (three to five years in
normal use, one to two years at the seaside).
• Keep the TV away from electrical noise sources such as cars, motorcycles, hair-
dryers or optional equipment.
• When installing optional equipment, leave some space between the optional
equipment and the TV.
• Check the antenna/cable connection.
• Keep the antenna cable away from other connecting cables.
• Broadcast signals are too strong. Set the “Signal Booster” to “Off” (page 30) or turn
off or disconnect the booster if it is in use.
• Select “Manual Programme Preset” in the “Channel Set-up” menu and adjust
“AFT” (Automatic Fine Tuning) to obtain better picture reception (page 30).
• Select “Noise Reduction” in the “Picture” menu to reduce the noise in the picture
(page 24).
Additional Information
Continued
33
GB
Page 70
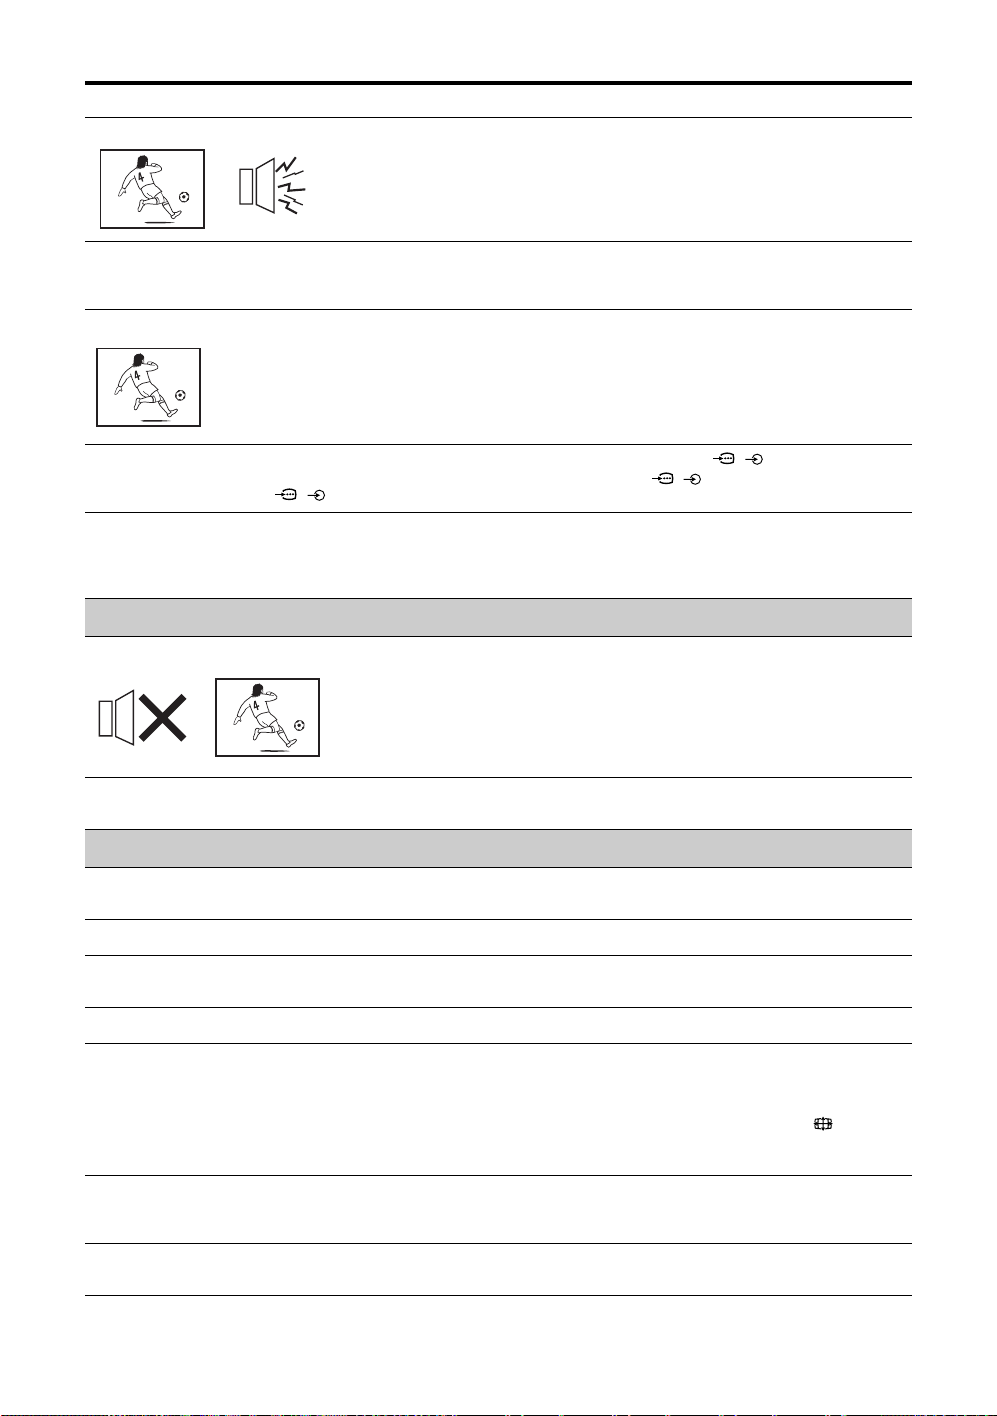
Problem Cause/Remedy
Good picture, but noisy sound • The TV system setting is inappropriate.
• If the sound of all the channels are noisy, perform “Auto Tuning” in the “Channel
Set-up” menu to preset the channel again (page 29).
• If the sound of some channels is noisy, select the channel, then perform “Manual
Programme Preset” in the “Channel Set-up” menu, and select the appropriate TV
system (“TV System”) (page 30).
Some tiny black points and/or
bright points appear on the
• The picture of a display unit is composed of pixels. Tiny black points and/or bright
points (pixels) on the screen do not indicate a malfunction.
screen
No colour on programmes • Select “Reset” in the “Picture” menu to return to the factory settings (page 24).
No colour or irregular colour
when viewing a signal from the
Y, P
B/CB, PR/CR jacks of /
Picture flashes initially when
changing to HDMI mode or
• Check the connection of the Y, P
• Make sure that the Y, PB/CB, PR/CR jacks of / are firmly seated in their
respective jacks.
• This is probably caused by the authentication process between HDMI equipment
and the TV. It does not indicate a malfunction.
B/CB, PR/CR jacks of / .
switching on the TV with HDMI
mode
Sound
No sound, but good picture • Press 2 +/– or % (Mute).
TV cannot receive FM radio
station
• Check if the “Speaker” is set to “TV Speaker” from the “AV Set-up” menu in “Set-
up” menu (page 27).
• Connect a separate FM antenna and the TV channel source through an antenna
selector (switch) to your TV (page 7).
General
The TV turns off automatically
(the TV enters standby mode)
The TV turns on automatically • Check if the “Wake Up Timer” is activated (page 27).
Some input sources cannot be
selected
The remote does not function • Replace the batteries.
The wide screen mode
changes spontaneously when
“Auto Wide” is “On”
Cannot play shooting games • Some shooting games which involve pointing a light beam at the TV screen with an
The TV cabinet creaks • Changes in room temperature sometimes make the TV cabinet expand or contract,
GB
34
• Check if the “Sleep Timer” is activated, or confirm the “Duration” setting of “Wake
Up Timer” (page 27).
• Select “Video Labels” in the “AV Set-up” menu and cancel “Skip” of the input
source (page 27).
• When changing between two input modes, the TV detects the optimum wide screen
mode. During this period, an irregular wide screen mode may appear.
• The wide mode is switched automatically according to the revised signal with a
Wide ID signal (only available for video input and HDMI input).
• The “Auto Wide” feature stops working temporarily when you press , and
resumes after a while. To fix in the manually selected wide screen mode, set “Auto
Wide” to “Off” in the “Screen” menu (page 25).
electronic gun or rifle cannot be used with your TV. For details, see the instruction
manual supplied with the video game software.
causing a noise. This does not indicate a malfunction.
Page 71
Problem Cause/Remedy
Static discharge is felt when
touching the TV cabinet
• This is the same static discharge that is felt when touching metal door handles or
car doors especially when the air is dry, for example in winter. This does not
indicate a malfunction.
Weak signal (signal level
indicator displayed in red)
Sound does not match
pictures on the screen when
audio is output directly from
the amplifier system
• Check the antenna/cable connection.
• Set the “Signal Booster” to “Auto” (page 30) or try using an external booster.
• Adjust the sound delay settings from the connected equipment to minimize the time
gap between the audio and video output.
35
Additional Information
GB
Page 72

Customer support
Printed in Malaysia
Page 73
LCD Colour TV
Operating Instructions
KLV-32T400A
KLV-26T400A
KLV-26T400G
KLV-19T400A
KLV-19T400G
KLV-19T400W
© 2008 Sony Corporation 4-110-401-11(1)
Page 74

Introduction Trademark information
Thank you for choosing this Sony product.
Before operating the TV, please read this manual
thoroughly and retain it for future reference.
The illustrations used in this manual are of the
KLV-32T400A unless otherwise stated.
• HDMI, the HDMI logo and High-Definition Multimedia
Interface are trademarks or registered trademarks of
HDMI Licensing LLC.
• “BRAVIA” and are trademarks of Sony
Corporation.
GB
2
Page 75

Table of Contents
Start-up Guide 4
Checking the accessories ...........................4
Inserting batteries into the remote...............4
1: Attaching the 3D WOOFER and stand....4
Attaching the stand................................... 4
Attaching the 3D WOOFER and stand ..... 6
2: Connecting an antenna/cable/VCR .........7
3: Preventing the TV from toppling over......7
4: Bundling the cables .................................8
5: Performing the initial set-up ....................8
Selecting the language............................. 8
Auto-tuning the TV .................................... 9
Watching TV ............................................ 10
Detaching the Table-Top Stand from the
TV..............................................................10
Safety information .....................................12
Precautions ...............................................14
Overview of the remote ..........................15
Using the Tools menu ............................. 17
Overview of the TV buttons and
indicators .................................................18
19
Using Optional Equipment
34
Additional Information
Specifications ........................................... 34
Troubleshooting ........................................ 35
Connecting optional equipment................. 19
Viewing pictures from the connected
equipment .................................................20
21
Using MENU Functions
Navigating through menus ........................21
Listening to the FM Radio .........................22
Listening to preset stations..................... 22
Listening to non-preset stations.............. 22
Settings adjustment...................................23
Picture menu........................................... 25
Sound menu............................................ 26
Screen menu........................................... 27
Set-up menu ........................................... 28
PC Settings menu ................................... 30
Channel Set-up menu ............................. 31
GB
3
Page 76
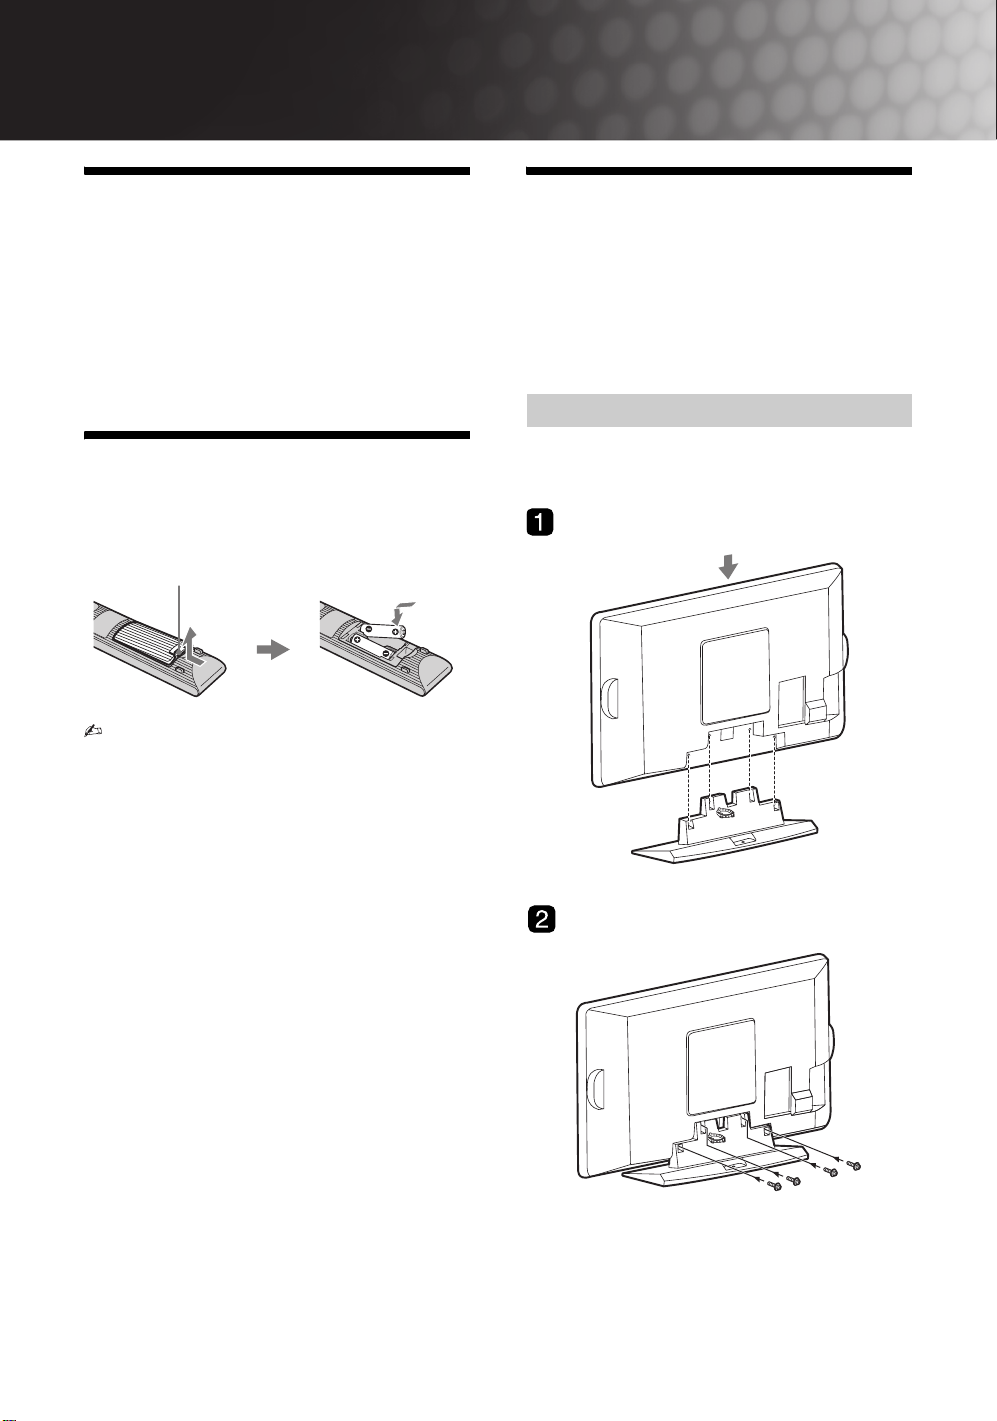
Start-up Guide
Checking the
accessories
Stand (1) and screws (4)
3D WOOFER (1) and screws (4) (KLV-19T400W)
Remote RM-GA013 (1)
Size AA batteries (R6 type) (2)
Inserting batteries into
the remote
Push and lift the cover to open.
• Observe the correct polarity when inserting
batteries.
• Do not use different types of batteries together or
mix old and new batteries.
• Dispose of batteries in an environmentally
friendly way. Certain regions may regulate the
disposal of batteries. Please consult your local
authority.
• Handle the remote with care. Do not drop or step
on it, or spill liquid of any kind onto it.
• Do not place the remote in a location near a heat
source, a place subject to direct sunlight, or a
damp room.
1: Attaching the 3D
WOOFER and stand
Please ensure the AC power cord is away from the
3D WOOFER/stand installation location before you
attach below 3D WOOFER/stand.
3D WOOFER is only available for KLV-19T400W.
Attaching the stand
– Except for KLV-19T400W
B KLV-32T400A
GB
4
Page 77
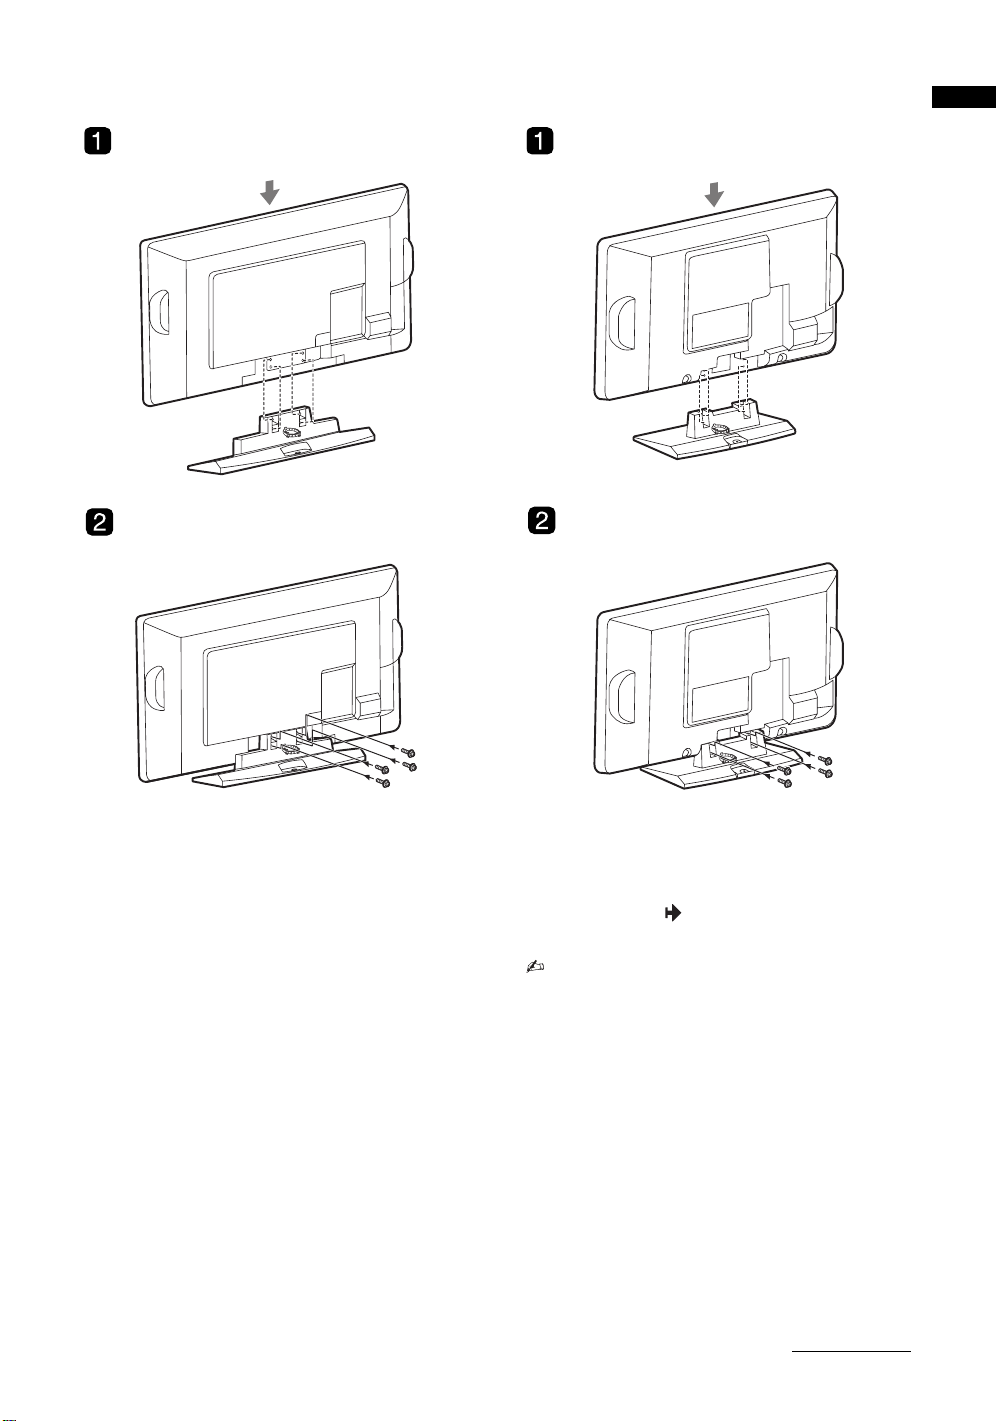
B KLV-26T400A/26T400G B KLV-19T400A/19T400G
Start-up Guide
1 Place the TV onto the stand by aligning the
screw hole alignment lines over the stand
as shown.
2 Fix the TV to the stand according to the
arrow marks that guide the screw holes
using the supplied screws.
• This TV is very heavy, so two or more people
should place the TV onto the stand.
• If using an electric screwdriver, set the tightening
torque at approximately 1.5N·m (15kgf·cm).
• Ensure the AC power cord is away from screw
holes during stand installation to avoid damage to
the AC power cord.
Continued
5
GB
Page 78
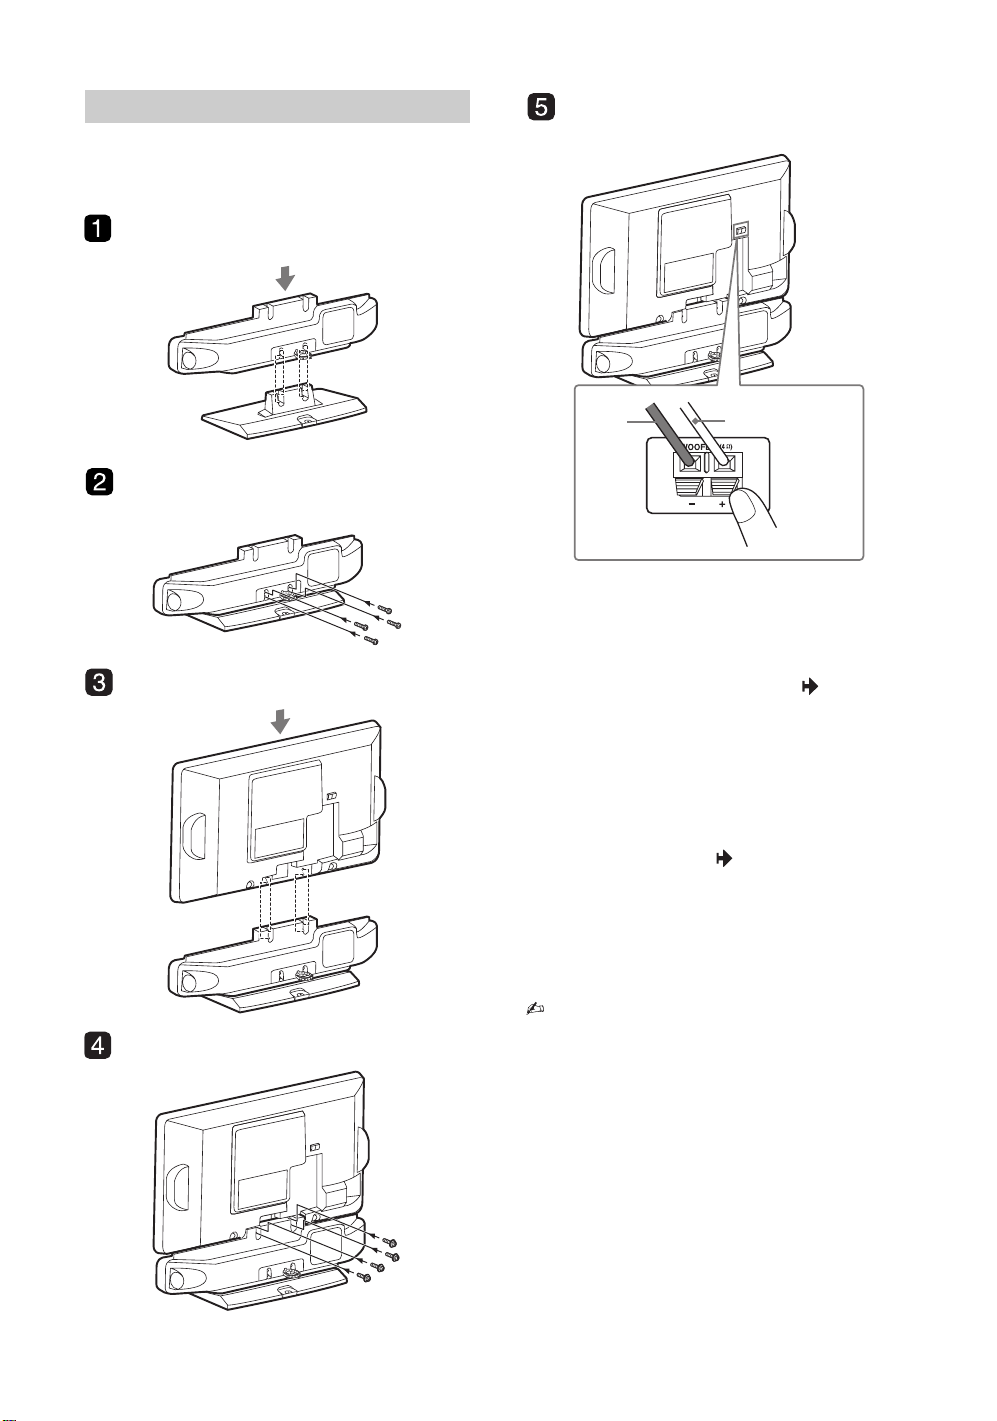
Attaching the 3D WOOFER and stand
You can enjoy high quality sound by attaching the 3D
WOOFER as follows:
B KLV-19T400W
Black
wire
Red wire
1 Place the 3D WOOFER onto the stand by
aligning the screw hole alignment lines
over the stand as shown.
2 Fix the 3D WOOFER to the stand
according to the arrow marks that guide
the screw holes using the supplied screws
(+BVTP2 4x16).
3 Place the TV onto the 3D WOOFER by
aligning the screw hole alignment lines
over the 3D WOOFER as shown.
4 Fix the TV to the 3D WOOFER according
to the arrow marks that guide the screw
holes using the supplied screws (+PSW
M5x16).
5 Connect using only the supplied 3D
WOOFER; otherwise your TV may
malfunction.
• If using an electric screwdriver, set the tightening
torque at approximately 1.2N·m (12kgf·cm) when
attaching the stand. However, set the tightening
torque at approximately 1.5N·m (15kgf·cm) when
attaching the TV to the 3D WOOFER.
• Ensure the AC power cord is away from screw
holes during stand installation to avoid damage to
the AC power cord.
GB
6
Page 79
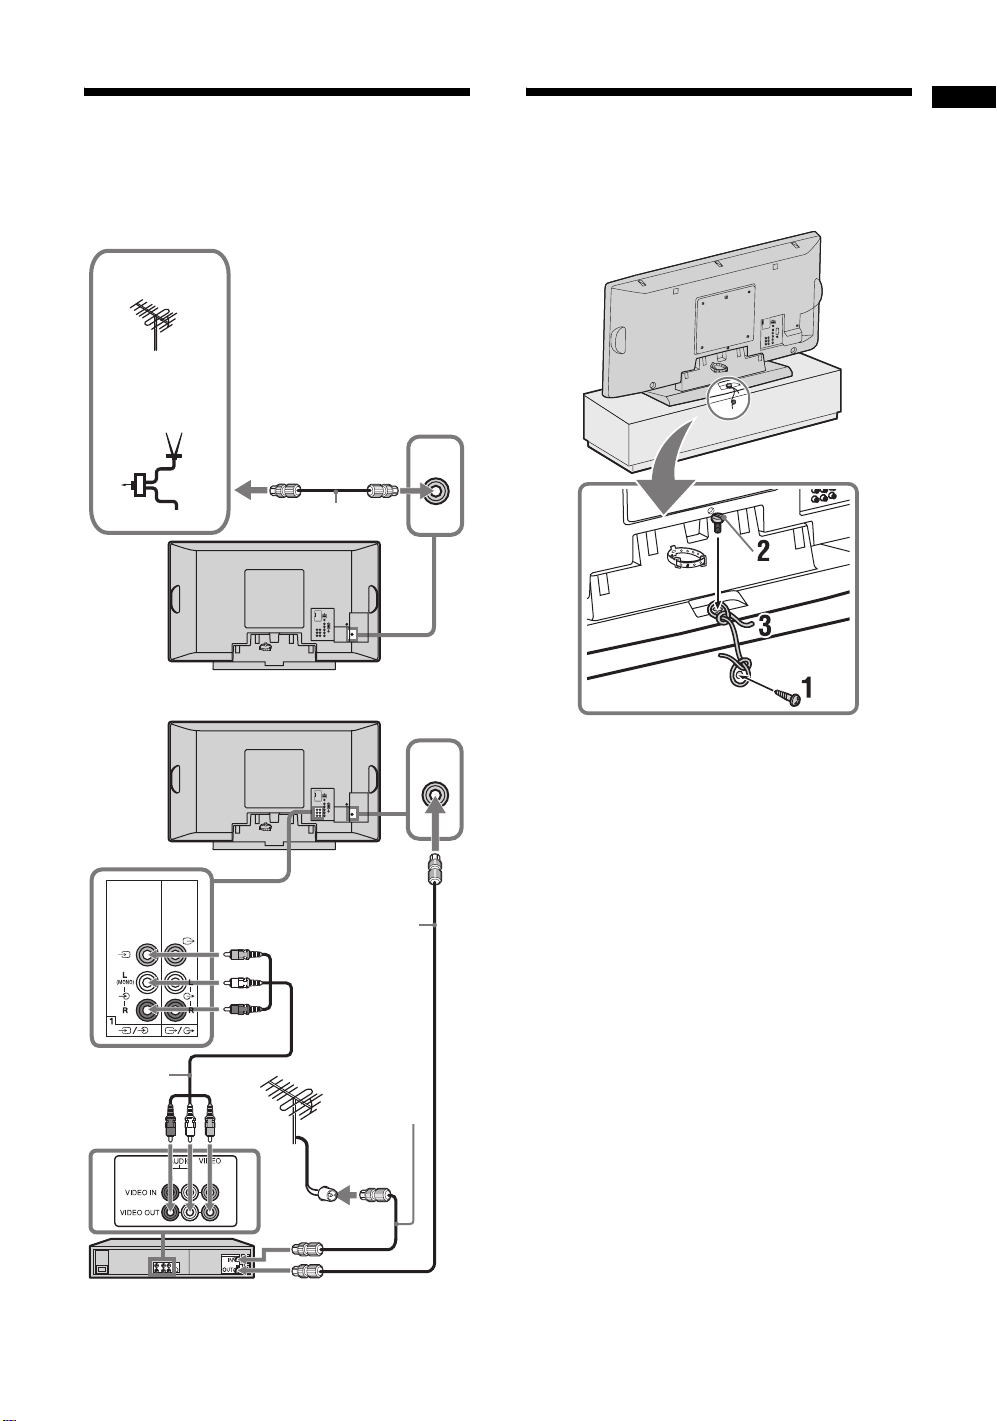
2: Connecting an
3: Preventing the TV
Start-up Guide
antenna/cable/VCR
Connecting an antenna/cable
TV, CATV,
Satellite
or
If cannot
receive FM
signal
Antenna
selector
TV signal
Connecting an antenna/cable and VCR
FM
signal
Antenna cable
(not supplied)
8
8
8
8
from toppling over
1 Install a wood screw (4 mm in diameter, not
supplied) in the TV stand.
2 Install a machine screw (M6 x 12, not
supplied) into the screw hole of the TV.
3 Tie the wood screw and the machine screw
with a strong cord.
Audio/Video
cable (not
supplied)
VCR
Antenna cable
(not supplied)
Antenna cable
(not supplied)
GB
7
Page 80
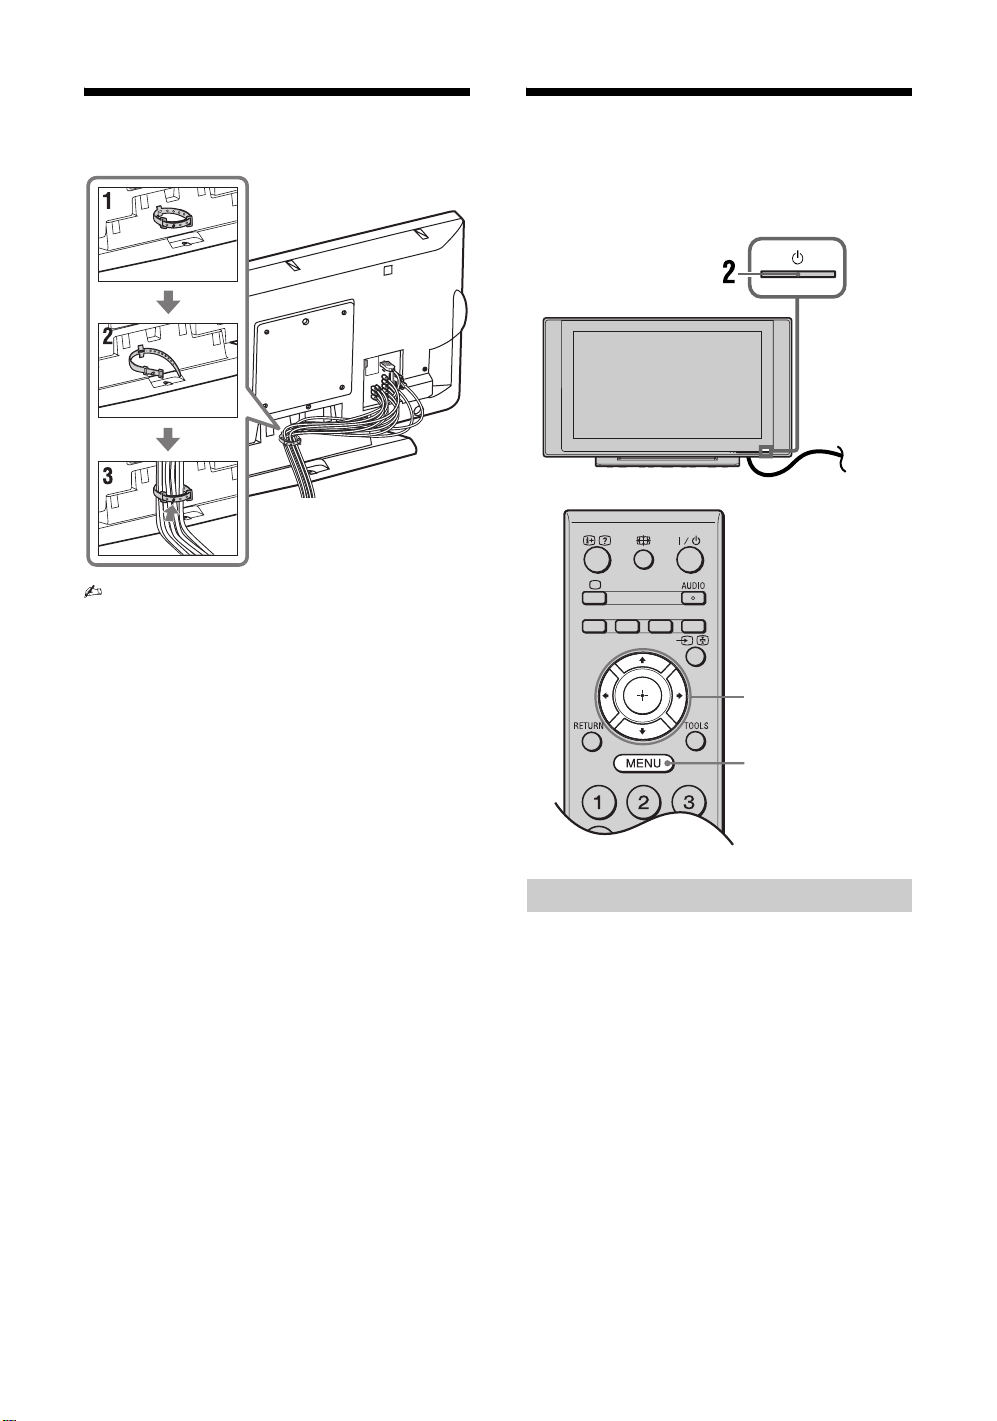
4: Bundling the cables
• Cable holder is located at 3D WOOFER for
KLV-19T400W.
5: Performing the initial
set-up
, 1
3, 4, 5, 6, 9
8
Selecting the language
1 Connect the TV to your AC power outlet
(110-240 V AC, 50/60 Hz) (New Zealand
only: 220-240 V AC, 50/60 Hz).
2 Press 1 on the TV.
When the TV is in standby mode (the 1 (standby)
indicator on the TV front panel is red), press "/1
on the remote to turn on the TV.
When you turn on the TV for the first time, the
“Language” menu appears on the screen.
GB
8
Page 81
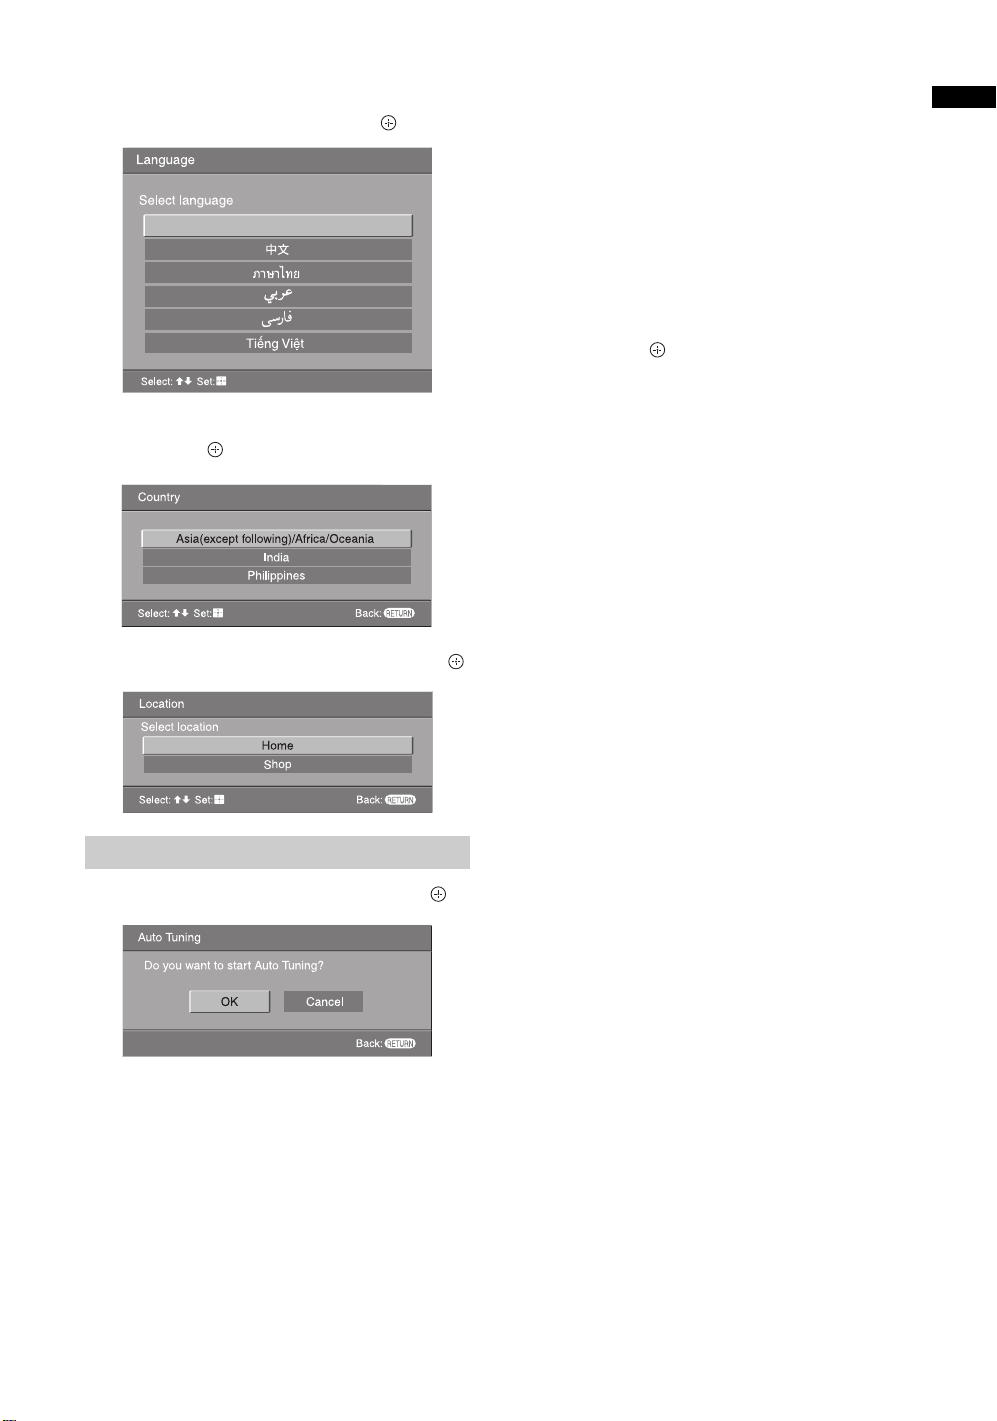
3
Press F/f to select the language displayed
on the menu screens, then press .
English
4 Press F/f to select the country/region,
then press .
Select country
5 Press F/f to select “Home”, then press .
7 When the “Programme Sorting” menu
appears on the screen, follow the steps of
“Programme Sorting” (page 31).
If you do not want to change the order in which the
channels are stored on the TV, go to step 8.
8 Press MENU to exit.
The TV has now tuned in all the available
channels.
9 Press G/g to select the desired setting in
“Display this menu next time?” dialogue,
then press
z • If “Yes” is selected and the TV is turned off by
pressing 1 on the TV, or is disconnected from
the AC power outlet, the initial set-up
procedure restarts the next time the TV is
turned on.
to exit.
Start-up Guide
Auto-tuning the TV
6 Press G/g to select “OK”, then press .
The TV starts searching for all available channels.
This may take some time, please be patient and do
not press any buttons on the TV or remote.
If a message appears for you to confirm the
antenna connection
No programmes found. Please connect antenna
(aerial) and select “Confirm” to start auto-tuning
again. If 200 channels are found, auto-tuning is
stopped.
GB
9
Page 82
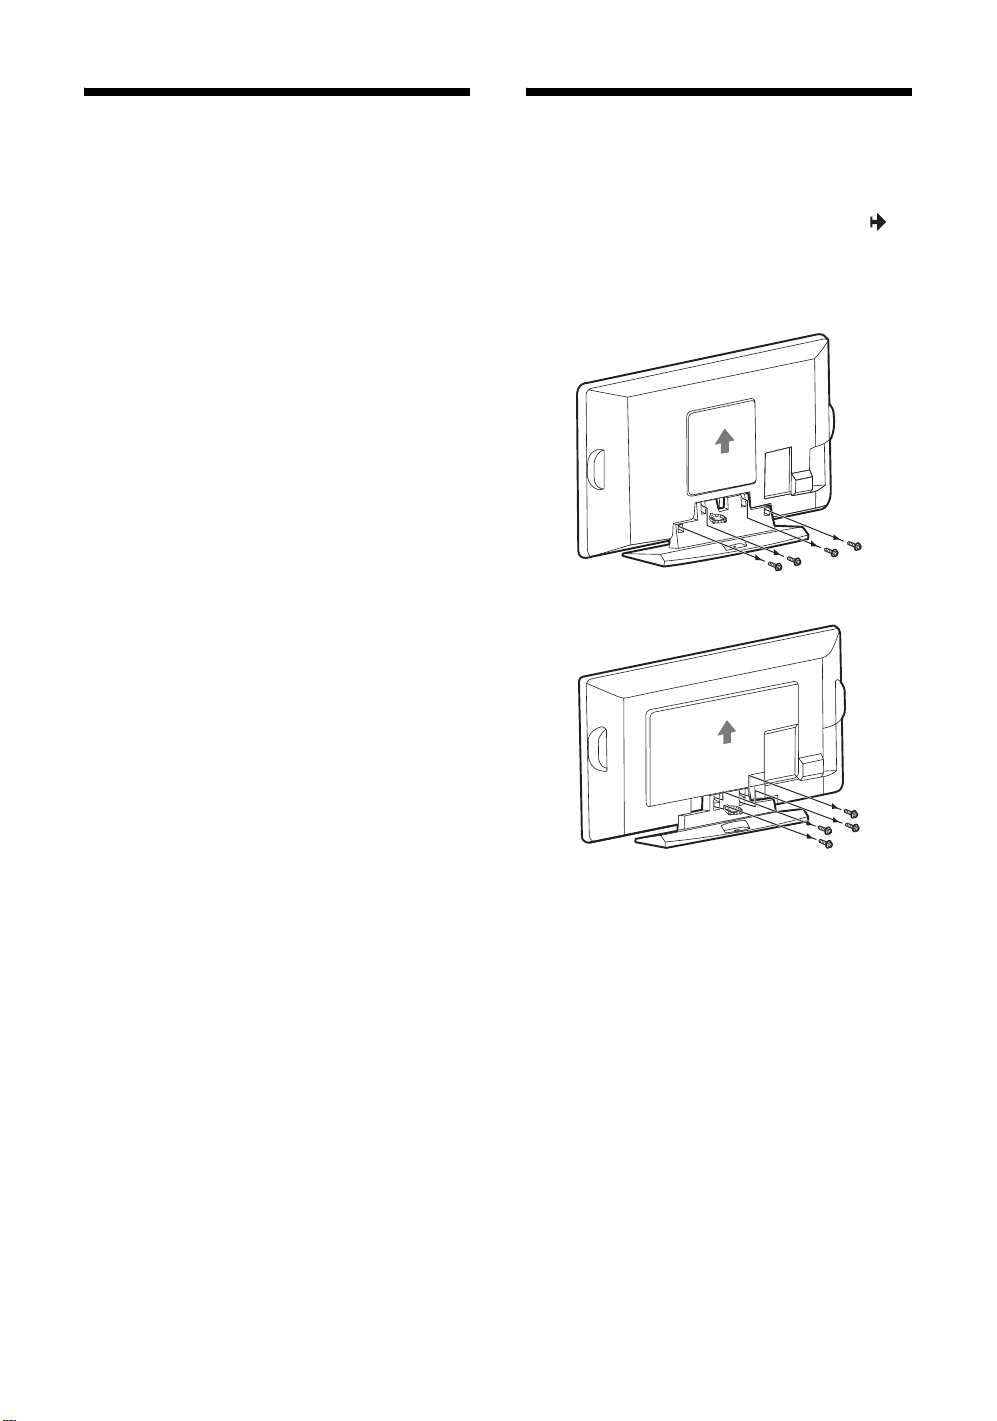
Watching TV
Detaching the Table-
1 Press 1 on the TV to turn on the TV.
2 Press the number buttons or PROG +/– to
select a TV channel.
3 Press 2 +/– to adjust the volume.
Top Stand from the TV
Remove the screws guided by the arrow marks of
the TV.
Do not remove the Table-Top Stand for any reason
other than to wall-mount the TV.
B KLV-32T400A
B KLV-26T400A/26T400G
10
GB
Page 83
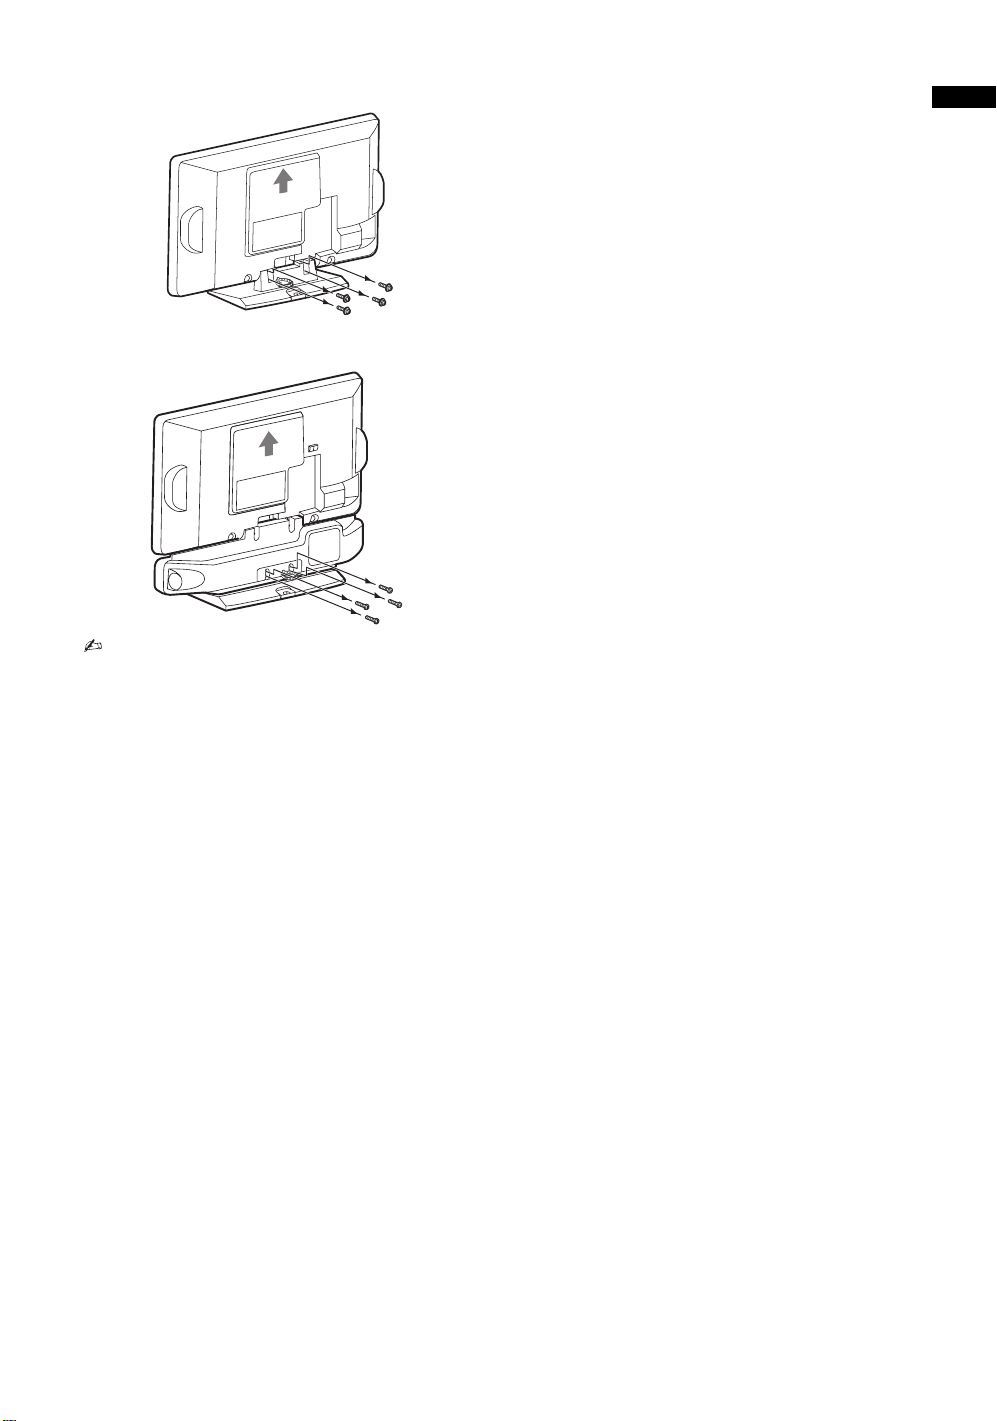
B KLV-19T400A/19T400G
B KLV-19T400W
• For bracket installation, refer to the instruction
guide provided by the Wall-Mount Bracket model
for your TV. Sufficient expertise is required in
installing this TV, especially to determine the
strength of the wall for withstanding the TV’s
weight. For product protection and safety
reasons, Sony strongly recommends that you
use the Wall-Mount Bracket model designed
for your TV and the wall-mounting of your TV
should be performed by Sony dealers or
licensed contractors.
Start-up Guide
11
GB
Page 84
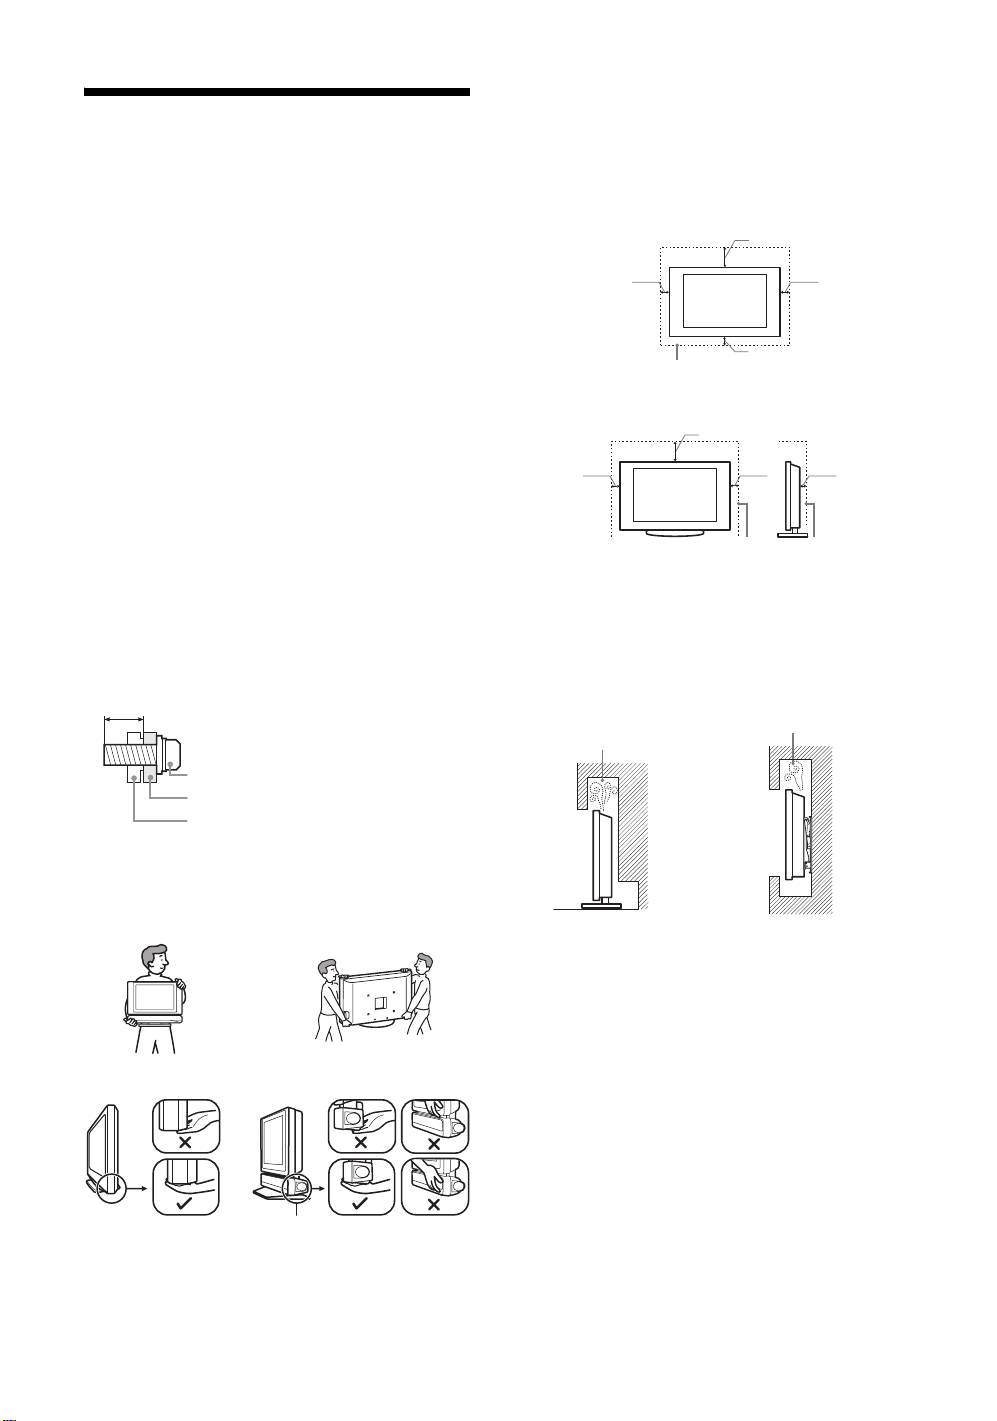
Safety information
Installation/Set-up
Install and use the TV set in accordance with the
instructions below in order to avoid any risk of fire,
electrical shock or damage and/or injuries.
Installation
• The TV set should be installed near an easily accessible
AC power outlet.
• Place the TV set on a stable, level surface to avoid it from
falling down and cause personal injury or damage to the
TV.
• Only qualified service personnel should carry out wall
installations.
• For safety reasons, it is strongly recommended that you
use Sony accessories, including:
– KLV-32T400A:
Wall-mount bracket SU-WL500 or SU-WL50B
– KLV-26/19T400A/26/19T400G/19T400W:
Wall-mount bracket SU-WL100
• Be sure to use the screws supplied with the Wall-mount
bracket when attaching the mounting hooks to the TV set.
The supplied screws are designed so that they are 8 mm to
12 mm in length when measured from the attaching
surface of the mounting hook.
The diameter and length of the screws differ depending on
the Wall-mount bracket model.
Use of screws other than those supplied may result in
internal damage to the TV set or cause it to fall, etc.
8mm - 12mm
Screw (supplied with the Wall-mount
bracket)
Mounting Hook
Hook attachment on rear of TV set
Transporting
• Before transporting the TV set, disconnect all cables.
• Two or more people are needed to transport a large TV set.
• When transporting the TV set by hand, hold it as shown.
Do not put stress on the LCD panel.
KLV-19T400A/
19T400G/19T400W
Do not handle with dent area.
• When lifting or moving the TV set, hold it firmly from the
bottom.
• When transporting the TV set, do not subject it to jolts or
excessive vibration.
• When transporting the TV set for repairs or when moving,
pack it using the original carton and packing material.
GB
12
KLV-32/26T400A/
26T400G
Ventilation
• Never cover the ventilation holes or insert anything in the
cabinet.
• Leave space around the TV set as shown below.
• It is strongly recommended that you use a Sony wallmount bracket in order to provide adequate air-circulation.
Installed on the wall
30 cm
10 cm 10 cm
10 cm
Leave at least this space around the set.
Installed with stand
30 cm
10 cm 10 cm 6 cm
Leave at least this space around the set.
• To ensure proper ventilation and prevent the collection of
dirt or dust:
– Do not lay the TV set flat, install upside down,
backwards, or sideways.
– Do not place the TV set on a shelf, rug, bed or in a closet.
– Do not cover the TV set with a cloth, such as curtains,
or items such as newspapers, etc.
– Do not install the TV set as shown below.
Air circulation
Air circulation is blocked.
is blocked.
Wall
Wall
AC power cord
Handle the AC power cord and outlet as follows in
order to avoid any risk of fire, electrical shock or
damage and/or injuries:
– Use only Sony supplied AC power cords, not those of
other brands.
– Insert the plug fully into the AC power outlet.
– Operate the TV set on a 110-240 V AC supply only
(New Zealand only: 220-240 V AC).
– When wiring cables, be sure to unplug the AC power
cord for your safety and take care not to catch your feet
on the cables.
– Disconnect the AC power cord from the AC power
outlet before working on or moving the TV set.
– Keep the AC power cord away from heat sources.
– Unplug the AC power plug and clean it regularly. If the
plug is covered with dust and it picks up moisture, its
insulation may deteriorate, which could result in a fire.
Page 85

Notes
• Do not use the supplied AC power cord on any other
equipment.
• Do not pinch, bend, or twist the AC power cord
excessively. The core conductors may be exposed or
broken.
• Do not modify the AC power cord.
• Do not put anything heavy on the AC power cord.
• Do not pull on the AC power cord itself when
disconnecting the AC power cord.
• Do not connect too many appliances to the same AC
power outlet.
• Do not use a poor fitting AC power outlet.
Prohibited Usage
Do not install/use the TV set in locations,
environments or situations such as those listed below,
or the TV set may malfunction and cause a fire,
electrical shock, damage and/or injuries.
Location:
Outdoors (in direct sunlight), at the seashore, on a ship or
other vessel, inside a vehicle, in medical institutions,
unstable locations, near water, rain, moisture or smoke.
Environment:
Places that are hot, humid, or excessively dusty; where
insects may enter; where it might be exposed to mechanical
vibration, near flammable objects (candles, etc). The TV
shall not be exposed to dripping or splashing and no objects
filled with liquids, such as vases, shall be placed on the TV.
Situation:
Do not use when your hands are wet, with the cabinet
removed, or with attachments not recommended by the
manufacturer. Disconnect the TV set from AC power outlet
and antenna during lightning storms.
If the following problems occur...
Turn off the TV set and unplug the AC power cord
immediately if any of the following problems occur.
Ask your dealer or Sony service centre to have it
checked by qualified service personnel.
When:
– AC power cord is damaged.
– Poor fitting of AC power outlet.
– TV set is damaged by being dropped, hit or having
something thrown at it.
– Any liquid or solid object falls through openings in the
cabinet.
Broken pieces:
• Do not throw anything at the TV set. The screen glass may
break by the impact and cause serious injury.
• If the surface of the TV set cracks, do not touch it until you
have unplugged the AC power cord. Otherwise electric
shock may result.
When not in use
• If you will not be using the TV set for several days, the TV
set should be disconnected from the AC power for
environmental and safety reasons.
• As the TV set is not disconnected from the AC power
when the TV set is just turned off, pull the plug from the
AC power outlet to disconnect the TV set completely.
• However, some TV sets may have features that require the
TV set to be left in standby to work correctly.
For children
• Do not allow children to climb on the TV set.
• Keep small accessories out of the reach of children, so that
they are not mistakenly swallowed.
13
GB
Page 86

Precautions
Viewing the TV
• View the TV in moderate light, as viewing the TV in poor
light or during long period of time, strains your eyes.
LCD Screen
• Although the LCD screen is made with high-precision
technology and 99.99% or more of the pixels are effective,
black dots may appear or bright points of light (red, blue,
or green) may appear constantly on the LCD screen. This
is a structural property of the LCD screen and is not a
malfunction.
• Do not push or scratch the front filter, or place objects on
top of this TV set. The image may be uneven or the LCD
screen may be damaged.
• If this TV set is used in a cold place, a smear may occur in
the picture or the picture may become dark. This does not
indicate a failure. These phenomena disappear as the
temperature rises.
• Ghosting may occur when still pictures are displayed
continuously. It may disappear after a few moments.
• The screen and cabinet get warm when this TV set is in
use. This is not a malfunction.
• The LCD screen contains a small amount of liquid crystal.
Mercury is sometimes contained depending on the kind of
fluorescent tubes. Follow your local ordinances and
regulations for disposal.
Handling and cleaning the screen surface/cabinet of
the TV set
Be sure to unplug the AC power cord connected to the TV set
from AC power outlet before cleaning.
To avoid material degradation or screen coating degradation,
observe the following precautions.
• To remove dust from the screen surface/cabinet, wipe gently
with a soft cloth. If dust is persistent, wipe with a soft cloth
slightly moistened with a diluted mild detergent solution.
• Never use any type of abrasive pad, alkaline/acid cleaner,
scouring powder, or volatile solvent, such as alcohol,
benzene, thinner or insecticide. Using such materials or
maintaining prolonged contact with rubber or vinyl
materials may result in damage to the screen surface and
cabinet material.
• When adjusting the angle of the TV set, move it slowly so
as to prevent the TV set from moving or slipping off from
its table stand.
Optional Equipment
Keep optional components or any equipment emitting
electromagnetic radiation away from the TV set. Otherwise
picture distortion and/or noisy sound may occur.
Disposal of Old Electrical & Electronic Equipment
(Applicable in the European Union and other
European countries with separate collection
systems)
This symbol is on the remote control.
GB
14
Page 87
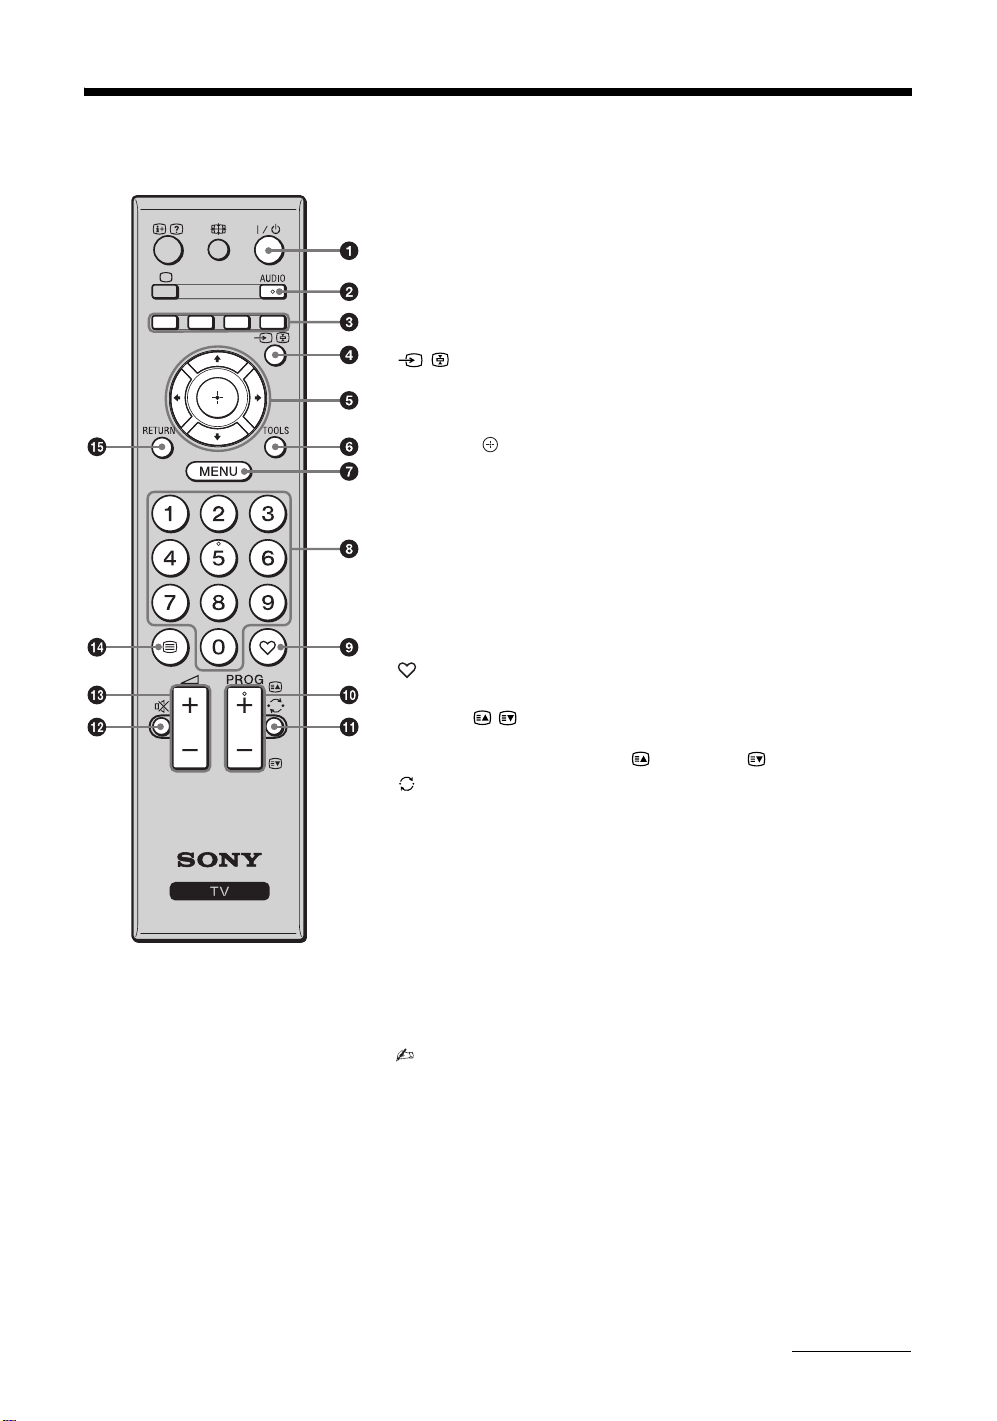
Overview of the remote
1 "/1 – TV standby
Turns the TV on and off from standby mode.
2 AUDIO – Dual Sound (page 27)
3 Coloured buttons
In Text mode: Accesses the corresponding coloured Fastext menu quickly
and easily. The Fastext feature can be used only when the Fastext broadcast
is available.
4 / – Input select / Text hold
• Displays the connected equipment list and selects the input source
(page 20).
• In Text mode: Holds the current page.
5 F/f/G/g/ – Item select / OK
• Selects or adjusts items.
• Confirms selected items.
6 TOOLS (page 17)
7 MENU
Displays or cancels the menu.
8 Number buttons
• Selects channels. For channel numbers 10 and above, enter the next digit
quickly (page 31).
• In Text mode: Enters the three digit page number to select the page.
9 – Favourite list
This button has no function for this TV.
q; PROG +/–/ /
• Selects the next (+) or previous (-) channel.
• In Text mode: Selects the next ( ) or previous ( ) page.
qa – Previous channel
Returns to the previous channel watched (for more than five seconds).
qs % – Mute
Press to mute the sound. Press again to restore the sound.
z • In standby mode, if you want to turn on the TV without sound, press this
button.
qd 2 +/– – Volume
Adjusts volume.
• The number 5, PROG + and
AUDIO buttons have tactile dots.
Use the tactile dots as references
when operating the TV.
qf / – Text
In Text mode: Displays Text broadcast.
Each time you press /, the display changes cyclically as follows:
Text t Text over the TV picture (mix mode) t No Text (exit the Text
service)
• Text language displays can be either English, Persian or French depending
on your broadcast signal.
qg RETURN
Returns to the previous screen of any displayed menu.
Continued
15
GB
Page 88
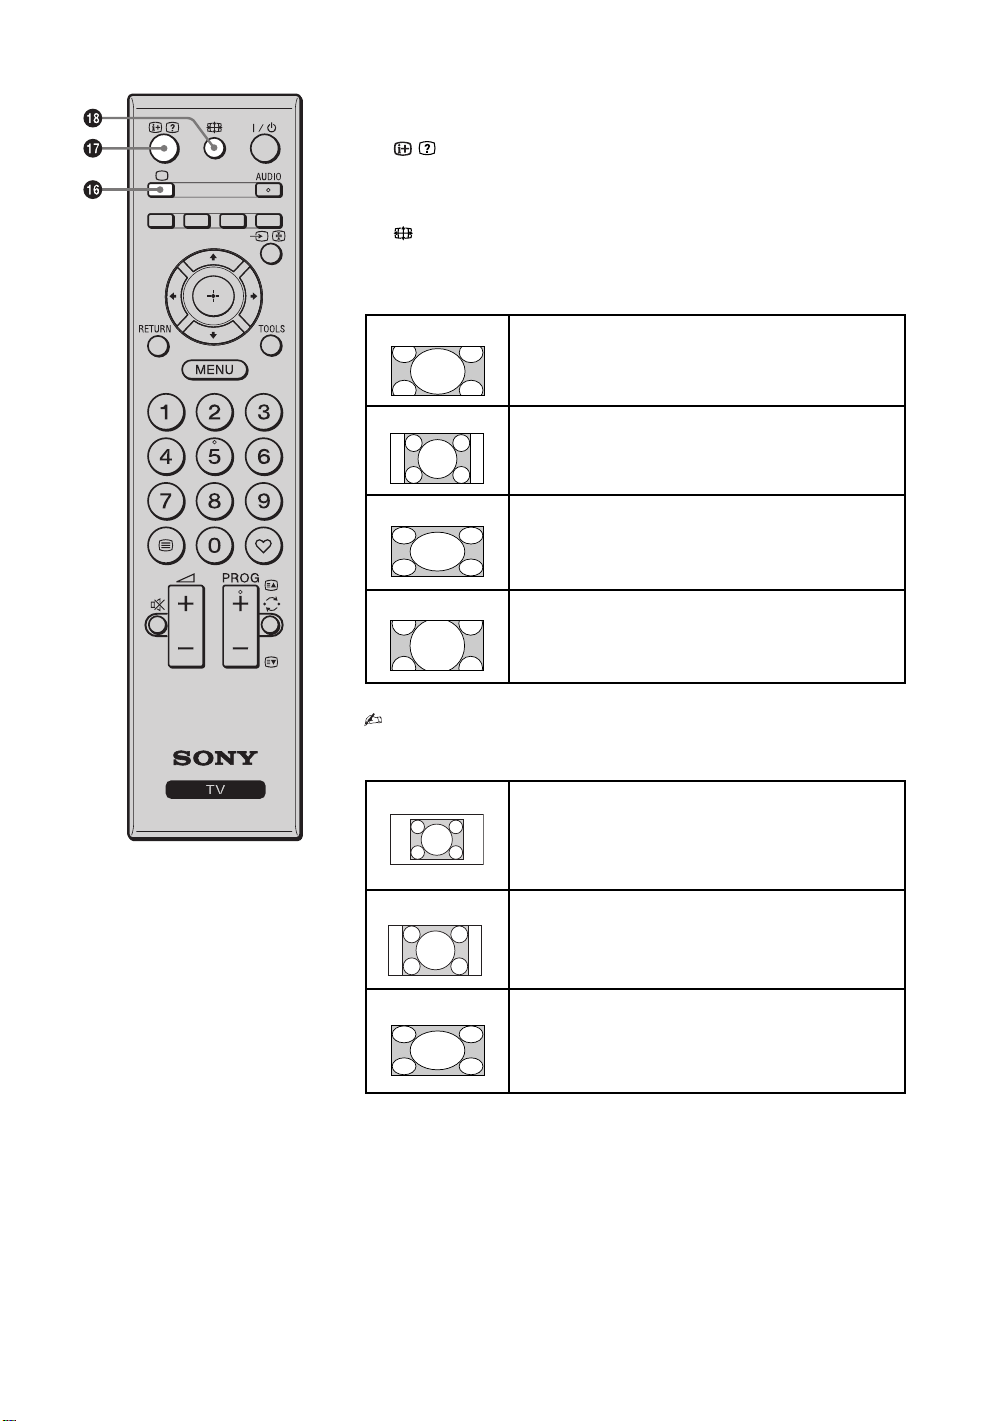
qh a – TV mode
Exit Text mode, or switches to a TV display when displaying external input.
qj / – Info / Text reveal
• Displays information. Press once to display current channel number and
screen mode. Press again to remove the display from the screen.
• In Text mode: Reveals hidden information (e.g. answers to a quiz).
qk – Wide Mode
Changes the picture size. Press repeatedly to select the desired wide mode.
For TV, Video, HD/DVD or HDMI (except PC input)
Wide Zoom* Enlarges the centre portion of the picture. The left and
right edges of the picture are stretched to fill the 16:9
screen.
Normal Displays the 4:3 picture in its original size. Side bars are
shown to fill the 16:9 screen.
Full Stretches the 4:3 picture horizontally to fill the 16:9
screen (KLV-32/26T400A/26T400G) and the 16:10
screen (KLV-19T400A/19T400G/19T400W).
Zoom* Displays cinemascopic (letter box format) broadcasts in
the correct proportions.
* Parts of the top and bottom of the picture may be cut off.
• You cannot select “Normal” for HD signal source pictures.
For PC Input
Normal Displays the picture in its original pixel size. Bars are
shown at the top, bottom, and both sides for small
picture.
Full 1 Stretches the original picture to fill the screen vertically.
Full 2 Stretches the Full 1 picture horizontally to fill the 16:9
screen (KLV-32/26T400A/26T400G) and the 16:10
screen (KLV-19T400A/19T400G/19T400W).
16
GB
Page 89
Using the Tools menu
Press TOOLS enables you to access various options and change/make adjustments according to the source and
screen mode. The options displayed vary depending on the input source.
Viewing TV programme
Options Description
Picture Mode See page 25.
Sound Mode See page 26.
Intelligent Picture See page 31.
MPEG Noise
Reduction
Speaker See page 28.
Sleep Timer See page 29.
Wake Up Timer See page 29.
Power Saving See page 29.
See page 25.
Listening FM Radio
Options Description
Sound Mode See page 26.
Speaker See page 28.
Sleep Timer See page 29.
Wake Up Timer See page 29.
Power Saving See page 29.
Viewing connected equipment
Options Description
Picture Mode (except PC
input mode)
Display Mode (in PC input
mode only)
Sound Mode See page 26.
MPEG Noise Reduction
(except PC input mode)
Speaker See page 28.
Auto Adjustment (in PC
input mode only)
Horizontal Shift (in PC
input mode only)
Sleep Timer (except PC
input mode)
Wake Up Timer (except PC
input mode)
Power Saving See page 29.
See page 25.
See page 25.
See page 25.
See page 30.
See page 30.
See page 29.
See page 29.
17
GB
Page 90
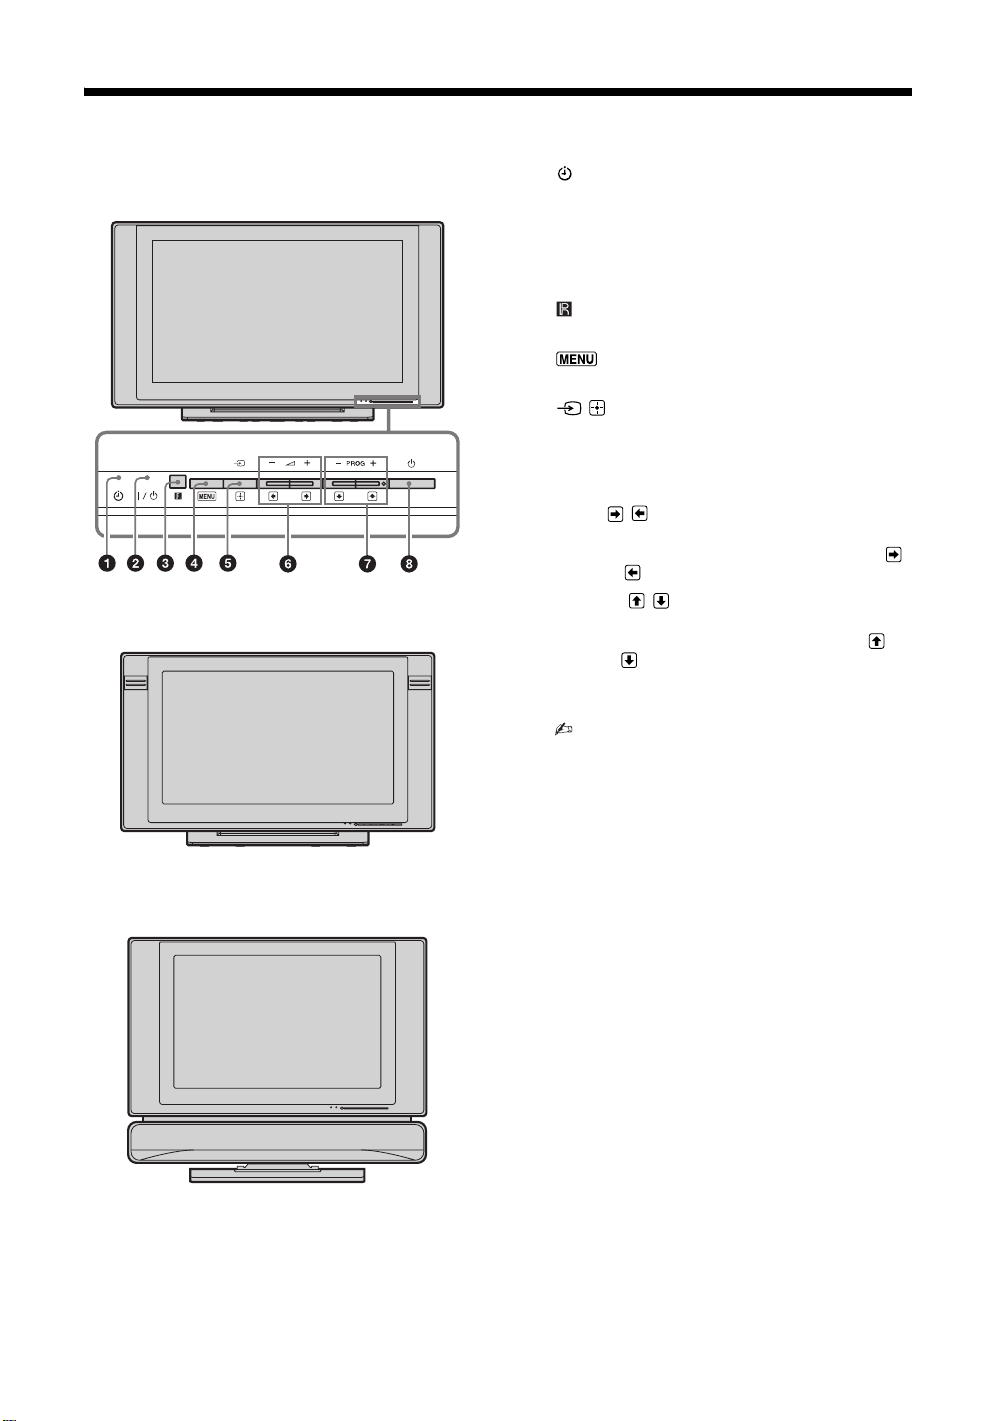
Overview of the TV buttons and indicators
B KLV-32/26/19T400A
B KLV-26/19T400G
1 – Timer indicator
Lights up in amber when the timer is set (page 29).
2 "/1 – Power indicator / Standby indicator
• Lights up in green when the TV is turned on.
• Flashes while the remote is being operated.
• Lights up in red when the TV is in standby mode.
3 – Remote sensor
Receives IR signals from the remote.
4
Displays or cancels the menu.
5 / – Input select / OK
• Displays the connected equipment list and selects
the input source (page 20).
• In TV menu: Selects the menu or option, and
confirms the setting.
6 2 +/-/ /
• Increases (+) or decreases (-) the volume.
• In TV menu: Moves through the options right ( )
or left ( ).
7 PROG +/-/ /
• Selects the next (+) or previous (-) channel.
• In TV menu: Moves through the options up ( ) or
down ( ).
8 1 – Power
Turns the TV on or off.
• To disconnect the TV from the AC power
completely, pull the plug from the AC power
outlet.
B KLV-19T400W
GB
18
Page 91
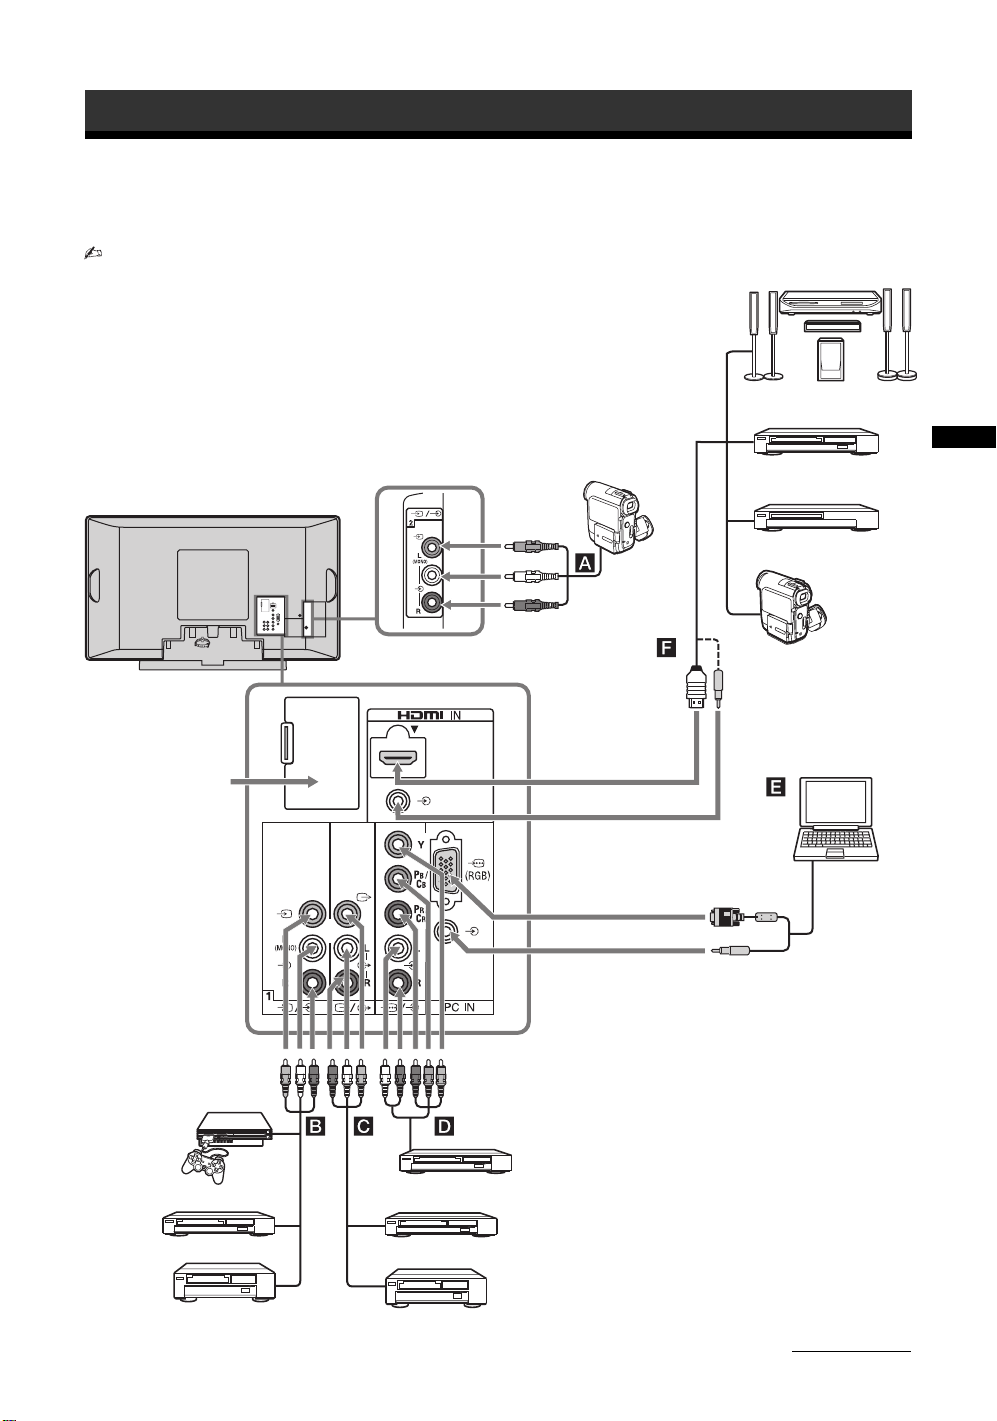
Using Optional Equipment
Connecting optional equipment
You can connect a wide range of optional equipment to your TV.
• The below terminals vary depending on TV models.
Home theatre system
For service use only
DVD player with HDMI output
Blu-ray disc player
S VHS/Hi8/
DVC
8
camcorder
Digital video camcorder
PC
Using Optional Equipment
Video game equipment
DVD player without component
video output
VCR
DVD player with component video output
DVD recorder
VCR
Continued
19
GB
Page 92
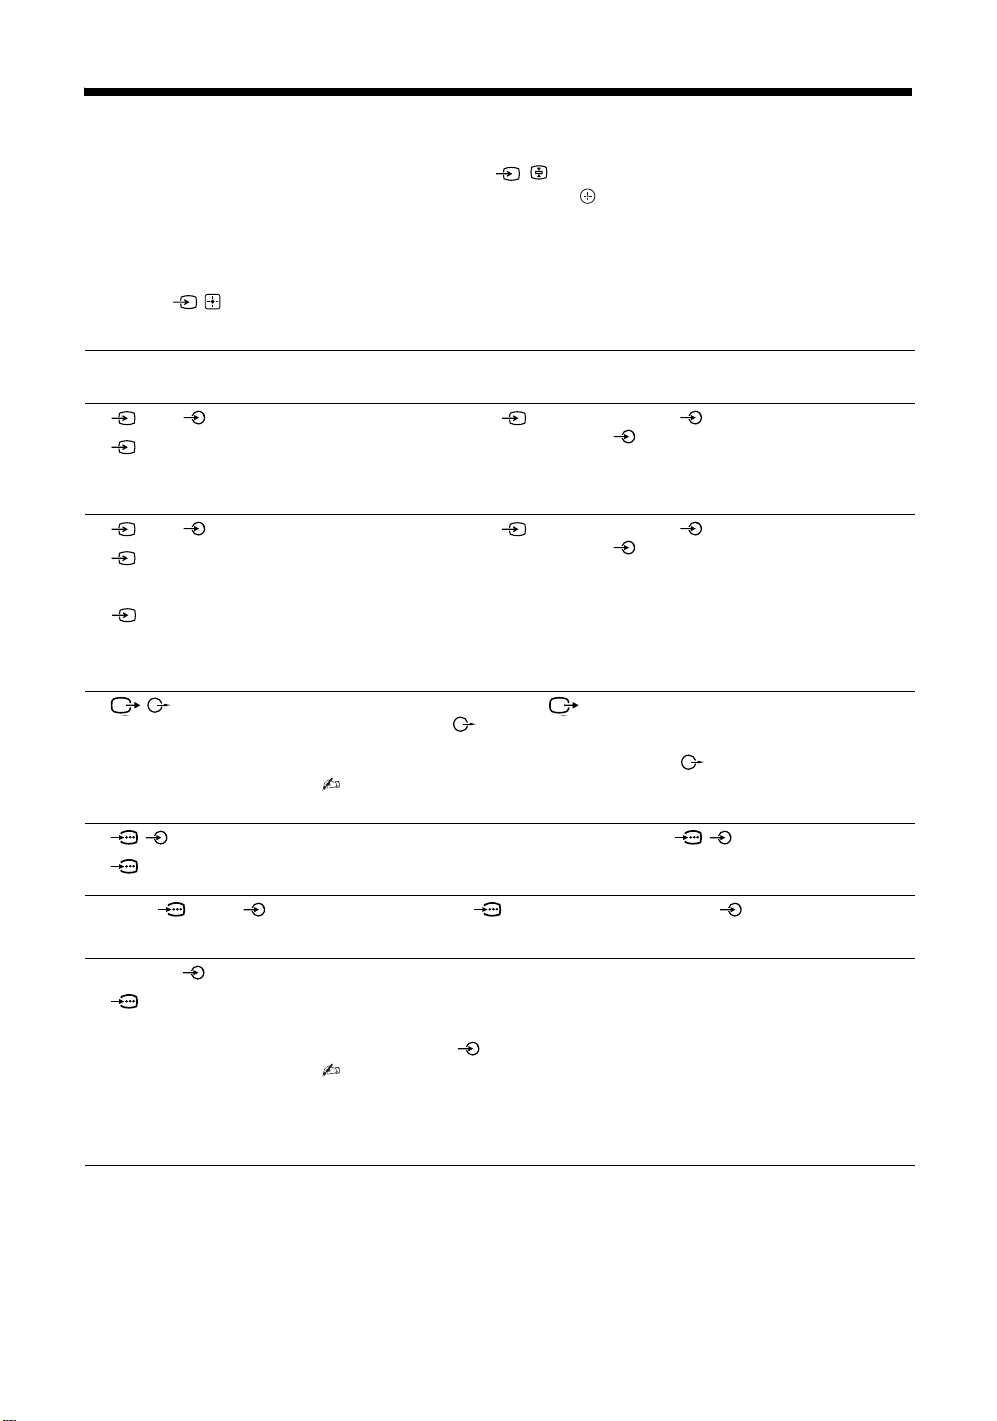
Viewing pictures from the connected equipment
Turn on the connected equipment, then press / to display the connected equipment list.
Press F/f to select the desired input source, then press . (The highlighted item is selected if
2 seconds pass without any operation after pressing F/f.) When the input source is set to “Skip”
in the “Video Labels” under the “AV Set-up” menu (page 28), that input does not appear in the
list.
z • Press / on the TV to display the connected equipment list and select the desired input source. You can also
press F/f to select the desired input source. Then wait for 2 seconds to display the selected input source.
Jacks/
Description
Input symbol on screen
A 2, and 2
Video 2
(KLV-32/26T400A/
26T400G only)
B 1, and 1
Video 1
(KLV-32/26T400A/
26T400G)
Vid e o
(KLV-19T400A/
19T400G/
19T400W)
C / Connect to the video output jack to record the image from the TV. Connect to the
D /
HD/DVD
E PC IN (RGB)/
PC
Connect to the video jack 2, and the audio jacks 2. If you connect mono
equipment, connect to the L(MONO) jack 2.
Connect to the video jack 1, and the audio jacks 1. If you connect mono
equipment, connect to the L(MONO) jack 1.
audio output jacks to record the sound from the TV on DVD recorder or VCR. To
turn off the sound of the TV speakers, set “Speaker” to “Audio System” (page 28). If
you connect mono equipment, connect to the L jack .
• The monitor output jacks cannot support HD/DVD, HDMI and PC signals source
pictures, also digital audio signal for sound.
Connect to the component jacks and the audio jacks / . For better picture quality,
component connection is recommended if your DVD player has a component video
output.
Connect to the PC IN (RGB) jack and the audio jack . It is recommended to
use a PC cable with ferrite core.
F HDMI IN/
HDMI
GB
20
Connect to the HDMI IN jack if the equipment has an HDMI jack. The digital video
and audio signals are input from the equipment.
For equipment with DVI jack, connect the DVI jack to the HDMI IN jack using a DVIHDMI adaptor interface (not supplied). Then, connect the equipment’s audio out jack
to the audio in jack of the HDMI IN.
• The HDMI jack only support the following video inputs: 480i, 480p, 576i, 576p,
720p (50/60 Hz), 1080i (50/60 Hz) and 1080p (50/60 Hz).
• Be sure to use only an HDMI cable that bears the HDMI logo (recommended
Sony HDMI cable).
• To connect a PC, use the PC IN jack.
Page 93
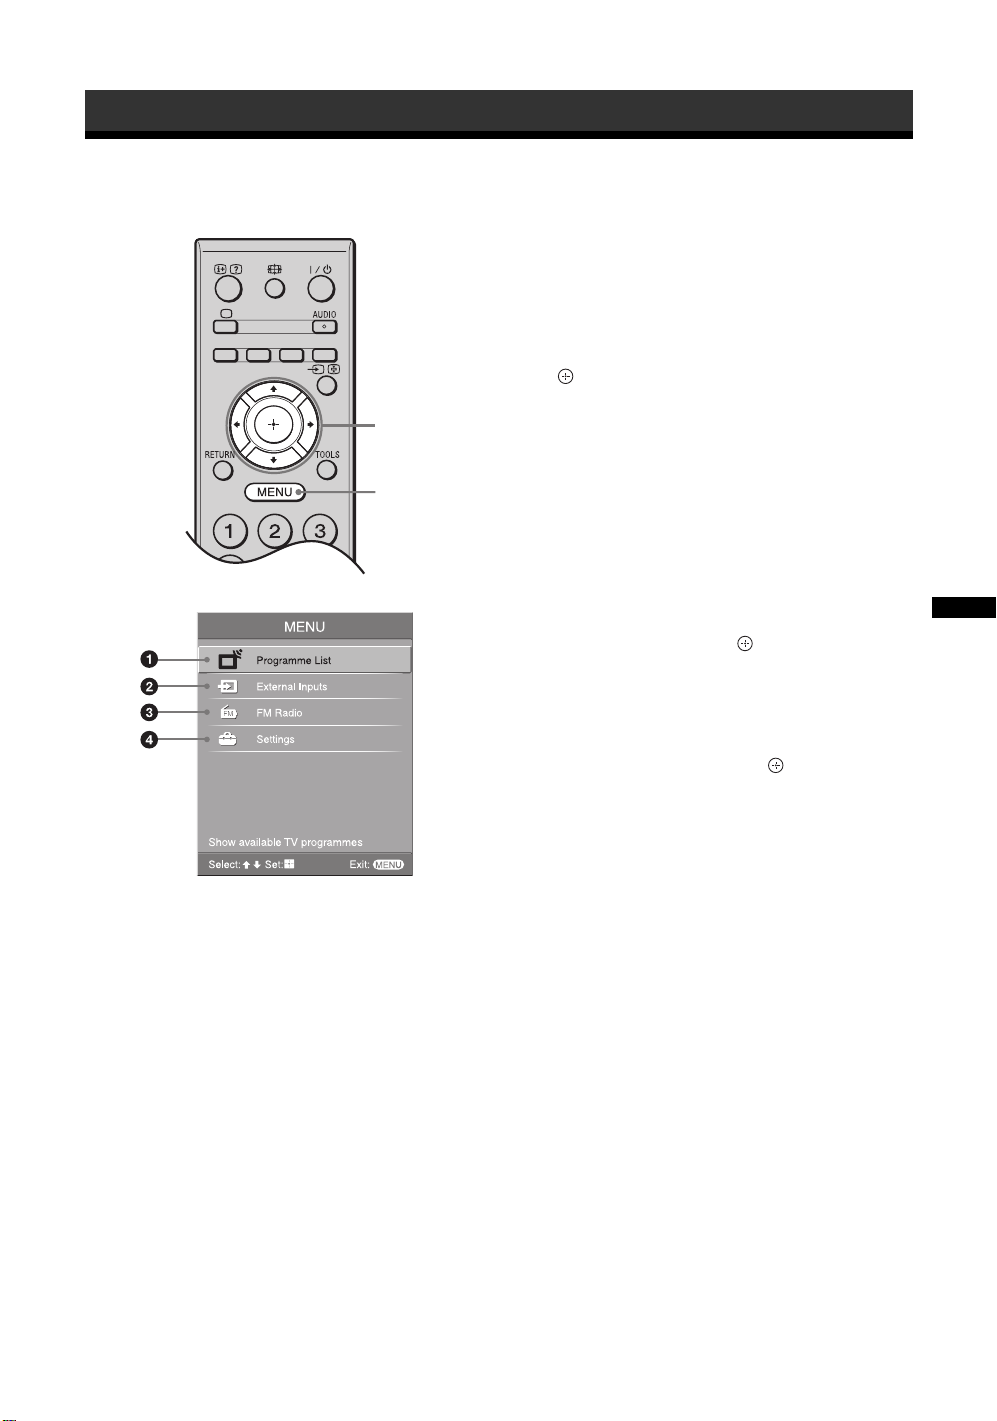
Using MENU Functions
Navigating through menus
2
1
“MENU” allows you to enjoy various convenient
features of this TV. You can easily select channels or
inputs sources, preset FM radio stations and change
the settings for your TV.
1 Press MENU.
2 Press F/f to select an option, then press
.
To exit the menu, press MENU.
1 Programme List
Displays available TV channels.
• To watch the desired channel, select the
channel, then press .
• To assign a label to a channel, select “Edit
Programme Labels”, then see page 31.
2 External Inputs
Selects equipment connected to your TV.
• To watch the desired external input, select the
input source, then press .
• To assign a label to an external input, select
“Edit Video Labels”, then see page 28.
3 FM Radio
Listens to the FM Radio (page 22).
4 Settings
Displays the “Settings” menu where most of the
advanced settings and adjustments are performed.
For details about settings, see page 23 to 24.
Using MENU Functions
21
GB
Page 94

Listening to the FM
Radio
You are able to listen to the FM radio stations using
your TV by connecting an antenna (page 7). FM
Radio tuning range is from 87.5-108.0 MHz.
To access to FM Radio mode:
Press MENU and select “FM Radio” (page 21).
To exit from FM Radio mode:
Press MENU, select the desired items: “Programme
List” or “External Inputs”, then press . Select the
desired TV channels or external inputs and press .
Listening to preset stations
1 Access to FM Radio mode.
2 Press MENU and select “Settings”. Preset
the desired FM radio stations and its labels
in “FM Radio Set-up” from “Channel Setup” menu (page 33).
3 Exit from “Channel Set-up” menu by
pressing MENU. The selected preset FM
radio station number and label will appear
on the screen. To select the desired preset
FM radio station, press PROG +/–.
• You can also use the 1-9 buttons on the remote to
directly select the desired preset FM radio
station.
Listening to non-preset stations
1 Access to FM Radio mode.
2 Press F/f to automatically search for the
desired FM radio station.
• You can also manually search for the desired FM
radio station by pressing G/g.
• The available radio frequency is only for
temporary listening pleasure and cannot be
stored in the memory.
• If the message “Please set-up FM Radio”
appears, display the “Channel Set-up” menu and
select “FM Radio Set-up” to preset the desired
FM radio stations (page 33).
• If the station has a noisy sound, you may be able to
improve the sound quality by pressing G/g.
• When a FM stereo programme has static noise, press
AUDIO until “Mono” appears. There will be no
stereo effect, but the noise will be reduced.
GB
22
Page 95
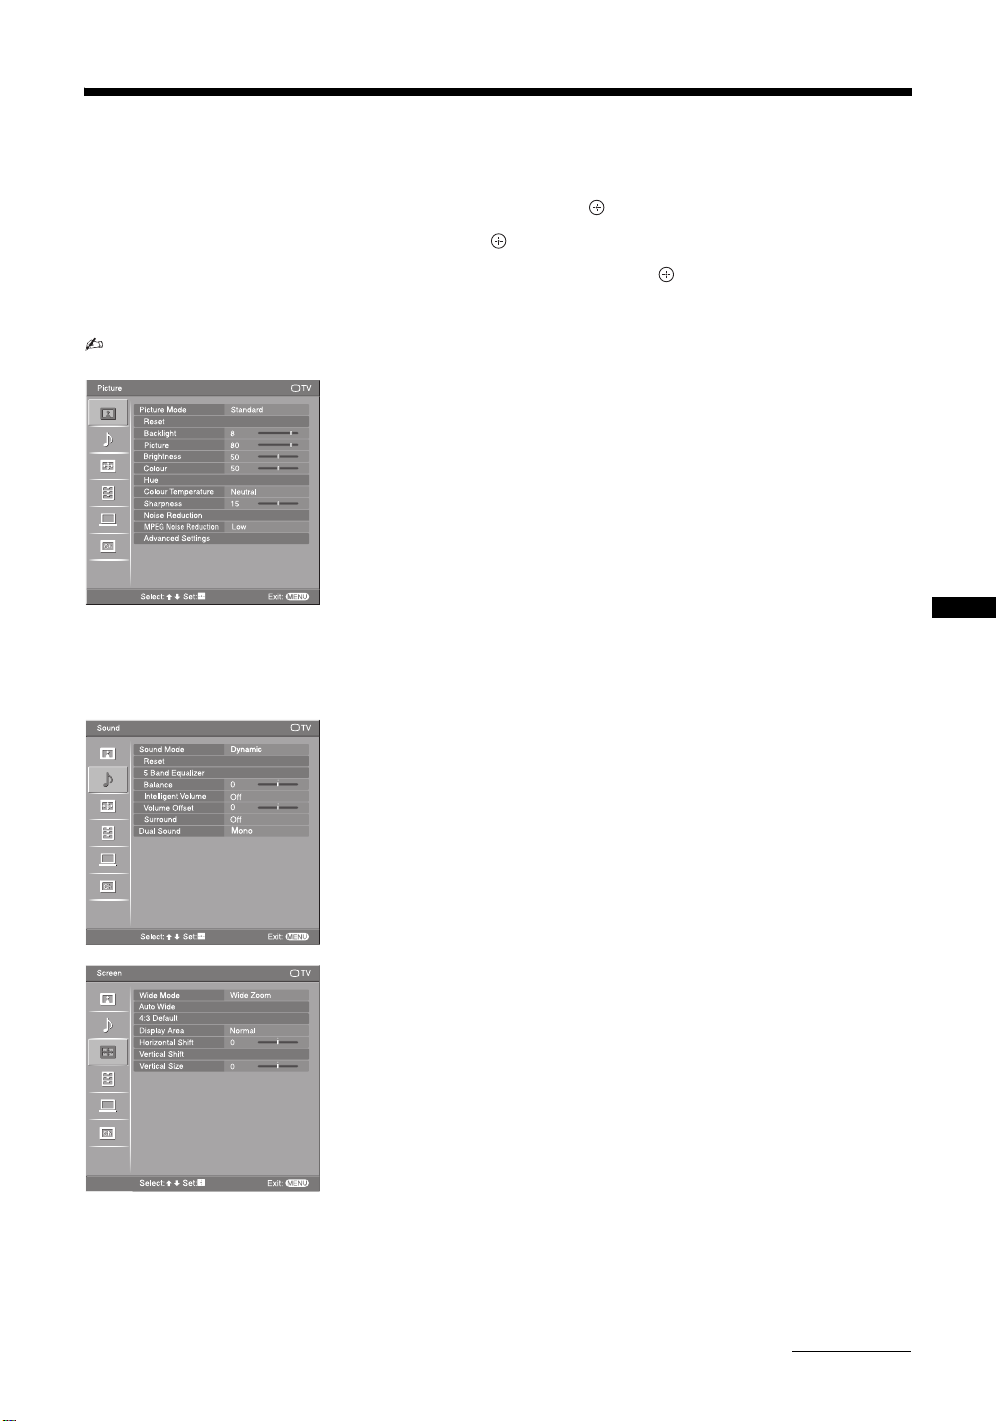
Settings adjustment
You are able to change the settings of your TV from “Settings” menu.
1 Press MENU. Press F/f to select “Settings”, then press .
2 Press F/f to select a menu icon, then press .
3 Press F/f/G/g to select an option or adjust a setting, then press .
The following is an overview of the items that can be adjusted.
• The options you can adjust vary depending on the situation. Unavailable options are greyed out or not displayed.
Picture TV
Standard
8
80
50
50
Neutral
15
Low
Set: Exit:
Dynamic
0
Off
0
Off
Mono
Set: Exit:
MENU
MENU
Sound
Picture Mode
Reset
Backlight
Picture
Brightness
Colour
Hue
Colour Temperature
Sharpness
Noise Reduction
MPEG Noise Reduction
Advanced Settings
Select:
Sound Mode
Reset
5 Band Equalizer
Balance
Intelligent Volume
Volume Offset
Surround
Dual SoundDual Sound
Select:
Picture menu (page 25)
“Picture Mode”: “Vivid” t “Standard” t “Cinema”
“Display Mode”: “Video” t “Text”
“Reset”
“Backlight”
“Picture”
“Brightness”
“Colour”
“Hue”
“Colour Temperature”: “Cool” t “Neutral” t “Warm 1” t “Warm 2”
“Sharpness”
“Noise Reduction”: “High” t “Medium” t “Low” t “Off”
“MPEG Noise Reduction”: “High” t “Medium” t “Low” t “Off”
Using MENU Functions
“Advanced Settings”: “Reset”, “Adv. Contrast Enhancer”, “Gamma”, “Clear
White”, “Live Colour”
TV
Sound menu (page 26)
“Sound Mode”: “Dynamic” t “Standard” t “Clear Voice”
“Reset”
“5 Band Equalizer”: “Adjust”, “Reset”
“Balance”
“Intelligent Volume”: “On” t “Off”
“Volume Offset”
“Surround”: “On” t “Simulated Stereo” t “Off”
“Dual Sound”
Screen
Wide Mode
Auto Wide
4:3 Default
Display Area
Horizontal Shift
Vertical Shift
Vertical Size
Select:
Wide Zoom
Normal
0
0
TV
Screen menu (page 27)
“Wide Mode”: “Wide Zoom” t “Normal” t “Full” t “Zoom”
“Auto Wide”: “On” t “Off”
“4:3 Default”: “Wide Zoom” t “Normal” t “Off”
“Display Area”: “Normal” t “-1” t “-2”
“Horizontal Shift”
“Vertical Shift”
“Vertical Size”
Set:
Exit:
MENU
Continued
GB
23
Page 96
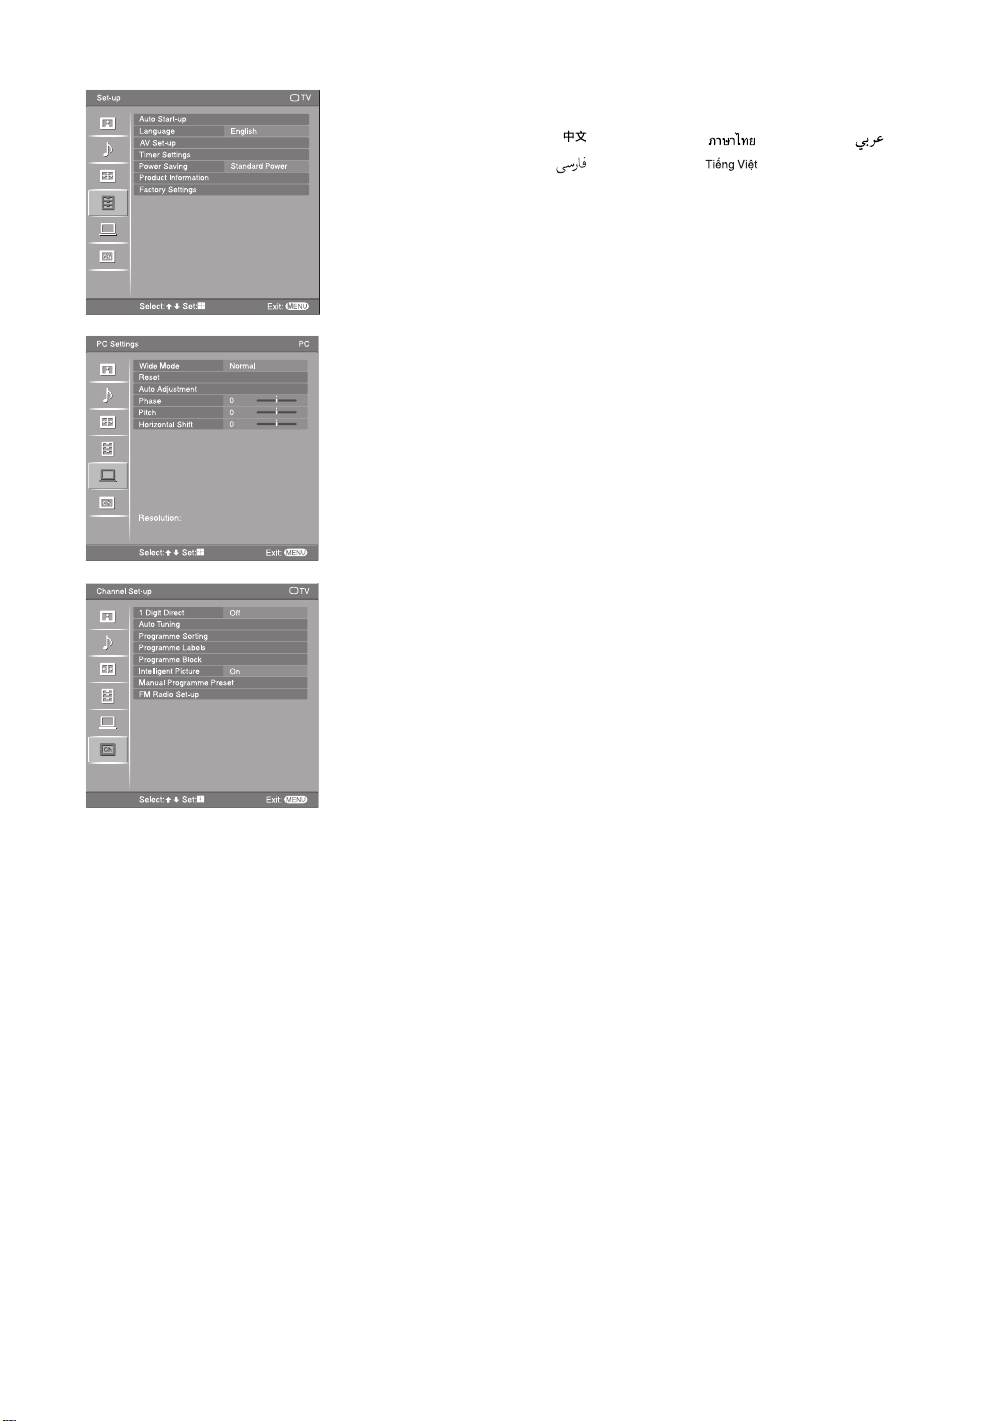
Set-up
Auto Start-up
Language
AV Set-up
Timer Settings
Power Saving
Product Information
Factory Settings
Set:
Select:
English
Standard Power
Exit:
MENU
TV
Set-up menu (page 28)
“Auto Start-up”
“Language”: “English” t “ ” (Chinese) t “” (Thai) t “”
(Arabic) t “ ” (Persian) t “ ” (Vietnamese)
“AV Set-up”: “Video Labels”, “Speaker”, “Colour System”
“Timer Settings”: “Sleep Timer”, “Wake Up Timer”
“Power Saving”: “Standard Power” t “Reduced Power”
“Product Information”
“Factory Settings”
PC Settings
Channel Set-up
Wide Mode
Reset
Auto Adjustment
Phase
Pitch
Horizontal Shift
Resolution:
Set:
Select:
1 Digit Direct
Auto Tuning
Programme Sorting
Programme Labels
Programme Block
Intelligent Picture
Manual Programme Preset
FM Radio Set-up
Set:
Select:
Normal
0
0
0
Off
On
Exit:
Exit:
MENU
MENU
PC
PC Settings menu (page 30)
“Wide Mode”: “Normal” t “Full 1” t “Full 2”
“Reset”
“Auto Adjustment”
“Phase”
“Pitch”
“Horizontal Shift”
TV
Channel Set-up menu (page 31)
“1 Digit Direct”: “On” t “Off”
“Auto Tuning”
“Programme Sorting”
“Programme Labels”
“Programme Block”
“Intelligent Picture”: “On with Indicator”t “On”t “Off”
“Manual Programme Preset”: “Programme”, “TV System”, “VHF Low”/ “VHF
High”/ “UHF”, “Label”, “AFT”, “Skip”, “Colour
System”, “Signal Booster”, “Signal Level”
“FM Radio Set-up”
24
GB
Page 97
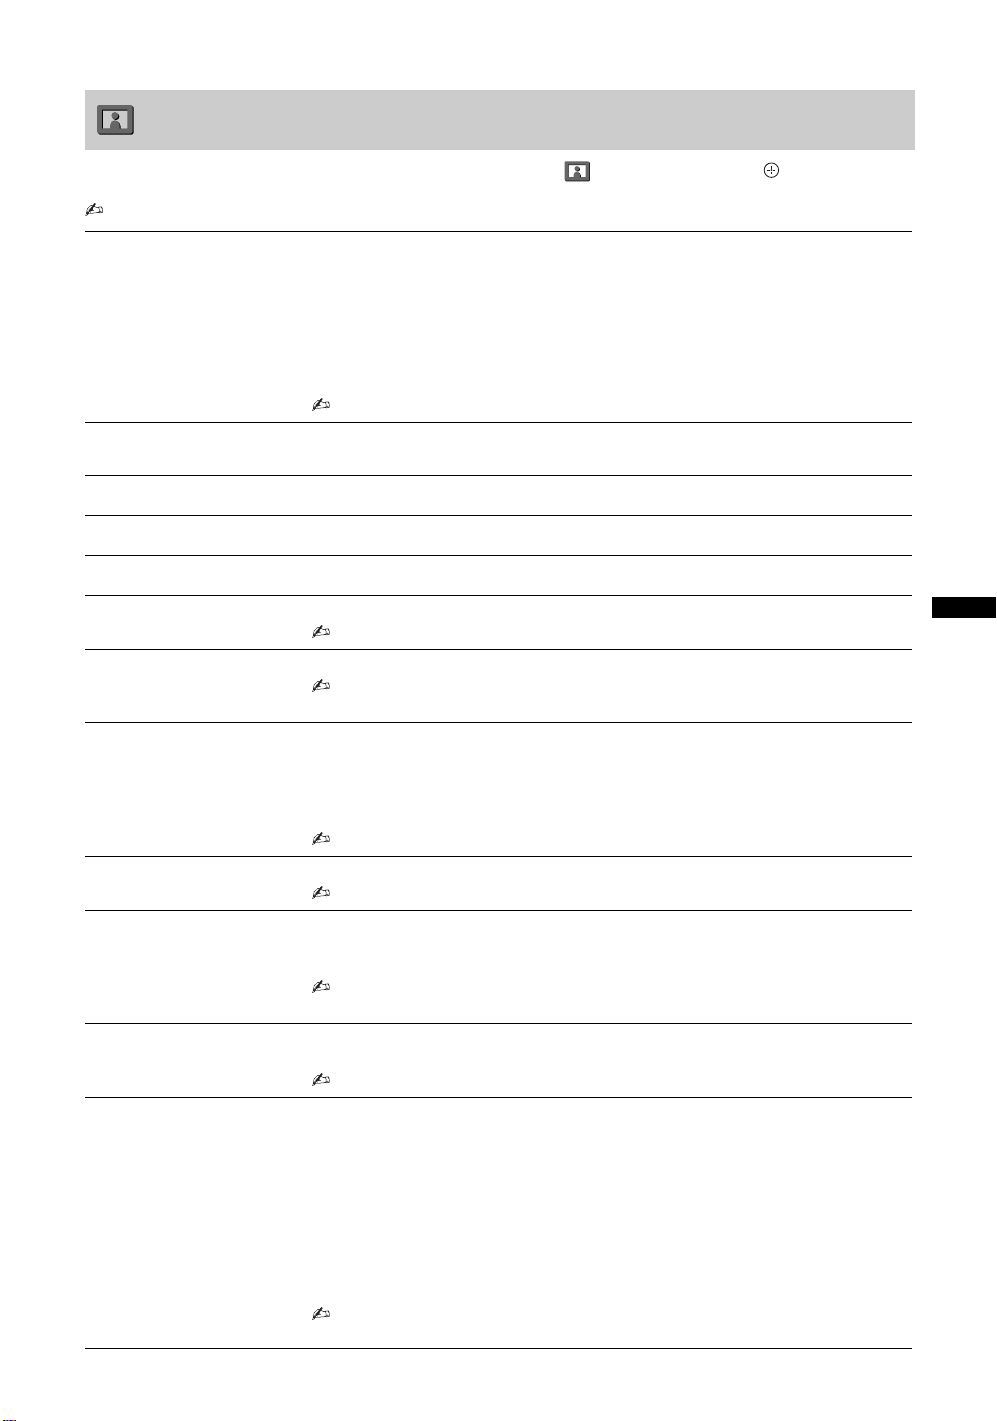
Picture menu
Press MENU and select “Settings”. Make sure the “Picture” icon ( ) is selected, then press .
• “Picture” menu is not available for FM Radio mode.
Picture Mode
Display Mode
Reset
Backlight
Picture
Brightness
Colour
Hue
Colour Temperature
Sharpness
Noise Reduction
MPEG Noise Reduction
Advanced Settings
Selects the picture mode except for PC input source.
“Vivid”: For enhanced picture contrast and sharpness.
“Standard”: For standard picture. Recommended for home entertainment.
“Cinema”: For optimum picture quality of film videos.
Selects the display mode for PC input source.
“Video”: For video images.
“Text”: For text, charts or tables.
• The options displayed vary depending on the input source.
Resets all the “Picture” settings except “Picture Mode” and “Display Mode” to the
factory settings.
Adjusts the brightness of the backlight.
Increases or decreases picture contrast.
Brightens or darkens the picture.
Increases or decreases colour intensity.
• “Colour” is not available for a PC input source.
Increases or decreases the green tones and red tones.
• “Hue” can only be adjusted for an NTSC colour system (e.g. U.S.A. video tapes).
• “Hue” is not available for PC input, component and HDMI input source.
Adjusts the whiteness of the picture.
“Cool”: Gives the white colours a blue tint.
“Neutral”: Gives the white colours a neutral tint.
“Warm 1”/“Warm 2”: Gives the white colours a red tint. “Warm 2” gives a redder
tint than “Warm 1”.
• “Warm 1” and “Warm 2” are not available when “Picture Mode” is set to “Vivid”.
Sharpens or softens the picture.
• “Sharpness” is not available for a PC input source.
Reduces the picture noise (snowy picture) in a weak broadcast signal.
“High”/“Medium”/“Low”: Modifies the effect of the noise reduction.
”: Turns off the “Noise Reduction” feature.
“Off
• “Noise Reduction” can only be adjusted when “Intelligent Picture” is set to “Off”.
• “Noise Reduction” is not available for a PC input source.
Reduces the picture noise in MPEG-compressed video.
Choose either “High”, “Medium”, “Low” or “Off
• “MPEG Noise Reduction” is not available for a PC input source.
Customises the “Picture” function in more detail. When you set “Picture Mode” to
“Standard” or “Cinema”, you can set/change these settings.
“Reset”: Resets all the advanced settings to the factory settings.
“Adv. Contrast Enhancer”: Automatically adjusts “Backlight” and “Picture” to
the most suitable settings judging from the brightness of the screen. This setting is
especially effective for dark images scenes. It will increase the contrast distinction
of the darker picture scenes.
“Gamma”: Adjusts the balance between bright and dark areas of the picture.
“Clear White”: Emphasises white colours.
“Live Colour”: Makes colours more vivid.
• “Advanced Settings” is not available for a PC input source or when “Picture Mode”
is set to “Vivid”.
”.
Using MENU Functions
25
GB
Page 98
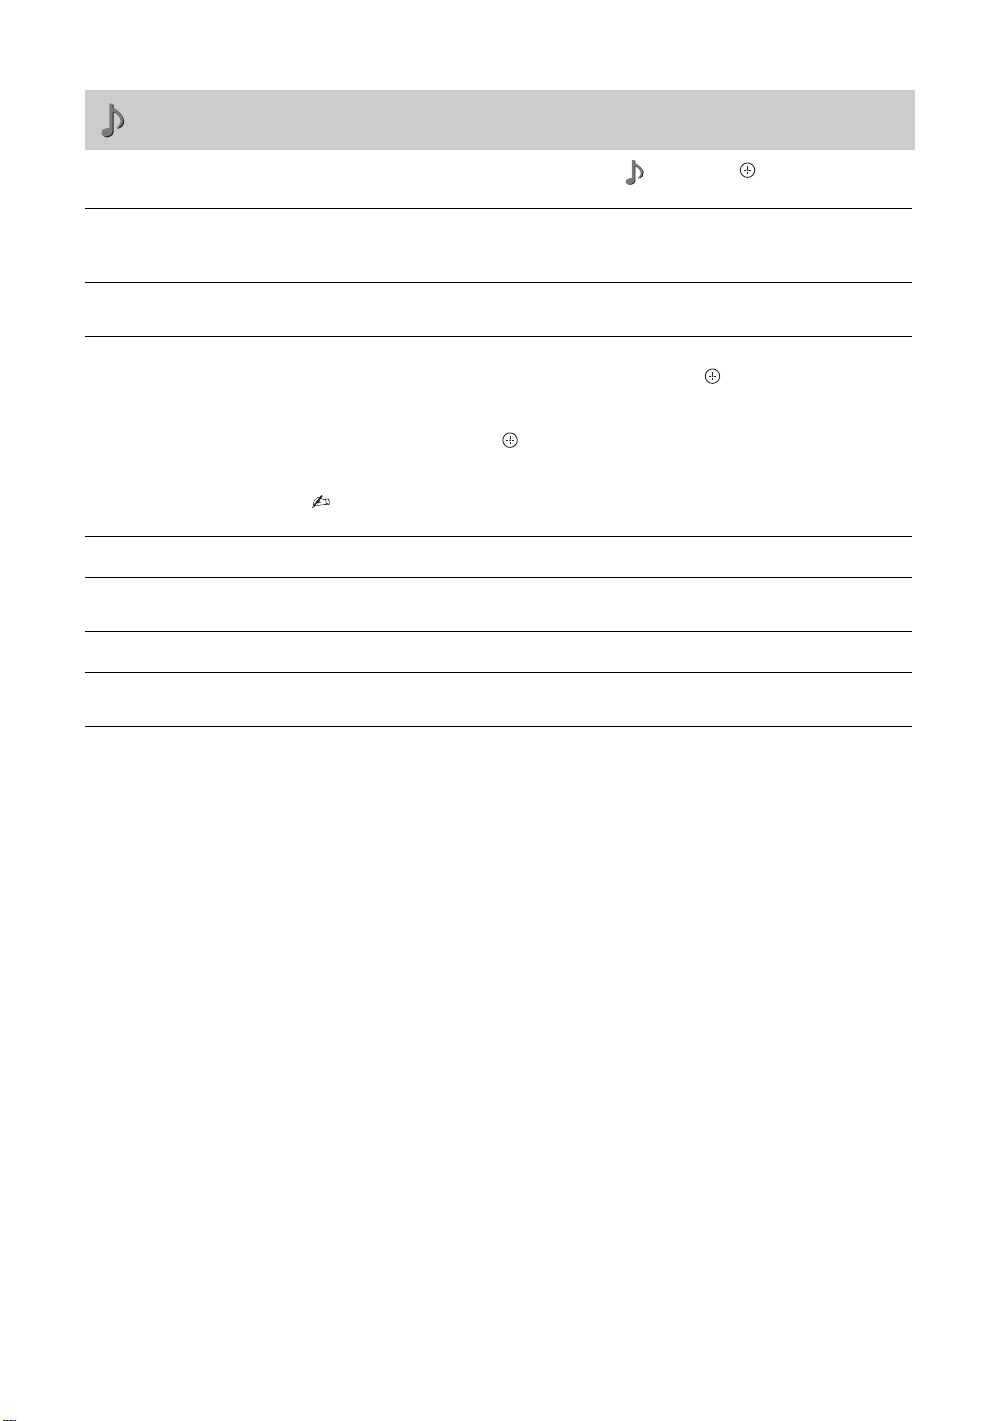
Sound menu
Press MENU and select “Settings”. Press F/f to select the “Sound” icon ( ), then press .
Sound Mode
Reset
5 Band Equalizer
Balance
Intelligent Volume
Volume Offset
Surround
“Dynamic”: Enhances treble and bass. Recommended for home entertainment.
“Standard”: For standard sound.
“Clear Voice”: Makes voice sound clearer.
Resets all the “Sound” settings except “Sound Mode” and “Dual Sound” to the
factory settings.
Adjusts sound frequency settings.
1 Make sure that “Adjust” is selected, then press .
Selecting “Reset” will set your TV to the factory settings.
2 Press G/g to select the desired sound frequency, then press F/f to adjust
the setting and press .
The adjusted settings will be received when you select “Sound Mode”
options.
• Adjusting higher frequency will affect higher pitched sound and adjusting lower
frequency will affect lower pitched sound.
Emphasises left or right speaker balance.
Keeps a constant volume level even when volume level gaps occur (e.g. adverts tend
to be louder than programmes).
Adjusts the volume level of the current input relative to other inputs.
Choose either “On” (surround), “Simulated Stereo” (stereo-like monaural sound) or
“Off”.
26
GB
Page 99
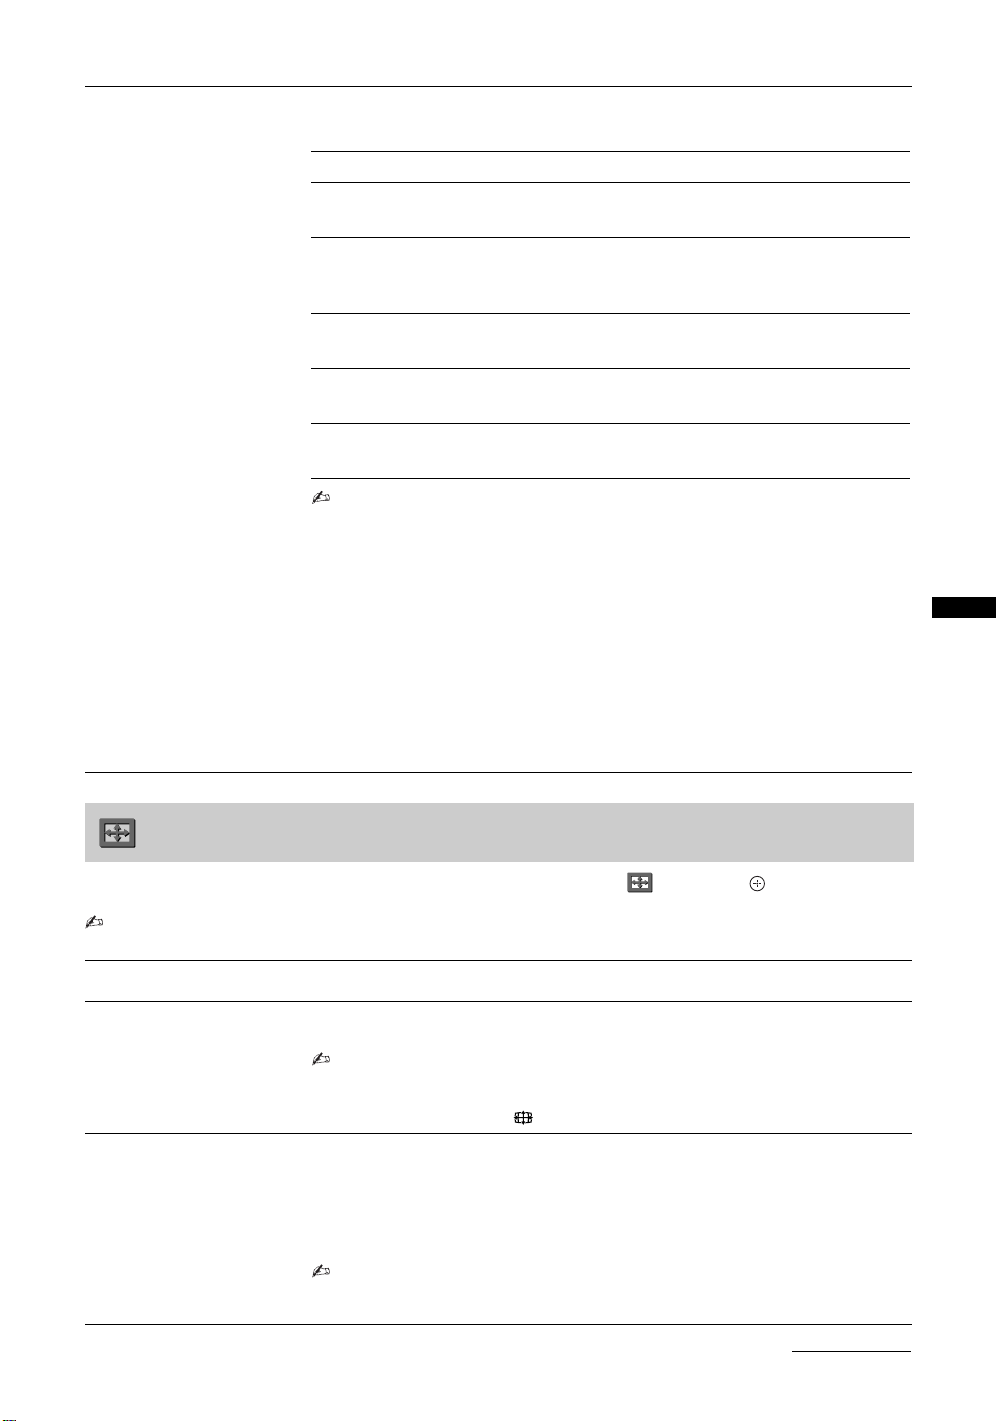
Dual Sound
Selects the sound from the speaker for a stereo or bilingual broadcast.
The selection varies, depending on the Broadcasting.
Broadcasting Selection
NICAM stereo Stereo (stereo sound)
Mono (regular sound)
NICAM bilingual Main (main sound)
Sub (sub sound)
Mono (regular sound)
NICAM monaural Main (main sound)
Mono (regular sound)
A2 (German) stereo Stereo (stereo sound)
Mono (regular sound)
A2 (German) bilingual Main (main sound)
Sub (sub sound)
• If the signal is very weak, the sound becomes monaural automatically.
• If the stereo sound is noisy when receiving a NICAM programme, select “Mono”.
The sound becomes monaural, but the noise is reduced.
• The “Dual Sound” setting is memorised for each programme position.
• You cannot receive a stereo broadcast signal when “Mono” is selected for the
programme position.
z • NICAM is receivable in following countries/regions. Hong Kong, Singapore, New
Zealand, Malaysia, Thailand, etc.
• A2 (German) is receivable in following countries/regions. Australia, Malaysia,
Thailand, etc.
• If you select other equipment connected to the TV, set “Dual Sound” to “Stereo”,
“Main” or “Sub”. However, when the external equipment connected to the HDMI
jack is selected, this is fixed to “Stereo”, except HDMI IN with DVI analogue
sound input.
• If you access to FM Radio mode, set “Dual Sound” to “Stereo” or “Mono”.
Using MENU Functions
Screen menu
Press MENU and select “Settings”. Press F/f to select the “Screen” icon ( ), then press .
• “Screen” menu is not available for FM Radio mode and PC input mode. When receiving PC signal, you can use “PC
Settings” menu to perform related settings (page 30).
Wide Mode
Auto Wide
4:3 Default
For details about the wide mode, see page 16.
Automatically changes the wide mode according to the input signal from an external
equipment. To keep your setting, select “Off”.
• “Auto Wide” is only available when watching programmes from video input and
HDMI input.
z • Even if “Auto Wide” is set to “On” or “Off”, you can always modify the format of
the screen by pressing repeatedly.
Selects the default screen mode for use with 4:3 broadcasts.
“Wide Zoom”: Displays conventional 4:3 broadcasts with an imitation wide screen
effect.
“Normal”: Displays conventional 4:3 broadcasts in the correct proportions.
“Off”: Keeps the current “Wide Mode” setting when the channel or input is
changed.
• “4:3 Default” is available only if “Auto Wide” is set to “On”.
• “4:3 Default” is not available when watching TV programmes, component input
or for HD input signal.
Continued
27
GB
Page 100
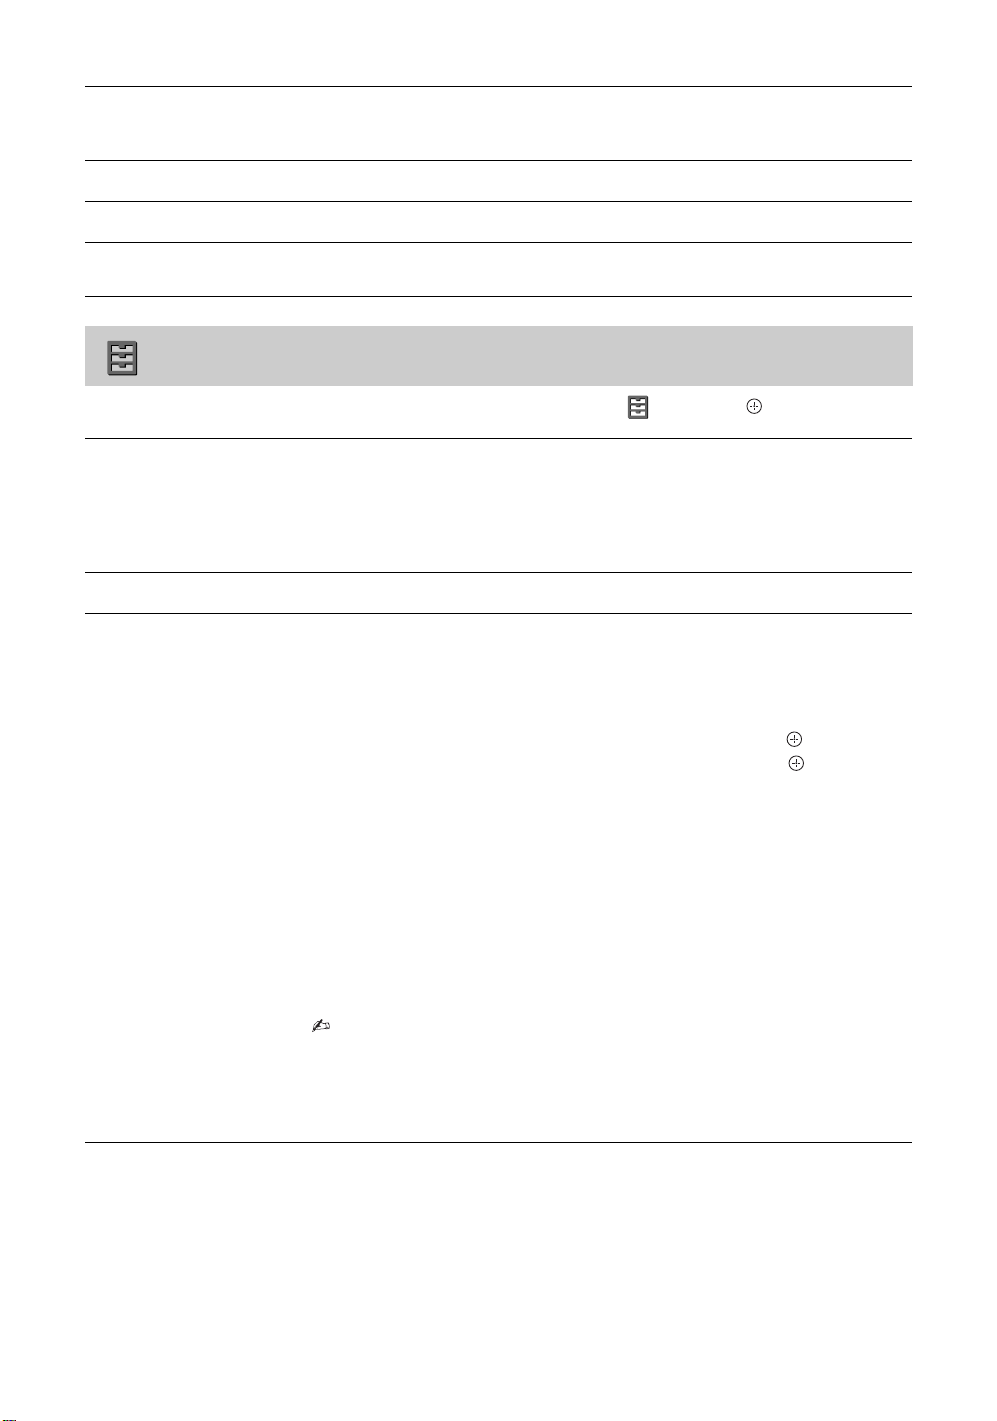
Display Area
Horizontal Shift
Adjusts the screen area for displaying the picture.
“Normal”: Displays the picture in the original size.
“-1”/“-2”: Enlarges the picture to hide the edge of the picture.
Adjusts the horizontal position of the picture.
Vertical Shift
Vertical Size
Adjusts the vertical position of the picture when “Wide Mode” is set to “Zoom”.
Adjusts the vertical size of the picture when “Wide Mode” is set to “Wide Zoom” or
“Zoom”.
Set-up menu
Press MENU and select “Settings”. Press F/f to select the “Set-up” icon ( ), then press .
Auto Start-up
Language
AV Set-up
Starts the initial set-up procedure.
Usually, you do not need to do this operation because it was done when the TV was
first installed (page 8).
However, this option allows you to repeat the process (e.g. to retune the TV after
moving house, or to search for new channels that have been launched by
broadcasters).
Selects the language in which the menus are displayed.
Video Labels
Assigns a name to any equipment connected to the side (refer A in page 19) and rear
jacks. The name will be displayed briefly on the screen when the equipment is
selected. You can skip input signals from connected equipment that you do not want
displayed on the screen.
1 Press
2 Press
F/f to select the desired input source, then press .
F/f to select the desired option below, then press .
Equipment labels: Uses one of the preset labels to assign a name to connected
equipment.
“Edit:”: Creates your own label. Follow steps 2 to 4 of “Programme Labels”
(page 31).
“Skip”: Skips an unnecessary input source.
28
Speaker
Turns on/off the TV’s internal speakers.
“TV Speaker”: The TV speakers are turned on in order to listen to the TV’s sound
through the TV speakers.
“Audio System”: The TV speakers are turned off in order to listen to the TV’s sound
only through your external audio equipment connected to the audio output jacks.
• All items in “Sound” menu except “Dual Sound” are not available when “Speaker”
is set to “Audio System”.
Colour System
Selects the colour system (“Auto”, “PAL”, “SECAM”, “NTSC3.58”, “NTSC4.43”
or “PAL60”) according to the composite video signal from the input source.
GB
 Loading...