

Sony KLV-19T400W, KLV-26T400G, KLV-19T400A, KLV-32TV00A, KLV-19TV00W Operating Instructions Manual
...
LCD Colour TV
Operating Instructions
KLV-32T400A
KLV-26T400A
KLV-26T400G
KLV-19T400A
KLV-19T400G
KLV-19T400W
© 2008 Sony Corporation 4-110-401-12(1)

Introduction Trademark information
Thank you for choosing this Sony product.
Before operating the TV, please read this manual
thoroughly and retain it for future reference.
The illustrations used in this manual are of the
KLV-32T400A unless otherwise stated.
• HDMI, the HDMI logo and High-Definition Multimedia
Interface are trademarks or registered trademarks of
HDMI Licensing LLC.
• “BRAVIA” and are trademarks of Sony
Corporation.
Notes for New Zealand model
Your Bravia TV is ENERGY STAR qualified in the home
mode.
• When the TV is initially set up, it is designed to meet
ENERGY STAR requirements.
• Changes to certain features, settings, and functionalities of
this TV (i.e. TV Guide, Picture/Sound, Light Sensor,
Power Savings) can slightly change the power
consumption.
Depending upon such changed settings, the power
consumption may increase which possibly could exceed the
limit required for ENERGY STAR qualification.
GB
2

Table of Contents
Start-up Guide 4
Checking the accessories ...........................4
Inserting batteries into the remote...............4
1: Attaching the 3D WOOFER and stand....4
Attaching the stand................................... 4
Attaching the 3D WOOFER and stand ..... 6
2: Connecting an antenna/cable/VCR .........7
3: Preventing the TV from toppling over......7
4: Bundling the cables .................................8
5: Performing the initial set-up ....................8
Selecting the language............................. 8
Auto-tuning the TV .................................... 9
Watching TV ............................................ 10
Detaching the Table-Top Stand from the
TV..............................................................10
Safety information .....................................12
Precautions ...............................................14
Overview of the remote .......................... 15
Using the Tools menu ............................. 17
Overview of the TV buttons and
indicators ................................................. 18
19
Using Optional Equipment
34
Additional Information
Specifications ........................................... 34
Troubleshooting ........................................ 35
Connecting optional equipment.................19
Viewing pictures from the connected
equipment .................................................20
21
Using MENU Functions
Navigating through menus ........................21
Listening to the FM Radio .........................22
Listening to preset stations..................... 22
Listening to non-preset stations.............. 22
Settings adjustment...................................23
Picture menu........................................... 25
Sound menu............................................ 26
Screen menu........................................... 27
Set-up menu ........................................... 28
PC Settings menu ................................... 30
Channel Set-up menu ............................. 31
GB
3
Start-up Guide
Checking the accessories
Stand (1) and screws (4)
3D WOOFER (1) and screws (4) (KLV-19T400W)
Remote RM-GA013 (1)
Size AA batteries (R6 type) (2)
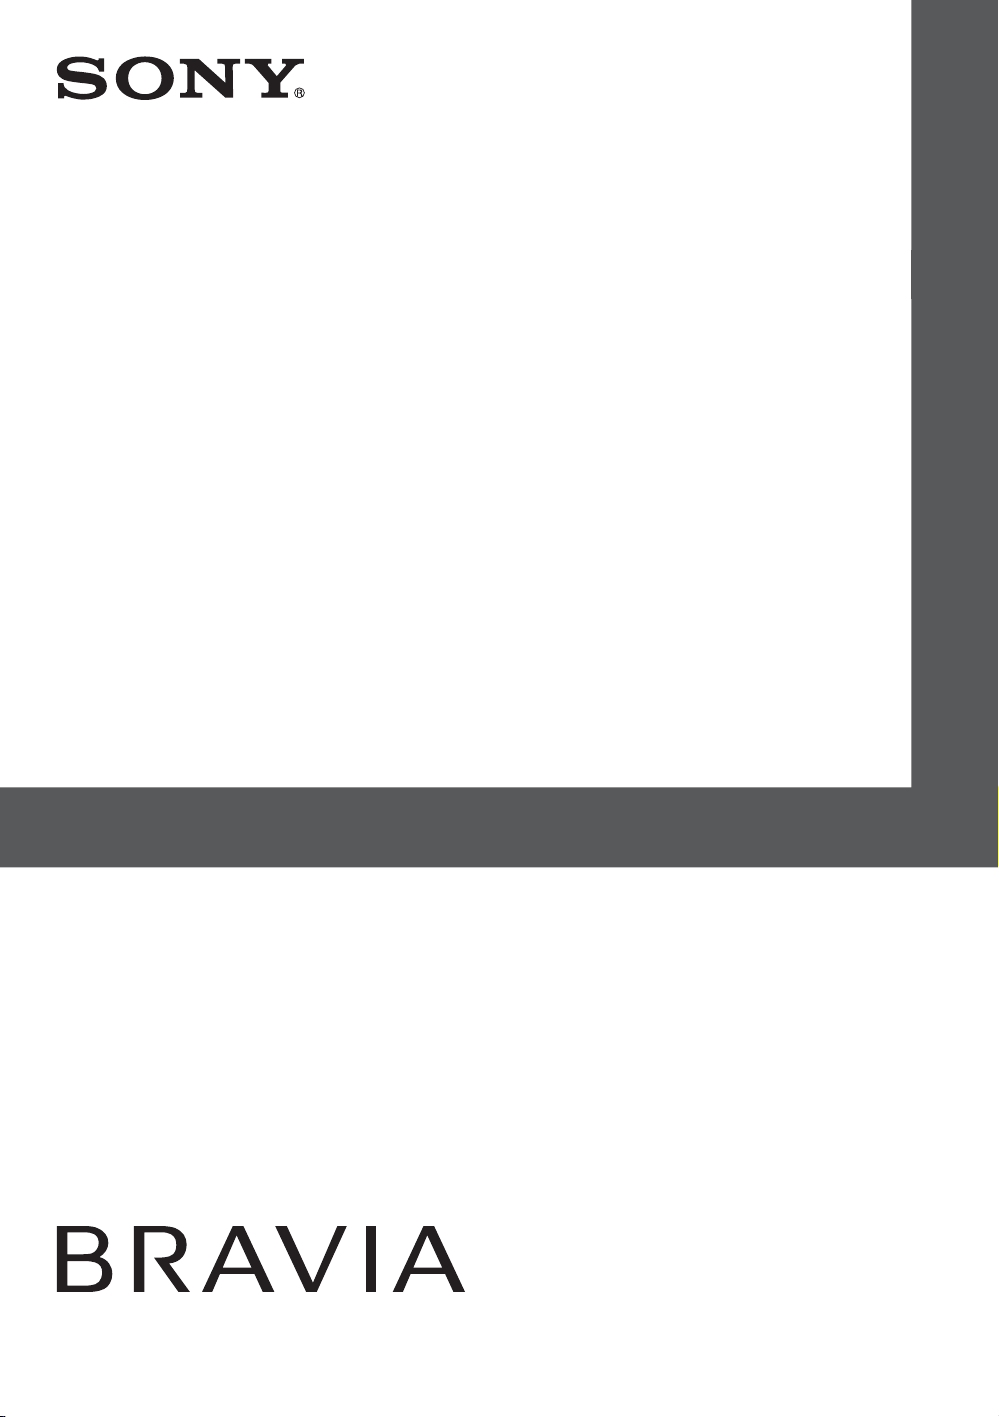
Inserting batteries into the remote
Push and lift the cover to open.
• Observe the correct polarity when inserting
batteries.
• Do not use different types of batteries together or
mix old and new batteries.
• Dispose of batteries in an environmentally
friendly way. Certain regions may regulate the
disposal of batteries. Please consult your local
authority.
• Handle the remote with care. Do not drop or step
on it, or spill liquid of any kind onto it.
• Do not place the remote in a location near a heat
source, a place subject to direct sunlight, or a
damp room.
1: Attaching the 3D WOOFER and stand
Please ensure the AC power cord is away from the
3D WOOFER/stand installation location before you
attach below 3D WOOFER/stand.
3D WOOFER is only available for KLV-19T400W.
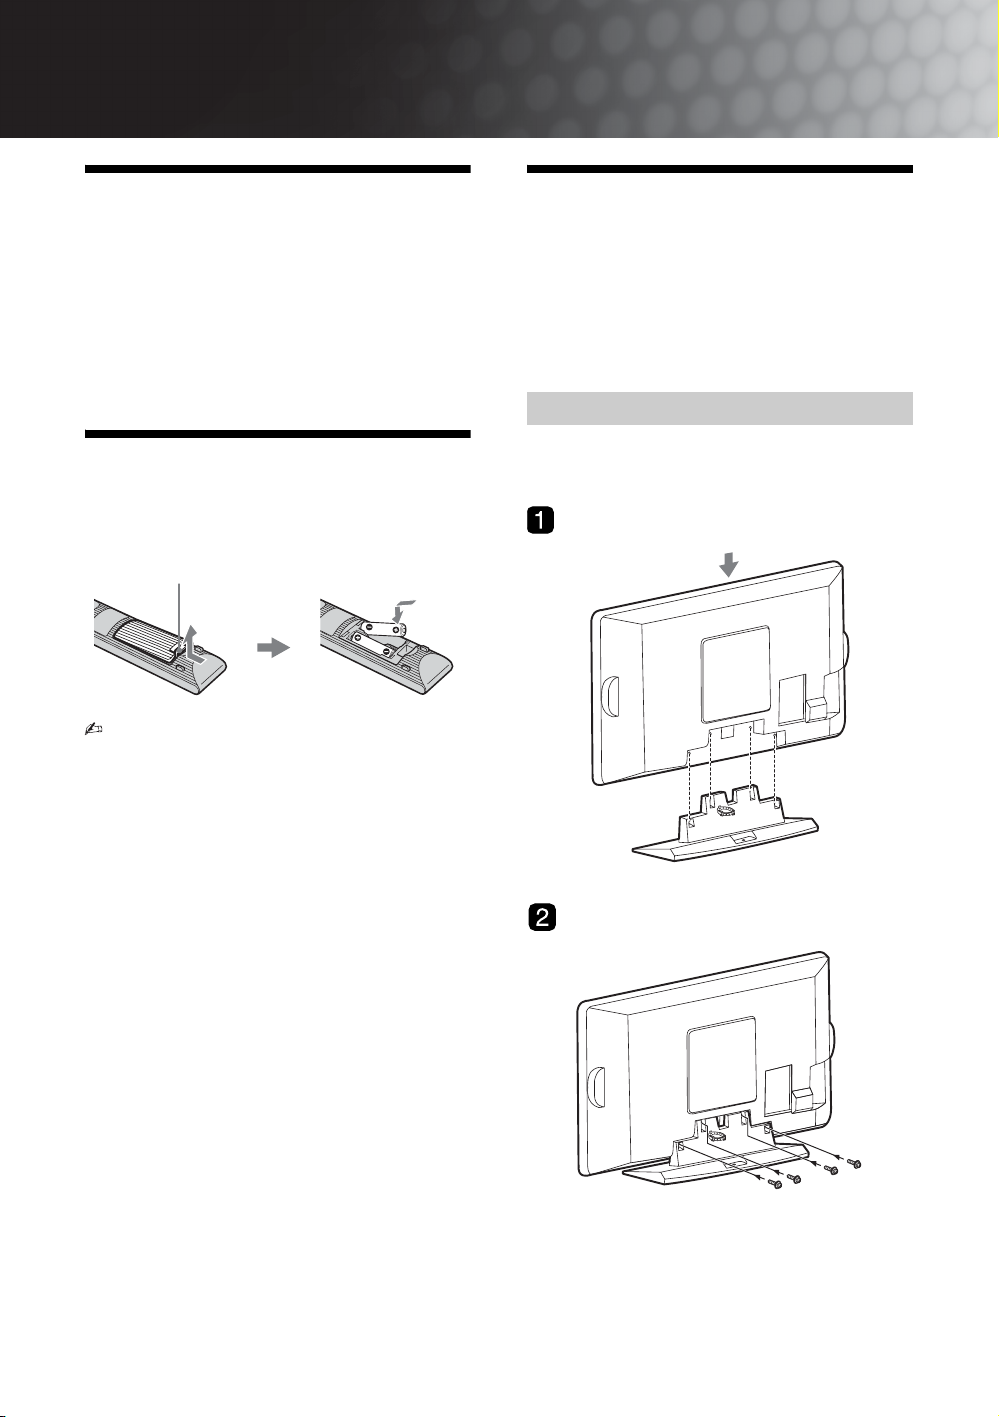
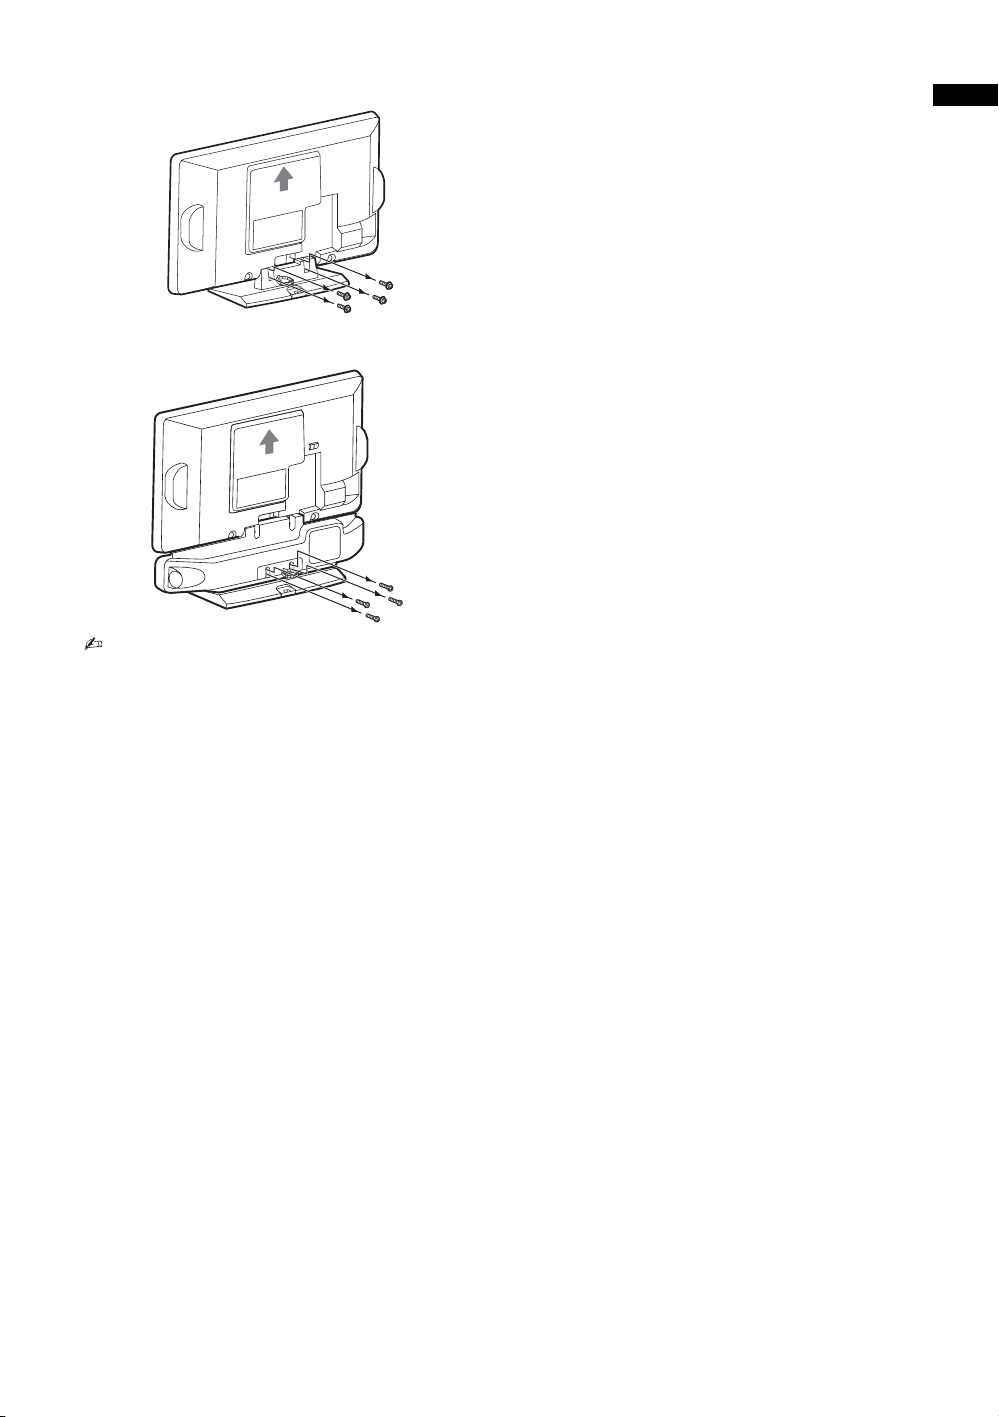
Attaching the stand
– Except for KLV-19T400W
B KLV-32T400A
GB
4
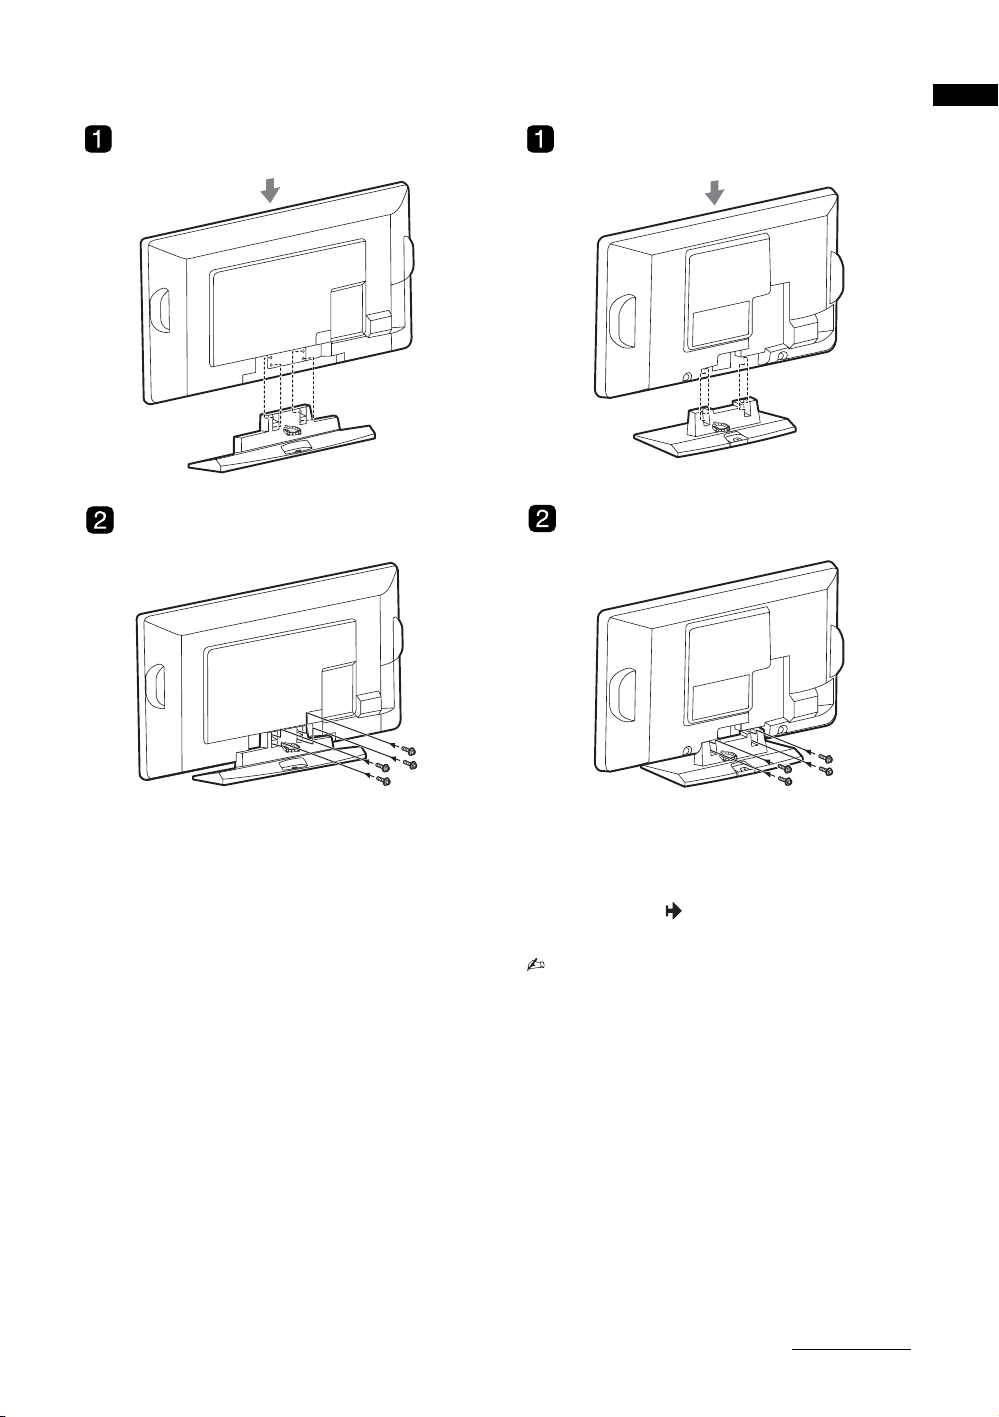
B KLV-26T400A/26T400G B KLV-19T400A/19T400G
Start-up Guide
1 Place the TV onto the stand by aligning the
screw hole alignment lines over the stand
as shown.
2 Fix the TV to the stand according to the
arrow marks that guide the screw holes
using the supplied screws.
• This TV is very heavy, so two or more people
should place the TV onto the stand.
• If using an electric screwdriver, set the tightening
torque at approximately 1.5N·m (15kgf·cm).
• Ensure the AC power cord is away from screw
holes during stand installation to avoid damage to
the AC power cord.
Continued
5
GB
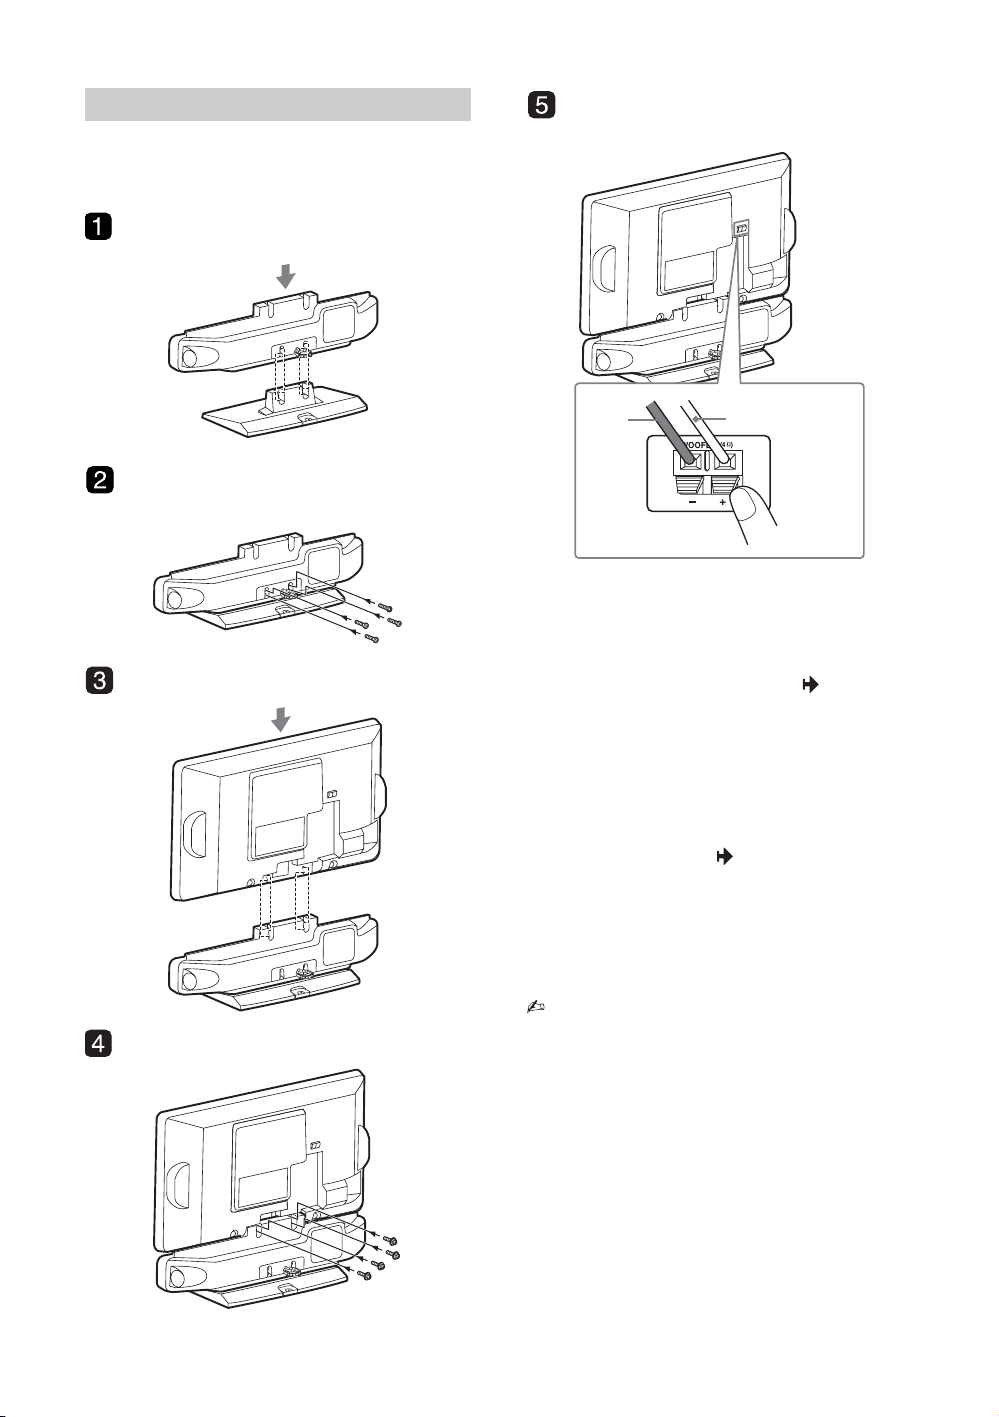
Attaching the 3D WOOFER and stand
You can enjoy high quality sound by attaching the 3D
WOOFER as follows:
B KLV-19T400W
Black
wire
Red wire
1 Place the 3D WOOFER onto the stand by
aligning the screw hole alignment lines
over the stand as shown.
2 Fix the 3D WOOFER to the stand
according to the arrow marks that guide
the screw holes using the supplied screws
(+BVTP2 4x16).
3 Place the TV onto the 3D WOOFER by
aligning the screw hole alignment lines
over the 3D WOOFER as shown.
4 Fix the TV to the 3D WOOFER according
to the arrow marks that guide the screw
holes using the supplied screws (+PSW
M5x16).
5 Connect using only the supplied 3D
WOOFER; otherwise your TV may
malfunction.
• If using an electric screwdriver, set the tightening
torque at approximately 1.2N·m (12kgf·cm) when
attaching the stand. However, set the tightening
torque at approximately 1.5N·m (15kgf·cm) when
attaching the TV to the 3D WOOFER.
• Ensure the AC power cord is away from screw
holes during stand installation to avoid damage to
the AC power cord.
GB
6
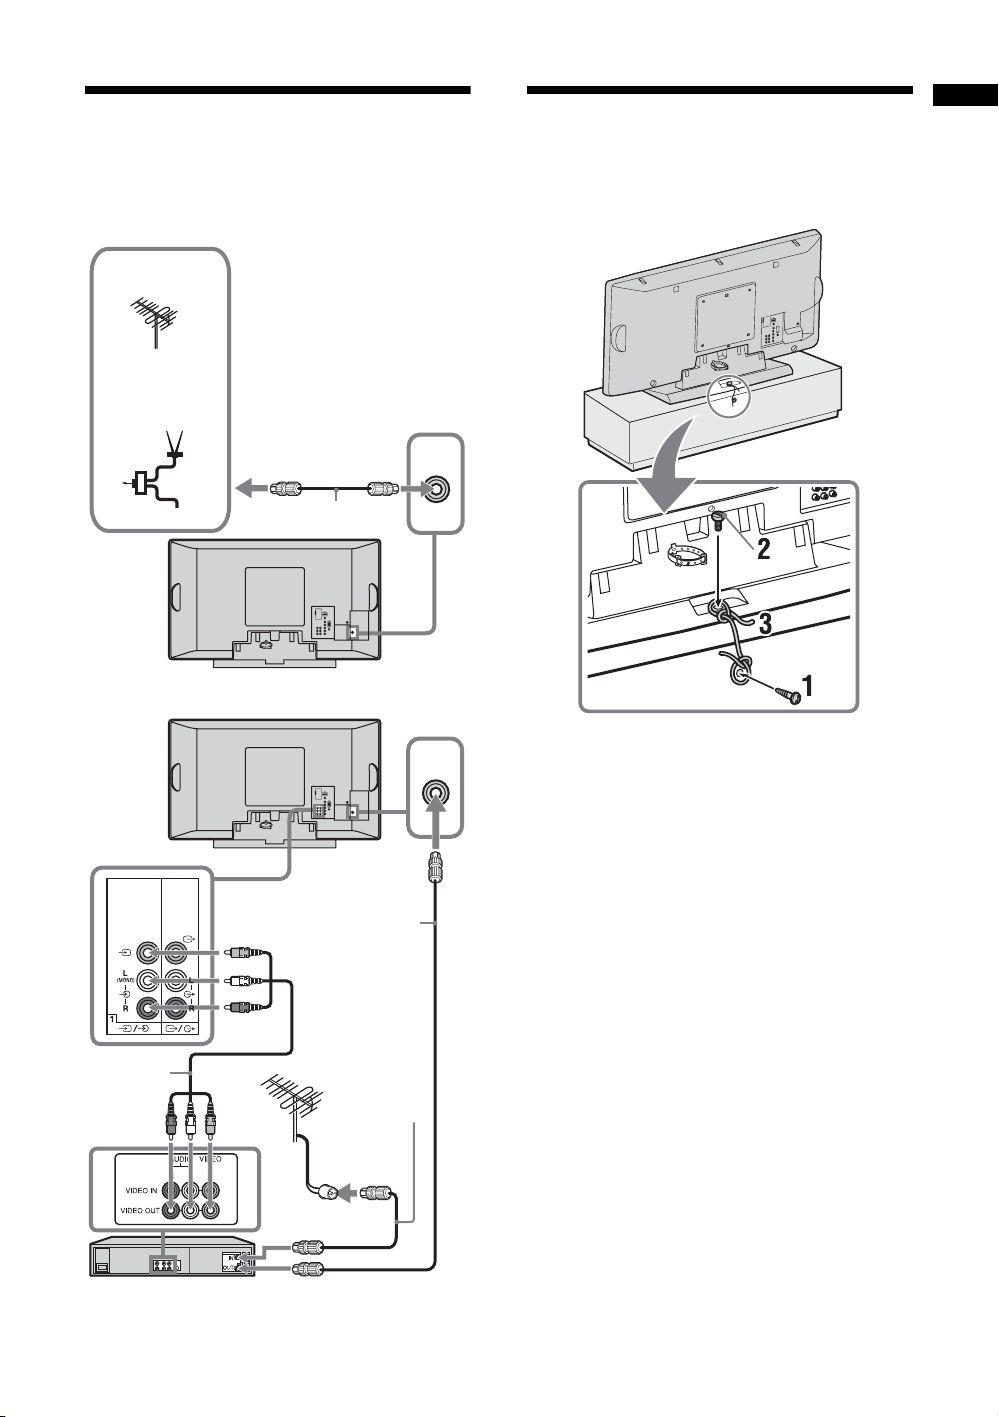
2: Connecting an
3: Preventing the TV
Start-up Guide
antenna/cable/VCR
Connecting an antenna/cable
TV, CATV,
Satellite
or
If cannot
receive FM
signal
Antenna
selector
TV signal
Connecting an antenna/cable and VCR
FM
signal
Antenna cable
(not supplied)
8
8
8
8
from toppling over
1 Install a wood screw (4 mm in diameter, not
supplied) in the TV stand.
2 Install a machine screw (M6 x 12, not
supplied) into the screw hole of the TV.
3 Tie the wood screw and the machine screw
with a strong cord.
Audio/Video
cable (not
supplied)
VCR
Antenna cable
(not supplied)
Antenna cable
(not supplied)
GB
7
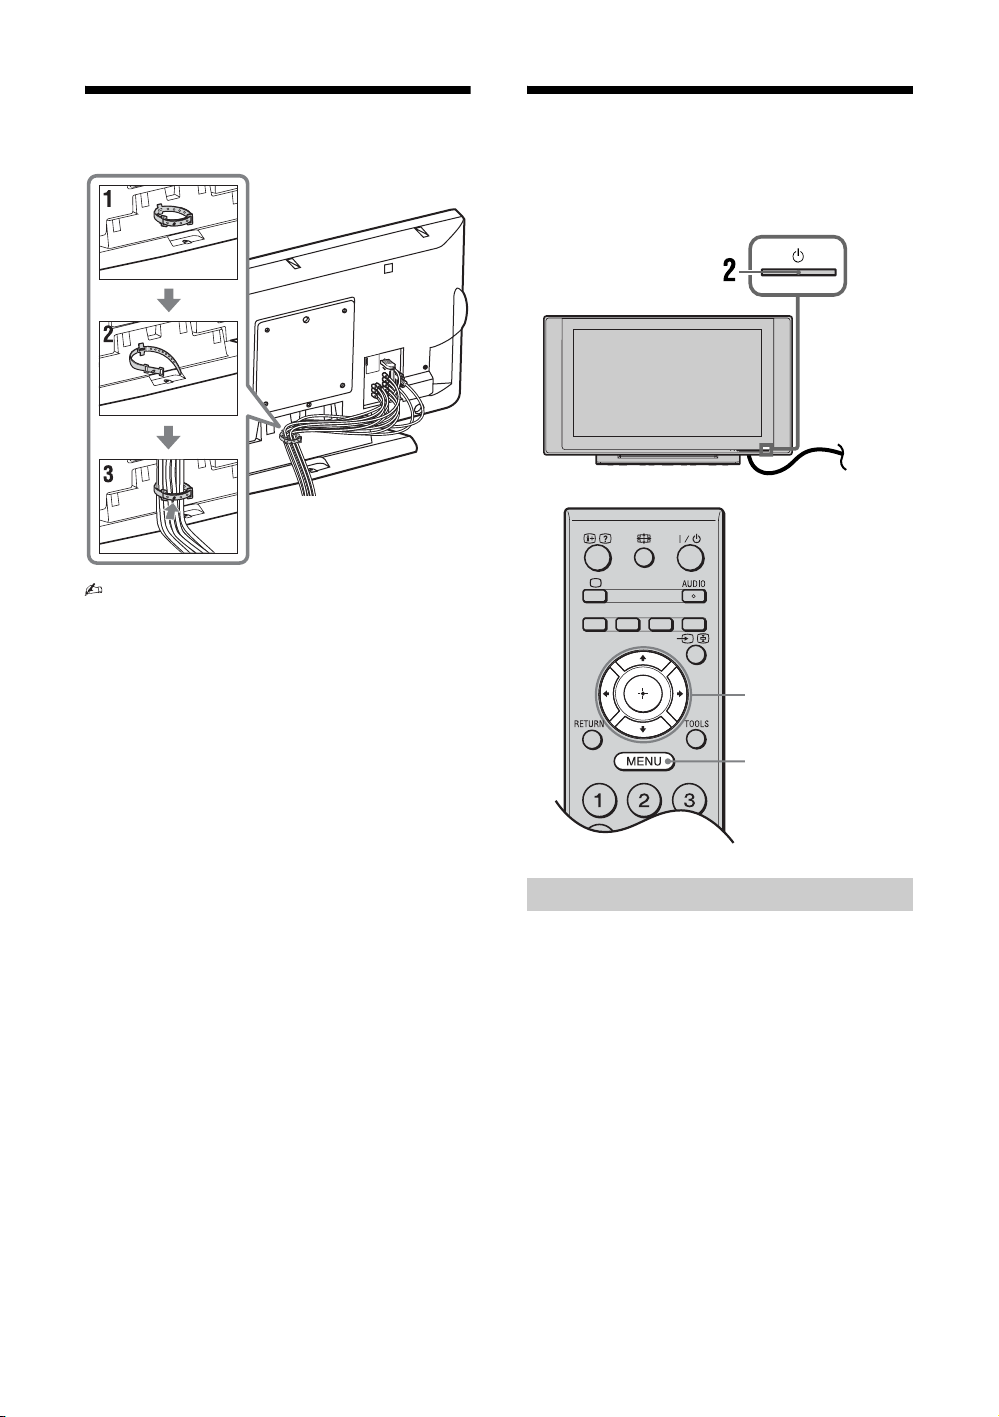
4: Bundling the cables
• Cable holder is located at 3D WOOFER for
KLV-19T400W.
5: Performing the initial set-up
, 1
3, 4, 5, 6, 9
8
Selecting the language
1 Connect the TV to your AC power outlet
(110-240 V AC, 50/60 Hz) (New Zealand
only: 220-240 V AC, 50/60 Hz).
2 Press 1 on the TV.
When the TV is in standby mode (the 1 (standby)
indicator on the TV front panel is red), press "/1
on the remote to turn on the TV.
When you turn on the TV for the first time, the
“Language” menu appears on the screen.
GB
8
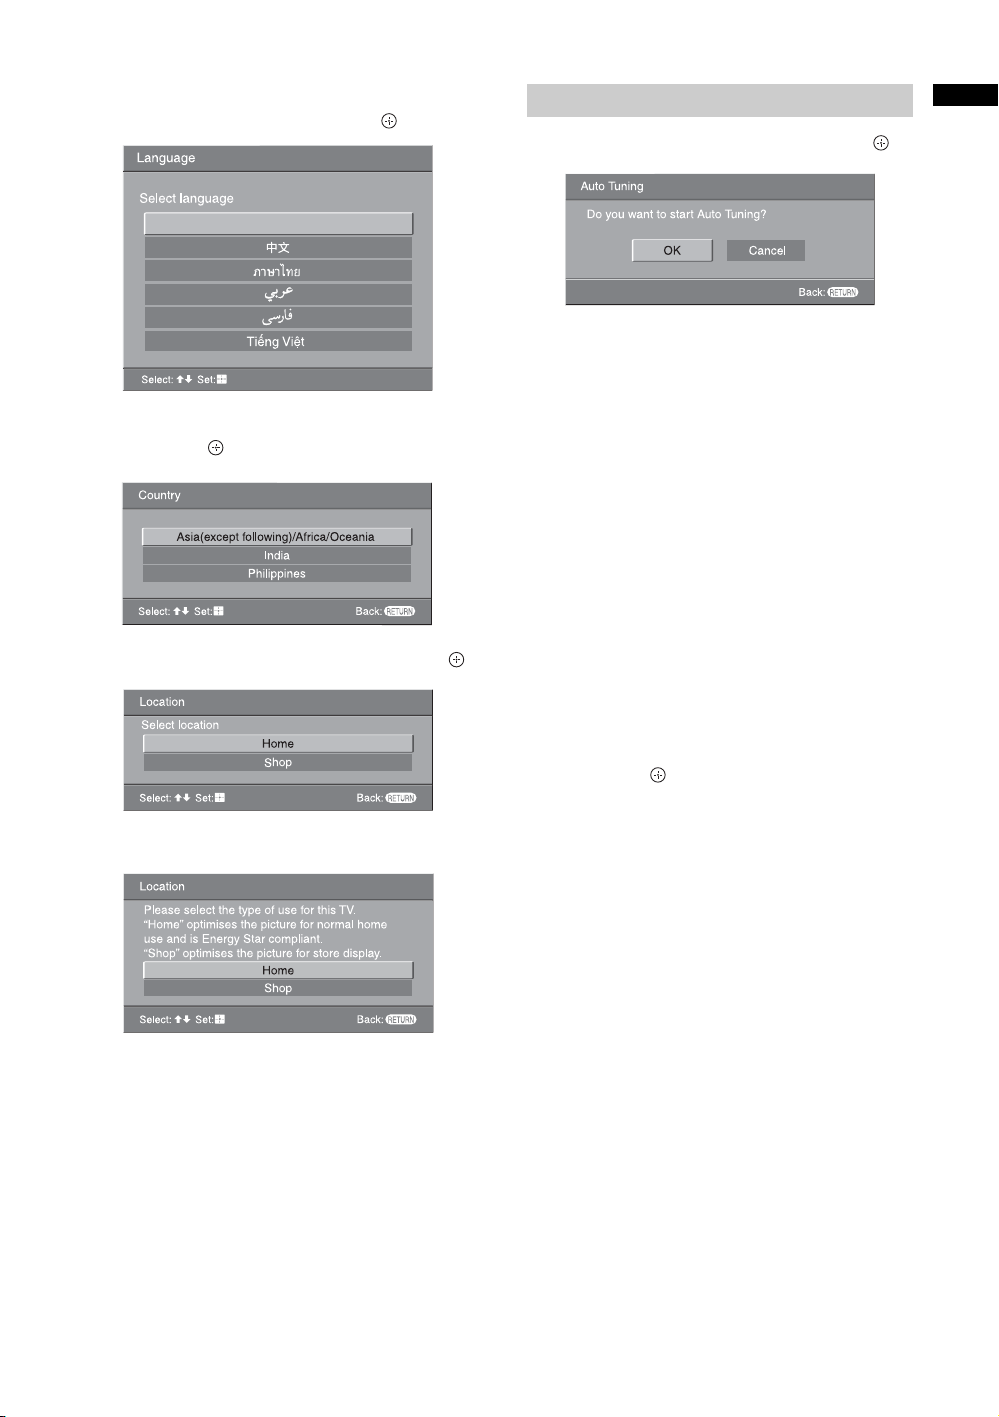
3
Press F/f to select the language displayed
on the menu screens, then press .
English
4 Press F/f to select the country/region,
then press .
Select country
Auto-tuning the TV
Start-up Guide
6 Press G/g to select “OK”, then press .
The TV starts searching for all available channels.
This may take some time, please be patient and do
not press any buttons on the TV or remote.
If a message appears for you to confirm the
antenna connection
No programmes found. Please connect antenna
(aerial) and select “Confirm” to start auto-tuning
again. If 200 channels are found, auto-tuning is
stopped.
7 When the “Programme Sorting” menu
appears on the screen, follow the steps of
“Programme Sorting” (page 31).
If you do not want to change the order in which the
channels are stored on the TV, go to step 8.
5 Press F/f to select “Home”, then press .
B For New Zealand model
8 Press MENU to exit.
The TV has now tuned in all the available
channels.
9 Press G/g to select the desired setting in
“Display this menu next time?” dialogue,
then press
z • If “Yes” is selected and the TV is turned off by
pressing 1 on the TV, or is disconnected from
the AC power outlet, the initial set-up
procedure restarts the next time the TV is
turned on.
to exit.
GB
9
Watching TV
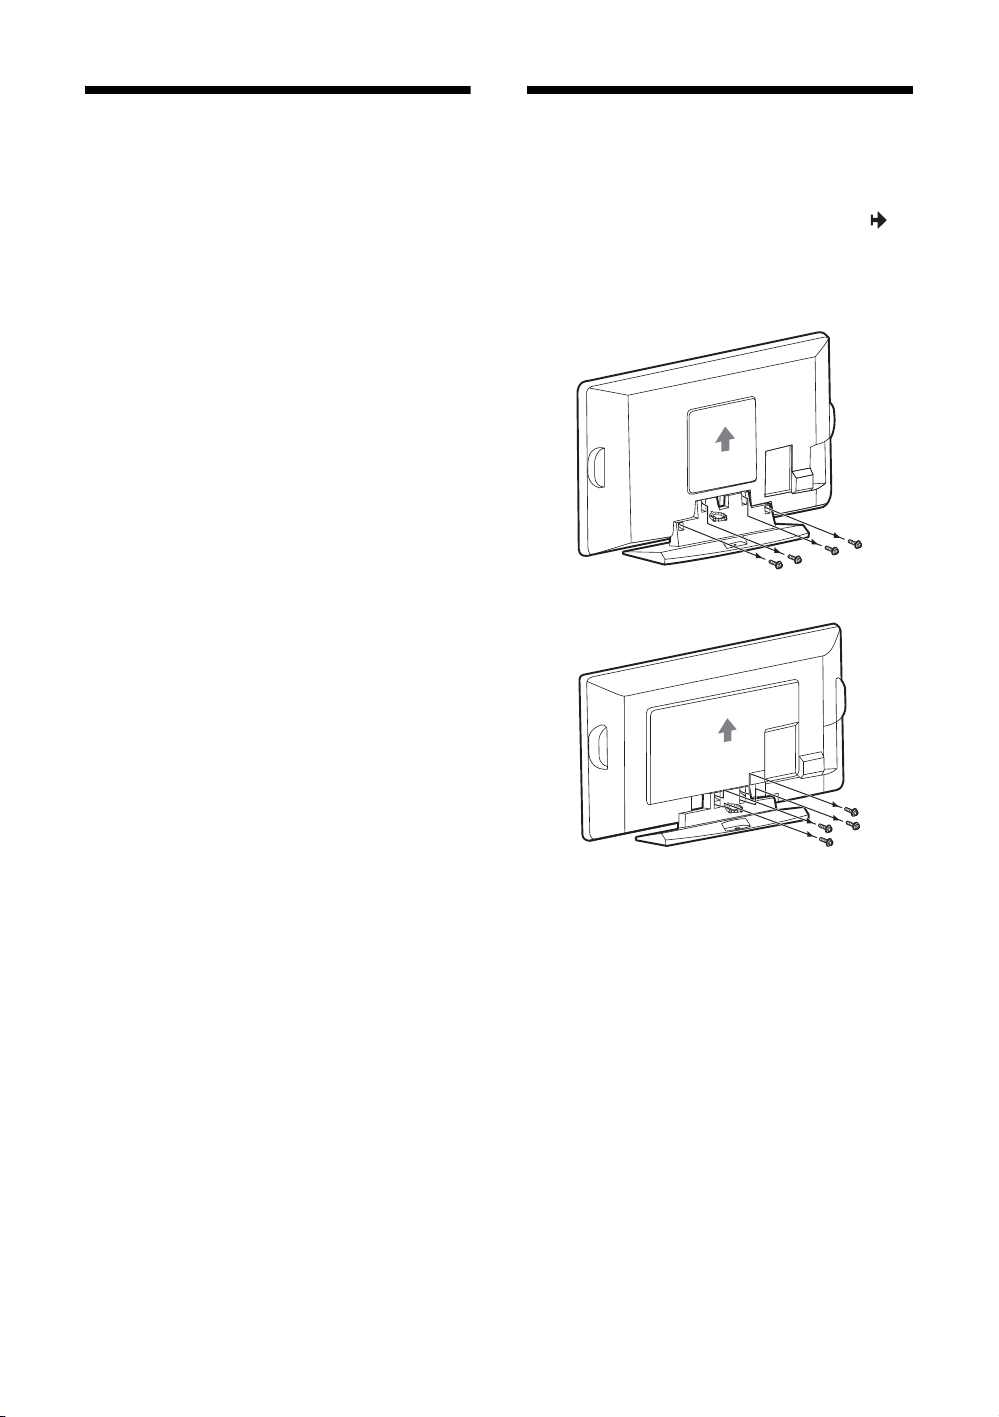
Detaching the Table-
1 Press 1 on the TV to turn on the TV.
2 Press the number buttons or PROG +/– to
select a TV channel.
3 Press 2 +/– to adjust the volume.
Top Stand from the TV
Remove the screws guided by the arrow marks of
the TV.
Do not remove the Table-Top Stand for any reason
other than to wall-mount the TV.
B KLV-32T400A
B KLV-26T400A/26T400G
10
GB
B KLV-19T400A/19T400G
B KLV-19T400W
• For bracket installation, refer to the instruction
guide provided by the Wall-Mount Bracket model
for your TV. Sufficient expertise is required in
installing this TV, especially to determine the
strength of the wall for withstanding the TV’s
weight. For product protection and safety
reasons, Sony strongly recommends that you
use the Wall-Mount Bracket model designed
for your TV and the wall-mounting of your TV
should be performed by Sony dealers or
licensed contractors.
Start-up Guide
11
GB
Safety information
Installation/Set-up
Install and use the TV set in accordance with the
instructions below in order to avoid any risk of fire,
electrical shock or damage and/or injuries.
Installation
• The TV set should be installed near an easily accessible
AC power outlet.
• Place the TV set on a stable, level surface to avoid it from
falling down and cause personal injury or damage to the
TV.
• Only qualified service personnel should carry out wall
installations.
• For safety reasons, it is strongly recommended that you
use Sony accessories, including:
– KLV-32T400A:
Wall-mount bracket SU-WL500 or SU-WL50B
– KLV-26/19T400A/26/19T400G/19T400W:
Wall-mount bracket SU-WL100
• Be sure to use the screws supplied with the Wall-mount
bracket when attaching the mounting hooks to the TV set.
The supplied screws are designed so that they are 8 mm to
12 mm in length when measured from the attaching
surface of the mounting hook.
The diameter and length of the screws differ depending on
the Wall-mount bracket model.
Use of screws other than those supplied may result in
internal damage to the TV set or cause it to fall, etc.
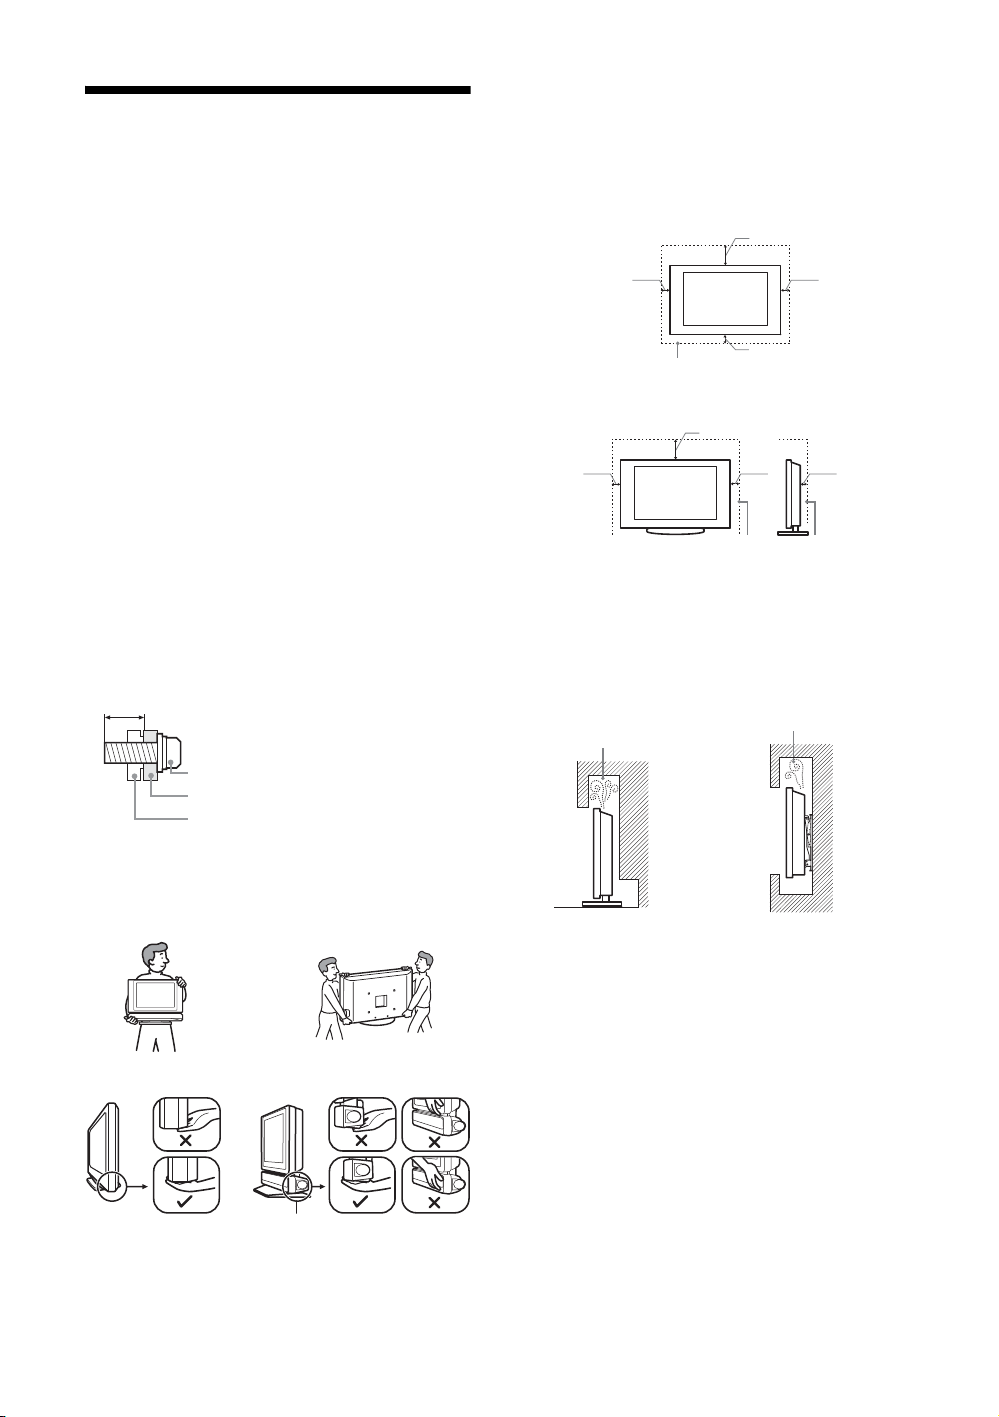
8mm - 12mm
Screw (supplied with the Wall-mount
bracket)
Mounting Hook
Hook attachment on rear of TV set
Transporting
• Before transporting the TV set, disconnect all cables.
• Two or more people are needed to transport a large TV set.
• When transporting the TV set by hand, hold it as shown.
Do not put stress on the LCD panel.
KLV-19T400A/
19T400G/19T400W
Do not handle with dent area.
• When lifting or moving the TV set, hold it firmly from the
bottom.
• When transporting the TV set, do not subject it to jolts or
excessive vibration.
• When transporting the TV set for repairs or when moving,
pack it using the original carton and packing material.
GB
12
KLV-32/26T400A/
26T400G
Ventilation
• Never cover the ventilation holes or insert anything in the
cabinet.
• Leave space around the TV set as shown below.
• It is strongly recommended that you use a Sony wallmount bracket in order to provide adequate air-circulation.
Installed on the wall
30 cm
10 cm 10 cm
10 cm
Leave at least this space around the set.
Installed with stand
30 cm
10 cm 10 cm 6 cm
Leave at least this space around the set.
• To ensure proper ventilation and prevent the collection of
dirt or dust:
– Do not lay the TV set flat, install upside down,
backwards, or sideways.
– Do not place the TV set on a shelf, rug, bed or in a closet.
– Do not cover the TV set with a cloth, such as curtains,
or items such as newspapers, etc.
– Do not install the TV set as shown below.
Air circulation
Air circulation is blocked.
is blocked.
Wall
Wall
AC power cord
Handle the AC power cord and outlet as follows in
order to avoid any risk of fire, electrical shock or
damage and/or injuries:
– Use only Sony supplied AC power cords, not those of
other brands.
– Insert the plug fully into the AC power outlet.
– Operate the TV set on a 110-240 V AC supply only
(New Zealand only: 220-240 V AC).
– When wiring cables, be sure to unplug the AC power
cord for your safety and take care not to catch your feet
on the cables.
– Disconnect the AC power cord from the AC power
outlet before working on or moving the TV set.
– Keep the AC power cord away from heat sources.
– Unplug the AC power plug and clean it regularly. If the
plug is covered with dust and it picks up moisture, its
insulation may deteriorate, which could result in a fire.
 Loading...