

Page 1

R
3-858-007-11 (1)
KL-37W1
KL-50W1
Getting Started
Operating Instructions
Procedimientos
iniciales
Instrucciones de
funcionamiento
Como começar
Instruções de
funcionamento
Komma igång S
Basfunktioner
Przed uéciem po raz
pierwszy
GB
GB
E
E
P
P
S
PL
LCD Projection TV
Instrukcja Obsàugi
A kíszÖlík
Özembehelyezíse
Hasznèlati Øtmutatô
àÌcÚpyÍáËÓ Ôo
íÍcÔÎyaÚaáËË
èoÀÖoÚoÇÍa Í
íÍcÔÎyaÚaáËË
PL
H
H
RF
RF
© 1996 by Sony Corporation Printed in Spain
Page 2

WARNING
To prevent fire or shock hazard, do not expose the unit to
rain or moisture.
Dangerously high voltages are present inside the set. Do
not open the cabinet. Refer servicing to qualified
personnel only.
Safety Information
All TVs operate on extremely high voltages. To prevent
fire or electric shock, please follow the safety procedures
below. For your protection, refer all servicing to qualified
personnel only.
For general safety:
• Do not expose the TV to rain or moisture.
• Do not open the rear cover.
For safe operations:
• Do not operate the TV on any other voltages, but 220–
240 V AC.
• Do not operate the TV if any liquid or solid object falls in it
- have it checked immediately.
• Do not keep the set plugged in if you are not going to use
it for several days.
• Do not pull on the power cord to disconnect the TV. Pull it
out by the plug.
• Do not place anything on the surface of the front panel
cover when you open it.
Important Information
Please read the following information on using and
maintaining the TV, for optimum viewing quality.
Picture Quality
• Avoid touching the screen, and take care not to scratch
the surface with hard objects.
Illumination
To obtain a clear picture, do not expose the screen to
direct illumination or direct sunlight. If possible, use spot
lighting directed down from the ceiling.
Installation
• To prevent over heating of the set, do not block the
ventilation openings.
• Do not install the TV in a hot or humid place, or in a place
subject to direct sunlight, excessive dust or mechanical
vibration.
• After transporting the TV directly from a cold to a warm
location, or if the room temperature has changed
suddenly, pictures may be blurred or show poor colour
over portions of the picture. This is because moisture has
condensed on the mirrors or lenses inside the TV. Let the
moisture evaporate before using the TV.
Maintenance
• Save the original shipping carton and packing material to
use if you ever have to ship your TV. For maximum
protection, repack your TV as it was originally packed at
the factory.
• To keep the cabinet looking brand-new, periodically clean
it with a soft cloth. Stubborn stains may be removed with a
cloth slightly dampened with a mild detergent solution.
Never use strong solvents such as thinner or benzene, or
abrasive cleaners since these will damage the cabinet. As
a safety precaution, unplug the TV before cleaning it.
• To remove dust from the front of the screen, unplug the
TV and wipe gently with a soft cloth lightly dampened with
water or a mild detergent solution, using vertical strokes
only. Then wipe it with a dry, soft cloth. Never use
solvents or thinners for cleaning purposes.
• If the picture turns dark after the TV has been in use for a
long period of time, it may be necessary to clean the
inside of the TV. Consult qualified service personnel for
this.
GB
GB
2
Page 3

Contents
Overview ................................................................................... 4
Getting Started...............................................................
Step 1 Preparation..................................................................... 6
Check the supplied accessories ...................................... 6
Insert the battery into the Remote Commander................ 6
Connect the aerial ........................................................... 6
Step 2 Tuning in to TV Stations .................................................. 7
Choose a language......................................................... 7
Display the menu ............................................................ 7
Preset Channels automatically ........................................ 8
Preset Channels manually .............................................. 9
Additional Presetting Functions ................................................ 10
Sorting Programme Positions........................................ 10
Using “Further Programme Preset” ............................... 11
Skipping Programme Positions ..................................... 12
Captioning a Station Name ........................................... 12
Parental Lock................................................................ 13
Tuning in a Channel Temporarily................................... 13
Operating Instructions .................................................
Watching the TV....................................................................... 14
Switching the TV on and off ........................................... 14
Selecting TV Programmes ............................................ 14
Adjusting the Volume .................................................... 14
Operating the TV Using the Buttons on the TV ............... 14
Watching Teletext or Video Input ................................... 15
More Convenient Functions .......................................... 15
14
6
Getting Started
Operating Instructions
GB
GB
Adjusting and Setting the TV Using the Menu ........................... 16
Adjusting the Picture and Sound ................................... 16
Graphic Equalizer ......................................................... 17
Using the Sleep Timer................................................... 17
PAP (Picture and Picture)......................................................... 18
Operating Screen Mode/PAP Using the Menu ............... 19
Auto Format.................................................................. 19
Teletext.................................................................................... 20
Direct Access Functions................................................ 20
Using the Teletext Menu ............................................... 21
User Page Bank System ............................................... 22
Connecting and Operating Optional Equipment ........................ 23
Connecting Optional Equipment.................................... 23
Selecting lnput and Output ............................................ 24
Using AV Preset ........................................................... 25
Remote Control of Other Sony Equipment ..................... 26
For Your Information ................................................................ 27
Optimum Viewing Area ................................................. 27
Cleaning of the Air Filter ................................................ 28
Replacing the Lamp ...................................................... 29
Troubleshooting............................................................ 30
Specifications ............................................................... 30
Warning Indicators ........................................................ 31
Stabilizing the Projection TV.......................................... 31
3
Page 4

Overview
This section briefly describes the buttons and controls on the TV
set and on the Remote Commander. For more information, refer to
the pages given next to each description.
TV set-front
AB
PROGR
GB
Symbol
φ
φ
A-µ-B
PROGR+/–
+/–
λ
S
3, 3, 3
Name
Main power switch
Standby indicator
Stereo A/B indicators
Programme
Volume buttons
Input select buttons
Headphones jack
Input jacks (S video/video/audio)
Refer to page
14
14
16
14
14
15
23
24
4
Page 5

Note
The SAT button does not
operate with this TV.
Remote commander
RM-838
2
1
45
7
PROGR
3
6
9
8
0
TV/Teletext
operation
Full-Function sideSimple side
2
1
45
8
7
0
SAT
MEM
USE
RM-838
RESET
3
6
9
C
+
_
+
_
VTR 1-2-3
GB
PAP operation
PROGR
+
1
_
1
MENU
PROGR
OK
MDP
+
_
Menu operation
Video operation
TV/Teletext operation
Symbol
ο
φ
Ο
_
1,2,3,4,5,6,
7,8,9 and 0
–/-C
+/–
PROGR +/–
1
1
∃
[
#
ΛΛΛΛ
Name
Mute on/off button
Standby button
TV power on/TV mode selector
button
Teletext button
Input mode selector
Output mode selector
Number buttons
Double-digit entering button
Direct channel entering button
Volume control button
Programme selectors
Teletext page access buttons
Picture adjustment button
Sound adjustment button
On-screen display button
Teletext hold button
Time display button
Fastext buttons
“Freeze” button
Button to change Screen Format
Refer to page
15
14
14
15
15
24
14
14
10
14
14
20
16
16
15
20
15
20
15
15
PAP (Picture-and-picture) operation
Symbol
Χ
Name
PAP on/off button
PAP source selector
Swap button
PAP freeze button
Menu operation
Symbol
MENU
>+/ ?–
OK
≅
Name
Menu on/off button
Select buttons
OK(confirming)button
Back button
Video operation
Symbol
VTR1/2/3,
MDP
;; − :: Λ
ϑ α φ
PROGR +/–
Name
Video equipment selector
Video equipment operation
buttons
Refer to page
18
18
18
18
Refer to page
7
7
7
7
Refer to page
26
26
5
Page 6

Getting Started
RM-838
PROGR
VTR 1-2-3
MDP
1
2
4
5
3
6
9
8
7
0
C
SAT
MENU
+
_
OK
+
4
PROGR
1
1
+
_
+
_
Step 1 Preparation
2
1
1
Check the supplied accessories
2
1
GB
Note: Always remember
to dispose of used
batteries in an
enviromental friendly
way.
When you’ve taken everything
out of the carton, check that you
have these items:
• RM-838 Remote Commander
• One IEC designation R6 battery
RM-838
3
2
1
6
5
4
9
8
7
0
PROGR
• Lamp (1)
• Wrench (1)
• Bracket (2)
2
Insert the battery into the Remote Commander
RM-838
2
1
1
4
7
Remove the cover. Check the correct
1
RM-838
3
6
5
9
8
0
PROGR
3
2
1
6
5
4
9
8
7
0
PROGR
3
3
2
Refit the outside cover
polarities.
making sure that the FullFunction side is visible to use
the menu in step 2.
Connect the aerial
3
L/G/S/I
Fit an IEC aerial connector attached to 75-ohm coaxial cable (not
supplied) to the ) socket at the rear of the TV.
R/D/D/D
L/G/S/I
R/D/D/D
L/G/S/I
R/D/D/D
L/G/S/I
R/D/D/D
6
Page 7

Step 2 Tuning in to TV Stations
2
1
Once you have set up the TV, you can choose the language of the
menu. Then, you should preset the channels (up to 100 channels)
by choosing either the automatic or manual method. The
automatic method is easier if you want to preset all receivable
2
1
45
8
7
0
SAT
MEM
USE
RM-838
C
+
VTR 1-2-3
RESET
3
6
9
PROGR
+
1
_
_
1
+
MENU
_
OK
MDP
+
PROGR
_
channels at once. Use the manual method if you only have a few
channels and want to preset channels one by one.
Before you begin
• Check that the Full-Function side of the Remote Commander is
visible.
• Locate Menu operation buttons on the Remote Commander.
They are shaded in the illustration at the left.
Choose a language
1
1 Press φ on the TV.
The TV will switch on. If the standby indicator on the TV is lit, press
Ο or a number button on the Remote Commander.
2 Press the MENU button.
The LANGUAGE menu appears. (See Fig. 1.)
MENU
3 Select the language you want with > + or ? – and press OK.
Fig. 1
LANGUAGE
+
_
OK
Sec
Select
English
Deutsch
Français
Italiano
Español
Nederlands
Português
Suomi
Svenska
¶ Ł غÆ
Türkçe
and press OK
GB
φ Fig. 2
To go back to main
menu
Keep pressing ≅.
To go back to the
normal TV picture
Press MENU. Normal
TV picture will be
restored after one
minute if menu functions
are not selected.
Note on the Demo
function
If you choose Demo in
the Installation menu,
you can see a sequential
demonstration of the
menu functions.
Press MENU to stop the
function.
Display the menu
2
Press MENU.
The main menu appears. (See Fig. 2.)
Using > + or ? – select the symbol
Now, choose one of the methods described overleaf:
“Preset Channels Automatically”
or
“Preset Channels Manually”
and press OK.
SCREEN MODE
Screen Mode
Screen Position
Strobe
PAP
[on]
Clip Board
[off]
Auto Format
[off]
Select and press OK
[ ]zoom
[ ]
0
7
Page 8

Preset channels automatically
B/G
SYS PROG
C25CH–
LABEL
––––04
3
1 Select the symbol for “Preset” with >+ or ?– and press OK.
The PRESET menu appears. (See Fig. 3.)
2 Select “Auto Programme” with >+ or ?– and press OK.
The AUTO PROGRAMME menu appears. (See Fig. 4.)
3 Press OK.
Select if necessary the TV broadcast system (B/G for Western
European or D/K for Eastern European countries) with >+ or ?–
and press OK. The first element of the “PROG” number will be
highlighted.
4 Select the programme (number button) from which you want to
start presetting. Select the first element of the double-digit number
with >+ or ?– or the number buttons (e.g., For “04,” select “0”
here) and press OK.
The second element of “PROG” will be highlighted.
5 Select the second element of the double-digit number with >+ or
?– or the number buttons (e.g., For “04,” select “4” here) (See Fig.
5) and press OK.
6 Select “C” or “S” with >+ or ?– and press OK.
The automatic channel presetting starts.
When presetting is finished, the preset menu reappears. All
available channels are now stored on successive number buttons.
Press menu to restore normal TV picture.
PRESET
Auto Programme
Manual Programme Preset
Programme Sorting
Parental Lock
Installation
Select and press OK
Fig. 3
AUTO PROGRAMME
SYS PROG
B/G
Select and press OK
Fig. 4
Fig. 5
C25CH–
LABEL
––––01
GB
To go back to the main
menu
Keep pressing ≅.
To stop automatic
channel presetting
Press ≅ on the Remote
Commander.
Notes
• After presetting the
channels automatically,
you can check which
channels are stored on
which programme
positions.
For details, see
“Displaying the
Programme Table” on
page 15.
• You can sort the
programme positions to
have them appear on
screen in the order you
like. For details, see
“Sorting Programme
Positions” on page 10.
8
Page 9

Use this method if there
2 C –––––21B/G off
are only a few channels
in your area to preset or if
you want to preset
channels one by one.
You may also allocate
programme numbers to
various video input
sources.
If you have made a
mistake
Press ≅ to go back to
the previous position.
To return to the main
menu
Keep pressing ≅.
To go back to the
normal TV picture
Press MENU.
To tune in a channel by
frequency
After selecting F in step 6,
enter three digits using
the number buttons.
Preset channels manually
3
1 Select the symbol for “Preset” with >+ or ?– and press OK.
The PRESET menu appears. (See Fig. 6.)
2 Select “Manual Programme Preset” with >+ or ?– and press OK.
The MANUAL PROGRAMME PRESET menu appears. (See Fig.
7.)
3 Using >+ or ?–, select the programme position (number button) to
which you want to preset a channel, and press OK.
4 Select, if necessary the TV broadcast system or a video input
source (EXT)) with >+ or ?–.
5 Then press OK. The CH position will be highlighted. (See Fig. 8.)
6 Using >+ or ?–, select C (to preset a regular channel), S (cable
channel) or F (to tune in by frequency) and press OK.
The first element of the “CH” number will be highlighted.
If you have selected EXT in step 5, select the video input source
with >+ or ?–. (See Fig. 9.)
There are two ways to preset channels, If you know the channel
number, go to step “7-Manual,”
or
If you don’t know the channel number, go to step “7-Search.”
7 Manual
-a Select the first element of the “CH” number with >+ or ?– or the
number buttons and press OK.
The second element of the “CH” number will be highlighted.
-b Select the second element of the number with >+ or ?– or the
number buttons.
The selected number appears. (See Fig. 10.)
-c Press OK
The “SEARCH” position is highlighted and the selected channel is
now stored. (See Fig. 11.)
-d Press OK until the cursor appears by the next programme position.
-e Repeat steps 3 to 7 to preset other channels.
PRESET
Auto Programme
Manual Programme Preset
Programme Sorting
Parental Lock
Installation
Select and press OK
Fig. 6
MANUAL PROGRAMME PRESET
PROG
SYS
CH
B/G
B/G
B/G
B/G
B/G
B/G
B/G
B/G
B/G
B/G
SEARCH LABEL
C21
off
C34
off
C33
off
C45
off
C02
off
C08
off
C10
off
C12
off
C20
off
C59
off
1
2
3
4
5
6
7
8
9
10
Select and press OK
Fig. 7
Fig. 8
3 AV1 –––––EXT
Fig. 9
2 C –––––21B/G off
Fig. 10
2 C –––––35B/G off
Fig. 11
-----
-----
-----
-----
-----
-----
-----
-----
-----
-----
GB
7 Search
-a Press OK repeatedly until the colour of the SEARCH position
changes.
-b Start searching for the channel with >+ (up) or ?– (down).
The CH position changes colour. (See Fig. 12.)
The CH number starts counting up or downwards. When a
channel is found, it stops. (See Fig. 13.)
-c Press OK if you want to store this channel. If not, press >+ or ?–
to continue channel searching.
-d Press OK until the cursor appears by the next programme position.
-e Repeat steps 3 to 7 to preset other channels.
2 C –––––35B/G off
Fig. 12
2 C –––––50B/G
Fig. 13
4$
9
Page 10

PROGRAMME SORTING
PROG
1
2
3
4
5
6
7
8
Select and press OK
C15
C03
C04
C07
C09
C12
C13
C14
CH LABEL
BBC 1
BBC 2
ITV
MBC
-----
-----
-----
-----
Move PR 1 to PR - -
Additional Presetting Functions
8 BBC1C15
2
1
This section shows you additional presetting functions such as
sorting or skipping programme positions, captioning a station
name, manual fine-tuning, and using the parental lock.
Before you begin
• Check that the Full Function side of the Remote
Commander is visible.
• Locate the Menu operation buttons.
Sorting Programme Positions
PROGRAMME
SORTING
2
1
45
7
3
6
9
8
0
C
PROGR
+
1
_
1
SAT
+
_
VTR 1-2-3
MEM
USE
+
_
MENU
OK
MDP
With this function, you can sort the programme positions to a
preferable order.
1 Press MENU to display the main menu.
2 Select the symbol
for “Preset” with >+ or ?– and press OK.
The PRESET menu appears.
3 Select “Programme Sorting” with >+ or ?– and press OK.
The PROGRAMME SORTING menu appears. (See Fig. 14.)
4 Using >+ or ?–, select the programme position you want to move
to another and press OK.
The colour of the selected position changes. (See Fig. 15.)
5 Using >+ or ?–, select the programme position to which you want
to move the channel of the programme position selected in step 4
and press OK. Now the programme positions have been sorted.
(See Fig. 16.)
6 Repeat steps 4 and 5 to sort other programme positions.
PROGRAMME SORTING
PROG
1
2
3
4
5
6
7
8
Move PR 8 to PR - -
Select and press OK
Fig. 14
Fig. 15
CH LABEL
C03
BBC 2
C04
C07
C09
C12
C13
C14
C15
ITV
MBC
-----
-----
-----
-----
BBC 1
GB
For higher programme
positions
The display scrolls
automatically.
If you have made a
mistake
Press ≅ to go back to
the previous position
To go back to main
menu
Keep pressing ≅.
To go back to the
normal TV picture
Press MENU.
RM-838
RESET
PROGR
+
_
Fig. 16
10
Page 11

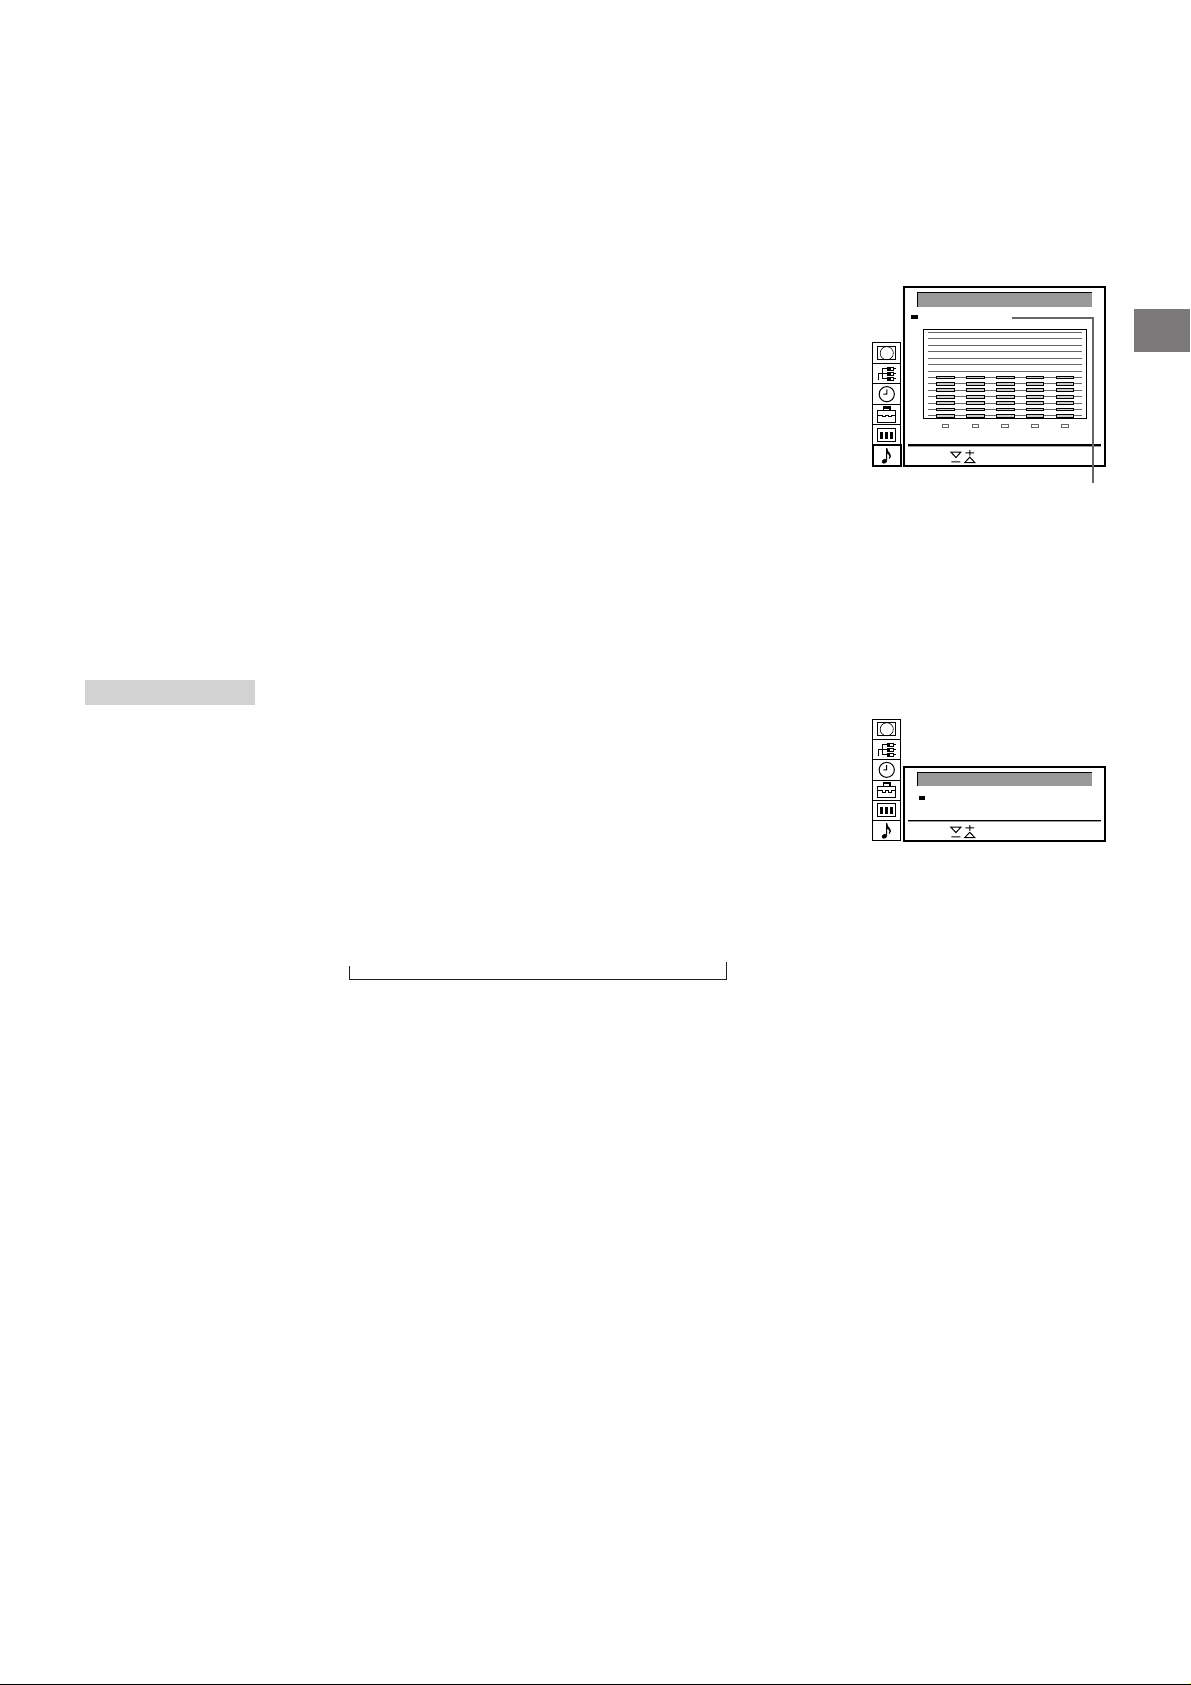
INSTALLATION
Using “Further Programme
Preset”
Using the menu “further Programme Preset” you can
a) in case of a strong local aerial signal (striped picture) attenuate the
signal individually for each programme position (RF attenuator).
b) individually adjust and store the volume level of each channel
(Volume offset).
c) in case of a strong sound signal (distorted sound), attenuate the
sound signal for each programme position.
d) use the manual fine tuning to obtain a better picture reception, if
the picture is distorted. Normally the AFT (automatic fine tuning) is
operating.
GB
1 Press MENU to display the main menu.
2 Select the symbol
for “Preset” with >+ or ?– and press OK.
The PRESET menu appears.
3 Select “Installation” with >+ or ?– and press OK. The
INSTALLATION menu appears.
4 Select “Further Programme Preset” with >+ or ?– and press OK.
The FURTHER PROGRAMME PRESET menu appears (See Fig.
17).
5 Using >+ or ?– select the desired programme position and press
OK once to select a) “ATT” (RF Attenuator), twice to select b)
“VOL” (Volume offset), three times to select c) “IN-AMP” (Input
Amplifier) or four times to select d) AFT (Automatic Fine Tuning).
The selected item changes colour.
To adjust or change:
a) RF attenuator (ATT)
Using >+ or ?– select “On” for the selected programme position.
Press OK to confirm the selection. Repeat step 5 to attenuate
other programme positions.
b) Volume offset (VOL)
Using >+ or ?– you can adjust the volume level for the selected
programme position within a range form –7 to +7.
Press OK to store the volume level.
Repeat step 5 to set the volume level for other programme
positions.
FURTHER PROGRAMME PRESET
PROG
ATT
VOL
IN-AMP AFT
off
1
0
on
off
0
2
3
4
5
6
7
8
9
10
Select and press OK
on
off
- 1
on
off
- 1
on
off
0
on
off
- 1
on
off
- 1
on
off
- 1
on
off
- 1
on
off
- 1
on
Fig. 17
on
on
- 1
- 1
on
- 1
- 1
- 1
- 1
- 1
To reactivate AFT
(Automatic Fine
Tuning)
Repeat from the
beginnig and select “ON”
in step 5.
c) IN-AMP (input amplifier)
Using >+ or ?– select “Off” for the selected programme position.
Press OK to confirm the selection. Repeat step 5 to switch off the
input amplifier for other programme positions.
d) AFT
Using >+ or ?– you can fine-tune the channel within a range from
–15 to +15. Press OK to store the fine-tuned level. Repeat step 5
to fine-tune the other channels.
6 Press MENU to return to the normal TV mode.
11
Page 12

MANUAL PROGRAMME PRESET
PROG
1
2
3
4
5
6
7
8
9
10
Select and press OK
B/G
B/G
B/G
B/G
B/G
B/G
B/G
B/G
B/G
B/G
SYS
C21
C24
C25
C27
C28
C22
C26
C25
C23
C29
CH
off
off
off
off
off
off
off
off
off
off
SEARCH LABEL
-----
-----
-----
-----
-----
-----
-----
-----
-----
-----
MANUAL
3 –––
4 B/G
3 –––
2 C S––––25B/G off
2CSONY25B/G off
PROGRAMME
PRESET
If you have made a
mistake
Press ≅ to go back to
the previous position.
To go back to main
menu
Keep pressing ≅.
To go back to the
normal TV picture
Press MENU.
MANUAL
PROGRAMME
PRESET
Skipping Programme Positions
You can skip unused programme positions when selecting
programmes with PROGR +/– buttons. However, the skipped
programmes may still be called up when you use the number
buttons.
1 Press MENU to display the main menu.
2 Select the symbol
for “Preset” with >+ or ?– and press OK.
The PRESET menu appears.
3 Select “Manual Programme Preset” with >+ or ?– and press OK.
The MANUAL PROGRAMME PRESET menu appears. (See Fig.
18.)
4 Using >+ or ?–, select the programme position which you want to
skip and press OK.
The “SYS” position changes colour.
5 Press >+ or ?– until “– – –” appears in the SYSTEM position.
(See Fig. 19.)
6 Press OK. (See Fig. 20.)
When you select programmes using the PROGR +/– buttons, the
programme position will be skipped.
7 Repeat steps 4 to 6 to skip other programme positions.
Captioning a Station Name
Programme names are usually automatically taken from Teletext if
available, You can also “name” a channel or an input video source
using up to five characters (letters or numbers) to be displayed on
the TV screen (e.g. BBC1). Using this function, you can easily
identify which channel or video source you are watching.
1 Press MENU to display the main menu.
2 Select the symbol
The PRESET menu appears.
3 Select “Manual Programme Preset” with >+ or ?– and press OK.
The MANUAL PROGRAMME PRESET menu appears. (See Fig.
21.)
4 Using >+ or ?–, select the programme position you want to
caption and press OK repeatedly until the first element of the
LABEL position is highlighted.
5 Select a letter or number with >+ or ?– and press OK.
The next element will be highlighted.
Select other characters in the same way. If you want to leave an
element blank, select - and press OK. (See Fig. 22.)
6 After selecting all the characters, press OK repeatedly until the
cursor appears by the next programme position (at the left margin).
Now the caption you chose is stored. (See Fig. 23.)
7 Repeat steps 5 and 6 to caption names for other channels.
for “Preset” with >+ or ?– and press OK.
PROGR
+
_
MANUAL PROGRAMME PRESET
PROG
SYS
CH
B/G
B/G
B/G
B/G
B/G
B/G
B/G
B/G
B/G
B/G
SEARCH LABEL
C21
off
C24
off
C25
off
C27
off
C28
off
C22
off
C26
off
C25
off
C23
off
C29
off
1
2
3
4
5
6
7
8
9
10
Select and press OK
Fig. 18
Fig. 19
Fig. 20
Fig. 21
Fig. 22
Fig. 23
-----
-----
-----
-----
-----
-----
-----
-----
-----
-----
GB
12
Page 13
3 C26 C 4
2 C42 BBC 1
PROG CH LABEL
1 C25 BBC 2
0 AV1 VHS
PARENTAL LOCK
If you try to select a
programme that has
been blocked
The message
“LOCKED” appears on
the blank TV screen.
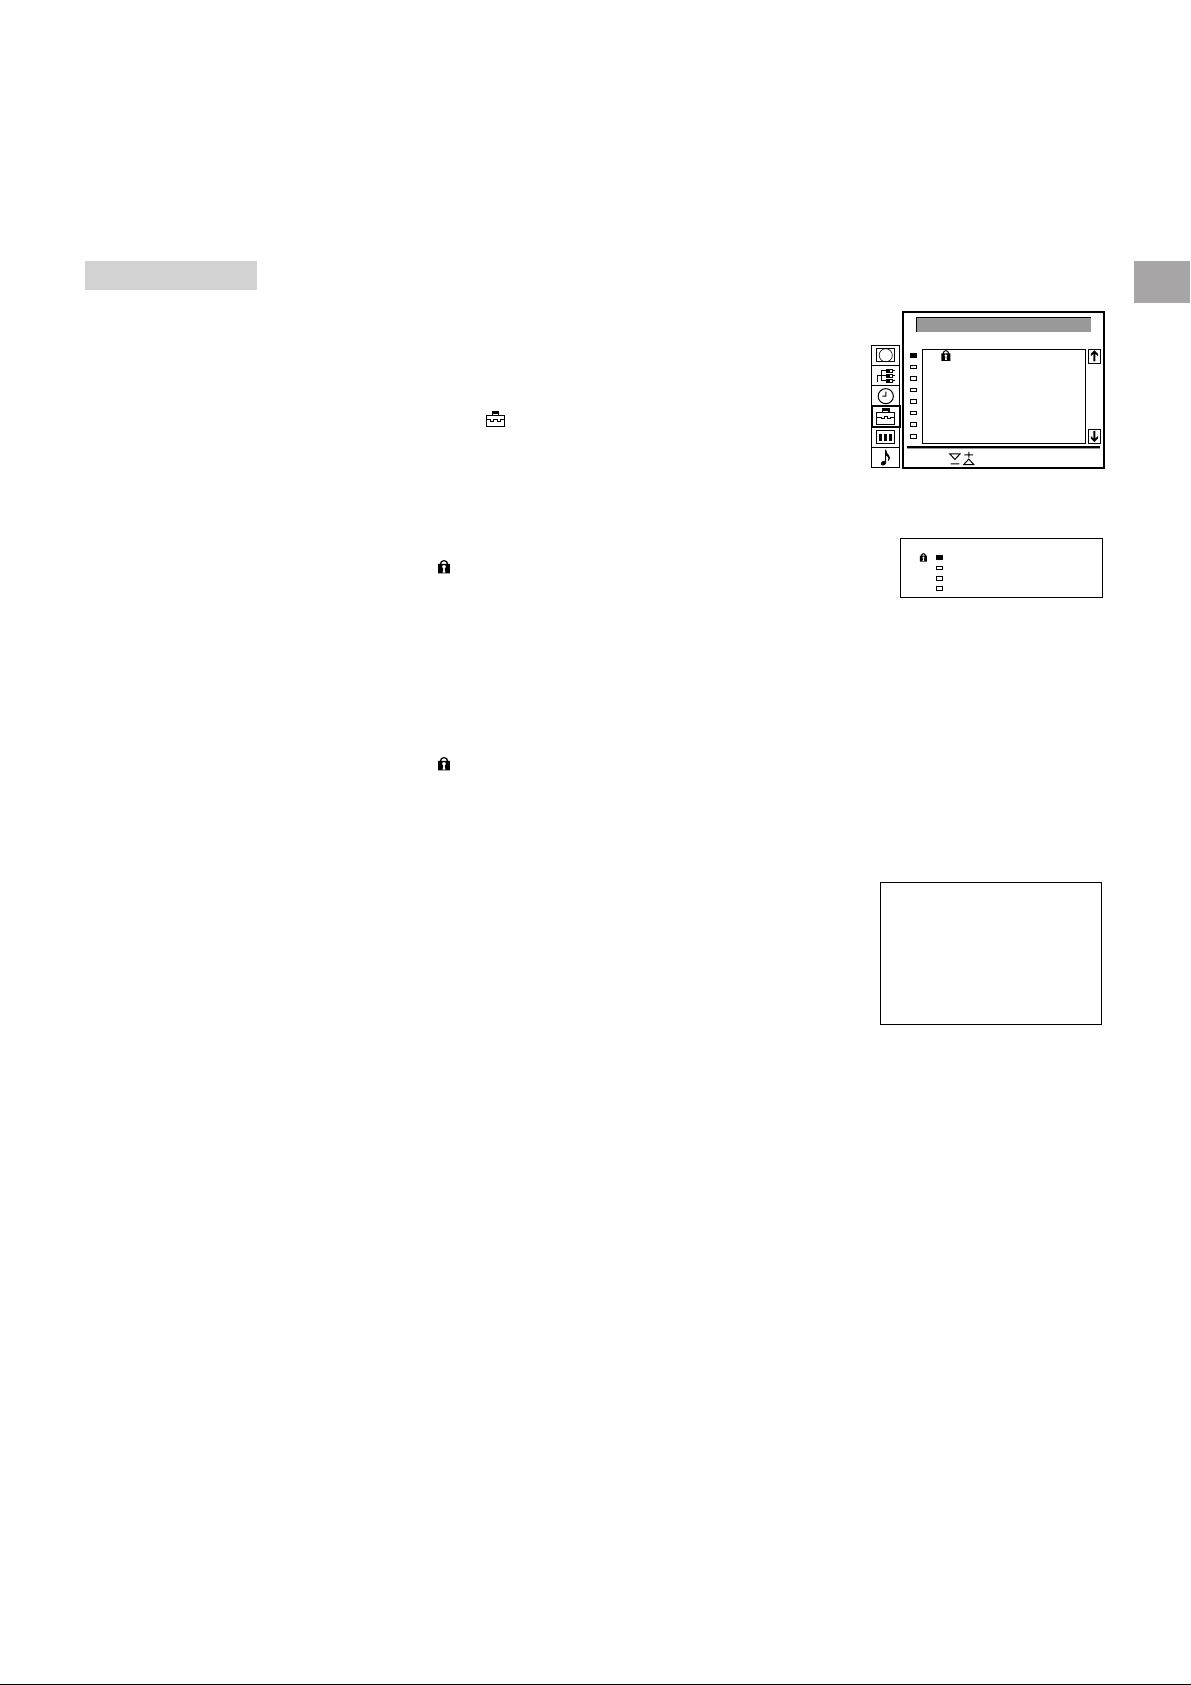
Parental Lock
You can prevent undesirable broadcasts from appearing on the
screen. We suggest you use this function to prevent children from
watching programmes which you consider unsuitable.
1 Press MENU to display the main menu.
2 Select the symbol
The PRESET menu appears.
3 Select “Parental Lock” with >+ or ?– and press OK.
The PARENTAL LOCK menu appears. (See Fig. 24.)
4 Using >+ or ?–, select the programme position you want to block
and press OK.
The symbol
indicating that this programme is now blocked. (See Fig. 25.)
5 Repeat step 4 to block other programme positions.
Cancelling blocking
1 On the PARENTAL LOCK menu, select the programme position
you want to unblock with >+ or ?–.
2 Press OK.
The symbol
cancelled.
for “Preset” with >+ or ?– and press OK.
appears in front of the programme number
disappears indicating that the blocking has been
PARENTAL LOCK
Select and press OK
Fig. 24
Fig. 25
PROG
0
1
2
3
4
5
6
7
CH LABEL
AV1
VHS
C25
BBC 2
C42
BBC 1
C26
C34
C35
C36
C37
C 4
ITV
-----
-----
-----
GB
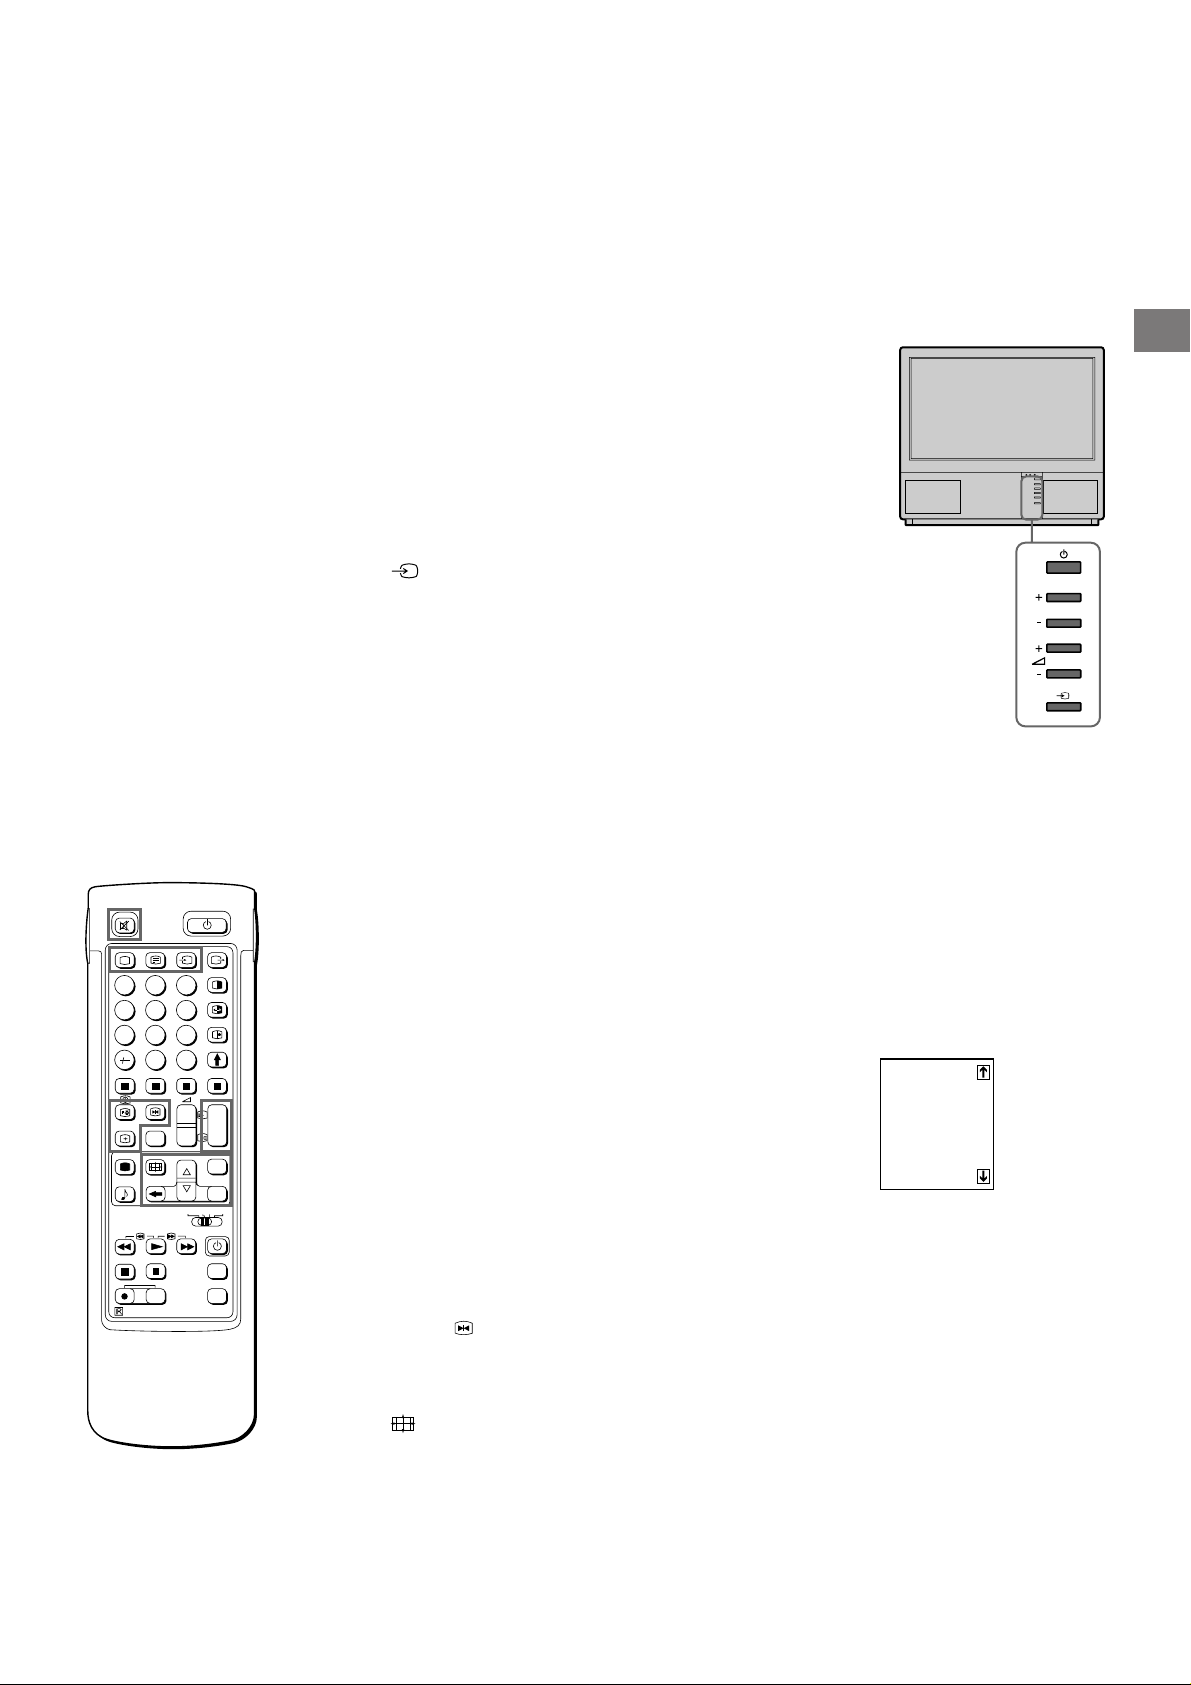
Tuning in a Channel Temporarily
You can tune in to a channel temporarily, even when it has not
been preset. Use the buttons on the Full-Function side of the
Remote Commander.
1 Press C on the Remote Commander. For cable channels, press C
twice.
The indication “C” ( “S” for cable channels) appears on the screen.
(See Fig. 26.)
2 Enter the double-digit channel number using the number buttons
(e.g. for channel 4, first press 0, then 4).
The channel appears.
However, the channel will not be stored.
C - -
Fig. 26
13
Page 14

Operating Instructions
AB
PROGR
Watching the TV
This section explains the basic functions you use while watching
TV. Most of the operations can be done using the simple side of
RM-838
the Remote Commander.
GB
2
1
45
7
PROGR
If no picture appears
when you depress φ
on the TV and if the
standby indicator on
the TV is lit, the TV is in
standby mode.
Press Ο or one of the
number buttons to
switch it on.
3
6
9
8
0
Switching the TV on and off
Switching on
Depress φ on the TV.
Switching off temporarily
Press φ on the Remote Commander.
The TV enters standby mode and the standby indicator on the front
of the TV lights up in red.
To switch on again
Press Ο, PROGR +/–, or one of the number buttons on the
Remote Commander.
Switching off completely
Depress φ on the TV and indicator on the front of the TV lights up
in amber.
Selecting TV Programmes
Press PROGR +/– or press the number buttons.
To select a double-digit number
Press -/--, then the numbers.
For example, If you want to choose 23, press -/--, 2 and 3.
Adjusting the Volume
Press +/–.
Operating the TV Using the
Buttons on the TV
To select the programme number, press the PROGR +/– buttons.
To adjust the volume, press the
To select the video input picture, press the
To reset picture and sound controls to the factory preset level
(RESET function), press PROGR +/– buttons simultaneously.
+/– buttons.
button.
14
Page 15
Watching Teletext or Video Input
PROGR
For details of the teletext
operation, refer to
page 20.
For details of the video
input picture, refer to
page 24.
Watching teletext
1 Press _ to view the teletext.
2 For teletext operation, enter a 3-digit page number with the number
buttons to select a page.
For fastext operation, press one of the coloured buttons.
For both operations, press ς (PAGE + ) for the next page or
Υ (PAGE – ) for the preceding page.
3 To go back to the normal TV picture, press Ο .
Watching a video input picture
1 Press repeatedly until the desired video input appears.
2 To go back to the normal TV picture, press Ο.
More Convenient Functions
Use the Full-Function side of the Remote Commander.
Displaying the on screen indications
• Press ∃ once to display all the indications. They will disappear
after a few seconds.
• Press ∃ twice to have the programme number and label stay on
screen. Press twice again to make the indications disappear.
Muting the sound
Press ο.
To resume normal sound, press ο again.
GB
2
1
45
8
7
0
SAT
MEM
USE
RM-838
C
+
VTR 1-2-3
RESET
3
6
9
PROGR
+
1
_
_
1
+
MENU
_
OK
MDP
Displaying the time
Press #. This function is available only when teletext is broadcast.
To make the time display disappear, press # again.
Displaying the Programme Table
Press OK. A Programme Table will be displayed on the left side of
the TV screen. (See Fig. 27.)
Selecting TV programmes
Press PROGR +/– or select the desired programme position using
>+ or ?– and press OK.
1
2
3
4
5
6
7
8
9
10
Fig. 27
BBC
SAT
TV5
C02
C15
RTL
SKY
S34
AV1
MTV
To make the Programme Table disappear, press MENU.
+
PROGR
_
Freezing the Picture
When watching the TV you have the possibility to “freeze” the
picture. Press
. Press the button again to return to the normal
TV picture.
Changing the Screen format
Press repeatedly to change the Screen mode as follows:
4:3 (4:3 picture)
Α Smart (imitation of 16:9 for 4:3 broadcast)
Α Zoom (imitation of 16:9 for movies broadcast in
cinemascopic format)
or
Α Wide (for 16:9 broadcast).
See also page 19 for more information.
15
Page 16

Adjusting and Setting the TV Using
Brightness
Colour
Brightness
the Menu
PICTURE
CONTROL
SOUND
CONTROL
2
1
45
8
7
0
SAT
MEM
USE
RM-838
C
+
VTR 1-2-3
RESET
Adjusting the Picture and Sound
Although the picture and sound are adjusted at the factory, you can
adjust them to suit your own taste. You can also select dual sound
(bilingual) programmes when available or adjust the sound for
listening with the headphones. Also you have the possibility to
adjust the sound to your individual taste using the Graphic
Equalizer and special Sound effects.
1 Press
(for picture) or (for sound) on the Remote Commander.
or
3
6
9
Press MENU and select the symbol
Sound Control, then press OK.
The PICTURE CONTROL or SOUND CONTROL menu appears.
for Picture Control or
(See Fig. 28 or Fig. 29.)
PROGR
+
1
_
_
1
+
MENU
_
OK
MDP
2 Using >+ or ?–, select the item you want to adjust and press OK.
The selected item changes colour. (See Fig. 30.)
3 Adjust the setting with >+ or ?– and press OK.
The cursor appears beside the next item (at the left margin). (See
Fig. 31.)
For the effect of each control, see the table below.
4 Repeat steps 2 and 3 to adjust other items.
PROGR
+
_
5 Press MENU to return to TV picture.
Effect of each control
PICTURE CONTROL
Contrast
Brightness
Colour
Sharpness
Reset
Resolution (high)
Select and press OK
Fig. 28
SOUND CONTROL
Grafic Equalizer
Surround-Mode
Hall effect
Dual Sound
2
Volume
2
Dual Sound (A)
Select and press OK
Fig. 29
Fig. 30
Fig. 31
[ ]Hall
[ ]
[ ]mono
[ ]mono
GB
If you have made a
mistake
Press ≅ to go back to
the previous position.
To go back to the main
menu
Keep pressing ≅.
Notes
• HUE is only available for
NTSC colour systems.
• Hall Surround is not
available via
headphones.
Note on LINE OUT
The audio level and the
dual sound mode output
from the > jack on the
rear correspond to the
HEADPHONES
VOLUME and DUAL
SOUND settings.
When watching a video
input source with
stereo sound
You can select DUAL
SOUND to change the
sound.
PICTURE CONTROL
Contrast
Brightness
Colour
Hue
Sharpness
RESET
Resolution
SOUND CONTROL
Graphic Equalizer
Surround Mode
Hall Effect
(only if “Hall” is on)
Dual Sound
Headphones:
2 Volume
2 Dual Sound
Effect
Less More
Darker
Less
Greenish
Softer
Brighter
More
Reddish
Sharper
Resets picture to the factory preset levels.
Normal high: obtain a high quality picture
Effect
(See page 17 for more information)
Off: Normal n Dolby n Hall
➝
Choice between different hall effects
Room n Dome n Arena
➝
A: left channel B: right channel Stereo Mono
The selected mode of the A-µ-B indicator on the TV lights up.
Less
A: channel 1 n B: channel 2 n PAP (if PAP is switched on you
can select the PAP sound for the headphones)
Stereo n Mono
More
16
Page 17
Note: The modifications
made in “USER” mode
will be stored. All other
settings are reset to
factory-set level when
you change to another
mode.
Graphic Equalizer
Using this function you can individually adjust the sound by cutting
and boosting selected frequencies. You can also select between
the following modes:
Flat n Pop n Rock n Jazz n Vocal n User
1 Select “Sound Control” in the main menu, then select “Graphic
Equalizer” using >+ or ?– and press OK.
The GRAPHIC EQUALIZER menu appears (See Fig. 32).
2 Press OK. The colour of “Mode” changes. Select the desired
mode with >+ or ?– and press OK.
3 If you want to modify a mode, select the desired bar of a frequency
band using >+ or ?– and press OK. The selected frequency
changes colour. Using >+ or ?– adjust the level of frequency and
press OK. In this way you can adjust all 5 graphic bars.
4 Press MENU to return to the normal TV mode.
GRAPHIC EQUALIZER
+
0
–
100 400 1K 4K 10K
Select and press OK
Fig. 32
[User]Mode:
GB
Flat
Pop
Rock
Jazz
Vocal
User
TIMER
To switch off the timer
Select “OFF” in step 3.
To check the
remaining time
Press ∃.
To go back to the
normal TV picture
Press MENU.
Using the Sleep Timer
You can select a time period after which the TV automatically
switches into standby mode.
1 Using >+ or ?– select the symbol t for “Timer” and press OK.
The TIMER menu appears (see Fig. 33).
2 Press OK.
The time period option changes colour.
3 Select the time period with >+ or ?–.
The time period (in minutes) changes as follows:
10 n 20 n 30 n 40 n 50 n 60 n 70 n 80 n 90
↑
4 After selecting the time period, press OK.
The cursor moves back to the left margin and the timer starts
counting.
One minute before the TV switches into standby mode, a message
is displayed on the screen.
TIMER
Sleep Timer [ ]10 Min
Select and press OK
Fib. 33
17
Page 18

PAP (Picture and Picture)
With this function you can display two screens at the same time. In
this way you can watch two TV programmes at the same time. Also
you can watch or monitor the video output from any connected
equipment (for example from a VCR) while watching TV or vice
2
1
45
8
7
0
SAT
MEM
USE
RM-838
3
6
9
C
+
_
+
_
VTR 1-2-3
RESET
PROGR
+
1
_
1
MENU
OK
MDP
+
PROGR
_
versa. For information about connection of other equipment, refer
to page 23.
Main
TV picture
Switching PAP on and off
Press to display the screens in 8:9 format.
Press
The PAP screen will be displayed next to the main TV screen.
The PAP screen will come from the source chosen when the TV
was last used.
To switch PAP off
Press repeatedly.
twice to display the screens in 4:3 format.
GB
PAP screen
Notes
• RGB input source
cannot be displayed in
PAP.
• PAP is not available in
the Zoom mode.
• The sound of the right
screen is only available
via the headphones.
• The picture quality of
the TV screen and
PAP may differ.
Selecting PAP source
Press >.
The symbol > will be displayed at the bottom, left-hand corner of
the screen.
Press PROGR +/–, the number buttons or … to select the desired
source for the PAP screen.
Swapping screens
Press .
The main screen will switch the picture with the PAP screen.
8: 9 8: 9 4: 3
AB BA
AB BA
Freezing the picture
You have the possibility to “freeze” the picture of the PAP screen.
Press
16: 9
once to freeze and twice to return to the normal screen.
A
AA
Freeze
/
8: 9
4: 3
AB
AB
AA
Freeze
/
Freeze
/
AA
18
Page 19

Operating Screen Mode/PAP using
2
1
45
7
RM-838
3
6
9
8
0
C
PROGR
+
+
1
_
_
1
SAT
+
MENU
_
OK
VTR 1-2-3
MEM
MDP
USE
+
PROGR
RESET
_
When you want to
select the screen
mode
You can also select the
screen mode by
pressing the button
on the Remote
Commander.
the Menu
Using the Screen Mode menu you have the possibility to change
the aspect ratio for the TV display for wide screen effects, operate
the PAP Mode or reproduce the main picture image by image
(Strobe function).
1 Press MENU to display the main menu.
2 Select the symbol
OK. The SCREEN MODE menu appears (See Fig. 34).
You have the choice among the following modes:
4:3 for normal ratio 4:3 (See Fig. 35).
Smart: imitation of wide screen effect (16:9) for 4:3 broadcasts
(See Fig. 36).
Zoom imitation of wide screen effect (16:9) for movies broadcast
in cinemascopic format (See Fig. 37).
or
Wide: for 16:9 broadcasts (See Fig. 38).
a) Changing the Screen position (only for Zoom mode)
When using the Zoom mode part of the picture at the top and
bottom will be cut off. With the help of the function “Screen
position” you can move the screen up- or downwards in order to
see the cut-off part of the screen (e.g., to read the subtitles).
Using >+ or ?– select “Screen position” and press OK. The
selected item changes colour. Using >+ or ?– adjust the screen
position and press OK.
b) Strobe Mode
Using >+ or ?– select “Strobe” and press OK. Now the TV picture
is displayed image by image, creating a slow motion effect (See
Fig. 39). Using >+ or ?– select the speed of the motion (3
different speeds are available). Press OK to return to the normal
TV mode.
c) Switching PAP on and off
Using >+ or ?– select “PAP” and press OK. Using >+ or ?–
select “1” to display the PAP screen in 8:9 format, “2” for 4:3 format
and “OFF” to switch if off and press OK.
d) Freezing the PAP screen
Using >+ or ?– select “Clip Board” and press OK.
Using >+ or ?– select “On” to freeze the PAP screen and “Off” to
restore the normal picture.
for “Screen Mode” with >+ or ?– and press
SCREEN MODE
Screen Mode
Screen Position
Strobe
PAP
Clip Board
Auto Format
Select and press OK
Fig. 34
Fig. 35
Fig. 36
Fig. 37
[on]
[off]
[off]
[ ]zoom
[ ]
0
GB
Auto Format
If you preset Auto Format to ON and the 16 : 9 format signal is
being transmitted, the screen mode automatically changes from
any mode to the 16 : 9 mode. When the 16 : 9 format programme is
finished, the screen mode automatically returns to the previous
mode.
1 Press MENU to display the main menu.
2 Select the symbol
OK. The SCREEN MODE menu appears.
3 Select “Auto Format” with >+ or ?– and press OK.
4 Select ON or OFF with >+ or ?– and press OK.
for “Screen Mode” with >+ or ?– and press
Fig. 38
Fig. 39
Strobe: Speed:
LIVELIVE
off: OK
19
Page 20

Teletext
2
1
45
3
6
9
8
7
0
C
TV stations broadcast an information service called Teletext via
the TV channels.Teletext service allows you to receive various
information pages such as weather reports or news at any time
you want. For advanced teletext operation, use the buttons on the
Full-Function side of the Remote Commander.
Direct Access Functions
GB
PROGR
+
+
1
_
_
1
SAT
+
MENU
_
OK
VTR 1-2-3
MEM
RM-838
MDP
USE
+
PROGR
RESET
_
Note
Teletext errors may
occur if the broadcasting
signals are weak.
With the simple side of
the Remote
Commander
You can switch teletext
on and off, operate
Fastext, and directly
select page numbers.
Note
Fastext operation is only
possible, if the TV station
broadcasts Fastext
signals.
Switching Teletext on and off
1 Select the TV channel which carries the teletext broadcast you
want to watch.
2 Press _ to switch on teletext.
A teletext page will be displayed (usually the index page).
If there is no teletext broadcast, “No text available” is displayed on
the information line at the top of the screen.
To switch teletext off
Press Ο.
Selecting a teletext page
With direct page selection
Use the number buttons to input the three digits of the chosen
page number.
If you have made a mistake, type in any three digits. Then re-enter
the correct page number.
With page-catching
1 Select a teletext page with a page overview (e.g. index page).
2 Press OK. Using >+ or ?–, select the desired page. “Page
Catching” will be displayed on the information line. Press OK.
The requested page will appear in a few seconds.
Press _ to resume normal teletext reception.
Accessing next or preceding page
Press g (PAGE+) or G (PAGE-).
The next or preceding page appears.
Superimposing the teletext display on the TV programme
• Press _ once in teletext mode or twice in TV mode.
• Press _ again to resume normal teletext reception.
Preventing a teletext page from being updated
• Press [ (HOLD). The HOLD symbol “[” is displayed on the
information line.
• Press _ to resume normal teletext reception.
Using Fastext
With Fastext you can access pages with one key stroke.
When a Fastext page is broadcast, a colour-coded menu will
appear at the bottom of the screen. The colours of this menu
correspond to the red, green, yellow and blue buttons on the
Remote Commander.
Press the corresponding coloured button on the Remote
Commander which corresponds to the colour-coded menu. The
page will be displayed after a few seconds.
20
Page 21
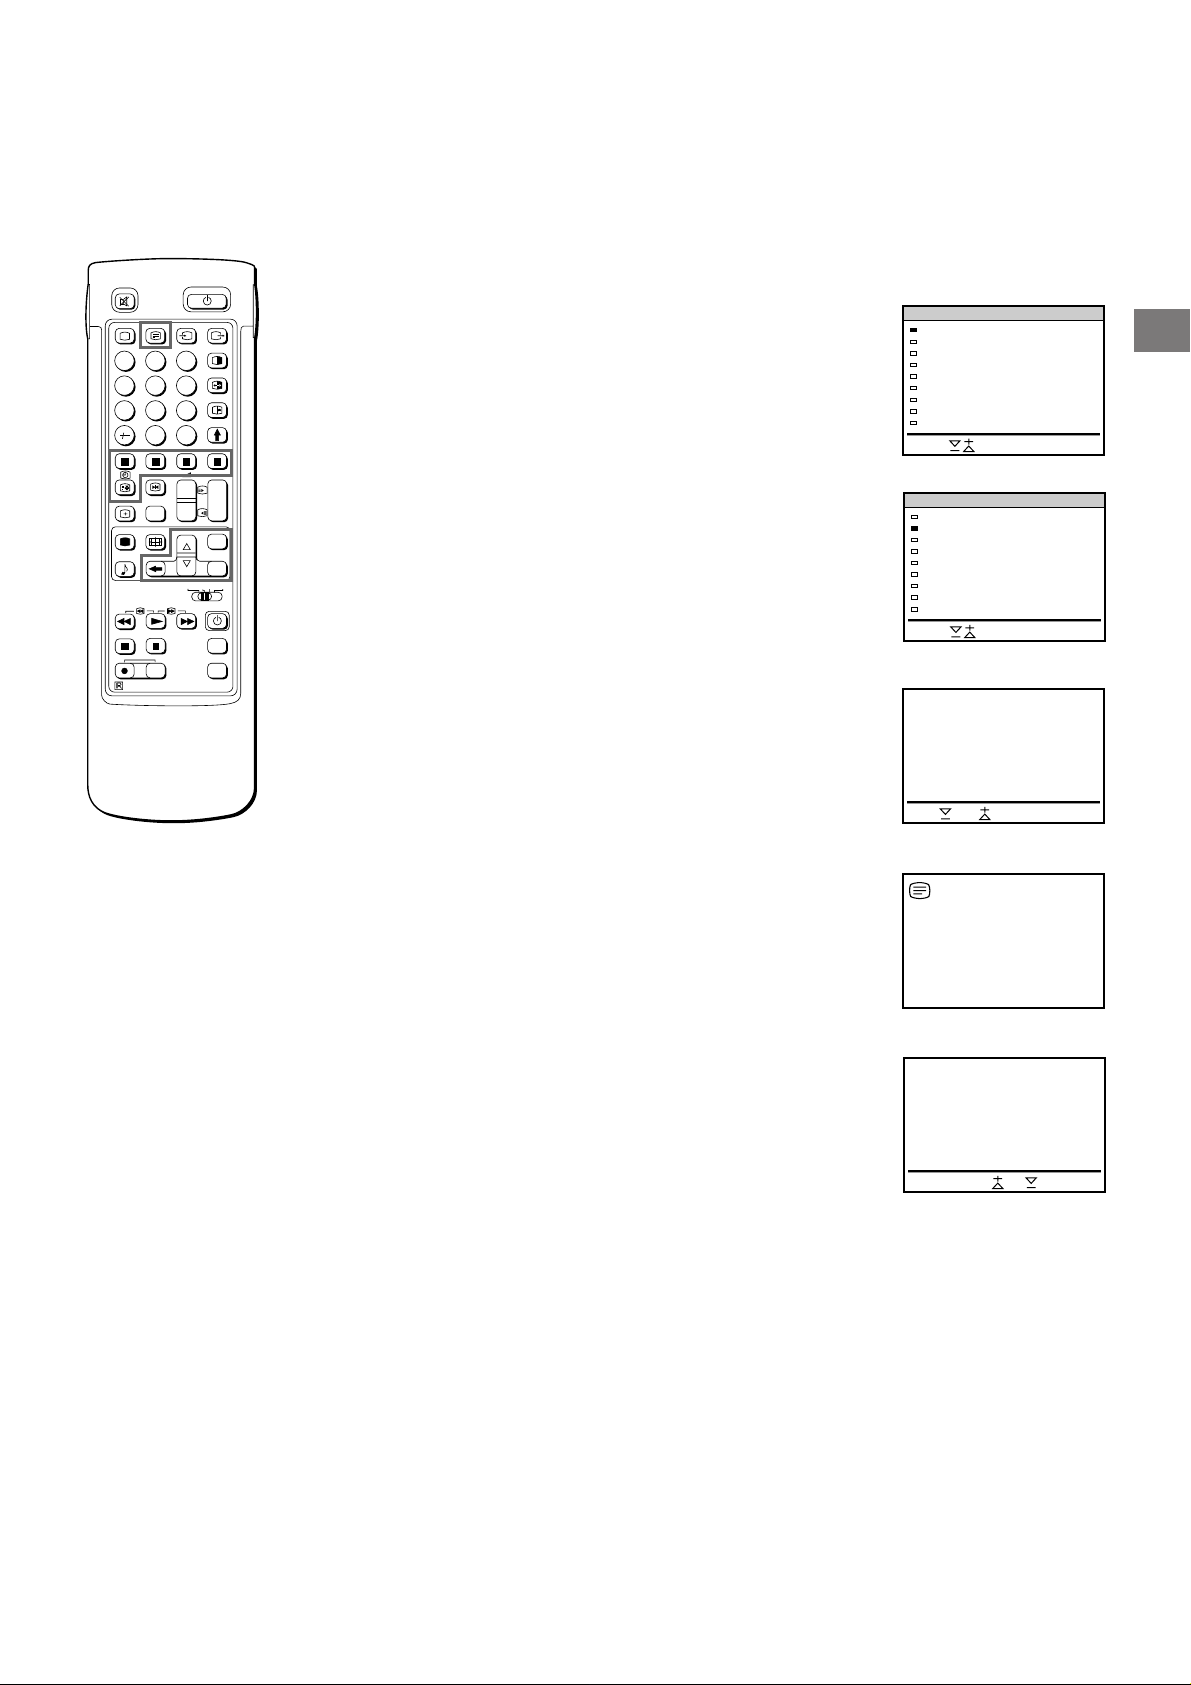
Using the Teletext Menu
TELETEXT MENU
Select and press OK
User Pages
Index
Top/Bottom/Full
Text Clear
Subtitles
Reveal
Time Page
Subpage
Preset User Pages
2
1
45
8
7
0
SAT
MEM
USE
RM-838
C
+
VTR 1-2-3
RESET
This TV is provided with a menu-guided teletext system. When
teletext is switched on, you can use the menu buttons to operate
3
6
9
the teletext menu. Select the teletext menu functions in the
following way:
1 Press MENU. The menu will be superimposed on the teletext
GB
display. (See Fig. 40.)
PROGR
+
1
_
_
1
+
MENU
_
OK
MDP
+
PROGR
_
2 Using >+ or ?–, select the teletext function you want and press
OK. (See Fig. 41.)
USER PAGES/PRESET USER PAGES
See page 22 for information about presetting and operating the
user pages.
INDEX
The index will give you an overview of the contents of the teletext
and the page numbers.
Fig. 40
TELETEXT MENU
User Pages
Index
Top/Bottom/Full
Text Clear
Subtitles
Reveal
Time Page
Subpage
Preset User Pages
Select and press OK
Fig. 41
TOP/BOTTOM/FULL
For convenient reading of a teletext page, you can enlarge the
teletext display with the ability to scroll up and down. After having
selected the function, an information line Top/Bottom/Full will be
displayed. (See Fig. 42.)
Press >+ for “Top” to enlarge the upper half. For “Bottom” keep
pressing ?–, to enlarge the lower half. Press OK for “Full” to
resume the normal size.
Press _ to resume normal teletext reception.
Fig. 42
Top Bottom OK Full
Note
Some of the features
may not be available
depending on the
teletext service.
Press OK to select “OFF”
for the TIME PAGE
setting to cancel the
request.
TEXT CLEAR
After selecting the function, you can watch a TV programme while
waiting for a teletext page to be captured. (The symbol changes
colour.) (See Fig. 43.)
Press _ to resume normal teletext reception.
SUBTITLES
Your teletext service will inform you if a TV programme is subtitled.
After having selected the function the subtitles will be displayed.
REVEAL
Sometimes pages contain concealed information, such as
answers to a quiz. The reveal option lets you disclose the
information. After having selected the function, an information line
“REVEAL ON/OFF” will be displayed. (See Fig.44.)
Using >+ or ?–, select ON to reveal the information or OFF to
conceal it again.
Press _ to resume normal teletext reception.
TIME PAGE
Your teletext service will inform you, if a time coded page is
available. You may have a page (e.g., an alarm page) displayed at
a certain time.
1 An information window will be displayed at the bottom of the page.
Using >+ or ?– select “ON” and press OK.
2 To select the desired page, enter three digits for the page number
(e.g., 452) using the number buttons.
3 To select the desired time, enter four digits for the desired time
(e.g., 1800) using the number buttons. Press MENU.
The selected time is displayed at the top in the left-hand corner.
At the requested time, the page will be displayed.
Press _ to resume normal teletext mode.
Fig. 43
onReveal off
Fig. 44
21
Page 22
PRESET USER PAGES
Select and press OK
BANK
A
B
C
D
E
Allocate Bank
PROG LABEL BANK PROG LABEL BANK
00
01
02
P1
300
200
100
128
400
P2
255
120
220
321
238
P3
456
301
300
255
240
P4
234
303
444
118
P5
200
550
127
P6
179
345
VHS
BBC1
BBC2
–
A
C
04
05
06
MTV
SKY
ITV
D
B
C
To cancel the request
Select Subpage and
press OK.
If two broadcasting
stations use the same
Teletext
You can preset one
bank to 2 different
programme positions.
SUBPAGE
You may want to select a particular teletext page from several
subpages which are rotated automatically. After having selected
the function, an information line will be displayed.
To select the desired subpage, enter four digits using PROGR +/–
or the number buttons (e.g., enter 0002 for the second page of a
sequence).
User Page Bank System
You can store up to 30 pages in the “Teletext page band system”.
In this way you have quick access to the pages you watch
frequently.
Storing pages
There are 5 “banks” (A to E) for 5 teletext stations. In each bank
you can store 6 preferred pages (P1 to P6).
1 Press _ (if Teletext is not on already) and MENU to show the
TELETEXT MENU display.
2 Select PRESET USER PAGES with >+ or ?– and press OK.
3 Select the desired bank with >+ or ?– and press OK. The cursor
will go to the first position (P1) of the preferred pages.
4 Input the three digits of your first preferred page with the number
buttons and press OK.
The cursor will go to the second position.
5 Repeat step 4 for the other 5 page numbers you want to preset. If
you do not want to preset all 6 page numbers available, press OK
without inserting any number. After having finished the presetting
press OK repeatedly until the cursor appears besides the next bank
at the left margin.
6 Select Allocate Bank with >+ or ?– and press OK.
7 Select the programme position for which you have preset pages
with >+ or ?– and press OK. (See Fig. 45.)
8 Select the desired bank with >+ or ?– (Banks A to E are available)
and press OK.
9 Repeat steps 3 to 8 for the other 4 banks available.
Displaying User Pages
1 Select MENU.
2 Select User Pages with >+ or ?– and press OK.
A table of the stored preferred pages will be displayed. (See Fig.
46)
3 Select the desired page with >+ or ?– and press OK. The page
will be displayed after some seconds.
or
You can use the coloured buttons on the Remote Commander to
have quick access to the first four User pages. Page 1 corresponds
to the red button, P2 to the green one, P3 to the yellow one and P4
to the blue button.
To select the desired page press the respective coloured button
while you are in TV mode. Now the Page number of this teletext
page will appear in white at the top in the left-handed comer of the
TV screen. When the page number changes colour, the page is
available. Press the coloured button again to display the page.
Fig. 45
USER PAGES - BANK B
PAGE 300
PAGE 200
PAGE 203
PAGE 500
PAGE 234
PAGE 159
Select and press OK
Fig. 46
GB
22
Page 23
Connecting and Operating Optional
Equipment
Connecting Optional Equipment
To connect a VCR
using the ) terminal
Connect the aerial output
of the VCR to the aerial
terminal ) of the TV.
We recommend that you
tune in the video signal to
programme number “0.”
For details see “Preset
channels manually” on
page 9.
If the picture or the
sound is distorted
Move the VCR away from
the TV.
S/video Input
(Y/C input)
Video signals may be
separated into Y
(luminance or brightness)
and C (chrominance)
signals.
Separating the Y and C
signals prevents them
from interfering with one
another, and therefore
improves picture quality
(especially luminance).
This TV is equipped with
3 S Video input jacks
through which these
separated signals can be
input directly.
When connecting a
monaural VCR
Connect only the white
jack to both the TV
and VCR.
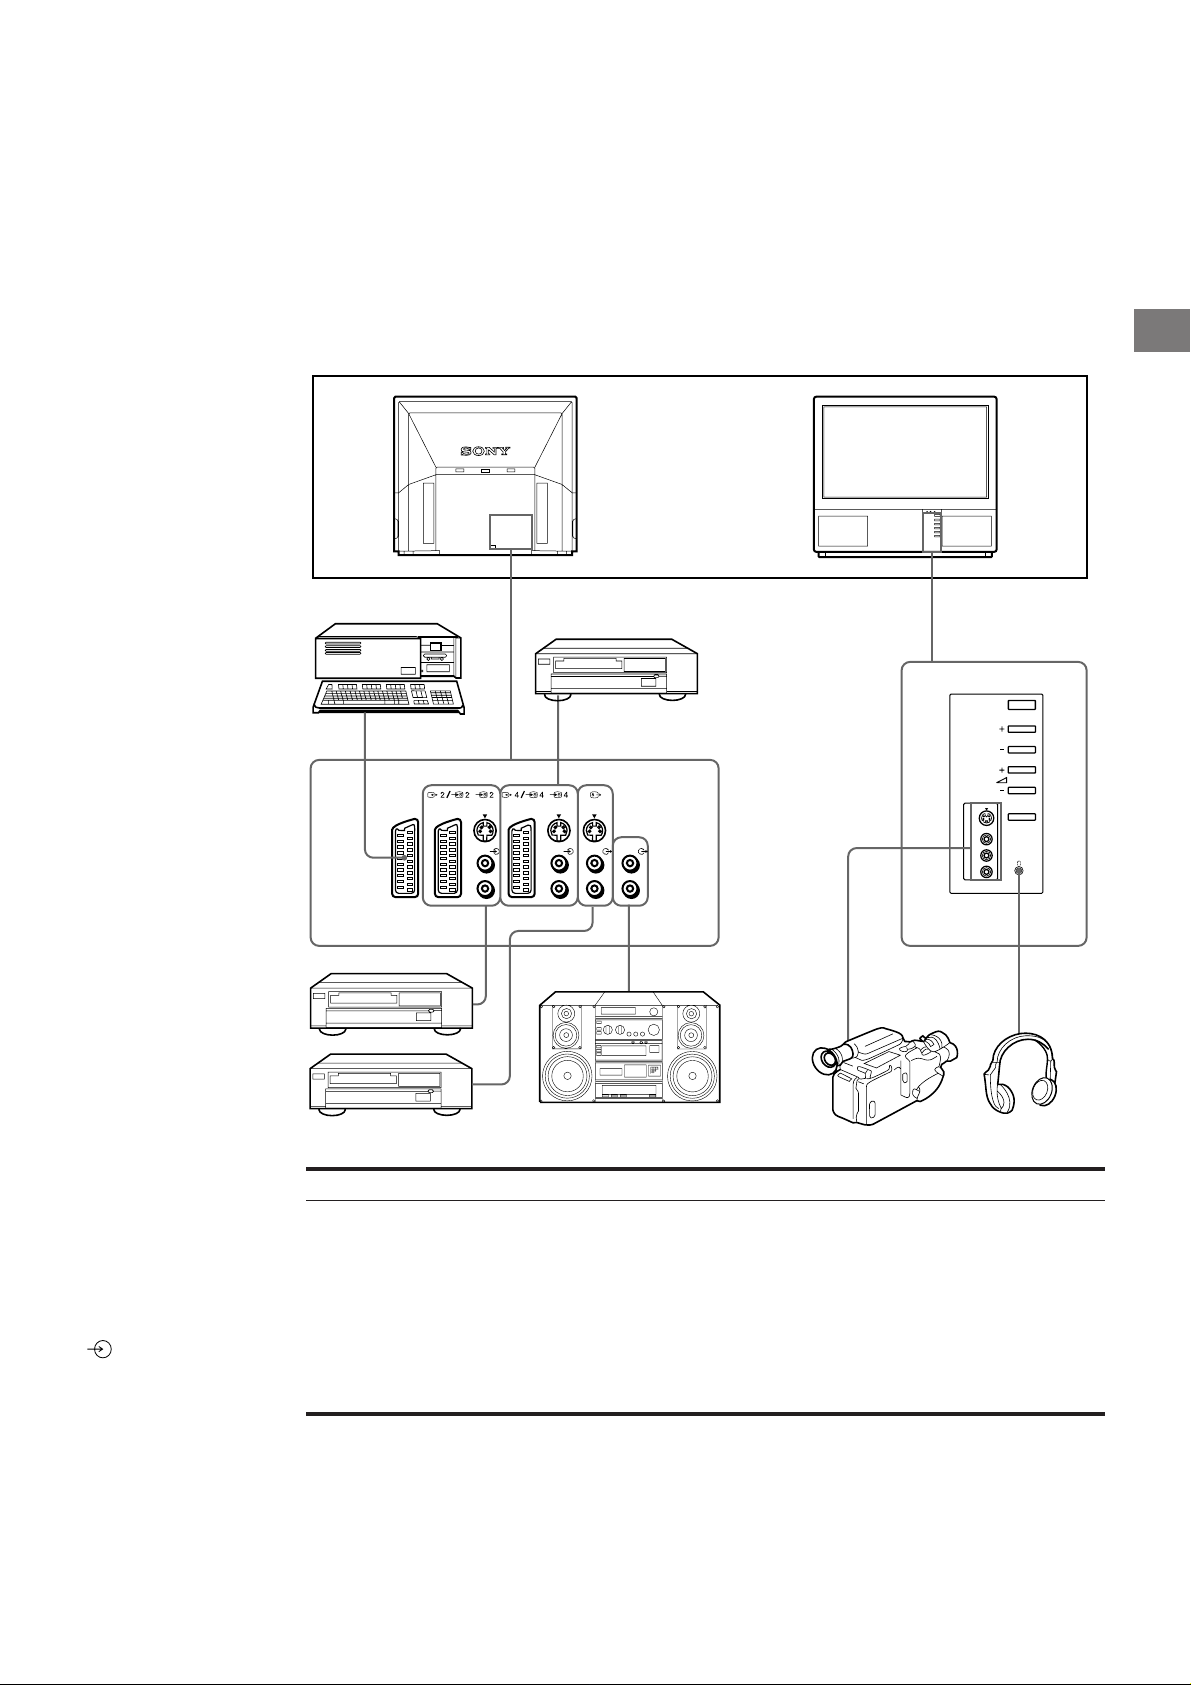
You can connect optional audio-video equipment to this TV such as a
VCR, video disc player, and stereo system.
1
L/G/S/I
R/D/D/D
2
Acceptable input signal
1 Normal audio/video and RGB signal
2 Normal audio/video and S video signal
3 Normal audio/video and S video signal
4 Normal audio/video and S video signal
5 No inputs
4
L/G/S/I
L/G/S/I
L/G/S/I
R/D/D/D
R/D/D/D
R/D/D/D
5
6
Available output signal
Video/audio from TV tuner
Video/audio from selected source
No outputs
Video/audio displayed on TV screen (monitor out)
S/video/audio signal displayed on TV screen (monitor
out)
6 No inputs
Audio signal (variable)
GB
PROGR
3
23
Page 24

1
S
Selecting Input and Output
S
1
Selecting input with
PROGR +/– or number
buttons
You can preset video
input sources to the
programme positions so
that you can select them
with PROGR +/– or
number buttons. For
details, see “Preset
channels manually” on
page 9.
2
1
45
7
3
6
9
8
0
C
PROGR
+
+
1
_
_
1
SAT
+
MENU
_
OK
VTR 1-2-3
MEM
MDP
USE
This section explains how to view the video input picture (of the
video source connected to your TV), and how to select the output
signal using direct access buttons or the menu system.
Selecting input
Press repeatedly to select the input source.
The symbol of the selected input source will appear.
To go back to the normal TV picture
Press Ο.
Input modes
Symbol
1
2
S
2
3
S
3
4
S
4
You can also select the input mode using the button on the TV.
Input signal
Audio/video input through the 1 connector
Audio/RGB input through the
Audio/video input through the
Audio/S video input through the
connector)
Audio/video input through
S video input through the
Audio/video input through the
S video input through the 4 / S 4 or S 4 connector(4-pin connector)
1 connector
2/ S 2 connector
2/ S 2 or S 2 connector (4-pin
3 and 3 connector on the front
3 connector (4-pin connector) at the front
4/ S 4 connector
GB
RM-838
RESET
+
PROGR
_
Selecting the output
The 2 /S 2 connector outputs the source input from the
other connectors.
Press
repeatedly to select the output.
The symbol of the selected output source appears.
Output modes
Symbol
1
2
S
2
3
S
3
4
S
4
TV
2/ S 2 connector outputs
Audio/video signal from the 1 connector
Audio/video signal from the
Audio/S video signal from the
Audio/video signal from the
Audio/S video signal from the
Audio/video signal from the
Audio/S video signal from the
Audio/video signal from the ) aerial terminal
2/ S connector
2/ S 2 or S2 connector (4 pin)
3, 3 connectors
3, 3 connectors
4/ S4 connector
4/ S 4 or S4 connector (4 pin)
24
Page 25
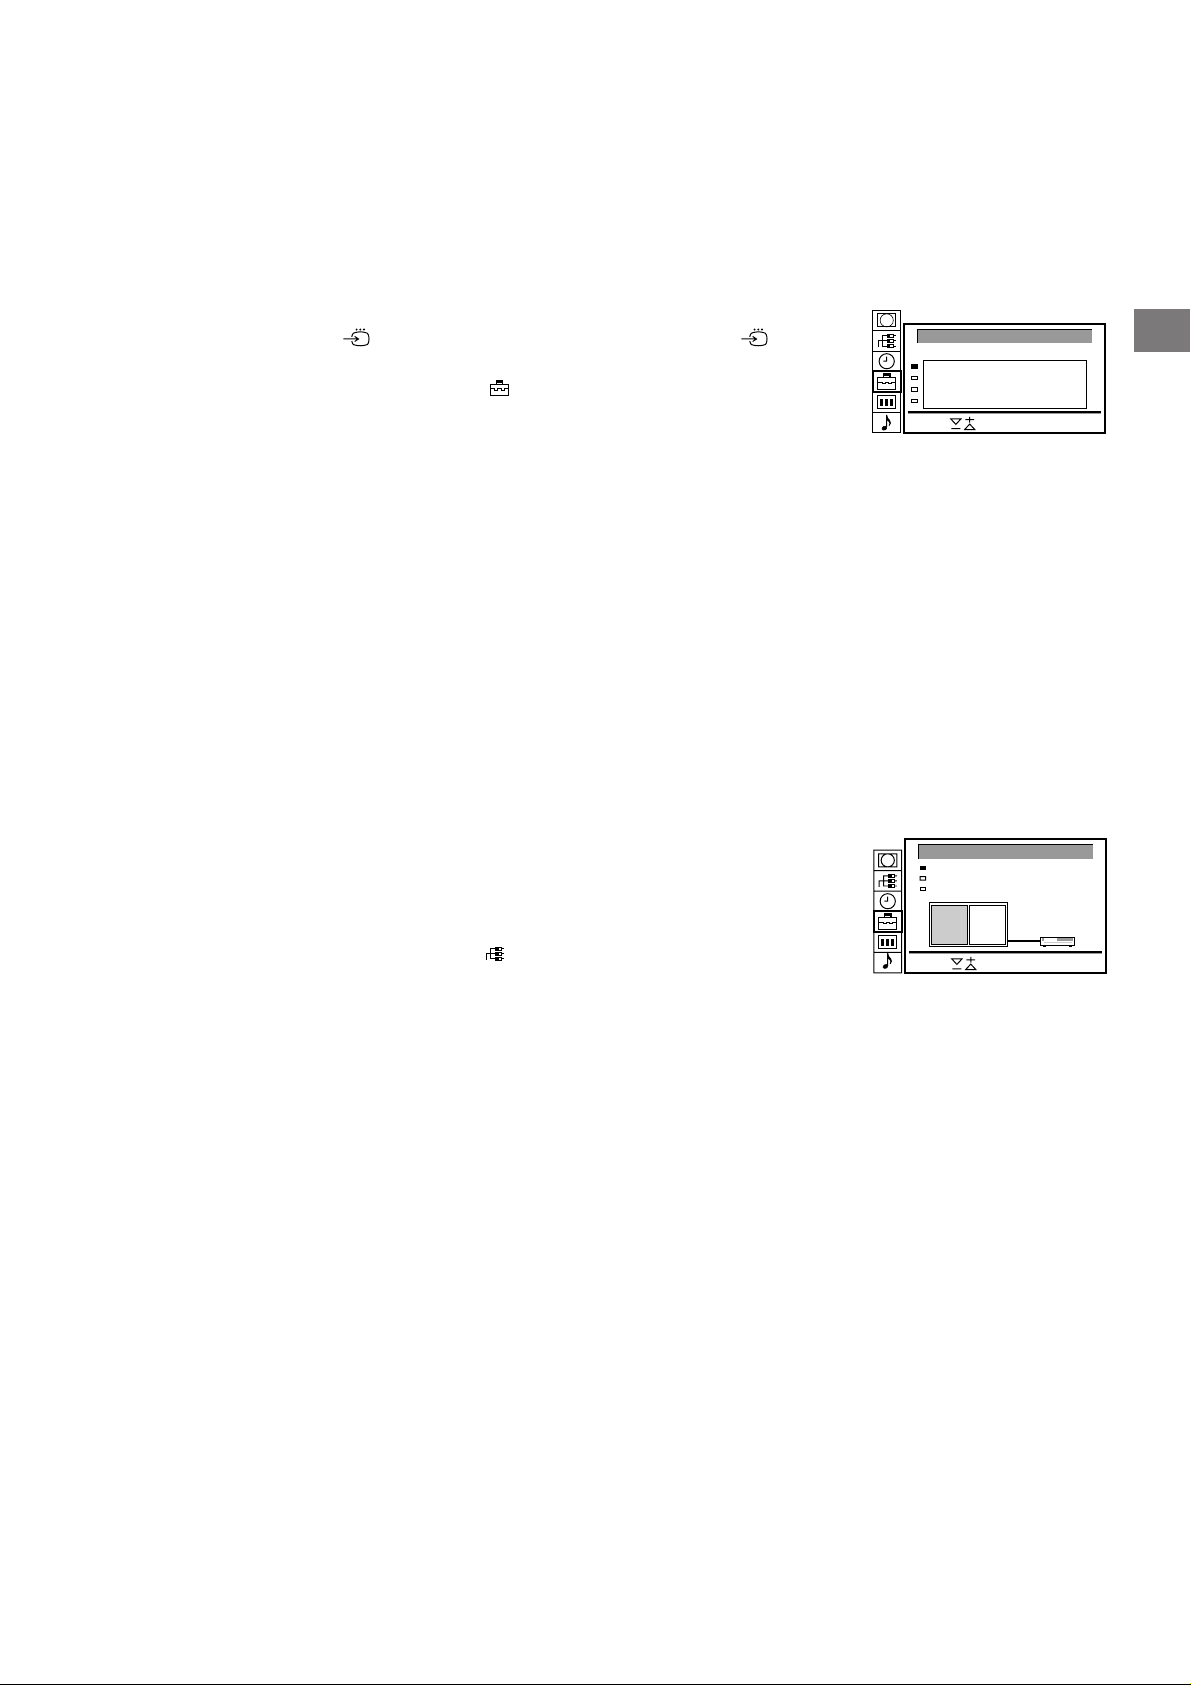
Using AV Preset
Select and press OK
PAP
TV screen [ ]
VIDEO CONNECTION
Output
TV ----[ ]AV2 VHS 2
[ ]TV -----
TV
VHS 2
TV
Using this function you can preset the desired input source (e.g.
1, RGB signal) to the respective AV input (AV 1 ). In this
way a connected VTR will automatically switch to the RGB signal.
1 Select the symbol
for “Preset” with >+ or ?– and press OK.
2 Select first “Installation”, then “AV Preset” with >+ or ?– and press
OK.
The AV PRESET menu appears (See Fig. 47).
3 Select the desired AV input with >+ or ?– and press OK.
4 Select the desired source with >+ or ?– and press OK.
For the respective AV inputs you have the following possibilities:
AV1 RGB or AV AV3 YC3 or AV
AV2 YC2 or AV AV4 YC4 or AV
5 If you want to name the AV input select “Label” using >+ or ?–
and press OK. Select a letter or a number with >+ or ?– and
press OK. The next element will be highlighted. Select other
characters in the same way. If you want to leave an element blank,
select - and press OK.
After having selected all the characters, press OK repeatedly until
the cursor appears by the next AV input at the left margin.
6 Repeat steps 3 to 6 for the other AV inputs.
Checking and selecting the input and output sources
using the menu
You can display the menu to see which input sources are selected
for the TV screen and PAP screen, and which output source is
selected. You can also select them on the menu display.
1 Select the symbol
press OK. The VIDEO CONNECTION menu appears. (See Fig.
48)
You can see which source is selected for the TV and PAP input,
and for the output. If you want to select the input and output on this
menu, go on to the next step.
2 Select TV Screen (input source for the TV screen), PAP (input
source for the PAP screen), or output (output source) with >+ or
?– and press OK. One of the source items changes colour.
3 Select the desired source with >+ or ?–.
For details about each source, see the table on page 24.
4 Press OK.
The selected source is confirmed, and the cursor appears.
5 Repeat steps 2 to 4 to select the source for other inputs or outputs.
for “Video Connection” with >+ or ?– and
AV PRESET
AV-INPUT
AV1
AV2
AV3
AV4
Select and press OK
Fig.47
Fig. 48
SOURCE
RGB
Y/C
Y/C
Y/C
LABEL
RGB
YC2
YC2
YC2
GB
25
Page 26

Remote Control of Other Sony
2
1
45
7
RM-838
3
6
9
8
0
C
PROGR
+
+
1
_
_
1
SAT
+
MENU
_
OK
VTR 1-2-3
MEM
MDP
USE
+
PROGR
RESET
_
When recording
when you use the α
(record) button, make
sure to press this button
and the one to the right
of it simultaneously.
Equipment
GB
You can use the TV Remote Commander to control most of Sony
remote-controlled video equipment such as: beta, 8 mm and VHS
VCRs and video disc players.
Tuning the Remote Commander to the equipment
1 Set the VTR 1/2/3 MDP selector according to the equipment you
want to control:
VTR1: Beta VCR
VTR2: 8 mm VCR
VTR3: VHS VCR
MDP: Video disc player
2 Use the buttons indicated in the illustration to operate the
additional equipment.
If your video equipment is furnished with a COMMAND MODE
selector, set this selector to the same position as the VTR 1/2/3
MDP selector on the TV Remote Commander.
If the equipment does not have a certain function, the
corresponding button on the Remote Commander will not operate.
26
Page 27
For Your Information
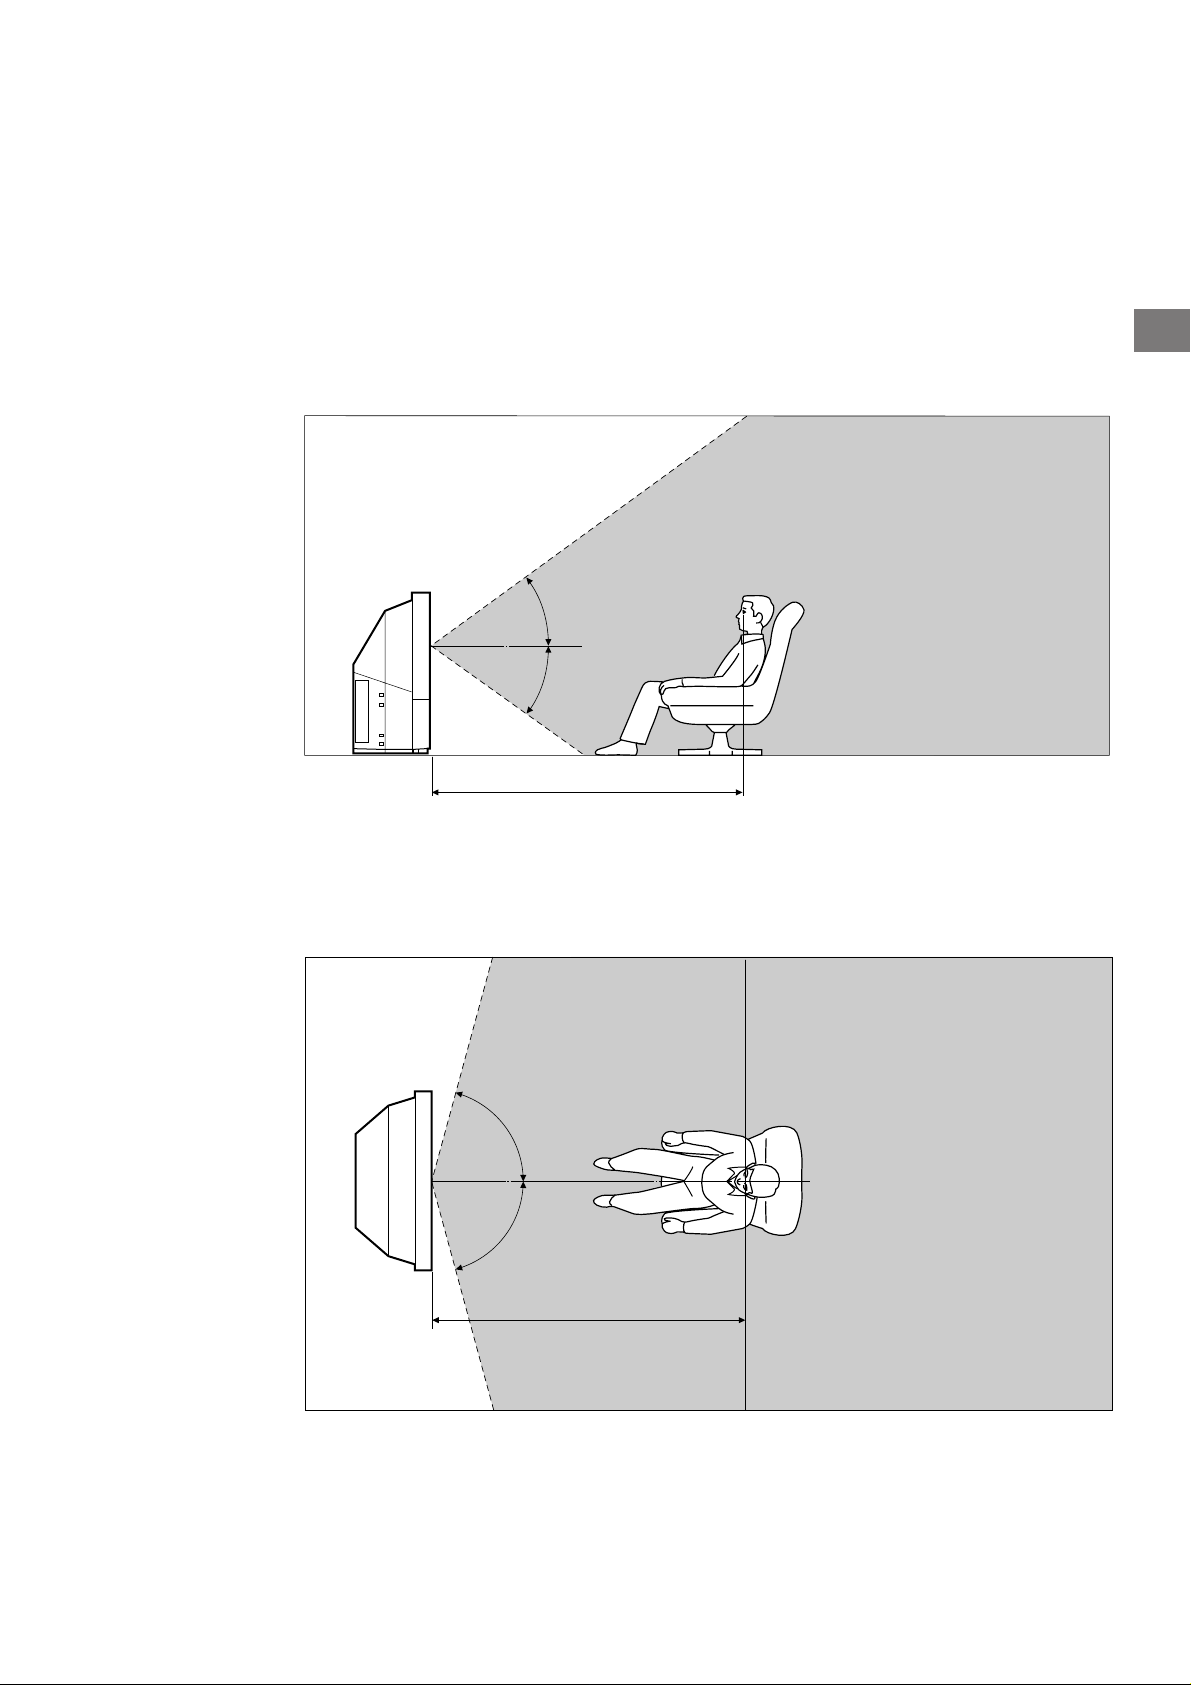
Optimum Viewing Area
For the best picture quality, try to position the projection TV so that you
can view the screen from within the areas shown below.
Horizontal viewing area
35˚
35˚
1.5 m and more
GB
Vertical viewing area
75˚
75˚
1.5 m and more
27
Page 28

Cleaning of the Air Filter
4 Clean the dust with a vacuum cleaner.
Periodic cleaning of the air filter is necessary. Clean the air
filter once a month. When the filter becomes old and dust
remains on the filter even after cleaning, replace it with a new
one.
If you do not take the following precautions, you may get hurt or
household belongings may be damaged.
• Clean the air filter periodically. If you don’t clean, it may
cause internal heat build-up.
• Never use an air filter which is torn or has holes. Attach the
filter firmly with six tabs. If dust enters the TV, the picture
may become dark or it may cause fire.
1 Turn off the power and disconnect the
power cord.
2 Remove the front panel.
GB
vacuum cleaner
5 Attach the filter.
Attach the six tabs securely.
6 Attach the front panel.
Be careful not to damage the speaker.
Remove the front panel without moving the TV.
Grasping the side of the front panel with your fingers, pull
it forward. Be careful not to catch your fingernails.
3 Pull the filter upward and remove it.
Notes
• Attach the filter firmly. If it is not firmly attached, the power will not
turn on.
• Remove the supplied filter in the same way as the attached filter.
• Consult your nearest Sony service center to obtain a new filter.
Supplied filter
28
Page 29

Replacing the Lamp
The lamp life is about 6000 hours. When the lamp becomes
dark or the picture colour is not normal, replace with a new
lamp (supplied).
If you do not take the following precautions, you may get hurt or
household belongings may be damaged.
• Use the supplied new lamp for replacement. If you use
another lamp, it may cause damage to the TV.
• Do not remove the lamp except when replacing it. This may
cause heat damage or fire.
• Before replacing the lamp, turn off the power and disconnect
the power cord.
• Replace the lamp after it becomes cool. The front glass of
the lamp remains 100 °C (212 °F) and more even 30 minutes
after the power is turned off.
• Do not place the removed lamp in proximity to children or
flammable material.
• Do not get the removed lamp wet, or insert objects inside the
lamp. It may cause the lamp to explode.
• Do not place near metal or easily flammable objects, as this
may cause fire. Also, do not put your hand inside the lamp
compartment, as you may be burned.
• Attach the new lamp firmly. If it is not firmly attached, the
picture may become dark or fire may result.
3 Loosen the screw with the object such as a
coin and remove the lamp cover.
GB
4 Loosen two screws and pull out the lamp.
The lamp is still too hot just after the power is turned off.
Be careful that you don’t touch the front glass or
surrounding area of the lamp or the glass of the lamp
compartment.
1 Turn off the power and disconnect the
power cord.
Replace the lamp 30 minutes or more after the power is
turned off.
Prepare the new lamp.
2 Remove the front panel.
Remove the front panel without moving the TV.
Loosen two screws with the supplied wrench.
Pull out the lamp by the handle.
5 Attach the new lamp.
Fasten two screws tightly.
6 Attach the lamp cover.
Fasten the screws tightly.
7 Attach the front panel.
Be careful not to damage the speaker.
Notes
• Do not touch or stain the front glass of the new lamp or the glass of
the lamp compartment. If the glass become dirty, the picture quality
may deteriorate or the lamp life may shorten.
• Attach the lamp cover firmly. If it is not firmly attached, the power will
not turn on.
• When the lamp burns out, a noise is audible. This does not represent
a damage.
• Consult your nearest Sony service center to obtain a new lamp.
Grasping the side of the front panel with your fingers, pull it
forward. Be careful not to catch your fingernails.
29
Page 30
Troubleshooting
Here are some simple solutions to some problems which may affect the picture and sound.
Problem
No picture (screen is dark), no sound
Poor or no picture (screen is dark), but sound is OK
Poor picture quality when watching an RGB video source
Poor picture quality of PAP screen
Good picture but no sound
No colour for colour programmes
Remote Commander does not function
If you continue to have problems, have your TV serviced by qualified personnel. Never open the casing yourself.
Solution
• Plug in the TV in.
• Press φ on the TV (if φ indicator is on, press Ο or a programme number
on the Remote Commander).
• Check the aerial connection.
• Check if the selected video source is on.
• Press
brightness, contrast and colour.
• Press Ζ repeatedly to select
• Press .
• Press +.
• Check loudspeakers connection.
• If ο is displayed on the screen, press ο.
• Press
press OK.
• The batteries are weak.
to enter the PICTURE CONTROL menu and adjust the
.
to enter the PICTURE CONTROL menu, select RESET, then
Specifications
This product complies with the EU Directive 89/336/EEC.
GB
Television system B/G/H, D/K, I, L
Colour system PAL/SECAM
NTSC 3.58/4.43 (VIDEO IN)
Channel coverage See “Receivable channels and
channel displays” at the bottom.
Projected picture size 37 inches (KL-37W1)
Approx. 94 cm diagonally
50 inches (KL-50W1)
Approx. 127 cm diagonally
Terminals
Rear
Front
1 21-pin Euro connector
(CENELEC standard) inputs for audio
and video signals
- inputs for RGB
- outputs of TV video and audio
signals
2/ S 2 21-pin Euro connector
- inputs for audio and video signals
- inputs for S video
- outputs for audio and video signals
(selectable)
4/ S 4 21-pin Euro connector
- inputs for audio and video signals
- inputs for S video
- outputs for audio and video signals
(monitor out)
S
2, S 4 S video inputs
- 4 pin DIN
Audio inputs (L, R) - phono jacks
S
S video output 4-pin DIN
Audio outputs - phono jacks
Audio outputs (variable)-phono
jacks
3 video input - phono jack
Audio inputs - phono jacks
S
3 S video input - 4-pin DIN
2 Headphone jack: stereo minijack
Sound output 2 × 5 W (music power)
Centre 1 × 20 W
Power consumption 170 W
Dimensions (W × H × D) 920 × 825 × 390 mm
(KL-37W1)
1,230 × 1,055 × 550 mm
(KL-50W1)
Mass 29 kg (KL-37W1)
43 kg (KL-50W1)
Supplied accessories See page 6.
Other features Digital comb filter (High resolution)
PAP (Picture-and-picture)
FASTEXT
100 Hz Digital Plus
Graphic Equaliger
Design and specifications are subject to change without notice.
Receivable Channels and Channel Displays
Indication on the
screen
C02 C03 C04..C12
C21..C69
S01 S02..S41
S42..S46 S01..S10
S11..S20
C11..C69
C02..C12 C21..C69
S01 S02..S41
S42 S43..S46
S02, S03..S17,
S21..S41
C01..C12 C21..C69
C21..C68
B/G/H
CABLE TV (1)
CABLE TV (2)
ITALIA
D/K
CABLE TV (1)
CABLE TV (2)
CABLE TV
L
I
Receivable
channels
E2..12 21..69
S1..41
S01..S05 M1..M10
U1..U10
A B C D E F G H H1
H2 21..69
R01..R12 R21..R69
B..Q, S21..41
F2..F10 F21..F69
B21..B68
30
Page 31

Warning Indicators
When a problem occurs, the indicator flashes as follows.
Attempt the solution recommended for the given problem.
AB
GB
Cause
The lamp burns out or the
quality of the lamp is deficient.
The cover of the filter or the
lamp is removed.
The fan for cooling stops.
Internal heat builds up.
If the lamp flashes in a way not described above, consult your nearest Sony service center.
Indicator flashing patterns
The B indicator flashes twice then A flashes once.
Flashing continues in this manner.
The B indicator flashes three times then A flashes once.
Flashing continues in this manner.
The B indicator flashes four times then A flashes once.
Flashing continues in this manner.
The B indicator flashes five times then A flashes once.
Flashing continues in this manner.
Stabilizing the Projection TV
After setting up, secure the projection TV to a wall, etc., with the supplied brackets, for safety
purposes.
1 Mount the two supplied brackets with the screws to the upper rear side
of the projection TV.
Bracket (supplied)
2 Pass a strong cord or a chain through each bracket mounted in 1, and
then secure to a wall or a pillar, etc.
31
Page 32

ADVERTENCIA
Para evitar el riesgo de incendio o de descarga eléctrica,
no exponga la unidad a la lluvia ni a la humedad.
El alto voltaje en el interior de la máquina puede resultar
peligroso. No abra la unidad. Solicite la intervención de
personal cualificado para las tareas de mantenimiento.
Información sobre seguridad
El voltaje durante el funcionamiento del TV es
extremadamente elevado. Para evitar el riesgo de
incendio o de descarga eléctrica, siga los procedimientos
descritos a continuación. Para su seguridad, solicite la
realización de tareas de mantenimiento a personal
cualificado.
Seguridad general:
• No exponga el TV a la lluvia ni a la humedad.
• No abra la cubierta posterior.
Seguridad en las operaciones:
• No utilice el TV con tensiones distintas de 220–240 V CA.
• En caso de que se viertan líquidos o se inserte cualquier
objeto en la unidad, no utilice el TV e inmediatamente
solicite su revisión.
• No deje la unidad enchufada si no se va a utilizar durante
varios días.
• No tire del cable de red para desconectar el TV.
Extráigalo desde la toma de corriente.
• No sitúe ningún objeto sobre la superficie de la cubierta
del panel frontal cuando abra la unidad.
Información importante
Para obtener una calidad de imagen superior, lea la
información siguiente sobre el uso y mantenimiento del
TV.
Calidad de la imagen
• Evite tocar la pantalla y tenga cuidado de no rayar la
superficie.
Iluminación
Para obtener imágenes nítidas, no exponga la pantalla a
iluminación directa o a la luz solar directa. Cuando sea
posible, utilice puntos de iluminación desde el techo.
Instalación
• Para evitar el exceso de temperatura en el interior de la
unidad, no obstruya los orificios de ventilación.
• No instale el TV en lugares calurosos o húmedos, ni
expuestos a luz solar directa, a polvo excesivo o
vibraciones mecánicas.
• Si cambia el TV de un lugar frío a otro cálido
directamente, o se produce un cambio repentino en la
temperatura de la habitación, las imágenes pueden
aparecer borrosas o mostrar mala calidad de color en
algunas zonas. Esto se debe a que la humedad se ha
condensado en los espejos o lentes dentro del TV. Antes
de utilizar el TV, deje que la humedad se evapore.
Mantenimiento
• Conserve el material de embalaje original del equipo para
utilizarlo en caso necesario. Para una mayor protección,
el embalaje del TV debe reproducir el original de fábrica.
• Para mantener el mueble en buen estado, límpielo
periódicamente con un paño suave. Las manchas
persistentes pueden eliminarse utilizando un paño
ligeramente humedecido en una solución de detergente
poco concentrado. No utilice detergentes concentrados
como disolvente o bencina, ni limpiadores abrasivos, ya
que podrían dañar el mueble. Como medida de
seguridad, desenchufe el TV antes de limpiarlo.
• Para eliminar el polvo de la pantalla, desenchufe el TV y
límpiela con un paño suave ligeramente humedecido en
agua o en detergente poco concentrado, aplicándolo
mediante suaves toques en sentido vertical. A
continuación séquelo con un paño seco. No use nunca
limpiadores a base de disolventes o diluyentes.
• Si tras utilizar el TV durante un largo periodo de tiempo la
imagen se oscurece, puede ser necesario limpiar el
interior del TV. Consulte a personal de servicio
cualificado.
32
Page 33

Indice
Descripción general ................................................................. 34
Procedimientos iniciales .............................................
Paso 1: Preparativos ............................................................... 36
Comprobación de los accesorios suministrados .......... 36
Inserción de la pila en el mando a distancia ................. 36
Conexión de la antena ................................................ 36
Paso 2: Sintonización de emisoras de TV................................. 37
Selección del idioma ................................................... 37
Acceso al menú .......................................................... 37
Sintonía automática de canales ................................... 38
Sintonía manual de canales ........................................ 39
Funciones de programación complementarias.......................... 40
Ordenación de las posiciones de programa ................. 40
Uso de “Sintonía (Continuación)”................................. 41
Para omitir posiciones de programas ........................... 42
Identificatión individual de emisoras............................. 42
Bloqueo de seguridad ................................................. 43
Sintonización temporal de canales .............................. 43
36
Procedimientos iniciales
Instrucciones de
funcionamiento
E
E
Instrucciones de funcionamiento ................................
Visualización del TV ................................................................. 44
Activación y desactivación del TV ................................ 44
Selección de programas de TV.................................... 44
Ajuste del volumen ...................................................... 44
Funcionamiento del TV utilizando las teclas del TV ...... 44
Visualización del teletexto o de la entrada de vídeo...... 45
Funciones aconsejadas .............................................. 45
Ajuste y configuración del TV utilizando el menú ....................... 46
Ajuste de la imagen y el sonido.................................... 46
Ecualizador gráfico...................................................... 47
Uso de la desconexión automática .............................. 47
PAP (imagen e imagen) ........................................................... 48
Manejo del modo de pantalla/PAP utilizando el menú .. 49
Formato automático .................................................... 49
Teletexto.................................................................................. 50
Funciones de acceso directo ....................................... 50
Uso del menú de teletexto ........................................... 51
Sistema de banco de páginas del usuario .................... 52
Conexión y funcionamiento de equipos opcionales ................... 53
Conexión del equipo opcional...................................... 53
Selección de la entrada y la salida ............................... 54
Uso de “Sintonía Audio/Vídeo” .................................... 55
Control remoto de otros equipos Sony ......................... 56
44
Información complementaria .................................................... 57
Angulo óptimo de visión .............................................. 57
Limpieza del filtro de aire ............................................. 58
Sustitución de la lámpara ............................................ 59
Solución de problemas ................................................ 60
Especificaciones ......................................................... 60
Indicadores de aviso ................................................... 61
Fijación del televisor de proyección ............................. 61
33
Page 34

Descripción general
En esta sección se describen brevemente las teclas y controles
del TV y del mando a distancia. Para obtener más información,
consulte las páginas citadas junto a cada descripción.
Frontal del TV
AB
PROGR
Símbolo Nombre
φ
φ
A-µ-B
PROGR+/–
+/–
λ
S
3, 3, 3,
Interruptor de alimentación
Indicador de espera
Indicadores A/B estéreo
Programa
Teclas de volumen
Teclas de selección de entrada
Toma de auriculares
Tomas de entrada (S vídeo/vídeo/
audio)
Consulte la página
44
44
46
44
44
45
53
54
34
Page 35

Mando a distancia
RM-838
2
1
45
7
PROGR
3
6
9
8
0
Funcionamiento
del TV/teletexto
2
1
45
8
7
0
SAT
MEM
USE
3
6
9
C
+
_
+
_
VTR 1-2-3
Funcionamiento de
PAP
PROGR
+
1
_
1
MENU
OK
MDP
Funcionamiento del
menú
Nota
La tecla SAT no funciona en
este TV.
Funcionamiento del TV/teletexto
Símbolo Nombre
ο
φ
Ο
_
1,2,3,4,5,6,
7,8,9 y 0
–/-C
+/–
PROGR +/–
1
1
∃
[
#
ΛΛΛΛ
Tecla de activación/desactivación
de sonido
Tecla de espera
Tecla de activación del TV/selector
de modo de TV
Tecla de teletexto
Selector del modo de entrada
Selector del modo de salida
Teclas numéricas
Tecla de introducción de dos dígitos
Tecla de introducción directa de
canal
Tecla de control de volumen
Selectores de programa
Teclas de acceso a las páginas del
teletexto
Tecla de ajuste de la imagen
Tecla de ajuste del sonido
Tecla de indicaciones en pantalla
Tecla de mantenimiento del teletexto
Tecla de hora en pantalla
Teclas de teletexto rápido
Tecla de congelación
Tecla de cambio de formato de
pantalla
Consulte la página
45
44
44
45
45
54
44
44
40
44
44
50
46
46
45
50
45
50
45
45
Funcionamiento del
vídeo
RM-838
RESET
PROGR
+
_
Sección de funciones avanzadasSección de funciones básicas
Funcionamiento de PAP (imagen e imagen)
SímboloΧNombre
Función de activación/desactivación
de PAP
Selector de la fuente de PAP
Tecla de cambio
Tecla de congelación PAP
Consulte la página
48
48
48
48
Funcionamiento del menú
Símbolo
MENU
>+/ ?–
OK
≅
Nombre
Tecla de activación/
desactivación del menú
Teclas de selección
Tecla de confirmación
Tecla de retroceso
Consulte la página
37
37
37
37
Funcionamiento del vídeo
Símbolo Nombre
VTR1/2/3,
MDP
;; − :: Λ
ϑ α φ
PROGR +/–
Selector del equipo de vídeo
Teclas de funcionamiento del
equipo de vídeo
Consulte la página
56
56
35
Page 36

RM-838
PROGR
VTR 1-2-3
MDP
1
2
4
5
3
6
9
8
7
0
C
SAT
MENU
+
_
OK
+
4
PROGR
1
1
+
_
+
_
Procedimientos
iniciales
Paso 1: Preparativos
2
1
Comprobación de los accesorios suministrados
1
Una vez que desembale por
completo la unidad, verifique
que incluye los siguientes
componentes:
• Mando a distancia RM-838
• Una pila R6 de designación IEC
• Lámpara (1)
• Llave (1)
• Soporte (2)
1
2
RM-838
3
2
1
6
5
4
9
8
7
0
PROGR
Nota: Deshágase de las
pilas de forma
responsable.
Inserción de la pila en el mando a
2
distancia
1
RM-838
3
2
6
1
5
9
4
1
8
7
0
PROGR
2
Extraiga la cubierta. Compruebe que las
Conexión de la antena
3
RM-838
3
2
1
6
5
4
9
8
7
0
PROGR
polaridades sean
correctas.
3
3
Vuelva a insertar la cubierta
exterior y asegúrese de dejar
visible la sección del mando
con las funciones avanzadas
para utilizar el menú en el
paso 2.
Inserte el conector de antena IEC, fijado a un cable coaxial de 75
36
ohmios (no suministrado), en la clavija ) de la parte posterior del TV.
L/G/S/I
R/D/D/D
L/G/S/I
R/D/D/D
L/G/S/I
R/D/D/D
L/G/S/I
R/D/D/D
Page 37

Paso 2: Sintonización de emisoras de TV
2
1
Una vez instalado el TV, es posible elegir el idioma del menú. A
continuación, es necesario programar los canales (hasta 100
canales) seleccionando el método automático o bien el manual.
Cuando se quiere programar todos los canales que se reciben a la
2
1
45
8
7
0
SAT
MEM
USE
RM-838
VTR 1-2-3
RESET
3
6
9
C
PROGR
+
+
1
_
_
1
+
MENU
_
OK
MDP
+
PROGR
_
vez, el método automático es el más sencillo. El manual se
emplea cuando se dispone de pocos canales y se quieren
programar de uno en uno.
Antes de comenzar
• Compruebe que la sección del mando a distancia con las
funciones avanzadas está visible.
• Localice en el mando las teclas de funcionamiento del menú.
Estas teclas aparecen sombreadas en la ilustración de la
izquierda.
Selección del idioma
1
1 Pulse φ en el TV.
El TV se encenderá. Si el indicador de espera del TV está
iluminado, pulse ; o una tecla numérica en el mando a distancia.
2 Pulse la tecla MENU.
Aparece el menú de idioma (LANGUAGE). (Véase la Fig. 1.)
MENU
3 Seleccione el idioma que desee mediante >+ o ?– y pulse OK.
Fig. 1
LANGUAGE
+
_
Sec
Select
OK
and press OK
English
Deutsch
Français
Italiano
Español
Nederlands
Português
Suomi
Svenska
¶ Ł غÆ
Türkçe
E
φ
Para volver al menú
principal
Mantenga pulsado ≅.
Para volver a la
imagen normal de TV
Pulse MENU. La imagen
normal de TV se
restaurará
transcurrido un minuto si
no se han seleccionado
las funciones de menú.
Nota sobre la función
de demostración
Si selecciona Demo en
el menú de instalación,
es posible ver una
demostración
secuencial de las
funciones de menú.
Pulse MENU para
detener la función.
Acceso al menú
2
Pulse MENU.
Aparece el menú principal. (Véase la Fig. 2.)
Seleccione el símbolo
con las teclas >+ o ?– y pulse OK.
A continuación, elija uno de los métodos descritos en las páginas
siguientes:
“Sintonía automática de canales”
o
“Sintonía manual de canales”
MODO DE PANTALLA
Modo de Pantalla
Posición de Pantalla
Estroboscópico
PAP
PAP Foto
Formato automático
Elija y pulse OK
Fig. 2
[ ]zoom
[ ]
0
[si]
o
]
[n
[no]
37
Page 38

Para volver al menú
B/G
SIST PROG
C25CA–
NOMBRE
––––04
principal
Mantenga pulsado ≅.
Para detener la
sintonía automática de
canales
Pulse ≅ en el mando a
distancia.
Sintonía automática de canales
3
1 Pulsando la tecla >+ o ?–, elija el símbolo para “Sintonia”
y pulse la tecla OK.
En pantalla aparece el menú SINTONIA. (Véase la Fig. 3.)
2 Pulsando la tecla >+ o ?– elija “Sintonía automática” y pulse
la tecla OK.
En pantalla aparece el menú SINTONIA AUTOMATICA.
(Véase la Fig. 4.)
3 Pulse la tecla OK. Si fuese necesario, elija el sistema de
transmisión de TV (B/G para los países de Europa occidental,
D/K para los países de Europa oriental) pulsando la tecla >+
o ?– y pulse OK. En pantalla resalta el primer elemento del
número “PROG”.
4 Elija el programa (tecla numérica) con el cual desea iniciar la
sintonía. Con la tecla >+ o ?– o con las teclas numéricas
(p.ej. para el “04” elija aquí el “0”) elija el primer elemento del
número de dos dígitos y pulse OK.
En la pantalla se iluminará el segundo elemento de “PROG”
5 Con la tecla >+ o ?–, o con las teclas numéricas (p.ej. para el
“04” elija aquí el “4”), elija el segundo elemento del número de
dos dígitos (Véase la Fig. 5) y pulse OK.
6 Con la tecla >+ o ?– elija “C” o “S” y pulse OK.
Entonces comienza la sintonía automática de canales.
Al terminar la sintonía , en pantalla aparece el menú de
sintonía. Todos los canales disponibles han quedado
memorizados en las teclas numéricas sucesivas.
Pulse MENU para restaurar la imagen normal de TV.
SINTONIA
Sintonía automática
Sintonía manual
Ordenar Programas
Bloqueo de Seguridad
Instalación
Elija y pulse OK
Fig. 3
SINTONIA AUTOMATICA
SIST PROG
B/G
Elija y pulse OK
Fig. 4
Fig. 5
C25CA–
NOMBRE
––––01
Notas
• Tras la sintonía
automática, es posible
comprobar la posición
de programa de los
canales almacenados.
Para obtener
información detallada,
consulte
“Visualización de la
tabla de programas” en
la página 45.
• La posición puede
ordenarse para que los
programas aparezcan
en pantalla en el orden
deseado. Para obtener
información detallada,
consulte “Ordenación
de las posiciones de
programa” en la página
40.
38
Page 39

Utilice este modo si en
2 C –––––21B/G no
3 AV1 –––––EXT
2 C –––––35B/G no
2 C –––––21B/G no
2 C –––––35B/G no
2 C –––––50B/G
4$
su zona sólo pueden
programarse unos
pocos canales o si
prefiere programarlos
uno a uno. También es
posible asignar los
números de programa a
varias fuentes de
entrada de vídeo.
Si comete un error
Pulse ≅ para volver a la
posición anterior.
Para volver al menú
principal
Mantenga pulsado ≅.
Para volver a la
imagen normal de TV
Pulse MENU.
Sintonía manual de canales
3
1 Con la tecla >+ o ?– elija el símbolo para “Sintonía”.
Pulse OK.
En pantalla aparece el menú SINTONIA. (Véase la Fig. 6.)
2 Con la tecla >+ o ?– elija “Sintonía manual” y pulse OK. En
pantalla aparece el menú SINTONIA MANUAL. (Véase Fig.
7.)
3 Pulse la tecla >+ o ?– para seleccionar la posición de
programa (tecla numérica) en el cual desea almacenar un
canal: pulse después OK.
4 Si fuese necesario, pulsando la tecla >+ o ?– elija el sistema
de transmisión de TV o una fuente de entrada de vídeo (EXT).
5 Pulse OK. En pantalla se iluminará CA . (Véase la Fig. 8.)
6 Con la tecla >+ o ?– elija C (para almacenar en memoria un
canal normal), S (para almacenar un canal por cable) o F
(para sintonizar según frecuencia) y pulse OK.
En pantalla se iluminará el primer elemento del número “CA”.
Si ha elegido EXT en el paso 5, elija la fuente de entrada de
vídeo con >+ o ?–. (Véase la Fig. 9.)
Existen dos maneras de almacenar los números de los
canales. Si ya sabe cuál es el número del canal, prosiga en el
paso “7-Manual”,
o
si ignora el número del canal, prosiga en el paso “7Búsqueda”.
SINTONIA
Sintonía automática
Sintonía manual
Ordenar Programas
Bloqueo de Seguridad
Instalación
Elija y pulse OK
Fig.6
SINTONIA MANUAL
PROG
1
2
3
4
5
6
7
8
9
10
Elija y pulse OK
Fig. 7
Fig. 8
Fig. 9
SIST
B/G
B/G
B/G
B/G
B/G
B/G
B/G
B/G
B/G
B/G
CA
BUSQ NOMBRE
C21
no
C34
no
C33
no
C45
no
C02
no
C08
no
C10
no
C12
no
C20
no
C59
no
-----
-----
-----
-----
-----
-----
-----
-----
-----
-----
E
Para sintonizar
canales mediante la
frecuencia
Tras seleccionar F en el
paso 6, introduzca tres
dígitos utilizando las
teclas numéricas.
7 Manual
-a Con la tecla >+ o ?– o con las teclas numéricas elija el primer
elemento del número “CA” y pulse OK. Se ilumina entonces el
lugar para el segundo elemento del número de “CA”.
-b Con la tecla >+ o ?– o con las teclas numéricas elija el
segundo elemento del número.
En pantalla se visualiza el número elegido. (Véase la Fig. 10.)
-c Pulse OK.
En pantalla se ilumina la posición “BUSQ”(Búsqueda) y el
canal elegido queda memorizado en la memoria. (Véase la
Fig. 11.)
-d Pulse ahora OK hasta que el cursor se coloque en la siguiente
posición del programa.
-e Repita los pasos 3 a 7 para almacenar en memoria los demás
canales.
7 Búsqueda
-a Pulse repetidamente la tecla OK hasta que cambie el color del
lugar BUSQ.
-b Para iniciar la búsqueda del canal, pulse >+ (arriba) o ?–
(abajo).
El campo CA cambia de color. (Véase la Fig. 12.)
El número CA se modifica en orden ascendente o
descendente: la búsqueda se detiene al encontrar un canal
captable. (Véase la Fig. 13.)
-c Si desea almacenar el canal, pulse OK. Si no, pulse de nuevo
>+ o ?– para continuar la búsqueda de canales.
-d Pulse OK hasta que el cursor aparezca colocado en la
próxima posición de programa.
-e Para almacenar otros canales, repita los pasos 3-7.
Fig. 10
Fig. 11
Fig. 12
Fig. 13
39
Page 40

Funciones de programación complementarias
8 TVE 1C15
1
2
3
4
5
6
7
8
C15
C03
C04
C07
C09
C12
C13
C14
ORDENAR PROGRAMAS
PROG CA NOMBRE
TVE 1
TVE 2
TVE 3
T 5
-----
-----
-----
-----
Mover PR 1 a PR - -
Elija y pulse OK
2
1
En esta sección se describen las funciones de programación
complementarias, como la ordenación u omisión de posiciones de
programa, la asignación de nombres a emisoras, la sintonización
fina manual y el uso del bloqueo de seguridad.
Antes de empezar
• Compruebe que está visible la sección del mando a distancia con
las funciones avanzadas.
• Localice las teclas de funcionamiento del menú.
ORDENAR
PROGRAMAS
2
1
45
7
RM-838
3
6
9
8
0
C
+
1
_
1
SAT
+
_
VTR 1-2-3
MEM
USE
RESET
PROGR
MENU
OK
PROGR
Ordenación de las posiciones de
programa
Esta función permite establecer el orden de las posiciones de
programa.
1 Pulse MENU para acceder al menú principal.
2 Seleccione el símbolo
para “Sintonía” mediante >+ o ?– y
pulse OK.
Aparece el menú SINTONIA.
3 Seleccione “Ordenar programas” mediante >+ o ?– y pulse OK.
Aparece el menú ORDENAR PROGRAMAS. (Véase la Fig. 14.)
4 Utilice >+ o ?– para seleccionar la posición de programa a la que
+
_
desee desplazarse y pulse OK.
El color de la posición seleccionada cambia. (Véase la Fig. 15.)
5 Utilice >+ o ?– para seleccionar la posición de programa al que
desee desplazar el canal de la posición seleccionada en el paso 4
MDP
y pulse OK. Las posiciones de programa ya se han ordenado.
(Véase la Fig. 16.)
+
_
6 Repita los pasos 4 y 5 para establecer el orden de otras
posiciones de programa.
ORDENAR PROGRAMAS
PROG
1
2
3
4
5
6
7
8
Mover PR 8 a PR - -
Elija y pulse OK
Fig. 14
Fig. 15
CA NOMBRE
C03
TVE 2
C04
TVE 3
C07
C09
C12
C13
C14
C15
T 5
-----
-----
-----
-----
TVE 1
Para posiciones de
programa superiores
El visor se desplaza
automáticamente.
Si comete un error
Pulse ≅ para volver a la
posición anterior.
Para volver al menú
principal
Mantenga pulsado ≅.
Para volver a la
imagen normal de TV
Pulse MENU.
40
Fig. 16
Page 41

INSTALACION
Uso de “Sintonía (Continuación)”
Con el menu “Sintonía (Contin.)” puede.
a) En caso de una fuerte señal de la antena (rayas en la imagen)
atenuar la señal de forma individual para cada posición de
programa (atenuador RF).
b) Ajustar y memorizar individualmente el nivel de volumen de cada
emisora (Volumen individualizado).
c) En caso de una fuerte señal acústica de la emisora (sonido
distorsionado) atenuar la señal para cada posición de programa.
d) En caso de una imagen distorsionada, usar la sintonía manual
para mejorar la recepción. Normaimente, la AFT (sintonía
automática de precisión) se encuentra en funcionamiento.
E
1 Pulse MENU para visualizar el menú principal.
2 Con la tecla >+ o ?– elija el símbolo
para “Sintonía” y pulse
OK. En pantalla se visualiza el menú SINTONIA.
3 Con la tecla >+ o ?– elija “Instalación” y pulse OK. Se visualiza el
menú INSTALACION.
4 Con la tecla >+ o ?– elija “Sintonía (Contin.)” y pulse OK.
Se visualiza el menú SINTONIA (CONTIN.). (Véase la Fig.17.)
5 Con >+ o ?– elija la posición de programa deseada y pulse OK
una vez para elegir a) ARF (Atenuador RF), dos veces para elegir
b) VOL (Volumen individualizado), tres veces para elegir c) AMP
(Amplifiador de entrada) o cuatro veces para elegir d) AFT
(Sintonía automática de precisión). El elemento elegido cambia de
color.
Para ajustar o cambiar la función elegida:
a) Atenuador RF (ARF)
Con >+ o ?– elija “Si” para la posición de programa elegida y
pulse OK.
Repita el paso 5 para atenuar otras posiciones de programa.
b) Volumen individualizado (VOL)
Utilizando >+ o ?– ajuste el nivel de volumen de la posición de
programa elegida. La escala de ajuste va de –7 a +7.
Pulse OK para almacenar el nivel de volumen.
Repita el paso 5 para ajustar el nivel de volumen de otras
posiciones de programa.
SINTONIA (CONTIN.
PROG
1
2
3
4
5
6
7
8
9
10
Elija y pulse OK
Fig. 17
ARF
no
no
no
no
no
no
no
no
no
no
VOL
- 1
- 1
- 1
- 1
- 1
- 1
- 1
0
0
0
)
AMP. AFT
si
si
si
- 1
si
- 1
si
si
- 1
si
- 1
si
- 1
si
- 1
si
- 1
si
si
si
Para reactivar AFT
Repita el procedimiento
desde el principio y elija
“SI” en el punto 5.
c) Amplificador de entrada (AMP)
Con >+ o ?– elija “NO” para la posición de programa elegida y
pulse OK. Repita el paso 5 para desactivar el amplificador de
entrada de otras posiciones de programa.
d) AFT
Utilizando >+ o ?– puede sintonizar el canal. La escala de ajuste
va de –15 a +15. Pulse OK para almacenar el nivel del sintonía.
Repita el paso 5 para sintonizar otros canales.
6 Pulse MENU para volver a la imagen normal de TV.
41
Page 42

SINTONIA
SINTONIA MANUAL
PROG
1
2
3
4
5
6
7
8
9
10
B/G
B/G
B/G
B/G
B/G
B/G
B/G
B/G
B/G
B/G
SIST
C21
C24
C25
C27
C28
C22
C26
C25
C23
C29
CA
no
no
no
no
no
no
no
no
no
no
BUSQ NOMBRE
-----
-----
-----
-----
-----
-----
-----
-----
-----
-----
Elija y pulse OK
3 –––
4 B/G
3 –––
2 C S––––25B/G no
2C SONY25B/G no
MANUAL
Si se equivoca
Pulse ≅ para volver a la
posición anterior.
Para volver al menú
principal
Mantenga pulsado ≅.
.
Para volver a la
imagen normal de TV
Pulse MENU.
Para omitir posiciones de
programas
Al elegir los programas con las teclas PROGR +/–, podrá Vd.
saltar las posiciones de programa no utilizadas. No obstante,
usando las teclas numéricas, podrá Vd. llamar aún dichos
programas.
1 Para visualizar el menú principal pulse la tecla MENU.
2 Con la tecla >+ o ?– elija el símbolo
OK.
En pantalla se visualiza el menú SINTONIA.
3 Con la tecla >+ o ?– elija “Sintonía manual” y pulse OK.
En pantalla se visualiza el menú SINTONIA MANUAL. (Véase la
Fig. 18.)
4 Con la tecla >+ o ?– elija la posición de programa que desea
saltarse y pulse OK.
El campo “SIST” (Sistema) cambia de color.
5 Pulse >+ o ?– hasta visualizar “–––” en el campo SIST. (Véase la
Fig. 19.)
6 Pulse OK. (Véase la Fig. 20.)
Al seleccionar los programas con las teclas PROGR +/–, se saltará
esta posición de programa.
7 Para omitir otras posiciones de programa, repita los pasos 4-6.
para “Sintonía” y pulse
PROGR
+
_
Fig. 18
Fig. 19
Fig. 20
SINTONIA
MANUAL
42
Identificación individual de
emisoras
Normalmente la identificación de emisoras se obtiene
automáticamente a través de la información de Teletexto.
También puede Vd. “denominar” un canal o una fuente de entrada
de vídeo usando hasta 5 caracteres (letras o números) que se
visualizarán en la pantalla de TV (p.ej.:TVE-1). Esta función
permite identificar fácilmente el canal o la fuente de vídeo que
aparece en pantalla.
1 Pulse MENU para visualizar el menú principal.
2 Con la tecla >+ o ?– elija el símbolo
OK.
En pantalla se visualiza el menú SINTONIA.
3 Con la tecla >+ o ?– elija “Sintonía manual” y pulse OK.
En pantalla aparece el menú SINTONIA MANUAL. (Véase la Fig.
21.)
4 Con la tecla >+ o ?– elija la posición de programa que desea
denominar y pulse repetidamente OK hasta que resalte el primer
elemento del campo NOMBRE.
5 Con la tecla >+ o ?– elija una letra o un número y pulse OK. Se
ilumina el siguiente elemento.
Procediendo en igual forma, elija los demás caracteres. Si desea
dejar un elemento en blanco, elija - y pulse OK. (Véase la Fig. 22.)
6 Una vez elegidos todos los caracteres pulse repetidamente OK
hasta que el cursor se coloque en la siguiente posición del
programa (al margen izquierdo).
Con ello, la denominación escogida ha quedado almacenada en
memoria. (Véase Fig. 23.)
7 Para registrar los nombres de otros canales, repita los pasos 5 y 6.
para “Sintonía” y pulse
SINTONIA MANUAL
PROG SIST CA
1
2
3
4
5
6
7
8
9
10
Elija y pulse OK
Fig. 21
Fig. 22
Fig. 23
B/G
B/G
B/G
B/G
B/G
B/G
B/G
B/G
B/G
B/G
BUSQ NOMBRE
C21
no
C24
no
C25
no
C27
no
C28
no
C22
no
C26
no
C25
no
C23
no
C29
no
-----
-----
-----
-----
-----
-----
-----
-----
-----
-----
Page 43

BLOQUEO DE
3 C26 TVE 2
2 C42 T 5
PROG CA NOMBRE
1 C25 TV 3
0 AV1 VHS
SEGURIDAD
Al elegir un programa
que se encuentra
bloqueado,
en pantalla aparece el
mensaje BLOQUEADO.
Bloqueo de seguridad
También puede Vd. impedir la visualización de transmisiones no
deseadas en la pantalla. Esta función es recomendable, p.ej. para
prevenir que los niños miren programas de TV que Vd. considera
inapropiados.
1 Pulse MENU para visualizar el menú principal.
2 Con la tecla >+ o ?– seleccione el símbolo
pulse OK. En pantalla aparece el menú SINTONIA.
3 Con la tecla >+ o ?– elija “Bloqueo de Seguridad” y pulse OK.
En pantalla aparece el menú BLOQUEO DE SEGURIDAD.
(Véase la Fig. 24.)
4 Con la tecla >+ o ?– elija la posición de programa que desea
bloquear y pulse OK.
Delante del número de programa aparece el símbolo
indicando que este programa ha quedado bloqueado. (Véase la
Fig. 25.)
5 Para bloquear otras posiciones de programa repita el paso 4.
Para suprimir el bloqueo
1 Con la tecla >+ o ?– elija en el menú BLOQUEO DE
SEGURIDAD la posición de programa que desea desbloquear.
2 Pulse OK.
Desaparece el símbolo
. El bloqueo se ha suprimido.
para “Sintonía” y
,
PARENTAL LOCK
Select and press OK
Fig. 24
Fig. 25
PROG
0
1
2
3
4
5
6
7
CH LABEL
AV1
VHS
C25
BBC 2
C42
BBC 1
C26
C34
C35
C36
C37
C 4
ITV
-----
-----
-----
E
Sintonización temporal de canales
Es posible sintonizar un canal temporalmente aunque no se haya
programado. Para ello, utilice las teclas situadas en la sección de
funciones avanzadas del mando a distancia.
1 Pulse C en el mando a distancia. Para los canales de TV por
cable, pulse C dos veces.
La indicación “C” (“S” para los canales de TV por cable) aparece
en la pantalla. (Véase la Fig. 26.)
2 Introduzca el número de canal de dos dígitos utilizando las teclas
numéricas (por ej., para el canal 4, pulse en primer lugar 0 y, a
continuación, 4).
A continuación aparece el canal.
Sin embargo, dicho canal no se almacenará.
C - -
Fig. 26
43
Page 44

Instrucciones de funcionamiento
AB
PROGR
Visualización del TV
En esta sección se describen las funciones básicas que pueden
utilizarse mientras se ve la televisión. La mayoría de estas
funciones pueden realizarse utilizando la sección del mando a
RM-838
2
1
45
8
7
0
PROGR
3
6
9
distancia con las funciones básicas.
Activación y desactivación del TV
Activación
Pulse φ en el TV.
Desactivación temporal
Pulse φ en el mando a distancia.
El TV entra en el modo de espera y el indicador correspondiente,
situado en el frontal del TV, se ilumina en rojo.
Para volver a activarlo
Pulse ;, PROGR +/– o cualquier tecla numérica del mando a
distancia.
E
Si al pulsar φ en el TV
no aparece ninguna
imagen y el indicador
de espera está
iluminado, el TV se
encuentra en modo de
espera.
Pulse ; o cualquier
tecla numérica para
encenderlo.
Desactivación total
Pulse φ en el TV; el indicador del frontal del TV se ilumina en
ámbar.
Selección de programas de TV
Pulse PROGR +/– o las teclas numéricas.
Para seleccionar un número de dos dígitos
Pulse -/--y, a continuación, los números.
Por ejemplo, si quiere seleccionar el 23, pulse -/-- y, a continuación,
2 y 3.
Ajuste del volumen
Pulse +/–.
Funcionamiento del TV utilizando
las teclas del TV
Para seleccionar el número de programa, pulse las teclas
PROGR +/–.
Para ajustar el volumen, pulse las teclas
Para seleccionar la imagen de entrada de vídeo, pulse la tecla
Para recuperar el nivel de ajuste de fábrica de los controles de
imagen y sonido (función PREESTABLECIDO), pulse
simultáneamente las teclas PROGR +/–.
+/–.
.
44
Page 45

Visualización del teletexto o de la
PROGR
1
2
3
4
5
6
7
8
9
10
BBC
SAT
TV5
C02
C15
RTL
SKY
S34
AV1
MTV
entrada de vídeo
Visualización del teletexto
1 Pulse _ para ver el teletexto.
2 Para utilizar el teletexto, seleccione una página introduciendo un
número de página de tres dígitos mediante las teclas numéricas.
Para utilizar la función de teletexto rápido, pulse una de las teclas
coloreadas. En ambos casos, pulse ς (PAGE +) para pasar a la
página siguiente o Υ (PAGE –) para retroceder a la página
anterior.
3 Para volver a la imagen de TV normal, pulse Ο.
Visualización de la imagen de entrada de vídeo
1 Pulse varias veces hasta que aparezca la entrada de vídeo
deseada.
2 Para volver a la imagen de TV normal, pulse Ο.
Funciones aconsejadas
Utilice la sección del mando a distancia con las funciones
avanzadas.
E
Para obtener
información detallada
sobre el funcionamiento
del teletexto, consulte la
página 50.
Para obtener
información detallada
sobre la imagen de
entrada de vídeo,
consulte la página 54.
2
1
45
7
3
6
9
8
0
C
PROGR
+
+
1
_
_
1
SAT
+
MENU
_
OK
VTR 1-2-3
MEM
MDP
USE
Visualización de las indicaciones en pantalla
• Pulse ∃ una vez para que aparezcan todas las indicaciones.
Transcurridos unos segundos, las indicaciones desaparecerán.
• Pulse ∃ dos veces para que el número y el nombre de programa
permanezcan en la pantalla. Vuelva a pulsarlo dos veces para que
desaparezcan las indicaciones.
Para desactivar el sonido
Pulse ο.
Para recibir el sonido normal pulse ο de nuevo.
Visualización de la hora
Pulse #. Esta función sólo se encuentra disponible con emisión
de teletexto. Para que desaparezca la indicación horaria, vuelva a
pulsar #.
Visualización de la tabla de programas
Pulse OK. En la parte izquierda de la pantalla aparece una tabla
de programas. (Véase la Fig. 27.)
Para elegir un programa
Pulse PROGR +/– o elija la posición de programa deseada con
>+ o ?– y pulse OK.
Para hacer desaparecer la table de programas, pulse MENU.
“Congelación” de la imagen
Mientras contempla la televisión , tiene la posibilidad de “congelar”
la imagen pulsando la tecla
a la imagen normal.
. Pulse la tecla otra vez para volver
Fig. 27
Cambio del formato de pantalla
+
PROGR
RESET
_
RM-838
Pulse la tecla repetidamente para cambiar el formato de
pantalla de la siguiente manera:
4:3 para la relación 4:3 normal
Α Optimizada: imitación del efecto de pantalla horizontal (16:9)
para las emisiones 4:3
Α Zoom: imitación del efecto de pantalla horizontal (16:9) para
las películas emitidas con el formato cinemascópico
o bien
Α Horizontal: para las emisiones 16:9.
Consulte la página 49 para mayores detalles sobre el cambio
del formato.
45
Page 46

Ajuste y configuración del TV utilizando el
Brillo
Color
Brillo
menú
CONTROL DE LA
IMAGEN
CONTROL DE SONIDO
2
1
45
7
RM-838
3
6
9
8
0
C
PROGR
+
+
1
_
_
1
SAT
+
MENU
_
OK
VTR 1-2-3
MEM
MDP
USE
+
PROGR
RESET
_
Ajuste de la imagen y el sonido
La imagen y el sonido se ajustan en fábrica; sin embargo, puede
modificar estos ajustes de acuerdo con sus preferencias. También
es posible seleccionar programas de sonido dual (bilingüe), en los
casos en los que se encuentra disponible, o ajustar el sonido para
su audición con auriculares. También puede ajustar el sonido
según sus preferencias mediante el ecualizador gráfico y los
efectos sonoros especiales.
1 Pulse
Pulse MENU y seleccione el símbolo
o
pantalla aparece el menú CONTROL DE LA IMAGEN o
CONTROL DE SONIDO. (Véase la Fig. 28 o 29.)
2 Utilice >+ o ?– para seleccionar la opción que quiere ajustar y
pulse OK.
El elemento seleccionado cambia de color. (Véase la Fig. 30)
3 Ajuste la configuración mediante >+ o ?– y pulse OK.
El cursor aparece junto al siguiente elemento (margen izquierdo).
(Véase la Fig. 31.)
Consulte en la tabla siguiente los efectos producidos por cada
control.
4 Repita los pasos 2 y 3 para ajustar otras opciones.
5 Pulse MENU para volver a la imagen de TV.
(para imagen) o (para sonido) en el mando a distancia.
O bien.
para controlar la imagen
para controlar el sonido. A continuación, pulse OK. En
CONTROL DE LA IMAGEN
Contraste
Brillo
Color
Tonalidad
Preestablecido
Resolución (alta)
Elija y pulse OK
Fig. 28
CONTROL DE SONIDO
Equalizador Gráfico
Modo Surround
Efecto de Eco
Sonido dual
2
Volumen
2
Sonido dual
Elija y pulse OK
Fig. 29
Fig. 30
Fig. 31
E
[Sala]
[mono]
[mono]
Si comete un error
Pulse ≅ para volver a la
posición anterior.
Para volver al menú
principal
Mantenga pulsado ≅.
Notas
• Matiz sólo está
disponible en
televisores con
sistema de color
NTSC.
• No es posible disponer
del modo Hall
Surround mediante los
auriculares.
Nota sobre LINE OUT
El nivel de audio y la
salida del modo de
sonido dual de la toma
>, situada en la parte
posterior, corresponden
a los ajustes VOLUMEN
del auricular y a
SONIDO DUAL.
Mientras se ve la
fuente de entrada de
vídeo con sonido
estéreo
Es posible cambiar el
sonido y seleccionar el
sonido dual.
Efectos de los controles
CONTROL DE LA IMAGEN
Contraste
Brillo
Color
Matiz
Nitidez
Preestablecido
Resolución
CONTROL DE SONIDO
Ecualizador gráfico
Modo Surround
Efecto de eco
(sólo si “Sala” se encuentra
activado)
Sonido dual
Auriculares:
2 Volumen
2 Sonido dual
Efecto
Menos Más
Más oscuro Más brillo
Menos Más
Verde Rojo
Más suave Más nítido
Recupera los niveles ajustados en fábrica
Normal alta: mejor calidad de la imagen
Efecto
Para obtener más información, consulte la página 47.
No: sonido normal n Dolby n Sala
➝
Para elegir entre diferentes efectos sonoros:
Salón n Boveda n Pista
➝
A:canal izquierdo B:canal derecho Estéreo Mono
El modo elegido del indicador A-µ-B se ilumina en el televisor
Menos Más
A:canal1n B:canal 2n PAP (si la pantalla PAP está activa,
podrá elegir el sonido del PAP para los auriculares)
Estéreo n Mono
46
Page 47

Nota: Las
SLEEP TIMER
Tiempo de desconexión [ 10 Min ]
Elija y pulse OK
modificaciones hechas
en el modo “Usuario“
quedan almacenadas.
Al conmutar a otro
modo, todos los demás
reglajes efectuados
retornarán a los valores
previamente hechos en
fábrica.
Uso del Sleep
Timer
(Desconexión
Automática)
Para desactivar el
temporizador
Seleccione “NO” en el
paso 3.
Para comprobar el
tiempo restante hasta
la desconexión
Pulse ∃.
Ecualizador gráfico
Esta función le permite regular el sonido según su gusto y sus
necesidades personales, ya que pueden modificarse los
márgenes de frecuencia seleccionados. Además puede Vd. elegir
entre los siguientes reglajes condicionados:
Lineal n POP n Rock n Jazz n Vocal n Usuario
1 En el menú principal elija el símbolo para “Control de Sonido”: con
las teclas >+ o ?–. Elija luego “Ecualizador gráfico” y pulse OK.
En pantalla aparece el menú ECUALIZADOR GRAFICO. (Véase
la Fig. 32.)
2 Pulse OK. Se modifica el color de “Modo”. Con las teclas >+ o ?–
elija entonces el reglaje deseado y pulse OK.
3 Para modificar un reglaje, elija con >+ o ?– la barra
correspondiente al margen de frecuencia deseado, y pulse OK. AI
hacerlo, la frecuencia elegida cambiará de color. Con las teclas
>+ o ?– regule entonces el valor y pulse OK. De tal forma pueden
regularse todas las barras.
4 Pulse MENU para volver al funcionamiento normal de TV.
Uso de la desconexión automática
También puede elegirse un lapso determinado tras el cual el TV
conmuta automáticamente a estado de espera (standby).
1 Partiendo del menú principal, elija el símbolo ρ para “Sleep Timer”
con la tecla >+ o ?– y pulse OK.
En pantalla aparece el menú SLEEP TIMER. (Véase la Fig. 33.)
2 Pulse OK.
La opción intervalo de tiempo cambia de color.
3 Con la tecla >+ o ?– elija el intervalo de tiempo.
Dicho intervalo de tiempo (en minutos ) se modifica en la siguiente
forma:
10 n 20 n 30 n 40 n 50 n 60 n70 n 80 n 90
↑
EQUALIZADOR GRAFICO
Modo: [Usuario]
+
0
–
100 400 1K 4K 10K
Wähler und OK dücken
Fig. 32
Fig. 33
E
Lineal
Pop
Rock
Jazz
Vocal
Usuario
Para volver a la
imagen normal de TV
Pulse MENU.
4 Después de elegir el intervalo de tiempo, pulse OK. EI cursor
retorna al margen izquierdo y se inicia la cuenta atrás.
Un minuto antes de que el televisor conmute a la modalidad de
espera (standby) aparece un mensaje en la pantalla.
47
Page 48

PAP (Imagen e imagen)
AA
Con esta función puede visualizar dos pantallas de forma
simultánea, lo cual permite ver dos programas al mismo tiempo.
También puede contemplar, o controlar la salida de vídeo de los
equipos conectados (por ejemplo, de una videograbadora)
2
1
45
8
7
0
SAT
MEM
USE
RM-838
3
6
9
C
+
_
+
_
VTR 1-2-3
RESET
1
PROGR
1
MENU
PROGR
+
_
OK
MDP
+
_
mientras ve la televisión o viceversa. Para obtener información
sobre la conexión de otros equipos, consulte la página 53.
Imagen
principal de TV
Conexión y desconexión de la función PAP
Pulse la tecla para ver las pantallas en formato 8:9.
Pulse la tecla
4:3.
Se visualiza la pantalla PAP.
La imagen PAP procede de la misma fuente utilizada en el
momento en que se usó el televisor por última vez.
Para desconectar la función PAP
Pulse repetidamente la tecla
dos veces para ver las dos pantallas en formato
Pantalla PAP
E
.
Notas
• La fuente de entrada
RGB no puede
mostrarse en PAP.
• PAP no está disponible
en el modo Zoom.
• El sonido de la pantalla
derecha sólo está
disponible mediante
los auriculares.
• Es posible que la
calidad de imagen de
la pantalla de TV y de
PAP difiera.
Elección de una fuente PAP
Pulse >.
El símbolo > se visualiza en la parte inferior de la pantalla (ángulo
izquierdo).
Pulse PROGR +/–, las teclas numéricas o … hasta que se
indique la fuente PAP deseada.
Intercambio de pantallas
Pulse .
La pantalla principal intercambiará la imagen con el recuadro PAP.
8: 9 8: 9 4: 3
AB BA
AB BA
Congelación de la imagen
Tiene la posibilidad de “congelar” la imagen de la pantalla PAP.
Pulse
volver a la pantalla normal.
16: 9
una vez para congelar la imagen, y dos veces para
A
AA
Congelada
/
8: 9
4: 3
AB
AB
Congelada
/
Congelada
/
AA
48
Page 49

Manejo del modo de pantalla/PAP
utilizando el menú
2
1
45
7
RM-831
3
6
9
8
0
C
PROGR
+
+
1
_
_
1
SAT
+
MENU
_
OK
VTR 1-2-3
MDP
+
PROGR
_
Si desea seleccionar el
modo de pantalla
También es posible
seleccionar el modo de
pantalla con la
tecla del mando a
distancia.
Utilizando el menú “Modo de pantalla” puede Vd. modificar el
formato de la pantalla a banda ancha, manejar el PAP, o
reproducir la imagen principal en una especie de cámara lenta
(modo estroboscópico).
1 Pulse MENU para visualizar el menú principal en la pantalla.
2 Con las teclas >+ o ?– elija el símbolo
para “Modo de
pantalla” y pulse OK. En pantalla aparece el menú MODO DE
PANTALLA. (Véase la Fig. 34.)
Puede elegir entre los siguientes modos:
4:3: Para la relación 4:3 normal. (Véase la Fig. 35.)
Optimizada: Imitación del efecto de pantalla horizontal (16:9)
para las emisiones 4:3 (Véase la Fig. 36.)
Zoom: Imitación del efecto de pantalla horizontal (16:9)
para las películas emitidas con el formato
cinemascópico. (Véase la Fig. 37.)
o bien
Horizontal: para las emisiones 16:9. (Véase la Fig. 38.)
a) Cambio de la posición de la pantalla (sólo para el modo
Zoom)
Al utilizar el modo Zoom, se cortarán las zonas superior e inferior
de la imagen. Con la ayuda de la función “Posición de Pantalla”,
puede desplazar la pantalla en sentido vertical para ver las zonas
cortadas (por ejemplo, para leer subtítulos).
Con >+ o ?–, elija “Posición de Pantalla” y pulse OK. EI elemento
seleccionado cambia de color. Ajuste la posición de la pantalla con
>+ o ?– y pulse OK.
b) Modo estroboscópico
Con las teclas >+ o ?– elija “Estroboscópico” y pulse OK. La
imagen del televisor se reproduce ahora en una especie de
cámara lenta. (Véase la Fig. 39). Con las teclas >+ o ?– puede
variarse la velocidad (puede escogerse entre tres velocidades
diferentes). Para volver al funcionamiento normal de televisión,
pulse OK.
c) Conexión y desconexión de PAP
Con >+ o ?–, elija “PAP” y pulse OK. Elija “1” con >+ o ?– para
visualizar la pantalla PAP en formato 8:9, “2” para formato 4:3 o
“NO” para suprimirla y pulse OK.
d) Congelación de la pantalla PAP
Con >+ o ?–, elija “PAP Foto” y pulse OK. Con >+ o ?– elija “SI”
para congelar la imagen PAP y “NO” para volver a la imagen
normal.
MODO DE PANTALLA
Modo de Pantalla
Posición de Pantalla
Estroboscópico
PAP
PAP Foto
Formato automático
Elija y pulse OK
Fig. 34
Fig. 35
Fig. 36
Fig. 37
Fig. 38
[ ]zoom
[ ]
0
[si]
o
]
[n
[no]
E
Formato automático
Si define el modo de formato AUTO en SI y la señal de formato
16: 9 está transmitiéndose, el modo de pantalla cambiará
automáticamente a 16: 9. Una vez finalizado el programa de
formato 16: 9, el modo de pantalla volverá automáticamente al
anterior.
1 Pulse MENU para que aparezca el menú principal.
2 Seleccione el símbolo
>+ o ?– y pulse OK. Aparece el menú MODE DE PANTALLA.
3 Seleccione “Formato automático” con las teclas >+ o ?– y pulse
OK.
4 Seleccione SI o NO con las teclas >+ o ?– y pulse OK.
para “Modo de pantalla” con las teclas
LIVELIVE
Strobo: Velocidad: no: OK
Fig. 39
49
Page 50

Teletexto
2
1
45
7
RM-838
3
6
9
8
0
C
PROGR
+
+
1
_
_
1
SAT
+
MENU
_
OK
VTR 1-2-3
MEM
MDP
USE
+
PROGR
RESET
_
Las emisoras de TV emiten servicios de información conocidos
como Teletexto a través de canales de TV. Estos servicios
permiten consultar en cualquier momento varias páginas de
información, como informes meteorológicos o boletines
informativos. Para acceder a las funciones avanzadas del
teletexto, utilice las teclas del mando a distancia situadas en la
sección correspondiente del mismo.
Funciones de acceso directo
Activación y desactivación del teletexto
1 Seleccione el canal de TV que emite el servicio de teletexto que
desea ver.
2 Pulse _ para activar el teletexto.
Aparece una página del teletexto, normalmente el índice.
Si no se recibe la emisión de teletexto, en la línea superior de la
pantalla aparece “No text available”.
Para desactivar el teletexto
Pulse Ο.
Nota
La recepción del
teletexto puede ser
defectuosa cuando la
señal de emisión es
débil.
Con la sección del
mando a distancia con
las funciones básicas
Es posible activar y
desactivar el teletexto,
utilizar el teletexto rápido
y seleccionar
directamente los
números de página.
Nota
Las operaciones en
teletexto rápido sólo
pueden realizarse si la
emisora de TV transmite
señales de teletexto
rápido.
Selección de una página del teletexto
Selección directa
Utilice las teclas numéricas para introducir los tres dígitos
correspondientes al número de página seleccionada.
Si se equivoca, termine de introducir los dígitos y, a continuación,
vuelva a introducir el número de la página.
Con la función de localización de páginas
1 Seleccione una página de teletexto con una descripción general de
páginas (por ejemplo, página de índices).
2 Pulse OK. Seleccione la página que desee con >+ o ?–. El
mensaje “Page Catching” aparecerá en la línea de información.
Pulse OK.
La página solicitada aparece transcurridos unos segundos.
Pulse _ para reanudar la recepción normal de teletexto.
Acceso a la página anterior o posterior
Pulse g (PAGE+) o G (PAGE–).
Aparece la página anterior o la que sigue.
Superposición de la pantalla de teletexto sobre un programa
de TV
• Pulse _ una vez en el modo de teletexto o dos veces en el modo
de TV.
• Pulse _ de nuevo para reanudar la recepción normal del teletexto.
Protección de las páginas del teletexto contra
actualizaciones
• Pulse [ (HOLD). El símbolo de HOLD [ aparece en la línea
informativa.
• Pulse _ para reanudar la recepción normal del teletexto.
50
Uso del teletexto rápido
El teletexto rápido permite acceder a las páginas pulsando una
sola tecla. Cuando se emite una página de este teletexto, en la
parte inferior de la pantalla aparece un menú codificado a color.
Los colores de este menú se corresponden con las teclas roja,
verde, amarilla y azul del mando a distancia.
Pulse en el mando a distancia la tecla de color correspondiente al
menú codificado a color. Después de unos segundos, la página
aparecerá en pantalla.
Page 51

2
1
3
RM-838
6
9
8
0
C
PROGR
+
+
1
_
_
1
SAT
+
MENU
_
OK
VTR 1-2-3
MEM
MDP
USE
+
PROGR
RESET
_
45
7
Nota
Algunas de las
funciones pueden no
estar disponibles,
dependiendo del
servicio de teletexto.
Pulse OK y seleccione
“NO” para el ajuste
correspondiente a
PAGINA DE ALARMA
con el fin de cancelar la
solicitud.
Uso del menú de teletexto
Este TV está equipado con un sistema de menú que le guiará a
través del teletexto. Cuando el teletexto está activado, las teclas
de menú permiten utilizar el menú. Seleccione las funciones del
menú como se explica a continuación:
1 Pulse MENU. El menú se superpondrá en la pantalla del teletexto.
(Véase la Fig. 40.)
2 Utilice >+ o ?– para seleccionar la función que desee y pulse OK.
(Véase la Fig. 41.)
PAGINAS DE USUARIO/PAGINAS
PROGRAMADAS DE USUARIO
Consulte la página 52 para obtener información sobre el
procedimiento de programación y empleo de las páginas de
usuario.
ÍNDICE
La función de índice proporciona una visión general del contenido
del teletexto, así como de los números de página.
SUPERIOR/INFERIOR/COMPLETA
Para leer de forma adecuada la página del teletexto, es posible
ampliar la imagen mediante las funciones de ampliación de la
parte superior o inferior de la imagen. Una vez seleccionada esta
función, aparece la línea informativa con las opciones superior/
inferior/completa. (Véase la Fig. 42.)
Pulse >+ para seleccionar “Superior” y aumentar la mitad
superior. Mantenga pulsado ?– para seleccionar “Inferior” y
aumentar la mitad inferior. Pulse OK para seleccionar “Completa”
y recuperar el tamaño normal.
Pulse _ para reanudar la recepción normal del teletexto.
DESAPARICIÓN DE TEXTO
Después de seleccionar esta función, podrá ver un programa de
TV mientras espera a que la página del teletexto se capture (El
símbolo cambia de color). (Véase la Fig. 43.)
Pulse _ para reanudar la recepción normal del teletexto.
SUBTÍTULOS
El servicio de teletexto informa sobre si el programa de TV incluye
subtítulos.
Tras seleccionar esta función, los subtítulos aparecerán en la
pantalla del TV.
REVELAR
En alguna ocasiones las páginas contienen información oculta,
como la respuesta a unas preguntas. Por tanto, existe una opción
que permite desvelar esta información. Tras seleccionar esta
función, aparece la línea informativa con la opción “REVELAR SI/
NO”. (Véase la Fig. 44.)
Utilice >+ o ?– para seleccionar SI si desea conocer la
información oculta y NO en caso contrario.
Pulse _ para reanudar la recepción normal del teletexto.
PÁGINA DE ALARMA
El servicio de teletexto informa sobre la disponibilidad de las
páginas con código de tiempo. En caso afirmativo, una página, por
ejemplo de aviso, puede aparecer en pantalla a una hora
determinada.
1 En la parte inferior de la página aparecerá una ventana
informativa.
Seleccione “SI” con >+ o ?– y pulse OK.
2 Para seleccionar la página deseada, introduzca los tres dígitos
correspondientes al número de página (por ej., 452) mediante las
teclas numéricas.
3 Para seleccionar la hora, introduzca cuatro dígitos (por ej., 1800)
mediante las teclas numéricas y pulse MENU.
La hora seleccionada se muestra en la parte superior izquierda de
la pantalla.
La página del teletexto aparecerá a la hora seleccionada.
Pulse _ para regresar al modo de teletexto normal.
MENU DE TELETEXTO
Páginas del Usuario
Indice
Superior/Inferior/Completa
Desaparición de Texto
Subtitulos
Revelar
Página de Alarma
Subpágina
Memorizar Páginas del Usuario
Elija y pulse OK
Fig. 40
MENU DE TELETEXTO
Páginas del Usuario
Indice
Superior/Inferior/Completa
Desaparición de Texto
Subtitulos
Revelar
Página de Alarma
Subpágina
Memorizar Páginas del Usuario
Elija y pulse OK
Fig. 41
Superior Inferior OK Completa
Fig. 42
Fig. 43
Fig. 44
E
siRevelar no
51
Page 52

Para cancelar la
MEMORIZAR PAGINAS DEL USUARIO
BANCO
A
B
C
D
E
Reasignar las Páginas
PROG
00
01
02
P1
300
200
100
128
400
P2
255
120
220
321
238
P3
456
301
300
255
240
P4
234
303
444
118
P5
200
550
127
P6
179
345
VHS
ZDF
ARD
–
A
C
04
05
06
MTV
SKY
SAT
D
B
C
NOMBRE
PROG
BANCO BANCO
NOMBRE
Elija y pulse OK
función
Seleccione Subpágina y,
a continuación, pulse
OK.
Si dos emisoras de
radiodifusión utilizan
el mismo teletexto
Es posible programar un
banco para 2 posiciones
de programa distintas.
52
SUBPÁGINA
Esta función permite seleccionar una página del teletexto
determinada de entre las subpáginas que se muestran
secuencialmente de forma automática. Tras seleccionar esta
función, en la pantalla aparecerá una línea informativa.
Para seleccionar la subpágina deseada, introduzca cuatro dígitos
utilizando PROGR+/– o las teclas numéricas (por ej., introduzca
0002 para ver la segunda de las páginas que se muestran en
secuencia).
Sistema de banco de páginas del
usuario
En el “Sistema de banco de páginas de Teletexto “podrá Vd.
almacenar hasta 30 páginas. Esto facilita el acceso rápido a las
páginas consultadas frecuentemente.
Para almacenar las páginas
Existen 5 “bancos” diferentes (A a E) para 5 estaciones de Teletexto.
En cada uno de estos bancos podrá Vd. almacenar hasta 6 páginas
(P1 a P6).
1 Pulse _ (si Teletexto no se encuentra conectado) y MENU para
visualizar el “Menú de Teletexto”.
2 Con la tecla >+ o ?– elija “Memorizar Páginas del Usuario” y pulse
OK.
3 Con la tecla >+ o ?– elija el banco deseado y pulse OK. El cursor se
traslada al primer campo (P1) de las páginas preferidas.
4 Con las teclas numéricas, introduzca los tres dígitos de la primera
página preferida y pulse OK.
El cursor se desplazará al segundo campo.
5 Repita el paso 4 para almacenar los 5 números de página restantes.
Si no desea Vd. almacenar los 6 números de páginas, pulse OK sin
insertar ningún número. Una vez finalizada la operación, pulse OK
varias veces hasta que el cursor aparezca junto al siguiente banco
del margen izquierdo.
6 Con la tecla >+ o ?– elija “Reasignar las páginas” y pulse OK.
7 Con la tecla >+ o ?– elija la posición de programa para la cual
desea almacenar las páginas en memoria y pulse OK. (Véase la Fig.
45.)
8 Con la tecla >+ o ?– elija el banco deseado (dispone Vd. de los
bancos A a E) y pulse OK.
9 Para los 4 bancos restantes repita los puntos 3 a 8.
Visualización de las páginas del usuario
1 Elija MENU.
2 Con la tecla >+ o ?– elija “PAGINAS DEL USUARIO” y pulse OK.
En pantalla se visualiza una tabla de las páginas preferidas
almacenadas. (Véase la Fig. 46.)
3 Con la tecla >+ o ?– elija la página que desea y pulse OK.
Transcurridos algunos segundos, la página aparecerá en la pantalla.
o bien
Vd.también puede utilizar las teclas de Fastext (teclas coloreadas del
mando a distancia) para tener rápido acceso a las cuatro primeras
“páginas del usuario”. La primera página (P1) corresponde a la tecla
de color rojo, la segunda (P2) a la de color verde, la tercera (P3) a la
amarilla y la cuarta página a la tecla azul.
Para seleccionar la página deseada, pulse la respectiva tecla de
color mientras Vd. se halla en modo TV, entonces el nº de página del
teletexto aparecerá de color blanco en la esquina superior izquierda.
Cuando el color del nº de página cambie la página está disponible.
Pulse de nuevo la tecla de color para visualizar la página.
Fig. 45
PAGINAS DEL USUARIO BANCO B
Página 300
Página 200
Página 203
Página 500
Página 234
Página 159
Elija y pulse OK
Fig. 46
Page 53

Conexión y funcionamiento de equipos
opcionales
Conexión del equipo opcional
Es posible conectar equipos de audio o vídeo opcionales al TV,
como por ejemplo, videograbadoras, reproductores de
videodiscos y sistemas estéreo.
Para conectar una
videograbadora
mediante el terminal )
Conecte la salida de
antena de la
videograbadora al
terminal ) del TV.
Se recomienda
sintonizar la señal de
vídeo en el número de
programa “0”. Para
obtener información
detallada, consulte
“Sintonía manual de
canales” en la página
39.
Si se distorsiona la
imagen o el sonido
Aleje la videograbadora
del TV.
Entrada S/vídeo
(entrada Y/C)
Las señales de vídeo se
dividen en señales Y
(luminancia o brillo) y C
(crominancia).
Separando estas
señales, se evita que
interfieran entre sí y, de
esta forma, se mejora la
calidad de la imagen
(especialmente la
luminancia). El TV
dispone de 3 tomas de
entrada S vídeo por las
que se reciben
directamente las
señales separadas.
Para conectar una
videograbadora
monofónica
Conecte sólo la toma
blanca al TV y a la
videograbadora.
1
L/G/S/I
R/D/D/D
2
Señales de entrada admitidas
1 Señales RGB y de audio/vídeo normales
2 Señales de S vídeo y de audio/vídeo
normales
3 Señales de S vídeo y de audio/vídeo
normales
4 Señales de S vídeo y de audio/vídeo
normales
5 Sin entradas
6 Sin entradas
4
L/G/S/I
L/G/S/I
L/G/S/I
R/D/D/D
R/D/D/D
R/D/D/D
56
Señales de salida disponibles
Vídeo/audio del sintonizador de TV
Vídeo/audio de la fuente seleccionada
Sin salidas
Vídeo/audio en la pantalla del TV (monitor out)
Señales S/vídeo/audio en la pantalla del TV
(monitor out)
Señal de audio (variable)
3
E
PROGR
53
Page 54

Para seleccionar la
S
1
S
entrada mediante
PROGR +/– o con las
teclas numéricas
Es posible ajustar las
fuentes de entrada de
vídeo en las posiciones
de programa, de forma
que puedan
seleccionarse mediante
PROGR +/– o con las
teclas numéricas. Para
obtener información
detallada, consulte
“Sintonía manual de
canales” en la página
39.
2
1
45
7
3
6
9
8
0
C
PROGR
+
+
1
_
_
1
SAT
+
MENU
_
OK
VTR 1-2-3
MEM
MDP
USE
Selección de la entrada y la salida
En esta sección se explica cómo ver la imagen de entrada de
vídeo (procedente de la fuente de vídeo conectada al TV) y la
forma en que se selecciona la señal de salida mediante las teclas
de acceso directo o el sistema de menú.
Selección de la entrada
Pulse varias veces para seleccionar la fuente de entrada.
A continuación, aparece el símbolo de la fuente de entrada
seleccionada.
Para volver a la imagen de TV normal
Pulse Ο.
Modos de entrada
Símbolo
1
2
S
2
3
S
3
4
S
4
También es posible seleccionar el modo de entrada con la tecla del TV.
Señal de entrada
Entrada de audio/vídeo mediante el conector 1
Entrada de audio/RGB mediante el conector 1
Entrada de audio/video mediante el conector 2 / 2
Entrada de audio/S video mediante el conector 2 / 2 S o 2 S(conector
de 4 terminales)
Entrada de audio/vídeo mediante el conector 3
Entrada de S vídeo mediante el conector 3
y 3 de la parte frontal
(conector de 4 terminales) de la
parte frontal
Entrada de audio/vídeo mediante el conector 4
/ 4
Entrada de S vídeo mediante el conector 4 / 4 S o 4
(4 terminales)
1
S
S
S
Selección de la salida
RM-838
RESET
+
PROGR
_
El conector 2 / 2 Spermite la salida de las entradas de
fuentes procedentes de otros conectores.
Pulse
varias veces para seleccionar la salida.
Aparece el símbolo de la fuente de salida seleccionada.
Modos de salida
Símbolo
1
2
S
2
3
S
3
4
S
4
TV
El conector 2 /2Senvía
Señal de audio/vídeo del conector 1
Señal de audio/vídeo del conector 2 /
S
Señal de audio/S vídeo del conector 2 / 2 So 2 S(4 terminales)
Señal de audio/vídeo de los conectores 3
, 3
Señal de audio/S vídeo de los conectores 3 S, 3
Señal de audio/vídeo del conector 4 / 4
Señal de audio/S vídeo del conector 4 / 4 So 4 S(4 terminales)
Señal de audio/vídeo del conector de antena )
54
Page 55

Uso de “Sintonía Audio/Vídeo”
La función “Sintonía Audio’Video “permite sintonizar una fuente de
entrada (p.e.
correspondiente (p.e.AV1
Esto significa que al elegir
1, Senal RGB) para la entrada audio/vídeo
).
1 automáticamente el reproductor
de vídeo selecciona la señal RGB.
1 Con >+ o ?– elija el símbolo
para “Sintonía” y pulse OK.
2 Con >+ o ?– elija primero “Instalación” después “Sintonía
Audio’Video” y pulse OK. En pantalla aparece el menú” SINTONIA
AUDIO/VIDEO. (Véase Fig. 47.)
3 Con >+ o ?– elija la entrada Audio/Video que desea sintonizar y
pulse OK.
4 Con >+ o ?– elija la fuente y pulse OK. Hay las siguientes
posibilidades:
AV1 Señal RGB o bien Audio/Video
AV2 Señal S Vídeo 2 o bien Audio/Vídeo
AV3 Señal S Vídeo 3 o bien Audio/Vídeo
AV4 Señal S Vídeo 4 o bien Audio/Vídeo
5 Si desea denominar una entrada Audio/Vídeo, elija “Nombre” con
>+ o ?– y pulse OK. Con >+ o ?– elija una letra o un número y
pulse OK. Se ilumina el siguiente elemento. Procediendo en
igual forma, elija los demás caracteres. Si desea dejar un
elemento en blanco, elija - y pulse OK.
Una vez seleccionados todos los caracteres, pulse OK varias
veces hasta que el cursor aparezca en la siguiente entrada Audio/
Vídeo del margen izquierdo.
6 Para las otras entradas Audio/Vídeo, repita los pasos 3-6.
Comprobación y selección de las fuentes de
entrada y salida utilizando el menú
Podrá Vd. visualizar el menú para ver qué fuentes de entrada se
han elegido para la pantalla TV y el recuadro PAP y cuál fuente de
salida se ha elegido. También puede Vd. elegirlas en el menú.
1 Con la tecla >+ o ?– elija el símbolo
Vídeo” y pulse OK. Aparece el menú CONEXION DE VIDEO.
(Véase Fig. 48.)
Allí podrá Vd. ver cuál es la fuente elegida para la entrada TV y
PAP, así como para la salida. Si desea Vd. elegir la entrada y la
salida en este menú, prosiga en el próximo paso.
2 Con la tecla >+ o ?– elija Pantalla TV (fuente de entrada para la
pantalla TV), PAP (fuente de entrada para el recuadro PAP) o
Salida (fuente de salida) y pulse OK. Uno de los campos de fuente
cambiará de color.
3 Con la tecla >+ o ?– elija la fuente deseada.
Para mayores detalles sobre cada fuente, véase la tabla en la
página 54.
4 Pulse OK.
Se confirma la fuente elegida y el cursor aparece en pantalla.
5 Para elegir la fuente para otras entradas o salidas, repita los pasos
2-4.
para “Conexión de
SINTONIA AUDIO/VIDEO
ENTRADA
AV1
AV2
AV3
AV4
Elija y pulse OK
Fig. 47
CONEXION DE VIDEO
Pantalla TV [ ]
Pantalla PAP
Salida
TV
Elija y pulse OK
Fig. 48
FUENTE
RGB
Y/C
Y/C
Y/C
VHS 2
NOMBRE
RGB
YC2
YC2
YC2
AV1 ----[ ]AV2 VHS 2
[ ]AV4 -----
TV
E
55
Page 56

Control remoto de otros equipos
Sony
2
1
45
8
7
0
SAT
MEM
USE
RM-838
VTR 1-2-3
RESET
3
6
9
C
PROGR
+
+
1
_
_
1
+
MENU
_
OK
MDP
+
PROGR
_
Para realizar
grabaciones
Cuando utilice la tecla α
(grabación), asegúrese
de pulsar
simultáneamente esta
tecla y la que se
encuentra a su derecha.
El mando a distancia del TV puede utilizarse en la mayor parte de
equipos con control remoto de Sony, por ejemplo, en sistemas
beta, en 8 mm o con videograbadoras para VHS y reproductores
de videodiscos.
Sintonización del mando a distancia con el equipo
1 Ajuste el selector VTR 1/2/3 MDP de la videograbadora de
acuerdo con el equipo que quiere utilizar:
VTR1: Videograbadora para Beta
VTR2: Videograbadora para 8 mm
VTR3: Videograbadora para VHS
MDP: Reproductor de videodiscos
2 Para activar el equipo adicional, utilice las teclas que se indican en
la ilustración.
Si el vídeo dispone de un selector COMMAND MODE, ajústelo en
el mando a distancia en la misma posición que el selector MDP 1/
2/3 de la videograbadora.
Si el equipo no dispone de una función determinada, la tecla
correspondiente del mando a distancia no funcionará.
56
Page 57

Información complementaria
Angulo óptimo de visión
Para que la calidad de la imagen recibida sea óptima, procure situar el
TV de forma que pueda ver la pantalla desde los ángulos que se
muestran a continuación.
Angulo de visión horizontal
35°
E
1,5 m y más
Angulo de visión vertical
75°
75°
35°
1,5 m y más
57
Page 58

Limpieza del filtro de aire
Es preciso limpiar periódicamente el filtro de aire. Límpielo una
vez al mes. Si el filtro es viejo y el polvo permanece en él
incluso después de limpiarlo, sustitúyalo por otro nuevo.
Si no toma las precauciones descritas a continuación, es
posible que sufra daños físicos o que las pertenencias
domésticas se vean afectadas.
• Limpie periódicamente el filtro de aire, ya que en caso
contrario puede producirse recalentamiento en el interior
de la unidad.
• No utilice nunca un filtro de aire que presente agujeros o
desperfectos. Fije firmemente el filtro con seis lengüetas. Si
se introduce polvo en el TV, es posible que la imagen se
oscurezca o que se produzca un incendio.
1 Desactive el suministro eléctrico y
desconecte el cable de alimentación.
2 Retire el panel frontal.
4 Limpie el polvo con una aspiradora.
aspiradora
5 Fije el filtro.
Fije con firmeza las seis lengüetas.
Retire el panel frontal sin mover el TV.
Empuje el panel frontal hacia delante sujetando el lateral
de éste con los dedos. Tenga cuidado de no pillarse las
uñas.
3 Empuje el filtro hacia arriba y retírelo.
6 Instale el panel frontal.
Tenga cuidado de no dañar el altavoz.
Notas
• Fije el filtro con firmeza, ya que en caso contrario la alimentación no
se activará.
• Retire el filtro suministrado de la misma forma que el filtro instalado.
• Póngase en contacto con el centro de servicio técnico Sony más
próximo cuando desee obtener un filtro nuevo.
58
Filtro suministrado
Page 59

Sustitución de la lámpara
La duración de la lámpara es de 6000 horas
aproximadamente. Si la lámpara se oscurece o si el color de la
imagen no es normal, sustituya dicha lámpara por otra nueva
(suministrada).
Si no toma las precauciones descritas a continuación, es
posible que sufra daños físicos o que sus pertenencias
domésticas se vean afectadas.
• Para realizar la sustitución, utilice la lámpara suministrada.
El TV puede dañarse si emplea otro tipo de lámpara.
• No extraiga la lámpara, excepto para realizar susustitución.
En caso contrario, pueden producirse daños por
calentamiento o incendios.
• Antes de sustituir la lámpara, desactive el suministro
eléctrico y desconecte el cable de alimentación.
• Antes de reemplazarla, espere a que se enfríe. La
temperatura del vidrio frontal de la lámpara supera los
100 °C (212 °F) incluso 30 minutos después de desactivar la
alimentación.
• Una vez extraída, no coloque la lámpara cerca de niños ni
de materiales inflamables.
• No moje la lámpara extraída ni introduzca objetos en su
interior, ya que puede explotar.
• No coloque objetos metálicos ni fácilmente inflamables
cerca de la lámpara, ya que pueden producirse incendios.
Tampoco introduzca la mano en el compartimiento de la
lámpara, ya que puede quemarse.
• Fije la lámpara nueva con firmeza, ya que en caso contrario
es posible que la imagen se oscurezca o que se produzca
un incendio.
3 Afloje el tornillo con un objeto, como por
ejemplo una moneda, y extraiga la cubierta
de la lámpara.
E
4 Afloje dos tornillos y saque la lámpara.
La lámpara estará demasiado caliente inmediatamente
después de desactivar la alimentación. Tenga cuidado de
no tocar el vidrio frontal, las partes circundantes de la
lámpara ni el vidrio del compartimiento de ésta.
Afloje dos tornillos con la llave suministrada.
1 Desactive el suministro eléctrico y
desconecte el cable de alimentación.
Sustituya la lámpara una vez transcurridos 30 minutos o
más después de desactivar la alimentación.
Prepare la lámpara nueva.
2 Retire el panel frontal.
Retire el panel frontal sin mover el TV.
Saque la lámpara sujetando la manilla.
5 Fije la lámpara nueva.
Apriete firmemente dos tornillos.
6 Fije la cubierta de lámpara.
Apriete firmemente los tornillos.
7 Instale el panel frontal.
Tenga cuidado de no dañar el altavoz.
Notas
• No toque ni manche el vidrio frontal de la lámpara nueva ni el vidrio
del compartimiento de la lámpara. Si el vidrio se ensucia, la calidad
de imagen puede deteriorarse o la duración de la lámpara reducirse.
• Fije firmemente la cubierta de lámpara, ya que de no ser así la
alimentación no se activará.
• Si la lámpara se funde, se oirá un ruido. Esto no representa daño
alguno.
• Para obtener una lámpara nueva , póngase en contacto con el centro
de servicio técnico Sony más próximo.
Empuje el panel frontal hacia delante sujetando el lateral
de éste con los dedos. Tenga cuidado de no pillarse las
uñas.
59
Page 60

Solución de problemas
En esta sección se ofrece una solución sencilla a algunos de los problemas relacionados con la imagen y el sonido.
Problema
Ausencia de imagen (pantalla en negro) y de
sonido
Ausencia o mala calidad de la imagen, pero buena
calidad de sonido
Mala calidad de imagen al visualizar una fuente de
vídeo RGB
Mala calidad de imagen de la pantalla PAP
Buena calidad de imagen, pero ausencia de sonido
Ausencia de color en programas a color
El mando a distancia no funciona
Si los problemas persisten, solicite a personal cualificado la revisión del TV. No abra por ningún motivo el TV.
Solución
• Enchufe el TV.
• Pulse φ en el TV (si el indicador φ está encendido, pulse Ο o un número de
programa en el mando a distancia)
• Compruebe la conexión en serie.
• Compruebe si la fuente de vídeo seleccionada está activada.
• Pulse
contraste y el color.
• Pulse
• Pulse
• Pulse
• Compruebe la conexión de los altavoces.
• Si en la pantalla aparece ο, pulse ο.
• Pulse
PREESTABLECIDO y, a continuación, pulse OK.
• Las pilas están agotadas.
para acceder al menú CONTROL DE IMAGEN y ajuste el brillo, el
varias veces para seleccionar .
.
+.
para acceder al menú CONTROL DE IMAGEN, seleccione
Especificaciones
Este producto cumple con la directiva U.E. 89/336/EEC.
Sistema de TV B/G/H, D/K,I,L
Sistema de color PAL/SECAM
Cobertura de canales Consulte abajo “Recepción y
Tamaño de imagen proyectada
Conectores
Parte posterior Euro conector 1
Parte frontal Entrada de vídeo 3
NTSC 3.58/4.43 (VIDEO IN)
exhibición de canales”.
37 pulgadas (KL-37W1)
Aprox. 94 cm en diagonal
50 pulgadas (KL-50W1)
Aprox. 127 cm en diagonal
(norma CENELEC) con entrada para
señales de audio y vídeo
- Entradas para RGB
- Euro conector 2
terminales para salidas de vídeo TV y
señales de audio
- Entradas para señales de audio y
vídeo
- Entradas para S vídeo
- Euro conector 4
terminales para salida de señales de
audio y vídeo (seleccionable)
- Entradas para señales de audio y
vídeo
- Entradas para S vídeo
- Salidas para señales de audio y vídeo
(monitor out)
Entradas de S vídeo 2
4 terminales conforme a norma DIN
Entradas de audio
phono
Salida de S vídeo
terminales conforme a norma DIN
Salidas de audio
Salidas de audio
phono
Entradas de audio
Entrada de S vídeo 3
terminales conforme a DIN
Toma de auriculares λ: minitoma
estéreo
de 21 terminales
/ 2S con 21
/ 4S con 21
S
(L, R)-tomas
con 4
S
-tomas phono
(variable)-tomas
-toma phono
-tomas phono
S
de 4
, 4 Scon
Salida de sonido 2 × 5 W (Pontencia musical)
Central 1 × 20 W
Consumo de energía 170 W
Dimensiones (an/al/prf) 920 × 825 × 390 mm (KL-37W1)
Masa 29 kg (KL-37W1)
Accesorios suministrados
Otras características Filtro de peine digital (alta resolución)
El diseño y las especificaciones están sujetos a cambios sin previo
aviso.
1.230 × 1.055 × 550 mm (KL-50W1)
43 kg (KL-50W1)
Consulte la página 36.
PAP (imagen e imagen)
FASTEXT
100 Hz Digital Plus
Ecualizador gráfico
Recepción y exhibición de canales
Indicación en pantalla
C02 C03 C04..C12
C21..C69
S01 S02..S41
S42..S46 S01..S10
S11..S20
C11..C69
C02..C12 C21..C69
S01 S02..S41
S42 S43..S46
S02, S03..S17,
S21..S41
C01..C12 C21..C69
C21..C68
B/G/H
CABLE TV (1)
CABLE TV (2)
ITALIA
D/K
CABLE TV (1)
CABLE TV (2)
CABLE TV
L
I
Canales recibidos
E2..12 21..69
S1..41
S01..S05 M1..M10
U1..U10
A B C D E F G H H1
H2 21..69
R01..R12 R21..R69
B..Q,S21..41
F2..F10 F21..F69
B21..B68
60
Page 61

Indicadores de aviso
Si se produce un problema, el indicador parpadea de la
siguiente forma. Pruebe la solución sugerida para remediar el
problema.
AB
E
Cause
La lámpara se funde o la
calidad de la misma es
deficiente.
La cubierta del filtro o la
lámpara se retira.
El ventilador de refrigeración
se detiene.
Se produce calentamiento
interno.
Si el indicador parpadea de una manera diferente a la descrita anteriormente, póngase en contacto
con un centro de servicio técnico Sony.
Patrones de parpadeo de los indicadores
El indicador B parpadea dos veces y, continuación, el A
parpadea una vez.
El parpadea continúa de esta manera.
El indicador B parpadea tres veces y, continuación, el A
parpadea una vez.
El parpadea continúa de esta manera.
El indicador B parpadea quatro veces y, continuación, el A
parpadea una vez.
El parpadea continúa de esta manera.
El indicador B parpadea cinco veces y, continuación, el A
parpadea una vez.
El parpadea continúa de esta manera.
Fijación del televisor de proyección
Después de realizar el ajuste, fije el televisor de proyección a la pared, etc., con los soportes
suministrados como medida de seguridad.
1 Monte los dos soportes suministrados con los tornillos en la parte
posterior superior del televisor de proyección.
Soporte
(suministrado)
2 Pase una cuerda resistente o una cadena por cada soporte que ha
montado en el paso 1 y, a continuación, realice la fijación a la pared o a
un pilar, etc.
61
Page 62

ADVERTÊNCIA
Para evitar o risco de incêndio ou de choque eléctrico,
não exponha o aparelho à chuva nem à humidade.
O televisor tem vários componentes internos expostos a
altas tensões. Não abra a caixa do aparelho. A
assistência técnica só deve ser prestada por pessoal
qualificado.
Informações de segurança
Todos os televisores funcionam com tensões
extremamente elevadas. Para evitar os riscos de
incêndio e de choques eléctricos, leia atentamente os
procedimentos de segurança descritos abaixo. Para sua
protecção, a assistência técnica só deve ser prestada por
pessoal qualificado.
Segurança geral:
• Não exponha o televisor à chuva nem à humidade.
• Não abra a tampa posterior do televisor.
Funcionamento seguro:
• O televisor só funciona com uma tensão de 220–240 V
CA.
• Se entornar um líquido ou deixar cair algum objecto para
dentro do televisor, contacte imediatamente os serviços
de assistência técnica.
• Se não vai utilizar o televisor por algum tempo, desligue-o
da tomada.
• Quando quiser desligar o televisor, puxe sempre pela
ficha e nunca pelo cabo de alimentação.
• Quando abrir a tampa do painel frontal, não coloque nada
em cima da respectiva tampa.
Informações importantes
Para obter imagens nítidas e com qualidade, leia
atentamente as informações apresentadas abaixo sobre
a utilização e manutenção do televisor.
Qualidade de imagem
• Não toque no ecrã do televisor e tenha muito cuidado
para não o riscar com objectos contundentes.
Iluminação
Para obter imagens nítidas, não exponha o ecrã à
iluminação directa ou à incidência dos raios solares. Se
possível, utilize focos de luz instalados no tecto.
Instalação
• Para evitar o sobreaquecimento do aparelho, não tape os
orifícios de ventilação.
• Não instale o televisor num local quente ou húmido, em
locais expostos à incidência directa dos raios solares, pó
excessivo ou vibrações mecânicas.
• Se transportar o televisor directamente de um local frio
para um quente ou se ocorrerem mudanças bruscas de
temperatura, as imagens podem ficar esborratadas ou
com as cores esbatidas. Isto deve-se à condensação da
humidade nos espelhos ou lentes que se encontram no
interior do televisor. Antes de utilizar o televisor, espere
até que a humidade se evapore.
Manutenção
• Guarde a embalagem original e os materiais de
embalagem para utilizações futuras. Para que o televisor
fique totalmente protegido, volte a empacotar o televisor
tal como veio da fábrica.
• Para manter a caixa do televisor em bom estado, limpe-a
com um pano macio. Utilize um pano humedecido num
detergente suave para remover as manchas mais
difíceis. Nunca utilize solventes (como por exemplo,
diluente ou benzina) nem produtos de limpeza abrasivos
porque pode danificar a caixa do aparelho. Como medida
de segurança, desligue sempre o televisor antes de o
limpar.
• Para retirar o pó da parte da frente do ecrã, desligue o
televisor da tomada e limpe-o cuidadosamente com um
pano macio humedecido em água ou num detergente
suave, utilizando unicamente movimentos verticais.
Depois, limpe-o com um pano seco e macio. Nunca
utilize solventes ou diluentes para limpezas.
• Se a imagem escurecer após um longo período de
funcionamento do televisor, pode ser necessário limpar a
parte interna do televisor. Para este efeito, contacte os
serviços de assistência técnica.
62
Page 63

Índice
Apresentação geral .................................................................. 64
Como começar.............................................................
Ponto 1 Preparação ................................................................. 66
Verificação dos acessórios fornecidos ......................... 66
Colocação da pilha no telecomando ............................ 66
Ligação da antena....................................................... 66
Ponto 2 Sintonização dos canais de televisão .......................... 67
Selecção da língua...................................................... 67
Visualização do menu ................................................. 67
Selecção automática de canais ................................... 68
Selecção manual de canais......................................... 69
Funções adicionais de pré-selecção ......................................... 70
Ordenação de posições de programa .......................... 70
Utilização de “Outras funções de pré-selecção” ........... 71
Como saltar posições de programa ............................. 72
Como legendar um nome de estação .......................... 72
Interdição de programas ............................................. 73
Sintonização temporária de um canal .......................... 73
66
Como começar
Instruçoes de funcionamento
P
P
Instruções de funcionamento.....................................
Ver televisão ............................................................................ 74
Ligar/desligar o televisor.............................................. 74
Seleccionar programas de televisão ............................ 74
Regular o volume ........................................................ 74
Controlar o televisor com os respectivos botões .......... 74
Ver teletexto ou imagens de vídeo............................... 75
Outras funções úteis ................................................... 75
Utilizar o menu para regular e programar o televisor ................. 76
Regular o som e a imagem.......................................... 76
Equalizador Gráfico..................................................... 77
Utilizar o temporizador de sono ................................... 77
PAP (Imagem-e-Imagem) ........................................................ 78
Utilizar o modo de Ecrã/PAP através do menu............. 79
Formatação automática .............................................. 79
Teletexto.................................................................................. 80
Funções de acesso directo.......................................... 80
Utilizar o menu Teletexto ............................................. 81
Sistema de Banco do Utilizador de Página .................. 82
Ligação e funcionamento do equipamento opcional.................. 83
Ligação do equipamento opcional ............................... 83
Selecção da entrada e da saída .................................. 84
Utilizar pré-selecção audio/video ................................. 85
Telecomando de outros equipamentos Sony ............... 86
74
Outras informações.................................................................. 87
Àrea de visualização ideal ........................................... 87
Limpeza do filtro de ar ................................................. 88
Substituir a lâmpada.................................................... 89
Resolução de problemas............................................. 90
Especificações............................................................ 90
Indicadores luminosos de aviso ................................... 91
Estabilizar o projector de televisão............................... 91
63
Page 64

Apresentação geral
Esta secção descreve resumidamente as teclas e os controlos do
televisor e do telecomando. Para mais informações, consulte as
páginas mencionadas a seguir a cada descrição.
Parte da frente do televisor
AB
PROGR
Símbolo Nome
φ
φ
A-µ-B
PROGR+/–
+/–
λ
S
3, 3, 3
Interruptor de corrente
Indicador Em Espera
Indicadores Estéreo A/B
Programa
Tecla de volume
Teclas de selecçào de entrada
Ficha tipo jack dos auscultadores
Fichas tipo jack de entrada (vídeo S/
vídeo/audio)
Consulte a página
74
74
76
74
74
75
83
84
64
Page 65

Telecomando
RM-838
2
1
45
7
PROGR
3
6
9
8
0
Funcionamento
do televisor/
teletexto
2
1
45
8
7
0
SAT
MEM
USE
3
6
9
C
+
_
+
_
VTR 1-2-3
Funcionamento da
função PAP
PROGR
+
1
_
1
MENU
OK
MDP
Funcionamento do
menu
Nota
A tecla SAT não funciona neste
televisor.
Funcionamento do televisor/teletexto
Símbolo
ο
φ
Ο
_
1,2,3,4,5,6,
7,8,9 e 0
–/--
C
+/–
PROGR +/–
1
1
∃
[
#
ΛΛΛΛ
Nome
Tecla ligar/desligar função mute
Tecla Em Espera
Tecla ligar TV/selector do modo TV
Tecla Teletexto
Selector do modo de entrada
Selector do modo de saída
Teclas numéricas
Tecla de introdução de dois
algarismos
Tecla de introdução directa de canais
Tecla de controlo do volume
Selectores de programas
Teclas de acesso às páginas do
teletexto
Tecla de regulação da imagem
Tecla de controlo de som
Tecla de informações no ecrã
Tecla Teletexto em espera
Tecla de visualização das horas
Teclas Fastext
Tecla de fixação
Tecla de alteração do formato do ecrã
Consulte a página
75
74
74
75
75
84
74
74
70
74
74
80
76
76
75
80
75
80
75
75
Funcionamento do
vídeo
RM-838
RESET
PROGR
+
_
Lado Funções CompletasLado Funções Simples
Funcionamento da função PAP (Imagem-e-Imagem)
Símbolo
Χ
Nome
Tecla ligar/desligar a função
PAP
Selector da fonte PAP
Tecla de mudança
Tecla de fixação da função
PAP
Consulte a página
78
78
78
78
Funcionamento do menu
Símbolo
MENU
>+/ ?–
OK
≅
Nome
Tecla activar/desactivar menu
Teclas de selecção
Tecla OK (confirmação)
Tecla Retrocesso
Consulte a página
67
67
67
67
Funcionamento do vídeo
Símbolo
VTR1/2/3,
MDP
;; − :: Λ
ϑ α φ
PROGR +/–
Nome
Selector do equipamento de
vídeo
Teclas de funcionamento do
equipamento de vídeo
Consulte a página
86
86
65
Page 66

Como começar
RM-838
PROGR
VTR 1-2-3
MDP
1
2
4
5
3
6
9
8
7
0
C
SAT
MENU
+
_
OK
+
4
PROGR
1
1
+
_
+
_
Ponto 1 Preparação
2
1
1
Verificação dos acessórios fornecidos
2
1
Nota: Ao desfazer-se
das pilhas gastas faça-o
de uma forma que não
prejudique o ambiente.
Verifique se a embalagem
contém os seguintes
acessórios:
• Telecomando RM-838
• Uma pilha R6 com a designação IEC
• Lâmpada (1)
• Chave (1)
• Suporte (2)
2
Colocação da pilha no
telecomando
1
RM-838
3
2
6
1
5
9
4
1
3
Ligação da antena
8
7
0
PROGR
2
Retire a tampa. Coloque as pilhas
RM-838
3
2
1
6
5
4
8
7
0
RM-838
3
2
1
6
5
4
9
8
7
0
PROGR
respeitando as
polaridades.
9
PROGR
3
3
Volte a colocar a tampa
exterior de maneira a que a
lado Funções Completas
fique visível. Só assim
poderá utilizar o menu no
ponto 2.
Ligue um conector de antena IEC montado no cabo coaxial de 75 ohms (não fornecido) à socket )
L/G/S/I
R/D/D/D
localizada na parte posterior do televisor.
L/G/S/I
R/D/D/D
L/G/S/I
R/D/D/D
L/G/S/I
R/D/D/D
66
Page 67

Ponto 2 Sintonização dos canais de televisão
2
1
Depois de instalar o televisor, seleccione a língua do menu. Deve
pré-programar os canais (máximo de 100 canais) seleccionando o
método automático ou manual. Para pré-programar todos os
canais de uma só vez, utilize o método automático. Se só tiver
2
1
45
8
7
0
SAT
MEM
USE
RM-838
VTR 1-2-3
RESET
3
6
9
C
PROGR
+
+
1
_
_
1
+
MENU
_
OK
MDP
+
PROGR
_
alguns canais e quiser pré-programá-los um a um, recorra ao
método manual.
Antes de começar
• Verifique se consegue ver o lado Funções Completas do
telecomando.
• Procure as teclas de funcionamento do menu no telecomando
(aparecem a sombreado na figura à esquerda).
Selecção da língua
1
1 Carregue em φ no televisor.
O televisor liga-se automaticamente. Se o indicador Em Espera do
televisor estiver aceso, carregue em ; ou numa das teclas
numéricas do telecomando.
2 Prima MENU.
O menu LANGUAGE aparece no ecrã. (Veja a figura. 1.)
MENU
3 Seleccione a língua pretendida com a tecla >+ ou ?– e depois
carregue na tecla OK.
LANGUAGE
Select
figura. 1
+
_
OK
Sec
and press OK
English
Deutsch
Français
Italiano
Español
Nederlands
Português
Suomi
Svenska
¶ Ł غÆ
Türkçe
P
φ
Para voltar ao menu
principal
Prima sem soltar ≅.
Para voltar à imagem
normal do televisor
Prima MENU. Decorrido
um minuto, a imagem do
televisor volta ao
normal, se não
seleccionar nenhuma
das funções do menu.
Nota sobre a função
Demo
Se seleccionar Demo no
menu Instalação, obtém
uma demonstração
sequencial das funções
do menu.
Prima MENU para
desactivar a função.
Visualizaçao do menu
2
Carregue em MENU.
O menu principal aparece no ecrã. (Veja a figura. 2.)
Utilize as teclas >+ ou ?– para seleccionar o símbolo
OK.
Depois, escolha um dos métodos descritos a seguir:
“Selecção automática de canais”
ou
“Selecção manual de canais”
e prima
MODO DE ECRÁ
Modo de Ecrá
Posição de Ecrá
Strobe
PAP
PAP Foto
Formatação Auto
Seleccione e prima OK
figura. 2
[sim]
[n
[ ]zoom
[ ]
0
ão
]
[não]
67
Page 68

Para voltar ao menu
B/G
SIS PROG
C25CA–
NOME
––––04
B/G
SELEÇÃO AUTOMÁTICA
SIS PROG
C25CA–
NOME
––––01
Seleccione e prima OK
principal
Carregue sem soltar em
≅ .
Selecção automática de canais
3
1 Seleccione o símbolo para “Pré-selecção” com >+ ou ?– e
prima OK.
O menu de PRÉ-SELECÇÃO aparece. (Veja a figura. 3.)
2 Seleccione “Selecção automática “com >+ ou ?– e prima OK.
O menu de SELECCÃO AUTOMÁTICA aparece. (Veja a figura.
4.)
3 Prima OK.
Seleccione, se necessário, o sistema de emissão de televisão (B/
G para os países de Europa Ocidental, D/K para os países de
Europa de Leste) com >+ ou ?– e prima OK. O primeiro
elemento do número de “PROG” ficará em realce.
4 Seleccione o programa (botão numérico) a partir do qual deseja
começar a pré-selecção. Seleccione o primeiro elemento do
número com dois algarismos com >+ ou ?– ou os botões
numéricos (Para “04”, seleccione “0” aqui) e prima OK.
O segundo elemento de “PROG”ficará em realce.
5 Seleccione o segundo elemento do número de dois algarismos
com >+ ou ?– ou os botões numéricos (Para “04”, seleccione “4”
aqui) (Veja a figura. 5) e prima OK.
6 Seleccione “C” ou “S” com >+ ou ?– e prima OK.
A pré-selecção automática do canal começa.
Quando a pré-selecção tiver acabado, o menu de “Pré-selecção”
aparece. Todos os canais disponíveis encontram-se agora
memorizados em botões numéricos sucessivos.
Prima MENU para voltar à imagem normal do televisor.
PRÉ-SELECÇÃO
Selecção automática
Selecção manual
Alterar de programa
Interdição de programas
Instalação
Seleccione e prima OK
figura. 3
figura. 4
figura. 5
Para interromper a préselecção automática
de canais
Carregue em ≅ no
telecomando.
Notas
• Após ter efectuado a
pré-selecção
automática de canais,
pode verificar quais os
canais memorizados
em cada uma das
posições de programa.
Para mais
informações, consulte
“Visualização da
tabela de programas”
na página 75.
• Pode ordenar as
posições de programa
para que apareçam no
ecrã pela ordem
pretendida. Para mais
informações, consulte
“ordenação das
posições de programa”
na página 70.
68
Page 69

Utilize este método, se a
2 C –––––21B/G não
3 AV1 –––––EXT
2 C –––––21B/G não
2 C –––––35B/G não
2 C –––––50B/G4$2 C –––––35B/G não
sua área tiver poucos
canais para préseleccionar ou quando
quiser pré-seleccionar
os canais um a um.
Também pode atribuir
números de programa
às várias fontes de
entrada de vídeo.
Se se enganar
Carregue em ≅ para
voltar à posição anterior.
Para voltar ao menu
principal
Carregue sem soltar em
≅ .
Para volta à imagen
normal do televisor
Prima MENU.
Selecção manual de canais
3
1 Seleccione o símbolo para “Pré-selecção” com >+ ou ?– e
prima OK.
O menu de PRÉ-SELECÇÃO aparece. (Veja a figura. 6.)
2 Seleccione o “Selecção manual”com >+ ou ?– e príma OK.
O menu de SELECÇÃO MANUAL aparece. (Veja a figura. 7.)
3 Utillzando >+ ou ?–, seleccione a posição de programa (botão
numérico) na qual deseja pré-seleccionar um canal e prima OK.
4 Seleccione, se necessário, o sistema de emissão de televisão ou
uma fonte de entrada de vídeo (EXT) com >+ ou ?–.
5 A seguir prima OK. A posição “CA” (canal) ficará em realce. (Veja
a figura. 8.)
6 Utilizando >+ ou ?–, seleccione C (para pré-seleccionar um canal
normal), S (para pré-seleccionar uma canal de cabo), ou F (para
sintonizar por frequência)e prima OK.
O primeiro algarismo do número do canal “CA” será realçado.
Se tiver seleccionado EXT no passo 5, seleccione a fonte de
entrada de vídeo com >+ ou ?–. (Veja a figura. 9.)
Existem duas maneiras de pré-seleccionar canais. Se souber o
número do canal, vá para o Passo “7-Manual”
ou
Se não souber o número de canal, vá para o Passo “7-Busca”.
PRÉ-SELECÇÃO
Selecção automática
Selecção manual
Alterar de programa
Interdição de programas
Instalação
Seleccione e prima OK
figura. 6
SELECÇÃO MANUAL
PROG
SIS
1
B/G
B/G
2
3
B/G
4
B/G
5
B/G
6
B/G
7
B/G
8
B/G
9
B/G
10
B/G
Seleccione e prima OK
figura. 7
figura. 8
CA
BUSCA NOME
C21
não
C34
não
C33
não
C45
não
C02
não
C08
não
C10
não
C12
não
C20
não
C59
não
-----
-----
-----
-----
-----
-----
-----
-----
-----
-----
P
Para sintonizar canais
por frequência
Seleccione F no ponto 6
e depois introduza três
algarismos com as
teclas numéricas.
7 Manual
-a Seleccione o primeiro elemento do número “CA” com >+ ou ?–
ou com os botões numéricos e prima OK.
O segundo elemento do número “CA” ficará em realce.
-b Seleccione o segundo elemento do número com >+ ou ?– ou
com os botões numéricos.
O número seleccionado aparece. (Veja a figura. 10.)
-c Prima OK.
A posição “BUSCA” fica realçada e o canal seleccionado é
memorizado. (Veja a figura. 11.)
-d Prima OK até que o cursor apareça na posiçao de programa
seguinte.
-e Repita os passos 3 a 7 para pré-seleccionar outros canais.
7 Busca
-a Prima OK repetidamente até a cor da posição de “BUSCA” mudar.
-b Comece a procurar o canal com >+ (Para cima) ou ?– (para
baixo).
A posição de CA muda de cor. (Veja a figura. 12.)
O número de CA começa a contagem ascendente ou
descendente e pára quando um canal é encontrado. (Veja a
figura. 13.)
-c Prima OK se pretender memoizar este canal. Caso contrário prima
>+ ou ?– para continuar com a busca de canais.
-d Prima OK até o cursor aparecer na posição de progrma seguinte.
-e Repita os passos 3 a 7 para pré-selecção outros canais.
figura. 9
figura. 10
figura. 11
figura. 12
figura. 13
69
Page 70

Funções adicionais de pré-selecção
8 BBC 1C15
1
2
3
4
5
6
7
8
C15
C03
C04
C07
C09
C12
C13
C14
BBC 1
BBC 2
ITV
MBC
-----
-----
-----
-----
ALTERAR DE PROGRAMA
PROG CA NOME
Alterar PR 1 para PR - -
Seleccione e prima OK
2
1
Esta secção mostra-lhe algumas funções adicionais de préselecção, como por exemplo ordenação ou salto de posições de
programa, atribuição de nomes a canais e sintonização fina
manual e a interdição de acesso a programas.
Antes de começar
• Verifique se consegue ver o lado Funções Completas do
telecomando.
• Procure as teclas de funcionamento do menu.
ALTERAR DE
PROGRAMA
2
1
45
8
7
0
SAT
MEM
USE
RM-838
VTR 1-2-3
RESET
3
6
9
C
+
_
1
+
_
1
PROGR
+
_
MENU
OK
MDP
+
PROGR
_
Ordenação de posições de
programa
Com esta função, pode ordenar as posições de programa de
modo a colocá-las pela ordem pretendida.
1 Carregue em MENU para visualizar o menu principal no ecrã.
2 Seleccione o símbolo
prima OK.
O menu de PRÉ-SELECÇÃO aparece.
3 Seleccione “ALTERAR DE PROGRAMA” com a tecla >+ ou ?– e
depois carregue em OK.
O menu ALTERAR DE PROGRAMA aparece no ecrã. (Veja a
figura. 14.)
4 Carregue na tecla >+ ou ?– para seleccionar a posição de
programa a alterare depois carregue em OK.
A cor da posição seleccionada é alterada (Veja a figura. 15.)
5 Carregue na tecla >+ ou ?– para seleccionar a posição de
programa para onde pretende mover o canal da posição de
programa seleccionada no ponto 4 e depois carregue em OK. O
televisor troca as posições de programa.
(Veja a figura. 16.)
6 Se quiser ordenar outras posições de programa, repita os pontos
4 e 5.
para “Pré-selecção” com >+ ou ?– e
ALTERAR DE PROGRAMA
PROG
1
2
3
4
5
6
7
8
Alterar PR 8 para PR - -
Seleccione e prima OK
figura. 14
figura. 15
CA NOME
C03
BBC 2
C04
ITV
C07
MBC
C09
-----
C12
-----
C13
-----
C14
-----
C15
BBC 1
Para as posições de
programas superiores
As indicações
visualizadas no ecrã
deslocam-se
automaticamente.
Se se enganar
Carregue em ≅ para
voltar à posição anterior.
Para voltar ao menu
principal
Carregue sem soltar em
≅ .
Para voltar à imagem
normal do televisor
Prima MENU.
70
figura. 16
Page 71

INSTALAÇÃO
Utilização de “Outras funções de
pré-selecção”
O menu “Pré-selecção (adicional)” permite-lhe fazer o seguinte:
a) se existir um sinal local muito forte (imagem às riscas) pode
diminuir o sinal para cada posição de programa (Atenuador RF).
b) regular e memorizar individualmente o volume de som de cada
canal (Volume por cnal).
c) no caso de um forte sinal sonoro da estação emissora (som
distorcido), pode diminuir o sinal sonoro para cada posição de
programa.
d) utilizar a sintonização fina manual para obter uma melhor
recepção da imagem se a imagem estiver distorcida.
Normalmente a função AFT (sintonização fina automática) é a que
está activa.
1 Prima MENU para visualizar o menu principal.
2 Seleccione o símbolo
prima OK.
Aparece o menu PRÉ-SELECÇÃO.
3 Seleccione “Instalação” com >+ ou ?– e prima OK.
Aparece o menu INSTALAÇÃO.
4 Seleccione “Pré-selecção (adicional)” com >+ ou ?– e prima OK.
Aparece o menu PRÉ-SELECÇÃO (ADICIONAL). (Veja a figura.
17.)
5 Seleccione a posição de programa desejada com >+ ou ?– e
prima uma vez OK para seleccionar a) “ATT” (Atenuador RF),
duas vezes para seleccionar b) VOL (Volume por canal), três
vezes para seleccionar c) IN-AMP (Amplificador de Entrada) ou
quatro vezes para seleccionar d) AFT (Sintonização Fina
Automática).
O item seleccionado muda de cor.
Para regular ou alterar:
de “Pré-selecção” com >+ ou ?– e
PRÉ-SELECÇÃO (ADICIONAL
PROG
AT-RF
VOL
não
1
0
não
0
2
não
3
- 1
não
- 1
4
não
0
5
não
- 1
6
não
- 1
7
não
- 1
8
não
- 1
9
não
- 1
10
Seleccione e prima OK
figura. 17
AMPL-ENT AFT
sim
sim
sim
sim
sim
sim
sim
sim
sim
sim
sim
sim
sim
P
)
- 1
- 1
- 1
- 1
- 1
- 1
- 1
Para reactivar a função
AFT (Sintonização
Fina Automática)
repita o procedimento
desde o passo 1 e
seleccione “Sim” no
passo 5.
a) Atenuador RF(ATT)
Seleccione “SIM”com >+ ou ?– para activar a posição de
programa seleccionada. Prima OK para confirmar a selecção.
Repita o passo 5 para atenuar as outras posições de programa.
b) Volume por canal (VOL)
Com >+ ou ?– pode regular o volume de som para a posição de
programa seleccionado numa amplitude de –7 a +7.
Prima OK para memorizar o volume de som escolhido.
Repita o passo 5 para definir o volume de som para as outras
posições de programa.
c) IN-AMP (Amplificador de entrada)
Utilizando >+ ou ?–, seleccione “NÃO” (desactivado) para a
posição de programa seleccionada.
Pressione OK para confirmar a selecção. Repita o passo 5 para as
outras posições de programa.
d) AFT
Com >+ ou ?–, pode sintonizar com precisão o canal numa
amplitude de –15 a +15. Prima OK para memorizar o nível de
sintonização escolhido. Repita o passo 5 para sintonizar com
precisão os outros canais.
6 Prima MENU para voltar ao modo normal de televisão.
71
Page 72

3 –––
4 B/G
3 –––
SELECÇÃO
2 C S––––25B/G não
2C SONY25B/G não
SELECÇÃO MANUAL
PROG
1
2
3
4
5
6
7
8
9
10
B/G
B/G
B/G
B/G
B/G
B/G
B/G
B/G
B/G
B/G
SIS
C21
C24
C25
C27
C28
C22
C26
C25
C23
C29
CA
não
não
não
não
não
não
não
não
não
não
BUSCA NOME
-----
-----
-----
-----
-----
-----
-----
-----
-----
-----
Seleccione e prima OK
1
2
3
4
5
6
7
8
9
10
B/G
B/G
B/G
B/G
B/G
B/G
B/G
B/G
B/G
B/G
C21
C24
C25
C27
C28
C22
C26
C25
C23
C29
-----
-----
-----
-----
-----
-----
-----
-----
-----
-----
SELECÇÃO MANUAL
PROG SIS CA
não
não
não
não
não
não
não
não
não
não
BUSCA NOME
Seleccione e prima OK
MANUAL
Se se enganar
Prima ≅ para voltar à
posição anterior.
Para voltar ao menu
principal
Continue a premir ≅.
Para voltar à imagem
normal do televisor,
prima MENU.
Como saltar posições de
programa
Poderá saltar posições de programa por utilizar se seleccionar
programas com os botões de PROGR +/–. Contudo, os
programas ignorados poderão ainda ser chamados se utilizar os
botões numéricos.
1 Prima MENU para visualizar o menu principal.
2 seleccione o símbolo
prima OK. O menu de PRÉ-SELECÇÃO aparece.
3 Seleccione “Selecção manual” com >+ ou ?– e prima OK.
O menu de SELECÇÃO MANUAL aparece. (Veja a figura. 18.)
4 Utilizando >+ ou ?–, seleccione a posição de programa que
pretende saltar e prima OK.
A posição de “SIS” muda de cor.
5 Prima >+ ou ?– até“– – –”aparecer na posição de SIS.
(Veja a figura. 19.)
6 Prima OK. (Veja a figura. 20.)
Quando seleccionar programas utilizando os botões de PROGR
+/–, a posição de programa será ignorada.
7 Repita os passos 4 a 6 para saltar outras posições de programa.
para “Pré-selecção” com >+ ou ?– e
PROGR
+
_
figura. 18
figura. 19
figura. 20
SELECÇÃO
MANUAL
72
Como legendar um nome de
estação
Os nomes dos programas podem ser seleccionados directamente
a partir do Teletexto, quando este estiver disponível. Poderá
“designar”um canal ou uma fonte de entrada de vídeo utilzando
até um máximo de cinco caracteres (letras ou números)
visualizados no écran da televisão. (p.e.RTP1)Ao utilizar esta
função, poderá identificar facilmente qual o canal ou fonte de
vídeo que está a ver.
1 Prima MENU para visualizar o menu principal.
2 Seleccione o símbolo
prima OK.
O menu de PRÉ-SELECÇÃO aparece.
3 Seleccione “Selecção manual”com >+ ou ?– prima OK.
O menu de SELECÇÃO MANUAL aparece. (Veja a figura. 21.)
4 Utilizando >+ ou ?–, seleccione posição de programa que
pretender lengendar e prima OK repetidamente até o primeiro
elemento da posição de NOME ficar em realce.
5 Seleccione uma letra ou número com >+ ou ?– e prima OK.
O elemento seguinte ficará em realce.
Seleccione outros caracteres do mesmo modo. Se pretender
deixar um elemento em branco, seleccione - e prima OK. (Veja a
figura. 22.)
6 Após ter seleccionado todos os caracteres, prima OK
repetidamente até o cursor aparecer na posição de programa
seguinte (na margem esquerda).
O nome de estação que legendou está agora memorizado. (Veja a
figura. 23.)
7 Repita os passos 5 e 6 para legendar nomes para outros canais.
para “Pré-selecção”com >+ ou ?– e
figura. 21
figura. 22
figura. 23
Page 73

NTERDICÃO DE
3 C26 C 4
2 C42 BBC 1
PROG CA NOME
1 C25 BBC 2
0 AV1 VHS
PROGRAMAS
Se tentar seleccionar
um programa que tiver
sido bloquado
A mensagem
“Bloqueado” aparece no
écran de televisão em
branco.
Interdição de programas
Pode evitar o aparecimento no écran de programas não
desejados. Aconselhamos a utilização desta função para evitar
que as criançãs vejam programas que você considera não serem
adequados.
1 Prima MENU para visualizar o menu principal.
2 Seleccione o símbolo
prima OK.
O menu de PRÉ-SELECÇÃO aparece.
3 Seleccione “Interdição de Programas” com >+ ou ?– e prima OK.
O menu de INTERDIÇÃO DE PROGRAMAS aparece. (Veja a
figura. 24.)
4 Utilizando >+ ou ?–, seleccione a posição de programa que
pretende bloquear e prima OK.
O símbolo
aparece à frente do número do programa indicando
que este programa está bloqueado. (Veja a figura. 25.)
5 Repita o passo 4 para bloquear outras posições de programa.
Como cancelar o bloqueio
1 No menu de INTERDIÇÃO DE PROGRAMAS, seleccione a
posição de programa que pretende desbloquear com >+ ou ?–.
2 Prima OK.
O símbolo
desaparece indicando que o bloqueio foi cancelado.
para “Pré-selecção” com >+ ou ?– e
INTERDIÇÃO DE PROGRAMAS
PROG
CA NOME
0
AV1
C25
1
C42
2
3
C26
4
C34
5
C35
6
C36
7
C37
Seleccione e prima OK
figura. 24
figura. 25
VHS
BBC 2
BBC 1
C 4
ITV
-----
-----
-----
P
Sintonização temporária de um
canal
Pode sintonizar um canal temporariamente, mesmo que não
tenha sido programado. Utilize as teclas do lado Funções
Completas do telecomando.
1 Carregue em C no telecomando. Para os canais da televisão por
cabo, carregue duas vezes em C.
A indicação “C” (“S” para os canais da televisão por cabo) aparece
no ecrã. (Veja a figura. 26.)
2 Introduza os dois algarismos do número do canal com as teclas
numéricas (por exemplo, para o canal 4, carregue em 0 e depois
em 4).
O canal aparece.
No entanto, o televisor não memoriza o canal.
C - -
figura. 26
73
Page 74

Instruções de funcionamento
AB
PROGR
Ver televisão
Esta secção explica as funções básicas que utiliza enquanto vê
televisão. Pode executar a maior parte destas operações com o
RM-838
lado Funções Simples do telecomando.
P
2
1
45
7
PROGR
Se, quando carregar
em φ no televisor, não
aparecer a imagem e
se o indicador Em
Espera estiver aceso,
o televisor está em
modo de espera.
Carregue em ; ou
numa das teclas
numéricas para ligar o
televisor.
3
6
9
8
0
Ligar/desligar o televisor
Ligar o televisor
Carregue em φ no televisor.
Desligar o televisor temporariamente
Carregue em φ no telecomando.
O televisor entra em modo de espera e o indicador Em Espera
situado na parte da frente do televisor acende com uma luz
vermelha.
Voltar a ligar o televisor
Carregue em ;, PROG +/– ou numa das teclas numéricas do
telecomando.
Desligar o televisor
Carregue em φ no televisor e o indicador luminoso localizado na
parte da frente do televisor acende-se com uma luz âmbar.
Seleccionar programas de
televisão
Carregue em PROG +/– ou nas teclas numéricas.
Seleccionar um número com dois algarismos
Carregue em -/-- e depois nos números.
Por exemplo, se quiser seleccionar 23, carregue em -/-- e depois
em 2 e 3.
Regular o volume
Carregue em +/–.
Controlar o televisor com os
respectivos botões
Para seleccionar o número do programa, prima PROG +/–.
Para ajustar o volume, prima
Para seleccionar a imagem de entrada de vídeo, prima
Para que os controlos da imagem e do som voltem às regulações
de fábrica (função Nitidez), prima ao mesmo tempo os botões
PROGR +/–.
+/–.
.
74
Page 75

Ver teletexto ou imagens de vídeo
PROGR
1
2
3
4
5
6
7
8
9
10
BBC
SAT
TV5
C02
C15
RTL
SKY
S34
AV1
MTV
Ver teletexto
1 Carregue em _ para ver o teletexto.
2 Se quiser utilizar o teletexto, seleccione uma página introduzindo
um número de página de três algarismos com as teclas
numéricas.
Para utilizar o Fastext, carregue numa das teclas com cores.
Para executar ambas as operações, carregue em ς (PAGE +)
para ir para a página seguinte ou em Υ (PAGE –) para ir para a
página anterior.
3 Para voltar à imagem normal do televisor, carregue em Ο.
Ver imagens de vídeo
1 Carregue várias vezes em até aparecer a imagen de vídeo
pretendida no ecrã.
2 Para voltar à imagen normal do televisor, carregue em Ο.
Outras funções úteis
Utilize o lado Funções Completas do telecomando.
P
Para mais informações
sobre o funcionamento
do teletexto, consulte a
página 80.
Visualizar informações no ecrã
• Carregue uma vez em ∃ para visualizar todas as indicações no
ecrã. Passados alguns segundos, elas desaparecem.
• Carregue duas vezes em ∃ para manter o número do programa e
a respectiva etiqueta no ecrã. Volte a carregar duas vezes para
fazê-los desaparecer.
Para mais informações
sobre a imagem de
vídeo, consulte a página
84.
Cortar o som
Carregue em ο.
Para repor o som normal, volte a carregar em ο.
Ver as horas
Carregue em #. Esta função só está disponível durante a
transmissão do teletexto. Volte a carregar em # para que as
horas desapareçam do ecrã.
2
1
45
7
3
6
9
8
0
C
PROGR
+
+
1
_
_
1
SAT
+
MENU
_
OK
VTR 1-2-3
MEM
MDP
USE
Activar a Tabela de Programas
Prima OK. A Tabela de programas aparecerá no lado esquerdo do
ecrã. (Ver a figura. 27.)
Seleccionar programas de TV
Prima a tecla PROGR +/– ou seleccione o programa desejado
usando >+ ou ?– e prima seguidamente a tecla OK.
Para fazer desaparecer a tabela de programas prima MENU.
Fixar a imagem
Quando estiver a ver televisão pode “fixar”a imagem. Carregue
em
. Para voltar à imagem normal, volte a premir o botão.
figura. 27
Alterar o formato do ecrã
+
PROGR
RESET
_
RM-838
Prima várias vezes para alterar o modo de ecrã da forma
apresentada abaixo:
4:3 para o formato normal
Α Inteligente: imitação do formato de ecrã 16:9 para emissões
em 4:3
Α Zoom: imitação do formato de ecrã 16:9 para
transmissão de filmes em formato de cinemascope
ou
Α 16:9: para emissões 16:9
Para mais informações, consulte a página 79.
75
Page 76

Utilizar o menu para regular e
Cor
Brilho
Brilho
programar o televisor
CONTROLO DE
IMAGEN
CONTROLO DE SOM
2
1
45
7
RM-838
3
6
9
8
0
C
PROGR
+
+
1
_
_
1
SAT
+
MENU
_
OK
VTR 1-2-3
MEM
MDP
USE
+
PROGR
RESET
_
Regular o som e a imagem
Embora a imagem e o som venham regulados de fábrica, pode
regulá-los da forma que quiser. Além disso, também pode
seleccionar programas bilíngues (se estiverem disponíveis) ou
regular o som para poder ouvir com auscultadores.Também pode
regular o som de acordo com os seus gostos pessoais, utilizando
o Equalizador Gráfico e os Efeitos de som especiais.
1 Carregue em
telecomando
ou
Prima MENU e seleccione o símbolo para o Controlo de
Imagem ou
OK.
Aparece o menu CONTROLO DE IMAGEN (Controlo de Imagem)
ou CONTROLO DE SOM (Controlo de som). (Veja a figura. 28 ou
29.)
2 Carregue na tecla >+ ou ?– para seleccionar o elemento que
pretende regular e depois carregue em OK.
O elemento seleccionado muda de cor. (Veja a figura. 30.)
3 Regule a programação com a tecla >+ ou ?– e depois carregue
em OK.
O cursor aparece ao lado do elemento seguinte (na margem
esquerda). (Veja a figura. 31.)
Para visualizar o efeito de cada controlo, consulte a tabela abaixo.
4 Se quiser regular os outros elementos, repita os pontos 2 e 3.
5 Carregue em MENU para voltar à imagem do televisor.
(para a imagem) ou (para o som) no
para o Controlo do Som. Em seguida, carregue em
CONTROLO DE IMAGEM
Contraste
Brilho
Cor
Tonalidade
Nitidez
Resolução (alta)
Seleccione e prima OK
figura. 28
CONTROLO DE SOM
Equalizador Gráfico
Modo Som Ambiente
Hall Som Ambiente
Som Duplo
2
Volume
2
Som Duplo (A)
Seleccione e prima OK
figura. 29
figura. 30
figura. 31
[Hall]
[mono]
[mono]
P
Se se enganar
Carregue em ≅ para
voltar à posição anterior.
Para voltar ao menu
principal
Carregue
continuamente em ≅.
Nota
• Só pode utilizar a
função tom (HUE) nos
sistemas a cores
NTSC.
• O efeito Hall Surround
não pode ser
reproduzido através
dos auscultadores.
Nota sobre LINE OUT
O nível de som e a saída
do modo dois canais de
som da ficha tipo jack
> (parte posterior)
correspondem ao
Volume dos
auscultadores e às
programações da
função Som Duplo.
Quando estiver a ver
uma imagem de vídeo
Pode seleccionar a
função Som Duplo para
alterar o som.
Efeito de cada controlo
CONTROLO DE IMAGEN
Contraste
Brillo
Cor
Tom
Tonalidade
Nitidez
Resolução
CONTROLO DE SOM
Equalizador Gráfico
Modo Som Ambiente
Hall Som Ambiente
(só se “Hall” estiver activado)
Som Duplo
Auscultadores:
2 Volume
2 Som Duplo
Efeito
Menos Mais
Mais escuro Mais claro
Menos Mais
Esverdeado Avermelhado
Menos nítido Mais nítido
Repõe os níveis pré-programados de fábrica da imagem
Não alta: Para obter uma imagen de qualidade mais elevada
Efeito
Veja a página 77
Não: Normal n Dolby n Hall
➝
Escolha entre os diversos efeitos de “Hall”:
Room n Dome n Arena
➝
A: canal 1n B: canal 2 stereo (estéreo) mono
O modo seleccionado do indicador A-µB da televisão acende-
se.
Menos Mais
A: canal 1n B: canal 2 n PAP (Se a função PAP estiver
activada, pode seleccionar o som PAP para os auscultadores)
stereo (estéreo) n mono
76
Page 77

Nota: As modificações
TEMPORIZADOR DE SONO
Período de tempo [ não ]
Seleccione e prima OK
EQUALIZADOR GRÁFICO
Modo: [Utilizador]
+
–
0
100 400 1K 4K 10K
Seleccione e prima OK
efectuadas no modo
“UTILIZADOR” serão
guardadas. Todas as
outras definições são
repostas no nível
definido pela fàbrica
quando mudar para
outro modo.
TEMPORIZADOR
DE SONO
Para desligar o
temporizador
Seleccione “NÃO”,
(desligado) no passo 3.
Para verificar o tempo
que falta
Carregue em ∃.
Para voltar à imagem
normal do televisor
Prima MENU.
Equalizador Gráfico
Utilizando esta função pode ajustar o som individualmente
diminuindo e aumentado frequências seleccionadas. Também
pode escolher entre os seguintes modos:
Linear ➝ Pop ➝ Rock ➝ Jazz ➝ Vocal ➝ Utilizador
1 Seleccione “Controlo de Som” a partir do menu principal. Em
seguida, seleccione “Equalizador Gráfico”utiliazando >+ ou ?– e
prima OK.
Será apresentado o menu EQUALIZADOR GRÁFICO.
(Veja a figura. 32.)
2 Prima OK. A cor da opção “Modo” é alterada. Seleccione o modo
desejado com as teclas >+ ou ?– e prima OK.
3 Se desejar modificar um modo seleccione a barra da banda de
frequência desejada utilizando as teclas >+ ou ?– e prima OK.
A frequência seleccionada muda de cor. Utilizando novamente as
teclas >+ ou ?–, ajuste o nível da frequência e prima OK. Pode
ajustar qualquer uma das 5 barras gráficas utilizando este método.
4 Prima MENU para regressar ao modo de TV normal.
Como utilizar o temporizador de
sono
Proderá seleccionar um período de tempo após o qual a televisão
comutará automaticamente para modo de espera.
1 Seleccione o símbolo ρ para “Temporizador de Sono” com >+ ou
?– e prima OK.
O menu de TEMPORIZADOR DE SONO aparece. (Veja a figura.
33.)
2 Prima OK.
A opção de Período de Tempo muda de cor.
3 Seleccione o Período de Tempo com >+ ou ?–.
O período de tempo (em minutos)muda do modo seguinte:
figura. 32
figura. 33
Linear
Pop
Rock
Jazz
Vocal
Utilizador
P
10 ➝ 20 ➝ 30 ➝ 40 ➝ 50 ➝ 60 ➝ 70 ➝ 80 ➝ 90
↑
4 Após ter seleccionado o período de tempo, prima OK.
O cursor desloca-se de novo para a margem esquerda e o
temporizador inicia a sua contagem.
Um minuto antes da televisão comutar para modo de espera, é
visualizada uma mensagem no écran.
77
Page 78

PAP (Imagem e Imagem)
AA
AA
Com esta função pode visualizar dois ecrãs ao mesmo tempo.
Assim, pode ver dois programas de televisão ao mesmo tempo.
Pode ver também ou monitorizar a saída de vídeo a partir de
qualquer equipamento ligado (por exemplo a partir de um
2
1
45
8
7
0
SAT
MEM
USE
RM-838
VTR 1-2-3
RESET
3
6
9
C
PROGR
+
+
1
_
_
1
+
MENU
_
OK
MDP
+
PROGR
_
vídeogravador) enquanto vê televisão ou vice versa. Para obter
informações sobre como ligar outros aparelhos, consulte a página
83.
Imagem de
televisão
principal
Como ligar e desligar o PAP
Prima o botão uma vez para visualizar os ecrãs no formato 8:9
e duas vezes
O ecrã de PAP será visualizado junto do ecrã principal.
A imagem de PAP surgirá a partir da fonte escolhida da última vez
que a televisão foi utilizada.
Para desligar o PAP
Prima
para visualizar os ecrãs em formato 4:3.
várias vezes.
PAP
P
Nota
• A fonte de entrada
RGB não pode ser
visualizada em modo
PAP.
• A função PAP não está
disponível em modo
Zoom.
• O som do ecrã da
direita não se ouve
através dos
auscultadores.
• A qualidade da
imagem dos ecrãs de
TV e PAP pode ser
diferente.
Como seleccionar uma fonte PAP
Prima >.
O símbolo > será visualizado no canto esquerdo, no fundo do
ecrã.
Prima PROGR +/–, os botões numéricos ou
para seleccionar
a fonte pretendida para o ecrã PAP.
Como trocar de ecrã
Prima .
O ecrã principal trocará a imagem com o ecrã de PAP.
8:9 8:9 4:3
AB BA
AB BA
Fixar a imagem
Tem a possibilidade de fixar a imagem do ecrã PAP.
Prima uma vez
ao ecrã normal.
16: 9
para Fixar a imagem e duas vezes para voltar
A
Fixar
/
8: 9
4: 3
AB
/
AB AA
/
Fixar
Fixar
78
Page 79

Utilizar o Modo de Ecrã/PAP
através do Menu
2
1
45
7
RM-838
3
6
9
8
0
C
PROGR
+
+
1
_
_
1
SAT
+
MENU
_
OK
VTR 1-2-3
MEM
MDP
USE
+
PROGR
RESET
_
Quando pretender
seleccionar o modo de
ecrã
Também pode
seleccionar o modo do
ecrã premindo o botão
do telecomando.
Utilizando o menu Modo de Ecrã pode alterar o aspecto do ecrã
do televisor para obter efeitos do ecrã em formato 16:9 funcionar
com o modo PAP, predefinir Auto PAL plus ou reproduzir o ecrã
principal imagem a imagem (função Strobe).
1 Prima MENU para visualizar o menu principal.
2 Seleccione o símbolo
para “Modo de Ecrã”com >+ ou ?– e
prima OK. Aparece o menu MODO DE ECRÃ. (Veja a figura. 34.)
Pode escolher entre os seguintes modos:
4:3 para o formato normal (Veja a figura. 35.)
inteligente: imitação do formato de ecrã (16:9) para emissões em
4:3 (Veja a figura. 36.)
Zoom: Imitação do formato de ecrã (16:9) para transmissão
de filmes em formato de cinemascópio. (Veja a figura.
37.)
ou
16:9: para emissões 16:9 (Veja a figura 38.)
a) Alterar a posição do ecrã (só para o modo Zoom)
Quando utilizar o modo de zoom uma parte da imagem no cimo e
no fundo do ecrã fica cortada. Com a função “Posição do Ecrã”
pode mover o ecrã para cima ou para baixo para ver a parte
cortada do ecrã (por exemplo para ler as legendas).
Seleccione “Posição do Ecrã” com >+ ou ?– e prima OK. O item
seleccionado muda de cor. Regule a posição do ecrã com >+ ou
?– e prima OK.
b) Modo Strobe
Utilizando os botões >+ ou ?–, seleccione “Strobe” e prima OK.
A imagem da TV é apresentada imagem a imagem, criando um
efeito de câmara lenta. (Veja a figura. 39.) Utilizando os botões
>+ ou ?–, escolha a velocidade da sucessão das imagens (estão
disponívels 3 velocidades da sucessão das imagens (estão
disponívels 3 velocidades diferentes). Prima OK para regressar ao
modo de TV normal.
c) Activar e desactivar a função PAP
Seleccione “PAP”com >+ ou ?– e prima OK. Com >+ ou ?–
seleccione “1” para activar o ecrã PAP no formato 8:9, “2” para
seleccionar o formato 4:3 e “NÃO” para o desactivar e, por fim,
carregue em OK.
d) Fixar o ecrã PAP
Seleccione “PAP Foto”com >+ ou ?– e prima OK.
Com >+ ou ?– seleccione “SIM” para “fixar” o ecrã PAP e “NÃO”
para voltar à imagem normal.
Formatação Automática
MODO DE ECRÁ
Modo de Ecrá
Posição de Ecrá
Strobe
PAP
PAP Foto
Formatação Auto
Seleccione e prima OK
figura. 34
figura. 35
figura. 36
figura. 37
figura. 38
[sim]
[n
[ ]zoom
[ ]
0
ão
]
[não]
P
Se pré-regular “Formatação Auto” para SIM durante a transmissão
do sinal do formato 16:9, o modo do ecrã muda automaticamente do
modo em que estiver para o modo 16:9. Quando terminar o
programa em formato 16:9, o modo do ecrã volta automaticamente
ao modo anterior.
1 Prima MENU para ver o menu principal.
2 Seleccione o símbolo
para “Modo do ecrã” com >+ e ?– e
prima OK. Aparece o menu MODO DE ECRÃ.
3 Seleccione “Auto format” com >+ e ?– e prima OK.
4 Seleccione SIM ou NÃO com >+ e ?– e prima OK.
LIVELIVE
Strobe: Velocidade: não: OK
figura. 39
79
Page 80

Teletexto
2
1
45
7
Nota
Se os sinais da
transmissão forem
fracos, podem ocorrer
erros de teletexto.
Com o lado Funções
Simples do
telecomando
Pode activar/desactivar
o teletexto, utilizar o
Fastext e seleccionar
directamente números
de página.
Nota
Só pode utilizar o
Fastext, se a estação de
televisão transmitir
sinais Fastext.
RM-838
3
6
9
8
0
C
PROGR
+
+
1
_
_
1
SAT
+
MENU
_
OK
VTR 1-2-3
MEM
MDP
USE
+
PROGR
RESET
_
As estações de televisão transmitem um serviço de informações
chamado Teletexto através dos canais de televisão. O serviço
Teletexto permite receber várias páginas de informação (como por
exemplo, boletins metereológicos ou notícias) em qualquer altura.
Para utilizar as funções avançadas do Teletexto, carregue nos
botões do lado Funções Completas do telecomando.
Funções de acesso directo
Activar/desactivar o teletexto
1 Seleccione o canal de televisão que transmite o serviço Teletexto
pretendido.
2 Carregue em _ para activar o teletexto.
O ecrã mostra uma página de teletexto (normalmente a página de
índice).
Se não houver transmissão de teletexto, a mensagem “Não tem
texto” aparece na linha de informação na parte superior do ecrã.
Para desactivar o teletexto
Carregue em Ο.
Seleccionar uma página de teletexto
Através da selecção directa de páginas
Utilize as teclas numéricas para introduzir os três algarismos do
número de página seleccionado.
Se se enganar, digite três algarismos ao acaso e depois volte a
introduzir o número de página certo.
Com detecção de página
1 Seleccione uma página de teletexto com uma introdução de
página (por exemplo, página de índice).
2 Carregue em OK. Utilizando >+ ou ?–, seleccione a página
pretendida. A mensagem “Page Catching” aparece na linha de
informações. Prima OK.
A página pretendida aparece decorridos alguns segundos.
Prima _ para voltar à recepção normal de teletexto.
Aceder à página seguinte/anterior
Carregue g (PAGE +) ou G (PAGE –).
O ecrã mostra a página seguinte/anterior.
Sobrepor o ecrã teletexto ao programa de televisão
• Carregue uma vez em _ no modo teletexto ou duas vezes no
modo TV.
• Volte a carregar em _ para retomar a recepção normal do
teletexto.
Impedir a actualização de uma página de teletexto
• Carregue em [ (HOLD). O símbolo HOLD “ [ ” aparece na linha
de informação.
• Carregue em _ para retomar a recepção normal do teletexto.
80
Utilizar o Fastext
Com o Fastext, pode aceder a páginas carregando numa só tecla.
Quando se transmite uma página de Fastext, aparece um menu
de cores codificadas na parte inferior do ecrã. As cores que
aparecem neste menu correspondem às teclas vermelha, verde,
amarela e azul do telecomando.
Carregue na tecla a cores do telecomando que corresponde à cor
mostrada no menu de cores codificadas. O ecrã mostra a página
passados alguns segundos.
Page 81

2
1
3
RM-838
6
9
8
0
C
PROGR
+
+
1
_
_
1
SAT
+
MENU
_
OK
VTR 1-2-3
MEM
MDP
USE
+
PROGR
RESET
_
45
7
Nota
Algumas destas funções
só podem ser utilizadas
em certos serviços
Teletexto.
Prima OK para colocar
PÁGINA COM ALARME
na posição OFF e
cancelar o pedido.
Utilizar o menu Teletexto
Este televisor está equipado com um sistema de teletexto guiado
por menu. Quando activar o teletexto, carregue nas teclas do
menu para utilizar o menu Teletexto. Seleccione as funções do
menu Teletexto da seguinte maneira:
1 Carregue em MENU. O televisor sobrepõe o menu ao ecrã do
teletexto. (Veja a figura. 40.)
2 Com a tecla >+ ou ?–, seleccione a função teletexto pretendida e
carregue em OK. (Veja a figura. 41.)
PåGINA DO UTILIZADOR/Pré-selecção da página
do utilizador
Para mais informações sobre a pré-selecção e a utilização das
páginas do utilizador, consulte a página 82.
INDICE
O índice dá-lhe uma panorâmica geral do conteúdo do teletexto e
dos números de página.
SUPERIOR/INFERIOR/COMPLETO
Para poder ler convenientemente uma página de teletexto, pode
aumentar o ecrã Teletexto de maneira a percorrê-lo para cima e
para baixo. Depois de seleccionar esta função, aparece uma linha
de informação Superior/Inferior/Complete no ecrã. (Veja a figura.
42.)
Para aumentar a metade superior, prima >+ para seleccionar
“Superior”. Para aumentar a metade inferior, prima continuamente
?– para seleccionar “Inferior”. Prima em OK para seleccionar
“Completo” e voltar ao formato normal.
Carregue em _ para retomar a recepção normal do teletexto.
TEXTO APAGADO
Depois de seleccionar a função, pode ver televisão enquanto
espera que a página de teletexto apareça no ecrã. (O símbolo
muda de cor.) (Veja a figura. 43.)
Carregue em _ para retomar a recepção normal do teletexto.
LEGENDAS
O serviço de teletexto informa-o se o programa de televisão tem
legendas.
Depois de seleccionar a função, as legendas aparecem no ecrã.
REVELAR
Por vezes, as páginas contêm informações ocultas (como por
exemplo, as respostas de um concurso). A opção Revelar
possibilita o acesso a essa informação. Depois de seleccionar a
função, aparece uma linha de informação “REVEAL ON/OFF” no
ecrã. (Veja a figura. 44.)
Com as teclas >+ ou ?–, seleccione ON para aceder à
informação ou OFF para voltar a ocultá-la.
Carregue em _ para retomar a recepção normal do teletexto.
PÁGINA COM ALARME
O serviço de teletexto informa-o se houver páginas codificadas
temporizadas disponíveis. Pode haver páginas (como por
exemplo, uma página de alarme) que são visualizadas a
determinadas horas.
1 Aparece uma janela de informação na parte inferior da página.
Utilize >+ ou ?– para seleccionar “ON” e prima OK.
2 Para seleccionar a página pretendida, introduza três algarismos
para o número de página (por exemplo, 452) com as teclas
numéricas.
3 Para seleccionar a hora pretendida, introduza quatro algarismos
para a hora (por exemplo, 1800) com as teclas numéricas.
A hora seleccionada aparece no canto superior esquerdo do ecrã.
A página aparece no ecrã à hora programada.
Carregue em _ para retomar o modo de teletexto normal.
MENU DE TELETEXTO
Páginas do utilizador
Índice
Superior/Inferior/Completo
Texto apagado
Legendas
Revelar
Página com alarme
Sub-página
Pré-selecção de pag. do utilizador
Seleccione e prima OK
figura. 40
MENU DE TELETEXTO
Páginas do utilizador
Índice
Superior/Inferior/Completo
Texto apagado
Legendas
Revelar
Página com alarme
Sub-página
Pré-selecção de pag. do utilizador
Seleccione e prima OK
figura. 41
Superior Inferior OK Completo
figura. 42
figura. 43
figura. 44
P
simRevelar não
81
Page 82

Para cancelar o pedido
Seleccione Sub-página
e prima OK.
Se duas estações de
emissão utilizarem o
mesmo Teletexto
Poderá pré-seleccionar
um banco para duas
posições de programa
diferentes.
SUB-PÁGINA
Pode seleccionar uma determinada página de teletexto a partir de
várias subpáginas que rodam automaticamente no ecrã. Depois de
seleccionar esta função, aparece uma linha de informação no ecrã.
Para seleccionar a subpágina pretendida, introduza quatro
algarismos com a tecla PROG +/– ou com as teclas numéricas (por
exemplo, digite 0002 para a segunda página de uma sequência).
Sistema de Banco do Utilizador de
Página
Poderá memorizar até 30 páginas no “Sistema de banco de página
de teletexto”.
Deste modo poderá aceder rapidamente às páginas que costuma
ver com mais frequência.
Como memorizar páginas
Existem 5 “bancos” (A a E)para 5 estações de teletexto. Em cada
banco poderá memorizar 6 páginas da sua preferência (P1 a P6)
1 Prima _ (caso o teletexto ainda não esteja ligado) e MENU para
apresentar a visualização de MENU DE TELETEXTO.
2 Seleccione “Pré-selecção de páginas do utilizador” com >+ ou ?–
e prima OK.
3 Seleccione o banco pretendido com >+ ou ?– e prima OK. O
cursor irá para a primeira posição (P1) das páginas preferidas.
4 Introduza os três dígitos da sua primeira página de preferência com
os botões numéricos.
O cursor irá para a segunda posição.
5 Repita o passo 4 para os outros 5 números de página que pretende
pré-seleccionar. Caso não deseje pré-seleccionar todos os 6
números de página disponíveis, prima OK sem inserir qualquer
número. Depois de ter terminado a pré-selecção prima OK
repetidamente até o cursor aparecer junto do banco seguinte na
margem esquerda.
6 Seleccione “Designar banco” com >+ ou ?– e prima OK.
7 Seleccione a posição de programa para a qual pretende pré-
seleccionar páginas com >+ ou ?– e prima OK. (Veja a figura. 45.)
8 Seleccione o banco pretendido com >+ ou ?– (Bancos A a E
estão disponíveis) e prima OK.
9 Repita os passos 3 a 8 para os outros 4 bancos disponíveis.
Como visualizar Páginas do Utilizador
1 Seleccione MENU.
2 Seleccione “Páginas do Utilizador” com >+ ou ?– e prima OK.
Aparecerá uma tabela das páginas de preferência memorizadas.
(Veja a figura. 46.)
3 Seleccione a página pretendida com >+ ou ?– e prima OK.
A página aparecerá após alguns segundos.
ou
Pode utilizar os botões coloridos do telecomando para ter acesso
rápido às quatro primeiras páginas do utilizador. A página 1
corresponde ao botão vermelho, P2 ao botão verde, P3 ao botão
amarelho e P4 ao botão azul.
Para seleccionar a página pretendida prima o respectivo botão
colorido enquanto está no modo TV. O número desta página de
teletexto aparecerá a branco no canto superior esquerdo do ecrã.
Quando o número de página mudar de cor, a página està
disponível. Prima novamente o botão colorido para visualizar a
página.
PRÉ-SELECÇÃO DE PÁG. DO UTILIZADOR
BANCO
P1
P2
P3
P4
P5
A
300
255
B
C
D
E
Designar banco
PROG
00
01
02
Seleccione e prima OK
456
200
120
301
100
220
300
128
321
255
400
238
240
NOME PROG
BANCO BANCO
VHS
–
ZDF
A
ARD
C
P6
234
200
179
303
550
345
444
118
127
NOME
04
MTV
SKY
SAT
D
B
C
05
06
figura. 45
PÁGINAS DO UTILIZADOR BANCA
PÁGINA 300
PÁGINA 200
PÁGINA 203
PÁGINA 500
PÁGINA 234
PÁGINA 159
Seleccione e prima OK
figura. 46
82
Page 83

R/D/D/D
L/G/S/I
R/D/D/D
L/G/S/I
R/D/D/D
L/G/S/I
PROGR
R/D/D/D
L/G/S/I
Ligação e funcionamento do equipamento
opcional
Ligação do equipamento opcional
Pode ligar equipamento vídeo-audio opcional ao televisor, como
por exemplo videogravadores, leitores de CD vídeo e sistemas
estéreo.
Para ligar um
videogravador com o
terminal ˘
Ligue a saída da antena
do videogravador ao
terminal da antena do
televisor.
Se quiser programar o
número “0”, sintonize o
sinal de vídeo. Para
mais informações,
consulte “Pré-selecção
manual de canais” na
página 69.
Se a imagem ou o som
estiverem distorcidos
Afaste o videogravador
do televisor.
1
4
3
P
Sinal de entrada S/
vídeo (entrada Y/C)
Pode separar os sinais
de vídeo em sinais Y
(luminância e brilho) e C
(crominância). A
separação dos sinais Y
e C impede que haja
interferência mútua o
que permite melhorar a
qualidade da imagem
(especialmente a
luminância).
Este televisor está
equipado com três
fichas tipo jack de
entrada Vídeo S através
das quais se processa a
transmissão directa
destes sinais.
Se ligar um
videogravador mono
Ligue apenas o jack
branco ao televisor
e ao videogravador.
5
Sinal de entrada aceite
1 audio/vídeo normal e sinal RGB
2 audio/vídeo normal e sinal de vídeo S
3 audio/vídeo normal e sinal de vídeo S
4 audio/vídeo normal e sinal de vídeo S
5 sem sinais de entrada
6 sem sinais de entrada
62
Sinal de saída disponível
vídeo/audio do sintonizador do televisor
vídeo/audio da fonte seleccionada
sem sinais de saída
vídeo/audio mostrado no ecrã do televisor (monitor
desligado)
sinal S/vídeo/audio mostrado no ecrã do televisor
(monitor desligado)
Sinal audio (variável)
83
Page 84

Seleccionar a entrada
1
1
S
S
com a tecla PROG +/–
ou com as teclas
numéricas
Pode pré-programar
fontes de entrada de
vídeo para as posições
de programa de maneira
a poder seleccioná-las
com a tecla PROG +/–
ou com as teclas
numéricas. Para mais
informações, consulte
“Pré-selecção manual
de canais” na página 69.
2
1
45
7
3
6
9
8
0
C
Selecção da entrada e da saída
Esta secção explica como visualizar a imagem de vídeo (da fonte
de vídeo ligada ao televisor) e como seleccionar o sinal de saída
com as teclas de acesso directo ou com o sistema de menu.
Selecção da entrada
Carregue várias vezes em para seleccionar a fonte de
entrada.
O símbolo da fonte de entrada seleccionada aparece no ecrã
Para voltar à imagem normal do televisor
Carregue em Ο.
Modos de entrada
Símbolo
S
S
S
1
2
2
3
3
4
4
Sinal de entrada
entrada audio/vídeo através do conector
entrada audio/RGB através do conector
entrada audio/vídeo através do conector
entrada audio/vídeo S através do conector
pinos)
entrada audio/vídeo através de conector
S
entrada vídeo S através de conector
3 (conector de 4 pinos) na parte da frente
entrada audio/vídeo através do conector
entrada vídeo S através do conector
4/S4 ou S4 (conector de 4 pinos)
1
1
2/S2
2/S2 ou S2 (conector de 4
3e de 3 na parte da frente
4/S4
RM-838
PROGR
+
+
1
_
_
1
SAT
+
MENU
_
OK
VTR 1-2-3
MEM
MDP
USE
+
PROGR
RESET
_
Pode também seleccionar o modo de entrada utilizando o botão do televisor.
Selecção da saída
A fonte de entrada dos outros conectores sai pelo conector
2/S2.
Carregue várias vezes em
O símbolo da fonte de saída seleccionada aparece no ecrã.
para seleccionar a saída.
Modos de saída
Símbolo
1
2
S
2
3
S
3
4
S
4
TV
Saídas do conector2 /2
sinal audio/vídeo a partir do conector 1
sinal audio/vídeo a partir do conector
2/
sinal audio/vídeo a partir do conector 2/ S 2 ou S2 (4 pinos)
sinal audio/vídeo a partir dos conectores
sinal audio/vídeo a partir dos conectores
3/ 3
S
3,
sinal audio/vídeo a partir do conector 4 /S4
sinal audio/vídeo a partir do conector
4/S4 ou S4 (4 pinos)
sinal audio/vídeo a partir do terminal ) antena
84
Page 85

Uitilizar “Pré-selecção Audio/
Video”
Com esta função pode pré-seleccionar a fonte de entrada
desejada (por exemplo o sinal
respectiva (AV 1
). Desta forma um videogravador ligado
comutará automaticamente para o sinal RGB.
1 Seleccione o símbolo
para fazer a “Pré-selecção” com >+ ou
?– e prima OK.
2 Seleccione “Instalação”, depois “Pré-selecção AV” e prima OK.
Aparece o menu PRÉ-SELECÇÃO AV. (Veja a figura. 47.)
3 Seleccione a entrada AV desejada com >+ ou ?– e prima OK.
4 Seleccione a fonte desejada com >+ ou ?– e prima OK. Para as
entradas existem as possibilidades seguintes:
AV1 RGB ou AV AV3 YC3 ou AV
AV2 YC2 ou AV AV4 YC4 ou AV
5 Se quiser dar um nome à entrada AV, seleccione “Nome” com >+
ou ?– e prima OK. Seleccione uma letra ou um número com >+
ou ?– e prima OK. O elemento seguinte aparece em realce.
Repita o procedimento para seleccionar os outros caracteres. Se
quiser deixar um elemento em branco, seleccione - e prima OK.
Depois de seleccionar todos os caracteres, prima várias vezes OK
até o cursor aparecer junto da próxima entrada AV da margem
esquerda.
6 Repita os passos 3 a 6 para seleccionar as outras entradas de AV.
RGB) para a entrada AV
PRÉ-SELECÇÃO AV
AV-ENTRADA
AV1
AV2
AV3
AV4
Seleccione e prima OK
figura. 47
FONTE
RGB
Y/C
Y/C
Y/C
NOME
RGB
YC2
YC2
YC2
P
Como verificar e seleccionar as fontes de entrada
e de saída utilizando o menu
Pode visualizar o menu para ver quais as fontes de entrada
seleccionadas para o ecrã de televisão e para o ecrã PAP e qual a
fonte de saída seleccionada. Pode também seleccioná-las na
visualização do menu.
1 Seleccione o símbolo
e prima OK. O menu de LIGAÇÕES DE VIDEO aparece. (Veja a
figura. 48.)
Poderá ver quais as fontes seleccionadas para a entrada de
televisão e PAP, e para a saída. Se deseja seleccionar a entrada e
saída neste menu prossiga para o passo seguinte.
2 Seleccione ecrã de TV (Fonte de entrada para o ecrã de
televisão), PAP (Fonte de entrada para o ecrã PAP), ou Fonte de
saída com >+ ou ?– e prima OK. Um dos elementos de fonte
muda de cor.
3 Seleccione a fonte que pretende com >+ ou ?–. Para mais
informações sobre cada fonte veja a tabela na página 84.
4 Prima OK.
A fonte seleccionada é confirmada e o cursor aparece.
5 Repita os passos 2 a 4 para seleccionar a fonte para outras
entradas ou saídas.
para “Ligações de Vídeo “com >+ ou ?–
LIGAÇÕES DE VIDEO
Ecran de TV [ ]
PAP
Fonte de saída
TV
Seleccione e prima OK
figura. 48
VHS 2
AV1 ----[ ]AV2 VHS 2
[ ]AV4 -----
TV
85
Page 86

Telecomando de outros
equipamentos Sony
2
1
3
6
45
9
8
7
0
C
PROGR
+
+
1
_
_
1
SAT
+
MENU
_
OK
VTR 1-2-3
MEM
RM-838
MDP
USE
+
PROGR
RESET
_
Quando estiver a gravar
Se utilizar o botão α
(gravar) tem de premir
simultâneamente este
botão e o botão da
direita.
Pode utilizar o telecomando do televisor para controlar a maioria
do equipamento de vídeo telecomandado como, por exemplo,
videogravadores beta, 8 mm e VHS e leitores de CD vídeo.
Sintonizar o telecomando com o equipamento
1 Regule o selector VTR 1/2/3 MDP de acordo com o equipamento
que pretende controlar :
VTR 1: videogravador Beta
VTR 2: videogravador de 8 mm
VTR 3: videogravador VHS
MDP: Leitor de CD vídeo
2 Utilize as teclas indicadas na ilustração para controlar o
equipamento adicional.
Se o equipamento de vídeo estiver equipado com o selector
COMMAND MODE, regule-o para a mesma posição em que se
encontra o selector VTR 1/2/3 MDP no telecomando do televisor.
Se o equipamento de vídeo não tiver determinada função, a tecla
correspondente no telecomando não funciona.
86
Page 87

Outras informações
Área de visualização ideal
Para obter uma boa qualidade de imagem, posicione o televisor de
maneira a ver o ecrã a partir de uma das áreas indicadas abaixo.
Área de visualização horizontal
35°
35°
1,5 m ou mais
Área de visualização vertical
75°
P
75°
1,5 m ou mais
87
Page 88

Limpeza do filtro de ar
É necessário limpar regularmente o filtro de ar. Limpe o filtro
de ar uma vez por mês. Quando o filtro ficar velho e o pó
permanecer no filtro após a sua limpeza, substitua-o.
Se não respeitar as precauções indicadas abaixo, pode ferirse ou danificar os aparelhos domésticos.
• Limpe regularmente o filtro de ar. Caso contrário, pode
ocorrer um sobreaquecimento interno do aparelho.
• Não utilize um filtro de ar rasgado ou perfurado. Fixe bem o
filtro com as seis patilhas. Se entrar pó para dentro do
televisor, a imagem pode ficar escura e ocorrer um incêndio.
1 Desligue o aparelho e retire a ficha do cabo
de alimentação da tomada de parede.
2 Retire o painel frontal.
4 Limpe o pó com um aspirador.
aspirador
5 Volte a colocar o filtro.
Aperte bem as seis patilhas.
Retire o painel frontal sem mover o televisor.
Segure a parte lateral do painel frontal com os dedos e
puxe-o para a frente. Tome cuidado para não entalar as
unhas.
3 Puxe o filtro para cima e retire-o.
6 Volte a colocar o painel frontal.
Tenha cuidado para não danificar o altifalante.
Notas
• Fixe bem o filtro. Caso contrário, não conseguirá ligar o aparelho.
• Retire o filtro fornecido, utilizando o procedimento de remoção do
filtro em utilização no televisor.
• Dirija-se ao centro de assistência Sony mais próximo para adquirir
um filtro novo.
88
Filtro fornecido
Page 89

Substituir a lâmpada
A lâmpada tem uma duração de cerca de 6000 horas. Quando
a lâmpada ficar escura ou a cor da imagem não for normal,
substitua a lâmpada (fornecida).
Se não cumprir as precauções indicadas abaixo, pode ferir-se
ou danificar os aparelhos domésticos.
• Utilize a nova lâmpada fornecida para substituir a lâmpada
velha. Se utilizar outra lâmpada, pode avariar o televisor.
• Não retire a lâmpada a não ser para a substituir. Se o fizer
pode provocar avarias devido ao calor ou incêndios.
• Antes de substituir a lâmpada, desligue o aparelho e retire a
ficha do cabo de alimentação da tomada de parede.
• Deixe a lâmpada arrefecer e depois retire-a. O vidro frontal
da lâmpada está a uma temperatura de 100º C (212º F) ou
mesmo superior durante cerca de 30 minutos depois de
desligar o aparelho.
• Não deixe a lâmpada que retirou junto de crianças ou
materiais inflamáveis.
• Não molhe a lâmpada depois de a retirar nem introduza
objectos dentro da lâmpada. A lâmpada pode explodir.
• Não a coloque perto de objectos de metal ou produtos
inflamáveis, pois pode provocar um incêndio. Não coloque
as mãos dentro do compartimento da lâmpada pois pode
queimar-se.
• Aperte bem a nova lâmpada. Caso contrário, a imagem
pode ficar escura ou provocar um incêndio.
3 Desaperte o parafuso com a ajuda de um
objecto semelhante a uma moeda e retire a
tampa da lâmpada.
4 Desaperte os dois parafusos e puxe a
lâmpada para fora.
A lâmpada permanece quente mesmo depois de desligar
o aparelho. Tome cuidado para não tocar o vidro frontal ou
na área que rodeia a lâmpada nem no vidro do
compartimento da lâmpada.
P
1 Desligue o aparelho e retire a ficha do cabo
de alimentação da tomada de parede.
Translation - Volte a colocar a lâmpada 30 minutos ou
mais depois de desligar o aparelho.
Prepare a nova lâmpada.
2 Retire o painel frontal.
Retire o painel frontal sem mover o televisor.
Segure a parte lateral do painel frontal com os dedos e
puxe-o para a frente. Tome cuidado para não entalar as
unhas.
Desaperte os dois parafusos com a chave fornecida.
Puxe a lâmpada para fora agarrando no manípulo.
5 Coloque a nova lâmpada.
Aperte bem os dois parafusos.
6 Coloque a tampa da lâmpada.
Aperte bem os dois parafusos.
7 Coloque o painel frontal.
Tenha cuidado para não danificar o altifalante.
Notes
• Não toque nem manche o vidro fontal da nova lâmpada ou o vidro do
compartimento da lâmpada. Se o vidro ficar sujo, a qualidade da
imagem ou a durabilidade da lâmpada pode diminuir.
• Fixe bem a tampa da lâmpada. Se não ficar bem fixa, não
conseguirá ligar o aparelho.
• Se a lâmpada ficar queimada, ouve-se um ruído. Isto não significa
que o aparelho esteja avariado.
• Contacte o centro de assistência da Sony mais próximo para adquirir
uma lâmpada nova.
89
Page 90

Resolução de problemas
Vejamos algumas soluções simples para alguns problemas susceptíveis de afectar a imagem e o som.
Problema
Sem imagem (o ecrã está escuro), sem som
Sem imagem ou com uma imagem de má
qualidade (o ecrã está escuro), som normal
Imagem de má qualidade quando estiver a ver
uma fonte de vídeo RGB
Imagem de má qualidade do ecrã PAP
Boa imagem mas sem som
Os programas a cores não têm cor
O telecomando não funciona
Se os problemas persistirem, solicite a assistência de pessoal qualificado. Nunca tente abrir a caixa do aparelho.
Solução
• Ligue a ficha do televisor à tomada.
• Carregue em φ no televisor (se o indicador φ estiver aceso, carregue em Ο
ou num número de programa no telecomando).
• Verifique a ligação da antena.
• Verifique se ligou a fonte de vídeo seleccionada.
• Carregue
brilho, o contraste e a cor.
• Carregue várias vezes em
• Carregue em
• Carregue na tecla +.
• Verifique a ligação dos altifalantes.
• Se ο aparecer no ecrã, carregue em ο.
• Carregue em
RESET e depois carregue em OK.
• As pilhas estão quase gastas.
para aceder ao menu CONTROLO DE IMAGEN e regule o
para seleccionar .
para aceder ao menu CONTROLO DE IMAGEN, seleccione
Especificações
Este produto está em conformidade com a Directiva UE 89/336/CE.
Sistema de televisão B/G/H, D/K, I, L
Sistema de cor PAL/SECAM
NTSC 3.58/4.43 (VIDEO IN)
Cobertura de canais Consulte “Canais de recepção e
respectivas indicações no ecrã” na
tabela abaixo.
Tamanho da imagem projectada
37 polegadas (KL-37W1)
imagem medida na diagonal
aproximadamente 94 cm
50 polegadas (KL-50W1)
imagem medida na diagonal
aproximadamente 127 cm
Terminais
Parte posterior Entradas do conector Euro
pinos (norma CENELEC) para sinais de
vídeo e audio
- entradas para RGB
- saídas do conector
Euro
sinais TV vídeo e audio
- entradas para sinais de audio e vídeo
- entradas para vídeo S
- Saídas para sinais de audio e de vídeo
(seleccionáveis)
- conector Euro
21 pinos
- entradas para sinais de audio e vídeo
- entradas para vídeo S
- saídas para sinais de audio e vídeo
(monitor desligado)
- DIN de 4 pinos
Entradas audio
jack RCA
Saídas audio
Saídas audio
jack RCA
Parte da frente entrada de vídeo
RCA
2/S2
S
2, S4 entradas vídeo S
S
DIN de 4 pinos com saída vídeo S
de 21 pinos para
4/S4 de
(L,R)- fichas tipo
- fichas tipo jack RCA
(variável) - fichas tipo
3 - ficha tipo jack
1 de 21
Saída do som 2 × 5 W (Poténcia da música)
Consumo de energia 170 W
Dimensões (L × H × P) 920 × 825 × 390 mm (KL-37W1)
Peso 29 kg (KL-37W1)
Acessórios fornecidos Consulte a página 66.
Outras funções Filtro de combinação digital (alta
O design e as especificações estão sujeitos a alterações sem
aviso prévio.
Canais de recepção e respectivas indicações no ecrã
Canais de recepção Indicação no ecrã
B/G/H
CABLE TV (1)
CABLE TV (2)
ITALIA
D/K
CABLE TV(1)
CABLE TV(2)
CABLE TV
L
I
E2..12 21..69
S1..41
S01..S05 M1..M10
U1..U10
A B C D E F G H H1 H2
21..69
R01..R12 R21..R69
B..Q S21..S41
F2..F10 F21..F69
B21..B68
Entradas de vídeo - fichas tipo
jack RCA
Entrada vídeo S
pinos
Ficha tipo jack λ dos auscultadores:
ficha mini-jack estéreo
1 × 20 W (Altifalante central)
1.230 × 1.055 × 550 mm (KL-50W1)
43 kg (KL-50W1)
resolução)
PAP (Imagem-e-Imagem)
FASTEXT
Televisão de 100 Hz
Equalizador Gráfico
S
3 - DIN de 4
C02 C03 C04..C12
C21..C69
S01 S02..S41
S42..S46 S01..S10
S11..S20
C11..C69
C02..C12 C21..C69
S01 S02..S41
S42 S43..S46
S02 S03..S17
S21..S41
C01..C12 C21..C69
C21..C68
90
Page 91

Indicadores luminosos de aviso
Quando ocorrer um problema o indicador pisca da forma
apresentada. Tente a solução recomendada para o problema
indicado.
AB
Causa
A lâmpada funde-se ou é de
má qualidade.
Retirou a tampa do filtro ou a
lâmpada.
A ventoinha de arrefecimento
pára.
O calor interno aumenta.
Se o indicador luminoso piscar de uma forma diferente das descritas acima, consulte o centro de
assistência Sony mais próximo.
Formas de piscar do indicador luminoso
O indicador luminoso B pisca duas vezes e o A pisca uma vez.
Esta forma de piscar mantém-se.
O indicador luminoso B pisca três vezes e o A pisca uma vez.
Esta forma de piscar mantém-se.
O indicador luminoso B pisca quatro vezes e o A pisca uma
vez.
Esta forma de piscar mantém-se.
O indicador luminoso B pisca cinco vezes e o A pisca uma vez.
Esta forma de piscar mantém-se.
Estabilizar o projector de televisão
Após a instalação e por razões de segurança, fixe o projector de televisão à parede, etc. com os
suportes fornecidos.
1 Monte os dois suportes fornecidos com os parafusos na parte posterior
superior do projector de televisão.
P
Suporte (fornecido)
2 Passe um cabo resistente ou uma correia ao longo de cada suporte
montado em 1 e, em seguida, fixe-o a uma parede ou a um pilar, etc.
91
Page 92

VARNING
Utsätt inte enheten för regn eller fukt, eftersom den då
kan börja brinna eller ge elektriska stötar.
Öppna inte skyddshöljet. Innanför finns farlig
högspänning. Låt endast auktoriserad personal
underhålla och reparera enheten.
Säkerhetsinformation
Alla TV-apparater arbetar med extremt hög spänning. Följ
säkerhetsföreskrifterna nedan för att undvika elektriska
stötar och brand. Överlåt allt underhåll och alla
reparationer åt auktoriserad personal, för din egen
säkerhets skull.
Allmän säkerhet:
• Utsätt inte TVn för regn eller fukt.
• Öppna inte det bakre höljet.
Användning:
• Använd endast TVn med spänningen 220-240 V
växelström.
• Använd inte TVn om den skadats av vätska eller ett hårt
föremål - låt snarast auktoriserad personal kontrollera
den.
• Dra ut kontakten om du inte tänker använda TVn på flera
dagar.
• Håll i kontakten när du drar ut den. Dra inte i sladden.
• Placera inte något på den främre panelluckan när du
öppnar den.
Viktig information
För att få bästa möjliga bildkvalitet bör du läsa följande
information innan du använder och underhåller TVn.
Bildkvalitet
• Undvik att röra vid bildskärmen och var försiktig så att du
inte repar ytan.
Belysning
Du får tydligast bild om du undviker att placera TVn i
direkt belysning eller solljus. Om möjligt kan du ha en
nedåtriktad spotlight i taket.
Placering
• Täck inte över ventilationsöppningarna. Annars finns det
risk för att apparaten överhettas.
• Placera inte TVn på heta, fuktiga eller mycket dammiga
platser, eller i direkt solljus. Placera den inte heller på en
plats där den kan utsättas för mekaniska vibrationer.
• Det kan hända att det bildas fukt på speglarna eller
linserna i själva TVn när den förs utifrån direkt in i ett
varmt rum. Detta kan resultera i dålig bild eller
färgåtergivning på delar av skärmen. Låt fukten avdunsta
innan du använder TVn.
Underhåll
• Spara förpackningen och förpackningsmaterialet för den
händelse du måste transportera TVn. Störst säkerhet får
du om du förpackar TVn på samma sätt som på fabriken.
• Höljet ser alltid nytt ut om du med jämna mellanrum
rengör det med en mjuk duk. Svåra fläckar tar du bort om
du fuktar duken med en mild tvållösning. Använd aldrig
starka lösningsmedel som thinner eller tvättsprit, eller
frätande rengöringsmedel då dessa kan skada TVn. Du
bör för säkerhets skull dra ut kontakten innan du rengör
TVn.
• Dra ut kontakten innan du dammar av skärmen. Använd
en mjuk duk lätt fuktad med vatten eller en mild
tvållösning. Tvätta den bara med lodräta rörelser.
Eftertorka med en torr, mjuk trasa. Använd aldrig
lösningsmedel eller thinner.
• Om bilden blir svart när du har använt TVn under en lång
tid måste du kanske rengöra TVn inuti. Rådgör med
auktoriserad personal om detta.
92
Page 93

Innehåll
Översikt ................................................................................... 94
Komma igång ...............................................................
Steg 1 Förberedelser................................................................ 96
Kontrollera de medsända tillbehören ........................... 96
Sätta i batteriet i fjärrkontrollen..................................... 96
Ansluta antennen ........................................................ 96
Steg 2 Ställa in TV-stationer ..................................................... 97
Välja språk .................................................................. 97
Visa menyn ................................................................. 97
Automatisk kanalinställning ......................................... 98
Manuell kanalinställning .............................................. 99
Ytterligare förinställningsfunktioner ......................................... 100
Sortera programpositioner......................................... 100
Hur menyn "Utvidgat Kanalförval" tillämpas ............... 101
Överhoppning av kanaler .......................................... 102
Namngivning av inprogrammerade kanaler ............... 102
Låsning av kanaler .................................................... 10 3
Ställa in en kanal tillfälligt ........................................... 103
96
Komma igång
S
Basfunktioner.............................................................
Se på T V................................................................................ 104
Sätta på och slå av TVn............................................. 10 4
Välja TV-program...................................................... 104
Justera volymen........................................................ 10 4
Använda TVn med knapparna på TVn ....................... 104
Se på text-TV eller video ........................................... 105
Fler användbara funktioner........................................ 105
Justera och ställa in TVn med hjälp av menyn ......................... 106
Justera bild och ljud................................................... 10 6
Grafisk Tonkontroll .................................................... 107
Användning av insomningstimer ................................ 107
Bild-vid-bild (PAP) .................................................................. 108
Ändra Bildformat/PAP genom att använda menyn ..... 109
Auto Format .............................................................. 109
Text-TV ................................................................................. 110
Direkttillträdesfunktioner............................................ 110
Använda text-TV-menyn ........................................... 111
Åtkomst av favoritsidor .............................................. 112
Ansluta och använda extrautrustning ...................................... 113
Ansluta extrautrustning ............................................. 11 3
Välja ingång och utgång ............................................ 114
Hur menyn AV FÖRVAL utnyttjas .............................. 115
Använda fjärrkontrollen för annan Sony-utrustning..... 116
104
Basfunktioner
S
Ytterligare information ............................................................ 117
Bästa synfält ............................................................. 117
Rengöra luftfiltret....................................................... 11 8
Byta lampa................................................................ 119
Felsökning ................................................................ 120
Tekniska data ........................................................... 120
Varningsindikatorer ................................................... 121
Stabilisera projektions-TV: n...................................... 121
93
Page 94

Översikt
I det här avsnittet beskrivs kortfattat knapparna och reglagen på
TVn och på fjärrkontrollen. Mer information finns på de sidor som
anges för varje funktion.
Frontpanelen
AB
PROGR
Symbol Namn
φ
φ
A-µ-B
PROGR+/–
+/–
λ
S
3, 3, 3
Huvudströmbrytare
Standby-lampa
Lampor för Stereo A/B
Program
Volymknappar
Inmatningsknappar
Uttag för hörlurar
Ingång (S video/video/ljud)
Sid
104
104
106
104
104
105
113
114
94
Page 95

Obs
Knappen SAT fungerar inte på
denna TV.
Fjärrkontroll
RM-838
2
1
45
7
PROGR
3
6
9
8
0
För TV/text-TV
2
1
45
8
7
0
SAT
MEM
USE
RM-838
RESET
3
6
9
C
+
_
+
_
VTR 1-2-3
PAP-användning
PROGR
+
1
_
1
MENU
PROGR
OK
MDP
+
_
Menyanvändning
Videoanvändning
TV/text-TV-användning
Symbol Namn
ο
φ
Ο
_
1,2,3,4,5,6,
7,8,9 och 0
–/-C
+/–
PROGR +/–
1
1
∃
[
#
ΛΛΛΛ
Dämpningsknapp, av/på
Standby-knapp
TV på/av/val av TV-läge
Text-TV-knapp
Knapp för val av ingång
Knapp för val av utgång
Sifferknappar
Inmatningsknapp för sifferpar
Direktkanalsknapp
Volymkontrollsknapp
Programvalsknapp
Knapp för åtkomst till Text-TV-sida
Bildjusteringsknapp
Ljudjusteringsknapp
Skärmvisningsknapp
Knapp för att hålla kvar text-TV
Tidvisningsknapp
Knapp för snabbtext
Knappen “Freeze”
Knapp för att ändra skärmens format
Enkel sida
Sid
105
104
104
105
105
114
104
104
100
104
104
110
106
106
105
110
105
110
105
105
Fullfunktionssida
PAP-användning (Bild-vid-bild)
SymbolΧNamn
PAP-knappen av/på
PAP-källval
Växlingsknapp
PAP-låsknapp (Freeze)
Meny-användning
Symbol
MENU
>+/ ?–
OK
≅
Namn
Menyn av/på
Valknappar
OK-knapp (bekräftar)
Bakåtknapp
Video-användning
Symbol Namn
VTR1/2/3,
MDP
;; − :: Λ
ϑ α φ
PROGR +/–
Knapp för val av videoutrustning
Knappar för användning av
videoutrustning
Sid
108
108
108
108
Sid
97
97
97
97
Sid
116
116
95
Page 96

Komma igång
RM-838
PROGR
VTR 1-2-3
MDP
1
2
4
5
3
6
9
8
7
0
C
SAT
MENU
+
_
OK
+
4
PROGR
1
1
+
_
+
_
Steg 1 Förberedelser
2
1
1
Kontrollera de medsända tillbehören
2
1
Observera: Se till att
kasserade batterier tas
omhand på ett
miljövänligt sätt.
Kontrollera att följande tillbehör
finns med när du packar upp
apparaten:
RM-838
1
4
• Fjärrkontroll RM-838
• Ett R6-batteri för IEC
• Lampa (1)
• Nyckel (1)
• Konsol (2)
2
Sätta i batteriet i fjärrkontrollen
1
RM-838
3
2
6
1
5
9
4
1
8
7
0
PROGR
RM-838
3
2
1
5
4
8
7
0
2
Ta bort skyddet. Kontrollera plus- och
minuspolerna.
3
2
6
5
9
8
7
0
PROGR
6
9
PROGR
3
3
Sätt tillbaka höljet och se till
att fullfunktionssidan är
tillgänglig så att du kan
använda menyn i steg 2.
3
Ansluta antennen
Anslut en IEC-antennkontakt till en 75-ohms koaxialkabel (medföljer
96
inte). Sätt i anslutningen i antennuttaget ) på TVns baksida.
L/G/S/I
R/D/D/D
L/G/S/I
R/D/D/D
L/G/S/I
R/D/D/D
L/G/S/I
R/D/D/D
Page 97

Steg 2 Ställa in tv-stationer
2
1
När du har installerat TVn kan du välja ett språk för menyn. Du
förinställer kanalerna (upp till 100 kanaler) manuellt eller
automatiskt. Den automatiska metoden är lättare om du genast vill
förinställa alla kanaler som går att ta emot. Använd den manuella
2
1
45
8
7
0
SAT
MEM
USE
RM-838
VTR 1-2-3
RESET
3
6
9
C
PROGR
+
+
1
_
_
1
+
MENU
_
OK
MDP
+
PROGR
_
metoden om du har få kanaler och du vill förinställa dem en i taget.
Innan du börjar
• Kontrollera att fullfunktionssidan på fjärrkontrollen är åtkomlig.
• Leta reda på menyanvändningsknapparna på fjärrkontrollen. De är
skuggade i bilden till vänster.
Välja språk
1
1 Tryck på φ på TVn.
TVn slås på. Om standby-lampan på TVn tänds trycker du på ;
eller en sifferknapp på fjärrkontrollen.
2 Tryck på knappen MENU.
Menyn LANGUAGE visas. (Se bild. 1.)
MENU
3 Tryck på >+ eller ?– tills önskat språk visas och tryck på OK.
bild. 1
LANGUAGE
+
_
OK
Sec
Select
English
Deutsch
Français
Italiano
Español
Nederlands
Português
Suomi
Svenska
¶ Ł غÆ
Türkçe
and press OK
S
φ
Gå tillbaka till
huvudmenyn
Tryck på knappen ≅.
Återgå till TV-bilden
Tryck på MENU
Den normala TV-bilden
återställs efter en minut
om menyfunktionerna
inte väljs.
Angående Demofunktionen
Om du väljer Demo i
installationsmenyn,
visas menyfunktionerna i
tur och ordning.
Om du vill avsluta
funktionen trycker du på
MENU.
Visa menyn
2
Tryck på MENU.
Huvudmenyn visas. (Se bild . 2.)
Använd >+ eller ?– för att stega till symbolen
Välj därefter någon av metoderna som beskrivs på nästa sida:
“Automatisk kanalinställning”
eller
“Manuell kanalinställning”
och tryck på OK.
TV-FORMAT
TV format
Bildläge
Strobe
PAP
PAP Foto
Auto format
Välj med och tryck OK
bild. 2
[av]
[på]
[på]
[zoom]
[ 0 ]
97
Page 98

Gå tillbaka till
B/G
SYS PROG
C25KH–
NAMN
––––04
huvudmenyn
Tryck på knappen ≅
upprepade gånger.
Automatisk kanalinställning
3
1 Tryck på lämplig knapp >+ eller ?– för att välja symbol för
kanalinställning och tryck på OK.
Då visas KANALINSTÄLLNING menyn. (Se bild. 3.)
2 Välj “Automatisk kanalinställning” med >+ eller ?– och tryck på
OK.
Då visas menyn för AUTOMATISK KANALINSTÄLLNING. (Se
bild. 4.)
3 Tryck på OK.
Välj, om så behövs, TV-system (B/G för Västeuropa, D/K för
Östeuropa)med >+ eller ?– och tryck på OK. Den första
positionen för programnumret ljusmarkeras.
4 Välj det nummer du vill börja programmeringen från. Alla
programnummer måste anges tvåsiffright (lägg till en nolla före
ensiffriga nummer). Stega med >+ eller ?– till den första siffran i
numret eller skriv in den med en sifferknapp (t ex “0” för “4”) och
tryck på OK.
Då ljusmarkeras den andra positionen för programnumret.
5 Stega med >+ eller ?– till den andra siffran eller skriv in den med
en sifferknapp (t ex “4” för “4”) (Se bild. 5) och tryck på OK.
6 Välj “C” eller “S” med >+ eller ?– och tryck på OK.
Då börjar den automatiska förinställningen.
När programmeringen är klar visas menyn för
KANALINSTÄLLNING.
Alla kanaler som kan tas in finns nu lagrade på programnummer
efter varandra.
KANALINSTÄLLNING
Automatisk kanalinställning
Manuell kanalinställning
Kanal sortering
Låsning av kanaler
Installation
Välj med och tryck OK
bild. 3
AUTOMATISK KANALINSTÄLLNING
SYS PROG
B/G
Välj med och tryck OK
C25KA–
bild. 4
bild. 5
NAMN
––––01
Avbryta automatisk
förinställning av
kanaler
Tryck på ≅ på
fjärrkontrollen.
Observera
• När du har förinställt
kanalerna automatiskt
kan du kontrollera vilka
kanaler som är lagrade
på vilka
programpositioner.
Mer information får du
om du läser “Visa
programtabell” på
sidan 105.
• Du kan byta ut
programpositionerna
så att de visas på
skärmen i önskad
ordning. Mer
information finns i
avsnittet “Sortera
programpositioner” på
sid 100.
98
Page 99

Använd den här
2 C –––––21B/G av
3 AV1 –––––EXT
2 C –––––21B/G av
2 C –––––35B/G av
2 C –––––35B/G av
2 C –––––50B/G
4$
metoden om det bara
finns ett fåtal kanaler i
området som du kan
förinställa eller om du vill
förinställa kanalerna en i
taget. Du kan också
välja programpositioner
för olika videokällor.
Om du gör fel
Tryck på ≅ för att gå
tillbaka till föregående
position.
Gå tillbaka till
huvudmenyn
Tryck på knappen ≅
upprepade gånger.
Tryck på MENU när du
vill återgå till den vanliga
TV-bilden.
Manuell kanalinställning
3
1 Tryck på lämplig knapp >+ eller ?– för att välja symbol för
kanalinställning och tryck på OK.
Då visas KANALINSTÄLLNING menyn. (Se bild. 6.)
2 Välj “Manuell kanalinställning” med >+ eller ?– och tryck på
OK.
Då visas menyn för MANUELL KANALINSTÄLLNING. (Se
bild. 7.)
3 Använd >+ eller ?–, för att stega till det programnummer du
vill programmera in en kanal på och tryck på OK.
4 Välj, om så behövs, TV-system (B/G för Västeuropa, D/K för
Östeuropa) eller en videokälla (EXT) med >+ eller ?–.
5 Tryck på OK. Då ljusmarkeras den första positionen för
programnumret. (Se bild. 8.)
6 Välj med >+ eller ?– C (för att programmera in en vanlig
kanal), S (för att programmera in en kabelkanel) eller F (för att
programmera in efter frekvens) och tryck på OK.
Då ljusmarkeras den första positionen för programnumret.
Om du valde EXT i steg 5 väljer du nu videokälla med >+
eller ?–. (Se bild. 9.)
Det finns två sätt att programmera in kanaler. Om du känner
till progranmumret går du till steg 7 “Manuellt”,
eller
Om du inte känner till programnumret går du till steg 7
“Sökning”
KANALINSTÄLLNING
Automatisk kanalinställning
Manuell kanalinställning
Kanal sortering
Låsning av kanaler
Installation
Välj med och tryck OK
bild. 6
MANUELL KANALINTÄLLNING
PROG
SYS
KH
B/G
B/G
B/G
B/G
B/G
B/G
B/G
B/G
B/G
B/G
C21
C34
C33
C45
C02
C08
C10
C12
C20
C59
SÖK
1
2
3
4
5
6
7
8
9
10
Välj med och tryck OK
bild. 7
bild. 8
bild. 9
NAMN
av
-----
av
-----
av
-----
av
-----
av
-----
av
-----
av
-----
av
-----
av
-----
av
-----
S
Ställa in en kanal efter
frekvens
När du har valt F i steg 6
anger du tre nummer
med sifferknapparna.
7 Manuellt
-a Stega till den första siffran i det tvåsiffriga programnumret med
>+ eller ?– skriv in den med en sifferknapp och tryck på OK.
Då ljusmarkeras den andra positionen för programnumret.
-b Stega till den andra siffran i numret med >+ eller ?– eller skriv
in den med en sifferknapp.
Då visas det valda numret. (Se bild. 10.)
-c Tryck på OK.
Då ljusmarkeras tecknen under SÖK och den valda kanalen
är lagrad. (Se bild. 11.)
-d Tryck på OK tills markören visas vid nästa programnummer.
-e Upprepa steg 3 till 7 för att programmera in andra kanaler.
7 Sökning
-a Tryck på OK upprepade gånger tills tecken under SÖK ändrar
färg.
-b Börja söka efter kanalen med >+ (uppåt) eller ?– (nedåt).
Då ändrar tecknen under KA (kanal) färg (Se bild. 12) och en
upp/nedräkning börjar.
När en kanal påträffats stannar upp/nedräkningen. (Se bild.
13.)
-c Tryck på OK om du vill lagra denna kanal. Om inte, trycker du
på >+ eller ?– för att fortsätta sökningen.
-d Tryck på OK tills markören visas vid nästa programnummer.
-e Upprepa steg 3 till 7 för att programmera in andra kanaler.
bild. 10
bild. 11
bild. 12
bild. 13
99
Page 100

Ytterligare förinställningsfunktioner
KANAL SORTERING
PROG
1
2
3
4
5
6
7
8
C03
C04
C07
C09
C12
C13
C14
C15
KA
NAMN
BBC 2
ITV
MBC
-----
-----
-----
-----
BBC 1
Flytta PR 8 till PR - -
Välj med och tryck OK
1
2
3
4
5
6
7
8
C15
C03
C04
C07
C09
C12
C13
C14
KANAL SORTERING
PROG KA
NAMN
BBC 1
BBC 2
ITV
MBC
-----
-----
-----
-----
Flytta PR 1 till PR - -
Välj med och tryck OK
8 BBC 1C15
2
1
I det här avsnittet beskrivs ytterligare förinställningsfunktioner som
att sortera eller hoppa över programpositioner, namnge en station
eller finjustera manuellt, samt använda barnlås.
Innan du börjar
• Kontrollera att fjärrkontrollens fullfunktionssida är tillgänglig.
• Se till så att du vet var menyoperationsknapparna finns.
Sortera programpositioner
KANAL
SORTERING
2
1
45
7
RM-838
3
6
9
8
0
C
+
_
SAT
+
_
VTR 1-2-3
MEM
USE
RESET
Med den här funktionen kan du sortera programpositionerna så att
de visas i önskad ordning.
1 Tryck på MENU så visas huvudmenyn.
2 Välj
genom att trycka på >+ eller ?– och tryck på OK.
Menyn KANALINSTÄLLNING visas.
3 Välj KANAL SORTERING genom att trycka på >+ eller ?– och
tryck på OK.
Menyn KANAL SORTERING visas. (Se bild. 14.)
bild. 14
4 Tryck på >+ eller ?– för att välja den programposition som ska
flyttas och tryck på OK.
Färgen på den valda positionen ändras. (Se bild. 15.)
PROGR
+
1
_
1
MENU
OK
MDP
+
PROGR
_
5 Tryck på >+ eller ?– för att välja den programposition som du vill
flytta kanalen till för den programposition som valdes i steg 4. (Se
bild. 16)
6 Upprepa steg 4 och 5 om du vill byta ut fler programpositioner.
bild. 15
bild. 16
För högre
programpositioner
Skärmen bläddrar
automatiskt.
Om du gör fel
Tryck på ≅ för att gå
tillbaka till föregående
position.
Gå tillbaka till
huvudmenyn
Tryck på knappen ≅
upprepade gånger.
Tryck på MENU när du
vill återgå till den vanliga
TV-bilden.
100
 Loading...