

Sony KF-WS60, KF-WE50, KF-WE42 Operating Instructions Manual
2-179-402-22(1)
Projection TV
Operating Instructions
• Before operating the unit, please read this manual thoroughly and retain it for
future reference.
KF-WS60
KF-WE50
KF-WE42
© 2004 Sony Corporation
S1
A1

Safety Information
2

WARNING
To prevent fire or shock hazard, do not expose the projection
TV to rain or moisture.
Dangerously high voltages are present inside the projection
TV. Do not open the cabinet. Refer servicing to qualified
personnel only.
For general safety:
• Do not expose the projection TV to rain or moisture.
• Do not open the rear cover.
• This set should be operated only from the type of power
source indicated on the serial/model plate.
If you are not sure of the type of electrical power supplied
to your home, consult your dealer or local power company.
For those sets designed to operate from battery power, refer
to the operating instructions.
For safe installation:
• Never cover the slots and openings with a cloth or other
materials.
• Do not block the ventilation openings.
• Do not use power-line operated sets near water — for
example, near a bathtub, washbowl, kitchen sink,
swimming pool, etc.
• Do not install the projection TV in hot, humid or
excessively dusty places.
• Do not allow anything to rest on or roll over the power
cord, and do not place the set where the power cord is
subject to wear or abuse.
• Do not install the projection TV where it may be exposed
to mechanical vibrations.
• Avoid operating the projection TV at temperatures below
5ºC.
• If the projection TV is transported directly from a cold to a
warm location, or if the room temperature has changed
suddenly, the picture may be blurred or show poor color.
This is because moisture has condensed on the mirror or
lenses inside. If this happens, let the moisture evaporate
before using the projection TV.
• If direct sunlight or other strong illumination shines on the
screen, part of the screen may appear white due to
reflections from behind the screen. This is a structural
property of the projection TV.
Do not expose the screen to direct illumination or sunlight.
• Do not install the appliance in a confined space, such as a
bookcase or built-in cabinet.
• Do not place the set on an unstable cart, stand, table or
shelf. The set may fall, causing serious injury to a child or
an adult and serious damage to the set. Use only a cart or
stand recommended by the manufacturer for the specific
model of projection TV. An appliance and cart
combination should be moved with care. Quick stops,
excessive force, and uneven surfaces may cause the
appliance and cart combination to overturn.
• When the set exhibits a distinct change in performance, it
indicates a need for service.
For safe operations:
• Do not operate the projection TV on anything but 220-240
V AC, 50/60 Hz.
• Do not operate the projection TV if any liquid or solid
object falls in it — have it checked immediately.
• Never push objects of any kind into the set through the
cabinet slots as they may touch dangerous voltage points or
short out parts that could result in a fire or electric shock.
Never spill liquid of any kind on the set.
• Do not keep the projection TV plugged in if you are not
going to use it for several days. Even if your projection TV
is turned off, it is still connected to AC power when
plugged into an outlet.
• Do not pull the power cord to disconnect the projection TV.
Pull it out by the plug.
• Do not plug in too many appliances to the same power
socket. Do not damage the power cord.
• Do not place any objects on the projection TV. The
apparatus shall not be exposed to dripping or splashing and
that no objects filled with liquids, such as vases, shall be
placed on the apparatus.
• To prevent fire, keep inflammable objects or naked lights
(e.g. candles) away from the projection TV.
• If a snapping or popping soun d from a TV set is continuous
or frequent while the TV is operating, unplug the TV and
consult your dealer or service technician. It is normal for
some TV sets to make occasional snapping or popping
sounds, particularly when being turned on or off.
• Give careful consideration to the environment when
disposing of batteries.
Carry the projection TV in the specified
manner
If you carry the projection TV in a manner other than the
specified manner and without the specified number of
persons, it may drop and a serious injury may be caused. Be
sure to follow the instructions mentioned below.
• Carry the projection TV with the specified number of
persons (see page 11).
• Do not carry the projection TV holding the speaker grill.
• Hold the Projection TV tightly when carrying it.
• Before carrying the projection TV, disconnect any
accessories or cables.
• Do not carry the projection TV holding the screen edges.
Caution
• When using TV games, computers, and similar products
with your projection TV, keep the brightness and contrast
functions at low settings. If a fixed (non-moving) pattern is
left on the screen for long periods of time at a high
brightness or contrast setting, the image can be
permanently imprinted onto the screen. These types of
imprints are not covered by your warranty.
• Do not use the projection TV at altitudes higher than
4000 m, as doing so might cause malfunctions.
,continued
3

Cleaning
Clean the rear cover area of the projection TV regularly.
Dust in rear cover area may cause a problem with the
cooling system of the projection TV set.
• To remove hard contamination, use a cloth moistened with
a solution of mild detergent and water. Do not use a spray
cleaning solution directly to the TV. It should only be used
to moisten the cleaning cloth.
• Clean the cabinet of the projection TV with a dry soft cloth.
To remove dust from the screen, wipe it gently with a soft
cloth. Stubborn stains may be removed with a cloth sl ightly
dampened with a solution of mild soap and warm water.
Never use strong solvents such as thinner or benzine for
cleaning. If picture brightness decreases over time, it may
be necessary to clean the inside of the projection TV.
Consult qualified service personnel.
• Unplug the AC power cord when cleaning this unit. If not,
it may result in electric shock.
• Do not rub, touch, or tap the surface of the screen with
sharp or abrasive items, like a ball point pen or a screw
driver. Otherwise, this type or contact may result in a
scratched screen.
About the projection TV
Although the projection TV is made with high-precision
technology, black dots may appear or bright points of light
(red, blue, or green) may appear constantly on the screen.
This is a structural property of the panel and is not a
malfunction.
Projection lamp
• Your projection TV uses a projection lamp as its light
source. It is time to replace the lamp with a new one (not
supplied) when:
– the lamp replacement indicator on the front panel blinks
in red,
– screen images become dark,
– no image appears on the display after prolonged use.
• In rare instances, the bulb may pop inside the lamp unit, but
the lamp unit is designed to contain all of broken glass
pieces inside the lamp unit. (See “Replacing the lamp” on
page 16.)
• When the lamp eventually burns out, you may hear a
noticeable pop sound. This is normal and is inherent in this
type of lamp.
Cooling fan
This projection TV uses a cooling fan. You may hear some
fan noise (depending on the placement of the projection TV),
which may be more noticeable during the night, or when
ambient noise is particularly low.
The features you will enjoy include:
• “DRC-MF” for viewing higher quality pictures
(page 32)
• “Twin” for watching two programs at the same time
(page 37)
• “Program Index” for displaying multiple programs
(page 38)
• “Picture Mode”/“Sound Mode”/“Surround” for
customizing your projection TV (pages 31 and 41)
• “Wide Screen” to enjoy wide mode pictures (page 33)
• “MEMORY STICK” button on the remote control for
viewing still pictures and movies stored in a “Memory
Stick” (page 48)
Your projection TV also offers the
following features:
• Initial Setup function for on-screen language
selection, automatic channel presetting. (page 15)
• Menu language options
– English/Chinese/Arabic/Thai (page 84)
• “Program Block” for locking out specific channels
(page 83)
• “Intelligent Volume” for automatic volume
adjustment (page 67)
• “Fine” tuning feature (page 77)
4

Table of Contents
Safety Information .......................... 2
WARNING ...................................... 3
Using Your New Projection TV ...... 6
Identifying parts and controls ..........6
Step 1: Install the projection TV ....11
Step 2: Connect the antenna
and the VCR ........................... 13
Step 3: Insert the batteries
into the remote ........................ 14
Step 4: Set up your projection TV
automatically ........................... 15
Replacing the lamp .......................16
Connecting optional
components ............................22
Watching the projection TV ..........28
Advanced Operations ............... 31
Selecting the picture and sound
modes ..................................... 31
Viewing higher quality pictures
— “DRC-MF” .......................... 32
Using wide screen mode .............. 33
Watching two programs at the same
time — “Twin” ......................... 37
Displaying multiple programs
—“Program Index” .................. 38
Using the Freeze function .............40
Listening with surround sound ...... 41
Enjoying stereo or bilingual
programs ................................ 41
Viewing Teletext ........................... 42
Operating optional components ....44
Selecting the inputs to enjoy WEGA
Theatre ...................................46
Using the projection TV’s center
speaker ................................... 47
Using the “Memory Stick”
viewer ..................................... 48
Adjusting Your Setup (MENU) ..... 65
Introducing the menu system ....... 65
Changing the “Picture” setting ...... 71
Changing the “Sound” setting ...... 72
Entering the “Memory Stick
Menu” ..................................... 74
Changing the “Wide Screen”
setting ..................................... 75
Operating the “Multi Picture” using
the menu ................................ 76
Changing the “Program”
setting ..................................... 77
Changing the “Setup” setting ....... 84
Additional Information .............. 87
Troubleshooting ........................... 87
Self-diagnosis function ................. 92
Specifications ............................... 93
Index ............................................ 94
5
Using Your New Projection TV
9 0q
q
q
4 2
390 q
5
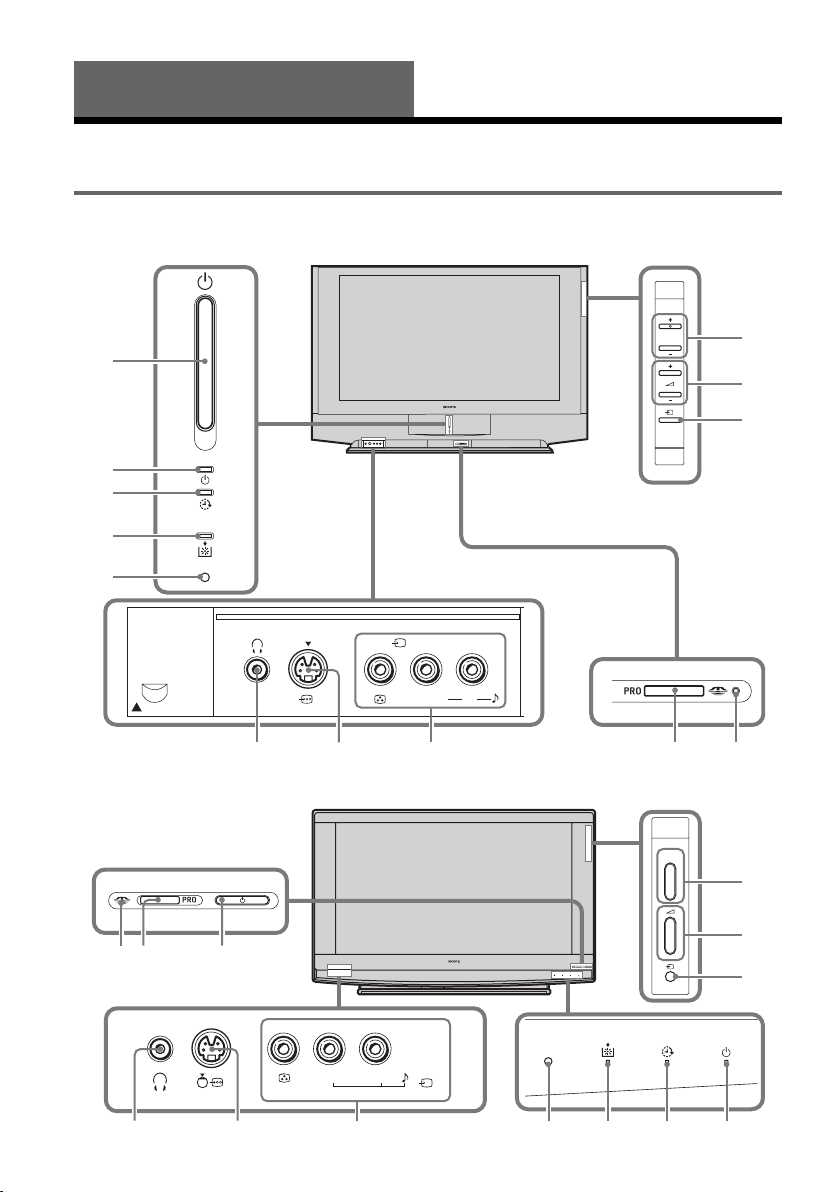
Identifying parts and controls
Front panel
KF-WE42/KF-WE50
1
2
3
4
5
Push up to open the
front panel
KF-WS60
STD/DUO
qsqd
Press up lightly to release
the console
OPEN
1
4
L (MONO)
a
PROG
6
7
8
STD/DUO
R
s
PROG
3
#
3
PRO
STD/DUO
#
d
6
7
8
L (MONO)
R
4
a
6
Button/
Indicator
A 1 Press to turn the
B
1 (Power/
Standby)
indicator
C (Timer)
indicator
D (Lamp)
indicator
E (IR)
Infrared
Receiver
F PROG +/– Select program number. 28
G 2 +/– Adjust volume. 29
H t Select TV or video
I
i Headphone jack –
J t 4 ( ) Connect to S video
K t 4 ( ,
L(MONO)/
R)
L “Memory
Stick” slot
M “Memory
Stick”
indicator
Function Page
projection TV on or off.
Lights up in green when
the TV set is turned on.
When in standby mode,
the indicator lights up in
red.
Lights up in red when
the TV set goes into
standby mode after the
Wake Up timer is set.
Flashes when the lamp
should be replaced with
a new one.
Receives IR signals
from the remote control.
input.
output of video
equipment.
Connect to video/audio
outputs of equipment.
Insert a “Memory Stick”
into this slot.
Flashes when the data is
being read from a
“Memory Stick”. (Do
not remove the
“Memory Stick” when
the indicator is lit.)
28
29
16
29
22
22
50
50
–
–
Using Your New Projection TV
,continued
7
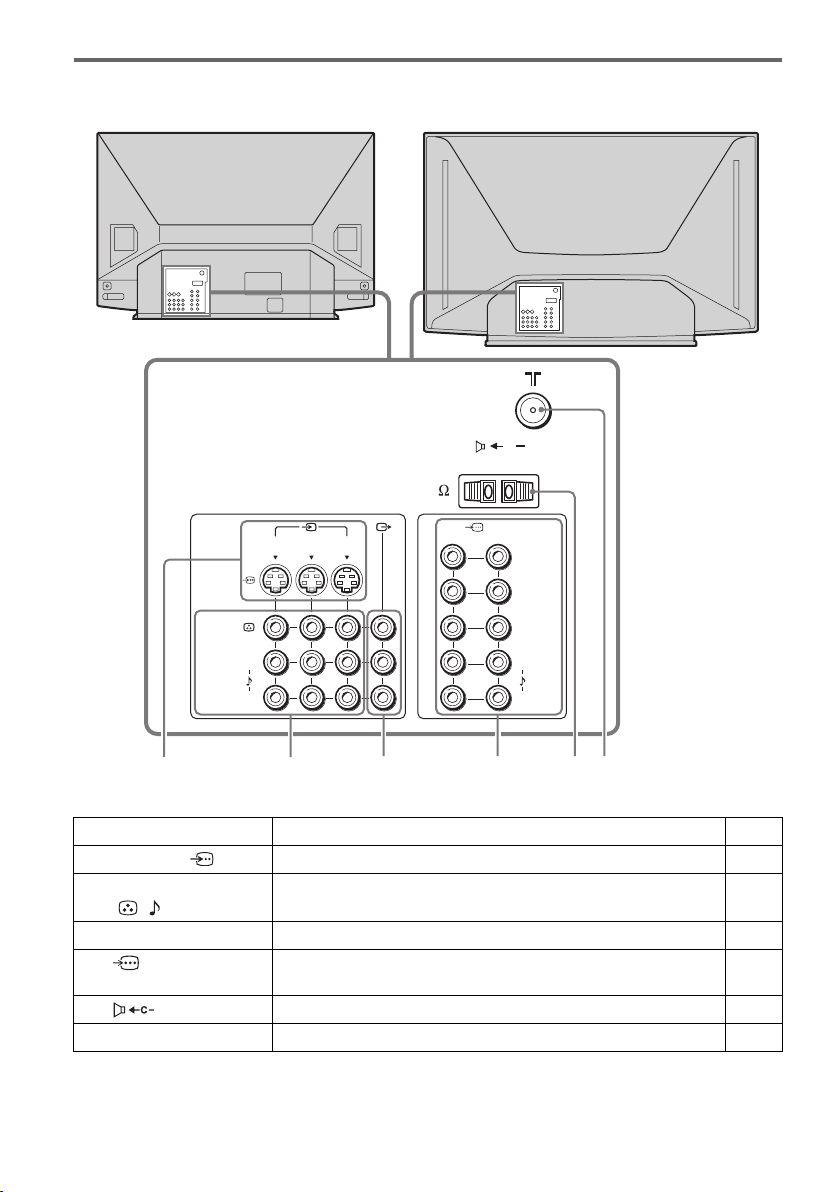
Rear
KF-WE42/KF-WE50 KF-WS60
120W MAX 8
1
(MONO)
1
2 3
L
C
#3
2
Y
P
B/CB
PR/CR
L
R
R
123456
Connector Function Page
A t 1 to 3 ( ) Connect to S video output of video equipment. 14
B t 1 to 3
Connect to video/audio outputs of video equipment. 14
( , L(MONO)/R)
C T Connect to video/audio inputs of audio/video equipment. 23
D 1 to 2 Connect to component video outputs on a DVD player or DTV
(digital television) receiver.
E Connect to speaker terminals on an amplifier. 27
8 Connect the antenna cable. 13
F
8
24
26
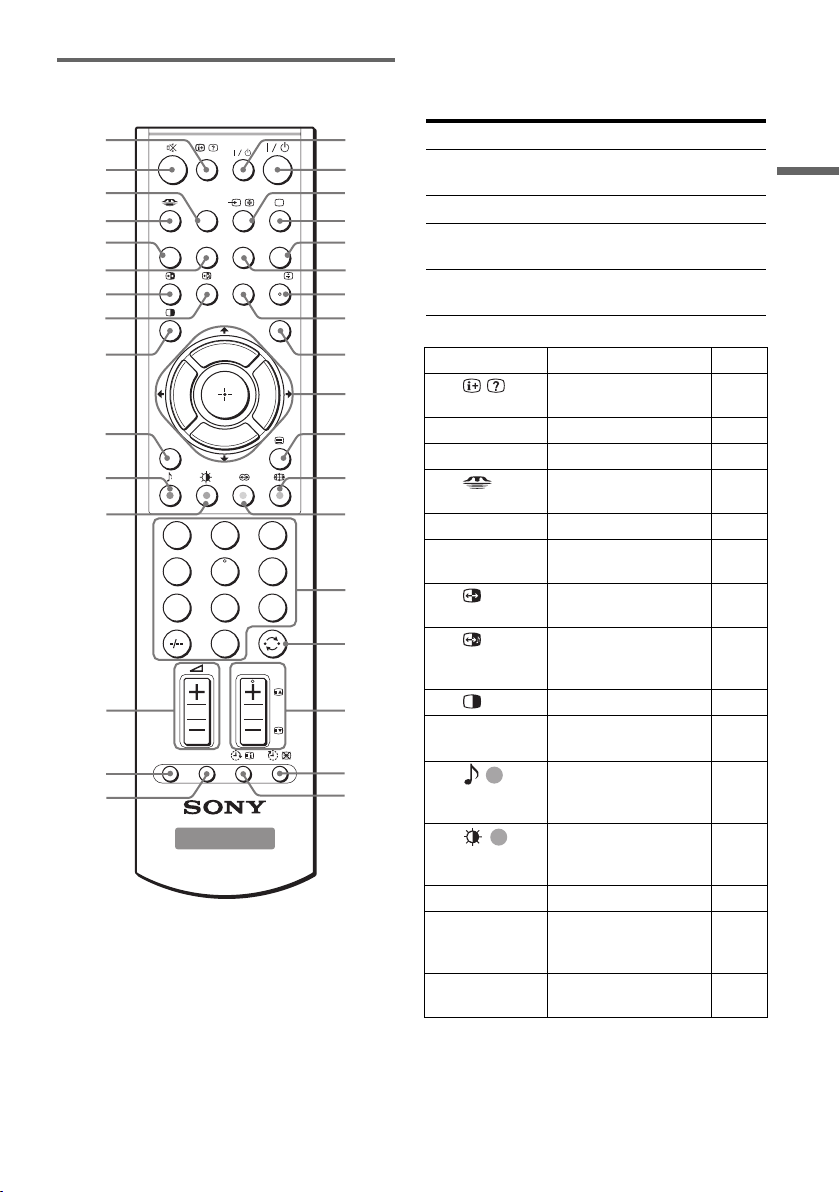
Remote control
1
2
3
4
5
6
7
8
9
0
qa
qs
qd
qf
qg
DRC-MF
.>
PROG
INDEX
1
4
7
OPTION RESET
HD/DVD
FREEZE
N
I
W
T
T
W
P
N
I
N
2
5
8
0
TV
VIDEO
CENTER
SP
V CENTER
R
O
G
X
x
G
O
R
P
PROG
The names/symbols of buttons on the remote are
indicated in different colors to represent the
available functions.
qh
qj
qk
WEGA
THEATRE
A/B
MENU
+
ql
w;
wa
ws
wd
wf
wg
wh
-
wj
Label color Button function
White For general TV
operations
Green For Teletext operations
Yellow For Twin picture
operations
Purple For optional components
operations
Button Function Page
A Display on-screen
29
information.
B % Mute the sound. 29
C HD/DVD Select component input. 29
D Display “Memory Stick
50
Using Your New Projection TV
Home”.
wk
3
6
wl
9
e;
E DRC-MF Select DRC-MF mode. 32
F FREEZE Freeze current picture in
40
separate window.
G Swap the left and right
37
pictures.
H Swap sound between
37
the left and right
pictures.
ea
es
ed
I Display Twin pictures. 37
J PROG
INDEX
K
(red)
Display all preset TV
programs.
• Select sound mode.
• Access a FASTEXT
38
31
44
menu.
L
(green)
• Select picture mode.
• Access a FASTEXT
menu.
31
44
M 2 +/– Adjust volume. 29
N OPTION Use with another button
45
to operate optional
components.
O RESET Reset items in the menu
69
to the initial setting.
,continued
9

1
VIDEO
2
3
4
5
6
7
8
9
0
qa
HD/DVD
CENTER
P
N
X
N
x
I
N
SP
V CENTER
R
O
G
G
O
R
P
WEGA
THEATRE
A/B
MENU
+
-
FREEZE
DRC-MF
I
W
T
.>
PROG
INDEX
T
W
qs
1
4
7
3
2
6
5
9
8
0
PROG
qd
OPTION RESET
qf
qg
TV
Button Function Page
P VIDEO
?/1
Q ?/1 Turn off temporarily or
R t • Select video input.
• Power button for
video equipment.
• Use with the number
buttons to set up the
remote.
turn on the TV.
• Stop Teletext page
from scrolling.
qh
qj
qk
ql
w;
wa
ws
wd
wf
wg
wh
wj
wk
wl
e;
ea
es
ed
45
45
28
29
43
Button Function Page
S a • Display the TV
29
program.
• Turn off Teletext.
T WEGA
THEATRE
Select input to enjoy
WEGA Theatre.
U CENTER SPSelect TV’s center
42
46
47
speaker mode.
V A/B Select stereo/bilingual
41
mode.
W V
CENTER
Adjust the vertical
position of the picture.
36
X MENU Display the menu. 70
Y • Select, adjust and
R
O
P
G
N
I
+
W
T
X
N
.>
x
-
T
W
G
I
O
N
R
P
confirm selected items
in the menu.
• Select a program of
the right picture.
• Select desired channel
in Program Index.
• Operate optional
70
37
38
44
components.
Z Display Teletext page
42
on the TV picture.
wj
(blue)
wk
(yellow)
•Select wide mode.
• Access a FASTEXT
menu.
• Select surround mode.
• Access a FASTEXT
menu.
33
44
41
44
wl 0 – 9, - Input numbers. 28
e; Jump to previous
29
channel.
ea PROG +/–
(/)
es • Set the TV to turn off
• Select program
number.
• Select a Teletext page.2843
30
automatically.
•Show TV screen
43
while waiting for
Teletext page.
ed • Set the TV to turn on
29
automatically.
• Display Teletext
43
service contents.
10
Step 1: Install the projection TV
To obtain the best picture, do not expose the
screen to direct illumination or direct sunlight. It is
recommended to use spot lighting directed down
from the ceiling or to cover the windows that face
the screen with opaque drapery. It is desirable to
install the projection TV in a room where the floor
and walls are not of reflecting material. If
necessary, cover them with dark carpeting or wall
paper.
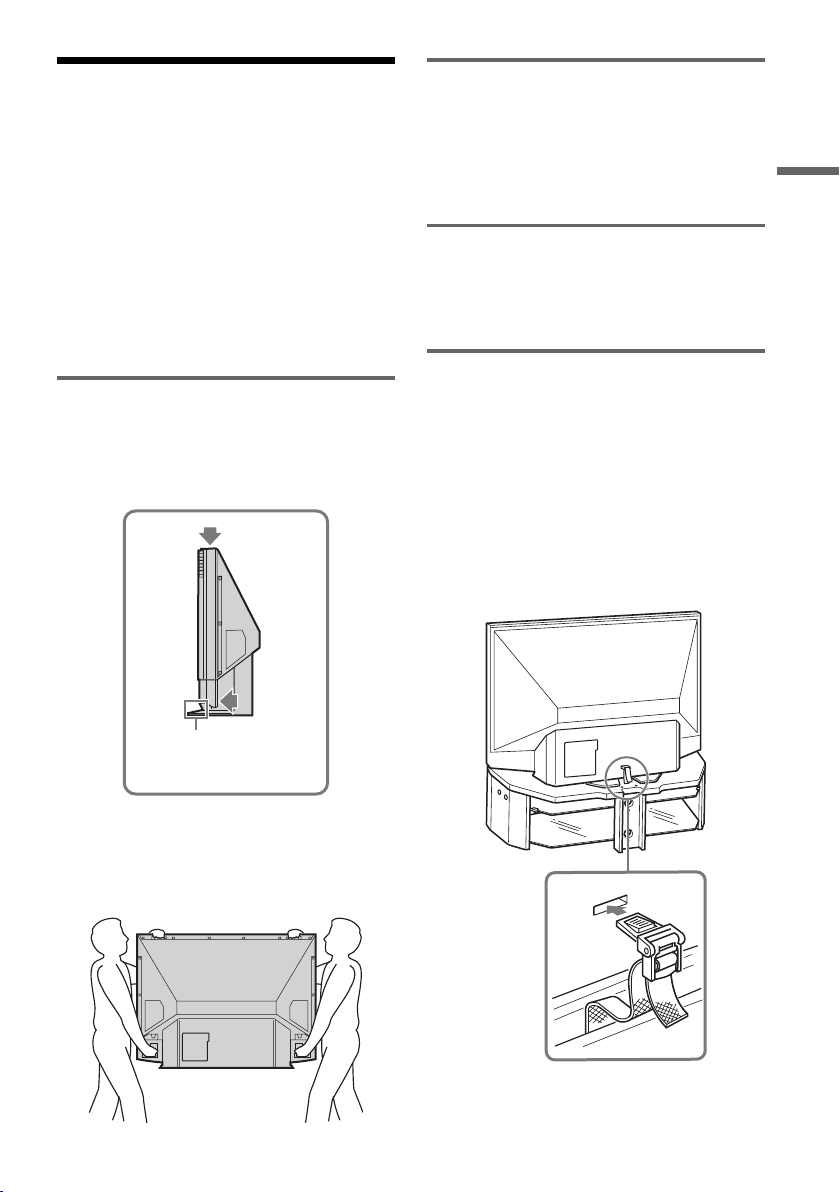
Carrying the projection TV
Carrying the projection TV requires at least two
people. Do not hold the pedestal or the front panel
of the projection TV. Doing so may cause these
parts to break off.
Take precaution during the
installation
To ensure the safety of children and the projection
TV, keep children away from the TV during
installation. Climbing on or pushing the projection
TV or its stand may cause it to fall.
When installing the projection TV
against a wall
Keep the projection TV at least 10 cm away from
the wall to provide proper ventilation.
To prevent the projection TV from
falling
As a protective measure, secure the projection TV
as follows.
Using the projection TV stand with support
belts
You can use the projection TV stand model SUGW11 (for KF-WE42/KF-WE50, not supplied) or
model SU-GW12 (for KF-WS60, not supplied)
with a support belt.
Using Your New Projection TV
Do not grasp the pedestal or
the front panel of the
projection TV.
When moving the projection TV, place one hand
in the hole on the lower portion of the TV while
grasping the top with the other hand, as shown in
the illustration below.
,continued
11

Optimum viewing area
65
62.5˚˚
For the best picture quality, install the projection
TV within the areas below.
Horizontal
KF-WE42/KF-WE50
min. 2.0 m
(KF-WE50)
min. 1.8 m
(KF-WE42)
65
65˚
6565˚
65˚
˚
Vertical
KF-WE42/KF-WE50
min. 2.0 m
(KF-WE50)
min. 1.8 m
(KF-WE42)
30˚
30˚
KF-WS60
62.5
62.5˚
KF-WS60
min. 2.2 m
min. 2.2 m
62.5˚
27.5˚
27.5˚
12
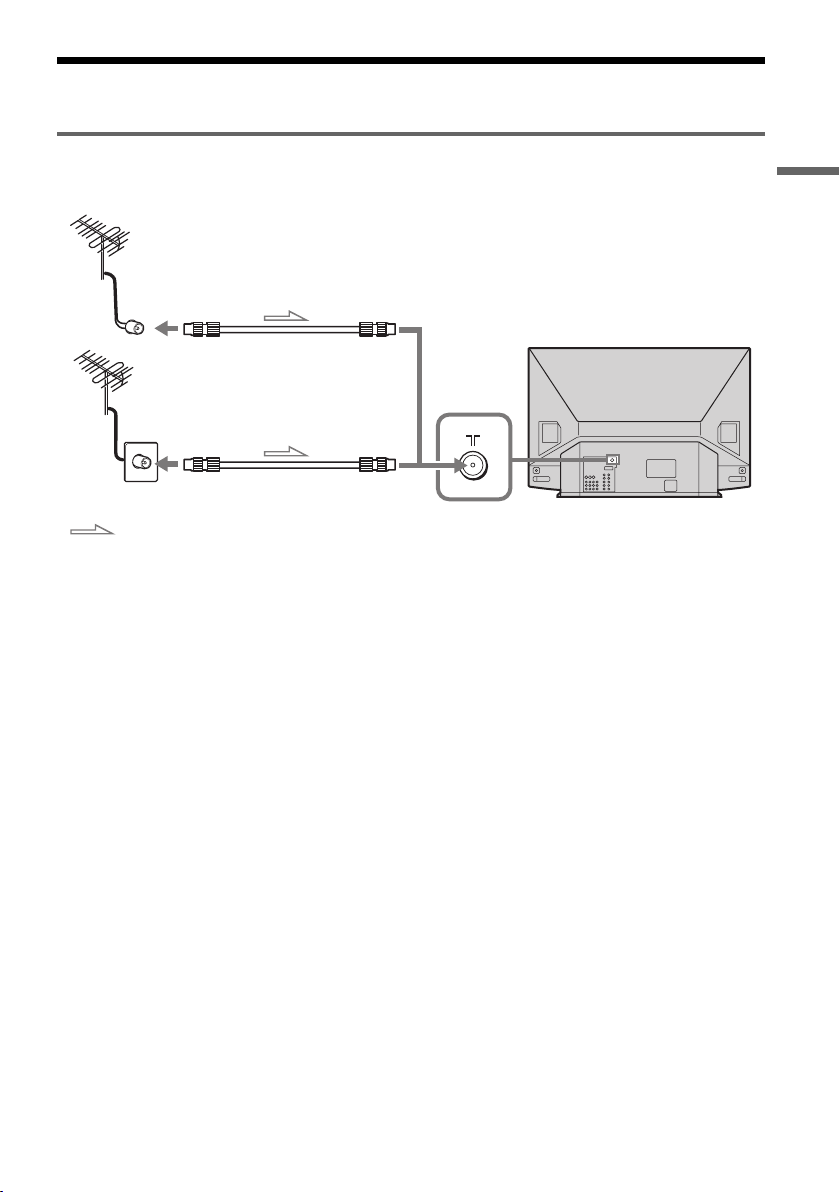
Step 2: Connect the antenna and the VCR
Connect the antenna
If you wish to connect a VCR, see “Connect a VCR” on page 14.
Using Your New Projection TV
Antenna cable (not supplied)
Rear of projection TV
or
Antenna cable (not supplied)
: Signal flow
For optimum Performance
To connect the projection TV to the antenna or the VCR, use an antenna cable (not supplied).
Note that one end of the cable has a male plug fitted while the other end is fitted with a female socket.
Connect the male plug to the
CAUTION
Do not connect the power cord until all other connections are complete;
otherwise, a minimal current leakage through the antenna and/or other terminals to the ground could occur.
8 (antenna) terminal of the projection TV.
,continued
13
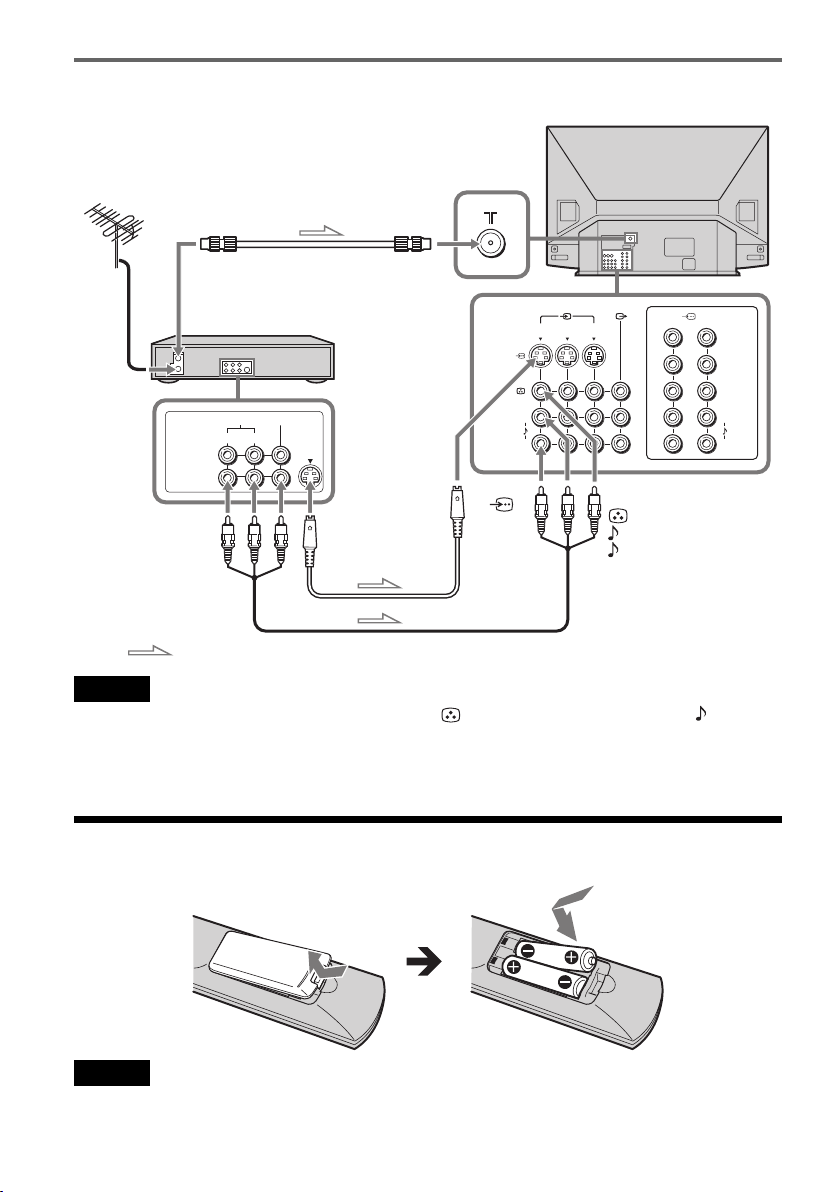
Connect a VCR
To play a video tape, press t (see page 29).
Rear of projection TV
To antenna output
To 8 (antenna)
Antenna cable (not supplied)
1
2
Y
P
B/CB
PR/CR
L
R
VIDEO IN
VIDEO OUT
To video and
audio outputs
VCR
AUDIO
R L
VIDEO
To S video output
1
(MONO)
L
R
To 1,
2 or 3
(S video
input)
2 3
To t 1, 2 or 3 (video input)
(yellow)
-L (MONO) (white)
-R (red)
S video cable (not supplied)
: Signal flow
Audio/Video cable (not supplied)
Notes
• If you connect a monaural VCR, connect the yellow plug to (the yellow jack) and the black plug to -L (MONO)
(the white jack).
• If you connect a VCR to the 8 (antenna) terminal, preset the signal output from the VCR to the program number 0
on the projection TV. If you cannot preset it to the program number 0 (depending on the VCR), then consult the VCR’s
operating manual for instructions.
Step 3: Insert the batteries into the remote
Notes
• Never use old batteries, or different types of batteries together.
• Give careful consideration to the environment when disposing of batteries.
14

Step 4: Set up your projection TV automatically
VIDEO
HD/DVD
CENTER
P
N
N
I
N
SP
V CENTER
R
O
G
X
x
G
O
R
P
WEGA
THEATRE
A/B
MENU
+
MENU
/ / / /
N
-
FREEZE
DRC-MF
I
W
T
.>
PROG
INDEX
T
W
2 Press V/v/B/b to select the desired
language, then press .
N
“Please connect cable/antenna before starting
auto program Start auto program now?”
appears.
R
O
P
G
N
I
+
W
T
X
N
.>
x
-
T
W
G
I
O
N
R
P
Initial Setup
Please connect cable / antenna
before starting auto program
Start auto program now?
Confirm:
No
MENU
End:
N
Yes
Select:
3 Press B/b to select “Yes”, then press
to preset the channels automatically.
The screen will indicate automatic presetting
is in progress.
R
O
P
G
N
I
+
W
T
X
N
.>
x
-
T
W
G
I
O
N
R
P
Using Your New Projection TV
1 Press 1 to turn on the projection TV.
The “Initial Setup” menu appears, and you
can select the on-screen language.
Initial Setup
Please select your language
English
Select:
Confirm:
Initial Setup
Program TV System
01
VHF Low
Press any key to cancel
Auto
MENU
End:
The last “Initial Setup” menu appears.
Initial Setup
Display this menu next time?
Yes
Select:
4 Press B/b to select “No”, then press .
MENU
End:
The “Initial Setup” menu will not appear
No
Confirm:
N
again the next time you turn on the projection
TV by pressing 1.
To allow this menu to appear again, select
“Yes”, then press .
N
,continued
15
z Tips
• If your projection TV has preset an unwanted channel
or cannot preset a particular channel, then preset your
projection TV manually (see page 77).
• If the “No channel found Please connect cable/
antenna” message appears, check the antenna cable
connection, then start auto program again.
Note
If you want to cancel any setup, press B/b to select “No”
and press , or press MENU.
N
Replacing the lamp
The projection lamp, which illuminates the
picture, has a limited life.
If the screen becomes dark, the color looks
unusual, or the (LAMP) indicator on the front
of the projection TV flashes, it is time to replace
the lamp with a new one (not supplied).
WARNING
Electric appliances can cause fire or high temperature,
resulting in injury or death. Be sure to follow the
instructions below.
• Use a Sony XL-2100 (for KF-WE42/KF-WE50), or
XL-2300 (for KF-WS60) replacement lamp (not
supplied) for replacement. Use of any other lamp may
damage the projection TV.
• Do not remove the lamp for any purpose other than
replacement. Doing so may cause injury or fire.
• Before replacing the lamp, turn the power off on the
main unit. Wait several minutes, then unplug the power
cord. (The cooling fan will continue to blow for about
two minutes after turning the power off.)
• Allow the lamp to cool down completely before
removing it. The surface o f the lamp remains extremely
hot for at least 30 minutes after the power has been
turned off.
• Do not put flammable materials and metal objects
inside the lamp receptacle of the projection TV after
removing the lamp. Doing so may cause fire or
electrical shock.
• To avoid being burned, do not touch the lamp
receptacle once the lamp has been removed.
• Mount the new lamp securely. Failure to do so may
cause a fire or the screen to go dark.
• Do not touch the glass of the new lamp with your
fingers.
16
Note
Avoid touching the front glass of a new lamp as this may
reduce picture quality or lamp life.
Disposing of the lamp
This product contains mercury. For disposal
or recycling information, please contact your
local authorities.
• Do not leave the used lamp near flammable
materials or within the reach of children.
• Do not pour water onto the used lamp or put
any object inside the lamp. Doing so may
cause the lamp to burst.
For KF-WE42/KF-WE50
Note
For instruction for KF-WS60, see page 19.
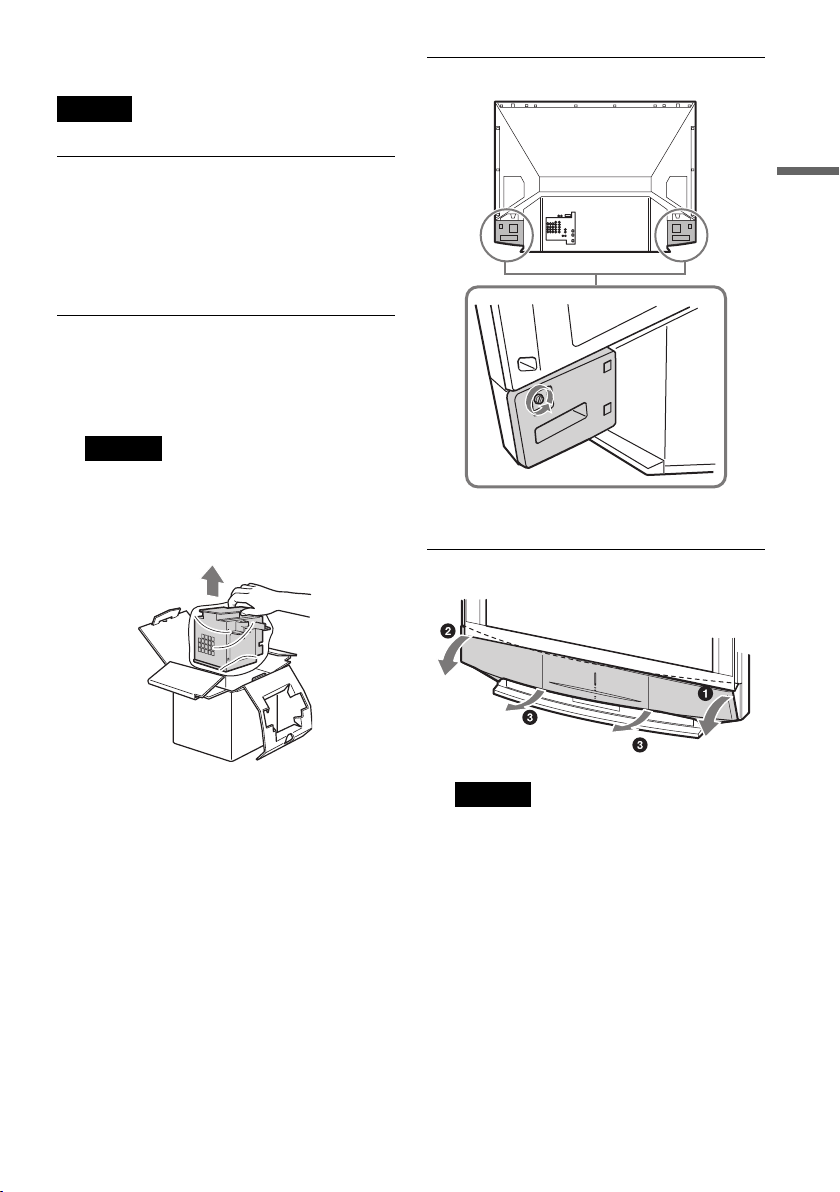
3 Loosen the screws on the rear side panel.
1 Turn off the power on the main unit. Wait
several minutes, then unplug the power
cord.
(The cooling fan will continue to blow for
about two minutes after turning the power
off.)
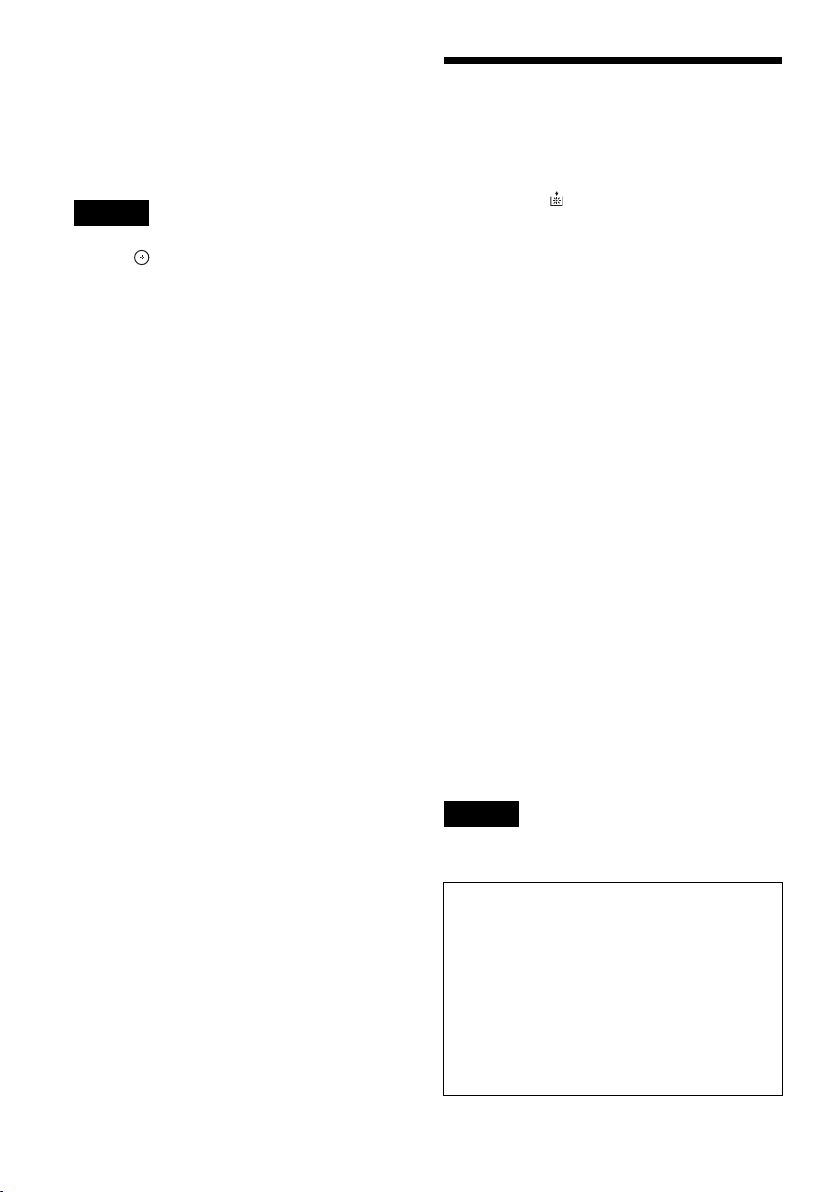
2 Wait at least 30 minutes after unplugging
the power cord to allow the lamp to cool
down before replacing it.
Take the new lamp out of the box.
Notes
• Do not shake the lamp. Vibration can damage the
lamp or shorten its life.
• Avoid touching the front glass of a new lamp or
the glass of the lamp receptacle. This may reduce
picture quality or lamp life.
This illustration is for KF-WE50. The screw for
KF-WE42 is located to the right.
4 Remove the front panel.
Using Your New Projection TV
Note
The front panel cover is securely attached to the
cabinet. Pull firmly on the cover in the numbered
order (see illustration) with both hands to release it.
,continued
17

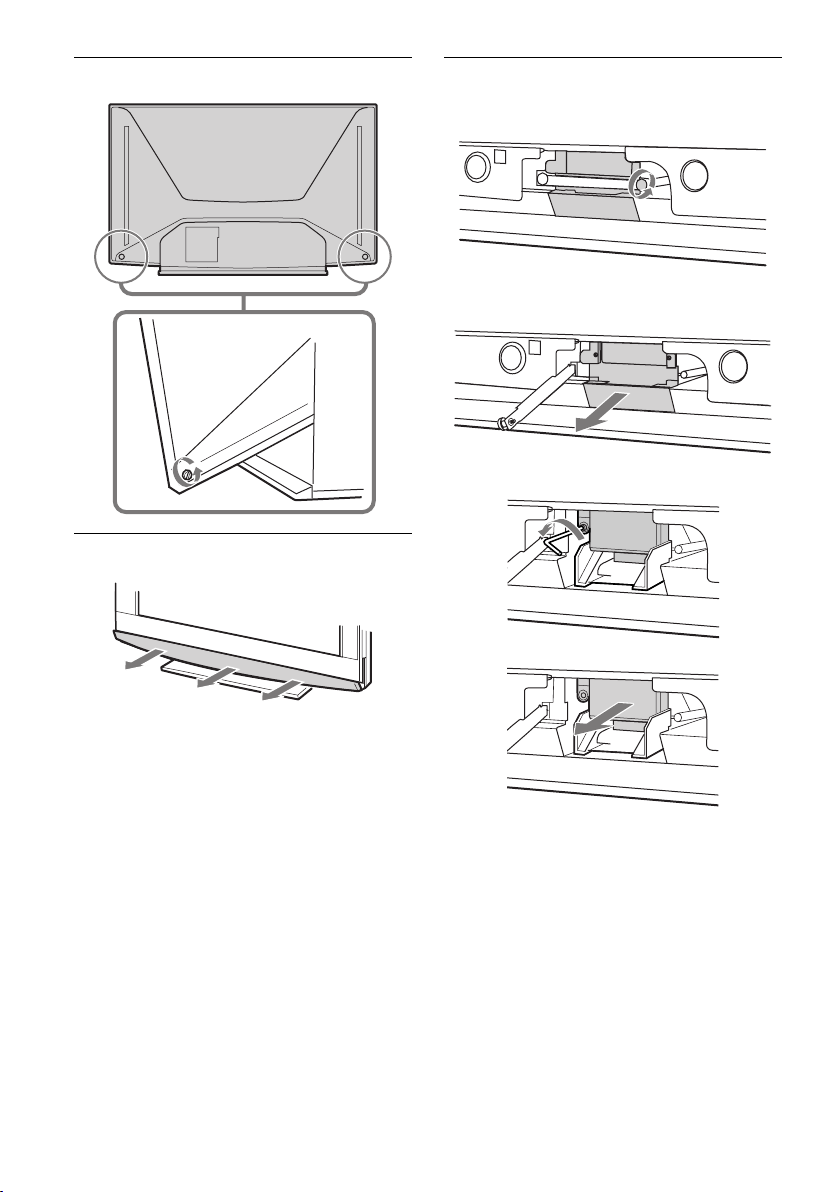
5 Pull out the lamp.
Loosen the screw on the lamp cover with a
coin or similar object. Remove the cover.
Loosen the two screws that hold the lamp,
then pull out the lamp.
6 Place the new lamp, with two screws.
Place back the lamp cover, then tighten the
screw.
18
CAUTION
• The lamp is very hot immediately after use. Never
touch the front glass of the lamp or the
surrounding parts.
• After it has cooled, place the used lamp into the
empty box of the replacement lamp. Never put the
used lamp into a plastic bag.
Notes
• If the screw of the lamp cover is slanted, the lamp
may not light up properly. In such a case, take out
the screw and reinsert it straight into the screw
hole, then tighten the screw completely.
• If the lamp cover is not reattached securely, the
self-diagnostic function may be triggered and the
1 indicator flashes three times (see page 92).
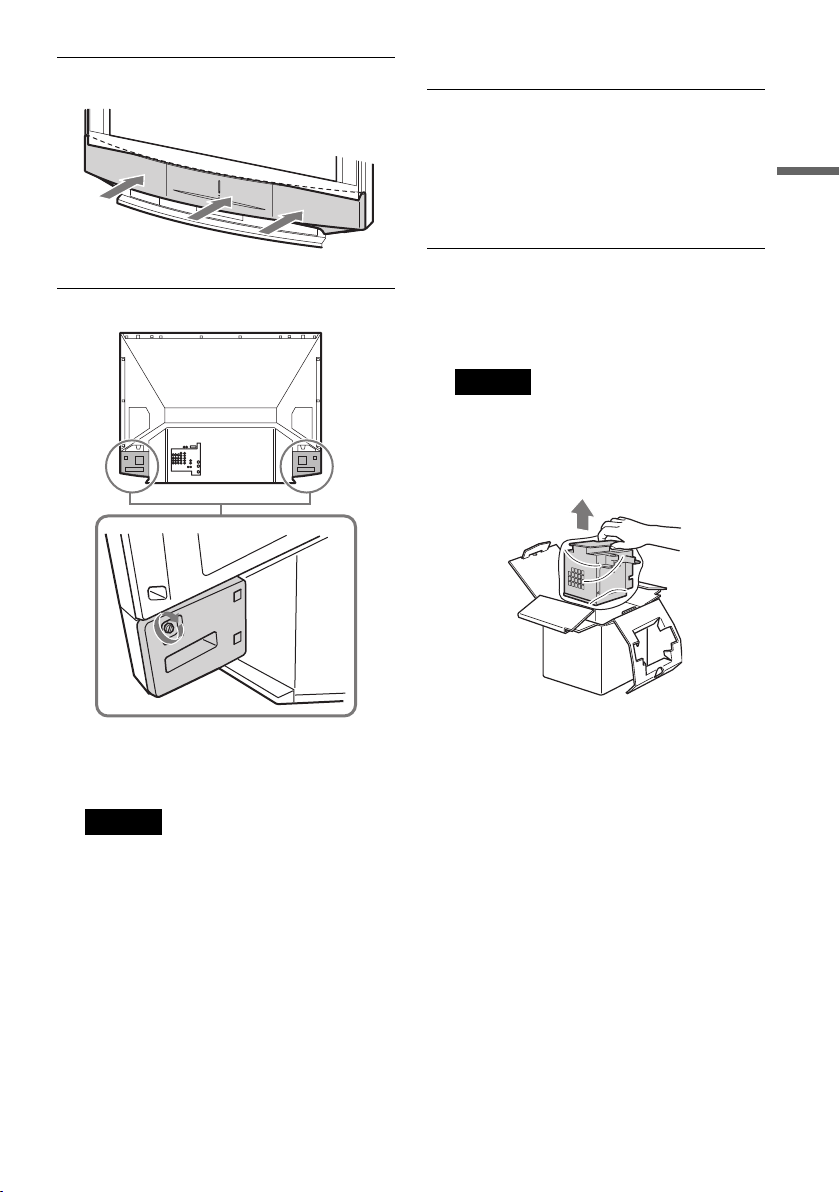
7 Reattach the front panel securely.
8 Tightly screw the side panel in its place.
For KF-WS60
1 Turn off the power on the main unit. Wait
several minutes, then unplug the power
cord.
(The cooling fan will continue to blow for
about two minutes after turning the power
off.)
2 Wait at least 30 minutes after unplugging
the power cord to allow the lamp to cool
down before replacing it.
Take the new lamp out of the box.
Notes
• Do not shake the lamp. Vibration can damage the
lamp or shorten its life.
• Avoid touching the front glass of a new lamp or
the glass of the lamp receptacle. This may reduce
picture quality or lamp life.
Using Your New Projection TV
This illustration is for the KF-WE50. The
screw locations for the KF-WE42 are
located inside those for the KF-WE50.
Notes
• Consult your Sony dealer for a Sony XL-2100 (for
KF-WE42/KF-WE50) replacement lamp.
• Take great care when replacing the lamp or
plugging in/unplugging the connecting cords.
Rough handling may cause the projection TV to
fall, damaging the TV, the TV stand and/or the
floor.
,continued
19
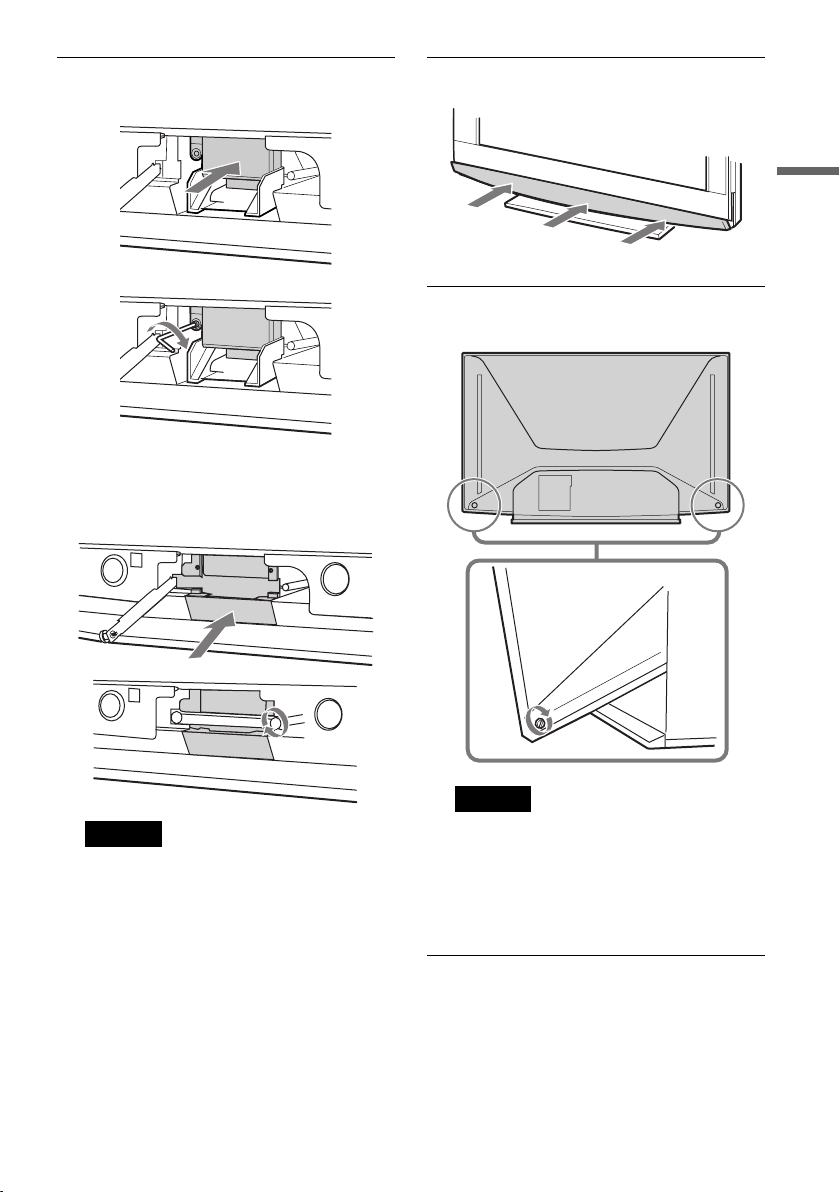
3 Loosen the screws on the rear side panel.
STD/DUO
PO
WER
PRO
4 Remove the front panel.
5 Pull out the lamp.
Loosen the right screw on the cover with a
coin or similar object.
Remove the screw from the lamp cover. Pull
the cover down towards you.
Unscrew the lamp and pull it out squarely.
20
CAUTION
• The lamp is very hot immediately after use. Never
touch the front glass of the lamp or the
surrounding parts.
• After it has cooled, place the used lamp into the
empty box of the replacement lamp. Never put the
used lamp into a plastic bag.
6 Install the new lamp in place, and then
S
T
D/
DU
O
P
O
WE
R
PR
O
tighten the screw.
Push the cover back on. Make sure that the
hole on the cover aligns with the hole on the
unit. Reattach the lamp cover by tightening
the screw.
7 Reattach the front panel securely.
Using Your New Projection TV
8 Tightly screw the rear side panel in its
place.
Notes
• If the screw of the lamp cover is slanted, the lamp
may not light up properly. In such a case, take out
the screw and reinsert it straight into the screw
hole, then tighten the screw completely.
• If the lamp cover is not reattached securely, the
self-diagnostic function may be triggered and the
1 indicator flashes three times (see page 92).
Notes
• Consult your Sony deale r for a Sony XL-2300 (for
KF-WS60) replacement lamp.
• Take great care when replacing the lamp or
plugging in/unplugging the connecting cords.
Rough handling may cause the projection TV to
fall, damaging the TV, the TV stand and/or the
floor.
21

Connecting optional components
You can connect optional audio/video components, such as a VCR, a DTV (Digital Television) receiver,
multi disc player, camcorder, video game, or stereo system. To watch and operate the connected
equipment, see pages 29 and 44.
Connecting a camcorder/video game equipment using t 4 (video input 4)
jacks
Front of projection TV
4
L( MONO)
R
To
Video game
equipment
Camcorder
To S video
output
or
S video cable (not supplied)
(S video input)
To t 4 (video input)
(yellow)
-L (MONO) (white)
-R (red)
Audio/Video cable (not supplied)
To video and audio outputs
: Signal flow
Note
You can also connect video equipment to the t 1, 2, or 3 (video input) jacks at the rear of your projection TV.
22
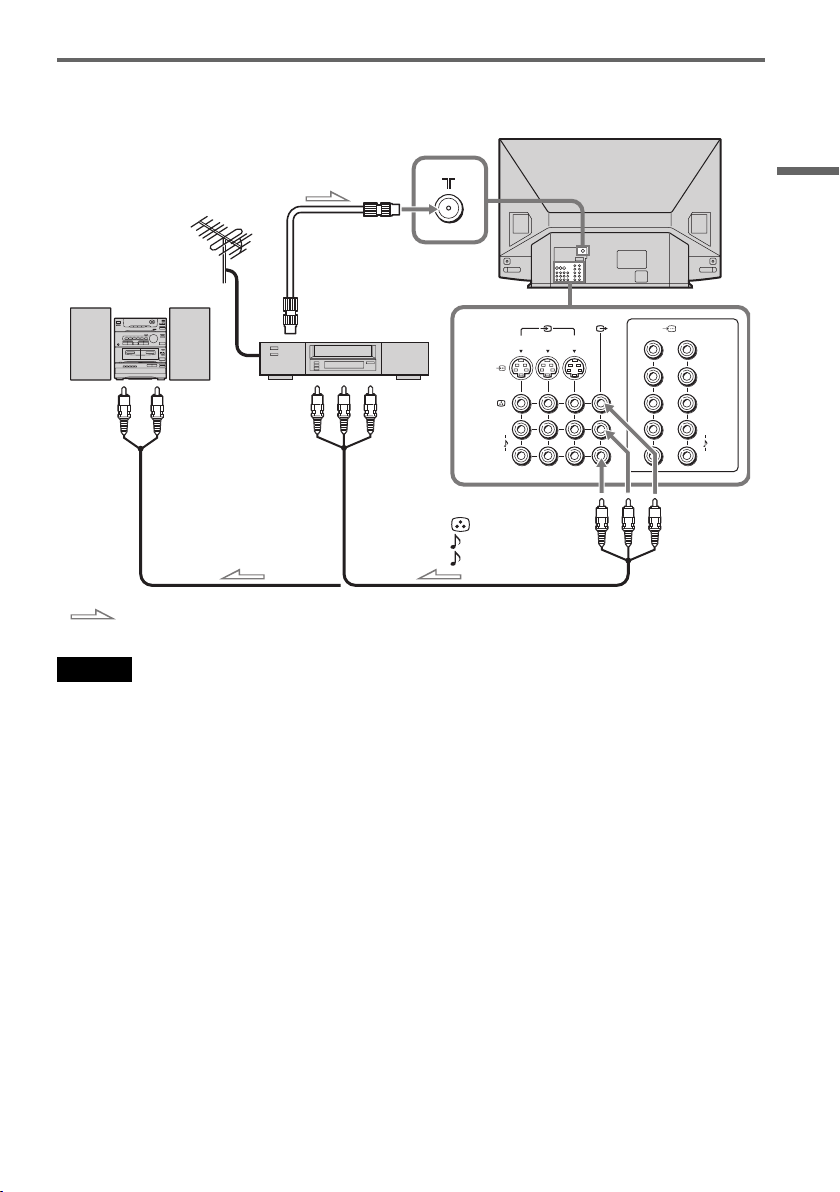
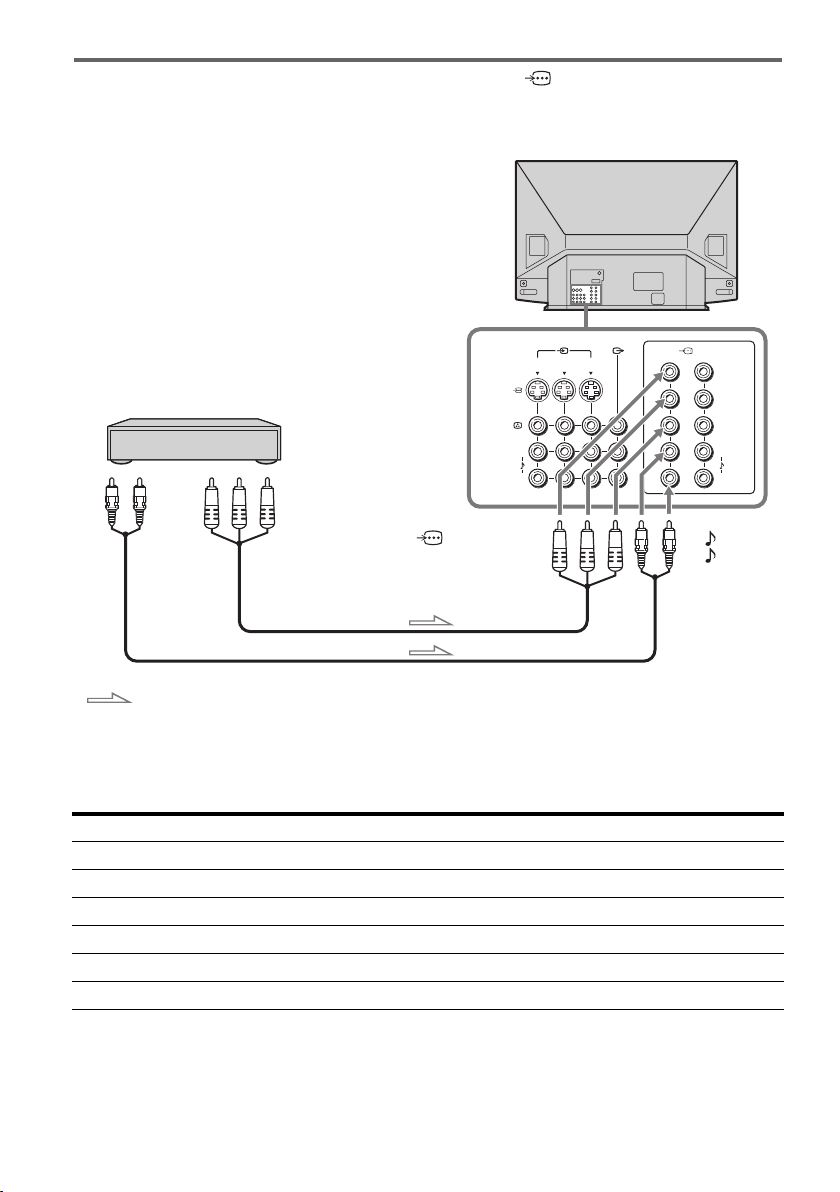
Connecting audio/video equipment using the T (monitor output) jacks
Rear of projection TV
To
8 (antenna)
Antenna cable
(not supplied)
Audio system
Using Your New Projection TV
To audio inputs
: Signal flow
or
VCR
To video
and audio
inputs
Audio/Video cable (not supplied)Audio cable (not supplied)
2 3
1
(MONO)
L
R
To T (monitor output)
(yellow)
-L (MONO) (white)
-R (red)
1
2
Y
P
B/CB
PR/CR
L
R
Note
If you select “HD/DVD 1” or “HD/DVD 2” on your projection TV screen (see page 29), sound will be heard but no
picture will be output from the T (monitor output) jacks. This does not indicate a malfunction.
,continued
23
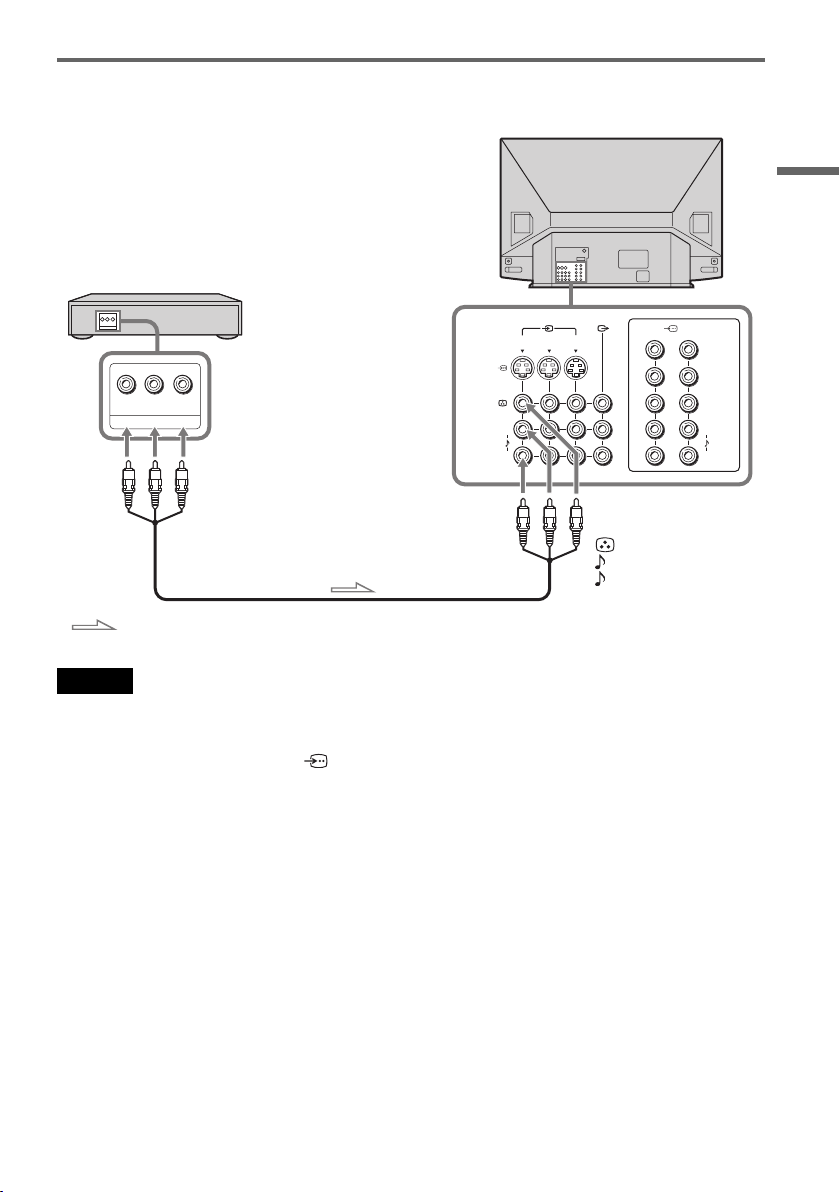
Connecting a DVD player to (component video input) 1 or 2 jacks
Rear of projection TV
R-AUDIO-L
LINE OUT
DVD player
VIDEO
To audio
outputs
Y
CB CR
COMPONENT VIDEO OUT
To component
video output
Component video
cable (not supplied)
(MONO)
To 1 or 2
(component video input)
2 3
1
L
R
Audio cable (not supplied)
: Signal flow
Notes
• Some DVD player terminals may be labeled differently:
Connect To (on the DVD player)
Y (green) Y
(blue) CB, B-Y or P
P
B/CB
PR/CR (red) CR, R-Y or P
B
R
1
2
Y
P
B/CB
PR/CR
L
R
To -L (white)
-R (red)
• If you select “HD/DVD 1” or “HD/DVD 2” on your projection TV screen (see page 29), sound will be heard but no
picture will be output from T (monitor output). This does not indicate a malfunction.
• When receiving a progressive signal through (component video input), Twin and Freeze features are not
available, and “DRC-MF” is not selectable.
24
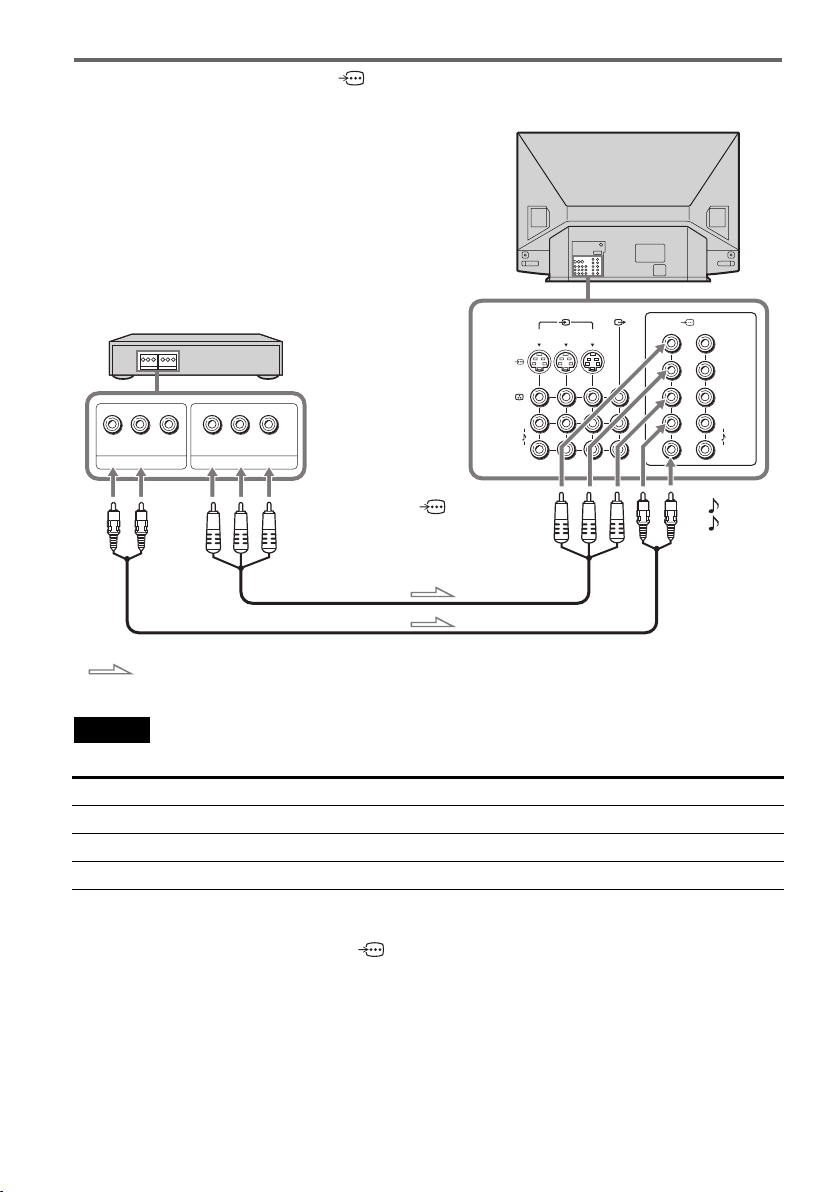
Connecting a DVD player to t (video input) 1, 2 or 3 jacks
Rear of projection TV
DVD player
2 3
1
R-AUDIO-L
VIDEO
LINE OUT
To video and audio
outputs
(MONO)
L
R
To t 1, 2, or 3
(video input)
1
2
Y
P
PR/CR
L
R
(yellow)
-L (MONO) (white)
-R (red)
Using Your New Projection TV
B/CB
: Signal flow
Audio/Video cable (not supplied)
Notes
• Since the high quality pictures on a DVD disc contain a lot of information, picture noise may appear. In this case,
display the “Picture” menu and select “Personal” for “Picture Mode”, then adjust the sharpness (“Sharpness”) (see
page 71).
• You can also connect a DVD player to (S video input) on the projection TV.
,continued
25
Connecting a DTV (digital television) receiver to 1 or 2 (component video
input) jacks
Rear of projection TV
1
2
Y
P
B/CB
PR/CR
L
R
To -L (white)
-R (red)
Digital TV receiver
To audio
outputs
(MONO)
To component
video output
To 1 or 2
(Component video input)
Component video cable (not supplied)
2 3
1
L
R
Audio cable (not supplied)
: Signal flow
z Tip
The projection TV accepts the following signal formats:
Total scanning line Effective scanning line fV (Hz)
1125i 1080i 50/60
750p 720p 50/60
625p 576p 50
625i 576i 50
525p 480p 60
525i 480i 60
26
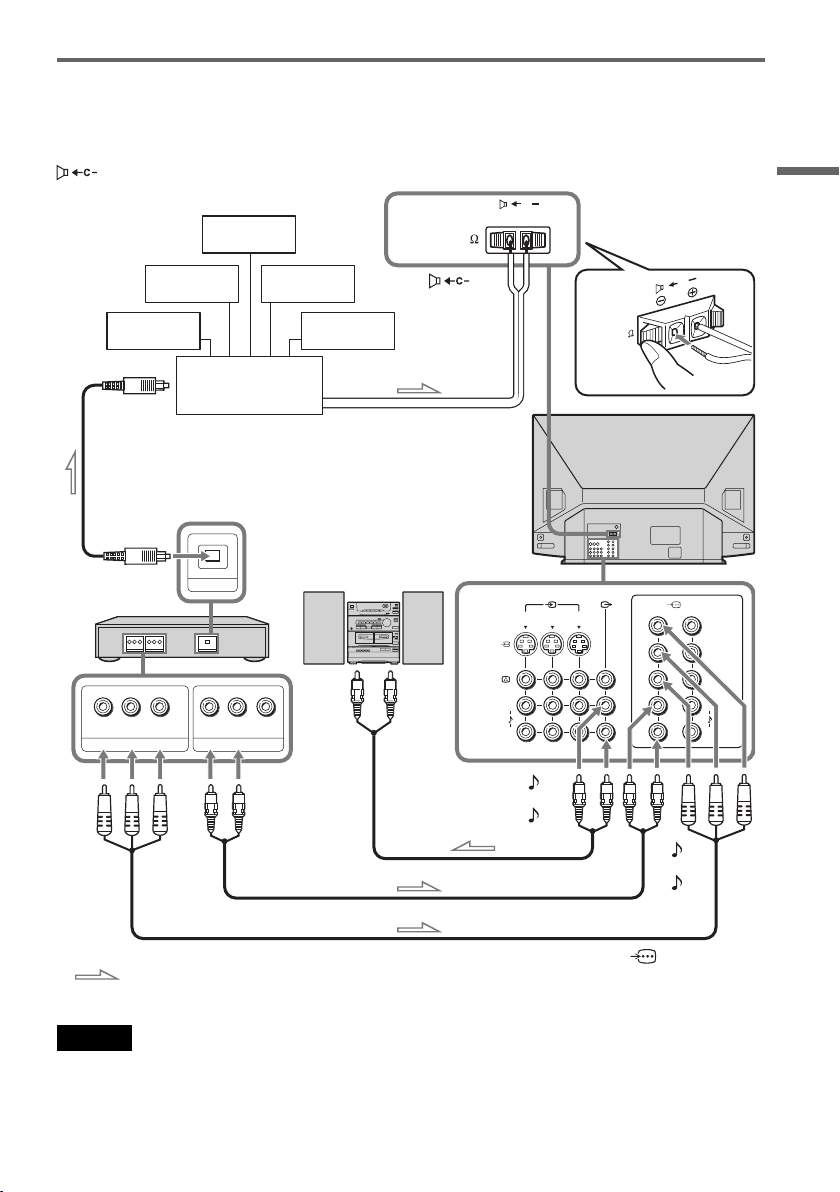
Connecting an amplifier
If you use an amplifier with a Dolby* surround decoder instead of the projection TV’s audio system, you
can use the projection TV’s speakers as the center speaker for your audio system.
Using the speaker cords supplied with the amplifier, connect the speaker terminals of the amplifier to the
(center speaker input) terminals on the projection TV.
C
Woofer
120W MAX 8
#3
Using Your New Projection TV
Rear
speaker (L)
Front
speaker (L)
To digital
audio input
Optical digital cable
(not supplied)
To digital audio
output
DVD player
Y
CB CR
COMPONENT VIDEO OUT
To
component
video output
Amplifier
R-AUDIO-L
LINE OUT
speaker (R)
VIDEO
To audio
output
Rear
Front
speaker (R)
Audio system
Audio cable (not supplied)
To
(center speaker
input)
1
To audio
inputs
(MONO)
L
R
To -L
(white)
-R
(red)
Audio cable (not supplied)
120W MAX 8
Rear of projection TV
2 3
C
1
To -L
(white)
-R
(red)
2
Y
P
B/CB
PR/CR
L
R
Component video cable (not supplied) To 1 or 2
: Signal flow
(Component video input)
Note
To use the projection TV’s speakers as the center speaker, press the CENTER SP button on the remote control (see
page 47).
* “Dolby” is a trademark of Dolby Laboratories.
27
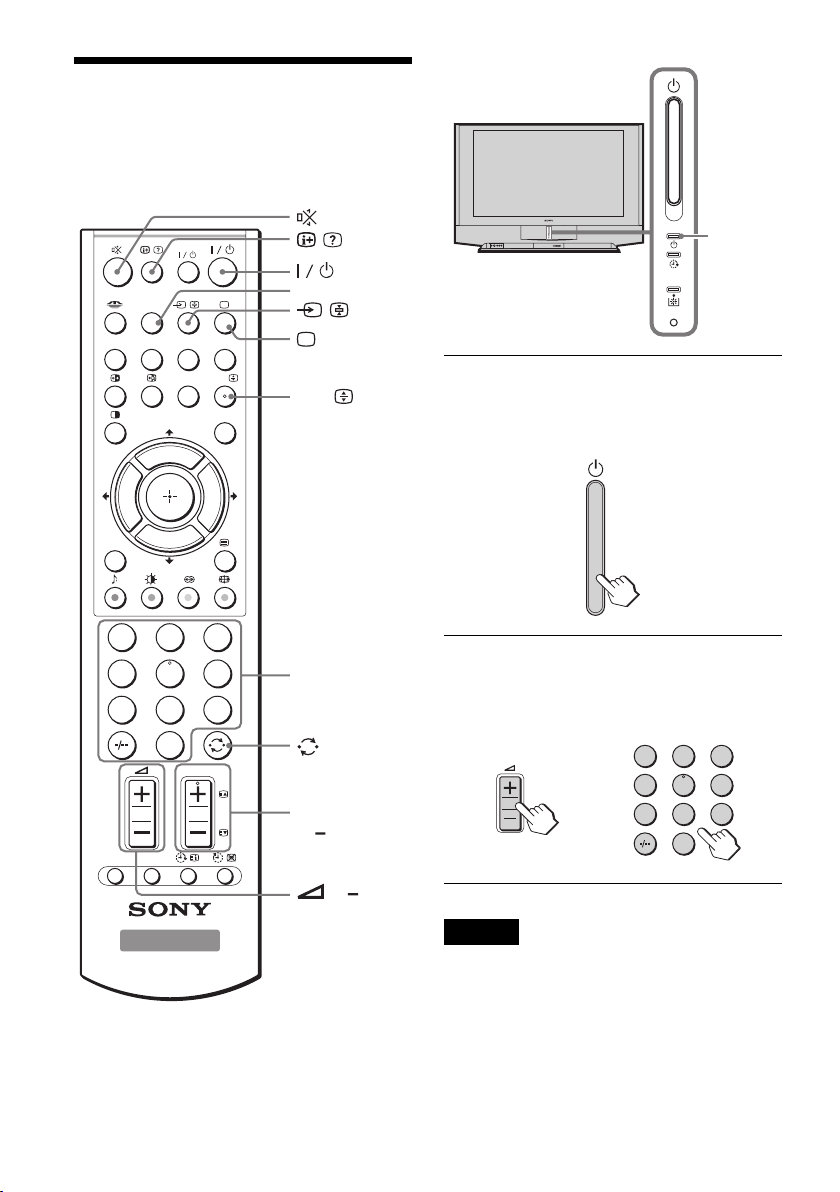
Watching the projection TV
This section explains various functions and
operations used while watching the TV. Most
operations can be done using the remote.
VIDEO
HD/DVD
CENTER
P
N
N
I
N
2
5
8
SP
V CENTER
R
O
G
X
x
G
O
R
P
WEGA
THEATRE
A/B
MENU
+
-
3
6
9
FREEZE
DRC-MF
I
W
T
.>
PROG
INDEX
T
W
1
4
7
0
PROG
OPTION RESET
HD/DVD
A/B
Number
buttons
PROG
+/
1
indicator
1 Press 1 to turn on the projection TV.
When the projection TV is in standby mode
1 indicator on the projection TV is lit
(the
red), press !/1 on the remote.
2 Press PROG +/– or the number buttons to
select the TV channel.
For double digit numbers, press -/--, then the
number (e.g., for 25, press -/--, then 2 and 5).
or
1
4
7
3
2
6
5
9
8
0
28
TV
+/
Note
When you turn on the projection TV, either the program
number or video mode is displayed for approximately 40
seconds.
To select a TV program quickly
p
1 Press and hold PROG +/–.
Only the program number will change
quickly.
Note
When you select a TV program quickly, the picture
may be disrupted.
This does not indicate a malfunction.
2 Release PROG +/– when the desired program
number appears.
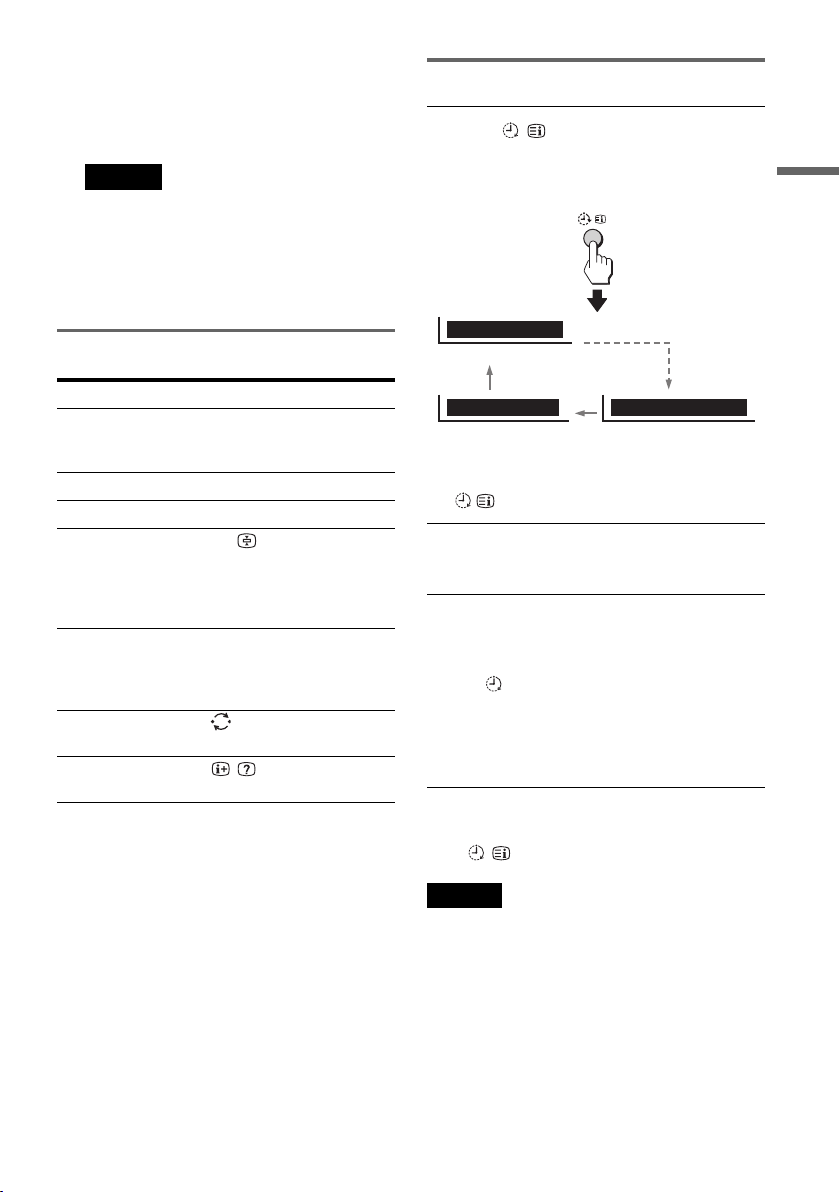
Additional tasks
Setting the Wake Up timer
1 Press until the desired period of
time appears.
The Wake Up timer starts immediately after
you have set it.
Wake Up Timer: 10M
After 10 minutes
Using Your New Projection TV
To Press
turn off temporarily @/1.
adjust the volume 2 +/–.
mute the sound %.
watch the video input
(VCR, camcorder,
etc.)
watch the component
input
(DVD, DTV
receiver)
jump back to the
previous channel
display the on-screen
information*
* Some picture/sound settings, and either the program
number or video mode are displayed. The on-screen
display for the picture/sound settings disappears after
about 3 seconds.
The
1 indicator on the
projection TV lights up red.
t to select “VIDEO
1”, “VIDEO 2”, “VIDEO 3”
or “VIDEO 4”.
To return to the TV screen,
press a.
HD/DVD to select “HD/
DVD 1” or “HD/DVD 2”.
To return to the TV screen,
press a.
.
.
Wake Up Timer: Off Wake Up Timer: 12H00M
No Wake U
Timer
z Tip
To change the period of time quickly, press and hold
button.
After 12 hours
2 Select the TV channel or video mode you
want to wake up to.
3 Press !/1, or set the Sleep timer if you
want the projection TV to turn off
automatically.
The indicator on the projection TV lights
up red when the TV goes into standby mode.
If any button is pressed within two hours after
the TV is turned on using the Wake Up timer,
this indicator will switch off.
To cancel the Wake Up timer
Press until “Wake Up Timer: Off” appears.
Note
If no buttons or controls are pressed for more than two
hours after the TV is turned on using the Wake Up timer,
the TV automatically goes into standby mode. To resume
watching the TV, press !/1 button on the remote.
,continued
29
 Loading...