

Sony KFO42WE610, KFO60WE610, Grand WEGA KF-42WE610, Grand WEGA KF-50WE610, Grand WEGA KF-60WE610 Operating Instructions Manual
i S ONY,
4-097-546-11 (1)
I=1 N IZ)
E
LCD Projection TV
HD-Monitor
Operating Instructions
KFo42WE610
KFo50WE610
KFo60WE610
Digital Reality Creation
MEMORY 5TICK
@ 2003 Sony Corporation
To prevent fire or shock hazard, do not
expose the LCD Projection TV to rain or
moisture.
RISK OF ELECTRIC SHOCK
DO NOT OPEN
ATTENTION
RISQUE DE CHOC ELECTRIQUE,
NE PAS OUVRIR
PRECAUCION
RIESGO DE CHOQUE ELECTRICO
NO ABRIR
CAUTION : TO REDUCE THE RISK OF ELECTRIC SHOCK,
DO NOT REMOVE COVER (OR BACK).
NO USER SERVICEABLE PARTS INSIDE.
REFER SERVICING TO QUALIFIED SERVICE PERSONNEL.
This symbol is intended to alert the user to the
presence of uninsulated "dangerous voltage"
within the product's enclosure that may be of
sufficient magnitude to constitute a risk of
electric shock to persons.
This symbol is intended to alert the user to the
presence of important operating and
maintenance (servicing) instructions in the
literature accompanying the appliance.
To prevent electric shock, do not use this polarized AC
plug with an extension cord, receptacle or other outlet
unless the blades can be fully inserted to prevent blade
exposure.
{ {
This television receiver provides display of television
closed captioning in accordance with §15.119 of the FCC
rules.
ot toCAiV y_:®,,_
This reminder is provided to call the CATV system
installer's attention to Article 820-40 of the NEC that
provides guidelines for proper grounding and, in
particular, specifies that the cable ground shall be
connected to the grounding system of the building, as
close to the point of cable entry as practical.
Use of this television receiver for other than private
viewing of programs broadcast on UHF, VHF,
transmitted by cable companies or satellite for the
use of the general public may require authorization
from the broadcaster/cable company and/or
program owner.
This equipment has been tested and found to comply with
the limits for a Class B digital device pursuant to Part 15
of the FCC Rules. These limits are designed to provide
reasonable protection against harmful interference in a
residential installation. This equipment generates, uses,
and can radiate radio frequency energy and, if not
installed and used in accordance with the instructions,
may cause harmful interference with radio
communications. However, there is no guarantee that
interference will not occur in a particular installation. If
this equipment does cause harmful interference to radio
or television reception, which can be determined by
turning the equipment off and on, the user is encouraged
to try to correct the interference by one or more of the
following measures:
Reorient or relocate the receiving antennas.
Increase the separation between the equipment and
receiver.
Connect the equipment into an outlet on a circuit
different from that to which the receiver is
connected.
Consult the dealer or an experienced radio/TV
technician for help.
You are cautioned that any changes or
modifications not expressly approved in
this manual could void your warranty and
your authority to operate this equipment.
This document is for the remote control RM-Y913.
MODEL: KF-42WE610, KF-50WE610, KF-60WE610
Please keep this notice with the instruction manual.
2
Operate the LCD Projection TV only on 120 V AC.
The plug is designed, for safety purposes, to fit into
the wall outlet only one way. If you are unable to
insert the plug fully into the outlet, contact your
dealer.
If any liquid or solid object should fall inside the
cabinet, unplug the LCD Projection TV immediately
and have it checked by qualified service personnel
before operating it further.
If you will not be using the LCD Projection TV for
several days, disconnect the power by pulling the plug
itself. Never pull on the cord.
For details concerning safety precautions, see
"Important Safeguards" on page 4.
To prevent internal heat buildup, do not block the
ventilation openings.
Do not install the LCD Projection TV in a hot or
humid place, or in a place subject to excessive dust or
mechanical vibration.
Avoid operating the LCD Projection TV at
temperature below 41 °F (5°C).
If the LCD Projection TV is transported directly from
a cold to a warm location, or if the room temperature
changes suddenly, the picture may be blurred or show
poor color. In this case, please wait a few hours to let
the moisture evaporate before turning on the LCD
Projection TV.
To obtain the best picture, do not expose the screen to
direct illumination or direct sunlight. It is
recommended to use spot lighting directed down from
the ceiling or to cover the windows that face the
screen with opaque drapery. It is desirable to install
the LCD Projection TV in a room where the floor and
walls are not of a reflective material.
As an ENERGY STAR ® Partner,
Sony Corporation has determined
that this product meets the
ENERGY STAR ® guidelines for
energy efficiency.
ENERGY STAR _ is a U.S. registered mark.
TruSurround, SRS and the ( • )¢_symbol are trademarks
of SRS Labs, Inc.
TruSurround technology is incorporated under license
from SRS Labs, Inc.
BBE and BBE Symbol are trademarks of BBE Sound, Inc.
and are licensed by BBE Sound, Inc. under U.S. Patent No.
4,638,258 and 4,482,866.
Pour prdvenir les chocs 61ectriques, ne pas utiliser cette
fiche polaris6e avec un prolongateur, une prise de courant
ou une autre sortie de courant, sauf si les lames peuvent tre
inser6es fi fond sans en laisser aucune partie fi decouvert.
The model and serial numbers are located at the rear of the
LCD Projection TV, below the Sony logo, on the sticker,
and also on the TV box (white label). Record these
numbers in the spaces provided below. Refer to them
whenever you call upon your Sony dealer regarding this
product.
Model No.
Serial No.
3

1) Readthese instructions.
2) Keep these instructions.
3) Heed all warnings.
4) Following all instructions.
5) Do not use this apparatus near water.
6) Clean only with dry cloth.
7) Do not block any ventilation openings. Install in
accordance with the manufacturer's instructions.
8)
9)
Do not install near any heat sources such as radiators,
heat registers, stoves, or other apparatus (including
amplifiers) that produce heat.
Do not defeat the safety purpose of the polarized or
grounding-type plug. A polarized plug has two
blades with one wider than the other. A grounding
type plug has two blades and a third grounding prong.
The wide blade or the third prong are provided for
your safety. If the provided plug does not fit into
your outlet, consult an electrician for replacement of
the obsolete outlet.
10) Protect the power cord from being walked on or
pinched particularly at plugs, convenience
receptacles, and the point where they exit from the
apparatus.
11) Only use attachments/accessories specified by the
manufacturer.
12) Use only with the cart stand, tripod, bracket, or table
specified by the manufacturer, or sold with the
apparatus. When a cart is used, use caution when
moving the cart/apparatus combination to avoid
injury from tip-over.
13) Unplug this apparatus during lightning storms or
when unused for long periods of time.
14) Refer all servicing to qualified service personnel.
Servicing is required when the apparatus has been
damaged in any way, such as power-supply cord or
plug is damaged, liquid has been spilled or objects
have fallen into the apparatus, the apparatus has been
exposed to rain or moisture, does not operate
normally, or has been dropped.
15) Apparatus shall not be exposed to dripping or
splashing and no objects filled with liquids, such as
vases, shall be placed on the apparatus.
For your protection, please read these instructions
completely, and keep this manual for future reference.
Carefully observe and comply with all warnings, cautions
and instructions placed on the set or described in the
operating instructions or service manual.
To guard against injury, the following basic safety
precautions should be observed in the installation, use
and servicing of the set.
OW<
This set should be operated only from
the type of power source indicated on
the serial/model plate. If you are not sure
of the type of electrical power supplied
to your home, consult your dealer or
local power company. For those sets designed to operate
from battery power, refer to the operating instructions.
This set is equipped with a polarized AC power cord plug
(a plug having one blade wider than the other), or with a
three-wire grounding type plug (a plug having a third pin
for grounding). Follow the instructions below:
::? ,:
This plug will fit into the power outlet
only one way. This is a safety feature. If _-'---__._
you are unable to insert the plug fully
into the outlet, try reversing the plug. If
the plug still fails to fit, contact your electrician to have a
suitable outlet installed. Do not defeat the safety purpose
of the polarized plug by forcing it in.
This plug will only fit into a grounding-
type power outlet This is a safety _i<
feature. If you are unable to insert the
plug into the outlet, contact your
electrician to have a suitable outlet
installed. Do not defeat the safety purpose of the
grounding plug.
4

Do not overload wall outlets, extension
cords or convenience receptacles
beyond their capacity, since this can
result in fire or electric shock.
Always turn the set off when it is not
being used. When the set is left
unattended and unused for long
periods of time, unplug it from the
wall outlet as a precaution against the
possibility of an internal malfunction that could create a
fire hazard.
Ifa snapping or popping sound from a TV q
set is continuous or frequent while the TV ,,_ po_..
is operating, unplug the TV and consult ' ' ' '
your dealer or service technician. It is _'1_/_
normal for some TV sets to make
occasional snapping or popping sounds,
particularly when being turned on or off.
Never push objects of any kind into the
set through the cabinet slots as they may
touch dangerous voltage points or short
out parts that could result in a fire or
electric shock. Never spill liquid of any
kind on the set.
Do not use attachments not
recommended by the manufacturer, as
they may cause hazards.
Clean the cabinet of the LCD Projection y-_
TV with a dry soft cloth. To remove dust _'_'_
from the screen, wipe it gently with a soft
cloth. Stubborn stains may be removed
with a cloth slightly dampened with
solution of mild soap and warm water. Never use strong
solvents such as thinner or benzine for cleaning.
If the picture becomes dark after using the LCD
Projection TV for a long period of time, it may be
necessary to clean the inside of the LCD Projection TV.
Consult qualified service personnel.
©
The screen surface has a special coating to reduce a
picture displayed by reflecting. If you clean the screen
surface in the wrong way, the screen may be damaged. To
clean the screen, do as follows:
Clean the screen with a soft cloth, such as the
supplied cleaning cloth or a glass cleaning cloth.
To remove hard contamination, use the supplied
cleaning cloth or a glass cleaning cloth moistened
with a solution of mild detergent and water.
Do not use any type of abrasive pad, alkaline
cleaner, acid cleaner, scouring powder, chemical
cloth, or solvent such as alcohol, benzene or thinner,
as these may scratch the screen's coating.
Wa_e_ __i _ois_u_e
Do not use power-line operated sets
near water -- for example, near a
bathtub, washbowl, kitchen sink, or
laundry tub, in a wet basement, or
near a swimming pool, etc.
Do not place the set on an unstable
cart, stand, table or shelf. The set
may fall, causing serious injury to a
child or an adult and serious damage
to the set. Use only a cart or stand
recommended by the manufacturer
for the specific model of LCD
Projection TV. An appliance and cart
combination should be moved with
care. Quick stops, excessive force,
and uneven surfaces may cause the appliance and cart
combination to overturn.
®
The slots and openings in the cabinet and in the back or
bottom are provided for necessary ventilation. To ensure
reliable operation of the set, and to protect it from
overheating, these slots and openings must never be
blocked or covered.
Never cover the slots and openings
.... ,r_
with a cloth or other materials. [?'=,;+_..j_
5
Never block the slots and openings
by placing the set on a bed, sofa, rug
or other similar surface.
Never place the set in a confined
space, such as a bookcase or built-in
cabinet, unless proper ventilation is
provided.
Do not place the set near or over a
radiator or heat register, or where it is
exposed to direct sunlight.
Do not allow anything to rest on or roll
over the power cord, and do not place the
set where the power cord is subject to
wear or abuse.
If an outdoor antenna is installed, follow the precautions
below. An outdoor antenna system should not be located
in the vicinity of overhead power lines or other electric
light or power circuits, or where it can come in contact
with such power lines or circuits.
WHEN INSTALLING AN OUTDOOR ANTENNA
SYSTEM, EXTREME CARE SHOULD BE TAKEN TO
KEEP FROM CONTACTING SUCH POWER LINES
OR CIRCUITS AS CONTACT WITH THEM IS
ALMOST INVARIABLY FATAL.
Be sure the antenna system is grounded so as to provide
some protection against voltage surges and built-up static
charges.
Section 810 of the National Electrical Code (NEC) in
USA and Section 54 of the Canadian Electrical Code in
Canada provides information with respect to proper
grounding of the mast and supporting structure,
grounding of the lead-in wire to an antenna discharge
unit, size of grounding conductors, location of antenna
discharge unit, connection to grounding electrodes, and
requirements for the grounding electrode.
6
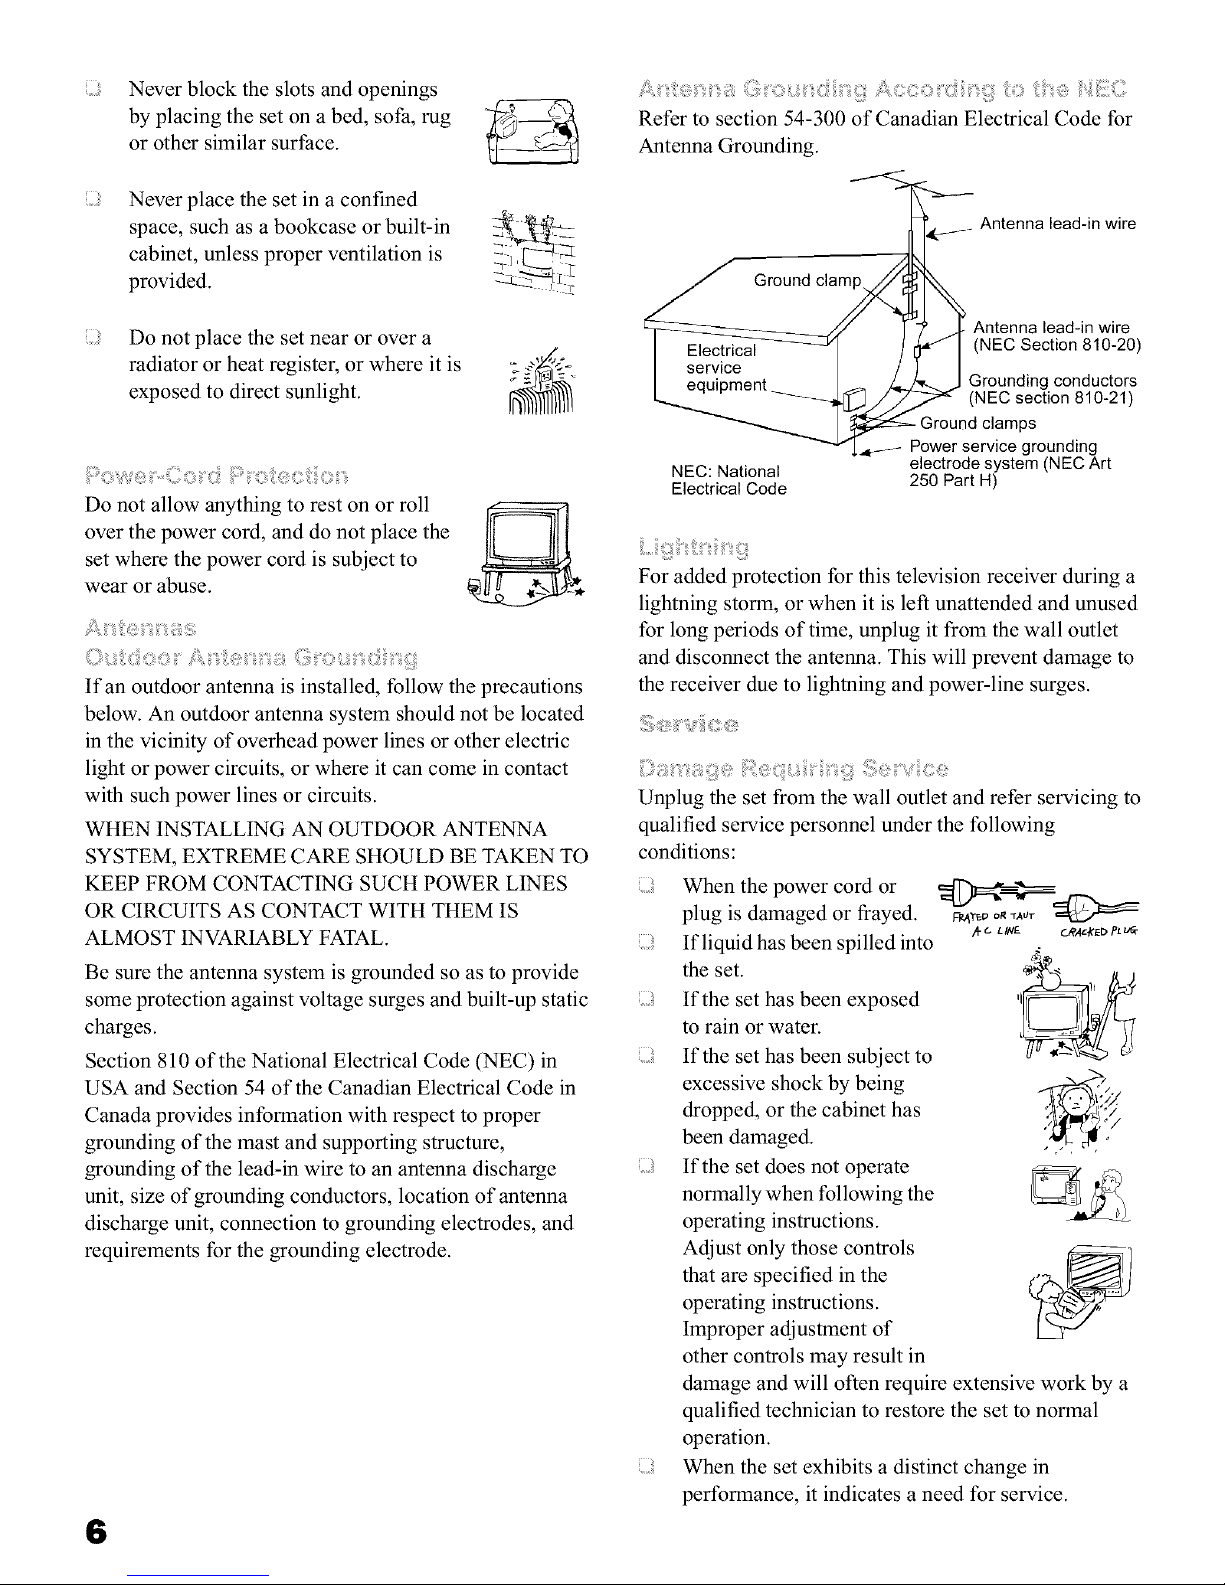
Refer to section 54-300 of Canadian Electrical Code for
Antenna Grounding.
---%-<0___
NEC: National
Electrical Code
' Antenna lead-in wire
_ Antenna lead-in wire
(NEC Section 810-20)
Grounding conductors
(NEC section 810-21)
Ground clamps
Power service grounding
electrode system (NEC Art
250 Part H)
For added protection for this television receiver during a
lightning storm, or when it is left unattended and unused
for long periods of time, unplug it from the wall outlet
and disconnect the antenna. This will prevent damage to
the receiver due to lightning and power-line surges.
_@':V: :7@
Unplug the set from the wall outlet and refer servicing to
qualified service personnel under the following
conditions:
When the power cord or
plug is damaged or frayed.
If liquid has been spilled into
the set.
If the set has been exposed
to rain or water.
If the set has been subject to
excessive shock by being
dropped, or the cabinet has
been damaged.
If the set does not operate
normally when following the
operating instructions.
Adjust only those controls
that arc specified in the
operating instructions.
Improper adjustment of
other controls may result in
Fp,4"C_po_ _Atlr
_¢ C. LIN_- CRA_#ED _L _r
It ,
i
damage and will often require extensive work by a
qualified technician to restore the set to normal
operation.
When the set exhibits a distinct change in
performance, it indicates a need for service.
Donotattempttoservicethesetbyyourself
sinceopeningthecabinetmayexposeyouto
dangerousvoltageorotherhazards.Referall
servicingtoqualifiedservicepersonnel.
Whenreplacementpartsarerequired,besuretheservice
techniciancertifiesinwritingthathehasused
replacementpartsspecifiedbythemanufacturerthathave
thesamecharacteristicsastheoriginalparts.
Unauthorizedsubstitutionsmayresultinfire,electric
shockorotherhazards.
Uponcompletionofanyserviceorrepairs
totheset,asktheservicetechnicianto
performroutinesafetychecks(asspecified
bythemanufacturer)todeterminethatthe
setisinsafeoperatingcondition,andtoso
certify.Whenthesetreachestheendofits
usefullife,improperdisposalcouldresult
inapicturetubeimplosion.Askaqualified
servicetechniciantodisposeoftheset.
WhenyouplacetheLCDProjection
TVinposition,becarefulnotto
dropitonyourfootorfingers.
Watchyourfootingwhileinstalling
theLCDProjectionTV.
IfyoucarrytheLCDProjectionTVina ,__"
mannerotherthanthespecifiedmanner
andwithoutthespecifiednumberof
persons,itmaydropandaseriousinjury
maybecaused.Besuretofollowtheinstructions
mentionedbelow.
CarrytheLCDProjectionTVwiththespecified
numberofpersons(seepage18).
DonotcarrytheLCDProjectionTVholdingthe
speakergrill.
HoldtheLCDProjectionTVtightlywhencarrying
it.
?
AlthoughtheLCDprojectionTVismadewithhigh-
precisiontechnology,blackdotsmayappearorbright
pointsoflight(red,blue,orgreen)mayappearconstantly
ontheLCDscreen.Thisisastructuralpropertyofthe
LCDpanelandisnotamalfunction.
Ifdirectsunlightorotherstrongilluminationshines
onthescreen,partofthescreenappearswhitedueto
reflectionsfrombehindthescreen.Thisisa
structuralpropertyoftheLCDProjectionTV.
Donotexposethescreentodirectilluminationor
directsunlight.
Thepicturequalitymaybeaffectedbyyourviewing
position.IfyouviewtheTVclosetoyou,youmay
sufferfromeyefatigue.
Forthebestpicturequality,installyourLCD
projectionTVaccordingtotheoperating
instructions.
Sitatlest1.8m(approx.5.9ft.) for KF-42WE610,
2.0m (approx. 6.6ft.) for KF-50WE610 or 2.2m
(approx. 7.2ft.) for KF-60WE610 away from your
LCD projection TV, and within 60° of the vertical
viewing area, and 130° of the horizontal viewing
area.
When installing your LCD Projection TV against a
wall, keep it at least 10 cm (4 inches) from the wall.
Avoid installing the LCD projection TV close to
high temperature sources such as a heater.
:: _ ::>
Your LCD projection TV uses a projection lamp as
its light source. When the projection lamp wears out
after using the LCD projection TV for a long period
of time, the screen image becomes dark, or no image
will appear on the display. If the lamp replacement
indicator of the front panel blinks in red, replace the
lamp with a new one (not supplied). In some cases,
the lamp bursts inside the lamp unit noisily, but the
lamp unit is securely designed so that the pieces of
broken glass remain inside the lamp unit. (See
"Replacing the Lamp" on page 13.)
<
This LCD projection TV uses a cooling fan to
prevent the internal temperature from heating up.
You might hear the noise from the cooling fan,
depending on the place you install the LCD
projection TV.
When carrying the LCD projection TV, disconnect
the connections.
The remote control detection is at the upper right
side. For remote control operations, point it to that
position.
7
_i_i_i_i_i_i_i_i_i_i_i_i_i_i_i_i_i_i_i_i_i_i_i_i_i_i_i_i_i_i_i_i_i_i_i_i_i_i_i_i_i_i_i_i_i_i_i_i_i_i_i_i_i_i_i_i_i_i_i_i_i_i_i_i_i_i_i_i_i_i_i_i_i_i_i_i_i_i_i_i_i_i_i_i_i_i_i_i_i_i_i_i_i_i_i_i_i_i_i_i_i_i_i_i_i_i_i_i_i_i_i_i_i_i_i_i_i_i_i_i_i_i_i_i_i_i_i_i_i_i_i_i_i_i_i_i_i_i_i_i_i_i_i_i_i_i_i_i_i_i_i_i_i_i_i_i_i_i_i_i_i_i_i_i_i_i_i_i_i_i_i_i_i_i_i_i_i_i_i_i_i_i_i_i_i_i_i_i_i_i_i_i_i_i_i_i_i_i_i_i_i_i_i_i_i_i_i_i_i_i_i_i_i_i_i_i_i_i_i_i_i_i_i_i_i_i_i_i_i_i_i_i_i_i_i_i_i_i_i_i_i_i_i_i_i_i_i_i_i_i_i_i_i_i_i_i_i_i_i_i_i_i_i_i_i_i_i_i_i_i_i_i_i_i_i_i_i_i_i_i_i_i_i_i_i_i_i_i_i_i_i_i_i_i_i_i_i_i_i0
()O J?
Presenting the Sony LCD Projection TV ................. 9
Using This Manual ................................................. 10
Enjoying Your LCD Projection TV ....................... 11
Replacing the Lamp ............................................... 13
; fi:!: : ::i )/)
Contents ................................................................. 17
Inserting Batteries into the Remote Control .......... 17
Carrying Your LCD Projection TV ....................... 18
To Prevent the LCD Projection TV
rom Falling Down .......................................... 19
When Installing Your LCD Projection TV
Against a Wall ............................................... 19
Recommended Viewing Area ................................ 20
LCD Projection TV Connectors ..............................
Connector Types .................................................... 24
Basic Connections
(Connecting Cable TV or Antenna) ............... 25
Connecting a VCR and Cable ................................ 29
Connecting a VCR and Cable Box ........................ 30
Connecting Two VCRs for Tape Editing .............. 32
Connecting a Satellite Receiver ............................. 33
Connecting a Satellite Receiver with a VCR ......... 34
Connecting an Audio Receiver .............................. 36
Connecting a DVD Player with Component
Video Connectors .......................................... 37
Connecting a DVD Player with A/V Connectors ..38
Connecting a Digital TV Receiver with component
connectors ...................................................... 39
Connecting a Digital TV Receiver with DVI-HDTV
connector ........................................................ 40
Connecting a Camcorder ....................................... 41
Using the CONTROL S Feature ............................ 42
Setting Up the LCD projection TV Automatically 43
Using the Remote Control ..................................... 44
Watching the TV .................................................... 46
Watching Digital TV ............................................. 48
Using Favorite Channels ........................................ 49
Using Twin View TM ............................................... 50
Using the Freeze Function ..................................... 53
Using Wide Screen Mode ...................................... 54
About Memory Stick ............................................. 55
Inserting and Removing a Memory Stick .............. 57
Displaying the Memory Stick Home
(Memory Stick Index) .................................... 58
Using the Memory Stick Home ............................. 60
Viewing Still Images ............................................. 62
Playing Movies ...................................................... 63
Memory Stick Home Menu Options ...................... 65
Overview ................................................................ 68
Using the Video Menu ........................................... 69
Using the Audio Menu ........................................... 72
Using the Screen Menu .......................................... 74
Using the Channel Menu ....................................... 76
Using the Parent Menu .......................................... 78
Using the Setup Menu ........................................... 82
O O i1, _? 7o1
Programming the Remote Control ......................... 86
Operating Other Components with Your LCD
Projection TV Remote Control ...................... 88
Notes on Using Memory Stick,
Memory Stick PRO Media ............................ 90
Notes on Using Memory Stick Duo ....................... 91
Contacting Sony ..................................................... 92
Troubleshooting ..................................................... 92
Flashing Indicators on the Front of the Monitor....98
Specifications ......................................................... 99
8
i_:_y_i!i;!_i_!ii_i_j_ji!_gy_:Ail;,,_i__!iiiii:O_i,':_l/LC,_II;I_i_:_Y_i:_j_!ii_iiii_:_U,il;_i,':_?%
Thank you for purchasing the Sony LCD Projection TV.
This manual is for models KF-42WE610, KF-50WE610 and KF-60WE610.
Features
Some of the features that you will enjoy with your new LCD projection TV
include:
HD-Monitor: Enables to display the 1080i, 720p, 480p and 480i digital
TV format signals.
By using the HD/DVD IN jacks, you can connect a DTV (digital
television) receiver to view DTV programs.
TM
DRC (Digital Reality Creation) Multifunction Vl: Unlike
conventional line doublers, the DRC feature converts frames reproduced
every 1/60th of a second in real time, minimizing the blur or ghost of the
motion images (for 480i signals only).
TM
CineMotion : Using the reverse 3-2 pull down technology, the
CineMotion feature allows you to obtain a smooth picture movement
when playing back movies or other video sources on film.
TM
Twin View : Using Multi-Image Driver (MID-X), Twin View allows
you to watch two programs side by side with the ability to zoom in on
one picture and listen to the program in the selected window. You can
watch pictures from two different sources (1080i, 720p, 480p or 480i)
simultaneously.
Memory Stick ® Picture Viewer: Allows you to view on your LCD
Projection TV screen digital images that are stored on Memory Stick
media.
Parental Control: V-Chip technology allows parents to block
unsuitable programming for younger viewers.
Digital Visual Interface (DVI-HDTV): Can accommodate a copy-
protected digital connection (HDCP*) to other devices (such as digital
set-top boxes) that have compatible interfaces. The DVI-HDTV input
terminal is compliant with the EIA-861 standard and is not intended for
use with personal computers.
i:;!!!i
.........ii
* High-bandwidth Digital Content Protection
(Continued)
9
Component Video Inputs: Offers the best video quality for DVD
(480p, 480i) and Digital Set-top box (1080i, 720p, 480p, 480i)
connections.
S-VIDEO Inputs: Provides a high-quality image for connected
equipment.
Favorite Channel Preview: Preview up to six-teen favorite channels
without leaving the current channel.
Wide Screen Mode: Allows you to watch 4:3 normal broadcasts in
wide screen mode (16:9 aspect ratio).
Auto Wide: Allows you to select the wide screen mode automatically.
We recommend that you carefully review the contents of the following three
sections in the order shown to ensure that you fully understand the operation
of your new LCD projection TV.
Installing and Connecting the LCD Projection TV
This section guides you through your initial setup. It shows you how to
install your LCD projection TV, to connect your new components and to
connect the antenna and cable.
Using the Features
This section shows you how to begin using your new LCD projection
TV. It also shows you how to use your remote control functions.
Using the menus
This section teaches you how to access on-screen menus and adjust your
LCD projection TV settings.
Instructions in this manual are written for the remote control. Similar
controls are also found on the LCD projection TV console.
10
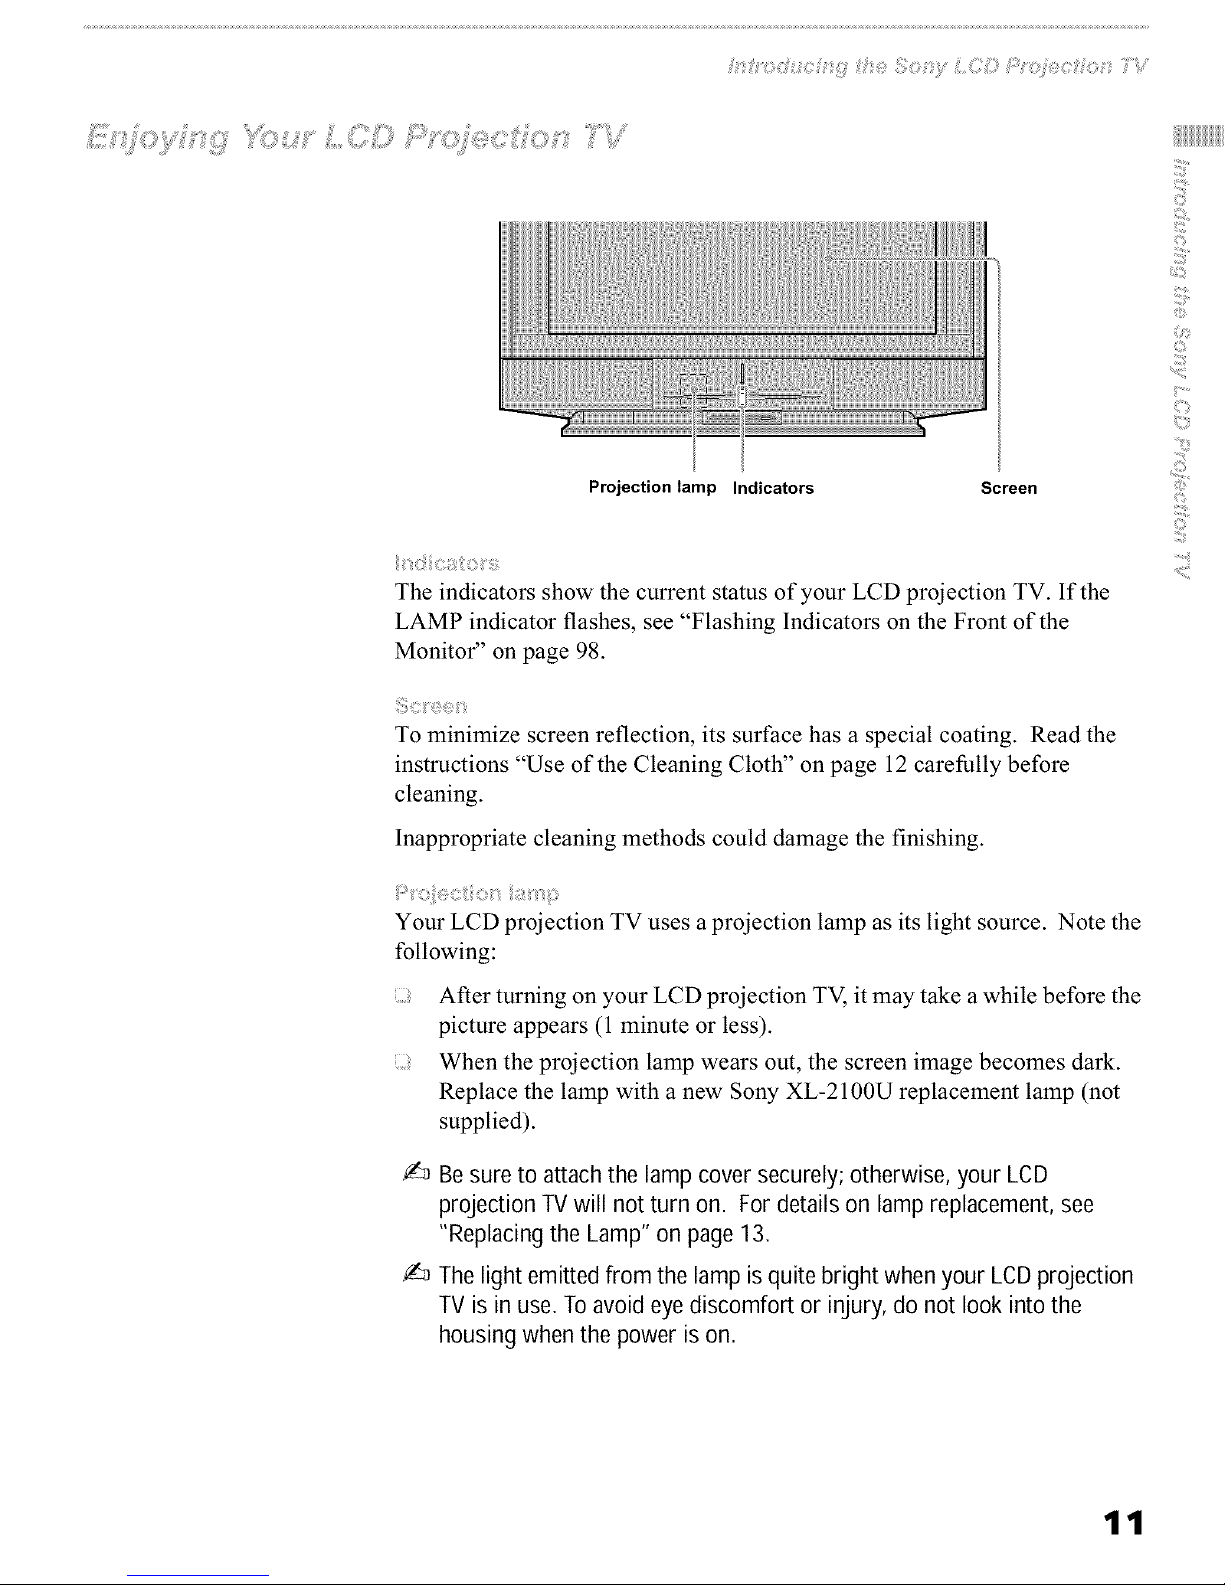
Projection lamp Indicators Screen
The indicators show the current status of your LCD projection TV. If the
LAMP indicator flashes, see "Flashing Indicators on the Front of the
Monitor" on page 98.
To minimize screen reflection, its surface has a special coating. Read the
instructions "Use of the Cleaning Cloth" on page 12 carefully before
cleaning.
Inappropriate cleaning methods could damage the finishing.
Your LCD projection TV uses a projection lamp as its light source. Note the
following:
: After turning on your LCD projection TV, it may take a while before the
picture appears (1 minute or less).
: When the projection lamp wears out, the screen image becomes dark.
Replace the lamp with a new Sony XL-2100U replacement lamp (not
supplied).
Besureto attachthe lamp coversecurely;otherwise, your LCD
projection TVwill not turn on. For detailson lampreplacement,see
"Replacingthe Lamp" on page 13.
Thelight emitted from the lamp is quite bright whenyour LCDprojection
TV is inuse. Toavoideyediscomfort or injury, do not look into the
housing whenthe power is on.
.........ii
11
Notes on the LCD
Projection TV
_b _}_%_ C/_ ¸__:}iC_eS
: Be sure not to allow sunlight or light from a lamp to shine directly onto
the screen.
: The screen surface is easily scratched. Do not rub, touch, or tap it with a
sharp or abrasive object (see "Use of the Cleaning Cloth" below).
?
: If your LCD projection TV is transported directly from a cold to a warm
location, is placed in a humid room, or if the room temperature changes
suddenly, the picture may be blurred or show poor color. This is
because moisture has condensed on the lenses inside. If this happens,
leave the power on and let the moisture evaporate before using your
LCD projection TV.
Wh: a
: Turn off the main power on the front of your LCD projection TV before
going to sleep or going out. Disconnect the AC plug if idle for more
than 7 days.
: Be sure to turn off the power switch on the main unit or on the remote
control. After turning off the power, the fan will continue to blow for
about two minutes. Be sure to wait for several minutes after turning the
power off when unplugging from the outlet or switching the breaker off.
: };?
: Disconnect the connections.
Use of the Cleaning
Cloth
To remove dust from the front of the screen, wipe with the supplied Cleaning
Cloth.
4% Donot useanytype of abrasive pad, alkaline cleaner,scouring powder,
window cleanersor solvent such as alcoholor benzene.Otherwise, this
type of contact may result ina damagedscreen.
4% Toclean the screen,pleaseuse the suppliedCleaningCloth lightly
moistenedwith water diluted mild detergentsolution. Do not applyheavy
press when cleaning.
4% Thesupplied CleaningCloth is washablewith warm water and a mild
detergent solution, and can be usedrepeatedly.
12
The projection lamp has a limited life which illuminates the picture.
If the screen becomes dark, the color looks unusual, or the LAMP indicator
on the front of the LCD projection TV flashes, it is time to replace the lamp
with a new one (not supplied).
_ _!!i;i !iiiiiii!]
Electricappliancescan causefire or high temperature, resulting in injury
or death. Be sureto follow the instructions below.
: Use a Sony XL-2100U replacement lamp (not supplied) for
replacement. Failure to do so may damage the LCD projection TV.
: Do not remove the lamp for any purpose other than replacement.
Failure to do so may cause fire or a skin bum.
Before replacing the lamp, turn the power off on the main unit, then
several minutes later, unplug the power cord. (The cooling fan will
continue to blow for about two minutes after turning the power off.)
: Before replacing the lamp, let it cool down completely, as the surface of
the lamp remains extremely hot for at least 30 minutes after the power
has been turned off.
Do not leave the removed lamp near flammable materials or within the
reach of children.
: Do not pour water onto the removed lamp, or put any object inside the
lamp. Doing so may cause the lamp to burst.
: Do not put flammable materials and metal objects inside the lamp
receptacle of the LCD projection TV after removing the lamp. Doing so
may cause fire or electrical shock. Also, be sure not to touch the
receptacle, because it may cause a skin burn.
: Mount the new lamp securely, otherwise the screen may become dark,
or it may cause a fire.
: Do not touch the glass with your fingers on the new lamp.
iii: i i,:i11
The used lamp contains Mercury, Dispose According to Local, State or
Federal Laws.
4% Donot touch the front glass of a new lamp or the glass of the lamp
receptacle.This may reducepicture quality or lamp life.
/....
C')
.........i
(Continued)
13
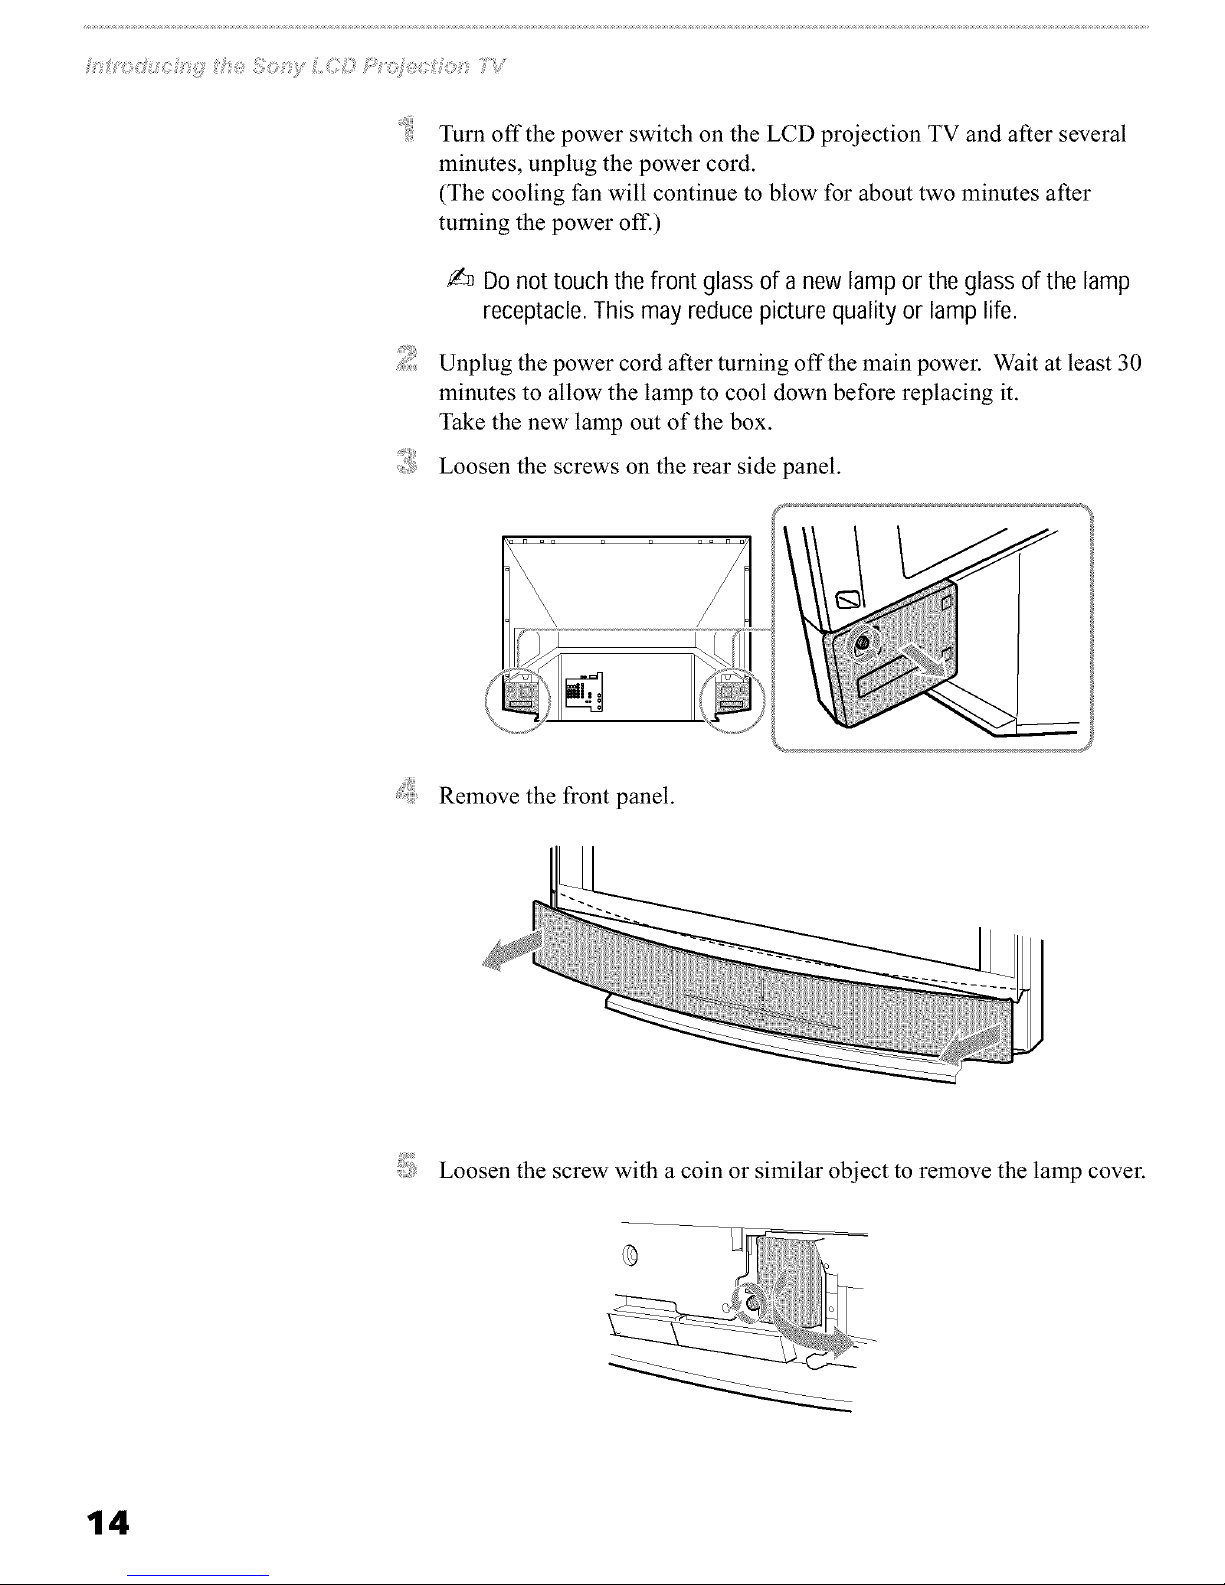
Turn off the power switch on the LCD projection TV and after several
minutes, unplug the power cord.
(The cooling fan will continue to blow for about two minutes after
turning the power off.)
Donot touch the front glass of a new lamp or the glass of the lamp
receptacle.This may reducepicture quality or lamp life.
Unplug the power cord after turning off the main power. Wait at least 30
minutes to allow the lamp to cool down before replacing it.
Take the new lamp out of the box.
Loosen the screws on the rear side panel.
Remove the front panel.
Loosen the screw with a coin or similar object to remove the lamp cover.
14
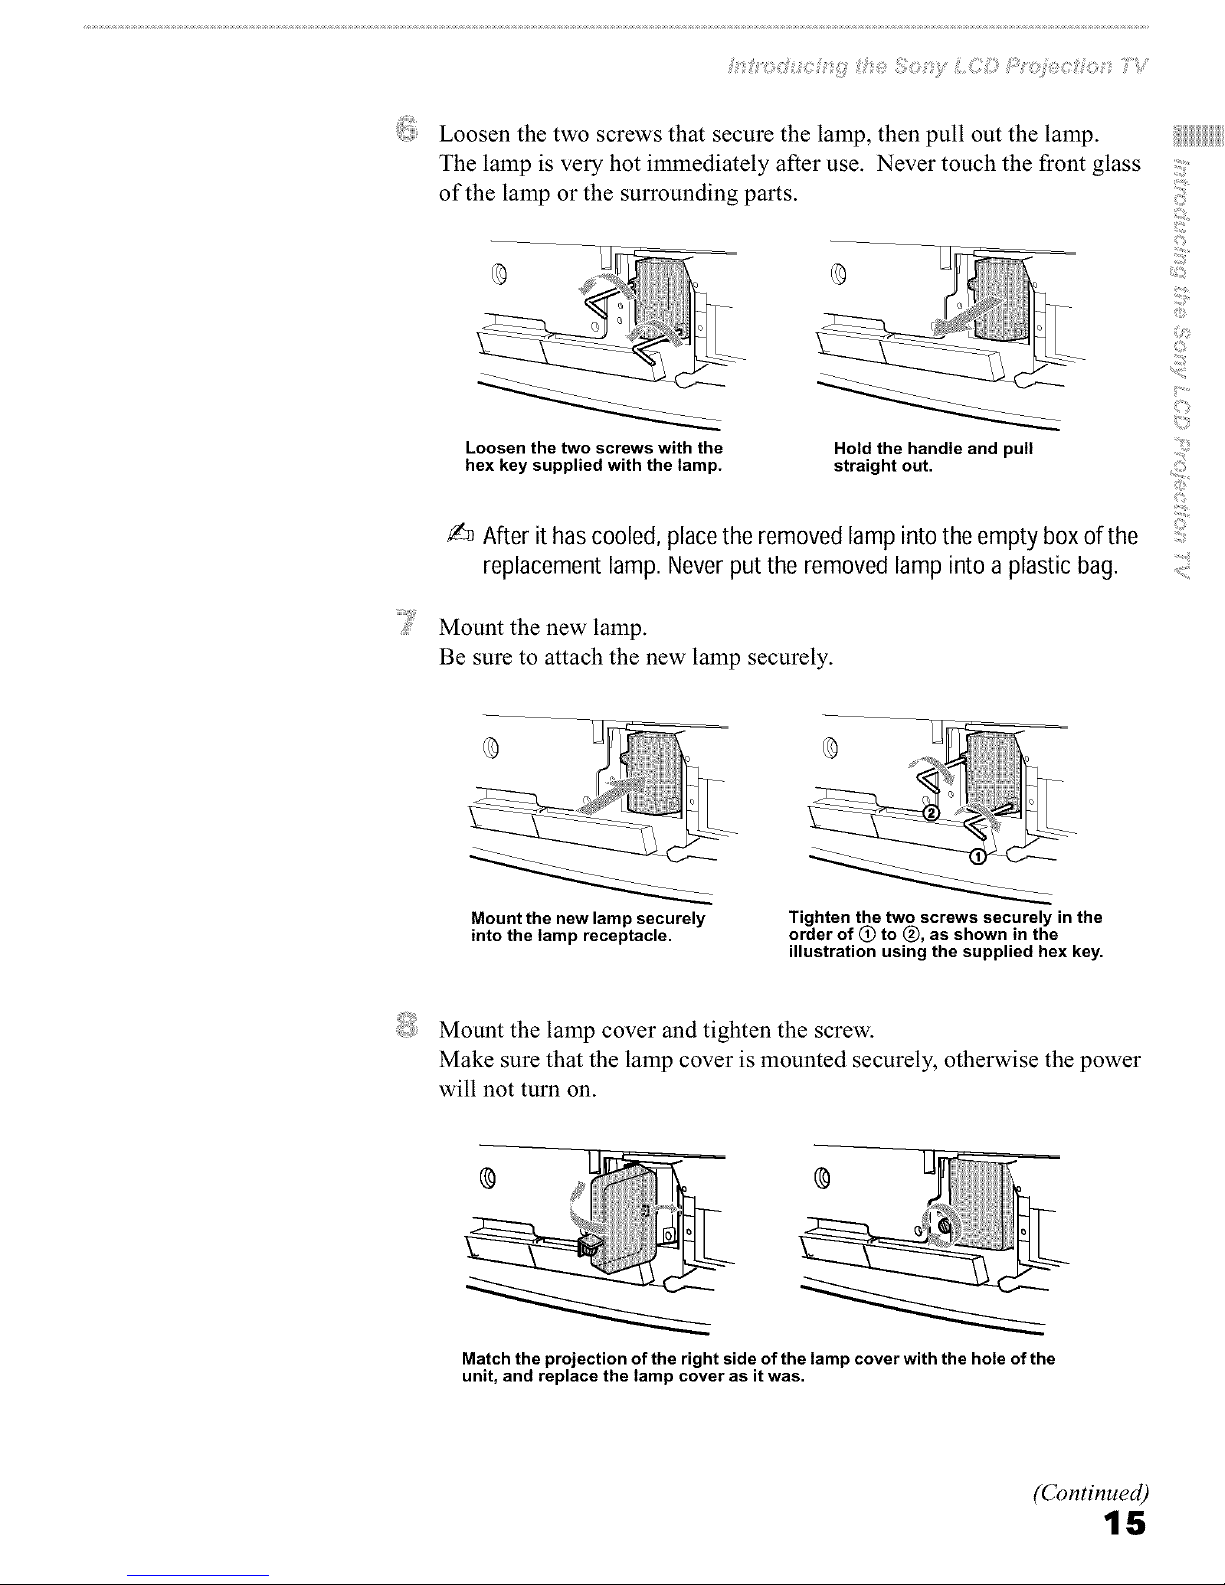
Loosen the two screws that secure the lamp, then pull out the lamp.
The lamp is very hot immediately after use. Never touch the front glass
of the lamp or the surrounding parts.
Loosen the two screws with the
hex key supplied with the lamp.
Hold the handle and pull
straight out.
After ithascooled, placethe removedlampinto theempty boxof the
replacementlamp. Neverput the removed lamp into a plastic bag.
Mount the new lamp.
Be sure to attach the new lamp securely.
.........ii
Mount the new lamp securely
into the lamp receptacle.
Tighten the two screws securely in the
order of @ to @, as shown in the
illustration using the supplied hex key.
Mount the lamp cover and tighten the screw.
Make sure that the lamp cover is mounted securely, otherwise the power
will not turn on.
Match the projection of the right side of the lamp cover with the hole of the
unit, and replace the lamp cover as it was.
(Continued)
15
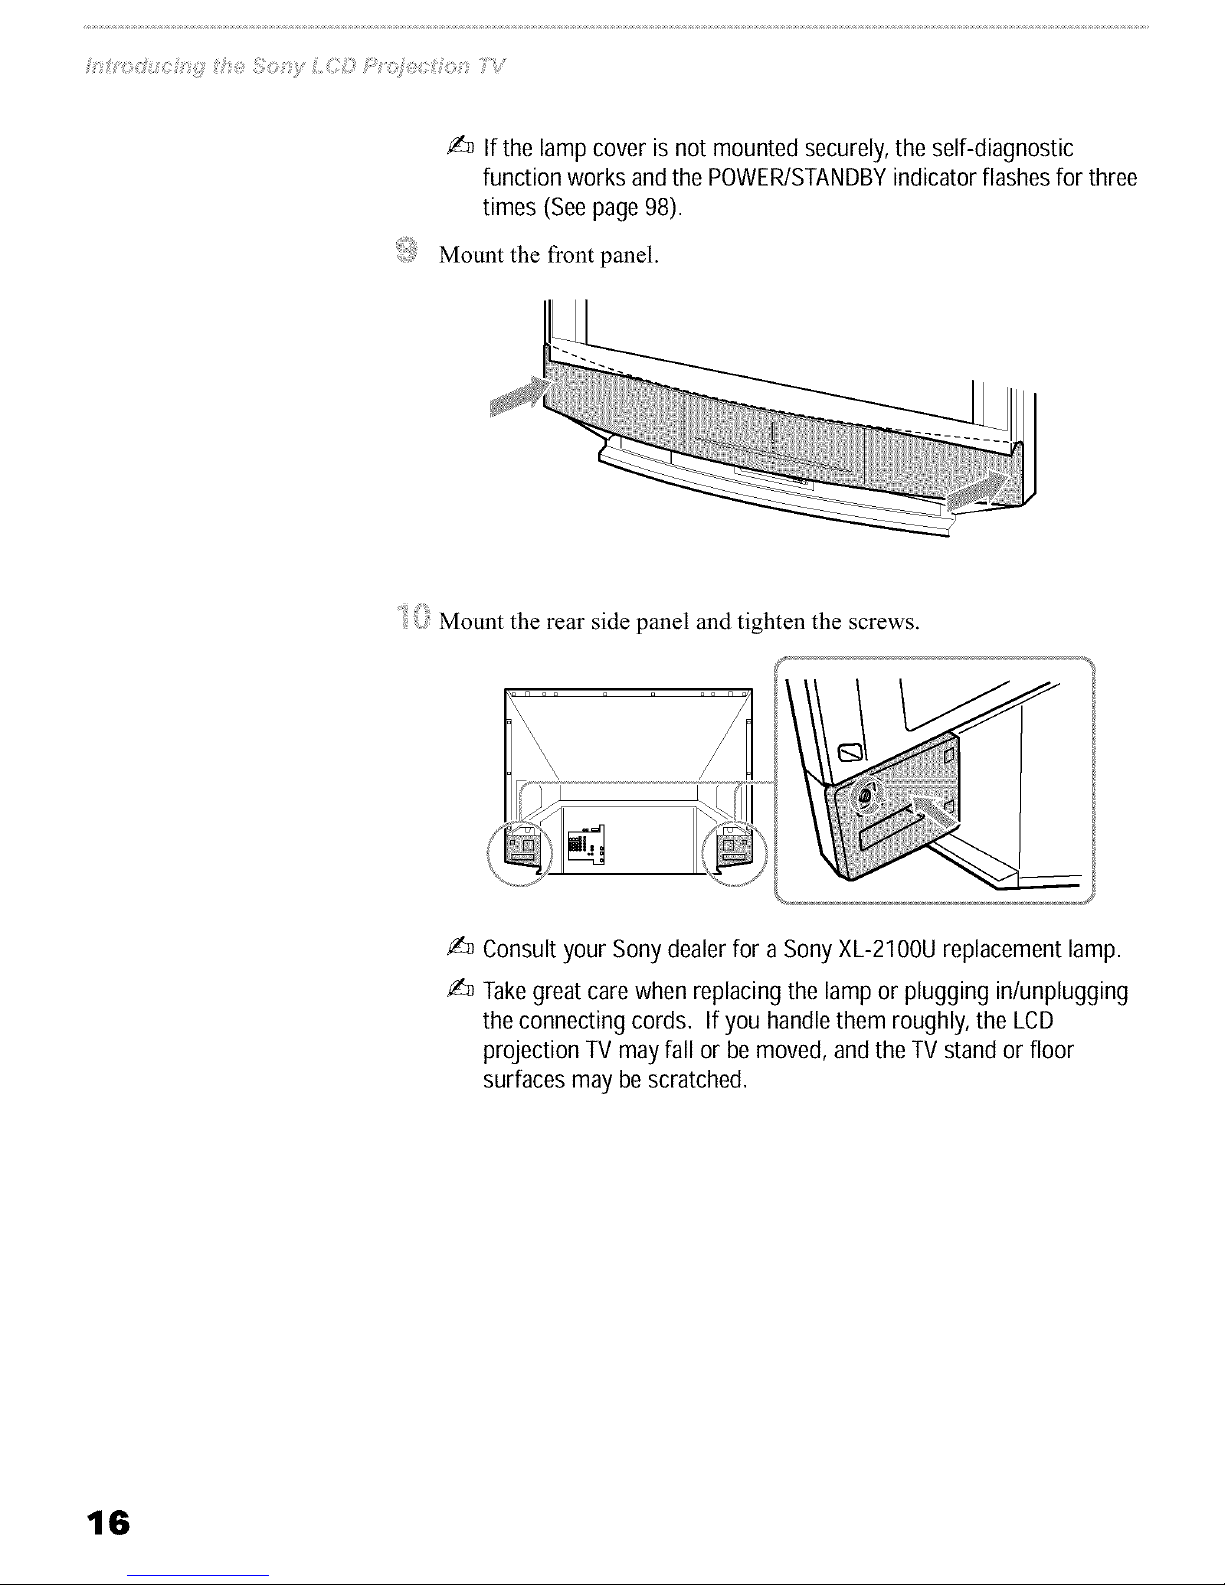
4% If the lamp cover is not mounted securely,the self-diagnostic
function works andthe POWER/STANDBYindicator flashesfor three
times (Seepage98).
Mount the front panel.
i Mount the rear side panel and tighten the screws.
4% Consultyour Sonydealer for a Sony XL-2100U replacement lamp.
4% Takegreat carewhen replacing the lamp or plugging in/unplugging
the connecting cords. If you handlethem roughly,the LCD
projection TVmay fall or be moved, andthe TV stand or floor
surfaces may bescratched.
16
!!!!!!ii:
ilJii_
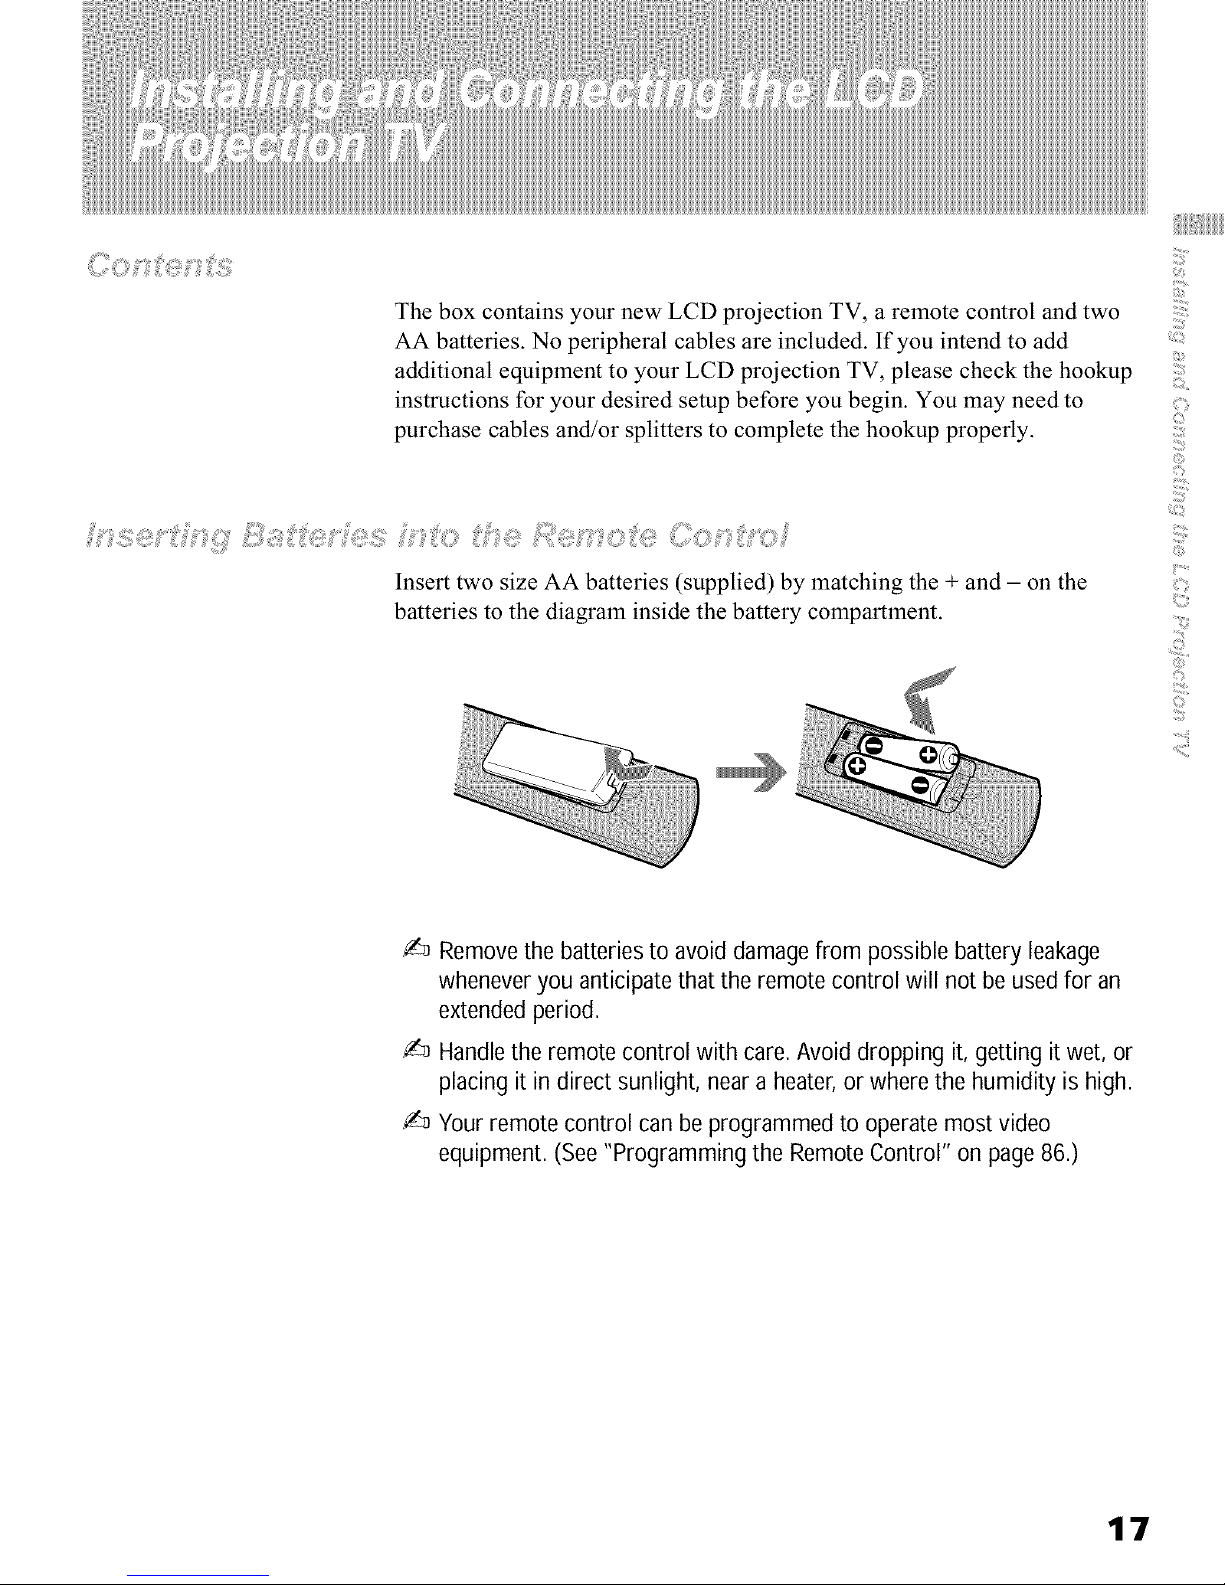
The box contains your new LCD projection TV, a remote control and two
AA batteries. No peripheral cables are included. If you intend to add
additional equipment to your LCD projection TV, please check the hookup
instructions for your desired setup before you begin. You may need to
purchase cables and/or splitters to complete the hookup properly.
©
Insert two size AA batteries (supplied) by matching the + and - on the
batteries to the diagram inside the battery compartment.
_iii:;
ii.........
....ii;;il
.........ii
Removethe batteriesto avoid damagefrom possible battery leakage
wheneveryou anticipate that the remote control will not beusedfor an
extendedperiod.
Handlethe remote control with care. Avoiddropping it, getting it wet, or
placing it in direct sunlight, neara heater,or where the humidity is high.
Your remote control can beprogrammed to operatemost video
equipment. (See"Programming the RemoteControl" on page86.)
17
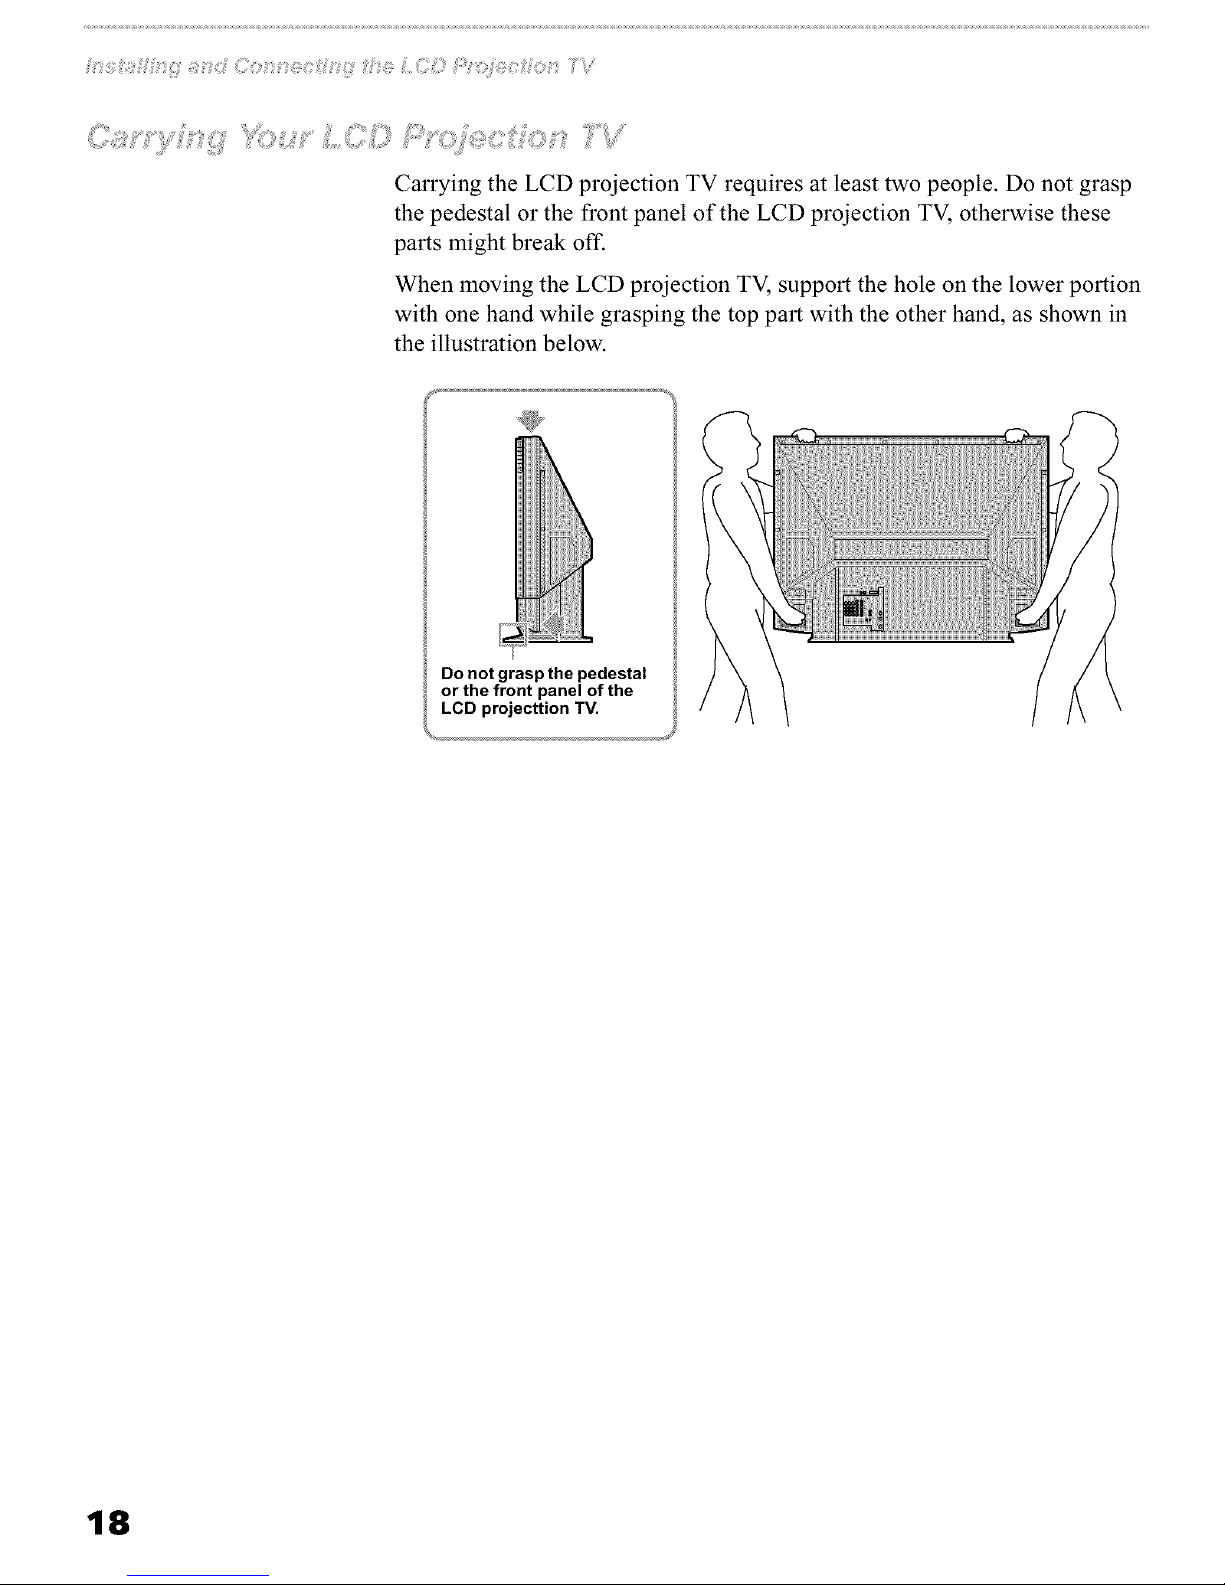
Carrying the LCD projection TV requires at least two people. Do not grasp
the pedestal or the front panel of the LCD projection TV, otherwise these
parts might break off.
When moving the LCD projection TV, support the hole on the lower portion
with one hand while grasping the top part with the other hand, as shown in
the illustration below.
Do not grasp the pedestal
or the front panel of the
LCD projecttion TV,
18
Pay special attention to children around the LCD projection TV. If children
should climb onto or push the LCD projection TV or its stand, it may fall
down.
As a protective measure, secure the LCD projection TV as follows.
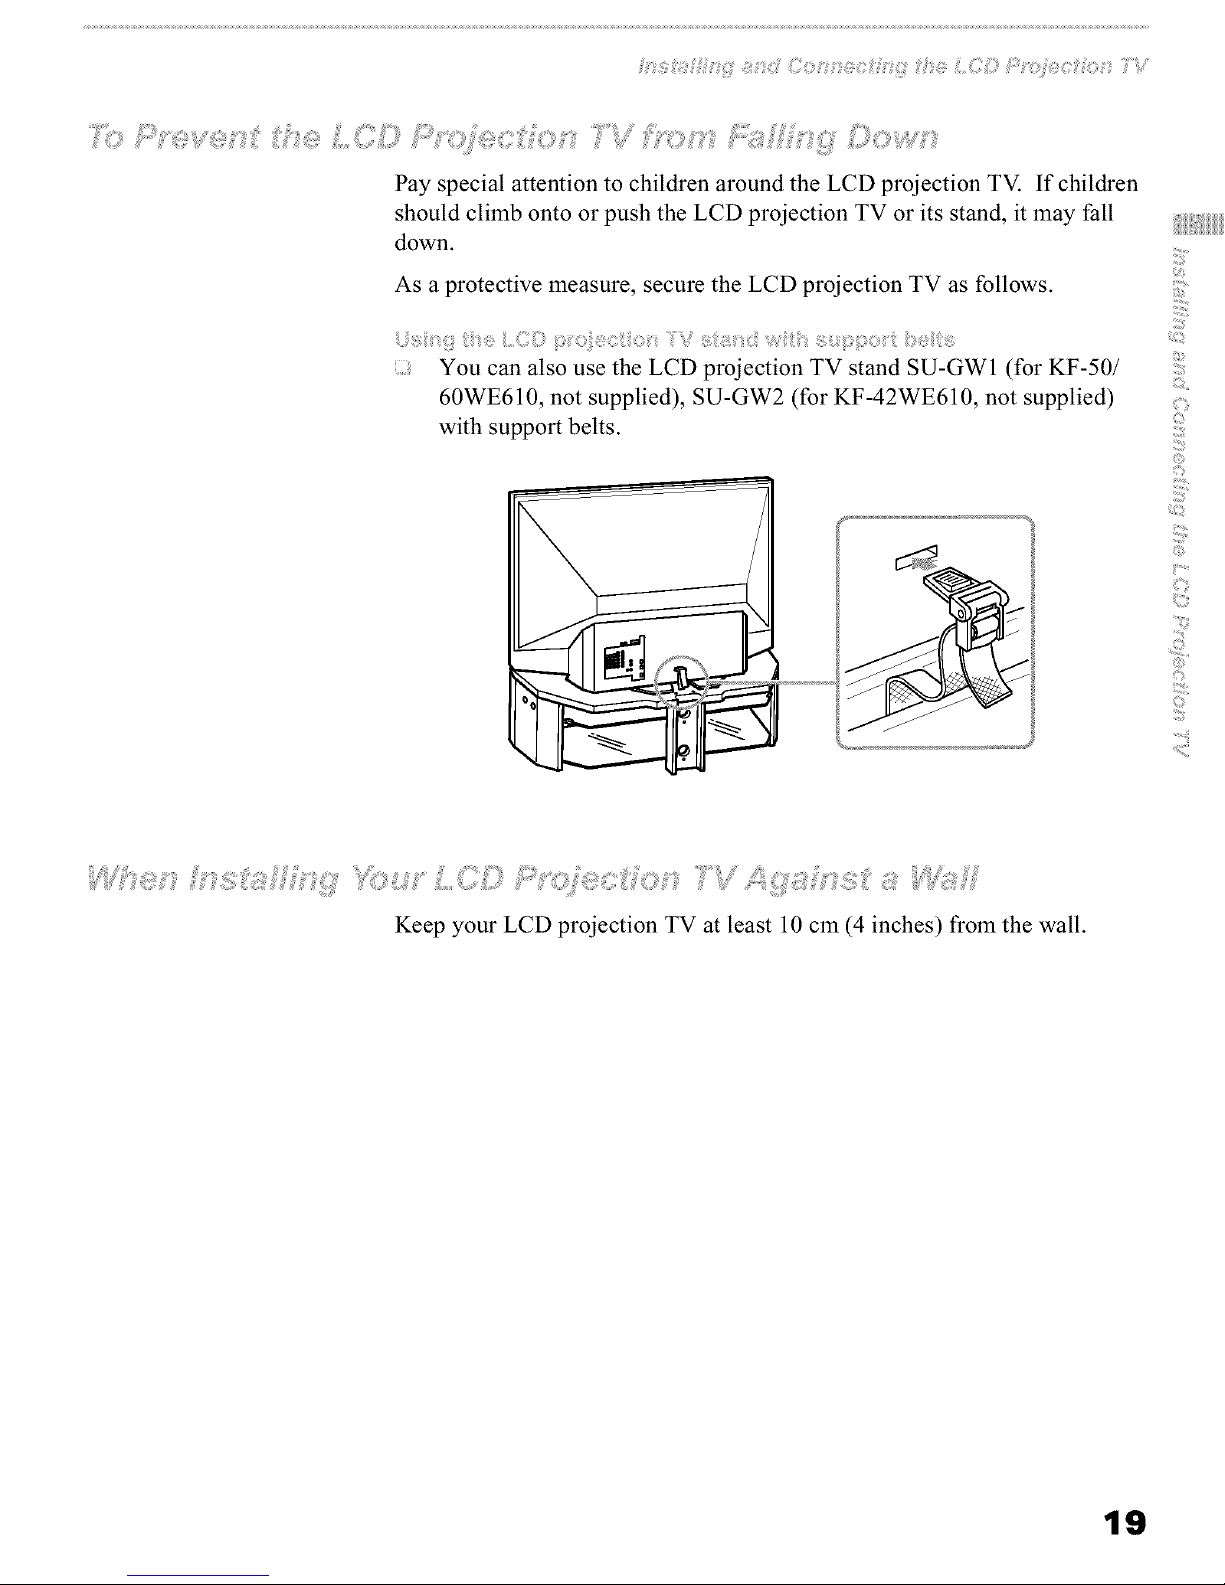
,! i O0 ]d wi_
; You can also use the LCD projection TV stand SU-GWl (for KF-50/
60WE610, not supplied), SU-GW2 (for KF-42WE610, not supplied)
with support belts.
!!!!!!ii:_
iljl)
Z)
Z]I
O)
©
]I
©
I.........
....ii;)i
l;ii_
.........i
Keep your LCD projection TV at least 10 cm (4 inches) from the wall.
19
_:_;!_O0,_,'_,_i!,i,,'_,_i!_!ii!_i,,,:i_[J_!;!_[:i_':i_%_,iiiS_i,%j_fliiii_s,_@,_i!iiii:¸
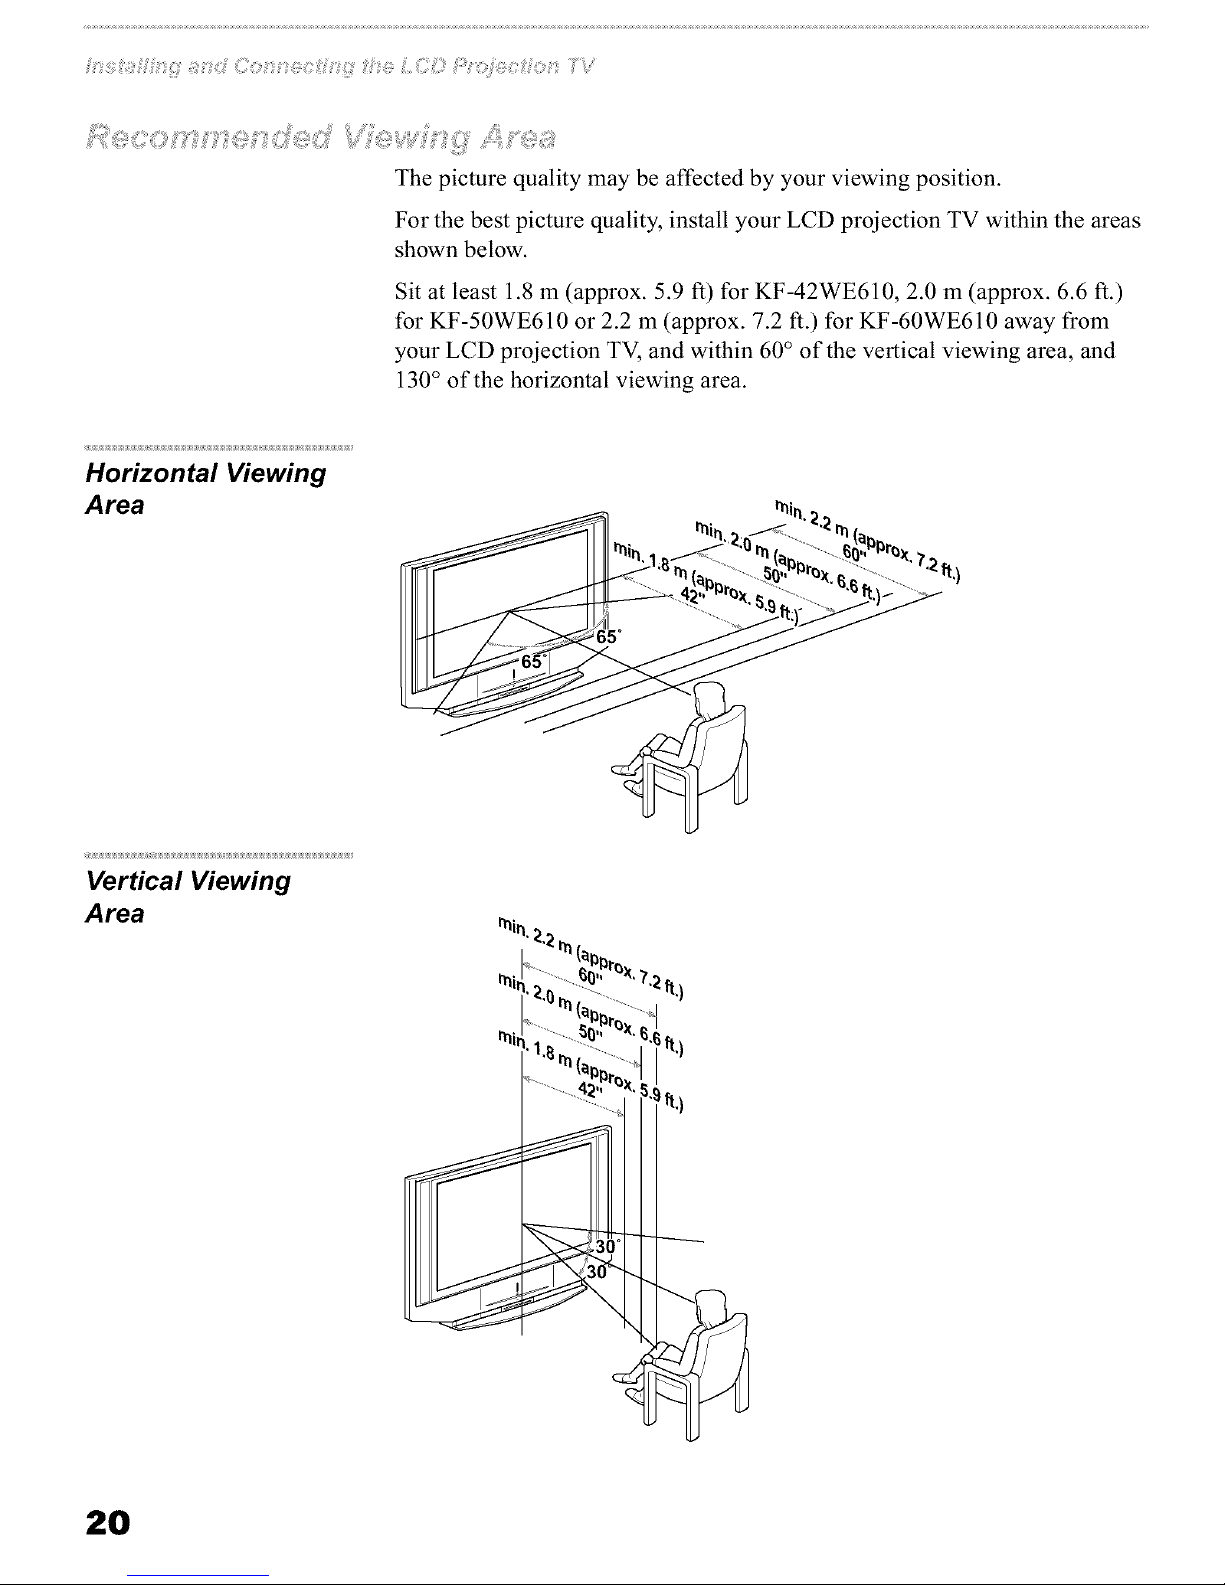
The picture quality may be affected by your viewing position.
For the best picture quality, install your LCD projection TV within the areas
shown below.
Sit at least 1.8 m (approx. 5.9 ft) for KF-42WE610, 2.0 m (approx. 6.6 ft.)
for KF-50WE610 or 2.2 m (approx. 7.2 ft.) for KF-60WE610 away from
your LCD projection TV, and within 60° of the vertical viewing area, and
130 ° of the horizontal viewing area.
Horizontal Viewing
Area
Vertical Viewing
Area
rnirk2'1_rn
rn ...................._11,, ,7_8_
n,:_,_rni..........................',
........./_,r_ _"1
r_i . ....................u', ;ft..
,,/,_rn2........................is,)
............................_ii..........._t,)
S
"-------
20
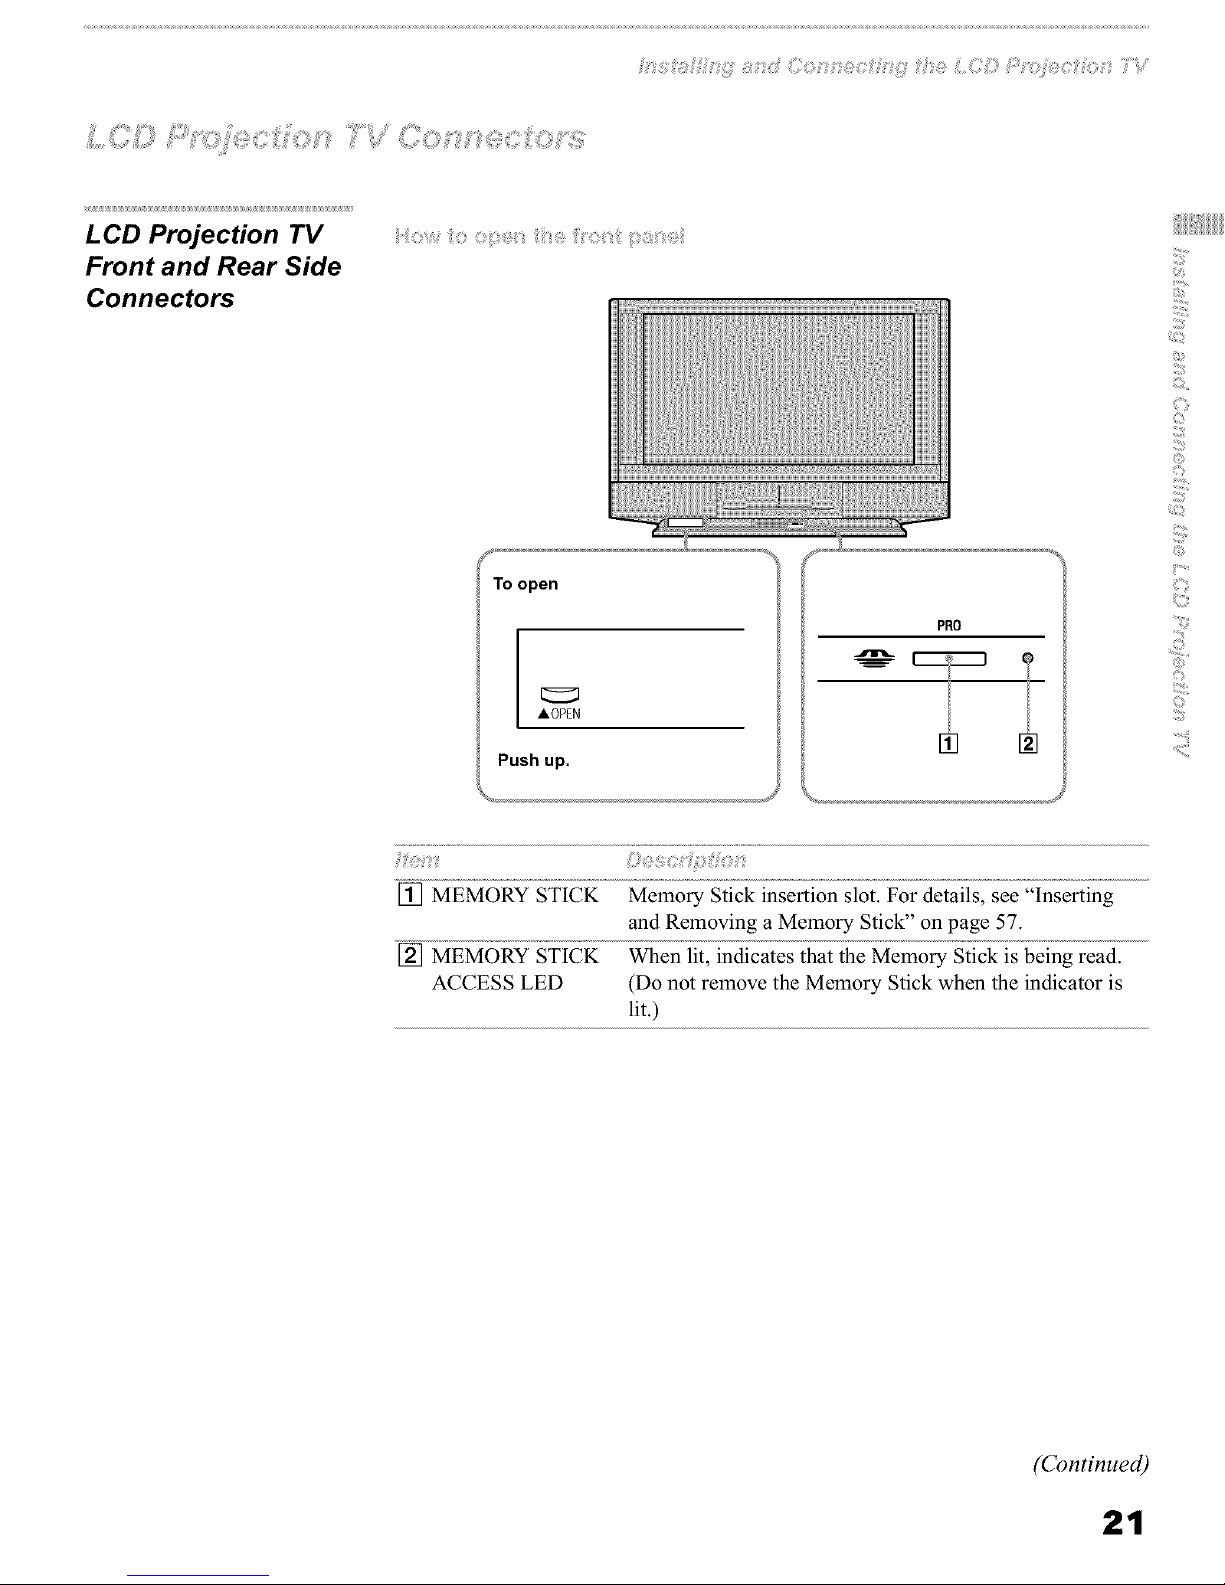
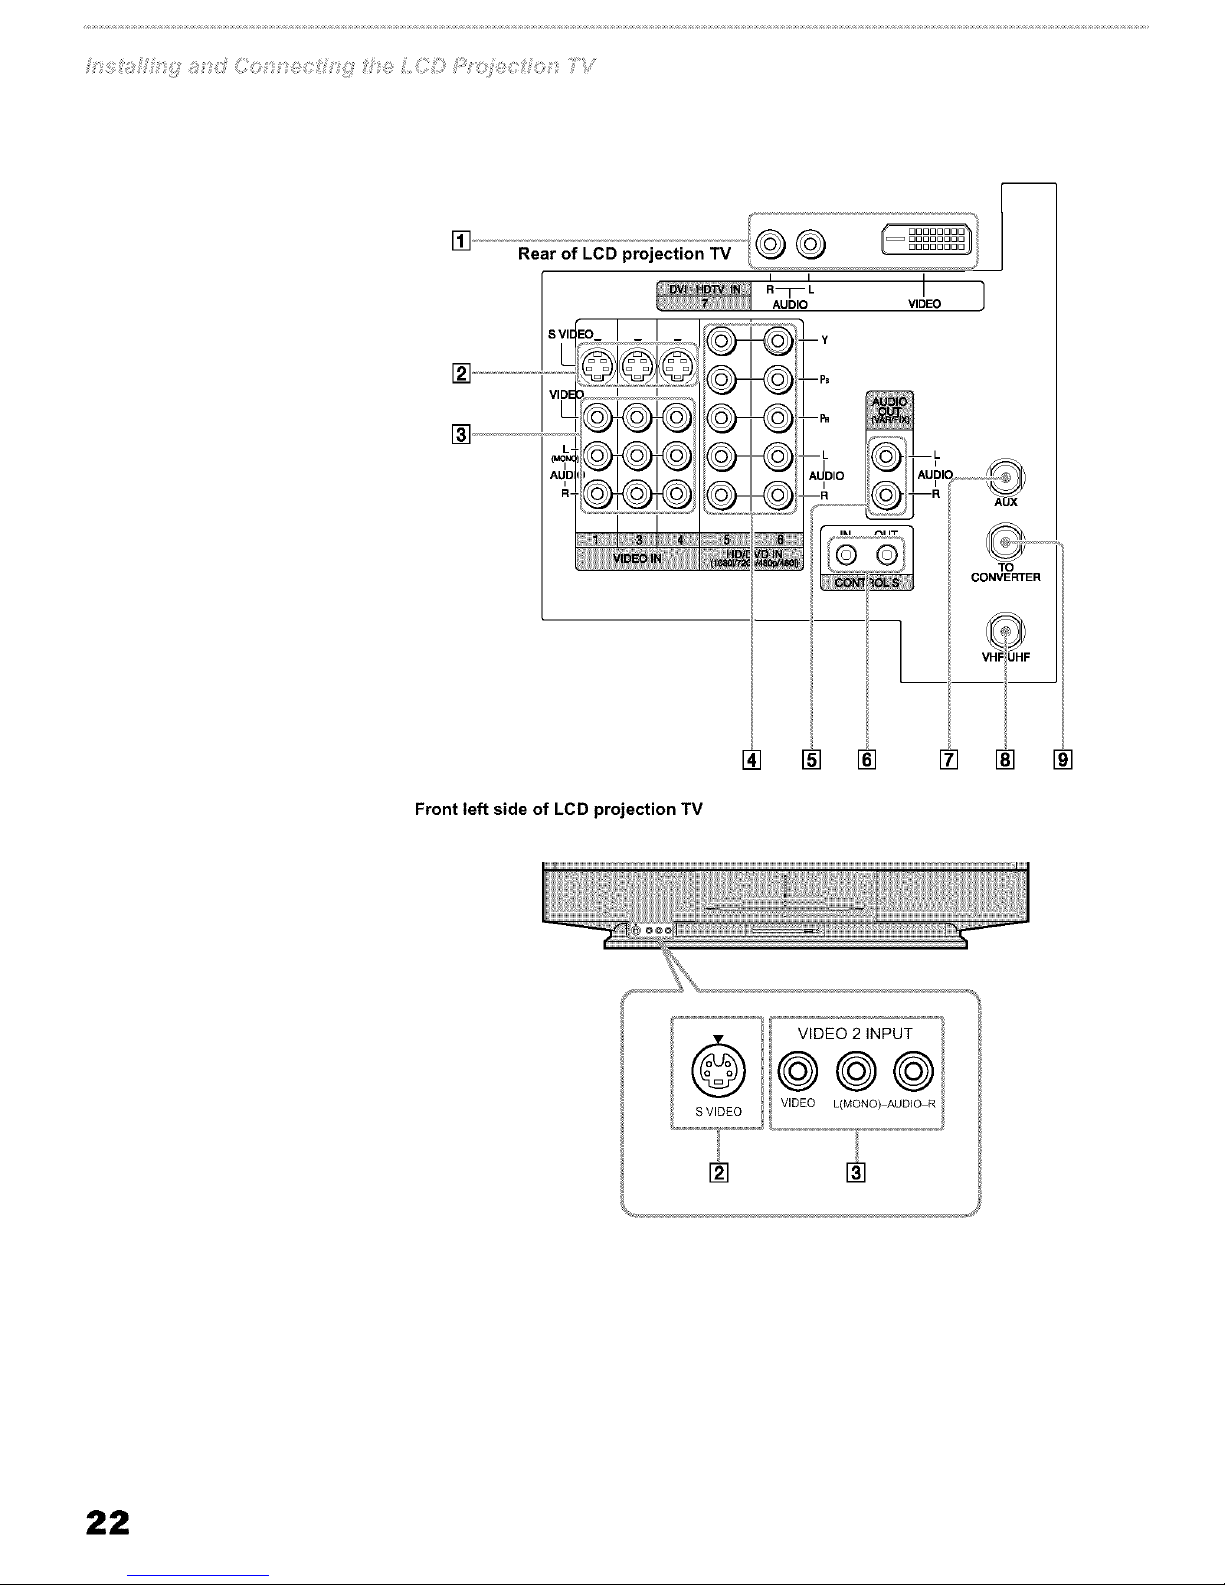
LCD Projection TV
Front and Rear Side
Connectors
To open
AOPEN
Push up.
PRO
1
!!!!!!ii:
ii;_i)
iiiiii_,
]1]i
O)
©
]I
©
i!]_;;
I.........
....iil]i
C_
.........i
:!i i ii ':i: ;i
[] MEMORY STICK Memory Stick insertion slot. For details, see "Inserting
and Removing a Memory Stick" on page 57.
[] MEMORY STICK When lit, indicates that the Memory Stick is being read.
ACCESS LED (Do not remove the Memory Stick when the indicator is
lit.)
(Continued)
21
m
Front left side of LCD projection TV
22
_ii,;0iOi:_?_!i!_(]ii!_'0 _i_ii_¸ [) iii!_!;O_i<i):!)_i:_11_
iOi:fi 9iii6 eii iiiOmmOiiiii iii ::ili ii i£ £iiiiiiiOiiiiiOi.....................
AUDIO R/L (HE)CP) to other devices (such as digital set-top boxes)
(VIDEO 7 IN) that have compatible interfaces. The E)VI-HE)TV input
terminal is compliant with the EIA-861 standard and is not
intended for use with personal computers. See the
instruction manual that came with your equipment for
details about connecting and using it with the LCE)
projection TV.
[] S VIDEO Connects to the S VIDEO OUT jack of your VCR or other
(Rear and front) SVIE)EO-equipped video component. Provides better
picture quality than the VHF/UHF jacks or the Video IN
jack.
[] VIDEO/ Connects to the audio and video OUT jacks on your VCR
(L/R) AUDIO or other video component. A fourth video input (VIDEO 2)
(Rear and front) is located on the side panel of the LCE) projection TV.
[] HD/DVD IN (1080i, Connects to your DVD player's or Digital Set-top box's
72013, 48013, 480i) component video (Y, PB, PR) and audio (L/R)jacks.
(VAR/FIX) video component.
L (MONO)/R
[] CONTROL S To control other Sony equipment with the LCE) projection
IN/OUT TV's remote control, connect the CONTROL S IN jack of
the equipment to the CONTROL S OUT jack on the LCE)
projection TV with the CONTROL S cable.
To control the LCE) projection TV with a remote control
for another Sony product, connect the CONTROL S OUT
jack of the equipment to the CONTROL S IN jack on the
LCE) projection TV with the CONTROL S cable.
[] AUX Allows you to view local and cable channels if your cable
provider does not feature local channels. You can switch
between local and cable channels easily by pressing ANT
on the remote control. Devices connected to the AUX input
cannot be viewed in Twin View.
[] VHF/UHF (Primary Connects to your VHF/UHF antenna or cable.
RF input)
ICE) projection TV to switch between scrambled channels
(through a cable box) and normal cable channels (CATV).
Use this jack instead of a splitter to get better picture
quality when switching between scrambled and
unscrambled cable channels.
High-bandwidth E)lgltal Content Protection
ilji)
]1]i
O)
©
]I
©
i!]_:;
/.........
....ii;)i
.....i
23
You may find it necessary to use some of the following connector types
during set up.
Standard TV cable and antenna cable
Plug Type
___ _@ _ Push into connection.
Screw-on Type
_._ _ _ Screw into connection.
;}:::
High quality video cable for enhanced picture quality
__$_, @ Align guides and push into
connection.
}
___:_ _ _ Push into connection.
Video - Yellow
Audio (Left) - White
Audio (Right) - Red
Some DVD Players are equipped with the following three video connectors:
Y - Green
PB (CB,Cbor B-Y) - Blue
PR(CR, Cr or R-Y) - Red
CONTROL S connections are exclusive to Sony products and allow greater
control of all Sony equipment.
--z_2_=_ .... _, _) Push into connection.
24
Connecting Directly
to Cable or an
Antenna
The connection you choose depends on the cable found in your home. Newer
homes are equipped with standard coaxial cable (see _); older homes
probably have 300-ohm twin lead cable (see _); other homes may contain
both (see _).
_IiI::!i)i!i,= : _lil::::iJlil:: : C;III;i:
75-ohm coaxial
cable Rear of LCD projection TV
VHF/UHF
IiI::!: ii iJlil::!: ii : Iii:: !ili::
300-ohm twin lead cable
_;_ Rear of LCD projection TV
I
VHF/UHF
/
Antenna connector
_ IiI:: i! !:I ii::
75-ohm coaxial cable
ofLO0projection
II II --
I_1 uNSplitter VHF/UHF
(not supplied)
300-ohm twin lead cable _, _,.
It is highlyrecommendedto connectthe antennausinga 75-ohm coaxial
cableto get optimum picture quality.A 300-ohm twin leadcablecan be
easily affectedby radionoiseand the like, resulting in signal
deterioration. If you usea 300-ohm twin leadcable,keepit away asfar
as possible from the LCDprojection TV.
Donot usean indoor antennabecauseit is especiallysusceptible to
radio noise.
!!!!!!ii:_
i_ji)
]1]i
O)
©
]I
©
_iiii;
i!]_;;
/.........
....ii;;)i
C_
l;;ii:
.........i
25
Cable and Antenna
If your cable provider does not feature local channels, you may find this set
up convenient.
CATV cable
(No connection to
TO CONVERTER)
Antenna cable
AUX
CONVERTER
VHF/UHF
Rear of LCD projection TV
Select CABLE or antenna (ANT) mode by pressing ANT on the remote
control.
4% Toreceivechannelswith anantenna,you needto turn your Cableto Off
(seepage76) and perform the Auto Program function (seepage 76).
Cable Box
Connections This is the preferred basic cable TV hookup to use if:
: Your cable TV company scrambles some channels, but not all of them
(pay channels vs. regular cable channels) and you need to use a cable
box, and
: You want to enjoy the Twin View feature.
With this setup you can:
: Use the LCD projection TV remote control to change channels using
your cable box when the signal is scrambled.
: Use the LCD projection TV remote control to change channels using
your LCD projection TV when the signal is not scrambled. (Your LCD
projection TV's tuner provides a better signal than the cable box.)
: Use the Twin View feature. (When all channels are routed through your
cable box, only one channel is sent to the LCD projection TV, so you
can not use the Twin View feature for your cable box.)
Connect the Cable TV cable to the LCD projection TV's VHF/UHF
jack.
Using a coaxial cable, connect the LCD projection TV's TO
CONVERTER jack to the cable box's IN jack. The LCD projection
TV's internal converter allows you to switch between unscrambled
signals coming straight into the LCD projection TV and scrambled
signals coming in through the cable box, eliminating the need for an
external splitter.
26
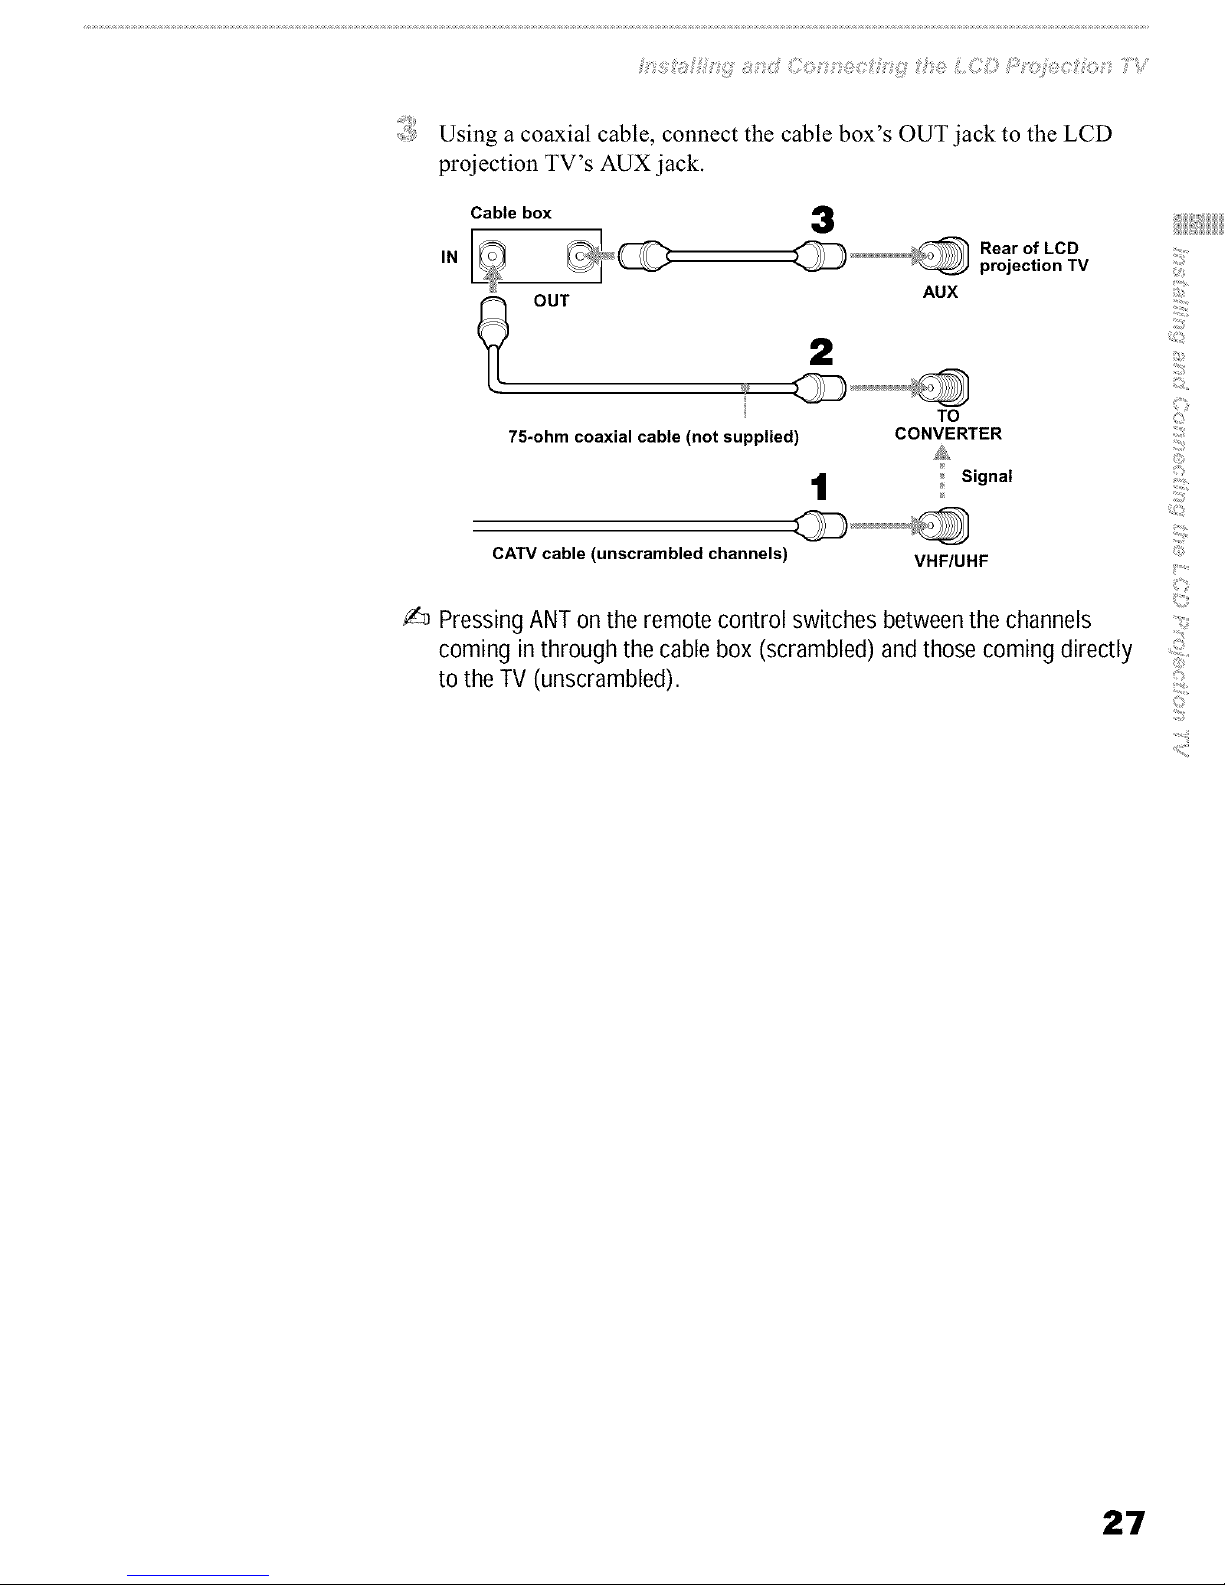
Using a coaxial cable, connect the cable box's OUT jack to the LCD
projection TV's AUX jack.
IN
Cable box
OUT
3
Rearo,LCO
projection TV !:
AUX
2
75-ohm coaxial cable (not supplied)
1
131
O)
TO ©
CONVERTER
A
Signal
CATV cable (unscrambled channels)
VHF/UHF
_i:ii;
i!]_;;
I.........
4% PressingANTon the remotecontrol switches betweenthe channels
coming in through the cablebox (scrambled) and those coming directly
to the TV (unscrambled).
.........i
'<;iii
27
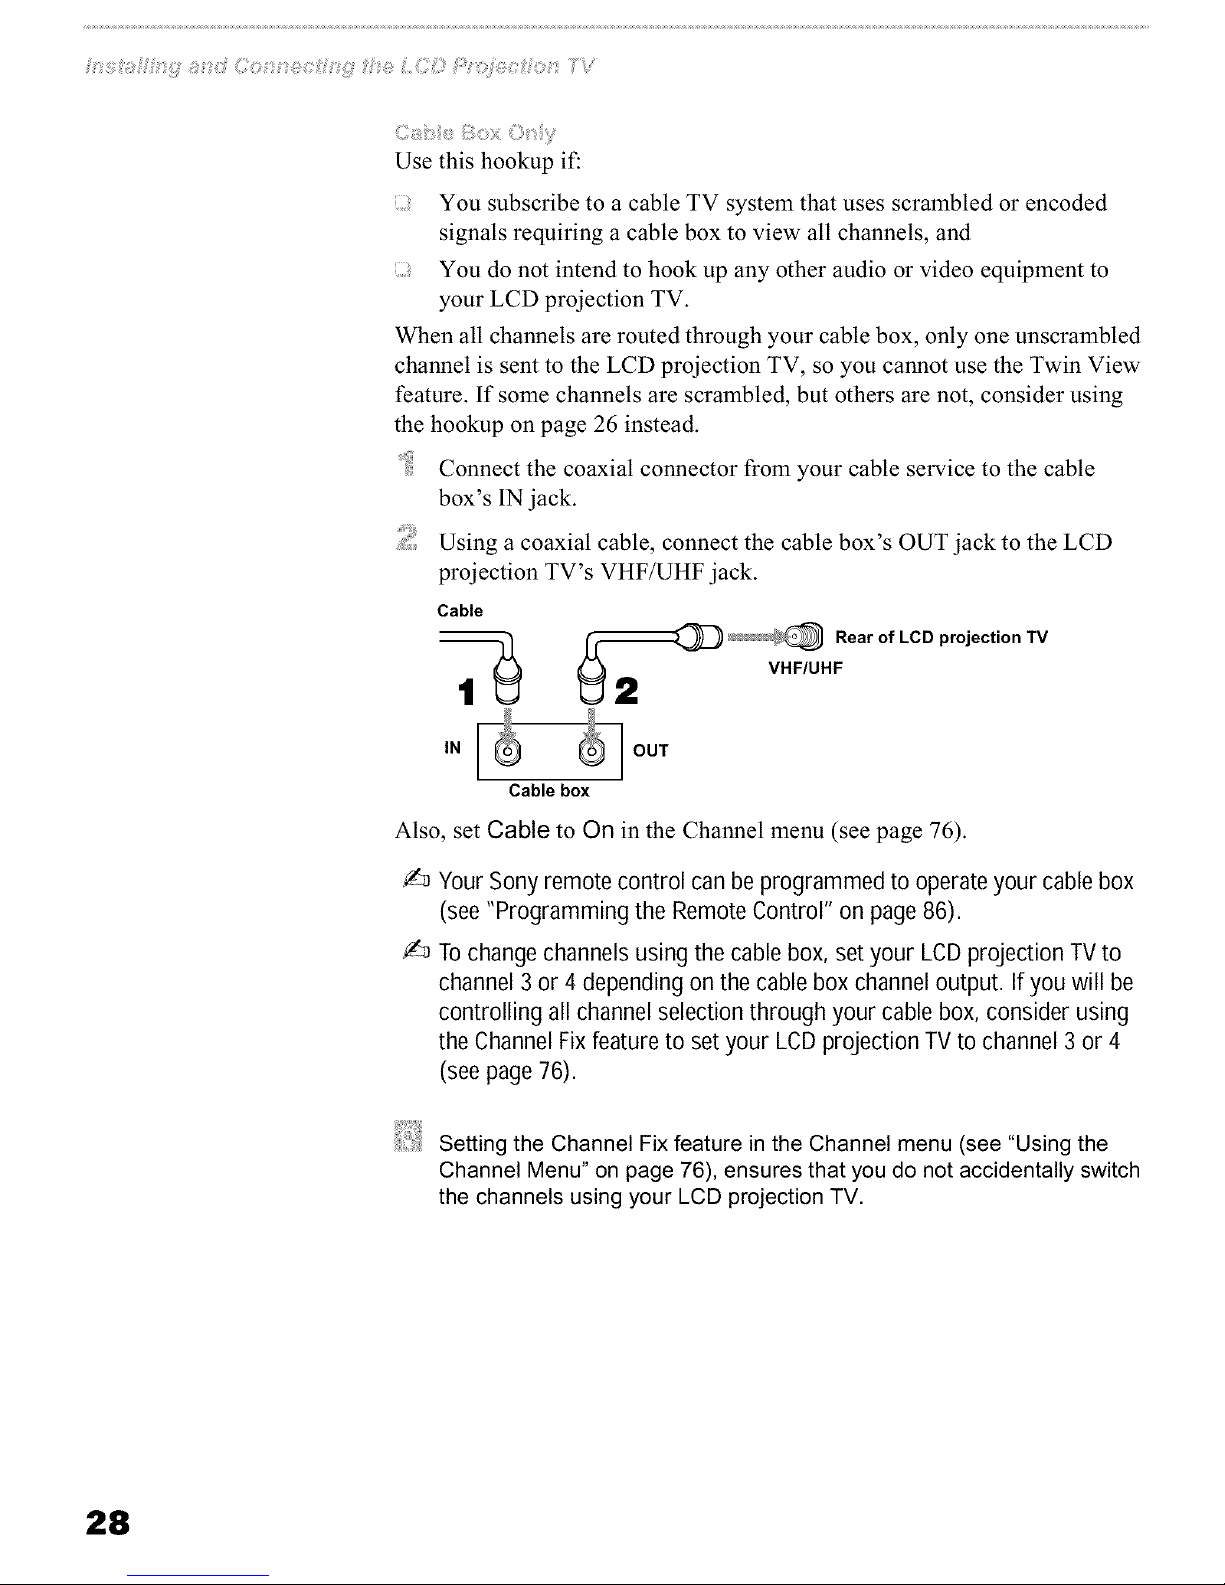
Use this hookup if:
; You subscribe to a cable TV system that uses scrambled or encoded
signals requiring a cable box to view all channels, and
; You do not intend to hook up any other audio or video equipment to
your LCD projection TV.
When all channels are routed through your cable box, only one unscrambled
channel is sent to the LCD projection TV, so you cannot use the Twin View
feature. If some channels are scrambled, but others are not, consider using
the hookup on page 26 instead.
Connect the coaxial connector from your cable service to the cable
box's IN jack.
Using a coaxial cable, connect the cable box's OUT jack to the LCD
projection TV's VHF/UHF jack.
Cable
_ _/@ Rear of LCD projection TV
VHF/UHF
IN OUT
Cable box
Also, set Cable to On in the Channel menu (see page 76).
Your Sony remotecontrol canbe programmed to operateyour cablebox
(see"Programming the RemoteControl" on page86).
Tochangechannelsusing the cablebox, setyour LCDprojection TVto
channel3 or 4 dependingon the cablebox channeloutput. If you will be
controlling all channelselectionthrough your cable box, consider using
the ChannelFixfeature to setyour LCDprojection TVto channel3 or 4
(seepage76).
Setting the Channel Fix feature in the Channel menu (see "Using the
Channel Menu" on page 76), ensures that you do not accidentally switch
the channels using your LCD projection TV.
28
_i:iii;_:!¸0_i_?_i'_?_!iii:_C_'_i_":i_{ilJ_!:i_
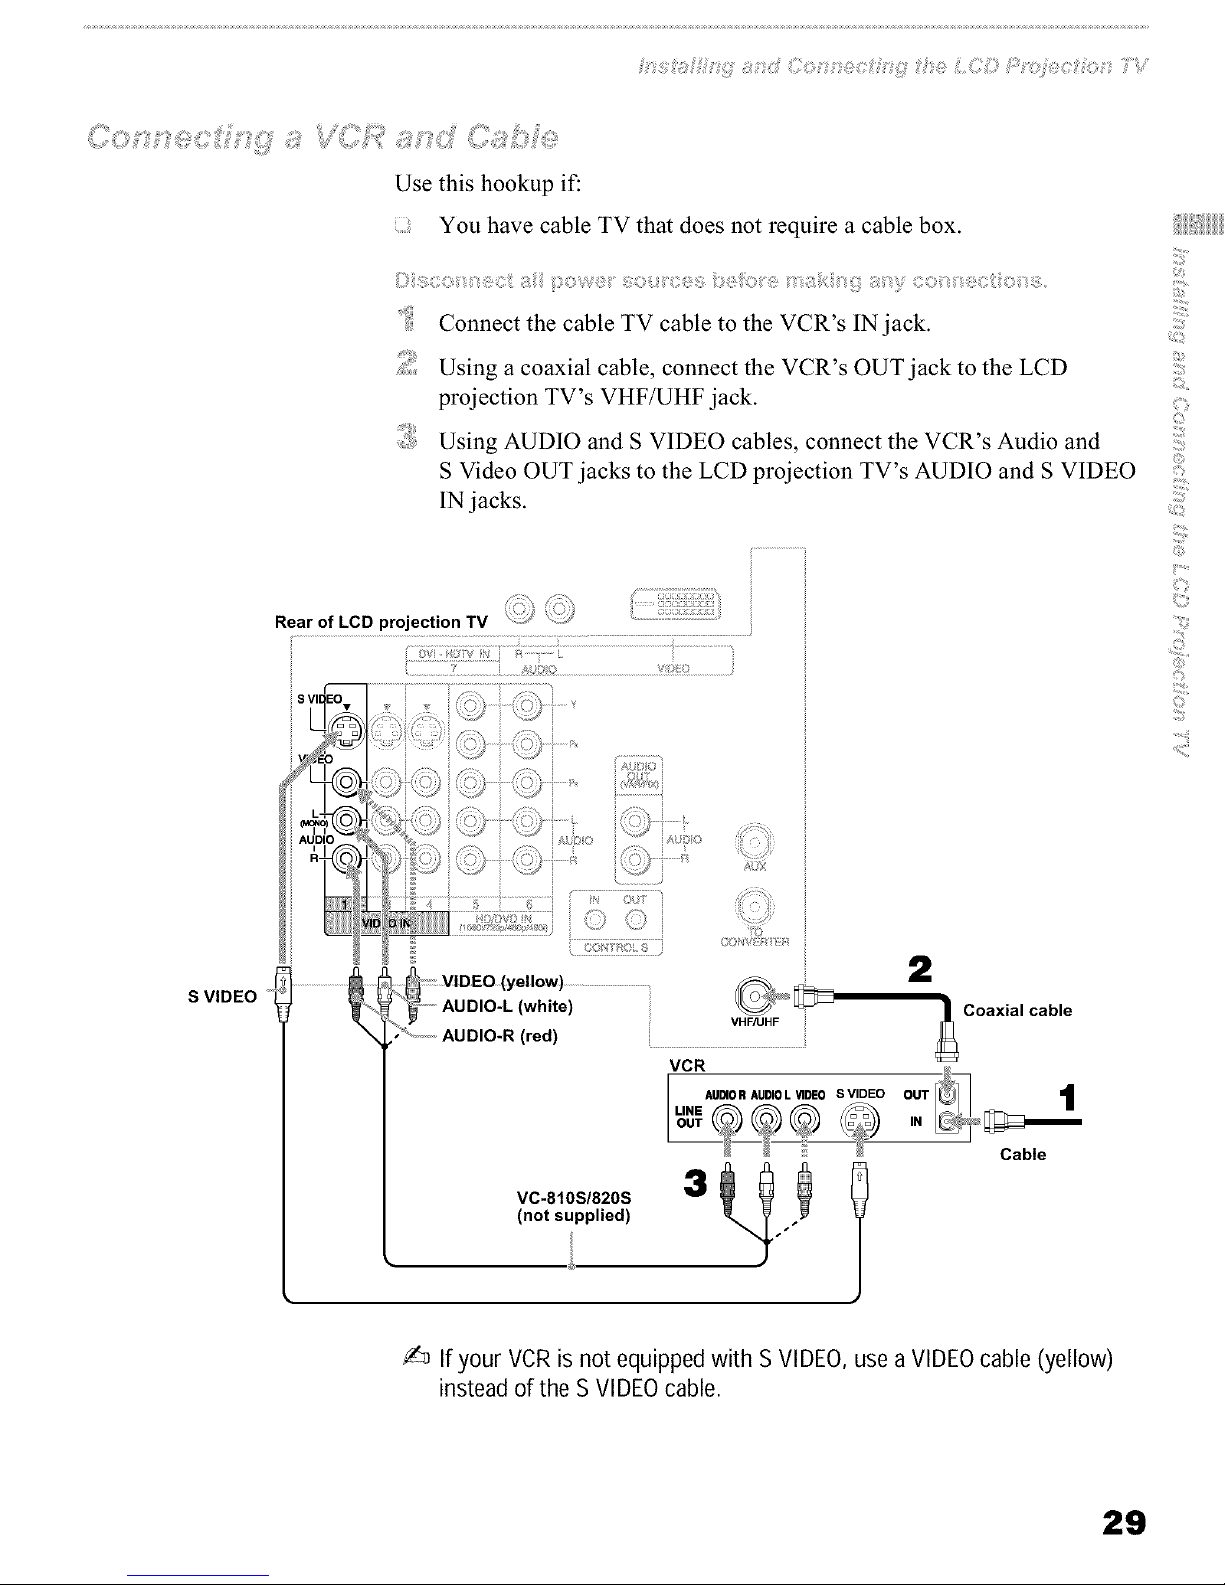
Use this hookup if:
You have cable TV that does not require a cable box.
Disoo_c_ a/i [)ow@_ _so_c_s _ _Ri_g a_y coi_c_ioi_
Connect the cable TV cable to the VCR's IN jack.
Using a coaxial cable, connect the VCR's OUT jack to the LCD
projection TV's VHF/UHF jack.
Using AUDIO and S VIDEO cables, connect the VCR's Audio and
S Video OUT jacks to the LCD projection TV's AUDIO and S VIDEO
IN jacks.
Rear of LCD projection TV _£,J i
.......................................................i...............!
+
.......
i
_-:_': VIDEO (yellow) ..................................................
°'_--- AU DIO-L (white)
..............AUDIO-R (red)
0 )!4 ; :_
VHFAJHF
VC-810S/820S
(not supplied)
2
VCR
I AUDIOR AUDIOL VIDEO SVIDEO OUT
LINE @)
OUT IN
' I
_ Coaxial cable
Cable
If your VCR isnot equippedwith S VIDEO,usea VIDEOcable (yellow)
insteadof the S VIDEOcable.
!!!!!!ii:_
ii;_i)
]1]i
O)
©
]I
©
_iiii;
i!]_;;
/.........
....ii;;)i
:if%
l;;ii:
.........i
29
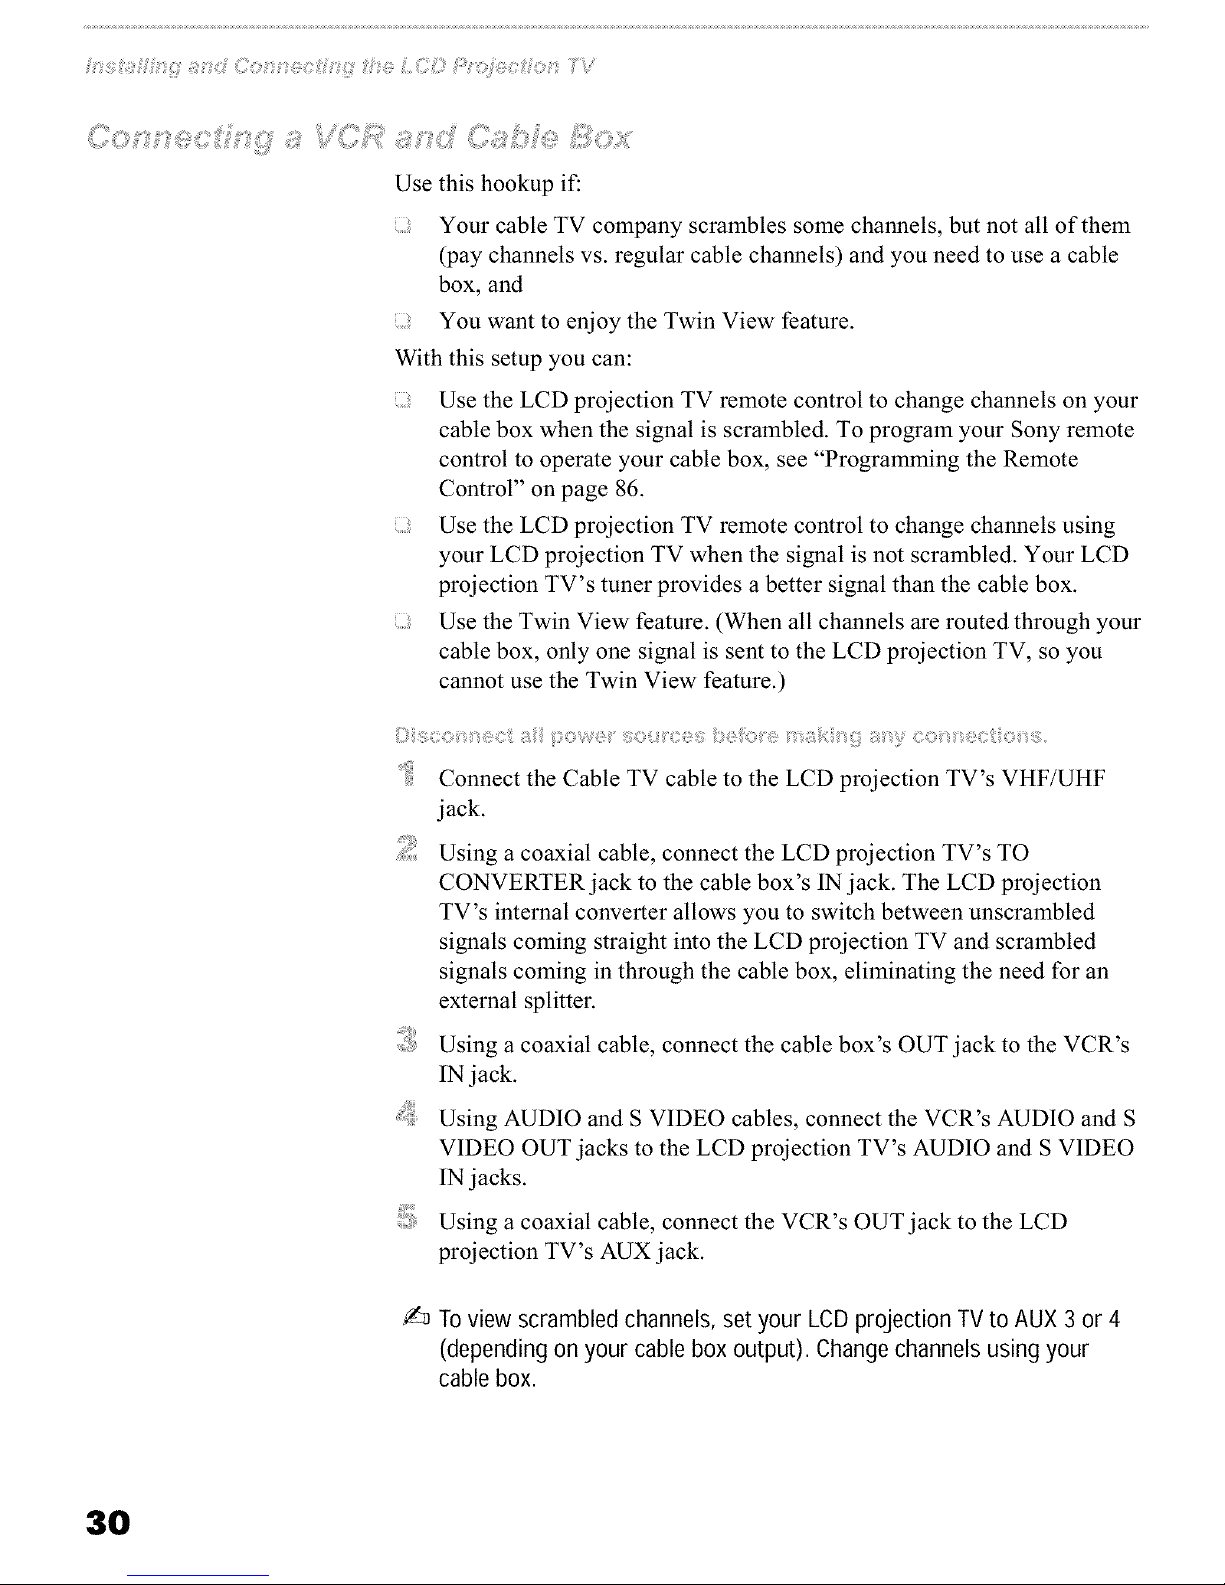
Use this hookup if."
; Your cable TV company scrambles some channels, but not all of them
(pay channels vs. regular cable channels) and you need to use a cable
box, and
; You want to enjoy the Twin View feature.
With this setup you can:
; Use the LCD projection TV remote control to change channels on your
cable box when the signal is scrambled. To program your Sony remote
control to operate your cable box, see "Programming the Remote
Control" on page 86.
; Use the LCD projection TV remote control to change channels using
your LCD projection TV when the signal is not scrambled. Your LCD
projection TV's tuner provides a better signal than the cable box.
; Use the Twin View feature. (When all channels are routed through your
cable box, only one signal is sent to the LCD projection TV, so you
cannot use the Twin View feature.)
:} ::}o, :_ s©;_{; s :Ty
Connect the Cable TV cable to the LCD projection TV's VHF/UHF
jack.
Using a coaxial cable, connect the LCD projection TV's TO
CONVERTER jack to the cable box's IN jack. The LCD projection
TV's internal converter allows you to switch between unscrambled
signals coming straight into the LCD projection TV and scrambled
signals coming in through the cable box, eliminating the need for an
external splitter.
Using a coaxial cable, connect the cable box's OUT jack to the VCR's
IN jack.
Using AUDIO and S VIDEO cables, connect the VCR's AUDIO and S
VIDEO OUT jacks to the LCD projection TV's AUDIO and S VIDEO
IN jacks.
Using a coaxial cable, connect the VCR's OUT jack to the LCD
projection TV's AUX jack.
Toview scrambled channels,set your LCDprojection TVto AUX3 or 4
(dependingon your cable box output). Changechannelsusing your
cablebox.
3O
 Loading...