

Page 1
Page 2

WARNING
To Reduce the risk of fire or shock hazard,
do not expose the TV to rain or moisture.
A'n'ENTION
RISQUE DE CHOC ELECTRiQUE,
NE PAS OUVRiR
PRECAUCION
This symbol is intended to alert the user to the
presence of uninsulated "dangerous voltage" within
the product's enclosure that may be of sufficient
magnitude to constitute a risk of electric shock to
persons.
This symbol is intended to alert the user to the
presence of important operating and maintenance
(servicing) instructions in the literature
accompanying the appliance.
CAUTION
TO PREVENT ELECTRIC SHOCK, MATCH WIDE BLADE OF
PLUG TO WIDE SLOT, FULLY INSERT.
CAUTION
When using TV games, computers, and similar products with your
TV, keep the brightness and contrast functions at low seltings. If a
fixed (non-moving pattern is left on the screen for long periods of
time at a high brightness or contrast setting, the image can be
permanently imprinted onto tl_e screen. Cominuously watching the
same program can cause the imprint of station logos onto the TV
screen. Theses types of imprints are not covered by your warranty
because they are the result of misuse.
Note on Caption Vision
This television receiver provides display of television closed
captioning in accordance with §15.119 of the PCC rules.
Notes on Cleaning the TV
Clean the TV with a soft dry cloth. Never use strong solvents such
as thinner or benzine, which might damage the finish of the cabinet.
Note on use in highlands
When used at an altitude of greater than 1900m or 6248 feet (air
pressure less than 800hPa), this Plasma Display Panel may generate
a low buzzing sound as a result of the difPerence between the interior
and exterior air pressure of the panels. This is not considered a
defect and is not covered under by the Limited Warranty. This
buzzing sound is an inherent characteristic of any Plasma Display
Panel.
2 (us)
Note to CATV system installer
This reminder is provided to call the CATV system installer's
attention to Article 820-40 of the NEC that provides guidelines for
proper grounding and, in particular, specifies that the cable ground
shall be connected to the grounding system of the building, as close
to the point of cable entry as practical.
Use of this television receiver for other than private viewing of
programs broadcast on UHP, VHE, transmitted by cable companies
or satellite for the use of the general public may require
authorization from the broadcaster/cable company and/or program
owner.
NOTIFICATION
This equipment has been tested and found to comply with the limits
for a Class B digital device pursuant to Part 15 of the FCC Rules.
These limits are designed to provide reasonable protection against
harmful interference in a residential installation. This equipment
generates, uses, and can radiate radio frequency energy and, if not
installed and used in accordance with the instructions, may cause
harmful interference with radio communications. However, there is
no guarantee that interference will not occur in a particular
installation. If this equipment does cause harmful interference to
radio or television reception, which can be determined by turning the
equipment off and on, the user is encouraged te Iry Io correct the
interference by one or more of the following measures:
- Reorient or relocate the receiving antennas.
- Increase the separation between the equipment and receiver.
- Connect tl_e equipment into an outlet on a circuit difl_rent from
that to which the receiver is connected.
- Consult the dealer or an experienced radio/FV technician for help.
You are cautioned that any changes or modifications not expressly
approved in this manual could void your warranty and your
authorily to operate this equipment.
Safety
- Operate the TV only on 120 V AC.
- The plug is designed, for safety purposes, to fit into the wall outlet
only one way. If you are unable te insert the plug l_lly into the
oudet, contact your dealer.
- If any liquid or solid object should fall inside the cabinet, unplug
the TV immediately and have it checked by qualified service
personnel before operating it further.
Installing
- To prevent internal heat buildup, do not block the ventilation
openings.
- Do not install the TV in a hot or humid place, or in a place subject
to excessive dust or mechanical vibration.
- The AC power cord is attached to the rear of the TV with hooks.
Do not attempt te remove tl_e cord from these hooks. Doing so
could cause damage to the TV.
Owner's Record
The model and serial numbers are provided on the front of this
instruction manual and at the rear of the TV. Refer to daem whenever
you call upon your Sony dealer regarding this products.
CAUTION
The following SONY appliance(s) for use only with the l_llowing
TV STAND.
Use with other TV STAND is capable of resulting in instability
causing possible injury.
SONY APPLIANCE MODEL NO.
KE-32TS2U
KE-42TS2U
TV STAND MODEL NO.:
SU-TS 1U
SONY ELECTRONICS INC.
Page 3
Important Safeguards
For your protection, please read these il_structions completely, and keep this
mantlal for future reference.
Carefully observe and comply with al! warnings, cautions and il_structions
placed on the set or described in the operating instructions or service
manual.
WARNING
I"o guard against inim'y, the followhlg basic safety precautions should be
observed in the installation, use and servicing of the set.
Use
Power Sources
This set should be operated only from the type of
power source indicated on the serial/model
plate. If you are not sure of the type of electrical
power supplied to your home, consult your
dealer or local power company. For those sets
designed to operate from battery power, wfer to
tile operating instructions.
Grounding or Polarization
This set is equipped with a polarized AC power cord plug (a plug having
one blade wider than the other), or with a three-wire grounding type plug
(a plug having a third pin for grounding). Follow the il_structions below:
For the set with a polarized AC power cord plug
This plug wil! fit into the power outlet only one
way_ This is a safety feature. If you are unable to
insert the plug fully into the outlet, try reversing
tile plug. If the plug still fails to fit, contact your
electrician to have a suitable outlet irtstalled. Do
not defeat the safety purpose of the polarized
plug by forcing it in.
Alternate Warning
For the set with a three-wire grounding type AC plug
This plug will only fit into a grounding-type power €__7-'_ X
outlet. This is a safety feature. If you are unable to [V__* 7 "rl/II[,r_
insert the plug into the outlet, contact your electrician _ }/_
to have a suitab!e outlet installed. Do not defeat the
safety purpose of the grounding plug.
Overloading
Do not overload wall outlets, extension cords or
convenience receptacles beyond their capacity, since this
can result in fire or electric shock.
Always turn the set off when it is not being used. When
the set is left unattended and unused for long periods of
time, unplug it from the wall outlet as a precaution
against the possibility of an internal malfunction that
could create a fieo hazard.
If a snapping or popping sound from a TV set is 9 -
continuous or frequent while the TV is operating, unplug p _':@
tile 'IV and consult your dealer or service technician. It is , _ ,,,
norn_al for some TV sets to make occasional snapping or j'_ -7/: _C
popping sounds, particularly when being turned on or I_41_
off.
Object and Liquid Entry
Never push objects of any kind into the set through the _11_1_,/_
cabinet slots as they may touch dangerous voltage
points or short out parts that could result in a fire or
electric shock. Never spill liquid of any kind on the set.
Cleaning
Unplug tile set from the wall outlet before cleaning
or polishing it. Do not use liquid cleane_ or aerosol
cleaners. Use a cloth lightly dampened with water
for cleaning the exterior of tile set.
Installation
Attachments
Do not use attachments not recommended by the
nlanufacturer, as they may cause hazards.
Water and Moisture
DO not use power-fine opelated sets near water -- for
example, near a bathtub, washbowl, kitchen sink, or
laundry tub, in a wet basement, or near a swimming pool,
etc.
Corrosion
Use of this set near the seashore may subject the set to excessive salt,
corrosion and internal damage and result in deterioration of the seFs
performance. If the set will be subjected to these conditions, steps should be
taken to reduce the humidity and temperature of the area where the set is
located.
Accessories
DO not place the set on an unstable cart, stand, table
or shelf. The set may fall, causing serious injury to a
child or an adult and serious damage to the set. Use
only a cart or stand recommended by Sony for the
specific model of 'IV. No part of the TV set should
overhang any edge of the 'IW cart or stand; any
overhanging edge is a safety hazard. An appliance and
cart combination should be moved with care. Quick
stops, excessive force, and uneven surfaces may cause the
appliance and cart combination to overturn.
®
Ventilation
Ti_e slots and openings in the cabinet and in the back or bottom are
provided for necessary ventilation. To ensure Peliab Ie operation of the set,
and to protect it from overheating, these slots and openings must never be
blocked or covePod.
[] otherNeVermaterials.C°verthe slots and openings with a cloth or _
©
[] Never block the slots and openings by placing the set
on a bed, sofa, rug or other similar surface.
[] Never place the set in a confined space, such as a
bookcase or built-in cabinet, unless proper ventilation
is provided.
[] Do not place the set near or over a radiator or heat
Pogister, or where it is exposed to direct sunlight.
Power-Cord Protection
DO not allow anything to Pest on or roll over the power
cord_ and do not place the set where the power cord is
subject to wear or abuse.
Carrying
This set should only be moved by two or more
people. !f the set needs to be transpor tcKI,it should
be protected to insure that it is not subject to
shock, vibration or excessive force.
Antennas
Outdoor Antenna Grounding
If an outdoor antenna is installed, follow the precautions below. An outdoor
antenna system should not be located in the vicinity of overhead power
lines or other electric light or power circuits, or where it can come in contact
with such power lines or circuits.
WHEN INSTALLING AN OUTDOOR ANTENNA SYSTEM, EXTREME
CARE SHOULD BE TAKEN TO KEEP FROM CONTACTING SUCH
POWER LINES OR CIRCUITS AS CONTACT WITH THEM !S ALMOST
INVARIABLY FATAL.
Be sure the antenna system is grounded so as to provide some protection
against voltage surges and built-up static charges. Section 810 of the
National Electrical Code (NEC) in USA and Section 54 of the Canadian
Electrical Code in Canada provides information with respect to proper
grounding of the mast and supporting sh'ucture, grounding of the lead-in
wire to an antenna discharge unit, size of grounding conductors, location of
antenna discharge unit, connection to grounding electrodes, and
requirements for the grounding electrode.
(us)3
Page 4
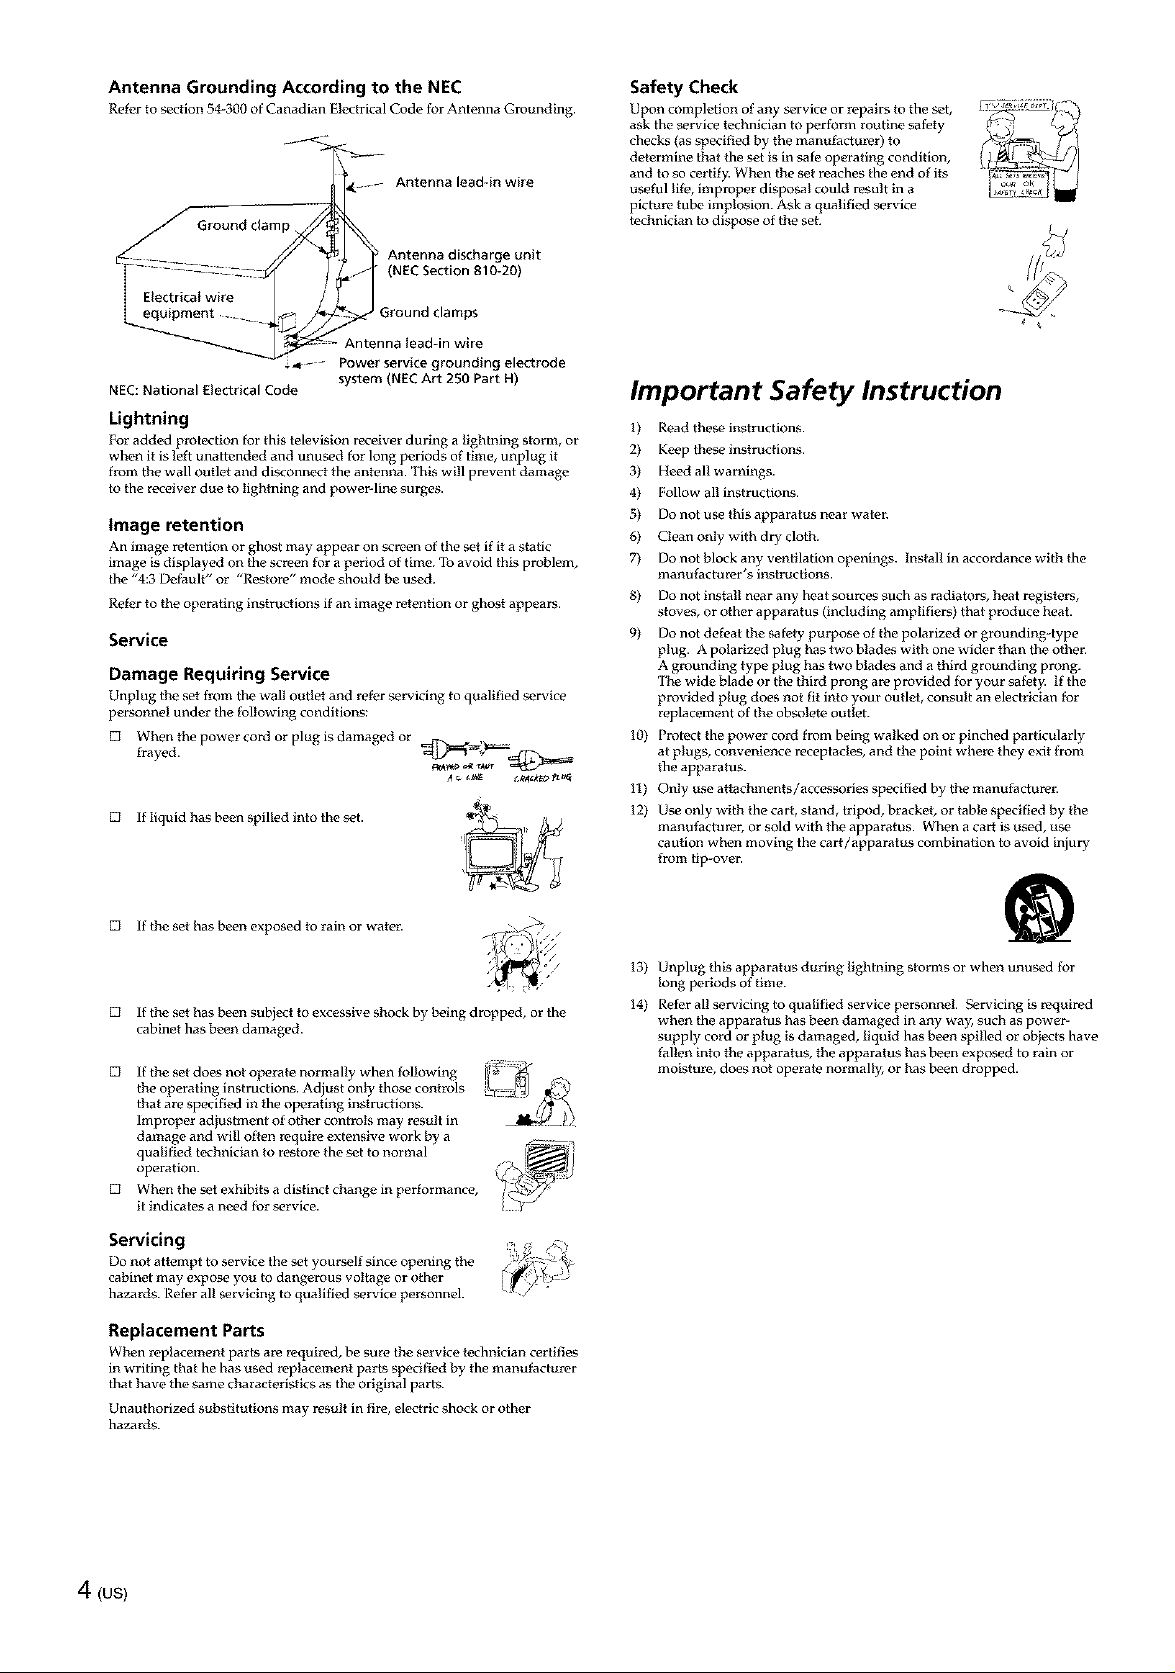
Antenna Grounding According to the NEC
Refer to section 54-300 of Canadian Electrical Code for Antenna Grom_dlng.
._ Antenna lead-in wire
_ 2_-_ (NEC Section 810-20)
" Ground clam/_ i
Electrical wire /
÷_- - Power service grounding electrode
NEC: National Electrical Code
Antenna discharge unit
Ground clamps
- Antenna lead-in wire
system (N£C Art 250 Part H)
Lightning
For added protection for this television receiver durlng a lightning storm, or
when it is left unattended and unused for long periods of time, unplug it
from the wall outlet and disconnect the antenna. This will pwvent damage
to the receiver due to fight nhlg and powePline surges,
Image retention
An image retention or ghost may appear on screen of the set if it a static
image is displayed on the screen for a period of time. ']b avoid this problem,
the "4:3 Default" or "Restore" mode should be used.
Refer to the operating instructions if an image PPtention or ghost appears.
Service
Damage Requiring Service
Unplug the set from the wall outlet and refer servicing to quallfied service
personnel under the following conditions:
[] When the power cord or plug is damaged or
frayed. @_x _
[] If liquid has been spilled into the set.
Safety Check
Upon cOnlpletion of any service or repairs to the set,
ask the service technician to perform routine safoty
checks (as specified by the nlanUfactm_r) to
determine that the set is in safe operating condition,
and to so certify. When the set reaches the end of its
useful life, improper disposal could result in a
picture tube implosion. Ask a qualified service
technician to dispose of the set.
Important Safety Instruction
1) Read these il_structions.
2) Keep these instructions.
3) Heed all warnings.
4) Follow all instructions.
5)
Do not use this apparatus near water.
6)
Clean only with dry cloth.
7)
Do not block any ventilation openings. Install in accordance with the
manufacturer's il_structions.
8) Do not install near any heat sources such as radiators, heat registers,
stoves, or other apparatus (including amplifiers) that produce heat.
9) Do not defeat the safety purpose of the polarized or grounding-type
plug. A polarized plug has two blades with one wider than the other.
A grounding type plug has two blades and a third grounding prong.
The wide blade or tile third prong are provided for your sa fet)a If the
provided plug does not fit into your outlet, consult an elechician for
replacement of the obs_)lete outlet.
10) Protect the power cord from being walked on or pinched particularly
at plugs, convenience receptacles, and tile point where they exit from
the apparatus.
11) Only use attachments/accessories specified by the manufacturer.
12) Use only with the cart, stand, tripod, brackeb or table specified by the
manufacturer, or sold with the apparatus. When a cart is uscKI, use
caution when moving the cart/apparatus combination to avoid injury
from tip-over.
[] If the set has been exposed to rain or water.
[] If the set has been subject to excessive shock by being dropped, or the
cabinet has been damaged.
[] If the set does not operate normally when following
the operating instructions. Adjust only tfiose controls
that are specified in the operating instructions.
Improper adjustment of other controls may result in
damage and will often require extensive work by a
qualified technician to restore the set to normal
operation.
[] When the set exhibits a distinct change in performance,
it indicates a need for service.
Servicing
Do not attempt to service the set yourself since opening the
cabinet may expose you to dangerous voltage or other
hazards. Refor all servicing to qualified service personnel.
Replacement Parts
When replacement parts a_ required, be sure the service technician certifies
in writing that he has used replacement parts specified by the manufacturer
that have the same characteristics as tile original parts.
Unauthorized substitutions may result in fire, electric shock or other
hazards.
13) Unplug thls apparatus during lighh_ing storms or when unused for
long periods of time.
14) Refer all sen, icing to qualified service personnel. ,qervicing is requiped
when the apparatus has be'en damaged in any way, such as power-
supply cord or plug is damaged, liquid has been spilled or obiects have
fallen into the apparatus, the apparatus has been exposed to rain or
moisture, does not operate normally, or has been dropped.
4 (us)
Page 5

Table of Contents
Table of Contents
Installing and Connecting the TV
Unpacking .......................................................... 6
Inserting Batteries into the Remote Control ... 6
Preventing the TV from Falling Down ............ 6
Connector Types ................................................ 7
Identifying Front and Rear Connectors .......... 8
Basic Connections (Connecting Cable TV or
Antenna) ........................................................ 9
Connecting directly to cable or an antenna ...... 9
Cable box connections .............................. 9
Connecting a VCR and Cable ........................ 10
Connecting a Satellite Receiver ...................... 11
Connecting a Satellite Receiver with a VCR.... 12
Connecting an Audio Receiver ....................... 13
Connecting a DVD Player with
Component Video Connectors .................. 14
Connecting a DVD Player with
A/V Connectors .......................................... 15
Setting the Video Inputs .................................. 32
Operating Video Equipment with Your TV
Remote Control .......................................... 33
Programming the remote control ............ 33
Operating optional equipment ................. 35
Using Favorite Channels ................................. 36
Setting your favorite channels ................. 36
Watching Favorite Channel .................... 37
Adjusting Your Setup
Adjusting the Picture Size_usition ................ 38
Using the Picture Control Mode Option ....... 39
Using the Sound Control Option .................... 41
Selecting Stereo or Bilingual Programs ......... 43
Using the Parental Control Feature ............... 43
Activating the Parental Control feature ..... 44
Selecting a Custom Rating ...................... 46
What the Ratings Mean .................................. 48
Connecting a Digital Satellite Receiver ......... 16
Connecting a Digital TV Receiver ................. 17
Connecting a Sub Woofer ............................... 18
Connecting an RGB Equipment .................... 19
Setting the Channels ........................................ 20
Selecting the On-screen Menu Language ...... 22
Watching the TV
Watching the TV ............................................. 23
Watching with closed caption ................. 24
Enjoying High-quality Pictures and Sounds .... 25
Selecting the Picture Mode ............................. 26
Selecting the Effect Mode ............................... 27
Saving the Power Consumption ..................... 28
Using the Wide Screen Mode ......................... 29
Changing the Wide Screen Mode
automatically ...................................... 29
Ratings in the U.S.A ............................... 48
Ratings in Canada ................................... 49
Adjusting Advanced AV Setting Options ...... 51
Using the Timer
Turning Off the TV Automatically ................ 54
Setting the Current Time ................................ 55
Controlling Power On/Off Automatically ..... 56
Additional Information
Troubleshooting ............................................... 58
Self-diagnosis function ........................... 58
Trouble symptoms and remedies ............ 59
Specifications ................................................... 61
Index ................................................................. 62
Changing the Wide Screen Mode
manually ............................................. 30
Changing the Wide Setup ....................... 30
(us) 5
Page 6
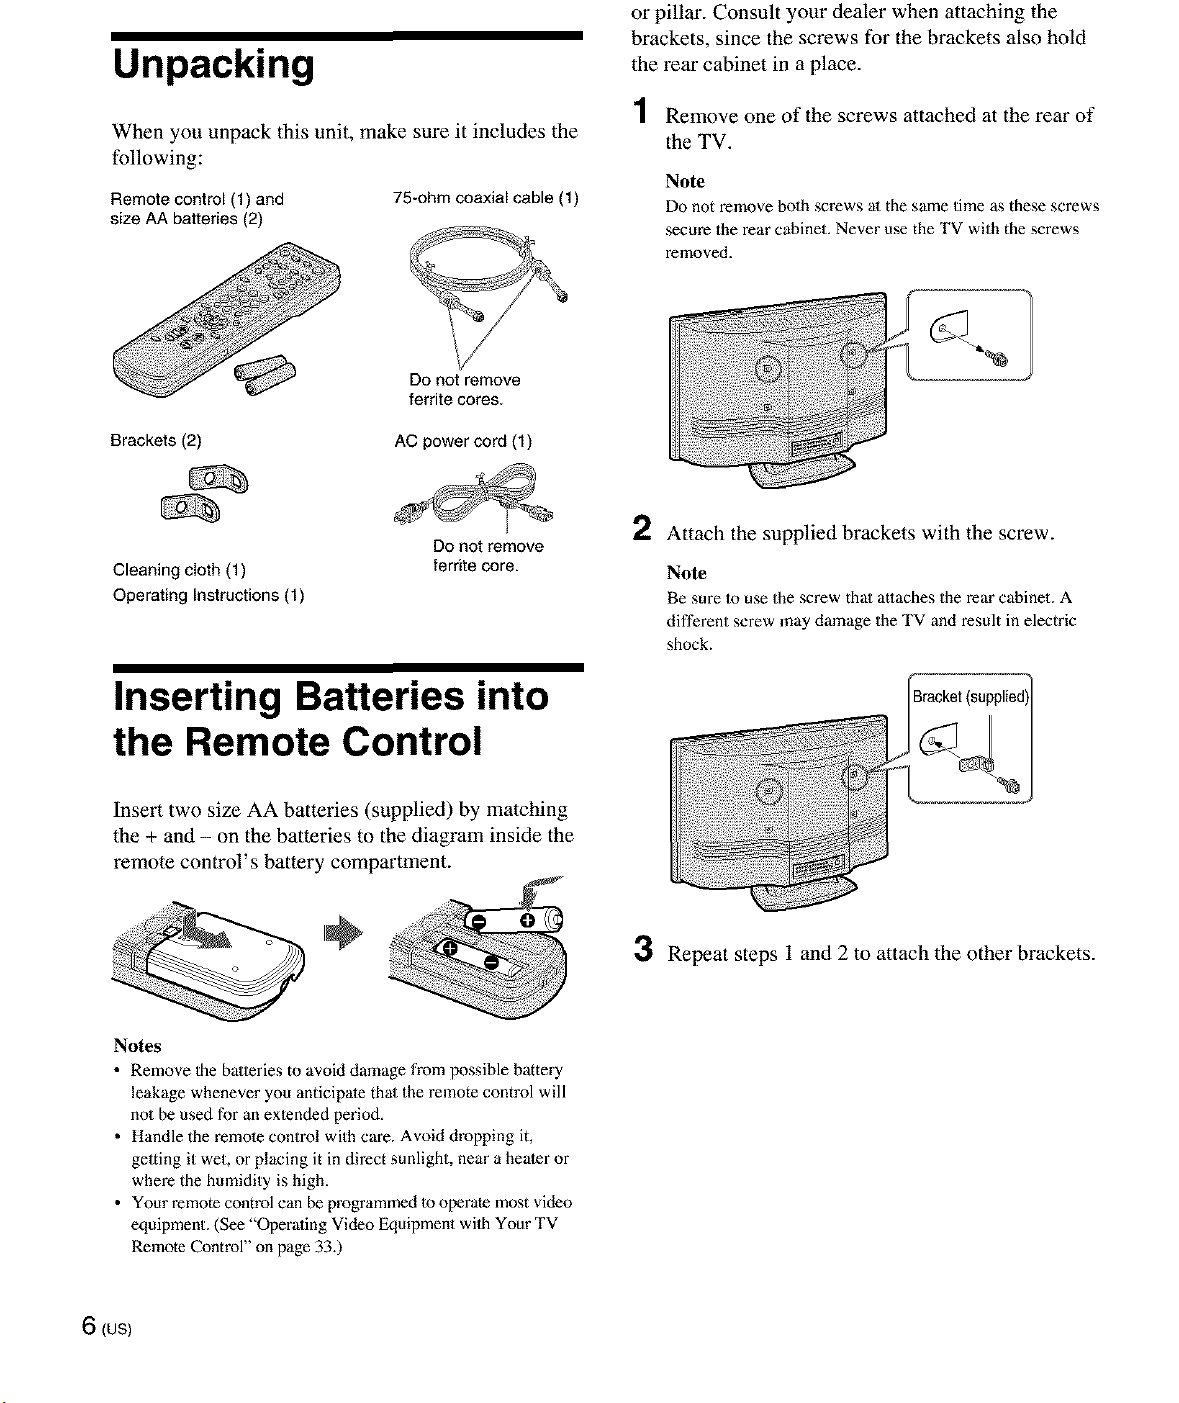
Unpacking
or pillar. Consult your dealer when attaching the
brackets, since the screws for the brackets also hold
the rear cabinet in a place.
When you unpack this unit, make sure it
following:
Remote control (1) and
size AA batteries (2)
Brackets (2)
Cleaning cloth (1)
Operating Instructions (1)
75-ohm coaxial cable (1)
Do not remove
ferrite cores.
AC power cord (1)
DOnot remove
fertile core.
includes the
Remove one of the screws attached at the rear of
the TV.
Note
Do not remove bolh screws al the same lime as these screws
secure the rear cabinet. Never use the TV with the screws
removed.
2 Attach the supplied brackets with the screw.
Note
Be sure Io use the screw thai atlaches the rear cabinet. A
different screw may damage the TV and result in electric
shock.
Inserting Batteries into
the Remote Control
Insert two size AA batteries (supplied) by matching
the + and - on the batteries to the diagram inside the
remote control's battery compartment.
Notes
• Remove Ihe balleries to avoid damage from possible battery
leakage whenever you anticipale thai the remote control will
no1 be used for an exlended period.
• Handle the remole control with care. Avoid dropping it,
geaing it wet, or placing it in direct sunlight, near a healer or
where the hmnidity is high.
• Your remote control can be programmed 1o operate most video
equipment. (See "Operaling Video Equipment wilh Your TV
Remote Control" on page 33.)
3 Repeat steps 1 and 2 to attach the other brackets.
6(us)
Page 7
Installing and Connecting the TV
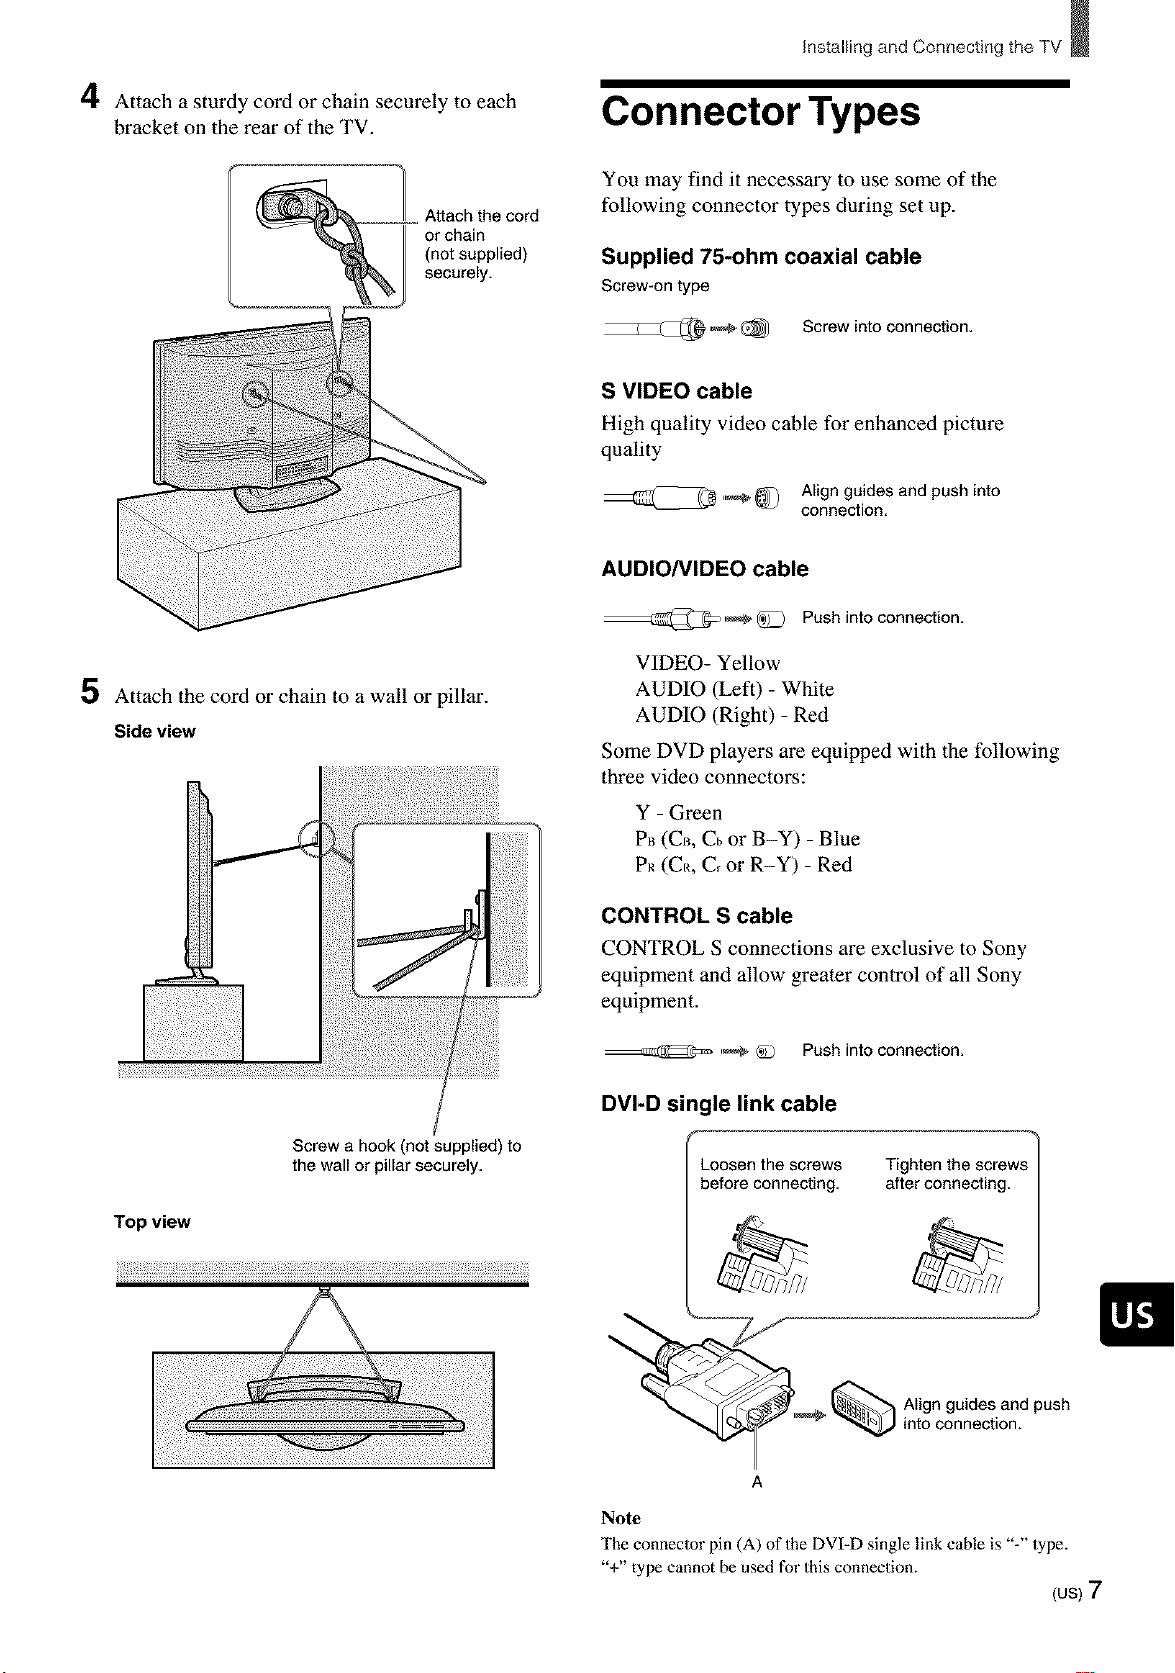
4 Attach a sturdy cord or chain securely to each
bracket on the rear of the TV.
Attach the cord
or chain
(not supplied)
securely.
5 Attach the cord or chain to a wall or pillar.
Side view
Connector Types
You may find it necessary to use some of the
following connector types during set up.
Supplied 7f-ohm coaxial cable
Screw-on type
Screw into connection.
S VIDEO cable
High quality video cable for enhanced picture
quality
Align guides and push into
connection.
AUDIO/VIDEO cable
--@,_ @ Push into connection.
VIDEO- Yellow
AUDIO (Left) - White
AUDIO (Right) - Red
Some DVD players are equipped with the following
three video connectors:
Screw a hook (not supplied) to
the wall or pillarsecurely.
Top view
iiiiii!iii!i!ii!i!¸I;I¸ii!iiiill¸I¸;I¸i;i_;!i;'ii!i!i_i!ii_il¸i!i_!i!:;!;il¸i!i!!il¸i!i;iii!i;;ii:;!i¸I!II¸i!i!!il¸i!i;iii!i;;ii:;!i¸I!II¸i!i!!il¸i!i;iii!i;;ii:;!i¸I!II¸i!i!!il¸i!i;iii!i;;ii:;!i¸I!II¸i!i!!il¸i!i;iii!i;;ii:;!i¸I!II¸i!i!!il¸i!i;iii!i;;ii:;!i¸I!II¸i!i!!il¸i!i;iii!i;;ii:;!i¸I!II¸i!i!!il¸i!i;iii!i;;ii:;!i¸I!II¸i!i!!il¸i!i;iii!i;;ii:;!i¸I!II¸i!i!;¸ii_i
Y - Green
Pl_(CB, Cb or B-Y) - Blue
PR (C_, C, or R-Y) - Red
CONTROL S cable
CONTROL S connections are exclusive to Sony
equipment and allow greater control of all Sony
equipment.
'_ *N-) Push into connection,
DVI-D single link cable
Loosen the screws
before connecting.
Tighten the screws
after connecting.
Align guides and push
into connection.
A
Note
The connector pin (A) of the DVI-D single link cable is "-" type.
+ type cannot be used fo" this connection.
(us)7
Page 8
Installing and Connecting the TV
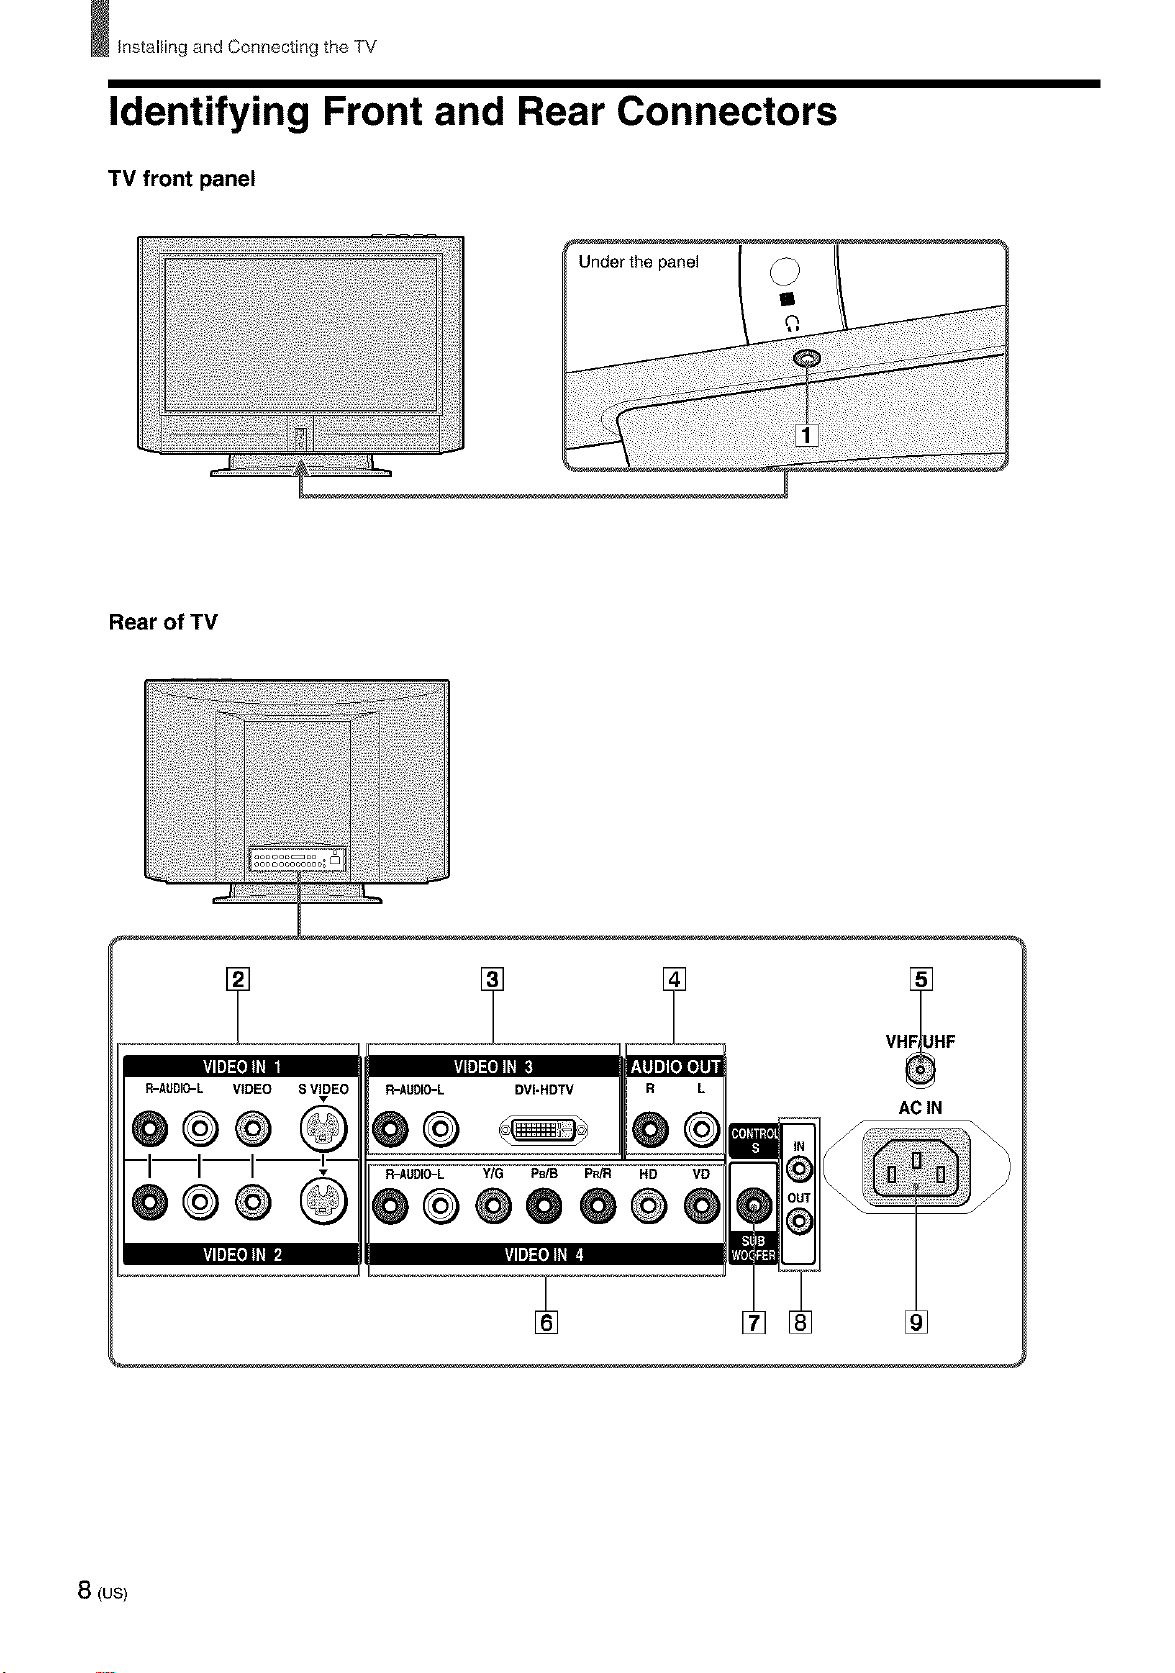
Identifying Front and Rear Connectors
TV front panel
Rear of TV
@@@
@@@
8 (us)
rll'l'_'ll I
R--AUDIO--L VIDEO S V_EO
I I I '
Page 9
[] Headphones jack
Connects to your headphones.
If your headphones do not match the jack, use a
suitable plug adaptor (not supplied).
[] VIDEO IN 1, 2 (pages 10 - 12, 15)
Connects to the output jacks of your VCR or
other video equipment.
[] VIDEO IN 3 (DVI-HDTV connector and
AUDIO (R/L) jacks) (page 16)
Accommodates a copy-protected digital
connection (HDCP*) to other devices (such as
digital set-top boxes) that have DVI-HDTV. The
DVI-HDTV input terminal is compliant with the
EIA-861 standard and is not intended for use
with personal computers. See the instruction
manual that came with your equipment for
details about connecting and using it with the
TV.
* High-bandwidth Digital Conlent Protection
[] AUDIO OUT (page 13)
Connects to the input jacks of your audio
equipment.
[] VHF/UHF (pages 10 - 12)
Connects to your VHF/UHF antenna or cable.
[] VIDEO IN 4
AUDIO (L/R) input jacks (pages 14, 17, 19):
Connects to the audio output jacks of your DVD
player or RGB equipment.
Y/G, PB/B, P_R, HD, VD input jacks:
Connecting a DVD player (page 14) or a Digital
TV Receiver (page 17)
Connect with component video connectors (Y/
CdCR, Y/B-Y/R-Y or Y/PdPR) to the Y/G, PB/
B, PR/R jacks on the TV.
Connecting an RGB equipment (page 19)
Connect the RGB equipment's video/
synchronized signal output terminal to the Y/G,
PB/B, PR/R, HD and VD jacks on the TV.
[] SUB WOOFER (page 18)
Connects to the input jack of your sub woofer.
[] CONTROL S IN/OUT
To control other Sony equipment with the TV's
remote control,** connect the CONTROL
S IN jack of the equipment to the CONTROL S
OUT jack of the TV with the CONTROL S
cable.
To control the TV with a remote control for
another Sony equipment, connect the CONTROL
S OUT jack of the equipment to the CONTROL
S IN jack on the TV with the CONTROL S
cable.
** Only when the TV is turned on, or the STANDBY/
SLEEP indicator lights up in red. When the TV is turned
off (the STANDBY/SLEEP indicalor goes off), you
cannot use 1his function.
[] AC IN
Connects the supplied AC power cord.
Installing and Connecting the TV
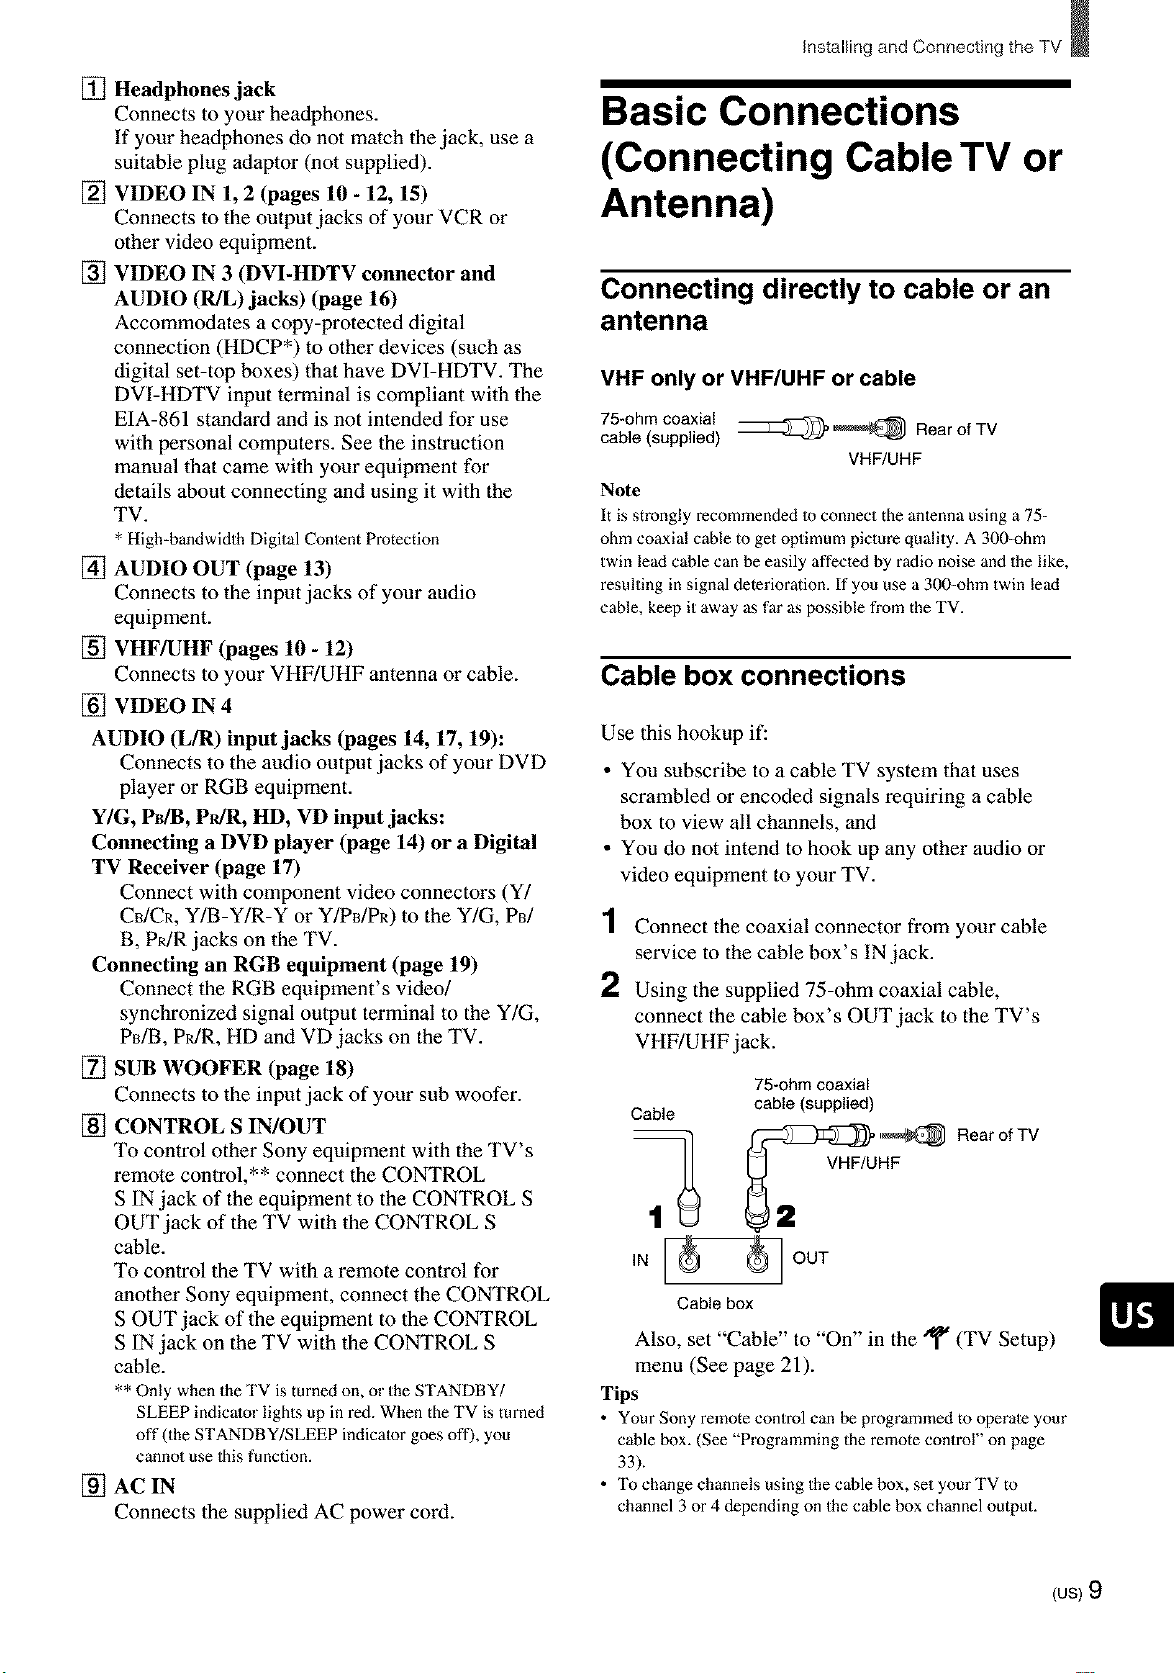
Basic Connections
(Connecting Cable TV or
Antenna)
Connecting directly to cable or an
antenna
VHF only or VHF/UHF or cable
75-ohm coaxial
cable (supplied) _'_ Rear of TV
VHF/UHF
Note
It is strongly recommended 1o connect the anlenna using a 75-
ohm coaxial cable to get oplimum picture quality. A 300-ohm
twin lead cable can be easily affecled by radio noise and the like,
resulting in signal deterioration. If you use a 300-ohm twin lead
cable, keep it away as far as possible from the TV.
Cable box connections
Use this hookup if:
• You subscribe to a cable TV system that uses
scrambled or encoded signals requiring a cable
box to view all channels, and
• You do not intend to hook up any other audio or
video equipment to your TV.
1 Connect the coaxial connector from your cable
service to the cable box's IN .jack.
2 Using the supplied 75-ohm coaxial cable,
connect the cable box's OUT .jack to the TV's
VHF/UHF jack.
75-ohm coaxial
Cable
IN _ OUT
Cable box
Also, set "Cable" to "On" in the _' (TV Setup)
menu (See page 21).
Tips
• Your Sony remote control can be programmed to operale your
cable box. (See "Programming the remote control" on page
33).
• "I_ change channels using the cable box, set your TV to
channel 3 or 4 depending on the cable box channel output.
cable (supplied)
_:J_)=_ ,_ Rear of TV
(us)9
Page 10
Installing and Connecting the TV
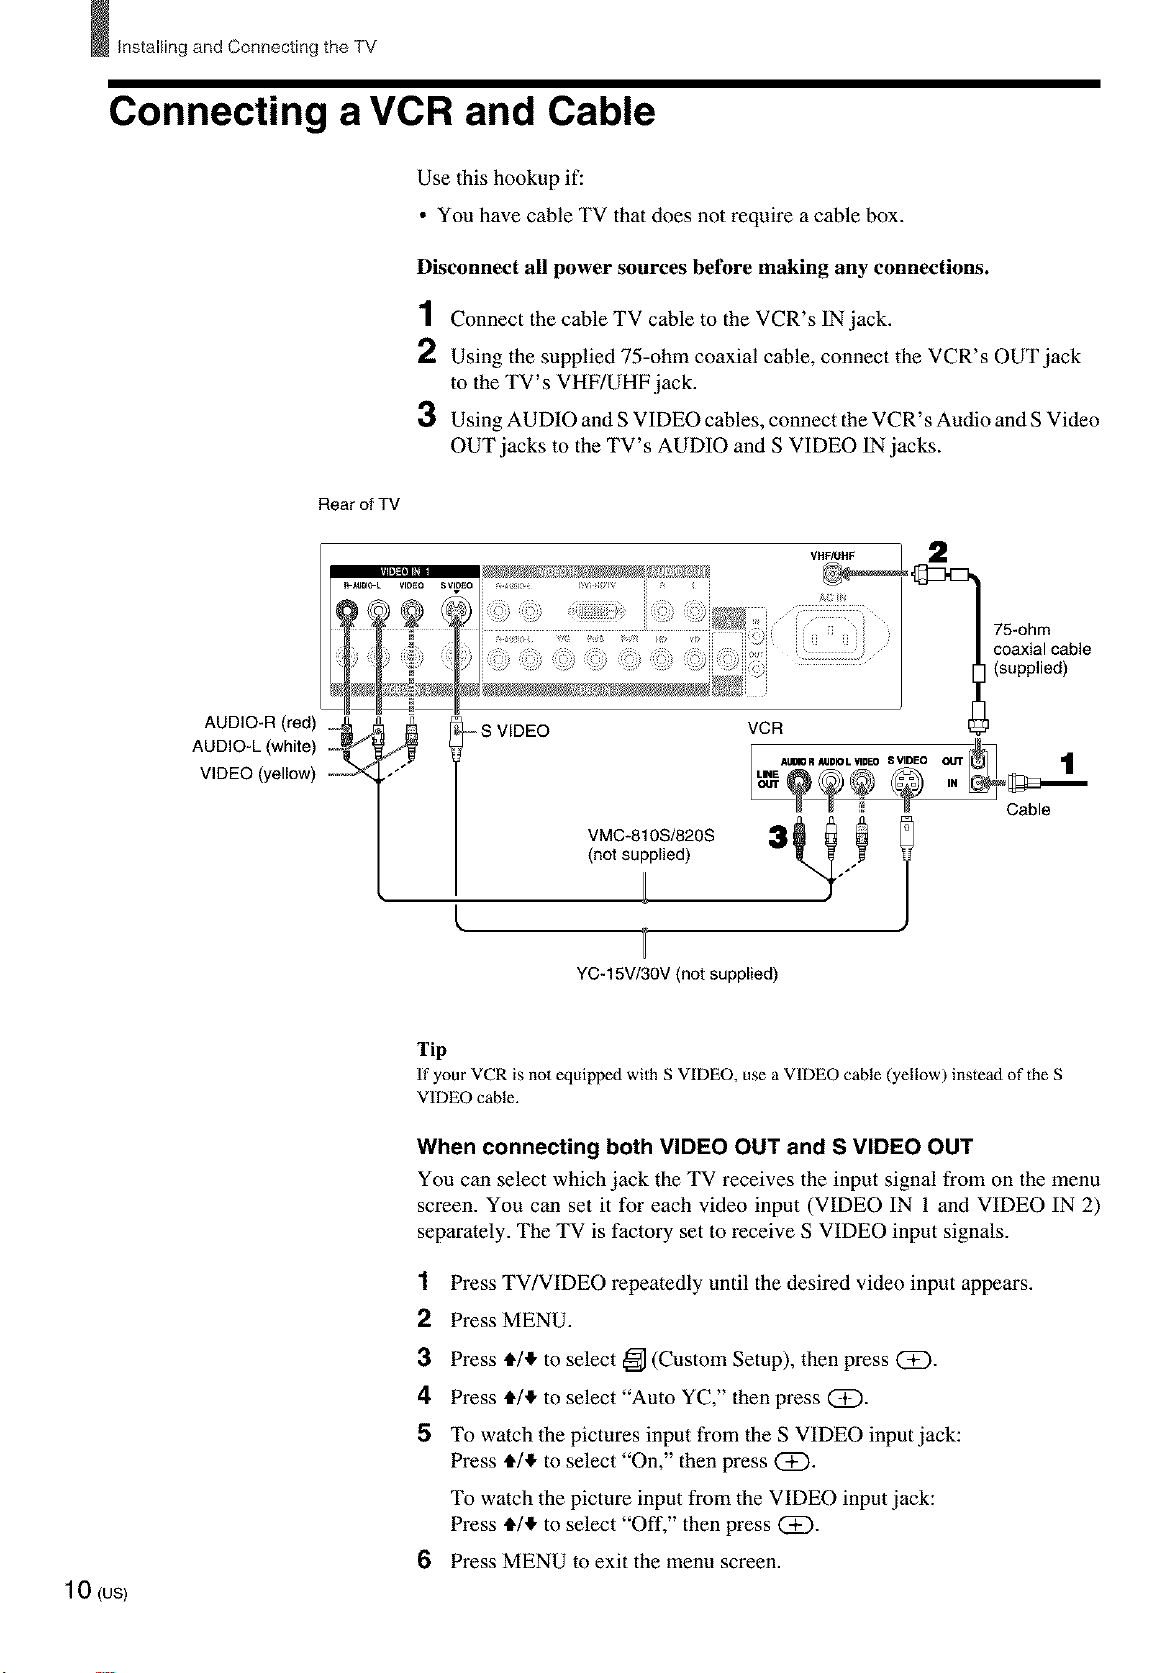
Connecting a VCR and Cable
Use this hookup if:
• You have cable TV that does not require a cable box.
Disconnect all power sources before making any connections.
1 Connect the cable TV cable to the VCR's IN.jack.
2 Using the supplied 75-ohm coaxial cable, connect the VCR's OUT.jack
to the TV's VHF/UHF jack.
3 Using AUDIO and S VIDEO cables, connect the VCR' s Audio and S Video
OUT jacks to the TV's AUDIO and S VIDEO IN jacks.
Rear of TV
75-ohm
coaxial cable
(supplied)
AUDIO-L (white)
AUDIO-R (red) !!_
VIDEO (yellow)
--S VIDEO VCR
VMC-810S/820S
(not supplied)
YC-15V/30V (not supplied)
Tip
If your VCR is not equipped with S VIDEO, use a VIDEO cane (yellow) instead of the S
VIDEO cane.
When connecting both VIDEO OUT and S VIDEO OUT
You can select which jack the TV receives the input signal from on the menu
screen. You can set it for each video input (VIDEO IN 1 and VIDEO IN 2)
separately. The TV is factory set to receive S VIDEO input signals.
1 Press TV/VIDEO repeatedly until the desired video input appears.
10 (us)
2 Press MENU.
3 Press tt/,l, to select _ (Custom Setup), then press (_).
4 Press tt/,l, to select "Auto YC," then press (i).
5 To watch the pictures input from the S VIDEO input jack:
Press tt/,l, to select "On," then press C_).
To watch the picture input from the VIDEO input jack:
Press tt/,l, to select "Off," then press (Z).
6 Press MENU to exit the menu screen.
Page 11
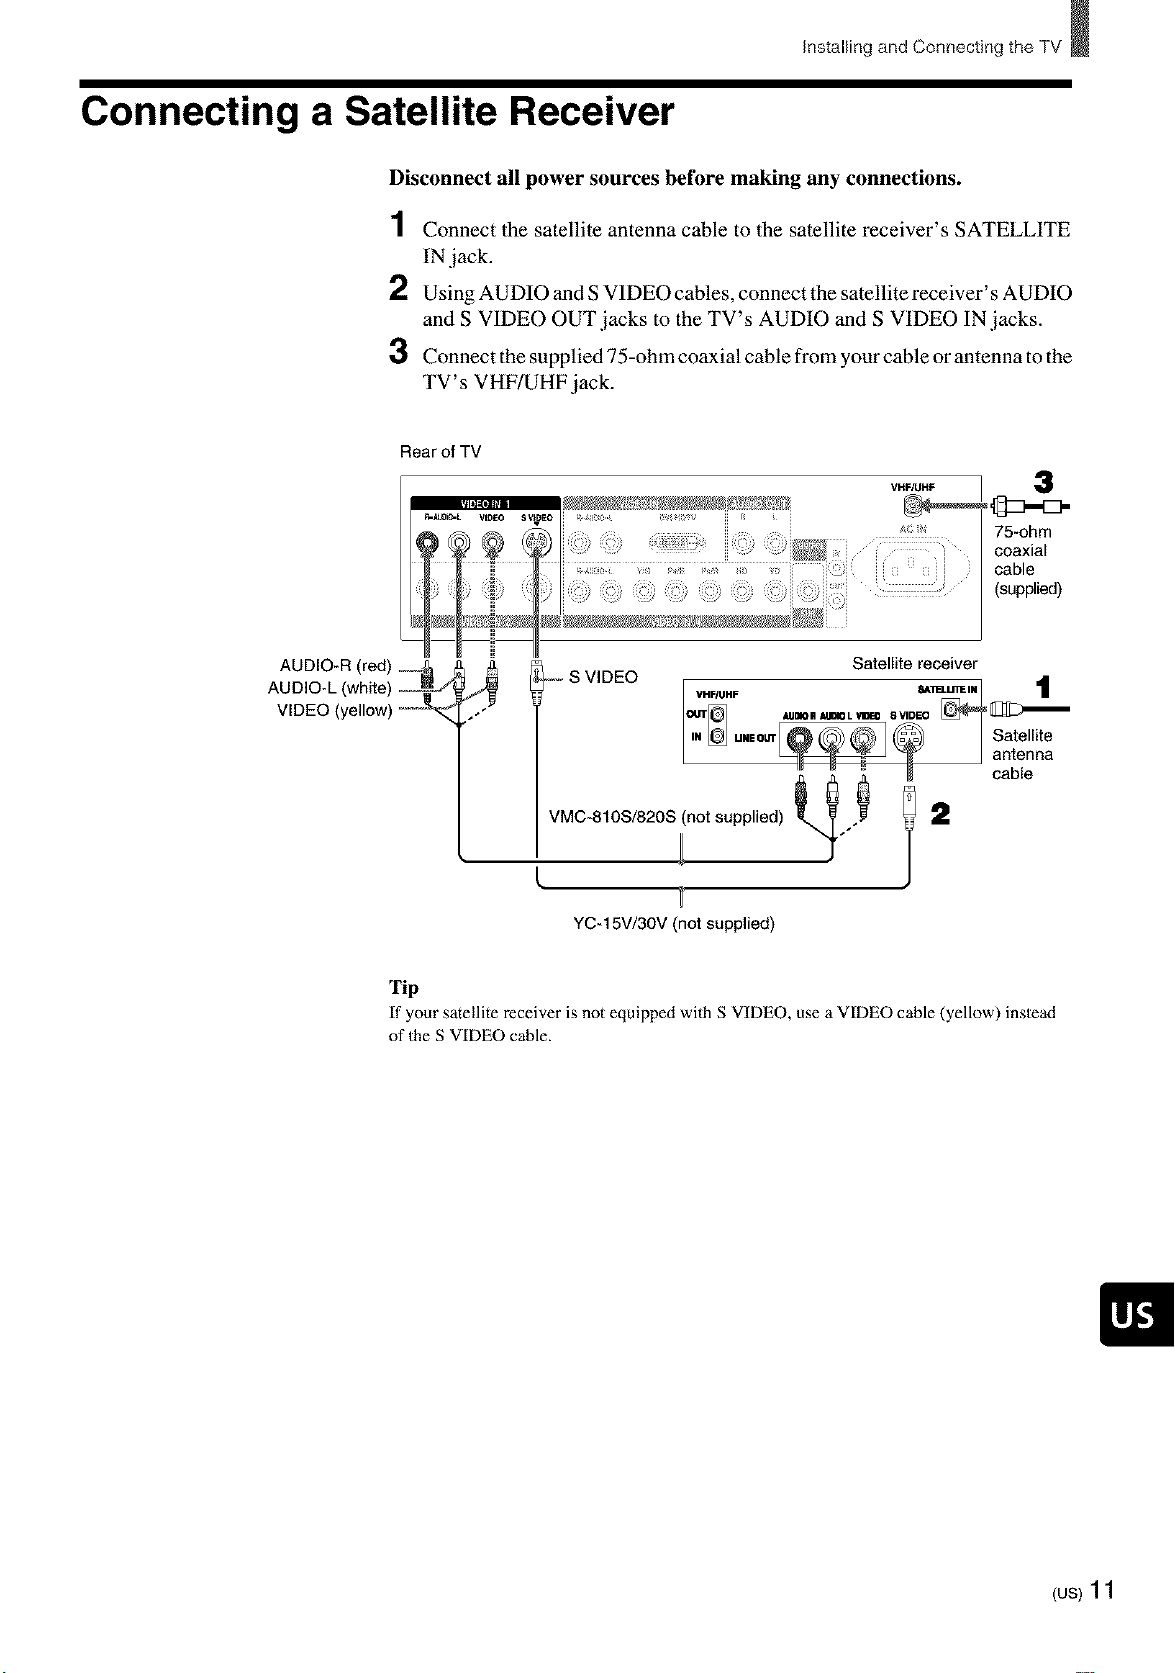
Connecting a Satellite Receiver
Disconnect all power sources before making any connections.
1 Connect the satellite antenna cable to the satellite receiver's SATELLITE
IN jack.
2 Using AUDIO and S VIDEO cables, connect the satellite receiver's AUDIO
and S VIDEO OUT jacks to the TV's AUDIO and S VIDEO IN jacks.
3 Connect the supplied 75-ohm coaxial cable from your cable or antenna to the
TV' s VHF/UHF jack.
Rear of TV
Installing and Connecting the TV
VHF_HF
3
75-ohm
coaxial
cable
(supplied)
AUDIO-L (white)
AUDIO'R (red) i_
VIDEO (yellow)
Satellite receiver
_-- S VIDEO V.FlU.F _-_ t
.. _ u..our_ _ | Satellite
_ _ | antenna
_ _ _ " cane
[VMC'SlOS/820Sln°tsupplied)_/'7_ I 2
YC-15V/30V (not supplied)
Tip
If your satellite receiver is not equipped with S VIDEO. use a VIDEO cable (yellow) instead
of the S VIDEO cable.
(us)11
Page 12
Installing and Connecting the TV
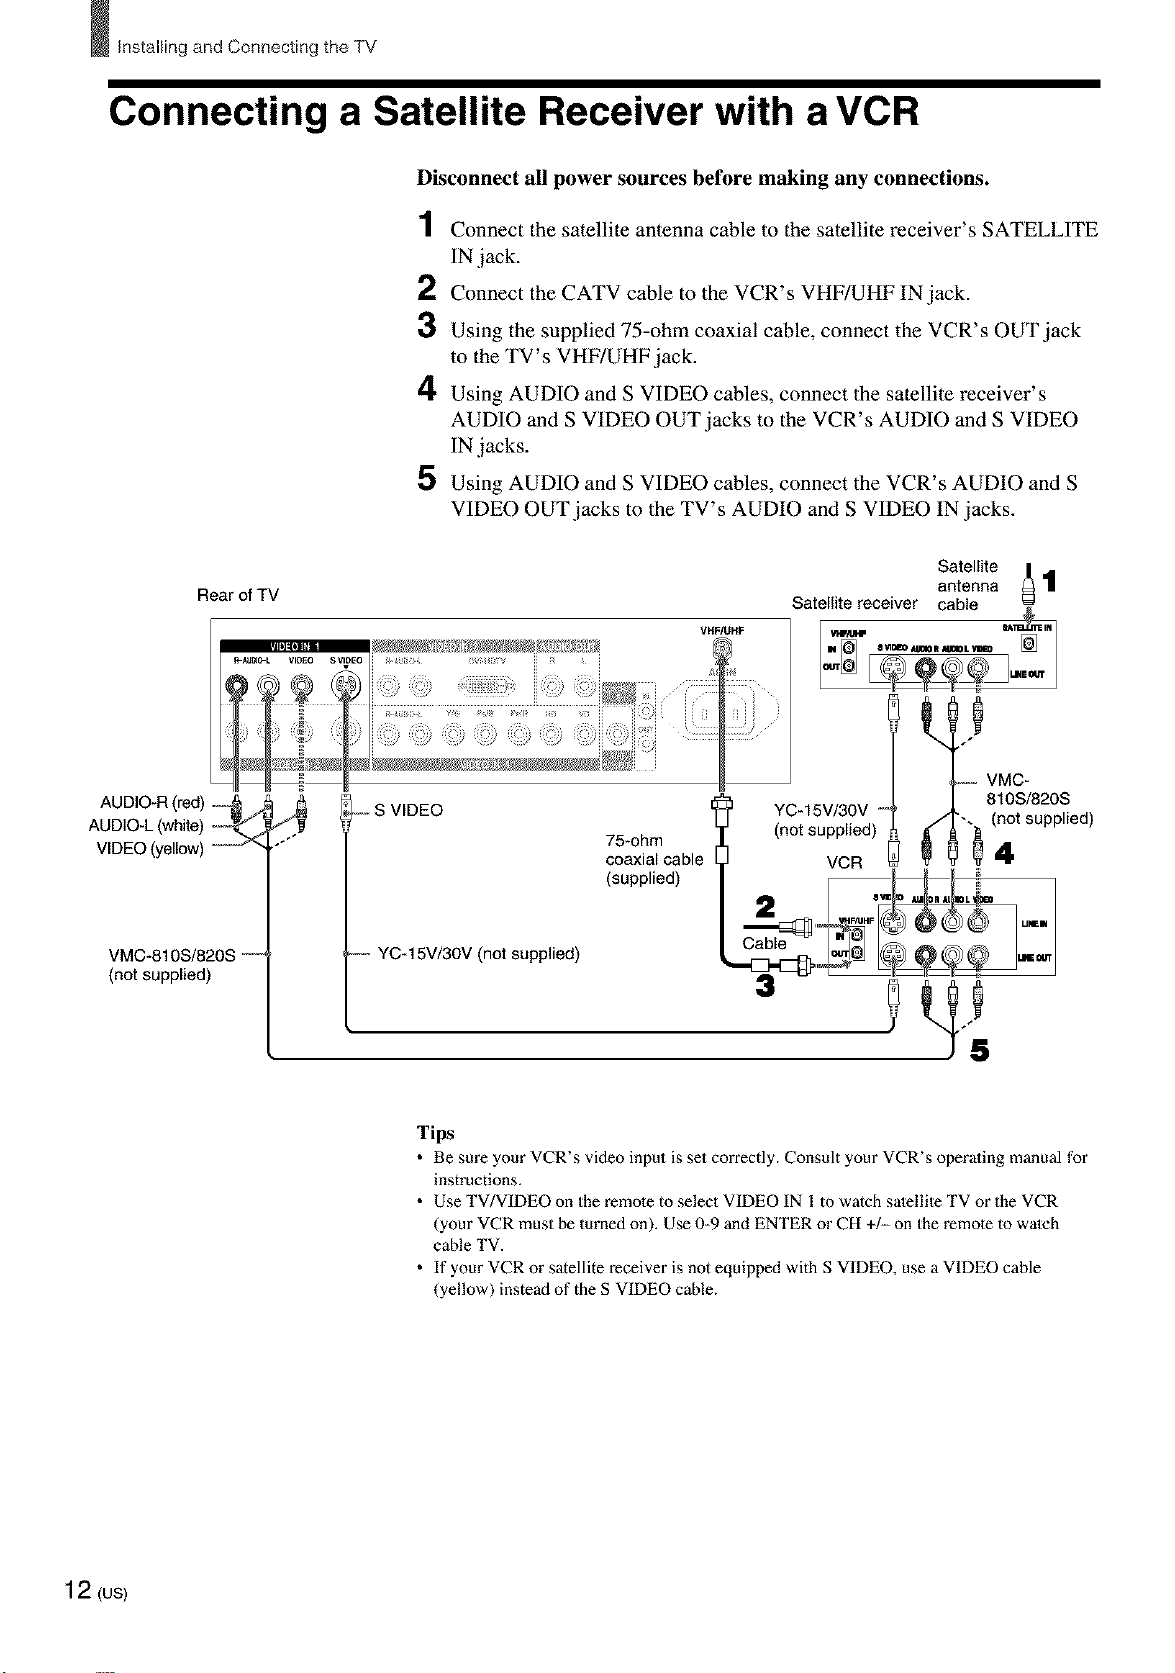
Connecting a Satellite Receiver with a VCR
Disconnect all power sources before making any connections.
1 Connect the satellite antenna cable to the satellite receiver's SATELLITE
IN jack.
2 Connect the CATV cable to the VCR's VHF/UHF IN jack.
3 Using the supplied 75-ohm coaxial cable, connect the VCR's OUT jack
to the TV's VHF/UHF jack.
4 Using AUDIO and S VIDEO cables, connect the satellite receiver's
AUDIO and S VIDEO OUT jacks to the VCR's AUDIO and S VIDEO
IN jacks.
5 Using AUDIO and S VIDEO cables, connect the VCR's AUDIO and S
VIDEO OUT jacks to the TV's AUDIO and S VIDEO IN jacks.
Rear of TV
VH_UHF
Satellite receiver cable
I %"
Satellite |
antenna _ 1
AUDIO-R (red) __A ,
AUDlO-L(white)-_-_ *'_
VIDEO (yellow) _ _" """
VMC-810S/820S -°-
(not supplied)
•-- S VIDEO
-_- YC-15V/30V (not supplied)
Tips
• Be sure your VCR's video input is set correctly. Consult your VCR's operating manual for
instructions.
• Use TV/VIDEO on the remote to select VIDEO IN 1 to watch satellile TV or the VCR
(your VCR must be turned on). Use 0-9 and ENTER or CH +1- on the remole to watch
cable TV.
• If your VCR or satellite receiver is not equipped with S VIDEO, use a VIDEO cable
(yellow) instead of the S VIDEO cable.
75-ohm
coaxial cable
(supplied)
(not supplied)
YC-, 5V/30V d. _t supplied )
VCR
12 (us)
Page 13

Connecting an Audio Receiver
Disconnect all power sources before making any connections.
Using an AUDIO cable, connect the TV's AUDIO OUT jacks to the audio
receiver's AUDIO IN jacks.
Rear of TV
Installing and Connecting the TV
AC _
i S
/@--_ AUDIO-L
(white)
_- RK-74A
(not supplied)
Audio
input [_
Audio reciever (Compact
AV system DAV-C990, etc)
1::::::::::::::::=3
When using your audio system speakers
Set "Speaker" to "Off" on the _ (Custom Setup) menu. The TV's sound is
not output through the TV's speakers.
Tip
The sound signal of an equipment connected to the VIDEO IN 4 jacks is also output through
the AUDIO OUT jacks. Note that the video signal is not output.
Note
Even though you change the TV's volume or other sound settings, the sound of your audio
system does not change.
(us)13
Page 14
Installing and Connecting the TV
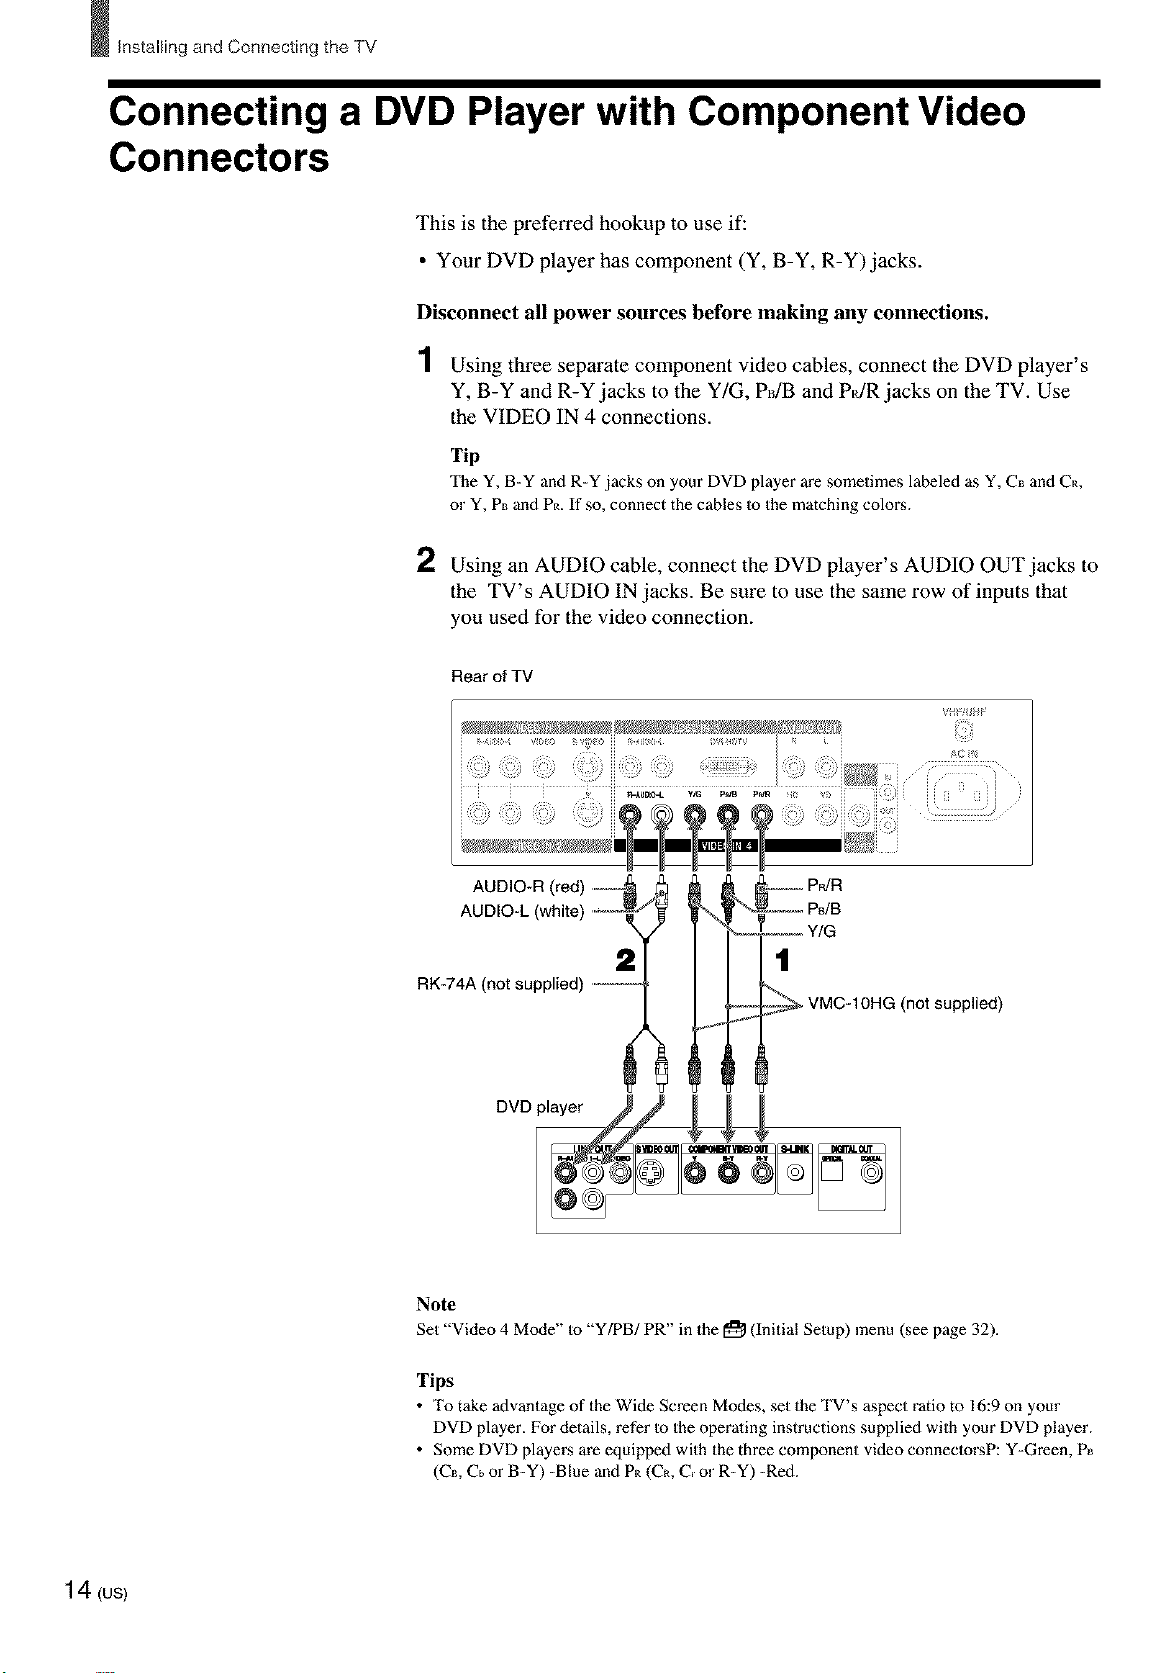
Connecting a DVD Player with Component Video
Connectors
This is the preferred hookup to use if:
• Your DVD player has component (Y, B-Y, R-Y) jacks.
Disconnect all power sources before making any connections.
1 Using three separate component video cables, connect the DVD player's
Y, B-Y and R-Y jacks to the Y/G, PdB and PUR .lacks on the TV. Use
the VIDEO IN 4 connections.
Tip
The Y, B-Y and R-Y jacks on your DVD player are sometimes labeled as Y, C_ and C_,
or Y, Pr_and P_. If so, connect the cables to the matching colors.
2 Using an AUDIO cable, connect the DVD player's AUDIO OUT jacks to
the TV's AUDIO IN jacks. Be sure to use the same row of inputs that
you used for the video connection.
Rear of TV
RK-74A (not supplied) ----_
PdB
Y/G
2
t
,----_ _ VMC-IOHG (not supplied)
j_.f
tt
14 (us)
Note
Set "Video 4 Mode" to "Y/PB/PR" in the [_ (Initial Setup) menu (see page 32).
Tips
• To take advantage of the Wide Screen Modes, set the TV's aspect ratio to 16:9 on your
DVD player. For details, refer Io the operaling instructions supplied with your DVD player.
• Some DVD players are equipped with the three component video conneclorsP: Y-Green, P_
(CI_, C_ or B-Y) -Blue and P_ (C_, C, or R-Y) -Red.
Page 15
Installing and Connecting the TV
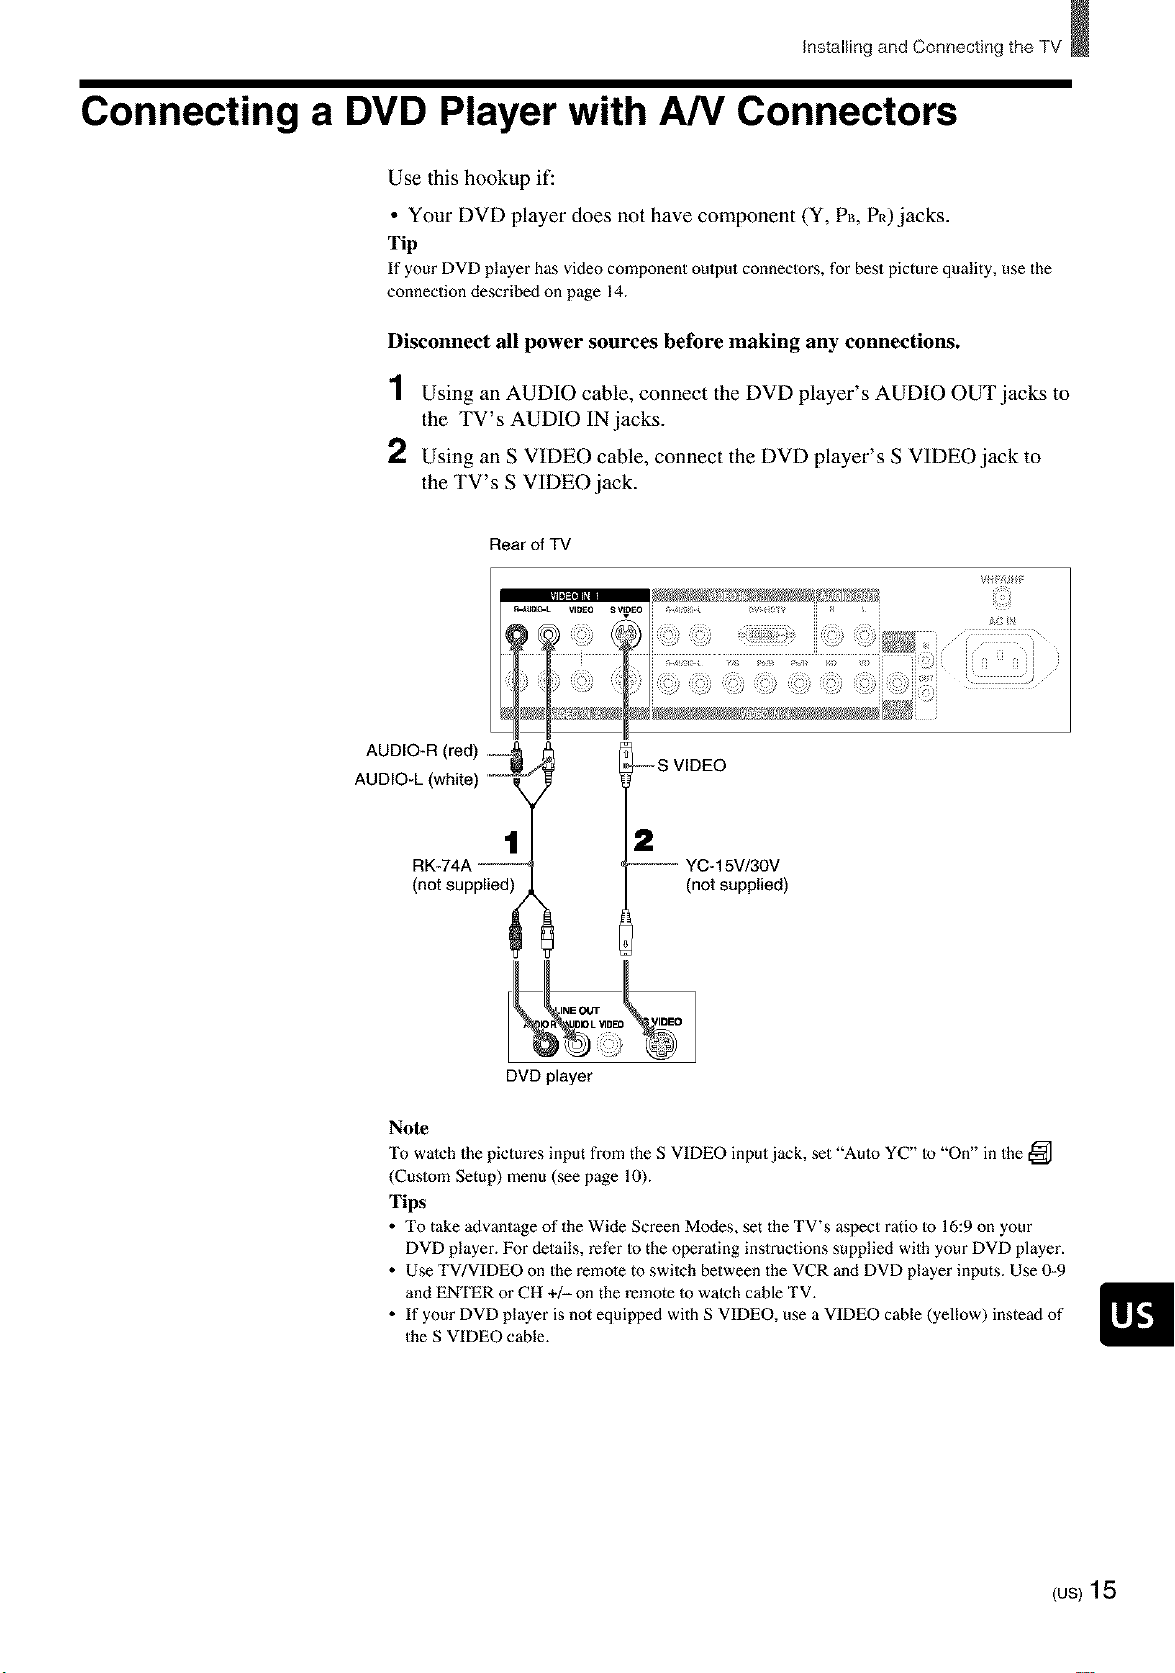
Connecting a DVD Player with A/V Connectors
Use this hookup if:
• Your DVD player does not have component (Y, P_, P_0 jacks.
Tip
If your DVD player has video component oulput conneclors, for best picture quality, use the
connection described on page 14.
Disconnect all power sources before making any connections.
1 Using an AUDIO cable, connect the DVD player's AUDIO OUT jacks to
the TV's AUDIO IN jacks.
2 Using an S VIDEO cable, connect the DVD player's S VIDEO jack to
the TV's S VIDEO jack.
Rear of TV
AUDIO'R (red) -_-_I
AUDIO-L (white) --_
t
RK-74A ---_-"
(not supplied i
,_ R I0 L _IDEO VIDEO
DVD player
Note
"I% watch the pictures input from the S VIDEO input jack, set "Aulo YC" Io "On" in the
(Cuslom Setup) menu (see page 10).
Tips
• To take advantage of the Wide Screen Modes, set the TV's aspect ratio Io 16:9 on your
DVD player. For details, refer Io the operaling inslructions supplied with your DVD player.
• Use TV/VIDEO on the remote to swilch between the VCR and DVD player inputs. Use 0-9
and ENTER or CH +/- on the remote Io walch cable TV.
• If your DVD player is not equipped with S VIDEO, use a VIDEO cable (yellow) instead of
the S VIDEO cable.
"-o S VIDEO
2
_-_-_-_-_YC-15V/30V
(not supplied)
(us)15
Page 16

Installing and Connecting the TV
Connecting a Digital Satellite Receiver
Disconnect all power sources before making any connections.
1 Using a DVI-D singe link cable, connect the Digital Satellite Receiver's
DVI-HDTV OUT connector to the TV's DVI-HDTV IN connector.
Note
DVI-HDTV connection or component video (Y, Pt_,P_) connection is necessary m view 480p,
720p, and 1080i formats. Nole that this TV displays all formal types of picture in a resolution
of 852 dots x 1024 lines (KE-32TS2U), or 1024 x 1024 (KE-42TS2U).
2 Using an AUDIO cable, connect the Digital Satellite Receiver's Audio
OUT jacks to the TV's AUDIO IN jacks.
Note
The DVI-HDTV connector does not provide audio, so audio cables must be connected to
provide sound.
Rear of TV
AUDIO-R (red)-_-_
Digital Satellite Receiver ---_
AUDIO-L
(SAT-HD200)
(white)
= I
RK-74A (not supplied)
-_ DVI-D single link cable
(not supplied)
16 (us)
Page 17
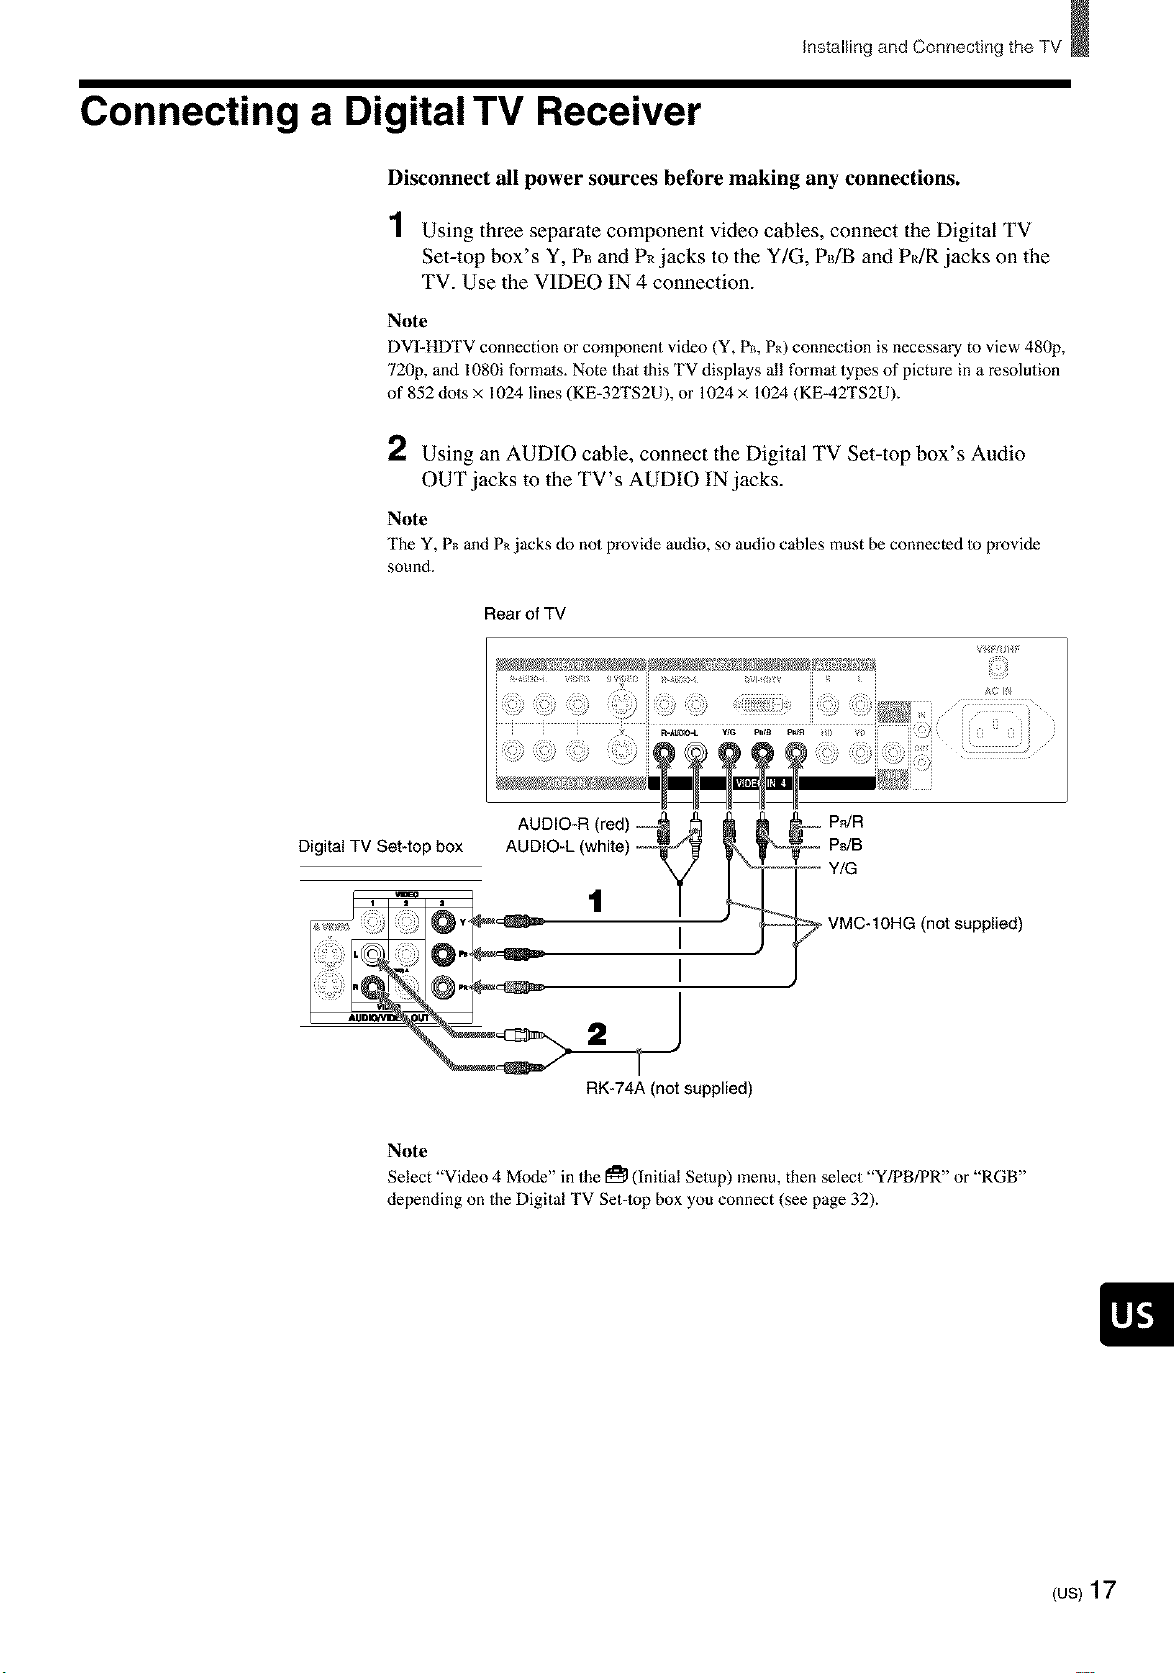
Connecting a Digital TV Receiver
Disconnect all power sources before making any connections.
1 Using three separate component video cables, connect the Digital TV
Set-top box's Y, P_ and PRjacks to the Y/G, PdB and P[JR jacks on the
TV. Use the VIDEO IN 4 connection.
Note
DVI-HDTV connection or component video (Y, P_, P_) connection is necessary to view 480p,
720p, and 1080i formals. Note that1his TV displays all formal types of picture in a resolution
of 852 dots x 1024 lines (KE-32TS2U), or 1024 × 1024 (KE-42TS2U).
2 Using an AUDIO cable, connect the Digital TV Set-top box's Audio
OUT jacks to the TV's AUDIO IN jacks.
Note
The Y, P_ and P_ jacks do not provide audio, so audio cables must be connected to provide
sound.
Rear of TV
Installing and Connecting the TV
Vi4f/J/_F
Digital TV Set4op box
Note
Select "Video 4 Mode" in the [_ (Initial Setup) nenu, then select Y/PB/PR or RGB
depending on the Digital TV Set-top box you connect (see page 32).
VMC-10HG (not supplied)
2
RK-74A (not supplied)
(us)17
Page 18
Installing and Connecting the TV
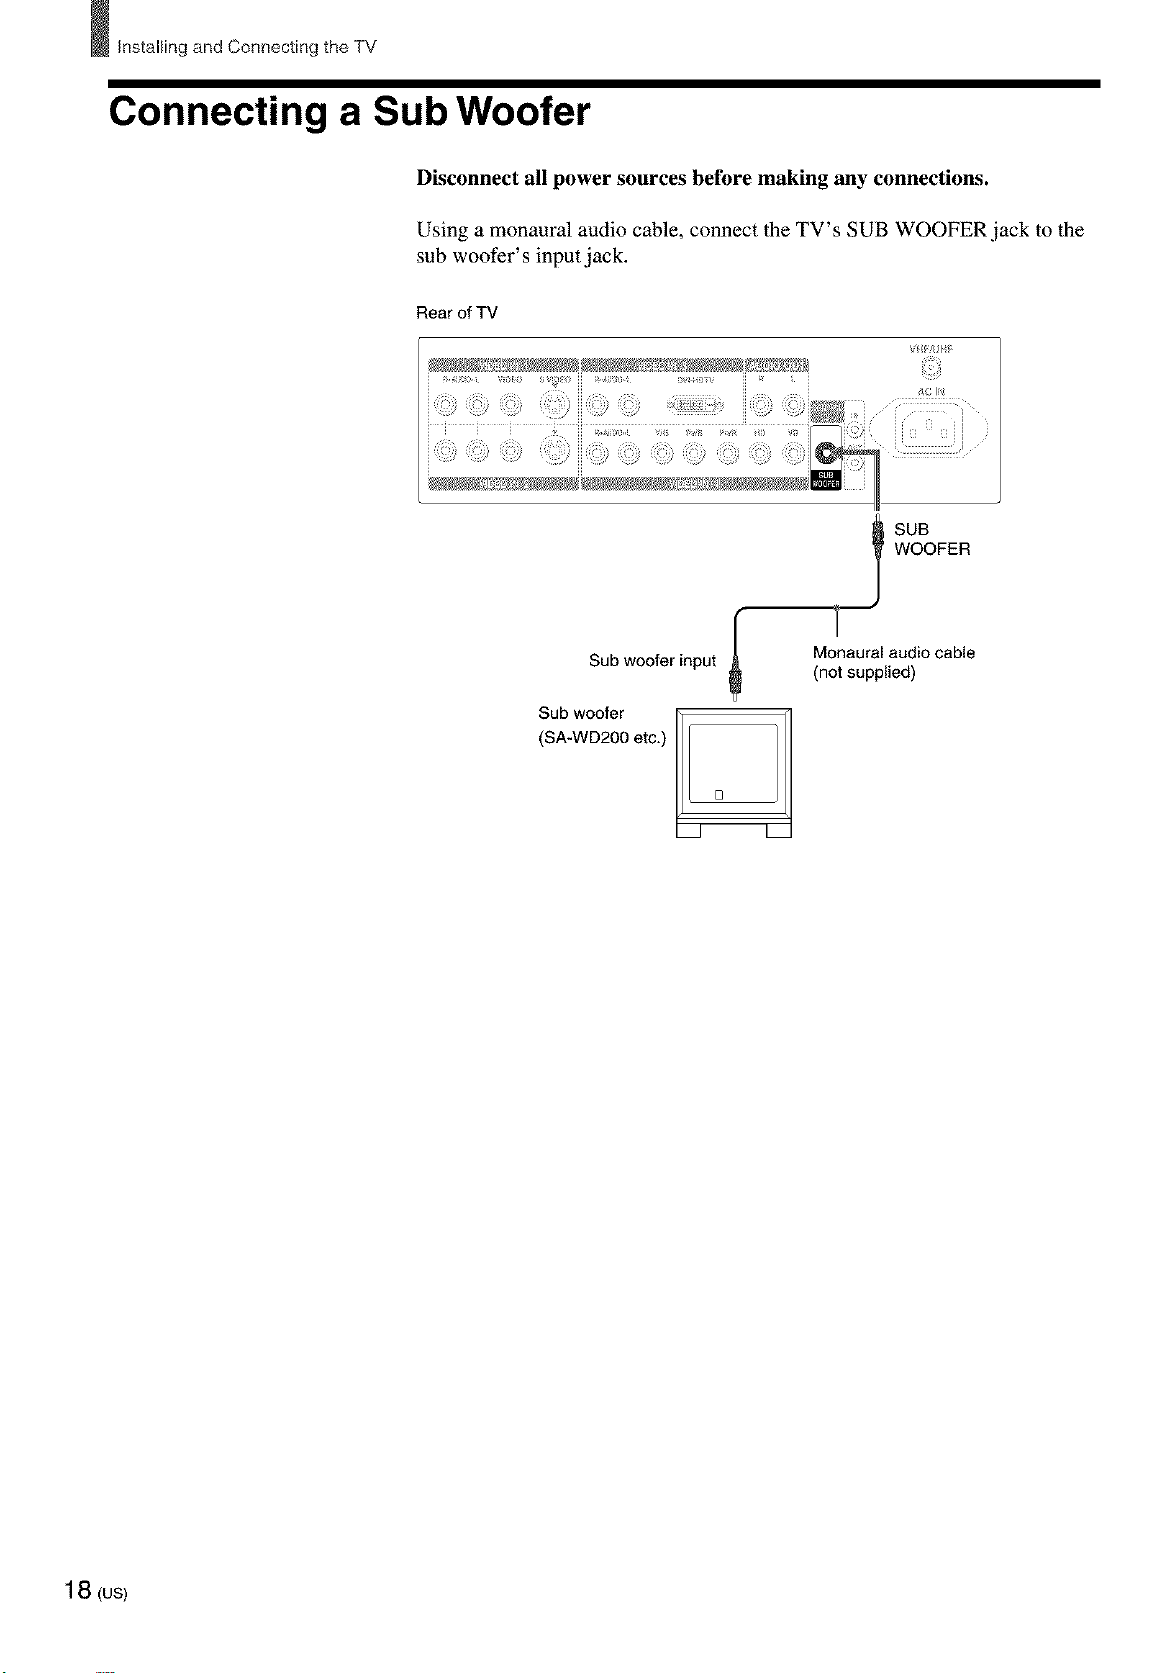
Connecting a Sub Woofer
Disconnect all power sources before making any connections,
Using a monaural audio cable, connect the TV's SUB WOOFER .jack to the
sub woofer' s input.jack.
Rear of TV
=
WOOFER
t SUB
Sub woofer input
Sub woofer
(SA-WD200 etc.)
r
G
Monaural audio cable
(not supplied)
L
18 (us)
Page 19
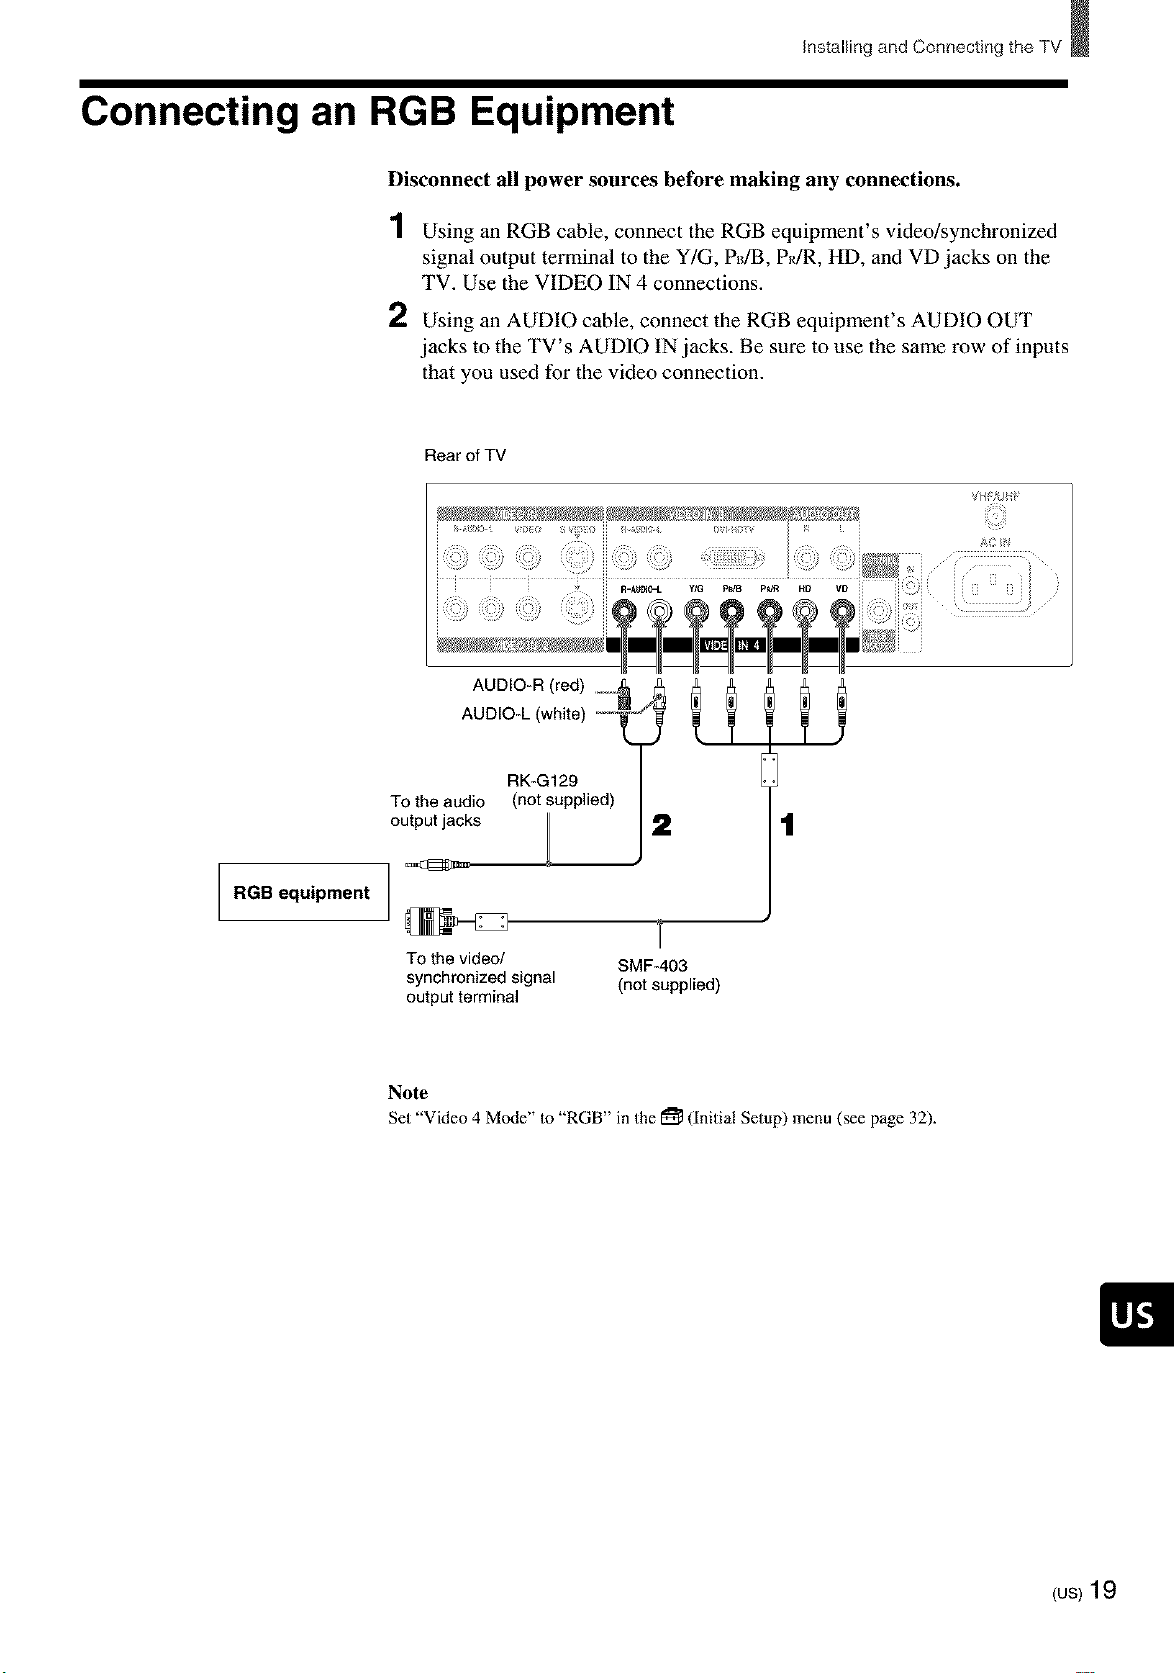
Connecting an RGB Equipment
Disconnect all power sources before making any connections.
1 Using an RGB cable, connect the RGB equipment's video/synchronized
signal output terminal to the Y/G, PUB, P_/R, HD, and VD jacks on the
TV. Use the VIDEO IN 4 connections.
2 Using an AUDIO cable, connect the RGB equipment's AUDIO OUT
jacks to the TV's AUDIO IN jacks. Be sure to use the same row of inputs
that you used for the video connection.
Rear of TV
Installing and Connecting the TV
RGB equipment
AUDIO-L (white)
AUDIO-R(red) _ _ 1
RK-G129
TOthe audio (not supplied)
2
To the video/ SMF-403
synchronized signal (not supplied)
output terminal
Note
Set "Video 4 Mode" to "RGB" in the [_ (Initial Setup) menu (see page 32).
(us)19
Page 20

Installing and Connecting the TV
Setting the Channels
After you finish connecting your TV, you can run
Auto Program to set up your channels. The Auto
Program screen appears when you turn your TV on
for the first time after installing it.
To change or skip channels, see page 21.
Note
The Auto Program feature does not apply for an installation that
uses a cable box for aH channels.
1 Press Power on the front panel of your TV. The
Auto Setup menu appears.
Auto Setup
Auto Program:[CH+]
Exit [OH-]
First please connect
cable/antenna
2 Press CH+ on the remote control or on the front
panel of your TV to perform Auto Program.
To perform Auto Program again
1 PressMENU.
2 Press 41./,I.to select _" (TV Setup), then press
3 Press 41./,I.to select "Auto Program," then press
4 Press */,1_ to select "OK," then press _).
"Auto-Channel Set" appears and the TV starts
scanning and presetting channels automatically.
When all the receivable channels are stored, the
lowest numbered channel will be displayed, then
the '_ (TV Setup) menu appears.
5 Press MENU to exit the menu screen.
To cancel Auto Program
While "Auto-Channel Set" appears in step 4, press
MENU on the remote.
20(us)
2
Page 21

Installing and Connecting the TV
To watch CATV channels
You have to subscribe to a cable TV company. Note
that cable TV cannot be received in some areas. This
TV receives 1-125 cable TV channels. For details on
cable TV subscription, consult your nearest cable TV
company.
1 Press MENU.
2 Press i_/t_ to select "_" (TV Setup), then press
(5£).
3 Press i_/t_ to select "Cable," then press (Z)-
4 Press tF/t_ to select "On," then press (Z)-
5 Perform steps 3 and 4 on page 20.
Note
You cannot receive and set the CATV channels and UHF
channels at the same time.
When you have a cable box or satellite receiver
connected
The Channel Fix feature is useful when you have a
cable box or satellite receiver connected. For details,
see page 53.
To skip channels
You can skip unnecessary channels when selecting
channels using the CH +/- buttons.
1 Press MENU.
2 Press t_/_ to select fi*"(TV Setup), then press
GD.
3 Press t_/tJ, to select "Channel Skip/Add," then
press (Z)-
• _1 2_Skip
] _,_ to select, _,S to
set
3_Add
4:SkiP
5:Add
6:Skip
7:Add
8:Add
4 Press t_/tJ, to select the channel you want to skip,
then press (_).
t_ _hannel SkiD/Add
m_l 2:Skip
1:Skip
3:Add
] _,_ to elect, press
to retL n
Example: Select this
to skip channel 5.
5 Press _/_ to select"Skip,"then press(_).
;hannel Skiu/Add
m 2:Skip
_) 8:Add
] _,_ to select, _,_ to
set
1:Skip
3:Add
6:Skip
7:Add
If you want to re-enter the skipped channel,
select "Add."
6 Press MENU to exit the menu screen.
(us)21
Page 22

Selecting the On-screen
Menu Language
Yon can select the language to be displayed in all
menu.
1 Press MENU.
pie_l_r_/R_und _rH rn_
MENU
Picture Mode :
Adiust Picture
_ IAdiust Sound Liv Rrn I
Q
•_ _,N to select, _,N to
enter adj menu
2 Press 4q!!, to select [_ (Initial Setup), then press
@.
nitial Setup
_ENU Function : On/Off
E
m 3olor System :
•_ _,[] to select, _,N to
sel
3 Press _/! to select"Language,"then press@.
Initial Setup
Q
[]
._ _,_ to select, press_
to return
4 Press ¢/! to select your preferred language, then
press@.
IF16(l[aae initial
Syst couleur :
Fonction MENU :Mar/art
[9 pour regler
•_ _,_ pour s_lectionner,
5 Press MENU to exit the menu screen.
22 (us)
Page 23

Watching the TV
@
STANDBY/
SLEEP
When the STANDBY/SLEEP indicator goes off, press
POWER on the TV.
2
Select the desired channel using the 0-9 and
ENTER buttons.
Press 0-9 to select a channel, the channel
changes after 2 seconds. Press ENTER to select
immediately.
Use the CH +/- buttons to scan through the
channels.
OH
or
1
JUMP
Tip
When you press and hold CH + or - the channel nmnber
will change rapidly.
3 Adjust the volume using the VOL +1- buttons.
VOL
Other button operations
Press To
MUTING mute the sound. Press again or press
VOL + to restore sound.
SYSTEM OFF turn off the TV and all other Sony
equipment.
DISPLAY display the current channel number.
Press again to turn display off,
The channel display will automalically
disappear after a few minutes.
To display the channel again, press
again.
JUMP jump back and forth between two
channels. The TV alternates between 1he
current channel and the last channel
selected using the 0-9 buttons.
3
Tips
• While the STANDBY]SLEEP indicator is lit, the TV turns on
aulomalically if you press the 0-9 and ENTER buttons or CH
+]- buttons on the remote.
• You can adjust 1he volume by referring 1o the value beside 1he
volume indicalion (on screen).
(Continued)
(us)23
Page 24

Watching the TV
Watching with closed caption
You can display Caption Vision if the broadcaster
offers this service.
[]
Press [] repeatedly until the desired Caption Vision
appears.
Each time you press the button, Caption Vision
changes as follows:
Select To
Off turn off Caplion Vision.
CC 1(Caplure 1), display a prinled version of the
CC2 (Caplure 2) dialogue or sound effects of a
program. (The mode should be
set 1o CCI (Capture 1) for
most programs.)
Textl, Text2 display network/stalion
informalion presented using
either half or the whole screen.
Tip
You can select Caption Vision on the menu screen. Select
Caption Vision in the _] (Custom Setup) :qenu, then select
the desired Caption Vision.
24 (us)
Page 25

Enjoying High-quality
Pictures and Sounds
To enjoy high-quality pictures and sound, refer to the
following and adjust the picture and audio options to
best suit the program you are watching.
When watching TV
Set Picture Mode to "Standard" (page 26)
To adjust the picture quality
Select "Liv. Rm." (Living Room) and adjust the oplions,
referring to the following (See page 39).
• Adjust "Brightness" and "Contrast" according to the light
conditions in your room.
First, adjust the brightness. Note thai increasing "Brightness"
too much whitens black color. Next, adjust the contrast. If
"Contrast" is reduced and there is little difference between
bright and dark areas, increase "Gamma Correct." (Gamma
Correetioo).
• lf antenna reception level istoolow, the picture maybe noisy.
In this case, increase "Noise Reduet." (Noise Reduction). If
the picture is still noisy, decrease "Sharpness" to reduce any
noise.
• Set "Cine Motion" to "Off" excepl when watching movies.
Set Sound Mode to "Standard" (page 26)
To adjust the sound quality
Select "Liv. Rm." (Living Room) and adjust the oplions,
referring to the following (See pages 27, 41 ).
• Adjust "Treble" and "Bass" to your taste.
• Set "Effect" as follows:
- When watching news: "Off"
- When watching music programs: "Hall"
- "I%add a surround-like effect to mono programs: "SimuL"
(Simulated).
Note
If "Aulo Shutoff" is activated (page 53), the TV changes to the
standby mode aulomalieally when there is no broadcast. You can
prevent the TV from remaining on even if you fall asleep.
Watching the TV
When watching movies on videotapes or
DVD
Set Picture Mode to "Movie" (page 26)
To adjust the picture quality
Select "Movie" and adjust the oplions, referring 1o the following
(See page 39).
• Set "Cine Molion" to "Auto" for smoothest presentalion of
movies on screen (24 frame per second).
• If there is too much noise when watching a rental videolape,
increase "Noise Reduct." (Noise Reduction). If the picture is
still noisy, decrease "Sharpness" to reduce noise.
• To enjoy high-level picture quality of DVD, increase
"Sharpness" to a degree where the picture appears clear, but
not overly sharp (See page 40).
Set Sound Mode to "Movie" (page 26)
To adjust the sound quality
Select "Movie" and adjust the oplions, referring to the following
(See page 27).
• For surround sound, set "Effect" to "TS" (TruSurround) (See
page 27).
Tip
Caplion Vision is displayed if you activate the Closed Caption
feature (See page 24).
Notes on Image Retention
If the [_-[i_] images (below) are displayed for an extended
period of time, image relention (afterimage) in areas of the
screen may result due to the characteristics of the Plasma
Display Panel. It is possible to reduce image retention by
following steps _'_-['i].
Situations which can result in burn-in and picture
retention
[] Black bars at the top and bottom that appear with wide video
source (Letter box picture)
[] Black bra's to the left and right that appem" with 4:3 video
source (conventional TV broadcast)
[] Video game sources
[] DVD on-screen menu displays
[] On-screen menus, channel numbez_s,etc., of connected
equipment such as DSS, Cable box, video decks, etc.
Precautions to avoid/reduce burn-in and picture
retention
[] Use the automatic orbiting Screen Saver function.
[] Avoid displaying channel numbers, on-screen menus etc. of
connected equipment such as DSS, Cable box, video decks,
etc. "I_ erase channel nmnbers, on-screen menus, refer to the
user manual of connected equipment.
[] Reduce brightness of the picture and/or display video source
in Wide _m or Full Mode.
(us)25
Page 26

Watching the TV
Selecting the Picture
Press PICTURE MODE repeatedly until the desired
mode appears.
Mode
Yon can select one of the five different picture
modes that best suits the program you are watching.
Yon can also adjust the picture quality for the
Liv.Rm. (Living Room), Movie, and AV Pro modes
to suit your taste (See page 39).
When selecting Picture Mode, see "Enjoying High-
quality Pictures and Sounds" on page 25.
Yon can set a different Picture Mode for each picture
signal format and store them in memory.
PICTURE MODE
If you press the button once, the current Picture
Mode appears. Each time you press the button, the
Picture Mode changes as follows.
PICTURE
MODE
Vivid
Select for enhanced picture contrast and sharpness.
Standard
Select to display a picture with contrast to suit your
room's lighting conditions.
Liv.Rm. (Living Room)
Select to display a picture with moderate contrast,
which may better suit the living room's lighting
conditions.
Adjust the options to your taste (See pages 39, 41).
Movie
Select to display a finely detailed picture. The sound
automatically changes to "TS" (TruSurronnd) (See
page 28).
Adjust the options to your taste (See pages 39, 41).
AV Pro
Use this mode for your own custom settings (See
pages 39, 41).
26 (us)
Page 27

Selecting the Effect
Mode
You can select one of the three different Effect
modes that best suits the program yon are watching.
You can select the Effect mode, when watching the
picture of connected equipment as well.
TmSurround* produces a virtual surround effect, and
enables you to enjoy the sound effects of a movie
theater.
You can set a different Effect mode for each picture
signal format and store them in memory.
Watching the TV
1
Press PICTURE MODE repeatedly to select
"Liv.Rm." (Living Room), "Movie," or "AV
Pro."
Note
Effect m(xte cannot be set for the "Vivid" and "Standard"
modes (See page 26).
PICTURE
MODE
* TruSurround and the (O) symbol are trademarks of SRS
Labs, Inc.
TruSurround technology is incorporated under license from
SRS Labs, Inc.
Tip
You can adjust other sound options. For details, see "Using the
Sound Control Option" on page 41.
1
2 Press MENU.
Picture/Sound Control
MENU
=L'VomI
Q
g
N,_ to select, _,N to
"_ enter adj menu
3 Press t_/,_ to select _l_ (Picture/Sound Control),
then press Q_.
_Jcture/Seund Control
Adjust
IAdiust SoundPiCture
Q
NI- -
ALl" _,_ to select, _,_ to
set
4
Press t_/tJ, to select "Adjust Sound," then press
(5£).
Pict u re/Sound Control
Balance
Effecl
Reset
Bass
•_ _,_ to select, _,N to
set
5 Press t_/tJ, to select "Effect," then press Q_.
_i e_ _l r _/Rnlmd ¢2rm_ r nF
kdiust Sound (Liv Rm }B_SS m
Q Balance
IReset IHa [ [
_,[_ to select , press
to return
(Continued)
(us)27
Page 28

Watching the TV
6
Press €/€. to select "Hall," "Simul."
(Simulated), or "TS" (TruSurround), then press
(Z).
Hall
Select for movies and music programs.
Simul. (Simulated)
Select for normal broadcast. It adds a surround-
like effect to mono programs.
TS (TruSurround)
Select for surround sound (for example, DVD
software). It produces a virtual surround effect.
rieble m
3ass m
_diust Sound /t iv Rm t
e
._ _,_ to select, _,B to
set
Saving the Power
Consumption
You can save the power consumption of the TV.
POWER SAVING
7 Press MENU to exit the menu screen.
Press POWER SAVING.
POWER
SAVING
To cancel the Power Saving mode
Press POWER SAVING again.
"Power Saving: Standard" appears.
28 (us)
Tips
• If you turn off the TV while the Power Saving mode is on, the
mode stays on next time you turn on the TV.
• You can set the Power Saving mode to on using the menu
screen. Select "Power Saving" in the d (Custom Setup)
menu, then set it to "Standard" or "Reduce."
• If you select "Liv.Rm." (Living Room), "Movie" or "AV Pro"
using the PICTURE MODE button, you can adjust the picture
oplion even if the Power Saving mode is set to on (page 39).
Note that if you increase "Contrast" or "Brightness," the
power consumption is not reduced.
Page 29

Watching the TV
Using the Wide Screen
Mode
Changing the Wide Screen Mode
automatically
The Auto Wide Mode lets you watch 4:3 normal
broadcasts or other sizes of the picture such as
movies in several Wide Screen Modes (16:9 aspect
ratio). The following example shows the default
settings. (The "Auto Wide" screen mode is set to
"Mode2," and "4:3 Default" is set to "Widezoom."
Widezoom
Original Picture Auto Wide
• Normal 4:3 aspect ralio
picture
• DTV 4:3 aspect ralio picture
"Widezoom" enlm'ges the
4:3 picture m fill the 16:9
screen, keeping the
original image as much as
Full
Original Picture AutoWide
• 4:3 squeezed video camera or "Full" slretches the 4:3
DVD picture picture horizontally only,
• DTV 16:9 aspect ralio picture to fill the 16:9 screen.
Subtitle
Original Picture Auto Wide
• Letler box movies with
subtitles outside the picture
(2.35:1 aspect ratio)
"Subtitle" enlarges the
picture horizontally and
vertically Io an equal
aspect ratio thai fills the
screen, while the subtitle
area is compressed to fit
Zoom
Original Picture Auto Wide
• Letterbox movie of a video
tape or a DVD disc
"Zoom" enlarges the 4:3
picture horizontally and
vertically to an equal
aspect ralio thai fills the
16:9 screen. Useful for
watching Letlerbox
Normal
Original Picture Auto Wide
• Normal 4:3 aspect ratio
picture
• DTV 4:3 aspect ratio picture
"Normal" returns the 4:3
picture 1o its original size.
(Continued)
(us)29
Page 30

Watching the TV
Changing the Wide Screen Mode
manually
You can change the Wide Screen Mode manually
with the WIDE MODE button. When the antenna
reception is low, or the picture is too dark, the Auto
Wide function may not work properly. In this case,
set the Wide Screen Mode manually.
WIDE MODE
Changing the Wide Setup
Auto Wide setting has two options: "Mode 1" and
"Mode2."
Auto Wide: "Model"
Normal broadcast (4:3 aspect ratio) transmits the
control signal together with the picture signal. Some
video equipment, such as camcorders, transmit the
control signal *_ as well. In "Model," the TV detects
the control signal and displays the picture with its
original aspect ratio. Note that black bands may
appear near the frame, or part of the picture may not
appear, if you select the Wide Screen Mode
manually while watching the picture without the
control signal.
Auto Wide: "Mode2"
In "Mode2," the TV selects the best Wide Screen
Mode automatically to fit the wide screen, regardless
of the control signal.
The fadory setting of this TV is:
"Aulo Wide" is set to "Mode2," and "4:3 Default" is set to
"Widezoom."
Press WIDE MODE repeatedly until the desired
Wide Screen Mode appears.
Pressing the WIDE MODE button once lets the TV
select the best Wide Screen Mode, and the selected
Wide Screen Mode appears.* Each time you press
the button, Wide Screen Mode changes as follows.
For details on Wide Screen Mode, see page 29.
WIDE MODE
* When "Auto Wide" in the _ (Screen Control) menu is set to
"Mode2," and the "4:3 Default" is set Io "Normal" (page 31 ),
the picture remains 4:3 aspect ralio ("Normal").
* _Control signal which returns the picture to its original aspect
ratio. The following include the control signal.
- Pictures from camcorder with specified aspect ratio
- Broadcasts with the 4:3 aspect ratio signal
Tip
Set "Aulo Wide" 1o "Off" when changing the Wide Screen
Mode manually (See page 31).
30 (us)
Page 31

Watching the TV
How Wide Screen Mode works in Auto Wide "Model" and "Mode2"
Wide Screen Mode
Original picture Auto Wide: "Model" Auto Wide: "Mode2"
Normal broadcasts Wide Screen Mode selected with the "Widezoom" or "Normal ''.2
WIDE MODE button
Broadcasts with the 4:3 "Normal .... Widezoom" or "Normal ''.2
aspect ratio signal *_
Letterbox movies with subtitles Wide Screen Mode selected with the "_m"
inside the picture WIDE MODE button
Letterbox movies with subtitles Wide Screen Mode selected with the "Subtitle"
outside the picture WIDE MODE button
Pictures from camcorder or DVD "Zoom" or "Full"
software with the 16:9 aspect ratio
signal *_
Pictures from cameorder or DVD "Normal .... Widezoom" or "Normal ''.2
software with the 4:3 aspect ratio
signal *_
*2Set it on the menu screen (See below right). When purchasing, it is set 1o"Widezoom."
,3 Pictures with control signal (page 30).
Tips
• If you select the Wide Screen Mode manually (page 30), the
Wide Screen Mode may no1change as noted above.
• If you press the WIDE MODE button (page 30) with Auto
Wide set to on, Auto Wide functions noted above. If you press
the WIDE MODE button repeatedly, Wide Screen Mode
changes as follows (according to the control signal).
- If the TV receives a picture with control signal, Wide
Screen Mode changes according to the control signal.
- If the TV receives a picture without control signal, Aulo
Wide does not function even if "Aulo Wide" is set Io
"Mode2." Note that it functions again when you select other
channels or inputs, or turn the TV off and on again.
• This TV features superior presentation of movie fihns by
identifying movie signals and processing them accordingly.
When Wide Screen Mode changes
automatically with Auto Wide set to on
• The TV receives the picture with a control signal
and selects the best Wide Screen Mode
automatically to fit the wide screen (See page 29).
• While "Auto Wide" is set to "Mode2," the picture
size may change during commercial breaks. This is
because the TV selects the best Wide Screen Mode
automatically for each program (See page 29).
Notes on Wide Screen Mode
• The Wide Screen Mode function of this TV allows for various
display options: select the appropriate Wide Screen Mode for
the original aspect ralio of the picture you are watching.
• If you change the screen size using the WIDE MODE feature
with the TV installed in a public space for commercial use or
public purpose, it might be an infringement of copyright.
• If you select "Widezoom" when watching the picture with 4:3
aspect ratio, par of the picture is transformed. You can watch
the picture with its original aspect ratio in "Normal" mode.
• The upper and lower parts may no1 appear or subtitles may nol
go in the screen according 1o the size of the original picture. In
this case, adjust the size or position (See page 38).
Changing the Auto Wide setting
For details on Auto Wide, see page 29.
1
Press MENU.
2
Press t'/_!" to select _ (Screen Control), then
press (_).
3 Make sure that "Wide Setup" is selected, then
press (_).
If not, press 4,/!!, to select "Wide Setup," and
then press @.
4 Press t_/,IF to select "Auto Wide," and then press
(SD
5 To set "Auto Wide" to "Off":
Press t_/_ to select "Off," then press (_).
(Go to step 8.)
To set "Auto Wide" to "Model":
Press t_/,IF to select "Model," then press Q_.
(Go to step 8.)
To set "Auto Wide" to "Mode2":
Press t_/,IF to select "Mode2," then press Q_.
6
If you set "Auto Wide" to "Mode2," press i_/tF
to select "4:3 Default," then press (_).
Press t_/,IF to select "Normal" or "Widezoom,"
then press Q_).
8 Press MENU to exit the menu screen.
(us)31
Page 32

Watching the TV
Setting the Video Inputs
1
Press TV/VIDEO repeatedly until the desired
video input appears.
Yon can enjoy images (and sound) from optional
video equipment connected to this unit by selecting
the appropriate input. For details on connection, see
pages 9 through 19.
__1
0-9 and ENTER
buttons
Each time you press TV/VIDEO, the input
changes as follows:
Select
• TV TV _--
• VIDEO IN 1 VIDEOI*
• VIDEO IN 2 VIDEO2*
• VIDEO IN 3 VIDEO3
• VIDEO IN 4 VIDEO4
* If a video equipment is connected to S VIDEO input and
"Auto YC" in the _ (Custom Setup) menu is set to "On"
(page 10), "S VIDEOI ," or "S VIDEO2" appem's.
2 Operate the selected optional equipment.
For details, see "Operating Video Equipment
with your TV Remote Control" on page 33, or
refer to the instructions supplied with each
equipment.
Display indication
CH +/-
Tip
You can select the inputs by using the INPUT button on the TV.
Each time you press the button, the input changes as follows:
TV--_VIDEOI/S VIDEOI*--_VIDEO2/S VIDEO2*
t
VIDEO 4 _-- VIDEO 3
When connecting optional video equipment
to VIDEO IN 4
1 Press MENU.
2 Press t_/4, to select _ (Initial Setup), then press
3 Press t_/4, to select "Video 4 Mode," then press
(iD.
4 Press t_/4, to select "Y/PB/PR" or "RGB," then
press (i).
5 Press MENU to exit the menu screen.
To watch the TV
Press the 0-9 and ENTER buttons or CH +/-.
®@@ c.
32 (us)
Page 33

Operating Video
Watching the TV
The remote control is preset to operate Sony brand
video equipment.
Equipment with Your TV
Remote Control
Programming the remote control
5
2
Sony equipment Programmable code number
Beta, ED Beta VCRs 303
8ram VCR 302
VHS VCR 301
DV VCR 348
DVD player 751
If you have video equipment other than Sony brand
that you want to control with the TV's remote
control, use the following procedures to program the
remote control.
Note
The equipment must have infrared (IR) remote capability in
order to be used with this remote control
From the "Manufacturer's codes" listed on page 34,
select the three-digit code number for the
manufacturer's code of your equipment. If more than
one code number is listed, start with the number
listed first. Use the code number to complete the
following procedure.
3
4
1
1
Press CODE SET.
2
Press the function button you want to program.
To program a cable box or a satellite receiver
Press SAT/CABLE (FUNCTION).
To program video equipment
Press VCR/DVD (FUNCTION).
3
Enter the three-digit manufacturer's code number
using the 0-9 buttons.
4
Press ENTER.
5
To check if the code number works, aim the
TV's remote control at the equipment and press
the VCR/DVD and/or SAT/CABLE (POWER)
button that corresponds with that equipment. If it
responds, the programming is completed. If not,
try using the other codes listed for that
manufacturer.
Tips
• If more than one number is listed, try entering them one by
one until you come 1o the correct code for your equipment.
• If you enler a new code number, the code number you
previously entered at thai setting is erased.
• In some rare cases, you may no1 be able Io operate your
equipment with the Sony remote control. In this case, use the
equipment's own remote control unit.
(Continued)
(us)33
Page 34

Watching the TV
Manufacturer's codes Manufacturer Code DVD Players
Pentax 305,304 Manufacturer Code
VCRs Philco 308,309 Sony 751
Manufacturer Code Philips 308,309, 310 Panasonic 753
Sony 301 Pioneer 308 Pioneer 752
Admiral (M. Win'd) 327 Quasm" 308,309, 306 RCA 755
Aiwa 338, 344 RCA/PROSCAN 304, 305,308, Toshiba 754
Audio Dynamic 314, 337 309, 311,312,
Broksonic 319, 317
Canon 309, 308
Citizen 332
Craig 302, 332 Samsung 322, 313, 321 Sony 230
Criterion 315 Hamlin/Regal 222, 223,
Curtis Mathes 304, 338, 309 Scott 312, 313,321, Jerrold/G. I. 201,202, 203,
Daewoo 341,312, 309 335,323,324, 204, 205,206,
DBX 314, 336, 337 325,326 207, 208,218
Dimensia 304 Shm'p 327,328 Oak 227,228,229
Emerson 319, 320, 316, Shintom 315 Panasonic 219, 220, 221
317, 318, 341 Signature 2000 338,327 Pioneer 214, 215
Fisher 330, 335 (M. Ward)
Funai 338 SV2000 338
General Electric 329, 304, 309 Sylvania 308,309, 338,
Go Video 322, 339, 340 310 Zenith 212, 213
Goldstar 332 Symphonic 338
Hitachi 306, 304, 305, Tashiro 332
338 Tatung 314, 336, 337
Instant Replay 309, 308 Teac 314, 336, 338,
JC Penney 309, 305, 304, 337 Sony 801
330, 314, 336, Technics 309, 308 General Electric 802
337 Toshiba 312, 311 Hitachi 805
JVC 314, 336, 337, Wards 327,328,335, Hughes 804
345, 346, 347 331,332 Panasonic 803
Kenwood 314, 336, 332, Yamaha 314, 330, 336, RC?dPROSCAN 802, 808
337 337
LXI (Sears) 332, 305, 330, Zenith 331
335, 338
LG 332
Magnavox 308, 309, 310
Marantz 314, 336, 337
Mm'ta 332
Memorex 309, 335
Minolta 305, 304
Mitsubishi!MGA 323, 324, 325,
326
Multitech 325, 338, 321
NEC 314, 336, 337
Olympic 309, 308
Optimus 327
Panasonic 308, 309, 306,
307
Realistic 309, 330, 328, Cable Boxes
Sansui 314
Sanyo 330, 335 224, 225,226
313,310, 329
335,324, 338 Manufacturer Code
Scientific Atlanta 209, 210, 211
Tocom 216, 217
Satellite Receivers
Manufacturer Code
Toshiba 806, 807
34 (us)
Page 35

Watching the TV
Operating optional equipment
POWER buttons
(VCR/DVD, SAT/
CABLE)
FUNCTION
buttons (VCR/
DVD, SAT/
CABLE)
VCR/DVD
operating buttons
DISPLAY
0-9 buttons
ENTER
JUMP
GUIDE
• , 0, 4., _, (_
MENU
Operating a DVD player
To Press
Turn on/off VCR]DVD (POWER)
Control a DVD player VCR]DVD (FUNCTION)
Play
Stop []
Pause [1I](press again Io resume normal
playback)
Slep through different Df> 1o step forwm'd or <3<I to slep
tracks of an audio disc backward
Slep through different CH + Io step forwm'd or CH - to
chaptens of a video disc step backwm'd
Select tracks directly 0-9 buttons
Display the menu (Setup) MENU
Operate the DVD menu t, ,I', _-, *, (_
Operating a cable box
To Press
Turn on/off SAT/CABLE (POWER)
Select cable box SAT/CABLE (FUNCTION)
Select a channel 0-9 buttons, ENTER
Change channels CH +/-
Go to previous channel JUMP
CH +/-
Operating a VCR
To Press
Turn on/off VCR/DVD (POWER)
Control a VCR VCR/DVD (FUNCTION)
Change channels CH +/-
Record _ and • simultaneously
Play
Stop []
Fast forward [::,l>
Rewind the tape <3<:1
Pause [1I](press again Io resume normal
playback)
Search the picture DI> or <3<:1during playback
forward or backwm'd (release to resume normal playback)
Operating a satellite receiver
To Press
Turn on/off SAT/CABLE (POWER)
Select satellile receiver SAT/CABLE (FUNCTION)
Select a channel 0-9 buttons, ENTER
Change channels CH +/-
Go to previous channel JUMP
Display channel number DISPLAY
Display DBS guide GUIDE
Display DBS menu MENU
Move highlight (cursor) t_, €, _, *,
Select item (_)
(us)35
Page 36

Watching the TV
Using Favorite Channels
You can select programs from a list of favorite
channels that you preset.
Setting your favorite channels
2 Press i_/,1, to select _' (TV Setup), then press
GD.
=
_hannel _kip/Add
_a hie off
_uto Pro ram off
_hannel Fix
_,_ to select, _,B to
[]
enter set menu
3 Press _/_ to select"FavoriteChannel,"then
press@.
avorlte Oh nne_
_,_ to select, _,B to
set
2: 2
3: 3
4: 4
5: 5
6: 6
7: 7
8: 8
4 Press tl./tJ, to select the position you want to
change, then press (_).
1 Press MENU.
MENU
2-6
1,7
_infllr_/Rnund Cnnf rn_
Q
e
_,_ to select, _,B to
enter ad i menu
o:
:avorite Channel 1
I 6: 6
_,_ to select, press_
to return
5
Press _/_ to selectthe desired channel, then
press Q_.
:avorite Channel
_ te select_ _,B te
_et
You have now selected a favorite channel for the
position selected in step 4.
6
Repeat steps 4 and 5 to program other favorite
channels.
7
Press MENU to exit the menu screen.
2: 2
3: 3
7: 7
8: 8
1: 1CH
2: 2
3: 3
4: 4
6_ 6
7_ 7
8_ 8
36(us)
Page 37

Watching Favorite Channel
Watching the TV
1
2
1 Press FAVORITES.
The Favorite Channel options appear.
FAVORITES _1_
2 Press t_/!!, to select the desired channel, then
press Q_.
The selected channel will be displayed.
42
(us)37
Page 38

Adjusting the Picture
',.j
N,_ to select, _,B toenter ad i menu
Size/Position
Yon can adjust the size and position of the picture for
each Wide Screen Mode (page 29) in the following
cases:
• To move the position of the picture in
"Widezoom" and "Zoom" modes
• When subtitles may not go in the screen in
"Subtitle" mode
"H Size" (Horizontal Size) and "H Shift" (Horizontal
Shift) cannot be adjusted in "Widezoom."
2 Press 4,/!!, to select the _ (Screen Control), then
press (_).
_creen Control
Nide Mode :Normal
_creen Zoom
_creen Size
_creen Shift
[_ _djust Pixel
_eset
O
enter set menu
3
Press e/tJ, to select the option you want to
adjust.
To adjust screen size
Press 4,/t, to select "Screen Size," then press
QD.
To adjust screen position
Press _/t, to select "Screen Shift," then press
GD.
Note
The menu screen changes as follows when "Menu
Function" is set to "Return" in the [_ (Initial Setup) menu.
creer_ Gout rg!
38(us)
Page 39

Adjusting Your Setup
4 Press t_/!!,/I,/* to adjust each option, then press
To adjust the "Screen Size"
Enlarges Enlarges
vertically horizontally
Shrinks -°-°-°-°-°' Shrinks
horizontally vertically
To adjust the "Screen Shift"
Moves up Moves to
the right
Moves to _--------- Moves
the left down
5 Press MENU to exit the menu screen.
Using the Picture
Control Mode Option
You can precisely set the picture quality with
"Liv.Rm." (Living Room), "Movie," or "AV Pro"
(selected with the PICTURE MODE button).
You can set a different picture control option for
each picture signal format and store them in
memory.
-7
,8
(Continued)
(us)39
Page 40

Adjusting Your Setup
1 Press PICTURE MODE repeatedly until
"Liv.Rm." (Living Room), "Movie," or "AV
Pro" appears.
Note
The picture control option cannot be adjusted in "Vivid" or
"Standard" modes (See page 26).
PICTURE
MODE
2 Press MENU.
p_l_r_/Round C._n_ r n [
MENU
Picture Mode :
Adjust Picture
_ IAdiust Sound Liv Rrn I
Q
e
•_ _,N to select, _,E] to
enter adj menu
3 Press 't/,l" to select _[_ (Picture/Sound Control),
then press (_.
Picture/Sound Control
Adjust Sound
IAdius t Picture
o
_ _,_ to select, _,_ to
set
5
Press e/,J, to select the option you want to
adjust, then press (_).
6
Press ,t-/,l!,/_,/,_ to make the desired adjustment,
then press (_).
picfl_r_/£nund C.onf r _ [
Color m
_] Hue
Sharpness m
_] Noise Reduct : LO,_
Cine Motion : Off
Dynamic Pictur: Or
._ _,_ to select, _,B to
set
Adjustable options
Option Press _,/_,, Press ,I,/,*
Contrast To reduce picture To enhancepicture
contrast contrast
Brightness To darkenthe To brighten the
picture picture
Color To decrease color "Ib increasecolor
intensity intensity
Hue To decrease the "I_ increase the
green tones green tones
Sharpness To soften the To sharpen the
picture picture
4 Press ,t/,l. to select "Adiust Picture" then press
(D.
_icf=_rR/R_l_nd Coniro[
rightness
Co]or m
Sharpness m
Noise Reduct : Low
_Hue m
Cine Motion : Off
_,_ to select, _,_ to
LivRm
Tip
Option adjustrnents are indicated by a numerical value.
40(us)
Page 41

If you press and hold !!,, the following options
appear.
Adjusting Your Setup
Using the Sound Control
>icture/Seund Control
_diust Picture (Liv Rm)
Sharpness m
Noise Reduct kow
Cine Motion : Off
DY namic Picture: On
Color Temp : Cool
Color Correct : On
/,_ _,_ to select, _,B to
set
Adjustable options
Option Description Setting
Noise Select to reduce the noise Off/Low/
Reduct. level of equipment Mid (Middle)/
(Noise connecled m the VHF/ High
Reduction) UHF, VIDEO IN* jacks.
It is most effective on the
signal from the VHF/
UHF jack.
Cine Motion Obtains asmooth picture Auto!Off
movement that
approaches the original
film-like quality when
reproducing movies or
other video sources on 24
frame per second films.
Dynamic Select to enhance the On/Off
Picture picture contrast.
Color Select to give bright Cool/Neulral/
Temp. colors a red tint (Setting Warm/
(Color variable from "Cool" to USERI **/
Temperature) "Warm"). USER2**/
Color Select to emphasize reds On/Off
Correct. and blues.
(Color
Correction)
Gamma Select to adjust the High/
Correct. balance between bright Mid (Middle)/
(Gamma and dark m'eas of the Low
Correction) picture.
USER3**
Option
You can precisely adjust the sound settings for
"Liv.Rm." (Living Room), "Movie," or "AV Pro"
(selected with the PICTURE MODE button).
You can set a different sound control option for each
picture signal format and store them in memory.
For details on Effect mode, see page 27.
-7
,8
* You cannot adjust "Noise Reduct." (Noise Reduction) for
an equipment connected only Io the RGB (Y/G, PdB, Pd
R) input.
**For details on these seldngs, see page 51.
7 Repeat steps 5 and 6 to adjust other options.
8 Press MENU to exit the menu screen.
To reset to the factory settings
Select "Reset" in step 5, then press (_).
(Continued)
(us)41
Page 42

Adjusting Your Setup
1 Press PICTURE MODE repeatedly until
"Liv.Rm." (Living Room), "Movie," or "AV
Pro" appears.
Note
The sound control option cannot be adjusted in "Vivid" or
"Standard" modes (page 26).
PICTURE
MODE
2 Press MENU.
MENU
Picture/Sound Control
Picture Mode :
Adjust Picture
IA0,u.,8ooo0L"°°I
€3
d_
_,_ to select, _,[_ to
enter adj menu
6 Press _/!!,/I,/,*. to make the desired adjustment,
then press (_).
Option Press t!,/_- Press t_/,*
Treble To decrease higher- To increase higher-
pilched sounds, pitched sounds.
Bass To decrease lower- To increase lower-
pilched sounds, pitched sounds.
Balance To emphasize the To emphasize the
left speaker, right speaker.
Effect See page 27.
Tip
Option adjustments are indicated by a nmnerical value.
7 Repeat steps 5 and 6 to adjust other options.
8 Press MENU to exit the menu screen.
:3Press 4,/,!, to select _1_ (Picture/Sound Control),
then press (_.
Piel_lr_/Round C_nlrol
IN -
IAdius t Picture
Q
Adjust Sound
._ _,_ to select, _,B to
set
4 Press 4,/,!, to select "Adiust Sound" then press
GD
Picture/Sound Control
Effect
BaJ_nc e
R_!
I°'''
O
_- _,_ to select, _,_ to
set
5 Press t_/t_ to select the option yon want to
adjust, then press (_).
To reset to the factory settings
Select "Reset" in step 5, then press @.
42(us)
Page 43

Adjusting Your Setup
Selecting Stereo or
Bilingual Programs
You can enjoy stereo, bilingual and mono programs.
MTS/SAP
Using the Parental
Control Feature
The TV programs and movies shown on TV are
given a rating signal based on the following rating
systems.
In U.S.A.: U.S. Television Parental Guidelines to
rate television programs (U.S. TV ratings), and
Motion Picture Association of America (MPAA)
Guidelines to rate movies including those shown on
TV (movie ratings).
In Canada: Canadian English Language ratings to
rate television programs in English, and Canadian
French Language ratings to rate those in French.
To block programs you feel are unsuitable for your
children, you need to set the TV for the desired
rating systems. Sony's predetermined ratings are also
available. See page 48 for a description of the
ratings.
Press MTS/SAP repeatedly until the desired sound
indication appears.
Each time you press the button, the sound indication
changes as follows:
Sound indication Description
Stereo Select for stereo receplion when
viewing a program broadcast in stereo.
Auto-SAP Select to automatically swilch the TV
Io second audio programs when a signal
is received. (If no SAP signal is
present, the TV remains in Slereo
mode.)
Mono Select for mono receplion. (Use to
reduce noise during weak slereo
broadcasts.)
The TV's Parental Control feature functions by
receiving the rating signal from your local
broadcasting station or cable service provider.
(Continued)
(us)43
Page 44

Adjusting Your Setup
Activating the Parental Control
feature
4-5
3 Make sure that "Parental Control" is selected,
then press Q_.
;u_tom _t _ln
[_ >arental Control
Enter Password
e
4
Enter a four digit password using the 0-9 buttons.
The factory preset password is "0000."
>arental Cohtrol
ConHrm Password
m---
e
Note
Do not enter "4357" corresponding to "HELP" on a phone
number pad (See page 45).
2 - 3_
6-9
1,10
1 Press MENU.
>iet_=r_/£mmd (_nnf r _]
MENU
Q
o
N,_ to select, _,B to
enter ad} menu
2 Press t_/,I" to select _] (Custom Setup), then
press Q_.
}Custom SetuB
_1 MTS : Stereo
Speaker : On
Caption Vision: Off
Display : On
Screen Saver
Powe r Saving :Standard
_,Aut o yC
enter set menu
•_ _,_ to select, _,B to
5 Confirm your password by entering it again.
Your password is stored and the Parent menu
options appear.
3ustom Setuo
Country •
IChange Pa ..... d USA I
I
Tips
• You need to enter the p&sswordhere for any feature
access into 1be Parental Control menu. If you lose your
password, see "Tip" on page 45.
• If you want m change the password, see page 45.
6 Press 4"/!! "to select "Country," then press (_).
_u_tom N_t _ln
[_ >arental Control
lGh_nge Pas_w_r_
o
._ _,_ to select, press_
to retur_
44(us)
Page 45

7 Press t_/tJ, to select your country (U.S.A. or
Canada), then press Q_).
)ustorn SO[Up
[_ _rRnt_F ¢2nnlrcH
_ IChange Password I
,,_ N,_ to selecl, _,8 to
sel
8 Press t_/!_ to select "Lock," then press (_.
;_l_fnm £_hlrJ
Ioh°o0°P...... A0o,I
Coun_ ry _ "hi Id
e
_,_ to seloct , press
to return
Adjust{ng Your Setup
To deactivate the Parental Control feature
Set "Lock" to "Off" in the Parental Control menu.
To change the password
1 Select "Parental Control" from the _ (Custom
Setup) menu (See page 44).
2 Enter your four digit password using the 0-9
buttons.
The "Parental Control" menu appears.
3 Press t_/tJ, to select "Change Password," then
press (_.
4 Enter a new four digit password using 0-9
buttons.
5 Enter the password set in step 4 again to confirm,
then press Q_.
6 Press MENU to exit the menu screen.
9 Press t_/tJ, to select a desired rating, then press
GD.
If you select "Child," "Youth," or "Y.Adult"
(Young Adult), the Parental Control is activated
automatically.
If you want to select the ratings from "Custom,"
see "Selecting a Custom Rating" on page 46.
10 Press MENU to exit the menu screen.
Viewing blocked programs
You can view a blocked programs by entering the
password.
}us[ore Setup
_ r _al contr I
Country
_iCh_n_° Password CanadaI
set
Tip
If you have forgotten your password, enter the masler password
"4357" (corresponding 1o "HELP" on a phone nmnber pad) in
step 2. You can then store a new password.
Notes
• If you emered "4357" as your password the first time, you
cannot slore a new password (See step 4 of "Activating the
Parental Control feature" on page 44).
• When you select a Parental Control program and the []
indicator is displayed on the screen, you cannot view thai
program even if you emer "4357." (See "Viewing blocked
programs" on the left.)
] Press ENTER to display the "Password" screen.
2 Enter your password using the 0-9 buttons.
The Parental Control feature will be canceled
("Lock" set to "Off") until you turn the TV off.
(us)45
Page 46

Adjusting Your Setup
Selecting a Custom Rating
If you want to select the ratings to be blocked from
Custom once you have activated the Parental Control
feature (page 44), follow the procedure below.
For a detailed description of each rating, see "What
the Ratings Mean" on page 48.
3
Make sure that "Movie Rating" is selected, then
press Q_.
(2u_fnm £_h_n
Parental Control
Custom
>G13:-
_ovie_at i n 9
4
Press 4,/,I, to select the rating to be blocked, then
wess (_).
The [] indication automatically appears beside
the selected rating and all "higher" ratings,
indicating that the programs that match the
ratings will be blocked.
[_ Parental Control
gu_!om
3G13:D
_1017: D
_ Jlov i e Rating
,,r
2-9
10
1 Perform the steps 1 to 8 in "Activating the
Parental Control feature" on page 44 to display
the Parental Lock options.
2 Press 4"/,1, to select "Custom," then press (_).
In U.S.A.
_ustom SetuB
{_ >arental Control
Jnrated
rv Rating AIIowl
5
Press <. to return to the "Custom" menu.
3ustom Setuo
[_ _arental Control
e
•_ _,_ to select, _,_ to
set
6 To select a TV rating in U.S.A.:
Press _/_ to select "TV Rating," then press
(5E).
Sustom Setup
[_ Parental Control
_H_fom
TV-y; :-
TV-G :-
_] TV-PG:- D- L- S- V Z
_ TV Ral ng
TV-14 :- D- L- S-
_} TV-MA:- L- _- v-
set
/,_ _,_ to select, _,N to
set
In Canada
_ustom SetuB
>arental Control
JS A Ratinq
_ =rench Rating
•_ _,_ to select, _,B to
set
46 (us) To select a rating in Canada, go to step 6.
Page 47

Adjusting Your Setup
ToselectaTVratingsinCanada:
Presstl,/!_toselect"EnglishRating,""French
Rating,"or"U.S.A.Rating,"thenpressQ_.
English Rating
_us_om Setup
I_ "arental Control
Cusfom
m -
PG
_ t4÷ -
_ tS+ -
French Rating
]ustom 8etuo
[_ >arental Control
gans+ : _
_ rench ating
136ns+:_
16arts+:
18_ns+:
,,f
U.S.A. Rating
3ustom 8etuo
_Parental Control
TV-Y :_
TV-YT:- FV-
_ US A Rating
TV-G :-
TV-PG:- D- L- $- V-
TV-14:- D- L- S- V-
TV-MA:- L- S- V-
_,_,B,B to select, _ to
set
7 Press tl,/!_ to select the TV rating to be blocked,
then wess (_).
8 Press <./,_. to select the extender to be viewed,
then press Q_).
3ustom Setuo
[_=arental Control
TV-Y :-
TV-Y7:- FV-
_ V Rating
TV-G :-
TV-PG:- M_B L- S-
TV-14:D L_ SD vD
_1 TV-MA:D LD SD VD
_ Cusfom
to set
"-" appears beside the selected extender,
indicating that the programs that match the
extender can be viewed.
If you re-press Q_), [] is displayed to show that
the programs that match the extender will be
blocked again.
9 Repeat step 8 for other extenders.
All programs that match the ratings you select
and higher, except for the extenders that were
canceled, will be blocked.
10Press MENU to exit the menu screen.
To block TV programs and/or movies for
which a rating is not given (NR and N/A)
For a description of the NR and N/A ratings, see
page 48.
The [] indication automatically appears beside
the selected rating and all "higher" ratings,
indicating that the wograms that match the
ratings will be blocked.
Example: TV rating in U.S.A.
Custom 8etuu
[_ Parental Control
FV-Y :-
FV-Y7 : - FV-
_ FV Rating
FV-G :-
FV-PG:- D- L- 8- V-
FV-14:_ D[3 L[3 813 V[3
FV-MA:[3 L[3 8[3 V[3
z,_ ®,®,_',B to select, _ to
set
Some U.S.TV ratings have additional content
ratings called "extenders." The extenders are
defined as follows: D (sexually suggestive
Dialog), FV (Fantasy Violence), L (coarse
Language), S (Sexual situations) and V
(Violence). By setting the extenders, you can
define additional viewing limits. For more details
of extenders, see page 49.
All of the extenders included in the selected
ratings will be blocked. If yon wish to allow any
of them to be viewed, go to step 8.
1 Perform steps 1-2 of "Selecting a Custom
Rating" on page 46.
2 Press tl,/tJ, to select "Unrated," then press Q_).
3 Press t_/_ to select "Block," then press (_.
4 Press MENU to exit the menu screen.
(us)47
Page 48

Adjusting Your Setup
What the Ratings Mean
Ratings in the U.S.A.
Sony's predetermined ratings
These are original ratings that Sony has
predetermined according to the viewer's age. Each
rating allows for viewing of certain programs, as
follows. (See the next column for a description of
TV and movie ratings.)
Option Description
NC- 17 or X (No One 17 Or This is a fihn thai most parents
Under Admitted.): would consider not suitable for
children aged 17 and under.
There may be violence, sex,
abhon'ent behavior, drug abuse
or other elements of concern.
NR (Not Rated): This is a fihn that a producer
has noi rated, intending to have
his film widely released.
N/A (Not Applicable): This is a fihn thai a producer
considers outside the scope of
the MPAA ratings.
Option
CHILD:
YOUTH:
YOUNG ADULT:
Description
Suitable for children under 1he
age of 6.
Viewable U.S. movie ratings:
G, NR, and N/A
Viewable U.S. TV ratings:
TV-Y, TV-G, and TV-NR
Suitable for children aged 7
and older.
Viewable U.S. movie ratings:
G, PG, NR, and N/A
viewable U.S. TV ratings: TV-
Y, TV-Y7, TV-G, TV-PG, and
TV-NR
Suitable for children aged 13
and older.
Viewable U.S. movie ratings:
G, PG, PG-I 3, NR, and N/A
Viewable U.S. TV ratings:
TV-Y, TV-Y7, TV-G, TV-PG,
TV- 14, and TV-NR
U.S. movie ratings
U.S. movie ratings are for movies (including those
shown on TV) rated according to the Motion Picture
Association of America (MPAA) Guidelines.
Option Description
G (General Audiences-- In G-rated fihns no strong
All Ages Admitted): words are used, the violence is
at a minimmn, nudity and sex
scenes are noi present, nor is
there any drug use.
PG (Parental Guidance This is a film which may need
Suggested. Some Material May to be monitored first by
Not Be Suitable For Children): parents.
PG-13 (Parents Strongly Parenls are alerted to be very
Cautioned. Some Material May careful about the attendance of
Be Inappropriate For Children their under-teenage children
Under 13): when viewing.
R (Restricted, Under 17 This film includes hard
Require Accompanying Parent language, tough violence,
Or Adult Guardian): nudity, drug abuse or other
elements of concern.
Note
NR and N/A ratings are shown together as "Unrated" in the
I_enu •
U.S. TV ratings
U.S. TV ratings are for TV programs rated according
to the U.S. Television Parental Guidelines.
Option Description
TV-Y (All Children): This program is designed for
young children aged 2_6 and
is appropriate for all children.
TV-Y7 (Directed to OMer This program is designed for
Children): children aged 7 and above.
Themes and elements in this
program may include mild
fantasy violence or slapstick
violence, or may frighten
children under the age of 7.
TV-G (General Audience): Most parents would find this
program suitable for all ages.
It contains litlle or no
violence, no strong language
and little or no sexual dialog
or situations.
TV-PG (Parental Guidance This program contains some
Suggested): material thai parents may find
unsuitable for younger
children.
TV-14 (Parents Strongly This program contains some
Cautioned): material that many parents
would find unsuitable for
children under the age of 14.
TV-MA (Mature Audience This program is specifically
Only): designed to be viewed by
adults and therefore may be
unsuitable for children under
the age of 17.
TV-NR (Not Rated/Unrated): This is a program broadcast
without any rating, such as
news, news flashes or sports.
Note
The TV-NR rating is shown as "Unrated" in the menu.
48 (us)
Page 49

Adjusting Your Setup
About the extenders of U.S. TV ratings
TV-Y7, TV-PG, TV-14 and TV-MA ratings have
additional content ratings called "extenders" to
define additional viewing limits. The extenders are
defined as follows:
Option Description
D (sexually suggestive Programs containing
Dialog): suggestive dialog, or sexual
innuendo
FV (Fantasy Violence): Programs containing cartoon
violence occun'ing in TV-Y7
programs only
L (coa_se Language): Programs containing coarse
language
S (Sexual situations): Programs containing sexual
content
V (Violence): Programs containing violence
There may be some profanity,
violence or brief nudity in
these programs.
Ratings in Canada
Sony's predetermined ratings
These are original ratings that Sony predetermined
according to the viewer's age. Each rating allows
you to view the certain programs, as follows.
See the next column for a description of each rating.
Option
CHILD:
YOUTH:
YOUNG ADULT:
Description
Suitable for children under the
age of 7.
Viewable Canadian English
Language ratings: C and G
Viewable Canadian French
Language ratings: G
Viewable U.S. TV ratings:
TV-Y, TV-G, and TV-NR
Suitable for children aged 8
and older.
Viewable Canadian English
Language ratings: C, G, C8+
and PG
Viewable Canadian French
Language ratings: G and 8
ans+
Viewable U.S. TV ratings:
TV-Y, TV-Y7, TV-G, TV-PG,
and TV-NR
Suitable for children aged 14
and older.
Viewable Canadian English
Language ratings: C, G, C8+,
PG and 14+
Viewable Canadian French
Language ratings: G, 8 ans+,
13 ans+
Viewable U.S. TV ratings:
TV-Y, TV-Y7, TV-G, TV-PG,
TV-14, and TV-NR
(Continued)
los)49
Page 50

Adjusting Your Setup
Canadian English Language ratings
The Canadian English Language Ratings are for TV
programs in English broadcast in Canada.
Option
C (Programming intended for
children under age 8):
C8+ (Programming generally
considered acceptable for
children 8 years and over to
watch on their own):
G (General Audience):
PG (Pm'ental Guidance):
14+ (Programming contains
themes or content which may
no1 be suitable for viewers
under the age of 14):
18+ (Adult):
E (Exempt):
Description
There will be no realistic
scenes of violence or no
offensive language, nudity or
sexual conlent. Careful
atlention is paid Io themes,
which could threaten
children's sense of security
and well-being.
Violence will not be portrayed
as the preferred, acceptable, or
only way to resolve conflict;
or encourage children to
imitate dangerous acts which
they may see on television.
There will be no profanity,
nudity or sexual content.
Will contain very little
violence, either physical or
verbal or emotional. There
may by some inoffensive
slang, no profanity and no
nudity.
Programming inlended for a
general audience but which
may no1 be suitable for
younger children. Parents
may consider some conlent
inappropriate for unsupervised
viewing by children aged 8 -
13.
Parenls are strongly cautioned
Io exercise discretion in
permitting viewing by pre-
leens and early leens.
May contain violence inlegral
to the development of 1he plot,
charaOer or theme, inlended
for adult audiences. May
contain graphic language and
explicit portrayals of nudity
and!or sex.
Exempt programming
includes: news, spo_s
documentaries and other
informalion programming:
talk shows, music videos, and
vm'iety programming.
Canadian French Language ratings
The Canadian French Language Ratings are for TV
programs in French broadcast in Canada.
Option Description
G (General): Programming intended for
audience of all ages. Contains
no violence, or the violence it
contains is minimal or is
depicted appropriately with
humor or caricature or in an
unrealistic manner.
8 ans+ (8+ General - No1
recommended for young
children):
13 ans+ (Programming may Viewing with an adult is
no1 suitable for children under strongly recommended for
the age of 13): children under 13.
16 ans+ (Programming is nol Contains frequent scenes of
suitable for children under the violence or intense violence.
age of 16):
18 ans+ (Programming Contains constant violence or
reslricted Io adults): scenes of extreme violence.
E (Exempt): Exempt programming.
Note
The E (Exempt) rating is not shown in the menu.
Programming intended for a
broad audience but contains
light or occasional violence
that could disturb young
children. Viewing with an
adult is recommended for
young children (under the age
of 8).
Note
The E (Exempt) rating is not shown in the menu.
50 (us)
Page 51

Adjusting Advanced AV
Setting Options
Advanced AV settings can be optimally set on the
menu screen.
• Items which appear in yellow are selected.
• You cannot select items which appear in pale
color.
Adjusting Your Setup
To select the option
MENU
Press t,/I_ to select the option,
then press * or (_).
(The ,_ button cannot be used
on some menus.)
To adjust the setting
Maximize the "o-o-o-o-o-
setting value
Menu category Menu item
_- Minimize the
setting value
_J_,_icture/Sound&Control
_djust Picture
oto,ooo0oLvooI
_dIust Sound
_- _,_ to select, _,8 to
enter ad} menu
Example: when selecting "Contrast"
from the setting options
Setting option
(Example: when selecting "Adjust
Picture" in the _1_ (Picture/Sound
Control) menu)
Picture/Sound Control
3rightness m
m ]clot
4ue m
_harpness m
_oise Reduct : Lov
line M orion : Of 1
_1 3ynamic Pictur: Or
_- _,_ to select, _,8 to
set
i
Menu category Menu item Setting option
"USERI ," "USER2," and "USER3" of "Color Temp." (Color Temperature):
_l_l_ Adjust Picture
Picture/Sound
Control
Select to customize the "Color Temp.'(Color Temperalure) by adjusting "Red Gain,"
"Green Gain," and "Blue Gain" (tint) in the range of"-127" - "+126," and store these 3
settings as the user setting.
Name Set: Select to name your original settings. Press 41,/tr,/_,,/,*,to select the letler, then
press Q_. To con'ect the letler, select _- on the screen to go back. If you set
"Menu Function" to "Return" in the [_ (Initial Setup) menu (page 53), you
can select letters by t_1,1, buttons.
(Continued)
(us)51
Page 52

Adjusting Your Setup
Menu category Menu item Setting option
_._ Screen Zoom Select to enlarge the picture with the center position fixed (only when "Wide Mode" is set
Screen Adjust Pixe[ Select Io adjust the picture fi'om an RGB equipment.
Control
to "Full"). Select from "Standard" (normal size), "x2" (doubled), "x3" (tripled), or "x4"
(quadrupled).
Auto Adjust: Select "OK" to make best possible adjustment for the input signal
aulomalically. Note that it may no1 be adjusled perfectly depending on the
input signal condition or picture paltern. In this case, perform "Aulo Adjust"
again.
Dot Phase: Adjust in the range of "01" -"62" if pm't of a displayed text or image is no1 clear.
"I%tal H Pixel (Total Horizontal Pixel): Adjust when the letter or picture is not clear as a
whole.
Reset: Reset to the factory seldngs.
Select "On" to display which input is selected.
_] Display
Cuslom Setup
Screen Saver
Color Malrix
RGB Mode
Select Io reduce image retention.
Pic. Orbit (Picture Orbit) (To prevent image retention)
Move 1he picture position 1o reduce image retention. This does no1 prevent image
retention complelely if the same picture is displayed for an extended period of time.
Orbit: Select "On" or "Off" Io set the Pie. Orbit. The factory setting is "On."
A slop-start moving picture goes around the screen edge (one cycle per hour).
The picture shifts a little once every one to two minutes. This is because the
"Orbit" option is set to "On" to prevent image retention. When the "Orbit"
oplion is set to "Off," note that displaying the same patterned signals or 4.3
aspect ratio pictures for a long time may result in image retention.
Select 1o give the picture a neulral tint, if the oulput signal from the DVD player
connected to the VIDEO IN 4 jacks is 525p (480p), 1125i (1080i), or 750p (720p) signal
format. Adjust this only when the picture tint goes out of tune. Select the signal formal for
each input, then set it to "Y/CdG," or "Y/Pb/P,." When purchasing, all formals are set Io
"Y/Pb/P,."
Select if an equipment which outputs the RGB signal is connected to the Y/G, P[dB, P[dR
jacks of the VIDEO IN 4 jacks.
Sync Mode
D_: Select when a digital tuner with RGB signal is connected.
Others: Select when other RGB equipment is connected.
Set according 1o the input signal from the HD jack of the VIDEO IN 4 jacks.
H/Comp: Select when the input signal is a horizontal synchronized signal or a composite
signal.
Video: Select when the input signal is a video signal.
52 (us)
Page 53

Menu category Menu item Setting option
Color System Select when the picture from a VCR of other television system is not very good. You can
Adjusting Your Setup
Menu Function Select how the MENU button on the remote functions.
Initial Setup
Auto Shutoff
E)
Timer/Clock
Channel Fix
TV Setup
Model Name
1_ Serial Number
Temperature
Unit Status Fan
adjust the setting only when the VIDEO input is selected.
On/Off: If the MENU button is pressed, the menu screen appem's. If the button is pressed
again, the menu screen disappem's. (factory setting)
Return: If the MENU button is pressed, the menu screen appears. If the button is pressed
while the menu screen appem's, the menu returns Io the previous screen. Some
menu operalion changes.
Select to set the TV to change to the standby mode automatically if there is no broadcast
or input signal through the connected equipment.
OFF: "Auto Shutoff" does not function.
5min: Changes to the standby mode after 5 minutes if there is no broadcast or input
signal.
lOmin: Changes to the standby mode after 10 minutes if there is no broadcast or input
signal.
Select this when you have a cable box or satellite receiver connected.
2-6: Select this 1o 'fix' your TV's channel setting Io 2-6 and use the cable box or satellite
receiver to change channels. Select one of these settings if you have connected the
equipment Io the VHF/UHF jack.
Video 1: Select this if you have eonnecled the equipment to the AUDIO and VIDEO IN
jacks.
Select "Off" to turn off the Channel Fix feature.
Noles
• When you select Channel Fix, the Favorite channel cannot be used.
• When you select Channel Fix, you cannot use Channel Skip/Add or Auto Program in the
TV Setup menu. To use them, set Channel Fix to "Off."
Model name of this TV.
Serial number allocated for each TV
If "NG" flashes, follow the procedure in "Self-diagnosis function" (See page 58).
If "NG" flashes, follow the procedure in "Self-diagnosis function" (See page 58).
(us)53
Page 54

Turning Off the TV
Automatically
You can set the TV to turn off automatically after a
predetermined period of time (30, 60, 90 or 120
minutes).
SLEEP
SLEEP _
To cancel the Sleep timer
Press SLEEP repeatedly until "Sleep: Off" appears.
Tips
• If you press the SLEEP button while the Sleep timer is
activated, the remaining time appears for a few seconds.
• If you turn off and on the TV, the Sleep timer returns to "Off."
• You can set the Sleep timer on the menu screen. Select
"Sleep" in the (_ (Timer/Clock) menu, then set the desired
period of time.
54 (us)
Page 55

Using the Timer
Setting the Current Time
The error range of the built-in clock is _+30 seconds
a month.
3 Press 'l_/,l"to select "Clock Set," then press
(5£).
Timer/Clock
_lock Set
4 Set the current time.
1 Press tt,/tJ, to set the hour, then press (_.
2 Press _/_ to set the minute, then press
(3D.
If you want to set the second to "00," press
t./tJ, to set the second, then press Q_).
3 Press (_ or ,_.at the time signal.
The clock starts.
Press MENU.
_icture/Sound Control
MENU
Q
O
_1_ [],_ to select, _,_ to
enter adj menu
2 Press i_/t_ to select (_ (Timer/Clock), then press
(5£).
Clock Dis la_ : Off
Daylight _awng: On
On/Ofl Timer : Off I
Auto Shutoff : 0ffl
i Tim_r/Cl_ek
_,_ to select, _,B to
set
Tip
Pressing and holding the tF/lr, buttons moves the hoUl-Sor
minutes quickly.
5
Press 'l_/,l"to select "Clock Display," then press
Timer/CIock
Sleep : Off
_avin2_lockSet 20:03:0
On/Ofl Timer :
Auto Shutoff _
N,_ to select, press_
to return
"imer/Clock
_lock Set 00:00:00
SIock Dis lay : Off
_nJOff Timer : Off
_,_ to select, _,_ to
set
(Continued)
(us_55
Page 56

Using the Timer
6 Press i_/_ to select "On," then press Q_).
3lock el 20:0 : 0
Sleep : Oil
3a [i ht Saving: On
_uto Shutof_ Off
set
To cancel Clock Display, select "Off."
7 Press MENU to exit the menu screen.
Note
The clock display will aummalically disappear after 5 minules.
To display the clock again, select "On" for the "Clock Display"
in the menu screen.
Setting the daylight saving
The clock adjusts the time for daylight-saving time
automatically.
1 Press MENU.
Controlling Power On/
Off Automatically
You can turn the TV on and off at a specified time
automatically. To use this function, set the clock in
advance (page 55).
Note
When using this function, do not turn off the TV with the
POWER button on the TV as the On Timer function will not
work.
2 Press 't/,I" to select (_) (Timer/Clock), then press
(ID
3 Press _/_ to select "Daylight Saving," then
press @.
_[ock Set 20:03:00
Sleep : Off
'imer/CIoc_
_,_ to select, press_
to return
: Off
4 Press _/_ to select "On" or "Off," then press
(ID
Daylight-saving setting Description
On Select to compensate for
daylight=saving time in
spring. The current time
aulomatically moves ahead
one hour.
Off Select at the end of daylight=
saving time in fall. The
current time moves back one
hour.
1
Press MENU.
MENU
>ieH_r_/£mmd Cnnfr_l
1
C1
5 Press MENU to exit the menu screen.
56(us)
El
_,_ to select, _,B to
enter ad i monu
Page 57

2 Press e/!!, to select (_) (Timer/Clock), then press
(SB
3lock Dis lay _ OI_
3lock Se_ 20_03_00 I
3ayIight _aving_ On
_nfOf_ Timer _ OI_ I
_uto Shutoff _ OI_ I
_ to _eIect, _B to
sot
3 Press t./,I, to select "On/OFF Timer," then press
Using the Timer
7
To set the time to turn off the TV:
Press 4"/,1, to select "Off Time," then press
(5£).
To set the time to turn on the TV:
Press e/* to select "On Time," then press (_.
Timer/Clock
1_ Repeat : of f
Q
d_
Dn/Of f Timer : On
if,
"imer/Clock
3lock Set 20:03:00
I_ 31oc k Dis lay : Off
_uto Shutoff IOn
[_ 3ieep : Off
Q
_" _,_ to select, press_
to return
4 Press_/_to select "On," then press@.
"imor/C[oek
Timer Mode : Off
On Time : 00:00
Q
)n/Off Timer : n
,_ _,_ to select, _,B to
set
5 Press 4"/,I" to select "Timer Mode," then press
"imer/Clock
)n/Off Timer : On
On Ti_ _
10ff Time :lOn/Off
8
Set the time.
1 Press e/_ to set the hour, then press Q_).
2 Press e/_ to set the minute, then press Q_.
3 Press <..
Tip
Pressing and holding the _,/_, buttons moves the hem's or
minutes quickly.
Timer/Cleck
Repeat : Of f
O : Off
o
[_ Dn/Off Timer : On
m
9 If you select "On/Off' in step 6, repeat steps 7
and 8 to set both "OFF Time" and "On Time."
] 0 Press MENU to exit the menu screen.
_" _,_ to select, press_
to return
6 Presse/!!,to select"Off," "On," or "On/OFF,"
then press Q_.
Timer Mode Description
Oft" Select 1o set the time 1o turn
off the TV.
On Select m set the time m turn
on the TV.
On/Off Select Io set the time m turn
on and off the TV.
"imer/Clock
On Time _ 00_00
Ioff Time : 00:0 0 I
_n/C_f f Timer : On
•_- _,_ to select, _,_ to
set
To turn the TV on and off at a specified time
everyday
After step 4, do the following, then go to step 5.
1 Press e/,l. to select "Repeat," then press (_).
2 Press e/_ to select "On," then press @.
To cancel, select "Off."
3 Go to step 5.
To cancel On/Off Timer
Select "Off' in step 4.
Tip
You can set the TV to turn off automatically after a certain
period if there is no broadcast or input signal (Auto Shutoft. see
page 53).
(us)57
Page 58

Troubleshooting
Mode[ Name: KE-32TS2U
: 2000001
•--- 'q-emperature" and
"Fan"
If, after reading the following instructions, you
have additional questions related to the use of
your Sony TV, please call one of the following
numbers (English only).
Customers in the continental United States
contact the Direct Response Center at:
1-800-222-SONY (7669)
Customers in Canada contact the Customer
Relations Center at:
(416) 499-SONY (7669)
Self-diagnosis function
The TV is equipped with a self-diagnosis function. If
there is a problem with your TV, the STANDBY/
SLEEP indicator on the front panel will flash
repeatedly. Counting the number of flashes helps
you inform qualified Sony personnel of the TV's
condition.
Case1:
When the picture turns off and the STANDBY/
SLEEP indicator on the front panel flashes
1
Count how many times the STANDBY/SLEEP
indicator flashes in total. It flashes at 3 second
intervals. If, for example, the indicator flashes
twice, stops flashing for 3 seconds, and flashes
twice again, that counts as twice.
_,_ to select item
3
Check the indication of "Temperature" and
"Fan" columns.
If "NG" lights in red, and the STANDBY/
SLEEP indicator flashes, press POWER on the
TV to turn off the TV, and disconnect the AC
power cord.
Case 2-a: If "NG" appears in the
"Temperature" column
Install the TV in a cool location so that the
temperature of the T¥ fells.
If the ventilation openings are blocked
The ventilation openings must never be blocked
or covered. Install the TV in a well ventilated
place to allow adequate air circulation.
Make sure that the STANDBY/SLEEP indicator
stops flashing. If the STANDBY/SLEEP
indicator still flashes, consult your nearest Sony
dealer or Direct Response Center (See the left
column).
Case 2-b: If "NG" appears in the "Fan"
column
Consult your nearest Sony dealer or Direct
Response Center (See the left column).
58(us)
2
Press POWER on the TV to turn it off, and
disconnect the AC power cord, then inform
qualified Sony personnel or the above Direct
Response Center of the number of flashes.
Page 59

Additional Information
Trouble symptoms and remedies
Problem Possible remedies
No picture.
Cannot receive any channels. * Make sure the power cord is connected securely.
• Turn on the power of the TV.
• Check antenna/cable connections.
Cannot receive certain * Set the channels again (page 20).
channels.
The TV turns off * Check that the Sleep timer is activated (page 54).
automatically. * Check that the On/OffTimer is activated (page 56).
(The TV enters the standby * Check that Auto Shutoff is activated (page 53).
mode.)
Some video sources do not * Check the connection between the optional video equipment and the TV.
appear. * Press TV/VIDEO on the remote (page 32).
"No Sync" appears, or the * If you connect the video equipment to the S VIDEO input of the TV, set "Auto YC" in the
STANDBY/SLEEP indicator _] (Custom Setup) menu to "On" (page 10).
lights up in red.
Poor picture.
Double images or ghosts. * Check antenna/cable connections.
• Check the antenna location and direction.
Only snow and noise appear * Check if the antenna is broken or bent.
on the screen. * Check if the antenna has reached the end of its serviceable life. (3-5 years in normal use,
1-2 years at the seaside)
Dotted lines or stripes * Keep the TV away from noise sources such as cars, motorcycles, or hair-dryers.
No color. * Press PICTURE MODE to select the desired Picture Mode (page 26).
Color is not correct. * Adjust the picture mode options in the [_b (Picture/Sound Control) menu.
Dark picture. * If you set the POWER SAVING function to "Reduce," the picture may become dimmer
(page 28).
Some tiny black points and/ * The picture of a flat panel display is composed of pixels. Tiny black points and/or bright
or bright points on the screen, points (pixels) on the screen, this does not indicate a malfunction.
The screen flickers when * This is caused by the Plasma Display Panel feature, and does not indicate a malfunction.
turning on the TV.
The picture is too bright. * Press PICTURE MODE to select the desired Picture Mode (page 26).
Picture (stripe) noise. * Make sure that the antenna is connected using the supplied 75-ohm coaxial cable.
• Keep the antenna cable away from other connecting cords.
• Do not use 300-ohm twin lead cables as interference may occur.
Distorted picture and noisy * Check if the connected optional equipment are installed in front of the TV or at the side of
sound, the TV. When installing optional equipment, leave some space between the optional
equipment and TV.
Striped noise during * Video head interference. Keep your VCR away from the TV.
playback/recording of a * Leave a space of 30 cm (117h inch) between your VCR and the TV to avoid noise.
VCR. * Avoid installing your VCR in front of the TV or at the side of the TV.
The whole screen is green * Y, PB/CB, PR/CR signal is applied to the VIDEO IN 4 jacks. Set "Video 4 Mode" to "Y/
when VIDEO 4 input is PB/PR" in the _ (Initial Setup) menu.
selected.
The whole screen reddens * RGB signal is applied to the VIDEO IN 4 jacks. Set "Video 4 Mode" to "RGB" in the [_
when VIDEO 4 input is (Initial Setup) menu.
selected.
(Continued)
(us)59
Page 60

Additional information
Problem Possible remedies
Moving pictures.
The picture moves a little.
• The"Orbit" option of "Screen Saver" in the _ (Custom Setup) menu (page 52) is set to
"On" by the default. This setting moves the picture position periodically to prevent image
retention and this is not a malfunction. If this screen movement bothers you, set "Orbit" to
"Off." When the "Orbit" option is set to "Off," note that displaying the same patterned
signals or 4.3 aspect ratio pictures for a long time may result in image retention.
No sound./Noisy sound.
Good picture, no sound.
Audio noise.
• Check the volume control.
• Press MUTING or VOL + so that "Muting" disappears from the screen (page 23).
• Disconnect your headphones.
• Set "Speaker" to "On" in the _ (Custom Setup) menu (page 13). If it is set to "Off,"
sound is not output from the TV's speakers regardless of the TV's volume control.
• Make sure that the antenna is connected using the supplied 75-ohm coaxial cable.
• Keep the antenna cable away from other connecting cords.
• Do not use 300-ohm twin lead cables as interference may occur.
• Press MTS/SAP to select "MONO" (page 43).
• Communication problems may occur if the infrared communication equipment (e.g.,
infrared cordless headphones) is used near the TV. Please use headphones other than
infrared cordless headphones. Also, if you use the infrared communication equipment
other than infrared cordless headphones, move the infrared transceiver away from the TV
until the noise is eliminated, or move the transmitter and receiver of the infrared
communication equipment closer together.
The TV fan noise becomes • The ventilation holes can accumulate dust over a period of time. The accumulated dust
bigger, may make the cooling function of the built-in fan less effective. To prevent this, we
recommend removing the dust periodically (once a month) using a vacuum cleaner.
Cannot operate the menu. • If the item you want to select appears in a pale color, you cannot select it.
Wide Screen Mode changes
automatically.
Wide Screen Mode changes
automatically while Auto
Wide is set to on.
Strange sound.
The TV cabinet creaks. • Changes in room temperature sometimes causes the TV cabinet to expand or contract,
The TV whirs. • The TV's fan setting is working. This does not indicate a malfunction.
The TV ticks. • An electrical circuit inside the TV is activated when the TV is turned on. This does not
The TV buzzes. • There might be a surge sound when turning on the TV. This does not indicate a
Remote control does not • The batteries could be weak. Replace the batteries.
operate. • Check the polarity of the batteries.
• The picture size may change when the program has commercial breaks, because the TV
selects the best Wide Screen Mode automatically for each program (See page 29).
• The TV receives the picture with control signal and selects the best Wide Screen Mode
automatically to fit the wide screen (See page 29).
• When you change the channel or input, the TV selects the best Wide Screen Mode
automatically. If you want to fix the Wide Screen Mode selected with the WIDE MODE
button, set "Auto Wide" to "Off" in the 1_1 (Screen Control) menu (page 31).
which can make slight noises. This does not indicate a malfunction.
indicate a malfunction.
malfunction.
• If the STANDBY/SLEEP indicator on the TV does not light in red, press POWER on the
TV.
• Point the remote control at the remote control sensor of the TV.
• Install the TV away from fluorescent lights.
60 (us)
Page 61

Specifications
Television system:
American TV standard
Channel coverage:
VHF: 2-t3/UHF: t4-69/CATV: 1-t25
Antenna:
75 ohm external terminal for VHF/UHF
Screen size (measured diagonally):
32 inches (KE-32TS2U)
42 inches (KE-42TS2U)
Panel System:
Plasma Display panel
Display resolution:
852 dots (horizontal) x 1024 lines (vertical)
(KE-32TS2U)
1024 dots (horizontal) × 1024 lines (vertical)
(KE-42TS2U)
VIDEO IN 1/2:
S VIDEO IN (4-pin mini DIN):
Y: 1 Vp-p, 75-ohms unbalanced,
sync negative
C:0.286 Vp-p (Burst signal),
75 ohms
VIDEO (phono jack):
l Vp-p, 75-ohms unbalanced, sync
negative
AUDIO (phono jacks):
500 mVrms (100% modulation),
Impedance: 47 kitohms
VIDEO IN 3:
DV1-HDTV : 1 terminal, 3.3V T.M.D.S., 50 ohms
DVI-HDTV input terminal is compliant
with the EIA-861 standard and is not
intended for use with personal
computers.
AUDIO (phono jacks):
500 mVrms (t 00% modulation),
Impedance: 47 kilohms
VIDEO IN 4:
Y:t Vp-p, 75 ohms, 0.3 V negative sync
Pt_:0.7 Vp-p, 75 ohms
P_:0.7 Vp-p, 75 ohms
or
G:0.7 Vp-p, 75 ohms, Sync on Green
B:0.7 Vp-p, 75 ohms, Sync on Green
R:0.7 Vp-p, 75 ohms, Sync on Green
or
G:0.7 Vp-p, 75 ohms, non Sync on Green
B:0.7 Vp-p, 75 ohms, non Sync on Green
R:0.7 Vp-p, 75 ohms, non Sync on Green
Additional Information
HD: 1-5 Vp-p
VD: 1-5 Vp-p
AUDIO (phono jacks):
500 mVrms (100% modulation),
Impedance: 47 kilohms
SUB WOOFER: phono jack
AUDIO OUT (phono jacks):
500 mVrms (100% modulation)
Headphones: Stereo minijack
CONTROL S IN/OUT:
minijacks
Speaker: 50 x 130 mm (2 x 5 _/sinches)
x2
Speaker output: 7W x 2 (KE-32TS2U)
9W x 2 (KE-42TS2U)
Power requirement:
120 V AC, 60 Hz
Power consumption:
In use (Max.): KE-32TS2U:300W
KE42TS2U:415W
In standby: KE-32TS2U: 1.7W
KE-42TS2U:2.9W
Dimensions (W/H/D):
856 x 627 x 132 mm
(33 3/4x 24 3h X 5 1]4inch)
(KE-32TS2U)
1,056 x 764 x 124 mm
(4t 5/s x 30 _/8x 5 inch)
(KE-42TS2U)
Mass:
Supplied accessories
Optional accessories
Note that some optional accessories may be out of
stock.
Headphones plug adapter
Connecting cables
Design and specifications are subject to change
without notice.
26kg(571bs3 oz.)
(KE-32TS2U)
37.5 kg(821bs7 oz.)
(KE-42TS2U)
Remote control RM-928Y (1)
Batteries size AA (2)
75-ohm coaxial cable (t)
AC power cord (1)
Brackets (2)
Cleaning cloth (1)
Operating instructions (t)
VMC-810S/820S, YC- t 5V/30V,
RK-74A, VMC-10HG, SMF-403
(us)61
Page 62

Additional information
Index
A
Adjust Picture ....................................... 38
Adjust Pixel .......................................... 52
Adjust Sound ........................................ 41
Advanced AV setting oplions ............... 51
Auto Program ....................................... 20
Auto Shutoff ......................................... 53
Auto YC ............................................... 10
Auto Wide ...................................... 29, 30
C
Channel setting ..................................... 20
Clock Display ....................................... 55
Clock Set .............................................. 55
CONTROL S jacks ................................. 9
Closed Caplion ..................................... 24
Color Matrix ......................................... 52
Color System ........................................ 53
Connecting .............................................. 7
antenna ................................................ 9
audio receiver .................................... 13
cable box ............................................. 9
digital TV receiver ............................ 17
DVD player .................................. 14,15
RGB equipment ................................ 19
satellite receiver ................................ 11
sub woofer ........................................ 18
VCR .................................................. 10
D
Daylight Saving .................................... 56
Display .................................................. 52
E
Effect .................................................... 27
F
Favorile Channel .................................. 36
Front and rear connectox:s ....................... 8
Full ........................................................ 29
I
Initial Setup .......................................... 53
Input select ........................................... 32
L
Language selection ............................... 22
M
Menu Function ..................................... 53
MTS ...................................................... 43
Muting .................................................. 23
N
Normal .................................................. 29
O
On/Off Timer ........................................ 56
Optional equipment .............................. 33
P
Parental Control .................................... 43
password ........................................... 45
ratings ............................................... 48
Picture Mode ........................................ 26
Power Saving ........................................ 28
R
RGB Mode ........................................... 52
Remote control ....................................... 6
battery installation .............................. 6
operating optional equipment ........... 35
programming .................................... 33
S
Screen Saver ......................................... 52
Screen Shift .......................................... 38
Screen Size ........................................... 38
Screen Zoom ......................................... 52
Self-diagnosis function ......................... 58
Sleep timer ............................................ 54
Speaker ................................................. 13
Specificalions ....................................... 61
Subtitles ................................................ 29
Sync Mode ............................................ 52
T
Troubleshooting .................................... 58
U
Unit Status ............................................ 53
Unpacking .............................................. 6
V
VIDEO IN 4 jacks .......................... 14, 17
W
Wide Screen Mode ............................... 29
Wide Setup ........................................... 30
Wide Zoom ........................................... 29
Z
Zoom .................................................... 29
62(us)
Page 63

 Loading...