

Sony KE-42MR1, KE-50MR1 User Manual
Connecting the
1/
R/D/D/D
55
L/G/S/I
Y
CTRL
S
CENTRE
SPEAKER IN
180W (6 ) MAX
P
B/CBPR/CR
(SMARTLINK)
(SMARTLINK)
AV
MOUSE
W/G/W/GL/G/S/IR/D/D/D
2/
3/
4/
DISPLAY SIGNAL OUT
BLACK WHITE
AC IN
1/
R/D/D/D
55
L/G/S/I
Y
CTRL
S
CENTRE
SPEAKER IN
180W (6 ) MAX
P
B/CBPR/CR
(SMARTLINK)
(SMARTLINK)
AV
MOUSE
W/G/W/GL/G/S/IR/D/D/D
2/
3/
4/
DISPLAY SIGNAL OUT
BLACK WHITE
AC IN
OUT IN
VCR
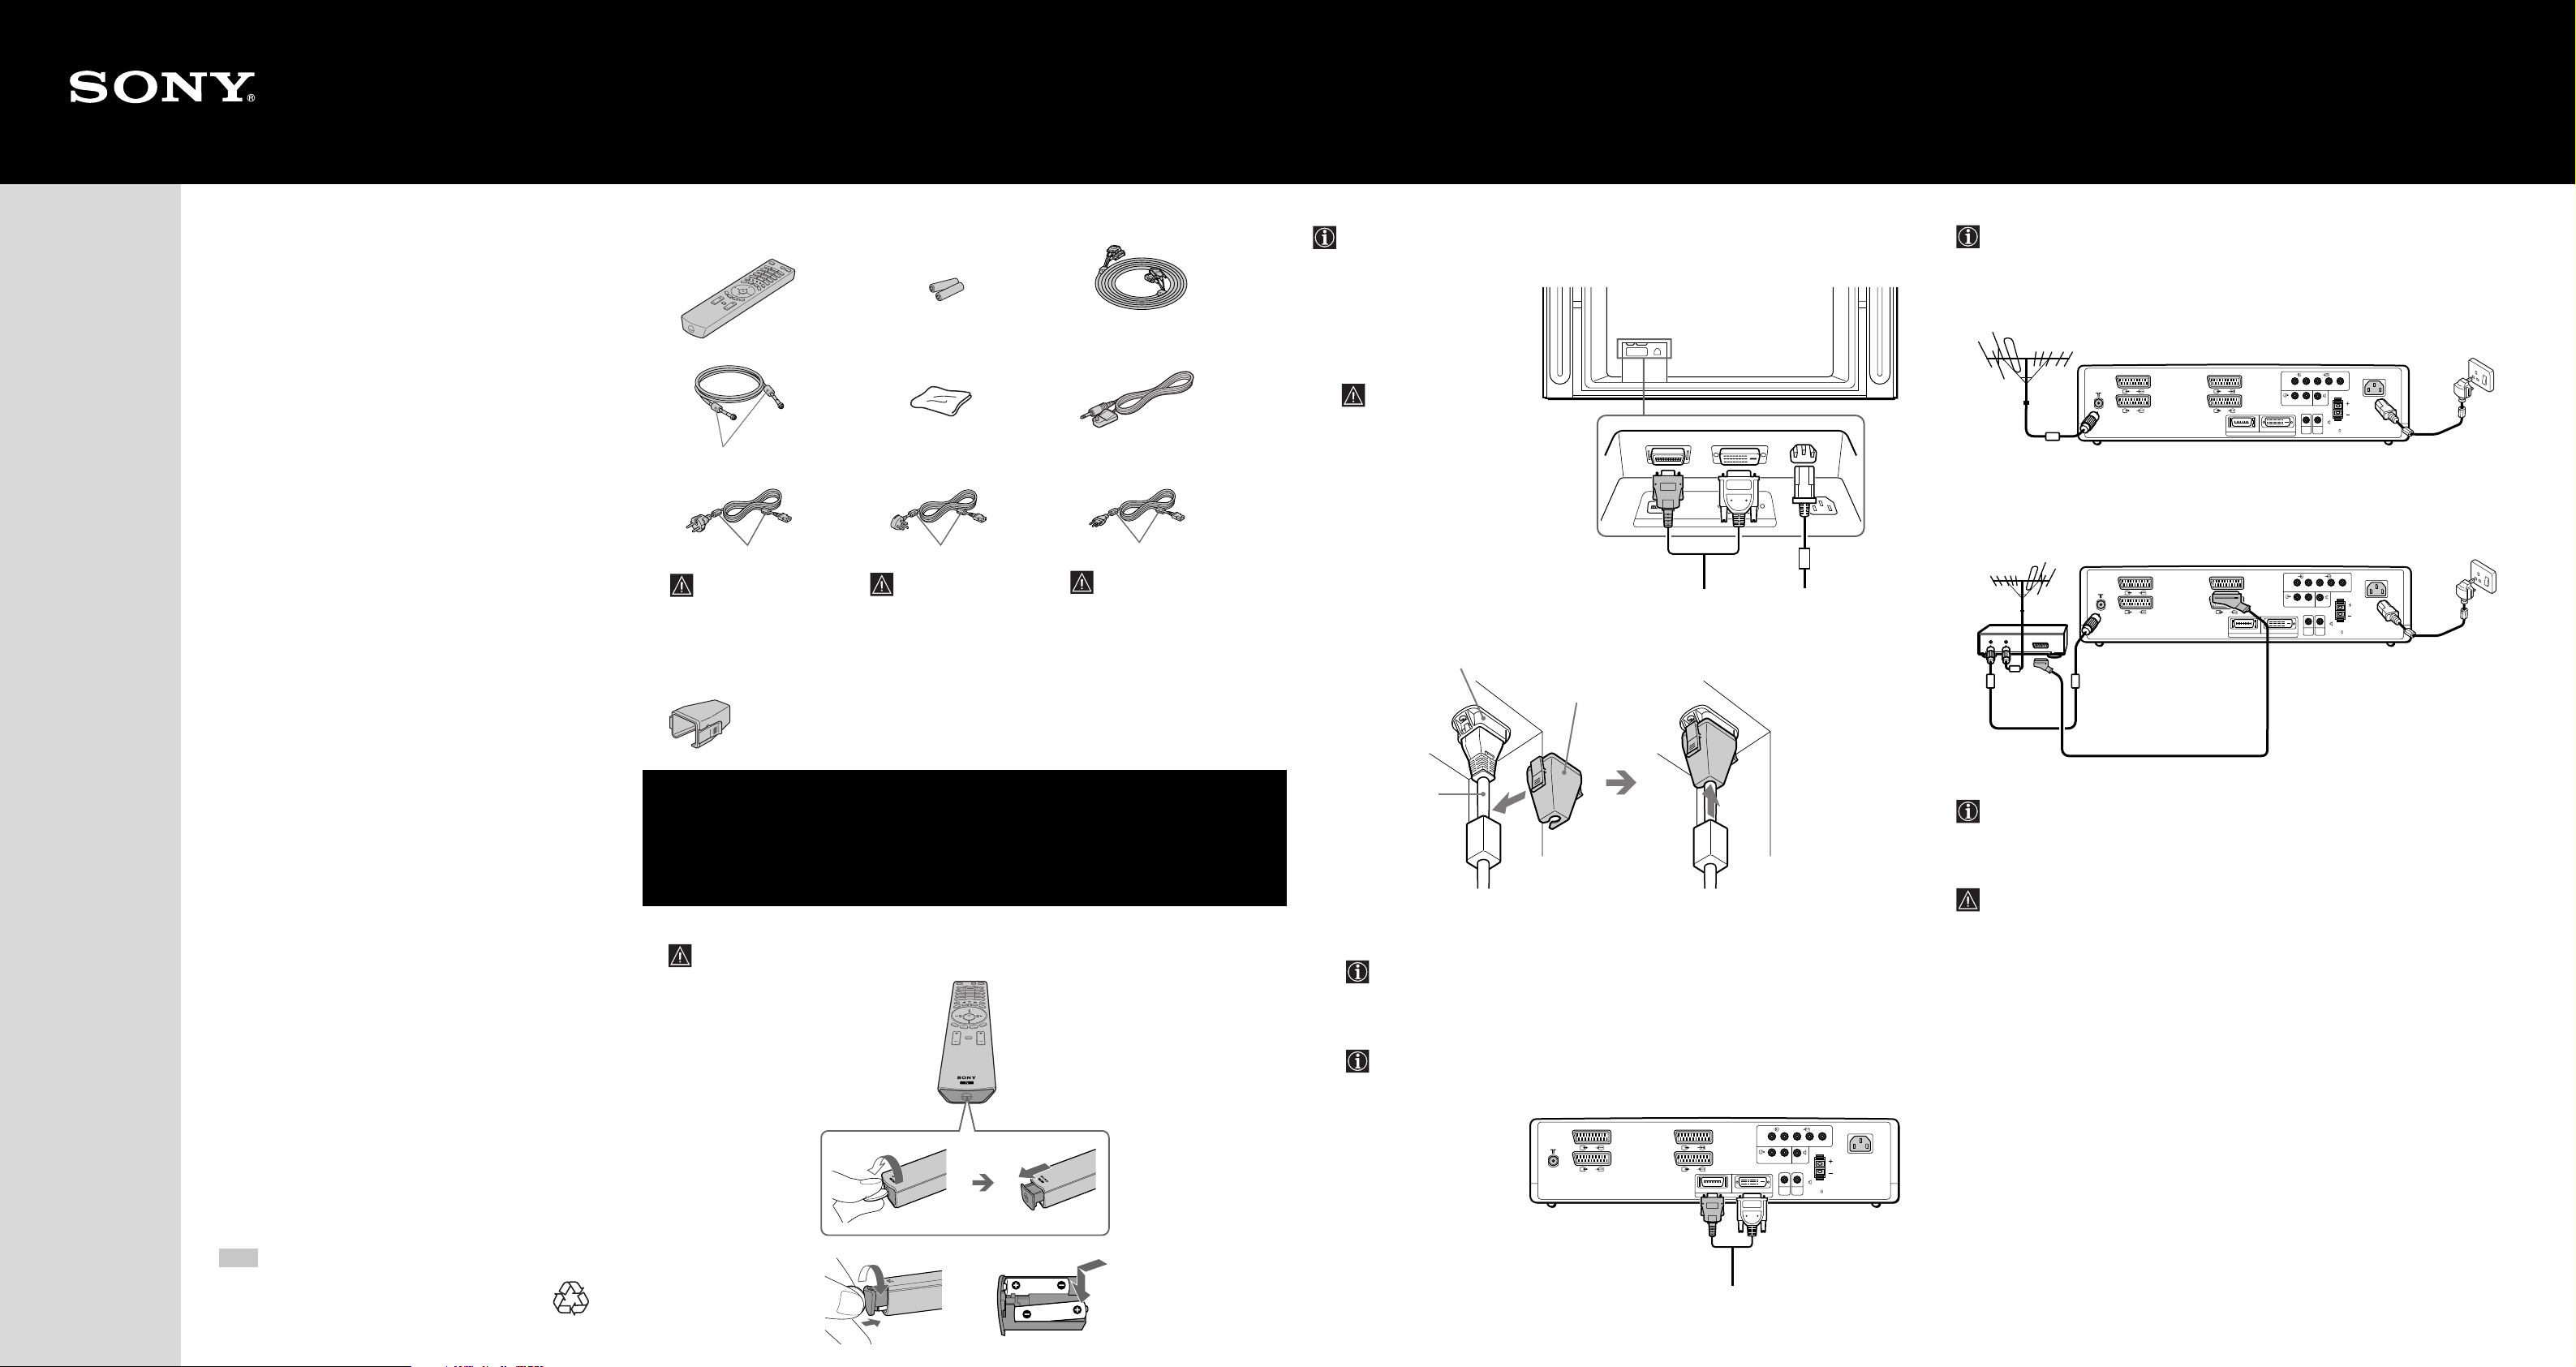
Connect the supplied
coaxial cable.
Connect the supplied mains
lead (Type C-4, Type BF or
Type C-5, with safety earth).
Scart lead is optional.
Connecting an aerial
Connecting a VCR with an aerial
Connect the supplied
mains lead (Type C-4,
Type BF or Type C-5, with
safety earth).
KE-42MR1
KE-50MR1
Thank you for purchasing this Sony
product.
After following this step by step guide
you will be able to:
Insert Batteries into the Remote
Control.
Connect the Display Unit to the Media
Receiver Unit.
Connect the AC Cable, Aerial and VCR
to your TV.
Select the language of the menu
screens.
Select the country in which you wish to
operate the set.
Set the current time.
Checking the Accessories Supplied
1
One Remote Control
(RM-972):
One Coaxial Cable: One Cleaning Cloth: One AV Mouse:
Do not remove ferrite cores.
Two Mains Leads (Type C-4):
Do not remove ferrite cores.
Use these mains leads (with
safety earth) if you use the
set outside the United
Kingdom.
One Mains Plug holder:
Inserting Batteries into the Remote Control
Two size AAA batteries
(R03 Type):
Two Mains Leads (Type BF):
Do not remove ferrite cores.
•Use these mains leads
(with safety earth) if you
use the set in the United
Kingdom.
• See “NOTICE FOR
CUSTOMERS IN THE
UNITED KINGDOM” on
page 2 of the instruction
manual when using the
mains leads.
• These mains leads may not
be supplied depending on
the country.
One Display Interface Cable:
Two Mains Leads (Type C-5):
Do not remove ferrite cores.
•Use these mains leads (with
safety earth) if you use the
set in the Swiss
Confederation.
• These mains leads may not
be supplied depending on
the country.
Display Unit to the
Media Receiver Unit
34
• Use the supplied display interface cable.
• Use the supplied mains lead for the display unit (Type C-4, Type BF or Type C-5, see
step 1).
1 Connect the supplied
display interface cable and
the supplied mains lead for
the display unit to the
display unit.
Do not connect to the
mains before all
connections are
completed.
2 Secure the mains plug to the display’s AC IN jack.
AC IN (Power
supply input) jack of
the display unit
Mains lead
(supplied)
Mains plug
holder
(supplied)
SONY EXCLUSIVE CABLE ONLY
BLACK
DISPLAY SIGNAL IN
WHITE
AC IN
Connecting the AC Cable, Aerial and VCR
• Use the supplied mains lead for the media receiver unit (Type C4, Type BF or Type C-5, see step 1).
• Use the supplied coaxial cable for aerial connection.
• Other connecting cables are not supplied.
• The Scart lead is optional, however if you use a Scart lead to connect your VCR it
can improve picture and sound quality when using it.
• For more details of VCR connection, please refer to the section “Connecting
Optional Equipment” on page 61 of the instruction manual.
Tune your TV.
Change the broadcast channels into a
different order.
View TV Programmes.
Quick Start Guide
GB
©2002 by Sony Corporation
Ecological Paper - Totally Chlorine Free
4-093-109-01 (1)
Printed in Spain
Make sure you insert the supplied batteries using the correct polarity.
2
Always remember to dispose of used batteries in an environmentally friendly way.
m
<
a Attach the mains plug holder
(supplied) to the mains lead.
To unplug the mains lead pull down the mains plug holder by pushing in both
sides of the holder, then pull out the plug.
b Clip on the AC IN jack until
you hear clicking.
3 Install the display unit using the specified wall-mount bracket or stand.
Before installing the display unit, check the installation instructions of your wallmount bracket or stand.
4 Connect the supplied
display interface cable to
the media receiver unit.
1/
2/
(SMARTLINK)
3/
(SMARTLINK)
4/
BLACK WHITE
DISPLAY SIGNAL OUT
55
R/D/D/D
L/G/S/I
CTRL
S
W/G/W/GL/G/S/IR/D/D/D
MOUSE
Y
AV
P
B/CBPR/CR
CENTRE
SPEAKER IN
180W (6 ) MAX
If you do not have a Scart lead, after automatically tuning the TV, tune in the VCR
test signal to the TV programme number “0” by using the “Manual Programme
Preset” option. (for details of how to manually programme these presets, see page 39,
step A of the instruction manual).
Refer to your VCR instruction manual to find out how to find the output channel of
your VCR.
AC IN
OK
PROG
MENU
TVVIDEO
Auto Tuning
Programme :
System :
Channel :
Searching...
01
I
C23
Programme Sorting
Select channel
01
02
03
04
05
06
07
08
09
10
TVE
TVE2
TV3
C33
C27
C58
S02
S06
S08
S12
Exit:
MENU
Do you want to start
automatic tuning ?
Yes No
No channel found.
Please connect aerial
Confirm
m
m
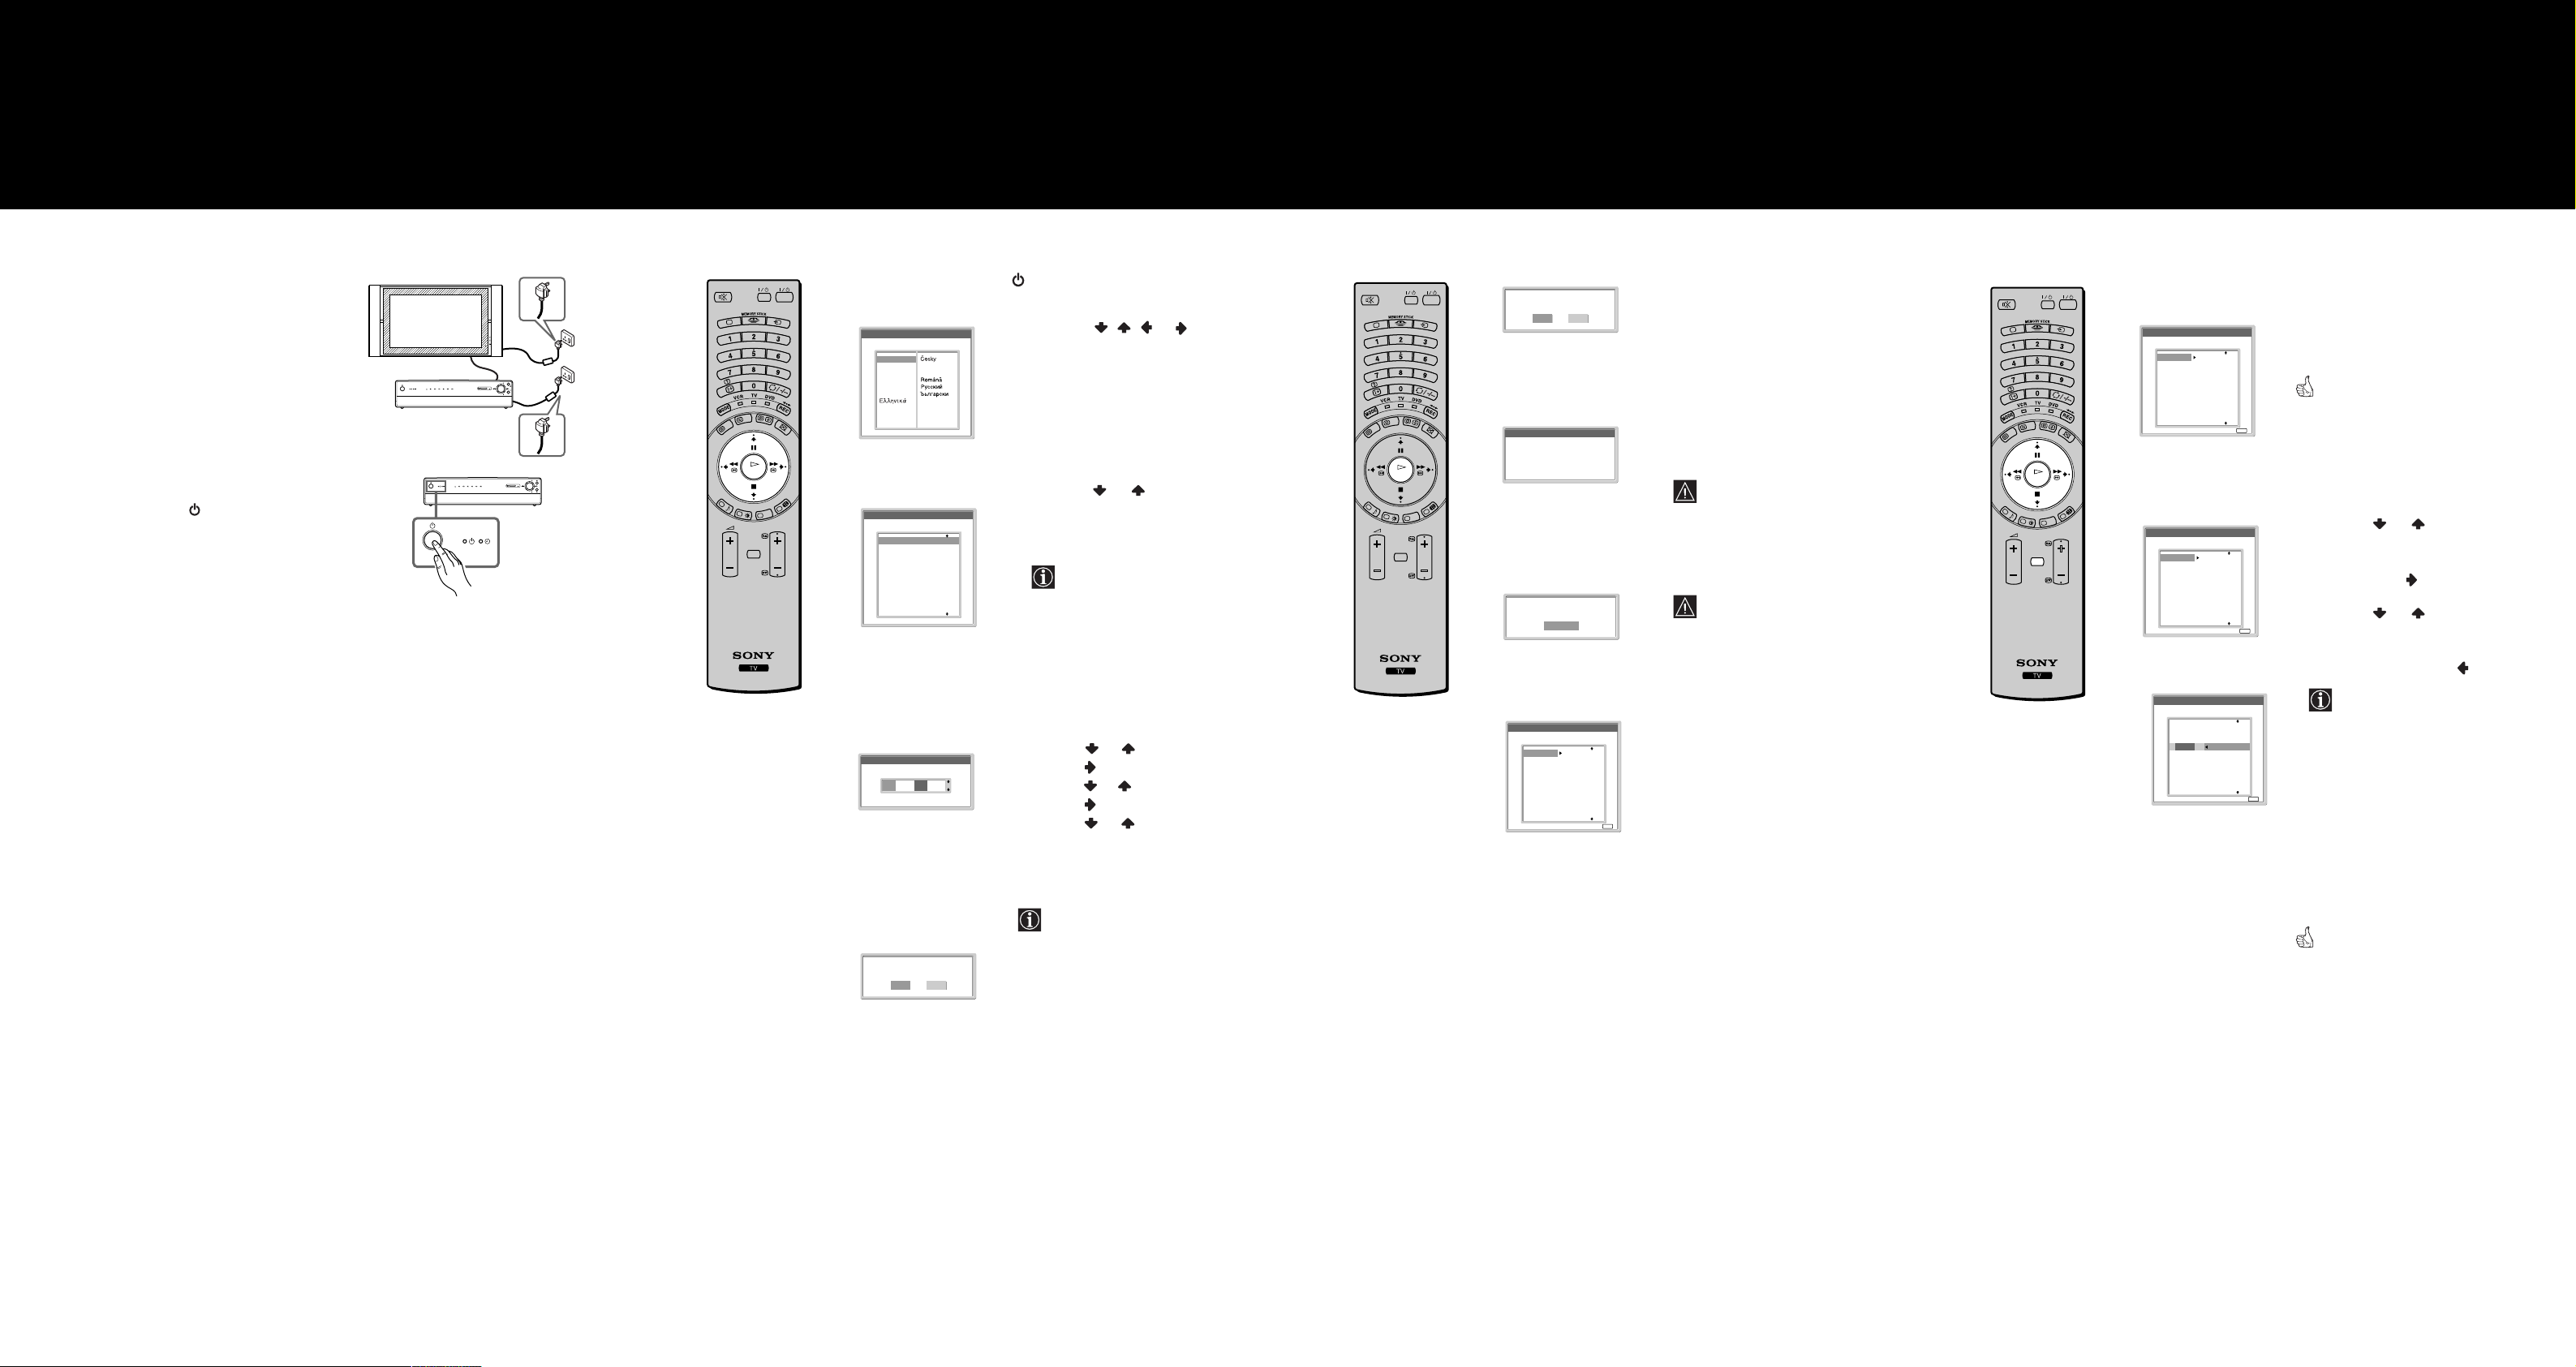
Selecting the language of the
Switching on the set
1
Connect the display unit and media
receiver unit to the mains (100 - 240V
AC; 50/60Hz for the display unit, 220 240V AC; 50/60Hz for the media
receiver unit).
2
The first time that the TV set is
connected, it is usually turned on. If the
TV is off, press the
Power
switch on
the media receiver unit to turn on the
TV.
menu screens, the country and
Automatically Tune
Changing the Programme Order
setting the current time
This TV set works with menu screens. By following the
instructions below, you can select the desired language
of the menu screens, the country in which you wish to
operate the TV set and set the current time.
65
The first time you press the
displays automatically on the TV screen.
Language
Select language
English
Nederlands
Slovensy
Français
Magyar
PROG
PC
MEMORY STICK
654321
PROG
PROG
PC
MEMORY STICK
654321
PROG
Italiano
Deutsch
Türkçe
Español
Português
Polski
m
Country
Select country
Off
United Kingdom
Ireland
Nederland
België/Belgique
Luxembourg
France
Italia
Schweiz/Suisse/Svizzera
Deutschland
Österreich
Suomi
Dansk
Svenska
Norsk
m
Clock Set
0 0 : 0 0 : 0 0 Mon
m
Do you want to start
automatic tuning ?
Yes No
Power
1
Press the
switch, a
Language
/ / or
button on the
menu
remote control to select the language,
then press the OK button to confirm
your selection.
From now on all the menus will appear
in the selected language.
The
2
Country
menu appears
automatically on the TV screen.
Press the or button to select the
country in which you will operate the
TV set, then press the OK button to
confirm your selection.
• If the country in which you want
to use the TVset does not appear
in the list, select “off” instead of
a country.
• If you change the country
selection,
Clock Set
should
always be performed next.
The
3
Clock Set
menu appears on the TV
screen.
a)
Press or to set the hour, then
press .
b)
Press or to set the minutes, then
press .
c)
Press or to set the day of a
week, then press OK at the time
signal.
The clock starts.
If you adjust the clock,
Auto Tuning
should always be performed next.
The
Auto Tuning
menu appears on the TV
screen.
the TV
You need to tune the TV to receive channels (TV Broadcast).
By following the instructions below, this set automatically
searches and stores all available channels for you.
7
TVVIDEO
OK
PROG
MENU
1
Press the OK button on the remote
control to select
The TV starts to automatically search
2
Yes
.
and store all available broadcast
channels for you.
This procedure could take some
minutes.
Please be patient and do not press
any buttons while the auto tuning
is in progress, otherwise the auto
tuning will not be completed.
If no channels were found during
the auto tuning process then a
new menu appears automatically
on the screen asking you to
connect the aerial. Please connect
the aerial (refer to the step 4) and
press OK. The auto tuning
process will start again.
When the auto tuning is finished, the
Programme Sorting
menu appears on
the screen.
of the broadcast channels
By following the instrutions below, you can rearrange the
order in which the broadcast channels appear on the screen
8
a) If you wish to keep the broadcast channels
TVVIDEO
OK
PROG
MENU
in the tuned order:
Programme Sorting
Select channel
01
TVE
02
TVE2
03
TV3
04
C33
05
C27
06
C58
07
S02
08
S06
09
S08
10
S12
Press the
control to exit and return to the normal
TV screen.
MENU
Exit:
MENU
button on the remote
Your set is now ready for use.
b) If you wish to store the broadcast
channels in a different order:
1
Programme Sorting
Select channel
01
TVE
02
TVE2
03
TV3
04
C33
05
C27
06
C58
07
S02
08
S06
09
S08
10
S12
m
Programme Sorting
Select channel
TVE
01
TVE2
02
TV3
03
C33
04
C27
05
C58
06
S02
07
S06
08
S08
09
S12
10
01 TVE
MENU
Exit:
MENU
Exit:
Press the or button to select the
programme number with the channel
(TV Broadcast) you wish to rearrange,
then
press the button.
2
Press the or button to select the
new programme number position for
your selected channel (TV
Broadcast), then press .
The selected broadcast channel
now moves to its new programme
position and the other broadcast
channels move accordingly.
3
Repeat steps 1) and 2) if you wish to
change the order of the other channels.
4
Press the
MENU
button on the remote
control to exit and return to the normal
TV screen.
The TV set is now ready for use.
Your television stations are now stored in your television’s memory.
 Loading...