

Page 1

2-698-270-22(1)
SXRD Projection TV
KDS-70R2000
KDS-55A2000
Operating Instructions
Before operating the TV, please read the “Safety
information” section of this manual.
Retain this manual for future reference.
Mode d’emploi
Avant d’utiliser le téléviseur, lisez attentivement la section
« Consignes de sécurité » de ce manuel.
Conservez ce manuel pour toute référence ultérieure.
Bedienungsanleitung
Lesen Sie vor der Inbetriebnahme des Fernsehgeräts bitte
den Abschnitt „Sicherheitsinformationen“ in dieser
Anleitung. Bewahren Sie die Anleitung zum späteren
Nachschlagen auf.
Manual de instrucciones
Antes de utilizar el televisor, lea la sección “Información de
seguridad” de este manual.
Conserve este manual para consultarlo en el futuro.
GB
FR
DE
ES
© 2006 Sony Corporation
For useful information about Sony products
Pour obtenir les informations utiles concernant les produits
Sony
Fur hilfreiche Informationen zu Sony Produkten
Información de utilidad para productos Sony
Page 2

Introduction
Thank you for choosing this Sony product.
Before operating the TV, please read this manual
thoroughly and retain it for future reference.
Notice for Digital TV function
• Any functions related to Digital TV (with logo) will
only work in countries or areas where DVB-T (MPEG2)
digital terrestrial signals are broadcasted. Please confirm
with your local dealer if you can receive a DVB-T signal
where you live.
• Although this TV set follows DVB-T specifications,
compatibility with future DVB-T digital terrestrial
broadcasts cannot be guaranteed.
• Some Digital TV functions may not be available in some
countries.
Trademark information
• is a registered trademark of the DVB Project
• Manufactured under license from BBE Sound, Inc.
Licensed by BBE Sound, Inc. under one or more of the
following US patents: 5510752, 5736897. BBE and BBE
symbol are registered trademarks of BBE Sound, Inc.
• “Dolby”, “Pro Logic”, and the double-D symbol are
trademarks of Dolby Laboratories.
• Manufactured under license from Dolby Laboratories.
• TruSurround technology is used as a virtualizer for Virtual
Dolby Surround.
• TruSurround, SRS and (
Labs, Inc.
TruSurround technology is incorporated under license
from SRS Labs, Inc.
• HDMI, the HDMI logo and High-Definition Multimedia
Interface are trademarks or registered trademarks of
HDMI Licensing LLC.
• The illustrations used in this manual are of the KDS55A2000 unless otherwise stated.
z) symbol are trademarks of SRS
GB
2
Page 3
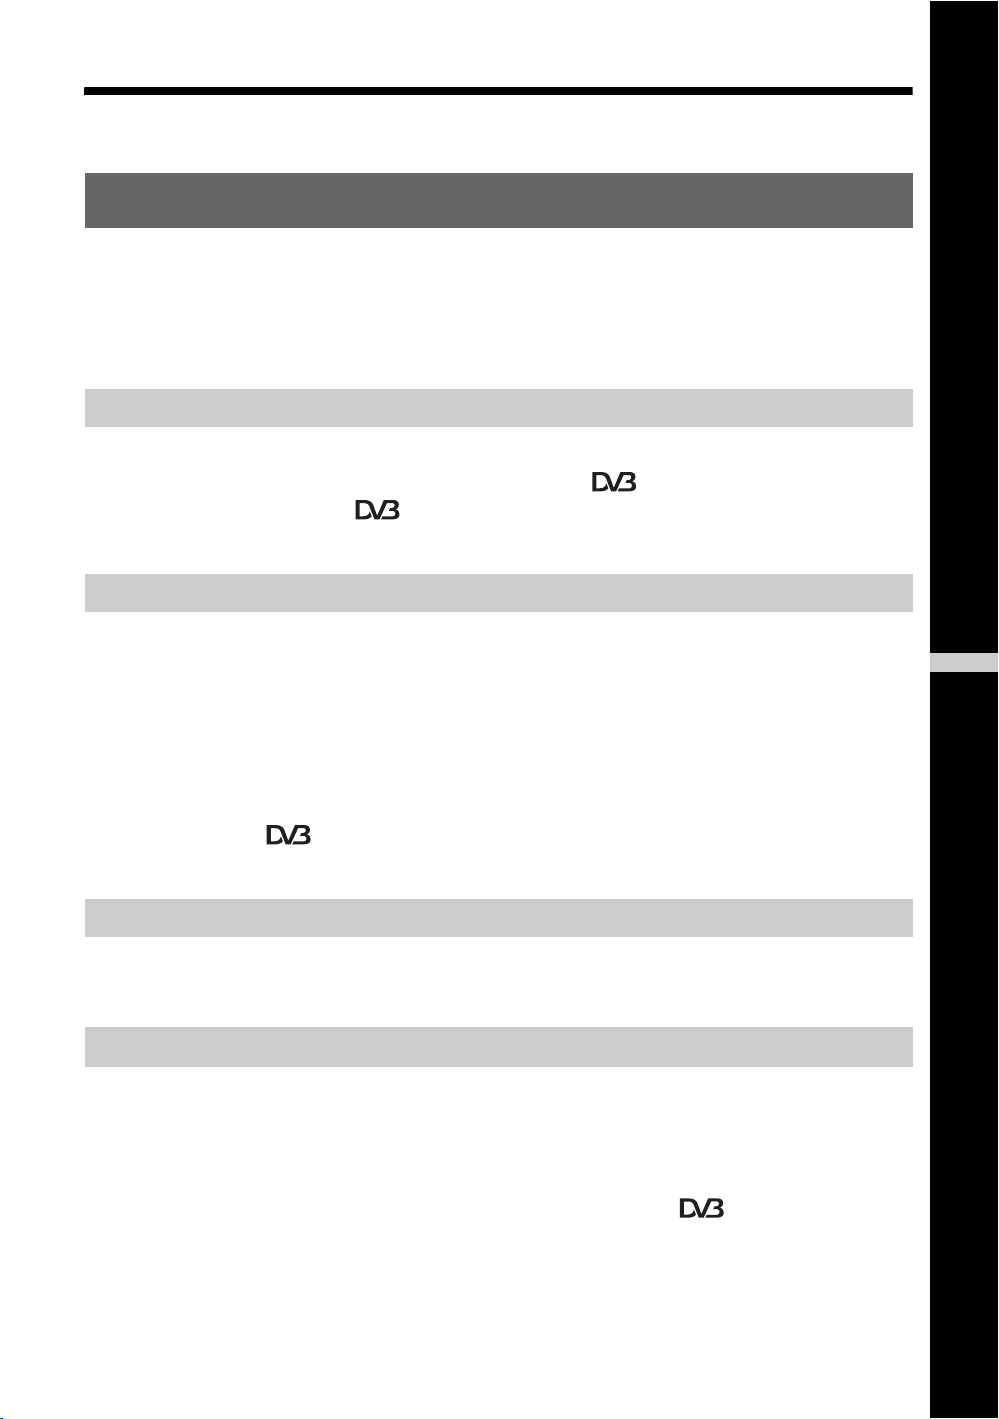
Table of Contents
Start-up Guide 4
Safety information ...................................................................................................................10
Precautions .............................................................................................................................12
Overview of the remote ........................................................................................................13
Overview of the TV buttons and indicators........................................................................15
Watching TV
Watching TV............................................................................................................................17
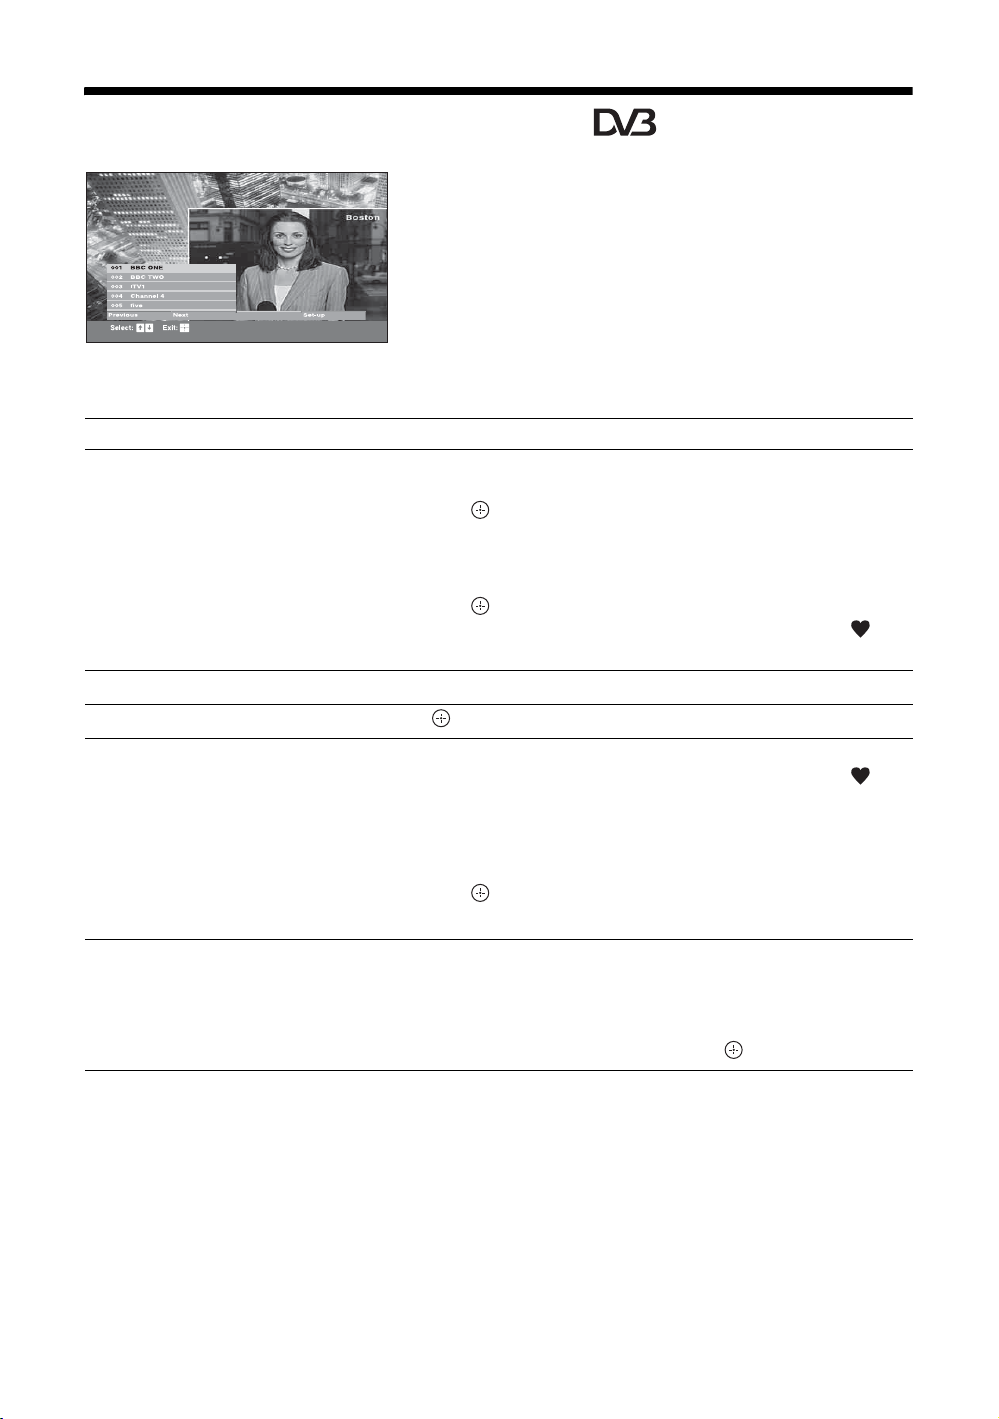
Checking the Digital Electronic Programme Guide (EPG) ............................................. 20
Using the Digital Favourite list .......................................................................................22
Viewing pictures from connected equipment ..........................................................................23
Using MENU Functions
Navigating through menus ......................................................................................................24
Picture menu ...........................................................................................................................25
Sound menu............................................................................................................................28
Screen menu...........................................................................................................................30
Set-up menu............................................................................................................................31
AV Set-up menu......................................................................................................................34
Analogue Set-up menu ...........................................................................................................36
Digital Set-up menu .......................................................................................................39
PC Settings menu ...................................................................................................................41
GB
Using Optional Equipment
Connecting optional equipment...............................................................................................43
Programming the remote ........................................................................................................45
Additional Information
Replacing the lamp .................................................................................................................48
Specifications ..........................................................................................................................51
Troubleshooting ......................................................................................................................53
Index .......................................................................................................................................56
: for digital channels only
3
GB
Page 4
Start-up Guide
To insert batteries into the remote
1: Checking the
accessories
Remote RM-ED006 (1)
Size AA batteries (R6 type) (2)
Mains lead (Type C-6) (1)
Coaxial cable (1)
Do not remove these ferrite cores.
Side cover (2) (only for KDS-70R2000)
Push and slide to open.
Notes
• Observe the correct polarity when inserting batteries.
• Do not use different types of batteries together or mix old
and new batteries.
• Dispose of batteries in an environmentally friendly way.
Certain regions may regulate disposal of the battery.
Please consult your local authority.
• Handle the remote control with care. Do not drop or step
on it, or spill liquid of any kind onto it.
• Do not place the remote control in a location near a heat
source, or in a place subject to direct sunlight, or in a damp
room.
Spare projection lamp (1) (only for KDS-70R2000)
GB
4
Page 5
2: Installing the TV
65.
65
°
Recommended viewing area
Your viewing position may affect the picture quality.
For the best picture quality, install your TV within the
areas shown below.
\
Model Viewing distance
KDS-70R2000 min. 2.4 m
KDS-55A2000 min. 2.1 m
Horizontal Viewing Area
KDS-70R2000
min. 2.4 m
KDS-55A2000
min. 2.1 m
65
65°
65°
65.
Carrying your TV
KDS-55A2000
Carrying the TV requires at least two people.
When moving the TV, place one hand in the hole on
the lower portion of the TV while supporting the top
with the other hand, as shown in the illustration below.
KDS-70R2000
Carrying the TV requires at least three people. Do not
hold by the pedestal or the speakers of the TV. Doing
so may cause these parts to break off.
When moving the TV, one person should lift the back,
and the other two people should lift the front and
sides. Support the TV by placing your hands in the
holes on the lower part of the TV set, and then lift
carefully.
Start-up Guide
Vertical Viewing Area
KDS-70R2000
min. 2.4 m
KDS-55A2000
min. 2.1 m
30°
30°
Notes
• Do not hold by the pedestal or the front panel of the TV.
Doing so may cause these parts to break off.
Do not grasp the
pedestal or the front
panel of the TV.
• To ensure the safety of children and the TV, keep children
away from the TV during installation. Climbing on or
pushing the TV or its stand may cause it to fall and damage
the TV.
• When installing your TV against a wall, keep your TV at
least 10 cm away from the wall to provide proper
ventilation.
Continued
GB
5
Page 6
Preventing the TV from toppling over
KDS-55A2000
SU-RS11X
KDS-70R2000
Installing the TV against a wall
Keep the TV at least 10 cm away from the wall to
provide proper ventilation.
Blocking the ventilation opening of the cooling fan
may damage the TV.
Allow this much space
10 cm
30 cm
10 cm 10 cm
SU-RS51U
Note
When using the TV stand SU-RS11X (for KDS-55A2000,
not supplied) or SU-RS51U (for KDS-70R2000, not
supplied) for your TV, you must use the support belt.
Never install the TV as follows
Air circulation is
blocked.
Note
Do not install the TV near any ventilatio n, as it may affect the
normal TV operating temperature.
Warm air is blown to
ventilation openings.
GB
6
Page 7
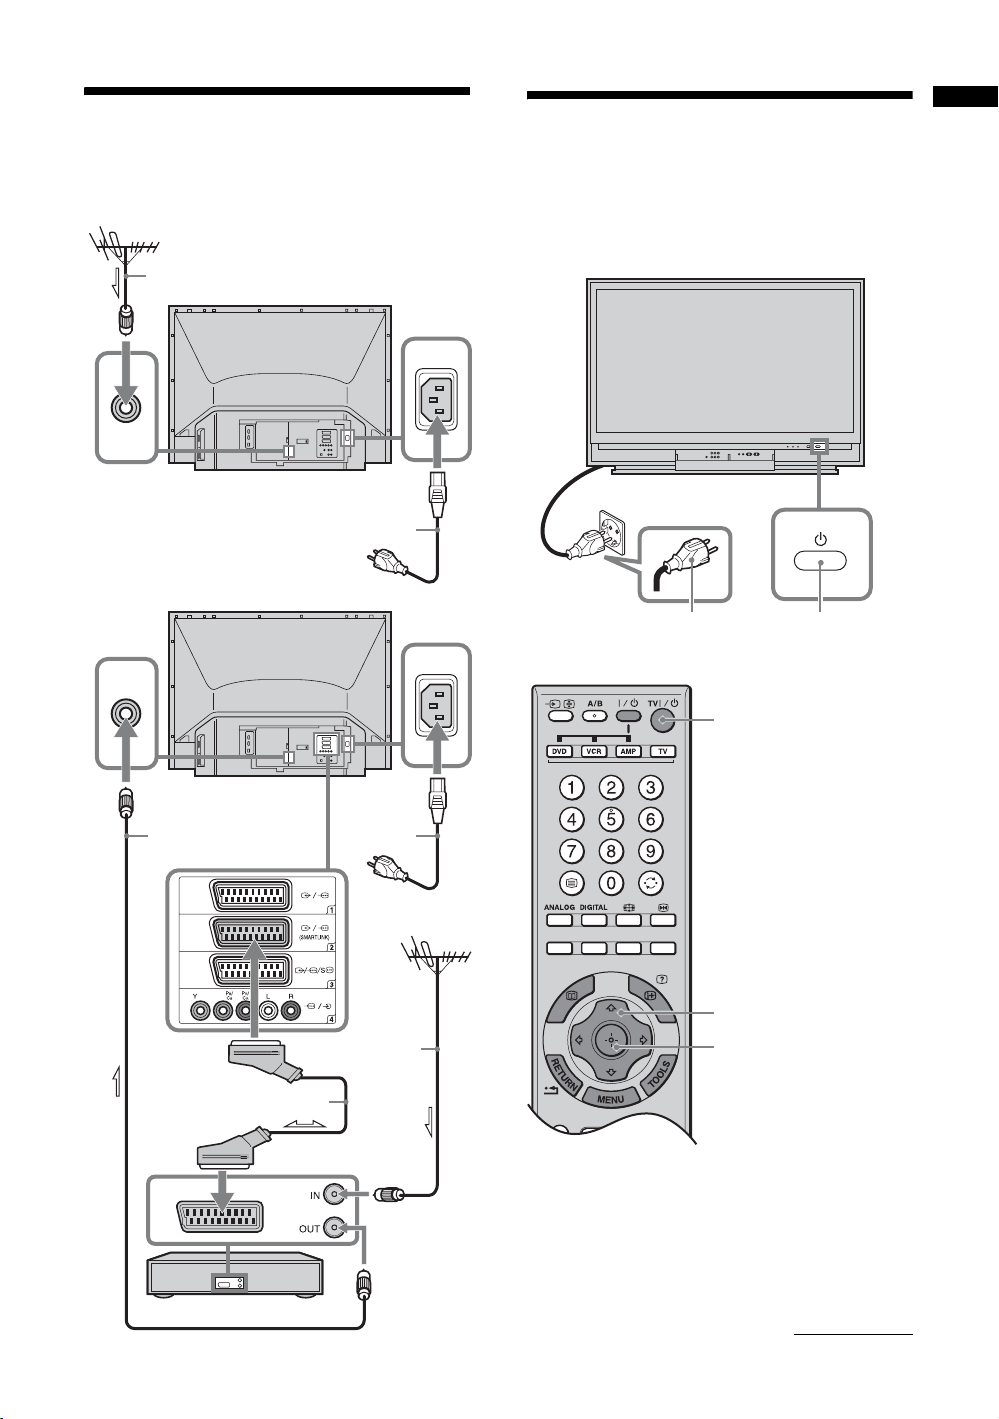
3: Connecting an aerial/
4: Selecting the
Start-up Guide
VCR
Connecting an aerial only
Coaxial cable (supplied)
Mains lead (supplied)
Connecting an aerial and VCR
language and country/
region
1
2
2
Coaxial cable
(supplied)
Scart lead (not supplied)
VCR
Mains
lead
(supplied)
Coaxial cable
(not supplied)
3,4
3,4
1 Connect the TV to your mains socket
(220-240 V AC, 50 Hz).
Continued
GB
7
Page 8
2 Press 1 on the TV (front).
When you switch on the TV for the first time, the
Language menu appears on the screen.
When the TV is in standby mode (the
standby) indicator on the TV (front) is red), press
TV "/1 on the remote to switch on the TV.
1 (on/
3 Press F/f/G/g to select the language
displayed on the menu screens, then press
.
5: Auto-tuning the TV
The TV will search for and store all available TV
channels.
2
4 Press F/f to select the country/region in
which you will operate the TV, then press
.
If the country/region in which you want to use the
TV does not appear in the list, select “-” instead of
a country/region.
The message confirming the TV start auto-tuning
appears on the screen, then go to “5: Auto-tuning
the TV”.
2
4
1 Before you start auto-tuning the TV, insert
a pre-recorded tape into the VCR
connected to the TV (page 7) and start play
back.
The video channel will be located and stored on
the TV during auto-tuning.
If no VCR is connected to the TV, skip this step.
2 Press G/g to select “OK”, then press .
The TV starts searching for all available digital
channels, followed by all available analogue
channels. This may take some time, please be
patient and do not press any buttons on the TV or
remote.
If a message appears for you to confirm the aerial
connection
No digital or analogue channels were found.
Check the aerial connection and press G/g to
select “Yes”, then press to start auto-tuning
again.
GB
8
Page 9

3 When the Programme Sorting menu
appears on the screen, follow the steps of
“Programme Sorting” (page 36).
If you do not change the order in which the analogue
channels are stored on the TV, go to step 4.
4 Press MENU to exit.
The TV has now tuned in all the available channels.
Note
When a digital broadcast channel cannot be received, or
when selecting a region in which there are no digital
broadcasts in step 4 (page 8) under “4: Selecting the
language and country/region”, the time must be set after
performing step 3.
Start-up Guide
GB
9
Page 10

Safety information
Mains lead
• Observe the followings to prevent the mains lead being
damaged. If the mains lead is damaged, it may result in a
fire or an electric shock.
– Unplug the mains
lead when moving
the TV set.
– When you disconne ct
the mains lead,
disconnect it from the
mains socket first.
– Be sure to grasp the plug when
disconnecting the m ains lead. Do
not pull on the mains lead itself.
– Do not pinch, bend, or twist the
mains lead excessively. The core
conductors may be exposed or
broken.
– Do not modify the mains lead.
– Do not put anything heavy on the
mains lead.
– Keep the mains lead away from heat
sources.
• If you damage the mains lead, stop
using it and ask your dealer or Sony service centre to
exchange it.
• Do not use the supplied mains lead on any other
equipment.
• Use only an original Sony mains lead, not other brands.
Mains socket
• The TV set with a three-wire grounding
type mains plug must be connected to a
mains socket with a protective earthing
connection.
• Do not use a poor fitting mains socket.
Insert the plug fully into the mains socket.
A poor fit may cause arcing and result in a
fire. Contact your electrician to have the
mains socket changed.
Cleaning the mains plug
Unplug the mains plug and clean it
regularly. If the plug is covered with dust
and it picks up moisture, its insulation may
deteriorate and result in a fire.
Overloading
This TV set is designed to operate on
a 220–240 V AC supply only. Take
care not to connect too many
appliances to the same mains socket
as this could result in a fire or an electric shock.
When not in use
• If you will not be using the TV
set for several days, the TV set
should be disconnected from
the mains for environmental
and safety reasons.
• The TV set is not disconnected from the mains when the
TV set is switched off. To disconnect the TV set
completely, pull the plug from the mains. However, some
TV sets may have features which need the TV set to be left
in standby to work correctly.
Carrying
• Before carrying the TV set, disconnect all the cables from
the TV set.
• Carrying the large size TV set requires two or more
people.
• When you carry the TV set by hand,
hold the TV set as illustrated on the
right. When lifting the TV set or moving
the panel of the TV set, hold it firmly
from the bottom. If you do not do so, the
TV set may fall and be damaged or cause
serious injury.
• When transporting it, do not subject the TV set to jolts or
excessive vibration. The TV set may fall and be damaged
or cause serious injury.
• If the TV set has been dropped or damaged, have it
checked immediately by qualified service personnel.
• When you carry the TV set in for repair or when you move
it, pack it using the original carton and packing material.
Placement
• The TV set should be installed near an easily accessible
mains socket.
• Place the TV set on a stable, level surface.
Do not hang anything on the TV set. If
you do, the TV set may fall from the
stand, causing damage or serious injury.
• Do not install the TV set in places subject
to extreme temperature, for example in
direct sunlight, or near a radiator, or heating vent. If the
TV set is exposed to extreme temperature, the TV set may
overheat and cause deformation of the casing or cause the
TV set to malfunction.
• Do not install the TV set in a place exposed to direct air
conditioning. If the TV set is installed in such a location,
moisture may condense inside and may cause a
malfunction.
• Never place the TV set in hot, oily,
humid or excessively dusty places.
• Do not install the TV set where
insects may enter.
• Do not install the TV set where it
may be exposed to mechanical vibration.
• Do not install the TV set in a location where it may
protrude, such as on or behind a pillar, or where you might
bump your head on it. Otherwise, it may result in injury.
• Do not allow children to climb on the TV
set.
• If you use the TV set near the seashore,
salt may corrode metal parts of the TV set
and cause internal damage or fire.
• Do not install the appliance in a confined space, such as a
bookcase or built-in cabinet.
• Use the TV at temperatures between 5ºC and 35ºC.
• Do not use the TV at altitudes higher than 3,000 m, as
doing so might cause malfunctions.
10
GB
Page 11
Ventilation
• Never cover the ventilation
holes or insert anything in the
cabinet. It may cause
overheating and result in a fire.
• Unless proper ventilation is provided, the TV set may
gather dust and get dirty. For proper ventilation, observe
the following:
– Do not install the TV set turned backwards or sideways.
– Do not install the TV set turned over or upside down.
– Do not install the TV set on a shelf or in a closet.
– Do not place the TV set on a rug or bed.
– Do not cover the TV set with cloth, such as curtains, or
items such as newspapers, etc.
• Leave some space around the TV set (see “Installing the
TV against a wall” on page 6). Otherwise, air-circulation
may be inadequate and cause overheating, which may
cause a fire or damage to the TV set.
Optional accessories
Observe the following when installing the TV set using a
stand. If you do not do so, the TV set may fall and cause
serious injury.
• It is strongly recommended that you use Sony accessories
for safety reasons:
– KDS-55A2000:
TV stand SU-RS11X
– KDS-70R2000:
TV stand SU-RS51U
• Secure the TV set properly, following the instructions
supplied with your stand when installing the TV set.
• Be sure to attach the brackets supplied with your stand.
Wiring
• When wiring cables, be sure to unplug the mains lead for
your safety.
• Take care not to catch your feet on the cables. It may
damage the TV set.
Medical institutions
Do not place this TV set in a place
where medical equipment is in
use. It may cause a malfunction of
medical instruments.
Outdoor use
• Do not install this TV set
outdoors. If the TV set is
exposed to rain, it may result in a
fire or an electric shock.
• If this TV set is exposed to direct
sunlight, the TV set may heat up
and it may damage the TV set.
Vehicle, Ships and other
vessels
• Do not install this TV set in a
vehicle. The motion of the
vehicle may cause the TV set to
fall down and cause injury.
• Do not install this TV set on a
ship or other vessel. If the TV set
is exposed to seawater, it may
cause a fire or damage the TV
set.
Water and moisture
• Do not use this TV set near water
– for example, near a bathtub or
shower room. Also do not expose
to rain, moisture or smoke. This
may result in a fire or an electric shock.
• Do not touch the mains lead and the TV
set with wet hands. D oing so may cause
an electric shock or damage to the TV
set.
Moisture and flammable objects
• Do not place any objects on the TV
set. The TV set shall not be exposed to
dripping or splashing and that no
objects filled with liquid, such as
vases, shall be placed on the TV set.
• To prevent fire, keep flammable
objects or naked lights (e.g. candles)
away from the TV set.
• If any liquid or solid object does fall through openings in
the cabinet, do not operate the TV set. It may result in an
electric shock or damage to the TV set. Have it checked
immediately by qualified service personnel.
Lightning storms
For your own safety, d o not touch any
part of the TV set, mains lead, or
aerial lead during lightning storms.
Broken pieces
• Do not throw anything at the TV set.
The screen glass may break by the
impact and cause serious injury.
• If the surface of the TV set cracks, do
not touch it until you have unplugged the mains lead.
Otherwise electric shock may result.
Servicing
Dangerously high voltages are
present inside the TV set.
Do not open the cabinet. Entrust the
TV set to qualified service personnel
only.
Small accessories removal and fittable
Keep small accessories out of children’s reach.
Attachments
Do not use attachments not
recommended by the manufacturer,
as they may cause hazards.
11
GB
Page 12
Precautions
Viewing the TV
• To view the TV comfortably, the recommended viewing
position is from four to seven times the screen’s vertical
length away from the TV set.
• To obtain a clear picture, do not expose the screen to direct
illumination or direct sunlight. If possible, use spot
lighting directed down from the ceiling.
• View the TV in moderate light, as viewing the TV in poor
light or during long period of time, strains your eyes.
Volume adjustment
• Adjust the volume so as not to trouble your neighbours.
Sound carries very easily at night time. Therefore, closing
the windows or using headphones is suggested.
• When using headphones, adjust the volume so as to avoid
excessive levels, as hearing damage may result.
About the TV
• Although the TV is made with high-precision technology,
black dots may appear or bright points of light (red, blue,
or green) may appear constantly on the screen. This is a
structural property of the panel and is not a malfunction.
• When High contrast non-moving images such as station
logos and channel numbers are displayed for a long period
of time, there may be some image retention on the screen.
This is only a temporary condition. Turning off the power
for a while or letting the TV run on another channel will
eliminate the retained image.
• If direct sunlight or other strong illumination shines on the
screen, part of the screen may appear white due to
reflections from behind the screen. This is a structural
property of the TV.
Do not expose the screen to direct illumination or sunlight.
Projection lamp
• Your TV uses a projection lamp as its light source. It is
time to replace the lamp with a new one when:
– the message, “Projection lamp is nearing end of life.
Please replace the lamp.” appeared on the screen,
– the lamp indicator on the front blinks in red,
– screen images become dark,
– no image appears on the display after prolonged use.
• In rare instances, the bulb may pop inside the lamp unit,
but the lamp unit is designed to contain all of broken glass
pieces inside the lamp unit. (See “Replacing the lamp” on
page 48.)
• When the lamp eventually burns out, you may hear a
noticeable pop sound. This is normal and is inhe rent in this
type of lamp.
• The projection lamp contains mercury and should be
disposed of properly. Consult your local authorities
regarding safe disposal. If the lamp is broken during use,
a small amount of mercury may be released. In this
situation, move away from the product and ventilate the
area. In case of accidental contact or inhalation, or if you
feel unwell, consult a physician promptly.
Cooling fan
This TV uses a cooling fan. You may hear some fan noise
(depending on the placement of the TV), which may be more
noticeable during the night, or when ambient noise is
particularly low.
Handling and cleaning the screen surface/cabinet of
the TV set
Be sure to unplug the mains lead connected to the TV set
from mains socket before cleaning.
To avoid material degradation or screen coating degradation,
observe the following precautions.
• Do not push on the screen, scratch it with a hard object, or
throw anything at it. The screen may be damaged.
• Do not touch the display panel after operating the TV set
continuously for a long period as the display panel
becomes hot.
• We recommend that the screen surface be touched as little
as possible.
• To remove dust from the screen surface/cabinet, wipe
gently with a soft cloth. If dust is persistent, wipe with a
soft cloth slightly moistened with a diluted mild detergent
solution.
• Never use any type of abrasive pad, alkaline/acid cleaner,
scouring powder, or volatile solvent, such as alcohol,
benzene, thinner or insecticide. Using such materials or
maintaining prolonged contact with rubber or vinyl
materials may result in damage to the screen surface and
cabinet material.
• The ventilation holes can accumulate dust over time. To
ensure proper ventilation, we recommend removing the
dust periodically (once a month) using a vacuum cleaner.
• If the angle of the TV set is to be adjusted, steady the base
of the stand with your hand to prevent the TV set from
becoming separated from the stand. Be careful not to get
your fingers caught between the TV set and the stand.
Optional Equipments
• Do not install optional components too close to the TV set.
Keep optional components at least 30 cm away from the
TV set. If a VCR is installed in front of the TV set or
beside the TV set, the picture may become distorted.
• Picture distortion and/or noisy sound may occur if the TV
set is positioned in close proximity to any equipment
emitting electromagnetic radiation.
Disposal of the TV set
Disposal of Old Electrical &
Electronic Equipment
(Applicable in the European
Union and other European
countries with separate
collection systems)
This symbol on the product or on
its packaging indicates that this
product shall not be treated as
household waste. Instead it shall
be handed over to the applicable
collection point for the recycling
of electrical and electronic equipment. By ensuring this
product is disposed of correctly, you will help prevent
potential negative consequences for the environment and
human health, which could otherwise be caused by
inappropriate waste handling of this product. The recycling
of materials will help to conserve natural resources. For more
detailed information about recycling of this product, please
contact your local Civic Office, your household waste
disposal service or the shop where you purchased the
product.
12
GB
Page 13
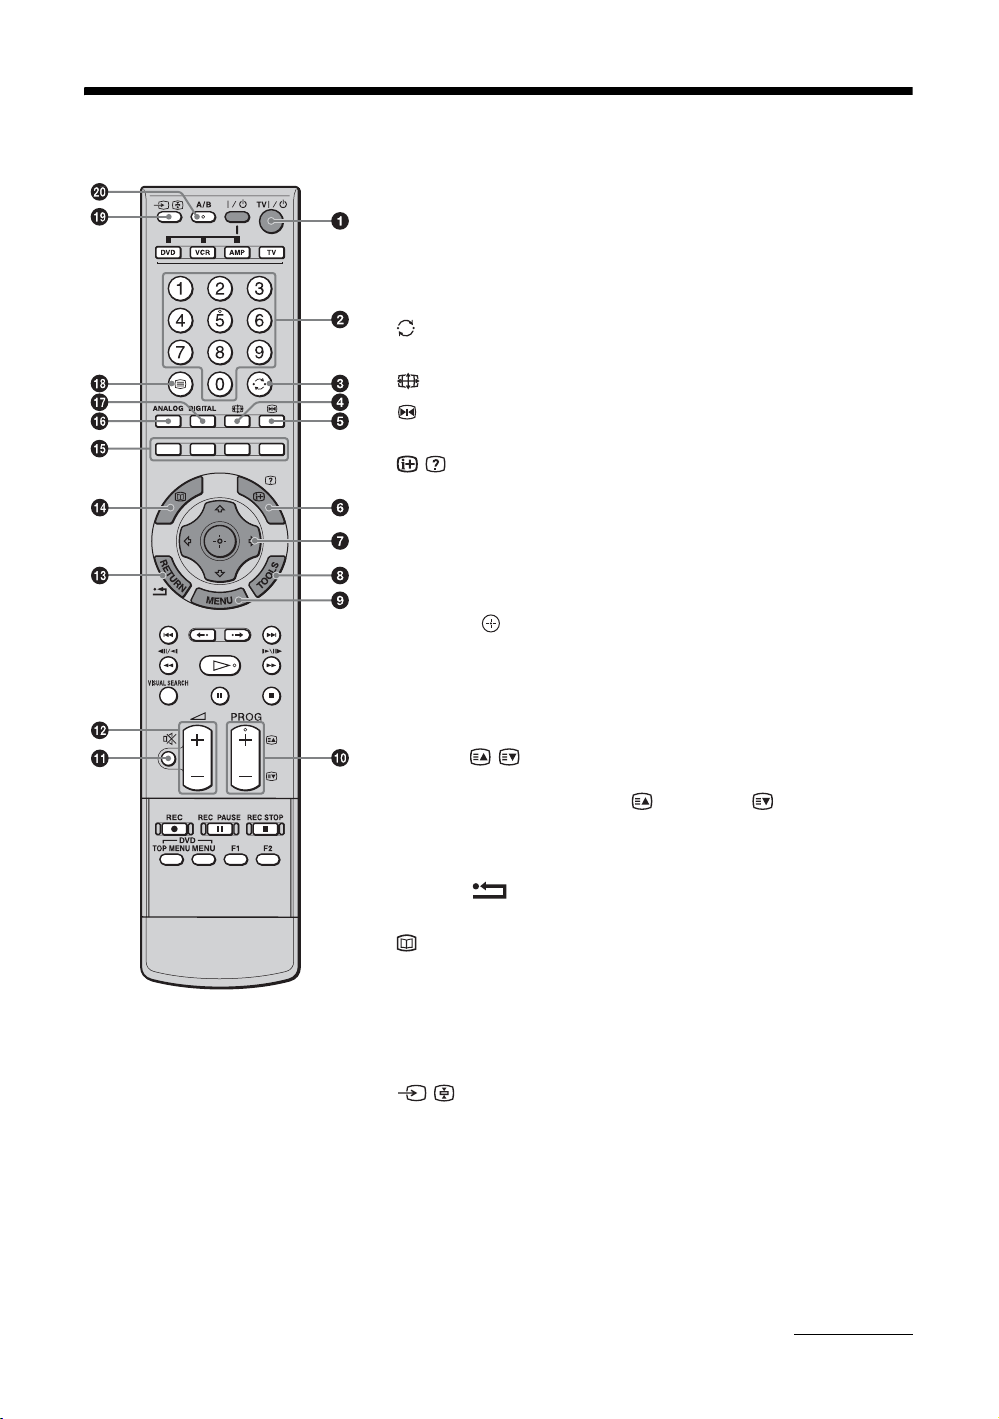
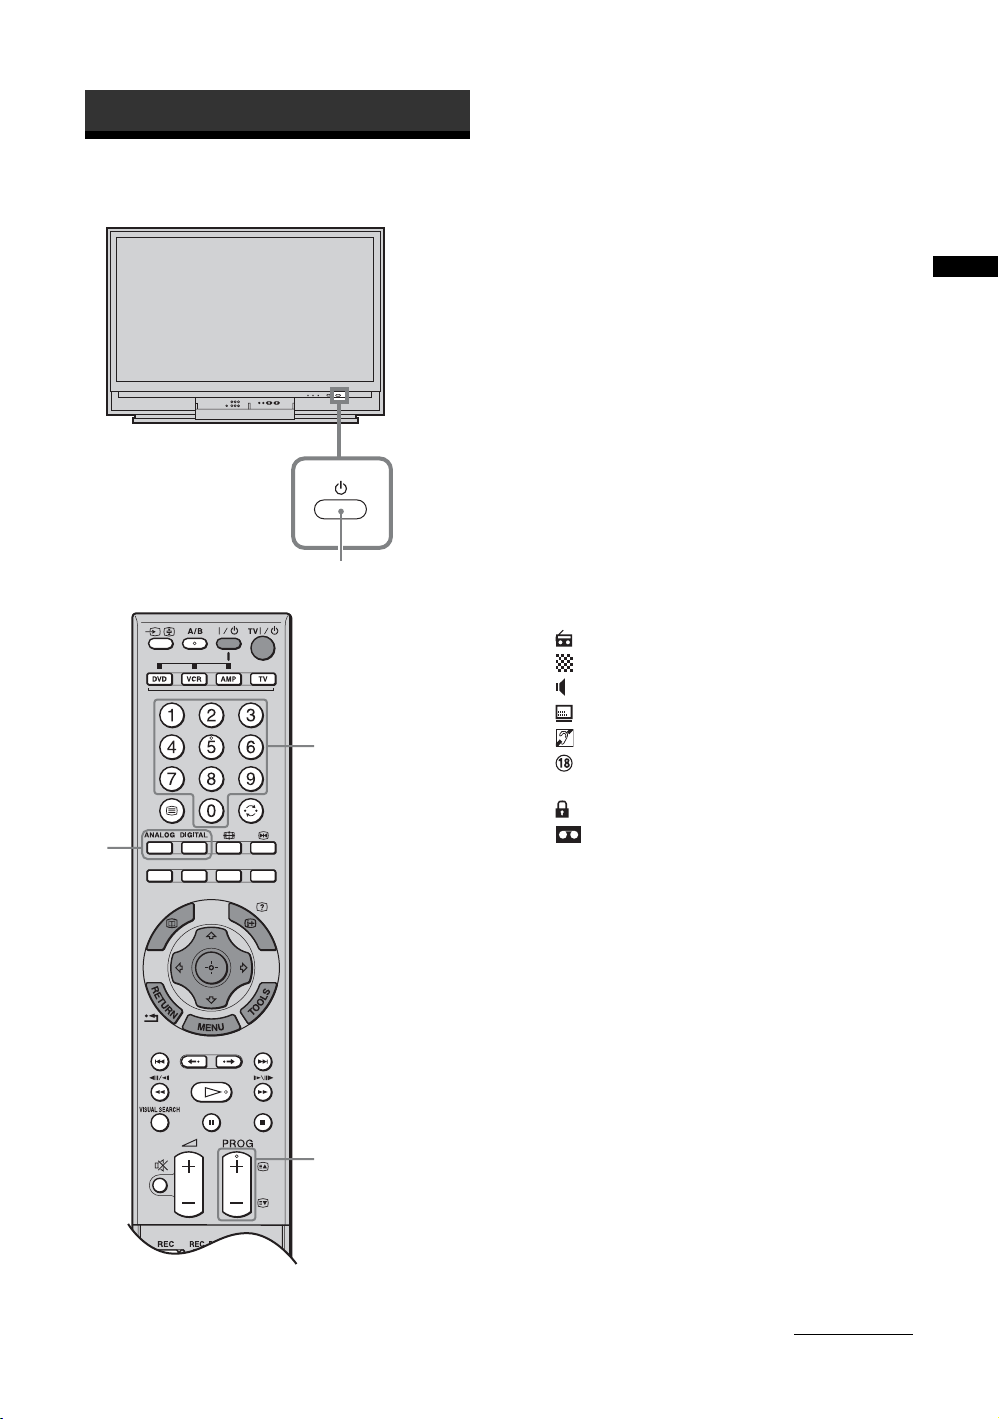
Overview of the remote
1 TV "/1 – TV standby
Switches the TV on and off from standby mode.
2 Number buttons
• In TV mode: Selects channels. For channel numbers 10 and above, enter
the second and third digit quickly.
• In Text mode: Enters the three digit page number to select the page.
3 – Previous channel
Returns to the previous channel watched (for more than five seconds).
4 – Screen mode (page 18)
5 – Picture freeze (page 18)
Freezes the TV picture.
6 / – Info / Text reveal
• In digital mode: Displays brief details of the programme currently being
watched.
• In analogue mode: Displays information such as current channel number
and screen format.
• In Text mode (page 18): Reveals hidden information (e.g. answers to a
quiz).
7 F/f/G/g/ (page 18, 24)
8 TOOLS (page 19, 23)
Enables you to access various viewing options and change/make adjustments
according to the source and screen format.
9 MENU (page 24)
0 PROG +/-/ / (page 17, 18)
• In TV mode: Selects the next (+) or previous (-) channel.
• In Text mode: Selects the next ( ) or previous ( ) page.
qa % – Mute (page 18)
qs 2 +/- – Volume
qd RETURN /
Returns to the previous screen of any displayed menu.
qf – EPG (Digital Electronic Programme Guide) (page 20)
qg Coloured buttons (page 18, 20, 22)
qh ANALOG – Analogue mode (page 17)
qj DIGITAL – Digital mode (page 17)
/ – Text (page 18)
qk
ql / – Input select / Text hold
• In TV mode (page 23): Selects the input source from equipment connected
to the TV sockets.
• In Text mode (page 18): Holds the current page.
w; A/B – Dual Sound (page 29)
Continued
13
GB
Page 14
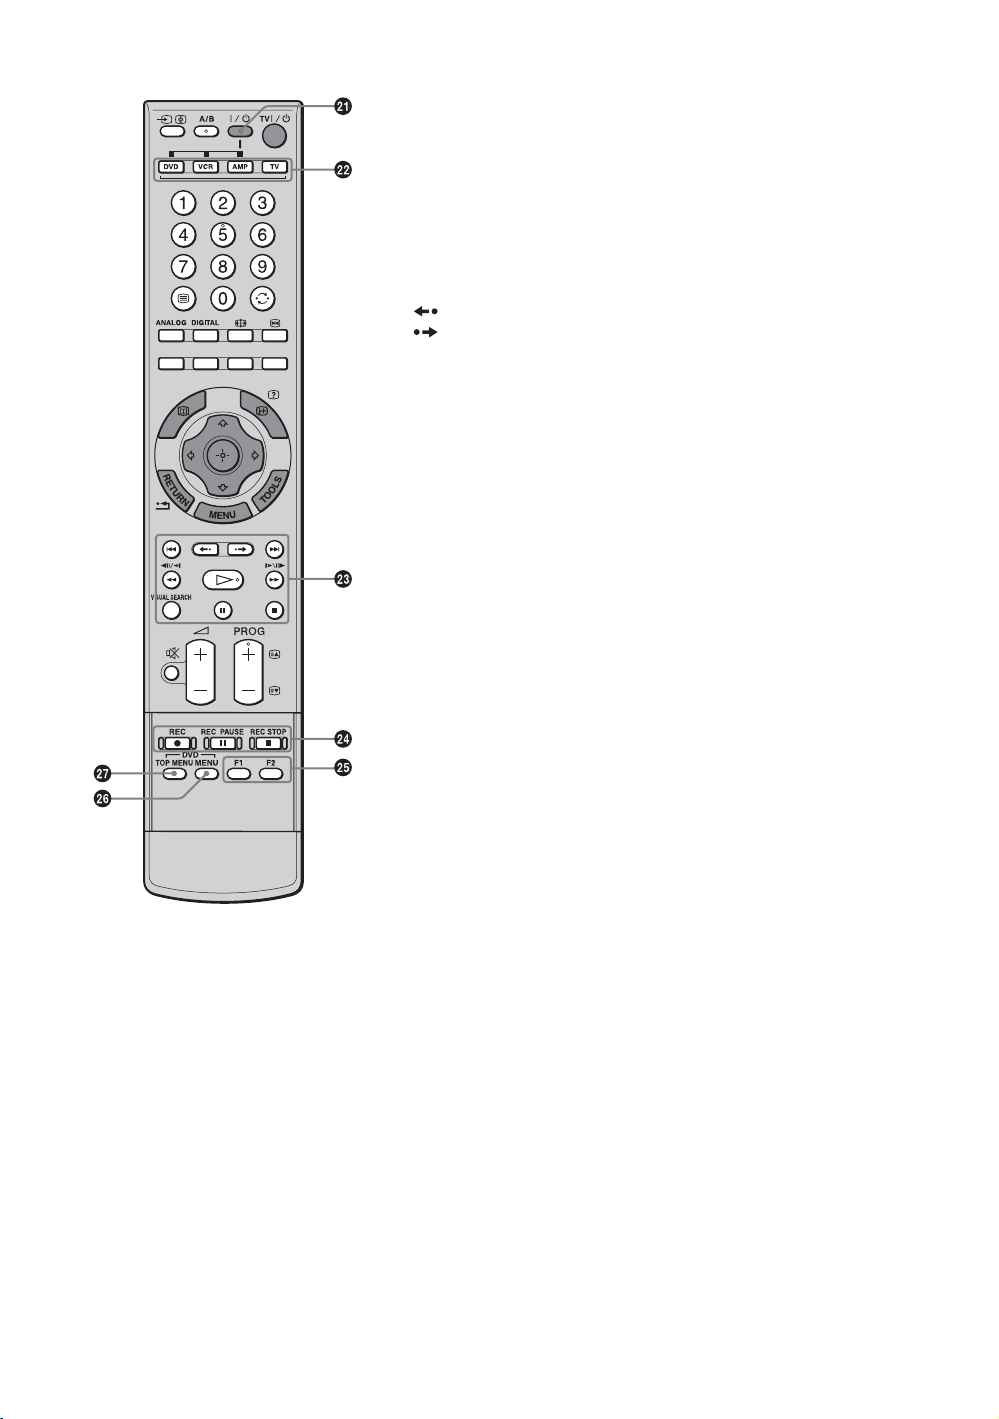
wa "/1
Switches on or off the optional equipment selected from the function buttons.
ws Function buttons
Enables you to operate the corresponding equipment. For details, see
“Programming the remote” on page 45.
wd DVD/VCR operating buttons
• . : Replays the current programme from the previous chapter mark (if
any).
• > : Advances forward to the next chapter mark (if any).
• : Replays the current programme for a set period of time.
• : Advances forward a set period of time.
• m : Plays a programme in fast reverse mode.
• M : Plays a programme in fast forward mode.
• H : Plays a programme at a normal speed.
• X : Pauses playback.
• x : Stops the playback.
• VISUAL SEARCH : Only for Sony DVD recorders with the visual search
function. For details, see the operating instructions supplied with the DVD
recorder.
wf DVD/VCR record buttons
• z REC: Starts recording.
• X REC PAUSE: Pauses the recording.
• x REC STOP: Stops the recording.
X REC PAUSE and x REC STOP are available only on DVD recorders.
wg F1/F2
• Selects a disc when using a DVD changer.
• Selects a function when using a combination unit (e.g. a DVD/VCR).
For details, see the operating instructions supplied with the DVD changer or
combination unit.
wh DVD MENU
Displays the DVD disc menu.
wj DVD TOP MENU
Displays the top menu of the DVD disc.
Tips
• The number 5, H, PROG + and A/B buttons have tactile dots. Use the tactile dots
as references when operating the TV.
• When using the remote, aim it at the remote control sensor on the TV. See page 15
for the location of the sensor.
14
GB
Page 15
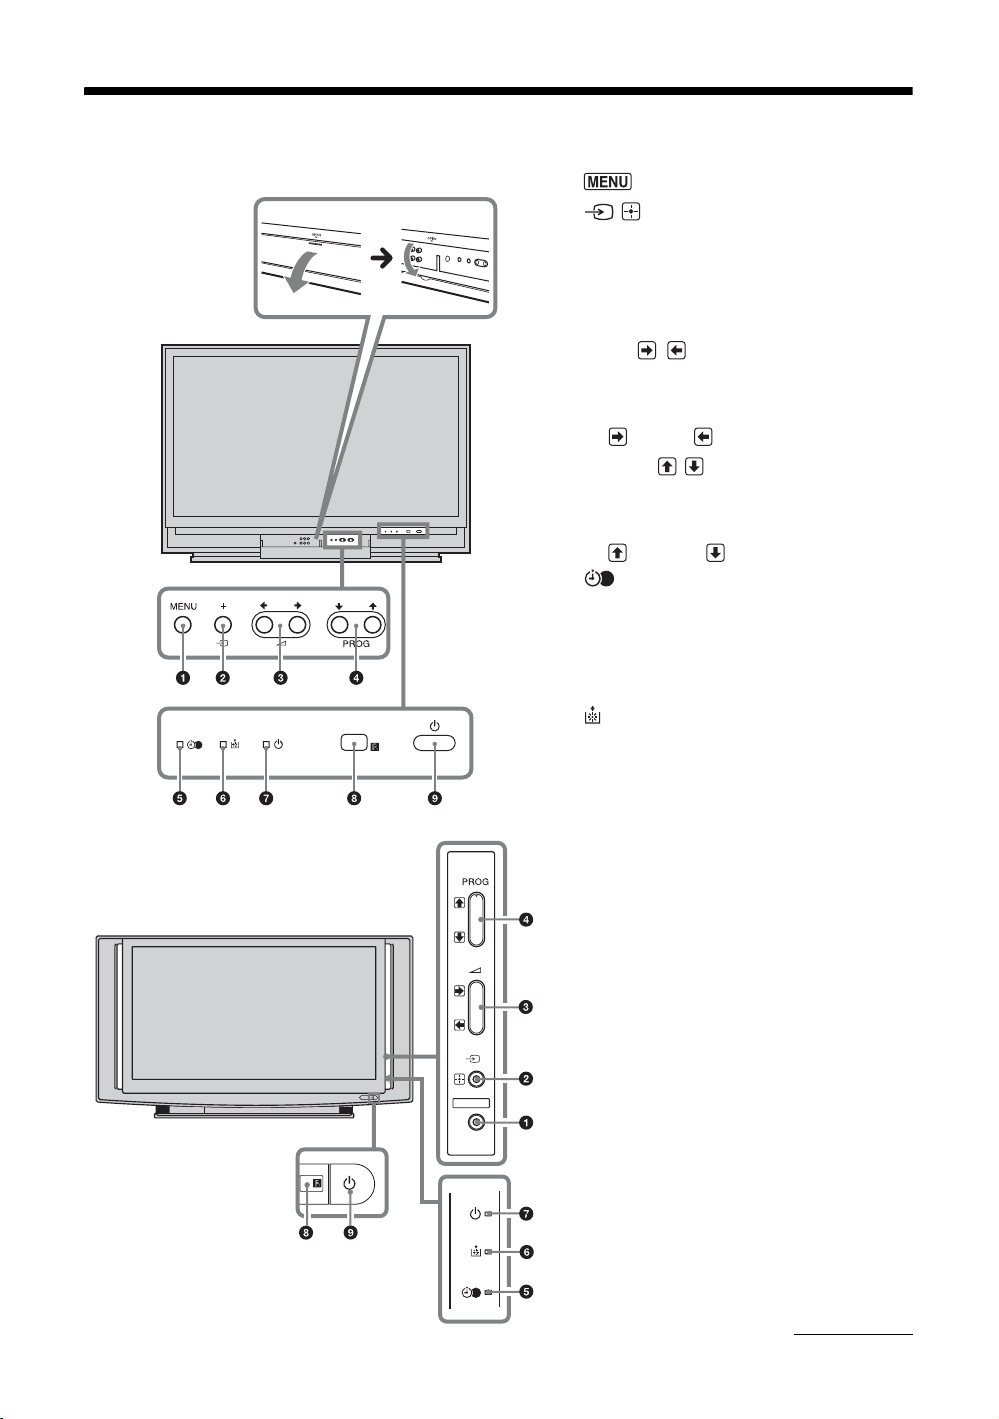
Overview of the TV buttons and indicators
KDS-55A2000
Be careful not to pinch
your fingers when
opening the cover.
KDS-70R2000
MENU
1 (page 24)
2 / – Input select/OK
• In TV mode (page 23): Selects the input
source from equipment connected to the TV
sockets.
• In TV menu: Selects the menu or option, and
confirms the setting.
3 2 +/-/ /
• In TV mode: Increases (+) or decreases (-) the
volume.
• In TV menu: Moves through the options right
( ) or left ( ).
4 PROG +/-/ /
• In TV mode: Selects the next (+) or previous
(-) channel.
• In TV menu: Moves through the options up
( ) or down ( ).
5 – Timer REC programme/Timer indicator
• Lights up in orange when the Timer recording
is set (page 20, 21). Lights up in red when the
recording starts.
• Lights up in orange when the timer is set
(page 31).
6 – Lamp indicator
Flashes in red when the lamp for the light source
has burned out.
7 1 – On/standby indicator
Flashes in green when the light source is
preparing to turn on. Lights up in green when the
TV is switched on.
Lights up in red when the TV is in standby mode.
3
#
If the lamp cover or the lamp itself is not securely
attached, the red indicator will continue to flash
in intervals of three blinks at a time (page 49).
8 Remote control sensor
3
#
• Receives IR signals from the remote.
• Do not put anything over the sensor, as its
function may be affected.
9 1 – Power
Switches the TV on or off.
Note
Make sure that the TV is completely switched off before
unplugging the mains lead. Unplugging the mains lead
while the TV is turned on may cause the indicator to
remain lit or may cause the TV to malfunction.
Continued
15
GB
Page 16
Projection lamp
Your TV uses a projection lamp as its light source. As with
any lamp, it has lifespan and needs to be replaced when the
lamp indicator flashes or the screen becomes darker.
Notes
• After switching on your TV, it may take a while (1 minute
or less) before the picture appears.
• When the projection lamp wears out, the screen goes dark.
Replace the lamp with a new Sony XL-5200 (for KDS55A2000, not supplied) or XL-5300 (for KDS-70R2000,
supplied) replacement lamp. How to replace the lamp, see
page 48.
Warning
The light emitted from the lamp is quite bright when your TV
is in use. To avoid eye discomfort or injury, do not look into
the light housing when the power is on.
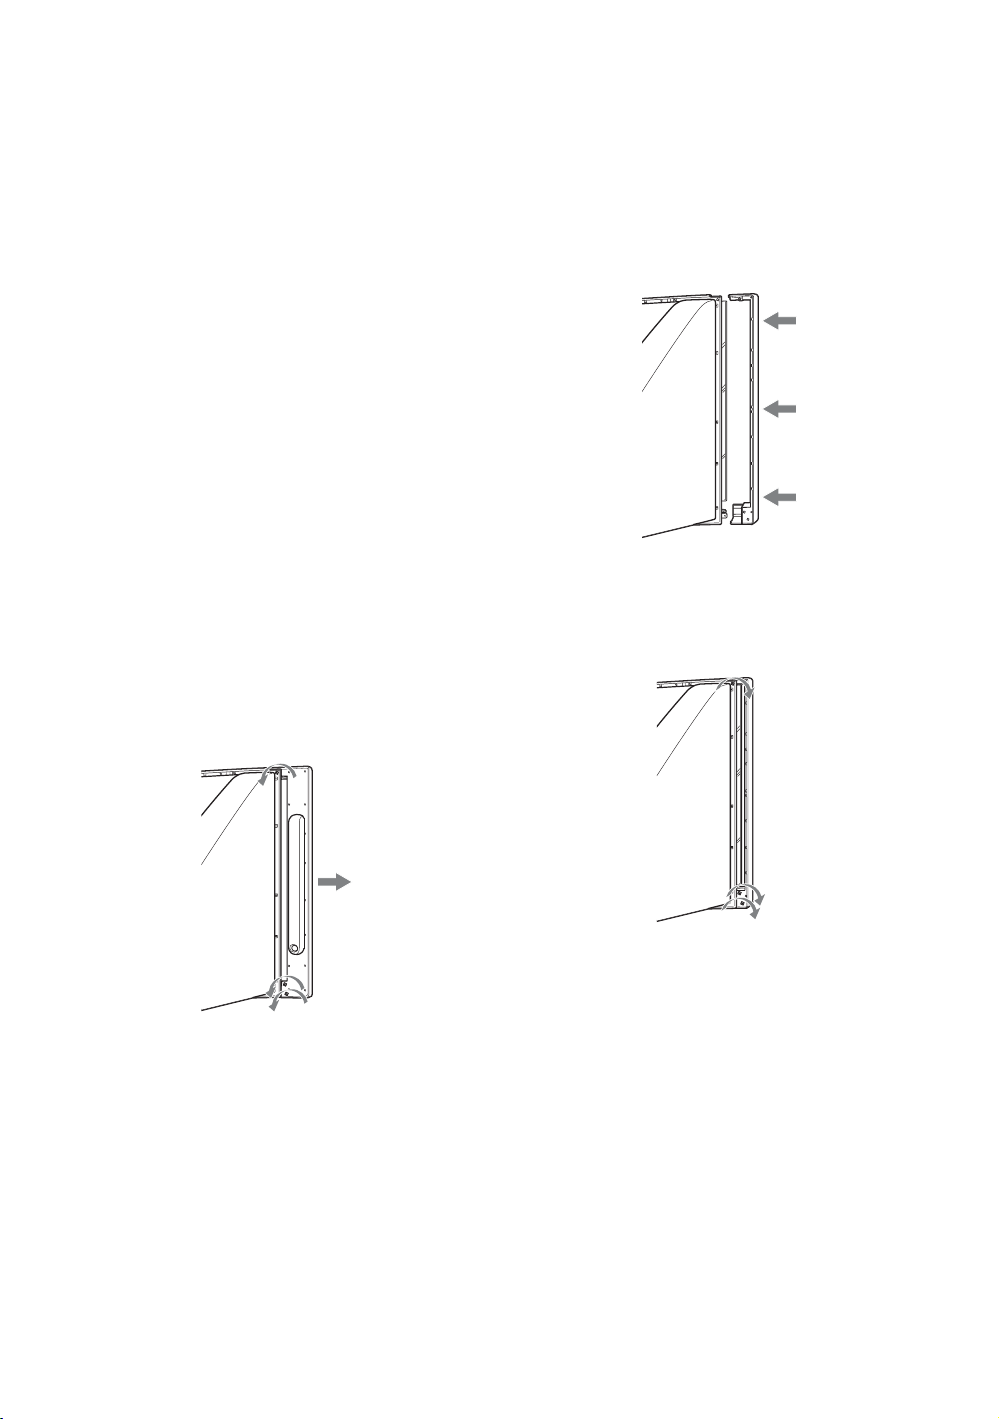
To detach the speakers
(KDS-70R2000 only)
The speakers on the KDS-70R2000 can be detached if
required. If you use a multi-channel surround speaker
system and there is insufficient space to install the
display unit, we recommend using the speakers
detached.
1 Remove the three screws that are located
on the rear of the speaker, and pull the
speaker straight out to detach it from the
panel.
When removing the screws, use a coin to turn
them counterclockwise.
2 Attach the side cover that came in the box.
Press the cover at the top, middle, and bottom to
make sure that it is attached securely (see
illustration).
Note
Facing the TV, make sure that the side covers marked
“R” (right) and “L”(left) are attached to the
corresponding sides of the TV.
3 Tighten the side cover with the three
screws that you removed in step 1.
When attaching the screws, use a coin to turn them
clockwise.
16
4 Repeat steps 1 through 3 with the speaker
on the other side.
Note
After you remove the speakers, place them in the box that
originally contained the side cover.
GB
Page 17
Watching TV
Watching TV
2
1 Press 1 on the TV (front) to switch on the
TV.
When the TV is in standby mode (the 1 (on/
standby) indicator on the TV (front) is red), press
TV "/1 on the remote to switch on the TV.
2 Press DIGITAL to switch to digital mode or
ANALOG to switch to analogue mode.
The channels available vary depending on the
mode.
Watching TV
3 Press the number buttons or PROG +/- to
select a TV channel.
To select channel numbers 10 and above using the
number buttons, enter the second and third digits
quickly.
To select a digital channel using the Digital
Electronic Programme Guide (EPG), see page 20.
1
3
In digital mode
An information banner appears briefly. The
following icons may be indicated on the banner.
: Radio service
: Scrambled/Subscription service
: Multiple audio languages available
: Subtitles available
: Subtitles available for the hearing impaired
: Recommended minimum age for current
programme (from 4 to 18 years)
: Parental Lock
: Current programme is being recorded
3
Continued
GB
17
Page 18
Additional operations
To Do this
Switch off the TV
temporarily
(standby mode)
Switch off the TV Press 1 on the TV (front).
Switch on the TV
without sound from
standby mode
Adjust the volume Press 2 + (increase)/
Mute the sound Press %. Press again to restore.
Press TV "/1.
Note
To disconnect the TV completely,
pull the plug from the mains.
Press %. Press 2 +/- to adjust
the volume.
- (decrease).
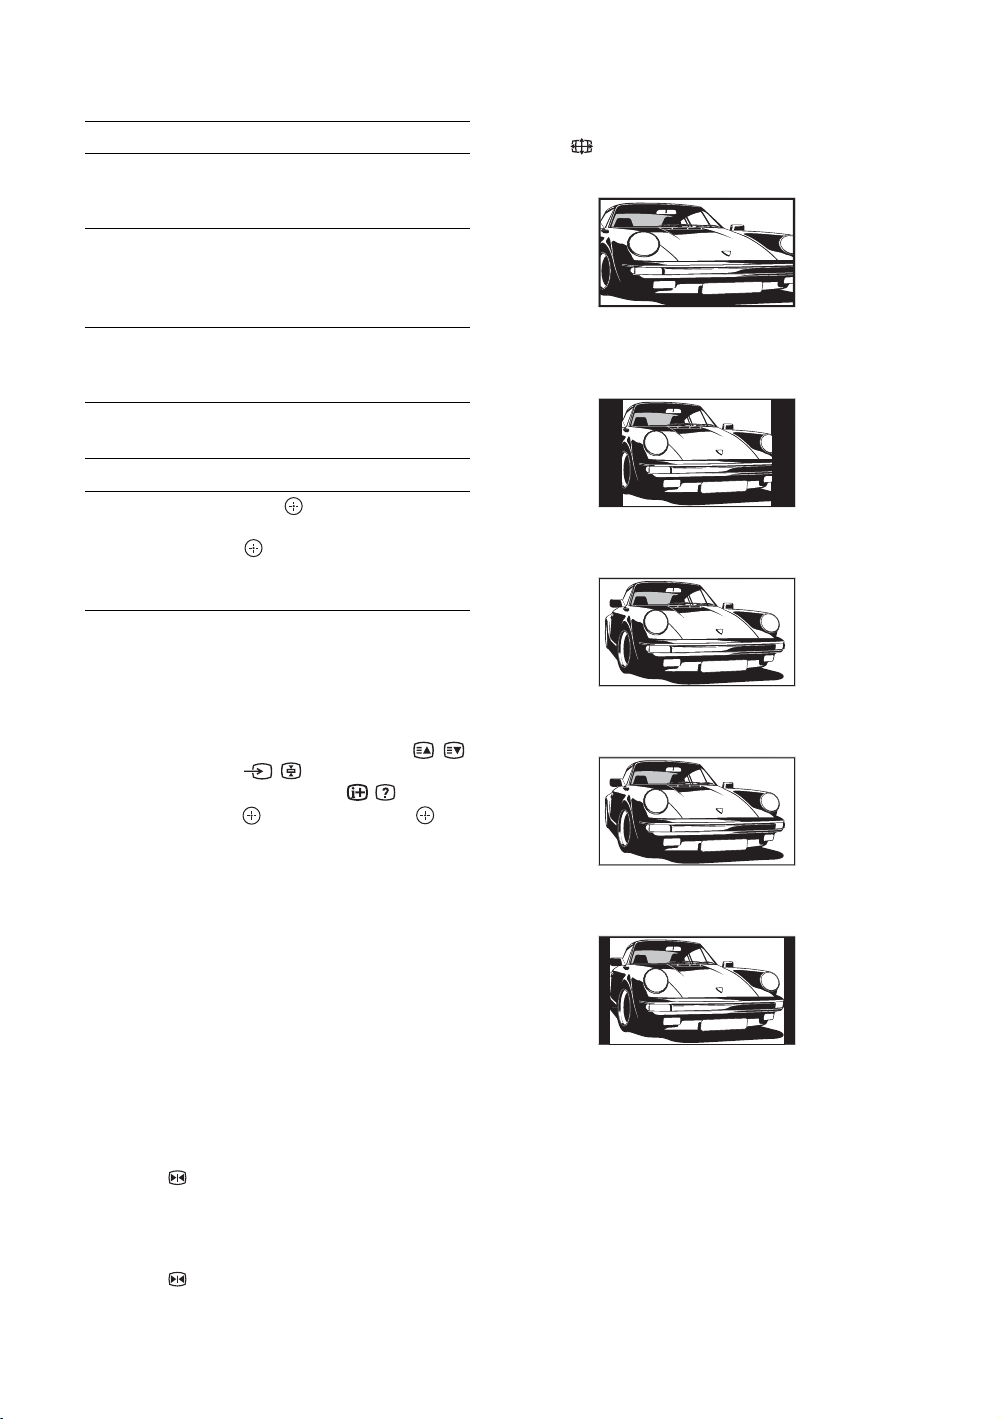
To change the screen format manually to
suit the broadcast
Press repeatedly to select Smart, 4:3, Wide,
Zoom, or 14:9.
Smart*
Displays conventional 4:3 broadcasts with an
imitation wide screen effect. The 4:3 picture is
stretched to fill the screen.
4:3
Access the
Programme index
table (in analogue
mode only)
Press . To select an analogue
channel, press
.
To access the Input signal index
table, see page 23.
F/f, then press
To access Text
Press /. Each time you press /, the display changes
cyclically as follows:
Text and TV picture t Text t No Text (exit the
Text service)
To select a page, press the number buttons or / .
To hold a page, press / .
To reveal hidden information, press / .
To jump a page, press and
F/f, then press (for
three digit pages).
Tips
• Ensure that the TV is receiving a good signal, or some text
errors may occur.
• Most TV channels broadcast a Text service. For
information on the use of the service, select the index
page.
• When four coloured items appear at the bottom of the Text
page, Fastext is available. Fastext allows you to access
pages quickly and easily. Press the corresponding
coloured button to access the page.
To freeze the picture – Picture freeze
You can freeze the current picture to make a note of a
telephone number or recipe.
1 Press .
The frozen picture is displayed on the right of the
screen. You can watch a moving picture on the
left.
2 Press again to return to normal TV
mode.
Displays conventional 4:3 broadcasts (e.g. non-wide
screen TV) in the correct proportions.
Wide
Displays wide screen (16:9) broadcasts in the correct
proportions.
Zoom*
Displays cinemascopic (letter box format) broadcasts
in the correct proportions.
14:9*
Displays 14:9 broadcasts in the correct proportions.
As a result, black border areas are visible on the
screen.
* Parts of the top and bottom of the picture may be cut off.
Tips
• Alternatively, you can set “Auto Format” to “On”. The TV
will automatically select the best mode to suit the
broadcast (page 30).
• You can adjust the position of the picture when selecting
Smart, 14:9 or Zoom. Press
(e.g. to read subtitles).
F/f to move up or down
18
GB
Page 19

To use the Tools menu
Press TOOLS to display the following options when
viewing a TV programme.
Options Description
Close Closes the Tools menu.
PAP (or Single Picture) See page 19.
Picture Mode See page 25.
Sound Mode See page 28.
Subtitle Setting (in
digital mode only)
Digital Favourites (in
digital mode only)
Power Saving See page 31.
Sleep Timer See page 31.
i Volume* See page 32.
Auto Clock Set (in
analogue mode only)
* This option appears only if “i Speaker Link” is set to
“Off” (page 32).
See page 39.
See page 22.
Allows you to switch to digital
mode and obtain the time.
To view two pictures simultaneously – PAP
(Picture and Picture)
You can view two pictures (external input and TV
programme) on the screen simultaneously.
Connect the optional equipment (page 43), and make
sure that images from the equipment appear on the
screen (page 23).
Note
This function is not available for a PC input source.
Watching TV
1 Press TOOLS to display the Tools menu.
2 Press F/f to select “PAP”, then press .
The picture from connected equipment is displayed
on the left and the TV programme is displayed on the
right.
3 Press number buttons or PROG +/- to
select the TV channel.
To return to normal TV mode
Press or RETURN.
Tips
• You can also return to normal TV mode by selecting
“Single Picture” from the Tools menu.
• The picture framed in green is audible. You can switch the
audible picture by pressing G/g.
• You can change the size of the picture by pressing and
holding G/g.
19
GB
Page 20
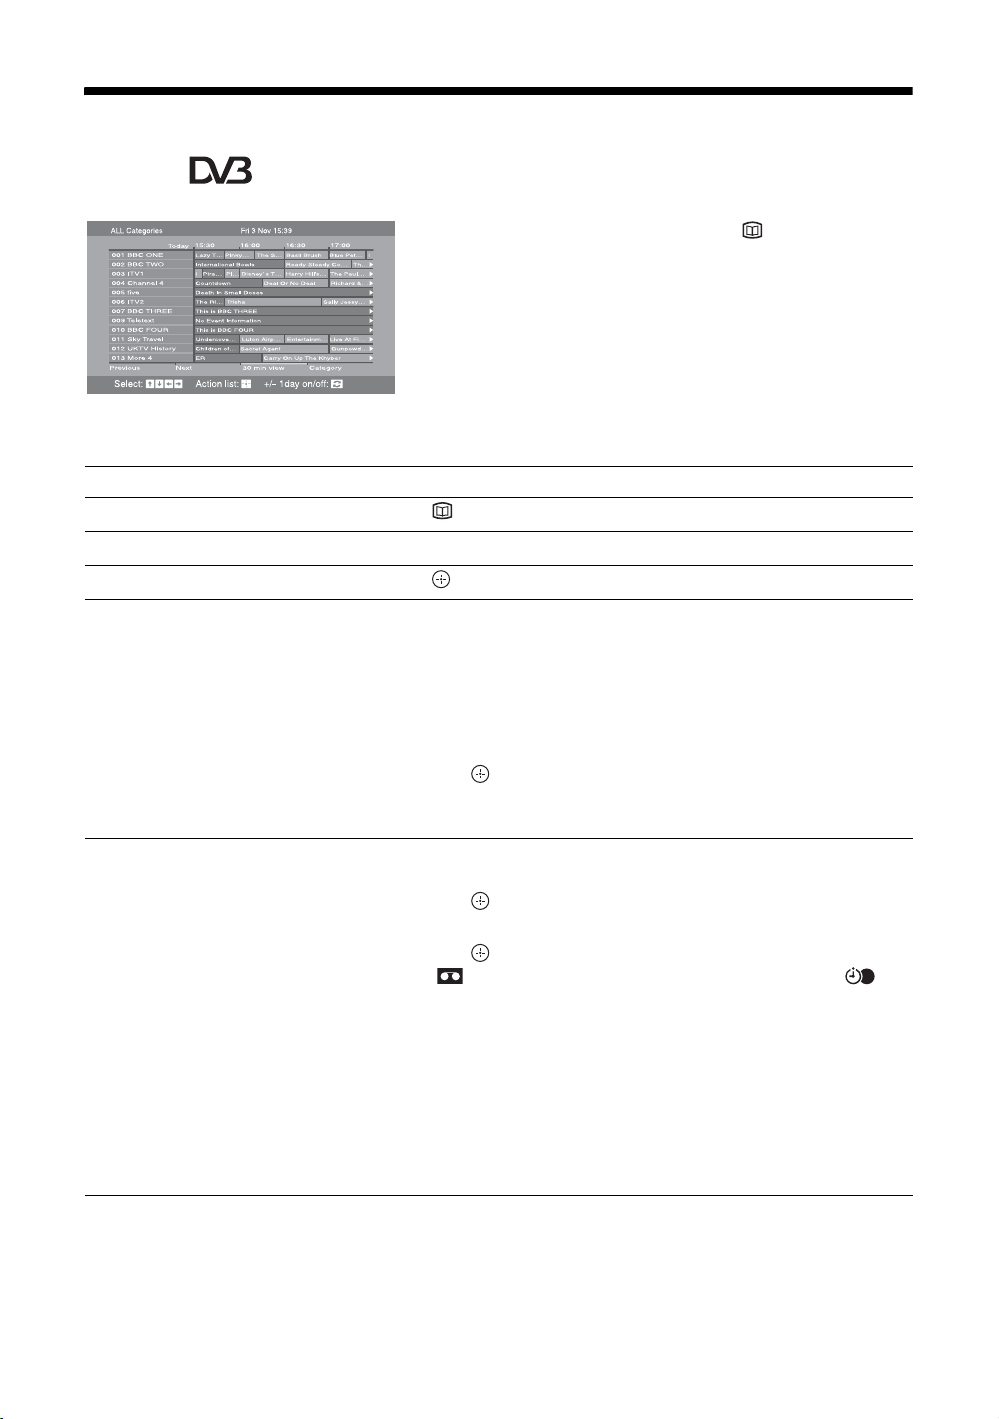
Checking the Digital Electronic Programme Guide
(EPG) *
1 In digital mode, press to display the
Digital Electronic Programme Guide
(EPG).
2 Perform the desired operation, as shown in
the following table.
Note
Programme information will only be displayed if the TV
Digital Electronic Programme Guide (EPG)
* This function may not be available in some countries.
To Do t h i s
Turn off the EPG Press .
station is transmitting it.
Move through the EPG Press
Watch a current programme Press while the current programme is selected.
Sort the programme information by
category – Category list
Set a programme to be recorded – Timer
REC
F/f/G/g.
1 Press the blue button.
2 Press
3 Press .
1 Press F/f/G/g to select the future programme you want to
2 Press .
3 Press
4 Press to set the TV and your VCR timers.
Notes
• You can set VCR timer recording on the TV only for Smartlink compatible
VCRs. If your VCR is not Smartlink compatible, a message will be displayed to
remind you to set your VCR timer.
• Once a recording has begun, you can switch the TV to standby mode, but do not
switch off the TV completely or the recording may be cancelled.
• If an age restriction for programmes has been selected, a message asking for a
PIN code will appear on the screen. For more details refer to “Parental Lock”
on page 39.
F/f/G/g to select a category. The category name is
displayed on the side.
The categories available include:
“All Categories”: Contains all available channels.
Category name (e.g. “News”): Contains all channels corresponding to the
selected category.
The Digital Electronic Programme Guide (EPG) now only displays the
current programmes from the category selected.
record.
F/f to select “Timer REC”.
A symbol appears by that programme’s information. The
indicator on the TV (front) lights up in orange.
20
GB
Page 21
To Do t h i s
Set a programme to be displayed
automatically on the screen when it starts
– Reminder
1 Press F/f/G/g to select the future programme you want to
display.
2 Press .
3 Press
4 Press to automatically display the selected programme
when the programme starts.
A c symbol appears by that programme’s information.
Note
If you switch the TV to standby mode, it will automatically turn itself on
when the programme is about to start.
Set the time and date of a programme you
want to record – Manual timer REC
1 Press .
2 Press
3 Press F/f to select the date, then press g.
4 Set the start and stop time in the same way as in step 3.
5 Press
6 Press to set the TV and your VCR timers.
A symbol appears by that programme’s information. The
indicator on the TV (front) lights up in orange.
Notes
• You can set VCR timer recording on the TV only for Smartlink compatible
VCRs. If your VCR is not Smartlink compatible, a message will be displayed to
remind you to set your VCR timer.
• Once a recording has begun, you can switch the TV to standby mode, but do not
switch off the TV completely or the recording may be cancelled.
• If an age restriction for programmes has been selected, a message asking for a
PIN code will appear on the screen. For more details refer to “Parental Lock”
on page 39.
Cancel a recording/reminder – Timer list
1 Press .
2 Press
3 Press F/f to select the programme you want to cancel, then
press .
4 Press
A display appears to confirm that you want to cancel the programme.
5 Press G/g to select “Yes”, then press to confirm.
F/f to select “Reminder”.
Watching TV
F/f to select “Manual timer REC”, then press .
F/f to select the programme, then press .
F/f to select “Timer list”.
F/f to select “Cancel Timer”, then press .
Tip
You can also display the Digital Electronic Programme Guide (EPG) by selecting “Digital EPG” in the “MENU” (page 24).
21
GB
Page 22
Using the Digital Favourite list *
The Favourite feature allows you to select
programmes from a list of up to 20 channels you
specify. To display the Favourite list, see “Navigating
through menus” (page 24).
Digital Favourite list
* This function may not be available in some countries.
To Do t h i s
Create your Favourite list for the first time A message appears asking if you want to add channels to the Favourite list
when you select “Digital Favourites” in the “MENU” for the first time.
1 Press to select “Yes”.
2 Press
3 Press .
Turn off the Favourite list Press RETURN.
F/f to select the channel you want to add.
If you know the channel number, you can use the number buttons to
directly select a channel.
Channels that are stored in the Favourite list are indicated by a
symbol.
Watch a channel Press while selecting a channel.
Add or remove channels in the Favourite
list
Remove all channels from the Favourite list
1 Press the blue button.
Channels that are stored in the Favourite list are indicated by a
symbol.
2 Press F/f to select the channel you want to add or remove.
If you know the channel number, you can use the number buttons to
directly select a channel.
3 Press .
4 Press the blue button to return to the Favourite list.
1 Press the blue button.
2 Press the yellow button.
A display appears to confirm that you want to delete all channels from the
Favourite list.
3 Press G/g to select “Yes”, then press to confirm.
22
GB
Page 23
Additional operations
Viewing pictures from
connected equipment
Switch on the connected equipment, then
perform one of the following operation.
For equipment connected to the scart sockets using a
fully-wired 21-pin scart lead (page 44)
Start playback on the connected equipment.
The picture from the connected equipment appears on
the screen.
For an auto-tuned VCR (page 8)
In analogue mode, press PROG +/-, or the number
buttons, to select the video channel.
For other connected equipment (page 43)
Press / repeatedly until the correct input
symbol (see below) appears on the screen.
On screen
display
AV1/2 or
AV1/2
AV3 , AV3
or AV3
AV 4 4 (Y, P
AV 5 5 HDMI IN
AV 6 6 HDMI IN
AV7 or
AV 7
PC PC IN RGB and PC IN
Labels of input jacks
1 or 2 /
3 //
B/CB, PR/CR) and
(L, R)
6 HDMI IN and 6 HDMI IN
(L, R)
7 or (Y, P
C
R) and (L (MONO), R)
B/CB, PR/
To Do this
Return to normal
TV mode
Access the Input
signal index table
(except for PC video
input signal)
Press DIGITAL or ANALOG.
Press to access the Input signal
index table. (Then, only in
analogue mode, press
select an input source, press
then press .
g.) To
F/f,
To use the Tools menu
Press TOOLS to display the following options when
viewing pictures from connected equipment other
than a PC.
Options Description
Close
PAP (or Single Picture)
Picture Mode See page 25.
Sound Mode See page 28.
Power Saving See page 31.
Sleep Timer See page 31.
i Volume* See page 32.
Auto Clock Set Allows you to switch to digital
* This option appears only if “i Speaker Link” is set to
“Off” (page 32).
Closes the Tools menu.
See page 19.
mode and obtain the time.
Watching TV
23
GB
Page 24
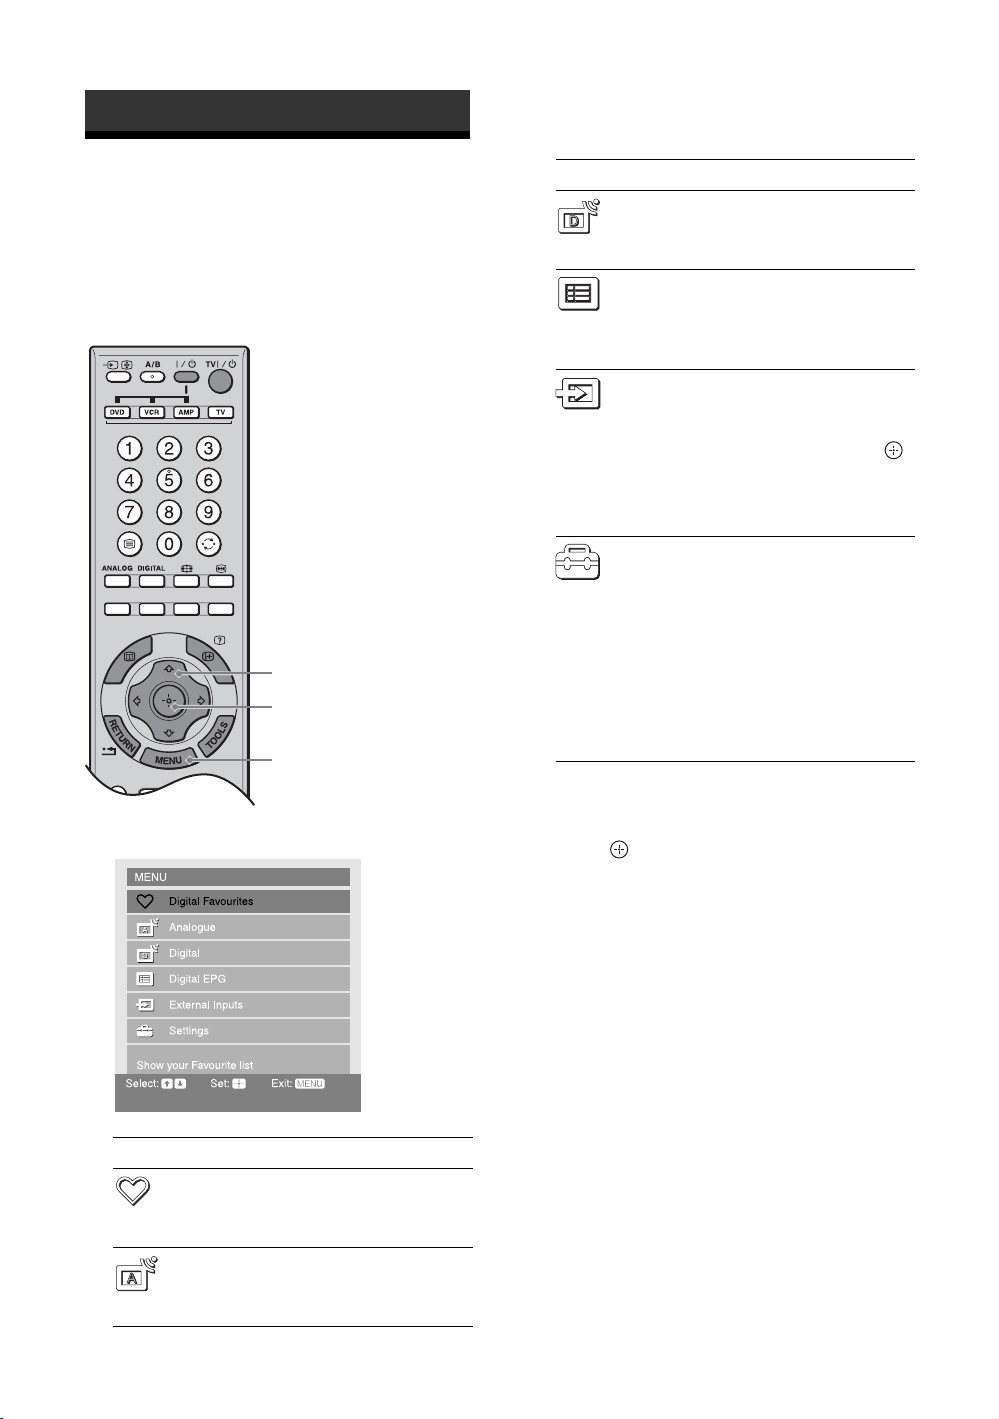
Using MENU Functions
Navigating through
menus
“MENU” allows you to enjoy various convenient
features of this TV. You can easily select channels or
inputs sources and change the settings for your TV.
2
3
1
1 Press MENU to display the menu.
Icon Description
Digital*
Returns to the last viewed digital
channel.
Digital EPG*
Displays the Digital Electronic
Programme Guide (EPG).
For details about settings, see page 20.
External Inputs
Selects equipment connected to your TV.
• To watch the desired external input,
select the input source, then press .
• To assign a label to an external input,
select “Edit AV Labels”, then see
page 34.
Settings
Displays the Settings menu where most
of the advanced settings and adjustments
are performed.
For details about settings, see page 25 to
40.
Note
The options you can adjust vary depending
on the situation. Unavailable options are
greyed out or not displayed.
* This function may not be available in some countries.
2 Press F/f to select an option.
3 Press to confirm a selected option.
To exit the menu, press MENU.
Icon Description
Digital Favourites*
Displays the Favourite list. For details
about settings, see page 22.
Analogue
Returns to the last viewed analogue
channel.
GB
24
Page 25
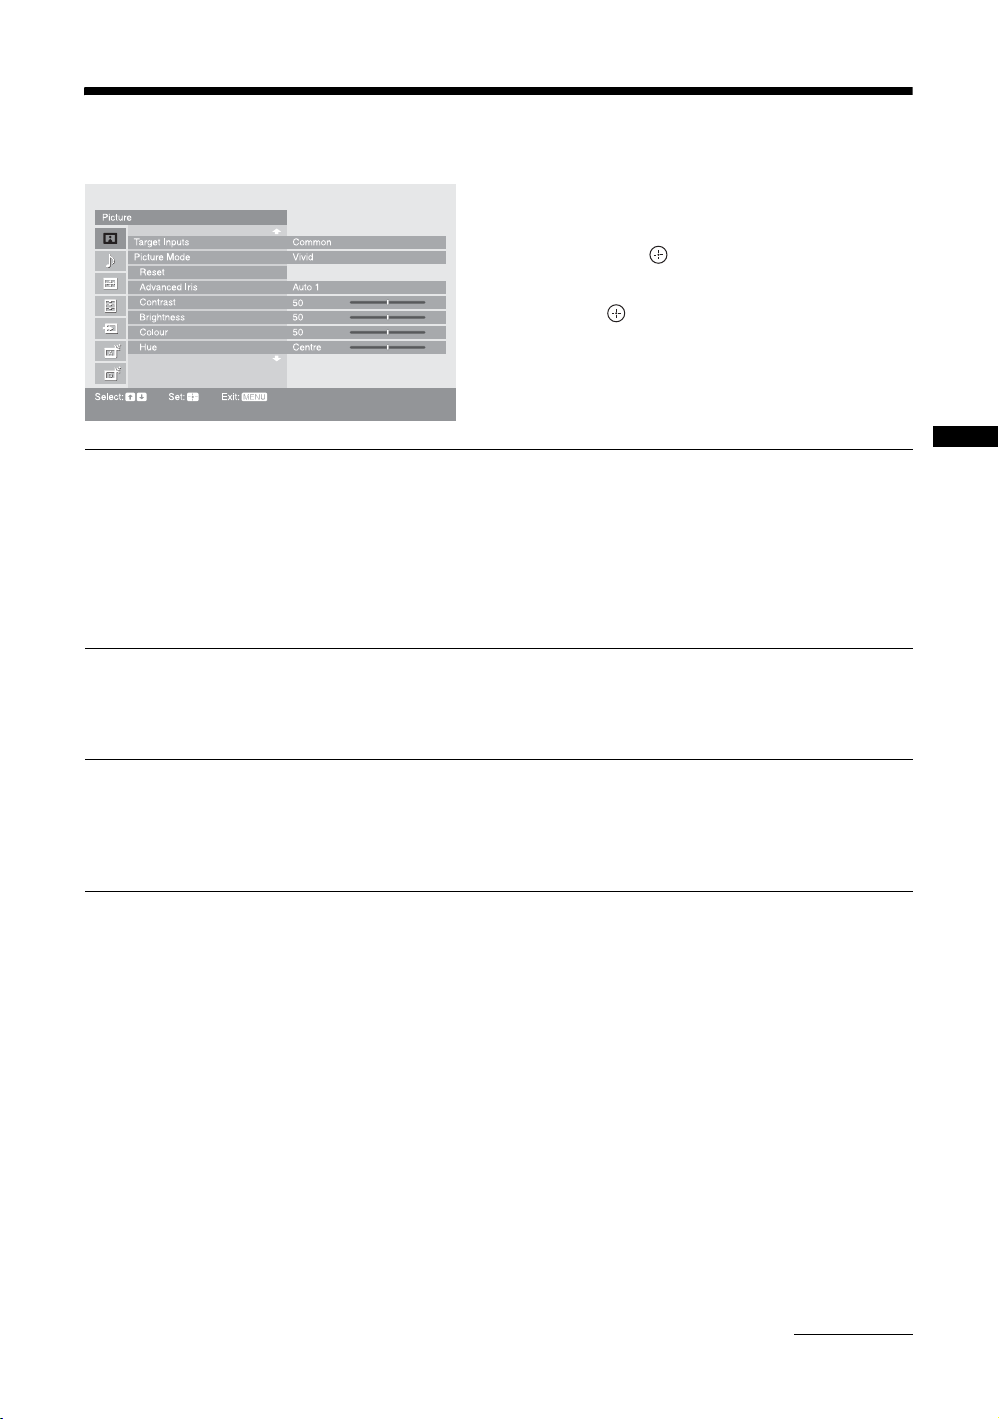
Picture menu
Picture
Target Inputs
Picture Mode
Reset
Advanced Iris
Contrast
Brightness
Colour
Hue
Select: Set: Exit:
Common
Vivid
Auto 1
50
50
50
Centre
You can select the options listed below on the Picture
menu.
1 Press F/f to select “Settings” on MENU,
then press .
2 Press F/f to select a menu icon, then
press .
3 Press F/f/G/g to select an option.
Target Inputs
Picture Mode
Reset
For the input currently being viewed, select whether to use the common setting or to
set each item separately.
“Common”: Applies common settings whose adjustments are shared with other
inputs in which “Target Inputs” is set to “Common”.
Current input name (e.g. AV1): Allows you to set each option separately for the
current input.
Tip
Set each input to “Common” if you require the same settings to apply to each input.
Selects the picture mode.
“Vivid”: For enhanced picture contrast and sharpness.
“Standard”: For standard picture. Recommended for home entertainment.
“Custom”: Allows you to store your preferred settings.
Resets all the “Picture” settings except “Target Inputs” and “Picture Mode” to the
factory settings.
Tip
“Advanced Settings” (page 27) is also not reset. Select “Reset” in “Advanced Settings” to reset
items in “Advanced Settings”.
Using MENU Functions
Continued
25
GB
Page 26

Advanced Iris
By selecting the iris option, you can obtain the best brightness and contrast suited for
your TV viewing.
“Auto 1”*: Recommended option for viewing programmes that have larger variation
in brightness from scene to scene.
“Auto 2”*: Recommended option for viewing programmes that have less variation
in brightness from scene to scene.
“Max”: With this option, the screen has maximum level of brightness. It is suitable
for TV viewing in a brightly lit room.
“High”: With this option, the screen becomes bright. It is suitable for TV viewing in
a brightly lit room.
“Medium”: With this option, the brightness is about the standard level.
“Low”: With this option, the screen brightness dims and increases in contrast. It is
suitable for TV viewing in a room with low lighting.
“Min”: With this option, the screen is dimmed but contrast is at a maximum. It is
suitable for TV viewing in a room with low lighting.
* Automatically detects the brightness of the screen. These options are best suited for
programmes such as movies that often change between bright scenes and low light setting
scenes.
Note
“Advanced Iris” is not available when using Freeze or PAP features.
Contrast
Brightness
Colour
Hue
Colour Temperature
Sharpness
Noise Reduction
Increases or decreases picture contrast.
Brightens or darkens the picture.
Increases or decreases colour intensity.
Increases or decreases the green tones and red tones.
Tip
“Hue” can only be adjusted for an NTSC colour signal (e.g. U.S.A. video tapes).
Adjusts the whiteness of the picture.
“Cool”: Gives the white colours a blue tint.
“Neutral”: Gives the white colours a neutral tint.
“Warm 1”/“Warm 2”: Gives the white colours a red tint. “Warm 2” gives a redder
tint than “Warm 1”.
Tip
“Warm 1” and “Warm 2” can only be selected when you set “Picture Mode” to “Custom”.
Sharpens or softens the picture.
Reduces the (snowy picture).
“Auto”: Automatically reduces the .
“High”/“Medium”/“Low”: Modifies the effect of the noise reduction.
“Off”: Turns off the Noise Reduction feature.
“BNR”: Reduces the block. This is effective for digital channels, or a connected
DVD player/digital receiver with MPEG playback.
Tips
• “Auto” is not available when watching component, HDMI or digital RF inputs.
• “Noise Reduction” is not available when using Freeze or PAP features.
26
GB
Page 27
DRC Mode
Creates a high-resolution for high density source (i.e. DVD player, digital receiver).
“Mode 1”: Recommended mode
“Mode 2”: Only available when input signal format is 1080i. Mode 2 is suitable
setting if original signal content is based on standard definition signal.
“Off”: Turns off the DRC Mode.
Tip
“DRC Mode” is not available when “Game Mode” is set to “On” or when using Freeze or PAP
features; also not available when watching PC or 1080p sources.
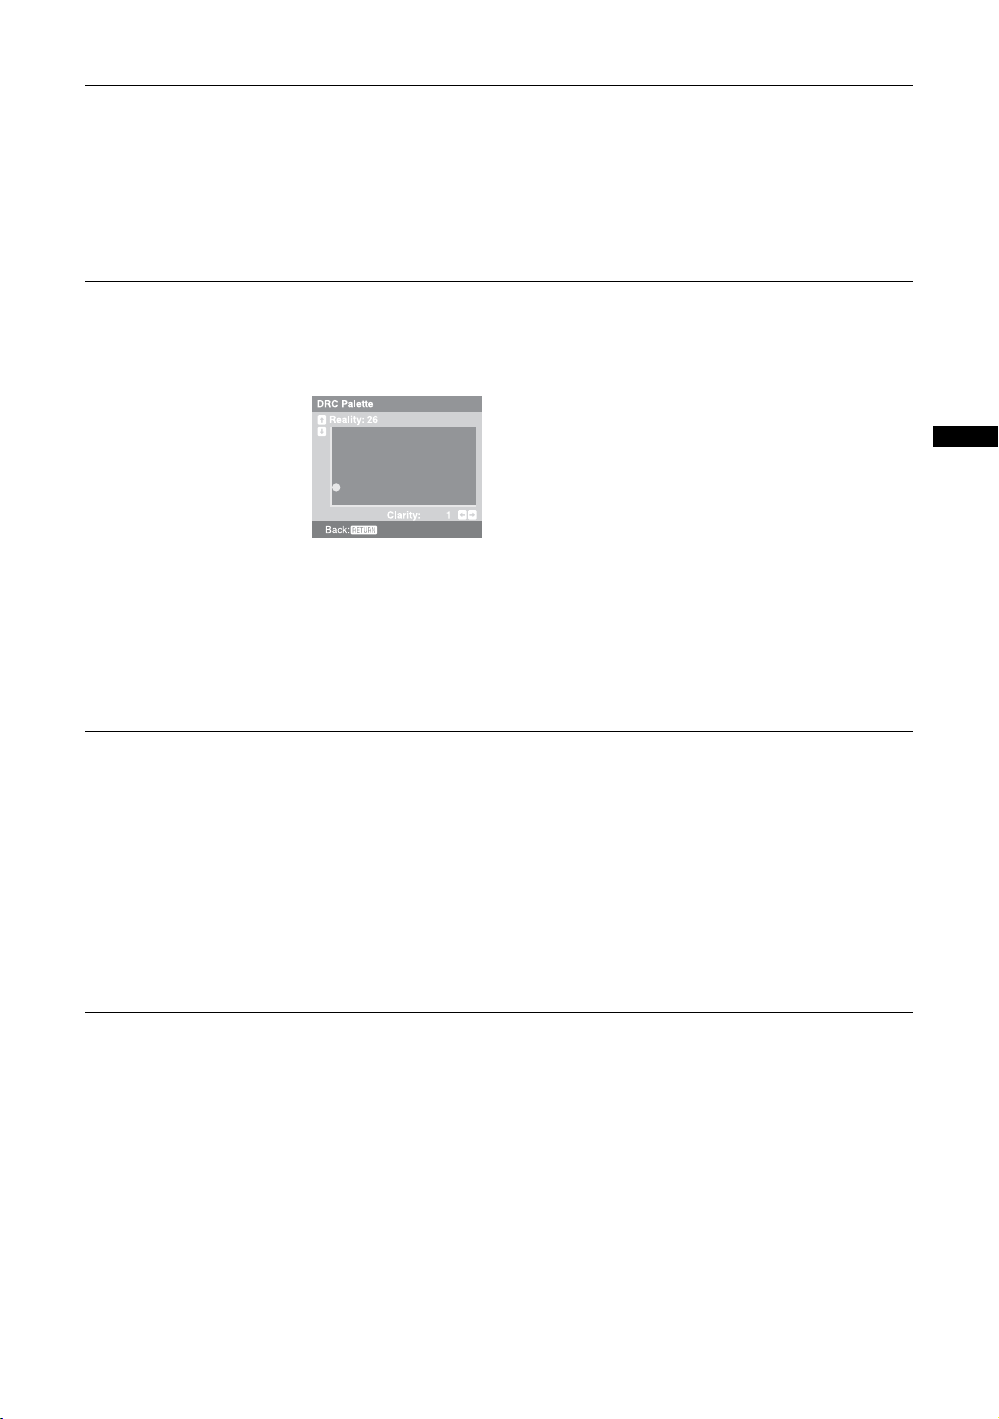
DRC Palette
Advanced Settings
Customizes the level of detail (“Reality”) and smoothness (“Clarity”) for each input
signal. For example, you can create a custom setting for your cable input’s picture,
and create another for your DVD player’s pictures.
The DRC palette appears.
Press
F/f/G/g to adjust the position of the marker (z).
As you move the z higher along the “Reality” axis, the picture becomes more
detailed. As you move the z to the right along the “Clarity” axis, the picture
becomes smoother.
Tip
“DRC Palette” is not available when “Game Mode” is set to “On”, “DRC Mode” is set to “Off”
or when using Freeze or PAP features; also not available when watching PC or 1080p sources.
Customizes the Picture function in more detail. When you set “Picture Mode” to
“Custom”, you can set/change these settings.
“Reset”: Resets all the advanced settings to the factory settings.
“Black Corrector”: Enhances black areas of the picture for stronger contrast.
“Gamma”: Adjusts the balance between bright and dark areas of the picture.
“Clear White”: Emphasizes white colours.
“Live Colour”: Makes colours more vivid.
“White Balance”: Adjusts the colour temperature colour by colour.
“Detail Enhancer”: Enhances the details of the picture.
“Edge Enhancer”: Enhances the outline of the picture.
Tip
“Detail Enhancer” is not available when using Freeze or PAP features.
Using MENU Functions
27
GB
Page 28
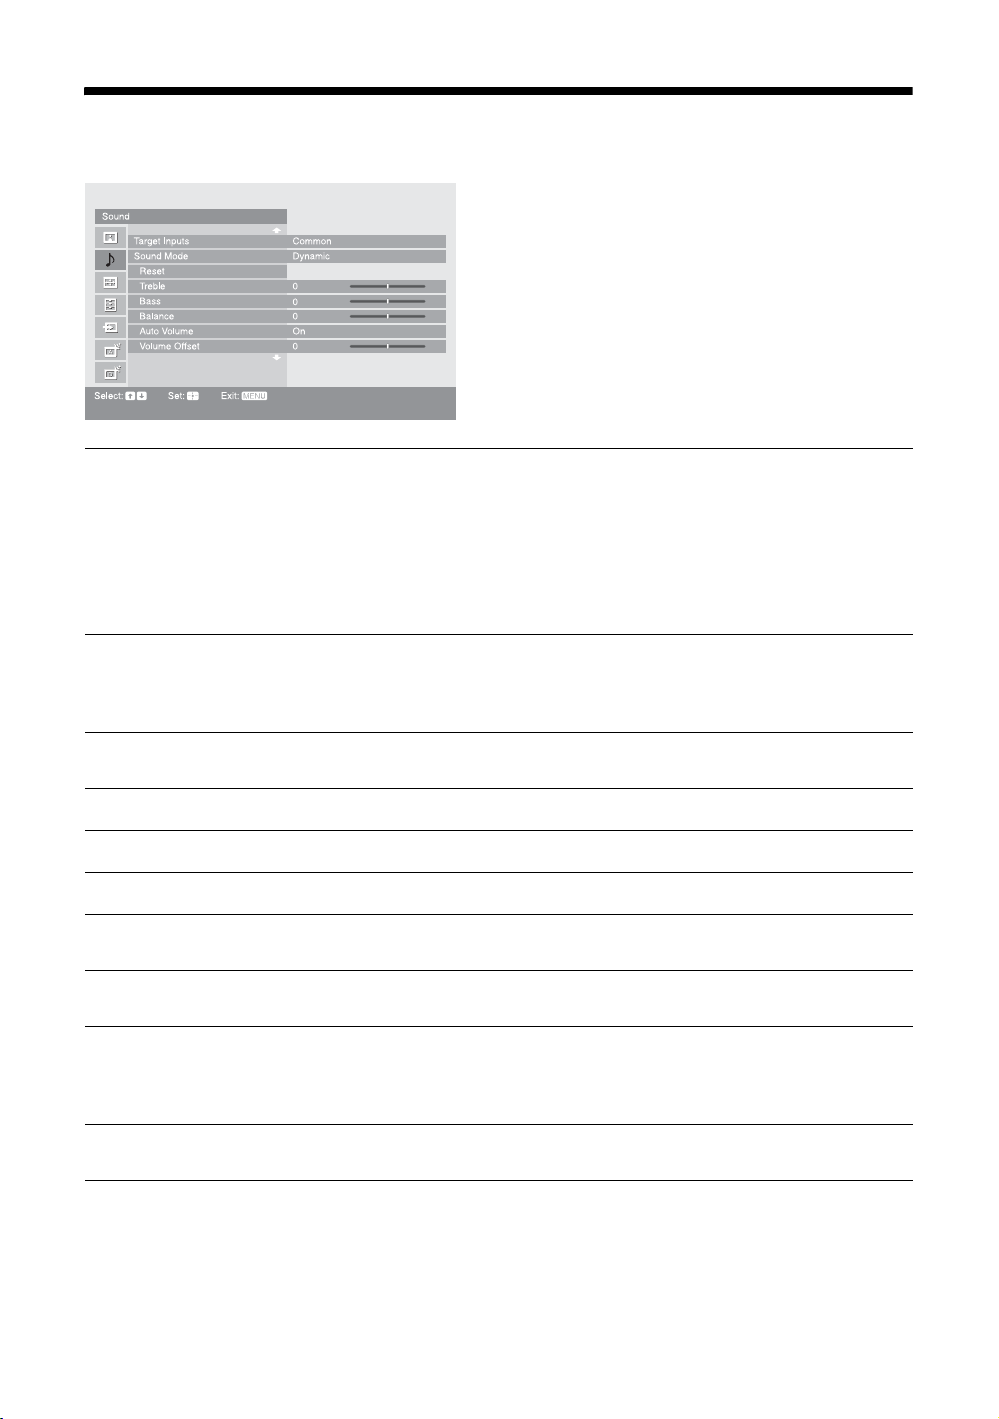
Sound menu
You can select the options listed below on the Sound
menu. To select options in “Settings”, refer to “Picture
menu” (page 25).
Target Inputs
Sound Mode
Reset
Treble
Bass
Balance
Auto Volume
Volume Offset
Surround
For the input currently being viewed, select whether to use the common setting or to
set each item separately.
“Common”: Applies common settings whose adjustments are shared with other
inputs in which “Target Inputs” is set to “Common”.
Current input name (e.g. AV1): Allows you to set each option separately for the
current input.
Tip
Set each input to “Common” if you require the same settings to apply to each input.
Selects the sound mode.
“Dynamic”: Enhances treble and bass.
“Standard”: For standard sound. Recommended for home entertainment.
“Custom”: Flat response. Also allows you to store your preferred settings.
Resets all the “Sound” settings except “Target Inputs”, “Sound Mode” and “Dual
Sound” to the factory settings.
Adjusts higher-pitched sounds.
Adjusts lower-pitched sounds.
Emphasizes left or right speaker balance.
Keeps a constant volume level even when volume level gaps occur (e.g. adverts tend
to be louder than programmes).
Adjusts the volume level of the current input relative to other inputs, when “Target
Inputs” is set to the current input name (e.g. AV1).
Selects the surround mode.
“Dolby Virtual”: Uses the TV speakers to simulate the surround effect produced by
a multi channel system.
“Off”: For normal stereo or mono reception.
28
BBE
GB
Gives sound more impact by compensating for phase effects in speakers using the
“BBE High Definition Sound System”, when “Sound Mode” is set to “Custom”.
Page 29

Dual Sound
Tip
Sound menu options other than “Dual Sound” cannot be used for headphones and audio output sockets.
Selects the sound from the speaker for a stereo or bilingual broadcast.
“Stereo”, “Mono”: For a stereo broadcast.
“A”/“B”/“Mono”: For a bilingual broadcast, select “A” for sound channel 1, “B” for
sound channel 2, or “Mono” for a mono channel, if available.
Tip
If you select other equipment connected to the TV, set “Dual Sound” to “Stereo”, “A” or “B”.
Using MENU Functions
29
GB
Page 30

Screen menu
You can select the options listed below on the Screen
menu. To select options in “Settings”, refer to “Picture
menu” (page 25).
Target Inputs
Screen Format
Auto Format
4:3 Default
Display Area
For the input currently being viewed, select whether to use the common setting or to
set each item separately.
“Common”: Applies common settings whose adjustments are shared with other
inputs in which “Target Inputs” is set to “Common”.
Current input name (e.g. AV1): Allows you to set each option separately for the
current input.
Tip
Set each input to “Common” if you require the same settings to apply to each input.
For details about the screen format, see “To change the screen format manually to
suit the broadcast” (page 18).
Automatically changes the screen format according to the broadcast signal. To keep
your setting, select “Off”.
Tip
Even if “Auto Format” is set to “On” or “Off”, you can always modify the format of the screen
by pressing repeatedly.
Selects the default screen format for use with 4:3 broadcasts.
“Smart”: Displays conventional 4:3 broadcasts with an imitation wide screen effect.
“4:3”: Displays conventional 4:3 broadcasts in the correct proportions.
“Off”: Keeps the current “Screen Format” setting when the channel or input is
changed.
Tip
This option is available only if “Auto Format” is set to “On”.
Adjusts the screen area displaying the picture.
“Normal”: Displays the picture in the original size.
“-1”/“-2”: Enlarges the picture to hide the edge of the picture.
Horizontal Shift
Vertical Shift
Vertical Size
GB
30
Adjusts the horizontal position of the picture.
Adjusts the vertical position of the picture when the screen format is set to “Smart”,
“Zoom” or “14:9”.
Adjusts the vertical size of the picture when the screen format is set to “Smart”.
Page 31

Set-up menu
You can select the options listed below on the Set-up
menu. To select options in “Settings”, refer to “Picture
menu” (page 25).
Timer Settings
Auto Start-up
Sets the timer to switch on/off the TV.
Sleep Timer
Sets a period of time after which the TV automatically switches itself into standby
mode.
When the Sleep Timer is activated, the (Timer) indicator on the TV (front)
lights up in orange.
Tips
• If you switch off the TV and switch it on again, “Sleep Timer” is reset to “Off”.
• “TV will soon turn off by Sleep Timer” appears on the screen one minute before the TV
switches to standby mode.
On Timer
Sets the timer to switch on the TV from standby mode.
“Day”: Selects the day on which you want to activate the On Timer.
“Time”: Sets the time to switch on the TV.
“Duration”: Selects the time period after which the TV automatically switches to
standby mode again.
“Volume Set-up”: Sets the volume for when the timer switches on the TV.
Clock Set
Allows you to adjust the clock manually. When the TV is receiving digital channels,
the clock cannot be adjusted manually since it is set to the time code of the
broadcasted signal.
Starts the “first time operation menu” to select the language and country/region, tune
in all available digital and analogue channels, and set the time (only when no digital
channels are received). Usually, you do not need to do this operation because the
language and country/region will have been selected and channels already tuned
when the TV was first installed (page 7, 8). However, this option allows you to
repeat the process (e.g. to retune the TV after moving house, or to search for new
channels that have been launched by broadcasters).
Using MENU Functions
Power Saving
Reduces the power consumption by adjusting the lamp brightness. This also
enhances the black level. Select “Auto” (only for KDS-70R2000), “On” or “Off”.
Continued
31
GB
Page 32

Film Mode
Provides smoother picture movement when playing DVD or VCR images taken on
film, reducing picture blur and graininess.
“Auto 1”: For a stable picture with minimal noise. Set to “Auto 2” if the screen is
partially degraded.
“Auto 2”: Use this setting for standard use.
“Off”: Turns off the Film mode.
Notes
• Even if “Auto 1” or “Auto 2” is selected, “Film Mode” will be automatically turned off and
a moving image will not be played smoothly if the image contains irregular signals or too
much noise.
• Film Mode is not available when using Freeze or PAP features, or when watching 480p,
576p, 720p, 1080i or 1080p sources.
i Volume
(headphone volume)
i Speaker Link
(headphone speaker
link)
Speaker
Audio Out
Cooling Mode
Lamp Replacement
Adjusts the volume of the headphones when “i Speaker Link” is set to “Off”.
Switches the TV’s internal speakers on/off when headphones are connected.
“On”: Sound is output only from headphones.
“Off”: Sound is output from both the TV and headphones.
Switches on/off the TV’s internal speakers.
“On”: The TV speakers are turned on in order to listen to the TV’s sound through the
TV speakers.
“Off”: The TV speakers are turned off in order to listen to the TV’s sound only
through your external audio equipment connected to the audio output sockets.
“Variable”: The audio output from your audio system can be controlled by the TV’s
remote.
“Fixed”: The audio output of the TV is fixed. Use your audio receiver’s volume
control to adjust the volume (and other audio settings) through your audio system.
Select “High” to use the TV at an altitude of 1,500 m or higher, or to use the TV in
certain circumstances where there is a considerable rise in temperature inside the
TV. Select “Normal” to use the TV at normal altitudes.
When the lamp nears the end of its life, a message appears every time you switch on
the TV. After you replace the lamp, select this option and follow the on-screen
procedure.
Notes
• Select this option after you replace the lamp.
• Depending on environmental and other conditions, such as frequency of use, some lamps
may burn out before the lamp replacement message appears on the screen.
• Until you set the Lamp Replacement option, a message announcing that the lamp is at the
end of its life will appear every time you switch on the TV.
Display Position
Language
Information
GB
32
Adjust the horizontal/vertical position of the picture including menu displays and
messages, etc. on the TV screen.
Selects the language in which the menus are displayed.
Displays your TV’s product information.
Page 33

All Reset
Resets all settings to the factory settings and then displays the Auto Start-up screen.
Notes
• All settings, including Digital Favourite list, country, language, auto tuned channels, etc.
will be reset.
• The On/standby indicator flashes in green while the settings are being reset.
Using MENU Functions
33
GB
Page 34

AV Set-up menu
You can select the options listed below on the AV Setup menu. To select options in “Settings”, refer to
“Picture menu” (page 25).
AV Preset
AV3 Input
AV7 Input
Assigns a name to any equipment connected to the side and rear sockets. The name
will be displayed briefly on the screen when the equipment is selected. You can skip
input signals from connected equipment that you do not want displayed on the
screen.
1 Press
2 Press
Sets a signal to be input through the socket labelled / / 3 on the rear of
the TV.
“Auto”: Switches automatically among the signals of RGB input, S video input,
Composite video input depending on the input signal.
“RGB”: Inputs the RGB signal.
“S Video”: Inputs the S Video signal.
“Composite”: Inputs the Composite video signal.
Sets a signal to be input through the sockets labeled / / 7 on the front of
the TV.
“Auto”: Switches automatically between the component video sockets and the
composite video sockets depending on the cable connection.
“Component”: Activates the component video sockets.
“Composite”: Activates the composite video sockets.
Tip
When multiple cables are connected and “Auto” is selected, “Component”,
“Composite” will be activated in that order.
F/f to select the desired input source, then press .
F/f to select the desired option below, then press .
Equipment labels: Uses one of the preset labels to assign a name to connected
equipment.
“Edit:”: Creates your own label. Follow steps 2 to 4 of “Programme Labels” (page 36).
“Skip”: Skips an unnecessary input source.
AV2 Output
GB
34
Sets a signal to be output through the socket labelled / 2 on the rear of the
TV. If you connect a VCR or other recording equipment to the / 2 socket,
you can then record from the equipment connected to other sockets of the TV.
“TV”: Outputs a broadcast.
“AV1”: Outputs signals from equipment connected to the / 1 socket.
“AV3”: Outputs signals from equipment connected to the / / 3 socket.
“AV7”: Outputs signals from equipment connected to the / 7 socket.
“Auto”: Outputs whatever is being viewed on the screen (except signals from the
/ 4, HDMI IN 5, HDMI IN 6 and PC IN RGB/ sockets).
Page 35

Colour System
Selects the colour system (“Auto”, “PAL”, “SECAM”, “NTSC3.58” or
“NTSC4.43”) according to the input signal from the input source.
Game Mode
Colour Matrix
Depending on the game software, reaction times may slow during fast-moving
scenes, etc. Select “On” to improve the reaction times.
Usually used in the factory setting (AV1/2/3/7 (Composite and S video input signal)
is set to “ITU601”, and AV4/5/6/7 (Component input signal) is set to “Auto”). If the
tone of the picture from the input source is unnatural, select either “ITU601” or
“ITU709”, which normalizes the tone.
Using MENU Functions
35
GB
Page 36

Analogue Set-up menu
You can select the options listed below on the
Analogue Set-up menu. To select options in
“Settings”, refer to “Picture menu” (page 25).
1 Digit Direct
Auto Tuning
Programme Sorting
Programme Labels
When “1 Digit Direct” is set to “On”, you can select an analogue channel using one
preset number button (0 - 9) on the remote.
Note
When “1 Digit Direct” is set to “On”, you cannot select channel numbers 10 and above entering
two digits using the remote.
Tunes in all the available analogue channels.
Usually you do not need to do this operation because the channels are already tuned
when the TV was first installed (page 8). However, this option allows you to repeat
the process (e.g. to retune the TV after moving house, or to search for new channels
that have been launched by broadcasters).
Changes the order in which the analogue channels are stored on the TV.
1 Press
2 Press
Assigns a channel name of your choice up to five letters or numbers. The name will
be displayed briefly on the screen when the channel is selected. (Names for channels
are usually taken automatically from Text (if available).)
1 Press F/f to select the channel you want to name, then press .
2 Press F/f to select the desired letter or number (“_” for a blank space),
3 Repeat the procedure in step 2 until the name is complete.
4 Select “OK”, then press .
F/f to select the channel you want to move to a new position,
then press .
F/f to select the new position for your channel, then press .
then press
If you input a wrong character
Press G/g to select the wrong character. Then, press F/f to select the correct
character.
To delete all the characters
Select “Reset”, then press .
g.
36
GB
Page 37

Manual Programme
Preset
Before selecting “Label”/“AFT”/“Audio Filter”/“Skip”/“Decoder”, press PROG +/to select the programme number with the channel. You cannot select a programme
number that is set to skip (page 38).
Programme
Presets programme channels manually.
1 Press
2 Press
3 Press
4 Press F/f to select one of the following TV broadcast systems, then
5 Press F/f to select “Channel”, then press .
6 Press
7 Tune the channels as follows:
8 Press to jump to “Confirm”, then press .
9 Press f to select “OK”, then press .
Repeat the procedure above to preset other channels manually.
Label
Assigns a name of your choice, up to five letters or numbers, to the selected channel.
This name will be displayed briefly on the screen when the channel is selected.
To input characters, follow steps 2 to 4 of “Programme Labels” (page 36).
AFT
Allows you to fine-tune the selected programme number manually if you feel that a
slight tuning adjustment will improve the picture quality.
You can adjust the fine tuning over a range of -15 to +15. When “On” is selected, the
fine tuning is performed automatically.
Audio Filter
Improves the sound for individual channels in the case of distortion in mono
broadcasts. Sometimes a non-standard broadcast signal can cause sound distortion or
intermittent sound muting when watching mono programmes.
If you do not experience any sound distortion, we recommend that you leave this
option set to the factory setting “Off”.
Notes
• You cannot receive stereo or dual sound when “Low” or “High” is selected.
• “Audio Filter” is not available when “System” is set to “L”.
/System/Channel
F/f to select “Programme”, then press .
F/f to select the programme number you want to manually tune
(if tuning a VCR, select channel 00), then press RETURN.
F/f to select “System”, then press .
press RETURN.
B/G: For western European countries/regions
I: For the United Kingdom
D/K: For eastern European countries/regions
L: For France
F/f to select “S” (for cable channels) or “C” (for terrestrial
channels), then press
If you do not know the channel number (frequency)
Press F/f to search for the next available channel. When a channel has been found,
the search will stop. To continue searching, press
If you know the channel number (frequency)
Press the number buttons to enter the channel number of the broadcast you want or
your VCR channel number.
g.
F/f.
Using MENU Functions
Continued
37
GB
Page 38

Skip
Skips unused analogue channels when you press PROG +/- to select channels. (You
can still select a skipped channel using the number buttons.)
Decoder
Views and records the scrambled channel selected when using a decoder connected
directly to scart connector / 1, or to scart connector / 2 via a VCR.
Note
Depending on the country/region selected for “Country” (page 8), this option may not be
available.
Confirm
Saves changes made to the “Manual Programme Preset” settings.
38
GB
Page 39

Digital Set-up menu
You can select the options listed below on the Digital
Set-up menu. To select options in “Settings”, refer to
“Picture menu” (page 25).
Note
Some functions may not be available in some countries.
Digital Settings
Displays the “Digital Settings” menu.
Subtitle Setting
Displays digital subtitles on the screen.
When “For Hard Of Hearing” is selected, some visual aids may also be displayed
with the subtitles (if TV channels broadcast such information).
Subtitle Language
Selects which language subtitles are displayed in.
Audio Language
Selects the language used for a programme. Some digital channels may broadcast
several audio languages for a programme.
Audio Type
Increases the sound level when “For Hard Of Hearing” is selected.
Parental Lock
Sets an age restriction for programmes. Any programme that exceeds the age
restriction can only be watched after a PIN Code is entered correctly.
1 Press the number buttons to enter your existing PIN code.
If you have not previously set a PIN, a PIN code entry screen appears. Follow the
instructions of “PIN Code” below.
2 Press F/f to select the age restriction or “None” (for unrestricted
watching), then press .
3 Press RETURN.
PIN Code
Sets a PIN code for the first time, or allows you to change your PIN code.
1 Enter a PIN as follows:
If you have previously set a PIN
Press the number buttons to enter your existing PIN.
If you have not set a PIN
Press the number buttons to enter the factory setting PIN of 9999.
2 Press the number buttons to enter the new PIN code.
A message appears to inform you that the new PIN has been accepted.
3 Press RETURN.
Tip
PIN code 9999 is always accepted.
Using MENU Functions
Continued
39
GB
Page 40

Technical Set-up
Displays the Technical Set-up menu.
“Auto Service Update”: Enables the TV to detect and store new digital services as
they become available.
“Software Download”: Enables the TV to automatically receive software updates
free through your existing aerial (when issued). It is recommended that this option
be set to “On” at all times. If you do not want your software to be updated, set this
option to “Off”.
“System Information”: Displays the current software version and the signal level.
“Time Zone”: Allows you to manually select the time zone you are in, if it is not the
same as the default time zone setting for your country.
CA Module Set-up
Allows you to access a Pay Per View service once you obtain a Conditional Access
Module (CAM) and a view card. See page 43 for the location of the (PCMCIA)
socket.
Notes
• CAM is not supported in all countries. Check with your authorized dealer.
• “CA Module Set-up” is available only when a CAM is inserted.
Digital Tuning
Displays the “Digital Tuning” menu.
Digital Auto Tuning
Tunes in all the available digital channels.
Usually you do not need to do this operation because the channels were already tuned
when the TV was first installed (page 8). However, this option allows you to repeat
the process (e.g. to retune the TV after moving house, or to search for new channels
that have been launched by broadcasters).
Programme List Edit
Removes any unwanted digital channels stored on the TV, and changes the order of
the digital channels stored on the TV.
1 Press
2 Remove or change the order of the digital channels as follows:
3 Press RETURN.
Digital Manual Tuning
Tunes the digital channels manually.
1 Press the number button to select the channel number you want to
2 When the available channels are found, press
3 Press
Repeat the above procedure to manually tune other channels.
F/f to select the channel you want to remove or move to a new
position.
If you know the programme number
Press the number buttons to enter the three-digit programme number of the broadcast
you want.
To remove the digital channel
Press . A message that confirms whether the selected digital channel is to be
deleted appears. Press
To change the order of the digital channels
Press g, then press F/f to select the new position for the channel and press G.
Repeat the procedure in steps 1 and 2 to move other channels if required.
manually tune, then press
G to select “Yes”, then press .
F/f to tune the channel.
F/f to select the channel
you want to store, then press .
F/f to select the programme number where you want to store the
new channel, then press .
40
GB
Page 41

PC Settings menu
Picture
Display Mode
Reset
Advanced Iris
Contrast
Brightness
Resolution:
1024x768/60Hz
Picture
Display Mode
Reset
Advanced Iris
Video
Video
You can select the options listed below on the PC
Settings menu when the TV is connected to a PC.
1 Press / repeatedly until PC
Auto 1
appears on the screen.
2 Press MENU to display the PC settings
menu.
Note
ExitSet
Selects the display mode.
“Video”: Select to view video images.
“Text”: Select to view text, charts or tables.
Resets all the “Picture” settings except “Display Mode” to the factory settings.
By selecting the iris option, you can obtain the best brightness and contrast suited for
your TV viewing.
“Auto 1”*: Recommended option for viewing programmes that have larger variation
in brightness from scene to scene.
“Auto 2”*: Recommended option for viewing programmes that have less variation
in brightness from scene to scene.
“Max”: With this option, the screen has maximum level of brightness. It is suitable
for TV viewing in a brightly lit room.
“High”: With this option, the screen becomes bright. It is suitable for TV viewing in
a brightly lit room.
“Medium”: With this option, the brightness is about the standard level.
“Low”: With this option, the screen brightness dims and increases in contrast. It is
suitable for TV viewing in a room with low lighting.
“Min”: With this option, the screen is dimmed but contrast is at a maximum. It is
suitable for TV viewing in a room with low lighting.
* Automatically detects the brightness of the screen. These options are best suited for
programmes such as movies that often change between bright scenes and low light setting
scenes.
Note
You cannot select “Auto 1” or “Auto 2” when “Display Mode” is set to “Text”.
When you connect a PC to your TV for the first time, you
may need to adjust the screen display. In such cases, perform
“Auto Adjustment” or adjust the “Phase”, “Pitch”,
“Horizontal Shift”, or “Vertical Shift” in “Others” (page 42).
Using MENU Functions
Contrast
Brightness
Increases or decreases picture contrast.
Brightens or darkens the picture.
Continued
41
GB
Page 42

Colour Temperature
Sound
Adjusts the whiteness of the picture.
“Cool”: Gives the white colours a blue tint.
“Neutral”: Gives the white colours a neutral tint.
“Warm 1”/“Warm 2”: Gives the white colours a red tint. “Warm 2” gives a redder
tint than “Warm 1”.
Sound Mode
Others
Auto Adjustment
Reset
Phase
Pitch
Horizontal Shift
Vertical Shift
Selects the sound mode.
“Dynamic”: Enhances treble and bass.
“Standard”: For standard sound. Recommended for home entertainment.
“Custom”: Provides a flat response. Sound quality as customized on the connected
PC is maintained in the TV sound.
Automatically adjusts the display position, phase and pitch of the picture when the
TV receives an input signal from a connected PC.
Tip
Auto Adjustment may not work well with some input signals. In such cases, manually adjust
“Phase”, “Pitch”, “Horizontal Shift” and “Vertical Shift”.
Resets all the “Others” settings to the factory settings.
Adjusts the phase when the screen flickers.
Adjusts the pitch when the picture has unwanted vertical stripes.
Adjusts the horizontal position of the picture.
Adjusts the vertical position of the picture.
Screen Format
GB
42
Selects the screen format for signals with a 60 Hz vertical frequency.
“Normal”: Displays the picture in its original size.
“Full1”: Enlarges the picture to fill the display area, keeping its original horizontalto-vertical aspect ratio.
“Full2”: Enlarges the picture to fill the display area.
Page 43

Using Optional Equipment
Connecting optional equipment
You can connect a wide range of optional equipment to your TV. Connecting cables are not supplied.
Connecting to the TV (front)
KDS-55A2000
Headphones
KDS-70R2000
HDV camcorder with
component output
S VHS/Hi8/
DVC camcorder with
composite output
S VHS/Hi8/
DVC camcorder with
composite output
To connect Do this
HDV camcorder
with component
output A
S VHS/Hi8/DVC
camcorder with
composite output
B
Headphones C Connect to the i socket to listen to
Conditional Access
Module (CAM) D
Connect to the component video Y,
B/CB, PR/CR sockets 7 and
P
audio L (MONO), R sockets 7.
Connect to the composite video
socket 7, and the audio
sockets 7. If you connect
mono equipment, connect to the L
socket 7.
sound from the TV on headphones.
To use Pay Per View services. For
details, refer to the instruction
manual supplied with your CAM.
To use the CAM, press the eject
button and remove the “dummy”
card. Switch off the TV when
inserting your CAM into the CAM
slot. When you do not use the
CAM, we recommend that the
“dummy” card be inserted and
kept in the CAM slot.
Note
CAM is not supported in all
countries. Check with your
authorized dealer.
Using Optional Equipment
HDV camcorder with
component output
For service use only
Push up to open
the front panel
using the small lip
on the panel.
Headphones
Tip
You can select the front socket input signals by setting “AV7
Input” in the “AV Set-up” menu (page 34).
Continued
43
GB
Page 44

Connecting to the TV (rear)
DVD recorder
VCR
Decoder
VCR
DVD player
S VHS/Hi8/
DVC camcorder
with S-Video
output
Digital receiver
DVD player
Video game
equipment
DVD player
Decoder
DVD player with
component output
(for only
HDMI IN 6)
PC
To connect Do this
Video game
equipment, DVD
player or decoder
E
DVD recorder or
VCR that supports
SmartLink F
VCR, DVD player
or S VHS /Hi8/DVC
camcorder with SVideo output G
DVD player with
component output
H
Digital receiver or
DVD player I
PC J Connect to the PC IN RGB/
Connect to the scart socket /
1. When you connect the
decoder, the scrambled signal from
the TV tuner is output to the
decoder, then the unscrambled
signal is output from the decoder.
Connect to the scart socket /
2. SmartLink is a direct link
between the TV and a VCR/DVD
recorder.
Connect to the scart socket /
/ 3. You can select the
input signals by setting “AV3
Input” in the “AV Set-up” menu
(page 34). If the equipment has an
S Video socket, connect it through
an S Video - scart adaptor interface
(not supplied).
Connect to the component sockets
and the audio sockets / 4.
Connect to the HDMI IN 5 or 6
socket if the equipment has a
HDMI socket. The digital video
and audio signals are input from
the equipment. If the equipment
has a DVI socket, connect the DVI
socket to the HDMI IN 6 socket
through a DVI - HDMI adaptor
interface (not supplied), and
connect the equipment’s audio out
sockets to the audio in the HDMI
IN 6 sockets.
Notes
• The HDMI sockets only support
the following video inputs: 480i,
480p, 576i, 576p, 720p, 1080i and
1080p. To connect a PC, use the
PC IN RGB/ sockets.
• Be sure to use only an HDMI
cable that bears the HDMI logo.
sockets. It is recommended to
use a PC cable with ferrites.
Digital audio (PCM)
GB
44
component
Hi-Fi audio
equipment
Page 45

To connect Do this
Digital audio
(PCM) component
K
Hi-Fi audio
equipment L
Connect to the DIGITAL OUT
(OPTICAL) socket using the
Optical audio cable.
Note
The DIGITAL OUT (OPTICAL)
socket only supports di gital terrestrial
signals.
Connect to the audio output
sockets to listen to the sound
from the TV on Hi-Fi audio
equipment.
Programming the
remote
This remote is preset to operate Sony TVs, most Sony
DVDs, VCRs and AMPs (Home Theatre, etc.).
To control VCRs and DVDs of other manufacturers
(and some other Sony VCR, DVD and AMP models),
do the following procedure to programme the remote.
Note
Before you start, look up the three-digit code for your brand
of DVD, VCR or AMP from the “Manufacturer’s codes” on
page 46.
1
2
Using Optional Equipment
1
3
1 Press and hold the DVD, VCR or AMP
function button you want to programme on
the remote, then press
function button pressed down.
The selected function button (DVD, VCR or
AMP) will flash.
, keeping the
2 Press the number buttons to enter the
three-digit manufacturer’s code number
while the button is lit. If code is not entered
within 10 seconds, you must perform the
step 1 again.
3 Press .
When the programming is correct, the selected
function button will flash twice, and when not, it
will flash five times.
Continued
45
GB
Page 46

4 Switch on your equipment and check that
the following main functions work.
H (playback), x (stop), m (rewind), M (fast
forward), channel selection for both VCR and
DVDs, TOP MENU/MENU and
for DVDs.
If your equipment is not working, or some of the
functions do not work
Enter the correct code or try the next code listed
for the brand. However, not all models of every
brand may be covered.
To return to normal TV operation
Press the TV function button.
Manufacturer’s codes
VCR brand list
Brand Code
SONY 301, 302, 303, 304, 305, 306, 307, 308,
309, 310, 362
AIWA 325, 331, 351
AKAI 326, 329, 330
DAEWOO 342, 343
GRUNDIG 358, 355, 360, 361, 320, 351, 366
HITACHI 327, 333, 334
JVC 314, 315, 322, 344, 352, 353, 354, 348,
349
LG 332, 338
LOEWE 358, 355, 360, 361, 320, 351
MATSUI 356, 357
ORION 328
PANASONIC 321, 323
PHILIPS 311, 312, 313, 316, 317, 318, 358, 359,
363, 364
SAMSUNG 339, 340, 341, 345
SANYO 335, 336
SHARP 324
THOMSON 319, 350, 365
TOSHIBA 337
F/f/G/g only
DVD brand list
DVD Player
Brand Code
SONY 001, 029, 030, 036, 037, 038, 039, 040,
041, 042, 043, 044, 053, 054, 055
AIWA 021
AKAI 032
DENON 018, 027, 020, 002
GRUNDIG 009, 028, 023, 024, 016, 003
HITACHI 025, 026, 015, 004, 035
JVC 006, 017
KENWOOD 008
LG 015, 014, 034
LOEWE 009, 028, 023, 024, 016, 003
MATSUI 013, 016
ONKYO 022, 033
PANASONIC 018, 027, 020, 002, 045, 046, 047
PHILIPS 009, 028, 023, 024, 016, 003, 031
PIONEER 004, 050, 051, 052
SAMSUNG 011, 014
SANYO 007
SHARP 019, 027
THOMSON 012
TOSHIBA 003, 048, 049
YAMAHA 018, 027, 020, 002
DVD/VCR Player
Brand Code
SONY 101
DVD recorder
Brand Code
SONY 201, 202, 203
AUX Sony systems brand list
DAV Home Theatre System
46
Brand Code
SONY (DAV) 401, 402, 403, 404
GB
Page 47

AV receiver
Brand Code
SONY 451, 452, 453, 454
Digital terrestrial receiver
Brand Code
SONY 501, 502, 503
Using Optional Equipment
47
GB
Page 48

Additional Information
Replacing the lamp
The Projection lamp, like all lamps, will eventually
lose brightness and functionality which affects the
overall performance of your TV. How long the Lamp
maintains its brightness will vary depending upon
your usage and environmental conditions. To
maintain the quality of your viewing experience, Sony
recommends that you replace the Lamp (1) when the
screen becomes dark or the colour looks unusual; (2)
when on the front of the TV flashes; (3) after
approximately 8,000 hours of use (for KDS-55A2000)
or 4,000 hours of use (for KDS-70R2000); or (4) when
the lamp replacement message appears on the TV
screen.
WARNING
Electric appliances can cause fire or high temperature,
resulting in injury or death. Be sure to follow the
instructions below.
• Use only a Sony XL-5200 (for KDS-55A2000, not
supplied) or XL-5300 (for KDS-70R2000, supplied)
replacement lamp for replacement. Use of any other lamp
may damage the TV.
• Do not remove the lamp for any purpose other than
replacement. Doing so may cause injury or fire.
• Do not put flammable materials and metal objects inside
the lamp receptacle of the TV after removing the lamp.
Doing so may cause fire or electrical shock. Do not touch
the lamp receptacle once the lamp has been removed.
• When the lamp eventually burns out, you may hear a
noticeable “pop” sound. This is normal and it is inherent
to this type of lamp.
• In rare instances, the bulb may pop inside the lamp unit,
but the lamp unit is designed to contain all of the broken
glass pieces inside the lamp unit.
• This TV’s lamp contains mercury and should be disposed
of properly. Consult your local authorities regarding safe
disposal. The material contained in this lamp are similar to
those of a fluorescent lamp, so you should dispose of it in
the same way.
1 Switch off the TV. Wait several minutes,
then unplug the mains lead.
(The cooling fan will continue to operate for
about two minutes after switching the TV
off.)
2 Wait at least 30 minutes after unplugging
the mains lead to allow the lamp to cool
down before replacing it. To avoid being
burned, do not touch the lamp receptacle
once the lamp has been removed.
3 Take the new lamp out of its package.
Do not touch the glass portion of the new
lamp.
Notes
• Do not shake the lamp. Vibration can damage the
lamp or shorten its life.
• Avoid touching the front glass of a new lamp or the
glass of the lamp receptacle. This may reduce picture
quality or lamp life.
4 Remove the outside lamp cover.
KDS-55A2000
KDS-70R2000
5 Remove the lamp door.
Turn the screw counterclockwise. Then
slide the lever to the left (KDS-55A2000) or
turn the knob to the left until the marks on
the lid and the case line up
(KDS-70R2000). Remove the door.
KDS-55A2000
KDS-70R2000
48
GB
Page 49

6 Pull out the lamp.
Hold the indented grooves of the lamp as
shown, and pull the lamp straight out.
If the lamp is hard to remove, pull the right
side of the lamp for additional traction
(KDS-55A2000).
KDS-55A2000
Hold this part of the lamp
KDS-70R2000
Hold this part of the lamp
Notes
• Do not touch the inside of the lamp compartment.
• The lamp is very hot immediately after use. Never
touch the glass portion of the lamp or the surrounding
parts.
• After the used lamp has cooled, place it into the empty
box of the replacement lamp. Never put the used lamp
into a plastic bag.
7 Put the new lamp into its place.
Make sure the lamp is securely mounted
into the compartment. Failure to do so may
cause a fire or the screen to go dark.
KDS-55A2000
Notes
• The lamp compartment is tilted.
• If the lamp is not securely reattached, the selfdiagnostic function may be triggered and
red three times (page 15).
KDS-55A2000 KDS-70R2000
1 flashes in
8 Reattach the lamp door.
For KDS-55A2000, replace the door by
inserting the two tabs in the slot from the
left side. Slide the lever to the right and
then turn the screw clockwise to secure the
door.
For KDS-70R2000, turn the knob to the
right while pushing the door in, until the
marks on the lid and the case line up. Then
turn the screw clockwise to secure the
door.
KDS-55A2000
KDS-70R2000
Additional Information
KDS-70R2000
Continued
49
GB
Page 50

9 Put the outside lamp cover back in its
place.
Replace the cover, inserting it from the left
side. Press the two tabs on the right side
(KDS-55A2000) or press the clamp on the
right side (KDS-70R2000) to secure the
cover.
KDS-55A2000
KDS-70R2000
10Turn on the TV and set the Lamp
Replacement option in the Set-up menu
(page 32). This setting is necessary to
inform you when the next lamp
replacement is needed.
Notes
• Until you set the Lamp Replacement option, a
message announcing that the lamp is at the end of its
life will appear every time you switch on the TV.
• Consult your Sony dealer for a Sony XL-5200 (for
KDS-55A2000) or XL-5300 (for KDS-70R2000)
replacement lamp.
• Take great care when replacing the lamp or plugging
in/unplugging the connecting cords. Rough handling
may cause the TV to fall, damaging the TV, the TV
stand and the floor.
50
GB
Page 51

Specifications
Display Unit
Power Requirements:
220–240 V AC, 50 Hz
Projection System:
3 SXRD Panel, 1 lens projection system
SXRD Panel:
Size 0.61 inch SXRD panel
Resolution 1920 × 1080 pixels
Projection Lenses:
High performance, large-diameter hybrid lens F2.5
Lamp:
KDS-70R2000:
Ultra high pressure lamp, 180 W, XL-5300
KDS-55A2000:
Ultra high pressure lamp, 120 W, XL-5200
Screen Size:
KDS-70R2000:
70 inches (Approx. 177.8 cm measured diagonally)
KDS-55A2000:
55 inches (Approx. 139.7 cm measured diagonally)
Power Consumption:
KDS-70R2000: 285 W
KDS-55A2000: 210 W
Standby Power Consumption*:
0.5 W
* Specified standby power is reached after the TV
finishes necessary internal processes.
Dimensions (w × h × d):
KDS-70R2000:
Approx. 1,885 × 1,154 × 611 mm (with speakers)
Approx. 1,714 × 1,154 × 611 mm
KDS-55A2000:
Approx. 1,292 × 913 × 480 mm
Mass:
KDS-70R2000:
Approx. 74 kg
KDS-55A2000:
Approx. 39 kg
TV System
Analogue: Depending on your country/region selection:
B/G/H, D/K, L, I
Digital: DVB-T
Colour/Video System
Analogue: PAL, SECAM
NTSC 3.58, 4.43 (only Video In)
Digital: MPEG-2 MP@ML
Aerial
75 ohm external terminal for VHF/UHF
Channel Coverage
Analogue: VHF: E2–E12
UHF: E21–E69
CATV: S1–S20
HYPER: S21–S41
D/K: R1–R12, R21–R69
L: F2–F10, B–Q, F21–F69
I: UHF B21–B69
Digital: VHF/UHF
(without speakers)
Terminals
/1
21-pin scart connector (CENELEC standard) including
audio/video input, RGB input, and TV audio/video
output.
/2 (SmartLink)
21-pin scart connector (CENELEC standard) including
audio/video input, RGB input, selectable audio/video
output, and SmartLink interface.
// 3
21-pin scart connector (CENELEC standard) including
audio/video input, RGB input, S video input, and audio/
video output which currently appears on the screen.
4
Supported formats: 1080i, 720p, 576p, 576i, 480p, 480i
Y: 1 Vp-p, 75 ohms, 0.3V negative sync
B/CB: 0.7 Vp-p, 75 ohms
P
R/CR: 0.7 Vp-p, 75 ohms
P
4
Audio input (phono jacks)
500 mVrms
Impedance: 47 kilohms
HDMI IN 5, 6
Video: 1080p, 1080i, 720p, 576p, 576i, 480p, 480i
Audio: Two channel linear PCM
32, 44.1 and 48 kHz, 16, 20 and 24 bits
Analogue audio (phono jacks):
500 mVrms, Impedance 47 kilohms
(HDMI IN 6 only)
7
Supported formats: 1080i, 720p, 576p, 576i, 480p, 480i
Y: 1 Vp-p, 75 ohms, 0.3V negative sync
B/CB: 0.7 Vp-p, 75 ohms
P
P
R/CR: 0.7 Vp-p, 75 ohms
7 Video input (phono jack)
7 Audio input (phono jacks)
DIGITAL OUT (OPTICAL OUT jack)
Audio output (phono jacks)
PC IN RGB PC Input (D-sub 15-pin) (see page 52)
G: 0.7 Vp-p, 75 ohms, non Sync on Green
B: 0.7 Vp-p, 75 ohms
R: 0.7 Vp-p, 75 ohms
HD: 1-5 Vp-p
VD: 1-5 Vp-p
PC IN PC audio input (minijack)
i Headphones jack
CAM (Conditional Access Module) slot
Sound Output
KDS-70R2000: 15 W + 15 W
KDS-55A2000: 12 W + 12 W
Supplied Accessories
Refer to “1: Checking the accessories” on page 4.
Optional Accessories
TV stand:
SU-RS51U (for KDS-70R2000)
SU-RS11X (for KDS-55A2000)
Design and specifications are subject to change
without notice.
Continued
Additional Information
51
GB
Page 52

PC Input Signal Reference Chart
Horizontal
Signals Horizontal (Pixel) Vertical (Line)
frequency
(kHz)
VGA 640 480 31.5 60 VGA
640 480 37.5 75 VESA
720 400 31.5 79 VGA-T
SVGA 800 600 37.9 60 VESA Guidelines
800 600 46.9 75 VESA
XGA 1024 768 48.4 60 VESA Guidelines
1024 768 56.5 70 VESA
1024 768 60 75 VESA
1280 720 44.7 60 VESA CVT
WXGA 1280 768 47.4 60 VESA
1280 768 47.8 60 VESA
1280 768 60.3 75 VESA
1360 768 47.7 60 VESA
SXGA 1280 1024 64 60 VESA
1280 1024 80 75 VESA
Vertical
frequency (Hz)
Standard
HDTV 1920 1080 67.5 60 EIA
• This TV’s PC input does not support Sync on Green or Composite Sync.
• The PC input signal displays on-screen in a smaller size than the actual TV screen size and does not support interlaced signals.
• For the best picture quality, it is recommended to use the signals (boldfaced) in the above chart with a 60 Hz vertical frequency
from a personal computer. In plug and play, signals with a 60 Hz vertical frequency will be selected automatically.
52
GB
Page 53

Troubleshooting
Check whether the 1 (on/standby) indicator is flashing in red.
When it is flashing
The self-diagnosis function is activated. (When the indicator flashes in two- or three-blink intervals, see page 55.)
1 Count how many 1 (on/standby) indicator flashes between each two second break.
For example, the indicator flashes three times, then there is a two second break, followed by another three flashes, etc.
2 Press 1 on the TV (front) to switch it off, disconnect the mains lead, and inform your dealer or Sony
service centre of how the indicator flashes (number of flashes).
When it is not flashing
1 Check the items in the tables below.
2 If the problem still persists, have your TV serviced by qualified service personnel.
Picture
Problem Cause/Remedy
No picture (screen is dark) and
no sound
• Check the aerial connection.
• Connect the TV to the mains, and press 1 on the TV (front).
• If the 1 (on/standby) indicator lights up in red, press TV "/1.
No picture or no menu
information from equipment
connected to the scart
connector
Double images or ghosting
Only snow and noise appear
on the screen
Distorted picture (dotted lines
or stripes)
Picture noise when viewing a
TV channel
Some tiny black points and/or
bright points appear on the
screen
No colour on programmes
No colour or irregular colour
when viewing a signal from the
Y, P B/CB, PR/CR sockets 4
or 7
• Check that the optional equipment is on and press / repeatedly until
the correct input symbol is displayed on the screen.
• Check the connection between the optional equipment and the TV.
• Check aerial/cable connections.
• Check the aerial location and direction.
• Check if the aerial is broken or bent.
• Check if the aerial has reached the end of its serviceable life (three to five
years in normal use, one to two years at the seaside).
• Keep the TV away from electrical noise sources such as cars, motorcycles,
hair-dryers or optical equipment.
• When installing optional equipment, leave some space between the optional
equipment and the TV.
• Make sure that the aerial is connected using the supplied coaxial cable.
• Keep the aerial cable away from other connecting cables.
• Select “Manual Programme Preset” in the “Analogue Set-up” menu and
adjust “AFT” (Automatic Fine Tuning) to obtain better picture reception
(page 37).
• The picture of a display unit is composed of pixels. Tiny black points and/or
bright points (pixels) on the screen do not indicate a malfunction.
• Select “Reset” in the “Picture” menu to return to the factory settings
(page 25).
• Check the connection of the Y, PB/CB, PR/CR sockets 4 or 7.
• Make sure that the Y, P
their respective sockets.
B/CB, PR/CR sockets 4 or 7 are firmly seated in
Additional Information
Continued
53
GB
Page 54

Problem Cause/Remedy
Picture flashes initially when
changing to HDMI mode or
when switching on the TV in
HDMI mode
A white oval image appears on
the screen
• This is probably caused by the authentication process between HDMI
equipment and the TV. It does not indicate a malfunction.
• This is due to strong light reflecting off both the TV screen and reflections
coming from behind the screens.
• Position your TV away from strong ambient light or sunlight, or lower any
ambient lights.
Sound
Problem Cause/Remedy
No sound, but good picture
• Press 2 +/– or % (Mute).
• Check that “Speaker” is set to “On” in the “Set-up” menu (page 32).
Noisy sound
• See “Picture noise” causes/remedies on page 53.
Channels
Problem Cause/Remedy
The desired channel cannot be
selected
Some channels are blank
• Switch between digital and analogue mode and select the desired digital/
analogue channel.
• Scrambled/Subscription only channel. Subscribe to the Pay Per View
service.
• Channel is used only for data (no picture or sound).
• Contact the broadcaster for transmission details.
Digital channels are not
displayed
• Contact a local installer to find out if digital transmissions are provided in
your area.
• Upgrade to a higher gain aerial.
General
Problem Cause/Remedy
The TV turns off automatically
(the TV enters standby mode)
• Check if the “Sleep Timer” is activated, or confirm the “Duration” setting of
“On Timer” (page 31).
• If the inside of the TV grows warm while Cooling Mode is set to “High”,
the TV automatically switches to standby mode.
(When Cooling Mode is set to “Normal” under the same conditions, the
mode switches to “High”, the cooling fan starts, and a loud whirring noise
may be heard.)
• If no signal is received and no operation is performed in the TV mode for
10 minutes, the TV automatically switches to standby mode.
The TV turns on automatically
Some input sources cannot be
selected
GB
54
• Check if the “On Timer” is activated (page 31).
• Select “AV Preset” in the “AV Set-up” menu and cancel “Skip” of the input
source (page 34).
Page 55

Problem Cause/Remedy
Uneven colour uniformity
appears on the screen when
the TV is powered on
• After turning on the TV, you may notice a slight colour (tint) variation in
certain areas of the picture. This will last only a few minutes each time you
turn on the TV. This is a normal temperature characteristic of the
components and not a malfunction.
The remote does not function
indicator flashes in red
The TV does not switch on
Cannot play shooting games
On/standby indicator flashes in
intervals of some blinks at a
time
A slight creaking noise occurs
from the bottom part of the TV
High Temperature Warning
message appears
• Check that the remote is set correctly for the equipment you are using.
• Check whether the equipment you want to use corresponds to the function
button being pressed (page 14).
• If the remote does not operate the equipment even when the remote has been
set correctly to the equipment, enter the necessary code as explained in
“Programming the remote” (page 45).
• Replace the batteries.
• Replace the lamp (page 48).
• The TV cools down its projection lamp after being switched off. It takes up
to two minutes for the picture to come back after the TV is switched on
again. Wait for a while until the picture returns.
• Some shooting games that involve pointing a light beam at the TV screen
with an electronic gun or rifle cannot be used with your TV. For details, see
the instruction manual supplied with the video game software.
• Three blinks: The lamp cover or the lamp itself is not securely attached.
• Two blinks: If there is a considerable rise in temperature inside the TV such
as when any ventilation openings are blocked.
• Other: Consult your dealer or service.
• Advanced Iris applies a mechanical iris system. When Advanced Iris is
turned On/Off, a natural creaking noise occurs due to the basic structure of
the optical unit. The creaking sound is an inherent nature of this system and
is not a defect.
• This message will appear when there is a rise in temperature inside the TV.
Make sure to remove dust from the ventilation slots on the rear and both
sides of the TV. In addition, make sure that there are no obstacles in front of
the ventilation slots. If no blockage is found, you may need to set Cooling
Mode to “High”, otherwise the TV will turn off. With Cooling Mode set to
“High”, if the message reappears and the TV turns off again, the TV may
need servicing. Call your local Sony service centre.
Additional Information
55
GB
Page 56

Index
Numerics
1 Digit Direct 36
18
14:9
5
2
4:3 Default
4:3
A
Advanced Iris 26, 41
Advanced Settings
Aerial, connecting
AFT
All Reset
Analogue Set-up menu
Audio Filter
Audio Language
Audio Out
Audio Type
Auto Adjustment
Auto Clock Set
Auto Format
Auto Start-up
Auto Tuning
Auto Volume
AV Preset
AV Set-up menu
AV2 Output
AV3 Input
AV7 Input
B
Balance 28
Bass
Batteries, inserting into the remote
BBE
Black Corrector
Brightness
C
CA Module Set-up 40
Category list
Channels
Clear White
Clock Set
Colour
Colour Matrix
Colour System
Colour Temperature
Confirm
30
18
27
7
37
33
36
37
39
32
39
42
19, 23
30
31
analogue and digital channels
analogue channels only
digital channels only
40
28
34
34
34
34
34
28
28
27
26, 41
20
auto-tuning
selecting
Skip
8
17
38
27
31
26
35
35
26, 42
38
36
Connecting
an aerial/VCR
optional equipment
Contrast
26, 41
Cooling Mode
7
Country
D
Digital Auto Tuning 40
Digital Manual Tuning
Digital Settings
Digital Set-up menu
Digital Tuning
Display Area
Display Mode
Display Position
DRC Mode
DRC Palette
Dual Sound
E
EPG (Digital Electronic Programme
20
Guide)
8
4
Equipment labels
F
Fastext 18
Favourite list
Film mode
G
Game Mode 35
27
Gamma
H
Headphones
connecting
Speaker Link
Volume
Horizontal Shift
Hue
26
I
Information 32
Input signal index table
L
Label 37
Lamp ( ) indicator
Lamp Replacement
Language
Live Colour
M
Manual Programme Preset 37
Manual timer REC
MENU
7, 32
24
7
43
32
40
39
39
40
30
41
32
27
27
29
34
22
32
43
32
32
30, 42
23
15
32
27
21
N
Noise Reduction 26
O
On Timer 31
On/standby (1) indicator
P
PAP 19
Parental Lock
PC Settings menu
Phase
Picture Freeze
Picture menu
Picture Mode
PIN Code
Pitch
Power (1) switch
Power Saving
Programme index table
Programme Labels
Programme List Edit
Programme Sorting
R
Reminder 21
Remote control
Reset
S
Screen format 18
Screen Format
Screen menu
Set-up menu
Sharpness
Skip
Sleep Timer
Smart
Sound menu
Sound Mode
Speaker
Specifications
Subtitle Language
Subtitle Setting
Surround
39
41
42
18
25
25
39
42
15
31
inserting batteries
overview
13
programming
sensor
15
PC settings
picture
sound
42
25, 41
28
30, 42
30
31
26
34, 38
31
18
28
28, 42
32
51
39
39
28
36
40
36
45
15
18
4
56
GB
Page 57

T
Target Inputs
Technical Set-up
Text
Timer ( ) indicator
Timer list
Timer REC
Timer Settings
Tools
Treble
V
VCR
Vertical Shift
Vertical Size
Volume Offset
W
Wide 18
Z
Zoom 18
picture
screen
28
sound
18
21
20
19, 23
28
connecting
recording
25
30
40
31
7
20
30, 42
30
28
15
57
Additional Information
GB
Page 58

Introduction
Nous vous remercions d’avoir porté votre choix sur ce
produit Sony.
Avant d’utiliser le téléviseur, lisez attentivement ce
manuel et conservez-le pour vous y référer
ultérieurement.
Notification pour la fonction de
télévision numérique
• Toutes fonctions liées à la télévision numérique (avec le
logo ) ne seront disponibles que dans les pays ou
régions où des signaux terrestres numériques DVB-T
(MPEG2) sont diffusés. Veuillez confirmer auprès de
votre revendeur si vous pouvez recevoir des signaux
DVB-T dans la région où vous habitez.
• Bien que ce téléviseur soit conforme aux spécifications
DVB-T, il n’est pas possible de garantir sa compatibilité
avec des émissions terrestres numériques DVB-T futures.
• Certaines fonctions de télévision numérique peuvent ne
pas être disponibles dans certains pays.
Informations sur les marques
commerciales
• est une marque déposée du DVB Project
• Fabriqué sous licence de BBE Sound, Inc. Sous licence de
BBE Sound, Inc., sous les brevets USP 5510752 et
5736897. BBE et le symbole BBE sont des marques
déposées de BBE Sound, Inc.
• Les termes « Dolby » et « Pro Logic », ainsi que le sigle
double D sont des marques commerciales de Dolby
Laboratories.
• Fabriqué sous licence de Dolby Laboratories.
• La technologie TruSurround est utilisée pour virtualiser le
son Virtual Dolby Surround.
• TruSurround, SRS et le (
déposées de SRS Labs, Inc.
TruSurround technologie est incorporé sous licence de
SRS Labs, Inc.
• HDMI, le logo HDMI et High-Definition Multimedia
Interface sont des marques ou des marques déposées de
HDMI Licensing LLC.
• Les illustrations utilisées dans ce manuel sont celles du
KDS-55A2000, sauf indication contraire.
z) symbole sont des marques
FR
2
Page 59

Table des matières
Guide de démarrage 4
Consignes de sécurité.............................................................................................................10
Précautions .............................................................................................................................12
Présentation de la télécommande .......................................................................................14
Présentation des touches et témoins du téléviseur ..........................................................16
Regarder la télévision
Regarder la télévision .............................................................................................................18
Vérification du guide électronique numérique de programmes (EPG) ...........................21
Utilisation de la liste de favoris numériques ...................................................................23
Affichage d’images depuis un appareil raccordé ....................................................................24
Utilisation des fonctions MENU
Navigation au sein des menus ................................................................................................25
Menu Image ............................................................................................................................26
Menu Son................................................................................................................................29
Menu Commande écran..........................................................................................................31
Menu Réglage.........................................................................................................................32
Menu Réglage AV ...................................................................................................................35
Menu Réglage analogique ......................................................................................................37
Menu Réglage TNT ........................................................................................................40
Menu Réglages PC (ordinateur) .............................................................................................43
FR
Utilisation d’un appareil optionnel
Raccordement d’un appareil optionnel....................................................................................45
Programmation de la télécommande ......................................................................................47
Informations complémentaires
Remplacement de la lampe ....................................................................................................50
Spécifications ..........................................................................................................................53
Dépannage..............................................................................................................................55
Index .......................................................................................................................................58
: pour les chaînes numériques uniquement
3
FR
Page 60

Guide de démarrage
1: Vérification des
accessoires
Télécommande RM-ED006 (1)
Piles AA (type R6) (2)
Cordon d’alimentation secteur (type C-6) (1)
Câble coaxial (1)
Ne retirez pas ces noyaux de ferrite.
Cache latéral (2) (seulement pour le KDS-70R2000)
Pour insérer les piles dans la
télécommande
Appuyez et faites glisser pour ouvrir
Remarques
• Respectez les polarités lors de l’insertion de piles.
• Ne mélangez pas des piles de types différents, pas plus que
des piles usagées et des piles neuves.
• Respectez l’environnement lorsque vous jetez les piles.
L’élimination des piles peut être réglementée dans
certaines régions. Consultez les autorités locales.
• Manipulez la télécommande avec soin. Ne la laissez pas
tomber, ne la piétinez pas et ne renversez aucun liquide sur
celle-ci.
• Ne placez pas la télécommande à proximité d’une source
de chaleur ou dans un endroit soumis à la lumière directe
du soleil, pas plus que dans une pièce humide.
Lampe de projection de rechange (1) (seulement
pour le KDS-70R2000)
FR
4
Page 61

2: Installation du
65.
65
°
téléviseur
Champ de visualisation recommandé
Votre position peut affecter la qualité d’image.
Pour obtenir la meilleure qualité d’image, installez
votre téléviseur aux distances illustrées ci-dessous.
\
Modèle Distance de visualisation
KDS-70R2000 2,4 m min.
KDS-55A2000 2,1 m min.
Champ de visualisation horizontal
KDS-70R2000
2,4 m min.
KDS-55A2000
2,1 m min.
65
65°
65°
65.
Transport du téléviseur
KDS-55A2000
Le transport de ce téléviseur nécessite au moins deux
personnes.
Pour déplacer le téléviseur, placez une main dans
l’orifice sur la partie inférieure du téléviseur tout en
soutenant le haut avec l’autre main, comme illustré cidessous.
KDS-70R2000
Le transport de ce téléviseur nécessite au moins trois
personnes. Ne tenez pas le téléviseur par son socle ou
ses haut-parleurs. Cela pourrait provoquer une rupture
de ces pièces.
Pour déplacer le téléviseur, une personne doit soulever
le dos, et les deux autres personnes l’avant et les côtés.
Soutenez le téléviseur en plaçant les mains dans les
orifices sur la partie inférieure du téléviseur, puis
soulevez-le avec précautions.
Guide de démarrage
Champ de visualisation vertical
KDS-70R2000
2,4 m min.
KDS-55A2000
2,1 m min.
30°
30°
Remarques
• Ne tenez pas le téléviseur par son socle ou panneau avant.
Cela pourrait provoquer une rupture de ces pièces.
Ne saisissez pas le
socle ou le panneau
avant du téléviseur.
Suite
FR
5
Page 62

• Par mesure de sécurité pour les enfants et le téléviseur,
éloignez les enfants de celui-ci pendant son installation.
Le fait de monter sur le téléviseur ou son support, ou de le
pousser, peut le faire tomber et l’endommager.
• Lors de l’installation du téléviseur contre un mur, placezle à au moins 10 cm du mur pour que la circulation d’air
soit adéquate.
Protection du téléviseur contre les chutes
KDS-55A2000
SU-RS11X
Remarque
Lors de l’utilisation du support SU-RS11X (pour le KDS55A2000, non fourni) ou SU-RS51U (pour le KDS70R2000, non fourni) pour votre téléviseur, vous devez
utiliser la courroie de soutien.
Installation du téléviseur contre un mur
Placez le téléviseur à au moins 10 cm du mur pour que
la circulation d’air soit adéquate.
L’obstruction de l’orifice d’aération du ventilateur de
refroidissement peut endommager le téléviseur.
Laissez cet espace
10 cm
30 cm
KDS-70R2000
SU-RS51U
10 cm 10 cm
N’installez jamais le téléviseur de la façon suivante
La circulation de l’air
est bloquée.
Remarque
N’installez pas le téléviseur près d’une aération, car cela peut
affecter la température de fonctionnement normale du
téléviseur.
De l’air chaud est
soufflé vers les orifices
d’aération.
FR
6
Page 63

3: Raccordement d’une
4: Sélection de la langue et
Guide de démarrage
antenne ou d’un magnétoscope
Raccordement d’une antenne uniquement
Câble coaxial (fourni)
Cordon d’alimentation secteur (fourni)
Raccordement d’une antenne et
d’un magnétoscope
du pays ou de la région
1
2
2
Câble coaxial
(fourni)
Câble coaxial
Câble Péritel (non fourni)
Magnétoscope
Cordon
d’alimentation
secteur
(fourni)
(non fourni)
3,4
3,4
1 Raccordez le téléviseur à votre prise
secteur (220 à 240 V CA, 50 Hz).
Suite
FR
7
Page 64

2 Appuyez sur 1 du téléviseur (avant).
Lorsque vous mettez le téléviseur sous tension
pour la première fois, le menu Language (Langue)
apparaît à l’écran.
Lorsque le téléviseur est en mode de veille (le
témoin
1 (marche/veille) du téléviseur (avant) est
rouge), appuyez sur TV "/1 de la télécommande
pour mettre le téléviseur sous tension.
3 Appuyez sur F/f/G/g pour sélectionner la
langue affichée dans les écrans de menus,
puis appuyez sur .
5: Réglage
automatique du
téléviseur
Le téléviseur recherche et mémorise toutes les chaînes
de télévision disponibles.
4 Appuyez sur F/f pour sélectionner le pays
ou la région d’utilisation du téléviseur, puis
appuyez sur .
Si le pays ou la région où vous souhaitez utiliser le
téléviseur ne figure pas dans la liste, sélectionnez
« - » plutôt qu’un pays ou une région.
Le message confirmant que le téléviseur démarre
le réglage automatique apparaît à l’écran, puis
passez à « 5: Réglage automatique du téléviseur ».
2
2
4
1 Avant de commencer le réglage
automatique du téléviseur, insérez une
cassette préenregistrée dans le
magnétoscope raccordé au téléviseur
(page 7) et démarrez la lecture.
Le canal vidéo sera localisé et mémorisé dans le
téléviseur pendant le réglage automatique.
Si aucun magnétoscope n’est raccordé au
téléviseur, sautez cette étape.
2 Appuyez sur G/g pour sélectionner
« OK », puis appuyez sur .
Le téléviseur commence à rechercher toutes les
chaînes numériques disponibles, puis toutes les
chaînes analogiques disponibles. Cela peut durer
un certain temps. Soyez patient et n’appuyez sur
aucune touche du téléviseur ou de la
télécommande.
FR
8
Page 65

Si un message s’affiche vous demandant de
vérifier le raccordement de l’antenne
Aucune chaîne numérique ou analogique n’a été
détectée. Vérifiez le raccordement de l’antenne et
appuyez sur G/g pour sélectionner « Oui », puis
appuyez sur pour redémarrer le réglage
automatique.
3 Quand le menu Ordre des chaînes
apparaît à l’écran, suivez les étapes de la
section « Ordre des chaînes » (page 37).
Si vous ne désirez pas modifier l’ordre dans lequel
les chaînes analogiques sont mémorisées sur le
téléviseur, passez à l’étape 4.
4 Appuyez sur MENU pour quitter le menu.
Le téléviseur a maintenant réglé toutes les chaînes
disponibles.
Remarque
Lorsqu’un canal de diffusion numérique ne peut pas être reçu
ou lors de la sélection d’une région où il n’y a pas de
diffusions numériques à l’étape 4 (page 8) de « 4: Sélection
de la langue et du pays ou de la région », l’heure doit être
réglée après avoir effectué l’étape 3.
Guide de démarrage
FR
9
Page 66

Consignes de sécurité
Cordon d’alimentation secteur
• Suivez les indications ci-dessous pour éviter
d’endommager le cordon d’alimentation secteur.
L’utilisation d’un cordon d’alimentation secteur
endommagé peut provoquer un incendie ou une décharge
électrique.
– Débranchez le cordon
d’alimentation secteur
avant de déplacer le
téléviseur.
– Lorsque vous
débranchez le cordon
d’alimentation
secteur, commencez par le débrancher de la prise secteur.
– Saisissez toujours le cordon par sa
fiche lorsque vous le débranchez.
Ne tirez jamais sur le cordon
d’alimentation secteur
proprement dit.
– Ne pliez pas et ne tordez pas
exagérément le cordon
d’alimentation secteur. Cela
pourraît mettre à nu ou rompre les
conducteurs du noyau.
– Ne modifiez pas le cordon
d’alimentation secteur.
– Ne posez jamais d’objet lourd sur le cordon
d’alimentation secteur.
– Eloignez le cordon d’alimentation secteur des sources de
chaleur.
• Si vous endommagez le cordon d’alimentation secteur,
cessez de l’utiliser et demandez à votre centre de service
après-vente Sony de le remplacer.
• N’utilisez pas le cordon d’alimentation fourni avec un autre
appareil.
• Utilisez uniquement un cordon d’alimentation d’origine
Sony et pas un cordon d’une autre marque.
Prise secteur
• Les téléviseurs équipés d’une prise secteur à
trois fils avec mise à la terre doivent être
branchés à une prise de courant mise à la
terre.
• Pour la prise de courant, n’utilisez pas une
prise de mauvaise qualité. Insérez la fiche à
fond dans la prise secteur. Si elle n’est pas
solidement insérée, des étincelles peuvent se
produire et provoquer un incendie. Prenez
contact avec votre électricien pour
remplacer cette prise par une prise plus
adéquate.
Nettoyage de la fiche secteur
Débranchez la fiche du cordon
d’alimentation secteur et nettoyez-la
régulièrement. Si la fiche accumule de la
poussière et reçoit de l’humidité, l’isolation
peut se détériorer et un incendie se déclarer.
Surcharge
Ce téléviseur est conçu pour
fonctionner sur une alimentation de
220–240 V CA uniquement. Prenez
soin de ne pas brancher un trop grand
nombre d’appareils sur la même prise
de courant, ce qui pourrait provoquer
un incendie ou une décharge
électrique.
Au repos
• Si vous envisagez de ne pas
utiliser le téléviseur pendant
plusieurs jours, il est conseillé d e
le débrancher de l’alimentation
secteur pour des raisons de
sécurité et de protection de
l’environnement.
• Le téléviseur n’est pas débranché du secteur lorsque
l’alimentation du téléviseur est hors tension. Pour
déconnecter totalement le téléviseur, débranchez la fiche de
la prise secteur. Toutefois, certains téléviseurs possèdent
des fonctionnalités dont le bon fonctionnement exige que
l’appareil demeure sous tension lorsqu’il est en mode de
veille.
Transport
• Avant de transporter le téléviseur, débranchez tous ses
câbles.
• Le transport des téléviseurs de grande taille exige la
présence de deux personnes ou plus.
• Pour transporter le téléviseur, saisissezle de la manière illustrée ci-contre. Pour
soulever le téléviseur ou déplacer son
panneau, saisissez-le par sa base. Sinon,
le téléviseur risque de tomber et d’être
endommagé ou de provoquer des
blessures graves.
• Lorsque vous transportez le téléviseur, ne le soumettez pas
à des secousses ou des vibrations excessives. Le téléviseur
peut tomber, être endommagé et provoquer des blessures
graves.
• Si le téléviseur est tombé ou a été endommagé, faites-le
vérifier immédiatement par un technicien de service aprèsvente qualifié.
• Lorsque vous transportez le téléviseur pour le porter à
réparer ou lorsque vous déménagez, glissez-le dans son
emballage et son carton d’origine.
Disposition
• Le téléviseur doit être installé à proximité d’une prise de
courant aisément accessible.
• Placez le té léviseur sur une surface sta ble
et horizontale. Ne suspendez rien dessus,
car il pourrait tomber du pied et
provoquer des dommages ou des
blessures graves.
• N’installez pas le téléviseur dans des
lieux sujets à des températures extrêmes, par exemple en
plein soleil ou près d’un radiateur ou d’une bouche d’air
chaud. Si le téléviseur est exposé à de fortes températures,
il peut chauffer excessivement et ceci peut entraîner la
déformation des pièces moulées ou un mauvais
fonctionnement.
10
FR
Page 67

• N’installez pas le téléviseur dans un lieu directement
exposé à un système de c limatisation. Lorsqu’il est installé
dans un tel endroit, de l’humidité peut s’infiltrer à
l’intérieur du téléviseur occasionnant de la condensation
susceptible d’entraîner un mauvais fonctionnement.
• Ne jamais placer le téléviseur dans
un endroit excessivement chaud,
graisseux, humide ou poussiéreux.
• Ne pas installer le téléviseur dans
un endroit accessible aux insectes.
• Ne pas installer le téléviseur dans un endroit où il pourrait
être exposé à des vibrations mécaniques.
• N’installez pas le téléviseur dans un endroit où il serait en
en équilibre, notamment sur ou derrière un pilier, ou
encore dans un emplacement où vous pourriez le heurter
avec la tête. En effet, vous risqueriez de vous blesser.
• Ne pas laisser les enfants grimper sur
le téléviseur.
• Si vous utilisez le téléviseur en bord de
mer, la salinité peut en faire rouiller les
parties métalliques et causer des dégâts
internes ou provoquer un incendie.
• N’installez pas l’appareil dans un espace fermé, comme
une bibliothèque ou un meuble intégré.
• Utilisez le téléviseur à une température de 5 °C à 35 °C.
• N’utilisez pas le téléviseur à une altitude de plus de
3 000 mètres car cela pourrait provoquer des
dysfonctionnements.
Aération
• Vous ne devez jamais obstruer
les orifices d’aération du coffret
ni y introduire quoi que ce soit.
Cela pourrait entraîner une
surchauffe et provoquer un
incendie.
• Si le téléviseur ne dispose pas d’une bonne aération, il
peut accumuler poussière et saleté. Pour une bonne
aération, appliquez les conseils suivants :
– Ne placez pas le téléviseur vers l’arrière ou sur le côté.
– N’installez pas le téléviseur inversé ou à l’envers.
– N’installez pas le téléviseur sur une étagère ou dans un
meuble.
– Ne posez pas le téléviseur sur un tapis ou sur un lit.
– Ne couvrez pas le téléviseur avec des tissus tels que
rideaux, pas plus qu’avec des journaux, etc.
• Laissez un espace libre autour du téléviseur (voir
« Installation du téléviseur contre un mur » à la page 6),
faute de quoi, la circulation d’air peut être inadéquate et
entraîner une surchauffe qui peut provoquer un incendie
ou des dégâts internes.
Accessoires en option
Lors de l’installation du téléviseur sur un pied, suivez les
indications ci-dessous. Sinon, le téléviseur risque de tomber
et de causer des blessures graves.
• Pour des raisons de sécurité, il est vivement recommandé
d’utiliser les accessoires Sony :
– KDS-55A2000 : Meuble TV SU-RS11X
– KDS-70R2000 : Meuble TV SU-RS51U
• Suivez les instructions fournies avec le pied pour bien
fixer le téléviseur lors de l’installation.
• Vérifiez que les supports du pied sont fixés correctement.
Câblage
• Pour votre propre sécurité, assurez-vous que le cordon
d’alimentation secteur est débranché lorsque vous réalisez
des branchements.
• Veillez à ne pas trébucher dans les câbles. Cela pourrait
endommager le téléviseur.
Centres médicaux
Ce téléviseur ne doit pas être
installé dans un lieu où sont
utilisés des équipements
médicaux. Cela pourrait entraîner
un mauvais fonctionnement des
instruments médicaux.
Utilisation à l’extérieur
• Ne jamais installer le téléviseur à
l’extérieur. Toute exposition du
téléviseur à l’eau de pluie peut
provoquer un incendie ou une
électrocution.
• L’exposition du téléviseur aux
rayons directs du soleil peut
entraîner sa surchauffe et
l’endommager.
Véhicule, bateau ou voilier
• Ne pas installer pas le
téléviseur dans un véhicule.
Les mouvements du véhicule
risquent de provoqu er la chute
du téléviseur ainsi que des
blessures.
• Ne jamais installer le
téléviseur sur un bateau ou un
voilier. L’exposition du
téléviseur à l’eau de mer peut
occasionner un incendie ou
l’endommager.
Eau et humidité
• Ne jamais utiliser ce téléviseur
près d’un point d’eau, par ex emple
près d’une baignoire ou d’une
douche. Ne pas non plus exposer
le téléviseur à la pluie, à
l’humidité ou à la fumée. Cela
pourrait provoquer un incendie ou
l’électrocution.
• Ne touchez pas le cordon
d’alimentation secteur ou le
téléviseur avec les mains humides.
Cela risquerait de provoquer
l’électrocution ou d’endommager le
téléviseur.
Suite
11
FR
Page 68

Humidité et objets inflammables
• Ne posez aucun objet sur le téléviseur.
Le téléviseur ne doit être exposé à
aucune forme d’écoulement ou
d’éclaboussure. C’est pourquoi , aucun
objet rempli d’un liquide quelconque,
comme un vase, ne doit être placé sur
le téléviseur.
• Pour éviter les risques d’incendie, tenez le téléviseur à
l’écart d’objets inflammables ou de flammes nues
(bougies, etc.).
• Si un objet liquide ou solide tombe sur le téléviseur, ne le
mettez pas sous tension. Cela risquerait de provoquer
l’électrocution ou d’endommager le téléviseur. Faites-le
vérifier immédiatement par un technicien de service
après-vente qualifié.
Orages
Pour votre sécurité ne touchez a ucune
des parties du téléviseur, pas plus que
le cordon d’alimenta tion secteur ou le
câble de l’antenne pendant les orages.
Eclats et projections d’objets
• Ne rien jeter sur le téléviseur. Le verre
de l’écran pourrait être brisé lors de
l’impact et provoquer des blessures
graves.
• Si la surface de l’écran se fendille, ne
touchez pas le téléviseur avant d’avoir débranché le
cordon d’alimentation secteur. Faute de quoi, vous
pourriez recevoir une décharge électrique.
Entretien
A l’intérieur de ce téléviseur,
certains points présentent une
tension élevée pouvant être
dangereuse.
Ne pas ouvrir le boîtier de
l’appareil. Confiez le téléviseur à un technicien qualifié
uniquement.
Petits accessoires amovibles et enfichables
Conservez les petits accessoires hors de la portée des enfants.
Accessoires
N’utilisez pas d’accessoires non
recommandés par le fabricant, car ils
peuvent occasionner des dommages.
Précautions
Regarder la télévision
• Pour regarder confortablement la télévision, nous vous
conseillons de vous trouver à une distance du téléviseur
égale à quatre à sept fois la diagonale de l’écran.
• Pour obtenir une image nette, n’exposez pas directement
l’appareil à une lumière intense ou aux rayons directs du
soleil. Si possible, utilisez une source de lumière dirigée
du plafond vers le sol.
• Regarder la télévision dans une pièce modérément
éclairée ou peu éclairée ou pendant une période prolongée
soumet vos yeux à un effort.
Réglage du volume
• Maintenez le volume sonore à un niveau qui ne gêne pas
les voisins. Le son se transmet très facilement pendant la
nuit. Nous vous conseillons donc de fermer les fenêtres ou
d’utiliser un casque.
• Si vous utilisez un casque, réglez le volume de façon à
éviter un niveau sonore excessif qui pourrait altérer votre
capacité auditive.
A propos de ce téléviseur
• Bien que le téléviseur soit fabriqué avec une technologie
de haute précision, il est possible que des points noirs ou
des points lumineux (rouges, bleus ou verts) apparaissent
constamment sur l’écran. Ce phénomène est une propriété
structurelle du panneau et n’est pas un
dysfonctionnement.
• Lorsque des images fixes à contraste élevé, comme des
logos de stations et des numéros de chaînes sont affichés
pendant longtemps, une certaine rémanence d’image est
possible sur l’écran. Ce phénomène n’est que passager.
Mettez le téléviseur hors tension pendant un moment ou
réglez-le sur une autre chaîne pour faire disparaître
l’image rémanente.
• Si les rayons directs du soleil ou un autre éclairage fort
frappent l’écran, une partie de l’écran peut apparaître
blanche du fait de réflexions de derrière l’écran. Ce
phénomène est une propriété structurelle du téléviseur.
N’exposez pas l’écran à un éclairage direct ni aux rayons
du soleil.
12
FR
Page 69

Lampe de projection
• Ce téléviseur utilise une lampe de projection comme
source de lumière. Il est temps de remplacer la lampe par
une neuve lorsque :
– le message, « La lampe de projection est presque en fin
de vie. Merci de la remplacer. » s’affiche sur l’écran,
– le témoin de lampe à l’avant clignote en rouge,
– les images deviennent sombres sur l’écran,
– aucune image n’apparaît sur l’affichage après une
utilisation prolongée.
• En de très rares cas, l’ampoule peut éclater à l’intérieur de
la lampe, mais la lampe est conçue pour conserver tous les
morceaux de verre brisés à l’intérieur de celle-ci. (Voir
« Remplacement de la lampe » à la page 50.)
• Lorsque la lampe grille, il se peut que vous entendiez un
bruit sec perceptible. Cela n’est pas une anomalie et est
inhérent à ce type de lampe.
• La lampe de projection contient du mercure et il faut la
mettre au rebut de manière appropriée. Consultez votre
municipalité pour la manière sûre de la mettre au rebut. Si
la lampe se casse pendant son utilisation, une petite
quantité de mercure peut se dégager. Dans ce cas,
éloignez-vous de la lampe et aérez la pièce. En cas de
contact accidentel ou d’inhalation, ou si vous vous sentez
indisposé, consultez immédiatement un médecin.
Ventilateur de refroidissement
Ce téléviseur utilise un ventilateur de refroidissement. Il est
possible que vous entendiez un bruit de ventilateur (selon
l’emplacement du téléviseur), qui peut être plus perceptible
la nuit ou lorsque le bruit ambiant est particulièrement faible.
Traitement et nettoyage du boîtier et de la surface de
l’écran du téléviseur
Assurez-vous que le cordon d’alimentation secteur relié au
téléviseur est débranché de la prise de courant avant
d’entreprendre toute opération de nettoyage.
Pour éviter toute dégradation du matériau ou du revêtement
de l’écran, respectez les précautions suivantes.
• N’exercez pas de pression et ne rayez pas l’écran avec des
objets durs. Ne jetez jamais rien sur l’écran.
• Ne touchez pas la surface de l’écran alors que le téléviseur
a fonctionné de manière continue pendant une période
prolongée, car l’écran est alors chaud.
• Nous vous conseillons d’éviter le plus possible de toucher
la surface de l’écran.
• Pour ôter la poussière du boîtier ou de la surface de
l’écran, frottez délicatement avec un linge doux. En cas de
saleté tenace, frottez avec un linge doux légèrement
imprégné d’une solution à base de détergent doux dilué.
• N’utilisez jamais aucune éponge abrasive, produit de
nettoyage alcalin/acide, poudre à récurer ou solvant
volatil, qu’il s’agisse d’alcool, d’essence, de diluant ou
d’insecticide. L’utilisation de ces produits ou tout contact
prolongé avec des matériaux en caoutchouc ou en vinyle
peut endommager la surface de l’écran et le matériau du
boîtier.
• Avec le temps, la poussière peut s’accumuler sur les
ouvertures d’aération. Pour une ventilation correcte, nous
vous conseillons d’aspirer régulièrement la poussière (une
fois par mois).
• Si l’angle du téléviseur doit être réglé, maintenez le pied
avec la main pour éviter que le téléviseur s’en détache.
Veillez à ne pas coincer les doigts entre le téléviseur et le
pied.
Appareils optionnels
• N’installez pas les appareils optionnels trop près du
téléviseur. Laissez un intervalle de 30 cm au moins. Si un
magnétoscope est installé devant ou à côté du téléviseur,
l’image risque d’être déformée.
• Si le téléviseur est placé à proximité d’un appareil
produisant des radiations électromagnétiques, l’image
pourrait être déformée et/ou un bruit être provoqué.
Mise au rebut du téléviseur
Traitement des appareils
électriques et électroniques
en fin de vie (Applicable dans
les pays de l’Union
Européenne et aux autres
pays européens disposant de
systèmes de collecte
sélective)
Ce symbole, apposé sur le produit
ou sur son emballage, indique que
ce produit ne doit pas être traité
avec les déchets ménagers. Il doit
être remis à un point de collecte
approprié pour le recyclage des équipements électriques et
électroniques. En s’assurant que ce produit est bien mis au
rebut de manière appropriée, vous aiderez à prévenir les
conséquences négatives potentielles pour l’environnement et
la santé humaine. Le recyclage des matériaux aidera à
préserver les ressources naturelles. Pour toute information
supplémentaire au sujet du recyclage de ce produit, vous
pouvez contacter votre municipalité, votre déchetterie ou le
magasin où vous avez acheté le produit.
13
FR
Page 70

Présentation de la télécommande
1 TV "/1 – Veille du téléviseur
Allume et éteint le téléviseur à partir du mode de veille.
2 Touches numériques
• En mode TV : sélectionne les chaînes. Pour les numéros de chaînes 10 et
supérieurs, entrez les deuxième et troisième chiffres en moins de deux
secondes.
• En mode Télétexte : entre le numéro de la page à trois chiffres afin de la
sélectionner.
3 – Chaîne précédente
Permet de revenir à la chaîne précédemment sélectionnée (pendant plus de
cinq secondes).
4 – Mode d’écran (page 19)
5 – Pause sur image (page 19)
Permet de figer l’image.
6 / – Infos / Affichage du texte
• En mode numérique : affiche de brefs détails sur le programme
actuellement regardé.
• En mode analogique : affiche des informations telles que le numéro de la
chaîne actuelle et le format d’écran.
• En mode Télétexte (page 19) : affiche les informations masquées (par
exemple les réponses d’un questionnaire).
7 F/f/G/g/ (page 19, 25)
8 TOOLS (page 20, 24)
Permet d’accéder à diverses options de visualisation et de modifier/effectuer
des réglages en fonction de la source et du format d’écran.
9 MENU (page 25)
0 PROG +/-/ / (pages
• En mode TV : sélectionne la chaîne suivante (+) ou précédente (-).
• En mode Télétexte : sélectionne la page suivante ( ) ou précédente
().
qa % – Silencieux (page 19)
qs 2 +/- – Volume
qd RETURN /
Permet de revenir à l’écran précédent d’un menu affiché.
qf – EPG (Digital Electronic Programme Guide – guide électronique
numérique de programmes) (page 21)
qg Touches de couleur (page 19, 21, 23)
qh ANALOG – Mode analogique (page 18)
qj DIGITAL – Mode numérique (page 18)
/ – Télétexte (page 19)
qk
ql / – Sélecteur d’entrée / Maintien du texte
• En mode TV (page 24) : sélectionne la source d’entrée à partir de
l’appareil raccordé aux prises du téléviseur.
• En mode Télétexte (page 19) : maintient l’affichage de la page en cours.
w; A/B – Son stéréo (page 30)
18, 19)
14
FR
Page 71

wa "/1
Met sous ou hors tension l’appareil optionnel sélectionné par les touches de
fonctions.
ws Touches de fonctions
Permettent de commander les appareils correspondants. Pour plus de détails,
voir « Programmation de la télécommande » à la page 47.
wd Touches de commande DVD/magnétoscope
• . : relit le programme en cours depuis la marque de chapitre
précédente (le cas échéant).
• > : avance jusqu’à la marque de chapitre suivante (le cas échéant).
• : relit le programme en cours pendant une durée préréglée.
• : avance pendant une durée préréglée.
• m : lit un programme en mode retour rapide.
• M : lit un programme en mode avance rapide.
• H : lit un programme à la vitesse normale.
• X : met la lecture en pause.
• x : arrête la lecture.
• VISUAL SEARCH : Seulement pour graveurs de DVD Sony avec
fonction de recherche visuelle. Pour plus de détails, reportez-vous au
mode d’emploi fourni avec le graveur de DVD.
wf Touches d’enregistrement DVD/magnétoscope
• z REC : démarre l’enregistrement.
• X REC PAUSE : met l’enregistrement en pause.
• x REC STOP : arrête l’enregistrement.
X REC PAUSE et x REC STOP ne sont disponibles que pour des graveurs
de DVD.
wg F1/F2
• Sélectionne un disque lors de l’utilisation d’un changeur de DVD.
• Sélectionne une fonction lors de l’utilisation d’un appareil combiné
(DVD/magnétoscope par exemple).
Pour plus de détails, reportez-vous au mode d’emploi fourni avec le
changeur de DVD ou l’appareil combiné.
wh DVD MENU
Affiche le menu du disque DVD.
wj DVD TOP MENU
Affiche le menu supérieur du disque DVD.
Conseils
• Les touches numéro 5, H, PROG + et A/B sont munies de points tactiles. Ils vous
serviront de références lors de l’utilisation du téléviseur.
• Pour utiliser la télécommande, pointez-la vers le capteur de télécommande du
téléviseur. Voir page 16 pour l’emplacement du capteur.
15
FR
Page 72

Présentation des touches et témoins du téléviseur
KDS-55A2000
Veillez à ne pas vous
pincer les doigts en
ouvrant le cache.
KDS-70R2000
MENU
1 (page 25)
2 / – Sélecteur d’entrée/OK
• En mode TV (page 24) : sélectionne la source
d’entrée à partir de l’appareil raccordé aux
prises du téléviseur.
• Dans le menu du téléviseur : sélectionne le
menu ou l’option et confirme le réglage.
3 2 +/-/ /
• En mode TV : augmente (+) ou diminue (-) le
volume.
• Dans le menu du téléviseur : parcourt les
options vers la droite ( ) ou vers la gauche
().
4 PROG +/-/ /
• En mode TV : sélectionne la chaîne suivante
(+) ou précédente (-).
• Dans le menu du téléviseur : parcourt les
options vers le haut ( ) ou vers le bas ( ).
5 – Programme enregistrement minuterie/
Témoin Minuterie
• S’allume en orange lorsqu’un enregistrement
par minuterie est réglé (pages 21, 22).
S’allume en rouge lorsque l’enregistrement
commence.
• S’allume en orange lorsque la minuterie est
activée (page 32).
6 – Témoin de lampe
Clignote en rouge lorsque la lampe pour la
source de lumière est grillée.
7 1 – Témoin Marche/Veille
Clignote en vert lorsque la source de lumière est
3
#
3
#
en préparation pour l’allumage. S’allume en vert
lorsque le téléviseur est sous tension.
S’allume en rouge lorsque le téléviseur est en
mode de veille. Si le couvercle de lampe ou la
lampe elle-même n’est pas bien fixé, le témoin
rouge continue à clignoter, en intervalles de trois
clignotements successifs (page 51).
8 Capteur de télécommande
• Reçoit les signaux IR de la télécommande.
• Ne placez rien sur le capteur car cela peut
affecter son fonctionnement.
9 1 – Alimentation
Met le téléviseur sous ou hors tension.
Remarque
Assurez-vous que le téléviseur est complètement hors
tension avant de débrancher le cordon d’alimentation
secteur. Un débranchement du cordon d’alimentation
secteur alors que le téléviseur est sous tension peut faire
que le témoin reste allumé ou provoquer un
dysfonctionnement du téléviseur.
16
FR
Page 73

Lampe de projection
Ce téléviseur utilise une lampe de projection comme source
de lumière. Comme toutes les lampes, elle a une durée de
service et doit être remplacée lorsque le témoin de lampe
clignote ou que l’écran devient sombre.
Remarques
• Après la mise sous tension du téléviseur, l’apparition de
l’image peut prendre un certain temps (1 minute ou
moins).
• Lorsque la lampe de projection est usée, l’écran devient
sombre. Remplacez la lampe par une lampe Sony XL5200 (pour le KDS-55A2000, non fournie) ou XL-5300
(pour le KDS-70R2000, fournie) neuve. Pour remplacer la
lampe, reportez-vous à la page 50.
Attention
La lumière émise par la lampe est très brillante lorsque le
téléviseur est utilisé. Afin d’éviter une gêne ou une lésion de
la vue, ne regardez pas dans le boîtier de lumière lorsque la
lampe est allumée.
Pour détacher les haut-parleurs
(KDS-70R2000 seulement)
Les haut-parleurs du KDS-70R2000 peuvent être
détachés si nécessaire. Si vous utilisez un système
d’enceintes surround multicanaux et qu’il n’y a pas
assez de place pour installer l’unité d’affichage, nous
recommandons de détacher les haut-parleurs.
1 Retirez les trois vis qui sont situées à
l’arrière du haut-parleur, et tirez le hautparleur tout droit pour le détacher du
panneau.
Pour retirer les vis, utilisez une pièce de monnaie
pour les tourner dans le sens inverse des aiguilles
d’une montre.
2 Fixez le cache latéral qui se trouvait dans
le carton.
Appuyez en haut, au milieu et en bas du cache
pour être sûr qu’il est bien fixé (voir l’illustration).
Remarque
Placez-vous face au téléviseur et assurez-vous que les
caches latéraux marqués « R » (droit) et « L » (gauche)
sont fixés aux côtés correspondants du téléviseur.
3 Fixez le cache latéral avec les trois vis que
vous avez retirées à l’étape 1.
Pour mettre en place les vis, utilisez une pièce de
monnaie pour les tourner dans le sens des aiguilles
d’une montre.
4 Répétez les étapes 1 à 3 pour le haut-
parleur de l’autre côté.
Remarque
Après avoir retiré les haut-parleurs, placez-les dans le carton
qui contenait initialement le cache latéral.
17
FR
Page 74

Regarder la télévision
Regarder la télévision
1
3
2
1 Appuyez sur 1 du téléviseur (avant) pour
mettre le téléviseur sous tension.
Lorsque le téléviseur est en mode de veille (le
témoin 1 (marche/veille) du téléviseur (avant) est
rouge), appuyez sur TV "/1 de la télécommande
pour mettre le téléviseur sous tension.
2 Appuyez sur DIGITAL pour passer au
mode numérique ou sur ANALOG pour
passer au mode analogique.
Les chaînes disponibles diffèrent selon le mode.
3 Appuyez sur les touches numériques ou
sur PROG +/- pour sélectionner une
chaîne de télévision.
Pour sélectionner des numéros de chaînes 10 et
supérieurs à l’aide des touches numériques, entrez
les deuxièmes et troisième chiffres en moins de
deux secondes.
Pour sélectionner une chaîne numérique au moyen
du guide EPG (Digital Electronic Programme
Guide – guide électronique numérique de
programmes), reportez-vous à la page 21.
En mode numérique
Un panneau d’informations apparaît brièvement.
Les icônes suivantes peuvent être affichées sur le
panneau.
: Service radio
: Service crypté/abonnement
: Langues audio multiples disponibles
: Sous-titres disponibles
: Sous-titres disponibles pour les malentendants
: Age minimum recommandé pour le
programme actuel (de 4 à 18 ans)
: Verrouillage parental
: Le programme actuel est en cours
d’enregistrement
18
3
FR
Page 75

Opérations supplémentaires
Pour Faites ceci
Mettre
temporairement le
téléviseur hors
tension
(mode de veille)
Mettre le téléviseur
hors tension
Mettre le téléviseur
sous tension sans
son depuis le mode
de veille
Régler le volume Appuyez sur 2 + (augmenter)/
Couper le son Appuyez sur %. Appuyez de
Accéder à la table
d’index des chaînes
(uniquement en mode
analogique)
Appuyez sur TV "/1.
Appuyez sur 1 du téléviseur
(avant).
Remarque
Pour mettre le téléviseur totalement
hors tension, débranchez-le de la
prise secteur.
Appuyez sur %. Appuyez sur 2
+/- pour régler le volume.
-(réduire).
nouveau pour restaurer le son.
Appuyez sur . Pour
sélectionner une chaîne
analogique, appuyez sur
puis sur .
Pour accéder à la table d’index
des signaux d’entrée, reportezvous à la page 24.
F/f,
Pour faire une pause sur image – Pause sur
image
Il est possible de mettre l’image actuelle en pause pour
prendre note d’un numéro de téléphone ou d’une
recette.
1 Appuyez sur .
L’image immobilisée s’affiche sur la droite de
l’écran. Vous pouvez regarder une image animée
sur la gauche.
2 Appuyez de nouveau sur pour revenir
au mode TV normal.
Pour changer manuellement le format
d’écran en fonction de l’émission
Appuyez plusieurs fois sur pour sélectionner
Large+, 4:3, Plein, Zoom ou 14:9.
Large+*
Affiche les émissions au format 4:3 conventionnel
avec une imitation du format 16:9. L’image 4:3 est
étirée afin de remplir l’écran.
4:3
Regarder la télévision
Pour accéder au Télétexte
Appuyez sur /. Chaque fois que vous appuyez sur
/, l’écran défile en boucle dans l’ordre suivant :
Texte et image du téléviseur t Texte t Pas de texte
(quitter le service Télétexte)
Pour sélectionner une page, appuyez sur les touches
numériques ou sur / .
Pour maintenir l’affichage d’une page, appuyez sur
/.
Pour afficher les informations masquées, appuyez sur
/.
Pour sauter une page, appuyez sur et
appuyez sur (pour les pages à trois chiffres).
Conseils
• Vérifiez que le téléviseur reçoit un signal correct; sinon,
des erreurs de texte peuvent se produire.
• La plupart des chaînes de télévision diffusent un service
Télétexte. Pour plus d’informations sur l’utilisation du
service, sélectionnez la page d’index.
• Lorsque quatre éléments de couleur s’affichent au bas de
la page de Télétexte, le service Fastext est disponible.
Fastext vous permet d’accéder rapidement et aisément à
des pages. Appuyez sur la touche de couleur
correspondante pour accéder à la page indiquée.
F/f, puis
Affiche les émissions au format 4:3 conventionnel
(pas au format 16:9) dans les proportions correctes.
Plein
Affiche les émissions au format 16:9 dans les
proportions correctes.
Zoom*
Affiche les émissions cinémascopiques (au format
Letter Box) dans les proportions correctes.
Suite
19
FR
Page 76

14:9*
Affiche les émissions au format 14:9 dans les
proportions correctes. Par conséquent, des zones de
bordure noires sont visibles à l’écran.
* Des parties de l’image peuvent être coupées en haut et en
bas.
Conseils
• Vous pouvez également régler « Auto 16:9 » sur « Oui ».
Le téléviseur sélectionne automatiquement le mode le
mieux adapté à l’émission (page 31).
• Vous pouvez régler la position de l’image lors de la
sélection de Large+, 14:9 ou Zoom. Appuyez sur
pour la déplacer vers le haut ou vers le bas (par exemple
pour lire les sous-titres).
F/f
Pour visualiser deux images
simultanément – PAP (Picture et Picture)
Vous pouvez visualiser deux images (entrée externe et
émission de télévision) simultanément sur l’écran.
Raccordez l’appareil optionnel (page 45), et vérifiez
que les images de l’appareil apparaissent sur l’écran
(page 24).
Remarque
Cette fonction n’est pas disponible pour une source d’entrée
PC (ordinateur).
1 Appuyez sur TOOLS pour afficher le menu
Tools.
2 Appuyez sur F/f pour sélectionner
« PAP », puis appuyez sur .
L’image de l’appareil raccordé s’affiche sur la
gauche et l’émission de télévision s’affiche sur la
droite.
Pour utiliser le menu Tools
Appuyez sur TOOLS pour afficher les options
suivantes lorsque vous regardez une émission de
télévision.
Options Description
Fermer Ferme le menu Tools.
PAP (ou Une seule
image)
Mode de l’image Reportez-vous à la page 26.
Mode son Reportez-vous à la page 29.
Réglage sous-titre (en
mode numérique
uniquement)
Favoris TNT (en mode
numérique uniquement)
Eco d’énergie Reportez-vous à la page 32.
Arrêt tempo. Reportez-vous à la page 32.
Vo l u m e i * Reportez-vous à la page 33.
Réglage horloge auto
(en mode analogique
uniquement)
Reportez-vous à la page 20.
Reportez-vous à la page 40.
Reportez-vous à la page 23.
Vous permet de passer en mode
numérique et d’obtenir l’heure.
3 Appuyez sur les touches numériques ou
sur PROG +/- pour sélectionner la chaîne
de télévision.
Pour revenir au mode TV normal
Appuyez sur ou RETURN.
Conseils
• Vous pouvez aussi revenir au mode TV normal en
sélectionnant « Une seule image » dans le menu Tools
(outils).
• Le son de l’image encadrée en vert est audible. Vous
pouvez commuter l’image audible en appuyant sur G/g.
• Vous pouvez changer la taille de l’image en appuyant
continuellement sur G/g.
* Cette option n’apparaît que si « Liaison avec i » est réglé
sur « Non » (page 33).
FR
20
Page 77

Vérification du guide électronique numérique de
programmes (EPG) *
1 En mode numérique, appuyez sur pour
afficher le guide électronique numérique
de programmes (EPG).
2 Effectuez l’opération souhaitée comme
indiqué dans le tableau suivant.
Remarque
Les informations de programme ne s’affichent que si la
Guide électronique numérique de programmes (EPG)
* Il est possible que cette fonction ne soit pas disponible dans certains pays.
Pour Faites ceci
Désactiver le guide EPG Appuyez sur .
station de télévision les diffuse.
Regarder la télévision
Naviguer dans le guide EPG Appuyez sur
Regarder le programme actuel Appuyez sur pendant que le programme actuel est sélectionné.
Classer les informations de programmes
par catégorie – Liste de catégories
Régler un programme à enregistrer –
Enregistrement Prog.
1 Appuyez sur la touche bleue.
2 Appuyez sur
nom de la catégorie s’affiche sur le côté.
Les catégories disponibles comprennent :
« Toutes catég. » : contient toutes les chaînes disponibles.
Nom de catégorie (« Informations » par exemple) : contient toutes les
chaînes correspondant à la catégorie sélectionnée.
3 Appuyez sur .
Le guide électronique numérique de programmes (EPG) n’affiche alors
que les programmes actuels de la catégorie sélectionnée.
1 Appuyez sur F/f/G/g pour sélectionner le programme futur
que vous souhaitez enregistrer.
2 Appuyez sur .
3 Appuyez sur
4 Appuyez sur pour régler les minuteries du téléviseur et de
votre magnétoscope.
Un symbole apparaît à côté des informations de ce programme. Le
témoin sur le téléviseur (avant) s’allume en orange.
Remarques
• Vous pouvez régler un enregistrement par minuterie du magnétoscope sur le
téléviseur uniquement pour les magnétoscopes compatibles Smartlink. Si votre
magnétoscope n’est pas compatible Smartlink, un message s’affiche pour vous
rappeler de régler la minuterie de votre magnétoscope.
• Une fois que l’enregistrement a commencé, vous pouvez mettre le téléviseur en
mode de veille, mais ne mettez pas le téléviseur complètement hors tension ou
l’enregistrement peut être annulé.
• Si une restriction d’âge pour les programmes a été sélectionnée, un message
demandant le code numéro d’identification personnel s’affiche sur l’écran. Pour
plus de détails, reportez-vous à la section « Verrouillage parental » à la page 40.
F/f/G/g.
F/f/G/g pour sélectionner une catégorie. Le
F/f pour sélectionner « Enregistrement Prog. ».
Suite
21
FR
Page 78

Pour Faites ceci
Régler un programme pour qu’il s’affiche
automatiquement à l’écran lorsqu’il
commence – Rappel
1 Appuyez sur F/f/G/g pour sélectionner le programme futur
que vous souhaitez afficher.
2 Appuyez sur .
3 Appuyez sur
4 Appuyez sur pour afficher automatiquement le programme
sélectionné lorsqu’il commence.
Un symbole c apparaît à côté des informations de ce programme.
Remarque
Si vous mettez le téléviseur en mode de veille, il se mettra automatiquement
sous tension lorsque le programme est sur le point de commencer.
Régler l’heure et la date du programme que
vous souhaitez enregistrer – Prog manuelle
1 Appuyez sur .
2 Appuyez sur
appuyez sur .
3 Appuyez sur
g.
4 Réglez les heures de début et de fin de la même manière qu’à
l’étape 3.
5 Appuyez sur
appuyez sur .
6 Appuyez sur pour régler les minuteries du téléviseur et de
votre magnétoscope.
Un symbole apparaît à côté des informations de ce programme. Le
témoin sur le téléviseur (avant) s’allume en orange.
Remarques
• Vous pouvez régler un enregistrement par minuterie du magnétoscope sur le
téléviseur uniquement pour les magnétoscopes compatibles Smartlink. Si votre
magnétoscope n’est pas compatible Smartlink, un message s’affiche pour vous
rappeler de régler la minuterie de votre magnétoscope.
• Une fois que l’enregistrement a commencé, vous pouvez mettre le téléviseur en
mode de veille, mais ne mettez pas le téléviseur complètement hors tension ou
l’enregistrement peut être annulé.
• Si une restriction d’âge pour les programmes a été sélectionnée, un message
demandant le code numéro d’identification personnel s’affiche sur l’écran. Pour
plus de détails, reportez-vous à la section « Verrouillage parental » à la page 40.
Annuler un enregistrement/rappel
– Liste des program.
1 Appuyez sur .
2 Appuyez sur
3 Appuyez sur F/f pour sélectionner le programme que vous
souhaitez annuler, puis appuyez sur .
4 Appuyez sur
program. », puis appuyez sur .
Un affichage apparaît pour confirmer que vous souhaitez annuler le
programme.
5 Appuyez sur G/g pour sélectionner « Oui », puis appuyez sur
pour confirmer.
F/f pour sélectionner « Rappel ».
F/f pour sélectionner « Prog manuelle », puis
F/f pour sélectionner la date, puis appuyez sur
F/f pour sélectionner le programme, puis
F/f pour sélectionner « Liste des program. ».
F/f pour sélectionner « Supprimer la
Conseil
Vous pouvez aussi afficher le guide électronique numérique de programmes (EPG) en sélectionnant « EPG TNT » dans le
« MENU » (page 25).
FR
22
Page 79

Utilisation de la liste de favoris numériques *
La fonction liste de favoris vous permet de
sélectionner des programmes dans une liste de jusqu’à
20 chaînes que vous spécifiez. Pour afficher la liste de
favoris, reportez-vous à « Navigation au sein des
menus » (page 25).
Liste de favoris numériques
* Il est possible que cette fonction ne soit pas disponible dans certains pays.
Pour Faites ceci
Créer votre liste de favoris pour la première
fois
Un message apparaît vous demandant si vous souhaitez ajouter des chaînes à
la liste de favoris lorsque vous sélectionnez « Favoris TNT » dans le
« MENU » pour la première fois.
1 Appuyez sur pour sélectionner « Oui ».
2 Appuyez sur
souhaitez ajouter.
Si vous connaissez le numéro de la chaîne, vous pouvez utiliser les
touches numériques pour la sélectionner directement.
3 Appuyez sur .
Les chaînes qui sont mémorisées dans la liste de favoris sont indiquées
par un symbole .
F/f pour sélectionner la chaîne que vous
Regarder la télévision
Désactiver la liste de favoris Appuyez sur RETURN.
Regarder une chaîne Appuyez sur pendant la sélection d’une chaîne.
Ajouter ou supprimer des chaînes dans la
liste de favoris
Supprimer toutes les chaînes de la liste de
favoris
1 Appuyez sur la touche bleue.
Les chaînes qui sont mémorisées dans la liste de favoris sont indiquées
par un symbole .
2 Appuyez sur F/f pour sélectionner la chaîne que vous
souhaitez ajouter ou supprimer.
Si vous connaissez le numéro de la chaîne, vous pouvez utiliser les
touches numériques pour la sélectionner directement.
3 Appuyez sur .
4 Appuyez sur la touche bleue pour revenir à la liste de favoris.
1 Appuyez sur la touche bleue.
2 Appuyez sur la touche jaune.
Un affichage apparaît pour confirmer que vous souhaitez supprimer
toutes les chaînes de la liste de favoris.
3 Appuyez sur G/g pour sélectionner « Oui », puis appuyez sur
pour confirmer.
23
FR
Page 80

Opérations supplémentaires
Affichage d’images
depuis un appareil
raccordé
Mettez l’appareil raccordé sous tension,
puis effectuez l’une des opérations
suivantes.
Pour les appareils raccordés aux prises Péritel à
l’aide d’un câble Péritel 21 broches complètement
câblé (page 46)
Lancez la lecture sur l’appareil raccordé.
L’image de l’appareil raccordé apparaît à l’écran.
Pour un magnétoscope à réglage automatique
(page 8)
En mode analogique, appuyez sur PROG +/- ou sur les
touches numériques pour sélectionner le canal vidéo.
Pour tout autre appareil raccordé (page 45)
Appuyez plusieurs fois sur / jusqu’à ce que le
symbole d’entrée correct (voir ci-dessous) apparaisse
à l’écran.
Affichage sur
écran
AV1/2 ou
AV 1 /2
AV3 , AV3
ou AV3
AV 4 4 (Y, P
AV 5 5 HDMI IN
Noms des prises d’entrée
1 ou 2 /
3 //
B/CB, PR/CR) et
(L, R)
Pour Faites ceci
Revenir au mode
TV normal
Accéder à la table
d’index des signaux
d’entrée (sauf pour
signal d’entrée
vidéo PC)
Appuyez sur DIGITAL ou
ANALOG.
Appuyez sur pour accéder à la
table d’index des signaux d’entrée.
(Puis, uniquement en mode
analogique, appuyez sur
sélectionner une source d’entrée,
appuyez sur F/f, puis sur .
g.) Pour
Pour utiliser le menu Tools
Appuyez sur TOOLS pour afficher les options
suivantes lors de la visualisation d’images d’un
appareil, autre qu’un ordinateur, raccordé.
Options Description
Fermer
PAP (ou Une seule
image)
Mode de l’image Reportez-vous à la page 26.
Mode son Reportez-vous à la page 29.
Eco d’énergie Reportez-vous à la page 32.
Arrêt tempo. Reportez-vous à la page 32.
Volume i * Reportez-vous à la page 33.
Réglage horloge auto Vous permet de passer en mode
* Cette option n’apparaît que si « Liaison avec i » est réglé
sur « Non » (page 33).
Ferme le menu Tools.
Reportez-vous à la page 20.
numérique et d’obtenir l’heure.
AV 6 6 HDMI IN
6 HDMI IN et 6 HDMI IN
(L, R)
AV7 ou
AV 7
PC PC IN RGB et PC IN
FR
24
7 ou (Y, P
R) et (L (MONO), R)
C
B/CB, PR/
Page 81

Utilisation des fonctions MENU
Navigation au sein des
menus
« MENU » vous permet d’utiliser les diverses
fonctions pratiques de ce téléviseur. Vous pouvez
sélectionner facilement des chaînes ou des sources
d’entrée et modifier les paramètres de votre téléviseur.
2
3
1
1 Appuyez sur MENU pour afficher le menu.
Icône Description
Favoris TNT*
Affiche la liste de favoris. Pour plus de
détails sur les paramètres, reportez-vous
à la page 23.
Analogique
Fait revenir à la dernière chaîne
analogique regardée.
TNT*
Fait revenir à la dernière chaîne
numérique regardée.
EPG TNT*
Affiche le guide électronique numérique
de programmes (EPG).
Pour plus de détails sur les paramètres,
reportez-vous à la page 21.
Entrées externes
Sélectionne l’appareil raccordé à votre
téléviseur.
• Pour regarder l’entrée externe
souhaitée, sélectionnez la source
d’entrée, puis appuyez sur .
• Pour affecter une étiquette à une entrée
externe, sélectionnez « Edition noms
AV », puis reportez-vous à la page 35.
Réglages
Affiche le menu Réglages où la plupart
des réglages et ajustements avancés sont
effectués.
Pour plus de détails sur les paramètres,
reportez-vous à la page 26 à 42.
Remarque
Les options que vous pouvez régler varient
selon la situation. Les options non
disponibles sont grisées ou ne sont pas
affichées.
Utilisation des fonctions MENU
* Il est possible que cette fonction ne soit pas disponible
dans certains pays.
2 Appuyez sur F/f pour sélectionner une
.
option
3 Appuyez sur pour confirmer une option
sélectionnée.
Pour quitter le menu, appuyez sur MENU.
25
FR
Page 82

Menu Image
Vous pouvez sélectionner les options répertoriées cidessous dans le menu Image.
1 Appuyez sur F/f pour sélectionner
« Réglages » sur le MENU, puis appuyez
sur .
2 Appuyez sur F/f pour sélectionner une
icône du menu, puis appuyez sur .
3 Appuyez sur F/f/G/g pour sélectionner
une option.
Entrées cibles
Mode de l’image
R à Z
Iris avancé
Pour l’entrée actuellement regardée, sélectionnez l’utilisation des paramètres communs
ou le réglage indépendant de chaque élément.
« Commun » : Applique les paramètres communs dont les réglages sont partagés avec
d’autres entrées pour lesquelles « Entrées cibles » est réglé sur « Commun ».
Nom de l’entrée actuelle (AV1 par exemple) : Vous permet de régler chaque option
indépendamment pour l’entrée actuelle.
Conseil
Réglez chaque entrée sur « Commun » si vous voulez que les mêmes paramètres s’appliquent à
toutes les entrées.
Sélectionne le mode de l’image.
« Intense » : pour un meilleur contraste et une meilleure netteté de l’image.
« Standard » : pour une image standard. Conseillé pour le divertissement à domicile.
« Expert » : permet d’enregistrer vos propres paramètres préférés.
Rétablit tous les paramètres « Image » sauf « Entrées cibles » et « Mode de l’image »
aux réglages par défaut.
Conseil
« Réglages avancés » (page 28) n’est pas non plus ramené aux réglages par défaut. Sélectionnez
« R à Z » dans « Réglages avancés » pour ramener les éléments de « Réglages avancés » aux
réglages par défaut.
En sélectionnant l’option diaphragme, vous pouvez obtenir la luminosité et le contraste
les mieux adaptés pour regarder la télévision.
« Auto 1 »* : Option recommandée pour regarder des programmes qui comportent une
grande différence de luminosité d’une scène à l’autre.
« Auto 2 »* : Option recommandée pour regarder des programmes qui comportent une
faible différence de luminosité d’une scène à l’autre.
« Max » : Avec cette option, l’écran a le niveau de luminosité maximum. Elle est
appropriée pour regarder la télévision dans une pièce où l’éclairage est fort.
« Haut » : Avec cette option, l’écran devient clair. Elle est appropriée pour regarder la
télévision dans une pièce où l’éclairage est fort.
« Moyen » : Avec cette option, la luminosité est approximativement au niveau standard.
« Bas » : Avec cette option, la luminosité de l’écran diminue et le contraste augmente.
Elle est appropriée pour regarder la télévision dans une pièce où l’éclairage est faible.
« Min » : Avec cette option, l’écran est atténué mais le contraste est au maximum. Elle
est appropriée pour regarder la télévision dans une pièce où l’éclairage est faible.
* Détecte automatiquement la luminosité de l’écran. Ces options sont les mieux appropriées pour
des programmes comme des films où les scènes à forte et faible lumière changent fréquemment.
Remarque
« Iris avancé » n’est pas disponible lors de l’utilisation de la fonction pause sur image ou PAP.
26
FR
Page 83

Contraste
Augmente ou réduit le contraste de l’image.
Luminosité
Couleurs
Teinte
Temp. couleur
Netteté
Réduc.de bruit
Eclaircit ou assombrit l’image.
Augmente ou réduit l’intensité des couleurs.
Augmente ou réduit les tons verts et les tons rouges.
Conseil
« Teinte » ne peut être réglé que pour un signal couleur NTSC (des cassettes en provenance des
Etats-Unis, par exemple).
Ajuste le ton blanc de l’image.
« Froid » : donne aux couleurs blanches une teinte bleue.
« Normal » : donne aux couleurs blanches une teinte neutre.
« Chaud 1 »/« Chaud 2 » : donne aux couleurs blanches une teinte rouge. « Chaud 2 »
donne une teinte plus rouge que « Chaud 1 ».
Conseil
« Chaud 1 » et « Chaud 2 » ne peuvent être sélectionnés que lorsque vous réglez « Mode de
l’image » sur « Expert ».
Rend l’image plus nette ou plus douce.
Réduit le bruit de l’image (neige sur l’image).
« Auto » : réduit automatiquement le bruit de l’image.
« Haut »/« Moyen »/« Bas » : modifient l’effet de la réduction du bruit.
« Non » : désactive la fonction Réduc.de bruit.
« Réducteur de bruit MPEG » : réduit le bruit d’image de bloc. Cette option est effective
pour les chaînes numériques ou un lecteur DVD/récepteur numérique avec lecture
MPEG raccordé.
Conseils
• « Auto » n’est pas disponible lorsque des sources d’entrée composantes, HDMI ou RF
numérique sont regardées.
• « Réduc.de bruit » n’est pas disponible lors de l’utilisation de la fonction pause sur image ou
PAP.
Utilisation des fonctions MENU
Mode DRC
Crée une haute résolution pour une source à haute densité (lecteur DVD, récepteur
numérique par exemple).
« Mode 1 » : Mode recommandé
« Mode 2 » : N’est disponible que lorsque le format du signal d’entrée est 1080i. Le
mode 2 est un réglage adéquat si le contenu du signal d’origine est basé sur un signal à
définition standard.
« Non » : désactive le mode DRC.
Conseil
« Mode DRC » n’est pas disponible lorsque « Mode Jeu » est réglé sur « Oui » ou lors de
l’utilisation de la fonction pause sur image ou PAP ; il n’est pas non plus disponible lorsque des
sources PC ou 1080p sont regardées.
Suite
27
FR
Page 84

Palette DRC
Personnalise le niveau de détails (« Réalité ») et de lissage (« Netteté ») pour chaque
signal d’entrée. Vous pouvez, par exemple, créer un paramètre personnalisé pour
l’image de votre entrée câble et en créer un autre pour les images de votre lecteur DVD.
La palette DRC s’affiche.
Réglages avancés
Appuyez sur
Plus vous déplacez z vers le haut le long de l’axe « Réalité », plus l’image devient
détaillée. Plus vous déplacez z vers la droite le long de l’axe « Netteté », plus l’image
devient lisse.
Conseil
« Palette DRC » n’est pas disponible lorsque « Mode Jeu » est réglé sur « Oui », « Mode DRC »
est réglé sur « Non » ou lors de l’utilisation de la fonction pause sur image ou PAP ; il n’est pas
non plus disponible lorsque des sources PC ou 1080p sont regardées.
Personnalise la fonction Image de manière plus détaillée. Lorsque vous réglez « Mode
de l’image » sur « Expert », vous pouvez régler/modifier ces paramètres.
« R à Z » : rétablit tous les paramètres avancés aux réglages par défaut.
« Correction du noir » : accentue les zones noires de l’image pour un contraste plus net.
« Gamma » : règle l’équilibre entre les zones lumineuses et sombres de l’image.
« Correction du blanc » : accentue les couleurs blanches.
« Couleur naturelle » : rend les couleurs plus éclatantes.
« Balance des blancs » : ajuste la température couleur, couleur par couleur.
« Amélioration des détails » : accentue les détails de l’image.
« Amélioration des bords » : accentue les contours de l’image.
Conseil
« Amélioration des détails » n’est pas disponible lors de l’utilisation de la fonction pause sur image
ou PAP.
F/f/G/g pour ajuster la positon du marqueur (z).
28
FR
Page 85

Menu Son
Vous pouvez sélectionner les options répertoriées cidessous dans le menu Son. Pour sélectionner des
options dans « Réglages », reportez-vous à la section
« Menu Image » (page 26).
Entrées cibles
Mode son
R à Z
Aigus
Graves
Balance
Volume auto.
Décalage volume
Pour l’entrée actuellement regardée, sélectionnez l’utilisation des paramètres
communs ou le réglage indépendant de chaque élément.
« Commun » : Applique les paramètres communs dont les réglages sont partagés
avec d’autres entrées pour lesquelles « Entrées cibles » est réglé sur « Commun ».
Nom de l’entrée actuelle (AV1 par exemple) : Vous permet de régler chaque option
indépendamment pour l’entrée actuelle.
Conseil
Réglez chaque entrée sur « Commun » si vous voulez que les mêmes paramètres s’appliquent
à toutes les entrées.
Sélectionne le mode son.
« Dynamique » : intensifie les graves et les aigus.
« Standard » : pour un son standard. Conseillé pour le divertissement à domicile.
« Expert » : réponse linéaire. Vous permet aussi d’enregistrer vos propres paramètres
préférés.
Rétablit tous les paramètres « Son » sauf « Entrées cibles », « Mode son » et « Son
stéréo » aux réglages par défaut.
Règle les sons élevés.
Règle les sons bas.
Amplifie la balance des haut-parleurs gauche et droit.
Keeps a constant volume level even when volume level gaps occur (e.g. adverts tend
to be louder than programmes).
Règle le niveau de volume de l’entrée actuelle par rapport aux autres entrées, lorsque
« Entrées cibles » est réglé sur le nom d’entrée actuelle (AV1 par exemple).
Utilisation des fonctions MENU
Surround
BBE
Sélectionne le mode surround.
« Dolby Virtual » : utilise les haut-parleurs du téléviseur pour simuler l’effet
surround produit par un système multicanaux.
« Non » : pour une réception stéréo normale ou mono.
Donne plus d’impact au son en compensant les effets de phase des haut-parleurs au
moyen du « BBE High Definition Sound System » lorsque « Mode son » est réglé
sur « Expert ».
Suite
29
FR
Page 86

Son stéréo
Sélectionne le son du haut-parleur pour une diffusion en stéréo ou bilingue.
« Stéréo », « Mono » : pour une diffusion en stéréo.
« A »/« B »/« Mono » : pour une émission bilingue, sélectionnez « A » pour le canal
son 1, « B » pour le canal son 2 ou « Mono » pour un canal mono éventuel.
Conseil
Si vous sélectionnez un autre appareil raccordé au téléviseur, réglez l’option « Son stéréo » sur
«Stéréo», «A» ou «B».
Conseil
Les options du menu Son autres que « Son stéréo » ne peuvent pas être utilisées pour les prises de casque et de sortie audio.
30
FR
Page 87

Menu Commande écran
Vous pouvez sélectionner les options répertoriées cidessous dans le menu Commande écran. Pour
sélectionner des options dans « Réglages », reportezvous à la section « Menu Image » (page 26).
Entrées cibles
Format écran
Auto 16:9
4:3 par défaut
Pour l’entrée actuellement regardée, sélectionnez l’utilisation des paramètres
communs ou le réglage indépendant de chaque élément.
« Commun » : Applique les paramètres communs dont les réglages sont partagés avec
d’autres entrées pour lesquelles « Entrées cibles » est réglé sur « Commun ».
Nom de l’entrée actuelle (AV1 par exemple) : Vous permet de régler chaque option
indépendamment pour l’entrée actuelle.
Conseil
Réglez chaque entrée sur « Commun » si vous voulez que les mêmes paramètres s’appliquent à
toutes les entrées.
Pour plus de détails sur le format d’écran, reportez-vous à « Pour changer
manuellement le format d’écran en fonction de l’émission » (page 19).
Modifie automatiquement le format d’écran en fonction du signal de diffusion. Pour
conserver votre réglage, sélectionnez « Non ».
Conseil
Même si « Auto 16:9 » est réglé sur « Oui » ou « Non », vous pouvez toujours modifier le format
de l’écran en appuyant plusieurs fois sur .
Sélectionne le format d’écran par défaut à utiliser avec les diffusions 4:3.
« Large+ » : affiche les émissions au format 4:3 conventionnel avec une imitation du
format 16:9.
« 4:3 » : affiche les émissions au format 4:3 conventionnel dans les proportions
correctes.
« Non » : maintient le paramètre « Format écran » actuel lors du changement de
chaîne ou d’entrée.
Conseil
Cette option est disponible uniquement si « Auto 16:9 » est réglé sur « Oui ».
Utilisation des fonctions MENU
Zone d’affichage
Centrage horizontal
Centrage vertical
Amplitude verticale
Règle la zone de l’écran affichant l’image.
« Normale » : affiche l’image dans sa taille d’origine.
« -1 »/« -2 » : agrandit l’image pour cacher ses bords.
Règle la position horizontale de l’image.
Règle la position verticale de l’image lorsque le format d’écran est réglé sur
« Large+ », « Zoom » ou « 14:9 ».
Règle la taille verticale de l’image lorsque le format d’écran est réglé sur « Large+ ».
31
FR
Page 88

Menu Réglage
Vous pouvez sélectionner les options répertoriées cidessous dans le menu Réglage. Pour sélectionner des
options dans « Réglages », reportez-vous à la section
« Menu Image » (page 26).
Réglages minuterie
Démarrage auto
Règle la minuterie pour qu’elle mette le téléviseur sous/hors tension.
Arrêt tempo.
Définit une période après laquelle le téléviseur doit passer automatiquement en mode
de veille.
Lorsque l’Arrêt tempo. est activé, le témoin (Minuterie) du téléviseur (avant)
s’allume en orange.
Conseils
• Si vous éteignez le téléviseur, puis le rallumez, la fonction « Arrêt tempo. » revient au
réglage « Non ».
• « L’arrêt tempo. va bientôt arrêter le téléviseur » apparaît à l’écran une minute avant que le
téléviseur bascule en mode de veille.
Marche tempo
Règle la minuterie pour qu’elle mette le téléviseur sous tension depuis le mode de
veille.
« Jour » : sélectionne le jour où vous voulez activer Marche tempo.
« Heure » : règle l’heure de mise sous tension du téléviseur.
« Durée » : sélectionne la période après laquelle le téléviseur repasse
automatiquement en mode de veille.
« Réglage du volume » : règle le volume lorsque la minuterie met le téléviseur sous
tension.
Régl. horloge
Vous permet de régler manuellement l’horloge. Lorsque le téléviseur reçoit des
chaînes numériques, l’horloge ne peut pas être ajustée manuellement car elle est
réglée sur le code temporel du signal diffusé.
Lance le « menu de première utilisation » afin de sélectionner la langue et le pays/
région, de régler toutes les chaînes numériques et analogiques disponibles et de
régler l’heure (seulement lorsqu’aucune chaîne numérique n’est reçue).
Généralement, vous ne devez pas effectuer cette opération, car la langue et le pays
ou la région sont déjà sélectionnés et les chaînes sont déjà réglées lors de la première
installation du téléviseur (page 7, 8). Cependant, cette option vous permet de répéter
la procédure (par exemple pour régler à nouveau le téléviseur après un
déménagement ou pour rechercher de nouvelles chaînes lancées par des émetteurs de
diffusion).
Eco d’énergie
FR
32
Réduit la consommation électrique en ajustant la luminosité de la lampe. Accentue
aussi le niveau du noir. Sélectionnez « Auto » (seulement pour le KDS-70R2000),
« Oui » ou « Non ».
Page 89

Mode Film
Fournit un mouvement d’image plus fluide lors de la lecture d’images de DVD ou
de magnétoscope prises sur un film, réduisant le flou et la granulation de l’image.
« Auto 1 » : pour une image stable avec un minimum de bruit. Réglez sur « Auto 2 »
si l’écran est partiellement dégradé.
« Auto 2 » : sélectionnez ce paramètre pour une utilisation standard.
« Non » : désactive le mode Film.
Remarques
• Même si « Auto 1 » ou « Auto 2 » est sélectionné, « Mode Film » est automatiquement
désactivé et une image animée n’est pas lue de manière fluide si elle contient des signaux
irréguliers ou trop de bruit.
• Le mode Film n’est pas disponible lorsque vous utilisez la fonction de pause sur image ou
PAP ou lorsque vous regardez des sources 480p, 576p, 720p, 1080i ou 1080p.
Volume i
(volume du casque)
Liaison avec i
(liaison casque
haut-parleur)
Haut parleur
Sortie audio
Mode de
refroidissement
Remplacement de la
lampe
Règle le volume du casque lorsque « Liaison avec i » est réglé sur « Non ».
Active/désactive les haut-parleurs internes du téléviseur lorsqu’un casque est
branché.
« Oui » : le son est restitué seulement par le casque.
« Non » : le son est restitué par le téléviseur et le casque.
Active/désactive les haut-parleurs internes du téléviseur.
« Oui » : les haut-parleurs du téléviseur sont activés afin d’écouter le son du
téléviseur par ces haut-parleurs.
« Non » : les haut-parleurs du téléviseur sont désactivés afin d’écouter le son du
téléviseur seulement par l’appareil audio externe raccordé aux prises de sortie audio.
« Variable » : La sortie audio de votre chaîne audio peut être commandée par la
télécommande du téléviseur.
« Fixe » : la sortie audio du téléviseur est fixée. Utilisez la commande de volume de
votre récepteur audio pour régler le volume (et autres paramètres audio) transitant
par votre chaîne audio.
Sélectionnez « Haute densité » pour utiliser le téléviseur à une altitude de 1 500 m
ou plus, ou pour utiliser le téléviseur dans certaines circonstances où il y a une
augmentation considérable de la température à l’intérieur du téléviseur. Sélectionnez
« Normal » pour utiliser le téléviseur à une altitude normale.
Lorsque la lampe approche de la fin de sa durée de service, un message s’affiche
chaque fois que vous mettez le téléviseur sous tension. Après avoir remplacé la
lampe, sélectionnez cette option et suivez la procédure indiquée sur l’écran.
Remarques
• Sélectionnez cette option après avoir remplacé la lampe.
• Selon les conditions ambiantes et autres facteurs, comme la fréquence d’utilisation, certaines
lampes peuvent griller avant que le message de remplacement de la lampe s’affiche sur
l’écran.
• Le message annonçant que la lampe a atteint la fin de sa durée de service s’affiche chaque
fois que vous mettez le téléviseur sous tension jusqu’à ce que vous régliez l’option
Remplacement Lampe.
Utilisation des fonctions MENU
Position d’affichage
Règle la position horizontale/verticale de l’image, y compris les affichages de menu
et les messages, etc. sur l’écran du téléviseur.
Suite
33
FR
Page 90

Langue
Sélectionne la langue d’affichage des menus.
Informations
R à Z total
Affiche les informations de produit de votre téléviseur.
Rétablit tous les paramètres aux réglages par défaut, puis affiche l’écran Démarrage
auto.
Remarques
• Tous les paramètres, y compris la liste de favoris numériques, le pays, la langue, les chaînes
réglées automatiquement, etc. seront ramenés aux réglages par défaut.
• Le témoin marche/veille clignote en vert pendant que les paramètres sont ramenés à leurs
réglages par défaut.
34
FR
Page 91

Menu Réglage AV
Vous pouvez sélectionner les options répertoriées cidessous dans le menu Réglage AV. Pour sélectionner
des options dans « Réglages », reportez-vous à la
section « Menu Image » (page 26).
Présél. audio/vidéo
Entrée AV3
Entrée AV7
Attribue un nom à un appareil raccordé aux prises latérales et arrière. Ce nom
apparaîtra brièvement à l’écran lors de la sélection de l’appareil. Vous pouvez sauter
les signaux d’entrée d’un appareil raccordé que vous ne voulez pas afficher sur
l’écran.
1 Appuyez sur
puis appuyez sur .
2 Appuyez sur
appuyez sur .
Noms des chaînes : utilise un des noms préréglés pour attribuer un nom à un appareil
raccordé.
« Editer: » : permet de créer votre propre nom. Suivez les étapes 2 à 4 de « Noms des
chaînes » (page 37).
« Saut » : permet de sauter une source d’entrée inutile.
Spécifie un signal à entrer par la prise marquée / / 3 au dos du
téléviseur.
« Auto » : Commute automatiquement entre les signaux d’entrée RVB, d’entrée
S-vidéo, d’entrée vidéo composite en fonction du signal d’entrée.
« RGB » : Entre le signal RVB.
« S Vidéo » : Entre le signal S-vidéo.
« Composite » : Entre le signal vidéo composite.
Spécifie un signal à entrer par les prises marquées / / 7 sur l’avant du
téléviseur.
« Auto » : Commute automatiquement entre les prises vidéo composantes et les
prises vidéo composite en fonction du raccordement du câble.
« Composantes » : Active les prises vidéo composantes.
« Composite » : Active les prises vidéo composite.
Conseil
Lorsque plusieurs câbles sont raccordés et que « Auto » est sélectionné,
« Composantes », « Composite » seront activés dans cet ordre.
F/f pour sélectionner la source d’entrée de votre choix,
F/f pour sélectionner l’option souhaitée ci-dessous, puis
Utilisation des fonctions MENU
Suite
35
FR
Page 92

Sortie AV2
Spécifie qu’un signal doit être restitué par la prise / 2 située à l’arrière du
téléviseur. Si vous raccordez un magnétoscope ou tout autre appareil
d’enregistrement à la prise / 2, vous pouvez enregistrer à partir de l’appareil
raccordé à d’autres prises du téléviseur.
« TV » : restitue les diffusions.
« AV1 » : restitue les signaux provenant de l’appareil raccordé à la prise / 1.
« AV3 » : restitue les signaux provenant de l’appareil raccordé à la prise / /
3.
« AV7 » : restitue les signaux provenant de l’appareil raccordé à la prise / 7.
« Auto » : restitue ce qui est affiché à l’écran (sauf les signaux des prises
HDMI IN 5, HDMI IN 6 et PC IN RGB/ ).
/ 4,
Standard couleur
Mode Jeu
Matrice couleurs
Sélectionne le système couleur (« Auto », « PAL », « SECAM », « NTSC3.58 », ou
« NTSC4.43 ») en fonction du signal d’entrée provenant de la source d’entrée.
Selon le logiciel de jeu, les temps de réaction peuvent être lents pendant des scènes
rapides, etc. Sélectionnez « Oui » pour améliorer les temps de réaction.
Généralement utilisé au réglage par défaut (AV1/2/3/7 (Signal d’entrée composite et
S-vidéo) est réglé sur « ITU601 » et AV4/5/6/7 (Signal d’entrée composantes) est
réglé sur « Auto »). Si la teinte de l’image de la source d’entrée n’est pas naturelle,
sélectionnez soit « ITU601 » soit « ITU709 », celui de ces paramètres qui normalise
la teinte.
36
FR
Page 93

Menu Réglage analogique
Vous pouvez sélectionner les options répertoriées cidessous dans le menu Réglage analogique. Pour
sélectionner des options dans « Réglages », reportezvous à la section « Menu Image » (page 26).
Direct 1 chiffre
Mémorisation auto
Ordre des chaînes
Noms des chaînes
Lorsque « Direct 1 chiffre » est réglé sur « Oui », vous pouvez sélectionner une
chaîne analogique au moyen d’une touche numérique (0 - 9) préréglée de la
télécommande.
Remarque
Lorsque « Direct 1 chiffre » est réglé sur « Oui », vous ne pouvez pas sélectionner des numéros
de chaîne 10 et supérieurs en introduisant deux chiffres avec la télécommande.
Règle toutes les chaînes analogiques disponibles.
Généralement, vous ne devez pas effectuer cette opération, car les chaînes sont déjà
réglées lors de la première installation du téléviseur (page 8). Cependant, cette
option vous permet de répéter la procédure (par exemple pour régler à nouveau le
téléviseur après un déménagement ou pour rechercher de nouvelles chaînes lancées
par des émetteurs de diffusion).
Modifie l’ordre dans lequel les chaînes analogiques sont mémorisées sur le
téléviseur.
1 Appuyez sur
déplacer vers une nouvelle position, puis appuyez sur .
2 Appuyez sur
puis appuyez sur .
Attribue à la chaîne un nom de votre choix, de cinq lettres ou chiffres maximum. Le
nom apparaîtra brièvement à l’écran lors de la sélection de la chaîne. (Les noms de
chaînes sont généralement extraits automatiquement du Télétexte, s’il est
disponible.)
1 Appuyez sur
nommer, puis appuyez sur .
2 Appuyez sur
(« _ » pour un espace), puis appuyez sur
Si vous entrez un caractère incorrect
Appuyez sur G/g pour sélectionner le caractère incorrect. Puis appuyez sur F/f pour
sélectionner le caractère correct.
Pour effacer tous les caractères
Sélectionnez « R à Z », puis appuyez sur .
3 Répétez la procédure décrite à l’étape 2 jusqu’à ce que le nom soit
terminé.
4 Sélectionnez « OK », puis appuyez sur .
F/f pour sélectionner la chaîne que vous souhaitez
F/f pour sélectionner la nouvelle position de votre chaîne,
F/f pour sélectionner la chaîne que vous souhaitez
F/f pour sélectionner la lettre ou le chiffre de votre choix
g.
Utilisation des fonctions MENU
Suite
37
FR
Page 94

Mémorisation
manuelle
Avant de sélectionner « Nom »/« AFT »/« Filtre Audio »/« Saut »/« Décodeur »,
appuyez sur PROG +/- pour sélectionner le numéro du canal avec la chaîne. Vous ne
pouvez pas sélectionner de numéro de canal configuré comme devant être ignoré
(page 39).
Chaîne/Norme/Canal
Permet de prédéfinir manuellement les chaînes.
1 Appuyez sur
2 Appuyez sur
souhaitez régler manuellement (si vous réglez un magnétoscope,
sélectionnez la chaîne 00), puis appuyez sur RETURN.
3 Appuyez sur
4 Appuyez sur
programmes télévisés suivants, puis appuyez sur RETURN.
B/G : pour les pays/régions d’Europe occidentale
I : pour le Royaume-Uni
D/K : pour les pays/régions d’Europe de l’Est
L : pour la France
5 Appuyez sur F/f pour sélectionner « Canal », puis appuyez sur .
6 Appuyez sur
par câble) ou « C » (pour les chaînes terrestres), puis appuyez sur
7 Réglez les canaux comme suit :
Si vous ne connaissez pas le numéro du canal (fréquence)
Appuyez sur F/f pour rechercher le prochain canal disponible. Lorsqu’un canal est
détecté, la recherche s’arrête. Pour poursuivre la recherche, appuyez sur
Si vous connaissez le numéro du canal (fréquence)
Appuyez sur les touches numériques pour entrer le numéro du canal de la diffusion
de votre choix ou le numéro de canal de votre magnétoscope.
8 Appuyez sur pour sauter à « Confirmer », puis appuyez sur .
9 Appuyez sur f pour sélectionner « OK », puis appuyez sur .
Répétez la procédure ci-dessus pour prédéfinir d’autres canaux manuellement.
Nom
Permet d’attribuer un nom de votre choix au canal sélectionné à l’aide de cinq lettres
ou chiffres maximum. Ce nom apparaîtra brièvement à l’écran lors de la sélection de
la chaîne.
Pour introduire des caractères, suivez les étapes 2 à 4 de « Noms des chaînes »
(page 37).
AFT
Permet le réglage fin manuel du numéro de chaîne sélectionné si vous avez
l’impression qu’un léger réglage améliorerait la qualité de l’image.
Le réglage fin est possible sur une plage de -15 à +15. Lorsque « Oui » est
sélectionné, le réglage fin s’effectue automatiquement.
Filtre Audio
Permet d’améliorer le son des différentes chaînes en cas de déformation dans des
émissions mono. Il peut arriver qu’un signal de diffusion non standard entraîne une
déformation du son ou une coupure intermittente du son lorsque vous regardez des
programmes mono.
Si vous ne rencontrez pas de déformation du son, il est recommandé de laisser cette
option à sa valeur par défaut : « Non ».
Remarques
• Vous ne pouvez pas recevoir de son stéréo ou « dual » si vous sélectionnez « Bas » ou
«Haut».
• « Filtre Audio » n’est pas disponible lorsque « Norme » est réglé sur « L ».
F/f pour sélectionner « Chaîne », puis appuyez sur .
F/f pour sélectionner le numéro de la chaîne que vous
F/f pour sélectionner « Norme », puis appuyez sur .
F/f pour sélectionner un des systèmes de diffusion des
F/f pour sélectionner « S » (pour les chaînes diffusées
g.
F/f.
38
FR
Page 95

Saut
Permet d’ignorer des canaux analogiques non utilisés lorsque vous appuyez sur
PROG +/- pour sélectionner des chaînes. (Vous pouvez toujours sélectionner un
canal ignoré à l’aide des touches numériques.)
Décodeur
Permet de voir et d’enregistrer la chaîne cryptée sélectionnée lors de l’utilisation
d’un décodeur raccordé directement au connecteur Péritel / 1 ou au
connecteur Péritel / 2 par l’intermédiaire d’un magnétoscope.
Remarque
Selon le pays ou la région sélectionné(e) pour l’option « Pays » (page 8), il est possible que
cette option ne soit pas disponible.
Confirmer
Enregistre les modifications apportées aux paramètres « Mémorisation manuelle ».
Utilisation des fonctions MENU
39
FR
Page 96

Menu Réglage TNT
Vous pouvez sélectionner les options répertoriées cidessous dans le menu Réglage TNT (numérique).
Pour sélectionner des options dans « Réglages »,
reportez-vous à la section « Menu Image » (page 26).
Remarque
Il est possible que certaines fonctions ne soient pas
disponibles dans certains pays.
Réglages TNT
Affiche le menu « Réglages TNT ».
Réglage sous-titre
Permet d’afficher des sous-titres numériques sur l’écran.
Lorsque «
s’afficher avec les sous-titres (si les chaînes de télévision diffusent ces informations).
Langue sous-titre
Permet de sélectionner la langue d’affichage des sous-titres.
Langue bande son
Permet de sélectionner la langue utilisée pour un programme. Certaines chaînes
numériques peuvent diffuser plusieurs langues audio pour un programme.
Type audio
Augmente le niveau du son lorsque « Mal-entendant » est sélectionné.
Verrouillage parental
Permet de définir une restriction d’âge pour les programmes. Tout programme qui
dépasse la restriction d’âge ne peut être visualisé qu’après avoir entré correctement un
code numéro d’identification personnel.
1 Appuyez sur les touches numériques pour entrer votre code numéro
2 Appuyez sur F/f pour sélectionner la restriction d’âge ou « Aucun »
3 Appuyez sur RETURN.
Mal-entendant
d’identification personnel actuel.
Si vous n’avez pas encore spécifier un numéro d’identification personnel, un écran
d’introduction de code s’affiche. Suivez les instructions de « Code PIN » ci-dessous.
(pour un accès non restreint), puis appuyez sur .
» est sélectionné, certaines aides visuelles peuvent aussi
40
FR
Page 97

Code PIN
Permet de spécifier un code numéro d’identification personnel pour la première fois ou
de modifier votre code numéro d’identification personnel.
1 Entrez un code numéro d’identification personnel comme suit :
Si vous avez déjà spécifié un code numéro d’identification personnel
Appuyez sur les touches numériques pour entrer votre code numéro d’identification
personnel actuel.
Si vous n’avez pas spécifié de code numéro d’identification personnel
Appuyez sur les touches numériques pour entrer le code numéro d’identification
personnel réglé en usine, 9999.
2 Appuyez sur les touches numériques pour entrer le nouveau code numéro
d’identification personnel.
Un message apparaît afin de vous informer que le nouveau code numéro
d’identification personnel a été accepté.
3 Appuyez sur RETURN.
Conseil
Le code numéro d’identification personnel 9999 est toujours accepté.
Configuration technique
Permet d’afficher le menu Configuration technique.
« MAJ.auto du service » : permet au téléviseur de détecter et de mémoriser les
nouveaux services numériques lorsqu’ils deviennent disponibles.
« Télécharg. Logiciel » : permet au téléviseur de recevoir automatiquement des mises
à jour du logiciel gratuites via votre antenne existante (lorsqu’elles sont publiées). Il
est recommandé que cette option soit toujours réglée sur « Oui ». Si vous ne souhaitez
pas mettre votre logiciel à jour, réglez cette option sur « Non ».
« Info système » : permet d’afficher la version actuelle du logiciel et le niveau du
signal.
« Fuseau horaire » : permet de sélectionner manuellement le fuseau horaire où vous
vous trouvez, si ce n’est pas le même que le paramètre de fuseau horaire par défaut
pour votre pays.
Réglage du module CA
Cette option vous permet d’accéder à un service de paiement à la séance une fois que
vous aurez obtenu un module CAM (Conditional Access Module – module d’accès
conditionnel) et une carte. Reportez-vous à la page 45 pour l’emplacement de la prise
(PCMCIA).
Remarques
• La fonction CAM n’est pas prise en charge dans tous les pays. Vérifiez auprès de votre
distributeur agréé.
• « Réglage du module CA » n’est disponible que lorsqu’un module CAM est installé.
Utilisation des fonctions MENU
Suite
41
FR
Page 98

Mémorisation TNT
Affiche le menu « Mémorisation TNT ».
Mémo TNT auto
Permet de régler toutes les chaînes numériques disponibles.
Généralement, vous ne devez pas effectuer cette opération car les chaînes ont déjà été
réglées lors de la première installation du téléviseur (page 8). Cependant, cette option
vous permet de répéter la procédure (par exemple pour régler à nouveau le téléviseur
après un déménagement ou pour rechercher de nouvelles chaînes lancées par des
émetteurs de diffusion).
Ordre des chaînes
Permet de supprimer des chaînes numériques inutiles mémorisées sur le téléviseur et
de modifier l’ordre des chaînes numériques mémorisées sur le téléviseur.
1 Appuyez sur
ou déplacer à une autre position.
Si vous connaissez le numéro du canal
Appuyez sur les touches numériques pour entrer le numéro de programme à trois
chiffres du canal de diffusion de votre choix.
2 Supprimez ou modifiez l’ordre des chaînes numériques comme suit :
Pour supprimer une chaîne numérique
Appuyez sur . Un message qui confirme si la chaîne numérique sélectionnée doit être
supprimée apparaît. Appuyez sur
Pour modifier l’ordre des chaînes numériques
Appuyez sur g, puis appuyez sur F/f pour sélectionner la nouvelle position de la
chaîne et appuyez sur
d’autres chaînes le cas échéant.
3 Appuyez sur RETURN.
Mémo TNT manuel
Permet de régler manuellement les chaînes numériques.
1 Appuyez sur les touches numériques pour sélectionner le numéro de
chaîne que vous souhaitez régler manuellement, puis appuyez sur
pour régler la chaîne.
2 Lorsque les chaînes disponibles sont trouvées, appuyez sur
sélectionner la chaîne que vous souhaitez mémoriser, puis appuyez sur
.
3 Appuyez sur
souhaitez mémoriser la nouvelle chaîne, puis appuyez sur .
Répétez la procédure ci-dessus pour régler manuellement d’autres chaînes.
F/f pour sélectionner la chaîne que vous voulez supprimer
G pour sélectionner « Oui », puis appuyez sur .
G. Répétez la procédure décrite aux étapes 1 et 2 pour déplacer
F/f
F/f pour
F/f pour sélectionner le numéro de programme où vous
42
FR
Page 99

Menu Réglages PC (ordinateur)
Vous pouvez sélectionner les options répertoriées cidessous dans le menu Réglages PC lorsque le
téléviseur est raccordé à un ordinateur.
1 Appuyez plusieurs fois sur / jusqu’à
ce que PC s’affiche sur l’écran.
2 Appuyez sur MENU pour afficher le menu
de réglages PC.
Remarque
Lorsque vous raccordez un ordinateur à votre téléviseur pour
la première fois, il se peut que vous deviez régler l’affichage
de l’écran. Dans ce cas, effectuez « Réglage auto » ou réglez
les options « Phase », « Pixel », « Centrage horizontal » ou
« Centrage vertical » de « Autres » (page 44).
Image
Utilisation des fonctions MENU
Mode d’affichage
R à Z
Iris avancé
Sélectionne le mode d’affichage.
« Vidéo » : sélectionnez cette option pour visualiser des images vidéo.
« Texte » : sélectionnez cette option pour visualiser du texte, des graphiques ou
tableaux.
Rétablit tous les paramètres « Image » sauf « Mode d’affichage » aux réglages par
défaut.
En sélectionnant l’option diaphragme, vous pouvez obtenir la luminosité et le
contraste les mieux adaptés pour regarder la télévision.
« Auto 1 »* : Option recommandée pour regarder des programmes qui comportent
une grande différence de luminosité d’une scène à l’autre.
« Auto 2 »* : Option recommandée pour regarder des programmes qui comportent
une faible différence de luminosité d’une scène à l’autre.
« Max » : Avec cette option, l’écran a le niveau de luminosité maximum. Elle est
appropriée pour regarder la télévision dans une pièce où l’éclairage est fort.
« Haut » : Avec cette option, l’écran devient clair. Elle est appropriée pour regarder
la télévision dans une pièce où l’éclairage est fort.
« Moyen » : Avec cette option, la luminosité est approximativement au niveau
standard.
« Bas » : Avec cette option, la luminosité de l’écran diminue et le contraste
augmente. Elle est appropriée pour regarder la télévision dans une pièce où
l’éclairage est faible.
« Min » : Avec cette option, l’écran est atténué mais le contraste est au maximum.
Elle est appropriée pour regarder la télévision dans une pièce où l’éclairage est faible.
* Détecte automatiquement la luminosité de l’écran. Ces options sont les mieux appropriées
pour des programmes comme des films où les scènes à forte et faible lumière changent
fréquemment.
Remarque
Vous ne pouvez pas sélectionner « Auto 1 » ou « Auto 2 » lorsque « Mode d’affichage » est
réglé sur « Texte ».
Contraste
Augmente ou réduit le contraste de l’image.
Suite
43
FR
Page 100

Luminosité
Eclaircit ou assombrit l’image.
Temp. couleur
Son
Mode son
Autres
Réglage auto
R à Z
Ajuste le ton blanc de l’image.
« Froid » : donne aux couleurs blanches une teinte bleue.
« Normal » : donne aux couleurs blanches une teinte neutre.
« Chaud 1 »/« Chaud 2 » : donne aux couleurs blanches une teinte rouge. « Chaud
2 » donne une teinte plus rouge que « Chaud 1 ».
Sélectionne le mode son.
« Dynamique » : intensifie les graves et les aigus.
« Standard » : pour un son standard. Conseillé pour le divertissement à domicile.
« Expert » : fournit une réponse linéaire. La qualité du son telle que personnalisée
sur l’ordinateur raccordé est maintenue dans le son du téléviseur.
Règle automatiquement la position d’affichage, la phase et le pas de l’image lorsque
le téléviseur reçoit un signal d’entrée d’un ordinateur raccordé.
Conseil
Il est possible que Réglage auto ne fonctionne pas bien avec certains signaux d’entrée. Dans ce
cas, réglez manuellement « Phase », « Pixel », « Centrage horizontal » et « Centrage vertical ».
Rétablit tous les paramètres « Autres » aux réglages par défaut.
Phase
Pixel
Centrage horizontal
Centrage vertical
Format écran
Règle la phase lorsque l’écran scintille.
Règle le pas lorsque l’image présente des rayures verticales indésirables.
Règle la position horizontale de l’image.
Règle la position verticale de l’image.
Sélectionne le mode d’écran pour les signaux dont la fréquence verticale est de
60 Hz.
« Normal » : affiche l’image dans sa taille d’origine.
« Etiré 1 » : agrandit l’image pour remplir la zone d’affichage, en conservant son
format d’image horizontal-vertical d’origine.
« Etiré 2 » : agrandit l’image pour remplir la zone d’affichage.
44
FR
 Loading...