

Page 1
LCD TV
Operating Instructions
(Setup Guide)
4-476-177-11(1)
KDL-65W850A
Sony Customer Support
U.S.A.:
http://www.sony.com/tvsupport
Canada:
http://www.sony.ca/support
United States Canada
1.800.222.SONY 1.877.899.SONY
Please Do Not Return
the Product to the Store
Page 2
Owner’s Record
The model and serial numbers
are located at the side and rear
of the TV. Record these
numbers in the spaces provided
below. Refer to them whenever
you call upon your Sony dealer
regarding this TV.
Model Name
Serial No.
CAUTION
To prevent electric shock and blade
exposure, do not use this polarized
AC plug with an extension cord,
receptacle or other outlet unless the
blades can be fully inserted.
• Operate the TV only on 110-240 V
AC (U.S.A./Canada 120 V AC)
• Some people may experience
discomfort (such as eye strain,
fatigue, or nausea) while watching
3D video images or playing
stereoscopic 3D games. Sony
recommends that all viewers take
regular breaks while watching 3D
video images or playing
stereoscopic 3D games. The length
and frequency of necessary breaks
will vary from person to person. You
must decide what works best. If you
experience any discomfort, you
should stop watching the 3D video
images or playing stereoscopic 3D
games until the discomfort ends;
consult a doctor if you believe
necessary. You should also review
(i) the instruction manual of any
other device or media used with
this television and (ii) our website
(http://www.sony.com/tvsupport) for
the latest information. The vision of
young children (especially those
under six years old) is still under
development. Consult your doctor
(such as a pediatrician or eye
doctor) before allowing young
children to watch 3D video images
or play stereoscopic 3D games.
Adults should supervise young
children to ensure they follow the
recommendations listed above.
• Do not use, store, or leave the 3D
Glasses or battery near a fire, or in
places with a high temperature,
e.g., in direct sunlight, or in sunheated cars.
• When using the simulated 3D
function, please note that the
displayed image is modified from
the original due to the conversion
done by this television.
Licensing Information
The terms HDMI and HDMI HighDefinition Multimedia Interface, and
the HDMI Logo are trademarks or
registered trademarks of HDMI
Licensing LLC in the United States
and other countries.
Fergason Patent Properties, LLC:
U.S. Patent No. 5,717,422
U.S. Patent No. 6,816,141
Manufactured under license from
Dolby Laboratories.
“Blu-ray Disc”, “Blu-ray” and “Blu-ray
Disc” logo are trademarks of Blu-ray
Disc Association.
“BRAVIA” and , S-Force,
Motionflow, BRAVIA Sync, and are
trademarks or registered marks of
Sony Corporation.
®
DLNA
, the DLNA Logo and DLNA
CERTIFIED
marks, or certification marks of the
Digital Living Network Alliance.
TrackID is a trademark or registered
trademark of Sony Mobile
Communications AB.
Music and video recognition
technology and related data are
provided by Gracenote®. Gracenote
is the industry standard in music
recognition technology and related
content delivery. For more
information, please visit
www.gracenote.com.
CD, DVD, Blu-ray Disc, and music
and video-related data from
Gracenote, Inc., copyright ©
2000-present Gracenote. Gracenote
Software, copyright © 2000-present
Gracenote. One or more patents
owned by Gracenote apply to this
product and service. See the
Gracenote website for a nonexhaustive list of applicable
Gracenote patents.
Gracenote, MusicID, VideoID, Video
Explore, the Gracenote logo and
logotype, and the “Powered by
Gracenote” logo are either registered
trademarks or trademarks of
Gracenote in the United States and/
or other countries.
®
are trademarks, service
®
Opera
Devices SDK from Opera
Software ASA. Copyright 1995-2013
Opera Software ASA. All rights
reserved.
Wi-Fi, Wi-Fi Direct and Miracast are
marks or registered marks of the
Wi-Fi Alliance.
“Sony Entertainment Network logo”
and “Sony Entertainment Network”
are trademarks of Sony Corporation.
MHL, Mobile High-Definition Link and
the MHL Logo are trademarks or
registered trademarks of MHL
Licensing, LLC.
Manufactured under license from
DTS Licensing Limited. For U.S. and
worldwide patent and trademark
information, see
www.dts.com/patents/legacy.aspx.
(c) DTS Licensing Limited and DTS,
Inc. 2012.
The Bluetooth
are owned by the Bluetooth SIG, Inc.
and any use of such marks by Sony
Corporation is under license. Other
trademarks and trade names are
those of their respective owners.
The N Mark is a trademark or
registered trademark of NFC Forum,
Inc. in the United States and in other
countries.
®
word mark and logos
2
Page 3

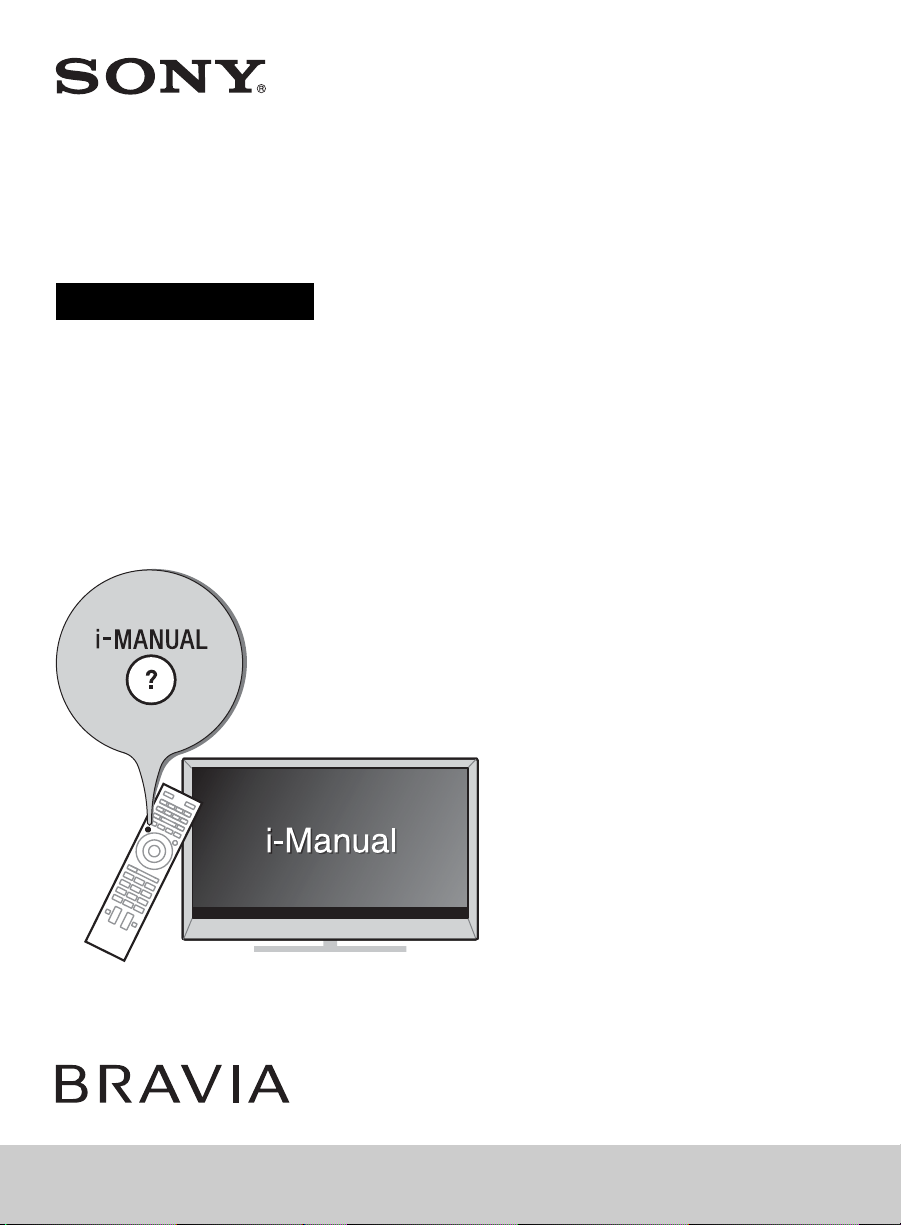
Your BRAVIA TV is
ENERGY STAR
qualified in the
“Home” mode.
It meets strict
guidelines set by the U.S.
Environmental Protection Agency
and Department of Energy. ENERGY
STAR is a joint program of these
government agencies, designed to
promote energy efficient products
and practices.
Changes to certain features, settings,
and functionalities of this TV (i.e.
Picture/Sound, Light Sensor, Power
Savings, Picture Scene) can increase
or change the power consumption.
The “Auto” and “General” picture
scenes are default settings optimized
for the input signal selected. Your
BRAVIA TV is tested in these settings
for ENERGY STAR qualification.
Depending upon such changed
settings, the power consumption may
exceed the limits required for the
ENERGY STAR qualification in the
“Home” mode.
The 65 class has a 64.5 inch
(163.9 cm) viewable image size
(measured diagonally).
energy efficiency
®
~
• The illustrations of the remote
control used in this manual are of
the RM-YD087 unless otherwise
stated.
• The illustrations used in this manual
may differ depending on your TV
model.
• Retain this manual for future
reference.
3
Page 4
The BRAVIA® Full HDTV
Experience
Thank you for choosing Sony! Your new
BRAVIA
HDTV Experience.” This document will help
you get the most out of your TV.
Please take a moment to register your TV
at:
U.S.A.: http://productregistration.sony.com
Canada: http://www.sony.ca/registration
Four Steps to a Full HD Experience
Set, Source, Sound, and Setup.
®
TV opens the door to the “Full
1 Set
Now that you have made the best selection
in LED backlit LCD TV technology, be sure
to remove all accessory contents from the
packaging before setting up your TV.
2 Source
To experience the stunning detail of your
BRAVIA TV, you need access to HD
programming.
• Upgrade your signal or content source to
high-definition (HD) by contacting your
HD service provider.
This TV displays all video input signals in a resolution of 1,920 dots × 1,080 lines.
• Receive over-the-air HD broadcasts with
an HD-quality antenna connected
directly to the back of your TV.
Visit http://www.antennaweb.org for
more information on antenna selection
and setup.
• Discover the wealth of entertainment now
available on super-high resolution
Blu-ray Disc™ player and other Sony HD
equipment.
3 Sound
Complete the high-definition experience
with a BRAVIA Sync™ surround sound
system or A/V receiver from Sony.
4 Setup
Install your TV and connect your sources.
See page 11 for sample connection
diagrams. To help assure the highest
quality for your HD experience, use Sony
HDMI (High-Definition Multimedia
Interface) cables.
To learn more about HDTV, visit:
U.S.A.: http://www.sony.com/HDTV
Canada: http://www.sony.ca/hdtv
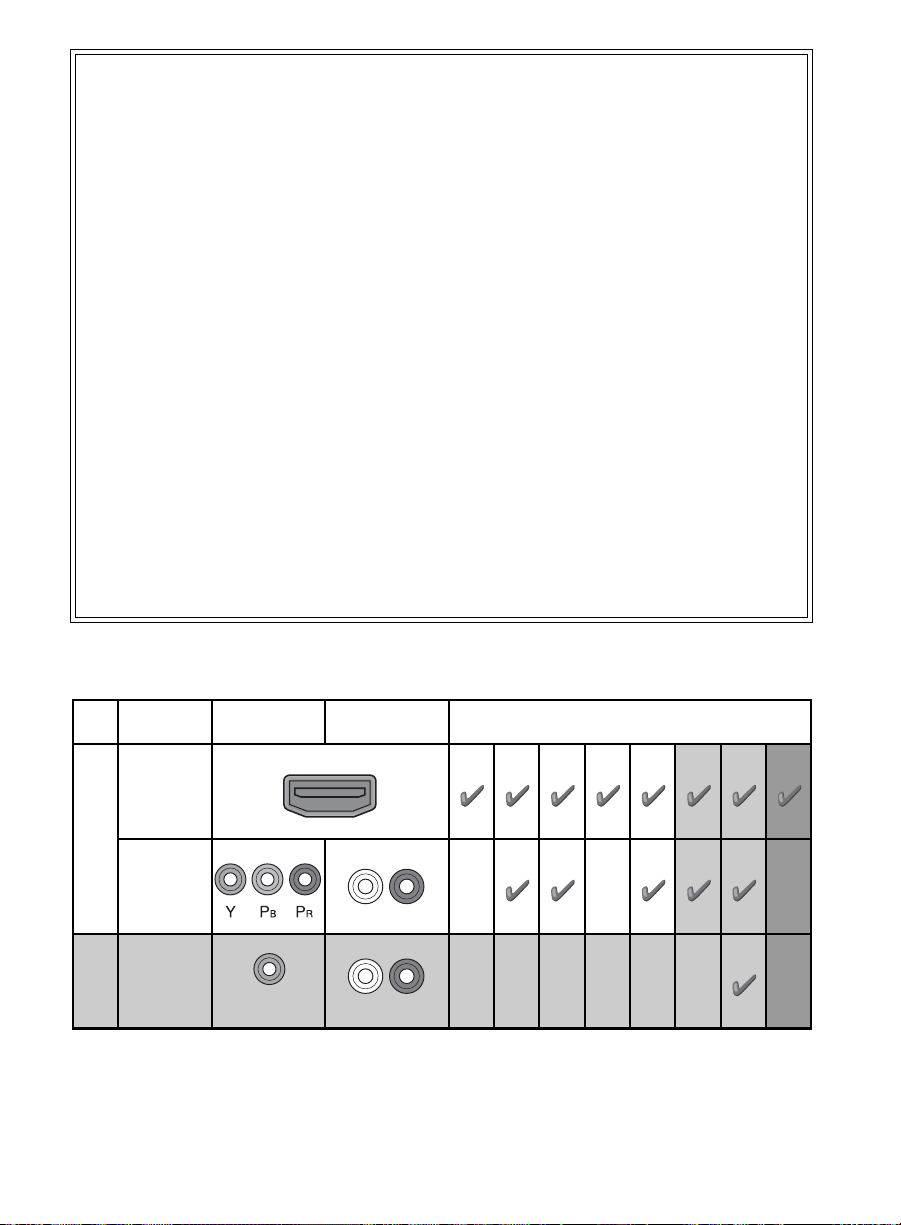
The following chart shows the high-definition (HD) and standard-definition (SD) video formats
supported by your BRAVIA TV inputs.
INPUT VIDEO AUDIO
HDMI
1080/24p/30p
SUPPORTED FORMATS
1080p*11080i
720/24p/30p
720p*1480p 480i PC*
2
HD
COMPONENT
Audio L/R
VIDEO
SD
*1For details of supported formats, refer to the “Specifications” in this manual.
*2For supported PC formats refer to the i-Manual.
Composite video
connection
Audio L/R
4
Page 5

5
Page 6
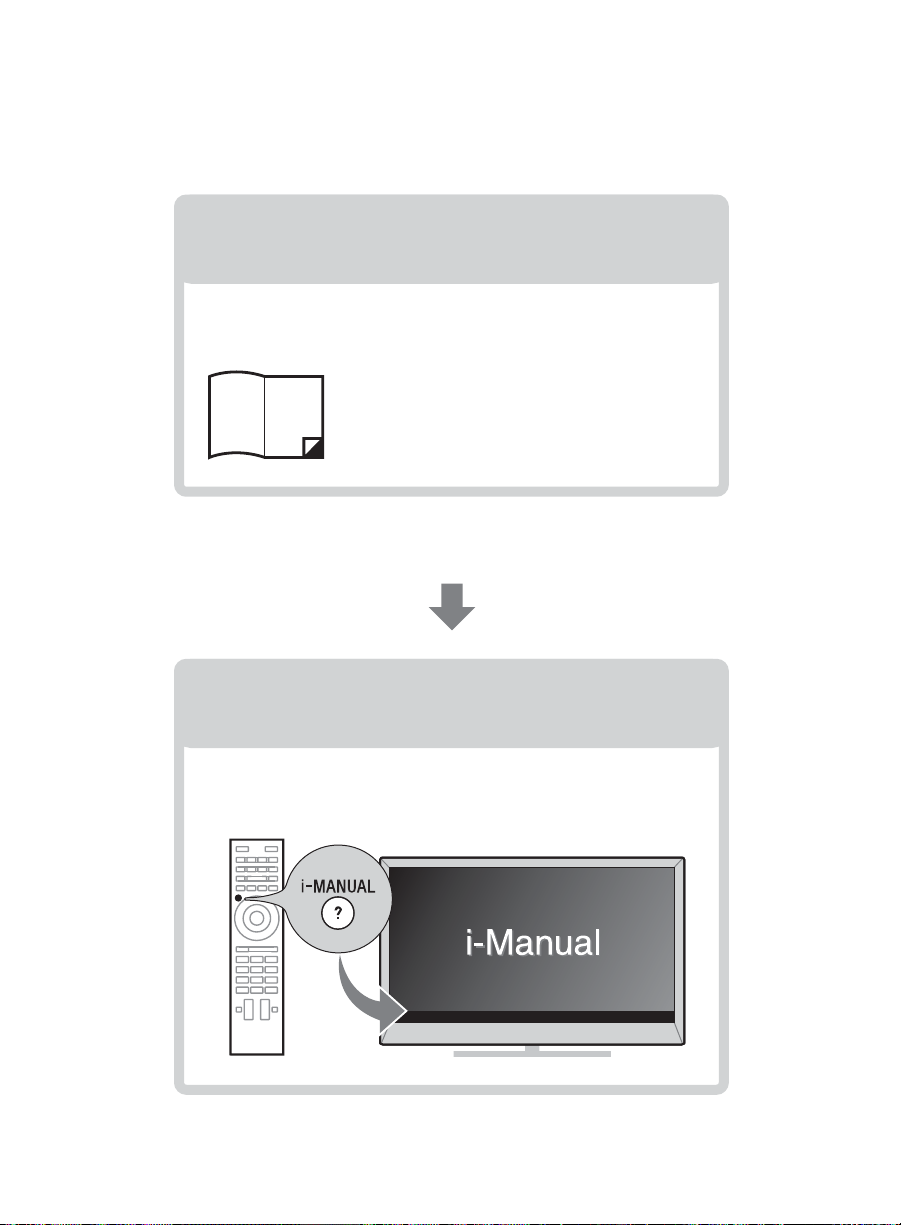
About this manual (Operating Instructions)
This manual explains how to setup your TV. For more
information on how to use BRAVIA TV, refer to the “Electronic
manual”.
Operating Instructions
Electronic manual
(i-Manual)
Explains how to setup your TV such as connections,
initial setup, and basic operations.
For more information, press the i-MANUAL button
Explains how to use all the features. See page 27 on
how to use the i-Manual.
Images and illustrations used in this manual may differ from
the actual screen.
6
Page 7

Table of Contents
Getting Started
Checking the accessories........................................................................8
Inserting batteries into the remote control................................................8
Before setting up your TV.........................................................................9
1: Attaching the Table-Top Stand ..........................................................10
2: Connecting the TV..............................................................................11
3: Securing the TV..................................................................................17
4: Bundling the cables ...........................................................................18
5: Connecting the TV to the Internet.......................................................19
6: Running initial setup...........................................................................20
Using a Wall-Mount Bracket...................................................................21
Installing the TV against a wall or enclosed area...................................21
Using Your BRAVIA TV
Watching TV B..............................ws
Selecting various functions and settings (Home Menu).........................24
Watching Internet Video.........................................................................26
Looking for Instructions
Looking for instructions in the
electronic manual (i-Manual)
Additional Information
Troubleshooting......................................................................................30
How to care for your BRAVIA TV ............................................................31
Specifications.........................................................................................32
Safety Information...................................................................................34
B
...wj
7
Page 8
Getting Started
Checking the accessories
Remote control (1)*
One-touch Remote Control (1)*
Size AAA batteries (4)
Table-Top Stand (1)*
Fixing screws for Table-Top Stand
(M5 x 12) (4)
Active 3D Glasses (battery included) (4)
Operating Instructions (this manual) and
other documents
*1Please refer to the model name printed on the
remote control.
*2Assembling the Table-Top Stand is required.
Refer to the supplied Table-Top Stand leaflet to
assemble the Table-Top Stand.
1
1
2
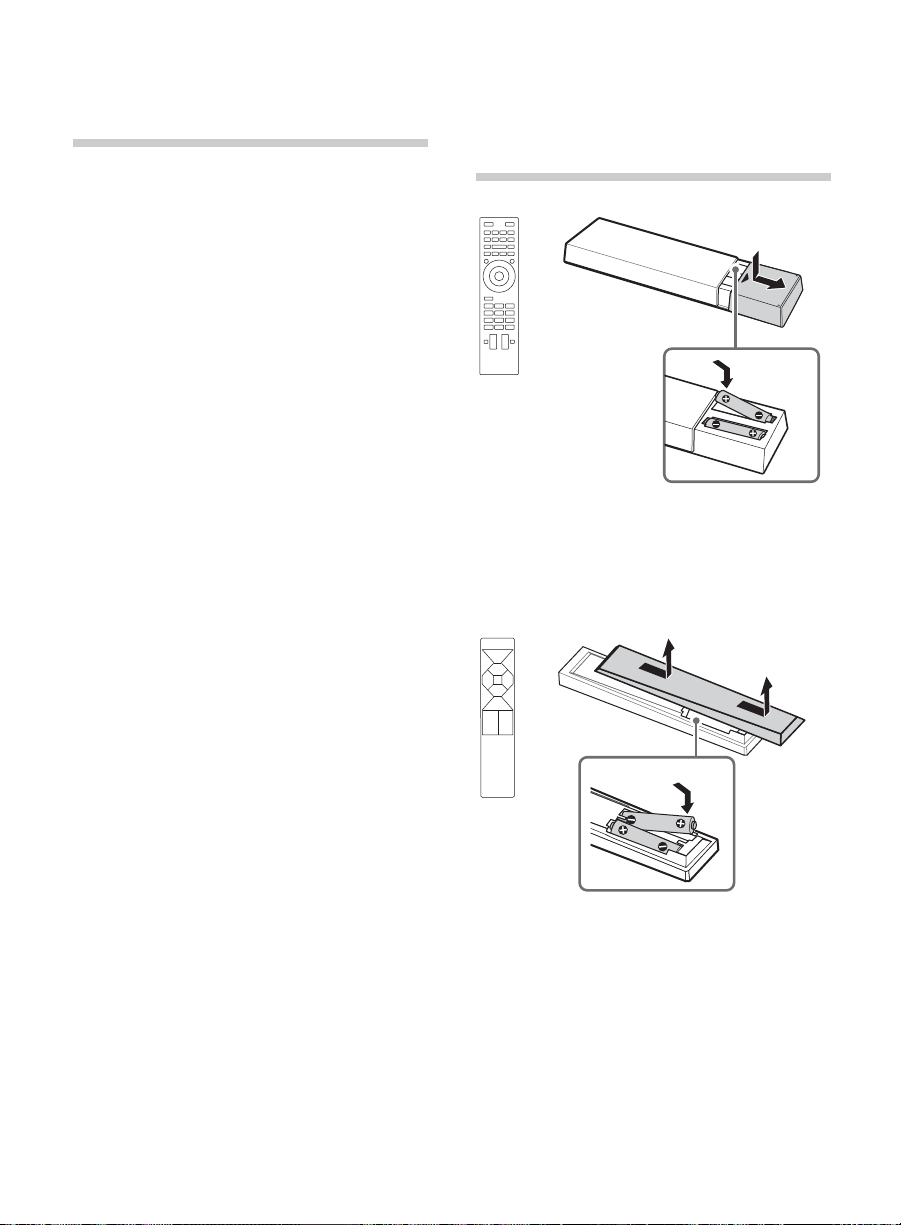
Inserting batteries into the remote control
1 Remove the protection sheet.
2 Push and slide the cover to open.
1 Remove the protection sheet.
2 Push and slide the cover to open.
8
Page 9
~
• One-touch Remote Control can only be used
after registration with the TV. For more
information on how to register, press
i-MANUAL, then select “Table of Contents”
t “Configuring Various Settings” t
“General Settings” t “Setting One-touch
Remote Control”.
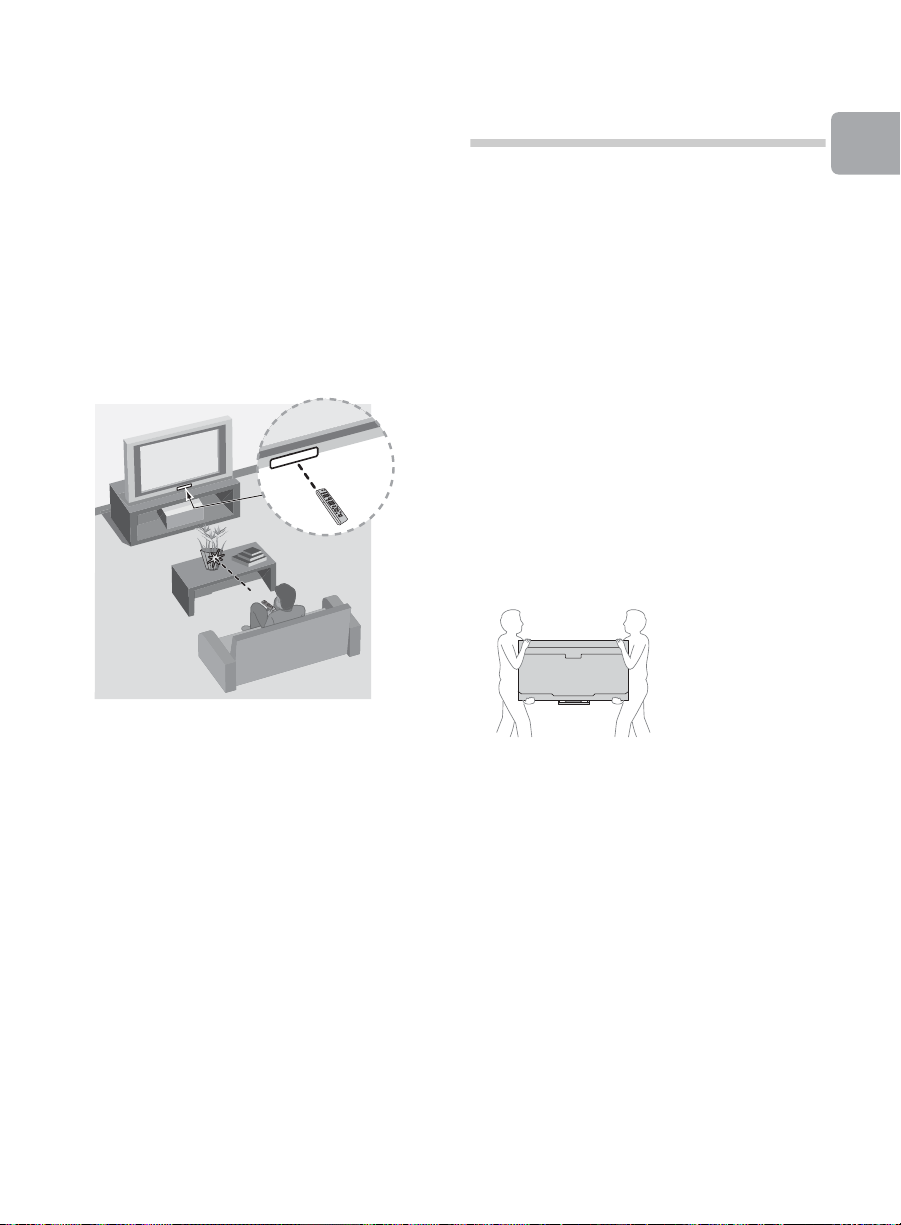
x Guidelines for Remote Control
• Point your remote control directly at the
IR sensor located on your TV.
• Make sure that no objects are blocking
the path between the remote control and
the IR sensor on your TV.
Before setting up your TV
Some TV models are packaged with a
detached Table-Top Stand so you can
mount your TV to a wall right away. See
page 21 (Using a Wall-Mount Bracket) if you
want to mount the TV to a wall. If you are not
mounting the TV to a wall, you will need to
attach the Table-Top Stand. You will need a
Phillips screwdriver (not supplied) and the
supplied screws to complete the task. Look
for the supplied Table-Top Stand instruction
leaflet.
Be sure to consider the following while
setting up your TV:
• Disconnect all cables when carrying the
TV.
• Carry the TV with the adequate number
of people; larger size TVs require two or
more people.
• Correct hand placement while carrying
the TV is very important for safety and to
avoid damage.
Getting Started
• Fluorescent lamps can interfere with your
remote control; try turning off the
fluorescent lamps.
• If you are having problems with the
remote control, reinsert or replace your
batteries and make sure that they are
correctly inserted.
• Ensure your TV has adequate ventilation,
see page 21.
• For best picture quality, do not expose
the screen to direct illumination or
sunlight.
• Avoid installing the TV in a room with
reflective wall and floor materials.
• Avoid moving the TV from a cold area to
a warm area. Sudden room temperature
changes may cause moisture
condensation. This may cause the TV to
show poor picture and/or poor color.
Should this occur, allow moisture to
evaporate completely before powering
the TV on.
(Continued)
9
Page 10
• Ensure that there are no objects in front
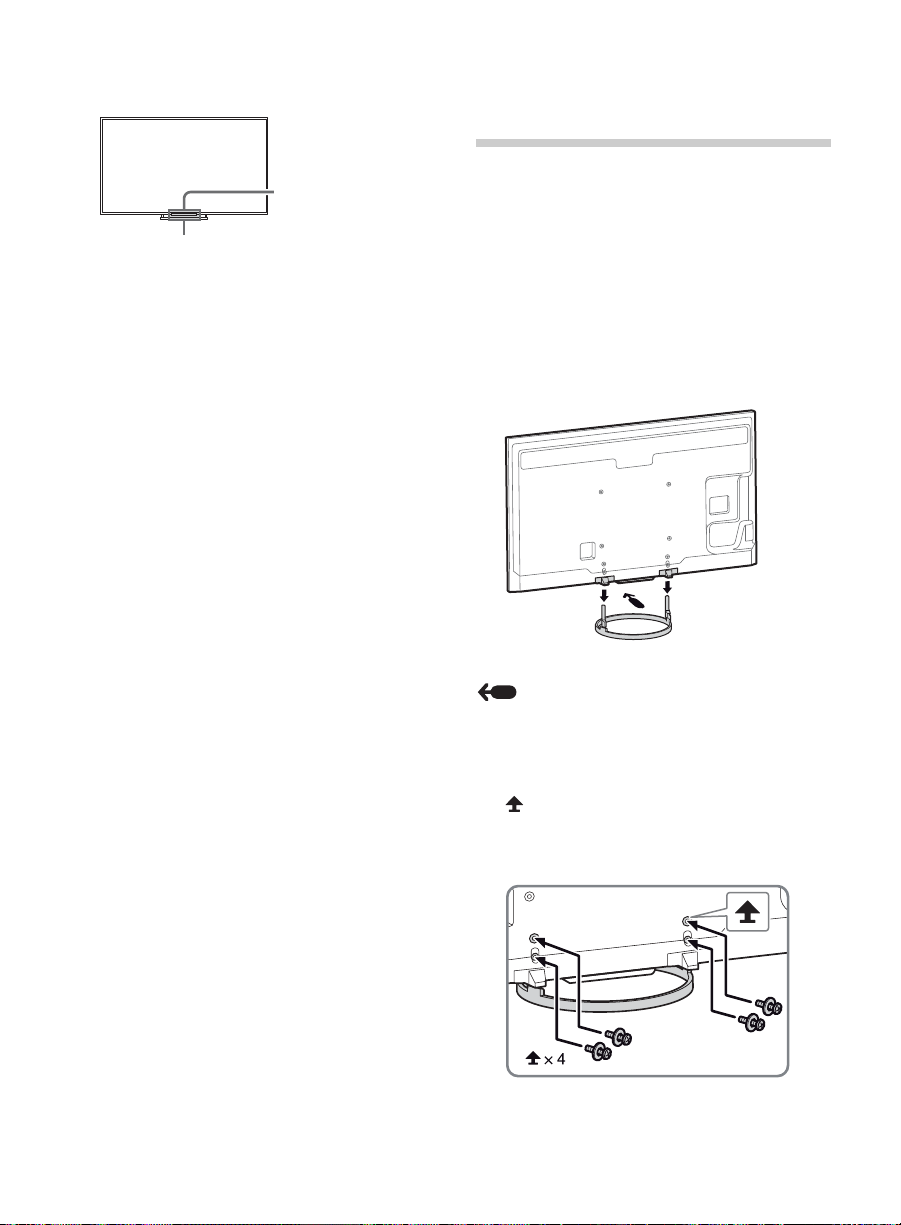
IR Sensor
3D Sync
Transmitter
of the TV.
1: Attaching the
Table-Top Stand
Refer to the supplied Table-Top Stand
leaflet for proper attachment.
~
• Do not put stress on the LCD panel or the
frame around the screen.
• Be careful to not pinch your hands or the AC
power cord when you install the TV set to the
Table-Top Stand.
1 Place the TV set on the Table-Top Stand.
10
Arrow direction shows front of the Table-Top
Stand.
2 Fix the TV to the Table-Top Stand using
the supplied screws. The arrow marks
indicate the location of the screw
holes used for securing the Table-Top
Stand.
Page 11
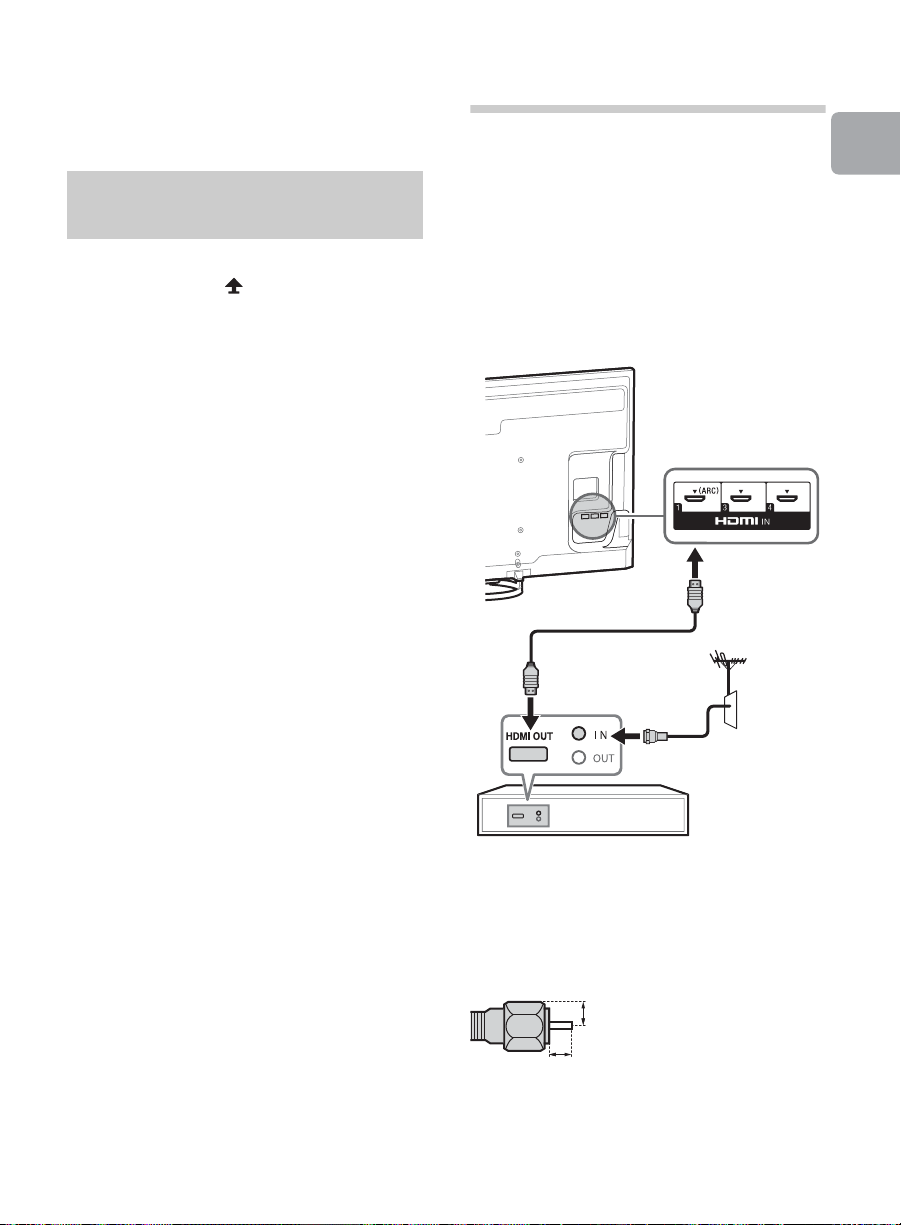
~
Set Top Box
(Reference drawing of the F type plug)
1.5 mm max.
7 mm max.
• If using an electric screwdriver, set the
torque at approximately 1.5 N·m
{15 kgf·cm}.
Detaching the Table-Top
Stand from the TV
To detach the Table-Top Stand from the TV,
remove the screws fixed in step 2.
~
• Do not remove the Table-Top Stand for any
reason other than to install corresponding
accessories on the TV.
• Be sure the TV is vertical before turning on.
To avoid uneven picture uniformity do not
power on the TV with the LCD panel facing
down.
• When installing the TV on a wall, remove the
screws from the rear of the TV. Be sure to
store the removed screws in a safe place,
keeping them away from children.
• When attaching the Table-Top Stand again,
be sure to fasten the screws (previously
removed) to the original holes on the rear of
the TV.
2: Connecting the TV
~
• Use an antenna cable connector no greater
than 14 mm thick.
• Use an HDMI cable connector within 12 mm
(thickness) × 21 mm (width).
• For more information on connections, refer to
the i-Manual.
x Shown with a Set Top Box with
HDMI connection
Getting Started
Recommendation of the F type plug
Projection of the inner wire from the
connection part must be less than 1.5 mm.
(Continued)
11
Page 12

x Shown with a Set Top Box with
Set Top Box
Cable or
Antenna
Use authorized
MHL 2 CABLE
with MHL logo MHL device
COMPONENT connection
x Cable System or VHF/UHF Antenna
System
x Shown with MHL device with MHL
connection
12
The MHL (Mobile High-Definition Link)
enables the TV to communicate with a
connected MHL-compatible device. The TV
can charge the connected MHL-compatible
device while playing photo/music/video
from it. You can use the TV remote control to
control the connected MHL-compatible
device.
Page 13

~
• If Auto Input Change (MHL) is set to On, the
TV automatically switches to HDMI IN 2/MHL
from other input when MHL-compatible
device is connected to HDMI IN 2/MHL jack.
The availability of Auto Input Change (MHL)
depends on whether the MHL-compatible
device can support this feature.
• You can continue normal usage of the
connected MHL-compatible device (such as
receiving calls) depending on its capability.
• Some remote control functions may not be
available depending on features of the
connected MHL-compatible device. Please
refer to the device manual for details.
• If Charge MHL during Power Off is set to
On, you can continue charging the MHL-
compatible device even when the TV is in
standby mode.
• This product is officially MHL-certified for
operation with other MHL-certified devices. If
you encounter any problems when using the
MHL function, please consult the device
manufacturer for support.
Getting Started
(Continued)
13
Page 14

x Shown with HD BRAVIA® Sync™ Basic Connection
*1Rear of TV
*
1
Blu-ray Disc
HD Cable Box or
HD Satellite Receiver
*
1
A/V Receiver
SAT (Dish)
Cable/Antenna
*1Signifies a BRAVIA Sync capable device.
*2The optical connection is only needed for A/V receivers that do not support ARC (Audio Return Channel).
*2Optical Connection
*
1
Rear of TV
14
Page 15

x Shown with HD Basic Connection with Home Theater System
VIDEO
L
R
Rear of TV
Cable/
Antenna
or
Blu-ray Disc/DVD
SD Cable Box or
SD Satellite Receiver
Cable/SAT
(Dish)
Home Theater System
*Optical
Connection
* The optical connection is only needed for home theater system that do not support ARC (Audio Return
Channel) when connecting with HDMI.
Rear of TV
Getting Started
(Continued)
15
Page 16

x Shown with PC Connection with SD VCR/DVD
Rear of TV
PC
DVDVCR
Splitter
Cable/Antenna
VCR/DVD Combo
Rear of TV
* DVI does not support audio signals. Connect the audio output of the PC to the PC speakers or an A/V receiver
to listen to sound from the PC.
*DVI
or
Notebook PC
Side Panel
16
Page 17

3: Securing the TV
Stand
Angle brace
(not supplied)
Rope or chain
(not supplied)
M4 machine
screw
(not supplied)
Screw (not
supplied)
Screw M4
Rope or
chain
TV’s
Table-Top
Stand
6-7 mm
Sony strongly recommends
taking measures to prevent
the TV from toppling over.
Unsecured TVs may topple
and result in property
damage, serious bodily
injury or even death.
Preventing the TV from
Toppling
• Secure the TV to a wall and/or stand.
• Do not allow children to play or climb on
furniture and TV sets.
• Avoid placing or hanging items on the
TV.
• Never install the TV on:
– slippery, unstable and/or uneven
surfaces.
– furniture that can easily be used as
steps, such as a chest of drawers.
• Install the TV where it cannot be pulled,
pushed, or knocked over.
• Route all AC power cords and
connecting cables so that they are not
accessible to curious children.
Getting Started
2 Secure the TV to the Stand.
Use the optional hardware listed as
follows (not supplied):
• M4 machine screw (screwed into the
TV’s Table-Top Stand)
• A screw or similar (attach it to the
Stand)
• Rope or chain (strong enough to
support the weight of the TV). Make
sure that there is no excess slack in
the rope or chain.
An alternative way to secure the TV is
with an optional Sony Support Belt Kit.
The Sony Support Belt Kit is available as
an optional accessory, depending on
your TV model.
Recommended Measures
to Secure the TV
Consider the following measures when
securing your TV to a Stand (not supplied).
1 Secure the Stand for the TV.
Make sure the Stand can adequately
support the weight of the TV. Use two
angle braces (not supplied) to secure
the stand. For each angle brace use the
appropriate hardware to:
• Attach one side of the angle brace to
the wall stud.
• Attach the other side to the Stand.
The length of the M4 machine screw
differs depending on the rope or chain
diameter. Please see below illustration.
(Continued)
17
Page 18

~
Anchor bolts (M6) (not supplied)
Wallmount
holes
Rope or
chain (not
supplied)
Wall-anchor
(not
supplied)
12
4
3
*
or
Contact Sony Customer Support to obtain
the optional Support Belt Kit by providing
your TV model name.
• For United States call: 1-800-488-7669
• For Canada call: 1-877-899-7669
3 Anchor the TV to the Wall.
Anchor the TV to the wall by using bolts,
wall anchor and chain (or rope).
4: Bundling the
cables
Before bundling the cables, remove the
cable holder from the AC cover. Reuse the
cable holder to bundle the other cables.
~
• Do not bundle the AC power cord together
with other cables.
* When installing on the wall, attach the cable holder
as shown below.
~
• Your TV is shipped with screws attached
to the rear of the TV depending on the TV
model. (They are fastened in the screw
holes for wall mounting.) Be sure to
remove the upper two screws prior to
anchoring the TV to a wall.
• Securing the TV to the stand without
securing the TV and the stand to the wall
provides minimum protection against the
TV toppling over. For further protection,
be sure to follow the three measures
recommended.
18
Page 19

5: Connecting the TV
TV
Internet
Modem
with router
functions
Router
Modem
Internet
or
Wireless
router
Modem
Internet
TV
to the Internet
When you connect this TV to the Internet,
you can enjoy multiple functions. For details
on the functions, refer to the i-Manual.
~
• You will need to contract with an Internet
service provider to connect to the Internet.
Preparing a wired network
Preparing a wireless LAN
The built-in wireless LAN device allows you
to access the Internet and your home
network. With this feature, you can connect
to a wireless LAN and enjoy the benefits of
networking in a cable-free environment.
Before setting up the wireless LAN function
of the TV, be sure to set up a wireless LAN
router.
Getting Started
~
• For LAN connections, use a Category 7
cable (not supplied).
19
Page 20

6: Running initial
setup
3 Press V/v/B/b to select an item, then
press .
Follow the instructions on the screen.
~
• Home mode sets the TV to settings
optimized for home viewing (this setting
is ENERGY STAR compliant).
1 Complete your cable connections before
proceeding with the Initial Setup.
Connect the TV to your nearest power
outlet.
2 Press "/1 on the TV. The illumination
LED will light up in white.
When you switch on the TV for the first
time, the Language menu appears on
the screen.
~
• When you turn on the TV for the first time,
the TV requires some internal processing
for optimization before you can perform
the initial setup. There will be no picture
and sound, and the illumination LED on
the front of the TV blinks white for about
40 seconds. Do not turn off the TV during
this process.
This process has been completed at the
factory for some TVs.
• The illumination LED lights up in different
colors according to the status of the TV.
If you do not wish to light up the
illumination LED, you can turn it off later.
Press HOME, then select Settings t
Preferences t Front Panel
Illumination t Illumination LED t
Off. You can also press OPTIONS, then
select Illumination LED t Off.
4 Scan for available channels. If you
receive channels from a cable box or
satellite receiver and do not wish to use
the TV’s built-in tuner, select Skip.
5 Set up the Internet settings. If you do not
access the Internet, or to set up later,
select Skip. After you select Continue or
Start (depending on model) at the
Internet setup confirmation screen,
select Auto to connect to the network
automatically. Select Custom to connect
manually.
~
• If you use WEP security, select Custom
t Wireless Setup t Scan. Then,
select the network name (SSID) you want
to connect. If you cannot find the
required network name, select [Manual
Entry] and press to enter network
name.
• To set Network Setup later, press
HOME, then select Settings t Network
t Network Setup.
• Use the optional USB Wireless LAN
Adapter to connect with your wireless
router (or access point) at 5GHz. Insert
USB Wireless LAN Adapter and set Wi-Fi
Direct to Off. Press HOME, then select
Settings t Network t Wi-Fi Direct t
Off.
20
Page 21

Using a Wall-Mount
8-12 mm
Screw
Mounting Hook
Hook attachment on rear of
TV set
Leave at least this much space around the set.
Installed with stand
4 inches
(10 cm)
11
7
/8 inches
(30 cm)
4 inches
(10 cm)
2
3
/8 inches
(6 cm)
Installed on the wall
Leave at
least this
much space
around the
set.
4 inches
(10 cm)
4 inches (10 cm)
4 inches
(10 cm)
11
7
/8 inches
(30 cm)
Never install the TV set as follows:
Air circulation is blocked. Air circulation is blocked.
Wall Wall
Bracket
Installing the TV against a wall or enclosed area
Your TV can be mounted on a wall using a
Wall-Mount Bracket (not supplied) out of the
box as packaged. If the Table-Top Stand is
attached to the TV, the TV may require
detaching the Table-Top Stand; see
page 11 (Detaching the Table-Top Stand
from the TV).
Prepare the TV for the Wall-Mount Bracket
before making cable connections.
For product protection and safety
reasons, Sony strongly recommends that
installation of your TV on the wall be
performed by qualified professionals. Do
not attempt to install it yourself.
• Follow the instruction guide provided
with the Wall-Mount Bracket for your
model. Sufficient expertise is required in
installing this TV, especially to determine
the strength of the wall for withstanding
the TV’s weight.
• The length of the screw for Wall-Mount
Bracket differs depending on the
mounting hook thickness. Please see
below illustration.
Make sure that your TV has adequate
Getting Started
ventilation. Allow enough space around the
TV as shown in the illustration.
• Be sure to store the unused screws and
Table-Top Stand in a safe place until you
are ready to attach the Table-Top Stand.
Keep the screws away from small
children.
~
• Read the supplied Safety Booklet for
additional safety information.
~
• Inadequate ventilation can lead to
overheating of the TV and may cause
damage to your TV or cause a fire.
21
Page 22

Using Your BRAVIA TV
1
2
2
1
or or
Rear of TV
Watching TV
1 Turn on the TV.
Press "/1 on the TV or POWER on the remote
control to turn on the TV.
2 Select a TV channel or select an
input.
x To select digital channels
Use 0-9 and . For example, to enter channel
2.1:
Press , and , then press .
~
• See below illustration for location of the CH+/-,
, V/v/B/b, , and HOME buttons on the
+/-
TV.
22
Page 23

1
2
3
4
5
1 PIC OFF
Turns picture off, and sound remains on.
2 Color buttons
When the color buttons are available, an
operation guide appears on the screen.
3 JUMP
You can jump back and forth between two
channels or inputs. The TV alternates
between the current channel or input and the
last channel or input that was selected.
4 DISPLAY
Displays channel number, details of
programs, and the clock.
5 SUBTITLE/CC
You can turn closed captions/subtitles on/off.
Watching 3D contents
This feature lets you experience powerful 3D entertainment, such as stereoscopic 3D games
and 3D Blu-ray Disc. Refer to the i-Manual as well as the instruction manual supplied with the
3D Glasses on how to set the 3D settings or watch the 3D contents.
Frequently used buttons
Using Your BRAVIA TV
23
Page 24

Selecting various functions and
2, 3
1
OPTIONS
settings (Home Menu)
You can select the features of your TV from the Home menu.
Here is an example on how to select an item and
modify the TV settings.
1 Press HOME.
2 Press V/v to select Settings
category.
The contents of Settings are displayed
horizontally.
24
See page 25 (Category list) for all categories.
3 Press B/b to select a desired
setting item, then press .
4 Modify the settings.
x To exit the Home menu
Press HOME.
x To select using the OPTIONS button
Press OPTIONS.
A list of convenient functions and menu shortcuts
are displayed. The menu items vary based on the
current input and/or content.
Page 25

Category list
Category
The categories are available depending on your TV model, region and country.
Featured
History
TV
Applications
Connected Devices
Settings
Provides information on available applications and content.
If there is no network connection, or the Featured Display setting is
set to Off, the Featured category will not be displayed.
Displays recently viewed items.
Allows you to select a list of TV channels, or a program guide.
Program guide is available depending on your TV model or region.
A list of channels registered as favorites in the TV category are
displayed.
Launches applications that require an Internet connection, including
Media Player which does not require an Internet connection.
A list of applications registered as favorites in the Applications
category are displayed.
Enables selection of devices connected to the TV.
Provides settings (e.g. picture settings, sound settings, key tone
setting) that allow you to customize your TV.
Using Your BRAVIA TV
25
Page 26

Watching Internet Video
2, 3, 4
1
This feature serves as a gateway to Internet content, delivering a variety of on-demand
entertainment straight to your TV. You can enjoy video content, including movies and cartoons.
You will need to make a broadband Internet connection. For details, see page 19
(5: Connecting the TV to the Internet).
1 Press HOME.
2 Press V/v to select Applications
category.
3 Press B/b to select All
Applications, then press .
4 Press V/v/B/b to select the
desired service, then press .
~
• If you experience difficulties with this feature, check that the Internet connection is set up properly.
• The interface to Internet content depends on the Internet content providers.
• Services block video content based on the Parental Lock setting of the TV. Some service
providers do not support this function.
• To update Internet Video content services, press HOME, then select Settings t Network t
Refresh Internet Content.
26
Page 27

Looking for Instructions
1
2
RETURN
Arrow mark*
Looking for instructions in the electronic manual (i-Manual)
Operating instructions are built into your BRAVIA TV and can be displayed on the screen.
To learn more about your TV features, access your i-Manual with the touch of a button.
1 Press i-MANUAL.
2 Select an item.
1 Press B/b to select an item.
2 Press V/v/B/b to select an item, then press
.
* If an arrow mark appears, press v repeatedly to
display more items.
(Continued)
27
Looking for Instructions
Page 28

The page of the selected item appears.
~
• If your TV is connected to the Internet, you
can check for latest FAQ (Frequently Asked
Questions). Refer to “Troubleshooting” in the
i-Manual, select “Frequently Asked
Questions” and then follow the instructions
on the screen. (Available in English and for
United States only)
• You can step through pages using B/b.
Press RETURN to return to the previous
page.
Saving frequently viewed
pages (Bookmark)
You can save frequently viewed pages for
easy access anytime.
x To access the bookmarked page
When displaying the i-Manual, press the
blue button on the remote control to display
the bookmark list. Press V/v to select the
desired item, then press .
~
• To return to the previous screen, press
RETURN.
x To remove a bookmark
When the bookmarked page is displayed,
press the red button on the remote control.
x To save a page
In the page to bookmark, press the red
button on the remote control.
28
Page 29

Displaying the page again
i-Manual screen previously displayed
BRAVIA TV screen
while operating the TV
You can switch between the i-Manual
screen and the TV screen. This feature
allows you to refer to the instructions in the
i-Manual while using your BRAVIA TV. Press
i-MANUAL to switch between the i-Manual
screen previously displayed and the TV
screen.
~
• To jump to the top page of i-Manual, press
the yellow button on the remote control. You
can also press HOME, then select Settings
t i-Manual to jump to the top page of
i-Manual.
• Once you turn off the TV or the TV goes to
standby mode, the i-Manual will be
displayed from the top page when you select
i-Manual.
Looking for Instructions
29
Page 30

Additional Information
Troubleshooting
When the illumination LED is flashing in red, count how many times it flashes
(interval time is three seconds).
Press "/1 on the TV to turn it off, disconnect the AC power cord, and contact Sony Customer
Support (information provided on the front cover) with how many times the indicator flashes.
When the illumination LED is not flashing, check the items in the table as
follows.
Also refer to “Troubleshooting” in the i-Manual. If the problem persists, contact Sony Customer
Support (information provided on the front cover).
Condition Explanation/Solution
There is no picture (screen
is dark) and no sound.
Some programs cannot be
tuned.
The remote control does not
function.
The Parental Lock
password has been
forgotten.
The TV and its surrounding
become warm.
How to reset the TV to
factory settings
Frozen audio or video, a
blank screen, or the TV
does not respond to TV or
remote control buttons.
• Check the antenna/cable connection.
• Connect the TV to the AC power, and press "/1 on the
TV or POWER on the remote control.
• Check the antenna.
• Replace the batteries.
• Your TV may be in SYNC mode.
Press SYNC MENU, select TV Control and then
select Home (Menu) or Options to control the TV.
• Enter 4357 for the PIN code. (PIN code 4357 is always
accepted.)
• When the TV is used for an extended period of time,
the TV and its surroundings may become warm to
touch. This is not a malfunction of the TV.
• Turn on the TV. While holding down V on the remote
control, press "/1 on the TV. (The TV will turn itself off,
then back on again.) Release V.
WARNING: The reset will clear all of your customized
settings including the Parental Lock setting.
• Perform a simple reset of the TV by unplugging the
AC power cord for two minutes, then plug it in again.
30
Page 31

How to care for your BRAVIA TV
Safety is very important. Please read and follow the safety documentation (Safety Booklet)
separately provided.
Unplug the TV and other connected equipment from the wall
outlet before you begin cleaning your TV.
• Wipe the LCD screen gently with a soft cloth.
• Stubborn stains may be removed with a cloth slightly
moistened with a solution of mild soap and warm water.
• If using a chemically pretreated cloth, please follow the
instruction provided on the package.
• Never spray water or detergent directly on the TV set. It
may drip to the bottom of the screen or exterior parts and
enter the TV set, and may cause damage to the TV set.
• Never use strong solvents such as a thinner, alcohol or
benzine for cleaning.
• Do not plug in the TV into the wall outlet until the moisture
from cleaning has evaporated.
The TV should also be placed on a stable surface to prevent it from toppling over (see
page 17). If you have young children or pets at home, check regularly to ensure the TV is
securely fastened.
31
Additional
Information
Page 32

Specifications
System
Television system NTSC: American TV standard
Channel coverage Analog terrestrial: 2 - 69 / Digital terrestrial: 2 - 69
Panel system LCD (Liquid Crystal Display) Panel
Speaker output 10 W + 10W +10W
Input/Output jacks
CABLE/ANTENNA 75-ohm external terminal for RF inputs
VIDEO IN 1 Video / Audio input (phono jacks)
COMPONENT IN
VIDEO IN 2
HDMI IN 1/2/3/4 Video (2D): 1080p (30, 60 Hz), 1080/24p, 1080i (60 Hz), 720p (30, 60 Hz), 720/24p,
MHL
(common with HDMI IN 2)
AUDIO OUT/Headphones Stereo mini jack
DIGITAL AUDIO OUT
(OPTICAL)
LAN 10BASE-T/100BASE-TX connector (Connection speed may differ depending on the
USB/DLNA Refer to the i-Manual for supported formats.
REMOTE RS232C, Serial Control mini jack; IR IN mini jack.
Others
Supplied accessories See page 8 (Checking the accessories).
Optional accessories Connecting cables
ATSC (8VSB terrestrial): ATSC compliant 8VSB
QAM on cable: ANSI/SCTE 07 2000 (Does not include CableCARD functionality)
Analog Cable: 1 - 135 / Digital Cable: 1 - 135
YP
BPR (Component Video): 1080p (60 Hz), 1080i (60 Hz), 720p (60 Hz), 480p, 480i
Audio input (phono jacks)
Video input (common phono pin with Y input)
Video (3D):
Frame Packing 1080p (30 Hz), 1080/24p, 1080i (60 Hz), 720p (30, 60 Hz), 720/24p
Side-by-Side 1080p (60 Hz), 1080/24p, 1080i (60 Hz), 720p (60 Hz)
Over-Under 1080p (30, 60 Hz), 1080/24p, 1080i (60 Hz), 720p (60 Hz)
Audio: Two channel linear PCM: 32, 44.1 and 48 kHz, 16, 20 and 24 bits, Dolby Digital
ARC (Audio Return Channel) (HDMI IN 1 only)
Video (2D): 1080p (30 Hz), 1080/24p, 1080i (60 Hz), 720p (30, 60 Hz), 720/24p, 480p,
Video (3D):
Side-by-Side 1080/24p, 1080i (60 Hz), 720p (60 Hz)
Over-Under 1080p (30 Hz), 1080/24p, 1080i (60 Hz), 720p (60 Hz)
Audio: Two channel linear PCM: 32, 44.1 and 48 kHz, 16, 20 and 24 bits, Dolby Digital
Digital optical jack (Two channel linear PCM, Dolby Digital)
network environment. 10BASE-T/100BASE-TX communication rate and
communication quality are not guaranteed for this TV.)
These jacks are for receiving the external control signal.
Support Belt Kit
Camera and Microphone Unit: CMU-BR200/CMU-BR100
USB Wireless LAN Adapter: UWA-BR100
Active 3D Glasses:
480p, 480i, PC Formats
480i
TDG-BT500A
Operating temperature 32 ºF – 104 ºF (0 ºC – 40 ºC)
32
Page 33

Model name KDL- 65W850A
Power and others
Power requirement 110-240 V AC, 50/60 Hz (U.S.A./Canada 120 V AC, 60 Hz)
Power
consumption
Screen size
(inches measured diagonally)
Display resolution 1,920 dots (horizontal) × 1,080 lines (vertical)
Dimensions*with stand (mm)
Mass
in use 227 W
in standby Less than 0.15 W with 120 V AC and less than 0.3 W with 240 V AC
*
without stand
wall-mount hole pattern (mm)
wall-mount screw size (mm) M6 (length: see diagram on page 21.)
with stand (kg)/(lb.) 35.6 / 78.5
*
without stand (kg)/(lb.) 34.2 / 75.4
(inches)
(inches)
(inches)
64.5 inches
(65 class)
1,468 × 894 × 405
57
(mm)
1,468 × 863 × 64
57
400 × 300
15
7
/8 × 35 1/4 × 16
7
/8 × 34 × 2 5/
3
/4 × 11 7/
8
8
* Screen size, dimensions and mass are approximate values.
• Optional accessories availability depends on countries/region/TV model/stock.
• Design and specifications are subject to change without notice.
33
Additional
Information
Page 34

Additional Information
Safety Information
Declaration of Conformity
Trade Name: SONY
Model: KDL-65W850A
Responsible Party: Sony Electronics Inc.
Address: 16530 Via Esprillo,
San Diego, CA 92127 U.S.A.
Telephone Number: 858-942-2230
This device complies with part 15 of the FCC
rules. Operation is subject to the following two
conditions:
(1) This device may not cause harmful
interference, and (2) this device must accept
any interference received, including
interference that may cause undesired
operation.
FCC Related Information
This equipment has been tested and found to
comply with the limits for a Class B digital device,
pursuant to Part 15 of the FCC Rules. These limits
are designed to provide reasonable protection
against harmful interference in a residential
installation. This equipment generates, uses and
can radiate radio frequency energy and, if not
installed and used in accordance with the
instructions, may cause harmful interference to
radio communications. However, there is no
guarantee that interference will not occur in a
particular installation. If this equipment does
cause harmful interference to radio or television
reception, which can be determined by turning
the equipment off and on, the user is encouraged
to try to correct the interference by one or more of
the following measures:
❑ Reorient or relocate the receiving antenna.
❑ Increase the separation between the
equipment and receiver.
❑ Connect the equipment into an outlet on a
circuit different from that to which the receiver
is connected.
❑ Consult the dealer or an experienced radio/TV
technician for help.
Pursuant to FCC regulations, you are cautioned
that any changes or modifications not
expressly approved in this manual could void
your authority to operate this equipment.
Safety and Regulatory
This equipment complies with FCC/IC radiation
exposure limits set forth for uncontrolled
equipment and meets the FCC radio frequency
(RF) Exposure Guidelines in Supplement C to
OET65 and RSS-102 of the IC radio frequency
(RF) Exposure rules. This equipment has very low
levels of RF energy that it deemed to comply
without maximum permissive exposure evaluation
(MPE). But it is desirable that it should be installed
and operated with at least 20 cm and more
between the radiator and person’s body
(excluding extremities: hands, wrists, feet and
ankles).
This device and its antenna(s) must not be colocated or operating with any other antenna or
transmitter except Grant condition.
Note
This television includes a QAM demodulator
which should allow you to receive unscrambled
digital cable television programming via
subscription service to a cable service provider.
Availability of digital cable television
programming in your area depends on the type of
programming and signal provided by your cable
service provider.
34
Page 35

Page 36

Online
Registration:
Software
Updates:
For Your Convenience
Be sure to register your TV.
United States
Canada
Your TV is capable of receiving software updates. For the
latest information about software updates for your TV, visit:
United States
Canada
NOTE: If your TV is connected to the Internet, you can check
for software updates by selecting Settings, Product
Support and then Software Update.
http://productregistration.sony.com
http://www.sony.ca/registration
http://www.sony.com/tvsupport
http://www.sony.ca/support
© 2013 Sony Corporation Printed in Mexico
 Loading...