

Page 1

HISTORY INFORMATION FOR THE FOLLOWING MANUAL:
SERVICE MANUAL (COMMON)
Version Date Subject
1 01/2014 1st Issue.
RB2G CHASSIS
Segment: HM
2 04/2014 Model Addition : Add 60” Models ( Model List , pg 45-46 )
LCD TV
9-888-150-02
For SM - Uni q u e , pleas e ref er :
9-888-150-A1 ( America )
9-888-150-C1 ( China)
9-888-150-E1 ( Europe )
9-888-150-P1 ( Pan Asia )
Page 2

SERVICE MANUAL (COMMON)
RB2G CHASSIS
Segment: HM
LCD TV
Page 3

MODEL LIST
THIS SERVICE MANUAL CONTAINS COMMON INFORMA TION FOR BELOW REGIONS AND MODE LS :
REGION
ASIA CHINA AMERICA JAPAN EUROPE
MODEL
KDL-40W580B KDL-48W580B
KDL-40W590B KDL-48W585B
KDL-40W600B KDL-48W590B
KDL-40W605B KDL-48W600B
KDL-40W607B KDL-48W605B
KDL-40W608B KDL-48W607B
KDL-48W608B
KDL-48WM15B
KDL-60W600B
KDL-60W605B
KDL-60W607B
KDL-60W608B
KDL-60W610B
KDL-60W630B
KDL-60WM15B
3
Page 4

Overvie w of C on trol B utton s .......... .. .. ... .. ... .. ... .. ... .. .... . .... . .... .. ... .. ... .. ... .. ..
TA BLE OF C ON TEN TS
Sect ion T itle Page
1. SAFETY NOTES
1-1. Warnings and Caution……………………………………… ……………… . 5
1-2. Caution Handling of LCD P ane l ......…………….................................... 5
1-3. Caution About the Lithium Battery……………………………… ………….. 6
1-4. Safe ty C he ck Out ........................……………......................................... 6
1-5. Leakage Te st .......................................................................................... 6
1-6. How to Find a Good Earth Ground………………………………………… 7
1-7. Lead Free Information….…………………………………………………… 7
1-8. Handling the Flexible Flat Cable (FFC)……………………………………. 7
2. SELF DIAGNOSTIC FUNCTION
2-1.
2-2. LED Display Control ………..................................................................... 9
2-3. LED Pattern………………........................................................................ 9
2-4. Standby LED Error Display…………………………………………………. 9
2-5. Triage Chart ............................................................................................ 10
3. TROU BL E S HOOT ING
3-1. No Power…….……………………………………………………………….. 11
3-2. LED Blinking……………….………………………………………............... 12
3-3. No Sound……………………………......................................................... 20
3-4. No Picture................................................................................................. 21
3-5. Side Buttons Malfunction……………………………………………………. 23
3-6. IR Remote Commander Malfunction……………………………………… 23
3-7. Light Sensor Error……………………………… ……………… ………… . 23
3-8. Network Malfunction: Ethernet (Wired)………………………… …………. 24
3-9. 3D-Glasses (Active) malfunction…………………… …… ………… …… .. 25
3-10. Wireless Ne twork Malfunction…………………………… ……………… . 26
3-11. Bluetooth Malfunction……………………………………………………….. 27
8
Sect ion T itle Page
4. SERVICE ADJUSTMENTS
4-1. Accessing Service Mode ..................................................................... 28
4-2. Transition o f Each M icro’s S ervice Mode……….……………………… 28
4-3. Change Data b y Service Mode 1………………………………….. …… . 28
4-4. Change Data by Se rvice Mode 2……………………… …… …………... 29
4-5. Restore WB / Gamma Adj. Data to B Board.………………………….. 30
4-6. WB Adjustment by Service Mode…………………………… ………….. 31
4-7. VCOM Adjustment (NFR-AUO/SDC/FXC Pane l) …………………………… 31
4-8. VCOM Adjustment (HFR-AUO /FXC Panel) …………………………………. 32
4-9. REC Setting………………………………………................................... 32
4-10. Reset Panel Operation Time………………………………… ……....... .. 33
4-11. Set to Shipping Condition……………………………………….............. 33
4-12. Summary of Service Control……………………………………….......... 33
4-13. Service Menu Tree……………………………………… ....... ........ ......... 34
4-14. How to Enter Self Diagnosis Display…………………………………… 35
5. DIAGRAMS
5-1. Circuit Board Location ......................................................................... 38
5-2. Block Diagram...................................................................................... 39
5-3. Connector Diagram ………………………………………...................... 44
Please refer Service Manual – Unique for below information :
-Safety Warnings
-Wire Dressing
-Circuit Board Location
-Disassembly and Exploded View.
4
Page 5

SECTION 1
SA FETY NOTES
RB2G CHASSIS
W580B/W585B/W590B/W600B/W605B/W607B/W608B/WM15B
1-1. Warn ings and Caution
1) These servicing instructions are for use by qualified service personnel only.
2) To reduce the risk of electric shock, do not perform any servicing other than
that contained in the operating instructions unless you are qualified to do so.
3) An isolation transformer should be used during any service to avoid
Possible shock hazard, because of live chassis. The chassis of this receiver is
directly connected to the ac power line.
4) Be sure to follow these guidelines to protect your property and
avoid causing serious injury :
• Carry the TV with an adequate number of people; larger size TVs require
two or more people.
• Correct hand placement while carrying the TV is very important for
safety and to avoid damages.
5) Components identified by shading and mark on the exploded views,
and in the parts list are critical for safe operation. Replace these
components with Sony parts whose part numbers appear as shown in this
manual or in supplements published by Sony. Circuit adjustments that are
critical for safe operation are identified in this manual. Follow these
procedures whenever critical components are replaced or improper
operation is suspected.
!
1-2. Caution Handling of LCD Panel
When repairing the LC D Panel, make sur e you are grounded with a wrist band.
When repairing the LC D Panel on the wall, the panel must be secured using the
4 mounting hol es on the rear cover .
1) Do not press the panel or frame edge to avo id the risk of electr ic shock.
2) Do not scr atch or press on the panel w ith any sharp object s.
3) Do not leave the module in high temperat ure or in areas of high hum idity for
an extended per iod of time.
4) Do not expose the LCD panel to direct sunlight.
5) Avoid contact with water . I t may cause short ci rcu it within the module.
6) Disco nnect the AC power when replaci ng the backl ight ( CCF L) or
inverter cir cuit . (Hi gh voltage occur s at the inver ter ci rcui t at 650Vrms)
7) Always cl ean the LCD panel with a soft cloth mater ial .
8) Use care when handli ng the wir es or connectors of the inver ter ci rcui t.
Damaging the wir es may cause a short cir cuit.
9) Protect the panel from ESD to avoid damaging the elect roni c circuit (C-MOS).
10) Dur i ng the r epai r , DO NOT leave the Power On or Bur n-in period for more
than 1 hour w hil e the T V i s face dow n on a cloth.
Figure 1. TV is faced down on a cloth during repair.
5
Page 6

Safety Notes
1-3. Caution About the Lithium Battery
1) Danger of explosion if battery is incorrectl y replaced. Replace only with
the same or equivalent type.
2) Outer case broken battery shoul d not contact to water.
1-4. Safety Check-Out
After correcting the original service problem, perform the following
safety checks before releasing the set to the customer:-
1) Check the area of your repair for unsoldered or poorly soldered
connections. Check the entire board surface for solder splashes and bridges.
2) Check the inter board wiring to ensure that no wires are pinched or
contact high-wattage resistors.
3)Check all control knobs, shields, covers, ground straps and mounting
hardware have been replaced. Be absolutely certain you have replaced all
the insulators.
4) Look for unauthorized replacement parts, particularly transistors that
were installed during a previous repair. Point them out to the customer and
recommend their replacement.
5) Look for parts which, though functioning show obvious signs of
deterioration. Point them out to the customer and recommend their
replacement.
6) Check the line cords for cracks and abrasion. Recommend the
replacement of any such line cord to the customer.
7) Check the antenna terminals, metal trim, metalized knobs, screws and all
other exposed metal parts for AC leakage. Check leakage test as described
next.
8. For safety reasons, repairing the Power board and/or Inverter board is
prohibited.
1-5.Leakage T est
The AC leakage from any exposed m etal par t to earth ground and from all
exposed metal par ts to any exposed metal part having a retur n to chassi s must
not exceed 0.5mA (500 micr oamperes) .
Leakage cu rrent can be measur ed by any one of the three m ethods:-
1) A commerci al leakage t ester such as the SI M PSON 229 or RCA WT540A.
Follow the manufacturers instr uctions to use those instruct ions.
2) A battery-operate d AC milliampmeter The DATA PRECISI ON 245 digital
multimeter i s suitable for this job.
RB2G CHASSIS
W580B/W585B/W590B/W600B/W605B/W607B/W608B/WM15B
3) Measu ring the volt age dr op across a resi stor by means of a VOM or battery
operated AC voltmeter. The 'li mi t' indication is 0.75V so analog m eters m ust
have an accurate low volt age scale. T he SIM PSON' S 250 and SANWA SH63TRD are exampl es of passi ve VOM s that are sui table. N early all battery
operated digi tal mul timeter that have a 2 VAC range are sui table.
(see Figur e 2.)
Figure 2. AC voltmeter to check AC leakage
1-6. How to Find a Good Earth Ground
1) A cold-water pi pe is a guaranteed ear th ground; t he cover-pl ate retaini ng
screw on most AC outlet boxes i s also at earth ground.
2) If the retaining scr ew is to be used as your earth ground, veri fy that it is at
ground by measuring the resistance between i t and a co l d-w ater pipe w ith an
ohmmeter. T he readi ng should be zer o ohms.
3) I f a cold-w ater pi pe is not accessi ble, connect a 60- to 100-watt t roublelight (not a neon lamp) between the hot side of the recept acle and the
retaining scr ew. Tr y both slots, if necessa ry, to locate the hot si de on the line;
the l am p shoul d l i ght at normal bril l i ance i f the screw is at ground potenti al
(see Figur e 3).
Figure 3. Checking for earth
ground.
6
Page 7

Safety Notes
1-7. Lead Free Inform ation
The circui t boards used i n these model s have been pr ocessed using Lead
Free Solder. The boards ar e identified by the LF logo loca ted close to the
board designation.
W580B/W585B/W590B/W600B/W605B/W607B/W608B/WM15B
Pleas e hol d rei nfor ce men t b oard an d
plunge it to depths.
Main Board
RB2G CHASSIS
Please pull out FFC while pushing the
but ton of both end s at the s ame tim e.
Main Board
The servici ng of these boards r equires special precautions. It is strongly
recommended to use Lead Free Solder m ateri al in order to guarantee optimal
Figure 4: LF Logo
Figure 5: LF logo on circuit board
quality of new solder joi nts.
1-8. Handling the FLEXIBLE FLAT CABLE (FFC)
When you insert / pull out FFC, please grasp a reinforcement board and main
body of FFC.
< Insertion>
<Pull out>
7
Page 8

Self Diagnostic Function
2-1. Overview of Control Buttons
2-1-1. (EXCEPT CHIN A)
SECTION 2
SELF DIAGNOSTIC FUNCTION
2-1-2. (CHINA)
RB2G CHASSIS
W580B/W585B/W590B/W600B/W605B/W607B/W608B/WM15B
FRONT
REAR OF TV
HOME
Press to display
the TV Home Menu.
Power
Turn the TV on or switch to standby mode
CH+/- (Channel) / / ,
+/- (Volume) / / .
Press to select the next or
previous channel.
Press to adjust the volume.
In TV Home Menu: buttons
will work as , , , .
INPUT SELECT /
SELECT/ CONFIRM
Press to select the next or
previous channel.
In TV Home Menu: buttons
will work as (select/confirm)
FRONT
REAR OF TV
频道 +
频道 -
主菜单
主菜单
Press to display
the TV Home Menu.
Power
Turn the TV on or switch to standby mode
频道
+/- (Channel) / / ,
+/- (Volume) / / .
Press to select the next or
previous channel.
Press to adjust the volume.
In TV Home Menu: buttons
will work as , , , .
INPUT SELECT /
SELECT/ CONFIRM
Press to select the next or
previous channel.
In TV Home Menu: buttons
will work as (select/confirm)
8
Page 9

Self Diagnostic Function
RB2G CHASSIS
W580B/W585B/W590B/W600B/W605B/W607B/W608B/WM15B
2-2. LED Display Control
2-4. Standby LED Error Display
White Center
Status
LED
(app li cab le f or
Side RGB LED
Si de Amber
LED
Remarks
HSC2 only)
( by power saving switch off and *1)
Pow er Of f
- Off Off
*1 power switch off (by side
key)
Pow er On - G reen Li t Off
STBY/i.LINK STBY/PC STBY
( by rem ote c ontrol off onl y )
- Off Off
Sky pe C al l R ec ei ve - White one shot Off
Pi cture Off - White one shot Off
Devi ce C onn ect ion - Cyan on e shot Off
Pow er ON A n i mati on - White one shot Off
Tim er / Rem in der /R EC Ti m er/ P hot o
Sl eep T i mer/ O n
Frame
( Power On )
On Timer/ Reminder/REC Tim er
( Deep Standby )
-
Amber
Lit*2, *6
- Off Amber
*2 One S hot is only user act i on.
*6 The ac tu al dat a beh avi ou r is
Off
“On e S hot->L i t ” t o s ol ve is su e
related to LE D priority.
Aft er 5 m i nu t es , si d e amber
LED On
The number of LED blinking
Failure -
Red
Blinking
Off
ind i c at es c au se of f ai l u re
( refer to Led Error / Triage
chart)
Aging mode - Green Blinking Off Blinking:0.5sec On / 0. 5sec Off
End of Aging mode - Green Blinking Off Blinking:3sec On / 3sec Off
Soft war e Updat in g - white blinking off
Software Updating finish - Blue lit off
Test R eset - white blinking
Err or of pan el I D - Green Blinking
Amber
blinking
Amber
Blinking
Blinking:0.5sec O n / 0.5sec Off
*2 One S hot is only user act i on.
REC (SCART REC & HDD
REC/LIVE PAUSE) [AEP/J on l y ]
-
Red(Pink)
Lit*2, *6
*6 The ac tu al dat a beh avi ou r is
Off
“On e S hot->L i t ” t o s ol ve is su e
related to LE D priority.
ePOP/
Shop Illumination
2-3. LED Pattern
When safety shutdown occurs, Standby LED display reports the cause by using the lightning
patterns as indicated below
.
0.5sec
- Cyan loop Off
3.0sec 3.0sec
0.5sec
One s hot C en t er Whi te when
featu re chan ge.
Example: The figure above s hows LED display when SHUT DOW N is caused by Audio
Error. It repeats f lashing f or a specified number of t imes in 0.5sec/c ycl e and has a 3 s econds
interval of lighting off. Please note that a 3 seconds interval of lighting off is fixed regardl ess of abnormal state types.
RED LED
blinking count
2x
3x
4x
5x
6x
7x
8x
9x Tuner Board Error [TU_BOARD] Tuner Board Error
Main 12V failure [MAIN_POWE]
* This failure is not saved
Main 5.0/3.3/1.8/1.0/ 1.1V failure [DC_ALERT]
* 5.0/1.0V failures are not saved.
Audio amp. protection [AUD_ERR]
HDMI eq u a l i zer/switch I2 C NACK [HDMI_EQ] * There is T e mp.
sensor on the same I2C bus.
Tuner or demodulator I2C NACK [TU_DEMOD]
AFE device I2C NACK [AFE_I2C]
AFE device error SPI NACK [AFE_SPI] * only for AEP,CH
LED driver failure [LD_ERR]
LED voltage error [VLED]]
Panel ID EEPROM I 2C NACK (Also panel power failure is a
suspect) [P _ID_ERR]
Backlight failure [BACKLIGHT]
Backlight converter OVP [BACKLIGHT]
Over temperature protection [TEMP_ERR]
Temp . se n so r I2C NACK [TEMP_ERR] * Ther e is H DMI Eq on the
same I2C bus.
Software Error (Also the main board’s memory or CAM module is a
suspect)
Size G** Board Type
Detection Ite ms
G** Board Error
BAX_L Board Error
BAX_L Board Error
BAX_L Board Error
Speaker
BAX_L Board Error
BAX_L Board Error
Tuner Board Error
BAX_L Board Error
Tuner Board Error
BAX_L Board Error
Tuner Board Error
LED Driver (LD) Board Error
Panel module
LED Driver (LD) Board Error
Panel module
Panel module
Tcon board
G** Board Error
BAX_L Board Error
Panel module
G** Board Error
BAX_L Board Error
Panel module
Tcon board
G** Board Error
BAX_L Board Error
BAX_L Board Error
BAX_L Board Error
Tu ner B oard
America/Pan As ia/China/E urope Japan
40” Not applicabl e TUS TUW
48” Not applicabl e TUS TUW
Board Error Item
9
Page 10
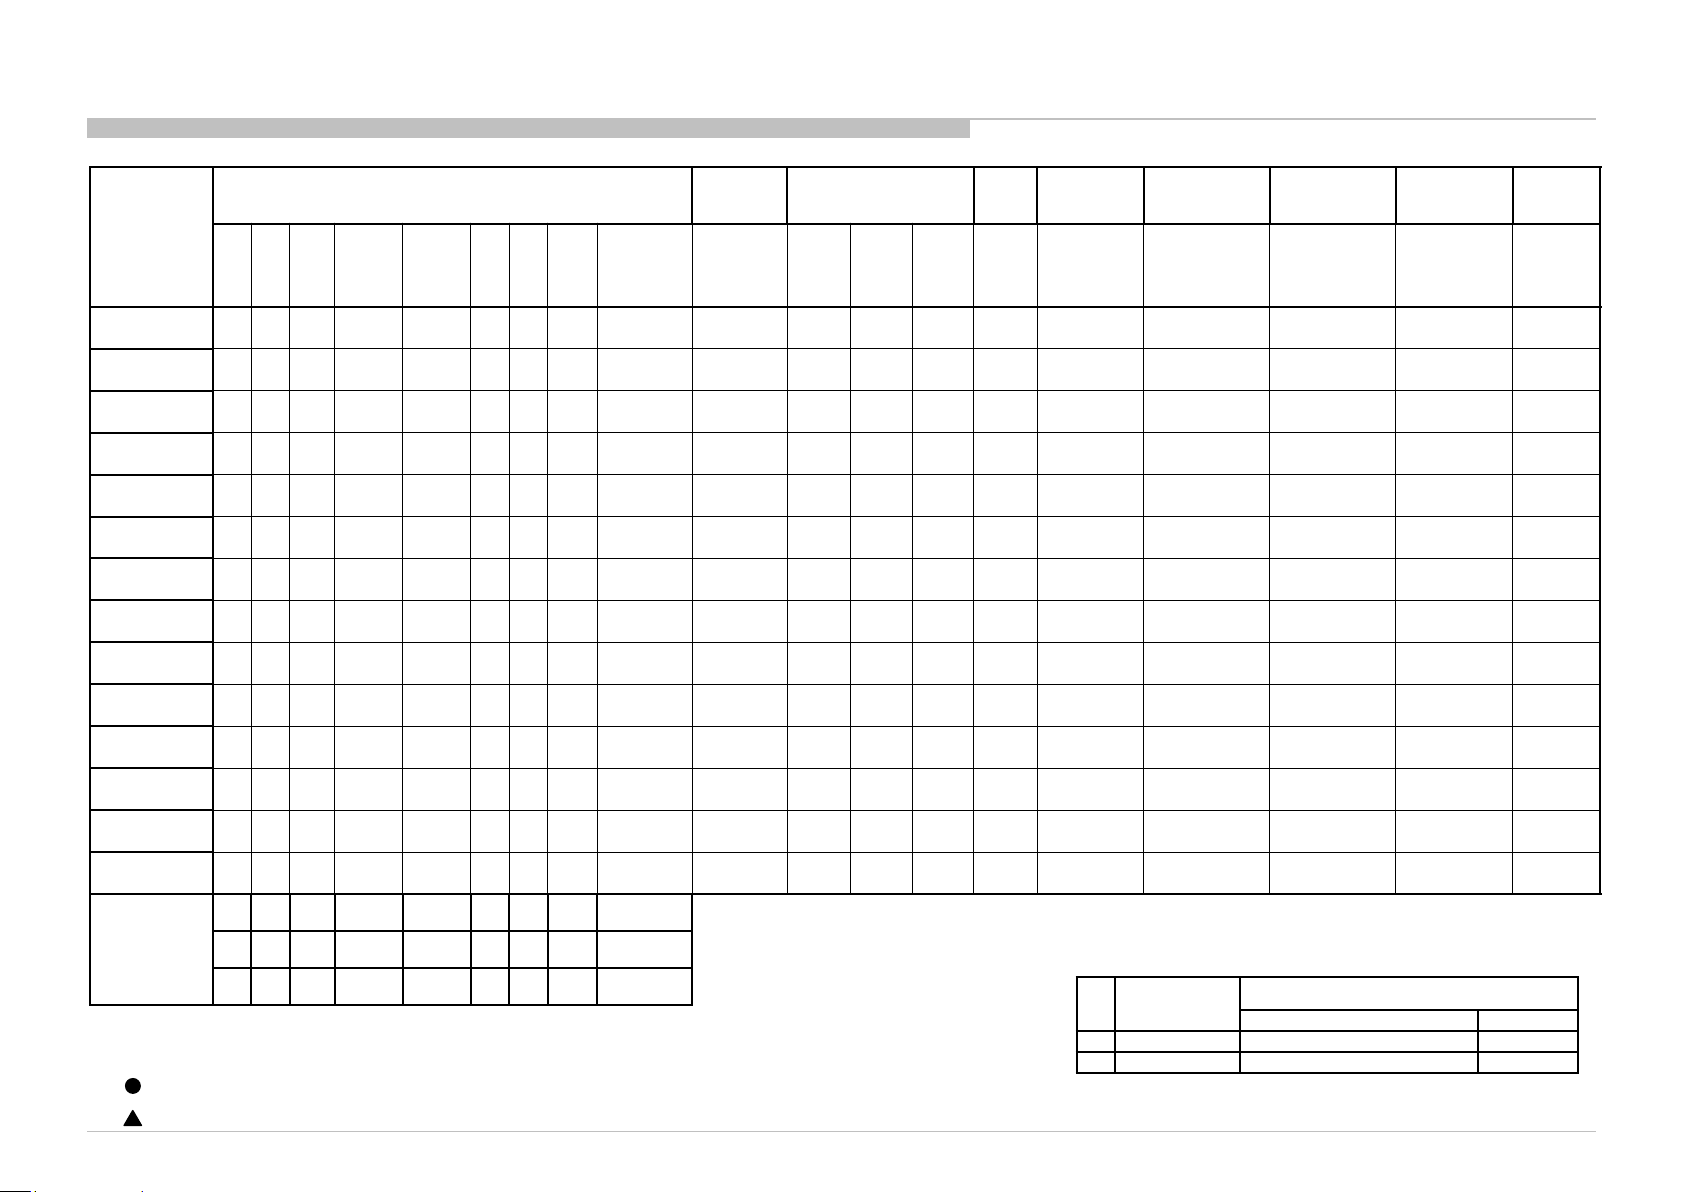
Self Diagnostic Function
No White P ower LED
to rem ote ( Dead S et)
or dots
No video O n e
p
l
p
p
l
l
p
p
l
l
p
p l p
p
p
p
p
l
p
l
l
p
l
p p
l
l
p
l
l
p
l
l
p
l
l
l
p
l
l
p
p p
p p
p l p
p
p p
l l l
p
l
p
2-5. T riage Char t
RB2G CHASSIS
W580B/W585B/W590B/W600B/W605B/W607B/W608B/WM15B
Reference
B* Boar d
TU board
G* Board
H* Board
Speaker
Skype Module
Camera Module
Mic. Module
Wifi Module
BT Module
LD* Board
Symptoms - Shutdown. Power LED
blinking red diagnostics seque nces
2 3 4 5 6 7 8 9 10
No
Power
& does not reponse
Stationary
colored lines
Video
- missing or distorted
No video al l
of Inputs
Inputs
Remote Network Audio Skype Smart Core
No Remote
Wireless
can't connect
No Audio
Bluetooth
(BT)
Bluetooth / One
Skype
Can't Work
Smart Core no LED (Set
is still alive)
Step Rem ote
(OSR) can't
connect
LVDS FFC
Tcon
LCD Panel
Problem
Power Power LD
Audio
Local
I2C
Panel
(Tcon)
Most likely defective part
Secondary possible defective part
Panel
(Backlight) TEMP
FAN
(N/A)
Software Emitter
Size G** Board Type
TU Board
America/Pan As ia/China/E urope Japan
40” Not applicabl e TUS TUW
48” Not applicabl e TUS TUW
10
Page 11

Troubleshooting
3-1. NO POWER
3-1-1. NO POWER AC ADAPTER
No Power
RB2G CHASSIS
W580B/W585B/W590B/W600B/W605B/W607B/W608B/WM15B
SECTION 3
TROUBLESHOOTING
3-1-2. NO POWER – AYU2/AYU2L fail ur e
Check STBY 3.3V
L9107
OK
BAXL Board
NG
Replace
Betw een LD Board to
B* Board Harness
OK
Harness
NG
Replace
LD- Board
OK
LD Board
For HT, HM, change LD board.
For HE, change Panel.
Note :
-B* Board – BAXL Board
Parts Board PWB (BAXL- A si de) Detail
(L9107)
1
NG
L9107
Adapter
AYU2/L Fail Suspected
eMMC / RawNAND erase
Product SW rewrite
Yes
Recover?
No
Replace BAXL Board
Product SW
writing issue
11
Page 12

Troubleshooting
3-2. LED BLINKING
3-2-1. LED Blinking: 3x (DC Alert & Communicati on Er ror)
RB2G CHASSIS
W580B/W585B/W590B/W600B/W605B/W607B/W608B/WM15B
Note: For location details, refer to troubleshooting Reference for parts location.
3-time blinking
Check D+1.0V at
JL9003 / JL9127 on
the B* Board
OK
Check
+3.3V_MAIN_1
at JL9117 on
the B* Board
OK
Check
+1.8V_MAIN on
Pin 2 of IC9201
OK
Check
+5.0V_MAIN
at JL9113 / JL9112 on
the B* Board
DC_ALERT
NG
NG
NG
NG
F9105,IC9103,
Etc (B* Board)
F9104,IC9104,
etc (B* Board)
IC9201,etc
(B* Board)
IC9102 / IC9101
,etc (B* Board)
Change TUS/TUW
Board
OK
TUNER Board
TUNER
NG
Check
Speaker Impedance
at SP Connector
OK
Check
Audio +12.5V
at pin 18/20 of CN9101
on the B* Board
(except Adapter model)
OK
Check
+12.5V / +19.5V
at Power Amp side
of F4401 / F4601 on
the B* Board
OK
IC4901 / IC4601,etc
(B* Board)
AUDIO
NG
NG
NG
Speaker
G* Board
F4401 / F4601,
IC4901 / IC4601
,etc
(B* Board)
Size G** Board Type B* Board
40” Not applicabl e BAX_L
48” Not applicabl e BAX_L
12
Page 13

Troubleshooting
3-2-1. LED Blinking: 3x (DC Alert & Communicati on Error) Troubleshooti ng References (a)
Board / Parts Board PWB (A side) Detail
BAXL
(F9104)
BAXL
(IC9104)
RB2G CHASSIS
W580B/W585B/W590B/W600B/W605B/W607B/W608B/WM15B
F9104
IC9104
BAXL
(IC9201)
IC9201
13
Page 14

Troubleshooting
3-2-1. LED Blinking: 3x (DC Alert & Communicati on Er ror) Troubleshooti ng References (b)
Board / Parts Board PWB (A side) (B side) Detail
BAXL
(IC9101)
RB2G CHASSIS
W580B/W585B/W590B/W600B/W605B/W607B/W608B/WM15B
IC9101
BAXL
(JL9112)
TU-S (Others)
(CL2101,
CL2102)
TU-W (Japan)
(CL2318,
CL2319)
JL9112
B-Side
CL2102
CL2101
CL2318
CL2319
14
Page 15

Troubleshooting
W580B/W585B/W590B/W600B/W605B/W607B/W608B/WM15B
3-2-1. LED Blinking: 3x (DC Alert & Communicati on Er ror) Troubleshooti ng References (c)
Board /Parts Board PWB (A side) Detail
RB2G CHASSIS
BAXL
(RB8517)
BAXL
(R8546, R8547)
BAXL
(CL5023, CL5024)
B-Side
RB8517
R8546
R8547
CL5024
CL5023
15
Page 16
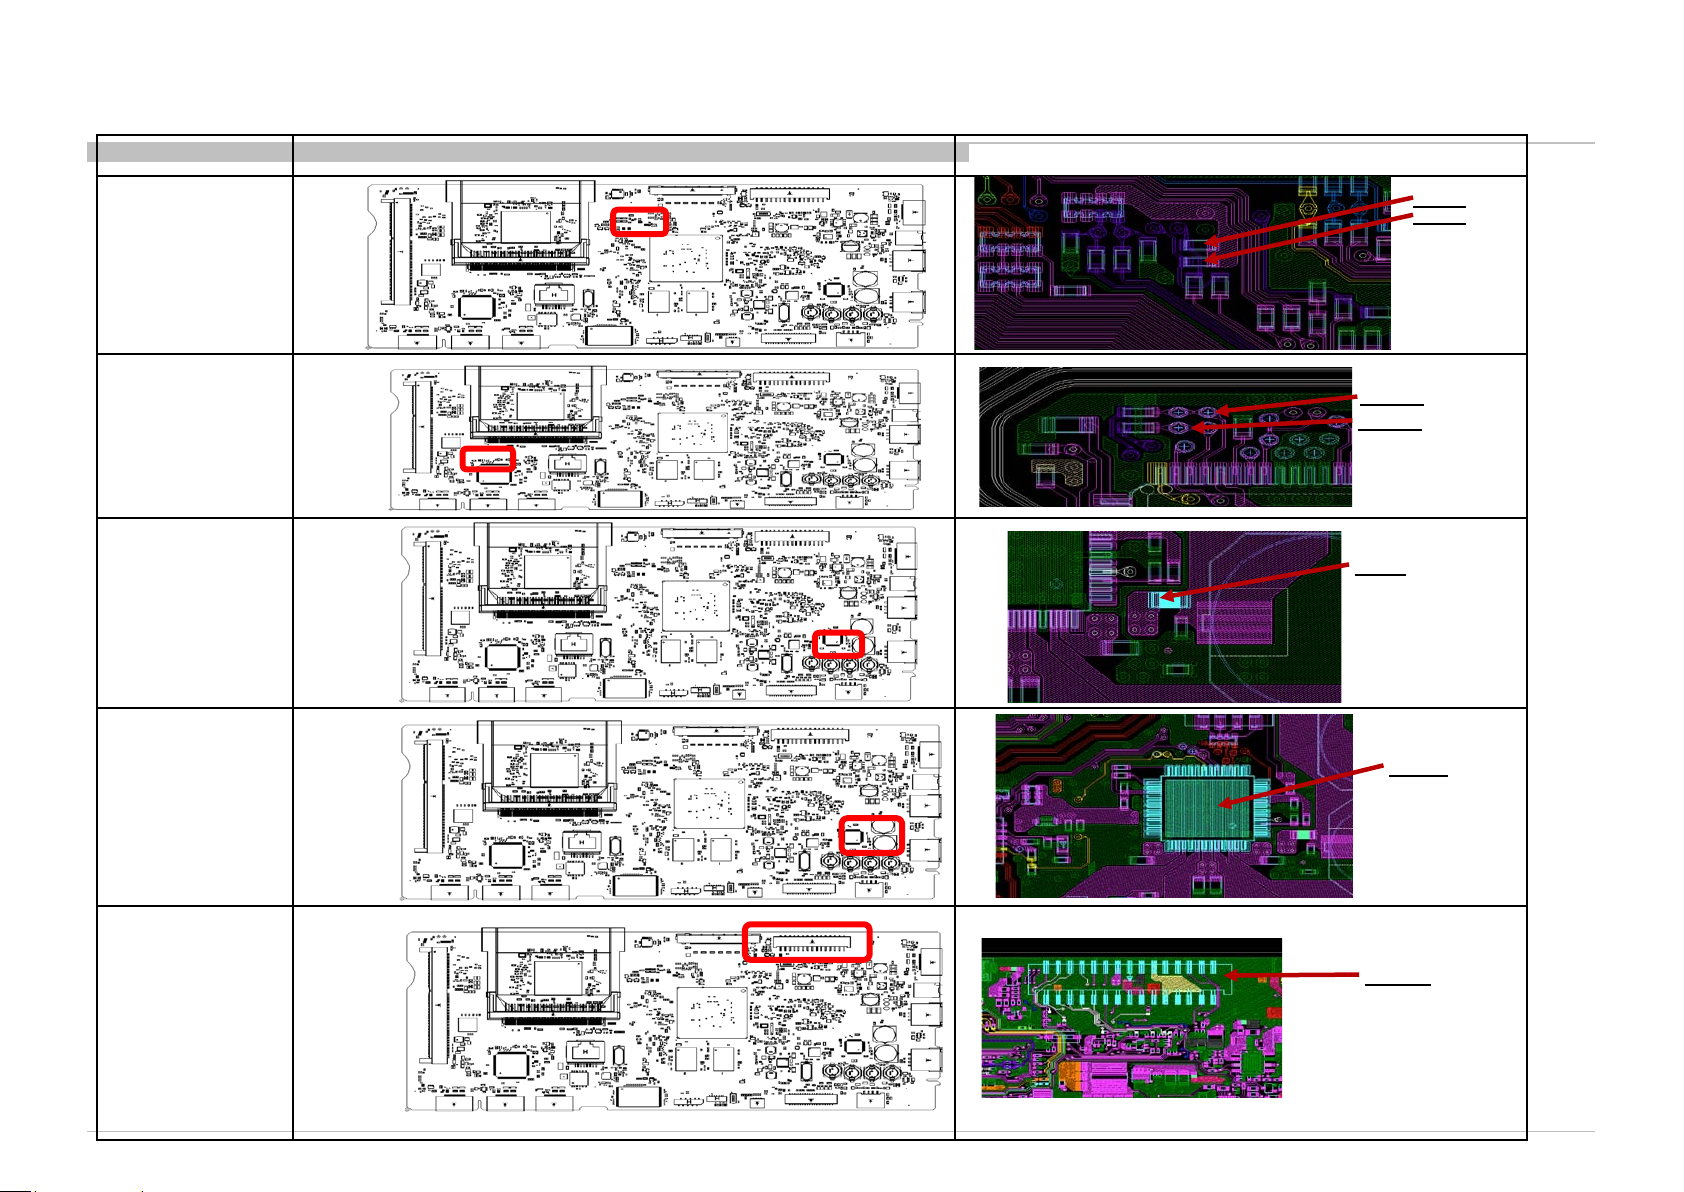
Troubleshooting
W580B/W585B/W590B/W600B/W605B/W607B/W608B/WM15B
3-2-1. LED Blinking: 3x (DC Alert & Communicati on Er ror) Troubleshooti ng References (d)
Board /Parts Board PWB (A side) Detail
RB2G CHASSIS
BAXL
(R8546, R8547)
BAXL
(CL5023,
CL5024)
BAXL
(F4601)
BAXL
(IC4601)
R8546
R8547
CL5024
CL5023
F4601
IC4601
BAXL
(CN9101)
CN9101
16
Page 17
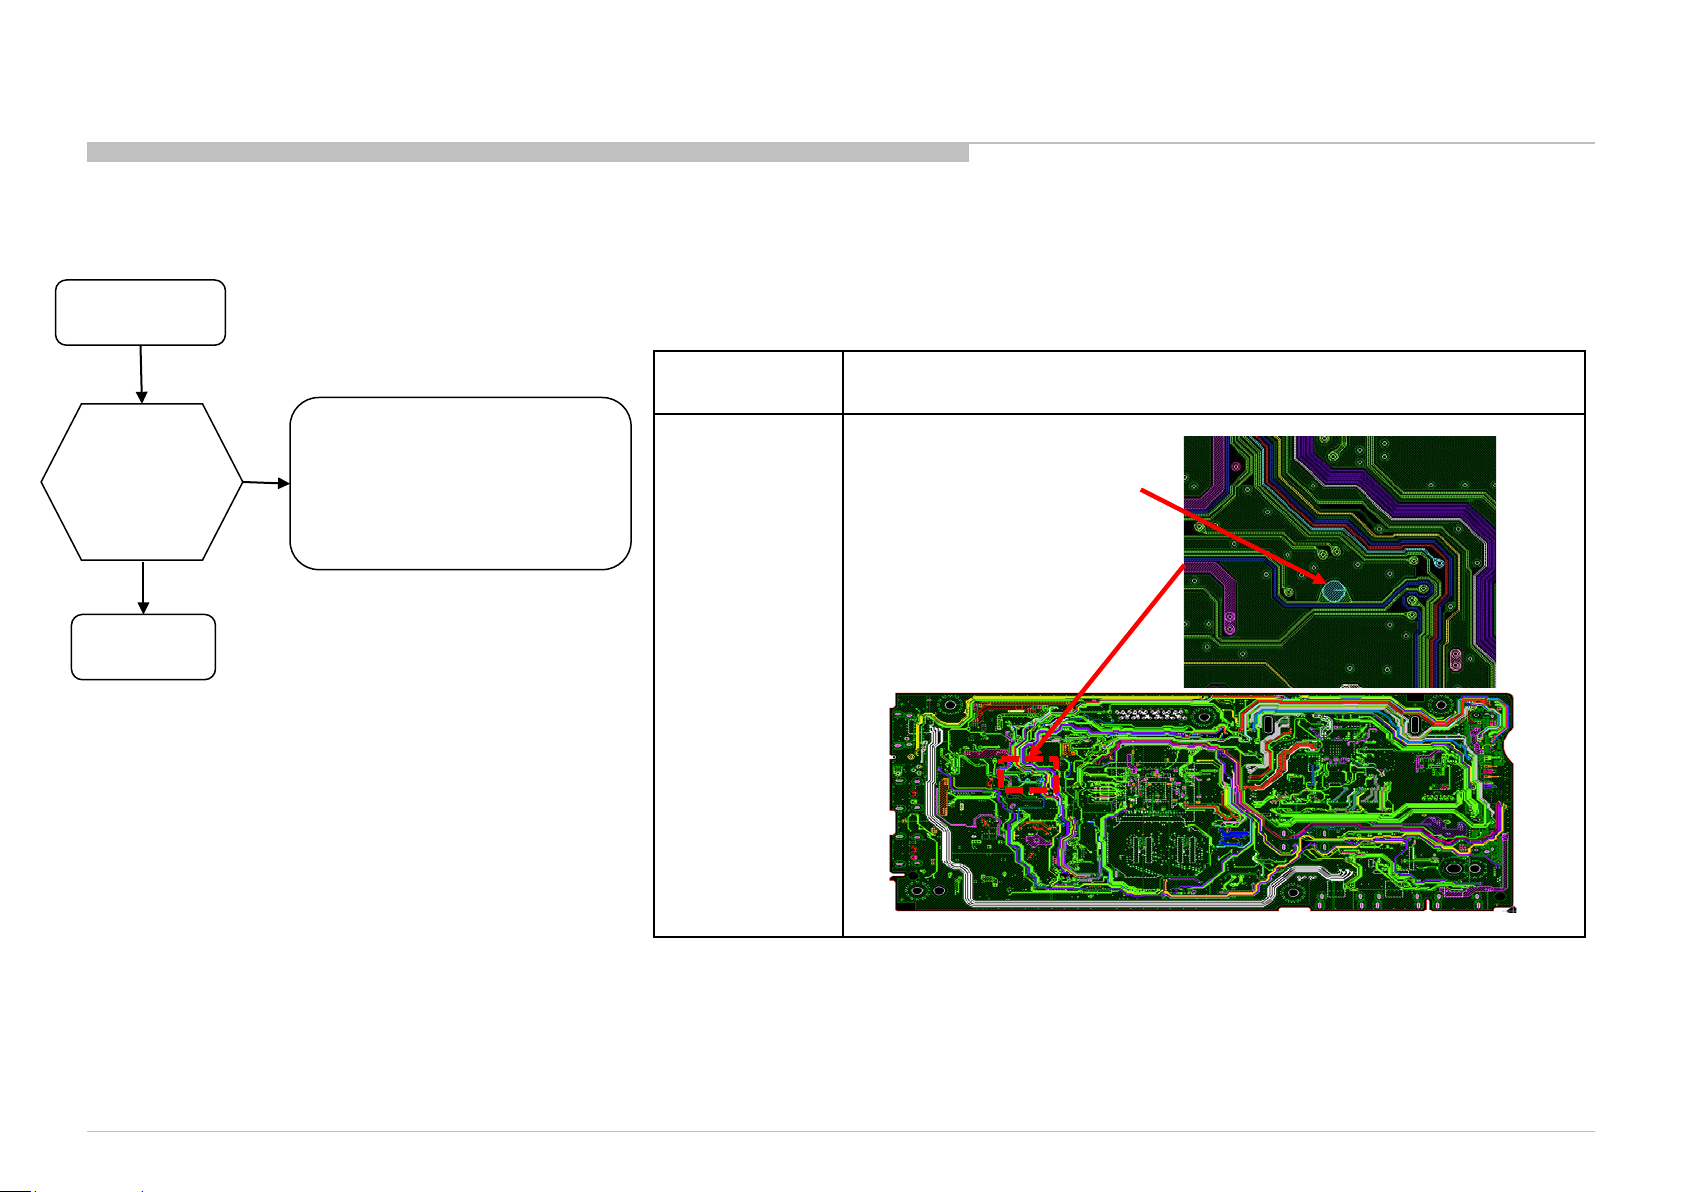
Troubleshooting
3-2-3. LED BLINKIN G 4x ( LED Voltage Error)
4-times blinking
RB2G CHASSIS
W580B/W585B/W590B/W600B/W605B/W607B/W608B/WM15B
Between 0.49V to 1.32V
Check
BACKLIGHT_MON
on the BAXL
Board
BAXL Board
LED driver
For HT, HM, change LD board.
For HE, change Panel.
Board /Parts Board PWB (BAX-L – B SIDE)
BAXL
BACKLIGHT_MON
= JL9106
BACKLIGHT_MON
= JL9106
17
Page 18
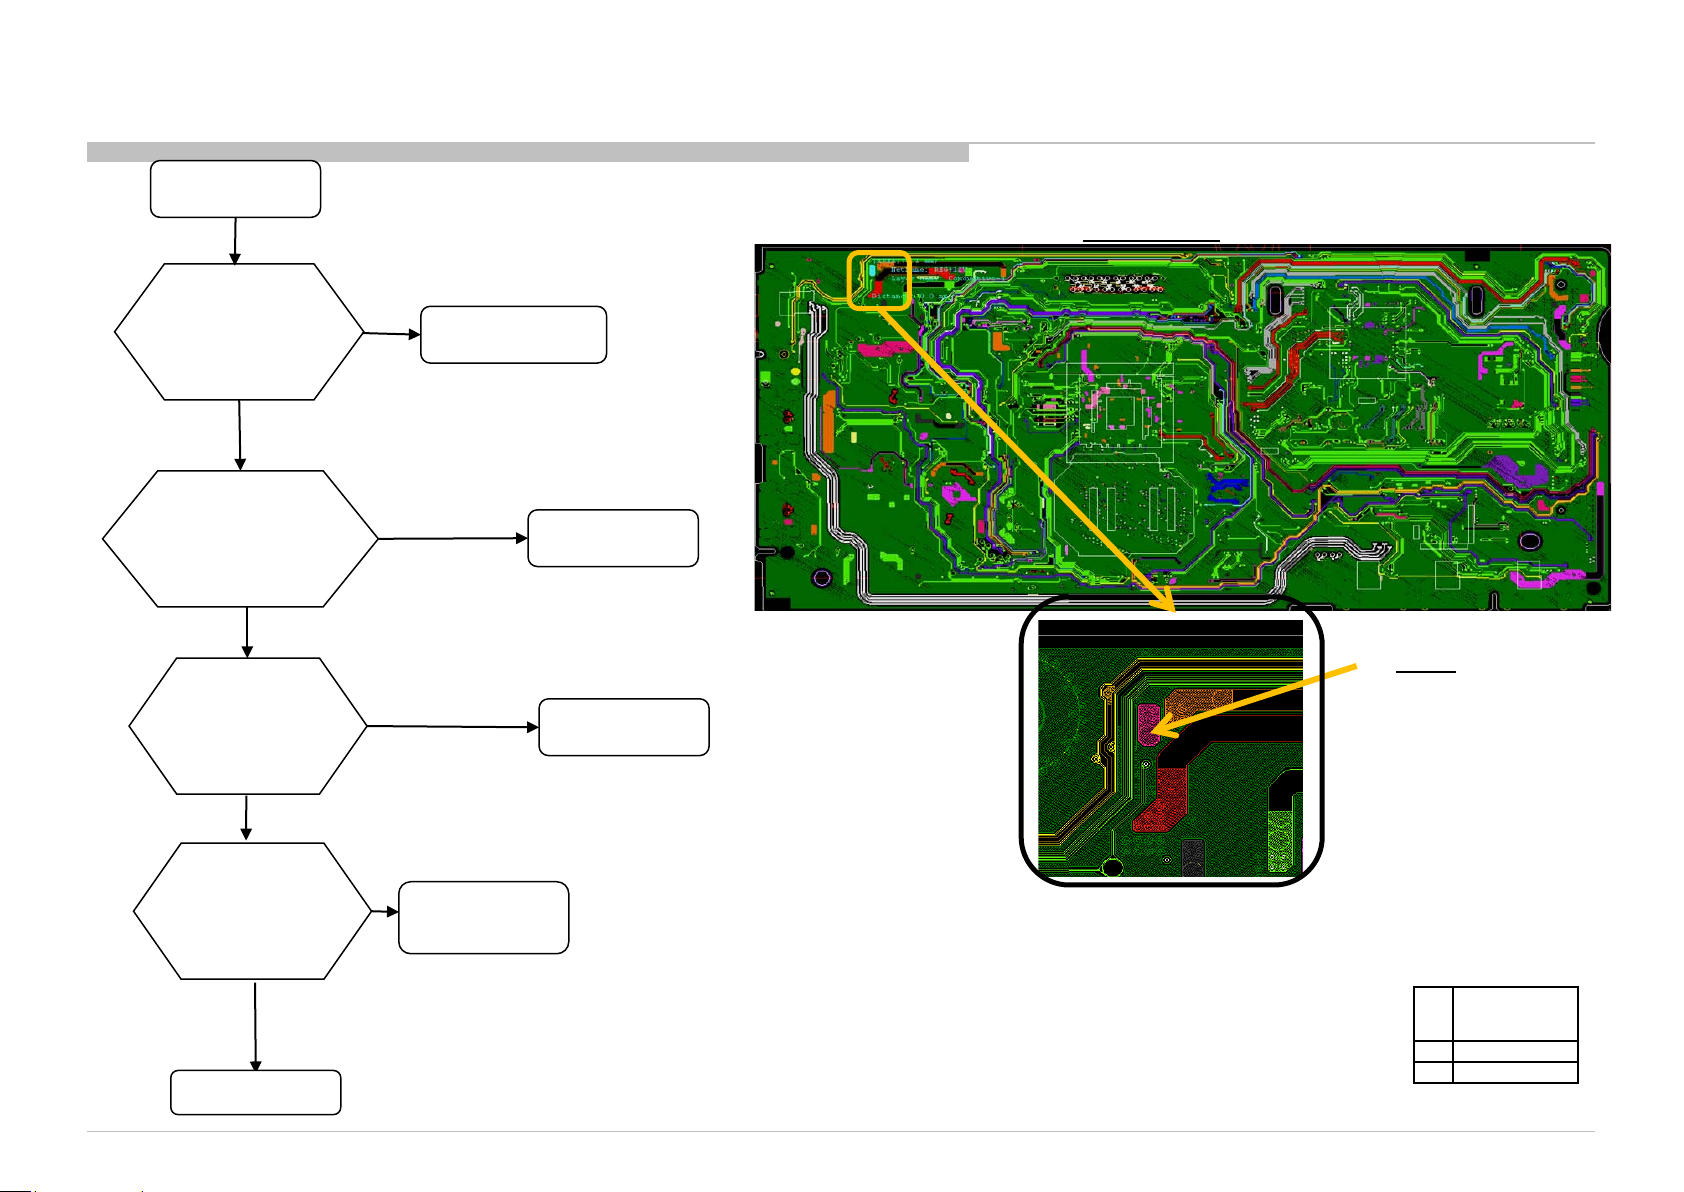
Troubleshooting
3-2-3. LED BLINKING 5x (T-Con Error)
5-times blinking
RB2G CHASSIS
W580B/W585B/W590B/W600B/W605B/W607B/W608B/WM15B
BAXL (B-Side)
Check
PANEL_VCC 12.5V at
CN8001 on
on the BAXL Board
About 12.5V
OK
Replace the Harness
Between G* / LD board
and BAXL board
NG
Replace
the LVDS Harness
NG
NG
G* Board / Adaptor
Symptom
improvement
Symptom
improvement
Harness
JL9132
(PANEL_VCC)
LVDS Harness
Change
BAXL Board
NG
Symptom
improvement
Change
Panel (T-con)
Confirm Tcon 12V.
Size G* Board Type
40” Not applicabl e
48” Not applicabl e
BAXL Board
18
Page 19
Troubleshooting
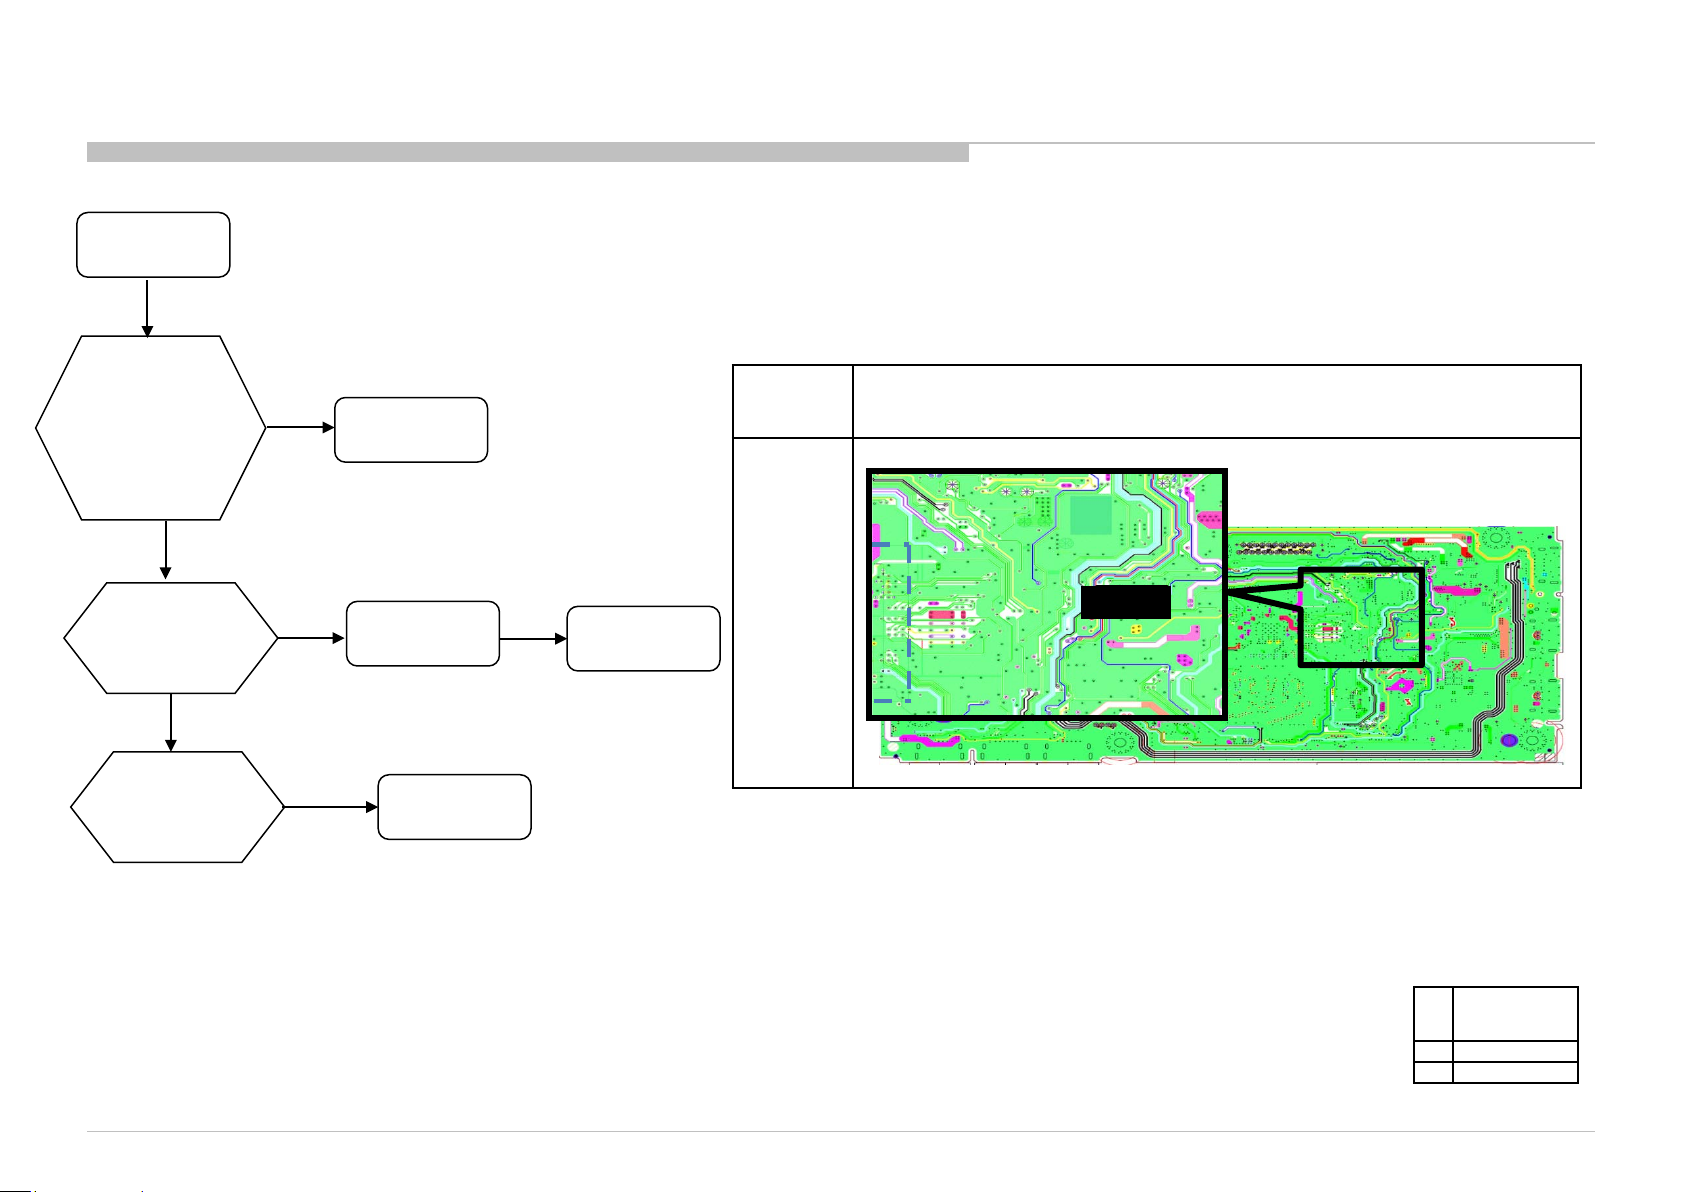
3-2-4. LED BLINKIN G 6x ( Backlight Error )
6-times blinking
RB2G CHASSIS
W580B/W585B/W590B/W600B/W605B/W607B/W608B/WM15B
Check JL9106* at
(BACKLIGHT_MON)
of CN9101
on the BAXL Board
1.3 -1.8 V
Have G* board?
No
Change LD Board
BAXL Board
Yes
Symptom
improvement
Change
G* board
LD Board
Symptom
improvement
G* Board
Parts Board PWB (BAXL- B side)
(JL9106)
AYU2
JL9106
Size G* Board Type
40” Not applicabl e
48” Not applicabl e
19
Page 20
Troubleshooting
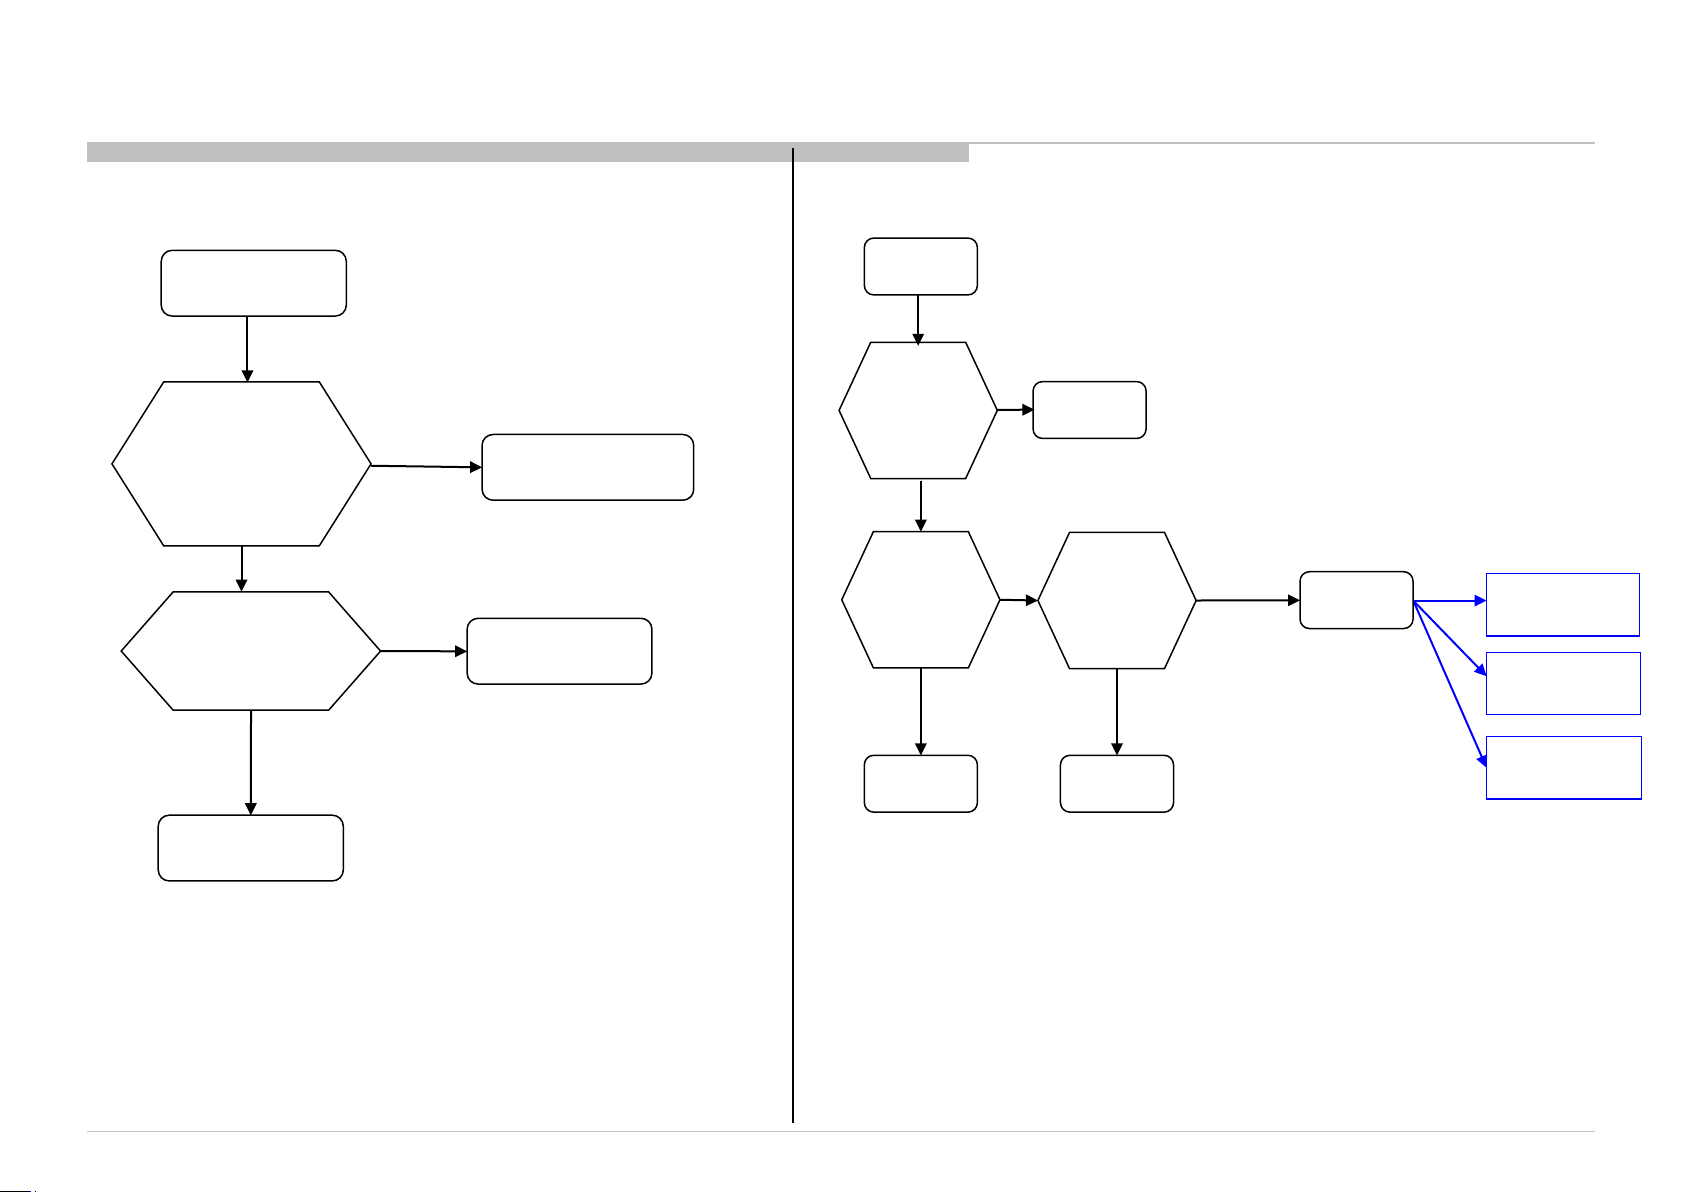
RB2G CHASSIS
W580B/W585B/W590B/W600B/W605B/W607B/W608B/WM15B
3-2-5. LED BLINKIN G 7x ( Tem per atur e Error)
7-times blinking
Setting
circumstance is OK?
No
Set to another
Temperature,
Ventilation, etc.
Yes
Change BAXL Board,
NG
and Aging a few
hours
Symptom
improvement
location, etc.
Panel
3-3. No Sound
No Sound
Check the
“Speakers setting”
“TV Speakers”
Change
the Speaker
Harness
Symptom
improvement
Speaker
Harness
“Audio System”
Change to
“TV Speaker”
NG
Replace
the BAXL
Board
NG
Speaker
Symptom
improvement
BAXL Board
No Sound:
Audio
No Sound:
Tuner
No Sound:
HDMI
BAXL
Board
20
Page 21
Troubleshooting
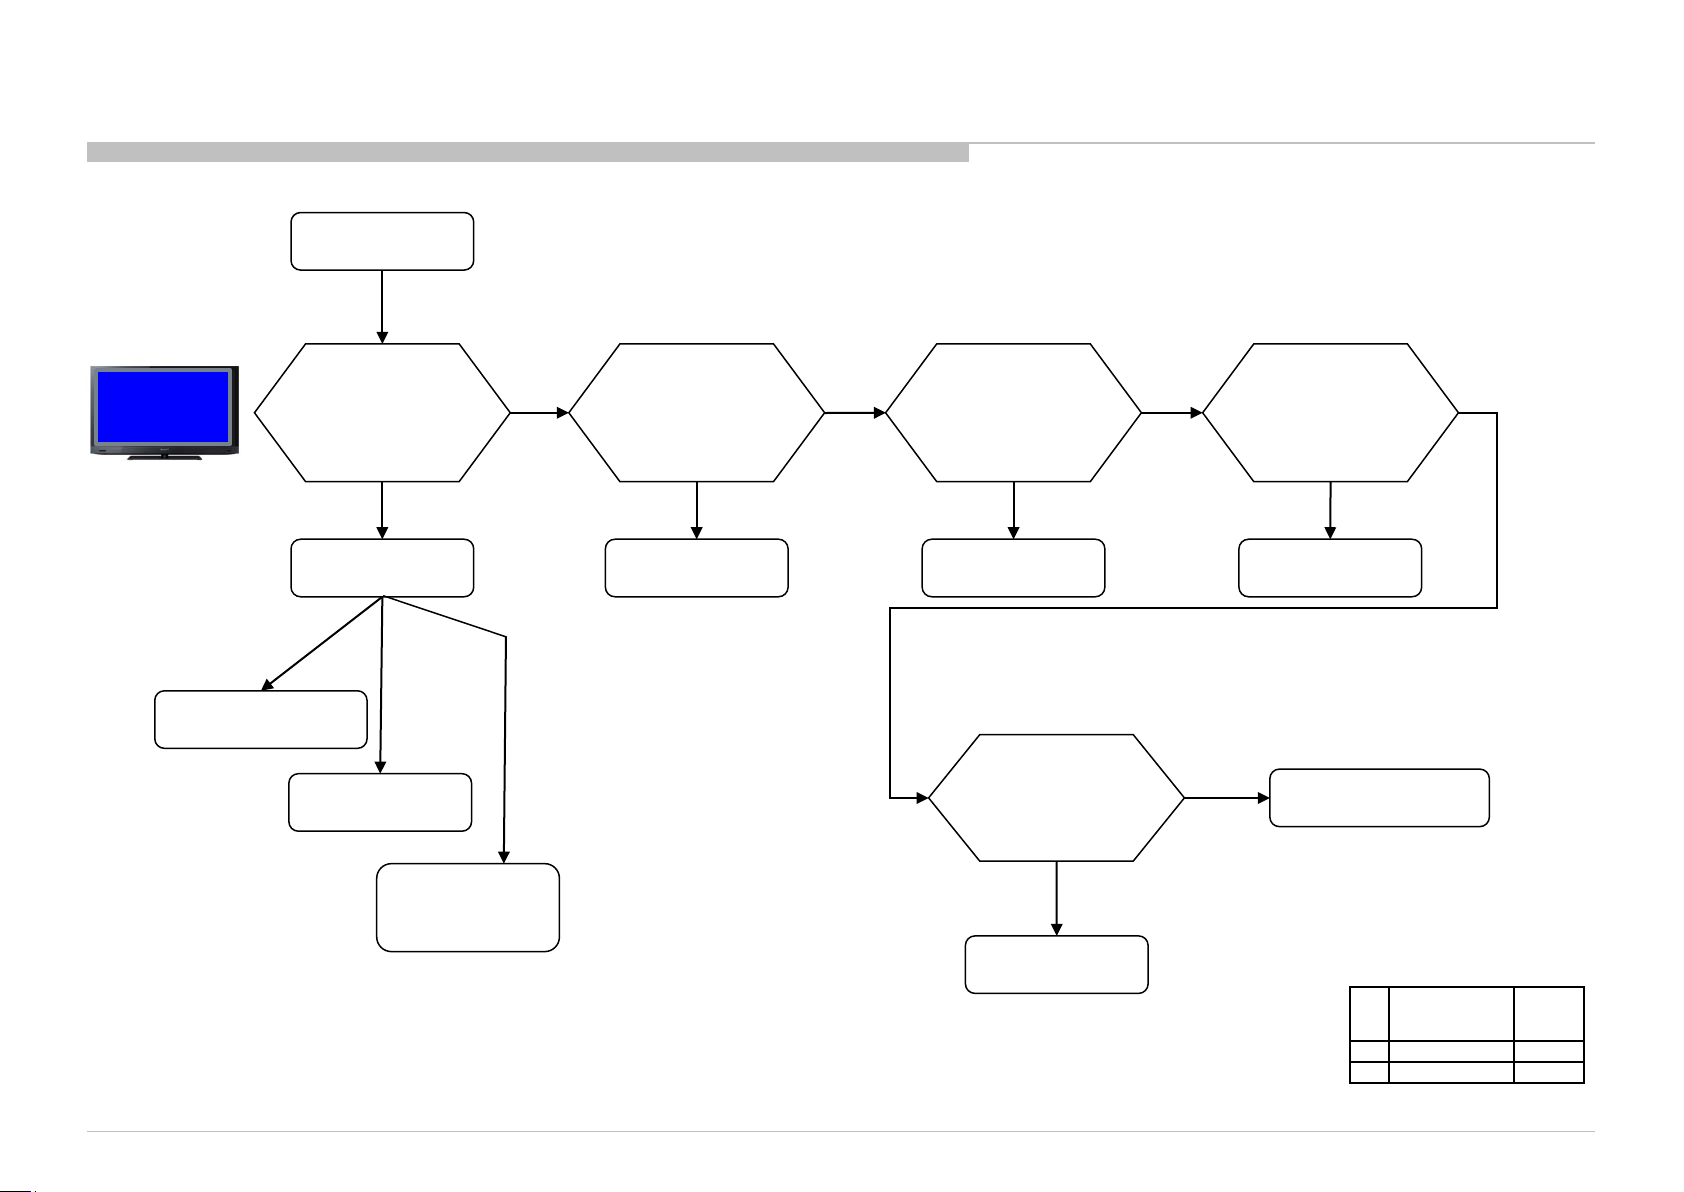
3-4.. NO PICTURE
3-4-1. NO PICTURE: LD Models only
No Picture
RB2G CHASSIS
W580B/W585B/W590B/W600B/W605B/W607B/W608B/WM15B
・
All blue picture is on?
Factory SW is booted.)
Tuner
No Picture
Yes
BAXL Board
HDMI
No Picture
EXT. Video Input
No Picture
No
Check the G*- LD
Harness
NG
Harness
OK
Symptom
improvement
Replace
the B-Tcon,
Tcon-LD FFC
B-Tcon, Tcon-LD
FFC
Change G* Board
Symptom
improvement
NG
Symptom
improvement
NG
NG
Change B* Board
B* Board
LCD Panel
(T-con, LD)
G* Board
Size G* Board Type B* Board
40” Not applicabl e BAX_L
48” Not applicabl e BAX_L
21
Page 22
Troubleshooting
RB2G CHASSIS
W580B/W585B/W590B/W600B/W605B/W607B/W608B/WM15B
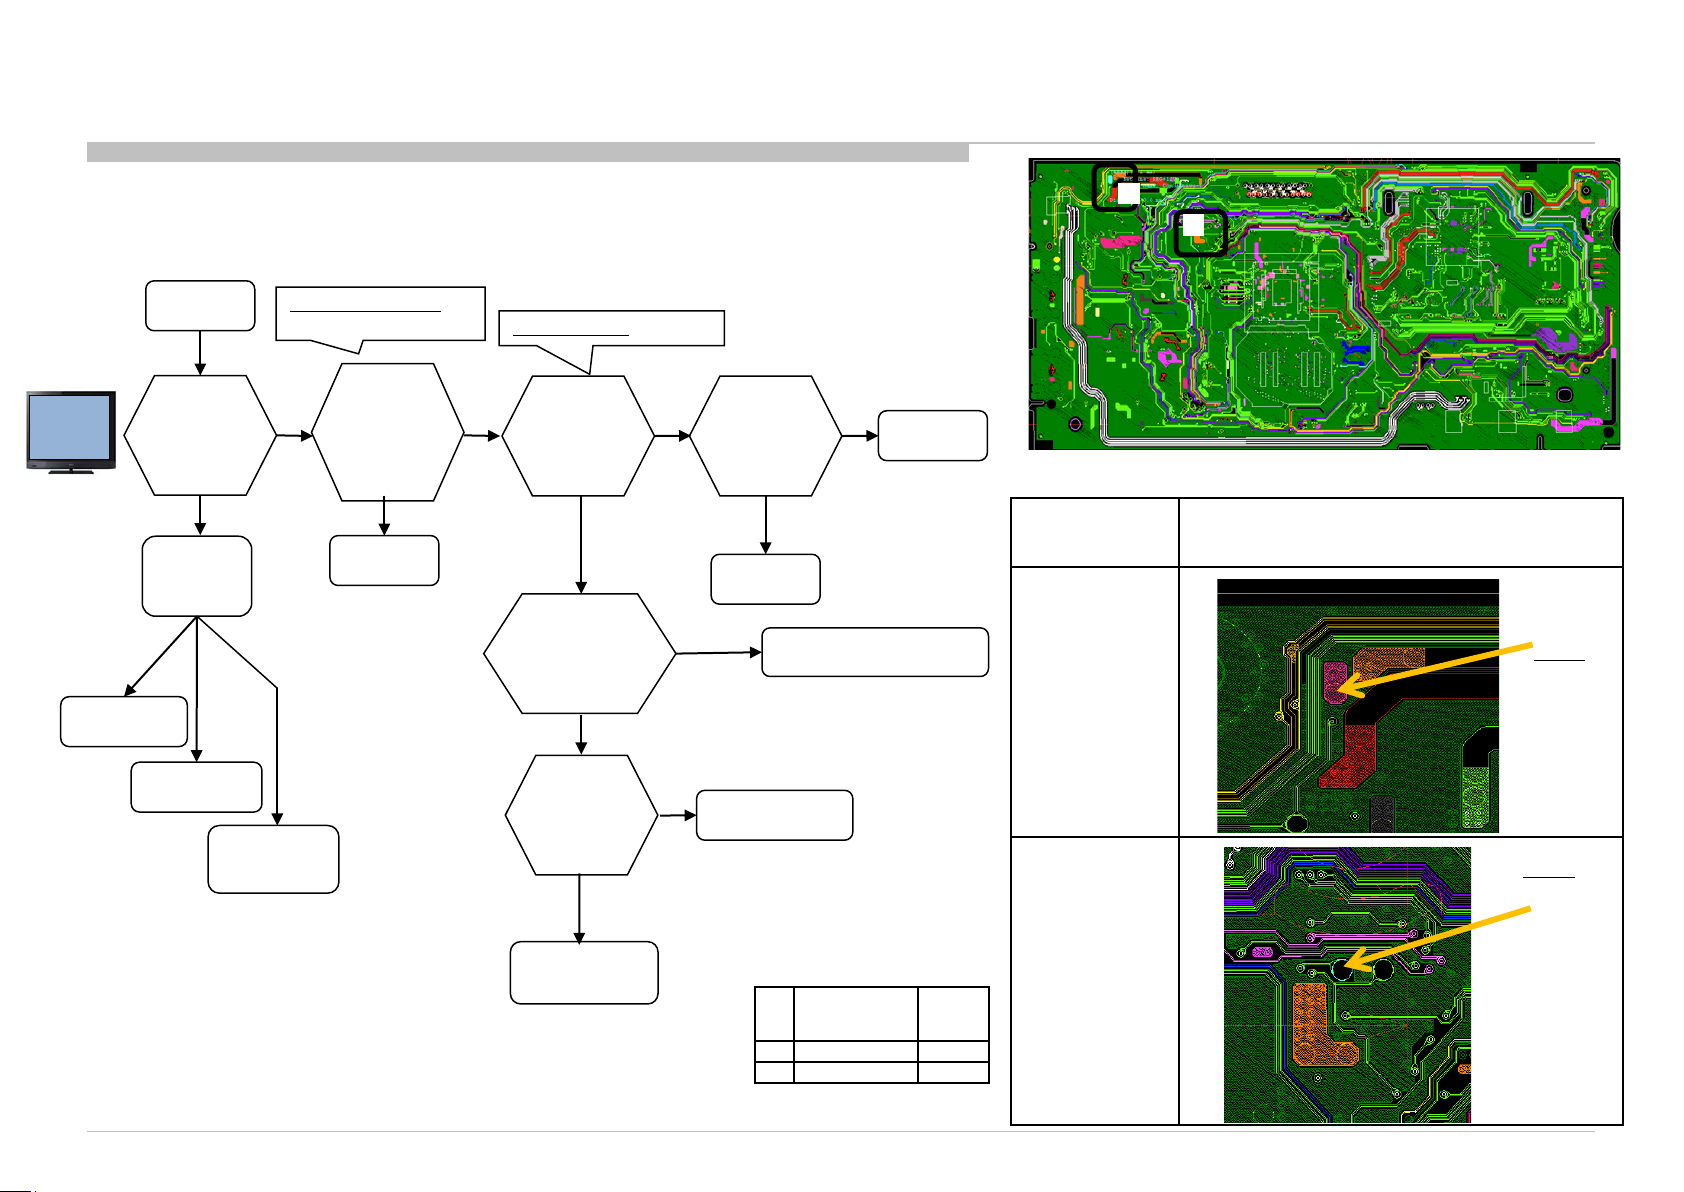
3-4-2. NO PICTURE: (All Model)
PANEL_VCC = +12V
HE,HM (BAX-L): JL9132
No
・
No Picture
Is blue picture
on display?
(Factory SW
is booted)
Yes
BAXL
Board is OK.
Check:
Tuner –
No Picture
Check
PANEL_VCC
at JIG LAND
on t h e B* Board
No
G*-Board or
Adap tor NG
BL_ON (L or H): JL9105
Yes
Check
BL_ON at JIG LAND
on the B* Board
BL_ON:L
Repl ace H arnes s
between G*-Board/
LD-Board
to B-Board
NG
BL_ON:H
Symptom
improvement
Replace
the LVDS FFC
Harness
Symptom
improvement
LVDS FFC
Harness
Repl ace G *-Board/LD-Bo ard to
NG
B-Board Harn ess
LCD Panel
(T-CON)
1
Parts
Location/Parts
(1)
(JL9132
(PANEL_VCC)
2
<BAXL- B SIDE>
Detail
JL9132
(PANEL_VCC)
HDMI –
No Picture
Ext. Video
Input -
No Picture
Change
B*-Board
Symptom
improvement
NG
Chan ge G *-Board
/ LD board
(2)
JL9105
(BL_ON)
JL9105
(BL_ON)
BAXL Board NG
Size G* Board Type B* Board
40” Not applicabl e BAX_L
48” Not applicabl e BAX_L
22
Page 23
Troubleshooting
RB2G CHASSIS
W580B/W585B/W590B/W600B/W605B/W607B/W608B/WM15B
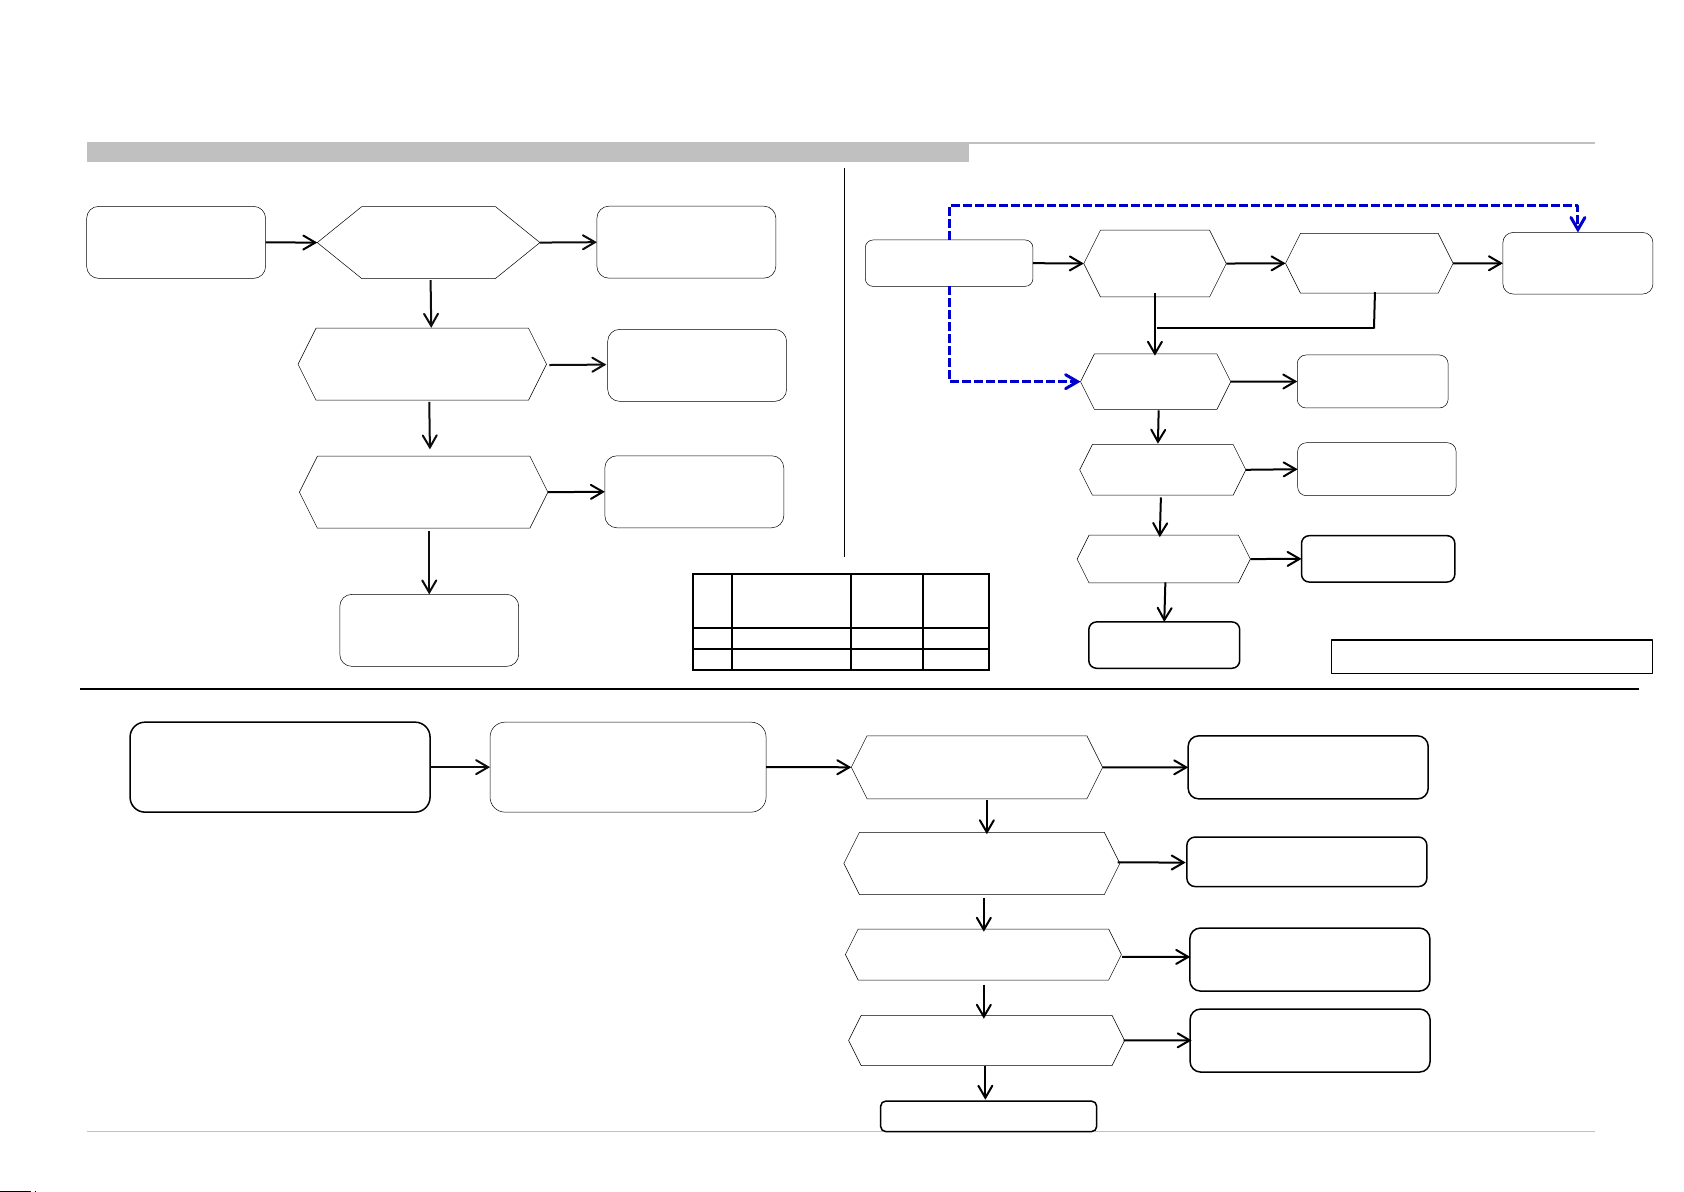
3-5. SIDE BUTTONS MALFUNCTION
Side Key button
malfunction
Switch unit-BAXL board Harness
Change Switch
Unit
NG
Harness on Switch Unit
and B AXL Boar d prop er ly
connected
NG
Change
NG
Change BAXL
Board
3-7. Light Sensor Error
Backlight doesn’t change
when ambient lighting
level changed
OK
Switch unit iss ue
OK
Har nes s c onn ec ti on
issue
OK
Harness issue
Size G* Board Type B* Board H Board
40” N ot applicab l e BAX_L HJM
48” N ot applicab l e BAX_L HJM
Check UI setting f or light
Sens or. Make s ure it is “on”
3-6. IR REMOTE COMMANDER MALFUNCTION
IR do not response to
Remote Commander
Chan ge t he UI sett ing t o
“:ON”
NG
Har nes s on H-board and
B* Board properly connected
NG
Change
H-BA XL b oar d Harness
NG
Chan ge S mart C ore
NG
Change BAXL Board
Center white LED
lit up when
remote is control
is pressed
Harness on H-board
and BAXL Board
properly connected
Change H-BAXL
board Harness
Change Smart Core or
H-board
NG
Change BAXL Board
OK
User did not activat e light
OK
OK
OK
Har nes s c onn ec ti on
H-BAXL board harness
Check whether center
white LED blink ,when
using commander near
the sensor windows
Harness
connection
issue
H-BAXL board harness
OK
Smart core issue or
H-board issue
Note: Blue line/font for HM segment
sen sor fu nc ti on
issue
Smar t Cor e i s s ue
issue
issue
Remote control battery
could be weak.
Change battery.
23
Page 24
Troubleshooting
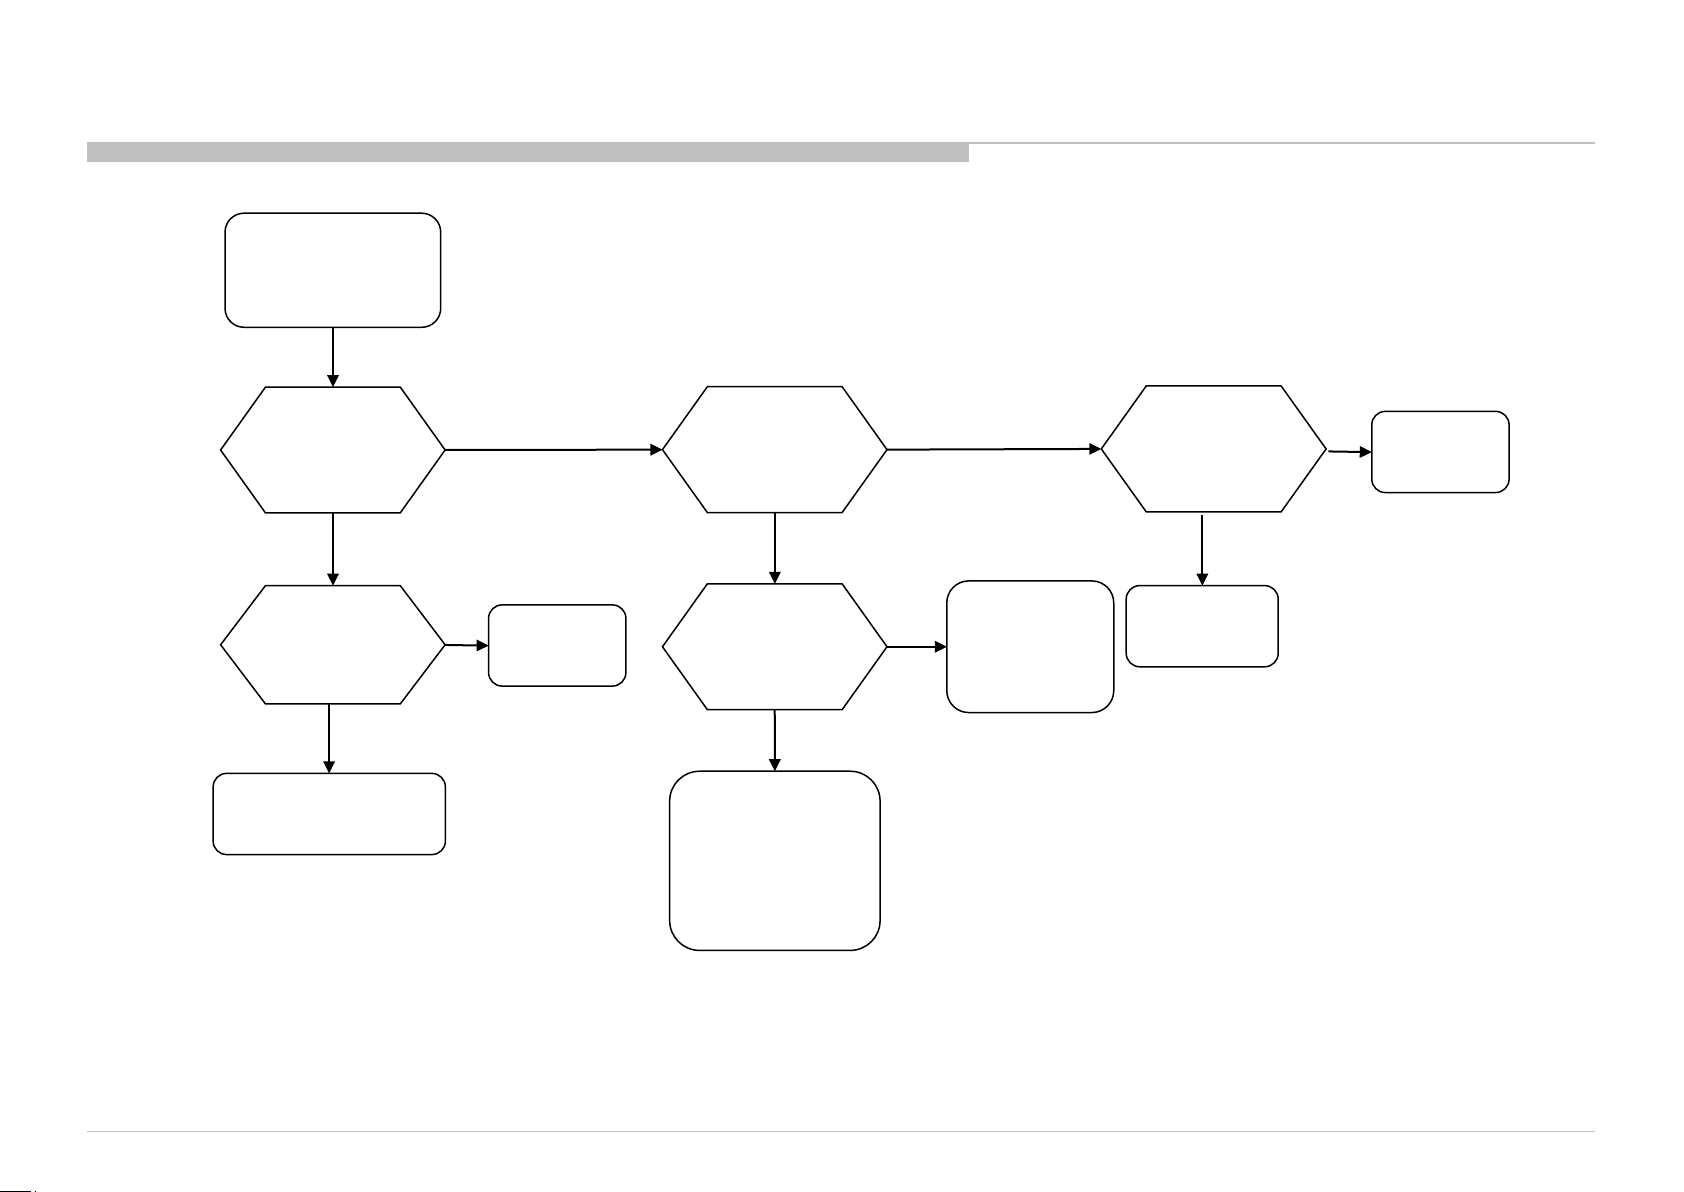
3-8. Network Malfunction: Ethernet (Wired)
[Network Set-up]
>[Wired Set-up]
on the TV
RB2G CHASSIS
W580B/W585B/W590B/W600B/W605B/W607B/W608B/WM15B
Connection
Results
Cable
Connection
Failed
Check cable
NG
Ethernet Cable
OK
OK
BAXL
board
Failed
Manual
Connection
Results
Local Access
Wired Set-up
IP address
setting
Check IP
address
&
Local router
setting
OK
Auto
Check
Local router
DHCP server
Connection
Results
Internet
Access
Failed
Proxy
setting
OK
BAXL
board
24
Page 25
Troubleshooting
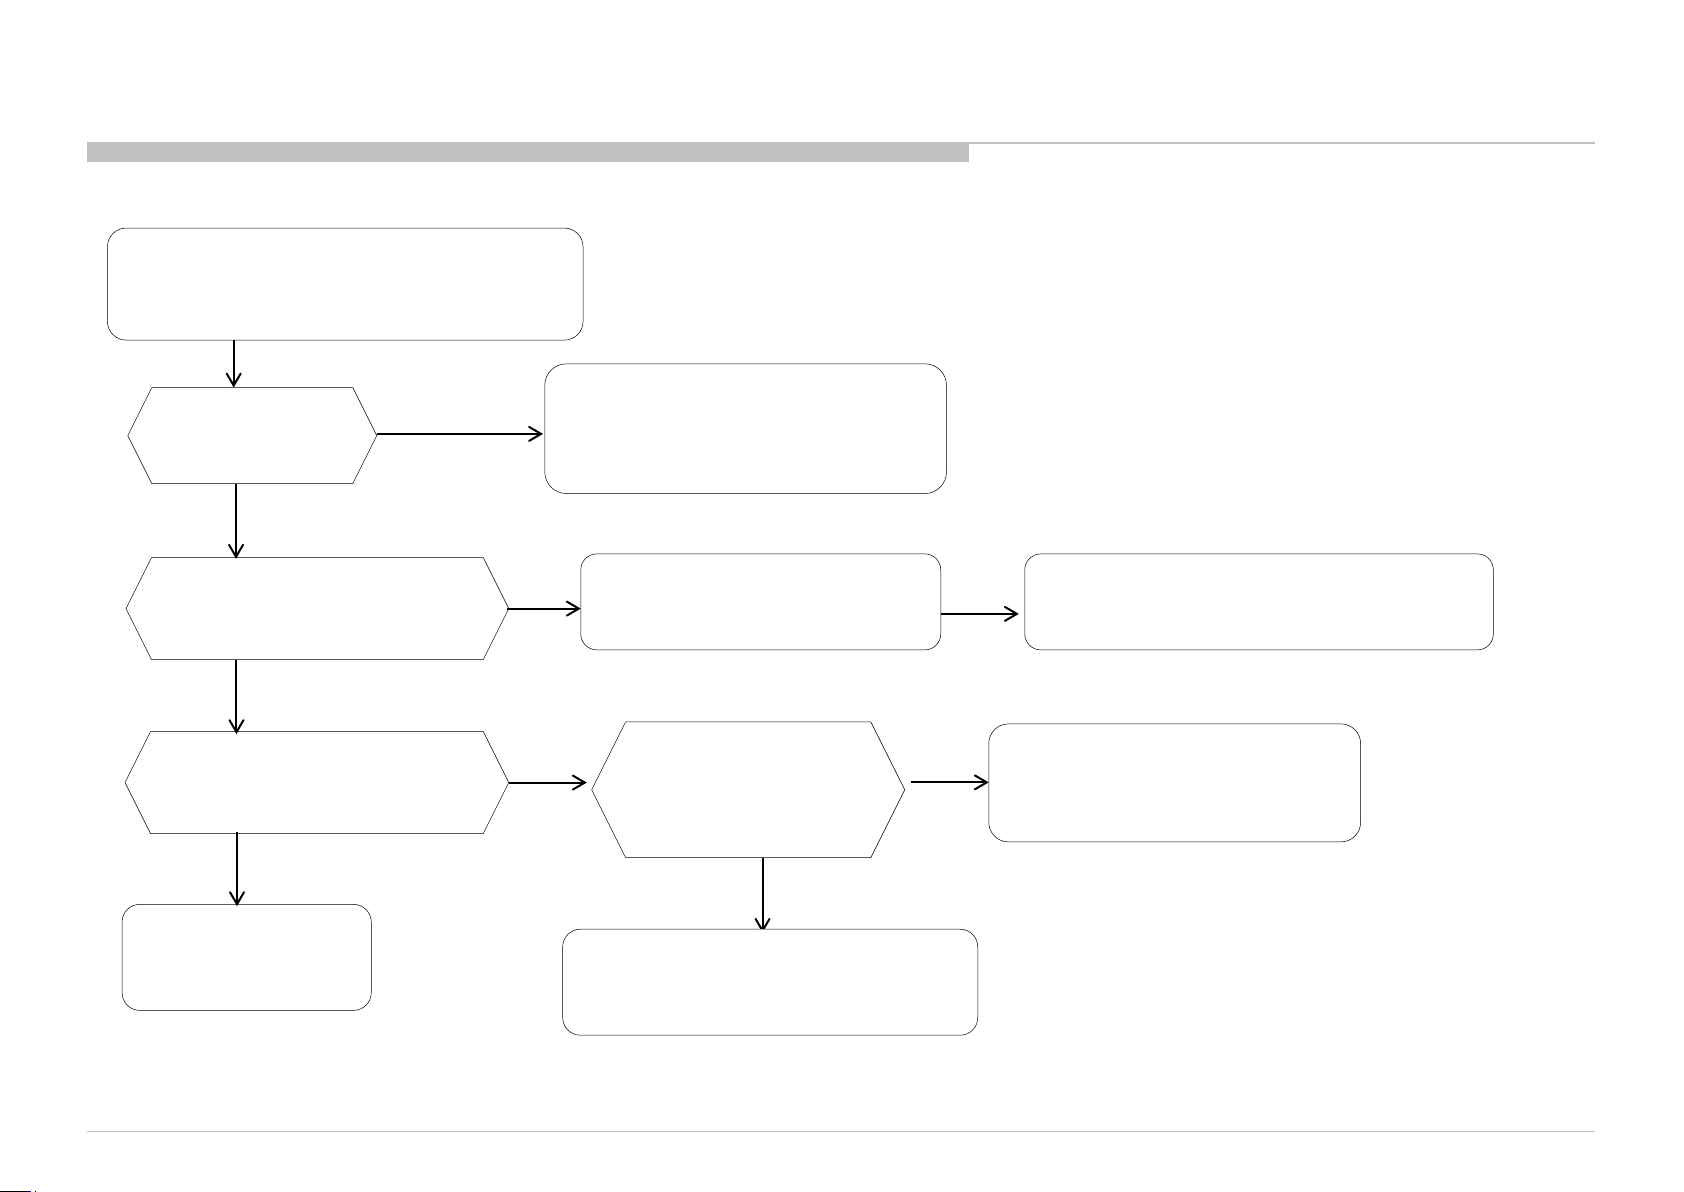
3-9. 3D-Glasses(Active) m alfunction
*(2) BT Active 3D glasses doesn’ t work
<2.8V
Check 3D-Glasses
Battery volt age is
>2.8V?
RB2G CHASSIS
W580B/W585B/W590B/W600B/W605B/W607B/W608B/WM15B
Replace to New Battery and try again.
(use CR2025 onl y.)
Registered
Restart TV . Power-off 3D-Glasses
and TRY registration again wi th
50cm distance .
Cannot Register
Check another 3D-Glasse s and
re-register.
OK
3D-Glasses NG.
NG
Interferen ce from other
devices.
Change to another
NG
environment and try
registrat ion again.
OK
Very strong inter ference on that sp ot.
Check if 2.4GHz devi ces are used or not?(ex.
WiFi, other bluetooth devices, microw ave,
cordless phone, ....)
Confirm BT (Bluetooth) malfunction
trouble shooti ng flow.
25
Page 26
Troubleshooting
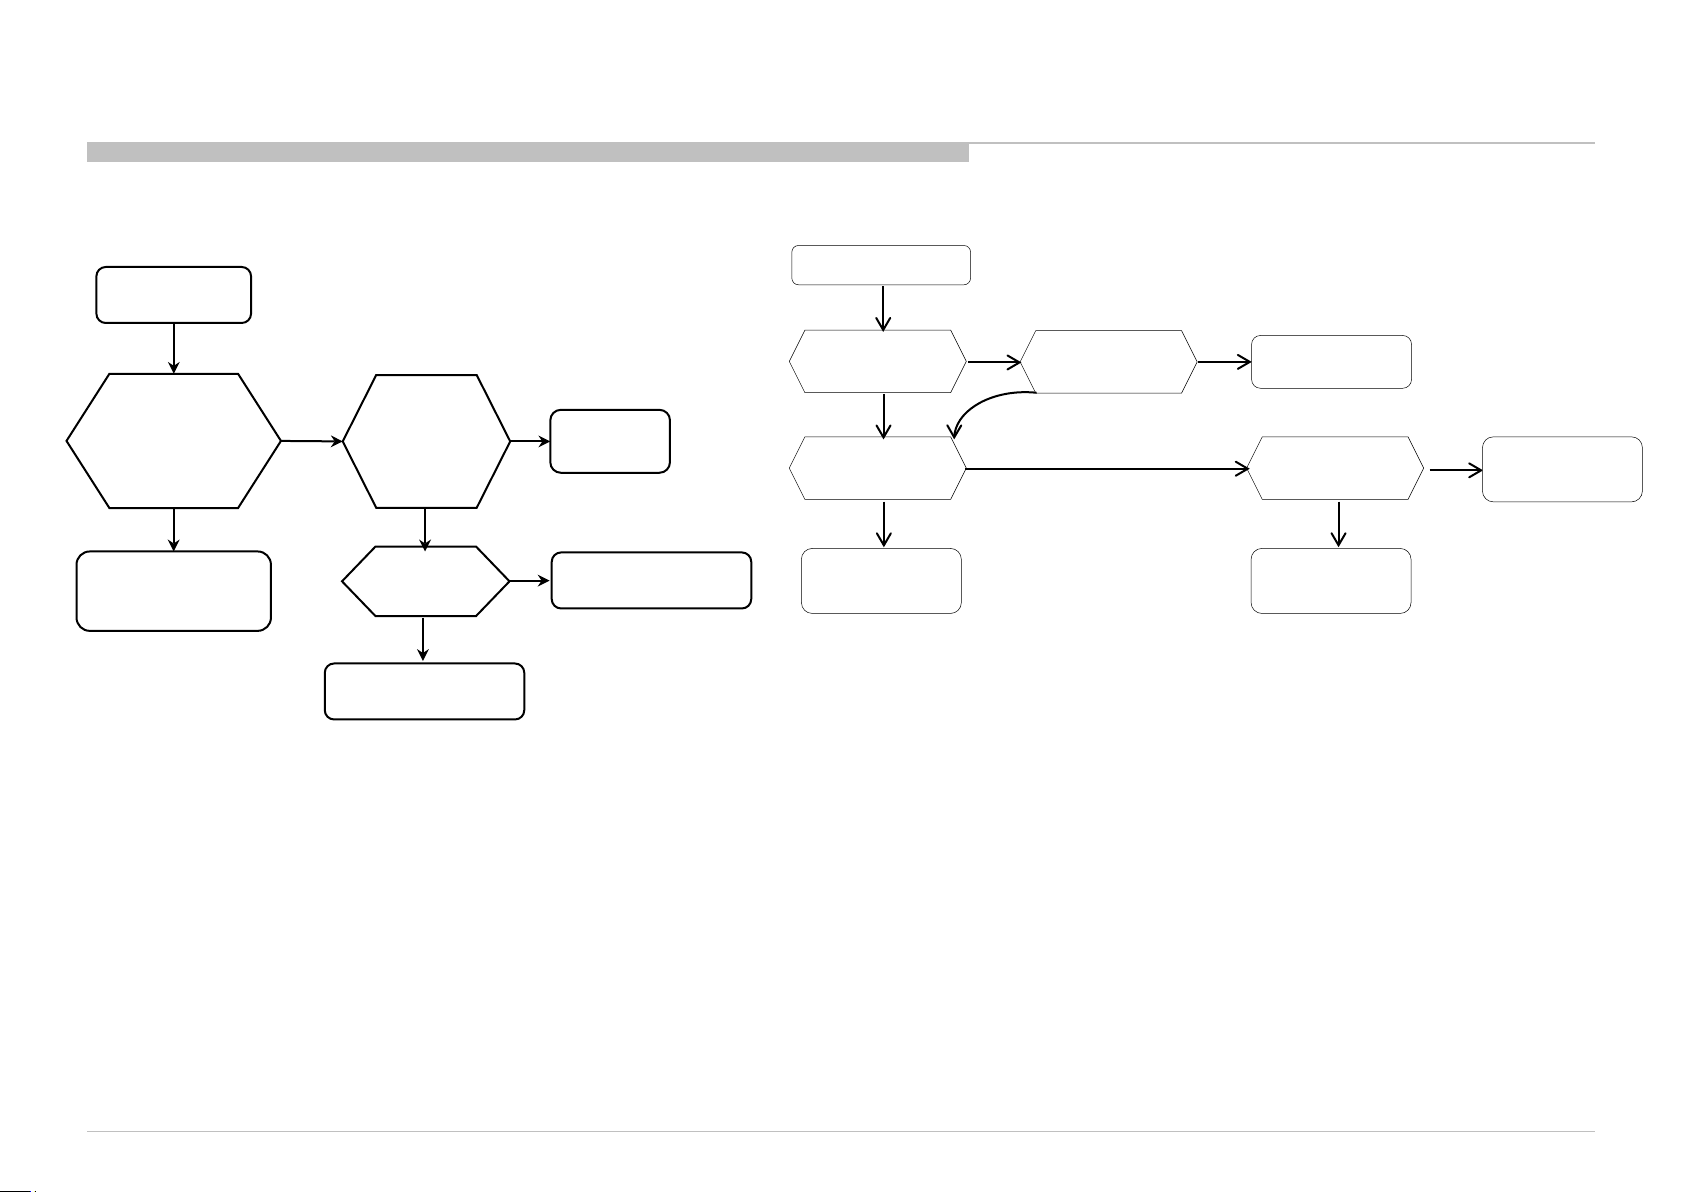
3-10. Wireless Network malfunction
1) Internal Wireless Network malfunction
Wireless Network
on the TV
RB2G CHASSIS
W580B/W585B/W590B/W600B/W605B/W607B/W608B/WM15B
From *1
Error Message appear
when the Wireless
Network is selected?
Yes
Hardware defect
*1
suspected.
Go to the next
No
Is the radio field
Strength too weak
Change WiFi
or eve n No
signal?
Yes
module
OK
WiFi module
No
NG
BAXL Board
Access Point
Check harness
connection is OK
betwee n WiFi and BAXL
OK
Change
Wi-Fi module
OK
Wi-Fi module
NG
NG
Connect properly
NG
OK
Loose harness
Change harness
between BAXL
board and WiFi
Main Harness
NG
OK
If Wi-Fi malfunction happens,
• Wi-Fi module
• Harness between WiFi and BAXL
• BAXL board are suspected.
Change
BAXL board
26
Page 27
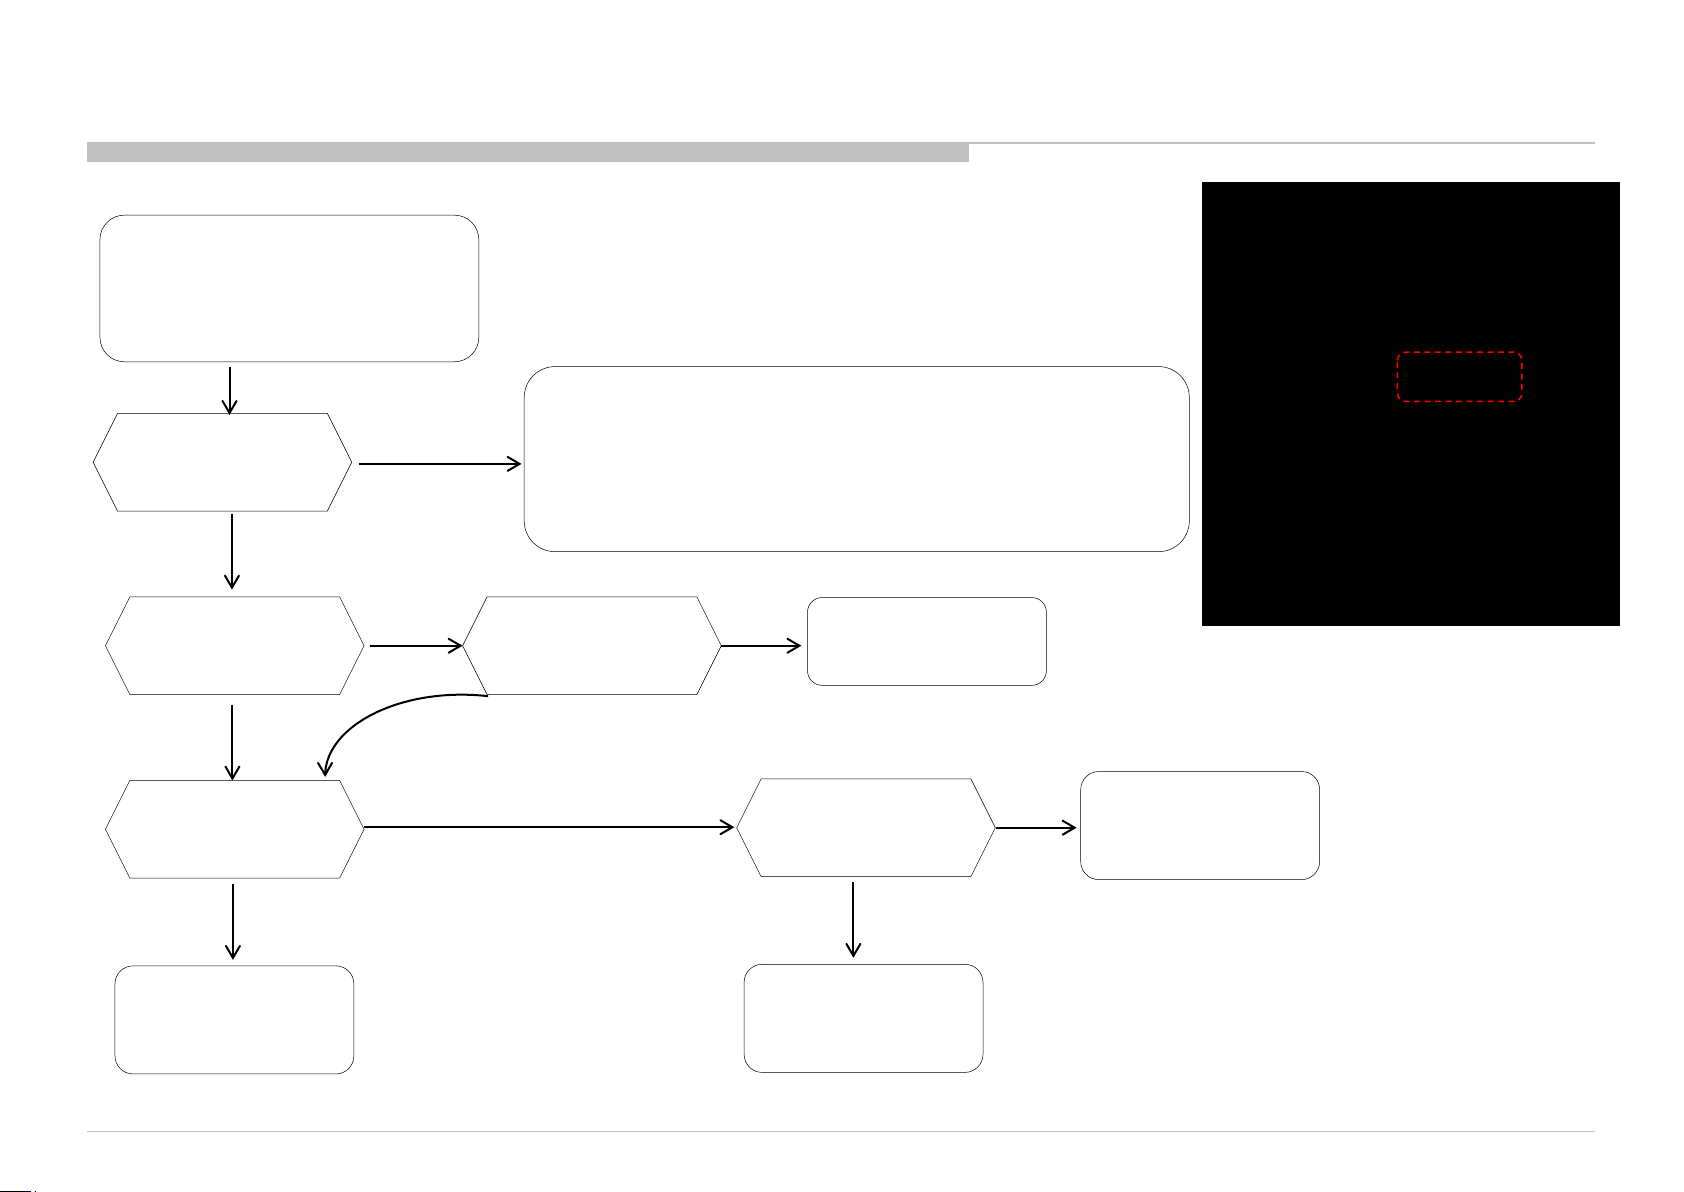
Troubleshooting
RB2G CHASSIS
W580B/W585B/W590B/W600B/W605B/W607B/W608B/WM15B
3-11.Bluetooth malfunction
Touch pad Remote doesn’t work
Or
One touch remote doesn’t work
Or
3D-glasses (Active) doesn’t work
BT version check
in Service Menu
Ver = --------
Check harness
connection is OK
between BT and BAXL
OK
Ver info.
can be read
NG
NG
Touch pad Remote malfunction trouble shooting flow
*(2) 3D-glasses (Active) malfunction trouble shooting flow
Connect properly
Confirm
Or
One touch remote doesn’t work
Or
OK
Loose harness
001 OP
000 VERS
<MAIN> <EXT>
DM0.001JPA WF: 3.0.0.1021
WF0.300W00AA WF: -------DF2.070W00AA FD: 0.003
YM0.619W00AA BT:
M4.922C 1.2.14.848
(DM0.0J00AA)
DD0.320W00AA
PK0.320W 00AA EFR:----------AM0.030JP
MID: 04A3B50F
PID: 0F051040
PNL:
DQ3Y400LN0101
BT Version info.
Change BT module
OK
BT module
NG
Change harness
Between BAXL board
and BT
OK
Main Harness
NG
Change BAXL board
If Bluetooth malfunction happens,
• BT module
• Harness between BT module and BAXL
• BAXL board are suspected.
27
Page 28
SECTION 4
SERVICE ADJUSTMENTS
RB2G CHASSIS
W580B/W585B/W590B/W600B/W605B/W607B/W608B/WM15B
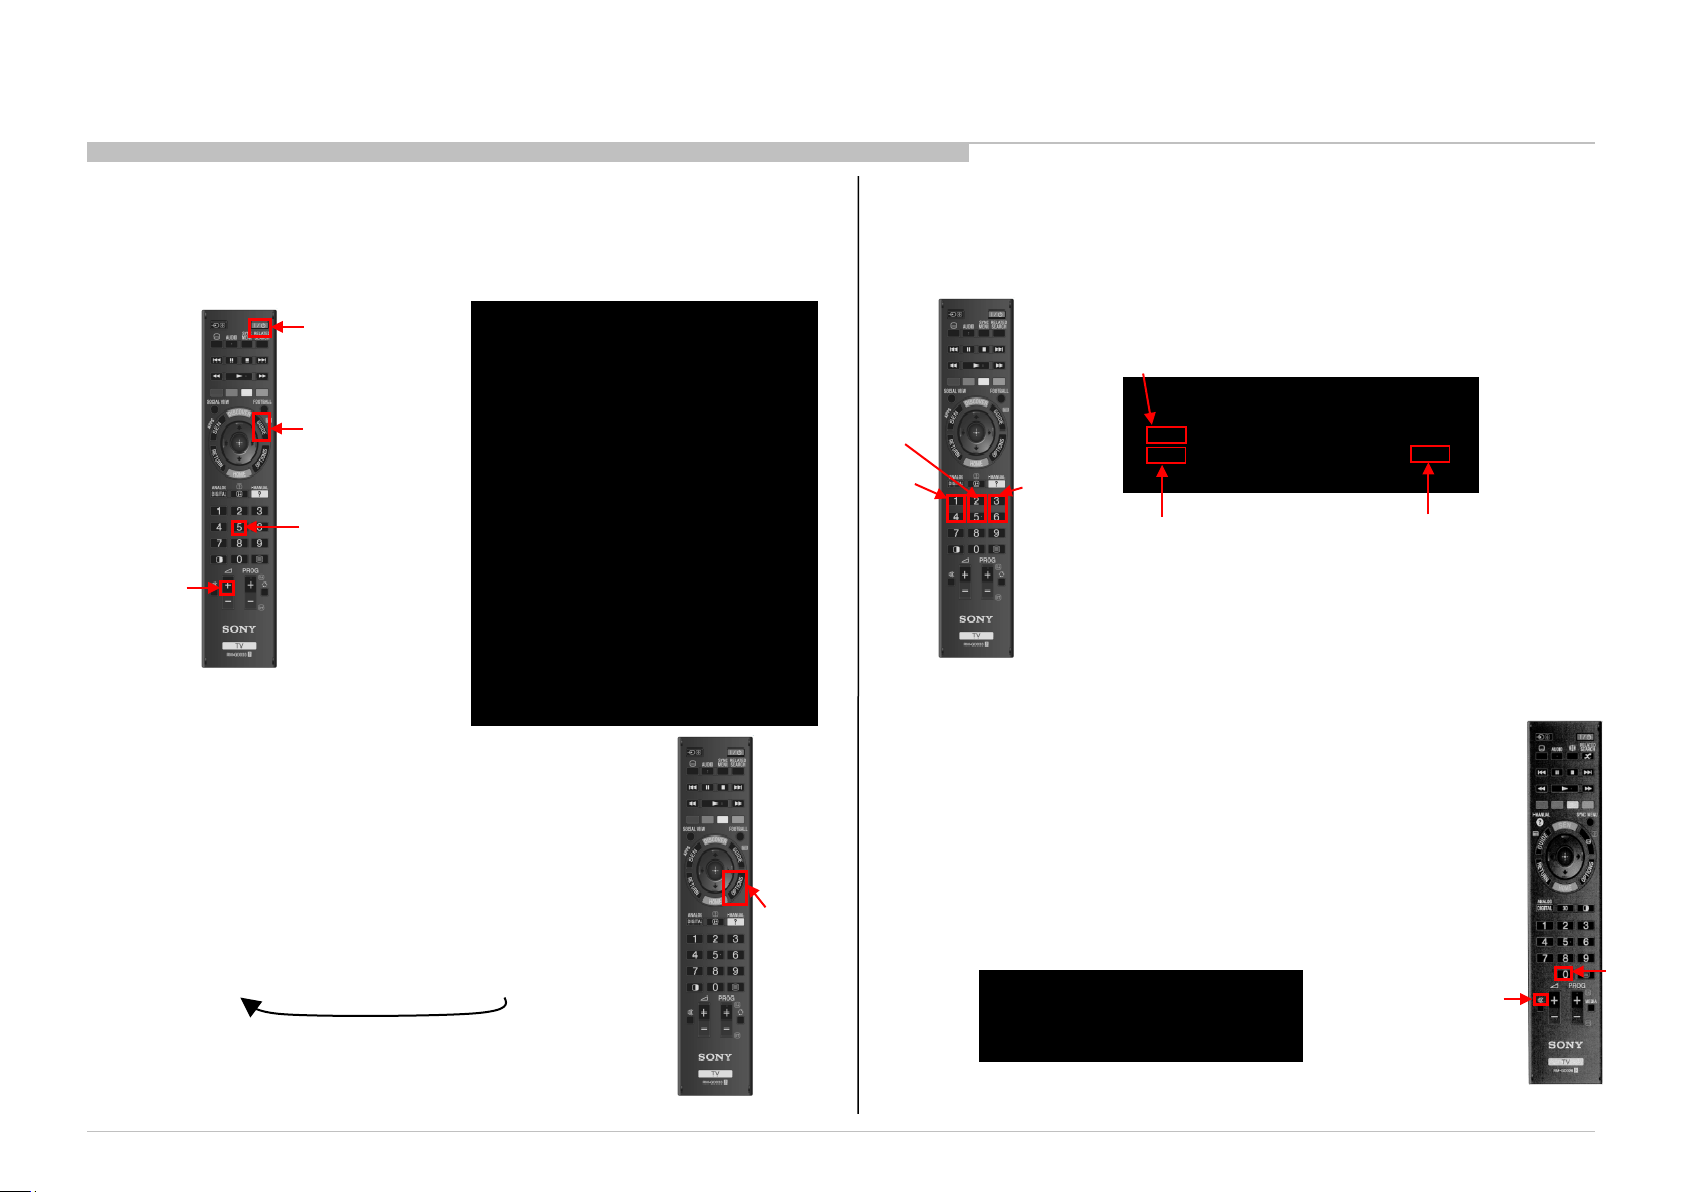
4-1. Accessing Service Mode
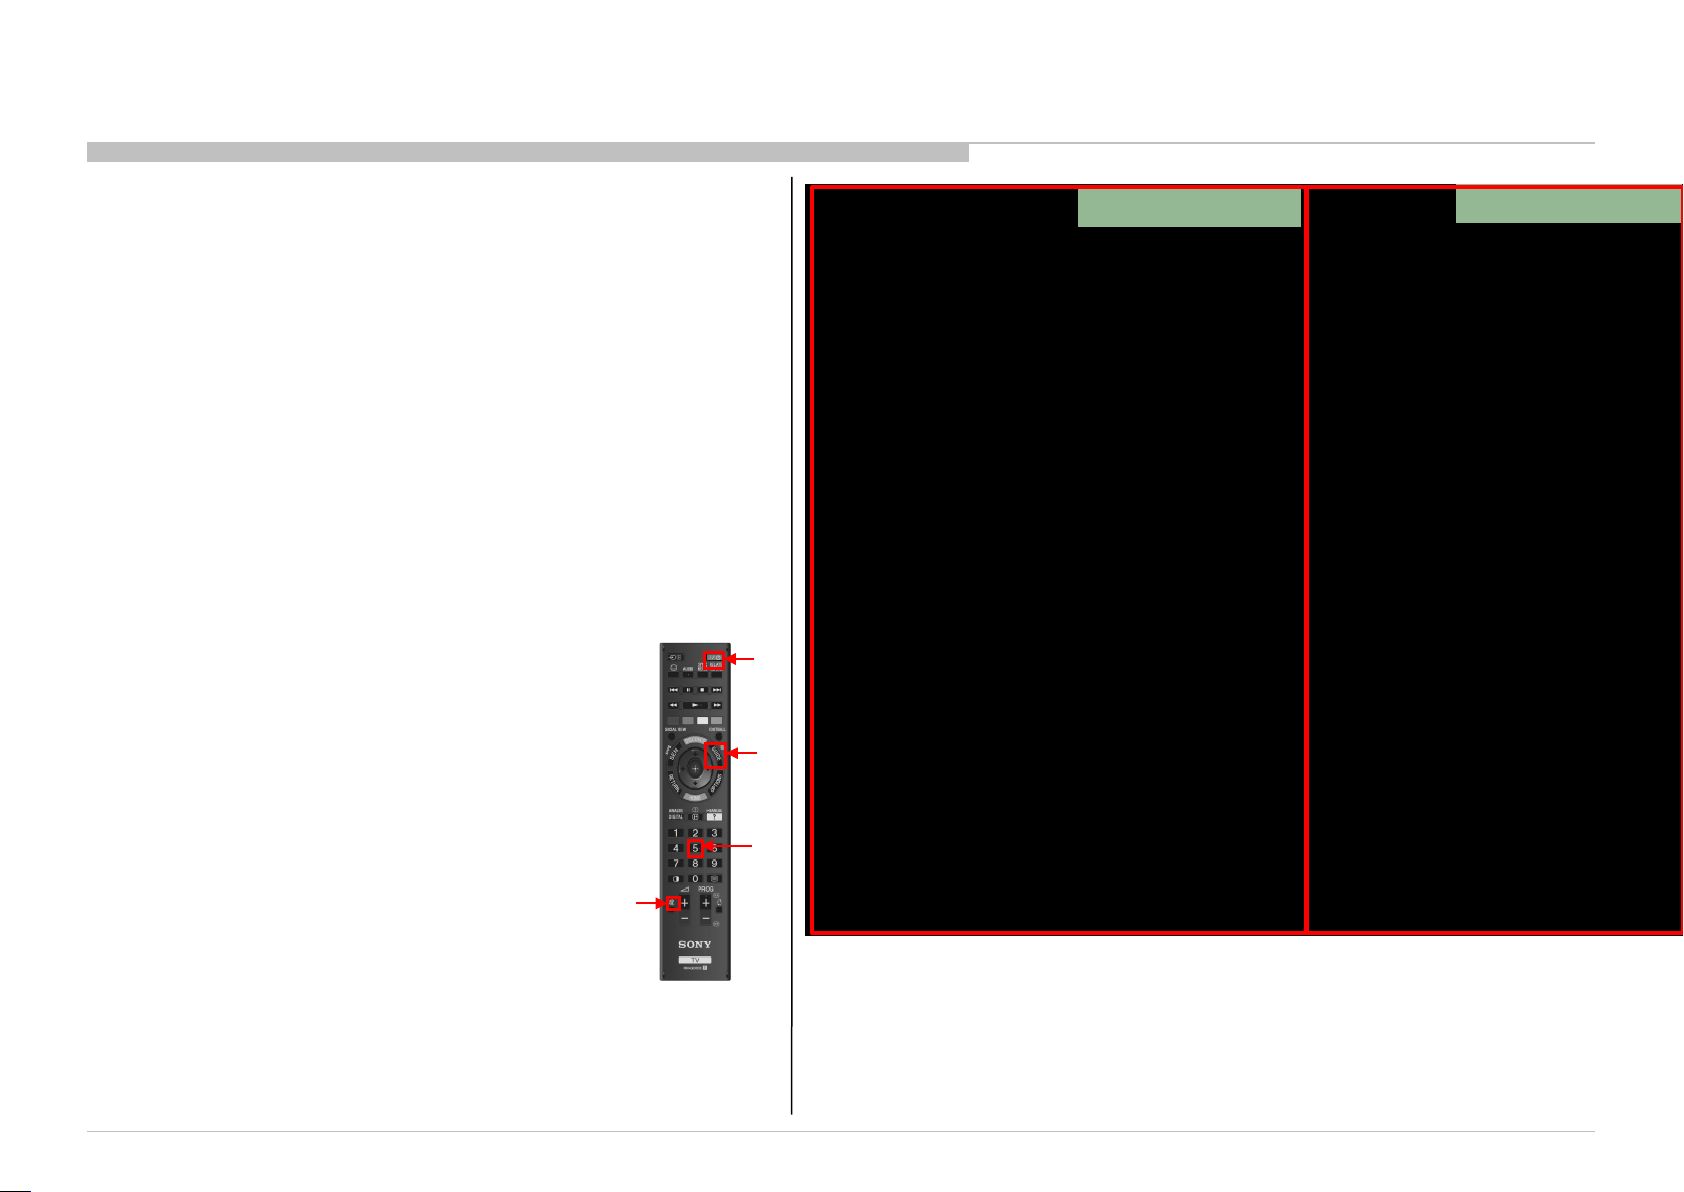
1) Go to TV standby condi tion by remote com mander .
2) Press “i+ (info)”, “5”, “V olum e + ” then “TV power” on r em ote.
3) You can se e Ser vi ce Mode on display.
* The above operation should be finished within 15 seconds after the set go to STBY
mode
3
Remote Commander
4
TV Power
(i+)
1
(5)
2
DIGITAL SERVICE
001 OP
000 VERS ---
<MAIN> <EXT>
DM0.270EUA WF:3.5.3.9999
WF0.190W00AA WF:-------DF5.091W00AA FD:-.--YM1.212W00AA BT:
M5.426C 2.1.14.413
(DM0.270EUA)
DD0.181W00AA EFR:----------PK0.181W00AA
AM0.270WW
MID:2A11A30E
PID:0E048040
PNL:
LC550EUF-FGF1-00
Sc reen S ampl e
4-2. Trans ition of Each Micro’s Service Mode
1. First of all, when you enter Servi ce M ode, you can
see “Digi tal” service mode.
2. Whenever you press “OPTI ON S” on r em ote, service
mode is changed accor ding to the flow below :
OPTIONS
Digital” -> “Chassis” -> “VPC”
Part A “Chassis” & “VPC”
4-3. Change Data by Service Mode 1 (Part A)
1. Change Data of “Chassis” or “VPC” servi ce m ode
a. Press “2 / 5” on r em ote t o sel ect ( up / dow n) ca tegor y.
b. Press “1 / 4” on r em ote t o sel ect ( up / dow n) Item.
c. Press “ 3 / 6” on r em ot e to ch ange (up / down) data.
Press 2: increment
Press 5: decrement
a
b
c
Remot e Comm and er
CHASSIS SERVICE
000 WYVERN
000 S2_NOISE_TH 32
Press 1: increment
Press 4: decrement
CHASSIS Servic e menu
Press 3: increment
Press 6: decrement
Save Changing Data by Service Mode 1
2. Write data for “Chassis” or “VPC” se r vi ce m ode.
a. Press “Mute” on remote.
It shows green “SERVI C E” changes to green
“WRITE”.
b. Press “0” on remote. Gr een “ WRITE” changes to
red “WRITE”. I t indicate w riti ng is processing.
c. After a while, red “ WRITE” changes to gr een
“SERVICE”. Writing process is done at this point.
3.
TV reboot is necessa ry for applyi ng data change.
CHASSIS WRITE
000 WYVERN
000 S2_NOISE_TH 32
b
a
Part B “Digital” ser vi ce m ode
Remot e Comm and er
CHASSIS Servic e menu
Remot e Comm and er
28
Page 29
Service Adjustment
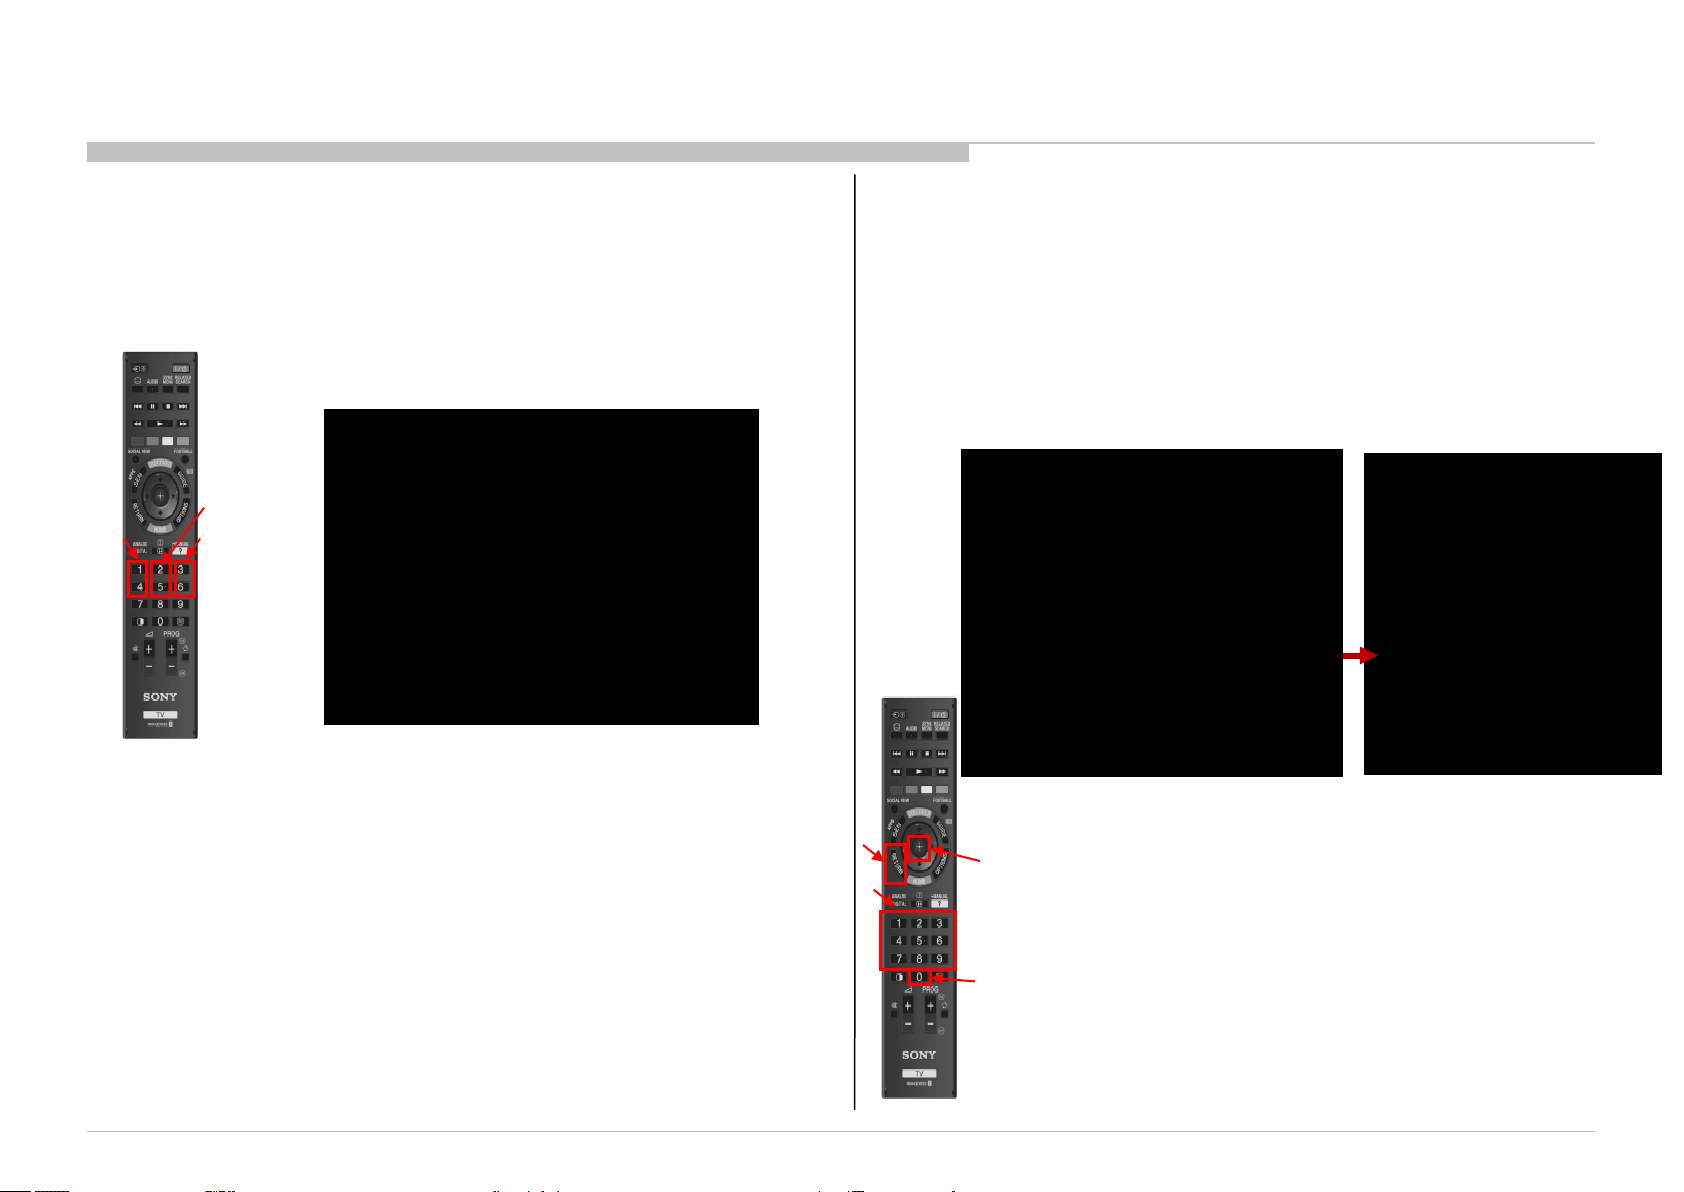
4-4. Change Data by Service Mode 2 (Part B)
RB2G CHASSIS
W580B/W585B/W590B/W600B/W605B/W607B/W608B/WM15B
1. Change Data of “Digital” service mode (exce pt “003 DIG_SRV_MODE”
category)
a. Press “2 / 5” on remote to select ( up / down) category.
b. Press “1 / 4” on remote to select ( up / down) Item .
c. Press “3 / 6” on remote to ch ange (up / down) data.
“Digital” service mode don’t have to Save. (except “002 MODEL”)
DIGITAL SERVICE
004 TUNER
000 !A_NOSIG_DET 001
a
b
Remot e Comm and er
c
VIDEO:STANDARD AUDIO:STANDARD
PSAVE:STANDARD
MAIN: SUB:
TUNER/----/---- ----/----/-----
----X----/----- 6553X6553/-----
-----/--- -----/---
DIGITAL Service menu
2. Change Data of “Digital” service mode ( “003 DIG _SRV_M ODE ”
category). “003 DIG_S RV_MOD E” is one category of “Di gital” service
mode. Please note because this operation is special.
a. Press “2 / 5” on remote to select “003 DI G_SR V_M ODE”.
b. Press “1 / 4” on r em ote t o sel ect ( up / dow n) Item.
c. Press “ 0 / 10” on remote to select item .
d. Press number key “1”~ ”9” directly. “*” stamp move.
e. Press “12 / enter / select” to decide and adva nce t o the next
step. P ress “r eturn” , to retur n to the previ ous page.
DIGITAL SERVICE
003 DIG_SRV_MODE
000 TEST_PATTERN ---
VIDEO:STANDARD AUDIO:STANDARD
PSAVE:STANDARD
MAIN: SUB:
TUNER/----/---- ----/----/-----
----X----/----- 6553X6553/-----
-----/--- -----/---
DIGITAL Service menu
DIGITAL(DIG_SRV_MODE) SERVICE
TEST PATTERN
*1 Video
2 Audio
e
e
d
c
Remot e Comm and er
29
Page 30
Service Adjustment
RB2G CHASSIS
W580B/W585B/W590B/W600B/W605B/W607B/W608B/WM15B
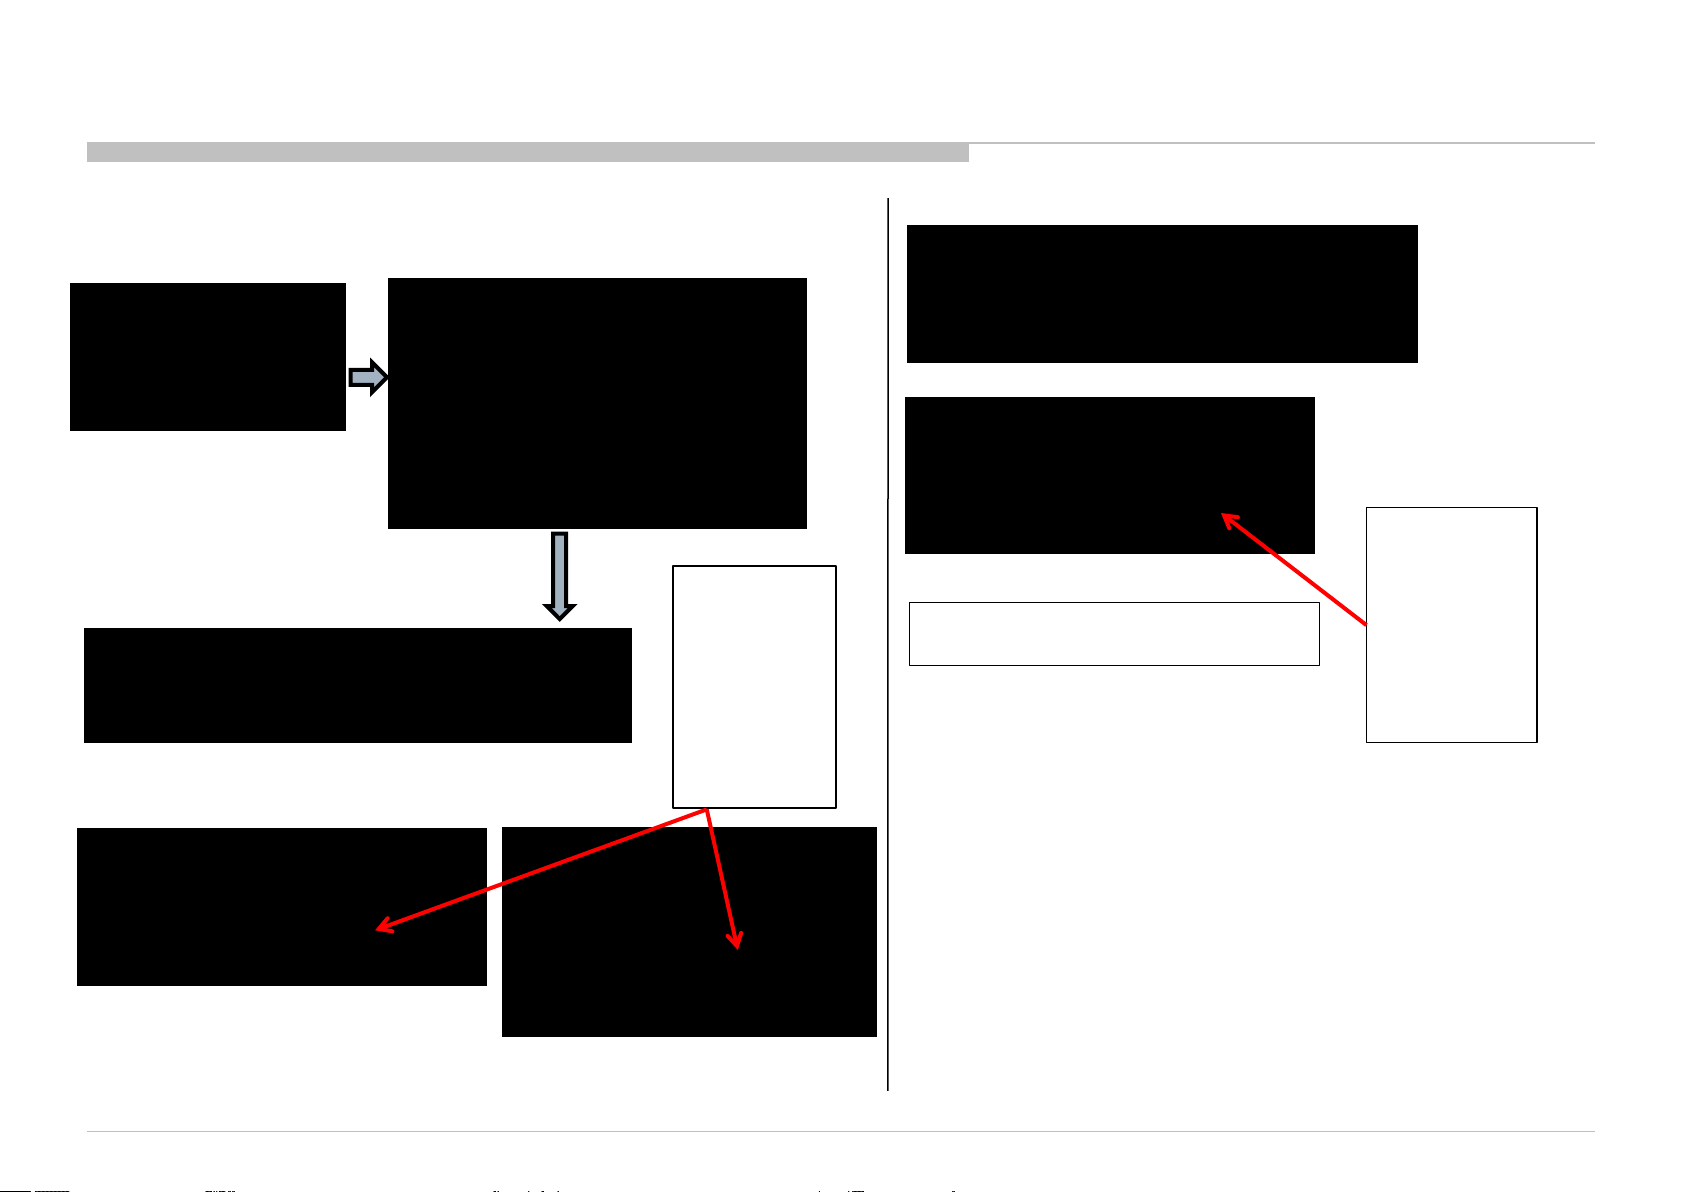
Checking B oard Information
1. In “Digital” service mode ( “002 MODEL” category)
2.
Press “0 / 10” on remote to select item.
DIGITAL SERVICE
002 MOD EL
000 BOARD CHECK
DIGITAL (MODEL) SERVICE
Board Check
1. REPLACE MAIN BOARD (and T UN ER BOARD)
2. REPLACE T UNER BOARD ONLY
3. Press “1” on Remote.
Note : Check the Result. Result 1 : NG ,
Result 2: OK, Result 3 : OK (W ith “TUNER BOARD OPTION
is c hang ed cor rect ly”) com men t
DIGITAL (MODEL) SERVICE
Board Check
NG
WRONG COMBINATION of MAIN BOARD and TUNER BOARD
This ca se is N G. The m ain boar d is mi smat ch t o the tuner boar d.
The valu e of Tuner Boar d Op ti on was kep t.
This value is below;
・Standard
・C4
・PCA
・HTL
・PCA/Dsub
・PCA/Dsub/HTL
・Dsub
・PCA/HTL
4. Press “Return” on Remote
5. P r ess “2” on Remot e.
DIGITAL (MODEL) SERVICE
Board Chec k
NG
DIFFERENT KIND of TUNER BOARD HAS BEEN CONNECTED
DIGITAL (MODEL) SERVICE
Board Check
OK
TUNER BOARD OPTION:STANDARD
This ca se is OK.
The valu e of T uner Board Opt ion was kept.
In th is cas e, Th e value of Tuner Board Opt ion is
never changed automaticall y.
.
6. Press “Return” on Remote.
IF “OK” Go to
Save Changing Data by Service Mode 2.
This ca se is NG.
Th e main boar d is mis matc h t o
the t un er boar d.
Th e valu e of Tuner Board Opt i on
was k ept .
This value is below;
・Standard
・C4
・PCA
・HTL
・PCA/Dsub
・PCA/Dsub/HTL
・Dsub
・PCA/HTL
DIGITAL (MODEL) SERVICE
Board Check
OK
TUNER BOARD OPTION:STANDARD
This ca se is OK.
The valu e of Tuner Boar d Op ti on was kep t. .
DIGITAL (MODEL) SERVICE
Board Check
OK
TUNER BOARD OPTION:PCA/HTL
TUNER BOARD OPTION is changed correctly
This ca se is OK.
-Only when TU NER BOARD OPTION part of
model ID has been changed
-The valu e of T uner Board Opt ion was changed
automatically.
30
Page 31
Service Adjustment
RB2G CHASSIS
W580B/W585B/W590B/W600B/W605B/W607B/W608B/WM15B
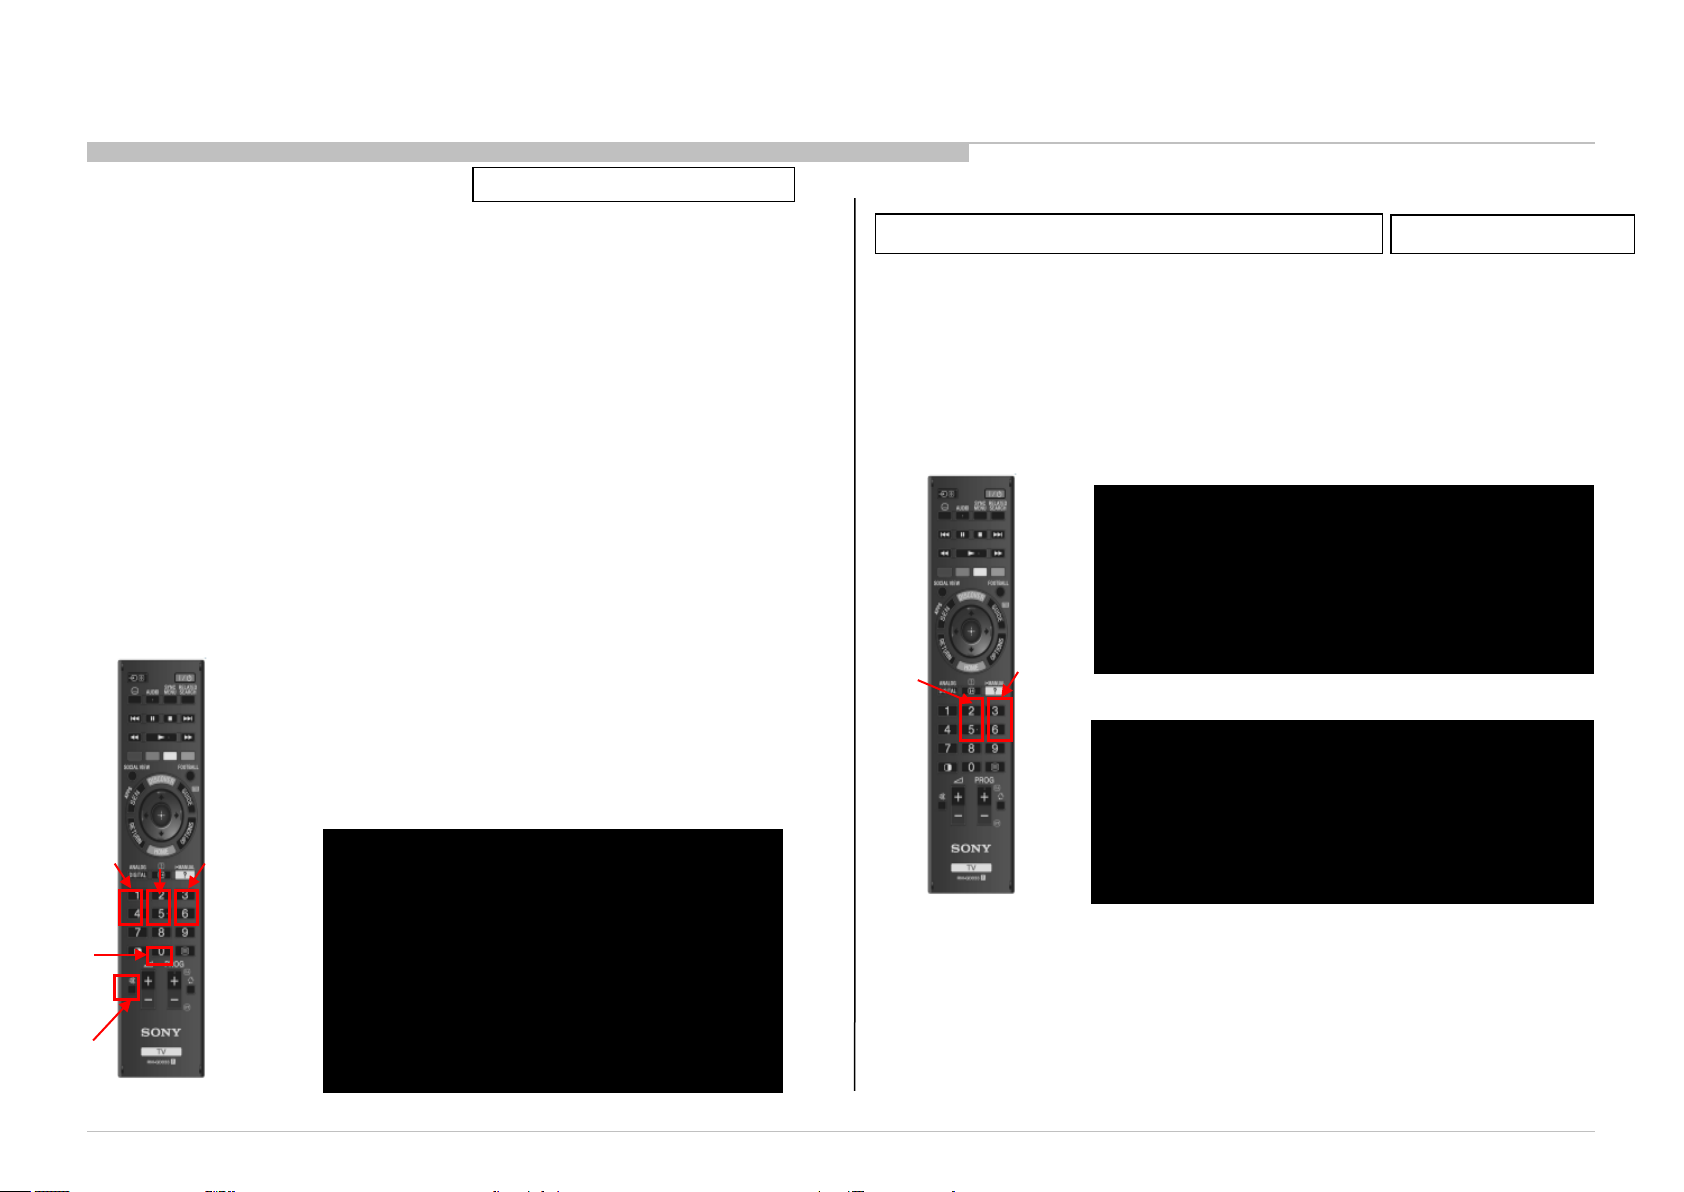
Save Changing Data by Service Mode 2
Only when B* board is replaced.
1. In “Digital” service mode ( “002 MODEL” category)
001 SEG Select segment information
002 DEST Select destination information
003 MODELNAME Select Model Name
004 SERIAL Can be set Only Once for the new board
005 SHIP_CONFIRM...Can set correct Product Code
006 VAR_TYPE Select variable information
a. Change data for each model. (Refer to 4-4 Part B)
b. P r ess “Mute” , “0” on remote sequentially. Red “WRITE” is
shown. This indicates writing is in process.
c. After a w hile, red “WRITE” disappears. Green Done will b e
displayed for a while, which means writing process is done.
d. For the items SEG, DEST, MODELNAME after changing
each item, service save (“mute”+”0”) is required. For the
item SERIAL, after inputting the serial number, press key
“12” or “Enter” to save the data.
– Please save the items according to the sequence “SEG ->
DEST -> MODELN AME-> VAR_TYPE”
– When Saving the item "SEG", sometimes instead of
"Writing", the word "Pending" will appear. In this case, skip
"SEG", saving "DEST“ , "MODELNAME“ and “VAR_TYPE”
is OK.
a a a
DIGITAL SERVICE
002 MODEL
001 SEG HE_BASE
Write
b
b
Remot e Comm and er
VIDEO:STANDARD AUDIO:STANDARD
PSAVE:STANDARD
MAIN: SUB:
TUNER/----/---- ----/----/NTSCU
----X----/----- ----X----/-----
-----/--- -----/---
DIGITAL Service menu
4-5. Restore WB / Gamma Adj. Data to B board.
Please apply after USB-DL when B board is replaced.
1.in “VPC” service mode
a.Select “000 D ATA_CO PY” category by pr essing “ 2 / 5” on remote.
b.Change data from “0” to “1” by pressing “3 / 6” on remote.
c.Wait until data is changed from 1 to 3.
d.When data is changed from 1 to 3, restori ng process i s finished.
e.In case data is changed from 1 to 2, keep default setti ng. (No
more process is needed.)
VPC SERVICE
000 DATA_COPY
000 BU_TRANS 1
DO NOT POWER OFF
a
Remot e Comm and er
b
DO NOT TOUCH ANY KEY NOW
VPC SERVICE
000 DATA_COPY
000 BU_TRANS 3
DATA TRANSFER SUCCESS
HE,HS Models
Res tore pr ocess
End rest ore process
31
Page 32
Service Adjustment
RB2G CHASSIS
W580B/W585B/W590B/W600B/W605B/W607B/W608B/WM15B
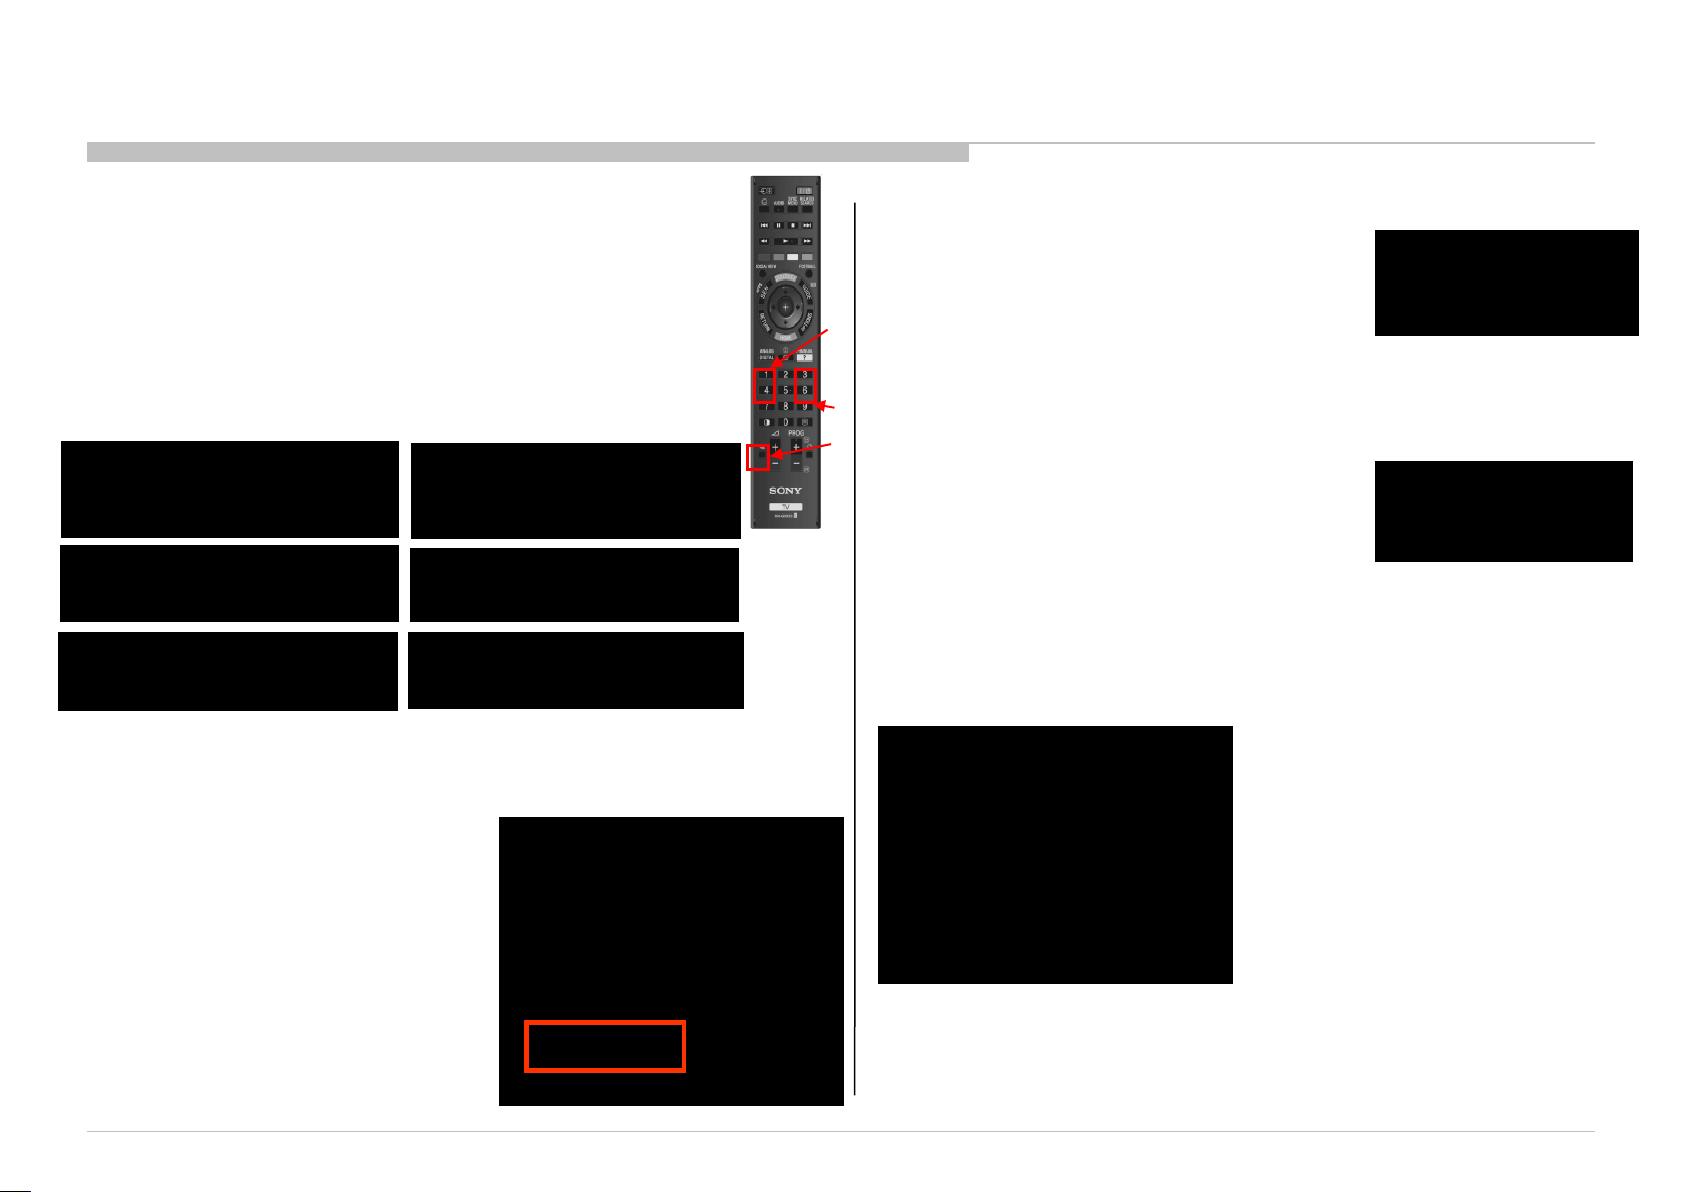
4-6. WB Adjustment by Service Mode
a. Pr ess “1” or “4” on remote to select WB adjustment menu.
b. C hange data by pressi ng “3” or “6” . Each range of these
items is 0~1023.
c. Press “mute” +”0” on remote to save the data. “SERVICE”
comment is changed to “WRITE”, indicating wr iting process.
d. After a whi le, “WRITE” co mment r eturns to “ SERVI CE” ,
which means wri ting process is done. (takes about a couple
of seconds)
VPC SERVICE
003 WB
000 R_DRV 128
VPC SERVICE
003 WB
001 G_DRV 128
VPC SERVICE
003 WB
002 B_DRV 128
VPC Service menu
4-7. VCOM A djus tme nt (NFR-A UO/SDC/FXC Panel)
4-7-1. STEP1
a. Sel ect “003 DIG_SR V_MOD E”
category by pressi ng “ 2 / 5” on
remote.
b. Pr ess “0” to go to “TEST PAT TER N ”
Mode.
c. Press “Enter” or “12” to go into
Video TEST PATTERN.
d. Pr ess “7” or “8” to se l ect the t est
pattern
e. Pr ess “E nter” or “12” twice to show
the VCOM TEST PATTERN.
VPC SERVICE
003 WB
003 R_BKG 128
VPC SERVICE
003 WB
004 G_BKG 128
VPC SERVICE
003 WB
005 B_BKG 128
DIGITAL (DIG_SRV_MODE) SERVICE
TEST PATTERN
--> 1 Video
*1 White
2 Ramp
3 R R aster
4 G R aster
5 B R aster
6 Color Bar
7 VCOM Pattern1
8 VCOM Pattern2
9 Off
4-7-2. STEP2
2.in “VPC” service mode
a. Sel ect “002 VCOM ” category by pressing
“2 / 5” on r em ote.
b. Sel ect “000 EN ABLE” i tem by pr essing “1
a
/ 4” on rem ot e.
c. Change EN ABLE from “0” to “1” by
pressing “ 3” to enable VCOM adjustment.
b
4-7-3. STEP3
c
3. in “ VPC” servi ce mode
a. Sel ect “002 VCOM ” category by
b. Sel ect “001 ADJUST ” item by
Remote
Commander
4-7-4. STEP4
DIGITAL SERVICE
007 VCOM
000 SRV_OSD_EN 1
VIDEO:STANDARD AUDIO:STANDARD
PSAVE:STANDARD
MAIN: SUB:
TUNER/----/---- ----/----/NTSCU
----X----/----- ----X----/-----
-----/--- -----/---
c. Change data by pressing “3 / 6” on
pressing “2 / 5” on rem ote.
pressing “1 / 4” on rem ote.
remote.
4. in “ Digi tal” service mode
a. Sel ect “007 VCOM” category by
b. C hange data from “1” to “0” by
c. Confirm the final r esult of the
d. I f OK, Finish the VCOM
VPC SERVICE
002 VCOM
000 ENABLE 0
VPC SERVICE
002 VCOM
001 ADJUST 64
pressing “ 2 / 5” on r emot e.
pressing “ 3 or 6 ” on remote.
VCOM adjustment .
adjustment. I f NG, pressing “ 3 or
6” to show the OSD again and
go back to VCOM adjustment
Step 3.
32
Page 33
Service Adjustment
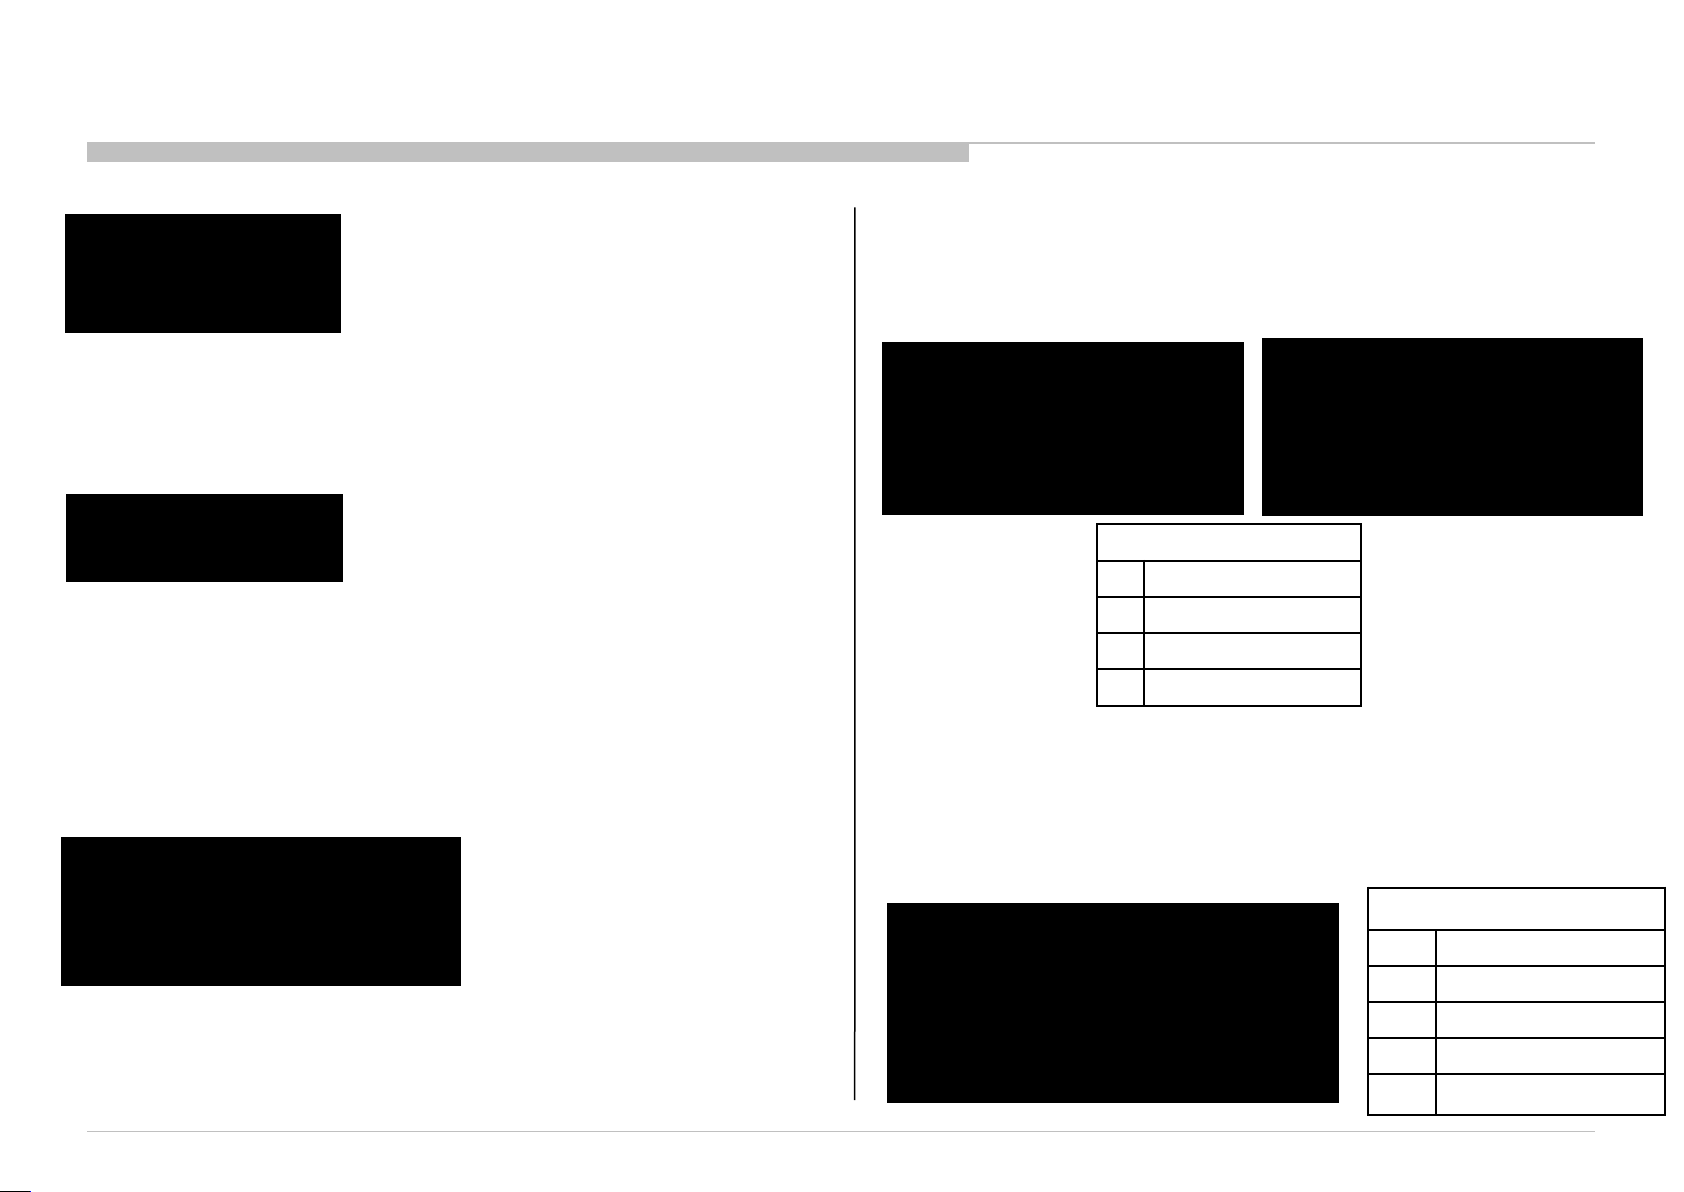
4-8. VCOM Adjust ment (HFR -A U O/FXC P a ne l)
4-8-1. STEP1
VPC SERVICE
002 VCOM
000 ENABLE 0
1. in “ VPC” servi ce mode
a. Sel ect “002 VCOM ” category by pressing “2 /
5” on remote.
b. Sel ect “000 EN ABLE” i tem by pr essing “1 / 4”
on remote..
c. Change EN ABLE from “0” to “1” by pr essing
“3” to enable VCOM adjustment.
The Picture is change Vcom Pattern and you
-
can’t see OSD
4-8-2. STEP2
2. in “ VPC” servi ce mode (Ther e is no OSD.)
a. Sel ect “002 VCOM ” category by pressing
VPC SERVICE
002 VCOM
001 ADJUST 64
“2 / 5” on r em ote.
b. Sel ect “001 AD JU ST ” item by pr essing “1 /
4” on remote.
c. Change data by pressing “3 / 6” on rem ote.
d. Fi nish the adj ustm ent w hen the pictur e
seems OK.
e. Sel ect “000 EN ABLE” i tem by pr essing “1 /
4” on remote.
f. Change ENABLE from “1” to “0” by
pressing “6” to disabl e VC O M adjustment.
and you can see OSD.
4-9. REC Setting
4-9-1. STEP1
DIGITAL (DIG_SRV_MODE) SERVICE
REC_SETTING
* 1 Key Copy
2 HDD Re-Register
1. in “ D i gi tal ” servi ce m ode
a.Select “003 DIG_SRV_MOD E” cat egor y by pressing “2 / 5” on remote.
b. Select “ 006 REC_SETTI N G ” item by pr essing “1 / 4” on r em ote.
c. Press “ 0” or “10” to go to detailed REC Setting scr een.
W580B/W585B/W590B/W600B/W605B/W607B/W608B/WM15B
4-9-2. STEP2
2. i n detailed R EC setting scr een
a. Press “1” to sel ect “Key Copy” i tem
b. Press “Enter ” or “12” twice to execute the com mand.
c. I f OK, show the messa ge “Key Copy OK” . If NG, show the messa ge
“Key Copy NG (= xx )”.
Press “R eturn” to retur n to previous page.
d.
DIGITAL (DIG_SRV_MODE) SERVICE
REC_SETTING
* 1 Key Copy
2 HDD Re-Register
Key Copy OK
xx value representation
0 copy success
1 decrypt error
2 file acquisition error
3 other
4-9-3. STEP3
3. in detailed REC setting scr een
a. Press “2” to select “HDD Re-Register” I t em .
b. Press “Ent er” or “12” twice to execut e the com mand.
c. If OK, xx= x+1. If NG, xx=x.
d. Press “R eturn” to retur n to previous page.
DIGITAL (DIG_SRV_MODE) SERVICE
REC_SETTING
1 Key C op y
* 2 HDD Re-Register
(x) HDDs OK ( xx )
RB2G CHASSIS
DIGITAL (DIG_SRV_MODE) SERVICE
REC_SETTING
* 1 Key Copy
2 HDD Re-Register
Key Copy NG ( xx )
xx value representation
0 register success
1 HDD repetition
2 file acquisition error
3 HDD info miss-match
4 other
33
Page 34
Service Adjustment
RB2G CHASSIS
W580B/W585B/W590B/W600B/W605B/W607B/W608B/WM15B
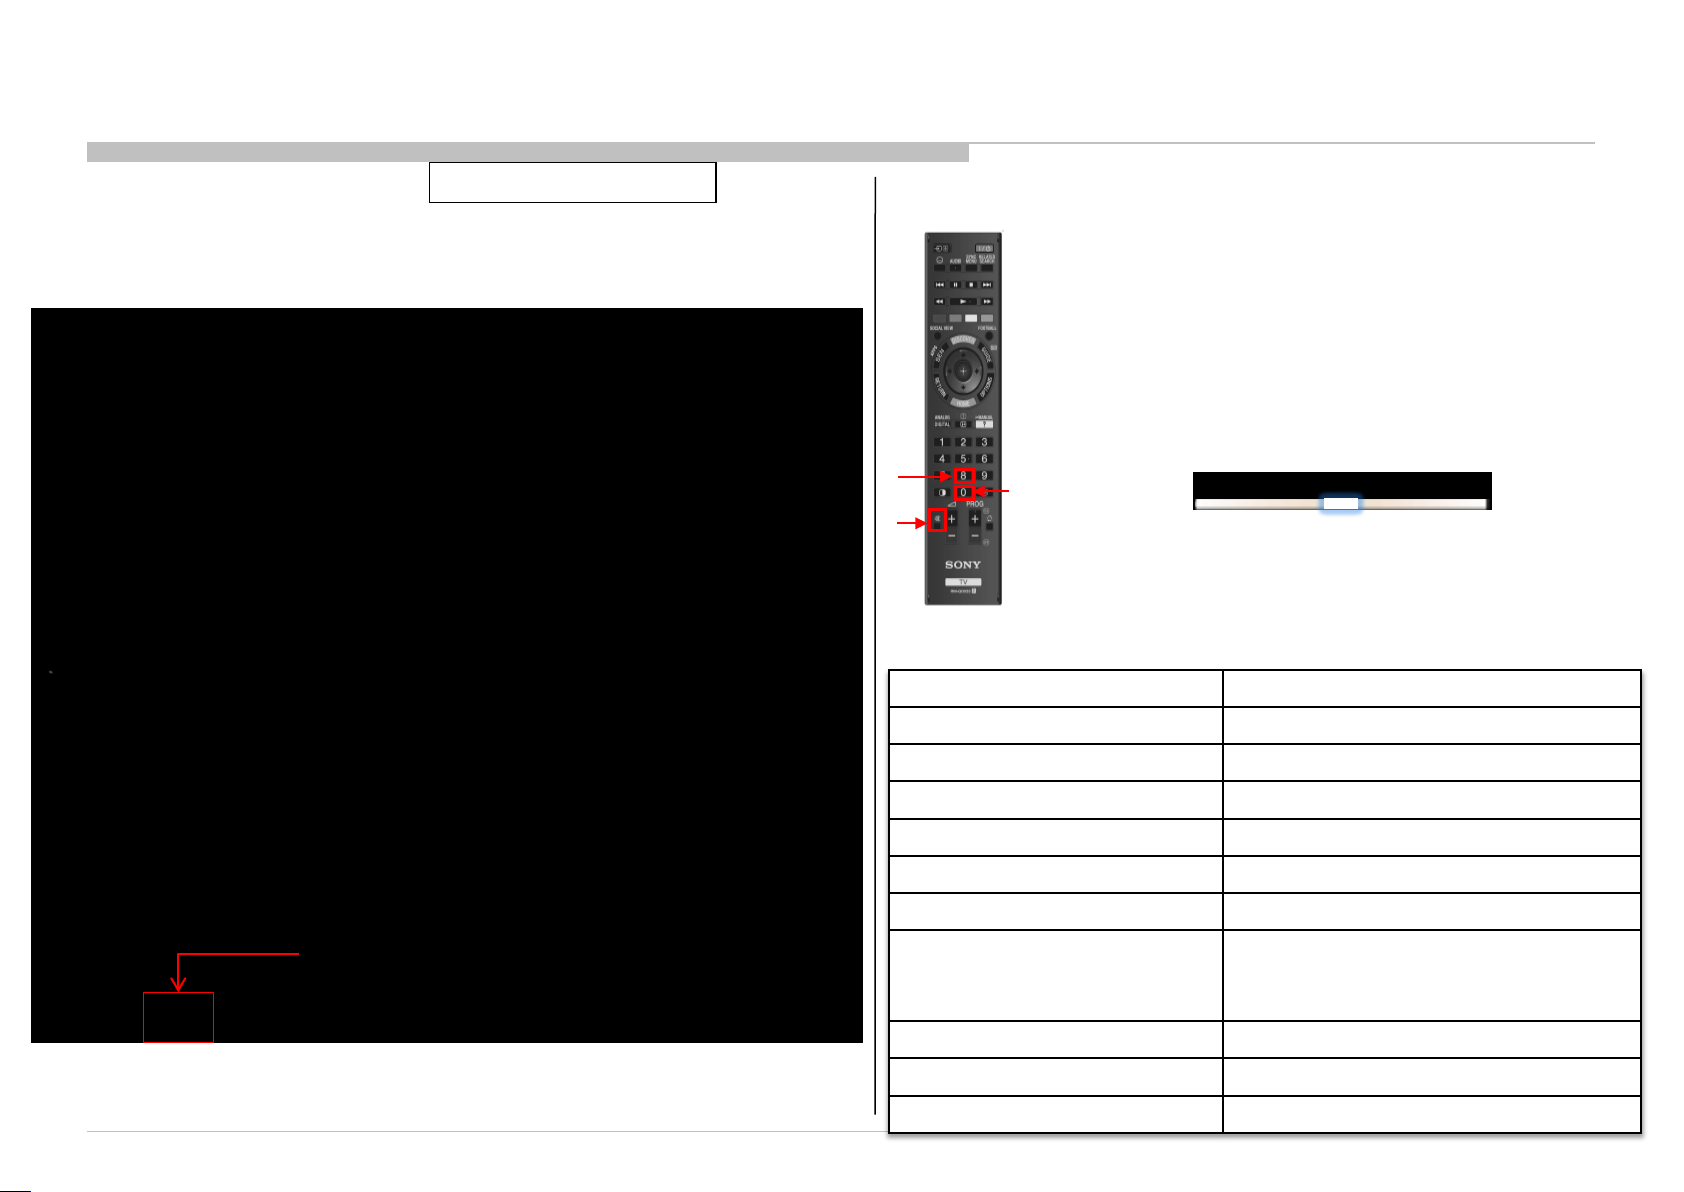
4-10. Reset Panel Operation Time
Only when Panel is replaced.
4-11. Set to Shipping C ondition
1. In Self Diagnosi s D i spl ay ( refer to How to Enter Self Diagnosis Display)
a. Reset Panel Operation Tim e <7> -> <0>
SELF CHECK
002 MAIN_POWE ------------ ------------ ------------ 00 Model Name : KDL-RB2
003 AFE_I2C ------------ ------------ ------------ 00 Serial Number : 1000008
003 DC_ALERT ------------ ------------ ------------ 00 Package Number : PKG0.270EUA
003 AUD_ERR ------------ ------------ ------------ 00 Device ID : B0:00:01:EF:4B:C6
003 HDMI_EQ ------------ ------------ ------------ 00 Wired MAC : D8:D4:3C:17:84:3E
003 TU_DEMOD ------------ ------------ ------------ 00 Wireless MAC : N/A
003 AFE_SPI ------------ ------------ ------------ 00 USB dongle : N/A
004 VLED ------------ ------------ ------------ 00
004 LD_ERR ------------ ------------ ------------ 00 <MAIN> <EXT>
005 TCON_ERR 120823132523 ------------ ------------ 01 DM0.270EUA WF:3.5.3.99
`
005 P_ID_ERR ------------ ------------ ------------ 00 WF0.190W0AA WF:--------
005 FRCTC_I2C ------------ ------------ ------------ 00 DF5.091W00AA FD:-.---
006 BACKLIGHT ------------ ------------ ------------ 00 YM1.212W00AA BT:2.1.14.413
007 TEMP_ERR ------------ ------------ ------------ 00 M5.426C
007 FAN_ERR ------------ ------------ ------------ 00 (DM0.270EUA) EFR : -----------
008 VPC_WDT ------------ ------------ ------------ 00 DD0.181W00AA
008 MEPS_WDT ------------ ------------ ------------ 00 PK0.181W00AA
008 HOST_WDT ------------ ------------ ------------ 00 AM0.270WW
008 STBY_WDT ------------ ------------ ------------ 00
008 AFE_WDT ------------ ------------ ------------ 00 MID:2A11A30E
009 TU_BOARD ------------ ------------ ------------ 00 PID:0E048040
PNL:LC550EUF-FGF1
00021-10573-00025 0000000000000600-0000000000000000
PANEL OPERATION TIME
Diagnosis Display
b
c
Remot e Comm and er
4-12. Summary of Service Control
1. H ow to do shipping conditi on.
a. Move to “Digital” service m ode.
b. Press “8” on r em ote. It shows gr een “ SER VI C E” ch anges to
green “RST-”.
c. Press “mute” on remote. Added gr een “EXE” after gr een
“RST-” .
d. Press “0” on remote. Gr een “E XE-RST” ch anges to red “EXE-
RST”. I t indicate wr iting is processi ng.
e. After a whil e, r ed “ EXE-RST” changes to green “ SERVI CE” .
f. And blink Smart Core WHITE LED. Writing process is done
at this point.
d
<Another way>
You can set to shipping condition w/o entering Service Mode.
-> “Cursor Up” + “Power Key” on remote.
Function The flow of control
Service mode on <Test>+<TV>/<Display><5><Vol Up><Power>
Service mode off <Other> / <Power off + on>
Item up / down <1>/<4>
Category up / down <2>/<5>
Data up / down <3>/<6>
Test rese t (テストリセット)
HDD Deregistration
(HDD登録削除)
Execute ( 実行)
Write data (書込み)
SONY
<8> + <Mute> + <0>
From UI Menu:
HDD登録削除 (JPモデル)
HDD Dere gistration (AEP M odel)
<10 or 0>
<Mute> + <0>
Change module (モジュール変更)
<Jump> / <Option>
34
Page 35
Service Adjustment
4-13. Service Menu Tree
4-13-1. Tree 1
“Digital”
001 OP
000 VERS …Software version
002 MODEL
000 BOARD CHECK ...Check the main board and tuner board combination
001 SEG ...Select segment information
002 DEST ...Select destination information
003 MODELNAME ...Select Model Name
004 SERIAL ...Can be set Only Once for the new board
005 SHIP_CONFIRM ...Can set correct Product Code
006 VAR_TYPE
003 DIG_SRV_MODE
000 TEST_PATTERN …Main Chip Test Pattern
001 MONITOR_MODE …Tuner Monitor
002 FACT_SETTING …Factory shipment settings
003 MODEL_DATA
004 NETWORK
005 TT84 …Only for AEP
006 REC_SETTING
004 TUNER
000 A_NOSIG_DET …Analog-RF No signal detection
001 SCAN_COPY …Copy the scan data to USB.
003 ASCOT
004 WYVERN_1
007 VCOM …Service item for VCOM Adjustment
000 SRV_OSD_EN
008 WIFI …Servi ce ite m fo r WIFI (o nly WiFi mode l)
000 PING
001 MONITOR
009 BT MODE
000 MONITOR
RB2G CHASSIS
W580B/W585B/W590B/W600B/W605B/W607B/W608B/WM15B
4-13-2. Tree 2
“Chassis”
000 WYVERN
<omission>
001 TUNING
<omission>
002 D_DEMOD
<omission>
003 SATELLITE
<omission>
004 AUDIO
000 MPEG_LV …Level OFFSET for MPEG1-L1/L2.
001 HEAAC_LV …Level OFFSET for HE-AAC.
005 TEMPSEN No Use for Service
<omission>
006 DL
000 PID_DATA_MISMAT
007 BT_MODE … Se rvice Item for BT (only BT model)
000 FEATURE
001 FIRST_DIS_CH
002 LAST_DIS_CH
003 3D_BEACON_ENABLE1
004 BT_DEBUG
008 CAM … Ser vice Item for CI (only A E P/CH/HK mod el)
000 CAM_TS_FORMAT
009 OBI
000 RSTBOT
No use for Service.
35
Page 36
Service Adjustment
RB2G CHASSIS
W580B/W585B/W590B/W600B/W605B/W607B/W608B/WM15B
4-13-3. Tree 3
“VPC”
000 DATA_COPY …WB Data Restore Function (Tcon board-to-B board).
000 BU_TRANS
001 DATA_BAKUP ...WB Data Backup Function (B board-to-Tcon board).
000 BU_FLASH
002 DATA_INIT ...WB Data initialization (B board-to-Tcon board).
000 WB_INIT
001 ADJUST
003 VCOM …VCOM Adjustment Function.
000 ENABLE
001 ADJUST
004 WB …W/B adjustment
<omission>
005 TEST_PTN
<omission>
006 PANEL
<omission>
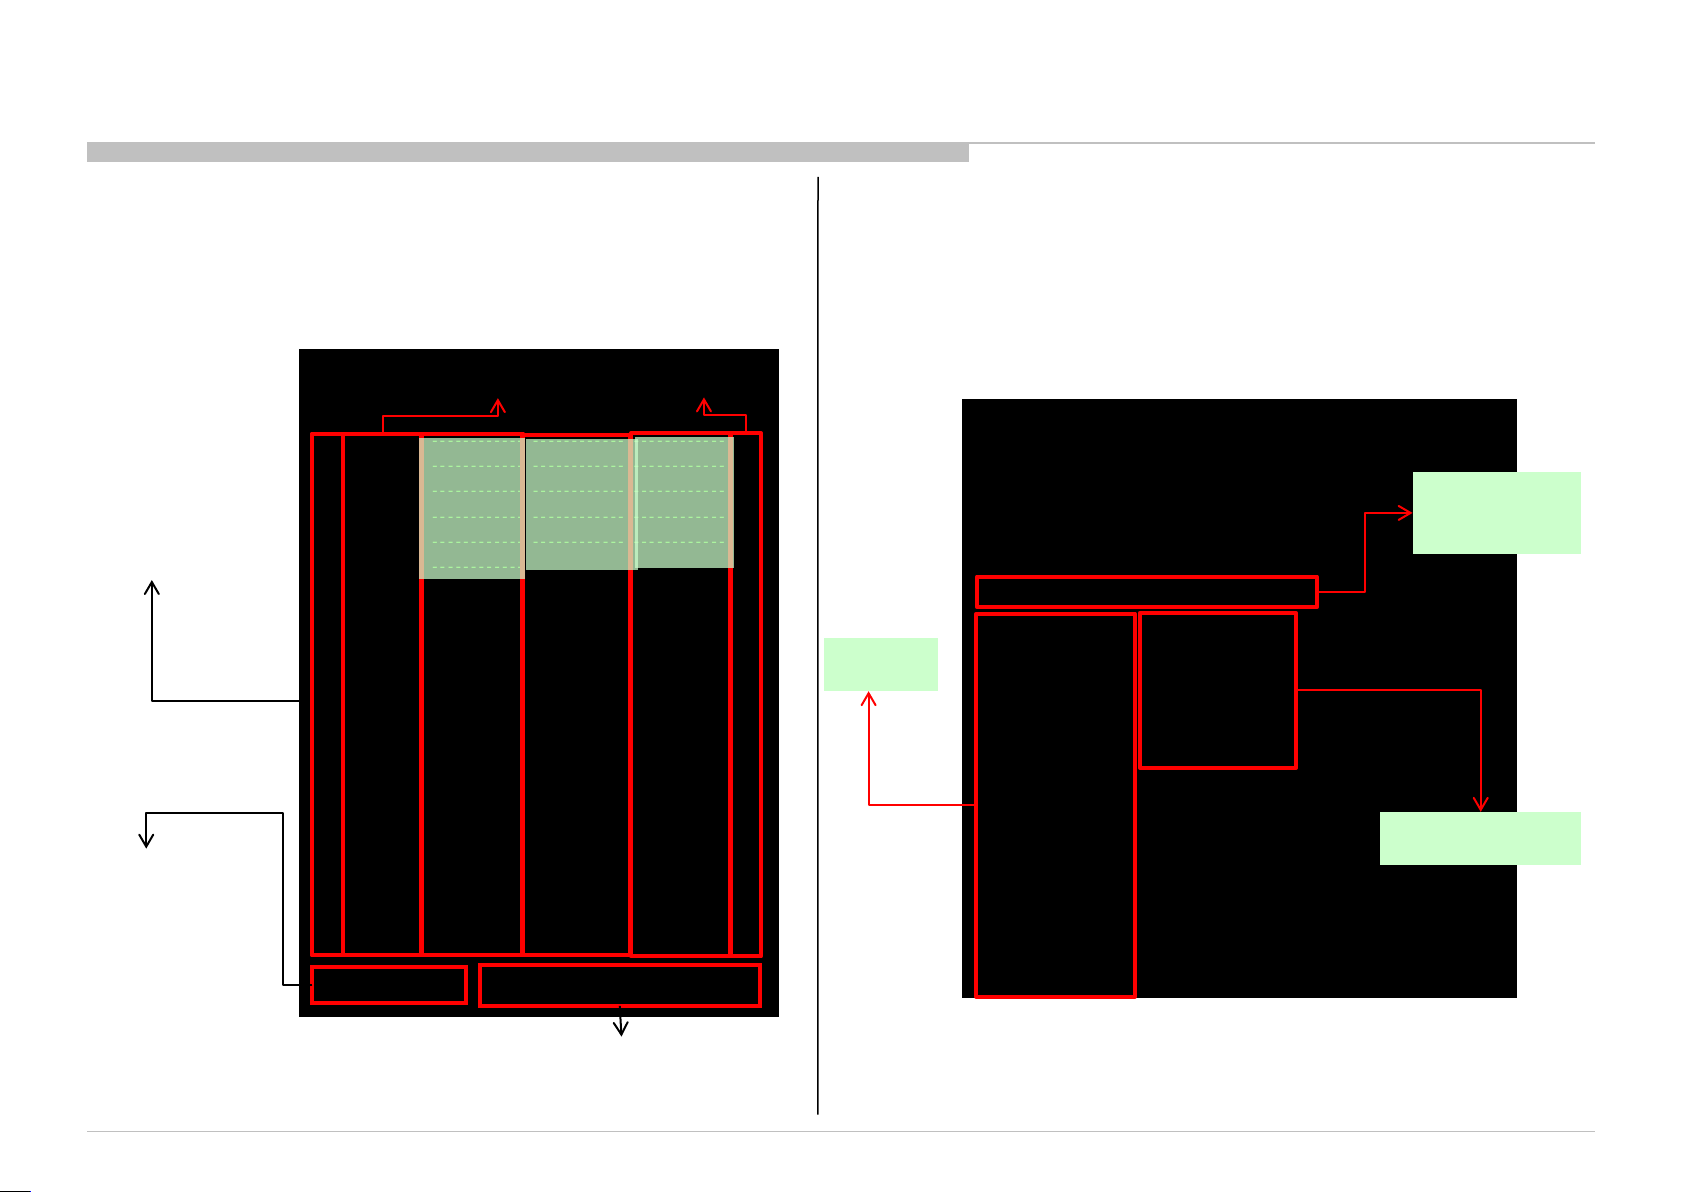
4-14. How to Enter Self Diagnosis Displa y
1. Go to TV standby condition by r em ot e
commander.
2. Press “i+ (info)”, “5”, “Volume-” then “TV power”
on remote.
3. You can see Self Diagnosis Disp lay.
4. To Exit , Press Pow er Off and On.
3
SELF CHECK
002 MAIN_POWE ------------ ------------ ------------ 00 Model Name : KDL-46W90AA
003 AFE_I2C ------------ ------------ ------------ 00 Serial Number : --------
003 DC_ALERT ------------ ------------ ------------ 00 Package Number : PKG0.280JPA
003 AUD_PROT ------------ ------------ ------------ 00 Wired MAC : 30:F9:ED:04:2C:17
003 HDMI_EQ ------------ ------------ ------------ 00 Wireless MAC : F0:F0:02:AA:82:DA
003 TU_DEMOD ------------ ------------ ------------ 00 USB dongle : N/A
003 AFE_SPI ------------ ------------ ------------ 00
004 VLED ------------ ------------ ------------ 00 <MAIN> <EXT>
004 LD_ERR ------------ ------------ ------------ 00 DM1.301JPA WF:2.0.0.99
005 TCON_ERR ------------ ------------ ------------ 00 WF1.003W00AA WF:0B
`
005 P_ID_ERR ------------ ------------ ------------ 00 DF1.001W00AA FD:-.---
006 BACKLITE ------------ ------------ ------------ 00 YM1.010W00AA BT:1.2.14.848
007 TEMP_ERR 120823132523 ------------ ------------ 01 M4.992C
007 FAN_ERR ------------ ------------ ------------ 00 (DM1.301W00AA)
4
008 VPC_WDT ------------ ------------ ------------ 00 DD1.016W00AA
008 MEPS_WDT ------------ ------------ ------------ 00 PK1.016W00AA
008 HOST_WDT ------------ ------------ ------------ 00 AM01.300JP
1
008 STBY_WDT ------------ ------------ ------------ 00
008 AFE_WDT ------------ ------------ ------------ 00 MID:1C117081
009 TU_BOARD ------------ ------------ ------------ 00 PID:04020000
2
010 EMIT_ERR ------------ ------------ ------------ 00 PNL:LC470EUF-FFP1
00081-000671-00088 00000000000000000570-00000000000000000132
Description on Part i
Description on Part ii
Remot e Comm and er
Self Diagnosis Display
36
Page 37
Service Adjustment
RB2G CHASSIS
W580B/W585B/W590B/W600B/W605B/W607B/W608B/WM15B
Self Diagnosis Display [Part i)
Format of error time stamps
YYMMDDhhmmss (in UTC)
Example:
120823132523 -> Aug 23 2012 13:25:23 UTC
* Only when time is set, an error timestamp is saved.
*Following e rror is invalid in RB1.
- FAN_ERR
- EMIT_ERR
- TCON_ERR
Smart Core Red
LED blinking count
Total Operation Time
[hr] – Boot Count –
Panel Operation Time
[hr]
SELF CHECK
002 MAIN_POWE ------------ ------------ ---------- -- 00
003 AFE_I2C ------------ ------------ ---------- -- 00
003 DC_ALERT ------------ ------------ ---------- -- 00
003 AUD_PROT ------------ ------------ ---------- -- 00
003 HDMI_EQ ------------ ------------ ---------- -- 00
003 TU_DEMOD ------------ ------------ ---------- -- 00
003 AFE_SPI ------------ ------------ ---------- -- 00
004 VLED ------------ ------------ ---------- -- 00
004 LD_ERR ------------ ------------ ---------- -- 00
005 TCON_ERR ------------ ------------ ---------- -- 00
`
005 P_ID_ERR ------------ ------------ ---------- -- 00
006 BACKLITE ------------ ------------ ---------- -- 00
007 TEMP_ERR 120823132523 ------------ ---------- -- 01
007 FAN_ERR ------------ ------------ ---------- -- 00
008 VPC_WDT ------------ ------------ ---------- -- 00
008 MEPS_WDT ------------ ------------ ---------- -- 00
008 HOST_WDT ------------ ------------ ---------- -- 00
008 STBY_WDT ------------ ------------ ---------- -- 00
008 AFE_WDT ------------ ------------ ---------- -- 00
009 TU_BOARD ------------ ------------ ---------- -- 00
010 EMIT_ERR ------------ ------------ ---------- -- 00
00081-000671-00088 0000000000000570-000000000000 0132
Error Naming
Error
timestamp
for last
recorded
error
•Panel Operation Time is recorded every
30 min, but Total Operation Time is
recorded every 1 hr. Therefore, the panel op.
time might become larger than the total op.
time.
Error history clear
<8> -> <0>
Panel operation time clear
<7> -> <0>
Error count
Error
timestamp
for second
last
recorded
error
Error
timestam
p for 3rd
last
recorded
error
Count of writing to NAND de vice:
As vfat partition– As ext4 partition
Self Diagnosis Display (Part ii)
USB dongle:
1. When no Wi-Fi USB dongle is connected, NA is displayed.
2. If you insert/disconnect Wi-Fi USB Dongle during Self Diagnosis Display, press <1> > <4> on remote commander to refresh MAC address displayed on “USB dongle”.
- Alternatively, you can re-display Self Diagnosis Display to update the information.
Model Name : KDL-46W90AA
Main CPU
information
Serial Number : --------
Package Number : PKG0.280JPA
Wired MAC : 30:F9:ED:04:2C:17
Wireless MAC : F0:F0:02:AA:82:DA
USB dongle : N/A
<MAIN> <EXT>
DM1.301JPA WF:2.0.0.99
`
WF1.003W00AA WF:0B
DF1.001W00AA FD:-.---
YM1.010W00AA BT:1.2.14.848
M4.992C
DM1.301W00AA
DD1.016W00AA
PK1.016W00AA
AM01.300JP
MID:1C117081
PID:04020000
PNL:LC470EUF-FFP1
MAC address
of Wi-Fi USB
dongle.
External module
information
37
Page 38
Diagrams
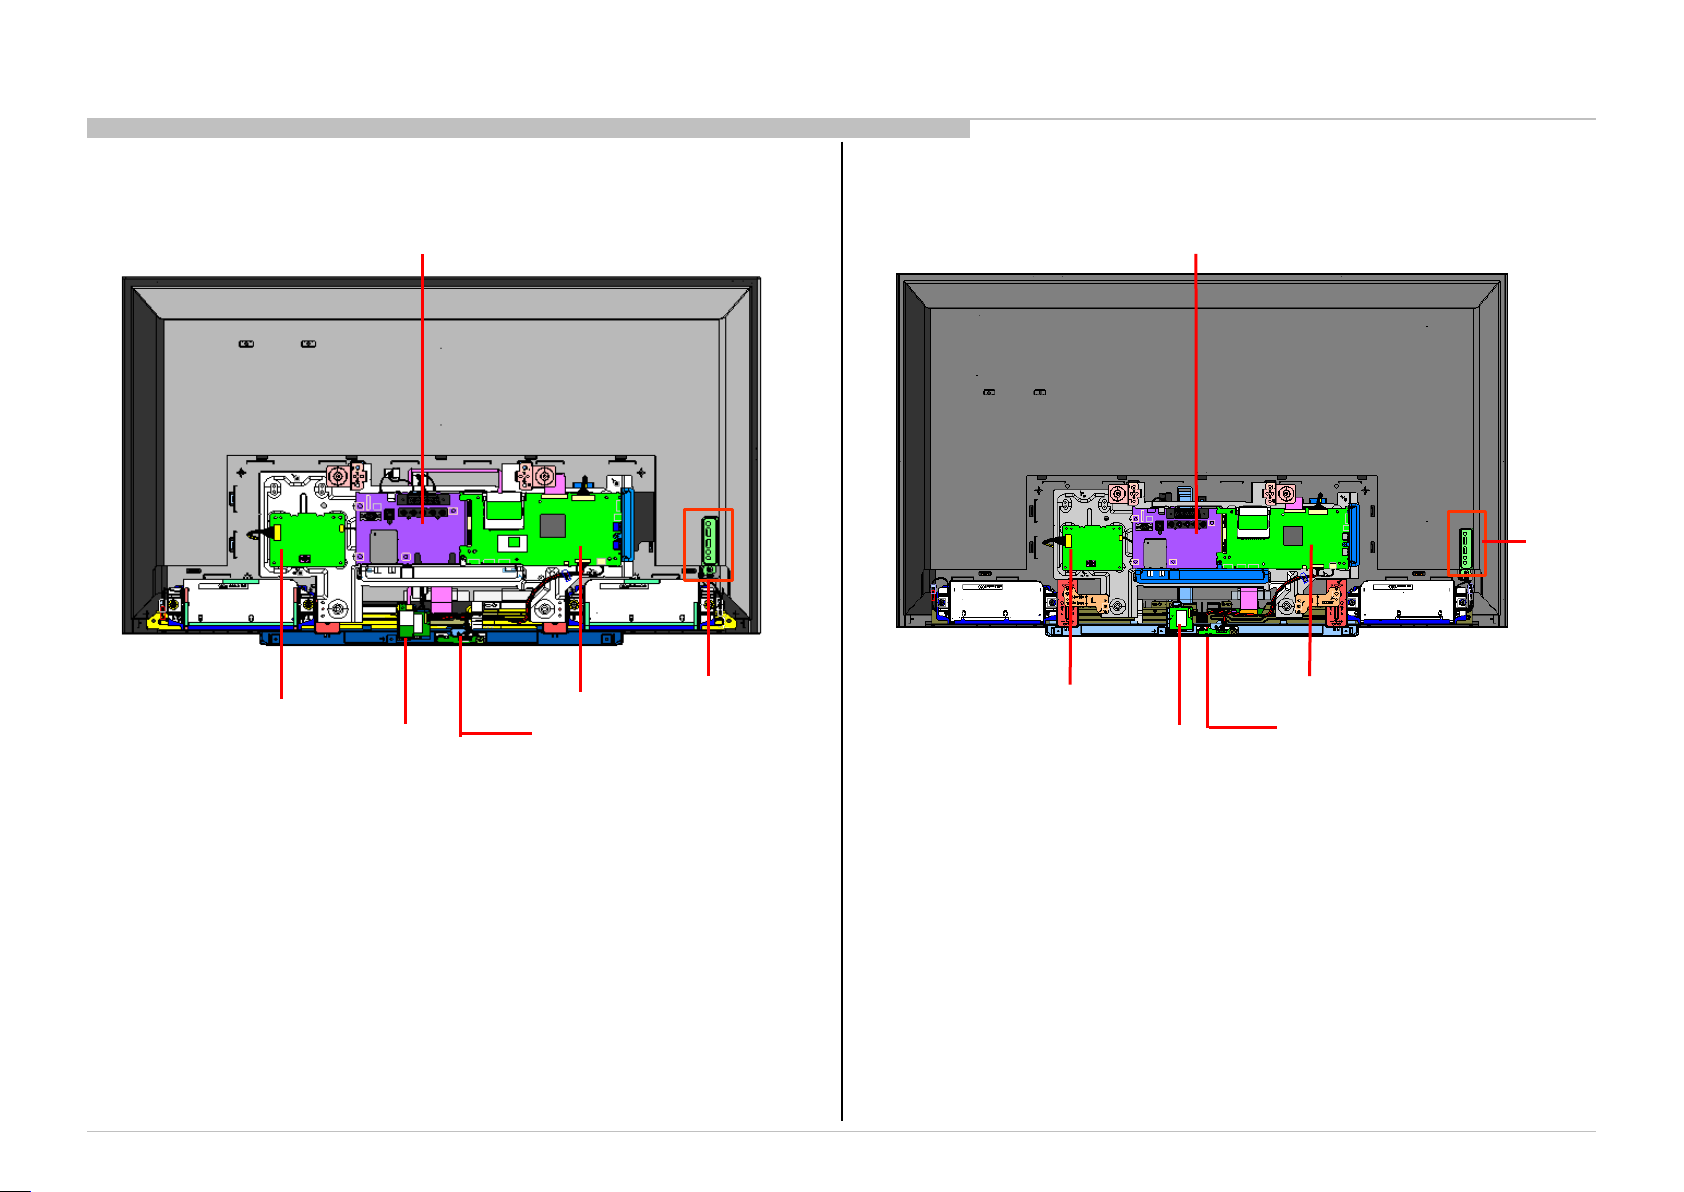
5-1.CIRCUIT BOARD LOCATION
5-1-1. KDL- 40W*B
SECTION 5
DIAGRAMS
5-1-2. KDL-48W*B
RB2G CHASSIS
W580B/W585B/W590B/W600B/W605B/W607B/W608B/WM15B
TUS BOARD
LD BOARD
CARD, WIRELESS LAN
BAXL BOARD
HJM BOARD
SWITCH
UNIT
TUS BOARD
LD BOARD
CARD, WIRELESS LAN
SWITCH
UNIT
BAXL BOARD
HJM BOARD
38
Page 39
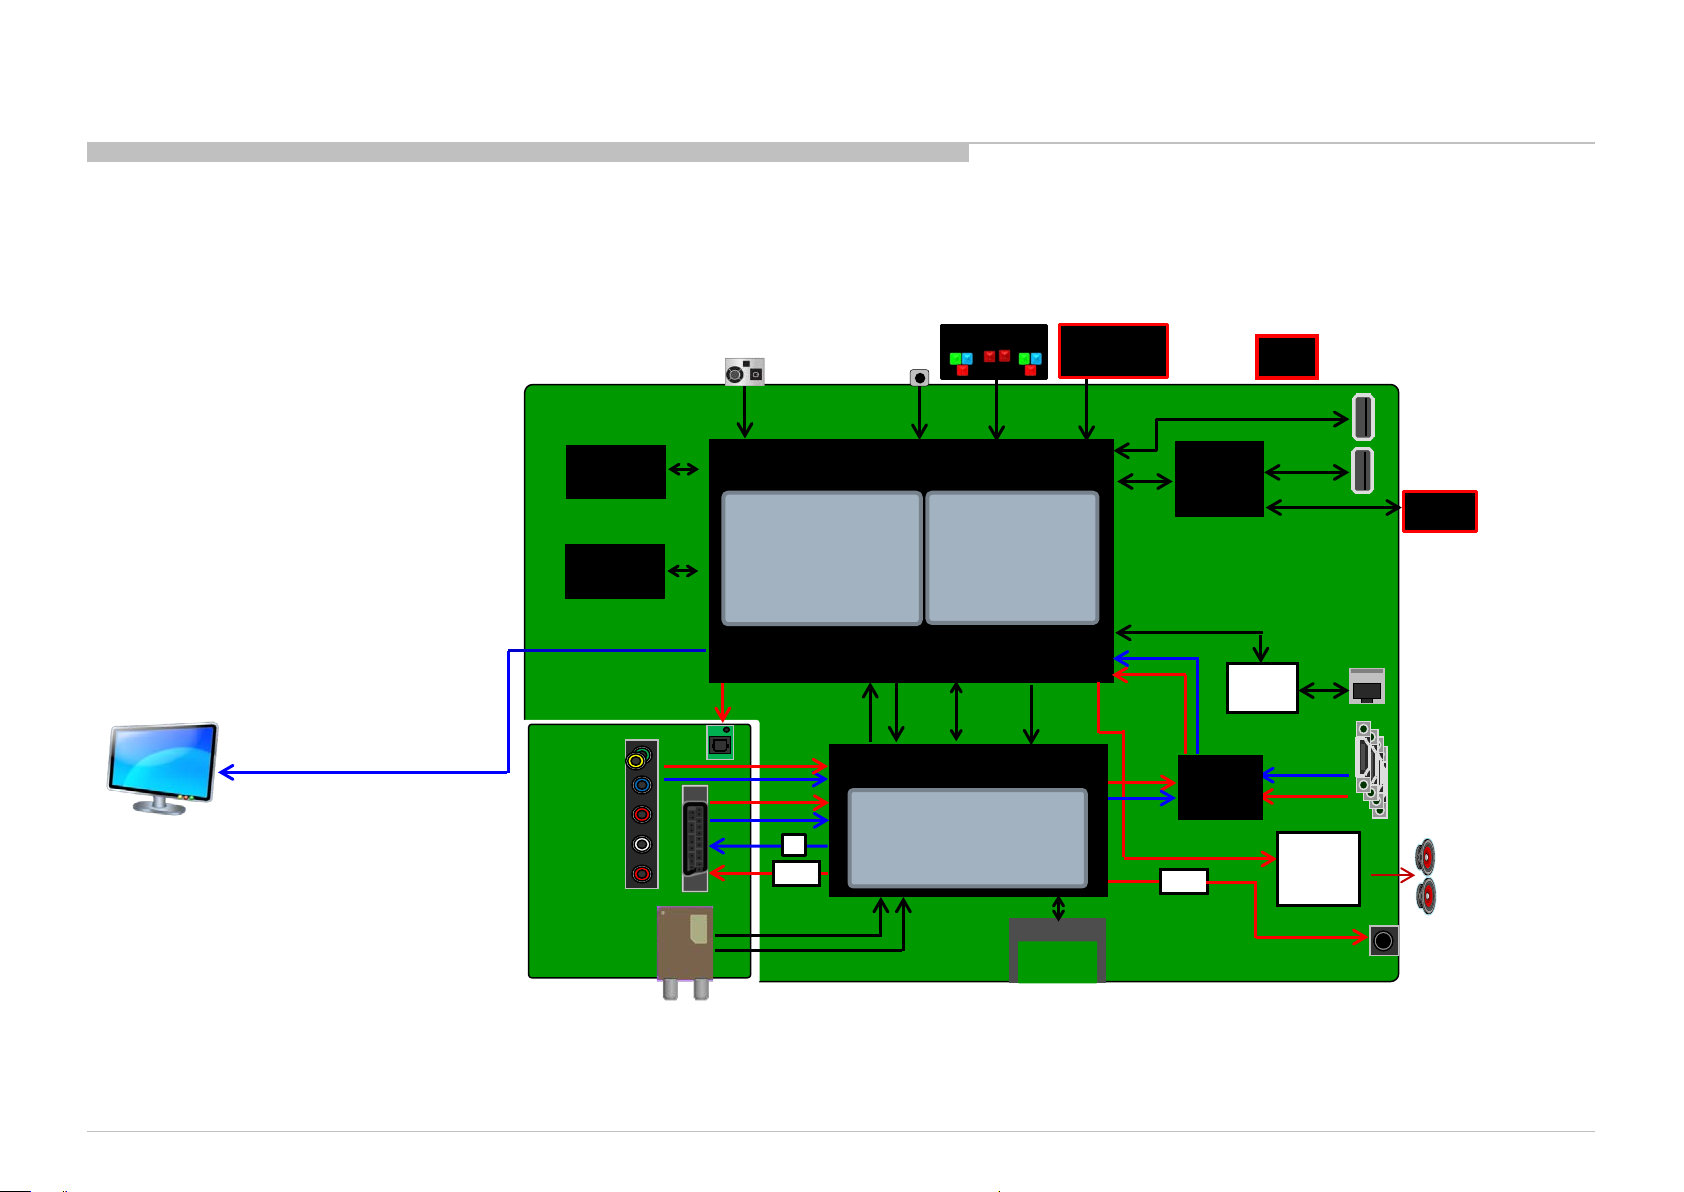
Diagrams
5-2. Block Diagram
5-2-1. AEP based
RB2G CHASSIS
W580B/W585B/W590B/W600B/W605B/W607B/W608B/WM15B
60Hz
Non-3D
LVDS
/60Hz
BAX-CI
DDR3
1GB (4Gb×2)
Raw NAND
1GB
LVDS
TUS_L_AEP
Key
SPDIF
GPIO
CPU (CA9 Dual
800MHz)
GPU (SGX543)
Multi-format Dec.
Video Processor
Audio Processor
S-TS x2
75Ω
AMP
LED
Sircs
SIRCS
GPIO
Ayu2L
Ether(10/100MAC)
USB×2
X-Reality Pro
LD
LVDS TX
P-TS
SD
Video
Brownie
VFE/AFE
DEMOD(ATSC,DVB-T/C)
ADC/DAC
3D Comb
IF
TS
Bluetooth
I2S x2
UART
HDMI
HDMI
USB HUB
GL850G
EQ SW
Sil9589
AMP
(5ch)
I2S
Ether
PHY
: New device
USB2.0
USB2.0
HDMI×4
Audio
P-AMP
(YDA178)
HDD
USB
WiFi
Ether
HDMI
/ MHL
SP
2ch
HP
L/R Out
CI/CI+
39
Page 40
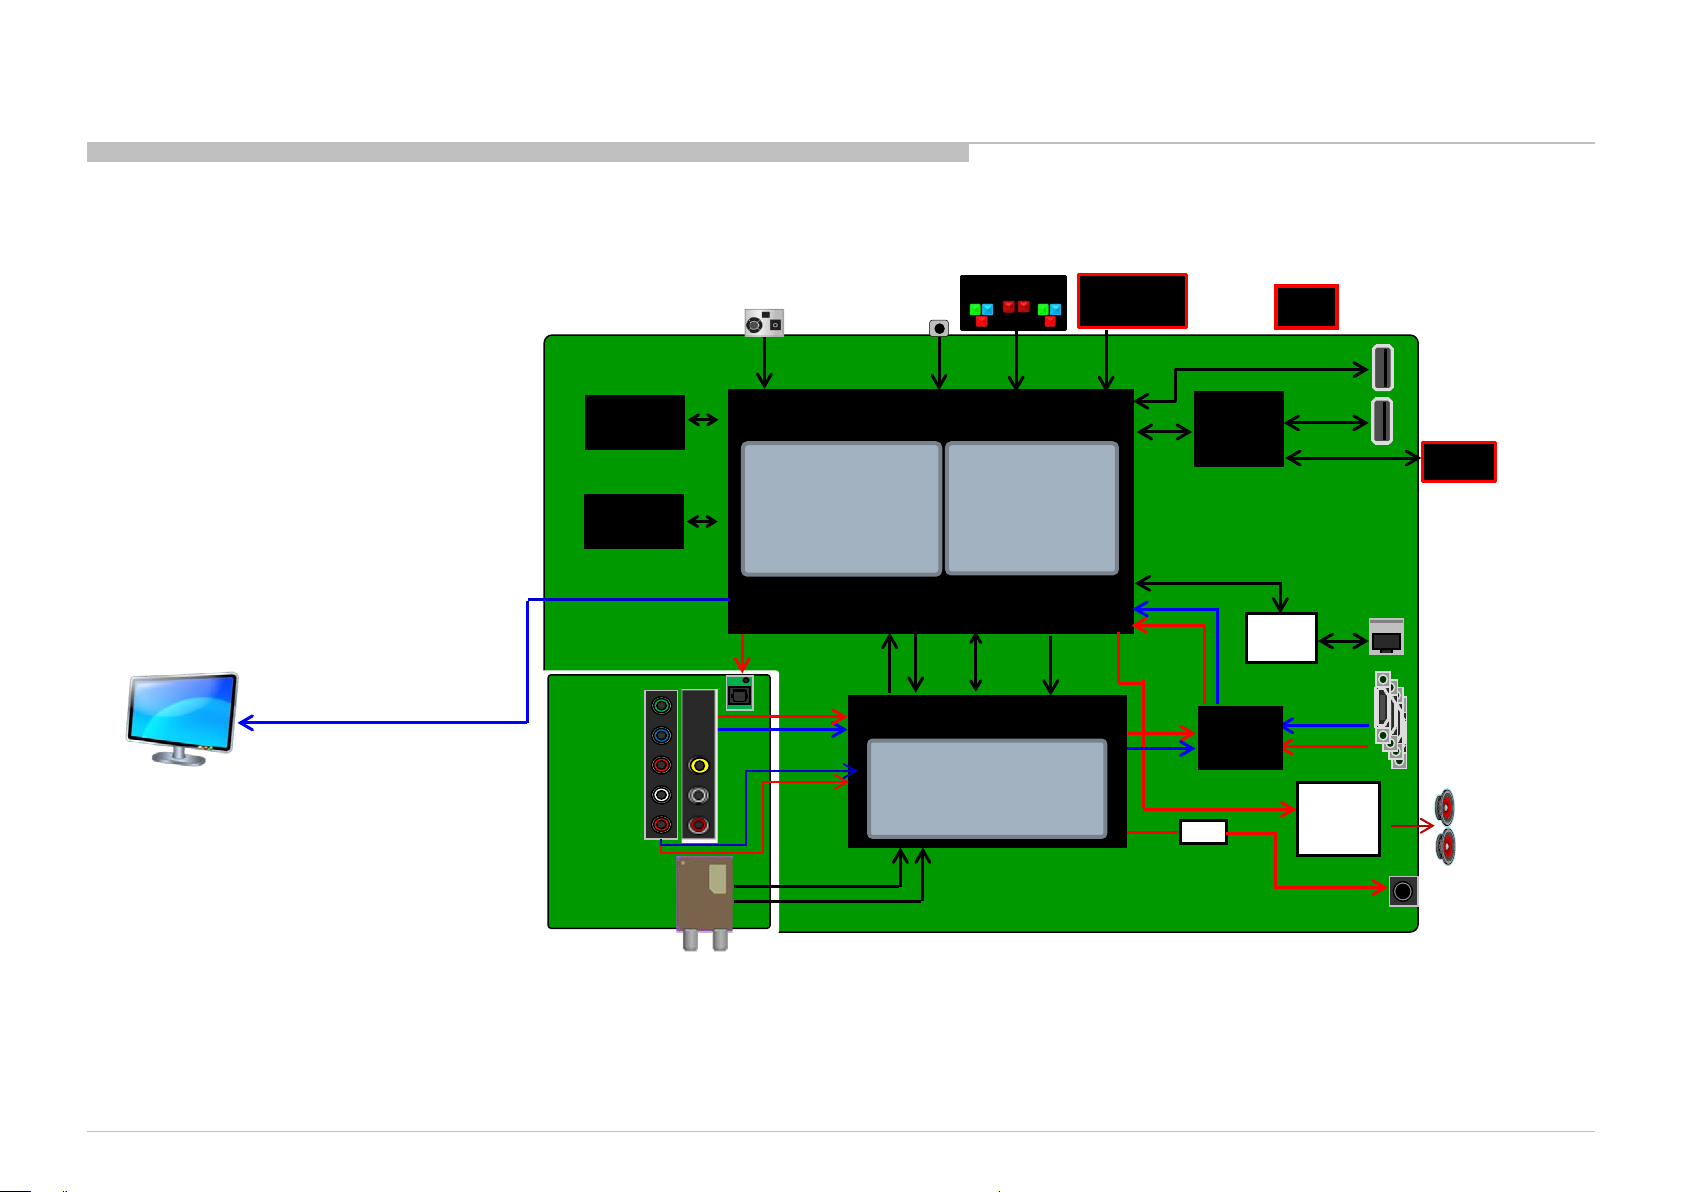
Diagrams
5-2. Block Diagram
5-2-2. BR, AR, LA_ISDB
RB2G CHASSIS
W580B/W585B/W590B/W600B/W605B/W607B/W608B/WM15B
60Hz
Non-3D
LVDS
/60Hz
BAX-L
DDR3
1GB (4Gb×2)
Raw NAND
1GB
LVDS
TUS_BR/
TUS_COL_
Key
SPDIF
GPIO
CPU (CA9 Dual
800MHz)
GPU (SGX543)
Multi-format Dec.
Video Processor
Audio Processor
S-TS x2
LED
Sircs
SIRCS
GPIO
Ayu2L
Ether(10/100MAC)
USB×2
X-Reality Pro
LD
LVDS TX
P-TS
SD
Video
Brownie
VFE/AFE
DEMOD(ATSC,DVB-T/C)
ADC/DAC
3D Comb
IF
TS
Bluetooth
I2S x2
UART
HDMI
HDMI
USB HUB
GL850G
EQ SW
Sil9589
AMP
(5ch)
I2S
Ether
PHY
: New device
USB2.0
USB2.0
HDMI×4
Audio
P-AMP
(YDA178)
HDD
USB
WiFi
Ether
HDMI
/ MHL
SP
2ch
HP
L/R Out
LTN
CI/CI+
40
Page 41
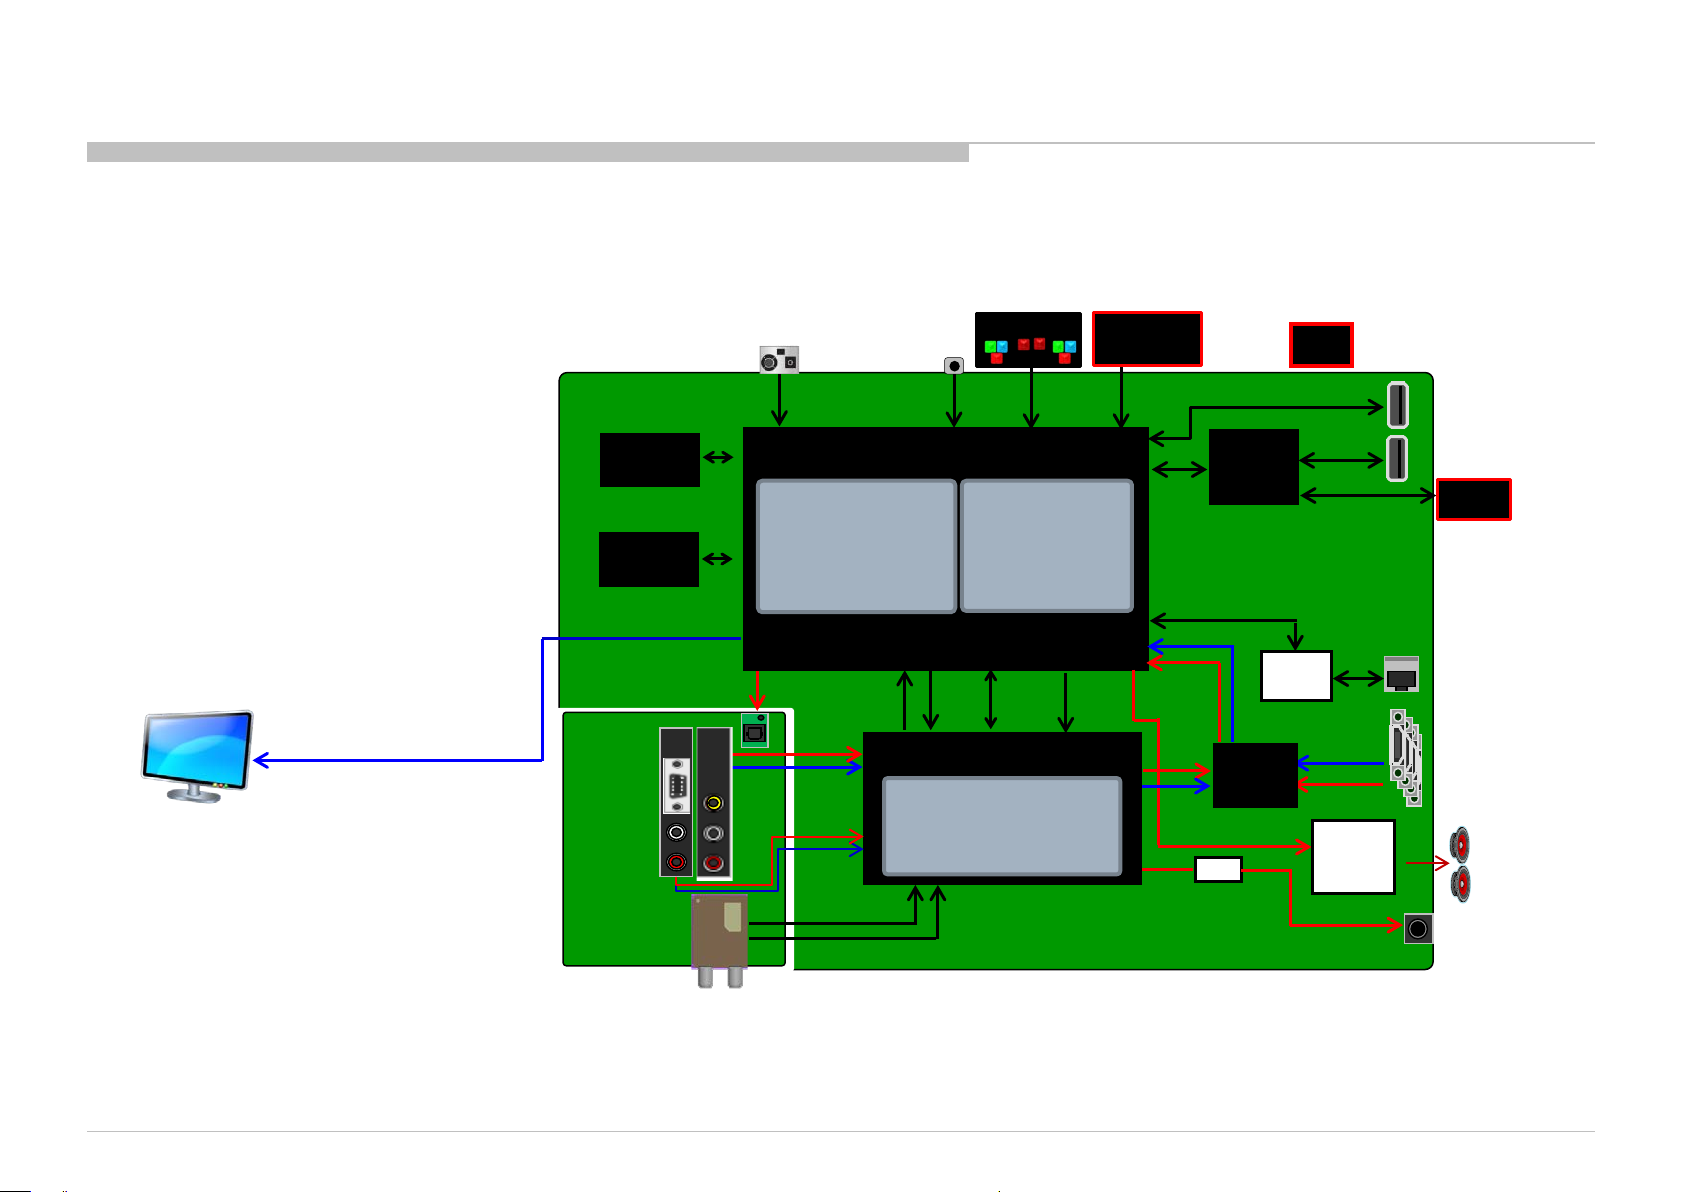
Diagrams
5-2. Block Diagram
5-2-3. JP
RB2G CHASSIS
W580B/W585B/W590B/W600B/W605B/W607B/W608B/WM15B
60Hz
Non-3D
LVDS
/60Hz
BAX-L
DDR3
1GB (4Gb×2)
Raw NAND
1GB
LVDS
TUW-J
Key
SPDIF
GPIO
CPU (CA9 Dual
800MHz)
GPU (SGX543)
Multi-format Dec.
Video Processor
Audio Processor
Sircs
SIRCS
Ayu2L
S-TS x2
P-TS
Brownie
VFE/AFE
DEMOD(ATSC,DVB-T/C)
ADC/DAC
3D Comb
IF
TS
LED
GPIO
Ether(10/100MAC)
USB×2
X-Reality Pro
LD
LVDS TX
SD
Video
I2S x2
CI/CI+
Bluetooth
UART
HDMI
HDMI
USB HUB
GL850G
EQ SW
Sil9589
AMP
(5ch)
I2S
Ether
PHY
: New device
USB2.0
USB2.0
HDMI×4
Audio
P-AMP
(YDA178)
HDD
USB
WiFi
Ether
HDMI
/ MHL
SP
2ch
HP
L/R Out
41
Page 42
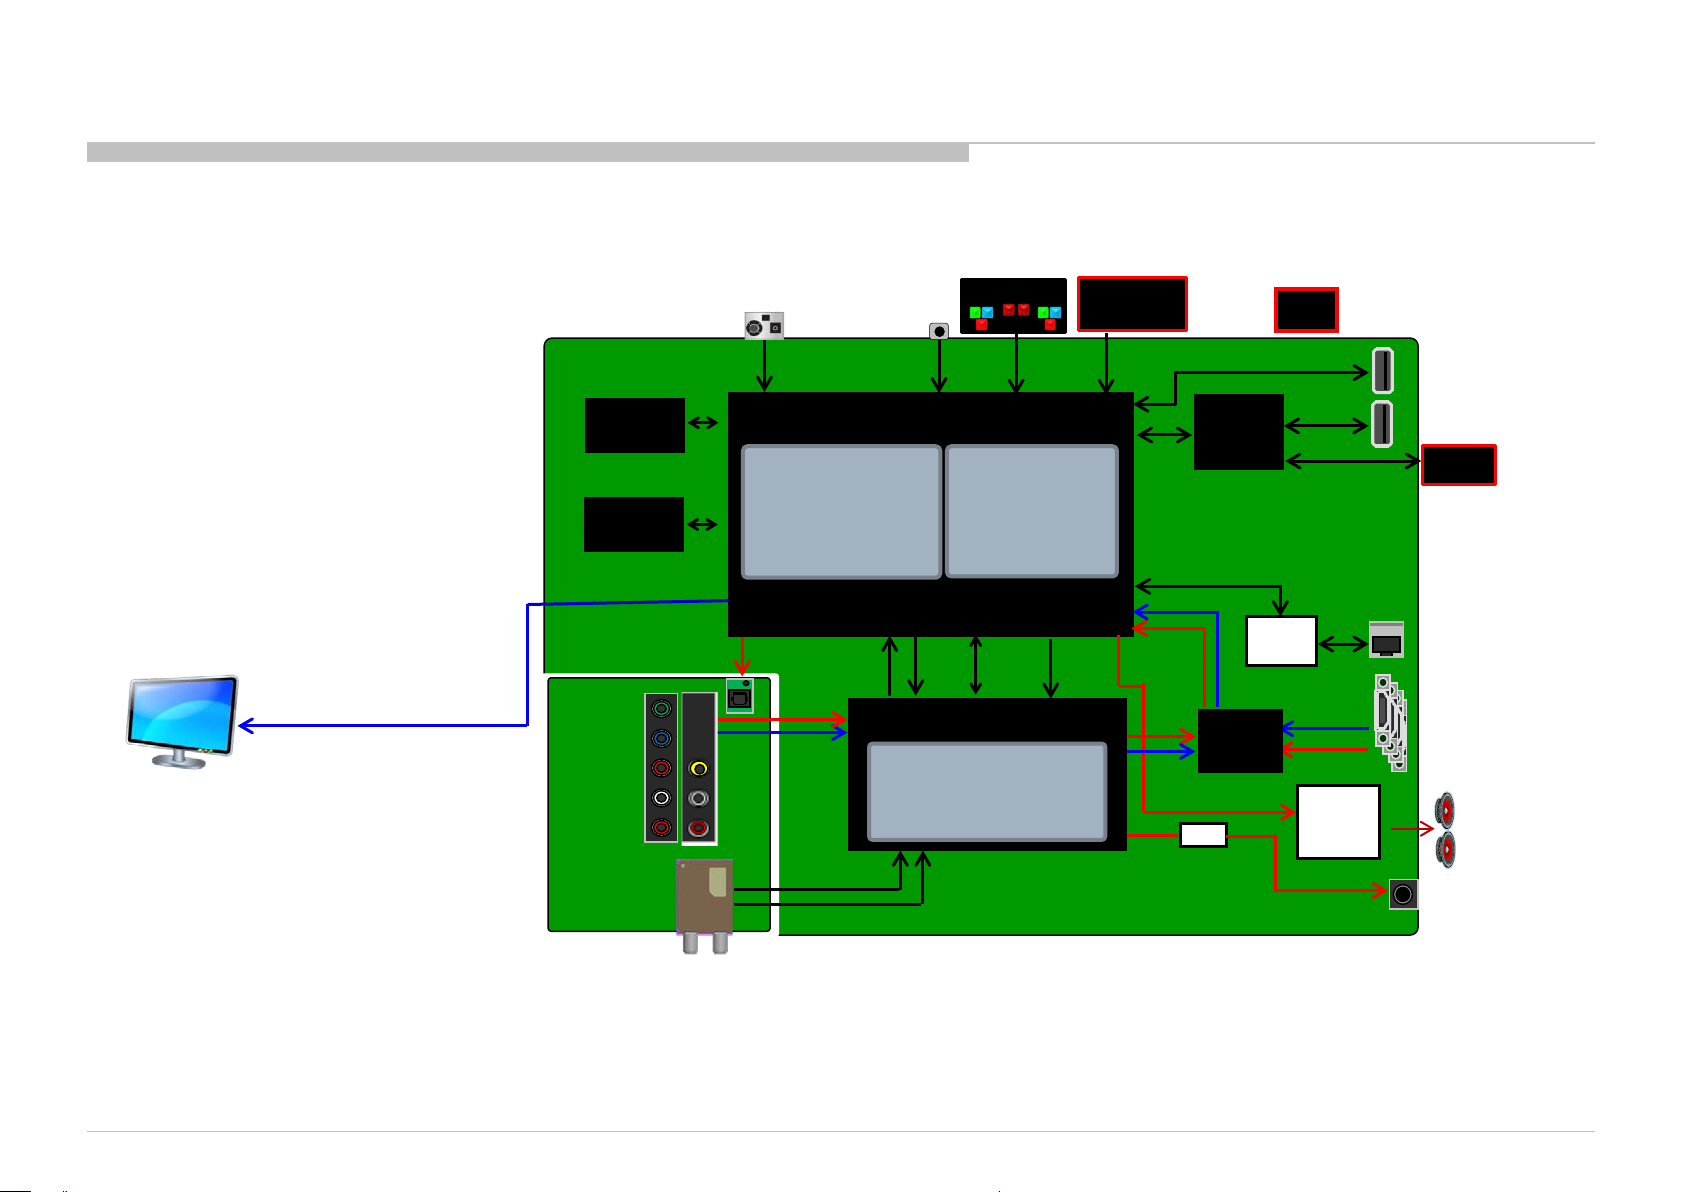
Diagrams
5-2. Block Diagram
5-2-4. CH, HK, TW
RB2G CHASSIS
W580B/W585B/W590B/W600B/W605B/W607B/W608B/WM15B
60Hz
Non-3D
LVDS
/60Hz
BAX-L_AVS
DDR3
1GB (4Gb×2)
Raw NAND
1GB
LVDS
SPDIF
TUS_TW/
TUS_HK/
TUW_CH
Key
GPIO
CPU (CA9 Dual
800MHz)
GPU (SGX543)
Multi-format Dec.
Video Processor
Audio Processor
S-TS x2
LED
Sircs
SIRCS
GPIO
Ayu2L
Ether(10/100MAC)
USB×2
X-Reality Pro
LD
LVDS TX
P-TS
SD
Video
Brownie
VFE/AFE
DEMOD(ATSC,DVB-T/C)
ADC/DAC
3D Comb
IF
TS
I2S x2
CI/CI+
Bluetooth
UART
HDMI
HDMI
USB HUB
GL850G
EQ SW
Sil9589
AMP
(5ch)
I2S
Ether
PHY
: New device
USB2.0
USB2.0
HDMI×4
Audio
P-AMP
(YDA178)
HDD
USB
WiFi
Ether
HDMI
/ MHL
SP
2ch
HP
L/R Out
42
Page 43
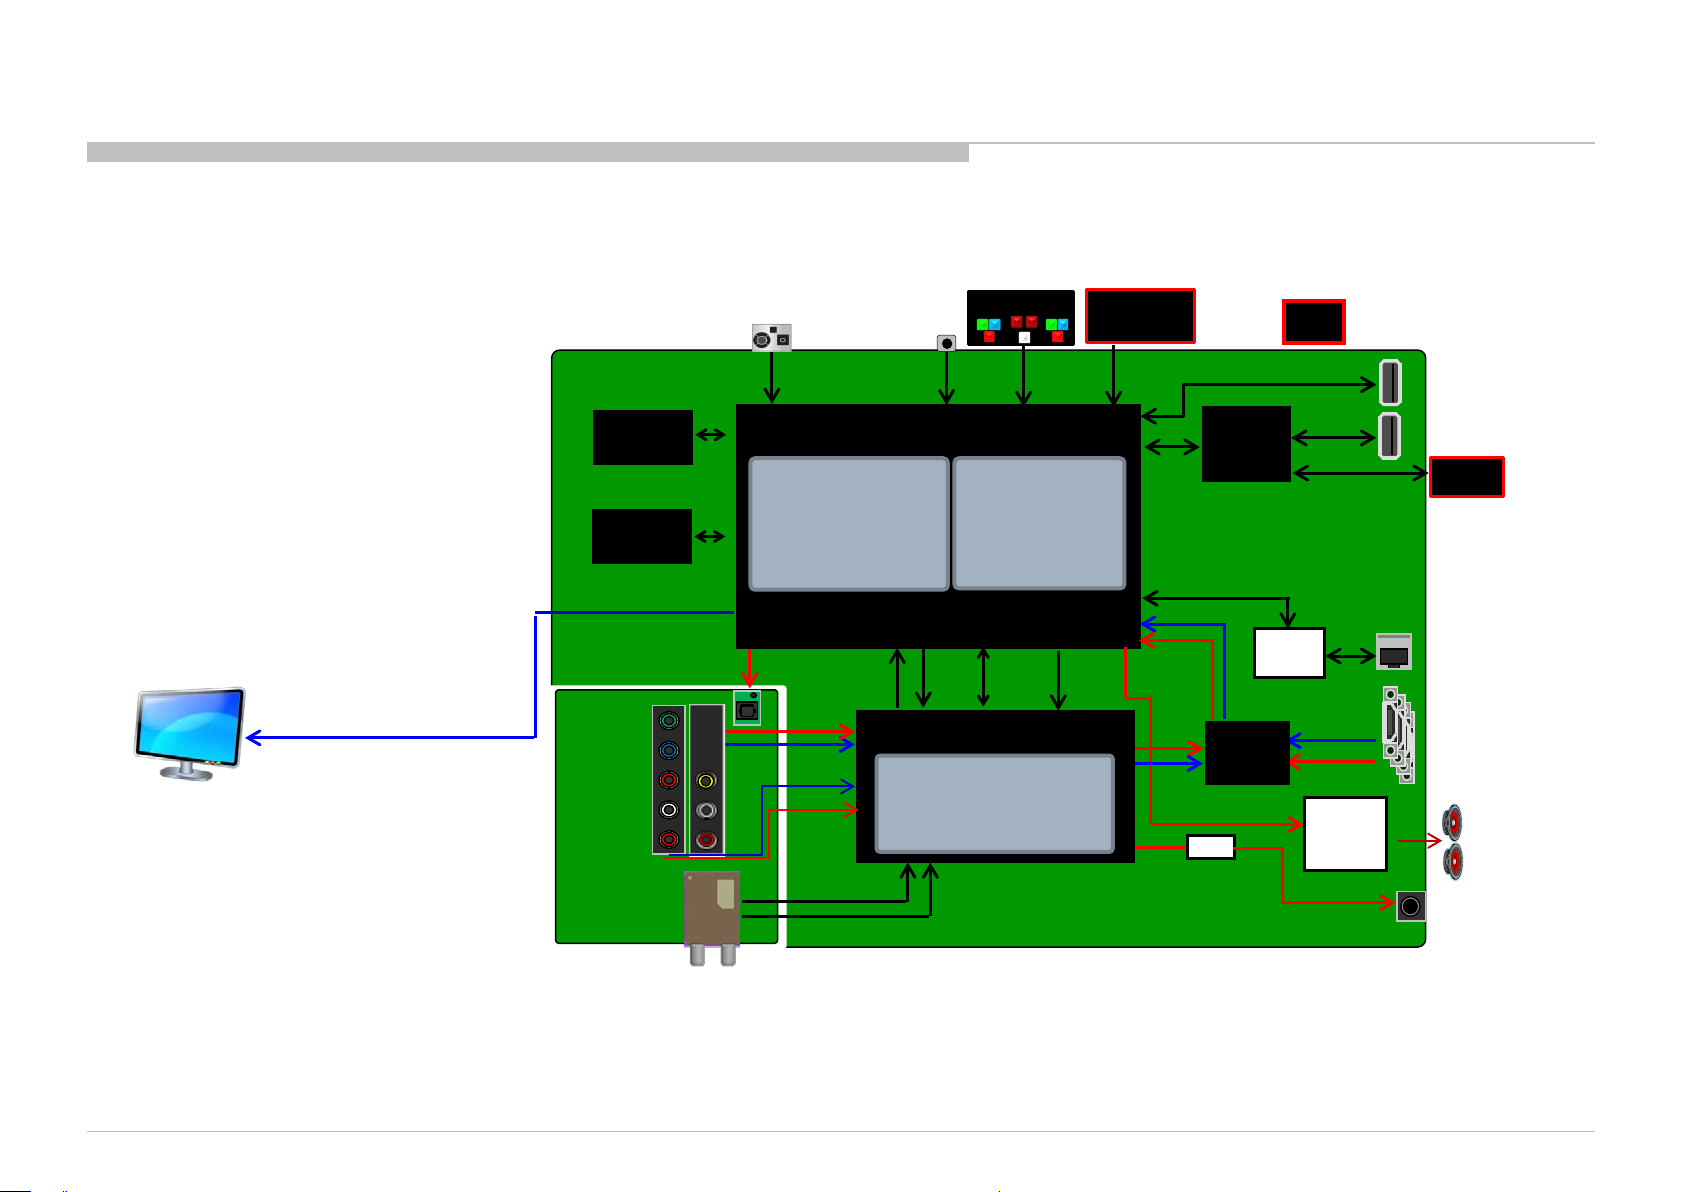
Diagrams
5-2. Block Diagram
5-2-5 UC
RB2G CHASSIS
W580B/W585B/W590B/W600B/W605B/W607B/W608B/WM15B
60Hz
Non-3D
LVDS
/60Hz
BAX-L_AVS
DDR3
1GB (4Gb×2)
Raw NAND
1GB
LVDS
SPDIF
TUS_UC
Key
GPIO
CPU (CA9 Dual
800MHz)
GPU (SGX543)
Multi-format Dec.
Video Processor
Audio Processor
S-TS x2
LED
Sircs
SIRCS
GPIO
Ayu2L
Ether(10/100MAC)
USB×2
X-Reality Pro
LD
LVDS TX
P-TS
SD
Video
Brownie
VFE/AFE
DEMOD(ATSC,DVB-T/C)
ADC/DAC
3D Comb
IF
TS
I2S x2
CI/CI+
Bluetooth
UART
HDMI
HDMI
USB HUB
GL850G
EQ SW
Sil9589
AMP
(5ch)
I2S
Ether
PHY
: New device
USB2.0
USB2.0
HDMI×4
Audio
P-AMP
(YDA178)
HDD
USB
WiFi
Ether
HDMI
/ MHL
SP
2ch
HP
L/R Out
43
Page 44
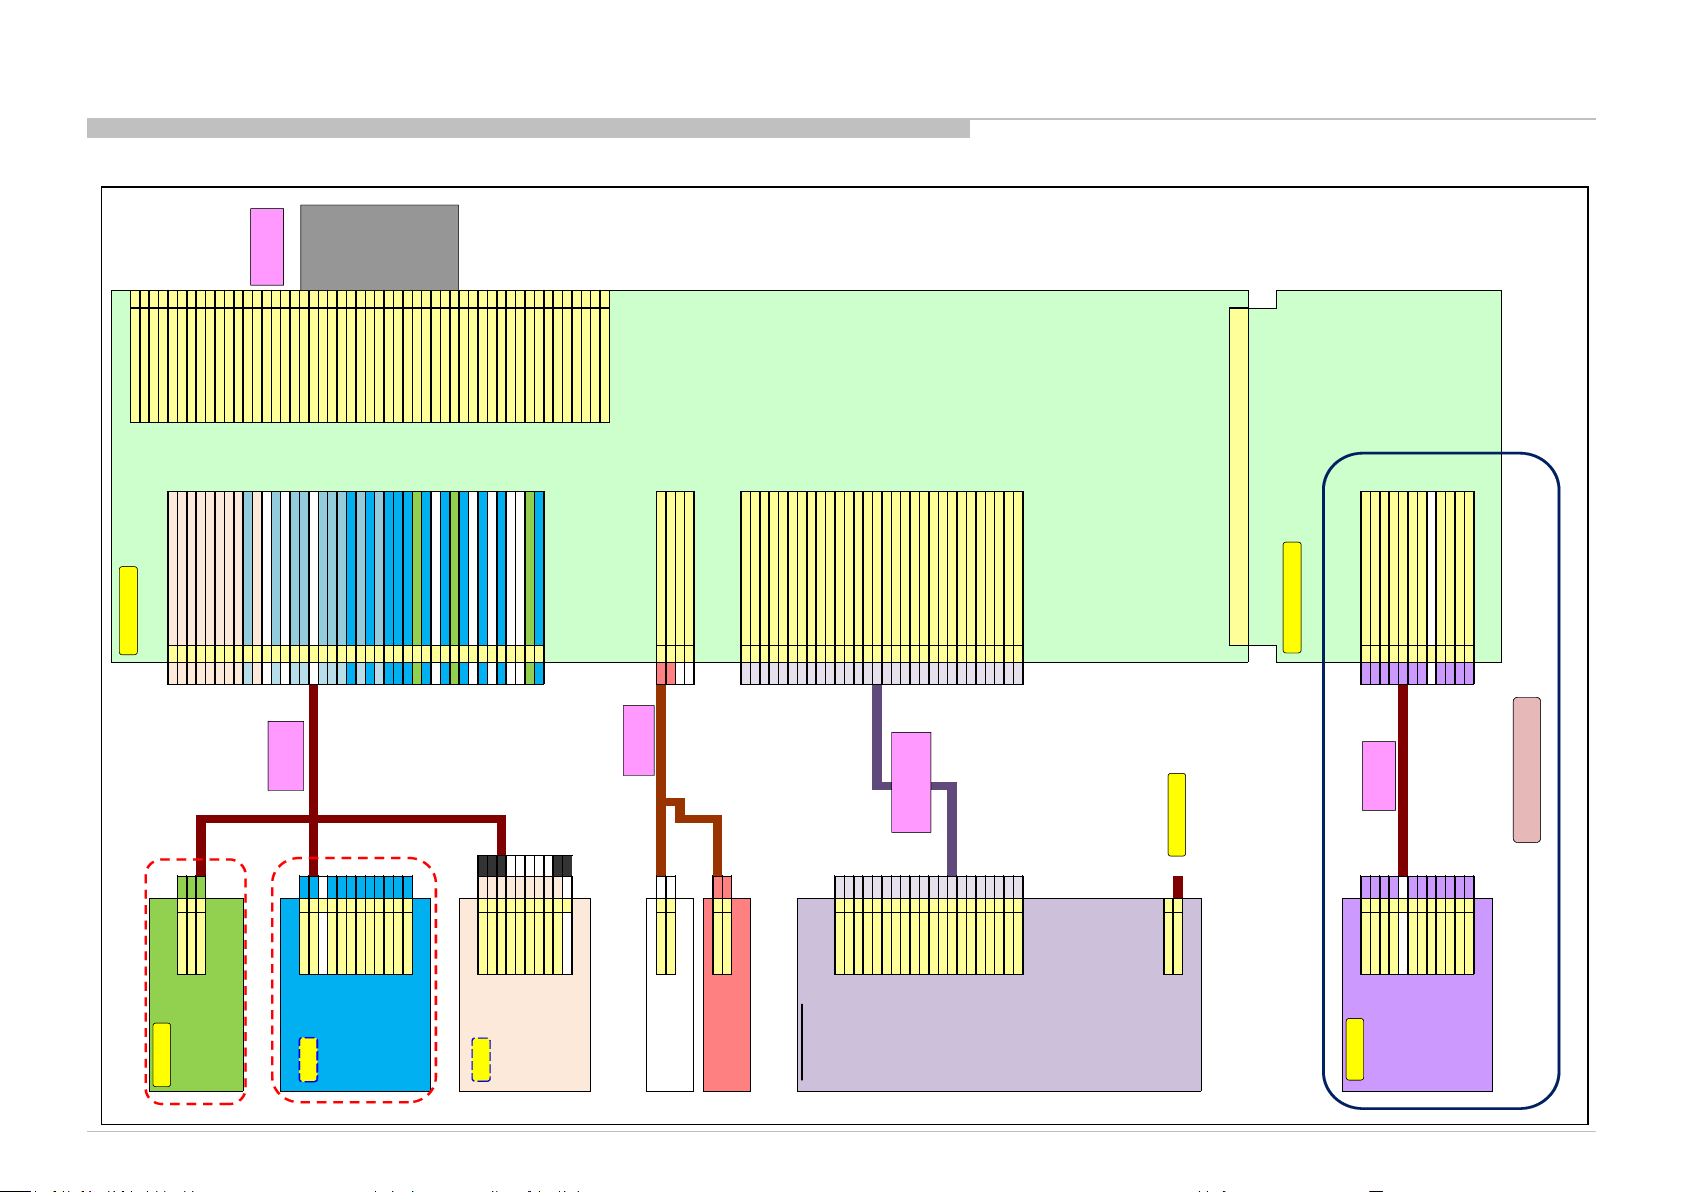
Diagrams
CN8001
LVDS_SEL1
RESERVED2
RESERVED3
CN7301
RESERVED4
41WFI_USB_GND_S
PANEL_CTRL_07/LUT_SEL15
GND131
72WIFI_STBY_3.3V
PANEL_CTRL_08/LUT_SEL06
POWER_INT227
63WIFI_USB_P
PANEL_CTR L_12/ SA_MODE7
KEY1339
84WIFI_STBY_3.3V
RESERVED8
1-822-693-111-821-900- 11
55WIFI_USB_M
PANEL_CTRL_04/ BINT9
JAM SZ15-03WLRSZ15-03HGR
16WIFI_GND
RESERVED10
97WIFI_GNDSDA
11
28WIFI_WAKESCL
12
69BT_DEVIC E_WAKE
PANEL_DET13
310WIFI_RST
RX4P_EV EN/Tx 7p14
NC11
RX4N_EV EN/Tx 7n15
1012BT_STBY_3.3V
RX3P_EVEN /GND16
NC13
RX3N_EVEN/GND/Option17
CN101214BT_UART_ RX
GND18
STBY_+3.3V120115BT_GND
RXCLKP_EVEN/Tx6p19
MAIN_+5V234NC16
RXCLKN_EVEN/Tx6n20
GND3NC917
BT_USB_GND_S BT_GND
GND21
LED_AMBER422318BT_UART_TX
RX2P_EV EN/Tx 5p22
LED_PWM_W524719BT_H OST_WAKE
RX2N_EV EN/Tx 5n23
LED_STBY_PWM_R630120SC_STBY_3.3V
RX1P_EVEN /GND24
LED_STBY_PWM_B728521BT_RST
RX1N_EVEN/GND25
LED_STBY_PWM_G826422SC_LED_ AMBER
RX0P_EV EN/Tx 4p26
GND925823BT_EMT_SYNC
RX0N_EV EN/Tx 4n27
MAIN3.3V1040524SC_LED_PWM_W
GND28
OPT_SENSE1132925SC_GN D
RX4P_ODD /Tx3p29
SIRCS1236826SC_LED_PWM_G
RX4N_ODD /Tx3n30
1-819-339-11
227HUS_POWER_KEY
RX3P_ODD/GN D31
J
728SC_LED_PWM_B
RX3N_ODD/GND/Opti on32
NC29
GND33
630SC_LED_PWM_R
RXCLKP_ODD/Tx2p34
131HUS__GND_2
RXCLKN_ODD/Tx2n35
1132SC_OPT_SENSOR
GND36
USB Cable(UL2725)NC33
RX2P_ODD /Tx1p37
GND
16234SC_MAIN _5V (LED)
RX2N_ODD /Tx1n38
WO_WLAN
28NC35HUS_GND_2
RX1P_ODD/GN D39
WIFI_RST
3101236SC _SIRCS
RX1N_ODD/GN D40
GND
411ShieldNC37
RX0P_ODD /Tx0p41
USB_DM
551WHT#28NC38
RX0N_ODD /Tx0n42
USB_DP
631GRN#28339HUS__KEY_AD
GND43
STBY3.3V
721RED#281040SC_MAIN_3.3V (OPT)
GND/LOCKN144
STBY3.3V
841BLK#28
1-819-760-11GND/HTPDN145
GND
97
MOLEX 501571-4007NC46
GND
10NC
POWER47
1-819-469-111-819-497-11
POWER48
J
GHR-10V-S
POWER49
POWER50
POWER51
FFC Direct Connector :I-PEX
CN4601
SPEAKE
L+ 1411R+
Front
L- 23
2
2R-
Lch
23L-
14L+
1-842-593-111-842-566-12
JST PBVP-04VJST SM04B-PBVSS-TB(LF) (SN)
SPEAKE
R+11
Front
R-22
Rch
CN9101
NC30GND
NC29GND
228BL_ERR
NC27BL_ON
NC26DIGITAL_STBY
1425GND
1224GND
1023GND
822GND
CN2001
421+19.5V(12V)
PWM0202320+19.5V(12V)
PWM1193719+19.5V_SS(12V)
IP_REF188918+19.5V_HOLD(12V)
PWM21741117REG+12V
AC_MON1612616GND
MAIN_PWR1511515GND
GND14251314STBY+3.3V
STBY_+3.3V1314NC13TCON_ON
GND12241612AC_OFF_D ET
REG+12V11171511POWER_ON
GND
1023NC10
SA_MODE
19.5V_HOLD
91819
LD_STBY
GND
822188
IP_REF
19.5V_SS
719NC7
FB_REF
GND
616NC6
LD_PWR_4 / SPI0_RDATA / BLU_TEMP
GND
515NC5
LD_PWM_3 / SPI0_3(CLKF)
+19.5V
421174
LD_PWM_2 / SPI0_2(DATAF)
+19.5V
320193
LD_PWM_1 / SPI0_1(LATF)
LD_ERR
228202
LD_PWM_0 /SPI0_0(EMIT IN)
LD_STBY
19NC1
LD_MODE_SW
1-843-151-11Housing : PBDP-20V-S
1-843-917-11
J
Terminal : SPBD- 001T-P0.5
JST SM30B-PBDSS (LF)( SN)
AC_IN
DC-IN1
DC_GND2
JAM SFP79-02WLB
CN304 on HTL
CN7318
STBY_+3.3V112
121
HTL_VOL_DOWN
UART_HTL_to_B211
112
HTL_VOL_UP
UART_B_to_HTL310
103
HTL_LINEOUT_L
HTL_SIRCS_OUT49
94
HTL_SP_MUTE
NC5NC
85
HTL_GND
HTL_GND67
76
HTL_12V
HTL_12V76
AWG30
67
HTL_GND
HTL_GND85
AWG30
NC8
NC
HTL_SP_MUTE94
49
HTL_SIRCS_OUT
HTL_LINEOUT_L103
310
UART_B_to_HTL
HTL_VOL_UP112
211
UART_HTL_to_B
HTL_VOL_DOWN121
112
HTL_STBY_3.3V
1-821-152-11 1-821-126-111-821-126-11
1-821-152-11
JAM SYT10-12WL-ETSYT10-12HGSYT10-12HG
JAM SYT10-12WL-ET
CARD EDGE CONNECTOR SO-DIMM 204PIN
1-8
GH
1-8
50
1
1-
1-
1
51pin
B
AC Adaptor
SF7
T
HTL4
Hotel only
HSC
HJM
Wifi
LV-FFC
M
B-LD Harn
(Th is not ribbon
harness
S
H
LD-HM
5-3. Connector Diagram
5-3-1. 40, 48 W*B
RB2G CHASSIS
W580B/W585B/W590B/W600B/W605B/W607B/W608B/WM15B
44
Page 45
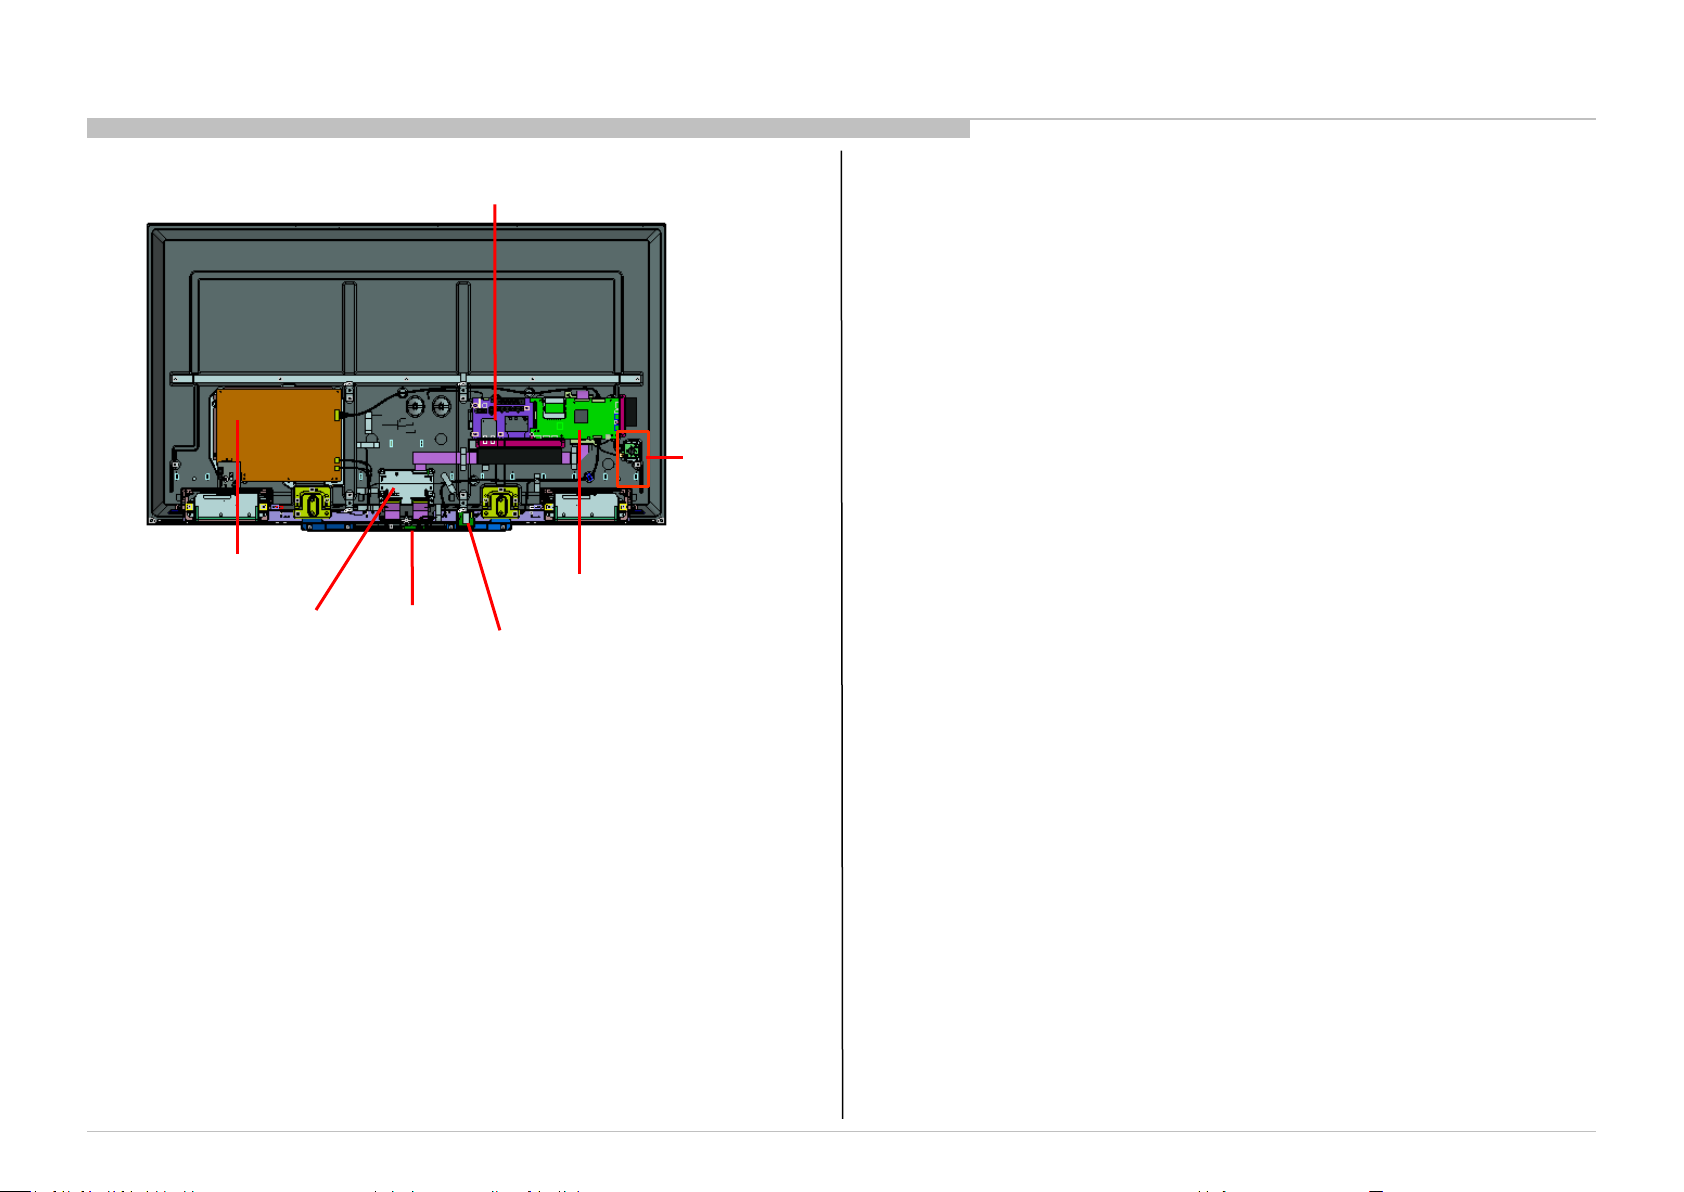
Diagrams
Supp-1:
KDL-60W600B
5-1.CIRCUIT BOARD LOCATION
5-1-3. KDL- 60W*B
GL2 BOARD
TCON BOARD
HJM BOARD
TUS BOARD
BAXL BOARD
CARD,
WIRELESS
LAN
SWITCH
UNIT
SECTION 2
DIAGRAMS
RB2G CHASSIS
W580B/W585B/W590B/W600B/W605B/W607B/W608B/WM15B
45
Page 46
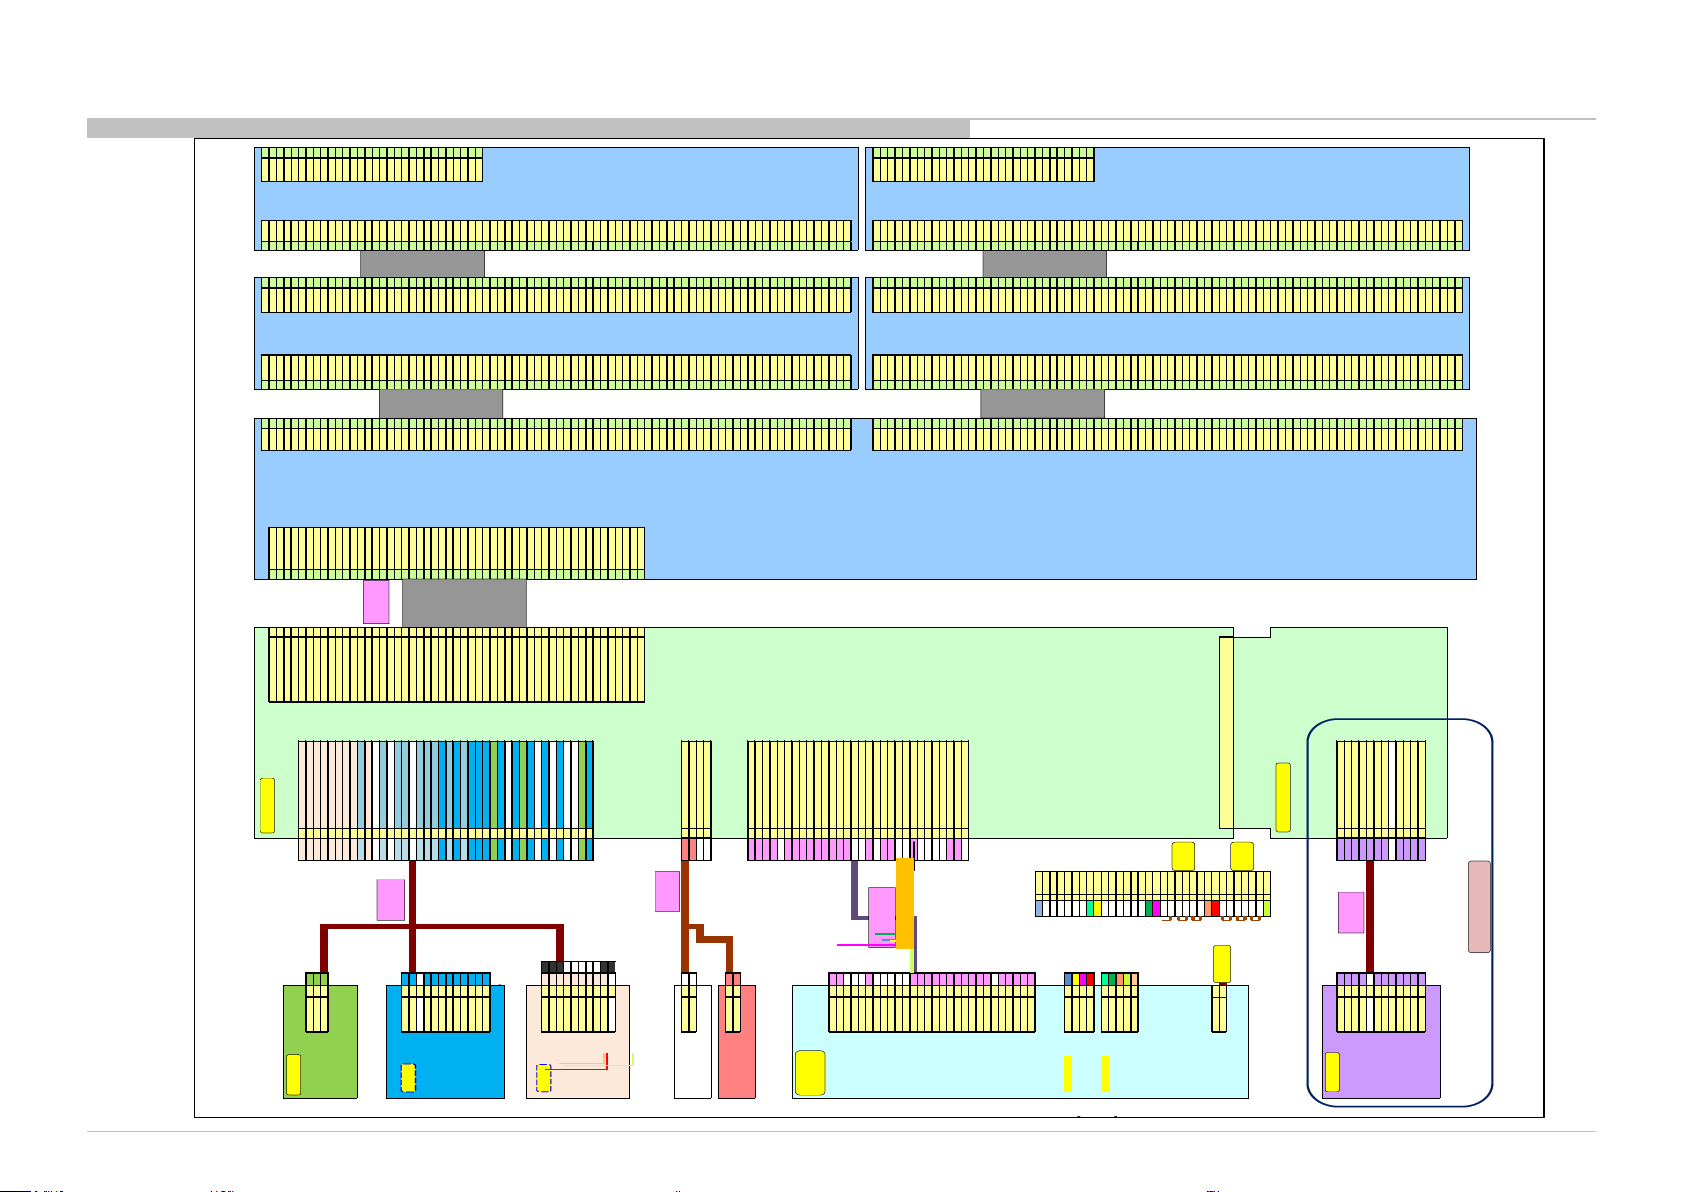
Diagrams
CN1CN 11CN12CN15
CN8001CN1CN600
GND8080GNDGND8080GNDCS130
PANEL_CTRL_11/SPI_CS1
51
SPI_CS
25P80B120
VL2557979VL255VL2557979VL255CS229
PANEL_CTRL_02/ FRC_RST2
50
FRC_RST
ZXEC
VL2477878VL247VL2477878VL247CS328
PANEL_CTRL_06/ SPI_CK3
49
SPI_CLKVL1917777VL191VL1917777VL191CS427
CN7301
NC4
48
3D_ENVL1597676VL159VL1597676VL159CS526
41W FI_USB_GND_S
PANEL_CTRL_07/ SPI_DO5
47
SPI_DOVL1277575VL127VL1277575VL127CS625
GND13172WIFI_STBY_3.3V
PANEL_CTRL_08/ SPI_DI6
46
SPI_DIVL957474VL95VL957474VL95CS724
KEY_AD23963W IFI_USB_P
PANEL_CTRL_12/ SA_MODE7
45
SA_MODEVL637373VL63VL637373VL63CS823
POWER_INT32784WIFI_STBY_3.3V
NC8
44
SPI_ENVL317272VL31VL317272VL31CS922
1-821-143-111-821- 117-11
55W IFI_USB_M
PANEL_CTRL_04/ BINT9
43
B INTVL07171VL0VL07171VL0CS1021
JAM SYT10-3WLSYT10-03HG
16WIFI_GN D
RESERVED10
42
3D_SYNCVLS7070VLSVLS7070VLSCS1120
97WIFI_GN DSDA
11
41
I2C_SDAVLS6969VLSVLS6969VLSCS1219
28WIFI_WAKESCL
12
40
I2C_SCLLLV0N6868LLV0NLLV0N6868LLV0NGND18
69B T_DEVICE_WAKE
PANEL_DET13
39
GNDLLV0P6767LLV0PLLV0P6767LLV0PG SP117
310WIFI_RST
RX4P_EVEN/Tx7p14
38
BIN4+LLV1N6666LLV1NLLV1N6666LLV1NG SP216
NC11
RX4N_EVEN/Tx7n15
37
BIN4-LLV1P6565LLV1PLLV1P6565LLV1PGCK15
1012BT_STBY_3.3V
RX3P_EVEN/GND16
36
BIN3+LLV2N6464LLV2NLLV2N6464LLV2NGOE14
NC13
RX3N_EVEN/GND/Option17
35
BIN3-LLV2P6363LLV2PLLV2P6363LLV2PUD13
CN100214BT_UA RT_RX
GND18
34
GNDGND6262GNDGND6262GNDG ND12
STBY_+3.3V120115BT_GND
RXCLKP_EVEN/Tx6p19
33
BCK+LLVCKN6161LLVCKNLLVCKN6161LLVCKNVCC11
MAIN_+5V234NC16
RXCLKN_EVEN/Tx6 n20
32
BCK-LLVCKP6060LLVCKPLLVCKP6060LLVCKPV CC10
GND3NC917B T_USB_GND_S
GND21
31
GNDGND5959GNDGND5959GNDG ND9
LED_AMBER422318BT_UART_TX
RX2P_EVEN/Tx5p22
30
BIN2+LLV3N5858LLV3NLLV3N5858LLV3NVGH8
LED_PWM_W524719BT_HOST_WAKE
RX2N_EVEN/Tx5n23
29
BIN2-LLV3P5757LLV3PLLV3P5757LLV3PVGL7
LED_STBY_PWM_R630120SC_STBY_3.3V
RX1P_EVEN/GND24
28
BIN1+LLV4N5656LLV4NLLV4N5656LLV4NGND6
LED_STBY_PWM_B728521BT_RST
RX1N_EVEN/GND25
27
BIN1-LLV4P5555LLV4PLLV4P5555LLV4PYOB115
LED_STBY_PWM_G826422SC_LED_AMBER
RX0P_EVEN/Tx4p26
26
BIN0+LLV5N5454LLV5NLLV5N5454LLV5NYOB124
GND925823B T_EMT_SYNC
RX0N_EVEN/Tx4n27
25
BIN0-LLV5P5353LLV5PLLV5P5353LLV5PYOB133
MAIN3.3V1040524SC_LED_PWM_W
GND28
24
GNDGND5252GNDGND5252GNDYOB142
OPT_SENSE1132925SC_G ND
RX4P_ODD/Tx3p29
23
AIN4+LS5151LSLS5151LSGND1
SIRCS1236826SC_LED_PWM_G
RX4N_ODD/Tx3n30
22
AIN4-REV5050REVR EV5050REV
1-819-339-11
327HUS_ POWER_KEY
RX3P_ODD/GND31
21
AIN3+FS4949FSFS4949FS
728SC_LED_PWM_B
RX3N_ODD/GND/Optio n32
20
AIN3-VCC3.3V4848VCC3.3VVCC3.3V4848VCC3.3V
NC29
GND33
19
GNDVCC3.3V4747VCC3.3VVCC3.3V4747VCC3.3V
SSHL-002T-P0.2630SC_LED_PWM_R
RXCLKP_ODD/Tx2p34
18
ACK+RLV0N4646R LV0NRLV0N4646RLV0N
131HUS__GN D_2
RXCLKN_ODD/Tx2n35
17
ACK-RLV0P4545RLV0PRLV0P4545RLV0P
1132SC_OPT_SENSOR
GND36
16
GNDRLV1N4444RLV1NR LV1N4444RLV1N
USB Cable(UL2725)NC33
RX2P_ODD/Tx1p37
15
AIN2+RLV 1P4343R LV1PRLV1P4343RLV1P
GND
16234SC_MAIN_5V (LED)
RX2N_ODD/Tx1n38
14
AIN2-RLV 2N4242RL V2NRLV2N4242RLV2N
WO_WLAN
28NC35HUS_GND_2
RX1P_ODD/GND39
13
AIN1+RLV 2P4141R LV2PRLV2P4141RLV2P
WIFI_RST
3101236SC_SIRCS
RX1N_ODD/GND40
12
AIN1-GND4040GNDGND4040GND
GND
411ShieldNC37
RX0P_ODD/Tx0p41
11
AIN0+RLVCKN3939RLVCKNRLVCKN3939RLVCKN
USB_DM
551WHT#28NC38
RX0N_ODD/Tx0n42
10
AIN0-RLVCKP3838RLVCKPRLVCKP3838RL VCKP
USB_DP
631GRN#28239HUS__KEY_AD
GND43
9
GNDGND3737GNDGND3737GND
STBY3.3V
721RED#281040SC_MAIN_3.3V (OPT)
GND/LOCKN144
8
GNDRLV3N3636RLV3NR LV3N3636RLV3N
STBY3.3V
841BLK#28
1-819-760-11GND/HTPDN145
7
GNDRLV3P3535RLV3PR LV3P3535RLV3P
GND
97
MOLEX 501571-4007NC46
6
NCRLV4N3434RLV4NRLV4N3434RLV4N
GND
10NC
POWER47
5
VCCRLV4P3333R LV4PRLV4P3333RLV4P
1-819-469-11
POWER48
4
VCCRLV5N3232RLV 5NRLV5N3232RLV5N
J
POWER49
3
VCCRLV5P3131R LV5PRLV5P3131RLV5P
POWER50
2
VCCVH03030VH0VH03030VH0
SSHL-002T-P0.2
POWER51
1
VCCVH312929VH31VH312929VH31
VH632828VH63VH632828VH63
FFC Direct Connector :I-PEX91213-0510Y
VH952727VH95VH952727VH95
ACES
VH1272626VH127VH1272626VH127
VH1592525VH159VH1592525VH159
CN4601
VH1912424VH191VH1912424VH191
SPEAK
L+ 1411R+
VH2472323VH247VH2472323VH247
Front
L- 23
2
2R-
VH2552222VH255VH2552222VH255
Lch
23L-
VCOM2121VCOMVCOM2121V COM
1
4L+
CS122020CS12CS122020CS12
1-842-566-12
CS111919CS11CS111919CS11
JST SM04B-PBVSS-TB(LF)(SN)
CS101818CS10CS101818CS10
SPEAK
R+11
CS91717CS9CS91717CS9
Front
R-22
CS81616CS8CS81616CS8
Rch
CN9101
CS71515CS7CS71515CS7
1230GND
CS61414CS6CS61414CS6
1129GND
CS51313CS5CS51313CS5
328BL_ER R
CS41212CS4CS41212CS4
527BL_ON
CS31111CS3CS31111CS3
NC26DIGITAL_STBY
CS21010CS2CS21010CS2
1025GND
CS199CS1CS199CS1
924GND
U/DL88U/DLU/DL88U/DL
823GND
GOE77GOEGOE77G OE
722GND
GCK66GCKGCK66GCK
CN6401 (CN2)
1721+19.5V(12V)
GSP155GSP1GSP155GSP1
To B board (100106)1620+19.5V(12V)
GSP244GSP2GSP244GSP2
POWER_ON28
111519+19.5V_SS(12V)
VGH33VGHVGH33VGH
AC_OFF_DET27
121418+19.5V_HOLD(12V)
VGL22VGLVGL22VGL
T-CON_ON26
NC1317REG+12V
GND11G NDGND11G ND
NC25
NCNC16GND
GND24
NCNC15GND
STBY3.3V23
142314STBY+3.3VCN2CN 21CN22CN25
GND22
NCNC13TCON_ONCN601
GND8080GNDGND8080GNDCS130
GND21
NC2712AC_OFF_DET25P80B120
VL2557979VL255VL2557979VL255CS229
T-CON_VCC12V20
NC2811POWER_ONZXEC
VL2477878VL247VL2477878VL247CS328
T-CON_Vcc12V19
NCNC10
SA_MODEVL1917777VL191VL1917777VL191CS427
REG12V18
NCNC9
LD_STBYVL 1597676VL159VL1597676VL159CS526
REG12V17
2118
IP_REFVL1277575VL127VL1277575VL127CS625
REG12V16
20NC7
FB_REFVL957474VL95VL957474VL95CS724
REG12V15
19NC6
LD_PWR_4 / SPI0_RDATA / BLU_TEMPVL637373VL63VL637373VL63CS823
REG12V14
18NC5
LD_PWM_3 / SPI0_3(CLKF)VL317272VL31VL317272VL31CS922
REG12V13
17NC4
LD_PWM_2 / SPI0_2(DATAF)VL07171VL0VL07171VL0CS1021
GND12
3043
LD_PWM_1 / SPI0_1(LATF)VLS7070VLSVLS7070V LSCS1120
GND11
2922
LD_PWM_0 /SPI0_0(EMIT IN)VLS6969VLSVLS6969VLSCS1219
GND10
25NC1
LD_MODE_SWLLV0N6868LLV0NLLV0N6868LLV0NGND18
GND9
24
1-843-917-11
LLV0P6767LLV0PLLV0P6767LLV0PGS P117
GND8
23
JST SM30B-PBDSS (LF)(SN)
LLV1N6666LLV1NLLV1N6666LLV1NGSP216
GND7
221-843-125-11
LLV1P6565LLV1PLLV1P6565LLV1PGCK15
DIGITAL_STBY6
NC
LLV2N6464LLV2NLLV2N6464LLV2NG OE14
BL ON5
27
LLV2P6363LLV2PLLV2P6363LLV2PUD13
BLINKING4
3
GND6262GNDGND6262GNDG ND12
BL_ERR3
28
LLVCKN6161LLVCKNLLVCKN6161LLVCKNVCC11
PWM_DIMMER2
2
LLVCKP6060LLVCKPLLVCKP6060LLVCKPVCC10
DC_DIMMER1
8
GND5959GNDGND5959GNDG ND9
1-842-551-11
1-842-598-1111
LLV3N5858LLV3NLLV3N5858LLV3NVGH8
JAM SJM20-28WLBSJM20-28HG22
LLV3P5757LLV3PLLV3P5757LLV3PVGL731LLV4N5656LLV4NLLV4N5656LLV4NGND642LLV4P5555LLV4PLLV4P5555LLV4PYOB115
1-822-359-11
+OUT1
11
5
1
LLV5N5454LLV5NLLV5N5454LLV5NYOB124
53426-0410 / MO
+OUT2
29
6
2
LLV5P5353LLV5PLLV5P5353LLV5PYOB133
CN6801 (CN3)
+OUT3
317
7
1
GND5252GNDGND5252GNDYOB142
+OUT4
425
8
2
LS5151LSLS5151LSGND1
9
1
REV5050REVREV5050REV
1-822-360-11
-OUT1
18
10
2
FS4949FSFS4949FS
53426-0510 / MO
-OUT2
216
11
1
VCC3.3V4848VCC3.3VVCC3.3V4848V CC3.3V
CN6802 (CN4)
-OUT3
324
12
2
VCC3.3V4747VCC3.3VVCC3.3V4747V CC3.3V
-OUT4
432
13
1
RLV0N4646RLV0NRLV0N4646RLV0N
NC
5NC
14
2
RLV0P4545RLV0PRLV0P4545R LV0P
15
1
RLV1N4444RLV1NRLV1N4444RLV1N
16
2
RLV1P4343RLV1PRLV1P4343R LV1P
17
1
RLV2N4242RLV2NRLV2N4242RLV2N
18
2
RLV2P4141RLV2PRLV2P4141R LV2P
19
1
GND4040GNDGND4040GND
20
2
RLVCKN3939RLVCKNRLVCKN3939RLVCKN
21
1
RLVCKP3838RLVCKPRLVCKP3838RLV CKP
22
2
GND3737GNDGND3737GND
CN6101
23
1
RLV3N3636RLV3NRLV3N36
36RL V3N
AC_IN
24
2
RLV3P3535RLV3PRLV3P3535R LV3P
AC-N1251
RLV4N3434RLV4NRLV4N3434RLV4N
AC-L2262
RLV4P3333RLV4PRLV4P3333R LV4P
1-822-908-11
271
RLV5N3232RLV5NRLV5N3232RLV5N
JAM SFP79-02WLB
282
RLV5P3131RLV5PRLV5P3131R LV5P
291
VH03030VH0VH03030VH0
302
VH312929VH31VH312929VH31
311
VH632828VH63VH632828VH63
322
VH952727VH95VH952727VH95
VH1272626VH127VH1272626VH127
VH1592525VH159VH1592525VH159
VH1912424VH191VH1912424VH191
VH2472323VH247VH2472323VH247
VH2552222VH255VH2552222VH255
VCOM2121VCOMVCOM2121V COM
CS122020CS12CS122020CS12
CS111919CS11CS111919CS11
CN304 on HTL
CN7318
CS101818CS10CS101818CS10
STBY_+3.3V112121
HTL_VOL_DOWNCS91717CS9CS91717CS9
UART_HTL_to_B211112
HTL_VOL_UPCS81616CS8CS81616CS8
UART_B_to_HTL310103
HTL_LINEOUT_LCS71515CS7CS71515CS7
HTL_SIRCS_OUT4994
HTL_SP_MUTECS61414CS6CS61414CS6
NC5NC85
HTL_GNDCS51313CS5CS51313CS5
HTL_GND6776
HTL_12VCS41212CS4CS41212CS4
HTL_12V76
AWG30
67
HTL_GNDCS31111CS3CS31111CS3
HTL_GND85
AWG30
NC8
NCCS21010CS2CS21010CS2
HTL_SP_MUTE9449
HTL_SIRCS_OUTCS199CS1CS 199CS1
HTL_LINEOUT_L103310
UART_B_to_HTLU/DL88U/DLU/DL88U/DL
HTL_VOL_UP112211
UART_HTL_to_BGOE77GOEGOE77G OE
HTL_VOL_DOWN121112
HTL_STBY_3.3VGCK66GCKGCK66GCK
1-821-152-11
1-821-152-11
GSP155GSP1GSP155GSP1
JAM SYT10-12WL-ET
JAM SYT10-12WL-ET
GSP244GSP2GSP244GSP2
VGH33VGHVGH33VGH
VGL22VGLVGL22VGL
GND11G NDGND11G ND
LED 1
LED 1
LED 1
LED 1
LED 1
LED 1
LED 1
LED 1
LED 1
LED 1
LED 1
LED 1
LED 8
LED 9
LED 9
LED 1
LED 1
LED 6
LED 6
LED 7
LED 7
LED 8
LED 3
LED 4
LED 4
LED 5
LED 5
J
J
Housin
Term
11S
JST P
LED 3
LED 1
LED 1
LED 2
LED 2
Housi
J
S
Term
Term
1
J
Housin
1
S
Term
1
JA
Housi
1
S
Housin
1
G
Term
1
Housin
1
G
Term
1
1
CARD EDGE CONNECTOR S O-DIMM 204
1
1
151
Housi
Term
1
5
51pin FFC
B
SM
T
HTL4
Hotel only
HSC
HJM
Wifi
LV-FFC
M
G-B H
S
H
RB2
GL2
AC pigtail
80 pin
Mini LV
80 pi n
Mini LV
FPC to 2nd
Part SoC
(Provide by
SDP)
FPC to 2nd
Part SoC
(Provide by
SDP)
1 block
3 block
2 block
4 block
Fem -502585-001/ MOLEX (on LS Bar)
Ma -502578-001/MOLEX
W580B/W585B/W590B/W600B/W605B/W607B/W608B/WM15B
RB2G CHASSIS
5-3. Connector Diagram
5-3-2. 60” W*B
46
Page 47

RB2G CHASSIS
W580B/W585B/W590B/W600B/W605B/W607B/W608B/WM15B
9-888-150-02
Sony Corpor ation
Sony EMCS (Malay sia) Sdn. Bhd.
HESRDM
English
© 2014.04
47
 Loading...