

Sony KDL-32W5800, KDL-37V5800, KDL-32W5830, KDL-40W5800, KDL-46W5820 User Manual
...
Table of Contents
Remote and TV Controls/Indicators
Remote and TV controls.................................................................................................................................(4)
Indicators.....................................................................................................................................................(19)
About the operation guide on the TV screen................................................................................................(21)
Watching TV
Watching TV..................................................................................................................................................(22)
Using the Digital Electronic Programme Guide (EPG)..................................................................................(29)
Using the Favourite List...............................................................................................................................(32)
Using Optional Equipment
Connecting Optional Equipment..................................................................................................................(36)
Viewing Pictures from Connected Equipment..............................................................................................(43)
Playing back Photo/Music/Video via USB.....................................................................................................(46)
Using BRAVIA Sync with Control for HDMI...................................................................................................(53)
1/119

Table of Contents
Using Home Network Features
Connecting to the Network ..........................................................................................................................(55)
Enjoying AppliCast.......................................................................................................................................(57)
Enjoying Photo/Music/Video Files via the Network......................................................................................(59)
Checking the Network Connection................................................................................................................(62)
Adjusting the Server Display Settings..........................................................................................................(64)
Using Menu Functions
Navigating through TV Home Menu on XMB™............................................................................................(66)
TV Settings Menu
System Update......................................................................................................................................(69)
Bravia Tips.............................................................................................................................................(70)
Clock/Timers.........................................................................................................................................(71)
Eco.........................................................................................................................................................(72)
2/119

Table of Contents
Picture...................................................................................................................................................(73)
Sound....................................................................................................................................................(79)
Screen (for inputs other than a PC)......................................................................................................(83)
Screen (for PC input).............................................................................................................................(85)
Video Settings.......................................................................................................................................(87)
Audio Settings.......................................................................................................................................(88)
Set-up...................................................................................................................................................(90)
Analogue Set-up...................................................................................................................................(96)
Digital Set-up......................................................................................................................................(101)
Network Settings................................................................................................................................(107)
Additional Information
Troubleshooting.........................................................................................................................................(109)
3/119

Remote and TV Controls
23
22
21
20
19
18
17
16
15
1
3
4
5
6
7
8
9
10
11
12
1314
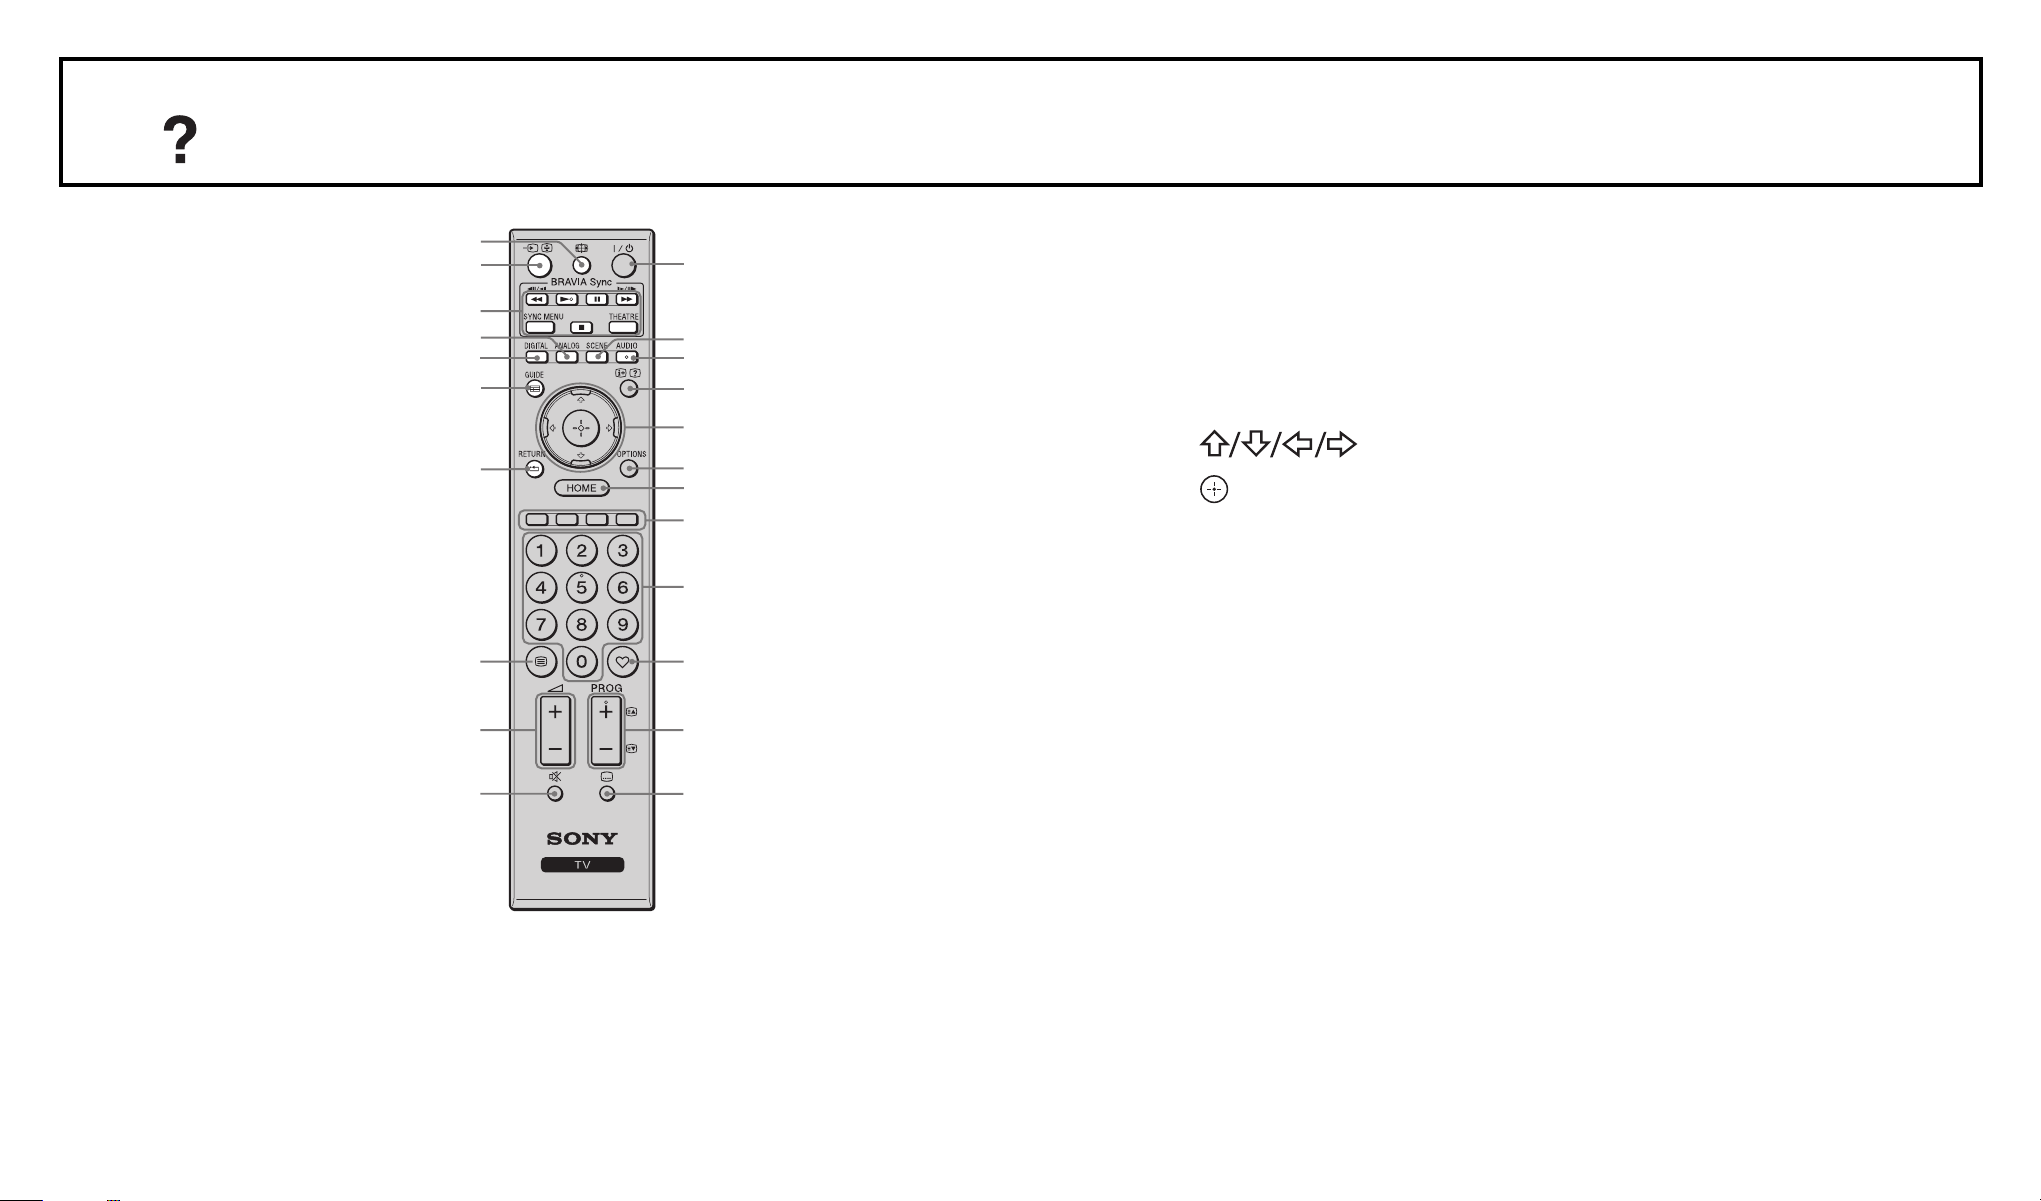
In case of KDL-46/40/37/32W5820/5830/5840, please refer to the separate leaflet.
1 (TV standby)
Press to turn the TV on and off from standby
mode.
• The number 5, , PROG + and AUDIO buttons on the remote have a tactile dot. Use the tactile dots as a reference when operating the TV.
4/119

Remote and TV Controls
Buttons on the TV will work the same as those on the remote.
*In the TV menu, these buttons will work as
.
5/119

Remote and TV Controls
2 (Power)
Press to turn the TV on or off.
• To turn the TV completely off (0 W, no power
consumption), turn off the TV, then unplug the
mains lead/AC power cord from the mains/AC
power.
6/119
Remote and TV Controls
23
22
21
20
19
18
17
16
15
1
3
4
5
6
7
8
9
10
11
12
1314
3 SCENE
Press to display the “Scene Select” menu.
When you select the desired scene option, the
optimum sound quality and picture quality for
the selected scene are automatically set.
Press to select the scene option, then
press .
• Cinema: Delivers picture scenes just like those
in a theatre-like atmosphere with dynamic
sound.
• Photo: Delivers picture scenes that
authentically reproduces the texture and colour
of a printed photo.
7/119

Remote and TV Controls
23
22
21
20
19
18
17
16
15
1
3
4
5
6
7
8
9
10
11
12
1314
• Sports: Delivers picture scenes that let you
experience realistic picture and sound like
those in a stadium.
• Music: Delivers sound effects that let you
experience dynamic and clear sound like that
at a concert.
• Game: Delivers picture scenes that let you
enjoy your game-playing experience to the
fullest with superb picture and sound quality.
• Graphics: Delivers picture scenes that ease
your prolonged monitor viewing experience and
reduce fatigue by displaying clearer detailed
pictures.
8/119

Remote and TV Controls
23
22
21
20
19
18
17
16
15
1
3
4
5
6
7
8
9
10
11
12
1314
• General: Current user settings.
• Auto: The optimum sound quality and picture quality are automatically set according to the input source, though there may not be any effect depending on the connected devices.
• In Digital mode, "Scene" options are applied
independently for HD (High-definition) and SD
(Standard-definition) pictures.
• When you set Theatre Mode (17) to on, the
“Scene Select” setting switches to “Cinema”
automatically.
4 AUDIO
9/119
• In analogue mode: Press to change the dual
sound mode (82).

Remote and TV Controls
23
22
21
20
19
18
17
16
15
1
3
4
5
6
7
8
9
10
11
12
1314
• In digital mode: Press to change the language
to be used for the programme currently being
viewed (101).
5 / (Info/Text reveal)
Each time you press the button, the display
changes as follows:
• In digital mode: Details of the current
programme Details of the next programme
(only for Sony Guide)
• In analogue mode: Current channel number
and screen mode Clock information
• In Text mode: Reveals hidden information (e.g.
answers to a quiz) (24).
10/119
Remote and TV Controls
23
22
21
20
19
18
17
16
15
1
3
4
5
6
7
8
9
10
11
12
1314
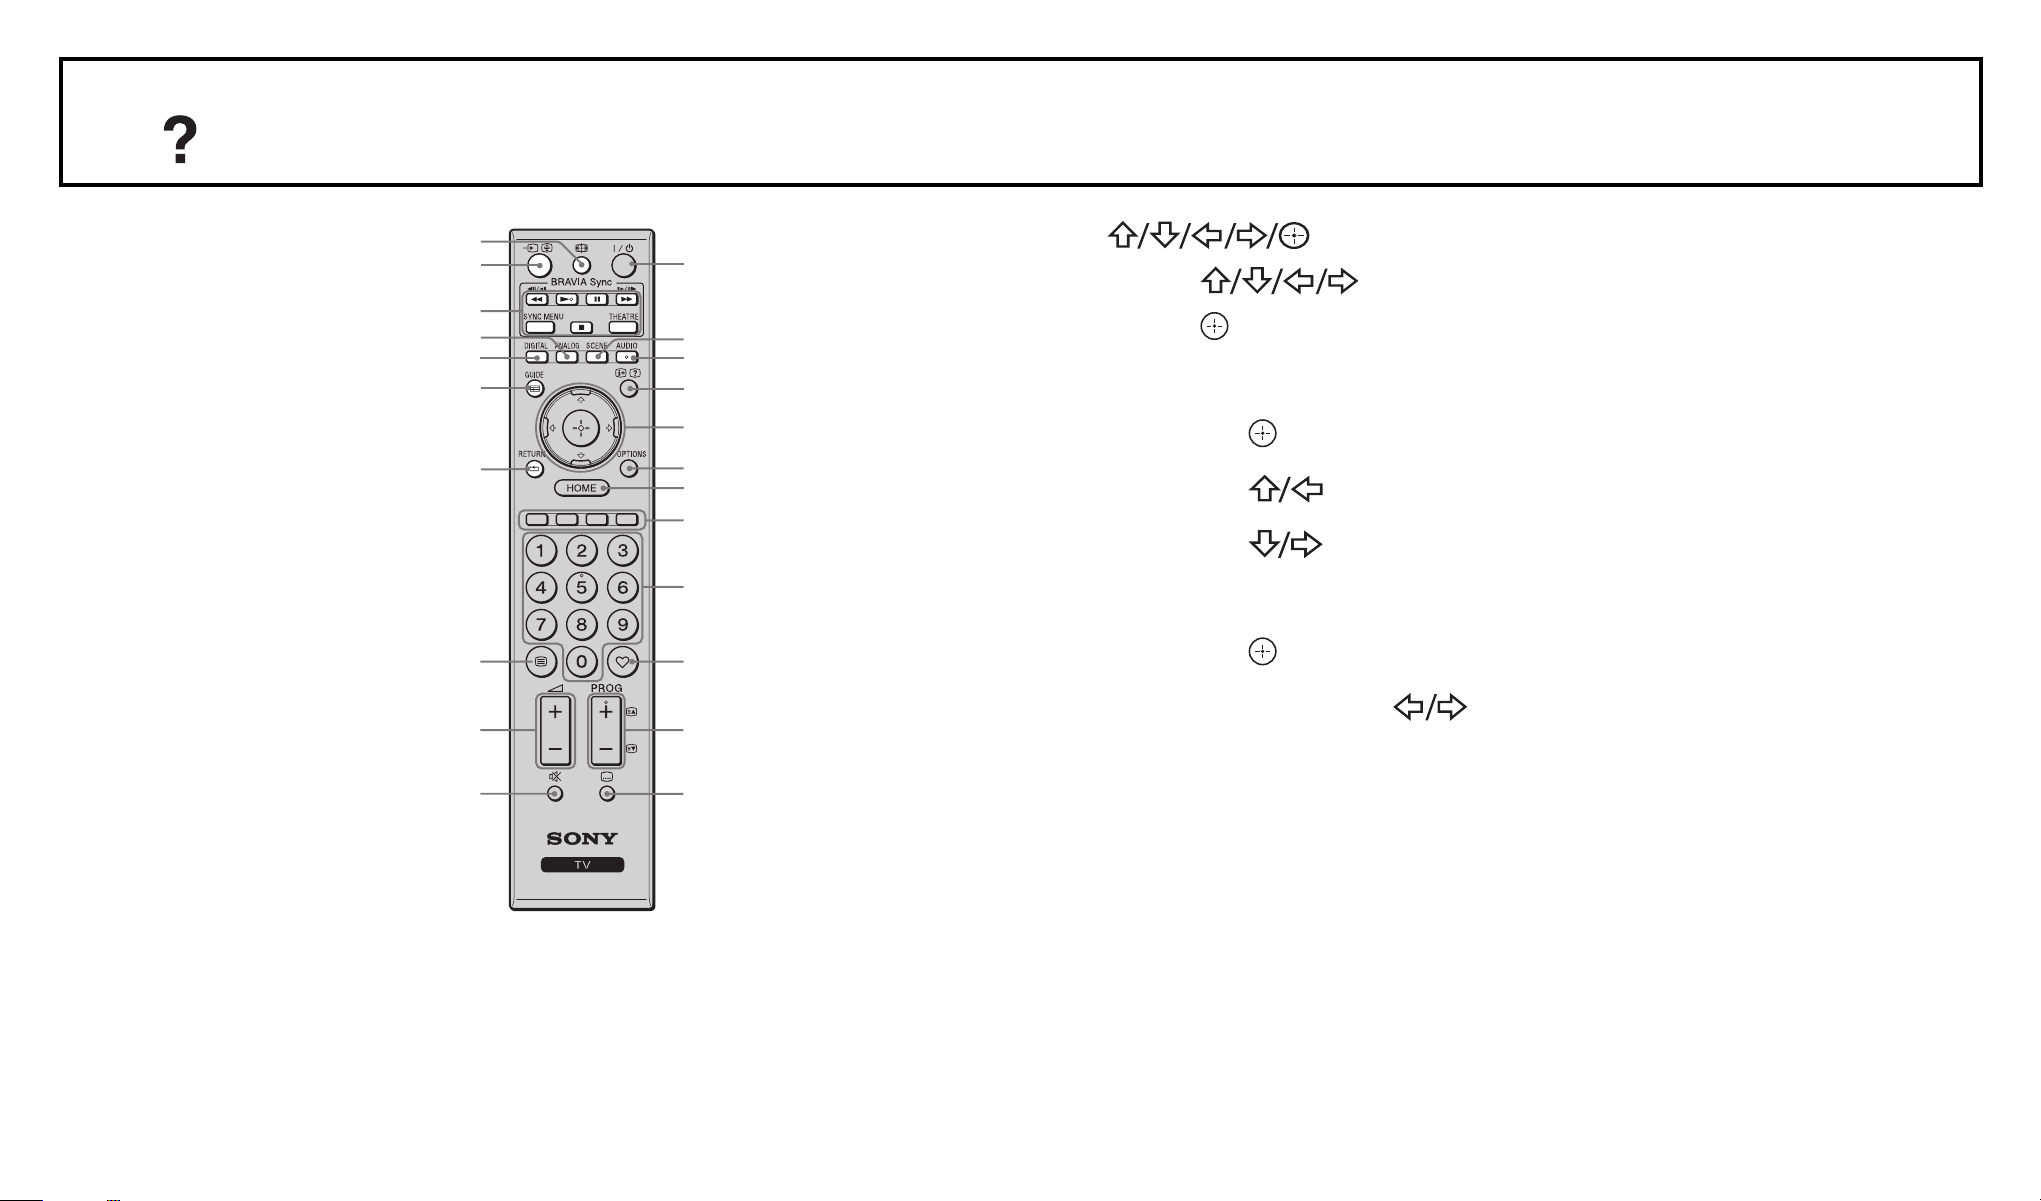
6
Press to move the on-screen cursor. Press to select/confirm the highlighted item.
• When playing a photo file:
- Press to pause/start a slideshow.
- Press to select the previous file.
- Press to select the next file.
• When playing a music/video file:
- Press to pause/start the playback.
- Press and hold to fast forward/fast reverse, then release the button at the point where you want to resume playback.
11/119

Remote and TV Controls
23
22
21
20
19
18
17
16
15
1
3
4
5
6
7
8
9
10
11
12
1314
- Press to start playback from the beginning of the current file.
- Press to go to the next file.
7 OPTIONS
Press to display a list that contains “Device
Control” or shortcuts to some setting menus.
Use the “Device Control” menu to operate
equipment that is compatible with Control for
HDMI.
The listed options vary depending on the input
source.
8 HOME
Press to display the TV Home Menu (66).
9 Coloured buttons
12/119
When the coloured buttons are available, an
operation guide appears on the screen.

Remote and TV Controls
23
22
21
20
19
18
17
16
15
1
3
4
5
6
7
8
9
10
11
12
1314
10 Number buttons
• In TV mode: Press to select channels. For channel numbers 10 and above, press the next digit quickly.
• In Text mode: Press to enter a page number.
11 (Favourite)
Press to display the Favourite List that you have
specified (32).
12 PROG +/–/ /
• In TV mode: Press to select the next (+) or previous (–) channel.
• In Text mode: Press to select the next ( )or previous ( ) page.
13/119

Remote and TV Controls
23
22
21
20
19
18
17
16
15
1
3
4
5
6
7
8
9
10
11
12
1314
13 (Subtitle setting)
Press to change the subtitle language (101) (in
digital mode only).
14 (Mute)
Press to mute the sound. Press again to restore
the sound.
• In standby mode, if you want to turn on the TV without sound, press this button.
15 +/– (Volume)
Press to adjust the volume.
16 (Text)
Press to display text information (24).
14/119
Remote and TV Controls
23
22
21
20
19
18
17
16
15
1
3
4
5
6
7
8
9
10
11
12
1314
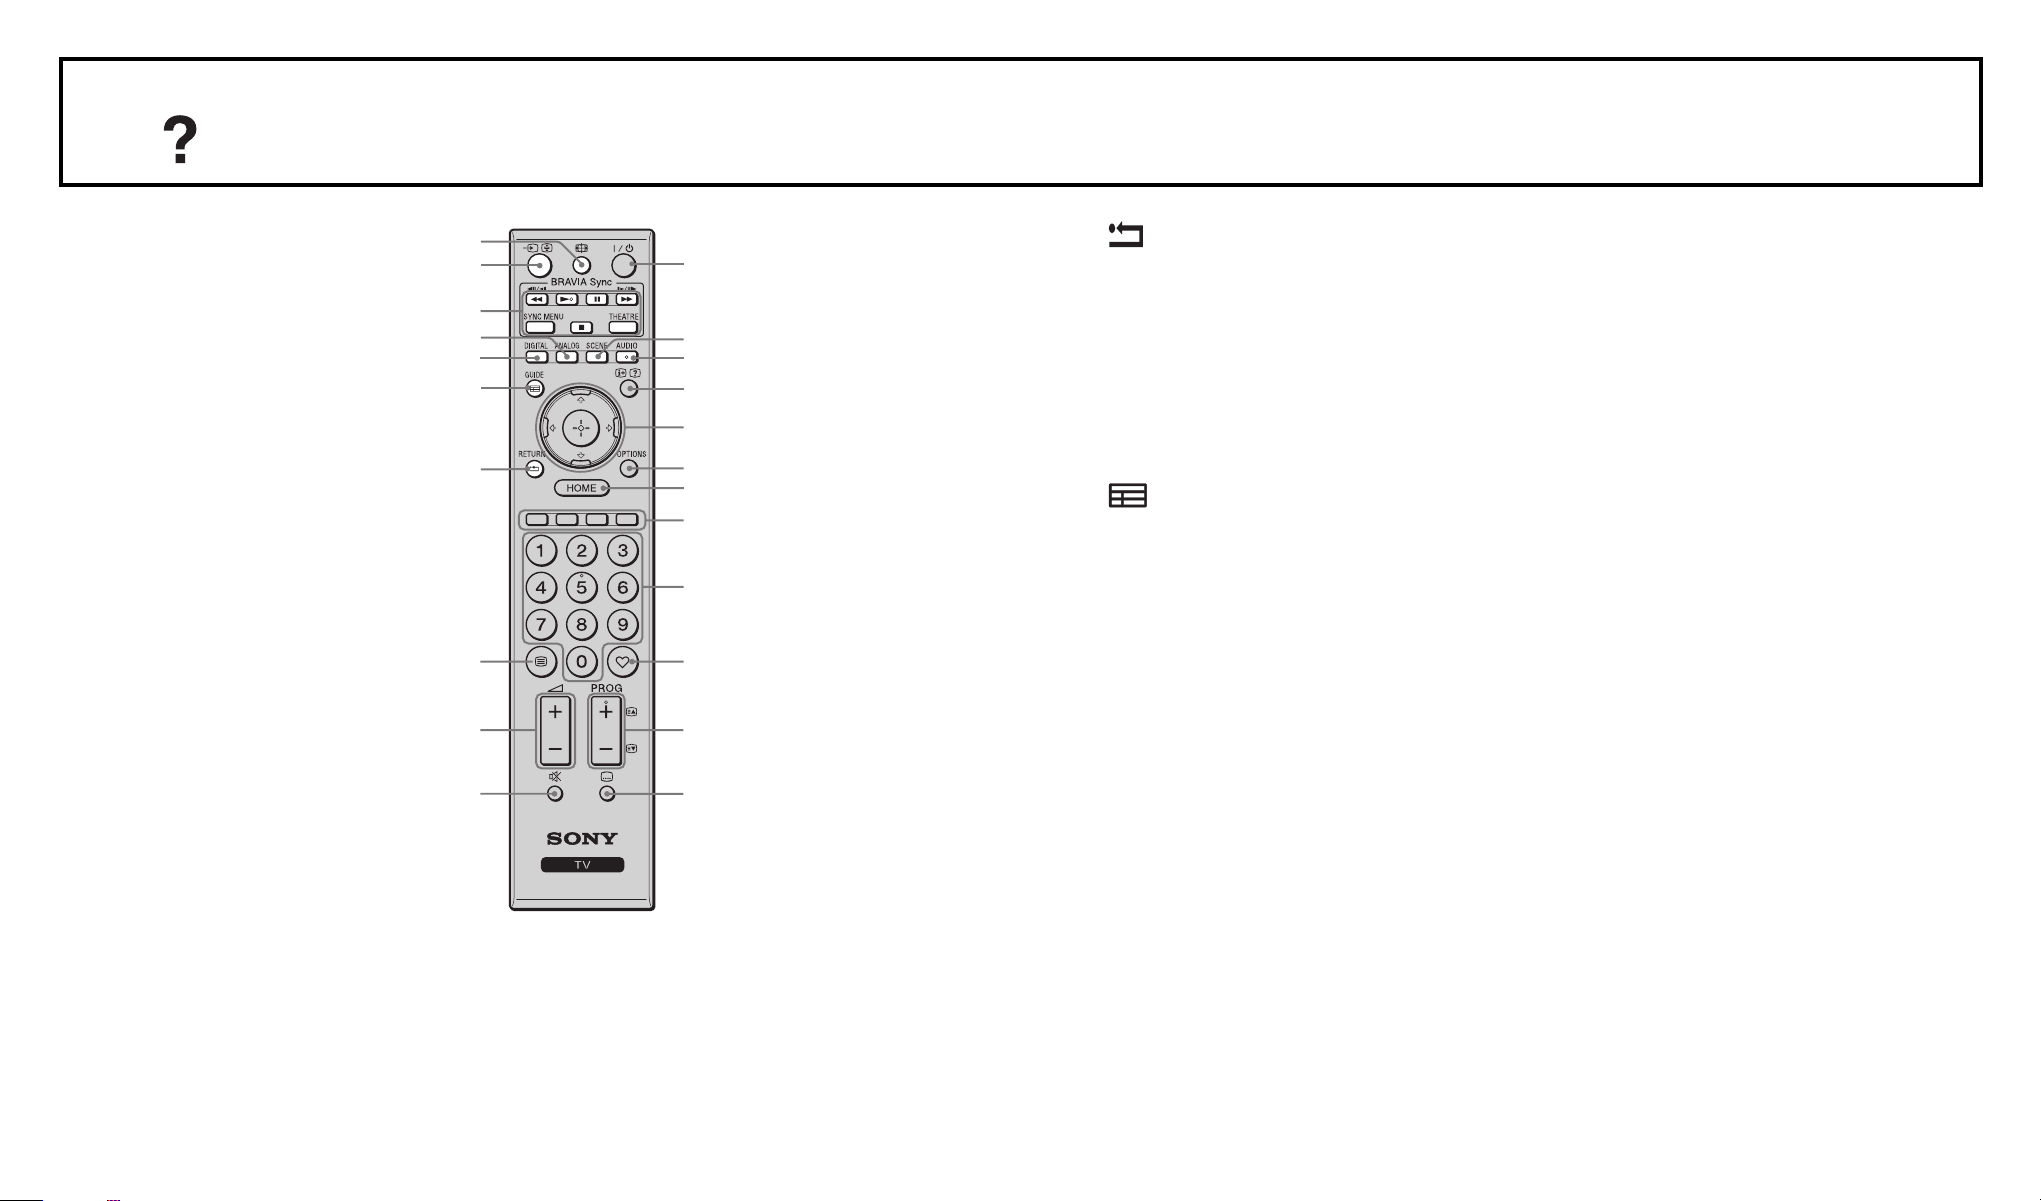
17 RETURN
Press to return to the previous screen of the
displayed menu.
When playing a photo/music/video file: Press to
stop the playback. (The display returns to the
file or folder list.)
18 GUIDE (EPG)
Press to display the Digital Electronic
Programme Guide (EPG) (29).
19 DIGITAL
Switches from analogue mode to the last
selected digital mode (DVB-S or Antenna/Cable).
Toggles between two digital modes (DVB-S and
Digital (Antenna/Cable)) when the TV set
15/119
operates in Digital mode.

Remote and TV Controls
23
22
21
20
19
18
17
16
15
1
3
4
5
6
7
8
9
10
11
12
1314
When viewing pictures from connected equipment: Press to return to normal TV mode.
20 ANALOG
Press to display the analogue channel that was
last viewed.
When viewing pictures from connected
equipment: Press to return to normal TV mode.
21 BRAVIA Sync
• : You can operate the BRAVIA Sync-compatible equipment that is connected to the TV.
• SYNC MENU: Displays the menu of connected
HDMI equipment. While viewing other input
screens or TV programmes, “HDMI Device
16/119
Selection” is displayed when the button is
pressed.

Remote and TV Controls
23
22
21
20
19
18
17
16
15
1
3
4
5
6
7
8
9
10
11
12
1314
• THEATRE: You can set Theatre Mode to on or off. When Theatre Mode is set to on, the optimum sound quality (if the TV is connected with an audio system using an HDMI cable) and picture quality for film-based contents are automatically set.
• If you turn the TV off, Theatre Mode is also turned off.
• When you change the “Scene Select” setting, Theatre Mode turns off automatically.
17/119

Remote and TV Controls
23
22
21
20
19
18
17
16
15
1
3
4
5
6
7
8
9
10
11
12
1314
• “Control for HDMI” (BRAVIA Sync) is only available with the connected Sony equipment that has the BRAVIA Sync or BRAVIA Theatre Sync logo or is compatible with Control for HDMI.
22 (Input select / Text hold)
• In TV mode: Press to display a list of inputs.
• In Text mode: Press to hold the current page.
23 (Screen mode)
Press to change the screen format (26).
18/119

Indicators
1 Light sensor
Do not put anything over the sensor, doing so
may affect its function (72).
2 Remote control sensor
Receives signals from the remote.
Do not put anything over the sensor. The sensor
may not work properly.
3 (Picture Off / Timer)
• Lights up in green when you select “Picture Off” (72).
• Lights up in orange when you set the timer
19/119
(30), (71).

Indicators
4 (Standby)
Lights up in red when the TV is in standby mode.
5 (Power)
Lights up in green when the TV is on.
20/119

About the operation guide on the TV screen
The operation guide provides help on how to operate the TV using the remote, and is displayed at the bottom of the screen. Use the remote buttons shown on the operation guide.
Operation Guide
Example: Press or RETURN (see (11) or
(15)).
21/119

Watching TV
1 Press on the TV to turn on the TV.
When the TV is in standby mode (the
(standby) indicator on the TV front panel is red),
press on the remote to turn on the TV.
2 Press DIGITAL to switch to digital or satellite
mode, or press ANALOG to switch to analogue
2
The available channels vary depending on the
mode.
mode.
3
3
22/119

Watching TV
3 Press the number buttons or PROG +/– to select a
TV channel.
2
To select a digital programme using the Digital Electronic Programme Guide (EPG) (29).
3
3
23/119

Watching TV
In digital mode
An information banner appears briefly.
The following icons may be indicated on the
banner.
: Radio Service
: Scrambled / Subscription service
: Multiple audio languages available
: Subtitles available
: Subtitles available for the hearing impaires
: Recommended minimum age for current
programme (ages from 4 to 18)
To access Text
In analogue mode, press . Each time you press , the display changes cyclically as follows:
Text and TV picture Text No Text (exit the Text service)
To select a page, press the number buttons or / .
To hold a page, press .
To reveal hidden information, press .
: Parental lock
24/119
Watching TV
• You can also jump directly to a page by selecting
the page number displayed on the screen. Press
and to select the page number,
then press .
• When four coloured items appear at the bottom of the Text page, you can access pages quickly and easily (FasText). Press the corresponding coloured button to access the page.
25/119
Watching TV
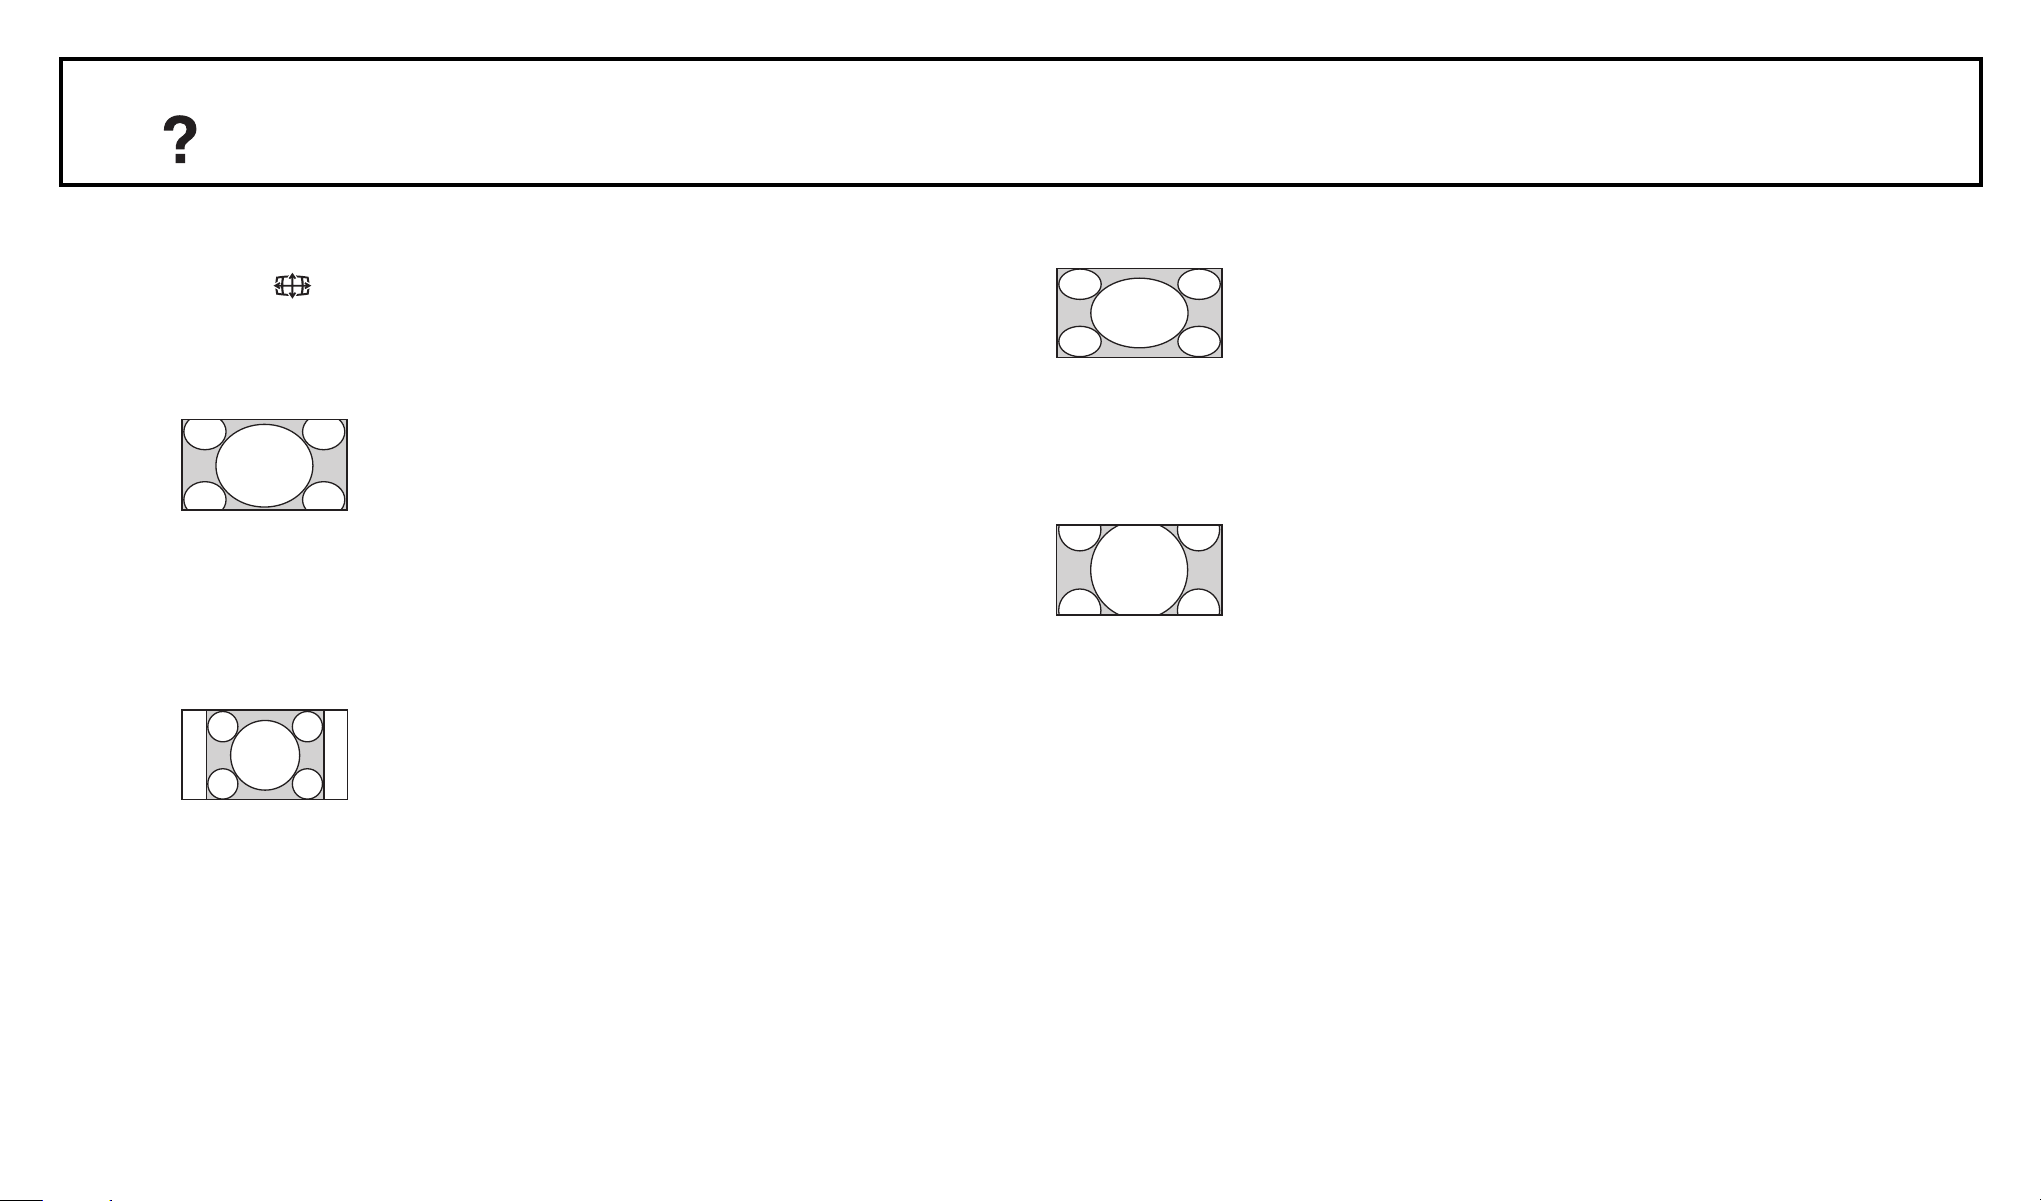
To change the Screen Format manually
Press repeatedly to select the desired Screen Format.
Smart*
Enlarges the centre portion of the picture. The left and right edges of the picture are stretched to fill the 16:9 screen.
4:3
Wide
Stretches the 4:3 picture horizontally, to fill the 16:9 screen.
Zoom*
Displays the cinemascopic (letter box format) picture in the correct proportion.
Displays the 4:3 picture in its original size. Side bars are shown to fill the 16:9 screen.
26/119

Watching TV
14:9*
Displays the 14:9 picture in the correct proportion. As a result, side bars are shown on the screen.
27/119

Watching TV
* Parts of the top and bottom of the picture may
be cut off. You can adjust the vertical position of
the picture. Press to move the picture up or
down (e.g. to read subtitles).
• When you select “Smart”, some characters and/or letters at the top and the bottom of the picture may not be visible. In such a case, adjust “Vertical Size” in the “Screen” menu (84).
• When “Auto Format” (83) is set to “On”, the TV automatically selects the best mode to suit the broadcast.
• If 720p, 1080i or 1080p source pictures are displayed with black borders on the screen edges, select “Smart” or “Zoom” to adjust the pictures.
28/119
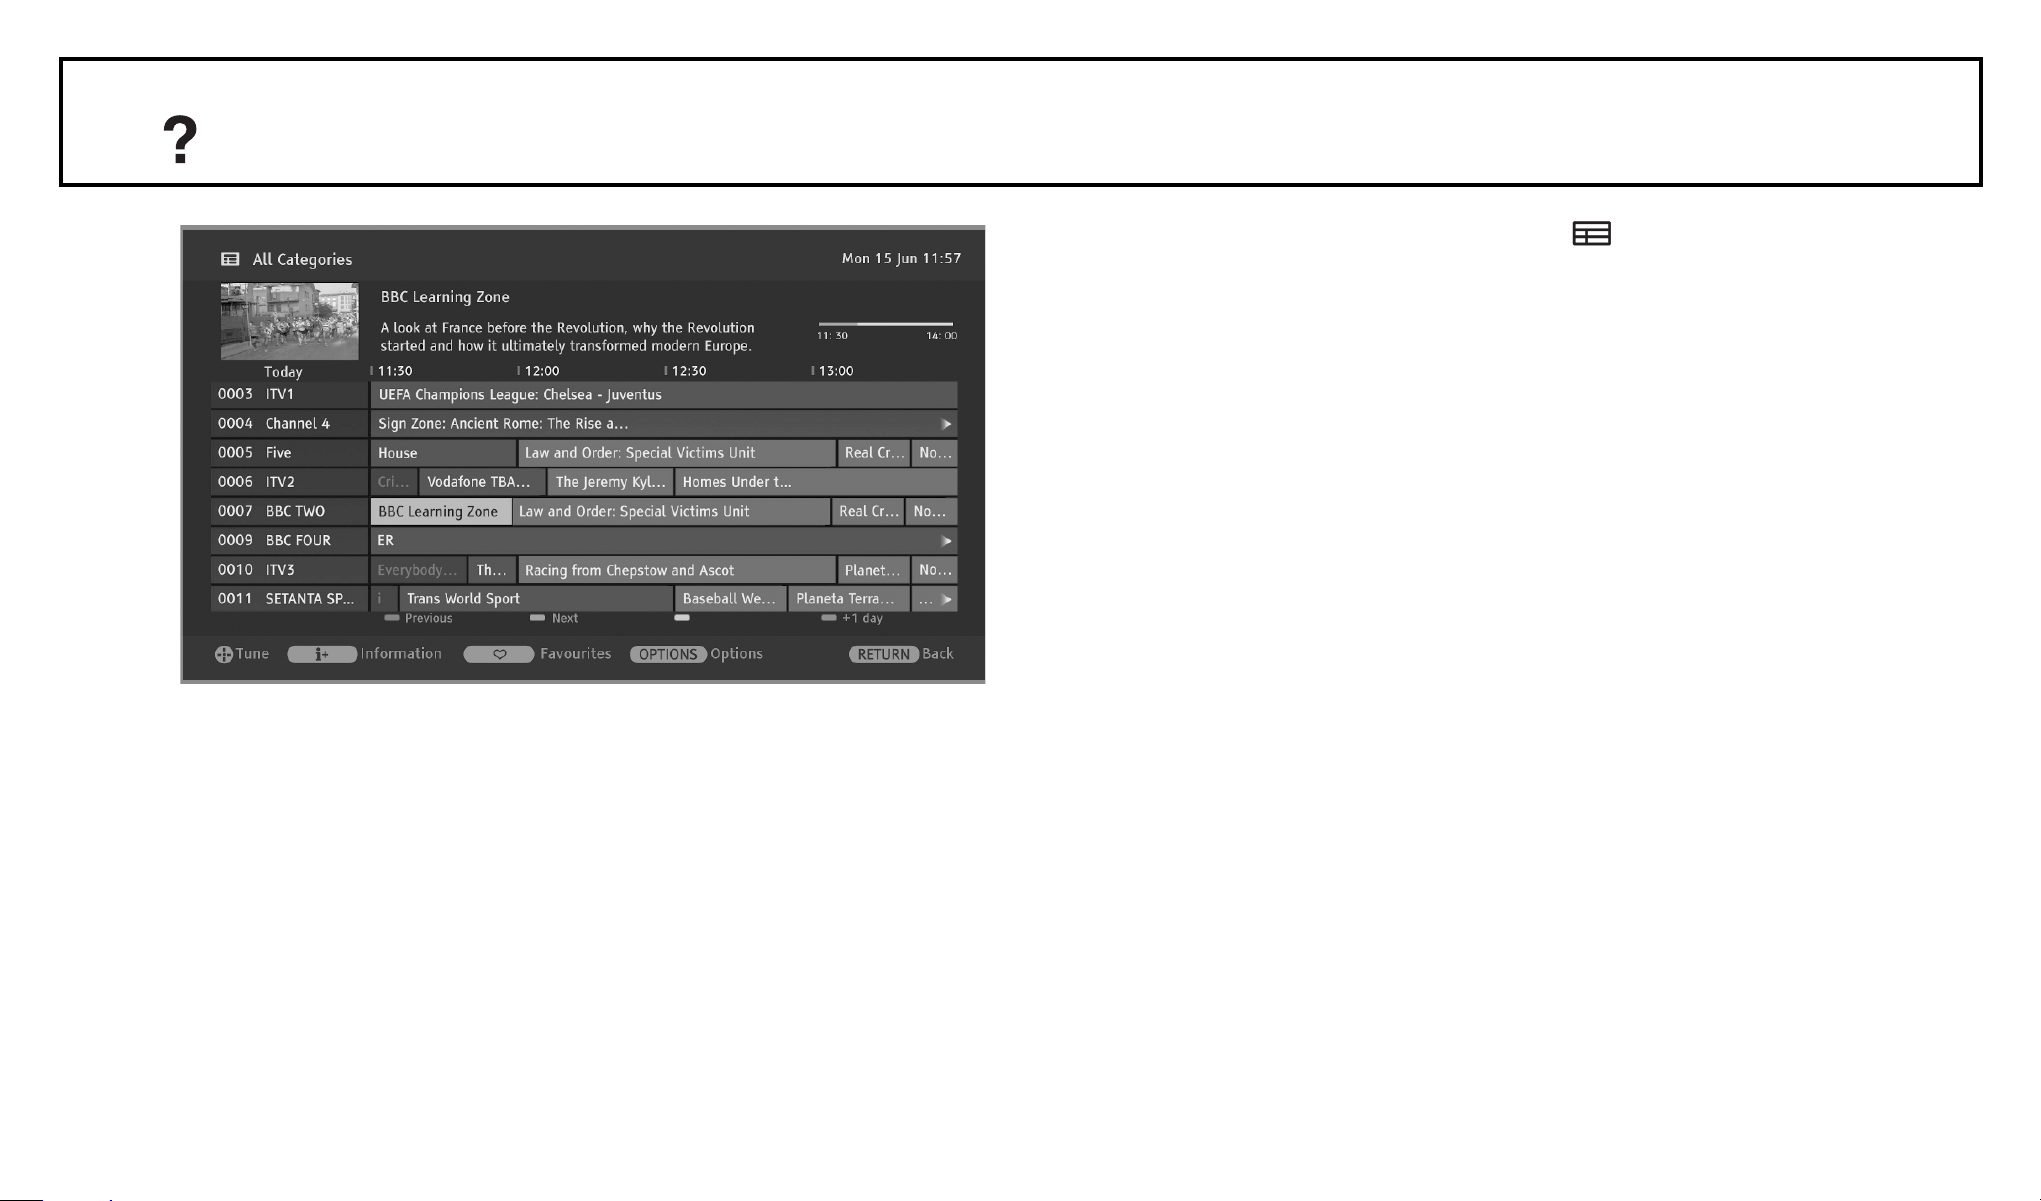
Using the Digital Electronic Programme Guide (EPG)
This function may not be available in some
1 In digital/satellite mode, press GUIDE. 2 Perform the desired operation as shown in the
following table or displayed on the screen.
countries/regions.
29/119

Using the Digital Electronic Programme Guide (EPG)
View a programme
Press to select a programme, then press .
Turn off the EPG
Press GUIDE.
Sort programme information by category – Category list
1 Press OPTIONS.
2 Select "Category" and press .
3 Press to select a category, then press .
Category name (e.g. “News”) contains all channels corresponding to the selected category.
Set a programme to be displayed automatically on the screen when it starts – Reminder
1 Press to select a future programme
you want to display, then press .
2 Press to select “Reminder”, then press .
A symbol appears next to the programme’s
information. The indicator on the TV front
panel lights up in orange.
• If you switch the TV to standby mode, the TV
will automatically turn on when the programme
starts.
30/119
 Loading...