

Page 1

4-Line
Telephone
3-047-337-12 (1)
Operating Instructions
Manual de instrucciones
US
ES
IT-M704
2000 Sony Corporation
Page 2

Owner’s Record
The model and the serial numbers are
located at the bottom of the unit. Record
the serial number in the space provided
below. Refer to these numbers
whenever you call upon your Sony
dealer regarding this product.
Model No. IT-M704
Serial No. ________________
IMPORTANT
SAFETY
INSTRUCTIONS
When using your telephone equipment,
basic safety precautions should always
be followed to reduce the risk of fire,
electric shock and injury to persons,
including the following:
1. Read and understand all instructions.
2. Follow all warnings and instructions
marked on the product.
3. Unplug this product from the wall
outlet before cleaning. Do not use
liquid cleaners or aerosol cleaners.
Use a damp cloth for cleaning.
4. Do not use this product near water,
for example, near a bath tub, wash
bowl, kitchen sink, or laundry tub, in
a wet basement, or near a swimming
pool.
5. Do not place this product on an
unstable cart, stand, or table. The
product may fall, causing serious
damage to the product.
6. Slots and openings in the cabinet and
the back or bottom are provided for
ventilation. To protect it from
overheating, these openings must not
be blocked or covered. The openings
should never be blocked by placing
the product on the bed, sofa, rug, or
other similar surface. This product
should never be placed near or over a
radiator or heat register. This product
should not be placed in a built-in
installation unless proper ventilation
is provided.
7. This product should be operated only
from the type of power source
indicated on the marking label. If you
are not sure of the type of power
supply to your home, consult your
dealer or local power company.
8. Do not allow anything to rest on the
power cord. Do not locate this
product where the cord will be abused
by persons walking on it.
9. Do not overload wall outlets and
extension cords as this can result in
the risk of fire or electric shock.
10. Never push objects of any kind into
this product through cabinet slots as
they may touch dangerous voltage
points or short out parts that could
result in a risk of fire or electric shock.
Never spill liquid of any kind on the
product.
11. To reduce the risk of electric shock,
do not disassemble this product, but
take it to a qualified service personnel
when some service or repair work is
required. Opening or removing
covers may expose you to dangerous
voltages or other risks. Incorrect
reassembly can cause electric shock
when the appliance is subsequently
used.
12. Unplug this product from the wall
outlet and refer servicing to qualified
service personnel under the following
conditions:
US
2
Page 3

A. When the power cord or plug is
damaged or frayed.
B. If liquid has been spilled into the
product.
C. If the product has been exposed to
rain or water.
D. If the product does not operate
normally by following the operating
instructions. Adjust only those
controls that are covered by the
operating instructions because
improper adjustment of other controls
may result in damage and will often
require extensive work by a qualified
technician to restore the product to
normal operation.
E. If the product has been dropped or
the cabinet has been damaged.
F. If the product exhibits a distinct
change in performance.
13. Avoid using a telephone (other than
a cordless type) during an electrical
storm. There may be a remote risk of
electric shock from lightning.
14. Do not use the telephone to report a
gas leak in the vicinity of the leak.
SA VE THESE
INSTRUCTIONS
CAUTION:
To reduce the risk of fire or injury to persons by
battery, read and follow these instructions.
1. Use only the following type and size battery:
6F22/6LR61 9V.
2. Do not dispose of the battery pack in a fire.
The cell may explode. Check with local codes
for possible special disposal instructions.
3. Do not open or mutilate the battery pack.
Released electrolyte is corrosive and may
cause damage to the eyes or skin. It may be
toxic if swallowed.
4. Exercise care in handling battery pack in
order not to short the battery with conducting
materials such as rings, bracelets, and keys.
The battery or conductor may overheat and
cause burns.
5. Do not attempt to recharge the batteries
provided with or identified for use with this
product. The batteries may leak corrosive
electrolyte or explode.
6. Do not attempt to rejuvenate the batteries
provided with or identified for use with this
product by heating them. Sudden release of
the battery electrolyte may occur causing
burns or irritation to the eyes or skin.
7. Remove the batteries from this product if the
product will not be used for a long period of
time (several months or more) since during
this time the battery could leak in the product.
8. Discard “dead” batteries as soon as possible
since “dead” batteries are more likely to leak
in a product.
9. Do not store this product, or the batteries
provided with or identified for use with this
product, in high-temperature areas. Batteries
that are stored in a freezer or refrigerator for
the purpose of extending shelf life should be
protected from condensation during storage
and defrosting. Batteries should be stabilized
at room temperature prior to use after cold
storage.
INFORMATION FOR
GENERAL TELEPHONES
1. This equipment complies with Part 68 of the
FCC rules. On the bottom of this equipment
is a label that contains, among other
information, the FCC registration number and
ringer equivalence number (REN) for this
equipment. If requested, this information
must be provided to the telephone company.
2. The applicable registration jacks (connectors)
USOC-RJ11C/RJ14C are used for this
equipment.
3. This equipment is designed to be connected to
the telephone network or premises wiring
using a compatible modular jack which is Part
68 compliant.
The FCC compliant telephone cord and
modular plug is provided with this
equipment.
4. The REN is used to determine the quantity of
devices which may be connected to the
telephone line. Excessive RENs on the
telephone line may result in the devices not
ringing in response to an incoming call. In
most, but not all areas, the sum of the RENs
should not exceed five (5.0).To be certain of
the number of devices that may be connected
to a line, as determined by the total RENs,
contact the local telephone company.
USUS
US
3
Page 4

5. If your equipment (IT-M704) causes harm to
the telephone network, the telephone
company will notify you in advance that
temporary discontinuance of service may be
required. But if advance notice isn’t practical,
the telephone company will notify the
customer as soon as possible. Also, you will
be advised of your right to file a complaint
with the FCC if you believe it is necessary.
6. The telephone company may make changes in
its facilities, equipment, operations or
procedures that could affect the operation of
the equipment. If this happens the telephone
company will provide advance notice in order
for you to make necessary modifications to
maintain uninterrupted service.
7. If trouble is experienced with this equipment
(IT-M704), for repair or warranty information,
please contact Sony Direct Response Center:
Tel 1-800-222-7669. If the equipment is
causing harm to the telephone network, the
telephone company may request that you
disconnect the equipment until the problem is
resolved.
8. All repairs will be performed in an authorized
Sony service station.
9. This equipment cannot be used to party lines
or coin lines.
10.This equipment is hearing aid compatible.
If your telephone is equipped
with automatic dialers
When programming emergency numbers and
(or) making test calls to emergency numbers:
1. Remain on the line and briefly explain to
the dispatcher the reason for the call.
2. Perform such activities in the off-peak
hours, such as early morning or late
evenings.
Note
This equipment has been tested and found to
comply with the limits for a Class B digital
device, pursuant to Part 15 of the FCC Rules.
These limits are designed to provide reasonable
protection against harmful interference in a
residential installation. This equipment
generates, uses and can radiate radio frequency
energy and, if not installed and used in
accordance with the instructions, may cause
harmful interference to radio communications.
However, there is no guarantee that interference
will not occur in a particular installation. If this
equipment does cause harmful interference to
radio or television reception, which can be
determined by turning the equipment off and
on, the user is encouraged to try to correct the
interference by one or more of the following
measures:
– Reorient or relocate the receiving antenna.
– Increase the separation between the
equipment and receiver.
– Connect the equipment into an outlet on a
circuit different from that to which the
receiver is connected.
– Consult the dealer or an experienced radio/
TV technician for help.
Caution
You are cautioned that any changes or
modifications not expressly approved in this
manual could void your authority to operate this
equipment.
US
4
Page 5

Table of contents
Getting Started
6 Read this first
7 Step 1: Checking the package
contents
8 Step 2: Setting up the phone
17 Step 3: Setting the day and time
19 Step 4: Changing the display
language
20 Identifying the parts
22 Lamp indications
Basics
23 Making calls
26 Redialing
27 Making another call while
talking
28 Receiving calls
30 Receiving a call while talking
Telephone Features
31 One-touch dialing
31 Storing phone numbers
33 Erasing a stored phone
number
33 Making calls with one-touch
dialing
34 Having a three-way conference
call
34 Making another call while
talking
35 Receiving a call while talking
36 Using visual message waiting
service
Intercom Operation
37
Talking between the phones
(Intercom)
39
Voice paging (PAGE)
40
Paging all phones (ALL PAGE)
41
Ha
ving an intercom conference
call
42 Transferring a call
43 To transfer during an
intercom call
43 To transfer during a page
43 To transfer during an all
page
Additional Information
44 Mounting the phone on a wall
45 Using the phone during a power
failure
46 Maintenance
47 Troubleshooting
49 Specifications
50 Index
Back cover LIMITED WARRANTY
US
Table of contents
US
5
Page 6
Getting Started
Read this first
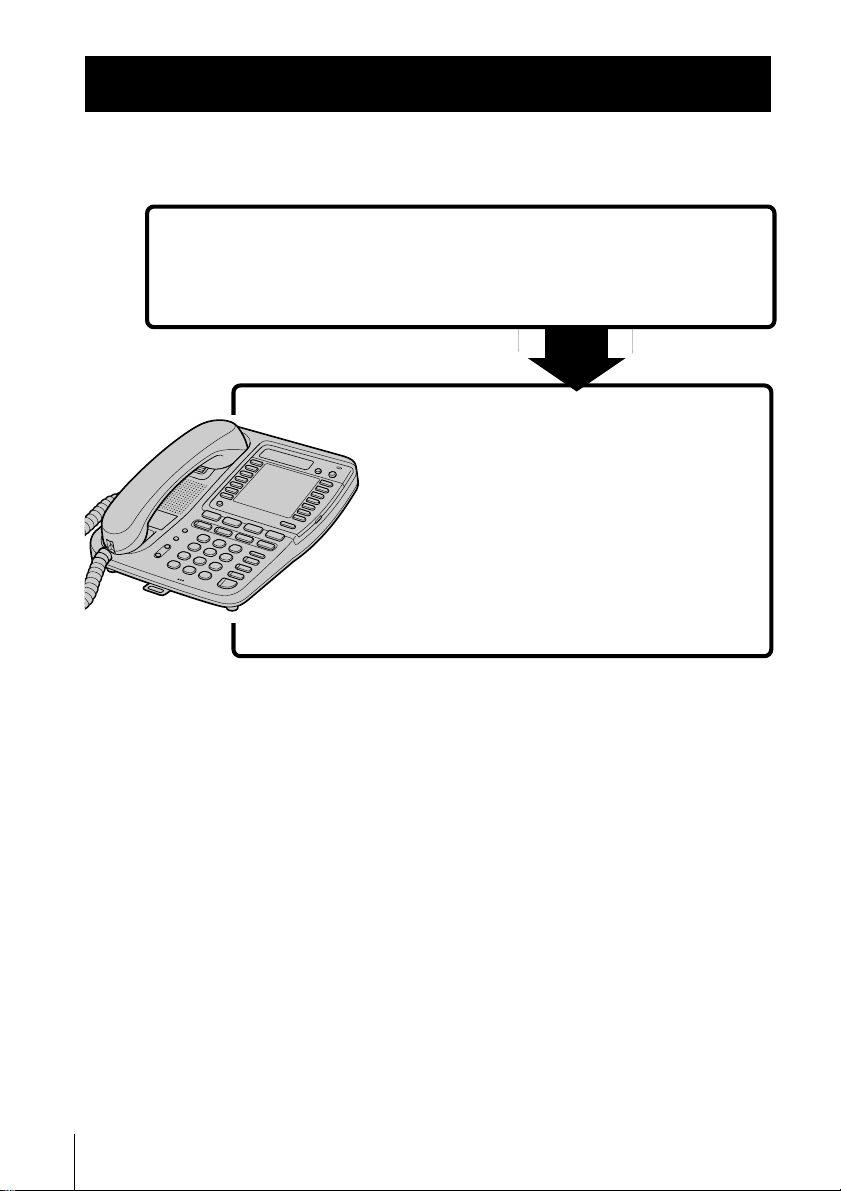
Before you use your phone, you must first set it up. Here’s a quick way
to set up your phone: Steps 1 and 2.
Step 1 (page 7)
First, unpack the phone and the supplied
accessories.
Step 2 (pages 8 to 16)
Next, you need to do four things to set
up the phone, including finding the best
location for the phone.
That’s it!
US
Getting Started
6
For the date and time setting, follow the procedure in
“Step 3 Setting the day and time” on page 17.
For changing the display language, follow the procedure
in “Step 4 Changing the display language” on page 19.
Page 7

Step 1
Step 1
Checking the package contents
Make sure you have received the following items in the package. If
anything is missing, contact your local Sony dealer.
PhoneAC power adaptor (AC-T71) Handset
Getting Started
Handset cord
Wall bracket/stand for phone
Telephone line cords (3)
Quick sheet
Pads (4)
Assignment of
using line sticker
Getting Started
US
7
Page 8
Step 2
Setting up the phone
Do the following steps:
• Connect the phone
• Assigning station number
• Choose the dialing mode
• Enabling/disabling the line
Note on installation
Install the unit:
• on a level surface
• away from heat sources, such as radiators, airducts, and sunlight
• away from excessive moisture, extremely low temperatures, dust, mechanical
vibration, or shock
Connect the phone
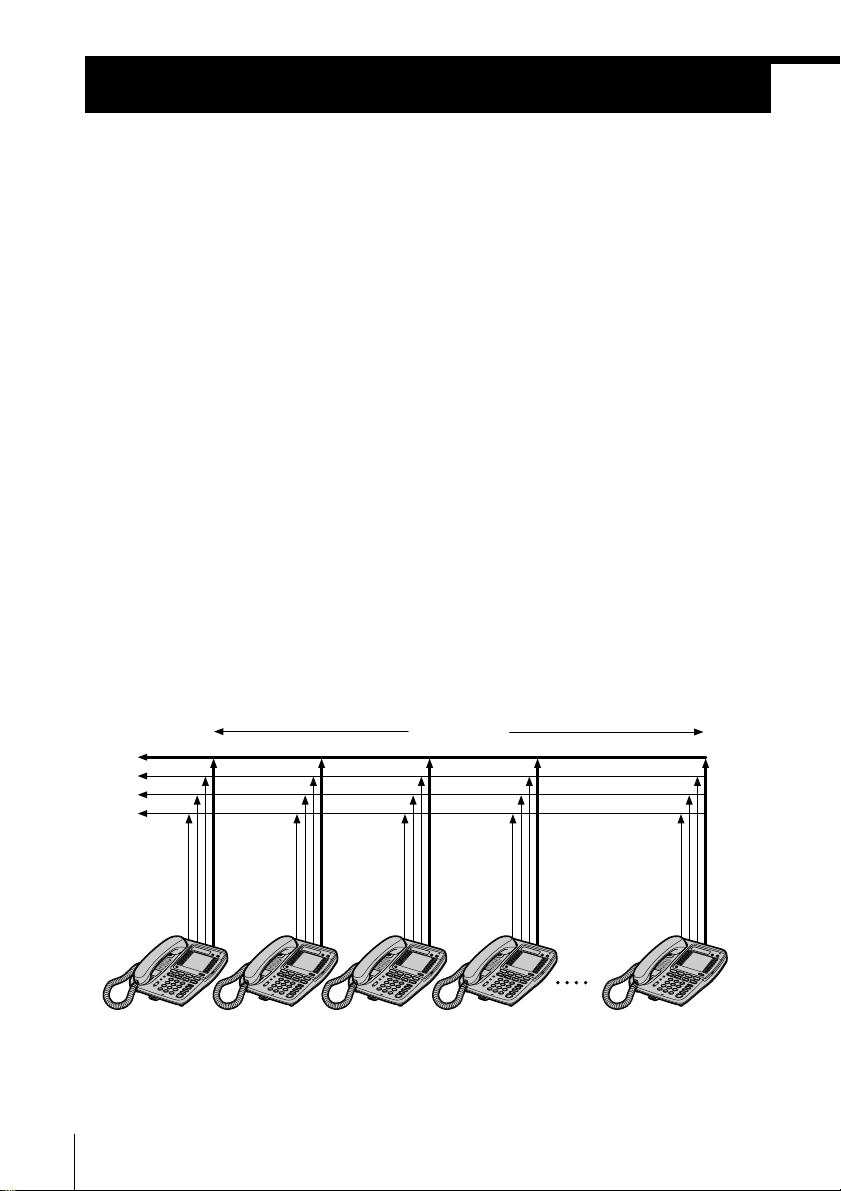
You can connect a maximum of 16 phones (IT-M704 or IT-M804) to use
your phone as an intercom phone, in addition to using as the 4-line
telephone.
To use the intercom features, you must connect all phones
(IT-M704 or IT-M804) to the LINE 1 jack correctly.
If you set the dialing mode and date and time on this phone after
connecting other phones, these settings will be set automatically to
every phone.
If you want to hang the phone on the wall, mount the phone first (see
page 44).
300 feet
L1
L2
L3
L4
TEL-1 TEL-2 TEL-3 TEL-4 TEL-16
Note
If the each line is not connected correctly, you cannot use the functions of this
phone.
US
Getting Started
8
Page 9
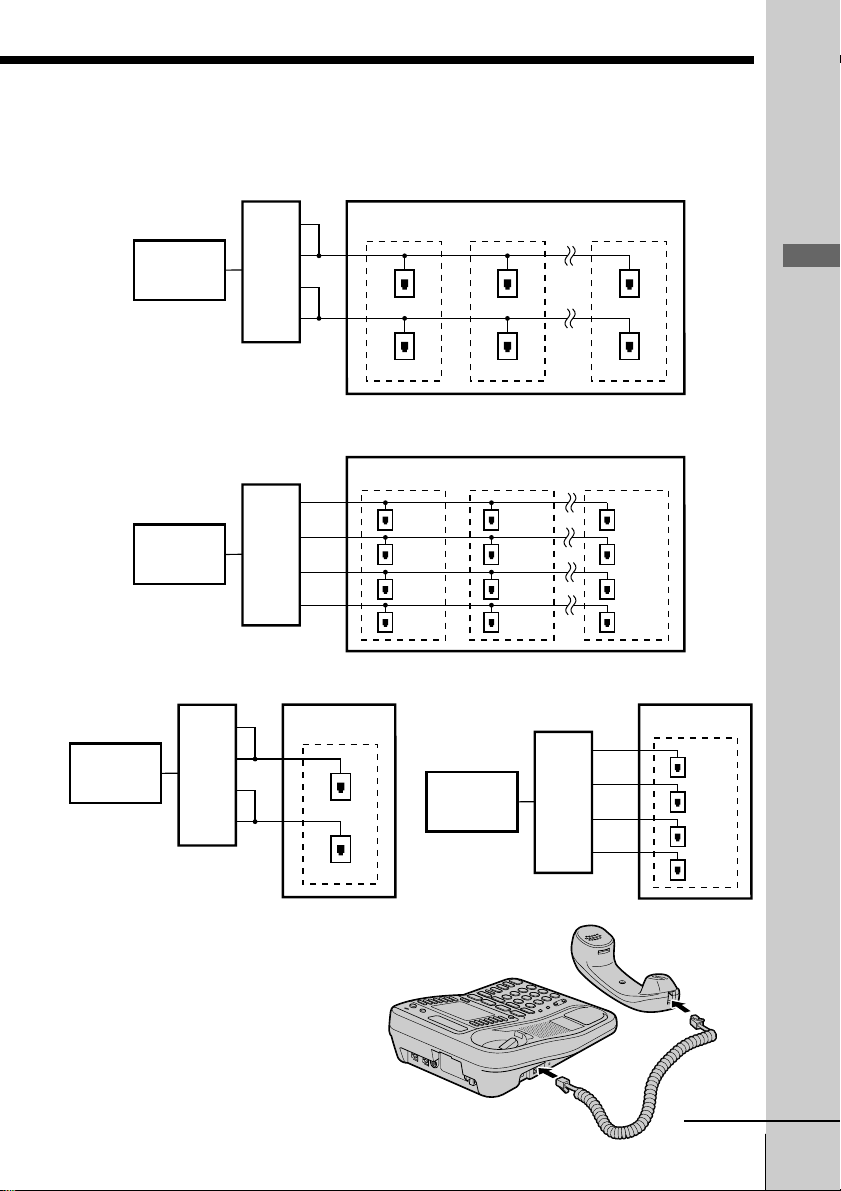
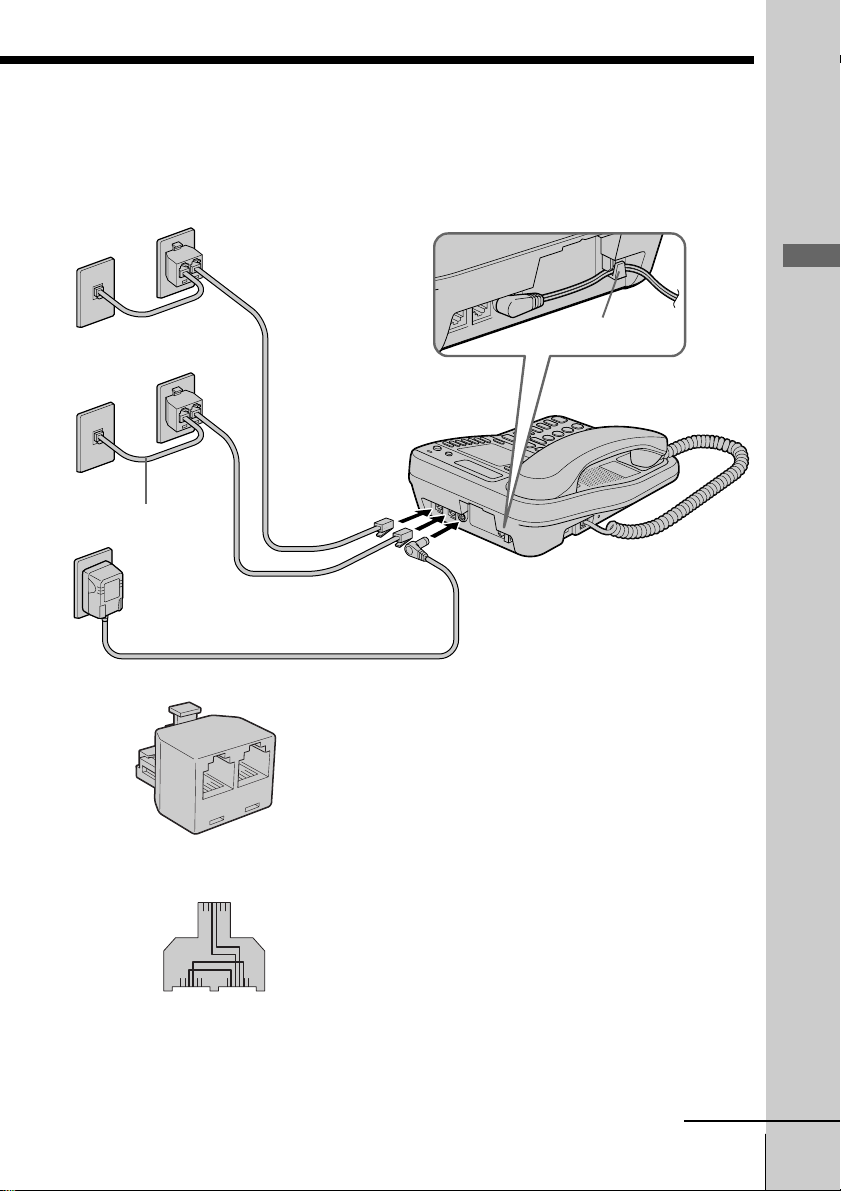
The connection method differs according to the conditions of indoor wiring.
[Wiring 1]
Conduct connections follow the procedure in “To connect the phone to two outlets having two
lines” on page 10.
To a telephone To a telephone To a telephone
Line1, 2
Line1, 2
Line1, 2
Telephone
Office
Line1
Line2
Line3
Line4
Getting Started
Line3, 4
Line3, 4
Line3, 4
[Wiring 2]
Conduct connections follow the procedure in “To connect the phone to four separate outlets” on
page 11.
Telephone
Office
Line1
Line2
Line3
Line4
To a telephone
Line1
Line2
Line3
Line4
To a telephone
Line1
Line2
Line3
Line4
To a telephone
Line1
Line2
Line3
Line4
[Wiring 3, 4]
When there is only one outlet for one telephone, wiring work is necessary.
To a telephone
Line1
Line2
Line3
Line4
Telephone
Office
Line1
Line2
Line3
Line4
To a telephone
Line1, 2
Line3, 4
Telephone
Office
Line1
Line2
Line3
Line4
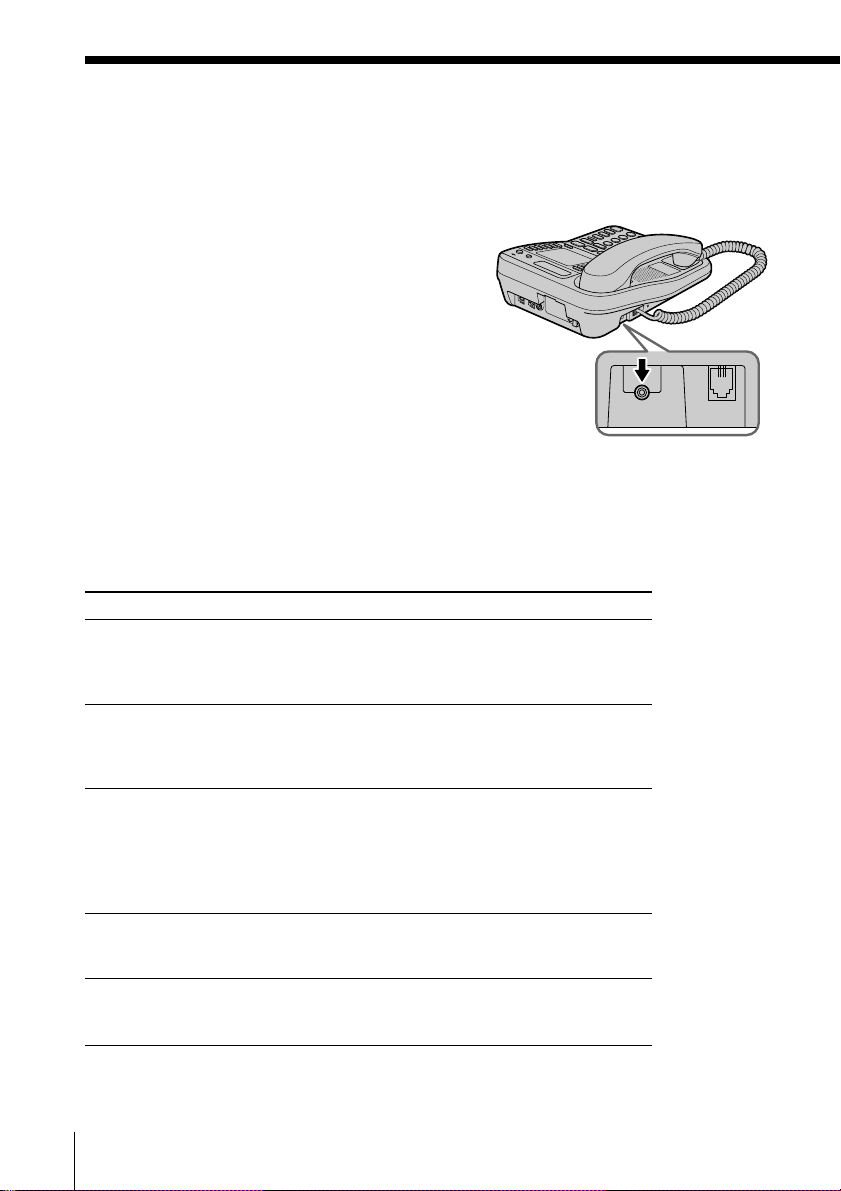
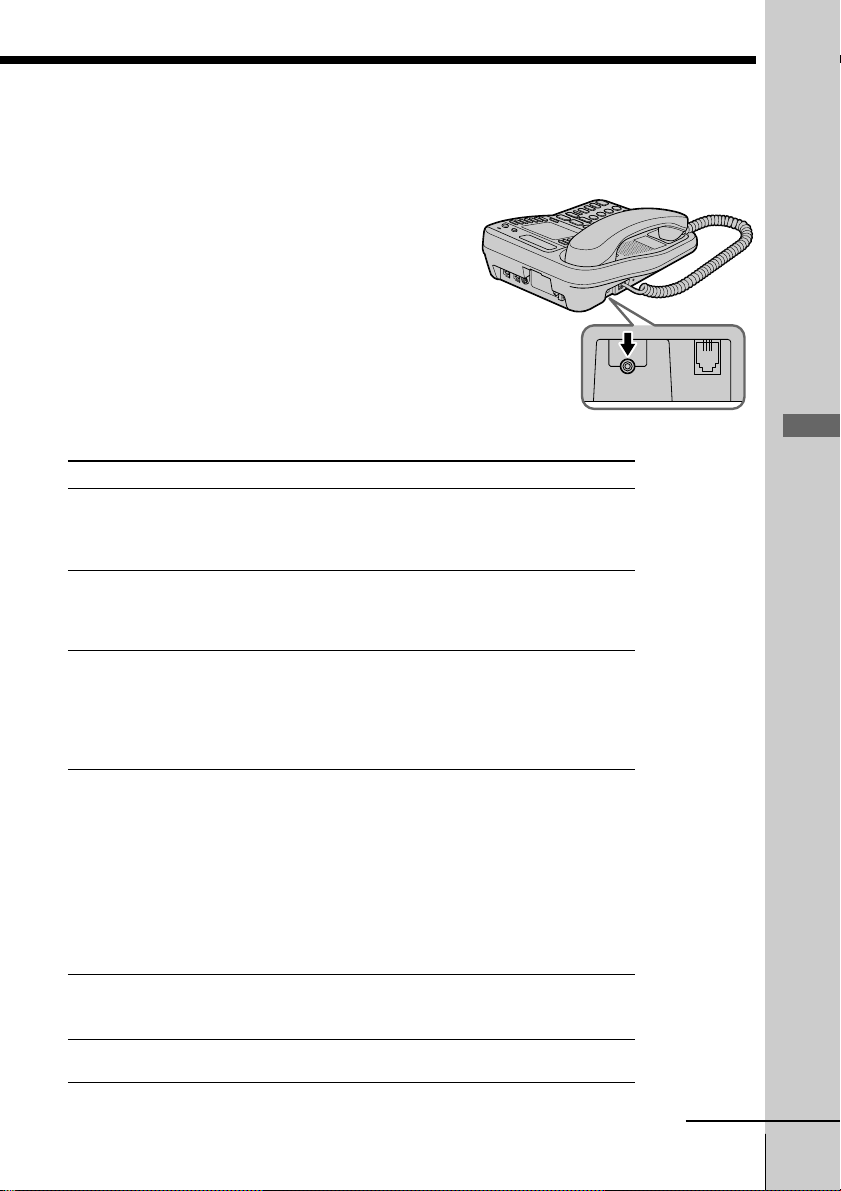
To connect the handset
Connect one end of the handset cord to
the handset and the other end to the
HANDSET jack on the phone.
To HANDSET jack
continued
Getting Started
US
9
Page 10
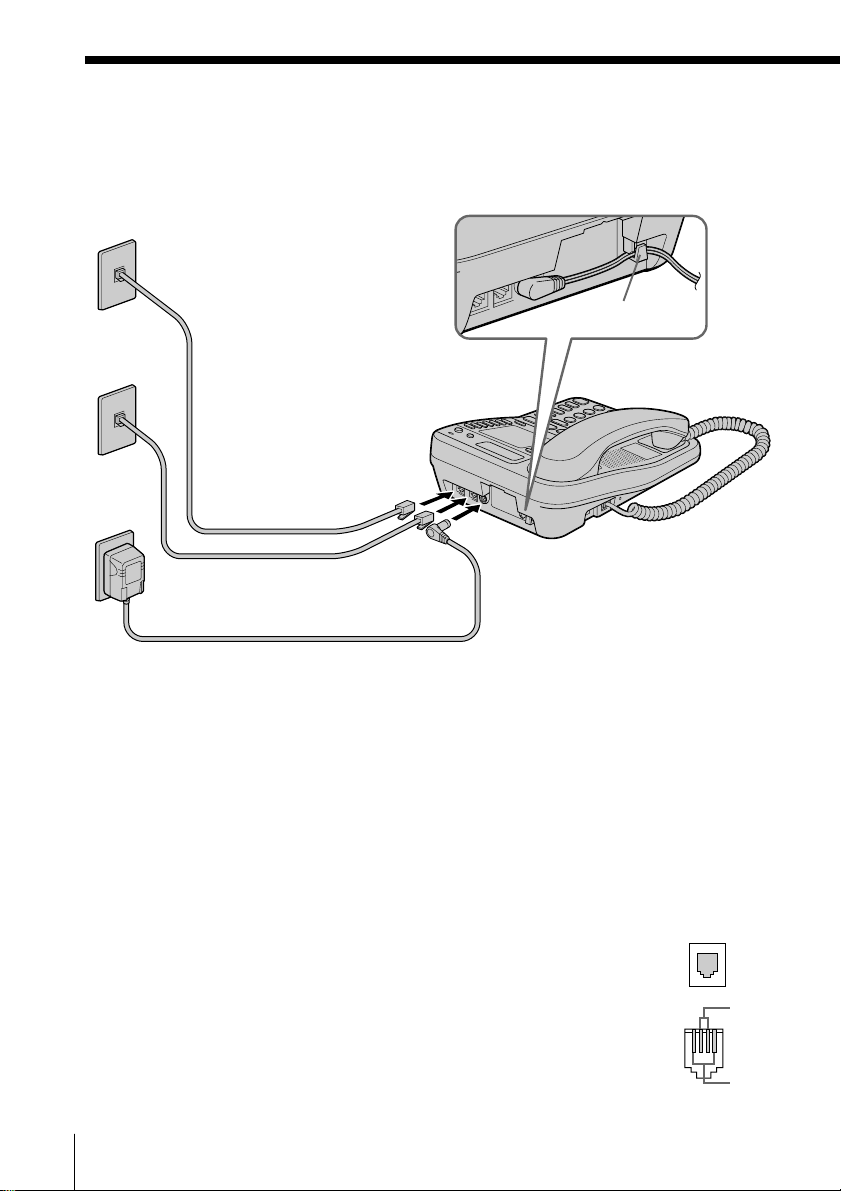
Step 2: Setting up the phone (continued)
To connect the phone to two outlets having two lines
To the telephone outlets
Line 1, 2
Line 3, 4
To an AC outlet
1
Telephone line
cords (supplied)
2
AC power adaptor
(supplied AC-T71)
Hook the cord.
To “LINE 1/
LINE 1+2”
To DC IN 12V
To “LINE 3/
LINE 3+4”
1 Connect the telephone line cords to the “LINE
1/LINE 1+2” and “LINE 3/LINE 3+4” jacks
and to the telephone outlets.
2 Connect the AC power adaptor to the DC IN
12V jack and to an AC outlet.
Tips
• If your telephone outlet is not modular, contact your telephone service
company for assistance.
• L1 is the first phone line connected to center pair of wires. L2 is the second
phone line connected to outer pair of wires.
US
Getting Started
10
Modular
L1
L2
Page 11
To connect the phone to four separate outlets
If you have single line outlet, you need two Two-Line adaptors (not
supplied) to connect the phone to the four separate outlets.
To the telephone outlets
1
Two-Line adaptors
(not supplied)
Getting Started
Line 2
Line 1
Line 3
Line 4
Telephone line
cord (not supplied)
4
AC power adaptor
(supplied AC-T71)
To an AC outlet
Two-Line adaptor
LINE 2 PHONE
LINE 1
Hook the cord.
2, 3
Telephone line
cords (supplied)
To “LINE 1/
LINE 1+2”
To DC IN 12V
To “LINE 3/
LINE 3+4”
1 Connect the Two-Line adaptors to
the line 1 and line 3 outlets.
2 Connect the telephone line cords to
the “LINE 1/LINE 1+2” and “LINE
3/LINE 3+4” jacks and to the TwoLine adaptors.
3 Connect the telephone line cords to
the Two-Line adaptors and to the
line 2 and line 4 outlets.
LINE 2 PHONE
Two-Line adaptor
interconnection
Note
The Duplex Jack adaptor cannot be used as the adaptor, which is used in step1.
4 Connect the AC power adaptor to
the DC IN 12V jack and to an AC
outlet.
continued
Getting Started
11
US
Page 12
Step 2: Setting up the phone (continued)
LINE SELECTDATA
L2 L3 L4
DATA LINE SELECTDATA
L2 L3 L4
Notes
• Conduct connections instructed on page 10 or 11 first, when
inserting battery for backup (not supplied) in case for a power
failure. If “POWER FAILURE” remains displayed when you
connect the AC power adaptor to an AC outlet for the first
time, remove the battery from the phone and unplug the AC
power adaptor, then plug it into an AC outlet.
• Use only the supplied AC-T71 AC power adaptor. Do not use
any other AC power adaptor.
• Connect the AC power adaptor to a continuous power
supply.
• Place the phone close to the AC outlet so that you can unplug
the AC power adaptor easily.
Tips
• Phones other than the IT-M704 and IT-M804 phones cannot be
connected to LINE 1 jack.
• Connection and utilization of Private Branch Exchange (PBX)
is not possible.
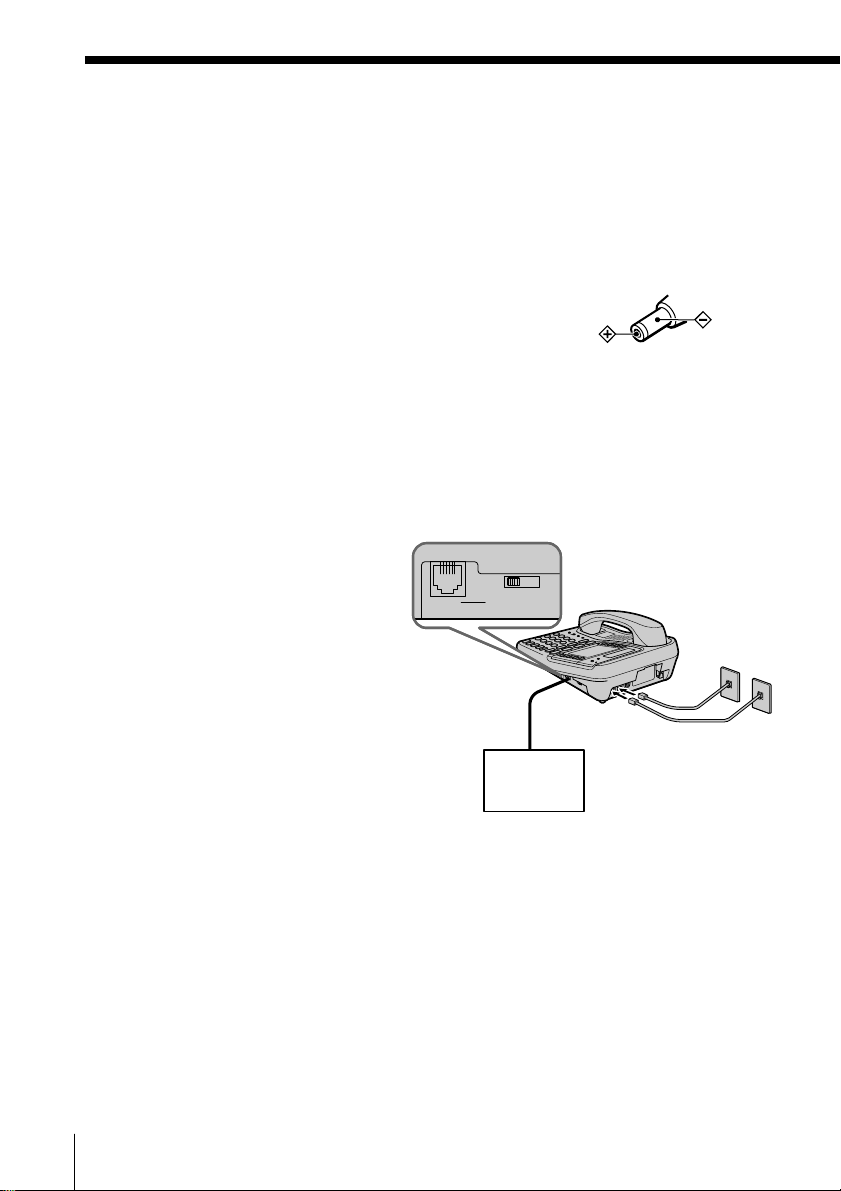
Connecting a computer or FAX
You can connect a computer or FAX, etc. to
the DATA jack.
For the line to be used for data
communication, select L2, L3 or L4 using
the DATA LINE SELECT switch.
Notes
• “LINE 2”, “LINE 3” or “LINE 4” is used for
receiving or sending computer or FAX data in
addition to making or receiving calls.
If a call comes in on the line selected with the
“call waiting” service while a computer or
FAX connected to the “DATA” jack is
receiving or sending data, that data may be
effected.
If you have data communication frequently,
we recommend that you and your callers use
the line selected for data communication only.
• Connection to ADSL devices is not possible.
• Noise may occasionally be heard on other
lines during data communication depending
on the condition of the indoor wiring.
To “DATA”
Computer
FAX
Polarity of the plug
To “LINE 1/LINE 1+2”
and “LINE 3/LINE 3+4”
or
12
US
Getting Started
Page 13
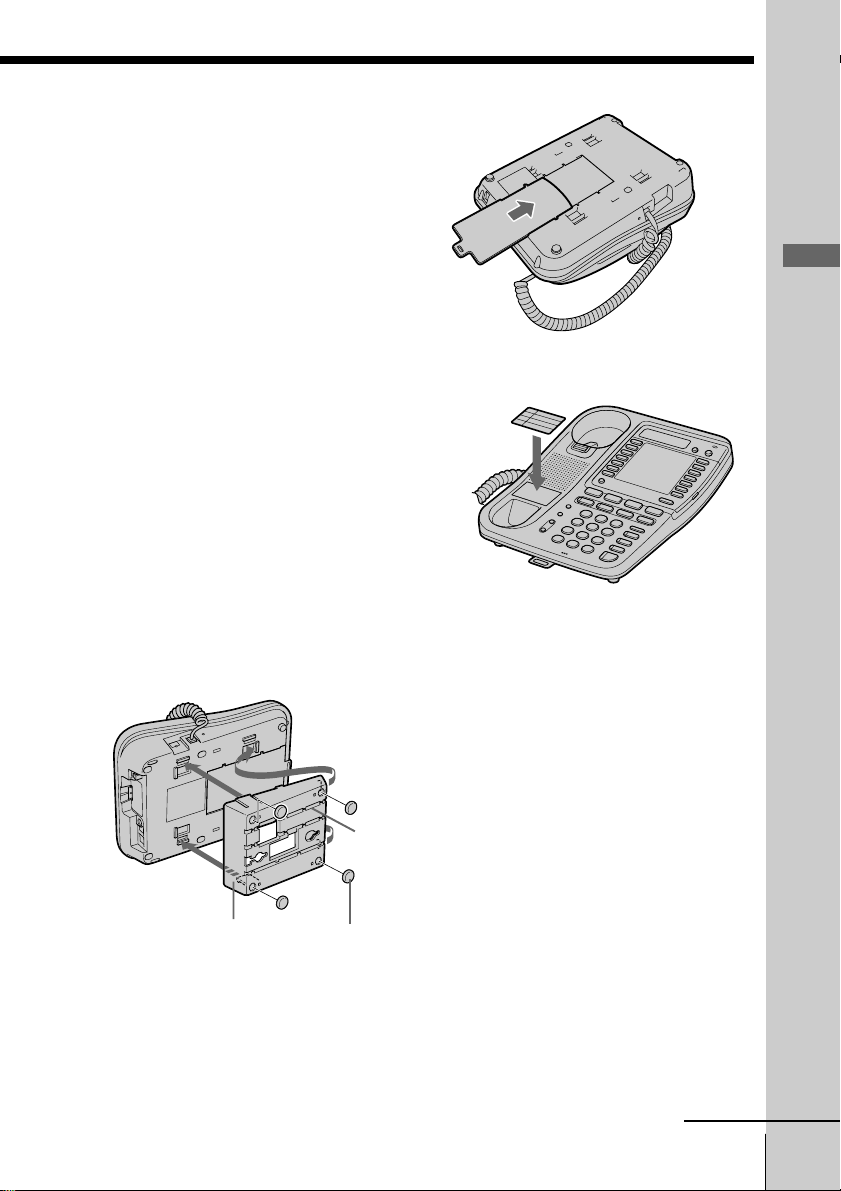
To attach the quick sheet
Attach the supplied quick sheet on the bottom of
the phone.
To attach assignment of using line sticker
Attach the supplied assignment of using line
sticker under the speaker of the phone.
To tilt the phone
If you want to tilt the phone, attach the supplied wall bracket on the
bottom of the phone.
Getting Started
Wall bracket
2
Pad
groove
1
1 Put the four pads into the
hollows of the wall bracket.
2 Attach the wall bracket to the
telephone.
3 Connect the telephone line
cords and AC power adaptor by
following the procedure on
page 10 or 11.
continued
Getting Started
13
US
Page 14

Step 2: Setting up the phone (continued)
Assigning station number
Ensure to connect all phones (IT-M704 or IT-M804) to LINE 1 jack
correctly, and then assign the station number to all phones. To confirm
the assigned station number is set correctly, make an intercom call one
another. See “Talking between the phones” on page 37.
1 Press (PROGRAM).
2 Press b(*) or (#)B until
“STATION #” appears on the
display.
3 Press (PROGRAM).
STATION #=??
4 Enter the two digits station
number (01 to 16) by pressing
the dialing keys.
5 Press (PROGRAM).
You will hear a long
confirmation beep.
Note
If the number already used for other phone or a number except for 01 to 16 is
entered in step 4, “INVALID NUMBER” will be displayed. Enter the different
number.
US
Getting Started
14
Page 15
Choose the dialing mode
For the telephone to work properly, select an appropriate dialing
mode (tone or pulse).
When other phones (IT-M704 or IT-M804) are connected to the LINE 1
jack, the same dialing mode is automatically set to all the phones. Be
sure to connect the phones beforehand, and set the dialing mode.
1 Press (PROGRAM).
2 Press b(*) or (#)B until
“DIAL MODE” appears on the
display.
3 Press (PROGRAM).
TONE PULSE
4 Press b(*) or (#)B to choose
the dialing mode (“TONE” or
“PULSE”), and then press
(PROGRAM).
You will hear a long
confirmation beep.
Getting Started
Notes
• Do not allow more than 20 seconds to elapse between each step of the
procedure.
• The dialing mode cannot be set for every line.
If you aren’t sure of your dialing system
Make a trial call with the dialing mode set to “TONE”.
If the call connects, leave the setting as is; otherwise, set to “PULSE”.
continued
Getting Started
15
US
Page 16

Step 2: Setting up the phone (continued)
Enabling/disabling the line
When you may not use all four lines, you need to disable the unused
line for the telephone to work properly.
This setting can be set up at each phone separately.
1 Press (PROGRAM).
2 Press b(*) or (#)B until
“DISABLE LINE” appears on
the display.
Note
You cannot disable the line 1.
(ERASE/CLEAR)
3 Press (PROGRAM).
LINE2
4 Press b(*) or (#)B to choose
the line you want to change, and
then press (PROGRAM).
ENABLE DISABLE
5 Press b(*) or (#)B to choose
“ENABLE” or “DISABLE”, and
then press (PROGRAM).
The line next to the selected line
will flash and you will hear a
long confirmation beep.
Repeat steps 4 and 5 for other
line setting, if necessary.
To end the setting, press
(ERASE/CLEAR).
16
US
Getting Started
Page 17

Step 3
Step 3
Setting the day and time
When other phones (IT-M704 or IT-M804) are connected to the LINE 1
jack, the day and time is automatically set to all the phones. Be sure to
connect the phones beforehand, and set the day and time.
1 Press (PROGRAM).
2 Press b(*) or (#)B until
“DATE TIME” appears on the
display.
3 Press (PROGRAM).
MONTH=01
4 Enter the two digits for the
month (01 to 12 for January to
December) by pressing the
dialing keys.
Getting Started
5 Press (PROGRAM).
DAY=01
6 Enter the two digits for the day
(01 to 31) by pressing the dialing
keys.
continued
Getting Started
17
US
Page 18
Step 3: Setting the day and time (continued)
7 Press (PROGRAM).
8 Enter the two digits for the hour (01 to 12) by
pressing the dialing keys.
The hour is on a 12-hour cycle.
9 Press (PROGRAM).
10Enter the two digits for the minute (00 to 59)
by pressing the dialing keys.
11Press (PROGRAM).
HOUR=01
MINUTE=01
AM PM
12Press b(*) or (#)B to choose “AM” or
“PM”, and then press (PROGRAM).
You will hear a long confirmation beep.
Note
Do not allow more than 20 seconds to elapse between each step of the
procedure in steps 1 to 11 and 60 seconds in step 12.
US
Getting Started
18
Page 19
Step 4
Changing the display language
You can choose English or Spanish as the display language by
following the procedure below.
1 Press (PROGRAM).
2 Press b(*) or (#)B until
“LANGUAGE” appears on the
display.
Display “IDIOMA” when you
want to change the display
language from Spanish to
English.
3 Press (PROGRAM).
The currently selected language
flashes.
ENGLISH ESPA OL
4 Press b(*) or (#)B to change
the display language, and then
press (PROGRAM).
You will hear a long
confirmation beep.
Getting Started
Note
Do not allow more than 20 seconds to elapse between each step of the
procedure.
Getting Started
19
US
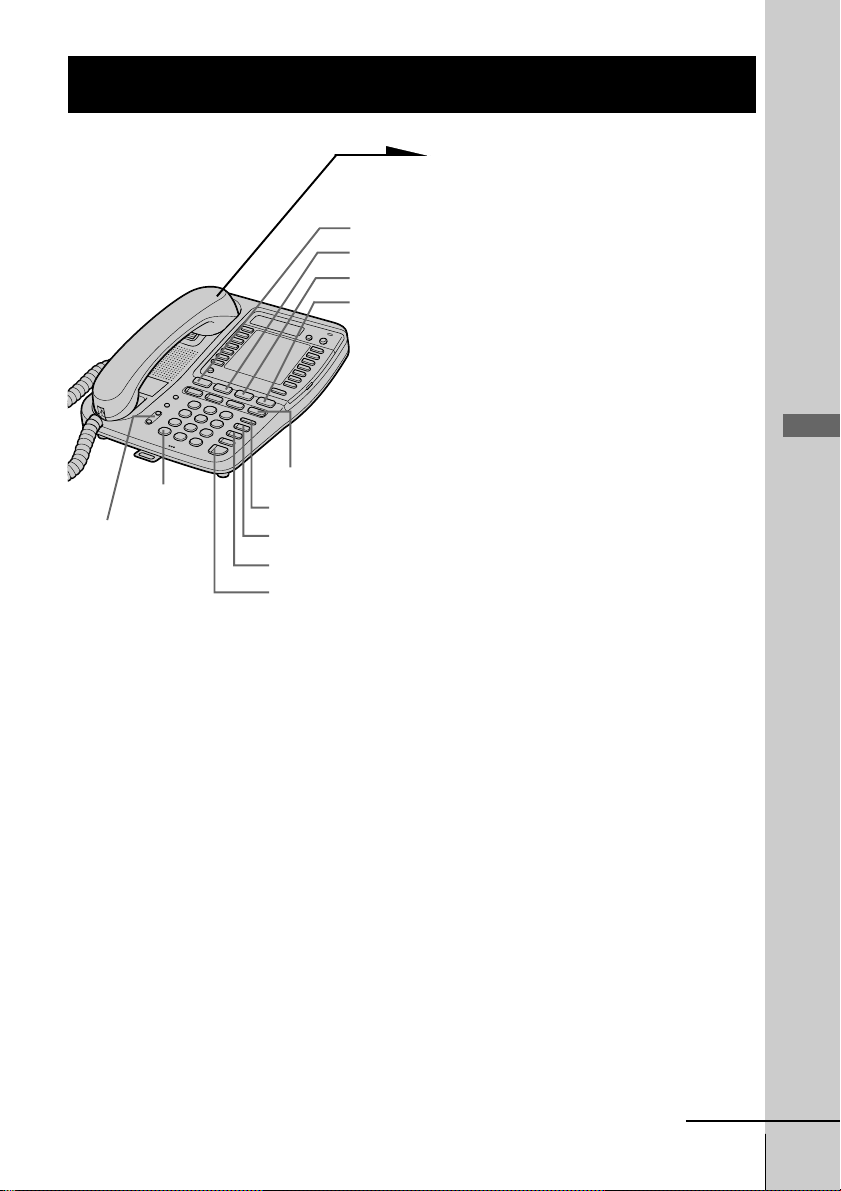
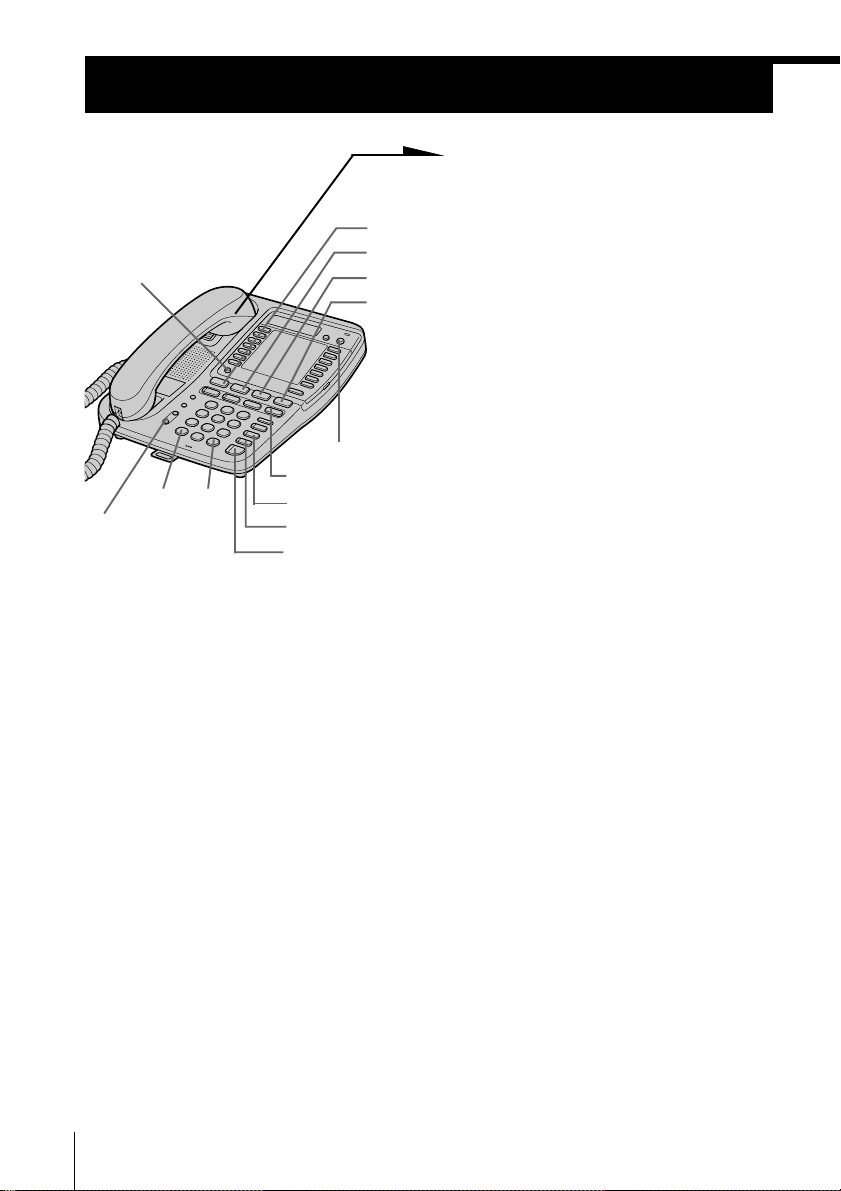
Page 20
Identifying the parts
Refer to the pages indicated in parentheses for details.
1
2
3
4
5
6
7
8
9
q;
qa
qs
qd
qf
qg
qh
qj
qk
ql
w;
wa
ws
wd
wf
wg
1 Display window
2 One-touch dial buttons (p. 31)
Used to store numbers on the onetouch dial.
3 Speaker
4 Handset (p. 9, 23, 28)
5 PROGRAM button
(p. 14, 31)
Used to access the menu.
6 LINE buttons (1, 2, 3, 4)
(p. 23, 28)
Lets you make or receive a call.
7 INTERCOM button (p. 37, 42)
Used to make an intercom call.
8 ALL PAGE button (p. 40)
Used to page all phones through
the speakerphone.
9 CONF (conference) button
(p. 34, 41)
Lets you talk with two parties at the
same time.
US
Getting Started
20
q; PAGE button (p. 39)
Used to page the other phone.
qa VOLUME +/- button (p. 24, 29)
qs TONE b button (p. 24)
Allows you to switch temporarily to
tone dialing.
qd MIC (microphone)
qf Dialing keys (p. 23)
qg # B button (p. 14)
qh ERASE/CLEAR button (p. 33, 36)
Used to erase a stored one-touch
dialing memory, end the operation
during the procedure.
qj FLASH button (p. 29)
Switches to a second call if you
have “call waiting” service, or lets
you make a new call.
qk LOWER button (p. 31)
Used to store numbers in the
second memory of a one-touch dial
button.
Page 21

L2 L3 L4
wh
wlwk
DATA LINE SELECTDATA
e;ea es
wj
Getting Started
ed
ef
eg
ql HOLD button (p. 24, 29)
Puts a call on hold.
w; TRANSFER button (p. 42)
Used to transfer a call.
wa REDIAL/PAUSE button (p. 26)
Redials the last number called,
inserts a pause in the dialing
sequence.
ws BUSY REDIAL button (p. 27)
Redials the last number called
automatically when the line is busy.
wd MUTING button (p. 24, 29)
Mutes your voice during a
conversation.
wf DO NOT DISTURB button
(p. 30)
Used to turn off the call ringing and
voice from the speaker.
wg SPEAKERPHONE (HEADSET)
button (p. 23, 24)
Used to make or receive a call
through the speakerphone or the
headset.
wh DATA jack (p. 12)
wj DATA LINE SELECT switch
(p. 12)
Used to select the line for data
communication.
wk LINE 1/LINE 1+2 jack (p. 10, 44)
wl LINE 3/LINE 3+4 jack (p. 10, 44)
e; DC IN 12V jack (p. 10)
ea Battery compartment (p. 45)
es Hook for AC power adaptor
cord (p. 10)
ed RESET button (p. 48)
ef HANDSET jack (p. 9)
eg I (HEADSET) jack (p. 24, 29)
continued
Getting Started
21
US
Page 22
Identifying the parts (continued)
Lamp indications
ek
el
r;
eh
ej
ra
rs
rd
rf
Lamp/button Lighting pattern Status
Lights up OFF
eh INTERCOM Lights up Calling extension from your phone or
Flashes Receiving an intercom call.
Flashes Other phone using extension.
ej CONF Lights up This function is activated.
ek MESSAGES Flashes There are voice mail messages.
conversation available.
el LOWER Lights up Selecting the second memory of the
r; LINE 1 to 4 Lights up You are using this line.
Flashes Receiving a call.
Flashes Call being held on your phone line or
Flashes Call being held on other phone line.
Flashes Receiving a transferred call.
Flashes Line is used by other phone.
ra BUSY REDIAL Lights up This function is activated.
rs MUTING Lights up This function is activated.
rd DO NOT DISTURB Lights up This function is activated.
rf SPEAKERPHONE Lights up Talking through the speakerphone or
(HEADSET) headset, paging or busy redialing.
US
Getting Started
22
one-touch dial button.
transferred call being made.
Page 23
Basics
Making calls
TONE b(*)
(VOLUME)
(LINE 1)
(LINE 2)
(LINE 3)
(LINE 4)
(HOLD)
(REDIAL/PAUSE)
(BUSY REDIAL)
(MUTING)
(SPEAKERPHONE)
1 Pick up the handset (or press
(SPEAKERPHONE)).
“=== TALK ===” appears on
the display, and then the
operation duration in hours,
minutes and seconds is
displayed.
The connected line button lights
up.
When you want to select the line
beforehand, press (LINE 1),
(LINE 2), (LINE 3) or (LINE 4).
The corresponding line button
lights up.
2 Dial the phone number.
The phone number dialed
appears on the display.
Basics
3 When you’re done talking,
replace the handset in the cradle
(or press (SPEAKERPHONE)).
The disconnected line button
goes off.
Note
If there is a line put on hold, you cannot make a call by just picking up the
handset and pressing (SPEAKERPHONE) in step 1. Press a line button that is not
used first, and then dial the phone number.
Tip
If you pick up the handset during speakerphone conversation, it will change to
handset conversation, and conversely when you press (SPEAKERPHONE)
during handset conversation, it becomes speakerphone conversation.
continued
Basics
23
US
Page 24
Making calls (continued)
HANDSET
Making calls when the headset is connected
When the TL-HD1 headset (not supplied) is connected to the I
(HEADSET) jack, you can talk through the headset.
1 Press (SPEAKERPHONE) (HEADSET).
The SPEAKERPHONE lamp lights up.
2 Dial the phone number.
3 When you’re done talking, press
(SPEAKERPHONE) (HEADSET).
The SPEAKERPHONE lamp goes off.
Notes
• If the headset is not connected, you will make a call through the
speakerphone in step 1.
• If there is a line put on hold, you cannot make a call by just pressing
(SPEAKERPHONE) (HEADSET) in step 1. Press a line button that is not used
first, and then dial the phone number.
Additional tasks
To Do this
Adjust the handset or During phone conversation, press (VOLUME)
headset volume (+) or (--). Each press of (VOLUME)(+) or (--)
switches the handset or headset volume
between “HIGH”, “MID” (middle) and “LOW”.
Adjust the speaker volume During speakerphone conversation, press
(VOLUME)(+) or (--). Each press of
(VOLUME)(+) or (--) switches the speaker
volume by one of 16 levels.
Put a call on hold Press (HOLD). The line button on which a call is
put on hold will flash.
Press (LINE 1), (LINE 2), (LINE 3) or (LINE 4)
that is flashing to resume the conversation.
The corresponding line button can be pressed
on every phone.
Mute your voice Press (MUTING) to disable the microphone. The
MUTING lamp lights up. Press (MUTING) again
to cancel.
Switch to tone dialing Press TONE b(*) after you’re connected.
temporarily The line will remain in tone dialing until
disconnected.
I
24
US
Basics
Page 25

Notes
• When another extension connected to line is in use, the line button flashes .
• When another call comes in on the other line, the corresponding line button
flashes and two beeps are heard from the speaker, but the phone won’t ring.
(see page 30).
• If a call is put on hold for more than about three minutes, you will hear an
alarm.
Tips
• You can switch to speakerphone during conversation by pressing
(SPEAKERPHONE). Then you can replace the handset in the cradle.
To switch back to the handset, pick up the handset again.
• When you pick up the handset or press (SPEAKERPHONE), the vacant line is
automatically connected from line 1 to line 4. When neither line is in use, line
1 is connected.
To obtain the best speakerphone performance
• You may not be able to hear the other party’s voice in a noisy place.
Therefore, use the speakerphone in a quiet room.
• Do not bring your hand or other objects too close to the microphone
or you will hear a shrill noise (“feedback”).
• When the speaker volume is loud, or the telephone has been placed
close to a wall, you may find that the volume drops suddenly. This is
due to a circuit in the telephone designed to protect against
feedback. In such cases, lower the speaker volume slightly.
Basics
continued
Basics
25
US
Page 26

Making calls (continued)
Redialing
1 Pick up the handset (or press (SPEAKERPHONE)).
“=== TALK ===” appears on the display.
Press (LINE 1), (LINE 2), (LINE 3) or (LINE 4) to select the
line, if necessary.
The corresponding line button lights up.
2 Press (REDIAL/PAUSE) to redial the last number dialed.
The last number dialed appears on the display and is
automatically redialed.
Notes
• The last number dialed cannot be stored separately for each line. It is the very
last one you have dialed using any line.
• If the last number dialed exceeds 32 digits or if it is erased, the number
cannot be redialed.
Tip
When the redialed number exceeds 16 digits, the first 16 digits are displayed,
and then the remaining digits are displayed one by one while the displayed
numbers move from right to left across the display.
To check the last phone number dialed
When not making a call, press (REDIAL/PAUSE).
The number appears on the display for 20 seconds.
To dial the number, pick up the handset (or press (SPEAKERPHONE))
while the number is displayed.
Note
“NO DATA” will appear on the display if the last dialed number exceeds 32
digits or if it is erased.
To erase the last phone number dialed
While the phone is not in use, press (REDIAL/PAUSE) twice within 20
seconds.
The number will be erased from the memory.
US
Basics
26
Page 27

Busy redialing
If the other line you called is busy, the phone will automatically redial
the last number dialed up to 10 times every 30 seconds until the call is
connected.
When not making a call, press (BUSY REDIAL).
The BUSY REDIAL lamp, MUTING lamp, SPEAKERPHONE lamp
and selected line button light up and the last number dialed appears
on the display.
Notes
• Busy redialing is canceled when you press (BUSY REDIAL), or receive or
make a call during busy redialing.
• If the last number dialed exceeds 32 digits or if it is erased, the number
cannot be redialed.
Making another call while talking
Example: Making a call on line 2 while talking on line 1
1 Press (HOLD) while talking.
The line 1 is put on hold and the LINE 1 button flashes
slowly.
2 Press (LINE 2).
3 Dial a phone number for the second party.
Now you can talk to the second party on line 2.
To disconnect line 2, press (LINE 1).
Basics
Notes
• If you do not press (HOLD) in step 1, line 1 will be disconnected.
• If a call is put on hold for more than about three minutes, you will hear an
alarm.
To talk with two parties at the same time using two lines, see “Having
a three-way conference call” on page 34.
Basics
27
US
Page 28
Receiving calls
(PROGRAM)
(HOLD)
b(*)
(#)B
(VOLUME)
(MUTING)
(DO NOT DISTURB)
(SPEAKERPHONE)
(FLASH)
(LINE 1)
(LINE 2)
(LINE 3)
(LINE 4)
1 When you hear the phone ring;
• Pick up the handset from the
phone (or press
(SPEAKERPHONE)).
or
• Press (LINE 1), (LINE 2),
(LINE 3) or (LINE 4)
whichever button is flashing.
The SPEAKERPHONE lamp
lights up and you can talk
through the speakerphone. To
talk through the handset, pick
up it from the cradle.
The connected line button lights
up.
“=== TALK ===” appears on
the display and the display also
shows the operation duration in
hours, minutes and seconds.
2 When you’re done talking,
replace the handset in the cradle
(or press (SPEAKERPHONE)).
The disconnected line button
goes off.
When calls come in on two or more lines at the same time
Press (LINE 1), (LINE 2), (LINE 3) or (LINE 4) whichever button
is flashing.
To put a call on hold or disconnect the line, see “Receiving a
call while talking” on page 30.
US
Basics
28
Page 29
Receiving calls when the headset is connected
HANDSET
When the TL-HD1 headset (not supplied) is connected to the I
(HEADSET) jack, you can talk through the headset.
1 When you hear the phone ring, press
(SPEAKERPHONE) (HEADSET).
The SPEAKERPHONE lamp lights up.
2 When you’re done talking, press
(SPEAKERPHONE) (HEADSET).
The SPEAKERPHONE lamp goes off.
Note
If the headset is not connected, you will receive a call
through the speakerphone in step 1.
I
Additional tasks
To Do this
Adjust the handset or During phone conversation, press (VOLUME)
headset volume (+) or (--). Each press of (VOLUME)(+) or (--)
switches the handset or headset volume
between “HIGH”, “MID” (middle) and “LOW”.
Adjust the speaker volume During speakerphone conversation, press
(VOLUME)(+) or (--). Each press of
(VOLUME)(+) or (--) switches the speaker
volume by one of 16 levels.
Put a call on hold Press (HOLD). The line button on which a call is
put on hold will flash.
Press (LINE 1), (LINE 2), (LINE 3) or (LINE 4)
that is flashing to resume the conversation.
The corresponding line button can be pressed
on every phone.
Adjust the ringer volume Press (PROGRAM). Press b(*) or (#)B up
until “RING VOLUME” appears on the
display, and then press (PROGRAM). Press
b(*) or (#)B to choose “HIGH”, “MID”
(middle), “LOW” or “OFF”, and then press
(PROGRAM). You will hear (monitor) the phone
ring with the adjusted level. While the phone is
ringing, you can adjust the ringer volume by
pressing (VOLUME)(+) or (--), however, the
ringer volume cannot be set to “OFF”.
Mute your voice Press (MUTING) to disable the microphone. The
MUTING lamp lights up. Press (MUTING) again
to cancel.
Switch to another call on Press (FLASH).
(“call waiting” service*) Press (FLASH) again to return to the first caller.
* You need to subscribe to the service from your telephone company.
continuedcontinued
Basics
Basics
US
29
Page 30

Receiving calls (continued)
Notes
• When another phone connected to line is in use, the line button flashes
slowly.
• If a call is put on hold for more than about three minutes, you will hear an
alarm.
Using Do Not Disturb
You can turn off the outside call and intercom call ringing of all the
lines and voice from the speaker during a Page and an All Page using
this function. However, when a call comes in, “** RINGING **” will
be displayed even if this function is activated.
Making calls is available even if this function is activated.
While the phone is not in use or the phone is ringing, you can press
(DO NOT DISTURB).
The DO NOT DISTURB lamp lights up.
To cancel this function, press (DO NOT DISTURB) again.
Note
An outside call cannot be transferred to the phone with the “DO NOT
DISTURB” function activated.
Receiving a call while talking
If another call comes in while talking on the other line, the
corresponding line button will flash and two beeps will be heard from
the speaker.
Example: Receiving a call on line 2 while talking on line 1
1 Press (HOLD).
Line 1 is put on hold and the LINE 1 button flashes slowly.
2 Press (LINE 2).
Now you can talk to the other caller on line 2.
To disconnect line 2, press (LINE 1).
Note
If you do not press (HOLD) in step 1, line 1 will be disconnected.
To talk with two parties at the same time using both line 1 and line 2,
see “Having a three-way conference call” on page 34.
US
Basics
30
Page 31

Telephone Features
One-touch dialing
You can dial with a one-touch dial button by storing a phone number
to that button. Since two phone numbers can be stored in a one-touch
dial button, up to 28 phone numbers can be stored.
Storing phone numbers
1 Press (PROGRAM).
“ONE-TOUCH DIAL” appears
on the display.
2 Select the first memory or
second memory of the onetouch dial button by pressing
(LOWER).
b(*)
(ERASE/CLEAR)
(#)B
(SPEAKERPHONE)
When you store the phone
number in the first memory of a
one-touch dial button, make sure
that the LOWER button is not lit.
When you store the phone
number in the second memory
of a one-touch dial button, press
(LOWER) so that the LOWER
button lights up.
Telephone Features
3 Press one of the one-touch dial
buttons.
“ENTER NUMBER” appears on
the display.
continued
Telephone Features
31
US
Page 32

One-touch dialing (continued)
1234567
4 Enter the phone number by pressing the
dialing keys.
You can enter up to 20 digits, including a tone
and a pause, each of which is counted as one
digit.
5 Press (PROGRAM).
You will hear a long confirmation beep, and the
number is stored. The display goes off.
Note
Do not allow more than 20 seconds to elapse between each step of the
procedure.
Tips
• If you have entered a wrong number in step 4, press (ERASE/CLEAR), then
start from the beginning.
• You can store a flash only to the first digit.
To change a stored number
Store a new number, as described previously.
US
Telephone Features
32
Page 33

Erasing a stored phone number
1 Display the phone number you want to erase by
pressing the one-touch dial button.
2 Press (ERASE/CLEAR).
ERASE ? YES NO
3 Press b(*) or (#)B to choose “YES”, and then
press (PROGRAM).
You will hear a long confirmation beep and the
phone number is erased.
Making calls with one-touch dialing
1 Pick up the handset, or press (SPEAKERPHONE).
When you want to select the phone number stored in the
second memory of the one-touch dial button, press
(LOWER).
2 Press the desired one-touch dial button.
The phone number stored in the one-touch dial button will
be dialed.
To check the phone number before one-touch dialing
When not making a call, press the desired one-touch dial button. Each
time the button is pressed, the display shows the phone number, and
then the display goes off successively.
To check the phone number stored in the second memory of the onetouch dial button, first press (LOWER) and then press the one-touch
dial button.
The number stored in the button appears on the display for 20 seconds.
To dial the number, pick up the handset or press (SPEAKERPHONE)
while the number is displayed.
Telephone Features
Note
When there is no phone number stored to a one-touch dial button, “NO
DATA” appears on the display.
Tip
When the phone number of 17 digits or more has been entered, “–” is displayed
next to 15th digit and then the remaining digits are displayed after about 10
seconds.
Telephone Features
33
US
Page 34

Having a three-way conference call
You can talk on two lines at the same time.
Making another call while talking
You can talk with two parties at the same time using two lines. (Threeway conference)
1 Press (HOLD) while talking on
one line.
The line in use is put on hold.
2 Press (LINE 1), (LINE 2),
(LINE 3) or (LINE 4) whichever
button is not used.
(SPEAKERPHONE)
3 Dial a phone number for the
second party.
4 Press (CONF) (conference) after
you’re connected to the second
party.
The CONF lamp lights up. Now
you can talk to both parties.
When you want to return to a
normal outside call, press the
line button to continue the call.
Notes
• If you do not press (HOLD) in step 1, the first line will be disconnected.
• If three or four lines are connected or put on hold, “Three-way conference”
will not be available.
US
Telephone Features
34
Page 35

Receiving a call while talking
If another call comes in while talking, the line button on which another
call is coming will flash.
1 Press (HOLD).
The line in use is put on hold.
2 Press (LINE 1), (LINE 2), (LINE 3) or (LINE 4), in which
another call is coming.
3 Press (CONF).
Now you can talk to both parties. (Three-way conference)
Notes
• If you do not press (HOLD) in step 1, the first line will be disconnected.
• If three or four lines are connected or put on hold, “Three-way conference”
will not be available.
To disconnect the lines during a three-way conference
Example: During a three-way conference between line 1 and 2
To disconnect both lines at the same time, replace the handset in the
cradle.
If you talk through the speakerphone or headset, press
(SPEAKERPHONE) (HEADSET).
To disconnect line 1 and continue talking on line 2 only:
Press (LINE 2).
To disconnect line 2 and continue talking on line 1 only:
Press (LINE 1).
Telephone Features
To put the lines on hold during a three-way conference
Example: During a three-way conference between line 1 and 2
Press (HOLD). Both lines are put on hold.
To resume the conversations on both lines, press (CONF).
To resume the conversation only on one line, press (LINE 1) or
(LINE 2), for the line you want. The other line you did not select is kept
on hold.
Note
During a three-way conference, you cannot use the “call waiting” service.
Telephone Features
35
US
Page 36

Using visual message waiting service
If you subscribe to your telephone company’s message service which
includes this feature, the display will show that you have messages
waiting to be retrieved. This phone has a special stutter dial tone and
does not respond to FSK service.
(ERASE/CLEAR)
If you have messages
Example: When there are messages
on line 1.
“LINE 1” and “MESSAGES” appear
on the display of all phones
connected to LINE 1 jack and the
MESSAGES lamp of all phones
MESSAGES
lamp
flashes.
The display and the MESSAGES lamp
of all phones will go off when one
phone retrieves messages.
Note
You cannot use this feature, if you have not subscribed to your telephone
company’s message service.
For details on the availability of this service, please ask your telephone
company.
If the display and the MESSAGES lamp remain flashing
If the display and MESSAGES lamp do not go off (e.g. When you
retrieve your messages with other phones), you can go off the display
and MESSAGES lamp manually by pressing (ERASE/CLEAR).
Note
When there are messages on two or more lines, you can turn off the message
display and MESSAGES lamp on all the lines by pressing (ERASE/CLEAR).
However, the display and MESSAGES lamp on other connected phones are not
turned off.
US
Telephone Features
36
Page 37

Intercom Operation
Talking between the phones (Intercom)
You can converse with the other phone connected to the LINE 1 jack.
Example : Making an intercom call
from station number 02
to 03.
1 Pick up the handset.
2 Press (INTERCOM).
“INTERCOM ??” appears on
the display.
3 Enter the two digits station
number (01 to 16) by pressing
the dialing keys.
The phone makes a call
(SPEAKERPHONE)
immediately after the number is
entered.
“INTERCOM TO 03” appears
on the display of the phone
making a call.
The phone rings and
“INTERCOM FROM 02”
appears on the display of the
phone receiving a call.
When a person at the phone
receiving a call picks up the
handset or presses
(SPEAKERPHONE) or
(INTERCOM), you can talk with
each other.
Intercom Operation
4 When you’re done talking,
replace the handset in the
cradle.
Intercom Operation
continued
37
US
Page 38

Talking between the phones (Intercom)
Notes
• An intercom call is available between two phones only. If the other phone are
busy with intercom, page, or all page, you will hear a busy tone and “BUSY”
will be displayed.
• If the other phone is in Do Not Disturb mode, you will hear a short busy tone
and “DO NOT DISTURB” will be displayed.
• While conversing with an outside caller via the phone receiving an intercom
call, you cannot make an intercom call. If you press (INTERCOM), you will
hear a busy tone.
• If you enter your station number mistakenly in step 3, you will hear five short
error beeps. If you enter a station number which has not been assigned, “NO
ANSWER” will be displayed.
Tips
• When you receive an intercom call, the phone will ring at a low level even
when the “RING VOLUME” is set to “OFF”.
• While on an intercom call, the INTERCOM lamp on the connected two
phones lights up and on other phones flashes.
• If you press (INTERCOM) in step 2 without performing step 1 on page 37, the
speakerphone will automatically turn on. When you’re done talking, press
(SPEAKERPHONE) in this case.
• If you pick up the handset during speakerphone conversation, it will change
to handset conversation, and conversely when you press (SPEAKERPHONE)
during handset conversation, it becomes speakerphone conversation.
(continued)
US
Intercom Operation
38
Page 39

Voice paging (PAGE)
You can page the other phone connected to the LINE 1 jack without
any operation on the other phone. The phone being called rings once
and the speakerphone automatically turns on.
Example: Page from station
number 02 to 03.
1 Pick up the handset.
2 Press (PAGE).
“PAGE ??” appears on the
display.
3 Enter the two digits station
number (01 to 16) by pressing
the dialing keys.
The phone pages immediately
after the number is entered.
“PAGE TO 03” appears on the
(SPEAKERPHONE)
display of the phone making a
call.
The phone rings and “PAGE
FROM 02” appears on the
display of the phone receiving a
call.
You can begin talking.
4 When you’re done talking,
replace the handset in the
cradle.
Notes
• Paging is available between two phones only. If the other phone are busy
with intercom, page, or all page, you will hear a busy tone and “BUSY” will
be displayed.
• If the other phone is in Do Not Disturb mode, you will hear a short busy tone
and “DO NOT DISTURB” will be displayed.
• While conversing with an outside caller via the phone to be paged, you
cannot page that phone. If you press (PAGE), you will hear a busy tone.
• If you enter your station number mistakenly in step 3, you will hear five
short error beeps. If you enter a station number which has not been assigned,
“NO ANSWER” will be displayed.
Tips
• If you press (PAGE) in step 2 without performing step 1, the speakerphone
will automatically turn on. To disconnect the speakerphone conversation,
press (SPEAKERPHONE).
• A person can also answer a page by picking up the handset in step 3.
Intercom Operation
Intercom Operation
US
39
Page 40

Paging all phones (ALL PAGE)
You can page all phones connected to the LINE 1 jack through the
speakerphone.
Example : Page all phones from
station number 02.
1 Pick up the handset.
2 Press (ALL PAGE).
“ALL PAGE” appears on the
display of the phone making the
page.
The other phones being called
ring once and
“ALL PAGE 02” appears on
the display.
You can page all phones
(SPEAKERPHONE)
through the speakerphone.
3 When you’re done talking,
replace the handset in the
cradle.
Notes
• When the other phone are busy with intercom, page, or all page, you cannot
execute all page.
• You cannot use All Page for the phone which is on an outside call or in Do
Not Disturb mode.
• Answering or finishing an all page is not available from the paged phone.
Tips
• If you press (ALL PAGE) in step 2 without performing step 1, the
speakerphone will automatically turn on. To disconnect the speakerphone
conversation, press (SPEAKERPHONE).
• When being called with all page, press (SPEAKERPHONE) to cancel the
calling and operate the phone.
US
Intercom Operation
40
Page 41

Ha
ving an intercom conference call
While on an outside call, connecting an intercom call allows you to talk
with two parties at the same time (Intercom conference call).
1 While conversing with an
outside caller, press
(INTERCOM).
The line in use is put on hold
and “INTERCOM ??” appears
on the display.
2 Enter the two digits station
number (01 to 16) by pressing
the dialing keys.
3 Press (CONF) (conference) after
you’re connected to the second
party.
The CONF lamp lights up. Now
you can talk to both parties.
When you want to return to a
normal outside call, disconnect
from one of the internal lines.
Notes
• Even if (CONF) is pressed on the phone receiving an intercom call, “intercom
conference call” cannot be performed.
• If two or more lines are put on hold, select the line to be included into the
conversation by pressing the line button, and then perform the procedure
above.
Tip
You can conduct an intercom conference if you press a line button during an
outside call, with other phones also pressing the same line button.
Intercom Operation
Intercom Operation
US
41
Page 42

Transferring a call
You can transfer a call to the other phone connected to the LINE 1 jack.
Example : When transferring the call
on line 1 to station
number 03.
1 While conversing with an
outside caller, press
(TRANSFER).
The line in use is put on hold
and “TRANSFER ??” appears
on the display.
2 Enter two digits station number
(01 to 16) of the phone receiving
the transfer by pressing the
dialing keys.
(SPEAKERPHONE)
The phone makes a call
immediately after the number is
entered.
“TRANSFER TO 03” appears
on the display of the phone
making a call.
The phone rings and
“LINE1 TRANSFER” appears
on the display of the phone
receiving a call.
US
Intercom Operation
42
3 When a person picks up the
handset (or presses
(SPEAKERPHONE)) or presses
(LINE 1), (LINE 2), (LINE 3) or
(LINE 4) whichever button is
flashing on the phone receiving
a transferred call, an outside call
is connected.
Page 43

Notes
• If there is another call from outside while transferring a call, you cannot speak to
the outside caller in step 3. Press the line button you want to answer and talk.
• After step 2, if the phone receiving the transferred call does not perform step 3
within about one minute after the handset has been replaced or (SPEAKERPHONE)
pressed on the phone transferring the call, an alarm will be heard from the phone
transferring the call.
• If the other phone is in Do Not Disturb mode, you will hear a short busy tone and
“DO NOT DISTURB” will be displayed.
• If the phone receiving the transfer is on an outside call or intercom call, an outside
call will not be transferred, you will hear a busy tone and “BUSY” or “NO
ANSWER” will be displayed.
• If two or more lines are put on hold, select the line to be transferred by pressing
the line button, and then perform the procedure on page 42.
• If you enter your station number mistakenly in step 2, you will hear five short
error beeps. If you enter a station number which has not been assigned, “NO
ANSWER” will be displayed.
Tips
• Transferring is available even while any of phones are on an intercom call other
than the phone receiving the transfer.
• When you receiving a transferred call, the phone will ring at a low level even
when the “RING VOLUME” is set to “OFF”.
• You can replace the handset in the cradle or press (SPEAKERPHONE) after you
have entered the station number in step 2.
• To cancel transferring a call, press the line button which is flashing. The
conversation with an outside caller is resumed.
To transfer during an intercom call
While on an outside call, make an intercom call (see page 37). The
outside call is put on hold. When the line button which is flashing is
pressed on the phone called, the outside call is connected.
To transfer during a page
While on an outside call, make a Page (see page 39). The outside
call is put on hold. When the line button which is flashing is
pressed on the phone paged, the outside call is connected.
To transfer during an all page
While on an outside call, make an All Page (see page 40). The
outside call is put on hold. The outside call is connected by pressing
the line button which is flashing on every phone.
When you do not know the phone to which an outside call should
be transferred, use this function.
Tip
To cancel the transfer during an intercom call, Page or All Page, press the line button
which is flashing. The conversation with an outside caller is resumed.
Intercom Operation
Intercom Operation
US
43
Page 44

Additional Information
Mounting the phone on a wall
1
Hang-up
tab
2
Wall bracket
3, 4
Telephone
line cords
AC power
adaptor cord
1 Remove the hang-up tab and
replace it upside down.
2 Attach the wall bracket to the
phone. Insert the upper tabs
first, then press the phone into
the wall bracket so that the
lower tabs on the wall bracket
go into the phone.
3 Attach the AC power adaptor
cord and the telephone line
cords to the wall bracket.
4 Plug the other end of the
telephone line cords into the
LINE 1/LINE 1+2, LINE 3/
LINE 3+4 jacks, and plug the
telephone line cord into the
DATA jack if necessary.
5 Hook the wall bracket to the
wall plate, and plug the
telephone line cords into the
telephone outlets. Plug the
telephone line cord into the
input jack on the computer or
FAX, etc., if necessary.
5
Wall plate
US
Additional Information
44
Page 45

Using the phone during a power failure
Open
During a power failure, you cannot make or receive calls. When power
returns, reset the date and time. Other settings and memory will return as
they were before the power failure.
We recommend that you install the 6F22/6LR61 9V battery (not supplied)
into the phone.
When you install the 6F22/6LR61 9V battery (not supplied) into
the phone
During a power failure, you can make or receive calls. However, the
speakerphone does not function. To make a call, you must press the line
button after picking up the handset, and to receive a call, press the line
button which is flashing after picking up the handset.
The phone can be used for about 30 minutes continuously.
When making a call, you can only use the dialing keys.
During a power failure, “POWER FAILURE” appears on the display.
In the following cases, the battery has been exhausted so it needs to be
replaced.
• When calls cut out during a conversation.
• When the line button does not light up or goes off quickly even if the line
button is pressed after picking up the handset.
• When the display of “POWER FAILURE” becomes weak
• A clicking noise may be heard from the phone
Additional Information
Battery
compartment
Notes
• You cannot operate the phone other than for making or receiving calls.
• If the AC adaptor is pulled out from the AC outlet when the battery is still inside
the phone, the battery will discharge even if the phone is not being used. Remove
the battery when unplugging the phone for a long time in order to avoid battery
discharge and damage to the phone from battery leakage.
• If there is a power failure during a call with intercom, page, and all page, the call
will be disconnected. When transferring a call, outside call will remain on hold
even in the case of a power failure, so you can return to the outside call.
Tip
If there is a power failure during an outside call, the call may be continued, but the
handset volume and speakerphone volume can not be adjusted.
9V
6F22/6LR61 9V battery
(not supplied)
Additional Information
45
US
Page 46

Maintenance
• Clean the cabinets with a soft cloth slightly moistened with water or
a mild detergent solution. Do not use any type of abrasive pad,
scouring powder or solvent such as alcohol or benzine as they may
damage the finish of the cabinet.
• If you have any questions or problems concerning your phone,
please consult your nearest Sony dealer.
US
Additional Information
46
Page 47

Troubleshooting
If you’ve experienced any of the following difficulties while using your
phone, use this troubleshooting guide to help you remedy the
problem. Should any problem persist, consult your nearest Sony
dealer.
Symptom
You hear no dial tone.
The telephone does not connect
at all, even though the number
you dial is correct.
The phone does not redial
correctly.
You cannot hear anything from
the speaker.
The phone does not ring.
The line button of the unused
Making/receiving calls
line flashes.
You hear five short error beeps
when you press the line button.
A click will sound from the
phone after call completion or
when the connection of the call
has been unsuccessful.
You hear five short error beeps
and cannot store a number on a
one-touch dial.
One-touch dialing is incorrect.
One-touch dialing
Remedy
• Make sure the telephone line cord is securely
connected to the telephone outlet.
• Make sure the dial mode is set correctly (page 15).
• Make sure the last dialed number is really the one you
want to dial.
• Press (VOLUME)(+) to increase the speaker volume
(page 24).
• “RING VOLUME” set to “HIGH”, “MID” or “LOW”
(page 29).
• Make sure the phone is not in Do Not Disturb mode
(page 30).
• Make sure the unused line is set to “DISABLE”
(page 16).
• Make sure the line is set to “DISABLE” (page 16).
• This sound is an automatic confirmation of whether
or not there have been any voice messages, and not a
malfunction.
• Make sure you follow the procedure for storing the
number correctly (page 31).
• Make sure the number (including the tone and pause
digits) does not exceed 20 digits.
• Store the correct number (page 31).
Additional Information
continued
Additional Information
47
US
Page 48

Troubleshooting (continued)
Symptom
You cannot use visual massage
waiting service.
Visual
waiting
massage
When pressing (INTERCOM),
you hear a busy tone and
cannot make an intercom call.
When pressing (INTERCOM) or
(PAGE), you hear a short busy
tone and cannot make an
intercom call or make a paging.
Intercom
The dialing mode, date and
time and station number is
incorrect.
Remedy
• Make sure you have subscribed to visual message
waiting service (see page 36).
• The other phone is on an intercom call.
• Make sure that the other phone (IT-M704 or IT-M804)
is connected to the LINE 1 jack correctly.
• Make sure a phone other than the IT-M704 and IT-
M804 phone is not connected to the LINE 1 jack.
• Make sure that all phones are appropriately connected
according to the indoor wiring (page 9).
• Make sure the phone is not in Do Not Disturb mode
(page 30).
• The data of these settings were not sent to the phones
correctly. Set these settings up again.
To reset the phone
If any of these remedies do not work, unplug the AC power adaptor. If
the battery is still inserted in the phone, take it out. When the phone
won’t be reset yet, press RESET button on the left side of the phone
with a ball-point pen, etc.
The day and time setting and last phone number dialed will be erased.
Note
When you reset the phone by pressing RESET button, messages, the dialing
mode and Do Not Disturb settings may be erased.
To return the phone to the factory setting
When you need to erase the whole contents of one-touch dial and all
settings, reset the phone by following the procedure below.
To return the phone to the factory setting, unplug the AC power
adaptor, and then plug it while pressing (ERASE/CLEAR). If the battery
is still inserted in the phone, take it out first.
US
Additional Information
48
Page 49

Specifications
Power source
DC 12V from AC power adaptor AC-T71
Dial signal
Tone, 10 PPS (pulse) selectable
Dimensions
Approx. 7 7⁄8 x 2 5⁄8 x 9 1⁄4 inches
(w/h/d)
(approx. 199 x 68.2 x 235.5 mm)
Mass
Approx. 1 lb 14 oz
(approx. 990 g)
Supplied accessories
See page 7.
Design and specifications are subject to
change without notice.
Additional Information
Additional Information
49
US
Page 50

Index
A
Assigning station
number 14
Adjusting the volume
handset 24, 29
headset 24, 29
ringer 29
speaker 24, 29
B
Busy redialing 27
C
Call waiting service 29
Conference 34, 41
Connection 8
D, E, F, G
Dialing mode
choosing 15
switching to tone dialing
temporarily 24
Disable the line 16
Display language 19
Do Not Disturb 30
H
Headset 24, 29
Hold 24, 29
I, J, K
Identifying the parts 20
Intercom 37
Intercom conference 41
L
Lamp indications 22
M, N
Making calls 23
Mounting the phone on a
wall 44
O
One-touch dialing 31
P, Q
Package contents 7
Paging all phones 40
Power failure 45
Pulse dialing 15
R
Receiving calls 28
Redialing 26
Reset the phone 48
Return to the factory
setting 48
S
Setting up
dialing mode 15
phone 8
Speakerphone
performance 25
Specifications 49
T, U
Talking between the
phones 37
Three-way
conference 34
Tone
dialing 15
switching to 24
Troubleshooting 47
Transferring a call 42
V, W, X, Y, Z
Visual message waiting
service 36
Voice paging 39
Volume
handset 24, 29
headset 24, 29
ringer 29
speaker 24, 29
US
Additional Information
50
Page 51

Page 52

Registro del propietario
Los números de modelo y de serie se
encuentran en la parte inferior del
teléfono. Anote el número de serie en el
espacio que se proporciona a
continuación. Refiérase a estos números
cada vez que se comunique con su
distribuidor Sony con respecto al
producto.
o
o
IT-M704
Modelo N
Serie N
IMPORTANTES
INSTRUCCIONES
DE SEGURIDAD
A fin de reducir el riesgo de incendio,
descarga eléctrica y lesiones a las
personas cuando usted use su equipo
telefónico, siempre debe observar
precauciones básicas de seguridad, entre
ellas:
1. Lea y entienda todas las instrucciones.
2. Siga todas las advertencias e
instrucciones indicadas en el
producto.
3. Desconecte este producto de la línea
telefónica antes de limpiarlo. No use
limpiadores líquidos ni en aerosol.
Use un paño húmedo para limpiarlo.
4. No use este producto cerca del agua,
por ejemplo, cerca de una bañera,
lavabo, fregadero de cocina o
lavadora, en un sótano mojado o cerca
de una piscina.
5. No ponga este producto sobre un
carrito, estante o mesa inestables. El
aparato se puede caer y ocasionar
daños graves al teléfono.
6. Las ranuras y aberturas situadas en la
parte posterior o inferior son parte del
sistema de ventilación. Para evitar el
calentamiento del aparato, no
obstruya o cubra las ranuras de
ventilación y evite dejarlo sobre la
cama, sofá, sillón o superficie similar.
Este producto nunca debe colocarse
cerca de un radiador o calefacción, o
encima de éste. Este producto no debe
colocarse en una instalación
empotrada salvo que se provea
ventilación apropiada.
7. Este producto sólo debe operarse
desde el tipo de fuente de
alimentación indicada en la etiqueta
de especificaciones. Si no está seguro
del tipo de fuente de alimentación en
su hogar, consulte con su distribuidor
o compañía de electricidad local.
8. No deje que nada descanse sobre el
cable eléctrico. No sitúe este producto
en un lugar donde el cable esté
expuesto a abuso debido al tránsito de
la gente.
9. No sobrecargue los tomacorrientes de
pared y cables de extensión, ya que
esto puede ocasionar el riesgo de
incendio o shock eléctrico.
10. Nunca introduzca a presión objetos
de ningún tipo en este producto a
través de las ranuras del gabinete, ya
que pueden hacer contacto con un
punto de voltaje peligroso u ocasionar
un cortocircuito entre piezas que
podría conducir a incendios o shock
eléctrico. Nunca derrame líquidos de
ningún tipo sobre el producto.
11. Para reducir el riesgo de shock
eléctrico, no desarme este producto;
en caso de necesitarse servicio o
reparación, llévelo a personal de
servicio calificado. El abrir o quitar las
tapas puede exponerle a voltaje
peligroso u otros riesgos. El
reensamblaje incorrecto puede
ocasionar shock eléctrico cuando el
aparato se use posteriormente.
ES
2
Page 53

12. Desconecte este producto de la línea
telefónica y refiera el servicio a
personal de servicio calificado bajo las
siguientes condiciones:
A. Cuando el cable eléctrico o el
enchufe se encuentra dañado o
deshilachado.
B. Si se ha derramado líquido dentro
del producto.
C. Si el producto ha estado expuesto
a lluvia o agua.
D. Si el producto no opera
normalmente al seguir las
instrucciones de operación. Sólo debe
ajustar los controles incluidos en las
instrucciones de operación, ya que el
ajuste incorrecto de otros controles
puede producir daños y a menudo
exigirá trabajo extenso por un técnico
calificado para restaurar el producto a
las operaciones normales.
E. Si el producto se ha dejado caer o
el gabinete está dañado.
F. Si el producto exhibe un cambio
perceptible de operación.
13. Evite usar un teléfono (que no sea
del tipo inalámbrico) durante una
tormenta eléctrica. Existe la remota
posibilidad de shock eléctrico debido
a rayos.
14. Para notificar una fuga de gas, no
utilice el teléfono en la vecindad de
dicha fuga.
GUARDE ESTAS
INSTRUCCIONES
PRECAUCIÓN:
Para reducir el riesgo de incendio o lesión a
personas debido a la pila, lea y siga estas
instrucciones:
1. Sólo debe utilizar una pila del siguiente tipo y
tamaño: 6F22/6LR61 9V.
2. No deseche las pilas en una hoguera ya que la
pila puede explotar. Compruebe los
reglamentos locales sobre posibles
instrucciones especiales de desecho.
3. No abra ni mutile las pilas. El electrólito
liberado es corrosivo y puede ocasionar daños
a los ojos o la piel. Puede ser tóxico si se
ingiere.
4. Tenga cuidado al manejar las pilas a fin de
evitar cortocircuitos de la pila con materiales
conductores tales como anillos, pulseras y
llaves. La pila o el conductor puede
sobrecalentarse y ocasionar quemaduras.
5. No intente cargar las pilas suministradas o
identificadas para uso con este producto.
Pueden producirse fugas de electrólito
corrosive, o las pilas pueden explotar.
6. No intente calentar las pilas suministradas o
identificadas para uso con este producto para
prolongar su vida útil. Puede producirse una
inesperada fuga de electrólito de las pilas, con
riesgo de quemaduras o irritación en la piel o
los ojos.
7. Si no piensa utilizar este producto durante
largo tiempo (un mes o más) extraiga las pilas,
ya que podrían producirse fugas.
8. Deseche inmediatamente las pilas totalmente
agotadas, ya que son más propensas a sufrir
fugas.
9. No guarde este producto, ni las pilas
suminstradas o identificadas para uso con este
producto, en zonas sometidas a altas
temperaturas, Si guarda las pilas en un
refrigerador para prolongar su duración en
condiciones de almacenamiento, debe
protegerlas de la condensación durante su
almacenamiento y durante el desescarchado.
Antes de utilizarlas, debe dejarlas a
temperatura ambiente hasta que recuperen la
temperatura normal de funcionamiento.
INFORMACIÓN GENERAL
SOBRE LOS TELÉFONOS
1. Este equipo cumple con la Parte 68 de las
reglas de la FCC. En la base de este equipo
hay una etiqueta que contiene, entre otra
información, el número de registro de la FCC
y el número de equivalencia de timbre de
llamada (REN) para este equipo. Cuando se
solicite, esta información deberá ofrecerse a la
compañía telefónica.
2. Las tomas (conectors) de registro aplicable
USOC-RJ11C/RJ14C se utiliza para este
equipo.
3. Este equipo ha sido diseñado para conectarse
a la red telefónica o la de un usuario
utilizando una toma modular compatible que
esté de acuerdo con la Parte 68 de la FCC.
Con este equipo se suministran un cable y una
clavija modular que cumplen con las normas
de la FCC.
ES
ES
ES
3
Page 54

4. El REN se utiliza para determinar la cantidad
de dispositivos que podrán conectarse a la
línea telefónica. El exceso de REN conectados
a la línea telefónica puede resultar en que los
dispositivos no contesten a llamadas
entrantes. En la mayoría de las zonas, no en
todas, la suma de REN no deberá ser superior
a cinco (5,0). Para enterarse del número total
de REN que puede conectarse a una línea,
póngase en contacto con la compañía
telefónica.
5. Si su equipo (IT-M704) produce daños en la
red telefónica, la compañía telefónica le
notificará con antelación que es posible que se
requiera la interrupción temporal del servicio.
Pero si la notificación con antelación no es
práctica, la compañía telefónica lo notificará al
cliente lo antes posible. Además, se le
notificará el derecho a realizar una
reclamación a la FCC si usted lo considera
necesario.
6. La compañía telefónica puede realizar
cambios en sus instalaciones, equipos,
operaciones, o procedimientos que pueden
afectar la operación del equipo. Cuando
suceda esto, la compañía telefónica le avisará
con antelación para que usted realice las
modificaciones necesarias para mantener
ininterrumpido el servicio.
7. Si experimenta algún problema con este
equipo (IT-M704), con respecto a la reparación
o a la información sobre la garantía, póngase
en contacto con Sony Direct Response Center:
Tel 1-800-222-7669 (EE. UU. solamente). Si el
equipo causa problemas en la línea, la
compañía telefónica puede solicitarle que
desconecte el equipo hasta que se resuelva el
problema.
8. Todas las reparaciones deberá realizarlas un
centro de reparaciones Sony.
9. Este equipo no deberá utilizarse en líneas
compartidas ni en líneas de pago previo.
10. Este equipo es compatible con dispositivos
para ayuda a la audición.
Precaución
Se le advierte que cualquier cambio o
modificación no aprobado expresamente en el
presente manual podría anular su autorización
para operar este equipo.
Nota
Este equipo se ha sometido a pruebas y se ha
determinado que cumple los límites para un
aparato digital Clase B de conformidad con la
Parte 15 de las Reglas FCC. Dichos límites están
diseñados para brindar protección razonable
contra interferencia dañina en una instalación
residencial. Este equipo genera, utiliza y puede
radiar energía de radiofrecuencia y, si no se
instala y se usa de acuerdo con las instrucciones,
puede ocasionar interferencia dañina en las
radiocomunicaciones. Sin embargo, no hay
garantía de que no ocurra interferencia en una
instalación específica. En caso de que este equipo
ocasione interferencia dañina en la recepción de
radio o televisión, que se puede determinar
apagando y encendiendo el equipo, se le insta al
usuario a que trate de corregir la interferencia
mediante una o más de las siguientes medidas:
– Reorientar o reubicar la antena de recepción.
– Aumentar la separación entre el equipo y el
receptor.
– Conectar el equipo en un enchufe de un
circuito distinto al circuito al cual está
conectado el receptor.
– Consultar con el distribuidor o con un técnico
experimentado de radio/televisión para
ayuda.
Si su teléfono dispone de
marcadores automáticos
Cuando programe números de emergencia y (o)
realice llamadas de prueba a los mismos:
1. Permanezca poco tiempo en la línea y
explique a la otra parte la razón de la llamada.
2. Realice tales actividades en horas no punta,
como por la mañana temprano o a últimas
horas de la tarde.
ES
4
Page 55

Índice
Preparativos
6 Lea esto en primer lugar
7 Paso 1: Comprobación del
contenido del paquete
8 Paso 2: Instalación del teléfono
17 Paso 3: Introducción del día y de
la hora
19 Paso 4: Cambio del idioma de las
indicaciones
20 Identificación de las partes
22 Indicaciones de las lámparas
Operaciones básicas
23 Realización de llamadas
26 Repetición de la marcación
27 Realización de otra llamada
durante la conversación
28 Recepción de llamadas
30 Recepción de una llamada
durante la conversación
Funciones del teléfono
31 Marcación abreviada
31 Almacenamiento de
números de teléfono
33 Borrado de un número de
teléfono almacenados
33 Realización de llamadas con
la marcación abreviada
34 Realización de una llamada de
conferencia tripartita
34 Realización de otra llamada
durante la conversación
35 Recepción de una llamada
durante la conversación
36 Utilización del servicio de espera
con mensaje visual
Operación de
intercomunicación
37 Conversación entre teléfonos
(Intercomunicación)
39 Buscapersonas vocal (BUSCAR)
40 Buscapersonas en todos los
teléfonos (BUSCAR TODOS)
41 Realización de una llamada de
conferencia con
intercomunicación
42 Transferencia de una llamada
43 Para transferir durante una
llamada de
intercomunicación
43 Para transferir durante la
función buscapersonas
43 Para transferir durante la
función buscapersonas en
todos los teléfonos
Información adicional
44 Montaje del teléfono en una
pared
45 Utilización del teléfono durante
un corte del suministro eléctrico
46 Mantenimiento
47 Solución de problemas
49 Especificaciones
50 Índice alfabético
53 GARANTÍA LIMITADA
Índice
ES
ES
5
Page 56

Preparativos
Lea esto en primer lugar
Antes de utilizar su teléfono, tendrá que instalarlo. A continuación se
indica la forma rápida de hacerlo: Pasos 1 y 2.
Paso 1 (página 7)
En primer lugar, desembale el teléfono y los
accesorios suministrados.
Paso 2 (páginas 8 a 16)
A continuación, tendrá que hacer cuatro
cosas para instalar el teléfono,
incluyendo la búsqueda del mejor lugar
para el mismo.
ES
6
¡Esto es todo!
Para introducir el día y la hora, siga el procedimiento del
“Paso 3 Introducción del día y de la hora” de la página
17.
Para cambiar el idioma de las indicaciones, siga el
procedimiento del “Paso 4 Cambio del idioma de las
indicaciones” de la página 19.
Preparativos
Page 57

Paso 1
Comprobación del contenido del paquete
Compruebe si con el paquete ha recibido los componentes siguientes.
Si falta alguno, póngase en contacto con su proveedor Sony.
Preparativos
de CA (AC-T71)
Cable del
microteléfono
Soporte para montaje mural/
pedestal del teléfono
TeléfonoAdaptador de alimentación
Cables de línea telefónica (3)
Guía rápida
Microteléfono
Almohadillas (4)
Pegatina de asignación
de líneas utilizadas
Preparativos
ES
7
Page 58

Paso 2
Instalación del teléfono
Realice los pasos siguientes:
• Conecte el teléfono
• Asignación del número de estación
• Elija el modo de marcación
• Habilitación/inhabilitación de la línea
Nota sobre la instalación
Instale la unidad:
• sobre una superficie nivelada
• alejada de fuentes térmicas, tales como radiadores, conductos de ventilación, y la luz
solar
• alejada de la humedad excesiva, temperaturas extremadamente bajas, polvo,
vibraciones, y golpes
Conexión del teléfono
Usted podrá conectar un máximo de 16 teléfonos (IT-M704 o IT-M804) para
utilizar su teléfono como interfono, además de usarlo como teléfono de 4
líneas.
Para utilizar las funciones de intercomunicación, conecte los otros
teléfonos (IT-M704 o IT-M804) a la toma LINE 1 de este teléfono.
Si ajusta el modo de marcación, y la hora en este teléfono después de haber
conectado otros teléfonos, estos ajustes se introducirán automáticamente en
cada teléfono.
Si desea colgar el teléfono en una pared, monte primero el teléfono (consulte la
página 44).
300 pies
L1
L2
L3
L4
TEL-1 TEL-2 TEL-3 TEL-4 TEL-16
Nota
Si no ha conectado correctamente todas las líneas, no podrá utilizar las funciones de este
teléfono.
ES
Preparativos
8
Page 59

El método de conexión diferirá de acuerdo con las condiciones del cableado interior.
[Cableado 1]
Realice las conexiones siguiendo el procedimiento de “Para conectar el teléfono a dos tomas
telefónicas que posean dos líneas” de la página 10.
A un teléfono A un teléfono A un teléfono
Línea1, 2
Línea3, 4
Línea1, 2
Línea3, 4
Línea1, 2
Línea3, 4
Central
telefónica
Línea1
Línea2
Línea3
Línea4
[Cableado 2]
Realice las conexiones siguiendo el procedimiento de “Para conectar el teléfono a cuatro tomas
telefónicas separadas” de la página 11.
Central
telefónica
Línea1
Línea2
Línea3
Línea4
A un teléfono
Línea1
Línea2
Línea3
Línea4
A un teléfono
Línea1
Línea2
Línea3
Línea4
A un teléfono
Línea1
Línea2
Línea3
Línea4
[Cableado 3, 4]
Cuando solamente haya una toma telefónica, tendrá que realizar el trabajo de cableado.
A un teléfono
Línea1
Línea2
Línea3
Línea4
Central
telefónica
Línea1
Línea2
Línea3
Línea4
A un teléfono
Línea1, 2
Línea3, 4
Central
telefónica
Línea1
Línea2
Línea3
Línea4
Preparativos
Para conectar el microteléfono
Conecte un extremo del cable del
microteléfono en éste y el otro en la
toma HANDSET del teléfono.
A la toma HANDSET
continúa
Preparativos
ES
9
Page 60

Paso 2: Instalación del teléfono (continuación)
Para conectar el teléfono a dos tomas telefónicas que
posean dos líneas
A las tomas telefónicas
Línea 1, 2
1
Cables de línea telefónica
Línea 3, 4
(suministrados)
2
Adaptador de alimentación de
CA (AC-T71, suministrado)
A un tomacorriente
de CA
Enganche el cable.
A “LINE 1/
LINE 1+2”
A “LINE 3/
LINE 3+4”
A DC IN 12V
1 Conecte los cables de línea telefónica a las
tomas “LINE 1/LINE 1+2” y “LINE 3/LINE
3+4” y a las tomas telefónicas.
2 Conecte el adaptador de alimentación de CA a
la toma DC IN 12V y a un tomacorriente de CA.
Sugerencias
• Si su toma telefónica no es modular, póngase en contacto con la
compañía telefónica para solicitar ayuda.
• L1 es la primera línea telefónica conectada al par central de conductores.
L2 es la segunda línea telefónica conectada al par exterior de conductores.
ES
Preparativos
10
Toma modular
L1
L2
Page 61

Para conectar el teléfono a cuatro tomas telefónicas separadas
Si usted solamente posee una toma telefónica, necesitará dos
adaptadores para dos líneas (no suministrados) para conectar el
teléfono a cuatro tomas telefónicas separadas.
A las tomas telefónicas
1
Adaptadores para dos
líneas (no suministrados)
Preparativos
Línea 2
Línea 4
Línea 1
Línea 3
Cable de línea
telefónica (no
suministrado)
4
Adaptador de alimentación de
CA (AC-T71, suministrado)
A un tomacorriente de CA
LINE 2 PHONE
Adaptador para dos líneas
LINE 1
2, 3
Cables de línea
telefónica
(suministrado)
A “LINE 1/
LINE 1+2”
A “LINE 3/
LINE 3+4”
Enganche el cable.
A DC IN 12V
1 Conecte los adaptadores para dos
líneas a las tomas de la línea 1 y la
línea 3.
2 Conecte los cables de línea telefónica
a las tomas “LINE 1/LINE 1+2” y
“LINE 3/LINE 3+4” y a los
adaptadores para dos líneas.
3 Conecte los cables de línea telefónica
a los adaptadores para dos líneas y a
las tomas de la línea 2 y la línea 4.
LINE 2 PHONE
Adaptador para dos líneas
Interconexión
Nota
El adaptador para dos tomas, utilizado en el paso 1, no podrá usarse.
4 Conecte el adaptador de
alimentación de CA a la toma DC IN
12V y a un tomacorriente de CA.
continúa
Preparativos
11
ES
Page 62

Paso 2: Instalación del teléfono (continuación)
LINE SELECTDATA
L2 L3 L4
DATA LINE SELECTDATA
L2 L3 L4
Notas
• Antes de insertar la pila (no suministrados) para protección en
caso de corte del suministro eléctrico, realice en primer lugar
las conexiones indicadas en las páginas 10 y 11. Si en el
visualizador aparece “CORTE SUM ELÉC” en vez de “SIN
CÓD DE ÁREA” cuando conecte por primera vez el
adaptador de alimentación de CA en un tomacorriente,
extraiga la pila del teléfono, desenchufe el adaptador de
alimentación de CA y después vuelva a enchufarlo.
• Utilice solamente el adaptador de alimentación de CA AC-T71
suministrado. No utilice ningún otro adaptador de
alimentación de CA.
• Conecte el adaptador de alimentación de CA a un
tomacorriente que suministre continuamente alimentción.
• Coloque el teléfono cerca de un tomacorriente de CA a fin de
poder desenchufar fácilmente el adaptador de alimentación de
CA.
Sugerencias
• Los teléfonos que no sean IT-M704 e IT-M804 no podrán
conectarse a al toma LINE 1.
• Usted no podrá conectar ni utilizar el teléfono con una
centralita privada (PBX).
Conexión a un PC o facsímil
Usted podrá conectar un PC o un facsímil
a la toma DATA.
Como línea utilizada para la comunicación
de datos, seleccione L2, L3, o L4 utilizando
el selector DATA LINE SELECT.
Notas
• “LINE 2”, “LINE 3”, o “LINE 4” se utiliza
para recibir/transmitir datos del/al PC o
facsímil además de realizar o recibir llamadas
telefónicas.
Si entra una llamada a través de la línea
seleccionada con el servicio de “llamada en
espera”, mientras el PC o el facsímil
conectado a la toma DATA esté recibiendo o
transmitiendo datos, tales datos pueden verse
afectados.
Si usted utiliza frecuentemente la transmisión
de datos, le recomendamos que usted y los
demandantes utilicen la línea seleccionada
para comunicación de datos solamente.
• Usted no podrá realizar la conexión a
dispositivos ADSL.
• Durante la comunicación de datos, es posible
que a veces oiga ruido dependiendo de las
condiciones del cableado interior.
A “DATA”
PC
o
facsímil
Polaridad de la clavija
A “LINE 1/LINE 1+2” y
“LINE 3/LINE 3+4”
12
ES
Preparativos
Page 63

Para fijar la hoja de guía rápida
Fije la hoja de guía rápida suministrada en
la base del teléfono.
Para fijar la pegatina de asignación de
líneas utilizadas
Fije la pegatina de asignación de líneas utilizadas
suministrada debajo del altavoz del teléfono.
Para inclinar el teléfono
Si desea inclinar el teléfono, fíjele el soporte para instalación mural
suministrado en la parte superior de su base.
Preparativos
Soporte para
instalación mural
2
Ranura
1
Almohadilla
1 Coloque las cuatro almohadillas
en las hendiduras del soporte
para instalación mural.
2 Fije el soporte para instalación
mural en el teléfono.
3 Conecte los cables de línea
telefónica y el adaptador de
alimentación de CA siguiendo el
procedimiento de la página 10 o
11.
continúa
Preparativos
13
ES
Page 64

Paso 2: Instalación del teléfono (continuación)
Asignación del número de estación
Cerciórese de conectar correctamente todos los teléfonos (IT-M704 o
IT-M804) a la toma LINE 1, y después asigne un número de estación a
todos los teléfonos. Para confirmar si el número de estación asignado
es correcto, realice una llamada de intercomunicación. Consulte
“Conversación entre teléfonos” de la página 37.
1 Presione (PROGRAM).
2 Presione b(*) o (#)B hasta
que en el visualizador aparezca
“ESTACIÓN #”.
3 Presione (PROGRAM).
ESTACI N #=??
4 Introduzca los dos dígitos del
número de estación (01 a 16)
presionando las teclas de
marcación.
5 Presione (PROGRAM).
Usted oirá un pitido largo de
confirmación.
Nota
Si en el paso 4 introduce un número ya utilizado para otro teléfono, u otro
número excepto 01 a 16, se visualizará “NÚMERO INVÁLIDO”. Introduzca
un número diferente.
ES
Preparativos
14
Page 65

Elección del modo de marcación
Para que el teléfono funcione correctamente, seleccione el modo de
marcación apropiado (por tonos o por pulsos).
Cuando conecte otros teléfonos (IT-M704 o IT-M804) a la toma LINE 1,
se ajustará automáticamente el mismo modo de marcación para todos
los teléfonos. Cerciórese de conectar los teléfonos con antelación, y
después ajuste el modo de marcación.
1 Presione (PROGRAM).
2 Presione b(*) o (#)B hasta
que en el visualizador aparezca
“MODO MARCACIÓN”.
3 Presione (PROGRAM).
TONOS PULSOS
4 Presione b(*) o (#)B para
elegir el modo de marcación
(“TONOS” o “PULSOS”), y
después presione (PROGRAM).
Usted oirá un pitido largo de
confirmación.
Preparativos
Notas
• No deje que transcurran más de 20 segundos entre cada paso del
procedimiento.
• El modo de marcación no podrá ajustarse para cada línea.
Si no está seguro de sus sistema de marcación
Realice una llamada de prueba con el modo de marcación ajustado a
“TONOS”.
Si la llamada se conecta, deje así el ajuste. En caso contrario, ajuste a
“PULSOS”.
continúa
Preparativos
15
ES
Page 66

Paso 2: Instalación del teléfono (continuación)
Habilitación/inhabilitación de la línea
Cuando no vaya a utilizar las cuatro líneas, tendrá que inhabilitar las
que no use para que el teléfono trabaje adecuadamente.
Este ajuste podrá realizarse por separado para cada teléfono.
1 Presione (PROGRAM).
2 Presione b(*) o (#)B hasta
que en el visualizador aparezca
“INHAB LÍNEA”.
(ERASE/CLEAR)
3 Presione (PROGRAM).
L NEA2
4 Presione b(*) o (#)B para
elegir la línea que desee
cambiar, y después presione
(PROGRAM).
HABIL INHAB
5 Presione b(*) o (#)B para
elegir “HABIL” o “INHAB”, y
después presione (PROGRAM).
Usted oirá un pitido largo de
confirmación y la línea siguiente
a la seleccionada parpadeará.
Para ajustar otras líneas, si es
necesario, repita los pasos 4 y 5.
Para finalizar el ajuste, presione
(ERASE/CLEAR).
Nota
Usted no podrá inhabilitar la línea 1.
ES
Preparativos
16
Page 67

Paso 3
Introducción del día y de la hora
Cuando haya otros teléfonos (IT-M704 o IT-M804) conectados a la
toma LINE 1, el día y la hora se ajustarán automáticamente para todos
los teléfonos. Cerciórese de conectar los teléfonos con antelación, y
después introduzca el día y la hora.
1 Presione (PROGRAM).
2 Presione b(*) o (#)B hasta
que en el visualizador aparezca
“FECHA HORA”.
3 Presione (PROGRAM).
MES=01
4 Introduzca dos dígitos para el
mes (01 a 12 para enero a
diciembre) presionando las
teclas de marcación.
Preparativos
5 Presione (PROGRAM).
D A=01
6 Introduzca dos dígitos para el
día (01 a 31) presionando las
teclas de marcación.
continúa
Preparativos
17
ES
Page 68

Paso 3: Introducción del día y de la hora (continuación)
7 Presione (PROGRAM).
8 Introduzca dos dígitos para la hora (01 a 12)
presionando las teclas de marcación.
La hora se indicará con el ciclo de 12 horas.
9 Presione (PROGRAM).
10Introduzca dos dígitos para los minutos (00 a
59) presionando las teclas de marcación.
11Presione (PROGRAM).
HORA=01
MINUTOS=01
AM PM
12Presione b(*) o (#)B para elegir “AM” o
“PM”, y después presione (PROGRAM).
Usted oirá un pitido largo de confirmación.
Nota
No deje que transcurran más de 20 segundos entre el procedimiento de los
pasos 1 a 11, ni 60 segundos en el paso 12.
ES
Preparativos
18
Page 69

Paso 4
Cambio del idioma de las indicaciones
Usted podrá elegir entre inglés o español como idioma para las
indicaciones realizando el procedimiento siguiente.
1 Presione (PROGRAM).
2 Presione b(*) o (#)B hasta
que en el visualizador aparezca
“IDIOMA”.
Cuando desee cambiar el
idioma de inglés a español, haga
que se visualice “LANGUAGE”.
3 Presione (PROGRAM).
El idioma actualmente
seleccionado parpadeará.
ENGLISH ESPA OL
4 Presione b(*) o (#)B para
cambiar el idioma de las
indicaciones, y después presione
(PROGRAM).
Usted oirá un pitido largo de
confirmación.
Preparativos
Nota
No deje que transcurran más de 20 segundos entre cada paso del
procedimiento.
Preparativos
19
ES
Page 70

Identificación de las partes
Con respecto a los detalles, consulte las páginas indicadas entree paréntesis.
1
2
3
4
5
6
7
8
9
q;
qa
qs
qd
qf
qg
qh
qj
qk
ql
w;
wa
ws
wd
wf
wg
1 Visualizador
2 Teclas de marcación abreviada
(p. 31)
Utilícelas para almacenar números
de marcación abreviada.
3 Altavoz
4 Microteléfono (p. 9, 23, 28)
5 Tecla de programa
(PROGRAM) (p. 14, 31)
Utilícelo para lograr el acceso al
menú.
6 Teclas selectores de línea
(LINE 1, 2, 3, 4) (p. 23, 28)
Le permitirán realizar o recibir
llamadas.
7 Tecla de intercomunicación
(INTERCOM) (p. 37, 42)
Para realizar una llamada de
intercomunicación.
8 Tecla de buscapersonas total
(ALL PAGE) (p. 40)
Utilícela para llamar a todos los
teléfonos a través del interfono.
9 Tecla de conferencia (CONF)
(p. 34, 41)
Le permitirá conversar con dos
interlocutores al mismo tiempo.
Preparativos
20
ES
q; Tecla de buscapersonas
(PAGE) (p. 39)
Utilícela para llamar a otro teléfono.
qa Tecla de volumen
(VOLUME +/-) (p. 24, 29)
qs Tecla de tono (TONE b )
(p. 24)
Le permitirá cambiar
temporalmente a marcación por
tonos.
qd Micrófono (MIC)
qf Teclas de marcación (p. 23)
qg Tecla # B (p. 14)
qh Tecla de borrado/anulación
(ERASE/CLEAR) (p. 33, 36)
Utilícela para borrar un número de
marcación abreviada, y finalizar la
operación durante el
procedimiento.
qj Tecla de accionamiento del
gancho (FLASH) (p. 29)
Cambiará a una segunda llamada si
posee el servicio de “llamada en
espera”, o le permitirá realizar una
nueva llamada.
qk Tecla de segunda memoria
(LOWER) (p. 31)
Utilícela para almacenar números
en la segunda memoria de una tecla
de marcación abreviada.
Page 71

L2 L3 L4
wh
wlwk
DATA LINE SELECTDATA
e;ea es
wj
Preparativos
ed
ef
eg
ql Tecla de retención (HOLD)
(p. 24, 29)
Utilícela para poner una llamada en
retención.
w; Tecla de transferencia
(TRANSFER) (p. 42)
Utilícela para transferir una
llamada.
wa Tecla de repetición de
marcación/pausa (REDIAL/
PAUSE) (p. 26)
Utilícela para repetir la marcación
del último número llamado, y para
insertar una pausa en la secuencia
de marcación.
ws Tecla de repetición de
marcación en caso de línea
ocupada (BUSY REDIAL) (p. 27)
Utilícela para repetir
automáticamente la marcación del
último número llamado cuando la
línea esté ocupada.
wd Tecla de silenciamiento
(MUTING) (p. 24, 29)
Utilícela para silenciar su voz
durante una conversación.
wf Tecla de no molestar (DO NOT
DISTURB) (p. 30)
Utilícela para desactivar el
generador de llamada y el altavoz.
wg Tecla de interfono (casco)
[SPEAKERPHONE (HEADSET)]
(p. 23, 24)
Utilícela para realizar o recibir
llamadas a través del interfono o el
casco.
wh
Toma para datos (DATA) (p. 12)
wj Selector de línea de datos
(DATA LINE SELECT) (p. 12)
Utilícelo para seleccionar la línea
para comunicación de datos.
wk Toma de línea 1/línea 1+2
(LINE 1/LINE 1+2) (p. 10, 44)
wl Toma de línea 3/línea 3+4
(LINE 3/LINE 3+4) (p. 10, 44)
e; Toma de entrada de CC
(DC IN 12V) (p. 10)
ea
Compartimiento de la pila (p. 45)
es Gancho para el cable del
adaptador de alimentación de
CA (p. 10)
ed Tecla de reposición (RESET)
(p. 48)
ef Toma para el microteléfono
(HANDSET) (p. 9)
eg Toma para casco I (p. 24, 29)
continúa
Preparativos
21
ES
Page 72

Identificación de las partes (continuación)
Indicaciones de las lámparas
ek
el
r;
eh
ej
ra
rs
rd
rf
Lámpara/tecla Patrón de encendido Estado
Encendida Apagada
eh INTERCOM Encendida Posibilidad de llamada a una extensión
Parpadeando Recepción de una llamada de
Parpadeando Otro teléfono está utilizando la
ej CONF Encendida Esta función está activada.
ek MESSAGES Parpadeando Hay mensajes vocales.
desde su teléfono o de conversación.
intercomunicación.
extensión.
el LOWER Encendida Selección de la segunda memoria de la
r; LINE 1 a 4 Encendida Usted está utilizando la línea.
Parpadeando Usted está recibiendo una llamada.
Parpadeando La llamada está retenida en su línea
Parpadeando Otra línea telefónica tiene una llamada
Parpadeando Está recibiendo una llamada transferida.
Parpadeando Otro teléfono está utilizando la línea.
ra BUSY REDIAL Encendida Esta función está activada.
rs MUTING Encendida Esta función está activada.
rd
DO NOT DISTURB
rf SPEAKERPHONE Encendida Esta hablando a través del interfono o el
(HEADSET) casco, utilizando el servicio
ES
Preparativos
22
Encendida Esta función está activada.
tecla de marcación abreviada.
telefónica, o está realizando una
transferencia de llamada.
en retención.
buscapersonas, o repitiendo la llamada
por línea ocupada.
Page 73

Operaciones básicas
Realización de llamadas
1 Descuelgue el microteléfono (o
(LINE 1)
(LINE 2)
(LINE 3)
(LINE 4)
TONE b(*)
(VOLUME)
(HOLD)
(REDIAL/PAUSE)
(BUSY REDIAL)
(MUTING)
(SPEAKERPHONE)
2 Marque el número de teléfono.
presione (SPEAKERPHONE)).
En el visualizador aparecerá
“== CONVERSAR ==”, y
después se visualizará la
duración de la operación en
horas, minutos, y segundos.
La tecla de la línea conectada se
encenderá.
Cuando desee seleccionar la
línea con antelación, presione
(LINE 1), (LINE 2), (LINE 3), o
(LINE 4).
La tecla correspondiente a la
línea se encenderá.
El número de teléfono marcado
aparecerá en el visualizador.
Operaciones básicas
3 Cuando termine de hablar,
cuelgue el microteléfono (o
presione (SPEAKERPHONE)).
La tecla de la línea desconectada
se apagará.
Nota
Si hay una línea en retención, no podrá realizar una llamada descolgando
simplemente el microteléfono y presionando (SPEAKERPHONE) en el paso 1.
Presione en primer lugar una tecla correspondiente a una línea que no esté
utilizándose, y después marque el número de teléfono.
Sugerencia
Si descuelga el microteléfono durante una conversación a través del interfono,
cambiará a conversación a través de dicho microteléfono, y si presiona
(SPEAKERPHONE) durante una conversación a través del microteléfono, pasará
a conversación a través del interfono.
continúa
Operaciones básicas
23
ES
Page 74

Realización de llamadas (continuación)
HANDSET
Realización de llamadas con un casco conectado
Cuando haya conectado un casco TL-HD1 (no suministrado) a la toma
I (HEADSET), usted podrá conversar a través de él.
1 Presione (SPEAKERPHONE) (HEADSET).
La lámpara SPEAKERPHONE se
encenderá.
2 Marque el número de teléfono.
3 Cuando termine de hablar, presione
(SPEAKERPHONE) (HEADSET).
La lámpara SPEAKERPHONE se apagará.
Notas
• Si no ha conectado un caso, usted realizará la llamada a través del interfono
en el paso 1.
• Si hay una línea en retención, no podrá realizar una llamada descolgando
simplemente el microteléfono y presionando (SPEAKERPHONE) (HEADSET)
en el paso 1. Presione en primer lugar una tecla correspondiente a una línea
que no esté utilizándose, y después marque el número de teléfono.
Tareas adicionales
Para
Ajustar el volumen del
microteléfono o del casco
Ajustar el volumen del altavoz
Poner una llamada en retención
Silenciar su voz
Cambiar temporalmente a
marcación por tonos
Haga lo siguiente
Durante la conversación, presione (VOLUME) (+) o (--).
Cada vez que presione (VOLUME) (+) o (--), el volumen del
microteléfono o del casco cambiará entre “ALTO”, “MEDIO”,
y “BAJO”.
Durante la conversación a través del interfono, presione
(VOLUME) (+) o (--). Cada vez que presione (VOLUME) (+)
o (--), el volumen cambiará entre 16 niveles.
Presione (HOLD). La tecla correspondiente a la línea que esté
en retención parpadeará.
Para reanudar la conversación, presione la tecla que esté
parpadeando, (LINE 1), (LINE 2), (LINE 3), o (LINE 4). La
tecla correspondiente a la línea podrá presionarse en cada
teléfono.
Para inhabilitar el micrófono, presione (MUTING). La
lámpara MUTING se encenderá. Para habilitar el micrófono
vuelva a presionar (MUTING).
Presione TONE b(*) después de haberse conectado.
La línea permanecerá en el modo de marcación por tonos
hasta que la desconecte.
I
ES
Operaciones básicas
24
Page 75

Notas
• Cuando esté utilizándose otra extensión conectada a la línea, la tecla
correspondiente a dicha línea parpadeará.
• Cuando entre otra llamada por otra línea, la tecla correspondiente a la misma
parpadeará y el altavoz emitirá dos pitidos, pero el teléfono no sonará
(consulte la página 30).
• Si pone una llamada en retención durante más de unos tres minutos, oirá una
alarma.
Sugerencias
• Usted podrá cambiar a interfono durante la conversación presionando
(SPEAKERPHONE). En este caso podrá colgar el microteléfono.
Para volver al microteléfono, descuélguelo de nuevo.
• Cuando descuelgue el microteléfono o presione (SPEAKERPHONE), la línea
vacante se conectará automáticamente de la línea 1 a la línea 4. Cuando no
estén conectadas otras líneas, la conexión se realizará a través de la línea 1.
Para obtener el mejor rendimiento del interfono
• Es posible que no oiga la voz de la otra persona en un lugar ruidoso.
Por lo tanto, utilice el interfono en una sala silenciosa.
• No acerque demasiado la mano ni otros objetos al micrófono porque
podría oír ruido de aullido (“retroalimentación acústica”).
• Cuando el volumen del altavoz sea alto, o el teléfono base esté
colocado cerca de una pared, es posible que el volumen se reduzca
repentinamente. Esto se debe a un circuito del teléfono diseñado
como protección contra la retroalimentación acústica. En tales casos,
reduzca ligeramente el volumen del altavoz.
Operaciones básicas
continúa
Operaciones básicas
25
ES
Page 76

Realización de llamadas (continuación)
Repetición de la marcación
1 Descuelgue el microteléfono (o presione (SPEAKERPHONE)).
En el visualizador aparecerá “== CONVERSAR ==”.
Presione (LINE 1), (LINE 2), (LINE 3), o (LINE 4) para
seleccionar la línea, si es necesario.
La tecla correspondiente a la línea se encenderá.
2 Para volver a llamar al último número marcado, presione
(REDIAL/PAUSE).
El último número marcado aparecerá en el visualizador y se
volverá a marcar automáticamente.
Notas
• El último número marcado no podrá almacenarse por separado para dada
línea. El número almacenado será el último marcado a través de cualquier
línea.
• Si el último número marcado tenía más de 32 dígitos, o si se borró, no se
repetirá su marcación.
Sugerencia
Cuando el número de marcación repetida sea superior a 16 dígitos, se
visualizará el primero, y después los restantes se visualizarán uno tras otro
mostrándose de la derecha a la izquierda a través del visualizador.
Para comprobar el último número de teléfono marcado
Cuando no esté realizando ninguna llamada, presione
(REDIAL/PAUSE).
El número aparecerá en el visualizador durante 20 segundos.
Para marcar el número, descuelgue el microteléfono (o presione
(SPEAKERPHONE)) mientras el número esté visualizándose.
Nota
Si el último número marcado tenía más de 32 dígitos, o si se ha borrado,
aparecerá “SIN DATOS”.
Para borrar el último número de teléfono marcado
Cuando no esté utilizando el teléfono, presione (REDIAL/PAUSE) dos
veces antes de 20 segundos.
El número se borrará de la memoria.
ES
Operaciones básicas
26
Page 77

Repetición de la marcación por línea ocupada
Si la línea a la que llamó está ocupada, el teléfono repetirá
automáticamente la marcación del último número marcado hasta 10
veces cada 30 segundos hasta que se conecte la llamada.
Cuando no esté realizando una llamada, presione (BUSY REDIAL).
Se encenderán las lámparas BUSY REDIAL, MUTING, y
SPEAKERPHONE, se encenderá la tecla correspondiente a la línea
seleccionada, y en el visualizador aparecerá el último número
marcado.
Notas
• La repetición de la marcación por línea ocupada se cancelará cuando presione
(BUSY REDIAL), o reciba o realice una llamada durante este modo de
repetición de la marcación.
• Si el último número marcado tenía más de 32 dígitos, o si se borró, no se
repetirá su marcación.
Realización de otra llamada durante la conversación
Ejemplo: Para realizar una llamada a través de la línea 2 mientras
converse a través de la línea 1
1 Presione (HOLD) mientras esté conversando.
La línea 1 pasará a retención y la tecla LINE 1 parpadeará
lentamente.
2 Presione (LINE 2).
3 Marque el número de teléfono del segundo interlocutor.
De esta forma podrá conversar con el segundo interlocutor a
través de la línea 2.
Para desconectar la línea 2, presione (LINE 1).
Notas
• Si no presione (HOLD) en el paso 1, la línea 1 se desconectará.
• Si pone una llamada en retención durante más de unos tres minutos, oirá una
alarma.
Operaciones básicas
Para conversar con dos interlocutores al mismo tiempo utilizando dos
líneas, consulte “Realización de una llamada de conferencia tripartita”
de la página 34.
Operaciones básicas
27
ES
Page 78

Recepción de llamadas
(LINE 1)
(LINE 2)
(PROGRAM)
b(*)
(VOLUME)
(#)B
(HOLD)
(MUTING)
(DO NOT DISTURB)
(SPEAKERPHONE)
(LINE 3)
(LINE 4)
(FLASH)
1 Cuando suene el teléfono:
• Descuelgue el microteléfono
(o presione
(SPEAKERPHONE)).
o
• Presione la tecla, (LINE 1),
(LINE 2), (LINE 3), o (LINE 4),
que esté parpadeando.
La lámpara SPEAKERPHONE
se encenderá y usted podrá
conversar a través del interfono.
Para hablar a través del
microteléfono, descuélguelo.
La tecla de la línea conectada se
encencerá, en el visualizador
aparecerá
“== CONVERSAR ==”, y éste
también mostrará la duración
de la operación en horas,
minutos, y segundos.
2 Cuando termine de hablar,
cuelgue el microteléfono (o
presione (SPEAKERPHONE)).
La tecla correspondiente a la
línea desconectada se apagará.
Cuando lleguen llamadas por dos o más líneas a la vez
Presione la tecla que esté parpadeando, (LINE 1), (LINE 2),
(LINE 3), o (LINE 4).
Para poner en retención una llamada o desconectar la línea,
consulte “Recepción de una llamada durante la conversación”
de la página 30.
ES
Operaciones básicas
28
Page 79

Recepción de llamadas con el casco conectado
HANDSET
Cuando haya conectado un casco TL-HD1 (no suministrado) a la toma
I (HEADSET), podrá conversar a través del mismo.
1 Cuando suene el teléfono, presione
(SPEAKERPHONE) (HEADSET).
La lámpara SPEAKERPHONE se
encenderá.
2 Cuando termine de hablar, vuelva a
presionar (SPEAKERPHONE) (HEADSET).
La lámpara SPEAKERPHONE se apagará.
Nota
Si el casco no está conectado, recibirá las llamadas a través
del interfono en el paso 1.
Tareas adicionales
Para
Ajustar el volumen del
microteléfono o del
casco
Ajustar el volumen del
altavoz
Poner una llamada en
retención
Ajustar el volumen del
generador de llamada
Silenciar su voz
Cambiar a otra llamada
(servicio de “llamada en
espera”*)
* Usted tendrá que abonarse a este servicio poniéndose en contacto con la
compañía telefónica.
Haga lo siguiente
Durante la conversación, presione (VOLUME) (+) o (--). Cada vez
que presione (VOLUME) (+) o (--), el nivel de volumen del
microteléfono o del casco cambiará entre “ALTO”, “MEDIO”, y
“BAJO”.
Durante la conversación a través del interfono, presione (VOLUME)
(+) o (--). Cada vez que presione (VOLUME) (+) o (--), el volumen
cambiará entre 16 niveles.
Presione (HOLD). La tecla correspondiente a la línea con la llamada
en retención parpadeará.
Para reanudar la conversación, presione la tecla que esté
parpadeando, (LINE 1), (LINE 2), (LINE 3), o (LINE 4). La tecla
corresponidente a la línea podrá presionarse en cada teléfono.
Presione (PROGRAM). Presione b(*) o (#)B hasta que en el
visualizador aparezca “VOLUMEN LLAMADA”, y después
presione (PROGRAM). Presione b(*) o (#)B para elegir “ALTO”,
“MEDIO”, “BAJO”, o “DESACTIVADO”, y después presione
(PROGRAM). Usted oirá sonar el teléfono con el nivel ajustado.
Mientras el teléfono esté sonando, podrá ajustar el volumen del
generador de llamada presionando (VOLUME) (+) o (--), sin
embargo, el volumen del generador de llamada no podrá ajustarse
a “DESACTIVADO”.
Para inhabilitar el micrófono, presione (MUTING). La lámpara
MUTING se encenderá. Para habilitar el micrófono vuelva a
presionar (MUTING).
Presione (FLASH).
Para volver al primer interlocutor, presione de nuevo (FLASH).
I
continúa
Operaciones básicas
Operaciones básicas
ES
29
Page 80

Recepción de llamadas (continuación)
Notas
• Cuando esté utilizando otra teléfono conectada a la línea, la tecla de la línea
parpadeará lentamente.
• Si pone una llamada en retención durante más de unos tres minutos, oirá una
alarma.
Utilización de la función de no molestar
Utilizando esta podrá desactivar el sonido de llamadas del exterior y
de intercomunicación de todas las líneas, y la voz a través del altavoz
durante el servicio buscapersonas en uno y en todos los teléfonos. Sin
embargo, cuando entre una llamada se visualizará
“** LLAMANDO **” aunque esta función esté activada.
Aunque esta función esté activada, podrá realizar llamadas.
Cuando no esté utilizando el teléfono, o cuando éste esté sonando,
podrá presionar (DO NOT DISTURB).
La lámpara DO NOT DISTURB se encenderá.
Para cancelar esta función, vuelva a presionar (DO NOT DISTURB).
Nota
Una llamada exterior no podrá transferirse al teléfono con la función “NO
MOLESTAR” activada.
Recepción de una llamada durante la conversación
Si llega otra llamada mientras esté conversando a través de una línea,
parpadeará la tecla correspondiente a tal línea, y oirá dos pitidos a
través del altavoz.
Ejemplo: Para recibir una llamada a través de la línea 2 durante la
conversación a través de la línea 1
1 Presione (HOLD).
La línea 1 pasará a retención y la tecla LINE 1 parpadeará
lentamente.
2 Presione (LINE 2).
De esta forma podrá conversar con el segundo interlocutor a
través de la línea 2.
Para desconectar la línea 2, presione (LINE 1).
Nota
Si no presiona (HOLD) en el paso 1, la línea 1 se desconectará.
Para hablar con dos interlocutores al mismo tiempo utilizando ambas
líneas, 1 y 2, consulte “Realización de una llamada de conferencia
tripartita” de la página 34.
ES
Operaciones básicas
30
Page 81

Funciones del teléfono
Marcación abreviada
Usted podrá marcar presionando una tecla de marcación abreviada
después de haber almacenado un número en la misma. Como en cada
tecla podrán almacenarse dos números de teléfono, en total podrán
almacenarse hasta 28 números.
Almacenamiento de números de teléfono
1 Presione (PROGRAM).
En el visualizador aparecerá
“PRE-PROGRAMACIÓN”.
2 Seleccione la primera o la
segunda memoria de la tecla de
marcación abreviada
presionando (LOWER).
Cuando almacene un número
de teléfono en la primera
memoria de una tecla de
marcación abreviada, cerciórese
de que la tecla LOWER no esté
encendida.
Cuando almacene un número
de teléfono en la segunda
memoria de una tecla de
marcación abreviada, presione
(LOWER) para que se encienda
la tecla LOWER.
b(*)
(ERASE/CLEAR)
(#)B
(SPEAKERPHONE)
Funciones del teléfono
3 Presione una de las teclas de
marcación abreviada.
En el visualizador aparecerá
“INGRESAR NÚMERO”.
continúa
Funciones del teléfono
31
ES
Page 82

Marcación abreviada (continuación)
1234567
4 Introduzca el número de teléfono presionando
las teclas de marcación.
Usted podrá introducir hasta 20 dígitos,
incluyendo un tono y una pausa, que se
contarán cada uno como un dígito.
5 Presione (PROGRAM).
Usted oirá un pitido largo de confirmación, y el
nombre y el número se almacenarán. La
visualización desaparecerá.
Nota
No deje que transcurran más de 20 segundos entre cada paso del
procedimiento.
Sugerencias
• Si introdujo un número erróneo en el paso 4, presione (ERASE/CLEAR) y
vuelva a comenzar desde el principio.
• Usted solamente podrá almacenar un accionamiento del gancho en el primer
dígito.
Para cambiar un número almacenado
Almacence otro nuevo como se ha descrito auteriormente.
ES
Funciones del teléfono
32
Page 83

Borrado de un número de teléfono almacenados
1 Haga que se visualice el número de teléfono que
desee borrar presionando la tecla de marcación
abreviada correspondiente.
2 Presione (ERASE/CLEAR).
BORRAR? S NO
3 Presione b(*) o (#)B para elegir “SÍ”, y
después presione el botón Jog.
Usted oirá un pitido largo de confirmación, y el
número de teléfono se borrarán.
Realización de llamadas con la marcación abreviada
1 Descuelgue el microteléfono, o presione (SPEAKERPHONE).
Cuando desee seleccionar un número de teléfono
almacenado en la segunda memoria de una tecla de
marcación abreviada, presione (LOWER).
2 Presione la tecla de marcación abreviada deseada.
El número de teléfono almacenado en la tecla de marcación
abreviada se marcará.
Para comprobar el número de teléfono antes de la
marcación abreviada
Cuando no esté realizando una llamada, presione la tecla de marcación
abreviada deseada. Cada vez que presione la tecla, el visualizador
mostrará sucesivamente, el número de teléfono, y después la
visualización desaparecerá.
Para comprobar el número de teléfono almacenado en la segunda
memoria de una tecla de marcación abreviada, presione en primer
lugar la tecla (LOWER), y después la tecla de marcación abreviada.
El número almacenado en la tecla de marcación abreviada aparecerá
en el visualizador durante 20 segundos.
Para marcar el número, descuelgue el microteléfono o presione
(SPEAKERPHONE) mientras esté visualizándose el número.
Funciones del teléfono
Nota
Cuando no haya número de teléfono almacenado en una tecla de marcación
abreviada, en el visualizador aparecerá “SIN DATOS”.
Sugerencia
Cuando haya introducido un número de teléfono de más de 17 dígitos, después
del 15.o se visualizará “–”, y los restantes se visualizarán después de unos 10
segundos.
Funciones del teléfono
33
ES
Page 84

Realización de una llamada de conferencia tripartita
Usted podrá conversar a través de dos líneas al mismo tiempo.
Realización de otra llamada durante la conversación
Usted podrá conversar con dos interlocutores al mismo tiempo
utilizando dos líneas. (Conferencia tripartita)
1 Presione (HOLD) mientras esté
conversando a través de una
línea.
La línea se pondrá en retención.
2 Presione cualquiera de las teclas
(LINE 1), (LINE 2), (LINE 3),
(LINE 4) que no esté utilizando.
(SPEAKERPHONE)
3 Marque el número de teléfono
4 Presione (CONF) (conferencia)
Notas
• Si no presiona (HOLD) en el paso 1, la primera línea se desconectará.
• Si hay tres o cuatro líneas conectadas o en retención, no podrá realizar una
“conferencia tripartita”.
ES
Funciones del teléfono
34
del segundo interlocutor.
después de haberse conectado al
segundo interlocutor.
La lámpara CONF se encenderá.
Ahora podrá conversar con
ambos interlocutores.
Cuando desee volver a una
llamada del exterior normal,
presione la tecla de la línea para
continuar la llamada.
Page 85

Recepción de una llamada durante la conversación
Si llega otra llamada mientras esté conversando a través de una línea,
parpadeará la tecla correspondiente a la línea a través de la que llegó
tal llamada.
1 Presione (HOLD).
La línea que esté utilizando pasará a retención.
2 Presione (LINE 1), (LINE 2), (LINE 3) o (LINE 4) de acuerdo
con la línea por la que llegó la otra llamada.
3 Presione (CONF).
Ahora podrá conversar con ambos interlocutores. (Conferencia tripartita)
Notas
• Si no presiona (HOLD) en el paso 1, la primera línea se desconectará.
• Si hay tres o cuatro líneas conectadas o en retención, no podrá realizar una
“conferencia tripartita”.
Para desconectar las líneas durante una conferencia tripartita
Ejemplo: Durante una conferencia tripartita entre las líneas 1 y 2.
Para desconectar al mismo tiempo ambas líneas, cuelgue el
microteléfono.
Si está conversando a través del interfono o el casco, presione
(SPEAKERPHONE) (HEADSET).
Para desconectar la línea 1 y continuar conversando a través de la línea
2 solamente:
Presione (LINE 2).
Para desconectar la línea 2 y continuar conversando a través de la línea
1 solamente:
Presione (LINE 1).
Funciones del teléfono
Para poner las líneas en retención durante una conferencia
tripartita
Ejemplo: Durante una conferencia tripartita entre las líneas 1 y 2.
Presione (HOLD). Ambas líneas se pondrán en retención.
Para reanudar la conversación a través de ambas líneas, presione
(CONF).
Para reanudar la conversación a través de una sola línea, presione
(LINE 1) o (LINE 2), de acuerdo con la línea que desee. La otra línea
que no haya seleccionado se mantendrá en retención.
Nota
Durante una conferencia tripartita, no podrá utilizar el servicio de “llamada en
espera”.
Funciones del teléfono
35
ES
Page 86

Utilización del servicio de espera con mensaje visual
Si usted se ha abonado al servicio de mensajes de su compañía
telefónica que incluya esta función, el visualizador le indicará que
tiene mensajes a la espera de ser escuchados. Este teléfono posee un
tono de marcación de tartamudeo especial y no responde al servicio
FSK.
(ERASE/CLEAR)
Lámpara
MESSAGES
Nota
Usted no podrá utiliza esta función si no se ha abonado a este servicio de
mensajes de su compañía telefónica.
Con respecto a los detalles sobre la disponibilidad de este servicio, consulte a su
compañía telefónica.
Si tiene mensajes
Ejemplo: Cuando haya mensajes en
la línea 1.
En el visualizador de todos los
teléfonos conectados a la toma LINE 1
aparecerán “LINE 1” y “MESSAGES”,
y parpadeará la lámpara MESSAGES
de todos ellos.
Cuando un teléfono recupere los
mensajes, desaparecerá la
visualización y se apagará la lámpara
MESSAGES de todos los teléfonos.
Si la visualización y lámpara MESSAGES continúa
parpadeando
Si la visualización no desaparece y la lámpara MESSAGES no se apaga
(es decir, cuando haya recuperado sus mensajes con otros teléfonos),
podrá hacer que la visualización desaparezca y que la lámpara
MESSAGES se apague presionando manualmente (ERASE/CLEAR).
Nota
Cuando haya mensajes en dos o más líneas, podrá hacer que la visualización de
los mensajes desaparezca y que la lámpara MESSAGES se apague en todas las
líneas presionando (ERASE/CLEAR). Sin embargo, la visualización y la lámpara
MESSAGES de otros teléfonos conectados no desaparecerá ni se apagará.
ES
Funciones del teléfono
36
Page 87

Operación de intercomunicación
Conversación entre teléfonos (Intercomunicación)
Usted podrá conversar con otro teléfono conectado a la toma LINE 1.
Ejemplo: Realización de una
llamada del número de
estación 02 al 03.
1 Descuelgue el microteléfono.
(SPEAKERPHONE)
2 Presione (INTERCOM).
En el visualizador aparecerá
“INTERCOM ??”.
3 Introduzca los dos dígitos del
número de estación (01 a 16)
presionando las teclas de
marcación.
El teléfono realizará la llamada
inmediatamente después de
haber introducido el número.
En el visualizador del teléfono
que esté realizando la llamada
aparecerá “INTERCOM A 03”.
El teléfono que reciba la llamada
sonará, y en su visualizador
aparecerá “INTERCOM DESDE
02”.
Cuando una persona
descuelgue el microteléfono, o
presione (SPEAKERPHONE) o
(INTERCOM), del teléfono de
recepción, podrá conversar con
ella.
Operación de intercomunicación
4 Cuando termine de conversar,
cuelgue el microteléfono.
continúa
Operación de intercomunicación
37
ES
Page 88

Conversación entre teléfonos (Intercomunicación) (continuación)
Notas
• La intercomunicación solamente podrá realizarse entre dos teléfonos. Si el
otro teléfono está ocupado con una llamada de intercomunicación,
buscapersonas, o buscapersonas a todos los teléfonos, oirá un tono de
ocupado y se visualizará “OCUPADO”.
• Si el otro teléfono esté en el modo de no molestar, oirá un tono corto de
ocupado y se visualizará “NO MOLESTAR”.
• Cuando converse con un interlocutor exterior a través del teléfono que esté
recibiendo una llamada de intercomunicación, no podrá realizar una llamada
de intercomunicación. Si presiona (INTERCOM), oirá un tono de ocupado.
• Si introduce un número erróneo de estación en el paso 3, oirá cinco pitidos
cortos de error. Si introduce un número no asignado, se visualizará “SIN
RESPUESTA”.
Sugerencias
• Cuando reciba una llamada de intercomunicación, el teléfono sonará a bajo
nivel incluso cuando “VOLUMEN LLAMADA” está ajustado a
“DESACTIVADO”.
• Durante una llamada de intercomunicación, la lámpara INTERCOM de los
dos teléfonos conectados estará encendida, y la de los demás parpadeará.
• Si presiona (INTERCOM) en el paso 2 sin haber realizado el paso 1 de la
página 37, se activará automáticamente la función de interfono. En este caso,
cuando no esté conversando, presione (SPEAKERPHONE).
• Si descuelga el microteléfono durante una conversación a través del
interfono, cambiará a conversación a través de dicho microteléfono, y si
presiona (SPEAKERPHONE) durante una conversación a través del
microteléfono, pasará a conversación a través del interfono.
ES
Operación de intercomunicación
38
Page 89

Buscapersonas vocal (BUSCAR)
Usted podrá buscar una persona de otro teléfono conectado a la toma LINE 1 sin que
haya que realizar ninguna operación en dicho teléfono. El teléfono llamado sonará
una vez, y la función de interfono se activará automáticamente.
(SPEAKERPHONE)
Ejemplo: Búsqueda del número de
estación 02 al 03.
1 Descuelgue el microteléfono.
2 Presione (PAGE).
En el visualizador aparecerá
“BUSCAR ??”.
Operación de intercomunicación
3 Introduzca el número de
estación de dos dígitos (01 a 16)
presionando las teclas de
marcación.
El teléfono llamará
inmediatamente después de
haber introducido el número.
En el visualizador del teléfono
que esté realizando la llamada
aparecerá “BUSCAR A 03”.
El teléfono que reciba la llamada
sonará y el su visualizador
aparecerá “BUSCAR DESDE
02”.
Usted podrá comenzar a hablar.
4 Cuando termine de conversar,
cuelgue el microteléfono.
Notas
• El servicio buscapersonas solamente será posible entre dos teléfonos. Si el otro teléfono está
ocupado con una llamada de intercomunicación, buscapersonas, o buscapersonas a todos los
teléfonos, oirá un tono de ocupado y se visualizará “OCUPADO”.
• Si el otro teléfono está en el modo de no molestar, usted oirá un pitido corto de ocupado, y se
visualizará “NO MOLESTAR”.
• Mientras esté conversando con alguien del exterior, nadie podrá llamarle con el servicio
buscapersonas. Si alguien presiona (PAGE), oirá el tono de ocupado.
• Si introduce un número erróneo de estación en el paso 3, oirá cinco pitidos cortos de error. Si
introduce un número de estación no asignado, se visualizará “SIN RESPUESTA”.
Sugerencias
• Si presiona (PAGE) en el paso 2 sin haber realizado el paso 1, se activará automáticamente la
función de interfono. Para desconectar la conversación a través del interfono, presione
(SPEAKERPHONE).
• Una persona también podrá contestar descolgando el microteléfono en el paso 3.
Operación de intercomunicación
39
ES
Page 90

Buscapersonas en todos los teléfonos (BUSCAR TODOS)
Usted podrá llamar a todos los teléfonos conectados a la toma LINE 1 a
través del interfono.
Ejemplo:Para llamar a todos los
teléfonos desde el número
de estación 02.
1 Descuelgue el microteléfono.
2 Presione (ALL PAGE).
En el visualizador del teléfono
que esté realizando la llamada,
se visualizará “BUSCAR
TODOS”.
Los demás teléfonos sonarán
una vez, y en su visualizador
aparecerá “BUSCAR TODOS
02”.
(SPEAKERPHONE)
Usted podrá llamar a todos los
teléfonos con la función de
interfono.
3 Cuando termine de conversar,
cuelgue el microteléfono.
Notas
• Cuando el otro teléfono esté ocupado con una llamada de intercomunicación,
buscapersonas, o buscapersonas a todos los teléfonos, no podrá utilizar el
servicio de buscapersonas a todos los teléfonos.
• Usted no podrá utilizar la función de buscapersonas en todos los teléfonos
para un teléfono que esté conectado con el exterior o en el modo de no
molestar.
• Desde un teléfono llamado no podrá finalizarse la función de buscapersonas.
Sugerencias
• Si presiona (ALL PAGE) en el paso 2 sin haber realizado el paso 1, se activará
automáticamente la función de interfono. Para desconectar la conversación a
través del interfono, presione (SPEAKERPHONE).
• Cuando esté recibiendo una llamada del servicio buscapersonas, presione
(SPEAKERPHONE) para cancelar la llamada y utilizar el teléfono.
ES
Operación de intercomunicación
40
Page 91

Realización de una llamada de conferencia con intercomunicación
Durante una llamada con el exterior, realizando una llamada de
intercomunicación podrá conversar con dos interlocutores al mismo
tiempo (Llamada de conferencia con intercomunicación).
1 Cuando está conversando con
alguien del exterior, presione
(INTERCOM).
La línea se pondrá en retención
y en el visualizador aparecerá
“INTERCOM ??”.
2 Introduzca los dos dígitos del
número de estación (01 a 16)
presionando las teclas de
marcación.
3 Presione (CONF) (conferencia)
después de haberse conectado al
segundo interlocutor.
La lámpara CONF se encenderá.
Ahora podrá conversar con
ambos interlocutores.
Cuando desee volver a una
llamada del exterior normal,
desconéctese de una de las
líneas internas.
Operación de intercomunicación
Notas
• Aunque se presione (CONF) en el teléfono que reciba una llamada de
intercomunicación, no podrá realizarse una “llamada de conferencia con
intercomunicación”.
• Si dos o más líneas están retenidas, seleccione la línea que desee incluir en la
conversación presionando su tecla correspondiente, y después realice el
procedimiento indicado anteriormente.
Sugerencia
Usted podrá realizar una conferencia de intercomunicación si presiona una
tecla de línea durante una llamada del exterior, y en otros teléfonos se presiona
la misma tecla de línea.
Operación de intercomunicación
41
ES
Page 92

Transferencia de una llamada
Usted podrá transferir una llamada a otro teléfono conectado a la toma
LINE 1.
Ejemplo:Para transferir la llamada
de la línea 1 a la estación
número 03.
1 Durante la conversación con un
interlocutor del exterior,
presione (TRANSFER).
La línea utilizada se pondrá en
retención, y en el visualizador
aparecerá
“TRANSFERENCIA ??”.
2 Introduzca el número de dos
dígitos de estación (01 a 16) del
teléfono al que desee realizar la
transferencia utilizando las tecla
(SPEAKERPHONE)
de marcación.
El teléfono realizará la llamada
inmediatamente después de
haber introducido el número.
En el visualizador del teléfono
que esté realizando la
transferencia aparecerá
“TRANSFER A 03”.
El teléfono que reciba la llamada
sonará, y en su visualizador
aparecerá “LÍNEA1
TRANSFER”.
ES
Operación de intercomunicación
42
3 Cuando alguien descuelgue el
microteléfono (o presione
(SPEAKERPHONE)) o presione
(LINE 1), (LINE 2), (LINE 3), o
(LINE 4), la tecla que esté
parpadeando en el teléfono que
esté recibiendo una llamada
transferida, se conectará una
llamada del exterior.
Page 93

Notas
• Si hay otra llamada desde el exterior durante la transferencia de una llamada, usted no podrá
hablar con el interlocutor del exterior en el paso 3. Para contestar y hablar, presione la tecla
correspondiente a la línea.
• Después del paso 2, si el teléfono que esté recibiendo una llamada transferida no realiza el
paso 3 antes de unos minuto de haber colgado el microteléfono o de haber presionado
(SPEAKERPHONE) en el teléfono que está tratando de transferir la llamada, a través de éste se
oirá una alarma.
• Si el otro teléfono está en el modo de no molestar, oirá un tono corto de ocupado y se
visualizará “NO MOLESTAR”.
• Cuando el teléfono al que haya intentado realizar la transferencia esté ocupado en una
llamada con el exterior, o de intercomunicación, no podrá transferir la llamada del exterior,
oirá un tono de ocupado, y se visualizará “OCUPADO” o “SIN RESPUESTA”.
• Si dos o más líneas están retenidas, seleccione la línea que desee incluir en la conversación
presionando su tecla correspondiente, y después realice el procedimiento indicado en la
página 42.
• Si introduce un número erróneo de estación en el paso 2, oirá cinco pitidos cortos de error. Si
introduce un número de estación no asignado, se visualizará “SIN RESPUESTA”.
Sugerencias
• La transferencia estará disponible incluso aunque cualquiera de los teléfonos, excepto el que
esté recibiendo la transferencia, esté ocupado en una llamada de intercomunicación.
• Cuando reciba una llamada transferida, el teléfono sonará a bajo nivel incluso aunque el
“VOLUMEN LLAMADA” está ajustado a “DESACTIVADO”.
• Usted podrá colgar el microteléfono o presionar (SPEAKERPHONE) después de haber
introducido el número de estación en el paso 2.
• Para cancelar la transferencia de una llamada, presione la tecla de línea que esté parpadeando.
Así podrá reanudar la conversación con el interlocutor del exterior.
Para transferir durante una llamada de intercomunicación
Durante una llamada con el exterior, podrá realizar una llamada de
intercomunicación (consulte la página 37).
La llamada con el exterior se pondrá en retención. Cuando presione la tecla
de línea del teléfono llamado que esté parpadeando, la llamada del exterior
se conectará.
Operación de intercomunicación
Para transferir durante la función buscapersonas
Durante una llamada con el exterior, podrá utilizar la función buscapersonas
(consulte la página 39). La llamada con el exterior se pondrá en retención.
Cuando presione la tecla que línea del teléfono al que esté llamando para
buscar a alguien que esté parpadeando, la llamada del exterior se conectará.
Para transferir durante la función buscapersonas en todos los teléfonos
Durante una llamada con el exterior, podrá utilizar la función buscapersonas
en todos los teléfonos (consulte la página 40). La llamada con el exterior se
pondrá en retención. Esta llamada se conectará presionando la tecla de línea
que esté parpadeando en cualquiera de los teléfonos. Utilice esta función
cuando no sepa a qué teléfono tiene que transferir la llamada del exterior.
Sugerencia
Para cancelar la transferencia durante una llamada de intercomunicación, o de buscapersonas en
un teléfono o en todos, presione la tecla que esté parpadeando. Así podrá reanudar la
conversación con el interlocutor del exterior.
Operación de intercomunicación
43
ES
Page 94

Información adicional
Montaje del teléfono en una pared
Lengüeta para
1
enganchar el
microteléfono
1 Extraiga la lengüeta para colgar
el microteléfono y dele la vuelta.
2 Fije el soporte para instalación
mural al teléfono. Inserte en
primer lugar las lengüetas
superiores, y después presione
2
Soporte para
instalación
mural
el teléfono contra el soporte
para instalación mural de forma
que las lengüetas inferiores de
dicho soporte entren en el
teléfono.
3 Fije el adaptador de
alimentación de CA y los cables
de línea telefónica al soporte
para instalación mural.
3, 4
Cables de
línea
telefónica
5
Placa mural
ES
Información adicional
44
Cable del
adaptador de
alimentación
de CA
4 Enchufe el otro extremo de los
cables en las tomas LINE 1/
LINE 1+2, LINE 3/LINE 3+4, y
si es necesario, enchufe el cable
de línea telefónica en la toma
DATA.
5 Cuelgue el soporte para
instalación mural en la placa
mural, y enchufe los cables de
línea telefónica en las tomas del
teléfono. Si es necesario,
enchufe el cable de línea
telefónica en la toma de entrada
de su PC, facsímil, etc.
Page 95

Utilización del teléfono durante un corte del suministro eléctrico
Durante un corte del suministro eléctrico, no podrá realizar ni recibir llamadas.
Cuando vuelva a reanudarse el suministro eléctrico, reajuste la fecha y la hora. Los
demás ajustes y los datos de la memoria seguirán como antes de dicho corte del
suministro eléctrico.
Le recomendamos que instale una pila de 9V 6F22/6LR61 (no suministrada) en el
teléfono.
Cuando haya instalado una pila de 9V 6F22/6LR61 (no suministrada) en
el teléfono
Durante un corte del suministro eléctrico, podrá realizar o recibir llamadas. Sin
embargo, la función de interfono no trabajará. Para realizar una llamada, tendrá que
presionar la tecla de línea después de descolgar el microteléfono, y para recibir una
llamada, tendrá que presionar la tecla de línea que esté parpadeando después de
descolgar también el microteléfono.
El teléfono podrá utilizarse continuamente durante unos 30 minutos.
Para realizar una llamada, solamente podrá utilizar las teclas de marcación.
Durante un corte del suministro eléctrico, en el visualizador aparezca “CORTE SUM
ELÉC”.
En los casos siguientes, la pila se habrá agotado y tendrá que reemplazarla.
• Cuando una llamada se corte durante la conversación.
• Cuando la tecla de línea no se encienda, o se apague rápidamente, incluso después
de haber descolgado el microteléfono.
• Cuando la indicación de “CORTE SUM ELÉC” sea débil.
• Cuando oiga un ruido de chasquido a través del teléfono.
Abra
Información adicional
9V
Pila de 9V 6F22/6LR61
(no suministrada)
Compartimiento de la pila
Notas
• Usted no podrá utilizar el teléfono más que para realizar o recibir llamadas.
• Si desconecta el adaptador de CA del tomacorriente de CA con la batería instalada en el
teléfono, ésta se descargará incluso aunque no utilice el teléfono. Cuando vaya a desconectar
el teléfono durante mucho tiempo, extraiga la batería para evitar que ésta se descargue y los
daños que podría producir el electrólito de la misma.
• Si se produce un corte del suministro eléctrico durante una llamada de intercomunicación, de
buscapersonas, o de buscapersonas a todos los teléfonos, la llamada se desconectará. Cuando
transfiera una llamada, la llamada del exterior permanecerá en retención, incluso en el caso de
un corte del suministro eléctrico, a fin de que usted pueda volver a dicha llamada.
Sugerencia
Si se produce un corte del suministro eléctrico durante una llamada con el exterior, podrá
continuar tal llamada, pero no podrá ajustarse el volumen del microteléfono ni del interfono.
Información adicional
45
ES
Page 96

Mantenimiento
• Limpie el exterior con un paño suave ligeramente humedecido en
agua o en una solución de detergente neutro. No utilice limpiadores
abrasivos, desengrasantes ni disolventes, como el alcohol o la
bencina, ya que podrían dañar el acabado.
• En caso de duda o problemas con el teléfono, consulte a su
proveedor Sony más próximo.
ES
Información adicional
46
Page 97

Solución de problemas
Si experimenta cualquiera de los problemas siguientes cuando utilice
su teléfono, use esta guía como ayuda para solucionarlos. Si el
problema persiste, póngase en contacto con su proveedor Sony.
Síntoma
No se oye tono de invitación a
marcar.
El teléfono no permite la
conexión en absoluto, incluso al
marcar el número correcto.
El teléfono no repite
correctamente la marcación.
No se oye nada a través del
altavoz.
El teléfono no suena.
La tecla de una línea no usada
parpadea.
Se oyen cinco pitidos cortos de
error al presionar una tecla de
Realización/recepción de llamadas
línea.
Al finalizar una llamada, o
cuando una llamada no tiene
éxito, se un chasquido a través
del teléfono.
Se oyen cinco pitidos cortos de
error, y no es posible almacenar
un número de marcación
abreviada.
El teléfono no realiza la
abreviada
Marcación
marcación abreviada.
Solución
• Compruebe si el cable de línea telefónica está
conectado con seguridad a la toma telefónica.
• Compruebe si el modo de marcación está
correctamente ajustado (página 15).
• Compruebe si el último número marcado es el
realmente deseado.
• Presione (VOLUME) (+) para aumentar el volumen
del altavoz (página 24).
• Compruebe si “VOLUMEN LLAMADA” está
ajustado a “ALTO”, “MEDIO”, o “BAJO” (página 29).
• Cerciórese de que el teléfono no esté en el modo de no
molestar (página 30).
• Cerciórese de que la línea no utilizada esté ajustada a
“INHAB” (página 16).
• Cerciórese de que la línea esté ajustada a “INHAB”
(página 16).
• Este sonido es una confirmación automática de si hay
o no mensajes vocales, y no significa mal
funcionamiento.
• Realice correctamente el procedimiento de
almacenamiento de número (página 31).
• Cerciórese de que el no sea superior a 20 dígitos
(incluyendo tono y pausa).
• Almacene el número correcto (página 31).
Información adicional
continúa
Información adicional
47
ES
Page 98

Solución de problemas (continuación)
Síntoma
No es posible utilizar el servicio
de espera de mensajes visuales.
visuales
mensajes
Espera de
Al presionar (INTERCOM) se
oye un tono de ocupado y no es
posible realizar una llamada de
intercomunicación.
Al presionar (INTERCOM) o
(PAGE), se oye un pitido corto
de ocupado y no es posible
realizar una llamada de
intercomunicación ni de
buscapersonas.
Intercomunicación
El modo de marcación, los
códigos de área, la fecha y la
hora, y el número de estación
son incorrectos.
Solución
• Compruebe si está subscrito al servicio de espera de
mensajes visuales (consulte la página 36).
• El otro teléfono está ocupado en una llamada de
intercomunicación.
• Compruebe si el otro teléfono (IT-M704 o IT-M804)
está conectado correctamente a LINE 1.
• Compruebe si hay un teléfono que no sea IT-M704 e
IT-M804 conectado a la toma LINE 1.
• Cerciórese de que todos los teléfonos estén
adecuadamente conectados de acuerdo con el
cableado interior (página 9).
• Cerciórese de que a la toma LINE 1 no esté conectado
un teléfono que no sea IT-M704 e IT-M804 (página
30).
• Los datos de estos ajustes no se enviaron
correctamente a los teléfonos. Vuelva a realizar los
ajustes.
Para reponer el teléfono
Si con estas medidas no puede resolver el problema, desenchufe el
adaptador de alimentación de CA. Si hay una pila insertada en el
teléfono, extráigala. Si con esto el teléfono no se repone, presione el
botón RESET de la parte izquierda del mismo con un bolígrafo, etc.
El día, la hora, y el último número de teléfono marcado se borrarán.
Nota
Cuando reponga el teléfono presionando el botón RESET es posible que se
borre todo el contenido del directorio telefónico, los códigos de área, los datos
de identificación de demandantes, los mensajes, el modo de marcación, y el
ajuste de no molestar.
Para devolver el teléfono a los ajustes de fábrica
Si necesita borrar todos los datos de marcación abreviada, y todos los
ajustes, reponga el teléfono de acuerdo con el procedimiento siguiente.
Para devolver el teléfono a los ajustes de fábrica, desenchufe el
adaptador de alimentación de CA, y vuelva a enchufarlo manteniendo
presionada (ERASE/CLEAR). Si hay una pila insertada en el teléfono,
extráigala en primer lugar.
ES
Información adicional
48
Page 99

Especificaciones
Alimentación
12 V CC desde el adaptador de
alimentación de CA AC-T71
Señal de marcación
Tonos, 10 pps (pulsos por segundo),
seleccionable
Dimensiones
Aprox. 199 x 68,2 x 235,5 mm
Masa
Aprox. 990 g
Accesorios suministrados
Consulte la página 7.
El diseño y las especificaciones están sujetos a
cambio sin previo aviso.
Información adicional
Información adicional
ES
49
Page 100

Índice alfabético
A
Ajuste
del modo de marcación
14
del teléfono 8
Ajuste del volumen
altavoz 24, 29
casco 24, 29
generador de llamada 29
microteléfono 24, 29
Asignación del número de
estación 14
B
Buscapersonas en todos los
teléfonos 40
Buscapersonas vocal 39
C, D
Casco 24, 29
Conexión 8
Conferencia 34, 41
Conferencia tripartita 34
Conferencia con
intercomunicación 41
Contenido del paquete 7
Conversación entre
teléfonos 37
Corte del suministro
eléctrico 45
E, F, G, H
Especificaciones 49
I, J, K, L
Identificación de partes 20
Idioma de las indicaciones
19
Indicaciones de las
lámparas 22
Inhabilitación de la línea
16
Intercomunicación 37
M
Marcación abreviada 31
Marcación por pulsos 14
Modo de marcación
cambio temporal a la
marcación por tonos 24
selección 14
Montaje del teléfono en una
pared 44
N, O, P, Q
No molestar 30
R
Recepción de llamadas 28
Realización de llamadas 23
Rendimiento de interfono
25
Repetición de la marcación
26
Repetición de la marcación
por línea ocupada 27
Reposición del teléfono 48
Retención 24, 29
S
Servicio de llamada en
espera 29
Servicio de llamada en
espera con mensaje
visual 36
Solución de problemas 47
T, U
Tonos
cambio a 14
marcación 24
Transferencia de una
llamada 42
V, W, X, Y, Z
Volumen
altavoz 24, 29
casco 24, 29
generador de llamada 29
microteléfono 24, 29
Vuelta a los ajustes de
fábrica 48
ES
Información adicional
50
 Loading...