

Page 1

5-021-320-41(1)
“Help Guide” (Web manual)
Refer to “Help Guide” for
in-depth instructions on the
many functions of the camera.
« Guide d’aide » (Manuel en ligne)
Consultez le « Guide d’aide » pour
obtenir des instructions détaillées
au sujet des nombreuses fonctions
E-mount
https://rd1.sony.net/help/ilc/2010/h_zz/
Interchangeable Lens Digital Camera/Instruction Manual GB
Appareil photo à objectif interchangeable/Mode d’emploi FR
Digitalkamera mit Wechselobjektiv/Gebrauchsanleitung DE
de l’appareil.
©2020 Sony Corporation Printed in Thailand
Cámara Digital de Lentes Intercambiables/Manual de instrucciones
Fotocamera digitale con obiettivo intercambiabile/Istruzioni per l’uso
Câmara Digital de Objetivas intercambiáveis/Manual de instruções
Digitale camera met verwisselbare lens/Gebruiksaanwijzing NL
Aparat cyfrowy z wymiennymi obiektywami/Instrukcja obsługi PL
Цифровой фотоаппарат со сменным объективом/Инструкция по эксплуатации
Цифрова камера зі змінним об’єктивом/Посібник з експлуатації
Digitalkamera med utbytbart objektiv/Handledning SE
Digitaalinen kamera vaihdettavalla objektiivilla/Käyttöopas FI
Digitalkamera med utskiftbart objektiv/Bruksanvisning NO
Digitalkamera med udskifteligt objektiv/Betjeningsvejledning DK
ILCE-7SM3
ES
IT
PT
RU
UA
Page 2

English
Check out the
Help Guide!
The “Help Guide” is an on-line manual that you can read on your
computer or smartphone. Refer to it for details on menu items,
advanced usage, and the latest information on the camera.
Scan
here
https://rd1.sony.net/help/ilc/2010/h_zz/
ILCE-7SM3 Help Guide
Instruction Manual
(this book)
This manual introduces some
basic functions.
For the quick start guide, see
“Startup guide” (page3). The
“Startup guide” introduces the
initial procedures from when you
open the package until you release
the shutter for the first shot.
GB
2
In-Camera Guide
The [In-Camera Guide] shows
explanations of the menu
items on the monitor of the
camera.
You can quickly pull up information
during shooting.
On the menu screen, select an
item for which you want to view
a description, and then press the
(Delete) button.
Page 3

Startup guide
1: Checking the camera and the supplied
items
The number in parentheses indicates the number of pieces.
• Camera (1)
• Battery charger (1)
• Shoulder strap (1)
• Power cord (mains lead) (1)*
(supplied in some countries/
regions)
* Multiple power cords may be
supplied with this equipment.
Use the appropriate one that
matches your country/region.
See page 77.
• Rechargeable battery pack
NP-FZ100 (1)
• USB Type-C® cable (1)
• Body cap (1) (Attached to the
camera)
• Cable Protector (1)
• Shoe cap (1) (Attached to the
camera)
• Eyepiece cup (1) (Attached to
the camera)
• Instruction Manual (1) (this
manual)
• Reference Guide (1)
GB
GB
3
Page 4

2: Preparing the battery pack
1
Insert the battery pack into
the battery charger.
• Place the battery pack on the
battery charger in the direction
of . Slide the battery pack in
the direction of the arrow as far
as it will go.
2
Connect the battery charger
to a wall outlet (wall socket)
using the power cord
(supplied).
• When charging starts, the
CHARGE lamp on the battery
charger will light up. When
charging is finished, the CHARGE
lamp and all indicators turn off.
3
Insert the battery pack into
the camera.
• Open the battery cover, and
then insert the battery pack
while pressing the lock lever.
• Push the battery pack until it
locks into place, and then close
the cover.
GB
4
CHARGE lamp
To a wall outlet
(wall socket)
Lock lever
Page 5

To charge the battery with the battery pack inserted into
the camera
Turn off the power of the camera, and connect the USB Type-C terminal on
the camera to an external power source such as a commercially available
USB AC adapter or mobile battery using a USB cable. When a device
compatible with USB-PD (USB Power Delivery) is connected to the camera,
fast charging is possible.
Note
• USB charging is not possible from the Multi/Micro USB Terminal.
• Operation with all USB-PD-compatible devices is not guaranteed.
• We recommend using a USB-PD-compatible device with an output of 9V/3A
or 9V/2A.
GB
GB
5
Page 6

3: Inserting a memory card into the
camera
You can use CFexpress Type A memory cards and SD memory cards with
this camera (page 79).
1
Open the memory card cover.
2
Insert the memory card into the
Slot 1.
• Both Slot 1 and Slot 2 support
CFexpress Type A memory cards and
SD memory cards.
• Insert a CFexpress Type A memory card
with the label facing the monitor, and
an SD memory card with the terminal
facing the monitor. Insert the card until
it clicks into place.
• You can change which memory
card slot to use by selecting MENU
(Shooting) [Media]
Rec. Media Settings]
[
[Prioritize Rec. Media]. The Slot 1 is
used in the default settings.
Slot 1 Slot 2
Hint
• When you use a memory card with the camera for the first time, it is
recommended that you format the card on the camera for more stable
performance of the memory card (page 42).
GB
6
Page 7

4: Attaching a lens
1
Remove the body cap from the camera and the rear lens cap
from the rear of the lens.
• When changing the lens, work quickly in a dust-free environment to
keep dust or debris from getting inside the camera.
2
While aligning the white
index marks (mounting
indexes), push the lens
gently toward the camera.
Then, turn the lens slowly
in the direction of the arrow
until it clicks into place.
• Make sure that the mount is
facing down to prevent dust
and debris from entering the
camera.
Note
• If you want to shoot full-frame images, use a full-frame size compatible lens.
• Do not press the lens release button when attaching a lens.
• Do not hold the part of the lens that is extended for zoom or focus
adjustment.
GB
GB
7
Page 8

To remove the lens
Keep pressing the lens release
button and turn the lens in the
direction of the arrow until it stops.
Lens release button
Compatible lenses
You can use lenses compatible with the 35 mm full-frame format or APS-C
size dedicated lenses on this camera. When you use APS-C size dedicated
lenses, the angle of view will correspond to approximately 1.5 times the
focal length indicated on the lens.
GB
8
Page 9

5: Setting the language and the clock
ON/OFF (Power) switch
Control wheel
1
Set the ON/OFF (Power) switch to “ON” to turn on the camera.
2
Select the desired language and then press the center of the
control wheel.
3
Make sure that [Enter] is selected on the area/date/time
confirmation screen, and then press the center of the control
wheel.
4
Select the desired geographic location, set [Daylight Savings],
and then press the center.
• [Daylight Savings] can be switched on/off using the top/bottom of
the control wheel.
5
Set the date format (year/month/day), and press the center.
6
Set the date and time (hour/minute/second), and press the
center.
• To set the date and time or geographic location again at a
later point, select MENU
[Area/Date/Time Setting].
(Setup) [Area/Date]
GB
Note
• The built-in clock of the camera may exhibit time errors. Adjust the time at
regular intervals.
GB
9
Page 10

6: Shooting images
Shooting still images (Intelligent Auto)
This section describes how to shoot still images in the [Intelligent Auto]
mode. In the [Intelligent Auto] mode, the camera automatically focuses
and automatically determines the exposure based on the shooting
conditions.
1
Set the mode dial to
(Auto Mode).
The shooting mode will be set to
(Intelligent Auto).
• Turn the mode dial while
pressing the mode dial lock
release button in the center of
the mode dial.
2
Adjust the monitor to an easily viewable angle, and hold the
camera. Alternatively, look through the viewfinder and hold the
camera.
3
When a zoom lens is mounted, enlarge the appearance of
subjects by rotating the zoom ring.
4
Press the shutter button
halfway down to focus.
When the image is in focus, a
beep sounds and the indicator
(such as) lights up.
5
Press the shutter button fully down.
GB
10
Page 11

To play back images
Press the (Playback) button to play back images. You can select the
desired image using the control wheel.
To delete displayed image
Press the (Delete) button while an image is displayed to delete it. Select
[Delete] using the control wheel on the confirmation screen, and then
press the center of the control wheel to delete the image.
To shoot images in various shooting modes
Set the mode dial to the desired mode depending on the subject or
purpose of shooting (page15).
Shooting movies
You can set the recording format and exposure and record movies by
using the dedicated menu items for movies.
1
Set the mode dial to
(Movie).
• Turn the mode dial while
pressing the mode dial lock
release button in the center of
the mode dial.
GB
2
Press the MOVIE (Movie)
button to start recording.
3
Press the MOVIE button again to stop recording.
MOVIE (Movie) button
GB
11
Page 12

To play back movies
Press the (Playback) button to switch to the playback mode. Select a
movie to play back using the control wheel, and press the center of the
control wheel to start playback.
To change the exposure mode for movies (P/A/S/M)
MENU (Shooting) [Shooting Mode] [Exposure Mode] Select
the desired exposure mode depending on the subject or purpose of
shooting (page 16).
12
GB
Page 13

Basic operations
Using the control wheel
On the menu screen or the screen displayed by pressing the Fn button,
you can move the selection frame by turning the control wheel or by
pressing the top/bottom/left/right side of the control wheel. Your
selection is confirmed when you press the center of the control wheel.
• The DISP (Display Setting), / (Drive Mode), and ISO ( ISO)
functions are assigned to the top/left/right side of the control wheel.
In addition, you can assign selected functions to the left/right/bottom
side and the center of the control wheel, and to the rotation of the
control wheel.
• During playback, you can display the next/previous image by pressing
the right/left side of the control wheel or by turning the control wheel.
GB
GB
13
Page 14

Using the multi-selector
You can move the focus area by pushing the multi-selector up/down/left/
right. You can also assign a function to be activated when you press the
center of the multi-selector.
• Put your finger right on top of the multi-selector to manipulate it more
precisely.
• You can move the focus area when [ Focus Area] is set to the
following parameters:
– [Zone]
– [Spot]
– [Expand Spot]
– [Tracking: Zone]
– [Tracking: Spot S] / [Tracking: Spot M] / [Tracking: Spot L]
– [Tracking: Expand Spot]
• The [Focus Standard] function is assigned to the center of the multiselector in the default settings.
14
GB
Page 15

Using the mode dial
Use the mode dial to select a shooting mode according to the subject and
purpose of shooting.
• Turn the mode dial while pressing the mode dial lock release button in
the center of the mode dial.
Shooting mode details
The modes on the mode dial are divided into still image shooting modes,
movie recording modes, and registration recall modes.
(A) Still image shooting modes
(B) Movie recording modes
(C) Registration recall modes
Hint
• The menu items displayed vary depending on the mode dial setting
(pages20, 41).
GB
GB
15
Page 16

(A) Still image shooting modes
The shooting mode you select determines how to adjust the aperture (F
value) and shutter speed.
Mode dial Shooting mode Description
Intelligent Auto The camera shoots with automatic
Program Auto Allows you to shoot with the
Aperture Priority The aperture value is given priority
Shutter Priority The shutter speed is given priority
Manual Exposure Manually adjust both the aperture
scene recognition.
exposure adjusted automatically
(both the shutter speed and the
aperture value). You can set shooting
functions such as [
and the shutter speed is adjusted
automatically.
Select this when you want to blur the
background or focus on the entire
screen.
and the aperture value is adjusted
automatically.
Select this when you want to shoot a
fast-moving subject without blurring,
or when you want to shoot a water
or light trail.
value and shutter speed.
You can shoot with your favorite
exposure.
ISO].
(B) Movie recording modes
Mode dial Shooting mode Description
Movie You can set the exposure mode for
S&Q Motion You can set the exposure mode for
movie shooting.
S&Q Motion shooting.
16
GB
Page 17

The method for setting the exposure (shutter speed and aperture) in
the movie recording modes depends on the MENU
[Shooting Mode] [Exposure Ctrl Type] setting.
(Shooting)
When [Exposure Ctrl Type] is set to [P/A/S/M Mode]:
MENU (Shooting) [Shooting Mode] [Exposure Mode] or
Exposure Mode] Select the desired exposure mode from among
[
P/A/S/M.
When [Exposure Ctrl Type] is set to [Flexible Exp. Mode]:
You can use the custom button to which [Av Auto/Manual Switch] or
[Tv Auto/Manual Switch] under [Auto/Manual Swt. Set.] is assigned
to switch between the automatic setting and manual setting for each
aperture value and shutter speed. If you select the manual setting, turn
the front/rear dial and set the desired value.
(C) Registration recall modes
Mode dial Shooting mode Description
1/2/3
Recall Camera Setting
You can call up frequently used
modes and numerical value settings
that have been registered* in
advance then shoot the images.
* In [ Camera Set. Memory],
you can register various shooting
settings, such as the exposure
mode (P / A / S / M), aperture (F
value), and shutter speed.
GB
GB
17
Page 18

Using the MENU button
The menu screen is displayed by pressing the MENU button. You can
change settings related to all of the camera operations including shooting
and playback, or you can execute a function from the menu screen.
1
2
3
4
5
6
7
Menu tab
Menu tabs are categorized by usage scenario, such as shooting,
playback, network settings, etc.
Menu group
In each tab, menu items are grouped by function.
The number assigned to the group is the serial number in the tab.
Refer to the number to determine the location of the group in use.
Menu item
Select the function you want to set or execute.
Hint
• The name of the selected tab or group is displayed at the top of the screen.
• For a list of items displayed on the menu screen, see “List of MENU items”
(page 41).
• When [Touch Operation] is set to [On], touch operations on the menu screen
are possible.
18
GB
Page 19

Basic operations on the menu screen
Press the MENU button to display the menu screen.
Move within the menu tree and find the desired menu
item by pressing the top/bottom/left/right side of the
control wheel.
• The displayed menu items differ between the still image shooting
modes and movie recording modes (page 20).
1
2
3
4
5
6
7
1
2
3
4
5
6
7
Menu tabs Menu groups Menu items
Press the center of the control wheel to select the menu
item.
The setting screen or execution screen for the selected item will
appear on the monitor.
Select a parameter or execute the function.
• If you want to cancel changing the parameter, press the MENU
button and go back to the previous screen.
Press the MENU button to exit the menu screen.
You will return to the shooting screen or playback screen.
Hint
• You can display the menu screen by assigning the [MENU] function to a
custom key using [
then pressing that key.
Custom Key Setting] or [ Custom Key Setting], and
1
2
3
4
5
6
7
GB
GB
19
Page 20

Relationship between the mode dial and menu screen
The menu groups and menu items displayed in the [Shooting],
[Exposure/Color], and [Focus] tabs vary depending on the mode dial
setting.
Still image shooting modes (AUTO/P/A/S/M)
• Menu items for shooting still images are displayed.
1
2
3
4
5
6
7
Movie recording modes ( /S&Q)
• Menu items for recording movies are displayed.
1
2
3
4
5
6
7
Icons used in this manual
Menu items displayed in the still image shooting modes
:
(AUTO/P/A/S/M)
Menu items displayed in the movie recording modes
:
(Movie/S&Q)
Menu items displayed in both the still image shooting modes
:
and movie recording modes
20
GB
Page 21

Using the C (custom) buttons
If you assign frequently used functions to the custom buttons (C1 to C4)
in advance, you can quickly call up those functions simply by pressing the
button during shooting or playback.
Recommended functions are assigned to the custom buttons by default.
To check/change the functions of the custom buttons
You can confirm the function currently assigned to each custom button
via the following procedure.
MENU
[ Custom Key Setting] or [ Custom Key Setting].
If you want to change the function of the custom button, press the center
of the control wheel while the custom button is selected. The functions
that can be assigned to that button will appear. Select your desired
function.
(Setup) [Operation Customize] [ Custom Key Setting],
GB
GB
21
Page 22

Using the Fn (Function) button
If you press the Fn (function) button during shooting, a menu (function
menu) containing frequently used functions such as the Drive Mode and
Focus Mode is displayed on the screen, allowing you to quickly call up the
functions.
Example of function menu
The displayed items differ depending on the camera status.
Hint
• Use MENU (Setup) [Operation Customize] [Fn Menu Settings]
to register your favorite functions in the function menu. You can register
12functions for shooting still images and 12functions for shooting movies
separately.
• When [Touch Operation] is set to [On], touch operations on the menu screen
are possible.
1
Press the DISP on the control wheel repeatedly to display a
screen mode other than [For viewfinder].
2
Press the Fn (Function) button.
22
Fn (Function) button
GB
Page 23

3
Press the top/bottom/left/
right side of the control
wheel to select a function
to set.
4
Turn the front dial to select the desired setting, and press the
center of the control wheel.
• Some functions can be fine-tuned using the rear dial.
Using the Fn button in the [For viewfinder] display
If you press the Fn button while the monitor display is set to
[For viewfinder], you can directly operate items you want to change.
In the auto mode
In the P/A/S/M mode
• The displayed contents and their positions shown in the illustrations are
just a guideline, and may differ from the actual display.
GB
GB
23
Page 24

To adjust settings from the dedicated setting screens
Select the icon for the desired function
and then press the center of the control
wheel. The dedicated setting screen for the
function will appear. Follow the operating
guide to adjust settings.
Operating guide
Note
• Items that are grayed out on the [For viewfinder] screen cannot be changed
by pressing the Fn button.
• Some settings, such as [ Creative Look] and [ Picture Profile], cannot
be operated on the [For viewfinder] screen unless you enter the dedicated
setting screen.
24
GB
Page 25

Using the DISP (Display Setting) button
By pressing the DISP (Display Setting) button, you can change the content
displayed on the screen during shooting and playback. The display
switches each time the DISP button is pressed.
Hint
• The monitor can be turned off with the DISP button. Add a check mark
to [Monitor Off] under MENU
[DISP (Screen Disp) Set] [Monitor].
During shooting (Monitor)
Display All Info. No Disp. Info. Histogram Level For viewfinder
Display All Info.
699 12
M
(Setup) [Operation Customize]
GB
GB
25
Page 26

During shooting (Viewfinder)
Level No Disp. Info. Histogram Level
• To switch the information displayed on the viewfinder, press the DISP
button while looking into the viewfinder.
During playback (Monitor/Viewfinder)
Display Info. Histogram No Disp. Info. Display Info.
• If the image has an overexposed or underexposed area, the
corresponding section will blink on the histogram display (overexposed/
underexposed warning).
• The settings for playback are also applied in [ Auto Review].
Note
• The displayed contents and their position shown in the illustration are just a
guideline, and may differ from the actual display.
• The following are not displayed in the default settings.
– Monitor Off
– Display All Info. (when using the viewfinder)
• The viewfinder display and the monitor display for shooting can be set
separately. Look through the viewfinder to set the display settings for the
viewfinder.
• In the movie recording modes, [For viewfinder] cannot be displayed. If
the monitor display is set to [For viewfinder], the display will switch to all
information when movie shooting starts.
26
GB
Page 27

Using the shooting functions
Focusing
Selecting the focus method ( Focus Mode)
Selects the focus method to suit the movement of the subject.
MENU (Focus) [AF/MF] [ Focus Mode] desired
setting.
(Single-shot AF): The product locks the focus once focusing is
complete. Use this when the subject is motionless.
(Automatic AF): [Single-shot AF] and [Continuous AF] are switched
according to the movement of the subject. When the shutter button is
pressed halfway down, the product locks the focus when it determines
that the subject is motionless, or continues to focus when the subject
is in motion. During continuous shooting, the product automatically
shoots with [Continuous AF] from the second shot.
(Continuous AF): The product continues to focus while the shutter
button is pressed and held halfway down. Use this when the subject is
in motion. In [Continuous AF] mode, there is no beep when the camera
focuses.
(DMF): You can make fine adjustments manually after performing
auto focusing, letting you focus on a subject more quickly than
when using [Manual Focus] from the beginning. This is convenient in
situations such as macro shooting.
(Manual Focus): Adjusts the focus manually. If you cannot focus on
the intended subject using auto focus, use [Manual Focus].
GB
GB
27
Page 28

Focus indicator
(lit): The subject is in focus and the focus is locked.
(flashing): The subject is not in focus.
(lit): The subject is in focus. The focus will be adjusted continuously
according to the movements of the subject.
(lit): Focusing is in progress.
Subjects on which it is difficult to focus using auto focus
• Dark and distant subjects
• Subjects with poor contrast
• Subjects seen through glass
• Fast-moving subjects
• Reflective light or shiny surfaces
• Flashing light
• Back-lit subjects
• Continuously repetitive patterns, such as the facades of buildings
• Subjects in the focusing area with different focal distances
Hint
• In [Continuous AF] mode, you can lock the focus by pressing and holding the
button that has been assigned the [Focus Hold] function.
• When you set the focus to infinity in the [Manual Focus] mode or the [DMF]
mode, make sure that the focus is on a sufficiently distant subject by checking
the monitor or the viewfinder.
Note
• [Automatic AF] is available only when you are using a lens that supports
phase detection AF (page 32).
• When [Continuous AF] or [Automatic AF] is set, the angle of view may change
little by little while focusing. This does not affect the actual recorded images.
• Only [Continuous AF] and [Manual Focus] are available when shooting movies
or when the mode dial is set to
(S&Q Motion).
28
GB
Page 29

Selecting the focus area ( Focus Area)
Set the type of focusing frame when shooting with the auto focus.
Select the mode according to the subject.
MENU (Focus) [Focus Area] [ Focus Area]
desired setting.
Wide: Focuses on a subject covering the whole range of the screen
automatically. When you press the shutter button halfway down in the
still image shooting mode, a green frame is displayed around the area
that is in focus.
Zone: Select a zone on the monitor on which to focus, and the product
will automatically select a focus area.
Center Fix: Focuses automatically on a subject in the center of
the image. Use together with the focus-lock function to create the
composition you want.
Spot: S / Spot: M / Spot: L: Allows you to move the focusing frame to
a desired point on the screen and focus on an extremely small subject
in a narrow area.
Expand Spot: If the product cannot focus on a single selected point,
it uses focus points around the [Spot] as a secondary priority area for
focusing.
Tracking: When the shutter button is pressed and
held halfway down, the product tracks the subject within the selected
autofocus area. This setting is available only when the [
is set to [Continuous AF]. Point the cursor at [Tracking] on the
Focus Area] setting screen, and then select the desired area to
[
start tracking using the left/right sides of the control wheel. You can
also move the tracking start area to the desired point by designating
the area as a [Tracking: Zone], [Tracking: Spot S]/[Tracking: Spot M]/
[Tracking: Spot L] or [Tracking: Expand Spot].
Focus Mode]
GB
Hint
• In the default settings, [ Focus Area] is assigned to the C2 button.
GB
29
Page 30

Note
• [ Focus Area] is locked to [Wide] in the following situations:
– [Intelligent Auto]
• The focus area may not light up during continuous shooting or when the
shutter button is pressed all the way down at once.
• When the mode dial is set to (Movie) or (S&Q Motion), or during
movie shooting, [Tracking] cannot be selected as the [ Focus Area].
Examples of the focusing frame display
The focusing frame differs as follows.
When focusing on a larger area
When focusing on a smaller area
• When [ Focus Area] is set to [Wide] or [Zone], the focusing frame may
switch between “When focusing on a larger area” and “When focusing
on a smaller area” depending on the subject or situation.
• When you attach an A-mount lens with a Mount Adaptor (LA-EA1 or
LA-EA3) (sold separately), the focusing frame for “When focusing on a
smaller area” may be displayed.
30
GB
Page 31
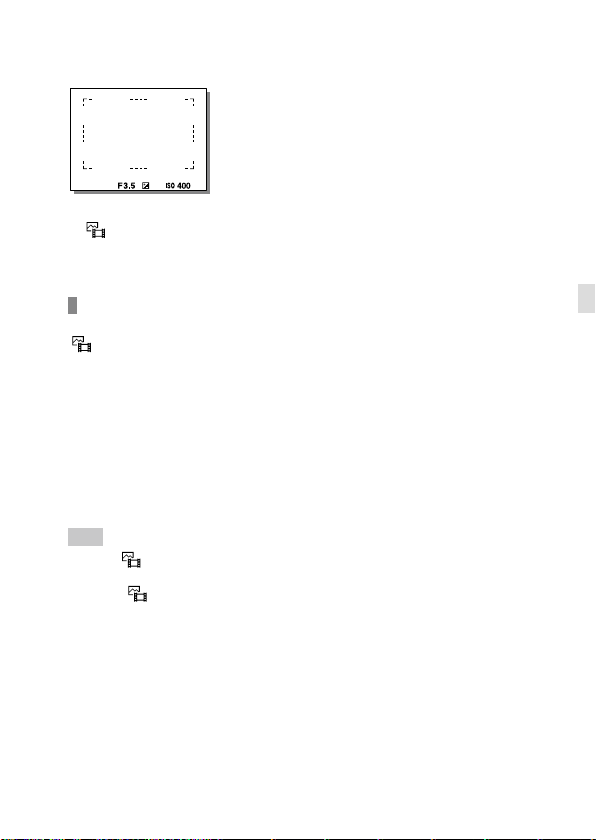
When focus is achieved automatically based on the whole range of the
monitor
• When you use a zoom function other than the optical zoom, the
Focus Area] setting is disabled and the focusing frame is shown by
[
the dotted line. The AF operates with priority on and around the center
area.
To move the focus area
You can move the focus area by operating the multi-selector when
Focus Area] is set to the following parameters:
[
– [Zone]
– [Spot]
– [Expand Spot]
– [Tracking: Zone]
– [Tracking: Spot S] / [Tracking: Spot M] / [Tracking: Spot L]
– [Tracking: Expand Spot]
If you assign [Focus Standard] to the center of the multi-selector
beforehand, you can move the focusing frame back to the center of the
monitor by pressing the center of the multi-selector.
Hint
• When [ Focus Area] is set to [Spot] or [Expand Spot], you can move the
focusing frame over a greater distance at a time with the multi-selector by
setting [
• You can move the focusing frame quickly by touching and dragging it on
the monitor. Set [Touch Operation] to [On] and [Touch Func. in Shooting] to
[Touch Focus] beforehand.
AF Frame Move Amt] to [Large].
GB
GB
31
Page 32
To track the subject temporarily (Tracking On)
You can temporarily change the setting for [ Focus Area] to [Tracking]
while you press and hold down the custom key to which you have
assigned [Tracking On] in advance. The [
activated [Tracking On] will switch to the equivalent [Tracking] setting.
For example:
[ Focus Area] before you activate
[Tracking On]
[Wide] [Tracking: Wide]
[Spot: S] [Tracking: Spot S]
[Expand Spot] [Tracking: Expand Spot]
Focus Area] setting before you
[
Focus Area] while [Tracking On] is
active
Phase detection AF
When there are phase detection AF points within the auto focus area,
the product uses the combined autofocus of the phase detection AF and
contrast AF.
Note
• Phase detection AF is available only when an applicable lens is attached.
If you use a lens that does not support phase detection AF, you cannot
use [Automatic AF], [AF Tracking Sensitivity], [AF Subj. Shift Sensitivity] or
[AF Transition Speed]. Also, even if you use a previously purchased applicable
lens, the phase detection AF might not function unless you update the lens.
Focusing on eyes
The camera can automatically detect faces and eyes and focus on the
eyes (Eye AF). The faces of up to 8 subjects can be detected.
There are two methods for performing [Eye AF], with some differences
between their specifications. Select the appropriate method according to
your purpose.
32
GB
Page 33
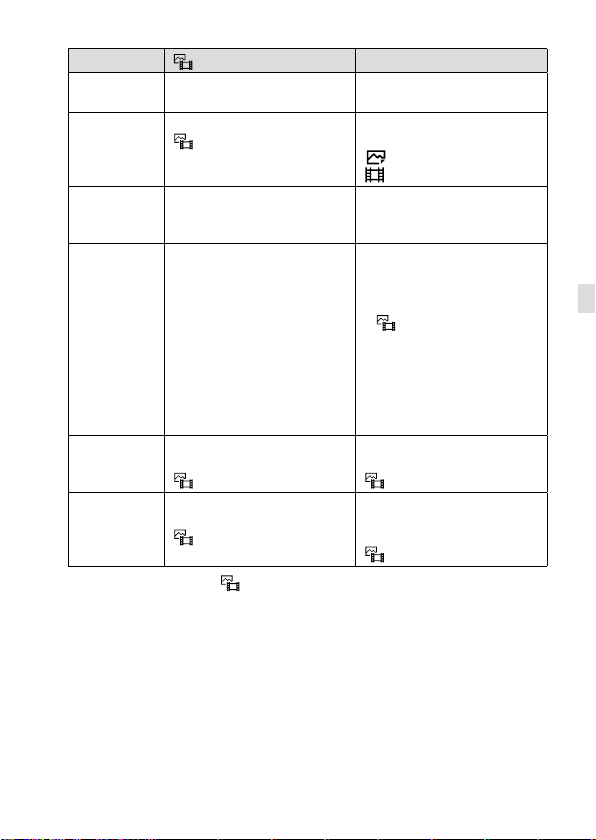
Item
Subject
detection
Advance
preparation
How to perform
[Eye AF]
Specifications
Focus mode Follows the setting
Focus area Follows the setting
* Regardless of whether [ Face/Eye Prior. in AF] is set to [On] or [Off], you can
use [Eye AF] via a custom key while you are pressing the custom key to which
you have assigned [Eye AF].
[
Face/Eye Prior. in AF] function
The camera will detect faces/
eyes with greater priority.
Select
[
Face/Eye Prior. in AF]
[On] (page 51).
Press the shutter button
halfway down.
• When the camera detects a
face or eye inside or around
the designated focus area,
it focuses on the face or eye
with greater priority.
• If the camera does not
detect any faces or eyes
inside or around the
designated focus area,
it will focus on another
detectable subject.
designated with
Focus Mode]
[
designated with
Focus Area]
[
[Eye AF] via a custom key
The camera will detect faces/
eyes exclusively.
Assign [Eye AF] to
the desired key using
Custom Key Setting] or
[
[ Custom Key Setting].
Press the key to which you
have assigned the [Eye AF]
function*.
• The camera focuses
exclusively on faces or eyes
anywhere on the screen,
regardless of the setting for
Focus Area].
[
• The camera will not
automatically focus on
another subject if no face or
eye is detected anywhere
on the screen.
Follows the setting
designated with
Focus Mode]
[
The focus area temporarily
becomes the entire screen,
regardless of the setting for
Focus Area].
[
GB
GB
33
Page 34

[Eye AF] by custom key
The Eye AF function can be used by assigning [Eye AF] to a custom key.
The camera can focus on eyes as long as you are pressing the key. This
is useful when you want to temporarily apply the Eye AF function to the
entire screen regardless of the setting for [
does not focus automatically if no faces or eyes are detected.
(Note: When you try to focus on eyes by pressing the shutter button
halfway down, the camera only detects faces or eyes inside or around the
focus area designated with [
or eyes, it performs normal auto-focusing.)
Focus Area]. If the camera detects no faces
MENU (Setup) [Operation Customize]
[ Custom Key Setting] or [ Custom Key Setting]
desired key, then assign the [Eye AF] function to the key.
MENU (Focus) [Face/Eye AF]
[ Face/Eye Subject] desired setting.
Point the camera at the face of a human or animal, and
press the key to which you have assigned the [Eye AF]
function.
To shoot a still image, press the shutter button while pressing the key.
Note
• The [Eye AF] function may not function very well in the following situations:
– When the person is wearing sunglasses.
– When the front hair covers the person’s eyes.
– In low-light or back-lit conditions.
– When the eyes are closed.
– When the subject is in the shade.
– When the subject is out of focus.
– When the subject is moving too much.
There are also other situations in which it may not be possible to focus on the
eyes.
• When the camera cannot focus on human eyes, it will detect and focus on
the face instead. The camera cannot focus on eyes when no human faces are
detected.
• The camera may not detect faces at all or may accidentally detect other
objects as faces in some conditions.
Focus Area]. The camera
34
GB
Page 35
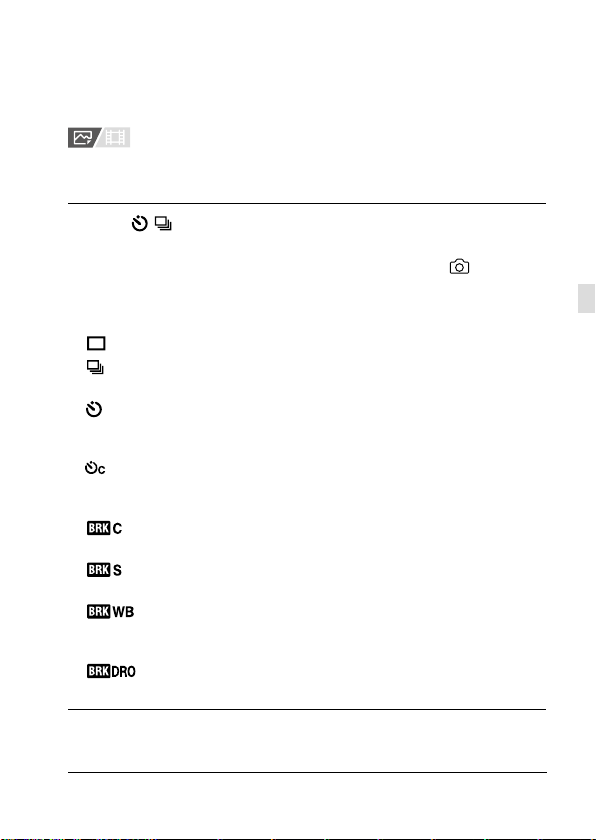
Shooting with drive modes (continuous
shooting/self-timer)
Select the appropriate mode for the subject, such as single shooting,
continuous shooting or bracketing shooting.
1
Select / (Drive Mode) on the control wheel desired
setting.
• You can also set the drive mode by selecting MENU (Shooting)
[Drive Mode] [Drive Mode].
• For details on parameters other than [Cont. Shooting], refer to the
“Help Guide.”
Single Shooting: Normal shooting mode.
Cont. Shooting: Shoots images continuously while you press and
hold down the shutter button (page 36).
Self-timer(Single): Shoots an image using the self-timer after
a designated number of seconds have elapsed since the shutter
button was pressed.
Self-timer(Cont): Shoots a designated number of images using the
self-timer after a designated number of seconds have elapsed since
the shutter button was pressed.
Cont. Bracket: Shoots images while holding the shutter button
down, each with different degrees of exposure.
Single Bracket: Shoots a specified number of images, one by
one, each with a different degrees of exposure.
WB bracket: Shoots a total of three images, each with different
color tones according to the selected settings for white balance,
color temperature and color filter.
DRO Bracket: Shoots a total of three images, each at a
different degree of D-Range Optimizer.
GB
2
Select the desired mode using the right/left side of the control
wheel.
GB
35
Page 36
Cont. Shooting
Shoots images continuously while you press and hold down the shutter
button.
1
Select / (Drive Mode) on the control wheel
[Cont. Shooting].
• You can also set the drive mode by selecting MENU (Shooting)
[Drive Mode] [Drive Mode].
2
Select the desired mode using the right/left side of the control
wheel.
Continuous Shooting: Hi+: Images are shot continuously at the
maximum speed while you press and hold down the shutter button.
Continuous Shooting: Hi/ Continuous Shooting: Mid/
Continuous Shooting: Lo: Subjects are easier to track because
the subject is displayed in real-time on the monitor or viewfinder
during shooting.
Hint
• To continuously adjust the focus and exposure during continuous shooting,
set as follows:
– [ Focus Mode]: [Continuous AF]
– [AEL w/ Shutter]: [Off] or [Auto]
Note
• When the F-value is greater than F11 in [Continuous Shooting: Hi+],
[Continuous Shooting: Hi] or [Continuous Shooting: Mid] mode, the focus is
locked to the setting in the first shot.
• The subject is not displayed in real-time on the monitor or viewfinder when
shooting in [Continuous Shooting: Hi+] mode.
• The speed of continuous shooting decreases when you shoot with a flash.
36
GB
Page 37
Touch functions when shooting
You can use two different touch functions when focusing with this
camera.
Touch Focus
You can specify where to focus using touch operations.
Touch Tracking
The camera maintains focus on the subject that was touched on the
monitor. The camera continues tracking even if the subject moves.
Touch pad operations
There are two kinds of touch operations for this camera. One is touch
panel operations: touching the monitor while looking directly at it. The
other is touch pad operations: using the monitor as a touch pad while
looking through the viewfinder.
Select MENU
choose which type of operation to enable.
For details on the touch functions, refer to the “Help Guide.”
Hint
• Setting [Touch Sensitivity] to [Sensitive] improves the touch response.
Note
• The monitor may not respond when you operate it with gloves.
(Setup) [Touch Operation] [Touch Panel/Pad] to
GB
GB
37
Page 38
Using a smartphone and a computer
Transferring images to a smartphone
You can transfer images to a smartphone by connecting the camera and a
smartphone via Wi-Fi.
: Operations performed on the smartphone
: Operations performed on the camera
1
: Install Imaging Edge Mobile on your smartphone.
To connect the camera and your smartphone, Imaging Edge Mobile is
required.
Install Imaging Edge Mobile to your smartphone in advance.
If Imaging Edge Mobile is already installed on your smartphone, be sure
to update it to the latest version.
https://www.sony.net/iem/
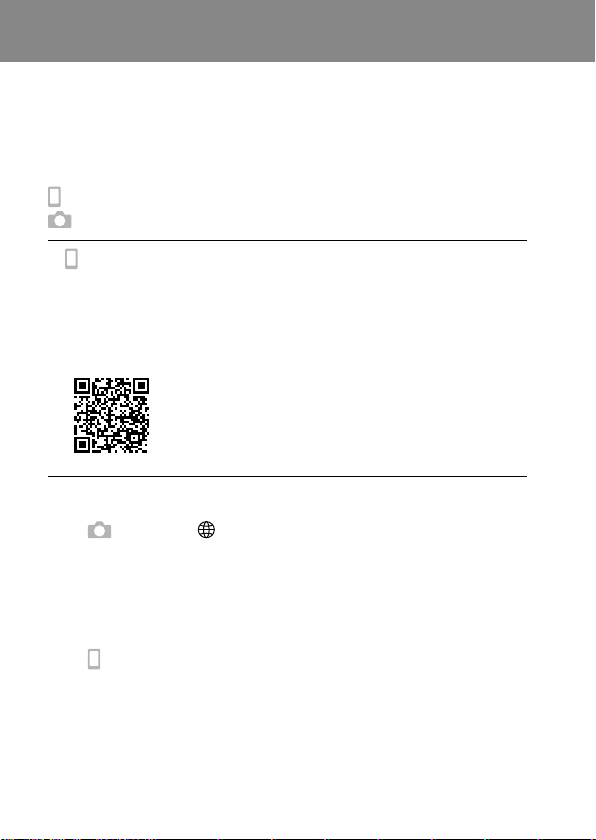
2
Connect the camera and your smartphone using the QR Code.
: MENU (Network) [Transfer/Remote]
[Send to Smartphone] [Select on This Device]
Select [This Image], [All with this date], or
[Multiple Images] as the method for transferring images.
If you want to select images on the smartphone, select
[Select on Smartphone].
: Launch Imaging Edge Mobile on your smartphone,
and select [Connect with a new camera].
38
GB
Page 39
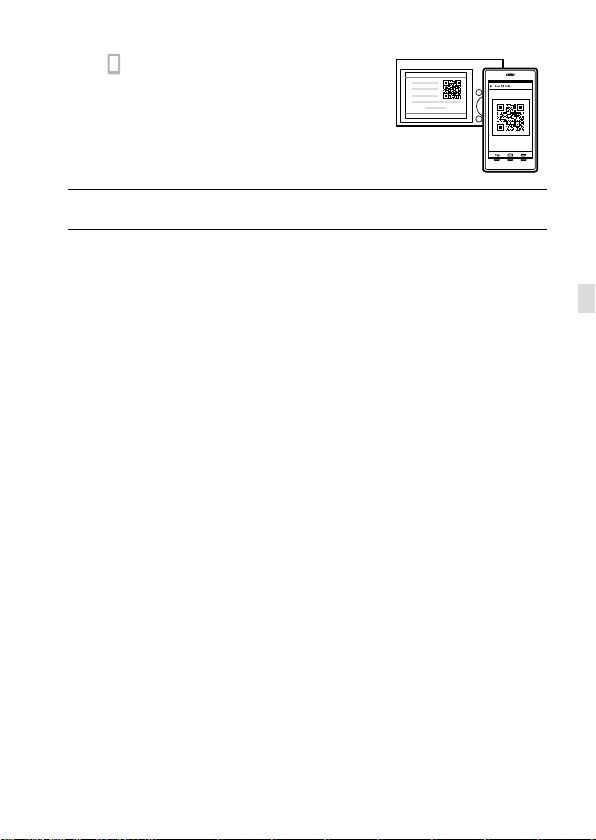
: Scan the QR Code displayed
on the camera while the
[Connect using the camera QR Code]
screen is displayed on the
smartphone.
3
The selected images will be transferred.
When transferring images after the first time, perform the above Step2-
on the camera.
After that, launch Imaging Edge Mobile on your smartphone, and select
the camera to be connected from the smartphone screen.
For details on how to connect to a smartphone, refer to the following
support sites:
https://www.sony.net/dics/iem02/
• For details on other connection methods, types of images that can be
transferred, or how to use the smartphone as a remote commander to
operate the camera, refer to the “Help Guide.”
• The Wi-Fi functions introduced in this manual are not guaranteed to operate
on all smartphones or tablets.
• The Wi-Fi functions of this camera are not available when connected to a
public wireless LAN.
GB
GB39GB
39
Page 40

Managing and editing images on a
computer
By connecting the camera to a computer using a USB cable or inserting
the camera’s memory card into the computer, you can import recorded
images to the computer.
You can perform remote shooting from a computer, and adjust or develop
RAW images recorded with the camera by using the software suite
Imaging Edge Desktop.
For details on the computer software, refer to the following URL:
https://www.sony.net/disoft/
40
GB
Page 41
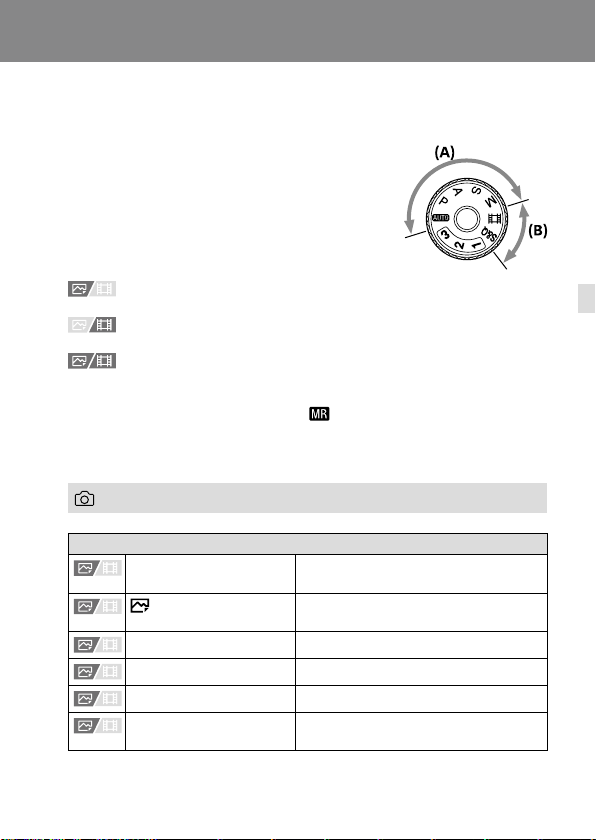
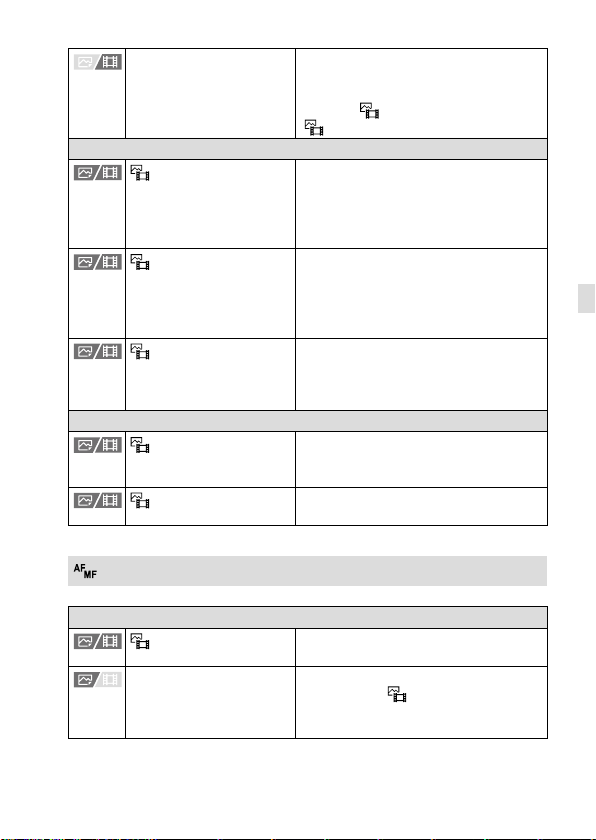
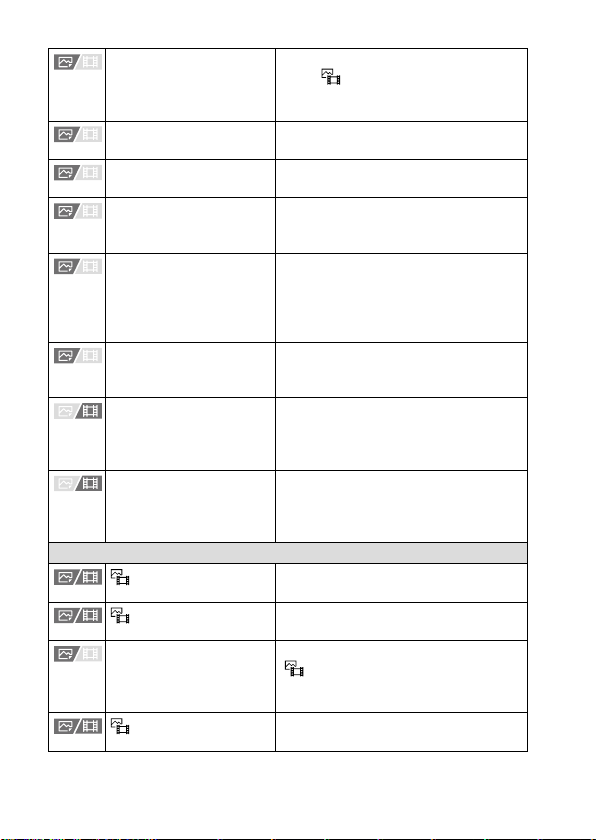
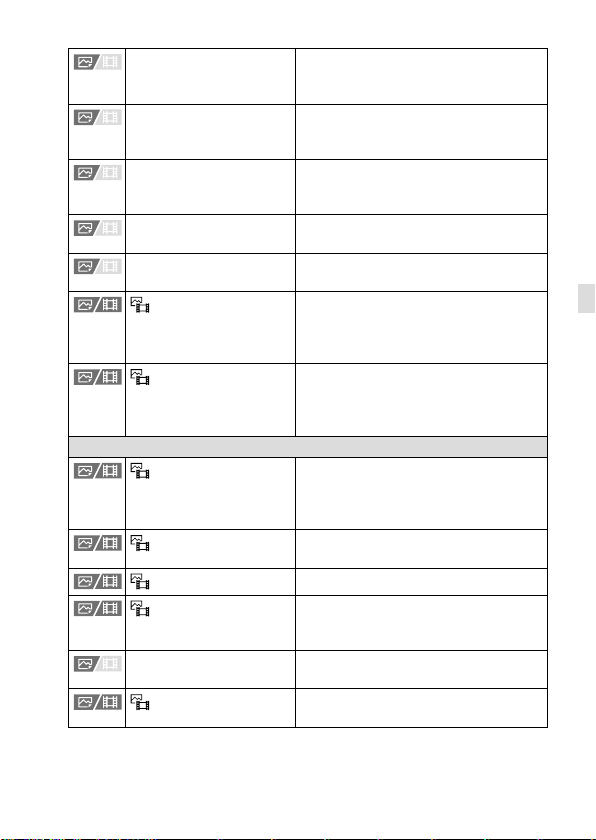
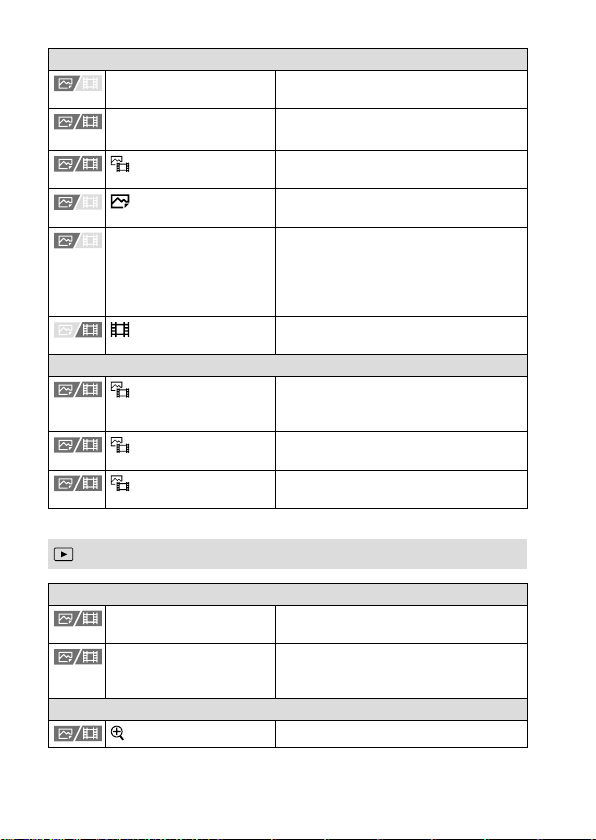
Finding functions from MENU
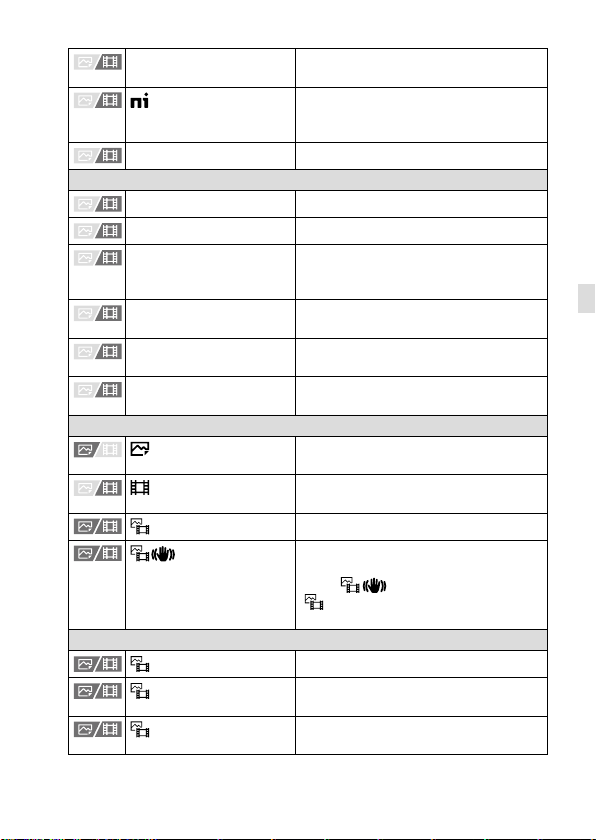
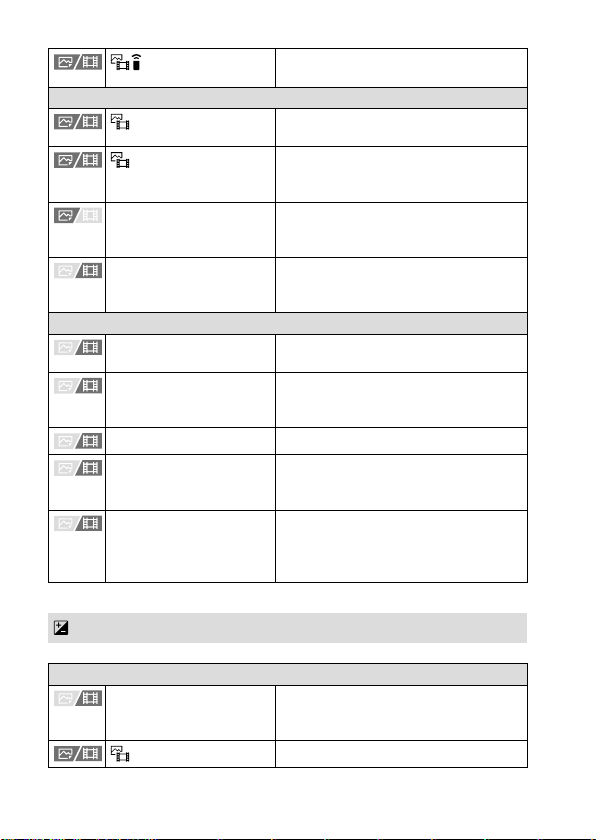
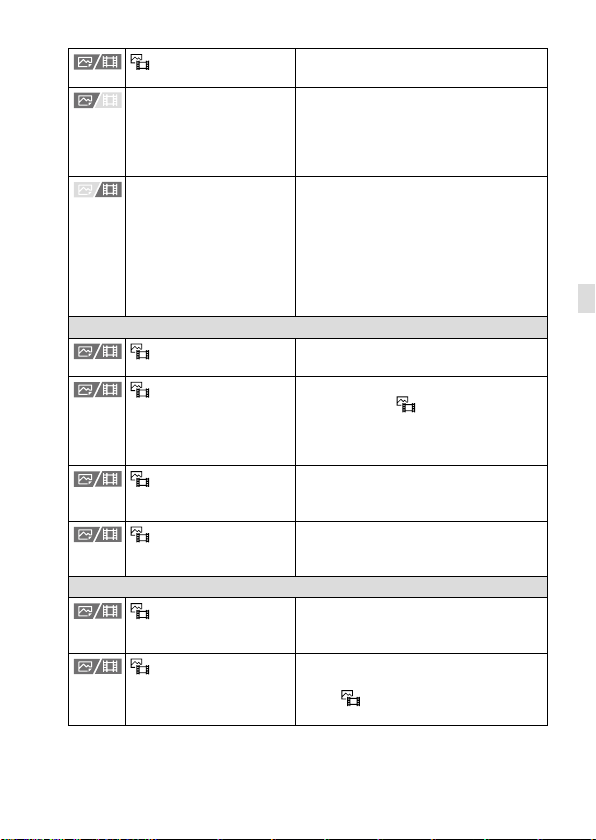
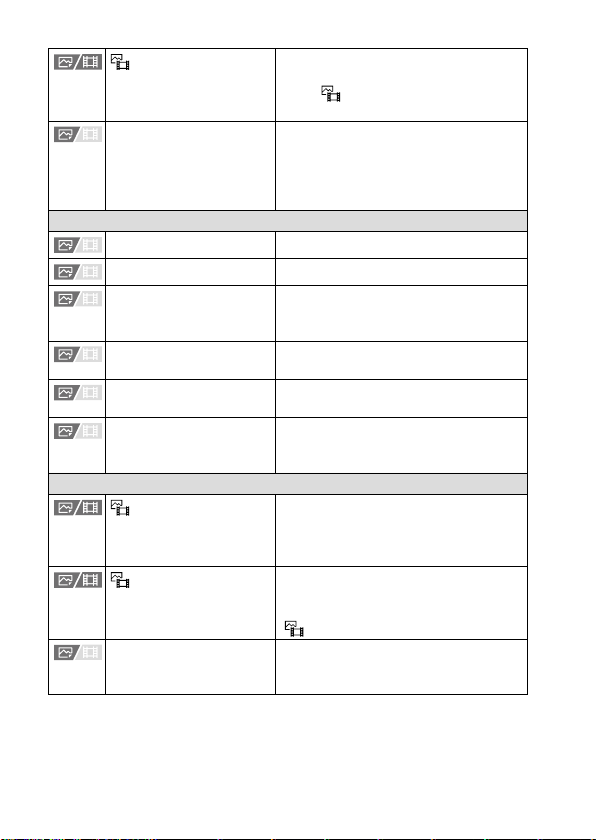
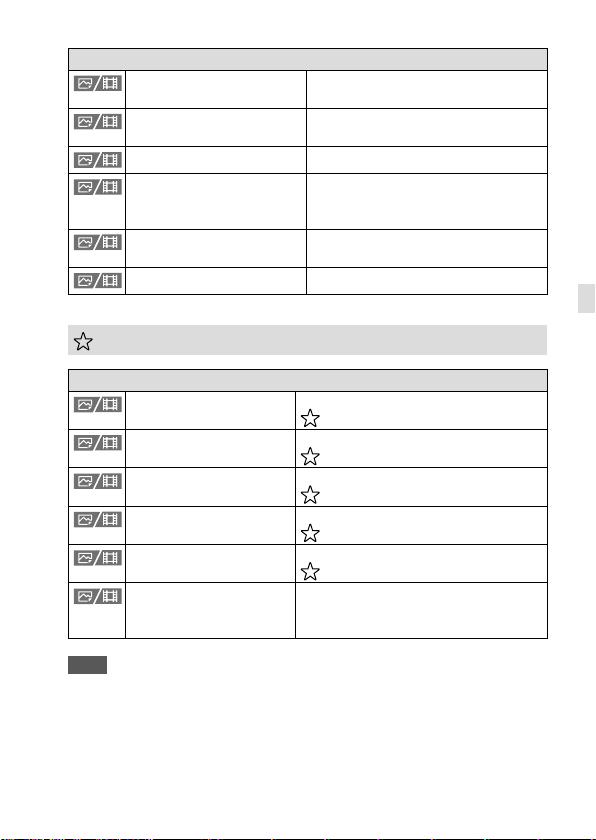
List of MENU items
For details on how to use the menu, see “Using
the MENU button” (page 18).
The displayed menu items vary depending on
the position of the mode dial (page 15).
In the tables below, the modes in which each
menu item is displayed are indicated by the still
image/movie icons.
: The menu item is displayed when the mode dial position is set to
the still image shooting modes (A).
: The menu item is displayed when the mode dial position is set to
the movie recording modes (B).
: The menu item is displayed when the mode dial position is set to
either the still image shooting modes (A) or the movie recording modes
(B).
• When the mode dial is set to 1, 2, or 3 ( Recall Camera Setting), the
displayed menu items are determined by the mode registered to each
registration number.
(Shooting) tab
Image Quality
JPEG/HEIF Switch Switches the file format for still images
File Format
RAW File Type Selects the file type for RAW images.
JPEG Quality Selects the JPEG image quality.
HEIF Quality Selects the HEIF image quality.
JPEG Image Size Selects the size of JPEG images.
to either JPEG or HEIF.
Sets the file format for still images.
([RAW] / [JPEG] / [HEIF], etc.)
(L / M / S)
GB
GB
41
Page 42
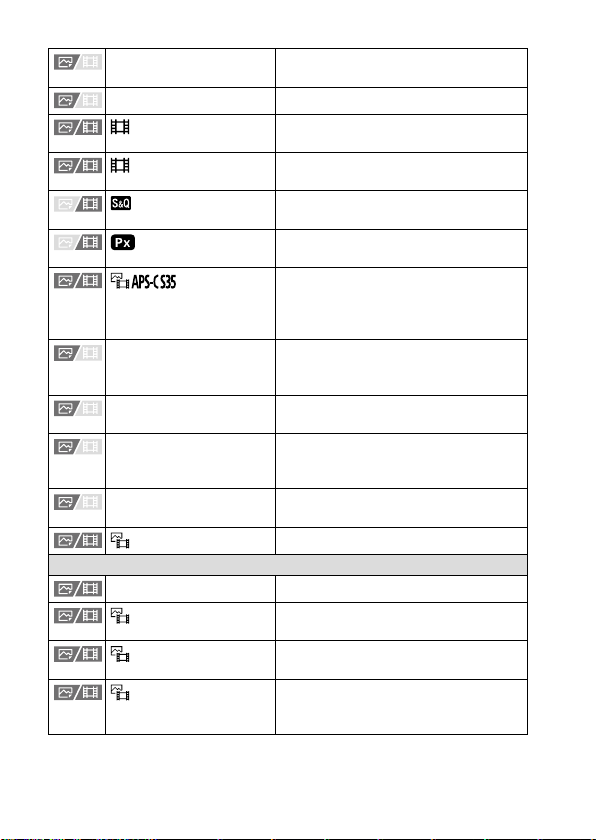
HEIF Image Size Selects the size of HEIF images.
Aspect Ratio Selects the aspect ratio for still images.
File Format
Movie Settings
S&Q Settings
Proxy Settings
Shooting
Long Exposure NR Sets noise reduction processing for
High ISO NR Sets noise reduction processing for
HLG Still Image Shoots still images compatible with
Color Space Changes the color space (range of
Lens Compensation
Media
Format Formats the memory card.
Rec. Media Settings
Recover Image DB
Display Media Info.
(L / M / S)
Selects the movie file format.
([XAVC HS 4K] / [XAVC S 4K], etc.)
Selects a frame-rate and bit-rate for the
movie.
Changes the settings for slow-motion
and quick-motion movie shooting.
Records low-bit-rate proxy files
simultaneously.
Sets whether to record in
APS-C-equivalent size for still images
and Super 35 mm-equivalent size for
movies.
shots with a shutter speed of 1 second
or longer.
high-sensitivity shooting.
the HDR standard Hybrid Log-Gamma
(HLG).
reproducible colors).
Selects the type of lens compensation.
Sets the method for recording images
to two memory card slots.
Recovers the image database file and
enables recording and playback.
Displays the remaining recording time
of movies and the recordable number
of still images on the memory card.
42
GB
Page 43
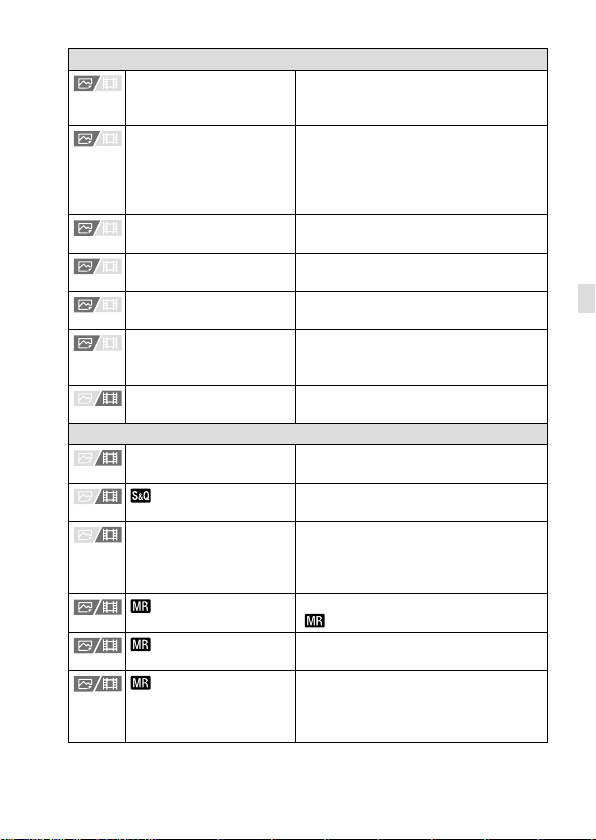
File
File/Folder Settings Sets file names for still images to be
Select REC Folder Selects the folder to which images are
Create New Folder Creates a new folder on the memory
IPTC Information Writes IPTC information when recording
Copyright Info Sets copyright information for still
Write Serial Number Writes the camera’s serial number
File Settings Sets file numbers and file names for
Shooting Mode
Exposure Mode Sets the exposure mode when shooting
Exposure Mode
Exposure Ctrl Type Selects the method for setting the
Recall Camera Setting
Camera Set. Memory
Memory/Recall Media
shot, and specifies folders for storing
the shot still images.
saved (REC folder) when [Folder Name]
under [File/Folder Settings] is set to
[Standard Form], and there are two or
more folders.
card for recording still images.
still images.
images.
to the Exif data when recording still
images.
movies to be recorded.
movies.
Sets the exposure mode when shooting
slow-motion/quick-motion movies.
exposure (shutter speed and aperture)
during movie shooting and slow/quickmotion shooting.
Calls up settings pre-registered to
Camera Set. Memory].
[
Registers the desired modes and
camera settings.
Selects the memory card slot from
which settings are recalled or to which
settings are registered for M1 through
M4.
GB
GB
43
Page 44
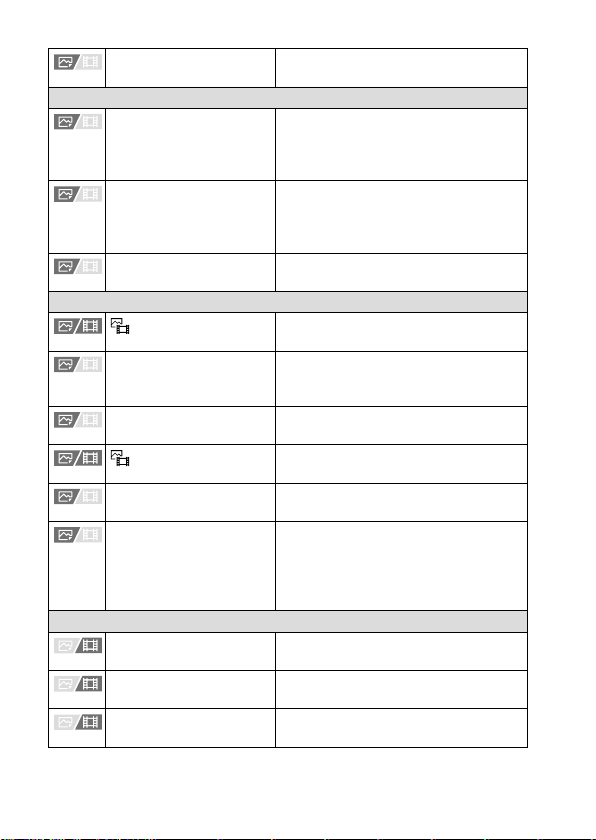
Reg. Custom Shoot Set Assign functions to the custom key to
Drive Mode
Drive Mode Selects a shooting mode, such as
Bracket Settings Sets self-timer shooting in the bracket
Interval Shoot Func. Configures settings for interval
Shutter/Silent
Silent Mode Settings
Shutter Type Sets whether to shoot with a
e-Front Curtain Shut. Sets whether to use the electronic front
Release w/o Lens
Release w/o Card Sets whether to release the shutter
Anti-flicker Shoot. Detects flickering/blinking from artificial
Audio Recording
Audio Recording Sets whether to record audio when
Audio Rec Level Adjusts the audio recording level during
Audio Out Timing Sets the timing of audio output during
recall when shooting.
continuous shooting.
([Self-timer(Single)] / [Cont. Bracket],
etc.)
mode, and the shooting order for
exposure bracketing or white-balance
bracketing.
shooting.
Sets the silent mode to suppress the
operating sounds of the camera.
mechanical shutter or an electronic
shutter.
curtain shutter function.
Sets whether to release the shutter
when the lens is not attached.
when a memory card is not inserted.
light sources such as fluorescent
lighting and times the shooting of
images to moments when flickering will
have less of an impact.
shooting a movie.
movie recording.
the movie recording.
44
GB
Page 45
Wind Noise Reduct. Reduces wind noise during movie
Shoe Audio Set.
Audio Level Display Sets whether to display the audio level.
TC/UB
Time Code Preset Sets the time code.
User Bit Preset Sets the user bit.
Time Code Format Sets the recording method for the time
Time Code Run Sets the count up format for the time
Time Code Make Sets the recording format for the time
User Bit Time Rec Sets whether or not to record the time
Image Stabilization
SteadyShot
SteadyShot
SteadyShot Adjust.
Focal Length
Zoom
Zoom
Zoom Range
Zoom Speed
recording.
Sets the recording format for digital
audio transmitted from accessories
attached to the Multi interface shoe.
code. (Only when [NTSC/PAL Selector] is
set to NTSC.)
code.
code on the recording medium.
as a user bit.
Sets whether to activate SteadyShot
during still-image shooting.
Sets whether to activate SteadyShot
during movie recording.
Sets SteadyShot settings.
Applies the SteadyShot function
according to the focal length set
Focal Length] when
using [
SteadyShot Adjust.] is set to
[
[Manual].
Sets the zoom scale.
Sets whether to use the Clear Image
Zoom and Digital Zoom when zooming.
Sets the zoom speed when the zoom
function is assigned to a custom key.
GB
GB
45
Page 46
Zoom Speed
Shooting Display
Grid Line Display
Grid Line Type
Live View Display Set. Sets whether to apply settings such as
Emph disp dur REC Sets whether or not to display a red
Marker Display
Marker Display Sets whether to display markers on the
Center Marker Sets whether or not to display the
Aspect Marker Sets the aspect marker display.
Safety Zone Sets the safety zone display. This
Guideframe Sets whether or not to display the
Sets the zoom speed when using the
zoom function with a remote control.
Sets whether or not to display grid lines
for adjusting the image composition.
Selects a grid line type from among
[Rule of 3rds Grid], [Square Grid], and
[Diag. + Square Grid].
exposure compensation to the live view
display.
frame around the edges of the camera’s
monitor while recording a movie.
monitor when recording movies.
center marker in the center of the
shooting screen.
becomes the standard range that can
be received by a general household TV.
guide frame. You can verify whether the
subject is level or perpendicular to the
ground.
(Exposure/Color) tab
46
GB
Exposure
Auto Slow Shutter Sets whether or not to automatically
ISO
slow down the shutter speed when
recording movies if the subject is dark.
Sets the ISO sensitivity.
Page 47
ISO Range Limit
ISO AUTO Min. SS If you select [ISO AUTO] when the
Auto/Manual Swt. Set. When recording movies, you can switch
Exposure Comp.
Exposure Comp.
Reset EV Comp.
Exposure step
Exposure Std. Adjust
Metering
Metering Mode
Face Priority in Multi Metering
You can limit the range of ISO sensitivity
when the ISO sensitivity is set manually.
shooting mode is [Program Auto]
or [Aperture Priority], you can set
the shutter speed at which the ISO
sensitivity starts changing.
the auto/manual setting of the aperture
value and shutter speed independently.
You can use this function just like
the exposure control system of a
professional video camera. The function
is available when [Exposure Ctrl Type] is
set to [Flexible Exp. Mode].
Compensates for the brightness of the
entire image.
Sets whether to maintain the exposure
value set using [
when you turn off the power when the
exposure compensation dial position is
set to “0.”
Selects the size of the increment
step for shutter speed, aperture, and
exposure compensation values.
Adjusts the standard for the correct
exposure value for each metering
modes.
Selects the method for measuring
brightness.
([Multi] / [Spot], etc.)
Sets whether the camera measures
brightness based on detected faces
Metering Mode] is set to
when [
[Multi].
GB
Exposure Comp.]
GB
47
Page 48
Spot Metering Point
AEL w/ Shutter Sets whether to lock the exposure
Flash
Flash Mode Sets the flash settings.
Flash Comp. Adjusts the intensity of flash output.
Exp.comp.set Sets whether to reflect exposure
Wireless Flash Sets whether to shoot with the wireless
Red Eye Reduction Reduces the red-eye phenomenon
External Flash Set. Sets the flash mode or luminescence
White Balance
White Balance
Priority Set in AWB
Shutter AWB Lock Sets whether to lock the white balance
Sets whether to coordinate the spot
metering point with the focus area
Focus Area] is set to [Spot],
when [
etc.
when the shutter button is pressed
halfway down. This is useful when you
want to adjust the focus and exposure
separately.
compensation value to flash
compensation.
flash.
when using flash.
of the external flash from menu on the
camera.
Corrects the tone effect of the ambient
light to shoot whitish objects in a white
tone.
([Auto] / [Daylight], etc.)
Selects which tone to prioritize when
shooting under lighting conditions
such as incandescent light with
White Balance] set to [Auto].
[
while the shutter button is pressed in
the auto white balance mode.
48
GB
Page 49
Shockless WB Sets the switching speed of
Color/Tone
D-Range Optimizer
Creative Look
Picture Profile
Zebra Display
Zebra Display
Zebra Level
White Balance during movie
shooting, such as when the setting
value for [
Priority Set in AWB] is changed.
[
Analyzes the contrast of light and
shadow between the subject and the
background by dividing the image into
small areas, and creates an image with
the optimal brightness and gradation.
Selects the desired image processing
([VV] / [PT], etc.).
You can also make detailed adjustments
to parameters such as contrast,
saturation, and sharpness.
Changes settings such as color and tone
when recording images.
* This function is for skilled movie
creators.
Sets whether or not to display stripes
to use as a guide when adjusting the
brightness.
Adjusts the brightness level of the zebra
pattern.
(Focus) tab
AF/MF
Focus Mode
Priority Set in AF-S Sets the timing of the shutter
Selects the focus mode.
([Single-shot AF] / [Continuous AF], etc.)
release when [
set to [Single-shot AF], [DMF], or
[Automatic AF] with a still subject.
White Balance] or
GB
Focus Mode] is
GB
49
Page 50
Priority Set in AF-C Sets the timing of the shutter release
AF Tracking Sensitivity Sets the AF tracking sensitivity for the
AF Illuminator Sets the AF illuminator, which provides
Aperture Drive in AF Changes the aperture drive system to
AF w/ Shutter Sets whether to perform auto focusing
Pre-AF Sets whether or not to perform auto
AF Transition Speed Sets the speed at which the focus
AF Subj. Shift Sensitivity Sets the sensitivity with which the focus
Focus Area
Focus Area
Focus Area Limit
Switch V/H AF Area Sets whether to adjust the
Focus Area Color
Focus Mode] is set to
when [
[Continuous AF] or [Automatic AF] with
a moving subject.
still image shooting mode.
light to aid focusing in dark scenes.
prioritize the auto-focusing tracking
performance or to prioritize silence.
when the shutter button is pressed
halfway down. This is useful when you
want to adjust the focus and exposure
separately.
focus before the shutter button is half
pressed.
position is moved when the target of
the auto focus is switched during movie
shooting.
switches to another subject when the
subject goes out of the focus area
during movie shooting.
Selects the area of focus.
([Wide] / [Spot], etc.)
Limits the types of available focus area
settings in advance.
Focus Area] and the position of the
[
focusing frame based on the camera’s
position (horizontal or vertical).
Sets the color of the frame indicating
the focusing area.
50
GB
Page 51
AF Area Registration Sets whether to temporarily move
Del. Regist. AF Area Deletes the focusing frame position
AF Area Auto Clear Sets whether the focus area is displayed
AF-C Area Display Sets whether or not to display the focus
Phase Detect. Area Sets the area display for phase
Circ. of Focus Point
AF Frame Move Amt
Face/Eye AF
Face/Eye Prior. in AF
Face/Eye Subject
Right/Left Eye Select
Face/Eye Frame Disp.
Face Memory Registers or changes the person to be
Regist. Faces Priority
the focusing frame to a preassigned
position when shooting still images.
information that was registered using
[AF Area Registration].
all the time or disappears automatically
shortly after focusing.
area in [Continuous AF] mode.
detection AF.
Sets whether to allow the focusing
frame to jump from one end to the
other when you move the focusing
frame.
Sets the distance by which the focusing
frame is moved. This function is
available when the focus area is set to
[Spot] or [Expand Spot].
Sets whether or not the camera detects
faces or eyes inside the focus area while
performing autofocus, and then focuses
on the eyes automatically (Eye AF).
Selects the target of face or eye
detection.
Specifies the eye to be detected.
Sets whether or not to display the face/
eye detection frame when a face or
eyes are detected.
given priority when focusing.
Detects the registered face with higher
priority using [Face Memory].
GB
GB
51
Page 52
Focus Assistant
Auto Magnifier in MF Displays an enlarged image when
Focus Magnifier Enlarges the image before shooting so
Focus Magnif. Time
Initial Focus Mag.
AF in Focus Mag. Sets whether or not to autofocus when
Initial Focus Mag.
Peaking Display
Peaking Display
Peaking Level
Peaking Color
focusing manually.
that you can check the focus.
Sets the length of time the image will
be shown in an enlarged form.
Sets the initial magnification scale when
using [Focus Magnifier].
an enlarged image is being displayed.
While the enlarged image is being
displayed, you can focus within a
smaller area than the [Spot].
Sets the initial magnification scale when
using [Focus Magnifier].
Sets the peaking function, which
enhances the outline of in-focus areas
when focusing manually.
Sets the level of enhancement of infocus areas.
Sets the color used to enhance in-focus
areas.
(Playback) tab
Playback Target
Select Playback Media Selects the memory card slot of the
View Mode Plays back all images from a specified
Magnification
Enlarge Image
memory card to be played back.
date, all still images in a specified folder,
or all movies.
Enlarges the playback images.
52
GB
Page 53
Enlarge Initial Mag.
Enlarge Initial Position
Selection/Memo
Protect Protects recorded images against
Rating Assigns rating to recorded images on a
Rating Set(Custom Key) Sets the rating (number of ) that can
Delete
Delete Deletes images.
Delete confirm. Sets whether ["Delete" first] or
Edit
Rotate Rotates the image.
Copy Copies images from the memory card
Photo Capture Captures a chosen scene in a movie to
JPEG/HEIF Switch
Viewing
Cont. Play for Interval
Play Speed for Interval
Slide Show Plays a slide show.
Sets the initial magnification scale when
playing back enlarged images.
Sets the initial magnification area when
playing back enlarged images.
accidental erasure.
scale from
be selected using the custom key to
which [Rating] has been assigned with
[
["Cancel" first] is preselected in the
delete confirmation screen.
in the memory card slot designated in
[Select Playback Media] to the memory
card in the other slot.
save as a still image.
Sets the format of still images captured
with [Photo Capture] to either JPEG or
HEIF.
Continuously plays back images shot
using interval shooting.
Sets the playback speed when
continuously playing back still images
with [Cont. Play for
to .
Custom Key Setting].
GB
Interval].
GB
53
Page 54
Playback Option
Image Index Displays multiple images at the same
Display as Group Sets whether or not to display images
Display Rotation Sets the playback orientation for images
Focus Frame Display
Select Image Jump Dial Selects the dial to use for jumping
Image Jump Method Sets the method for jumping between
time.
shot continuously or shot using interval
shooting as a group.
shot vertically.
Sets whether to display the focus frame
during playback.
between images.
images.
(Network) tab
Transfer/Remote
Ctrl w/ Smartphone Sets the condition for connecting the
Send to Smartphone Displays/transfers still images, movies,
Sending Target
Cnct. during Power OFF Sets whether or not to allow a Bluetooth
FTP Transfer Func. Sets image transfer using FTP and
PC Remote Function Configures settings for PC remote
camera to a smartphone.
and slow-motion/quick-motion movies
to a smartphone.
Sets whether to send the low-bit-rate
proxy movie or the high-bit-rate original
movie when transferring movies to a
smartphone with [Send to Smartphone].
connection with a smartphone when
the camera is turned off.
executes it.
* Basic knowledge of FTP server is
required.
shooting.
54
GB
Page 55
Bluetooth Rmt Ctrl Sets whether or not to use a Bluetooth
Location Information
Location Info Link Sets whether or not to obtain location
Auto Time Correction Sets whether or not to automatically
Auto Area Adjustment Sets whether or not to automatically
Wi-Fi
WPS Push Registers an access point by pushing the
Access Point Set. Registers an access point manually.
Wi-Fi Frequency Band Sets the frequency band for Wi-Fi
Display Wi-Fi Info. Displays Wi-Fi information for the
SSID/PW Reset Resets the SSID and password shared
Bluetooth
Bluetooth Function Sets whether to activate or not the
Pairing Pairs the camera with a Bluetooth
Disp Device Address Displays the BD address of the camera.
Wired LAN
IP Address Setting
remote commander.
information from a paired smartphone.
adjust the camera’s date settings by
using information obtained from a
paired smartphone.
adjust the camera’s area settings by
using information obtained from a
paired smartphone.
Wi-Fi Protected Setup (WPS) button on
the access point.
communications.
camera such as the MAC address, IP
address, etc.
with devices with permission to connect
to the camera.
Bluetooth function of the camera.
device. When the camera is connected
to a paired device, the name of the
device is displayed.
Selects the method for obtaining the IP
address of a wired LAN.
GB
GB
55
Page 56
Display Wired LAN Info. Displays wired LAN information for this
Network Option
Airplane Mode Disables wireless communications
Edit Device Name Changes the device name under Wi-Fi
Import Root Certificate Imports a root certificate to the camera.
Security(IPsec) Sets whether or not to encrypt
Reset Network Set. Resets all the network settings.
camera such as the MAC address or IP
address, etc.
from the device such as Wi-Fi, NFC, and
Bluetooth function.
Direct, etc.
communications between the camera
and a computer while they are
connected via Wi-Fi or a wired LAN.
(Setup) tab
Area/Date
Language
Area/Date/Time Setting Sets the area, date, and time where
NTSC/PAL Selector Changes the TV format of the device
Reset/Save Settings
Setting Reset Restores settings to their defaults.
Save/Load Settings Saves the camera settings to a
Selects the language.
the camera is used.
so that you can shoot in a different
movie format.
Select [Initialize] to restore all settings
to their default values.
memory card, or reads saved settings
from the memory card.
56
GB
Page 57
Operation Customize
Custom Key Setting
Custom Key Setting
Custom Key Setting
Fn Menu Settings Customizes the functions displayed
Different Set for Still/Mv For each item, select whether to set
DISP (Screen Disp) Set Sets the type of information to be
REC w/ Shutter
Zoom Ring Rotate Assigns the zoom in/out to the
Dial Customize
My Dial Settings Assigns the desired functions to
Assigns functions to the various keys
so that you can perform operations
more quickly by pressing the keys
when shooting still images.
Assigns functions to the various keys
so that you can perform operations
more quickly by pressing the keys
when shooting movies.
Assigns functions to the keys so that
you can perform operations more
quickly by pressing the keys when
playing back images.
when the Fn (Function) button is
pressed.
the same parameters for still images
and movies or to apply parameters
independently.
displayed on the monitor or in the
viewfinder when the DISP button is
pressed.
Sets whether or not to record movies
using the shutter button.
rotational direction of the zoom ring.
This function is only available with a
power zoom lens that is compatible
with this function.
the dials and the control wheel, and
register up to three combinations of
settings.
GB
GB
57
Page 58
Dial Setup Sets the functions of the front and
Av/Tv Rotate Sets the direction of turning the front
Dial Ev Comp Sets whether to compensate the
Function Ring(Lens) Assigns a function to the function ring
Lock Operation Parts Sets whether to disable the
Touch Operation
Touch Operation Sets whether or not to activate the
Touch Sensitivity Sets the touch sensitivity when using
Touch Panel/Pad Selects whether to activate touch
Touch Pad Settings Adjusts settings related to touch pad
Touch Func. in Shooting Sets either [Touch Focus] or
Finder/Monitor
Select Finder/Monitor Sets the method of switching
Monitor Brightness Adjusts the brightness of the screen.
Viewfinder Bright. Sets the brightness of the viewfinder.
rear dials when the exposure mode
is set to M. Dials can be used for
adjusting shutter speed and aperture
value.
or rear dial or the control wheel to
adjust the aperture value or shutter
speed.
exposure with the front or rear dial.
on the lens.
multiselector, control wheel, or front
and rear dials temporarily when the
Fn button is pressed and held down.
touch operation of the monitor.
touch operations.
panel operation when shooting with
the monitor, or touch pad operation
when shooting with the viewfinder.
operation.
[Touch Tracking] as the active function
when the monitor is touched during
shooting.
between the finder/monitor displays.
58
GB
Page 59
Finder Color Temp. Sets the color temperature of the
Viewfinder Magnifi. Sets the magnification scale of the
Display Quality Sets the display quality.
Finder Frame Rate
Display Option
TC/UB Disp. Setting Sets the counter display, time code
Gamma Display Assist Converts movies recorded with
Gamma Disp. Assist Typ. Sets the method for converting
Remain Shoot Display
Auto Review
Power Setting Option
Power Save Start Time Sets the time intervals to
Auto Power OFF Temp. Sets the camera temperature at which
Sound Option
Volume Settings Sets the volume for movie playback.
viewfinder.
viewfinder.
• When [High] is selected, the battery
is consumed more quickly.
• When the temperature of the
camera is high, [Display Quality]
may be locked to [Standard].
Sets the frame rate for the viewfinder
when shooting still images.
display, and user bit display.
the S-Log/HLG gamma for easier
monitoring.
movies recorded with the S-Log/HLG
gamma for easier monitoring.
Sets whether or not to display an
estimate indicating the number of
continuously recordable images.
Sets auto review to display the
captured image after shooting.
automatically switch to power save
mode.
the camera turns off automatically
during shooting. When shooting in
hand-held mode, set to [Standard].
GB
GB
59
Page 60
4ch Audio Monitoring
Audio signals Selects whether the camera beeps
USB
USB Connection Sets the USB connection method
USB LUN Setting Enhances compatibility by limiting
USB Power Supply Sets whether to supply power via
External Output
HDMI Resolution
HDMI Output Settings
HDMI Info. Display Sets whether or not to output
CTRL FOR HDMI Sets whether or not to operate the
Selects the audio channel
combination to output to the
headphone terminals when the audio
channel number is set to 4ch.
during auto focus and self-timer
operations.
according to the computer or USB
device to be connected.
the functions of USB connection. Set
to [Multi] in normal conditions and
to [Single] only when the connection
cannot be established.
USB connection when the camera
is connected to a computer or USB
device.
Sets the resolution for outputting
images to a TV via HDMI when
shooting still images or during
playback.
Sets the parameters for outputting
images to other devices via HDMI
when recording movies.
shooting information when the
camera is connected to other devices
via HDMI.
camera by aiming the TV remote
control at the TV when the camera
is connected to a “BRAVIA” Synccompatible TV with an HDMI cable
(sold separately).
60
GB
Page 61
Setup Option
Video Light Mode Sets the illumination setting for the
HVL-LBPC LED light (sold separately).
IR Remote Ctrl Sets whether to use the infrared
remote control.
Sensor Cleaning Cleans the image sensor.
Auto Pixel Mapping Sets whether or not to automatically
optimize the image sensor when the
camera is turned off.
Pixel Mapping Performs image sensor optimization
manually.
Version Displays the camera software version.
(My Menu) tab
My Menu Setting
Add Item Adds desired menu items to
(My Menu).
Sort Item Sorts the menu items added to
(My Menu).
Delete Item Deletes menu items added to
(My Menu).
Delete Page Deletes all the menu items on a page in
(My Menu).
Delete All Deletes all the menu items added to
(My Menu).
Display From My Menu Sets whether or not to display the
My Menu first when the MENU button
is pressed.
GB
Note
• The order in which the menu tabs are listed here differs from the actual
display.
GB
61
Page 62
Identifying parts
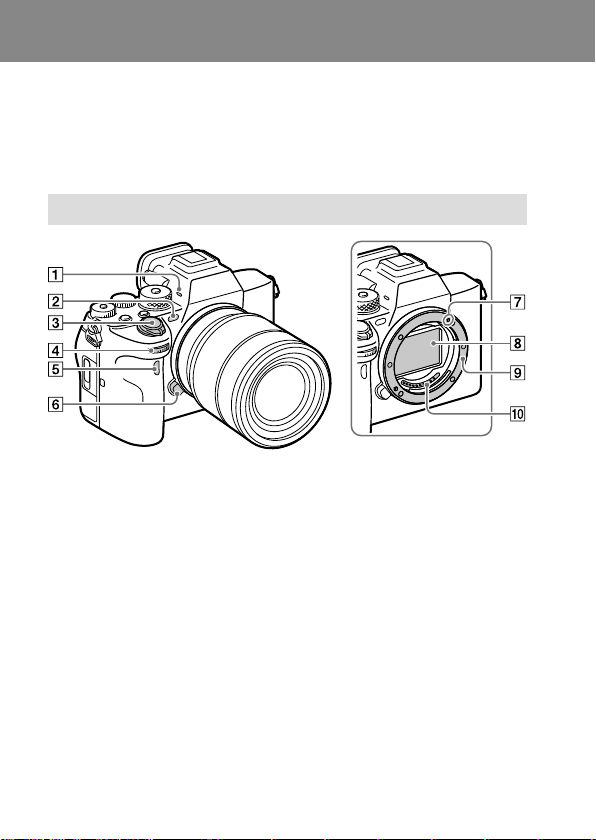
Identifying parts
See the pages in parentheses for details.
Front side
Microphone
Do not cover this part during
movie recording. Doing so
may cause noise or lower the
volume.
AF illuminator/Self-timer
lamp/Visible light sensor and
IR sensor
Do not cover this part during
shooting.
ON/OFF (Power) switch
(9)/Shutter button (10)
Front dial
You can quickly adjust the
settings for each shooting
mode.
GB
62
Infrared remote sensor
Lens release button (7)
Mounting index (7)
Image sensor*
Mount
Lens contacts*
* Do not directly touch these parts.
Page 63
Rear side
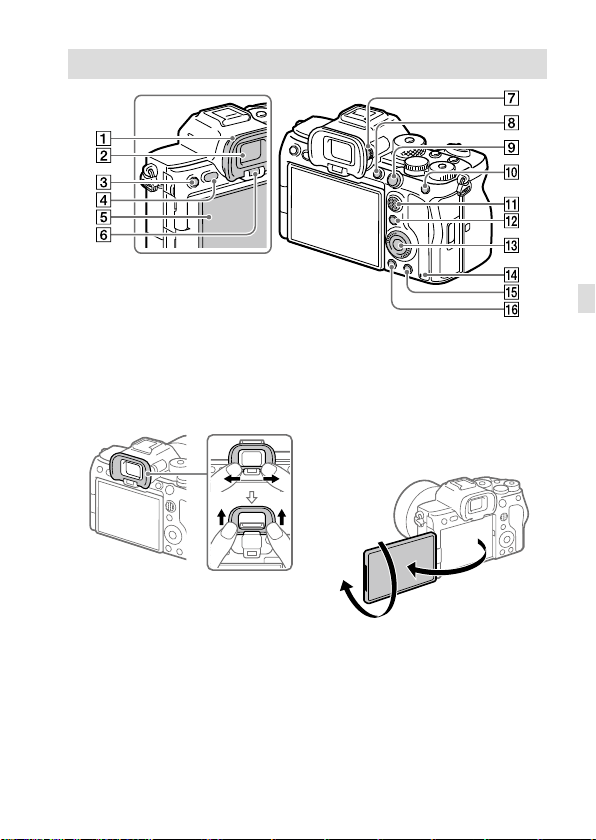
GB
Eyepiece cup
To remove the eyepiece cup
Push the grips at the bottom
of the eyepiece cup to the left
and right and lift up the cup.
Viewfinder
C3 button (Custom button3)/
(Protect) button
MENU button (18)
Monitor
(For touch operation: Touch
panel/Touch pad) (37)
You can adjust the monitor to
an easily viewable angle and
shoot from any position.
Eye sensor
GB63GB
63
Page 64
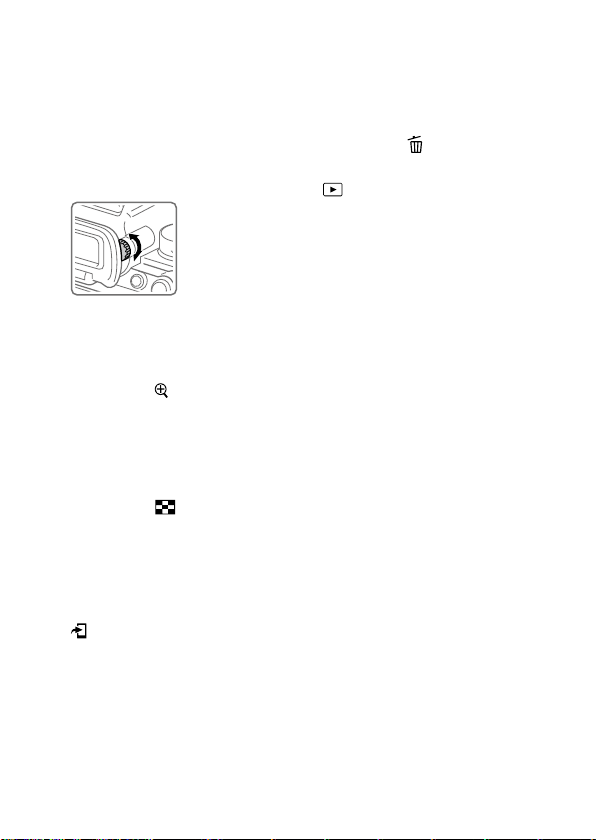
Diopter-adjustment dial
Adjust the diopter-adjustment
dial according to your eyesight
until the display appears clearly
in the viewfinder. If it is hard to
operate the diopter-adjustment
dial, remove the eyepiece cup
before operating the dial.
C1 button (Custom button 1)
For shooting: AF-ON (AF On)
button
For viewing:
(Enlarge Image)
button
For shooting: AEL button
[AEL hold] is assigned to the
AEL button in the default
settings.
For viewing:
(Image Index)
button
Multi-selector (14)
For shooting: Fn (Function)
button (22)
For viewing:
(Send to Smartphone)
button
You can display the screen
for [Send to Smartphone] by
pressing this button.
Control wheel (13)
Access lamp
For shooting: C4 button
(Custom button 4)
For viewing:
(Delete) button
(11)
(Playback) button (11)
64
GB
Page 65
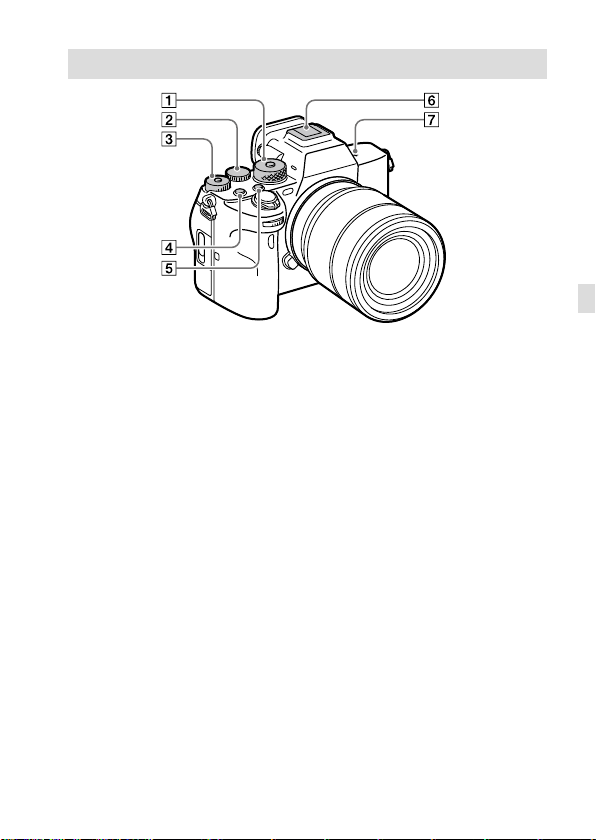
Top side
GB
Mode dial (15)
The mode dial is unlocked
while you hold down the
unlock button at the center.
Rear dial
You can quickly adjust the
settings for each shooting
mode.
Exposure compensation dial
Pressing the lock button at the
center switches the exposure
compensation dial between
the locked and unlocked status.
The dial is unlocked when the
lock button is popped up and
the white line is visible.
MOVIE (Movie) button (11)
C2 button (Custom button 2)
Multi Interface Shoe*
Some accessories may not go
in all the way and protrude
backward from the Multi
interface shoe. However,
when the accessory reaches
the front end of the shoe, the
connection is completed.
GB
65
Page 66
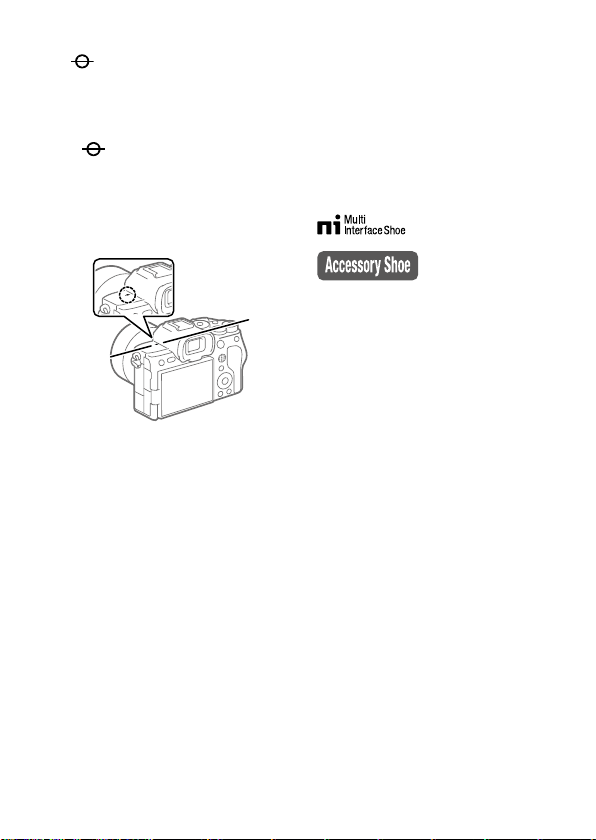
Image sensor position
mark
• The image sensor is the
sensor that converts light
into an electric signal. The
mark shows the location
of the image sensor. When
you measure the exact
distance between the camera
and the subject, refer to the
position of the horizontal line.
• If the subject is closer than
the minimum shooting
distance of the lens, the focus
cannot be confirmed. Make
sure you put enough distance
between the subject and the
camera.
* For details on compatible
accessories for the Multi Interface
Shoe, visit the Sony website, or
consult your Sony dealer or local
authorized Sony service facility.
Accessories for the Accessory Shoe
can also be used. Operations with
other manufacturers’ accessories
are not guaranteed.
66
GB
Page 67
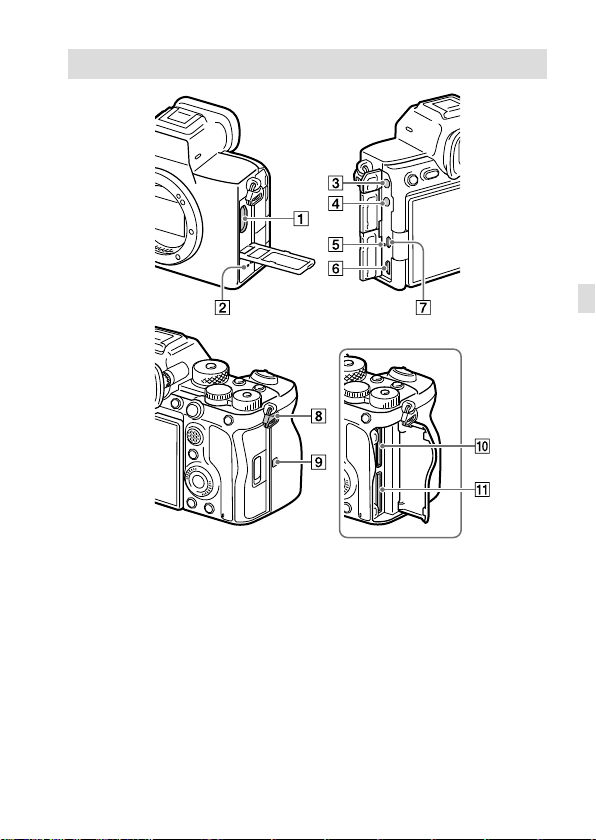
Sides
GB
HDMI Type-A terminal
Speaker
(Microphone) jack
When an external microphone
is connected, the built-in
microphone turns off
automatically. When the
external microphone is a
plugin-power type, the power
of the microphone is supplied
by the camera.
(Headphones) jack
Charge lamp
Multi/Micro USB Terminal*
This terminal supports Micro
USB-compatible devices.
USB Type-C terminal
GB
67
Page 68
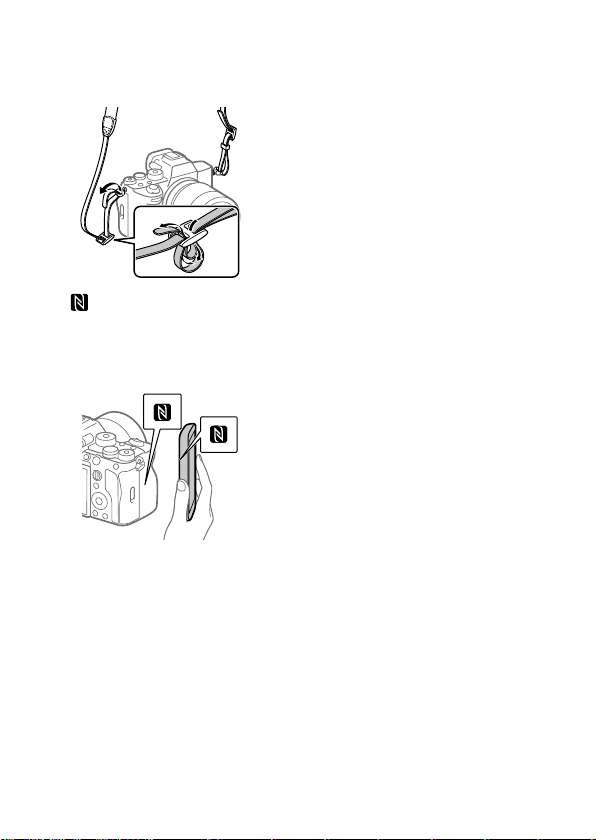
Hooks for shoulder strap
Attach both ends of the strap
onto the camera.
(N-Mark)
• This mark indicates the touch
point for connecting the
camera and an NFC-enabled
Smartphone.
• NFC (Near Field
Communication) is an
international standard
of short-range wireless
communication technology.
SLOT 1 (Memory card slot 1)
(6)
SLOT 2 (Memory card slot 2)
(6)
* For details on compatible
accessories for the Multi/Micro
USB Terminal, visit the Sony
website, or consult your Sony
dealer or local authorized Sony
service facility.
Notes on USB terminals
You can use either the USB Type-C
terminal or the Multi/Micro USB
Terminal for USB communications.
However, you cannot conduct
USB communications with both
terminals simultaneously.
Use the USB Type-C terminal to
supply power and charge the
battery pack.
This camera cannot be powered
via the Multi/Micro USB terminal.
• You can use accessories for
the Multi/Micro USB Terminal,
such as a remote commander
(sold separately), while
supplying power or performing
PC Remote shooting using the
USB Type-C terminal.
Notes on the terminal cover
Ensure that the terminal cover is
closed before use.
68
GB
Page 69
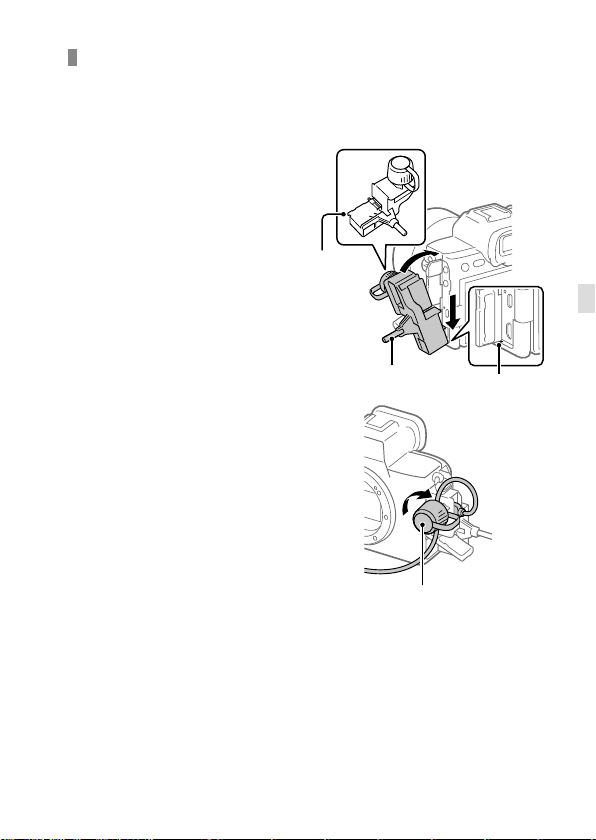
Notes on the cable protector
Use the cable protector to prevent a cable from being disconnected when
shooting images with the cable connected.
To attach the cable protector
Open the HDMI terminal cover,
headphone terminal cover, and
USB terminal cover.
Fit the hook of the cable
protector into the notch below
the Multi/Micro USB terminal,
and press down so that it does
not come off, and then attach
it so that it covers the terminal
surface of the unit.
Push the attachment screw in
and turn it to secure the cable
protector.
Insert the cable into one of the
jacks.
Insert the cable into the holding
part and then secure the cable
with the fixing dial.
To remove the cable protector
Loosen the attachment screw, and then remove the cable protector.
Hook
Attachment screw
Notch
Fixing dial
GB
GB
69
Page 70
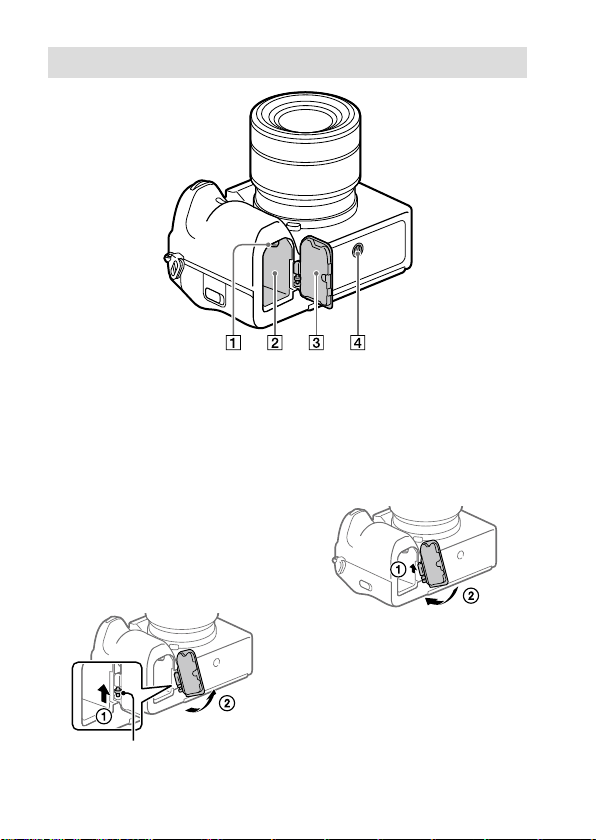
Bottom
Lock lever (4)
Battery insertion slot (4)
Battery cover (4)
When attaching an accessory
such as a vertical grip
(sold separately), remove the
battery cover.
To remove the battery cover
Pull the battery cover release
lever in the direction of the
arrow, and then remove the
battery cover.
Battery cover release lever
GB
70
To attach the battery cover
Insert the shaft on one side
of the battery cover into the
attachment site, and then
push in the battery cover by
attaching the shaft on the
opposite side.
Tripod socket hole
Supports 1/4-20 UNC screws
Use a tripod with a screw less
than 5.5mm (7/32inches)
long. Otherwise, you cannot
firmly secure the camera, and
damage to the camera may
occur.
Page 71
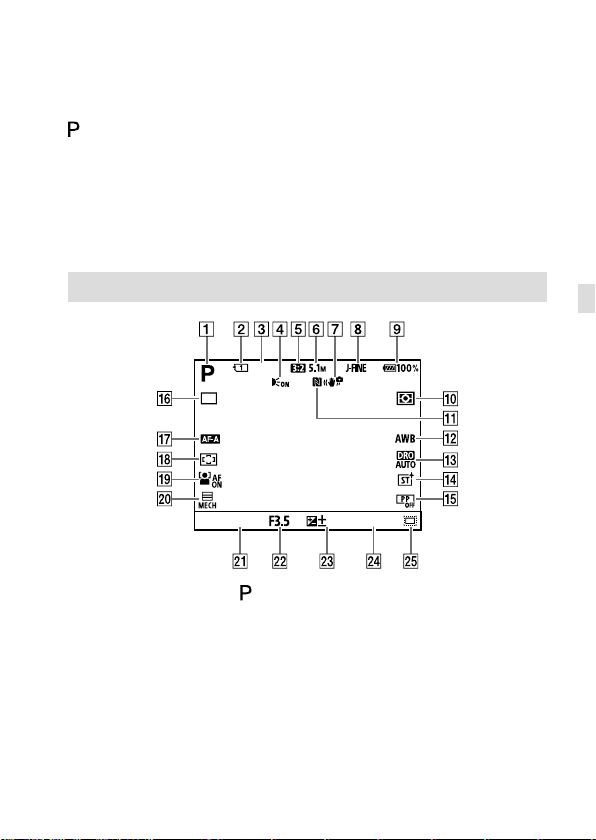
Basic icons
This section describes the screen display when the shooting mode is
(Program Auto).
• The examples are of the display when the screen is in the allinformation display mode.
• The displayed content and positions are for reference only, and may
differ from the actual display. Some icons may not be displayed
depending on the camera settings.
• For other icons, refer to the “Help Guide.”
During still image shooting
699
ISO AUTO
0.01/8
The mode dial is set to (Program Auto).
Number of the memory card slot recording the shooting data
Number of still images that can be recorded on the memory card in
the slot indicated by
Displayed when [AF Illuminator] is set to [Auto] and the camera
detects that the AF Illuminator is required
[Aspect Ratio] is set to [3:2].
[JPEG Image Size] is set to [L: 5.1M].
GB
GB
71
Page 72

[ SteadyShot] is set to [On].
[JPEG/HEIF Switch] is set to [JPEG].
[JPEG Quality] is set to [Fine].
Remaining battery level
[ Metering Mode] is set to [Multi].
NFC is active.
[ White Balance] is set to [Auto].
[ D-Range Optimizer: Auto] is selected.
[ Creative Look] is set to [ST].
[ Picture Profile] is set to [Off].
[Drive Mode] is set to [Single Shooting].
[ Focus Mode] is set to [Automatic AF].
[ Focus Area] is set to [Wide].
[ Face/Eye Prior. in AF] is set to [On].
[Shutter Type] is set to [Mechanical Shutter].
Shutter speed
Aperture value
Exposure compensation
[ ISO] is set to [ISO AUTO].
[ Shooting] is set to [On] or [Auto], and the recordable area is
the APS-C-equivalent size.
72
GB
Page 73
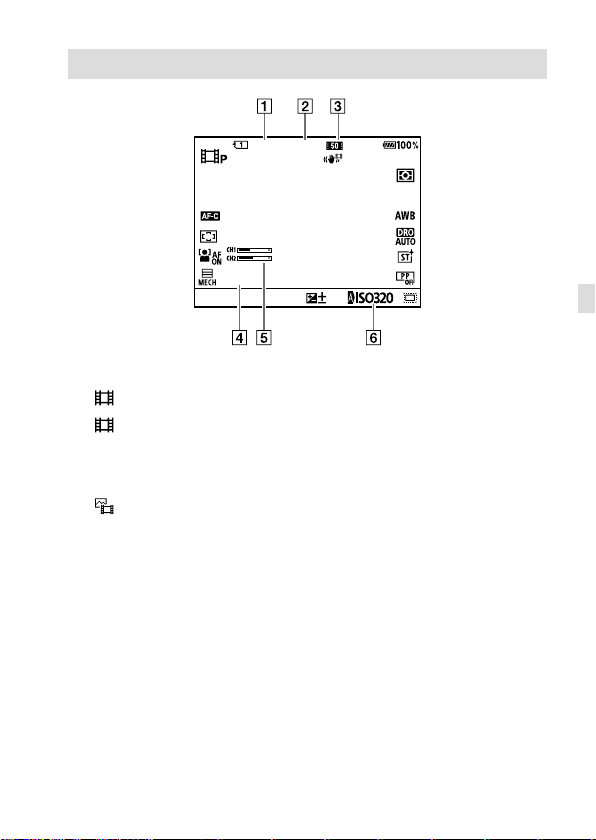
During movie recording
0:00
18m
XAVC S HD 60p
4:2:0 8
bit
0.0
Recordable movie time for the currently displayed slot
[ File Format] is set to [XAVC S HD].
[ Movie Settings] is set to [60p 50M 4:2:0 8bit].
Actual movie recording time
[Audio Level Display] is set to [On].
[ ISO] is set to [ISO AUTO]. (The ISO value automatically set by the
camera is displayed.)
GB
GB
73
Page 74

About this product/Notes on use
Notes on using your camera
Along with this section, also see
“Precautions” in the Help Guide.
Notes on handling the product
• This camera is designed to be dust
resistant and splash resistant, but
it is not guaranteed to completely
prevent the ingress of dust or water
droplets.
• Do not leave the lens or the
viewfinder exposed to a strong light
source such as sunlight. Because
of the lens’s condensing function,
doing so may cause smoke, fire, or
a malfunction inside the camera
body or the lens. If you have to
leave the camera exposed to a light
source such as sunlight, attach the
lens cap to the lens.
• When you shoot with backlighting,
keep the sun sufficiently far away
from the angle of view. Otherwise,
the sunlight may focus inside the
camera and cause smoke or fire.
Even if the sun is slightly away from
the angle of view, it may still cause
smoke or fire.
• Do not directly expose the lens to
beams such as laser beams. That
may damage the image sensor and
cause the camera to malfunction.
• Do not look at sunlight or a strong
light source through the lens when
it is detached. This may result in
unrecoverable damage to the eyes.
• This camera (including accessories)
has magnet(s) which may interfere
with pacemakers, programmable
shunt valves for hydrocephalus
treatment, or other medical devices.
Do not place this camera close to
persons who use such medical
devices. Consult your doctor before
using this camera if you use any
such medical device.
• Increase the volume gradually.
Sudden loud noises can damage
your ears. Be especially careful
when listening to headphones.
• Do not leave the device parts within
the reach of infants. It may cause
an accident or injury.
Notes on the monitor and
electronic viewfinder
• The monitor and electronic
viewfinder are manufactured
using extremely high-precision
technology, and over 99.99% of the
pixels are operational for effective
use. However, there may be some
small black dots and/or bright
dots (white, red, blue or green in
color) that constantly appear on the
monitor and electronic viewfinder.
These dots are normal due to the
manufacturing process and do not
affect the images in any way.
74
GB
Page 75
• When shooting with the viewfinder,
you may experience symptoms
such as eyestrain, fatigue,
travel sickness, or nausea. We
recommend that you take a break
at regular intervals when you are
shooting with the viewfinder.
• If the monitor or electronic
viewfinder is damaged, stop using
the camera immediately. The
damaged parts may harm your
hands, face, etc.
Notes on continuous shooting
During continuous shooting, the
monitor or viewfinder may flash
between the shooting screen and a
black screen. If you keep watching
the screen in this situation, you may
experience uncomfortable symptoms
such as feeling of unwellness. If you
experience uncomfortable symptoms,
stop using the camera, and consult
your doctor as necessary.
Notes on recording for long
periods of time or recording 4K
movies
• The camera body and battery may
become warm with use – this is
normal.
• If the same part of your skin
touches the camera for a long
period of time while using the
camera, even if the camera does
not feel hot to you, it may cause
symptoms of a low-temperature
burn such as redness or blistering.
Pay special attention in the following
situations and use a tripod, etc.
– When using the camera in a high-
temperature environment
– When someone with poor
circulation or impaired skin
sensation uses the camera
– When using the camera with the
[Auto Power OFF Temp.] set to
[High].
Notes on using memory cards
• When recording is finished, the
memory card may become hot. This
is not a malfunction.
• If (overheating warning icon) is
displayed on the monitor, do not
remove the memory card from the
camera right away. Instead, wait for
a while after turning off the camera,
and then remove the memory card.
If you touch the memory card while
it is hot, you may drop it and the
memory card may be damaged.
Be careful when removing the
memory card.
Sony lenses/accessories
Using this unit with products from
other manufacturers may affect its
performance, leading to accidents or
malfunction.
On the data specifications
described in this manual
The data on performance and
specifications are defined under
the following conditions, except
as described in this manual: at an
ordinary ambient temperature of
25ºC (77°F), and using a battery pack
that has been fully charged until the
charge lamp has turned off.
GB
GB75GB
75
Page 76

Warning on copyright
Television programs, films,
videotapes, and other materials
may be copyrighted. Unauthorized
recording of such materials may
be contrary to the provisions of the
copyright laws.
Notes on location information
If you upload and share an image
tagged with a location, you may
accidentally reveal the information
to a third party. To prevent third
parties from obtaining your location
information, set [Location Info Link] to
[Off] before shooting images.
Notes on discarding or transferring
this product to others
When discarding or transferring
this product to others, make sure to
perform the following operation to
protect private information.
• [Setting Reset] [Initialize]
Notes on discarding or transferring
a memory card to others
Executing [Format] or [Delete] on
the camera or a computer may not
completely delete the data on the
memory card. When transferring
a memory card to others, we
recommend that you delete the
data completely using data deletion
software. When discarding a memory
card, we recommend that you
physically destroy it.
Note on network functions
When you use network functions,
unintended third parties on
the network may access the
camera, depending on the usage
environment.
For example, unauthorized access
to the camera may occur in network
environments to which another
network device is connected or can
connect without permission. Sony
bears no responsibility for any loss
or damage caused by connecting to
such network environments.
Note on the 5 GHz band for
wireless LAN
When using the wireless LAN function
outdoors, set the band to 2.4 GHz
by following the procedure below.
(WW271448 only)
• MENU (Network) [Wi-Fi]
[Wi-Fi Frequency Band]
How to turn off wireless network
functions (Wi-Fi, etc.) temporarily
When you board an airplane,
etc., you can turn off all wireless
network functions temporarily using
[Airplane Mode].
76
GB
Page 77
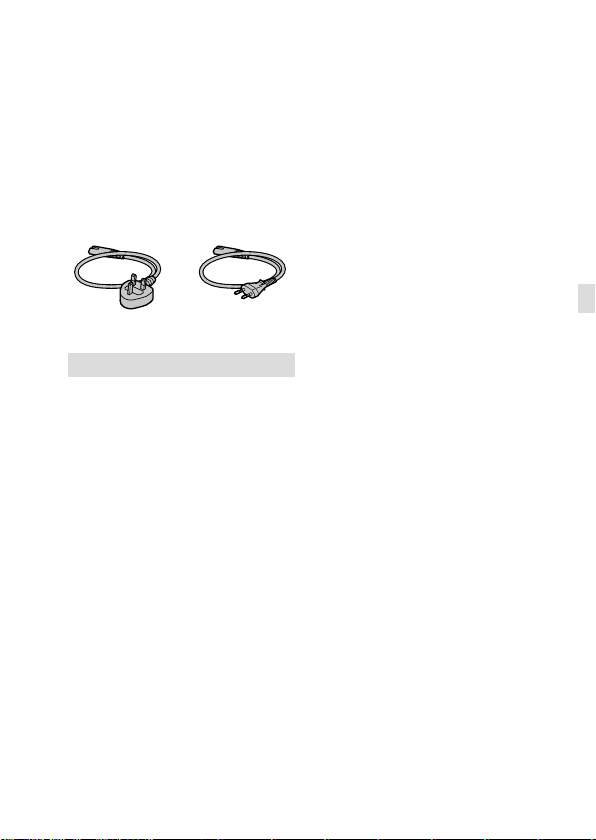
Power Cord
For the customers in the UK, Ireland,
Malta, Cyprus and Saudi Arabia
Use the power cord (A). For safety
reasons, the power cord (B) is not
intended for above countries/regions
and shall therefore not be used there.
For the customers in other EU
countries/regions
Use the power cord (B).
(A) (B)
For Customers in the U.S.A.
For question regarding your product
or for the Sony Service Center nearest
you, call 1-800-222-SONY (7669).
Supplier’s Declaration of Conformity
Trade Name: SONY
Model No.: WW271448
Responsible Party: Sony Electronics
Inc.
Address: 16535 Via Esprillo, San
Diego, CA 92127 U.S.A.
Telephone Number: 858-942-2230
This device complies with part 15 of
the FCC rules. Operation is subject
to the following two conditions:
(1)This device may not cause harmful
interference, and (2)this device must
accept any interference received,
including interference that may cause
undesired operation.
GB
GB
77
Page 78
Troubleshooting
If you experience trouble with the product, try the following solutions.
Refer to the “Help Guide.”
Remove the battery pack, wait for about one minute, re-insert the
battery pack, then turn on the power.
Initialize the settings.
Consult your dealer or local authorized service facility. Additional
information on this product and answers to frequently asked
questions can be found at our Customer Support Website.
Americas
https://www.sony.com/am/support
Europe
https://www.sony.eu/support
Asia-Pacific, Oceania, Middle East and Africa
https://www.sony-asia.com/support
78
GB
Page 79
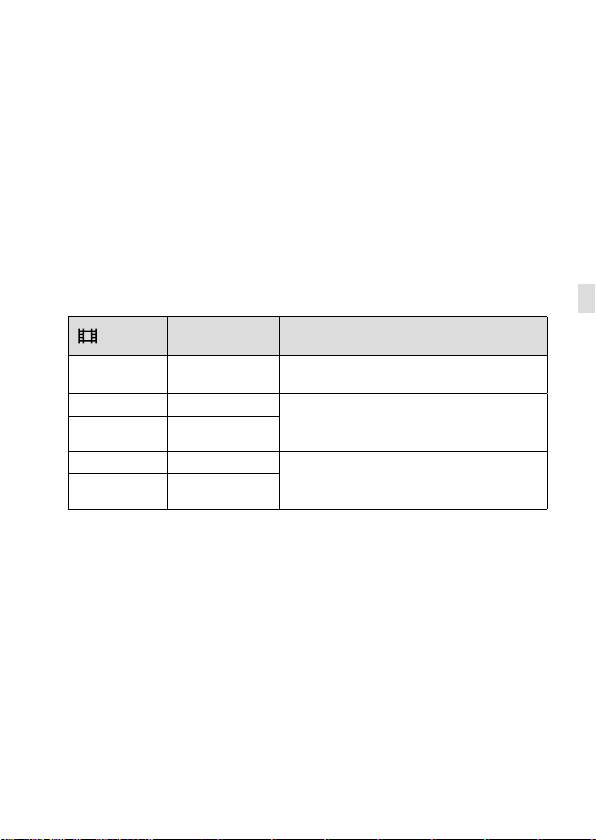
Memory cards that can be used
This camera supports CFexpress Type A memory cards and SD memory
cards (UHS-I and UHS-II compatible).
When using microSD memory cards with this camera, be sure to use the
appropriate adaptor.
For still-image shooting
The following memory cards can be used.
• CFexpress Type A memory cards
• SD/SDHC/SDXC memory cards
For movie recording
Movie recording formats and compatible memory cards are as follows.
File Format
XAVC S HD 100Mbps
XAVC S 4K 280Mbps
XAVC HS 4K 280Mbps
XAVC S-I 4K 600Mbps
XAVC S-I HD 222Mbps
For information on memory cards that can be used for [S&Q Motion]
shooting, refer to the “Help Guide.”
Maximum
recordable bit-rate
Supported memory card
• CFexpress Type A memory card
• SDHC/SDXC card (U3 or higher)
• CFexpress Type A memory card (VPG200
or higher)
• SDXC V60 or higher
• CFexpress Type A memory card (VPG200
or higher)
• SDXC V90 or higher
GB
GB
79
Page 80
Note
• When shooting a proxy movie, a higher-speed memory card may be required.
• CFexpress Type B memory cards cannot be used.
• When an SDHC memory card is used to record an XAVC S movie over
extended periods of time, the recorded movies will be divided into files 4GB
in size.
• When recording a movie on memory cards in both the Slot 1 and the Slot 2
with following camera settings, insert two memory cards with the same file
system.
Movies cannot be recorded simultaneously when using a combination of the
exFAT file system and FAT32 file system.
Memory card File system
CFexpress Type A memory card,
SDXCmemory card
SDHC memory card
• Charge the battery pack sufficiently before attempting to recover the
database files on the memory card.
exFAT
FAT32
80
GB
Page 81

Specifications
Camera
[System]
Camera Type:
Interchangeable Lens Digital Camera
Lens: Sony E-mount lens
[Image sensor]
Image format: 35mm full frame
(35.6mm × 23.8mm), CMOS image
sensor
Effective pixel number of camera:
Approx. 12100000 pixels
Total pixel number of camera:
Approx. 12900000 pixels
[SteadyShot]
In-camera sensor shift image
stabilization system
[Anti-Dust]
Anti-dust function implementing
antistatic coating and ultrasonic
vibration
[Auto focus system]
Detection system: Phase detection
system/Contrast detection system
Sensitivity Range: –6EV to +20EV (at
ISO 100 equivalent, F2.0)
[Electronic Viewfinder]
Type: 1.6 cm (0.64 type)
Electronic Viewfinder
Total number of dots: 9437184dots
Magnification: Approx. 0.90× with
50mm lens at infinity, –1m
Eye Point: Approx. 25mm from the
eyepiece and approx. 21mm from
the eyepiece frame at –1m
Diopter Adjustment:
–1
to +3.0m
–4.0m
–1
–1
–1
[Monitor]
7.5cm (3.0 type) TFT drive, touch
panel
Total number of dots: 1440000 dots
[Exposure control]
Metering method: 1200-zone
evaluative metering
Metering Range: –3EV to +20EV (at
ISO100 equivalent with F2.0 lens)
ISO sensitivity (Recommended
exposure index):
Still images: ISO80 to ISO102400
(Extended ISO: Minimum ISO40,
maximum ISO409600)
Movies: ISO80 to ISO102400
equivalent (Extended ISO:
Maximum ISO409600)
[Shutter]
Type: Electronically-controlled,
vertical-traverse, focal-plane type
Speed range:
Still images: 1/8000second to
30seconds, BULB
Movies: 1/8000second to
1/4second
60p-compatible devices
(50p-compatible devices):
up to 1/60 (1/50) second in AUTO
mode (up to 1/30 (1/25) second in
Auto slow shutter mode)
Flash sync speed: 1/250second
(when using a flash manufactured
by Sony)
[Recording format]
File format: JPEG (DCF Ver. 2.0, Exif
Ver. 2.32, MPF Baseline compliant),
HEIF (MPEG-A MIAF compliant),
RAW (Sony ARW 4.0 format
compliant)
GB
GB
81
Page 82

Movies (XAVC HS format):
XAVC Ver2.0: compliant with the
MP4 format
Video: MPEG-H HEVC/H.265
Audio: LPCM 2ch (48kHz 16bits),
LPCM 4ch (48kHz 24bits)*
LPCM 2ch (48kHz 24bits)*
MPEG-4 AAC-LC 2ch*
Movies (XAVC S format):
XAVC Ver2.0: compliant with the
MP4 format
Video: MPEG-4 AVC/H.264
Audio: LPCM 2ch (48kHz 16bits),
LPCM 4ch (48kHz 24bits)*
LPCM 2ch (48kHz 24bits)*
MPEG-4 AAC-LC 2ch*
*1 When using accessories that
support 4ch output and 24bits
with the Multi Interface Shoe
2
Proxy movies
*
[Recording media]
SLOT 1/SLOT 2:
Slots for CFexpress Type A memory
cards and SD cards (UHS-I and
UHS-II compatible)
[Input/output terminals]
USB Type-C terminal:
SuperSpeed USB 5Gbps (USB 3.2)
USB Power Delivery compatible
Multi/Micro USB Terminal*:
Hi-Speed USB (USB 2.0)
1
1
2
1
1
2
* Supports Micro USB compatible
devices.
HDMI: HDMI Type-A terminal
(Microphone) terminal:
3.5mm Stereo mini jack
(Headphones) terminal:
3.5mm Stereo mini jack
[General]
Rated input: 7.2V , 4.3W
Operating temperature:
0 to 40°C (32 to 104°F)
Storage temperature:
–20 to 55°C (–4 to 131°F)
Dimensions (W/H/D) (Approx.):
128.9 × 96.9 × 80.8 mm
128.9 × 96.9 × 69.7 mm
(from grip to monitor)
5 1/8 × 3 7/8 × 3 1/4 in.
5 1/8 × 3 7/8 × 2 3/4 in.
(from grip to monitor)
Mass (Approx.):
699 g (1 lb 8.7 oz) (including
battery pack, SDXC memory card)
[Wireless LAN]
WW271448 (see name plate on the
bottom of camera)
Supported format:
IEEE802.11a/b/g/n/ac
Frequency band: 2.4GHz/5GHz
Security: WEP/WPA-PSK/WPA2-PSK
Connection method:
Wi-Fi Protected Setup™ (WPS)/
Manual
Access method: Infrastructure mode
WW389565 (see name plate on the
bottom of camera)
Supported format:
IEEE 802.11 b/g/n
Frequency band: 2.4 GHz
Security: WEP/WPA-PSK/WPA2-PSK
Connection method:
Wi-Fi Protected Setup™ (WPS)/
Manual
Access method: Infrastructure mode
82
GB
Page 83
[NFC]
Tag type: NFC Forum Type 3 Tag
compliant
[Bluetooth communications]
Bluetooth standard Ver. 5
Frequency band: 2.4GHz
Battery charger BC-QZ1
Rated input:
100- 240V
Rated output: 8.4V , 1.6A
, 50/60Hz, 0.38A
Rechargeable battery pack
NP-FZ100
Rated voltage: 7.2V
Design and specifications are subject
to change without notice.
On image data compatibility
• This camera conforms with DCF
(Design rule for Camera File system)
universal standard established
by JEITA (Japan Electronics and
Information Technology Industries
Association).
• Playback of images recorded with
your camera on other equipment
and playback of images recorded
or edited with other equipment on
your camera are not guaranteed.
Trademarks
• XAVC S and are registered
trademarks of Sony Corporation.
• XAVC HS and are
registered trademarks of
Sony Corporation.
• Mac is a trademark of Apple Inc.,
registered in the United States and
other countries.
• iPhone and iPad are trademarks
of Apple Inc., registered in the U.S.
and other countries.
• USB Type-C® and USB-C®
are registered trademarks of
USB Implementers Forum.
• The terms HDMI, HDMI HighDefinition Multimedia Interface,
and the HDMI Logo are trademarks
or registered trademarks of HDMI
Licensing Administrator, Inc.
• Microsoft and Windows are
registered trademarks or
trademarks of Microsoft Corporation
in the United States and/or other
countries.
• SDXC logo is a trademark of
SD-3C, LLC.
• The CFexpress Type A logo is
a trademark licensed by the
CompactFlash Association.
• Android and Google Play
are trademarks or registered
trademarks of Google LLC.
• Wi-Fi, the Wi-Fi logo and
Wi-Fi Protected Setup are registered
trademarks or trademarks of the
Wi-Fi Alliance.
• The N-Mark is a trademark
or registered trademark of
NFC Forum, Inc. in the United States
and in other countries.
GB
GB
83
Page 84
• The Bluetooth® word mark and
logos are registered trademarks
owned by the Bluetooth SIG, Inc.
and any use of such marks by
Sony Corporation is under license.
• QR Code is a trademark of
Denso Wave Inc.
• In addition, system and product
names used in this manual are, in
general, trademarks or registered
trademarks of their respective
developers or manufacturers.
However, the
or marks may
not be used in all cases in this
manual.
Additional information on this
product and answers to frequently
asked questions can be found at our
Customer Support Website.
84
GB
Page 85

GB
85
GB
Page 86
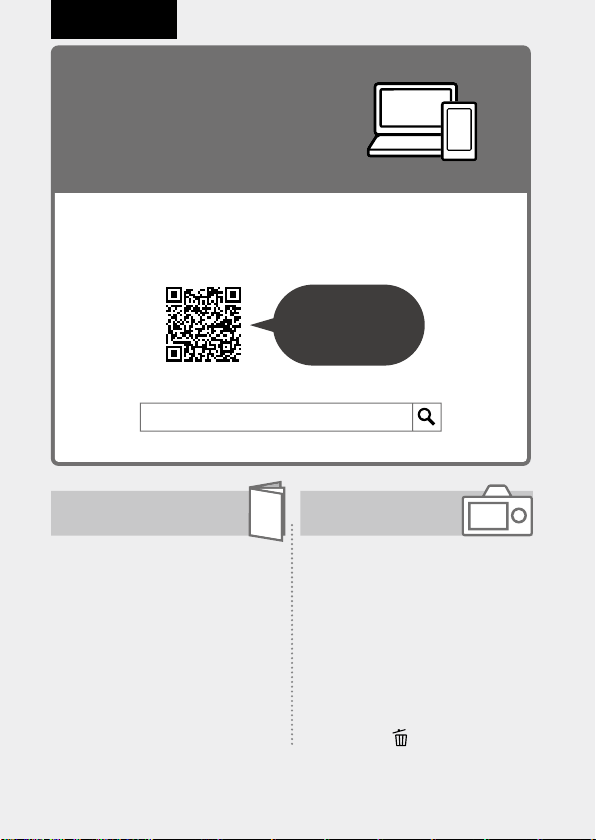
Français
Consultez le
Guide d’aide!
Le «Guide d’aide» est un mode d’emploi en ligne que vous
pouvez lire sur votre ordinateur ou smartphone. Consultezle pour en savoir plus sur les éléments du menu, l’utilisation
avancée et les plus récentes informations sur l’appareil.
Scannez ici
https://rd1.sony.net/help/ilc/2010/h_zz/
ILCE-7SM3 Guide d’aide
Mode d’emploi
(ce livret)
Ce mode d’emploi présente
certaines fonctions de base.
Voir «Guide de démarrage»
(page3) pour le guide de
démarrage rapide. Le «Guide
de démarrage» présente les
procédures initiales depuis le
moment où vous déballez le
produit jusqu’au moment où vous
déclenchez l’obturateur pour la
première prise de vue.
FR
2
Guide intégr. à
l'app.
Le [Guide intégr. à l'app.]
donne des explications des
éléments du menu sur l’écran
de l’appareil.
Vous pouvez facilement obtenir
des informations pendant la prise
de vue.
Sur l’écran du menu, sélectionnez
un élément dont vous souhaitez
afficher la description et appuyez
sur le bouton
(Supprimer).
Page 87
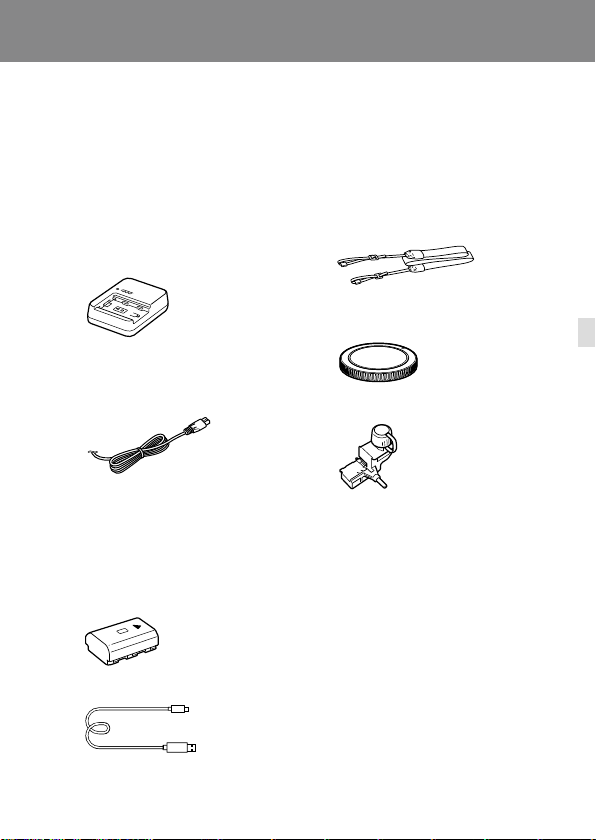
Guide de démarrage
1: Vérifier l’appareil et les éléments
fournis
Le nombre indiqué entre parenthèses correspond au nombre d’éléments
fournis.
• Appareil photo (1)
• Chargeur de batterie (1)
• Cordon d’alimentation (1)*
(fourni dans certains pays/
régions)
* Plusieurs cordons d’alimentation
peuvent être fournis avec cet
équipement. Utilisez le cordon
approprié qui correspond à votre
pays ou région. Voir page 82.
• Batterie rechargeable NP-FZ100
(1)
• Câble USB Type-C® (1)
• Bandoulière (1)
• Capuchon de boîtier (1) (fixé à
l’appareil photo)
• Protège-câble (1)
• Capuchon de la griffe (1) (fixé à
l’appareil photo)
• Oculaire de visée (1) (fixé à
l’appareil photo)
• Mode d’emploi (1) (le présent
manuel)
• Guide de référence (1)
FR
FR
3
Page 88
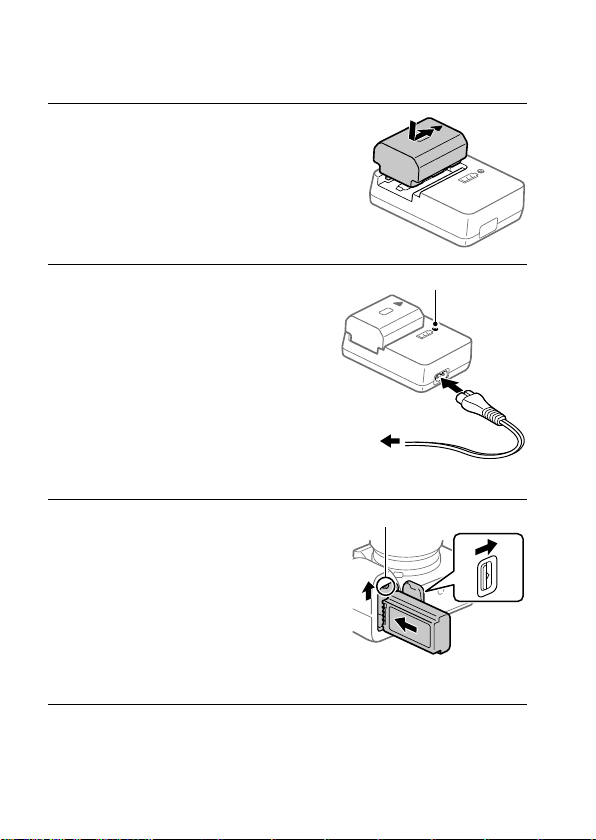
2: Préparer la batterie
1
Insérez la batterie dans le
chargeur de batterie.
• Insérez la batterie sur le
chargeur de batterie dans
le sens indiqué par . Faites
glisser la batterie à fond dans la
direction de la flèche.
2
Branchez le chargeur de
batterie à une prise murale
au moyen du cordon
d’alimentation (fourni).
• Lorsque la charge commence, le
témoin CHARGE s’allume sur le
chargeur de batterie. Lorsque la
batterie est chargée, le témoin
CHARGE et tous les autres
témoins s’éteignent.
3
Insérez la batterie dans
l’appareil.
• Ouvrez le couvercle du
compartiment de la batterie,
puis insérez la batterie tout
en appuyant sur le levier de
verrouillage.
• Poussez la batterie jusqu’à ce
qu’elle se verrouille en place,
puis refermez le couvercle.
FR
4
Témoin CHARGE
Vers la prise
murale
Levier de verrouillage
Page 89

Pour charger la batterie lorsque celle-ci est insérée dans
l’appareil
Mettez l’appareil hors tension et branchez le connecteur USB Type-C sur
l’appareil dans une source d’alimentation externe comme un adaptateur
secteur USB ou une batterie mobile en vente dans le commerce au moyen
d’un câble USB. Lorsqu’un périphérique compatible USB-PD (USB Power
Delivery) est connecté à l’appareil, la charge rapide est possible.
Note
• La charge USB est impossible depuis le Multi/micro connecteur USB.
• L’utilisation avec tous les périphériques compatibles USB-PD n’est pas
garantie.
• Nous vous recommandons d’utiliser un périphérique compatible USB-PD avec
une sortie de 9V/3A ou 9V/2A.
FR
FR
5
Page 90
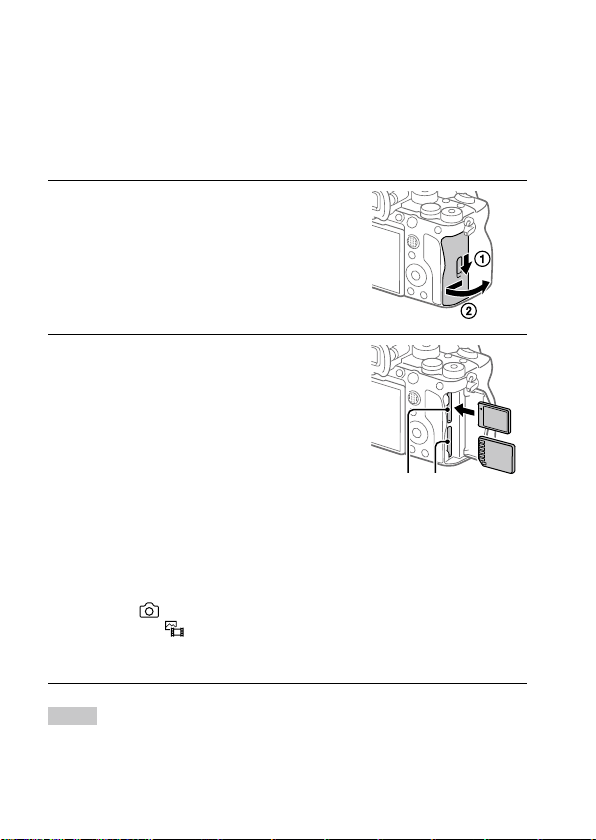
3: Insérer une carte mémoire dans
l’appareil photo
Vous pouvez utiliser les cartes mémoire CFexpress Type A et les cartes
mémoire SD avec cet appareil (page 85).
1
Ouvrez le couvercle de la carte
mémoire.
2
Insérez la carte mémoire dans la
fente 1.
• La fente 1 et la fente 2 acceptent
toutes deux les cartes mémoire
CFexpress Type A et les cartes mémoire
SD.
• Insérez une carte mémoire
CFexpress Type A avec l’étiquette
tournée vers l’écran, et une carte
mémoire SD avec le connecteur tourné
vers l’écran. Insérez la carte jusqu’au
clic d’enclenchement.
• Vous pouvez changer la fente de carte
mémoire utilisée en sélectionnant
MENU
[Support] [
[Prior. support d'enr.]. La fente 1 est
utilisée par défaut.
(Prise de vue)
Réglag. supp. enr.]
Fente 1 Fente 2
Astuce
• Lorsque vous utilisez une carte mémoire pour la première fois avec cet
appareil, nous vous recommandons de la formater avec l’appareil, afin de
garantir une performance stable de la carte mémoire (page45).
FR
6
Page 91
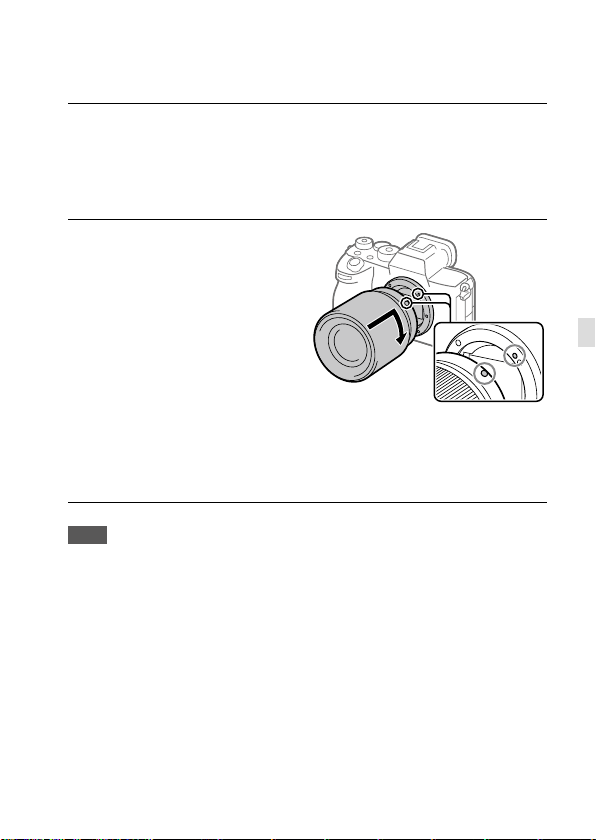
4: Fixer un objectif
1
Retirez le capuchon de boîtier de l’appareil et le capuchon
d’objectif arrière de l’arrière de l’objectif.
• Procédez rapidement au changement d’objectif à l’abri de la
poussière, pour éviter que de la poussière ou des corps étrangers ne
pénètrent dans l’appareil.
2
Tout en alignant les repères
blancs (repères de montage),
poussez doucement
l’objectif vers l’appareil.
Ensuite, tournez lentement
l’objectif dans le sens
de la flèche jusqu’au clic
d’enclenchement.
• Assurez-vous que la monture
est tournée vers le bas afin
d’éviter que de la poussière
ou des corps étrangers ne
pénètrent dans l’appareil.
Note
• Si vous voulez effectuer des prises de vue plein format, utilisez un objectif
compatible avec la prise de vue plein format.
• N’appuyez pas sur le bouton de déverrouillage de l’objectif lorsque vous
installez un objectif.
• Veillez toutefois à ne pas tenir l’objectif par la partie qui se déploie pour
zoomer ou effectuer la mise au point.
FR
FR
7
Page 92
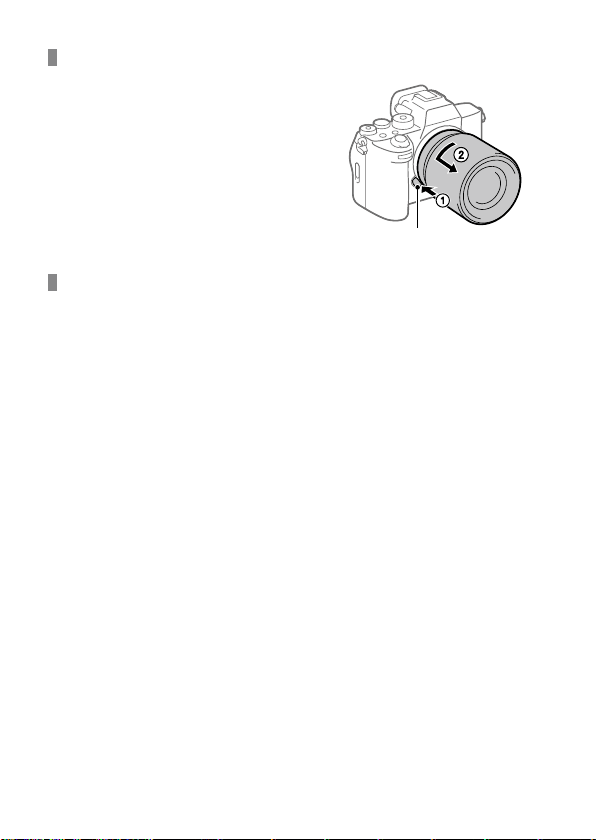
Pour retirer l’objectif
Maintenez le bouton de
déverrouillage de l’objectif enfoncé
et tournez l’objectif dans le sens de
la flèche jusqu’à ce qu’il s’arrête.
Bouton de déverrouillage de l’objectif
Objectifs compatibles
Vous pouvez utiliser des objectifs compatibles avec le plein format 35 mm
ou des objectifs dédiés au format APS-C sur cet appareil. Lorsque vous
utilisez des objectifs dédiés au format APS-C, l’angle de champ est égal à
environ 1,5fois la longueur focale indiquée sur l’objectif.
FR
8
Page 93
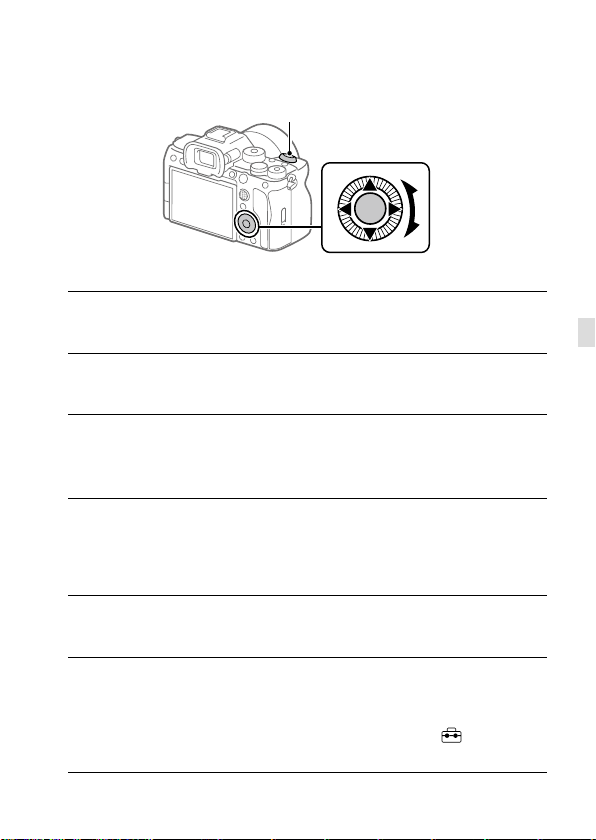
5: Régler la langue et l’horloge
Interrupteur ON/OFF (Alimentation)
Molette de commande
1
Placez l’interrupteur ON/OFF (Alimentation) sur « ON » pour
mettre l’appareil sous tension.
2
Sélectionnez la langue souhaitée et appuyez au centre de la
molette de commande.
3
Assurez-vous que [Entrer] est sélectionné sur l’écran de
confirmation de la zone/date/heure, puis appuyez au centre de
la molette de commande.
4
Sélectionnez l’emplacement géographique souhaité, réglez
[Heure d'été], puis appuyez au centre.
• [Heure d'été] peut être activé/désactivé en appuyant sur le côté
supérieur/inférieur de la molette de commande.
5
Réglez le format de la date (année/mois/jour), puis appuyez au
centre.
FR
6
Réglez la date et l’heure (heure/minute/seconde), puis
appuyez au centre.
• Pour régler à nouveau la date et l’heure ou l’emplacement
géographique ultérieurement, sélectionnez MENU
[Zone/date] [Réglag. zone/date/h].
(Réglage)
FR
9
Page 94

Note
• L’horloge interne de l’appareil peut afficher des erreurs de temps. Réglez
régulièrement l’heure.
10
FR
Page 95
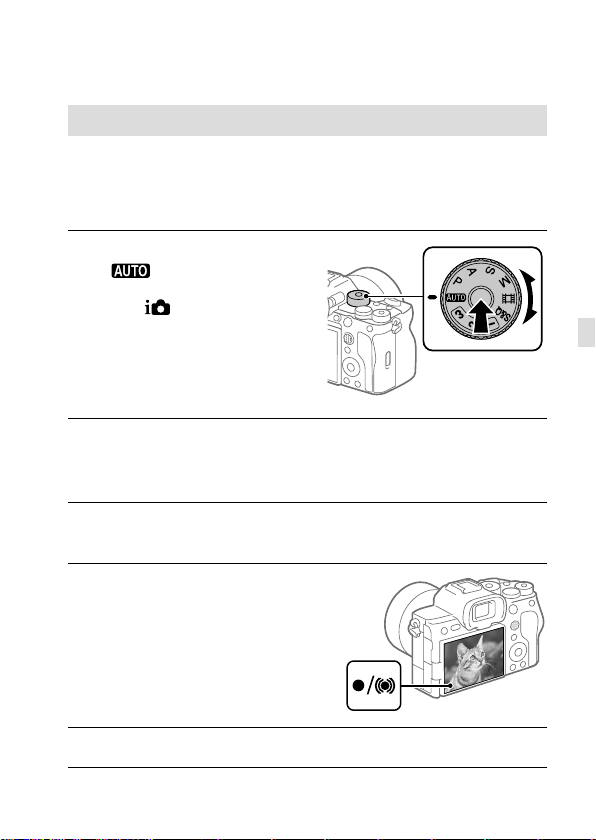
6: Effectuer des prises de vue
Prise d’images fixes (Auto intelligent)
Cette section explique comment prendre des images fixes en
mode [Auto intelligent]. En mode [Auto intelligent], l’appareil fait
automatiquement la mise au point et détermine automatiquement
l’exposition en fonction des conditions de prise de vue.
1
Placez le sélecteur de mode
sur
Le mode de prise de vue sera
réglé sur
2
Ajustez l’écran à un angle facilitant son visionnement et tenez
l’appareil photo. Vous pouvez aussi regarder dans le viseur et
tenir l’appareil photo.
3
Lorsqu’un objectif zoom est installé, agrandissez l’apparence
des sujets en tournant la bague de zoom.
4
Enfoncez le déclencheur à micourse pour effectuer la mise
au point.
Lorsque l’image est nette, un
bip se fait entendre et le témoin
(comme) s’allume.
(Mode auto).
(Auto intelligent).
• Tournez le sélecteur de mode
tout en appuyant sur le bouton
de déverrouillage du sélecteur
de mode au centre du sélecteur
de mode.
FR
5
Enfoncez complètement le déclencheur.
FR
11
Page 96
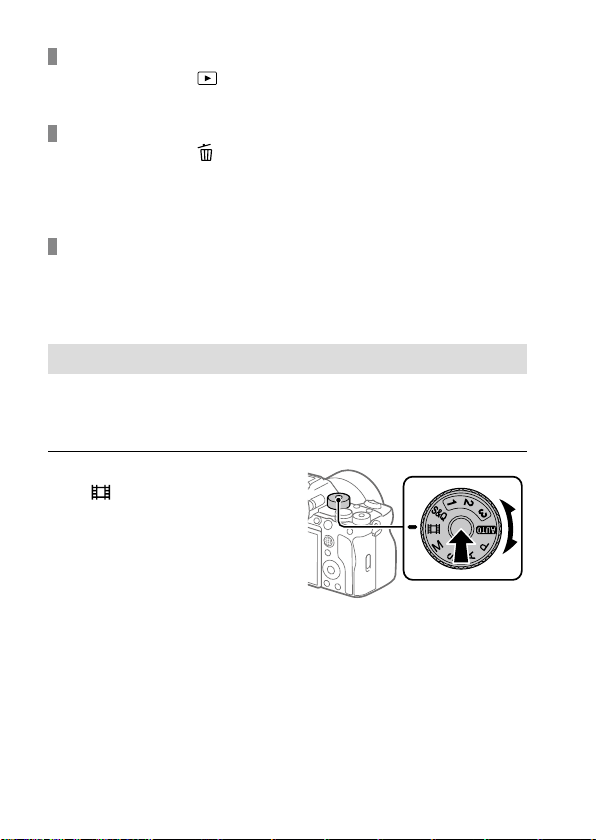
Pour lire des images
Appuyez sur le bouton (Lecture) pour lire les images. Vous pouvez
sélectionner l’image souhaitée à l’aide de la molette de commande.
Pour supprimer l’image affichée
Appuyez sur le bouton (Supprimer) pendant qu’une image est affichée
pour la supprimer. Sélectionnez [Supprimer] sur l’écran de confirmation au
moyen de la molette de commande puis appuyez au centre de la molette
de commande pour supprimer l’image.
Pour prendre des images dans différents modes de prise
de vue
Placez le sélecteur de mode sur le mode souhaité selon le sujet ou la
finalité de la prise de vue (page16).
Enregistrement de films
Vous pouvez régler le format d’enregistrement et l’exposition, et
enregistrer des films au moyen des éléments du menu dédiés pour les
films.
1
Placez le sélecteur de mode
sur
(Film).
• Tournez le sélecteur de mode
tout en appuyant sur le bouton
de déverrouillage du sélecteur
de mode au centre du sélecteur
de mode.
12
FR
Page 97
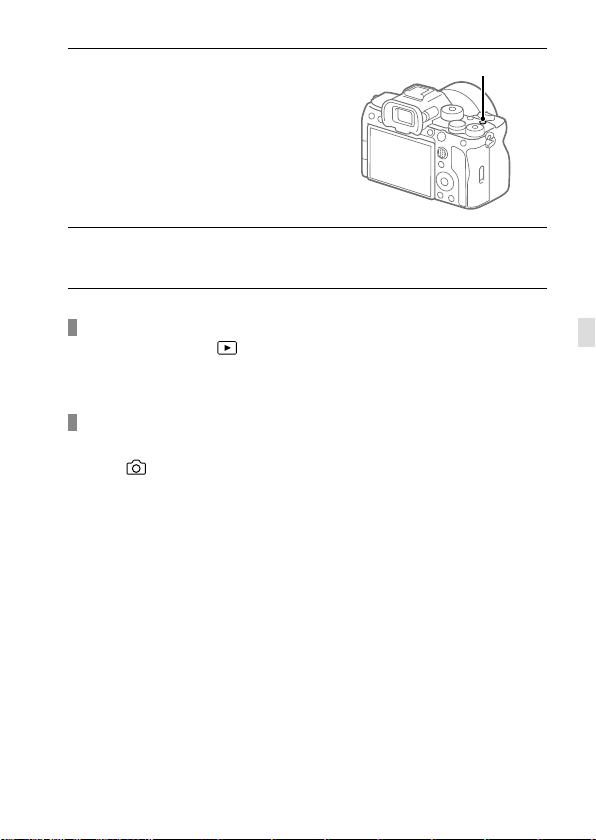
2
Appuyez sur le bouton MOVIE
Bouton MOVIE (Film)
(Film) pour commencer
l’enregistrement.
3
Appuyez à nouveau sur le bouton MOVIE pour arrêter
l’enregistrement.
Lecture de films
Appuyez sur le bouton (Lecture) pour basculer vers le mode lecture.
Sélectionnez un film à lire au moyen de la molette de commande puis
appuyez au centre de cette dernière pour lancer la lecture.
Pour changer le mode d’exposition pour les films (P/A/
S/M)
MENU (Prise de vue) [Mode pr. de vue] [Mode d'exposit.]
Sélectionnez le mode d’exposition souhaité en fonction du sujet ou de la
finalité de la prise de vue (page 18).
FR
FR
13
Page 98
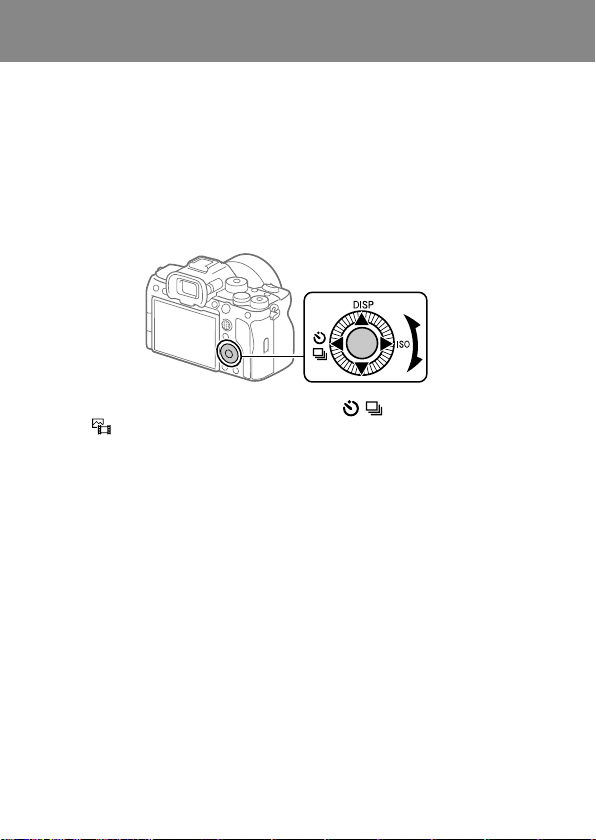
Fonctions de base
Utilisation de la molette de commande
Sur l’écran du menu ou sur l’écran affiché en appuyant sur le bouton Fn,
vous pouvez déplacer le cadre de sélection en tournant la molette de
commande ou en appuyant sur le côté supérieur/inférieur/gauche/droit
de la molette de commande. Confirmez votre sélection en appuyant au
centre de la molette de commande.
• Les fonctions DISP (Réglage de l’affichage), / (Entraînement) et
ISO) sont attribuées au côté supérieur/gauche/droit de la
ISO (
molette de commande. En outre, vous pouvez attribuer les fonctions
sélectionnées au côté gauche/droit/inférieur de la molette de
commande, au centre de la molette et à l’opération de rotation de la
molette.
• Pendant la lecture, vous pouvez afficher l’image suivante/précédente
en appuyant sur le côté droit/gauche de la molette de commande, ou
en la faisant tourner.
14
FR
Page 99
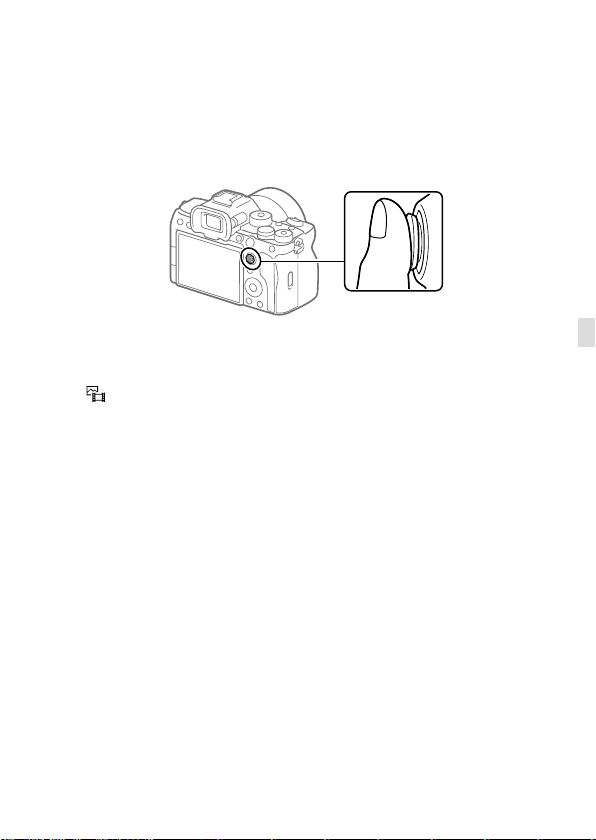
Utilisation du sélecteur multidirectionnel
Vous pouvez déplacer la zone de mise au point en appuyant en haut/
en bas/à gauche/à droite du sélecteur multidirectionnel. Vous pouvez
également attribuer une fonction qui sera activée lorsque vous appuyez
au centre du sélecteur multidirectionnel.
• Placez votre doigt juste au-dessus du sélecteur multidirectionnel pour
le manipuler plus précisément.
• Vous pouvez déplacer la zone de mise au point lorsque
Zone mise au pt] est réglé sur les paramètres suivants:
[
– [Zone]
– [Spot]
– [Spot élargi]
– [Suivi : Zone]
– [Suivi : spot S] / [Suivi : spot M] / [Suivi : spot L]
– [Suivi : spot élargi]
• Par défaut, la fonction [Standard mise au pt] est attribuée au centre du
sélecteur multidirectionnel.
FR
FR
15
15
FR
Page 100
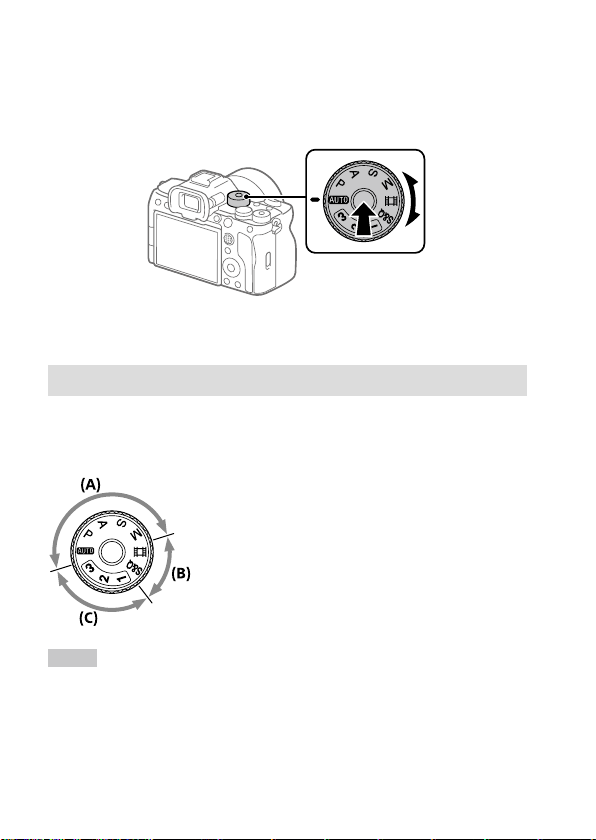
Utilisation du sélecteur de mode
Utilisez le sélecteur de mode pour sélectionner un mode de prise de vue
en fonction du sujet et de la finalité de la prise de vue.
• Tournez le sélecteur de mode tout en appuyant sur le bouton de
déverrouillage du sélecteur de mode au centre du sélecteur de mode.
Détails du mode de prise de vue
Les modes sur le sélecteur de mode sont divisés en modes de prise
d’images fixes, modes d’enregistrement de films et modes de rappel
d’enregistrements.
(A) Modes de prise d’images fixes
(B) Modes d’enregistrement de films
(C) Modes de rappel d’enregistrements
Astuce
• Les éléments du menu affichés varient selon le réglage du sélecteur de mode
(pages21, 46).
FR
16
 Loading...