

Page 1

Interchangeable Lens Digital Camera ILCE-7/ILCE-7R
How to Use
Before Use
Names of parts
Identifying parts (Front side) [1]
Identifying parts (Rear side) [2]
Identifying parts (Top side/Side view) [3]
Identifying parts (Bottom view) [4]
Identifying parts Lens FE 28-70 mm F3.5-5.6 OSS (Supplied with ILCE-7K) [5]
Icons and indicators
List of icons on the screen [6]
Using the strap
Using the shoulder strap [7]
Attaching the eyepiece cup
Attaching the eyepiece cup [8]
Adjusting the viewfinder
Adjusting the viewfinder (diopter-adjustment) [9]
In-Camera guide
Page 2

About the [In-Camera Guide] [10]
Confirming the operation method
Confirming the operation method
Using the control wheel [11]
Using MENU items [12]
Using the Fn (Function) button [13]
Using the “Quick Navi”
Shooting
Shooting still images/movies
Shooting still images [14]
Shooting movies [15]
Selecting a shooting mode
List of mode dial functions [16]
Intelligent Auto [17]
Superior Auto [18]
About Scene Recognition [19]
The advantages of automatic shooting [20]
Program Auto [21]
Sweep Panorama [22]
Scene Selection [23]
Shutter Priority [24]
Aperture Priority [25]
Manual Exposure [26]
BULB [27]
Memory recall [28]
Movie [29]
Page 3

Using shooting functions
Using the zoom
Zoom [30]
The zoom features available with this product [31]
Zoom Setting [32]
About zoom scale [33]
Using the flash
Using flash (sold separately) [34]
Flash Mode [35]
Flash Comp. [36]
Selecting a screen display mode
Switching the screen display (Shooting) [37]
DISP Button (Finder) [38]
DISP Button (Monitor) [39]
Selecting still image size/image quality
Image Size (still image) [40]
Aspect Ratio (still image) [41]
Quality (still image) [42]
Panorama: Size [43]
Panorama: Direction [44]
Adjusting the focus
Focus Mode [45]
Focus Area [46]
Focus-lock [47]
Manual Focus [48]
Direct manual focus (DMF) [49]
Page 4

MF Assist (still image) [50]
Focus Magnifier [51]
Focus Magnif. Time [52]
Peaking Level [53]
Peaking Color [54]
Lock-on AF [55]
Lock-on AF (On) [56]
Pre-AF (still image) [57]
Eye-Start AF (still image) [58]
AF/MF control [59]
AF Illuminator (still image) [60]
AF Micro Adj. [61]
Focus Settings [62]
AF w/ shutter (still image) [63]
AF On [64]
Eye AF [65]
Phase Detect. Area (ILCE-7) [66]
Measuring the exact distance to the subject [67]
Adjusting the exposure
Exposure Comp. [68]
Exposure compensation dial [69]
Metering Mode [70]
AE lock [71]
AEL w/ shutter (still image) [72]
Exp.comp.set [73]
Zebra [74]
Exposure Set. Guide [75]
Exposure step [76]
Dial Ev Comp [77]
Reset EV Comp. [78]
Page 5

Selecting a drive mode (Continuous shooting/Self-timer)
Drive Mode [79]
Cont. Shooting [80]
Spd Priority Cont. [81]
Self-timer [82]
Self-timer(Cont) [83]
Cont. Bracket [84]
Single Bracket [85]
WB bracket [86]
DRO Bracket [87]
Bracket order [88]
Selecting the ISO sensitivity
ISO [89]
Multi Frame NR [90]
Correcting the brightness or contrast
D-Range Opt. (DRO) [91]
Auto HDR [92]
Adjusting color tones
White Balance [93]
Capturing a basic white color in [Custom Setup] mode [94]
Selecting an effect mode
Picture Effect [95]
Creative Style [96]
Recording movies
File Format (movie) [97]
Record Setting (movie) [98]
Page 6

Audio Recording [99]
Audio Level Display [100]
Audio Rec Level [101]
Audio Out Timing [102]
Wind Noise Reduct. [103]
Auto Slow Shut. (movie) [104]
MOVIE Button [105]
Customizing the shooting functions for convenient use
Memory [106]
Function Menu Set. [107]
Custom Key Settings [108]
Function of the control wheel [109]
Function of the AEL button [110]
Function of the AF/MF button [111]
Function of the Custom button [112]
Function of the center button [113]
Function of the left button [114]
Function of the right button [115]
Function of the down button [116]
Dial Setup [117]
Setting the other functions of this product
Smile/Face Detect. [118]
Soft Skin Effect (still image) [119]
Face Registration (New Registration) [120]
Face Registration (Order Exchanging) [121]
Face Registration (Delete) [122]
Red Eye Reduction [123]
Auto Obj. Framing (still image) [124]
SteadyShot [125]
Long Exposure NR (still image) [126]
Page 7

High ISO NR (still image) [127]
Color Space (still image) [128]
Grid Line [129]
Auto Review [130]
Live View Display [131]
FINDER/MONITOR [132]
Release w/o Lens [133]
e-Front Curtain Shut. (ILCE-7) [134]
S. Auto Img. Extract. [135]
APS-C Size Capture [136]
Shading Comp. [137]
Chro. Aber. Comp. [138]
Distortion Comp. [139]
Dial / Wheel Lock [140]
Deactivate Monitor [141]
Aperture Preview [142]
Shot. Result Preview [143]
Viewing
Viewing still images
Playing back images [144]
Playback zoom [145]
Image Index [146]
Switching the screen display (during playback) [147]
Deleting images
Deleting a displayed image [148]
Deleting multiple selected images [149]
Playing back movies
Playing back movies [150]
Page 8

Viewing panoramic images
Playing back panoramic images [151]
Printing
Specify Printing [152]
Using viewing functions
View Mode [153]
Display Rotation [154]
Slide Show [155]
Rotate [156]
Protect [157]
4K Still Image PB [158]
Viewing images on a TV
Viewing images on an HD TV [159]
Viewing images on a “BRAVIA” Sync-compatible TV [160]
Changing settings
Setup menu
Monitor Brightness [161]
Viewfinder Bright. [162]
Finder Color Temp. [163]
Volume Settings [164]
Audio signals [165]
Upload Settings(Eye-Fi) [166]
Tile Menu [167]
Mode Dial Guide [168]
Delete confirm. [169]
Page 9

Display Quality [170]
Pwr Save Start Time [171]
PAL/NTSC Selector [172]
Cleaning Mode [173]
Demo Mode [174]
Remote Ctrl [175]
HDMI Resolution [176]
CTRL FOR HDMI [177]
HDMI Info. Display [178]
USB Connection [179]
USB LUN Setting [180]
Language [181]
Date/Time Setup [182]
Area Setting [183]
Format [184]
File Number [185]
Select REC Folder [186]
New Folder [187]
Folder Name [188]
Recover Image DB [189]
Display Media Info. [190]
Version [191]
Certification Logo (Overseas model only) [192]
Setting Reset [193]
Using Wi-Fi functions
Connecting this product and a Smartphone
“PlayMemories Mobile”
Connecting an Android smartphone to this product [194]
Connecting the product to an iPhone or iPad [195]
One-touch(NFC) [196]
Page 10

Controlling this product using a Smartphone
Smart Remote Embedded [197]
One-touch connection with an NFC-enabled Android smartphone (NFC One-touch remote)
[198]
Transferring images to a Smartphone
Send to Smartphone [199]
Sending images to an Android smartphone (NFC One-touch Sharing) [200]
Transferring images to a computer
Send to Computer [201]
Transferring images to a TV
View on TV [202]
Changing the settings of Wi-Fi functions
Airplane Mode [203]
WPS Push [204]
Access Point Set. [205]
Edit Device Name [206]
Disp MAC Address [207]
SSID/PW Reset [208]
Reset Network Set. [209]
Adding applications to the product
PlayMemories Camera Apps
PlayMemories Camera Apps [210]
Recommended computer environment [211]
Installing the applications
Page 11

Opening a service account [212]
Downloading applications [213]
Downloading applications directly to the product using the Wi-Fi function [214]
Starting the applications
Launching the downloaded application [215]
Managing the applications
Uninstalling applications [216]
Changing the order of applications [217]
Confirming the account information of “PlayMemories Camera Apps”
Viewing on computers
Recommended computer environment
Recommended computer environment [218]
Using the software
“PlayMemories Home”
Installing “PlayMemories Home”
Software for Mac computers [219]
“Image Data Converter”
Installing “Image Data Converter”
Accessing “Image Data Converter Guide”
“Remote Camera Control”
Installing “Remote Camera Control”
Accessing “Remote Camera Control Help Guide”
Connecting this product and a computer
Connecting the product to a computer [220]
Importing images to the computer [221]
Page 12

Disconnecting the product from the computer [222]
Creating a movie disc
Disc type [223]
Selecting the disc creation method [224]
Creating a disc with a device other than a computer [225]
Creating Blu-ray Discs [226]
Precautions/This product
Precautions
Precautions [227]
On the internal rechargeable battery [228]
Notes on the battery pack [229]
Charging the battery pack [230]
Memory card [231]
Cleaning this product
On cleaning [232]
Number of recordable still images and recordable time of movies
Number of still images [233]
Recordable time of movies [234]
Using this product abroad
Plug adaptor [235]
On TV color systems [236]
Other information
Mount Adaptor [237]
LA-EA1 Mount Adaptor [238]
Page 13

LA-EA2 Mount Adaptor [239]
LA-EA3 Mount Adaptor [240]
LA-EA4 Mount Adaptor [241]
Vertical grip [242]
AVCHD format [243]
License [244]
Trademarks
Trademarks [245]
Troubleshooting
If you have problems
If you have problems
Troubleshooting [246]
Troubleshooting
Battery pack and power
You cannot insert the battery pack into the product. [247]
You cannot turn on the product. [248]
The power turns off suddenly. [249]
The remaining battery level indicator shows an incorrect level. [250]
The charge lamp on the product flashes when charging the battery pack. [251]
The battery pack has not been charged even if the charge lamp on the product has turned
off. [252]
The battery pack is not charged. [253]
Shooting still images/movies
Page 14

You cannot record images. [254]
Recording takes a long time. [255]
The image is out of focus. [256]
The recording date and time are not displayed on the screen. [257]
The date and time are recorded incorrectly. [258]
The aperture value and/or shutter speed and/or metering indicator flashes. [259]
The image colors are not correct. [260]
Noise appears in the image when you view the screen in a dark place. [261]
The eyes of the subject come out red. [262]
Dots appear and remain on the screen. [263]
You cannot shoot images continuously. [264]
The image is not clear in the viewfinder. [265]
The image is whitish (Flare)./Blurring of light appears on the image (Ghosting). [266]
The corners of the picture are too dark. [267]
The image is blurred. [268]
The LCD screen darkens after a short period of time passed. [269]
Viewing images
Images cannot be played back. [270]
The date and time are not displayed. [271]
The image cannot be deleted. [272]
The image was deleted by mistake. [273]
A DPOF mark cannot be put. [274]
Wi-Fi
You cannot find the wireless access point to be connected. [275]
[WPS Push] does not work. [276]
[Send to Computer] is canceled halfway. [277]
You cannot send movies to a smartphone. [278]
[Smart Remote Embedded] or [Send to Smartphone] is canceled halfway. [279]
The shooting screen for [Smart Remote Embedded] is not displayed smoothly./The
connection between this product and the smartphone is disconnected. [280]
Page 15

You cannot use One-Touch connection (NFC). [281]
Computers
The computer does not recognize this product. [282]
You cannot import images. [283]
The image and sound are interrupted by noise when viewing a movie on a computer. [284]
Images exported from a computer cannot be viewed on this product. [285]
Memory cards
Formatted the memory card by mistake. [286]
Printing
You cannot print images. [287]
The color of the image is strange. [288]
Images are printed with both edges cut off. [289]
You cannot print images with the date. [290]
Others
The lens gets fogged. [291]
The product becomes warm when you use it for a long time. [292]
The Clock Set screen appears when you turn on the product. [293]
The number of recordable images does not decrease, or decreases two images at a time.
[294]
The product does not work properly. [295]
“--E-” appears on the screen. [296]
Messages
Messages
Warning messages [297]
Page 16
Situations this product has difficulty handling
Situations this product has difficulty handling
Situations this product has difficulty handling [298]
[1] Before Use > Names of parts
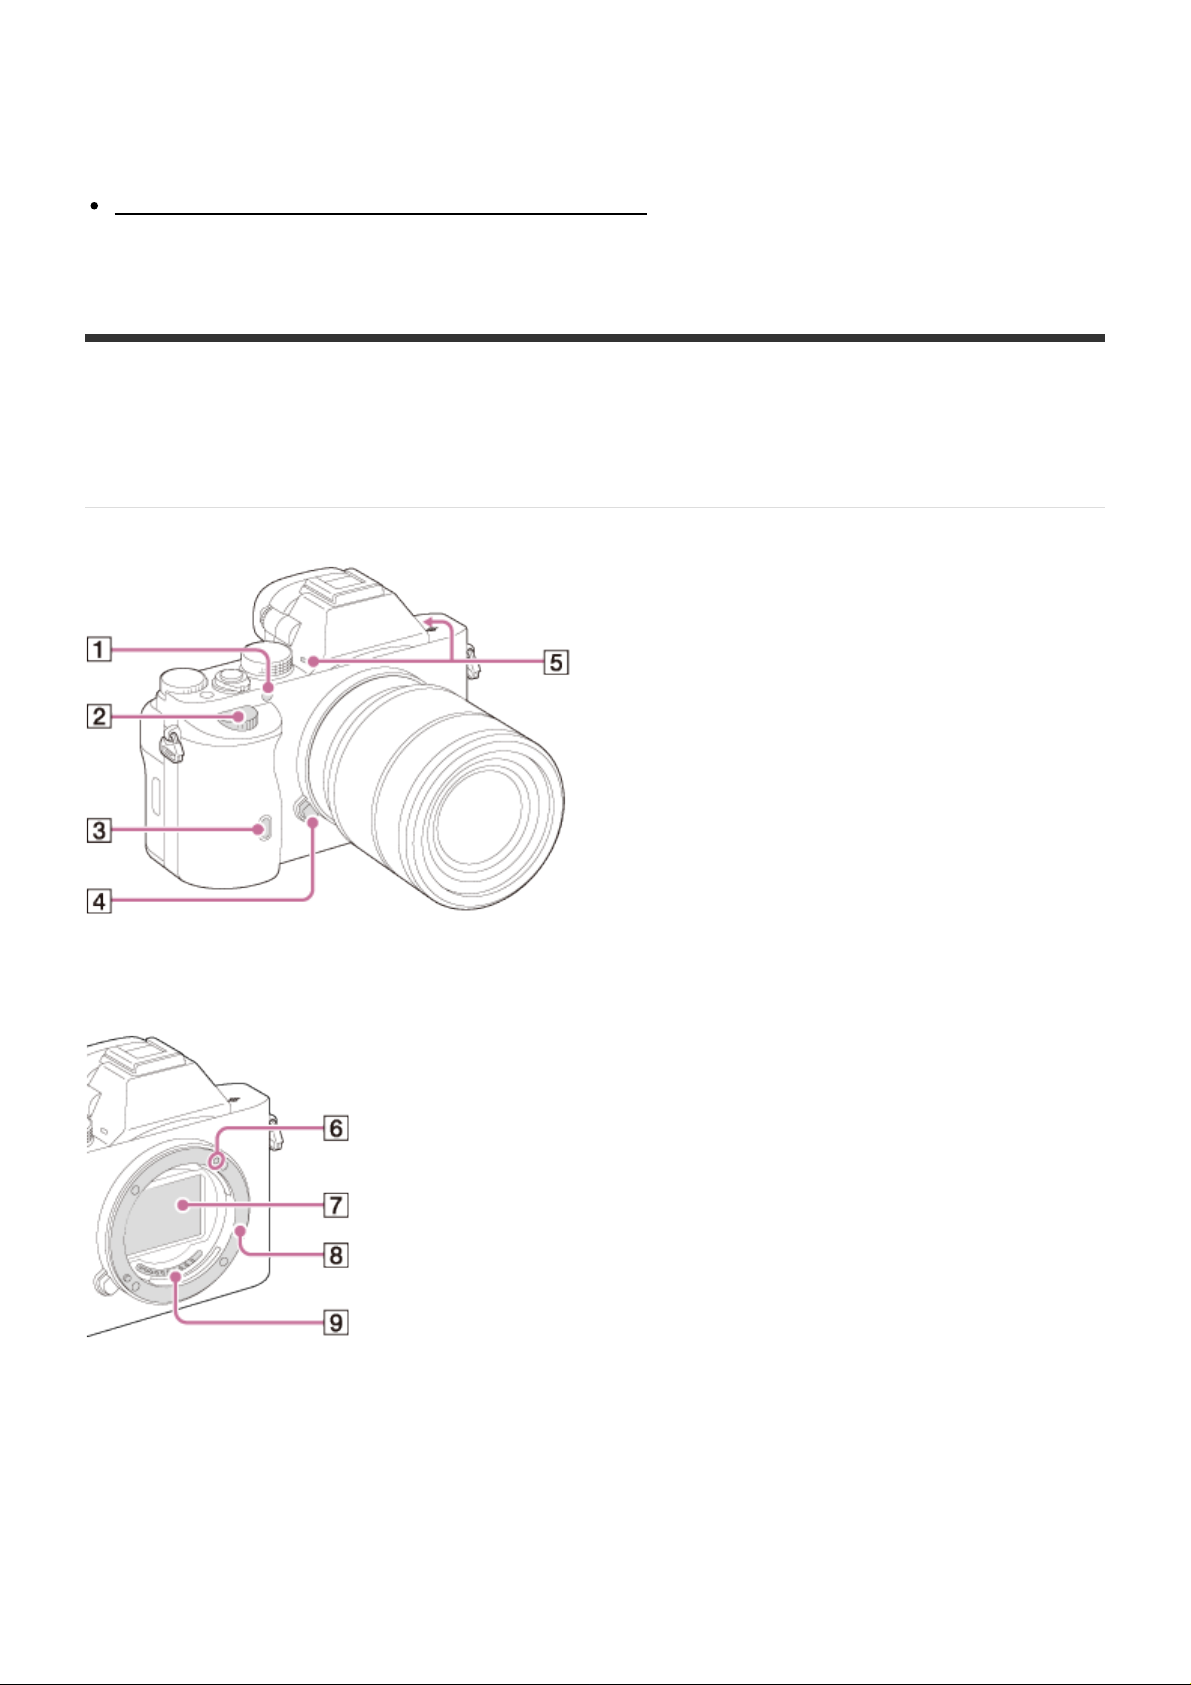
Identifying parts (Front side)
When the lens is removed
1. AF illuminator/Self-timer lamp
2. Front dial
3. Remote sensor
4. Lens release button
5. Built-in microphone*
6. Mount index
Page 17
7. Image sensor**
8. Mount
9. Contacts**
*
Do not cover this part during movie recording. Doing so may cause noise or lower the volume.
**
Do not directly touch these parts.
[2] Before Use > Names of parts
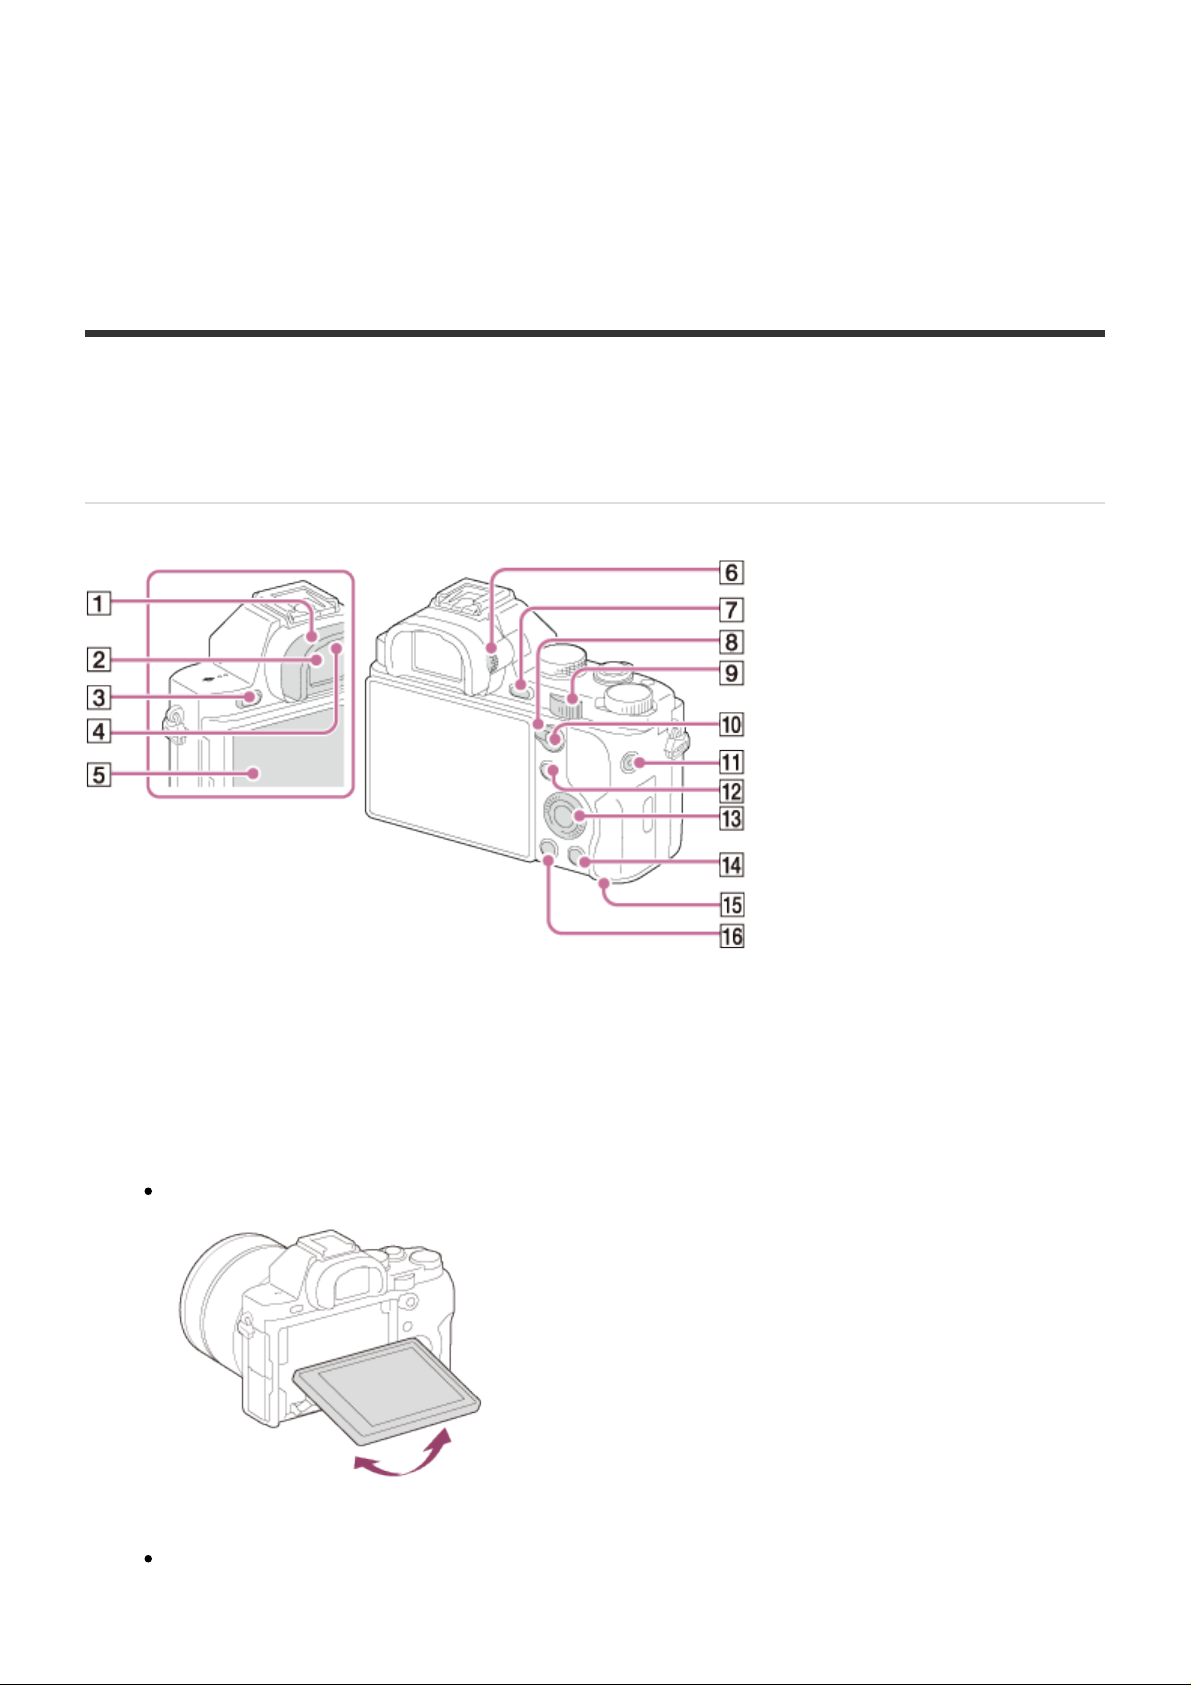
Identifying parts (Rear side)
1. Eyepiece cup
2. Viewfinder
3. MENU button
4. Eyepiece sensors
5. LCD screen
You can adjust the screen to an easily viewable angle and shoot from any position.
6. Diopter-adjustment dial
Adjust the diopter-adjustment dial to your eyesight until the display appears clearly in
the viewfinder.
Page 18
7. For shooting: C2 (Custom2) button
For viewing: (Enlarge) button
8. AF/MF/AEL switch lever
9. Rear dial
10. For shooting: AF/MF (Auto focus/manual focus) button/AEL button
For viewing: (Image index) button
11. MOVIE button
12. For shooting: Fn (Function) button
For viewing: (Send to Smartphone) button
13. Control wheel
14. For shooting: C3 (Custom 3) button
For viewing: (Delete) button
15. Access lamp
16. (Playback) button
[3] Before Use > Names of parts
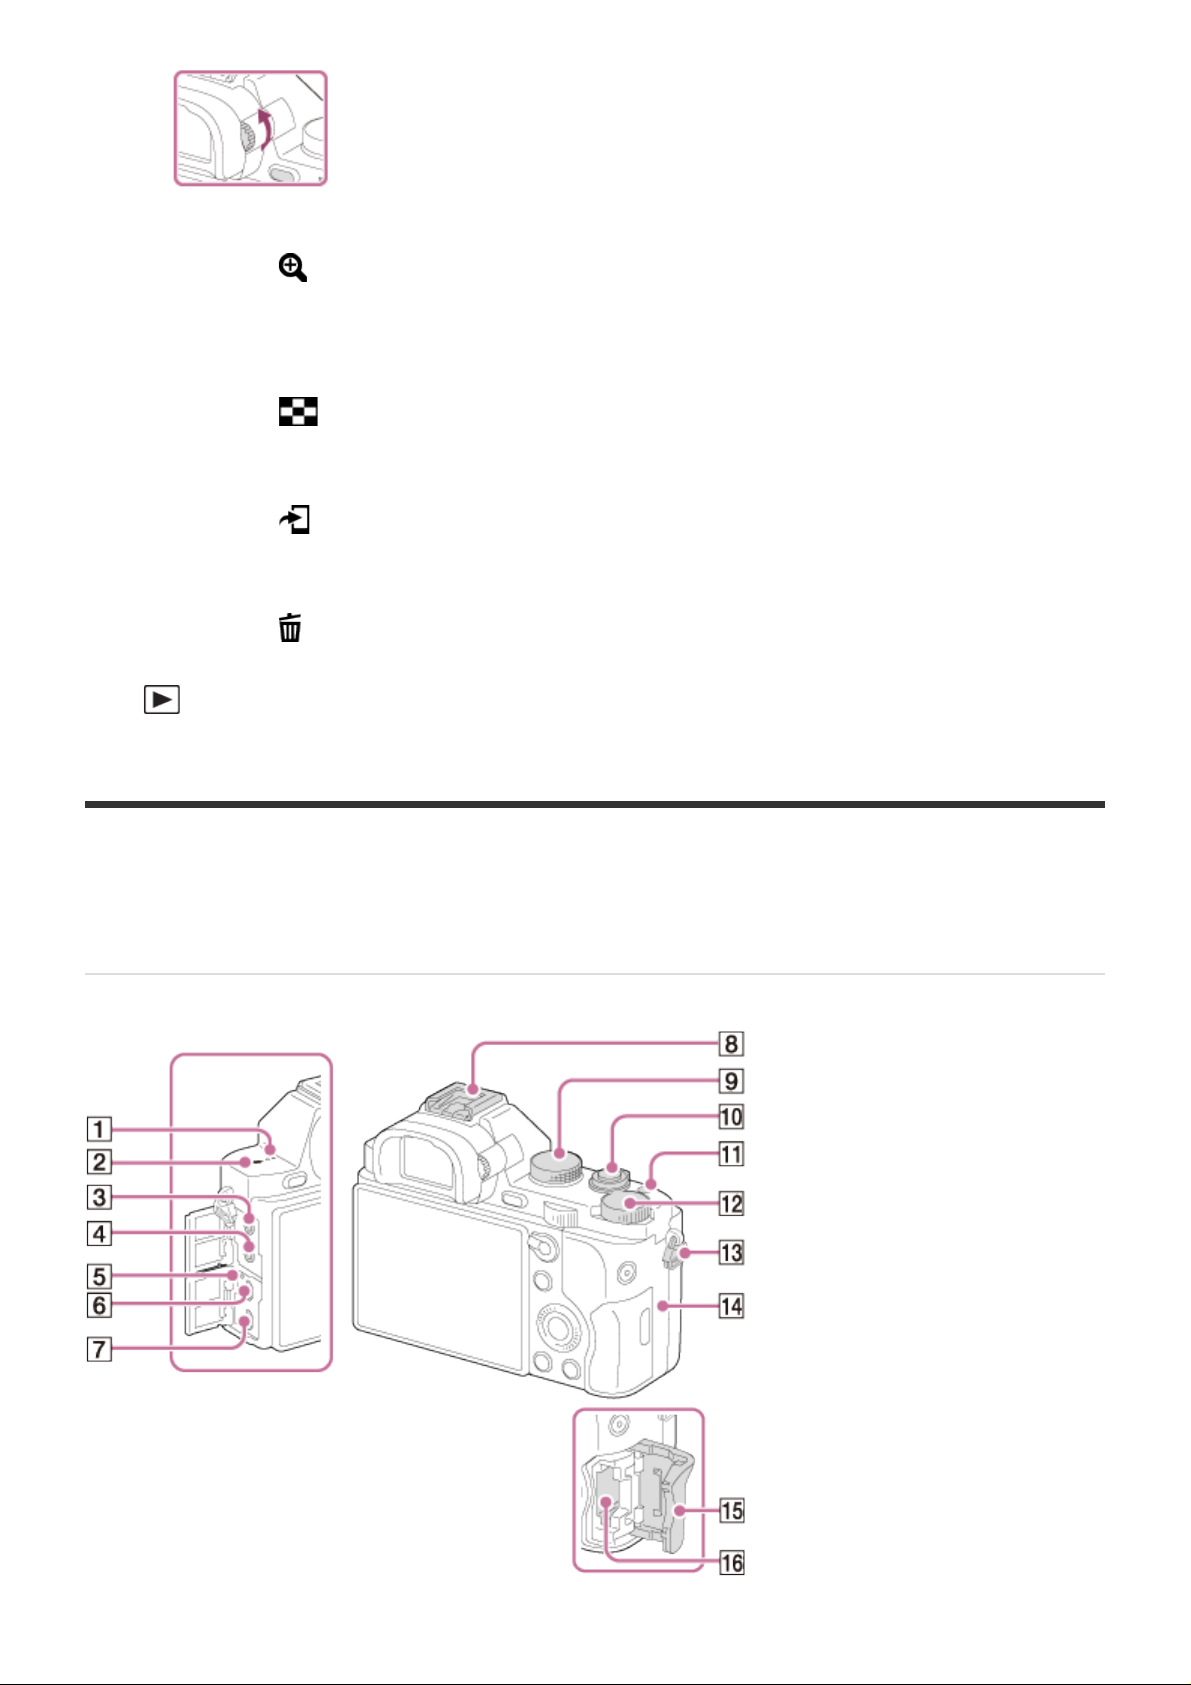
Identifying parts (Top side/Side view)
Page 19
1. Speaker
2. Image sensor position mark
3. (Microphone) jack
When an external microphone is connected, the microphone is turned on automatically.
If the external microphone is a plugin-power type, the power of the microphone is
supplied by this product.
4. (Headphones) jack
5. Charge lamp
6. Multi terminal
Supports Micro USB compatible device.
7. HDMI micro jack
8. Multi interface shoe*
Some of the accessories may not be inserted fully and protrude backward from the Multi
interface shoe. However, when the accessory reaches the front end of the shoe, the
connection is completed.
9. Mode dial
10. Power switch/Shutter button
11. C1 (Custom 1) button
12. Exposure compensation dial
13. Hooks for shoulder strap
Attach both ends of the strap onto the product.
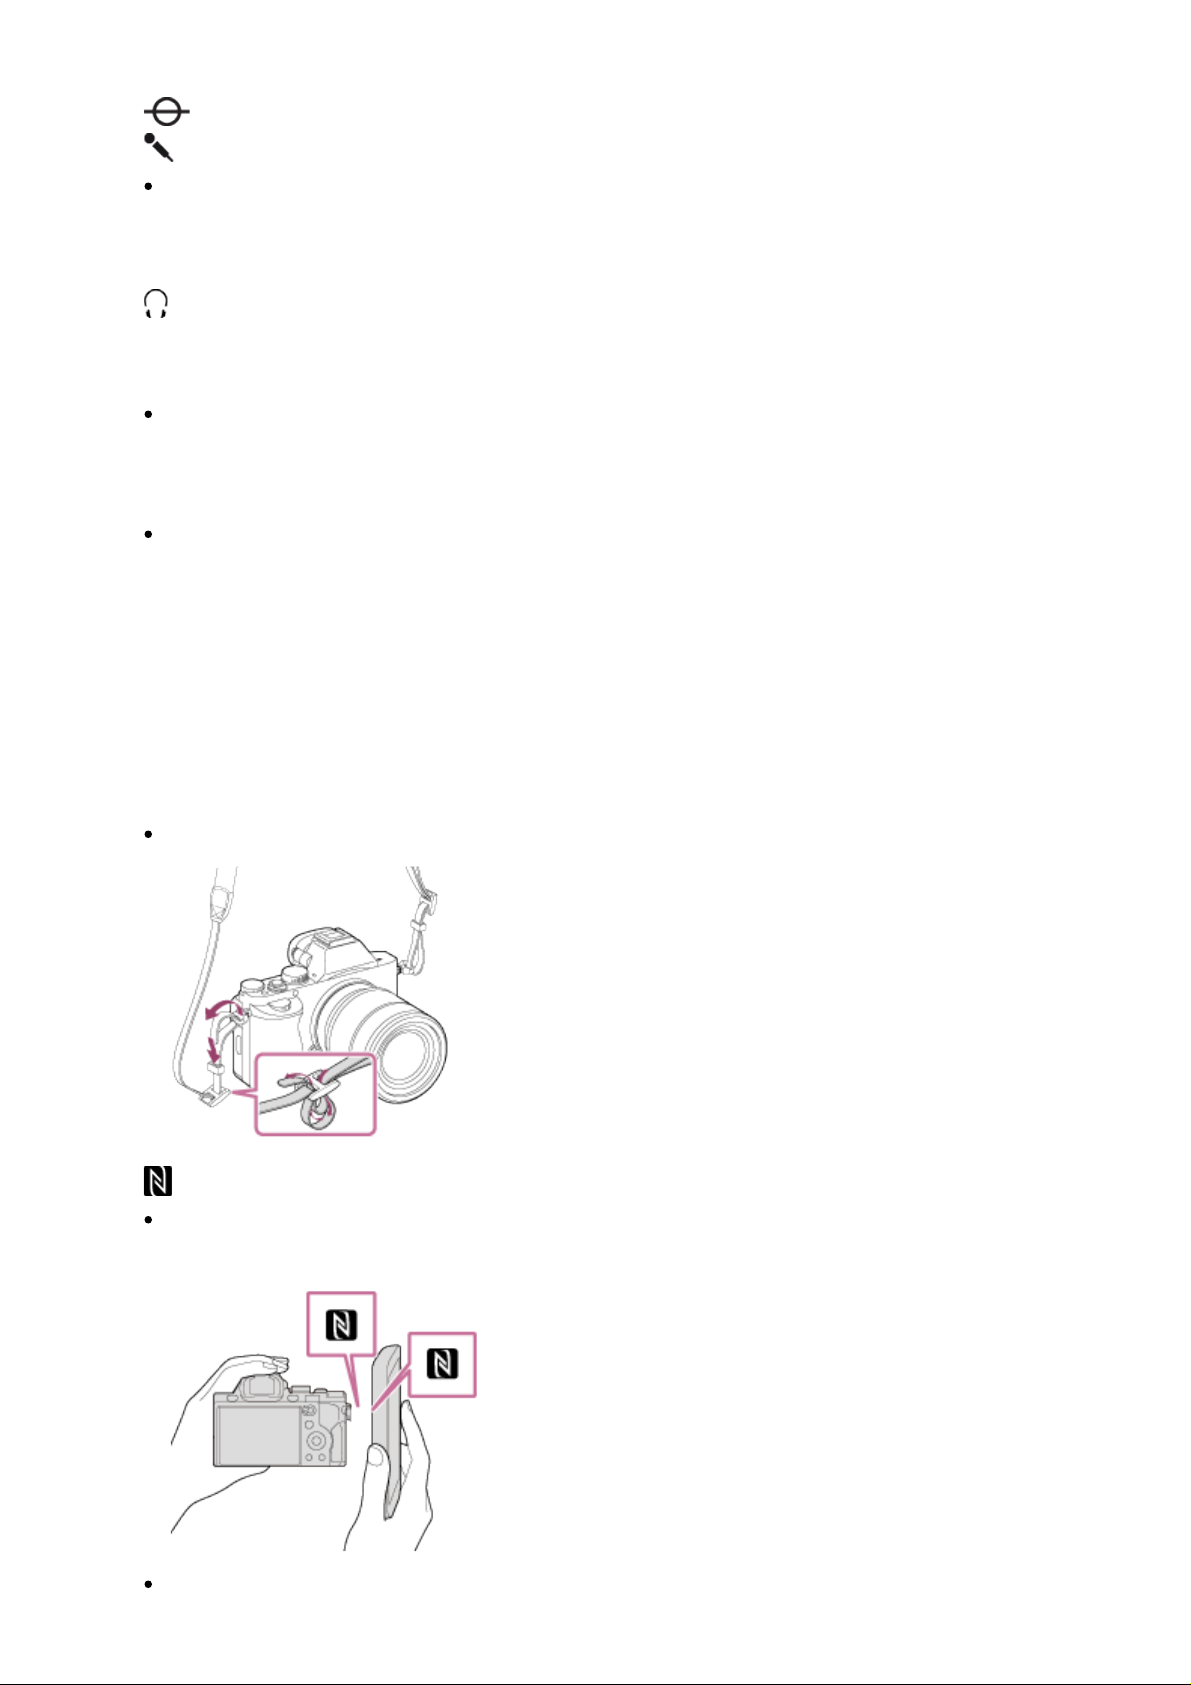
14. (N mark)
This mark indicates the touch point for connecting this product and an NFC-enabled
smartphone.
NFC (Near Field Communication) is an international standard of short-range wireless
Page 20
communication technology.
15. Memory card cover
16. Memory card slot
*
For details on compatible accessories of the Multi interface shoe, visit the Sony web site in your
area, or consult your Sony dealer or local authorized Sony service facility.
Accessories for the Accessory Shoe can also be used. Operations with other manufactures'
accessories are not guaranteed.
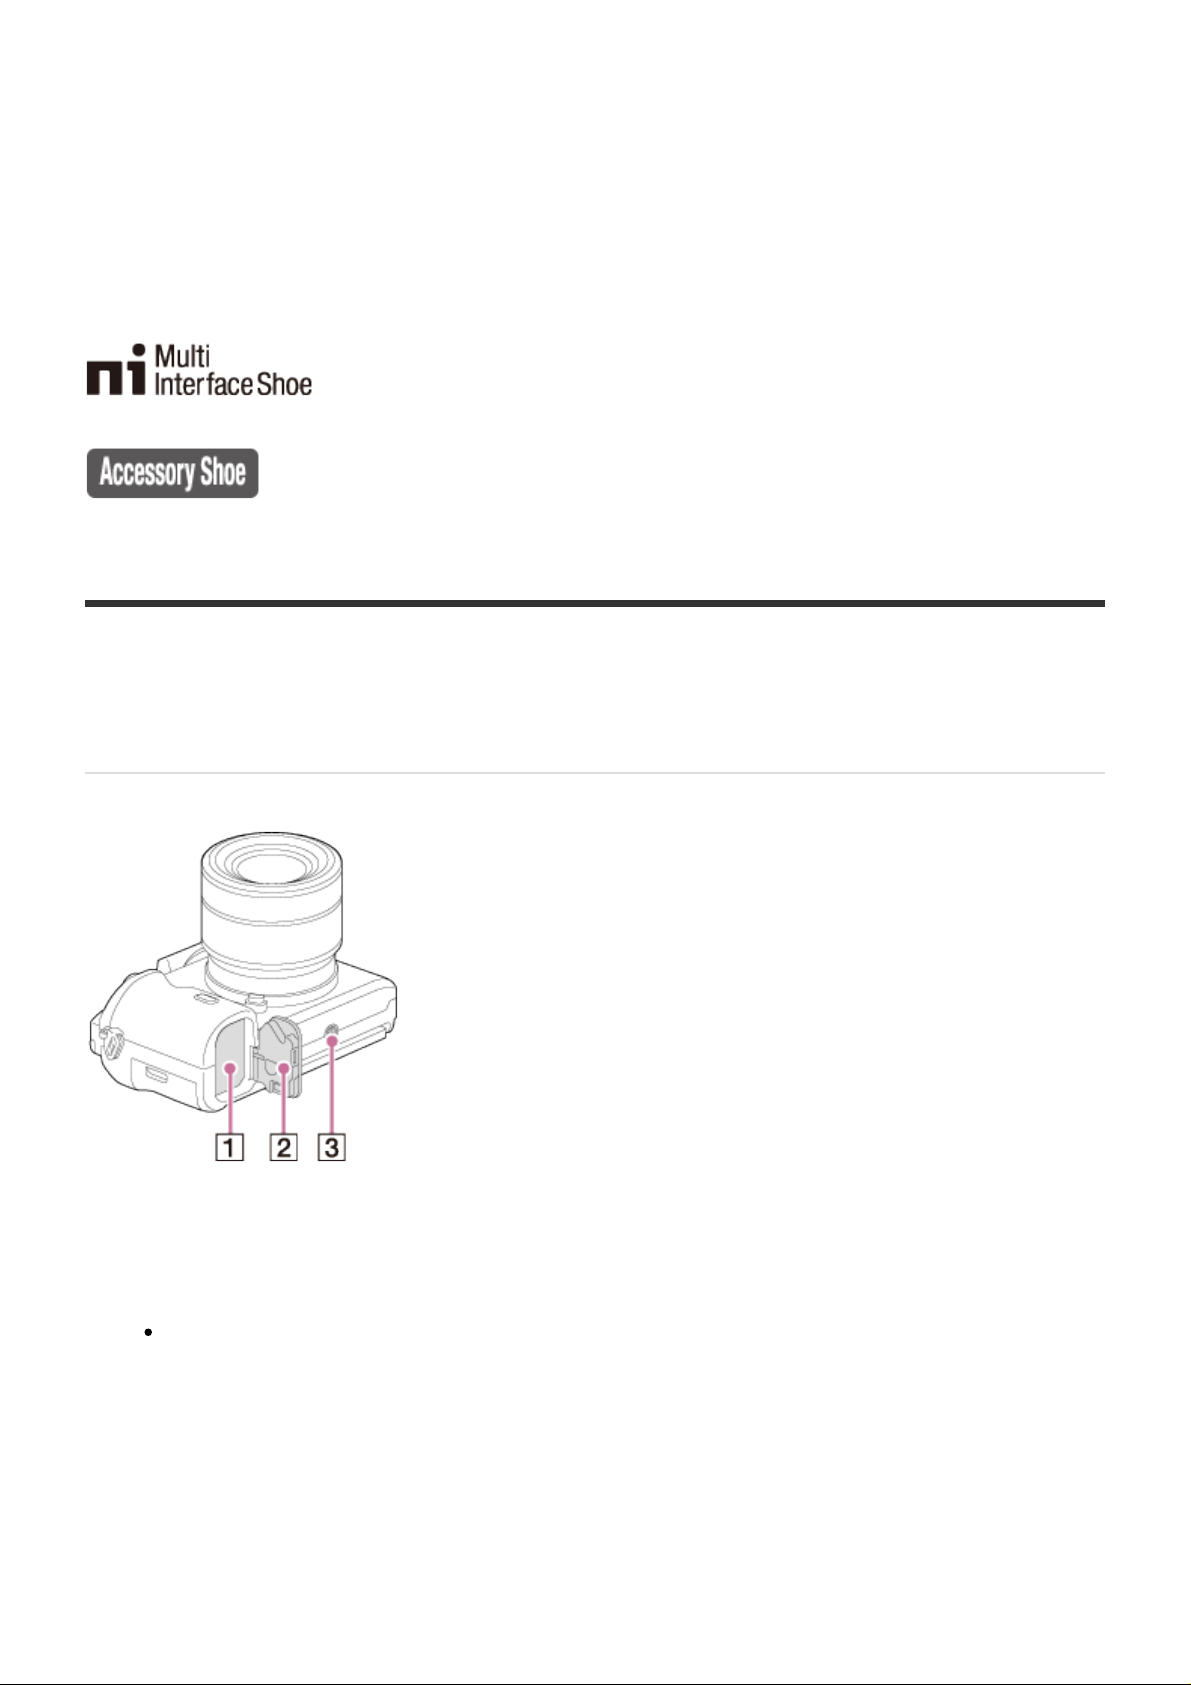
[4] Before Use > Names of parts
Identifying parts (Bottom view)
1. Battery insertion slot
2. Battery cover
3. Tripod socket hole
Use a tripod with a screw less than 5.5 mm (7/32 inches) long. Otherwise, you cannot
firmly secure this product, and damage to the product may occur.
Connection plate cover
Use this when using an AC-PW20 AC Adaptor (sold separately). Insert the connection plate
into the battery compartment, and then pass the cord through the connection plate cover as
shown below.
Page 21
Make sure that the cord is not pinched when you close the cover.
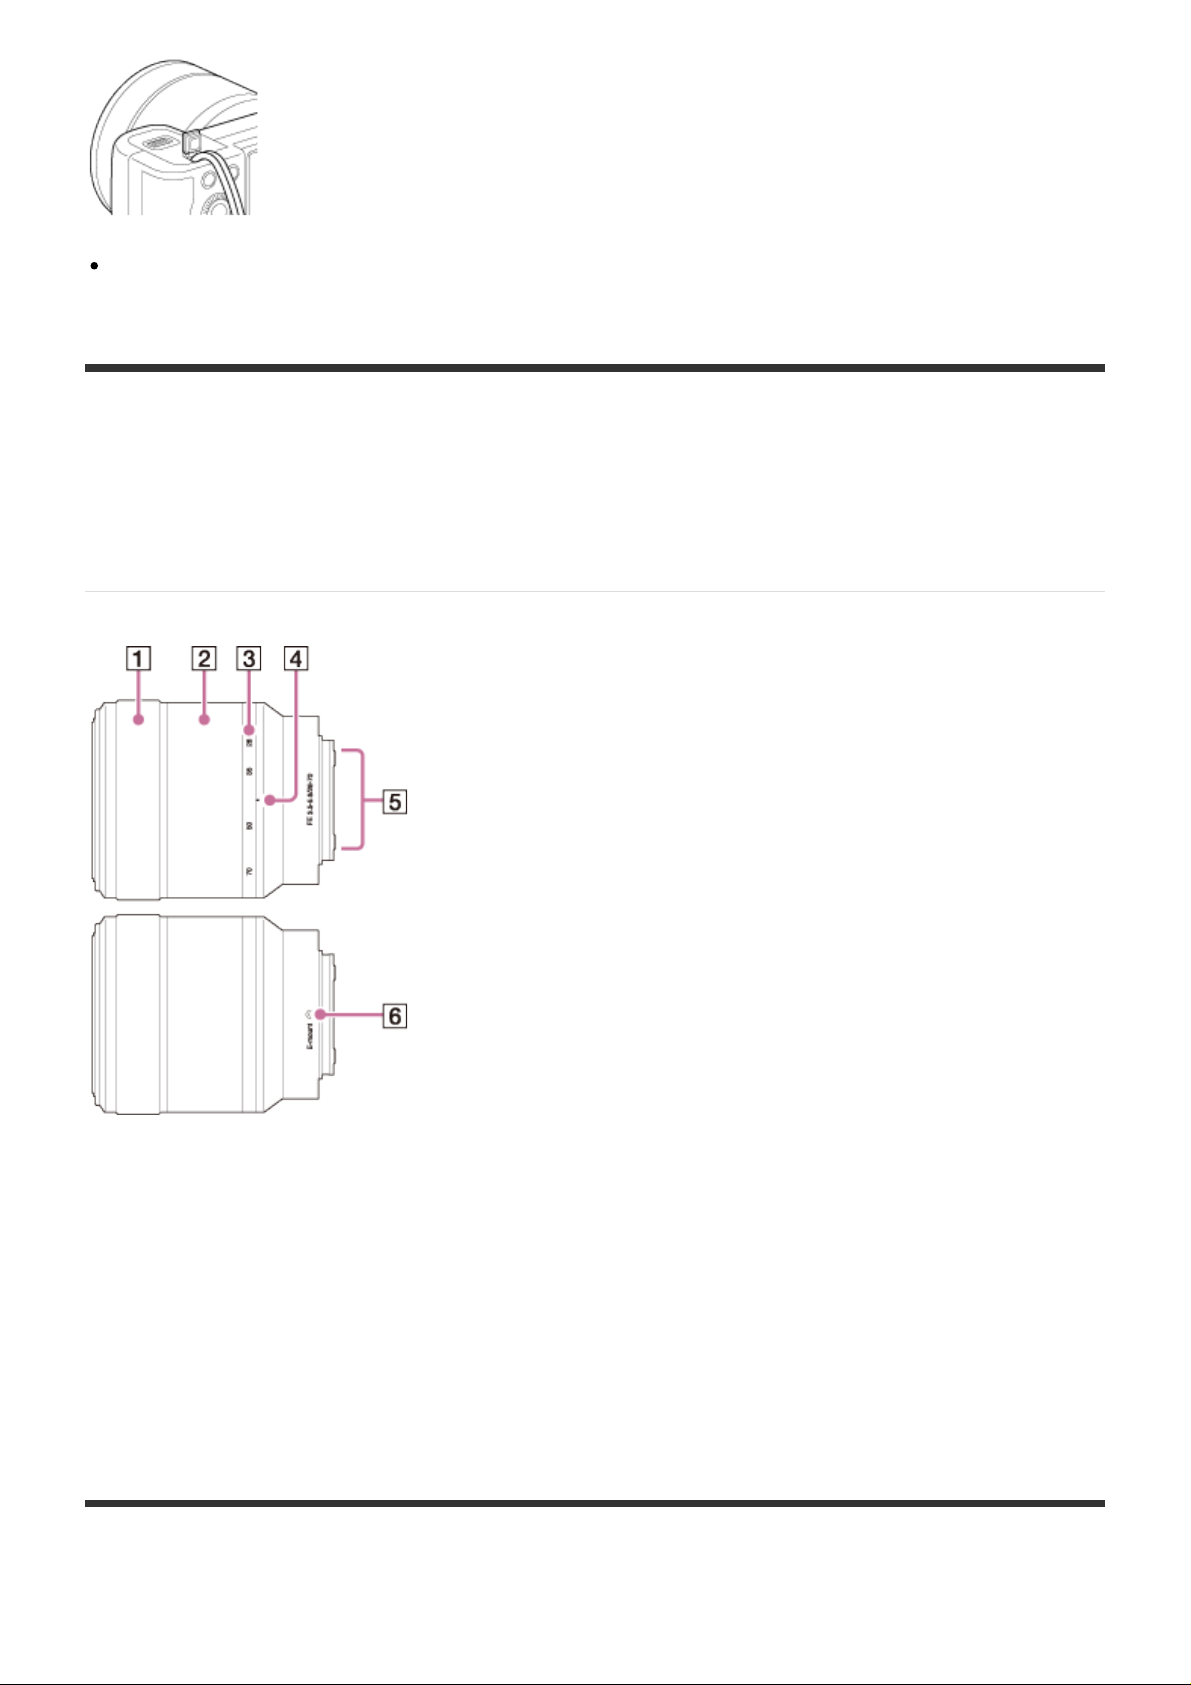
[5] Before Use > Names of parts
Identifying parts Lens FE 28-70 mm F3.5-5.6 OSS
(Supplied with ILCE-7K)
1. Focusing ring
2. Zoom ring
3. Focal-length scale
4. Focal-length index
5. Lens contacts*
6. Mount index
*
Do not touch this part directly.
[6] Before Use > Icons and indicators
Page 22
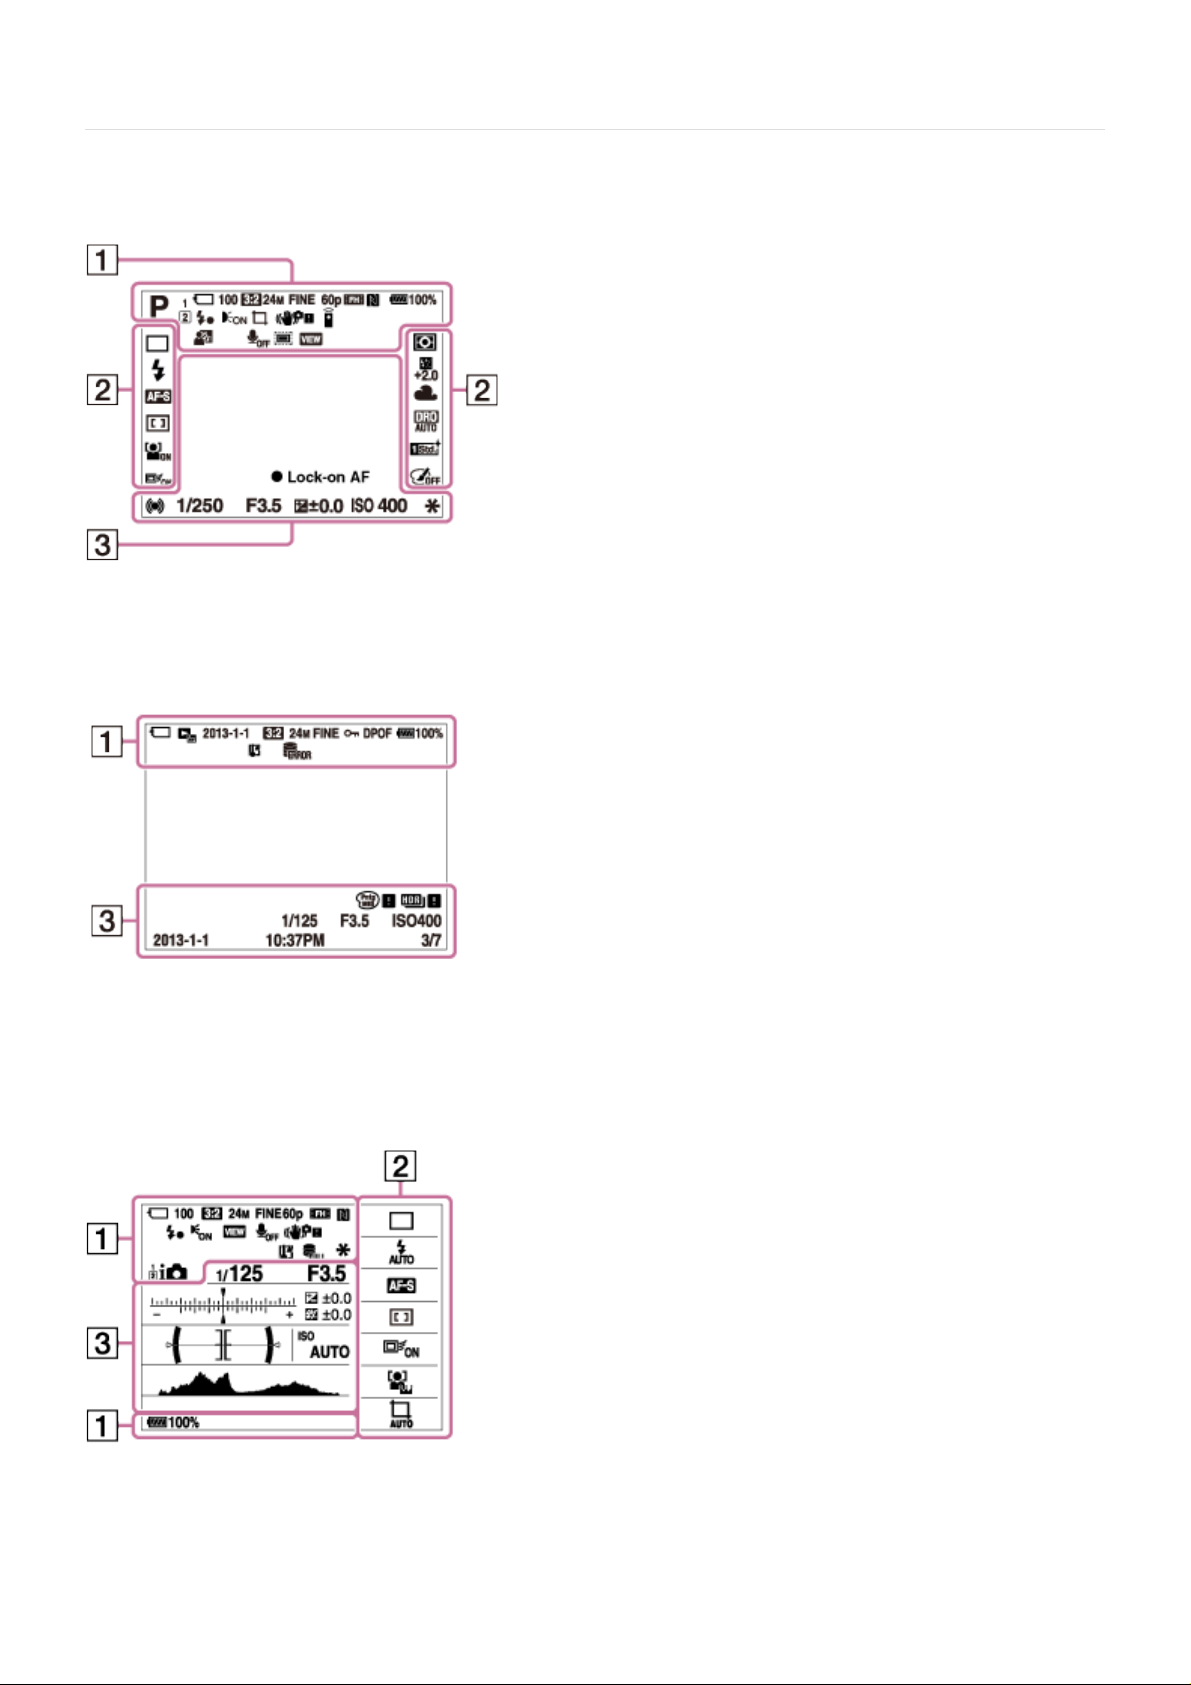
List of icons on the screen
For the LCD screen mode
For playback (Basic information display)
For the viewfinder mode
In Auto Mode or Scene Selection mode
In P/A/S/M/Sweep Panorama mode
Page 23
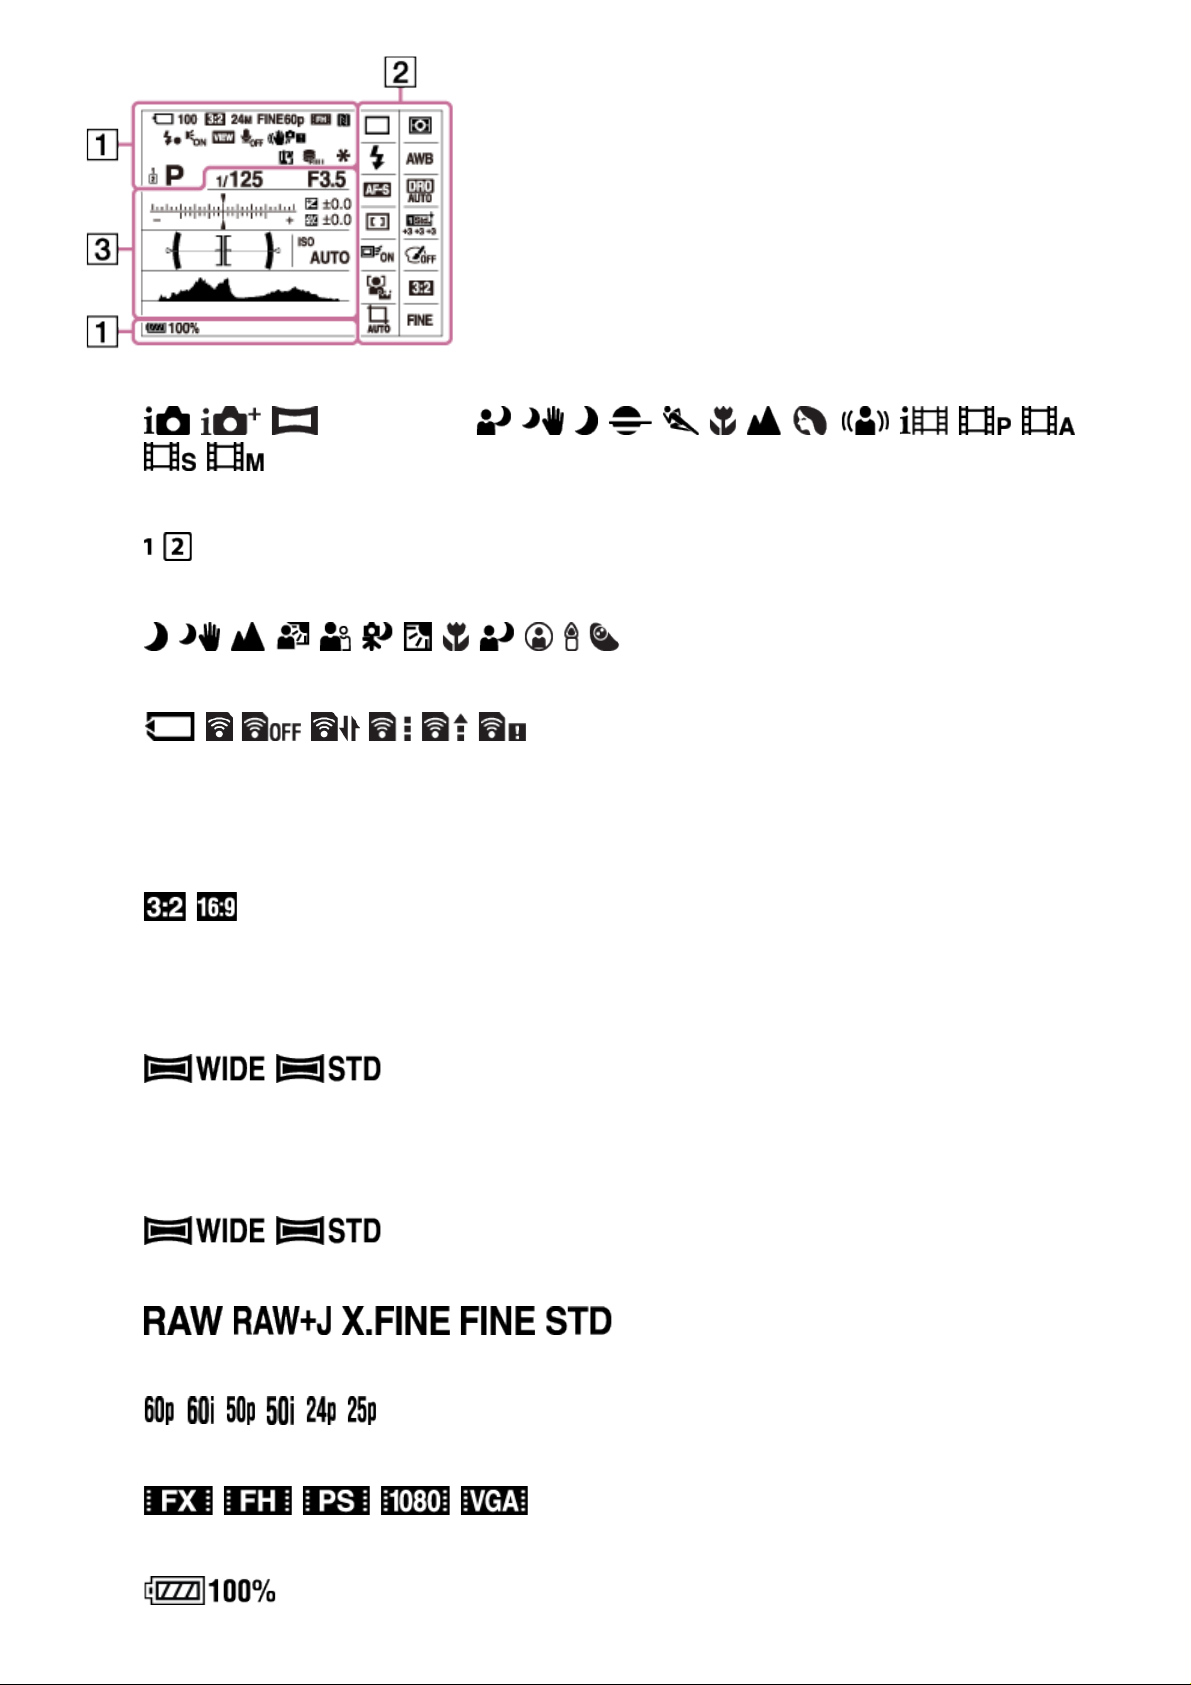
1. P P* A S M
Shooting mode
Memory number
Scene Recognition icons
Memory card/Uploading status
100
Remaining number of recordable images
Aspect ratio of still images
ILCE-7:
24M / 10M / 6.0M / 20M / 8.7M / 5.1M / 2.6M / 2.2M
Image size of still images
ILCE-7R:
36M / 15M / 9.0M / 30M / 13M / 7.6M / 3.8M / 3.2M
Image size of still images
Image quality of still images
Frame rate of movies
Recording settings of movies
Page 24
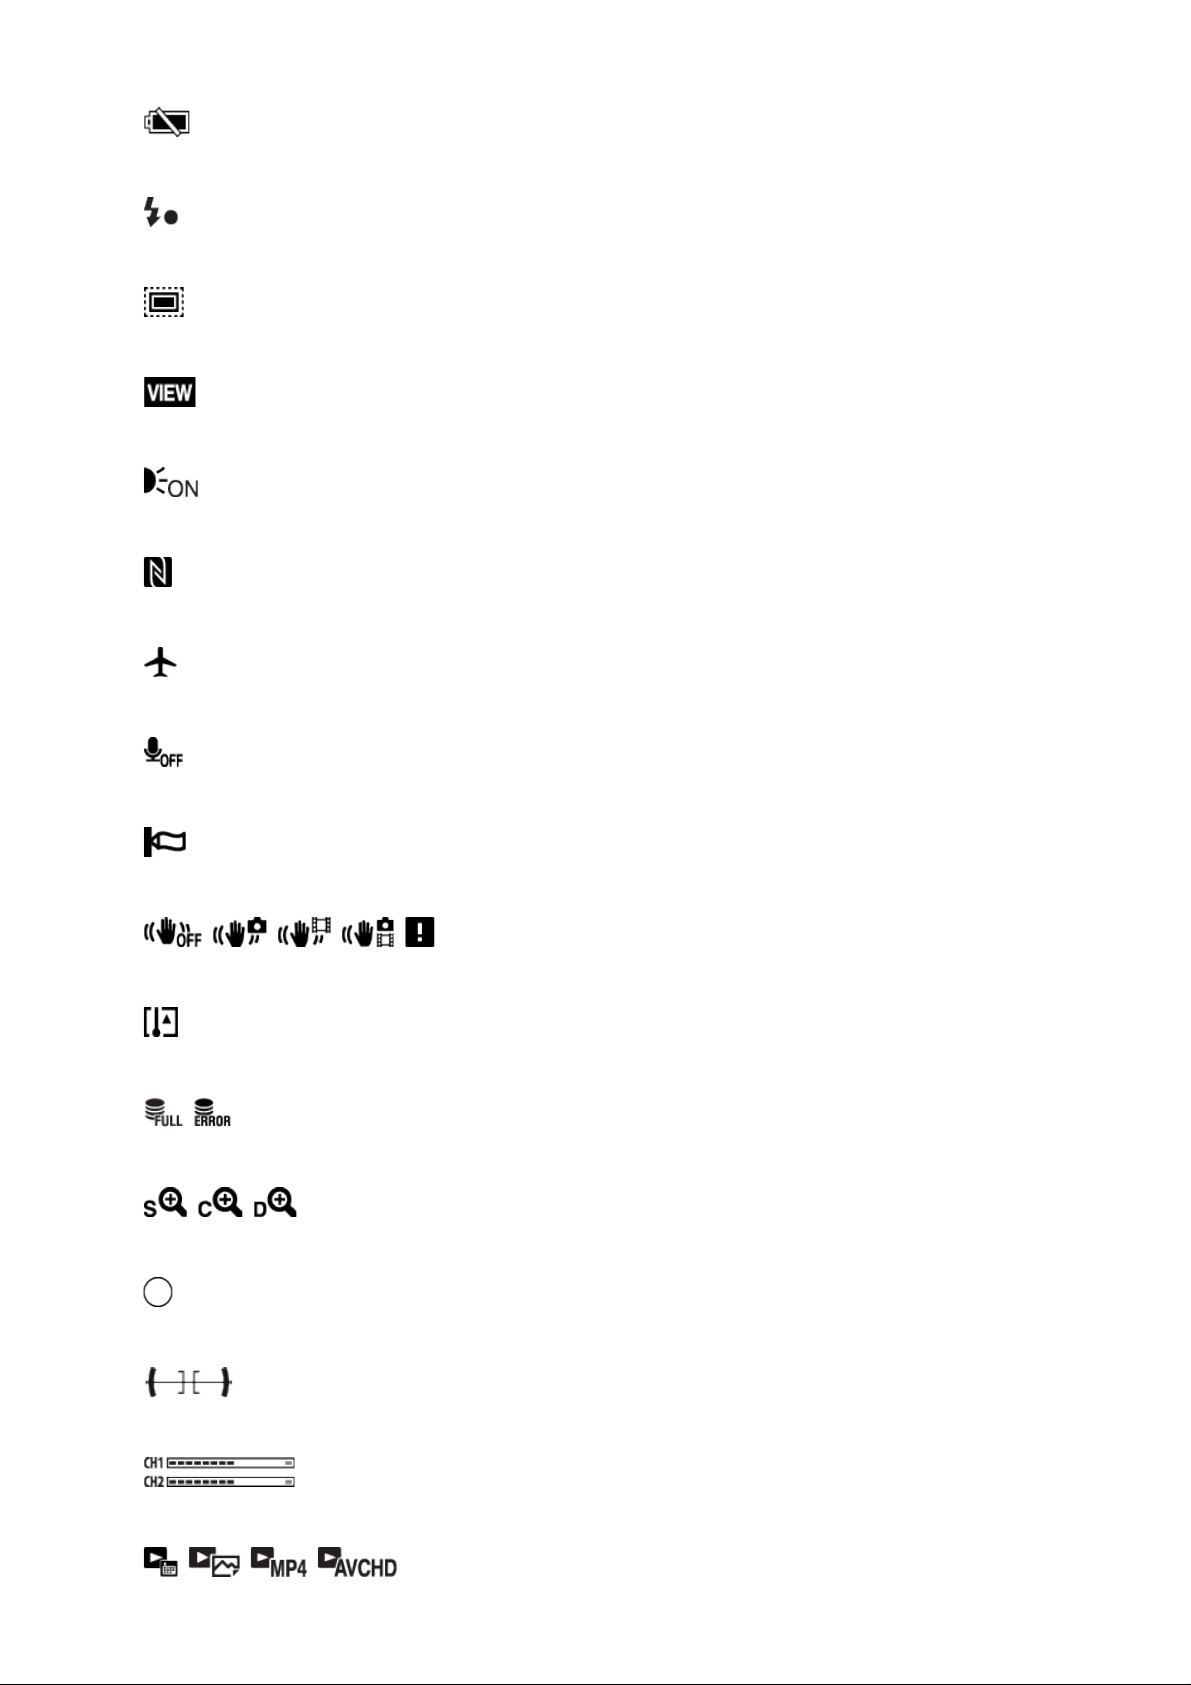
Remaining battery
View Mode
Remaining battery warning
Flash charge in progress
APS-C Size Capture
Setting Effect OFF
AF Illuminator
NFC is activated
Airplane Mode
No audio recording of movies
Wind Noise Reduction
SteadyShot/Camera-shake warning
Overheating warning
Database file full/Database file error
Smart Zoom/Clear Image Zoom/Digital Zoom
Spot metering area
Digital level gauge
Audio level
Page 25
100-0003
Folder - file number
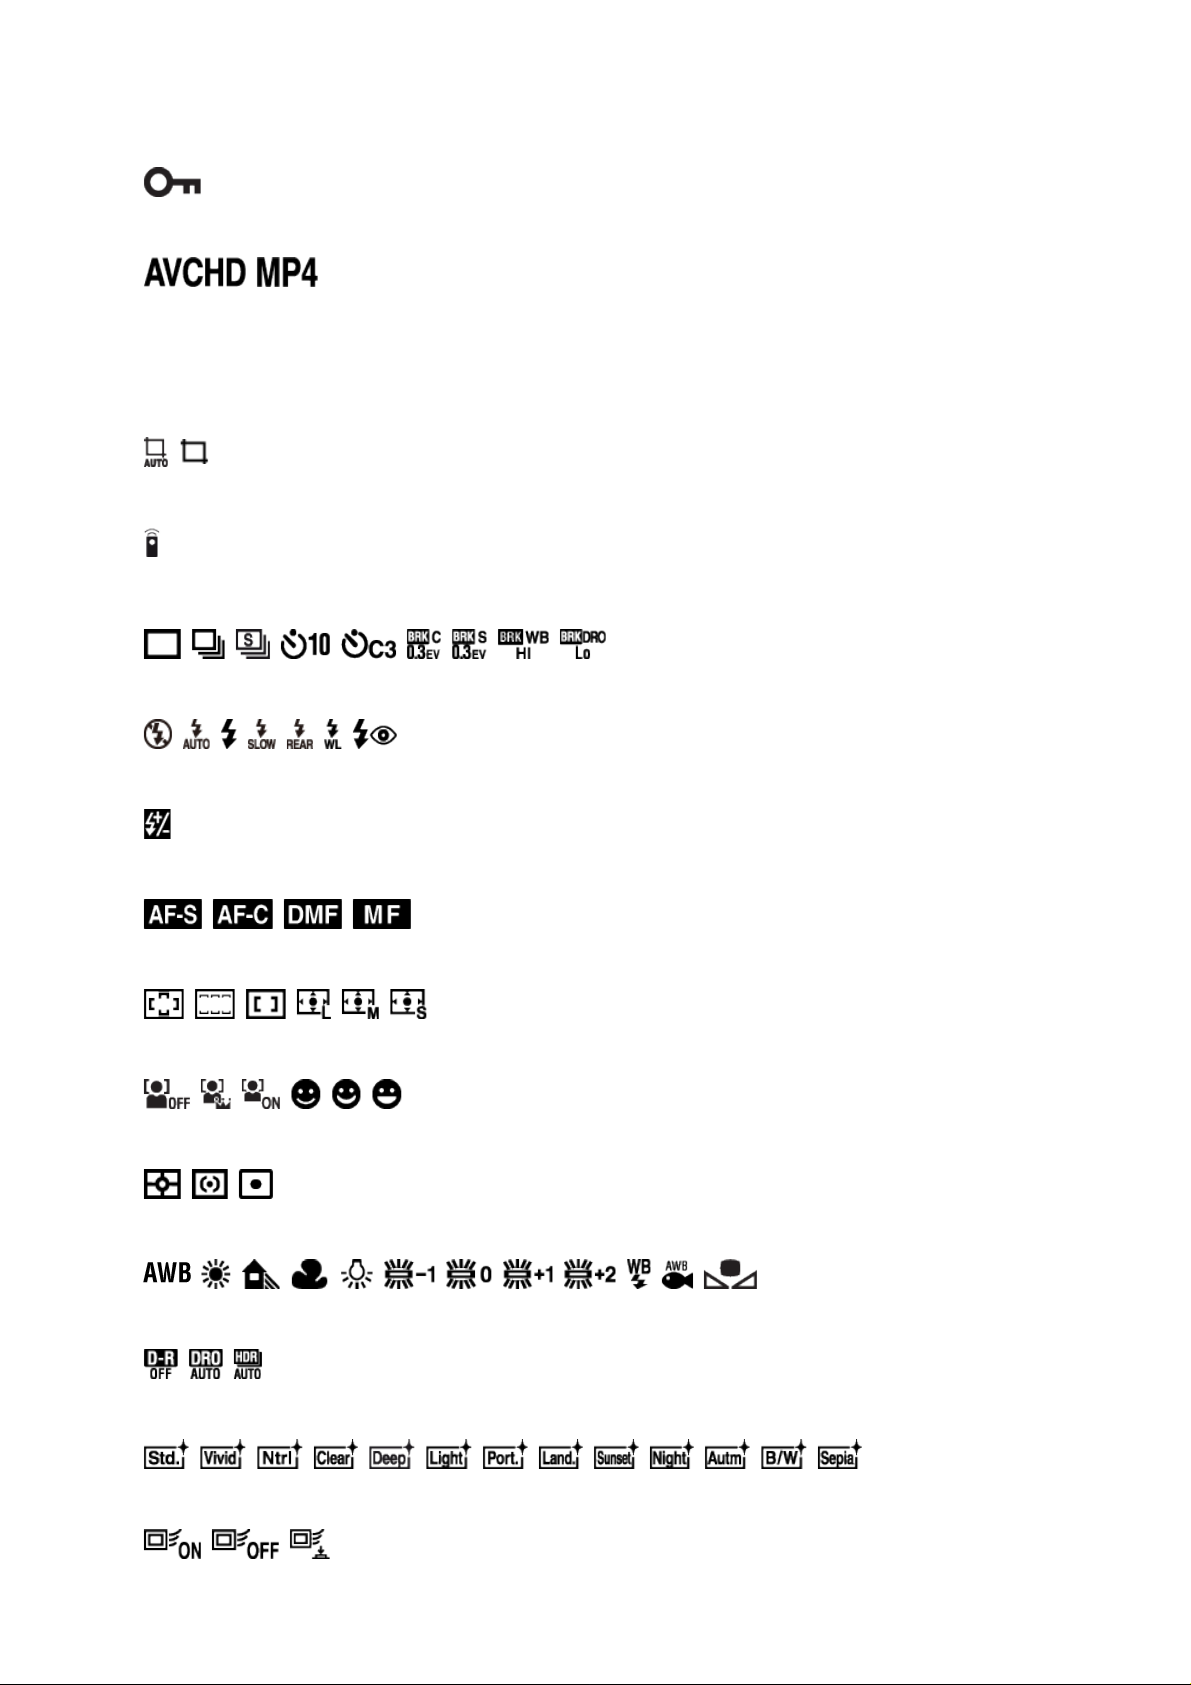
Protect
Recording format of movies
DPOF
DPOF set
Auto Object Framing
Remote control
2.
Drive mode
Flash mode/Red-eye reduction
±0.0
Flash compensation
Focus mode
Focus area
Face Detection/Smile Shutter
Metering mode
7500K A5 G5
White balance (Auto, Preset, Custom, Color temperature, Color filter)
D-Range Optimizer/Auto HDR
Creative Style/Contrast, Saturation, Sharpness
Lock-on AF
+3 +3 +3
Page 26
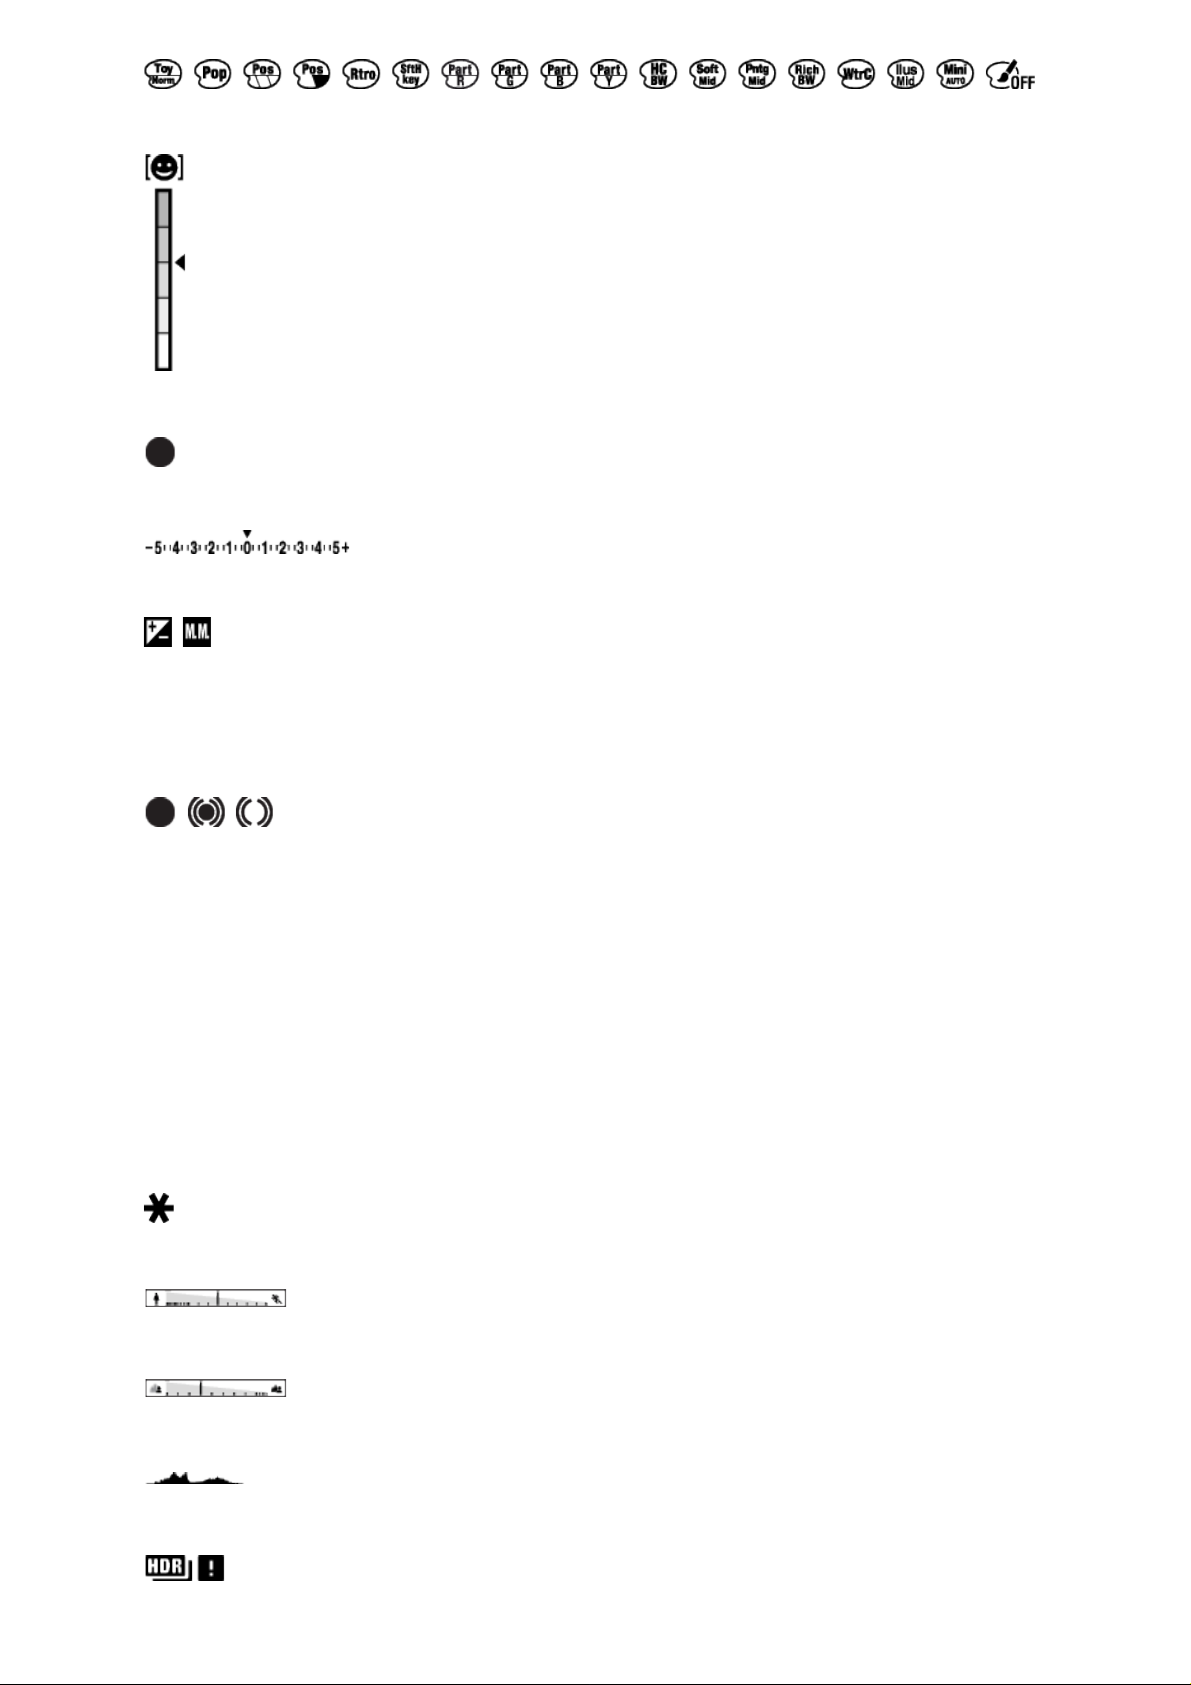
Picture Effect
Smile detection sensitivity indicator
3. Lock on AF
Lock on AF guide
EV scale
Exposure compensation/Metered Manual
REC 0:12
Recording time of the movie (m:s)
Focus
1/250
Shutter speed
F3.5
Aperture value
ISO400
ISO AUTO
ISO sensitivity
AE lock
Shutter speed indicator
Aperture indicator
Histogram
Page 27
Auto HDR image warning
Picture Effect error
2013-1-1
10:37AM
Date of recording
3/7
File number/Number of images in the view mode
[7] Before Use > Using the strap
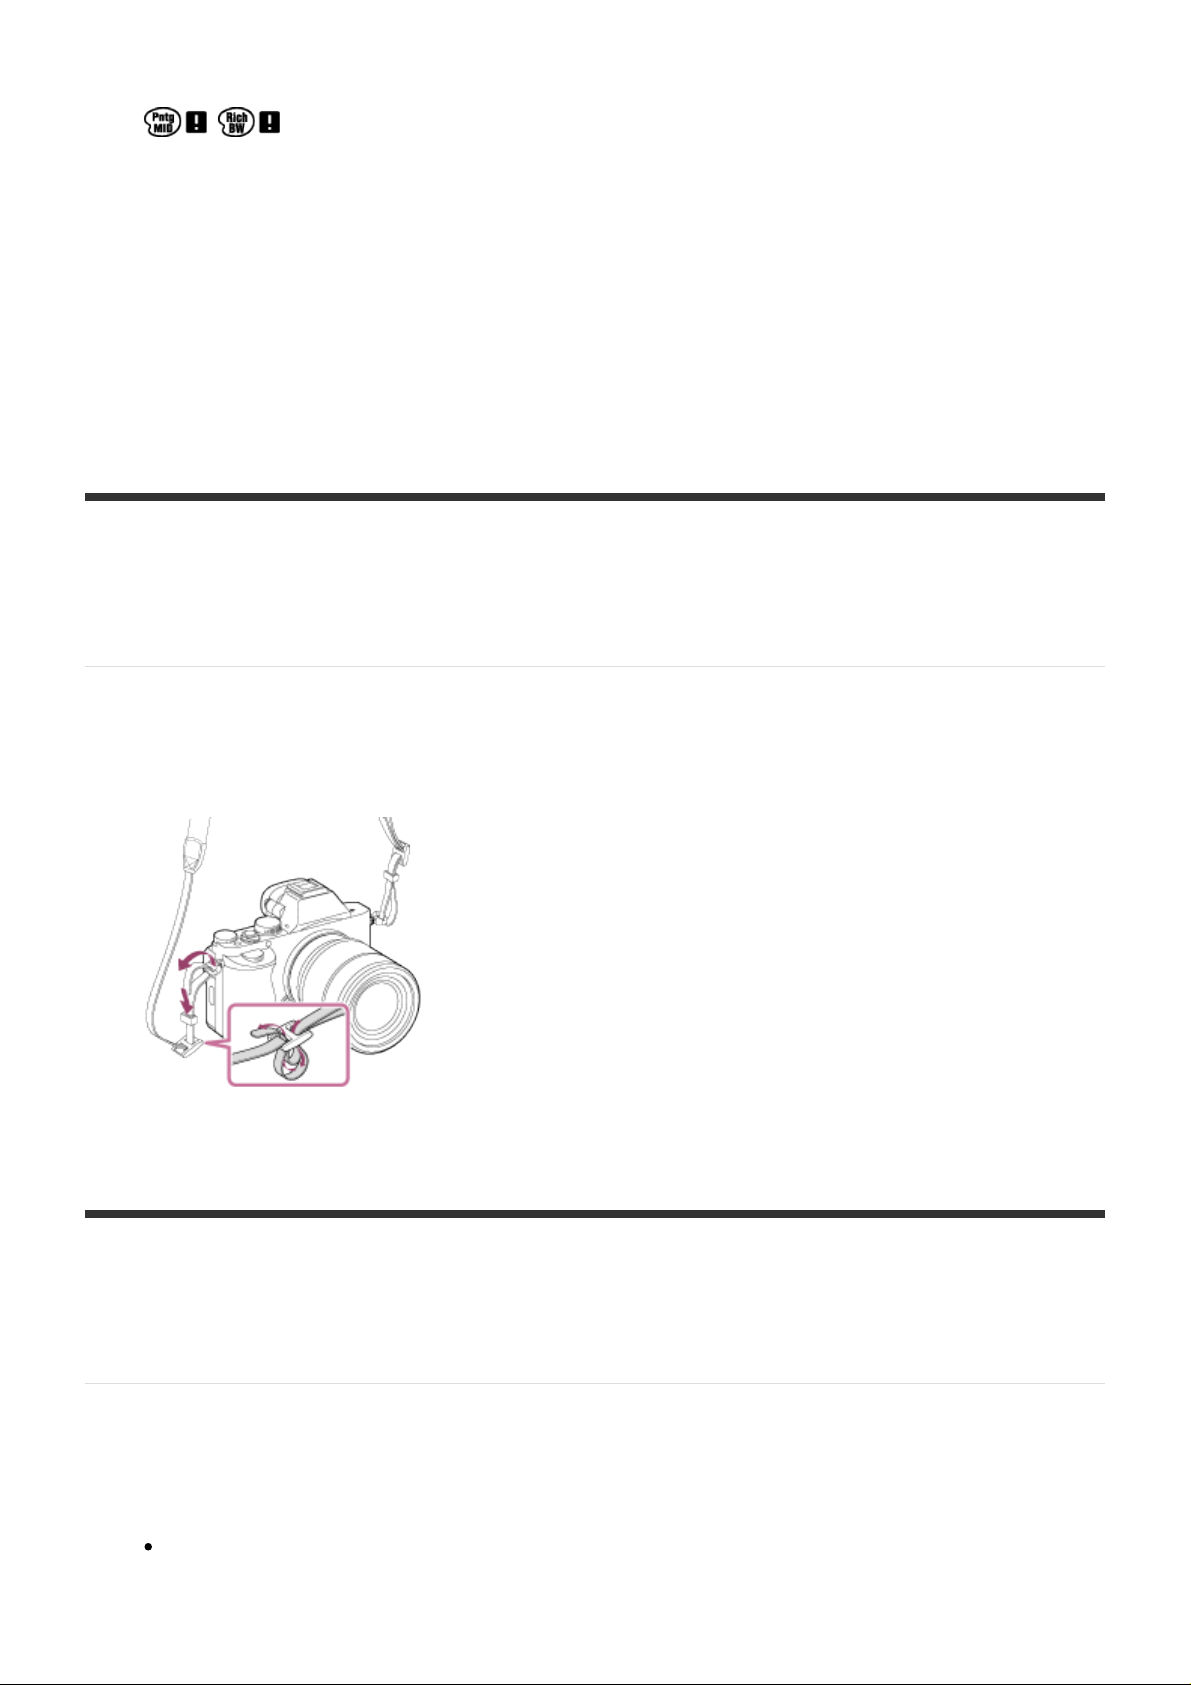
Using the shoulder strap
Attach the shoulder strap to prevent damage caused by dropping the product.
1. Attach both ends of the strap.
[8] Before Use > Attaching the eyepiece cup
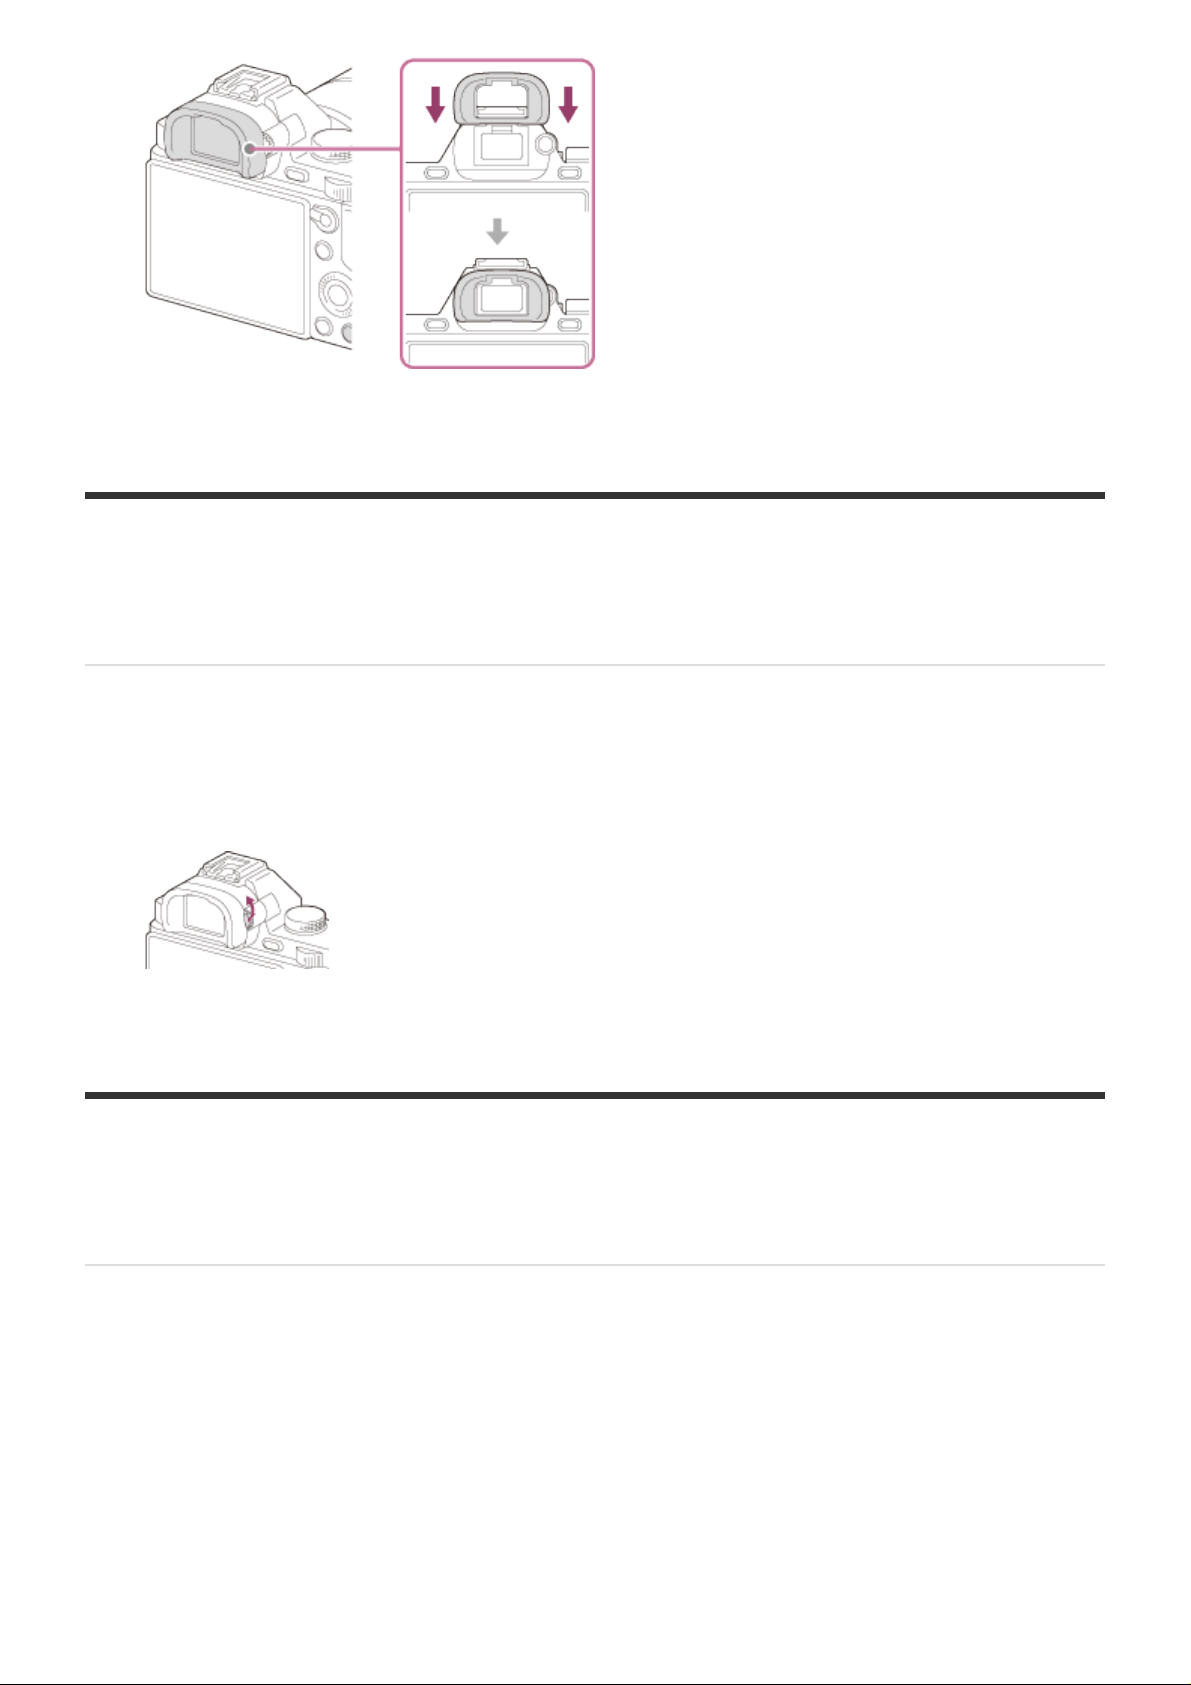
Attaching the eyepiece cup
It is recommended that you attach the eyepiece cup when you intend to use the viewfinder.
1. Match the eyepiece cup to the groove on the viewfinder and slide it into place.
To remove the eyepiece cup, grasp it on the left and right sides and lift up.
Page 28
[9] Before Use > Adjusting the viewfinder
Adjusting the viewfinder (diopter-adjustment)
Adjust the diopter-adjustment dial to your eyesight until the display appears clearly in the
viewfinder.
1. Turn the diopter-adjustment dial.
[10] Before Use > In-Camera guide
About the [In-Camera Guide]
The [In-Camera Guide] displays descriptions of MENU items, Fn (Function) button, and
settings, and if a function cannot be set, the reason why.
1. Press the MENU or Fn button.
2. Select the desired MENU item using up/down/left/right side on the control wheel.
3. Press the button to which the [In-Camera Guide] function is assigned.
The operation guide for the MENU item you have selected in step 2 is displayed.
Page 29
If you press the on the center of the control wheel after selecting an item shown in
gray, the reason the item cannot be set is displayed.
Note
Assign the [In-Camera Guide] function to a button in advance using the [Custom Key
Settings].
[11] Confirming the operation method > Confirming the
operation method
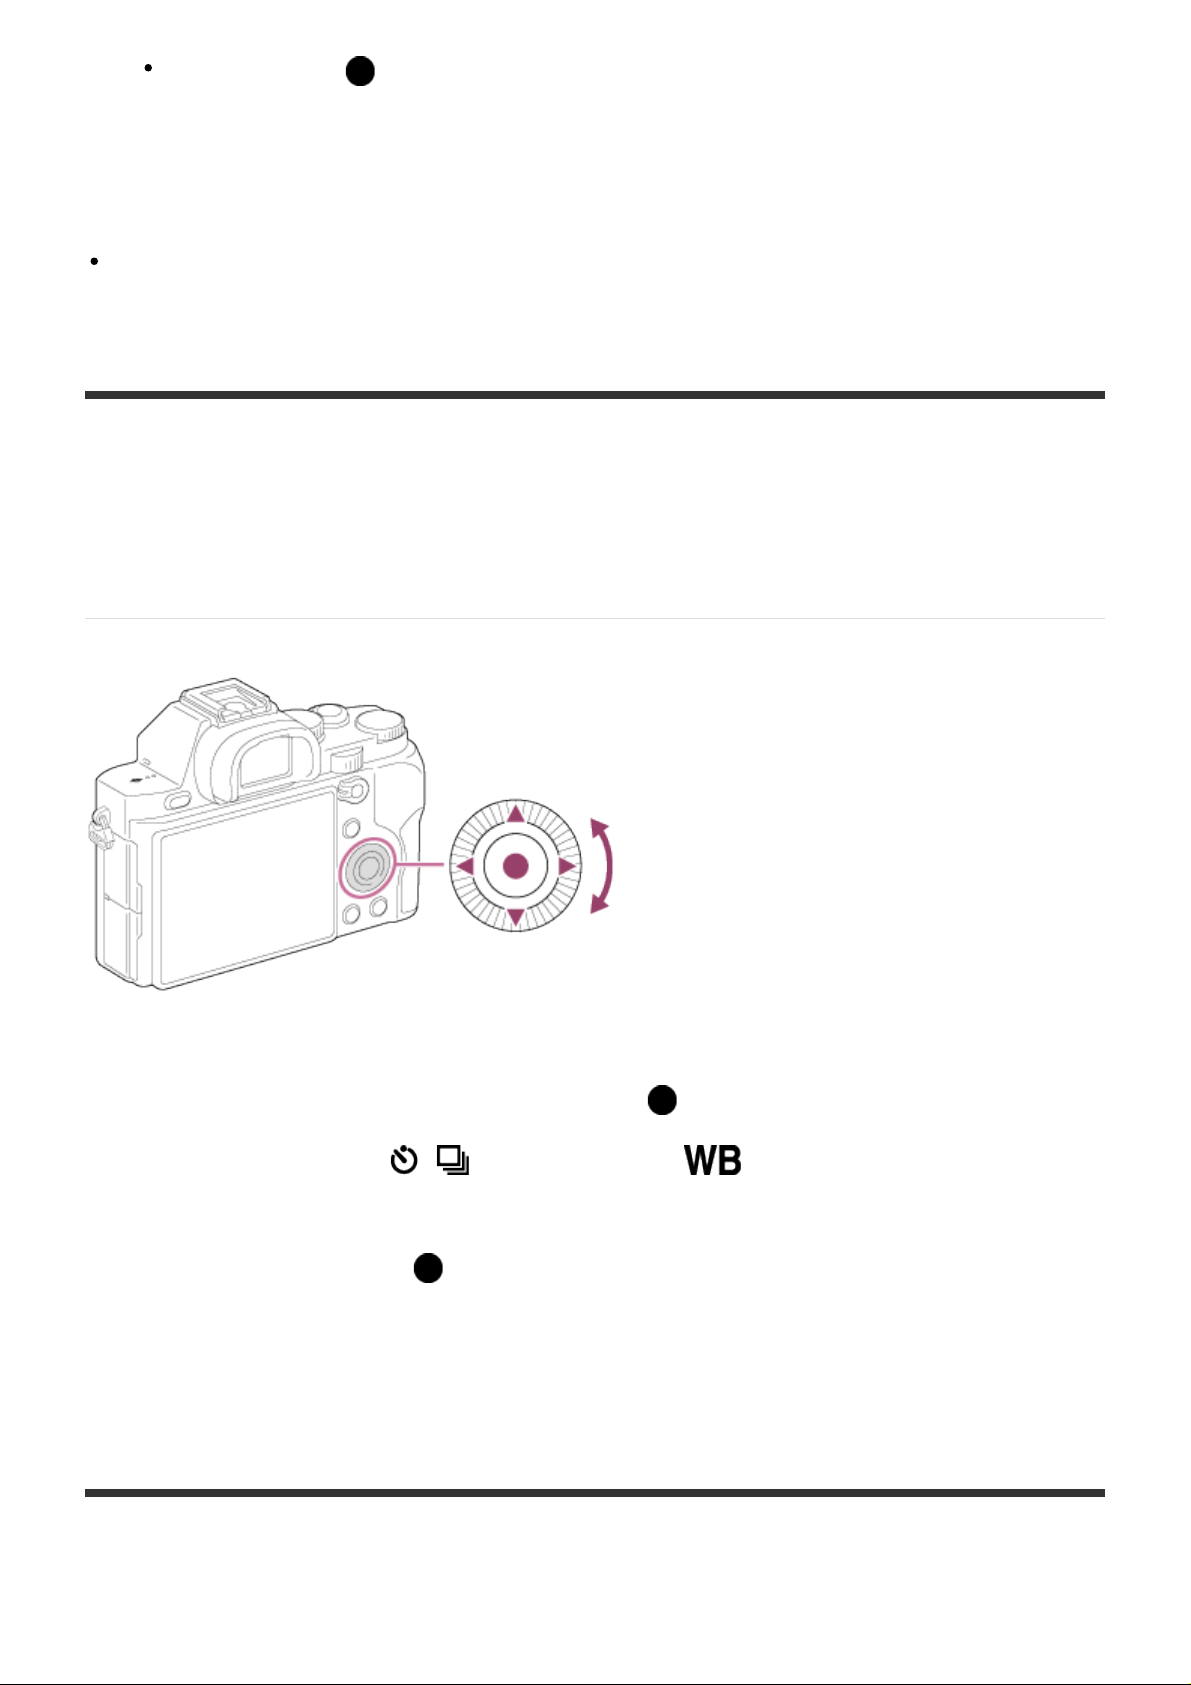
Using the control wheel
When you turn or press the top/bottom/right/left side of the control wheel, you can select setting
items. Your selection is determined when you press on the center of the control wheel.
The DISP (Display Setting), / (Drive Mode), and (White Balance) functions are
assigned to the top/left/right side of the control wheel. In addition, you can change [ISO]
settings by turning the control wheel. You can assign selected functions to the left/right/bottom
side of the control wheel or to in the center, and to the rotation of the control wheel.
During playback, you can display the next/previous image by pressing the right/left side of the
control wheel or by turning the control wheel.
[12] Confirming the operation method > Confirming the
Page 30
operation method
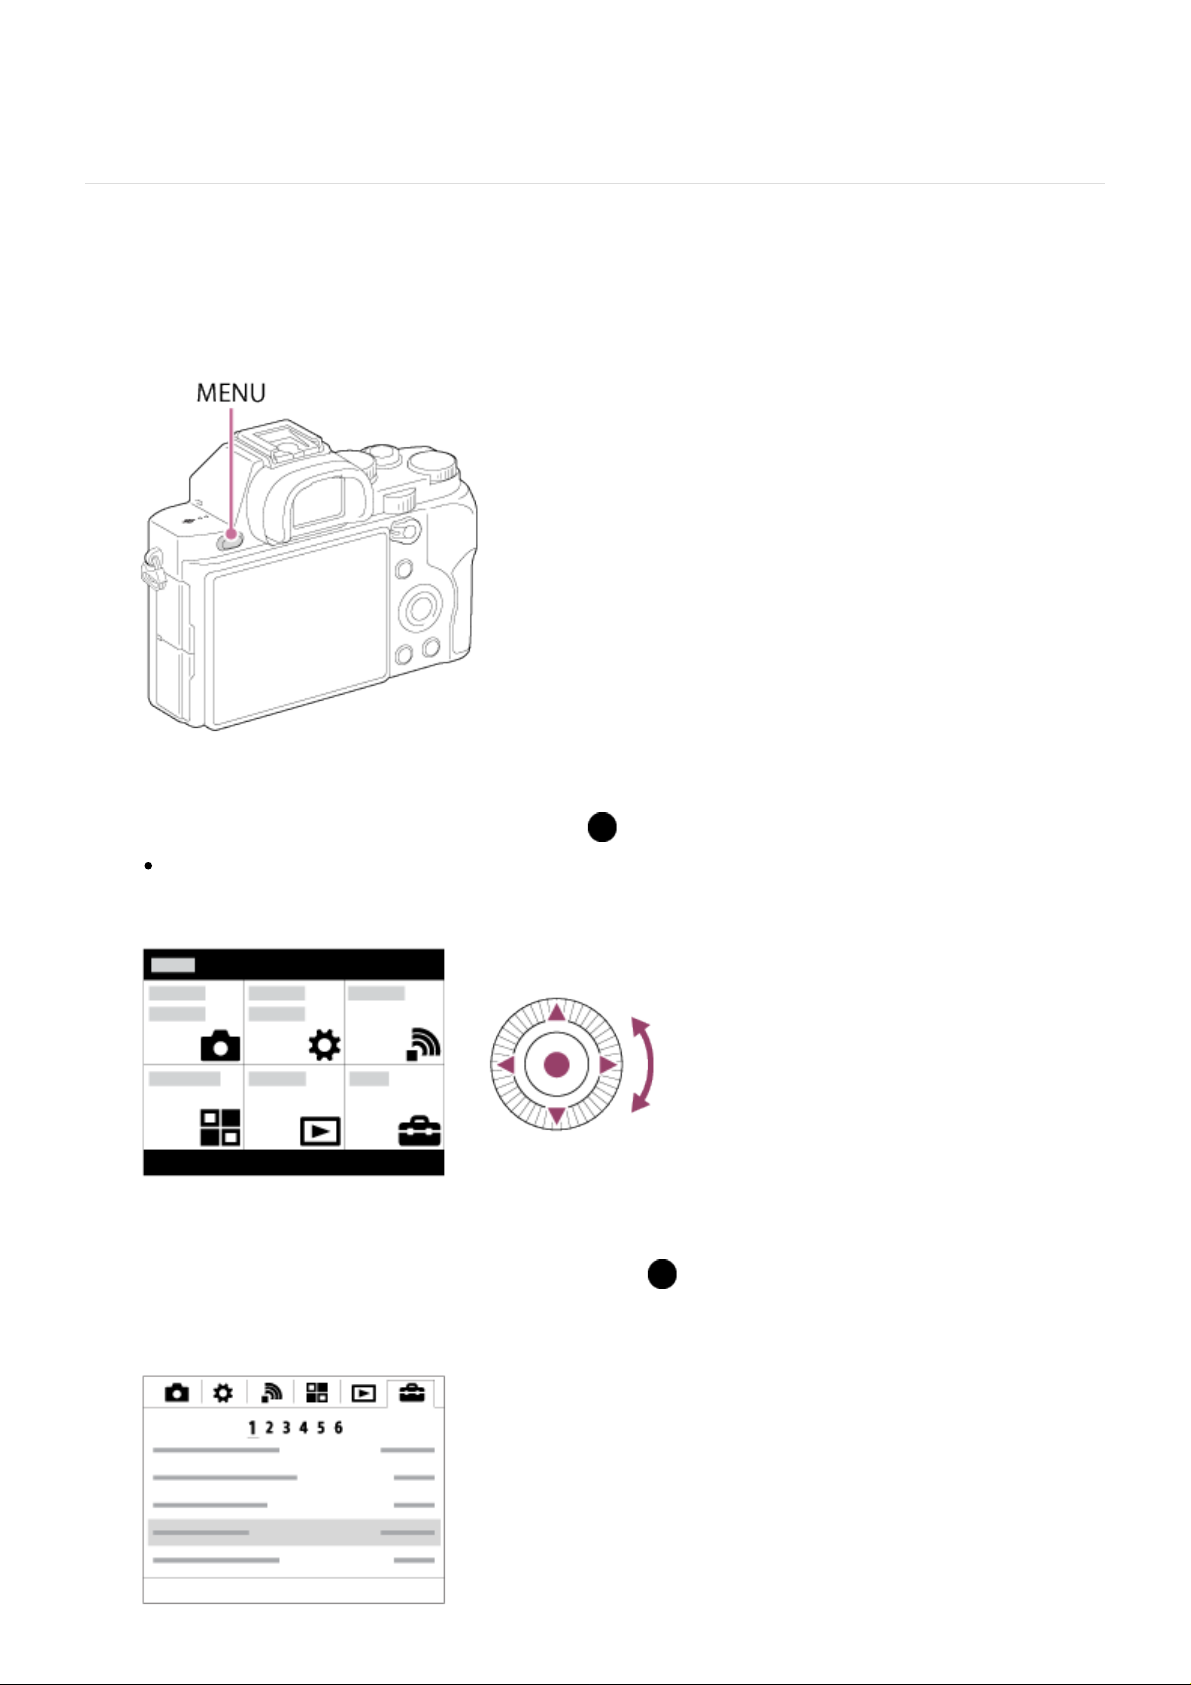
Using MENU items
In this section, you learn how to change settings related to all camera operations and execute
camera functions including shooting, playback, and operation methods.
1. Press MENU button to display the Menu screen.
2. Select the desired MENU item using the up/down/left/right side of the control wheel or by
turning the control wheel, and then press in the center of the control wheel.
The display may move directly from step 1 to step 3 depending on the [Tile Menu]
setting.
3. Select the desired setting item by pressing the up/down/left/right side on the control wheel
or by turning the control wheel, and then press on the center of the control wheel.
Select an icon at the top of the screen and press the left/right side of the control wheel to
move to another MENU item.
Page 31

4. Select the desired setting value, and press to confirm.
[13] Confirming the operation method > Confirming the
operation method
Using the Fn (Function) button
You can recall functions when shooting images. Up to 12 frequently used functions can be
registered to the Fn (Function) button.
1. Press the Fn (Function) button in shooting mode.
2. Select a function to be registered by pressing the up/down/left/right side of the control
wheel.
3. Turn the front dial to select the desired setting.
Some functions can be fine-tuned using the rear dial.
Page 32

Performing settings on the dedicated screen
Select the desired function in step 2, then press on the center of the control wheel. The
dedicated setting screen for the function appears. Follow the operating guides (A) to perform
the settings.
Using the “Quick Navi”
You can change the settings directly using the Quick Navi screen when using the viewfinder.
1. Press the DISP (Display Setting) button on the control wheel repeatedly until the screen is
set to [For viewfinder].
2. Press Fn (Function) button to switch the screen to Quick Navi screen.
3. Select the desired function by pressing the up/down/left/right side of the control wheel.
Page 33

4. Turn the front dial to select the desired setting.
Some setting values can be finely adjusted by turning the rear dial.
Performing settings on the dedicated screen
Select the desired function in step 3, then press on the center of the control wheel. The
dedicated setting screen for the function appears. Follow the operating guides (A) to perform
the settings.
[14] Shooting > Shooting still images/movies
Shooting still images
Shoots still images.
1. Set the shooting mode to (Intelligent Auto).
Page 34

2. Adjust the monitor angle, and hold the camera. Or look through the viewfinder and hold
the camera.
3. Press the shutter button halfway down to focus.
When the image is in focus, a beep sounds and the indicator ( or ) lights.
4. Press the shutter button fully down.
Focus indicator
lights:
Image is in the focus.
lights:
Image is in the focus. The focused position will change to suit the motion of the subject.
lights:
The focusing is in progress.
flashes:
The focusing has failed.
Hint
When the product cannot focus automatically, the focus indicator flashes and the beep does
not sound. Either recompose the shot or change the focus setting.
Focusing may be difficult in the following situations:
It is dark and the subject is distant.
The contrast between the subject and the background is poor.
Page 35

The subject is seen through glass.
[16] Shooting > Selecting a shooting mode
The subject is moving quickly.
There is reflective light or shiny surfaces.
There is a flashing light.
The subject is backlit.
[15] Shooting > Shooting still images/movies
Shooting movies
You can record movies by pressing the MOVIE button.
1. Press the MOVIE button to start recording.
To adjust the shutter speed and aperture value to the desired settings, set the shooting
mode to (Movie).
2. Press the MOVIE button again to stop recording.
Note
If you use a function such as zoom while shooting a movie, the noise of the product
operating will be recorded. The sound of the MOVIE button operating may also be recorded
when you press the MOVIE button to stop recording.
Continuous shooting is possible for approximately 29 minutes at one time at the product's
default settings and when the temperature is approximately 25°C (77°F). When movie
recording is finished, you can restart recording by pressing the MOVIE button again.
Recording may stop to protect the product depending on the ambient temperature.
Page 36

List of mode dial functions
You can select the desired shooting mode by turning the mode dial.
Available functions
(Auto Mode):
Allows you to shoot still images of any subject under any condition with good results by setting
the values determined appropriate by the product.
P (Program Auto):
Allows you to shoot with the exposure adjusted automatically (both the shutter speed and the
aperture value (F value)). Also you can select various settings using the menu.
A (Aperture Priority):
Allows you to adjust the aperture and shoot when you want to blur the background, etc.
S (Shutter Priority):
Allows you to shoot fast-moving subjects etc., by manually adjusting the shutter speed.
M (Manual Exposure):
Allows you to shoot still images with the desired exposure by adjusting the shutter speed and
the aperture value.
1/2 (Memory recall):
Allows you to shoot an image after recalling often-used modes or numeric settings registered in
advance.
(Movie):
Allows you to change the setting for movie recording.
SCN (Scene Selection):
Allows you to shoot with preset settings according to the scene.
[17] Shooting > Selecting a shooting mode
Intelligent Auto
Page 37

The product analyzes the subject, and allows you to shoot with appropriate settings.
1. Set the mode dial to (Auto Mode).
2. MENU → (Camera Settings) → [Auto Mode] →[Intelligent Auto].
When [Mode Dial Guide] is set to [On], you can select the desired settings after you
have changed the position of the mode dial.
3. Point the camera to the subject.
When the camera recognized the scene, the icon for the recognized scene appears on the
screen.
4. Adjust the focus and shoot the image.
Note
The product will not recognize the scene when you shoot images with zoom functions other
than optical zoom.
The product may not properly recognize these scenes under some shooting conditions.
[18] Shooting > Selecting a shooting mode
Superior Auto
The product automatically recognizes and evaluates the shooting conditions, and the
appropriate settings are set automatically.
The product may shoot multiple images and create a composite image, etc., using more
shooting settings than in Intelligent Auto mode to record higher quality images.
1. Set the mode dial to (Auto Mode).
2. MENU → (Camera Settings) → [Auto Mode] → [Superior Auto].
Page 38

When [Mode Dial Guide] is set to [On], you can select the desired settings after you
have changed the position of the mode dial.
3. Point the camera to the subject.
When the camera recognizes a scene, scene recognition icon appears on the screen. If
necessary, appropriate shooting function for the recognized scene and the number of
times the shutter is released also appear.
4. Adjust the focus and shoot the image.
When the camera shoots multiple images, it automatically chooses and saves the
appropriate image. You can also save all the images by setting the [S. Auto Img. Extract.].
Note
When the product is used to create composite images, the recording process takes longer
than usual.
The product will not recognize the scene when you use zoom functions other than optical
zoom.
The product may not properly recognize a scene under some shooting conditions.
When [ Quality] is set to [RAW] or [RAW & JPEG], the product cannot create a
composite image.
[19] Shooting > Selecting a shooting mode
About Scene Recognition
Scene Recognition operates in [Intelligent Auto] mode and [Superior Auto] mode.
This function allows the product to automatically recognize the shooting conditions and shoot
the image.
Scene Recognition:
Icons and guides such as (Portrait), (Infant), (Night Portrait), (Night Scene),
(Backlight Portrait), (Backlight), (Landscape), (Macro), (Spotlight), (Low
Page 39

Light), (Night Scene using a tripod) or (Hand-held Twilight) are displayed.
Image processing:
Cont. Shooting, Slow Sync., Auto HDR, Daylight Sync., Slow Shutter, Hand-held Twilight
Note
When [Smile/Face Detect.] is set to [Off], the [Portrait], [Backlight Portrait], [Night Portrait]
and [Infant] scenes are not recognized.
[20] Shooting > Selecting a shooting mode
The advantages of automatic shooting
In [Superior Auto] mode, the product shoots with higher quality than [Intelligent Auto] mode and
performs composite shooting as necessary.
In [Program Auto] mode, you can shoot after adjusting various functions, such as white balance,
ISO, etc.
(Intelligent Auto):
Select this mode when you want the camera automatically recognize the scene.
(Superior Auto):
Select this mode to shoot scenes under difficult circumstances, such as when it is dark or the
subjects are back-lit. Select this mode to shoot a higher quality image than that provided by
(Intelligent Auto).
P (Program Auto):
Select this mode to shoot with various functions other than the exposure (shutter speed and
aperture) adjusted.
Note
In [Intelligent Auto] mode, you may not be able to shoot dark scenes or back-lit subjects
clearly.
In [Superior Auto] mode, the recording process takes longer, since the product creates a
composite image.
[21] Shooting > Selecting a shooting mode
Program Auto
Page 40

Allows you to shoot with the exposure adjusted automatically (both the shutter speed and the
aperture value).
You can set shooting functions such as [ISO], [Creative Style] and [D-Range Opt.].
1. Set the mode dial to P (Program Auto).
2. Set the shooting functions to your desired settings.
3. Adjust the focus and shoot the subject.
Program Shift
You can change the shutter speed and aperture (F-value) combination by rotating the front/rear
dial, without changing the appropriate exposure that is set by this product. This function is
available when you do not use the flash.
“P” on the screen changes to “P*” when you turn the front/rear dial.
To cancel program shift, turn the front/rear dial to return the indication to “P”.
Note
According to the brightness of the environment, the program shift may not be used.
Set the shooting mode to another one than “P” or turn off the power to cancel the setting you
made.
When the brightness changes, the aperture (F value) and shutter speed also change while
maintaining the shift amount.
[22] Shooting > Selecting a shooting mode
Sweep Panorama
Allows you to create a single panoramic image from multiple images shot while panning the
camera.
1. Set the mode dial to (Sweep Panorama).
2. Point the camera at the subject for which you want to set the focus and brightness.
Page 41

3. While pressing the shutter button halfway down, aim the camera at one end of the desired
panoramic composition.
(A) This part will not be shot.
4. Press the shutter button fully down.
5. Pan the camera to the end of the guide in the direction of the arrow on the monitor.
(B) Guidance bar
Note
If the entire angle of the panoramic shot is not achieved within the set time, a gray area
occurs in the composite image. If this happens, move the product faster to record the full
panoramic image.
When [Wide] is selected for [Panorama: Size], the entire angle of the panoramic shot may
not be achieved within the given time. If this happens, try shooting after changing [Panorama:
Size] to [Standard].
While shooting Sweep Panorama, burst shooting mode is set and the sound of the shutter
will be emitted continuously until shooting ends.
Since several images are stitched together, the stitched part may not be recorded smoothly
in some cases.
The images may be blurred in dark scenes.
When a light source such as a fluorescent light flickers, the brightness and color of a stitched
Page 42

image may not be consistent.
When the whole angle of panoramic shooting and the AE/AF locked angle are very different
in brightness and focus, the shooting may not be successful. If this happens, change AE/AF
locked angle and shoot again.
The following situations are not suited for shooting Sweep Panorama:
Moving subjects.
Subjects that are too close to the product.
Subjects with continuously similar patterns, such as the sky, beach, or a lawn.
Subjects with constant change such as waves or water falls.
Subjects with brightness widely different from its surroundings such as the sun or a light bulb.
The Sweep Panorama shooting may be interrupted in the following situations.
When the camera is panned too fast or too slow.
The subject is too blurry.
Hint
You can turn the front dial on the shooting screen to select the shooting direction.
[23] Shooting > Selecting a shooting mode
Scene Selection
Allows you to shoot with preset settings according to the scene.
1. Set the mode dial to SCN (Scene Selection).
2. MENU → (Camera Settings) → [Scene Selection] → desired mode.
When [Mode Dial Guide] is set to [On], you can select the desired settings after you
have changed the position of the mode dial.
Menu item details
Portrait:
Blurs background and sharpens the subject. Accentuates the skin tones softly.
Sports Action:
Shoots a moving subject at a fast shutter speed so that the subject looks as if it is standing still.
Page 43

The product shoots images continuously while the shutter button is pressed.
Macro:
Shoots close-ups of the subjects, such as flowers, insects, food, or small items.
Landscape:
Shoots the entire range of a scenery in sharp focus with vivid colors.
Sunset:
Shoots the red of the sunset beautifully.
Night Scene:
Shoots night scenes without losing the dark atmosphere.
Hand-held Twilight:
Shoots night scenes with less noise and blur without using a tripod. A burst of shots are taken,
and image processing is applied to reduce subject blur, camera-shake, and noise.
Page 44

Night Portrait:
Shoots night scene portraits using the flash.
Anti Motion Blur:
Allows you to shoot indoor shots without using the flash and reduces subject blur. The product
shoots burst images and combines them to create the image, reducing subject blur and noise.
Note
In the [Hand-held Twilight] or [Anti Motion Blur] mode, the shutter clicks 4 times and an
image is recorded.
If you select [Hand-held Twilight] or [Anti Motion Blur] with [RAW] or [RAW & JPEG], the
image quality becomes [Fine] temporarily.
Reducing blur is less effective even in [Hand-held Twilight] or [Anti Motion Blur] when
shooting the following subjects:
Subjects with erratic movement.
Subjects that are too close to the product.
Subjects with continuously similar patterns, such as the sky, a beach, or a lawn.
Subjects with constant change such as waves or water falls.
In the case of [Hand-held Twilight] or [Anti Motion Blur], block noise may occur when using a
light source that flickers, such as fluorescent lighting.
The minimum distance that you can come close to a subject does not change even if you
select [Macro]. For the minimum in-focus range, refer to the minimum distance of the lens
attached to the product.
Hint
To change the scene, rotate the front dial on the shooting screen and select a new scene.
Page 45

[24] Shooting > Selecting a shooting mode
Shutter Priority
You can express the movement of a moving subject in various ways by adjusting the shutter
speed, for example, at the instant of the movement with high speed shutter, or as a trailing
image with low speed shutter. The shutter speed can be changed while recording movies.
1. Set the mode dial to S (Shutter Priority).
2. Select the desired value by turning the front dial.
3. Adjust the focus and shoot the subject.
The aperture is automatically adjusted to obtain proper exposure.
Note
If proper exposure cannot be obtained after setup, the aperture value on the shooting screen
blinks. Although you can shoot as it is, resetting is recommended.
Use a tripod to prevent blurring when you use a slow shutter speed.
The / (SteadyShot warning) indicator does not appear in shutter speed
priority mode.
When the shutter speed is 1 second(s) or longer, noise reduction will be done after shooting
for the same amount of time that the shutter was open. However, you cannot shoot any more
while noise reduction is in progress.
The brightness of the image on the monitor may differ from the actual image being shot.
Hint
When a faster shutter speed is used, moving subjects, such as a running person, cars, or
sea spray appear as if they are stopped. When a slower shutter speed is used, a trailing
image of the movement of the subject is captured to create a more natural and dynamic
image.
[25] Shooting > Selecting a shooting mode
Aperture Priority
You can shoot by adjusting the aperture and changing the range in focus, or by defocusing the
background. The aperture value can be changed while recording movies.
Page 46

1. Set the mode dial to A (Aperture Priority).
2. Select the desired value by turning the front dial.
Smaller F-value: The subject is in focus, but objects in front of and beyond the subject
are blurred.
Larger F-value: The subject and its foreground and background are all in focus.
3. Adjust the focus and shoot the subject.
The shutter speed is automatically adjusted to obtain proper exposure.
Note
If proper exposure cannot be obtained after setup, the shutter speed on the shooting screen
blinks. Although you can shoot as it is, resetting is recommended.
The brightness of the image on the screen may differ from the actual image being shot.
Hint
Smaller F-value (opening the aperture) narrows the range that is in focus. This allows you to
put the subject in sharp focus and blur objects in front of and beyond the subject (depth of
field becomes shallower). Larger F-value (narrowing down the aperture) widens the range
that is in focus. This allows you to shoot the depth of the scenery (depth of field becomes
deeper).
[26] Shooting > Selecting a shooting mode
Manual Exposure
You can shoot with the desired exposure setting by adjusting both the shutter speed and
aperture. The shutter speed and the aperture value can be changed while recording movies.
1. Set the mode dial to M (Manual Exposure).
2. Select the desired aperture value by turning the front dial.
Select the desired shutter speed by turning the rear dial.
When [ISO] is set to other than [ISO AUTO], use MM (Metered Manual) to check the
exposure value.
Toward +: Images become brighter.
Toward − : Images become darker.
0: Appropriate exposure analyzed by the product
3. Adjust the focus and shoot the subject.
Page 47

Note
When [ISO] is set to [ISO AUTO], the ISO value automatically changes to achieve the
appropriate exposure using the aperture value and shutter speed you have set. If the
aperture value and shutter speed you have set are not suitable for appropriate exposure, the
ISO value indicator will blink.
The Metered Manual indicator does not appear when [ISO] is set to [ISO AUTO].
When the amount of ambient light exceeds the metering range of the Metered Manual, the
Metered Manual indicator flashes.
The / (SteadyShot warning) indicator does not appear in manual exposure
mode.
The brightness of the image on the monitor may differ from the actual image being shot.
Hint
You can change the shutter speed and aperture (F-value) combination without changing the
set exposure value by rotating the front/rear dial while pressing the AEL button. (Manual
shift)
[27] Shooting > Selecting a shooting mode
BULB
You can shoot a trailing image of the movement of a subject with long exposure.
BULB is suitable for shooting trails of light, such as fireworks.
1. Set the mode dial to M (Manual Exposure).
2. Turn the rear dial clockwise until [BULB] is indicated.
3. Press the shutter button halfway down to adjust the focus.
4. Press and hold the shutter button for the duration of the shooting.
As long as the shutter button is pressed, the shutter remains open.
Note
Since the shutter speed becomes slow and the camera-shake tends to occur more easily, it
is recommended that you use a tripod.
The longer the exposure time, the more noise will be visible on the image.
After shooting, noise reduction ([ Long Exposure NR]) will be done for the same amount
of time that the shutter was open. However, you cannot shoot any more while noise
Page 48

reduction is in progress.
You cannot set the shutter speed to [BULB] in the following situations:
When the [Smile Shutter] function is activated.
When the [Auto HDR] function is activated.
When [Picture Effect] is set to [HDR Painting] or [Rich-tone Mono.].
When the [Multi Frame NR] function is activated.
When the [Drive Mode] function is set to [Cont. Shooting] , [Spd Priority Cont.] or [Self-timer(Cont)].
If you use the above functions when the shutter speed is set to [BULB], the shutter speed is
temporarily set to 30 seconds.
Hint
Images shot in [BULB] mode tend to blur. We recommend that you use a tripod or a multiterminal-compatible remote commander that has a shutter button lock function (sold
separately).
[28] Shooting > Selecting a shooting mode
Memory recall
Allows you to shoot an image after recalling often-used modes or camera settings registered in
advance.
1. Set the mode dial to 1 or 2 (Memory recall).
2. Press on the center of the control wheel.
Note
Register shooting settings in advance by [Memory].
If you set [Memory recall] after completing the shooting settings, the registered settings are
given priority and the original settings may become invalid. Check the indicators on the
screen before shooting.
[29] Shooting > Selecting a shooting mode
Movie
You can adjust the shutter speed or aperture value to your desired settings for recording
Page 49

movies. You can also check the image angle before shooting.
1. Set the mode dial to (Movie).
2. MENU → (Camera Settings) → [Movie] → desired setting.
When [Mode Dial Guide] is set to [On], you can select the desired settings after you
have changed the position of the mode dial.
Menu item details
Program Auto:
Allows you to shoot with the exposure (both the shutter speed and the aperture value) adjusted
automatically. The other settings can be adjusted manually.
Aperture Priority:
Allows you to shoot after adjusting the aperture value manually.
Shutter Priority:
Allows you to shoot after adjusting the shutter speed manually.
Manual Exposure:
Allows you to shoot after adjusting the exposure (both the shutter speed and the aperture
value) manually.
[30] Using shooting functions > Using the zoom
Zoom
When a zoom lens is mounted, you can enlarge images by turning the zoom ring of the lens.
1. Turn the zoom ring of the zoom lens to enlarge subjects.
When a Power zoom lens is mounted, move the zoom lever of the zoom lens to enlarge
subjects.
About [Zoom] on the camera
When you select other than [Optical zoom only] for [Zoom Setting], you can use the zoom on
the camera side.
When a Power zoom lens is mounted:
If the zoom range of the optical zoom is exceeded when you operate the zoom lever or zoom
ring, the camera automatically switches over to the camera side zoom.
When a lens other than a Power zoom lens is mounted:
MENU → (Camera Settings) → [Zoom] → desired value.
Page 50

[31] Using shooting functions > Using the zoom
The zoom features available with this product
The zoom feature of the product provides a higher magnification zoom by combining various
zoom features. The icon displayed on the screen changes, according to the selected zoom
feature.
(1) Optical zoom range
Zoom images in the zoom range of a lens.
When a Power zoom lens is mounted, the zoom bar of the optical zoom range is displayed.
When a lens other than a Power zoom lens is mounted, the zoom bar of optical zoom range is
not displayed.
(2) Smart Zoom range ( )
Zoom images without causing the original quality to deteriorate by partially cropping an image
(only when the image size is [M] or [S]).
(3) Clear Image Zoom range ( )
Zoom images using an image process with less deterioration. Set [Zoom Setting] to
[On:ClearImage Zoom] or [On:Digital Zoom] first.
(4) Digital Zoom range (
You can magnify images using an image process. When you select [On:Digital Zoom] for
[Zoom Setting], you can use this zoom function.
Note
The default setting for the [Zoom Setting] is [Optical zoom only].
The default setting for [ Image Size] is [L]. To use the smart zoom change [ Image
Size] to [M] or [S].
Zoom functions other than the optical zoom are not available when shooting in the following
situations:
)
[Sweep Panorama]
[Smile/Face Detect.] is set to [Smile Shutter]
[
Quality] is set to [RAW] or [RAW & JPEG]
You cannot use the Smart Zoom function with movies.
When a motor zoom lens is mounted, you cannot use [Zoom] from MENU. If you enlarge
images past the zoom range of the optical zoom, the product automatically switches to
Page 51

[Zoom].
When you use a zoom function other than the optical zoom, the [Focus Area] setting is
disabled. The AF operates with priority on and around the center area. Also, [Metering Mode]
is fixed to [Multi].
[32] Using shooting functions > Using the zoom
Zoom Setting
You can select the zoom setting of the product.
1. MENU → (Custom Settings) → [Zoom Setting] → desired setting.
Menu item details
Optical zoom only (default setting):
Optical zoom is activated. You can use the Smart Zoom function if you set [ Image Size] to
[M] or [S].
On:ClearImage Zoom:
Even if the zoom range of the optical zoom is exceeded, the product magnifies images within
the range in which image quality does not deteriorate significantly.
On:Digital Zoom:
When the zoom range of the [Clear Image Zoom] is exceeded, the product magnifies images to
the largest scale. However, the image quality will deteriorate.
Note
Set [Optical zoom only] if you want to magnify images within the range in which image quality
does not deteriorate.
[33] Using shooting functions > Using the zoom
About zoom scale
The zoom scale that is used in combination with the zoom of the lens changes according to the
selected image size.
The following zoom scales are for full-size shooting, and the numbers in brackets are for APSC size shooting.
Page 52

[Zoom Setting]: [Optical zoom only]
[ Image Size]: M Approx. 1.5× (Approx. 1.3×), S Approx. 2× (Approx. 2×)
[Zoom Setting]: [On:ClearImage Zoom]
[
Image Size]: L Approx. 2× (Approx. 2×), M Approx. 3×*, Approx. 3.1×** (Approx. 2.6×), S
Approx. 4× (Approx. 4×)
[Zoom Setting]: [On:Digital Zoom]
Image Size]: L Approx. 4× (Approx. 4×), M Approx. 6.1× (Approx. 5.2×), S Approx. 8×
[
(Approx. 8×)
*
ILCE-7
**
ILCE-7R
Using flash (sold separately)
In dark environments, use the flash to light up the subject while shooting and to prevent
camera-shake. When shooting against the sun, use the flash to lighten the image of the backlit
subject.
1. Attach the flash to the product (sold separately).
2. Press the shutter button fully down.
Note
Page 53

You cannot use the flash when recording movies.
While charging the flash, flashes. After charging is completed, the flashing icon will light
up.
Do not use a commercially available flash with high-voltage synchro terminals or with
reverse polarity.
The corners of a recorded image may be shaded, depending on the lens.
[35] Using shooting functions > Using the flash
Flash Mode
You can set the flash mode.
1. MENU → (Camera Settings) → [Flash Mode] → desired setting.
Menu item details
Flash Off:
Flash does not operate.
Autoflash:
Fires in dark environments or when shooting towards bright light.
Fill-flash (default setting):
Fires every time you trigger the shutter.
Slow Sync.:
Fires every time you trigger the shutter. Slow sync shooting allows you to shoot a clear image of
both the subject and the background by slowing the shutter speed.
Rear Sync.:
Fires right before the exposure is completed every time you trigger the shutter. Rear sync
shooting allows you to shoot a natural image of the trail of a moving subject such as a moving
car or a walking person.
Wireless:
When using a wireless flash, the shading effect provides a more 3D appearance to a subject
than when using an attached flash. This mode is effective when you attach a remote controlcompatible external flash (sold separately) to the product, and shoot with a wireless flash (sold
separately), placed away from the product.
Note
The default setting depends on the shooting mode.
Page 54

Available flash mode depends on the shooting mode.
[36] Using shooting functions > Using the flash
Flash Comp.
Adjusts the amount of flash light in a range of –3.0 EV to +3.0 EV.
Flash compensation changes the amount of flash light only. Exposure compensation changes
the amount of flash light along with the change of the shutter speed and aperture.
1. MENU → (Camera Settings) → [Flash Comp.] → desired setting.
Selecting higher values (+ side) makes the flash level higher, and lower values (– side)
makes the flash level lower.
Note
The higher flash effect may not be visible due to the limited amount of flash light available, if
the subject is outside the maximum range of the flash. If the subject is very close, the lower
flash effect may not be visible.
[37] Using shooting functions > Selecting a screen display
mode
Switching the screen display (Shooting)
You can change the display contents on the screen.
1. Press the DISP (Display Setting) button.
Each time you press the DISP button, the recording information display changes as
follows:
Graphic Display → Display All Info. → No Disp. Info. → Histogram → Level → For
viewfinder* → Graphic Display
Graphic Display
Page 55

Display All Info.
No Disp. Info.
Histogram
Level
For viewfinder*
Page 56

* [For viewfinder] is not displayed in viewfinder mode.
Some display methods are not displayed in the default settings.
The displayed screen varies depending on the setting of [DISP Button].
Note
Histogram is not displayed during panorama shooting.
In movie mode, [For viewfinder] cannot be displayed.
Hint
You can select different settings for both the viewfinder and the monitor. Look through the
viewfinder to set the display settings for the viewfinder.
[38] Using shooting functions > Selecting a screen display
mode
DISP Button (Finder)
Allows you to set the screen display modes that can be selected for the viewfinder using
(Display Setting) in shooting mode.
1. MENU → (Custom Settings) → [DISP Button] → [Finder] → desired setting → [Enter].
The items marked with are available.
Menu item details
Graphic Display:
Shows basic shooting information. Graphically shows the shutter speed and aperture value.
Display All Info.:
Shows recording information.
No Disp. Info.:
Does not show recording information.
Page 57

Histogram:
Displays the luminance distribution graphically.
Level:
Indicates whether the product is level in both the horizontal and front-back directions. When the
product is level in both directions, the indicator turns to green.
[39] Using shooting functions > Selecting a screen display
mode
DISP Button (Monitor)
Allows you to set the screen display modes that can be selected for the monitor using
(Display Setting) in shooting mode.
1. MENU → (Custom Settings) → [DISP Button] → [Monitor] → desired setting →
[Enter].
The items marked with are available.
Menu item details
Graphic Display:
Shows basic shooting information. Graphically shows the shutter speed and aperture value.
Display All Info.:
Shows recording information.
No Disp. Info.:
Does not show recording information.
Histogram:
Displays the luminance distribution graphically.
Level:
Indicates whether the product is level in both the horizontal and front-back directions. When the
product is level in both directions, the indicator turns to green.
For viewfinder:
Displays information suited for shooting with the viewfinder.
Page 58

[40] Using shooting functions > Selecting still image
size/image quality
Image Size (still image)
The larger the image size, the more detail will be reproduced when the image is printed on
large-format paper. The smaller the image size, the more images can be recorded.
1. MENU → (Camera Settings) → [ Image Size] → desired setting.
Menu item details
Image size when [ Aspect Ratio] is 3:2
ILCE-7
L: 24M 6000×4000 pixels
M: 10M 3936×2624 pixels
S: 6.0M 3008×2000 pixels
ILCE-7R
L: 36M 7360×4912 pixels
M: 15M 4800×3200 pixels
S: 9.0M 3680×2456 pixels
Image size when [ Aspect Ratio] is 16:9
ILCE-7
L: 20M 6000×3376 pixels
M: 8.7M 3936×2216 pixels
S: 5.1M 3008×1688 pixels
ILCE-7R
L: 30M 7360×4144 pixels
M: 13M 4800×2704 pixels
S: 7.6M 3680×2072 pixels
When [APS-C Size Capture] is [On] and [ Aspect Ratio] is 3:2
ILCE-7
L: 10M 3936×2624 pixels
M: 6.0M 3008×2000 pixels
S: 2.6M 1968×1312 pixels
ILCE-7R
L: 15M 4800×3200 pixels
M: 9.0M 3680×2456 pixels
S: 3.8M 2400×1600 pixels
When [APS-C Size Capture] is [On] and [ Aspect Ratio] is 16:9
ILCE-7
L: 8.7M 3936×2216 pixels
M: 5.1M 3008×1688 pixels
Page 59

S: 2.2M 1968×1112 pixels
ILCE-7R
L: 13M 4800×2704 pixels
M: 7.6M 3680×2072 pixels
S: 3.2M 2400×1352 pixels
Note
When [ Quality] is set to [RAW] or [RAW & JPEG], the image size for RAW images
corresponds to [L].
[41] Using shooting functions > Selecting still image
size/image quality
Aspect Ratio (still image)
Sets the aspect ratio of still images.
1. MENU → (Camera Settings) → [ Aspect Ratio] → desired setting.
Menu item details
3:2 (default setting):
Suitable for standard prints.
16:9:
For viewing on a high-definition TV.
[42] Using shooting functions > Selecting still image
size/image quality
Quality (still image)
Selects the compression format of still images.
1. MENU → (Camera Settings) → [ Quality] → desired setting.
Menu item details
Page 60

RAW:
When [Panorama: Direction] is [Up] or [Down]
File format: RAW (Records using the RAW compression format.)
Digital processing is not performed on this file format. Select this format to process images on a
computer for professional purposes.
The image size is fixed to the maximum size. The image size is not displayed on the screen.
RAW & JPEG:
File format: RAW (Records using the RAW compression format.) + JPEG
A RAW image and a JPEG image are created at the same time. This is suitable when you need
2 image files, a JPEG for viewing, and a RAW for editing.
Extra fine:
File format: JPEG
The image is compressed in the JPEG format and recorded using a higher quality than with
[Fine].
Fine (default setting):
File format: JPEG
The image is compressed in the JPEG format when recorded.
Standard:
File format: JPEG
The image is compressed in the JPEG format when recorded. Since the compression rate of
[Standard] is higher than that of [Fine], the file size of [Standard] is smaller than that of [Fine].
This will allow more files to be recorded on 1 memory card, but the image quality will be lower.
Note
If images are not to be modified using your computer, we recommend that you record
images in JPEG format.
You cannot add DPOF (print order) registration to RAW format images.
[43] Using shooting functions > Selecting still image
size/image quality
Panorama: Size
Sets the image size when shooting panoramic images. The image size varies depending on the
[Panorama: Direction] setting.
1. MENU → (Camera Settings) → [Panorama: Size] → desired setting.
Menu item details
Page 61

Standard: 3872×2160
Wide: 5536×2160
When [Panorama: Direction] is [Left] or [Right]
Standard: 8192×1856
Wide: 12416×1856
[44] Using shooting functions > Selecting still image
size/image quality
Panorama: Direction
Sets the direction to pan the camera when shooting panoramic images.
1. MENU → (Camera Settings) → [Panorama: Direction] → desired setting.
Menu item details
Right (default setting):
Pan the camera from the left to the right.
Left:
Pan the camera from the right to the left.
Up:
Pan the camera from the bottom to the top.
Down:
Pan the camera from the top to the bottom.
[45] Using shooting functions > Adjusting the focus
Focus Mode
Selects the focus method to suit the movement of the subject.
1. MENU → (Camera Settings) → [Focus Mode] → desired setting.
Menu item details
(Single-shot AF) (default setting):
Page 62

The product locks the focus when the focus adjustment is achieved. Use [Single-shot AF] when
the subject is motionless.
The product continues to focus while the shutter button is pressed and held halfway down. Use
this when the subject is in motion.
Allows you to use manual focus and auto focus in combination.
Adjusts the focus manually.
Note
(Continuous AF):
(DMF):
(Manual Focus):
If the subject is too close, the image may show any dust or fingerprints on the lens. Wipe the
lens with a soft cloth, etc.
Once you change the focus method, the distance of the focus you set up is cleared.
When [Focus Mode] is set to [Continuous AF], the beep does not sound when focus is
achieved.
[46] Using shooting functions > Adjusting the focus
Focus Area
Selects the focusing area. Use this function when it is difficult to get the proper focus in auto
focus mode.
1. MENU → (Camera Settings) → [Focus Area] → desired setting.
Menu item details
Wide:
Focuses automatically on a subject in all ranges of the image.
When you press the shutter button halfway down in still image shooting mode, a green frame is
displayed around the area that is in focus.
Zone:
Select a zone on the monitor on which to focus. A zone consists of nine focus areas, and the
product automatically selects a focus area on which to focus.
Center:
Focuses automatically on a subject in the center of the image. When used together with the AF
lock function, you can compose the image you want.
Flexible Spot:
Page 63

Allows you to move the AF range frame to the desired point on the screen and focus on an
extremely small subject in a narrow area.
On the Flexible Spot shooting screen, you can change the size of the AF range finder frame by
rotating the control wheel.
[47] Using shooting functions > Adjusting the focus
Focus-lock
Shoots images with the focus locked on the desired subject in auto focus mode.
1. MENU → (Camera Settings) → [Focus Mode] → [Single-shot AF].
2. Place the subject within the AF area and press the shutter button halfway down.
The focus is locked.
3. Keep pressing the shutter button halfway down, and place the subject back in the original
position to re-compose the shot.
4. Press the shutter button down fully to take the picture.
[48] Using shooting functions > Adjusting the focus
Manual Focus
When it is difficult to get the proper focus in autofocus mode, you can adjust the focus manually.
1. MENU → (Camera Settings) → [Focus Mode] → [Manual Focus].
2. Rotate the focus ring to achieve sharp focus.
Page 64

When you rotate the focus ring, the focus distance is displayed on the screen.
The image is enlarged. You can magnify images further by pressing on the center of
[49] Using shooting functions > Adjusting the focus
Direct manual focus (DMF)
You can make fine adjustments manually after the focus is locked.
You can quickly focus on a subject rather than using the manual focus from the beginning. This
is convenient in cases such as macro shooting.
1. MENU → (Camera Settings) → [Focus Mode] → [DMF].
2. Press the shutter button halfway down to focus automatically.
3. Keep the shutter button halfway down, rotate the focusing ring to achieve a sharper focus.
When you rotate the focus ring, the focus distance is displayed on the screen.
[50] Using shooting functions > Adjusting the focus
MF Assist (still image)
Enlarges the image on the screen automatically to make manual focusing easier. This works in
Manual Focus or Direct Manual Focus shooting.
1. MENU → (Custom Settings) → [ MF Assist] → [On].
2. Turn the focus ring to adjust the focus.
Page 65

the control wheel.
1. MENU → (Custom Settings) → [Focus Magnif. Time] → desired setting.
Note
You cannot use [ MF Assist] when shooting movies.
[51] Using shooting functions > Adjusting the focus
Focus Magnifier
You can check the focus by enlarging the image before shooting.
1. MENU → (Camera Settings) → [Focus Magnifier].
2. Press on the center of the control wheel to enlarge the image and select the position
you want to enlarge using up/down/left/right side of the control wheel.
3. Confirm the focus.
4. Press the shutter button fully down to shoot the image.
Hint
Each time you press in the center, the magnifier scaling changes.
When focusing manually, you can adjust the focus while an image is magnified.
The [Focus Magnifier] function will be released when the shutter button is pressed halfway.
You can record images while an image is enlarged, but the product records a full-display
image.
The [Focus Magnifier] function will be released after shooting.
[52] Using shooting functions > Adjusting the focus
Focus Magnif. Time
Set the duration for which an image is to be magnified using the [ MF Assist] or [Focus
Magnifier] function.
Page 66

Menu item details
2 Sec (default setting):
Magnifies the images for 2 seconds.
5 Sec:
Magnifies the images for 5 seconds.
No Limit:
Magnifies the images until you press the shutter button.
[53] Using shooting functions > Adjusting the focus
Peaking Level
Enhances the outline of in-focus ranges using a specific color in Manual Focus or Direct
Manual Focus shooting. This function allows you to confirm the focus easily.
1. MENU → (Custom Settings) → [Peaking Level] → desired setting.
Menu item details
High:
Sets the peaking level to high.
Mid:
Sets the peaking level to middle.
Low:
Sets the peaking level to low.
Off (default setting):
Does not use the peaking function.
Note
Since the product determines that sharp areas are in focus, [Peaking Level] differs,
depending on the subject and shooting situation.
The outline of in-focus ranges is not enhanced when the product is connected using an
HDMI cable.
Page 67

[54] Using shooting functions > Adjusting the focus
Peaking Color
Sets the color used for the peaking function in Manual Focus or Direct Manual Focus shooting.
1. MENU → (Custom Settings) → [Peaking Color] → desired setting.
Menu item details
Red:
Enhances outlines in red.
Yellow:
Enhances outlines in yellow.
White (default setting):
Enhances outlines in white.
[55] Using shooting functions > Adjusting the focus
Lock-on AF
Set up the tracking function to continue focusing on the subject.
1. MENU → (Camera Settings) → [Lock-on AF] → desired setting.
Menu item details
Off:
Does not track a subject to be focused on.
On:
Tracks a subject to be focused on.
On (Start w/shutter):
Tracks a subject to be focused on when the shutter button is pressed halfway.
Note
You can set [On (Start w/shutter)] only when [Continuous AF] is selected for [Focus Mode].
Page 68

[56] Using shooting functions > Adjusting the focus
Lock-on AF (On)
Maintains the focus on a moving subject automatically.
1. MENU → (Camera Settings) → [Lock-on AF] → [On].
2. Align the target frame and the subject to be tracked, and press in the center.
Note
The [Lock-on AF] function may not operate well in the following situations:
The subject is moving too quickly.
The subject is too small, or too large.
The contrast between the subject and the background is poor.
It is dark.
The ambient light changes.
Hint
If you lose track of the subject, this product can detect the subject and resume the Lock-on
AF function when the subject reappears on the screen.
[57] Using shooting functions > Adjusting the focus
Pre-AF (still image)
The product automatically adjusts focus before you press the shutter button halfway down.
1. MENU → (Custom Settings) → [ Pre-AF] → desired setting.
Menu item details
Page 69

On (default setting):
Adjusts focus before you press the shutter button halfway down.
Off:
Does not adjust focus before you press the shutter button halfway down.
Note
[ Pre-AF] is available only when an E-mount lens is mounted.
[58] Using shooting functions > Adjusting the focus
Eye-Start AF (still image)
Sets whether or not to use autofocus when you look through an Electronic Viewfinder.
1. MENU → (Custom Settings) → [ Eye-Start AF] → desired setting
Menu item details
On:
Auto focusing starts when you look through the Electronic Viewfinder.
Off (default setting):
Auto focusing does not start when you look through the Electronic Viewfinder.
Hint
[ Eye-Start AF] is available when an A-mount lens and a Mount Adaptor (LA-EA2, LAEA4) (sold separately) are attached.
[59] Using shooting functions > Adjusting the focus
AF/MF control
You can easily switch the focusing mode from auto to manual and vice versa while shooting
without changing your holding position.
1. Switch the AF/MF/AEL switch lever to the AF/MF position, then press the AF/MF button.
Page 70

During auto focus:
Temporarily switches the focusing mode to manual. Adjust the focus while the AF/MF button is
being held down.
During manual focus:
Temporarily switches the focusing mode to auto while the AF/MF button is held down, and locks
the focus.
Hint
If you select [AF/MF Ctrl Toggle] in [AF/MF Button] under [Custom Key Settings], the
focusing mode remains switched even if you remove your finger from the button.
[60] Using shooting functions > Adjusting the focus
AF Illuminator (still image)
The AF illuminator supplies fill light to focus more easily on a subject in dark surroundings. The
red AF illuminator allows the product to focus easily when the shutter button is pressed halfway,
until the focus is locked.
1. MENU → (Camera Settings) → [ AF Illuminator] → desired setting.
Menu item details
Auto (default setting):
Uses the AF illuminator.
Off:
Does not use the AF illuminator.
Note
Focus is achieved as long as the AF illuminator light reaches the subject, regardless of
whether light fails to reach the center of the subject.
Page 71

You cannot use [ AF Illuminator] in the following situations:
In movie mode
In [Sweep Panorama] mode
When [Focus Mode] is set to [Continuous AF]
When [Scene Selection] is set to [Landscape], [Sports Action] or [Night Scene].
When a Mount Adaptor is attached
When [Focus Area] is set to [Wide] or [Zone], the AF range finder frame is indicated by a
dotted line.
The AF illuminator emits a very bright light. Although there is no health hazard, do not look
directly into the AF illuminator at close range.
[61] Using shooting functions > Adjusting the focus
AF Micro Adj.
Allows you to adjust and register an autofocused position for each lens, when using an A-mount
lens with the Mount Adaptor LA-EA2 or LA-EA4 (sold separately).
1. Select MENU → (Custom Settings) → [AF Micro Adj.].
2. Select [AF Adjustment Set.] → [On].
3. [amount] → desired value.
You can select a value between −20 and +20. Selecting a positive value shifts the
autofocused position away from the product. Selecting a negative value shifts the
autofocused position closer to the product.
Note
It is recommended that you adjust the position under actual shooting conditions.
When you attach a lens for which you have already registered a value, the registered value
appears on the screen. [±0] appears for lenses for which a value has not yet been registered.
If [−] is displayed as the value, then a total of 30 lenses have been registered and no new
lens can be registered. To register a new lens, attach a lens for which the registration can be
erased, and set its value to [±0], or reset the values of all the lenses using [Clear].
Use [AF Micro Adj.] with Sony, Minolta, and Konica-Minolta lenses only. If you use [AF Micro
Adj.] with other brands of lenses, the registered value may be affected. Do not perform [AF
Micro Adj.] with an unsupported lens.
You cannot set [AF Micro Adj.] individually for a Sony, Minolta, and Konica-Minolta lens of
the same specification.
Page 72

[62] Using shooting functions > Adjusting the focus
Focus Settings
Sets up the focus functions.
1. MENU → (Camera Settings) → [Focus Settings].
2. Perform settings using the front/rear dial or control wheel.
When the focus mode is set to [Autofocus]/[DMF]
Front dial: Moves the focus area frame up/down.
Rear dial: Moves the focus area frame right/left.
Control wheel: Selects the focus area.
When the focus mode is set to [Manual Focus]
You can set the area to be magnified when focusing manually.
Front dial: Moves the area to be magnified up/down.
Rear dial: Moves the area to be magnified right/left.
Control wheel: Moves the area to be magnified up/down.
Note
You can move the focus area when [Focus Area] is set to [Zone] or [Flexible Spot].
[63] Using shooting functions > Adjusting the focus
AF w/ shutter (still image)
Selects whether to focus automatically when you press the shutter button halfway down. Select
[Off] to adjust the focus and the exposure separately.
1. MENU → (Custom Settings) → [ AF w/ shutter] → desired setting.
Menu item details
On (default setting):
The auto focus operates when you press the shutter button halfway down.
Page 73

Off:
Depending on the circumstances, you cannot use [Eye AF], such as when [Focus Mode] is
The auto focus does not operate even if you press the shutter button halfway down.
Hint
When [ AF w/ shutter] is set to [Off], you can still use the [AF On] function.
[64] Using shooting functions > Adjusting the focus
AF On
You can focus using any key instead of pressing the shutter button halfway down. The settings
for [Focus Mode] will be applied.
1. Select the desired key and assign the [AF On] function to it using MENU → (Custom
Settings) → [Custom Key Settings].
2. Press the key to which you have assigned the [AF On] function while auto-focus shooting.
[65] Using shooting functions > Adjusting the focus
Eye AF
Focuses on a person’s eyes when you press the button.
1. MENU → (Custom Settings) → [Custom Key Settings] → assign the [Eye AF] function
to the desired key.
2. Press the key to which you have assigned the [Eye AF] function and focus on the eyes.
3. Press the shutter button while pressing the key.
Note
Depending on the circumstances, the camera may not be able to focus on the eyes. In such
cases, the camera detects a face and focuses on the face.
If the camera cannot detect a person’s face, you cannot use [Eye AF].
Page 74

set to [Continuous AF] or [Manual Focus], etc.
[Eye AF] may not function in the following situations:
When the person is wearing sunglasses.
When the front hair covers the person’s eyes.
In low-light or back-lit conditions.
When the eyes are closed.
When the person is in the shade.
When the person is out of focus.
Hint
When the camera focuses on the eyes and [Smile/Face Detect.] is set to [On], a detection
frame is displayed on the face after it is displayed on the eyes. When [Smile/Face Detect.] is
set to [Off], a detection frame is displayed on the eyes for a certain time.
Phase Detect. Area (ILCE-7)
Sets whether or not to display the auto-focus points for Phase Detection AF.
1. MENU → (Custom Settings) → [Phase Detect. Area] → desired setting.
Menu item details
On:
Displays the auto-focus points for Phase Detection AF.
Off (default setting):
Does not display the auto-focus points for Phase Detection AF.
Note
When the aperture value is F9.0 or above, Phase Detection AF cannot be used. Only
Contrast AF is available.
Phase Detection AF is available only with compatible lenses. If an incompatible lens is
attached, you will be unable to use Phase Detection AF. Phase Detection AF may not
operate even with some compatible lens, such as lenses purchased in the past that have not
been updated. For details on compatible lenses, visit the Sony web site in your area, or
consult your Sony dealer or local authorized Sony service facility.
When using a Mount Adaptor (sold separately) to attach an A-Mount lens (sold separately),
this product’s Phase Detection AF cannot be used.
When shooting movies, the Phase Detection AF does not operate. The auto-focus points for
the Phase Detection AF will not be displayed.
Page 75

[67] Using shooting functions > Adjusting the focus
You can adjust the exposure in a range of –2.0 EV to +2.0 EV for movies.
Measuring the exact distance to the subject
The mark shows the location of the image sensor*. When you measure the exact distance
between the product and the subject, refer to the position of the horizontal line.
The distance from the lens contact surface to the image sensor is about 18 mm (23/32 in.).
*
The image sensor is the part that converts the light source to a digital signal.
Note
If the subject is closer than the minimum shooting distance of the attached lens, the focus
cannot be confirmed. Make sure you put enough distance between the subject and the
product.
[68] Using shooting functions > Adjusting the exposure
Exposure Comp.
You can adjust the exposure under MENU when the exposure compensation dial is set to “0.”
Based on the exposure value set by auto exposure, you can make the entire image brighter or
darker if you adjust [Exposure Comp.] to the plus side or minus side, respectively (exposure
compensation). Normally, exposure is set automatically (auto exposure).
1. MENU → (Camera Settings) → [Exposure Comp.] → desired setting.
You can adjust the exposure in a range of –5.0EV to +5.0EV when the exposure
compensation dial is set to “0.”
Note
Page 76

If you shoot a subject in extremely bright or dark conditions, or when you use the flash, you
may not be able to get a satisfactory effect.
Only a value between –3.0 EV and +3.0 EV with the equivalent image brightness appears on
the screen when shooting. If you set an exposure beyond this range, the image brightness on
the screen does not show the effect, but it will be reflected in the recorded image.
When the exposure compensation dial is set to other than “0,” settings for the exposure
compensation dial will be prioritized. For example, if you set [Exposure Comp.] to +5.0EV,
but the exposure compensation dial is set to +2.0EV, the “+2.0EV” setting will be prioritized.
When you set the exposure compensation dial to “0” from a setting other than “0,” the
exposure value switches to “0” even if the exposure has been set to other settings.
When you use [Manual Exposure], you can compensate for the exposure only when [ISO] is
set to [ISO AUTO].
[69] Using shooting functions > Adjusting the exposure
Exposure compensation dial
Based on the exposure value set by auto exposure, you can make the entire image brighter or
darker if you adjust [Exposure Comp.] to the plus side or minus side, respectively (exposure
compensation). Normally, exposure is set automatically (auto exposure).
1. Turn the exposure compensation dial.
Note
You can adjust the exposure in a range of −2.0 EV to +2.0 EV for movies.
If you shoot a subject in extremely bright or dark conditions, or when you use the flash, you
may not be able to get a satisfactory effect.
When you use [Manual Exposure], you can compensate for the exposure only when [ISO] is
set to [ISO AUTO].
Page 77

[70] Using shooting functions > Adjusting the exposure
exposure of the entire screen. To make the subject brighter, meter the light at a spot darker
Metering Mode
Selects the metering mode that sets which part of the screen to measure for determining the
exposure.
1. MENU → (Camera Settings) → [Metering Mode] → desired setting.
Menu item details
Multi (default setting):
Measures light on each area after dividing the total area into multiple areas and determines the
proper exposure of the entire screen (Multi-pattern metering).
Center:
Measures the average brightness of the entire screen, while emphasizing the central area of
the screen (Center-weighted metering).
Spot:
Measures only the central area (Spot metering). This function is useful when the subject is
backlit or when there is strong contrast between the subject and the background.
Note
[Multi] is selected when using the following functions:
Movie recording
[Intelligent Auto]
[Superior Auto]
[Scene Selection]
Zoom functions other than optical zoom
[71] Using shooting functions > Adjusting the exposure
AE lock
When the contrast between the subject and background is high, such as when shooting a
backlit subject or a subject near a window, meter the light at a spot where the subject appears
to have the appropriate brightness and lock the exposure before shooting. To reduce the
brightness of the subject, meter the light at a spot brighter than the subject and lock the
Page 78

than the subject and lock the exposure of the entire screen.
1. Adjust the focus on the spot at which the exposure is adjusted.
2. Switch the AF/MF/AEL switch lever to the AEL position, then press the AEL button.
The exposure is locked, and (AE lock) lights up.
3. Keep pressing the AEL button and focus on a subject, then shoot.
Keep holding the AEL button down while taking a shot if you want to continue shooting
with the fixed exposure. Release the button to reset the exposure.
Hint
If you select the [AEL toggle] function in [Custom Key Settings], you can lock the exposure
without holding down the AEL button.
[72] Using shooting functions > Adjusting the exposure
AEL w/ shutter (still image)
Sets whether to fix the exposure when you press the shutter button halfway down.
1. MENU → (Custom Settings) → [ AEL w/ shutter] → desired setting.
Menu item details
Auto (default setting):
Fixes the exposure after adjusting the focus automatically when you press the shutter button
halfway down when [Focus Mode] is set to [Single-shot AF].
On:
Fixes the exposure when you press the shutter button halfway down.
Off:
Page 79

Does not fix the exposure when you press the shutter button halfway down. Use this mode
when you want to adjust focus and exposure separately.
The product keeps adjusting the exposure while shooting in [Cont. Shooting] or [Spd Priority
Cont.] mode.
Note
When [Focus Mode] is set to [Continuous AF] and [ AEL w/ shutter] is [Off] or [Auto], the
aperture is fixed at the moment you press the shutter button halfway. If the brightness
changes drastically during continuous shooting, release your finger from the shutter button
once, then press the shutter button halfway down again.
Operation using the AEL button is prioritized over the [ AEL w/ shutter] settings.
[73] Using shooting functions > Adjusting the exposure
Exp.comp.set
Sets whether to apply the exposure compensation value to control both flash light and ambient
light, or just ambient light.
1. MENU → (Custom Settings) → [Exp.comp.set] → desired setting.
Menu item details
Ambient&flash (default setting):
Applies the exposure compensation value to control both flash light and ambient light.
Ambient only:
Applies the exposure compensation value to control ambient light only.
[74] Using shooting functions > Adjusting the exposure
Zebra
The zebra pattern will appear over the part of an image if the brightness level exceeds the IRE
that you set. Use this zebra pattern as a guide to adjust the brightness.
1. MENU → (Custom Settings) → [Zebra] → desired setting.
Page 80

Menu item details
Off (default setting):
Does not display the zebra pattern.
70/75/80/85/90/95/100/100+:
Adjusts the brightness level.
Note
The zebra pattern is not displayed during HDMI connection.
[75] Using shooting functions > Adjusting the exposure
Exposure Set. Guide
You can set whether to display a guide when you change the aperture, exposure, shutter
speed, or ISO.
1. MENU → (Custom Settings) → [Exposure Set. Guide] → desired setting.
Menu item details
Off:
Does not display the guide.
On (default setting):
Displays the guide.
Screen display when the F-value is changed
Note
The exposure setting guides for the aperture and shutter speed are not displayed when the
DISP setting is set to [Graphic Display] or [For viewfinder]
Page 81

[76] Using shooting functions > Adjusting the exposure
Exposure step
You can set the setting range for the shutter speed, aperture, and exposure compensation
values.
1. MENU → (Camera Settings) → [Exposure step] → desired setting.
Menu item details
0.3EV (default setting)/0.5EV
Note
Even if you set [Exposure step] to [0.5EV], the exposure value adjusted using the exposure
compensation dial changes in steps of 0.3EV.
[77] Using shooting functions > Adjusting the exposure
Dial Ev Comp
You can adjust the exposure using the front dial or rear dial when the exposure compensation
dial is set to “0.”
1. MENU → (Custom Settings) → [Dial Ev Comp] → desired setting.
Menu item details
Off (default setting):
Does not enable exposure compensation with the front or rear dial.
Front dial/ Rear dial:
Enables exposure compensation with the front or rear dial.
Note
When the exposure compensation function is assigned to the front or rear dial, any function
that had been assigned to that dial previously is re-assigned to another dial.
When the exposure compensation dial is set to a position other than “0,” the settings of the
exposure compensation dial will be prioritized. For example, if you set [Exposure Comp.] to
+5.0EV, but the exposure compensation dial is set to +2.0EV, the “+2.0EV” setting will be
prioritized.
Page 82

When [ISO AUTO] is selected in [Manual Exposure] shooting mode, [Dial Ev Comp] is
invalid.
[78] Using shooting functions > Adjusting the exposure
Reset EV Comp.
Sets whether to maintain the exposure value set using[Custom Settings] when you turn off the
power when the exposure compensation dial position is set to “0.”
1. MENU → (Custom Settings) → [Reset EV Comp.] → desired setting.
Menu item details
Maintain:
Maintains the settings of [Custom Settings].
Reset (default setting):
Resets the settings of [Exposure Comp.] to “0.”
[79] Using shooting functions > Selecting a drive mode
(Continuous shooting/Self-timer)
Drive Mode
You can set the drive mode, such as continuous or self-timer shooting.
1. MENU → (Camera Settings) → [Drive Mode] → desired setting.
Menu item details
Single Shooting (default setting):
Shoots one still image. Normal shooting mode.
Cont. Shooting:
Shoots images continuously while you press and hold down the shutter button.
Spd Priority Cont.:
Shoots images continuously at high speed while you press and hold down the shutter button.
Self-timer:
Shoots an image after 10 or 2 seconds.
Page 83

Self-timer(Cont):
Shoots images continuously after 10 seconds.
Cont. Bracket:
Shoots images while holding the shutter button down, each with different degrees of brightness.
Single Bracket:
Shoots a specified number of images, one by one, each with a different degree of brightness.
WB bracket:
Shoots a total of three images, each with a different degree of brightness according to the
selected settings for white balance, color temperature and color filter.
DRO Bracket:
Shoots a total of three images, each at a different degree of D-Range Optimizer.
[80] Using shooting functions > Selecting a drive mode
(Continuous shooting/Self-timer)
Cont. Shooting
Shoots images continuously while you press and hold down the shutter button.
1. MENU→ (Camera Settings) → [Drive Mode] → [Cont. Shooting].
Hint
To hold the focus and exposure during burst, change the following settings.
The exposure of the first shot is determined when you press the shutter button halfway
down. The exposure setting for the first shot is used for the subsequent shots.
Set [Focus Mode] to [Continuous AF].
Set [
AEL w/ shutter] to [Off] or [Auto].
[81] Using shooting functions > Selecting a drive mode
(Continuous shooting/Self-timer)
Spd Priority Cont.
The product continues to shoot as long as the shutter button is pressed. You can continuously
shoot at a rate faster than that of [Cont. Shooting].
Page 84

1. MENU→ (Camera Settings) → [Drive Mode] → [Spd Priority Cont.].
Note
The speed of continuous shooting is estimated using our criteria. The speed of continuous
shooting may be slower, depending on shooting conditions (Image size, ISO setting, High
ISO NR, or the setting of [Distortion Comp.]).
Between continuous shooting frames, an image of each frame is immediately displayed.
Hint
In [Spd Priority Cont.] mode, the focus is fixed when you press the shutter button halfway
down for the first image, and the focus is fixed after that. However, the exposure value is
adjusted for each image. To use the same exposure for subsequent shots, change the
following settings.
The exposure of the first shot is determined when you press the shutter button halfway
down. The exposure setting for the first shot is used for subsequent shots.
Set [ AEL w/ shutter] to [Auto] or [Off].
ILCE-7:
When [Focus Mode] is set to [Continuous AF], both the exposure and the focus are
maintained using the Phase Detection AF function.
[82] Using shooting functions > Selecting a drive mode
(Continuous shooting/Self-timer)
Self-timer
The product shoots an image using the self-timer with a 10-second or 2-second delay.
1. MENU → (Camera Settings) → [Drive Mode] → [Self-timer].
2. Select the desired mode using the right/left side of the control wheel.
Menu item details
Self-timer: 10 Sec (default setting):
Sets the 10-second delay self-timer.
When you press the shutter button, the self-timer lamp flashes and beeps until the shutter
operates. To cancel the self-timer, press the shutter button again.
Self-timer: 2 Sec:
Sets the 2-second delay self-timer. This reduces the camera-shake caused by pressing the
Page 85

shutter button.
[83] Using shooting functions > Selecting a drive mode
(Continuous shooting/Self-timer)
Self-timer(Cont)
Continuously shoots the number of images you have set after 10 seconds. You can choose the
best shot from several shots taken.
1. MENU → (Camera Settings) → [Drive Mode] → [Self-timer(Cont)].
2. Select the desired mode using the right/left side of the control wheel.
Menu item details
Self-timer(Cont.): 10 Sec. 3 Img. (default setting):
Shoots three frames in succession 10 seconds after you press the shutter button.
When you press the shutter button, the self-timer lamp flashes, a beep sounds, and the shutter
operates after 10 seconds.
Self-timer(Cont.): 10 Sec. 5 Img.:
Shoots five frames in succession 10 seconds after you press the shutter button.
When you press the shutter button, the self-timer lamp flashes, a beep sounds, and the shutter
operates after 10 seconds.
[84] Using shooting functions > Selecting a drive mode
(Continuous shooting/Self-timer)
Cont. Bracket
Shoots multiple images while automatically shifting the exposure from base to darker and then
to lighter. Press and hold down the shutter button until the bracket recording is completed.
You can select an image that suits your intention, after recording.
1. MENU → (Camera Settings) → [Drive Mode] → [Cont. Bracket]
2. Select the desired mode using the right/left side of the control wheel.
Page 86

Menu item details
Cont. Bracket: 0.3EV 3 Image (default setting):
This setting shoots three images continuously with an exposure value shifted by plus or minus
0.3 EV.
Cont. Bracket: 0.3EV 5 Image:
This setting shoots five images continuously with an exposure value shifted by plus or minus
0.3 EV.
Cont. Bracket: 0.5EV 3 Image:
This setting shoots three images continuously with an exposure value shifted by plus or minus
0.5 EV.
Cont. Bracket: 0.5EV 5 Image:
This setting shoots five images continuously with an exposure value shifted by plus or minus
0.5 EV.
Cont. Bracket: 0.7EV 3 Image:
This setting shoots three images continuously with an exposure value shifted by plus or minus
0.7 EV.
Cont. Bracket: 0.7EV 5 Image:
This setting shoots five images continuously with an exposure value shifted by plus or minus
0.7 EV.
Cont. Bracket: 1.0EV 3 Image:
This setting shoots three images continuously with an exposure value shifted by plus or minus
1.0 EV.
Cont. Bracket: 2.0EV 3 Image:
This setting shoots three images continuously with an exposure value shifted by plus or minus
2.0 EV.
Cont. Bracket: 3.0EV 3 Image:
This setting shoots three images continuously with an exposure value shifted by plus or minus
3.0 EV.
Note
The last shot is shown on the Auto Review.
When [ISO AUTO] is selected in [Manual Exposure] mode, the exposure is changed by
adjusting the ISO value. If a setting other than [ISO AUTO] is selected, the exposure is
changed by adjusting the shutter speed.
When you adjust the exposure, the exposure is shifted based on the compensated value.
When the flash is used, the product performs flash bracket shooting, which shifts the amount
of flash light even if [Cont. Bracket] is selected. Press the shutter button for each image.
Page 87

[85] Using shooting functions > Selecting a drive mode
(Continuous shooting/Self-timer)
Single Bracket
Shoots multiple images while automatically shifting the exposure from base to darker and then
to lighter.
Press the shutter button for each image. You can select an image that suits your purpose after
recording.
1. MENU → (Camera Settings) → [Drive Mode] → [Single Bracket].
2. Select the desired mode using the right/left side of the control wheel.
Menu item details
Single Bracket: 0.3EV 3 Image (default setting):
This setting shoots a total of three images in a row with an exposure value shifted by plus or
minus 0.3 EV.
Single Bracket: 0.3EV 5 Image:
This setting shoots a total of five images in a row with an exposure value shifted by plus or
minus 0.3 EV.
Single Bracket: 0.5EV 3 Image:
This setting shoots a total of three images in a row with an exposure value shifted by plus or
minus 0.5 EV.
Single Bracket: 0.5EV 5 Image:
This setting shoots a total of five images in a row with an exposure value shifted by plus or
minus 0.5 EV.
Single Bracket: 0.7EV 3 Image:
This setting shoots a total of three images in a row with an exposure value shifted by plus or
minus 0.7 EV.
Single Bracket: 0.7EV 5 Image:
This setting shoots a total of five images in a row with an exposure value shifted by plus or
minus 0.7 EV.
Single Bracket: 1.0EV 3 Image:
This setting shoots a total of three images in a row with an exposure value shifted by plus or
minus 1.0 EV.
Page 88

Single Bracket: 2.0EV 3 Image:
This setting shoots a total of three images in a row with an exposure value shifted by plus or
minus 2.0 EV.
Single Bracket: 3.0EV 3 Image:
This setting shoots a total of three images in a row with an exposure value shifted by plus or
minus 3.0 EV.
Note
When [ISO AUTO] is selected in [Manual Exposure] mode, the exposure is changed by
adjusting the ISO value. If a setting other than [ISO AUTO] is selected, the exposure is
changed by adjusting the shutter speed.
When you adjust the exposure, the exposure is shifted based on the compensated value.
[86] Using shooting functions > Selecting a drive mode
(Continuous shooting/Self-timer)
WB bracket
Shoots three images, each with different degrees of brightness according to the selected
settings of white balance, color temperature and color filter.
1. MENU → (Camera Settings) → [Drive Mode] → [WB bracket].
2. Select the desired mode using the right/left side of the control wheel.
Menu item details
White Balance Bracket: Lo (default setting):
Records a series of three images with small changes in the white balance.
White Balance Bracket: Hi:
Records a series of three images with large changes in the white balance.
Note
The last shot is shown on the Auto Review.
[87] Using shooting functions > Selecting a drive mode
Page 89

(Continuous shooting/Self-timer)
DRO Bracket
You can record a total of three images, each at a different degree of D-Range Optimizer value.
1. MENU → (Camera Settings) → [Drive Mode] → [DRO Bracket].
2. Select the desired mode using the right/left side of the control wheel.
Menu item details
DRO Bracket: Lo (default setting):
Records a series of three images with small changes in the D-Range Optimizer value.
DRO Bracket: Hi:
Records a series of three images with large changes in the D-Range Optimizer value.
Note
The last shot is shown on the Auto Review.
[88] Using shooting functions > Selecting a drive mode
(Continuous shooting/Self-timer)
Bracket order
You can set the shooting order for exposure bracketing and white balance bracketing.
1. MENU → (Custom Settings) → [Bracket order] → desired setting
Menu item details
0→-→+ (default setting):
Records in the following order: 0 → − → +.
-→0→+:
Records in the following order: − → 0 → +.
[89] Using shooting functions > Selecting the ISO
Page 90

sensitivity
ISO
Sensitivity to light is expressed by the ISO number (recommended exposure index). The larger
the number, the higher the sensitivity.
1. MENU → (Camera Settings) → [ISO] → desired setting.
Menu item details
Multi Frame NR:
Combines continuous shots to create an image with less noise.
ISO AUTO (default setting):
Sets the ISO sensitivity automatically.
50 / 64 / 80 / 100 / 125 / 160 / 200 / 250 / 320 / 400 / 500 / 640 / 800 / 1000 /
1250 / 1600 / 2000 / 2500 / 3200 / 4000 / 5000 / 6400 / 8000 / 10000 / 12800 /
16000 / 20000 / 25600:
You can reduce image blurring in dark locations or with moving subjects by increasing the ISO
sensitivity (select a larger number).
Note
[ISO AUTO] is selected when using the following functions:
[Intelligent Auto]
[Superior Auto]
[Scene Selection]
[Sweep Panorama]
When [ISO] is set to a value lower than ISO 100, the range for recordable subject brightness
(dynamic range) may decrease.
The higher the ISO value, the more noise will appear on the images.
When shooting movies, ISO values between ISO 200 and ISO 25600 are available.
Hint
You can change the automatically set range of ISO sensitivity in the [ISO AUTO] setting.
Select [ISO AUTO] and press the right side of the control wheel, and set the desired values
for [ISO AUTO Maximum] and [ISO AUTO Minimum]. The settings [ISO AUTO Maximum]
and [ISO AUTO Minimum] are also applied when shooting in [ISO AUTO] mode under [Multi
Frame NR].
[90] Using shooting functions > Selecting the ISO
Page 91

sensitivity
Multi Frame NR
The product automatically shoots multiple images continuously, combines them, reduces the
noise, and records them as one image. With multi frame noise reduction, you can select larger
ISO numbers than the maximum ISO sensitivity. The image recorded is one combined image.
1. MENU → (Camera Settings) → [ISO] → [Multi Frame NR].
2. Press the right side of the control wheel to display the setting screen, then select a desired
value using the top/bottom side of the control wheel.
Note
When [ Quality] is set to [RAW] or [RAW & JPEG], this function cannot be used.
The flash, [D-Range Opt.], and [Auto HDR] cannot be used.
Hint
You can change the automatically set range of ISO sensitivity in the [ISO AUTO] setting.
Select [ISO AUTO] and press the right side of the control wheel, and set the desired values
for [ISO AUTO Maximum] and [ISO AUTO Minimum]. The settings [ISO AUTO Maximum]
and [ISO AUTO Minimum] are also applied when shooting in [ISO AUTO] mode under [Multi
Frame NR].
[91] Using shooting functions > Correcting the brightness
or contrast
D-Range Opt. (DRO)
By dividing the image into small areas, the product analyzes the contrast of light and shadow
between the subject and the background, and creates an image with the optimal brightness and
gradation.
1. MENU → (Camera Settings) → [DRO/Auto HDR] → [D-Range Opt.].
2. Select the desired setting using the left/right side of the control wheel.
Menu item details
D-Range Optimizer: Auto (default setting):
Page 92

Corrects the brightness automatically.
D-Range Optimizer: Lv1 ― D-Range Optimizer: Lv5:
Optimizes the gradation of a recorded image for each divided area. Select the optimization level
from Lv1 (weak) to Lv5 (strong).
Note
[DRO/Auto HDR] is fixed to [Off] when the shooting mode is set to [Sweep Panorama], or
when [Multi Frame NR] or [Picture Effect] is used.
The setting is fixed to [Off] when [Sunset], [Night Scene], [Night Portrait], [Hand-held
Twilight], or [Anti Motion Blur] is selected in [Scene Selection]. The setting is fixed to [DRange Optimizer: Auto] when other modes are selected in [Scene Selection].
When shooting with [D-Range Opt.], the image may be noisy. Select the proper level by
checking the recorded image, especially when you enhance the effect.
[92] Using shooting functions > Correcting the brightness
or contrast
Auto HDR
Widens the range (gradation) so that you can record from bright parts to dark parts with correct
brightness (HDR: High Dynamic Range). 1 image with proper exposure and one overlaid image
are recorded.
1. MENU → (Camera Settings) → [DRO/Auto HDR] → [Auto HDR].
2. Select the desired setting using the left/right side of the control wheel.
Menu item details
Auto HDR: Exposure Diff. Auto (default setting):
Corrects the exposure difference automatically.
Auto HDR: Exposure Diff. 1.0EV ― Auto HDR: Exposure Diff. 6.0EV:
Sets the exposure difference, based on the contrast of the subject. Select the optimal level
between 1.0 EV (weak) and 6.0 EV (strong).
For example, if you set the exposure value to 2.0 EV, three images will be composed with the
following exposure levels; −1.0 EV, optimal exposure and +1.0 EV.
Note
Page 93

[Auto HDR] is not available for RAW images.
When the exposure mode is set to [Intelligent Auto], [Superior Auto], [Sweep Panorama] or
[Scene Selection], you cannot select [Auto HDR].
When [Multi Frame NR] is selected, you cannot select [Auto HDR].
You cannot start the next shot until the capture process is completed after you shoot.
You may not obtain the desired effect depending on the luminance difference of a subject
and the shooting conditions.
When the flash is used, this function has little effect.
When the contrast of the scene is low or when product shake or subject blur occurs, you may
not obtain good HDR images. If the product has detected a problem, is displayed
on the recorded image to inform you of this situation. Shoot again as necessary, paying
attention to the contrast or blur.
[93] Using shooting functions > Adjusting color tones
White Balance
Adjusts the color tones according to the ambient light conditions. Use this feature when the
color tones of the image did not come out as you expected, or when you want to change the
color tones on purpose for photographic expression.
1. MENU → (Camera Settings) → [White Balance] → desired setting.
Menu item details
Auto (default setting):
The product automatically detects the light source and adjusts the color tones.
Daylight:
The color tones are adjusted for the daylight.
Shade:
The color tones are adjusted for shadiness.
Cloudy:
The color temperature is adjusted for a cloudy sky.
Incandescent:
The color temperature is adjusted for places under an incandescent lamp, or under bright
lighting, such as in a photo studio.
Fluor.: Warm White:
The color temperature is adjusted for warm white fluorescent lighting.
Page 94

Fluor.: Cool White:
The color temperature is adjusted for white fluorescent lighting.
Fluor.: Day White:
The color temperature is adjusted for neutral white fluorescent lighting.
Fluor.: Daylight:
The color temperature is adjusted for daylight fluorescent lighting.
Flash:
The color temperature is adjusted for flash light.
Underwater Auto:
The color temperature is adjusted for underwater shooting.
C.Temp./Filter:
Adjusts the color tones depending on the light source. Achieves the effect of CC (Color
Compensation) filters for photography.
Custom 1/Custom 2/Custom 3:
Uses the white balance setting saved in [Custom Setup].
Custom Setup:
Memorizes the basic white color under the light conditions for the shooting environment.
Select a memorized custom white balance number.
Hint
You can use the right side of the control wheel to display the fine adjustment screen and
perform fine adjustments of the color temperature as required.
In [C.Temp./Filter], you can use the right side of the control wheel to display the color
temperature setting screen and perform a setting. When you press the right side again, the
fine adjustment screen appears to allow you perform fine adjustments as required.
Note
[White Balance] is fixed to [Auto] in the following situations:
[Intelligent Auto]
[Superior Auto]
[Scene Selection]
[94] Using shooting functions > Adjusting color tones
Capturing a basic white color in [Custom Setup] mode
In a scene where the ambient light consists of multiple types of light sources, it is recommended
to use the custom white balance in order to accurately reproduce the whiteness.
Page 95

1. MENU → (Camera Settings) → [White Balance] → [Custom Setup].
2. Hold the camera/camcorder so that the white area fully covers the AF area located in the
center, and then press on the center of the control wheel.
The calibrated values (Color Temperature and Color Filter) are displayed.
3. Select a registration number using the right/left side of the control wheel.
The monitor returns to the recording information display while retaining the memorized
custom white balance setting.
Note
The message [Custom WB Error] indicates that the value is higher than the expected range,
when the flash is used on a subject with too bright colors in the frame. If you register this
value, the indicator turns yellow on the recording information display. You can shoot at
this point, but it is recommended that you set the white balance again to get a more accurate
white balance value.
[95] Using shooting functions > Selecting an effect mode
Picture Effect
Select the desired effect filter to achieve more impressive and artistic images.
1. MENU → (Camera Settings) → [Picture Effect] → desired setting.
Menu item details
Off (default setting):
Disables the [Picture Effect] function.
Toy Camera:
Creates the look of a Toy Camera photo with shaded corners and pronounced colors.
Pop Color:
Creates a vivid look by emphasizing color tones.
Posterization:
Creates a high contrast, abstract look by heavily emphasizing primary colors, or in black and
white.
Retro Photo:
Creates the look of an aged photo with sepia color tones and faded contrast.
Page 96

Soft High-key:
[HDR Painting]
Creates an image with the indicated atmosphere: bright, transparent, ethereal, tender, soft.
Partial Color:
Creates an image which retains a specific color, but converts others to black and white.
High Contrast Mono.:
Creates a high-contrast image in black and white.
Soft Focus:
Creates an image filled with a soft lighting effect.
HDR Painting:
Creates the look of a painting, enhancing the colors and details.
Rich-tone Mono.:
Creates an image in black and white with rich gradation and reproduction of details.
Miniature:
Creates an image which enhances the subject vividly, with the background defocused
considerably. This effect may often be found in pictures of miniature models.
Watercolor:
Creates an image with ink bleed and blurring effects as if painted using watercolors.
Illustration:
Creates an illustration-like image by emphasizing the outlines.
Hint
You can perform detailed settings for the following [Picture Effect] modes using the left/right
side of the control wheel.
[Toy Camera]
[Posterization]
[Partial Color]
[Soft Focus]
[HDR Painting]
[Miniature]
[Illustration]
Note
When [Partial Color] is selected, images may not retain the selected color, depending on the
subject or shooting conditions.
You cannot check the following effects on the shooting screen, because the product
processes the image after the shot. Also, you cannot shoot another image until image
processing is finished. You cannot use these effects with movies.
[Soft Focus]
Page 97

[Rich-tone Mono.]
For shooting images with deep and dense colors, suitable for capturing the solid presence of
[Miniature]
[Watercolor]
[Illustration]
In the case of [HDR Painting] and [Rich-tone Mono.], the shutter is released three times for
one shot. Be careful about the following:
Use this function when the subject is motionless or does not flash light.
Do not change the composition before shooting.
When the contrast of the scene is low or when significant camera-shake or subject blur has
occurred, you may not be able to obtain good HDR images. If the product detects such a
situation, / appear on the recorded image to inform you of this situation. If
necessary, change the composition or otherwise adjust the settings, be careful of blurring,
and shoot again.
[96] Using shooting functions > Selecting an effect mode
Creative Style
Allows you to select the desired image processing. You can adjust exposure (shutter speed and
aperture) as you like with [Creative Style], unlike with [Scene Selection] where the product
adjusts the exposure.
1. MENU → (Camera Settings) → [Creative Style] → desired setting.
Menu item details
Standard (default setting):
For shooting various scenes with rich gradation and beautiful colors.
Vivid:
The saturation and contrast are heightened for shooting striking images of colorful scenes and
subjects such as flowers, spring greenery, blue sky, or ocean views.
Neutral:
The saturation and sharpness are lowered for shooting images in subdued tones. This is also
suitable for capturing image material to be modified with a computer.
Clear:
For shooting images in clear tones with limpid colors in highlight, suitable for capturing radiant
light.
Deep:
Page 98

the subject.
Light:
For shooting images with bright and simple colors, suitable for capturing a refreshingly light
ambience.
Portrait:
For shooting the skin color in a soft tone, ideally suited for shooting portraits.
Landscape:
The saturation, contrast, and sharpness are heightened for shooting vivid and crisp scenery.
Distant landscapes also stand out more.
Sunset:
For shooting the beautiful red of the setting sun.
Night Scene:
The contrast is lowered for reproducing night scenes.
Autumn leaves:
For shooting autumn scenes, vividly highlighting the reds and yellows of changing leaves.
Black & White:
For shooting images in black and white monotone.
Sepia:
For shooting images in sepia monotone.
To set [Contrast], [Saturation] and [Sharpness]
[Contrast], [Saturation] and [Sharpness] can be adjusted for each [Creative Style] item.
Select an item to be set by pressing the right/left side of the control wheel, then set the value
using the top/bottom side of the control wheel.
Contrast:
The higher the value selected, the more the difference of light and shadow is accentuated, and
the bigger the effect on the image.
Saturation:
The higher the value selected, the more vivid the color. When a lower value is selected, the
color of the image is restrained and subdued.
Sharpness:
Adjusts the sharpness. The higher the value selected, the more the contours are accentuated,
and the lower the value selected, the more the contours are softened.
Registering preferred settings (Style Box)
Select the six style box (the boxes with numbers on the left side ( )) to register preferred
settings. Then select the desired settings using the right side of the control wheel.
You can call up the same style with slightly different settings.
Page 99

Note
[Standard] is selected when using the following functions:
[Intelligent Auto]
[Superior Auto]
[Scene Selection]
[Picture Effect]
When [Creative Style] is set to [Black & White] or [Sepia], [Saturation] cannot be adjusted.
[97] Using shooting functions > Recording movies
File Format (movie)
Selects the movie file format.
1. MENU → (Camera Settings) → [ File Format] → desired setting.
Menu item details
AVCHD (default setting):
Records high-definition movies. This file format is suitable for viewing movies on a highdefinition TV.
You can create a Blu-ray Disc, an AVCHD recording disc, or a DVD-Video disc using the
software "PlayMemories Home."
MP4:
Records mp4 (AVC) movies. This format is suitable for WEB uploads, e-mail attachments, etc.
You cannot create a disc with a movie that was recorded when [ File Format] was set to
[MP4].
[98] Using shooting functions > Recording movies
Record Setting (movie)
Selects the image size, frame rate, and image quality for movie recording. The higher the bitrate, the higher the image quality.
1. MENU → (Camera Settings) → [ Record Setting] → desired setting.
When [ File Format] is set to [AVCHD]
Page 100

60i/50i: Movies are recorded at approximately 60 fields/sec (for 1080 60i-compatible devices) or
50 fields/sec (for 1080 50i-compatible devices), in interlaced mode, with Dolby Digital audio, in
AVCHD format.
24p/25p: Movies are recorded at approximately 24 frames/sec (for 1080 60i-compatible
devices) or 25 frames/sec (for 1080 50i-compatible devices), in progressive mode, with Dolby
Digital audio, in AVCHD format.
60p/50p: Movies are recorded at approximately 60 frames/sec (for 1080 60i-compatible
devices) or 50 frames/sec (for 1080 50i-compatible devices), in progressive mode, with Dolby
Digital audio, in AVCHD format.
When [ File Format] is set to [MP4]
Movies shot are recorded in MPEG-4 format, at approximately 30 frames/sec (for 1080 60icompatible devices) or approximately 25 frames/sec (for 1080 50i-compatible devices), in
progressive mode, with AAC audio, mp4 format.
Menu items details
When [ File Format] is set to [AVCHD]
60i 24M(FX)*:
50i 24M(FX)**:
Records high image quality movies of 1920 × 1080 (60i/50i).
Bit-rate: Maximum 24 Mbps
60i 17M(FH) (default setting)*:
50i 17M(FH) (default setting)**:
Records standard image quality movies of 1920 × 1080 (60i/50i).
Bit-rate: Average 17 Mbps
60p 28M(PS)*:
50p 28M(PS)**:
Records the highest image quality movies of 1920 × 1080 (60p/50p).
Bit-rate: Maximum 28 Mbps
24p 24M(FX)*:
25p 24M(FX)**:
Records high image quality movies of 1920 × 1080 (24p/25p). This produces a cinema-like
atmosphere.
Bit-rate: Maximum 24 Mbps
24p 17M(FH)*:
25p 17M(FH)**:
Records standard image quality movies of 1920× 1080 (24p/25p). This produces a cinema-like
atmosphere.
Bit-rate: Average 17 Mbps
 Loading...