

Page 1
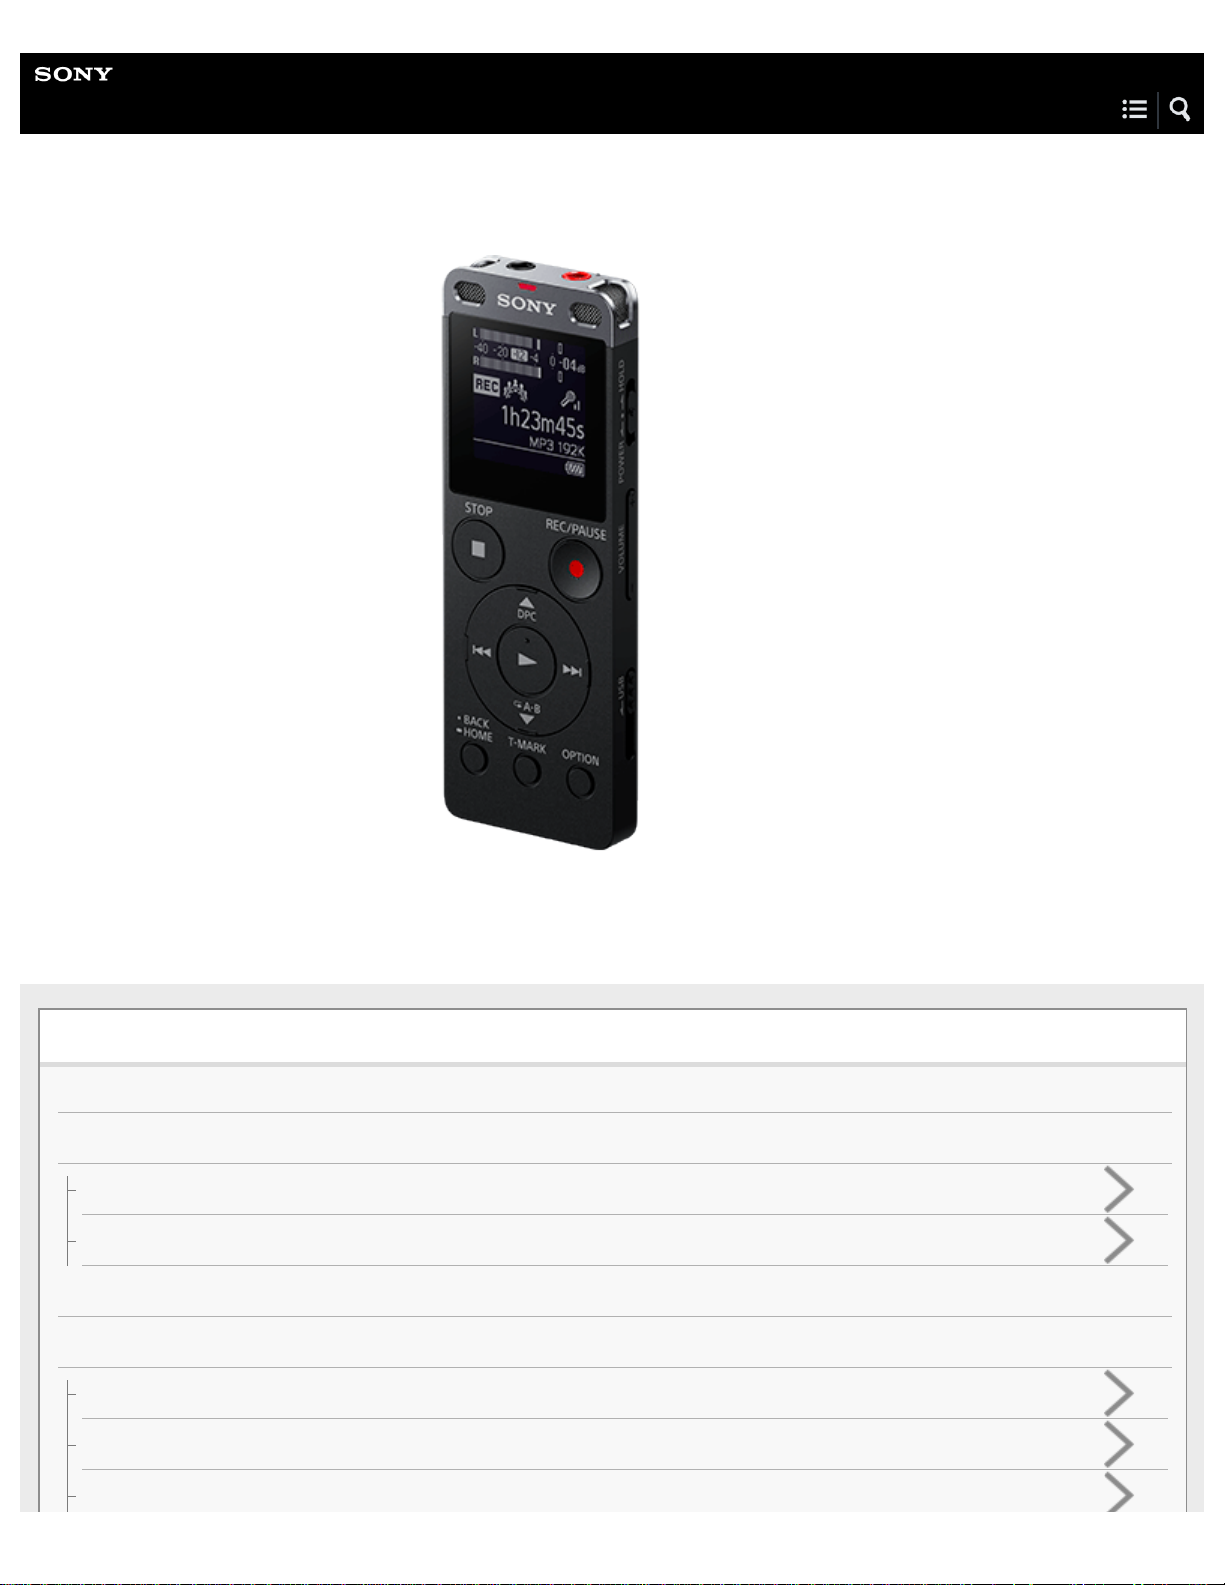
Help Guide
IC Recorder
ICD -UX560 / ICD-UX560F / ICD -UX565F
Use this Help Guide when you have any questions on how to use your IC recorder.
Preparation
Parts and controls
HOME menu/OPTION menu
Using the HOME menu
Using the OPTION menu
About folders and files
Display window
While the HOME menu is displayed
While recording is in progress or on standby
While playback is in progress
Page 2
While the recording information is displayed
While listening to the FM radio (ICD-UX560F / ICD-UX565F only)
While recording FM radio broadcasts (ICD-UX560F / ICD-UX565F only)
While the current file information is displayed
While the file search categories are displayed
Power
Charging the battery with a computer
Disconnecting the IC recorder from the computer
Charging the battery with the USB AC adaptor
Disconnecting the IC recorder from the USB AC adaptor
Turning the power on
Turning the power off
Using the screen off timer
Memory card
Inserting a memory card
Making the initial settings
Preventing unintentional operations (HOLD)
Placing the IC recorder into the HOLD state (HOLD)
Releasing the IC recorder from the HOLD state
Maintaining the volume level (European model only)
Maintaining the moderate volume level (European models only)
Recording
Recording
Recording with the built-in microphones
About the peak meters indicating the recording volume levels
Monitoring the recording audio
Additional operations available during recording
Changing the file storage destination folder
Page 3
Additional recording operations/settings
Selecting a recording scene for an individual situation
Customizing the recording settings for “My Scene”
Tips for better recording
Default settings for the recording scenes of the Scene Select function
Using the recording delay function
Recording automatically in response to the input sound volume – the VOR function
Recording with other devices
Recording with an external microphone
Recording audio from an external device with the synchronized recording function (SYNC REC)
Recording audio from an external device without the synchronized recording function (SYNC REC)
Using external devices for recording
Recording the playback audio of the IC recorder on an external device
Playback
Playing
Playing a file
Selecting a file
Locating a playback point with the track mark list (Track Mark List)
Additional operations available during playback
Additional playback operations/settings
Reducing noise in the playback audio to make human voices sound clearer – the Clear Voice function
Using the transcription playback mode
Adjusting the playback speed – the DPC (Digital Pitch Control) function
Selecting the sound effect (Effect)
Customizing the sound effect
Selecting the playback mode
Specifying a segment of a file to play repeatedly (A-B repeat)
Specifying the playback range in the stored file list
Listening to sound with better quality
Page 4
Searching forward/backward (Cue/Review)
Locating the desired playback point quickly (Easy Search)
Editing
Deleting
Deleting a file
Deleting all files in the searched folder or list
Deleting a folder
Organizing files
Moving a file to a different folder
Copying a file to a different folder
Creating a folder
Using track marks
Adding a track mark
Adding track marks automatically
Deleting a track mark
Deleting all the track marks in the selected file at one time
Dividing files
Dividing a file at the current playback point
Dividing a file at all the track mark points
Changing names
Changing a folder name
Changing a file name
Protecting a file
FM radio (ICD-UX560F / ICD-UX565F only)
Assigning FM radio stations
Assigning FM radio stations automatically to the preset numbers (Auto Preset) (ICD-UX560F / ICD-UX565F only)
Assigning FM radio stations manually to the preset numbers (ICD-UX560F / ICD-UX565F only)
Clearing the FM radio preset number assignment (ICD-UX560F / ICD-UX565F only)
Page 5
Tuning in a radio station
Tuning in an FM radio station manually (manual scanning) (ICD-UX560F / ICD-UX565F only)
Tuning in an FM radio station automatically (automatic scanning) (ICD-UX560F / ICD-UX565F only)
Tuning in an FM radio station with the assigned preset number (ICD-UX560F / ICD-UX565F only)
Recording radio broadcasts
Recording FM radio broadcasts (ICD-UX560F / ICD-UX565F only)
Changing the radio settings
Selecting the sensitivity level for FM radio scanning (ICD-UX560F / ICD-UX565F only)
Switching the FM radio output between the built-in speaker and the headphones (ICD-UX560F / ICD-UX565F only)
Settings menu
Using the Settings menu
List of the Settings menu items
Menu items with selectable setting items
Selecting the recording mode (REC Mode)
Selecting the sensitivity level of the built-in microphones (Built-in Mic Sensitivity)
Reducing noise during recording (Recording Filter)
Selecting the audio input type and the sensitivity level of the external microphone (Ext. Input Setting)
Turning the operation indicator on or off (LED)
Selecting the display language (Language)
Setting the clock (Date&Time)
Selecting the date display format (Date Display Format)
Selecting the clock display format (Time Display)
Turning the beep sound on or off (Beep)
Using the sleep timer (Sleep Timer)
Setting the time period before the IC recorder automatically turns off (Auto Power Off)
Resetting all menu settings to the default ones (Reset All Settings)
Formatting the memory (Format Built-In Memory/Format SD Card)
Checking the remaining recording time (Available Rec. Time)
Checking the information about the IC recorder (System Information)
Page 6
Computer
Connecting the IC recorder to a computer
Structure of folders and files
Copying files from the IC recorder to a computer
Copying music files from a computer to the IC recorder
Playing music files on the IC recorder that were copied from a computer
Using the IC recorder as a USB storage device
Software
What you can do with Sound Organizer 2 (for Windows only)
System requirements for Sound Organizer 2
Installing Sound Organizer 2 (for Windows only)
The Sound Organizer 2 window (for Windows only)
Specifications
Compatible memory cards
System requirements
Technical specifications
Maximum recording time
Maximum playback time/number of music files
Battery life
Announcements
Precautions
Safety regulations
Trademarks
Notice for users
License
Support website
Customer support websites
If you have problems/Troubleshooting
Page 7
Troubleshooting
Restarting the IC recorder
Noise
The recorded file is noisy and is hard to understand.
The recorded file is noisy and you want to record with less noise.
A rustling noise is recorded.
A buzzing or humming noise is recorded.
Noise is recorded when you use an external microphone (not supplied) for recording.
You hear noise when using headphones (not supplied) for playback.
The volume of the audio you recorded from an external device is low or you hear squeaking noises when you listen to the audio via the builtin speaker.
You hear noise during playback even with the Clear Voice function turned on.
Power
The IC recorder does not turn on or pressing any button does not work.
The IC recorder does not turn off.
The IC recorder automatically turns off.
The battery life is short.
Charging
You cannot charge the battery by connecting the IC recorder to your computer.
The charge indicator does not appear or it disappears in the middle of charging.
The charge error indicator appears where the battery indicator should be displayed.
General operations
The IC recorder does not operate correctly.
The operation indicator does not light.
Recording
You cannot record a file.
Recording is interrupted.
The VOR function does not work.
The input audio volume is too loud or not loud enough when you record audio from an external device.
Page 8
Playback
The playback volume is low.
You hear no sound from the built-in speaker.
You hear sound from the built-in speaker even when headphones (not supplied) are connected.
The sound effect you selected with “Effect” does not work.
Playback speed is too fast or too slow.
Editing
You cannot divide a file.
You cannot move a file.
You cannot copy a file to a different folder.
Clock
The recording date of a file appears as “----/--/--” or “--:--.”
Display
The display window turns off too soon.
The remaining recording time on the display window is shorter than the one displayed on the computer.
Files
The “Memory Full” message appears and you cannot start recording.
The “File Full” message appears and you cannot operate the IC recorder.
The microSD card is not detected.
Computer
A folder or file name appears in unreadable characters.
Copying a file takes time.
The IC recorder is not detected by the computer and you cannot transfer folders/files from the computer.
The file you transferred from the computer does not appear on the IC recorder and you cannot play the file.
The computer does not start.
FM radio (ICD-UX560F / ICD- UX565F only)
You hear no sound from the built-in speaker (ICD-UX560F / ICD-UX565F only).
You hear sound from the built-in speaker even when headphones (not supplied) are connected (ICD-UX560F / ICD-UX565F only).
The FM radio signals are weak or the sound quality is poor (ICD-UX560F / ICD-UX565F only).
Page 9
The TV images are distorted when you listen to the FM radio (ICD-UX560F / ICD-UX565F only).
You cannot tune in FM radio stations or you hear a lot of static (ICD-UX560F / ICD-UX565F only).
You cannot assign an FM radio station to a preset number (ICD-UX560F / ICD-UX565F only).
Software operations (Sound Organizer 2)
You cannot install Sound Organizer 2.
The IC recorder is not detected by Sound Organizer 2.
The playback volume of the computer is low or you hear no audio from the computer.
You cannot play or edit stored files.
The counter or slider does not operate correctly or you hear noise.
Operations slow down as the number of stored files increases.
The computer seems to freeze while a file is being saved, added, or deleted.
Sound Organizer 2 freezes during start-up.
List of messages
System limitations
4-573-936-32(1) Copyright 2015 Sony Corporation
Page 10

Table Of Contents
TOC-1
ICD-UX560 / ICD-UX560F / ICD-UX565F Help Guide i....................................................................
Preparation i......................................................................................................................................
Parts and controls 1...........................................................................................................................
HOME menu/OPTION menu i...........................................................................................................
Using the HOME menu 3.............................................................................................................
Using the OPTION menu 5..........................................................................................................
About folders and files 7....................................................................................................................
Display window i................................................................................................................................
While the HOME menu is displayed 8.........................................................................................
While recording is in progress or on standby 9...........................................................................
While playback is in progress 11.................................................................................................
While the recording information is displayed 13..........................................................................
While listening to the FM radio (ICD-UX560F / ICD-UX565F only) 14........................................
While recording FM radio broadcasts (ICD-UX560F / ICD-UX565F only) 15..............................
While the current file information is displayed 16........................................................................
While the file search categories are displayed 18.......................................................................
Power ii..............................................................................................................................................
Charging the battery with a computer 20.....................................................................................
Disconnecting the IC recorder from the computer 22..................................................................
Charging the battery with the USB AC adaptor 24......................................................................
Disconnecting the IC recorder from the USB AC adaptor 26......................................................
Turning the power on 27..............................................................................................................
Turning the power off 28..............................................................................................................
Using the screen off timer 29.......................................................................................................
Memory card ii...................................................................................................................................
Inserting a memory card 30.........................................................................................................
Making the initial settings 32.............................................................................................................
Preventing unintentional operations (HOLD) ii..................................................................................
Placing the IC recorder into the HOLD state (HOLD) 35.............................................................
Releasing the IC recorder from the HOLD state 36.....................................................................
Maintaining the volume level (European model only) ii.....................................................................
Maintaining the moderate volume level (European models only) 37...........................................
Recording ii........................................................................................................................................
Recording with the built-in microphones 38.................................................................................
About the peak meters indicating the recording volume levels 41..............................................
Monitoring the recording audio 42...............................................................................................
Additional operations available during recording 43....................................................................
Changing the file storage destination folder 44...........................................................................
Page 11

Additional recording operations/settings iii........................................................................................
TOC-2
Selecting a recording scene for an individual situation 45...........................................................
Customizing the recording settings for “My Scene” 47...............................................................
Tips for better recording 49.........................................................................................................
Default settings for the recording scenes of the Scene Select function 52.................................
Using the recording delay function 54.........................................................................................
Recording automatically in response to the input sound volume – the VOR
function 56...................................................................................................................................
Recording with other devices iii.........................................................................................................
Recording with an external microphone 58.................................................................................
Recording audio from an external device with the synchronized recording
function (SYNC REC) 59.............................................................................................................
Recording audio from an external device without the synchronized recording
function (SYNC REC) 61.............................................................................................................
Recording the playback audio of the IC recorder on an external device 63................................
Using external devices for recording iii..............................................................................................
Recording the playback audio of the IC recorder on an external device 63................................
Playback iii.........................................................................................................................................
Playing a file 64...........................................................................................................................
Selecting a file 66........................................................................................................................
Locating a playback point with the track mark list (Track Mark List) 67.......................................
Additional operations available during playback 68.....................................................................
Additional playback operations/settings iii.........................................................................................
Reducing noise in the playback audio to make human voices sound
clearer – the Clear Voice function 69.........................................................................................
Using the transcription playback mode 70...................................................................................
Adjusting the playback speed – the DPC (Digital Pitch Control) function 72.............................
Selecting the sound effect (Effect) 74..........................................................................................
Customizing the sound effect 76.................................................................................................
Selecting the playback mode 77..................................................................................................
Specifying a segment of a file to play repeatedly (A-B repeat) 79...............................................
Specifying the playback range in the stored file list 80................................................................
Listening to sound with better quality 81.....................................................................................
Searching forward/backward (Cue/Review) 82...........................................................................
Locating the desired playback point quickly (Easy Search) 83...................................................
Deleting iv..........................................................................................................................................
Deleting a file 85..........................................................................................................................
Deleting all files in the searched folder or list 87.........................................................................
Deleting a folder 89.....................................................................................................................
Organizing files iv..............................................................................................................................
Page 12

Moving a file to a different folder 91............................................................................................
TOC-3
Copying a file to a different folder 93...........................................................................................
Creating a folder 94.....................................................................................................................
Using track marks iv..........................................................................................................................
Adding a track mark 95................................................................................................................
Adding track marks automatically 97...........................................................................................
Deleting a track mark 99..............................................................................................................
Deleting all the track marks in the selected file at one time 101..................................................
Dividing files iv...................................................................................................................................
Dividing a file at the current playback point 103..........................................................................
Dividing a file at all the track mark points 105.............................................................................
Changing names iv............................................................................................................................
Changing a folder name 107.......................................................................................................
Changing a file name 109............................................................................................................
Protecting a file 111...........................................................................................................................
FM radio (ICD-UX560F / ICD-UX565F only) iv..................................................................................
Assigning FM radio stations iv...........................................................................................................
Assigning FM radio stations automatically to the preset numbers (Auto
Preset) (ICD-UX560F / ICD-UX565F only) 112...........................................................................
Assigning FM radio stations manually to the preset numbers (ICD-UX560F /
ICD-UX565F only) 114................................................................................................................
Clearing the FM radio preset number assignment (ICD-UX560F / ICD-
UX565F only) 115........................................................................................................................
Tuning in a radio station v.................................................................................................................
Tuning in an FM radio station manually (manual scanning) (ICD-UX560F /
ICD-UX565F only) 116................................................................................................................
Tuning in an FM radio station automatically (automatic scanning) (ICD-
UX560F / ICD-UX565F only) 118................................................................................................
Tuning in an FM radio station with the assigned preset number (ICD-
UX560F / ICD-UX565F only) 120................................................................................................
Recording radio broadcasts v............................................................................................................
Recording FM radio broadcasts (ICD-UX560F / ICD-UX565F only) 122....................................
Changing the radio settings v............................................................................................................
Selecting the sensitivity level for FM radio scanning (ICD-UX560F / ICD-
UX565F only) 123........................................................................................................................
Switching the FM radio output between the built-in speaker and the
headphones (ICD-UX560F / ICD-UX565F only) 124...................................................................
Settings menu v.................................................................................................................................
Using the Settings menu v.................................................................................................................
List of the Settings menu items 125............................................................................................
Page 13

Menu items with selectable setting items v.......................................................................................
TOC-4
Selecting the recording mode (REC Mode) 128..........................................................................
Selecting the sensitivity level of the built-in microphones (Built-in Mic
Sensitivity) 129............................................................................................................................
Reducing noise during recording (Recording Filter) 131.............................................................
Selecting the audio input type and the sensitivity level of the external
microphone (Ext. Input Setting) 133............................................................................................
Turning the operation indicator on or off (LED) 135....................................................................
Selecting the display language (Language) 136.........................................................................
Setting the clock (Date&Time) 137..............................................................................................
Selecting the date display format (Date Display Format) 139.....................................................
Selecting the clock display format (Time Display) 140................................................................
Turning the beep sound on or off (Beep) 141..............................................................................
Using the sleep timer (Sleep Timer) 142.....................................................................................
Setting the time period before the IC recorder automatically turns off (Auto
Power Off) 143............................................................................................................................
Resetting all menu settings to the default ones (Reset All Settings) 145....................................
Formatting the memory (Format Built-In Memory/Format SD Card) 146....................................
Checking the remaining recording time (Available Rec. Time) 147.............................................
Checking the information about the IC recorder (System Information) 148.................................
Computer vi.......................................................................................................................................
Connecting the IC recorder to a computer 149.................................................................................
Structure of folders and files 150.......................................................................................................
Copying files from the IC recorder to a computer 152.......................................................................
Copying music files from a computer to the IC recorder 153............................................................
Playing music files on the IC recorder that were copied from a computer 154.................................
Using the IC recorder as a USB storage device 155.........................................................................
Software vi.........................................................................................................................................
What you can do with Sound Organizer 2 (for Windows only) 156...................................................
System requirements for Sound Organizer 2 158.............................................................................
Installing Sound Organizer 2 (for Windows only) 160.......................................................................
The Sound Organizer 2 window (for Windows only) 163..................................................................
Compatible memory cards 165..........................................................................................................
System requirements 166..................................................................................................................
Technical specifications 167..............................................................................................................
Maximum recording time 170............................................................................................................
Maximum playback time/number of music files 171..........................................................................
Battery life 172...................................................................................................................................
Precautions 173.................................................................................................................................
Safety regulations 175.......................................................................................................................
Page 14

Trademarks 177................................................................................................................................
TOC-5
Notice for users 178..........................................................................................................................
License 179.......................................................................................................................................
Support website vi.............................................................................................................................
Customer support websites 180..................................................................................................
Troubleshooting 181..........................................................................................................................
Restarting the IC recorder 182..........................................................................................................
Noise vii.............................................................................................................................................
The recorded file is noisy and is hard to understand. 183...........................................................
The recorded file is noisy and you want to record with less noise. 184.......................................
A rustling noise is recorded. 185.................................................................................................
A buzzing or humming noise is recorded. 186............................................................................
Noise is recorded when you use an external microphone (not supplied) for
recording. 187..............................................................................................................................
You hear noise when using headphones (not supplied) for playback. 188.................................
The volume of the audio you recorded from an external device is low or you
hear squeaking noises when you listen to the audio via the built-in speaker. 189......................
You hear noise during playback even with the Clear Voice function turned on. 190...................
Power vii............................................................................................................................................
The IC recorder does not turn on or pressing any button does not work. 191............................
The IC recorder does not turn off. 192........................................................................................
The IC recorder automatically turns off. 193...............................................................................
The battery life is short. 194........................................................................................................
Charging vii........................................................................................................................................
You cannot charge the battery by connecting the IC recorder to your
computer. 195..............................................................................................................................
The charge indicator does not appear or it disappears in the middle of
charging. 196...............................................................................................................................
The charge error indicator appears where the battery indicator should be
displayed. 197.............................................................................................................................
General operations vii........................................................................................................................
The IC recorder does not operate correctly. 198.........................................................................
The operation indicator does not light. 199.................................................................................
Recording vii......................................................................................................................................
You cannot record a file. 200.......................................................................................................
Recording is interrupted. 201......................................................................................................
The VOR function does not work. 202.........................................................................................
The input audio volume is too loud or not loud enough when you record audio
from an external device. 203.......................................................................................................
Playback viii.......................................................................................................................................
Page 15

The playback volume is low. 204.................................................................................................
TOC-6
You hear no sound from the built-in speaker. 205.......................................................................
You hear sound from the built-in speaker even when headphones (not
supplied) are connected. 206......................................................................................................
The sound effect you selected with “Effect” does not work. 207................................................
Playback speed is too fast or too slow. 208................................................................................
Editing viii..........................................................................................................................................
You cannot divide a file. 209.......................................................................................................
You cannot move a file. 210........................................................................................................
You cannot copy a file to a different folder. 211..........................................................................
Clock viii............................................................................................................................................
The recording date of a file appears as “----/--/--” or “--:--.” 212.................................................
Display viii..........................................................................................................................................
The display window turns off too soon. 213................................................................................
The remaining recording time on the display window is shorter than the one
displayed on the computer. 214..................................................................................................
Files viii..............................................................................................................................................
The “Memory Full” message appears and you cannot start recording. 215...............................
The “File Full” message appears and you cannot operate the IC recorder. 216........................
The microSD card is not detected. 217.......................................................................................
Computer viii......................................................................................................................................
A folder or file name appears in unreadable characters. 218......................................................
Copying a file takes time. 219.....................................................................................................
The IC recorder is not detected by the computer and you cannot transfer
folders/files from the computer. 220............................................................................................
The file you transferred from the computer does not appear on the IC
recorder and you cannot play the file. 221..................................................................................
The computer does not start. 222................................................................................................
FM radio (ICD-UX560F / ICD-UX565F only) viii................................................................................
You hear no sound from the built-in speaker (ICD-UX560F / ICD-UX565F
only). 223.....................................................................................................................................
You hear sound from the built-in speaker even when headphones (not
supplied) are connected (ICD-UX560F / ICD-UX565F only). 224...............................................
The FM radio signals are weak or the sound quality is poor (ICD-UX560F /
ICD-UX565F only). 225...............................................................................................................
The TV images are distorted when you listen to the FM radio (ICD-UX560F /
ICD-UX565F only). 226...............................................................................................................
You cannot tune in FM radio stations or you hear a lot of static (ICD-
UX560F / ICD-UX565F only). 227...............................................................................................
You cannot assign an FM radio station to a preset number (ICD-UX560F /
Page 16

You cannot assign an FM radio station to a preset number (ICD-UX560F /
TOC-7
ICD-UX565F only). 228...............................................................................................................
Software operations (Sound Organizer 2) ix.....................................................................................
You cannot install Sound Organizer 2. 229.................................................................................
The IC recorder is not detected by Sound Organizer 2. 230.......................................................
The playback volume of the computer is low or you hear no audio from the
computer. 231..............................................................................................................................
You cannot play or edit stored files. 232.....................................................................................
The counter or slider does not operate correctly or you hear noise. 233....................................
Operations slow down as the number of stored files increases. 234..........................................
The computer seems to freeze while a file is being saved, added, or deleted. 235....................
Sound Organizer 2 freezes during start-up. 236.........................................................................
List of messages 237.........................................................................................................................
System limitations 242.......................................................................................................................
Page 17
Help Guide
1
IC Recorder
ICD -UX560 / ICD-UX560F / ICD -UX565F
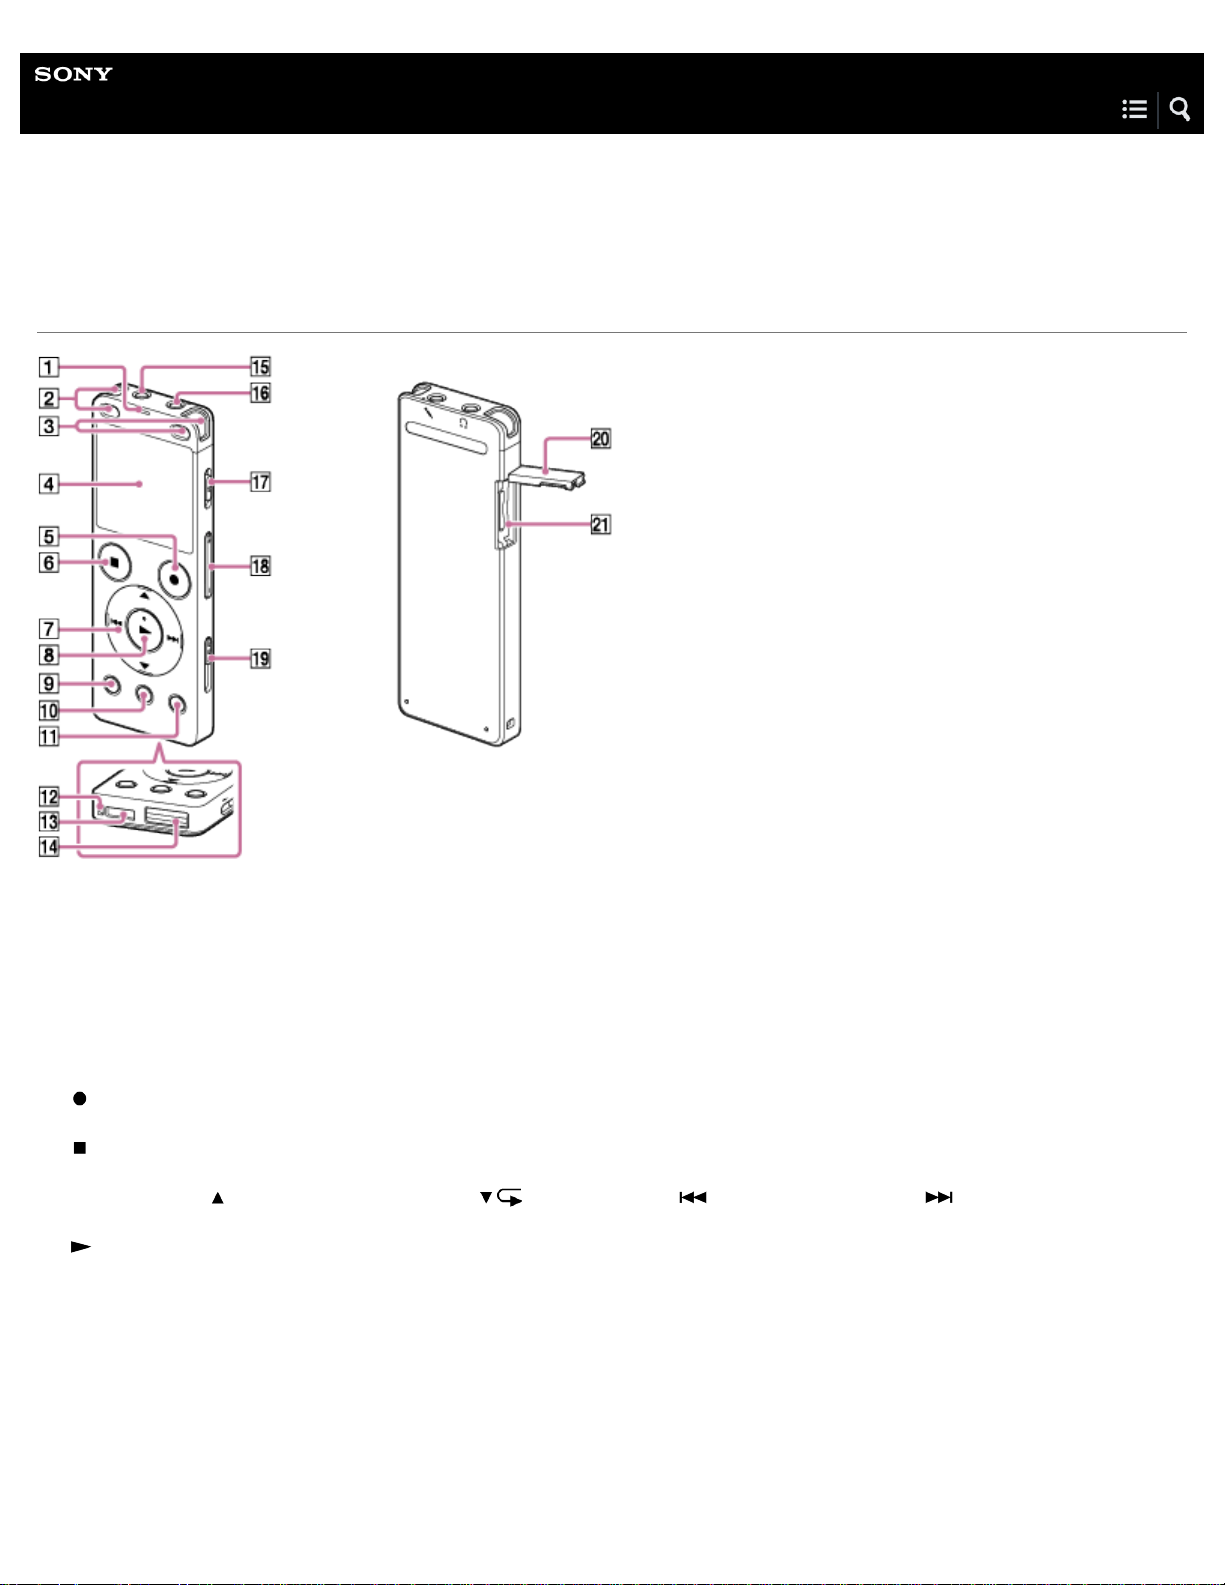
Parts and controls
Operation indicator
1.
Built-in microphones (stereo) (L)
2.
Built-in microphones (stereo) (R)
3.
Display window
4.
REC/PAUSE (record/pause) button
5.
STOP button
6.
Control button ( DPC (Digital Pitch Control), A-B (repeat A -B)/ (review/fast backward), (cue/fast forward))
7.
(play/enter) button (*1)
8.
BACK/HOME button
9.
T-MARK (track mark) button
10
.
OPTION button
11
.
Strap hole (No strap is supplied with your IC recorder.)
12
.
Built-in speaker
13
Page 18

.
USB connector cover (You can find the USB connector retracted behind the cover.)
2
14
.
(headphones) jack
15
.
(microphone) jack (*1)
16
.
POWER·HOLD switch (*2)
17
.
VOLUME (volume –/+) button (*1)
18
.
USB slide lever
19
.
Slot cover
20
.
microSD card slot (The card slot is located under the cover.)
21
.
*1
A tactile dot is provided. Use the tactile dot as a reference when operating the IC recorder.
*2
Sliding the POWER·HOLD switch to “POWER” and holding it for 8 seconds or longer restarts your IC recorder. See Restarting the IC recorder for more
information.
4-573-936-32(1) Copyright 2015 Sony Corporation
Page 19
Help Guide
3
IC Recorder
ICD -UX560 / ICD-UX560F / ICD -UX565F
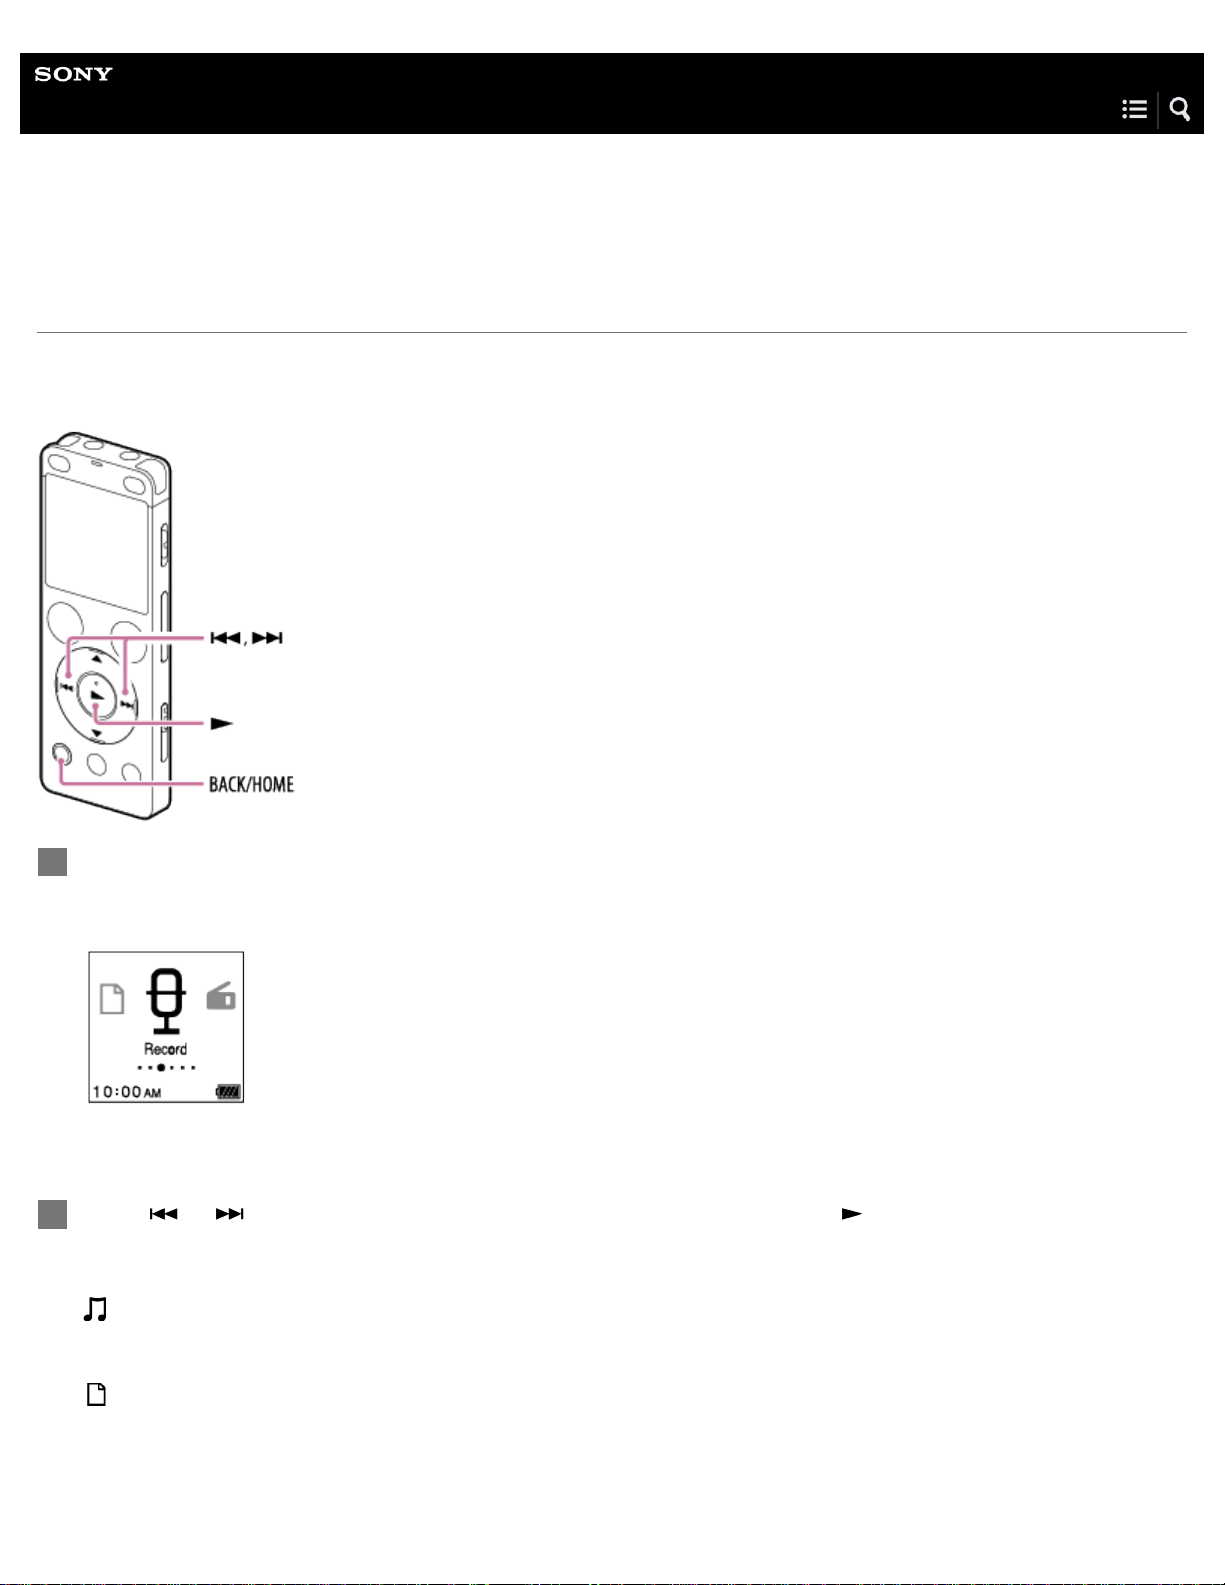
Using the HOME menu
On your IC recorder, the HOME menu is the starting point for all functions.
The HOME menu allows you to select a function, search for recorded files, or change the settings on the IC recorder.
Press and hold BACK/HOME.
1
The HOME menu appears.
Press or to select the function you want to use, and then press .
2
You can select the following functions:
Music:
You can select music files imported from a computer for playback.
To locate a music file, you can select one of the file search categories: “All Songs ,” “Albums,” “Artists,” and “ Folders.”
Recorded Files:
You can select files recorded by the IC recorder for playback.
To locate a recorded file, you can select one of the file search categories: “Latest Recording,” “ Search by REC Date,”
“Search by REC Scene ,” and “ Folders.”
Page 20

Record:
You can display the recording standby screen. To start recording, press REC/PAUSE.
4
FM Radio:
You can display the FM radio screen to listen to the FM radio or to record FM radio broadcasts. (ICD- UX560F / ICDUX565F only)
Settings:
You can display the Settings menu and change various settings on the IC recorder.
Return to XX(*):
Select this function to return to the screen before you displayed the HOME menu.
*
The function you are currently using is displayed in “XX.”
Hint
While the HOME menu is on the display window, you can press STOP to return to the screen before you displayed the HOME menu.
Related Topic
Using the OPTION menu
4-573-936-32(1) Copyright 2015 Sony Corporation
Page 21
Help Guide
5
IC Recorder
ICD -UX560 / ICD-UX560F / ICD -UX565F
Using the OPTION menu
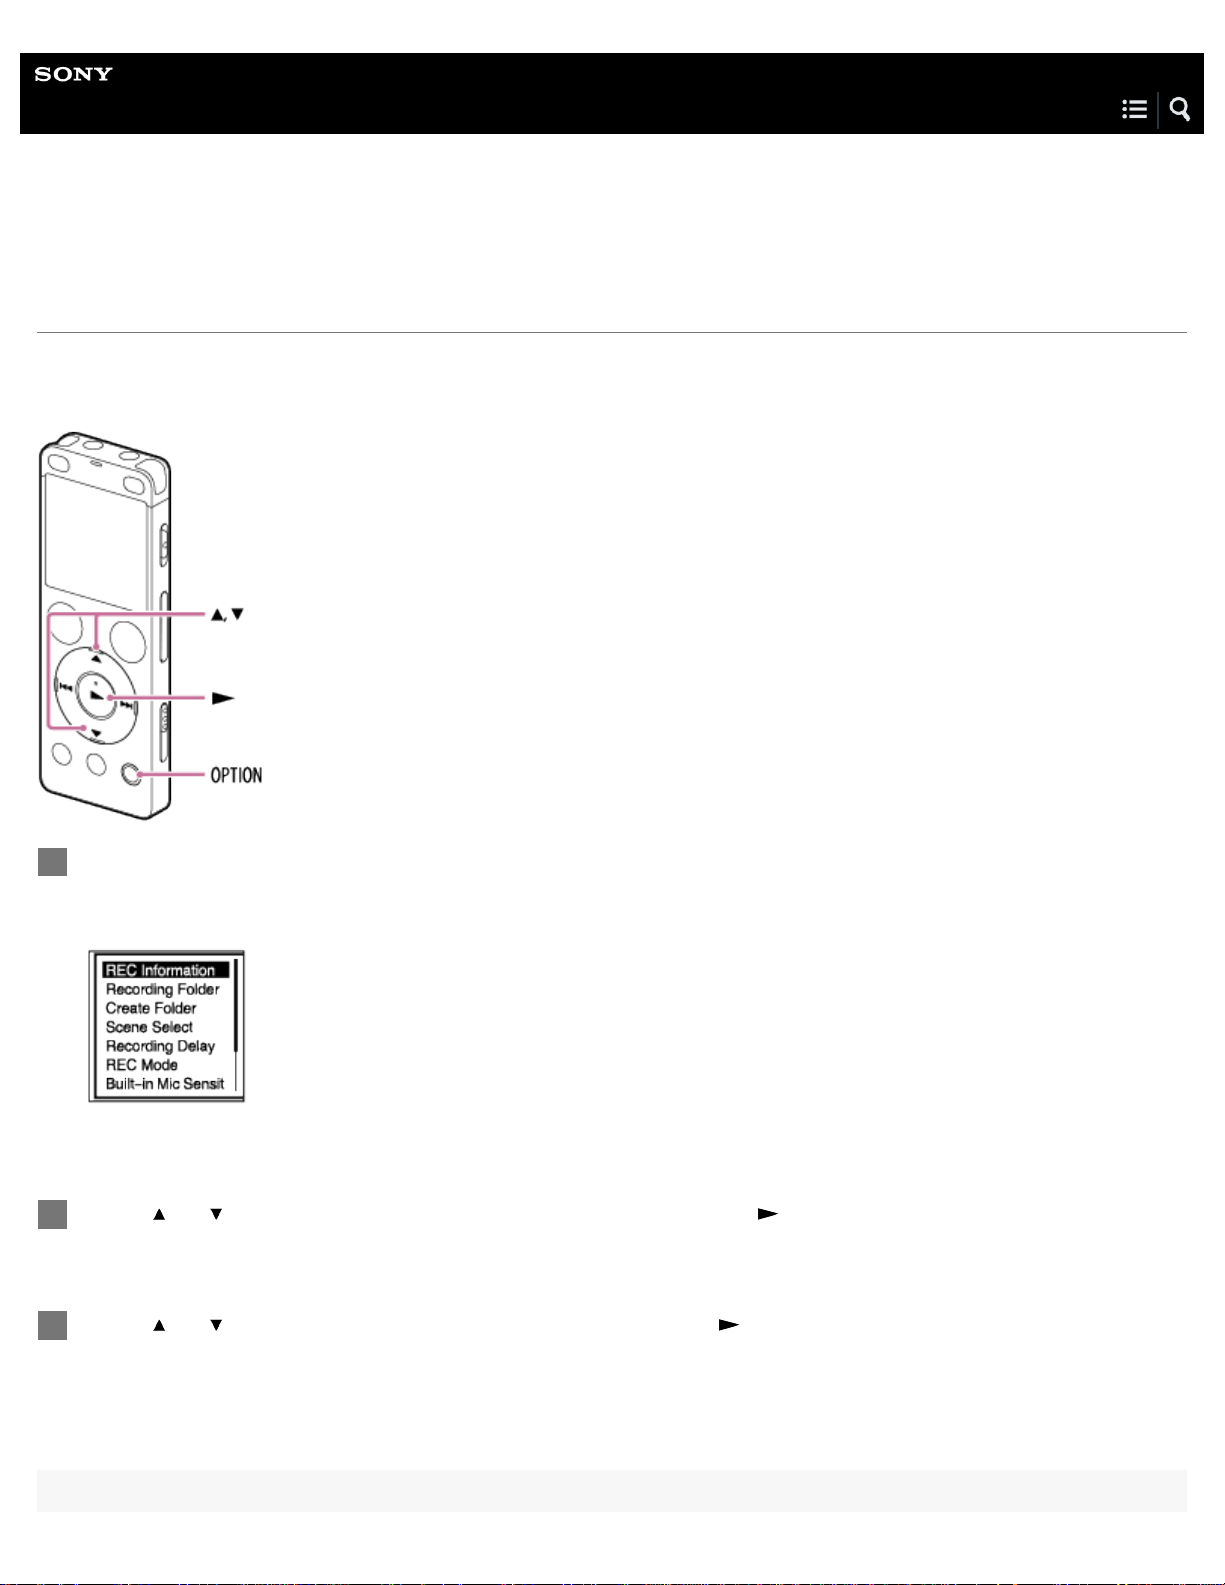
You can display the OPTION menu by pressing OPTION. The OPTION menu items vary depending on the selected function of
your IC recorder.
Select the function you want to use on the HOME menu, and then press OPTION.
1
The OPTION menu associated with the selected function appears.
Press or to select the desired menu item, and then press .
2
3
Press
or to select the desired setting, and then press .
Page 22

Hint
To return to the previous screen, press BACK/HOME while the OPTION menu is on the display window.
6
Related Topic
Using the HOME menu
4-573-936-32(1) Copyright 2015 Sony Corporation
Page 23
Help Guide
7
IC Recorder
ICD -UX560 / ICD-UX560F / ICD -UX565F
About folders and files
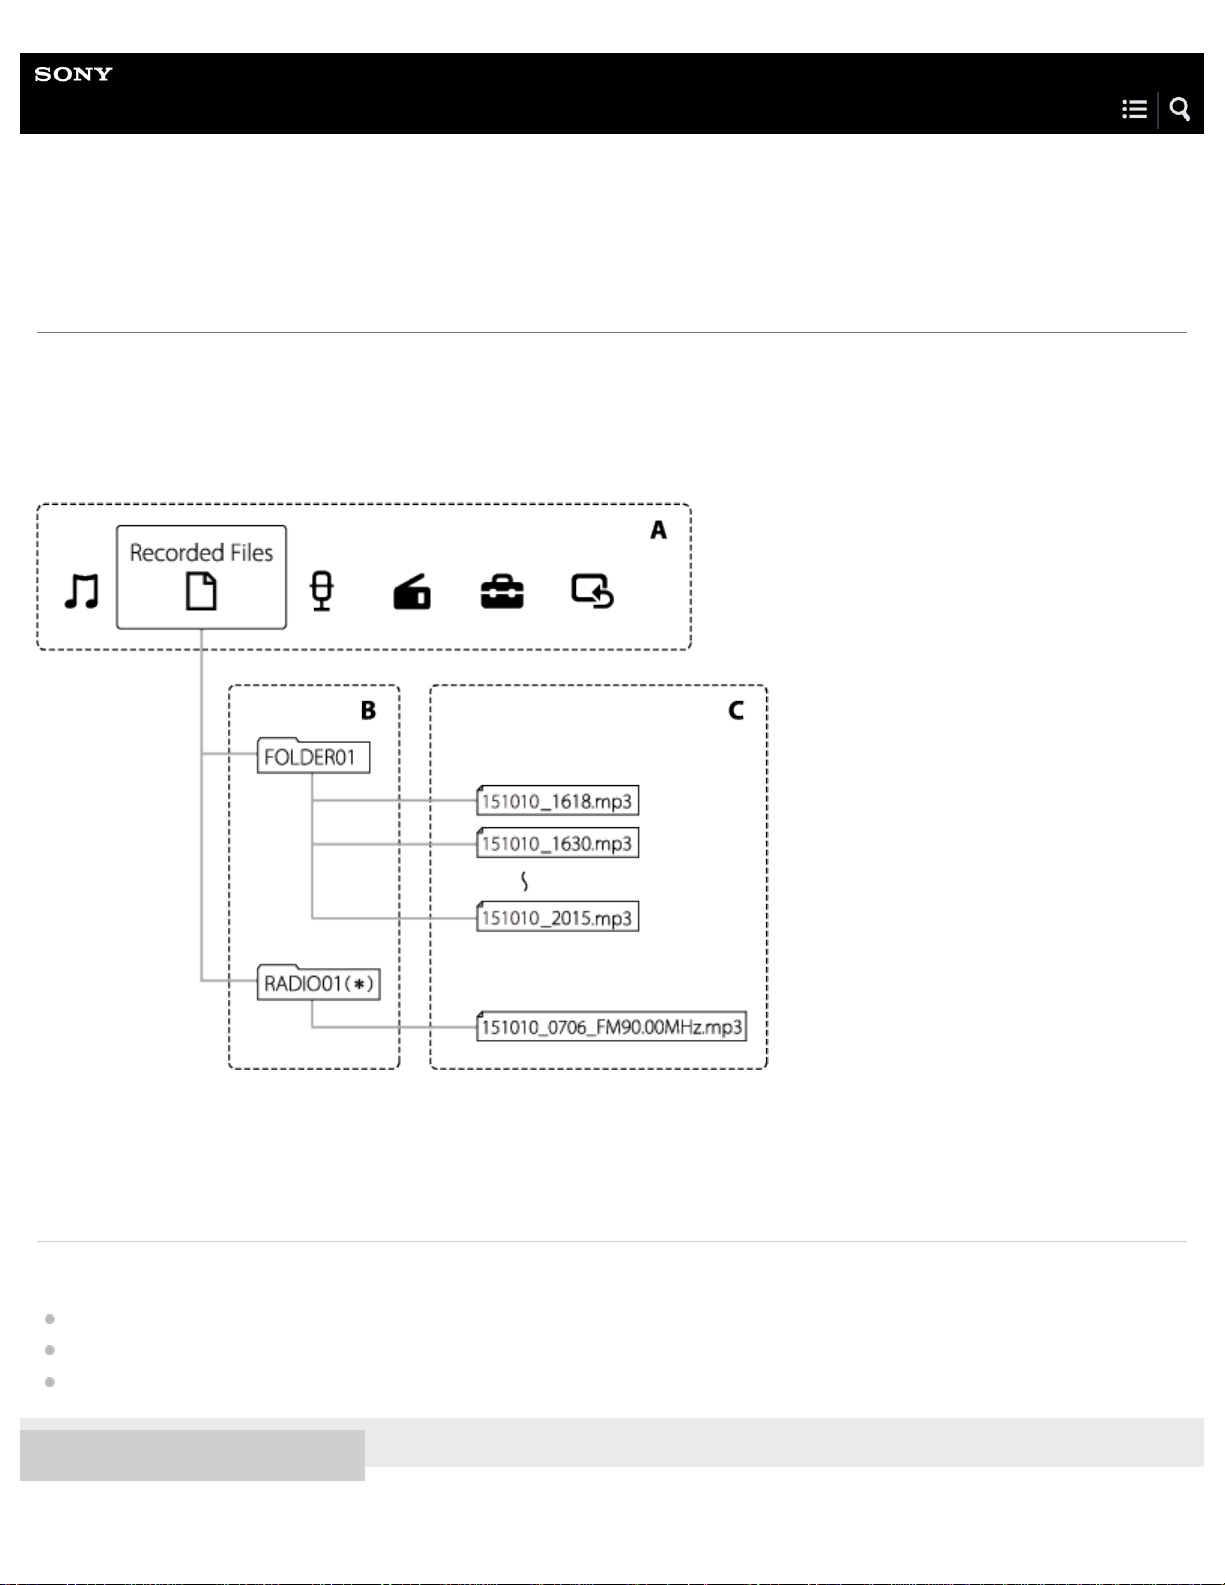
Audio files recorded by your IC recorder are stored in folders of the IC recorder.
The following folders are automatically created by default.
“FOLDER01”: Files recorded via the built- in microphones are stored.
“RADIO01”: Recorded FM radio files are stored. (ICD -UX560F / ICD -UX565F only)
A: HOME menu
B: Folders
C: Files
*
ICD-UX560F / ICD-UX565F only
Related Topic
Moving a file to a different folder
Copying a file to a different folder
Structure of folders and files
4-573-936-32(1) Copyright 2015 Sony Corporation
Page 24
Help Guide
8
IC Recorder
ICD -UX560 / ICD-UX560F / ICD -UX565F
While the HOME menu is displayed
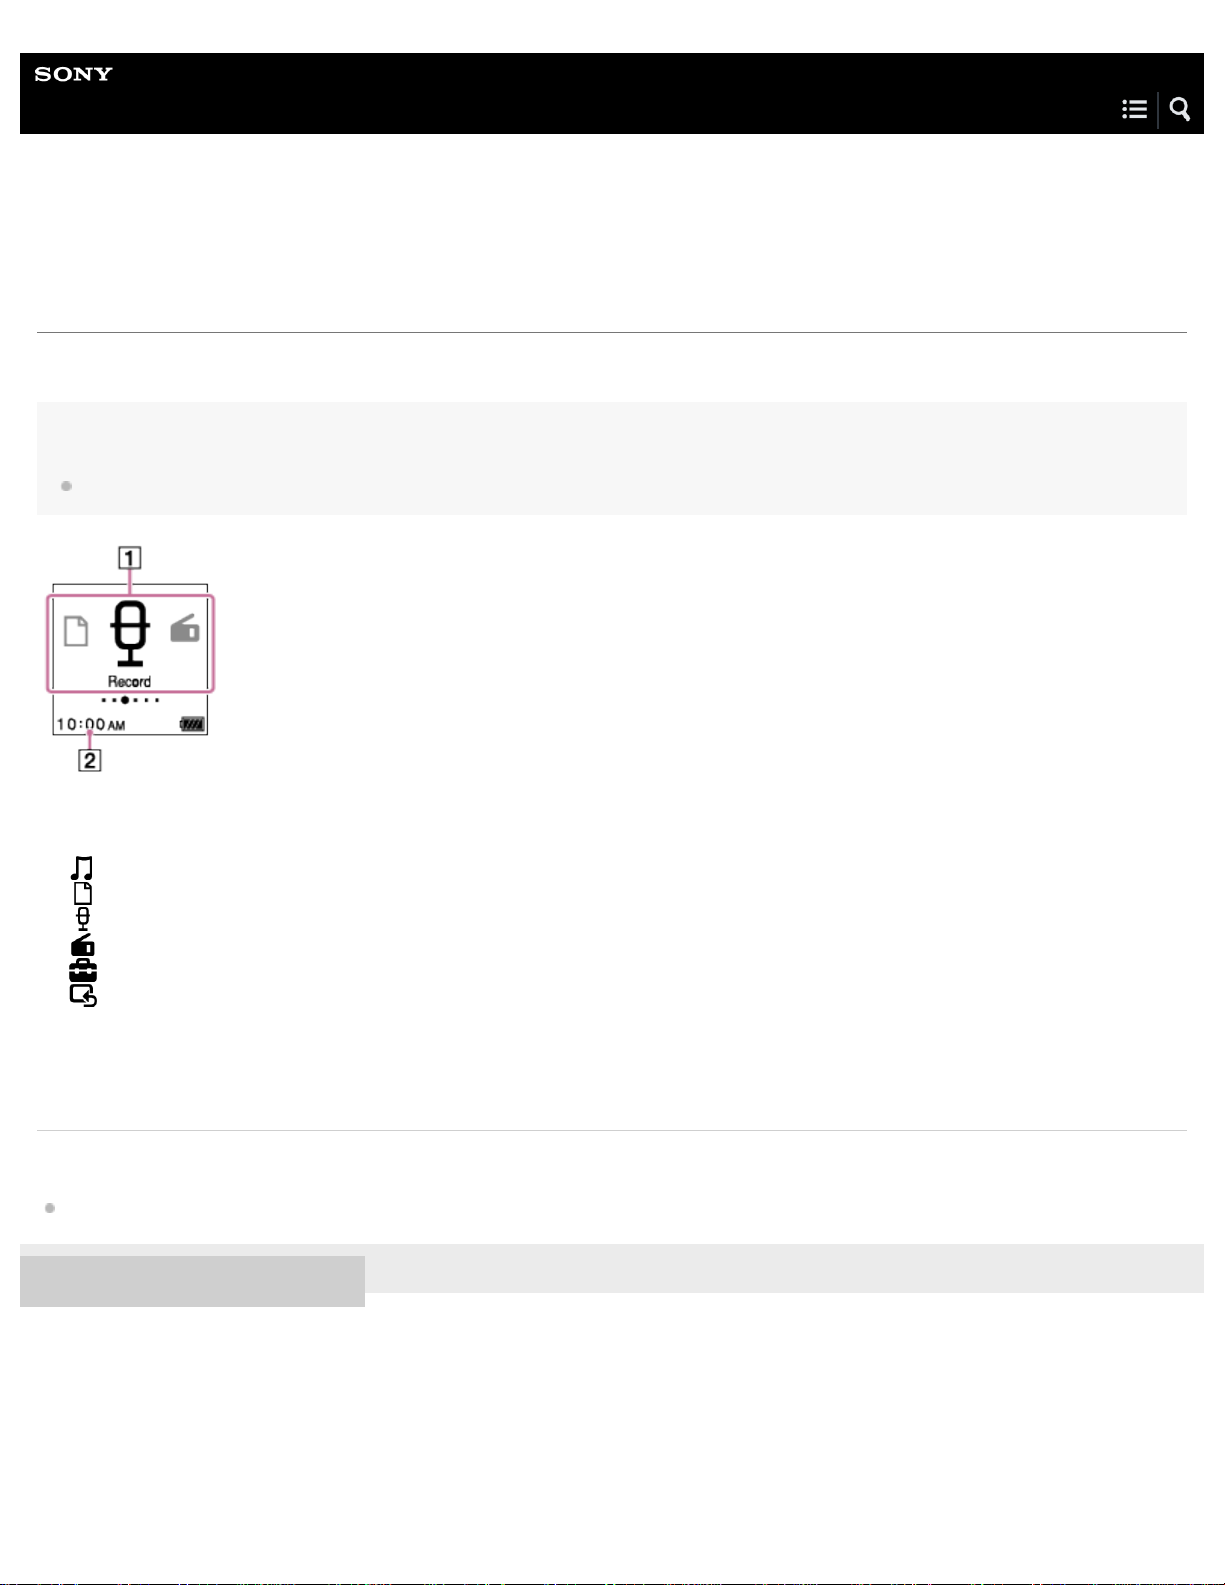
The following describes the HOME menu on the display window.
Note
The following screen is provided for explanatory purposes. It may look different from what you actually see on your IC recorder.
HOME menu items
1.
You can select one of the following:
: Music
: Recorded Files
: Record
: FM Radio (ICD - UX560F / ICD- UX565F only)
: Settings
: Return to XX (The function you are currently using is displayed in “XX.”)
Current time
2.
Indicates the current time.
Related Topic
Using the HOME menu
4-573-936-32(1) Copyright 2015 Sony Corporation
Page 25
Help Guide
9
IC Recorder
ICD -UX560 / ICD-UX560F / ICD -UX565F
While recording is in progress or on standby
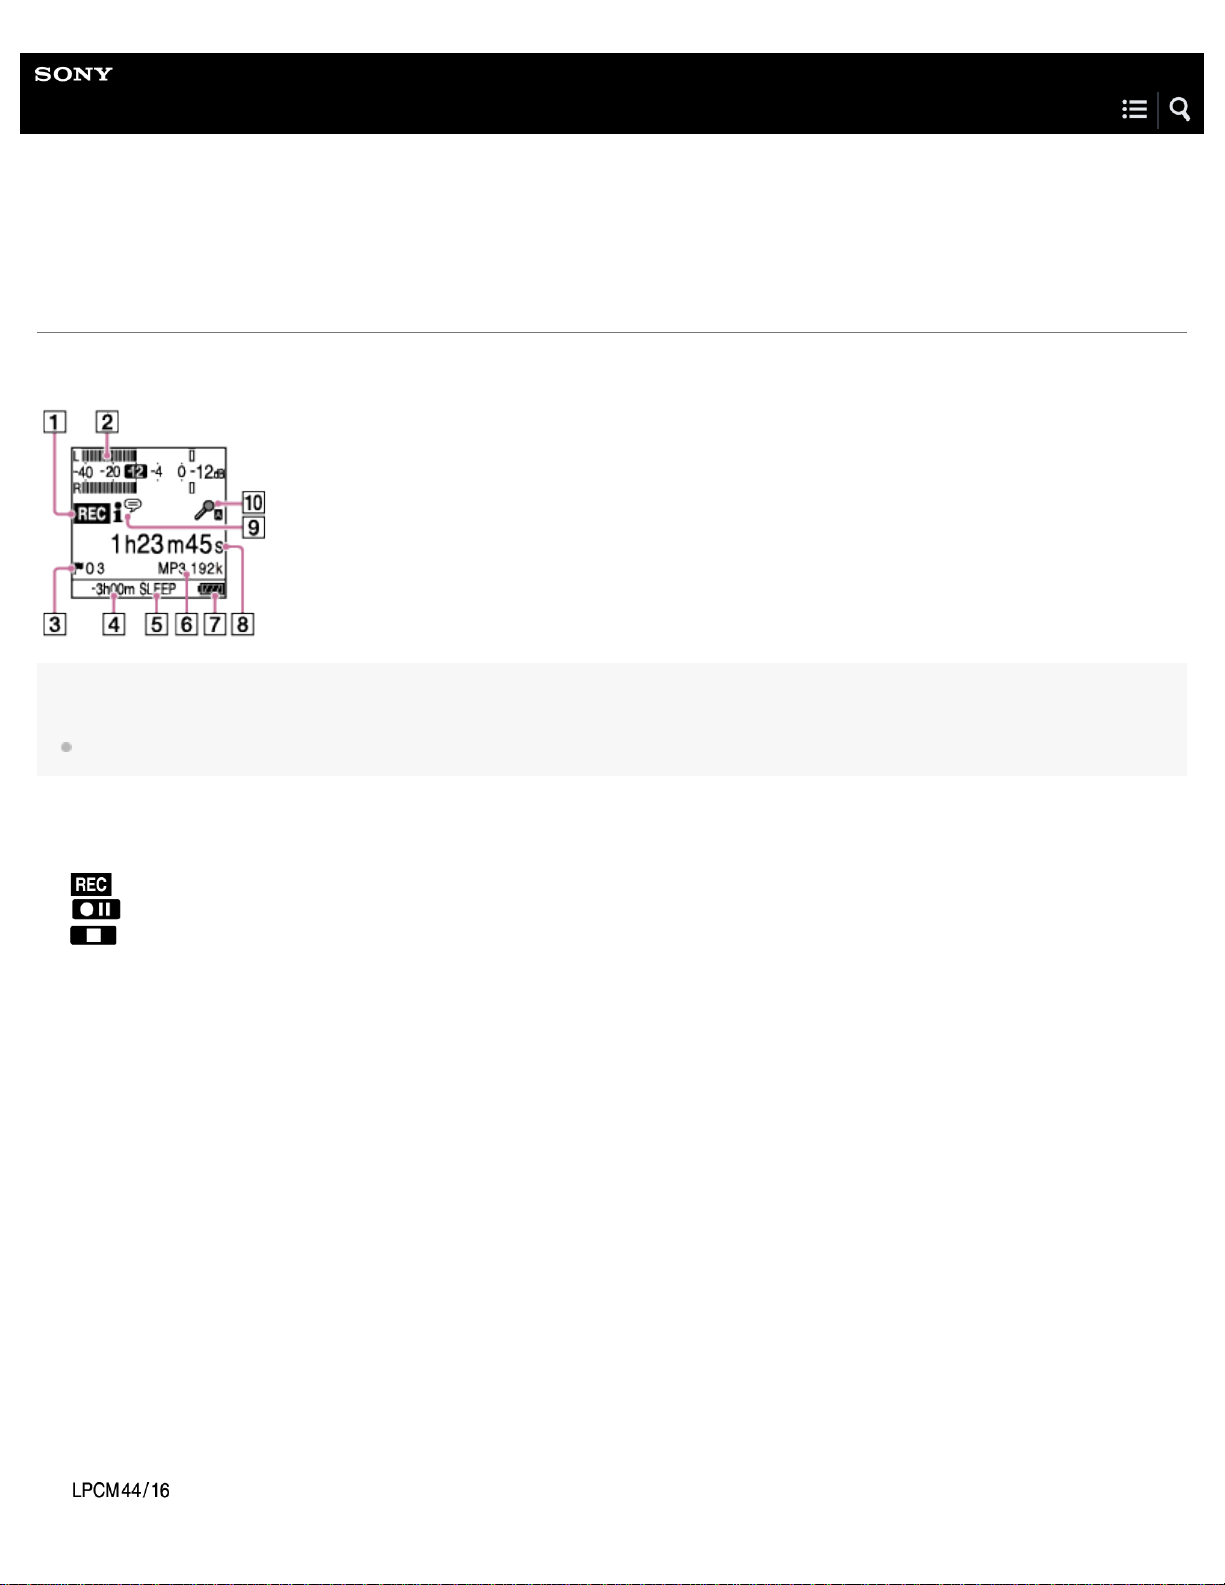
The following describes the display window while recording is in progress or on standby.
Note
The above screen is provided for explanatory purposes. It may look different from what you actually see on your IC recorder.
Recording status indicator
1.
Indicates the current recording status of your IC recorder.
: recording
: paused (The indicator flashes.)
: stopped
Peak meters
2.
Indicate the current and optimum recording volume levels of input sound for your reference.
Track mark number
3.
Indicates the number of added track marks.
Remaining recording time
4.
Indicates the remaining time available for recording in hours, minutes, and seconds.
10 hours or more: no indication
10 minutes to 10 hours: indicated in hours and minutes
Less than 10 minuets: indicated in minutes and seconds
Sleep timer indicator
5.
Indicates that the sleep timer is active.
REC Mode indicator
6.
Indicates the recording mode that is currently selected.
: LPCM file
Page 26
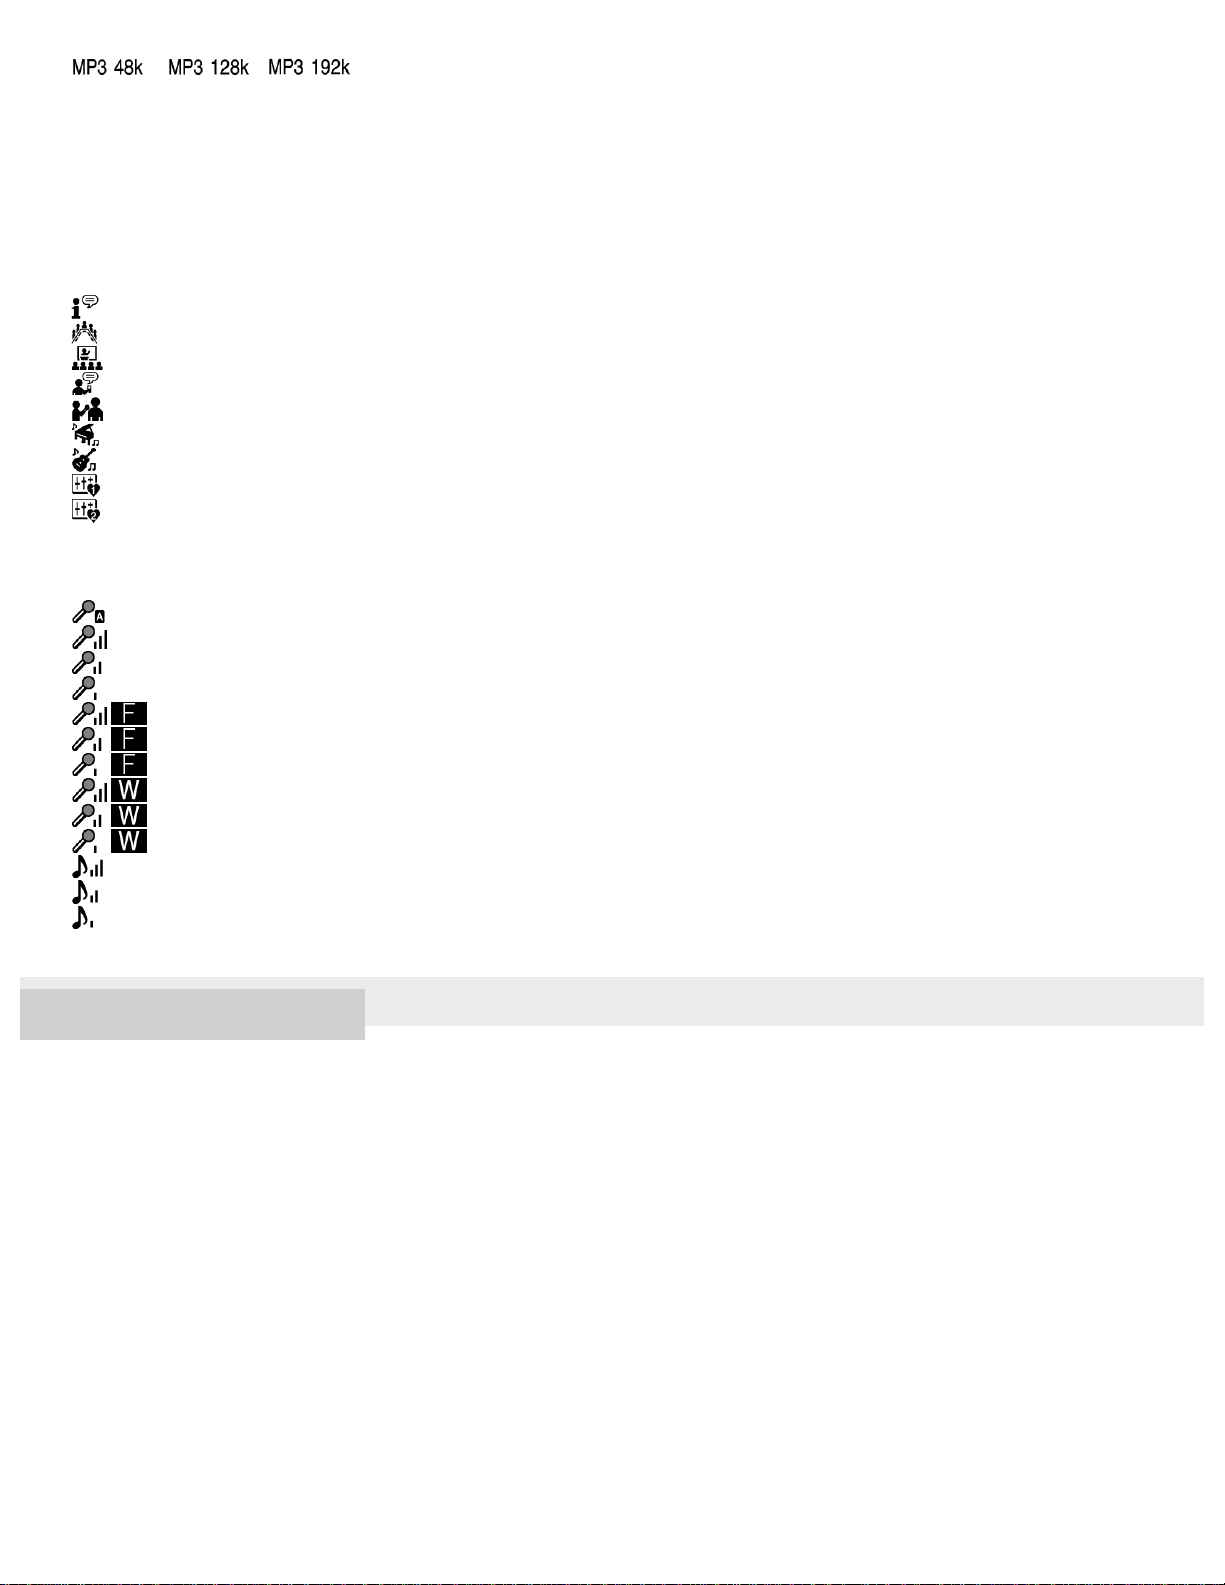
, , : MP3 file
Battery indicator
10
7.
8.
9.
10
.
Elapsed time
Indicates the elapsed time of the current recording.
Scene Select indicator
Indicates the recording scene that is currently selected.
: Auto Voice Rec
: Meeting
: Lecture
: Voice Notes
: Interview
: Soft Music
: Loud Music
: My Scene 1
: My Scene 2
Built-in Mic Sensitivity indicator
Indicates the sensitivity level of the built-in microphones that is currently selected.
: Auto
: High
: Medium
: Low
: High(Focused)
: Medium(Focused)
: Low(Focused)
: High(Wide)
: Medium(Wide)
: Low(Wide)
: High(Music)
: Medium(Music)
: Low(Music)
4-573-936-32(1) Copyright 2015 Sony Corporation
Page 27
Help Guide
11
IC Recorder
ICD -UX560 / ICD-UX560F / ICD -UX565F
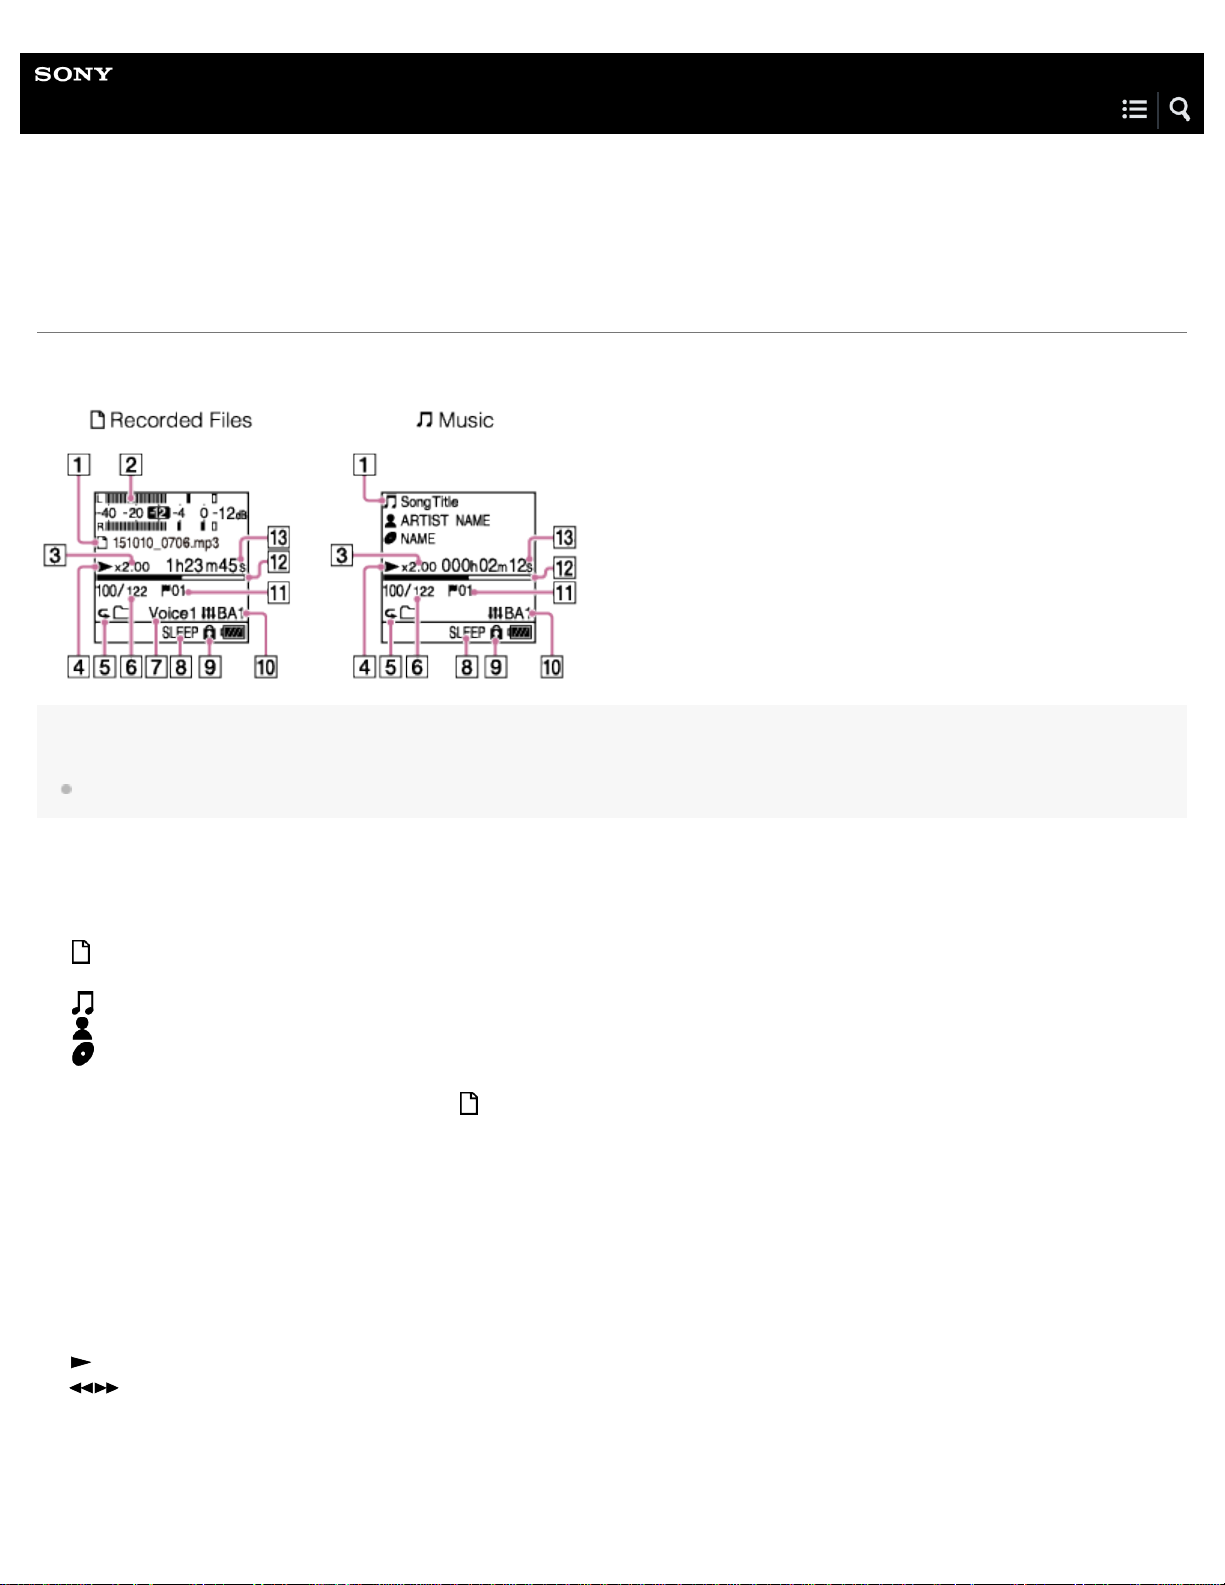
While playback is in progress
The following describes the display window during playback.
Note
The above screens are provided for explanatory purposes. They may look different from what you actually see on your IC recorder.
File information
1.
Indicates information about the file you are playing.
Files recorded with your IC recorder are indicated as follows:
: File name: recording date_recording time.file format (e.g. 151010_0706.mp3)
Music files are indicated as follows:
: Song title
: Artist name
: Album title
Peak meters (only indicated for the files in “ Recorded Files”)
2.
Indicate the recorded audio volume levels of the file you are playing.
DPC (Digital Pitch Control)
3.
Indicates that the playback speed is modified.
Playback status indicator
4.
Indicates the current playback status of your IC recorder.
: playing
: reviewing (fast -rewinding)/cueing (fast -forwarding)
Play Mode/Playback Range indicator
5.
No indication: Normal (Play Mode)
Page 28
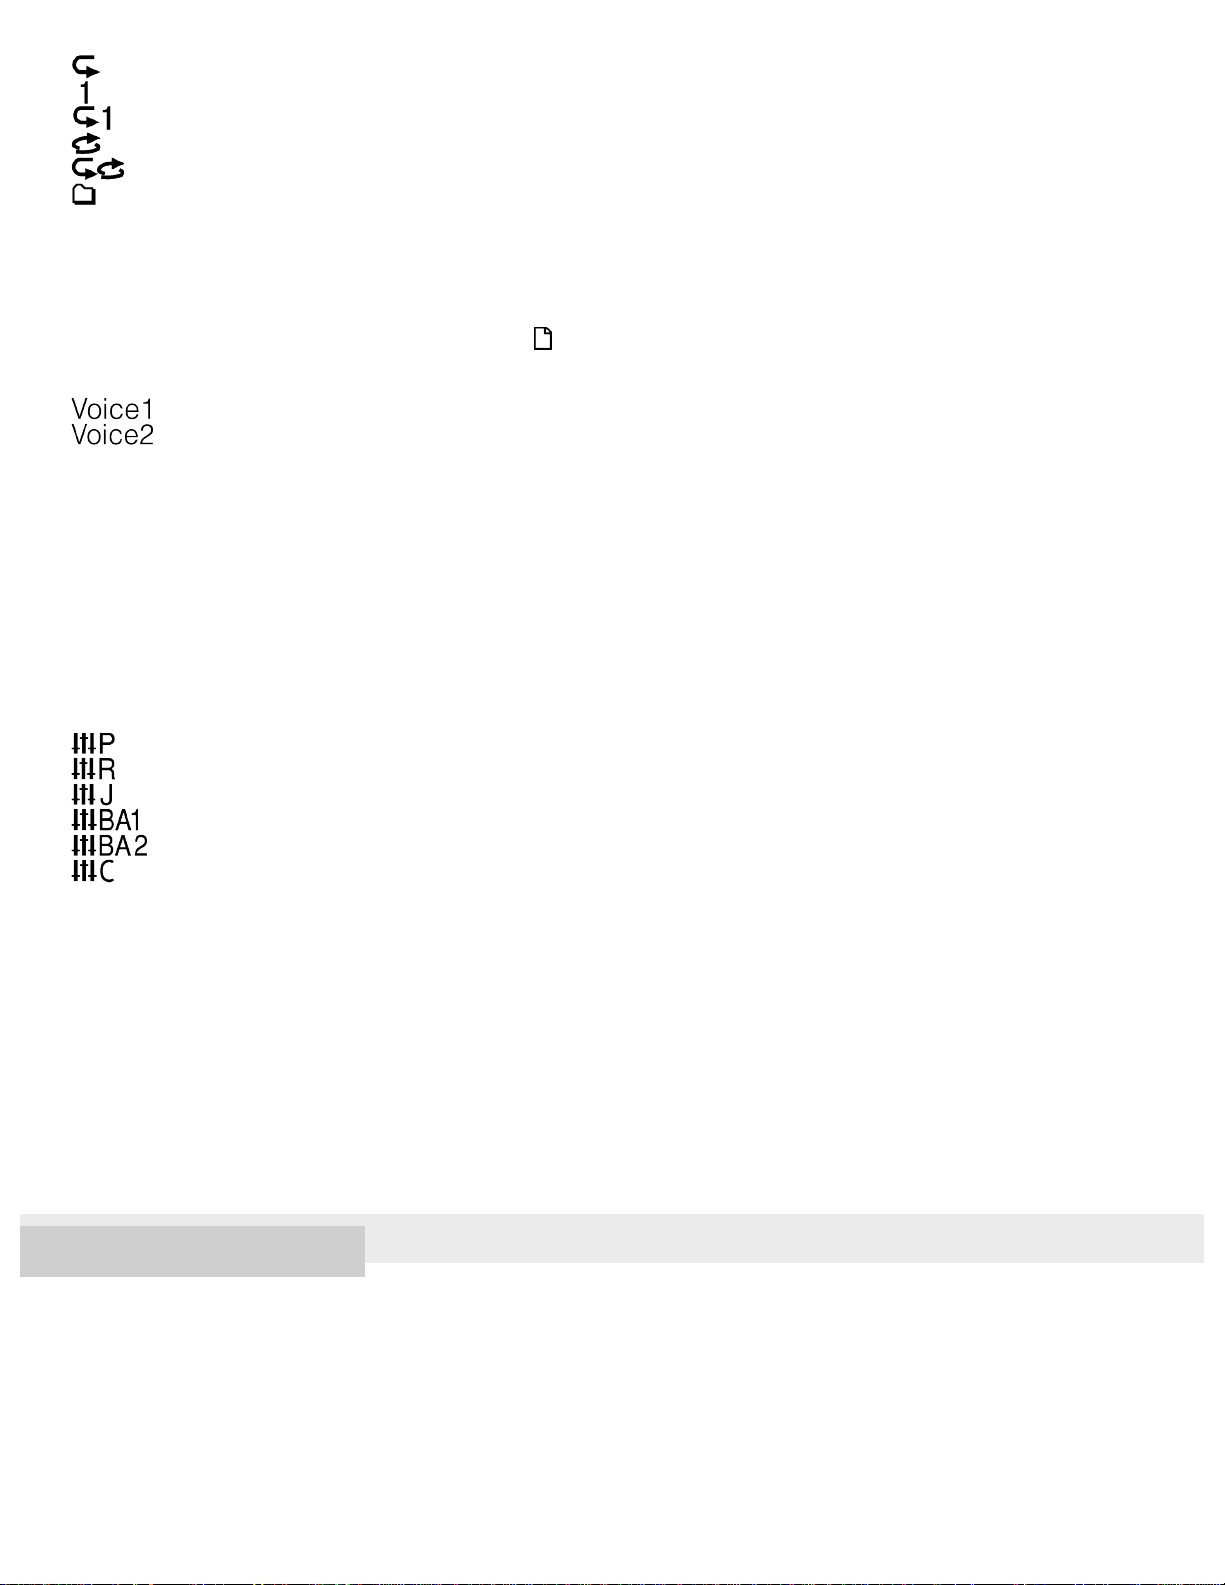
: Repeat (Play Mode)
: 1 File Play ( Play Mode)
12
: 1 File Repeat ( Play Mode)
: Shuffle ( Play Mode)
: Shuffle Repeat ( Play Mode )
: Selected Range (Playback Range )
File number information
6.
Indicates the file number of the playing file in the format (current file number)/(total number of files to play).
Clear Voice indicator (only indicated for the files in “ Recorded Files ”)
7.
Indicates that “ Clear Voice ” is set to one of the following on the OPTION menu.
: Clear Voice 1
: Clear Voice 2
Sleep timer indicator
8.
Indicates that the sleep timer function is active.
Protect indicator
9.
Indicates that the file you are playing is protected.
Effect indicator
10
.
Indicates that “ Effect” is set to one of the following on the OPTION menu.
: Pop
: Rock
: Jazz
: Bass1
: Bass2
: Custom
Track mark number
11
.
Indicates the track mark number, if added, of the current playback point.
Playback progress bar
12
.
Indicates how far playback of the file has progressed.
Elapsed time
13
.
Indicates the elapsed time of the current playback.
4-573-936-32(1) Copyright 2015 Sony Corporation
Page 29
Help Guide
13
IC Recorder
ICD -UX560 / ICD-UX560F / ICD -UX565F
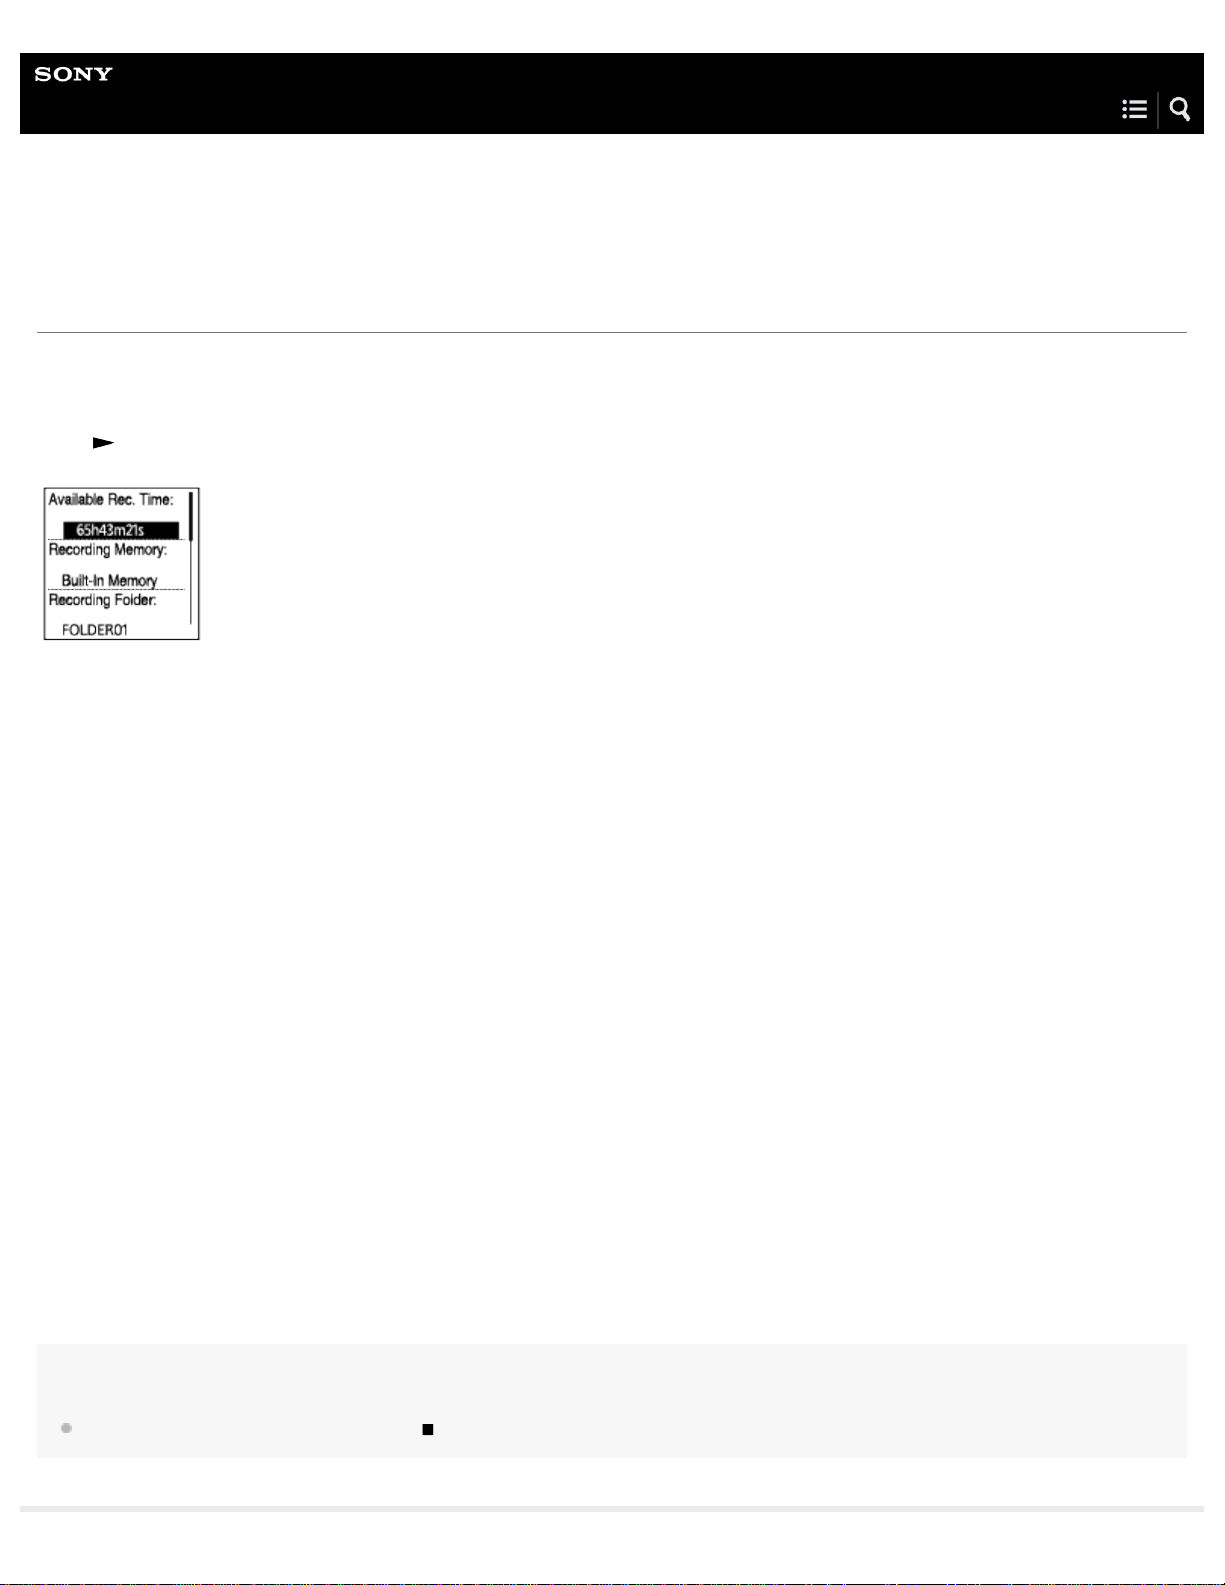
While the recording information is displayed
You can view the recording information of your IC recorder, including the remaining recording time, the memory storage for
recorded files, and the folder setting.
To display the recording information, while recording is on standby, select “ REC Information” on the OPTION menu, and then
press
The following recording information is available:
.
Available Rec. Time:
Remaining time available for recording.
Recording Memory:
Memory storage (“ Built- In Memory” or “SD Card”) for recorded files.
Recording Folder:
Storage folder for recorded files.
Scene Select:
Recording scene currently selected.
REC Mode:
Recording mode currently selected.
Input:
Audio input type currently selected.
Mic Sensitivity:
Sensitivity level of the microphones currently selected.
Recording Filter:
Recording filter currently selected.
VOR:
VOR (Voice Operated Recording) setting currently selected.
SYNC REC:
Synchronized recording setting currently selected.
Auto Track Marks:
Automatic track mark setting currently selected.
Hint
While recording is on standby, you can press STOP to view the recording information of your IC recorder.
Page 30
Help Guide
14
IC Recorder
ICD -UX560 / ICD-UX560F / ICD -UX565F
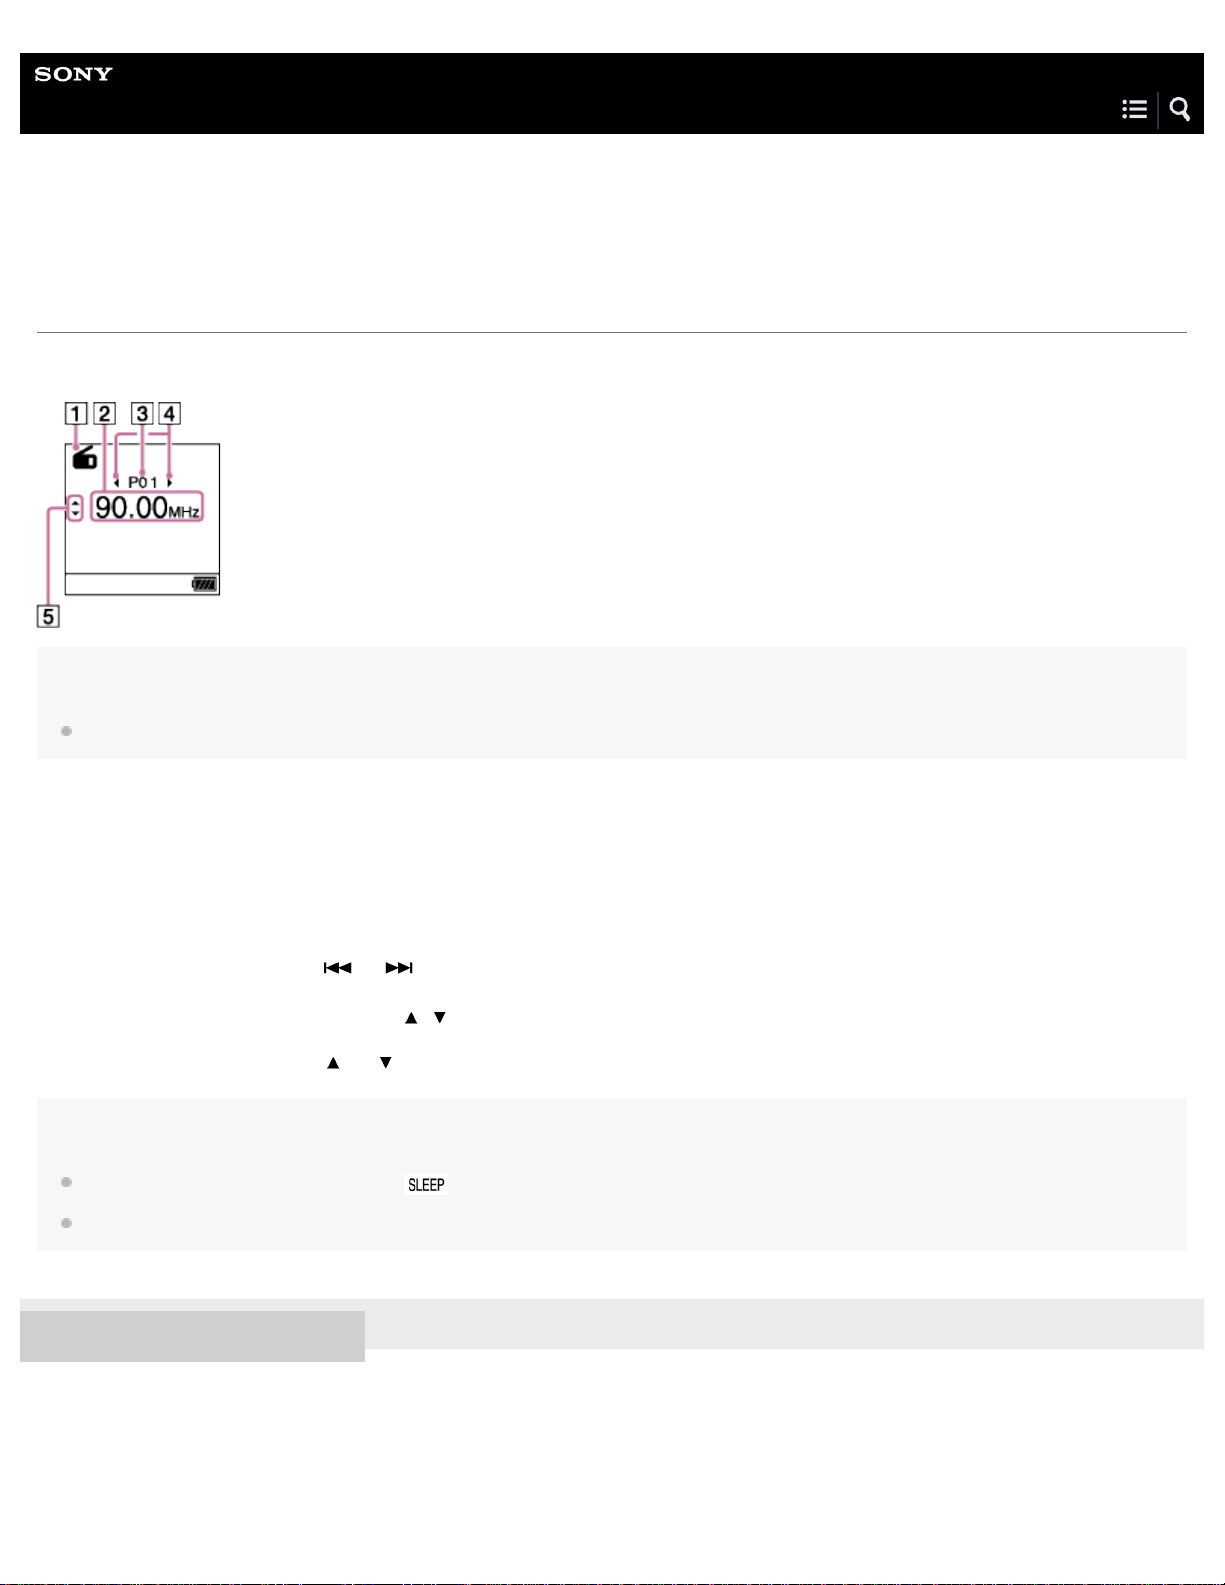
While listening to the FM radio (ICD- UX560F / ICD- UX565F only)
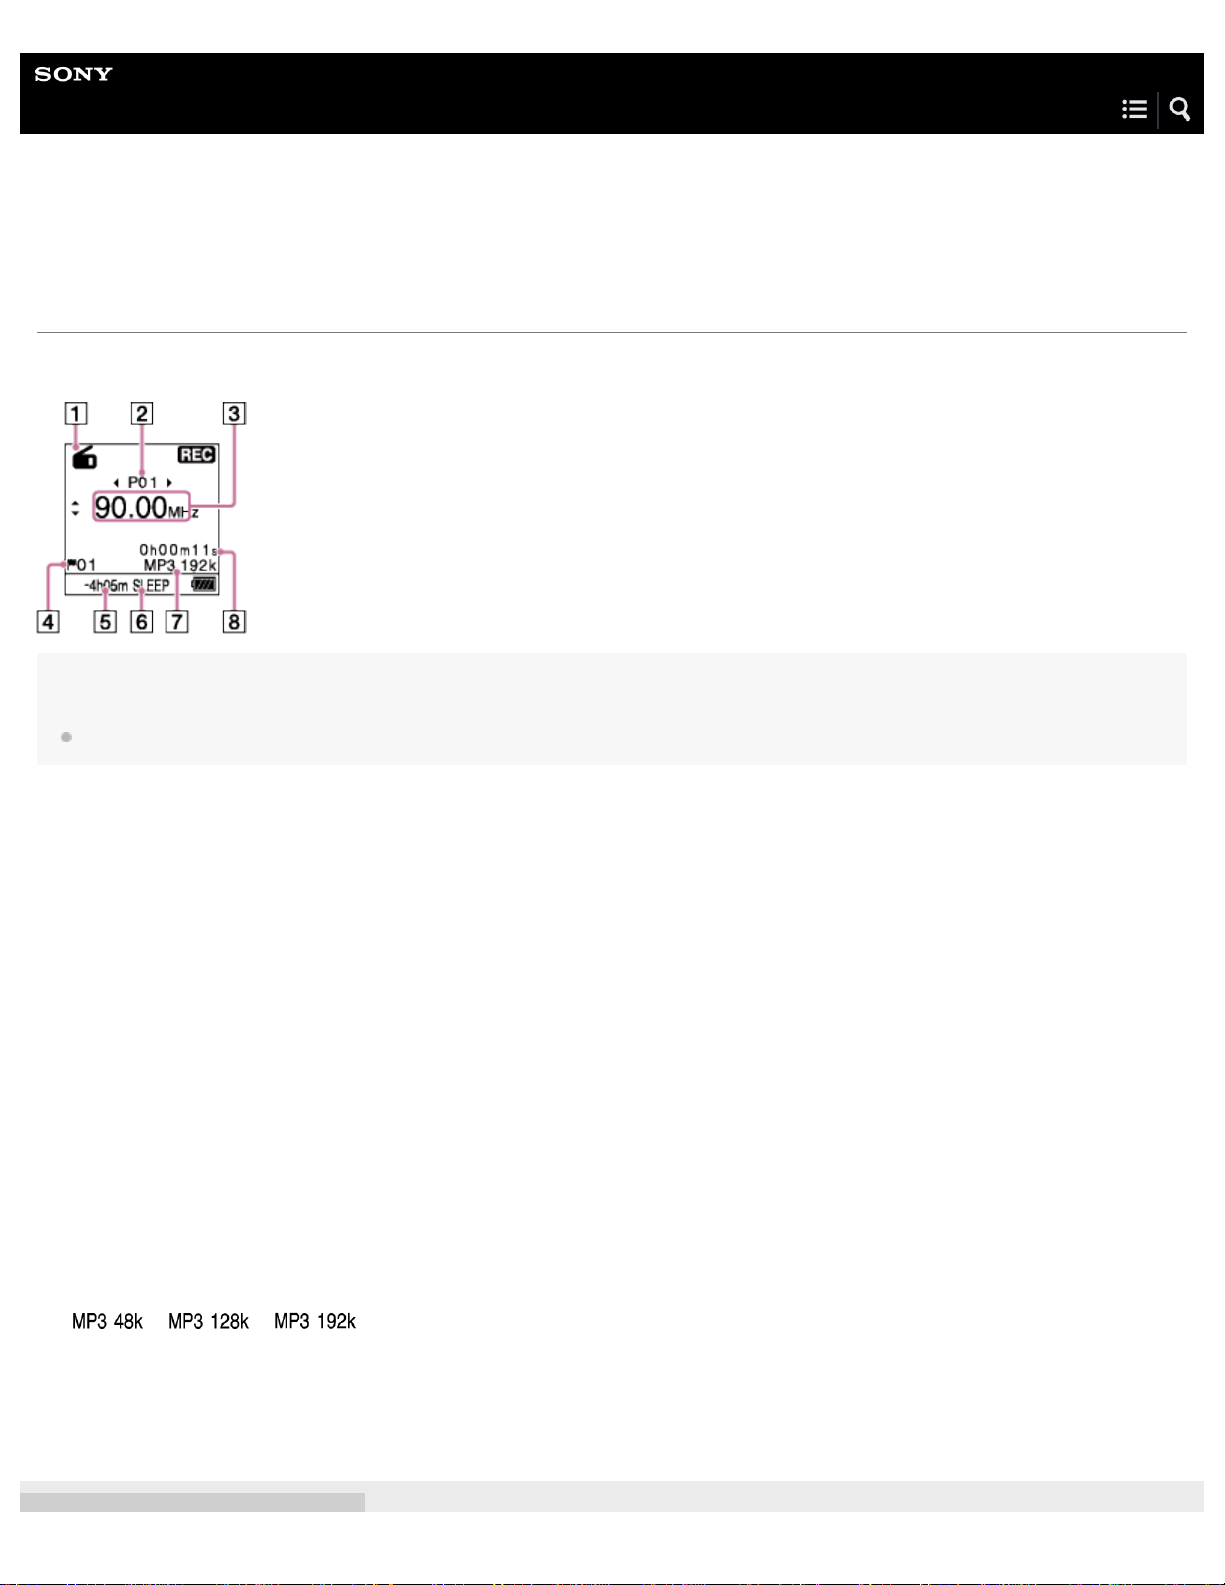
The following describes the display window during FM radio broadcasts.
Note
The above screen is provided for explanatory purposes. It may look different from what you actually see on your IC recorder.
FM indicator
1.
Indicates that you are listening to the FM radio.
Radio frequency
2.
Preset number
3.
Preset number selection indicators
4.
Indicates that you can press
Radio frequency selection indicators ( / )
5.
Indicates that you can press
Hint
While the sleep timer function is turned on, appears on the FM radio screen.
When the remaining recording time is less than 10 hours, the remaining recording time appears on the FM radio screen.
or to select the previous or next preset number.
or to change the radio frequency.
4-573-936-32(1) Copyright 2015 Sony Corporation
Page 31
Help Guide
15
IC Recorder
ICD -UX560 / ICD-UX560F / ICD -UX565F
While recording FM radio broadcasts (ICD - UX560F / ICD-UX565F only)
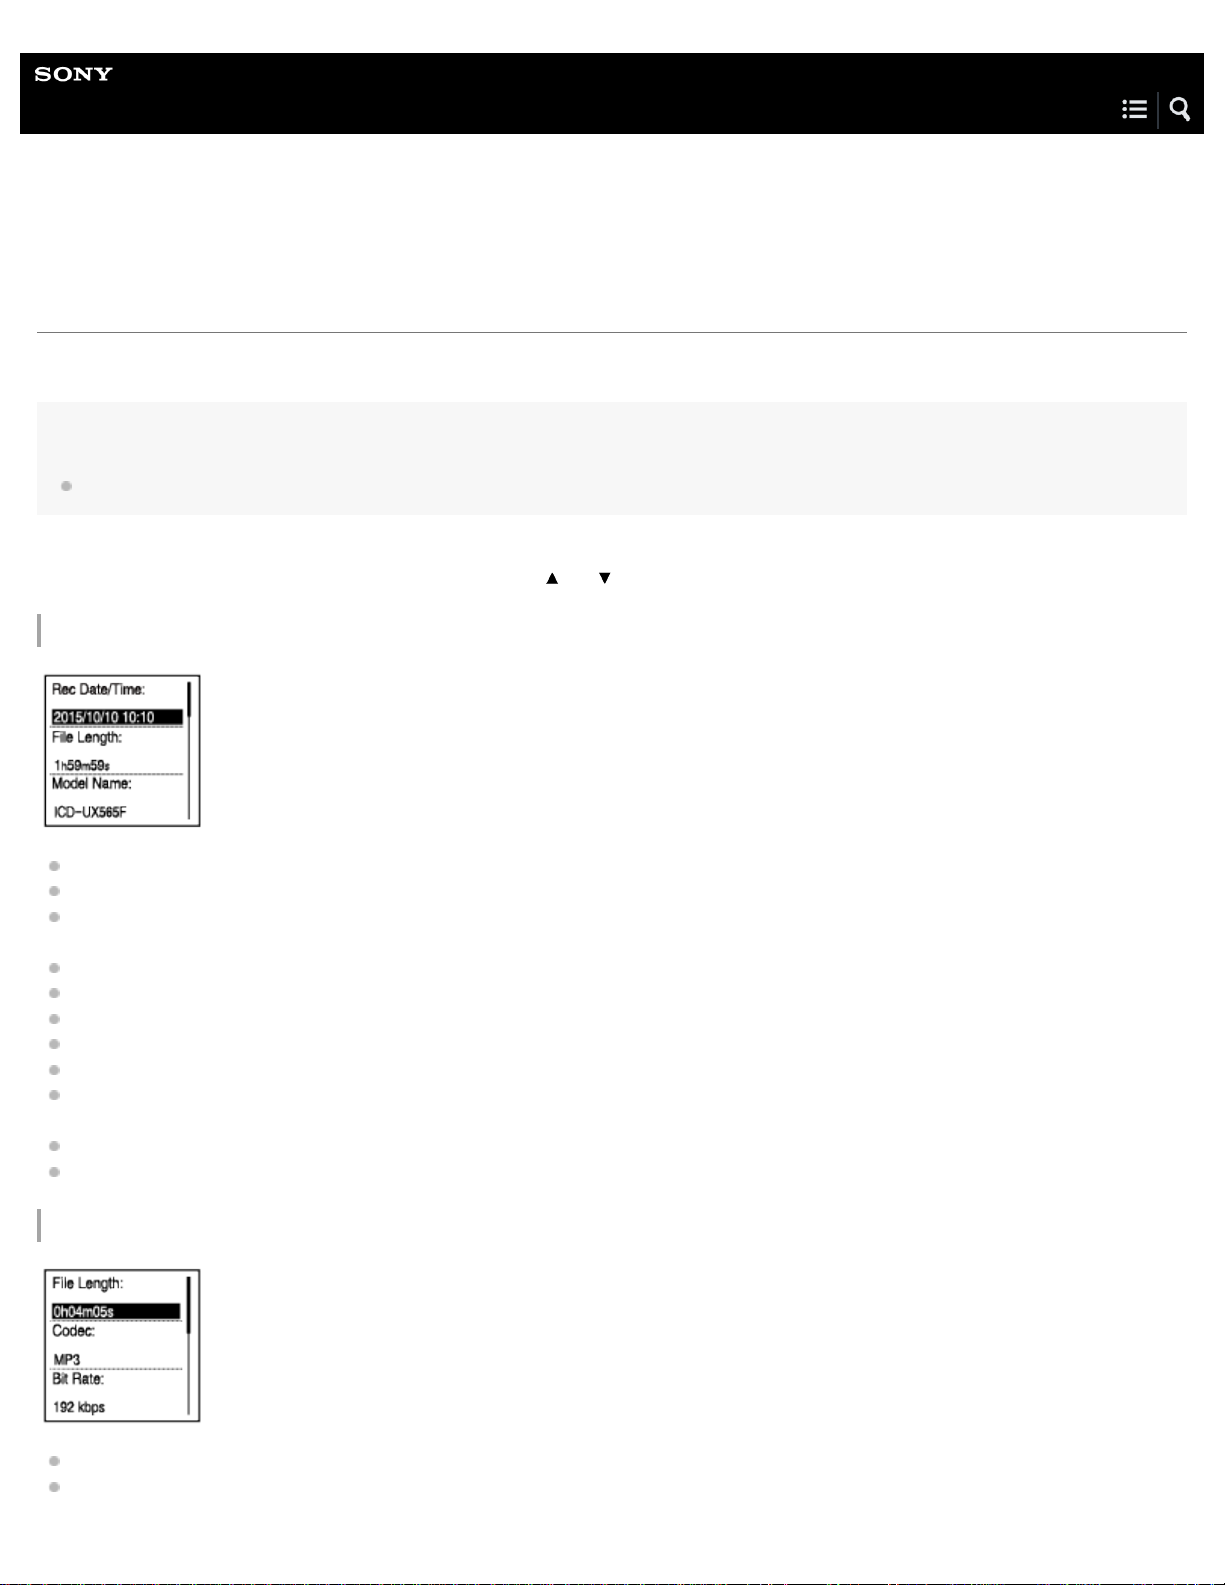
The following describes the display window while recording of FM radio broadcasts is in progress.
Note
The above screen is provided for explanatory purposes. It may look different from what you actually see on your IC recorder.
FM indicator
1.
Indicates that you are listening to the FM radio.
Preset number
2.
Radio frequency
3.
Track mark number
4.
Indicates the track mark number, if added, of the current playback point.
Remaining recording time
5.
Indicates the remaining time available for recording in hours, minutes, and seconds.
10 hours or more: no indication
10 minutes to 10 hours: indicated in hours and minutes
Less than 10 minuets: indicated in minutes and seconds
Sleep timer indicator
6.
Indicates that the sleep timer function is turned on.
REC Mode
7.
Indicates the recording mode that is currently selected.
, , : MP3 file
You cannot record FM radio broadcasts to LPCM files.
Elapsed time
8.
Indicates the elapsed time of the current recording.
Page 32
Help Guide
16
IC Recorder
ICD -UX560 / ICD-UX560F / ICD -UX565F
While the current file information is displayed
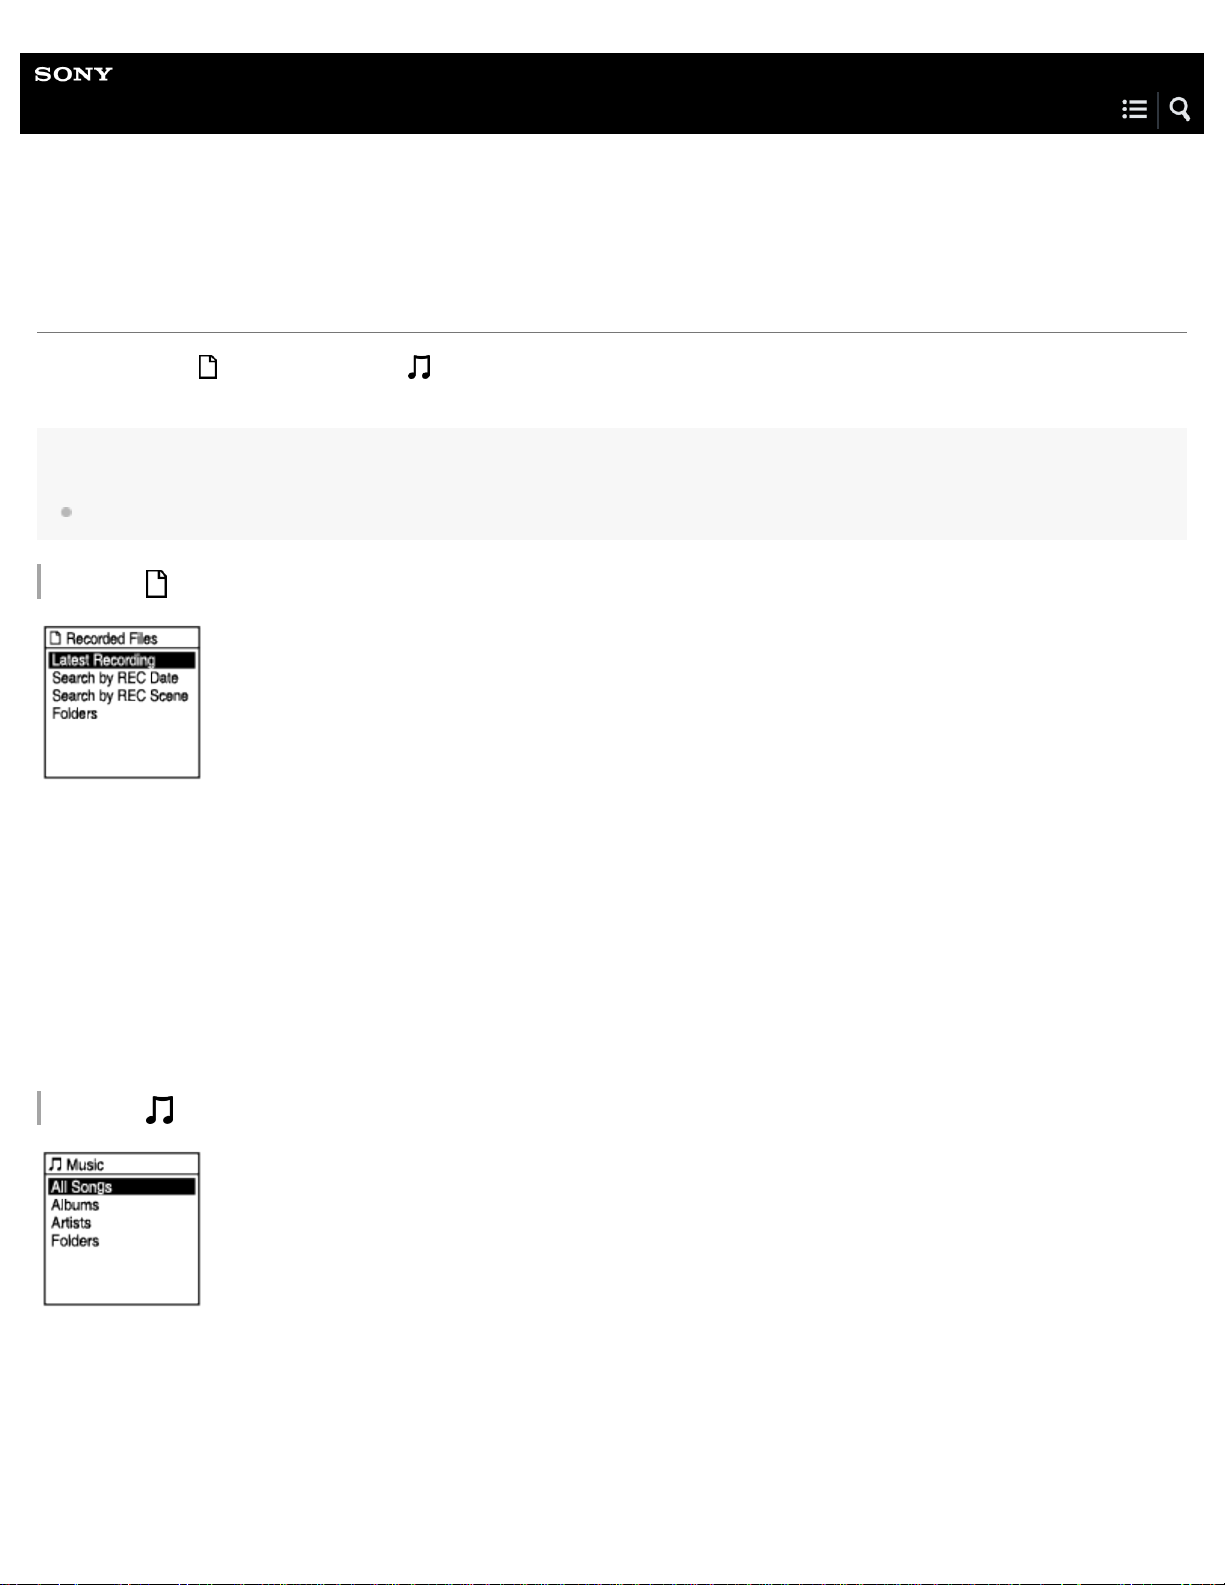
You can view the information (recording date and time, file length, etc.) about the recorded file you selected.
Note
The following screens are provided for explanatory purposes. They may look different from what you actually see on your IC recorder.
To view the information about a particular file, select a file you recorded with your IC recorder or a music file and select “File
Information” on the OPTION menu. Then, you can press
Information about the recorded file
or to scroll up or down to view the following:
Rec Date/Time: Date and time when the file was recorded (year/month/day/time).
File Length: Playback length of the file (h (hour), m (minute), and s (second)).
Model Name: Device by which the file was recorded. The same information for “Model:” in the “System Information” of the
Settings menu appears.
Scene Select: Recording scene selected at the time of recording.
REC Mode: Recording mode selected at the time of recording.
Mic Sensitivity: Sensitivity level of the microphones selected at the time of recording.
Recording Filter: Recording filter selected at the time of recording.
VOR: VOR (Voice Operated Recording) setting selected at the time of recording.
Input: Audio input type (“ Built -in Mic,” “ External Mic,” “ Audio IN,” or “ FM Radio” (ICD- UX560F / ICD- UX565F only)) selected at
the time of recording.
Recording Memory: Memory storage containing the file.
File Path: Path to the file.
Information about the music file
File Length: Playback length of the file (h (hour), m (minute), and s (second)).
Codec: Codec type selected at the time of recording.
Page 33

Bit Rate: Bit rate selected at the time of recording.
Sample Rate: Sampling rate selected at the time of recording.
17
Bit Depth: Bit depth selected at the time of recording.
Recording Memory: Memory storage containing the file.
File Path: Path to the file.
4-573-936-32(1) Copyright 2015 Sony Corporation
Page 34
Help Guide
18
IC Recorder
ICD -UX560 / ICD-UX560F / ICD -UX565F
While the file search categories are displayed
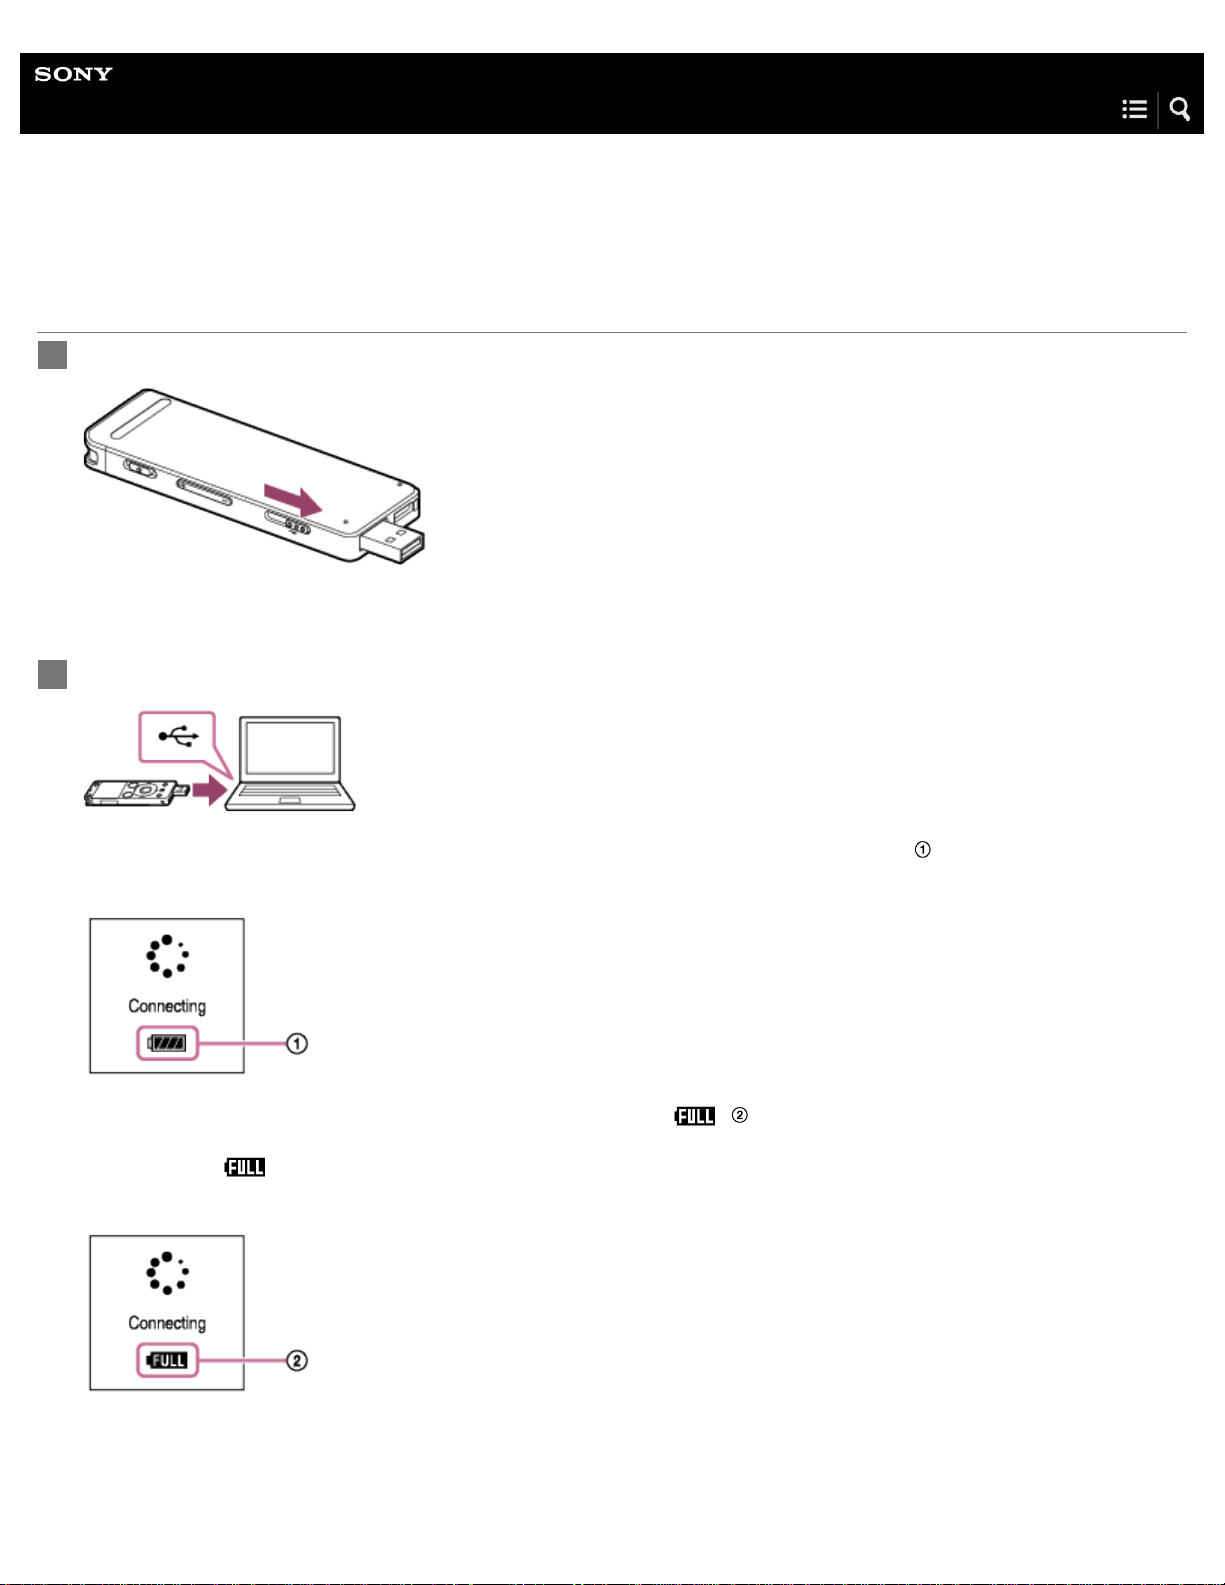
When you select “ Recorded Files ” or “ Music” on the HOME menu, the search categories of the stored files appear on the
display window.
Note
The following screens are provided for explanatory purposes. They may look different from what you actually see on your IC recorder.
When “ Recorded Files” is selected
You can select one of the following search categories:
Latest Recording:
Starts playing the latest recording.
Search by REC Date:
Recorded files are sorted by recording date.
Search by REC Scene:
Recorded files are sorted by recording scene.
Folders:
Recorded files in the selected folder are listed.
When “ Music” is selected
You can select one of the following search categories:
All Songs:
All music files are listed.
Albums:
Music files are sorted by album title.
Page 35

Artists:
Music files are sorted by artist name.
19
Folders:
4-573-936-32(1) Copyright 2015 Sony Corporation
Music files in the selected folder are listed.
Page 36
Help Guide
20
IC Recorder
ICD -UX560 / ICD-UX560F / ICD -UX565F
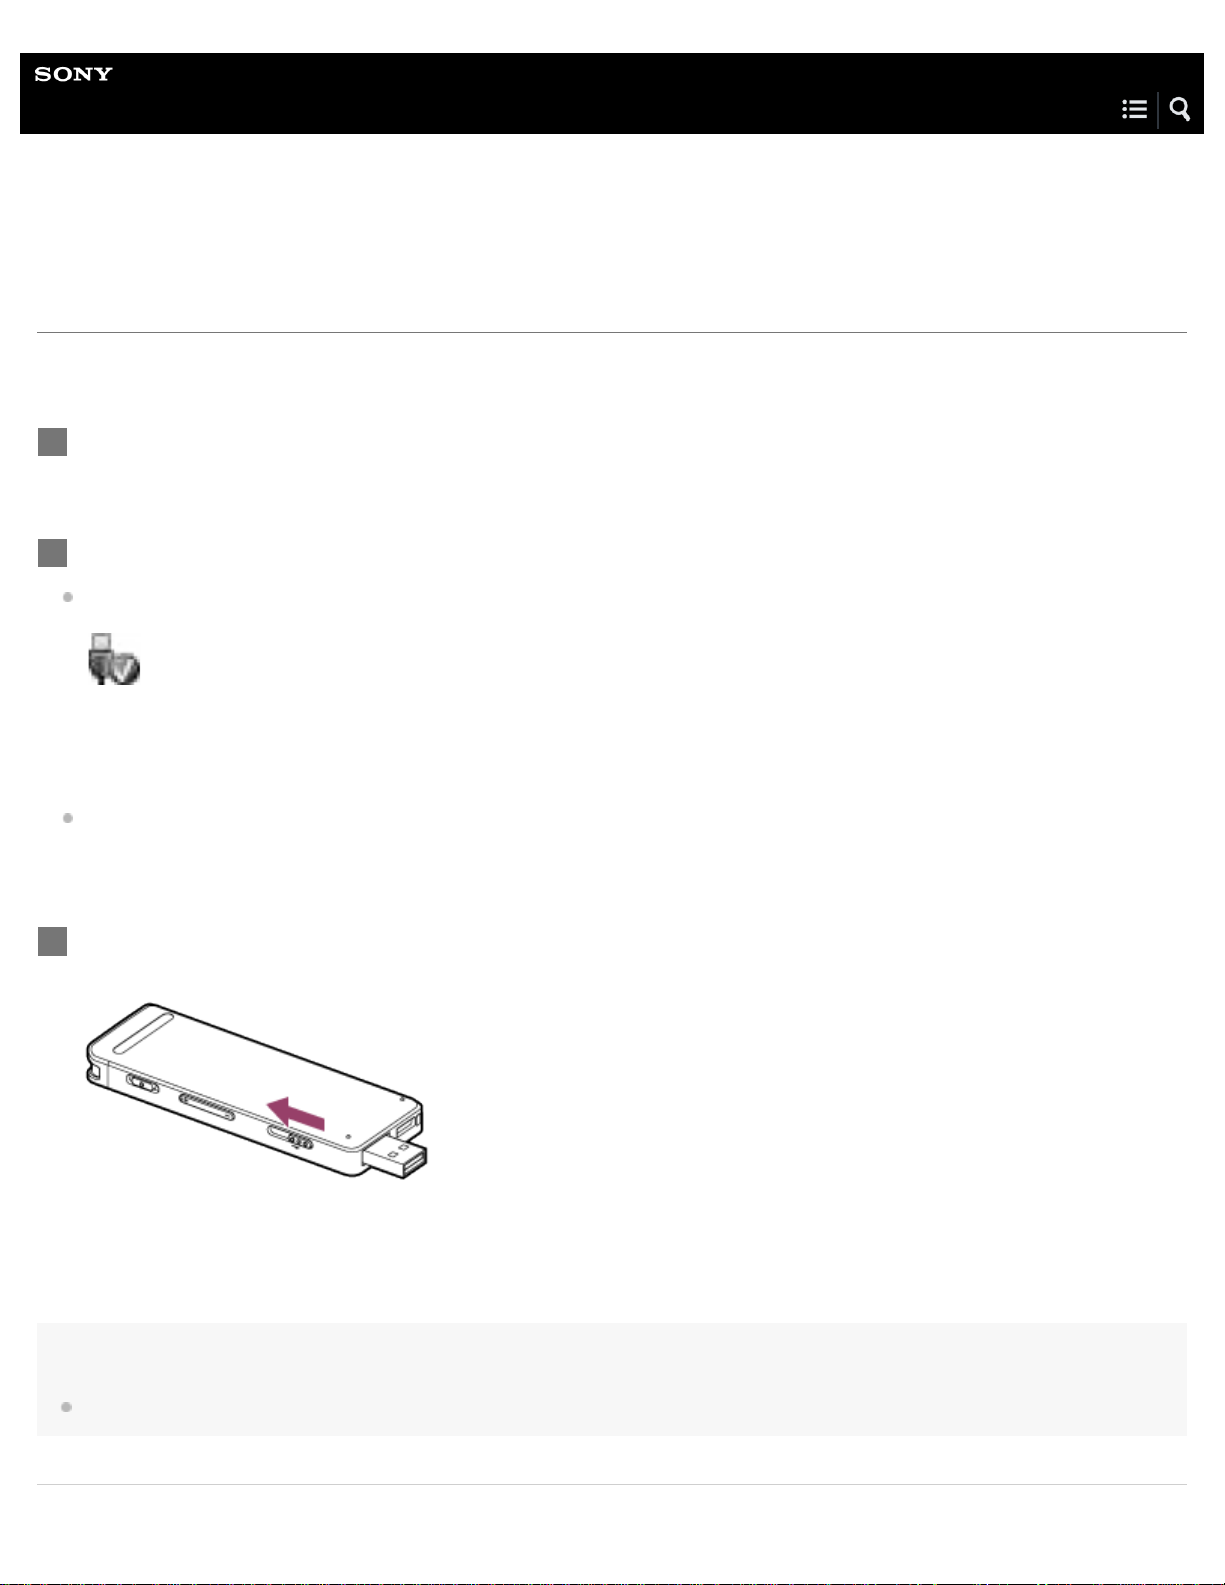
Charging the battery with a computer
Slide the USB slide lever in the direction of the arrow.
1
Insert the USB connector into the USB port of a running computer.
2
While the battery is charging, the “Connecting” animation and the battery indicator animation ( ) appear on the display
window.
When the battery is fully charged, the battery indicator will indicate ( ).
If you charge the battery of your IC recorder for the first time or you have not use the IC recorder for a long time, charge the
battery until the
indicator appears on the display window. It takes about 2 hours and 30 minutes (*) to fully charge an
exhausted battery.
*
This value is estimated, provided that the exhausted battery is fully charged at room temperature. It varies depending on the remaining power
and the condition of the battery.
Page 37

Note
21
If your IC recorder is connected to a computer which is not running or in a power saving mode (standby or sleep), the battery will not charge.
Related Topic
Disconnecting the IC recorder from the computer
Connecting the IC recorder to a computer
4-573-936-32(1) Copyright 2015 Sony Corporation
Page 38
Help Guide
22
IC Recorder
ICD -UX560 / ICD-UX560F / ICD -UX565F
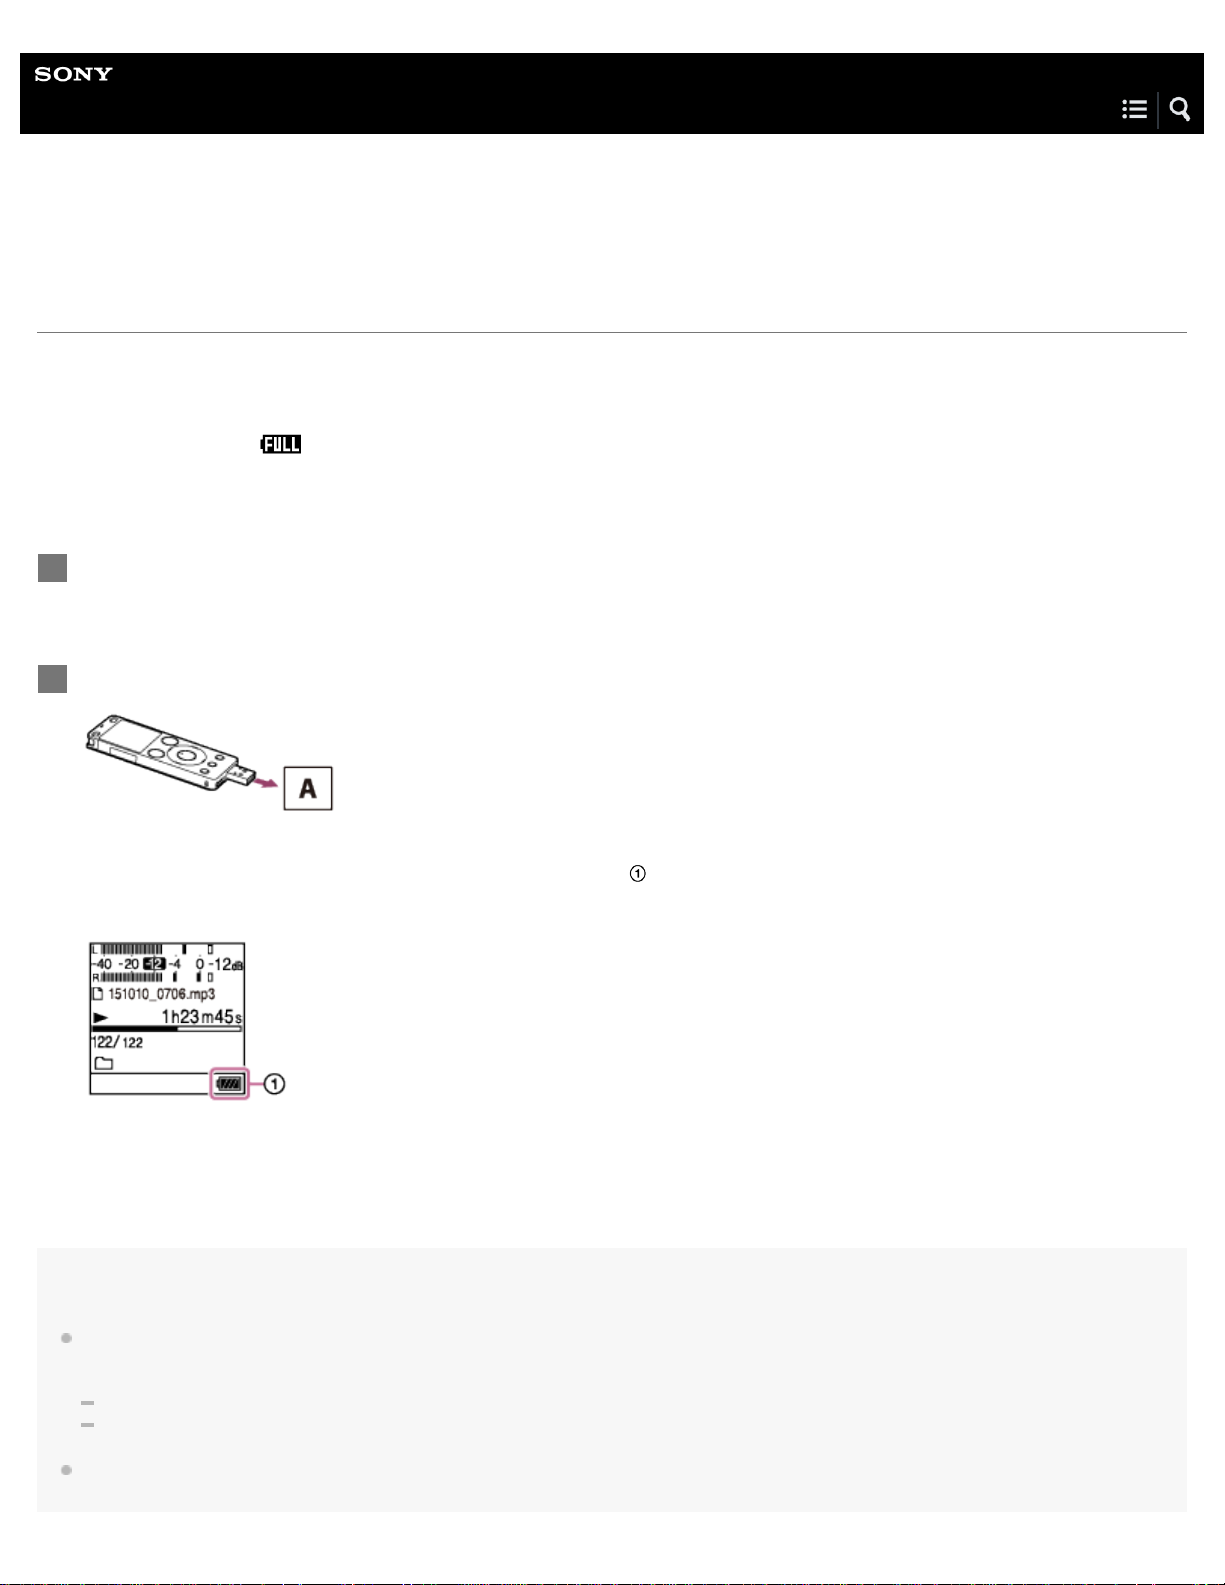
Disconnecting the IC recorder from the computer
Be sure to follow the procedure below, otherwise you may not be able to play the files stored on your IC recorder due to data
corruption.
Make sure that the operation indicator of the IC recorder is not lit.
1
Perform the following operation on the computer.
2
On the Windows taskbar at the bottom right of the desktop, click the following icon.
Then, click “Eject IC RECORDER” (Windows 7, Windows 8.1, Windows 10), or “Safely remove USB Mass Storage Device”
(Windows Vista). The icon and menu displayed can be different on different operating systems. The icon may not be always
displayed on the taskbar depending on your computer settings.
On the Mac screen, click the removal icon of the “IC RECORDER” that appears on the sidebar of the Finder.
Disconnect the IC recorder from the USB port of the computer, and slide the USB slide lever in the
3
direction of the arrow to retract the USB connector.
Hint
For details on disconnecting a USB device from the computer, refer to the operating instructions supplied with the computer.
Page 39

Related Topic
23
Charging the battery with a computer
Connecting the IC recorder to a computer
4-573-936-32(1) Copyright 2015 Sony Corporation
Page 40
Help Guide
24
IC Recorder
ICD -UX560 / ICD-UX560F / ICD -UX565F
Charging the battery with the USB AC adaptor
You can charge the battery or use your IC recorder by connecting it to an AC outlet with a USB AC adaptor (not supplied). It is
helpful to use the IC recorder with AC power when you want to record for a long time.
If you charge the battery of your IC recorder for the first time or you have not use the IC recorder for a long time, charge the
battery continuously until
It takes about 2 hours and 30 minutes (*) to fully charge an exhausted battery.
*
This value is estimated, provided that the exhausted battery is fully charged at room temperature. It varies depending on the remaining power and the
condition of the battery.
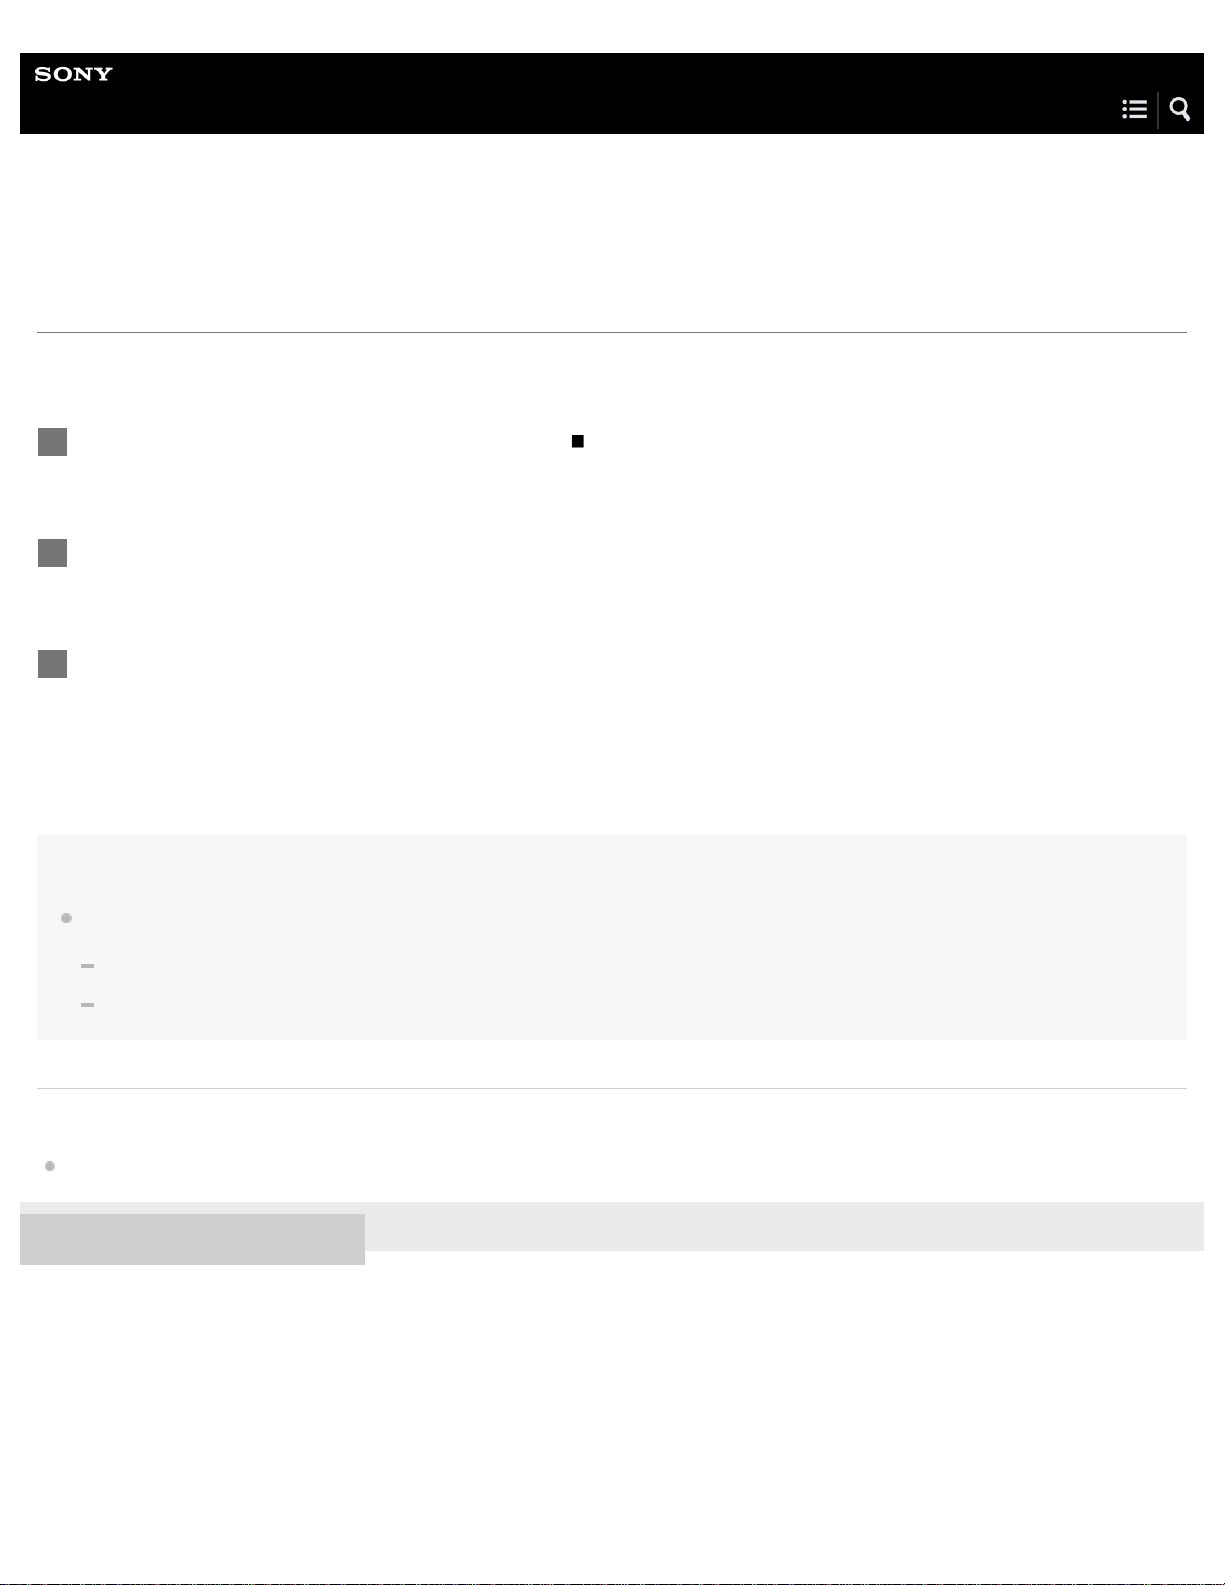
Connect a USB AC adaptor (not supplied) to an AC outlet.
1
Slide the USB slide lever of the IC recorder and connect the USB connector to the USB AC adaptor.
2
appears.
A: USB AC adaptor (not supplied)
While the battery is charging, the battery indicator animation (
) appears.
Now you can use the IC recorder while charging the battery.
Note
While recording is in progress (the operation indicator lights in red) or paused (the operation indicator flashes in red), or while data is being
accessed (the operation indicator flashes in orange), observe the following to avoid data corruption:
Do not connect/disconnect your IC recorder to/from the USB AC adaptor while the adaptor is connected to an AC outlet.
Do not connect/disconnect the USB AC adaptor to/from an AC outlet while your IC recorder is connected to the adaptor.
Be sure to connect the USB AC adaptor to a power outlet within reach so that you can immediately disconnect it when you detect any
malfunctions.
Page 41

Related Topic
25
Disconnecting the IC recorder from the USB AC adaptor
Battery life
4-573-936-32(1) Copyright 2015 Sony Corporation
Page 42
Help Guide
26
IC Recorder
ICD -UX560 / ICD-UX560F / ICD -UX565F
Disconnecting the IC recorder from the USB AC adaptor
Be sure to follow the procedure below, otherwise you may not be able to play the files stored on your IC recorder due to data
corruption.
If recording or playback is in progress, press STOP to stop the IC recorder.
1
Make sure that the operation indicator of the IC recorder is not lit.
2
Disconnect the IC recorder from the USB AC adaptor, and then disconnect the USB AC adaptor from
3
the AC outlet.
Note
While recording is in progress (the operation indicator lights in red) or on standby (the operation indicator flashes in red), or while data is being
accessed (the operation indicator flashes in orange), observe the following to avoid data corruption:
Do not connect/disconnect your IC recorder to/from the USB AC adaptor while the adaptor is connected to an AC outlet.
Do not connect/disconnect the USB AC adaptor to/from an AC outlet while your IC recorder is connected to the adaptor.
Related Topic
Charging the battery with the USB AC adaptor
4-573-936-32(1) Copyright 2015 Sony Corporation
Page 43
Help Guide
27
IC Recorder
ICD -UX560 / ICD-UX560F / ICD -UX565F
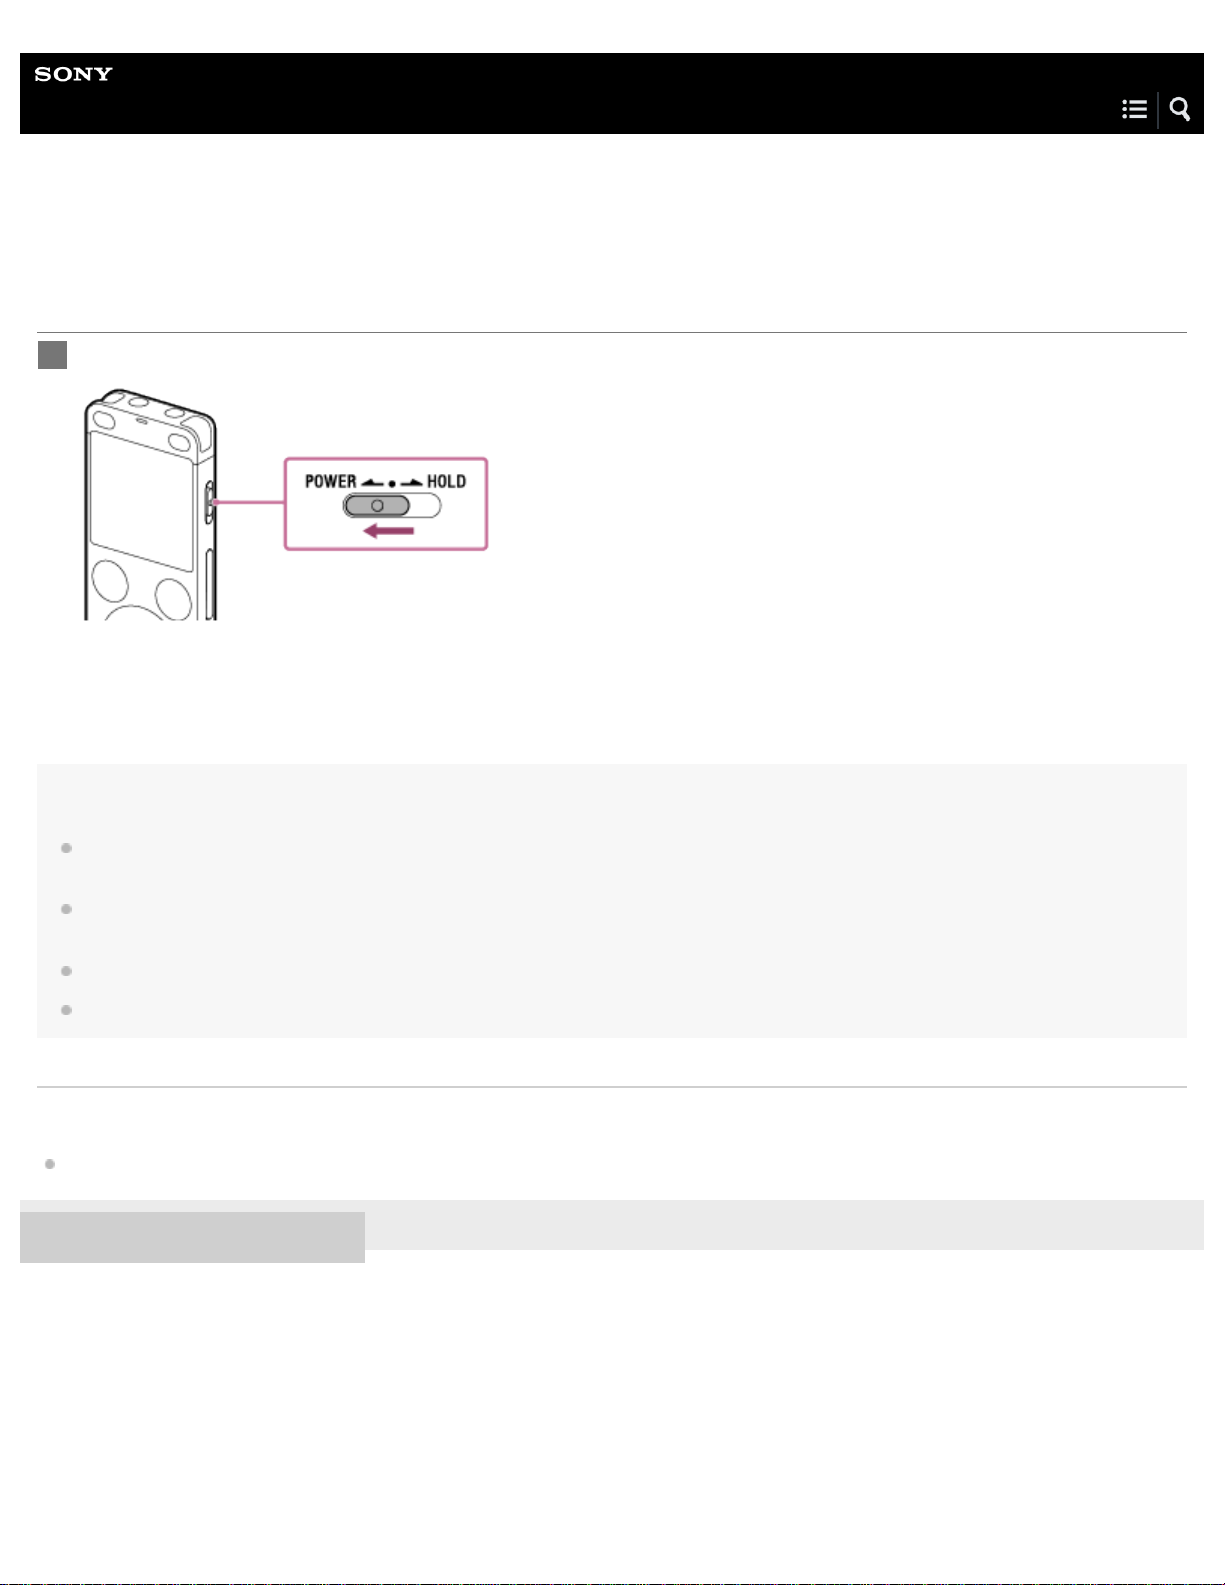
Turning the power on
Slide the POWER·HOLD switch to “POWER” and hold it until the display window turns on.
1
Hint
The Screen Off Timer function [Details] on your IC recorder is set to “30sec” by default to save battery power. If you leave the IC recorder unused
for 30 seconds, the display window will automatically turn off.
The Auto Power Off function [Details] on your IC recorder is set to “10min” by default to save battery power. If you leave the IC recorder unused for
10 minutes, it will automatically turn off.
If the sleep timer [Details] is active, your IC recorder will turn off automatically in the specified period of time.
If you turn the power back on within 4 hours from your last power-off, the power will come on quickly.
Related Topic
Turning the power off
4-573-936-32(1) Copyright 2015 Sony Corporation
Page 44
Help Guide
28
IC Recorder
ICD -UX560 / ICD-UX560F / ICD -UX565F
Turning the power off
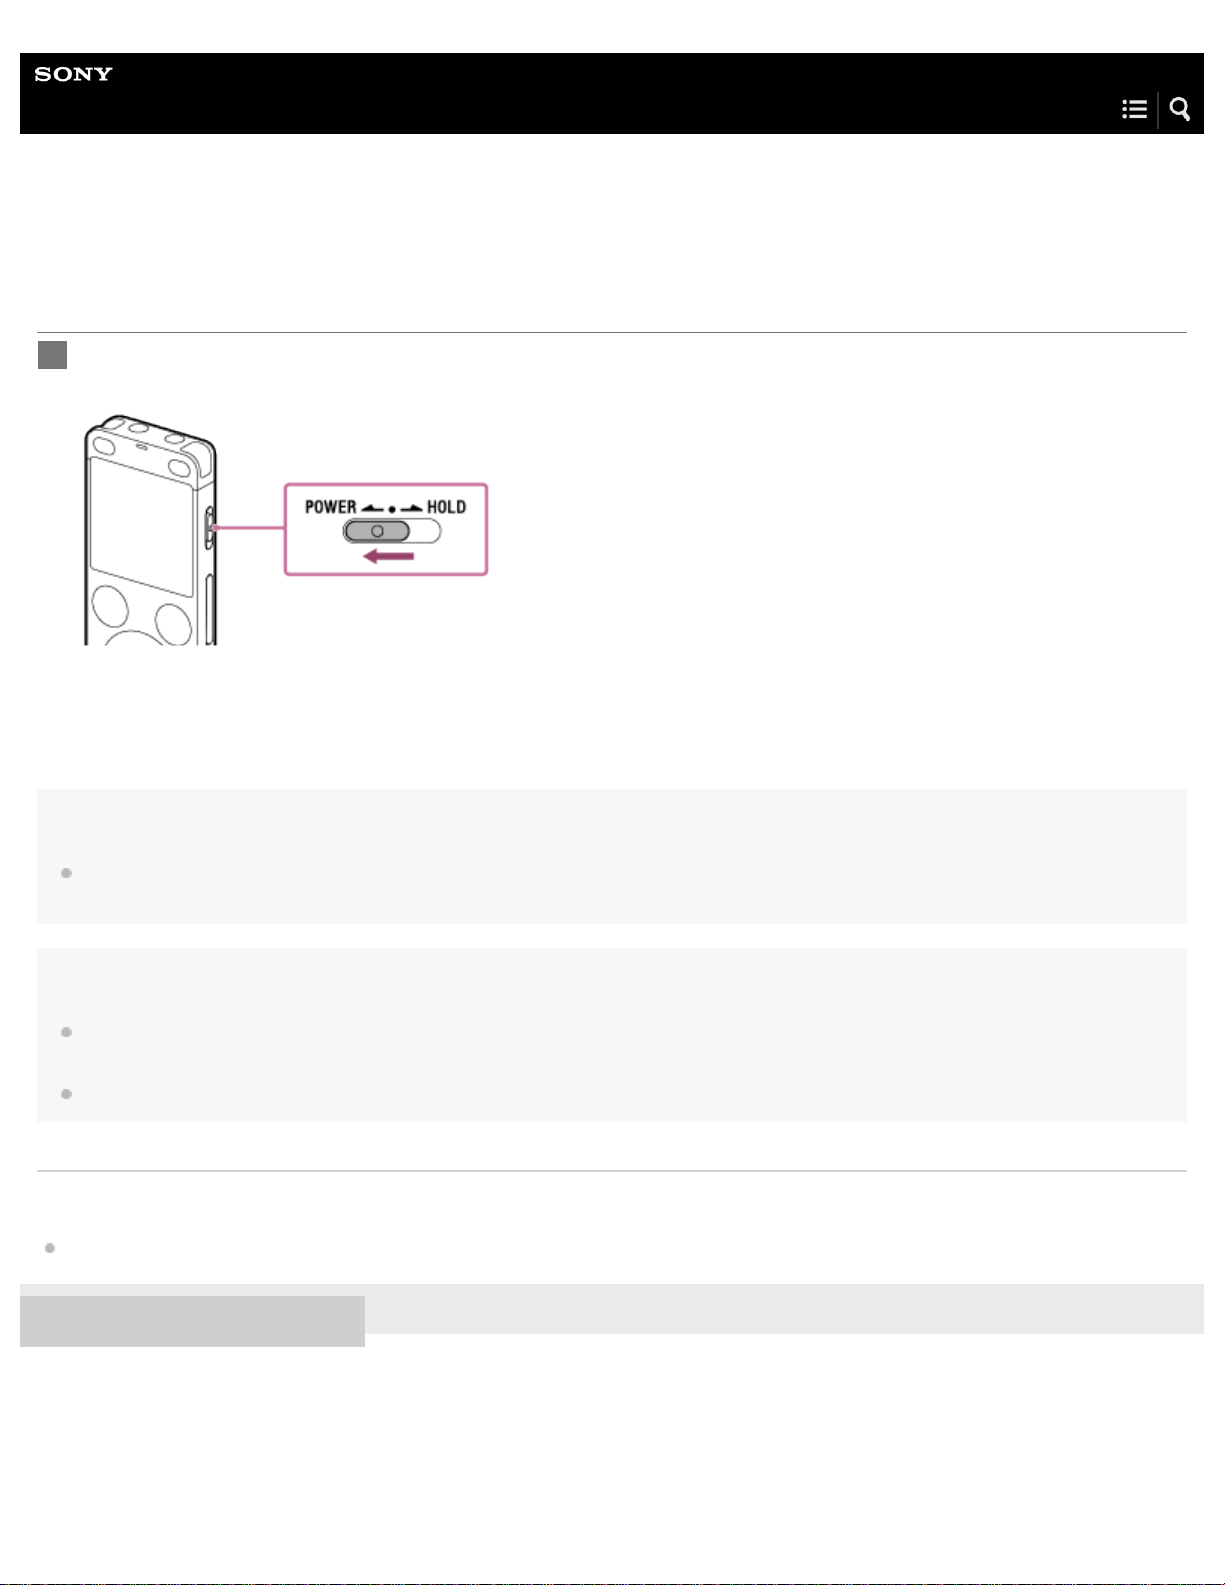
Slide the POWER·HOLD switch to “POWER” and hold it until “Power Off” appears on the display
1
window.
Note
Sliding the POWER·HOLD switch to “POWER” and holding it for 8 seconds or longer restarts your IC recorder. If you restart [Details] the IC
recorder while IC recorder operations are in progress, you may lose your data and settings stored on the IC recorder.
Hint
The Auto Power Off function [Details] on your IC recorder is set to “10min” by default to save battery power. If you leave the IC recorder unused for
10 minutes, it will automatically turn off.
If the sleep timer [Details] is active, your IC recorder will turn off automatically in the specified period of time.
Related Topic
Turning the power on
4-573-936-32(1) Copyright 2015 Sony Corporation
Page 45
Help Guide
29
IC Recorder
ICD -UX560 / ICD-UX560F / ICD -UX565F
Using the screen off timer
The Screen Off Timer function on your IC recorder is set to “ 30sec” by default to save battery power. If you leave the IC recorder
unused for 30 seconds, the display window will turn off, but you can still perform any button operations. To turn the display
window back on, press BACK/HOME.
Hint
To change the screen off timer setting, select “ Settings” - “Common Settings” - “Screen Off Timer” from the HOME menu, and then select “No
Auto Screen Off,” “15sec,” “30sec,” “1min,” “3min,” or “5min.”
4-573-936-32(1) Copyright 2015 Sony Corporation
Page 46
Help Guide
30
IC Recorder
ICD -UX560 / ICD-UX560F / ICD -UX565F
Inserting a memory card
In addition to the built-in memory, you can record files on a microSD card (not supplied).
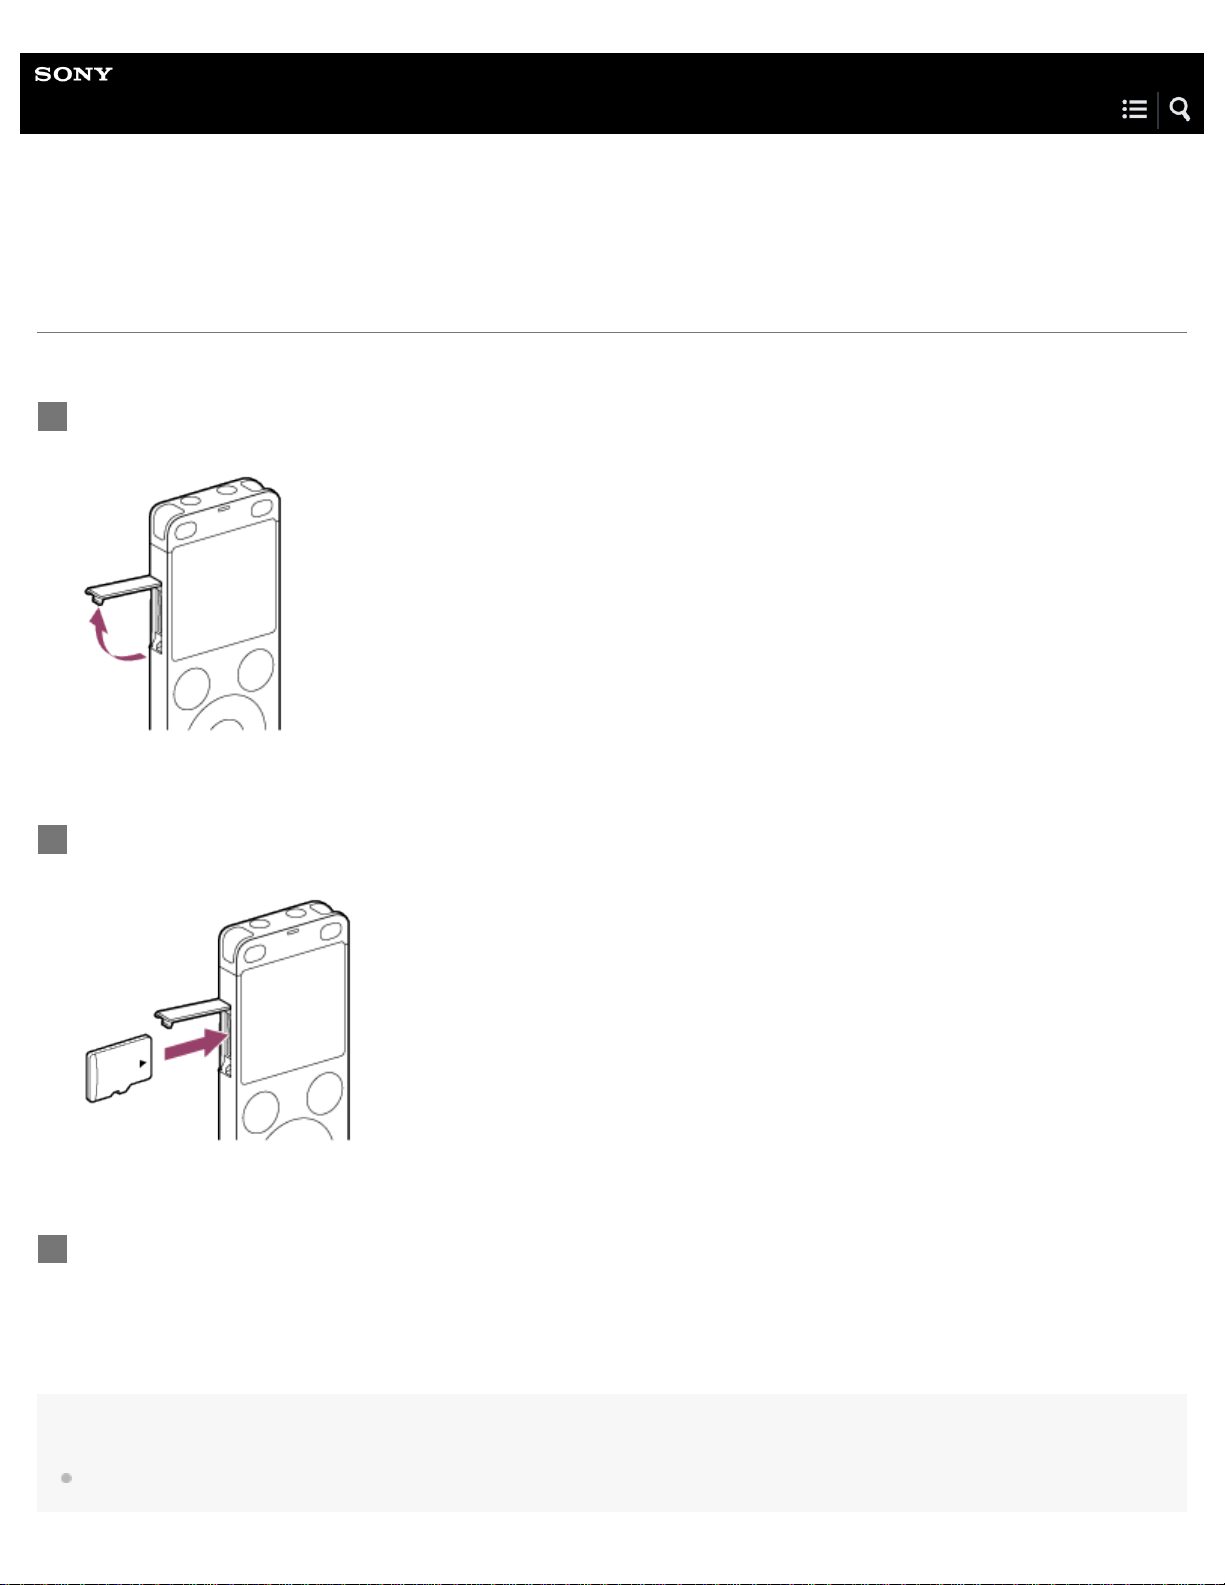
Make sure that the operation indicator of your IC recorder is not lit, and then open the cover of the
1
microSD card slot.
Hold a microSD card with the terminal side facing away from you and insert it into the microSD card
2
slot until it clicks into place.
Close the cover of the microSD card slot.
3
Note
If the microSD card is not detected by your IC recorder, remove it from the slot and then insert it back in.
Page 47
Keep any liquid and any metal or flammable object away from the microSD card slot to avoid a fire or shock hazard or malfunctions of your IC
31
recorder.
Before you start recording with a microSD card, we recommend that you copy all the data stored on the memory card to a computer and format
the memory card on your IC recorder so it contains no data. For instructions on formatting the microSD card, see Formatting the memory (Format
Built-In Memory/Format SD Card).
Hint
To remove the memory card, push the microSD card into the slot. When it pops out, remove it from the microSD card slot.
Related Topic
Structure of folders and files
Compatible memory cards
4-573-936-32(1) Copyright 2015 Sony Corporation
Page 48
Help Guide
previous item.
32
IC Recorder
ICD -UX560 / ICD-UX560F / ICD -UX565F
Making the initial settings
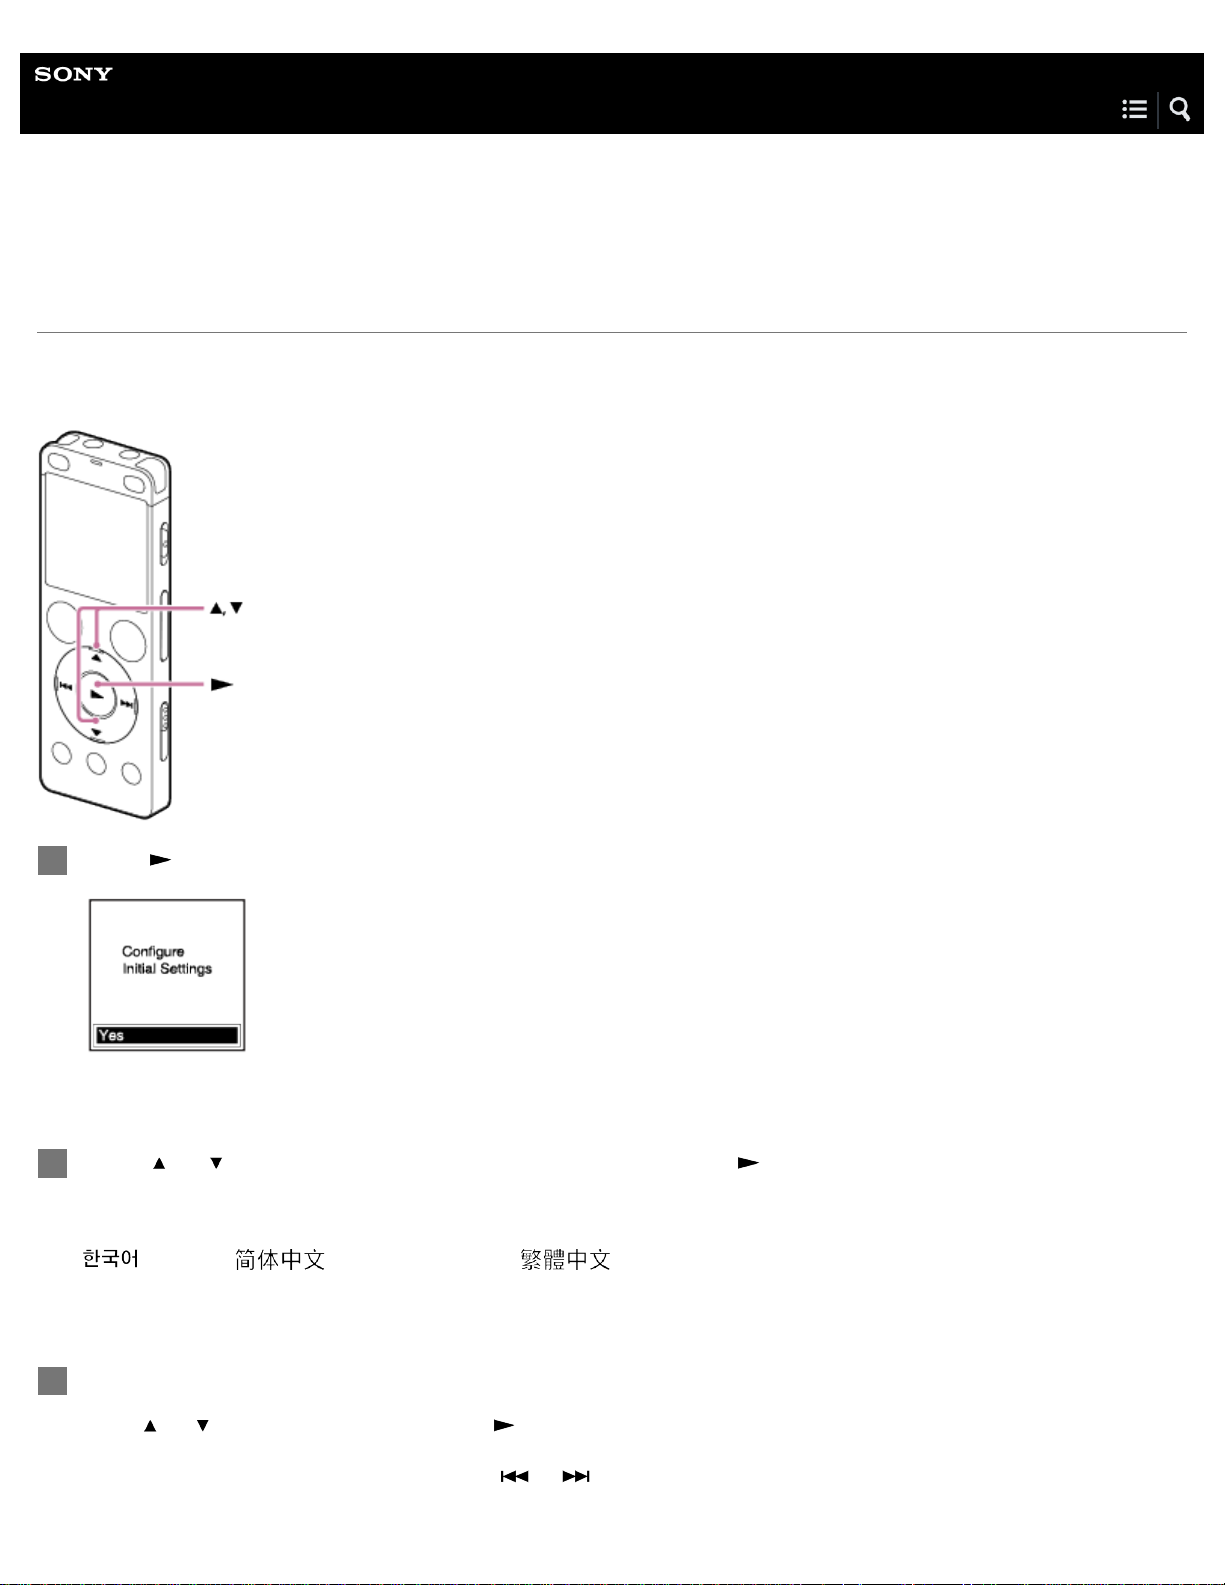
When you turn on your IC recorder for the first time, the Configure Initial Settings screen appears on the display window. You can
then select the display language, set the clock, and turn on/off the beep sound.
Press to select “Yes.”
1
Press
2
You can select from the following languages:
Deutsch (German), English, Español (Spanish), Français (French), Italiano (Italian), Русский (Russian), Türkçe (Turkish),
Set the current date and time.
3
Press
Repeat the actions to set all items.
To move the focus backward or forward, press
or to select the display language, and then press .
(Korean), (Simplified Chinese), (Traditional Chinese).
or to set an item, and then press .
or . You can also press BACK/HOME to move the focus to the
Page 49
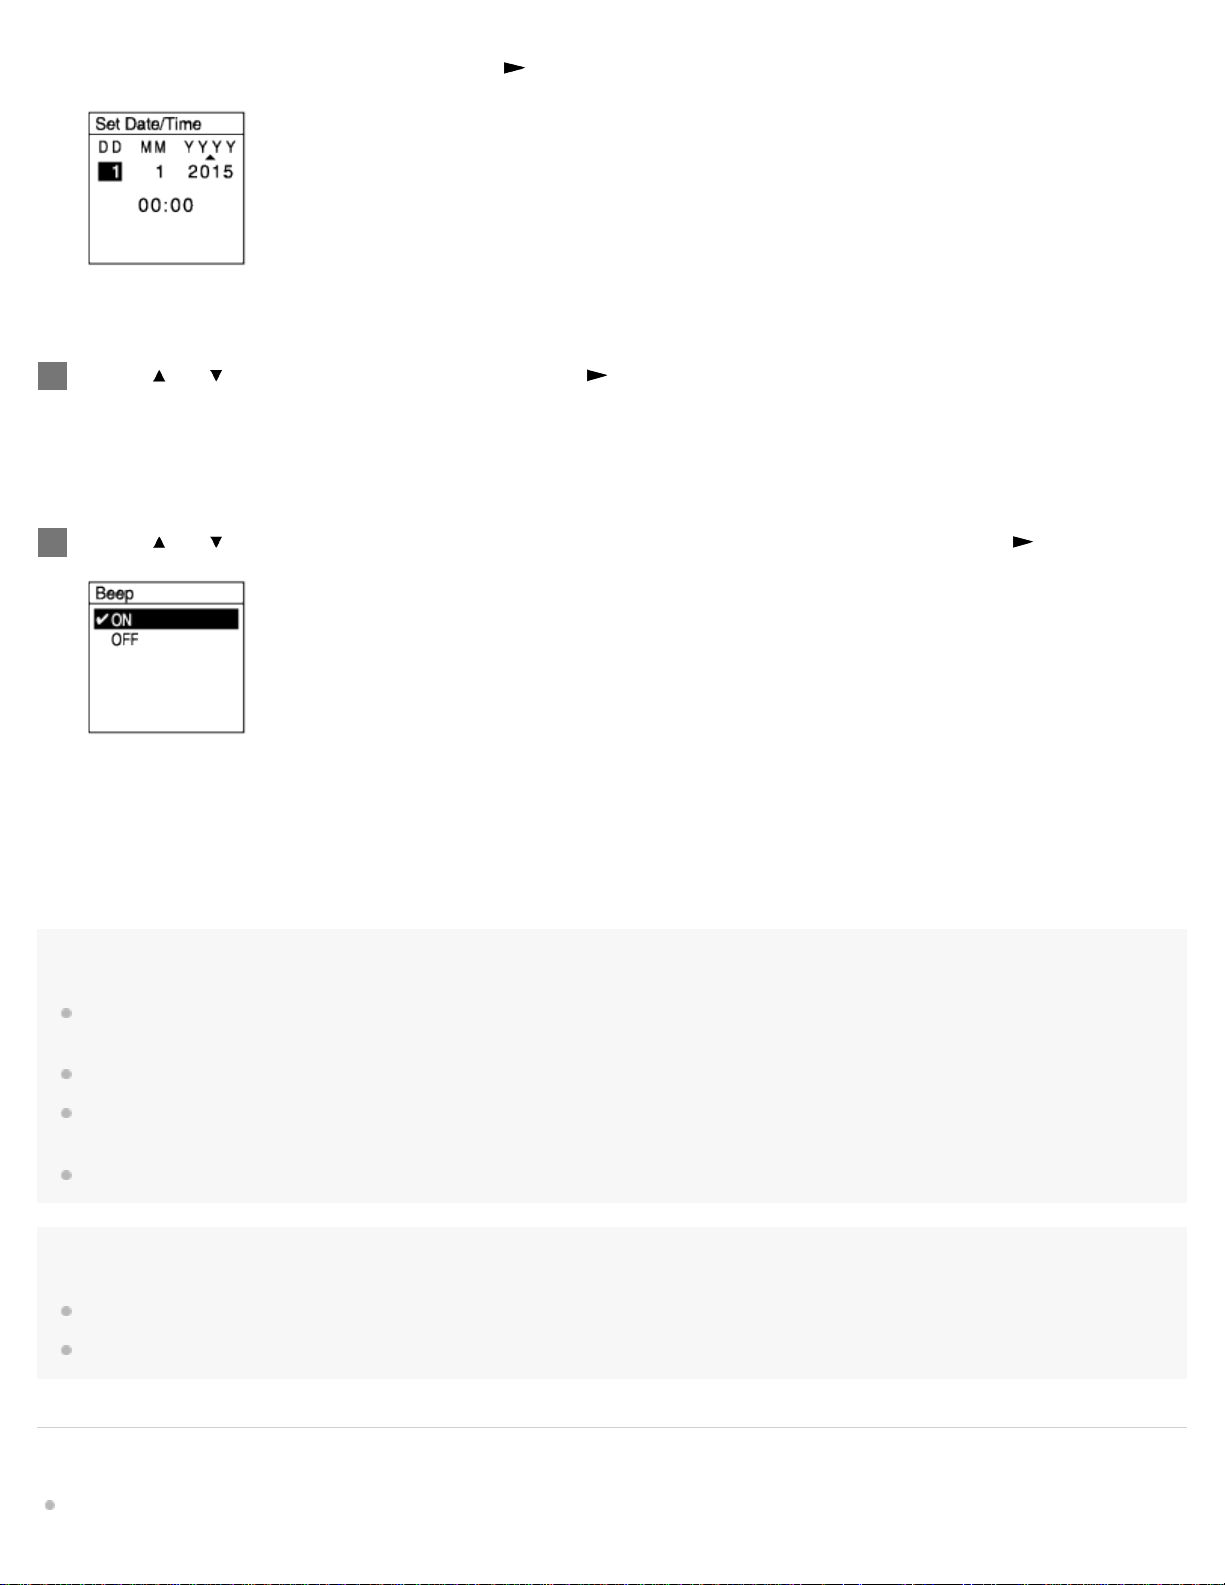
When you are finished with the last item, press to apply the settings to the clock.
33
Press or to select “Next,” and then press .
4
The setting window for turning the beep sound on or off is displayed.
5
Press
or to select “ON” or “OFF” to turn on or off the beep sound, and then press .
When the initial settings finish, the completion message and then the HOME menu appears.
Note
If you take 30 seconds or longer before proceeding to the next step, the display window will turn off. To turn on the display window for continuing
the initial settings, press BACK/HOME.
The default date display format depends on the country or region of your purchase.
The clock may tell the time either in 12-Hour format with “AM” or “PM” or in the 24-Hour format, depending on the selected clock display format
(Time Display) on the Settings menu. In addition, the default clock display format depends on the country or region of your purchase.
The number of language options you can select and the default setting differ depending on the country or region of your purchase.
Hint
You can press and hold BACK/HOME to display the HOME menu and check the current time.
You can change any of the initial settings at any time later with the Settings menu.
Related Topic
Page 50

Setting the clock (Date&Time)
Turning the beep sound on or off ( Beep)
34
While the HOME menu is displayed
4-573-936-32(1) Copyright 2015 Sony Corporation
Page 51
Help Guide
35
IC Recorder
ICD -UX560 / ICD-UX560F / ICD -UX565F
Placing the IC recorder into the HOLD state (HOLD)
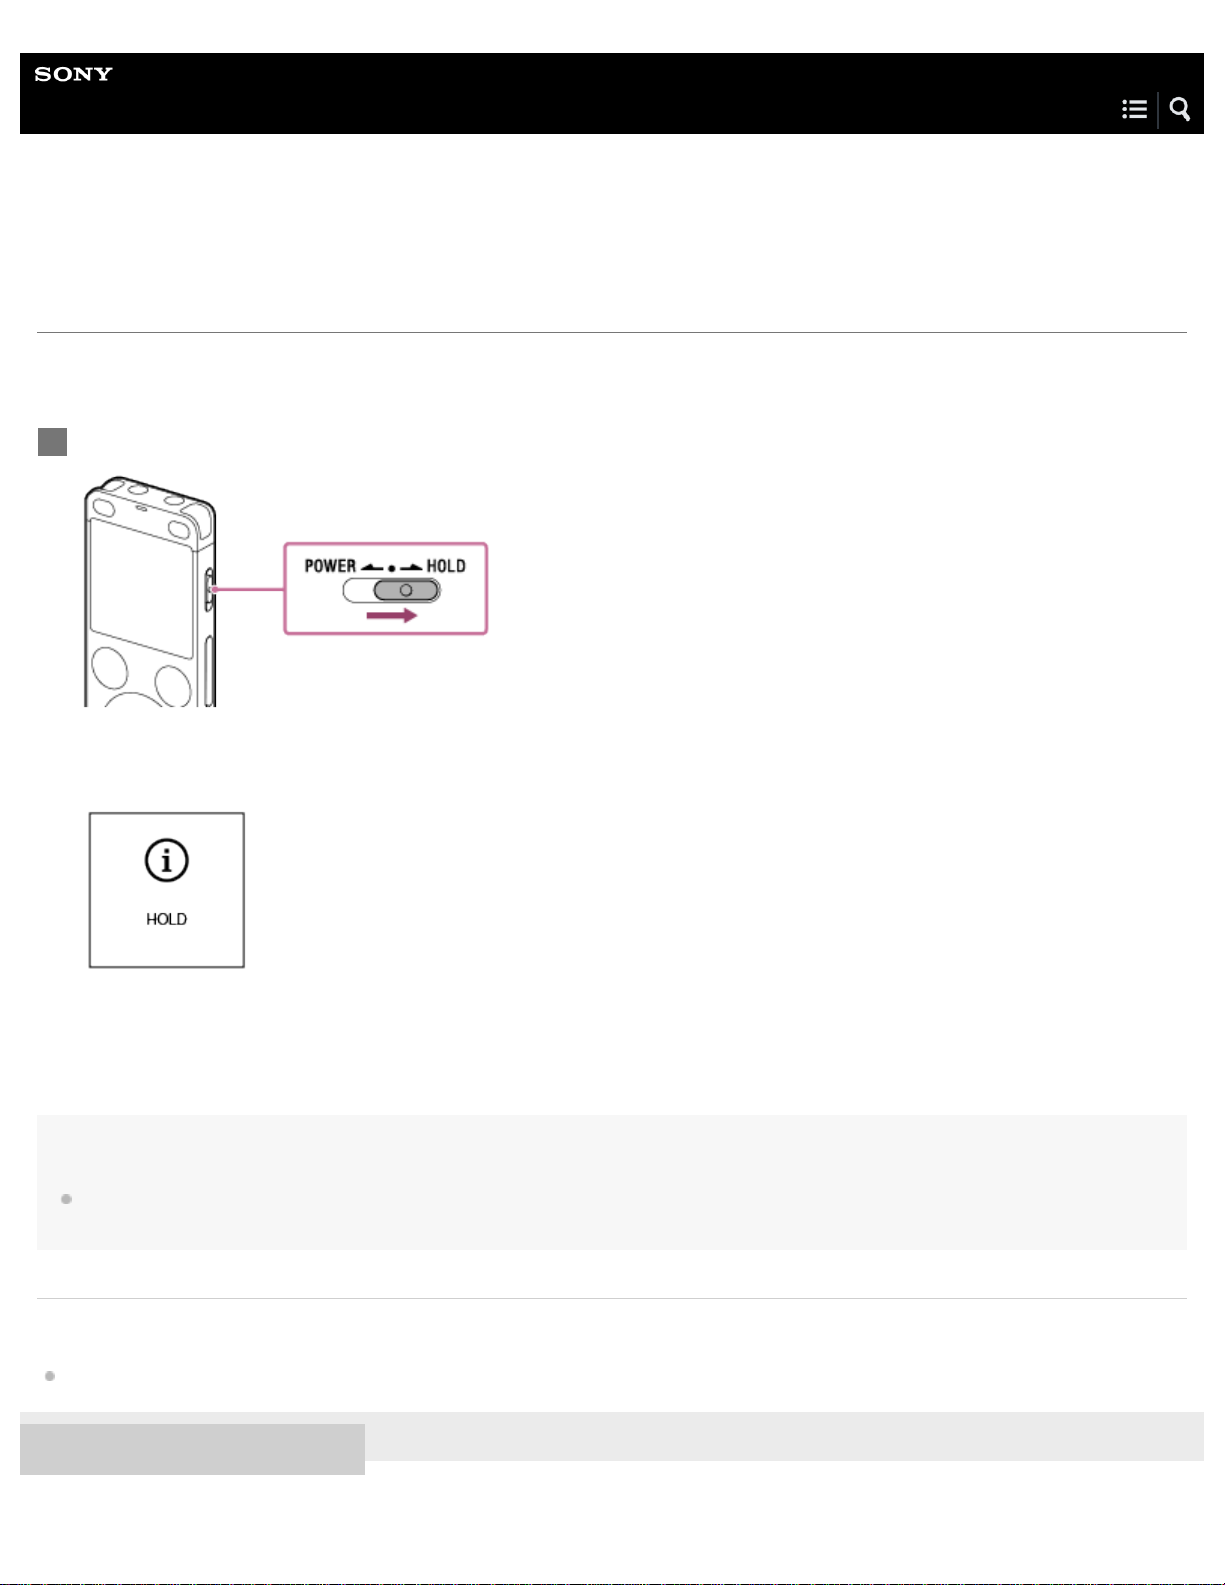
You can disable all the buttons (HOLD) on your IC recorder in order to prevent unintentional operations while you carry around the
IC recorder.
Slide the POWER·HOLD switch to “HOLD.”
1
While the IC recorder is turned on, sliding the POWER·HOLD switch to “HOLD” displays “HOLD” for approximately 3
seconds on the display window, indicating that all the buttons are disabled.
Note
Placing your IC recorder into the HOLD state disables all the buttons. Be sure to release it from the HOLD state before you use the IC recorder
again.
Related Topic
Releasing the IC recorder from the HOLD state
4-573-936-32(1) Copyright 2015 Sony Corporation
Page 52
Help Guide
36
IC Recorder
ICD -UX560 / ICD-UX560F / ICD -UX565F
Releasing the IC recorder from the HOLD state
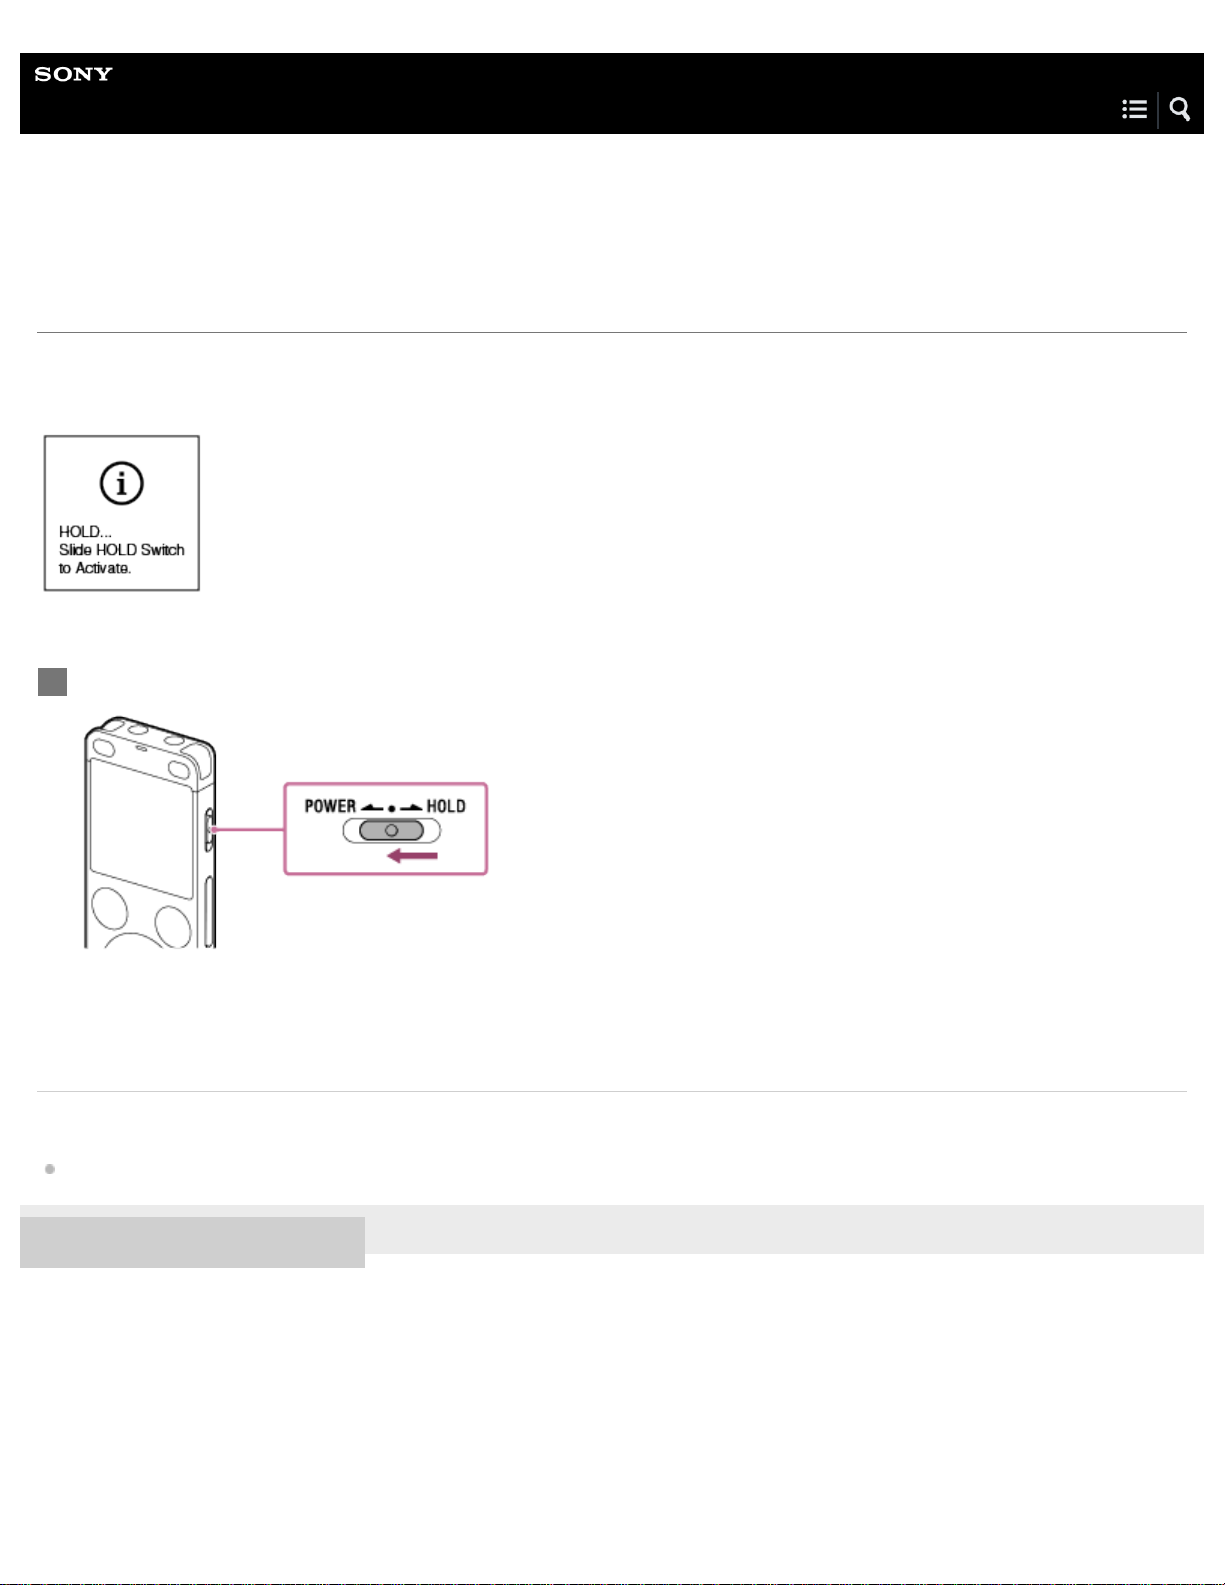
When all the buttons on your IC recorder are disabled, pressing any button displays “HOLD... Slide HOLD Switch to Activate.” on
the display window.
Release the IC recorder from the HOLD state before you use it.
Slide the POWER·HOLD switch to the center dot.
1
Related Topic
Placing the IC recorder into the HOLD state (HOLD)
4-573-936-32(1) Copyright 2015 Sony Corporation
Page 53
Help Guide
37
IC Recorder
ICD -UX560 / ICD-UX560F / ICD -UX565F
Maintaining the moderate volume level (European models only)
The IC recorder limits the maximum volume to allow you to listen to the sound at a moderate volume level when using the
headphones. When you try to adjust the volume to a level that exceeds the specified level, the “ Check The Volume Level”
message appears.
4-573-936-32(1) Copyright 2015 Sony Corporation
Page 54
Help Guide
38
IC Recorder
ICD -UX560 / ICD-UX560F / ICD -UX565F
Recording with the built- in microphones
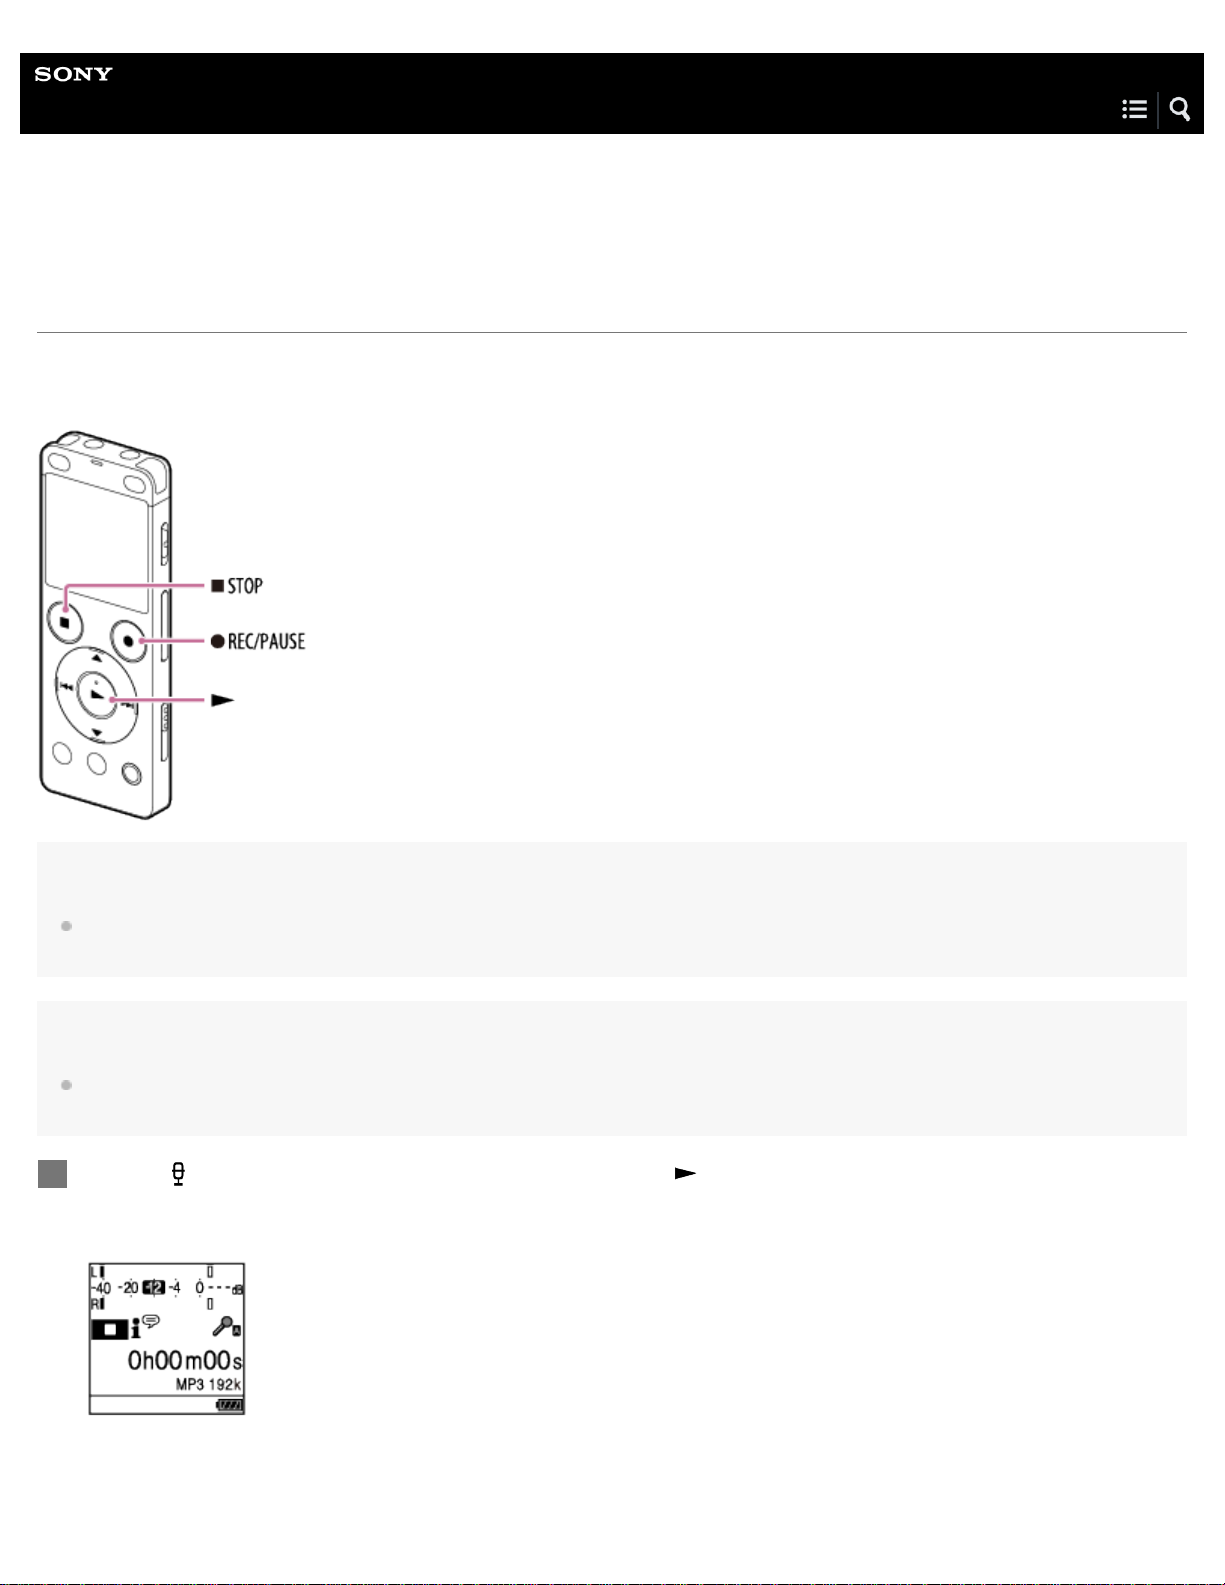
The following describes the basic recording steps with the selected sensitivity level of the built-in microphones and recording
mode.
Note
If you accidentally touch your IC recorder or let an object come in contact with it while recording is in progress, rustling or scratching noises may be
recorded.
Hint
Before you start recording, we recommend you first make a trial recording or monitor the recording. For instructions on monitoring the recording,
see Monitoring the recording audio.
Select “ Record” on the HOME menu, and then press .
1
The recording standby screen appears on the display window.
Page 55
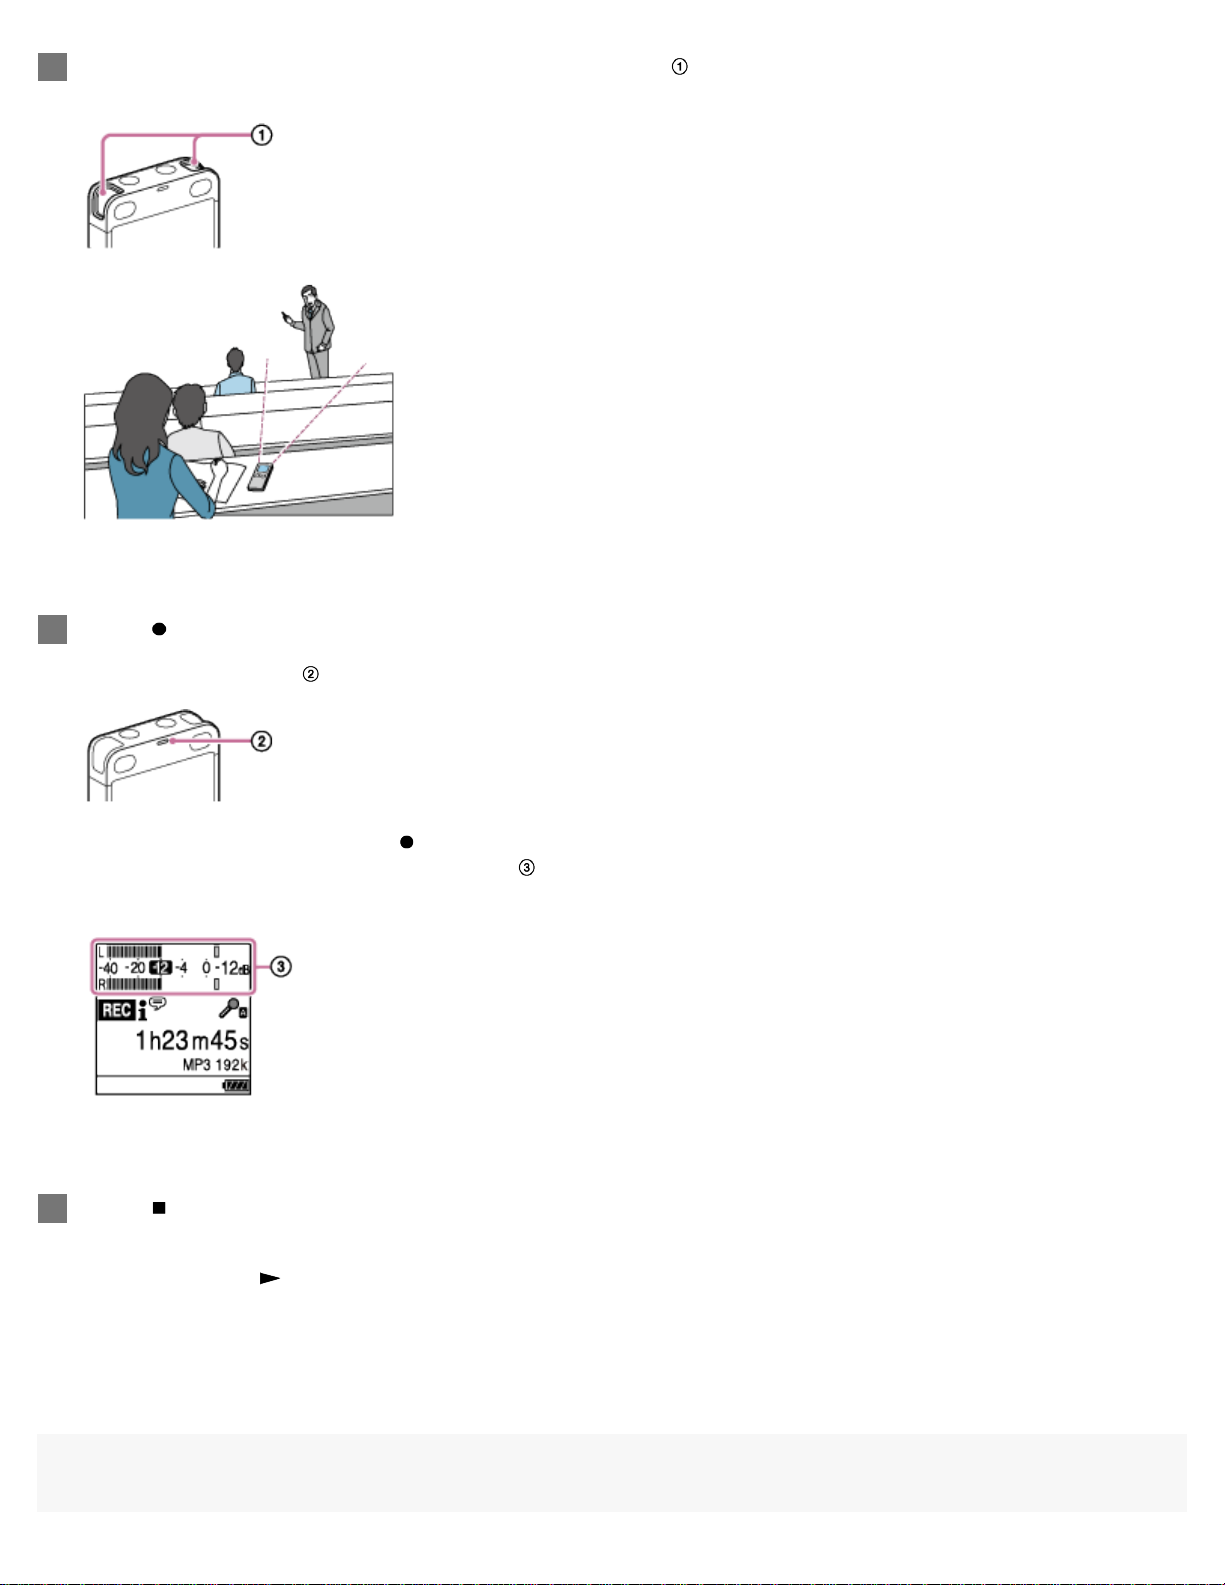
Turn your IC recorder so that its built-in microphones ( ) point in the direction of the target sound
source.
2
39
Press REC/PAUSE.
3
The operation indicator (
) lights in red.
You do not need to press and hold REC/PAUSE while recording.
While recording is in progress, the peak meters (
) appear to indicate the current and optimum recording volume levels of
input sound. For more information about the peak meters, see About the peak meters indicating the recording volume levels.
4
Press
STOP to stop recording.
The “ Please Wait” animation and then the recording standby screen appear.
Now you can press
to play the file you have just recorded.
Note
Page 56
While the “Please Wait” animation is on the display window, your IC recorder is saving the file to the memory storage. If the IC recorder is running
40
on AC power, do not disconnect the USB AC adaptor (not supplied) to avoid data corruption.
Hint
Recorded files are stored in “FOLDER01” under “ Recorded Files” by default. To change the file storage destination folder for recorded file, see
Changing the file storage destination folder.
You can still press
You can still press
Recorded files are named as “(recording date)_(recording time).(file format)” (e.g. 151010_0706.mp3).
While playback is in progress or on standby, you can press and hold the
you adjust the recording volume level without recording unnecessary audio data.
REC/PAUSE to start recording while playback is in progress or a menu is on the display window.
REC/PAUSE to pause the ongoing recording while a menu is on the display window.
Related Topic
Additional operations available during recording
Recording FM radio broadcasts (ICD -UX560F / ICD- UX565F only)
4-573-936-32(1) Copyright 2015 Sony Corporation
REC/PAUSE to make your IC recorder pause for recording. This helps
Page 57
Help Guide
41
IC Recorder
ICD -UX560 / ICD-UX560F / ICD -UX565F
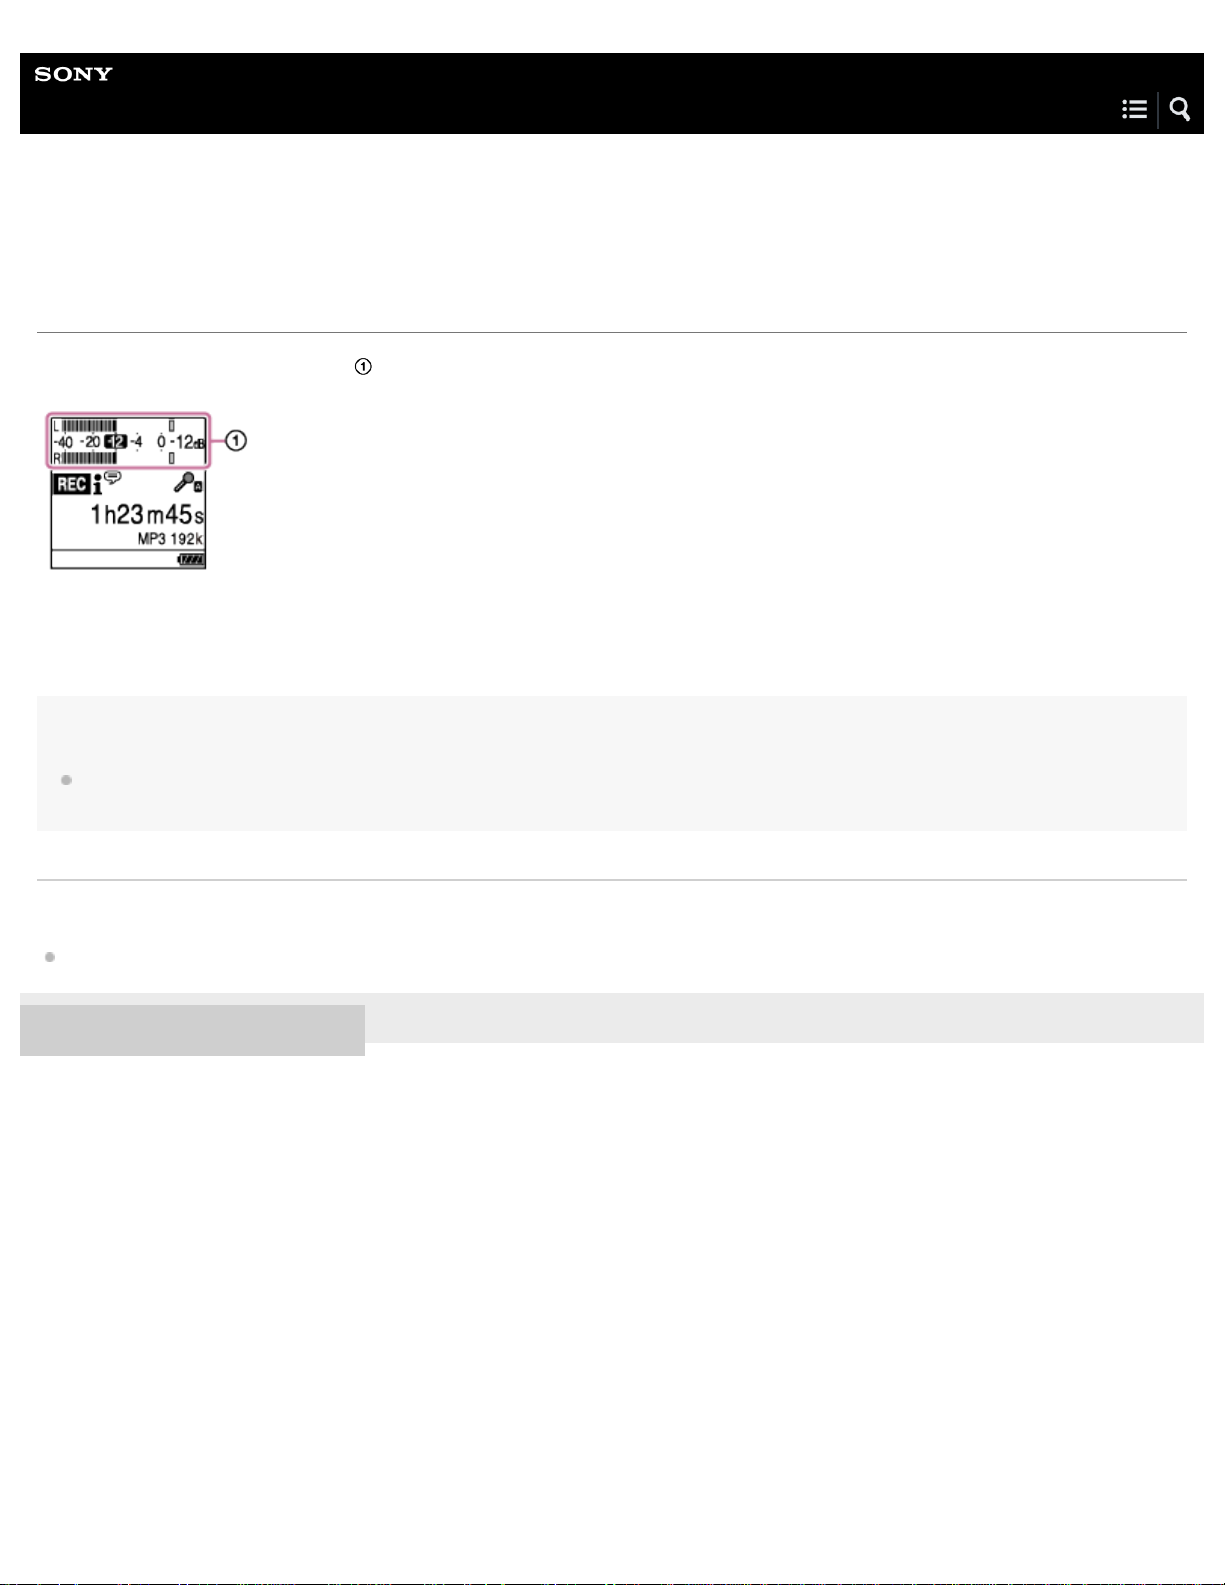
About the peak meters indicating the recording volume levels
During recording, the peak meters ( ) appear to help you adjust the recording level.
Please adjust the orientation of the built-in microphones, the distance from the sound source, or the sensitivity setting of the
microphones so that the recording level stays around - 12 dB, which fits within the optimum range, as illustrated above. See
Selecting the sensitivity level of the built-in microphones (Built -in Mic Sensitivity ) for selecting the microphone sensitivity level.
Hint
When the input sound volume is low, it is recommended you move your IC recorder closer to the sound source or increase the microphone
sensitivity level.
Related Topic
Recording with the built- in microphones
4-573-936-32(1) Copyright 2015 Sony Corporation
Page 58
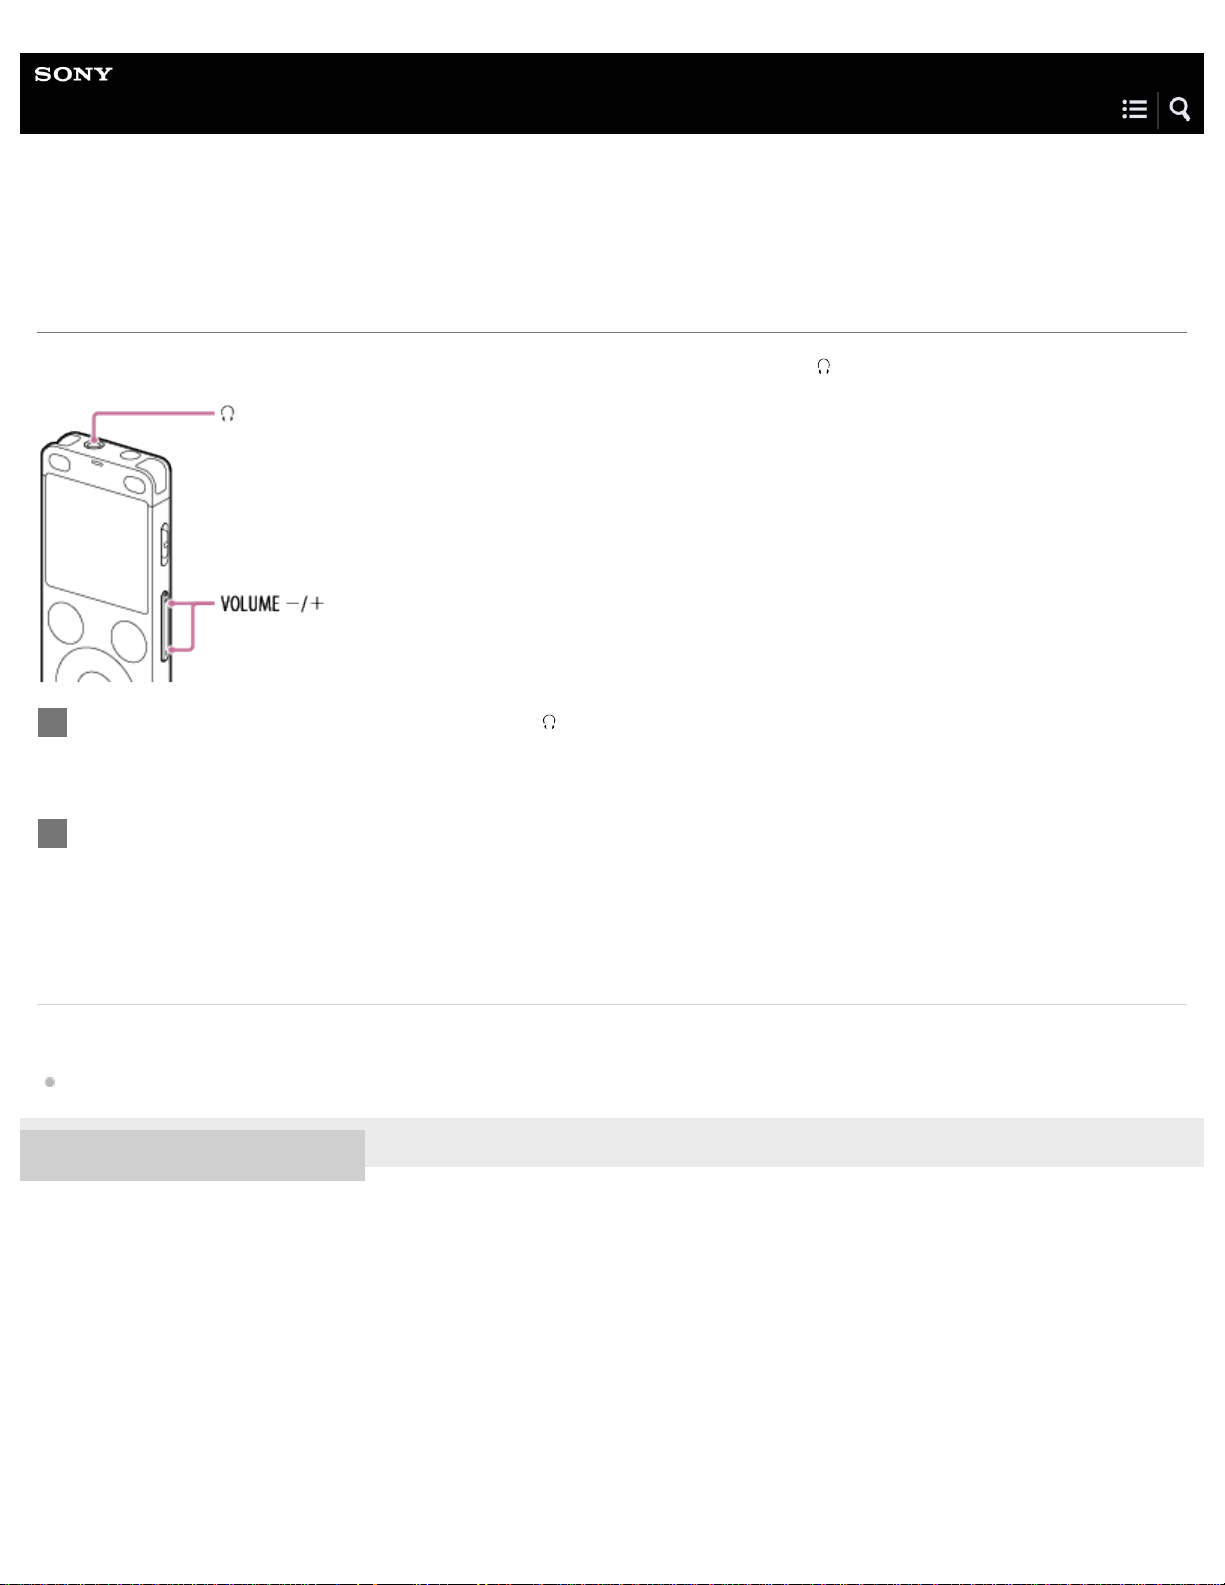
Help Guide
42
IC Recorder
ICD -UX560 / ICD-UX560F / ICD -UX565F
Monitoring the recording audio
You can monitor the ongoing recording by connecting headphones (not supplied) to the (headphones) jack.
Connect headphones (not supplied) to the (headphones) jack.
1
Press VOLUME -/+ to adjust the monitoring volume.
2
Changing the monitoring volume does not affect the recording volume.
Related Topic
Recording with the built- in microphones
4-573-936-32(1) Copyright 2015 Sony Corporation
Page 59
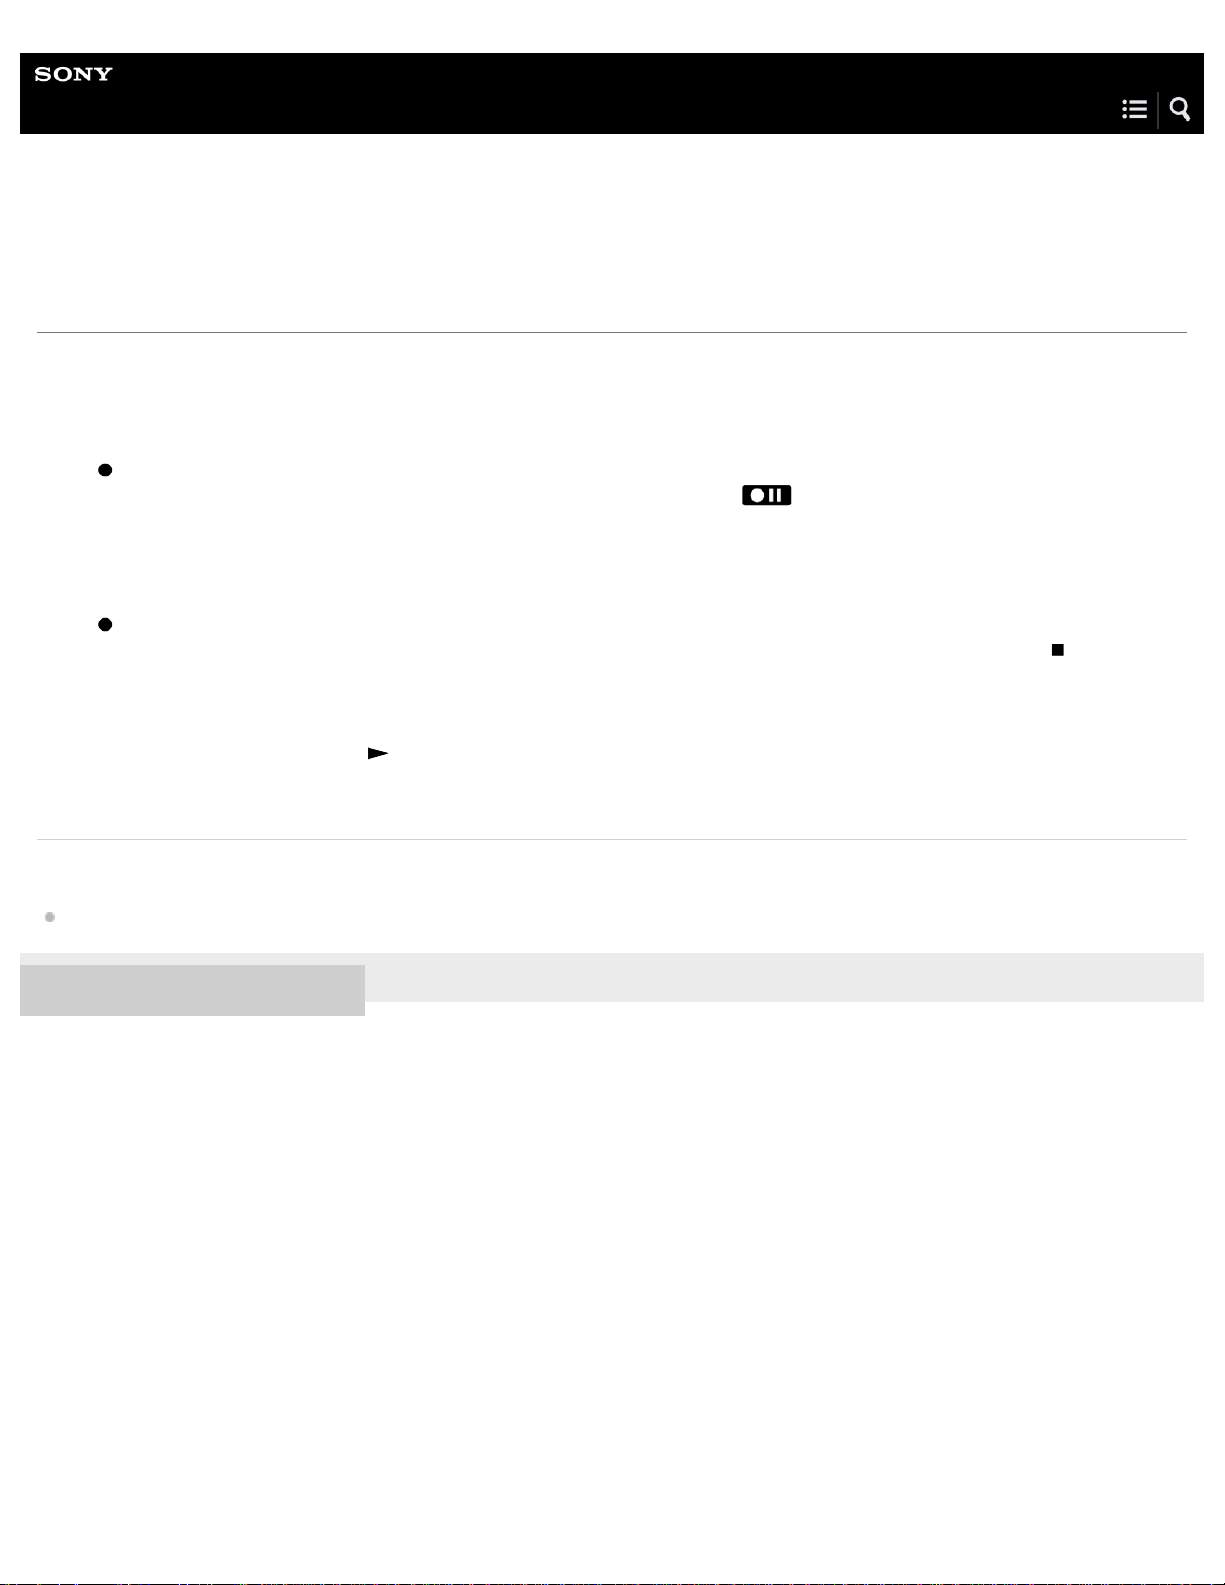
Help Guide
43
IC Recorder
ICD -UX560 / ICD-UX560F / ICD -UX565F
Additional operations available during recording
You can perform the following operations during recording.
To pause a recording
Press REC/PAUSE.
While a recording is paused, the operation indicator flashes in red and flashing
If you leave the recording paused for 1 hour, it will stop automatically.
To restart the recording from a pause
Press REC/PAUSE again.
The recording restarts from the paused point. (To completely stop recording after you paused the recording, press
appears on the display window.
STOP.)
To review the ongoing recording from the beginning
While recording is on standby, press .
The recording stops and plays from the beginning.
Related Topic
Recording with the built- in microphones
4-573-936-32(1) Copyright 2015 Sony Corporation
Page 60
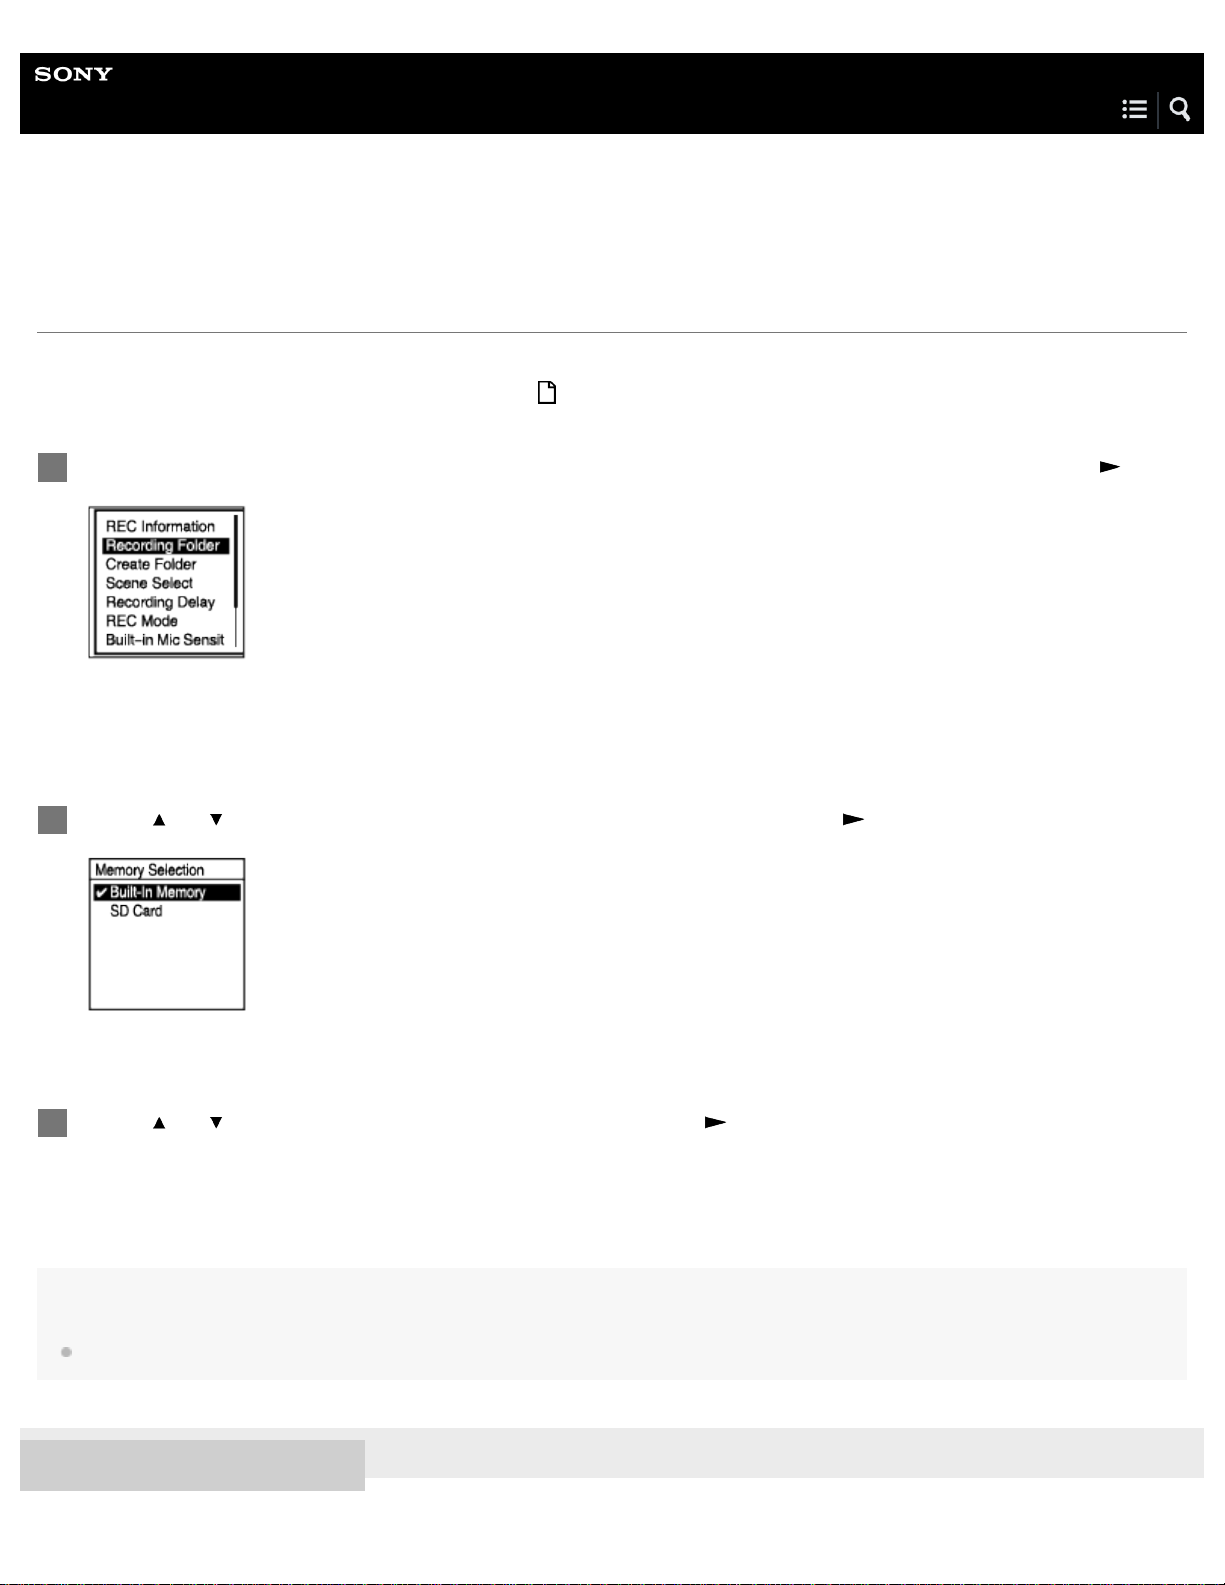
Help Guide
44
IC Recorder
ICD -UX560 / ICD-UX560F / ICD -UX565F
Changing the file storage destination folder
By default, the recorded files via the built-in microphones are stored in “FOLDER01” while the recorded FM radio files are stored
in “RADIO01” (ICD-UX560F / ICD -UX565F only) under “
You can change this storage folder setting by following the steps below:
While recording is on standby, select “Recording Folder” on the OPTION menu, and then press .
1
Recorded Files .”
The Memory Selection screen appears.
Press or to select “Built-In Memory” or “SD Card,” and then press .
2
3
Press
or to select the desired folder, and then press .
Hint
For instructions on creating a new folder, see Creating a folder.
4-573-936-32(1) Copyright 2015 Sony Corporation
Page 61
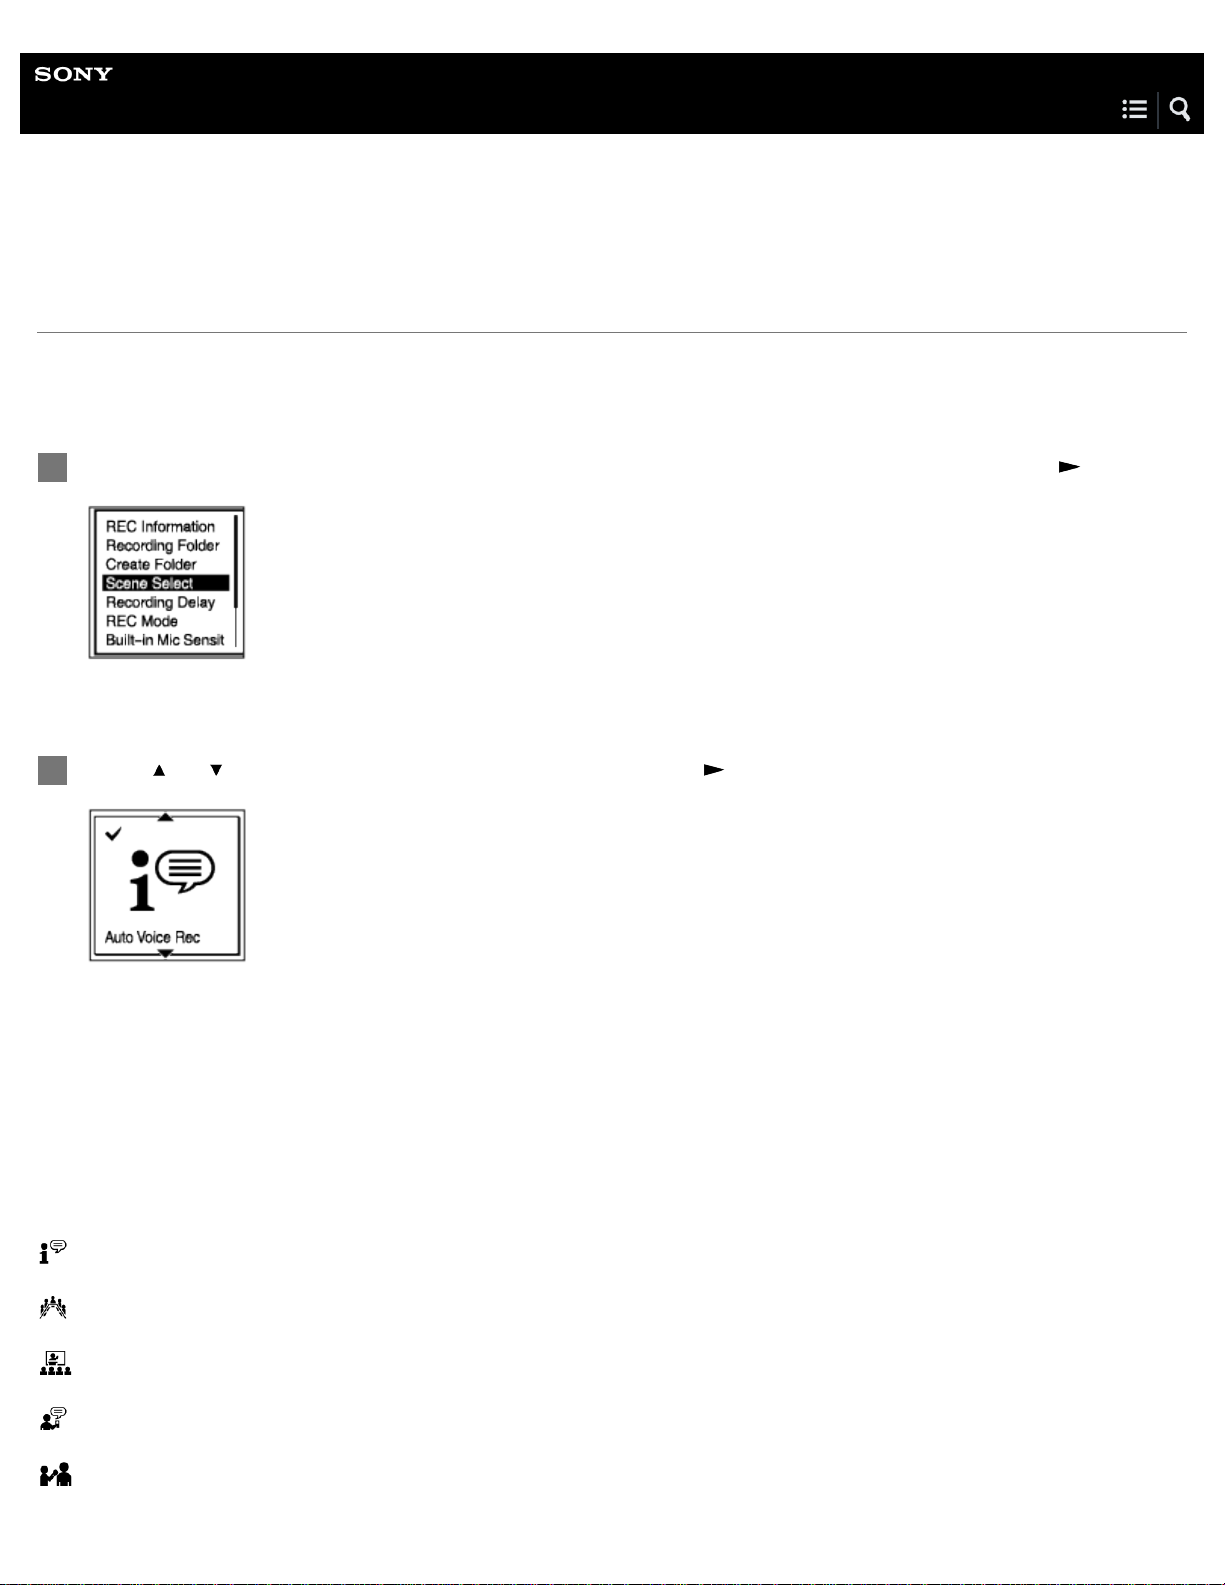
Help Guide
45
IC Recorder
ICD -UX560 / ICD-UX560F / ICD -UX565F
Selecting a recording scene for an individual situation
According to a particular recording situation, you can change some recording settings, including the recording mode and the
sensitivity level of the built-in microphones, at once by selecting one of the recording scenes (Scene Select ).
For “ My Scene 1 ” and “My Scene 2,” you can customize their recording settings to suit your preference.
While recording is on standby, select “Scene Select” on the OPTION menu, and then press .
1
Press
2
Description of menu items
You can select one of the following items:
Scene Select Off:
Available for the situation where no recording scene selection is required.
Auto Voice Rec:
Suitable for recording human voices in general (default setting).
Meeting:
Suitable for recording human voices in large spaces, including conference rooms.
Lecture:
Suitable for recording seminars and lectures.
Voice Notes:
Suitable for speaking into the built-in microphones to record voice notes.
Interview:
Suitable for recording human voices from a distance of 1 to 2 meters (40 to 80 inches), such as interviews and small
or to select a scene you want, and then press .
Page 62

meetings.
Soft Music:
46
Suitable for recording live music from a distance of 2 to 3 meters (80 to 120 inches), such as chorus or musical instrument
lessons.
Loud Music:
Suitable for recording live loud music, such as band performances.
My Scene 1/ My Scene 2:
You can customize the recording settings, including the recording mode and the sensitivity level of the built-in
microphones, to make your own recording scene.
Related Topic
Default settings for the recording scenes of the Scene Select function
List of the Settings menu items
Customizing the recording settings for “My Scene”
4-573-936-32(1) Copyright 2015 Sony Corporation
Page 63
Help Guide
47
IC Recorder
ICD -UX560 / ICD-UX560F / ICD -UX565F
Customizing the recording settings for “My Scene”
You can customize the recording settings for “ My Scene 1 ” or “My Scene 2” of the Scene Select function to make a recording
scene that suits your preference.
Use the Settings menu to set the following:
1
The following recording menu items can be set.
REC Mode
Built-in Mic Sensitivity
Ext. Input Setting
Recording Filter
VOR
Select “Scene Select” - “My Scene 1” or “My Scene 2” from the OPTION menu, and then press
2
3
4
Press
Press
or to select “Copy Current Settings,” and then press .
or to select “Yes,” and then press .
Hint
When a recording scene is already selected for “Scene Select,” changing any of the recording settings in step 1 displays “*” next to the selected
scene icon and then the message “Current Setting Not Saved. Save to My Scene?.” If you want to save the recording settings you changed,
select “Yes” and then “My Scene 1” or “My Scene 2” for “Save to.”
.
Related Topic
Selecting a recording scene for an individual situation
Default settings for the recording scenes of the Scene Select function
Selecting the recording mode (REC Mode )
Page 64

Selecting the sensitivity level of the built-in microphones (Built -in Mic Sensitivity )
Reducing noise during recording (Recording Filter)
48
Recording automatically in response to the input sound volume – the VOR function
4-573-936-32(1) Copyright 2015 Sony Corporation
Page 65
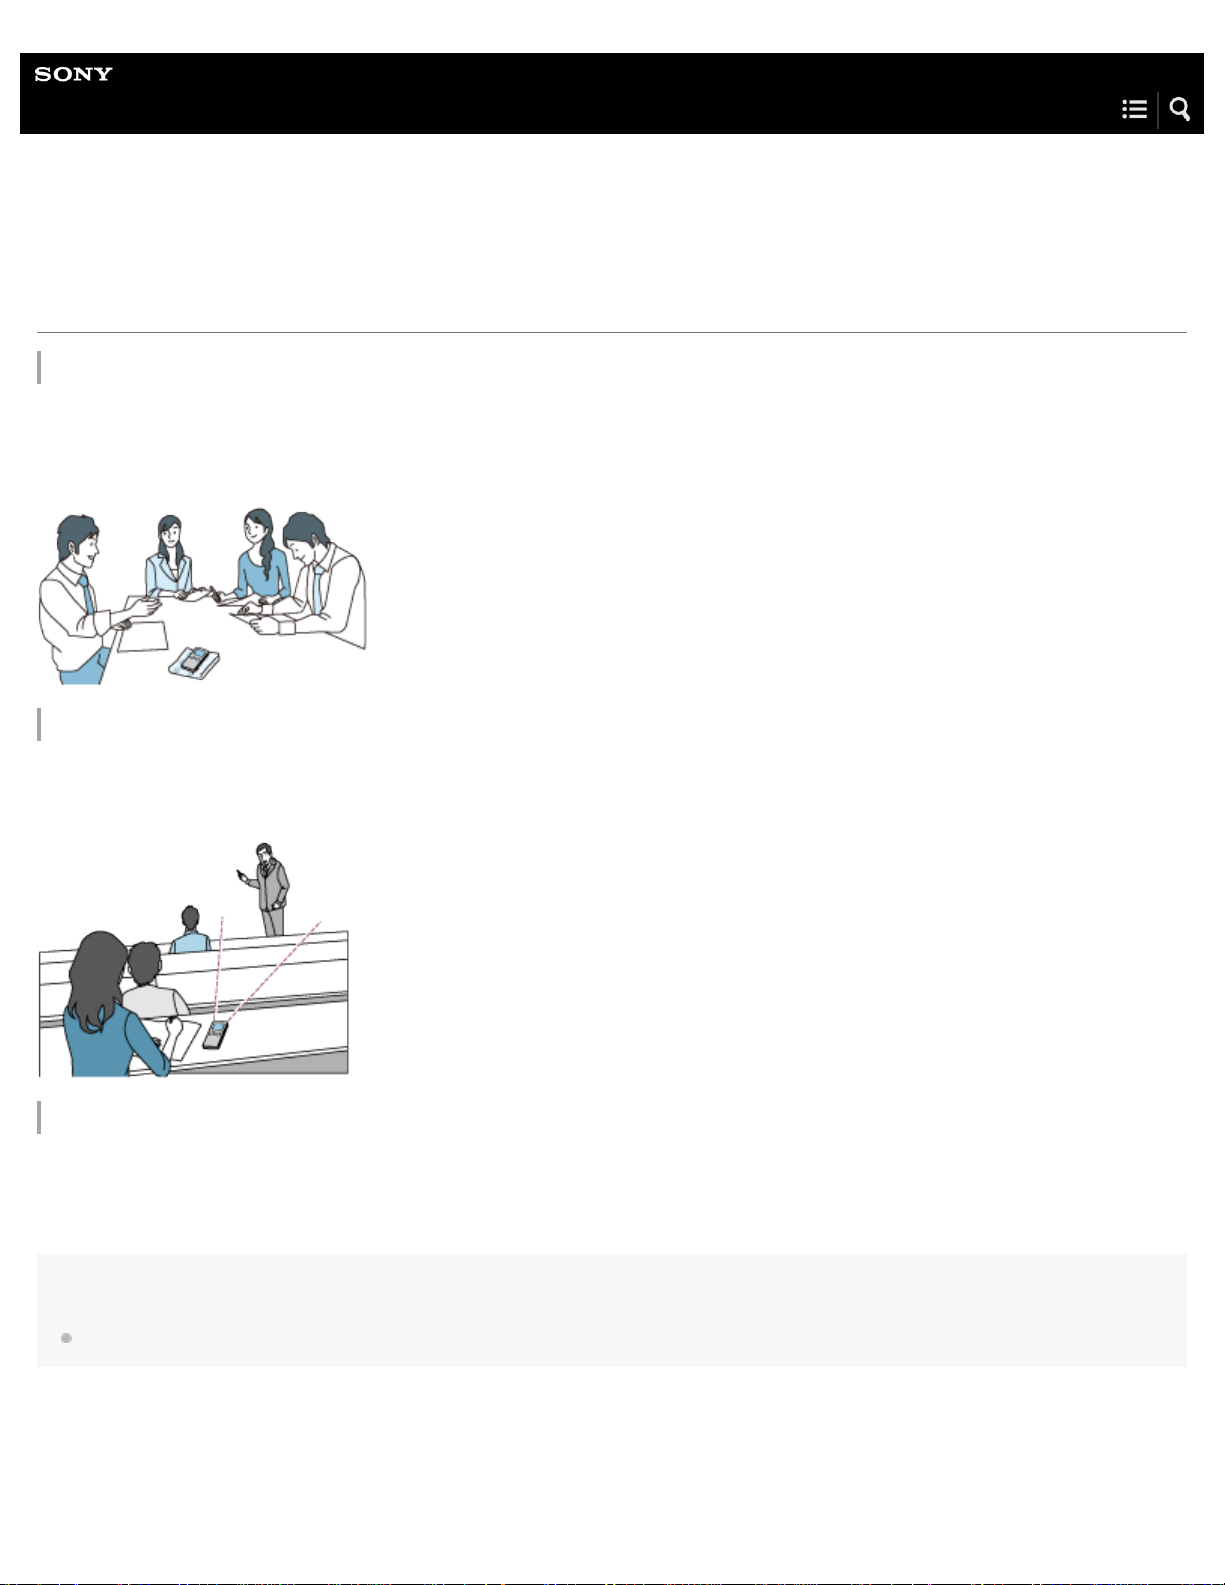
Help Guide
49
IC Recorder
ICD -UX560 / ICD-UX560F / ICD -UX565F
Tips for better recording
Recording at a meeting
Place your IC recorder close to speakers of the meeting. You can reduce noise (vibrations from the desk, etc.) by placing the IC
recorder on a soft cloth, such as a handkerchief.
For recording a meeting, it is suitable to select “Auto Voice Rec” or “Meeting” of the Scene Select function.
Recording a lecture/presentation
Place your IC recorder so that its built -in microphones point in the direction of the lecturer/presenter.
For recording a lecture/presentation, it is suitable to select “Lecture” of the Scene Select function.
Recording a voice note
When you speak into the built- in microphones, hold your IC recorder slightly off to the side of your mouth so that the built-in
microphones will not pick up breathing noises.
For recording a voice note, it is suitable to select “Auto Voice Rec” or “Voice Notes ” of the Scene Select function.
Note
While you are holding your IC recorder, make sure that the built-in microphones will not pick up rustling noises.
Page 66
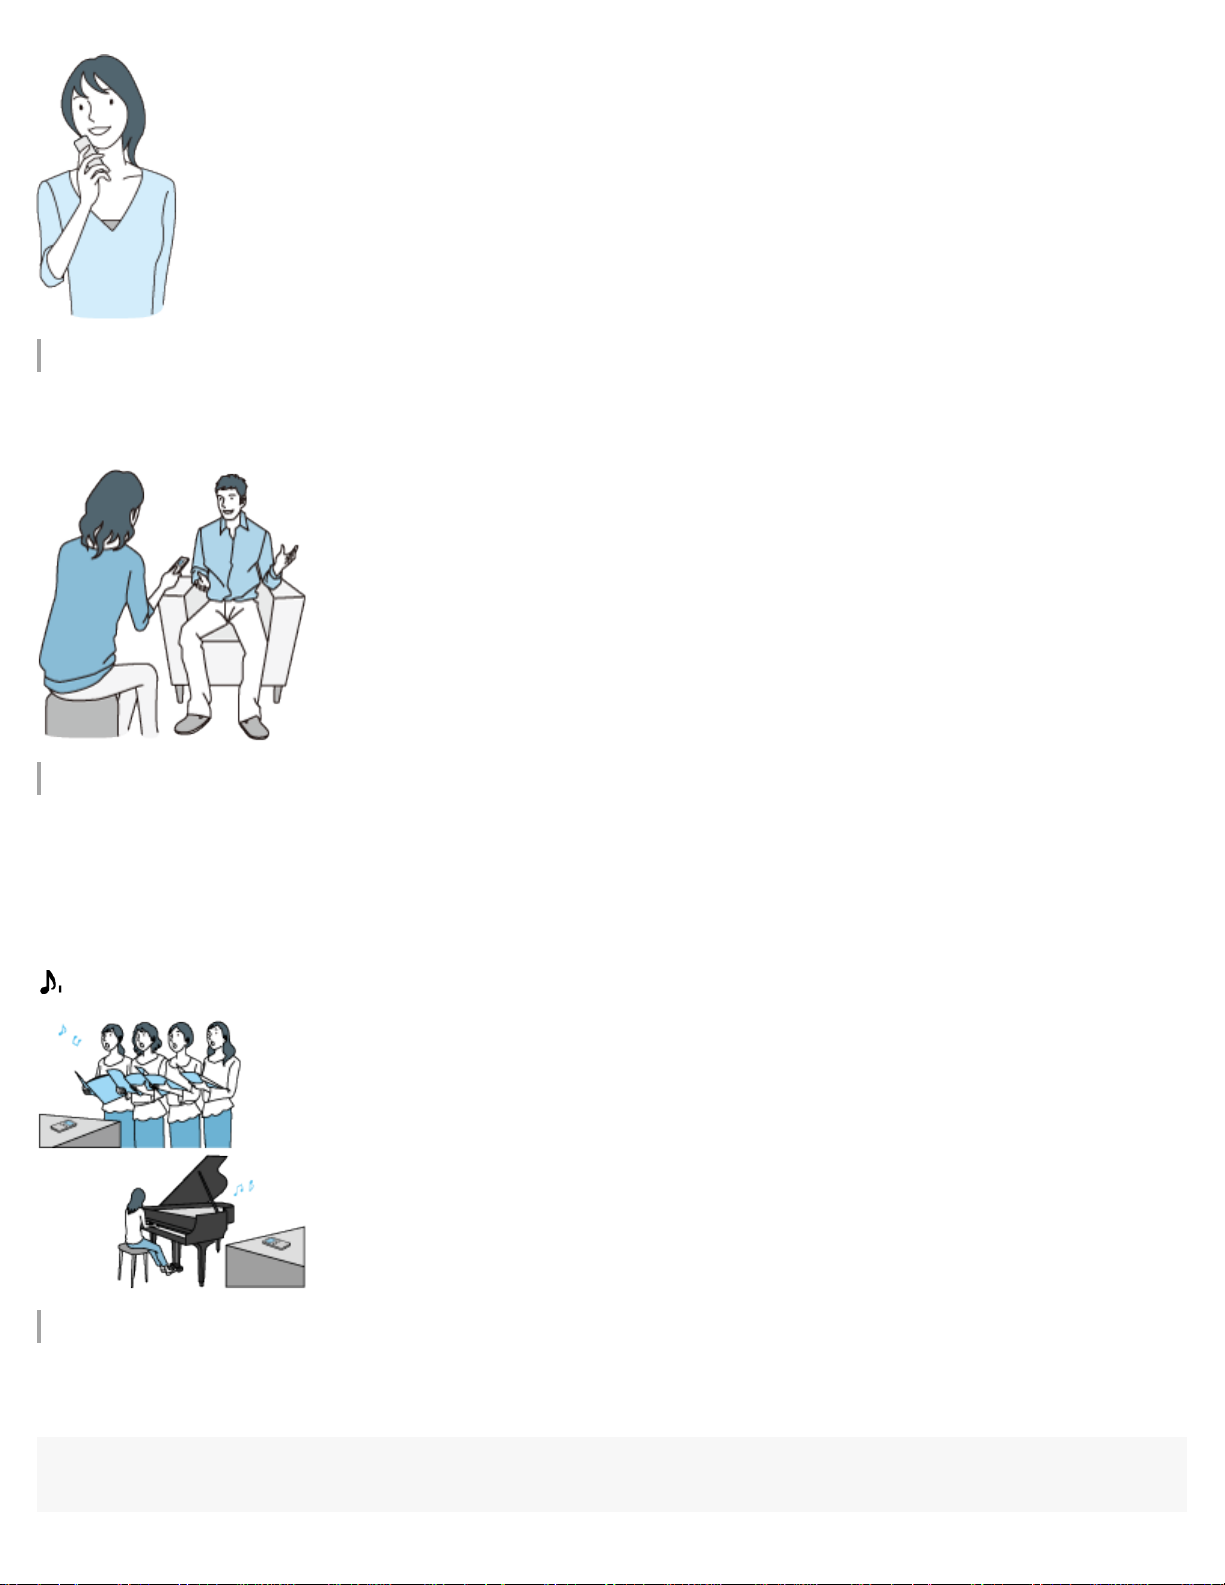
Recording an interview
50
Place your IC recorder so that the built-in microphones point in the direction of the interviewee.
For recording an interview, it is suitable to select “Auto Voice Rec” or “Interview” of the Scene Select function.
Recording a soft music performance
With your IC recorder, you can record immersive stereo sound by placing it close to musical instruments. However, if you place
the IC recorder on the piano to record a piano performance, for example, it will record vibration noise from the piano as well as
the performance. Be sure to place the IC recorder beside the piano to avoid recording undesirable noise.
With Sound Organizer 2, you can use recorded music performance files to make your own music CD as well. [Details]
For recording a soft music performance, it is suitable to select “Soft Music” of the Scene Select function.
If the audio of a recorded file is distorted, you can select “ Built- in Mic Sensitivity” on the OPTION menu and set “ For Music” to “
Low(Music)” to reduce distortion for the next recording. [Details]
Recording a loud music performance
Place your IC recorder from a distance of 1 to 2 meters (40 to 80 inches) from performers.
For recording a loud music performance, it is suitable to select “Loud Music” of the Scene Select function.
Note
Page 67
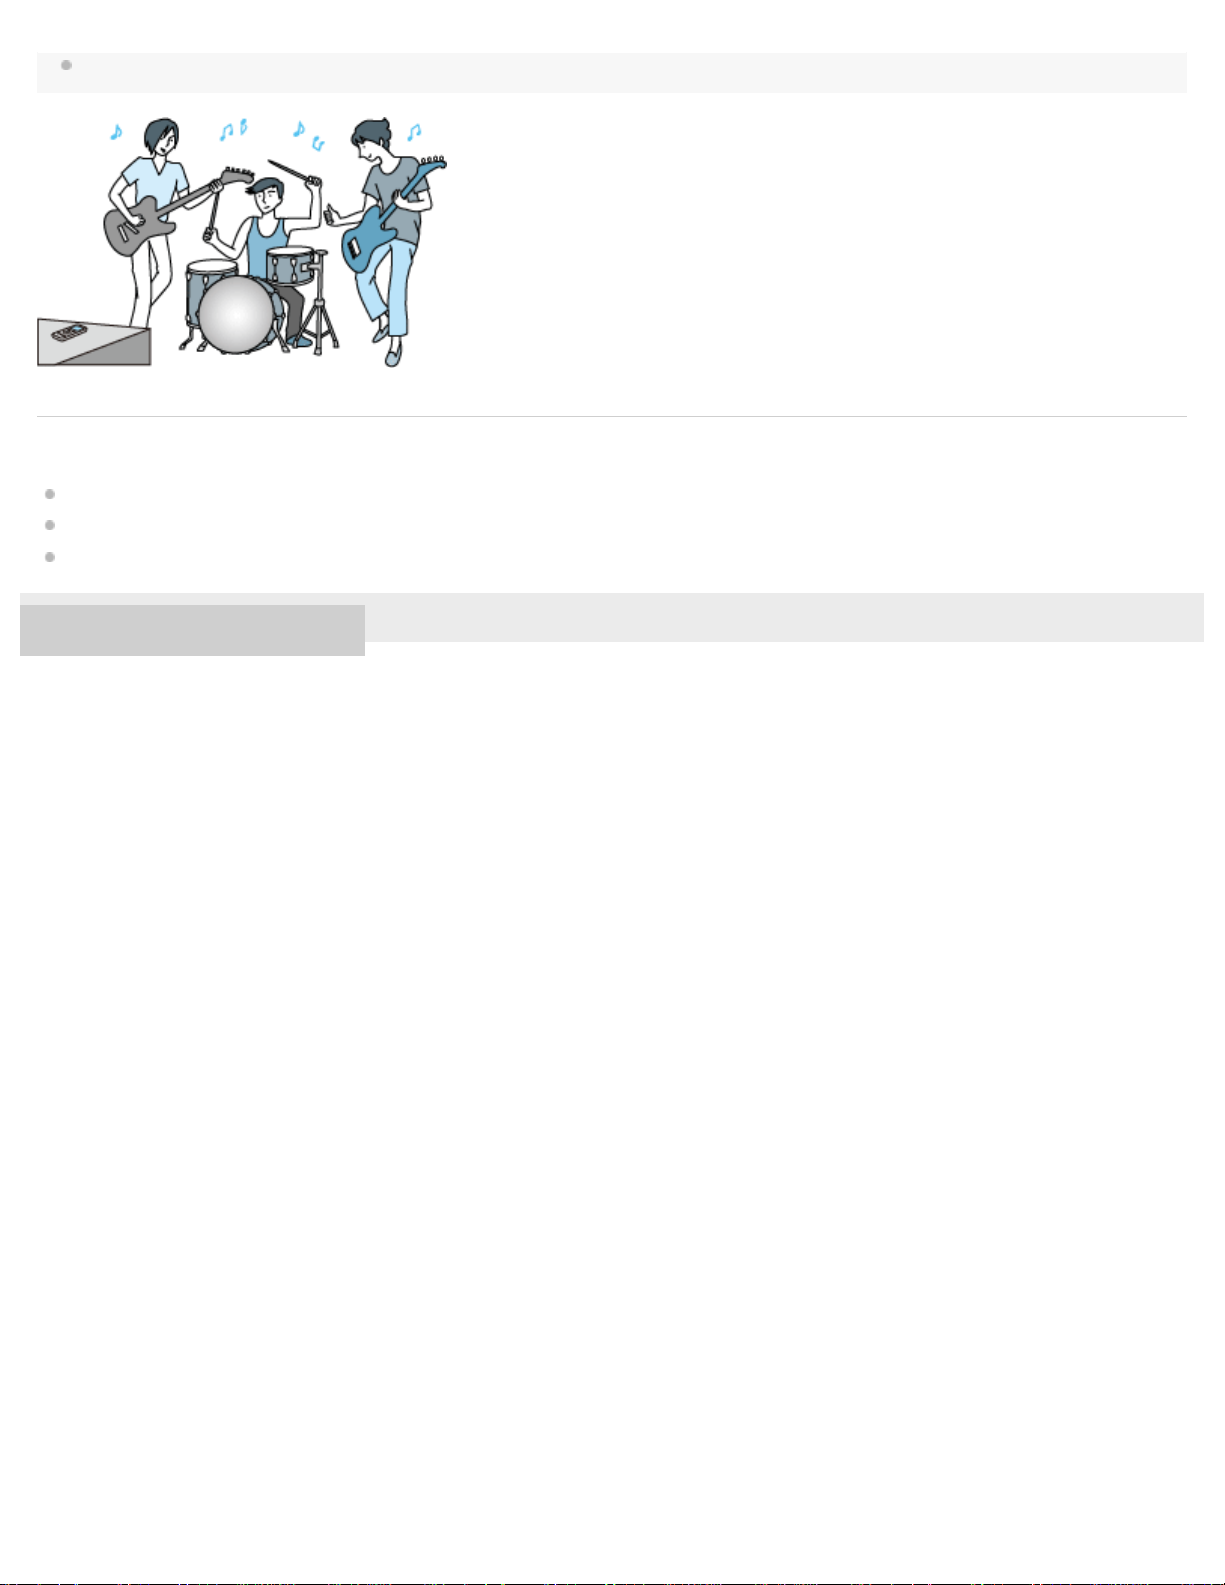
If the audio of a recorded file is distorted, place the IC recorder further away to record performances.
51
Related Topic
Selecting a recording scene for an individual situation
Reducing noise during recording (Recording Filter)
Selecting the sensitivity level of the built-in microphones (Built -in Mic Sensitivity )
4-573-936-32(1) Copyright 2015 Sony Corporation
Page 68
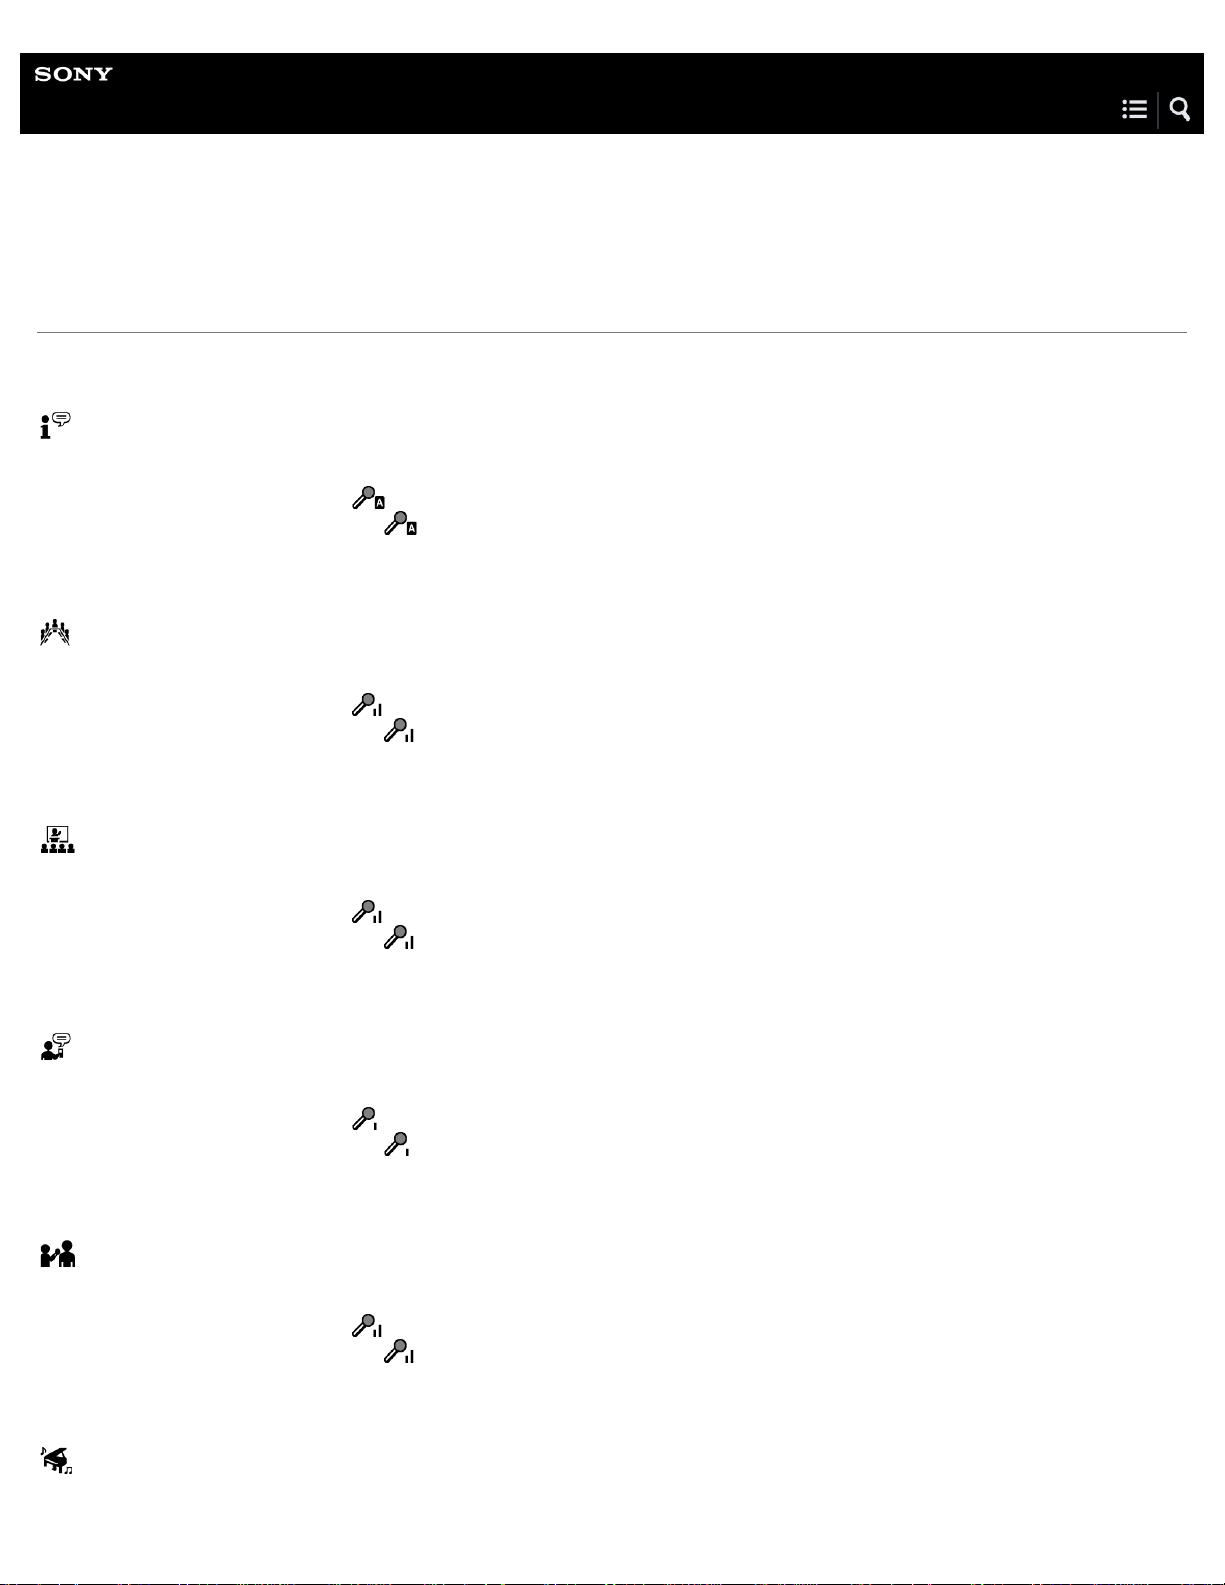
Help Guide
52
IC Recorder
ICD -UX560 / ICD-UX560F / ICD -UX565F
Default settings for the recording scenes of the Scene Select function
By default, the settings for the recording scenes of the Scene Select function are as follows:
Auto Voice Rec
REC Mode : MP3 192kbps
Built-in Mic Sensitivity : For Voice Ext. Input Setting (MIC IN): For Voice VOR: OFF
Recording Filter: NCF(Noise Cut)
Meeting
REC Mode : MP3 192kbps
Built-in Mic Sensitivity : For Voice Ext. Input Setting (MIC IN): For Voice VOR: OFF
Recording Filter: NCF(Noise Cut)
Auto
Auto
Medium
Medium
Lecture
REC Mode : MP3 192kbps
Built-in Mic Sensitivity : For Voice Ext. Input Setting (MIC IN): For Voice VOR: OFF
Recording Filter: NCF(Noise Cut)
Voice Notes
REC Mode : MP3 128kbps
Built-in Mic Sensitivity : For Voice Ext. Input Setting (MIC IN): For Voice VOR: OFF
Recording Filter: LCF(Low Cut)
Interview
REC Mode : MP3 128kbps
Built-in Mic Sensitivity : For Voice Ext. Input Setting (MIC IN): For Voice VOR: OFF
Recording Filter: NCF(Noise Cut)
Medium
Medium
Low
Low
Medium
Medium
Soft Music
Page 69
REC Mode : MP3 192kbps
Built-in Mic Sensitivity : For Music - Medium(Music)
53
Ext. Input Setting (MIC IN): For Music VOR: OFF
Medium(Music)
Recording Filter: OFF
Loud Music
REC Mode : MP3 192 kbps
Built-in Mic Sensitivity : For Music -
Ext. Input Setting (MIC IN): For Music -
Low(Music)
Low(Music)
VOR: OFF
Recording Filter: OFF
My Scene 1/ My Scene 2
REC Mode : MP3 192kbps
Built-in Mic Sensitivity : For Voice Ext. Input Setting (MIC IN): For Voice VOR: OFF
Recording Filter: OFF
Medium
Medium
Related Topic
Selecting a recording scene for an individual situation
4-573-936-32(1) Copyright 2015 Sony Corporation
Page 70
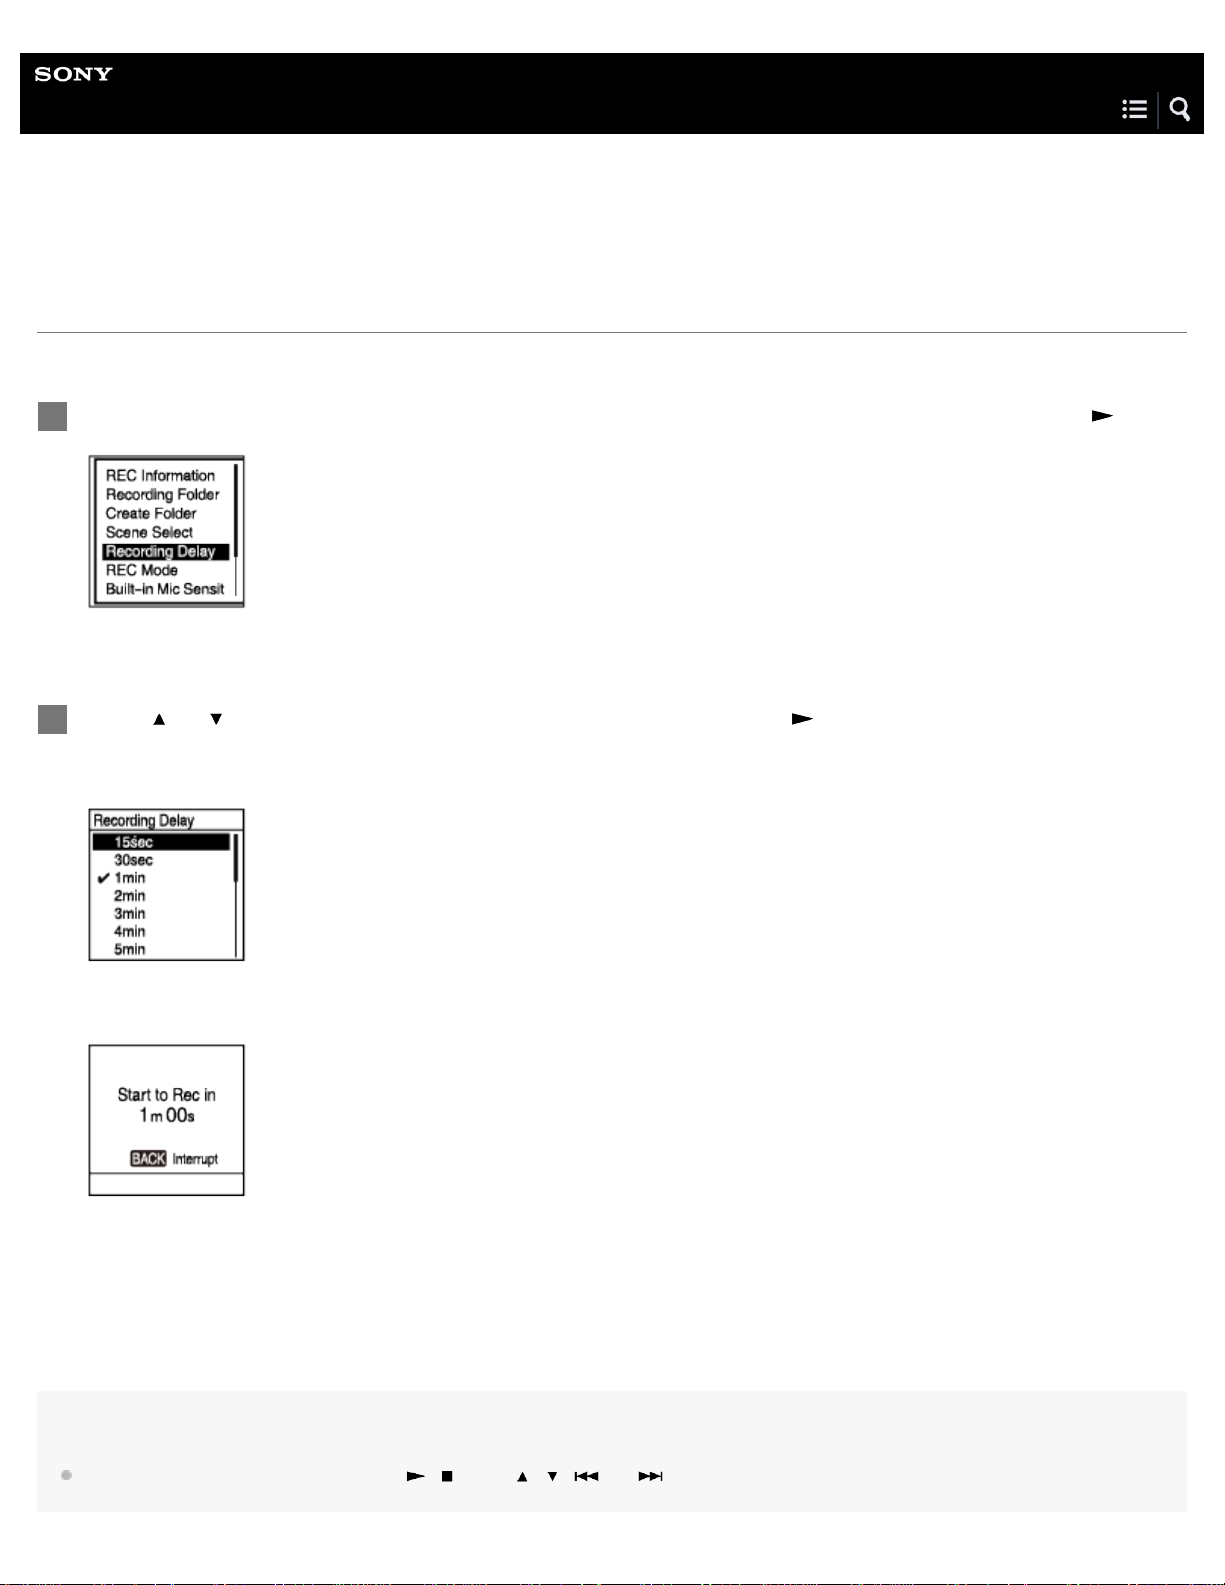
Help Guide
54
IC Recorder
ICD -UX560 / ICD-UX560F / ICD -UX565F
Using the recording delay function
You can set your IC recorder to start recording automatically when the specified period of time expires.
While recording is on standby, select “Recording Delay” on the OPTION menu, and then press .
1
Press
2
You can select from “ 15sec” to “60min.”
The countdown screen is displayed.
When the specified period of time expires, recording starts.
or to select the desired period of time, and then press .
Note
During the countdown, OPTION, T-MARK, , STOP, , , and are disabled.
Page 71

During the countdown, if you turn the power off or the time period specified for the sleep timer expires, your IC recorder will turn off.
55
During the countdown, your IC recorder does not turn off even when the period of time specified for the Auto Power Off function [Details] expires.
Hint
To cancel the recording delay function setup process, press BACK/HOME during the countdown, press or to select “Yes”, and then .
If you press
4-573-936-32(1) Copyright 2015 Sony Corporation
REC/PAUSE during the countdown, the recording delay function is cancelled, and recording starts.
Page 72
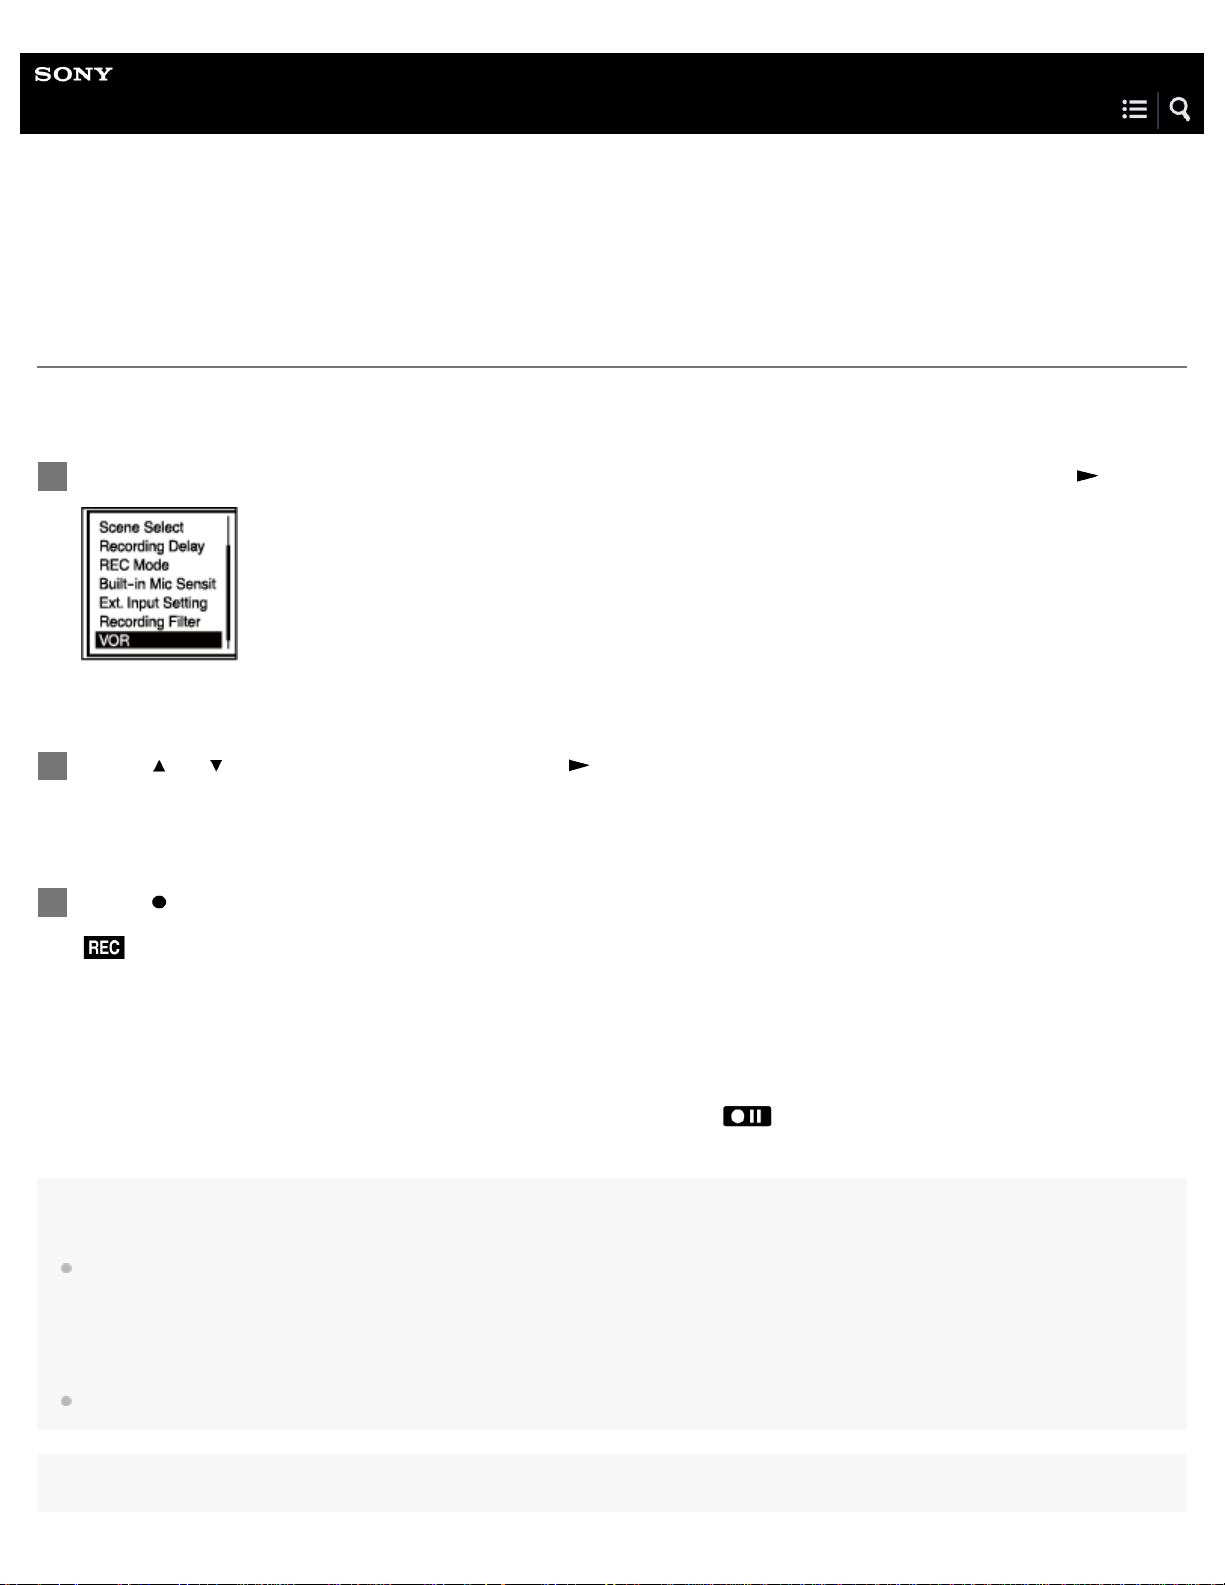
Help Guide
Hint
56
IC Recorder
ICD -UX560 / ICD-UX560F / ICD -UX565F
Recording automatically in response to the input sound volume – the VOR function
You can set your IC recorder to automatically start when the input sound volume reaches the predefined level, and pauses when
the volume decreases below the level.
While recording is on standby or paused, select “VOR” on the OPTION menu, and then press .
1
2
Press
or to select “ON,” and then press .
“VOR” is set to “ OFF” by default.
3
Press
REC/PAUSE.
appears on the display window.
When the input sound volume decreases below the predefined level, flashing
appears and the recording pauses. When the
volume reaches the level once again, the recording restarts.
Note
The VOR function is affected by the ambient sound conditions. Select the sensitivity level of the built-in microphones suitable to your ambient
sound conditions. For instructions on selecting the sensitivity level, see Selecting the sensitivity level of the built-in microphones (Built-in Mic
Sensitivity).
If the selected sensitivity level does not work as you expected or when you want make an important recording, follow the above steps to set “VOR”
to “OFF.”
During synchronized recording and FM radio recording (ICD-UX560F / ICD-UX565F only), the VOR function does not work.
Page 73

To cancel the VOR function setup process, set “VOR” to “OFF” in step 2.
57
Related Topic
Recording audio from an external device with the synchronized recording function ( SYNC REC )
Recording FM radio broadcasts (ICD -UX560F / ICD- UX565F only)
4-573-936-32(1) Copyright 2015 Sony Corporation
Page 74
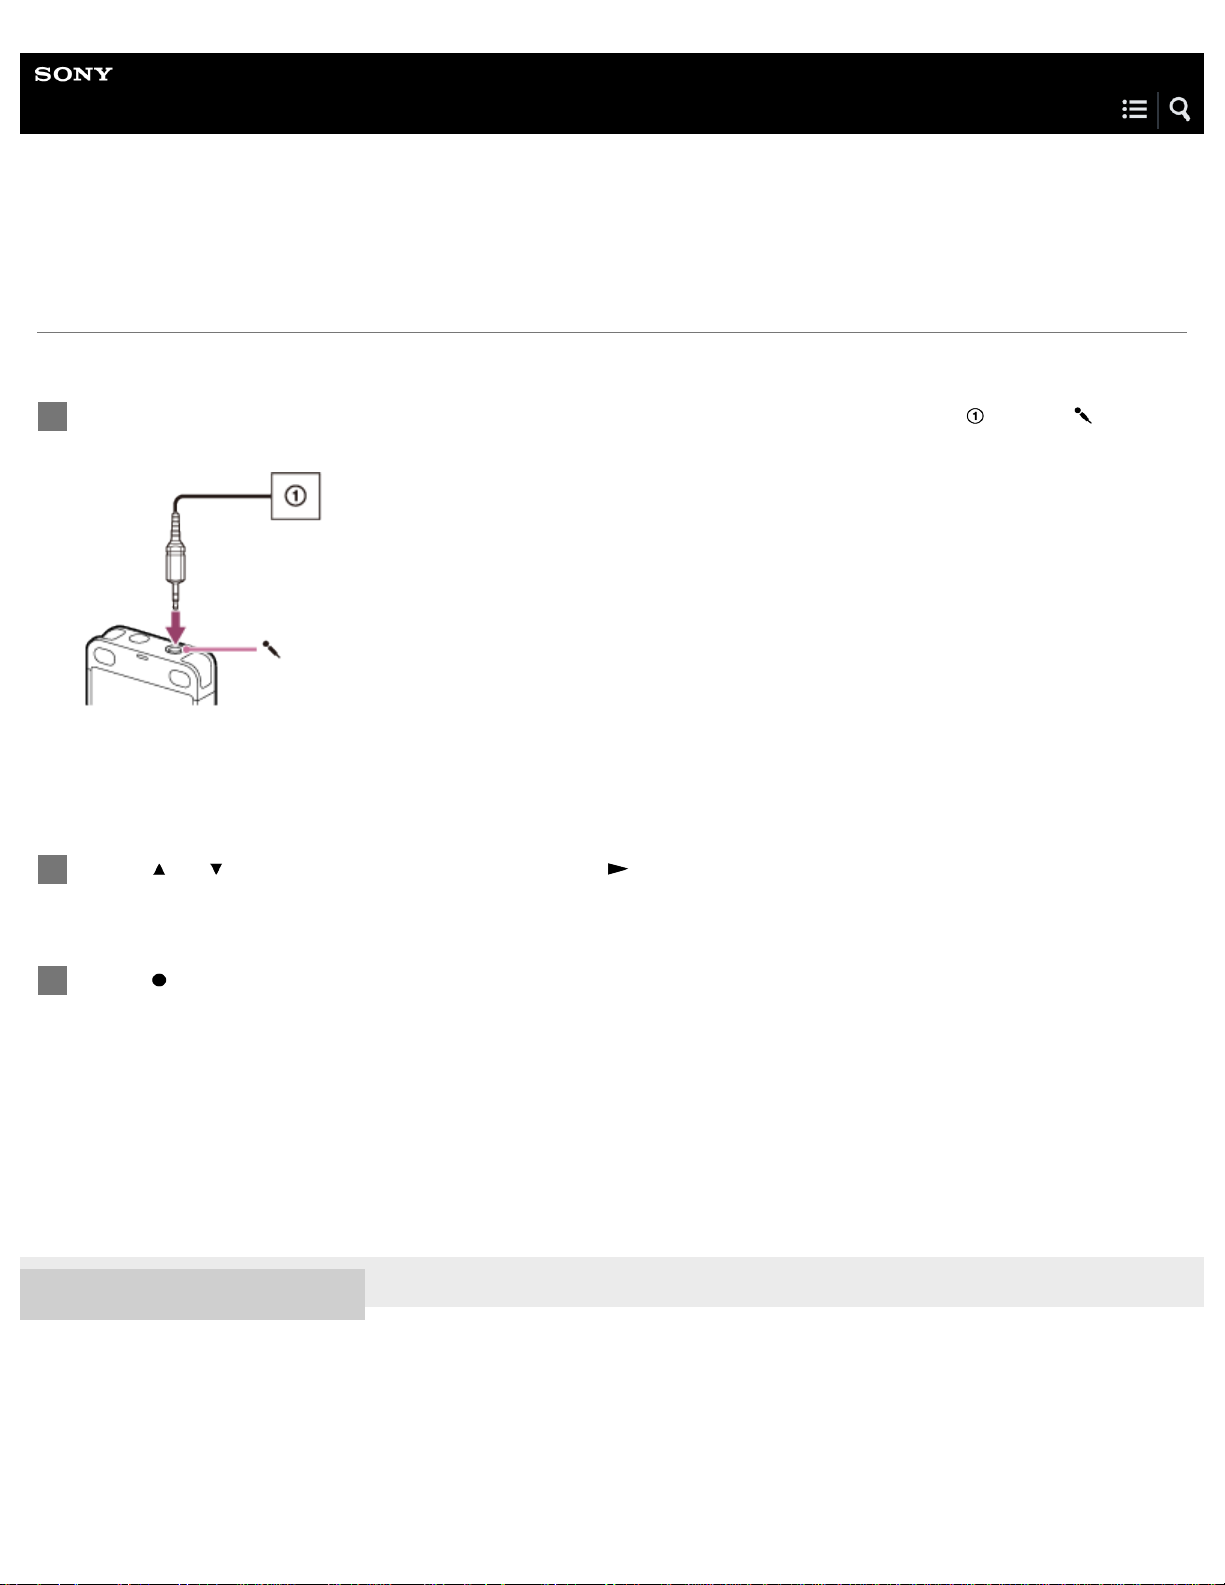
Help Guide
58
IC Recorder
ICD -UX560 / ICD-UX560F / ICD -UX565F
Recording with an external microphone
You can connect an external microphone to your IC recorder and use it for recording.
While no IC recorder operations are in progress, connect an external microphone ( ) to the
1
(microphone) jack.
“Ext. Input Setting ” appears on the display window. If not, use the OPTION menu to select “ MIC IN” for “Ext. Input Setting .”
[Details]
2
3
Press
Press
or to select “MIC IN,” and then press .
REC/PAUSE to start recording.
The built-in microphones are disabled and audio via the external microphone is recorded.
If the input audio volume is not loud enough, select “Ext. Input Setting ” - “MIC IN” - “Sensitivity setting” from the OPTION
menu to change the sensitivity level of the external microphone. [Details]
When a plug in power type microphone is connected, power is automatically supplied to the microphone from the IC recorder.
4-573-936-32(1) Copyright 2015 Sony Corporation
Page 75
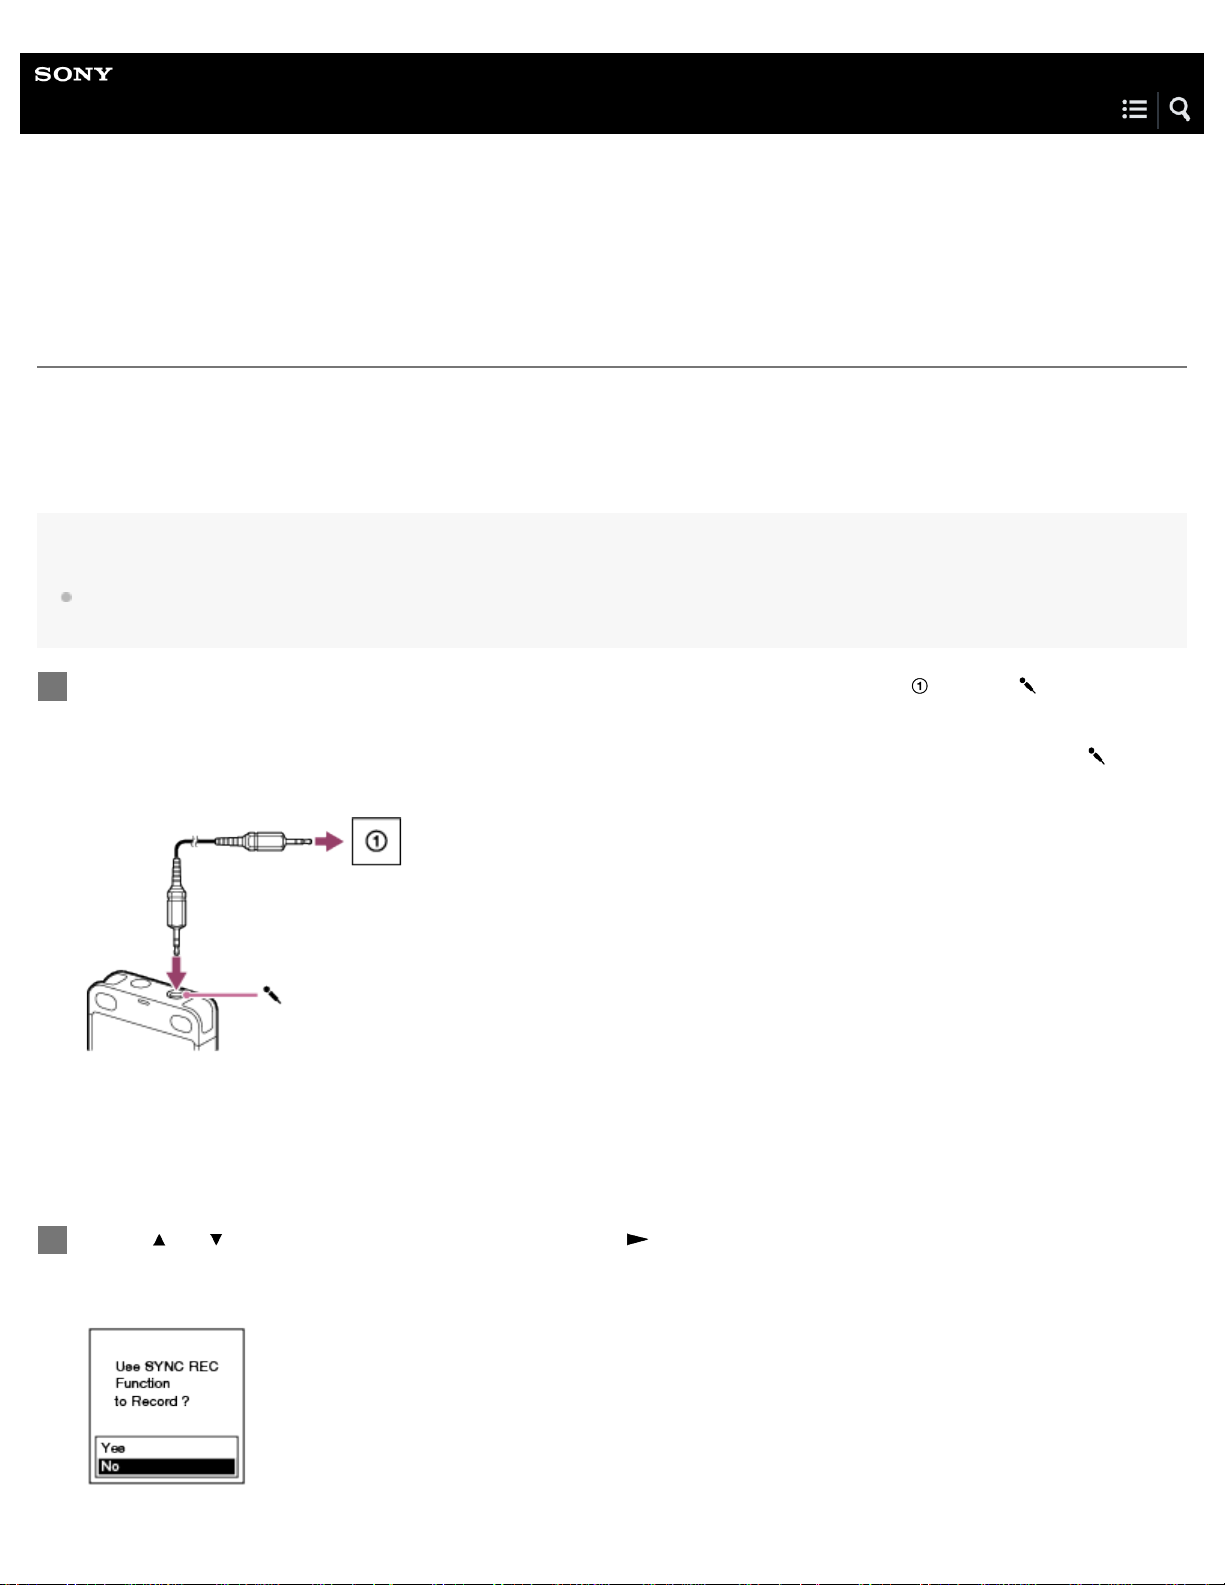
Help Guide
59
IC Recorder
ICD -UX560 / ICD-UX560F / ICD -UX565F
Recording audio from an external device with the synchronized recording function (SYNC REC )
You can make music files without using a computer by recording audio/music from the device (a radio cassette recorder, a tape
recorder, TV, etc.) connected to your IC recorder.
With the synchronized recording function turned on, the IC recorder pauses after 2 seconds of no audio input. When audio input
resumes, it restarts recording, saving the audio to a new file.
Hint
If the input audio volume is not loud enough, connect the audio connection cable from your IC recorder to the headphones jack (stereo mini-jack)
on the external device, adjust the volume of the external device while checking on the peak meters [Details] on the IC recorder's display window.
While no IC recorder operations are in progress, connect an external device ( ) to the (microphone)
1
jack on the IC recorder.
Use an audio connection cable to connect the audio output jack (stereo mini - jack) on the external device and the
(microphone) jack on the IC recorder.
“Ext. Input Setting ” appears on the display window. If not, use the OPTION menu to select “ Audio IN” for “ Ext. Input Setting.”
[Details]
Press
2
“Use SYNC REC Function to Record?” appears on the display.
or to select “Audio IN,” and then press .
Page 76

Press or to select “Yes,” and then press .
60
3
The synchronized recording function is turned on.
4
Press
REC/PAUSE.
Flashing appears on the display window and the IC recorder pauses.
Start playback on the connected external device.
5
appears and the IC recorder starts recording.
When no audio input continues for 2 seconds, flashing appears on the display window and the IC recorder pauses. When
audio input resumes, it restarts recording, saving the audio to a new file.
Related Topic
Recording the playback audio of the IC recorder on an external device
Recording audio from an external device without the synchronized recording function (SYNC REC)
4-573-936-32(1) Copyright 2015 Sony Corporation
Page 77
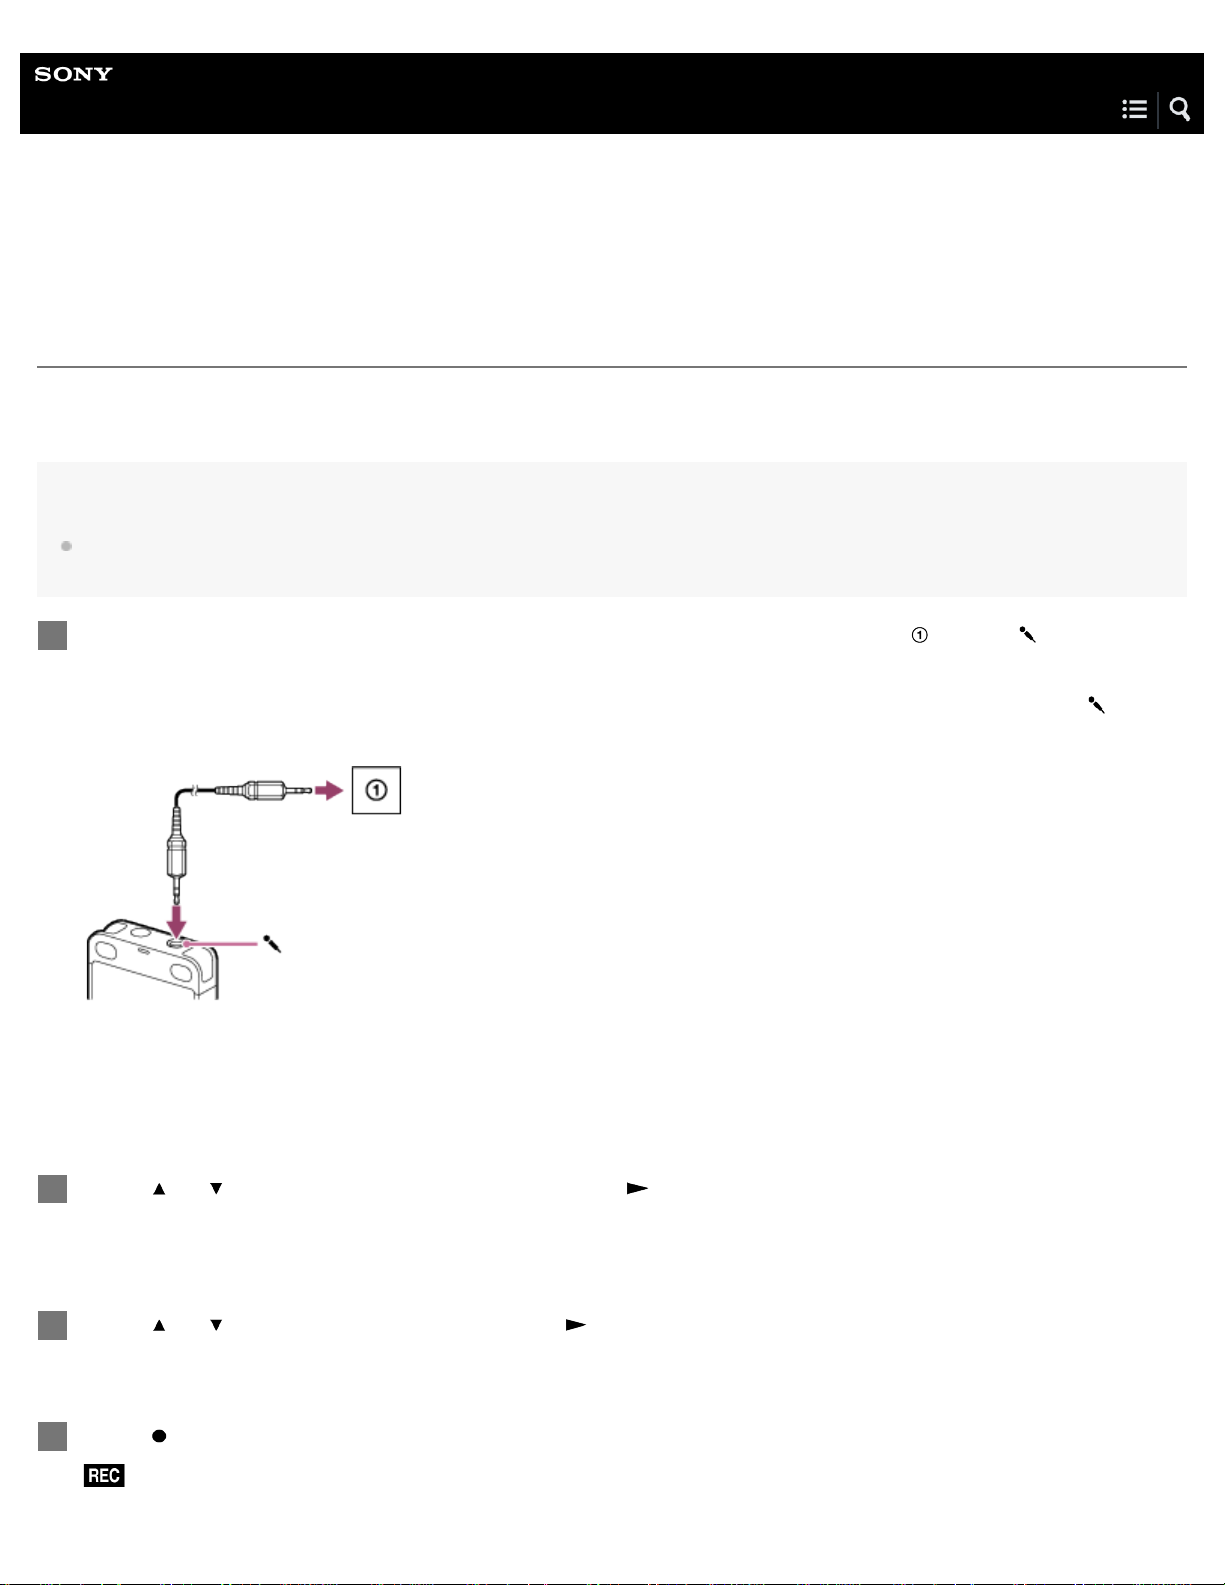
Help Guide
61
IC Recorder
ICD -UX560 / ICD-UX560F / ICD -UX565F
Recording audio from an external device without the synchronized recording function (SYNC REC)
You can make music files without using a computer by recording audio/music from the device (a radio cassette recorder, a tape
recorder, TV, etc.) connected to your IC recorder.
Hint
If the input audio volume is not loud enough, connect the audio connection cable from your IC recorder to the headphones jack (stereo mini-jack)
on the external device, adjust the volume of the external device while checking on the peak meters [Details] on the IC recorder's display window.
While no IC recorder operations are in progress, connect an external device ( ) to the (microphone)
1
jack on the IC recorder.
Use an audio connection cable to connect the audio output jack (stereo mini - jack) on the external device and the
(microphone) jack on the IC recorder.
“Ext. Input Setting ” appears on the display window. If not, use the OPTION menu to select “ Audio IN” for “ Ext. Input Setting.”
[Details]
Press
2
“Use SYNC REC Function to Record?” appears on the display.
or to select “Audio IN,” and then press .
3
4
Press
Press
or to select “No,” and then press .
REC/PAUSE to start recording.
appears on the display window and the IC recorder starts recording audio from the connected external device.
Page 78

Start playback on the connected external device.
62
5
Hint
To stop recording, press STOP.
Related Topic
Recording the playback audio of the IC recorder on an external device
Recording audio from an external device with the synchronized recording function ( SYNC REC )
4-573-936-32(1) Copyright 2015 Sony Corporation
Page 79
Help Guide
63
IC Recorder
ICD -UX560 / ICD-UX560F / ICD -UX565F
Recording the playback audio of the IC recorder on an external device
You can connect an external device to your IC recorder and record playback audio from the IC recorder.
Before you start recording, we recommend you make a trial recording first.
Connect one end of an audio connection cable to the (headphones) jack on the IC recorder and the
1
other end to the external input jack on the external device.
2
Press
on the IC recorder and the record button on the external device simultaneously to start
playback on the IC recorder and recording on the external device.
The playback audio from the IC recorder is recorded on the external device.
Press
3
4-573-936-32(1) Copyright 2015 Sony Corporation
STOP on the IC recorder and the stop button on the external device.
Page 80
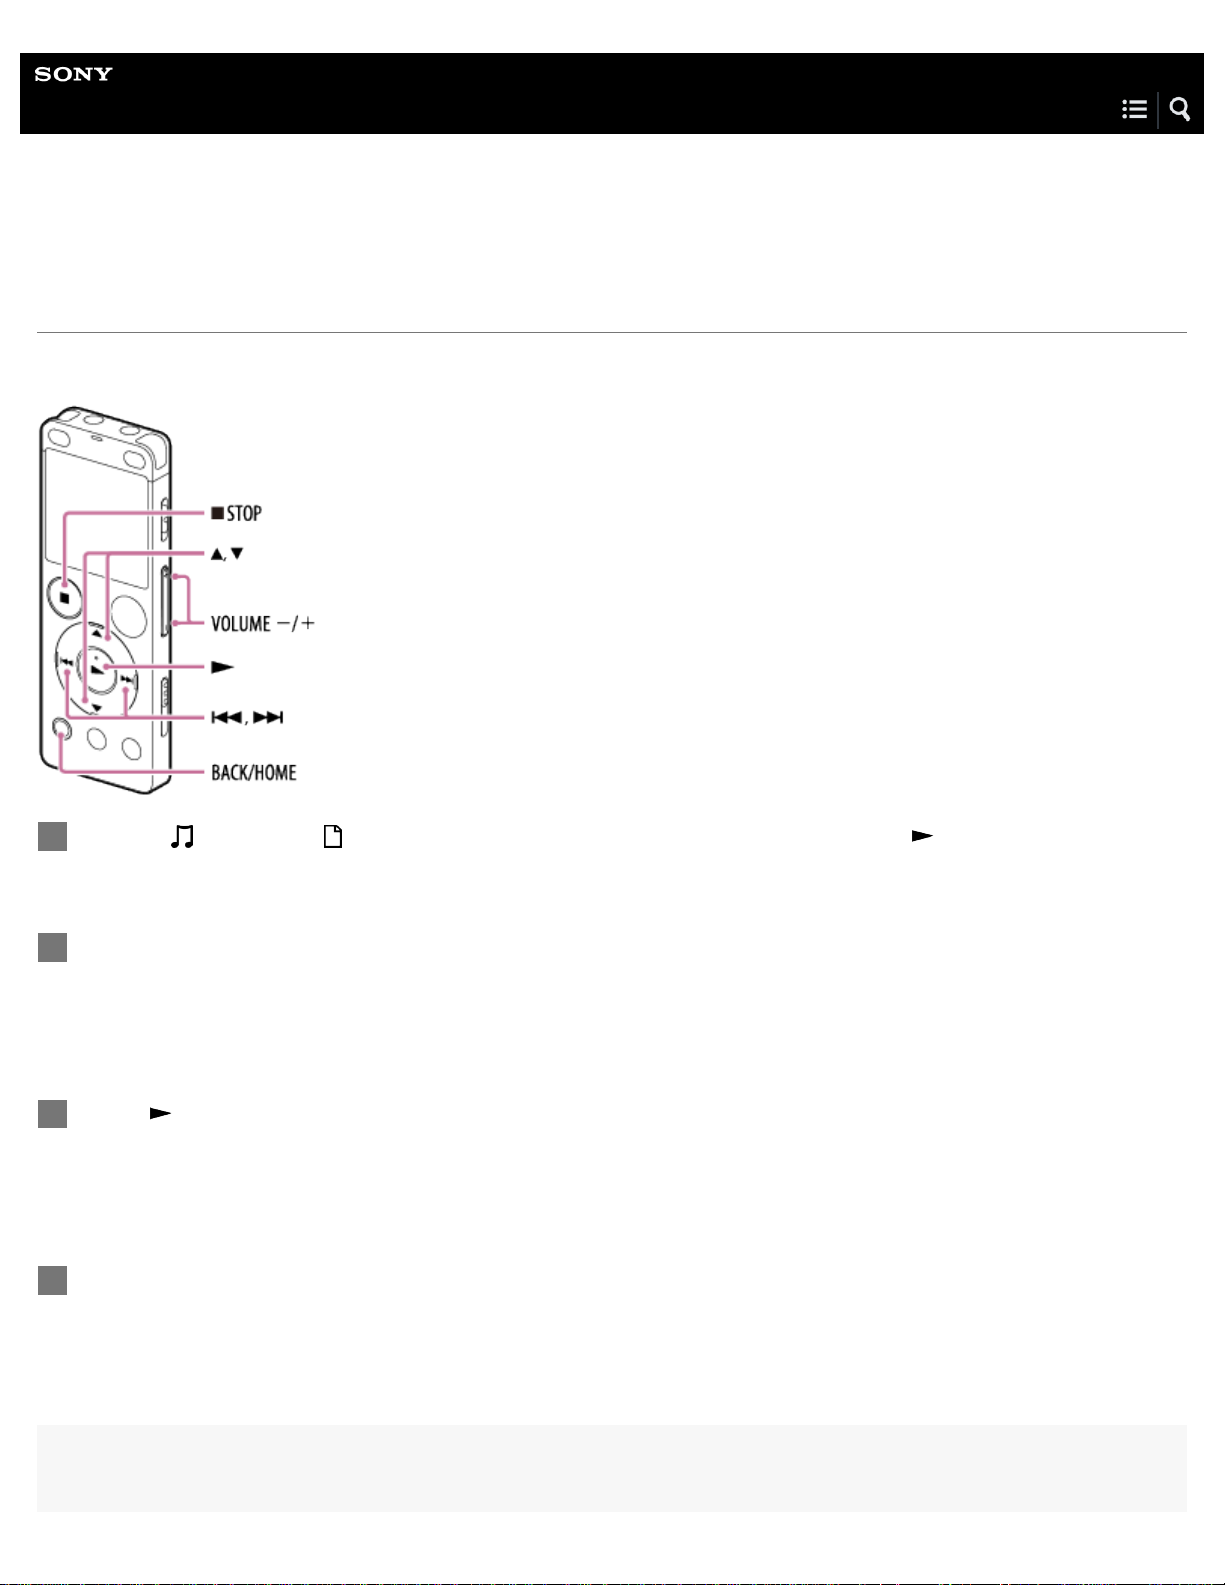
Help Guide
64
IC Recorder
ICD -UX560 / ICD-UX560F / ICD -UX565F
Playing a file
You can select a file from the HOME menu for playback.
Select “ Music” or “ Recorded Files” on the HOME menu, and then press .
1
Search and select a file.
2
For instructions on searching a file, see Selecting a file.
Press
3
Playback starts and the operation indicator lights in green.
Press VOLUME –/+ to adjust the playback volume.
4
.
Note
Page 81

For the customers in Europe only:
65
When you try to adjust the volume to a level that exceeds the specified level, the “Check The Volume Level” message appears.
Hint
To stop playback, press .
When you stop recording and the recording standby screen is on the display window, you can press
Related Topic
Additional operations available during playback
4-573-936-32(1) Copyright 2015 Sony Corporation
to play the file you have just recorded.
Page 82
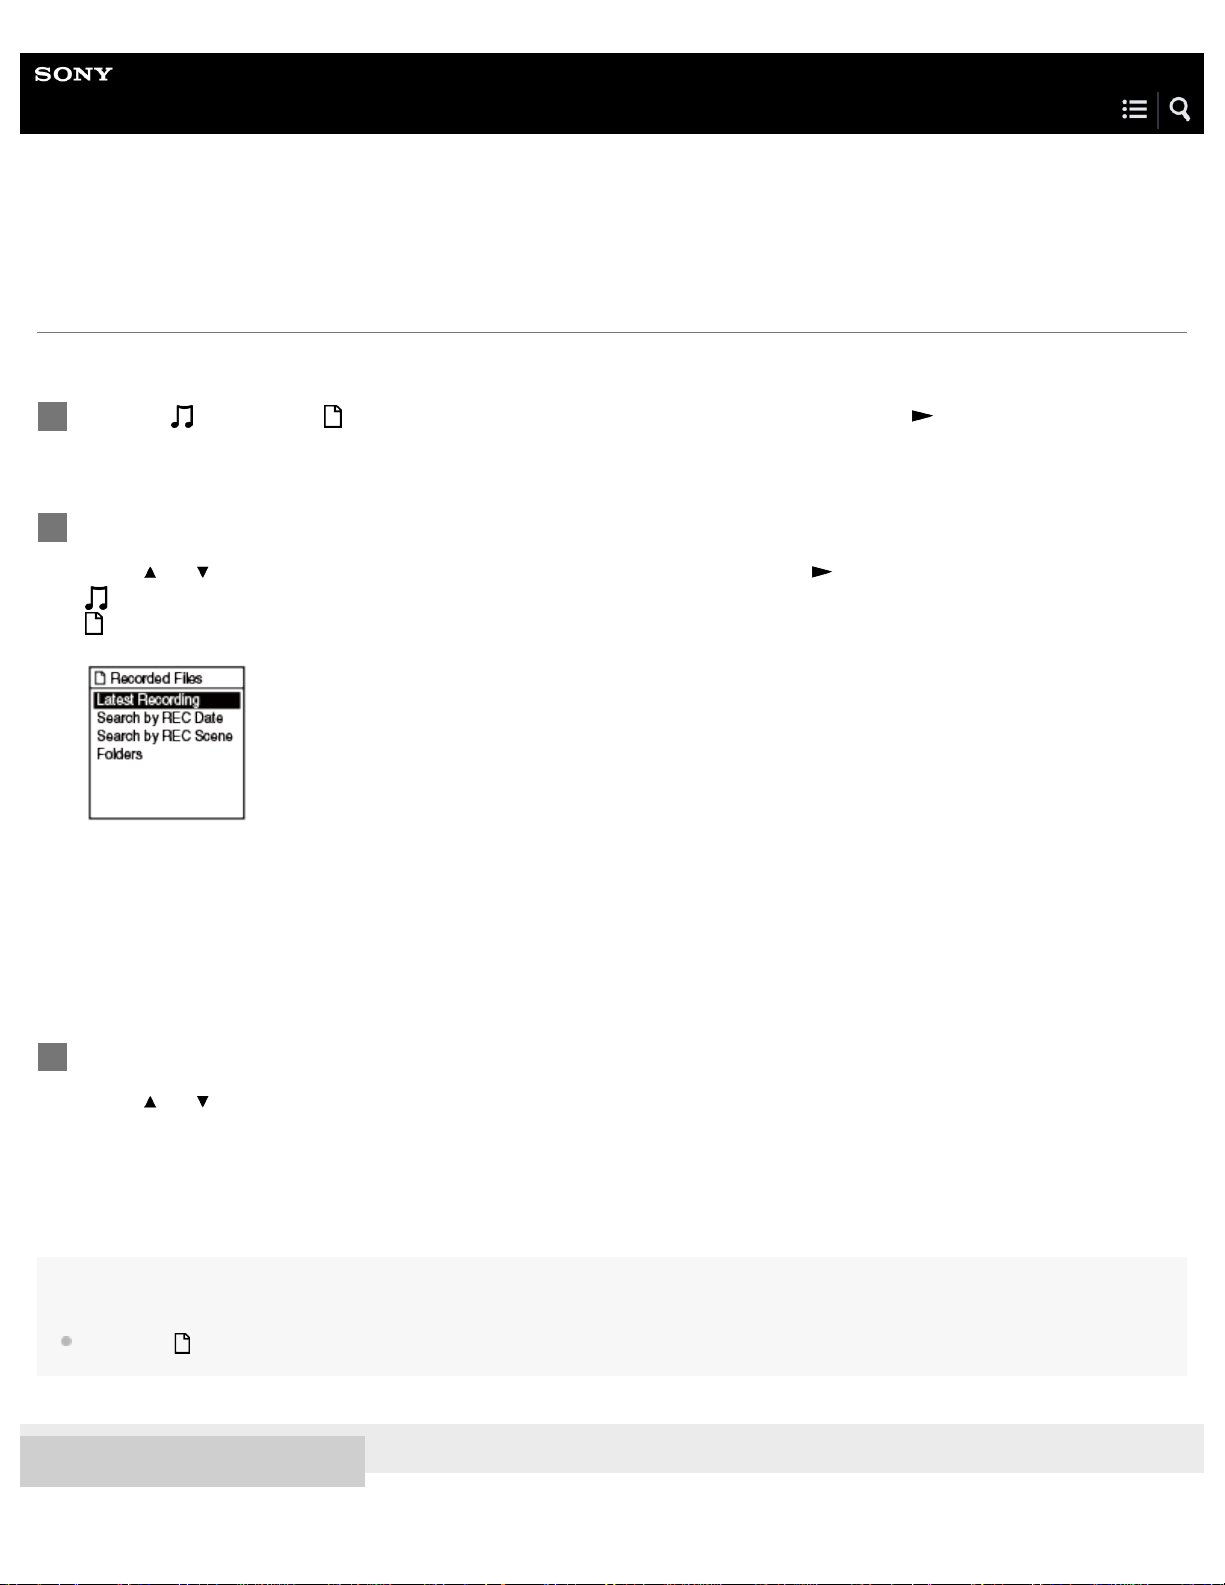
Help Guide
66
IC Recorder
ICD -UX560 / ICD-UX560F / ICD -UX565F
Selecting a file
You can select a file from the HOME menu for playback or editing.
Select “ Music” or “ Recorded Files” on the HOME menu, and then press .
1
Select a file search category.
2
Press
or to select one of the following file search categories, and then press .
Music: “All Songs ,” “Albums,” “Artists,” and “Folders”
Recorded Files : “ Latest Recording,” “ Search by REC Date,” “Search by REC Scene ,” and “ Folders”
Selecting “ Folders” as the file search category displays the Memory Selection screen. Select either “ Built- In Memory ” or “SD
Card” as the memory storage.
If you insert the microSD card that has previously been used in another IC recorder, “ SD Card(Other Models)” appears in
addition to “SD Card.”
Select a list or folder from the search results, and then select a file.
3
Press
or to select a list or folder, and then select the file.
Hint
By default, “ Recorded Files” has either “FOLDER01” (ICD-UX560) or “FOLDER01” and “RADIO01”(ICD-UX560F / ICD-UX565F).
4-573-936-32(1) Copyright 2015 Sony Corporation
Page 83
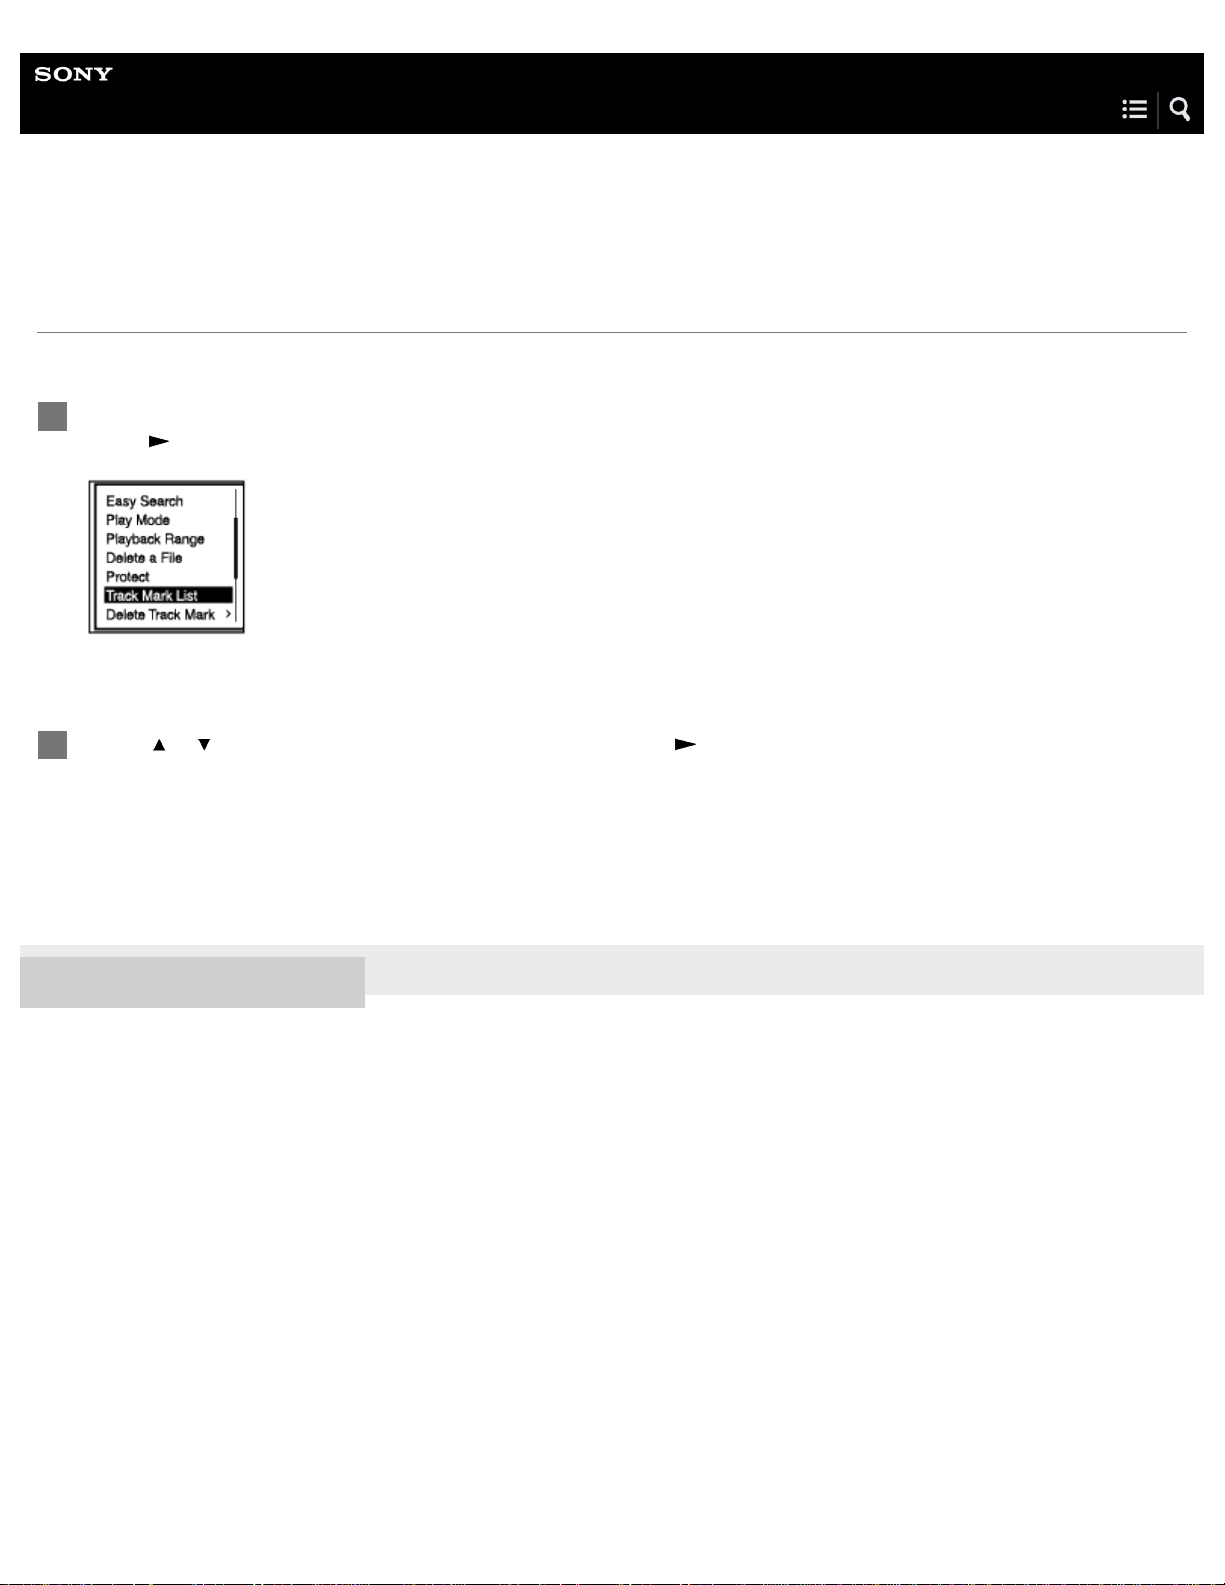
Help Guide
67
IC Recorder
ICD -UX560 / ICD-UX560F / ICD -UX565F
Locating a playback point with the track mark list (Track Mark List)
You can locate a playback point by selecting a track mark on the Track Mark List screen.
While playback is on standby or in progress, select “Track Mark List” on the OPTION menu, and then
1
press
.
2
Press
or to the desired track mark, and then press .
File playback starts from the selected track mark point.
4-573-936-32(1) Copyright 2015 Sony Corporation
Page 84
Help Guide
68
IC Recorder
ICD -UX560 / ICD-UX560F / ICD -UX565F
Additional operations available during playback
You can perform the following operations while playback is in progress .
To stop at the current position
Press .
To resume playback from that point, press
To go back to the beginning of the current file
Press once.
If track marks are added and the Easy Search function is turned off, the previous track mark point toward the beginning of the file
is located.
.
To go back to previous files
Press repeatedly.
To skip to the next file
Press once.
If track marks are added and the Easy Search function is turned off, the next track mark point toward the end of the file is
located.
To skip to the succeeding files
Press repeatedly.
Related Topic
Adding a track mark
Locating the desired playback point quickly ( Easy Search)
4-573-936-32(1) Copyright 2015 Sony Corporation
Page 85
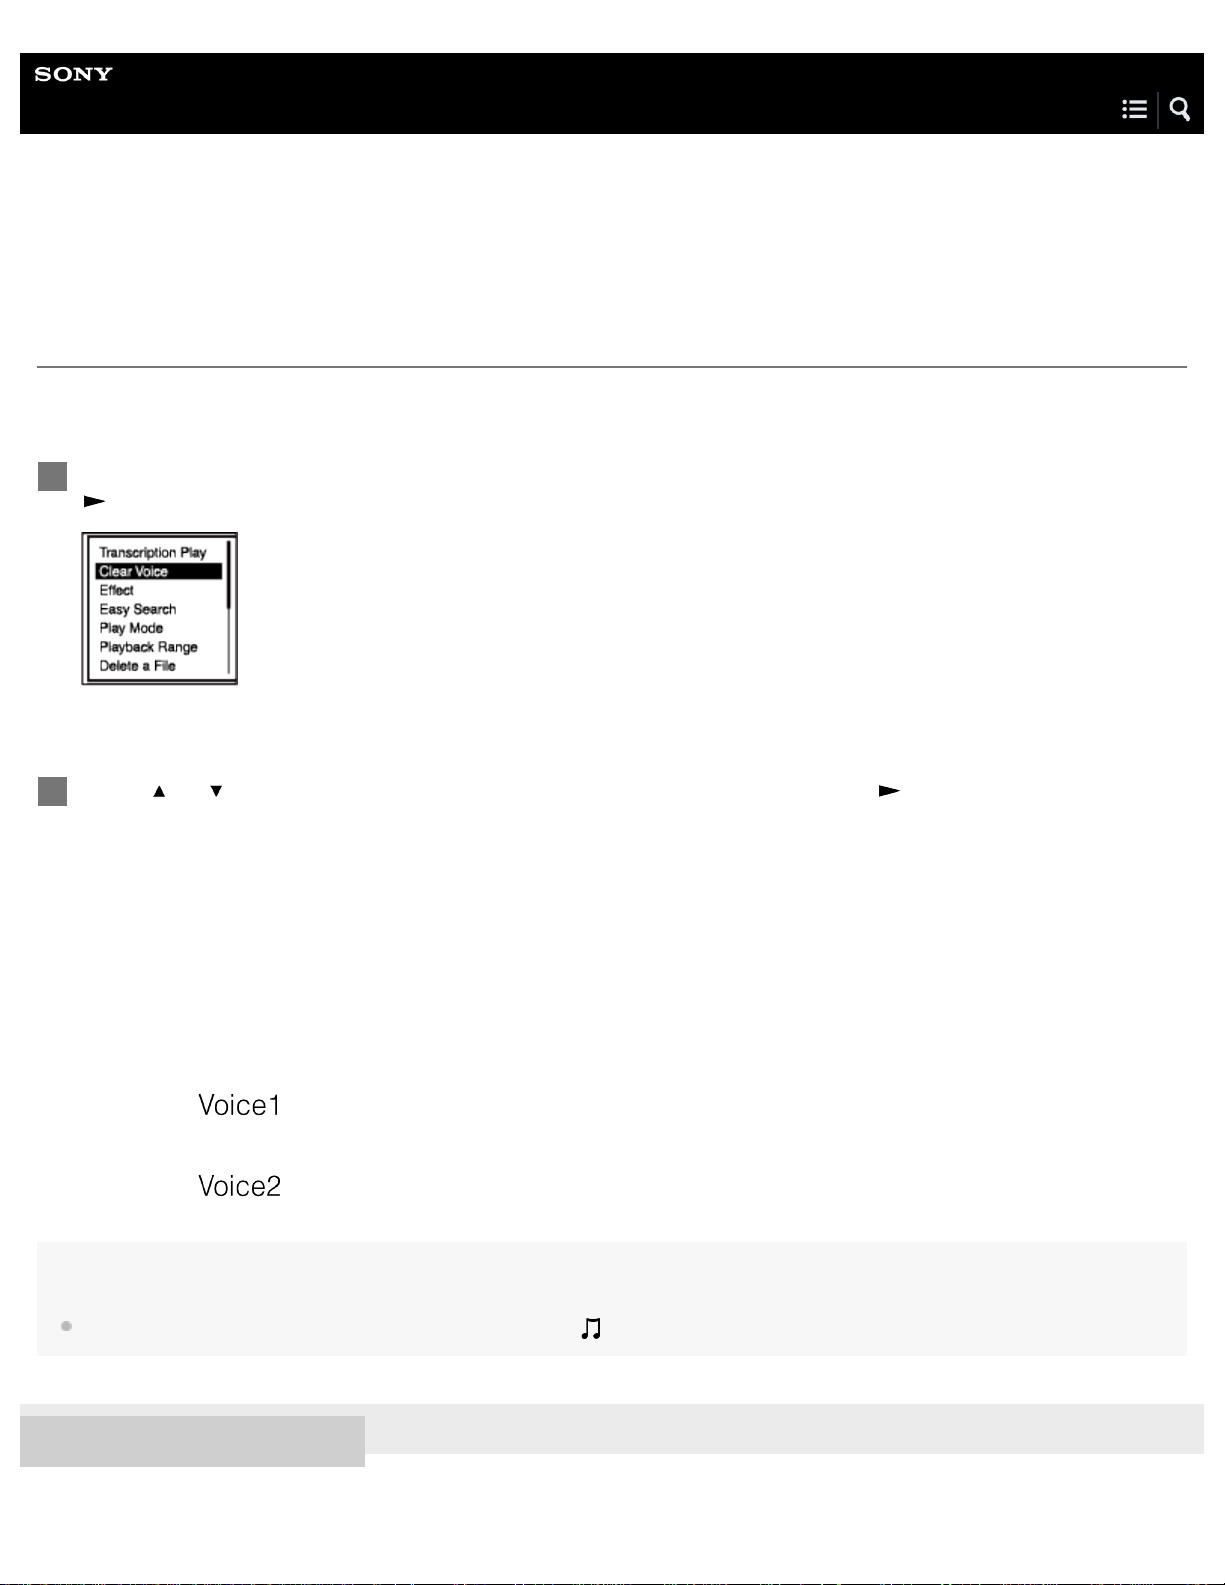
Help Guide
69
IC Recorder
ICD -UX560 / ICD-UX560F / ICD -UX565F
Reducing noise in the playback audio to make human voices sound clearer – the Clear Voice function
The Clear Voice function reduces ambient noises to make human voices distinctive. You will hear human voices more clearly in
the playback audio.
While playback is on standby or in progress, select “Clear Voice” on the OPTION menu, and then press
1
.
2
Press
or to select “Clear Voice 1” or “Clear Voice 2,” and then press .
Description of menu items
You can select one of the following items:
OFF:
Turns off the Clear Voice function (default setting).
Clear Voice 1 (
Reduces ambient noises and adjust loudness of human voices to the optimum level to make human voices sound more
clearly.
Clear Voice 2 (
Reduces ambient noises further than "Clear Voice 1" to make human voices sound much more clearly.
Note
While playback with the built-in speaker or playback of the files in “ Music” is in progress, the Clear Voice function does not work.
):
):
4-573-936-32(1) Copyright 2015 Sony Corporation
Page 86
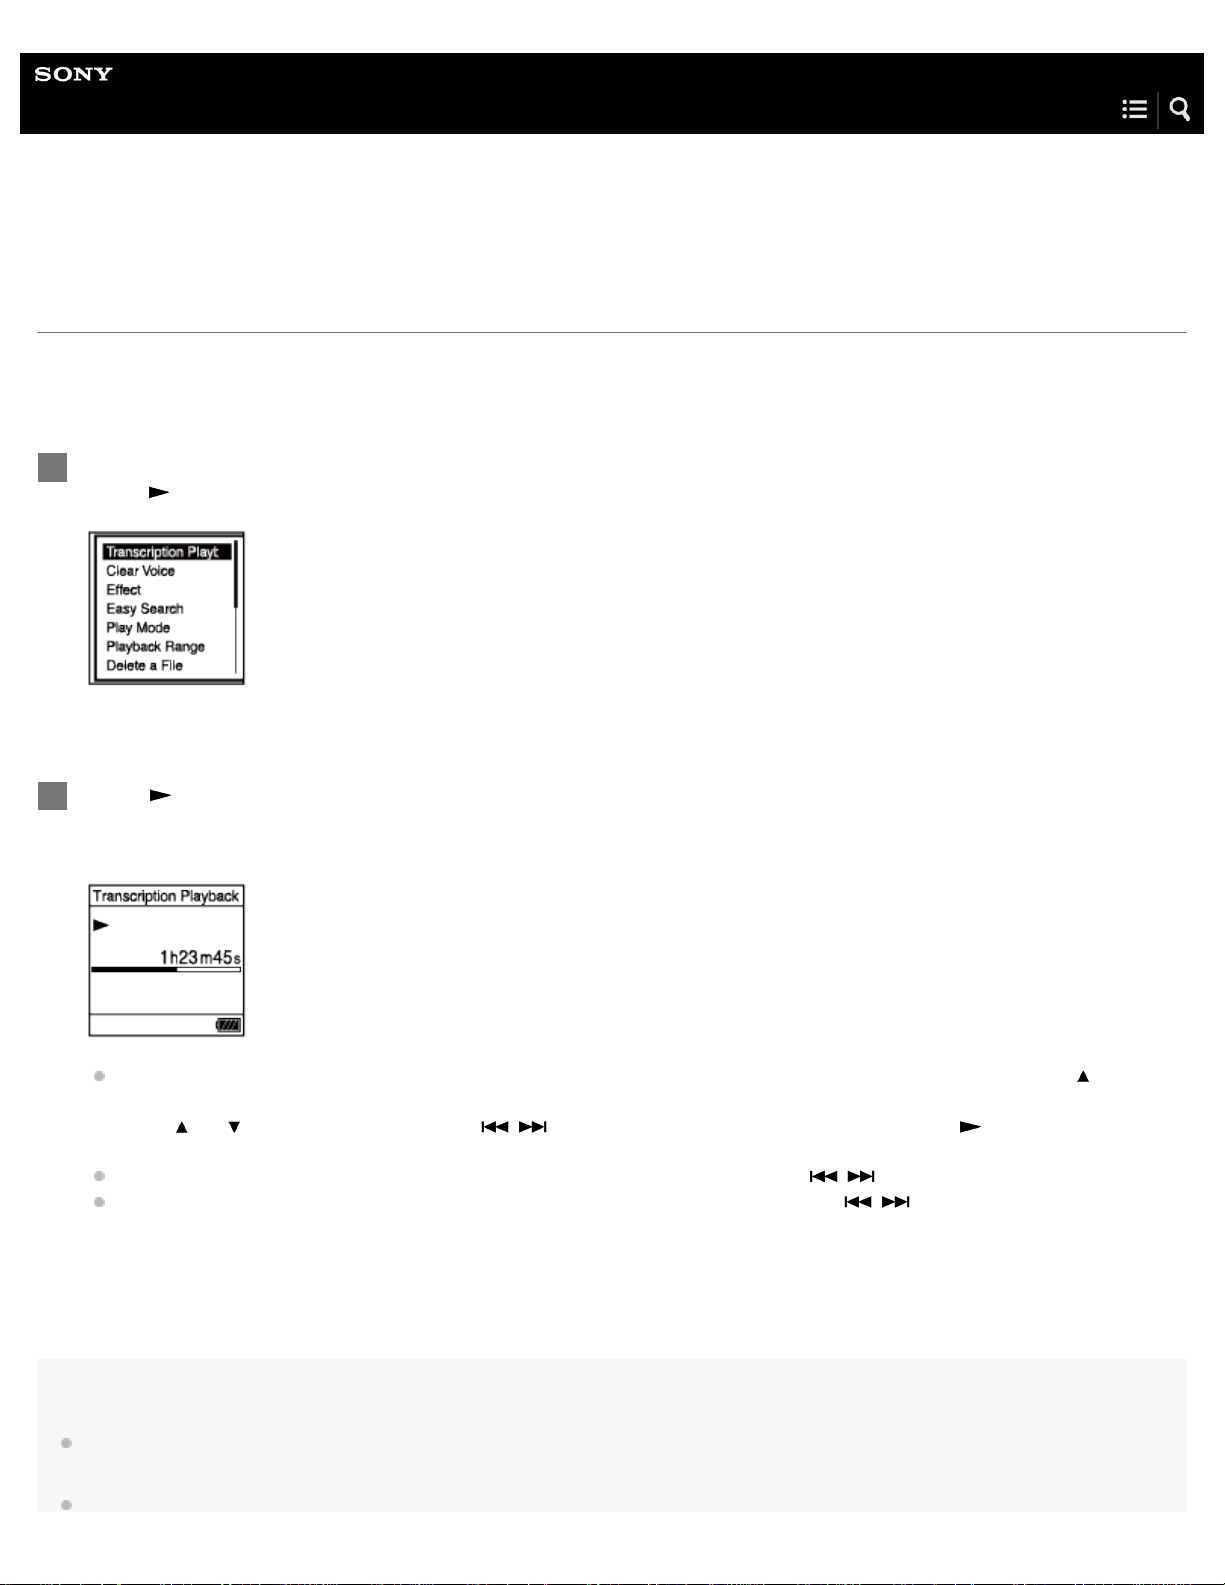
Help Guide
When your IC recorder is placed in the transcription playback mode, you cannot:
70
IC Recorder
ICD -UX560 / ICD-UX560F / ICD -UX565F
Using the transcription playback mode
In the transcription playback mode, you can fast- forward or fast-rewind to search for a particular point as well as use the DPC
(Digital Pitch Control) function to slow down the playback speed. This is useful when you want to transcribe a recorded file of a
meeting, etc.
While playback is on standby, select “Transcription Playback Mode” on the OPTION menu, and then
1
press
.
Press to start playback.
2
You can use the following functions while your IC recorder is in the transcription playback mode.
DPC: You can change the playback speed to help you understand what you are listening more easily. Press DPC
(Digital Pitch Control) to display the DPC (Speed Control) setting screen.
Press
Easy Search : You can quickly search the file for the desired point by pressing
or to select “ON,” and press / to adjust the playback speed, and then press .
/ .
Cue/Review: You can search the file for the desired point by pressing and holding
/ .
Note
If the sleep timer [Details] is active and the specified period of time expires, your IC recorder will automatically turns off even when it is in the
transcription playback mode.
Page 87

use the playback mode.
71
turn on the A-B repeat function.
Hint
To stop playback, press STOP.
To exit the transcription playback mode, select “End Transcription Playback Mode” on the OPTION menu while your IC recorder is in the
transcription playback mode or playback is on standby.
To listen to other files, press BACK/HOME to display the file list, and then select a file.
Related Topic
Adjusting the playback speed – the DPC (Digital Pitch Control) function
Locating the desired playback point quickly ( Easy Search)
4-573-936-32(1) Copyright 2015 Sony Corporation
Page 88
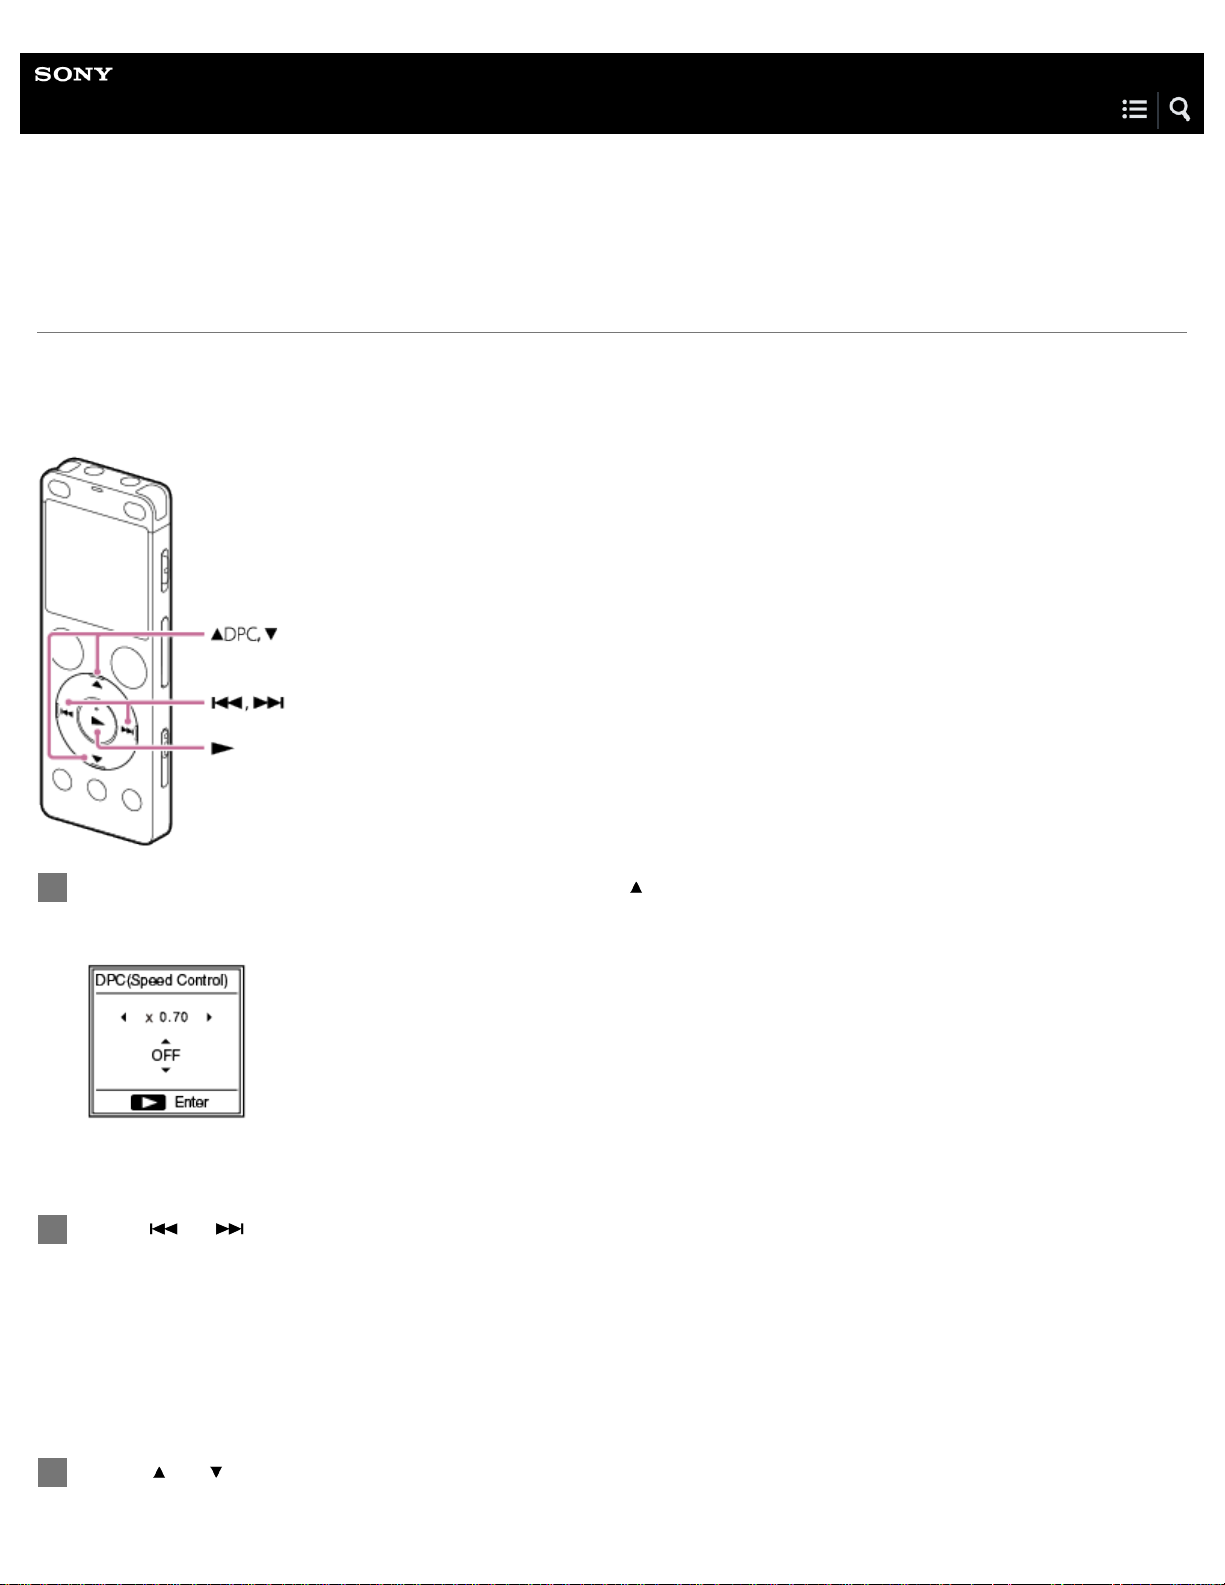
Help Guide
72
IC Recorder
ICD -UX560 / ICD-UX560F / ICD -UX565F
Adjusting the playback speed – the DPC (Digital Pitch Control) function
You can adjust the playback speed in a range from 0.25 times to 3.00 times. Changing the playback speed does not affect the
playback audio. Files will play in natural tones, thanks to digital processing.
You can also change the playback speed while your IC recorder is in the “ Transcription Playback Mode.”
While playback is on standby or in progress, press DPC (Digital Pitch Control).
1
The DPC (Speed Control) setting screen is displayed.
Press
2
The speed decreases by 0.05 times (from x 0.25 to x 1.00).
The speed increases by 0.10 times (from x 1.00 to x 3.00).
When you press and hold either button, you can change the speed continuously.
The playback speed is set to “x 1.00” by default.
or to adjust the playback speed.
3
Press
or to select “ON.”
Page 89

Press to set the playback speed.
73
4
Hint
To resume the normal playback speed, select “OFF” in step 3.
Related Topic
Using the transcription playback mode
4-573-936-32(1) Copyright 2015 Sony Corporation
Page 90
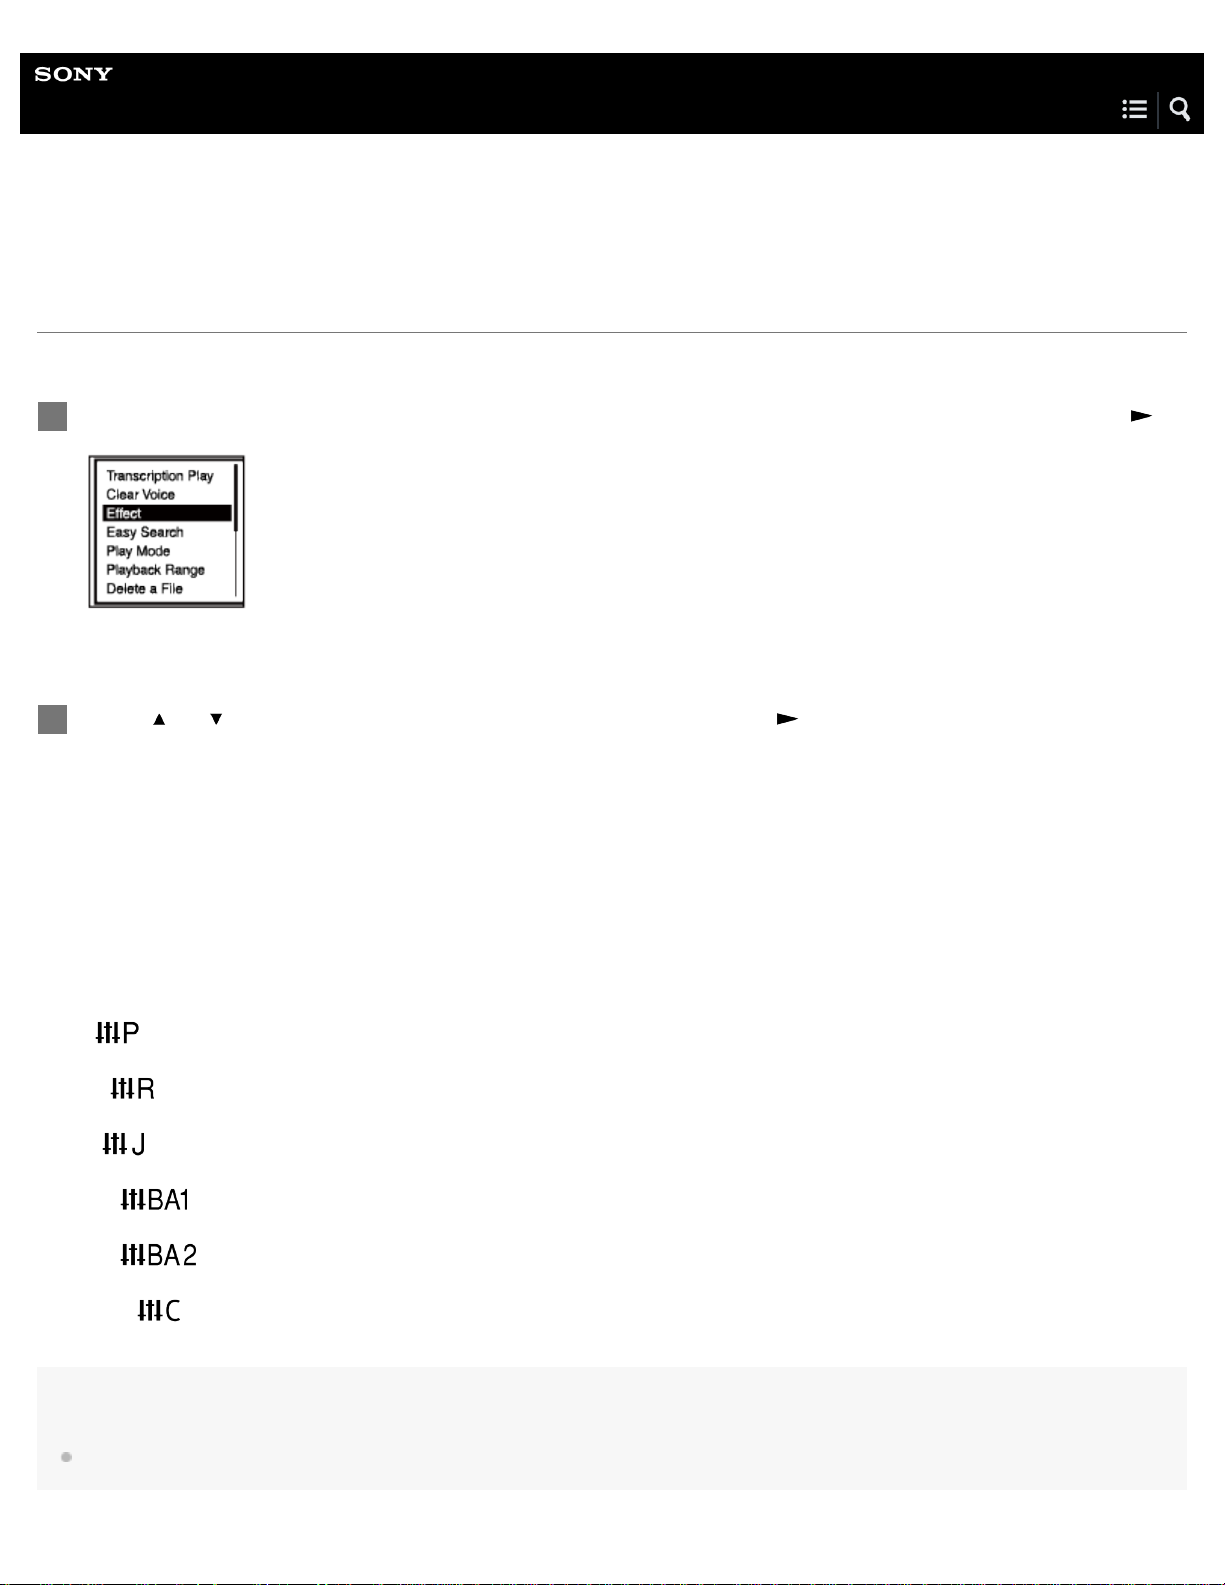
Help Guide
74
IC Recorder
ICD -UX560 / ICD-UX560F / ICD -UX565F
Selecting the sound effect ( Effect)
You can set the sound effect suitable for playing music files or recorded files.
While playback is on standby or in progress, select “Effect” on the OPTION menu, and then press .
1
2
Press
or to select the desired sound effect, and then press .
Description of menu items
You can select one of the following items:
OFF:
Turns off the Effect function (default setting).
Pop (
Rock (
Jazz (
Bass1 (
Bass2 (
Custom (
):
Emphasizes middle ranges, ideal for vocals.
):
Emphasizes high and low ranges for a powerful sound.
):
Emphasizes high ranges for a lively sound.
):
Emphasizes the bass sound.
):
Emphasizes the bass sound even more.
):
You can design your own sound effect by customizing five frequency band levels.
Note
The Effect function does not work for audio playback with the built-in speaker.
Page 91

Related Topic
75
Customizing the sound effect
Reducing noise in the playback audio to make human voices sound clearer – the Clear Voice function
4-573-936-32(1) Copyright 2015 Sony Corporation
Page 92
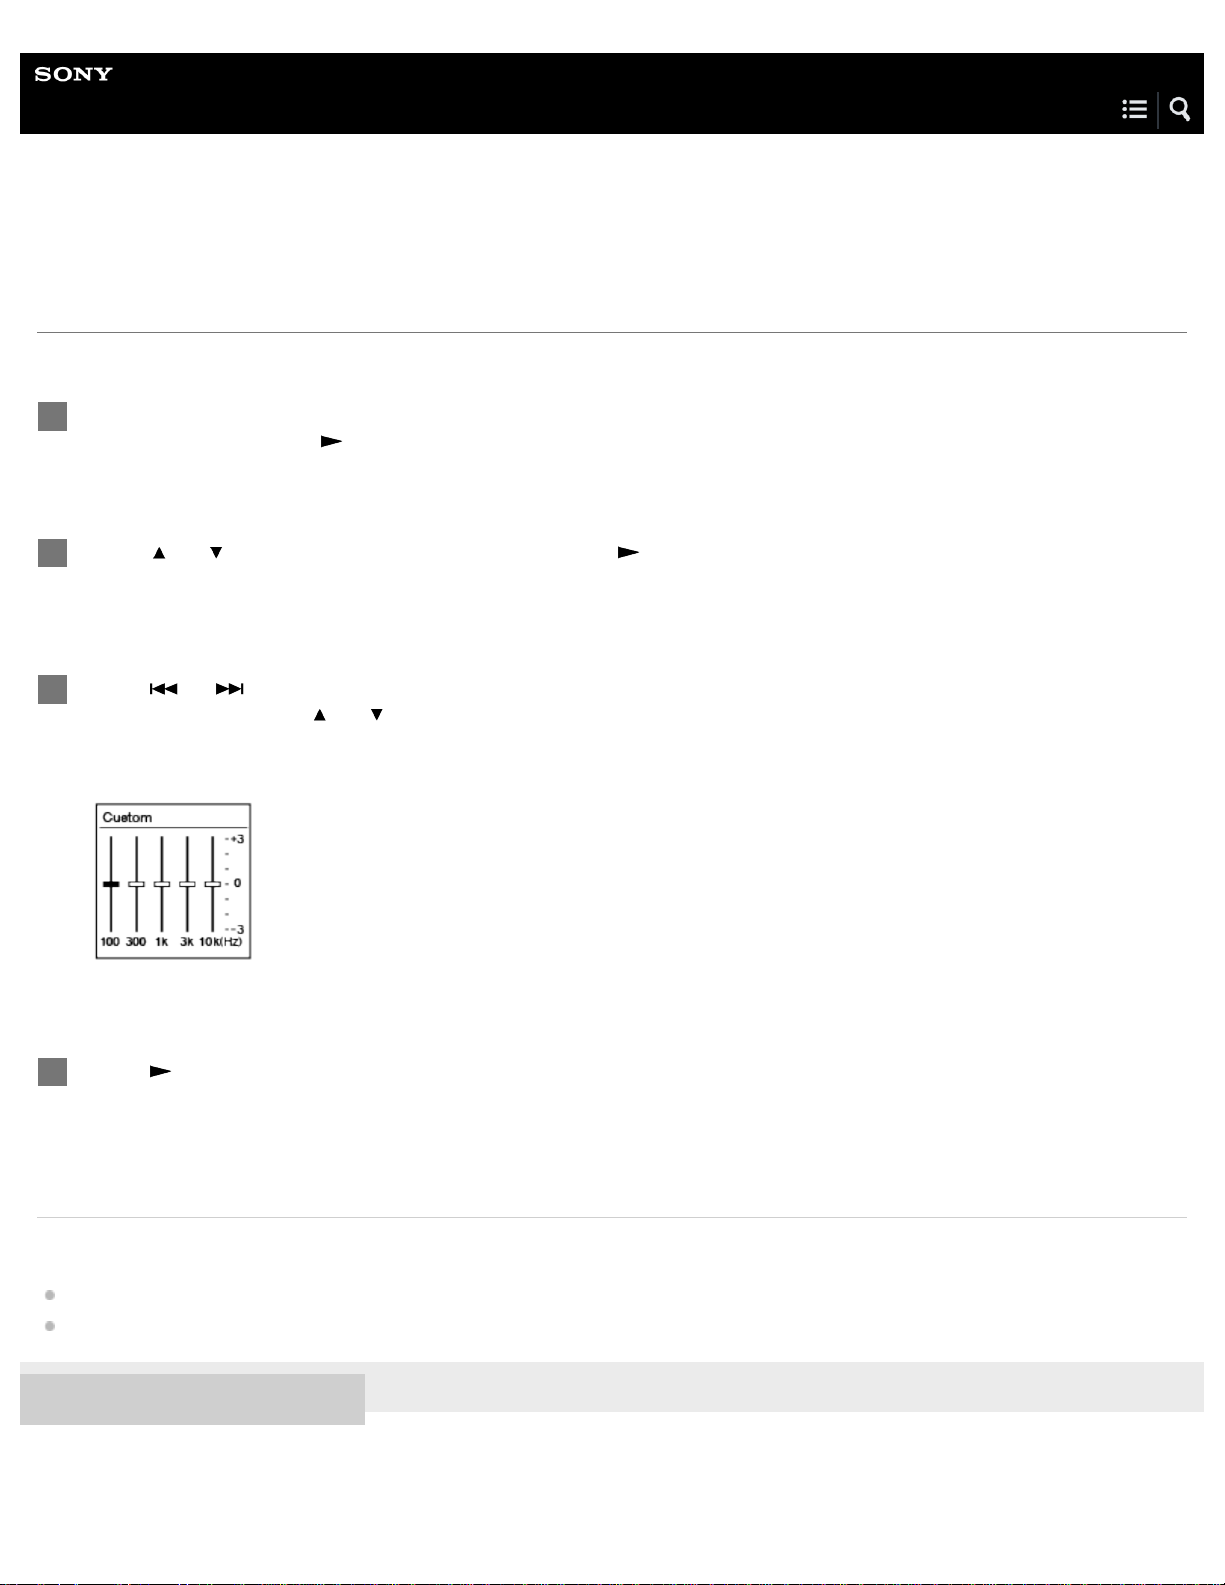
Help Guide
76
IC Recorder
ICD -UX560 / ICD-UX560F / ICD -UX565F
Customizing the sound effect
When selecting the sound effect ( Effect), you can select “Custom” and customize the sound quality to suit your preference.
While playback of a music or recorded file is on standby or in progress, select “Effect” on the OPTION
1
menu, and then press
.
2
Press
or to select “Custom,” and then press .
The custom setting screen appears.
Press
3
kHz), and then press
or to move the focus to the desired frequency band (100 Hz, 300 Hz, 1 kHz, 3 kHz, or 10
or to change the level.
You can select one of the seven levels from –3 to +3.
4
Press
.
Related Topic
Selecting the sound effect (Effect)
Reducing noise in the playback audio to make human voices sound clearer – the Clear Voice function
4-573-936-32(1) Copyright 2015 Sony Corporation
Page 93
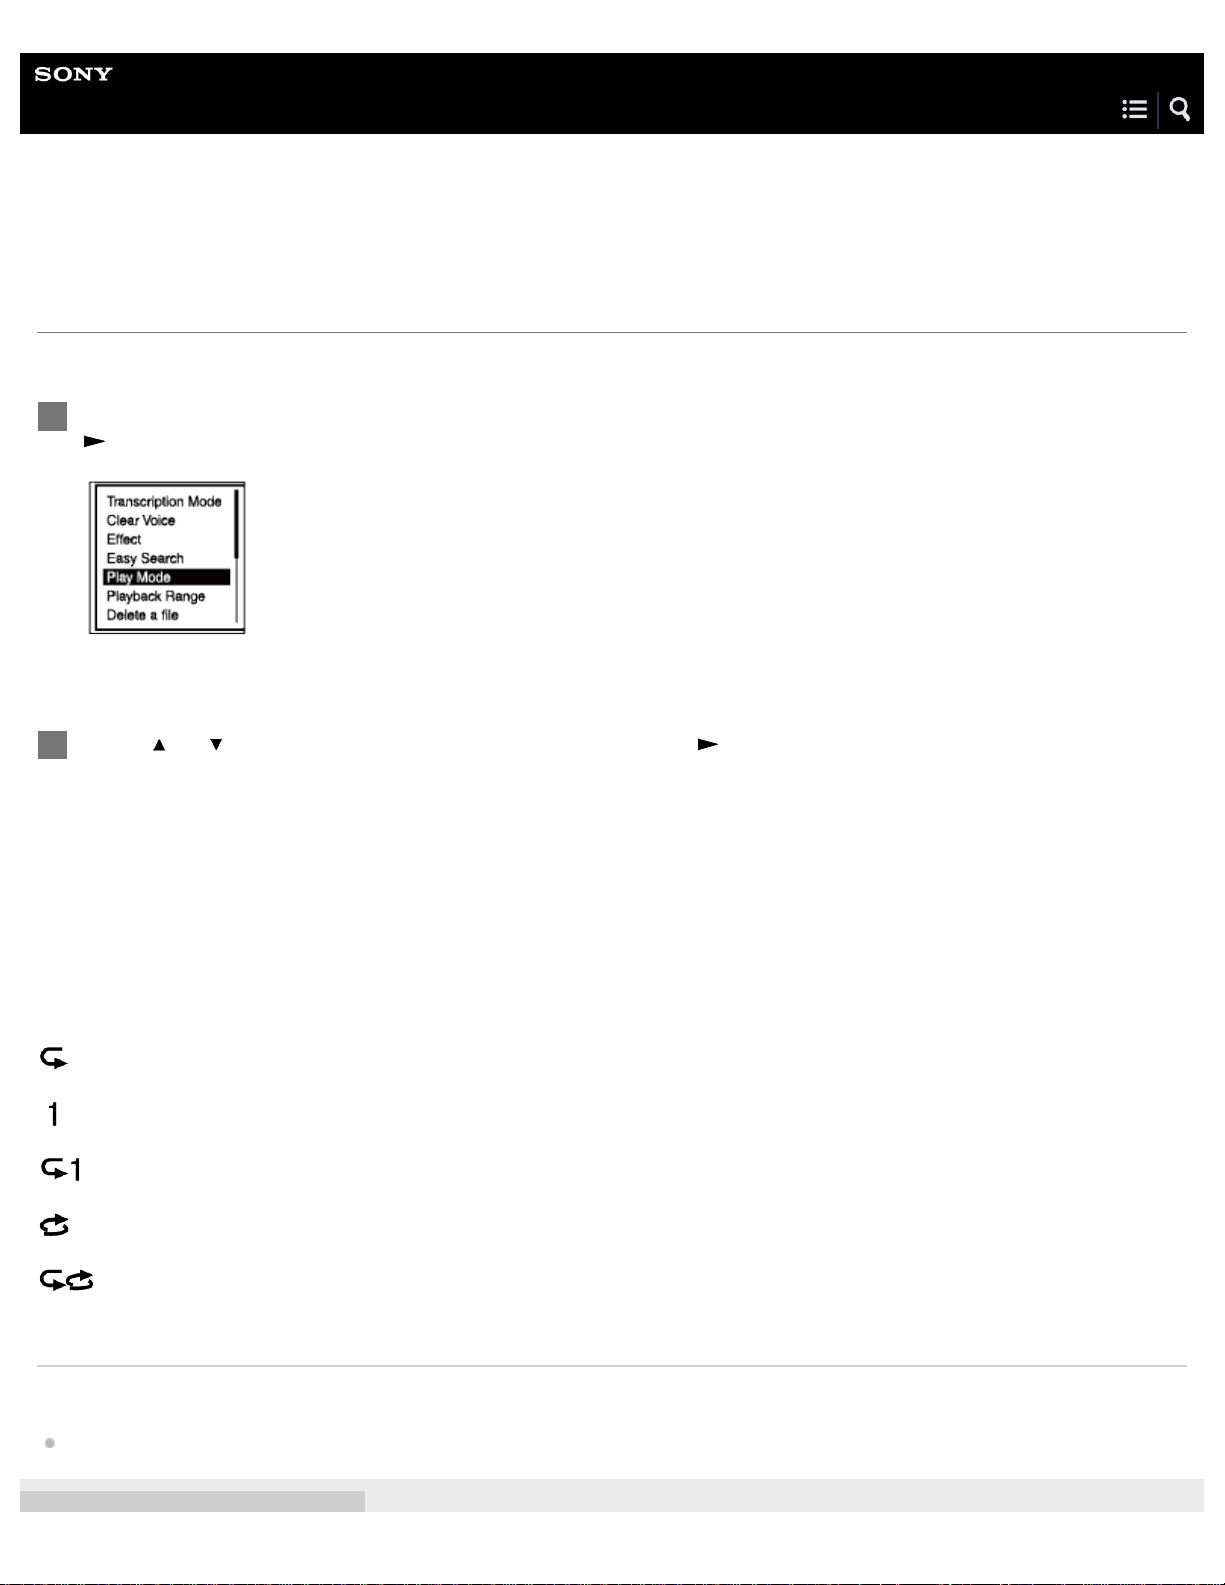
Help Guide
77
IC Recorder
ICD -UX560 / ICD-UX560F / ICD -UX565F
Selecting the playback mode
You can select the playback mode that suits your needs.
While playback is on standby or in progress, select “Play Mode” on the OPTION menu, and then press
1
.
2
Press
or to select a playback mode, and then press .
Description of menu items
You can select one of the following items:
Normal:
Plays the files in the specified range one by one.
Repeat:
Plays the files in the specified range repeatedly.
1 File Play:
Plays the current file to the end and stops.
1 File Repeat:
Plays the current file repeatedly.
Shuffle:
Plays the files in the specified range at random.
Shuffle Repeat:
Plays the files in the specified range repeatedly at random.
Related Topic
Specifying a segment of a file to play repeatedly (A- B repeat)
Page 94

4-573-936-32(1) Copyright 2015 Sony Corporation
78
Page 95
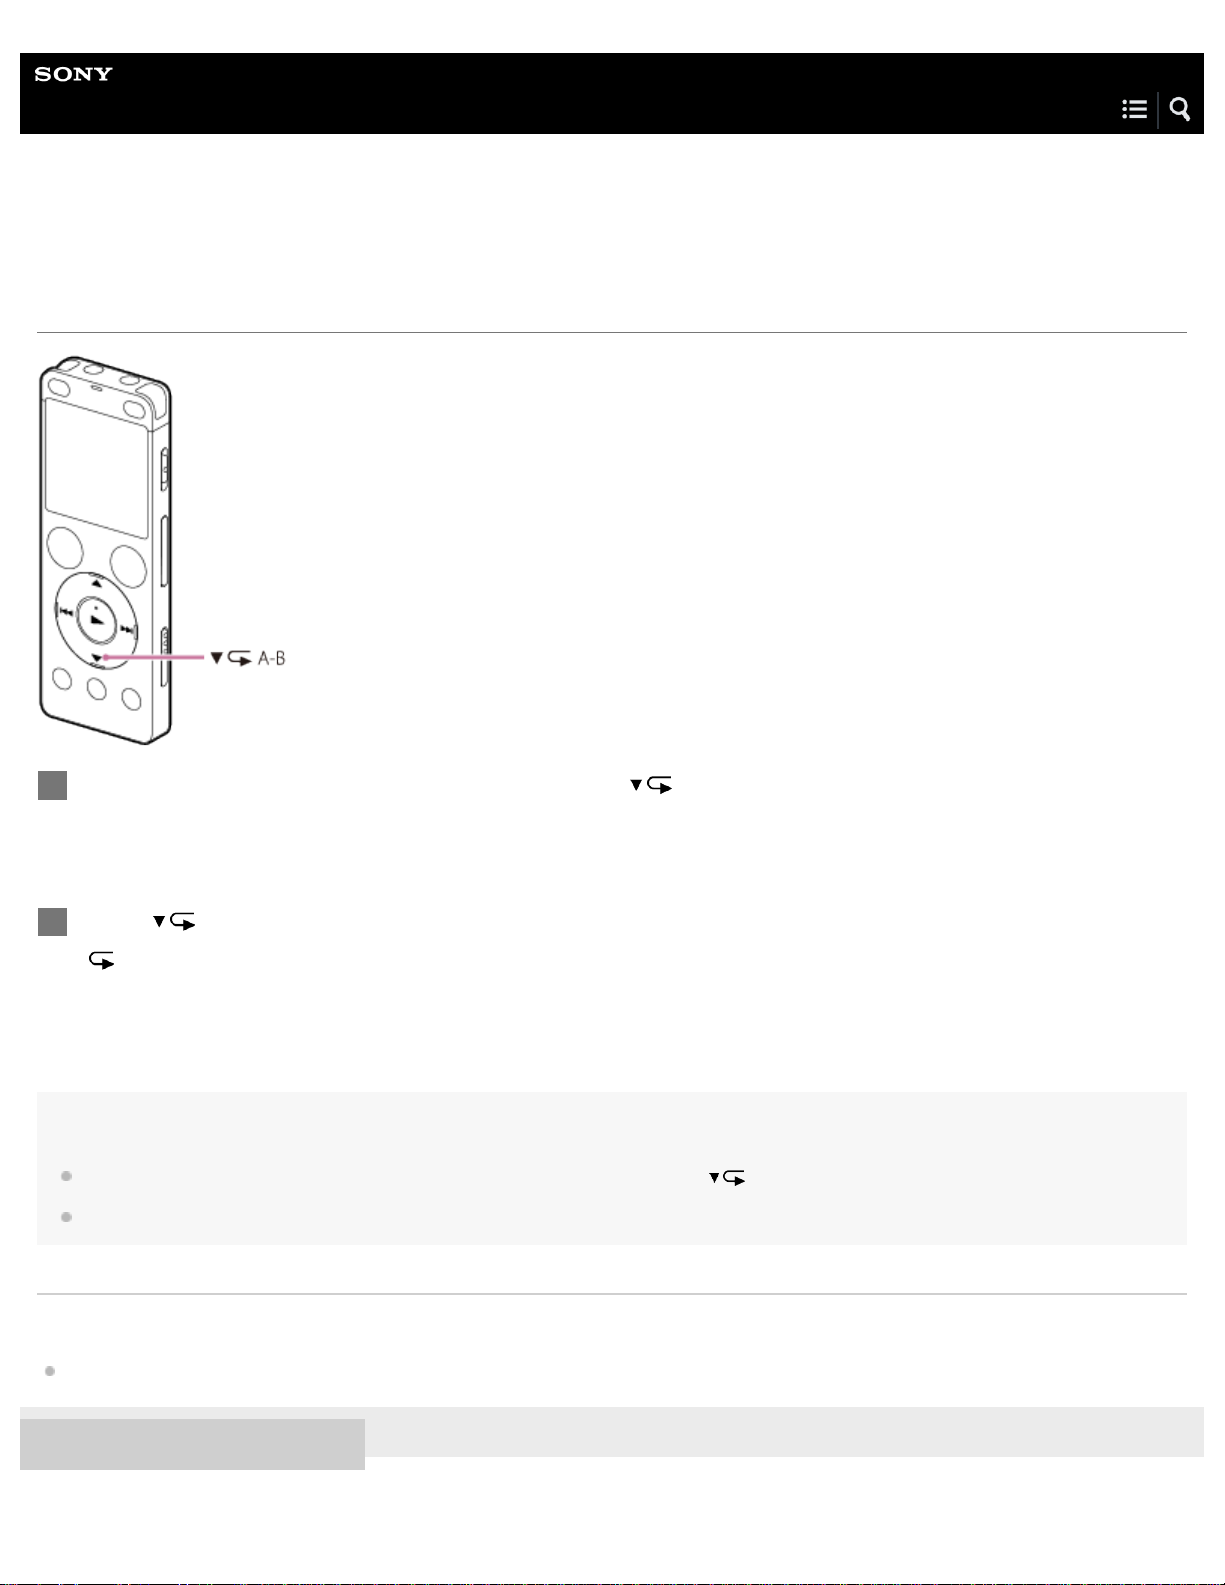
Help Guide
79
IC Recorder
ICD -UX560 / ICD-UX560F / ICD -UX565F
Specifying a segment of a file to play repeatedly (A- B repeat)
While playback is on standby or in progress, press A-B to specify the starting point A.
1
“A- B B? ” is displayed.
2
Press
A-B again to specify the finishing point B.
“ A-B” is displayed and the specified segment plays repeatedly.
Hint
To cancel the A-B repeat playback function and resume the normal playback, press A-B again.
To change the segment specified for the A-B repeat playback function, resume the normal playback and then repeat steps 1 and 2 once again.
Related Topic
Selecting the playback mode
4-573-936-32(1) Copyright 2015 Sony Corporation
Page 96
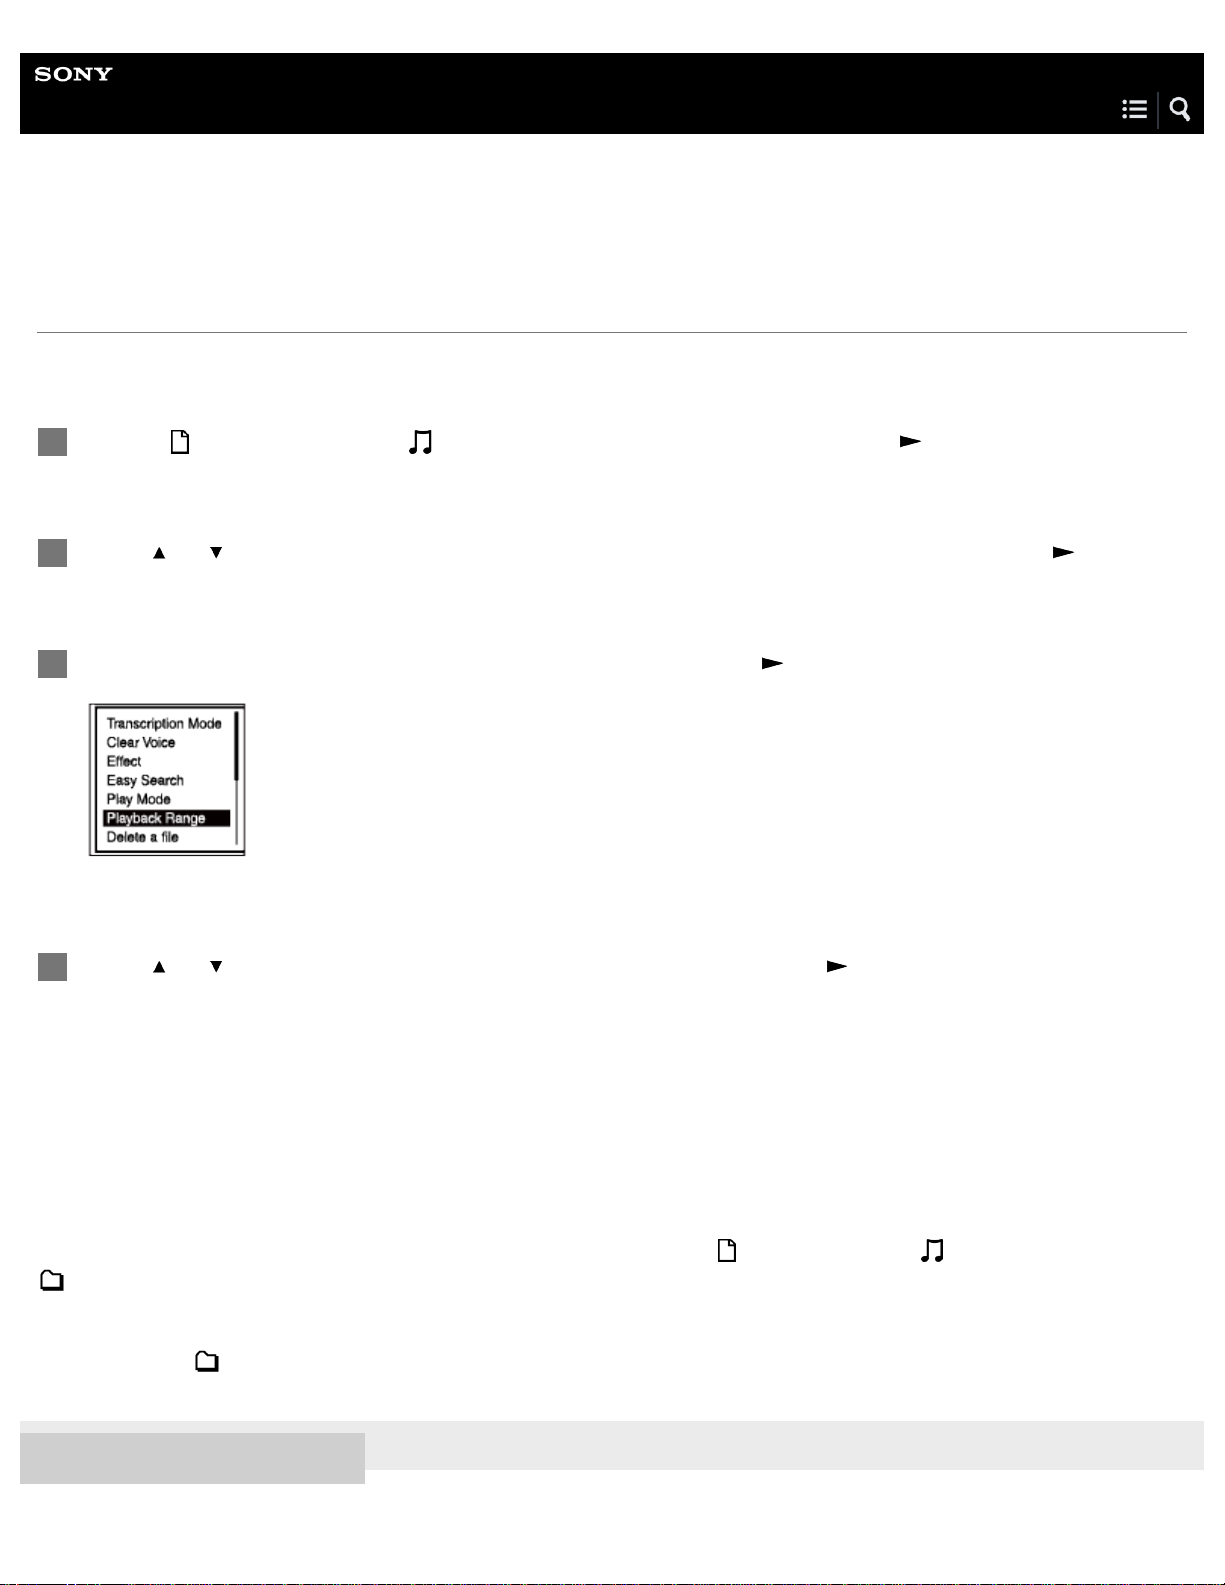
Help Guide
80
IC Recorder
ICD -UX560 / ICD-UX560F / ICD -UX565F
Specifying the playback range in the stored file list
You can specify the playback range in the playback file list. The contents of the playback range will vary depending on the file
search category (“ Latest Recording,” “ Search by REC Date,” “Search by REC Scene ,” or “Folders”).
Select “ Recorded Files” or “ Music” on the HOME menu, and then press .
1
Press
2
Select “Playback Range” on the OPTION menu, and then press
3
Press
4
or to select a file search category, select the memory storage, and then press .
or select “All Range” or “Selected Range,” and then press .
Descriptions of menu items
.
You can select one of the following items:
All Range:
Plays all files that belong to the file search category you selected for “
Selected Range:
Plays all files that are contained in the folder (recording date, recording scene, artist name, album title, etc.), including the
current playing file.
Selecting “
4-573-936-32(1) Copyright 2015 Sony Corporation
Selected Range ” displays the folder icon on the playback screen.
Recorded Files ” or “ Music.”
Page 97
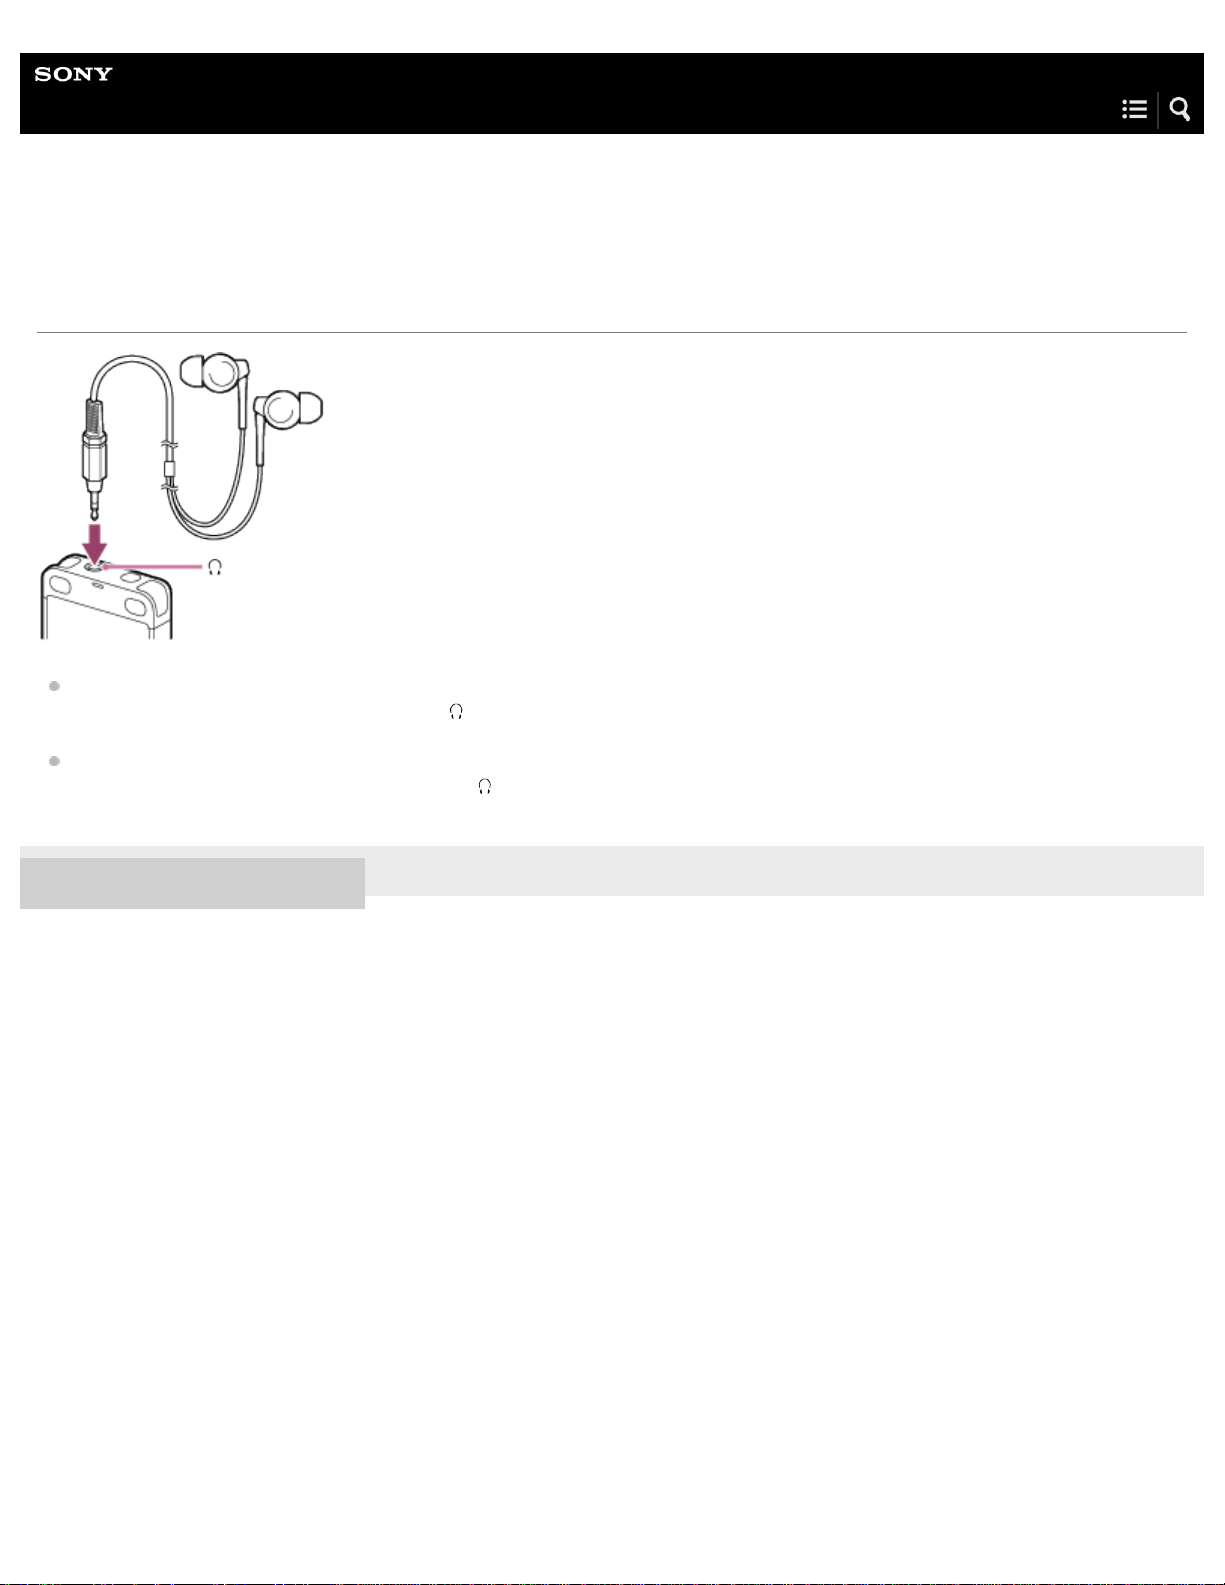
Help Guide
81
IC Recorder
ICD -UX560 / ICD-UX560F / ICD -UX565F
Listening to sound with better quality
Use headphones:
Connect headphones (not supplied) to the
(headphones) jack. This disables the built-in speaker.
Use external speakers:
Connect active speakers (not supplied) to the
4-573-936-32(1) Copyright 2015 Sony Corporation
(headphones) jack.
Page 98
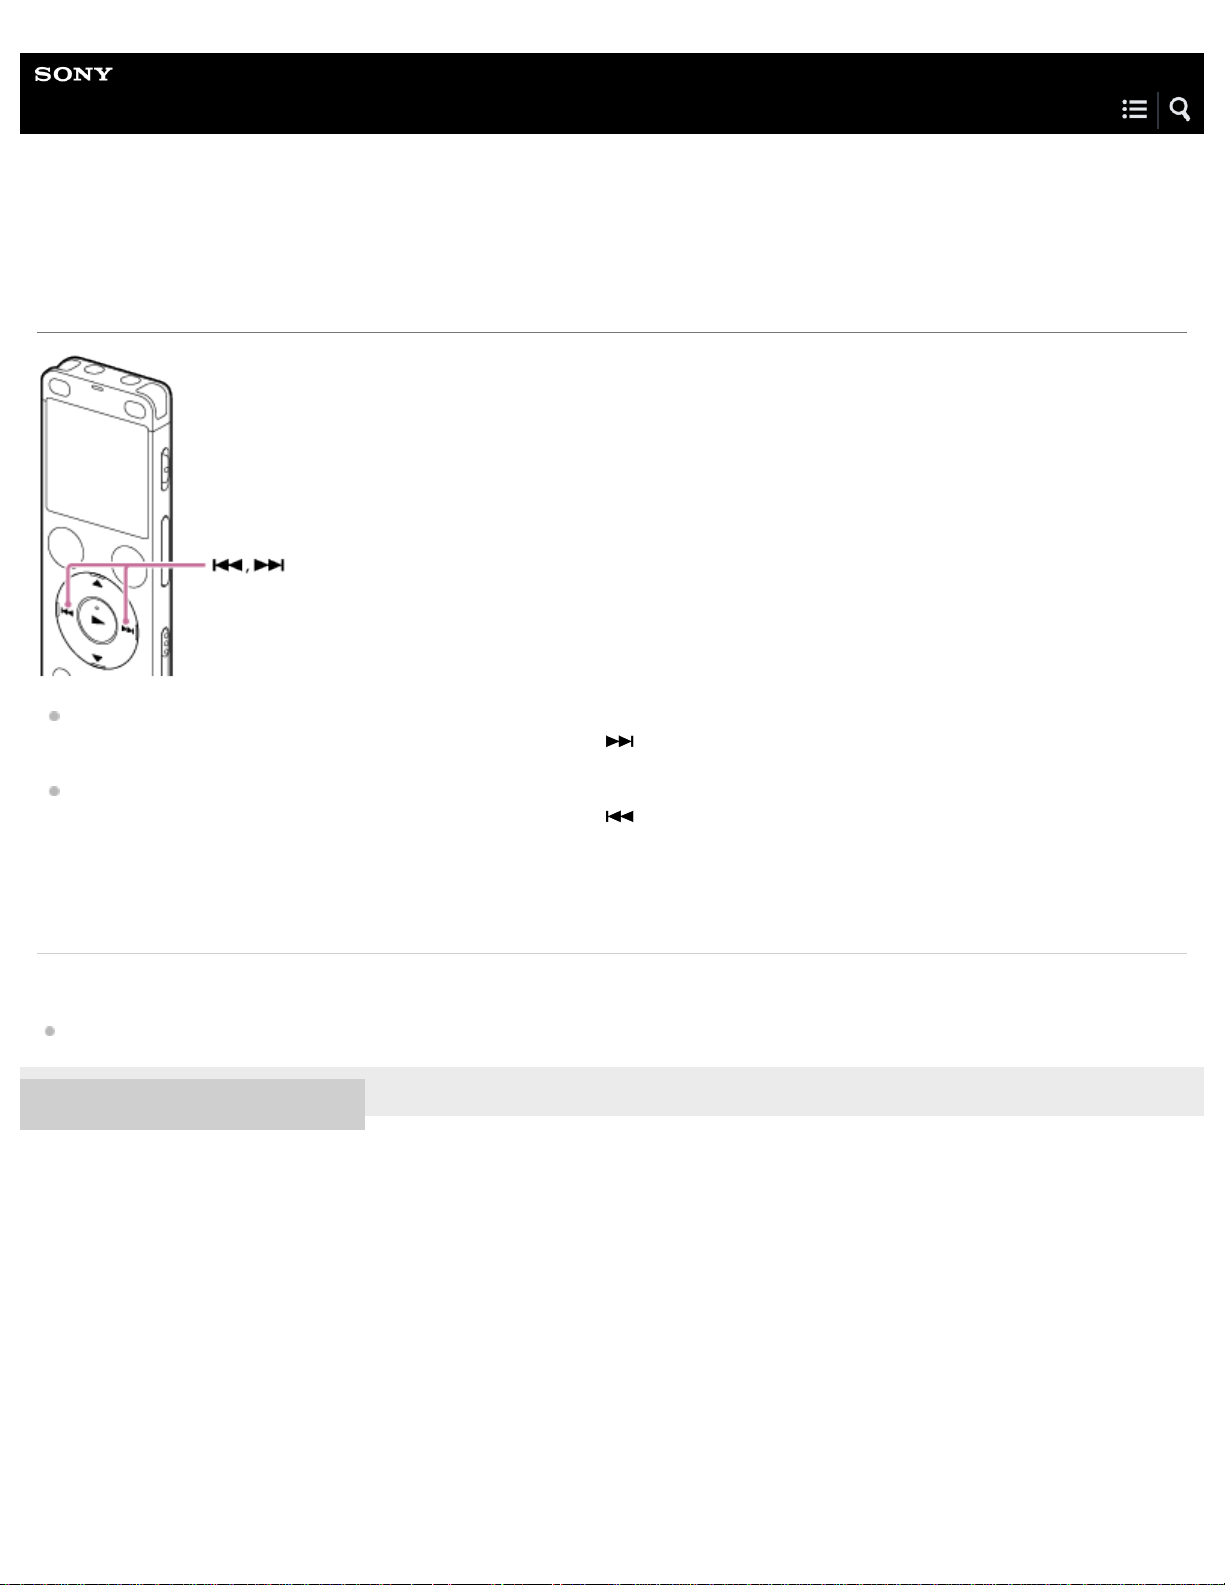
Help Guide
82
IC Recorder
ICD -UX560 / ICD-UX560F / ICD -UX565F
Searching forward/backward (Cue/Review)
To search forward (Cue):
While playback is on standby or in progress, press and hold
and release it at the point you want to resume playback.
To search backward (Review):
While playback is on standby or in progress, press and hold
and release it at the point you want to resume playback.
Forward or backward search begins at a slow speed, which helps you check the file word by word. If you keep holding either
button, forward or backward search will continue at a faster speed.
Related Topic
Locating the desired playback point quickly ( Easy Search)
4-573-936-32(1) Copyright 2015 Sony Corporation
Page 99
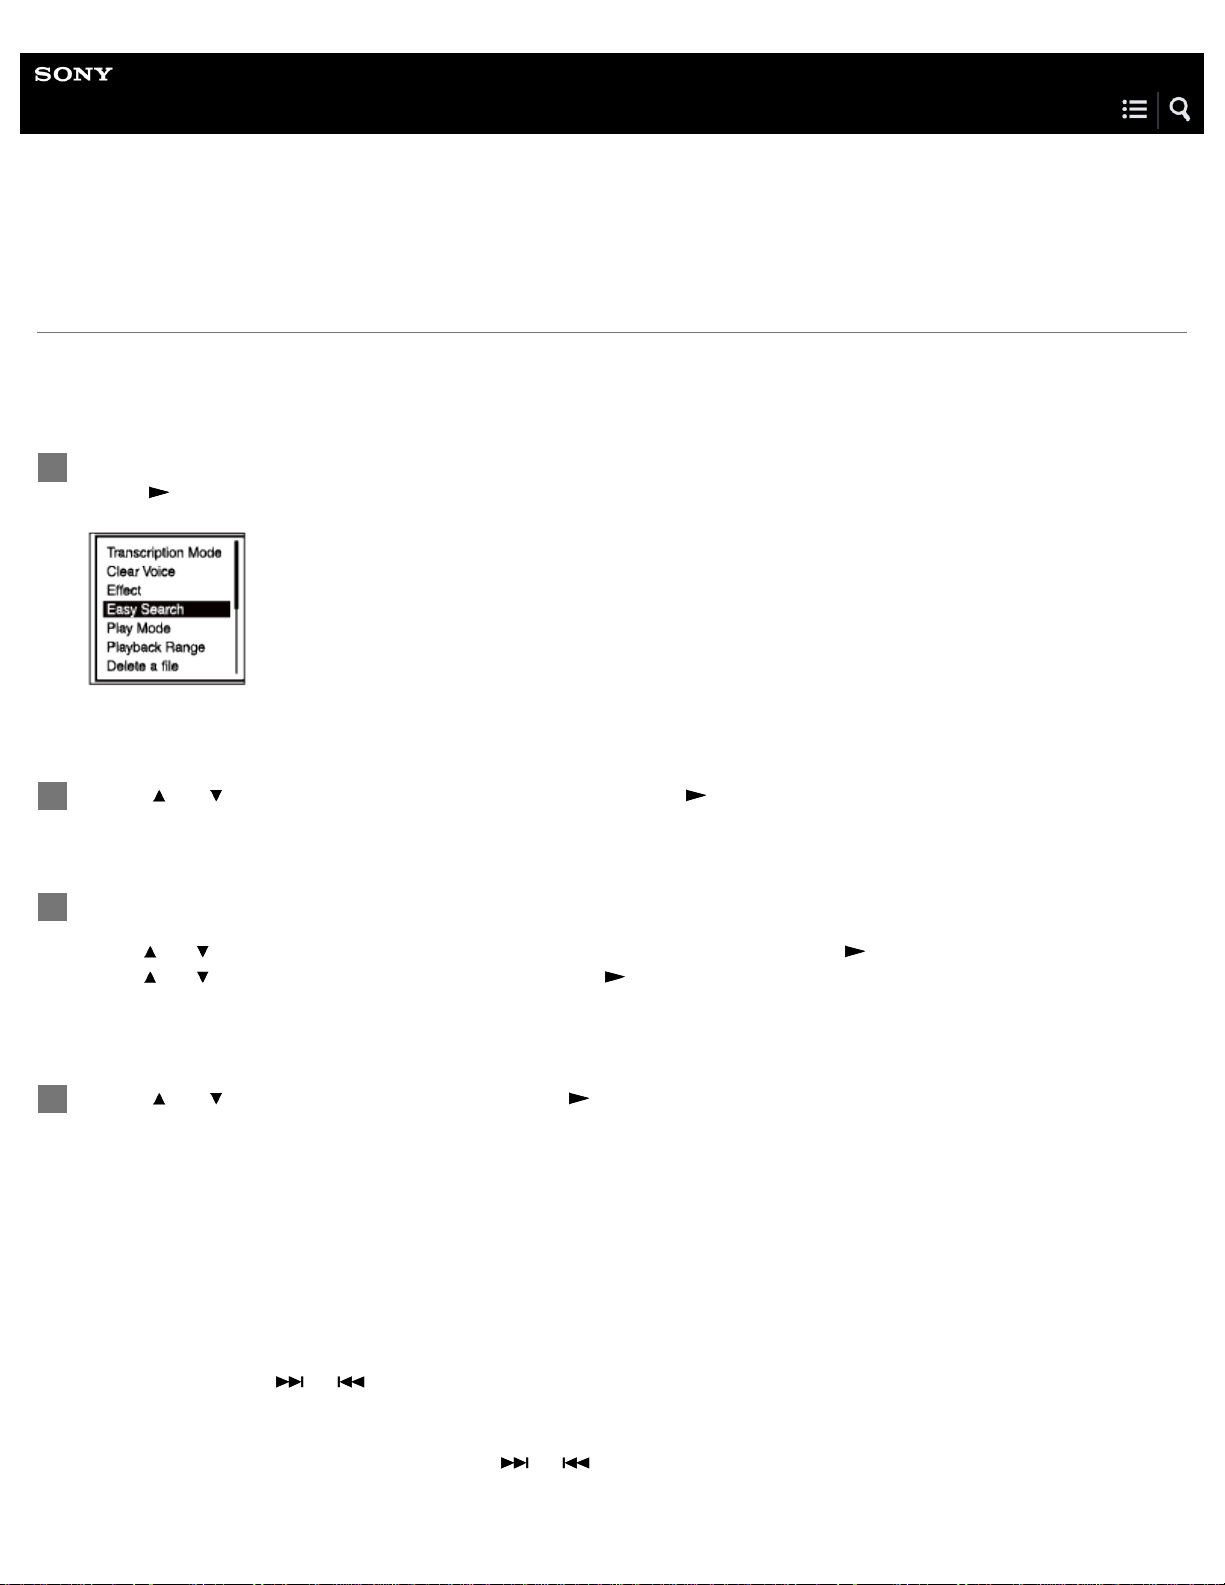
Help Guide
83
IC Recorder
ICD -UX560 / ICD-UX560F / ICD -UX565F
Locating the desired playback point quickly ( Easy Search )
The Easy Search function helps you quickly locate the point from which you want to play.
It would be more helpful in locating the desired point within a long file, such as a meeting recording, if you change the skip time
length.
While playback is on standby or in progress, select “Easy Search” on the OPTION menu, and then
1
press
.
Press
2
Select a skip time length.
3
Press
Press
Press
4
or to select “Set Skip Time,” and then press .
or to select “Forward Skip Time ” or “Reverse Skip Time,” and then press .
or to select the desired length and then press .
or to select “ON,” and then press .
Description of menu items
You can select one of the following items:
ON:
Allows you to press
long file for the desired playback point.
OFF:
Turns off the Easy Search function. Pressing
Set Skip Time:
or to search forward or backward by the specified skip time length. It is helpful in searching a
or fast-forwards or fast-rewinds (default setting).
Page 100

Allows you to specify the skip time length for Forward Skip Time and Reverse Skip Time.
For fast- forwarding: Select 5sec, 10sec (default setting), 30sec, 1min, 5min, or 10min to specify the skip time length for
84
fast-forwarding.
For fast- rewinding: Select 1sec, 3sec (default setting), 5sec, 10sec, 30sec, 1min, 5min, or 10min to specify the skip
time length for fast- rewinding.
Hint
You can also specify “Set Skip Time” while your IC recorder is in the transcription playback mode. For more information, see Using the
transcription playback mode.
4-573-936-32(1) Copyright 2015 Sony Corporation
 Loading...