

Page 1

3-866-581-13 (1)
ICD-PCLINK Software
Operating Instructions
1999 by Sony Corporation
Page 2
Notice for users
Program ©1999 Sony Corporation
Documentation ©1999 Sony Corporation
All rights reserved. This manual or the software described herein, in
whole or in part, may not be reproduced, translated or reduced to any
machine readable form without prior written approval from Sony
Corporation.
IN NO EVENT SHALL SONY CORPORATION BE LIABLE FOR ANY
INCIDENTAL, CONSEQUENTIAL OR SPECIAL DAMAGES, WHETHER
BASED ON TORT, CONTRACT, OR OTHERWISE, ARISING OUT OF OR
IN CONNECTION WITH THIS MANUAL, THE SOFTWARE OR OTHER
INFORMATION CONTAINED HEREIN OR THE USE THEREOF.
Sony Corporation reserves the right to make any modification to this
manual or the information contained herein at any time without notice.
The software described herein may also be governed by the terms of a
separate user license agreement.
User registration (For customers in the U.S.A.)
To receive the customer services, complete and return the registration
card included in your package.
•This software is for Windows and cannot be used for Macintosh.
•The supplied connecting cable is for the IC recorder ICD-R100 only. You
cannot connect other IC recorders.
Trademarks
•IBM and PC/AT are registered trademarks of International Business
Machines Corporation.
•Microsoft and Windows are trademarks of Microsoft Corporation,
registered in the U.S.A. and other countries.
•Apple and Macintosh are trademarks of Apple Computer Inc., registered
in the U.S.A. and other countries.
•Pentium is a registered trademark of Intel Corporation.
All other trademarks and registered trademarks are trademarks or
registered trademarks of their respective holders.
2
Page 3

Table of Contents
This manual explains how to install and use the ICD-PCLINK Software.
Please also refer to the instruction manual of the IC recorder.
Before You Begin
System Requirements ......................................................................................... 5
What You Can Do With the ICD-PCLINK Software...................................... 6
Operation Flow .................................................................................................... 8
Setting Up
Installing the ICD-PCLINK Software ............................................................... 9
Installing the software ................................................................................. 9
Uninstalling the software.......................................................................... 11
Connecting the Supplied Cable to Your Computer ..................................... 12
Basic Operation: Transferring Messages between IC
Recorder and Computer
Starting Up the ICD-PCLINK Software ......................................................... 13
Names and Functions of the Main Window ................................................. 16
Saving the Messages to the Computer ........................................................... 19
Saving messages one by one .................................................................... 20
Saving all the messages in a Message File at one time ......................... 23
Saving all Message Files at one time ....................................................... 25
On file types ................................................................................................ 27
Destination, file and folder names .......................................................... 28
Transferring Sound Files from the Computer to the IC Recorder ............. 30
Transferring sound files one by one........................................................ 31
Transferring all sound files in a folder at one time ............................... 33
Editing the Messages in the IC Recorder on the Computer Screen ........... 36
Moving the messages ................................................................................ 36
Deleting the Messages ............................................................................... 38
Saving a Backup of the IC Recorder (“Back Up”)......................................... 42
Saving a backup (ICB) file to the computer ........................................... 42
Restoring the backup file to the IC recorder .......................................... 45
Continued
3
Page 4
Table of Contents (continued)
Advanced Operation: Utilizing the Saved Messages
Playing Back the Saved Sound Files on the Computer ................................ 47
Playing back the WAV files ...................................................................... 47
Playing back the ICS files (ICS Player) ................................................... 48
Converting ICS files to WAV files (ICS Player) ..................................... 50
Tips on Utilizing the Saved Sound Files ........................................................ 51
Additional Information
Troubleshooting................................................................................................. 52
When problems occur ............................................................................... 52
Error messages ........................................................................................... 53
Changing the printer mode setting on the computer ........................... 55
Index .................................................................................................................... 57
Notes
• The illustrations in this manual may differ from the actual software.
• Explanations in this manual assume that you are familiar with basic
operations of Windows 98 or Windows 95. For how to use your computer and
operating system, please refer to the respective manuals.
For the latest information
For the latest information on this product, refer to the “readme.txt” file
on the supplied floppy disk, using the Windows “Notepad” program.
You can also open the file by clicking [Start], [Programs], [ICD-PCLINK],
and then [ReadMe].
4
Page 5

BBefore You Begin
System Requirements
Your computer and system software must meet the following minimum
requirements.
•IBM PC/AT or compatible
—CPU: 200MHz PentiumR processor or higher
—RAM: 16MB or more
—Hard disk space: 10MB or more depending on the size and number of
sound files you store.
—Floppy disk drive
—Parallel or printer port*
—Sound board
•OS: Microsoft Windows 98 or Windows 95
* Depending on the computer, the communication speed may vary.
Note
The ICD-PCLINK Software may not be used on some computers due to
differences in hardware specifications.
Before You Begin
5
Page 6
What You Can Do With the ICD-PCLINK Software
The ICD-PCLINK Software enables you to do the following.
• Transfer messages recorded on the ICD-R100 IC recorder to your
computer.
You can save the transferred messages as sound files on your computer’s
hard disk (page 20).
The messages saved to your computer can be played back on the
computer (page 47), or attached to your e-mail (page 51). (E-mail
software is not supplied.)
When saving the messages on your computer, you can select from three
file types: “ICS file”, “8-bit WAV file”, or “16-bit WAV file” (page 27).
Your computer
Record
messages on the
IC recorder
Save the
messages to the
computer as
sound files
Transfer
messages
ICS file
WAV file
6
Page 7
• Transfer sound files from the computer to your IC recorder
The messages saved on your computer’s hard disk can be transferred
back to the IC recorder (page 30).
The messages transferred from the computer can be played back on the
IC recorder.
Your computer
• Messages
transferred
from the IC
recorder
• Sound files
you received
via e-mail,
etc.
Play back on
the IC recorder
Transfer
sound files
You can transfer back to the IC recorder messages recorded with your IC
recorder and saved to your computer, or sound files (ICS or WAV files*)
you have received via e-mail, etc.
*The sound files you can transfer back to the IC recorder are ICS files recorded
with Sony IC Recorder ICD-R100, and PCM 11kHz sampling, 8/16 bit
monaural WAV files only.
• Utilize the saved sound files in various ways
– You can edit the messages in the IC recorder on your computer (page 36)
You can delete or change the order of the messages in the IC recorder
on your computer screen.
– You can save a backup of the messages (“Saving a Backup of the IC
Recorder ” on page 42)
You can save a backup of all messages in the IC recorder to your
computer (see “Saving a Backup of the IC Recorder” on page 42) and
later restore the messages to the IC recorder.
Before You Begin
7
Page 8
Operation Flow
Preparation: Install the ICD-PCLINK Software in your
1
computer (Page 9)
.
Transfer the messages in the IC recorder to your
2
computer.
You can view the list of the messages and play back the messages on the
computer.
1“Connecting the Supplied Cable to Your Computer”(Page 12)
1“Starting up the ICD-PCLINK Software ”(Page 13)
.
Use the features of the ICD-PCLINK Software to
3
transfer or edit messages.
1“Saving the Messages to the Computer”(Page 19)
1“Transferring Sound Files from the Computer to the IC Recorder ”
(Page 30)
1“Editing the Messages in the IC recorder on the Computer Screen”
(Page 36)
1“Saving a Backup of the IC Recorder”(Page 42)
.
Utilize the saved sound files (ICS files and WAV files)
4
1“Playing Back the Saved Sound Files on the Computer”(Page 47)
1“Tips on Utilizing the Saved Sound Files ” (Page 51)
8
Page 9

BSetting Up
Installing the ICD-PCLINK Software
Installing the software
Install the ICD-PCLINK Software in your computer’s hard disk, etc.
1 Turn on your computer and start up Windows.
Note
Be sure to close all running programs before installing the ICD-PCLINK
Software.
Setting Up
2 Insert the supplied floppy disk
11
1 into the floppy disk drive.
11
3 Open [My Computer] and choose [A:3.5inch FD].
4 Double-click [Setup.exe].
The [ICD-PCLINK installation] dialog box appears.
5 1Click [Next].
Be sure to read the displayed information before proceeding to the
next step.
2 Click [Next].
The [Select Destination Directory] dialog box appears.
3 Select the directory where the ICD-PCLINK Software is to be
installed and click [Next].
The [Select Components] dialog box appears.
4 When installing the ICD-PCLINK Software:
Select [ICD-PCLINK and ics-Player]. (Both the ICDPCLINK Software and the ICS Player will be installed).
When installing only the ICS Player:
Select [ics-Player].
Continued
9
Page 10

Installing the ICD-PCLINK Software (continued)
5 Click [Next].
The message “Ready to Install!” appears.
6 Click [Next].
The installation of the software starts.
6 When the message “Place installation disk #2 into the floppy
drive and press the OK button” appears, insert the supplied
floppy disk
22
2 and click [OK].
22
7 Following the instructions on the screen, insert the supplied
floppy disk
When the installation is finished, the message “Installation
Completed!” appears.
33
3 , and then click [OK].
33
8 Click [Finish].
Now the installation is completed.
If the message on the screen instructs you to restart the computer, eject
the floppydisk, click [OK] and restart the computer.
10
Page 11

Uninstalling the software
When you wish to uninstall the software, follow the steps below.
1 Click [Start] and select [Programs], [ICD-PCLINK] and then
[Uninstall].
The uninstaller starts up.
2 Follow the displayed instructions.
If you installed the ICD-PCLINK Software, both the ICD-PCLINK
Software and the ICS Player will be uninstalled.
If you installed the ICS Player only, the ICS Player will be uninstalled.
Note
If you wish to move the software to another drive or directory after it is
installed, you need to uninstall the software and then reinstall it. The software
does not work properly if you just move the files.
Tip
You can also start up the uninstaller by clicking [Start] and then selecting
[Settings], [Control Panel], and [Add/Remove Programs].
Setting Up
11
Page 12

Connecting the Supplied Cable to Your Computer
Connect the supplied connecting cable to the parallel (printer) port of your
computer.
To parallel (printer) port
Connecting cable (supplied)
Your computer
Note
For some computers, you may have to change the parallel (printer) port setting
to the ‘bidirectional’ mode. For details, see page 55.
To IC recorder
(see page 14.)
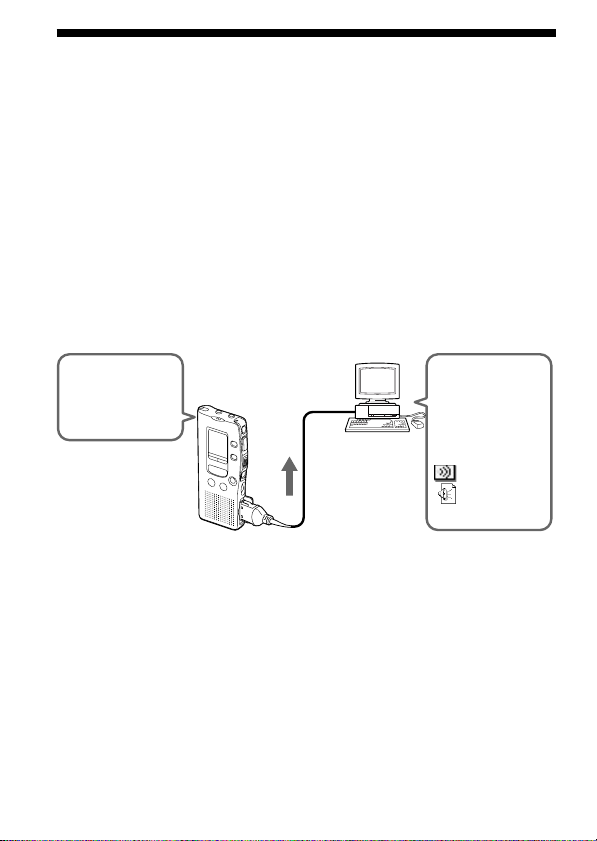
Start up the ICDPCLINK Software
before
connecting to the
IC recorder.
12
Page 13
BBasic Operation: Transferring Messages
between IC Recorder and Computer
Starting Up the ICD-PCLINK Software
Note
Before starting up the software, make sure that the supplied connecting cable is
connected to your computer (page 12).
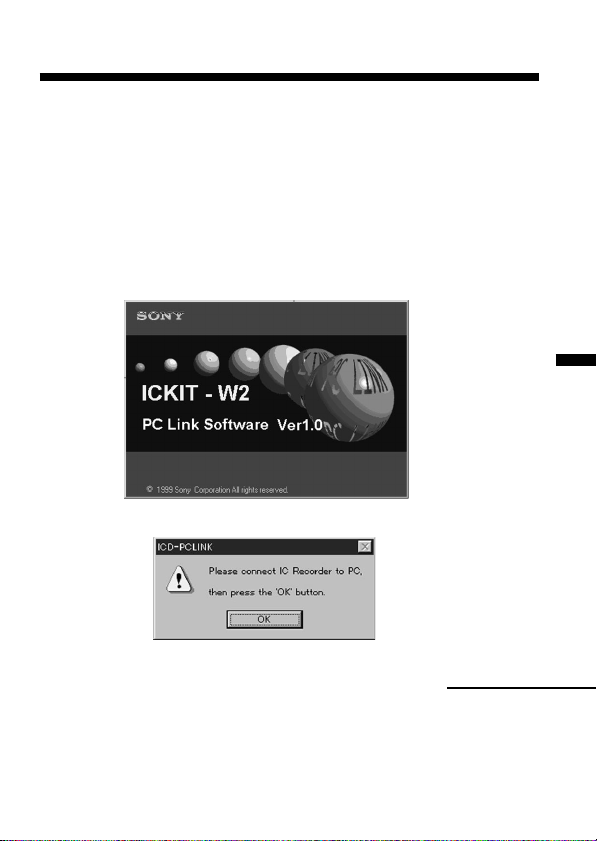
1 Start up Windows.
2 Click [Start], and select [Programs], [ICD-PCLINK] and then
[ICD-PCLINK].
The ICD-PCLINK Software starts up.
Then, the following dialog box appears.
Basic Operation
Continued
13
Page 14
Starting Up the ICD-PCLINK Software (continued)
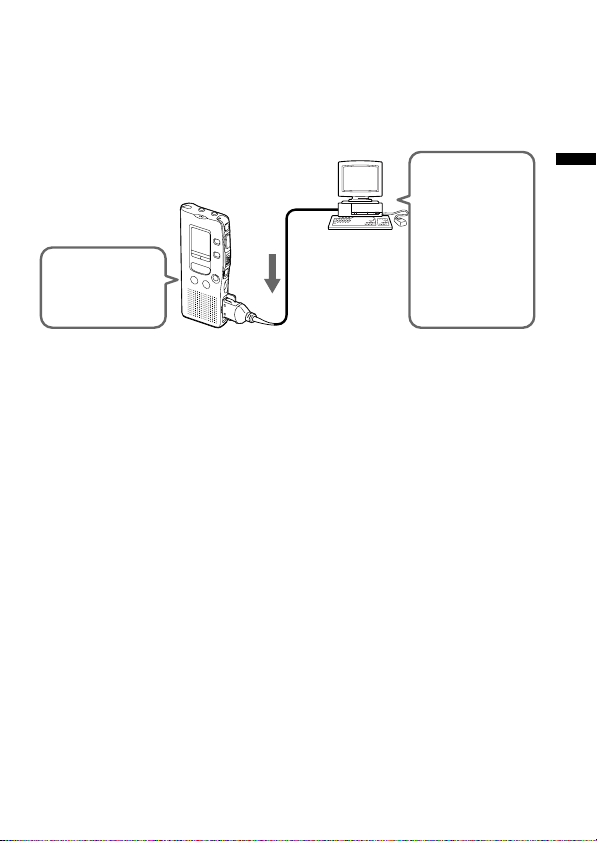
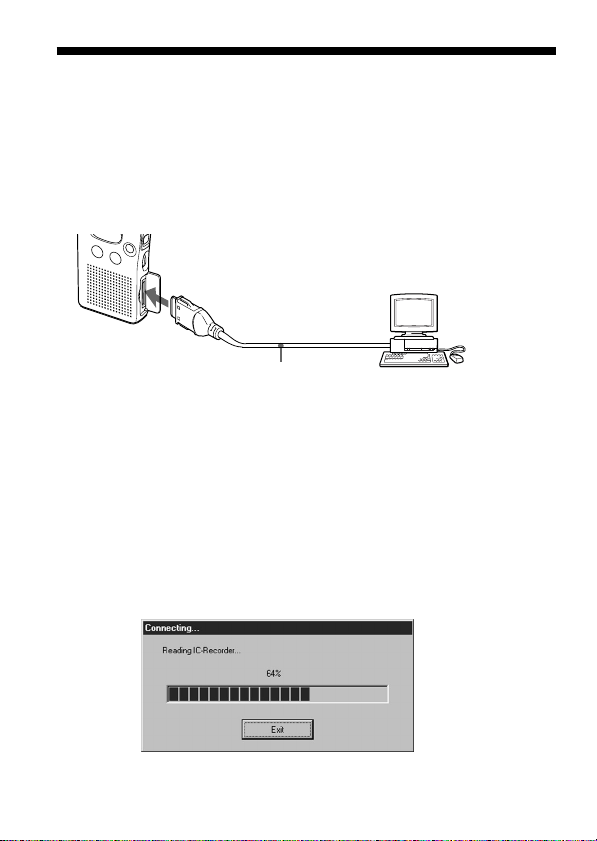
3 Connect the IC recorder to your computer.
Make sure that the IC recorder is in the stop mode and connect the
cable to the DIGITAL I/O connector of the IC recorder.
Note
Be sure not to connect the cable while operating the IC recorder (recording ,
playback, etc.). Doing so may damage the data in the IC recorder.
To DIGITAL I/O connector
Connecting cable (supplied)
Notes
• If you leave the IC recorder connected to the computer for an extended period
of time, the batteries in the IC recorder may be exhausted. Be sure to
disconnect the cable from the IC recorder after use.
• Do not remove the batteries from the IC recorder while it is connected to the
computer.
• While the IC recorder is connected to the computer, you cannot operate the IC
recorder. The alarm playback, if set, will not be activated either.
Your computer
(For
connection
with the
computer,
see page 12.)
4 Click [OK].
Data transmission between the IC recorder and the computer
starts.
When the data transmission is completed, the ICD-PCLINK main
window (Page 16) appears.
14
Page 15
If the message “Could not communicate with IC Recorder.
Make sure that the cable is connected properly.” appears
Communication between the IC recorder and the computer was not
successful (Connection Error). Check the following items and start the
procedure from the beginning.
•Is the cable connected properly?
t Check the connection between the cable and the computer (page 12) ,
and between the IC recorder and the cable (page 14).
•Maybe you were using the printer port before starting up the ICDPCLINK software, e.g. printing on a printer connected to the printer port.
t Restart the computer. If the message still appears, see
“Troubleshooting” on page 52.
Note
If the “Battery Low Error”message appears, the remaining battery power of the
IC recorder is not sufficient. Disconnect the cable from the IC recorder, replace
both batteries with new ones and connect the cable again. (Even if the
remaining battery indicator on the IC recorder indicates that the batteries are
not exhausted, battery power may not be sufficient for operation with the
computer.)
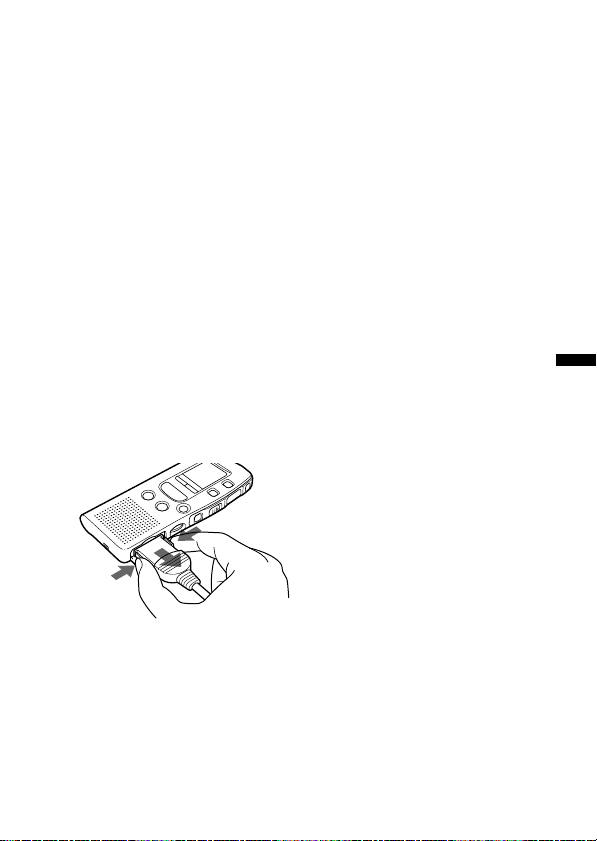
To detach the cable from the IC recorder
Basic Operation
15
Page 16
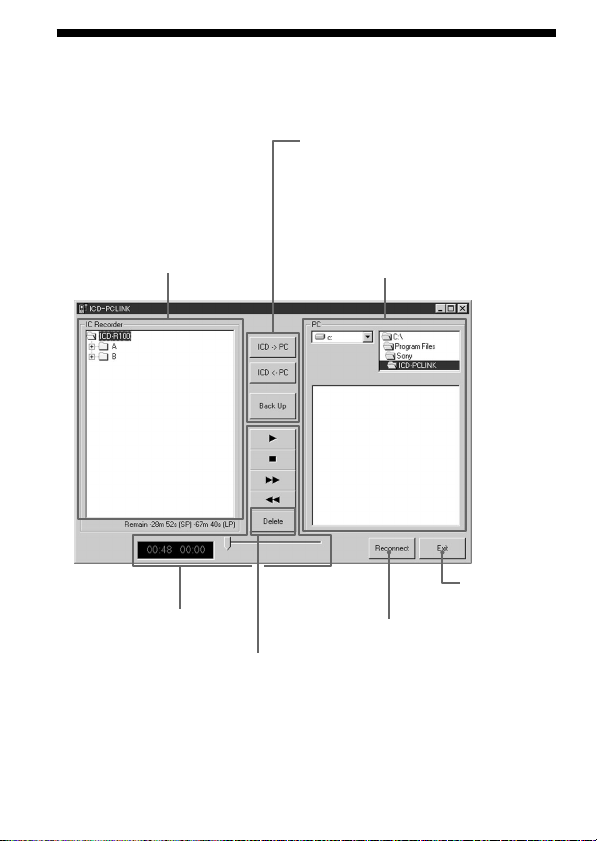
Names and Functions of the Main Window
[ICD –>PC] button for saving the message
to the computer (pages 22, 24, 26)
[ICD <–PC] button for transferring the
sound files to the IC recorder (pages 32, 35,
45)
[Back Up] button for saving a backup (icb
“IC RECORDER” Area:
Messages in the IC
recorder (page 17).
Operation buttons for
message playback
(page 18)
[Delete] button
(pages 38 - 41)
file) (page 43).
“PC” Area: Folders and files in the
computer (page 17)
[Reconnect] button
Click to re-transfer the
data from the IC
recorder.
[Exit] button
Click to quit the
ICD-PCLINK
Software.
To quit the ICD-PCLINK Software
Click the [Exit] button. The message “Disconnect the connecting cable
from the IC Recorder” appears. Be sure to disconnect the cable.
16
Page 17
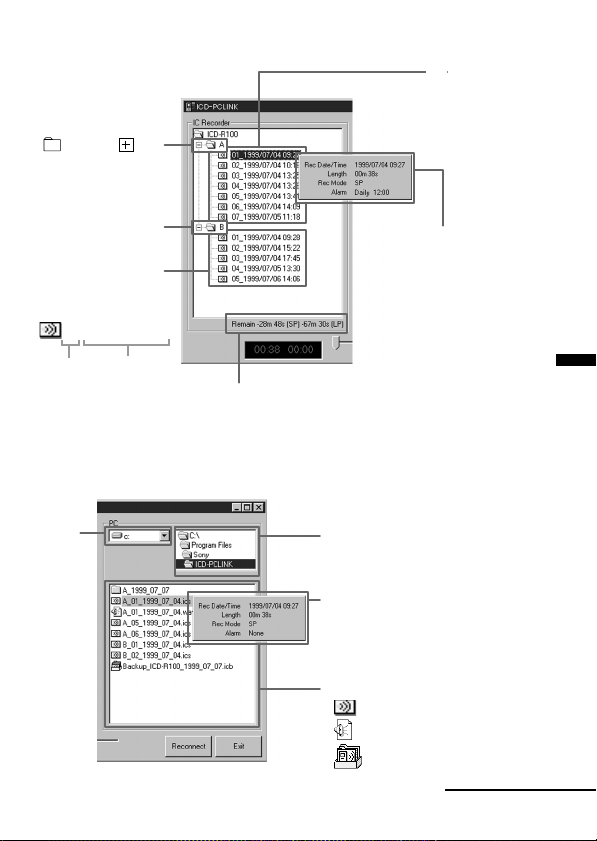
•“IC RECORDER” Area: Messages in the IC recorder
Messages
in File A
Message File A
If you double-click
A or click , the
list of the messages in
Message File A will be
displayed.
Message File B
List of
messages
01_1999/07/04 09:28
Message
Date and time
number
of recording (not
displayed when
the clock has not
been set on the
IC recorder)
Remaining recording time on the IC recorder
in SP and LP modes
If you click the right
mouse button (‘rightclick’), the date and time
of recording, length,
recording mode (SP or LP)
and the alarm setting of
that message are
displayed.
•“PC” Area: Folders and sound files in the computer
Basic Operation
Drive
Directory
If you right-click an ICS file, the date
and time of recording, length, recording
mode (SP or LP) and the alarm setting
(always “None”) are displayed.
Folders and sound files
ICS file (extension: .ics)
•
•
WAV file (extension: .wav)
•
ICB file (extension: .icb)
Continued
17
Page 18
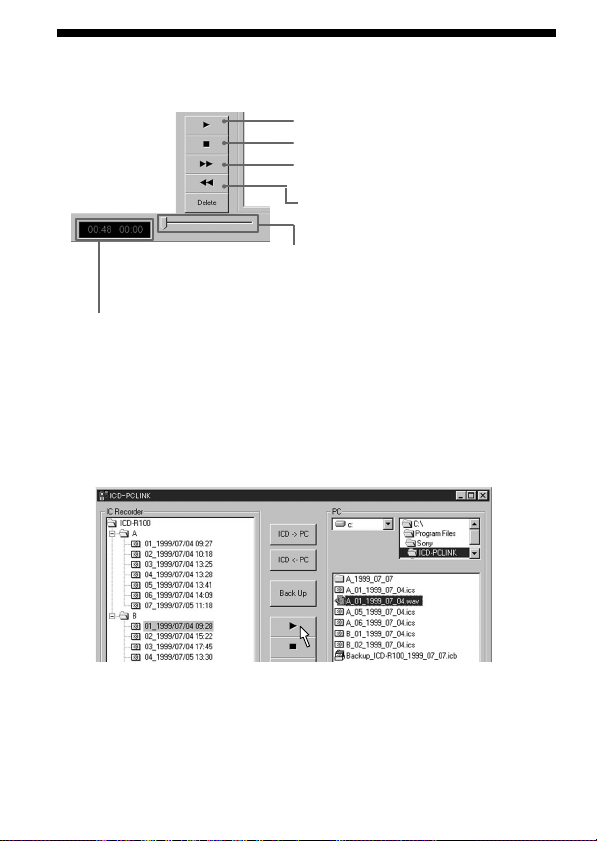
Names and Functions of the Main Window (continued)
•Operation buttons for message playback
N button: click to start playback
x button: click to stop playback
M button: click to search forward
m button: click to search backward
Slide bar
Slides from left to right during playback. You
can start playback at a desired point by
moving the slide bar.
Counter display
Left: length of the message being played back
Right: Elapsed playback time
You can play back the messages in the IC recorder and sound files saved to
the computer. Playback sound will be heard from the computer’s speaker.
To start playback, select a message in the “IC RECORDER”Area or an ICS
file or a WAV file on the “PC”Area and click the N button. (You can also
start playback by double-clicking the message or the ICS or WAV file.)
during playback
during playback
Note
The WAV files you can play back on the ICD-PCLINK Software are 11kHz
sampling 8/16 bit monaural or 8kHz sampling 8/16 bit monaural WAV files
only. WAV files of other format cannot be played back on the main window.
18
Page 19

Saving the Messages to the Computer
You can save the messages as sound files on your computer’s hard disk,
etc. You can choose from three file types: “ICS file” (Sony’s original
format), “8-bit WAV file” or “16-bit WAV file”. (See page 27 for details.)
There are three ways of saving messages: “one by one”(page 20), “all the
messages in a Message File at one time”(page 23) or “all Message Files at
one time”(page 25).
Tip
If you wish to save a backup of all the messages currently recorded in the IC
recorder, see page 42.
Continued
Basic Operation
19
Page 20

Saving the Messages to the Computer (continued)
Saving messages one by one
You can transfer messages from the IC recorder to the computer in either
of the following two ways: by “drag-and-drop” operation from the “IC
RECORDER” Area to the “PC” Area using the mouse, or by clicking the
[ICD –>PC] button.
The following procedure explains the former: “drag-and-drop” operation.
1 Drag the message you wish to save from the ”IC RECORDER“
Area and drop it in the ”PC“ Area.
1 Select and drag the message you wish to save.
When you start dragging, the pointer changes to
2 Drop the message in the ”PC“ Area.
You can drop it anywhere in the shadowed area in the above
illustration.
1 You can also drop the message in a folder in the ”PC“ Area to save it in
that folder.
.
20
Page 21

The following dialog box appears.
Destination
to which the
message is
to be saved
File type
Change the destination and/or the file name, if you wish, before
proceeding to the next step.
You can also save the message in a newly created folder by clicking
[New Folder] .
Note
The following characters cannot be used in a file name:
\ / : * ? ” < > |
3 Select the file type (page 27).
File name to be
saved (page 28)
Basic Operation
Select among ICS file, 8 bit WAV file
and 16 bit WAV file.
Continued
21
Page 22

Saving the Messages to the Computer (continued)
2 Click [Save].
The saved file will be displayed in the “PC” Area.
When a message with the same file name exists
The following dialog box appears.
If you wish to overwrite the file, click [Yes]. If you wish to change the file
name, click [No].
To save the message using the [ICD –>PC] button
Select the message in the “IC RECORDER” Area and click the [ICD –>PC]
button.
22
Page 23

Saving all the messages in a Message File at one time
You can save all the messages in a Message File (A or B) at one time as one
folder.
1 Drag the Message File (A or B) you wish to save from the ”IC
RECORDER” Area and drop it in the ”PC“ Area in the same
way explained in ”Saving messages one by one“ on page 20.
The following dialog box appears.
Continued
Basic Operation
23
Page 24

Saving the Messages to the Computer (continued)
Destination
to which the
file is to be
saved
Folder name
to be saved
(page 28)
Select file type (page 27). (All messages in the
folder are saved in the selected file type.)
Change the destination and/or the folder name, if you wish, before
proceeding to the next step.
You can also save the folder in a newly created folder by clicking
[New Folder] .
Note
The following characters cannot be used in a folder name:
\ / : * ? ” < > |
2 Click [Save].
The saved folder will be displayed in the “PC” Area.
When a folder with the same name already exists
The message “This folder already exists. Please rename.” appears.
Click [OK], change the folder name and then click [Save] again.
To save the Message File using the [ICD –>PC] button
Select the Message File (A or B) in the “IC RECORDER” Area and click the
[ICD –>PC] button.
24
Page 25

Saving all Message Files at one time
You can save all the messages in both Message Files A and B at one time as
one big folder that consists of two sub-folders.
1 Drag ”ICD-R100“ from the ”IC RECORDER“ Area and drop it in
the ”PC“ Area in the same way explained in ”Saving messages
one by one“ on page 20.
The following dialog box appears.
Destination
to which the
folder is to
be saved
Folder name
to be saved
(page 28)
Basic Operation
Select file type (page 27). (All messages in the
folder are saved in the selected file type.)
Continued
25
Page 26

Saving the Messages to the Computer (continued)
Change the destination and/or the folder name, if you wish, before
proceeding to the next step.
You can also save the folder in a newly created folder by clicking
[New Folder] .
Note
The following characters cannot be used in a folder name:
\ / : * ? ” < > |
2 Click [Save].
The saved folder will be displayed in the “PC”Area.
When a folder with the same name exists
The message “This folder already exists. Please rename.” appears.
Click [OK], change the folder name and then click [Save] again.
To save all Message Files using the [ICD –>PC] button
Select “ICD-R100” in the “IC RECORDER” Area and click the [ICD –>PC]
button.
26
Page 27

On file types
All the saved sound files can be played back on the ICD-PCLINK Software
in the same way, but the differences are the following:
• ICS file (SONY IC RECORDER (*. ics))
The ICS file is Sony’s original format. You can play back ICS files using the
supplied “ICS-Player” Software. (Page 48)
When messages are saved as ICS files, the sound data is compressed so
that the size of the data is relatively small.
You can convert the ICS files into WAV files. (Page 50).
• 8-bit WAV file (WAV FILE [8 bit] (*. wav))
The 8-bit WAV files can be played back using software such as Microsoft
Sound Recorder supplied with Windows 98 or Windows 95.
• 16-bit WAV file (WAV FILE [16 bit] (*. wav))
The 16-bit WAV files can be played back using software such as Microsoft
Sound Recorder supplied with Windows 98 or Windows 95. Save in 16-bit
when the software to be used requires 16-bit WAV files.
Approximate file size of a one-minute message recorded in SP mode
ICS file : approx. 248 KB
8 bit WAV file: approx. 660 KB
16 bit WAV file: approx. 1,320 KB (KB:kilobytes)
Approximate file size of a 64-minute message recorded in SP mode
ICS file : approx. 15.6 MB
8 bit WAV file: approx. 43 MB
16 bit WAV file: approx. 86 MB (MB:megabytes)
Approximate file size of a 150-minute message recorded in LP mode
ICS file : approx. 15.6 MB
8 bit WAV file: approx. 72 MB
16 bit WAV file: approx. 144 MB (MB:megabytes)
Basic Operation
Continued
27
Page 28

Saving the Messages to the Computer (continued)
Destination, file and folder names
When you save the messages, the file and folder names are automatically
created. See the following examples.
• When saving a message one by one (Page 20)
A_01_1999_07_04.ics
Message number
Massage File A or B on the IC recorder
(If the date of recording is not recorded the file name will be shorter, such as
A_01.ics)
File type (ICS or WAV)
Date of recording (Year/Month/Day)
• When saving all the messages in a Message File as a
folder (Page 23)
A_1999_10_10
Message File A or B on the IC recorder
Date of saving the folder
Each sound file in the folder will be named in the same way as indicated in
“When saving a message one by one”.
• When saving all Message Files as a folder (Page 25)
ICD-R100_1999_10_10
Date of saving the folder
Each sound file and folder in this folder will be named in the same way as
indicated above.
1 For the file name of a backup file, see page 42.
28
Page 29

•
Example of destinations where sound files and folders are saved
(C:) drive
Program Files
Sony
ICD-PCLINK
A_1999_10_10
A_01_1999_07_01. ics
A_02_1999_07_02. ics
A_03_1999_07_03. ics
B_1999_10_10
ICD-R100_1999_10_10
A_1999_10_10
B_1999_10_10
A_01_1999_07_04. wav
A_02_1999_07_05. wav
A_03_1999_07_06. wav
A_01_1999_07_04. ics
A_02_1999_07_04. ics
A_03_1999_07_04. wav
A_04_1999_07_04. wav
Backup_ICD-R100_1999_07_04. icb
Basic Operation
•“Sony” folder and “ICD-PCLINK” folder are automatically created when
the ICD-PCLINK Software is installed.
•When you save messages one by one, they will be saved in the “ICDPCLINK” folder.
•When you save a Message File (A or B) or all Message Files at one time,
folders are automatically created.
29
Page 30

Transferring Sound Files from the Computer to the IC Recorder
You can transfer sound files from the computer’s hard disk, etc. to the IC
recorder. You can transfer the sound files one by one (page 31) or transfer
all sound files in a folder at one time (page 33).
•Sound files transferred to the IC recorder can be played back as messages
in the IC recorder.
•Date and time of recording (for ICS files only) and recording mode are
transferred together with the messages. This is possible even for sound
files whose names have been changed.
•When a sound file is transferred to the IC recorder, its alarm setting will
be cancelled.
Note
If the memory of the IC recorder is already full, or the number of messages will
exceed 99 if a sound file or folder is transferred to the IC recorder, you cannot
transfer sound files to the IC recorder. First delete some of the messages from
the IC recorder (page 38).
File types that can be transferred to the IC recorder
The sound files that can be transferred from the computer to the IC recorder are
as follows:
– ICS files originally recorded on the Sony ICD-R100 IC Recorder
Can be transferred one by one or all the files in a folder at one time.
– WAV files (PCM 11kHz sampling, 8/16 bit monaural files only*)
Can be transferred one by one only.
*Messages such as those recorded in SP mode and saved as 8-bit or 16-bit WAV
files using the ICD-PCLINK Software. Messages recorded in LP mode are
saved as 8kHz sampling files and cannot be transferred to the IC recorder. You
must change the format following the procedure on page 32.
30
Page 31

Transferring sound files one by one
You can transfer the messages from the computer to the IC recorder one by
one.
1 Drag the sound file (ICS or WAV file) you wish to transfer
from the ”PC“ Area and drop it in the ”IC RECORDER“ Area .
Drop the sound file at the desired position in the IC Recorder.
Example: Transferring the file ”A_01_1999_07_04.ics“ to the top of
Message File B in the IC recorder
The following dialog box appears.
2 Select the position to insert the transferring sound file; either
before or after the selected message in the IC recorder.
Click [Before] in this example.
The transferred message will be displayed in the “IC RECORDER”
Area.
Basic Operation
Continued
31
Page 32

Transferring Sound Files from the Computer to
the IC Recorder (continued)
If ”File Format Error“ appears
The file you tried to transfer is of a file format that cannot be transferred to the
IC recorder. If the file is a WAV file, you need to convert it to a PCM 11,025Hz,
8/16 bit monaural file before transferring.
To conver the file, start up the Microsoft Sound Recorder (included in
Windows), select [Save as...] from the [FILE] menu and then select [Change].
1 If you placed the pointer on Message File A or B in the “IC
RECORDER” Area
The transferred message will be added at the end of the selected
Message File.
1 If you did not specify the position (if you dropped
somewhere in the “IC RECORDER” Area)
The following dialog box will appear.
Select the Message File (A or B) to which you wish to transfer the
message and click [OK]. The message will be added at the end of the
selected file.
To transfer the message using the [ICD<– PC] button
1 Select the sound file in the ”PC“ Area and click the
[ICD<– PC] button.
32
Page 33

2 When the dialog box shown in ”If you did not specify the
position” above appears, select the Message File (A or B) to
which you wish to transfer the message and click [OK].
Transferring all sound files in a folder at one time
If messages are saved in a folder as in “Saving all the messages in a
Message File at one time” on page 23, you can transfer all the messages in
that folder at one time to the IC recorder.
Notes
• The sound files that can be transferred are ICS files within that folder only.
• If all the messages in the IC recorder were saved to the computer as one folder
that consists of sub-folders, the folder cannot be transferred as is. You need to
transfer each sub-folder one bye one to each Message File in the IC recorder (A
or B).
• You can transfer the ICS files in a folder to the IC recorder only if that ICS file
is on the immediate next layer under the folder.
If there is another folder on the immediate next layer under the folder, you
cannot transfer the ICS files in that folder.
• You cannot transfer WAV files when transferring a folder, even if that WAV
file is of a format that can be transferred to the IC recorder (page 30). Only the
ICS files within that folder will be transferred.
1 Drag the folder you wish to transfer from the ”PC“ Area and
drop it in the ”IC RECORDER“ Area .
Drop the folder at the position in the IC recorder where you wish to
transfer the messages within the folder.
In the following example, you select “Message File B” in the “IC
RECORDER” Area. The result is the same when you place the pointer
to ”B” or on any of the messages in “Message File B”.
Basic Operation
Continued
33
Page 34

Transferring Sound Files from the Computer to
the IC Recorder (continued)
Example: Transferring folder ”A_1999_07_04“ to Message File B on the
IC recorder
The following dialog box appears.
2 Click [OK].
The messages within the folder transferred from the computer are
added at the end of the selected Message File (A or B).
34
Page 35

1 If you did not specify the position (if you dropped
somewhere in the “IC RECORDER” Area)
The following dialog box will appear.
Select the Message File (A or B) to which you wish to transfer the
messages and click [OK]. The messages in the transferred folder will be
added at the end of the selected Message File.
To transfer the messages using the [ICD<– PC] button
1 Select the folder in the ”PC“ Area and click the [ICD<– PC]
button.
2 When the dialog box shown in ”If you did not specify the
position” above appears, select the Message File (A or B) to
which you wish to transfer the message and click [OK].
Basic Operation
Note
If there are some files in that folder that cannot be transferred due to an
incompatible format, or if there is not enough memory available on the IC
recorder, only the sound files that can be transferred will be transferred, and
then an error message will appear. To transfer a WAV file to the IC recorder,
transfer it one by one following the procedure on page 31.
35
Page 36

Editing the Messages in the IC Recorder on the Computer Screen
Using the main window of the ICD-PCLINK Software, you can change the
order of messages in the IC recorder or delete the messages. (Adding or
deleting of index is not possible.)
Moving the messages
By moving the messages on the main window, you can change the order of
messages in the IC recorder. You can move the messages within the same
Message File or to another Message File (A or B).
Example: Moving Message05 in Message File A to the top of Message
File A
1 Drag the message in the ”IC RECORDER“ Area and drop it at
the desired position.
36
Page 37

The following dialog box appears.
2 Select the position to insert the message; either before or
after the selected message.
Click [Before] in this example.
The messages in the IC Recorder will be renumbered.
The moved message is now Message 01 of Message File A.
Basic Operation
Continued
37
Page 38

Editing the Messages in the IC Recorder on the
Computer Screen (continued)
Deleting the Messages
You can delete the messages in the “IC RECORDER” Area one by one, or
all the messages in a Message File (A or B) at one time.
You can also delete the ICS files, WAV files and ICB files in the “PC”Area
one by one (see page 41).
Notes
•You cannot delete both A and B message files at one time by selecting the
“ICD-R100” in the “IC RECORDER” Area.
•You cannot delete folders in the “PC” Area.
•Deleting messages in the IC recorder one by one
1 Select the message you wish to delete and click the [Delete]
button.
Example: Deleting Message05 in Message File A
38
Page 39

The following dialog box appears.
2 Click [Yes] if it is all right to delete the selected message.
When deleting is completed, the following message numbers decrease
by one.
Continued
Basic Operation
39
Page 40

Editing the Messages in the IC Recorder on the
Computer Screen (continued)
•Deleting all the messages in a Message File at one time
1 Select the file you wish to delete (A or B) and click the
[Delete] button.
Example: Deleting all the messages in Message File A
The following dialog box appears.
2 Click [Yes] if it is all right to delete the selected Message File.
40
Page 41

•Deleting files (ICS files, WAV files or ICB files) in the “PC”
Area
1 Select the file you wish to delete and click the [Delete] button.
The following dialog box appears.
2 Click [Yes] if it is all right to delete the selected file.
Basic Operation
41
Page 42

Saving a Backup of the IC Recorder (“Back Up”)
You can save all the messages in the IC recorder to the computer as one
backup file. The backup file is stored in a special format called an “ICB
file”.
What is an ICB file?
•An ICB file is Sony’s original file format. All of the data in the IC recorder
is compressed and can be stored as one ICB file.
•It is not possible to check the contents of or play back an ICB file, unless
you restore it to the IC recorder (page 45). When the ICB file is restored
to the IC recorder, the information accompanying the messages (file
name, message number, date and time of recording and alarm setting) is
also restored.
•The size of one ICB file is fixed (approx. 16.5 MB) regardless of the length
of recorded messages.
Saving a backup (ICB) file to the computer
Note
There must be at least 16.5 MB of space on your computer’s hard disk, etc. to
save a backup file.
If you wish to make another backup file of the current messages in the IC
recorder when restoring the backup file to the IC recorder, you need an extra
space of at least 16.5 MB in addition.
1 Click the [Back Up] button.
The following dialog box appears.
42
Page 43

Destination
to which the
message is
to be saved
File name of the backup file will be as follows:
Backup_ICD-R100_1999_07_07.icb
Date when the backup
file is saved
Extension of the backup file*
Change the destination and/or the file name, if you wish, before
proceeding to the next step.
You can also save the backup file in a newly created folder by clicking
[New Folder] .
* The extension “.icb” cannot be changed. Even if you delete the extension in
the step above, it will automatically be attached at the end of the file name.
Continued
Basic Operation
43
Page 44

Saving a Backup of the IC Recorder (“Back Up”)
(continued)
2 Click the [Save] button.
The backup (ICB) file will be created and saved to the computer.
Backup (ICB) file
When a backup file with the same file name exists
The following dialog box appears.
If you wish to overwrite the file, click [Yes]. If you wish to change the file
name, click [No].
44
Page 45

Restoring the backup file to the IC recorder
By restoring the backup file (ICB file) from the computer to the IC
recorder, you can play back the backed up messages on the IC recorder.
If there are messages recorded on the IC recorder, you can make another
backup file for these messages before you start restoring the backup file
(See Step 3 on page 46).
1 Drag the backup file (ICB file) you wish to restore from the
”PC“ Area and drop it in the ”IC RECORDER“ Area.
You can also restore the backup file by clicking the [ICD<– PC] button.
The following dialog box appears.
Basic Operation
Continued
45
Page 46

Saving a Backup of the IC Recorder (“Back Up”)
(continued)
2 Click [Yes].
The following dialog box appears.
3 Click [Yes] or [No].
If you click [Yes], the messages in the IC recorder will be saved to the
computer as a new backup file, and then the messages restored from
the backup file will replace the ones in the IC recorder.
If you click [No], the restored messages will replace the ones in the IC
recorder without saving a backup.
4 • When you click [Yes]
The dialog box for saving a new backup file appears. (See page 43.)
Change the destination and/or the file name, if you wish, before
proceeding to the next step.
Click [Save].
Another backup file for the messages in the IC recorder is created as
in the procedure shown on page 43, and then restoring starts.
• When you click [No]
The backup file will be immediately restored from the computer to
the IC recorder.
When the restoring is completed, the restored messages will be
displayed on the “IC RECORDER” Area of the main window.
46
Page 47

BAdvanced Operation: Utilizing the Saved Messages
Playing Back the Saved Sound Files on the Computer
Playing back the WAV files
You can play back the messages saved as WAV files using software such as
the Microsoft Sound Recorder.
To play back a WAV file
Double-click the file icon for the WAV file to play back.
A_01_1999_07_04
The software such as Sound Recorder starts up and playback starts.
Note
If the Sound Recorder is not yet installed in your computer, please install it from
Windows 98 or Windows 95.
Continued
Advanced Operation
47
Page 48

Playing Back the Saved Sound Files on the
Computer (continued)
Playing back the ICS files (ICS Player)
An “ICS file” is Sony’s original format of sound files. You can play back an
ICS file in the main window of the ICD-PCLINK (page 18), or using the
ICS Player Software. Start up the ICS Player in either way described
below.
To play back an ICS file
Double-click the file icon ICS file to play back.
A_01_1999_07_04
The ICS Player Software starts up and playback starts.
To start up the ICS Player Software
1 Click [Start], and select [Programs], [ICD-PCLINK] and then [ics-
Player].
The ICS Player Software starts up.
2 Select [Open] from the file [File] menu.
48
Page 49

The following dialog box appears.
3 Select the file you wish to play back and click [Open], or
double-click the file.
The selected file name will be displayed on the ICS Player.
4 Click the [N](Playback) button.
Counter
Left: elapsed
playback time
Right: length
Playback starts.
The slide bar slides from left to right during playback.
To stop playback
Click the [x] button.
Advanced Operation
To search forward or backward during playback
Click the [M] (Cue) button or the [m] (Review) button.
To exit the ICS Player
Click the [Exit] button.
49
Page 50

Playing Back the Saved Sound Files on the
Computer (continued)
Converting ICS files to WAV files (ICS Player)
After starting up the ICS-Player, you can convert ICS files to 8-bit WAV
files or to 16-bit WAV files (see page 27).
1 After Step 1 on page 48, select [Convert to Wave] from the
[FILE] menu and then select [Save As 8 bit Wave] or [Save As
16 bit Wave].
The following dialog box will appear.
Destination
to which the
converted
file is
to be saved
File name
to be
saved
(page 28)
File type (WAV file)
You cannot change the file type.
Change the destination and/or the file name, if you wish, before
proceeding to the next step.
2 Click [Save].
50
Page 51

Tips on Utilizing the Saved Sound Files
• Attaching messages to your e-mail
Use the document attachment function of your e-mail software to attach
the saved sound files to your e-mail. Make sure that the recipient of the
e-mail has a software that can play back sound files.
Also be sure to check the file size before sending it. (See page 27.)
Sending a WAV file
•The recipient needs to have a software that can play back WAV files
such as the Microsoft Sound Recorder included in Windows 98 or
Windows 95. (page 47)
•You can convert ICS files to WAV files before sending also. (page 50)
Sending an ICS file
If the recipient has the ICD-PCLINK Software or the ICS Player, the
received ICS file can be played back. (page 48)
• To easily find the folder in which the saved messages are
located
We recommend you make a ‘shortcut’ of the ICD-PCLINK folder or the
folder you frequently open and place it on the desktop.
Advanced Operation
51
Page 52

BAdditional Information
Troubleshooting
When problems occur
After trying the following measures, if the problem persists, contact your
dealer or a Sony service facility. Also refer to the supplied instruction
manual of the IC recorder.
Symptom
The ICD-PCLINK software
cannot be installed.
Messages in the IC recorder
cannot be transferred to the
computer.
Messages in “IC
RECORDER” Area, ICS
files or WAV files cannot be
played back.
ICS files cannot be played
back.
WAV files cannot be played
back.
Playback sound volume is
too low.
The Software ‘hangs’ when
the ICD-PCLINK Software
starts up.
52
• The memory space on the computer
• Check the installation of the software
• Refer to “Error messages” on page 53.
• No sound board is installed (Page
• No speaker is built-in or connected to
• Install the ICS Player Software. (See
• The software that can play back WAV
• Turn up the volume on the computer.
• The volume of WAV files can be
• There may be ‘conflict’ between
Remedy
is too small. Allocate a larger memory
space.
or connection of the cable.
5).
the computer.
page 48)
(When the ICD-PCLINK Software is
installed, the ICS Player Software is
automatically installed. You can also
install the ICS Player Software only.
See pages 9 and 10 for details.)
files is not installed. Install a
software such as the Microsoft Sound
Recorder. (See page 47.)
(Refer to the instruction manual of
the computer.)
changed and saved using the
“Increase Volume” feature of the
Microsoft Sound Recorder.
the ICD-PCLINK Software and other
driver or application.
Page 53

Error messages
Message
• Connection Error
“Could not communicate
with IC Recorder. Make
sure that the cable is
connected properly.”
“Data in IC Recorder has
been modified. Please
reconnect.”
Problem/Remedy
• The cable is disconnected.
t Check the connection (pages 12
and 14). Make sure that the IC
recorder is in the stop mode when
making connections.
• Other peripheral devices such as a
printer was connected to the printer
port before the IC recorder was
connected.
t Restart the computer. If the
message still appears, change the
mode setting of the printer port
(page 55).
• Another program has been set to
enable automatic communication to
the printer port at a certain interval.
t If such program is set,
communication with the IC
recorder cannot be made, even if
nothing is connected to the printer
port. Change the program setting
to disable the automatic
communication.
• Malfunction of the IC recorder.
tDisconnect the cable and check to
see if the IC recorder operates
properly.
• The ICD-PCLINK Software may not
be used on some computers due to
differences in hardware
specifications.
• You have disconnected the cable once
and made some changes on the IC
recorder. The latest data must be
transferred to the computer.
Continued
53
Additional Information
Page 54

Troubleshooting (continued)
Message
• Battery Low Error
“Disconnect the
connecting cable from the
IC Recorder, and replace
batteries.”
• Transfer Error
“No more space available
on selected drive.”
“No more space available
in IC Recorder.”
• Message Management
Area Full
“Part of message was not
transferred successfully.”
• File Format Error
“This WAV file cannot be
transferred to IC
Recorder. Please convert
to PCM, 11,025Hz, 8/16
Bit, Mono.”
“Could not transfer due
to an incompatible file
format. (The file was
created by a different
model.)”
Problem/Remedy
• The batteries in the IC recorder are
exhausted.*
tDisconnect the cable, replace the
batteries with new ones and
reconnect the cable.
• The available space on the selected
disk drive is too small for saving
messages or backup files.
Clear space on the drive, or select
another one.
• The memory space in the IC recorder
is too small for transferring
sound files or backup files to the IC
recorder.
Delete some messages.
• The memory space on the area
that controls messages in the IC
recorder is too small for
transferring files to the IC recorder.
• WAV files other than PCM 11kHz, 8/
16 Bit Monaural format cannot be
transferred to the IC Recorder. Save
the WAV file after changing the
format, and try again (see page 32).
• The ICS files that can be transferred
to the IC Recorder are ICS files of
messages recorded with the Sony IC
Recorder ICD-R100 only. ICS files of
other format cannot be transferred,
e.g. ICS files created by a different
model.
54
Page 55

* Even if the remaining battery indicator on the IC recorder indicates that the
batteries are not exhausted, battery power may not be sufficient for operation
with the computer. When you use the IC recorder without connecting a
computer, you do not need to replace the batteries until
display window.
appears in the
Changing the printer mode setting on the computer
When communication between the IC recorder and the computer was not
successful, change the settings as follows:
Before you begin
Since the printer port mode settings vary according to your computer, you
may have to try several different settings. Please refer to the instruction
manual of your computer.
1 Enter the BIOS set-up mode of the computer.
Note
The procedure varies according to the model. (For some models, the keys to be
pressed are displayed on the screen during start-up.) For details, refer to the
instruction manual of your computer.
2 Check the printer (parallel) port mode setting.
You need to select the mode that enables ‘bidirectional’
communication between the IC recorder and the computer, then store
the setting and exit the setting mode.
Notes
• The name of the ‘bidirectional’ mode varies according to the model.
• Settings such as “NORMAL”, “SPP”, etc. are for normal printing mode, and
must not be used for ICD-PCLINK Software.
• Modes such as “EPP” and “ECP ”may cause unstable operation.
• Some computers may be supplied with software that enables printer mode
setting such as ‘I/O Port Setting’ in the [Control Panel].
Continued
Additional Information
55
Page 56

Troubleshooting (continued)
3 Restart the computer.
The new setting will activate only if you restart the computer.
4 Start up the ICD-PCLINK Software, connect the cable to the IC
recorder and check to see if the communication between the
IC recorder and the computer is successful.
If a communication error occurs, repeat the above procedure from Step
1 , select a different mode setting in Step 2 and check the operation
again.
Notes
• In some cases the printer port mode setting may be changed when a different
application is installed in the computer. In such a case, set the printer port
mode again.
• If a printer or other devices had been connected to the printer port before
using the ICD-PCLINK Software, the printer port mode setting selected in
Step 2 may be automatically changed. In such a case, restart the computer. If
the communication is still unsuccessful, you need to change the setting.
We recommend you make a memo of the setting each time you change the
setting.
56
Page 57

Index
A
Alarm........................... 14, 17, 30, 42
[Add/Remove Program] ............ 11
B
[Back Up] ................................ 16, 42
Backup file (ICB file) ................... 42
Batteries............................. 14, 15, 54
Bidirectional mode ................ 12, 55
Bios set-up .................................... 55
C
Connection
(Computer and cable).............. 12
(IC recorder and cable)............ 14
Connection error .................... 15, 53
[Control panel] ............................. 11
Convert.......................................... 50
Counter ................................... 18, 49
D
Date of recording ......................... 28
Date and time of recording ........ 17
[Delete] ........................ 16, 38, 40, 41
Delete (messages/files)......... 38–41
DIGITAL I/O connector ............. 14
Directory ....................................... 17
Drag/drop
.................... 20, 23, 25, 31, 33, 36, 45
Drive .......................................... 5, 17
E
8 bit WAV file......................... 21, 27
Elapsed playback time .......... 18, 49
Error messages ............................. 53
[Exit] ........................................ 16, 49
Extension ................................ 17, 43
F, G, H
File
File name .................. 21, 27, 43, 50
File size ................................. 27, 51
File type.............. 21, 24, 25, 27, 50
Message File .................. 17, 23, 25
Sound file ................. 17, 19, 27, 30
Floppy disk ............................. 9—10
Folder name...................... 24, 26, 28
I, J, K
“IC RECORDER”Area
.............. 16, 20, 23, 25, 31, 33, 36, 45
ICB file..................................... 17, 42
[ICD –>PC] ................. 16, 22, 24, 26
[ICD<– PC] ................. 16, 32, 35, 45
ICD-PCLINK Software ........... 9, 13
ICS file . 17, 21, 27, 30, 48, 51, 52, 54
ICS Player ................................. 9, 48
Insert (message) ..................... 31, 37
Install ............................................... 9
L
LP mode ........................................ 17
Additional Information
Continued
57
Page 58

Index (continued)
M
Main Window .............................. 16
Message Files.................... 17, 23, 25
Message number.............. 17, 28, 39
Mouse ............................................ 17
Move(messages) .......................... 36
[My computer] ............................... 9
N
[New Folder] .............. 21, 24, 26, 43
O
Operation flow ............................... 8
P, Q
Parallel (printer )port ........ 5, 12, 55
“PC ”Area . 16, 20, 23, 25, 31, 33, 45
Playback .................................. 18, 47
Pointer ........................................... 20
Printer mode................................. 55
Printer (parallel )port ........ 5, 12, 55
[Programs] .............................. 11, 13
[Program files] ............................. 29
R
[ReadMe]......................................... 4
[Reconnect] ................................... 16
Recording mode........................... 17
Remaining recording time ......... 17
Restart ......................... 10, 15, 53, 56
Restore (backup file) ................... 45
Right-click ..................................... 17
Right mouse button ..................... 17
S
[Save] ..................... 22, 24, 26, 44, 50
Save (messages) ........................... 20
Saving messages one by one .. 20
Saving all messages in a Message
File .............................................. 23
Saving all Message Files ......... 25
[Setup.exe.] ..................................... 9
16 bit WAV file....................... 21, 27
Size (of file) ....................... 27, 42, 51
Slide bar .................................. 18, 49
[Sony] folder ................................. 29
Sound board ............................. 5, 52
Sound files .................. 17, 19, 27, 30
Sound Recorder ............... 32, 47, 52
SP mode ........................................ 17
Space (memory space) 5, 42, 52, 54
[Start] menu ............................ 11, 13
Start up .................................... 13, 48
T
Transfer (sound files to IC
recorder)........................................ 30
U, V
Uninstall........................................ 11
W, X, Y, Z
WAV file
.............. 17, 21, 27, 30, 47, 51, 52, 54
58
Page 59

Additional Information
59
Page 60

Sony Corporation Printed in Japan
60
 Loading...