

Page 1

IC Recorder
3-866-532-22 (1)
Operating Instructions
Mode d’emploi
ICD-R100/R100PC
1999 by Sony Corporation
GB
FR
Page 2

Table of Contents
What is the ICD-R100 IC recorder? ............................................................ 4
Features .......................................................................................................... 5
Getting Started
Step 1: Installing the Batteries ..................................................................... 6
Step 2: Setting the Clock............................................................................... 8
Basic Operations
Recording Messages ................................................................................... 10
Playing Back Messages............................................................................... 14
Erasing Messages ........................................................................................ 18
Various Ways of Recording
Starting Recording Automatically in Response to the Sound
— Advanced VOR function ............................................................... 20
Adding a Recording to a Previously Recorded Message ...................... 21
Recording with an External Microphone or Other Equipment............ 22
Other Functions
Adjusting the Playback Speed .................................................................. 23
Dividing a Message into Two/Combining Messages
— Index Function ................................................................................ 24
Moving Messages to a Different File
— Move Function ................................................................................ 27
Playing Back a Message at a Desired Time with an Alarm................... 28
Preventing Accidental Operation — HOLD function ........................... 33
Selecting the Display Mode ....................................................................... 34
Selecting the Recording Mode ................................................................. 35
Turning off the Beep Sound ....................................................................... 36
Playing Back All Messages in a File Continuously ................................ 38
GB
2
Page 3

Additional Information
Precautions................................................................................................... 39
Troubleshooting .......................................................................................... 40
Index to Parts and Controls ....................................................................... 42
Menu map .................................................................................................... 44
Index ............................................................................................................. 46
Specifications ............................................................................................... 48
Getting Started
For ICD-R100PC
Please read the instruction manual of “ICD-PCLINK Software” for PC Link
operations.
GB
GB
3
Page 4
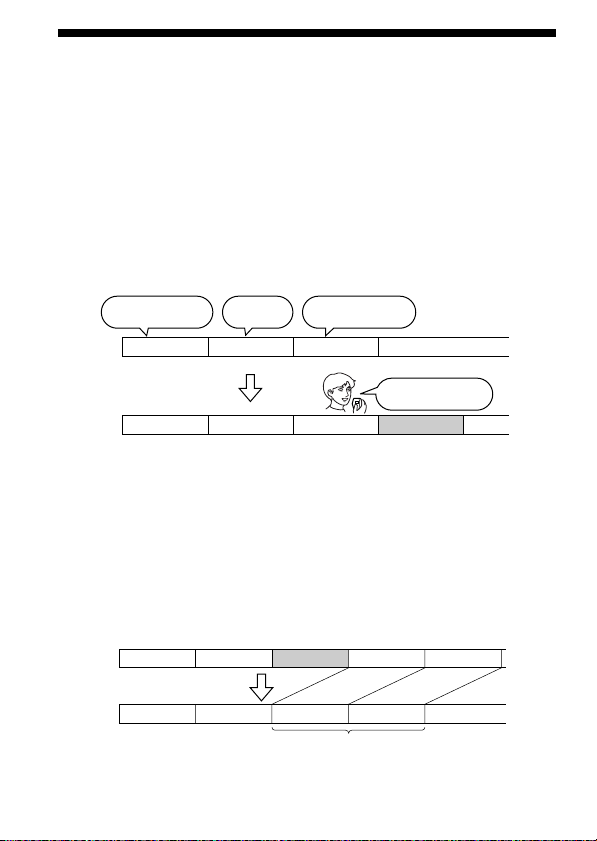
What is the ICD-R100 IC recorder?
The ICD-R100 IC recorder enables you to record and play back oral
messages in the built-in IC memory.
z Recording
When a new message is recorded, it is automatically added after the last
recorded messages.
Unlike with tape recorders, you do not need to worry about recording
over previously recorded messages by mistake.
Since you do not need to search for the end of the last recording, you can
start recording quickly whenever you wish.
11:30, November 1
Meet Mr. Brown at
2 p.m. tomorrow.
12:00, November 1
Don’t forget
to call Mary
Message 1 Message 2 Message 3
Message 1 Message 2 Message 3 Message 4
z Playback
With this IC recorder, you can quickly locate the message you want to play
back.
Reviewing the current recording is also very easy.
z Erasing
You can quickly erase unwanted messages with an easy operation. When a
message is erased, the next message automatically advances, leaving no
blank space.
10:00, November 2
Make remittance
at ABC bank
9:00, November 4
Send a card to
Miss Smith
Before
GB
4
Message 1 Message 2 Message 5
Message 3
Message 4
Erase Message 3
After
Message 4Message 1 Message 2 Message 3
Remaining messages
are renumbered.
Page 5

Features
•64 minutes (SP)/150 minutes (LP) recording time
This unit is suitable for recording long meetings or lectures.
•Possible of recording up to 99 messages in each of two files
•Alarm function (page 28)
You can start playing back a desired message with an alarm on a desired
date and time. You can use this function to remind you of the time of the
meeting, etc.
•Index function (page 24)
You can add an index at the desired point during recording or playback
to divide a message into two. You can access easily the point where you
added an index during playback of a long recording such as of a
meeting.
You can also combine messages by erasing the index.
•Playback speed control (page 23)
You can play back messages rapidly (Fast playback)* or slowly (Slow
playback)*. This is useful when playing back a long recording such as a
meeting.
* Fast playback: +30% in LP mode or +20% in SP mode
Slow playback: –15%
•Advanced VOR function (page 20)
•Adding a recording to a previously recorded message (page 21)
You can add a recording to the message being played back to count as
one message.
•External microphone jack (page 22)
Getting Started
•LCD window with back light (page 43)
•Connecting to a personal computer
You can transfer the messages recorded in the ICD-R100 IC recorder to
the computer with the ICD-PCLINK Software. (For ICD-R100PC, use the
supplied software. For ICD-R100, use the optional PC Connecting Kit
ICKIT-W2.)
GB
5
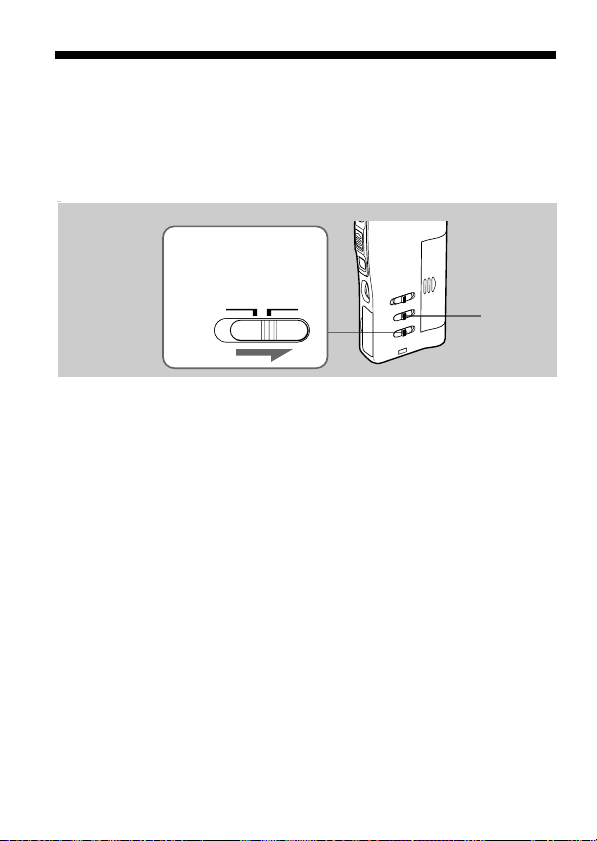
Page 6
Getting Started
Step 1: Installing the Batteries
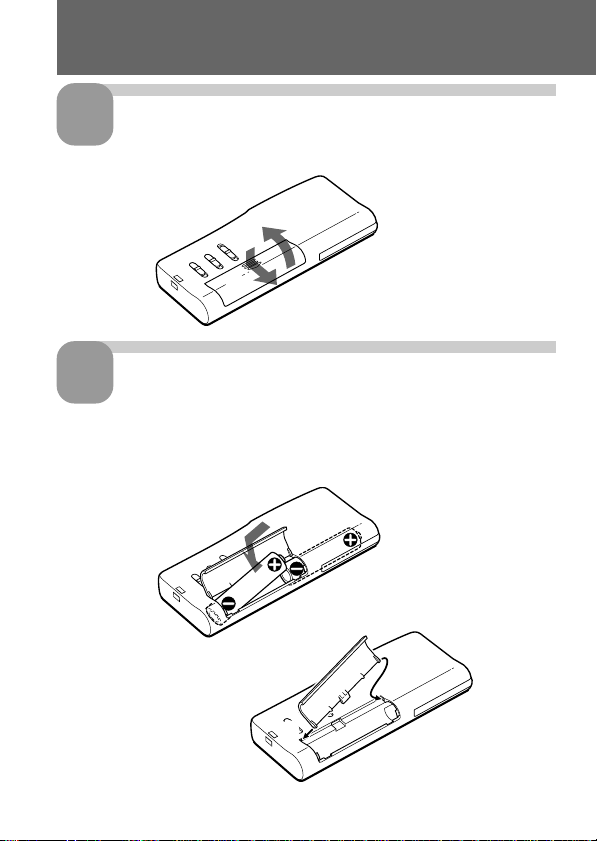
1
Slide and lift the battery
compartment lid.
Insert two LR03 (size AAA)
2
alkaline batteries with
correct polarity, and close
the lid.
If the battery compartment
lid is accidentally detached,
attach it as illustrated.
2
1
2
1
GB
6
Page 7
Clock setting display appears when you insert batteries for the first time,
or when you insert batteries after the unit has been without batteries for a
certain period of time. Please refer to Steps 2 to 4 in “Step 2: Setting the
Clock” on pages 8 and 9 to set the date and time.
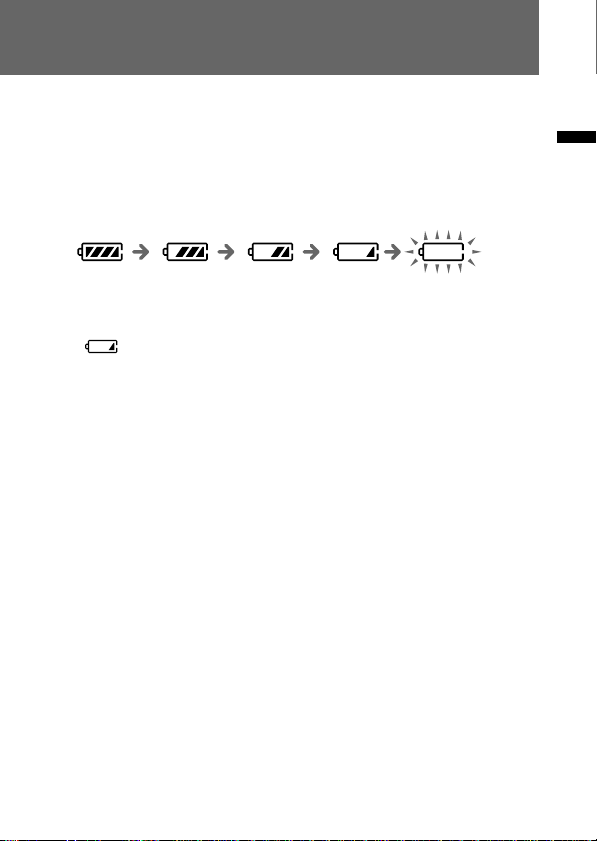
Replacing the batteries
The battery indicator on the display window shows the battery condition
as follows:
Getting Started
New
batteries
Weak
batteries
Batteries are exhausted.
The unit will stop
operation.
When is displayed, replace the batteries with new ones.
Battery life*
With continuous use, approx. 19 hours recording/10 hours playback
* Using Sony alkaline batteries LR03 (SG)
* When playing back through the internal speaker with VOL control at around 4
The battery life may shorten depending on the operation of the unit.
Notes
• Do not use manganese batteries for this unit.
• When you replace the batteries, insert the new ones within 3 minutes after you
removed the exhausted ones. Otherwise, the display may show the clock
setting display or incorrect date and time when you reinsert the batteries. In
this case, set the date and time again.
The recorded messages, however, will remain.
• When replacing the batteries, be sure to replace both batteries with new ones.
• Do not charge dry batteries.
• When you are not going to use the unit for a long time, remove the batteries to
prevent damage from battery leakage and corrosion.
7
GB
Page 8
Step 2: Setting the Clock
Clock setting display appears when you insert batteries for the first time,
or when you insert batteries after the unit has been without batteries for a
certain period of time. In this case, proceed from step 2.
1
1 Press MENU to
* The “ALARM” display
may appear instead of
the “MODE” display
(see page 44).
2
1 Press . or
1 Tip
This unit’s clock system
supports the Year 2000
indication. To set the
date to Year 2000,
display “00Y”.
GB
8
Display the clock setting display.
enter the menu
mode.*
Set the date.
> to select the
digits of the year.
2 Press .once
to display “SET
DATE”.
3 Press NPLAY/
STOP.
The year digits
will flash.
2 Press NPLAY/
STOP.
The month
digits will
flash.
3 Set the month
and day in
sequence, then
press NPLAY/
STOP.
The hour digits
will flash.
Page 9
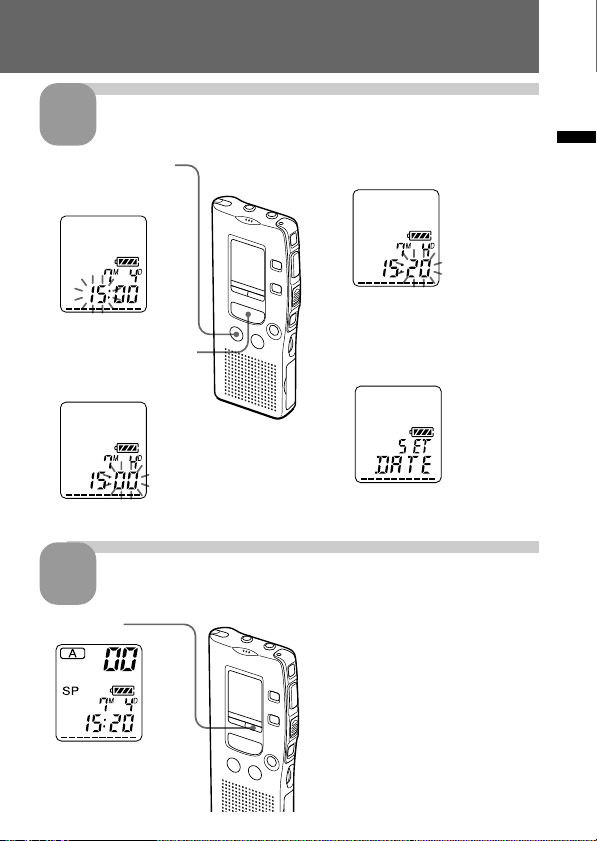
Set the time.
3
1 Press . or >
to select the digits
of the hour.
2 Press NPLAY/STOP.
The minute digits will
flash.
Exit from the menu mode.
4
Press MENU.
Getting Started
3 Set the minute.
4 Press NPLAY/STOP at the
time signal.
The display will return to
“SET DATE”.
GB
9
Page 10
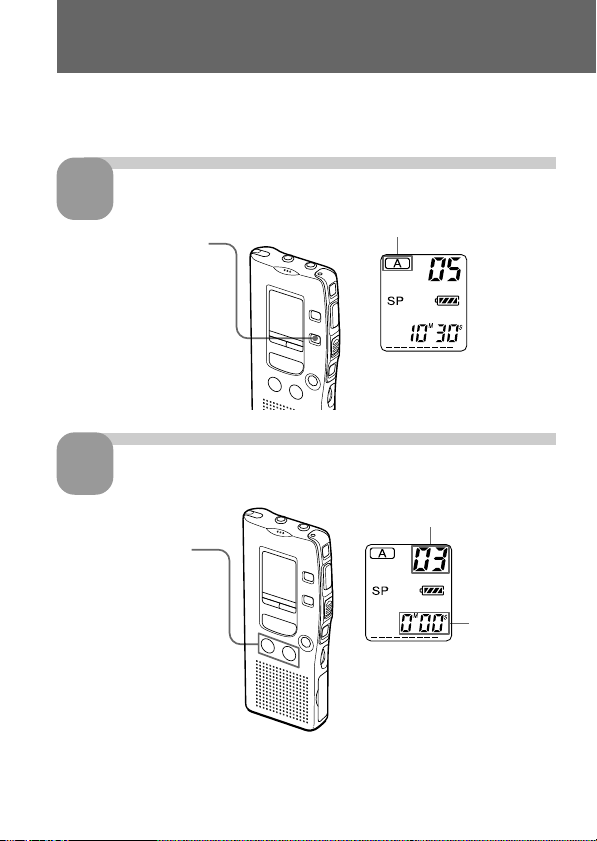
Basic Operations
Recording Messages
You can record up to 99 messages in each file (A and B).
Since a newly recorded message is automatically added behind the last
recorded message, you can start recording quickly without searching for
the end of the last recording.
e.g.
Message 1 Message 2
Note
Before making a long recording, be sure to insert new batteries and check the
battery indicator (page 7).
Newly recorded message
Blank space
1
Press FILE to display
“A” or “B”.
1 Press zREC/STOP.
Remaining
memory
indicator
You do not need to keep pressing zREC/STOP while recording.
10
Select the file.
Start recording.
2
Current
message
number
Counter
display*
GB
Current file
2 Speak to the built-in
microphone.
OPR indicator
(lights in red during
recording.)
* The display selected with
the DISPLAY button
(page 34) appears.
Page 11
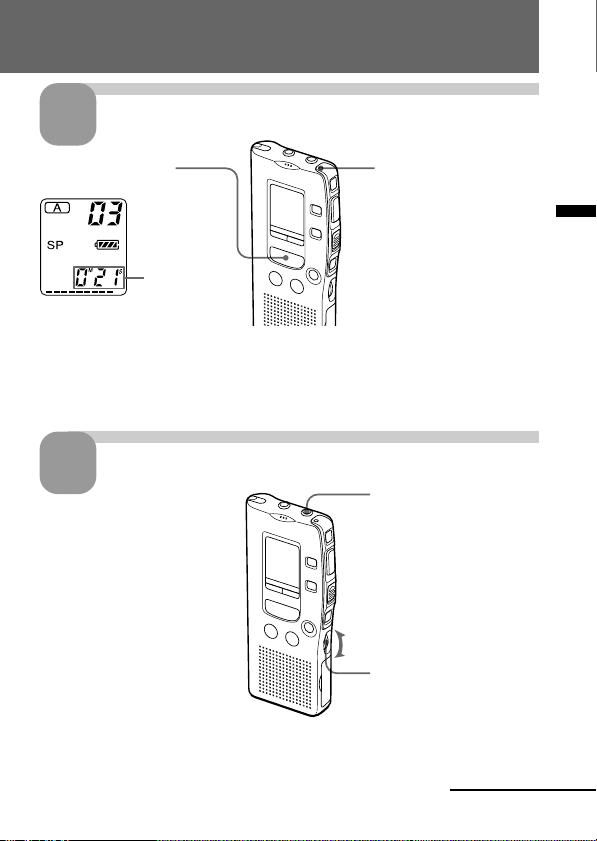
Stop recording.
3
Press zREC/STOP again.
The unit stops at the beginning
of the current recording.
xSTOP
If you do not change the file after you stop recording, the next time you record
you will record in the same file.
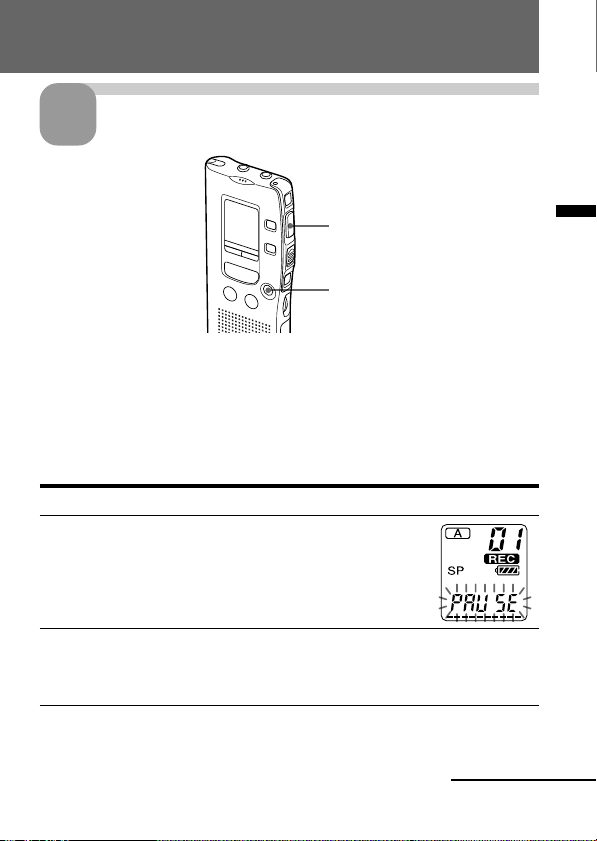
To stop recording
You can also stop recording by pressing xSTOP instead of zREC/STOP.
To pause recording
To Do this
pause recording* Press XPAUSE.
During recording pause,
the OPR indicator flashes
in red and “PAUSE”
flashes in the display
window.
release pause and Press XPAUSE or zREC/STOP.
resume recording Recording resumes from that point.
(To stop recording after pausing
recording, press xSTOP.)
* 15 minutes after you pause recording, recording pause is automatically
released and the unit goes into the stop mode.
Continued
11
Basic Operations
GB
Page 12

Recording Messages (continued)
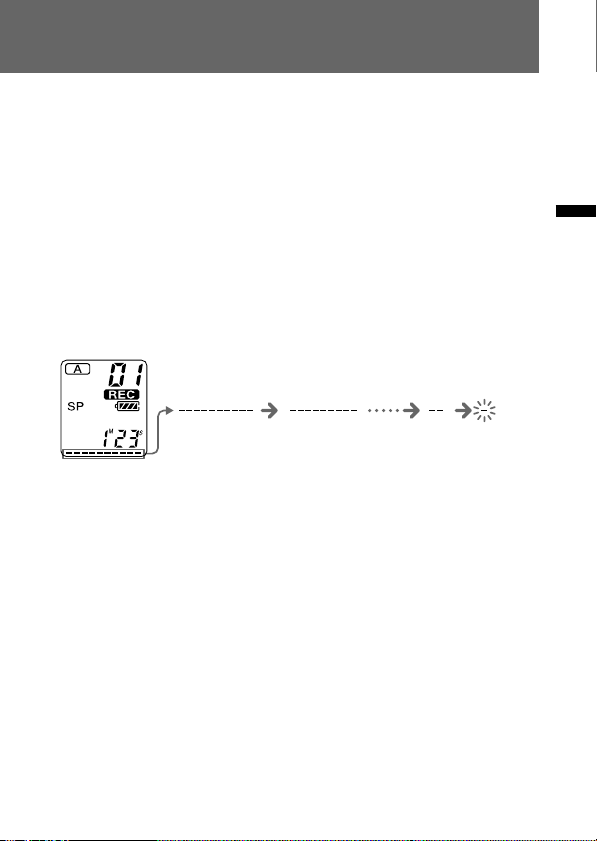
Note on recording
Noise may be recorded if an object, such as your finger, etc., accidentally rubs
or scratches the unit during recording.
To listen to the current recording
Press zREC/STOP or xSTOP to stop recording, then press NPLAY/
STOP.
To review the current recording instantly
Press NPLAY/STOP during recording.
To select the microphone sensitivity
You can select the microphone sensitivity by switching the MIC SENS
selector on the rear of the unit.
H (high): To record at meeting or in a quiet and/or spacious place.
L (low): To record for dictation or in a noisy place.
Recording with an external microphone or from other
equipment
See page 22.
To monitor the recording
Connect an earphone or headphones (not supplied) to the EAR jack. You
can adjust the volume with the VOL control, but the recording level is
fixed.
Note
If you turn up the volume excessively or place the earphone near the
microphone while monitoring recording, the microphone may pick up the
sound from the earphone, causing acoustic feedback (howling sound).
Maximum recording time
You can record for up to 64 minutes in SP (standard play) mode and 150
minutes in LP (long play) mode. If you record messages in a mixture of SP
and LP modes, the recordable time varies from 64 to 150 minutes.
The unit is factory-set to SP mode. To change the recording mode, see page 35.
You can check the remaining amount of recording time by selecting the
remaining recording time display mode. See page 34.
GB
12
Page 13
Notes
Due to the limitation of the IC recording system, this unit records in the
minimum recording unit of approx. 4 seconds in SP mode (approx. 10 seconds
in LP mode), therefore the following symptoms may occur.
• When a message is shorter than the minimum recording unit, it is still counted
as approx. 4 seconds (or approx. 10 seconds) so the remaining recording time
will decrease by more than the actual length of the message.
• When the message is longer than the minimum recording unit, the remaining
recording time will decrease by more than the actual length of the message if
it cannot be divided by the minimum recording unit without a remainder.
•The sum of the number on the counter (elapsed recording time) and the
remaining recording time may be less than the unit’s maximum recording
time (64 minutes in SP mode and 150 minutes in LP mode).
Remaining memory indication
During recording, the remaining memory indicator decreases one by one.
The memory is
nearly full.
Flashing
When the remaining time of recording reaches 5 minutes, the last one of
the indication flashes. When the remaining time of recording reaches 1
minute, the selected display mode (page 34) and “REMAIN” will flash one
after the other in the display window. When the memory is full, recording
automatically stops and “END” will flash in the display window with an
alarm sound. To continue recording, first erase some of the messages (page
18).
Notes
• If you press zREC/STOP when the memory is full, “END” will flash with an
alarm sound. Erase some of the messages before you start recording again.
(Page 18)
• If you press zREC/STOP after you have recorded 99 messages, “END” will
flash with an alarm sound. Select another file or erase some of the messages.
(Page 18)
Basic Operations
13
GB
Page 14
Playing Back Messages
When playing back a previously recorded message, start from Step 1.
When playing back a message you have just finished recording, start from
Step 3.
Select the file.
1
Press FILE to display
“A” or “B”.
Select the message number.
2
Press . or > to
display the desired
message number.
.: for smaller
message number
>: for larger
message number
Current file
Selected message number
Counter
display*
* The display selected with the DISPLAY button (page 34) appears.
GB
14
Page 15
Start playback.
3
Press NPLAY/STOP.
Counter
display (or
the selected
display mode)
After playing back one message, the unit stops at the beginning of the next
message.
When the last message on a file has been played back, the unit stops at the
beginning of the last message.
4
For private listening
Connect an earphone or headphones (not supplied) to the EAR jack. The builtin speaker will be automatically disconnected. If you plug in headphones, you
will get monaural output from both left and right channels.
Adjust the volume.
OPR indicator
(lights in green
during playback.)
EAR jack
Turn VOL.
Continued
15
GB
Basic Operations
Page 16

Playing Back Messages (continued)
To stop playback
To Do this
stop at the beginning of Press xSTOP.
the current message
stop at the current position Press NPLAY/STOP.
(Playback Pause function)* To resume playback from that point,
* You can also pause playback by pressing XPAUSE instead of NPLAY/STOP.
The OPR indicator will flash in green. After 15 minutes, the unit goes in to the
stop mode at the current position
Other operations
To Do this
go back to the beginning Press . once.
of the current message
go back to previous Press . repeatedly.
messages (During stop mode, keep the button
skip to the next message Press > once.
skip to the succeeding
messages (During stop mode, keep the button
Searching forward/backward during playback
(Cue/Review)
To search forward, keep > pressed during playback and release the
button at the point you wish to resume playback.
To search backward, keep . pressed during playback and release the
button at the point you wish to resume playback.
press NPLAY/STOP again.
pressed to skip the messages
continuously.)
Press > repeatedly.
pressed to skip the messages
continuously.)
If you keep > or .pressed for more than 10 seconds, the unit starts to
search at higher speed.
GB
16
Page 17

For the first 10 seconds of cue/review, fast playback sound can be heard.
When searching at a higher speed, playback sound will not be heard.
During cue/review, the counter will be displayed, regardless of the
display mode setting (page 34).
1 Tip
When fast playback is done to the end of the last message, “END” flashes
for 3 seconds and the OPR indicator lights up in green. (You cannot hear
the playback sound.) If you keep . pressed while “END” is flashing,
the messages are played back rapidly, and normal playback will start at
the point you release the button.
When “END” stops flashing and the OPR indicator goes off, the unit will
stop at the beginning of the last message.
If the last message is long and you wish to start playback at a later part of
the message, keep > pressed to play back the messsage to the end and
then press . while “END” is flashing to go back to the desired point .
(For messages other than the last one, go to the beginning of the next
message and play backward to the desired point.)
Playing back a message repeatedly
— Repeat Play
During playback, press NPLAY/STOP for more than one second.
“ “ will be displayed and the selected message will be played back
repeatedly.
To resume normal playback, press NPLAY/STOP again. To stop
playback, press xSTOP.
Playing the beginning of each message
— Scanning Play
During stop mode, press NPLAY/STOP for more than one second.
“SCAN” will be displayed in the display window and the first 5 seconds of
each message in the selected file will be played back.
When you find the desired message, press NPLAY/STOP. The message
will be played back until the end.
Basic Operations
Playing back all messages in a file continuously
— Continuous Play
See page 38.
17
GB
Page 18
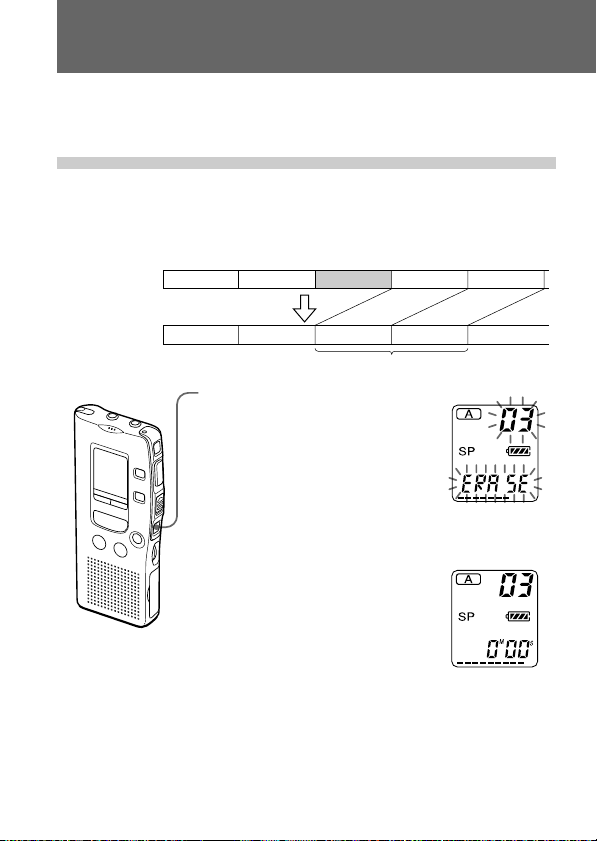
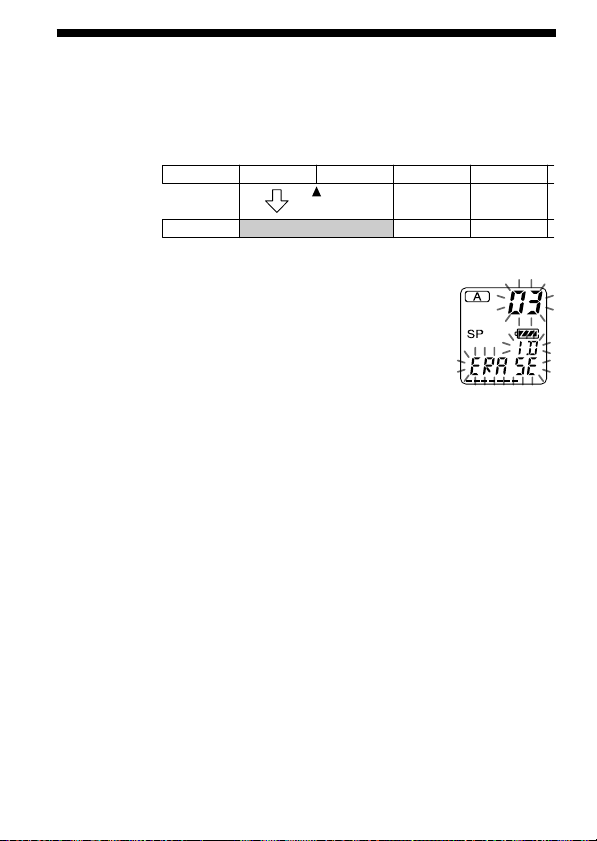
Erasing Messages
You can erase the recorded messages one by one or all messages in a file at
a time.
Note that once a recording has been erased, you cannot retrieve it.
Erasing messages one by one
When a message is erased, the remaining messages will advance and
renumbered so that there will be no space between messages.
Before erasing
After erasing
Message 1
Erase Message 3
Message 1
1 Press ERASE while playing back
the message you want to erase
or press ERASE for more than 1
second during stop mode.
A beep will sound and the message
number and “ERASE” will flash
while the first and last 5 seconds of
the message is played back 10
times.
2 Press ERASE while the message is
being played back.
The message is erased and the
remaining messages will be
renumbered. (For example, if you
erase Message 3, Message 4 will be
renumbered as Message 3. When
erasing is completed, the unit will
stop at the beginning of the
following message.)
To cancel erasing
Press xSTOP before step 2.
Message 2 Message 3 Message 4
Message 3
Remaining messages are renumbered.
Message 4 Message 5Message 2
18
GB
Page 19
To erase other messages
Repeat steps 1 and 2.
To erase a message partially
First divide the message by adding an index (see page 24) and then follow
the steps on page 18 to erase the message.
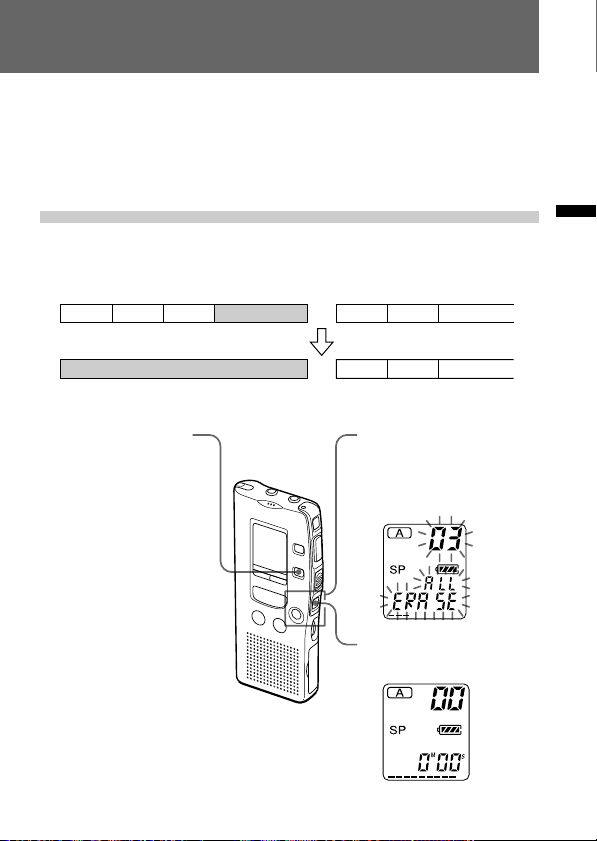
Erasing all messages in a file
e.g.
File A
Message 1 Message 2 Message 3
Blank space
File B
Message 1 Message 2 Message 3
Basic Operations
Blank space
1 Press FILE to select
the file you want to
erase.
To cancel erasing
Press xSTOP before step 3.
Message 1 Message 2 Message 3
2 While pressing xSTOP,
press ERASE for more
than 1 second.
“ALL ERASE” will flash
for 10 seconds.
3 While the display is
flashing, press ERASE.
19
GB
Page 20
BVarious Ways of Recording
Starting Recording Automatically in
Response to the Sound — Advanced
VOR function
When VOR (voice operated recording) function is set to on, recording
starts when the recorder detects sound and stops when no sound is heard.
Set the VOR
selector to ON.
VOR
OFF ON
When you record messages with VOR set to ON, the recording pauses
when no sound is detected, and “VOR PAUSE” appears on the display
window.
To cancel VOR
Set the VOR selector to OFF.
Note
VOR function is affected by the sound around you. Set the MIC SENS selector
to either H or L (see page 12). If recording is not satisfactory after you have
changed the microphone sensitivity, or for important recording, set the VOR
selector to OFF.
MIC SENS
20
GB
Page 21

Adding a Recording to a Previously Recorded Message
You can add a recording to the message being played back.
The added recording will be placed after the current message and counted
as a part of the message.
During playback
of Message 3
Message 3
Message 4
After adding
a recording
Built-in microphone
Message 3
Meeting at 2 o’clock
on December 1.
Added recording
at Conference
room A
OPR indicator
zREC/STOP
xSTOP
Message 4
1 During playback, press zREC/STOP for more
than 1 second.
The REC indicator appears and “PLUS” flashes three
times on the display window.
The OPR indicator will turn red.
The new recording will be added at the end of the
current message.
2 Press zREC/STOP or xSTOP to stop the recording.
Note
The added message will be recorded in the same recording mode (SP or LP; see
page 35) as the original message, regardless of the current recording mode
setting.
21
Various Ways of Recording
GB
Page 22
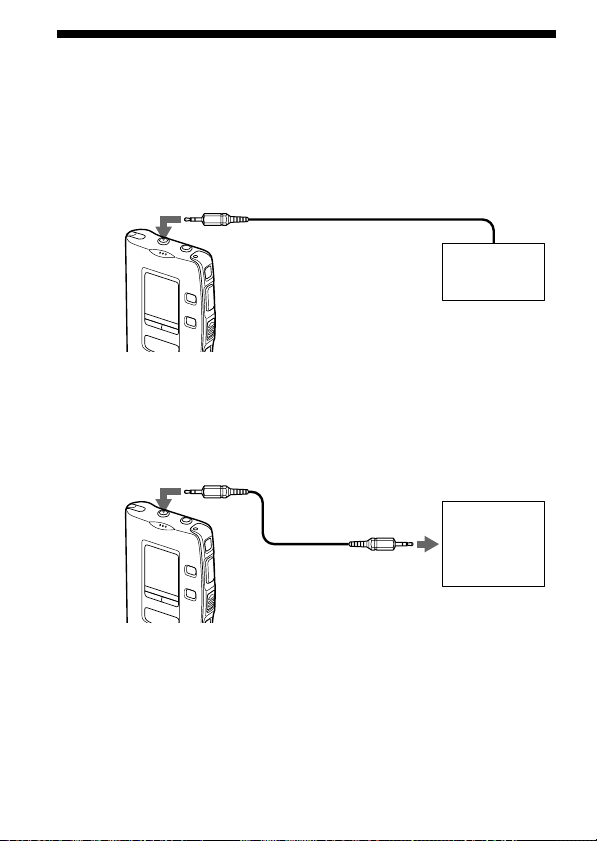
Recording with an External Microphone or Other Equipment
1 Connect a plug-in-power type microphone or other
equipment to the MIC (PLUG IN POWER) jack.
When recording with an external microphone
MIC
When you connect an external microphone, the built-in microphone is
automally cut off. When a plug in power type microphone is connected,
power is automatically supplied to the microphone from the IC recorder.
When recording from other equipment
MIC
ECM-R100, ECM-T15, etc.
(not supplied)
Connecting cord
(not supplied)
EAR,
EARPHONE, v
or REC OUT
External
microphone
Tape
recorder,
TV, radio,
etc.
2 Follow the steps in “Recording messages” on page 10 to
record messages.
Notes
• Make sure that the plugs are connected securely.
• We recommend you make a trial recording to check the connections and
volume control.
• When connecting equipment other than Sony’s, refer to the instruction
manual of the equipment.
GB
22
Page 23

BOther Functions
Adjusting the Playback Speed
You can adjust the speed of the playback with the use of the PLAY SPEED
selector on the rear of the unit.
PLAY SPEED selector
SLOW NORMAL FAST
To play back rapidly
Set PLAY SPEED to FAST.
When playback starts, “FAST” will flash
three times in the display window and the
messages will be played back about 30% (in
LP mode, or 20% in SP mode) faster than
normal.
To play back slowly
Set PLAY SPEED to SLOW.
When playback starts, “SLOW” will flash
three times in the display window and the
messages will be played back about 15%
slower than normal.
Other Functions
To play messages with normal speed
Set PLAY SPEED to NORMAL.
1 Tip
You can change the playback speed during playback.
23
GB
Page 24

Dividing a Message into Two/
Combining Messages — Index Function
You can divide a message by adding an index, or combine messages by
erasing the index.
While recording/playing back messages, you can add an index (see
below). In stop mode, you can erase the index (see page 26).
INDEX
ERASE
./>
xSTOP
Dividing a Message by Adding an Index
You can add an index to a message during recording or playback.
By dividing a message, you can easily find the point you want to play back
when you make a long recording such as a meeting.
When you add an index, The message numbers will increase as follows.
Before adding
an index
After adding
an index
GB
24
Message 1
Message 1
The first item on
the agenda is...
Message 3 Message 4Message 2
An index is added.
Message 2 Message 3 Message 4
We will now
proceed to the
next subject.
The message
numbers increase.
Message 5
Page 25
To mark an index during recording
While recording a message, press INDEX at the point you want to
divide.
The new message number flashes three times at the
point you pressed INDEX. The message will be
divided in two messages; however, the messages will
be recorded without a break.
Message 1 Message 3Message 2
An index is added.
Recording continues
1 Tip
You can add an index during recording pause (page 11).
To add an index during playback
While playing back a message, press INDEX at the point you want
to divide.
The message is divided in two and the new
message number flashes three times.
An index mark is added and the following
index numbers will increase by one.
1 Tip
You can add an index after you have paused playback with XPAUSE (page 16).
To play the message you marked with an index
Press . or > to display the message number as the divided messages
each have message numbers.
To play the divided messages continuously
Select “ON” for “CONT” as described in “Playing Back All Messages in a
File Continuously” on page 38.
Note
If 99 messages have been recorded in a file, you cannot add an index. In that
case, reduce the number of messages to 98 or less by erasing unnecessary
messages or by moving some of the messages to another file (see page 27) before
adding an index.
Other Functions
Continued
25
GB
Page 26
Dividing a Message into Two/Combining
Messages — Index Function (continued)
Combining messages by erasing the index
You can combine two messages into one by erasing the index.
Message 1 Message 2 Message 3 Message 4 Message 5
Message 1 Message 2
In stop mode, follow the steps below:
1 Press . or > to display the number of the
second of the two messages you want to combine.
2 While pressing ERASE, press INDEX for more than 1
second.
“ID ERASE” will flash for 10 seconds.
3 Press ERASE while the display is flashing.
The two messages are combined into one and the
messages will be renumbered as in the illustration
above.
To cancel erasing
Press xSTOP before step 3.
Notes on adding/erasing index
When recording with an IC recorder, the following symptoms may occur
because of the limitation of the system, however, they are not malfunction.
• If you add/erase indexes frequently, the unit may become unable to add/
erase indexes.
•You cannot add an index in the first or the last 1 second (2 seconds in LP
mode) of a message.
An index
is erased.
Message 3
The message numbers decrease.
Message 4
26
GB
Page 27
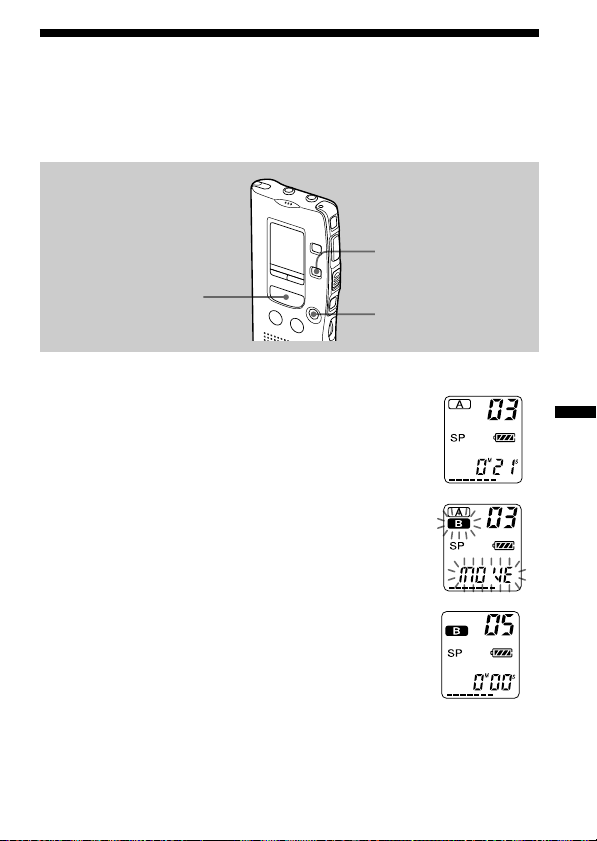
Moving Messages to a Different File—
Move Function
You can move the recorded messages to another file (i.e. from File A to B,
or from File B to A).
FILE
NPLAY/STOP
Example: Moving Message 3 in File A to File B
xSTOP
1 Play back the message you want to move.
2 While playing back the message, press FILE to flash
the indication of the file to which you want to move
the message (B in this case). The first and last 5
seconds of the message will be played back 10 times,
while the file indication and “MOVE” flash.
3 Press NPLAY/STOP.
To cancel moving the message(s)
Press xSTOP before step 3.
Note
The move function does not duplicate a message in another file. When you
move a message to another file, the one in the previous file will be deleted.
(Example: when File
B had 4 messages)
27
GB
Other Functions
Page 28
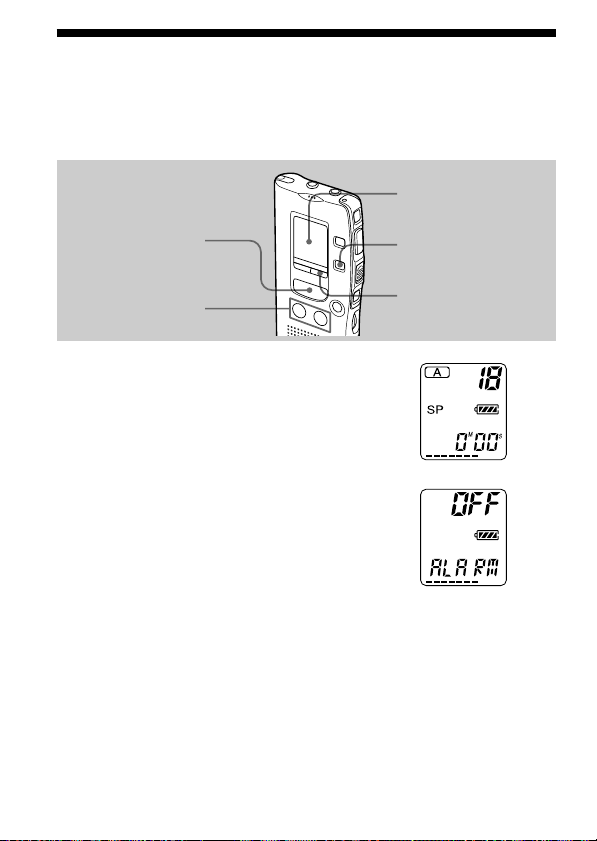
Playing Back a Message at a Desired Time with an Alarm
You can sound an alarm and start playback of a selected message at a
desired time.
Display window
NPLAY/STOP
./>
1 Use FILE and ./> to select the file
and the message you want to play
back.
2 Enter the alarm setting mode.
1 Press MENU.
The unit enters the menu mode and
“ALARM OFF” will be displayed.
(If “ALARM ON” is displayed, the alarm has
been set. If you do not wish to change the
setting, press MENU and exit the menu
mode.)
Note
“ALARM OFF (or ON)” will not appear and the
alarm cannot be set if the clock has not been set
or no message has been recorded in the selected
file.
GB
28
FILE
MENU
Page 29
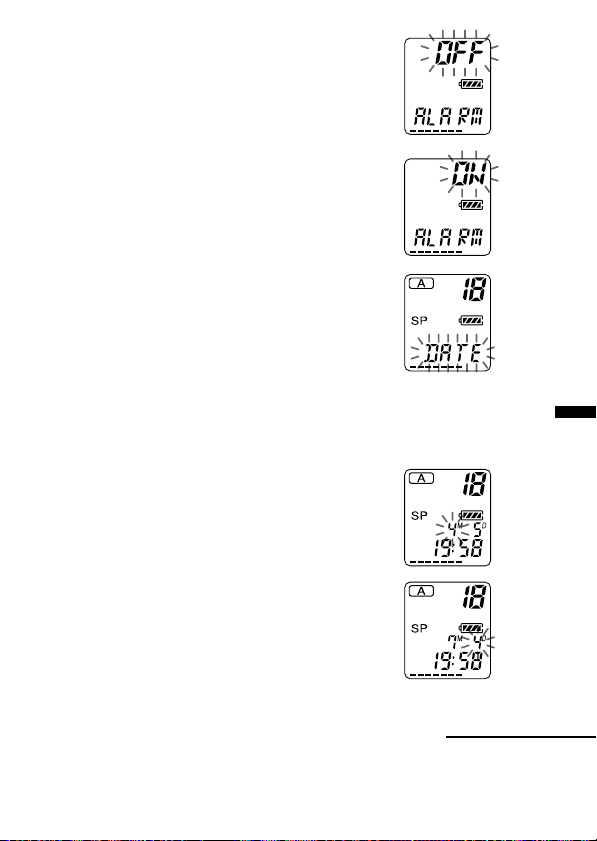
2 Press NPLAY/STOP.
“OFF” starts to flash.
3 Press . or > to flash “ON”.
4 Press NPLAY/STOP.
“DATE” will flash in the display window.
3 Set the alarm date.
• to play back on a desired date
(the message will be played back at the
same time on the same date every year
until you erase the message)
1 Press NPLAY/STOP while “DATE” is
flashing.
The month digits will flash.
2 Press . or > to select the month
digits and press NPLAY/STOP.
The day digits will flash.
Other Functions
3 Press . or > to select the day digits.
Continued
29
GB
Page 30

Playing Back a Message at a Desired Time with an Alarm
(continued)
• to play back once a week
Press . or > to select the day of the
week.
• to play back at the same time every day
Press . or > to select “DAILY”.
4 Press NPLAY/STOP.
The hour digits will flash.
5 Set the alarm time.
1 Press . or > to select the hour digits
and press NPLAY/STOP.
The minute digits will flash.
2 Press . or > to select the minute
digits and press NPLAY/STOP.
“ALARM ON” and “,” will be displayed to
indicate that the setting has been completed.
6 Press MENU to exit the menu mode.
GB
30
Page 31

“,” is displayed when the number of the message with alarm setting is
selected.
At the set time, the alarm will sound for about 10 seconds and the selected
message will be played back.
During playback, “ALARM” will flash in the display window.
When the playback ends, the unit will stop automatically at the beginning
of that message.
To listen to the same message again
Press NPLAY/STOP. The same message will be played back from the
beginning.
To cancel the alarm setting before the playback starts
Press xSTOP while the alarm sound is heard. You can stop even when the
HOLD function is activated.
Notes
• You cannot set the alarm if you have not set the clock or there is no message in
the selected file (the unit will not enter the alarm setting mode when you press
MENU in Step 2 on page 28).
• If you try to set the alarm to play back a message at a previously set time on
another message, “PRE SET” will be displayed, preventing new settings.
• If the alarm time comes while another message is being played back with an
alarm, the playback stops and the new message will be played back.
• If the alarm time comes during recording, alarm will sound for 10 seconds
after the recording is finished and playback begins. “,” will flash when the
alarm time comes.
• If more than one alarm time comes during recording, only the first message
will be played back.
• When the alarm time comes when the unit is in the menu mode, alarm will
sound and the menu mode will be cancelled.
• If you erase the message you set the alarm to play back, the alarm setting will
be cancelled.
• If you add an index to the message you set the alarm to play back, playback
will stop at the index.
• If you erase the index on the message you set the alarm to play back, the alarm
setting will be cancelled.
• You can adjust the playback volume with the VOL control.
• If the alarm time comes during erasing, alarm will sound for 10 seconds after
the erasing is finished and playback begins.
• Alarm setting will not be cancelled when the alarm playback finishes. To
cancel alarm setting, see page 32.
Other Functions
Continued
31
GB
Page 32

Playing Back a Message at a Desired Time with an Alarm
(continued)
To cancel the alarm setting or change the alarm time
1 Select the message you set the alarm to play back, and press MENU.
“ALARM ON” will be displayed.
2 Press NPLAY/STOP to flash “ON”.
3 To cancel the alarm setting: Press . or > to flash “OFF” and
press NPLAY/STOP.
To change the alarm date and time: Press NPLAY/STOP. When the
alarm date is displayed, follow the steps 3 to 5 on pages 29 and 30 to
change the alarm date and time.
4 Press MENU to exit the menu mode.
32
GB
Page 33

Preventing Accidental Operation — HOLD function
HOLD switch
Slide the HOLD switch in the direction of the
arrow. “HOLD” will flash three times, indicating
that all the functions of the buttons are locked.
To cancel the HOLD function, simply slide the
HOLD switch in the opposite direction.
Note
When the HOLD function is activated during recording, cancel the HOLD
function first to stop recording.
1 Tip
Even if the HOLD function is activated, you can stop the alarm playback. To
stop the alarm or playback, press xSTOP.
Other Functions
33
GB
Page 34

Selecting the Display Mode
You can select the display mode for the stop, recording and playback
modes. (If the unit is left unoperated for more than 3 seconds in the stop
mode, the display will show the current time, regardless of the display
mode setting.)
Each time you press DISPLAY, the display mode will change as shown
below:
DISPLAY
,
Counter:
Elapsed playback/
recording time in one
message
m
Remaining
recording time*:
m
Recorded date**:
The date and time the
current message was
recorded.
* The remaining recording time indication varies according to the recording
mode setting (SP or LP).
**If the clock has not been set, “-M--D--:--” will be displayed.
GB
34
Page 35

Selecting the Recording Mode
SP: You can make up to 64 minutes of recording with better sound.
LP: You can make up to 150 minutes of recording.
1 Press MENU to enter the menu mode.
2 Press . or > to display “MODE”
and press NPLAY/STOP.
“SP (or LP)” will flash.
3 Presse . or > to select “SP” or
“LP” and press NPLAY/STOP.
Now the setting is completed.
4 Press MENU to exit the menu mode.
Other Functions
35
GB
Page 36

Turning off the Beep Sound
BEEP ON: A beep will sound to indicate that operation has been
BEEP OFF: No beep sound will be heard except for the alarm and timer.
accepted.
1 Press MENU to enter the menu mode.
2 Press . or > to display “BEEP ON
(or OFF)” and press NPLAY/STOP.
“ON (or OFF)” will flash.
3 Press . or > to select “ON” or
“OFF” and press NPLAY/STOP.
The setting is completed.
4 Press MENU to exit the menu mode.
36
GB
Page 37

What beep sound means
Beep patterns Meaning
- (single tone) Usual mode
-- (double tone) Enter/exit special mode
--- (triple tone) Notice*
---- ---- (continuous beep) Alarm set time has come.
* This pattern lets you know the procedure is wrong or informs you of some
messages, such as:
- you are trying to record a message when you have already recorded up to the
maximum recordable time or the maximum number of messages.
- the unit has stopped functioning due to lack of battery power.
Other Functions
37
GB
Page 38

Playing Back All Messages in a File Continuously
CONT ON: You can play back all messages in a file continuously.
CONT OFF: Playback stops at the end of each message.
1 Press MENU to enter the menu mode.
2 Press . or > to display “CONT”
and press NPLAY/STOP.
“OFF (or ON)” will flash.
3 Press . or > to select “ON” or
“OFF” and press NPLAY/STOP.
Now the setting is completed.
4 Press MENU to exit the menu mode.
38
GB
Page 39

BAdditional Information
Precautions
On power
•Operate the unit only on 3 V DC. Use two LR03 (size AAA) alkaline
batteries.
On safety
•Do not operate the unit while driving, cycling or operating any
motorized vehicle.
On handling
•Do not leave the unit in a location near heat sources, or in a place subject
to direct sunlight, excessive dust or mechanical shock.
•Should any solid object or liquid fall into the unit, remove the batteries
and have the unit checked by qualified personnel before operating it any
further.
On noise
•Noise may be heard when the unit is placed near an AC power source, a
fluorescent lamp or a mobile phone during recording or playback.
•Noise may be recorded when an object, such as your finger, etc., rubs or
scratches the unit during recording.
On maintenance
•To clean the exterior, use a soft cloth slightly moistened in water. Do not
use alcohol, benzine or thinner.
Keep personal credit cards using magnetic coding or spring-wound
watches, etc., away from the unit to prevent possible damage from the
magnet used in the speaker.
If you have any questions or problems concerning your unit, please
consult your nearest Sony dealer.
Additional Information
Backup recommendations
To avoid potential risk of data loss caused by accidental operation or
malfunction of the IC recorder, we recommend that you save a backup
copy of your recorded messages on a tape recorder or to a computer,
etc.
You can transfer and save the messages in the IC recorder to your
computer using the ICD-PCLINK Software (see page 5).
39
GB
Page 40

Troubleshooting
Should any problem persist after you have made these checks, consult
your nearest Sony dealer.
Symptom
The unit does not
operate.
No sound comes
from the speaker.
“END” is displayed
and you cannot start
recording.
Noise is heard.
Recording level is
low.
Recording is
interrupted.
Recording level is
unstable (when
recording music, etc.)
Playback speed is too
fast or too slow.
GB
40
Remedy
•The batteries have been inserted with incorrect
polarity.
•The batteries are weak.
•The buttons are locked with the HOLD switch.
(If you press any button, “HOLD” will flash
three times.)
•The earphone or headphones are plugged in.
•The volume is turned down completely.
•The memory is full. Erase some of the
messages. See page 18.
•99 messages has been recorded in the selected
file. Select another file or erase some of the
messages. See page 18.
•An object, such as your finger, etc., accidentally
rubbed or scratched the unit during recording
so that noise was recorded.
•The unit was placed near an AC power source,
a fluorescent lamp or a mobile phone during
recording or playback.
•Plug of the connected microphone was dirty
when recording. Clean the plug.
•Earphone/headphones plug is dirty. Clean the
plug.
•The MIC SENS selector is set to “L”. Set it to
“H” (see page 12).
•The advanced VOR function (page 20) is
activated. Set the VOR selector to OFF.
•This unit is designed to automatically adjust
the recording level when recording meetings,
etc., and is not suitable for music recording.
•Set the PLAY SPEED selector to “NORMAL.”
See page 23.
Page 41

Symptom
“-M--D --:--” is
displayed.
“-M--D --:--” is
displayed on the REC
DATE display.
You cannot add an
index while
recording/playing a
message.
You cannot erase the
index.
You cannot record
messages up to the
maximum recording
time (64 minutes in
SP mode and 150
minutes in LP mode).
The unit does not
operate correctly.
The unit cannot be
connected to your
personal computer.
Remedy
•You have not set the clock (see page 8).
•The date of recording will not be displayed if
you recorded the message when the clock was
not set.
•If you add indexes frequently, the unit may
become unable to add indexes.
•You cannot add an index in the first or the last
1 second (2 seconds in LP mode) of a message.
•If you erase indexes frequently, the unit may
become unable to erase indexes.
•No more recording can be made when 99
messages each have been recorded in both A
and B files.
•If you record messages in a mixture of SP and
LP modes, the recordable time varies from 64
to 150 minutes
•Due to the limitation of the IC recording
system, this unit records in the minimum
recording unit of approx. 4 seconds in SP
mode (approx. 10 seconds in LP mode). If the
length of each message cannot be divided by
the minimum recording unit, the remaining
recording time may decrease by more than the
total length of the messages. See page 13.
•Take out the battery and insert it again.
•In order to connect to a computer, you need to
use the ICD-PCLINK Software (page 5) and
the connecting cable supplied with the
software. For details, see the instruction
manual of the “ICD-PCLINK Software”.
•ICKIT-W1 cannot be used with this unit.
Additional Information
Please note that recorded messages may be erased during service or repair
work.
41
GB
Page 42

Index to Parts and Controls
Refer to the pages indicated in parentheses for details.
Main unit
!º
!¡
1 !™
2 !£
3 !¢
4 !∞
5 !§
6 !¶
7 !•
8
9 !ª
When the
DIGITAL ?/a
connector cover is
accidentally
detached, attach it
as illustrated.
2
1
1 MIC (built-in microphone)
(10)
2 INDEX button (24)
3 Display window (43)
4 DISPLAY button(34)
5 MENU button (8, 28, 35, 36,
38)
6 NPLAY/STOP•EXECUTE
(play/stop•enter) button
(8, 15, 29, 35, 36, 38)
7 .REVIEW/>CUE (fast
backward, review/fast
forward, cue•selection of
menu mode) button (8, 14,
28, 35, 36, 38)
8 xSTOP button (11, 16)
9 Speaker
GB
42
q; MIC (PLUG IN POWER) jack
(22)
qa EAR (earphone) jack (12, 15)
qs OPR (operation) indicator
(10, 15)
qd X PAUSE button(11, 16)
qf zREC (record) /STOP
button(10, 21)
qg FILE button (10, 14)
qh HOLD switch(33)
qj ERASE button (18)
qk VOL (volume) control(15)
ql DIGITAL ?/a connector for
connecting to a computer (5)
Page 43

Rear
Display window
@º
@¡
@™
w; PLAY SPEED selector (23)
wa MIC SENS (microphone
sensitivity) selector (12)
ws VOR selector (20)
wd Clip*
wf Battery compartment (6)
wg Hook for handstrap (not
supplied)
Using the clip
Press here
to open.
Notes
• To prevent the clip from breaking,
avoid hooking it on thick fabric,
such as a pocket of a heavy coat.
• When bending down or running
with the unit clipped on your
pocket, be careful not to drop the
unit.
1
2
@£
3
4
5
@¢
6
7
@∞
1 File indication (10, 14)
2 Alarm indicator (30, 31)
3 Repeat play indicator (17)
4
Recording mode indication (35)
5 REC DATE (recorded date)
indication (34)
6 REMAIN indicator (34)
7 Counter /Remaining time
indication /Recording date
indication /Current time
indication (15:30, etc.) (34)/
Menu indication (ALARM,
BEEP, etc.) /Messages
(ERASE, HOLD, etc.)
8 Selected file number (10,
14)/Mode indication of the
menu (ON, OFF, etc.) (8, 28,
35, 36, 38)
9
REC (recording) indicator (10)
q; Remaining battery indicator
(7)
qa Remaining memory
indicator (13)
Note
The effect of the back light of the
display window may be reduced in a
bright location.
Additional Information
8
9
!º
!¡
GB
43
Page 44

Menu map
Press MENU to enter
the menu mode
ALARM*
MODE
BEEP
CONT
(See page 28.)
(See page 35.)
(See page 36.)
(See page 38.)
: Initial seItting
On
OFF
SP
LP
On
OFF
On
OFF
SET DATE
* The “ALARM” display will not appear if you have not set the date and time or if there is no
recorded message.
GB
44
(See page 8.)
: Press NPLAY/STOP to go to the next step.
: Press . or > to select.
Year Month Day Hour Minute
Page 45

Additional Information
DATE
SUN
MON
TUE
WED
THU
FRI
SAT
DAILY
Month
Day Hour Minute
Hour Minute
Hour Minute
Hour Minute
Hour Minute
Hour Minute
Hour Minute
Hour Minute
Hour Minute
45
GB
Page 46

Index
A
Accidental operation .................... 33
Advanced VOR .............................20
Alarm..............................................28
B
Battery .............................................. 6
Beep ................................................ 36
Built-in microphone ..................... 10
C
Clock setting .................................... 8
Connecting external microphone22
Connecting other equipment ......22
Continuous playback ...................38
Counter display ............................ 34
Cue .................................................. 16
D
Display window ........................... 43
Display mode ................................34
E
Erase, index ................................... 26
Erase, messages............................. 18
External microphone .................... 22
F, G
File ............................................ 10, 14
H
Hold ................................................ 33
L
LP mode .........................................35
M, N, O
Menu...................8, 28, 35, 36, 38, 44
Message, recording.......................10
Message, playing back .................14
Message, erasing ........................... 18
Message number ............... 18, 24, 26
Microphone, built-in .................... 10
Microphone, external ...................22
Microphone, connecting ..............22
Microphone sensitivity ................12
Move ............................................... 27
P, Q
PC connecting kit.......................... 42
Personal computer..........................5
Play back continuously ................ 38
Playback ......................................... 14
Playback Pause function .............. 16
Playback speed..............................23
Plug in power ................................ 22
R
Recorded date ............................... 34
Recording....................................... 10
Recording mode............................35
Remaining memory...................... 13
Remaining recording time...........34
Repeat play .................................... 17
Review ............................................ 16
I, J, K
IC memory ....................................... 4
Index ............................................... 24
GB
46
Page 47

S, T, U
Scanning play ................................ 17
Search backward ........................... 16
Search forward .............................. 16
SP mode. ........................................ 35
V, W, X, Y, Z
Volume control ............................. 15
VOR ................................................ 20
Additional Information
47
GB
Page 48

Specifications
Recording media Built-in flash memory, Monaural recording
Recording time SP: 64 minutes
Frequency response SP: 280 Hz - 4,800 Hz
Speaker approx. 2.8 cm (1
Power output 110 mW
Input/Output •Earphone jack (minijack) for 8 - 300 ohms
Playback speed control LP mode: FAST +30%
Power requirements Two LR03 (size AAA) alkaline batteries: 3 V DC
Dimensions (w/h/d)
Mass (incl. batteries) 68 g (1.6 oz)
Supplied accessories Carrying case × 1
Optional accessories Electret Condenser Microphone ECM-R100, ECM-
LP: 150 minutes
LP: 240 Hz - 2,800 Hz
earphone/headphones
•Microphone jack (minijack, monaural)
Plug in power
Minimum input level 0.5 mV
3 kilohms or lower impedance microphone
• Digital
SP mode: FAST +20%
(not incl. projecting parts and controls)
44.4 × 100.5 × 12.5 mm (1 3/4 × 4 1/4 × 1/
LR03 (size AAA) alkaline battery × 2 (ICD-R100PC
only)
Connecting cable × 1 (ICD-R100PC only)
Floppy disk × 3 (ICD-R100PC only)
Registration card × 1 (ICD-R100PC only)
T15
Active speakers SRS-T1
PC Connecting Kit ICKIT-W2 (For ICD-R100)
1
/8 in.)dia.
1/g
connector (15-pin)
SLOW –15%
SLOW –15%
in.)
2
Your dealer may not handle some of the above listed optional accessories. Please
ask the dealer for detailed information.
Design and specifications are subject to change without notice.
GB
48
Page 49

Additional Information
49
GB
Page 50

Table des matières
Qu’est-ce que l’enregistreur à CI ICD-R100? ............................................ 4
Caractéristiques ............................................................................................. 5
Préparation
1re étape: Installation des piles ................................................................... 6
2e étape: Réglage de l’horloge..................................................................... 8
Opérations de base
Enregistrement de messages ..................................................................... 10
Lecture de messages ................................................................................... 14
Effacement de messages............................................................................. 18
Différentes méthodes d’enregistrement
Démarrage automatique de l’enregistrement au son de la voix
— Fonction VOR avancée .................................................................. 20
Ajout d’un enregistrement à un message enregistré précédemment.. 21
Enregistrement au départ d’un microphone externe ou d’un autre
appareil ................................................................................................. 22
Autres fonctions
Réglage de la vitesse de lecture ................................................................ 23
Division d’un message en deux/Combinaison de messages
— Fonction d’index ............................................................................. 24
Déplacement de messages dans un autre fichier
— Fonction de déplacement .............................................................. 27
Lecture d’un message à une heure déterminée avec une alarme ........ 28
Prévention des manipulations accidentelles — Fonction HOLD ........ 33
Sélection du mode d’affichage .................................................................. 34
Sélection du mode d’enregistrement ....................................................... 35
Désactivation du bip sonore...................................................................... 36
Lecture de tous les messages dans un fichier continu........................... 38
FR
2
Page 51

Informations complémentaires
Précautions................................................................................................... 39
Dépannage ................................................................................................... 40
Index des composants et des commandes .............................................. 42
Organigramme des menus ........................................................................ 44
Index ............................................................................................................. 46
Spécifications ....................................................................... Couverture dos
Pour ICD-R100PC
Veuillez lire le mode d’emploi du “ICD-PCLINK Software” pour l’utilisation
de PC Link.
FR
FR
3
Page 52

Qu’est-ce que l’enregistreur à CI
ICD-R100?
L’enregistreur à CI ICD-R100 vous permet d’enregistrer des messages
vocaux dans la mémoire à CI intégrée et de les reproduire.
z Enregistrement
Lorsqu’un nouveau message est enregistré, il est automatiquement ajouté
après les derniers messages enregistrés.
Contrairement aux enregistreurs à cassettes, vous ne devez pas vous
inquiéter de réenregistrer par erreur des messages précédemment
enregistrés.
Comme vous ne devez pas rechercher la fin du dernier enregistrement,
vous pouvez démarrer rapidement vos enregistrements quand vous le
voulez.
1er novembre, 11 h 30
Rendez-vous avec M.
Dupont à 14 h 00
Message 1
Message 1
1er novembre, 12 h 00
Ne pas oublier
d’appeler Sylvie
Message 2 Message 3
Message 2 Message 3 Message 4
z Lecture
Cet enregistreur à CI vous permet de localiser rapidement le message que
vous voulez reproduire.
Le contrôle de l’enregistrement en cours est également très facile.
z Effacement
Vous pouvez effacer rapidement des messages jugés inutiles au moyen
d’une simple opération. Lorsqu’un message est effacé, le message suivant
avance automatiquement sans laisser d’espace blanc.
2 novembre, 10 h 00
Faire un paiement
à la banque ABC
4 novembre, 09 h 00
Envoyer une carte
à Mme Durand
Avant Message 5
Message 1
Après
FR
4
Message 2
Effacement du
message 3
Message 2
Message 3
Message 3
Message 4
Message 4Message 1
Les messages restants
sont renumérotés.
Page 53

Caractéristiques
•Durée d’enregistrement de 64 minutes (SP)/150 minutes (LP)
Cet appareil convient à l’enregistrement de réunions ou de conférences
de longue durée.
•Possibilité d’enregistrement de 99 messages dans chacun de deux
fichiers
•Fonction d’alarme (page 28)
Vous pouvez démarrer la lecture d’un message donné à une date et à une
heure déterminées au moyen d’une fonction d’alarme. Vous pouvez
utiliser cette fonction pour vous rappeler l’heure d’une réunion, etc.
•Fonction d’index (page 24)
Vous pouvez insérer un index à l’endroit voulu en cours
d’enregistrement ou de lecture de manière à diviser un message en deux.
Vous pouvez accéder aisément à l’endroit où vous avez inséré un index
pendant la lecture d’un long enregistrement, par exemple d’une réunion.
Vous pouvez également combiner des messages en effaçant l’index.
•Réglage de la vitesse de lecture (page 23)
Vous pouvez reproduire des messages rapidement (lecture accélérée)* ou
lentement (lecture au ralenti)*. Cette fonction s’avère bien pratique
lorsque vous reproduisez un long enregistrement, par exemple d’une
réunion.
* Lecture accélérée : +30% en mode LP ou +20% en mode SP
Lecture au ralenti : –15%
•Fonction VOR avancée (page 20)
•Ajout d’un enregistrement à un message précédemment enregistré
(page 21)
Vous pouvez ajouter un enregistrement au message en cours de lecture
qui comptera comme un message.
•Prise pour microphone externe (page 22)
•Fenêtre LCD à rétro-éclairage (page 43)
• Raccordement à un ordinateur personnel
Vous pouvez transférer les messages enregistrés sur l’enregistreur IC
ICD-R100 vers un ordinateur au moyen du logiciel ICD-PCLINK. (Pour
l’ICD-R100PC, utilisez le logiciel fourni. Pour l’ICD-R100, utilisez le kit
de connexion PC en option ICKIT-W2.)
Préparation
FR
5
Page 54

Préparation
1re étape: Installation des piles
1
Faites glisser et soulevez le
couvercle du compartiment
de la pile.
Introduisez deux piles
2
alcalines LR03 (AAA) en
respectant la polarité et
refermez le couvercle.
Si le couvercle du
compartiment s’enlève
accidentellement, réinstallez-le
comme illustré.
FR
6
2
1
2
1
Page 55

L’écran de réglage de l’horloge apparaît lorsque vous introduisez des piles
pour la première fois ou que vous introduisez des piles après que
l’appareil est resté sans piles pendant une certaine période. Pour le réglage
de la date et de l’heure, exécutez les étapes 2 à 4 de la “2e étape : Réglage
de l’horloge” aux pages 8 et 9.
Remplacement des piles
L’indicateur des piles dans la fenêtre d’affichage signale l’état des piles de
la façon suivante:
Préparation
Nouvelles
piles
Piles faibles
Les piles sont épuisées.
L’appareil va cesser de
fonctionner.
Lorsque l’indication apparaît, remplacez les piles.
Autonomie des piles*
En utilisation continue, approx. 19 heures d’enregistrement et 10 heures de
lecture
* Avec des piles alcalines Sony LR03 (SG)
* En mode de lecture via le haut-parleur interne avec la commande VOL réglée
sur environ 4
L’autonomie des piles peut être plus courte en fonction des conditions
d’utilisation de l’appareil.
Remarques
• N’utilisez pas de piles au manganèse dans cet appareil.
• Lorsque vous remplacez les piles, introduisez les nouvelles piles dans un délai
de 3 minutes après avoir retiré les piles usagées. Sinon, l’écran de réglage de
l’horloge ou une date et une heure incorrectes risquent d’apparaître dans la
fenêtre d’affichage lorsque vous installez les nouvelles piles. Dans ce cas,
recommencez le réglage de la date et de l’heure.
Les messages enregistrés restent cependant en mémoire.
• Lorsque vous remplacez les piles, remplacez les deux piles en même temps.
• Ne chargez pas les piles sèches.
• Si vous prévoyez de ne pas utiliser l’appareil pendant une période prolongée,
retirez-en les piles afin d’éviter tout dommage résultant d’une fuite des piles
et de la corrosion subséquente.
FR
7
Page 56

2e étape: Réglage de l’horloge
L’écran de réglage de l’horloge apparaît la première fois que vous installez
les piles ou lorsque vous installez les piles après que l’appareil est resté
inutilisé et sans piles pendant un certain temps. Dans ce cas, procédez à
partir de l’étape 2.
1
1 Appuyez sur MENU
* L’écran “ALARM”
peut s’afficher au lieu
de l’écran “MODE”
(voir page 44).
2
1 Appuyez sur
1 Conseil
Le système d’horloge
de cet appareil supporte
l’indication de l’année
2000. Pour régler la date sur
l’année 2000, affichez “00Y”.
FR
8
Activez l’écran de réglage de l’horloge.
pour activer le mode
de menu.*
Réglez la date.
. ou > pour
sélectionner les
chiffres de l’année.
2 Appuyez une
fois sur .
pour afficher
“SET DATE”.
3 Appuyez sur
NPLAY/STOP.
Les chiffres de
l’année se
mettent à
clignoter.
2 Appuyez sur
NPLAY/STOP.
Les chiffres du
mois se mettent à
clignoter.
3 Réglez
successivement
le mois et le jour
et appuyez
ensuite sur
NPLAY/STOP.
Les chiffres de l’heure se
mettent à clignoter.
Page 57

3
1 Appuyez sur . ou >
2 Appuyez sur NPLAY/STOP.
Réglez l’heure.
pour sélectionner les
chiffres de l’heure.
Les chiffres des minutes se
mettent à clignoter.
Préparation
3 Réglez les minutes.
4 Appuyez sur
NPLAY/STOP au
signal horaire.
L’affichage revient
à “SET DATE”.
4
Quittez le mode de menu.
Appuyez sur MENU.
FR
9
Page 58

Opérations de base
Enregistrement de messages
Vous pouvez enregistrer jusqu’à 99 messages dans chaque fichier (A et B).
Comme un nouveau message enregistré est automatiquement ajouté
derrière le dernier message enregistré, vous pouvez rapidement démarrer
l’enregistrement sans devoir rechercher la fin du dernier enregistrement.
Message 1
Ex.:
Remarque
Avant de procéder à un enregistrement de longue durée, veillez à installer de
nouvelles piles et à vérifier l’indicateur des piles (page 7).
Message 2
Dernier message enregistré
Espace blanc
1
2
1 Appuyez sur zREC/STOP.
Vous ne devez pas maintenir la touche zREC/STOP enfoncée pendant
l’enregistrement.
10
Sélectionnez le fichier.
Appuyez sur FILE
pour afficher “A”
ou “B”.
Démarrez l’enregistrement.
Numéro du
message en
cours
Indicateur
de mémoire
résiduelle
FR
Compteur*
Fichier en cours
2 Parlez dans le
microphone intégré.
Indicateur OPR
(s’allume en rouge en
cours d’enregistrement)
* L’écran sélectionné
avec la touche
DISPLAY (page 34)
apparaît.
Page 59

Arrêtez l’enregistrement.
3
Appuyez à nouveau sur zREC/STOP
pour arrêter l’enregistrement.
L’appareil s’arrête au début de
l’enregistrement en cours.
xSTOP
Si vous ne changez pas le fichier après avoir arrêté l’enregistrement, votre
prochain enregistrement se fera dans le même fichier.
Pour arrêter l’enregistrement
Vous pouvez également arrêter l’enregistrement en appuyant sur xSTOP
au lieu de zREC/STOP.
Pour activer une pause d’enregistrement
Pour Procédez comme suit
activer une pause Appuyez sur XPAUSE. En mode
d’enregistrement* de pause d’enregistrement,
désactiver la pause et Appuyez sur XPAUSE ou zREC/STOP.
reprendre L’enregistrement reprend à partir de ce point.
l’enregistrement (Pour arrêter l’enregistrement après une
* 15 minutes après que vous avez activé la pause d’enregistrement, la pause
d’enregistrement est automatiquement désactivée et l’appareil passe en mode
d’arrêt.
l’indicateur OPR clignote en
rouge et “PAUSE” clignote dans
la fenêtre d’affichage.
pause d’enregistrement, appuyez sur xSTOP.)
suite page suivante
Opérations de base
FR
11
Page 60

Enregistrement de messages (suite)
Remarque sur l’enregistrement
Il se peut que des bruits parasites soient enregistrés si quelque chose, comme
votre doigt par exemple, touche ou frotte accidentellement l’appareil pendant
l’enregistrement.
Pour écouter l’enregistrement en cours
Appuyez sur zREC/STOP ou xSTOP pour arrêter l’enregistrement et
appuyez ensuite sur NPLAY/STOP.
Pour contrôler instantanément l’enregistrement en cours
Appuyez sur NPLAY/STOP pendant l’enregistrement.
Pour sélectionner la sensibilité du microphone
Vous pouvez sélectionner la sensibilité du microphone en commutant le
sélecteur MIC SENS à l’arrière de l’appareil.
H (high) : Pour enregistrer une réunion ou dans un local tranquille et/ou
L (low) : Pour enregistrer en dictée ou à un endroit bruyant.
Enregistrement avec un microphone externe ou un autre
appareil
Voir page 22.
Pour contrôler l’enregistrement
Raccordez des écouteurs ou un casque d’écoute (non fourni) à la prise
EAR. Vous pouvez régler le volume à l’aide de la commande VOL, mais le
niveau d’enregistrement reste fixe.
Remarque
Si vous augmentez le volume à l’excès ou si vous rapprochez les écouteurs du
microphone pendant que vous contrôlez l’enregistrement, le microphone peut
capter des sons diffusés par les écouteurs, provoquant ainsi un retour
acoustique (hurlement).
Durée d’enregistrement maximum
Vous pouvez enregistrer 64 minutes en mode SP (lecture standard) et 150
minutes en mode LP (longue durée). Si vous enregistrez des messages à la
fois dans les modes SP et LP, la durée enregistrable varie de 64 à 150
minutes.
L’appareil est réglé par défaut en mode SP. Pour commuter le mode
d’enregistrement, voir page 35.
Vous pouvez contrôler la durée d’enregistrement restante disponible en
sélectionnant le mode d’affichage de la durée d’enregistrement résiduelle.
Voir page 34.
12
spacieux.
FR
Page 61

Remarques
En raison des limites du système d’enregistrement IC, cet appareil enregistre
des unités d’enregistrement minimales d’environ 4 secondes en mode SP
(approx. 10 secondes en mode LP). En conséquence, les symptômes suivants
peuvent se produire.
• Même si un message est plus court que l’unité d’enregistrement minimum, il
est compté comme s’il avait une durée d’environ 4 secondes (ou d’environ10
secondes) de sorte que la durée d’enregistrement restante disponible diminue
de plus de la longueur réelle du message.
• Si le message est plus long qu’une unité d’enregistrement minimum, la durée
d’enregistrement restante disponible diminue de plus de la longueur réelle du
message si elle ne peut être divisée par l’unité d’enregistrement minimum
sans reste.
• La somme du chiffre dans le compteur (durée d’enregistrement écoulée) et de
la durée d’enregistrement restante disponible peut être inférieure à la durée
d’enregistrement maximum de l’appareil (64 minutes en mode SP et 150
minutes en mode LP).
Indication de mémoire restante
En cours d’enregistrement, l’indicateur de mémoire restante diminue par
unités.
La mémoire est
presque saturée.
Clignote
Lorsque la durée d’enregistrement restante disponible n’est plus que de 5
minutes, la dernière des indications se met à clignoter. Lorsque la durée
d’enregistrement restante disponible n’est plus que de 1 minute, le mode
d’affichage sélectionné (page 34) et l’indication “REMAIN” clignotent
alternativement dans la fenêtre d’affichage. Lorsque la mémoire est
saturée, l’enregistrement s’arrête automatiquement et l’indication “END”
clignote dans la fenêtre d’affichage tandis qu’une alarme sonore retentit.
Pour poursuivre l’enregistrement, effacez d’abord quelques messages
(page 18).
Opérations de base
Remarques
• Si vous appuyez sur zREC/STOP alors que la mémoire est saturée,
l’indication “END” clignote en même temps qu’une alarme sonore est activée.
Effacez des messages avant de reprendre l’enregistrement. (Page 18)
• Si vous appuyez sur zREC/STOP après avoir enregistré 99 messages,
l’indication “END” se met à clignoter tandis qu’une alarme sonore est activée.
Sélectionnez un autre fichier ou effacez des messages. (Page 18)
13
FR
Page 62

Lecture de messages
Pour reproduire un message enregistré précédemment, démarrez à partir
de l’étape 1.
Pour reproduire un message que vous venez d’enregistrer, passez
directement à l’étape 3.
1
Appuyez sur FILE pour
afficher “A” ou “B”.
2
Sélectionnez le fichier.
Fichier en cours
Sélectionnez le numéro du
message.
Numéro de message
Appuyez sur . ou >
pour afficher le numéro
du message voulu.
.: pour les numéros
de message inférieurs
>: pour les numéros
de message supérieurs
* Le mode d’affichage sélectionné à l’aide de la touche DISPLAY (page 34)
apparaît.
FR
14
sélectionné
Compteur*
Page 63

Démarrez la lecture.
3
Appuyez sur NPLAY/STOP.
Compteur
(ou le mode
d’affichage
sélectionné)
Après avoir reproduit un message, l’appareil s’arrête au début du message
suivant.
Lorsque le dernier message d’un fichier a été reproduit, l’appareil s’arrête
au début du dernier message.
4
Pour une écoute individuelle
Branchez des écouteurs ou un casque d’écoute (non fournis) sur la prise
EAR. Le haut-parleur intégré est automatiquement déconnecté. Si vous
branchez un casque d’écoute, un son monaural est diffusé par les canaux
gauche et droit.
Réglez le volume.
Indicateur OPR
(s’allume en vert
pendant la lecture)
Prise EAR
Tournez VOL.
suite page suivante
15
Opérations de base
FR
Page 64

Lecture de messages (suite)
Pour arrêter la lecture
Pour Procédez comme suit
arrêter au début du Appuyez sur xSTOP.
message en cours
arrêter à la position Appuyez sur NPLAY/STOP. Pour reprendre
actuelle (fonction de la lecture à partir de ce point, appuyez à
pause de lecture)* nouveau sur NPLAY/STOP.
* Vous pouvez également activer une pause de lecture en appuyant sur
XPAUSE au lieu de NPLAY/STOP. L’indicateur OPR clignote en vert. Au
bout de 15 minutes, l’appareil passe en mode d’arrêt à la position en cours.
Autres opérations
Pour Procédez comme suit
revenir au début du Appuyez une fois sur ..
message en cours
revenir aux messages Appuyez plusieurs fois de suite sur ..
précédents (En mode d’arrêt, maintenez la touche .
passer au message Appuyez une fois sur >.
suivant
sauter les messages Appuyez plusieurs fois de suite sur >.
suivants (En mode d’arrêt, maintenez la touche
Recherche avant/arrière en cours de lecture
(Recherche/Contrôle)
Pour rechercher vers l’avant, maintenez la touche > enfoncée en cours
de lecture et relâchez-la à l’endroit où vous voulez reprendre la lecture.
Pour rechercher vers l’arrière, maintenez la touche . enfoncée en cours
de lecture et relâchez-la à l’endroit où vous voulez reprendre la lecture.
Si vous maintenez la touche > ou . enfoncée pendant plus de 10
secondes, l’appareil entame la recherche à grande vitesse.
Pendant les 10 premières secondes d’une recherche/contrôle, le son de
lecture accélérée est audible. Lors d’une recherche à grande vitesse, aucun
son de lecture n’est audible.
En cours de recherche/contrôle, le compteur s’affiche quel que soit le
réglage du mode d’affichage (page 34).
FR
16
enfoncée pour sauter les messages en continu.)
enfoncée pour sauter les messages en continu.)
Page 65

1 Conseil
Si la lecture accélérée est maintenue jusqu’à la fin du dernier message,
l’indication “END” clignote pendant 3 secondes et l’indicateur OPR
s’allume en vert. (Vous ne pouvez pas entendre le son de lecture.) Si vous
maintenez la touche . enfoncée alors que l’indication “END” clignote,
les messages sont reproduits rapidement et la lecture normale démarre à
l’endroit où vous relâchez la touche.
Lorsque l’indication “END” cesse de clignoter et que l’indicateur OPR est
désactivé, l’appareil s’arrête au début du dernier message.
Si le dernier message est long et si vous souhaitez démarrer la lecture à un
autre endroit qu’au début du message, maintenez la touche > enfoncée
pour reproduire le message jusqu’à la fin et appuyez ensuite sur .
lorsque l’indication “END” se met à clignoter pour revenir à l’endroit
voulu.
(Pour les messages autres que le dernier message, passez au début du
message suivant et activez la lecture arrière jusqu’au passage voulu.)
Lecture répétée d’un message
— Lecture répétée
En cours de lecture, appuyez sur la touche NPLAY/STOP pendant au
moins une seconde.
L’indication “ ” s’affiche et le message sélectionné est reproduit de
manière répétitive.
Pour reprendre la lecture normale, appuyez de nouveau sur la touche
NPLAY/STOP. Pour arrêter la lecture, appuyez sur xSTOP.
Reproduction du début de chaque message
— Lecture par balayage
En mode d’arrêt, appuyez sur NPLAY/STOP pendant au moins une
seconde.
L’indication “SCAN” apparaît dans la fenêtre d’affichage et les 5 premières
secondes de chaque message du fichier sélectionné sont reproduites.
Lorsque vous avez trouvé le message voulu, appuyez sur NPLAY/STOP.
Le message est reproduit jusqu’à la fin.
Lecture de tous les messages en un fichier
continu — Lecture continue
Voir page 38.
17
Opérations de base
FR
Page 66

Effacement de messages
Vous pouvez effacer les messages enregistrés un par un ou tous les
messages d’un fichier en même temps.
Attention que lorsqu’un enregistrement a été effacé, il n’est plus possible
de le restaurer.
Effacement de messages un par un
Lorsqu’un message est effacé, les autres messages sont avancés et
renumérotés de façon à ne pas laisser d’espace blanc entre les messages.
Avant
l’effacement
Après
l’effacement
Message 1
Pour annuler l’effacement
Appuyez sur xSTOP avant l’étape 2.
Message 2
Effacement du
message 3
Message 2
1 Appuyez sur ERASE pendant la
lecture du message que vous voulez
effacer ou appuyez sur ERASE
pendant au moins une seconde en
mode d’arrêt.
Un bip sonore retentit et le numéro du
message et l’indication “ERASE”
clignotent pendant que les 5 premières
et dernières secondes du message sont
reproduites 10 fois.
2 Appuyez sur ERASE pendant la
lecture du message.
Le message est effacé et les autres
messages sont renumérotés.
(Par exemple, si vous effacez le
Message 3, le Message 4 est renuméroté
en Message 3. Lorsque l’effacement est
terminé, l’appareil s’arrête au début du
message suivant.)
Message 3
Message 3
Les messages restants sont renumérotés.
Message 4
Message 4Message 1
Message 5
18
FR
Page 67

Pour effacer d’autres messages
Répétez les étapes 1 et 2.
Pour effacer partiellement un message
Divisez d’abord le message en insérant un index (voir page 24) et
appliquez ensuite la procédure de la page 18 pour effacer le message.
Effacement de tous les messages
d’un fichier
Ex.
Fichier A
Message 1
Message 2 Message 3
Espace blanc
Fichier B
Message 1
Message 2 Message 3
Opérations de base
Espace blanc
1 Appuyez sur
FILE pour
sélectionner le
fichier que vous
voulez effacer.
Pour annuler l’effacement
Appuyez sur xSTOP avant l’étape 3.
Message 2
Message 1
2 Tout en maintenant la touche
xSTOP enfoncée, appuyez sur
ERASE pendant au moins 1
seconde.
L’indication “ALL ERASE”
clignote pendant 10 secondes.
3 Pendant que l’affichage
clignote, appuyez sur ERASE.
Message 3
19
FR
Page 68

BDifférentes méthodes d’enregistrement
Démarrage automatique de
l’enregistrement au son de la voix
— Fonction VOR avancée
Lorsque la fonction VOR (enregistrement activé à la voix) est activée,
l’enregistrement démarre lorsque l’enregistreur détecte le son et s’arrête
lorsqu’aucun son n’est perçu.
Réglez le sélecteur
VOR sur ON.
VOR
OFF ON
Lorsque vous enregistrez des messages avec VOR réglé sur ON,
l’enregistrement se met en pause lorsqu’aucun son n’est détecté et
l’indication “VOR PAUSE” apparaît dans la fenêtre d’affichage.
Pour désactiver la fonction VOR
Réglez le sélecteur VOR sur OFF.
Remarque
La fonction VOR est affectée par les sons qui vous entourent. Réglez le
sélecteur MIC SENS sur H ou L (voir page 12). Si l’enregistrement ne s’avère
pas satisfaisant après que vous avez modifié la sensibilité du microphone, ou
pour un enregistrement important, réglez le sélecteur VOR sur OFF.
MIC SENS
20
FR
Page 69

Ajout d’un enregistrement à un
message enregistré précédemment
Vous pouvez ajouter un enregistrement au message en cours de lecture.
L’enregistrement ajouté sera placé après le message en cours et est compté
comme une partie de ce message.
Pendant la
lecture du
message 3
Après l’ajout
d’un
enregistrement
Message 3
Message 3 Message 4
Réunion du ler
décembre à 14 heures
Message 4
Enregistrement ajouté
dans la salle de
conférence A
Différentes méthodes d’enregistrement
Microphone intégré
Indicateur OPR
zREC /STOP
xSTOP
1 En cours de lecture, appuyez sur zREC/STOP
pendant au moins 1 seconde.
L’indicateur REC apparaît et l’indication “PLUS”
clignote trois fois dans la fenêtre d’affichage.
L’indicateur OPR vire au rouge.
Le nouvel enregistrement est ajouté à la fin du
message en cours.
2 Appuyez sur zREC/STOP ou xSTOP pour
arrêter l’enregistrement.
Remarque
Le message ajouté est enregistré dans le même mode d’enregistrement (SP ou
LP; voir page 35) que le message original, quel que soit le mode
d’enregistrement actuellement sélectionné.
21
FR
Page 70

Enregistrement au départ d’un microphone
externe ou d’un autre appareil
1 Branchez un microphone auto-alimenté par fiche ou tout
autre appareil dans la prise MIC (PLUG IN POWER).
Lors d’un enregistrement avec un microphone
externe
MIC
Lorsque vous branchez un microphone externe, le microphone intégré est
automatiquement coupé. Lorsqu’un microphone auto-alimenté par fiche
est raccordé, l’alimentation est automatiquement fournie au microphone
par l’enregistreur IC.
Lors d’un enregistrement au départ de tout
autre appareil
MIC
ECM-R100, ECM-T15, etc.
(non fourni)
Câble de connexion
(non fourni)
EAR,
EARPHONE, v
ou REC OUT
Microphone
externe
Enregistreur
à cassettes,
TV, radio, etc.
2 Suivez les étapes de “Enregistrement de messages” à la page
10 pour enregistrer les messages.
Remarques
• Assurez-vous que les fiches sont branchées correctement.
• Nous vous recommandons d’effectuer un essai d’enregistrement pour vérifier
les connexions et la commande du volume.
• Lorsque vous raccordez des appareils d’autres marques que Sony, reportezvous au mode d’emploi de cet appareil.
FR
22
Page 71

BAutres fonctions
Réglage de la vitesse de lecture
Vous pouvez régler la vitesse de lecture à l’aide du sélecteur PLAY SPEED
à l’arrière de l’appareil.
Sélecteur PLAY SPEED
SLOW NORMAL FAST
Pour reproduire des messages rapidement
Réglez PLAY SPEED sur FAST.
Lorsque la lecture démarre, l’indication
“FAST” clignote trois fois dans la fenêtre
d’affichage et les messages sont reproduits
environ 30% (en mode LP, ou 20% en mode
SP) plus rapidement que la normale.
Pour reproduire des messages lentement
Réglez PLAY SPEED sur SLOW.
Lorsque la lecture démarre, l’indication
“SLOW” clignote trois fois dans la fenêtre
d’affichage et les messages sont reproduits
environ 15% plus lentement que la normale.
Autres fonctions
Pour reproduire des messages à la vitesse
normale
Réglez PLAY SPEED sur NORMAL.
1 Conseil
Vous pouvez changer la vitesse de lecture en cours de lecture.
23
FR
Page 72

Division d’un message en deux/
Combinaison de messages — Fonction
d’index
Vous pouvez diviser un message en ajoutant un index ou combiner des
messages en supprimant un index.
Vous pouvez ajouter un index (voir ci-dessous) pendant l’enregistrement
et la lecture de messages. Vous pouvez effacer un index en mode d’arrêt
(voir page 26).
INDEX
ERASE
./>
xSTOP
Division d’un message par insertion d’un index
Vous pouvez diviser un message en insérant un index en cours
d’enregistrement ou de lecture. La division d’un message vous permet de
retrouver rapidement le point que vous voulez reproduire lorsque vous
réalisez un long enregistrement, par exemple d’une réunion.
Lorsque vous insérez un index, les numéros des messages augmentent
comme suit.
Avant
l’insertion
d’un index
Après
l’insertion d’un
index
FR
24
Message 1
Message 1
Le premier point à
l’ordre du jour est...
Message 2
Insertion d’un index
Message 2 Message 3 Message 4
Message 3
Nous allons à
présent passer au
sujet suivant.
Message 4
Message 5
Les numéros
des messages
augmentent.
Page 73

Insertion d’un index en cours d’enregistrement
Pendant l’enregistrement d’un message, appuyez sur INDEX à
l’endroit où vous voulez opérer une division.
Le nouveau numéro de message clignote trois fois à
l’endroit où vous avez appuyé sur INDEX. Le
message est divisé en deux messages, mais ces deux
messages sont enregistrés sans interruption.
Message 1 Message 2 Message 3
Insertion d’un index
L’enregistrement
continue.
1 Conseil
Vous pouvez insérer un index en mode de pause d’enregistrement (page 11).
Insertion d’un index en cours de lecture
Pendant la lecture d’un message, appuyez sur INDEX à l’endroit
où vous voulez opérer une division.
Le message est divisé en deux et le nouveau numéro
de message clignote trois fois.
Un index est inséré et les numéros d’index suivants
augmentent d’une unité.
1 Conseil
Vous pouvez insérer un index après avoir activé une pause de lecture à l’aide de
la touche XPAUSE (page 16).
Pour reproduire le message que vous avez identifié d’un
index
Appuyez sur . ou > pour afficher le numéro de message puisque
chacun des messages divisés porte un numéro de message.
Pour reproduire les messages divisés en continu
Sélectionnez “ON” pour “CONT” comme décrit dans la section “Lecture
de tous les messages dans un fichier continu” à la page 38.
Remarque
Lorsque 99 messages ont été enregistrés dans un fichier, vous ne pouvez pas
ajouter d’index. Dans ce cas, réduisez le nombre de messages à 98 ou moins en
effaçant des messages que vous jugez inutiles ou en déplaçant certains messages
dans un autre fichier (voir page 27) avant d’insérer un index.
Autres fonctions
suite page suivante
25
FR
Page 74

Division d’un message en deux/Combinaison de
messages — Fonction d’index (suite)
Combinaison de messages en supprimant un
index
Vous pouvez combiner deux messages en un seul en effaçant un index.
Message 1
Message 1 Message 2 Message 3 Message 4
En mode d’arrêt, appliquez la procédure ci-dessous:
1 Appuyez sur . ou > pour afficher le numéro
du second des deux messages que vous souhaitez
combiner.
2 Tout en maintenant la touche ERASE enfoncée,
appuyez sur INDEX pendant au moins 1 seconde.
L’indication “ID ERASE” clignote pendant 10
secondes.
3 Appuyez sur ERASE pendant que l’affichage
clignote.
Les deux messages sont combinés en un seul et les
messages sont ensuite renumérotés comme illustré cidessus.
Pour annuler l’effacement
Appuyez sur xSTOP avant l’étape 3.
Remarques sur l’ajout/effacement d’un index
Lorsque vous effectuez un enregistrement au moyen d’un enregistreur IC, les
symptômes suivants peuvent se produire en raison des limites du système, mais
ils ne sont pas le signe d’un dysfonctionnement.
• Si vous ajoutez/effacez fréquemment des index, il se peut que l’appareil
devienne incapable d’ajouter/effacer des index.
• Vous ne pouvez pas ajouter d’index durant la première ou la dernière seconde
(2 secondes en mode LP) d’un message.
Message 2 Message 3 Message 4 Message 5
Les numéros des messages diminuent d’une unité.
Effacement
d’un index
26
FR
Page 75

Déplacement de messages dans un autre
fichier — Fonction de déplacement
Vous pouvez déplacer les messages enregistrés dans un autre fichier (par
ex., du Fichier A dans le Fichier B, ou inversement).
FILE
NPLAY/STOP
Exemple: Déplacement du Message 3 du Fichier A dans le Fichier B
1 Démarrez la lecture du message que vous voulez
déplacer.
2 Pendant la lecture du message, appuyez sur FILE
pour faire clignoter l’indication du fichier dans lequel
vous souhaitez déplacer le message (dans ce cas, B).
Les 5 premières et dernières secondes du message
sont reproduites 10 fois, pendant que l’indication du
fichier et “MOVE” clignotent.
3 Appuyez sur NPLAY/STOP.
Pour annuler le déplacement de message(s)
Appuyez sur xSTOP avant l’étape 3.
Remarque
La fonction de déplacement ne duplique pas les messages dans un autre fichier.
Lorsque vous déplacez un message dans un autre fichier, il est effacé de son
fichier de départ.
xSTOP
(Exemple : si le
fichier B comprend
4 messages)
Autres fonctions
FR
27
Page 76

Lecture d’un message à une heure
déterminée avec une alarme
Vous pouvez activer une alarme sonore et démarrer la lecture d’un
message donné à une heure déterminée.
Fenêtre d’affichage
NPLAY/STOP
./>
1 Utilisez les touches FILE et ./> pour
sélectionner le fichier et le message que vous
voulez reproduire.
2 Activez le mode de réglage de l’alarme.
1 Appuyez sur MENU.
L’appareil passe en mode de menu et “ALARM OFF”
s’affiche. (Si “ALARM ON” s’affiche, c’est que
l’alarme a été programmée. Si vous ne souhaitez pas
modifier le réglage, appuyez sur MENU et quittez le
mode de menu.)
Remarque
“ALARM OFF (ou ON)” n’apparaît pas et l’alarme ne
peut être programmée si l’horloge n’a pas été réglée
ou si aucun message n’a été enregistré dans le fichier
sélectionné.
FR
28
FILE
MENU
Page 77

2 Appuyez sur NPLAY/STOP.
“OFF” se met à clignoter.
3 Appuyez sur . ou > pour faire clignoter
“ON”.
4 Appuyez sur NPLAY/STOP.
“DATE” clignote dans la fenêtre d’affichage.
3 Réglez la date de l’alarme.
• pour reproduire un message à une date
déterminée
(le message sera reproduit chaque année à la même
date et à la même heure jusqu’à ce que vous effaciez
le message)
1 Appuyez sur NPLAY/STOP lorsque “DATE”
clignote.
Les chiffres du mois se mettent à clignoter.
2 Appuyez sur . ou > pour sélectionner les
chiffres du mois et appuyez ensuite sur NPLAY/
STOP.
Les chiffres du jour se mettent à clignoter.
Autres fonctions
3 Appuyez sur . ou > pour sélectionner les
chiffres du jour.
suite page suivante
29
FR
Page 78

Lecture d’un message à une heure déterminée
avec une alarme (suite)
• pour reproduire un message une fois par
semaine
Appuyez sur . ou > pour sélectionner le jour
de la semaine.
• pour reproduire un message chaque jour à
la même heure
Appuyez sur . ou > pour sélectionner
“DAILY”.
4 Appuyez sur NPLAY/STOP.
Les chiffres de l’heure se mettent à clignoter.
5 Réglez l’heure de l’alarme.
1 Appuyez sur . ou > pour sélectionner les
chiffres de l’heure et appuyez ensuite sur NPLAY/
STOP.
Les chiffres des minutes se mettent à clignoter.
2 Appuyez sur . ou > pour sélectionner les
chiffres des minutes et appuyez ensuite sur
NPLAY/STOP.
“ALARM ON” et “,” s’affichent pour indiquer que
la programmation est terminée.
6 Appuyez sur MENU pour quitter le mode de
menu.
FR
30
Page 79

“,” s’affiche lorsque vous sélectionnez un numéro de message pour
lequel une alarme a été programmée.
A l’heure programmée, l’alarme retentit pendant environ 10 secondes et le
message sélectionné est reproduit.
Pendant la lecture du message, l’indication “ALARM” clignote dans la
fenêtre d’affichage.
Lorsque la lecture se termine, l’appareil s’arrête automatiquement au
début de ce message.
Pour réécouter le même message
Appuyez sur NPLAY/STOP. Le même message est de nouveau reproduit
à partir du début.
Pour annuler la programmation de l’alarme avant le début
de la lecture
Appuyez sur xSTOP pendant que l’alarme sonore retentit. Vous pouvez
l’arrêter même si la fonction HOLD est activée.
Remarques
• Vous ne pouvez pas programmer l’alarme si vous n’avez pas réglé l’horloge
ou si le fichier sélectionné ne comporte aucun message (l’appareil ne passe pas
en mode de programmation de l’alarme lorsque vous appuyez sur MENU à
l’étape 2 de la page 28).
• Si vous essayez de programmer l’alarme pour reproduire un message à une
heure précédemment programmée pour un autre message, l’indication “PRE
SET” s’affiche pour empêcher une nouvelle programmation.
• Si l’heure de programmation de l’alarme vient pendant la lecture d’un autre
message, la lecture s’arrête et le nouveau message est reproduit.
• Si l’heure de programmation de l’alarme vient pendant un enregistrement,
l’alarme retentit pendant 10 secondes après la fin de l’enregistrement et la
lecture démarre. L’indication “ ,” clignote pendant que l’alarme est activée.
• Si plus d’une heure de programmation d’alarme vient pendant un
enregistrement, seul le premier message est reproduit.
• Si l’heure de programmation de l’alarme vient alors que l’appareil se trouve
en mode de menu, l’alarme retentit et le mode de menu est désactivé.
• Si vous effacez le message pour lequel vous avez programmé une alarme, la
programmation de l’alarme est elle aussi effacée.
• Si vous ajoutez un index au message que vous avez programmé pour l’alarme,
Autres fonctions
suite page suivante
31
FR
Page 80

Lecture d’un message à une heure déterminée
avec une alarme (suite)
la lecture s’arrêtera à l’index.
• Si vous effacez l’index dans le message que vous avez programmé pour
l’alarme, le réglage de l’alarme est annulé.
• Vous pouvez régler le volume de lecture à l’aide de la commande VOL.
• Si l’heure de programmation de l’alarme vient pendant une procédure
d’effacement, l’alarme retentit pendant 10 secondes après la fin de
l’enregistrement et la lecture démarre.
• La programmation de l’alarme n’est pas désactivée lorsque la lecture d’un
message avec une alarme programmée se termine. Pour désactiver la
programmation de l’alarme, voir plus bas.
Pour désactiver la programmation de l’alarme
ou changer l’heure de l’alarme
1 Sélectionnez le message pour lequel vous avez
programmé une alarme de lecture et appuyez sur
MENU.
“ALARM ON” s’affiche.
2 Appuyez sur NPLAY/STOP pour faire clignoter “ON”.
3 Pour désactiver la programmation de l’alarme: Appuyez sur . ou
> pour faire clignoter “OFF” et appuyez sur NPLAY/STOP.
Pour changer la date et l’heure de l’alarme: Appuyez sur NPLAY/
STOP. Lorsque la date de l’alarme est affichée, exécutez les étapes 3 à 5
des pages 29 et 30 pour changer la date et l’heure de l’alarme.
4 Appuyez sur MENU pour quitter le mode de menu.
32
FR
Page 81

Prévention des manipulations
accidentelles — Fonction HOLD
Commutateur HOLD
Faites glisser le commutateur HOLD dans le sens
de la flèche. L’indication “HOLD” clignote trois
fois pour indiquer que toutes les fonctions des
touches sont verrouillées.
Pour désactiver la fonction HOLD, faites
simplement glisser le commutateur HOLD dans
le sens opposé à la flèche.
Remarque
Si la fonction HOLD est activée pendant un enregistrement, désactivez la
fonction HOLD avant d’arrêter l’enregistrement.
1 Conseil
Même si la fonction HOLD est activée, vous pouvez arrêter l’alarme. Pour
arrêter l’alarme ou la lecture, appuyez sur xSTOP.
Autres fonctions
33
FR
Page 82

Sélection du mode d’affichage
Vous pouvez sélectionner le mode d’affichage pour les modes d’arrêt,
d’enregistrement et de lecture. (Si vous ne manipulez pas l’appareil
pendant plus de 3 secondes en mode d’arrêt, la fenêtre d’affichage indique
l’heure, quel que soit le réglage du mode d’affichage.)
Chaque fois que vous appuyez sur DISPLAY, le mode d’affichage change
selon la séquence suivante:
DISPLAY
Compteur:
,
Durée de lecture/
enregistrement écoulée
d’un message
m
Durée d’enregistrement
restante*:
m
Date d’enregistrement **:
La date et l’heure du
message ont été
enregistrées.
* L’indication de la durée restante d’enregistrement disponible varie suivant le
réglage du mode d’enregistrement (SP ou LP).
** Si l’horloge n’a pas été réglée, l’indication “-M--D--:--” s’affiche.
FR
34
Page 83

Sélection du mode d’enregistrement
SP: Vous pouvez réaliser 64 minutes d’enregistrement avec une meilleure
qualité sonore.
LP: Vous pouvez réaliser 150 minutes d’enregistrement.
1 Appuyez sur MENU pour activer le
mode de menu.
2 Appuyez sur . ou > pour afficher
“MODE” et appuyez sur NPLAY/STOP.
“SP (ou LP)” se met à clignoter.
3 Appuyez sur . ou > pour
sélectionner “SP” ou “LP” et appuyez
ensuite sur NPLAY/STOP.
Le réglage est à présent terminé.
4 Appuyez sur MENU pour quitter le
mode de menu.
Autres fonctions
35
FR
Page 84

Désactivation du bip sonore
BEEP ON: Un bip sonore retentit pour indiquer que l’opération exécutée
BEEP OFF: Aucun bip ne retentit, sauf pour l’alarme et le programmateur.
est acceptée.
1 Appuyez sur MENU pour activer le
mode de menu.
2 Appuyez sur . ou > pour afficher
“BEEP ON (ou OFF)” et appuyez ensuite
sur NPLAY/STOP.
“ON (ou OFF)” se met à clignoter.
3 Appuyez sur . ou > pour
sélectionner “ON” ou “OFF” et appuyez
ensuite sur NPLAY/STOP.
Le réglage est terminé.
4 Appuyez sur MENU pour quitter le
mode de menu.
36
FR
Page 85

Signification du bip sonore
Type de bip Signification
- (simple tonalité) Mode normal
-- (double tonalité) Activer/désactiver un mode spécial
--- (triple tonalité) Notice*
---- ---- (bip continu) L’heure de programmation de l’alarme est
venue.
* Ce type de bip sonore indique que la procédure appliquée est incorrecte ou
vous informe de messages tels que:
- vous êtes en train d’enregistrer un message alors que vous avez atteint la
durée maximum d’enregistrement ou le nombre maximum de messages;
- l’appareil a cessé de fonctionner en raison de la faiblesse de la pile.
Autres fonctions
37
FR
Page 86

Lecture de tous les messages dans un
fichier continu
CONT ON: Vous pouvez reproduire tous les messages d’un fichier en
CONT OFF: La lecture s’arrête à la fin de chaque message.
continu.
1 Appuyez sur MENU pour activer le
mode de menu.
2 Appuyez sur . ou > pour afficher
“CONT” et appuyez ensuite sur
NPLAY/STOP.
“OFF (ou ON)” se met à clignoter.
3 Appuyez sur . ou > pour
sélectionner “ON” ou “OFF” et appuyez
ensuite sur NPLAY/STOP.
Le réglage est à présent terminé.
4 Appuyez sur MENU pour quitter le
mode de menu.
38
FR
Page 87

BInformations complémentaires
Précautions
Alimentation
•Faites uniquement fonctionner l’appareil sur une tension de 3 V CC.
Utilisez deux piles alcalines LR03 (AAA).
Sécurité
•Ne faites pas fonctionner l’appareil pendant la conduite d’une voiture,
d’une bicyclette ou de tout véhicule motorisé.
Manipulation
•Ne laissez pas l’appareil à proximité d’une source de chaleur ou dans un
endroit exposé au rayonnement direct du soleil, à de la poussière en
excès ou à des chocs mécaniques.
•Si des solides ou des liquides venaient à pénétrer à l’intérieur de
l’appareil, retirez-en les piles et faites-le vérifier par le personnel qualifié
avant de le remettre en service.
Bruits
•Des bruits parasites peuvent se faire entendre si l’appareil est placé à
proximité d’une source d’alimentation secteur, d’une lampe fluorescente
ou d’un téléphone mobile durant l’enregistrement ou la lecture.
•Il se peut que des bruits parasites soient enregistrés si quelque chose,
comme votre doigt par exemple, touche ou frotte accidentellement
l’appareil pendant l’enregistrement.
Entretien
•Pour nettoyer l’extérieur, utilisez un chiffon doux légèrement imprégné
d’eau. N’utilisez pas d’alcool, de benzine ni de diluant.
Gardez les cartes de crédit individuelles à code magnétique, les montres
mécaniques, etc., à l’écart de l’appareil afin d’éviter tout dommage sous
l’effet de l’aimant intégré dans le haut-parleur.
Si vous avez des questions ou des problèmes concernant cet appareil,
consultez votre revendeur Sony.
Sauvegardes recommandées
Pour éviter tout risque de perte de données à la suite d’une opération
accidentelle ou d’un dysfonctionnement de l’enregistreur à CI, nous
vous conseillons d’enregistrer une copie de sauvegarde de vos
messages sur une platine à cassette, sur un ordinateur, etc.
Vous pouvez transférer et sauvegarder les messages de l’enregistreur
IC sur votre ordinateur à l’aide du logiciel ICD-PCLINK (voir page 5).
39
Informations complémentaires
FR
Page 88

Dépannage
Si le problème persiste après que vous avez effectué ces contrôles,
consultez votre revendeur Sony.
Symptômes
L’appareil ne
fonctionne pas.
Aucun son n’est
diffusé par le hautparleur.
L’indication “END”
s’affiche et vous ne
pouvez pas
démarrer
l’enregistrement.
Des bruits parasites
sont audibles.
Le niveau d’enregistrement est faible.
L’enregistrement est
interrompu.
Le niveau d’enregistrement est instable
(pendant l’enregistrement de musique, etc.)
FR
40
Remèdes
•Les piles n’ont pas été installées en en respectant
la polarité.
•Les piles sont plates.
•Les touches ont été verrouillées à l’aide du
commutateur HOLD. (Si vous appuyez sur une
touche, l’indication “HOLD” clignote trois fois.)
•Les écouteurs ou le casque d’écoute sont branchés.
•Le volume est au minimum.
•La mémoire est saturée. Effacez des messages.
Voir page 18.
•99 messages ont été enregistrés dans le fichier
sélectionné. Sélectionnez un autre fichier ou
effacez des messages. Voir page 18.
•Quelque chose, comme votre doigt par exemple,
touche ou frotte accidentellement l’appareil
pendant l’enregistrement.
•L’appareil a été placé à proximité d’une source
d’alimentation secteur, d’une lampe fluorescente
ou d’un téléphone mobile durant l’enregistrement
ou la lecture.
•La fiche du microphone connecté était souillée lors
de l’enregistrement. Nettoyez la fiche.
•La fiche des écouteurs/casque d’écoute est
souillée. Nettoyez la fiche.
•La sélecteur MIC SENS est réglée sur “L”. Réglezla sur “H” (voir page 12).
•La fonction VOR avancée (page 20) est activée.
Réglez le sélecteur VOR sur OFF.
•Cet appareil est conçu pour ajuster
automatiquement le niveau d’enregistrement
pendant l’enregistrement de réunions, etc., et ne
convient pas à l’enregistrement de musique.
Page 89

Symptômes
La vitesse de lecture
est trop rapide ou trop
lente.
“-M--D --:--” s’affiche.
“-M--D --:--” s’affiche
dans l’écran REC
DATE.
Impossible d’insérer un
index pendant
l’enregistrement/la
lecture d’un message.
Vous ne pouvez pas
effacer un index.
Vous ne pouvez pas
enregistrer de messages
à concurrence de la
durée d’enregistrement
maximum (64 minutes
en mode SP et 150
minutes en mode LP).
L’appareil ne fonctionne
pas correctement.
Impossible de
raccorder l’appareil à
votre ordinateur
personnel.
Remède
•Réglez le sélecteur PLAY SPEED sur
“NORMAL”. Voir page 23.
•Vous n’avez pas réglé l’horloge (voir page 8).
•La date d’enregistrement ne s’affiche pas si vous
avez enregistré le message alors que l’horloge
n’était pas réglée.
•Si vous insérez fréquemment des index, il se
peut que l’appareil soit dans l’impossibilité d’en
insérer davantage.
•Vous ne pouvez pas insérer d’index durant la
première ou deuxième seconde (2 secondes en
mode LP) d’un message.
•Si vous effacez fréquemment des index, il se peut
que l’appareil ne puisse plus effacer d’index.
•Vous ne pouvez plus effectuer d’enregistrement
lorsque 99 messages ont été enregistrés dans
chacun des fichiers A et B.
•Si vous enregistrez des messages dans les deux
modes SP et LP, la durée enregistrable varie de
64 à 150 minutes
•En raison des limites du système
d’enregistrement IC, cet appareil enregistre des
unités d’enregistrement minimales d’environ 4
secondes en mode SP (approx. 10 secondes en
mode LP). Si la longueur de chaque message ne
peut être divisée par l’unité d’enregistrement
minimum, il se peut que la durée
d’enregistrement restante disponible diminue
de plus de la longueur totale réelle des
messages. Voir page 13.
•Retirez la pile et réintroduisez-la ensuite.
•Pour raccorder un ordinateur, vous devez
utiliser le logiciel ICD-PCLINK (page 5) et le
câble de connexion fourni avec le logiciel. Pour
plus de détails, reportez-vous au mode d’emploi
du “ICD-PCLINK Software”.
•L’ICKIT-W1 ne peut être utilisé avec cet appareil.
Informations complémentaires
Attention que les messages enregistrés seront peut-être effacés durant les
travaux d’entretien ou de réparation.
41
FR
Page 90

Index des composants et des
commandes
Pour plus de détails, reportez-vous aux pages indiquées entre parenthèses.
Appareil principal
!º
!¡
Si le couvercle du
1 !™
2 !£
3 !¢
4 !∞
5 !§
6 !¶
7 !•
8
9 !ª
1 MIC (microphone intégré)
(10)
2 Touche INDEX (24)
3 Fenêtre d’affichage (43)
4 Touche DISPLAY (34)
5 Touche MENU (8, 28, 35, 36,
38)
6 Touche NPLAY/STOP•
EXECUTE (lecture/stop•
entrée) (8, 15, 29, 35, 36, 38)
7 Touche .REVIEW/
>CUE (rembobinage,
contrôle/avance rapide,
recherche•sélection du
mode de menu) (8, 14, 28, 35,
36, 38)
8 Touche xSTOP (11, 16)
9 Haut-parleur
FR
42
q; Prise MIC (PLUG IN
POWER) (22)
qa Prise EAR (écouteurs) (12,
15)
qs Indicateur OPR
(fonctionnement) (10, 15)
qd Touche XPAUSE (11, 16)
qf Touche zREC
(enregistrement)/STOP (10,
21)
qg Touche FILE (10, 14)
qh Commutateur HOLD (33)
qj Touche ERASE (18)
qk Commande VOL (volume)
(15)
ql Connecteur DIGITAL ?/a
pour le raccordement à un
ordinateur (5)
connecteur
DIGITAL ?/a
s’enlève
accidentellement,
réinstallez-le
comme illustré.
2
1
Page 91

Arrière
Fenêtre d’affichage
@£
@º
@¢
@¡
@™
w; Sélecteur PLAY SPEED (23)
wa Sélecteur MIC SENS
(sensibilité microphone) (12)
ws Sélecteur VOR (20)
wd Agrafe*
wf Compartiment à piles (6)
wg Crochet pour dragonne (non
fournie)
Utilisation de l’agrafe
Poussez ici
pour ouvrir.
Remarques
• Pour éviter que l’agrafe se brise, ne
l’accrochez pas à du tissu épais
comme à la poche d’un manteau
doublé.
• Lorsque vous vous penchez ou que
vous courez avec l’appareil agrafé à
votre poche, veillez à ne pas le
laisser tomber.
@∞
1
2
3
4
8
9
!º
5
6
7
1 Indication du fichier (10, 14)
2 Indicateur d’alarme (30, 31)
3 Indicateur de lecture
répétée (17)
4 Indication du mode
d’enregistrement (35)
5 Indication REC DATE (date
d’enregistrement) (34)
6 Indicateur REMAIN (34)
7 Indication du compteur /
Durée restante /Date
d’enregistrement /Heure
(15:30, etc.) (34)/Menu
(ALARM, BEEP, etc.) /
Messages (ERASE, HOLD,
etc.)
8 Indication du numéro du
fichier sélectionné (10, 14)/
Mode du menu (ON, OFF,
etc.) (8, 28, 35, 36, 38)
9 Indicateur REC
(enregistrement) (10)
q; Indicateur d’autonomie
résiduelle des piles (7)
qa Indicateur de mémoire
restante (13)
Remarque
L’effet sur le rétro-éclairage de la
fenêtre d’affichage peut être réduit
à un endroit lumineux.
!¡
43
Informations complémentaires
FR
Page 92

Organigramme des menus
Appuyez sur MENU pour
activer le mode de menu
BEEP
(Voir page 28.)
(Voir page 35.)
(Voir page 36.)
(Voir page 38.)
ALARM*
MODE
CONT
: Réglage initial
On
OFF
SP
LP
On
OFF
On
OFF
SET DATE
: Appuyez sur NPLAY/STOP pour passer à l’étape suivante.
: Appuyez sur . ou > pour sélectionner.
* L’écran “ALARM” n’apparaît pas si vous n’avez pas réglé la date et l’heure ou s’il
n’y a pas de messages enregistrés.
FR
44
(Voir page 8.)
Année
Mois Jour
Heure
Minute
Page 93

Informations complémentaires
DATE
SUN
MON
TUE
WED
THU
FRI
SAT
DAILY
Heure
Heure
Heure
Heure
Heure
Heure
Heure
Heure
Heure
MinuteMois Jour
Minute
Minute
Minute
Minute
Minute
Minute
Minute
Minute
45
FR
Page 94

Index
A
Alarme............................................ 28
Auto-alimenté par fiche ............... 22
B
Bip sonore ......................................36
C
Commande du volume ................ 15
Compteur ....................................... 34
Connexion d’un autre appareil .. 22
Connexion d’un microphone
externe ............................................ 22
Contrôle ......................................... 16
D
Date d’enregistrement ................. 34
Déplacement.................................. 27
Durée d’enregistrement restante 34
E
Effacer, index................................. 26
Effacer, messages .......................... 18
Enregistrement .............................. 10
F, G, H
Fenêtre d’affichage ....................... 43
Fichier ....................................... 10, 14
I, J
Index ............................................... 24
K
Kit de connexion PC..................... 42
L
Lecture............................................ 14
Lecture continue ........................... 38
Lecture par balayage .................... 17
Lecture répétée.............................. 17
M
Mémoire à CI ................................... 4
Mémoire restante .......................... 13
Menu...................8, 28, 35, 36, 38, 44
Message, effacement .................... 18
Message, enregistrement .............10
Message, lecture............................ 14
Microphone auto-alimenté .......... 22
Microphone, connexion ...............22
Microphone externe ..................... 22
Microphone intégré ...................... 10
Microphone, sensibilité................ 12
Mode d’affichage ..........................34
Mode d’enregistrement ............... 35
Mode LP ......................................... 35
Mode SP .........................................35
N
Numéro de message ......... 18, 24, 26
O
Opération accidentelle .................33
Ordinateur personnel.....................5
P, Q
Pause de lecture ............................16
Pile .................................................... 6
46
FR
Page 95

R, S, T, U
Recherche ....................................... 16
Recherche vers l’arrière ............... 16
Recherche vers l’avant ................. 16
Réglage de l’horloge ....................... 8
V, W, X, Y, Z
Verrouillage ................................... 33
Vitesse de lecture .......................... 23
VOR ................................................ 20
VOR avancé ...................................20
Informations complémentaires
47
FR
Page 96

Spécifications
Support d’enregistrement Mémoire flash intégrée, enregistrement
Durée d’enregistrement SP: 64 minutes
Réponse en fréquence SP: 280 Hz - 4.800 Hz
Haut-parleur Approx. 2,8 cm (1
Puissance de sortie 110 mW
Entrée/sortie •Prise écouteurs (miniprise) pour écouteurs/
Réglage de la vitesse de lecture Mode LP: FAST +30%/SLOW –15%
Puissance de raccordement 3 V CC : deux piles alcalines LR03 (AAA)
Dimensions (l/h/p) (parties saillantes et commandes comprises)
Masse (sans la pile) 68 g (1,6 onces)
Accessoires fournis Etui de transport × 1
Accessoires en option Microphone condensateur à électret ECM-R100,
monaural
LP: 150 minutes
LP: 240 Hz - 2.800 Hz
casque d’écoute 8 - 300 ohms
• Prise microphone (miniprise, monaurale)
Auto-alimenté
Niveau d’entrée minimum 0,5 mV
Impédance du microphone de 3 kilohms ou
moins
• Connecteur 1/g numérique (15 broches)
1
⁄8 pouces) diam.
Mode SP: FAST +20%/SLOW –15%
3
44,4 × 100,5 × 12,5 mm (1
pouces)
Piles alcalines LR03 (AAA) x 2 (ICD-R100PC
uniquement)
Câble de connexion x 1 (ICD-R100PC
uniquement)
Disquettes x 3 (ICD-R100PC uniquement)
Carte d’enregistrement x 1 (ICD-R100PC
uniquement)
EMC-T15
Haut-parleurs actifs SRS-T1
/4 × 4 1/4 × 1/
2
Kit de connexion PC ICKIT-W2 (pour ICD-R100)
Il se peut que votre revendeur ne dispose pas de certains des accessoires en
option susmentionnés. Pour plus de détails, veuillez vous adresser auprès de
votre revendeur.
La conception et les spécifications sont sujettes à modifications sans préavis.
Sony Corporation Printed in Japan
 Loading...