


Sony ICD-LX30 Operating Instruction
4-413-754-11(1)
Memory Card
Recorder
Operating Instructions
ICD-LX30
Getting Started
Recording
Listening
Erasing
About the Menu Function
Additional Information
Troubleshooting
Index

The following FCC statement applies only to the
version of this model manufactured for sale in the
USA. Other versions may not comply with FCC
technical regulations.
INFORMATION
This equipment has been tested and found to comply
with the limits for a Class B digital device, pursuant to
Part 15 of the FCC Rules. These limits are designed to
provide reasonable protection against harmful
interference in a residential installation. This
equipment generates, uses and can radiate radio
frequency energy and, if not installed and used in
accordance with the instructions, may cause harmful
interference to radio communications.
However, there is no guarantee that interference will
not occur in a particular installation. If this equipment
does cause harmful interference to radio or television
reception, which can be determined by turning the
equipment off and on, the user is encouraged to try to
correct the interference by one or more of the
following measures:
Reorient or relocate the receiving antenna.
Increase the separation between the equipment and
receiver.
Connect the equipment into an outlet on a circuit
different from that to which the receiver is connected.
Consult the dealer or an experienced radio/TV
technician for help.
You are cautioned that any changes or modifications
not expressly approved in this manual could void
your authority to operate this equipment.
• The recorded music is limited to private use only.
Use of the music beyond this limit requires
permission of the copyright holders.
• Sony is not responsible for incomplete recording/
downloading or damaged data due to problems of
the memory card recorder or computer.
• Depending on the types of the text and characters,
the text shown on the memory card recorder may
not be displayed properly on device. This is due
to:
– The capacity of the connected memory card
recorder.
– The memory card recorder is not functioning
normally.
– Content information is written in the language
or the character that is not supported by the
memory card recorder.
GB
2
Notice for users
All rights reserved. This manual or the software
described herein, in whole or in part, may not be
reproduced, translated or reduced to any machine
readable form without prior written approval from
Sony Corporation.
IN NO EVENT SHALL SONY CORPORATION BE
LIABLE FOR ANY INCIDENTAL,
CONSEQUENTIAL OR SPECIAL DAMAGES,
WHETHER BASED ON TORT, CONTRACT, OR
OTHERWISE, ARISING OUT OF OR IN
CONNECTION WITH THIS MANUAL, THE
SOFTWARE OR OTHER INFORMATION
CONTAINED HEREIN OR THE USE THEREOF.
Sony Corporation reserves the right to make any
modification to this manual or the information
contained herein at any time without notice.
The software described herein may also be governed
by the terms of a separate user license agreement.
What you record is for personal
enjoyment and use only. Copyright
laws prohibit other forms of use
without the permission of the copyright
holders.
Trademarks
• MPEG Layer-3 audio coding technology and
patents licensed from Fraunhofer IIS and Thomson.
• SD, SDHC microSD and microSDHC logos are
trademarks of SD-3C, LLC.
All other trademarks and registered trademarks are
trademarks or registered trademarks of their
respective holders. Furthermore, “ ™ ” and “
not mentioned in each case in this manual.
®
” are
GB
3

Table of Contents
Getting Started
Step 1: Checking the Contents of the
Package .....................................................6
Index to parts and controls ...................7
Preventing unintentional operations
(HOLD) ..............................................10
Step 2: Preparing a Power Source ..........11
When to replace/charge the
batteries ...............................................12
Connecting the memory card
recorder to a wall outlet ......................12
Step 3: Inserting a Memory Card ............14
To remove a memory card ..................15
Step 4: Turning the Memory Card
Recorder On ............................................17
Turning the power on .........................17
Turning the power off .........................17
Step 5: Setting the Clock ........................18
Setting the clock using the menu ........ 19
Step 6: Setting the Language to Be
Used in the Display Window .................. 20
Recording
Starting to Record ...................................22
To stop recording ................................23
Note while accessing ..........................23
GB
4
Recording via Other Devices ..................25
Recording with an external
microphone .........................................25
Recording from other equipment ........26
Listening
Starting Playback ....................................28
Stopping the playback .........................29
Reviewing the current recording
instantly ...............................................29
Other operations ..................................29
Recording with other equipment ........32
Erasing
Erasing the File .......................................33
Erasing the current recording
instantly ...............................................35
Erasing all files in a recorded date
box ......................................................35
About the Menu Function
Making Settings for the Menu ................36
Menu Settings .........................................38

Additional Information
Precautions ..............................................42
Specifications ..........................................45
Memory card recorder section ............45
Battery life ..........................................47
Troubleshooting
Troubleshooting ......................................48
Message List ...........................................52
Display Window Guide ..........................55
Index .......................................................57
GB
5
Getting Started
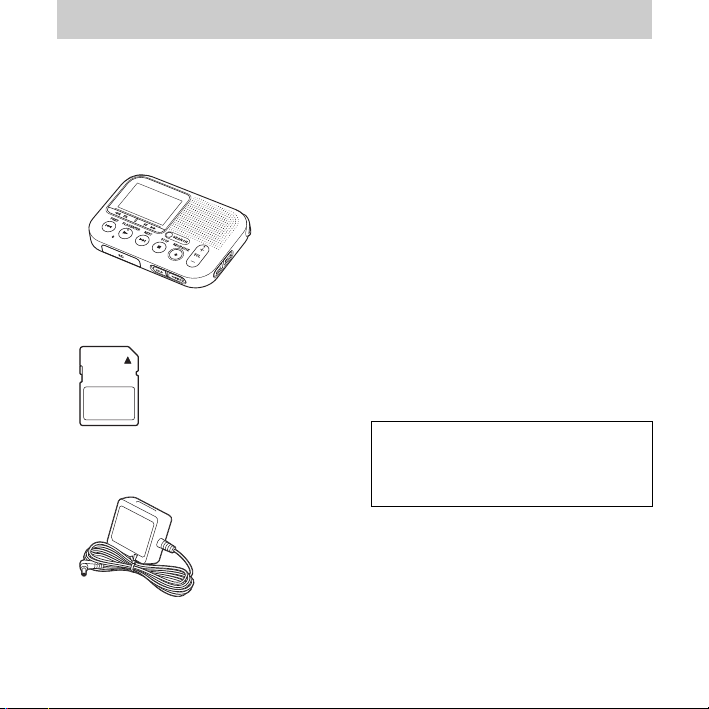
Step 1: Checking the Contents of the Package
Memory card recorder (1)
SD memory card (2GB) (1)
AC adaptor (1)
AC-ES3010K2
GB
6
LR03 (size AAA) alkaline batteries
(2)
Carrying pouch (1)
Hand strap (1)
The strap is attached via the strap hole of
the memory card recorder.
Quick Start Guide
Operating Instructions
The operating instructions are stored as
PDF files in the supplied SD memory
card with the memory card recorder.
You are cautioned that any changes or
modifications not expressly approved in
this manual could void your authority to
operate this equipment.
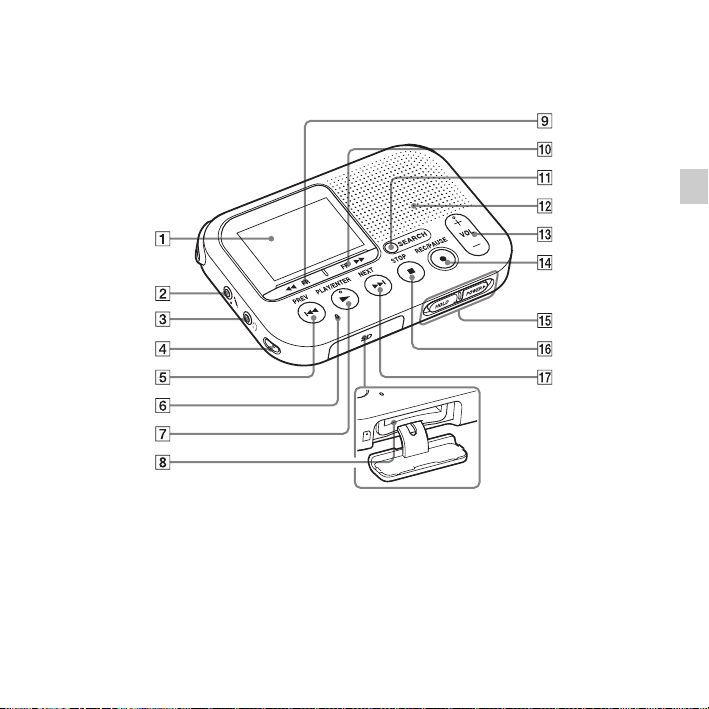
Index to parts and controls
Front
Getting Started
A Display window
B m (microphone) jack*
C i (headphone) jack*
D Strap hole*
3
E . PREV button
F Memory card access indicator
1
2
N PLAY/ENTER*
G
H Memory card slot
m FR button
I
M FF button
J
1
button
GB
7
K SEARCH button
L Speaker
1
M VOL (volume) +*
z REC/PAUSE button
N
/– button
(recording indicator)
O HOLD•POWER switch
x STOP button
P
> NEXT buttons
Q
*1These buttons and the jack have a tactile
dot. Use it as a reference point for
operations, or to identify each terminal.
2
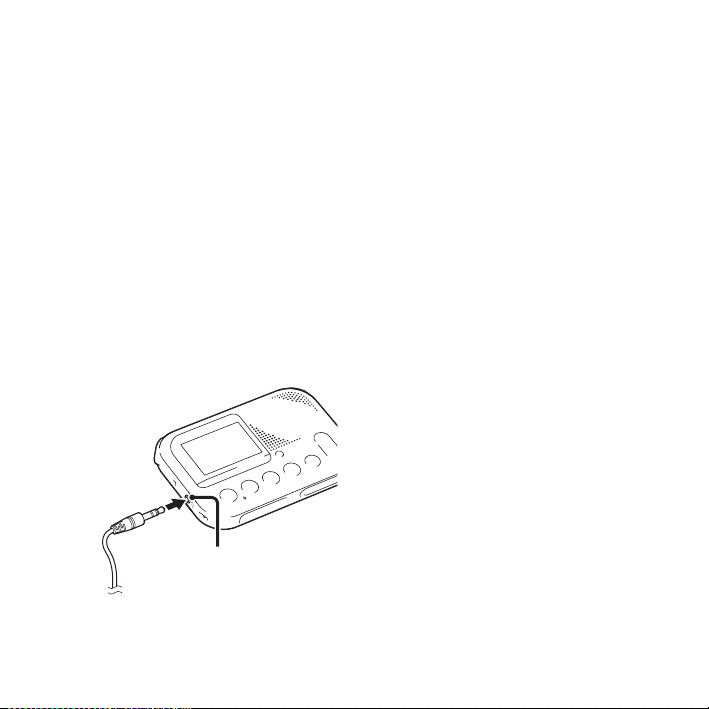
*
Connect a stereo headphones (not
supplied) to the i (headphone) jack.
When noise is heard, clean the plug of
the headphones.
Headphone
(not supplied)
i (headphone) jack
3
*
The strap is attached via the strap hole
when you purchase the memory card
recorder.
GB
8

Rear
R Built-in microphones
S ERASE button
T MENU button
U DC IN 3V jack
V Battery compartment
Getting Started
GB
9
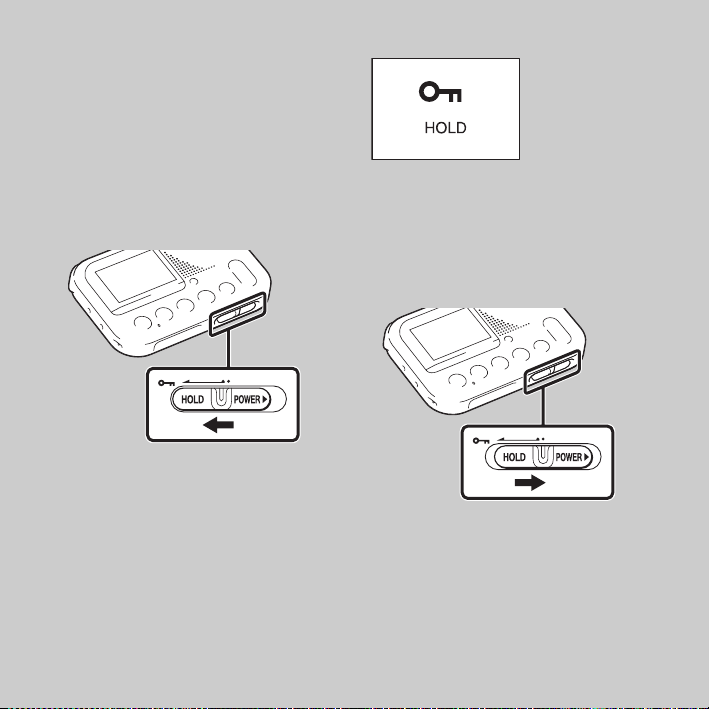
Preventing unintentional operations (HOLD)
You can disable all the buttons (HOLD)
in order to prevent unintentional
operations when you carry the memory
card recorder while the power is on.
To put the memory card recorder
in the HOLD status
Slide the HOLD•POWER switch in the
direction of “HOLD.”
“HOLD” will appear for approximately 3
seconds, indicating that all the button
operations are disabled.
GB
10
“HOLD. Slide HOLD Switch to
Activate.” appears if you press any
button when the HOLD function is
activated.
To release the memory card
recorder from the HOLD status
Slide the HOLD•POWER switch
towards the center.
P Note
When the HOLD function is activated
during recording, all the button operations
are disabled. To stop recording, cancel the
HOLD function first.

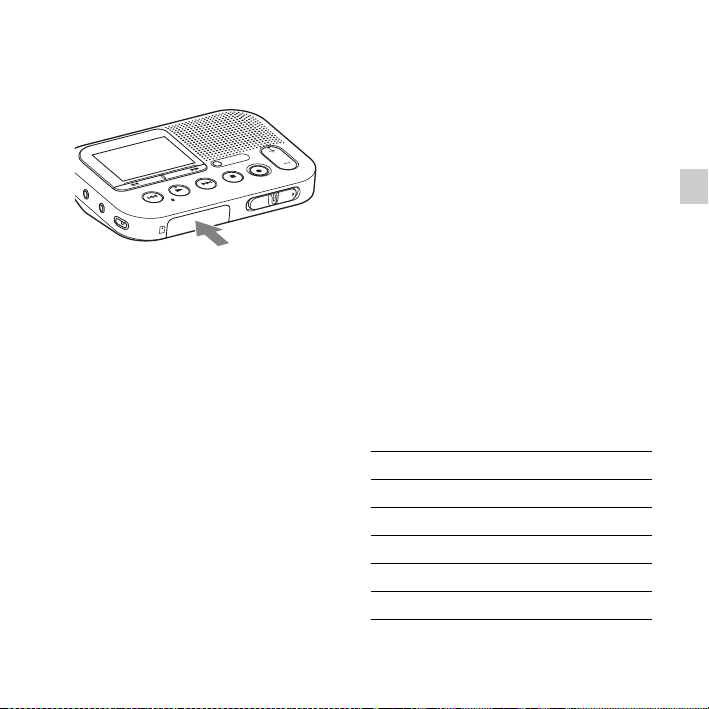
Step 2: Preparing a Power Source
1 Slide and lift the battery compartment
lid.
2 Insert LR03 (size AAA) alkaline
batteries with correct polarity, and
close the lid.
Be sure to insert the batteries with the
e and E ends in the right position.
The clock setting window appears when
you insert batteries for the first time, or
when you insert batteries after the
memory card recorder has been without
batteries for a certain period of time. See
“Step 5: Setting the Clock” on page 18 to
set the date and time.
z Tips
• When replacing the batteries, files
recorded are not erased even when you
remove the batteries.
• When replacing the batteries, the clock
continues moving for about 20 days after
you remove the batteries.
The batteries you can use
• LR03 (size AAA) alkaline batteries
• NH-AAA-B2KN rechargeable
batteries (not supplied)
(You cannot charge the battery using
the memory card recorder.)
The batteries you cannot use
Manganese batteries
P Notes
• When replacing the batteries, be sure to
replace both batteries with new ones.
• When you are not going to use the
memory card recorder for a long time,
11
Getting Started
GB
remove the batteries to prevent damage
from battery leakage and corrosion.
• The remaining battery indicator is not
displayed when you use an AC adaptor.
When to replace/charge the batteries
The battery indicator in the display
window shows the battery condition.
Battery remain indicator
: Replace the old batteries with
new ones. Or charge rechargeable
batteries.
m
: “Low Battery” appears and the
memory card recorder will stop
operation.
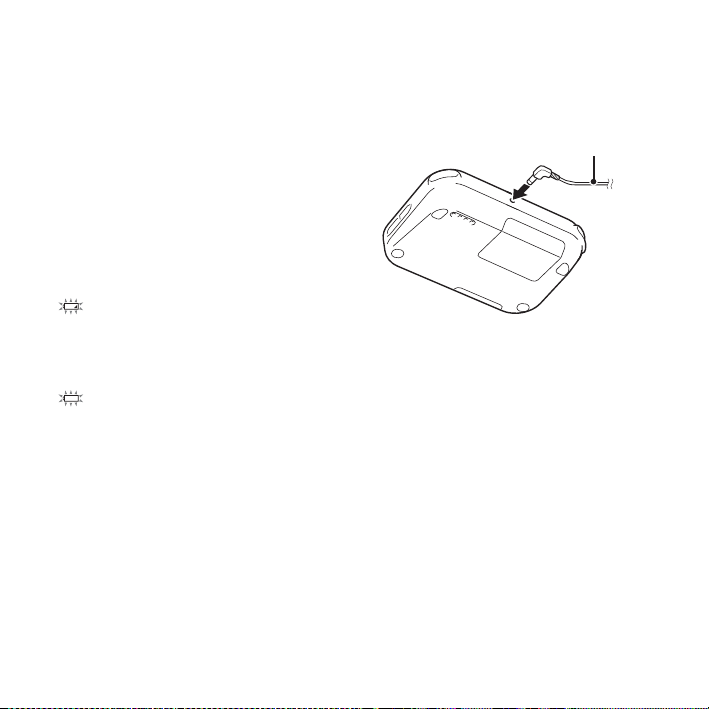
Connecting the memory card recorder to a wall outlet
DC IN 3V jack
You can use the memory card recorder
connected to a wall outlet via an AC
adaptor.
This is useful for long time use without
worrying about battery consumption.
The batteries are not depleted, even if
you use the memory card recorder with
the batteries inserted, because the power
is supplied via the AC adaptor.
P Note
Do not remove the memory card or
batteries, or disconnect the AC adaptor
while recording (the recording lamp lights
up in red) or accessing the memory card
AC adaptor
12
GB

(the memory card access indicator is
flashing in orange). Doing so may damage
the data.
The “Please Wait” animation appears when
there are a lot of files on the memory card.
This is not a malfunction. Please wait until
the animation disappears.
1 Insert the supplied AC adaptor securely
into the DC IN 3V jack until it stops to
the end.
2 Connect the supplied AC adaptor to a
wall outlet.
Getting Started
13
GB
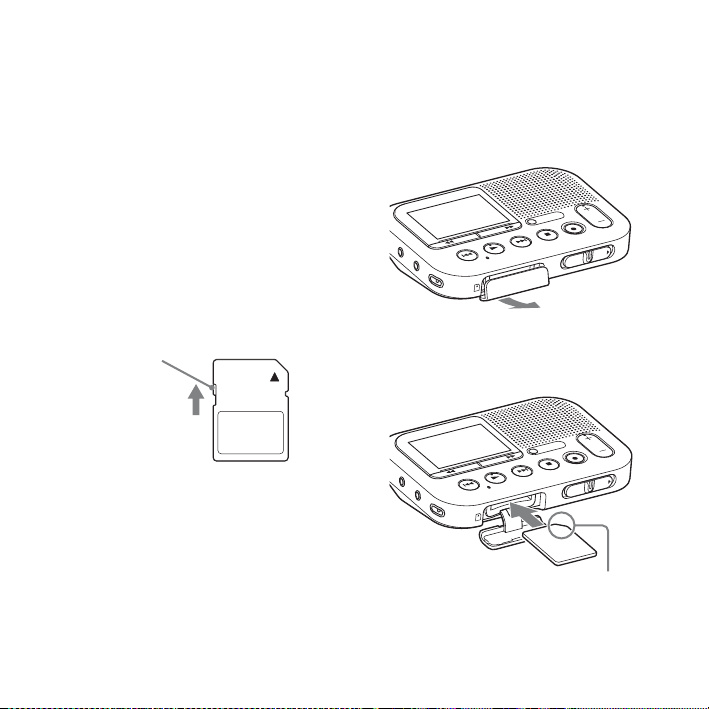
Step 3: Inserting a Memory Card
P Note
The memory card recorder does not have an
internal memory. Be sure to insert the
memory card before recording.
You cannot record if the write-protect
switch on the memory card is set to
write-protect.
Slide the write-protect switch in the
direction of the arrow if the lock has not
released.
Write-protect
switch
GB
14
1 Open the cover of the memory card
slot in the stop mode.
2 Insert a memory card securely to the
end of the slot until it clicks into place.
Check on the direction of the
notched corner.
3 Close the cover of the memory card
slot.
P Note
The data may be damaged if the cover is
closed when the memory card is not
inserted correctly.
To remove a memory card
Make sure the memory card access
indicator is off, then push the memory
card into the slot. When it pops out,
remove it from the memory card slot.
P Notes
• Do not insert or remove a memory card
during recording/playback/formatting.
Doing so may cause a malfunction of the
memory card recorder.
• Do not remove a memory card while the
“Please Wait” animation appears in the
display window. Doing so may damage
the data.
• If a memory card is not recognized,
remove it and then insert it into the
memory card recorder again.
• Close the cover of the memory card slot
firmly. Also, do not insert any liquid,
metal, flammable or any object other than
a memory card into the slot. Doing so
may cause fire, electric shock, or
malfunctions.
About compatible memory cards
You can use a commercially available
SD/SDHC/microSD/microSDHC
memory card with the memory card
recorder.
Although, operations of all types of
compatible memory cards are not
guaranteed.
Memory card compatible
SD memory card a
SDHC memory card a
SDXC memory card ×
microSD memory card a
microSDHC memory card a
Getting Started
15
GB

In this manual, SD memory card and
microSD memory cards are generally
referred to as a “memory card.”
The SD memory card slot is referred to
as the “memory card slot.”
Due to the file system specifications of
the memory card recorder, you can
record and play back a file smaller than
1 GB (You can record for approximately
11 hours and 10 minutes of audio when
you record with the memory card
recorder.) using a memory card.
You can record up to 4,074 files on an
memory card media.
P Note
• An adaptor is needed to use a microSD or
microSDHC memory card.
• Memory cards of 64 MB or less or more
than 32 GB are not supported.
16
GB
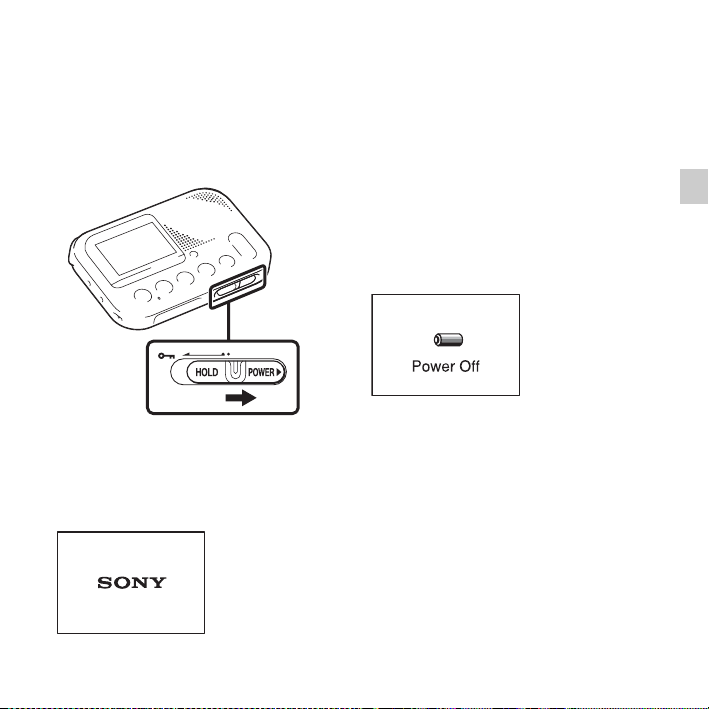
Step 4: Turning the Memory Card Recorder On
Turning the power on
Slide the HOLD•POWER switch in the
direction of “POWER” and keep it there
until the opening animation appears.
Turning the power off
Slide the HOLD•POWER switch in the
direction of “POWER” and keep it there
until “Power Off” animation appears.
The memory card recorder will turn off
in a few seconds.
z Tips
• When you are not going to use the
memory card recorder for a long time, we
recommend to turn off the memory card
recorder.
• When the memory card recorder is in the
stop mode, and you leave the memory
card recorder without attempting an
operation for approx. 30 minutes, the auto
power off function will take effect (auto
power off).
17
Getting Started
GB
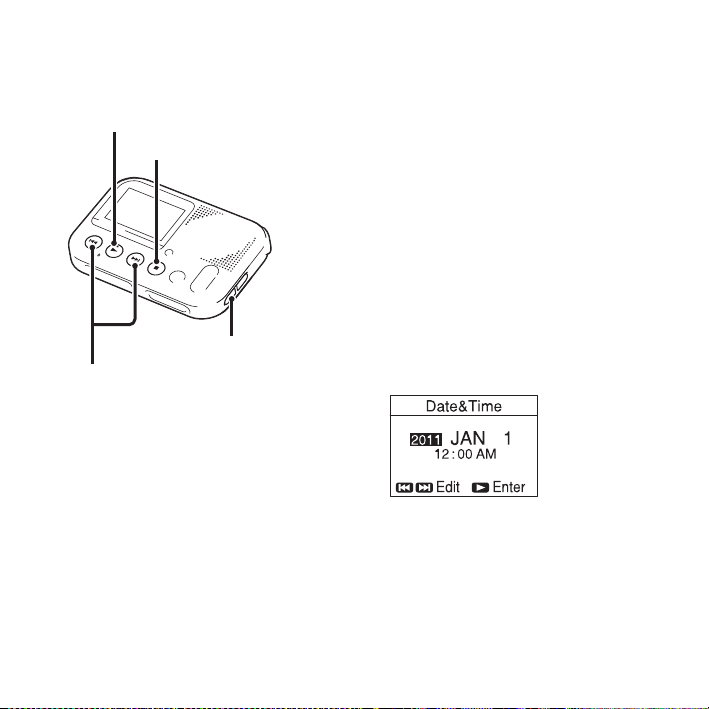
Step 5: Setting the Clock
N PLAY/ENTER
x STOP
MENU
. PREV, > NEXT
You can record the recording date after
setting the clock. This allows you to use
the date search function, then easily find
the recorded files using the date they
were recorded after recording.
If you do not set the clock, recorded file
is labeled “No Date Info.” This may it
make difficult to find the desired file.
When you insert batteries for the first
time, or when you insert batteries after
the memory card recorder has been
GB
18
without batteries for more than 20 days,
the “Set Date & Time ? Set to Search by
Date” message appears. Select “YES” by
pressing
press
. PREV or > NEXT, then
N PLAY/ENTER. The year
section is selected with the cursor in the
clock setting window.
Set the clock as follows:
1 Set the year.
. PREV or > NEXT to set
Press
the year, and then press
N PLAY/
ENTER.
When you press
N PLAY/ENTER,
the cursor moves to the month section.
2 Set the month, day, hour, and minute
in sequence in the same way.