

Page 1
Sound Bar
Operating Instructions US
Mode d’emploi FR
Manual de Instrucciones ES
HT-CT390
Page 2
For the customers in the USA
Owner’s Record
The model and serial numbers are
located on the bottom of the Bar
Speaker. Record these numbers in the
space provided below. Refer to them
whenever you call upon your Sony
dealer regarding this product.
Model No.
Serial No._____________________________
WARNING
To reduce the risk of fire or electric
shock, do not expose this apparatus
to rain or moisture.
To reduce the risk of fire, do not cover
the ventilation opening of the appliance
with newspapers, tablecloths, curtains,
etc.
Do not expose the appliance to naked
flame sources (for example, lighted
candles).
To reduce the risk of fire or electric
shock, do not expose this appliance to
dripping or splashing, and do not place
objects filled with liquids, such as vases,
on the appliance.
Do not install the appliance in a
confined space, such as a bookcase or
built-in cabinet.
Do not expose batteries or appliances
with battery-installed to excessive heat,
such as sunshine and fire.
To prevent injury, this apparatus must
be securely placed on the cabinet or
attached to the floor/wall in accordance
with the installation instructions.
Indoor use only.
On power sources
•The unit is not disconnected from the
mains as long as it is connected to the
AC outlet, even if the unit itself has
been turned off.
•As the main plug is used to disconnect
the unit from the mains, connect the
unit to an easily accessible AC outlet.
Should you notice an abnormality in
the unit, disconnect the main plug
from the AC outlet immediately.
For the Bar Speaker
The nameplate and the date of
manufacture marking are located on the
bottom.
For the customers in the USA
The Caution Marking is put on the
Bottom Enclosure (For the Bar Speaker).
This symbol is intended to alert
the user to the presence of
uninsulated “dangerous
voltage” within the product’s enclosure
that may be of sufficient magnitude to
constitute a risk of electric shock to
persons.
This symbol is intended to alert
the user to the presence of
important operating and
maintenance (servicing) instructions in
the literature accompanying the
appliance.
Properly shielded and grounded cables
and connectors must be used for
connection to host computers and/or
peripherals in order to meet FCC
emission limits.
US
2
Page 3

NOTE:
This equipment has been tested and
found to comply with the limits for a
Class B digital device, pursuant to Part
15 of the FCC Rules. These limits are
designed to provide reasonable
protection against harmful interference
in a residential installation. This
equipment generates, uses and can
radiate radio frequency energy and, if
not installed and used in accordance
with the instructions, may cause
harmful interference to radio
communications.
However, there is no guarantee that
interference will not occur in a particular
installation. If this equipment does
cause harmful interference to radio or
television reception, which can be
determined by turning the equipment
off and on, the user is encouraged to try
to correct the interference by one or
more of the following measures:
– Reorient or relocate the receiving
antenna.
– Increase the separation between the
equipment and receiver.
– Connect the equipment into an outlet
on a circuit different from that to
which the receiver is connected.
– Consult the dealer or an experienced
radio/TV technician for help.
CAUTION
You are cautioned that any changes or
modifications not expressly approved in
this manual could void your authority to
operate this equipment.
This equipment must not be co-located
or operated in conjunction with any
other antenna or transmitter.
This equipment complies with FCC
radiation exposure limits set forth for an
uncontrolled environment and meets
the FCC radio frequency (RF) Exposure
Guidelines. This equipment has very low
levels of RF energy that is deemed to
comply without maximum permissive
exposure evaluation (MPE).
Important Safety Instructions
1) Read these instructions.
2) Keep these instructions.
3) Heed all warnings.
4) Follow all instructions.
5) Do not use this apparatus near
water.
6) Clean only with dry cloth.
7) Do not block any ventilation
openings. Install in accordance with
the manufacturer’s instructions.
8) Do not install near any heat sources
such as radiators, heat registers,
stoves, or other apparatus (including
amplifiers) that produce heat.
9) Do not defeat the safety purpose of
the polarized or grounding-type
plug. A polarized plug has two
blades with one wider than the
other. A grounding type plug has
two blades and a third grounding
prong. The wide blade or the third
prong are provided for your safety. If
the provided plug does not fit into
your outlet, consult an electrician for
replacement of the obsolete outlet.
10) Protect the power cord from being
walked on or pinched particularly at
plugs, convenience receptacles, and
the point where they exit from the
apparatus.
11) Only use attachments/accessories
specified by the manufacturer.
US
3
Page 4

12) Use only with the cart, stand, tripod,
bracket, or table specified by the
manufacturer, or sold with the
apparatus. When a cart is used, use
caution when moving the cart/
apparatus combination to avoid
injury from tip-over.
13) Unplug this apparatus during
lightning storms or when unused for
long periods of time.
14) Refer all servicing to qualified service
personnel. Servicing is required
when the apparatus has been
damaged in any way, such as powersupply cord or plug is damaged,
liquid has been spilled or objects
have fallen into the apparatus, the
apparatus has been exposed to rain
or moisture, does not operate
normally, or has been dropped.
For the customers in Canada
Properly shielded and grounded cables
and connectors must be used for
connection to host computers and/or
peripherals.
This device complies with Industry
Canada’s licence-exempt RSSs.
Operation is subject to the following
two conditions:
(1) This device may not cause
interference; and
(2) This device must accept any
interference, including interference that
may cause undesired operation of the
device.
This equipment complies with IC
radiation exposure limits set forth for an
uncontrolled environment and meets
RSS-102 of the IC radio frequency (RF)
Exposure rules.
This equipment has very low levels of RF
energy that is deemed to comply
without maximum permissive exposure
evaluation (MPE). But it is desirable that
it should be installed and operated
keeping the radiator at least 20 cm or
more away from person’s body.
Copyrights and Trademarks
•This system incorporates Dolby*
Digital and the DTS** Digital Surround
System.
* Manufactured under license from
Dolby Laboratories.
Dolby and the double-D symbol are
trademarks of Dolby Laboratories.
** For DTS patents, see
http://patents.dts.com.
Manufactured under license from
DTS Licensing Limited. DTS, the
Symbol, & DTS and the Symbol
together are registered trademarks,
and DTS Digital Surround is a
trademark of DTS, Inc. © DTS, Inc. All
Rights Reserved.
•The BLUETOOTH® word mark and
logos are registered trademarks
owned by Bluetooth SIG, Inc. and any
use of such marks by Sony Corporation
is under license. Other trademarks and
trade names are those of their
respective owners.
•This system incorporates HighDefinition Multimedia Interface
(HDMI™) technology.
The terms HDMI and HDMI HighDefinition Multimedia Interface, and
the HDMI Logo are trademarks or
registered trademarks of HDMI
Licensing LLC in the United States and
other countries.
•The N-Mark is a trademark or
registered trademark of NFC Forum,
Inc. in the United States and in other
countries.
• Android™ is a trademark of Google Inc.
• Google Play™ is a trademark of Google
Inc.
US
4
Page 5

•“BRAVIA” is a trademark of Sony
Corporation.
•“PlayStation” is a registered trademark
of Sony Computer Entertainment Inc.
•MPEG Layer-3 audio coding
technology and patents licensed from
Fraunhofer IIS and Thomson.
•Windows Media is either a registered
trademark or trademark of Microsoft
Corporation in the United States and/
or other countries.
•This product is protected by certain
intellectual property rights of Microsoft
Corporation. Use or distribution of
such technology outside of this
product is prohibited without a license
from Microsoft or an authorized
Microsoft subsidiary.
•“ClearAudio+” is a trademark of Sony
Corporation.
•Apple, the Apple logo, iPhone, iPod,
iPod touch, and Retina are trademarks
of Apple Inc., registered in the U.S. and
other countries. App Store is a service
mark of Apple Inc.
“Made for iPod,” and “Made for
iPhone” mean that an electronic
accessory has been designed to
connect specifically to iPod or iPhone,
respectively, and has been certified by
the developer to meet Apple
performance standards. Apple is not
responsible for the operation of this
device or its compliance with safety
and regulatory standards. Please note
that the use of this accessory with iPod
or iPhone may affect wireless
performance.
Compatible iPod/iPhone models
The compatible iPod/iPhone models
are as follows. Update your iPod/
iPhone with the latest software before
using with the system.
BLUETOOTH technology works with:
– iPhone 6s Plus/iPhone 6s/
iPhone 6 Plus/iPhone 6/iPhone 5s/
iPhone 5c/iPhone 5
– iPod touch (6th generation)/
iPod touch (5th generation)
•Other system and product names are
generally trademarks or registered
trademarks of the manufacturers. ™
and marks are not indicated in this
document.
About these operating instructions
•The instructions in these Operating
Instructions describe the controls on
the remote control. You can also use
the controls on the Bar Speaker if they
have the same or similar names as
those on the remote control.
•Some illustrations are presented as
conceptual drawings, and may be
different from the actual products.
•The default setting is underlined.
•The text enclosed in double quotation
mark (“--”) appears in the top panel
display.
US
5
Page 6

Table of Contents
Connecting
About these operating
instructions ...........................5
Guide to parts and controls ....... 7
Startup Guide (separate document)
Listening
Listening to sound from the
connected devices ............. 10
Listening to music from a USB
device ..................................11
Sound Adjustment
Enjoying sound effects ............ 12
BLUETOOTH Functions
Listening to music from a
BLUETOOTH device ............ 13
Controlling the system using a
smartphone or tablet
(SongPal) ............................ 15
Settings and Adjustments
Using the setup display ........... 16
Other Functions
Using the Control for HDMI
function .............................. 18
Using the “BRAVIA” Sync
function .............................. 19
Saving power in standby
mode ..................................20
Mounting the Bar Speaker on a
wall .....................................20
Installing the subwoofer
horizontally ........................ 21
Activating wireless
transmission between
specific units (Secure
Link) .................................... 21
Adjusting the volume of
subwoofer ..........................22
Additional Information
Precautions ..............................22
Troubleshooting ....................... 23
Playable types of files ..............28
Supported audio formats ........28
Specifications ........................... 28
On BLUETOOTH
communication ..................30
US
6
Page 7

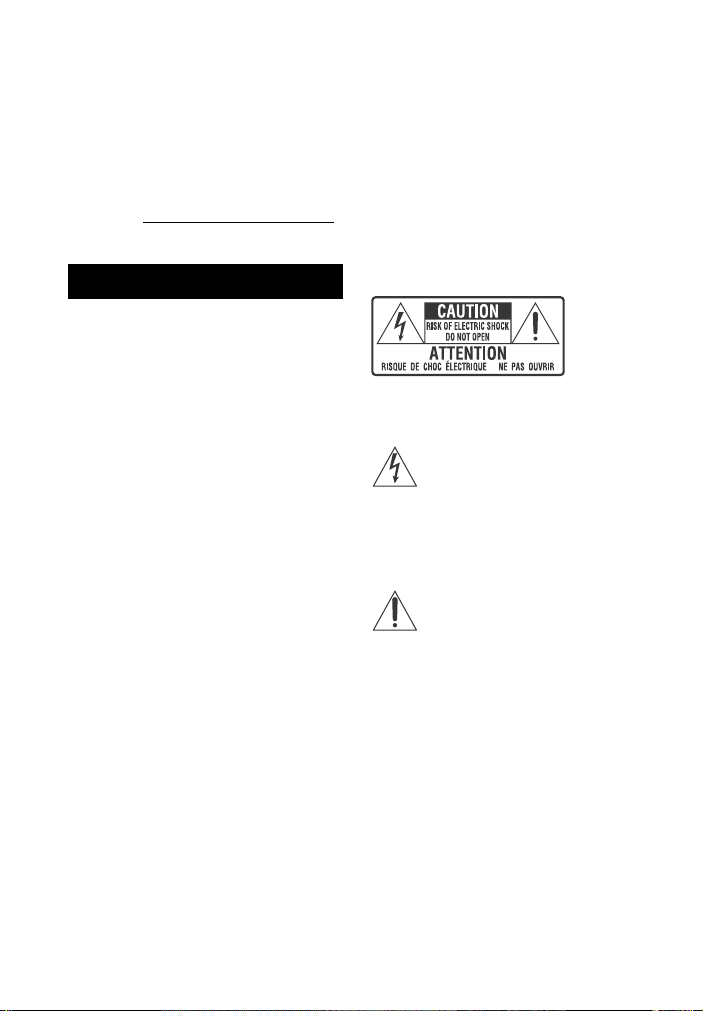
Guide to parts and controls
, slot
For more information, refer to the pages indicated in parentheses.
Bar Speaker
Top and side panel
(power) touch key
Turns on the system, or sets it to
standby mode.
INPUT touch key
Selects the device you want to
use.
PAIRING touch key
VOL (volume) +/– touch key
(N-Mark) (page 14)
Position the NFC-compatible
device near this indication to
activate the NFC function.
(USB) port (page 11)
Place your fingernail in the slot
(from bottom) to open the cover.
Blue LED indicator
Shows the BLUETOOTH status as
follows.
During BLUETOOTH
pairing
The system is
attempting to connect
with a BLUETOOTH
device
The system has
established connection
with a BLUETOOTH
device
Flashes quickly
Flashes
Lights up
Top panel display
Remote control sensor
About touch keys
The touch keys work when you touch
them lightly. Do not press on them with
excessive force.
7
US
Page 8
Rear panel
HDMI OUT TV (ARC) jack
TV IN OPTICAL jack
Subwoofer
Power indicator
• Lights off: Power is off.
• Red: Not connected to Bar
Speaker (standby mode).
• Green: Connected to Bar
Speaker (Secure Link
connection is not established).
• Orange: Secure Link connection
is established.
LINK (page 22)
ANALOG IN jack
AC power cord (mains lead)
(power)
Turns on the subwoofer, or sets it
to standby mode.
AC power cord (mains lead)
US
8
Page 9
About the standby mode
The subwoofer enters standby mode
automatically and the power indicator
turns red when the Bar Speaker is in
standby mode or wireless transmission
is deactivated. The subwoofer turns on
automatically when the Bar Speaker is
turned on and wireless transmission is
activated.
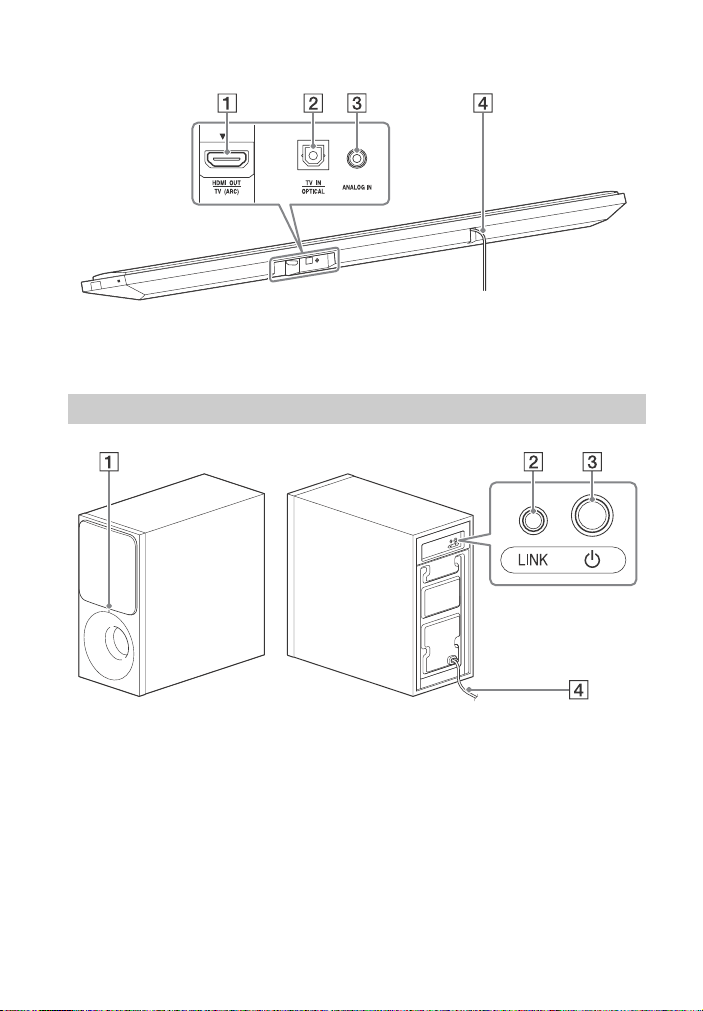
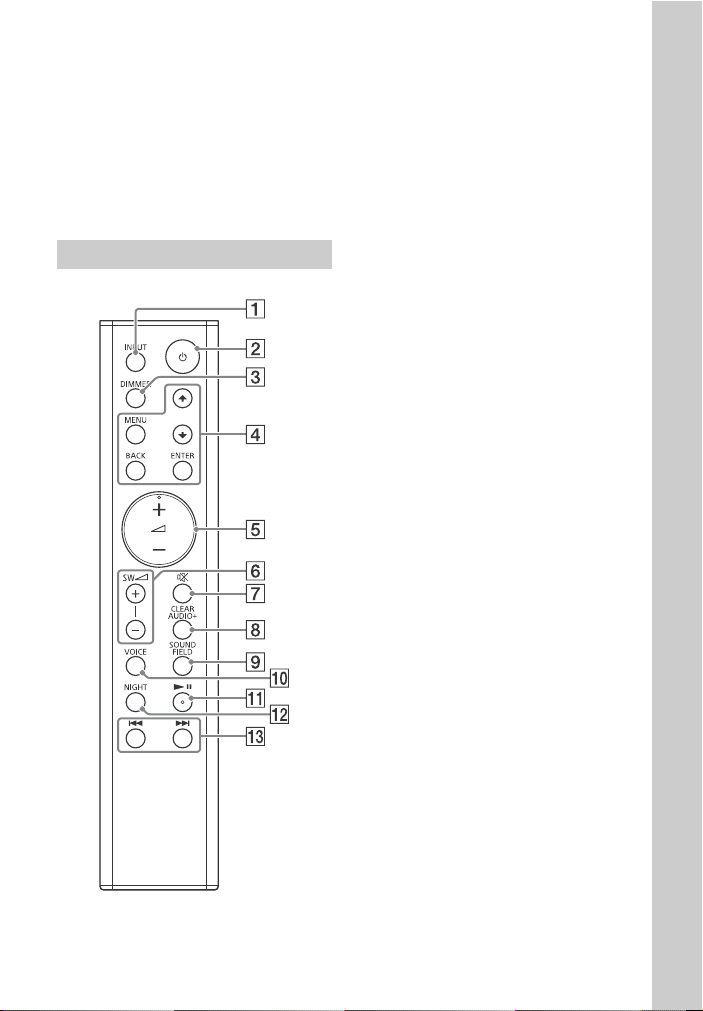
Remote control
INPUT (page 10)
(power)
Turns on the system, or sets it to
standby mode.
DIMMER
Adjust the brightness of the top
panel display.
“BRIGHT” “DARK” “OFF”
• The top panel display is turned
off when “OFF” is selected. It
turns on automatically when
you press any buttons, then
turns off again if you do not
operate the system for several
seconds. However, in some
cases, the top panel display
may not turn off. In this case,
the brightness of the top panel
display is same as “DARK”.
MENU
Turns on/off the menu in the top
panel display.
/
Selects the menu items.
ENTER
Enters the selection.
BACK
Returns to the previous display.
Stops USB playback.
(volume) +*/–
Adjusts the volume.
SW (subwoofer volume) +/–
(page 22)
Adjusts the volume of bass
sound.
(muting)
Turns off the sound temporarily.
CLEARAUDIO+
Automatically selects the suitable
sound setting for the sound
source.
SOUND FIELD (page 12)
Selects a sound mode.
VOICE (page 12)
US
9
Page 10
* (play/pause)
Pauses or resumes playback.
NIGHT (page 12)
/ (previous/next/
rewind/fast forward)
Press to select the previous/next
track or file.
Hold down to search back ward or
forward.
*The and + buttons have a tactile
dot. Use the tactile dot as a reference
when operating the remote control.
Listening
Listening to sound from the connected devices
Press INPUT repeatedly.
When you press INPUT once, the current
device appears in the top panel display,
then each time you press INPUT, the
device changes cyclically as follows.
“TV” “ANALOG” “BT” “USB”
“TV”
Device (TV, etc.) that is connected to the TV
IN OPTICAL jack, or a TV compatible with the
Audio Return Channel function that is
connected to the HDMI OUT TV (ARC) jack
“ANALOG”
Device (Digital media player, etc.) that is
connected to the ANALOG IN jack
“BT”
BLUETOOTH device that supports A2DP
(page 13)
“USB”
USB device that is connected to the (USB)
port (page 11)
10
US
Page 11
Listening
Listening to music from a USB device
You can play music files on a connected
USB device.
For playable types of files, see “Playable
types of files” (page 28).
Information of USB device
on the TV screen
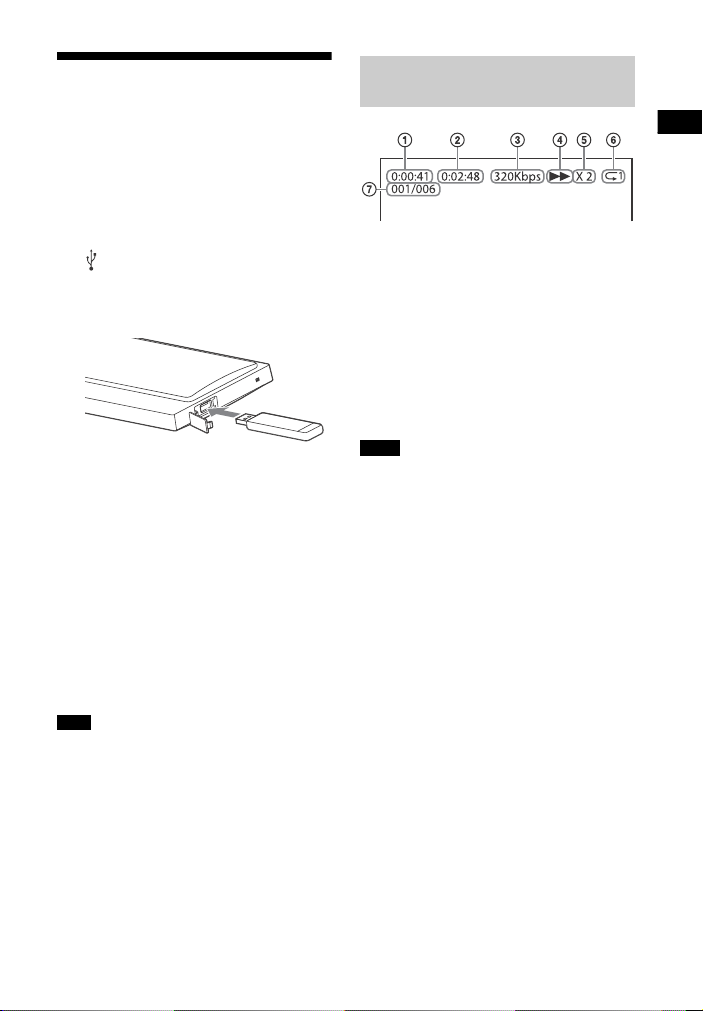
1 Connect the USB device to the
(USB) port.
Refer to the operating instructions
of the USB device before
connecting.
2 Press INPUT repeatedly to select
“USB”.
The USB content list appears on the
TV screen.
3 Press / to select the content
you want, then press ENTER.
The selected content starts playing.
4 Adjust the volume.
• Adjust the volume of Bar Speaker
by pressing +/–.
• Adjust the volume of subwoofer
by pressing SW +/–.
Note
Do not remove the USB device during
operation. To avoid data corruption or
damage to the USB device, turn the system
off before removing the USB device.
Playing time
Total playing time
Bit rate
Playback status
Rewind/fast forward speed
Repeat play status
Selected file index/Total files in the
folder
Notes
• Depending on the source being played,
some information may not be displayed.
• Depending on the play mode, the
information displayed may be different.
US
11
Page 12
Sound Adjustment
Enjoying sound effects
You can easily enjoy pre-programmed
sound fields that are tailored to different
kinds of sound sources.
Selecting the sound field
Using the Night mode
function
This function is useful when watching
movies late at night. You will be able to
hear the dialog clearly even at a low
volume level.
Press NIGHT to select “N.ON”.
To inactivate the Night mode, press
NIGHT to select “N.OFF”.
Press SOUND FIELD repeatedly until
the sound field you want appears in
the top panel display.
“CLEARAUDIO+”
You can enjoy the sound with Sonyrecommended sound field. Sound field is
automatically optimized according to
playback content and function.
“MOVIE”
Sounds are played back with surround
effects, and they are realistic and powerful,
making them suitable for movies.
“MUSIC”
Sound effects are optimized for listening to
music.
“SPORTS”
Commentary is clear, cheers are heard as
surround-sound, and sounds are realistic.
“GAME”
Sounds are powerful and realistic, suitable
for game play.
“STANDARD”
Sound that corresponds to every source.
Tip
You can also press CLEARAUDIO+ to select
“CLEARAUDIO+”.
Using the Clear Voice
function
This function helps make dialogs
clearer.
Press VOICE repeatedly.
• “UP OFF”: The Clear Voice function is
turned off.
• “UP 1”: Dialog range is enhanced.
• “UP 2”: Dialog range is enhanced, and
the parts of range difficult to be
discerned by the elderly are boosted.
12
US
Page 13
Sound Adjustment / BLUETOOTH Functions
BLUETOOTH Functions
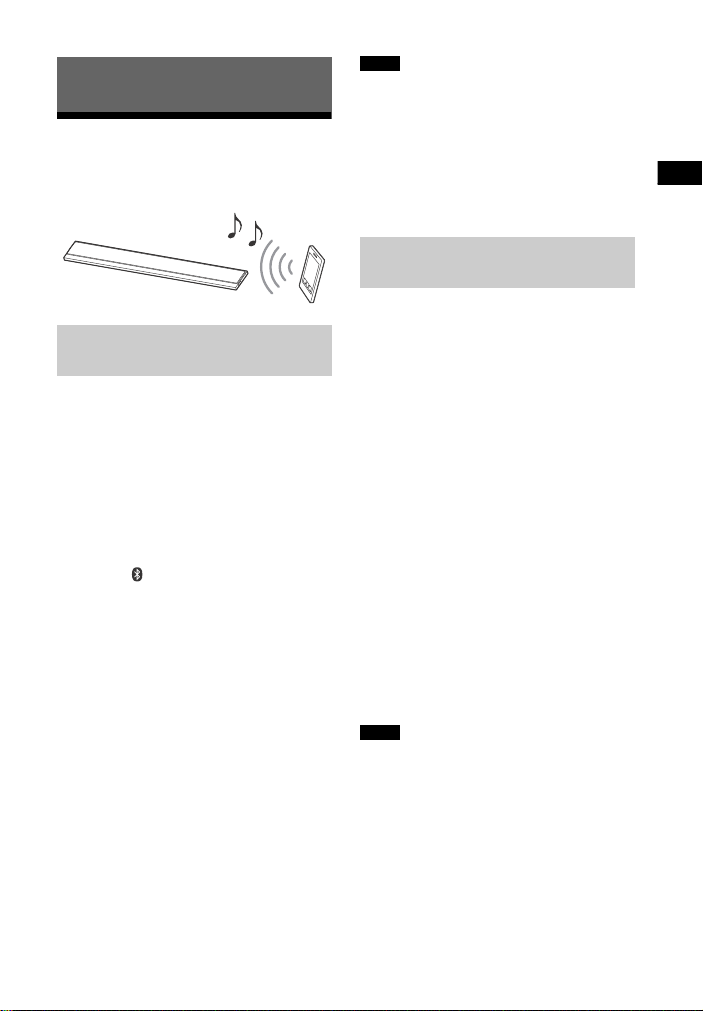
Listening to music from a BLUETOOTH device
Pairing this system with a
BLUETOOTH device
Pairing is an operation where
BLUETOOTH devices register with each
other beforehand. Once a pairing
operation is performed, it does not need
to be performed again.
1 Place the BLUETOOTH device
within 1 meter (3.3 feet) from the
Bar Speaker.
2 Press PAIRING on the Bar
Speaker.
The blue LED indicator on the Bar
Speaker flashes quickly during
BLUETOOTH pairing.
3 Turn on the BLUETOOTH function,
and then select “HT-CT390” after
searching for it on the BLUETOOTH
device.
Perform this step within 5 minutes,
otherwise pairing mode may be
canceled.
When the BLUETOOTH connection
is established, the blue LED
indicator lights up.
Notes
• If passkey is required on the BLUETOOTH
device, enter “0000”. Passkey may be
called “Passcode”, “PIN code”, “PIN
number” or “Password”.
• You can pair up to 9 BLUETOOTH devices.
If the 10th BLUETOOTH device is paired,
the least recently connected device will
be replaced by the new one.
Listening to music from the
paired device
1 Turn the BLUETOOTH function of
the paired device to on.
2 Press INPUT repeatedly to select
“BT”.
The system automatically
reconnects to the BLUETOOTH
device it was most recently
connected to.
When the BLUETOOTH connection
is established, the blue LED
indicator lights up.
3 Start playback on the BLUETOOTH
device.
4 Adjust the volume.
• Adjust the volume of the
BLUETOOTH device.
• Adjust the volume of Bar Speaker
by pressing +/–.
• Adjust the volume of subwoofer
by pressing SW +/–.
Notes
• Once the system and the BLUETOOTH
device are connected, you can control
playback by pressing and /.
• You can connect to the system from a
paired BLUETOOTH device even when the
system in standby mode, if you set the
“BTSTB” to “ON” (page 17).
• The audio playback on this system may
be delayed from that on the BLUETOOTH
device because of the characteristics of
the BLUETOOTH wireless technology.
13
US
Page 14
Tip
You can enable or disable codec AAC from
BLUETOOTH device (page 17).
To disconnect the BLUETOOTH
device
Perform any of the following items.
• Press PAIRING on the Bar Speaker
again.
• Disable the BLUETOOTH function on
the BLUETOOTH device.
• Turn off the system or the BLUETOOTH
device.
Connecting to a remote
device by One-touch
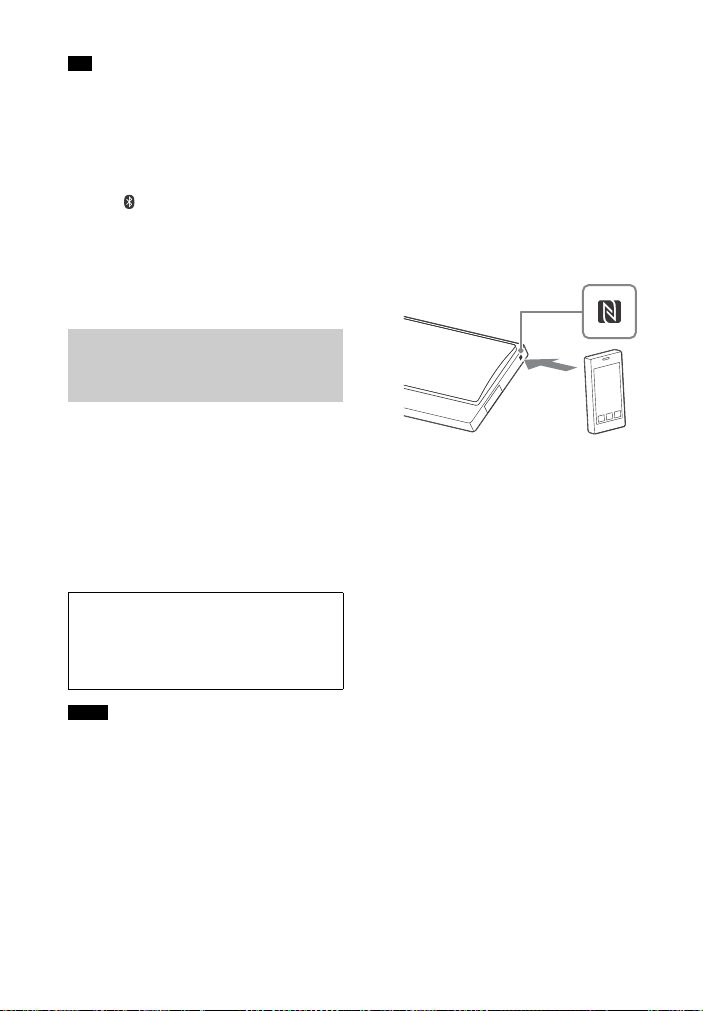
function (NFC)
NFC (Near Field Communication) is a
technology enabling short-range
wireless communication between
various devices.
By holding an NFC-compatible remote
device near to the N-Mark on the Bar
Speaker, the system and remote device
proceed to complete pairing and the
BLUETOOTH connection automatically.
Compatible remote devices
Remote devices with a built-in NFC
function
(OS: Android 2.3.3 or later, excluding
Android 3.x)
Notes
• The system only can recognize and
connect to one NFC-compatible device at
a time.
• Depending on your remote device, you
may need to perform the following items
on your remote device in advance.
– Turn on the NFC function. For details,
refer to the operating instructions of
the remote device.
– If your remote device is having an older
OS version than Android 4.1.x,
download and start the “NFC Easy
Connect” application. “NFC Easy
Connect” is a free application for
Android remote devices that can be
obtained from Google Play. (The
application may not be available in
some countries/regions.)
1 Hold the remote device near to
the N-Mark on the Bar Speaker
until the remote device vibrates.
Follow the on-screen instructions
displayed on the remote device,
and complete the procedure for
BLUETOOTH connection.
When the BLUETOOTH connection
is established, the blue LED
indicator on the Bar Speaker lights
up.
2 Start playback of audio source on
the remote device.
For details on playback operations,
refer to the operating instructions of
your remote device.
3 Adjust the volume.
• Adjust the volume of the
BLUETOOTH device.
• Adjust the volume of Bar Speaker
by pressing +/–.
• Adjust the volume of subwoofer
by pressing SW +/–.
14
US
Page 15

BLUETOOTH Functions
Tip
If pairing and the BLUETOOTH connection
fail, do the following.
– Hold the remote device near to the
N-Mark on the Bar Speaker again.
– Remove the case from the remote device
if using a commercially available remote
device case.
– Relaunch “NFC Easy Connect”
application.
To stop playback by One-touch
function
Hold the remote device near to the
N-Mark on the Bar Speaker again.
Controlling the system using a smartphone or tablet (SongPal)
SongPal is a dedicated app for
operating SongPal-compatible audio
devices manufactured by Sony using a
smartphone or tablet. Search for
SongPal on Google Play or App Store
and download it using your smartphone
or tablet.
SongPal allows you to:
– change commonly used settings,
selecting the input of the system and
adjusting the volume.
– enjoy music content stored on a
smartphone with the system.
– enjoy music visually with your
smartphone display.
Notes
• SongPal uses the BLUETOOTH function of
the system.
• Specifications and display design of
SongPal are subject to change without
notice.
Using SongPal
1 Download free SongPal app to the
remote device.
2 Connect the system and remote
device with the BLUETOOTH
connection (page 13).
3 Start SongPal.
4 Operate by following the SongPal
screen.
15
US
Page 16

Settings and Adjustments
Using the setup display
You can set the following items with the menu.
Your settings are retained even if you disconnect the AC power cord (mains lead).
1 Press MENU to turn on the menu in the top panel display.
2 Press BACK///ENTER repeatedly to select the item and press ENTER to
select the setting you want.
3 Press MENU to turn off the menu.
Menu list
The default settings are underlined.
Menu items Function
“LVL >”
(Level)
“SPK >”
(Speaker)
“AUD >”
(Audio)
“ATT”
(Attenuation
settings - Analog)
“DRC”
(Dynamic range
control)
“PLACE”
(Speaker
placement)
“DUAL”
(Dual mono)
“TV AU”
(TV audio)
“EFCT”
(Sound effect)
“STRM”
(Stream)
Distortion may occur when you listen to a device connected
to the ANALOG IN jack. You can prevent distortion by
attenuating the input level on the system.
•“ON”
: Attenuates the input level. The output level will
decrease at this setting.
• “OFF”: Normal input level.
Useful for enjoying movies at low sound volume. DRC
applies to Dolby Digital sources.
• “ON”: Compresses sound in accordance with the
information contained in the content.
• “OFF”
: Sound is not compressed.
• “STDRD”
: Select this setting if you install the Bar Speaker
in standard position.
• “WALL”: Select this setting if you mount the Bar Speaker
on a wall (page 20).
You can enjoy multiplex broadcast sound when the system
receives a Dolby Digital multiplex broadcast signal.
•“M/S”
: Mixed sound of both the main and sub languages
will be output.
•“MAIN”: Sound of the main language will be output.
• “SUB”: Sound of the sub language will be output.
•“AUTO”
: Select this setting when the system is connected
to an HDMI (ARC) jack of a TV with an HDMI cable.
• “OPT”: Select this setting when the system is connected to
a TV with the optical digital cable.
•“ON”
: The sound of the selected sound field is played. It is
recommended to use this setting.
• “OFF”: The input source is down-mixed for 2 channels.
Shows the current audio stream information.
See page 28 on the supported audio formats.
16
US
Page 17

Settings and Adjustments
Menu items Function
Note
“HDMI>” “CTRL”
(Control for HDMI)
“TVSTB”
(Standby Linked to
TV)
“COLOR”
(HDMI color)
“BT >”
(BLUETOOTH)
“WS >”
(Wireless
sound)
“USB >” “REPT”
“SYS >”
(System)
“BTAAC”
(BLUETOOTH
Advanced audio
coding)
“BTSTB”
(BLUETOOTH
standby)
“INFO”
(BLUETOOTH
device information)
“LINK”
(Secure Link)
(Playback mode)
“ASTBY”
(Auto standby)
“VER”
(Version)
•“ON”: The Control for HDMI function is enabled. Devices
connected with an HDMI cable can control each other.
• “OFF”: Off.
This function is available when you set “CTRL” to “ON”.
•“AUTO”
: If the input of the system is “TV”, the system turns
off automatically when you turn off the TV.
• “ON”: The system turns off automatically when you turn
off the TV regardless of the input.
• “OFF”: The system does not turn off when you turn off the
TV.
•“AUTO”
: Automatically detects the type of external device,
and switches to the matching color setting.
• “YCBCR”: Outputs YC
• “RGB”: Outputs RGB video signals.
You can set whether or not the system uses AAC via
BLUETOOTH.
•“ON”
: Enable AAC codec.
• “OFF”: Disable AAC codec.
If you change the “BTAAC” setting when a BLUETOOTH
device is connected, the codec setting is only reflected after
the next connection.
When the system has pairing information, the system is in
BLUETOOTH standby mode even when it is turned off.
•“ON”
: BLUETOOTH standby mode is enabled.
• “OFF”: BLUETOOTH standby mode is disabled.
The detected BLUETOOTH device name and device address
appear in the top panel display.
“NO DEVICE” appears if the system is not connected to a
BLUETOOTH device.
• “ON”: You can specify the wireless connection to link the
Bar Speaker to the subwoofer using the Secure Link
function (page 21).
• “OFF”
: Off.
: Plays back all tracks.
•“NONE”
•“ONE”: Repeats one track.
• “FLDER”: Repeats all tracks in a folder.
• “RANDM”: Repeats all tracks in a folder in random order.
• “ALL”: Repeats all tracks.
•“ON”
: Turns on the auto standby function. When you do
not operate the system for about 20 minutes, the system
enters standby mode automatically.
• “OFF”: Off.
The current firmware version information appears in the top
panel display.
BCR video signals.
US
17
Page 18

Other Functions
Using the Control for HDMI function
Connecting a device such as a TV or
Blu-ray Disc player compatible with the
Control for HDMI function* by HDMI
cable (High Speed HDMI Cable with
Ethernet, not supplied) enables you to
easily operate the device by a TV remote
control.
The following functions can be used
with the Control for HDMI function.
• System Power Off function
• System Audio Control function
• Audio Return Channel
• One-Touch Play function
* Control for HDMI is a standard used by
CEC (Consumer Electronics Control) for
allowing HDMI (High-Definition
Multimedia Interface) devices to control
each other.
Note
These functions may work with devices
other than those manufactured by Sony,
but operation is not guaranteed.
Preparing to use the Control
for HDMI function
Set “HDMI>” – “CTRL” on the system to
“ON” (page 17). The default setting is
“ON”.
Enable the Control for HDMI function
settings for the TV and other device
connected to the system.
Tip
If you enable the Control for HDMI
(“BRAVIA” sync) function when using a TV
manufactured by Sony, the Control for
HDMI function of the system is also
enabled automatically. When settings are
completed, “DONE” appears in the top
panel display.
System Power Off function
When you turn off the TV, the system
will turn off automatically.
Set “HDMI>” – “TVSTB” on the system to
“ON” or “AUTO” (page 17). The default
setting is “AUTO”.
System Audio Control
function
If you turn on the system while you are
watching the TV, the TV sound will be
output from the speakers of the system.
The volume of the system can be
adjusted using the TV’s remote control.
If the TV sound was output from the
speakers of the system the previous
time you watched the TV, the system
will be turned on automatically when
you turn on the TV again.
Operations can also be made by the
TV’s menu. For details, refer to the
operating instructions of your TV.
Notes
• Sound is only output from the TV if other
than “TV” input is selected when using
the Twin Picture function on the TV. When
you disable the Twin Picture function, the
sound is output from the system.
• The system’s volume level is displayed on
the TV screen depending on the TV. It
may differ from the volume level on the
top panel display.
• Depending on the settings of the TV, the
System Audio Control function may not
be available. For details, refer to the
operating instructions of your TV.
18
US
Page 19

Other Functions
Audio Return Channel
If the system is connected to a TV’s
HDMI IN jack compatible with Audio
Return Channel, you can listen to TV
sound from the speakers of the system
without connecting an optical digital
cable.
On the system, set “AUD >” – “TV AU” to
“AUTO” (page 16). The default setting is
“AUTO”.
Note
If the TV is not compatible with Audio
Return Channel, an optical digital cable
needs to be connected (Refer to the
supplied Startup Guide).
One-Touch Play function
When you play content on a device
(Blu-ray Disc player, “PlayStation®4”,
etc.) connected to the TV, the system
and TV are turned on automatically, the
input of the system is switched to the
input for the TV, and sound is output
from the speakers of the system.
Notes
• If the TV sound was output from the
speakers of the TV the previous time you
watched the TV, the system does not turn
on and the sound and picture are output
from the TV even if device content is
played.
• Depending on the TV, the beginning part
of content being played may not play
correctly.
Using the “BRAVIA” Sync function
In addition to the Control for HDMI
function, you can also use the following
function on devices compatible with the
“BRAVIA” sync function.
• Scene Select function
Note
This function is proprietary function of
Sony. This function cannot operate with
products other than those manufactured
by Sony.
Scene Select function
The sound field of the system is
automatically switched according to the
TV’s Scene Select or Sound Mode
function settings. For details, refer to
the operating instructions of your TV.
Set the sound field to “CLEARAUDIO+”
(page 12).
Notes on HDMI connections
• Use a High Speed HDMI cable. If you
use a Standard HDMI cable, 1080p
content may not be displayed
properly.
• Use an HDMI-authorized cable.
Use a Sony High Speed HDMI cable
with the Cable Type Logo.
• We do not recommend using an
HDMI-DVI conversion cable.
• Check the setup of the connected
equipment if an image is poor or the
sound does not come out of the
equipment connected via the HDMI
cable.
• Audio signals (sampling frequency, bit
length, etc.) transmitted from an HDMI
jack may be suppressed by the
connected equipment.
19
US
Page 20
• Sound may be interrupted when the
Wall mounting
bracket (supplied)
Screw (supplied)
sampling frequency or the number of
channels of audio output signals from
the playback equipment is switched.
• If the connected equipment is not
compatible with copyright-protection
technology (HDCP), the image and/or
the sound from the HDMI OUT jack of
this system may be distorted or may
not be output. In such a case, check
the specifications of the connected
equipment.
Saving power in standby mode
Check that you have made the following
settings:
– “CTRL” in “HDMI>” is set to “OFF”
(page 17).
– “BTSTB” in “BT >” is set to “OFF”
(page 17).
Mounting the Bar Speaker on a wall
You can mount the Bar Speaker on a
wall.
Notes
• Prepare screws (not supplied) that are
suitable for the wall material and
strength. As a plasterboard wall is
especially fragile, attach the screws
securely to two studs in the wall beam.
Install the Bar Speaker horizontally, hung
by screws in studs in a continuous flat
section of the wall.
• Be sure to subcontract the installation to
Sony dealers or licensed contractors and
pay special attention to safety during the
installation.
• Sony shall not be held responsible for
accidents or damage caused by improper
installation, insufficient wall strength,
improper screw installation or natural
calamity, etc.
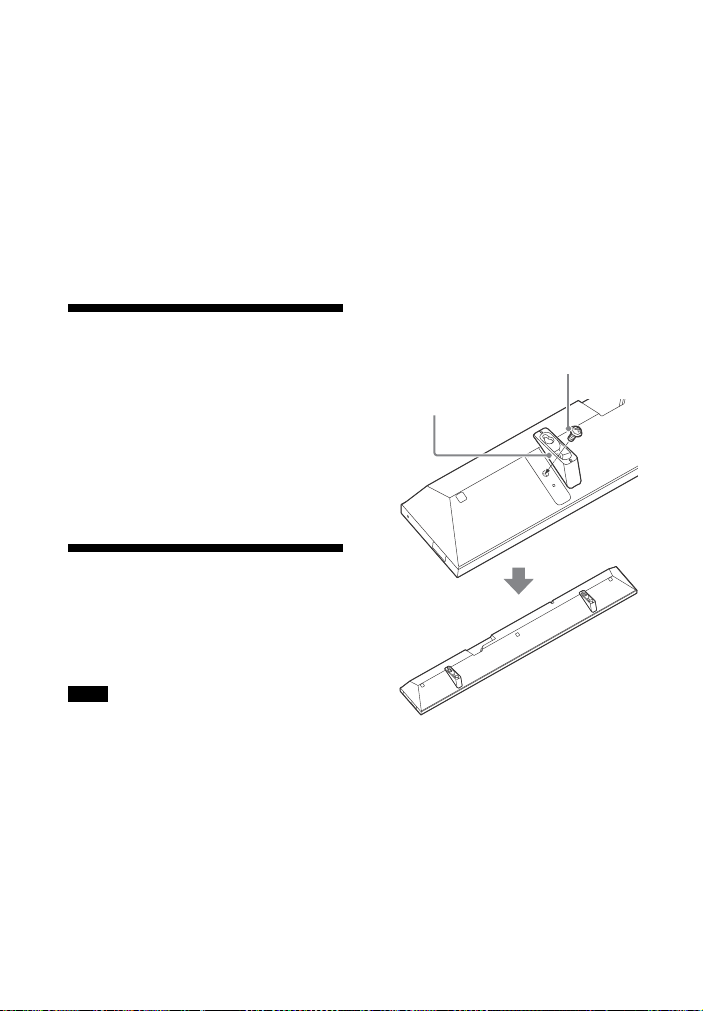
1 Fix the supplied wall mounting
brackets to the bracket fixing
holes on the bottom of the Bar
Speaker with the supplied screws
so that the surface of each wall
mounting bracket is as shown in
the illustration.
Fix the two wall mounting brackets
to the left and right fixing holes on
the bottom of the Bar Speaker.
20
US
Page 21
Other Functions
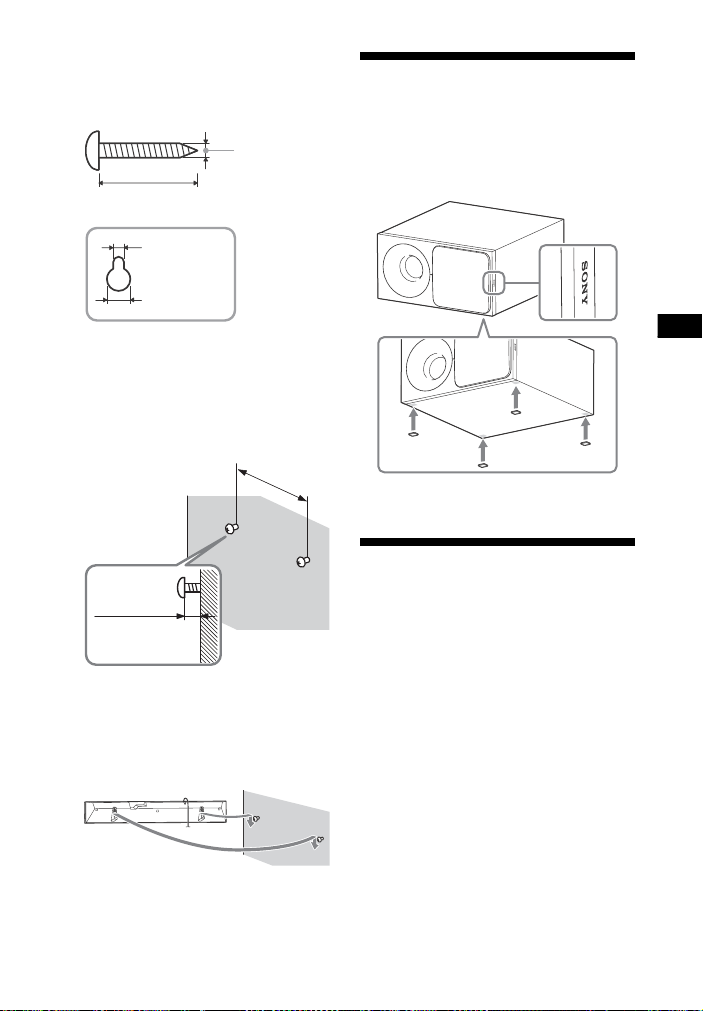
2 Prepare screws (not supplied) that
4 mm (3/16 in)
More than 30 mm (1
3
/16 in)
4.6 mm
(
3
/16 in)
Hole in the bracket
10 mm
(
13
/32 in)
560 mm (22 1/8 in)
5 mm to
6mm
(approx.
7
/32 in)
Attach the supplied speaker pads.
are suitable for the holes in the
brackets.
3 Fasten the screws to 2 studs in the
wall.
The screws should protrude by
5 mm to 6 mm (approx. 7/32 in).
4 Hang the Bar Speaker on the
screws.
Align the holes in the brackets with
the screws, then hang the Bar
Speaker on the two screws.
Installing the subwoofer horizontally
Place the subwoofer on the right side
with the “SONY” logo facing front.
Activating wireless transmission between specific units (Secure Link)
You can specify the wireless connection
to link the Bar Speaker to the subwoofer
using the Secure Link function.
This function can help prevent
interference if you use multiple wireless
products or your neighbors use wireless
products.
1 Press MENU.
2 Press / to select “WS >”, then
press ENTER.
21
US
Page 22

3 When “LINK” appears in the top
panel display, press ENTER.
4 Press / to select “ON”, then
press ENTER.
5 When “START” appears in the top
panel display, press ENTER.
“*****” appears, and the Bar Speaker
searches for a device that can be
used with Link. Proceed to the next
step within 2 minutes.
6 Press LINK on the subwoofer.
The power indicator on the
subwoofer flashes in orange.
7 When “DONE” appears in the top
panel display, press ENTER.
The subwoofer is linked to the Bar
Speaker and the power indicator on
the subwoofer turns orange.
If “FAIL” appears, check to ensure
the subwoofer is turned on and
press BACK to perform the process
again from step 3.
8 Press MENU.
The menu turns off.
Adjusting the volume of subwoofer
The subwoofer is designed for playback
of bass or low frequency sound.
Press SW +/– to adjust the
volume of subwoofer.
Note
When the input source does not contain
much of bass sound, such as in TV
programs, the sound from the subwoofer
may be difficult to hear.
Additional Information
Precautions
On safety
• Should any solid object or liquid fall into
the system, unplug the system and have
it checked by qualified personnel before
operating it any further.
• Do not touch the AC power cord (mains
lead) with wet hands. Doing so may caus e
an electric shock.
• Do not climb on the Bar Speaker and
subwoofer, as you may fall down and
injure yourself, or system damage may
result.
On power sources
• Before operating the system, check that
the operating voltage is identical to your
local power supply. The operating voltage
is indicated on the nameplate on the
bottom of the Bar Speaker.
• If you are not going to use the system for
a long time, be sure to disconnect the
system from the wall outlet (mains). To
disconnect the AC power cord (mains
lead), grasp the plug itself; never pull the
cord.
• One blade of the plug is wider than the
other for the purpose of safety and will fit
into the wall outlet (mains) only one way.
If you are unable to insert the plug fully
into the outlet, contact your dealer.
• AC power cord (mains lead) must be
changed only at a qualified service shop.
On heat buildup
Although the system heats up during
operation, this is not a malfunction.
If you continuously use this system at high
volume, the system temperature at the
rear and bottom rises considerably. To
avoid burning yourself, do not touch the
system.
22
US
Page 23

Additional Information
On placement
• Place the system in a location with
adequate ventilation to prevent heat
buildup and prolong the life of the
system.
• Do not place the system near heat
sources or in a place subject to direct
sunlight, excessive dust, or mechanical
shock.
• Do not place anything at the rear of the
Bar Speaker and subwoofer that might
block the ventilation holes and cause
malfunctions.
• If the system is being used in combination
with a TV, VCR, or tape deck, noise may
result and picture quality may suffer. In
such a case, place the system away from
the TV, VCR, or tape deck.
• Use caution when placing the system on a
surface that has been specially treated
(with wax, oil, polish, etc.), as staining or
discoloration of the surface may result.
• Take care to avoid any possible injury
from the corners of the Bar Speaker and
subwoofer.
• Keep 3 cm (1
the Bar Speaker when you hang it on a
wall.
3
/16 in) or more space under
On operation
Before connecting other equipment, be
sure to turn off and unplug the system.
If you encounter color irregularity
on a nearby TV screen
Color irregularities may be observed on
certain types of TV.
• If color irregularity is observed...
Turn off the TV, then turn it on again after
15 to 30 minutes.
• If color irregularity is observed again...
Place the system further away from the
TV.
On cleaning
Clean the system with a soft, dry cloth. Do
not use any type of abrasive pad, scouring
powder, or solvent such as alcohol or
benzine.
If you have any question or problem
concerning your system, please consult
your nearest Sony dealer.
Troubleshooting
If you experience any of the following
difficulties while using the system, use
this troubleshooting guide to help
remedy the problem before requesting
repairs. Should any problem persist,
consult your nearest Sony dealer.
General
The power does not turn on.
Check that the AC power cord
(mains lead) is connected securely.
The system does not work normally.
Disconnect the AC power cord
(mains lead) from the wall outlet
(mains), then reconnect after
several minutes.
The system is turned off automatically.
The auto standby function is
working. Set “ASTBY” in “SYS >” to
“OFF” (page 17).
The system does not turn on even
when the TV is turned on.
Set “HDMI>” – “CTRL” to “ON”
(page 17). The TV must support the
Control for HDMI function (page 18).
For details, refer to the operating
instructions of your TV.
Check the speaker settings of the
TV. The system power syncs with
the speaker settings of the TV. For
details, refer to the operating
instructions of your TV.
If the sound was output from the
speakers of the TV the previous
time, the system does not turn on
even when the TV is turned on.
23
US
Page 24

The system turns off when the TV is
turned off.
Check the setting of “HDMI>” –
“TVSTB” (page 17). When “TVSTB” is
set to “ON”, the system turns off
automatically when you turn off the
TV regardless of the input.
The system does not turn off even
when the TV is turned off.
Check the setting of “HDMI>” –
“TVSTB” (page 17). To turn the
system off automatically regardless
of the input when you turn off the
TV, set “TVSTB” to “ON”. The TV
must support the Control for HDMI
function (page 18). For details, refer
to the operating instructions of your
TV.
Sound
No TV sound is output from the system.
Check the type and connection of
the HDMI cable, optical digital
cable, or analog audio cable that is
connected to the system and the TV
(refer to the supplied Startup
Guide).
If your TV is compatible with Audio
Return Channel, make sure the
system is connected to an ARCcompatible HDMI input jack of the
TV (refer to the supplied Startup
Guide). If sound is still not output or
if sound is interrupted, connect the
supplied optical digital cable and
set “AUD >” – “TV AU” to “OPT”
(page 16).
If your TV is not compatible with
Audio Return Channel, TV sound will
not be output from the system even
if the system is connected to the
TV’s HDMI input jack. To output TV
sound from the system, connect the
supplied optical digital cable (refer
to the supplied Startup Guide).
If sound is not output from the
system even if the system and TV
are connected by optical digital
cable or if the TV does not have an
optical digital sound output jack,
connect an analog audio cable (not
supplied) and switch input of the
system to “ANALOG” (page 10).
Switch input of the system to “TV”
(page 10).
Increase the volume on the system
or cancel muting.
Depending on the order in which
you connect the TV and the system,
the system may be muted and
“MUTING” is displayed in the top
panel display of the system. If this
happens, turn on the TV first, then
the system.
Set the speakers setting of the TV
(BRAVIA) to Audio System. Refer to
the operating instructions of your
TV regarding how to set the TV.
The sound is output from both the
system and the TV.
Mute the sound of the system or the
TV.
No sound or only a very low-level
sound of the device connected to the
Bar Speaker is heard from the Bar
Speaker.
Press + and check the volume
level (page 9).
Press or + to cancel the
muting function (page 9).
Make sure the input source is
selected correctly. You should try
other input sources by pressing
INPUT repeatedly (page 10).
Check that all the cables and cords
of the system and the connected
device are firmly inserted.
No sound or only a very low-level
sound is heard from the subwoofer.
Press SW + to increase the
subwoofer volume (page 9).
24
US
Page 25

Additional Information
Make sure that the power indicator
on the subwoofer is lit in green. If
not, refer to “No sound is heard
from the subwoofer.” in “Subwoofer
wireless sound” (page 26).
A subwoofer is for reproducing bass
sound. In the case of input sources
that contain very little bass sound
components (i.e., a TV broadcast),
the sound from the subwoofer may
be difficult to hear.
When you play content compatible
with copyright protection
technology (HDCP), it is not output
from the subwoofer.
The surround effect cannot be
obtained.
Depending on the input signal and
the sound field setting, surround
sound processing may not work
effectively. The surround effect may
be subtle, depending on the
program or disc.
To play multi channel audio, check
the digital audio output setting on
the device connected to the system.
For details, refer to the operating
instructions supplied with the
connected device.
USB device
The USB device is not recognized.
Try the following:
Turn the system off.
Remove and reconnect the USB
device.
Turn the system on.
Make sure that the USB device is
securely connected to the (USB)
port.
Check if the USB device or a cable is
damaged.
Check if the USB device is on.
If the USB device is connected via a
USB hub, disconnect it and connect
the USB device directly to the Bar
Speaker.
BLUETOOTH device
BLUETOOTH connection cannot be
completed.
Make sure that the blue LED
indicator is lit (page 7).
Make sure the BLUETOOTH device
to be connected is turned on and
the BLUETOOTH function is
enabled.
Move the BLUETOOTH device closer
to the Bar Speaker.
Pair this system and the
BLUETOOTH device again. You may
need to cancel the pairing with this
system using your BLUETOOTH
device first.
Pairing cannot be done.
Move the BLUETOOTH device closer
to the Bar Speaker.
Make sure this system is not
receiving interference from a
wireless LAN equipment, other
2.4 GHz wireless devices, or a
microwave oven. If a device that
generates electromagnetic
radiation is nearby, move the device
away from this system.
Pairing may not be possible if other
BLUETOOTH devices are present
around the Bar Speaker. In this case,
turn off the other BLUETOOTH
devices.
No sound is output from the connected
BLUETOOTH device.
Make sure that the blue LED
indicator is lit (page 7).
Move the BLUETOOTH device closer
to the Bar Speaker.
25
US
Page 26

If a device that generates
electromagnetic radiation, such as a
wireless LAN equipment, other
BLUETOOTH devices, or a
microwave oven is nearby, move
the device away from this system.
Remove any obstacle between this
system and the BLUETOOTH device
or move this system away from the
obstacle.
Reposition the connected
BLUETOOTH device.
Try changing the wireless frequency
of the Wi-Fi router, computer, etc.
to 5 GHz band.
Increase the volume on the
connected BLUETOOTH device.
The sound is not in sync with the
image.
When you are watching movies, you
may hear the sound with a slight
delay from the image.
Subwoofer wireless sound
The subwoofer is designed for
playback of bass sound. When the
input source does not contain much
of bass sound, as is the case with
most TV programs, the bass sound
may not be audible.
Press SW + to increase the
volume of the subwoofer (page 22).
Sound skips or has noise.
If there is a device nearby that
generates electromagnetic waves
like a wireless LAN or a microwave
oven in use, locate the system apart
from it.
If there is an obstacle between the
Bar Speaker and the subwoofer,
move or remove it.
Locate the Bar Speaker and the
subwoofer as close as possible.
Switch the wireless LAN frequency
of any nearby Wi-Fi router or
personal computer to 5 GHz band.
Switch the TV, Blu-ray Disc player,
etc. from wireless LAN to wired LAN.
No sound is heard from the subwoofer.
The power indicator does not light
up.
• Check that the AC power cord
(mains lead) of the subwoofer is
connected properly.
• Press on the subwoofer to turn
on the power.
The power indicator flashes slowly
in green or lights up in red.
• Move the subwoofer to a location
near the Bar Speaker so that the
power indicator lights up in green.
• Follow the steps in “Activating
wireless transmission between
specific units (Secure Link)”
(page 21).
If the power indicator flashes in red,
press on the subwoofer to turn
off the power and check whether
the ventilation opening of the
subwoofer is blocked or not.
US
26
Remote control
The remote control does not function.
Point the remote control at the
remote control sensor on the Bar
Speaker (page 7).
Remove any obstacles in the path
between the remote control and the
Bar Speaker.
Replace both batteries in the
remote control with new ones, if
they are weak.
Make sure you are pressing the
correct button on the remote
control.
The TV remote control does not work.
Install the Bar Speaker so that it
does not obstruct the remote
control sensor of the TV.
Page 27

Additional Information
Others
The Control for HDMI function does not
work properly.
Check the connection with the
system (refer to the supplied
Startup Guide).
Enable the Control for HDMI
function on the TV. For details, refer
to the operating instructions of your
TV.
Wait a while, and then try again. If
you unplug the system, it will take a
while before operations can be
made. Wait for 15 seconds or
longer, and then try again.
Make sure the devices connected to
the system support the Control for
HDMI function.
Enable the Control for HDMI
function on the devices connected
to the system. For details, refer to
the operating instructions of your
device.
The type and number of devices
that can be controlled by the
Control for HDMI function is
restricted by the HDMI CEC standard
as follows:
• Recording devices (Blu-ray Disc
recorder, DVD recorder, etc.): up
to 3 devices
• Playback devices (Blu-ray Disc
Player, DVD player, etc.): up to 3
devices
• Tuner-related devices: up to 4
devices
• Audio system (receiver/
headphone): up to 1 device (used
by this system)
If “PRTCT” appears in the top panel
display of the Bar Speaker.
Press to turn off the system. After
the display turns off, disconnect the
AC power cord (mains lead) then
check that nothing is blocking the
ventilation holes of the Bar Speaker.
The top panel display of the Bar
Speaker is not lit.
Press DIMMER to set the brightness
to “BRIGHT” or “DARK”, if set to
“OFF” (page 9).
Sensors of the TV do not work properly.
The Bar Speaker may block some
sensors (such as the brightness
sensor) and the remote control
receiver of your TV, or the “emitter
for 3D glasses (infrared
transmission)” of a 3D TV that
supports the infrared 3D glass
system or the wireless
communication. Move the Bar
Speaker away from the TV within a
range that allow those parts to
operate properly. For the locations
of the sensors and remote control
receiver, refer to the operating
instructions supplied with the TV.
Reset
If the system still does not operate
properly, reset the system as follows.
Be sure to use the touch keys on the Bar
Speaker to perform this operation.
1 While holding INPUT, touch VOL –
and simultaneously for
5seconds.
“RESET” appears in the top panel
display, and the settings of the
menu and sound fields, etc. return
to their initial status.
2 Disconnect the AC power cord
(mains lead).
3 Connect the AC power cord (mains
lead), then press to turn on the
system.
4 Link the system to the subwoofer
(page 21).
27
US
Page 28

Playable types of files
Specifications
Codec Extension
MP3 (MPEG-1 Audio
Layer III)
AAC .m4a
WMA9 Standard .wma
LPCM .wav
Notes
• Some files may not play depending on
the file format, the file encoding, or the
recording condition.
• Some files edited on a PC may not play.
• The system does not play coded files such
as DRM and Lossless.
• The system can recognize the following
files or folders in USB devices:
– up to 200 folders
– up to 150 files/folders in a single layer
• Some USB devices may not work with this
system.
• The system can recognize Mass Storage
Class (MSC) devices.
.mp3
Supported audio formats
Audio formats supported by this system
are as follows.
• Dolby Digital
•DTS
• LPCM 2ch
•AAC
Bar Speaker (SA-CT390)
Amplifier section
USA models:
POWER OUTPUT AND TOTAL HARMONIC
DISTORTION:
(FTC)
Front L + Front R:
With 4 ohms loads, both channels
driven, from 200 Hz – 20,000 Hz; rated
35 watts per channel minimum RMS
power, with no more than 1% total
harmonic distortion from
250 milliwatts to rated output.
POWER OUTPUT (reference)
Front L/Front R: 100 W (per channel at
4ohms, 1kHz)
Canadian models:
POWER OUTPUT (rated)
Front L + Front R:
50 W + 50 W (at 4 ohms, 1 kHz, 1%
THD)
POWER OUTPUT (reference)
Front L/Front R: 100 W (per channel at
4ohms, 1kHz)
Inputs
USB
ANALOG IN
TV IN OPTICAL
Output
HDMI OUT TV (ARC)
HDMI section
Connector
Type A (19pin)
USB section
(USB) port
Type A
BLUETOOTH section
Communication system
BLUETOOTH Specification version 4.2
Output
BLUETOOTH Specification Power Class
1
Maximum communication range
Line of sight approx. 25 m (82 ft)
1)
28
US
Page 29

Additional Information
Frequency band
2.4 GHz band (2.4000 GHz –
2.4835 GHz)
Modulation method
FHSS (Freq Hopping Spread Spectrum)
Compatible BLUETOOTH profiles
A2DP 1.2 (Advanced Audio Distribution
Profile)
AVRCP 1.6 (Audio Video Remote
Control Profile)
Supported Codecs
SBC4), AAC
Transmission range (A2DP)
20 Hz – 20,000 Hz (Sampling
frequency 32 kHz, 44.1 kHz, 48 kHz)
1)
The actual range will vary depending on
3)
5)
factors such as obstacles between
devices, magnetic fields around a
microwave oven, static electricity,
cordless phone, reception sensitivity,
antenna’s performance, operating
system, software application, etc.
2)
BLUETOOTH standard profiles indicate
the purpose of BLUETOOTH
communication between devices.
3)
Codec: Audio signal compression and
conversion format
4)
Subband Codec
5)
Advanced Audio Coding
Front L/Front R speaker section
Speaker system
Full range speaker system, Acoustic
suspension
Speaker
60 mm (2
3
/8 in) cone type
General
Power requirements
120 V AC, 60 Hz
Power consumption
On: 45 W
Standby: 0.5 W or less (Power saving
mode)
(When “CTRL” in “HDMI>” and “BTSTB”
in “BT >” are set to “OFF”)
Standby: 2.8 W or less
(When “CTRL” in “HDMI>” or “BTSTB” in
“BT >” is set to “ON”)
Dimensions (w/h/d) (approx.)
900 mm × 52 mm × 121 mm
1
/2in × 21/8in × 47/8in)
(35
(without wall mounting brackets)
2)
900 mm × 121 mm × 59 mm
1
/2in × 47/8in × 23/8in)
(35
(with wall mounting brackets)
Mass (approx.)
2.2 kg (4 lb 14 oz)
6)
The system will automatically enter
Power saving mode when there is no
HDMI connection and no BLUETOOTH
pairing history, regardless of the settings
you have made for “CTRL” in “HDMI>”
and “BTSTB” in “BT >”.
Subwoofer (SA-WCT390)
POWER OUTPUT (reference)
100 W (per channel at 4 ohms, 100 Hz)
Speaker system
Subwoofer system, Bass reflex
Speaker
130 mm (5
Power requirements
120 V AC, 60 Hz
Power consumption
On: 20 W
Standby: 0.5 W or less
Dimensions (w/h/d) (approx.)
170 mm × 342 mm × 362 mm
(6
(vertical installation)
342mm × 172mm × 362mm
(13
(horizontal installation)
Mass (approx.)
1
/8in) cone type
3
/4in × 131/2in × 143/8in)
1
/2in × 67/8in × 143/8in)
6.5 kg (14 Ib 6 oz)
Wireless transmitter/
receiver section
6)
Frequency band
2.4 GHz (2.4000 GHz – 2.4835 GHz)
Modulation method
FHSS (Freq Hopping Spread Spectrum)
Design and specifications are subject to
change without notice.
29
US
Page 30

On BLUETOOTH communication
• BLUETOOTH devices should be used
within approximately 10 meters
(33 feet) (unobstructed distance) of
each other. The effective
communication range may become
shorter under the following
conditions.
– When a person, metal object, wall or
other obstruction is between the
devices with a BLUETOOTH
connection
– Locations where a wireless LAN is
installed
– Around microwave ovens that are in
use
– Locations where other
electromagnetic waves occur
• BLUETOOTH devices and wireless LAN
(IEEE 802.11b/g) use the same
frequency band (2.4 GHz). When using
your BLUETOOTH device near a device
with wireless LAN capability,
electromagnetic interference may
occur. This could result in lower data
transfer rates, noise, or inability to
connect. If this happens, try the
following remedies:
– Use this system at least 10 meters
(33 feet) away from the wireless LAN
device.
– Turn off the power to the wireless
LAN device when using your
BLUETOOTH device within 10 meters
(33 feet).
– Install this system and BLUETOOTH
device as close to each other as
possible.
• The radio waves broadcast by this
system may interfere with the
operation of some medical devices.
Since this interference may result in
malfunction, always turn off the power
on this system and BLUETOOTH device
in the following locations:
– In hospitals, on trains, in airplanes, at
gas stations, and any place where
flammable gasses may be present
– Near automatic doors or fire alarms
• This system supports security
functions that comply with the
BLUETOOTH specification to ensure
secure connection during
communication using BLUETOOTH
technology. However, this security
may be insufficient depending on the
setting contents and other factors, so
always be careful when performing
communication using BLUETOOTH
technology.
• Sony cannot be held liable in any way
for damages or other loss resulting
from information leaks during
communication using BLUETOOTH
technology.
• BLUETOOTH communication is not
necessarily guaranteed with all
BLUETOOTH devices that have the
same profile as this system.
• BLUETOOTH devices connected with
this system must comply with the
BLUETOOTH specification prescribed
by the Bluetooth SIG, Inc., and must be
certified to comply. However, even
when a device complies with the
BLUETOOTH specification, there may
be cases where the characteristics or
specifications of the BLUETOOTH
device make it impossible to connect,
or may result in different control
methods, display or operation.
• Noise may occur or the audio may cut
off depending on the BLUETOOTH
device connected with this system,
the communications environment, or
surrounding conditions.
30
US
Page 31

Page 32

Pour les clients aux États-Unis
Enregistrement du propriétaire
Les numéros de modèle et de série sont
situés dessous la barre de hautparleurs. Reportez ces numéros dans
l’espace fourni ci-dessous. Reportezvous à ces numéros lorsque vous
appelez votre fournisseur Sony pour ce
produit.
N° de modèle
N° de série
AVERTISSEMENT
Pour réduire le risque d’incendie ou
d’électrocution, n’exposez pas cet
appareil à la pluie ou à l’humidité.
Pour réduire le risque d’incendie,
n’obstruez pas l’orifice de ventilation de
l’appareil avec un journal, une nappe,
une tenture, etc.
N’exposez pas l’appareil à une source
de flamme nue (notamment une bougie
allumée).
Pour réduire le risque d’incendie ou
d’électrocution, n’exposez pas cet
appareil à un écoulement d’eau ou à
des éclaboussures, et ne placez pas
d’objets remplis de liquides,
notamment des vases, sur l’appareil.
N’installez pas l’appareil dans un
espace confiné, comme dans une
bibliothèque ou un meuble encastré.
N’exposez pas les piles ou un appareil
contenant des piles à une chaleur
excessive, notamment aux rayons du
soleil ou au feu.
Pour éviter de vous blesser, cet appareil
doit être convenablement placé sur le
meuble ou fixé au sol/mur selon les
instructions d’installation.
Pour utilisation en intérieur
uniquement.
Sources d’alimentation
•L’unité n’est pas déconnectée du
secteur tant qu’elle reste branchée à la
prise de courant, même si l’unité
proprement dite a été mise hors
tension.
•Comme la prise secteur sert à
déconnecter l’unité du secteur,
connectez l’unité à une prise de
courant facilement accessible. Si vous
constatez une anomalie sur l’unité,
débranchez immédiatement la prise
secteur de la prise de courant.
Pour la barre de haut-parleurs
La plaque signalétique et la date de
fabrication sont situées sous l’appareil.
Pour les clients aux États-Unis
Les marques d’attention se trouve sur le
dessous du boîtier (pour la barre de
haut-parleurs).
Ce symbole avertit l’utilisateur
de la présence d’une « tension
dangereuse » non isolée dans le
boîtier du produit qui peut être
suffisamment importante pour
constituer un risque d’électrocution des
personnes.
Ce symbole avertit l’utilisateur
de la présence d’instructions
d’utilisation et de maintenance
(entretien) importants dans les
documents fournis avec l’appareil.
Des câbles et connecteurs correctement
isolés et mis à la terre doivent être
utilisés pour la connexion d’ordinateurs
hôtes et/ou de périphérique, en
conformité avec les limites d’émission
FCC.
FR
2
Page 33

REMARQUE :
Cet équipement a été testé et déclaré
conforme aux limitations d’un appareil
numérique de Classe B, selon la partie 15
de la Réglementation FCC. Ces
limitations sont conçues pour offrir une
protection raisonnable contre des
interférences nuisibles dans une
installation résidentielle. Cet
équipement génère, utilise et peut
émettre une énergie de fréquence radio
et, s’il n’est pas installé et utilisé
conformément aux instructions, il peut
causer des interférences nuisibles aux
communications radio.
Cependant, il n’y a aucune garantie que
ces interférences ne se produisent pas
dans une installation particulière. Si cet
équipement cause des interférences
nuisibles avec la réception radio ou de
télévision, ce qui peut être constaté en
allumant et éteignant l’équipement,
l’utilisateur est encouragé à corriger ces
interférences en effectuant l’une ou
plusieurs des mesures suivantes :
– Réorientez ou replacez l’antenne de
réception.
– Augmentez la distance séparant
l’équipement du récepteur.
– Connectez l’équipement sur une prise
d’un circuit différent de celui où lequel
le récepteur est connecté.
– Consultez le fournisseur ou un
technicien qualifié radio/TV pour
obtenir de l’aide.
ATTENTION
Vous êtes informé que tout
changement ou modification non
expressément approuvé dans ce
manuel peut annuler votre droit
d’utilisation de cet équipement.
Cet équipement ne doit pas être situé à
proximité ou utilisé avec une autre
antenne ou un autre transmetteur.
Cet équipement est conforme aux
limites d’exposition aux radiations FCC
mises en places pour un environnement
non contrôlé et respectent les Directives
d’exposition aux fréquences radio (RF)
de la FCC. Cet équipement émet une
énergie RF très faible qui est considérée
conforme sans évaluation de
l’exposition maximale permise (EMP).
Instructions de sécurité
importantes
1) Veuillez lire ces instructions.
2) Conservez ces instructions.
3) Tenez compte de tous les
avertissements.
4) Suivez toutes les instructions.
5) N’utilisez pas cet appareil près de
l’eau.
6) Nettoyez l’appareil uniquement avec
un chiffon sec.
7) Ne bloquez pas les orifices de
ventilation. Installez l’appareil en
respectant les instructions du
fabricant.
8) N’installez pas l’appareil près de
sources de chaleur, notamment un
radiateur, un appareil de chauffage,
un réchaud ou autre appareil (y
compris amplificateurs) produisant
de la chaleur.
9) N’empêchez pas les fins de sécurité
de la prise polarisée ou avec mise à
la terre. Une prise polarisée dispose
de deux fiches, l’une plus grande
que l’autre. Une prise avec mise à la
terre dispose de deux fiches et une
troisièm broche de mise à la terre. La
fiche longue ou la troisième broche
de mise à la terre sont présentes
pour votre sécurité. Si la prise fournie
de rentre pas dans votre prise de
courant, consultez un technicien
pour qu’il remplace la prise de
courant obsolète.
FR
3
Page 34

10) Protégez le cordon d’alimentation
pour ne pas marcher dessus ni le
pincer, en particulier au niveau de la
prise, des multi-prises et au point de
sortie de l’appareil.
11) N’utilisez que les pièces/accessoires
spécifiés par le fabricant.
12) N’utilisez l’appareil qu’avec la
charrette, le stand, le trépied, le
socle ou la table spécifiés par le
fabricant, ou vendus avec l’appareil.
Lors de l’utilisation d’une charrette,
faites attention lors du déplacement
de l’ensemble charrette/appareil
pour éviter toute blessure par
renversement.
13) Débranchez l’appareil pendant les
orages ou lorsqu’il est inutilisé
pendant une longue période.
14) Consulter des techniciens
d’entretien qualifiés pour tout
entretien de l’appareil. L’entretien
est nécessaire lorsque l’appareil a
été endommagé, notamment si le
cordon d’alimentation ou la prise est
endommagée, si du liquide s’est
renversé ou si des objets sont
tombés sur l’appareil, s’il a été
exposé à la pluie ou à l’humidité, s’il
ne fonctionne pas normalement ou
s’il est tombé.
Pour les clients au Canada
Des câbles et connecteurs correctement
isolés et mis à la terre doivent être
utilisés pour la connexion d’ordinateurs
hôtes et/ou de périphérique.
Le présent appareil est conforme aux
CNR d’Industrie Canada applicables aux
appareils radio exempts de licence.
L’exploitation est autorisée aux deux
conditions suivantes :
(1) l’appareil ne doit pas produire de
brouillage;
(2) l’utilisateur de l’appareil doit
accepter tout brouillage radioélectrique
subi, même si le brouillage est
susceptible d’en compromettre le
fonctionnement.
Cet équipement est conforme aux
limites d’exposition aux rayonnements
énoncées pour un environnement non
contrôlé et respecte les règles
d’exposition aux fréquences
radioélectriques (RF) CNR-102 de l’IC.
Cet équipement émet une énergie RF
très faible qui est considérée comme
conforme sans évaluation de
l’exposition maximale autorisée.
Cependant, cet équipement doit être
installé et utilisé en gardant une
distance de 20 cm ou plus entre le
dispositif rayonnant et le corps.
Droits d’auteur et marques
commerciales
•Ce système intègre Dolby* Digital et
DTS** Digital Surround System.
* Fabriqué sous licence de Dolby
Laboratories.
Dolby et le symbole double-D sont
des marques déposées de Dolby
Laboratories.
** Pour les brevets DTS, voir
http://patents.dts.com. Fabriqué
sous licence de DTS Licensing
Limited. DTS, le symbole, ainsi que
DTS et le symbole utilisés ensemble
sont des marques déposées et DTS
Digital Surround est une marque
commerciale de DTS, Inc. © DTS, Inc.
Tous droits réservés.
FR
4
Page 35

•Le mot et les logos BLUETOOTH® sont
des marques déposées de Bluetooth
SIG, Inc. et toute utilisation de ces
marques par Sony Corporation est
sous licence. Les autres marques
commerciales et noms de marques
appartiennent à leurs propriétaires
respectifs.
•Le système intègre la technologie
High-Definition Multimedia Interface
(HDMI™).
Les termes HDMI et HDMI HighDefinition Multimedia Interface et le
logo HDMI sont des marques
commerciales ou des marques
déposées de HDMI Licensing LLC aux
États-Unis et dans d’autres pays.
•La N-Mark est une marque
commerciale ou une marque déposée
de NFC Forum, Inc. aux États-Unis et
dans d’autres pays.
•Android™ est une marque de
commerce de Google Inc.
•Google Play™ est une marque de
commerce de Google Inc.
•« BRAVIA » est une marque
commerciale de Sony Corporation.
•« PlayStation » est une marque
déposée de Sony Computer
Entertainment Inc.
•Technologie de codage audio et
brevets MPEG Layer-3 sous licence
Fraunhofer IIS et Thomson.
•Windows Media est une marque
déposée ou une marque commerciale
de Microsoft Corporation aux ÉtatsUnis et/ou dans d’autres pays.
•Ce produit est protégé par des droits
de propriété intellectuelle de Microsoft
Corporation. Il est interdit d’utiliser ou
de distribuer cette technologie hors de
ce produit sans disposer d’une licence
appropriée de Microsoft ou d’une
filiale de Microsoft autorisée.
•« ClearAudio+ » est une marque
commerciale de Sony Corporation.
•Apple, le logo Apple, iPhone, iPod,
iPod touch et Retina sont des marques
commerciales de Apple Inc., déposées
aux États-Unis et dans d’autres pays.
App Store est une marque de service
d’Apple Inc.
« Made for iPod » et « Made for
iPhone » signifient qu’un accessoire
électronique a été conçu pour être
connecté spécifiquement à un iPod ou
un iPhone, et qu’ il a été certifié par le
développeur comme étant conforme
aux normes de performances Apple.
Apple n’est pas responsable du bon
fonctionnement de cet appareil ni de
sa conformité aux normes
réglementaires et de sécurité. Veuillez
noter que l’utilisation de cet accessoire
avec un iPod ou un iPhone peut
affecter les performances des
transmissions sans fil.
Modèles iPod/iPhone
compatibles
Les modèles iPod/iPhone compatibles
sont les suivants. Mettez à jour votre
iPod/iPhone avec le logiciel le plus
récent avant de l’utiliser avec le
système.
La technologie BLUETOOTH fonctionne
avec :
– iPhone 6s Plus/iPhone 6s/
iPhone 6 Plus/iPhone 6/iPhone 5s/
iPhone 5c/iPhone 5
– iPod touch (6ème génération)/
iPod touch (5ème génération)
•Les autres noms de systèmes et de
produits sont généralement des
marques commerciales ou des
marques déposées des fabricants. Les
marques ™ et ne sont pas indiquées
dans ce document.
FR
5
Page 36

À propos de ce Mode d’emploi
•Les instructions contenues dans le
présent Mode d’emploi décrivent les
commandes de la télécommande.
Vous pouvez également utiliser les
commandes de la barre de hautparleurs, si elles portent le même nom
ou un nom analogue à celles de la
télécommande.
•Certaines illustrations sont des dessins
conceptuels qui peuvent être
différents des produits effectivement
commercialisés.
•Le réglage par défaut est souligné.
•Le texte situé entre deux guillemets
(« -- ») apparaît sur l’écran du panneau
supérieur.
FR
6
Page 37

Table des matières
Connexion
À propos de ce Mode
d’emploi ............................... 6
Index des composants et des
commandes ......................... 8
Guide de démarrage (document séparé)
Écoute
Écoute du son des appareils
connectés ............................11
Pour écouter de la musique à
partir d’un périphérique
USB ......................................12
Réglage du son
Pour utiliser des effets
sonores ............................... 13
Fonction BLUETOOTH
Pour écouter de la musique à
partir d’un périphérique
BLUETOOTH ........................ 14
Contrôler le système à l’aide
d’un smartphone ou d’une
tablette (SongPal) ...............16
Réglages et ajustements
Utilisation de l’écran de
configuration ...................... 17
Autres fonctions
Utilisation de la fonction
Contrôle pour HDMI .......... 20
Utilisation de la fonction
« BRAVIA » Sync ..................21
Économie d’énergie en mode
veille ....................................22
Fixation de la barre de haut-
parleurs au mur ..................22
Installation du subwoofer
horizontalement ................ 24
Activation de la transmission
sans fil entre unités
spécifiques (Secure Link) ... 24
Réglage du volume du
subwoofer ...........................25
Informations
complémentaires
Précautions ...............................25
Dépannage .............................. 26
Types de fichiers
compatibles ........................32
Formats audio pris en
charge .................................32
Spécifications ...........................32
Connexion BLUETOOTH ........... 34
FR
7
Page 38

Index des composants et des commandes
, fente
Pour plus d’informations, reportez-vous aux pages indiquées entre parenthèses.
Barre de haut-parleurs
Panneau supérieur et latéral
Touche (alimentation)
Mettre le système sous tension
ou en mode veille.
Touche INPUT
Sélectionne l’appareil que vous
souhaitez utiliser.
Touche PAIRING
Touche VOL (volume) +/–
(N-Mark) (page 15)
Placer l’appareil compatible NFC
à côté de ce symbole pour activer
la fonction NFC.
Port (USB) (page 12)
Placez votre ongle dans la fente
(par-dessous) pour ouvrir le
couvercle.
FR
8
Voyant DEL bleu
Affiche l’état BLUETOOTH comme
suit.
Pendant l’appairage
BLUETOOTH
Le système est en train
d’essayer de se
connecter à un
périphérique
BLUETOOTH
Le système s’est
connecté à un
périphérique
BLUETOOTH
Clignote
rapidement
Clignote
Éclairage
continu
Affichage du panneau
supérieur
Capteur de télécommande
À propos des touches
Les touches fonctionnent lorsque vous
les effleurez. N’appuyez pas dessus trop
fortement.
Page 39

Panneau arrière
Prise HDMI OUT TV (ARC)
Prise TV IN OPTICAL
Subwoofer
Témoin d’alimentation
• Voyants éteints : L’alimentation
est coupée.
• Rouge : Non connecté à la barre
de haut-parleurs (mode veille).
• Vert : Connecté à la barre de
haut-parleurs (la connexion
Secure Link n’est pas établie).
• Orange : La connexion Secure
Link est établie.
LINK (page 24)
Prise ANALOG IN
Cordon d’alimentation CA
(alimentation)
Met le subwoofer sous tension ou
en mode veille.
Cordon d’alimentation CA
FR
9
Page 40

À propos du mode veille
Le subwoofer passe en mode veille
automatiquement et le témoin
d’alimentation devient rouge lorsque la
barre de haut-parleurs est en mode
veille ou lorsque la transmission sans fil
est désactivée. Le subwoofer s’allume
automatiquement lorsque la barre de
haut-parleurs est sous tension ou que la
transmission sans fil est activée.
Télécommande
INPUT (page 11)
(alimentation)
Mettre le système sous tension
ou en mode veille.
DIMMER
Ajustez la luminosité de l’écran
du panneau supérieur.
«BRIGHT» «DARK»
«OFF»
• L’écran du panneau supérieur
s’éteint lorsque « OFF » est
sélectionné. Il s’allume
automatiquement lorsque vous
appuyez sur une touche et
s’éteint de nouveau si vous ne
commandez pas le système
pendant environ plusieurs
secondes. Cependant, dans
certains cas, l’écran du panneau
supérieur peut s’éteindre. Dans
ce cas, la luminosité de l’écran
du panneau supérieur est la
même que « DARK ».
MENU
Active/désactive le menu sur
l’écran du panneau supérieur.
/
Sélectionne les éléments de
menu.
ENTER
Affiche la sélection.
BACK
Revenir à l’affichage précédent.
Arrête la lecture depuis le
périphérique USB.
(volume) +*/–
Régler le volume.
SW (volume du
subwoofer) +/– (page 25)
Règle le volume des graves.
(mise en sourdine)
Désactiver temporairement le
son.
10
FR
Page 41

Écoute
CLEARAUDIO+
Sélectionne automatiquement le
réglage du son adapté à la source
sonore.
SOUND FIELD (page 13)
Sélectionner un mode de son.
VOICE (page 13)
* (lecture/pause)
Suspend ou reprend la lecture.
NIGHT (page 13)
/ (précédent/suivant/
rembobinage/avance rapide)
Appuyez pour sélectionner la
plage ou le fichier précédent/
suivant.
Maintenez enfoncé pour faire une
recherche vers l’arrière ou l’avant.
*Les touches et + ont un point
tactile. Utilisez le point tactile comme
repère lorsque vous utilisez la
télécommande.
Écoute
Écoute du son des appareils connectés
Appuyez plusieurs fois sur INPUT.
Lorsque vous appuyez une fois sur
INPUT, l’appareil actuel apparaît sur
l’affichage de l’écran du panneau
supérieur, puis chaque fois que vous
appuyez sur INPUT, l’appareil change
comme suit.
«TV» « ANALOG » «BT»
«USB»
«TV»
Appareil (téléviseur, etc.) qui est connecté à
la prise TV IN OPTICAL ou téléviseur
compatible avec la fonction Audio Return
Channel connecé à la prise HDMI OUT TV
(ARC)
«ANALOG»
Appareil (lecteurs de médias numériques,
etc.) connecté à la prise ANALOG IN
«BT»
Périphérique BLUETOOTH prenant en charge
le format A2DP (page 14)
«USB»
Périphérique USB connecté au port (USB)
(page 12)
FR
11
Page 42

Pour écouter de la musique à partir d’un périphérique USB
Vous pouvez lire des fichiers musique à
partir d’un périphérique USB connecté.
Pour connaître les différents types de
fichiers compatibles, reportez-vous à
la section « Types de fichiers
compatibles » (page 32).
1 Connectez le périphérique USB au
port (USB).
Reportez-vous au Mode d’emploi
du périphérique USB avant de le
connecter.
2 Appuyez plusieurs fois sur INPUT
pour sélectionner « USB ».
La liste du contenu USB s’affiche à
l’écran du téléviseur.
3 Appuyez sur / pour
sélectionner le contenu de votre
choix, puis appuyez sur ENTER.
Le contenu sélectionné commence
la lecture.
4 Réglez le volume.
• Ajustez le volume de la barre de
haut-parleurs en appuyant sur
+/–.
• Ajustez le volume du subwoofer
en appuyant sur SW +/–.
Remarque
N’ôtez pas le périphérique USB lors de son
utilisation. Pour éviter toute corruption ou
endommagement des données sur le
périphérique USB, éteignez le système
avant d’enlever un périphérique USB.
Informations sur le
périphérique USB sur l’écran
du téléviseur
Durée de lecture
Durée totale de lecture
Débit binaire
État de la lecture
Vitesse de retour/avance rapide
État de lecture répétée
Index des fichiers sélectionnés/
Nombre total de fichier dans le
dossier
Remarques
• En fonction de la source lue, certaines
informations peuvent être affichées.
• En fonction du mode de lecture, les
informations affichées peuvent être
différentes.
12
FR
Page 43

Réglage du son
Réglage du son
Pour utiliser des effets sonores
Vous pouvez facilement utiliser des
champs acoustiques préalablement
programmés qui sont faits sur mesure
en fonction des différentes sources de
sons.
Sélection du champ
acoustique
Appuyez plusieurs fois sur SOUND
FIELD jusqu’à ce que le champ
acoustique apparaisse sur l’écran du
panneau supérieur.
« CLEARAUDIO+ »
Vous pouvez apprécier le son avec le champ
acoustique recommandé par Sony. Le champ
acoustique est automatiquement optimisé
en fonction du contenu lu et de la fonction.
«MOVIE»
Les sons sont lus avec des effets surround, ce
qui les rend puissants et réalistes, convenant
aux films.
«MUSIC»
Les effets sonores sont optimisés pour
l’écroute de la musique.
«SPORTS»
Les commentaires sont clairs, les
acclamations sont perçues comme un son
d’ambiance et les sons sont ressemblants.
«GAME»
Les sons sont puissants et réalistes,
convenant aux jeux vidéo.
«STANDARD»
Son qui correspond à toutes les sources.
Pour utiliser la fonction
Mode nocturne
Cette fonction est utile pour regarder
des films lorsqu’il est tard la nuit. Vous
pourrez écouter clairement les
dialogues même lorsque le volume est
faible.
Appuyez sur NIGHT pour sélectionner
« N.ON ».
Pour rendre le Mode nocturne inactif,
appuyez sur NIGHT pour sélectionner
« N.OFF ».
Pour utiliser la fonction Voix
Claire
Cette fonction rend les dialogues plus
clairs.
Appuyez plusieurs fois sur VOICE.
• « UP OFF » : La fonction Voix Claire est
désactivée.
• « UP 1 » : La gamme des dialogues est
améliorée.
• « UP 2 » : La gamme des dialogues est
améliorée et les sections de la gamme
qui sont difficiles à discerner par les
personnes âgées sont améliorées.
Astuce
Vous pouvez aussi appuyer sur
CLEARAUDIO+ pour sélectionner
« CLEARAUDIO+ ».
13
FR
Page 44

Fonction BLUETOOTH
Pour écouter de la musique à partir d’un périphérique BLUETOOTH
Appairage de ce système
avec un périphérique
BLUETOOTH
L’appairage est une opération où les
périphériques BLUETOOTH
s’enregistrent entre-eux à l’avance. Une
fois l’opération d’appairage effectuée,
elle ne doit plus l’être.
1 Placez le périphérique
BLUETOOTH à 1 mètre (3,3 pieds)
de la barre de haut-parleurs.
2 Appuyez sur PAIRING sur la
barre de haut-parleurs.
Le voyant DEL bleu sur la barre de
haut-parleurs clignote rapidement
pendant l’appairage BLUETOOTH.
3 Activez la fonction BLUETOOTH
puis sélectionnez « HT-CT390 »
après avoir recherché le
périphérique BLUETOOTH.
Effectuez cette étape dans les
5 minutes, autrement le mode
d’appairage pourrait être annulé.
Lorsque la connexion BLUETOOTH
est établie, le voyant DEL bleu
s’allume.
Remarques
• Si une clé est requise pour le périphérique
BLUETOOTH, saisissez « 0000 ». La clé
peut être appelée « Clé », « Code NIP »,
« Numéro NIP » ou « Mot de passe ».
• Vous pouvez appairer jusqu’à
9 périphériques BLUETOOTH. Si un
dixième périphérique BLUETOOTH est
appairé, le dernier appareil connecté sera
alors remplacé par le nouveau.
Pour écouter de la musique à
partir d’un appareil apparié
1 Activez la fonction BLUETOOTH de
l’appareil apparié.
2 Appuyez plusieurs fois sur INPUT
pour sélectionner « BT ».
Le système reconnecte
automatiquement le dernier
périphérique BLUETOOTH qui était
connecté.
Lorsque la connexion BLUETOOTH
est établie, le voyant DEL bleu
s’allume.
3 Commencez la lecture sur le
périphérique BLUETOOTH.
4 Réglez le volume.
• Règle le volume du périphérique
BLUETOOTH.
• Ajustez le volume de la barre de
haut-parleurs en appuyant sur
+/–.
14
FR
Page 45

Fonction BLUETOOTH
• Ajustez le volume du subwoofer
en appuyant sur SW +/–.
Remarques
• Une fois que le système et le périphérique
BLUETOOTH sont connectés, vous pouvez
contrôler la lecture en appuyant sur
et /.
• Vous pouvez vous connecter au système
à partir d’un périphérique BLUETOOTH
apparié même lorsque le système est en
mode veille, si vous mettez « BTSTB » sur
«ON» (page18).
• La lecture audio sur ce système peut être
différée de celle sur le périphérique
BLUETOOTH de par les caractéristiques de
la technologie sans fil BLUETOOTH.
Astuce
Vous pouvez activer ou désactiver le codec
AAC à partir du périphérique BLUETOOTH
(page 18).
Pour déconnecter le périphérique
BLUETOOTH
Réalisez une des actions suivantes.
• Appuyez de nouveau sur PAIRING
sur la barre de haut-parleurs.
• Désactivez la fonction BLUETOOTH sur
le périphérique BLUETOOTH.
• Éteignez le système ou le périphérique
BLUETOOTH.
Appareils à distance compatibles
Appareils à distance intégrant une
fonction NFC
(OS : Android 2.3.3 ou ultérieur, sauf
Android 3.x)
Remarques
• Le système ne peut reconnaître et
connecter qu’un appareil compatible NFC
à la fois.
• En fonction de votre appareil à distance,
vous devrez réaliser à l’avance les actions
suivantes sur votre appareil à distance.
– Active la fonction NFC. Pour obtenir
plus de détails, reportez-vous au Mode
d’emploi de l’appareil à distance.
– Si la version de votre SE est antérieure à
la version Android 4.1.x, téléchargez et
lancez l’application « NFC Easy
Connect ». « NFC Easy Connect » est
une application gratuite pour les
appareils à distance Android
téléchargeable sur Google Play. (Il est
possible que l’application ne soit pas
disponible dans certains pays/régions.)
1 Placez l’appareil à distance près
de la N-Mark situé sur la barre de
haut-parleurs jusqu’à ce que
l’appareil à distance vibre.
Connexion d’un appareil à
distance à l’aide de la
fonction One-touch (NFC)
La technologie NFC (Near Field
Communication) permet une
communication sans fil à faible portée
entre différents appareils.
Lorsque vous placez un appareil à
distance compatible NFC à côté de la
N-Mark de la barre de haut-parleurs, le
système et l’appareil à distance
effectuent l’appairage et la connexion
BLUETOOTH automatiquement.
Suivez les instructions affichées sur
l’écran de l’appareil à distance, puis
terminez la procédure de connexion
BLUETOOTH.
Lorsque la connexion BLUETOOTH
est établie, le voyant DEL bleu sur la
barre de haut-parleurs s’allume.
15
FR
Page 46

2 Démarrez la lecture d’une source
audio sur l’appareil à distance.
Pour obtenir plus de détails sur les
opérations de lecture, reportezvous au Mode d’emploi de votre
appareil à distance.
3 Réglez le volume.
• Règle le volume du périphérique
BLUETOOTH.
• Ajustez le volume de la barre de
haut-parleurs en appuyant sur
+/–.
• Ajustez le volume du subwoofer
en appuyant sur SW +/–.
Astuce
Si l’appairage et la connexion BLUETOOTH
échouent, effectuez la procédure suivante.
– Placez de nouveau l’appareil à distance
près de la N-Mark sur la barre de hautparleurs.
– Enlevez l’étui de l’appareil à distance si
vous en utilisez un.
– Relancez l’application « NFC Easy
Connect ».
Pour arrêter la lecture à l’aide de
la fonction One-touch
Placez de nouveau l’appareil à distance
près de la N-Mark sur la barre de hautparleurs.
Contrôler le système à l’aide d’un smartphone ou d’une tablette (SongPal)
SongPal est une application dédiée
permettant d’utiliser des appareils
audio compatibles SongPal fabriqués
par Sony, avec un smartphone ou d’une
tablette. Recherchez SongPal sur
Google Play ou sur l’App Store et
téléchargez-le sur votre smartphone ou
votre tablette.
SongPal vous permet :
– de modifier les réglages courants, en
choisissant l’entrée du système et en
réglant le volume.
– d’écouter avec le système de la
musique stockée sur un smartphone.
– de profiter de la musique visuellement
avec l’écran de votre smartphone.
Remarques
• Ce système est compatible avec SongPal,
version 3.3 ou ultérieure.
• SongPal utilise la fonction BLUETOOTH du
système.
• Les caractéristiques techniques et
l’affichage de SongPal sont susceptibles
d’être modifiés sans avis préalable.
16
Utilisation de SongPal
1 Téléchargez l’application gratuite
SongPal sur l’appareil à distance.
2 Connectez le système et l’appareil
à distance avec la connexion
BLUETOOTH (page 14).
3 Démarrez SongPal.
4 Utilisez les indications sur l’éran
SongPal.
FR
Page 47

Réglages et ajustements
Réglages et ajustements
Utilisation de l’écran de configuration
Vous pouvez régler les éléments suivants avec le menu.
Vos réglages sont conservés même si vous déconnectez la cordon d’alimentation
CA.
1 Appuyez sur MENU pour activer le menu sur l’écran du panneau supérieur.
2 Appuyez plusieurs fois sur BACK///ENTER pour sélectionner l’élément et
appuyez sur ENTER pour sélectionner le réglage souhaité.
3 Appuyez sur MENU pour désactiver le menu.
Liste de menu
Les réglages par défaut sont soulignés.
Éléments de menu Fonction
«LVL >»
(Niveau)
«SPK >»
(Hautparleur)
«AUD >»
(Audio)
«ATT»
(Réglages
d’atténuation Analogique)
«DRC»
(Commande de la
gamme
dynamique)
«PLACE»
(Placement des
haut-parleurs)
«DUAL»
(Dual mono)
«TV AU»
(TV audio)
Une distorsion peut se produire lors de l’écoute d’un
appareil connecté à la prise ANALOG IN. Vous pouvez évi ter
la distorsion en atténuant le niveau d’entrée du système.
•«ON»
: Atténue le niveau d’entrée. Le niveau d’entrée
diminue lorsque ce réglage est défini.
• « OFF » : Niveau d’entrée normal.
Pour profiter des films à un faible niveau de volume. DRC
est appliqué aux sources Dolby Digital.
• « ON » : Compresse le son en fonction des informations
qu’il contient.
•«OFF »
: Le son n’est pas compressé.
• « STDRD »
barre de haut-parleurs en position standard.
• « WA LL » : Sélectionnez ce réglage si vous montez la barre
de haut-parleurs sur un mur (page 22).
Vous pouvez écouter un son diffusé en multiplex lorsque le
système reçoit un signal diffusé en multiplex Dolby Digital.
•«M/S »
est reproduit.
• « MAIN » : Le son de la langue principale est reproduit.
• « SUB » : Le son de la langue secondaire est reproduit.
•«AUTO»
connecté à une prise HDMI (ARC) d’un téléviseur avec un
câble HDMI.
• « OPT » : Sélectionnez ce réglage quand le système est
connecté à un téléviseur avec le câble optique numérique.
: Sélectionnez ce réglage si vous installez la
: Un mixage des langues principale et secondaire
: Sélectionnez ce réglage quand le système est
FR
17
Page 48

Éléments de menu Fonction
Remarque
«EFCT»
(Effet sonore)
«STRM»
(Flux)
«HDMI>» «CTRL»
«BT >»
(BLUETOOTH)
«WS >»
(Son sans fil)
(Contrôle pour
HDMI)
«TVSTB»
(Veille liée au
téléviseur)
« COLOR »
(Couleur HDMI)
« BTAAC »
(BLUETOOTH
Codage audio
avancé)
« BTSTB »
(BLUETOOTH en
mode veille)
«INFO»
(Information sur le
périphérique
BLUETOOTH)
«LINK»
(Secure Link)
•«ON»: Le son du champ acoustique sélectionné est lu. Il
est recommandé d’utiliser ce réglage.
• « OFF » : La source d’entrée est mixée en aval pour deux
canaux.
Montre les informations du flux audio actue.
Consulte la page 32 pour connaître les formats audio pris en
charge.
•«ON»
appareils connectés avec un câble HDMI peuvent se
commander mutuellement.
•«OFF »: Désactivé.
Cette fonction est disponible lorsque vous réglez « CTRL »
sur « ON ».
•«AUTO»
s’éteint automatiquement quand vous éteignez le
téléviseur.
• « ON » : Le système s’éteint automatiquement quand
vous éteignez les téléviseur quelle que soit l’entrée.
• « OFF » : Le système ne s’éteint pas lorsque vous éteignez
le téléviseur.
•«AUTO»
externe et bascule vers le réglage de couleurs
correspondant.
• « YCBCR » : Reproduit des signaux vidéo YC
• « RGB » : Reproduit des signaux vidéo RGB.
Vous pouvez régler si le système utilise ou non AAC via
BLUETOOTH.
•«ON»
• « OFF » : Désactiver codec AAC.
Si vous modifiez le réglage « BTAAC » lorsqu’un
périphérique BLUETOOTH est connecté, le réglage du
codec ne s’applique qu’à la prochaine connexion.
Quand le système a des informations d’appairage, le
système est en mode de veille BLUETOOTH même quand il
est éteint.
•«ON»
• « OFF » : Le mode de veille BLUETOOTH est désactivé.
Le nom d’un périphérique BLUETOOTH détecté et l’adresse
de l’appareil apparaissent sur l’écran du panneau
supérieur.
« NO DEVICE » apparaît si le système n’est pas connecté à
un périphérique BLUETOOTH.
• « ON » : Vous pouvez spécifier la connexion sans fil à
utiliser entre la barre de haut-parleurs et le subwoofer à
l’aide de la fonction Secure Link (page 24).
•«OFF »
: La fonction Contrôle pour HDMI est activée. Les
: Si l’entrée du système est « TV », le système
: Détecte automatiquement le type d’appareil
BCR.
: Activer codec AAC.
: Le mode de veille BLUETOOTH est activé.
: Désactivé.
18
FR
Page 49

Réglages et ajustements
Éléments de menu Fonction
«USB >» «REPT»
«SYS >»
(Système)
(Mode de lecture)
« ASTBY »
(Mode veille
automatique)
«VER»
(Version)
• « NONE » : Lit toutes les plages.
•«ONE»: Répète une plage.
• « FLDER » : Répète toutes les plages d’un dossier.
• « RANDM » : Répète toutes les plages d’un dossier dans
un ordre aléatoire.
• « ALL » : Répète toutes les plages.
•«ON»
: Active la fonction de veille automatique. Si vous
ne commandez pas le système pendant environ
20 minutes, le système se met automatiquement en
mode veille.
•«OFF »: Désactivé.
Les informations de la version actuelle du firmware
apparaissent sur l’écran du panneau supérieur.
19
FR
Page 50

Autres fonctions
Utilisation de la fonction Contrôle pour HDMI
Connecter un appareil tel qu’un
téléviseur ou un Lecteur de disques
Blu-ray compatible avec la fonction
Contrôle pour HDMI* à l’aide d’un câble
HDMI (câble HDMI haute vitesse avec
Ethernet, non fourni) vous permet de
commander facilement l’appareil avec
la télécommande du téléviseur.
Les fonctions suivantes peuvent être
utilisées avec la fonction de Contrôle
pour HDMI.
• Fonction de mise hors tension du
système
• Fonction de contrôle audio du
système
• Audio Return Channel
• Fonction One-Touch Play
* Contrôle pour HDMI est une norme
utilisée par CEC (Consumer Electronics
Control) permettant aux appareils HDMI
(High-Definition Multimedia Interface) de
se commander mutuellement.
Remarque
Ces fonction peuvent fonctionner sur des
appareils qui n’ont pas été fabriqués par
Sony, mais cela n’est pas garanti.
Préparation pour l’utilisation
de la fonction Contrôle pour
HDMI
Réglez « HDMI> » – « CTRL » sur le
système sur « ON » (page 18). Le
paramètre par défaut est « ON ».
Active les réglages de la fonction
Contrôle pour HDMI pour le téléviseur et
l’autre appareil connecté au système.
Astuce
Si vous activez la fonction Contrôle pour
HDMI (« BRAVIA » sync) lors de l’utilisation
d’un téléviseur fabriqué par Sony, la
fonction Contrôle pour HDMI du système
est aussi activée automatiquement. Quand
les réglages sont terminé, « DONE »
apparaît sur l’écran du panneau supérieur.
Fonction de mise hors
tension du système
Lorsque vous éteignez le téléviseur, le
système s’éteint automatiquement.
Réglez « HDMI> » – « TVSTB » sur le
système sur « ON » ou « AUTO »
(page 18). Le paramètre par défaut est
«AUTO».
Fonction de Contrôle audio
du système
Si vous allumez le système lorsque vous
regardez la télévision, le son du
téléviseur sera émis par les hautparleurs du système. Le volume du
système peut être réglé à l’aide de la
télécommande du téléviseur.
Si le son du téléviseur a été émis par les
haut-parleurs du système la dernière
fois que vous avec regardé la télévision,
le système sera mis en marche
automatiquement lorsque vous allumez
de nouveau le téléviseur.
Les opérations peuvent aussi être
réalisées à l’aide du menu du téléviseur.
Pour obtenir plus de détails, reportezvous au Mode d’emploi de votre
téléviseur.
20
FR
Page 51

Autres fonctions
Remarques
• Le son set sorti uniquement par le
téléviseur si un autre réglage que l’entrée
« TV » est sélectionné lors de l’utilisation
de la fonction Double image sur le
téléviseur. Si vous désactivez la fonction
Double image, le son est émis par le
système.
• Le niveau de volume du système s’affiche
sur l’écran du téléviseur en fonction du
téléviseur. Il peut être différent du niveau
de volume sur l’écran du panneau
supérieur.
• En fonction des réglages du téléviseur, le
fonction de Contrôle audio du système
peut ne pas être disponible. Pour obtenir
plus de détails, reportez-vous au Mode
d’emploi de votre téléviseur.
Audio Return Channel
Si le système est connecté à la prise
HDMI IN d’un téléviseur compatible
avec Audio Return Channel, vous
pouvez écouter le son du téléviseur à
partir des haut-parleurs du système
sans connecter de câble optique
numérique.
Sur le système, réglez « AUD > » –
« TV AU » sur « AUTO » (page 17). Le
paramètre par défaut est « AUTO ».
Remarque
Si le téléviseur n’est pas compatible avec
Audio Return Channel, vous devez
connecter un câble optique numérique
(reportez-vous au guide de démarrage
fourni).
Fonction One-Touch Play
Quand vous lisez un contenu sur un
appareil (Lecteur de disques Blu-ray,
« PlayStation®4 », etc.) connecté au
téléviseur, le système et le téléviseur
s’allument automatiquement, l’entrée
du système est commutée sur l’entrée
pour le téléviseur et le son est sorti par
les haut-parleurs du système.
Remarques
• Si le son du téléviseur a été émis par les
haut-parleurs du téléviseur la dernière
fois que vous avec regardé la télévision, le
système ne s’allume pas et le son et
l’image sont sortis par le téléviseur même
si le contenu de l’appareil est lu.
• En fonction du téléviseur, le début du
contenu peut ne pas être lu
correctement.
Utilisation de la fonction « BRAVIA » Sync
En plus de la fonction Contrôle pour
HDMI, vous pouvez aussi utiliser la
fonction suivante sur des appareils
compatibles avec la fonction « BRAVIA »
sync.
• Fonction de sélection de scène
Remarque
Cette fonction est une fonction propriétaire
de Sony. Cette fonction ne peut pas être
utilisée avec d’autres produits que ceux
fabriqués par Sony.
21
FR
Page 52

Fonction de sélection de
scène
Le champ acoustique du système est
commuté automatiquement en
fonction des réglages de la fonction de
sélection de scène ou de mode sonore
du téléviseur. Pour obtenir plus de
détails, reportez-vous au Mode
d’emploi de votre téléviseur.
Réglez le champ acoustique sur
« CLEARAUDIO+ » (page 13).
Remarques à propos des
connexions HDMI
• Utilisez un câble HDMI haute vitesse.
Si vous utilisez un câble HDMI
standard, il est possible que les
contenus de 1080p ne s’affichent pas
correctement.
• Utilisez un câble HDMI certifié.
Utilisez un câble HDMI haute vitesse
Sony avec le logo du type de câble.
• Nous ne vous recommandons pas
d’utiliser un câble de conversion
HDMI-DVI.
• Vérifiez la configuration de
l’équipement connecté si l’image est
mauvaise ou si le son ne sort pas de
l’équipement connecté par le câble
HDMI.
• Les signaux audio (fréquence
d’échantillonnage, longueur binaire,
etc.) transmis par une prise HDMI
peuvent être supprimés par
l’équipement connecté.
• Le son peut être interrompu lorsque la
fréquence d’échantillonnage ou le
nombre de canaux des signaux de
sortie audio de l’équipement de
lecture sont commutés.
• Si l’équipement connecté n’est pas
compatible avec la technologie de
protection des droits d’auteur (HDCP),
l’image et/ou le son de la prise HDMI
OUT de ce système peut être déformé
ou il peut ne pas avoir de sortie. Dans
ce cas, veuillez vérifier les
spécifications de l’équipement
connecté.
Économie d’énergie en mode veille
Vérifiez que vous avez effectué les
réglages suivants :
– « CTRL » dans les « HDMI> » est réglé
sur « OFF » (page 18).
– « BTSTB » dans les « BT > » est réglé
sur « OFF » (page 18).
Fixation de la barre de haut-parleurs au mur
Vous pouvez installer la barre de hautparleurs sur un mur.
Remarques
• Utilisez des vis (non fournies) adapt ées au
matériau et à la résistance du mur.
Comme les plaques de plâtre sont
particulièrement fragiles, fixez
fermement les vis à deux goujons dans la
poutre du mur. Installez la barre de hautparleurs à l’horizontale, accrochée par
des vis dans les goujons, sur une portion
plane du mur.
• Assurez-vous de confier l’installation à un
détaillant ou entrepreneur Sony et faites
particulièrement attention à la sécurité
pendant l’installation.
22
FR
Page 53

Autres fonctions
• Sony ne peut être tenu responsable de
Support de montage
au mur (fourni)
Vis (fourni)
4 mm (3/16 po)
Plus de 30 mm (1
3
/16po)
4,6 mm
(
3
/16 po)
Trou dans le support
10 mm
(
13
/32 po)
560 mm (22 1/8 po)
5mm à
6mm
(environ
7
/32 po)
tout accident ou dégât entraîné par une
installation incorrecte, une résistance
insuffisante du mur, une mauvaise
fixation des vis, une catastrophe
naturelle, etc.
1 Fixez les supports de montage au
mur fourni sur les trous de fixation
du support dessous la barre de
haut-parleurs avec les vis fournies
de façon que la surface de chaque
support soit comme montré sur
l’illustration.
Fixez les deux supports de montage
au mur sur les trous de fixation
gauche et droit dessous la barre de
haut-parleurs.
2 Préparez des vis (non fournies)
adaptées aux trous des supports.
3 Serrez les vis à 2 goujons dans le
mur.
Les vis doivent dépasser de 5 mm à
6 mm (environ 7/32 po).
4 Accrochez la barre de haut-
parleurs aux vis.
Alignez les trous des supports avec
les vis, puis accrochez la barre de
haut-parleurs aux les deux vis.
23
FR
Page 54

Installation du
Attachez les patins de haut-parleur fournis.
subwoofer
horizontalement
Placez le subwoofer sur le côté droit
avec le logo « SONY » dirigé vers l’avant.
Activation de la transmission sans fil entre unités spécifiques (Secure Link)
Vous pouvez spécifier la connexion sans
fil à utiliser entre la barre de hautparleurs et le subwoofer à l’aide de la
fonction Secure Link.
Cette fonction peut aider à éviter les
interférences si vous utilisez plusieurs
appareils sans fil ou que vos voisins en
utilisent.
2 Appuyez sur / pour
sélectionner « WS > », puis
appuyez sur ENTER.
3 Quand « LINK » apparaît sur
l’écran du panneau supérieur,
appuyez sur ENTER.
4 Appuyez sur / pour
sélectionner « ON », puis appuyez
sur ENTER.
5 Quand « START » apparaît sur
l’écran du panneau supérieur,
appuyez sur ENTER.
« ***** » apparaît, et la barre de
haut-parleurs recherche un appareil
qui peut être utilisé avec Link.
Passez à l’étape suivante avant
2 minutes.
6 Appuyez sur LINK sur le
subwoofer.
Le témoin d’alimentation du
subwoofer clignote en orange.
7 Quand « DONE » apparaît sur
l’écran du panneau supérieur,
appuyez sur ENTER.
Le subwoofer est lié à la barre de
haut-parleurs et le temoin
d’alimentation du subwoofer
devient orange.
Si « FAIL » apparaît, assurez-vous
que le subwoofer est allumé et
appuyez sur BACK pour réaliser de
nouveau la procédure à partir de
l’étape 3.
8 Appuyez sur MENU.
Le menu est désactivé.
1 Appuyez sur MENU.
FR
24
Page 55

Informations complémentaires
Réglage du volume du subwoofer
Le subwoofer est conçu pour reproduire
le son de basse ou les basses
fréquences.
Appuyez sur SW +/– pour régler
le volume du subwoofer.
Remarque
Quand la source d’entrée ne contient pas
beaucoup de son grave, comme dans le
cas d’une émission de télévision, le son du
subwoofer peut être difficile à entendre.
Informations complémentaires
Précautions
Sécurité
• Si un objet ou du liquide venait à pénétrer
à l’intérieur du système, débranchez le
système et faites-le vérifier par une
personne qualifiée avant de le remettre
en marche.
•Ne touchez pas le cordon d’alimentation
CA avec des mains humides. Vous
risqueriez de vous électrocuter.
• Ne montez pas sur la barre de hautparleurs et le subwoofer car vous pourriez
tomber, vous blesser ou endommager le
système.
Sources d’alimentation
• Avant de commander le système,
assurez-vous que la tension soit la même
que celle de votre réseau local. La tension
de fonctionnement est indiquée sur la
plaque signalétique sous la barre de
haut-parleurs.
• Débranchez le système de la prise murale
si vous prévoyez de ne pas l’utiliser
pendant une période prolongée. Pour
débrancher le cordon d’alimentation CA,
tirez sur la fiche, mais ne tirez jamais sur
le cordon proprement dit.
• Une des lames de la fiche est plus large
que l’autre pour des raisons de sécurité et
la fiche ne pourra être branchée sur la
prise secteur murale que d’une seule
façon. Si vous ne pouvez pas insérer la
fiche complètement dans la prise,
contactez votre revendeur.
• Le cordon d’alimentation CA ne peut être
remplacé que par un atelier d’assistance
qualifié.
25
FR
Page 56

À propos de l’échauffement
Si le système chauffe lors de son utilisatio n,
ce n’est pas un dysfonctionnement.
En cas d’utilisation continue à un volume
élevé de ce système, la température
augmente considérablement à l’arrière et
sur le dessous. Pour éviter de vous bruler,
ne touchez pas le système.
À propos de l’emplacement
• Installez le système dans un endroit
suffisamment ventilé pour éviter toute
surchauffe interne et prolonger la vie du
système.
• Ne placez pas le système près d’une
source de chaleur ni à un endroit exposé
à la lumière directe du soleil, à une
poussière excessive ou à des chocs
mécaniques.
• Ne placez rien à l’arrière de la barre de
haut-parleurs et du subwoofer qui
pourrait bloquer les trous de ventilation
est entraîner un mauvais
fonctionnement.
• Si le système est utilisé en combinaison
avec un téléviseur, un magnétoscope ou
un magnétophone, cela peut provoquer
du bruit et altérer la qualité de l’image.
Dans ce cas, placez le système à l’écart du
téléviseur, du magnétoscope ou du
magnétophone.
• Agissez avec prudence si vous allez placer
le système sur une surface qui a reçu un
traitement spécial (cire, huile, polissage,
etc.) car cela pourrait tâcher ou décolorer
la surface.
• Faites attention aux bords de la barre de
haut-parleurs et du subwoofer car il
peuvent causer des blessures.
• Laissez un espace de 3 cm (1
plus dessous la barre de haut-parleurs
quand vous l’accrochez sur un mur.
3
/16 po) ou
Fonctionnement
Avant de connecter d’autres équipements,
assurez-vous d’éteindre et de débrancher
le système.
Si vous recontrer un problème de
couleurs anormales sur un
téléviseur à proximité
Des couleurs irrégulières peuvent être
observées sur certains types de téléviseur.
• Si un problème de couleurs irrégulières se
produit...
Éteignez le téléviseur, puis rallumez le
après 15 à 30 minutes.
• Si le problème de couleurs irrégulières
continue...
Éloignez le système du téléviseur.
Nettoyage
Nettoyez le système avec un chiffon doux
et sec. N’utilisez pas de tampon abrasif, de
poudre à récurer ou de solvant tel que
l’alcool ou la benzine.
Si vous avez des questions ou des
problèmes en ce qui concerne votre
système, veuillez consulter votre
revendeur Sony le plus proche.
Dépannage
Si vous rencontrez l’un des problèmes
suivant en utilisant le système,
consultez ce guide de dépannage pour
vous aider à remédier à ce problème
avant de demander une réparation. Si le
problème persiste, consultez votre
revendeur Sony le plus proche.
Général
L’alimentation ne s’allume pas.
Vérifiez que le cordon
d’alimentation CA est correctement
connecté.
26
FR
Page 57

Informations complémentaires
Le système ne fonctionne pas
normalement.
Déconnectez le cordon
d’alimentation CA de la prise
murale, puis reconnectez-le après
quelques minutes.
Le système s’éteint automatiquement.
La fonction de veille automatique
fonctionne. Réglez « ASTBY » dans
« SYS > » sur « OFF » (page 19).
Le système ne s’allume pas même
quand le téléviseur est allumé.
Réglez « HDMI> » – « CTRL » sur
« ON » (page 18). Le téléviseur doit
prendre en charge la fonction
Contrôle pour HDMI (page 20). Pour
obtenir plus de détails, reportezvous au Mode d’emploi de votre
téléviseur.
Vérifier les réglages de haut-parleur
sur le téléviseur. L’alimentation du
système est synchronisée avec les
réglages de haut-parleur du
téléviseur. Pour obtenir plus de
détails, reportez-vous au Mode
d’emploi de votre téléviseur.
Si le son a été sortie par les haut-
parleurs du téléviseur la fois
précédente, le système ne s’allume
pas même quand le téléviseur est
allumé.
Le système s’éteint quand le téléviseur
est éteint.
Vérifiez le réglage de « HDMI> » –
« TVSTB » (page 18). Quand
« TVSTB » est réglé sur « ON », le
système s’éteint automatiquement
quand vous éteignez les téléviseur
quelle que soit l’entrée.
Le système ne s’éteint pas même
quand le téléviseur est éteint.
Vérifiez le réglage de « HDMI> » –
« TVSTB » (page 18). Pour éteindre
le système automatiquement
quelle que soit l’entrée quand vous
éteignez le téléviseur, réglez
« TVSTB » sur « ON ». Le téléviseur
doit prendre en charge la fonction
Contrôle pour HDMI (page 20). Pour
obtenir plus de détails, reportezvous au Mode d’emploi de votre
téléviseur.
Son
Le système n’émet aucun son de
téléviseur.
Vérifiez le type et la connexion du
câble HDMI, du câble optique
numérique ou du câble audio
analogique qui est connecté au
système et au téléviseur (reportezvous au Guide de démarrage
fourni).
Si vous téléviseur est compatible
avec with Audio Return Channel,
assurez-vous que le système est
connecté à une prise d’entrée HDMI
compatible ARC du téléviseur
(reportez-vous au Guide de
démarrage fourni). Si aucun son ne
sort toujours ou si le son est
interrompu, connectez le câble
optique numérique fourni et réglez
« AUD > » – « TV AU » sur « OPT »
(page 17).
Si votre téléviseur n’est pas
compatible avec Audio Return
Channel, le son du téléviseur n’est
pas sorti par le système même si le
système est connecté à la prise
d’entrée HDMI du téléviseur. Pour
sortir le son du téléviseur par le
système, connectez le câble
optique numérique fourni
(reportez-vous au Guide de
démarrage fourni).
27
FR
Page 58

Si le son n’est pas sorti par le
système même si le système et le
téléviseur sont connectés par un
câble optique numérique ou si le
téléviseur ne possède pas de prise
de sortie sonore numérique
optique, connectez un câble audio
analogique (non fourni) et changez
l’entrée du système sur « ANALOG »
(page 11).
Changez l’entrée du système sur
« TV » (page 11).
Augmentez le volume sur le
système ou retirez la sourdine.
En fonction de l’ordre de connexion
du téléviseur et du système, il se
peut que le système soit en
sourdine et que « MUTING » soit
affiché sur l’écran du panneau
supérieur du système. Si cela se
produit, allumez d’abord le
téléviseur, puis le système.
Réglez les paramètres des haut-
parleurs du téléviseur (BRAVIA) sur
Système audio. Reportez-vous aux
Mode d’emploi de votre téléviseur à
propos de ses réglages.
Le son est reproduit depuis le système
et le téléviseur.
Mettez en sourdine le système ou le
téléviseur.
L’appareil connecté à la barre de hautparleurs n’émet pas de son ou bien un
son très faible par la barre de hautparleurs.
Appuyez sur + et vérifiez le
volume (page 10).
Appuyez sur ou + pour
annuler la fonction de mise en
sourdine (page 10).
Assurez-vous de sélectionner la
bonne source d’entrée. Pour utiliser
d’autres sources d’entrée, appuyez
sur INPUT plusieurs fois (page 11).
Assurez-vous que tous les câbles et
cordons du système et de l’appareil
connecté soit fermement insérés.
Aucun son ou un son très faible
uniquement est reproduit par le
subwoofer.
Appuyez sur SW + pour
augmenter le volume du subwoofer
(page 10).
Vérifiez que le témoin
d’alimentation sur le subwoofer est
allumé en vert. Si non, reportezvous à « Aucun son n’est reproduit
par le subwoofer. » dans « Sons
sans fil du subwoofer » (page 30).
Un subwoofer sert à reproduire le
son de basse. Si les sources
d’entrée ne contiennent que de très
faibles composants de son de bass e
(par ex. une émission de télévision),
le son du subwoofer peut être
difficile à entendre.
Lorsque vous lisez du contenu
compatible avec la technologie de
protection du copyright (HDCP), il
ne sort pas du subwoofer.
L’effet surround ne peut pas être
obtenu.
En fonction du signal d’entrée et du
réglage du champ acoustique, le
traitement du son surround peut ne
pas fonctionner efficacement.
L’effet surround peut être léger en
fonction du programme ou du
disque.
Pour lire un son multicanal, vérifier
le réglage de sortie audio
numérique sur l’appareil connecté
au système. Pour les détails,
reportez-vous au Mode d’emploi
fourni avec l’appareil connecté.
28
FR
Page 59

Informations complémentaires
Périphérique USB
Le périphérique USB n’est pas reconnu.
Essayez d’effectuer les actions
suivantes :
Mettez le système hors tension.
Enlevez et reconnectez le
périphérique USB.
Mettez le système sous tension.
Vérifiez que le périphérique USB est
correctement connecté au port
(USB).
Vérifiez si le périphérique USB ou un
câble est endommagé.
Vérifiez si le périphérique USB est
activé.
Si le périphérique USB est connecté
via un hub USB, déconnectez-le et
connectez directement le
périphérique USB sur la barre de
haut-parleurs.
Périphérique BLUETOOTH
La connexion BLUETOOTH ne peut être
complétée.
Assurez-vous que le voyant DEL
bleu est allumé (page 8).
Assurez-vous que le périphérique
BLUETOOTH à connecter est sous
tension et que la fonction
BLUETOOTH a été activée.
Placez le périphérique BLUETOOTH
plus près de la barre de hautparleurs.
Appairez de nouveau ce système et
le périphérique BLUETOOTH. Il peut
s’avérer nécessaire d’annuler
l’appairage avec ce système en
utilisant d’abord votre le
périphérique BLUETOOTH.
Impossible d’effectuer l’appairage.
Placez le périphérique BLUETOOTH
plus près de la barre de hautparleurs.
Assurez-vous que ce système ne
reçoit pas d’interférences à partir
d’un équipement LAN sans fil, un
appareil sans fil 2,4 GHz ou un four
à micro-onde. Si un appareil qui
génère des radiations
électromagnétiques se trouve à
proximité, éloignez l’appareil du
système.
L’appairage peut être impossible si
d’autres périphériques BLUETOOTH
sont présents autour de la barre de
haut-parleurs. Dans ce cas, mettez
les autres périphériques
BLUETOOTH hors tension.
Aucun son n’est sortie du périphérique
BLUETOOTH connecté.
Assurez-vous que le voyant DEL
bleu est allumé (page 8).
Placez le périphérique BLUETOOTH
plus près de la barre de hautparleurs.
Si un appareil qui émet des
radiations électromagnétiques, tels
qu’un équipement LAN sans fil,
d’autres périphériques BLUETOOTH
ou un micro-onde se trouve à
proximité, éloignez-le du système.
Retirez tous les obstacles entre ce
système et le périphérique
BLUETOOTH ou éloignez ce système
de l’obstacle.
Changez la position du
périphérique BLUETOOTH
connecté.
Essayez de changer la fréquence
sans fil du routeur Wi-Fi, de
l’ordinateur, etc. sur la bande 5 GHz.
Augmentez le volume sur le
périphérique BLUETOOTH
connecté.
Le son n’est pas synchronisé avec
l’image.
Quand vous regardez un film, il se
peut que le son soit légèrement
décaler par rapport à l’image.
29
FR
Page 60

Sons sans fil du subwoofer
Aucun son n’est reproduit par le
subwoofer.
Le témoin d’alimentation ne
s’allume pas.
• Vérifiez que le cordon
d’alimentation CA du subwoofer
est correctement connecté.
•Appuyez sur sur le subwoofer
pour l’allumer.
Le témoin d’alimentation clignote
lentement en vert ou s’allume en
rouge.
• Déplacez le subwoofer vers un
endroit à proximité de la barre de
haut-parleurs pour que le témoin
d’alimentation s’allume en vert.
• Suivez les étapes de « Activation
de la transmission sans fil entre
unités spécifiques (Secure Link) »
(page 24).
Si le témoin d’alimentation clignote
en rouge, appuyez sur sur le
subwoofer pour couper
l’alimentation et vérifiez si l’orifice
de ventilation du subwoofer est
obstrué.
Le subwoofer est conçu pour
reproduire le son de basse. Lorsque
la source d’entrée ne contient pas
beaucoup de basses, comme c’est
le cas de la plupart des programmes
de télévision, le son de basse peut
être inaudible.
Appuyez sur SW + pour
augmenter le volume du subwoofer
(page 25).
Le son se coupe ou contient du bruit.
Si un appareil générant des ondes
électromagnétiques, tels qu’un LAN
sans fil ou un four à micro-onde en
fonctionnement, est placé à côté du
système, déplacez ce dernier à
l’écart de l’appareil.
S’il existe un obstacle entre la barre
de haut-parleurs et le subwoofer,
déplacez-le ou enlevez-le.
Placez la barre de haut-parleurs et
le subwoofer le plus près possible
l’un de l’autre.
Mettez la fréquence LAN sans fil de
tout routeur Wi-Fi ou ordinateur
personnel à proximité sur la bande
5GHz.
Changez le réglage du téléviseur,
du Lecteur de disques Blu-ray, etc.
du LAN sans fil sur le réseau filaire.
Télécommande
La télécommande ne fonctionne pas.
Pointez la télécommande sur le
capteur de télécommande de la
barre de haut-parleurs (page 8).
Retirez tous les obstacles qui se
trouvent entre la télécommande et
la barre de haut-parleurs.
Remplacez les deux piles de la
télécommande par des neuves si
elles sont usées.
Assurez-vous d’appuyer sur la
touche correcte de la
télécommande.
La télécommande du téléviseur ne
fonctionne pas.
Installez la barre de haut-parleurs
de façon qu’elle ne gène pas le
capteur de télécommande du
téléviseur.
Autres
La fonction Contrôle pour HDMI ne
fonctionne pas correctement.
Vérifiez la connexion avec le
système (reportez-vous au Guide
démarrage fourni).
Activez la fonction Contrôle pour
HDMI sur le téléviseur. Pour obtenir
plus de détails, reportez-vous au
Mode d’emploi de votre téléviseur.
30
FR
Page 61

Informations complémentaires
Attendez un moment, puis essayez
de nouveau. Si vous débranchez le
système, il faut un certain temps
avant qu’une opération soit
effectuée. Attendez 15 secondes ou
plus, puis essayez de nouveau.
Assurez-vous que les appareils
connectés au système prennent en
charge la fonction Contrôle pour
HDMI.
Active la fonction Contrôle pour
HDMI sur les appareils connectés au
système. Pour obtenir plus de
détails, reportez-vous au Mode
d’emploi de votre appareil.
Le type et le nombre d’appareils
pouvant être contrôlés par la
fonction Contrôle pour HDMI sont
restreints par la norme HDMI CEC
comme suit :
• Appareils d’enregistrement
(enregistreur de Blu-ray Disc,
enregistreur de DVD, etc.) :
jusqu’à 3 appareils
• Appareils de lecture (Lecteur de
disques Blu-ray, lecteurs de DVD,
etc.) : jusqu’à 3 appareils
• Appareils à tuner : jusqu’à
4appareils
• Système audio (récepteur/
écouteurs) : jusqu’à 1 appareil
(utilisé par ce système)
Si « PRTCT » apparaît sur l’écran du
panneau supérieur de la barre de hautparleurs.
Appuyez sur pour éteindre le
système. Après que l’écran s’est
éteint, déconnectez le cordon
d’alimentation CA puis vérifiez que
rien ne gène les orifices de
ventilation de la barre de hautparleurs.
L’écran du panneau supérieur de la
barre de haut-parleurs ne s’active pas.
Appuyez sur DIMMER pour régler la
luminosité sur « BRIGHT » ou
« DARK », si le réglage est sur
« OFF » (page 10).
Les capteurs du téléviseur ne
fonctionnent pas correctement.
La barre de haut-parleurs peut
bloquer certains capteurs (tels que
le capteur de luminosité) et le
récepteur de télécommande de
votre téléviseur, ou l’« émetteur
pour lunettes 3D (transmission par
infrarouges) » d’un télévise ur 3D qui
utilise le système de verre 3D
infrarouge ou une communication
sans fil. Éloignez la barre de hautparleurs du téléviseur à une
distance qui permette le
fonctionnement de ces pièces. Pour
connaître l’emplacement des
capteurs et du récepteur de la
télécommande, reportez-vous au
Mode d’emploi fourni avec le
téléviseur.
Réinitialisation
Si le système ne fonctionne toujours pas
correctement, réinitialisez le système de
la façon suivante.
Assurez-vous d’utiliser les touches sur la
barre de haut-parleurs pour réaliser
cette opération.
1 Tout en maintenant enfoncé
INPUT, touchez VOL – et
simultanément pendant
5 secondes.
« RESET » apparaît sur l’écran du
panneau supérieur, et les réglages
du menu, les champs acoustiques,
etc. retournent aux réglages
initiaux.
31
FR
Page 62

2 Débranchez le cordon
d’alimentation CA.
3 Connectez le cordon
d’alimentation CA, puis appuyez
sur pour allumer le système.
4 Liez le système au subwoofer
(page 24).
Types de fichiers compatibles
Codec Extension
MP3 (MPEG-1 Audio
Layer III)
AAC .m4a
Standard WMA9 .wma
LPCM .wav
Remarques
• Selon le format de fichier, le codage de
fichier ou les conditions
d’enregistrement, il se peut que certains
fichiers soient illisibles.
• Il se peut que certains fichiers modifiés à
l’aide d’un ordinateur soient illisibles.
• Le système ne lit pas les fichiers encodés
du type DRM et Lossless.
• Le système reconnaît les fichiers ou
dossiers suivants dans les périphériques
USB :
– 200 dossiers maximum
– jusqu’à 150 fichiers/dossiers dans un
même niveau
• Il est possible que certains périphériques
USB ne fonctionnent pas avec ce système.
• Le système peut reconnaître les
périphérique Mass Storage Class (MSC).
.mp3
Formats audio pris en charge
Ce système prend en charge les formats
audio suivants.
• Dolby Digital
•DTS
• LPCM 2ch
•AAC
Spécifications
Barre de haut-parleurs
(SA-CT390)
Section amplificateur
Modèles destinés aux États-Unis :
PUISSANCE DE SORTIE ET DISTORSION
D’HARMONIQUE TOTALE :
(FTC)
Avant G + Avant D :
Avec des charges de 4 ohms, les deux
canaux en fonctionnement, de 200 Hz
à 20 000 Hz ; puissance RMS débit
35 watts minimum par canal, avec un
maximum de 1% de distorsion
d’harmonique totale, de 250 milliwatts
à la puissance nominale.
PUISSANCE DE SORTIE (référence)
Avant G/Avant D : 100 W (par canal
sous 4 ohms, 1 kHz)
Modèles canadiens :
PUISSANCE DE SORTIE (nominale)
Avant G + Avant D :
50 W + 50 W (sous 4 ohms, 1 kHz,
1% DHT)
PUISSANCE DE SORTIE (référence)
Avant G/Avant D : 100 W (par canal
sous 4 ohms, 1 kHz)
Entrées
USB
ANALOG IN
TV IN OPTICAL
32
FR
Page 63

Informations complémentaires
Sortie
HDMI OUT TV (ARC)
Section HDMI
Connecteur
Type A (19 broches)
Section USB
Port (USB)
Type A
Section BLUETOOTH
Système de communication
Caractéristiques techniques
BLUETOOTH version 4.2
Sortie
Caractéristiques techniques
BLUETOOTH classe puissance 1
Plage de communication maximum
Ligne visuelle d’environ 25 m (82 pi)
Bande de fréquence
Bande 2,4 GHz (2,4000 GHz –
2,4835 GHz)
Méthode de modulation
FHSS (Freq Hopping Spread Spectrum)
Profils BLUETOOTH compatibles
A2DP 1.2 (Advanced Audio Distribution
Profile)
AVRCP 1.6 (Audio Video Remote
Control Profile)
Codecs pris en charge
SBC4), AAC
Plage de transmission (A2DP)
20 Hz – 20 000 Hz (Fréquence
d’échantillonnage 32 kHz, 44,1 kHz,
48 kHz)
1)
La plage actuelle varie en fonction de
facteurs tels que des obstacles entre les
appareils, un champ magnétique présent
à proximité d’un micro-onde, de
l’électricité statique, un téléphone sans
fil, la sensibilité de réception, la
performance de l’antenne, le système
d’exploitation, l’application logicielle,
etc.
2)
Les profils standard BLUETOOTH
indiquent le but de la communication
BLUETOOTH entre les appareils.
3)
Codec : Compression de signal audio et
format de conversion
4)
Codec subband
5)
Codage audio avancé
3)
5)
Section haut-parleur Avant G/Avant D
Système de haut-parleurs
Système de haut-parleurs pleine
gamme, Suspension acoustique
Haut-parleur
Conique de 60 mm (2
3
/8 po)
Général
Alimentation
120 V CA, 60 Hz
Consommation d’énergie
Allumé : 45 W
En veille : 0,5 W ou moins (mode
économie d’énergie)
(Quand « CTRL » dans « HDMI> » et
« BTSTB » dans « BT > » sont réglés sur
«OFF»)
1)
2)
En veille : 2,8 W ou moins
(Quand « CTRL » dans « HDMI> » ou
« BTSTB » dans « BT > » est réglé sur
«ON»)
Dimensions (l/h/p) (environ)
900 mm × 52 mm × 121 mm
1
/2po × 21/8po × 47/8po)
(35
(sans les supports de montage au mur)
900 mm × 121 mm × 59 mm
1
/2po × 47/8po × 23/8po)
(35
(avec les supports de montage au
mur)
Poids (environ)
2,2 kg (4 lb 14 oz)
6)
Le système entre automatiquement en
mode économie d’énergie quand il n’y a
pas de connexion HDMI ou aucun
historique d’appairage BLUETOOTH,
quels que soient les réglages réalisés
pour « CTRL » dans « HDMI> » et
« BTSTB » dans « BT > ».
6)
Subwoofer (SA-WCT390)
PUISSANCE DE SORTIE (référence)
100 W (par canal sous 4 ohms, 100 Hz)
Système de haut-parleurs
Système du subwoofer, Reflex graves
Haut-parleur
Conique de 130 mm (5
Alimentation
120 V CA, 60 Hz
Consommation d’énergie
Allumé : 20 W
En veille : 0,5 W ou moins
1
/8 po)
33
FR
Page 64

Dimensions (l/h/p) (environ)
170 mm × 342 mm × 362 mm
3
/4po × 131/2po × 143/8po)
(6
(installation verticale)
342mm × 172mm × 362mm
1
/2po × 67/8po × 143/8po)
(13
(installation horizontale)
Poids (environ)
6,5 kg (14 Ib 6 oz)
Section transmetteur/
récepteur sans fil
Bande de fréquence
2,4 GHz (2,4000 GHz – 2,4835 GHz)
Méthode de modulation
FHSS (Freq Hopping Spread Spectrum)
La conception et les caractéristiques
techniques sont susceptibles de changer
sans avis préalable.
Connexion BLUETOOTH
• Les périphériques BLUETOOTH
doivent être utilisés dans un rayon de
10 mètres (33 pieds) (distance sans
obstacles) l’un de l’autre. La plage de
communication effective peut être
réduite dans les cas suivants.
– Si une personne, un objet
métallique, un mur ou autre obstacle
est présent entre les appareils
connectés en BLUETOOTH
– Des lieux où une connexion LAN sans
fil est installée
– Autour d’un micro-onde en
fonctionnement
– Des lieux où d’autres ondes
électromagnétiques sont présentes
• Les périphériques BLUETOOTH et le
LAN sans fil (IEEE802.11b/g) utilisent la
même bande de fréquence (2,4 GHz).
Lorsque vous utilisez votre
périphérique BLUETOOTH à proximité
d’un périphérique ayant des capacités
LAN sans fil, des interférences
électromagnétiques peuvent survenir.
Cela risque de provoquer des taux de
transfert de données inférieurs, du
bruit ou une impossibilité de se
connecter. Si cela se produit, essayez
les solutions suivantes :
– Utilisez ce système à une distance
minimum de 10 mètres (33 pieds) de
l’appareil LAN sans fil.
– Mettez l’appareil LAN sans fil hors
tension lorsque vous utilisez votre
périphérique BLUETOOTH dans un
rayon de 10 mètres (33 pieds).
– Installez ce système et le
périphérique BLUETOOTH le plus
proche possible l’un de l’autre.
• Les ondes radio émises par ce
système peuvent interférer avec le
fonctionnement de certains appareils
médicaux. Ces interférences pouvant
provoquer un dysfonctionnement,
mettez toujours ce système et le
périphérique BLUETOOTH hors
tension dans les endroits suivants :
– Dans les hôpitaux, les trains, les
avions, les stations essences et tout
lieu où se trouvent des gaz
inflammables
– Près des portes automatiques ou
des alarmes incendies
• Ce système prend en charge des
fonctions de sécurité conformes aux
spécifications BLUETOOTH afin de
garantir une connexion sécurisée lors
de la communication à l’aide de la
technologie BLUETOOTH. Cependant,
cette sécurité peut être insuffisante
selon le contenu du réglage et
d’autres facteurs, faites donc toujours
attention lorsque vous effectuez une
communication à l’aide de la
technologie BLUETOOTH.
34
FR
Page 65

Informations complémentaires
• Sony ne peut pas être tenu
responsable pour tout dommage ou
toute perte causée par des fuites
d’information lors de la
communication à l’aide de la
technologie BLUETOOTH.
• La communication BLUETOOTH n’est
pas forcément garantie avec tous les
périphérique BLUETOOTH ayant le
même profil que ce système.
• Les périphériques BLUETOOTH
connectés à ce système doivent être
conformes aux caractéristiques
techniques BLUETOOTH prescrites par
Bluetooth SIG, Inc., et doivent être
certifiés conforme. Cependant, même
dans le cas d’un périphérique
BLUETOOTH certifié conforme, il est
possible que certaines
caractéristiques ou spécifications du
périphérique BLUETOOTH rendent la
connexion impossible, ou entraînent
des méthodes de contrôle, un
affichage ou un fonctionnement
différent.
• Du bruit peut survenir ou le son peut
se couper en fonction du périphérique
BLUETOOTH connecté à ce système,
de l’environnement de
communication ou des conditions
environnantes.
35
FR
Page 66

Para clientes de los EE.UU.
Registro del propietario
Los números de modelo y serie están
situados en la parte inferior del panel de
altavoces. Registre estos números en el
espacio proporcionado a continuación.
Indíquelos siempre que llame a su
distribuidor Sony relacionado con este
producto.
No. de modelo
No. de serie
ADVERTENCIA
Para reducir el riesgo de incendio o
descargas eléctricas, no exponga
este aparato a la lluvia ni humedad.
Para reducir el riesgo de incendio, no
cubra la abertura de ventilación del
aparato con periódicos, manteles,
cortinas, etc.
No exponga el aparato a fuentes de
llamas expuestas (por ejemplo, velas
encendidas).
Para reducir el riesgo de incendio o
descargas eléctricas, no exponga este
aparato a derrames ni salpicaduras, y no
coloque objetos llenos con líquidos,
como jarrones, sobre el aparato.
No instale el aparato en un espacio
cerrado, como un estante para libros o
un gabinete integrado.
No exponga baterías ni aparatos con las
baterías instaladas a calor excesivo,
como la luz del sol y el fuego.
Para evitar lesiones, este aparato se
debe instalar firmemente en el gabinete
o acoplado al piso/pared de acuerdo a
las instrucciones de instalación.
Para uso en interiores solamente.
En fuentes eléctricas
•La unidad no se desconecta de la red
eléctrica mientras permanezca
enchufada al tomacorriente de CA,
incluso si la unidad está apagada.
•Si se utiliza un enchufe principal para
desconectar la unidad de la red
eléctrica, conecte la unidad a un
tomacorriente de CA fácilmente
accesible. Si nota alguna anomalía en
la unidad, desconecte
inmediatamente el enchufe principal
del tomacorriente de CA.
Para el panel de altavoces
La placa de identificación y la fecha de
fabricación se encuentran en la parte
inferior.
Para clientes de los EE.UU.
La marca de precaución se encuentra en
el recinto inferior (para el panel de
altavoces).
Este símbolo tiene la intención
de alertar al usuario sobre la
presencia de “voltaje peligroso”
sin aislamiento dentro de la carcasa del
producto que puede ser lo
suficientemente alto para representar
un riesgo de descargas eléctricas para
las personas.
Este símbolo tiene la intención
de alertar al usuario sobre la
presencia de instrucciones
importantes de operación y
mantenimiento (servicio) en el material
impreso anexo al aparato.
Para cumplir con los límites de
emisiones de la FCC se deben utilizar
cables y conectores correctamente
blindados y conectados a tierra para
conexión a computadoras principales
y/o componentes periféricos.
ES
2
Page 67

NOTA:
Este equipo ha sido probado y se
comprobó que cumple con los límites
para un dispositivo digital Clase B, en
conformidad con la Parte 15 de las
Normas de la FCC. Estos límites están
diseñados para proporcionar protección
razonable contra interferencia negativa
en una instalación residencial. Este
equipo genera, utiliza y puede irradiar
energía de radiofrecuencia y, si no se
instala y utiliza de acuerdo a las
instrucciones, puede causar
interferencia negativa a las
radiocomunicaciones.
Sin embargo, no hay garantía de que no
ocurrirá interferencia en una instalación
en particular. Si este equipo causa
interferencia negativa a la recepción de
radio o televisión, lo cual puede ser
determinado apagando y encendiendo
el equipo, se le exhorta al usuario a
tratar de corregir la interferencia
realizando una o más de las siguientes
acciones:
– Reoriente o reubique la antena
receptora.
– Aumente la separación entre el
equipo y el receptor.
– Conecte el equipo en un
tomacorriente de un circuito diferente
al que está conectado el receptor.
– Para obtener ayuda, consulte al
distribuidor o a un técnico de radio/TV
calificado.
PRECAUCIÓN
Se le advierte que cualquier cambio o
modificación no aprobada
expresamente en este manual podría
invalidar su permiso para operar este
equipo.
Este equipo no se debe colocar ni
operar en conjunto con ninguna otra
antena o transmisor.
Este equipo cumple con los límites de
exposición a la radiación de la FCC
definidos para un ambiente no
controlado y cumple con los
lineamientos de exposición a
radiofrecuencia (RF) de la FCC. Este
equipo tiene niveles muy bajos de
energía de RF que se considera cumplen
sin que se requiera una evaluación de
exposición máxima permisible (MPE).
Instrucciones importantes de
seguridad
1) Lea estas instrucciones.
2) Guarde estas instrucciones.
3) Preste atención a todas las
advertencias.
4) Siga todas las instrucciones.
5) No utilice este aparato cerca del
agua.
6) Limpie únicamente con un trapo
seco.
7) No bloquee ninguna abertura de
ventilación. Instale de acuerdo a las
instrucciones del fabricante.
8) No instale cerca de ninguna fuente
de calor como radiadores, registros
de calor, estufas u otros aparatos
(incluyendo amplificadores) que
produzcan calor.
9) No deje sin efecto el propósito de
seguridad del enchufe polarizado o
de tipo con conexión a tierra. Un
enchufe polarizado tiene dos hojas,
una más ancha que la otra. Un
enchufe de tipo con conexión a tierra
tiene dos hojas y una tercera clavija
con conexión a tierra. La hoja ancha
o la tercera clavija se proporcionan
para su seguridad. Si el enchufe
proporcionado no entra en su
tomacorriente, consulte a un
eléctrico para que reemplace el
tomacorriente obsoleto.
ES
3
Page 68

10) Proteja el cable de alimentación para
evitar pisarlo o aplastarlo
especialmente en los enchufes,
receptáculos de tomas múltiples y
en el lugar por donde salen del
aparato.
11) Utilice únicamente aditamentos/
accesorios especificados por el
fabricante.
12) Utilice únicamente con el carrito,
plataforma, trípode, soporte o mesa
especificada por el fabricante, o
vendida con el aparato. Cuando
utilice un carrito, tenga precaución al
moverlo junto con el aparato para
evitar lesiones provocadas por una
volcadura.
13) Desenchufe este aparato durante
tormentas eléctricas o cuando no se
utilice por períodos de tiempo
prolongados.
14) Remita cualquier servicio a personal
de servicio calificado. Este aparato
requiere servicio si se dañó de
alguna manera, como por ejemplo si
se dañó un cable o enchufe eléctrico,
si se derramó líquido o cayeron
objetos dentro del aparato, si el
aparato se expuso a lluvia o
humedad, si no opera
correctamente o si de dejó caer.
Para clientes de Canadá
Se deben utilizar cables y conectores
correctamente blindados y conectados
a tierra para conexión a computadoras
principales y/o componentes
periféricos.
Este dispositivo cumple con las normas
industriales canadienses RSS de
excepción de licencias.
La operación está sujeta a las siguientes
dos condiciones:
(1) Este dispositivo no puede causar
interferencias; y
(2) Este dispositivo debe aceptar
cualquier interferencia, entre las que se
incluyen interferencias que pueden
causar la operación no deseada del
dispositivo.
Este equipo cumple con los límites de
exposición a la radiación de la IC
definidos para un entorno no
controlado y cumple con la RSS-102 de
las normas de exposición a
radiofrecuencia (RF) de la IC.
Este equipo tiene niveles muy bajos de
energía de RF que se considera cumplen
sin que se requiera una evaluación de
exposición máxima permisible (MPE).
Sin embargo, convendría instalar y
operar este equipo manteniendo el
radiador a una distancia de al menos
20 cm o más del cuerpo de la persona.
Derechos de autor y marcas
registradas
•Este sistema cuenta con Dolby* Digital
y DTS** Digital Surround System
(sistema envolvente digital).
* Fabricado con la autorización de
Dolby Laboratories.
Dolby y el símbolo de doble D son
marcas comerciales de Dolby
Laboratories.
** Para las patentes de DTS, consulte
http://patents.dts.com. Fabricado
bajo licencia de DTS Licensing
Limited. DTS, el símbolo, y DTS y el
símbolo juntos son marcas
comerciales registradas, y DTS
Digital Surround es una marca
registrada de DTS, Inc. © DTS, Inc.
Todos los derechos reservados.
ES
4
Page 69

•La marca mundial y los logos de
BLUETOOTH® son marcas comerciales
registradas propiedad de Bluetooth
SIG, Inc. y cualquier uso de dichas
marcas por parte de Sony Corporation
es bajo licencia. Otras marcas
registradas y nombres comerciales son
propiedad de sus respectivos
propietarios.
•Este sistema cuenta con tecnología de
High-Definition Multimedia Interface
(interfaz multimedia de alta definición)
(HDMI™).
Los términos HDMI e HDMI HighDefinition Multimedia Interface, y el
logo de HDMI son marcas registradas o
marcas comerciales registradas de
HDMI Licensing LLC en los Estados
Unidos y en otros países.
•N-Mark es una marca registrada o
marca comercial registrada del NFC
Forum, Inc., en los Estados Unidos y en
otros países.
•Android™ es una marca comercial de
Google Inc.
•Google Play™ es una marca comercial
de Google Inc.
•“BRAVIA” es una marca registrada de
Sony Corporation.
•“PlayStation” es una marca comercial
registrada de Sony Computer
Entertainment Inc.
•Tecnología de codificación de audio
MPEG Layer-3 y patentes con licencia
de Fraunhofer IIS y Thomson.
•Windows Media es una marca
comercial registrada o marca
registrada de Microsoft Corporation en
los Estados Unidos y/o en otros países.
•Este producto está protegido por
ciertos derechos de propiedad
intelectual de Microsoft Corporation. El
uso o distribución de dicha tecnología
fuera de este producto está prohibido
sin una licencia de Microsoft o de una
subsidiaria autorizada de Microsoft.
•“ClearAudio+” es una marca registrada
de Sony Corporation.
•Apple, el logo de Apple, iPhone, iPod,
iPod touch y Retina son marcas
registradas de Apple Inc., registradas
en Estados Unidos y otros países. App
Store es una marca de servicio de
Apple Inc.
“Made for iPod” y “Made for iPhone”
significa que un accesorio electrónico
ha sido diseñado específicamente
para conectarse con iPod y iPhone.
Respectivamente, ha sido certificado
por el desarrollador para cumplir con
los estándares de rendimiento de
Apple. En ningún caso Apple se hace
responsable de la operación de este
dispositivo o de su cumplimiento con
los estándares de regulación y
seguridad. Por favor, tenga en cuenta
que el uso de este accesorio con el
iPod o iPhone puede afectar el
rendimiento inalámbrico.
Modelos de iPod/iPhone
compatibles
Los modelos de iPod/iPhone
compatibles son los siguientes.
Actualice su iPod/iPhone con el
software más reciente antes de
utilizarlo con el sistema.
La tecnología BLUETOOTH funciona
con:
– iPhone 6s Plus/iPhone 6s/
iPhone 6 Plus/iPhone 6/iPhone 5s/
iPhone 5c/iPhone 5
– iPod touch (6ª generación)/
iPod touch (5ª generación)
•Otros nombres de sistemas y
productos son generalmente marcas
registradas o marcas comerciales
registradas de los fabricantes. Las
marcas ™ y no están indicadas en
este documento.
ES
5
Page 70

Acerca de este Manual de Instrucciones
•Este Manual de Instrucciones describe
los controles del control remoto.
También puede utilizar los controles
del panel de altavoces si tienen los
mismos nombres o nombres similares
a los del control remoto.
•Algunas ilustraciones se presentan
como dibujos conceptuales, y pueden
ser diferentes de los productos reales.
•El ajuste predeterminado está
subrayado.
•El texto encerrado entre comillas
dobles (“--”) aparece en la pantalla del
panel superior.
ES
6
Page 71

Contenidos
Conexión
Acerca de este Manual de
Instrucciones ....................... 6
Guía para partes y controles ..... 8
Guía de inicio (documento independiente)
Cómo escuchar
Cómo escuchar sonido de los
dispositivos conectados ......11
Cómo escuchar música desde
un dispositivo USB .............. 12
Ajustes de sonido
Cómo disfrutar de los efectos
de sonido ............................ 13
Funciones BLUETOOTH
Cómo escuchar música desde
un dispositivo
BLUETOOTH ........................ 14
Cómo controlar el sistema con
un smartphone o una
tableta (SongPal) ................16
Configuraciones y ajustes
Cómo utilizar la pantalla de
configuración ...................... 17
Otras funciones
Cómo utilizar la función
Control para HDMI ............. 20
Cómo utilizar la función
“BRAVIA” Sync .................... 21
Ahorro de energía en el modo
en espera ............................22
Montaje del panel de altavoces
en una pared ......................22
Cómo instalar el altavoz de
subgraves activo
(subwoofer)
horizontalmente ................ 24
Cómo activar la transmisión
inalámbrica entre
unidades específicas
(Enlace Seguro) .................. 24
Cómo ajustar el volumen del
altavoz de subgraves
activo (subwoofer) ..............25
Información adicional
Precauciones ............................25
Localización y corrección de
fallas ................................... 26
Tipos de archivos
reproducibles ......................32
Formatos de audio
soportados ..........................32
Especificaciones .......................33
Sobre la comunicación
BLUETOOTH ....................... 34
ES
7
Page 72

Guía para partes y controles
,
ranura
Para obtener más información, consulte las páginas indicadas entre paréntesis.
Panel de altavoces
El panel superior y lateral
Tecla táctil (alimentación)
Enciende el sistema o lo ajusta en
el modo en espera.
Tecla táctil INPUT
Selecciona el dispositivo que
desea utilizar.
Tecla táctil PAIRING
Tecla táctil VOL (volumen) +/–
(N-Mark) (página 15)
Coloque el dispositivo
compatible con NFC cerca de esta
indicación para activar la función
NFC.
Puerto (USB) (página 12)
Coloque la uña en la ranura
(desde abajo) para abrir la tapa.
ES
8
Indicador LED azul
Muestra el estado de BLUETOOTH
del siguiente modo.
Durante el
emparejamiento de
BLUETOOTH
El sistema está
intentando conectarse a
un dispositivo
BLUETOOTH
El sistema ha establecido
conexión con un
dispositivo BLUETOOTH
Destella
rápidamente
Destellos
Encendido
Pantalla del panel superior
Sensor del control remoto
Acerca de las teclas táctiles
Las teclas táctiles funcionan cuando se
tocan ligeramente. No los presione con
demasiada fuerza.
Page 73

Panel trasero
Toma HDMI OUT TV (ARC)
Toma TV IN OPTICAL
Toma ANALOG IN
Cable de alimentación de CA
Altavoz de subgraves activo (subwoofer)
Indicador de alimentación
• Luces apagadas: La
alimentación está desactivada.
• Rojo: No está conectado al
panel de altavoces (modo en
espera).
• Verde: Está conectado con el
panel de altavoces (no se
estableció la conexión Enlace
Seguro).
• Naranja: Se estableció la
conexión Enlace Seguro.
LINK (página 24)
(alimentación)
Activa el altavoz de subgraves
activo (subwoofer), o lo ajusta en
el modo de espera.
Cable de alimentación de CA
ES
9
Page 74

Acerca del modo de espera
El altavoz de subgraves activo
(subwoofer) entra en modo de espera
automáticamente y el indicador de
alimentación se vuelve rojo cuando el
panel de altavoces se encuentra en
modo de espera o la transmisión
inalámbrica está desactivada. El altavoz
de subgraves activo (subwoofer) se
enciende automáticamente cuando el
panel de altavoces se enciende y la
transmisión inalámbrica se activa.
Control remoto
INPUT (página 11)
(alimentación)
Enciende el sistema o lo ajusta en
el modo en espera.
DIMMER
Ajuste el brillo de la pantalla del
panel superior.
“BRIGHT” “DARK” “OFF”
• La pantalla del panel superior se
apaga cuando “OFF” está
seleccionado. Se activa
automáticamente al presione
cualquier botón, a
continuación, se apaga de
nuevo si el sistema no se utiliza
durante unos segundos. Sin
embargo, en algunos casos,
puede que la pantalla del panel
superior no se apague. En este
caso, el brillo de la pantalla del
panel superior es igual a
“DARK”.
MENU
Activa/desactiva el menú en la
pantalla del panel superior.
/
Selecciona los elementos del
menú.
ENTER
Introduce la selección.
BACK
Regresa a la pantalla anterior.
Detiene la reproducción del USB.
(volumen) +*/–
Ajusta el volumen.
SW (volumen del altavoz
de subgraves activo
(subwoofer)) +/– (página 25)
Ajusta el volumen de graves.
(silenciado)
Suspende el sonido
temporalmente.
10
ES
Page 75

Cómo escuchar
CLEARAUDIO+
Selecciona automáticamente la
configuración de sonido
adecuada para la fuente de
sonido.
SOUND FIELD (página 13)
Selecciona un modo de sonido.
VOICE (página 13)
* (reproducción/pausa)
Hace una pausa o reanuda la
reproducción.
NIGHT (página 13)
/ (anterior/siguiente/
retroceso/avance rápido)
Presione para seleccionar la pista
o el archivo anterior/siguiente.
Mantener presionado para buscar
hacia atrás o hacia adelante.
*Los botones y + tienen un punto
táctil. Use el punto táctil como referencia
cuando opere el control remoto.
Cómo escuchar
Cómo escuchar sonido de los dispositivos conectados
Presione repetidamente INPUT.
Cuando presione INPUT una vez, el
dispositivo en curso aparece en la
pantalla del panel superior, entonces
cada vez que presione INPUT, el
dispositivo cambiará cíclicamente de la
siguiente manera.
“TV” “ANALOG” “BT” “USB”
“TV”
Dispositivo (TV, etc.) que está conectado a la
tom a de T V IN O PTICA L o a u n TV c ompat ible
con la función de Canal de Retorno de Audio
que está conectado a la toma HDMI OUT TV
(ARC)
“ANALOG”
Dispositivo (reproductor de medios digitales,
etc.) que está conectado a la toma ANALOG
IN
“BT”
Dispositivo BLUETOOTH que soporta A2DP
(página 14)
“USB”
Dispositivo USB que está conectado al puerto
(USB) (página 12)
ES
11
Page 76

Cómo escuchar música desde un dispositivo USB
Puede reproducir archivos de música en
un dispositivo USB conectado.
Para tipos de archivos reproducibles,
consulte “Tipos de archivos
reproducibles” (página 32).
Información del dispositivo
USB en la pantalla del
televisor
1 Conecte el dispositivo USB al
puerto (USB).
Consulte el Manual de Instrucciones
del dispositivo USB antes de hacer
la conexión.
2 Presione INPUT repetidamente
para seleccionar “USB”.
La lista del contenido USB aparece
en la pantalla del televisor.
3 Presione / para seleccionar el
contenido que desea, luego
presione ENTER.
Se iniciará la reproducción del
contenido seleccionado.
4 Ajuste el volumen.
• Ajuste el volumen del panel de
altavoces presionando +/–.
• Ajuste el volumen del altavoz de
subgraves activo (subwoofer)
presionando SW +/–.
Nota
No quite el dispositivo USB cuando esté en
funcionamiento. Para evitar corrupción de
datos o daño del dispositivo USB, apague
el sistema antes de quitar el dispositivo
USB.
Tiempo de reproducción
Tiempo total de reproducción
Tasa de bits
Estado de reproducción
Rebobinar/velocidad de avance
rápido
Estado de repetición de
reproducción
Indice de archivos seleccionados/
Total de archivos de la carpeta
Notas
• Dependiendo de la fuente que se está
reproduciendo, puede que alguna
información no se muestre.
• Dependiendo del modo de reproducción,
la información mostrada puede ser
diferente.
12
ES
Page 77

Ajustes de sonido
Ajustes de sonido
Consejo
También puede presionar CLEARAUDIO+
para seleccionar “CLEARAUDIO+”.
Cómo disfrutar de los efectos de sonido
Puede disfrutar con facilidad de campos
de sonido preprogramados que están
adaptados a diferentes clases de
fuentes de sonido.
Selección del campo de
sonido
Presione SOUND FIELD repetidamente
hasta que el campo de sonido que
desea se encuentre en la pantalla del
panel superior.
“CLEARAUDIO+”
Puede disfrutar del sonido con el campo de
sonido recomendado de Sony. El campo de
sonido se optimiza automáticamente de
acuerdo con el contenido de reproducción y
la función.
“MOVIE”
Los sonidos se reproducen con efectos de
sonido envolvente que son realistas y
potentes, lo que los convierte en adecuados
para películas.
“MUSIC”
Los efectos de sonido están optimizados
para escuchar música.
“SPORTS”
Los comentarios se escuchan de forma clara,
se pueden escuchar los ánimos de los
aficionados de fondo y los sonidos son
realistas.
“GAME”
Los sonidos son potentes y realistas,
adecuados para los juegos.
“STANDARD”
Sonido que corresponde a cada una de las
fuentes.
Uso de la función de modo
Noche
Esta función resulta útil cuando se ven
películas a una hora tardía por la noche.
Podrá escuchar los diálogos de forma
clara incluso con un nivel de volumen
bajo.
Presione NIGHT para seleccionar
“N.ON”.
Para desactivar el modo Noche,
presione NIGHT para seleccionar
“N.OFF”.
Uso de la función Voz Clara
Esta función ayuda a que los diálogos
sean más claros.
Presione repetidamente VOICE.
• “UP OFF”: La función Voz Clara está
apagada.
• “UP 1”: El rango de los diálogos está
habilitado.
• “UP 2”: El rango de los diálogos está
habilitado, y se amplifican las
secciones del rango que sean de difícil
comprensión para las personas
mayores.
13
ES
Page 78

Funciones BLUETOOTH
Cómo escuchar música desde un dispositivo BLUETOOTH
Notas
• Si el dispositivo BLUETOOTH requiere una
clave de acceso, ingrese “0000”. Es
posible que la clave de acceso se llame
“Código de acceso”, “Código PIN”,
“Número PIN” o “Contraseña”.
• Puede emparejar hasta 9 dispositivos
BLUETOOTH. Si empareja un décimo
dispositivo BLUETOOTH, el dispositivo
conectado menos recientemente será
reemplazado por el nuevo.
Cómo escuchar música
desde el dispositivo
emparejado
Cómo emparejar este
sistema con un dispositivo
BLUETOOTH
El emparejamiento es una operación en
donde los dispositivos BLUETOOTH se
registran uno con otro por adelantado.
Una vez que se realiza esta operación,
no es necesario volverla a realizar.
1 Coloque el dispositivo
BLUETOOTH a menos de 1 metro
(3,3 pies) del panel de altavoces.
2 Presione PAIRING en el panel
de altavoces.
El indicador LED azul del panel de
altavoces parpadea rápidamente
durante el emparejamiento
BLUETOOTH.
3 Active la función BLUETOOTH y
luego seleccione “HT-CT390”
después de buscarlo en el
dispositivo BLUETOOTH.
Realice este paso en 5 minutos, ya
que de lo contrario podría
cancelarse el modo de
emparejamiento.
Cuando se establezca la conexión
BLUETOOTH, el indicador LED azul
se iluminará.
1 Encienda la función BLUETOOTH
del dispositivo emparejado.
2 Presione repetidamente INPUT
para seleccionar “BT”.
El sistema se reconecta
automáticamente al último
dispositivo BLUETOOTH con el que
estuvo conectado.
Cuando se establezca la conexión
BLUETOOTH, el indicador LED azul
se iluminará.
3 Inicie la reproducción en el
dispositivo BLUETOOTH.
4 Ajuste el volumen.
• Ajuste el volumen en el
dispositivo BLUETOOTH.
• Ajuste el volumen del panel de
altavoces presionando +/–.
• Ajuste el volumen del altavoz de
subgraves activo (subwoofer)
presionando SW +/–.
Notas
• Una vez que el sistema y el dispositivo
BLUETOOTH estén conectados, podrá
controlar la reproducción presionando
y /.
14
ES
Page 79

Funciones BLUETOOTH
• Puede conectarse al sistema desde un
dispositivo BLUETOOTH emparejado
incluso cuando el sistema se encuentra
en modo en espera, siempre que haya
configurado la función “BTSTB” como
“ON” (página 18).
• La reproducción de audio en este sistema
se puede demorar a partir del dispositivo
BLUETOOTH debido a las características
de la tecnología inalámbrica BLUETOOTH.
Consejo
Puede habilitar o inhabilitar el códec AAC
desde el dispositivo BLUETOOTH
(página 18).
Para desconectar el dispositivo
BLUETOOTH
Lleve a cabo cualquiera de las
siguientes acciones.
• Presione PAIRING en el panel de
altavoces otra vez.
• Inhabilite la función BLUETOOTH en el
dispositivo BLUETOOTH.
• Apague el sistema o el dispositivo
BLUETOOTH.
Conexión a un dispositivo
remoto mediante la función
de un solo toque (NFC)
Notas
• El sistema solo puede reconocer y
conectarse con un dispositivo compatible
con NFC a la vez.
• Dependiendo de su dispositivo remoto,
es posible que necesite ejecutar las
siguientes acciones en su dispositivo
remoto por adelantado.
– Active la función NFC. Para más
detalles, consulte el Manual de
Instrucciones del dispositivo remoto.
– Si su dispositivo remoto tiene una
versión de sistema operativo anterior a
Android 4.1.x, descargue e inicie la
aplicación “NFC Easy Connect”. “NFC
Easy Connect” es una aplicación gratis
para los dispositivos remotos con
Android que se puede obtener en
Google Play. (Es posible que la
aplicación no esté disponible en
algunos países y regiones.)
1 Mantenga el dispositivo remoto
cerca de la N-Mark en el panel de
altavoces hasta que el dispositivo
remoto vibre.
NFC (comunicación de campo cercano)
es una tecnología que habilita la
comunicación inalámbrica de corto
alcance entre diversos dispositivos.
Al mantener un dispositivo remoto
compatible con NFC cerca de la N-Mark
en el panel de altavoces, el sistema y el
dispositivo remoto procederán a
completar el emparejamiento y la
conexión BLUETOOTH
automáticamente.
Dispositivos remotos compatibles
Dispositivos remotos con una función
NFC integrada
(Sistema operativo: Android 2.3.3 o
posterior, excluyendo Android 3.x)
Siga las instrucciones en pantalla
mostradas en el dispositivo remoto
y complete el procedimiento de
conexión BLUETOOTH.
Cuando se establezca la conexión
BLUETOOTH, el indicador LED azul
que se encuentra en el panel de
altavoces se iluminará.
15
ES
Page 80

2 Inicie la reproducción de la fuente
de audio en el dispositivo remoto.
Para más detalles acerca de las
operaciones de reproducción,
consulte el Manual de Instrucciones
del dispositivo remoto.
3 Ajuste el volumen.
• Ajuste el volumen en el
dispositivo BLUETOOTH.
• Ajuste el volumen del panel de
altavoces presionando +/–.
• Ajuste el volumen del altavoz de
subgraves activo (subwoofer)
presionando SW +/–.
Consejo
Si falla el está emparejando y la conexión
BLUETOOTH, haga lo siguiente.
– Mantenga el dispositivo remoto cerca de
la N-Mark en el panel de altavoces
nuevamente.
– Quite la funda del dispositivo remoto en
caso de que se esté utilizando una funda
para dispositivo remoto disponible
comercialmente.
– Vuelva a iniciar la aplicación “NFC Easy
Connect”.
Cómo detener la reproducción
con la función de un solo toque
Mantenga el dispositivo remoto cerca
de la N-Mark en el panel de altavoces
otra vez.
Cómo controlar el sistema con un smartphone o una tableta (SongPal)
SongPal es una aplicación dedicada
para operar dispositivos de audio
compatibles con SongPal fabricados por
Sony utilizando un smartphone o una
tableta. Busque SongPal en Google Play
o en App Store y descárguela utilizando
su smartphone o tableta.
SongPal le permite:
– cambiar los ajustes utilizados
comúnmente, seleccionando la
entrada del sistema y ajustando el
volumen.
– disfrute del contenido musical
almacenado en un smartphone con el
sistema.
– disfrutar visualmente la música con la
pantalla de su smartphone.
Notas
• Este sistema es compatible con la versión
SongPal 3.3 o posterior.
• SongPal utiliza la función BLUETOOTH del
sistema.
• Las especificaciones y el diseño de la
pantalla de SongPal están sujetas a
cambios sin previo aviso.
16
Uso de SongPal
1 Descargue la aplicación SongPal
gratuita en el dispositivo remoto.
2 Conecte el sistema y el dispositivo
remoto con la conexión
BLUETOOTH (página 14).
3 Inicie SongPal.
4 Úselo siguiendo la pantalla
SongPal.
ES
Page 81

Configuraciones y ajustes
Configuraciones y ajustes
Cómo utilizar la pantalla de configuración
Puede ajustar los siguientes elementos con el menú.
Sus ajustes se conservan incluso si se desconecta el cable de alimentación de CA.
1 Presione MENU para activar el menú en la pantalla del panel superior.
2 Presione repetidamente BACK///ENTER para seleccionar el elemento y
presione ENTER para seleccionar el ajuste que desea.
3 Presione MENU para apagar el menú.
Lista de menús
Los ajustes predeterminados están subrayados.
Elementos del menú Función
“LVL >”
(Nivel)
“SPK >”
(Altavoz)
“AUD >”
(Audio)
“ATT”
(Configuraciones
de atenuación –
Analógico)
“DRC”
(Control de rango
dinámico)
“PLACE”
(Colocación de los
altavoces)
“DUAL”
(Mono dual)
“TV AU”
(Audio del
televisor)
“EFCT”
(Efecto de sonido)
Es posible que se produzca distorsión al escuchar un
dispositivo conectado a la toma ANALOG IN. Puede evitar la
distorsión atenuando el nivel de entrada en el sistema.
•“ON”
: Atenúa el nivel de entrada. El nivel de salida
disminuirá en este ajuste.
• “OFF”: Nivel de entrada normal.
Útil para disfrutar de películas con un volumen de sonido
bajo. DRC hace referencia a las fuentes Dolby Digital.
• “ON”: Comprime sonido de acuerdo con la información
presente en el contenido.
• “OFF”
: El sonido no está comprimido.
• “STDRD”
: Seleccione este ajuste si instala el panel de
altavoces en posición estándar.
• “WALL”: Seleccione este ajuste si monta el panel de
altavoces en una pared (página 22).
Puede disfrutar de sonido de transmisión multiplex cuando
el sistema recibe una señal de transmisión multiplex Dolby
Digital.
•“M/S”
: Se escuchará sonido combinado de los idiomas
principal y secundario.
• “MAIN”: Se escuchará el sonido del idioma principal.
• “SUB”: Se escuchará el sonido del idioma secundario.
•“AUTO”
: Seleccione esta configuración cuando el sistema
esté conectado a una toma de HDMI (ARC) de un televisor
con un cable HDMI.
• “OPT”: Seleccione esta configuración cuando el sistema
esté conectado a un televisor con el cable óptico digital.
•“ON”
: Se reproduce el sonido del campo de sonido
seleccionado. Se recomienda utilizar este ajuste.
• “OFF”: La fuente de entrada está mezclada para 2 canales.
ES
17
Page 82

Elementos del menú Función
Nota
“STRM”
(Stream)
“HDMI>” “CTRL”
“BT >”
(BLUETOOTH)
“WS >”
(Sonido
inalámbrico)
“USB >” “REPT”
(Control para HDMI)
“TVSTB”
(En espera
vinculado a la
televisión)
“COLOR”
(HDMI color)
“BTAAC”
(Codificación de
audio avanzado
BLUETOOTH)
“BTSTB”
(BLUETOOTH en
espera)
“INFO”
(Información del
dispositivo
BLUETOOTH)
“LINK”
(Secure Link
(enlace seguro))
(Modo de
reproducción)
Muestra la información actual flujo de audio.
Consulte la página 32 que trata sobre los formatos de audio
soportados.
•“ON”
dispositivos conectados con un cable HDMI se pueden
controlar entre sí.
• “OFF”: Apagado.
Esta función está disponible cuando se ajusta “CTRL” en
“ON”.
•“AUTO”
apaga automáticamente cuando se apaga el televisor.
• “ON”: El sistema se apaga automáticamente cuando se
apaga el televisor independientemente de la entrada.
• “OFF”: El sistema no se apaga cuando se apaga el
televisor.
•“AUTO”
externo y cambia a la configuración de color de
coincidencia.
• “YCBCR”: Salidas YC
• “RGB”: Salidas RGB señales de vídeo.
Puede ajustar si el sistema emplea AAC a través de
BLUETOOTH.
•“ON”
• “OFF”: Desactive el códec AAC.
Si cambia la configuración “BTAAC” cuando se conecta un
dispositivo BLUETOOTH, la configuración del codec se
refleja únicamente después de la siguiente conexión.
Cuando el sistema dispone de información de
emparejamiento, el sistema está en el modo de espera
BLUETOOTH, incluso cuando está apagado.
•“ON”
• “OFF”: El modo de espera BLUETOOTH está deshabilitado.
El nombre de dispositivo BLUETOOTH detectado y la
dirección del dispositivo aparecen en la pantalla del panel
superior.
“NO DEVICE” aparece si el sistema no está conectado a una
dispositivo BLUETOOTH.
• “ON”: Puede especificar la conexión inalámbrica para
vincular el panel de altavoces con el altavoz de subgraves
activo (subwoofer) utilizando la función Secure Link
(enlace seguro) (página 24).
• “OFF”
• “NONE”
• “ONE”: Repite una pista.
• “FLDER”: Repite todas las pistas de una carpeta.
• “RANDM”: Repite todas las pistas de una carpeta en orden
aleatorio.
• “ALL”: Repite todas las pistas.
: La función Control para HDMI está activada. Los
: Si la entrada del sistema es “TV”, el sistema se
: Detecta automáticamente el tipo de dispositivo
BCR señales de vídeo.
: Active el códec AAC.
: El modo de espera BLUETOOTH está habilitado.
: Apagado.
: Reproduce todas las pistas.
18
ES
Page 83

Configuraciones y ajustes
Elementos del menú Función
“SYS >”
(Sistema)
“ASTBY”
(Modo de espera
automático)
“VER”
(Versión)
•“ON”
: Activa la función de espera automática. Cuando
no se opera el sistema durante aproximadamente
20 minutos, el sistema entra automáticamente en el
modo en espera.
• “OFF”: Apagado.
La información sobre la versión de firmware en curso
aparece en la pantalla del panel superior.
19
ES
Page 84

Otras funciones
Cómo utilizar la función Control para HDMI
Conexión de un dispositivo, como un
televisor o Reproductor de Disco
Blu-ray compatible con la función
Control para HDMI* por cable HDMI
(Cable HDMI de alta velocidad con
Ethernet, no suministrado) le permite
operar fácilmente el dispositivo
mediante un control remoto de
televisor.
Las siguientes funciones se pueden usar
con la función de Control para HDMI.
• Función de apagado del sistema
• Función de control de audio del
sistema
• Canal de Retorno de Audio
• Función de reproducción con un solo
toque
* El Control para HDMI es un estándar
utilizado por CEC (Siglas en inglés de
Control de Dispositivos Electrónicos de
Consumo) para permitir que los
dispositivos HDMI (Siglas en inglés de
Interfaz Multimedia de Alta Definición) se
puedan controlar entre sí.
Nota
Puede que estas funciones puedan operar
con dispositivos que no estén fabricados
por Sony, pero es algo que no se garantiza.
Cómo prepararse para usar
con la función de Control
para HDMI
Ajuste “HDMI>” – “CTRL” en el sistema
en “ON” (página 18). El ajuste
predeterminado es “ON”.
Habilita la función Control para HDMI de
los ajustes del televisor y el otro
dispositivo conectado al sistema.
Consejo
Si habilita con la función de Control para
HDMI (“BRAVIA” sync) cuando use un
televisor fabricado por Sony, con la función
de Control para HDMI del sistema también
se activa automáticamente. Una vez
finalizados los ajustes “DONE” aparece en
la pantalla del panel superior.
Función de apagado del
sistema
Cuando se apaga el televisor, el sistema
se apagará automáticamente.
Ajuste “HDMI>” – “TVSTB” en el sistema
en “ON” o “AUTO” (página 18). El ajuste
predeterminado es “AUTO”.
Función de control de audio
del sistema
Si enciende el sistema mientras está
viendo la televisión, el sonido de la
televisión se escuchará
automáticamente desde los altavoces
del sistema. El volumen del sistema se
puede ajustar mediante el control
remoto del televisor.
Si el sonido del televisor salía de los
altavoces del sistema la última vez que
vio televisión, el sistema se activará
automáticamente cuando se encienda
el televisor.
Las operaciones también se pueden
realizar mediante el menú del televisor.
Para más detalles, consulte el Manual
de Instrucciones de su TV.
Notas
• El sonido solo se emite del televisor si se
selecciona otra entrada diferente a “TV”
cuando se utiliza la función Imagen Doble
en el televisor. Cuando se desactiva la
función Imagen Doble, el sonido se emite
desde el sistema.
20
ES
Page 85

Otras funciones
• El nivel de volumen del sistema aparece
en la pantalla del televisor dependiendo
del televisor. Puede que sea diferente del
nivel de volumen que aparece en la
pantalla del panel superior.
• Dependiendo de la configuración del
televisor, la función Control de audio del
sistema puede no estar disponible. Para
más detalles, consulte el Manual de
Instrucciones de su TV.
Canal de Retorno de Audio
Si el sistema está conectado a la toma
HDMI IN de un televisor compatible con
Canal de Retorno de Audio, podrá
escuchar el sonido del televisor desde
los altavoces del sistema sin necesidad
de conectar un cable óptico digital.
En el sistema, ajuste “AUD >” – “TV AU”
en “AUTO” (página 17). El ajuste
predeterminado es “AUTO”.
Nota
Si el televisor no es compatible con Canal
de Retorno de Audio, es necesario
conectar un cable óptico digital (Consulte
la Guía de inicio suministrada).
Función de reproducción con
un solo toque
Al reproducir el contenido en un
dispositivo (Reproductor de Disco
Blu-ray, “PlayStation®4”, etc.)
conectado al televisor, el sistema y el
televisor se encienden
automáticamente, la entrada del
sistema se activa en la entrada para el
televisor, y el sonido se emite desde los
altavoces del sistema.
Notas
• Si el sonido del televisor se emitió desde
los altavoces del televisor la anterior vez
que vio la televisión, el sistema no se
enciende y el sonido y la imagen se
emiten desde el televisor, incluso si se
reproduce el contenido del dispositivo.
• Dependiendo del televisor, puede que la
parte inicial del contenido que se está
reproduciendo no se reproduzca
correctamente.
Cómo utilizar la función “BRAVIA” Sync
Además de la función Control para
HDMI, también puede utilizar la
siguiente función en los dispositivos
compatibles con la función de
sincronización “BRAVIA”.
• Función de selección de escena
Nota
Esta función es un propiedad de Sony. Esta
función no funcionará con productos que
no sean los fabricados por Sony.
Función de selección de
escena
El campo de sonido del sistema se
activa automáticamente según los
ajustes de la función de selección de
escena del televisor o la función del
modo de sonido del televisor. Para más
detalles, consulte el Manual de
Instrucciones de su TV.
Ajuste el campo de sonido en
“CLEARAUDIO+” (página 13).
Notas acerca de las conexiones
HDMI
• Utilizar un cable HDMI de alta
velocidad. Si utiliza un cable HDMI
estándar, es posible que el contenido
de 1080p no se visualice
correctamente.
• Utilice un cable autorizado HDMI.
Utilice un cable HDMI de alta velocidad
de Sony con el logotipo del tipo de
cable.
21
ES
Page 86

• No recomendamos el uso de un cable
de conversión HDMI-DVI.
• Compruebe la configuración del
equipo conectado si una imagen es
deficiente o el sonido no sale del
equipo conectado a través del cable
HDMI.
• Las señales de audio (frecuencia de
muestreo, longitud de bits, etc.)
transmitidas desde una toma HDMI
podrían resultar suprimidas por el
equipo conectado.
• El sonido se podría interrumpir al
cambiar la frecuencia de muestreo o el
número de canales de las señales de
salida de audio del equipo de
reproducción.
• Si el equipo conectado no es
compatible con la tecnología de
protección de derechos de autor
(HDCP), la imagen y/o el sonido
procedente de toma HDMI OUT de
este sistema puede resultar
distorsionado o no se emita. En este
caso, compruebe las especificaciones
del equipo conectado.
Ahorro de energía en el modo en espera
Montaje del panel de altavoces en una pared
Puede montar el panel de altavoces en
una pared.
Notas
• Prepare unos tornillos (no suministrados)
que sean apropiados para el material y la
resistencia de la pared. Puesto que las
paredes de yeso son especialmente
frágiles, enrosque los tornillos en dos
vástagos de la viga de la pared. Instale el
panel de altavoces horizontalmente, con
unos tornillos colocados en vástagos en
una sección plana y continua de la pared.
• Asegúrese de subcontratar la instalación
a su distribuidor de Sony o a técnicos
cualificados, y preste especial atención a
la seguridad durante la instalación.
• Sony no se responsabiliza de accidentes o
daños causados por una instalación
inadecuada, una pared de poca
resistencia, una instalación incorrecta de
los tornillos, desastres naturales, etc.
Verifique que ya ha realizado los
siguientes ajustes:
– “CTRL” en “HDMI>” está ajustado en
“OFF” (página 18).
– “BTSTB” en “BT >” está ajustado en
“OFF” (página 18).
ES
22
Page 87

Otras funciones
1 Fije los soportes de montaje mural
Soporte de montaje
mural (suministradas)
Tornillo (suministradas)
4 mm
(
3
/16 pulg)
Más de 30 mm (1
3
/16 pulg)
4,6 mm
(
3
/16 pulg)
Agujero en el soporte
10 mm
(
13
/32 pulg)
560 mm (22 1/8 pulg)
5 mm a
6mm
(aprox.
7
/32 pulg)
que se incluyen en los orificios de
fijación del soporte en la parte
inferior del panel de altavoces,
para ello use los tornillos que se
incluyen de manera que la
superficie de cada soporte de
montaje mural sea como se
muestra en la ilustración.
Fije los dos soportes de montaje
mural en los agujeros de fijación de
la izquierda y de la derecha en la
parte inferior del panel de
altavoces.
2 Prepare los tornillos (no
suministrados) que sean
apropiados para los orificios del
soporte de montaje mural.
3 Fije los tornillos a los 2 montantes
en la pared.
Los tornillos deben sobresalir entre
5 mm y 6 mm (aprox. 7/32 pulg).
4 Cuelgue el panel de altavoces en
los tornillos.
Alinee los orificios de los soportes
con los tornillos, a continuación,
cuelgue el panel de altavoces de los
dos tornillos.
23
ES
Page 88

Cómo instalar el altavoz
Fije las almohadillas para altavoces
que se incluyen.
de subgraves activo
(subwoofer)
horizontalmente
Coloque el altavoz de subgraves activo
(subwoofer) en el lado derecho con el
logotipo de “SONY” en posición frontal.
Cómo activar la transmisión inalámbrica entre unidades específicas (Enlace Seguro)
Puede especificar la conexión
inalámbrica para vincular el panel de
altavoces con el altavoz de subgraves
activo (subwoofer) utilizando la función
Secure Link (enlace seguro).
Esta función puede ayudar a evitar
interferencia si utiliza diversos
productos inalámbricos o si sus vecinos
utilizan productos inalámbricos.
1 Presione MENU.
2 Presione / para seleccionar
“WS >”, luego presione ENTER.
3 Cuando “LINK” aparece en la
pantalla del panel superior,
presione ENTER.
4 Presione / para seleccionar
“ON”, luego presione ENTER.
5 Cuando “START” aparece en la
pantalla del panel superior,
presione ENTER.
Aparece “*****”, y el panel de
altavoces busca un dispositivo que
se puede utilizar con Link o enlace.
Continúe con el siguiente paso
dentro de 2 minutos.
6 Presione LINK en el altavoz de
subgraves activo (subwoofer).
El indicador de alimentación del
altavoz de subgraves activo
(subwoofer) parpadea en naranja.
ES
24
Page 89

Información adicional
7 Cuando “DONE” aparece en la
pantalla del panel superior,
presione ENTER.
El altavoz de subgraves activo
(subwoofer) está vinculado al panel
de altavoces y el indicador de
alimentación del altavoz de
subgraves activo (subwoofer)
pasará a ser naranja.
Si aparece “FAIL”, compruebe si el
altavoz de subgraves activo
(subwoofer) está encendido y
presione BACK para llevar a cabo el
proceso de nuevo desde el paso 3.
8 Presione MENU.
El menú se apaga.
Cómo ajustar el volumen del altavoz de subgraves activo (subwoofer)
El altavoz de subgraves activo
(subwoofer) está diseñado para la
reproducción del sonido de graves o de
baja frecuencia.
Presione SW +/– para ajustar el
volumen del altavoz de subgraves
activo (subwoofer).
Nota
Cuando la fuente de entrada no contiene
mucho sonido de graves, como es el caso
de los programas de televisión, puede que
el sonido del altavoz de subgraves activo
(subwoofer) sea difícil de escuchar.
Información adicional
Precauciones
Sobre seguridad
• En caso de que algún objeto sólido o
líquido caiga dentro del sistema,
desenchúfelo y haga que sea revisado
por personal certificado antes de volverlo
a poner en funcionamiento.
• No toque el cable de alimentación de CA
con las manos húmedas. Si lo hace puede
ocasionar una descarga eléctrica.
• No se suba al panel de altavoces ni al
altavoz de subgraves activo (subwoofer),
ya que podría caerse y sufrir lesiones, o
podría dañar el sistema.
En fuentes eléctricas
• Antes de operar el sistema, compruebe
que el voltaje de operación es idéntico al
voltaje de la red eléctrica local. La tensión
de funcionamiento aparece indicada en la
placa de identificación situada en la parte
inferior del panel de altavoces.
• Si no pretende utilizar el sistema durante
mucho tiempo, asegúrese de
desconectar el sistema del tomacorriente
de pared. Para desconectar el cable de
alimentación de CA, agarre el enchufe;
nunca jale del cable.
• Una clavija del enchufe es más ancha que
la otra por motivos de seguridad y
encajará en el tomacorriente de pared de
una sola manera. Si no puede insertar el
enchufe completamente en la toma,
póngase en contacto con su distribuidor.
• El cable de alimentación de CA debe ser
sustituido solamente por un técnico
cualificado.
25
ES
Page 90

Acerca de la acumulación de calor
Aunque el sistema se calienta durante la
operación, esto no es una falla.
Si utiliza continuamente este sistema a un
volumen alto, la temperatura del sistema
en la parte posterior e inferior se eleva
considerablemente. Para evitar quemarse,
no toque el sistema.
Sobre el sitio
• Coloque el sistema en un lugar con
ventilación adecuada para evitar la
acumulación de calor y prolongar la vida
útil del sistema.
• No coloque el sistema cerca de fuentes
de calor o en un lugar expuesto a la luz
solar directa, polvo excesivo o golpes
mecánicos.
• No coloque nada en la parte trasera del
panel de altavoces y del altavoz de
subgraves activo (subwoofer) que pueda
bloquear los orificios de ventilación y
provocar un mal funcionamiento.
• Si el sistema se utiliza en combinación
con un TV, VCR, o pletina, pueden
generarse ruidos y la calidad de la imagen
podría reducirse. En tal caso, aleje el
sistema del TV, el VCR o la pletina.
• Tenga cuidado al colocar el sistema sobre
una superficie que cuente con un
tratamiento especial (con cera, aceite,
pulimento, etc.), puesto que la superficie
podría sufrir decoloración o manchas.
• Evite cualquier posible accidente con las
esquinas del panel de altavoces y del
altavoz de subgraves activo (subwoofer).
• Mantenga una separación de 3 cm
3
(1
/16 pulg) o más espacio debajo del
panel de altavoces cuando lo cuelgue en
una pared.
Sobre la operación
Antes de conectar otros equipos,
asegúrese de apagar y desenchufar el
sistema.
Si detecta irregularidades en el
color de una pantalla de
televisión cercana
Pueden aparecer irregularidades en el
color en determinados tipos de televisión.
• Si se detectan irregularidades en el
color...
Apague el televisor y vuelva a encenderlo
de nuevo después de 15 a 30 minutos.
• Si la irregularidad se detecta de nuevo...
Aleje el sistema del televisor.
Sobre la limpieza
Limpie el sistema con un paño suave y
seco. No utilice ningún tipo de esponja
abrasiva, polvo para tallar ni solvente como
alcohol o bencina.
Si tiene alguna pregunta o problema
relacionado con su sistema, consulte al
servicio técnico autorizado de Sony más
cercano.
Localización y corrección de fallas
Si experimenta cualquiera de las
siguientes dificultades al utilizar el
sistema, utilice esta guía de localización
y corrección de fallas para ayudar a
remediar el problema antes de solicitar
reparaciones. Si el persiste alguno de
los problemas, consulte a su
distribuidor Sony más cercano.
Generalidades
El sistema no enciende.
Compruebe que el cable de
alimentación de CA esté conectado
firmemente.
26
ES
Page 91

Información adicional
El sistema no funciona normalmente.
Desconecte el cable de
alimentación de CA del
tomacorriente de pared, luego
vuelva a reconectar después de
varios minutos.
El sistema se apaga automáticamente.
La función de espera automática
está funcionando. Ajuste “ASTBY”
en “SYS >” en “OFF” (página 19).
El sistema no se enciende incluso
cuando el televisor está encendido.
Ajuste “HDMI>” – “CTRL” en “ON”
(página 18). El televisor debe ser
compatible con la función Control
para HDMI (página 20). Para más
detalles, consulte el Manual de
Instrucciones de su TV.
Compruebe los ajustes de los
altavoces del televisor. La
alimentación del sistema se
sincroniza con los ajustes de los
altavoces del televisor. Para más
detalles, consulte el Manual de
Instrucciones de su TV.
Si el sonido se emitió desde los
altavoces del televisor la vez
anterior, el sistema no se activará ni
con el televisor encendido.
El sistema se apaga cuando el televisor
se apaga.
Compruebe el ajuste de “HDMI>” –
“TVSTB” (página 18). Cuando
“TVSTB” está ajustado en “ON”, el
sistema se apaga automáticamente
cuando se apaga el televisor
independientemente de la entrada.
El sistema no se apaga incluso cuando
el televisor está apagado.
Compruebe el ajuste de “HDMI>” –
“TVSTB” (página 18). Para apagar el
sistema de forma automática
independientemente de la entrada
existente cuando se apaga el
televisor, ajuste “TVSTB” en “ON”. El
televisor debe ser compatible con la
función Control para HDMI
(página 20). Para más detalles,
consulte el Manual de Instrucciones
de su TV.
Sonido
No se escucha ningún sonido del TV
desde el sistema.
Compruebe el tipo y la conexión del
cable HDMI, cable óptico digital o
cable de audio analógico conectado
en el sistema y en el televisor
(consulte la Guía de inicio
suministrada).
Si su televisor es compatible con
Canal de Retorno de Audio,
asegúrese de que el sistema esté
conectado en una toma de entrada
HDMI del televisor compatible con
ARC (consulte la Guía de inicio
suministrada). Si sigue sin emitir
sonido o se interrumpe, conecte el
cable óptico digital que se incluye y
ajuste “AUD >” – “TV AU” en “OPT”
(página 17).
Si el televisor no es compatible con
Canal de Retorno de Audio, el
sonido del televisor no se emitirá
desde el sistema incluso si el
sistema está conectado a la toma
de entrada HDMI del televisor. Para
que el sistema emita el sonido del
televisor, conecte el cable óptico
digital que se incluye (consulte la
Guía de inicio suministrada).
27
ES
Page 92

Si el sistema no produce sonido
incluso si el sistema y el televisor
están conectados mediante un
cable óptico digital o si el televisor
no dispone de un conector de toma
de sonido digital óptico, conecte un
cable de audio analógico (no
suministrado) y cambie la entrada
del sistema a “ANALOG” (página 11).
Cambie la entrada del sistema a
“TV” (página 11).
Aumente el volumen en el sistema o
cancele el enmudecimiento.
En función del orden en el que se
conecta el televisor y el sistema, el
sistema podría estar enmudecido y
entonces “MUTING” aparece en la
pantalla del panel superior del
sistema. Si esto sucede, apague el
televisor y luego el sistema.
Ajuste la configuración de los
altavoces del televisor (BRAVIA) en
Sistema de audio. Consulte el
Manual de Instrucciones de
funcionamiento de su televisor para
hallar información sobre cómo
configurar el televisor.
El sonido se escucha tanto desde el
sistema como desde el TV.
Cómo enmudecer el sonido del
sistema o del televisor.
El dispositivo conectado en el panel de
altavoces no emite ningún sonido o
sólo se escucha un sonido muy bajo
desde el panel de altavoces.
Presione + y compruebe el nivel
de volumen (página 10).
Presione o + para cancelar la
función de silenciado (página 10).
Asegúrese de que se ha
seleccionado la fuente de entrada
correcta. Debería probar otras
fuentes de entrada presionando
repetidamente INPUT (página 11).
Compruebe que todos los cables
del sistema y del dispositivo
conectados están correctamente
insertados.
El altavoz de subgraves activo
(subwoofer) no produce ningún sonido
o un sonido muy bajo.
Presione SW + para aumentar el
volumen del altavoz de subgraves
activo (subwoofer) (página 10).
Asegúrese de que el indicador de
alimentación del altavoz de
subgraves activo (subwoofer) está
en verde. Si no es así, consulte “No
se escucha ningún sonido del
altavoz de subgraves activo
(subwoofer).” en “Sonido
inalámbrico del altavoz de
subgraves activo (subwoofer)”
(página 30).
El altavoz de subgraves activo
(subwoofer) sirve para reproducir
los sonidos graves. En el caso de
utilizar fuentes de entrada que
contengan muy pocos graves (por
ejemplo, una emisión de TV), puede
que el sonido del altavoz de
subgraves activo (subwoofer) sea
difícil de escuchar.
Cuando reproduzca contenido
compatible con la tecnología de
protección de derechos de autor
(HDCP), no se escucha desde el
altavoz de subgraves activo
(subwoofer).
28
ES
Page 93

Información adicional
No se puede obtener el efecto
envolvente.
Dependiendo de la señal de
entrada y del ajuste del campo de
sonido, puede que el
procesamiento del sonido
envolvente no funcione con
eficacia. El efecto de sonido
envolvente puede que sea difícil de
detectar, todo dependerá del
programa o disco.
Para reproducir el audio multicanal,
compruebe el ajuste de salida de
audio digital en el dispositivo
conectado al sistema. Para obtener
más información, consulte el
Manual de Instrucciones que se
incluye con el dispositivo
conectado.
Dispositivo USB
El dispositivo USB no es reconocido.
Intente lo siguiente:
Apague el sistema.
Extraiga y vuelva a conectar el
dispositivo USB.
Encienda el sistema.
Asegúrese de que el dispositivo USB
esté conectado firmemente al
puerto (USB).
Verifique si el dispositivo USB o un
cable está dañado.
Verifique si el dispositivo USB está
encendido.
Si el dispositivo USB se conecta a
través de un concentrador USB,
desconéctelo y vuelva a conectarlo
directamente en el panel de
altavoces.
Dispositivo BLUETOOTH
No se puede completar la conexión
BLUETOOTH.
Asegúrese de que el indicador LED
azul está encendido (página 8).
Asegúrese de que el dispositivo
BLUETOOTH que se va a conectar
está encendido y que la función
BLUETOOTH está habilitada.
Acerque el dispositivo BLUETOOTH
al panel de altavoces.
Empareje nuevamente este sistema
con el dispositivo BLUETOOTH.
Puede que primero necesite
cancelar el emparejamiento con
este sistema utilizando su
dispositivo BLUETOOTH.
No se puede hacer el emparejamiento.
Acerque el dispositivo BLUETOOTH
al panel de altavoces.
Asegúrese de que este sistema no
está recibiendo la interferencia de
un equipo inalámbrico LAN, otros
dispositivos inalámbricos 2,4 GHz o
un horno microondas. Si está cerca
de un dispositivo que genera
radiación electromagnética, aleje el
dispositivo de este sistema.
El emparejamiento no es posible si
otros dispositivos BLUETOOTH
están presentes cerca del panel de
altavoces. En este caso, apague los
otros dispositivos BLUETOOTH.
El dispositivo BLUETOOTH conectado
no produce ningún sonido.
Asegúrese de que el indicador LED
azul está encendido (página 8).
Acerque el dispositivo BLUETOOTH
al panel de altavoces.
Si un dispositivo que genera
radiación electromagnética, tal
como un equipo de LAN
inalámbrico, otros dispositivos
BLUETOOTH o un horno de
microondas está cerca, aleje el
dispositivo de este sistema.
Retire cualquier obstáculo entre
este sistema y el dispositivo
BLUETOOTH o alejar este sistema
del obstáculo.
Cambie de posición el dispositivo
BLUETOOTH conectado.
29
ES
Page 94

Intente cambiar la frecuencia
inalámbrica del router Wi-Fi,
ordenador, etc, y ajústela en la
banda de 5 GHz.
Aumente el volumen del dispositivo
BLUETOOTH conectado.
El sonido no está sincronizado con la
imagen.
Cuando usted está viendo películas,
es posible que escuche el sonido
con un ligero retraso de la imagen.
Sonido inalámbrico del
altavoz de subgraves activo
(subwoofer)
No se escucha ningún sonido del
altavoz de subgraves activo
(subwoofer).
El indicador de alimentación no está
iluminado.
• Compruebe que el cable de
alimentación de CA del altavoz de
subgraves activo (subwoofer) esté
conectado firmemente.
•Presione en el altavoz de
subgraves activo (subwoofer)
para encenderlo.
El indicador de alimentación
parpadea lentamente con un color
verde o se ilumina con un color rojo.
• Desplace el altavoz de subgraves
activo (subwoofer) a una
ubicación cercana al panel de
altavoces de modo que el
indicador de alimentación se
ilumine en verde.
• Siga los pasos en “Cómo activar la
transmisión inalámbrica entre
unidades específicas (Enlace
Seguro)” (página 24).
Si el indicador de alimentación
parpadea con un color rojo,
presione en el altavoz de
subgraves activo (subwoofer) para
apagar y compruebe si la apertura
de ventilación del altavoz de
subgraves activo (subwoofer) está
bloqueada o no.
El altavoz de subgraves activo
(subwoofer) está diseñado para la
reproducción de sonidos graves.
Cuando la fuente de entrada no
contiene un nivel alto de sonidos
graves, como es el caso de la
mayoría de los programas de TV,
puede que los sonidos graves no se
escuchen.
Presione SW + para aumentar el
volumen del altavoz de subgraves
activo (subwoofer) (página 25).
El sonido salta o tiene ruido.
Si esta presente un dispositivo
cercano que genera ondas
electromagnéticas, como una red
LAN inalámbrica o un horno
microondas en uso, aleje el sistema
de dicho dispositivo.
Si hay un obstáculo entre el panel
de altavoces y el altavoz de
subgraves activo (subwoofer),
desplácelo o retírelo.
Coloque el panel de altavoces y el
altavoz de subgraves activo
(subwoofer) lo más cerca posible
entre sí.
Cambie la frecuencia de la red LAN
inalámbrica de cualquier router
Wi-Fi o computadora al rango de
5GHz.
Cambie el televisor, Reproductor de
Disco Blu-ray etc., de LAN
inalámbrica a LAN cableada.
30
ES
Page 95

Información adicional
Control remoto
El control remoto no funciona.
Apunte el control remoto hacia el
sensor de control remoto del panel
de altavoces (página 8).
Retire cualquier obstáculo que se
encuentre en la trayectoria entre el
control remoto y el panel de
altavoces.
Cambie las dos pilas del control
remoto con otras nuevas en caso de
que estén agotadas.
Asegúrese de que está presionando
el botón correcto en el control
remoto.
El control remoto del televisor no
funciona.
Instale el panel de altavoces de
manera que no obstruya el sensor
del control remoto del televisor.
Otros
La función Control para HDMI no
funciona correctamente.
Compruebe la conexión con el
sistema (consulte la Guía de inicio
suministrada).
Habilita la función Control para
HDMI en el televisor. Para más
detalles, consulte el Manual de
Instrucciones de su TV.
Espere un momento y vuelva a
intentarlo. Si desconecta el sistema,
tardará un tiempo antes de poder
realizar operaciones. Espere
15 segundos o más, y vuelva a
intentarlo.
Asegúrese de que los dispositivos
conectados al sistema permiten de
la función Control para HDMI.
Habilita la función Control para
HDMI de los dispositivos
conectados al sistema. Para más
detalles, consulte el Manual de
Instrucciones de funcionamiento de
su dispositivo.
El tipo y número de dispositivos que
se pueden controlar por la función
de Control para HDMI está
restringido por el HDMI CEC
estándar tal como se describe a
continuación:
• Dispositivos de grabación
(Grabadora de Disco Blu-ray,
grabadora de DVD, etc.): hasta
3 dispositivos
• Dispositivos de reproducción
(Reproductor de Disco Blu-ray,
Reproductor de DVD, etc.): hasta
3 dispositivos
• Dispositivos relacionados con el
sintonizador: hasta 4 dispositivos
• Sistema de audio (receptor/
auricular): hasta 1 dispositivo
(utilizado por este sistema)
Si “PRTCT” aparece en la pantalla del
panel superior del panel de altavoces.
Presione para apagar el sistema.
Después de que se apague la
pantalla, desconecte el cable de
alimentación de CA, entonces
compruebe que nada bloquee los
orificios de ventilación del panel de
altavoces.
La pantalla del panel superior del panel
de altavoces no está encendido.
Presione DIMMER para ajustar el
brillo en “BRIGHT” o “DARK”, si está
ajustado en “OFF” (página 10).
31
ES
Page 96

Los sensores del TV no funcionan
correctamente.
El panel de altavoces puede
bloquear algunos sensores (como el
sensor de brillo) y el receptor del
control remoto del televisor, o el
“emisor de gafas 3D (transmisión
por infrarrojos)” de un televisor 3D
que soporte el sistema de cristal 3D
de infrarrojos o la comunicación
inalámbrica. Aleje el panel de
altavoces del TV a una distancia que
permita que dichos componentes
funcionen correctamente. Para las
ubicaciones de los sensores y del
receptor de control remoto,
consulte el Manual de Instrucciones
suministrado con el TV.
Reiniciar
Si el sistema sigue sin funcionar
correctamente, restablecer el sistema
de la siguiente manera.
Asegúrese de utilizar las teclas táctiles
del panel de altavoces para realizar esta
operación.
1 Mientras presiona INPUT, toque
VOL – y simultáneamente
durante 5 segundos.
“RESET” aparece en la pantalla del
panel superior, y la configuración
de los campos de menú y de
sonido, etc. vuelven a su estado
inicial.
2 Desconecte el cable de
alimentación de CA.
3 Conecte el cable de alimentación
de CA, a continuación, presione
para encender el sistema.
4 Conecte el sistema al altavoz de
subgraves activo (subwoofer)
(página 24).
Tipos de archivos reproducibles
Códec Extensión
MP3 (MPEG-1 Audio
Layer III)
Codificación de audio
avanzada
WMA9 estándar .wma
LPCM .wav
Notas
• Es posible que algunos archivos no se
reproduzcan dependiendo del tipo de
formato de archivo, codificación del
archivo, o condición de grabación.
• Es posible que algunos archivos editados
en una computadora personal no se
puedan reproducir.
• El sistema no reproduce archivos
codificados tal como DRM y Lossless.
• El sistema puede reconocer los siguientes
archivos o carpetas en dispositivos USB:
– hasta 200 carpetas
– hasta 150 archivos/carpetas en una
sola capa
• Es posible que algunos dispositivos USB
no funcionen con este sistema.
• El sistema puede reconocer dispositivos
de almacenamiento masivo (MSC).
.mp3
.m4a
Formatos de audio soportados
Este sistema soporta los siguientes
formatos de audio.
• Dolby Digital
•DTS
• LPCM 2ch
• Codificación de audio avanzada
32
ES
Page 97

Información adicional
Especificaciones
Panel de altavoces
(SA-CT390)
Sección del amplificador
Modelos de EE.UU.:
POTENCIA DE SALIDA Y DISTORSIÓN
ARMÓNICA TOTAL:
(FTC)
Delantero IZQ + Delantero DER:
Con cargas de 4 ohms, ambos canales
impulsados, de 200 Hz – 20.000 Hz;
potencia nominal de 35 watts RMS
mínimo por canal, no más del 1% de
distorsión armónica total de 250
miliwatts para la salida nominal.
POTENCIA DE SALIDA (referencia)
Delantero IZQ/Delantero DER: 100 W
(por canal a 4 ohms, 1 kHz)
Modelos canadienses:
POTENCIA DE SALIDA (nominal)
Delantero IZQ + Delantero DER:
50 W + 50 W (a 4 ohms, 1 kHz, 1% THD)
POTENCIA DE SALIDA (referencia)
Delantero IZQ/Delantero DER: 100 W
(por canal a 4 ohms, 1 kHz)
Entradas
USB
ANALOG IN
TV IN OPTICAL
Salida
HDMI OUT TV (ARC)
Sección HDMI
Conector
Tipo A (19 terminales)
Sección USB
Puerto (USB)
Tipo A
Sección BLUETOOTH
Sistema de comunicación
Especificación BLUETOOTH versión 4.2
Salida
Especificación BLUETOOTH potencia
clase 1
Rango máximo de comunicación
Campo visual de aproximadamente
25 m (82 pies)
1)
Banda de frecuencia
Banda de 2,4 GHz (2,4000 GHz –
2,4835 GHz)
Método de modulación
FHSS (espectro ensanchado por salto
de frecuencia)
Perfiles BLUETOOTH compatibles
A2DP 1.2 (perfil de distribución de
audio avanzado)
AVRCP 1.6 (perfil de control remoto de
audio y vídeo)
Códecs soportados
SBC4), AAC
Rango de transmisión (A2DP)
20 Hz – 20.000 Hz (Frecuencia de
muestreo 32 kHz, 44,1 kHz, 48 kHz)
1)
El rango real variará dependiendo de los
factores como obstáculos entre los
dispositivos, campos magnéticos
alrededor de un horno de microondas,
electricidad estática, teléfonos
inalámbricos, sensibilidad de recepción,
desempeño de la antena, sistema
operativo, aplicación de software, etc.
2)
Los perfiles estándares de BLUETOOTH
indican el propósito de la comunicación
BLUETOOTH entre dispositivos.
3)
Códec: Compresión de señal de audio y
formato de conversión
4)
Códec en subbandas
5)
Codificación de audio avanzada
(Advanced Audio Coding)
3)
5)
2)
Sección de altavoces Delantero IZQ/
Delantero DER
Sistema de altavoces
Sistema de altavoces de rango
completo, Suspensión acústica
Altavoz
60 mm (2
3
/8 pulg) de tipo cono
Generalidades
Requisitos de energía
120 V de CA, 60 Hz
Consumo de energía
Encendido: 45 W
En espera: 0,5 W o menos (modo de
ahorro de energía)
(Cuando “CTRL” en “HDMI>” y “BTSTB”
en “BT >” se ajusta en “OFF”)
En espera: 2,8 W o menos
(Cuando “CTRL” en “HDMI>” o “BTSTB”
en “BT >” está ajustado en “ON”)
6)
33
ES
Page 98

Dimensiones (ancho/alto/profundo)
(aprox.)
900 mm × 52 mm × 121 mm
1
/2pulg × 21/8pulg × 47/8pulg)
(35
(sin soportes de montaje de mural)
900 mm × 121 mm × 59 mm
1
/2pulg × 47/8pulg × 23/8pulg)
(35
(con soportes de montaje de mural)
Peso (aprox.)
2,2 kg (4 lb 14 oz)
6)
El sistema entra automáticamente en
modo de ahorro de energía cuando no
existe conexión HDMI e historial de
emparejamiento BLUETOOTH,
independientemente de los ajustes
realizados para “CTRL” en “HDMI>” y
“BTSTB” en “BT >”.
Altavoz de subgraves activo
(subwoofer) (SA-WCT390)
POTENCIA DE SALIDA (referencia)
100 W (por canal a 4 ohms, 100 Hz)
Sistema de altavoces
Sistema de altavoz de subgraves
activo (subwoofer), Bass reflex
Altavoz
130 mm (5
Requisitos de energía
120 V de CA, 60 Hz
Consumo de energía
Encendido: 20 W
En espera: 0,5 W o menos
Dimensiones (ancho/alto/profundo)
(aprox.)
170 mm × 342 mm × 362 mm
(6
(montaje vertical)
342 mm × 172 mm × 362 mm
(13
(montaje horizontal)
Peso (aprox.)
6,5 kg (14 lb 6 oz)
1
/8 pulg) de tipo cono
3
/4pulg × 131/2pulg × 143/8pulg)
1
/2pulg × 67/8pulg × 143/8pulg)
Sección de transmisor/
receptor inalámbrico
Banda de frecuencia
2,4 GHz (2,4000 GHz – 2,4835 GHz)
Método de modulación
FHSS (espectro ensanchado por salto
de frecuencia)
El diseño y las especificaciones están
sujetas a cambios sin previo aviso.
Sobre la comunicación BLUETOOTH
• Los dispositivos BLUETOOTH deben
utilizarse dentro de aproximadamente
10 metros (33 pies) (distancia sin
obstrucciones) uno del otro. El rango
de comunicación efectiva se puede
reducir en las siguientes condiciones.
– Cuando una persona, objeto
metálico, pared u otra obstrucción
esté entre los dispositivos con una
conexión BLUETOOTH
– Ubicaciones donde está instalada
una LAN inalámbrica
– Alrededor de hornos de microondas
que estén en uso
– Ubicaciones donde hay otras ondas
electromagnéticas
• Los dispositivos BLUETOOTH y las LAN
inalámbricas (IEEE 802.11b/g) utilizan
la misma banda de frecuencia
(2,4 GHz). Cuando utilice su
dispositivo BLUETOOTH cerca de un
dispositivo con capacidad de LAN
inalámbrica, es posible que ocurra
interferencia electromagnética. Esto
podría ocasionar tasas de
transferencia de datos bajas, ruido o
incapacidad para conectarse. Si esto
llegara a suceder, intente los
siguientes remedios:
34
ES
Page 99

Información adicional
– Use este sistema al menos a
10 metros (33 pies) de distancia del
dispositivo de LAN inalámbrica.
– Desactive la alimentación del
dispositivo de LAN inalámbrica
cuando utilice su dispositivo
BLUETOOTH a menos de 10 metros
(33 pies).
– Instale este sistema y el dispositivo
BLUETOOTH lo más cerca entre sí
como sea posible.
• La transmisión de las ondas de radio
de este sistema puede interferir con la
operación de algunos dispositivos
médicos. Puesto que esta
interferencia puede ocasionar fallas,
siempre apague la energía de este
sistema y del dispositivo BLUETOOTH
en las siguientes ubicaciones:
– En hospitales, trenes, aeronaves,
gasolineras y en cualquier lugar
donde haya gases inflamables
– Cerca de puertas automáticas o
alarmas de incendio
• Este sistema soporta funciones de
seguridad que cumplen con la
especificación BLUETOOTH para
garantizar una conexión segura
durante la comunicación utilizando
tecnología BLUETOOTH. Sin embargo,
esta seguridad puede ser insuficiente
dependiendo del contenido de
configuración y de otros factores, por
lo que siempre tenga cuidado cuando
realice comunicaciones utilizando
tecnología BLUETOOTH.
• Sony no puede ser responsabilizado
de ninguna manera por daños u otras
pérdidas que resulten por las fugas de
información durante la comunicación
utilizando tecnología BLUETOOTH.
• La comunicación BLUETOOTH no
necesariamente se garantiza con
todos los dispositivos BLUETOOTH
que tengan el mismo perfil que este
sistema.
• Los dispositivos BLUETOOTH
conectados con este sistema deben
cumplir con la especificación
BLUETOOTH recomendada por
Bluetooth SIG, Inc., y deben estar
certificados para cumplimiento. Sin
embargo, incluso cuando un
dispositivo cumple con la
especificación BLUETOOTH, puede
haber casos donde las características
o especificaciones del dispositivo
BLUETOOTH hagan imposible la
conexión o conlleven a diferentes
métodos de control, visualización o
funcionamiento.
• Es posible que se produzca ruido o
que el audio se corte dependiendo del
dispositivo BLUETOOTH conectado
con este sistema, el entorno de las
comunicaciones o las condiciones
circundantes.
35
ES
Page 100

©2016 Sony Corporation Printed in Malaysia 4-586-109-12(3)
 Loading...