


Sound Bar
Operating Instructions
GB
使用說明書
CT
HT-CT380/CT780

WARNING
Do not install the appliance in a
confined space, such as a bookcase or
built-in cabinet.
To reduce the risk of fire, do not cover
the ventilation opening of the appliance
with newspapers, tablecloths, curtains,
etc.
Do not expose the appliance to naked
flame sources (for example, lighted
candles).
To reduce the risk of fire or electric
shock, do not expose this appliance to
dripping or splashing, and do not place
objects filled with liquids, such as vases,
on the appliance.
The unit is not disconnected from the
mains as long as it is connected to the
AC outlet, even if the unit itself has been
turned off.
As the main plug is used to disconnect
the unit from the mains, connect the
unit to an easily accessible AC outlet.
Should you notice an abnormality in the
unit, disconnect the main plug from the
AC outlet immediately.
Do not expose batteries or appliances
with battery-installed to excessive heat,
such as sunshine and fire.
Indoor use only.
Recommended cables
Properly shielded and grounded cables
and connectors must be used for
connection to host computers and/or
peripherals.
For the Bar Speaker
The nameplate is located on the
bottom.
Copyrights and Trademarks
This system incorporates Dolby* Digital
and the DTS** Digital Surround System.
* Manufactured under license from
Dolby Laboratories.
Dolby, and the double-D symbol are
trademarks of Dolby Laboratories.
** For DTS patents, see http://
patents.dts.com. Manufactured
under license from DTS Licensing
Limited. DTS, DTS-HD, the Symbol, &
DTS and the Symbol together are
registered trademarks of DTS, Inc. ©
DTS, Inc. All Rights Reserved.
®
The BLUETOOTH
are registered trademarks owned by
Bluetooth SIG, Inc. and any use of such
marks by Sony Corporation is under
license.
This system incorporates HighDefinition Multimedia Interface
(HDMI™) technology.
The terms HDMI and HDMI HighDefinition Multimedia Interface, and the
HDMI Logo are trademarks or registered
trademarks of HDMI Licensing LLC in the
United States and other countries.
The N Mark is a trademark or registered
trademark of NFC Forum, Inc. in the
United States and in other countries.
Android™ and Google Play™ are
trademarks of Google Inc.
word mark and logos
GB
2

Apple, the Apple lo go, iPhone, iPod, and
iPod touch are tradem arks of Apple Inc.,
registered in the U.S. and other
countries. App Store is a service mark of
Apple Inc.
“Made for iPod,” and “Made for iPhone”
mean that an electronic accessory has
been designed to con nect specifically to
iPod or iPhone, respectively, and has
been certified by the developer to meet
Apple performance standards. Apple is
not responsible for the operation of this
device or its compliance with safety and
regulatory standards. Please note that
the use of this accessory with iPod or
iPhone may affect wireless
performance.
Compatible iPod/iPhone models
The compatible iPod/iPhone models
are as follows. Update your iPod/iPhone
with the latest software before using
with the system.
BLUETOOTH technology works with:
iPhone 6 Plus/iPhone 6/iPhone 5s/
iPhone 5c/iPhone 5/iPhone 4s/
iPhone 4/iPhone 3GS
iPod touch (5th generation)/iPod touch
(4th generation)
“PlayStation
of Sony Computer Entertainment Inc.
Other trademarks and trade names are
those of their respective owners.
” is a registered trademark
®
GB
“BRAVIA” logo is a trademark of Sony
Corporation.
“DSEE” is a trademark of Sony
Corporation.
“ClearAudio+” is a trademark of Sony
Corporation.
“x.v.Colour” and “x.v.Colour” logo are
trademarks of Sony Corporation.
GB
3

About these operating instructions
•The instructions in these Operating
Instructions describe the controls on
the remote control. You can also use
the controls on the main unit if they
have the same or similar names as
those on the remote control.
•Some illustrations are presented as
conceptual drawings, and may be
different from the actual products.
GB
4

Table of Contents
Connecting
About these operating
instructions .......................... 4
Startup Guide (separate document)
Listening
Listening to sound from a TV,
Blu-ray Disc™ player, cable/
satellite box, etc. ................. 6
Listening to music from a
BLUETOOTH device ............. 6
Sound Adjustment
Enjoying sound effects (Sports
mode, etc.) .......................... 9
BLUETOOTH Functions
Controlling the system using a
smartphone or tablet
device (SongPal) .................10
Viewing Copyright-protected
4K Content (HT-CT780 only)
Connecting to a 4K TV and 4K
devices ............................. 12
Settings and Adjustments
Using the setup display ........ 14
Other Functions
Using the Control for HDMI
function ............................... 17
Using “BRAVIA” Sync
features ...............................18
Using the parental lock
function ...............................19
Saving power in standby
mode ...................................19
Mounting the Bar Speaker on
a wall .................................. 20
Installing the subwoofer
horizontally (HT-CT380
only) ....................................22
Linking the system (Link to the
subwoofer) .........................22
Additional Information
Precautions ...............................23
Troubleshooting ...................... 24
Guide to parts and controls .... 29
Supported audio formats .........33
Specifications ...........................35
On BLUETOOTH
communication ..................37
END USER LICENSE
AGREEMENT ....................... 38
GB
5

Listening
Listening to sound from a TV, Blu-ray Disc™ player, cable/satellite box, etc.
Press INPUT repeatedly.
When you press INPUT once, the current
device appears on the front display,
then each time you press INPUT, the
device changes cyclically as follows.
Listening to music from a BLUETOOTH device
Pairing this system with a
BLUETOOTH device
[TV] [HDMI 1] [HDMI 2] [HDMI 3]
[ANALOG] [BT]
[TV]
Digital device that is connected to the
DIGITAL IN (TV) jack or TV compatible with
the Audio Return Channel function that is
connected to HDMI OUT (ARC) jack
[HDMI 1] [HDMI 2] [HDMI 3]
Blu-ray Disc player, etc. that is connected to
the HDMI IN 1, 2, or 3 jack
[ANALOG]
Analog device that is connected to the
ANALOG IN jack
[BT]
BLUETOOTH device that supports A2DP
Tip
• If the BLUETOOTH functions are disabled,
[BT OFF] appears instead of [BT].
Pairing is the process required to create
a link between BLUETOOTH devices to
allow wireless connection. You must
pair a device with the system before you
start using the system.
Once BLUETOOTH devices are paired,
there is no need to pair them again.
1 Press PAIRING on the system.
The BLUETOOTH indicator (blue)
flashes quickly during BLUETOOTH
pairing.
2 Turn on the BLUETOOTH function
on the BLUETOOTH device, search
for devices and select this system
(HT-CT380 or HT-CT780).
If a Passkey is requested, enter
“0000.”
3 Make sure that the BLUETOOTH
indicator (blue) lights up.
Connection has been established.
Note
• You can pair up to 9 BLUETOOTH
devices. If the 10th BLUETOOTH
device is paired, the least recently
connected device will be replaced by
the new one.
GB
6

Listening
Tip
• Once the BLUETOOTH connection is
established, an indication
recommending which application to
download will be displayed,
according to what equipment you
have connected. Following the
instructio ns displayed, a n application
called “SongPal,” which will enable
you to operate this system, can be
downloaded. Refer to “Controlling
the system using a smartphone or
tablet device (SongPal)” (page 10).
Listening to music of the
registered device
1 Press INPUT repeatedly to display
[BT].
The BLUETOOTH indicator (blue)
flashes during attempting
BLUETOOTH pairing.
2 On the BLUETOOTH device, select
this system (HT-CT380 or
HT-CT780).
3 Make sure that the BLUETOOTH
indicator (blue) lights up.
4 Start playback on the BLUETOOTH
device.
Connecting to a BLUETOOTH
device by One-touch
functions (NFC)
By holding an NFC-compatible remote
device near to the N-Mark on the
system, the system and remote device
proceed to complete pairing and the
BLUETOOTH connection automatically.
Compatible remote devices
Remote devices with a built-in NFC
function
(OS: Android 2.3.3 or later, excluding
Android 3.x)
1 Download, install, and start the
“NFC Easy Connect” application.
Note
• The application may not be available
in some countries/regions.
2 Hold the remote device near to
the N-Mark on the system until the
remote device vibrates.
3 Make sure that the BLUETOOTH
indicator (blue) lights up.
Connection has been established.
Notes
• You can connect only one device at a
time.
• Depending on a smartphone, you may
need to set the NFC function to on
beforehand. Refer to the operating
instructions of the smartphone.
GB
7

Tip
• If pairing and the BLUETOOTH connection
fail, do the following.
– Relaunch “NFC Easy Connect” and move
the remote device slowly over the
N-Mark.
– Remove the case from the remote
device if using a commercially available
remote device case.
GB
8

Sound Adjustment
Sound Adjustment
Enjoying sound effects (Sports mode, etc.)
You can easily enjoy pre-programmed
sound fields that are tailored to different
kinds of sound sources.
Setting the Night mode
Sounds are played back enhanced with
sound effects and clarity of dialog.
Press NIGHT to display [N. ON].
To inactivate the Night mode, press
NIGHT to display [N. OFF].
Setting the Voice mode
Selecting the sound field
Press SOUND FIELD repeatedly until
the desired sound field appears on
the front panel display.
[CLEARAUDIO+]
The suitable sound setting is automatically
selected for the sound source.
[STANDARD]
Corresponds to every source.
[MOVIE]
Sounds are played back with surround
effects, and they are realistic and powerful,
making them suitable for movies.
[SPORTS]
Commentary is clear, cheers are heard as
surround-sound, and sounds are realistic.
[GAME]
Sounds are powerful and realistic, suitable
for game play.
[MUSIC]
Sounds are played back to suit to a music
program, music Blu-ray Disc, or DVD.
[P.AUDIO (Portable audio)]
Sounds are played back to suit to a portable
music player using DSEE*.
* DSEE stands for Digital Sound
Enhancement Engine, a high range
compensation and fine sound restorat ion
technology developed independently by
Sony.
The Voice mode helps make dialogs
clearer.
Press VOICE repeatedly to display the
desired type.
[TYPE 1]
Dialog range is outputted directly.
[TYPE 2]
Dialog range is stressed.
[TYPE 3]
The range of dialogue is highlighted, and in
treble parts with low volume difficult to be
discerned by the elderly are boosted.
GB
9

BLUETOOTH Functions
Controlling the system using a smartphone or tablet device (SongPal)
“SongPal” is the application to operate
the system with your smartphone or
tablet, etc.
“SongPal” is available from either
Google Play or App Store.
This function is enabled by setting [BT
PWR] to [ON] (page 15). The default
setting is [ON].
When using an Android
device
1 Press / (on/standby) on the
remote control.
The display of the B ar Speaker lights
up.
2 Search for “SongPal” with the
Android device and download
that application.
3 Run “SongPal” then follow the on-
screen instructions.
Tip
• If the display for NFC connection
appears, see “One-Touch connection
using the Android device with the
NFC function built-in (NFC).”
4 After the BLUETOOTH connection
display appears on the Android
device, press PAIRING.
The BLUETOOTH indicator (blue)
flashes quickly during BLUETOOTH
pairing.
5 Select this system (HT-CT380 or
HT-CT780) from the BLUETOOTH
device list of the Android device.
When the connection has been
established, the BLUETOOTH
indicator (blue) lights up.
6 Operate the system with the
display of the connected Android
device.
One-Touch connection using the
Android device with the NFC
function built-in (NFC)
1 Perform steps 1 to 3 of “When
using an Android device.”
2 After the BLUETOOTH connection
display appears on the Android
device, touch the Android device
with the N-Mark on the Bar
Speaker.
When the connection has been
established, the BLUETOOTH
indicator (blue) lights up.
3 Operate the system with the
display of the Android device.
When using an iPhone/iPod
touch
1 Press / (on/standby) on the
remote control.
The display of the Bar Speaker lights
up.
2 Press PAIRING.
The BLUETOOTH indicator (blue)
flashes quickly during BLUETOOTH
pairing.
10
GB

BLUETOOTH Functions
3 Set the iPhone/iPod touch to
pairing mode and select this
system (HT-CT380 or HT-CT780)
from the BLUETOOTH device list
on the iPhone/iPod touch.
When the connection has been
established, the BLUETOOTH
indicator (blue) of the Bar Speaker
lights up.
4 Search for “SongPal” with the
connected iP hone/iPod touch and
download that application.
5 Run “SongPal” then operate the
system with the display of the
iPhone/iPod touch.
GB
11
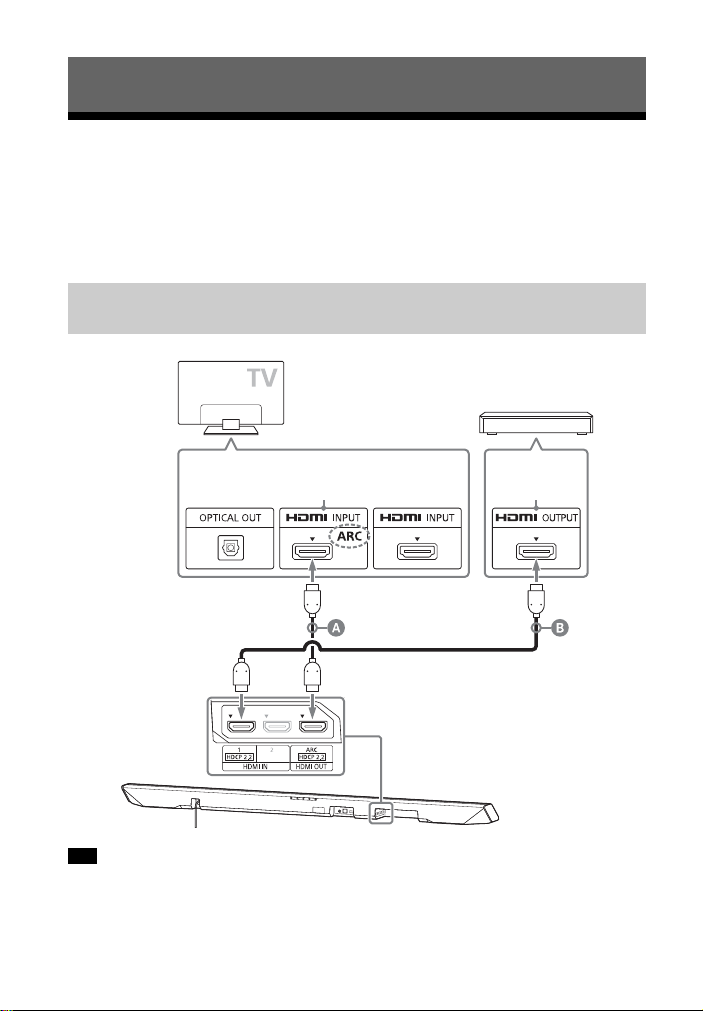
Viewing Copyright-protected 4K Content (HT-CT780 only)
HDCP 2.2compatible
HDMI jack
Blu-ray Disc player, cable
box or satellite box, etc.
HDMI cable (High Speed type, not
supplied)
HDMI cable (High Speed type, not
supplied)
HDCP 2.2compatible
HDMI jack
Connecting to a 4K TV and 4K devices
To view copyright-protected 4K content, connect the devices via an HDCP 2.2compatible HDMI jack on each end. Copyright-protected 4K content can be viewed
only by a connection via HDCP 2.2-compatible HDMI jacks. Refer to the TV’s
operating instructions as to whether or not the HDMI jack on the TV is HDCP 2.2compatible.
When the TV’s HDMI jack is HDCP 2.2-compatible and labeled
with ARC
Tips
• The HDMI 1 INPUT jack of the Bar Speaker is compatible with HDCP 2.2.
• The ARC (Audio Return Channel) function sends digital sound from a TV to this system or
an AV amplifier using just an HDMI cable.
GB
12

Viewing Copyright-protected 4K Content (HT-CT780 only)
When the TV’s HDMI jack is HDCP 2.2-compatible and not
Optical digital cable (supplied)
HDMI cable (High Speed type, not supplied)
HDMI cable (High Speed type, not supplied)
HDCP 2.2compatible
HDMI jack
Blu-ray Disc player, cable
box or satellite box, etc.
HDCP 2.2compatible
HDMI jack
labeled with ARC
Connect the optical digital cable to the optical output jack of the TV, and an HDMI
cable to the HDCP 2.2-compatible HDMI input jack.
Tip
• The HDMI 1 INPUT jack of the Bar Speaker is compatible with HDCP 2.2.
13
GB

Settings and Adjustments
Note
Using the setup display
You can set the following items with the menu.
Your settings are retained even if you disconnect the AC power cord (mains lead).
1 Press MENU to turn on the menu on the front panel display.
2 Press BACK/ (select)/ENTER repeatedly to select the item and press ENTER
to decide the setting.
3 Press MENU to turn off the menu.
Menu list
The default settings are underlined.
Menu items Function
[LEVEL]
(Level)
[TONE]
(Tone)
[AUDIO]
(Audio)
[DRC]
(Dynamic range
control)
[BASS]
(Bass)
[TREBLE]
(Treble)
[SYNC] (AV s ync) You can adjust the sound when the image and the sound
[DUAL]
(Dual mono)
[EFFECT]
(Sound effect)
Useful for enjoying movies at low sound volume. DRC
applies to Dolby Digital sources.
• [ON]: Compresses sound in accordance with the
information contained in the content.
]: Automatically compresses sound encoded in
•[AUTO
Dolby TrueHD.
• [OFF]: Sound is not compressed.
Adjusts the bass level.
• The parameters range from [–6] to [+6] in 1-step
increments.
Adjusts the treble level.
• The parameters range from [–6] to [+6] in 1-step
increments.
are not in sync.
• [ON]: Turns on the AV Sync function.
]: Turns off the AV Sync function.
•[OFF
You can enjoy multiplex broadcast sound when the system
receives a Dolby Digital multiplex broadcast sign al.
• [M/S]: Main sound is output from the left speaker and sub
sound is output from the right speaker.
]: Outputs only the main channel.
•[MAIN
• [SUB]: Outputs only the sub channel.
]: The sound of the selected sound field is played. It is
•[ON
recommended to use this setting.
• [OFF]: The input source is down-mixed for 2 channels.
14
• Even if [EFFECT] is se t to [OFF], [EFFECT] is automatically set
to [ON] when you change the sound field setting.
GB

Settings and Adjustments
Menu items Function
Note
Note
Note
Note
Note
[AUDIO]
(Audio)
[HDMI] [CTRL]
[STREAM]
(Stream)
(Control for HDMI)
[S. THRU]
(Standby-through)
Shows the current audio stream information.
See page 34 on the supported audio formats.
]: Turns on the Control for HDMI function.
•[ON
• [OFF]: Turns off the function. Select this setting when you
want to connect a device not compatible with the Control
for HDMI function.
You can set the power saving mode of the HDMI standbythrough function.
•[AUTO
system in standby mode according to the status of the TV.
This setting saves power in standby mode compared with
the [ON] setting.
• [ON]: Always outputs signals from the HDMI OUT jack in
standby mode. If any TV other than “BRAVIA” is connected,
use the system with the [ON] setting.
]: Outputs signals from the HDMI OUT jack of the
[SET BT]
(Set
BLUETOOTH)
[ARC]
(Audio Return
Channel)
[BT PWR]
(BLUETOOTH
power)
[BT.STBY]
(BLUETOOTH
standby)
[AAC]
(Advanced audio
coding)
• This item appears only when [CTRL] is set to [ON].
Set this item to listen to digital sound from a TV compatible
with the Audio Return Channel (ARC) technology that is
connected using a High Speed HDMI cable.
]: Turns on the ARC function.
•[ON
• [OFF]: Turns off the ARC function.
• This item appears only when [CTRL] is set to [ON].
Turns on or off the BLUETOOTH function of this system.
]: Turns on the BLUETOOTH function.
•[ON
• [OFF]: Turns off the BLUETOOTH function.
• If you change the setting to [OFF], the BLUETOOTH
function is disabled.
When the system has pairing information, the system is in
BLUETOOTH standby mode even when it is turned off.
]: BLUETOOTH standby mode is enabled.
•[ON
• [OFF]: BLUETOOTH standby mode is disabled.
• If the system does not have pairing information,
BLUETOOTH standby mode cannot be set.
You can set whether or not the system uses AAC via
BLUETOOTH.
]: The system uses AAC via BLUETOOTH.
•[ON
• [OFF]: The system does not use it.
• If you change the setting when the system is connected
with a BLUETOOTH device, the system will be
disconnected from the device.
15
GB

Menu items Function
[SYSTEM]
(System)
[WS]
(Wireless
sound)
[A. STBY]
(Auto standby)
[VER] (Version) The current firmware version information appears on the
[SYS.RST]
(System reset)
[UPDATE]*
(Update)
[LINK] You can link the wireless sound system again (page 22).
[RF CHK]
(RF check)
You can reduce power consumption. The system enters
standby mode automatically when you do not operate the
system for about 20 minutes and the system is not receiving
an input signal.
]: Turns on the auto standby function.
•[ON
• [OFF]: Turns off the function.
front panel display.
You can reset menus and settings (sound fields, etc.) of the
system to the initial status when it does not work properly
(page 28).
Updates will be announced on the Sony website. Update the
system following the instructions on the website.
You can check whether the wireless sound system of the
system can communicate or not.
• [OK]: The wireless sound system is working.
• [NG]: The wireless sound system is not working.
*HT-CT780 only
16
GB

Other Functions
Other Functions
Using the Control for HDMI function
By using the Control for HDMI function,
and connecting a device that is
compatible with the Control for HDMI
function via an HDMI cable (High Speed
type), operation is simplified with the
features below.
The Control for HDMI function is
enabled by setting [CTRL (Control for
HDMI)] to [ON] (page 15). The default
setting is [ON].
Control for HDMI is a mutual control
function standard used by HDMI CEC
(Consumer Electronics Control) for HDMI
(High-Definition Multimedia Interface).
System Power Off
When you turn off the TV, the system
and the connected device will turn off
automatically.
System Audio Control
If you turn on the system while you are
watching the TV, the TV sound will be
output from the speakers of the system
automatically.
The volume of the system will be
adjusted when you adjust the volume
using the TV’s remote control.
If the TV sound was output from the
speakers of the system the last time you
watched the TV, the system will be
turned on automatically when you turn
on the TV again.
listen to the TV sound from the speakers
of the system.
The ARC function is enabled by setting
[ARC (Audio return channel)] to [ON]
(page 15). The default setting is [ON].
One-Touch Play
When you activate the device (Blu-ray
Disc player, “PlayStation
connected to the system with a High
Speed HDMI cable, the connected TV is
turned on automatically and the
input signal of the system is switched to
the appropriate HDMI input.
4,” etc.)
®
Home Theatre Control
If a Home Theatre Control-compatible
TV is connected to the system, the
system menu appears on the connected
TV. You can switch an input of the
system or switch sound fields by using
the remote control of your TV. You can
also adjust the settings of voice level,
subwoofer volume, treble, bass, night
mode, Dual Mono, or A/V Sync.
Your TV must be able to access a
broadband service to use the Home
Theatre Control function.
Notes
• The above features may not operate with
certain device.
• Depending on the settings of the
connected device, the Control for HDMI
function may not work correctly. Refer to
the operating instructions of the device.
Audio Return Channel (ARC)
If the TV is compatible with the Audio
Return Channel (ARC) technology, an
HDMI cable connection will allow you to
GB
17

Using “BRAVIA” Sync features
The original Sony functions listed below
can also be used with products that are
compatible with “BRAVIA” Sync.
Power save
If a “BRAVIA” Sync-compatible TV is
connected to the system, the power
consumption will be reduced in standby
mode by stopping HDMI signal
transmission when the TV is turned off
with the HDMI standby-through
function* of the system set to [AUTO]
(page 15). The default setting is [AUTO].
If any TV other than “BRAVIA” is
connected, set the item to [ON]
(page 15).
* The HDMI standby-through function is
used to output the signals from the HDMI
OUT jack of this system even if it is in
standby mode.
Notes on HDMI connections
• Use a High Speed HDMI cable. If you
use a Standard HDMI cable, 1080p,
Deep Color, 3D, and 4K content may
not be displayed properly.
• Use an HDMI-authorized cable.
Use a Sony High Speed HDMI cable
with the Cable Type Logo.
• We do not recommend using an
HDMI-DVI conversion cable.
• Check the setup of the connected
equipment if an image is poor or the
sound does not come out of the
equipment connected via the HDMI
cable.
• Audio signals (sampling frequency, bit
length, etc.) transmitte d from an HDMI
jack may be suppressed by the
connected equipment.
• Sound may be interrupted when the
sampling frequency or the number of
channels of audio output signals from
the playback equipment is switched.
• If the connected equipment is not
compatible with copyright-protection
technology (HDCP), the image and/or
the sound from the HDMI OUT jack of
this system may be distorted or may
not be output. In such a case, check
the specifications of the connected
equipment.
• When “TV” is selected as the input
source of the system, video signals via
one of the HDMI IN 1/2/3 jacks
selected last time are output from the
HDMI OUT jack.
• This system supports Deep Color,
“x.v.Colour,” 3D, and 4K transmission.
• To enjoy 3D content, connect a 3Dcompatible TV and video equipment
(Blu-ray Disc player, “PlayStation
etc.) to the system using High Speed
HDMI cables, put on 3D glasses, and
then play back a 3D-compatible Bluray Disc, etc.
• To enjoy 4K content, the TV and
players that are connected to the
system must be compatible with 4K
content.
®
4,”
18
GB

Other Functions
Using the parental lock function
Saving power in standby mode
Buttons on the Bar Speaker, except for
/ (on/standby) button, will be
the
disabled.
Press INPUT on the Bar Speaker for
about 5 seconds when the system is
on.
[LOCKED] appears on the display.
To cancel the parental lock function,
press INPUT again for about 5 seconds
to display [UNLOCK].
Check that you have made the following
settings:
– [CTRL] in [HDMI] is set to [OFF]
(page 15).
– [S. THRU] in [HDMI] to [AUTO]
(page 15).
19
GB

Mounting the Bar
AC power cord (mains lead)
Screw (supplied)
Wall mounting bracket
(supplied)
Speaker on a wall
You can mount the Bar Speaker on a
wall.
Notes
• Prepare screws (not supplied) that are
suitable for the wall material and
strength. As a plasterboard wall is
especially fragile, attach the screws
securely to two studs in the wall beam.
Install the Bar Speaker horizontally, hung
by screws in studs in a continuous flat
section of the wall.
• Be sure to subcontract the installation to
Sony dealers or licensed contractors and
pay special attention to safety during the
installation.
• Sony shall not be held responsible for
accidents or damage caused by improper
installation, insufficient wall strength,
improper screw installation or natural
calamity, etc.
1 Fix the supplied wall mounting
brackets to the bracket fixing
holes on the bottom of the Bar
Speaker with the supplied screws
so that the surface of each wall
mounting bracket is as shown in
the illustration.
Fix the two wall mounting brackets
to the left and right fixing holes on
the bottom of the Bar Speaker.
Illustrative example: HT-CT780
GB
20

Other Functions
2 Prepare screws (not supplied) that
4 mm
More than 30 mm
4.5 mm
Hole in the bracket
10 mm
777.5 mm (HT-CT380)
876 mm (HT-CT780)
5 mm to
6mm
are suitable for the holes in the
brackets.
3 Fasten the screws to 2 studs in the
wall.
The screws should protrude by
5 mm to 6 mm.
4 Hang the Bar Speaker on the
screws.
Align the holes in the brackets with
the screws, then hang the Bar
Speaker on the two screws.
GB
21

Installing the subwoofer
Attach the supplied speaker pads.
horizontally (HT-CT380
only)
Place the subwoofer on the right side
with the “SONY” logo facing front.
Linking the system (Link to the subwoofer)
Set up the wireless subwoofer
connection again.
1 Press MENU.
2 Select [WS] with (select), then
press ENTER.
3 Select [LINK] with (select), then
press ENTER.
4 When [START] appears on the
display, press ENTER.
[SEARCH] appears, and the Bar
Speaker searches for a device that
can be used with Link. Proceed to
the next step within 1 minute.
To quit the Link function while
searching for a device, press BACK.
5 Press LINK on the subwoofer.
The on/standby indicator on the
subwoofer lights up in green. [OK]
appears on the display of the Bar
Speaker.
If [FAILED] appears, check to ensure
the subwoofer is turned on and
perform the process again from
step 1.
6 Press MENU.
The menu turns off.
22
GB

Additional Information
Additional Information
Precautions
On safety
• Should any solid object or liquid fall into
the system, unplug the system and have
it checked by qualified personnel before
operating it any further.
• Do not climb on the Bar Speaker and
subwoofer, as you may fall down and
injure yourself, or system damage may
result.
On power sources
• Before operating the system, check that
the operating voltage is identical to your
local power supply. The operating voltage
is indicated on the nameplate on the
bottom of the Bar Speaker.
• If you are not going to use the system for
a long time, be sure to disconnect the
system from the wall outlet (mains). To
disconnect the AC power cord (mains
lead), grasp the plug itself; never pull the
cord.
• One blade of the plug is wider than the
other for the purpose of safety and will fit
into the wall outlet (mains) only one way.
If you are unable to insert the plug fully
into the outlet, contact your dealer.
• AC power cord (mains lead) must be
changed only at a qualified service shop.
On heat buildup
Although the system heats up during
operation, this is not a malfunction.
If you continuously use this system at high
volume, the system temperature at the
rear and bottom rises considerably. To
avoid burning yourself, do not touch the
system.
On placement
• Place the system in a location with
adequate ventilation to prevent heat
buildup and prolong the life of the
system.
• Do not place the system near heat
sources or in a place subject to direct
sunlight, excessive dust, or mechanical
shock.
• Do not place anything at the rear of the
Bar Speaker and subwoofer that might
block the ventilation holes and cause
malfunctions.
• If the system is being used in combination
with a TV, VCR, or tape deck, noise may
result and picture quality may suffer. In
such a case, place the system away from
the TV, VCR, or tape deck.
• Use caution when placing the system on a
surface that has been specially treated
(with wax, oil, polish, etc.), as staining or
discoloration of the surface may result.
• Take care to avoid any possible injury
from the corners of the Bar Speaker and
subwoofer.
• Keep 3 cm or more space under the Bar
Speaker when you hang it on a wall.
On operation
Before connecting other equipment, be
sure to turn off and unplug the system.
If you encounter color irregularity
on a nearby TV screen
Color irregularities may be observed on
certain types of TV.
• If color irregularity is observed...
Turn off the TV, then turn it on again after
15 to 30 minutes.
• If color irregularity is observed again...
Place the system further away from the
TV.
On cleaning
Clean the system with a soft, dry cloth. Do
not use any type of abrasive pad, scouring
powder, or solvent such as alcohol or
benzine.
If you have any question or problem
concerning your system, please consult
your nearest Sony dealer.
23
GB

Troubleshooting
If you experience any of the following
difficulties while using the system, use
this troubleshooting guide to help
remedy the problem before requesting
repairs. Should any problem persist,
consult your nearest Sony dealer.
General
The power does not turn on.
Check that the AC power cord
(mains lead) is connected securely.
The system does not work normally.
Disconnect the AC power cord
(mains lead) from the wall outlet
(mains), then reconnect after
several minutes.
The system is turned off automatically.
The auto standby function is
working. Set [A. STBY] in [SYSTEM]
to [OFF] (page 16).
Sound
No TV sound is output from the system.
Repeatedly press the INPUT button
on the remote control to display
[TV] on the display (refer to the
supplied Startup Guide).
Turn on the TV first, then the
system. Set the speakers setting of
the TV (BRAVIA) to Audio System.
Refer to the operating instructions
of the TV for the TV setting.
Check the connection of the HDMI
cable, optical digital cable, or audio
cable that is connected to the
system and the TV (refer to the
supplied Startup Guide).
Increase the volume on the TV or
cancel muting.
When a TV compatible with the
Audio Return Channel (ARC)
technology is connected with an
HDMI cable, make sure the cable is
connected to the HDMI input (ARC)
terminal of the TV. If sound is still
not output or is dropped, connect
the supplied optical digital cable
and set [ARC] to [OFF] in the menu
(page 15). (Refer to the supplied
Startup Guide regarding the
connection.)
If the TV is not compatible with the
Audio Return Channel (ARC)
technology, connect the optical
digital cable. TV sound is not output
via an HDMI connection (refer to the
supplied Startup Guide).
If no sound is output from an optical
digital output jack or the TV does
not have an optical digital output
jack, connect the cable box or
satellite box directly to the DIGITAL
IN (TV) jack of the system.
The sound is output from both the
system and the TV.
Turn off the sound of the TV.
The TV sound from this system lags
behind the image.
If [SYNC] is set to [ON], set it to [OFF]
(page 14).
When you are watching movies, you
may hear the sound with a slight
delay from the image.
No sound or only a very low-level
sound of the device connected to the
Bar Speaker is heard from the Bar
Speaker.
Press the
the remote control and check the
volume level (page 29).
Press the
(volume) + button on the remote
control to cancel the muting
function (page 29).
(volume) + button on
(muting) or
24
GB
 Loading...