

Page 1

Home Theatre
System
Operating Instructions
us_
Page 2

To reduce the risk of fire or
electric shock, do not expose this
apparatus to rain or moisture.
The unit is not disconnected from the AC
power source (mains) as long as it is
connected to the wall outlet, even if the unit
itself has been turned off.
To reduce the risk of fire, do not cover the
ventilation opening of the apparatus with
newspapers, tablecloths, cnrtains, etc.
Do not place the naked flame sources such as
lighted candles on the apparatus.
To reduce the risk of fire or electric shock, do
not expose this apparatus to dripping or
splashing, and do not place objects filled with
liquids, such as vases, on the apparatus.
As the main plug is used to disconnect the unit
from the mains, connect the unit to an easily
accessible AC outlet. Should you notice an
abnormality in the unit, disconnect the main
plug from the AC outlet immediately.
Do not install the appliance in a confined
space, such as a bookcase or built-in cabinet.
Do not expose batteries or apparatus with
battery-installed to excessive heat such as
sunshine, fire or the like.
In door use only.
For the customers in the U.S.A
This symbol is intended to alert the
user to the presence of nninsulated
"dangerous voltage" within the
product's enclosure that may be of
snfficient magnitnde to constitute a risk of
electric shock to persons.
This symbol is intended to alert the
user to the presence of important
operating and maintenance
(servicing) instructions in the
literature accompanying the appliance.
Owner's Record
The model and serial numbers are located on
the rear oblique down-facing surface of the
unit. Record the serial numbers in the space
provided below. Refer to them whenever you
call upon your Sony dealer regarding this
product.
Model No. HT-CT260/HT-CT260HP
Serial No.
Important Safety
Instructions
1) Read these instructions.
2) Keep these instructions.
3) Heed all warnings.
4) Follow all instructions.
5) Do not use this apparatus near water.
6) Clean only with dry cloth.
7) Do not block any ventilation openings.
Install in accordance with the
manufacturer's instructions.
8) Do not install near any heat sources such
as radiators, heat registers, stoves, or other
apparatus (including amplifiers) that
produce heat.
9) Do not defeat the safety purpose of the
polarized or grounding-type plug. A
polarized ping has two blades with one
wider than the other. A grounding type
ping has two blades and a third grounding
prong. The wide blade or the third prong
are provided t_r your safety. If the
provided ping does not fit into your outlet,
consult an electrician for replacement of
the obsolete outlet.
10) Protect the power cord from being walked
on or pinched particularly at pings,
2t/s
Page 3

convenience receptacles, and the point
where they exit from the apparatus.
11) Only use attachments/accessories
specified by the manufacturer.
12)Use only with the cart, stand, tripod,
bracket, or table specified by the
manufacturer, or sokt with the apparatus.
When a cart is used, use caution when
moving the cart/apparatus combination to
avoid injury from tip-over.
13) Unplug this apparatus during lightning
storms or when unused t_r long periods of
time.
14) Refer all servicing to qualified service
personnel. Servicing is required when the
apparatus has been damaged in any way,
such as power-supply cord or plug is
damaged, liquid has been spilled or
objects have fallen into the apparatus, the
apparatus has been exposed to rain or
moisture, does not operate normally, or
has been dropped.
The following FCC statement applies only to
the version of this model manufactured for
sale in the U.S.A. Other versions may not
comply with FCC technical regulations.
NOTE:
This equipment has been tested and found to
comply with the limits for a Class B digital
device, pursuant to Part 15 of the FCC Rules.
These limits are designed to provide
reasonable protection against harmful
interference in a residential installation. This
equipment generates, uses and can radiate
radio frequency energy and, if not installed
and used in accordance with the instructions,
may cause harmfid interference to radio
communications.
However, there is no guarantee that
interference will not occur in a particular
installation. If this equipment does cause
harnfful interference to radio or television
reception, which can be determined by turning
the equipment off and on, the user is
encouraged to try to correct the interference
by one or more of the following measures:
Reorient or relocate the receiving antenna.
Increase the separation between the
equipment and receiver.
Connect the equipment into an outlet on a
circuit different from that to which the
receiver is connected.
Consult the dealer or an experienced radio/
TV technician for help.
CAUTION
You are cautioned that any changes or
modifications not expressly approved in this
manual could void your authority to operate
this equipment.
For the Sound Bar (SA-CT260)
The nameplate and the date of manufacture
marking are located on the rear oblique down-
facing surface.
For the Sound Bar (SA-CT260)
For the wireless transceiver
(EZW-RT50)
This device complies with Part 15 of the FCC
Rules. Operation is subject to the following
two conditions: (1) this device may not cause
hamfful interference, and (2) this device must
accept any interference received, including
interference that may cause undesired
operation.
This equipment nmst not be co-located or
operated in conjunction with any other
antenna or transmitter.
This equipment complies with FCC radiation
exposure limits set forth for an uncontrolled
environment and meets the FCC radio
frequency (RF) Exposure Guidelines in
Supplement C to OET65. This equipment
shoukt be installed and operated keeping the
radiator at least 20cm or more away from
person's body (excluding extremities: hands,
wrists, feet and ankles).
continued
3us
Page 4

For the customers in the Canada
For the Sound Bar (SA-CT260)
For the wireless transceiver
(EZW-RT50)
This Class B digital apparatus complies wdth
Canadian ICES-003.
Operation is subject to the following two
conditions:
(1) this device may not cause interference, and
(2) this device must accept any interference,
including interference that may cause
undesired operation of the device.
This equipment complies with IC radiation
exposure limits set t_rth for an uncontrolled
environment and meets the RS S- 102 of the ]C
radio frequency (RF) Exposure rules.
This equipment should be installed and
operated keeping the radiator at least 20 cm or
more away from person's body (excluding
extremities: hands, wrists, feet and ankles).
4t/S
Page 5

Precautions
On safety
• Should any solid object or liquid tMl into tile
system, unplug the system and have it
checked by qualified personnel bet_re
operating it any fimher.
• Do not climb on the Sound Bar or the
subwoofer, as you may fall down and injure
yourseff, or system damage may result.
On power sources
• Before operating the system, check that the
operating voltage is identical to your local
power supply. The operating voltage is
indicated on the nameplate at the rear of the
Sound Bar.
• If you are not going to use the system t_r a
long time, be sure to disconnect the system
from the wall outlet (mains). To disconnect
the AC power cord (mains lead), grasp the
plug itself; never pull the cord.
• One blade of the plug is wider than the other
for the purpose of safety and will fit into the
wall outlet (mains) only one way. If you are
unable to insert the plug filly into the outlet,
contact your dealer.
• AC power cord (mains lead) nmst be
changed only at the qualified service shop.
On beat buildup
Although the system heats up during
operation, this is not a malfimction. If you
continuously use this system at a large
volume, the system temperature of the back
and bottom rises considerably. To avoid
burning yourself, do not touch the system.
On placement
• Place the system in a location "a,ith adequate
ventihttion to prevent heat buildup and
prolong the life of the system.
• Do not phtce the system near heat sources, or
in a place subject to direct sunlight,
excessive dust, or mechanical shock.
• Do not place anything at the rear of the
Sound Bar that might block the ventilation
holes and cause malflmctions.
• If the system is being used in combination
with a TV, VCR, or tape deck, noise may
result, and picture quality may suffer. In this
case, place the system away from the TV,
VCR, or tape deck.
• Use caution when placing the system on
surfaces that have been specially treated
(with wax, oil, polish, etc.) as staining or
discoloration of the surface may result.
• Take care to avoid any possible injury on the
corners of the Sound Bar or the subwoofer.
On operation
Bet_re connecting other equipment, be sure to
turn off and unplug the system.
If you encounter color
irregularity on a nearby TV
screen
Color irregularities may be observed on
certain types of TV sets.
If color irregularity is
observed...
Turn off the TV set, then turn it on again after
15 to 30 minutes.
If color irregularity is
observed again...
Place the system further away from the TV
set.
On cleaning
Clean the system with :t soft dry cloth. Do not
use any type of abrasive pad, scouring powder
or solvent such as alcohol or benzine.
If you have any question or problem
concerning your system, please consult your
nearest Sony dealer.
continued _
5us
Page 6
This model incorporates Dolby* Digital and
Pro Logic Sound and the DTS** Digital
Surround System.
* Manufactured under license from Dolby
Laboratories.
Dolby, Pro Logic, and the double-D
symbol are trademarks of Dolby
Laboratories.
** Manufactured under license under U.S.
Patent Nos: 5,956,674; 5,974,380;
6,487,535 & other U.S. and worldwide
patents issued & pending. DTS, the
Symbol, & DTS and the Symbol together
are registered trademarks & DTS Digital
Surround and the DTS logos are
trademarks of DTS, Inc. Product includes
software. Q DTS, Inc. All Rights
Reserved.
The Bluerooth ® word mark and logos are
registered trademarks owned by Bluetooth
SIG, Inc. and any use of such marks by Sony
Corporation is under license.
Other trademarks and trade names are those of
their respective owners.
Bluetooth wireless
technology
Bluetooth wireless technology is a short-
range wireless technology linking digital
devices, such as personal computers and
digital cameras. Using the Bluetooth
wireless technology, you can operate the
units involved within a range of about 10
meters.
The Bhtetooth wireless technology is
commonly used between two devices,
but a single device can be connected to
multiple devices.
You do not need wires to get connected
as you do with a USB connection, and
you do not need to place the devices lace
to face as you do with wireless infrared
technology. You can use the technology
with one BIHetooth device in your bag or
pocket.
BIHetooth wireless technology is a global
standard supported by thousands of
companies. These companies produce
products that meet the global standard.
Supported Bluetooth
version and profiles
Profile refers to a standard set of
capabilities for various BlHetooth
product capabilities. This system
supports the following BIHetooth version
and profiles.
Supported BlHetooth version:
BIHetooth Standard version 2.1 + EDR
(Enhanced Data Rate)
Supported Bhtetooth profiles:
A2DP (Advanced Audio Distribution
Profile)
AVRCP (Audio Video Remote Control
Profile)
6t/$
Page 7

I,'[rll"4_
• For you to use the Bluetooth function,
the Bluetooth device to be connected
must support the same profile as this
system. Even if the device supports the
same profile, the functions may differ
because of the specifications of the
Bluetooth device.
• The audio playback on this system may
be delayed from that on the Bhtetooth
device because of the characteristics of
the Bluetooth wireless technology.
Effective communication
range
Bhtetooth devices should be used within
approximately 10 meters (33 feet)
(unobstructed distance) of each other.
The effective communication range may
become shorter under the following
conditions.
• When a person, metal object, wall or
other obstruction is between the
devices with a Bhtetooth connection
• Locations where a wireless LAN is
installed
• Around microwave ovens that are in
use
• Locations where other electromagnetic
waves Occur
Effects of other devices
Bhtetooth devices and wiMess LAN
(IEEE 802.1 Ib/g) use the stone frequency
band (2.4 GHz). When using your
Bluetooth device near a device with
wireless LAN capability, electromagnetic
interference may occur.
This could result in lower data transfer
rates, noise, or inability to connect. If
this happens, try the following remedies:
• Try connecting this system and
Bhtetooth mobile phone or Bhtetooth
device when you are at least 10 meters
(33 feet) away from the wireless LAN
equipment.
• Turn offthe power to the wireless LAN
equipment when using your Bluetooth
device within 10 meters.
Effects on other devices
The radio waves broadcast by this
system may interfere with the operation
of some medical devices. Since this
interference may result in malfunction,
always turn offthe power on this system,
Bhtetooth mobile phone and Bluetooth
device in the following locations:
• In hospitals, on trains, in airplanes, at
gas stations, and any place where
flammable gasses may be present
• Near automatic doors or fire alarms
• This system supports security fimctions that
comply with the Bluetooth specification as a
means of ensuring security during
communication using Bh¢etooth technology
However, this security may be insufficient
depending on the setting contents and other
factors, so always be carefid when
pert_rming communication using Bluetooth
technology.
• Sony cannot be held liable in any way tOr
damages or other loss resulting from
information leaks during conmmnication
using B/uetooth technology.
• Bluetooth comnmnication is not necessarily
guaranteed with all B/uetooth devices that
have the same profile as this system.
• Bluetooth devices connected with this
system must comply with the Bluetooth
specification prescribed by the Bluetooth
SIG, Inc., and must be certified to comply.
However, even when a device complies with
the Bluetooth specification, there may be
cases where the characteristics or
specifications of the Bhwtooth device make
it impossible to connect, or may result in
continued
7 us
Page 8

different control methods, display or
operation.
• Noise may occur or the audio may cut off
depending on the Bluetooth device
connected "a,ith this system, the
conlnlunications environment, or
surrounding conditions.
8tJ$
Page 9

Precautions .................................... 5
Bhtetooth wireless technology ...... 6
Getting Started
Unpacking ................................... 10
Index to parts and controls .......... 12
Installing the supplied wireless
transceivers ........................... 16
Connecting the TV and player,
etc ......................................... 18
Positioning the system ................ 19
Connecting the AC power cord
(mains lead) .......................... 22
Setting up the Wireless
System .................................. 22
Setting up the sound output of the
connected equipment ............ 23
Playback Options
Operating the system using the
supplied remote control ........ 24
Bluetooth Function
Using the Bhletooth function ...... 25
Surround Function
Enjoying the surround effect ...... 29
Advanced Settings
Controlling connected equipment
with the remote control ......... 30
Setting manufacturer of
controllable TVs ................... 31
Settings and adjustments using
the amplifier menu ................ 33
Additional Information
Troubleshooting .......................... 38
Specifications .............................. 40
Index ........................................... 43
9118
Page 10

Unpacking
• Subwoofer (SA-WCT260) (l)
• Sound Bar (SA CT260) (l)
• Analog audio cord (1) (HT CT260HP
only)
• Remote control (RM ANP084) (1)
[E3 E23_
IE3 15_ [E?
iC2] _ _
• Wireless transceivers (EZW RT50) (2)
• Digital optical cord for a TV (1)
• Digital coaxial cord (1) (HT CT260HP
only)
10us
czB _::1 cz:?
ocz_
• R6 (size AA) batteries (2)
• Operating Instructions (1)
• Warranty (1)
Page 11

Insert two R6 (size AA) battmies (supplied) by matching the @ and @ ends on the
batteries to the diagram inside the battery compartment of the remote control. To use
the remote control, point it at the remote control sensor [] at the flont of the Sound
Bar.
• Do not leave the remote control in an extremely hot or humid place.
• Do not use a new battery with an okt one.
• Do not drop any t_reign obiect into the remote control casing, particularly when replacing the
batteries.
• Do not expose the remote control sensor to direct sunlight or lighting apparatus. Doing so may
cause a malflmction.
• If you do not intend to use the remote control t_r an extended period of time, remove the batteries
to avoid possible damage from battery leakage and corrosion.
11us
Page 12

Index to parts and controls
For more information, see the pages indicated in parentheses.
[] I/_ (on/standby)
[] m (remote control sensor)
[] _) (Bluetooth) touch key/
indicator
[] INPUT touch key
Press to select the input source to
play back.
Every time you press the key, the
input source changes cyclically as
follows:
OPTICAL --_ COAXIAL--*
ANALOG --_ BT AU --_
OPTICAL
12us
[] VOL +/- touch keys
[] Frontpanel display (page 13)
k_
• Touch a touch key lightly with a fingertip. If
you touch two or more keys simultaneously
or touch with a thumb, appropriate operation
may not be obtained.
Page 13

[] Audio format indicators
Light up according to the audio
format that is being input to the
system.
IX1D: Dolby Digital
DTS
LPCM: Linear PCM
m PL II: Lights while Dolby Pro
Logic II is active (page 29).
[] NIGHT (page 35)
Lights up in NIGHT mode.
[] Message display area
Displays volume, selected input
source, etc.
:i
continued
13us
Page 14

[] I/_ (on/standby) indicator
[] I/_ (on/standby) button
[] SECURE LINK button (page 36)
14us
Page 15

This section describes subwoofer and
Sound Bar button operation. See page 30
for details on the button operation of
connected equipment.
• Point the remote control towards the remote
control sensor ([]) of the Sound Bar.
u_
] .................
] .................
IBLOETOOTHI
[263 CAD r-_-q
E99D F_q E_E3
PAIRING
0 r_q
[] I/_ (on/standby)
[] INPUT +/-
Press one of the buttons to select the
equipment you want to use.
[] SOUND FIELD (page 29)
[] DISPLAY
Press to change the display status.
Each time you press the button. ON
and OFF are toggled. The factory
setting is ON.
ON: The display is always lit.
OFF: The display is turned off.
When the system is operated, the
display is lit for several seconds.
[] MUTING
[] VOL +*/-
Press to adjust the volume.
[] AMP MENU (page 33)
[] ÷, ,I,, 4,, -> or @
Press (-. '1".4, or "-)to select the menu
items. Then press @ to enter the
selection.
[] NIGHT
Each time the button is pressed.
"ON" or "OFF" is toggled. For
details on night mode. see page 35.
,,,,1
111
* The _ and VOL + buttons have a tactile
clot. Use it as a guide during operation.
15us
Page 16

Installing the supplied wireless transceivers
Insert the two supplied wireless transceivers into the wireless transceiver
(EZW-RT50) slot on the rear panel of both the Sound Bar and the subwoofer.
4
| Remove the cover for the wireless transceiver slot on the rear of the
Sound Bar.
....../
2 Place the wireless transceiver as shown below.
16us
Wireless transceiver
Page 17

3 Push in the wireless transceiver to the slot until it stops.
G3
4
Attach the cover as it was.
Wireless transceivc
cn
17us
Page 18

Connectingthe TV and player, etc.
* Supplied with the HT-CT260HP only.
Smartphone,
"Walkman",etc.
18us
Page 19
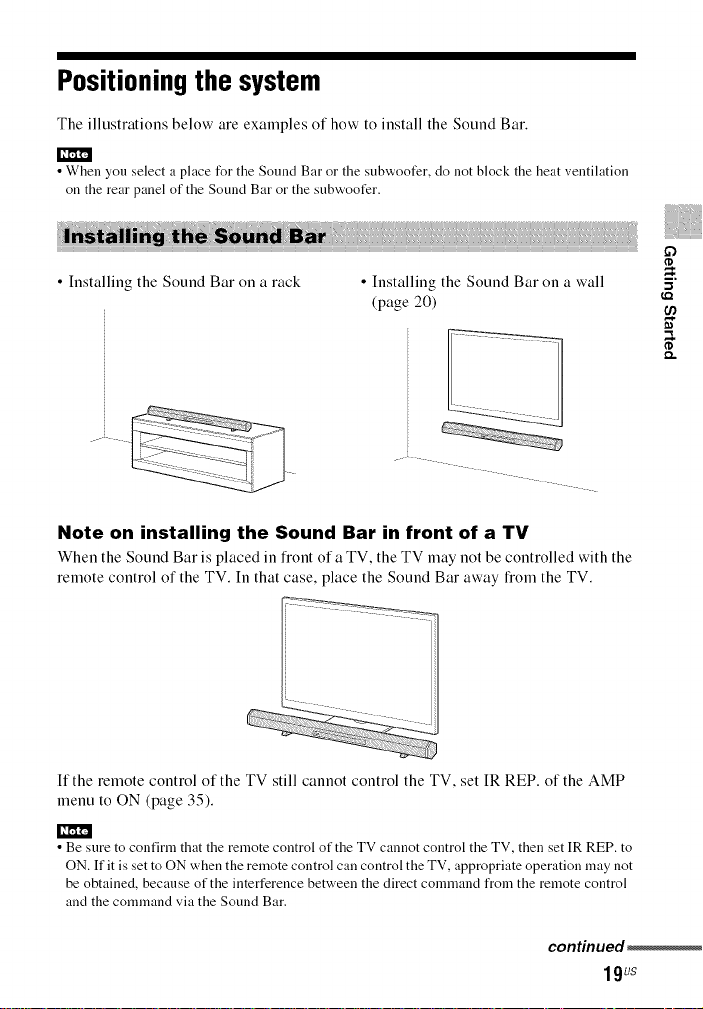
Positioning the system
The illustrations below are examples of how to install the Sound Bar.
• When you select a place for the Sound Bar or the subwoofer, do not block the heat ventilation
on the rear panel of the Sound Bar or the subwoofer.
• Installing the Sound Bar on a rack • Installing the Sound Bar on a wall
(page 20)
Note on installing the Sound Bar in front of a TV
When the Sound Bar is placed in fiont of a TV. the TV may not be controlled with the
remote control of the TV. In that case, place the Sound Bar away fiom the TV.
If the remote control of the TV still cannot control the TV. set IR REP. of the AMP
menu to ON (page 35).
• Be sure to confirm that the remote control of the TV cannot control the TV, then set IR REP. to
ON. If it is set to ON when the remote control can control the TV, appropriate operation may not
be obtained, because of the interference between the direct command from the remote control
and the connnand via the Sound Bar.
continued
19us
Page 20

When the Sound Bar is to be placed
facing upward slightly or on a wall.
remove the two stands at the bottom of
the Sound Bar. as shown below.
Stand _ _i[[
You can install the Sound Bar on the
wall.
• Use screws that are suitable for the wall
material and strength. As a plaster board wall
is especially fragile, attach the screws
securely to a wall beam. Install the Sound
Bar on a vertical and fiat reintUrced area of
the wall.
• Be sure to subcontract the installation to
Sony dealers or licensed contractors and pay
special attention to safety during the
installation.
• Sony is not responsible for accidents or
damage caused by improper installation,
insufficient wall strength, improper screw
installation or natural calamity, etc.
Prepare screws (not supplied)
that are suitable for the holes on
the back of the Sound Bar.
...............4mm
(3/16 inches)
, ,I
more than 25 mm (1 inch)
Hole on the back of the Sound Bar
2
Fasten the screws to the wall.
The screws should protrude 6 to
7 mm (approx. 1/4 inches).
592 mm
(233/8 inches)
20us
Page 21

3
Hang the Sound Bar onto the
screws.
Align the holes on the back of the
Sound Bar to the screws, then hang
the Sound Bar onto the two screws.
¢D
21us
Page 22

Connectingthe AC
powercord(mainslead)
Before connecting the AC power cord
(mains lead) of the Sound Bar and the
subwoofer to a wall outlet (mains),
connect all the other equipment and TV
to the system.
Setting up the Wireless
System
The Sound Bar transmits sound flom the
equipment to the subwoofer by wireless
conmmnication.
Check that the wireless
transceivers (supplied) are
inserted into the wireless
transceiver (EZW-RT50) slot on
the rear panel of both the Sound
Bar and the subwoofer.
For details, see "Installing the
supplied wireless transceivers"
(page 16).
2
Press I/_ to turn the Sound Bar
on.
The subwoofer tunis on
automatically and the I/(_) indicator
lights in green when the Sound Bar
is turned on and wireless
transmission is activated.
To specify a wireless
connection
It you use multiple Sony wireless
products, you can prevent improper
connection by specifying the wireless
connection to be used to link the Sound
Bar to the subwoofer (Secure Link
function).
For details, see "Activating wireless
transmission between specific units
(S. ON)" (page 36).
If no sound is heard from a
subwoofer whose I/_
indicator stays lit in red
• Check the location of the Sound Bar
and subwoofer.
-Do not place the Sound Bar and
subwoofer in a metal cabinet.
-Do not place an object such as an
aquarium between the Sound Bar and
subwoofer.
-Place the subwoofer close to the
Sound Bar in a room.
• Check the wireless communication
status (page 37).
• Change the fiequency for the wireless
system (page 37).
About the standby mode
The subwoofer enters standby mode
automatically and the I/(_) indicator
lights in red when the Sound Bar is in
standby mode.
22us
Page 23

Setting up the sound
outputofthe connected
equipment
To output multi-channel digital audio,
check the digital audio output setting on
the connected equipment.
For details, refer to the operating
instructions supplied with the connected
equipment.
¢D
23us
Page 24

Operatingthe system
usingthe supplied
remote control
MUTING iNPUT r/(b
EZ3 r--I EZ3
EE3EE3
NIGHT DISPLAY MUTING
O " OO,
RE;_J_N AMPMENU
-- BLUETOOTH --
r-_ ESB E_3
EA3 E?_ [5£3
_l/(b
_INPUT
+/-
VOL+/-
.....
Input Playable equipment
source
ANALOG Device connected to the
BT AU Device connected with
3
Adjust the volume by pressing
VO L +/-.
ANALOG jack
the B/uetooth
k_
• The sound may be output from the TV's
speaker. In this case, turn the volmne of the
TV's speaker down to minimum.
1
Turn on the system.
2
Press INPUT +/- to display the
input source on the front panel
display of the Sound Bar.
Input Playable equipment
source
OPTICAL Device connected to the
OPTICAL jack
COAXIAL Device connected to the
COAXIAL .jack
24us
Page 25

Usingthe Bluetooth
function
You can listen to music from your
Bhtetooth mobile phone or Bluetooth
device over a wireless connection.
This system supports the Bluetooth
A2DP and AVRCP profiles. For details
on Bluetooth wireless technology, see
"Bluetooth wireless technology"
(page 6).
Check the web site below for the latest
information about compatible devices.
• U.S.A.: http://www.sony.com/support
• Canada: http://www.sony.ca./support,
http://ff.sony.ca/support
About the indicator for
Bluetooth
The _ (Bhtetooth) indicator lights or
flashes in blue to allow checking the
Bhtetooth status.
System status Indication status
During Bluetooth Flashes quickly in
pairing blue.
The system is Flashes in blue.
attempting to connect
•a,ith a Bh¢etooth
device
The system has Lights up in blue.
established in
connection "a,ith a
Bhtetooth device
The system is in Flashes slo'a, ly in
Bhtetooth Standby blue.
mode (when the
system is off)
• For details on operation of the connected
devices, refer to the operating instructions
supplied with the devices.
• The Bluetooth devices to be connected must
support A2DP (Advanced Audio
Distribution Profile).
About pairing
Pairing is an operation where Bhtetooth
devices are registered with each other
beforehand. Use the procedure below to
pair the system with your Bluetooth
device. Once a pairing operation is
performed, it does not have to be
performed again. Once a pairing
operation is performed, you need not do
it again. However, repeat of pairing is
required in the cases listed below.
• Pairing information is deleted by
repairing the system.
• Pairing for ten or more devices is to be
set.
This system can set pairing with up to
nine devices. If pairing is to be set on a
device alter pairing has been set on nine
devices, the pairing information on a
device whose connection date is the
oldest is overwritten with new
information.
• The connection history with this
system is deleted on the connected
device.
• The system is reset to default.
If "BT AU" is selected with the INPUT
+/- buttons with no pairing being set
with a Bluetooth device on the system,
the system automatically sets pairing
with it. The system enters pairing mode
O
"N
0
0
continued ....
25u_
Page 26

and pairing is pedormed automatically,
as described below.
MUTING IPUT I/(b
EC3r-'-I C13
Tv 5
i '
cBr l
NIGHT DISPLAY MUTING
RETURN AMPMENU
J BLUETOOTH J
Dii3 CSE] C!iE3
C?ig3 _ _
1 Place the system and a
Bluetooth device within 1 m.
2 Press INPUT +/- to select "BT
AU."
3 Set the Bluetooth device in
pairing mode.
For details on setting the Bluetooth
device in pairing mode, refer to the
operating instructions supplied with
the device.
4 When the detected devices are
listed on the Bluetooth device,
check that "HT-CT260" is listed.
On some Bhtetooth devices, the list
may not be displayed.
5
Select "HT-CT260" on the list of
devices detected on the
Bluetooth device.
If entering the Passkey is requested,
enter "0000."
6
Make the Bluetooth connection
on the Bluetooth device.
When the Bhtetooth connection is
made conectly, the '_,:_)(Bluetooth)
indicator lights in blue and the
pairing information is stored in the
system.
__'ml'g"t
• Use a Bluetooth device such as Bluetooth
mobile phone in an easily visible place in the
same room where the Sound Bar is placed.
• If Wi-Fi equipment is used, Bluetooth
conmmnication may become unstable. In
that case, use the Bhwtooth device as close as
possible to the Sound Bar.
• Sound may be interrupted because of a
problem with the Bluetooth device.
26us
Page 27

If you intend to connect a second and
following pieces of Bhtetooth
equipment, manual pairing is necessary.
MUTING INPUT I_
EZ3 EZ3 EZ3
cz] EE3
NIGHT DISPLAY MUTING
REIL_N AMPM NU
-- BLUETOOTH --
c_ig] c5E3 ekE3
U
_INPUT
+/-
_i=VO L
+/-
cawq _ ZiK]
PAIRING_
_G C-Wq
VOL+/-
_$.(Bluetooth)
Place the Bluetooth device to be
connected to this system within
1 meter of the system.
2
Push PAIRING on the remote
control or touch _*)(Bluetooth)
on the Sound Bar for more than
two seconds.
3
Perform steps 3 to 6 in "Pairing
automatically" (page 25).
__'m!"g"t
• "Passkey" may be called "Passcode," "PIN
code," "PIN number" or "Password," etc.,
depending on the device.
• The pairing standby status of the systeln is
canceled alter about 5 minutes. If pairing is
not successfid, redo the procedure from step
1.
• If you wish to pair with several Bluetooth
devices, pert_rm the procedure from steps 1
to 3 individually for each B/uetooth device. O
• If no pairing iut_rmation is stored in the ._
system, the system automatically enters ,-
pairing mode when "BT AU" is selected as
input. In this case, pairing mode is not _'
released automatically. -_
The system supports SCMS-T content
protection. You can listen to a Bluetooth
device that supports SCMS-T content
protection.
Before starting music playback, check
the following:
• The BIuetooth timction on the
Bluetooth device is on.
• The pairing procedure is completed on
both this system and Bluetooth device.
1 Press INPUT +/- to select "BT
AU" on this system.
Ill
"1"1
continued
27us
Page 28

2
Start the Bluetooth connection
from the Bluetooth device.
The (_ (Bhtetooth) indicator lights
in blue when the Bluetooth
connection is established.
3
Start playback on the Bluetooth
device.
For details on operation, see "To
control the Bhtetooth device"
(page 30).
4
Adjust the volume.
Set the volume of the Bhtetooth
device to a moderate level and touch
the VOL +/- touch keys on the
Sound Bar or press the VOL +/-
buttons on the remote control.
• You can adjust the volume of the system via
a Bluetooth device supporting AVRCP
(Audio Video Remote Control Profile)
VOLUME UP/DOWN. For details, refer to
the operating instructions supplied with the
device.
• The volume of the system may not be
controllable, depending on the device.
Ii_,ml-g',t
• If the source device has a bass boost fimction
or equalizer function, turn them oft'. If these
fimctions are on, sound may be distorted.
• In the t_llowing cases, you will have to make
the Bluetooth connection again.
The power of the unit does not turn on.
The power of the Bhwtooth device does
not turn on, or the Bluetooth fimction is
off.
The Bluetooth connection is not
established.
• If more than one device paired with the unit
is being played back, sound will be heard
from just one of those devices.
Terminate the Bluetooth connection by
any of the operations listed below.
• Operate the Bluetooth device to
terminate the connection. For details.
refer to the operating instructions
supplied with the device.
• Turn offthe Bluetooth device.
• Turn offthe system.
28us
Page 29
Enjoyingthe surround
effect
This system can create multi-channel
SmTound sound. You can select one of
system' s optimized pre-programmed
sound fields.
MUTINGI_[_ [_INPUT IT_
E2_ ESBF-_
TVVOL TVCH INPUT
=SOUND
FIELD
NIGHT DISPIAY MUTING
RETURN AMPMENU
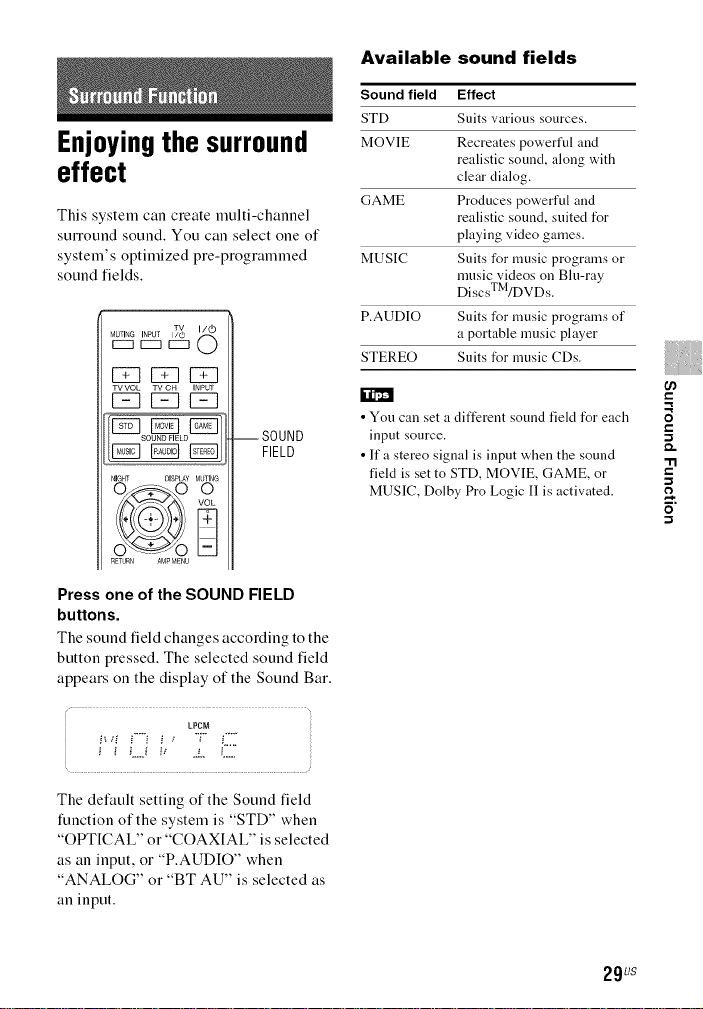
Press one of the SOUND FIELD
buttons.
The sound field changes according to the
button pressed. The selected sound field
appears on the display of the Sound Bar.
# •
i g L..." i_ ..L i.....
LPCM
Available sound fields
Sound field Effect
STD Suits various sources.
MOVIE Recreates powerful and
GAME Produces powerful and
MUSIC Suits for music programs or
P.AUD]O Suits for music programs of
STEREO Suits for music CDs.
• You can set a different sound field for each 0
input source. =
• If a stereo signal is input when the sound
field is set to STD. MOVIE, GAME, or '-
MUSIC, Dolby Pro Logic I1 is activated, o
realistic sound, along with
clear dialog.
realistic sound, suited for
playing video games.
nmsic videos on Blu-ray
DiscsTM/DVDs.
a portable music player
-rl
0
The default setting of the Sound field
timction of the system is "STD" when
"OPTICAL" or "COAXIAL" is selected
as an input, or "P.AUDIO" when
"ANALOG" or "BT AU" is selected as
an input.
29us
Page 30

Controlling connected
equipment with the
remote control
You can control connected equipment
with the remote control of this system.
Some flmctions may not be selectable
depending on the equipment. In that
case. select them using the remote
control supplied with the equipment.
] ........................:
NIGHT DISPLAY MUTING
nETURN AMPMENU
'4
........................]
To control the equipment
Referring to the following table,
press the corresponding button for
the operation.
Remote Control Function
Button
[] TV I/(_ Turns on or off the TV
(on/standby) that the remote control is
assigned to operate.
To control a TV
Press the buttons with yellow
printing.
RemoteControl Function
Button
[] TV CH +_ Selects the next (+) or
previous ( ) channel.
[] MUTING Turns off the sound.
[] TV VOL +_ Adjusts the vohnne.
[] INPUT Selects input.
To control the Bluetooth
device
RemoteControl Function
Button
[] "ql'_/llH_ To fast reverse or to fast
[] _/1_1_1 To go to the beginning of
[] _* Play mode buttons.
(playback)/|| Press again to resume
(pause)/ normal playback.
• (stop)
forward the music when
pressed during playback.
the previous or next
nmsic.
* The _ and VOL + buttons have a tactile
dot. Use it as a guide during operation.
30us
• The above explanations are intended to serve
as an example only. Depending on the
equipment, the above operations may not be
Page 31

possible, or may operate differently than
described.
Settingmanufacturer of
controllable TVs
The supplied remote control can control
TVs other than Sony products. Set the
manut:acturer, following the procedures
below.
--TV I/(_
..................Manufacturer
selecting
buttons
NIGHT DISP AY MUTING
RETURN AMPME_
-- BIOETOOTH--
While holding down the TV I/_
button, press the button
corresponding to the
manufacturer.
Manufacturer Button
SONY TV VOL +
Samsung TV CH +
LG INPUT +
Panasonic TV VOL
continued
31us
<
,-,I
o
@
,,,,1
Page 32

Manufacturer Button
VIZIO TV CH
Sharp INPUT
Toshiba STD
FUNAI MOVIE
2
While keeping TV I/_ held
down, press @.
3
Release TV I/_.
32us
Page 33

Settings and
adjustments usingthe
amplifier menu
-SET BT-- BT STBY_ON
_YSTEM_A. STBY _ON
/
t--OFF
You can set the following items with
AMP MENU on the remote control.
The default settings are underlined.
Your settings are retained even if you
disconnect the AC power cord (mains
lead).
AMP MENU
- LEVEL_CNT LVL ---6,-5, ... _0....
+5, +6
p swEVE---6,-s,... 0....
+5, +6
tIDRC EOo_F
- TONET BASSi_6,-5, ... _0....
t-OFF
+5, +6
-- '-- ,"'i,
+5, +6
- MAIN
[--TREBLE-- 6 B 0
-AUDIO-
I SYNC --cO0_F
-- DUAL _M/S
"-SUB
--mGHT_ON
IR REP ON
LOFF
• _OFF
LVERSION
WS----S. ON b
-- S. OFF2)
-- RFCH'_IUTO
--RFCHK
1) This setting appears only when the Secure
Link connection is not activated.
2) This setting appears only when the Secure
Link connection is activated.
<
,-,I
o
¢
continued
33us
Page 34

+, -).,
NIGHT DISPLAY MUTING
.........
RE_UR_ AUPUENU
-- BLUETOOTH --
r-_] F-Wn [:_
O
AMP
MENU
1 Press AMP MENU to turn on the
AMP menu.
2 Press ÷/'lVq,/-> repeatedly to
select the item and press (_ to
decide the setting.
3
Press AMP MENU to turn off the
AMP menu.
at low volume. DRC applies to Dolby
Digital sources.
• ON: Compresses the sound in
accordance with the
information contained in the
content.
• OFF: Sound is not compressed.
You can adjust the bass and treble level.
The parameters of "BASS" and
"TREBLE" range t)om "_6" to "+6" in
l-step increments.
• BASS: Adjusts the bass level.
• TREBLE: Adjusts the treble level.
The sound flom the center is output fiom
the left and right speakers on the Sound
Bar.
You can adjust the level and the balance
of the center and subwoofer. The
parameters of "CNT LVL" and "SW
LVL" range from "-6" to "+6" in l-step
increments.
• CNT LVL: Adjusts the center level.
• SW LVL: Adjusts the subwoofer
level.
Compresses the dynamic range of the
sound track. Usetill for enjoying movies
34us
You can delay the sound using this
limction when the image is slower than
the sound.
• ON: Adjusts the difference between
picture and sound.
• OFF: No adjustment.
• You may not be able to adjust the delay
between sound and image perfectly using
this function.
You can enjoy multiplex broadcast
sound when the system receives a Dolby
Digital multiplex broadcast signal.
Page 35

• To receive a Dolby Digital signal, you need
to connect a digital satellite tuner to the
Sound Bar with an optical cable or coaxial
cable, and set the digital outpnt mode of the
digital satellite tnner to Dolby Digital.
• M/S: Main sound is output
from the left speaker and
sub sound is output fiom
the fight speaker.
• MAIN: Plays back only the main
channel.
• SUB: Plays back only the sub
channel.
You can enjoy sound effects and hear the
dialog clearly even at a low volume level
using this limction.
• ON: Turns on the "NIGHT"
function.
• OFF: Turns off the limction.
• OFF: Bhtetooth standby mode is
disabled.
• If the Sound Bar does not have the pairing
registration information, Bhwtooth standby
mode cannot be set.
• During Bhwtooth standby mode, standby
power consumption increases.
You can reduce power consumption.
The Sound Bar enters standby mode
automatically when you do not operate
the Sound Bar for about 30 minutes and
the Sound Bar is not receiving an input
signal.
• ON: Turns on the "A. STBY"
timction.
• OFF: Turns off the timction.
1>
<
o
2
• You can listen to Dolby Digital sound at low
volume by using DRC (page 34).
IfBluetooth standby mode is set to ON.
the Sound Bar is in Bluetooth standby
mode even when it is turned oft: When
the Bluetooth device attempts to make
connection, the Sound Bar is turned on,
and you can enjoy sound with Bluetooth
connection.
• ON: Bluetooth standby mode is
enabled.
If the remote control of a TV cannot
control the TV. the Sound Bar can relay
the remote control signal to the TV to
control the TV. The remote control
signal can be relayed even when the
Sound Bar is turned off.
• ON: The relay limction is enabled.
• OFF: The relay limction is disabled.
__'m!'g"t
• Be sure to check that the remote control of
the TV cannot control the TV, then set IR
REP. to ON. If it is set to ON when the
remote control can control the TV,
appropriate operation may not be obtained,
because of the interference between the
continued _
35us
Page 36

direct command from the remote control and
the command via the Sound Bar.
• If the Sound Bar is placed ,:,;here it does not
obstruct the remote control sensor of the TV,
be sure to set IR REP. to "OFF".
• On some TVs, this fimction does not work.
In this case, move the Sound Bar to another
location.
The current firmware version
information appears on the front panel
display.
You can specify the wireless connection
to be used to link the Sound Bar to the
subwoofer using the Secure Link
function.
This function is useful when you use
multiple wireless products.
4
"START" appears, then press
G.
"SEARCH" appears, and the Sound
Bar searches for equipment that can
be used with Secure Link.
Proceed to the next step within 2
minutes.
To quit the Secure Link function
during a search for equipment, press
(-.
5
Press SECURE LINK on the rear
of the subwoofer with the point
of a pen, etc.
The I/Q) indicator on the subwoofer
lights in anaber. "SUCCEED"
appears on the fiont panel display.
If "FAILED" appears on the fiont
panel display, check to ensure the
subwoofer is turned on, and try to
perform the process again fiom
step 1.
6
Press AMP MENU.
The AMP menu turns off.
1 Press AMP MENU. 1
2 Select "WS" in the AMP menu, 2
then press (_) or ÷.
3 Select"S. ON," then press @ or 3
-.).
36us
Press AMP MENU.
Select "WS" in the AMP menu,
then press (_ or ÷.
Select "S. OFF," then press @
or -).
4
"RE LEASE" appears, then press
"FINISH" appears on the fiont panel
display.
5
Press AMP MENU.
The AMP menu turns off.
Page 37

6
Press and hold SECURE LINK on
the rear of the subwoofer for
several seconds until the I/_
indicator turns green or flashes
in green.
Be sure to press SECURE LINK
with the point of a pen. etc.
When subwoofer sound is interrupted
because of improper connection, the
transmission can be improved by
changing the following RF Channel
setting.
• AUTO: Normally select this item. The
system automatically selects
the best channel for
transmission.
• 1: Set the fiequency to CHI
(LOW 5.736 GHz).
• 2: Set the fiequency to CH2
(MID 5.762 GHz).
• 3: Set the fiequency to CH3
(HIGH 5.814 GHz).
When the Sound Bar finishes checking,
"OK" or "NG" appears.
• OK: A wireless connection is
possible.
• NG: A wireless connection is not
possible.
1>
<
m
o
(I)
tm
• The transmission may be improved by
changing the transmission channel
(frequency) of the Bluetooth device, other
wireless system(s), or Wi-Fi device. For
details, refer to the operating instructions of
the other wireless system(s).
Indicates whether o1 not the wireless
system is activated oll the Sound Bar.
37us
Page 38

Troubleshooting
If you experience any of the following
difficulties while using the system, use
this troubleshooting guide to help
remedy the problem before requesting
repairs. Should any problem persist,
consult your nearest Sony dealer.
POWER
The power is not turned on.
• Check that the AC power cord
(mains lead) is connected securely.
The system isturned off automatically.
• The A. STBY timction is working
(page 35).
SOUND
Dolby Digital or DTS multi-channel
sound is not reproduced.
• Check that the Blu-ray Disc, DVD,
etc., is recorded in Dolby Digital or
DTS format.
• When connecting the Blu-ray Disc,
DVD player, etc., to the digital input
jacks of this system, check the audio
setting (settings for the audio output)
of the connected equipment.
The surround effect cannot be
obtained.
• Depending on the input signal and
the setting for the sound field,
surround sound processing may not
work effectively (page 29). The
surround effect may be subtle
depending on the program or disc.
• If you connect a Blu-ray Disc player
or a DVD player compatible with
the surround effect limction, the
surround effect of the system may
not work.
In this case, set the sunound effect
limction of the connected equipment
to off.
For details, refer to the operating
instructions supplied with the
connected equipment.
No TV sound is output from the
system.
• Check the connection of the digital
optical cord or audio cord that is
connected to the system and the TV
(page 18).
• Check the sound output of the TV.
The sound is output from both the
system and the TV.
• Turn off the sound of the system or
the TV.
Sound lags behind the TV image.
• Set the "SYNC" to "OFF" if
"SYNC" is set to "ON."
No sound or only a very low-level
sound of the connected equipment is
heard from the system.
• Press VOL + and check the volume
level.
• Press MUTING or VOL + to cancel
the muting Iimction.
• Check that the input source is
correctly selected.
• Check that all the cables and cords
of the system and the connected
equipment are lidly inserted.
Wireless sound
Wireless transmission is not activated
or there is no sound from the
subwoofer.
Check the status of the I/(_ indicator
on the subwoofer.
38us
Page 39

• Turns off:
- Check that the AC power cord
(mains lead) of the subwoofer is
connected securely.
- Turn the subwoofer on by
pressing I/(J) on the subwoofer.
• Flashes in green quickly:
- @ Press I/(J) on the subwoofer.
@ Insert the wireless transceiver
into the subwoofer correctly.
@ Press I/(J) on the subwoofer.
• Flashes in red:
- Press I/(J) to turn off the
subwoofer, and check that
nothing is blocking the ventilation
holes of the subwoofer.
• Flashes in green or amber slowly or
turns red:
- Make sure that the wireless
transceiver is inserted correctly
into the Sound Bar.
- Make the Secure Link setting
"S. ON" again (page 36).
- Sound transmission is poor. Move
the subwoofer so that the I/(J)
indicator turns green or amber.
- Move the Sound Bar or the
subwoofer away fiom other
wireless devices.
- Avoid using any other wireless
devices.
Noise is heard from the subwoofer or
sound from the subwoofer skips.
• Wireless transmission is unstable.
Change the "RF CH" setting. For
details, refer to "Setting the
fiequency for the wireless system
(RF CH)" (page 37).
Bluetooth
There is no sound.
• Make sure this system is not too far
fi'om the Bluetooth device, or this
system is not receiving interference
fiom a Wi-Fi network, other
2.4 GHz wireless device, or
microwave oven.
• Check that the Bluetooth connection
is made properly between this
system and the Bluetooth device.
• Pair this system and the Bluetooth
device again.
• Keep the system away fiom metal
objects or surfaces.
• Make sure the system is in the
Bhtetooth mode. Otherwise. press
the ,_; (Bhtetooth) touch key.
Sound skips or the correspondence
distance is short.
• It"a device that generates
electromagnetic radiation, such as a
Wi-Fi network, other Bluetooth
device(s), or a nficrowave oven is
nearby, move away fiom such
sources.
• Remove any obstacle between this
system and Bhtetooth device, or
move away fiom the obstacle.
• Locate this system and Bhtetooth
device as near as possible.
• Re-position this system.
• Re-position the Bhtetooth device.
Connecting cannot be done.
• Perform pairing again (page 27).
Pairing cannot be done.
• Bring this system and the Bhtetooth
device closer together.
• Delete the system fium your
Bhtetooth device and perform
pairing again (page 27).
continued
39us
e_
e_
O
m
3
Page 40

The remote control does not
function
• Point the remote control at the
remote control sensor IN on the
system.
• Remove any obstacles in the path
between the remote control and the
system.
• Replace both batteries in the remote
control with new ones, if they are
weak.
• Make sure you select the correct
input on the remote control.
OTHER
If I/_ indicator on the subwoofer flash
in red.
Press I/(_) on the subwoofer to turn it
oft\ and check the following item.
• Is anything blocking the ventilation
holes of the system?
If "PROTECT" appears on the front
panel display.
Press I/(_) to turn off the system, and
check the following item after
"STANDBY" disappears.
• Is anything blocking the ventilation
holes of the system?
If the system still does not
operate properly after
performing the above
measures, reset the system
as follows:
Use buttons on the system for the
operation.
2
Press I/_ while pressing INPUT
and VOL - on the Sound Bar.
"RESET" appears and the system is
reset. AMP menu, sound field, etc.,
return to the default settings.
Alter checking the above item and fixing
any problems, tuna on the system. If the
cause of the problem cannot be found
even alter checking the above item.
consult your nearest Sony dealer.
Specifications
Formats supported by this system
Digital input formats supported by this
system are as follows.
Format Supported/Not
Dolby Digital O
DTS O
Linear PCM 2ch 48 kHz O
or less
supported
1 Press I/_ to turn on the power.
40us
Page 41
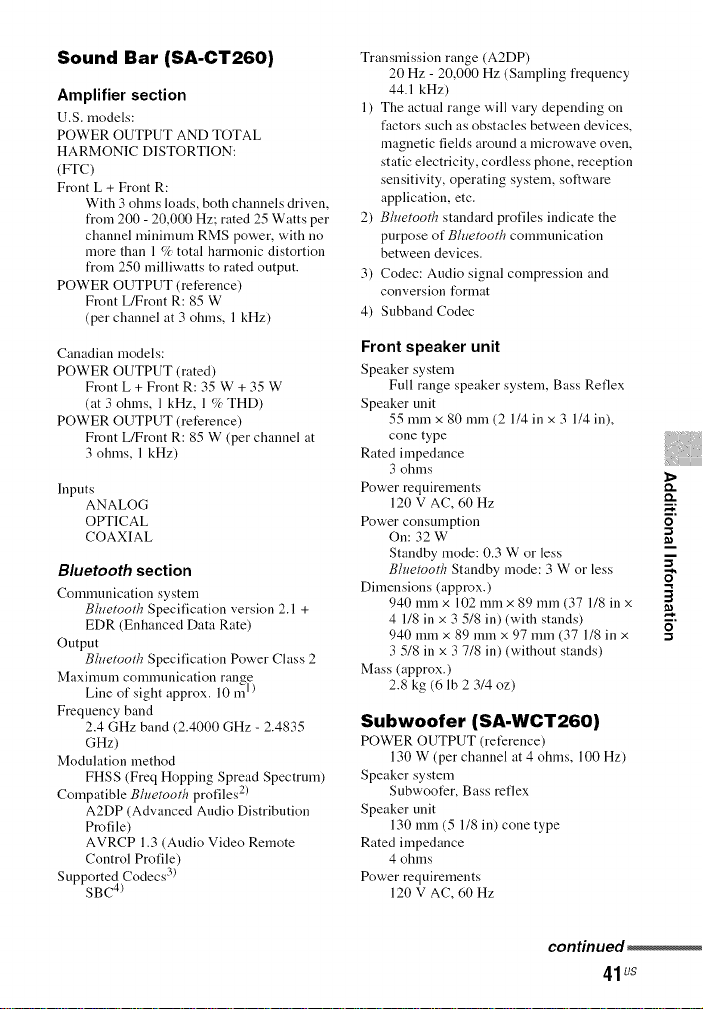
Sound Bar (SA-CT260)
Amplifier section
U.S. models:
POWER OUTPUT AND TOTAL
HARMONIC DISTORTION:
(FTC)
Front L + Front R:
With 3 ohms loads, both channels driven,
from 200 - 20,000 Hz; rated 25 Watts per
channel minimum RMS power, with no
more than 1% total harmonic distortion
from 250 milliwatts to rated output.
POWER OUTPUT (reference)
Front L/Front R: 85 W
(per channel at 3 ohms, 1 kHz)
Canadian models:
POWER OUTPUT (rated)
Front L + Front R: 35 W + 35 W
(at 3 ohms, 1 kHz, 1% THD)
POWER OUTPUT (reference)
Front L/Front R: 85 W (per channel at
3 ohms, 1 kHz)
Inputs
ANALOG
OPTICAL
COAXIAL
Bluetooth section
Comnmnication system
Bhwtooth Specification version 2.1 +
EDR (Enhanced Data Rate)
Output
Bhtetooth Specification Power Class 2
Maximum conmmnication range
Line of sight approx. 10 n{ 1)
Frequency band
2.4 GHz band (2.4000 GHz - 2.4835
GHz)
Modulation method
FHSS (Freq Hopping Spread Spectrum)
Compatible Bhwtooth profiles 2)
A2DP (Advanced Audio Distribution
Profile)
AVRCP 1.3 (Audio Video Remote
Control Profile)
Supported Codecs 3)
SBC 4)
Transmission range (A2DP)
20 Hz - 20,000 Hz (Sampling frequency
44.1 kHz)
1) The actual range will vary depending on
factors such as obstacles between devices,
magnetic fields around a microwave oven,
static electricity, cordless phone, reception
sensitivity, operating system, software
application, etc.
2) Bh_etooth standard profiles indicate the
purpose of Bhwtooth communication
between devices.
3) Codec: Audio signal compression and
conversion format
4) Subband Codec
Front speaker unit
Speaker system
Full range speaker system, Bass Reflex
Speaker unit
55 mmx 80 mm (2 114 in x 3 114 in),
cone type
Rated impedance
3 ohms
Power requirements
120 V AC, 60 Hz
Power consumption
On: 32 W
Standby mode: 0.3 W or less
Bhwtooth Standby mode: 3 W or less
Dimensions (approx.)
940 mmx 102 mmx 89 mm (37 118 in x
4 118 in x 3 518 in) (with stands)
940 mmx 89 mm x 97 mm (37 118 in x
3 518 in x 3 718 in) (without stands)
Mass (approx.)
2.8 kg (6 lb 2 3/4 oz)
Subwoofer (SA-WCT260)
POWER OUTPUT (reference)
130 W (per channel at 4 ohms, 100 Hz)
Speaker system
Subwoofer, Bass reflex
Speaker unit
130 mm (5 118 in) cone type
Rated impedance
4 ohms
Power requirements
120 V AC, 60 Hz
O
continued
41us
Page 42
Power consumption
On: 30 W
Standby mode: 0.5 W or less
Dimensions (approx.)
271 mm x 390 mmx 271 mm (10 3/4 in
x 15 3/8 in x 10 3/4 in) (w/h/d)
Mass (approx.)
7.2 kg (15 lb 4 oz)
Wireless transceiver
(EZW-RT50)
Conmmnication System
Wireless sound Specification version 1.0
Frequency band
5.736 GHz - 5.814 GHz
Power requirements
DC 3.3 V, 300 mA
Modulation method
DSSS
Dimensions (approx.)
30 mmx 9 mmx 60 nun (1 3/16 in x 3/8
in x 2 3/8 in) (w/h/d)
Mass (approx.)
10 g (3/8 oz)
Design and specifications are subject to
change without notice.
• Standby power consumption 0.5 W or
Jess.
• Over 85 % power efficiency of amplifier
block is achieved with the full digital
amplifier, S-Master.
42us
Page 43

Index
A
A.STBY 35
AMP menu 33
B
BASS 34
Bhtetooth 6, 25
BT STBY 35
C
CNT LVL 34
Connecting
TV 18
D
Digital optical cord 18
DRC 34
DUAL 34
DVD player 18
F
Front panel display 13
I
INPUT 12
Installing 19
IR REP. 35
M
MUTING 15
P
Positioning the system 19
PROTECTOR 40
R
Remote control
before use 11
operating 15, 30
Reset 40
RF CH 37
RF CHK 37
S
S. OFF 36
S. ON36
Sound field 29
SW LVL 34
SYNC 34
T
TREBLE34
V
VERSION 36
VOL 12, 15
W
Wireless System 22
_>
_=,.'
0
5"
3
5'
N
NIGHT 35
43us
Page 44

IT] DOLB¥
RIGITAL 1
PRO LOGIC II 1
_-F:ORCe
-.j=-==
FRONT SURROUND
http://www.sony.net/
©2012SonyCorporationPrintedinMalaysia
oio,,o,s......, ,Bluetooth°
_;-ITI2_--Tel-
Digital Amplifier
4-431-775-12(2)
IIIIIIIIIIIIIIIIIIIIII
*443177512*(2)
 Loading...