

Page 1
©2012 Sony Corporation Printed in Malaysia
4-431-775-12(2)
4-431-775-12(2)
HT-CT260/HT-CT260HP
Home Theatre
System
Operating Instructions US
Mode d’emploi FR
Manual de instrucciones ES
Page 2
WARNING
To reduce the risk of fire or
electric shock, do not expose this
apparatus to rain or moisture.
This symbol is intended to alert the
user to the presence of important
operating and maintenance
(servicing) instructions in the
literature accompanying the appliance.
The unit is not disconnected from the AC
power source (mains) as long as it is
connected to the wall outlet, even if the unit
itself has been turned off.
To reduce the risk of fire, do not cover the
ventilation opening of the apparatus with
newspapers, tablecloths, curtains, etc.
Do not place the naked flame sources such as
lighted candles on the apparatus.
To reduce the risk of fire or electric shock, do
not expose this apparatus to dripping or
splashing, and do not place objects filled with
liquids, such as vases, on the apparatus.
As the main plug is used to disconnect the unit
from the mains, connect the unit to an easily
accessible AC outlet. Should you notice an
abnormality in the unit, disconnect the main
plug from the AC outlet immediately.
Do not install the appliance in a confined
space, such as a bookcase or built-in cabinet.
Do not expose batteries or apparatus with
battery-installed to excessive heat such as
sunshine, fire or the like.
In door use only.
For the customers in the U.S.A
This symbol is intended to alert the
user to the presence of uninsulated
“dangerous voltage” within the
product’s enclosure that may be of
sufficient magnitude to constitute a risk of
electric shock to persons.
Owner’s Record
The model and serial numbers are located on
the rear oblique down-facing surface of the
unit. Record the serial numbers in the space
provided below. Refer to them whenever you
call upon your Sony dealer regarding this
product.
M o d e l N o . H T - C T 2 6 0 / H T - C T 2 6 0 H P
Seri al No .
Important Safety
Instructions
1) Read these instructions.
2) Keep these instructions.
3) Heed all warnings.
4) Follow all instructions.
5) Do not use this apparatus near water.
6) Clean only with dry cloth.
7) Do not block any ventilation openings.
Install in accordance with the
manufacturer’s instructions.
8) Do not install near any heat sources such
as radiators, heat registers, stoves, or other
apparatus (including amplifiers) that
produce heat.
9) Do not defeat the safety purpose of the
polarized or grounding-type plug. A
polarized plug has two blades with one
wider than the other. A grounding type
plug has two blades and a third grounding
prong. The wide blade or the third prong
are provided for your safety. If the
provided plug does not fit into your outlet,
consult an electrician for replacement of
the obsolete outlet.
10) Protect the power cord from being walked
on or pinched particularly at plugs,
US
2
Page 3

convenience receptacles, and the point
where they exit from the apparatus.
11) Only use attachments/accessories
specified by the manufacturer.
12) Use only with the cart, stand, tripod,
bracket, or table specified by the
manufacturer, or sold with the apparatus.
When a cart is used, use caution when
moving the cart/apparatus combination to
avoid injury from tip-over.
13) Unplug this apparatus during lightning
storms or when unused for long periods of
time.
14) Refer all servicing to qualified service
personnel. Servicing is required when the
apparatus has been damaged in any way,
such as power-supply cord or plug is
damaged, liquid has been spilled or
objects have fallen into the apparatus, the
apparatus has been exposed to rain or
moisture, does not operate normally, or
has been dropped.
The following FCC statement applies only to
the version of this model manufactured for
sale in the U.S.A. Other versions may not
comply with FCC technical regulations.
NOTE:
This equipment has been tested and found to
comply with the limits for a Class B digital
device, pursuant to Part 15 of the FCC Rules.
These limits are designed to provide
reasonable protection against harmful
interference in a residential installation. This
equipment generates, uses and can radiate
radio frequency energy and, if not installed
and used in accordance with the instructions,
may cause harmful interference to radio
communications.
However, there is no guarantee that
interference will not occur in a particular
installation. If this equipment does cause
harmful interference to radio or television
reception, which can be determined by turning
the equipment off and on, the user is
encouraged to try to correct the interference
by one or more of the following measures:
– Reorient or relocate the receiving antenna.
– Increase the separation between the
equipment and receiver.
– Connect the equipment into an outlet on a
circuit different from that to which the
receiver is connected.
– Consult the dealer or an experienced radio/
TV technician for help.
CAUTION
You are cautioned that any changes or
modifications not expressly approved in this
manual could void your authority to operate
this equipment.
For the Sound Bar (SA-CT260)
The nameplate and the date of manufacture
marking are located on the rear oblique downfacing surface.
For the Sound Bar (SA-CT260)
For the wireless transceiver
(EZW-RT50)
This device complies with Part 15 of the FCC
Rules. Operation is subject to the following
two conditions: (1) this device may not cause
harmful interference, and (2) this device must
accept any interference received, including
interference that may cause undesired
operation.
This equipment must not be co-located or
operated in conjunction with any other
antenna or transmitter.
This equipment complies with FCC radiation
exposure limits set forth for an uncontrolled
environment and meets the FCC radio
frequency (RF) Exposure Guidelines in
Supplement C to OET65. This equipment
should be installed and operated keeping the
radiator at least 20cm or more away from
person’s body (excluding extremities: hands,
wrists, feet and ankles).
continued
3
US
Page 4

For the customers in the Canada
For the Sound Bar (SA-CT260)
For the wireless transceiver
(EZW-RT50)
This Class B digital apparatus complies with
Canadian ICES-003.
Operation is subject to the following two
conditions:
(1) this device may not cause interference, and
(2) this device must accept any interference,
including interference that may cause
undesired operation of the device.
This equipment complies with IC radiation
exposure limits set forth for an uncontrolled
environment and meets the RSS-102 of the IC
radio frequency (RF) Exposure rules.
This equipment should be installed and
operated keeping the radiator at least 20 cm or
more away from person’s body (excluding
extremities: hands, wrists, feet and ankles).
US
4
Page 5

Precautions
On safety
• Should any solid object or liquid fall into the
system, unplug the system and have it
checked by qualified personnel before
operating it any further.
• Do not climb on the Sound Bar or the
subwoofer, as you may fall down and injure
yourself, or system damage may result.
On power sources
• Before operating the system, check that the
operating voltage is identical to your local
power supply. The operating voltage is
indicated on the nameplate at the rear of the
Sound Bar.
• If you are not going to use the system for a
long time, be sure to disconnect the system
from the wall outlet (mains). To disconnect
the AC power cord (mains lead), grasp the
plug itself; never pull the cord.
• One blade of the plug is wider than the other
for the purpose of safety and will fit into the
wall outlet (mains) only one way. If you are
unable to insert the plug fully into the outlet,
contact your dealer.
• AC power cord (mains lead) must be
changed only at the qualified service shop.
On heat buildup
Although the system heats up during
operation, this is not a malfunction. If you
continuously use this system at a large
volume, the system temperature of the back
and bottom rises considerably. To avoid
burning yourself, do not touch the system.
On placement
• Place the system in a location with adequate
ventilation to prevent heat buildup and
prolong the life of the system.
• Do not place the system near heat sources, or
in a place subject to direct sunlight,
excessive dust, or mechanical shock.
• Do not place anything at the rear of the
Sound Bar that might block the ventilation
holes and cause malfunctions.
• If the system is being used in combination
with a TV, VCR, or tape deck, noise may
result, and picture quality may suffer. In this
case, place the system away from the TV,
VCR, or tape deck.
• Use caution when placing the system on
surfaces that have been specially treated
(with wax, oil, polish, etc.) as staining or
discoloration of the surface may result.
• Take care to avoid any possible injury on the
corners of the Sound Bar or the subwoofer.
On operation
Before connecting other equipment, be sure to
turn off and unplug the system.
If you encounter color
irregularity on a nearby TV
screen
Color irregularities may be observed on
certain types of TV sets.
If color irregularity is
observed...
Turn off the TV set, then turn it on again after
15 to 30 minutes.
If color irregularity is
observed again...
Place the system further away from the TV
set.
On cleaning
Clean the system with a soft dry cloth. Do not
use any type of abrasive pad, scouring powder
or solvent such as alcohol or benzine.
If you have any question or problem
concerning your system, please consult your
nearest Sony dealer.
continued
US
5
Page 6

Copyrights
This model incorporates Dolby* Digital and
Pro Logic Sound and the DTS** Digital
Surround System.
* Manufactured under license from Dolby
Laboratories.
Dolby, Pro Logic, and the double-D
symbol are trademarks of Dolby
Laboratories.
** Manufactured under license under U.S.
Patent Nos: 5,956,674; 5,974,380;
6,487,535 & other U.S. and worldwide
patents issued & pending. DTS, the
Symbol, & DTS and the Symbol together
are registered trademarks & DTS Digital
Surround and the DTS logos are
trademarks of DTS, Inc. Product includes
software. © DTS, Inc. All Rights
Reserved.
The Bluetooth® word mark and logos are
registered trademarks owned by Bluetooth
SIG, Inc. and any use of such marks by Sony
Corporation is under license.
Other trademarks and trade names are those of
their respective owners.
Bluetooth wireless technology
Bluetooth wireless technology is a short-
range wireless technology linking digital
devices, such as personal computers and
digital cameras. Using the Bluetooth
wireless technology, you can operate the
units involved within a range of about 10
meters.
The Bluetooth wireless technology is
commonly used between two devices,
but a single device can be connected to
multiple devices.
You do not need wires to get connected
as you do with a USB connection, and
you do not need to place the devices face
to face as you do with wireless infrared
technology. You can use the technology
with one Bluetooth device in your bag or
pocket.
Bluetooth wireless technology is a global
standard supported by thousands of
companies. These companies produce
products that meet the global standard.
Supported Bluetooth
version and profiles
Profile refers to a standard set of
capabilities for various Bluetooth
product capabilities. This system
supports the following Bluetooth version
and profiles.
Supported Bluetooth version:
Bluetooth Standard version 2.1 + EDR
(Enhanced Data Rate)
Supported Bluetooth profiles:
A2DP (Advanced Audio Distribution
Profile)
AVRCP (Audio Video Remote Control
Profile)
US
6
Page 7

Notes
• For you to use the Bluetooth function,
the Bluetooth device to be connected
must support the same profile as this
system. Even if the device supports the
same profile, the functions may differ
because of the specifications of the
Bluetooth device.
• The audio playback on this system may
be delayed from that on the Bluetooth
device because of the characteristics of
the Bluetooth wireless technology.
Effective communication
range
Bluetooth devices should be used within
approximately 10 meters (33 feet)
(unobstructed distance) of each other.
The effective communication range may
become shorter under the following
conditions.
• When a person, metal object, wall or
other obstruction is between the
devices with a Bluetooth connection
• Locations where a wireless LAN is
installed
• Around microwave ovens that are in
use
• Locations where other electromagnetic
waves occur
Effects of other devices
Bluetooth
devices and wireless LAN
(IEEE 802.11b/g) use the same frequency
band (2.4 GHz). When using your
Bluetooth
device near a device with
wireless LAN capability, electromagnetic
interference may occur.
This could result in lower data transfer
rates, noise, or inability to connect. If
this happens, try the following remedies:
• Try connecting this system and
Bluetooth mobile phone or Bluetooth
device when you are at least 10 meters
(33 feet) away from the wireless LAN
equipment.
• Turn off the power to the wireless LAN
equipment when using your Bluetooth
device within 10 meters.
Effects on other devices
The radio waves broadcast by this
system may interfere with the operation
of some medical devices. Since this
interference may result in malfunction,
always turn off the power on this system,
Bluetooth mobile phone and Bluetooth
device in the following locations:
• In hospitals, on trains, in airplanes, at
gas stations, and any place where
flammable gasses may be present
• Near automatic doors or fire alarms
Notes
• This system supports security functions that
comply with the Bluetooth specification as a
means of ensuring security during
communication using Bluetooth technology.
However, this security may be insufficient
depending on the setting contents and other
factors, so always be careful when
performing communication using Bluetooth
technology.
• Sony cannot be held liable in any way for
damages or other loss resulting from
information leaks during communication
using Bluetooth technology.
• Bluetooth communication is not necessarily
guaranteed with all Bluetooth devices that
have the same profile as this system.
• Bluetooth devices connected with this
system must comply with the Bluetooth
specification prescribed by the Bluetooth
SIG, Inc., and must be certified to comply.
However, even when a device complies with
the Bluetooth specification, there may be
cases where the characteristics or
specifications of the Bluetooth device make
it impossible to connect, or may result in
continued
US
7
Page 8

different control methods, display or
operation.
• Noise may occur or the audio may cut off
depending on the Bluetooth device
connected with this system, the
communications environment, or
surrounding conditions.
US
8
Page 9

Table of contents
Precautions .................................... 5
Bluetooth wireless technology ...... 6
Getting Started
Unpacking ................................... 10
Index to parts and controls .......... 12
Installing the supplied wireless
transceivers ........................... 16
Connecting the TV and player,
etc. ........................................ 18
Positioning the system ................ 19
Connecting the AC power cord
(mains lead) .......................... 22
Setting up the Wireless
System .................................. 22
Setting up the sound output of the
connected equipment ............ 23
Playback Options
Operating the system using the
supplied remote control ........ 24
Bluetooth Function
Using the Bluetooth function ...... 25
Surround Function
Enjoying the surround effect ...... 29
Advanced Settings
Controlling connected equipment
with the remote control ......... 30
Setting manufacturer of
controllable TVs ................... 31
Settings and adjustments using
the amplifier menu ................ 33
Additional Information
Troubleshooting .......................... 38
Specifications .............................. 40
Index ........................................... 43
US
9
Page 10
Getting Started
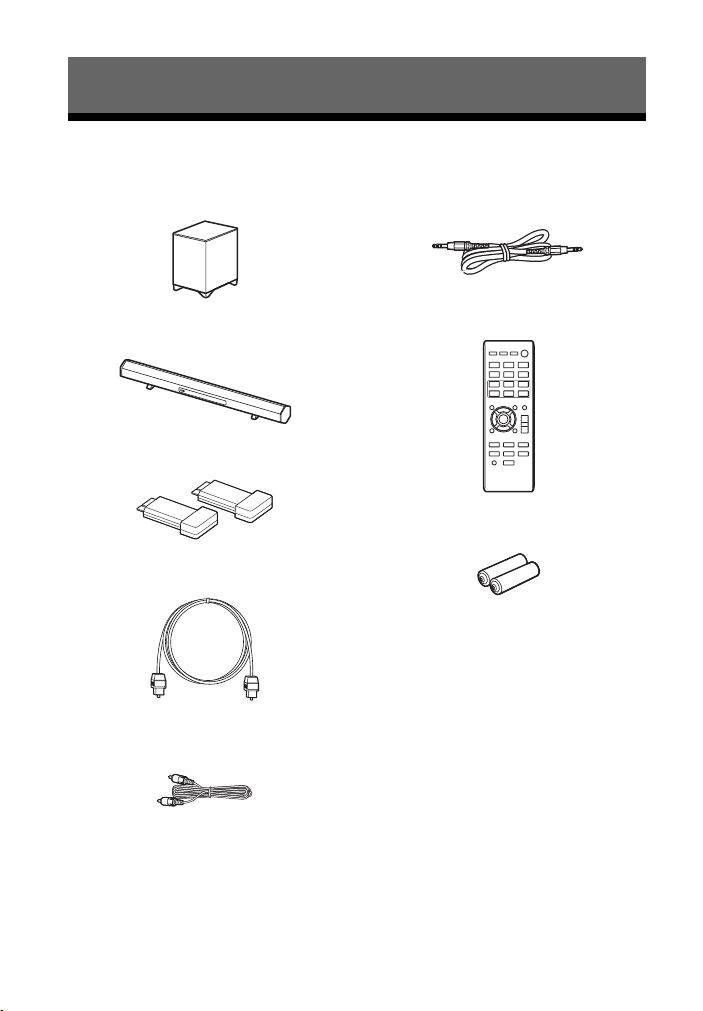
Unpacking
• Subwoofer (SA-WCT260) (1)
• Sound Bar (SA-CT260) (1)
• Wireless transceivers (EZW-RT50) (2)
• Digital optical cord for a TV (1)
• Digital coaxial cord (1) (HT-CT260HP
only)
• Analog audio cord (1) (HT-CT260HP
only)
• Remote control (RM-ANP084) (1)
• R6 (size AA) batteries (2)
• Operating Instructions (1)
• Warranty (1)
10
US
Page 11

Inserting batteries into the remote control
Insert two R6 (size AA) batteries (supplied) by matching the 3 and # ends on the
batteries to the diagram inside the battery compartment of the remote control. To use
the remote control, point it at the remote control sensor at the front of the Sound
Bar.
Notes
• Do not leave the remote control in an extremely hot or humid place.
• Do not use a new battery with an old one.
• Do not drop any foreign object into the remote control casing, particularly when replacing the
batteries.
• Do not expose the remote control sensor to direct sunlight or lighting apparatus. Doing so may
cause a malfunction.
• If you do not intend to use the remote control for an extended pe riod of time, remove the batteries
to avoid possible damage from battery leakage and corrosion.
Getting Started
11
US
Page 12
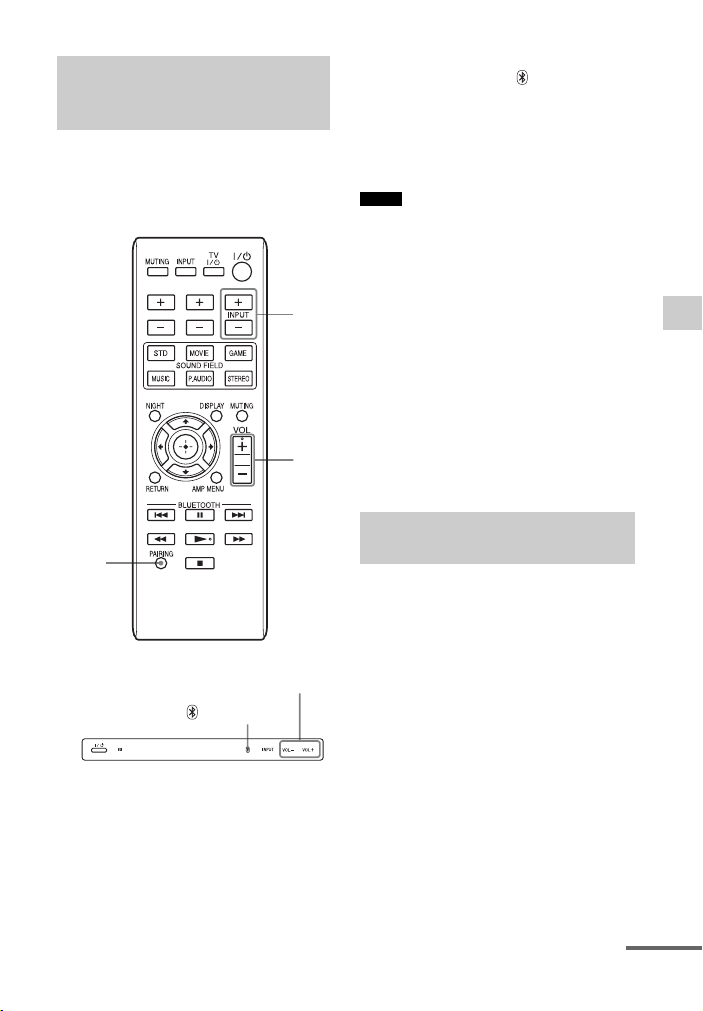
Index to parts and controls
For more information, see the pages indicated in parentheses.
Sound Bar
A ?/1 (on/standby)
B (remote control sensor)
C (Bluetooth) touch key/
indicator
D INPUT touch key
Press to select the input source to
play back.
Every time you press the key, the
input source changes cyclically as
follows:
OPTICAL t COAXIALt
ANALOG t BT AU t
OPTICAL
US
12
E VOL +/– touch keys
F Front panel display (page 13)
Tip
• Touch a touch key lightly with a fingertip. If
you touch two or more keys simultaneously
or touch with a thumb, appropriate operation
may not be obtained.
Page 13
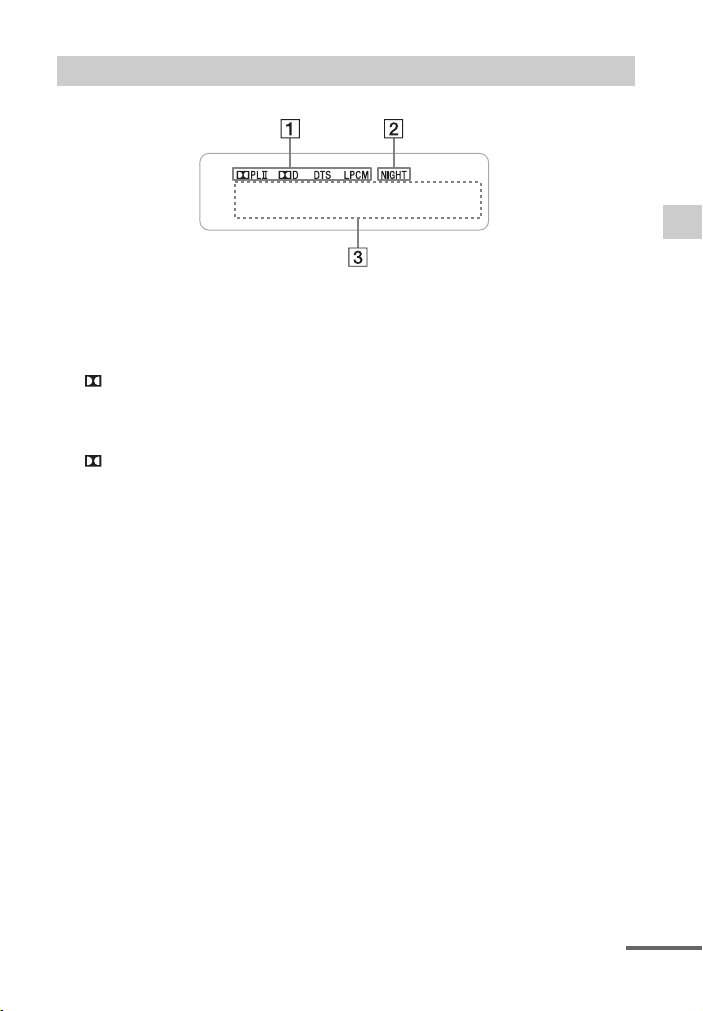
Front panel display (on the Sound Bar)
A Audio format indicators
Light up according to the audio
format that is being input to the
system.
D: Dolby Digital
DTS
LPCM: Linear PCM
PL II: Lights while Dolby Pro
Logic II is active (page 29).
B NIGHT (page 35)
Lights up in NIGHT mode.
C Message display area
Displays volume, selected input
source, etc.
Getting Started
continued
13
US
Page 14
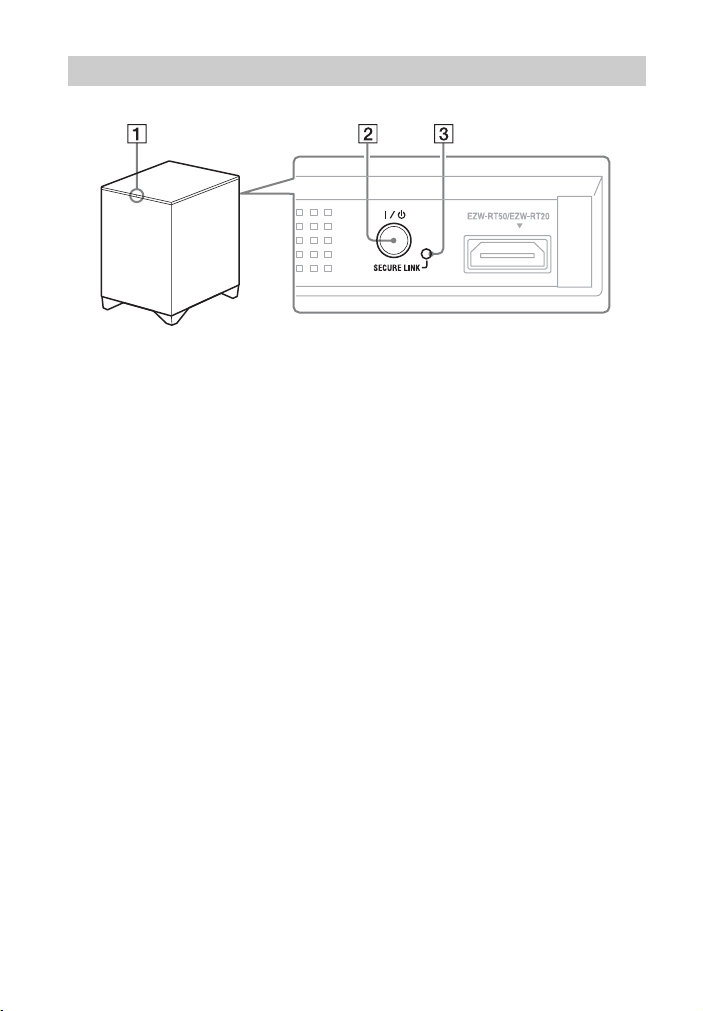
Subwoofer
A ?/1 (on/standby) indicator
B ?/1 (on/standby) button
C SECURE LINK button (page 36)
14
US
Page 15
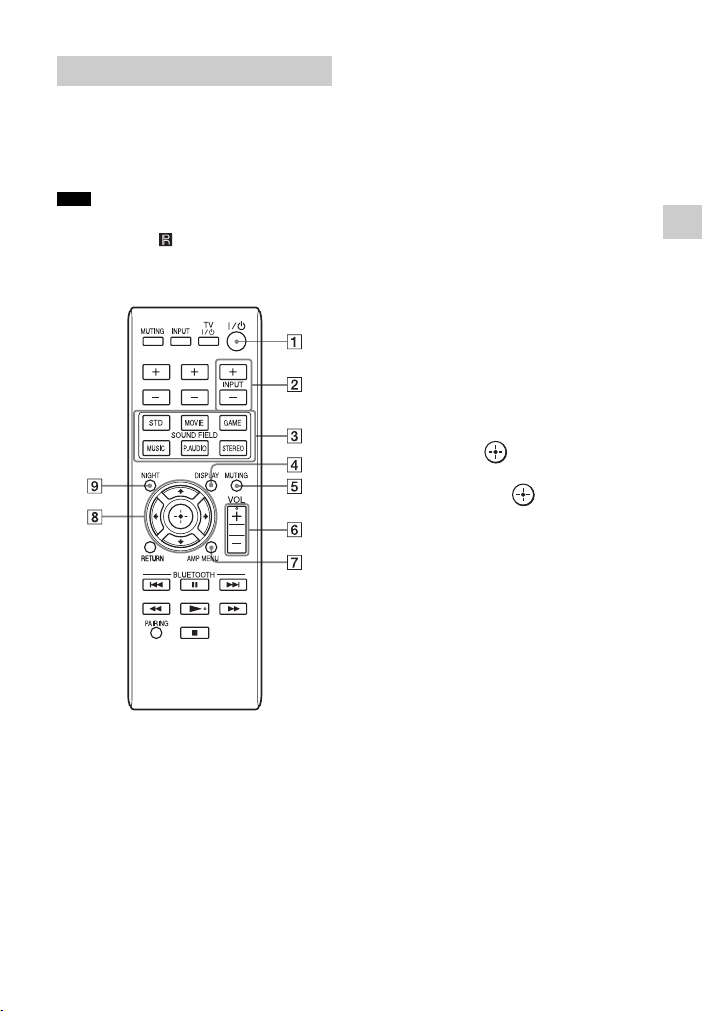
Remote control
This section describes subwoofer and
Sound Bar button operation. See page 30
for details on the button operation of
connected equipment.
Note
• Point the remote control towards the remote
control sensor ( ) of the Sound Bar.
TV VOL TV CH
A ?/1 (on/standby)
B INPUT +/–
Press one of the buttons to select the
equipment you want to use.
C SOUND FIELD (page 29)
D DISPLAY
Press to change the display status.
Each time you press the button, ON
and OFF are toggled. The factory
setting is ON.
ON: The display is always lit.
OFF: The display is turned off.
When the system is operated, the
display is lit for several seconds.
E MUTING
F VOL +*/–
Press to adjust the volume.
G AMP MENU (page 33)
H C, X, x, c or
Press C, X, x or c to select the menu
items. Then press to enter the
selection.
I NIGHT
Each time the button is pressed,
“ON” or “OFF” is toggled. For
details on night mode, see page 35.
Getting Started
*The N and VOL + buttons have a tactile
dot. Use it as a guide during operation.
15
US
Page 16
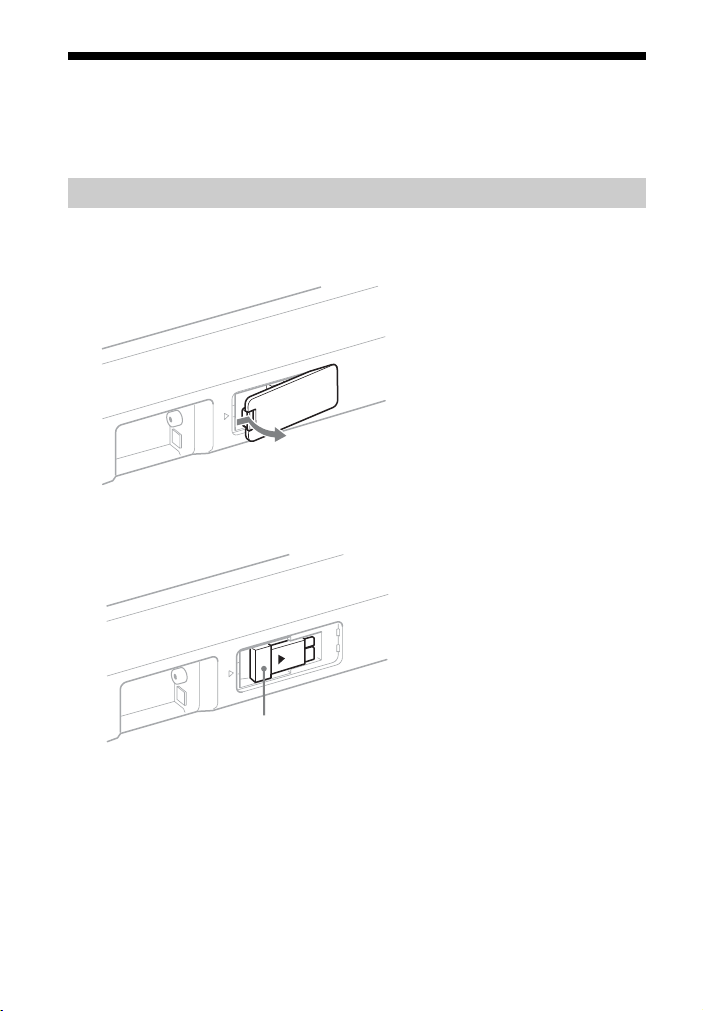
Installing the supplied wireless transceivers
Insert the two supplied wireless transceivers into the wireless transceiver
(EZW-RT50) slot on the rear panel of both the Sound Bar and the subwoofer.
Installing the wireless transceiver on the Sound Bar
1 Remove the cover for the wireless transceiver slot on the rear of the
Sound Bar.
2 Place the wireless transceiver as shown below.
16
Wireless transceiver
US
Page 17
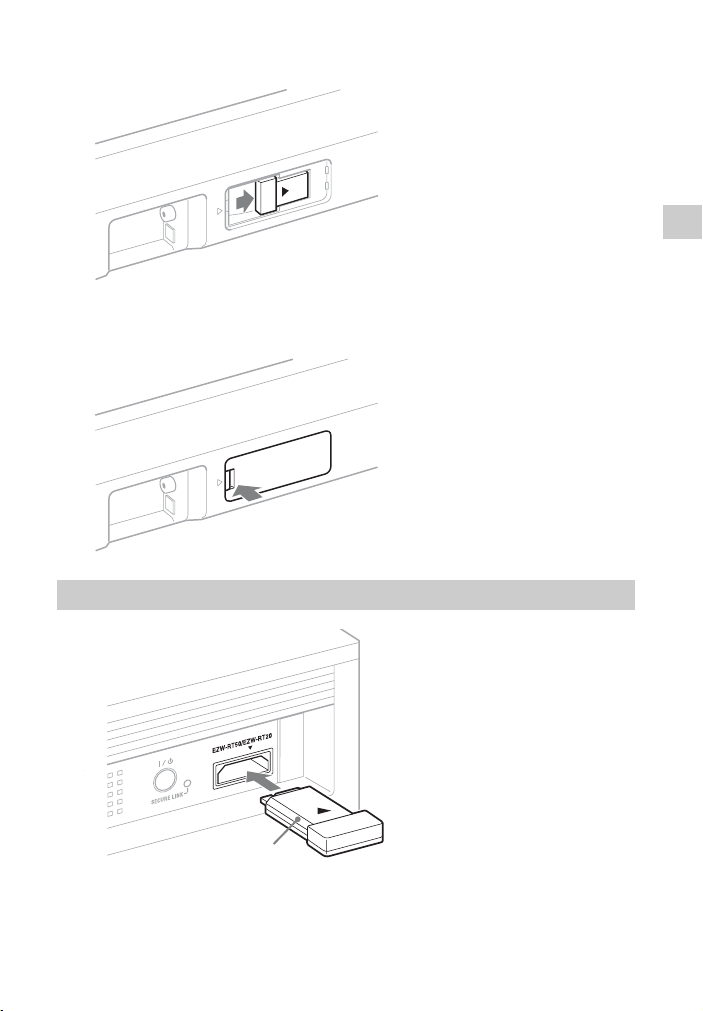
3 Push in the wireless transceiver to the slot until it stops.
4 Attach the cover as it was.
Installing the wireless transceiver to the subwoofer
Getting Started
Wireless transceiver
17
US
Page 18
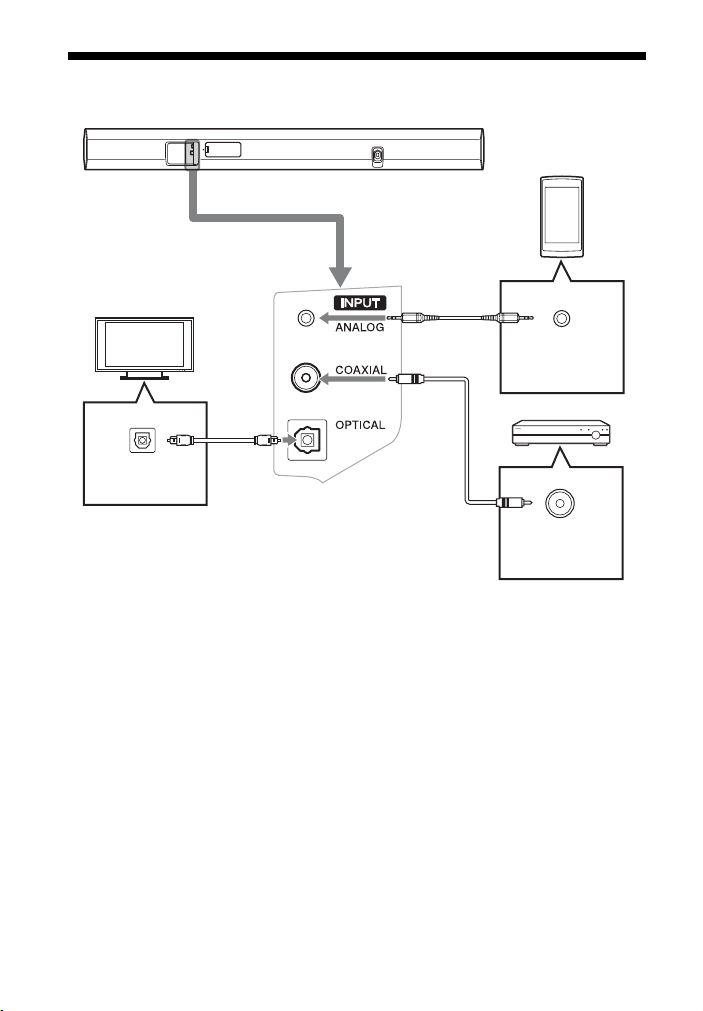
Connecting the TV and player, etc.
TV
Smartphone,
“Walkman”, etc.
Optical digital
audio output
Digital optical
cord (supplied)
Analog audio
cord
Digital coaxial cord
*
*
Analog audio
output
DVD player, etc.
Digital coaxial
audio output
* Supplied with the HT-CT260HP only.
18
US
Page 19
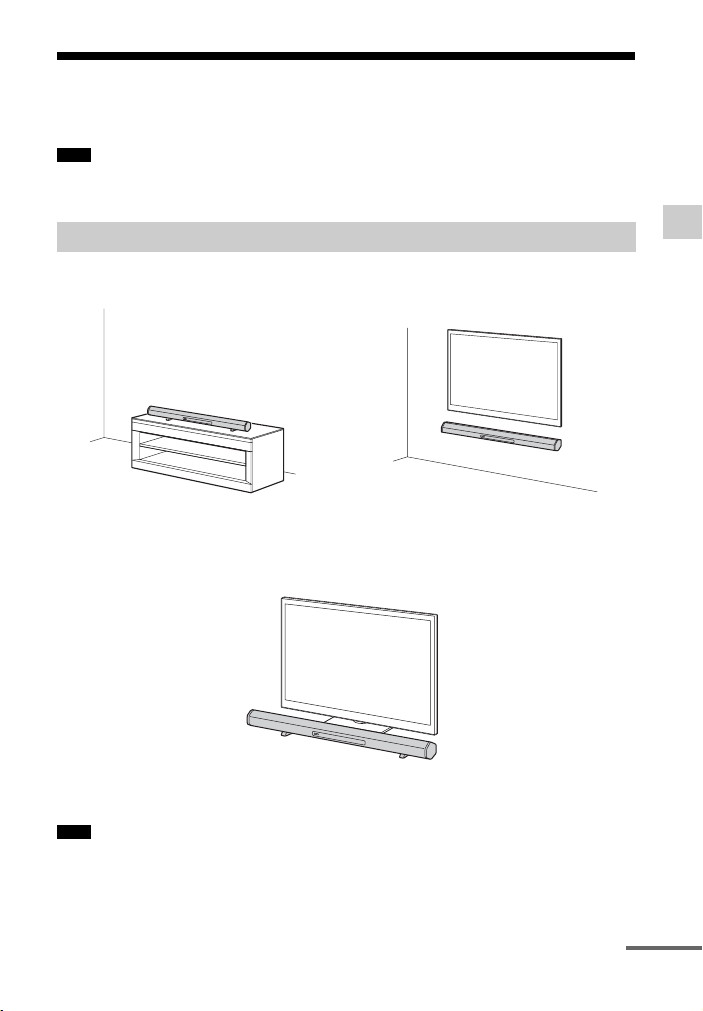
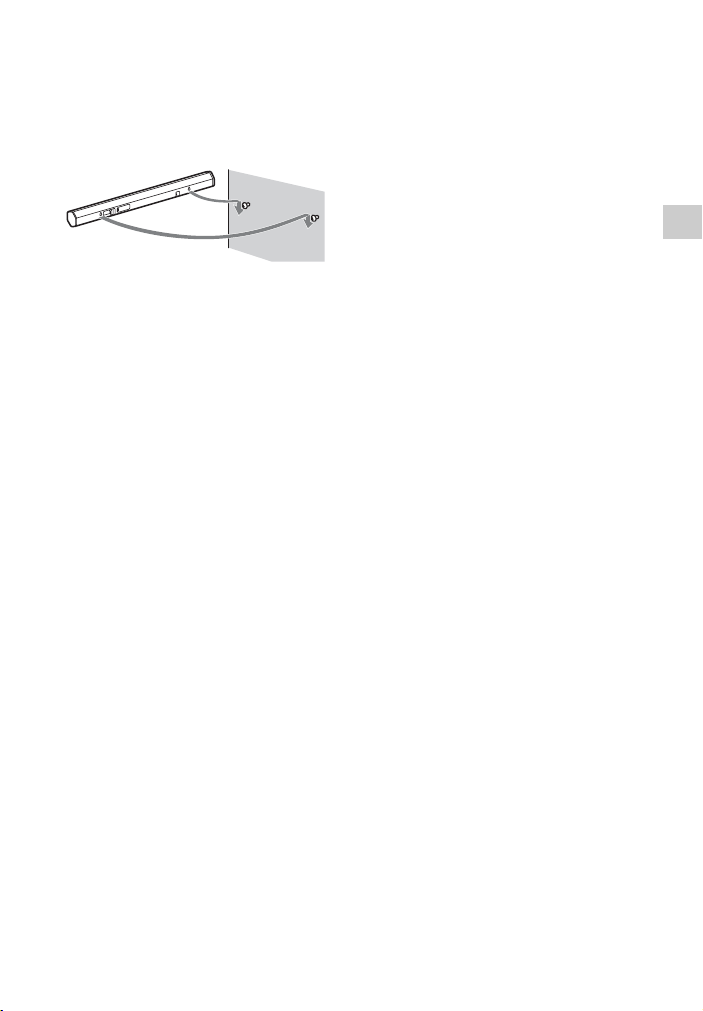
Positioning the system
The illustrations below are examples of how to install the Sound Bar.
Note
• When you select a place for the Sound Bar or the subwoofer, do not block the heat ventilation
on the rear panel of the Sound Bar or the subwoofer.
Installing the Sound Bar
• Installing the Sound Bar on a rack • Installing the Sound Bar on a wall
(page 20)
Note on installing the Sound Bar in front of a TV
When the Sound Bar is placed in front of a TV, the TV may not be controlled with the
remote control of the TV. In that case, place the Sound Bar away from the TV.
If the remote control of the TV still cannot control the TV, set IR REP. of the AMP
menu to ON (page 35).
Note
• Be sure to confirm that the remote control of the TV cannot control the TV, then set IR REP. to
ON. If it is set to ON when the remote control can control the TV, appropriate operation may not
be obtained, because of the interference between the direct command from the remote control
and the command via the Sound Bar.
Getting Started
continued
19
US
Page 20
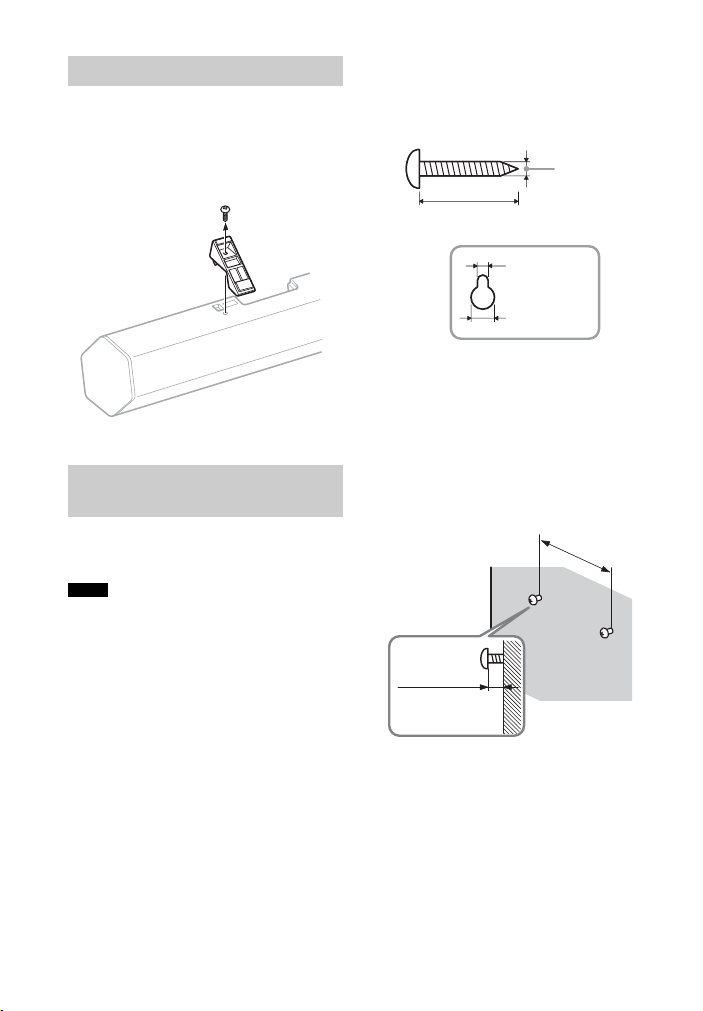
Removing the stands
When the Sound Bar is to be placed
facing upward slightly or on a wall,
remove the two stands at the bottom of
the Sound Bar, as shown below.
1 Prepare screws (not supplied)
that are suitable for the holes on
the back of the Sound Bar.
4 mm
(3/16 inches)
more than 25 mm (1 inch)
Stand
Installing the Sound Bar
on a wall
You can install the Sound Bar on the
wall.
Notes
• Use screws that are suitable for the wall
material and strength. As a plaster board wall
is especially fragile, attach the screws
securely to a wall beam. Install the Sound
Bar on a vertical and flat reinforced area of
the wall.
• Be sure to subcontract the installation to
Sony dealers or licensed contractors and pay
special attention to safety during the
installation.
• Sony is not responsible for accidents or
damage caused by improper installation,
insufficient wall strength, improper screw
installation or natural calamity, etc.
5mm
(7/32 inches)
10 mm
(13/32 inches)
Hole on the back of the Sound Bar
2 Fasten the screws to the wall.
The screws should protrude 6 to
7 mm (approx. 1/4 inches).
592 mm
(23 3/8 inches)
6 to 7 mm
(approx. 1/4
inches)
20
US
Page 21
3 Hang the Sound Bar onto the
screws.
Align the holes on the back of the
Sound Bar to the screws, then hang
the Sound Bar onto the two screws.
Getting Started
21
US
Page 22

Connecting the AC power cord (mains lead)
Before connecting the AC power cord
(mains lead) of the Sound Bar and the
subwoofer to a wall outlet (mains),
connect all the other equipment and TV
to the system.
Setting up the Wireless System
The Sound Bar transmits sound from the
equipment to the subwoofer by wireless
communication.
1 Check that the wireless
transceivers (supplied) are
inserted into the wireless
transceiver (EZW-RT50) slot on
the rear panel of both the Sound
Bar and the subwoofer.
For details, see “Installing the
supplied wireless transceivers”
(page 16).
2 Press ?/1 to turn the Sound Bar
on.
The subwoofer turns on
automatically and the ?/1 indicator
lights in green when the Sound Bar
is turned on and wireless
transmission is activated.
About the standby mode
The subwoofer enters standby mode
automatically and the ?/1 indicator
lights in red when the Sound Bar is in
standby mode.
To specify a wireless
connection
If you use multiple Sony wireless
products, you can prevent improper
connection by specifying the wireless
connection to be used to link the Sound
Bar to the subwoofer (Secure Link
function).
For details, see “Activating wireless
transmission between specific units
(S. ON)” (page 36).
If no sound is heard from a
subwoofer whose ?/1
indicator stays lit in red
• Check the location of the Sound Bar
and subwoofer.
– Do not place the Sound Bar and
subwoofer in a metal cabinet.
– Do not place an object such as an
aquarium between the Sound Bar and
subwoofer.
– Place the subwoofer close to the
Sound Bar in a room.
• Check the wireless communication
status (page 37).
• Change the frequency for the wireless
system (page 37).
22
US
Page 23

Setting up the sound output of the connected equipment
To output multi-channel digital audio,
check the digital audio output setting on
the connected equipment.
For details, refer to the operating
instructions supplied with the connected
equipment.
Getting Started
23
US
Page 24
Playback Options
Operating the system using the supplied remote control
?/1
TV VOL TV CH
INPUT
+/–
VOL +/–
Input
source
ANALOG Device connected to the
BT AU Device connected with
Playable equipment
ANALOG jack
the Bluetooth
3 Adjust the volume by pressing
VOL +/–.
Tip
• The sound may be output from the TV’s
speaker. In this case, turn the volume of the
TV’s speaker down to minimum.
Turn on the system.
1
2 Press INPUT +/– to display the
input source on the front panel
display of the Sound Bar.
Input
source
OPTICAL Device connected to the
COAXIAL Device connected to the
US
24
Playable equipment
OPTICAL jack
COAXIAL jack
Page 25
Bluetooth Function
Using the Bluetooth function
You can listen to music from your
Bluetooth mobile phone or Bluetooth
device over a wireless connection.
This system supports the Bluetooth
A2DP and AVRCP profiles. For details
on Bluetooth wireless technology, see
“Bluetooth wireless technology”
(page 6).
Check the web site below for the latest
information about compatible devices.
• U.S.A.: http://www.sony.com/support
• Canada: http://www.sony.ca./support,
http://fr.sony.ca/support
About the indicator for
Bluetooth
The (Bluetooth) indicator lights or
flashes in blue to allow checking the
Bluetooth status.
System status Indication status
During Bluetooth
pairing
The system is
attempting to connect
with a Bluetooth
device
The system has
established in
connection with a
Bluetooth device
The system is in
Bluetooth Standby
mode (when the
system is off)
Flashes quickly in
blue.
Flashes in blue.
Lights up in blue.
Flashes slowly in
blue.
Notes
• For details on operation of the connected
devices, refer to the operating instructions
supplied with the devices.
•The Bluetooth devices to be connected must
support A2DP (Advanced Audio
Distribution Profile).
About pairing
Pairing is an operation where Bluetooth
devices are registered with each other
beforehand. Use the procedure below to
pair the system with your Bluetooth
device. Once a pairing operation is
performed, it does not have to be
performed again. Once a pairing
operation is performed, you need not do
it again. However, repeat of pairing is
required in the cases listed below.
• Pairing information is deleted by
repairing the system.
• Pairing for ten or more devices is to be
set.
This system can set pairing with up to
nine devices. If pairing is to be set on a
device after pairing has been set on nine
devices, the pairing information on a
device whose connection date is the
oldest is overwritten with new
information.
• The connection history with this
system is deleted on the connected
device.
• The system is reset to default.
Pairing automatically
If “BT AU” is selected with the INPUT
+/– buttons with no pairing being set
with a Bluetooth device on the system,
the system automatically sets pairing
with it. The system enters pairing mode
Bluetooth Function
continued
25
US
Page 26
and pairing is performed automatically,
as described below.
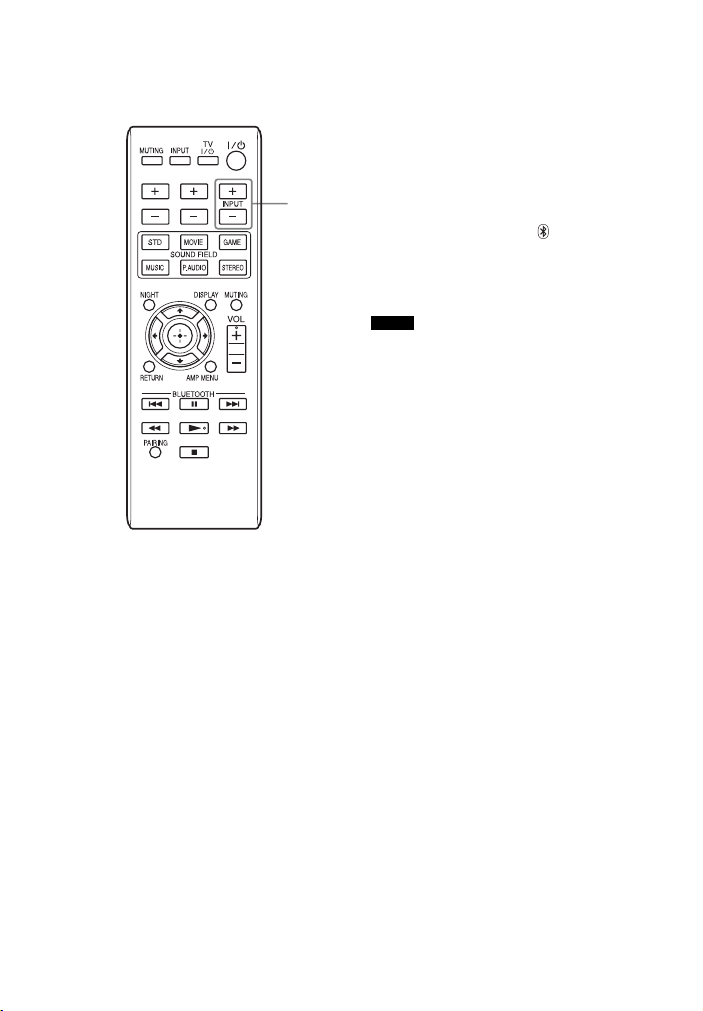
TV VOL TV CH
INPUT
+/–
1 Place the system and a
Bluetooth device within 1 m.
2 Press INPUT +/– to select “BT
AU.”
3 Set the Bluetooth device in
pairing mode.
For details on setting the Bluetooth
device in pairing mode, refer to the
operating instructions supplied with
the device.
4 When the detected devices are
listed on the Bluetooth device,
check that “HT-CT260” is listed.
On some Bluetooth devices, the list
may not be displayed.
5 Select “HT-CT260” on the list of
devices detected on the
Bluetooth device.
If entering the Passkey is requested,
enter “0000.”
6 Make the Bluetooth connection
on the Bluetooth device.
When the Bluetooth connection is
made correctly, the (Bluetooth)
indicator lights in blue and the
pairing information is stored in the
system.
Notes
•Use a Bluetooth device such as Bluetooth
mobile phone in an easily visible place in the
same room where the Sound Bar is placed.
• If Wi-Fi equipment is used, Bluetooth
communication may become unstable. In
that case, use the Bluetooth device as close as
possible to the Sound Bar.
• Sound may be interrupted because of a
problem with the Bluetooth device.
26
US
Page 27
Pairing this system with
T
a Bluetooth device
manually
If you intend to connect a second and
following pieces of Bluetooth
equipment, manual pairing is necessary.
TV VOL TV CH
INPU
+/–
VOL
+/–
2 Push PAIRING on the remote
control or touch (Bluetooth)
on the Sound Bar for more than
two seconds.
3 Perform steps 3 to 6 in “Pairing
automatically” (page 25).
Notes
• “Passkey” may be called “Passcode,” “PIN
code,” “PIN number” or “Password,” etc.,
depending on the device.
• The pairing standby status of the system is
canceled after about 5 minutes. If pairing is
not successful, redo the procedure from step
1.
• If you wish to pair with several Bluetooth
devices, perform the procedure from steps 1
to 3 individually for each Bluetooth device.
• If no pairing information is stored in the
system, the system automatically enters
pairing mode when “BT AU” is selected as
input. In this case, pairing mode is not
released automatically.
Bluetooth Function
PAIRING
VOL +/–
(Bluetooth)
1 Place the Bluetooth device to be
connected to this system within
1 meter of the system.
Listening to music with
the Bluetooth connection
The system supports SCMS-T content
protection. You can listen to a Bluetooth
device that supports SCMS-T content
protection.
Before starting music playback, check
the following:
•The Bluetooth function on the
Bluetooth device is on.
• The pairing procedure is completed on
both this system and Bluetooth device.
1 Press INPUT +/– to select “BT
AU” on this system.
continued
27
US
Page 28

2 Start the Bluetooth connection
from the Bluetooth device.
The (Bluetooth) indicator lights
in blue when the Bluetooth
connection is established.
3 Start playback on the Bluetooth
device.
For details on operation, see “To
control the Bluetooth device”
(page 30).
4 Adjust the volume.
Set the volume of the Bluetooth
device to a moderate level and touch
the VOL +/- touch keys on the
Sound Bar or press the VOL +/buttons on the remote control.
Tips
• You can adjust the volume of the system via
a Bluetooth device supporting AVRCP
(Audio Video Remote Control Profile)
VOLUME UP/DOWN. For details, refer to
the operating instructions supplied with the
device.
• The volume of the system may not be
controllable, depending on the device.
Notes
• If the source device has a bass boost func tion
or equalizer function, turn them off. If these
functions are on, sound may be distorted.
• In the followin g cases, you will have to make
the Bluetooth connection again.
– The power of the unit does not turn on.
– The power of the Bluetooth device does
not turn on, or the Bluetooth function is
off.
–The Bluetooth connection is not
established.
• If more than one device paired with the unit
is being played back, sound will be heard
from just one of those devices.
Finishing the Bluetooth
connection
Terminate the Bluetooth connection by
any of the operations listed below.
• Operate the Bluetooth device to
terminate the connection. For details,
refer to the operating instructions
supplied with the device.
• Turn off the Bluetooth device.
• Turn off the system.
28
US
Page 29
Available sound fields
Surround Function
Enjoying the surround effect
This system can create multi-channel
surround sound. You can select one of
system’s optimized pre-programmed
sound fields.
TV VOL TV CH
SOUND
FIELD
Press one of the SOUND FIELD
buttons.
The sound field changes according to the
button pressed. The selected sound field
appears on the display of the Sound Bar.
Sound field Effect
STD Suits various sources.
MOVIE Recreates powerful and
realistic sound, along with
clear dialog.
GAME Produces powerful and
realistic sound, suited for
playing video games.
MUSIC Suits for music programs or
music videos on Blu-ray
DiscsTM/DVDs.
P.AUDIO Suits for music programs of
a portable music player
STEREO Suits for music CDs.
Surround Function
Tips
• You can set a different sound field for each
input source.
• If a stereo signal is input when the sound
field is set to STD, MOVIE, GAME, or
MUSIC, Dolby Pro Logic II is activated.
The default setting of the Sound field
function of the system is “STD” when
“OPTICAL” or “COAXIAL” is selected
as an input, or “P.AUDIO” when
“ANALOG” or “BT AU” is selected as
an input.
29
US
Page 30
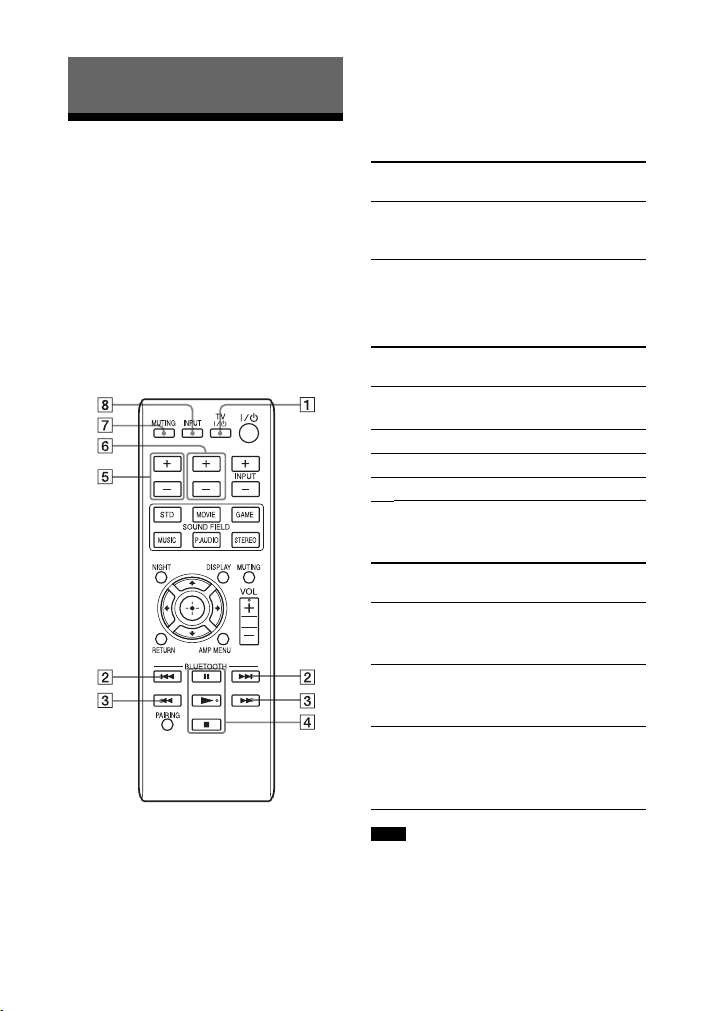
To control the equipment
Advanced Settings
Controlling connected equipment with the remote control
You can control connected equipment
with the remote control of this system.
Some functions may not be selectable
depending on the equipment. In that
case, select them using the remote
control supplied with the equipment.
TV VOL TV CH
Referring to the following table,
press the corresponding button for
the operation.
Remote Control
Button
1 TV ?/1
(on/standby)
Function
Turns on or off the TV
that the remote control is
assigned to operate.
To control a TV
Press the buttons with yellow
printing.
Remote Control
Button
6 TV CH +/– Selects the next (+) or
7 MUTING Turns off the sound.
5 TV VOL +/– Adjusts the volume.
8 INPUT Selects input.
Function
previous (–) channel.
To control the Bluetooth
device
Remote Control
Button
3 m/M To fast reverse or to fast
2 ./> To go to the beginning of
4 N*
(playback)/X
(pause)/
x (stop)
Function
forward the music when
pressed during playback.
the previous or next
music.
Play mode buttons.
Press again to resume
normal playback.
*The N and VOL + buttons have a tactile
dot. Use it as a guide during operation.
US
30
Note
• The above explanations are intended to serve
as an example only. Depending on the
equipment, the above operations may not be
Page 31

possible, or may operate differently than
described.
Setting manufacturer of controllable TVs
The supplied remote control can control
TVs other than Sony products. Set the
manufacturer, following the procedures
below.
TV ?/1
TV VOL TV CH
Manufacturer
selecting
buttons
1 While holding down the TV ?/1
button, press the button
corresponding to the
manufacturer.
Manufacturer Button
SONY TV VOL +
Samsung TV CH +
LG INPUT +
Panasonic TV VOL –
Advanced Settings
continued
31
US
Page 32

Manufacturer Button
VIZIO TV CH –
Sharp INPUT –
Toshiba STD
FUNAI MOVIE
2 While keeping TV ?/1 held
down, press .
3 Release TV ?/1.
32
US
Page 33

Settings and adjustments using the amplifier menu
Using the AMP menu
You can set the following items with
AMP MENU on the remote control.
The default settings are underlined.
Your settings are retained even if you
disconnect the AC power cord (mains
lead).
AMP MENU
LEVEL CNT LVL –6, –5 , … 0, …
SW LVL –6, –5, … 0
DRC ON
TONE BASS –6, –5, … 0, …
TREBLE –6, –5, … 0
+5, +6
+5, +6
OFF
+5, +6
+5, +6
, …
, …
SET BT
SYSTEM
WS
1)
This setting appears only when the Secure
Link connection is not activated.
2)
This setting appears only when the Secure
Link connection is activated.
BT STBY ON
OFF
A. STBY ON
OFF
IR REP. ON
OFF
VERSION
1)
S. ON
2)
S. OFF
RF CH AUTO
1
2
RF CHK
3
Advanced Settings
AUDIO
SYNC ON
OFF
DUAL
NIGHT
M/S
MAIN
SUB
ON
OFF
continued
33
US
Page 34

C, X,
x, c,
AMP
MENU
at low volume. DRC applies to Dolby
Digital sources.
• ON: Compresses the sound in
accordance with the
information contained in the
content.
• OFF: Sound is not compressed.
1 Press AMP MENU to turn on the
AMP menu.
2 Press C/X/x/c repeatedly to
select the item and press to
decide the setting.
3 Press AMP MENU to turn off the
AMP menu.
Setting the signal level
of the center or
subwoofer (CNT LVL,
SW LVL)
The sound from the center is output from
the left and right speakers on the Sound
Bar.
You can adjust the level and the balance
of the center and subwoofer. The
parameters of “CNT LVL” and “SW
LVL” range from “–6” to “+6” in 1-step
increments.
• CNT LVL: Adjusts the center level.
• SW LVL: Adjusts the subwoofer
level.
Enjoying Dolby Digital
sound at low volume
(DRC)
Compresses the dynamic range of the
sound track. Useful for enjoying movies
Adjusting the bass and
treble level (BASS,
TREBLE)
You can adjust the bass and treble level.
The parameters of “BASS” and
“TREBLE” range from “–6” to “+6” in
1-step increments.
• BASS: Adjusts the bass level.
• TREBLE: Adjusts the treble level.
Adjusting the delay
between the sound and
the image (SYNC)
You can delay the sound using this
function when the image is slower than
the sound.
• ON: Adjusts the difference between
picture and sound.
• OFF: No adjustment.
Note
• You may not be able to adjust the delay
between sound and image perfectly using
this function.
Enjoying multiplex
broadcast sound (DUAL)
You can enjoy multiplex broadcast
sound when the system receives a Dolby
Digital multiplex broadcast signal.
34
US
Page 35

Note
• To receive a Dolby Digital signal, you need
to connect a digital satellite tuner to the
Sound Bar with an optical cable or coaxial
cable, and set the digital output mode of the
digital satellite tuner to Dolby Digital.
• M/S: Main sound is output
from the left speaker and
sub sound is output from
the right speaker.
• MAIN: Plays back only the main
channel.
• SUB: Plays back only the sub
channel.
Enjoying the sound at
low volume (NIGHT)
You can enjoy sound effects and hear the
dialog clearly even at a low volume level
using this function.
• ON: Turns on the “NIGHT”
function.
• OFF: Turns off the function.
Tip
• You can listen to Dolby Digital sound at low
volume by using DRC (page 34).
Setting and releasing
Bluetooth standby
mode (BT STBY)
If Bluetooth standby mode is set to ON,
the Sound Bar is in Bluetooth standby
mode even when it is turned off. When
the Bluetooth device attempts to make
connection, the Sound Bar is turned on,
and you can enjoy sound with Bluetooth
connection.
• ON: Bluetooth standby mode is
enabled.
•OFF: Bluetooth standby mode is
disabled.
Notes
• If the Sound Bar does not have the pairing
registration information, Bluetooth standby
mode cannot be set.
•During Bluetooth standby mode, standby
power consumption increases.
Auto Standby function
(A. STBY)
You can reduce power consumption.
The Sound Bar enters standby mode
automatically when you do not operate
the Sound Bar for about 30 minutes and
the Sound Bar is not receiving an input
signal.
• ON: Turns on the “A. STBY”
function.
• OFF: Turns off the function.
Relaying the command
from the remote control
of a TV (IR REP.)
If the remote control of a TV cannot
control the TV, the Sound Bar can relay
the remote control signal to the TV to
control the TV. The remote control
signal can be relayed even when the
Sound Bar is turned off.
• ON: The relay function is enabled.
• OFF: The relay function is disabled.
Notes
• Be sure to check that the remote control of
the TV cannot control the TV, then set IR
REP. to ON. If it is set to ON when the
remote control can control the TV,
appropriate operation may not be obtained,
because of the interference between the
continued
35
Advanced Settings
US
Page 36

direct command from the remote control and
the command via the Sound Bar.
• If the Sound Bar is placed where it does not
obstruct the remote control sensor of the TV,
be sure to set IR REP. to “OFF”.
• On some TVs, this function does not work.
In this case, move the Sound Bar to another
location.
Checking the version of
the Sound Bar
(VERSION)
The current firmware version
information appears on the front panel
display.
Activating wireless
transmission between
specific units (S. ON)
You can specify the wireless connection
to be used to link the Sound Bar to the
subwoofer using the Secure Link
function.
This function is useful when you use
multiple wireless products.
1 Press AMP MENU.
2 Select “WS” in the AMP menu,
then press or c.
3 Select “S. ON,” then press or
c.
4 “START” appears, then press
.
“SEARCH” appears, and the Sound
Bar searches for equipment that can
be used with Secure Link.
Proceed to the next step within 2
minutes.
To quit the Secure Link function
during a search for equipment, press
C.
5 Press SECURE LINK on the rear
of the subwoofer with the point
of a pen, etc.
The ?/1 indicator on the subwoofer
lights in amber. “SUCCEED”
appears on the front panel display.
If “FAILED” appears on the front
panel display, check to ensure the
subwoofer is turned on, and try to
perform the process again from
step 1.
6 Press AMP MENU.
The AMP menu turns off.
Cancelling the Secure
Link function (S. OFF)
1 Press AMP MENU.
2 Select “WS” in the AMP menu,
then press or c.
3 Select “S. OFF,” then press
or c.
4 “RELEASE” appears, then press
.
“FINISH” appears on the front panel
display.
5 Press AMP MENU.
The AMP menu turns off.
36
US
Page 37

6 Press and hold SECURE LINK on
the rear of the subwoofer for
several seconds until the ?/1
indicator turns green or flashes
in green.
Be sure to press SECURE LINK
with the point of a pen, etc.
Setting the frequency
for the wireless system
(RF CH)
When subwoofer sound is interrupted
because of improper connection, the
transmission can be improved by
changing the following RF Channel
setting.
• AUTO: Normally select this item. The
system automatically selects
the best channel for
transmission.
• 1: Set the frequency to CH1
(LOW 5.736 GHz).
• 2: Set the frequency to CH2
(MID 5.762 GHz).
• 3: Set the frequency to CH3
(HIGH 5.814 GHz).
Note
• The transmission may be improved by
changing the transmission channel
(frequency) of the Bluetooth device, other
wireless system(s), or Wi-Fi device. For
details, refer to the operating instructions of
the other wireless system(s).
When the Sound Bar finishes checking,
“OK” or “NG” appears.
• OK: A wireless connection is
possible.
• NG: A wireless connection is not
possible.
Advanced Settings
Checking the wireless
communications status
of the wireless system
(RF CHK)
Indicates whether or not the wireless
system is activated on the Sound Bar.
37
US
Page 38

Additional Information
Troubleshooting
If you experience any of the following
difficulties while using the system, use
this troubleshooting guide to help
remedy the problem before requesting
repairs. Should any problem persist,
consult your nearest Sony dealer.
POWER
The power is not turned on.
• Check that the AC power cord
(mains lead) is connected securely.
The system is turned off automatically.
• The A. STBY function is working
(page 35).
SOUND
Dolby Digital or DTS multi-channel
sound is not reproduced.
• Check that the Blu-ray Disc, DVD,
etc., is recorded in Dolby Digital or
DTS format.
• When connecting the Blu-ray Disc,
DVD player, etc., to the digital input
jacks of this system, check the audio
setting (settings for the audio output)
of the connected equipment.
The surround effect cannot be
obtained.
• Depending on the input signal and
the setting for the sound field,
surround sound processing may not
work effectively (page 29). The
surround effect may be subtle
depending on the program or disc.
• If you connect a Blu-ray Disc player
or a DVD player compatible with
the surround effect function, the
surround effect of the system may
not work.
In this case, set the surround effect
function of the connected equipment
to off.
For details, refer to the operating
instructions supplied with the
connected equipment.
No TV sound is output from the
system.
• Check the connection of the digital
optical cord or audio cord that is
connected to the system and the TV
(page 18).
• Check the sound output of the TV.
The sound is output from both the
system and the TV.
• Turn off the sound of the system or
the TV.
Sound lags behind the TV image.
• Set the “SYNC” to “OFF” if
“SYNC” is set to “ON.”
No sound or only a very low-level
sound of the connected equipment is
heard from the system.
• Press VOL + and check the volume
level.
• Press MUTING or VOL + to cancel
the muting function.
• Check that the input source is
correctly selected.
• Check that all the cables and cords
of the system and the connected
equipment are fully inserted.
Wireless sound
Wireless transmission is not activated
or there is no sound from the
subwoofer.
Check the status of the ?/1 indicator
on the subwoofer.
38
US
Page 39

• Turns off:
– Check that the AC power cord
(mains lead) of the subwoofer is
connected securely.
– Turn the subwoofer on by
pressing ?/1 on the subwoofer.
• Flashes in green quickly:
– 1 Press ?/1 on the subwoofer.
2 Insert the wireless transceiver
into the subwoofer correctly.
3 Press ?/1 on the subwoofer.
•Flashes in red:
– Press ?/1 to turn off the
subwoofer, and check that
nothing is blocking the ventilation
holes of the subwoofer.
• Flashes in green or amber slowly or
turns red:
– Make sure that the wireless
transceiver is inserted correctly
into the Sound Bar.
– Make the Secure Link setting
“S. ON” again (page 36).
– Sound transmission is poor. Move
the subwoofer so that the ?/1
indicator turns green or amber.
– Move the Sound Bar or the
subwoofer away from other
wireless devices.
– Avoid using any other wireless
devices.
Noise is heard from the subwoofer or
sound from the subwoofer skips.
• Wireless transmission is unstable.
Change the “RF CH” setting. For
details, refer to “Setting the
frequency for the wireless system
(RF CH)” (page 37).
Bluetooth
There is no sound.
• Make sure this system is not too far
from the Bluetooth device, or this
system is not receiving interference
from a Wi-Fi network, other
2.4 GHz wireless device, or
microwave oven.
• Check that the Bluetooth connection
is made properly between this
system and the Bluetooth device.
• Pair this system and the Bluetooth
device again.
• Keep the system away from metal
objects or surfaces.
• Make sure the system is in the
Bluetooth mode. Otherwise, press
the (Bluetooth) touch key.
Sound skips or the correspondence
distance is short.
• If a device that generates
electromagnetic radiation, such as a
Wi-Fi network, other Bluetooth
device(s), or a microwave oven is
nearby, move away from such
sources.
• Remove any obstacle between this
system and Bluetooth device, or
move away from the obstacle.
• Locate this system and Bluetooth
device as near as possible.
• Re-position this system.
• Re-position the Bluetooth device.
Connecting cannot be done.
• Perform pairing again (page 27).
Pairing cannot be done.
• Bring this system and the Bluetooth
device closer together.
• Delete the system from your
Bluetooth device and perform
pairing again (page 27).
continued
39
Additional Information
US
Page 40

The remote control does not
function
• Point the remote control at the
remote control sensor on the
system.
• Remove any obstacles in the path
between the remote control and the
system.
• Replace both batteries in the remote
control with new ones, if they are
weak.
• Make sure you select the correct
input on the remote control.
OTHER
If ?/1 indicator on the subwoofer flash
in red.
Press ?/1 on the subwoofer to turn it
off, and check the following item.
• Is anything blocking the ventilation
holes of the system?
If “PROTECT” appears on the front
panel display.
Press ?/1 to turn off the system, and
check the following item after
“STANDBY” disappears.
• Is anything blocking the ventilation
holes of the system?
If the system still does not
operate properly after
performing the above
measures, reset the system
as follows:
Use buttons on the system for the
operation.
2 Press ?/1 while pressing INPUT
and VOL – on the Sound Bar.
“RESET” appears and the system is
reset. AMP menu, sound field, etc.,
return to the default settings.
After checking the above item and fixing
any problems, turn on the system. If the
cause of the problem cannot be found
even after checking the above item,
consult your nearest Sony dealer.
Specifications
Formats supported by this system
Digital input formats supported by this
system are as follows.
Format Supported/Not
Dolby Digital a
DTS a
Linear PCM 2ch 48 kHz
or less
supported
a
1 Press ?/1 to turn on the power.
US
40
Page 41

Sound Bar (SA-CT260)
Amplifier section
U.S. models:
POWER OUTPUT AND TOTAL
HARMONIC DISTORTION:
(FTC)
Front L + Front R:
With 3 ohms loads, both channels driven,
from 200 - 20,000 Hz; rated 25 Watts per
channel minimum RMS power, with no
more than 1 % total harmonic distortion
from 250 milliwatts to rated output.
POWER OUTPUT (reference)
Front L/Front R: 85 W
(per channel at 3 ohms, 1 kHz)
Canadian models:
POWER OUTPUT (rated)
Front L + Front R: 35 W + 35 W
(at 3 ohms, 1 kHz, 1 % THD)
POWER OUTPUT (reference)
Front L/Front R: 85 W (per channel at
3ohms, 1kHz)
Inputs
ANALOG
OPTICAL
COAXIAL
Bluetooth section
Communication system
Bluetooth Specification version 2.1 +
EDR (Enhanced Data Rate)
Output
Bluetooth Specification Power Class 2
Maximum communication range
Line of sight approx. 10 m1)
Frequency band
2.4 GHz band (2.4000 GHz - 2.4835
GHz)
Modulation method
FHSS (Freq Hopping Spread Spectrum)
Compatible Bluetooth profiles2)
A2DP (Advanced Audio Distribution
Profile)
AVRCP 1.3 (Audio Video Remote
Control Profile)
Supported Codecs3)
SBC4)
Transmission range (A2DP)
20 Hz - 20,000 Hz (Sampling frequency
44.1 kHz)
1) The actual range will vary depending on
factors such as obstacles between devices,
magnetic fields around a microwave oven,
static electricity, cordless phone, reception
sensitivity, operating system, software
application, etc.
2) Bluetooth standard profiles indicate the
purpose of Bluetooth communication
between devices.
3) Codec: Audio signal compression and
conversion format
4) Subband Codec
Front speaker unit
Speaker system
Full range speaker system, Bass Reflex
Speaker unit
55 mm × 80 mm (2 1/4 in × 3 1/4 in),
cone type
Rated impedance
3ohms
Power requirements
120 V AC, 60 Hz
Power consumption
On: 32 W
Standby mode: 0.3 W or less
Bluetooth Standby mode: 3 W or less
Dimensions (approx.)
940 mm × 102 mm × 89 mm (37 1/8 in ×
4 1/8 in × 3 5/8 in) (with stands)
940 mm × 89 mm × 97 mm (37 1/8 in ×
3 5/8 in × 3 7/8 in) (without stands)
Mass (approx.)
2.8 kg (6 lb 2 3/4 oz)
Subwoofer (SA-WCT260)
POWER OUTPUT (reference)
130 W (per channel at 4 ohms, 100 Hz)
Speaker system
Subwoofer, Bass reflex
Speaker unit
130 mm (5 1/8 in) cone type
Rated impedance
4ohms
Power requirements
120 V AC, 60 Hz
Additional Information
continued
41
US
Page 42

Power consumption
On: 30 W
Standby mode: 0.5 W or less
Dimensions (approx.)
271 mm × 390 mm × 271 mm (10 3/4 in
× 15 3/8 in × 10 3/4 in) (w/h/d)
Mass (approx.)
7.2 kg (15 lb 4 oz)
Wireless transceiver
(EZW-RT50)
Communication System
Wireless sound Specification version 1.0
Frequency band
5.736 GHz - 5.814 GHz
Power requirements
DC 3.3 V, 300 mA
Modulation method
DSSS
Dimensions (approx.)
30 mm × 9 mm × 60 mm (1 3/16 in × 3/8
in × 2 3/8 in) (w/h/d)
Mass (approx.)
10 g (3/8 oz)
Design and specifications are subject to
change without notice.
• Standby power consumption 0.5 W or
less.
• Over 85 % power efficiency of amplifier
block is achieved with the full digital
amplifier, S-Master.
42
US
Page 43

Index
A
A.STBY 35
AMP menu 33
B
BASS 34
Bluetooth 6, 25
BT STBY 35
C
CNT LVL 34
Connecting
TV 18
D
Digital optical cord 18
DRC 34
DUAL 34
DVD player 18
F
Front panel display 13
I
INPUT 12
Installing 19
IR REP. 35
M
MUTING 15
P
Positioning the system 19
PROTECTOR 40
R
Remote control
before use 11
operating 15, 30
Reset 40
RF CH 37
RF CHK 37
S
S. OFF 36
S. ON 36
Sound field 29
SW LVL 34
SYNC 34
T
TREBLE 34
V
VERSION 36
VOL 12, 15
W
Wireless System 22
Additional Information
N
NIGHT 35
43
US
Page 44

AVERTISSEMENT
Pour réduire les risques
d’incendie ou d’électrocution,
gardez cet appareil à l’abri de la
pluie et de l’humidité.
L’appareil n’est pas débranché du secteur
aussi longtemps qu’il est raccordé à la prise
secteur, même s’il s’éteint automatiquement.
Pour réduire le risque d’incendie, ne
recouvrez pas l’orifice de ventilation de
l’appareil avec des journaux, des nappes, des
rideaux, etc.
Ne placez pas de flammes nues, comme des
bougies allumées, sur l’appareil.
Pour réduire le risque d’incendie ou
d’électrocution, n’exposez pas cet appareil à
des éclaboussures et ne placez pas d’objets
remplis de liquide, comme des vases, sur
l’appareil.
La fiche principale étant utilisée pour
déconnecter l’unité de l’alimentation secteur,
connectez l’unité à une prise secteur aisément
accessible. Si vous remarquez une anomalie
dans l’appareil, débranchez immédiatement la
fiche principale de la prise secteur.
N’installez pas cet appareil dans un endroit
confiné, comme sur une étagère ou un meuble
TV intégré.
N’exposez pas les piles ou les appareils
contenant des piles à une chaleur excessive,
notamment aux rayons directs du soleil, à une
flamme, etc.
Utilisation à l'intérieur seulement.
Pour les clients résidant aux
Etats-Unis
Ce symbole est destiné à renseigner
l’utilisateur sur la présence à
l’intérieur du boîtier de l’appareil
d’une « tension dangereuse » non
isolée et suffisamment puissante pour
présenter un risque d’électrocution.
Ce symbole est destiné à renseigner
l’utilisateur sur la présence
d’importantes instructions
d’utilisation et d’entretien (service)
dans les documents qui accompagnent
l’appareil.
Enregistrement du propriétaire
Le modèle et les numéros de série se trouvent
dans la partie oblique inférieure située à
l'arrière de l’appareil. Indiquez ces numéros
dans l’espace prévu à cet effet ci-dessous.
Vous devrez vous y référer lors d’un appel à
votre revendeur Sony au sujet de ce produit.
N ° d e m o d è l e H T - C T 2 6 0 / H T - CT 2 6 0 H P
N° de sé rie
Consignes de sécurité
importantes
1) Lisez ces instructions.
2) Conservez ces instructions.
3) Respectez tous les avertissements.
4) Respectez toutes les instructions.
5) N’utilisez pas cet appareil à proximité de
l’eau.
6) Nettoyez-le uniquement avec un chiffon
sec.
7) N’obstruez pas les orifices de ventilation.
Installez l’appareil conformément aux
instructions du fabricant.
FR
2
Page 45

8) N’installez pas l’appareil à proximité des
sources de chaleur telles que les
radiateurs, les registres de chaleur, les
poêles ou autres appareils (y compris les
amplificateurs) produisant de la chaleur.
9) N’altérez pas le dispositif de sécurité de la
fiche polarisée ou mise à la terre. Une
fiche polarisée compte deux lames de
largeur différente. Une fiche de type mise
à la terre possède deux lam es et une broche
de mise à la terre. La lame la plus large ou
la troisième broche assure une fonction de
sécurité. Si la fiche fournie d’origine ne
s’adapte pas à votre prise, faites remplacer
la prise obsolète par un électricien.
10) Protégez le cordon d’alimentation des
lieux de passage ou des points de
pincement, en particulier au niveau des
fiches, des prises de courant et de sa sortie
de l’appareil.
11) Utilisez uniquement des accessoires
spécifiés par le fabricant.
12) Utilisez uniquement l’appareil avec le
chariot, socle, trépied, support ou table
spécifié par le fabricant ou vendu avec
l’appareil. Si vous utilisez un chariot,
soyez prudent lorsque vous le déplacez
avec l’appareil afin d’éviter toute chute
susceptible de provoquer des blessures.
13) Débranchez cet appareil en cas d’orage ou
d’inutilisation prolongée.
14) Confiez toutes les réparations à du
personnel de service qualifié. L’appareil
doit être réparé en cas de dommage
quelconque, notamment lorsque le cordon
d’alimentation ou sa fiche est
endommagé, du liquide ou un objet a
pénétré à l’intérieur de l’appareil,
l’appareil a été exposé à la pluie ou à
l’humidité, l’appareil ne fonctionne pas
normalement ou est tombé.
La déclaration de la FCC suivante s’applique
uniquement à la version de ce modèle
fabriquée pour la vente aux Etats-Unis. Il se
peut que les autres versions ne soient pas
conformes aux réglementations techniques de
la FCC.
REMARPUE :
Cet appareil a été testé et s’est révélé
conforme aux limites des appareils
numériques de Classe B, conformément à
l’alinéa 15 de la réglementation FCC. Ces
limites sont conçues pour assurer une
protection raisonnable contre les interférences
nuisibles dans une installation résidentielle.
Cet appareil génère, utilise et peut rayonner de
l’énergie de fréquence radio qui, en cas
d’installation et d’utilisation non conformes
aux instructions, peut engendrer des
interférences nuisibles avec les
communications radio. Il n’est toutefois pas
garanti qu’aucune interférence ne surviendra
dans une installation particulière. Si cet
appareil altère effectivement la réception
radio ou télévisée, ce qui peut être déterminé
en le mettant hors tensio n, puis à nouveau sous
tension, nous vous encourageons à essayer de
remédier à la situation en prenant une ou
plusieurs mesures ci-après :
– Réorientez ou repositionnez l’antenne de
réception.
– Augmentez la distance qui sépare l’appareil
du récepteur.
– Raccordez l’appareil à la prise d’un circuit
différent de celui auquel le récepteur est
raccordé.
– Sollicitez l’aide de votre revendeur ou d’un
technicien en radio/télévision expérimenté.
ATTENTION
Vous êtes prévenu que toute modification ou
changement non expressément approuvé dans
ce manuel peut annuler votre autorisation à
utiliser cet appareil.
Pour la barre de son (SA-CT260)
La plaque signalétique et l'inscription de la
date de fabrication sont situées sur la surface
oblique arrière faisant face vers le bas.
suite
3
FR
Page 46

Pour la barre de son (SA-CT260)
Pour l’émetteur-récepteur sans fil
(EZW-RT50)
Cet appareil est conforme à la section 15 des
règles de la FCC. Son fonctionnement est
soumis aux deux conditions suivantes : (1) cet
appareil ne peut pas provoquer d’interférences
dangereuses et (2) cet appareil doit accepter
toutes les interférences reçues, y compris les
interférences susceptibles de provoquer un
fonctionnement indésirable.
Cet appareil ne doit pas se trouver à proximité
d’un autre émetteur ou d’une autre antenne, ou
encore être utilisé en même temps que ceux-ci.
Cet appareil est conforme aux limites
d’exposition au rayonnement du FCC
déterminées pour un environnement
incontrôlé et rencontre les recommandations
d’exposition aux radiofréquences (RF) du
FCC dans le supplément C à OET65. Cet
équipement devrait être installé et opéré en
gardant le radiateur à au moins 20 cm ou plus
du corps d’une personne (excluant les
extrémités : mains, poignets, pieds et
chevilles).
Pour les clients au Canada
Pour la barre de son (SA-CT260)
Pour l'émetteur-récepteur sans fil
(EZW-RT50)
Cet appareil numérique de la classe B est
conforme à la norme ICES-003 du Canada.
incontrôlé et rencontre les règles d’exposition
RSS-102 de la radiofréquence (RF) d’IC.
Cet équipement devrait être installé et opéré
en gardant le radiateur à au moins 20 cm ou
plus du corps d’une personne (excluant les
extrémités : mains, poignets, pieds et
chevilles).
Son utilisation est soumise aux deux
préalables suivants : (1) ce dispositif ne peut
produire d’interférences nuisibles et (2) ce
dispositif doit accepter toutes les
interférences, y compris celles qui sont
susceptibles de provoquer un fonctionnement
indésirable.
Cet appareil est conforme aux limites
d'exposition au rayonnement d’IC
déterminées pour un environnement
FR
4
Page 47

Précautions
Concernant la sécurité
• Si un objet ou du liquide venait à pénétrer à
l’intérieur du système, débranchez-le et
faites-le vérifier par un technicien qualifié
avant de le remettre en marche.
• Ne grimpez pas sur la barre de son ou le
caisson de graves, car vous risqueriez de
tomber et de vous blesser, ou encore
d’endommager le système.
Concernant les sources
d’alimentation
• Avant de mettre en marche le système,
vérifiez que la tension de fonctionnement est
identique à celle de votre source
d’alimentation locale. La tension de
fonctionnement est indiquée sur l’étiquette
située à l’arrière de la barre de son.
• Si vous prévoyez de ne pas utiliser le
système pendant une période prolongée,
assurez-vous de le débrancher de la prise
murale. Pour débrancher le cordon
d’alimentation, tirez sur la fiche et non sur le
cordon.
• Pour des raisons de sécurité, l’une des
broches de la fiche est plus large que l’autre
et elle s’insère dans la prise murale dans un
seul sens. Si vous ne parvenez pas à insérer
la fiche à fond dans la prise, contactez votre
revendeur.
• Le cordon d’alimentation doit être remplacé
uniquement dans un centre de service aprèsvente qualifié.
Concernant l’accumulation
de chaleur
Bien que le système chauffe lors du
fonctionnement, il ne s’agit pas d’un
dysfonctionnement. Si vous utilisez le
système continuellement à un volume élevé, la
température augmente considérablement au
niveau de ses faces arrière et inférieure. Pour
éviter de vous brûler, ne touchez pas le
système.
Concernant l’emplacement
• Installez le système dans un endroit
correctement ventilé pour éviter
l’accumulation de chaleur et prolonger la
durée de vie de votre système.
• N’installez pas le système à proximité de
sources de chaleur ou dans un endr oit soumis
aux rayons du soleil, à une poussière
excessive ou à des chocs mécaniques.
• Ne placez rien à l’arrière de la barre de son
qui pourrait obstruer les orifices de
ventilation et provoquer des
malfonctionnements.
• Si le système est utilisé conjointement avec
un téléviseur, un magnétoscope ou un
magnétophone, cela peut provoquer des
parasites et diminuer la qualité de l’image.
Dans ce cas, placer le système loin du
téléviseur, du magnétoscope ou du
magnétophone.
• Faites attention lorsque vous installez le
système sur des surfaces traitées (avec de la
cire, de l’huile, etc.), car vous risquez de les
tacher et de les décolorer.
• Évitez de vous blesser sur les coins de la
barre de son ou du caisson de graves.
Concernant le
fonctionnement
Avant de raccorder un autre appareil, assurezvous d’éteindre et de débrancher le système.
Si l’écran du téléviseur situé
à proximité présente des
irrégularités de couleurs
Des irrégularités de couleurs peuvent être
constatées sur certains types de téléviseurs.
En cas d’irrégularités de
couleurs...
Mettez immédiatement le téléviseur hors
tension, puis remettez-le sous tension après
15 à 30 minutes.
En cas d’irrégularités de
couleurs persistantes...
Éloignez davantage le système du téléviseur.
suite
5
FR
Page 48

Concernant l’entretien
Nettoyez le système avec un chiffon sec et
doux. N’utilisez pas de tampons abrasifs, de
poudre à récurer ou de solvant tel que de
l’alcool ou de la benzine.
Si vous avez des questions ou si vous
rencontrez des problèmes avec votre système,
consultez votre revendeur Sony le plus
proche.
Copyrights
Ce modèle incorpore Dolby* Digital et Pro
Logic Sound et le système Surround DTS**
Digital.
* Fabriqué sous licence de Dolby
Laboratories.
Dolby, Pro Logic et le symbole double-D
sont des marques commerciales de Dolby
Laboratories.
**Fabriqué sous licence des brevets
américains suivants : 5 956 674 ;
5 974 380 ; 6 487 535, ainsi que d’autres
brevets délivrés ou en instance aux ÉtatsUnis et dans le monde. DTS, son symbole
ainsi que DTS et son symbole ensemble
sont des marques déposées, et DTS Digital
Surround et les logos de DTS sont des
marques de commerce de DTS, Inc. Ce
produit comprend un logiciel. © DTS, Inc.
Tous droits réservés.
Le terme et les logos Bluetooth® sont des
marques déposées appartenant à Bluetooth
SIG, Inc. et tout usage de ces marques par
Sony Corporation s’inscrit dans le cadre d’une
licence.
Les autres marques commerciales et noms de
marques appartiennent à leurs propriétaires
respectifs.
Technologie sans fil
Bluetooth
La technologie sans fil Bluetooth est une
technologie sans fil à faible portée qui
relie des dispositifs numériques, comme
des ordinateurs personnels et des
appareils photo numériques. En utilisant
la technologie sans fil Bluetooth, vous
pouvez faire fonctionner les unités
impliquées dans un rayon d'environ
10 mètres.
La technologie sans fil Bluetooth est
généralement utilisée entre deux
dispositifs, mais un seul dispositif peut
être connecté à plusieurs dispositifs.
Vous n'avez pas besoin de fils pour être
raccordé comme vous le faites avec une
connexion USB, et vous n'avez pas
besoin de placer les dispositifs face à
face comme vous le faites avec la
technologie infrarouge sans fil. Vous
pouvez utiliser la technologie avec un
dispositif Bluetooth dans votre sac ou
votre poche.
La technologie sans fil Bluetooth est une
norme mondiale acceptée par des
milliers d'entreprises. Ces entreprises
fabriquent des produits qui rencontrent
la norme mondiale.
Version Bluetooth prise en
charge et profils
Le profil se réfère à une série standard de
capacités pour les diverses capacités de
produit Bluetooth. Ce système prend en
charge la version Bluetooth et les profils
suivants.
Version Bluetooth prise en charge :
Version Bluetooth standard 2.1 + EDR
(Enhanced Data Rate)
FR
6
Page 49

Profils Bluetooth pris en charge :
A2DP (Advanced Audio Distribution
Profile)
AVRCP (Audio Video Remote Control
Profile)
Remarques
• Pour que vous puissiez utiliser la
fonction Bluetooth, le dispositif
Bluetooth à être raccordé doit prendre
en charge le même profil que ce
système. Même si le dispositif prend en
charge le même profil, les fonctions
peuvent différer à cause des
caractéristiques du dispositif
Bluetooth.
• La lecture de l'audio sur ce système
pourrait être retardée de celle sur le
dispositif Bluetooth à cause des
caractéristiques de la technologie sans
fil Bluetooth.
Portée efficace de
communication
Les dispositifs Bluetooth devraient être
utilisés en-dedans d'approximativement
10 mètres (33 pieds) (distance dégagée)
de chacun. La portée efficace de
communication peut devenir plus courte
dans les conditions suivantes :
• Lorsqu'une personne, un objet
métallique, un mur ou une autre
obstruction est entre les dispositifs
avec une connexion Bluetooth
• Des emplacements où un réseau local
sans fil est installé
• Autour des fours à micro-ondes qui
sont en usage
• Des emplacements où d'autres ondes
électromagnétiques se produisent
Les effets d'autres
dispositifs
Les dispositifs
Bluetooth
et le réseau local
sans fil (IEEE 802.11b/g) utilisent la
même bande de fréquence (2,4 GHz). En
utilisant votre dispositif
Bluetooth
près
d'un dispositif avec la capacité de réseau
local sans fil, des interférences
électromagnétiques peuvent se produire.
Ceci pourrait avoir pour résultat des taux
de transfert de données plus bas, des
parasites ou l'incapacité de se raccorder.
Si ceci se produit, essayez les remèdes
suivants :
• Essayez de raccorder ce système et un
téléphone portable Bluetooth ou
dispositif Bluetooth quand vous êtes à
au moins 10 mètres (33 pieds) de
l'équipement de réseau local sans fil.
• Coupez le courant de l'équipement de
réseau local sans fil lorsque vous
utiliser votre dispositif Bluetooth à
moins de 10 mètres.
Les effets sur d'autres
dispositifs
L'émission d'ondes radio par ce système
peut interférer avec l'opération de
quelques dispositifs médicaux. Puisque
cette interférence peut avoir pour résultat
le malfonctionnement, couper toujours
le courant sur ce système, un téléphone
portable Bluetooth ou un dispositif
Bluetooth dans les emplacements
suivants :
• Dans les hôpitaux, sur les trains, dans
les avions, aux stations-services et à
n'importe quel endroit où des gaz
inflammables peuvent être présents
• Près des portes automatiques ou des
alarmes d'incendie
suite
FR
7
Page 50

Remarques
• Ce système prend en charge des fonctions de
sécurité qui se conforment à la norme
Bluetooth comme un moyen de garantir la
sécurité pendant la communication en
utilisant la technologie Bluetooth.
Cependant, cette sécurité peut être
insuffisante dépendant du contenu des
paramètres et d'autres fac teurs, donc toujours
faire attention en utilisant la technologie de
communication Bluetooth.
• Sony ne peut pas être tenu responsable de
quelque façon pour les dommages ou d'autre
perte résultant des fuites d'informations
pendant l'utilisation de la technologie de
communication Bluetooth.
• La communication Bluetooth n'est pas
nécessairement garantie avec tous les
dispositifs Bluetooth qui ont le même profil
que ce système.
• Les dispositifs Bluetooth raccordés avec ce
système doivent se conformer à la norme
Bluetooth prescrite par le Bluetooth SIG,
Inc., et doivent être certifiés comme
conformes. Toutefois, même quand un
dispositif se conforme à la norme Bluetooth,
il peut y avoir des cas où les particularités ou
les caractéristiques du dispositif Bluetooth
rendent impossible de se raccorder, ou
peuvent occasionner d'avoir différentes
méthodes de contrôle, d'affichage ou
d'opération.
• Des parasites peuvent se produire ou l'audio
peut se couper dépendant du dispositif
Bluetooth raccordé avec ce système,
l'environnement de communications ou les
conditions environnantes.
FR
8
Page 51

Table des matières
Précautions .................................... 5
Technologie sans fil Bluetooth ..... 6
Comment démarrer
Déballage .................................... 10
Index des composants et des
commandes ........................... 12
Installation des émetteurs-récepteurs
sans fil fournis ...................... 16
Raccordement du téléviseur et du
lecteur, etc. ............................ 18
Positionnement du système ......... 19
Raccordement du cordon
d’alimentation ....................... 23
Configuration du système sans
fil .......................................... 23
Réglage de sortie du son de
l’appareil raccordé ................ 24
Options de lecture
Fonctionnement du système à l’aide
de la télécommande fournie ...25
Fonction Bluetooth
Utilisation de la fonction
Bluetooth .............................. 26
Fonction Surround
Reproduction de l’effet surround ...30
Configuration avancée
Contrôle un appareil raccordé à
l’aide de la télécommande ... 31
Définition du fabricant du téléviseur
contrôlable ............................ 32
Sélections et réglages à l’aide du
menu de l’amplificateur ........ 34
Informations
complémentaires
Dépannage .................................. 39
Caractéristiques ........................... 42
Index ........................................... 44
FR
9
Page 52

Comment démarrer
Déballage
• Caisson de graves (SA-WCT260) (1)
• Barre de son (SA-CT260) (1)
• Émetteur-récepteur sans fil
(EZW-RT50) (2)
• Cordon optique numérique pour un
téléviseur (1)
• Cordon audio analogique (1)
(HT-CT260HP seulement)
• Télécommande (RM-ANP084) (1)
• Piles R6 (format (AA)) (2)
• Mode d’emploi (1)
• Garantie (1)
• Cordon coaxial numérique (1)
(HT-CT260HP seulement)
FR
10
Page 53

Insertion des piles dans la télécommande
Insérez deux piles R6 (AA) (fournies) en faisant correspondre les pôles 3 et # des
piles avec le schéma représenté à l’intérieur du compartiment de la télécommande.
Pour utiliser la télécommande, dirigez-la vers le capteur de télécommande à l’avant
de la barre de son.
Remarques
• Ne laissez pas la télécommande dans un endroit extrêmement chaud ou humide.
• N’utilisez pas simultanément une pile neuve et une pile usagée.
• Ne laissez rien tomber dans le boîtier de la télécommande, en particulier lorsque vous remplacez
les piles.
• N’exposez pas le capteur de télécommande à la lumière directe du soleil ou d’une lampe. Vous
risqueriez de l’endommager.
• Si vous ne prévoyez pas d’utiliser la télécommande pendant une période prolongée, retirez les
piles pour éviter qu’elles fuient et génèrent de la corrosion, endommageant ainsi la
télécommande.
Comment démarrer
11
FR
Page 54

Index des composants et des commandes
Pour plus de détails, voir les pages indiquées entre parenthèses.
Barre de son
A ?/1 (marche/veille)
B (capteur de télécommande)
C Touche tactile/témoin
(Bluetooth)
D Touche tactile INPUT
Appuyez sur cette touche pour
sélectionner la source d’entrée à lire.
À chaque appui sur la touche, la
source d’entrée change de manière
cyclique comme suit :
OPTICAL t COAXIALt
ANALOG t BT AU t
OPTICAL
FR
12
E Touche tactile VOL +/–
F Affichage du panneau frontal
(page 13)
Conseil
• Toucher une touche tactile légèrement avec
le bout du doigt. Si vous touchez deux
touches ou plus simultanément ou touchez
avec un pouce, l'opération appropriée
pourrait ne pas être obtenue.
Page 55

Affichage du panneau frontal (sur la barre de son)
A Témoins du format audio
S’allument en fonction du format
audio inséré dans le système.
D: Dolby Digital
DTS
LPCM: Linéaire PCM
PL II: S'allument lorsque le
Dolby Pro Logic II est actif
(page 30).
B NIGHT (page 36)
S’allume en mode NIGHT.
C Zone d’affichage des messages
Affiche le volume, la source
d’entrée sélectionnée, etc.
Comment démarrer
suite
13
FR
Page 56

Caisson de graves
A Témoin ?/1 (marche/veille)
B Bouton ?/1 (marche/veille)
C Bouton SECURE LINK (page 38)
14
FR
Page 57

Télécommande
Cette section décrit le fonctionnement
des boutons du caisson de graves et de la
barre de son. Pour plus de détails sur le
fonctionnement des boutons de
l’appareil raccordé, reportez-vous à la
page 31.
Remarque
• Dirigez la télécommande vers le capteur de
télécommande ( ) de la barre de son.
TV VOL TV CH
A ?/1 (marche/veille)
B INPUT +/–
Appuyez sur l’une des boutons pour
sélectionner l’appareil que vous
souhaitez utiliser.
C SOUND FIELD (page 30)
D DISPLAY
Appuyez pour changer le statut
d'affichage. Chaque fois que vous
appuyez le bouton, ON et OFF sont
basculés. Le paramètre d'usine est
ON.
ON: L'affichage est toujours allumé.
OFF: L'affichage est hors tension.
Quand le système est en fonction,
l'affichage est allumé pour plusieurs
secondes.
E MUTING
F VOL +*/–
Appuyez pour régler le volume.
G AMP MENU (page 34)
H C, X, x, c ou
Appuyez sur C, X, x ou c pour
sélectionner les options de menu.
Ensuite, appuyez sur pour
valider la sélection.
I NIGHT
Chaque fois que le bouton est
enfoncé, « ON » ou « OFF » est
basculé. Pour les détails sur le
« NIGHT MODE », voir page 36.
Comment démarrer
* Les boutons N et VOL + ont un point
tactile. Utilisez-les comme guide pendant
le fonctionnement.
15
FR
Page 58

Installation des émetteurs-récepteurs sans fil fournis
Insérez les deux émetteurs-récepteurs sans fil fournis dans la fente de l’émetteurrécepteur sans fil (EZW-RT50) sur le panneau arrière de la barre de son et du caisson
de graves.
Installation de l'émetteur-récepteur sans fil sur la
barre de son
1 Enlevez le couvercle pour la fente de l'émetteur-récepteur sans fil à
l'arrière de la barre de son.
2 Placez l'émetteur-récepteur sans fil comme indiqué ci-dessous.
16
Émetteur-récepteur
sans fil
FR
Page 59

3 Enfoncez l'émetteur-récepteur sans fil dans la fente jusqu'à ce qu'il
arrête.
4 Attachez le couvercle comme il était.
Installation de l'émetteur-récepteur sans fil sur le
caisson de graves
Comment démarrer
Émetteur-récepteur
sans fil
17
FR
Page 60

Raccordement du téléviseur et du lecteur, etc.
Téléphone intelligent,
« Walkman », etc.
Téléviseur
Sortie audio
numérique
optique
Cordon optique
numérique
(fourni)
Cordon audio
analogique
Cordon coaxial
*
numérique
*
Lecteur DVD, etc.
Sortie audio
analogique
Sortie audio
numérique
coaxiale
* Fourni avec le HT-CT260HP seulement.
18
FR
Page 61

Positionnement du système
Les illustrations ci-dessous, fournies à titre d’exemple, indiquent comment installer la
barre de son.
Remarque
• Lorsque vous choisissez l’emplacement de la barre de son ou du caisson de graves, n’obstruez
pas les orifices de ventilation thermique situés sur le panneau arrière de la barre de son et du
caisson de graves.
Installation de la barre de son
Comment démarrer
• Installation de la barre de son sur un
bâti
• Installation de la barre de son sur un
mur (page 21)
Remarque sur l’installation de la barre de son à l’avant d’un
téléviseur
Quand la barre de son est placée à l'avant d'un téléviseur, le téléviseur pourrait ne pas
être contrôlé avec la télécommande du téléviseur. Dans ce cas, placez la barre de son
loin du téléviseur.
Si la télécommande du téléviseur ne peut toujours pas contrôler le téléviseur, réglez
IR REP. du menu AMP à ON (page 37).
suite
19
FR
Page 62

Remarque
• Assurez-vous de confirmer que la télécommande du téléviseur ne peut pas contrôler le
téléviseur, alors réglez IR REP. à ON. S'il est réglé à ON quand la télécommande peut contrôler
le téléviseur, l'opération appropriée pourrait ne pas être obtenue à cause de l'interférence entre
la commande directe de la télécommande et la commande via la barre de son.
20
FR
Page 63

Enlèvement des
supports
Lorsque la barre de son doit être placée
en direction légèrement vers le haut ou
sur un mur, enlevez les deux supports endessous de la barre de son, comme
indiqué ci-dessous.
1 Préparez des vis (non fournies)
adaptées aux trous situés au
dos de la barre de son.
4 mm
(3/16 pouces)
plus de 25 mm (1 pouce)
5mm
(7/32 pouces)
Comment démarrer
Support
Installation de la barre
de son sur un mur
Vous pouvez installer la barre de son sur
le mur.
Remarques
• Utilisez des vis adaptées au matériau et à la
résistance du mur. Comme les plaques de
plâtre sont particulièrement fragiles, fixez
fermement les vis à une poutre du mur.
Installez de la barre de son sur une partie
verticale et plate du mur qui est renforcée.
• Veillez à confier l’installation à des
revendeurs ou à des install ateurs agréés Sony
et portez une attention particulière aux
consignes de sécurité pendant l’installation.
• Sony ne peut être tenu responsable des
accidents ou dégâts occasionnés par une
mauvaise installation, une résistance
insuffisante du mur, une mauvaise fixation
des vis, une catastrophe naturelle, etc.
10 mm
(13/32 pouces)
Trou situé au dos de la barre de son
2 Fixez les vis au mur.
Les vis doivent dépasser de 6 à
7 mm (environ 1/4 pouce).
6 à 7 mm
(environ 1/4
pouce)
592 mm
(23 3/8 pouces)
suite
21
FR
Page 64

3 Accrochez la barre de son aux
vis.
Alignez les trous situés au dos de la
barre de son aux vis, puis suspendez
la barre de son aux deux vis.
22
FR
Page 65

Raccordement du cordon d’alimentation
Avant de raccorder le cordon
d’alimentation de la barre de son et du
caisson de graves à une prise murale,
raccordez tous les autres appareils et le
téléviseur au système.
Configuration du système sans fil
La barre de son transmet le son de
l'équipement au caisson des graves par
communication sans fil.
1 Vérifiez que les émetteurs-
récepteurs sans fil (fournis) sont
insérés dans la fente de
l’émetteur-récepteur sans fil
(EZW-RT50) sur le panneau
arrière de la barre de son et du
caisson de graves.
Pour plus d’informations, reportezvous à la section « Installation des
émetteurs-récepteurs sans fil fournis »
(page 16).
2 Appuyez sur ?/1 pour mettre la
barre de son sous tension.
Le caisson de graves est
automatiquement mis sous tension
et le témoin ?/1 devient vert
lorsque la barre de son est sous
tension et la transmission sans fil
activée.
À propos du mode veille
Le caisson des graves entre en mode
veille automatiquement et le témoin ?/1
devient rouge quand la barre de son est
en mode veille.
Pour spécifier une
connexion sans fil
Si vous utilisez plusieurs produits sans
fil Sony, vous pouvez éviter les
interférences en spécifiant la connexion
sans fil à utiliser pour relier la barre de
son au caisson de graves (fonction
Secure Link).
Pour plus de détails, voir « Activation de
la transmission sans fil entre des unités
spécifiques (S. ON) » (page 37).
Si aucun son n’est entendu
du caisson de graves dont
l’indicateur ?/1 reste allumé
en rouge
• Vérifiez la position de la barre de son et
du caisson de graves.
– Ne placez pas la barre de son et le
caisson de graves dans un cabinet
métallique.
– Ne placez pas un objet tel qu'un
aquarium entre la barre de son et le
caisson de graves.
– Placez le caisson de graves près de la
barre de son dans une pièce.
• Vérifiez le statut de la communication
sans fil (page 38).
• Changez la fréquence du système sans
fil (page 38).
Comment démarrer
23
FR
Page 66

Réglage de sortie du son de l’appareil raccordé
Pour émettre le son numérique
multicanaux, vérifiez le réglage de sortie
du son numérique sur l’appareil
raccordé.
Pour plus d’informations, reportez-vous
au mode d’emploi fourni avec l’appareil
raccordé.
24
FR
Page 67

Options de lecture
Fonctionnement du système à l’aide de la télécommande fournie
?/1
TV VOL TV CH
INPUT
+/–
VOL +/–
Source
d’entrée
OPTICAL Le dispositif est raccordé
COAXIAL Le dispositif est raccordé
ANALOG Le dispositif est raccordé
BT AU Le dispositif est raccordé
Appareil reconnu
à la prise OPTICAL
à la prise COAXIAL
à la prise ANALOG
avec le Bluetooth
3 Réglez le volume en appuyant
sur VOL +/–.
Conseil
• Le son pourrait venir du haut-parleur du
téléviseur. Dans ce cas, réduisez le volume
du haut-parleur du téléviseur au minimum.
Options de lecture
Mettez le système sous tension.
1
2 Appuyez sur INPUT +/– pour
afficher la source d'entrée sur
l'affichage du panneau frontal de
la barre de son.
25
FR
Page 68

Fonction Bluetooth
Utilisation de la fonction Bluetooth
Vous pouvez écouter de la musique de
votre téléphone portable Bluetooth ou de
votre dispositif Bluetooth avec une
connexion sans fil.
Ce système prend en charge Bluetooth
les profils A2DP et AVRCP. Pour des
détails sur la technologie sans fil
Bluetooth, voir « Technologie sans fil
Bluetooth » (page 6).
Vérifiez le site Web ci-dessous pour les
dernières informations à propos des
dispositifs compatibles.
• Aux États-Unis. :
http://www.sony.com/support
• Au Canada :
http://www.sony.ca./support,
http://fr.sony.ca/support
À propos du témoin pour
Bluetooth
Le témoin (Bluetooth) s'allume ou
clignote en bleu pour permettre de
vérifier l'état Bluetooth.
État du système État de l'indication
Pendant l'appairage
Bluetooth
Le système tente de
se raccorder avec un
dispositif Bluetooth
Le système a établi
un raccordement
avec un dispositif
Bluetooth
Le système est en
mode veille Bluetooth
(quand le système est
hors tension)
Clignote rapidement
en bleu.
Clignote en bleu.
S’allume en bleu.
Clignote lentement
en bleu.
Remarques
• Pour des détails sur l'opération des
dispositifs raccordés, se référer aux modes
d'emploi fournis avec les dispositifs.
• Les dispositifs Bluetooth à être raccordés
doivent prendre en charge A2DP (Advanced
Audio Distribution Profile).
À propos de l'appairage
L'appairage est une opération où les
dispositifs Bluetooth sont enregistrés les
uns avec les autres à l'avance. Utiliser la
procédure ci-dessous pour appairer le
système avec votre dispositif Bluetooth.
Une fois qu'une opération d'appairage
est exécutée, vous n'avez pas besoin de
l'exécuter de nouveau. Toutefois, un
nouvel appairage est requis dans les cas
énumérés ci-dessous :
• Les informations d'appairage sont
effacées en réparant le système.
• L'appairage de dix dispositifs ou plus
doit être réglé.
Ce système peut régler l'appairage avec
jusqu'à neuf dispositifs. Si l'appairage est
réglé sur un dispositif après que
l'appairage a été réglé sur neuf
dispositifs, les informations d'appairage
sur un dispositif dont la date de
raccordement est la plus vieille sont
écrasées par les nouvelles informations.
• L'historique de raccordement avec ce
système est effacé sur le dispositif
raccordé.
• Le système est réinitialisé à ses valeurs
par défaut.
26
FR
Page 69

Appairage automatique
Si « BT AU » est sélectionné à l’aide des
touches INPUT +/– sans qu’aucun
appariement avec un périphérique
Bluetooth du système n’ait été effectué,
le système effectue automatiquement
l’appariement avec lui. Le système entre
en mode appariement et l’appariement
s’effectue automatiquement, comme
décrit ci-après.
TV VOL TV CH
INPUT
+/–
1 Placez le système et un
dispositif Bluetooth à moins de
1 m.
2 Appuyez sur INPUT +/– pour
sélectionner « BT AU ».
3 Réglez le dispositif Bluetooth en
mode d'appairage.
Pour des détails sur comment mettre
un dispositif Bluetooth en mode
d'appairage, se référer aux modes
d'emploi fournis avec le dispositif.
4 Lorsque les dispositifs détectés
sont énumérés sur le dispositif
Bluetooth, vérifier que
« HT-CT260 » est énuméré.
Sur quelques dispositifs Bluetooth,
la liste pourrait ne pas être affichée.
5 Choisissez « HT-CT260 » dans la
liste des dispositifs détectés sur
le dispositif Bluetooth.
Si la saisie d'un « Passkey » est
demandée, entrez « 0000 ».
6 Faites le raccordement
Bluetooth sur le dispositif
Bluetooth.
Quand le raccordement Bluetooth
est correctement fait, le témoin
(Bluetooth) s'allume en bleu et les
informations d'appairage sont
emmagasinées dans le système.
Remarques
• Utiliser un dispositif Bluetooth comme un
téléphone portable Blueto oth dans un endroit
facilement visible dans la même pièce où la
barre de son est placée.
• Si de l'équipement Wi-Fi est utilisé, la
communication Bluetooth peut devenir
instable. Dans ce cas, utiliser le dispositif
Bluetooth le plus près possible de la barre de
son.
• Le son pourrait être interrompu à cause d'un
problème avec le dispositif Bluetooth.
Fonction Bluetooth
suite
27
FR
Page 70

Appairage manuel de ce
T
ce système avec un
dispositif Bluetooth
Si vous voulez raccorder un deuxième
ou plus de dispositifs Bluetooth,
l'appairage manuel est nécessaire.
INPU
+/–
VOL
+/–
VOL +/–
TV VOL TV CH
PAIRING
(Bluetooth)
1 Placez le dispositif Bluetooth à
être raccordé à ce système à
moins de 1 mètre du système.
2 Appuyez sur PAIRING sur la
télécommande ou touchez
(Bluetooth) sur la barre de son
pour plus de deux secondes.
3 Exécutez les étapes 3 à 6 de
« Appairage automatique »
(page 27).
Remarques
• Le « Passkey » pourrait être appelé « Code
de passage », « code PIN (ou NIP) »,
« nombre PIN (ou NIP) » ou « Mot de
passe » etc., dépendant du dispositif.
• L'état de veille de l'appairage du système est
annulé après environ 5 minutes. Si
l'appairage n'est pas réussi, refaites la
procédure à partir de l'étape 1.
• Si vous souhaitez appairer plusieurs
dispositifs Bluetooth, exécutez la procédure
des étapes 1 à 3 individuellement pour
chaque dispositif Bluetooth.
• Si aucune information d'appairage n'est
emmagasinée dans le système, le système se
met automatiquement en mode d'appairage
quand « BT AU » est choisi comme entrée.
Dans ce cas, le mode d'appairage n'est pas
automatiquement relâché.
Écoute de la musique
avec le raccordement
Bluetooth
L’appareil prend en charge la protection
de contenu SCMS-T. Vous pouvez
écouter un périphérique Bluetooth
prenant en charge la protection de
contenu SCMS-T.
Avant de commencer la lecture de la
musique, vérifiez ce qui suit :
• La fonction Bluetooth du dispositif
Bluetooth est activée.
• La procédure d'appairage est
complétée sur ce système et ce
dispositif Bluetooth.
28
FR
Page 71

1 Appuyez sur INPUT +/– pour
choisir « BT AU » sur ce
système.
2 Débutez le raccordement
Bluetooth sur le dispositif
Bluetooth.
Le témoin (Bluetooth) s'allume en
bleu quand le raccordement
Bluetooth est établi.
3 Commencez la lecture sur le
dispositif Bluetooth.
Pour des détails sur le
fonctionnement, reportez-vous à la
section « Pour contrôler l’appareil
Bluetooth » (page 31).
4 Réglez le volume.
Réglez le volume du dispositif
Bluetooth à un niveau modéré et
touchez les touches VOL + /- sur la
barre de son ou appuyez sur les
boutons VOL + /- de la
télécommande.
Conseils
• Vous pouvez ajuster le volume du système
via un dispositif Bluetooth qui prend en
charge AVRCP (Audio Video Remote
Control Profile) VOLUME UP/DOWN.
BAS. Pour plus de détails, reportez-vous au
mode d’emploi fourni avec le dispositif.
• Le volume du système peut ne pas être
contrôlable, dépendant du dispositif.
Remarques
• Si le dispositif source a une fonction
d'amplification de basses fréquences ou une
fonction d'égaliseur, désactivez-les. Si ces
fonctions sont activées, le son pourrait être
déformé.
• Dans les cas suivants, vous devrez faire
l'appairage Bluetooth encore une fois.
– Le pouvoir de l'unité ne s'allume pas.
– Le pouvoir du dispositif Bluetooth ne
s'allume pas, ou la fonction Bluetooth est
désactivée.
– Le raccordement Bluetooth n'est pas
établi.
• Si plus d'un dispositif appairé avec l'unité est
en mode de lecture, le son ne sera entendu
que d'un seul de ces dispositifs.
Terminer la connexion
Bluetooth
Terminez la connexion Bluetooth par
n'importe laquelle des opérations
énumérées ci-dessous.
• Faites fonctionner le dispositif
Bluetooth pour terminer la connexion.
Pour plus de détails, reportez-vous au
mode d’emploi fourni avec le
dispositif.
• Mettez le dispositif Bluetooth hors
tension
• Mettez le système hors tension.
Fonction Bluetooth
29
FR
Page 72

Fonction Surround
Reproduction de l’effet surround
Ce système peut créer le son surround
multicanaux. Vous pouvez sélectionner
l’un des champs acoustiques
préprogrammés et optimisés du système.
TV VOL TV CH
SOUND
FIELD
Appuyez sur un des boutons
SOUND FIELD.
Le champ acoustique change selon le
bouton appuyé. Le champ acoustique
choisi apparaît sur l'affichage de la barre
de son.
Champs acoustiques
disponibles
Champ
acoustique
STD Convient à diverses sources.
MOVIE Recrée un son puissant et
GAME Reproduit le son puissant et
MUSIC Convient aux programmes
P.AUDIO Convient aux programmes
STEREO Convient aux CD musicaux.
Conseils
• Vous pouvez définir un champ acoustique
différent pour chaque source d’entrée.
• Si un signal de stéréo est entré quand le
champ acoustique est réglé à STD, MOVIE,
GAME ou MUSIC, Dolby Pro Logic II est
activé.
Effet
réaliste, associé à un
dialogue clair.
réaliste adapté aux jeux
vidéo.
musicaux ou aux vidéos
musicales des Blu-ray
DiscTM/DVD.
de musique d'un lecteur de
musique portatif
Le paramètre par défaut de la fonction de
champ acoustique du système est « STD »
quand « OPTICAL » ou « COAXIAL »
est choisi comme une entrée, ou
« P.AUDIO » quand « ANALOG » ou
« BT AU » est choisi comme une sortie.
FR
30
Page 73

Pour commander l’appareil
Configuration avancée
Contrôle un appareil raccordé à l’aide de la télécommande
Vous pouvez commander l’appareil
raccordé à l’aide de la télécommande de
ce système.
Selon l’appareil, certaines fonctions ne
peuvent pas être sélectionnées. Dans ce
cas, sélectionnez-les à l’aide de la
télécommande fournie avec l’appareil.
TV VOL TV CH
* Les boutons N et VOL + ont un point
tactile. Utilisez-les comme guide pendant
le fonctionnement.
En vous reportant au tableau
suivant, appuyez sur le bouton
correspondant à l’opération
souhaitée.
Bouton de la
télécommande
1 TV ?/1
(marche/
veille)
Fonction
Permet de mettre sous
tension ou hors tension le
téléviseur que la
télécommande est
configurée pour
contrôler.
Pour commander un
téléviseur
Appuyez sur les boutons avec
l'impression jaune.
Bouton de la
télécommande
6 TV CH +/– Permet de sélectionner la
7 MUTING Permet de désactiver le
5 TV VOL +/– Permet de régler le
8 INPUT Permet de sélectionner
Fonction
chaîne suivante (+) ou
précédente (–).
son.
volume.
l’entrée.
Pour contrôler le dispositif
Bluetooth
Bouton de la
télécommande
3 m/M Pour effectuer un retour
2 ./> Pour accéder au début du
Fonction
ou une avance rapides de
la musique lorsque vous
appuyez sur ces touches
pendant la lecture.
morceau de musique
précédent ou suivant.
suite
31
Configuration avancée
FR
Page 74

Bouton de la
télécommande
4 N*
(lecture)/X
(pause)/
x (arrêt)
Remarque
• Les explications ci-dessus sont données à
titre d’exemple. Selon l’appar eil utilisé, il est
possible que les opérations précédentes
fonctionnent différemment ou que vous ne
puissiez pas les réaliser.
Fonction
Boutons de mode de
lecture.
Appuyez encore pour
reprendre la lecture
normale.
Définition du fabricant du téléviseur contrôlable
La télécommande fournie peut contrôler
des téléviseurs autres que les produits
Sony. Réglez le fabricant, en suivant les
procédures ci-dessous.
TV ?/1
TV VOL TV CH
Boutons de
sélection du
fabricant
1 Tout en maintenant le bouton
TV ?/1 enfoncé, appuyez sur le
bouton qui correspond au
fabricant.
Fabricant Bouton
SONY TV VOL +
Samsung TV CH +
LG INPUT +
32
FR
Page 75

Fabricant Bouton
Panasonic TV VOL –
VIZIO TV CH –
Sharp INPUT –
Toshiba STD
FUNAI MOVIE
2 En maintenant TV ?/1 enfoncé,
appuyez sur .
3 Relâchez TV ?/1.
Configuration avancée
33
FR
Page 76

Sélections et réglages à l’aide du menu de l’amplificateur
Utilisation du menu AMP
Vous pouvez régler les paramètres
suivants avec le bouton AMP MENU de
la télécommande.
Les réglages par défaut sont soulignés.
Vos réglages sont gardés en mémoire,
même si vous débranchez le cordon
d’alimentation.
AMP MENU
LEVEL CNT LVL –6, –5, … 0, …
SW LVL –6, –5, … 0
DRC ON
TONE BASS –6, –5, … 0, …
TREBLE –6, –5, … 0
+5, +6
, …
+5, +6
OFF
+5, +6
, …
+5, +6
SET BT
SYSTEM
WS
1)
Ce réglage apparaît uniquement lorsque la
connexion Secure Link n’est pas activée.
2)
Ce réglage apparaît uniquement lorsque la
connexion Secure Link est activée.
BT STBY ON
OFF
A. STBY ON
OFF
IR REP. ON
OFF
VERSION
1)
S. ON
2)
S. OFF
RF CH AUTO
1
2
RF CHK
3
34
AUDIO
FR
SYNC ON
OFF
DUAL
NIGHT
M/S
MAIN
SUB
ON
OFF
Page 77

C, X,
x, c,
AMP
MENU
1 Appuyez sur AMP MENU pour
activer le menu AMP.
2 Appuyez plusieurs fois sur C/X/
x/c pour sélectionner l’élément
et appuyez sur pour décider
le réglage.
3 Appuyez sur AMP MENU pour
désactiver le menu AMP.
Réglage du niveau de
signal de l’enceinte
centrale ou du caisson
de graves (CNT LVL, SW
LVL)
Le son provenant du centre est émis par
les enceintes gauche et droite sur la barre
de son.
Vous pouvez régler le niveau et la
balance de l’enceinte centrale et du
caisson de graves. Les paramètres de
« CNT LVL » et « SW LVL » sont
compris entre « –6 » et « +6 » par
incréments de 1.
• CNT LVL : Permet de régler le
niveau du centre.
• SW LVL : Permet de régler le
niveau du caisson de
graves.
Reproduction du son
Dolby Digital à faible
volume (DRC)
Permet de compresser la gamme
dynamique de la plage audio. Utile pour
apprécier des films à faible volume.
DRC s’applique aux sources Dolby
Digital.
• ON : Compresse le son en fonction
des informations présentes
dans le contenu.
• OFF : Le son n’est pas compressé.
Réglage du niveau des
graves et des aigus
(BASS, TREBLE)
Vous pouvez régler le niveau des graves
et des aigus.
Les paramètres de « BASS » et
« TREBLE » sont compris entre « –6 » et
« +6 » par incréments de 1.
• BASS : Règle le niveau des graves.
• TREBLE :Régle le niveau des aigus.
Réglage du décalage
entre le son et l’image
(SYNC)
Vous pouvez retarder le son à l’aide de
cette fonction lorsque l’image est plus
lente que le son.
• ON : Règle le décalage entre l’image
et le son.
• OFF : Aucun réglage.
Remarque
• Il se peut que vous ne puissiez pas régler
parfaitement le décalage entre le son et
l’image à l’aide de cette fonction.
Configuration avancée
suite
35
FR
Page 78

Reproduction d’un son
diffusé en multiplex
(DUAL)
Réglage et relâchement
de mode veille
Bluetooth (BT STBY)
Vous pouvez écouter un son diffusé en
multiplex lorsque le système reçoit un
signal diffusé en multiplex Dolby
Digital.
Remarque
• Pour recevoir un signal Dolby Digital, vous
devez raccorder un syntoniseur satellite
numérique à la barre de son à l’aide d’un
câble optique ou coaxial et régler le mode de
sortie numérique du syntoniseur satellite
numérique sur Dolby Digital.
• M/S : Le son principal est
reproduit par l’enceinte
gauche et le son
secondaire par
l’enceinte droite.
• MAIN : Lecture du canal
principal seulement.
• SUB : Lecture du canal
secondaire seulement.
Reproduction du son à
faible volume (NIGHT)
Cette fonction permet de bénéficier des
effets sonores et d’entendre clairement
les dialogues, même à faible volume.
• ON : La fonction « NIGHT » est
activée.
• OFF : La fonction est désactivée.
Conseil
• Vous pouvez écouter le son Dolby Digital à
faible volume en utilisant DRC (page 35).
Si le mode veille de Bluetooth est réglé à
ON, la barre de son est dans le mode de
veille Bluetooth même quand elle est
éteinte. Quand le dispositif Bluetooth
tente de faire la connexion, la barre de
son est allumée, et vous pouvez
apprécier le son avec la connexion
Bluetooth.
• ON : Le mode veille Bluetooth est
activé.
• OFF : Le mode veille Bluetooth est
désactivé.
Remarques
• Si la barre de son n'a pas les informations
d'enregistrement d'appairage, le mode veille
Bluetooth ne peut pas être réglé.
• Pendant le mode veille Bluetooth, la
consommation de pouvoir de l'état d'attente
augmente.
Fonction de mise en
veille automatique
(A. STBY)
Vous pouvez réduire la consommation
d’énergie. La barre de son passe
automatiquement en mode veille lorsque
vous n’utilisez pas la barre de son
pendant environ 30 minutes et que la
barre de son ne reçoit pas de signal
d’entrée.
• ON : La fonction « A. STBY » est
activée.
• OFF : La fonction est désactivée.
36
FR
Page 79

Relais de la commande
de la télécommande
d'un téléviseur (IR REP.)
Si la télécommande d'un téléviseur ne
peut pas contrôler le téléviseur, la barre
de son peut faire le relais du signal de la
télécommande au téléviseur pour
contrôler le téléviseur. Le signal de la
télécommande peut être retransmis
même quand la barre de son est éteinte.
• ON : La fonction de relais est activée.
• OFF : La fonction de relais est
désactivée.
Remarques
• Assurez-vous de confirmer que la
télécommande du téléviseur ne peut pas
contrôler le téléviseur, ensuite réglez IR
REP. à ON. Si elle est réglée à ON quand la
télécommande peut contrôler le téléviseur,
l'opération appropriée pourrait ne pas être
obtenue à cause de l'interférence entre la
commande directe de la télécommande et la
commande via la barre de son.
• Si la barre de son est placée où elle n'obstrue
pas le détecteur de télécommande du
téléviseur, assurez-vous de régler IR REP. à
« OFF ».
• Sur quelques téléviseurs, cette fonction ne
fonctionne pas. Dans ce cas, déplacez la
barre de son à un autre endroit.
Vérification de la
version de la barre de
son (VERSION)
Les informations relatives à la version
du micrologiciel actuel apparaissent sur
l’affichage du panneau frontal.
Activation de la
transmission sans fil
entre des appareils
spécifiques (S. ON)
Vous pouvez spécifier la connexion sans
fil à utiliser pour relier la barre de son au
caisson de graves à l’aide de la fonction
Secure Link.
Cette fonction est utile lorsque vous
utilisez plusieurs appareils sans fil.
1 Appuyez sur AMP MENU.
2 Sélectionnez « WS » dans le
menu AMP, puis appuyez sur
ou c.
3 Sélectionnez « S. ON », puis
appuyez sur ou c.
4 Lorsque « START » apparaît,
alors appuyez sur .
Lorsque « SEARCH » apparaît et la
barre de son cherche un appareil
pouvant être utilisé avec Secure Link.
Passez à l’étape suivante en
2 minutes.
Pour quitter la fonction Secure Link
pendant la recherche d’un appareil,
appuyez sur C.
5 Appuyez sur SECURE LINK à
l’arrière du caisson de graves
avec la pointe d’un stylo, etc.
Si le témoin ?/1 sur le caisson de
graves clignote en ambre.
« SUCCEED » apparaît sur
l’affichage du panneau frontal.
Si « FAILED » apparaît sur
l’affichage du panneau frontal,
vérifiez que le caisson de graves est
allumé et essayez d’effectuer à
nouveau la procédure à partir
de l’étape 1.
suite
37
Configuration avancée
FR
Page 80

6 Appuyez sur AMP MENU.
Le menu AMP est désactivé.
Annulation de la
fonction Secure Link
(S. OFF)
1 Appuyez sur AMP MENU.
2 Sélectionnez « WS » dans le
menu AMP, puis appuyez sur
ou c.
3 Sélectionnez « S. OFF », puis
appuyez sur ou c.
4 Lorsque « RELEASE » apparaît,
alors appuyez sur .
« FINISH » apparaît sur l’affichage
du panneau frontal.
5 Appuyez sur AMP MENU.
Le menu AMP est désactivé.
6 Appuyez sur le bouton SECURE
LINK à l’arrière du caisson de
graves et maintenez-la enfoncée
pendant plusieurs secondes
jusqu’à ce que le témoin ?/1
s’allume en vert ou clignote en
vert.
N’oubliez pas d’appuyer sur le
bouton SECURE LINK avec la
pointe d’un stylo, etc.
Réglage de la fréquence
du système sans fil
(RF CH)
• AUTO :Normalement, sélectionnez
cette option. Le système
sélectionne automatiquement
le meilleur canal pour la
transmission.
• 1 : Réglez la fréquence sur CH1
(LOW 5.736 GHz).
• 2 : Réglez la fréquence sur CH2
(MID 5.762 GHz).
• 3 : Réglez la fréquence sur CH3
(HIGH 5.814 GHz).
Remarque
• Vous pouvez améliorer la transmission en
modifiant le canal de transmission
(fréquence) du dispositif Bluetooth, des
autres systèmes sans fil ou du dispositif
Wi-Fi. Pour plus de détails, reportez-vous au
mode d’emploi des autres systèmes sans fil.
Vérification de l’état
des communications
sans fil du système sans
fil (RF CHK)
Indique l’activation ou la désactivation
du système sans fil sur la barre de son.
Une fois la vérification terminée par la
barre de son, « OK » ou « NG » apparaît.
• OK : Une connexion sans fil est
possible.
• NG : Une connexion sans fil n’est pas
possible.
Quand le son du caisson de graves est
interrompu à cause d'une mauvaise
connexion, la transmission peut être
améliorée en changeant le paramètre de
Chaîne de RF suivant.
FR
38
Page 81

Informations complémentaires
Dépannage
Si vous rencontrez l’une des difficultés
suivantes lors de l’utilisation de ce
système, consultez ce guide de
dépannage pour tenter de remédier au
problème. Si le problème persiste,
consultez votre revendeur Sony le plus
proche.
ALIMENTATION
L’appareil ne se met pas sous tension.
• Vérifiez que le cordon
d’alimentation est correctement
raccordé.
Le système se met automatiquement
hors tension.
• La fonction A. STBY est activée
(page 36).
SON
Le son multicanaux Dolby Digital ou
DTS n’est pas reproduit.
• Vérifiez que le Blu-ray Disc, DVD,
etc., est enregistré en format Dolby
Digital ou DTS.
• Lorsque vous raccordez le lecteur
Blu-ray Disc, DVD, etc. aux prises
d’entrée numériques de ce système,
vérifiez les réglages audio (réglages
correspondant à la sortie audio) de
l’appareil raccordé.
Vous n’arrivez pas à obtenir les effets
surround.
• Selon le signal d’entrée et le réglage
du champ acoustique, le traitement
du son surround peut ne pas
fonctionner correctement (page 30).
L’effet surround peut être subtil
selon le programme ou le disque en
cours de lecture.
• Si vous raccordez un lecteur Blu-ray
Disc ou un lecteur DVD compatible
avec la fonction d’effet surround, il
est possible que l’effet surround du
système ne fonctionne pas.
Dans ce cas, désactivez la fonction
d’effet surround de l’appareil
raccordé.
Pour plus d’informations, reportezvous au mode d’emploi fourni avec
l’appareil raccordé.
Le système n’émet aucun son
provenant du téléviseur.
• Vérifiez le raccordement du cordon
optique numérique ou du cordon
audio connecté au système et au
téléviseur (page 18).
• Vérifiez la sortie audio du
téléviseur.
Le système et le téléviseur
reproduisent le son.
• Éteindre le son du système ou du
téléviseur.
Le son est en retard sur l’image du
téléviseur.
• Réglez « SYNC » sur « OFF » si
« SYNC » est réglé sur « ON ».
Le système ne reproduit aucun son ou
ne reproduit que très faiblement le son
provenant de l’appareil raccordé.
• Appuyez sur VOL + et vérifiez le
niveau de volume.
• Appuyez sur MUTING ou sur
VOL + pour annuler la fonction de
mise en sourdine.
• Vérifiez que la source d’entrée est
correctement sélectionnée.
Informations complémentaires
suite
39
FR
Page 82

• Vérifiez que tous les câbles et
cordons du système de l’appareil
raccordé sont complètement insérés.
Son sans fil
La transmission sans fil n’est pas
activée ou aucun son n’est émis par le
caisson de graves.
Vérifiez l’état du témoin ?/1 sur le
caisson de graves.
•Éteint:
– Vérifiez que le cordon
d’alimentation du caisson de
graves est correctement raccordé.
– Mettez le caisson de graves sous
tension en appuyant sur le bouton
?/1 du caisson de graves.
• Clignote rapidement en vert :
– 1 Appuyez sur ?/1 sur le
caisson de graves.
2 Insérez correctement
l’émetteur-récepteur sans fil dans
le caisson de graves.
3 Appuyez sur ?/1 sur le
caisson de graves.
• Clignote en rouge :
– Appuyez sur ?/1 pour éteindre le
caisson de graves, et vérifiez que
rien ne bloque les orifices de
ventilation du caisson de graves.
• Clignote lentement en vert ou
orange ou s’allume en rouge :
– Assurez-vous que l’émetteur-
récepteur sans fil est inséré
correctement dans la barre de son.
– Vérifiez à nouveau le réglage
« S. ON » de Secure Link
(page 37).
– La transmission du son est
mauvaise. Déplacez le caisson de
graves afin que le témoin ?/1
devienne vert ou orange.
– Éloignez la barre de son ou le
caisson de graves des autres
dispositifs sans fil.
– Évitez d’utiliser d’autres
périphériques sans fil.
Des parasites sont perceptibles en
provenance du caisson de graves ou le
son provenant du caisson de graves
saute.
• La transmission sans fil est instable.
Changez le réglage « RF CH ». Pour
plus de détails, reportez-vous à la
rubrique « Réglage de la fréquence
du système sans fil (RF CH) »
(page 38).
Bluetooth
Il n’y a pas de son.
• Vérifiez que cet appareil n’est pas
trop éloigné du périphérique
Bluetooth, ou que cet appareil ne
capte pas d’interférence provenant
d’un réseau Wi-Fi, d’un autre
périphérique sans fil 2,4 GHz ou
d’un four micro-ondes.
• Vérifiez que la connexion Bluetooth
est correctement établie entre cet
appareil et l’appareil Bluetooth.
• Etablissez à nouveau le pairage entre
cet appareil et le périphérique
Bluetooth.
• Éloignez le système des objets ou
surfaces métalliques.
• Vérifiez que le système est en mode
Bluetooth. Sinon, appuyez sur la
Touche tactile (Bluetooth).
40
FR
Page 83

Le son saute ou la distance de
correspondance est courte.
• Si un dispositif générant des
rayonnements électromagnétiques,
tel qu’un réseau Wi-Fi , d’autres
périphériques Bluetooth ou un four
micro-ondes, se trouve à proximité,
éloignez l’appareil de ces sources.
• Retirez tout obstacle entre cet
appareil et le périphérique
ou éloignez l’appareil de l’obstacle.
• Installez cet appareil et le
périphérique Bluetooth aussi près
que possible.
• Déplacez cet appareil.
• Déplacez le périphérique Bluetooth.
Impossible d’établir la connexion.
• Etablissez à nouveau le pairage
(page 28).
Impossible d’établir le pairage.
• Rapprochez cet appareil du
périphérique Bluetooth.
• Supprimez le système de votre
périphérique Bluetooth, puis
établissez à nouveau le pairage
(page 28).
Bluetooth
La télécommande ne
fonctionne pas
• Dirigez la télécommande vers le
capteur de la télécommande situé
sur le système.
• Retirez tous les obstacles se trouvant
entre la télécommande et le système.
• Si les piles de la télécommande sont
usées, remplacez-les.
• Assurez-vous de sélectionner la
bonne entrée sur la télécommande.
AUTRES
Si le témoin ?/1 sur le caisson de
graves clignote en rouge.
Appuyez sur ?/1 sur le caisson de
graves pour le désactiver et vérifiez le
point suivant.
• Un élément bloque-t-il les orifices
de ventilation du système ?
Si « PROTECT » apparaît sur
,
l’affichage du panneau frontal.
Appuyez sur ?/1 pour désactiver le
système, puis vérifiez le point suivant
une fois que le message
« STANDBY » a disparu.
• Un élément bloque-t-il les orifices
de ventilation du système ?
Si après avoir suivi les
étapes ci-dessus le système
ne fonctionne toujours pas
correctement, réinitialisezle comme suit :
Utilisez les touches situées sur le
système.
1 Appuyez sur ?/1 pour mettre
l’appareil sous tension.
2 Appuyez sur ?/1 tout en
appuyant sur INPUT et VOL – sur
la barre de son.
« RESET » apparaît et le système est
réinitialisé. Le menu AMP, le champ
acoustique, etc., sont réinitialisés à
leurs valeurs par défaut.
Une fois le point ci-dessus vérifié et les
problèmes éventuels résolus, mettez le
système sous tension. Si vous ne trouvez
pas la cause du problème alors que vous
avez vérifié le point ci-dessus, consultez
le revendeur Sony le plus proche.
Informations complémentaires
41
FR
Page 84

Caractéristiques
Formats pris en charge par ce
système
Ce système prend en charge les formats
d’entrée numériques ci-dessous.
Format Pris en charge/
Dolby Digital a
DTS a
Linéaire PCM 2 canaux
48 kHz ou moins
Barre de son (SA-CT260)
Partie amplificateur
Modèles des États-Unis :
PUISSANCE DE SORTIE ET DISTORSION
HARMONIQUE TOTALE :
(FTC)
Avant G + Avant D :
Avec des charges de 3 ohms, les deux
canaux étant excités, de 200 à 20 000 Hz;
puissance efficace minimale de 25 Watts
par canal, avec une distorsion
harmonique totale maximale de 1 % de la
puissance de sortie nominale de 250 mW.
PUISSANCE DE SORTIE (référence)
Avant G/Avant D : 85 W
(par canal à 3 ohms, 1 kHz)
Modèles du Canada :
PUISSANCE DE SORTIE (nominale)
Avant G + Avant D : 35 W + 35 W
(at 3 ohms, 1 kHz, 1 % THD)
PUISSANCE DE SORTIE (référence)
Avant G/Avant D : 85 W (par canal à
3 ohms, 1 kHz)
Non pris en
charge
a
Section Bluetooth
Système de communication
Norme Bluetooth version 2.1 + EDR
(taux de données amélioré)
Sortie
Classe 2 de puissance de la norme
Bluetooth
Portée maximum de communication
Visibilité directe de l'émetteur
approximativement 10 m1)
Bande de fréquence
Bande 2,4 GHz (2,4000 GHz à
2,4835 GHz)
Méthode de modulation
FHSS (Freq Hopping Spread Spectrum)
Profils Bluetooth compatibles2)
A2DP (Profil de distribution audio
avancée)
AVRCP 1.3 (Profil de télécommande
audio et vidéo)
Codecs pris en charge3)
SBC4)
Portée de transmission (A2DP)
20 Hz - 20 000 Hz (fréquence
d'échantillonnage 44,1 kHz)
1) La portée réelle variera dépendant des
facteurs comme les obstacles entre les
dispositifs, les champs ma gnétiques autour
d'un four à micro-ondes, de l'électricité
statique, d'un téléphone sans fil, de la
sensibilité de réception, du système
d’exploitation, de l'application logicielle,
etc.
2) Les profils Bl uetooth standard indiquent le
but de la communication Bluetoothentre
les dispositifs.
3) Codec : Format de compression et de
conversion de signal audio
4) Codec de sous-bande
Entrées
ANALOG
OPTICAL
COAXIAL
FR
42
Page 85

Enceinte avant
Haut-parleur multivoix
Haut-parleur multivoix à gamme
étendue, Bass Reflex
Haut-parleur
55 mm × 80 mm (2 1/4 po × 3 1/4 po),
type cone
Impédance nominale
3ohms
Puissance de raccordement
120 V CA, 60 Hz
Consommation électrique
Marche : 32 W
Mode veille : 0,3 W ou moins Mode
veille Bluetooth : 3 W ou moins
Dimensions (approx.)
940 mm × 102 mm × 89 mm (37 1/8 po ×
4 1/8 po × 3 5/8 po) (avec supports)
940 mm × 89 mm × 97 mm (37 1/8 po ×
3 5/8 po × 3 7/8 po) (sans supports)
Poids (approx.)
2,8 kg (6 lb 2 3/4 oz)
Émetteur-récepteur sans fil
(EZW-RT50)
Système de communication
Norme de son sans fil, version 1.0
Bande de fréquence
5,736 GHz à 5,814 GHz
Puissance de raccordement
3,3V CC, 300mA
Méthode de modulation
DSSS
Dimensions (approx.)
30 mm × 9 mm × 60 mm (1 3/16 po ×
3/8 po × 2 3/8 po) (l/h/p)
Poids (approx.)
10 g (3/8 oz)
La conception et les caractéristiques sont
sujettes à modification sans préavis.
Caisson de graves
(SA-WCT260)
PUISSANCE DE SORTIE (référence)
130 W (par canal à 4 ohms, 100 Hz)
Haut-parleur multivoix
Caisson de graves, Bass reflex
Haut-parleur
130 mm (5 1/8 po) type cône
Impédance nominale
4ohms
Puissance de raccordement
120 V CA, 60 Hz
Consommation électrique
Marche : 30 W
Mode veille : 0,5 W ou moins
Dimensions (approx.)
271 mm × 390 mm × 271 mm (10 3/4 po
× 15 3/8 po × 10 3/4 po) (l/h/p)
Poids (approx.)
7,2 kg (15 lb 4 oz)
43
Informations complémentaires
FR
Page 86

Index
A
A.STBY 36
Affichage du panneau frontal 13
B
BASS 35
Bluetooth 6, 26
BT STBY 36
C
Champ acoustique 30
CNT LVL 35
Cordon optique numérique 18
D
DRC 35
DUAL 36
I
INPUT 12
Installation 19
IR REP. 37
L
Lecteur DVD 18
M
Menu AMP 34
MUTING 15
P
Positionnement du système 19
PROTECTOR 41
R
Raccordement
Téléviseur 18
Réinitialiser 41
RF CH 38
RF CHK 38
S
S. OFF 38
S. ON 37
SW LVL 35
SYNC 35
Système sans fil 23
T
Télécommande
avant l’utilisation 11
utilisation 15, 31
TREBLE 35
V
VERSION 37
VOL 12, 15
N
NIGHT 36
FR
44
Page 87

Page 88

ADVERTENCIA
Para reducir el riesgo de incendios
o electrocución, no exponga el
aparato a la lluvia ni a la humedad.
Este símbolo indica al usuario que
el manual que acompaña a este
aparato contiene instrucciones
importantes referentes a su
funcionamiento y mantenimiento.
La unidad no estará desconectada de la fuente
de alimentación de ca mientras esté conectada
a la toma de pared, aunque se haya apagado la
propia unidad.
Para reducir el riesgo de incendio, no cubra los
orificios de ventilación del aparato con
periódicos, manteles, cortinas, etc.
No coloque objetos con llamas al descubierto
como, por ejemplo, velas encendidas encima
del aparato.
Para reducir el riesgo de incendio o de sufrir
descargas eléctricas, no exponga el aparato a
goteos o salpicaduras, ni coloque encima de
éste recipientes que contengan líquidos como,
por ejemplo, jarrones.
Dado que el enchufe del cable de al imentación
se utiliza para desconectar la unidad de la
fuente de alimentación, conecte la unidad en
una toma de ca de fácil acceso. En caso de
percibir alguna anomalía en la unidad,
desconecte inmediatamente el enchufe del
cable de alimentación de la toma de ca.
No sitúe el aparato en un espacio cerrado,
como una estantería o un armario empotrado.
No exponga las baterías ni los aparatos con
baterías instaladas a fuentes de calor excesivo
como la luz solar, el fuego o similares.
Uso sólo en interiores.
Para clientes en los EE. UU.
Este símbolo señala al usuario la
presencia de “voltaje peligroso” sin
aislamiento en el interior del ap arato
de tal intensidad que podría
presentar riesgo de descarga eléctrica.
Registro de propiedad
El modelo y los números de serie se encuentran
en la parte trasera oblicua que esta mirando
hacia abajo de la superficie de la unidad.
Registre el número de serie en el espacio que se
encuentra a continuación. Consúltelo cuando
deba llamar a un distribuidor Sony con respecto
a este producto.
N . º d e m o d e l o H T - C T 2 6 0 / H T - C T 2 6 0 H P
N. º de seri e
Instrucciones de seguridad
importantes
1) Lea estas instrucciones.
2) Conserve estas instrucciones.
3) Preste atención a las advertencias.
4) Siga las instrucciones.
5) No utilice este aparato cerca del agua.
6) Límpielo sólo con un paño seco.
7) No bloquee los orificios de ventilación.
Instale el aparato según las instrucciones
del fabricante.
8) No instale el equipo cerca de fuentes de calor,
como radiadores, rejillas de calefacción,
estufas u otros aparatos (incluidos
amplificadores) que producen calor.
9) No anule el propósito de seguridad del
enchufe polarizado o enchufe con descarga
a tierra. Un enchufe polarizado dispone de
dos hojas, una más ancha que la otra. Un
enchufe de tipo conexión a tierra tiene dos
hojas y una tercera clavija para la conexión
a tierra. La hoja ancha o la tercera clavija se
proporcionan por razones de seguridad. Si
el enchufe suministrado no entra en la
toma, contacte a un electricista para que
reemplace la toma obsoleta.
ES
2
Page 89

10) Evite pisar o perforar los cables de
alimentación, sobre todo en la parte del
enchufe, en los receptáculos y en el punto
en el que el cable sale del equipo.
11) Use solamente los accesorios indicados
por el fabricante.
12) Use solamente con el carrito, soporte,
trípode, ménsula o mesa indicados por el
fabricante, o que se venden con el equipo.
Al utilizar el carrito, tenga cuidad al
desplazar el carrito con el aparato, para
evitar lesiones y que se vuelque el equipo.
13) Desenchufe este equipo durante tormentas
eléctricas o cuando no se vaya a utilizar
por períodos prolongados.
14) Consulte a personal de servicio calificado
para cualquier mantenimie nto. Se requiere
servicio de mantenimiento cuando se ha
dañado el equipo de algún modo, tal como
cuando se daña el cable o enchufe de
alimentación, se ha derramado líquido
sobre el equipo o han caído objetos dentro
de él, se ha expuesto el equipo a lluvia o
humedad o cuando el equipo no opera
como de costumbre o se ha dejado caer.
La siguiente declaración de la FCC (Comisión
Federal de Comunicaciones) sólo se aplica a la
versión de este modelo fabricado para la venta
en los EE. UU. Las demás versiones no
cumplen con las regulaciones técnicas de la
FCC.
NOTA:
Este equipo ha sido some tido a pruebas y se ha
determinado que cumple con los límites
requeridos por los aparatos digitales de la
clase B, en cumplimiento con la Sec ción 15 de
las regulaciones de la FCC. Estas
especificaciones han sido diseñadas para
proporcionar una protección razonable contra
interferencias perjudiciales en una instalación
residencial. Este equipo genera, utiliza y
puede emitir energía de radiofrecuencia y, de
no ser instalado y utilizado de acuerdo con las
instrucciones podría ocasionar interferencias
perjudiciales en las comunicaciones de radio.
No obstante, no se garantiza que no ocurra
ninguna interferencia en una instalación
particular. Si el presente equipo causa
interferencia en la recepción de radio o
televisión, que puede determinarse al apagar y
encender el equipo, se recomienda que el
usuario intente corregir la interferencia
mediante una o más de las siguientes medidas:
– Cambie la orientación o ubicación de la
antena de recepción.
– Aumente la separación entre el equipo y el
receptor.
– Conecte el equipo en una toma de circuito
distinta a la que está conectado el receptor.
– Consulte con su distribuidor o con un
técnico especializado en radio/televisión
para solicitar asistencia.
PRECAUCIÓN
Queda notificado que ante cualquier cambio o
modificación que no haya sido aprobado
expresamente en este manual podría anular su
poder para utilizar este equipo.
Para la barra de sonido (SA-CT260)
La placa de identificación y la marca de la
fecha de fabricación se encuentran en la
superficie posterior inclinada hacia abajo.
Para la barra de sonido (
SA-CT260
Para el transmisor receptor
inalámbrico (EZW-RT50)
Este dispositivo cumple con la Sección 15 de
las regulaciones de la FCC. El funcionamiento
depende de las siguientes dos condiciones: (1)
este dispositivo no puede ocasionar
interferencias perjudiciales, y (2) este
dispositivo debe aceptar cualquier
interferencia recibida, incluidas las
interferencias que puedan ocasionar un
funcionamiento no deseado.
Este equipo no debe colocarse ni utilizarse
junto con otras antenas o transmisores.
continuación
ES
3
)
Page 90

Este equipo cumple con los límites de
exposición a la radiación de la FCC
establecidos para un ambiente no controlado y
cumple con las pautas de exposición a
radiofrecuencia (RF) de la FCC en el
Suplemento C de OET65. Este equipo debe
ser instalado y operado a un a distancia mínima
de 20cm entre el dispositivo radiador y su
cuerpo (excluidas las extremidades: manos,
muñecas, pies y tobillos).
Para los clientes de Canadá
Para la barra de sonido (SA-CT260)
Para el transmisor receptor
inalámbrico (EZW-RT50)
Este equipo digital de Clase B cumple con la
normativa ICES-003 de Canadá.
Su funcionamiento está sujeto a las dos
condiciones siguientes: (1) este dispositivo no
debe provocar interferencias y (2) este
dispositivo debe aceptar cualquier
interferencia, incluidas las que pueden causar
un funcionamiento no deseado.
Este equipo cumple con los límites de
exposición a la radiación de la IC establecidos
para un ambiente no controlado y cumple con
RSS-102 de las normas de exposición a
radiofrecuencia (RF) de la IC.
Este equipo debe ser instalado y operado a una
distancia mínima de 20 cm entre el dispositivo
radiador y su cuerpo (excluidas las
extremidades: manos, muñecas, pies y
tobillos).
Precauciones
Seguridad
• En caso de que caiga algún objeto sólido o
líquido dentro del sistema, desconéctelo y
solicite al personal especializado que realice
una verificación antes de volver a utilizarlo.
• No se apoye en la barr a de sonido o el altavoz
potenciador de graves, dado que podría
caerse y lastimarse, o podría ocasionar daños
en el sistema.
Fuentes de alimentación
• Antes de con ectar el sistema, compruebe que
la tensión de funcionamiento sea idéntica a
su fuente de alimentación local. La tensión
de funcionamiento se indica en la placa de
identificación en la parte posterior de la barra
de sonido.
• Si no va a utilizar el sistema por un tiempo
prolongado, asegúrese de descon ectarlo de la
toma de pared. Para desconectar el cable de
alimentación de ca, tire del enchufe, nunca
del cable.
• Una clavija del enchufe es más ancha que la
otra por motivos de seguridad y entrará en la
toma de pared de una sola manera. Si no
puede insertar la totalidad del enchufe en la
toma, comuníquese con su proveedor.
• El cable de alimentación de ca sólo deberá
ser reemplazado en un centro de servicio
autorizado.
Acumulación térmica
Si bien el sistema se calienta durante su
funcionamiento, no se trata de una anomalía.
El uso prolongado de este sistema puede
provocar un incremento considerable de la
temperatura en la parte trasera e inferior del
sistema. Para evitar quemarse, no toque el
sistema.
Ubicación
• Instale el sistema en un lugar con ventilación
adecuada para evitar el recalentamiento
interno y prolongar la vida útil del sistema.
ES
4
Page 91

• No instale el sistema cerca de fuentes de
calor, como radiadores o conductos de aire
caliente, ni en lugare s expuestos a la luz solar
directa, polvo excesivo, vibraciones
mecánicas o golpes.
• No coloque objetos en la parte posterior de la
barra de sonido que puedan bloquear las
ranuras de ventilación y ocasionar fallas de
funcionamiento.
• Si el sistema se utiliza junto con un televisor,
videograbadora o lector de cintas, se puede
ocasionar ruido y la calidad de imagen se
podría ver afectada. En este caso, coloque el
sistema lejos del televisor, videograbadora o
lector de cintas.
• Tenga cuidado al colocar el sistema en
superficies que han sido tratadas de manera
especial (encerados, barnizados con aceites,
pulidos, etc.), ya que puede mancharse o
decolorarse.
• Tenga cuidado para evitar posibles lesiones
producidas con los bordes de la barra de
sonido o del altavoz potenciador de graves.
Funcionamiento
Antes de conectar otro equipo, asegúrese de
apagar y desenchufar el sistema.
Si encuentra
irregularidades en el color
en la pantalla de un
televisor cercano
Es posible que se observen ciertas
irregularidades en el color de la pantalla según
el tipo de televisor que utilice.
En caso de que observe
irregularidades en el color…
Desconecte la alimentación del televisor y
vuelva a conectarla después de 15 ó
30 minutos.
Si vuelve a observar
irregularidades en el color…
Aleje el sistema del televisor.
Limpieza
Limpie el sistema con un paño seco y suave.
No utilice estropajos abrasivos, detergente en
polvo ni disolventes, como alcohol o bencina.
Si desea realizar alguna pregunta o solucionar
algún problema relacionado con el sistema,
póngase en contacto con el distribuidor Sony
más cercano.
Derechos de autor
Este modelo incorpora Dolby* Digital y Pro
Logic Sound, y el sistema de sonido
envolvente DTS** Digital.
* Fabricado con licencia de Dolby
Laboratories.
Dolby, Pro Logic y el símbolo de la doble
D son marcas comerciales de Dolby
Laboratories.
**Fabricado bajo licencia según Patente de
los EE. UU N.°: 5.956.674; 5.974.380;
6.487.535 y otras patentes emitidas y
pendientes en los EE. UU. y el resto del
mundo. DTS, el símbolo, y DTS y el
símbolo en conjunto son marcas registradas
y DTS Digital Surround y los logotipos de
DTS son marcas comerciales de DTS, Inc.
El producto incluye software. © DTS, Inc.
Reservados todos los derechos.
La marca de palabra Bluetooth® y sus
logotipos son marcas comerciales registradas
propiedad de Bluetooth SIG, Inc. y todo uso
que Sony Corporation haga de dichas marcas
está sujeto a una licencia.
Otras marcas comerciales y nombres
comerciales pertenecen a sus respectivos
propietarios.
ES
5
Page 92

Tecnología inalámbrica
Bluetooth
Bluetooth es una tecnología inalámbrica
de corto alcance que vincula dispositivos
digitales, como computadoras
personales y cámaras digitales. Al usar la
tecnología inalámbrica Bluetooth, puede
hacer funcionar las unidades conectadas
dentro de un rango de cerca de
10 metros.
La tecnología inalámbrica Bluetooth se
usa comúnmente entre dos dispositivos,
pero un solo dispositivo se puede
conectar con muchos más.
No necesita cables para conectarse,
como lo haría con una conexión USB, y
tampoco necesita colocar los
dispositivos uno al lado del otro, como lo
haría con tecnología infrarroja
inalámbrica. Puede usar la tecnología
con un dispositivo Bluetooth en el bolso
o el bolsillo.
La tecnología inalámbrica Bluetooth es
una norma mundial que respaldan miles
de empresas. Estas empresas producen
productos que cumplen normas
mundiales.
Versión y perfiles de
Bluetooth compatibles
Los perfiles se refieren a un conjunto de
capacidades estándar para varias
capacidades de producto de Bluetooth.
Este sistema admite las siguientes
versiones y perfiles Bluetooth.
Versión de Bluetooth compatible:
Versión de Bluetooth estándar 2.1 +
EDR (Enhanced Data Rate)
Perfiles de Bluetooth compatibles:
A2DP (Advanced Audio Distribution
Profile)
AVRCP (Audio Video Remote Control
Profile)
Notas
• Para que pueda usar la función
Bluetooth, el dispositivo Bluetooth que
se conectará debe ser compatible con el
mismo perfil del sistema. Incluso si el
dispositivo fuera compatible con el
mismo perfil, las funciones pueden ser
diferentes debido a las
especificaciones del dispositivo
Bluetooth.
• La reproducción de audio de este
sistema puede retrasarse de la del
dispositivo Bluetooth debido a las
características de la tecnología
inalámbrica Bluetooth.
Rango de comunicación
eficaz
Los dispositivos Bluetooth se deben usar
dentro de aproximadamente 10 metros
(33 pies) (distancia sin obstrucciones)
uno del otro. El rango de comunicación
eficaz puede acortarse en las siguientes
condiciones.
• Cuando una persona, objeto metálico,
pared u otra obstrucción está entre los
dispositivos con una conexión
Bluetooth.
• Ubicaciones donde está instalada una
LAN inalámbrica
• Alrededor de hornos de microondas
que estén en uso
• Ubicaciones donde ocurran otras ondas
electromagnéticas
ES
6
Page 93

Efectos de otros
dispositivos
Los dispositivos
Bluetooth
y la LAN
inalámbrica (IEEE 802.11b/g) usan la
misma banda de frecuencia (2,4 GHz). Al
usar el dispositivo
Bluetooth
cerca de un
dispositivo con capacidades de LAN
inalámbrica, puede ocurrir interferencia
electromagnética.
Esto puede generar una menor velocidad
de transferencia de datos, ruido o que no
sea posible conectarse. Si esto sucede,
intente las siguientes soluciones:
• Intente conectar el sistema y el
teléfono móvil Bluetooth o el
dispositivo Bluetooth cuando esté al
menos a 10 metros (33 pies) de
distancia del equipo de LAN
inalámbrica.
• Apague el equipo de LAN inalámbrica
cuando use el dispositivo Bluetooth
dentro de 10 metros.
Efectos en otros
dispositivos
Las ondas de radio que emite este
sistema puede interferir con el
funcionamiento de algunos dispositivos
médicos. Dado que la interferencia
puede generar fallas de funcionamiento,
siempre apague el sistema, el teléfono
móvil Bluetooth y el dispositivo
Bluetooth en los siguiente lugares:
• En hospitales, en trenes, en aviones, en
estaciones de combustible y en
cualquier lugar donde puedan haber
gases inflamables.
• Cerca de puertas automáticas o alarmas
de incendio
Notas
• Este sistema admite funciones de seguridad
que cumplen con la especificación de
Bluetooth como un medio para garantizar la
seguridad durante las comunicaciones por
medio de la tecnología Bluetooth. Sin
embargo, esta seguridad puede ser
insuficiente según el contenido de la
configuración y otros factores, de modo que
siempre tenga cuidado al comunicarse por
medio de tecnología Bluetooth.
• Sony no será respons able de ninguna manera
por daños u otras pérdidas producto de la
divulgación de información durante la
comunicación mediante la tecnología
Bluetooth.
• No se garantiza con certeza la comunicación
de Bluetooth con todos los dispositivos
Bluetooth que tengan el mismo perfil del
sistema.
• Los dispositivos Bluetooth conectados con
este sistema deben cumplir con la
especificación de Bluetooth que se indica en
Bluetooth SIG, Inc., y deben tener
certificación para cumplir con ella. No
obstante, incluso si un dispositivo cumple
con la especificación de Bluetooth, pueden
haber casos donde las características o
especificaciones del dispositivo Bluetooth
hacen que sea imposible conectarlo, o
pueden generar métodos de control,
visualización o funcionamiento diferentes.
• Puede producirse ruido o el audio se puede
interrumpir según el dispositivo Bluetooth
conectado con el sistema, el entorno de
comunicaciones o las condiciones del
entorno.
ES
7
Page 94

Tabla de contenido
Precauciones ..................................4
Tecnología inalámbrica
Bluetooth .................................6
Procedimientos iniciales
Desembalaje ..................................9
Índice de componentes y
controles ................................11
Instalación de los transmisores
receptores inalámbricos
suministrados ........................15
Cómo conectar el televisor y el
reproductor, etc. ....................17
Cómo colocar el sistema .............18
Cómo conectar un cable de
alimentación de ca .................21
Cómo configurar el sistema
inalámbrico ...........................21
Cómo configurar la salida de
sonido del equipo
conectado ..............................22
Opciones de
reproducción
Operación del sistema mediante
el mando a distancia
suministrado ..........................23
Función Bluetooth
Para usar la función Bluetooth ....24
Función de sonido
envolvente
Cómo disfrutar del efecto de
sonido envolvente .................29
Ajustes avanzados
Cómo controlar equipos
conectados con el mando a
distancia ................................30
Configuración del fabricante de
televisores controlables ......... 31
Configuración y ajustes mediante
el menú del amplificador ...... 33
Información adicional
Solución de problemas ................ 38
Especificaciones ......................... 41
Índice .......................................... 43
ES
8
Page 95

Procedimientos iniciales
Desembalaje
• Altavoz potenciador de graves
(SA-WCT260) (1)
• Barra de sonido (SA-CT260) (1)
• Transmisor receptor inalámbrico
(EZW-RT50) (2)
• Cable digital óptico para televisor (1)
• Cable de audio analógico (1)
(solamente HT-CT260HP)
Procedimientos iniciales
• Mando a distancia (RM-ANP084) (1)
• Pilas R6 (tamaño AA) (2)
• Manual de instrucciones (1)
• Garantía (1)
• Cable coaxial digital (1)
(solamente HT-CT260HP)
continuación
ES
9
Page 96

Cómo insertar las pilas en el mando a distancia
Inserte dos pilas R6 (tamaño AA) (suministradas) de forma que sus extremos 3 y #
coincidan con el diagrama del interior del compartimiento del mando a distancia. Para
utilizar el mando a distancia, apunte hacia el sensor del mando a distancia que se
encuentra en la parte frontal de la barra de sonido.
Notas
• No deje el mando a distancia en lugares extremadamente cálidos o húmedos.
• No emplee pilas nuevas junto con usadas.
• No deje caer ningún objeto extraño dentro de la carcasa del mando a distancia, sobre todo al
sustituir las pilas.
• No exponga el sensor del mando a distancia a la luz solar directa ni a dispositivos de
iluminación. Si lo hace, puede provocar una falla de funcionamiento.
• Cuando tenga previsto que no va a utilizar el mando a distancia durante mucho tiempo, extraiga
las pilas para evitar su corrosión y posibles daños por fugas.
10
ES
Page 97

Índice de componentes y controles
Para obtener más información, consulte las páginas indicadas entre paréntesis.
Barra de sonido
Procedimientos iniciales
A ?/1 (encendido/en espera)
B (sensor del mando a
distancia)
C Tecla táctil/indicador
(Bluetooth)
D Tecla táctil INPUT
Presione este botón para seleccionar
la fuente de entrada para reproducir.
Cada vez que presiona la tecla, la
fuente de entrada cambia
cíclicamente de la siguiente manera:
OPTICAL t COAXIALt
ANALOG t BT AU t
OPTICAL
E Teclas táctiles VOL +/–
F Visor del panel frontal
(página 12)
Sugerencia
• Toque una tecla táctil ligeramente con la
punta del dedo. Si toca dos o más teclas
simultáneamente o las toca con un pulgar, no
se podrá realizar la operación correcta.
continuación
11
ES
Page 98

Visor del panel frontal (en la barra de sonido)
A Indicadores de formato de audio
Se encienden en función del formato
de audio que funciona como entrada
del sistema.
D: Dolby Digital
DTS
LPCM: Lineal PCM
PL II: se enciende mientras
Dolby Pro Logic II está activo
(página 29).
B NIGHT (página 35)
Se enciende en el modo NIGHT.
C Área de visualización de
mensajes
Muestra el volumen, la fuente de
entrada seleccionada, etc.
12
ES
Page 99

Altavoz potenciador de graves
A Indicador ?/1 (encendido/en
espera)
B Botón ?/1 (encendido/en
espera)
C Botón SECURE LINK (página 37)
Procedimientos iniciales
continuación
13
ES
Page 100

Mando a distancia
Esta sección describe el funcionamiento
del altavoz potenciador de graves y del
botón de la barra de sonido. Consulte
página 30 para obtener detalles sobre el
funcionamiento del botón del equipo
conectado.
Nota
• Apunte con el mando a distancia hacia el
sensor del mando a distancia ( ) de la barra
de sonido.
TV VOL TV CH
A ?/1 (encendido/en espera)
B INPUT +/–
Presione uno de los botones para
seleccionar el equipo que desea
utilizar.
C SOUND FIELD (página 29)
D DISPLAY
Presione para cambiar el estado del
visor. Cada vez que presione el
botón, se activa ON y OFF. La
configuración de fábrica es ON.
ON: el visor siempre está iluminado.
OFF: el visor está apagado.
Cuando se hace funcionar el
sistema, el visor se enciende por
varios segundos.
E MUTING
F VOL +*/–
Presione este botón para ajustar el
volumen.
G AMP MENU (página 33)
H C, X, x, c o
Presione C, X, x o c para
seleccionar los elementos del menú.
Luego presione para ingresar la
selección.
I NIGHT
Cada vez que presione el botón, se
activa “ON” o “OFF”. Para obtener
detalles en night mode (modo
nocturno), consulte la página 35.
* Los botones N y VOL + tienen un punto
táctil. Utilícelo como guía durante el
funcionamiento.
ES
14
 Loading...