

Page 1

4-174-097-11(1)
Home Theatre System
HT-CT150
©2010 Sony Corporation
Operating Instructions
Mode d’emploi
Manual de instrucciones
US
FR
ES
Page 2
3
WARNING
To reduce the risk of fire or electric
shock, do not expose this apparatus to
rain or moisture.
The unit is not disconnected from the AC power source
(mains) as long as it is connected to the wall outlet,
even if the unit itself has been turned off.
To reduce the risk of fire, do not cover the ventilation
opening of the apparatus with newspapers, tablecloths,
curtains, etc.
Do not place the naked flame sources such as lighted
candles on the apparatus.
To reduce the risk of fire or electric shock, do not
expose this apparatus to dripping or splashing, and do
not place objects filled with liquids, such as vases, on
the apparatus.
As the main plug is used to disconnect the unit from the
mains, connect the unit to an easily accessible AC
outlet. Should you notice an abnormality in the unit,
disconnect the main plug from the AC outlet
immediately.
Do not install the appliance in a confined space, such as
a bookcase or built-in cabinet.
Do not expose batteries or apparatus with batteryinstalled to excessive heat such as sunshine, fire or the
like.
For the customers in the U.S.A
This symbol is intended to alert the user to
the presence of uninsulated “dangerous
voltage” within the product’s enclosure that
may be of sufficient magnitude to constitute a risk of
electric shock to persons.
This symbol is intended to alert the user to
the presence of important operating and
maintenance (servicing) instructions in the
literature accompanying the appliance.
Owner’s Record
The model and serial numbers are located at the rear of the
subwoofer. Record the serial numbers in the spaces
provided below. Refer to them whenever you call upon
your Sony dealer regarding this product.
Model No. HT-CT150
Serial No.
Important Safety Instructions
1) Read these instructions.
2) Keep these instructions.
3) Heed all warnings.
4) Follow all instructions.
5) Do not use this apparatus near water.
6) Clean only with dry cloth.
7) Do not block any ventilation openings. Install in
accordance with the manufacturer’s instructions.
8) Do not install near any heat sources such as
radiators, heat registers, stoves, or other apparatus
(including amplifiers) that produce heat.
9) Do not defeat the safety purpose of the polarized or
grounding-type plug. A polarized plug has two
blades with one wider than the other. A grounding
type plug has two blades and a third grounding
prong. The wide blade or the third prong are
provided for your safety. If the provided plug does
not fit into your outlet, consult an electrician for
replacement of the obsolete outlet.
10) Protect the power cord from being walked on or
pinched particularly at plugs, convenience
receptacles, and the point where they exit from the
apparatus.
11) Only use attachments/accessories specified by the
manufacturer.
12) Use only with the cart, stand, tripod, bracket, or
table specified by the manufacturer, or sold with the
apparatus. When a cart is used, use caution when
moving the cart/apparatus combination to avoid
injury from tip-over.
13) Unplug this apparatus during lightning storms or
when unused for long periods of time.
US
2
Page 3

14) Refer all servicing to qualified service personnel.
Servicing is required when the apparatus has been
damaged in any way, such as power-supply cord or
plug is damaged, liquid has been spilled or objects
have fallen into the apparatus, the apparatus has
been exposed to rain or moisture, does not operate
normally, or has been dropped.
The following FCC statement applies only to the
version of this model manufactured for sale in the
U.S.A. Other versions may not comply with FCC
technical regulations.
NOTE:
This equipment has been tested and found to comply
with the limits for a Class B digital device, pursuant to
Part 15 of the FCC Rules. These limits are designed to
provide reasonable protection against harmful
interference in a residential installation. This
equipment generates, uses, and can radiate radio
frequency energy and, if not installed and used in
accordance with the instructions, may cause harmful
interference to radio communications. However, there
is no guarantee that interference will not occur in a
particular installation. If this equipment does cause
harmful interference to radio or television reception,
which can be determined by turning the equipment off
and on, the user is encouraged to try to correct the
interference by one or more of the following measures:
– Reorient or relocate the receiving antenna.
– Increase the separation between the equipment and
receiver.
– Connect the equipment into an outlet on a circuit
different from that to which the receiver is
connected.
– Consult the dealer or an experienced radio/TV
technician for help.
CAUTION
You are cautioned that any changes or modifications
not expressly approved in this manual could void your
authority to operate this equipment.
Precautions
On safety
• Should any solid object or liquid fall into the system,
unplug the system and have it checked by qualified
personnel before operating it any further.
• Do not climb on the subwoofer, as you may fall down
and injure yourself, or system damage may result.
On power sources
• Before operating the system, check that the operating
voltage is identical to your local power supply. The
operating voltage is indicated on the nameplate at the
rear of the subwoofer.
• If you are not going to use the system for a long time,
be sure to disconnect the system from the wall outlet
(mains). To disconnect the AC power cord (mains
lead), grasp the plug itself; never pull the cord.
• One blade of the plug is wider than the other for the
purpose of safety and will fit into the wall outlet
(mains) only one way. If you are unable to insert the
plug fully into the outlet, contact your dealer.
• AC power cord (mains lead) must be changed only at
the qualified service shop.
On heat buildup
Although the system heats up during operation, this is
not a malfunction. If you continuously use this system
at a large volume, the system temperature of the back
and bottom rises considerably. To avoid burning
yourself, do not touch the system.
On placement
• Place the system in a location with adequate
ventilation to prevent heat buildup and prolong the
life of the system.
• Do not place the system near heat sources, or in a
place subject to direct sunlight, excessive dust, or
mechanical shock.
• Do not place anything at the rear of the subwoofer that
might block the ventilation holes and cause
malfunctions.
• Do not place the syst em near equipment such as a TV,
VCR, or tape deck. (If the system is being used in
combination with a TV, VCR, or tape deck, and is
placed too close to that equipment, noise may result,
and picture quality may suffer. This is especially
likely when using an indoor antenna. Therefore, we
recommend using an outdoor antenna.)
• Use caution when placing the system on surfaces that
have been specially treated (wi th wax, oil, polish, etc.)
as staining or discoloration of the surface may result.
US
continued
US
3
Page 4

On operation
Before connecting ot her components, be sure to turn of f
and unplug the system.
If you encounter color irregularity on
a nearby TV screen
The system is magnetically shielded to allow it to be
installed near a TV set. However, color irregularities
may still be observed on certain types of TV sets.
If color irregularity is observed...
Turn off the TV set, then turn it on again after 15 to 30
minutes.
If color irregularity is observed
again...
Place the system further away from the TV set.
On cleaning
Clean the system with a soft dry cloth. Do not use any
type of abrasive pad, scouring powder or solvent such
as alcohol or benzine.
If you have any question or problem concerning your
system, please consult your nearest Sony dealer.
Copyrights
This system incorporates Dolby* Digital and Pro Logic
Surround and the DTS** Digital Surround System.
*
Manufactured under license from Dolby Laboratories.
Dolby, Pro Logic, and the double-D symbol are
trademarks of Dolby Laboratories.
** Manufactured under license under U.S. Patent #'s:
5,451,942; 5,956,674; 5,974,380; 5,978,762;
6,487,535 & other U.S. and worldwide patents
issued & pending. DTS and the Symbol are
registered trademarks & DTS Digital Surround and
the DTS logos are trademarks of DTS, Inc. Product
includes software. © DTS, Inc. All Rights Reserved.
“x.v.Color” and “x.v.Color” logo are trademarks of
Sony Corporation.
®
ENERGY STAR
registered mark.
As an ENERGY STAR
Sony Corporation ha s determined that
this product meets the ENERGY
®
STAR
guidelines for energy
efficiency.
is a U.S.
®
partner,
This system incorporates High-Definition Multimedia
Interface (HDMI™) technology.
HDMI, the HDMI Logo, and High-Definition
Multimedia Interface are trademarks or registered
trademarks of HDMI Licensing LLC in the United
States and other countries.
“BRAVIA Sync” is a trademark of Sony Corporation.
“PlayStation” is a registered trademark of Sony
Computer Entertainment Inc.
US
4
Page 5

Table of contents
Precautions...............................................3
Getting Started
Unpacking................................................6
Positioning the system .............................7
Connecting the speaker ............................9
Connecting the TV and player, etc. .......10
Connecting other components................12
Connecting the AC power cord (mains
lead) .................................................13
Setting up the sound output of the
connected component ......................13
Playback Options
Index to parts and controls.....................14
Enjoying TV...........................................16
Enjoying other components ...................17
Surround Function
Enjoying the surround effect..................19
“BRAVIA” Sync Features
What is “BRAVIA” Sync?.....................20
Preparing for “BRAVIA” Sync .............20
Enjoying Blu-ray Disc/DVD..................21
(One-Touch Play)
Enjoying the TV sound from the
system ..............................................22
(System Audio Control)
Turning off the system, TV and the
connected components.....................23
(System Power Off)
Using the power saving function ...........23
(HDMI PASS THRU)
Setting the Audio Return Channel function
to off ................................................24
Advanced Settings
Controlling connected Sony components
with the remote ................................25
Changing the input button assignments of
the remote ........................................28
Settings and adjustments using the
amplifier menu.................................30
Additional Information
Troubleshooting .................................... 34
Specifications........................................ 36
Index...................................................... 38
US
5
Page 6
Getting Started
Unpacking
• Subwoofer (SA-WCT150) (1)
• Speaker cord (1)
• Remote commander (RMAAU072) (1)
• Digital optical cord for a TV
(2.5 m) (1)
• Speaker (SS-CT150) (1)
• R6 (size AA) batteries (2)
• Warranty (1)
• Operating Instructions (1)
Inserting batteries into the remote
Insert two R6 (size AA) batteries (supplied) by matching the 3 and # ends on the batteries to the
markings inside the compartment. To use the remote, point it at the remote sensor in the front panel
display of the subwoofer.
Notes
• Do not leave the remote in an extremely hot or humid place.
• Do not use a new battery with an old one.
• Do not drop any foreign object into the remote casing, particularly when replacing the batteries.
• Do not expose the remote sensor to direct sunlight or lighting apparatus. Doing so may cause a malfunction.
• If you do not intend to use the remote for an extended period of time, remove the batteries to avoid possible damage
from battery leakage and corrosion.
US
6
Page 7
Positioning the system
Connecting the speaker cord to the speaker
The connectors of the speaker cord are color-coded depending on the type of speaker. Connect the
connectors of the speaker cord to match the color of the speaker jacks.
Rear of the speaker
R CENTER L
Green
Red
White
Getting Started
A
Note
• When you install the speaker on a wall, be careful not to stumble over the cord connected to the speaker.
A Speaker cord
(supplied)
continued
US
7
Page 8
Installing the speaker on a wall
You can install the speaker on the wall.
Notes
• Use screws that are suitable for the wall material and strength. As a plaster board wall is especially fragile, attach
the screws securely to a wall beam. Install the speaker on a vertical and flat reinforced area of the wall.
• Be sure to subcontract the installation to Sony dealers or licensed contractors and pay special attention to safety
during the installation.
• Sony is not responsible for accidents or damage caused by improper installation, insufficient wall strength,
improper screw installation or natural calamity, etc.
1 Prepare screws (not supplied) that are suitable for the holes on the back of the speaker.
See the illustrations below.
4 mm (1/6 inches)
more than 25 mm (1 inch)
5mm
(1/5 inches)
10 mm
(2/5 inches)
Hole on the back of the speaker
2 Fasten the screws to the wall. The screws should protrude 6 to 7 mm (approx. 1/4
inches).
265 mm
(10 2/5 inches)
6 to 7 mm
(approx. 1/4 inches)
3 Hang the speaker onto the screws.
Align the holes on the back of the speaker to the screws, then hang the speaker onto the two screws.
US
8
Page 9
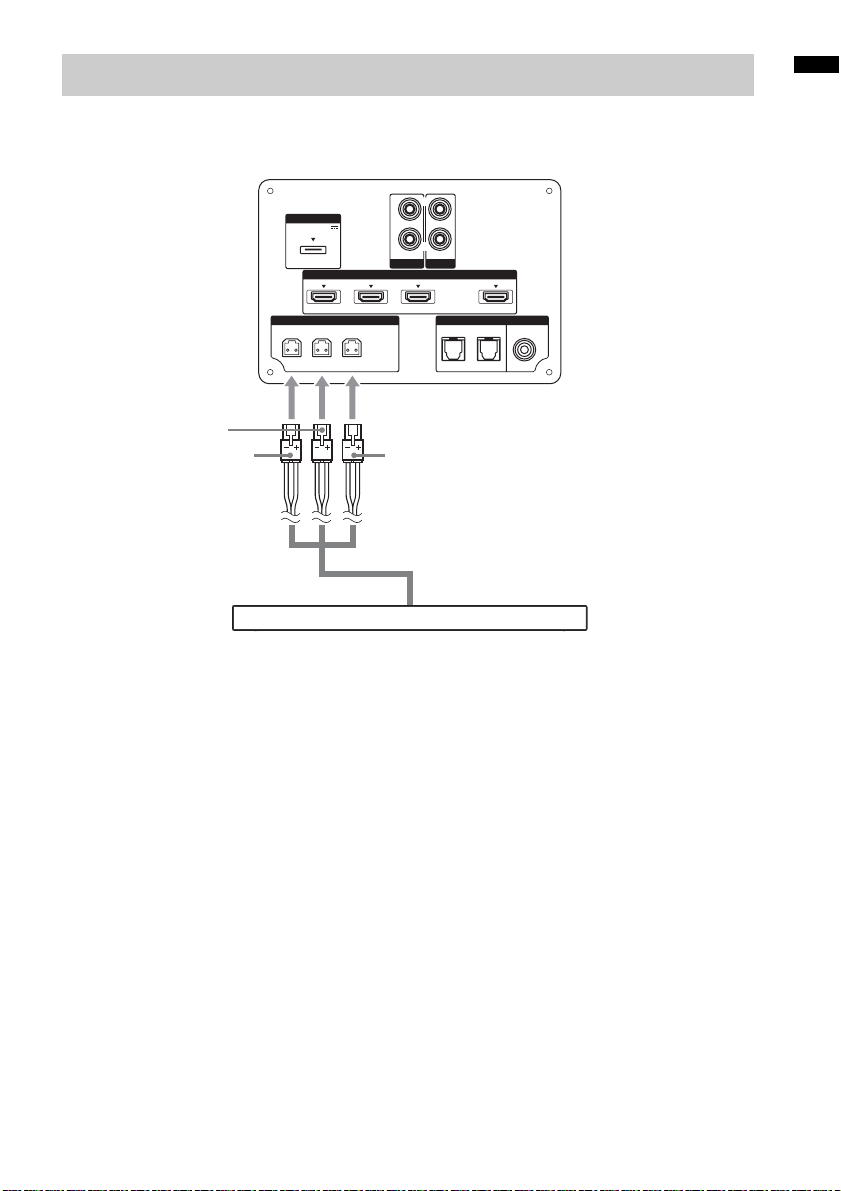
Connecting the speaker
The connectors of the speaker cord are color-coded depending on the type of speaker. Connect the
connectors of the speaker cord to match the color of the SPEAKERS jacks.
Rear of the
subwoofer
DMPORT
DC 5V
0.7A MAX
Green
Red White
Speaker
L
ONLY FOR
SS-CT150
A
AUDIO I N
SA-CD/CD
SAT/CATV INBD INDVD IN
HDMI
L
R
AUDIO I N
TV
ARC
TV OUT
DIGITALSPEAKERS
COAX IN
OPT IN
VIDEO
TVSAT/CATVR CENTER
Getting Started
A Speaker cord (supplied)
US
9
Page 10
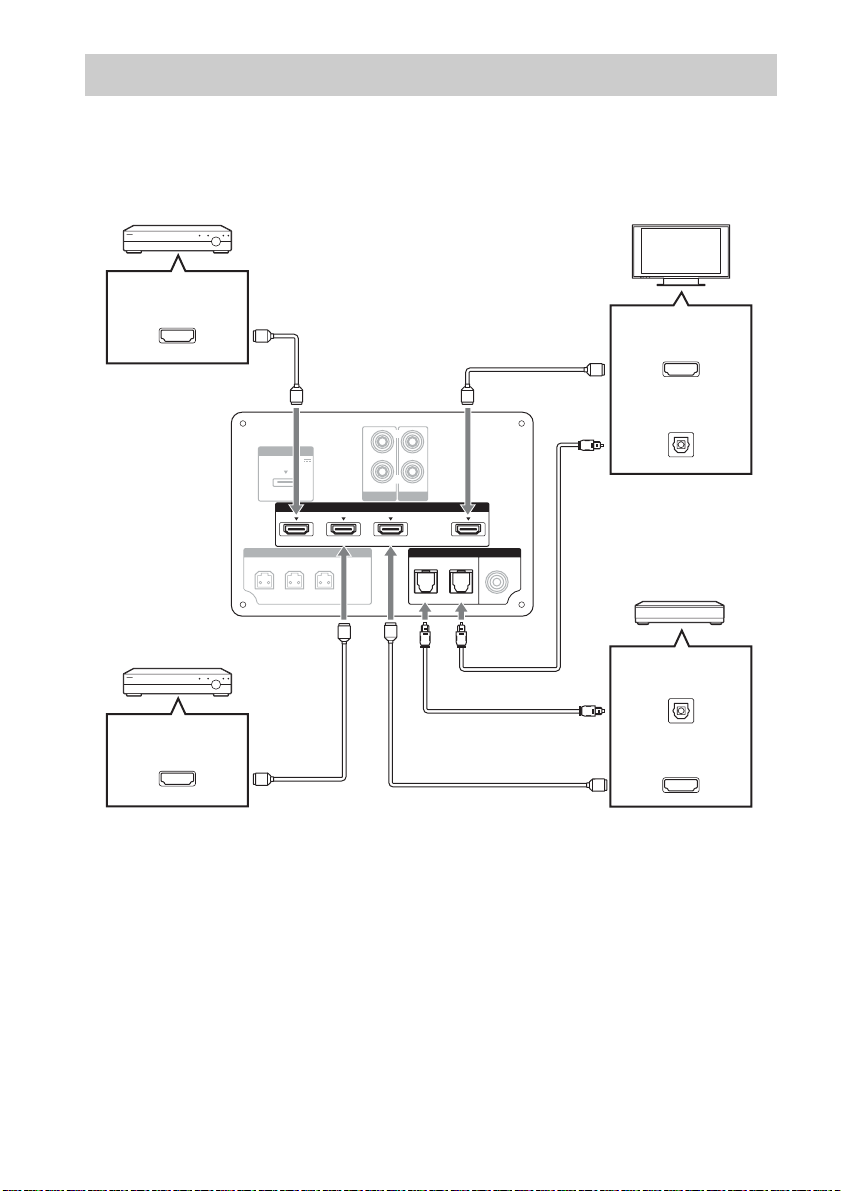
Connecting the TV and player, etc.
Connect the TV and/or player, etc., with HDMI jacks to the system using an HDMI cable.
By connecting Sony “BRAVIA” Sync-compatible components using HDMI cables and by setting the
Control for HDMI function via the TV for each connected component, operation can be simplified. See
““BRAVIA” Sync Features” (page 20).
DVD player, etc.
HDMI OUT
HDMI cable
(not supplied)
HDMI cable
(not supplied)
TV
HDMI IN
Rear of the
subwoofer
Blu-ray Disc player, etc.
HDMI OUT
DMPORT
DC 5V
0.7A MAX
L
HDMI cable
(not supplied)
ONLY FOR
SS-CT150
AUDIO I N
SA-CD/CD
SAT/CATV INDVD IN BD IN
L
R
AUDIO I N
TV
HDMI
DIGITALSPEAKERS
OPT IN
Digital optical cord
(not supplied)
ARC
TV OUT
COAX IN
TVSAT/CATVR CENTER
VIDEO
HDMI cable
(not supplied)
Digital Audio OUT
(optical)
Digital optical cord fo r a TV
(supplied)
Satellite tuner or cable television
tuner, etc., with an HDMI jack
Digital Audio OUT
(optical)
HDMI OUT
10
US
Page 11

Notes
• The system is compatible with the Audio Return Channel (ARC) function. If you connect the system to the ARCcompatible TV’s HDMI jack via an HDMI cable, you do not need to connect the TV to the system with the digital
optical cord (page 24).
• You can see the letters “ARC” beside the TV’s HDMI jack if it is compatible with the ARC function. Even if you
connect an HDMI cable to the jack, if the HDMI input jack is not compatible with the ARC function, you cannot
use the ARC function.
• The ARC function is available only when Control for HDMI is set to on.
• Depending on the satellite tuner, multi-channel sound may not be output. In this case, connect a digital optical cord
in addition to an HDMI cable and set “INPUT MODE” to “OPT” in the AMP menu (page 32).
• Connect a “PlayStation 3,” etc., to any available HDMI jack. All the HDMI jacks on the system function in the same
way.
• The HDMI jack connections have priority when you connect different components to the system using the INPUT
OPT/INPUT COAX and HDMI jacks.
• When connecting a TV that does not have a digital optical audio output jack, connect the TV to the system using
an analog audio cord (not supplied).
Tip
• Even if the system is tu rned off (active standby mode), the HDMI signal will be sent from the connected component
to the TV via the HDMI connection. You can enjoy image and sound from the component on the TV.
Notes on HDMI connections
• Use a High Speed HDMI cable. If you use a Standard HDMI cable, 1080p, Deep Color, or 3D images
may not be displayed properly.
• Sony recommends that you use an HDMI-authorized cable or Sony HDMI cable.
• Check the setup of the connected component if an image is poor or the sound does not come out of a
component connected via the HDMI cable.
• Audio signals (sampling frequency, bit length, etc.) transmitted from an HDMI jack may be
suppressed by the connected component.
• Sound may be interrupted when the sampling frequency or the number of channels of audio output
signals from the playback component is switched.
• When the connected component is not compatible with copyright protection technology (HDCP), the
image and/or the sound from the HDMI TV OUT jack may be distorted or may not be output.
In this case, check the specification of the connected component.
• We do not recommend using an HDMI-DVI conversion cable.
• When “TV,” “DMPORT,” “SA-CD/CD,” or “VIDEO” is selected for the input source of the system,
video signals via the HDMI input jack (BD, DVD, SAT/CATV) that was selected last time are output
from the HDMI TV OUT jack.
• This system supports Deep Color, “x.v.Color,” and 3D transmission.
• To enjoy 3D images, connect 3D-compatible TV and video components (Blu-ray Disc player, Blu-
ray Disc recorder, “PlayStation 3,” etc.) to the system using High Speed HDMI cables, put on 3D
glasses, and then play back 3D-compatible content.
Getting Started
11
US
Page 12
Connecting other components
When connecting components that do not have HDMI jacks, such as a “PlayStation 2,” a DVD player,
a satellite tuner, or a cable television tuner, etc., set “CTRL HDMI” to “OFF” in the AMP menu of the
system (page 21).
Other audio components, etc.
DVD player, etc.
Audio cord
(not supplied)
Digital coaxial cord
(not supplied)
Digital Audio OUT
(coaxial)
Audio signal OUT
VIDEO OUT
To the VIDEO IN of
the TV.
Rear of the
subwoofer
DMPORT
DC 5V
0.7A MAX
L
ONLY FOR
SS-CT150
AUDIO I N
SA-CD/CD
SAT/CATV INBD INDVD IN
HDMI
L
R
AUDIO I N
Satellite tuner or cable
TV
ARC
TV OUT
DIGITALSPEAKERS
COAX IN
OPT IN
TVSAT/CATVR CENTER
VIDEO
television tuner, etc.,
without an HDMI jack
Digital Audio OUT
(optical)
DIGITAL MEDIA
PORT adapter
Notes
Digital optical cord
(not supplied)
VIDEO OUT
To the VIDEO IN of the TV.
• Do not connect or disconnect the DIGITAL MEDIA PORT adapter while the system is turned on.
• When you connect the DIGITAL MEDIA PORT adapter, be sure the connector is inserted with the arrow mark
facing toward the arrow mark on the DMPORT jack. To detach the DIGITAL MEDIA PORT adapter, press and
hold A and then pull out the connector.
12
A
US
Page 13

Connecting the AC power cord (mains lead)
Before connecting the AC power cord (mains lead) of the system to a wall outlet (mains), connect all
the other components and TV to the system.
Notes
• After connecting the AC power cord (mains lead), wait about 20 seconds before turning on the power by pressing
?/1.
• Connect the system to an easily accessible AC outlet (mains). Should you notice an abnormality in the system,
disconnect the main plug from the AC outlet (mains) immediately.
Setting up the sound output of the connected component
To enjoy sound in multi-channel format (DTS, Dolby Digital, multi-channel LPCM), you need to make
the audio output settings of the connected component. Set the connected component to output sound in
multi-channel format. For details on audio output settings, refer to the operating instructions supplied
with the connected component.
Getting Started
13
US
Page 14
Playback Options
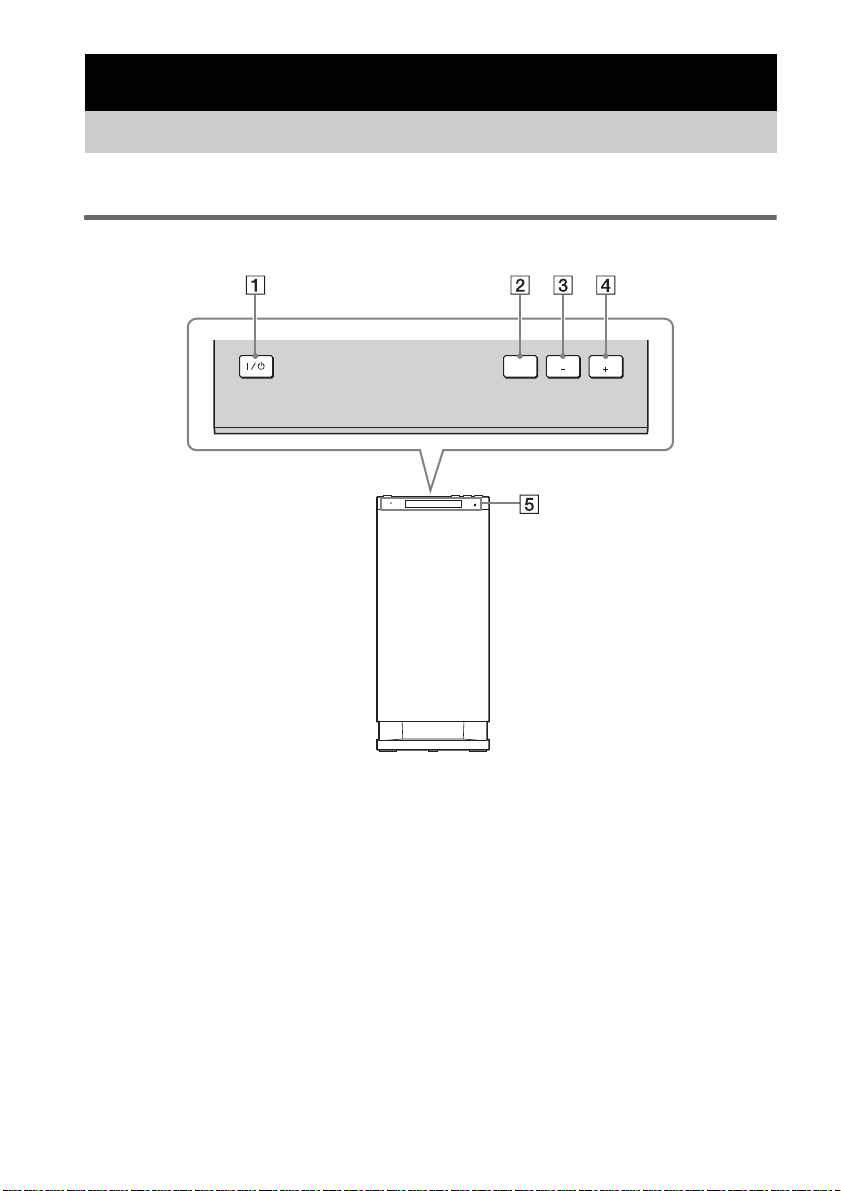
Index to parts and controls
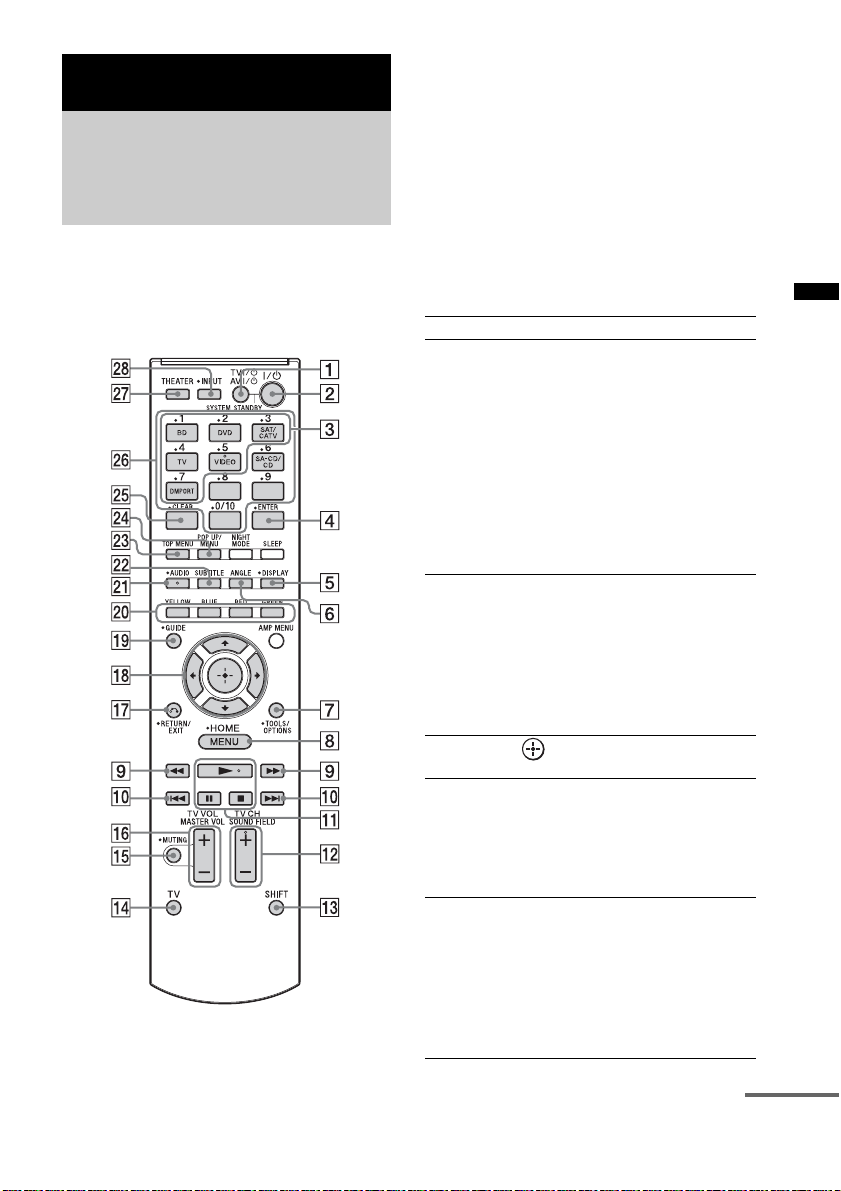
For more information, see the pages indicated in parentheses.
Subwoofer
Top view
POWER/
ACTIVE STANDBY
INPUT
SELECTOR
VOLUME VOLUME
A ?/1 (on/standby)
B INPUT SELECTOR
Press to select the input source to play back.
Every time you press the button, the input
source changes cyclically as follows: TV t
BD t DVD t SAT/CATV t VIDEO
t SA-CD/CD t DMPORT t TV……
US
14
C VOLUME –
D VOLUME +
E Front panel display
Page 15
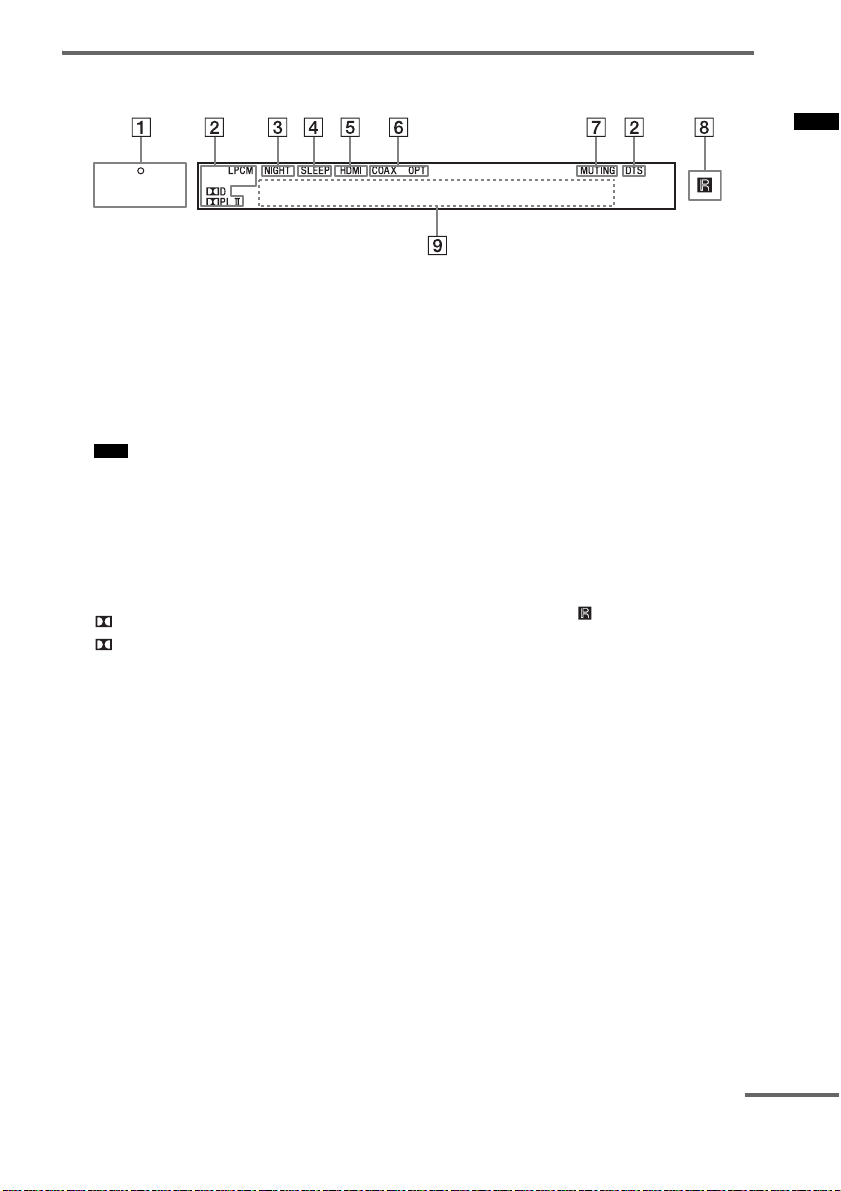
Front panel display (subwoofer)
POWER/
ACTIVE STANDBY
Playback Options
A POWER/ACTIVE STANDBY indicator
Lights as follows:
Green: The system is turned on.
Amber: Only HDMI parts of the system
are on (The Control for HDMI
function is working).
No light: The system is turned off.
Note
• The amber light turns off 30 seconds after you
turn off the TV. However, if you set “PASS
THRU” to “ON” in the AMP menu, the indicator
stays amber even if you turn off the TV.
B Audio format indicators
Light up according to the audio format that
is being input to the system.
D: Dolby Digital
PLII: Dolby Pro Logic II
LPCM: Linear PCM
DTS
C NIGHT (page 32)
Lights up in NIGHT MODE.
D SLEEP (page 33)
Flashes when the sleep timer is active.
E HDMI (page 10)
Lights up when HDMI components are
being used or when an ARC signal is being
input to the system while TV is selected as
the input source.
F COAX/OPT
Light up according to the cable which you
are using.
G MUTING
Lights up when the sound is turned off.
H Remote sensor
I Message display area
Displays volume, selected input source,
audio input signal, etc.
continued
15
US
Page 16
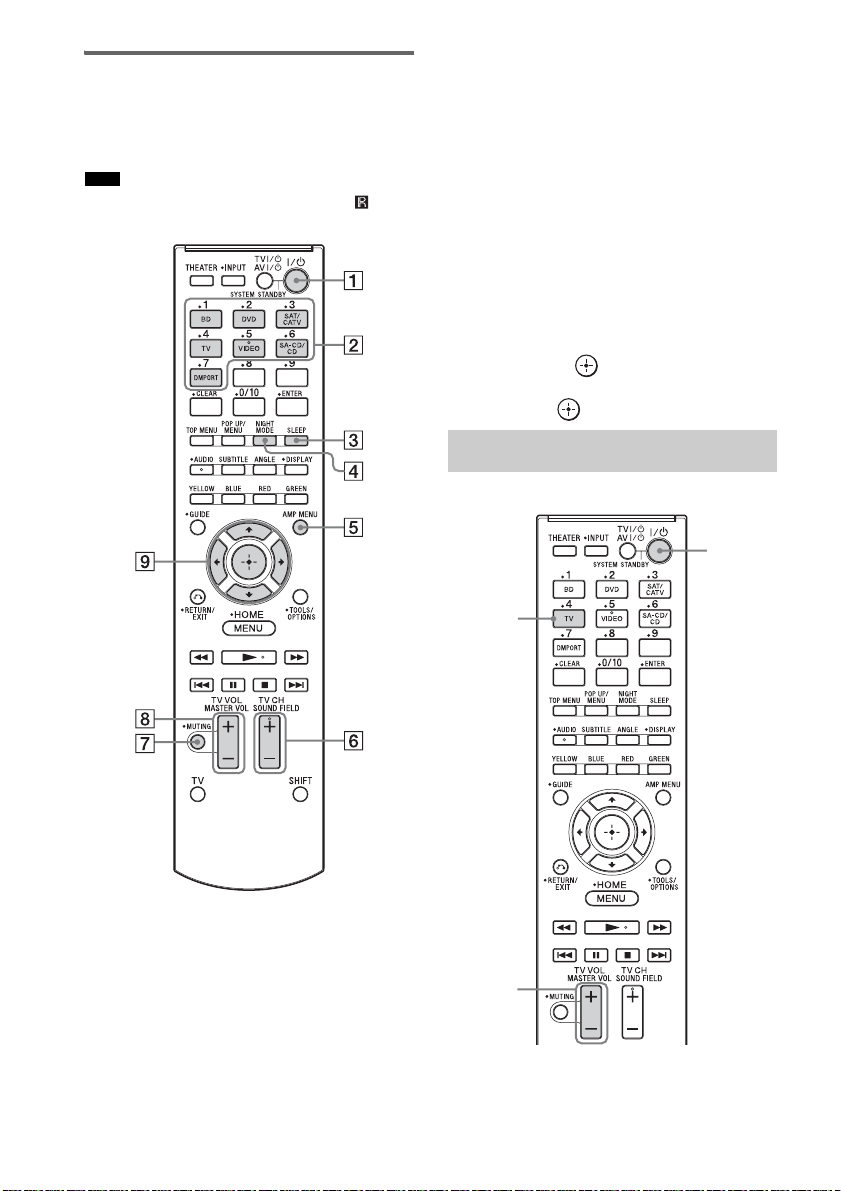
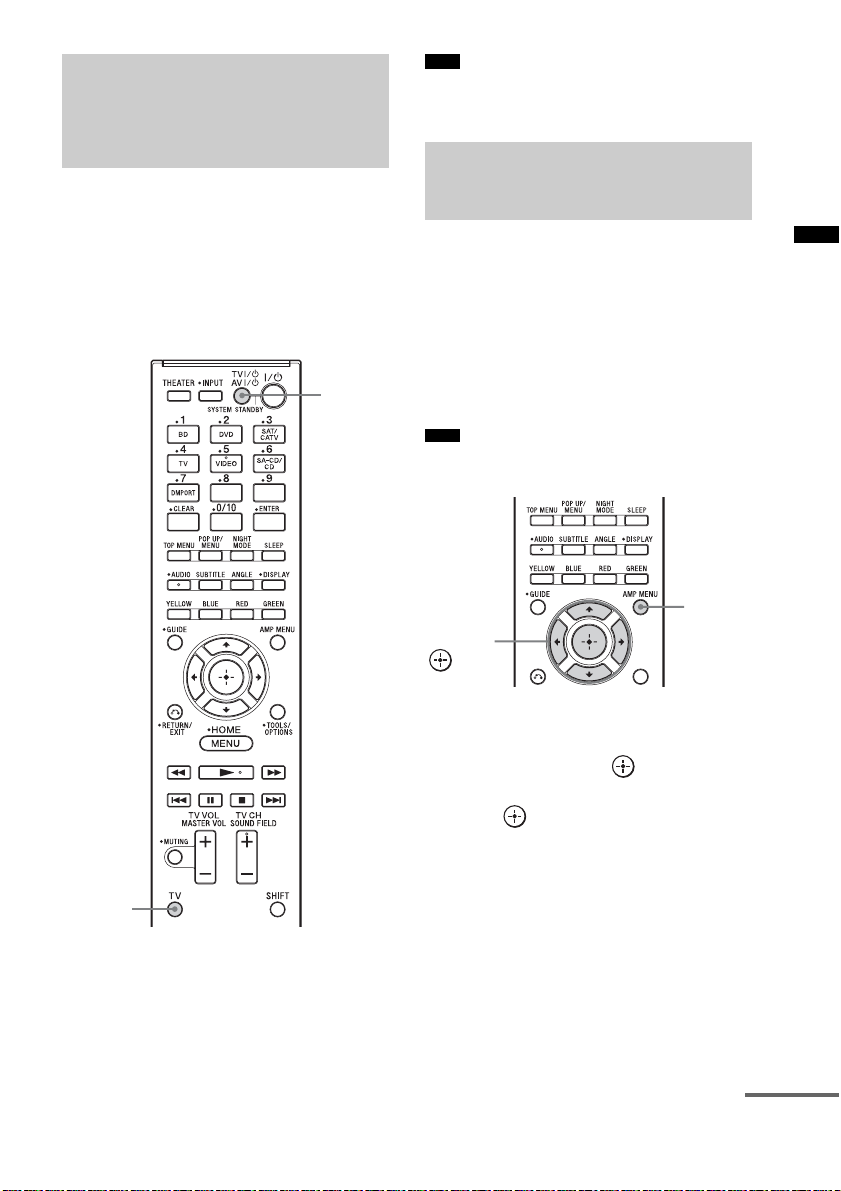
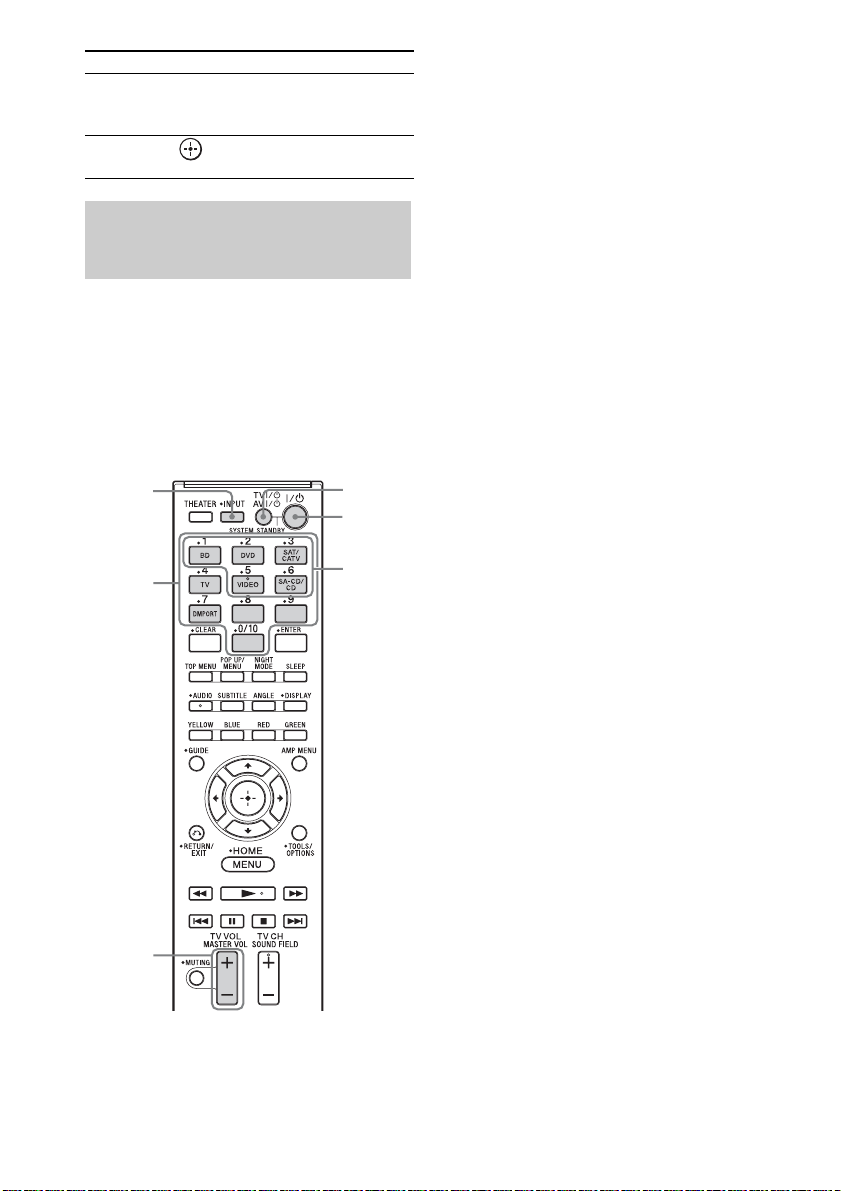
Remote control
This section describes subwoofer and speaker
button operation. See page 25 for details on the
button operation of connected components.
Note
• Point the remote towards the remote sensor ( ) of the
subwoofer.
C SLEEP
Press to turn off at a preset time when you
want to fall asleep listening to music. You
can preset the time in 10-minute increments.
D NIGHT MODE
Press to reproduce dialog clearly even at a
low volume level. This function is useful for
enjoying sound at night.
E AMP MENU (page 30)
F SOUND FIELD +/– (page 19)
G MUTING
H MASTER VOL +/–
Press to adjust the volume.
I C, X, x, c or
Press C, X, x or c to select the menu items.
Then press to enter the selection.
Enjoying TV
?/1
TV
* The 5, N, AUDIO and SOUND FIELD + buttons
have a tactile dot. Use it as a guide during operation.
A ?/1 (on/standby)
B Input buttons
Press one of the buttons to select the
component you want to use.
US
16
MASTER
VOL +/–
Page 17
1 Turn on the TV and choose a program.
Refer to the operating instructions of your
TV for details.
2 Turn the system on.
3 Press TV on the remote.
4 Adjust the volume by pressing
MASTER VOL +/–.
Tip
• The sound may be output from the TV’s speaker. In
this case, turn the volume of the TV’s speaker down
to minimum.
If you are using “BRAVIA” Sync
(System Audio Control)
You do not need to perform steps 2 and 3 above.
When you turn on the TV, the system is also
turned on, and the input source changes
automatically. You can also adjust the system’s
volume using the TV’s remote. If you turn off the
system, sound is output from the TV’s speaker.
For details on setting “BRAVIA” Sync, see
“Preparing for “BRAVIA” Sync” (page 20).
Tip
• The system is not turned on when you turn the TV on
if sound was being output from the TV speakers the
last time the TV was turned off.
Enjoying other
components
Input
buttons
MASTER
VOL +/–
Playback Options
?/1
1 Play the connected component.
2
Turn on the system.
continued
17
US
Page 18

3 Press the input buttons to display the
input source in the front panel display.
Input source Playable component
TV TV, etc. connected to the TV
jack
BD Blu-ray Disc player, etc.
connected to the BD jack
DVD DVD player, etc. connected to
the DVD jack
SAT/CATV Satellite tuner or cable
television tuner, etc. connected
to the SAT/CATV jack
VIDEO DVD player, etc. connected to
the DIGITAL COAX IN
VIDEO jack
SA-CD/CD CD player, et c. connected to the
SA-CD/CD AUDIO IN jack
DMPORT Portable audio player, etc.
connected to the DMPORT jack
4 For video components, change the TV’s
input to the HDMI input you chose in
step 3.
For details, refer to the operating
instructions of your TV.
5 Adjust the volume by pressing
MASTER VOL +/–.
Tips
• The sound may be output from the TV’s speaker. In
this case, turn the volume of the TV’s speaker down
to minimum.
• Even if you playback Dolby True HD, Dolby Digital
Plus or DTS HD with a connected component
compatible with these sound formats, the system
accepts the signal as Dolby Digital or DTS. When you
playback these high-quality sound formats, set the
connected component to output the sound in multichannel PCM, if possible.
Notes
• When you connect the video output jack of the
DIGITAL MEDIA PORT adapter to the video input
jack of the TV, set “CTRL HDMI” to “OFF” in the
AMP menu of the system (page 21). The images of a
component connected to the DIGITAL MEDIA
PORT adapter will not be played on the TV if “CTRL
HDMI” is set to “ON.”
• To enjoy the sound of a component without
displaying the images when “CTRL HDMI” is set to
“ON,” turn off the TV first and then reset the power of
the system.
If you turn on the system first and then turn off the
TV, all components connected to the TV will be
turned off because of the Control for HDMI function.
If you are using “BRAVIA” Sync
(One-Touch Play)
You do not need to perform steps 2 to 4 above.
When you turn on the connected components,
the system and the TV are also turned on, and the
input source changes automatically. You can
also adjust the system’s volume using the TV’s
remote.
For details on setting “BRAVIA” Sync, see
“Preparing for “BRAVIA” Sync” (page 20).
Tip
• The system is not turned on when you turn the TV on
if sound was being output from the TV speakers the
last time the TV was turned off.
18
US
Page 19
Available sound fields
Surround Function
Enjoying the surround
effect
Selecting the sound field
This system can create multi-channel surround
sound. You can select one of system’s optimized
pre-programmed sound fields.
SOUND
FIELD +/–
Press SOUND FIELD +/–.
The present sound field appears in the front panel
display.
Each time you press SOUND FIELD +/–, the
display changes cyclically as follows:
STANDARD y MOVIE y DRAMA y
NEWS y SPORTS y GAME y MUSIC
y 2CH STEREO y P.AUDIO y
STANDARD …
Sound field Effect
STANDARD* Suits various sources.
MOVIE* Recreates powerful and realistic
sound, along with clear dialog.
DRAMA* Suited for TV dramas.
NEWS* Produces the announcer’s voice
clearly.
SPORTS* Produces the play-by-play
commentary clearly and realistic
sound with surround effects, such as
cheering, etc.
GAME* Produces powerful and realistic
sound, suited for playing video
games.
MUSIC* Suited for music programs or music
videos on Blu-ray Discs/DVDs.
2CH STEREO Suited for music CDs.
P.AUDIO** Suited to replay portable audio
source.
* These sound fields are not available when
“DMPORT” is selected by pressing INPUT
SELECTOR.
** “P.AUDIO” appears only when “DMPORT” is
selected.
Tips
• You can set a different sound field for each input
source.
• The sound field default setting for “DMPORT” is
“P.AUDIO,” and for other sources, “STANDARD.”
• When “DMPORT” is selected by pressing INPUT
SELECTOR, the center speaker produces no sound.
• Some speakers will not produce sound depending on
the input signal, such as monaural programs.
• When “2CH STEREO” or “P.AUDIO” is selected,
the center speaker produces no sound.
• If you press the THEATER button on a Sony TV
remote when “CTRL HDMI” is set to “ON,” the
sound field changes to “MOVIE” (some Sony TVs
excluded).
Surround Function
19
US
Page 20
“BRAVIA” Sync Features
What is “BRAVIA” Sync?
By connecting Sony components that are
compatible with “BRAVIA” Sync via an HDMI
cable (not supplied), operation is simplified as
below:
• One-Touch Play (page 21)
• System Audio Control (page 22)
• System Power Off (page 23)
Preparing for “BRAVIA”
Sync
To use “BRAVIA” Sync, set the Control for
HDMI function to on for the connected
components.
When you connect a Sony TV with the Control
for HDMI function, the Control for HDMI
function for the system and the connected
components can be set simultaneously by setting
the Control for HDMI function of the TV.
“BRAVIA” Sync is compatible with Sony TVs,
Blu-Ray Disc/DVD players, AV amplifiers, etc.,
with the Control for HDMI function.
CONTROL FOR HDMI is a mutual control
function standard used by CEC (Consumer
Electronics Control) for HDMI (High-Definition
Multimedia Interface).
The Control for HDMI function will
not operate correctly in the
following cases:
• When you connect the system to components
which do not correspond with the Control for
HDMI function.
• When you connect the system and components
using other than an HDMI connection.
• When you connect non-Sony components
which are compatible with the Control for
HDMI function.
We recommend that you connect products
featuring “BRAVIA” Sync to this system.
Note
• Depend ing on the connected components, th e Control
for HDMI function may not work. Refer to the
operating instructions of the components.
?/1
AMP
MENU
C, X, x, c,
1 Make sure that the system is connected
to the TV and the connected
components via HDMI cables (not
supplied).
2 Turn on the system, the TV and the
connected components.
3 Select the input of the system and the
HDMI input of the TV (SAT/CATV, DVD,
BD), so that an image from a connected
component is displayed.
20
US
Page 21
4 Display the list of the HDMI
components on the TV menu, and set
the Control for HDMI function to on for
the connected components.
The Control for HDMI function for the
system and the connected components are
simultaneously set to on.
After you finish the setting, “COMPLETE”
appears in the front panel display.
Note
• For details on setting the TV and the connected
components, refer to their operating instructions.
If “COMPLETE” does not appear
after performing the steps above
Set the Control for HDMI function to on for both
the system and the connected component
individually.
1 Press AMP MENU.
2 Press X/x repeatedly until “SET HDMI”
appears, then press or c.
3 Press X/x repeatedly until “CTRL
HDMI” appears, then press or c.
4 Press X/x to select “ON.”
5 Press AMP MENU.
The AMP menu turns off. The Control for
HDMI function is set to on.
6 Select the input of the system
connected to the component you want
to use the Control for HDMI function for
(SAT/CATV, DVD, BD).
7 Set the Control for HDMI function of the
connected component to on.
For details on setting the connected
component, refer to its operating
instructions.
If you add or reconnect a
component
Perform steps of “Preparing for “BRAVIA”
Sync” (page 20) and “If “COMPLETE” does not
appear after performing the steps above” again.
Notes
• If the Control for HDMI function for the connected
component cannot be set simultaneously by setting
“CONTROL FOR HDMI” of the TV, set the Control
for HDMI function using the menu of the connected
component.
• For details on setting the TV and the connected
components, refer to their operating instructions.
Tip
• The default setting of the Control for HDMI function
of the system is “ON.”
Setting the Control for HDMI
function to off
Set the Control for HDMI function to off when
you connect components not compatible with
“BRAVIA” Sync, or that do not have HDMI
jacks, etc.
AMP
MENU
C, X, x, c,
1 Press AMP MENU.
2 Press X/x repeatedly until “SET HDMI”
appears, then press or c.
3 Press X/x to select “CTRL HDMI,” then
press or c.
4 Press X/x to select “OFF.”
5 Press AMP MENU.
The AMP menu turns off.
Enjoying Blu-ray Disc/DVD
(One-Touch Play)
Play back a connected component.
The TV turns on automatically and switches to
the appropriate HDMI input.
“BRAVIA” Sync Features
continued
21
US
Page 22

Tip
• Even if the system is turned off (active standby
mode), the HDMI signal will be sent from the
connected component to the TV via the HDMI
connection. You can enjoy image and sound of the
component on the TV.
Note
• Depending on the TV, the start of the content may not
be output.
Notes
• When the TV is turned on before this system is turned
on, the TV sound will not be output for a moment.
• Depending on the TV, when you adjust the system’s
volume using TV’s remote, the volume level appears
on the TV screen, in the same way it would appear
when you adjust the TV’s volume. In this case, the
volume level that appears on the TV screen and the
system’s front panel display may differ.
Enjoying the TV sound
from the system
(System Audio Control)
You can enjoy the TV sound from the speakers
of the system by means of a simple operation.
You can also adjust the volume and turn off the
sound of the system using the TV remote. For
details, refer to the operating instructions of the
TV.
?/1
AMP
C, X, x, c,
Press ?/1 to turn on the system.
The sound is output from the speaker of the
system. Sound output reverts to the TV's speaker
when you turn the system off.
MENU
Using the Volume Limit
function
When the System Audio Control function is
active and the output method changes from the
TV speaker to the system speakers
automatically, loud sound may be output
depending on the volume level of the system.
You can prevent this by limiting the volume
level.
1 Press AMP MENU.
2 Press X/x repeatedly until “SET HDMI”
appears, then press or c.
3 Press X/x repeatedly until “VOL LIMIT”
appears, then press or c.
4 Press X/x to select the volume limit you
want.
The volume limit changes as follows:
MAX y 49 y 48 … 2 y 1 y MIN
5 Press AMP MENU.
The AMP menu turns off.
Notes
• This function is available only when the Control for
HDMI function is set to on.
• This function is not available when the output method
changes from the system speakers to the TV speaker.
Tips
• We re commend that you set the volume limit to a little
lower than the volume you usually listen to.
• Regardless of the volume limit you set, the VOLUME
+/– buttons of the system and the MASTER VOL +/–
buttons of the remote are operable.
• If you do not want to limit the volume level, select
“MAX.”
22
US
Page 23
Turning off the system, TV
and the connected
components
(System Power Off)
When you turn the TV off by using the power
button on the TV’s remote, the system and the
connected components turn off automatically.
Also, when you turn the TV off by using the
system’s remote, the system and the connected
components turn off automatically.
AV ?/1
Note
• Depending on the status, the connected components
may not be turned off. For details, refer to the
operating instructions of the connected components.
Using the power saving
function
(HDMI PASS THRU)
When using “BRAVIA” Sync, you can enjoy
image and sound from a Blu-ray Disc, etc., on
the TV, even if the system is in standby mode.
Power consumption in standby mode is also
reduced automatically when the TV is turned off
if “PASS THRU” is set to “AUTO.”
The default setting is “AUTO.”
Note
• This function is available only when “CTRL HDMI”
is set to “ON.”
AMP
MENU
C, X, x, c,
“BRAVIA” Sync Features
TV
(yellow)
While pressing and holding TV (yellow),
press AV ?/1.
The TV, the system, and the connected
components are turned off.
1 Press AMP MENU.
2 Press X/x repeatedly until “SET HDMI”
appears, then press or c.
3 Press X/x to select “PASS THRU,” then
press or c.
continued
23
US
Page 24
4 Press X/x to select the setting.
• AUTO: When the TV is turned on while
the system is in standby mode, the
system outputs HDMI signals
from the system’s HDMI output
jack. We recommend this setting
if you use a TV that is compatible
with “BRAVIA” Sync. This
setting saves power in standby
mode compared with the “ON”
setting.
• ON: When the system is in standby
mode, the system continuously
outputs HDMI signals from the
system’s HDMI output jack.
Note
• When “AUTO” is selected, it may take a little
more time for the picture and sound to be output
to the TV than when “ON” is selected.
5 Press AMP MENU.
The AMP menu turns off.
Setting the Audio Return
Channel function to off
If the TV is compatible with the Audio Return
Channel (ARC) function, an HDMI cable
connection also sends a digital audio signal from
the TV. You do not need to make a separate
audio connection for listening to TV sound.
If you do not use the ARC function, connect the
system and TV via digital optical cord and set
“ARC” to “OFF” in the AMP menu.
3 Press X/x repeatedly until “ARC”
appears, then press or c.
4 Press X/x to select “OFF”.
• ON: The ARC function turns on.
• OFF: The ARC function turns off.
5 Press AMP MENU.
The AMP menu turns off.
Note
• When “CTRL HDMI” is set to “OFF,” the ARC
function and its setting are not available.
AMP
C, X, x, c,
MENU
1 Press AMP MENU.
2 Press X/x repeatedly until “SET HDMI”
appears, then press or c.
US
24
Page 25
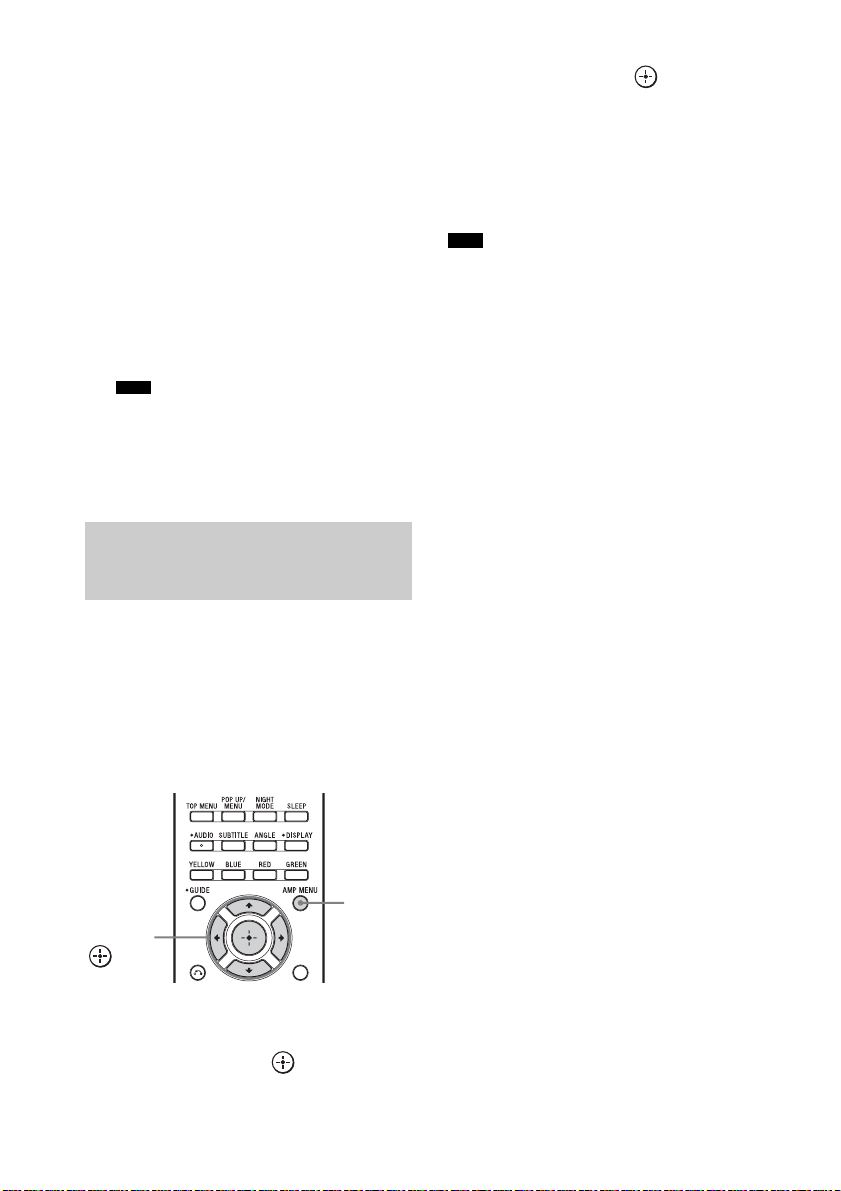
Advanced Settings
Controlling connected
Sony components with the
remote
You can control connected Sony components
with the remote of this system.
Some functions may not be selectable depending
on the equipment. In that case, select them using
the remote control supplied with the equipment.
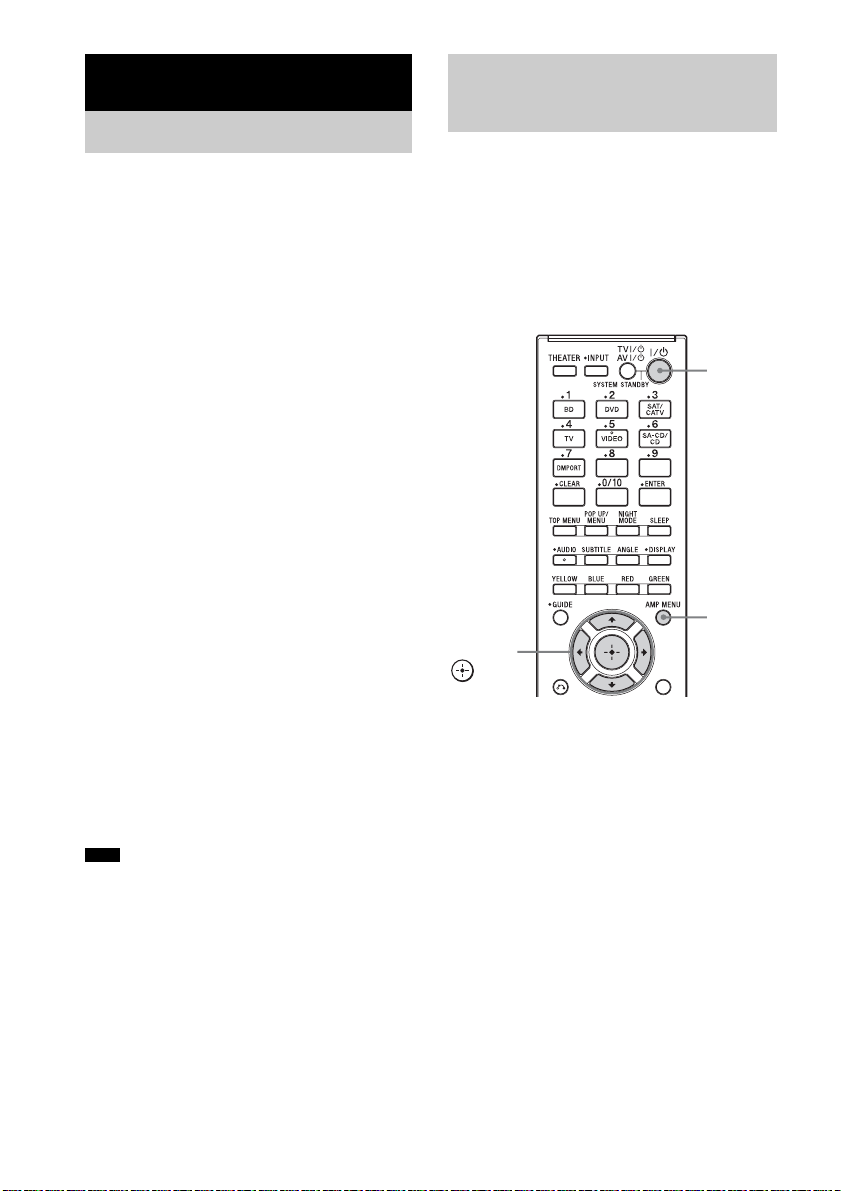
* The 5, N, AUDIO and SOUND FIELD + buttons
have a tactile dot. Use it as a guide during operation.
To control the component
1 Press one of the input buttons 3 (BD,
DVD, SAT/CATV, TV, VIDEO, or
DMPORT) to select the component you
want to operate.
The component assigned to the selected
input button becomes operable.
2 Referring to the following table, press
the corresponding button for the
operation.
Common operations
Remote Button Function
1 TV ?/1
AV ?/1
(on/standby)
4 ENTER Enters the selection.
qk C, X, x, c, Selects a menu item and
w; Color buttons Displays an operation
wg CLEAR Clears the selection.
Turns on or off the Sony
TV or audio/video
components that the
remote is assigned to
operate.
Press 1 TV
and 2
time to turn off the system
and all other components
that the remote is assigned
to operate (SYSTEM
STANDBY).
For TV, while pressing and
holding qf TV (yellow),
press 4 ENTER.
For other components,
while pressing and holding
qd SHIFT, press 4
ENTER.
enters the selection.
guide on the TV screen
when the color buttons are
available. Follow the
operation guide to perform
a selected operation.
For TV, while pressing and
holding qf TV (yellow),
press wg CLEAR.
For other components,
while pressing and holding
qd SHIFT, press wg
CLEAR.
?/1/AV ?/1
?/1 at the same
Advanced Settings
continued
25
US
Page 26
Remote Button Function
wh Number buttons Selects channels and tracks
directly.
For TV, press and hold qf
TV (yellow), and press the
number buttons to select
channels.
For other components,
press and hold qd SHIFT,
and press the number
buttons to select channels
or tracks.
To control a TV
While pressing and holding qf TV (yellow),
press the buttons with a yellow dot or
yellow printing.
Remote Button Function
5 DISPLAY Displays the current
7 TOOLS/
OPTIONS
8 MENU/HOME Allows you to select
qs TV CH +/– Selects the next (+) or
qg MUTING Turns off the sound.
qh TV VOL +/– Adjusts the volume.
qj O RETURN/EXIT Returns to the previous
qk C, X, x, c, Selects a menu item and
ql GUIDE Displays the guide when
wa AUDIO Selects the audio format/
channel number, etc.
Enables you to access
various viewing options
and change/make
adjustments according to
the source and screen
format.
channels or input sources
and change the settings for
your TV.
previous (–) channel.
screen of any displayed
menu.
enters the selection.
you are watching analog or
digital channels.
track.
Remote Button Function
wj THEATER Automatically sets the
wk INPUT Selects input.
optimal picture settings for
watching movies, such as
low-light settings, when
you connect a Sony TV
that is compatible with the
THEATER button
function. Also, audio is
automatically switched to
the audio output of this
system when you connect
the TV and the system with
HDMI connection, and the
Control for HDMI function
is set to on.
To control the DVD recorder/Bluray Disc recorder
Remote Button Function
6 ANGLE Switches to other viewing
8 MENU/HOME Displays the menu.
9 m/M To fast reverse or to fast
0 ./> To go to the beginning of
qa N (playback)/X
(pause, press again to
resume normal
playback)/x (stop)
qk C, X, x, c, Selects a menu item and
wa AUDIO Selects the audio format/
ws SUBTITLE Selects the subtitle
wd TOP MENU Displays the top menu/disc
wf POP UP/MENU Displays the BD-ROM’s
angles when multi-angles
are recorded on a DVD
VIDEO.
forward the disc when
pressed during playback.
the previous or next
chapter or track.
Play mode buttons.
enters the selection.
track.
language when
multilingual subtitles are
recorded on a BD-ROM/
DVD VIDEO.
menu.
Pop-up Menu, or the
DVD’s menu.
26
US
Page 27
To control the DVD player/Blu-ray
Disc player
Remote Button Function
6 ANGLE Switches to other viewing
8 MENU/HOME Displays the menu.
9 m/M To fast reverse or to fast
0 ./> To go to the beginning of
qa N (playback)/X
(pause, press again to
resume normal
playback)/x (stop)
qk C, X, x, c, Selects a menu item and
wa AUDIO Selects the audio format/
ws SUBTITLE Selects the subtitle
wd TOP MENU Displays the top menu/dis c
wf POP UP/MENU Displays the BD-ROM’s
angles when multi-angles
are recorded on a DVD
VIDEO.
forward the disc when
pressed during playback.
the previous or next
chapter or track.
Play mode buttons.
enters the selection.
track.
language when
multilingual subtitles are
recorded on a BD-ROM/
DVD VIDEO.
menu.
Pop-up Menu, or the
DVD’s menu.
To control the HDD/DVD COMBO
Remote Button Function
6 ANGLE Switches to other viewing
8 MENU/HOME Displays the menu.
9 m/M To fast reverse or to fast
0 ./> To specify the previous or
angles when multi-angles
are recorded on a DVD
VIDEO.
forward the disc when
pressed during playback.
next chapter or track.
Remote Button Function
qa N (playback)/X
(pause, press again to
resume normal
playback)/x (stop)
qk C, X, x, c, Moves the highlight
wa AUDIO Selects the audio format/
ws SUBTITLE Selects the subtitle
wd TOP MENU Displays t he top menu/disc
wf POP UP/MENU Displays the BD-ROM’s
Play mode buttons.
(cursor) and selects the
item.
track.
language when
multilingual subtitles are
recorded on a BD-ROM/
DVD VIDEO.
menu.
Pop-up Menu, or the
DVD’s menu.
To control the SAT
Remote Button Function
8 MENU/HOME Displays the menu.
qk C, X, x, c, Selects a menu item and
ql GUIDE Displays the guide menu.
Note
• The above explanations are intended to serve as an
example only. Depending on the component, the
above operations may not be possible, or may operate
differently than described.
enters the selection.
To control the connected
component through DMPORT
connection
Remote Button Function
5 DISPLAY Press to select the setting
8 MENU Displays the menu.
9 m/M Press to fast reverse or to
0 ./> Press to skip chapters.
qa N (playback)/X
(pause)/x (stop)
of the front panel display.
fast forward the disc when
pressed during playback.
Play mode buttons.
Advanced Settings
continued
27
US
Page 28
Remote Button Function
qj O RETURN Returns to the previous
qk C, X, x, c, Selects a menu item and
screen of any displayed
menu.
enters the selection.
Changing the input button
assignments of the remote
You can change the factory settings of the input
buttons to suit the components in your system.
For example, if you connect a Blu-ray Disc
player to the DVD jack on the system, you can
set the DVD button on this remote to control the
Blu-ray Disc player.
You cannot change the remote assignments for
TV and DMPORT.
INPUT
Number
buttons
AV ?/1
?/1
Input
buttons
1 Press and hold the input button whose
assignment you want to change, and
then press and hold AV ?/1 at the same
time.
Example: While holding down DVD, press
and hold AV ?/1.
2 While continuing to hold down AV ?/1,
release the input button you selected in
step 1.
Example: While continuing to hold down
AV ?/1, release DVD.
3 While continuing to hold down AV ?/1,
refer to the following table and press
the corresponding number button for
the category you want.
Example: While continuing to hold down
AV ?/1, press 1.
4 Release the number button you
selected in step 3, and then release AV
?/1.
Example: Release 1, then release AV ?/1.
Now you can use the DVD button to control
the Blu-ray Disc player.
MASTER
VOL +/–
US
28
Page 29

Categories and the
corresponding buttons for BD,
DVD, SAT/CATV, VIDEO and SACD/CD
Categories Press
Blu-ray Disc player
(command mode BD1)
Blu-ray Disc recorder
(command mode BD3)
DVD player
(command mode DVD1)
DVD recorder
(command mode DVD3)
VCR (command mode VTR3) 5
CD player 6
c)
DSS
a)
The initial setting of the BD button. For details on the
BD1 or BD3 setting, refer to the operating
instructions supplied with the Blu-ray Disc player or
Blu-ray Disc recorder.
b)
The initial setting of the DVD button. Sony DVD
recorders are operated with a DVD1 or DVD3
setting. For details, refer to the operating instructions
supplied with the DVD recorders.
c)
The initial setting of the SAT/CATV button.
a)
b)
1
2
3
4
7
To clear all remote button
assignments
While holding down MASTER VOL –, press
?/1 and INPUT. Then, release the buttons.
The remote is reset to its initial settings.
Advanced Settings
29
US
Page 30

Settings and adjustments
using the amplifier menu
SET
HDMI
*
CTRL
HDMI
ON
OFF
Using the AMP menu
You can set the following items with AMP
MENU on the remote.
The default settings are underlined.
AMP MENU
LEVEL CNT
TONE BASS –6, –5, … 0,
AUDIO
LEVEL
SW LEVEL –6, –5, … 0
AUDIO
DRC
TREBLE –6, –5, … 0
A/V SYNC ON
DUAL
MONO
NIGHT
MODE
–6, –5, … 0,
… +5, +6
… +5, +6
MAX
STD
OFF
… +5, +6
… +5, +6
OFF
MAIN
SUB
MAIN/SUB
ON
OFF
VOL
**
LIMIT
PASS
**
THRU
**
ARC
SYSTEM
,
,
* See ““BRAVIA” Sync Features” (page 20).
** This setting appears only when “CTRL HDMI” is
set to “ON.”
C, X, x, c,
DIMMER ON
DISPLAY ON
SLEEP OFF, 10M,
AUTO
STBY
MAX, 49, 48,
… 2, 1, MIN
AUTO
ON
ON
OFF
OFF
OFF
20M, …
80M, 90M
ON
OFF
AMP
MENU
30
INPUT
MODE
AUTO
OPT
1 Press AMP MENU to turn on the AMP
menu.
2 Press C/X/x/c repeatedly to select the
item and the setting.
3 Press AMP MENU to turn off the AMP
menu.
US
Page 31

Tip
• These settings are retained even if you disconnect the
AC power cord (mains lead).
The following pages show details for each
setting.
Setting the speaker level (CNT
LEVEL, SW LEVEL)
You can adjust the level and the balance of the
center speaker and subwoofer.
1 Select “LEVEL” in the AMP menu, then
press or c.
2 Select “CNT LEVEL” or “SW LEVEL,”
then press or c.
• CNT LEVEL: Adjusts the center speaker
level.
• SW LEVEL: Adjusts the subwoofer
level.
3 Select the parameter you want and
press .
The parameter of “CNT LEVEL” and “SW
LEVEL” is from “–6” to “+6” in 1-step
increments. The default setting is “0.”
Enjoying Dolby Digital sound
at low volume (AUDIO DRC)
Narrows the dynamic range of the sound track.
Useful for enjoying movies at low volume.
AUDIO DRC only applies to Dolby Digital
sources.
1 Select “LEVEL” in the AMP menu, then
press or c.
2 Select “AUDIO DRC,” then press or
c.
3 Select the setting and press .
• OFF: No compression of dynamic range.
• STD: Reproduces the sound track with
the kind of dynamic range that the
recording engineer intended.
• MAX: Compresses dynamic range fully.
Adjusting the bass and treble
level (BASS, TREBLE)
You can adjust the bass and treble level easily.
1 Select “TONE” in the AMP menu, then
press or c.
2 Select “BASS” or “TREBLE,” then
press or c.
• BASS : Adjusts the bass level.
• TREBLE : Adjusts the treble level.
3 Select the parameter you want and
press .
The parameter is from “–6” to “+6” in 1-step
increments. The default setting is “0.”
Adjusting the delay between
the sound and the image (A/V
SYNC)
You can delay the sound using this function
when the image is slower than the sound.
1 Select “AUDIO” in the AMP menu, then
press or c.
2 Select “A/V SYNC,” then press or c.
3 Select the setting and press .
• OFF: No adjustment.
• ON: Adjusts the difference between
picture and sound.
Notes
• You may not be able to adjust the delay between
sound and image perfectly using this function.
• This function is useful only for Dolby Digital, DTS
and Linear PCM (2ch) input via digital coaxial cord,
digital optical cord or HDMI cable.
Advanced Settings
continued
31
US
Page 32

Enjoying multiplex broadcast
sound (DUAL MONO)
You can enjoy multiplex broadcast sound when
the system receives an AC-3 multiplex broadcast
signal.
Note
• To receive an AC-3 signal, you need to connect a
digital satellite tuner to the system with an optical
cable or coaxial cable, and set the digital output mode
of the digital satellite tuner to AC-3.
1 Select “AUDIO” in the AMP menu, then
press or c.
2 Select “DUAL MONO,” then press
or c.
3 Select the setting and press .
• MAIN: Plays back only the main
channel.
• SUB: Plays back only the sub
channel.
• MAIN/SUB: Main sound is output from
the left speaker and sub
sound is output from the
right speaker.
Setting the sound from the
satellite tuner (INPUT MODE)
Even if you connect the satellite tuner to the
HDMI SAT/CATV input jack of the system,
multi-channel sound may not be output
depending on the satellite tuner. In this case,
connect a digital optical cord to the SAT/CATV
OPT IN jack of the system in addition to an
HDMI cable, and make the following setting.
1 Select “AUDIO” in the AMP menu, then
press or c.
2 Select “INPUT MODE,” then press
or c.
3 Select “OPT” and press .
• AUTO: Preferentially output the sound
signal from the HDMI SAT/
CATV input jack.
• OPT: Output the signal from the SAT/
CATV OPT IN jack.
Changing the brightness of
the front panel display
(DIMMER)
Enjoying the sound at low
volume (NIGHT MODE)
You can enjoy sound effects and hear the dialog
clearly even at a low volume level using this
function.
1 Select “AUDIO” in the AMP menu, then
press or c.
2 Select “NIGHT MODE,” then press
or c.
3 Select the setting and press .
• ON: Turns on the “NIGHT MODE”
function.
• OFF: Turns off the function.
Tip
• You can listen to Dolby Digital sound at low volume
by using AUDIO DRC (page 31).
US
32
The brightness of the front panel display can be
set to one of 2 levels.
1 Select “SYSTEM” in the AMP menu,
then press or c.
2 Select “DIMMER,” then press or c.
3 Select the setting and press .
• ON: Dim.
•OFF:Bright.
Page 33

Changing the display setting
(DISPLAY)
You can change the display behavior of the front
panel display.
1 Select “SYSTEM” in the AMP menu,
then press or c.
2 Select “ DISPLAY,” then press or c.
3 Select the setting and press .
• ON: The display stays turned on.
• OFF: The display appears for a few
seconds when you operate the
system.
Tip
• The display shows the kinds of input signal (digital
input only) when you press DISPLAY, even if you set
“DISPLAY” to “OFF.”
Note
• The display stays turned on when the muting or
protection function is working, even if you set
“DISPLAY” to “OFF.”
Using the sleep timer (SLEEP)
You can set the system to turn off at a preset time
when you want to fall asleep listening to music.
You can preset the time in 10-minute increments.
1 Select “SYSTEM” in the AMP menu,
then press or c.
2 Select “SLEEP,” then press or c.
3 Select the preset time you want and
press .
The minutes display (remaining time)
changes as follows:
Auto Standby function (AUTO
STBY)
You can reduce power consumption. The system
enters standby mode automatically when you do
not operate the system for about 30 minutes and
the system is not outputting sound for about 30
minutes.
The default setting is “ON”.
1 Select “SYSTEM” in the AMP menu,
then press or c.
2 Select “AUTO STBY,” then press or
c.
3 Select the setting and press .
• ON: Turns on the “AUTO STBY”
function.
• OFF: Turns off the function.
Notes
• When the system is turned off via the AUTO STBY
function, the system may not be turned on
automatically when you turn on the TV next time.
• “AUTO STBY” begins to flash in the front panel
display about two minutes before the system enters
standby mode.
Advanced Settings
OFF y 10M y 20M
YY
90M y 80M ... 30M
Note
• This function is only for this system, not for the
connected TV or other components.
33
US
Page 34

Additional Information
Troubleshooting
If you experience any of the following
difficulties while using the system, use this
troubleshooting guide to help remedy the
problem before requesting repairs. Should any
problem persist, consult your nearest Sony
dealer.
POWER
The power is not turned on.
• Check that the AC power cord (mains lead)
is connected securely.
The system is not turned on when the TV is
turned on.
• Check the TV speaker settings. The TV
speaker settings control how the system is
automatically turned on with the TV. To
enjoy the TV sound via the system, you need
to set the speaker settings of the TV to output
the sound from external audio equipment.
For details, refer to the operating
instructions of the TV.
• The system is not turned on when you turn
the TV on if sound was being output from
the TV speakers the last time the TV was
turned off.
The System Power Off function does not work.
• Change the setting of the TV to turn
connected components off automatically
when you turn off the TV. For details, refer
to the operating instructions of the TV.
The system is turned off when you turn off the
TV.
• When the Control for HDMI function is on,
the System Power Off function is active, and
the system is turned off when you turn off
the TV.
The system is turned off automatically.
• The AUTO STBY function is working
(page 33).
SOUND
Dolby Digital or DTS multi-channel sound is
not reproduced.
• Check that the Blu-ray Disc, DVD, etc., is
recorded in Dolby Digital or DTS format.
• When connecting the Blu-ray Disc, DVD
player, etc., to the digital input jacks of this
system, check the audio setting (settings for
the audio output) of the connected
component.
The surround effect cannot be obtained.
• Depending on the digital signal, the
surround processing may not work (page
19). Press DISPLAY to show the sound
format in the front panel display. If “2.0CH”
or “1.0CH” is displayed in the front panel
display, the signal is stereo or monaural and
does not include multi-channel sound. If
“5.1CH,” etc., is displayed, the signal
contains multiple channels, but the surround
effect may be subtle depending on the
program or disc.
No TV sound is output from the system.
• Check the connection of the digital optical
cord or audio cord that is connected to the
system and the TV (page 10).
• Check the sound output of the TV.
• If the TV is compatible with the ARC
function, set “CTRL HDMI” and “ARC” to
“ON.”
The sound is output from both the system and
the TV.
• If the Control for HDMI function is set to
off, or the selected component is not
compatible with the Control for HDMI
function, turn off the sound of the system or
the TV.
Sound lags behind the TV image.
• Set “A/V SYNC” to “OFF” if “A/V SYNC”
is set to “ON.”
The volume turns down when the output
method changes from the TV speaker to the
system speakers.
• The Volume Limit function is working. For
details, see “Using the Volume Limit
function” (page 22).
34
US
Page 35

No sound or only a very low-level sound of the
connected component is heard from the
system.
• Press MASTER VOL + and check the
volume level.
• Press MUTING or MASTER VOL + to
cancel the muting function.
• Check that the input source is correctly
selected.
• Check that all the cables and cords of the
system and the connected components are
fully inserted.
• Check the HDMI setting of the connected
components.
No sound is output from specific speakers.
• Check that the connectors of the speaker
cord are fully inserted into the jacks.
• Depending on the sound source that is input
to the system or selected sound field of the
system (page 19), no sound is output from
the center speaker.
Sound is interrupted or there is noise.
• Check “Formats supported by this system”
(page 36).
IMAGE
No image appears on the TV.
• Check that the TV and the system are
connected correctly.
• Check that the TV is selected correctly.
• Set the TV to the appropriate input mode.
• Check whether HDMI IN and HDMI OUT
are connected in reverse.
• Check that the cords are fully inserted into
the jacks on both the component and this
system (pages 10, 12).
No 3D image appears on the TV.
• Depending on the TV or the video
component, 3D images may not be
displayed. Check the 3D image formats
supported by the system (page 37).
When the system is in standby mode, there is
no image or sound on the TV.
• “CTRL HDMI” is set to “OFF.”
• When the system is in standby mode, image
and sound are output from the HDMI
component selected the last time you turned
off the system. If you want to play a
component other than the HDMI component
you selected last time, play the component
via One-Touch Play, or turn on the system to
select the HDMI component you want to
enjoy.
• Make sure “PASS THRU” is set to “ON” in
the AMP menu if you connect components
not compatible with “BRAVIA” Sync to the
system (page 23).
The remote does not function
• Point the remote at the remote sensor on
the system.
• Remove any obstacles in the path between
the remote and the system.
• Replace both batteries in the remote with
new ones, if they are weak.
• Make sure you select the correct input on the
remote.
OTHER
Control for HDMI does not work properly.
• Check the HDMI connection (pages 10).
• Set up Control for HDMI on the TV (page
20).
• Make sure the connected component is
compatible with “BRAVIA” Sync.
• Check the Control for HDMI settings on the
connected component. Refer to the
operating instructions supplied of the
connected component.
• If you change the HDMI connection,
connect/disconnect the AC power cord
(mains lead), or if there is a power failure,
repeat the procedures of ““BRAVIA” Sync
Features” (page 20).
• When you plug in or unplug the AC power
cord (mains lead), wait 15 seconds or more
before operating the system.
Additional Information
continued
35
US
Page 36

• If you connect the audio output of the video
component and the system using other than
an HDMI cable, no sound may be output
because of “BRAVIA” Sync. In this case, set
“CTRL HDMI” to “OFF” (page 21) or
connect the audio output jack directly to the
TV instead of the system.
If “PROTECTOR” and “PUSH POWER” appear
alternately in the front panel display.
Press ?/1 to turn off the system, and check
the following item after “STANDBY”
disappears.
• Is anything blocking the ventilation holes of
the system?
After checking the above item and fixing
any problems, turn on the system. If the
cause of the problem cannot be found even
after checking the above item, consult your
nearest Sony dealer.
If the system still does not
operate properly after performing
the above measures, reset the
system as follows:
Use buttons on the system for the operation.
1 Press ?/1 to turn on the power.
2 Press ?/1 while pressing INPUT
SELECTOR and VOLUME –.
“COLD RESET” appears and the system is
reset. AMP menu, sound field, etc., return to
the default settings.
Specifications
Formats supported by this
system
Digital input formats supported by this system
are as follows.
Format Supported/Not supported
Dolby Digital a
DTS a
Linear PCM (2ch)* a
Linear PCM (5.1ch,
7.1ch)* (Only on
HDMI)
Dolby Digital Plus ×
Dolby True HD ×
DTS-HD ×
* Linear PCM accepts sampling frequencies of no
more than 48 kHz.
AUDIO POWER SPECIFICATIONS
POWER OUTPUT AND TOTAL HARMONIC
DISTORTION:
(FTC)
for the U.S. model
Front L + Front R: With 4 ohms loads, both
channels driven, from 1 80 20,000 Hz; rated 50 Watts
per channel minimum R MS
power, with no more than 1
% total harmonic distortion
from 250 milli watts to
rated output.
a
36
Amplifier section
U.S. models:
POWER OUTPUT (reference)
Front L/Front R/Center: 85 W (per channel at
4 ohms, 1 kHz)
Subwoofer: 85 W (at 4 ohms, 100 Hz)
Canadian models:
POWER OUTPUT (rated)
Front L/Front R: 60 W + 60 W (at 4 ohms,
1 kHz, 1 % THD)
POWER OUTPUT (reference)
Front L/Front R/Center: 85 W (per channel at
4 ohms, 1 kHz)
Subwoofer: 85 W (at 4 ohms, 100 Hz)
US
Page 37

Inputs
TV, SA-CD/CD Analog
TV, SAT/CATV Digital (Optical)
VIDEO Digital (Coaxial)
Dimensions (approx.) 800 mm × 66 mm × 60 mm
1
(31
/2 in × 2 5/8 in ×
3
/8 in) (w/h/d)
2
Mass (approx.) 1.3 kg (2 lb 14 oz)
HDMI section
Connector HDMI™ connector
Video inputs/outputs BD, DVD, SAT/CATV;
640 × 480p@60 Hz
720 × 480p@59.94/60 Hz
1280 × 720p@59.94/60 Hz
1920 × 1080i@59.94/60 Hz
1920 × 1080p@59.94/60 Hz
720 × 576p@50 Hz
1280 × 720p@50 Hz
1920 × 1080i@50 Hz
1920 × 1080p@50 Hz
1920 × 1080p@24 Hz
Video inputs/outputs (3D) BD, DVD, SAT/CATV;
1280 × 720p@59.94/60 Hz
Frame packing
1920 × 1080i@59.94/60 Hz
Frame packing
1920 × 1080i@59.94/60 Hz
Side-by-Side (Half)
1920 × 1080p@59.94/60 Hz
Side-by-Side (Half)
1280 × 720p@50 Hz
Frame packing
1920 × 1080i@50 Hz
Frame packing
1920 × 1080i@50 Hz
Side-by-Side (Half)
1920 × 1080p@50 Hz
Side-by-Side (Half)
1920 × 1080p@24 Hz
Frame packing
Audio inputs BD, DVD, SAT/CATV:
Linear PCM 7.1ch/
Dolby Digital/DTS
Subwoofer (SA-WCT150)
Speaker system Subwoofer, Bass reflex
Speaker unit 130 mm (5
1
Rated impedance 4 ohms
Dimensions (approx.) 196 mm × 450 mm ×
1
/4 in)
3
410 mm (7
× 16
(w/h/d)
Mass (approx.) 10.5 kg (23 lb 3 oz)
General
Power requirements 120 V AC, 60 Hz
Power consumption
On: 75 Watts
Standby mode: 0.3 W or less (Co ntrol for HDMI
is off)
Power output
(DIGITAL MEDIA PORT) DC OUT: 5 V, 700 mA
Design and specifi cations are subject t o change without
notice.
• Standby power consumption 0.3 W or less.
• Halogenated flame retardants are not used in the
certain printed wiring boards.
• Over 85 % power efficiency of amplifier block is
achieved with the full digital amplifier, S-Master.
/8 in) cone type
/4 in × 17 3/4 in
Additional Information
Speaker (SS-CT150)
Front speaker unit
Speaker system Full range, Bass reflex
Speaker units 50 mm × 90 mm (2 in ×
5
/8 in) cone type
3
Rated impedance 4 ohms
Center speaker unit
Speaker system Full range, Bass reflex
Speaker units 50 mm × 90 mm (2 in ×
5
/8 in) cone type
3
Rated impedance 4 ohms
37
US
Page 38

Index
A
A/V SYNC 31
AMP menu
ARC
AUDIO DRC
AUTO S TBY
30
11, 24
31
33
B
BASS 31
“BRAVIA” Sync
20
C
CNT LEVEL 31
Connecting
Blu-ray Disc player 10
cable television tuner
DIGITAL MEDIA PORT adapter
DVD player
PlayStation 2
PlayStation 3
satellite tuner
10
TV
10, 12
10, 12
12
11
10, 12
D
Digital optical cord 10
DIMMER
DISPLAY
DUAL MONO
32
33
32
12
N
NIGHT MODE 32
P
PROTECTOR 36
R
Remote
before use
operating
6
16, 25
S
Sleep timer 33
Sound field
SW LEVEL
19
31
T
TREBLE 31
V
VOLUME 14, 16
Volume Limit function
22
F
Front panel display 15
I
INPUT MODE 32
INPUT SELECTOR
M
Muting 16
US
38
14
Page 39

Page 40

3
AVERTISSEMENT
Pour réduire les risques d’incendie ou
d’électrocution, gardez cet appareil à
l’abri de la pluie et de l’humidité.
L’appareil n’est pas débranché du secteur aussi
longtemps qu’il est raccordé à la prise secteur, même
s’il s’éteint automatiquement.
Pour réduire le risque d’incendie, ne recouvrez pas
l’orifice de ventilation de l’appareil avec des journaux,
des nappes, des rideaux, etc.
Ne placez pas de flammes nues, comme des bougies
allumées, sur l’appareil.
Pour réduire le risque d’incendie ou d’électrocution,
n’exposez pas cet appareil à des éclaboussures et ne
placez pas d’objets remplis de liquide, comme des
vases, sur l’appareil.
La fiche principale étant utilisée pour déconnecter
l’unité de l’alimentation secteur, connectez l’unité à
une prise secteur aisément accessible. Si vous
remarquez une anomalie dans l’appareil, débranchez
immédiatement la fiche principale de la prise secteur.
N’installez pas cet appareil dans un endroit confiné,
comme sur une étagère ou un meuble TV intégré.
N’exposez pas les piles ou les appareils contenant des
piles à une chaleur excessive, notamment aux rayons
directs du soleil, à une flamme, etc.
Pour les clients résidant aux Etats-Unis
Ce symbole est destiné à renseigner
l’utilisateur sur la présence à l’intérieur du
boîtier de l’appareil d’une « tension
dangereuse » non isolée et suffis amment puissante pour
présenter un risque d’électrocution.
Ce symbole est destiné à renseigner
l’utilisateur sur la présence d’importantes
instructions d’utilisation et d’entretien
(service) dans les documents qui accompagnent
l’appareil.
Enregistrement du propriétaire
Les numéros de modèle et de série se trouvent à l ’arrière du
caisson de graves. Indiquez ces numéros dans l’espace
prévu à cet effet ci-dessous. Vous devrez vous y référer lors
d’un appel à votre revendeur Sony au sujet de ce produit.
N° de modèle HT-CT150
N° de sér ie
Consignes de sécurité
importantes
1) Lisez ces instructions.
2) Conservez ces instructions.
3) Respectez tous les avertissements.
4) Respectez toutes les instructions.
5) N’utilisez pas cet appareil à proximité de l’eau.
6) Nettoyez-le uniquement avec un chiffon sec.
7) N’obstruez pas les orifices de ventilation. Installez
l’appareil conformément aux instructions du
fabricant.
8) N’installez pas l’appareil à proximité des sources
de chaleur telles que les radiateurs, les registres de
chaleur, les poêles ou autres appareils (y compris
les amplificateurs) produisant de la chaleur.
9) N’altérez pas le dispositif de sécurité de la fiche
polarisée ou mise à la terre. Une fiche polarisée
compte deux lames de largeur différente. Une fiche
de type mise à la terre possède deux lames et une
broche de mise à la terre. La lame la plus large ou la
troisième broche assure une fonction de sécurité. Si
la fiche fournie d’origine ne s’adapte pas à votre
prise, faites remplacer la prise obsolète par un
électricien.
10) Protégez le cordon d’alimentation des lieux de
passage ou des points de pincement, en particulier
au niveau des fiches, des prises de courant et de sa
sortie de l’appareil.
11) Utilisez unique ment des accessoires spécifiés par le
fabricant.
12) Utilisez uniquement l’appareil avec le chariot,
socle, trépied, support ou table spécifié par le
fabricant ou vendu avec l’appareil. Si vous utilisez
un chariot, soyez prudent lorsque vous le déplacez
avec l’appareil afin d’éviter toute chute susceptible
de provoquer des blessures.
FR
2
Page 41

13) Débranchez cet appareil en cas d’orage ou
d’inutilisation prolongée.
14) Confiez toutes les réparations à du personnel de
service qualifié. L’appareil doit être réparé en cas
de dommage quelconque, notamment lorsque le
cordon d’alimentation ou sa fiche est endommagé,
du liquide ou un objet a pénétré à l’intérieur de
l’appareil, l’appareil a été exposé à la pluie ou à
l’humidité, l’appareil ne fonctionne pas
normalement ou est tombé.
La déclaration de la FCC suivante s’applique
uniquement à la version de ce modèle fabriquée pour la
vente aux Etats-Unis. Il se peut que les autres versions
ne soient pas conformes aux réglementations
techniques de la FCC.
REMARPUE:
Cet appareil a été testé et s’est révélé conforme aux
limites des appareils numériques de Classe B,
conformément à l’alinéa 15 de la réglementation FCC.
Ces limites sont conçues pour assurer une protection
raisonnable contre les interférences nuisibles dans une
installation résidentielle. Cet appareil génère, utilise et
peut rayonner de l’énergie de fréquence radio qui, en
cas d’installation et d’utilisation non conformes aux
instructions, peut engendrer des interférences nuisibles
avec les communications radio. Il n’est toutefois pas
garanti qu’aucune interférence ne surviendra dans une
installation particulière. Si cet appareil altère
effectivement la réception radio ou télévisée, ce qui
peut être déterminé en le mettant hors tension, puis à
nouveau sous tension, nous vous encourageons à
essayer de remédier à la situation en prenant une ou
plusieurs mesures ci-après :
– Réorientez ou repositionnez l’antenne de réception.
– Augmentez la distance qui sépare l’appareil du
récepteur.
– Raccordez l’appareil à la prise d’un circuit différent
de celui auquel le récepteur est raccordé.
– Sollicitez l’aide de votre revendeur ou d’un
technicien en radio/télévision expérimenté.
ATTENTION
Vous êtes prévenu que toute modification ou
changement non expressément approuvé dans ce
manuel peut annuler votre autorisation à utiliser cet
appareil.
Précautions
Concernant la sécurité
• Si un objet ou du liquide venait à pénétrer à l’intérieur
du système, débranchez-le et faites-le vérifier par un
technicien qualifié avant de le remettre en marche.
• Ne grimpez pas sur le caisson de graves, car vous
risqueriez de tomber et de vous blesser, ou encore
d’endommager le système.
Concernant les sources
d’alimentation
• Avant de mettre en marche le système, vérifiez que la
tension de fonctionnement est identique à celle de
votre source d’alimentation locale. La tension de
fonctionnement est indiquée sur l’étiquette située à
l’arrière du caisson de graves.
• Si vous p révoyez de ne pas utiliser le système pendant
une période prolongée, assurez-vous de le
déconnecter de la prise murale. Pour déconnecter le
cordon d’alimentation, tirez sur la fiche et non sur le
cordon.
• Une des lames de la fiche est plus large que l’autre
pour assurer une meilleure sécurité et ne peut être
insérée dans la prise murale que dans un sens. Si vous
ne pouvez pas insérer la fiche dans la prise murale,
contactez votre revendeur.
• Le cordon d’alimentation doit être remplacé
uniquement dans un centre de service après-vente
qualifié.
Concernant l’accumulation de
chaleur
Bien que le système chauffe lors du fonctionnement, il
ne s’agit pas d’un dysfonctionnement. Si vous utilisez
le système continuellement à un volume élevé, la
température augmente considérablement au niveau de
ses faces arrière et inférieure. Pour éviter de vous
brûler, ne touchez pas le système.
Concernant l’emplacement
• Installez le système dans un endroit correctement
ventilé afin d’éviter l’accumulation de chaleur et de
prolonger la durée de vie de votre système.
• N’installez pas le système à proximité de sources de
chaleur ou dans un endroit soumis aux rayons du
soleil, à une poussière excessive ou à des chocs
mécaniques.
• A l’arrière du caisson de graves, ne placez aucun objet
qui pourrait obstruer les orifices de ventilation et
provoquer des dysfonctionnements.
FR
suite
FR
3
Page 42

• N’installez pas le système à proximité d’appareils tels
qu’un téléviseur, un magnétoscope ou un
magnétophone. (Si le système est utilisé
conjointement avec un téléviseur, un magnétoscope
ou un magnétophone, et s’il est trop proche de cet
appareil, cela peu t provoquer des parasites et altérer la
qualité de l’image. Il est très probable que cela se
produise en particulier si vous utilisez une antenne
intérieure. Par conséquent, il est recommandé
d’utiliser une antenne extérieure.)
• Faites attention lorsque vous installez le système sur
des surfaces traitées (avec de la cire, de l’huile, etc.),
car vous risquez de les tacher et de les décolorer.
Concernant le fonctionnement
Avant de raccorder d’autres composants, assurez-vous
d’éteindre et de débrancher le système.
Si l’écran du téléviseur situé à
proximité présente des irrégularités
de couleurs
Le système est doté d’un blindage magnétique qui
permet de l’installer à proximité d’un téléviseur.
Cependant, des irrégularités de couleurs peuvent
toujours être constatées sur certains types de
téléviseurs.
En cas d’irrégularités de couleurs...
Mettez immédiatement le téléviseur hors tension, puis
remettez-le sous tension après 15 à 30 minutes.
En cas d’irrégularités de couleurs
persistantes...
Eloignez le système davantage encore du téléviseur.
Concernant l’entretien
Nettoyez le système avec un chiffon sec et doux.
N’utilisez pas de tampons abrasifs, de poudre à récurer
ou de solvant tel que de l’alcool ou de la benzine.
Si vous avez des questions ou si vous rencontrez des
problèmes avec votre système, consultez votre
revendeur Sony le plus proche.
Copyrights
Ce système intègre les systèmes Dolby* Digital et Pro
Logic Surround, ainsi que DTS** Digital Surround
System.
* Fabriqué sous licence de Dolby Laboratories.
Dolby, Pro Logic et le symbole double-D sont des
marques de Dolby Laboratories.
** Fabriqué sous licence des brevets américains
suivants : 5 451 942 ; 5 956 674 ; 5 974 380 ;
5 978 762 ; 6 487 535, ainsi que d’autres brevets
délivrés ou en instance aux Etats-Unis et dans le
monde. DTS et son symbole sont des marques
déposées et DTS Digital Surround ainsi que les
logos DTS sont des marques commerciales de DTS,
Inc. Ce produit comprend un logiciel. © DTS, Inc.
Tous droits réservés.
Ce système intègre la technologie High-Definition
Multimedia Interface (HDMI™).
HDMI, le logo HDMI et High-Definition Multimedia
Interface sont des marques commerciales ou des
marques déposées de HDMI Licensing LLC aux EtatsUnis et dans d’autres pays.
« BRAVIA Sync » est une marque commerciale de
Sony Corporation.
« PlayStation » est une marque déposée de Sony
Computer Entertainment Inc.
« x.v.Color » et le logo « x.v.Color » sont des marques
commerciales de Sony Corporation.
®
ENERGY STAR
déposée aux États-Unis.
En sa qualité de partenaire ENERGY
®
, Sony Corporation a
STAR
déterminé que ce produit répond aux
prescriptions ENERGY STAR
matière d’utilisation efficace de
l’énergie.
est une marque
®
en
FR
4
Page 43

Table des matières
Précautions...............................................3
Mise en route
Déballage .................................................6
Positionnement du système......................7
Raccordement de l’enceinte.....................9
Raccordement du téléviseur, du lecteur,
etc.....................................................10
Raccordement d’autres composants.......12
Raccordement du cordon
d’alimentation..................................13
Réglage de sortie du son du composant
raccordé ...........................................13
Options de lecture
Index des composants et des
commandes ......................................14
Regarder la télévision ............................17
Utilisation d’autres composants.............18
Fonction Surround
Reproduction de l’effet surround...........20
Fonctionnalités de
« BRAVIA » Sync
Qu’est-ce que « BRAVIA » Sync ? .......21
Préparation de « BRAVIA » Sync.........21
Utilisation de Blu-ray Disc/DVD...........23
(Lecture une touche)
Reproduction du son du téléviseur à
partir du système..............................23
(Commande du son du système)
Mise hors tension du système, du
téléviseur et des composants
raccordés..........................................24
(Mise hors tension du système)
Utilisation de la fonction d’économie
d’énergie..........................................25
(HDMI PASS THRU)
Désactivation de la fonction Audio
Return Channel................................25
Configuration avancée
Contrôle des composants Sony raccordés
à l’aide de la télécommande............ 27
Modification des affectations des
touches de sélection d’entrée de la
télécommande.................................31
Sélections et réglages à l’aide du menu
de l’amplificateur............................ 33
Informations
complémentaires
Dépannage............................................. 37
Caractéristiques..................................... 40
Index...................................................... 42
FR
5
Page 44

Mise en route
Déballage
• Caisson de graves
(SA-WCT150) (1)
• Cordon d’enceinte (1)
• Télécommande (RM-AAU072)
(1)
• Cordon optique numérique pour
téléviseur (2,5 m) (1)
• Enceinte (SS-CT150) (1)
• Piles R6 (AA) (2)
• Garantie (1)
• Mode d’emploi (1)
Insertion des piles dans la télécommande
Insérez deux piles R6 (AA) (fournies) en faisant correspondre les pôles 3 et # des piles avec les signes
représentés à l’intérieur du compartiment. Pour utiliser la télécommande, dirigez-la vers le capteur de
télécommande de l’affichage du panneau frontal du caisson de graves.
Remarques
• Ne laissez pas la télécommande dans un endroit extrêmement chaud ou humide.
• N’utilisez pas simultanément une pile neuve et une pile usagée.
• Ne laissez rien tomber dans le boîtier de la télécommande, en particulier lorsque vous remplacez les piles.
• N’exposez pas le capteur de télécommande à la lumière directe du soleil ou d’une lampe. Vous risqueriez de
l’endommager.
• Si vous ne prévoyez pas d’utiliser la télécommande pendant une période prolongée, retirez les piles pour éviter
qu’elles fuient et génèrent de la corrosion, endommageant ainsi la télécommande.
FR
6
Page 45

Positionnement du système
Raccordement du cordon d’enceinte à l’enceinte
Les connecteurs du cordon d’enceinte possèdent un code de couleur qui dépend du type d’enceinte.
Raccordez les connecteurs du cordon d’enceinte aux prises d’enceinte de couleur correspondante.
Arrière de l’enceinte
R CENTER L
Vert
Rouge
Blanc
Mise en route
A
Remarques
• Lorsque vous installez l’enceinte au mur, veillez à ne pas trébucher sur le cordon qui lui est raccordé.
A Cordon d’enceinte
(fourni)
suite
FR
7
Page 46

Installation de l’enceinte au mur
Vous pouvez installer l’enceinte au mur.
Remarques
• Utilisez des vis adaptées au matériau et à la résistance du mur. Comme les plaques de plâtre sont particulièrement
fragiles, fixez fermement les vis à une poutre du mur. Installez l’enceinte sur une partie verticale et plate du mur
qui est renforcée.
• Veillez à confier l’installation à des revendeur s ou à des installateurs agréés Sony e t portez une attention particulière
aux consignes de sécurité pendant l’installation.
• Sony ne peut être tenu responsable de tout accident ou dégât entraîné par une installation incorrecte, une résistance
insuffisante du mur, une mauvaise fixation des vis, une catastrophe naturelle, etc.
1 Préparez des vis (non fournies) adaptées aux orifices situés au dos de l’enceinte.
Reportez-vous aux illustrations ci-dessous.
4 mm (1/6 pouce)
Plus de 25 mm (1 po.)
5mm
(1/5 pouce)
10 mm
(2/5 pouce)
Orifice situé au dos de l’enceinte
2 Fixez les vis au mur. Les vis doivent dépasser de 6 à 7 mm (environ 1/4 pouce).
265 mm
(10 2/5 pouce)
6 à 7 mm
(environ 1/4 pouce)
3 Accrochez l’enceinte aux vis.
Alignez les orifices situés au dos de l’enceinte aux vis, puis suspendez l’enceinte aux deux vis.
FR
8
Page 47

Raccordement de l’enceinte
Les connecteurs du cordon d’enceinte possèdent un code de couleur qui dépend du type d’enceinte.
Raccordez les connecteurs du cordon d’enceinte aux prises SPEAKERS de couleur correspondante.
Arrière du caisson
de graves
Vert
Rouge Blanc
Enceinte
DMPORT
DC 5V
0.7A MAX
L
ONLY FOR
SS-CT150
A
AUDIO I N
SA-CD/CD
SAT/CATV INBD INDVD IN
HDMI
L
R
AUDIO I N
TV
ARC
TV OUT
DIGITALSPEAKERS
COAX IN
OPT IN
VIDEO
TVSAT/CATVR CENTER
Mise en route
A Cordon d’enceinte (fourni)
FR
9
Page 48

Raccordement du téléviseur, du lecteur, etc.
Raccordez le téléviseur et/ou le lecteur, etc. équipé de prises HDMI au socle à l’aide d’un câble HDMI.
L’utilisation peut être simplifiée en raccordant des composants compatibles Sony « BRAVIA » Sync
à l’aide de câbles HDMI et en réglant pour chacun d’eux la fonction Commande pour HDMI par
l’intermédiaire du téléviseur. Consultez « Fonctionnalités de « BRAVIA » Sync » (page 21).
Lecteur DVD, etc.
HDMI OUT
Câble HDMI
(non fourni)
Câble HDMI
(non fourni)
Téléviseur
HDMI IN
Arrière du caisson
de graves
Lecteur Blu-ray Disc, etc.
HDMI OUT
DMPORT
DC 5V
0.7A MAX
L
Câble HDMI
(non fourni)
ONLY FOR
SS-CT150
AUDIO I N
SA-CD/CD
SAT/CATV INDVD IN BD IN
L
R
AUDIO I N
TV
HDMI
TV OUT
DIGITALSPEAKERS
OPT IN
TVSAT/CATVR CENTER
Cordon optique
numérique (non fourni)
ARC
COAX IN
VIDEO
Câble HDMI
(non fourni)
OUT - Sortie audio
numérique (optique)
Cordon optique numérique
pour téléviseur (fourni)
Tuner satellite, tuner de
télévision par câble, etc.
doté d’une prise HDMI
OUT - Sortie audio
numérique (optique)
HDMI OUT
10
FR
Page 49

Remarques
• Ce système est compatible avec la fonction Audio Return Channel (ARC). Si vous raccordez le système à la prise
HDMI du téléviseur compatible ARC à l’aide d’un câble HDMI, il n’est pas nécessaire de raccorder le téléviseur
au système à l’aide du cordon optique numérique (page 25).
• Les lettres « ARC » sont indiquées à côté de la prise HDMI du téléviseur s’il est compatible avec la fonction ARC.
Même si vous raccordez un câble HDMI à la prise, vous ne pouvez pas utiliser la fonction ARC si la prise d’entrée
HDMI n’est pas compatible avec la fonction ARC.
• La fonction ARC est uniquement disponible si la fonction Commande pour HDMI est activée.
• Selon le tuner satellite, il se peut qu’un son multicanaux ne soit pas reproduit. Dans ce cas, raccordez un cordon
optique numérique en plus d’un câble HDMI et réglez « INPUT MODE » sur « OPT » dans le menu AMP
(page 35).
• Raccordez une « PlayStation 3 », etc. à une prise HDMI disponible. Toutes les prises HDMI du système
fonctionnent de la même manière.
• Les raccordements aux prises HDMI ont la priorité lorsque vous connectez différents composants au système en
utilisant les prises INPUT OPT/INPUT COAX et HDMI.
• Lors du raccordement d’un téléviseur qui ne dispose pas d’une prise de sortie audio optique numérique, connectez
le téléviseur au système à l’aide d’un cordon audio analogique (non fourni).
Conseil
• Même si le système est éteint (mode veille active), le signal HDMI est transmis par le composant raccordé au
téléviseur via la connexion HDMI. Vous pouvez bénéficier du son et de l’image du composant sur le téléviseur.
Remarques sur les connexions HDMI
• Utilisez un câble HDMI haute vitesse. Si vous utilisez un câble Standard HDMI, il se peut que les
images 1080p, Deep Color ou 3D ne s’affichent pas correctement.
• Sony recommande d’utiliser un câble agréé HDMI ou un câble HDMI Sony.
• Si la qualité d’image est médiocre ou si le son n’est pas reproduit par un composant raccordé à l’aide
du câble HDMI, vérifiez la configuration de ce composant.
• Il se peut que les signaux audio (fréquence d’échantillonnage, longueur binaire, etc.) transmis par une
prise HDMI soient supprimés par le composant raccordé.
• Le son peut être interrompu en cas de modification de la fréquence d’échantillonnage ou du nombre
de canaux des signaux de sortie audio provenant du composant utilisé pour la lecture.
• Si le composant raccordé n’est pas compatible avec la technologie de protection des droits d’auteur
(HDCP), l’image et/ou le son provenant de la prise HDMI TV OUT peuvent être déformés ou absents.
Dans ce cas, vérifiez les caractéristiques du composant raccordé.
• Nous déconseillons d’utiliser un câble de conversion HDMI-DVI.
• Lorsque « TV », « DMPORT », « SA-CD/CD » ou « VIDEO » est sélectionné comme source
d’entrée du système, les signaux vidéo provenant de la dernière prise d’entrée HDMI (BD, DVD,
SAT/CATV) sélectionnée sont reproduits à partir de la prise HDMI TV OUT.
• Ce système prend en charge les émissions Deep Color, « x.v.Color » et 3D.
• Pour profiter d’images 3D , raccordez un téléviseur compatible 3D et des composants vidéo (lecteur
Blu-ray Disc, enregistreur Blu-ray Disc, « PlayStation 3 », etc.) au système à l’aide de câbles High
Speed HDMI, mettez des lunettes 3D, puis activez la lecture d’un contenu compatible 3D.
Mise en route
11
FR
Page 50

Raccordement d’autres composants
Lors du raccordement d’autres composants dépourvus de prise HDMI, tels qu’une « PlayStation 2 »,
un lecteur DVD, un tuner satellite, un tuner de télévision par câble, etc., réglez « CTRL HDMI » sur
« OFF » dans le menu AMP du système (page 22).
Autres composants audio, etc.
Lecteur DVD, etc.
Cordon audio
(non fourni)
Cordon coaxial
numérique (non fourni)
OUT - Sortie audio
numérique (coaxiale)
OUT - Sortie des
signaux audio
VIDEO OUT
Vers la prise VIDEO
IN du téléviseur.
Arrière du caisson
de graves
DMPORT
DC 5V
0.7A MAX
L
ONLY FOR
SS-CT150
AUDIO I N
SA-CD/CD
SAT/CATV INBD INDVD IN
HDMI
L
R
AUDIO I N
Tuner satellite, tuner de
TV
ARC
TV OUT
DIGITALSPEAKERS
COAX IN
OPT IN
TVSAT/CATVR CENTER
VIDEO
télévision par câble, etc.
dépourvu de prise HDMI
OUT - Sortie audio
numérique (optique)
Adaptateur DIGITAL
MEDIA PORT
VIDEO OUT
Cordon optique numérique
(non fourni)
Remarques
Vers la prise VIDEO IN du téléviseur.
• Ne connectez/déconnectez pas l’adaptateur DIGITAL MEDIA PORT lorsque le système est sous tension.
• Si vous connectez l’adaptateur DIGITAL MEDIA PORT, veillez à ce que le connecteur soit inséré avec la flèche
orientée vers celle de la prise DMPORT. Pour retirer l’adaptateur DIGITAL MEDIA PORT, maintenez enfoncé
A, puis tirez sur le connecteur pour l’extraire.
12
A
FR
Page 51

Raccordement du cordon d’alimentation
Avant de raccorder le cordon d’alimentation du système à une prise murale, raccordez tous les autres
composants et le téléviseur au système.
Remarques
• Une fois le cordon d’alimentation connecté, attendez environ 20 secondes avant de mettre l’appareil sous tension
en appuyant sur ?/1.
• Raccordez le système à une prise secteur aisément accessible. Si vous remarquez une anomalie dans le système,
débranchez immédiatement la fiche principale de la prise secteur.
Réglage de sortie du son du composant raccordé
Pour profiter du son au format multicanaux (DTS, Dolby Digital, LPCM multicanaux), vous devez
ajuster les réglages de sortie audio du composant raccordé. Réglez le composant raccordé afin qu’il
reproduise le son au format multicanaux. Pour plus de détails sur les différents paramètres de sortie,
reportez-vous au mode d’emploi fourni avec le composant raccordé.
Mise en route
13
FR
Page 52

Options de lecture
Index des composants et des commandes
Pour plus de détails, voir les pages indiquées entre parenthèses.
Caisson de graves
Vue du dessus
INPUT
SELECTOR
POWER/
ACTIVE STANDBY
VOLUME VOLUME
A ?/1 (marche/veille)
B INPUT SELECTOR
Appuyez sur cette touche pour sélectionner
la source d’entrée à lire.
A chaque appui de la touche, la source
d’entrée change de manière cyclique
comme suit : TV t BD t DVD t SAT/
CATV t VIDEO t SA-CD/CD t
DMPORT t TV……
FR
14
C VOLUME –
D VOLUME +
E Affichage du panneau frontal
Page 53

Affichage du panneau frontal (caisson de graves)
POWER/
ACTIVE STANDBY
Options de lecture
A Témoin POWER/ACTIVE STANDBY
S’allume de la manière suivante :
Vert : Le système est sous tension.
Orange : Seules les parties HDMI du
meuble sont activées (la fonction
Commande pour HDMI est
activée).
Eteint : Le système est hors tension.
Remarque
• Le témoin orange s’éteint 30 secondes après la
mise hors tension du téléviseur. Toutefois, si
vous réglez « PASS THRU » sur « ON » dans le
menu AMP, le témoin reste orange même si vous
mettez le téléviseur hors tension.
B Témoins du format audio
S’allument conformément au format audio
décodé de l’entrée actuelle du système.
D : Dolby Digital
PLII : Dolby Pro Logic II
LPCM : PCM linéaire
DTS
C NIGHT (page 35)
S’allume lorsque NIGHT MODE est
sélectionné.
D SLEEP (page 36)
Clignote quand la minuterie
d’endormissement est activée.
E HDMI (page 10)
S’allume lorsque des composants HDMI
sont utilisés ou lorsque l’entrée du système
est un signal ARC alors que le téléviseur est
sélectionné comme source d’entrée.
F COAX/OPT
S’allume en fonction du câble que vous
utilisez.
G MUTING
S’allume lorsque le son est désactivé.
H Capteur de télécommande
I Zone d’affichage des messages
Affiche le volume, la source d’entrée
sélectionnée, le signal d’entrée audio, etc.
suite
15
FR
Page 54

Télécommande
Cette section décrit le fonctionnement des
touches du caisson de graves et des enceintes.
Pour plus de détails sur le fonctionnement des
touches des composants raccordés, reportezvous à la page 27.
Remarque
• Dirigez la télécommande vers le capteur de
télécommande ( ) du caisson de graves.
B Touches de sélection d’entrée
Appuyez sur une des touches pour
sélectionner le composant que vous
souhaitez utiliser.
C SLEEP
Appuyez sur cette touche pour programmer
l’extinction du système à une heure
déterminée et vous endormir ainsi au son de
la musique. Vous pouvez régler cette heure
par incréments de 10 minutes.
D NIGHT MODE
Appuyez sur cette touche pour reproduire
clairement les dialogues, même à faible
volume. Elle est utile pour profiter
pleinement de la reproduction du son la nuit.
E AMP MENU (page 33)
F SOUND FIELD +/– (page 20)
G MUTING
H MASTER VOL +/–
Appuyez pour régler le volume.
I C, X, x, c ou
Appuyez sur C, X, x ou c pour sélectionner
les options de menu. Ensuite, appuyez sur
pour valider la sélection.
* Les touches 5, N, AUDIO et SOUND FIELD +
possèdent un point tactile qui vous servira de guide
lors de l’utilisation.
A ?/1 (marche/veille)
FR
16
Page 55

Regarder la télévision
TV
MASTER
VOL +/–
?/1
Si vous utilisez « BRAVIA » Sync
(Commande du son du système)
Vous n’avez pas besoin d’exécuter les étapes 2 et
3 ci-dessus. Lorsque vous mettez le téléviseur
sous tension, le système se met également sous
tension et la source d’entrée change
automatiquement. Vous pouvez aussi régler le
volume du système à l’aide de la télécommande
du téléviseur. Si vous mettez le système hors
tension, le son est reproduit par le haut-parleur
du téléviseur.
Pour plus d’informations sur le réglage de
« BRAVIA » Sync, reportez-vous à la section
« Préparation de « BRAVIA » Sync » (page 21).
Conseil
• Le systèm e ne se met pas sous tension en même temps
que le téléviseur si le son était reproduit par les hautparleurs du téléviseur la dernière fois que vous avez
mis celui-ci hors tension.
Options de lecture
1 Mettez le téléviseur sous tension et
choisissez un programme.
Pour plus de détails, reportez-vous au mode
d’emploi de votre téléviseur.
2 Mettez le système sous tension.
3 Appuyez sur la touche TV de la
télécommande.
4 Réglez le volume en appuyant sur
MASTER VOL +/–.
Conseil
• Il se peut que le son soit reproduit par le haut-parleur
du téléviseur. Dans ce cas, réduisez le volume de ce
dernier au minimum.
17
FR
Page 56

Utilisation d’autres
composants
?/1
Touches de
sélection
d’entrée
MASTER
VOL +/–
1 Mettez en mode de lecture le
composant raccordé.
2
Mettez le système sous tension.
3 Appuyez plusieurs fois sur les touches
de sélection d’entrée pour que la
source d’entrée apparaisse sur
l’affichage du panneau frontal.
Source
d’entrée
TV Téléviseur, etc. raccordé à la
BD Lecteur Blu-ray Disc, etc.
DVD Lecteur DVD, etc. raccordé à la
Composant reconnu
prise TV
raccordé à la prise BD
prise DVD
Source
d’entrée
SAT/CATV Tuner satellite, tuner télévision
VIDEO Lecteur DVD, etc. raccordé à la
SA-CD/CD Lecteur CD, etc. raccordé à la
DMPORT Lecteur audio portable, etc.
Composant reconnu
par câble, etc. raccordé à la
prise SAT/CATV
prise DIGITAL COAX IN
VIDEO
prise SA-CD/CD AUDIO IN
raccordé à la prise DMPORT
4 Pour les composants vidéo, remplacez
l’entrée du téléviseur par l’entrée HDMI
que vous avez choisie à l’étape 3.
Pour plus de détails, reportez-vous au mode
d’emploi du téléviseur.
5 Réglez le volume en appuyant sur
MASTER VOL +/–.
Conseils
• Il se peut que le son soit reproduit par le haut-parleur
du téléviseur. Dans ce cas, réduisez le volume de ce
dernier au minimum.
• Même si vous lisez une source Dolby True HD, Dolby
Digital Plus ou DTS HD avec un composant raccordé
compatible avec ces formats audio, le système accepte
les signaux en tant que Dolby Digital ou DTS.
Lorsque vous lisez ces formats audio haute qualité,
réglez le composant raccordé afin qu’il émette si
possible le son au format PCM multicanaux.
Remarques
• Lorsque vous connectez la prise de sortie vidéo de
l’adaptateur DIGITAL MEDIA PORT à la prise
d’entrée vidéo du téléviseur, réglez « CTRL HDMI »
sur « OFF » dans le menu AMP du système (page 22).
Les images d’un composant raccordé à l’adaptateur
DIGITAL MEDIA PORT ne seront pas affichées sur
le téléviseur si « CTRL HDMI » est réglé sur « ON ».
• Pour bénéficier du son d’un composant sans en
afficher les images lorsque « CTRL HDMI » est réglé
sur « ON », mettez tout d’abord le téléviseur hors
tension, puis réinitialisez l’alimentation du système.
Si vous mettez ce système sous tension pour la
première fois, puis mettez le téléviseur sous tension,
tous les composants raccordés au téléviseur seront mis
hors tension en raison de la fonction Commande pour
HDMI.
18
FR
Page 57

Si vous utilisez « BRAVIA » Sync
(Lecture une touche)
Vous n’avez pas besoin d’exécuter les étapes 2 à
4 ci-dessus. Lorsque vous mettez les composants
raccordés sous tension, le système et le téléviseur
se mettent également sous tension et la source
d’entrée change automatiquement. Vous pouvez
aussi régler le volume du système à l’aide de la
télécommande du téléviseur.
Pour plus d’informations sur le réglage de
« BRAVIA » Sync, reportez-vous à la section
« Préparation de « BRAVIA » Sync » (page 21).
Conseil
• Le système ne se met pas sous tension en même temps
que le téléviseur si le son était reproduit par les
haut-parleurs du téléviseur la dernière fois que vous
avez mis celui-ci hors tension.
Options de lecture
19
FR
Page 58

Champs acoustiques disponibles
Fonction Surround
Reproduction de l’effet
surround
Sélection du champ
acoustique
Ce système peut créer le son surround
multicanaux. Vous pouvez sélectionner un des
champs acoustiques préprogrammés et optimisés
du système.
SOUND
FIELD +/–
Appuyez sur SOUND FIELD +/–.
Le champ acoustique en cours apparaît dans
l’affichage du panneau frontal.
A chaque pression sur la touche SOUND FIELD
+/–, l’affichage change de manière cyclique dans
l’ordre suivant :
STANDARD y MOVIE y DRAMA y
NEWS y SPORTS y GAME y MUSIC
y 2CH STEREO y P.AUDIO y
STANDARD …
Champ
acoustique
STANDARD* Convient à diverses sources.
MOVIE* Recrée un son puissant et réaliste,
DRAMA* Convient aux pièces de théâtre
NEWS* Reproduit clairement la voix du
SPORTS* Reproduit le son réaliste et clair des
GAME* Reproduit le son puissant et réaliste
MUSIC* Convient aux programm es musicaux
2CH STEREO Convient aux CD musicaux.
P.AUDIO** Idéal pour écouter une source audio
* Ces champs acoustiques ne sont pas disponibles
lorsque « DMPORT » est sélectionné en appuyant
sur INPUT SELECTOR.
** « P.AUDIO » n’apparaît que si « DMPORT » est
sélectionné.
Conseils
• Vous pouvez définir un champ acoustique différent
pour chaque source d’entrée.
• Le réglage par défaut du champ acoustique de
« DMPORT » est « P.AUDIO ». Pour les autres
sources, il s’agit de « STANDARD ».
• Lorsque « DMPORT » est sélectionné en appuyant
sur INPUT SELECTOR, l’enceinte centrale ne
reproduit aucun son.
• Certaines enceintes ne reproduisent aucun son, en
fonction du signal d’entrée. C’est notamment le cas
avec les programmes en mono.
• Lorsque « 2CH STEREO » ou « P.AUDIO » est
sélectionné, l’enceinte centrale ne reproduit aucun
son.
• Si vous appuyez sur la touche THEATER de la
télécommande d’un téléviseur Sony alors que
« CTRL HDMI » est réglé sur « ON », le champ
acoustique devient « MOVIE » (cela ne s’applique
cependant pas à certains téléviseurs Sony).
Effet
associé à un dialogue clair.
télévisées.
commentateur.
commentaires de suivi avec des
effets surround tels que les
acclamations, etc.
adapté aux jeux vidéo.
ou aux vidéos musicales des Blu-ray
Disc/DVD.
portable.
20
FR
Page 59

Fonctionnalités de « BRAVIA » Sync
Qu’est-ce que « BRAVIA »
Sync ?
En connectant de s composants Sony compat ibles
avec « BRAVIA » Sync à l’aide d’un câble
HDMI (non fourni), le fonctionnement est
simplifié comme expliqué ci-dessous :
• Lecture une touche (page 23)
• Commande du son du système (page 23)
• Mise hors tension du système (page 24)
Préparation de « BRAVIA »
Sync
Pour utiliser « BRAVIA » Sync, activez la
fonction Commande pour HDMI des
composants raccordés.
Lorsque vous raccordez un téléviseur Sony doté
de la fonction Commande pour HDMI, il est
possible d’activer automatiquement la fonction
Commande pour HDMI du système et des
composants raccordés en sélectionnant la
fonction Commande pour HDMI du téléviseur.
Fonctionnalités de « BRAVIA » Sync
« BRAVIA » Sync est compatible avec les
téléviseurs, les lecteurs Blu-Ray Disc/DVD, les
amplificateurs AV, etc. de marque Sony dotés de
la fonction Commande pour HDMI.
CONTROL FOR HDMI est une norme de
fonction de contrôle mutuel utilisée par CEC
(Consumer Electronics Control) pour HDMI
(High-Definition Multimedia Interface).
La fonction Commande pour
HDMI ne fonctionne pas
correctement dans les cas
suivants :
• Lorsque vous connectez le système à des
composants qui ne correspondent pas à la
fonction Commande pour HDMI.
• Lorsque vous raccordez le système et les
composants à l’aide d’une connexion
différente de la connexion HDMI.
• Lorsque vous raccordez des composants non
Sony compatibles avec la fonction Commande
pour HDMI.
Il est recommandé de connecter à ce système des
produits présentant « BRAVIA » Sync.
Remarque
• En fonction des composants raccordés, la fonction
Commande pour HDMI peut ne pas fonctionner.
Reportez-vous au mode d’emploi des composants.
?/1
AMP
MENU
C, X, x, c,
1 Veillez à ce que le système soit
connecté au téléviseur et aux
composants raccordés à l’aide de
câbles HDMI (non fournis).
2 Mettez sous tension le système, le
téléviseur et les composants
raccordés.
3 Sélectionnez l’entrée du système et
l’entrée HDMI du téléviseur (SAT/CATV,
DVD, BD) afin qu’une image du
composant raccordé soit affichée.
suite
21
FR
Page 60

4 Affichez la liste des composants HDMI
sur le menu du téléviseur, puis activez
la fonction Commande pour HDMI pour
les composants raccordés.
La fonction Commande pour HDMI du
système et des composants raccordés est
simultanément activée.
Une fois le réglage terminé,
« COMPLETE » apparaît dans l’affichage
du panneau frontal.
Remarque
• Pour plus de détails sur le réglage du téléviseur
et des composants raccordés, reportez-vous aux
modes d’emploi de ceux-ci.
Si « COMPLETE » n’apparaît pas
après exécution des étapes
ci-dessus
Activez séparément la fonction Commande pour
HDMI du système et du composant raccordé.
1 Appuyez sur AMP MENU.
2 Appuyez plusieurs fois sur X/x jusqu’à
ce que « SET HDMI » apparaisse, puis
appuyez sur ou c.
3 Appuyez plusieurs fois sur X/x jusqu’à
ce que « CTRL HDMI » apparaisse, puis
appuyez sur ou c.
4 Appuyez sur X/x pour sélectionner
«ON».
5 Appuyez sur AMP MENU.
Le menu AMP est désactivé. La fonction
Commande pour HDMI est activée.
6 Sélectionnez l’entrée du système
connectée au composant pour lequel
vous souhaitez utiliser la fonction
Commande pour HDMI (SAT/CATV,
DVD, BD).
7 Activez la fonction Commande pour
HDMI du composant raccordé.
Pour plus de détails sur le réglage du
composant raccordé, reportez-vous au mode
d’emploi de celui-ci.
Si vous ajoutez ou reconnectez
un composant
Exécutez à nouveau les étapes de « Préparation
de « BRAVIA » Sync » (page 21) et « Si
« COMPLETE » n’apparaît pas après exécution
des étapes ci-dessus ».
Remarques
• Si la fonction Commande pour HDMI pour
composant raccordé ne peut pas être définie
simultanément lors du réglage « CONTROL FOR
HDMI » du téléviseur, réglez la fonction Commande
pour HDMI à l’aide du menu du composant raccordé.
• Pour plus de détails sur le réglage du téléviseur et des
composants raccordés, reportez-vous aux modes
d’emploi de ceux-ci.
Conseil
• Par défaut, la fonction Commande pour HDMI du
système est réglée sur « ON ».
Désactivation de la fonction
Commande pour HDMI
Désactivez la fonction Commande pour HDMI
lorsque vous connectez des composants non
compatibles avec « BRAVIA » Sync, ou qui ne
disposent pas de prises HDMI, etc.
AMP
MENU
C, X, x, c,
1 Appuyez sur AMP MENU.
2 Appuyez plusieurs fois sur X/x jusqu’à
ce que « SET HDMI » apparaisse, puis
appuyez sur ou c.
3 Appuyez sur X/x pour sélectionner
« CTRL HDMI », puis appuyez sur
ou c.
4 Appuyez sur X/x pour sélectionner
«OFF».
22
FR
Page 61

5 Appuyez sur AMP MENU.
Le menu AMP est désactivé.
Utilisation de Blu-ray Disc/
DVD
(Lecture une touche)
Lisez un composant raccordé.
Le téléviseur est automatiquement mis sous
tension et bascule sur l’entrée HDMI appropriée.
Conseil
• Même si le système est éteint (mode veille active), le
signal HDMI est transmis par le composant raccordé
au téléviseur via la connexion HDMI. Vous pouvez
bénéficier du son et de l’image du composant sur le
téléviseur.
Remarque
• Selon le téléviseur, il est possible que le début du
contenu ne soit pas reproduit.
Reproduction du son du
téléviseur à partir du
système
(Commande du son du système)
Une simple opération permet d’écouter le son du
téléviseur par l’intermédiaire des enceintes du
système. Vous pouvez également régler le
volume et couper le son du système à l’aide de la
télécommande du téléviseur. Pour plus de
détails, reportez-vous au mode d’emploi du
téléviseur.
?/1
Fonctionnalités de « BRAVIA » Sync
AMP
MENU
C, X, x, c,
Appuyez sur ?/1 pour mettre le système
sous tension.
Le son est reproduit par les enceintes du sy stème.
Le son est à nouveau reproduit par le hautparleur du téléviseur lorsque vous mettez le
système hors tension.
Remarques
• Lorsque le téléviseur est mis sous tension avant le
système, quelques instants s’écoulent avant que vous
entendiez le son du téléviseur.
• Selon le téléviseur, lorsque vous réglez le volume du
système à l’aide de la télécommande du téléviseur, le
niveau du volume apparaît sur l’écran du téléviseur,
exactement comme lorsque vous réglez le volume du
téléviseur. Dans ce cas, le niveau du volume affiché
sur l’écran du téléviseur peut être différent de celui
qui apparaît sur l’affichage du panneau frontal du
système.
suite
23
FR
Page 62

Utilisation de la fonction de
Limitation du volume
Lorsque la fonction Commande du son du
système est active et que le mode de sortie passe
automatiquement du haut-parleur du téléviseur
aux enceintes du système, un son puissant peut
être reproduit selon le niveau de volume du
système. Vous pouvez empêcher ceci en limitant
le niveau de volume.
1 Appuyez sur AMP MENU.
2 Appuyez plusieurs fois sur X/x jusqu’à
ce que « SET HDMI » apparaisse, puis
appuyez sur ou c.
3 Appuyez plusieurs fois sur X/x jusqu’à
ce que « VOL LIMIT » apparaisse, puis
appuyez sur ou c.
4 Appuyez sur X/x pour sélectionner la
limite de volume souhaitée.
La limite de volume change comme suit :
MAX y 49 y 48 … 2 y 1 y MIN
5 Appuyez sur AMP MENU.
Le menu AMP est désactivé.
Remarques
• Cette fonction est uniquement disponible si la
fonction Commande pour HDMI est activée.
• Cette foncti on n’est pas disponible si le mode de sortie
passe des enceintes du système au haut-parleur du
téléviseur.
Conseils
• Nous vous recommandons de définir la limite de
volume sur un niveau quelque peu inférieur à votre
volume d’écoute habituel.
• Quelle que soit la limite de volume définie, la touche
VOLUME +/– du système et la touche MASTER
VOL +/– de la télécommande sont actives.
• Si vous ne souhaitez pas limiter le niveau de volume,
sélectionnez « MAX ».
Mise hors tension du
système, du téléviseur et
des composants
raccordés
(Mise hors tension du système)
Lorsque vous mettez le téléviseur hors tension à
l’aide de la touche d’alimentation de sa
télécommande, le système et les composants
raccordés sont mis hors tension
automatiquement.
En outre, lorsque vous mettez le téléviseur hors
tension à l’aide de la télécommande du système,
le système et les composants raccordés sont mis
hors tension automatiquement.
AV ?/1
24
TV
(jaune)
FR
Page 63

Tout en maintenant la touche TV (jaune)
enfoncée, appuyez sur AV ?/1.
Le téléviseur, le système et les composants
raccordés sont mis hors tension.
Remarque
• En fonction de l’état, les composants raccordés
peuvent ne pas être désactivés. Pour plus
d’informations, reportez-vous au mode d’emploi des
composants raccordés.
Utilisation de la fonction
d’économie d’énergie
(HDMI PASS THRU)
« BRAVIA » Sync vous permet de profiter de
l’image et du son d’un Blu-ray Disc, etc. sur le
téléviseur, même si le système est en mode
veille. Par ailleurs, la consommation électrique
en mode veille est automatiquement réduite lors
de la mise hors tension du téléviseur si « PASS
THRU » est réglé sur « AUTO ».
Le réglage par défaut est « AUTO ».
Remarque
• Cette fonction est uniquement disponible si « CTRL
HDMI » est réglé sur « ON ».
4 Appuyez sur X/x pour sélectionner le
réglage.
• AUTO : Lorsque le téléviseur est sous
tension alors que le système est
en mode veille, ce dernier
reproduit les signaux HDMI
provenant de sa prise de sortie
HDMI. Ce réglage est
recommandé si vous utilisez un
téléviseur compatible avec
« BRAVIA » Sync. Ce réglage
permet d’économiser de l’énergie
en mode veille par rapport au
réglage « ON ».
• ON : Lorsque le système est en mode
veille, il reproduit en permanence
les signaux HDMI provenant de
sa prise de sortie HDMI.
Remarque
• Lorsque « AUTO » est sélectionné, la durée
d’apparition de l’image et du son sur le
téléviseur peut être légèrement plus longue
qu’avec le réglage « ON ».
5 Appuyez sur AMP MENU.
Le menu AMP est désactivé.
Désactivation de la
Fonctionnalités de « BRAVIA » Sync
AMP
MENU
C, X, x, c,
1 Appuyez sur AMP MENU.
2 Appuyez plusieurs fois sur X/x jusqu’à
ce que « SET HDMI » apparaisse, puis
appuyez sur ou c.
3 Appuyez sur X/x pour sélectionner
« PASS THRU », puis appuyez sur
ou c.
fonction Audio Return
Channel
Si le téléviseur est compatible avec la fonction
Audio Return Channel (ARC), un raccordement
à l’aide d’un câble HDMI envoie également le
signal audio numérique provenant du téléviseur.
Pour écouter le son du téléviseur, vous ne devez
pas procéder à un raccordement audio distinct.
Si vous n’utilisez pas la fonction ARC, raccordez
le système et le téléviseur à l’aide d’un cordon
optique numérique et réglez « ARC » sur
« OFF » dans le menu AMP.
suite
25
FR
Page 64

AMP
C, X, x, c,
MENU
1 Appuyez sur AMP MENU.
2 Appuyez plusieurs fois sur X/x jusqu’à
ce que « SET HDMI » apparaisse, puis
appuyez sur ou c.
3 Appuyez plusieurs fois sur X/x jusqu’à
ce que « ARC » apparaisse, puis
appuyez sur ou c.
4 Appuyez sur X/x pour sélectionner
«OFF».
• ON : La fonction ARC est activée.
• OFF : La fonction ARC est désactivée.
5 Appuyez sur AMP MENU.
Le menu AMP est désactivé.
Remarque
• Lorsque « CTRL HDMI » est réglé sur « OFF », la
fonction ARC et ses réglages ne sont pas disponibles.
26
FR
Page 65

Configuration avancée
Contrôle des composants
Sony raccordés à l’aide de
la télécommande
Vous pouvez commander les composants Sony
raccordés à l’aide de la télécommande de ce
système.
Selon l’appareil, certaines fonctions ne peuvent
pas être sélectionnées. Dans ce cas, sélectionnezles à l’aide de la télécommande fournie avec
l’appareil.
* Les touches 5, N, AUDIO et SOUND FIELD +
possèdent un point tactile qui vous servira de guide
lors de l’utilisation.
Pour commander le composant
1 Appuyez sur une des touches de
sélection d’entrée 3 (BD, DVD, SAT/
CATV, TV, VIDEO ou DMPORT) pour
sélectionner le composant que vous
souhaitez commander.
Vous pouvez à présent commander le
composant affecté à la touche de sélection
d’entrée sélectionnée.
2 En vous reportant au tableau suivant,
appuyez sur la touche correspondant à
l’opération souhaitée.
Opérations communes
Touche de la
télécommande
1 TV ?/1
AV ?/1
(mise sous tension/
veille)
4 ENTER Permet de valider la
qk C, X, x, c, Permettent de sélectionner
Fonction
Permet de mettre sous
tension ou hors tension le
téléviseur Sony ou les
composants audio/vidéo
que la télécommande est
configurée pour contrôler.
Appuyez simultanément
sur 1 TV
sur 2
système hors tension, ainsi
que tous les autres
composants que la
télécommande est
configurée pour contrôler
(SYSTEM STANDBY).
sélection.
Pour le téléviseur, tout en
maintenant la touche
qf TV (jaune) enfoncée,
appuyez sur 4 ENTER.
Pour les autres
composants, tout en
maintenant la touche
qd SHIFT enfoncée,
appuyez sur 4 ENTER.
un élément du menu et de
valider la sélection.
?/1/AV ?/1 et
?/1 pour mettre le
Configuration avancée
suite
27
FR
Page 66

Touche de la
télécommande
Fonction
w; Touches de couleur Permettent d’afficher un
guide d’utilisation à
l’écran du téléviseur
lorsque des touches de
couleur sont disponibles.
Suivez le guide
d’utilisation pour exécuter
l’opération sélectionnée.
wg CLEAR Efface la sélection.
Pour le téléviseur, tout en
maintenant la touche qf
TV (jaune) enfoncée,
appuyez sur wg CLEAR.
Pour les autres
composants, tout en
maintenant la touche qd
SHIFT enfoncée, appuyez
sur wg CLEAR.
wh Touches numériques Permettent de sélectionner
directement les chaînes et
les plages.
Pour le téléviseur,
maintenez la touche qf TV
(jaune) enfoncée, puis
appuyez sur les touches
numériques afin de
sélectionner des chaînes.
Pour les autres
composants, maintenez la
touche qd SHIFT
enfoncée, puis appuyez sur
les touches numériques
afin de sélectionner des
chaînes ou des plages.
Touche de la
télécommande
7 TOOLS/
OPTIONS
Fonction
Permet d’accéder à
différentes options
d’affichage et de modifier/
effectuer des réglages
selon la source et le format
d’affichage.
8 MENU/HOME Permet de sélectionner des
chaînes ou des sources
d’entrée et de modifier les
paramètres de votre
téléviseur.
qs TV CH +/– Permet de sélectionner la
chaîne suivante (+) ou
précédente (–).
qg MUTING Permet de désactiver le
son.
qh TV VOL +/– Permet de régler le
volume.
qj O RETURN/EXIT Permet de revenir à l’écran
précédent d’un menu
affiché.
qk C, X, x, c, Permettent de sélectionner
un élément du menu et de
valider la sélection.
ql GUIDE Permet d’afficher le guide
lorsque vous regardez des
chaînes analogiques ou
numériques.
wa AUDIO Permet de sélectionner le
format ou la plage audio.
Pour commander un téléviseur
Maintenez la touche qf TV (jaune) enfoncée
et appuyez sur les touches dotées d’un
point jaune ou d’une indication jaune.
Touche de la
télécommande
5 DISPLAY Affiche le numéro de la
FR
28
Fonction
chaîne actuelle, etc.
Page 67

Touche de la
télécommande
wj THEATER Permet de définir
wk INPUT Sélectionne l’entrée.
Fonction
automatiquement les
paramètres d’image
optimaux pour le
visionnage de films,
notamment les paramètres
de faible luminosité, lors
du raccordement d’un
téléviseur Sony compat ible
avec la fonction de la
touche THEATER. En
outre, le son bascule
automatiquement vers la
sortie audio de ce système
lorsque vous raccordez le
téléviseur au système à
l’aide d’une connexion
HDMI et que la fonction
Commande pour HDMI est
activée.
Touche de la
télécommande
wa AUDIO Permet de sélectionner le
ws SUBTITLE Permet de sélectionner la
wd TOP MENU Permet d’afficher le menu
wf POP UP/MENU Permet d’afficher le menu
Pour commander le lecteur DVD/
lecteur Blu-ray Disc
Touche de la
télécommande
6 ANGLE Permet de basculer vers
Pour commander l’enregistreur
DVD/enregistreur Blu-ray Disc
Touche de la
télécommande
6 ANGLE Permet de basculer vers
8 MENU/HOME Permet d’afficher le menu.
9 m/M Permettent d’effectuer un
0 ./> Permet d’accéder au début
qa N (lecture)/
X (pause, appuyez à
nouveau pour
reprendre une lecture
normale)/x (arrêt)
qk C, X, x, c, Permettent de sélectionner
Fonction
d’autres angles de vue
lorsque le DVD VIDEO en
contient plusieurs.
retour ou une avance
rapides sur le disque
lorsque vous appuyez sur
ces touches pendant la
lecture.
du chapitre ou de la plage
qui précède ou qui suit.
Touches de mode de
lecture.
un élément du menu et de
valider la sélection.
8 MENU/HOME Permet d’afficher le menu.
9 m/M Permettent d’effectuer un
0 ./> Permet d’accéder au début
qa N (lecture)/
qk C, X, x, c, Permettent de sélectionner
wa AUDIO Permet de sélectionner le
ws SUBTITLE Permet de sélectionner la
X (pause, appuyez à
nouveau pour
reprendre une lecture
normale)/x (arrêt)
Fonction
format ou la plage audio.
langue des sous-titres
lorsque des sous-titres
multilingues sont
enregistrés sur un BDROM/DVD VIDEO.
supérieur/menu du disque.
contextuel du BD-ROM ou
le menu du DVD.
Configuration avancée
Fonction
d’autres angles de vue
lorsque le DVD VIDEO en
contient plusieurs.
retour ou une avance
rapides sur le disque
lorsque vous appuyez sur
ces touches pendant la
lecture.
du chapitre ou de la plage
qui précède ou qui suit.
Touches de mode de
lecture.
un élément du menu et de
valider la sélection.
format ou la plage audio.
langue des sous-titres
lorsque des sous-titres
multilingues sont
enregistrés sur un BDROM/DVD VIDEO.
suite
29
FR
Page 68

Touche de la
télécommande
wd TOP MENU Permet d’afficher le menu
wf POP UP/MENU Permet d’afficher le menu
Fonction
supérieur/menu du disque.
contextuel du BD-ROM ou
le menu du DVD.
Pour commander un HDD/DVD
COMBO
Touche de la
télécommande
6 ANGLE Permet de basculer vers
8 MENU/HOME Permet d’afficher le menu.
9 m/M Permettent d’effectuer un
0 ./> Pour spécifier le chapitre
qa N (lecture)/
X (pause, appuyez à
nouveau pour
reprendre une lecture
normale)/x (arrêt)
qk C, X, x, c, Permettent de déplacer la
wa AUDIO Permet de sélectionner le
ws SUBTITLE Permet de sélectionner la
wd TOP MENU Permet d’afficher le menu
wf POP UP/MENU Permet d’afficher le menu
Fonction
d’autres angles de vue
lorsque le DVD VIDEO en
contient plusieurs.
retour ou une avance
rapides sur le disque
lorsque vous appuyez sur
ces touches pendant la
lecture.
ou la plage qui précède ou
qui suit.
Touches de mode de
lecture.
surbrillance (curseur) et de
sélectionner l’élément.
format ou la plage audio.
langue des sous-titres
lorsque des sous-titres
multilingues sont
enregistrés sur un BDROM/DVD VIDEO.
supérieur/menu du disque.
contextuel du BD-ROM ou
le menu du DVD.
Pour commander le SAT
Touche de la
télécommande
8 MENU/HOME Permet d’afficher le menu.
qk C, X, x, c, Permettent de sélectionner
ql GUIDE Permet d’afficher le menu
Remarque
• Les explications ci-dessus sont données à titre
d’exemple. Selon le composant, il est possible que ces
opérations fonctionnent différemment ou que vous ne
puissiez pas les réaliser.
Fonction
un élément du menu et de
valider la sélection.
de guidage.
Pour commander le composant
raccordé par l’intermédiaire
d’une connexion DMPORT
Touche de la
télécommande
5 DISPLAY Appuyez sur cette touche
8 MENU Permet d’afficher le menu.
9 m/M Appuyez sur cette touche
0 ./> Appuyez sur cette touche
qa N (lecture)/
X (pause)/x (arrêt)
qj O RETURN Permet de revenir à l’écran
qk C, X, x, c, Permettent de sélectionner
Fonction
pour sélectionner le
réglage de l’affichage du
panneau frontal.
pour effectuer un retour ou
une avance rapides sur le
disque durant la lecture.
pour passer d’un chapitre à
l’autre.
Touches de mode de
lecture.
précédent d’un menu
affiché.
un élément du menu et de
valider la sélection.
30
FR
Page 69

Modification des
affectations des touches
de sélection d’entrée de la
télécommande
Vous pouvez modifier les paramètres par défaut
des touches de sélection d’entrée en fonction des
composants de votre système. Par exemple, si
vous raccordez un lecteur Blu-ray Disc à la prise
DVD du système, vous pouvez configurer la
touche DVD de cette télécommande afin qu’elle
contrôle le lecteur Blu-ray Disc.
Vous ne pouvez pas modifier les affectations des
touches TV et DMPORT de la télécommande.
INPUT
Touches
numériques
AV ?/1
?/1
Touches
de
sélection
d’entrée
1 Maintenez enfoncée la touche d’entrée
dont vous souhaitez modifier
l’affectation, et appuyez simultanément
sur la touche AV ?/1 et maintenez-la
enfoncée.
Exemple : Tout en maintenant la touche
DVD enfoncée, appuyez sur la touche AV
?/1 et maintenez-la enfoncée.
2 Tout en maintenant la touche AV ?/1
enfoncée, relâchez la touche d’entrée
sélectionnée à l’étape 1.
Exemple : Tout en maintenant la touche AV
?/1 enfoncée, relâchez la touche DVD.
3 Tout en maintenant la touche AV ?/1
enfoncée, reportez-vous au tableau
suivant et appuyez sur la touche
numérique correspondant à la
catégorie souhaitée.
Exemple : Tout en maintenant la touche AV
?/1 enfoncée, appuyez sur 1.
4 Relâchez la touche numérique
sélectionnée à l’étape 3, puis la touche
AV ?/1.
Exemple : Relâchez 1, puis AV ?/1.
A présent, vous pouvez utiliser la touche
DVD pour commander le lecteur Blu-ray
Disc.
Configuration avancée
MASTER
VOL +/–
suite
31
FR
Page 70

Catégories et touches
correspondantes pour BD, DVD,
SAT/CATV, VIDEO et SA-CD/CD
Catégories Appuyez sur
Lecteur Blu-ray Disc
(mode de commande BD1)
Enregistreur Blu-ray Disc
(mode de commande BD3)
Lecteur DVD
(mode de commande DVD1)
Enregistreur DVD
(mode de commande DVD3)
Magnétoscope (mode de
commande VTR3)
Lecteur CD 6
c)
DSS
a)
Réglage initial de la touche BD. Pour plus de détails
sur les réglages BD1 ou BD3, reportez-vous aux
modes d’emploi fournis avec le lecteur Blu-ray Disc
ou l’enregistreur Blu-ray Disc.
b)
Réglage initial de la touche DVD. Les enregistreurs
DVD Sony sont commandés à l’aide d’un réglage
DVD1 ou DVD3. Pour plus d’informations, reportezvous au mode d’emploi qui accompagne
l’enregistreur DVD.
c)
Réglage initial de la touche SAT/CATV.
a)
1
2
3
b)
4
5
7
Pour supprimer toutes les
affectations des touches de la
télécommande
Maintenez enfoncée la touche MASTER VOL –,
puis appuyez sur
?/1
et sur INPUT. Ensuite,
relâchez les touches.
Les réglages initiaux de la télécommande sont
rétablis.
32
FR
Page 71

Sélections et réglages à
l’aide du menu de
l’amplificateur
Utilisation du menu AMP
Vous pouvez régler les paramètres suivants avec
la touche AMP MENU de la télécommande.
Les réglages par défaut sont soulignés.
AMP MENU
LEVEL CNT
TONE BASS –6, –5, … 0,
AUDIO
LEVEL
SW LEVEL –6, –5, … 0
AUDIO
DRC
TREBLE –6, –5, … 0
A/V SYNC ON
–6, –5, … 0,
… +5, +6
… +5, +6
MAX
STD
OFF
… +5, +6
… +5, +6
OFF
SET
*
HDMI
SYSTEM
,
* Cons ultez « Fonctionnalités de « B RAVIA » Sync »
,
(page 21).
**Ce réglage n’apparaît que si « CTRL HDMI » est
réglé sur « ON ».
CTRL
HDMI
VOL
**
LIMIT
PASS
**
THRU
**
ARC
DIMMER ON
DISPLAY ON
SLEEP OFF, 10M,
AUTO
STBY
ON
OFF
MAX, 49, 48,
… 2, 1, MIN
AUTO
ON
ON
OFF
OFF
OFF
20M, …
80M, 90M
ON
OFF
Configuration avancée
DUAL
MONO
NIGHT
MODE
INPUT
MODE
MAIN
SUB
MAIN/SUB
ON
OFF
AUTO
OPT
AMP
MENU
C, X, x, c,
1 Appuyez sur AMP MENU pour activer le
menu AMP.
2 Appuyez plusieurs fois sur C/X/x/c
pour sélectionner l’élément et le
réglage.
3 Appuyez sur AMP MENU pour quitter le
menu AMP.
suite
33
FR
Page 72

Conseil
• Ces réglages sont gardés en mémoire, même si vous
déconnectez le cordon d’alimentation.
Les pages suivantes décrivent chaque paramètre.
Réglage du niveau du hautparleur (CNT LEVEL, SW
LEVEL)
Pour régler le niveau et la balance de l’enceinte
centrale et du caisson de graves.
1 Sélectionnez « LEVEL » dans le menu
AMP, puis appuyez sur ou sur c.
2 Sélectionnez « CNT LEVEL » ou « SW
LEVEL », puis appuyez sur ou sur
c.
• CNT LEVEL : Pour régler le niveau de
l’enceinte centrale.
• SW LEVEL : Pour régler le niveau du
caisson de graves.
3 Sélectionnez le réglage de votre choix
et appuyez sur la touche .
Le paramètre de « CNT LEVEL » et « SW
LEVEL» se règle entre «–6» et «+6» par
incréments de 1. Le réglage par défaut est
«0».
Reproduction du son
Dolby Digital à faible volume
(AUDIO DRC)
Permet de réduire la gamme dynamique du son
de la plage. Utile pour regarder des films à faible
volume. AUDIO DRC s’applique uniquement
aux sources Dolby Digital.
1 Sélectionnez « LEVEL » dans le menu
AMP, puis appuyez sur ou sur c.
2 Sélectionnez « AUDIO DRC », puis
appuyez sur ou c.
3 Sélectionnez le réglage et appuyez sur
.
• OFF : Aucune compression de la gamme
dynamique.
• STD : Reproduit la plage audio en
respectant la gamme dynamique
prévue par l’ingénieur du son au
moment de l’enregistrement.
• MAX : Compresse complètement la
gamme dynamique.
Réglage du niveau des graves
et des aigus (BASS, TREBLE)
Vous pouvez aisément régler le niveau des
graves et des aigus.
1 Sélectionnez « TONE » dans le menu
AMP, puis appuyez sur ou sur c.
2 Sélectionnez « BASS » ou « TREBLE »,
puis appuyez sur ou sur c.
• BASS : Pour régler le niveau des
graves.
• TREBLE : Pour régler le niveau des aigus.
3 Sélectionnez le réglage de votre choix
et appuyez sur la touche .
Le paramètre se règle entre « –6 » et « +6 »
par incréments de 1. Le réglage par défaut
est « 0 ».
Réglage du décalage entre le
son et l’image (A/V SYNC)
Vous pouvez retarder le son à l’aide de cette
fonction lorsque l’image est plus lente que le
son.
1 Sélectionnez « AUDIO » dans le menu
AMP, puis appuyez sur ou sur c.
2 Sélectionnez « A/V SYNC », puis
appuyez sur ou sur c.
3 Sélectionnez le réglage et appuyez sur
.
• OFF : Aucun réglage.
• ON : Règle le décalage entre l’image et le
son.
34
FR
Page 73

Remarques
• Il se peut que vous soyez incapable de régler
parfaitement le décalage entre le son et l’image à
l’aide de cette fonction.
• Cette fonction n’est utile qu’avec Dolby Digital, DTS
et une entrée PCM linéaire (2 canaux) par cordon
coaxial numérique, cordon optique numérique ou
câble HDMI.
3 Sélectionnez le réglage et appuyez sur
.
• ON : La fonction « NIGHT MODE » est
activée.
• OFF : La fonction est désactivée.
Conseil
• Vous pouvez écouter du son Dolby Digital à faible
volume en utilisant AUDIO DRC (page 34).
Reproduction d’un son diffusé
en multiplex (DUAL MONO)
Vous pouvez écouter un son diffusé en multiplex
lorsque le système reçoit un signal diffusé en
multiplex AC-3.
Remarque
• Pour recevoir un signal AC-3, vous devez raccorder
un tuner satellite numérique à la chaîne à l’aide d’un
câble optique ou coaxial et régler le mode de sortie
numérique du tuner satellite numérique sur AC-3.
1 Sélectionnez « AUDIO » dans le menu
AMP, puis appuyez sur ou sur c.
2 Sélectionnez « DUAL MONO », puis
appuyez sur ou sur c.
3 Sélectionnez le réglage et appuyez sur
.
• MAIN : Lecture du canal principal
seulement.
• SUB : Lecture du canal secondaire
seulement.
• MAIN/SUB : Le son principal est
reproduit par l’enceinte
gauche et le son secondaire
par l’enceinte droite.
Reproduction du son à faible
volume (NIGHT MODE)
Cette fonction permet de bénéficier des effets
sonores et d’entendre clairement les dialogues,
même à faible volume.
1 Sélectionnez « AUDIO » dans le menu
AMP, puis appuyez sur ou sur c.
2 Sélectionnez « NIGHT MODE », puis
appuyez sur ou sur c.
Réglage du son provenant du
tuner satellite (INPUT MODE)
Même si vous raccordez le tuner satellite à la
prise d’entrée HDMI SAT/CATV du système, il
est possible que le son multicanaux ne soit pas
reproduit. Cela dépend du tuner satellite. Dans ce
cas, raccordez un cordon optique numérique à la
prise SAT/CATV OPT IN du système, en plus
d’un câble HDMI, et effectuez le réglage
suivant.
1 Sélectionnez « AUDIO » dans le menu
AMP, puis appuyez sur ou sur c.
2 Sélectionnez « INPUT MODE », puis
appuyez sur ou sur c.
3 Sélectionnez « OPT » et appuyez sur la
touche .
• AUTO : Pour reproduire de préférence le
signal audio provenant de la prise
d’entrée HDMI SAT/CATV.
• OPT : Pour reproduire le signal
provenant de la prise SAT/CATV
OPT IN.
Modification de la luminosité
de l’affichage du panneau
frontal (DIMMER)
La luminosité de l’affichage du panneau frontal
peut être réglée sur un des 2 niveaux.
1 Sélectionnez « SYSTEM » dans le menu
AMP, puis appuyez sur ou sur c.
2 Sélectionnez « DIMMER », puis
appuyez sur ou sur c.
Configuration avancée
suite
35
FR
Page 74

3 Sélectionnez le réglage et appuyez sur
.
•ON: Sombre.
• OFF : Lumineux.
3 Sélectionnez l’heure prédéfinie
souhaitée et appuyez sur la touche .
L’affichage des minutes (temps restant)
change comme suit :
Modification du réglage de
l’affichage (DISPLAY)
Pour modifier le comportement de l’affichage du
panneau frontal.
1 Sélectionnez « SYSTEM » dans le menu
AMP, puis appuyez sur ou sur c.
2 Sélectionnez « DISPLAY », puis
appuyez sur ou sur c.
3 Sélectionnez le réglage et appuyez sur
.
• ON : L’affichage reste activé.
• OFF : L’affichage apparaît pendant
quelques secondes lorsque vous
utilisez le système.
Conseil
• Même si vous réglez « DISPLAY » sur « OFF »,
l’affichage indique les types de signaux d’entrée
(entrée numérique uniquement) lorsque vous appuyez
sur DISPLAY.
Remarque
• L’affichage reste activé lorsque la fonction de m ise en
sourdine ou de protection est activée, même si vous
réglez « DISPLAY » sur « OFF ».
Utilisation de la minuterie
d’endormissement (SLEEP)
Vous pouvez programmer l’extinction du
système à une heure déterminée et vous
endormir ainsi au son de la musique. Vous
pouvez régler cette heure par incréments de
10 minutes.
1 Sélectionnez « SYSTEM » dans le menu
AMP, puis appuyez sur ou sur c.
2 Sélectionnez « SLEEP », puis appuyez
sur ou sur c.
OFF y 10M y 20M
YY
90M y 80M ... 30M
Remarque
• Cette fonction est disponible uniquement sur ce
système et ne fonctionne pas sur le téléviseur raccordé
ou sur d’autres composants.
Fonction de mise en veille
automatique (AUTO STBY)
Pour réduire la consommation d’énergie. Le
système passe automatiquement en mode veille
lorsque vous ne l’utilisez pas pendant environ
30 minutes et s’il ne reproduit aucun son pendant
environ 30 minutes.
Le réglage par défaut est « ON ».
1 Sélectionnez « SYSTEM » dans le menu
AMP, puis appuyez sur ou sur c.
2 Sélectionnez « AUTO STBY », puis
appuyez sur ou sur c.
3 Sélectionnez le réglage et appuyez sur
.
• ON : La fonction « AUTO STBY » est
activée.
• OFF : La fonction est désactivée.
Remarques
• En ca s de mise hors tension du système par la fo nction
AUTO STBY, il se peut qu’il ne se mette pas
automatiquement sous tension lors de la prochaine
activation du téléviseur.
• « AUTO STBY » se met à clignoter sur l’affichage du
panneau frontal environ deux minutes avant le
passage du système en mode veille.
36
FR
Page 75

Informations complémentaires
Dépannage
Si vous rencontrez l’une des difficultés suivantes
lors de l’utilisation de ce système, consultez ce
guide de dépannage pour tenter de remédier au
problème. Si le problème persiste, consultez
votre revendeur Sony le plus proche.
ALIMENTATION
L’appareil ne se met pas sous tension.
• Vérifiez que le cordon d’alimentation est
correctement raccordé.
Le système ne se met pas sous tension en
même temps que le téléviseur.
• Vérifiez les réglages du haut-parleur du
téléviseur. Les réglages des enceintes du
téléviseur contrôlent la mise sous tension
automatique du système avec le téléviseur.
Pour écouter le son du téléviseur par
l’intermédiaire du système, vous devez
ajuster les réglages des enceintes du
téléviseur afin que le son soit reproduit par
l’équipement audio externe. Pour plus de
détails, reportez-vous au mode d’emploi du
téléviseur.
• Le système ne se met pas sous tension en
même temps que le téléviseur si le son était
reproduit par les haut-parleurs du téléviseur
la dernière fois que vous avez mis celui-ci
hors tension.
La fonction Mise hors tension du système ne
fonctionne pas.
• Modifiez le réglage du téléviseur pour
désactiver automatiquement les composants
raccordés lorsque vous mettez le téléviseur
hors tension. Pour plus de détails, reportezvous au mode d’emploi du téléviseur.
Le système se met hors tension lorsque vous
mettez le téléviseur hors tension.
• Lorsque la fonction Commande pour HDMI
est activée, la fonction Mise hors tension du
système est active et le système se met hors
tension lorsque vous mettez le téléviseur
hors tension.
Le système se met automatiquement hors
tension.
• La fonction AUTO STBY est activée
(page 36).
SON
Le son multicanaux Dolby Digital ou DTS n’est
pas reproduit.
• Vérifiez que le DVD, le Blu-ray Disc, etc.
est enregistré en Dolby Digital ou DTS.
• Lorsque vous raccordez le lecteur Blu-ray
Disc, DVD, etc. aux prises d’entrée
numériques de ce système, vérifiez les
réglages audio (réglages correspondant à la
sortie audio) du composant raccordé.
Vous n’arrivez pas à obtenir les effets
surround.
• Il est possible que le traitement surround ne
fonctionne pas. Cela dépend du signal
numérique (page 20). Appuyez sur
DISPLAY pour faire apparaître le format
audio sur l’affichage du panneau frontal. Si
« 2.0CH » ou « 1.0CH » apparaît sur
l’affichage du panneau frontal, il s’agit d’un
signal stéréo ou mono qui ne comprend pas
de son multicanaux. Si « 5.1CH », etc.
apparaît, le signal contient plusieurs canaux,
mais l’effet surround peut être subtil selon le
programme ou le disque en cours de lecture.
Le système n’émet aucun son provenant du
téléviseur.
• Vérifiez le raccordement du cordon optique
numérique ou du cordon audio connecté au
système et au téléviseur (page 10).
• Vérifiez la sortie audio du téléviseur.
• Si le téléviseur est compatible avec la
fonction ARC, réglez « CTRL HDMI » et
« ARC » sur « ON ».
Le système et le téléviseur reproduisent le
son.
• Si la fonction Commande pour HDMI est
désactivée ou si le composant raccordé n’est
pas compatible avec la fonction Commande
pour HDMI, coupez le son du système ou du
téléviseur.
suite
37
Informations complémentaires
FR
Page 76

Le son est en retard sur l’image du téléviseur.
•Réglez «A/V SYNC» sur «OFF» si «A/V
SYNC » est réglé sur « ON ».
Le volume diminue lorsque le mode de sortie
passe du haut-parleur du téléviseur aux
enceintes du système.
• La fonction de Limitation du volume
fonctionne. Pour plus de détails, reportezvous à la section « Utilisation de la fonction
de Limitation du volume » (page 24).
Le système ne reproduit aucun son ou ne
reproduit que très faiblement le son provenant
du composant raccordé.
• Appuyez sur MASTER VOL + et vérifiez le
niveau de volume.
• Appuyez sur MUTING ou sur MASTER
VOL + pour annuler la fonction de mise en
sourdine.
• Vérifiez que la source d’entrée est
correctement sélectionnée.
• Vérifiez que tous les câbles et cordons du
système ainsi que des composants raccordés
sont complètement insérés.
• Vérifiez les réglages HDMI des composants
raccordés.
Aucun son n’est reproduit par les enceintes
spécifiques.
• Vérifiez que les connecteurs du cordon
d’enceinte sont bien insérés dans les prises.
• Selon la source audio du système ou son
champ acoustique (page 20), il se peut
qu’aucun son ne soit reproduit par l’enceinte
centrale.
Le son est interrompu ou s’accompagne de
parasites.
• Consultez « Formats pris en charge par ce
système » (page 40).
IMAGE
Aucune image n’apparaît sur le téléviseur.
• Vérifiez que le téléviseur et le système sont
correctement raccordés.
• Vérifiez que le téléviseur est correctement
sélectionné.
• Réglez le téléviseur sur le mode d’entrée
adéquat.
• Vérifiez si les connexions HDMI IN et
HDMI OUT ne sont pas inversées.
• Vérifiez que les cordons sont bien insérés
dans les prises du composant et du système
(pages 10, 12).
Aucune image 3D n’apparaît sur le téléviseur.
• Selon le téléviseur ou le composant vidéo, il
est possible que les images 3D
n’apparaissent pas. Vérifiez les formats
d’images 3D pris en charge par le système
(page 40).
Lorsque le système est en mode veille, le
téléviseur ne reproduit aucune image et aucun
son.
• « CTRL HDMI » est réglé sur « OFF ».
• Lorsque le système est en mode veille,
l’image et le son sont reproduits par le
composant HDMI sélectionné lors de la
dernière mise hors tension du système. Si
vous souhaitez écouter un composant autre
que le dernier composant HDMI
sélectionné, écoutez-le à l’aide de
l’opération Lecture une touche ou mettez le
système sous tension pour sélectionner le
composant HDMI que vous souhaitez
écouter.
• Vérifiez que « PASS THRU » est réglé sur
« ON » dans le menu AMP si vous
connectez des composants non compatibles
avec « BRAVIA » Sync au système
(page 25).
La télécommande ne fonctionne
pas
• Dirigez la télécommande vers le capteur de
la télécommande situé sur le système.
• Retirez tous les obstacles se trouvant entre la
télécommande et le système.
• Si les piles de la télécommande sont usées,
remplacez-les.
• Assurez-vous de sélectionner la bonne
entrée sur la télécommande.
38
FR
Page 77

AUTRES
Commande pour HDMI ne fonctionne pas
correctement.
• Vérifiez la connexion HDMI (page 10).
• Réglez la fonction Commande pour HDMI
sur le téléviseur (page 21).
• Veillez à ce que le composant raccordé soit
compatible avec « BRAVIA » Sync.
• Vérifiez les réglages de la Commande pour
HDMI du composant raccordé. Consultez le
mode d’emploi fourni avec le composant
raccordé.
• Si vous modifiez la connexion HDMI,
connectez/déconnectez le cordon
d’alimentation ou, en cas de coupure de
courant, répétez les procédures de
« Fonctionnalités de « BRAVIA » Sync »
(page 21).
• Lorsque vous branchez ou débranchez le
cordon d’alimentation, attendez au moins
15 secondes avant d’utiliser le système.
• Si vous raccordez la sortie audio du
composant vidéo et le système à l’aide d’un
câble HDMI, aucun son ne peut être
reproduit en raison de la fonction
« BRAVIA » Sync. Dans ce cas, réglez
« CTRL HDMI » sur « OFF » (page 22) ou
raccordez la prise de sortie audio
directement au téléviseur plutôt qu’en
passant par le système.
Si les messages « PROTECTOR » ou « PUSH
POWER » apparaissent en alternance sur
l’affichage du panneau frontal.
Appuyez sur ?/1 pour désactiver le système,
puis vérifiez le point suivant une fois le
message « STANDBY » disparu.
• Les orifices de ventilation du système ne
sont-ils pas obstrués ?
Une fois le point ci-dessus vérifié et les
problèmes éventuels résolus, mettez le
système sous tension. Si vous ne trouvez pas
la cause du problème alors que vous avez
vérifié le point ci-dessus, consultez le
revendeur Sony le plus proche.
Si après avoir suivi les étapes
ci-dessus le système ne
fonctionne toujours pas
correctement, réinitialisez-le
comme suit :
Utilisez les touches situées sur le système.
1 Appuyez sur ?/1 pour mettre l’appareil
sous tension.
2 Appuyez sur ?/1 tout en appuyant sur
INPUT SELECTOR et VOLUME –.
« COLD RESET » s’affiche et le système
est réinitialisé. Le menu AMP, le champ
acoustique, etc. retrouvent leurs réglages
par défaut.
Informations complémentaires
39
FR
Page 78

Caractéristiques
Formats pris en charge par ce
système
Ce système prend en charge les formats d’entrée
numériques ci-dessous.
Format Pris en charge/Non pris en
Dolby Digital a
DTS a
PCM linéaire
(2 canaux)*
PCM linéaire
(5.1 canaux,
7.1 canaux)*
(Uniquement sur
HDMI)
Dolby Digital Plus ×
Dolby True HD ×
DTS-HD ×
* PCM linéaire n’accepte pas les fréquences
d’échantillonnage supérieures à 48 kHz.
SPECIFICATIONS DE PUISSANCE AUDIO
PUISSANCE DE SORTIE ET DISTORSION
HARMONIQUE TOTALE :
(FTC)
pour le modèle des EtatsUnis Avant G + Avant D : Avec des charges de
charge
a
a
4 ohms, les deux canaux
étant excités, de 180 à
20 000 Hz ; puissance
efficace minimale de 50 W
par canal, avec une
distorsion harmonique
totale de 1 % max. de
250 mW à la puissance de
sortie nominale.
Partie amplificateur
Modèles des Etats-Unis :
PUISSANCE DE SORTIE (référence)
Avant G/Avant D/Centrale :
85 W (par canal sous
4 ohms, 1 kHz)
Caisson de graves : 85 W (sous 4 ohms,
100 Hz)
Modèles canadiens :
PUISSANCE DE SORTIE (nominale)
Avant G/Avant D : 60 W + 60 W (sous
4ohms, 1kHz, 1% DHT)
PUISSANCE DE SORTIE (référence)
Avant G/Avant D/Centrale :
85 W (par canal sous
4 ohms, 1 kHz)
Caisson de graves : 85 W (sous 4 ohms,
100 Hz)
Entrées
TV, SA-CD/CD Analogique
TV, SAT/CATV Numérique (optique)
VIDEO Numérique (coaxiale)
Partie HDMI
Connecteur Connecteur HDMI™
Entrées/sorties vidéo BD, DVD, SAT/CATV ;
640 × 480p@60 Hz
720 × 480p@59,94/60 Hz
1280 × 720p@59,94/60 Hz
1920 × 1080i@59,94/60 Hz
1920 × 1080p@59,94/60 Hz
720 × 576p@50 Hz
1280 × 720p@50 Hz
1920 × 1080i@50 Hz
1920 × 1080p@50 Hz
1920 × 1080p@24 Hz
Entrées/sorties vidéo (3D) BD, DVD, SAT/CATV ;
1280 × 720p@59,94/60 Hz
Paquet d’images
1920 × 1080i@59,94/60 Hz
Paquet d’images
1920 × 1080i@59,94/60 Hz
Côte à côté (Demi)
1920 × 1080p@59,94/60 Hz
Côte à côte (Demi)
1280 × 720p@50 Hz
Paquet d’images
1920 × 1080i@50 Hz
Paquet d’images
1920 × 1080i@50 Hz
Côte à côte (Demi)
40
FR
Page 79

1920 × 1080p@50 Hz
Côte à côte (Demi)
1920 × 1080p@24 Hz
Paquet d’images
Entrées audio BD, DVD, SAT/CATV :
PCM linéaire 7,1 canaux/
Dolby Digital/DTS
Enceinte (SS-CT150)
Enceinte avant
Enceinte Bass reflex pleine plage
Haut-parleur 50 mm × 90 mm (2 po. ×
5
/8 po.) de type conique
3
Impédance nominale 4 ohms
Enceinte centrale
Enceinte Bass reflex pleine plage
Haut-parleur 50 mm × 90 mm (2 po. ×
5
/8 po.) de type conique
3
Impédance nominale 4 ohms
Dimensions (approx.) 800 mm × 66 mm × 60 mm
1
/2 po. × 2 5/8 po. ×
(31
3
2
/8 po.) (l/h/p)
Poids (approx.) 1,3 kg (2 li. 14 on.)
Caisson de graves (SA-WCT150)
Enceinte Caisson de graves, Bass
reflex
1
Haut-parleur 130 mm (5
/8 po.) de type
conique
Impédance nominale 4 ohms
Dimensions (approx.) 196 mm × 450 mm ×
410 mm (7
po. × 16
3
/4 po. × 17 3/4
1
/4 po.) (l/h/p)
Poids (approx.) 10,5 kg (23 li. 3 on.)
Informations complémentaires
Caractéristiques générales
Puissance de
raccordement 120 V CA, 60 Hz
Consommation électrique
Marche : 75 W
Mode veille : 0,3 W ou moins (Commande pour
HDMI désactivée)
Intensité de sortie
(DIGITAL MEDIA PORT) DC OUT : 5 V, 700 mA
La conception et les caractéristiques sont sujettes à
modification sans préavis.
41
FR
Page 80

Index
A
A/V SYNC 34
Affichage du panneau frontal
11, 25
ARC
AUDIO DRC
AUTO STBY
34
36
15
B
BASS 34
« BRAVIA » Sync
21
C
Champ acoustique 20
CNT LEVEL
Cordon optique numérique
34
10
D
DIMMER 35
DISPLAY
DUAL MONO
36
35
F
Fonction Limitation du volume 24
I
INPUT MODE 35
INPUT SELECTOR
14
R
Raccordement
adaptateur DIGITAL MEDIA PORT
lecteur Blu-ray Disc
lecteur DVD
PlayStation 2
PlayStation 3
téléviseur
tuner de télévision par câble
tuner satellite
10
10
10, 12
12
11
10, 12
S
Sourdine 16
SW LEVEL
34
T
Télécommande
avant l’utilisation
utilisation
TREBLE
34
6
16, 27
V
VOLUME 14, 16
12
10, 12
M
Menu AMP 33
Minuterie d’endormissement
N
NIGHT MODE 35
P
PROTECTOR 39
FR
42
36
Page 81

Page 82

3
ADVERTENCIA
Para reducir el riesgo de incendios o
electrocución, no exponga el aparato a la
lluvia ni a la humedad.
La unidad no estará desconectada de la fuente de
alimentación de ca mientras esté conectada a la toma de
pared, aunque se haya apagado la propia unidad.
Registro de propiedad
El modelo y el número de serie se encuentran en la parte
posterior del altavoz potenciador de graves. Registre el
número de serie en el espacio que se encuentra a
continuación. Consúltelo cuando deba llamar a un
distribuidor Sony con respecto a este producto.
N.º de modelo HT-CT150
N.º d e serie
Para reducir el riesgo de incendio, no cubra los orificios
de ventilación del aparato con periódicos, manteles,
cortinas, etc.
No coloque objetos con llamas al descubierto como,
por ejemplo, velas encendidas encima del aparato.
Para reducir el riesgo de incendio o de sufrir descargas
eléctricas, no exponga el aparato a goteos o
salpicaduras, ni coloque encima de éste recipientes que
contengan líquidos como, por ejemplo, jarrones.
Dado que el enchufe del cable de alimentación se
utiliza para desconectar la unidad de la fuente de
alimentación, conecte la unidad en una toma de ca de
fácil acceso. En caso de percibir alguna anomalía en la
unidad, desconecte inmediatamente el enchufe del
cable de alimentación de la toma de ca.
No sitúe el aparato en un espacio cerrado, como una
estantería o un armario empotrado.
No exponga las baterías ni los aparatos con baterías
instaladas a fuentes de calor excesivo como la luz solar,
el fuego o similares.
Para clientes en los EE. UU.
Este símbolo señala al usuario la presencia
de “voltaje peligroso” sin aislamiento en el
interior del aparato de tal intensidad que
podría presentar riesgo de descarga eléctrica.
Este símbolo indica al usuario que el manual
que acompaña a este aparato contiene
instrucciones importantes referentes a su
funcionamiento y mantenimiento.
Instrucciones de seguridad
importantes
1) Lea estas instrucciones.
2) Conserve estas instrucciones.
3) Preste atención a las advertencias.
4) Siga las instrucciones.
5) No utilice este aparato cerca del agua.
6) Límpielo sólo con un paño seco.
7) No bloquee los orificios de ventilación. Instale el
aparato según las instrucciones del fabricante.
8) No instale el equipo cerca de fuentes de calor, como
radiadores, rejillas de calefacción, estufas u otros
aparatos (incluidos amplificadores) que producen
calor.
9) No anule el propósito de seguridad del enchufe
polarizado o enchufe con descarga a tierra. Un
enchufe polarizado dispone de dos hojas, una más
ancha que la otra. Un enchufe de tipo conexión a
tierra tiene dos hojas y una tercera clavija para la
conexión a tierra. La hoja ancha o la tercera clavija
se proporcionan por razones de seguridad. Si el
enchufe suministrado no entra en la toma, contacte
a un electricista para que reemplace la toma
obsoleta.
10) Evite pisar o perforar los cables de alimentación,
sobre todo en la parte del enchufe, en los
receptáculos y en el punto en el que el cable sale del
equipo.
11) Use solamente los accesorios indicados por el
fabricante.
12) Use solamente con el carrito, soporte, trípode,
ménsula o mesa indicados por el fabricante, o que
se venden con el equipo. Al utilizar el carrito, tenga
cuidad al desplazar el carrito con el aparato, para
evitar lesiones y que se vuelque el equipo.
ES
2
Page 83

13) Desenchufe este equipo durante tormentas
eléctricas o cuando no se vaya a utilizar por
períodos prolongados.
14) Consulte a personal de servicio calificado para
cualquier mantenimiento. Se requiere servicio de
mantenimiento cuando se ha dañado el equipo de
algún modo, tal como cuando se daña el cable o
enchufe de alimentación, se ha derramado líquido
sobre el equipo o han caído objetos dentro de él, se
ha expuesto el equipo a lluvia o humedad o cuando
el equipo no opera como de costumbre o se ha
dejado caer.
La siguiente declaración de la FCC (Comisión Federal
de Comunicaciones) sólo se aplica a la versión de este
modelo fabricado para la venta en los EE. UU. Las
demás versiones no cumplen con las regulaciones
técnicas de la FCC.
NOTA:
Este equipo ha sido sometido a pruebas y se ha
determinado que cumple con los límites requeridos por
los aparatos digitales de la clase B, en cumplimiento
con la Sección 15 de las regulaciones de la FCC. Estas
especificaciones han sido diseñadas para proporcionar
una protección razonable contra interferencias
perjudiciales en una instalación residencial. Este
equipo genera, utiliza y puede emitir energía de
radiofrecuencia y, de no ser instalado y utilizado de
acuerdo con las instrucciones podría ocasionar
interferencias perjudiciales en las comunicaciones de
radio. No obstante, no se garantiza que no ocurra
ninguna interferencia en una instalación particular. Si
el presente equipo causa interferencia en la recepción
de radio o televisión, que puede determinarse al apagar
y encender el equipo, se recomienda que el usuario
intente corregir la interferencia mediante una o más de
las siguientes medidas:
– Cambie la orientación o ubicación de la antena de
recepción.
– Aumente la separación entre el equipo y el receptor.
– Conecte el equipo en una toma de circuito distinta a
la que está conectado el receptor.
– Consulte con su distribuidor o con un técnico
especializado en radio/televisión para solicitar
asistencia.
PRECAUCIÓN
Queda notificado que ante cualquier cambio o
modificación que no haya sido aprobado expresamente
en este manual podría anular su poder para utilizar este
equipo.
Precauciones
Seguridad
• En caso de que caiga algún objeto sólido o líquido
dentro del sistema, desconéctelo y solicite al personal
especializado que realice una verificación antes de
volver a utilizarlo.
• No se apoye en el altavoz potenciador de graves, dado
que podría caerse y lastimarse o podría ocasionar
daños en el sistema.
Fuentes de alimentación
• Antes de conectar el sistema, compruebe que la
tensión de funcionamiento sea idéntica a su fuente de
alimentación local. La tensión de funcionamiento se
indica en la placa de identificación en la parte
posterior del altavoz potenciador de graves.
• Si no va a utilizar el sistema por un tiempo
prolongado, asegúrese de desconectarlo de la toma de
pared. Para desconectar el cable de alimentación de
ca, tire del enchufe, nunca del cable.
• Una clavija del enchufe es más ancha que la otra por
motivos de seguridad y entrará en la toma de pared de
una sola manera. Si no puede insertar la totalidad del
enchufe en la toma, comuníquese con su proveedor.
• El cable de alimentación de ca sólo deberá ser
reemplazado en un centro de servicio autorizado.
Acumulación térmica
Si bien el sistema se calienta durante su
funcionamiento, no se trata de una anomalía. El uso
prolongado de este sistema puede provocar un
incremento considerable de la temperatura en la parte
trasera e inferior del sistema. Para evitar quemarse, no
toque el sistema.
Ubicación
• Instale el sistema en un lugar con ventilación
adecuada para evitar el recalentamiento interno y
prolongar la vida útil de sistema.
• No instale el sistema cerca de fuentes de calor, como
radiadores o conductos de aire caliente, ni en lugares
expuestos a la luz solar directa, polvo excesivo,
vibraciones mecánicas o golpes.
• No coloque objetos en la parte posterior del altavoz
potenciador de graves que puedan bloquear las
ranuras de ventilación y ocasionar fallos de
funcionamiento.
ES
continuación
ES
3
Page 84

• No coloque el sistema cerca de equipos como
televisores, videograbadoras o lectores de cintas. (Si
el sistema se utiliza junto con un televisor, una
videograbadora o un lector de cinta y se coloca
demasiado cerca de ese equipo, es posible que se
generen ruidos y que la calidad de la imagen se vea
afectada. Esto se produce especialmente cuando se
utiliza una antena interior. Por lo tanto,
recomendamos la utilización de una antena exterior.)
• Tenga cuida do al colocar el sistema en superficies que
han sido tratadas de manera especial (encerados,
barnizados con aceites, pulidos, etc.), ya que pueden
mancharse o decolorarse.
Funcionamiento
Antes de conectar los otros componentes, asegúrese de
apagar y desenchufar el sistema.
Si encuentra irregularidades en el
color en la pantalla de un televisor
cercano
Debido a su diseño magnéticamente apantallado, este
sistema puede instalarse cerca de un televisor. Sin
embargo, es posible que todavía se observen ciertas
irregularidades en el color de la pantalla según el tipo
de televisor que utilice.
En caso de que observe
irregularidades en el color…
Desconecte la alimentación del televisor y vuelva a
conectarla después de 15 ó 30 minutos.
Si vuelve a observar irregularidades
en el color…
Aleje el sistema del televisor.
Limpieza
Limpie el sistema con un paño seco y suave. No utilice
estropajos abrasivos, detergente en polvo ni
disolventes, como alcohol o bencina.
Si desea realizar alguna pregunta o solucionar algún
problema relacionado con el sistema, póngase en
contacto con el distribuidor Sony más cercano.
Derechos de autor
Este sistema incorpora Dolby* Digital, Pro Logic
Surround y DTS** Digital Surround System.
Fabricado bajo licencia de Dolby Laboratories.
*
Dolby, Pro Logic y el símbolo de la doble D son
marcas comerciales de Dolby Laboratories.
** Fabricado bajo licencia segú n Patente de los EE. UU
N.°: 5.451.942; 5.956.674; 5.974.380; 5.978.762;
6.487.535 y otras patentes emitidas y pendientes en
los EE. UU. y el resto del mundo. DTS y el símbolo
de DTS son marcas comerciales registradas y DTS
Digital Surround y los logotipos de DTS son marcas
comerciales de DTS, Inc. Incluye el software de los
productos. © DTS, Inc. Reservados todos los
derechos.
Este sistema incorpora tecnología High-Definition
Multimedia Interface (HDMI™).
HDMI, el logotipo de HDMI y High-Definition
Multimedia Interface son marcas comerciales o marcas
comerciales registradas de HDMI Licensing LLC en
los EE. UU. y otros países.
“BRAVIA Sync” es una marca comercial de Sony
Corporation.
“PlayStation” es una marca comercial registrada de
Sony Computer Entertainment Inc.
“x.v.Color” y el logotipo de “x.v.Color” son marcas
comerciales de Sony Corporation.
®
ENERGY STAR
registrada en EE. UU.
Como socio de ENERGY STAR
Sony Corporation ha determinado
que este producto cumple con los
requisitos de eficiencia energética
determinados por ENERGY STAR
es una marca
®
,
®
.
ES
4
Page 85

Tabla de contenido
Precauciones ............................................3
Procedimientos iniciales
Desembalaje.............................................6
Cómo colocar el sistema ..........................7
Cómo conectar el altavoz.........................9
Cómo conectar el televisor y el
reproductor, etc................................10
Cómo conectar otros componentes........12
Cómo conectar un cable de alimentación
de ca.................................................13
Cómo configurar la salida de sonido del
componente conectado ....................13
Opciones de reproducción
Índice de componentes y controles........14
Cómo disfrutar del televisor...................17
Cómo disfrutar de otros componentes ...18
Función de sonido envolvente
Cómo disfrutar del efecto de sonido
envolvente........................................20
Características de “BRAVIA”
Sync
¿Qué es “BRAVIA” Sync? ....................21
Cómo prepararse para “BRAVIA”
Sync .................................................21
Cómo disfrutar de Blu-ray Disc/DVD ...23
(Reproducción mediante una
pulsación)
Cómo disfrutar del sonido del televisor
desde el sistema ...............................23
(Control de audio del sistema)
Apague el sistema, el televisor y los
componentes conectados .................24
(Apagado del sistema)
Cómo usar la función de ahorro de
energía .............................................25
(HDMI PASS THRU)
Para apagar la función Audio Return
Channel............................................25
Ajustes avanzados
Cómo controlar los componentes de Sony
con el mando a distancia................. 27
Cómo cambiar las asignaciones de los
botones de entrada del mando a
distancia ..........................................30
Configuración y ajustes mediante el menú
del amplificador.............................. 32
Información adicional
Solución de problemas .......................... 36
Especificaciones....................................38
Índice..................................................... 41
ES
5
Page 86

Procedimientos iniciales
Desembalaje
• Altavoz potenciador de graves
(SA-WCT150) (1)
• Cable de altavoz (1)
• Mando a distancia
(RM-AAU072) (1)
• Cable digital óptico para
televisor (2,5 m) (1)
• Altavoz (SS-CT150) (1)
• Pilas R6 (tamaño AA) (2)
• Garantía (1)
• Manual de instrucciones (1)
Cómo insertar las pilas en el mando a distancia
Inserte dos pilas R6 (tamaño AA) (suministradas) de forma que coincidan los extremos 3 y # de
dichas pilas con las marcas del interior del compartimiento. Para utilizar el mando a distancia, oriéntelo
hacia el sensor del mando a distancia en el visor del panel frontal del altavoz potenciador de graves.
Notas
• No deje el mando a distancia en lugares extremadamente cálidos o húmedos.
• No emplee pilas nuevas junto con usadas.
• No deje caer ningún objeto extraño dentro de la carcasa del mando a distancia, sobre todo al sustituir las pilas.
• No exponga el sensor del mando a distancia a la luz solar directa ni a dispositivos de iluminación. Si lo hace, puede
provocar un fallo de funcionamiento.
• Cuando tenga previsto que no va a utilizar el mando a distancia durante mucho tiempo, extraiga las pilas para evitar
su corrosión y posibles daños por fugas.
ES
6
Page 87

Cómo colocar el sistema
Cómo conectar el cable de altavoz al altavoz
Los conectores del cable de altavoz están codificados con colores de acuerdo con el tipo de altavoz.
Conecte los conectores del cable de altavoz de modo que coincidan con el color de las tomas del
altavoz.
Parte posterior del altavoz
R CENTER L
Verde
Rojo
Blanco
Procedimientos iniciales
A
Nota
• Cuando instale el altavoz en una pared, tenga cuidado de no tropezar con el cable conectado al altavoz.
A Cable de altavoz
(suministrado)
continuación
ES
7
Page 88

Instalación del altavoz en una pared
Puede instalar el altavoz en la pared.
Notas
• Utilice los tornillos adecuados para el material y la resistencia de la pared. Dado que las placas de yeso son muy
frágiles, coloque los tornillos en una viga de la pared. Instale el altavoz en un área reforzada de la pared que sea
vertical y plana.
• Asegúrese de solicitar la instalación a distribuidores o contratistas autorizados por Sony. Preste especial atención a
la seguridad durante la instalación.
• Sony no se responsabiliza por accidentes o daños ocasionados por una instalación incorrecta, resistencia
insuficiente de la pared, instalación incorrecta de los tornillos o desastres naturales, etc.
1 Prepare los tornillos (no suministrados) adecuados para los orificios en la parte
posterior del altavoz. Consulte las ilustraciones que se muestran a continuación.
4 mm (1/6 pulgadas)
más de 25 mm (1 pulgada)
5mm
(1/5 pulgadas)
10 mm
(2/5 pulgadas)
Orificio en la parte posterior del altavoz
2 Ajuste los tornillos a la pared. Los tornillos deben sobresalir entre 6 y 7 mm (aprox. 1/4
pulgadas).
265 mm
(10 2/5 pulgadas)
6 a 7 mm
(aprox. 1/4 pulgadas)
ES
8
Page 89

3 Cuelgue el altavoz en los tornillos.
Alinee los orificios en la parte posterior del altavoz con los tornillos, a continuación, cuelgue el
altavoz en los dos tornillos.
Cómo conectar el altavoz
Los conectores del cable de altavoz están codificados con colores de acuerdo con el tipo de altavoz.
Conecte los conectores del cable de altavoz de modo que coincidan con el color de las tomas
SPEAKERS.
Parte posterior del
altavoz potenciador
de graves
DMPORT
DC 5V
0.7A MAX
L
ONLY FOR
SS-CT150
AUDIO I N
SA-CD/CD
SAT/CATV INBD INDVD IN
HDMI
L
R
AUDIO I N
TV
ARC
TV OUT
DIGITALSPEAKERS
COAX IN
OPT IN
VIDEO
TVSAT/CATVR CENTER
Procedimientos iniciales
Verde
Rojo
Altavoz
A Cable de altavoz (suministrado)
A
Blanco
ES
9
Page 90

Cómo conectar el televisor y el reproductor, etc.
Conecte el televisor y/o el reproductor, etc. al sistema mediante las tomas HDMI a través de un cable
HDMI.
Si conecta los componentes compatibles con Sony “BRAVIA” Sync con los cables HDMI, la
operación se puede simplificar al establecer la función Control por HDMI en el televisor para cada
componente conectado. Consulte “Características de “BRAVIA” Sync” (página 21).
Reproductor de DVD, etc.
Cable HDMI
HDMI OUT
(no suministrado)
Cable HDMI
(no suministrado)
Televisor
HDMI IN
Parte posterior del
altavoz potenciador
de graves
Reproductor de Blu-ray
Disc, etc.
HDMI OUT
DMPORT
DC 5V
0.7A MAX
ONLY FOR
SS-CT150
L
Cable HDMI
(no suministrado)
AUDIO I N
SA-CD/CD
SAT/CATV INDVD IN BD IN
L
R
AUDIO I N
TV
HDMI
DIGITALSPEAKERS
OPT IN
Cable digital óptico
(no suministrado)
ARC
TV OUT
COAX IN
VIDEO
TVSAT/CATVR CENTER
Cable HDMI
(no suministrado)
Audio digital OUT
(óptico)
Cable digital óptico para
televisor (suministrado)
Sintonizador satelital o
sintonizador de televisión por
cable, etc. con una toma HDMI
Audio digital OUT
(óptico)
HDMI OUT
10
ES
Page 91

Notas
• El sistema es compatible con la función Audio Return Channel (ARC). Si conecta el sistema a una toma HDMI del
televisor compatible con ARC mediante un cable HDMI, no será necesario conectar el televisor al sistema con el
cable digital óptico (página 25).
• Si es compatible con la función “ARC”, podrá ver las letras ARC junto a la toma HDMI del televisor. Aunque
conecte un cable HDMI a la toma, si la toma de entrada HDMI no es compatible con la función ARC, no podrá
utilizar la función ARC.
• La función ARC sólo está disponible cuando Control por HDMI está activado.
• Según el sintonizador satelital, es posible que el sonido multicanal no pueda oírse. En este caso, conecte un cable
digital óptico además de un cable HDMI y establezca “INPUT MODE” en “OPT” en el menú AMP (página 34).
• Conecte una “PlayStation 3”, etc., en cualquier toma HDMI disponible. Todas las tomas HDMI del sistema
funcionan de la misma manera.
• Las conexion es de las tomas HDMI tienen prioridad cuando conecta diferentes componentes en el sistema mediante
tomas INPUT OPT/INPUT COAX y HDMI.
• Al conectar un televisor que no posee una toma de salida de audio digital óptico, conecte el televisor al sistema
mediante un cable de audio analógico (no suministrado).
Sugerencia
• Aunque el sistema esté desactivado (modo en espera activo), la señal HDMI se enviará desde el componente
conectado al televisor a través de la conexión HDMI. Puede disfrutar de la imagen y el sonido desde el componente
del televisor.
Notas sobre las conexiones HDMI
• Utilice un cable High Speed HDMI. Si utiliza un cable Standard HDMI, las imágenes 1080p, Deep
Color o 3D no se visualizarán correctamente.
• Sony recomienda la utilización de un cable HDMI autorizado o un cable HDMI Sony.
• Si la imagen es deficiente o si el sonido no se emite desde un componente conectado a través del cable
HDMI, compruebe la configuración del componente conectado.
• Las señales de audio (frecuencia de muestreo, longitud de bits, etc.) transmitidas desde una toma
HDMI pueden estar suprimidas por el componente conectado.
• Es posible que el sonido se interrumpa cuando se cambie la frecuencia de muestreo o los números de
los canales de las señales de salida de audio del componente de reproducción.
• Si el componente conectado no es compatible con la tecnología de protección de derechos de autor
(HDCP), es posible que la imagen y el sonido de la toma HDMI TV OUT se distorsione o no se emita.
En este caso, compruebe la especificación del componente conectado.
• No recomendamos la utilización de un cable de conversión HDMI-DVI.
• Si se selecciona “TV”, “DMPORT”, “SA-CD/CD” o “VIDEO” para la fuente de entrada del sistema,
las señales de video través de la toma de entrada HDMI (BD, DVD, SAT/CATV) que se seleccionó
por última vez se transmiten desde la toma HDMI TV OUT.
• Este sistema es compatible con transmisión Deep Color, “x.v.Color”, y 3D.
• Para disfrutar de imágenes 3D, conecte componentes de televisión y video compatibles con 3D
(reproductor de Blu-ray Disc, grabador de Blu-ray Disc, “PlayStation 3”, etc.) al sistema con los
cables High Speed HDMI, colóquese anteojos 3D, y luego reproduzca el contenido compatible con
3D.
Procedimientos iniciales
11
ES
Page 92

Cómo conectar otros componentes
Si desea conectar componentes que no tienen tomas HDMI, como “PlayStation 2”, un reproductor de
DVD, un sintonizador satelital, un sintonizador de televisión por cable, etc., establezca “CTRL HDMI”
en “OFF” en el menú AMP del sistema (página 22).
Otros componentes de audio, etc.
Reproductor de DVD, etc.
Cable de audio
(no suministrado)
Cable digital coaxial
(no suministrado)
Audio digital OUT
(coaxial)
Señal de audio OUT
VIDEO OUT
Para VIDEO IN del
televisor.
Parte posterior del
altavoz potenciador
de graves
DMPORT
DC 5V
0.7A MAX
L
ONLY FOR
SS-CT150
AUDIO I N
SA-CD/CD
SAT/CATV INBD INDVD IN
HDMI
L
R
AUDIO I N
Sintonizador satelital o
sintonizador de
TV
ARC
TV OUT
DIGITALSPEAKERS
COAX IN
OPT IN
TVSAT/CATVR CENTER
VIDEO
televisión por cable,
etc. sin una toma HDMI
Audio digital OUT
(óptico)
Adaptador DIGITAL
MEDIA PORT
Notas
Cable digital ópt ico
(no suministrado)
Para VIDEO IN del televisor.
VIDEO OUT
• No conecte ni desconecte el adaptador DIGITAL MEDIA PORT mientras el sistema está encendido.
• Cuando conecte el adaptador DIGITAL MEDIA PORT, asegúrese de que el conector esté insertado con la marca
de la flecha orientada hacia la marca de la flecha en la toma DMPORT. Para separar el adaptador DIGITAL MEDIA
PORT, mantenga presionado A y luego tire del conector.
12
A
ES
Page 93

Cómo conectar un cable de alimentación de ca
Antes de conectar el cable de alimentación de ca del sistema a una toma de pared, conecte todos los
demás componentes y el televisor al sistema.
Notas
• Luego de conectar el cable de alimentación de ca, espere aproximadamente 20 segundos antes de encenderlo
presionando ?/1.
• Conecte el sistema a una toma de ca de fácil acceso. En caso de percibir alguna anomalía en el sistema, desconecte
inmediatamente el enchufe del cable de alimentación de la toma de ca.
Cómo configurar la salida de sonido del componente
conectado
Para disfrutar del sonido en formato multicanal (DTS, Dolby Digital, LPCM multicanal), debe
configurar la salida de audio del componente conectado. Ajuste el componente conectado para que
emita sonido en formato multicanal. Para obtener más detalles sobre la configuración de salida de
audio, consulte el Manual de instrucciones que se suministra con el componente conectado.
Procedimientos iniciales
13
ES
Page 94

Opciones de reproducción
Índice de componentes y controles
Para obtener más información, consulte las páginas indicadas entre paréntesis.
Altavoz potenciador de graves
Vista superior
INPUT
VOLUME VOLUME
SELECTOR
POWER/
ACTIVE STANDBY
A ?/1 (encendido/en espera)
B INPUT SELECTOR
Presione este botón para seleccionar la
fuente de entrada para reproducir.
Cada vez que presiona el botón, la fuente de
entrada cambia cíclicamente de la siguiente
manera: TV t BD t DVD t
SAT/CATV t VIDEO t SA-CD/CD t
DMPORT t TV……
ES
14
C VOLUME –
D VOLUME +
E Visor del panel frontal
Page 95

Visor del panel frontal (altavoz potenciador de graves)
POWER/
ACTIVE STANDBY
Opciones de reproducción
A Indicador POWER/ACTIVE STANDBY
Se enciende de la siguiente manera:
Verde: el sistema está encendido.
Ámbar: sólo los componentes HDMI del
sistema están encendidos (la
función Control por HDMI está
activada).
Sin luz: el sistema está apagado.
Nota
• La luz de color ámbar se apaga 30 segundos
después de apagado el televisor. Sin embargo, si
establece “PASS THRU” en “ON” en el menú
AMP, el indicador se mantiene de color ámbar
aun cuando apague el televisor.
B Indicadores de formato de audio
Se encienden en función del formato de
audio que funciona como entrada del
sistema.
D: Dolby Digital
PLII: Dolby Pro Logic II
LPCM: PCM lineal
DTS
C NIGHT (página 34)
Se enciende en NIGHT MODE.
D SLEEP (página 35)
Parpadea cuando el temporizador de
apagado está activo.
E HDMI (página 10)
Se enciende cuando se utilizan los
componentes HDMI o cuando una señal
ARC funciona como señal del sistema
mientras el televisor está seleccionado como
fuente de entrada.
F COAX/OPT
Se enciende en función del cable que está
utilizando.
G MUTING
Se enciende cuando se apaga el sonido.
H Sensor del mando a distancia
I Área de visualización de mensajes
Se muestra el volumen, la fuente de entrada
seleccionada y la señal de entrada de audio,
etc.
continuación
15
ES
Page 96

Mando a distancia
Esta sección describe el funcionamiento del
botón del altavoz y el altavoz potenciador de
graves. Consulte página 27 para obtener detalles
sobre el funcionamiento de los componentes
conectados.
Nota
• Apunte con el mando a distancia orientado hacia el
sensor del mando a distancia ( ) del altavoz
potenciador de graves.
B Botones de entrada
Presione uno de los botones para
seleccionar el componente que desea
utilizar.
C SLEEP
Presione para apagar a una hora
preestablecida cuando desea dormirse
escuchando música. Puede preestablecer la
hora en incrementos de 10 minutos.
D NIGHT MODE
Presione para que se repoduzca un diálogo
claramente, incluso en un volumen de
sonido bajo. Esta función es útil para poder
disfrutar de una buena calidad de sonido
durante la noche.
E AMP MENU (página 32)
F SOUND FIELD +/– (página 20)
G MUTING
H MASTER VOL +/–
Presione este botón para ajustar el volumen.
I C, X, x, c o
Press C, X, x o c para seleccionar los
elementos del menú. A continuación,
presione para ingresar la selección.
* Los botones 5, N, AUDIO y SOUND FIELD +
tienen un punto tá ctil. Utilícelo como guía durante el
funcionamiento.
A ?/1 (encendido/en espera)
ES
16
Page 97

Cómo disfrutar del
televisor
TV
?/1
Si está utilizando “BRAVIA” Sync
(Control de audio del sistema)
No es necesario realizar los pasos 2 y 3 que se
mencionan anteriormente. Cuando se enciende
el televisor, también se enciende el sistema y la
fuente de entrada cambia automáticamente.
También puede ajustar el volumen del sistema
utilizando el mando a distancia del televisor. Si
apaga el sistema, el sonido se emitirá desde el
altavoz del televisor.
Para obtener detalles sobre la configuración de
“BRAVIA” Sync, consulte “Cómo prepararse
para “BRAVIA” Sync” (página 21).
Sugerencia
• El sistema no se enciende cuando se enciende el
televisor si la última vez que se apagó el televisor el
sonido se estaba emitiendo desde los altavoces del
televisor.
Opciones de reproducción
MASTER
VOL +/–
1 Encienda el televisor y elija un
programa.
Consulte el Manual de instrucciones de su
televisor para conocer más detalles.
2 Encienda el sistema.
3 Presione el botón TV del mando a
distancia.
4 Ajuste el volumen con los botones
MASTER VOL +/–.
Sugerencia
• Es posible que el sonido se emita desde el altavoz del
televisor. En este ca so, baje el volumen del altavoz del
televisor al mínimo.
17
ES
Page 98

Cómo disfrutar de otros
componentes
?/1
Botones de
entrada
MASTER
VOL +/–
1 Encienda el componente conectado.
2
Encienda el sistema.
3 Presione los botones de entrada para
visualizar la fuente de entrada en el
visor del panel frontal.
Fuente de
entrada
TV Televisor, etc. conectado a la
BD Reproductor de Blu-ray Disc,
DVD Reproductor de DVD, etc.
SAT/CATV Sintonizador satelital o
VIDEO Reproductor de DVD, etc.
SA-CD/CD Reproductor de CD, etc.
DMPORT Reproductor de audio portátil,
Componente que se puede
reproducir
toma de TV
etc. conectado a la toma de BD
conectado a la toma de DVD
sintonizador de televisión por
cable, etc. conectado a la toma
de SAT/CATV
conectado a la toma de
DIGITAL COAX IN VIDEO
conectado a la toma de SA-CD/
CD AUDIO IN
etc. conectado a la toma
DMPORT
4 Para componentes de vídeo, cambie la
entrada del televisor a la entrada HDMI
que eligió en el paso 3.
Para conocer más detalles, consulte el
Manual de instrucciones de su televisor.
5 Ajuste el volumen con los botones
MASTER VOL +/–.
Sugerencias
• Es posible que el sonido se emita desde el altavoz del
televisor. En este caso , baje el volumen del altavoz del
televisor al mínimo.
• Incluso si desea reproducir Dolby True HD, Dolby
Digital Plus o DTS HD c on un componente conectado
compatible con estos formatos de sonido, el sistema
acepta la señal como Dolby Digital o DTS. Cuando
reproduzca estos formatos de sonido de alta calidad,
establezca el componente conectado para que emita el
sonido en PCM multicanal, en caso de ser posible.
18
ES
Page 99

Notas
• Cuando conecte la toma de salida de vídeo del
adaptador DIGITAL MEDIA PORT a la toma de
entrada de vídeo del televisor, establezca “CTRL
HDMI” en “OFF” en el menú AMP del sistema
(página 22). Las imágenes de un componente
conectado al adaptador DIGITAL MEDIA PORT no
se mostrarán en el televisor si “CTRL HDMI” está
establecido en “ON”.
• Para disfrutar del sonido de un componente sin
mostrar las imágenes cuando “CTRL HDMI” está
establecido en “ON”, primero apague el televisor y
luego vuelva a encender el sistema.
Si enciende el sistema en primer lugar y luego apaga
el televisor, todos los componentes conectados al
televisor se apagarán debido a la función Control por
HDMI.
Si está utilizando “BRAVIA” Sync
(Reproducción mediante una
pulsación)
No es necesario realizar los pasos 2 a 4 que se
mencionan anteriormente. Cuando enciende los
componentes conectados, también se encienden
el sistema y el televisor y la fuente de entrada
cambia automáti camente. También puede ajustar
el volumen del sistema utilizando el mando a
distancia del televisor.
Para obtener detalles sobre la configuración de
“BRAVIA” Sync, consulte “Cómo prepararse
para “BRAVIA” Sync” (página 21).
Sugerencia
• El sistema no se enciende cuando se enciende el
televisor si la última vez que se apagó el televisor el
sonido se estaba emitiendo desde los altavoces del
televisor.
Opciones de reproducción
19
ES
Page 100

Campos acústicos disponibles
Función de sonido envolvente
Cómo disfrutar del efecto
de sonido envolvente
Cómo seleccionar el campo
acústico
Este sistema puede crear sonido envolvente
multicanal. Puede seleccionar uno de los campos
acústicos optimizados del sistema que se
programaron anteriormente.
SOUND
FIELD +/–
Presione SOUND FIELD +/–
El campo acústico actual aparece en el visor del
panel frontal.
Cada vez que presiona SOUND FIELD +/–, el
visor cambia cíclicamente de la siguiente
manera:
STANDARD y MOVIE y DRAMA y
NEWS y SPORTS y GAME y MUSIC
y 2CH STEREO y P.AUDIO y
STANDARD …
Campo
acústico
STANDARD* Se adapta a varias fuentes.
MOVIE* Recrea sonido realista y de alta
DRAMA* Ideal para telenovelas.
NEWS* Produce claramente la voz de
SPORTS* Produce claramente los comentarios
GAME* Produce sonido realista y de alta
MUSIC* Ideal para programas de música o
2CH STEREO Ideal para CD de música.
P.AUDIO** Ideal para reproducir fuentes de
* Estos campos acústicos no están disponibles cuando
se selecciona “DMPORT” al presionar INPUT
SELECTOR.
** “P.AUDIO” aparece sólo cuando se selecciona
“DMPORT”.
Sugerencias
• Se puede establecer un campo acústico diferente para
cada fuente de entrada.
• El ajuste del campo acústico predeterminado para
“DMPORT” es “P.AUDIO” y para otras fuentes es
“STANDARD”.
• Cuando se selecciona “DMPORT” al presionar
INPUT SELECTOR, el altavoz central no produce
sonidos.
• Es posible que algunos altavoces no produzcan
sonido en función de la señal de entrada, como los
programas monoaurales.
• Cuando se selecciona “2CH STEREO” o
“P.AUDIO”, el altavoz central no produce sonidos.
• Si presiona el botón THEATER en el mando a
distancia de un televisor Sony cuando “CTRL
HDMI” está establecido en “ON”, el campo acústico
cambia a “MOVIE” (no se incluyen algunos
televisores Sony).
Efecto
potencia, además de diálogos claros.
presentador.
jugada tras jugada y sonidos realistas
con efectos de sonido envolvente,
como ovaciones, etc.
potencia, ideal para videojuegos.
vídeos de música en Blu-ray Discs/
DVD.
audio portátiles.
20
ES
 Loading...