

Sony HT-A9 Users guide [en, fr]
RL RR
12V
What’s in the box
FL
FR
RL
RR
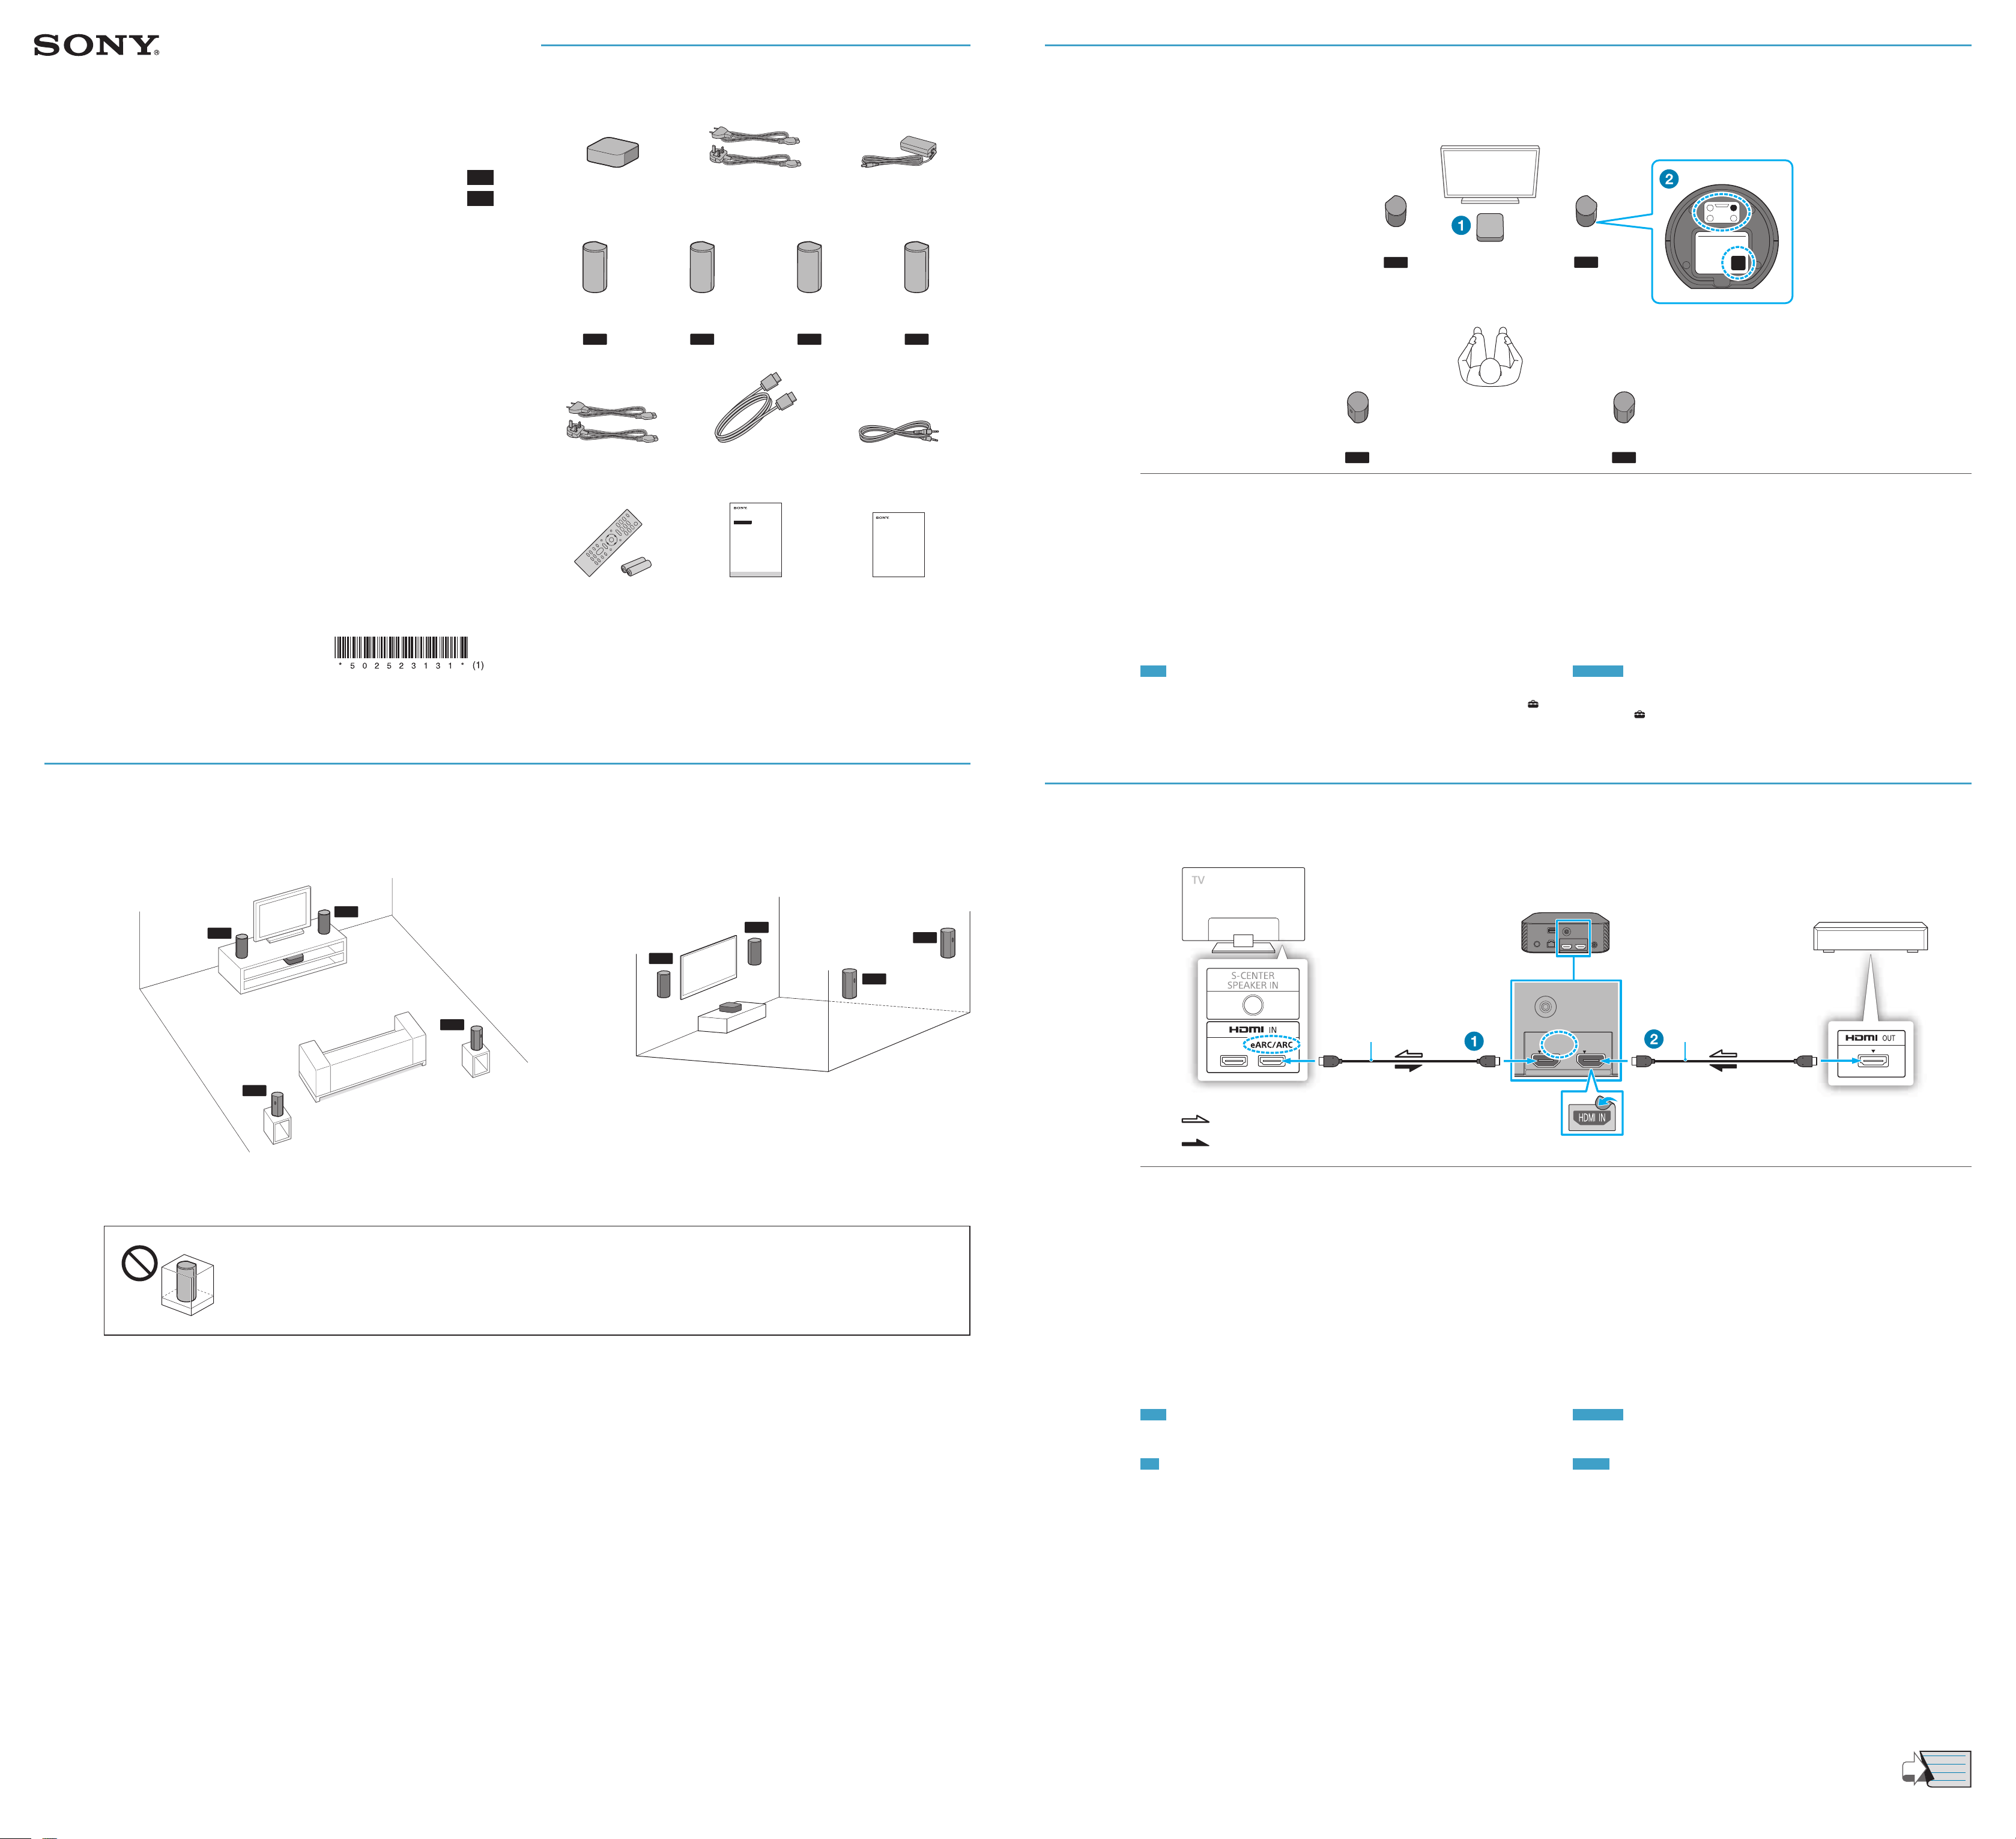
Choose an installation position
Home Theatre System
Startup Guide
Guide de démarrage
HT-A9
5-025-231-31(1)
GB
FR
Contenu de l’emballage
Control box (1)
Boîtier de commande (1)
Front left speaker (1)
Enceinte avant
gauche (1)
AC power cord (mains lead) for
speakers (8)
Cordon d’alimentation secteur
pour enceintes (8)
Remote control (1) /
R03 (size AAA) battery (2)
Télécommande (1)/
Pile R03 (taille AAA) (2)
* Supports the transmission of 4K/8K content.
* Prend en charge la transmission de contenu 4K/8K.
AC power cord (mains lead) for
control box (2)
Cordon d’alimentation secteur
pour boîtier de commande (2)
Front right speaker (1)
Enceinte avant
droite (1)
HDMI cable* (1)
Câble HDMI* (1)
Home Theatre System
Operating Instructions
Mode d’emploi
Rear left speaker (1)
Enceinte arrière
gauche (1)
Startup Guide (this document)
AC adaptor (1)
Adaptateur secteur (1)
Rear right speaker (1)
Enceinte arrière
droite (1)
TV center speaker mode
Câble du mode haut-parleur
cable (1)
central TV (1)
Home Theatre System
Startup Guide
Guide de démarrage (ce
document)
2
Choisir une position d’installation
Front left speaker
Enceinte avant gauche
FL
Rear left speaker
Enceinte arrière gauche
Install the control box on or in a shelf where the front panel display is not
covered.
Choose the installation position of the speakers by checking the labels on
the bottom of the speakers.
• Surround sound can be experienced more effectively by installing the 4 speakers to
surround your listening position and installing the front speakers on both sides of the
TV.
• If you install speakers as following, perform [Sound Field Adjustment] under [Manual
Speaker Settings].
– The distances from the TV to the front left speaker and the front right speaker have
a large difference.
– The distances from your listening position to the 4 speakers are very unbalanced.
Note
• Before connecting the speaker system, disconnect the AC power cords (mains leads) of the TV and
other devices from the AC outlets (mains). Reconnect them after step 5.
• If you change the installation position of the speakers, optimize the sound field again by selecting
[Setup]-[Advanced Settings]-[Speaker Settings]-[Sound Field Optimization].
Control box
Boîtier de commande
Bottom of the speaker
Dessous de l’enceinte
TV
FR
Front right speaker
Enceinte avant droite
FR
Rear right speaker
Enceinte arrière droite
Installez le boîtier de commande sur ou dans une étagère de façon à ce que
l’afficheur du panneau avant ne soit pas masqué.
Choisissez la position d’installation des enceintes en vérifiant les étiquettes
sur le dessous des enceintes.
• Le son surround peut être restitué plus efficacement en installant les enceintes
arrière autour de votre position d’écoute et les enceintes avant sur les deux côtés du
téléviseur.
• Si vous installez les enceintes comme suit, exécutez [Réglage du champ sonore] sous
[Réglages manuels des enceintes].
– Les distances entre le téléviseur et l’enceinte avant gauche et l’enceinte avant droite
sont très différentes.
– Les distances entre votre position d’écoute et les 4enceintes ne sont pas
équilibrées.
Remarque
• Avant de connecter le système d’enceintes, débranchez les cordons d’alimentation secteur du
téléviseur et des autres dispositifs des prises secteur. Rebranchez-les après l’étape 5.
• Si vous modifiez la position d’installation des enceintes, optimisez à nouveau le champ sonore en
sélectionnant
[Config.]-[Réglages avancés]-[Réglages Enceintes]-[Optimisation du champ sonore].
FR
1
Choose an installation method
Choisir une méthode d’installation
Installing on a shelf/stand
Installation sur une étagère/un socle
FR
FL
RR
RL
or
ou
Mounting on a wall
Fixation sur un mur
FR
RR
FL
RL
For details, refer to the Operating Instructions (separate document).
Pour plus de détails, reportez-vous au mode d’emploi (document
séparé).
3
Connect a TV and another device
Raccorder un téléviseur et un autre dispositif
S-CENTER OUT
HDMI cable (supplied)
Câble HDMI (fourni)
: Video signal
: signal vidéo
: Audio signal
: signal audio
HDMI OUT HDMI IN
ARC/
TV
eARC
Blu-ray Disc™ player, set-top box, gaming
console, etc.
Lecteur Blu-ray Disc™, décodeur, console de
jeu, etc.
HDMI cable (not supplied)
Câble HDMI (non fourni)
• Do not place the speakers in a shelf or right below the ceiling so
as not to block the sound output from the top of the speakers.
• Ne placez pas les enceintes sur une étagère ou juste sous le
plafond afin ne pas bloquer la reproduction du son depuis le
haut des enceintes.
• Do not place metal objects near the speaker system. Wireless
functions may become unstable.
• Ne placez pas d’objets métalliques à proximité du système
d’enceintes. Les fonctions sans fil pourraient devenir instables.
Connect the HDMI cable (supplied) to the HDMI OUT jack on the control box
and the HDMI IN jack labeled “eARC” or “ARC” on your TV.
The TV sound is not output from the speaker system unless the HDMI jacks labeled
“eARC” or “ARC” are connected to each other when you connect a TV and the speaker
system.
If your TV has a S-CENTER SPEAKER IN jack, connect the TV center speaker mode cable
(supplied) also to the control box and your TV.
Connect an HDMI cable (not supplied) to the HDMI OUT jack on another
device (a Blu-ray Disc player, set-top box, gaming console, etc.) and the HDMI
IN jack on the control box.
You can listen to high quality sound by playing the audio formats such as Dolby
Atmos-Dolby TrueHD or DTS:X.
If your TV is compatible with the eARC function, you can listen to high quality sound by
connecting another device to the HDMI IN jack on the TV and enabling the eARC
function of the TV.
Note
• Make sure that the connectors are firmly inserted.
• Enable the Control for HDMI function on the TV. Otherwise, there will be no TV sound output from the
speaker system.
Tip
• Select the appropriate HDMI cable and [HDMI Signal Format] setting according to the video formats
output from the device connected to the speaker system. For details, refer to the Help Guide.
• When you connect the speaker system to a device which supports the 8K video format, refer to
“Connecting an AV Device Compatible with the 8K Video Format” in the Operating Instructions
(separate document).
Connectez le câble HDMI (fourni) à la prise HDMI OUT du boîtier de
commande et à la prise HDMI IN jack portant la mention «eARC» ou «ARC»
de votre téléviseur.
Le son du téléviseur n’est pas reproduit par le système d’enceintes sauf si les prises
HDMI portant la mention «eARC» ou «ARC» sont connectées l’une à l’autre lorsque
vous connectez un téléviseur et le système d’enceintes.
Si votre téléviseur dispose d’une prise S-CENTER SPEAKER IN, connectez également le
câble du mode haut-parleur central TV (fourni) au boîtier de commande et à votre
téléviseur.
Connectez un câble HDMI (non fourni) à la prise HDMI OUT d’un autre
dispositif (lecteur Blu-ray Disc, décodeur, console de jeu, etc.) et à la prise
HDMI IN du boîtier de commande.
Vous pouvez écouter un son haute qualité en reproduisant notamment les formats
audio Dolby Atmos-Dolby TrueHD ou DTS:X.
Si votre téléviseur est compatible avec la fonction eARC, vous pouvez écouter du son
haute qualité en connectant un autre dispositif à la prise HDMI IN du téléviseur et en
activant la fonction eARC du téléviseur.
Remarque
• Assurez-vous que les connecteurs sont bien enfoncés.
• Activez la fonction Commande pour HDMI du téléviseur. Sinon, le système d’enceintes ne reproduira
pas le son du téléviseur.
Conseil
• Sélectionnez le câble HDMI et le réglage [Format du signal HDMI] adaptés en fonction des formats
vidéo reproduits par le dispositif connecté au système d’enceintes. Pour plus d’informations,
consultez le Guide d’aide.
• Lorsque vous connectez le système d’enceintes à un dispositif qui prend en charge le format vidéo
8K, reportez-vous à la section «Connexion d’un dispositif AV compatible avec le format vidéo 8K» du
mode d’emploi (document séparé).
Continued on back page
Suite au dos de la page
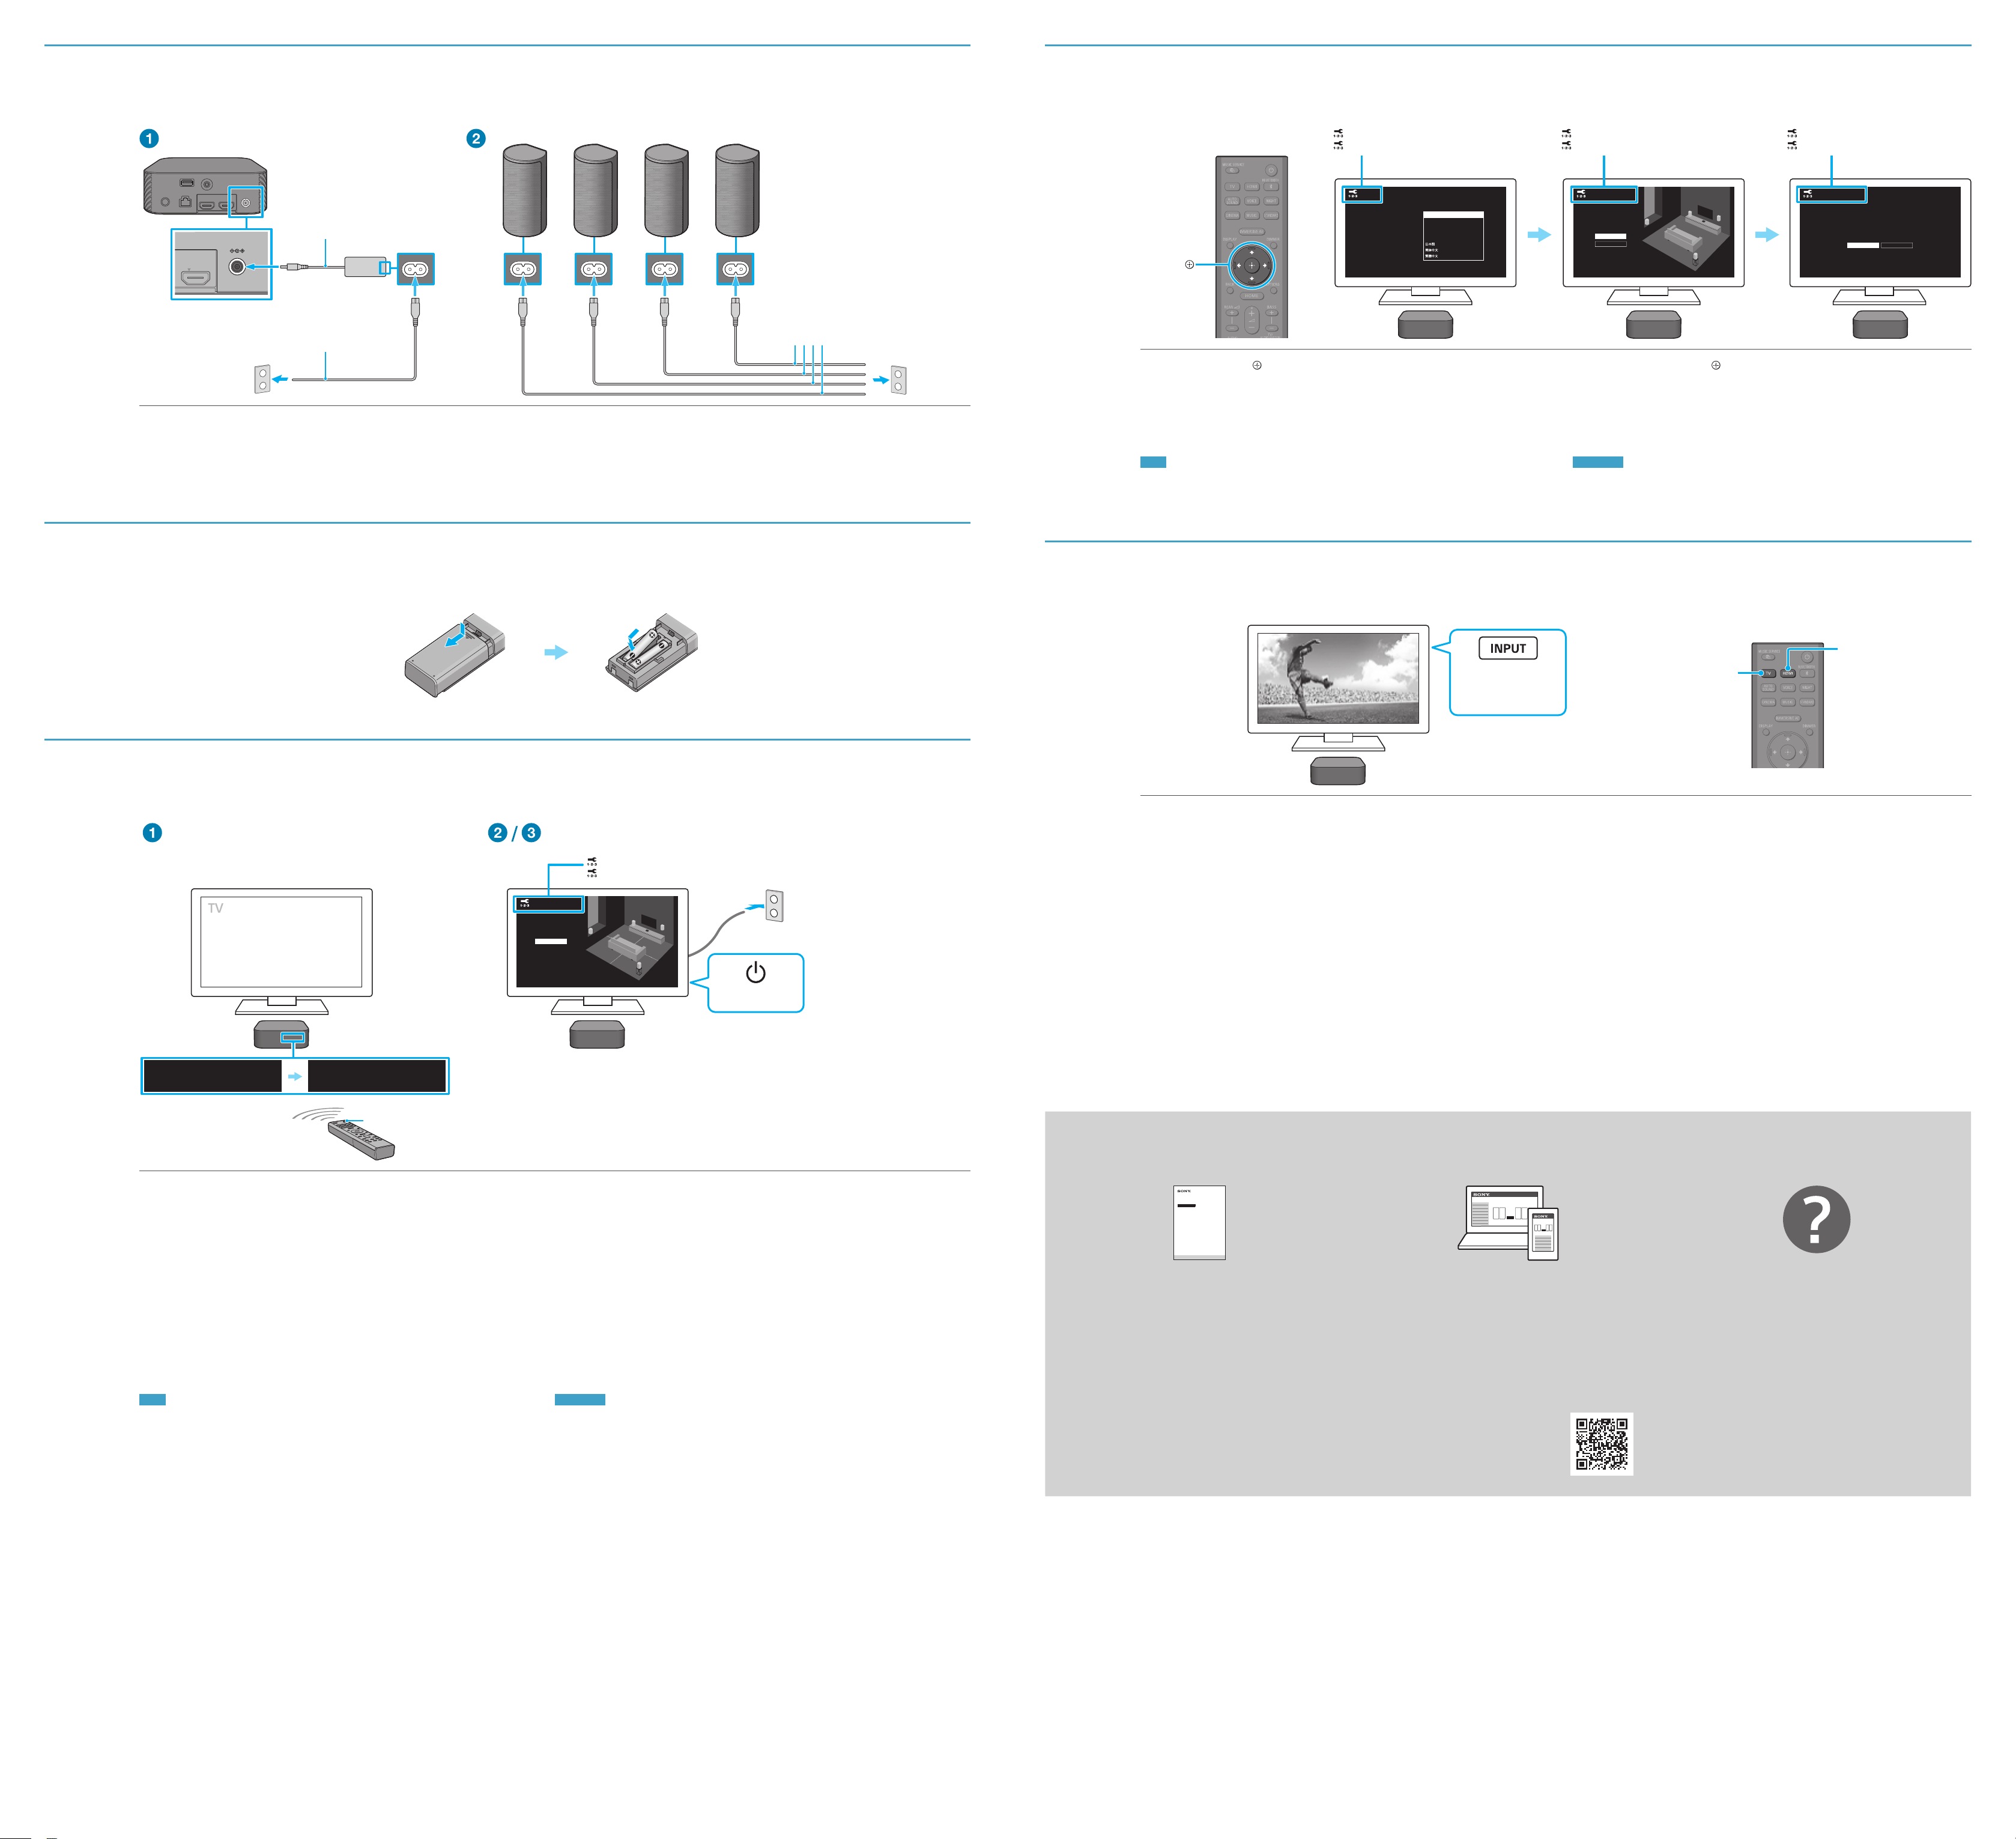
Connect the control box, then the speakers to the AC outlet (mains)
12V
Perform Initial Settings
4
Connecter le boîtier de commande, puis les enceintes à la prise secteur
AC adaptor (supplied)
Adaptateur secteur (fourni)
AC power cord (mains lead) (supplied)
Cordon d’alimentation secteur (fourni)
Connect the AC adaptor (supplied) to the control box, the AC power cord
(supplied) to the AC adaptor, and then the AC power cord to the AC outlet
(mains).
Connect the AC power cords (supplied) to the speakers and then to the AC
outlets.
Raccordez l’adaptateur secteur (fourni) au boîtier de commande, le cordon
d’alimentation (fourni) à l’adaptateur secteur, puis le cordon d’alimentation à
la prise secteur.
Raccordez les cordons d’alimentation secteur (fournis) aux enceintes puis aux
prises secteur.
AC power cord (mains lead) (supplied)
Cordon d’alimentation secteur (fourni)
7
Effectuer les réglages initiaux
Language
Langue
Language
English
Français (France)
Français (Canada)
Select your language.
////
Press /// and to select an item by following the on-screen
instructions.
When the Sound Field Optimization is complete and you have finished listening to the
demo music, press [Next] to continue network settings.
Once [Setup is complete.] appears, select [Finish].
Note
• During the Sound Field Optimization, a measurement sound is output for about 1 minute.
• The speaker system does not output sound until the connection between the control box and 4
speakers is completed.
Español
Deutsch
Sound Field Optimization
Optimisation du champ sonore
Sound Field Optimization
Optimize the surround sound for your environment.
Optimization takes about a minute. A loud sound
may come from your speakers during optimization.
Do not make loud noises, walk or stand in front of
the speakers during optimization.
Start
Later
Appuyez sur /// et pour sélectionner un élément en suivant les
instructions affichées à l’écran.
Lorsque l’optimisation du champ sonore est effectuée et que vous avez terminé
d’écouter la musique de démonstration, appuyez sur [Suivant] afin de poursuivre les
réglages réseau.
Quand [La configuration est terminée.] apparaît, sélectionnez [Terminer].
Remarque
• Pendant l’optimisation du champ sonore, un son de mesure est reproduit pendant 1minute environ.
• Le système d’enceintes ne reproduit aucun son jusqu’à ce que la connexion entre le boîtier de
commande et les 4enceintes soit établie.
Easy Network Setup - Start
Réglages réseau faciles - Début
Easy Network Setup - Start
Connect this unit to the Internet to:
- Use your mobile device to play streaming music on the unit.
- Install software updates to keep the latest functions available.
You can do this later from [Easy Setup] > [Easy Network Setup].
Next Later
5
6
Set up the remote control
Préparer la télécommande
Turn on the control box, then the TV
Mettre le boîtier de commande sous tension, puis le téléviseur
Speaker connection check
Vérification de la connexion des enceintes
Speaker connection check
Speaker connection successful.
Next
Power ON
Mise sous tension
8
Listen to sound
Écouter le son
TV input switch
Sélecteur d’entrée du
téléviseur
Listen to TV Audio
Select the desired input to the TV using the TV remote control.
The screen switches to the selected input screen and TV audio is output from the
speaker system.
If [TV] does not appear in the front panel display of the control box, press TV on the
remote control of the speaker system to select the TV input. [TV] appears in the front
panel display of the control box.
Listen to audio of another device connected to the HDMI IN jack on
the control box
Turn on the connected device. Then use the TV’s remote control to switch the
TV’s input to HDMI input to which the speaker system is connected.
Press HDMI on the remote control of the speaker system to switch to HDMI
input.
[HDMI] appears in the front panel display of the control box and the audio of the
connected device is output from the speaker system.
HDMI
TV
Écouter le son du téléviseur
Sélectionnez l’entrée souhaitée sur le téléviseur à l’aide de la télécommande
du téléviseur.
L’écran bascule sur l’écran de l’entrée sélectionnée et le son du téléviseur est reproduit
par le système d’enceintes.
Si l’indication [TV] n’apparaît pas sur l’afficheur du panneau avant du boîtier de
commande, appuyez sur TV sur la télécommande du système d’enceintes pour
sélectionner l’entrée TV. L’indication [TV] apparaît sur l’afficheur du panneau avant du
boîtier de commande.
Écouter le son d’un autre dispositif raccordé à la prise HDMI IN du
boîtier de commande
Mettez le dispositif connecté sous tension. Ensuite, utilisez la télécommande
du téléviseur pour basculer l’entrée du téléviseur sur l’entrée HDMI à laquelle
le système d’enceintes est connecté.
Appuyez sur HDMI sur la télécommande du système d’enceintes pour
basculer sur l’entrée HDMI.
[HDMI] apparaît sur l’afficheur du panneau avant du boîtier de commande et le son du
dispositif connecté est reproduit à partir du système d’enceintes.
PLEASE WAIT SETUP
Press the (power) button on the remote control of the speaker system to
turn on the control box.
The speaker system turns on and [SETUP] appears in the front panel display of the
control box.
Turn on the TV.
If the [Speaker connection check] screen does not appear on the TV screen, change the
TV input setting to the input that the speaker system is connected.
Check that the connection between the control box and 4 speakers is
completed on the TV screen.
The control box and speakers are connected automatically.
The sound for connection completion is output after the check marks appear on all the
speakers.
The power indicator of the speaker lights in green when connecting to the control box.
Note
• To use the speaker system, point the remote control at the front of the control box.
• Depending on the order in which you turn on the TV and the speaker system, the speaker system
may be muted and [MUTING] may appear on the front panel display of the control box. If this
happens, turn off all devices, and then turn on the TV first, then the speaker system.
• If you connect the TV center speaker mode cable (supplied) to the control box and your TV, follow the
instructions on the TV screen for the settings after Step 6.
Appuyez sur la touche (alimentation) de la télécommande du système
d’enceintes pour mettre le boîtier de contrôle sous tension.
Le système d’enceintes est mis sous tension et [SETUP] apparaît sur l’afficheur du panneau
avant du boîtier de commande.
Mettez le téléviseur sous tension.
Si l’écran [Vérification de la connexion des enceintes] n’apparaît pas sur l’écran du
téléviseur, basculez le réglage d’entrée du téléviseur sur l’entrée à laquelle le système
d’enceintes est connecté.
Vérifiez que la connexion entre le boîtier de commande et les 4enceintes est
établie sur l’écran du téléviseur.
Le boîtier de commande et les enceintes sont connectés automatiquement.
Le son indiquant l’établissement de la connexion est émis une fois que les coches
apparaissent pour toutes les enceintes.
L’indicateur d’alimentation de l’enceinte brille en vert lorsque la connexion au boîtier de
commande est établie.
Remarque
• Pour utiliser le système d’enceintes, dirigez la télécommande vers le panneau avant du boîtier de
commande.
• En fonction de l’ordre dans lequel vous mettez sous tension le téléviseur et le système d’enceintes, le
système d’enceintes peut être silencieux et l’indication [MUTING] peut apparaître sur l’afficheur du
panneau avant du boîtier de commande. Si cela se produit, mettez tous les dispositifs hors tension, puis
mettez d’abord le téléviseur sous tension, puis le système d’enceintes.
• Si vous connectez le câble du mode haut-parleur central TV (fourni) au boîtier de commande et à votre
téléviseur, suivez les instructions affichées sur l’écran du téléviseur pour effectuer les réglages après
l’étape6.
How to use the speaker system / Troubleshooting
Comment utiliser le système d’enceinte/Dépannage
Home Theatre System
Operating Instructions (booklet)
Describes basic usage such as installation/connection
and playback of connected devices.
Mode d’emploi (livret)
Décrit l’utilisation de base notamment l’installation, la
connexion et la lecture des dispositifs connectés.
Help Guide (Web instruction manual)
Describes all the usage such as the network function
and the detailed setting method, including the contents
of the Operating Instructions.
Guide d’aide (manuel d’instructions web)
Décrit toutes les fonctions notamment la fonction
réseau, la méthode des réglages détaillés et inclut les
contenus du mode d’emploi.
https://rd1.sony.net/help/ht/a9/h_zz/
For troubleshooting when the speaker system does not
operate correctly, see “Troubleshooting” in the Operating
Instructions or Help Guide.
Pour dépanner le système d’enceinte lorsqu’il ne
fonctionne pas correctement, référez-vous à la section
«Dépannage» du mode d’emploi ou du Guide d’aide.
© 2021 Sony Corporation Printed in Malaysia
 Loading...