

Page 1

The software of this system may be updated in the future. To find out details on any available
updates, please visit the following URL.
https://www.sony-asia.com/support
Le logiciel de ce système est susceptible d’être mis à jour. Pour en savoir plus sur les
éventuelles mises à jour disponibles, visitez l’URL suivante.
https://www.sony-asia.com/support
Home Theatre System
Operating Instructions
Mode d’emploi
GB
FR
©2021 Sony Corporation Printed in Malaysia
5-025-229-31(1)
HT-A9
Page 2

IMPORTANT – Read the End User
Software License Agreement before
using your Sony product. Using your
product indicates your acceptance of
the End User Software License
Agreement. The software license
agreement between you and Sony is
available at the following URL:
https://rd1.sony.net/help/ht/eula21/
h_zz/
WARNING
Do not install the speaker system in a
confined space, such as a bookcase or
built-in cabinet.
To reduce the risk of fire, do not cover
the ventilation opening of the speaker
system with newspapers, tablecloths,
curtains, etc.
Do not expose the speaker system to
naked flame sources (for example,
lighted candles).
To reduce the risk of fire or electric
shock, do not expose this speaker
system to dripping or splashing, and do
not place objects filled with liquids, such
as vases, on the speaker system.
The AC adaptor and speaker system are
not disconnected from the mains as long
as they are connected to the AC outlets,
even if the speaker system itself has
been turned off.
As the mains plugs of the AC power
cords and the AC power adaptor are
used to disconnect the speaker system
from the mains, connect the speaker
system to an easily accessible AC outlet.
Should you notice an abnormality in the
speaker system, disconnect the mains
plugs of the AC power cords and the AC
power adaptor from the AC outlets
immediately.
CAUTION
Risk of explosion if the battery is
replaced by an incorrect type.
Do not expose batteries or appliances
with battery-installed to excessive heat,
such as sunshine and fire.
Do not place this product close
to medical devices.
This product (including accessories) has
magnet(s) which may interfere with
pacemakers, programmable shunt
valves for hydrocephalus treatment, or
other medical devices. Do not place this
product close to persons who use such
medical devices. Consult your doctor
before using this product if you use any
such medical device.
For the network connection of the
speaker system, establish the
connection via the router or LAN port
with the router function. If these
connections are not established, a
security problem may occur.
Indoor use only.
Recommended cables
Properly shielded and grounded cables
and connectors must be used for
connection to host computers and/or
peripherals.
For the control box and the
speakers
The nameplate is located on the bottom
of the control box and the speakers.
For the AC adaptor
Labels for AC adaptor model number
and serial number are located on the
bottom of the AC adaptor.
This equipment has been tested and
found to comply with the li mits set out in
the EMC regulation using a connection
cable shorter than 3 meters.
GB
2
Page 3

Table of Contents
About Manuals of the Speaker
System ......................................5
Startup Guide
What’s in the Box
What You Can Do with the Speaker
System ..................................... 6
Guide to Parts and Controls .......... 8
Using the Home Menu .................12
(separate
document)
Setting Up
Installing the Speaker System ......13
Connecting to a TV .......................14
When Your TV Has the S-CENTER
SPEAKER IN Jack .....................15
Connecting an AV Device .............16
Connecting to the AC Outlet
(mains) ....................................18
Performing Initial Settings ...........19
If the Speakers Are not Connected
Correctly ................................ 20
Watching Images
Watching TV .................................22
Playing the Connected AV
Device .....................................22
Listening to Music/Sound
Listening to Sony TV Sound with the
BLUETOOTH® Function ...........23
Listening to Music/Sound with the
BLUETOOTH Function .............25
Listening to Sound of the Connected
TV or Device Using
Headphones ...........................27
Listening to Music by
Connecting to a Network
What You Can Do by Connecting the
Speaker System to a
Network ................................. 30
Adjusting the Volume and
Sound Quality
Adjusting the Volume ..................32
Enjoying Immersive Surround
Experience
(IMMERSIVE AE) ......................33
Setting the Sound Effect That Is
Tailored to Sound Sources
(Sound Mode) .........................34
Making Dialogs Clearer
(VOICE) ....................................35
Enjoying Clear Sound with Low
Volume at Midnight
(NIGHT) ...................................35
Adjusting the Delay Between the
Picture and Sound ..................36
Enjoying Multiplex Broadcast Sound
(AUDIO) ...................................36
Adjusting the Dialog Volume While
the DTS:X Content is Played
Back ........................................37
Using the Speaker System by
Interlocking with a TV
Operating the Speaker System by
Interlocking with a TV (Control
for HDMI Function) .................38
Operating the Speaker System by
Interlocking with a TV
Compatible with the “BRAVIA”
Sync Function .........................39
Changing the Settings
Changing the Brightness of the
Front Panel Display and
Indicators (DIMMER) ..............41
Saving Power in Standby
Mode ......................................42
Performing Easy Setup .................42
Performing Advanced
Settings ..................................43
Updating the Software ................ 44
GB
GB
3
Page 4

Troubleshooting
Troubleshooting .......................... 45
Resetting the Speaker System .... 53
Additional Information
Specifications ............................... 55
Supported Input Audio
Formats ...................................57
On BLUETOOTH
Communication ..................... 58
Precautions .................................. 59
Copyrights and Trademarks ........60
Index ............................................ 63
GB
4
Page 5

About Manuals of the
Home Theatre System
Startup Guide
Home Theatre System
Speaker System
The information included in each
manual is as shown below.
Startup Guide
Introduces the initial procedures
concerning installation and connection
for using the speaker system, and
operations until you play music.
Operating Instructions
(this document)
Explains the basic operations.
– Connection with a TV or other devices
– Playback for music/sound of devices
connected with an HDMI cable or the
BLUETOOTH function
– Sound adjustment, etc.
Help Guide (Web manual)
For customers in Americas
https://rd1.sony.net/
help/ht/a9/h_uc/
For customers in other countries/
regions
https://rd1.sony.net/
help/ht/a9/h_zz/
Provides all operations including
advanced usage.
– Playback for music/sound with the
network function
– Details on menu items, etc.
Tips
• The instructions in these manuals
describe operations using the controls on
the remote control.
• Characters in brackets [ ] appear on the TV
screen or front panel display.
• Details are omitted from the illustrations.
What’s in the Box
Refer to Startup Guide (separate
document).
GB
5
Page 6

What You Can Do with the Speaker System
The speaker system supports object-based audio formats such as Dolby Atmos
and DTS:X as well as HDR video formats such as HDR10, HLG, and Dolby Vision.
“Playing the Connected AV Device”
(page 22)
TV
•“Watching TV” (page 22)
•“Listening to Sony TV
Sound with the
BLUETOOTH® Function”
(page 23)
Blu-ray Disc™ player, set-top
box, gaming console, etc.
“Listening to Sound of
the Connected TV or
Device Using
Headphones” (page 27)
“Listening to Music/Sound with the
BLUETOOTH Function” (page 25)
Headphones
Mobile device
Supplied speakers
GB
6
Page 7

Internet
Wireless LAN
router
For the operations of the optional
subwoofer, refer to its operating
instructions.
For the supported optional subwoofer,
confirm on the Sony website.
Network
“What You Can Do by Connecting the Speaker System to a Network”
(page 30)
Optional subwoofer
For the connecting method to the network and functions enabled
with the network connection, refer to Help Guide (Web manual).
For customers in Americas
https://rd1.sony.net/help/ht/a9/h_uc/
For customers in other countries/regions
https://rd1.sony.net/help/ht/a9/h_zz/
GB
7
Page 8
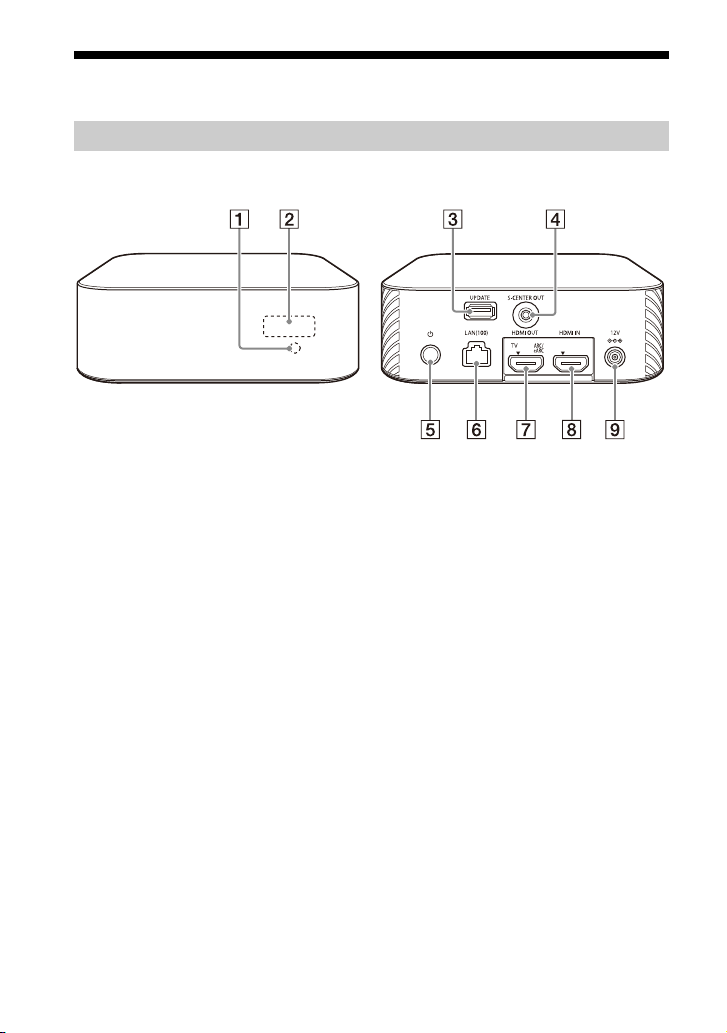
Guide to Parts and Controls
Front
Rear
Control Box
Remote control sensor
Point the remote control at the
remote control sensor to operate
the speaker system.
Front panel display
UPDATE port (page 44)
Connect the USB memory when
updating the speaker system.
S-CENTER OUT jack (page 15)
(power) button
Turns on the speaker system or
sets it to standby mode.
LAN(100) port
GB
8
HDMI OUT (TV ARC/eARC) jack
Connect a TV that has an HDMI
input jack with an HDMI cable.
The speaker system is compatible
with eARC and ARC. ARC is the
function that sends TV sound to
an AV device such as the speaker
system from the TV’s HDMI jack.
eARC is an extension of ARC and
enables transmission of the
object audio and multi-channel
LPCM content that cannot be
transmitted with ARC.
HDMI IN jack
DC IN terminal
Page 9

Speakers
Front
Rear
Bottom
Power indicator
Displays the connecting status
between the control box and
speaker as well as the power
condition of the speaker.
Red
– Lights up: The speaker is in
standby mode.
Green
– Lights up: The speaker is
connected to the control box.
– Flashes slowly: The speaker is
attempting to connect to the
control box.
– Flashes twice repeatedly: The
speaker is in the pairing standby
status via manual connection.
Turns off
– The speaker is turned off.
(power) button
Turns on/off the speaker.
LINK button (page 20)
AC inlet
Wall mounting hole
Mounting hole for the general
speaker stand
Note
When using the wall mounting hole () or
mounting hole for the general speaker
stand (), peel off the cover on them with
a safety-pin, etc. (page 13).
9
GB
Page 10
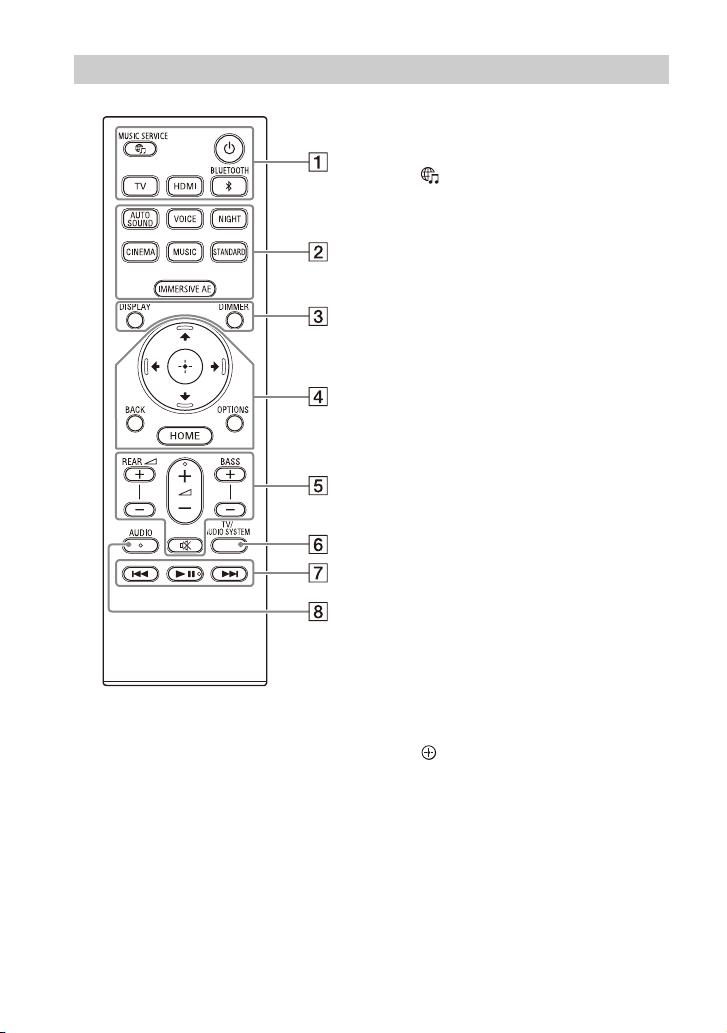
Remote Control
(power)
Turns on the speaker system or
sets it to standby mode.
(MUSIC SERVICE) button
If you have previously played
music on Spotify on the speaker
system, you can resume playback
by pressing this button.
This button may not be available
in some countries/regions.
BLUETOOTH (page 26)
TV (page 22)
HDMI (page 22)
AUTO SOUND (page 34)
VOICE (page 35)
NIGHT (page 35)
CINEMA (page 34)
MUSIC (page 34)
STANDARD (page 34)
IMMERSIVE AE (page 33)
DIMMER (page 41)
DISPLAY
Displays playback information on
the TV screen.
Playback information is displayed
in the front panel display for TV
input.
/// (page 12)
(enter) (page 12)
BACK (page 12)
OPTIONS (page 37)
Displays the options menu on the
TV screen.
The options menu is displayed in
the front panel display for TV
input.
HOME (page 12)
10
GB
Page 11

REAR (rear speakers volume)
+/–
Adjusts the volume of the rear
speakers.
(volume) +*/–
Adjusts the volume.
BASS (bass sound volume) +/–
Adjusts the volume of the bass
sound or optional subwoofer
when connecting it.
(muting)
Turns off the sound temporarily.
TV/AUDIO SYSTEM
Switches the output for the
connected TV sound between the
TV and speaker system.
Note
This button works in the following
conditions.
– The connected TV is compatible with
the System Audio Control function.
– The Control for HDMI function of the
speaker system is set to on (page 38).
Playback operation buttons
/ (previous/next)
Selects the previous/next track or
file.
Pressing and holding it searches
backward or forward (rewind/fast
forward) during playback.
(play/pause)*
Starts, pauses, or re-starts
playback (resume play).
AUDIO* (page 36)
About the replacement of
batteries for the remote control
When the speaker system does not
respond by operating with the remote
control, replace two batteries with new
batteries.
Use R03 (size AAA) manganese batteries
for replacement.
*The AUDIO, (play/pause), and
(volume) + buttons have a tactile dot. Use
it as a guide during operation.
GB
11
Page 12
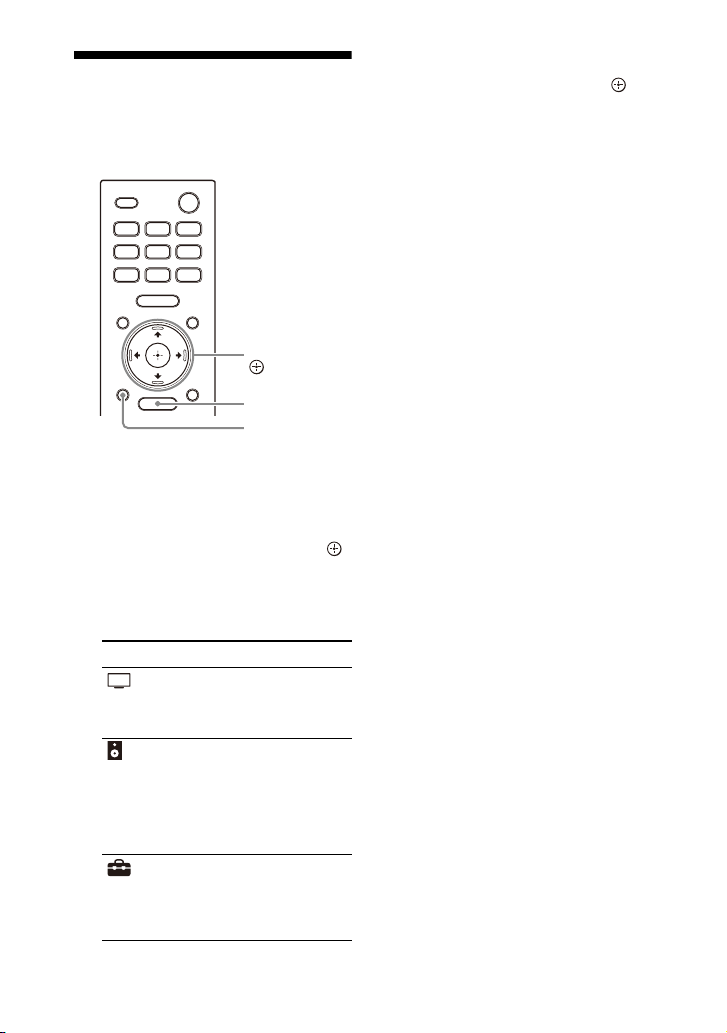
Using the Home Menu
HOME
BACK
///,
(enter)
You can display the home menu on the
TV screen by connecting the speaker
system and TV with an HDMI cable.
1 Press HOME.
The home menu appears on the
TV screen.
2 Press // to select the category
that you want, then press or
(enter).
The items for the selected
category appear under the
category list on the TV screen.
Category Explanation
[Watch] Selects the input of th e
[Listen] Selects the input of th e
[Setup] Performs the basic
TV or AV device that is
connected to the
speaker system.
audio device that is
connected to the
speaker system or
music service for
playing back on the
speaker system.
initial settings by using
[Easy Setup] or various
advanced settings of
the speaker system.
3 Press /// to select the item
that you want, then press
(enter).
The selected input or setting
display appears on the TV screen.
To return to the previous screen,
press BACK.
12
GB
Page 13
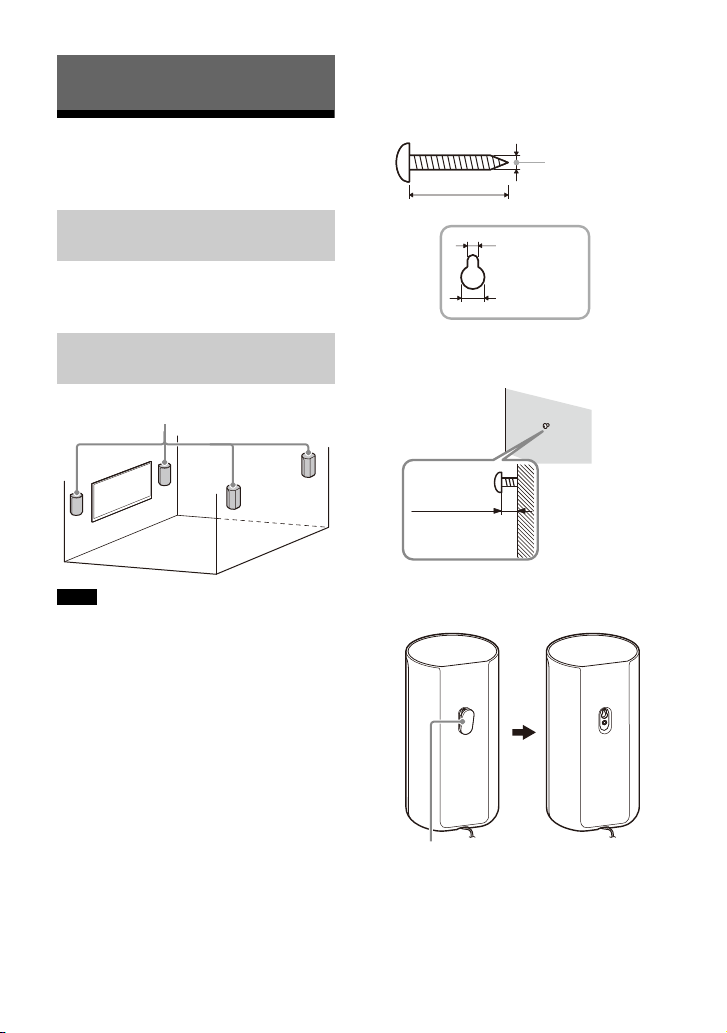
Setting Up
Speakers
Hole on the rear of the speaker
4mm (5/32 in)
More than 30 mm (1 3/16 in)
4.2 mm
(11/64 in)
9.6 mm
(3/8 in)
Approx.
7.35 mm
(approx.
19/64 in)
Cover
Installing the Speaker
System
Installing the Control Box
and Speakers
For the installation, refer to Startup
Guide (separate document).
1 Prepare screws (not supplied) that
are suitable for the wall mounting
hole on the rear of the speaker.
Mounting the Speakers on a
Wall
Notes
• Prepare screws (not supplied) that are
suitable for the wall material a nd stability.
Depending on the wall material, the wall
may be damaged.
• Fasten the screws securely in the wall
beam.
• Hang the speakers horizontally on the
reinforced wall.
• Have the installation done by a Sony
dealer or licensed contractor and pay
special attention to safety during the
installation.
• Sony shall not be held responsible for
accidents or damage caused by improper
installation, insufficient wall stability,
improper screw installation, natural
disasters, etc.
2 Fasten the screw in the wall.
3 Peel off the cover on the rear of the
speaker with a safety-pin, etc.
13
GB
Page 14
4 Hang the speakers by confirming
TV
HDMI cable
(supplied)
the type of the speakers.
Check the label on the bottom of the
speaker.
•“FL”: Front left
• “FR”: Front right
• “RL”: Rear left
• “RR”: Rear right.
Note
Keep the cover that is peeled off in step 3
for use when you do not mount the speaker
on a wall.
Installing the Optional
Speakers
Refer to the operating instruc tions of the
optional speakers.
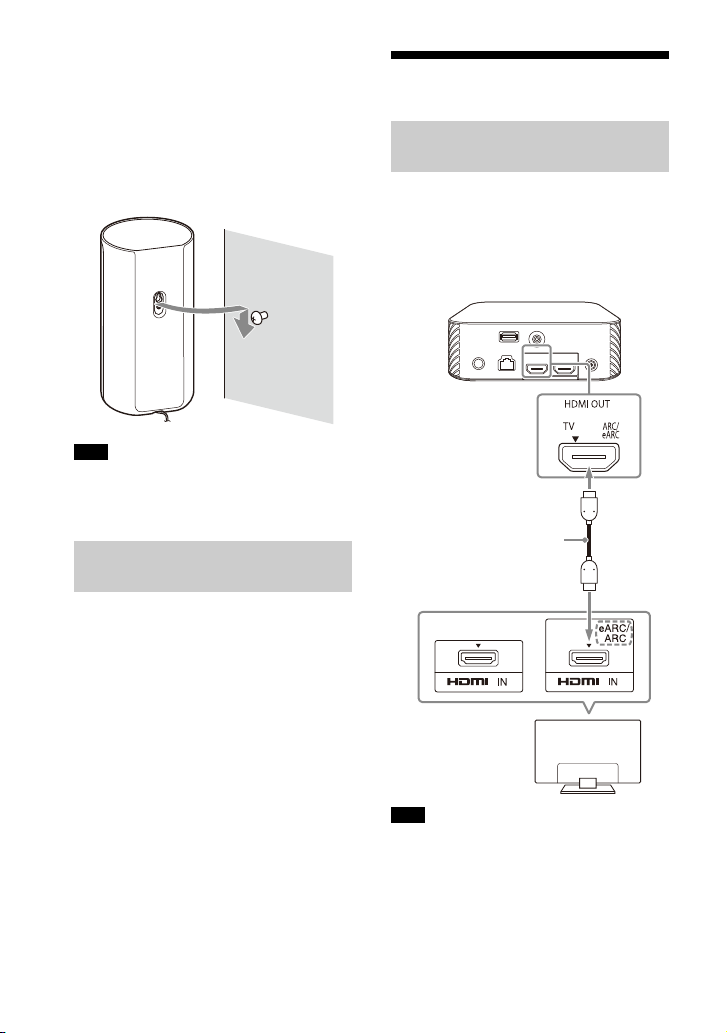
Connecting to a TV
Connecting a TV Compatible
with ARC/eARC
1 Connect the HDMI IN jack
compatible with ARC/eARC on the
TV and HDMI OUT (TV ARC/eARC)
jack on the speaker system with
the HDMI cable (supplied).
14
GB
Note
Make sure that the connectors are firmly
inserted.
Page 15
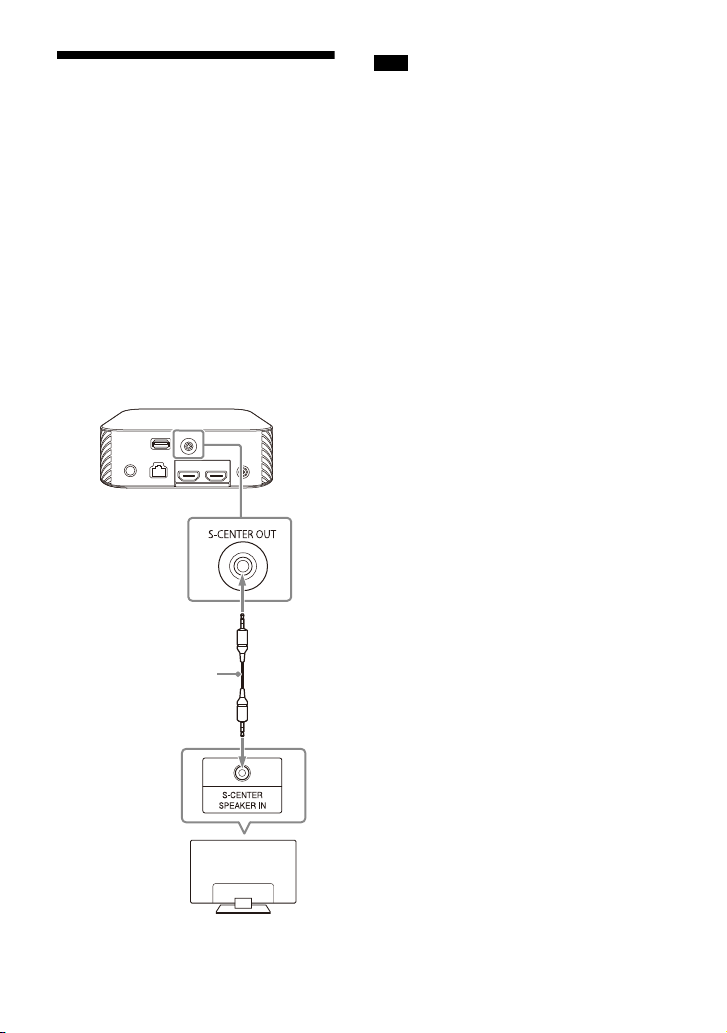
When Your TV Has the S-
TV
TV center speaker
mode cable
(supplied)
CENTER SPEAKER IN Jack
You can output the center part of the
speaker system sound from the TV by
connecting the TV with the following
method.
1 Connect the speaker system and
TV with the HDMI cable (supplied)
(page 14).
2 Connect the S-CENTER SPEAKER IN
jack on the TV and the S-CENTER
OUT jack on the speaker system
with the TV center speaker mode
cable (supplied).
Note
Make sure that the connectors are firmly
inserted.
Tip
If the length of the TV center speaker mode
cable is not sufficient, use a commercially
available stereo mini cable.
GB
15
Page 16

Connecting an AV Device
Blu-ray Disc player, set-top
box, gaming console, etc.
HDMI cable
(not supplied)
Connecting an AV Device
Compatible with the 2K/4K
Video Format
You can output sound such as Dolby
Atmos, Dolby TrueHD, and DTS:X in high
quality by connecting an AV device to
the speaker system.
1 Connect the HDMI OUT jack on the
AV device and HDMI IN jack on the
speaker system with an HDMI
cable (not supplied).
Tips
• If a TV is compatible with eARC, you can
also output the high quality sound by
connecting an AV device to the HDMI IN
jack on the TV. In this case, enable the
eARC function of the TV.
• Select the appropriate HDMI cable and
[HDMI Signal Format] setting according to
the video formats output from the device
connected to the speaker system. For
details, refer to Help Guide.
Connecting an AV Device
Compatible with the 8K
Video Format
When you connec t an AV device with the
following methods, you can play 8K
video and high quality sound such as
Dolby Atmos, Dolby TrueHD, or DTS:X.
1 Connect the speaker system and
TV with the HDMI cable (supplied)
(page 14).
2 Check that the eARC compatible
HDMI IN jack on the TV is
compatible with the 8K video
input.
Refer to the operating instructions
of the TV.
3 Connect an AV device with one of
the following methods.
Note
Make sure that the connectors are firmly
inserted.
GB
16
Page 17

When the eARC compatible
Blu-ray Disc player, set-top
box, gaming console, etc.
HDMI cable
(not supplied)
TV
Compatible with
8K video input
Blu-ray Disc player, set-top
box, gaming console, etc.
HDMI cable
(not supplied)
TV
Compatible with
8K video input
HDMI IN jack on the TV supports
the 8K video input:
Connect the HDMI IN jack on the
speaker system and HDMI OUT jack
on an AV device with an HDMI cable
(not supplied).
When the eARC compatible
HDMI IN jack on the TV does not
support the 8K video input:
Connect the HDMI OUT jack on an
AV device to the HDMI IN jack
compatible with the 8K video input
on a TV with an HDMI cable (not
supplied).
Make sure that the eARC function of
the TV is on.
Note
Make sure that the connectors are firmly
inserted.
Tip
Select the appropriate HDMI cable and
[HDMI Signal Format] setting according to
the video formats output from the device
connected to the speaker system. For
details, refer to Help Guide.
17
GB
Page 18

Connecting to the AC
AC adaptor
(supplied)
AC power cord
(mains lead)
(supplied)
AC adaptor
(supplied)
AC power cord (mains lead)
(supplied)
Outlet (mains)
1 Connect the AC adaptor (supplied)
and AC power cord (mains lead)
(supplied)* to the DC IN terminal of
the control box, then connect to
the AC outlet (mains).
*Except for North American models
For North American models
For other models
2 Connect the AC power cords
(mains leads) (supplied) to the AC
inlets on four speakers, then
connect to the AC outlets (mains).
GB
18
Page 19

Performing Initial
PLEASE WAIT SETUP
(power)
Speaker connection check
Next
Speaker connection successful.
[ Speaker connection check]
Sound Field Optimization
Later
Language
Select your language.
Easy Network Setup - Start
Optimize the surround sound for your environment.
Connect this unit to the Internet to:
Optimization takes about a minute. A loud sound
may come from your speakers during optimization.
Do not make loud noises, walk or stand in front of
the speakers during optimization.
- Use your mobile device to play streaming music on the unit.
- Install software updates to keep the latest functions available.
You can do this later from [Easy Setup] > [Easy Network Setup].
Start
Next Later
Français (France)
English
Français (Canada)
Español
Deutsch
[ Language]
[ Sound Field Optimization]
[ Easy Network Setup - Start]
Settings
1 Press (power) on the remote
control supplied with the speaker
system to turn on the speaker
system.
Operate the remote control by
pointing it toward the front of the
control box.
When the speaker system turns on,
[SETUP] appears in the front panel
display.
The sound for connection
completion is output after the check
marks appear on all the speakers.
The power indicator of the speaker
lights in green when connecting to
the control box.
4 Perform initial settings by
following the on-screen
instructions.
2 Turn on the TV.
If the [Speaker connection check]
screen does not appear on the TV
screen, change the TV input setting
to the input that the speaker system
is connected.
3
Check that the connection between
the control box and four speakers
is completed on the TV screen.
The control box and speakers are
connected automatically.
Once [Setup is complete.] appears,
select [Finish].
19
GB
Page 20

Notes
LINK
Power indicator
• Depending on the order in which you turn
on the TV and the speaker system, the
speaker system may be muted and
[MUTING] is displayed on the front panel
display of the speaker system. If this
happens, turn all devices off, then turn on
the speaker system after turning on the
TV.
• During [Sound Field Optimization], a
measuring sound is output for about 1
minute.
• The speaker system does not output
sound until completing the wireless
connection between the control box and
four speakers.
• If the control box and speakers are not
connected automatically in step 3, reset
the speakers (page 54).
If the Speakers Are not
Connected Correctly
The speakers are connected to the
control box automatically when they are
turned on.
If you use multiple speaker systems and
want to specify the control box that is
connected wirelessly to the speakers,
perform the manual connection by
following the steps below.
GB
20
1 Press HOME.
The home menu appears on the TV
screen.
2 Select [Setup] - [Advanced
Settings] on the home menu.
3 Select [Speaker Settings] -
[Wireless Speaker Settings] - [Start
manual linking].
The [Start manual linking] screen
appears on the TV screen.
Page 21

4 Press LINK on all the speakers.
The power indicators of the
speakers flash twice repeatedly in
green.
5 Select [Start].
The manual connection starts.
The connecting process appears on
the TV screen.
To cancel the manual connection,
select [Cancel].
6 When all the speakers display
[Connected], select [Finish].
7 Press (enter).
The manual connection is
established and the power
indicators of the speakers light in
green.
Notes
• If you perform [Start manual linking],
[Setup] - [Advanced Settings] -
[Speaker Settings] - [Wireless Speaker
Settings] - [Link mode] is set to [Manual]
automatically.
• Only the speakers for which [Connected]
has been displayed in step 6 connect to
the control box. If the connection of the
speakers cannot be established, perform
the operation again from step 1.
21
GB
Page 22

Watching Images
Watching TV
1 Press HOME.
The home menu appears on the TV
screen.
2 Select [Watch] - [TV] on the
home menu.
3 Select the program using the TV
remote control.
The selected TV program appears
on the TV screen and the TV sound is
output from the speaker system.
4 Adjust the volume (page 32).
Tip
You can select [TV] directly by pressing TV
on the remote control.
Playing the Connected AV
Device
1 Press HOME.
The home menu appears on the TV
screen.
2 Select [Watch] - [HDMI] on the
home menu.
The image of the selected device
appears on the TV screen and the
sound is output from the speaker
system.
3 Adjust the volume (page 32).
Tip
You can select [HDMI] directly by pressing
HDMI on the remote control.
22
GB
Page 23

Listening to Music/Sound
Blu-ray Disc player,
set-top box, gaming
console, etc.
Sony TV
TV
(power)
AUDIO
BLUETOOTH
PAIRING
Listening to Sony TV
Sound with the
BLUETOOTH® Function
What You Can Do by
Connecting a TV with the
BLUETOOTH Function
When using Sony TV* with the
BLUETOOTH function, you can listen to
sound of the TV or device that is
connected to the TV by connecting the
speaker system and TV wirelessly.
* T he TV n ee ds t o be co mpa ti ble wit h A 2DP
(Advanced Audio Distribution Profile) of
the BLUETOOTH profile.
Note
If connecting the speaker system and TV by
using the BLUETOOTH function, you cannot
display the operation screen for the
speaker system such as the home menu on
the TV screen, and use functions of the
speaker system other than the listening
function for the sound of the TV or device
that is connected to the TV.
To use all the functions of the speaker
system, connect the speaker system and TV
with the HDMI cable (supplied) (page 14).
Listening to TV Sound by
Connecting the Speaker
System and TV Wirelessly
You need to perform pairing of the
speaker system and TV by using the
BLUETOOTH function.
Pairing is the process required to
mutually register the information on
BLUETOOTH devices to be connected
wirelessly in advance.
1 Turn on the TV.
2 Press (power) to turn on the
speaker system.
3 Press TV, AUDIO, then BLUETOOTH
on the remote control in sequence.
4 Make sure that [PAIRING] appears
in the front panel display.
The speaker system enters the
BLUETOOTH pairing mode.
23
GB
Page 24

5 On the TV, search the speaker
system by performing the pairing
operation.
The list of the BLUETOOTH devices
that are detected appears on the TV
screen.
For the operation method to pair the
BLUETOOTH device to the TV, refer
to the operating instructions of the
TV.
6 Pair the speaker system and TV by
selecting “HT-A9” from the list on
the TV screen.
7 Make sure that [TV (BT)] appears in
the front panel display.
A connection between the speaker
system and TV has been
established.
8 Select the program or input of the
device by using the TV remote
control.
The sound of the displayed image
on the TV screen is output from the
speaker system.
9 Adjust the volume of the speaker
system by using the TV remote
control.
When pressing the muting button
on the TV remote control, the sound
is muted temporarily.
Notes
• If the TV sound is not output from the
speaker system, press TV and check the
status of the front panel display.
– [TV (BT)] appears in the front panel
display: The speaker system and TV are
connected, and TV sound is output from
the speaker system.
– [PAIRING] appears in the front panel
display: Perform pairing on the TV.
– [TV] appears in the front panel display:
Perform steps from the start.
• When you connect the speaker system
and TV with an HDMI cable, the
BLUETOOTH connection is canceled. To
connect the speaker system and TV with
the BLUETOOTH function again,
disconnect the HDMI cable, then perform
the connecting operation from the start.
Listening to Sound of the
Paired TV
1 Turn on the TV with the TV remote
control.
The speaker system is turned on by
interlocking with the TV power and
TV sound is output from the speaker
system.
2 Select the program or input of the
device by using the TV remote
control.
The sound of the displayed image
on the TV screen is output from the
speaker system.
3 Adjust the volume of the speaker
system by using the TV remote
control.
When pressing the muting button
on the TV remote control, the sound
is muted temporarily.
Tip
When the TV is turned off, the speaker
system is also turned off by interlocking
with the TV power.
24
GB
Page 25

About operations with the remote
(power)
BASS +/–
(volume) +/–
(muting)
REAR (rear
speakers volume)
+/–
AUTO SOUND,
VOICE,
NIGHT,
CINEMA,
MUSIC,
STANDARD,
IMMERSIVE AE
BLUETOOTH
BASS +/–
(volume) +/–
(play/
pause), /
(previous/next)
REAR (rear
speakers volume)
+/–
control that is supplied with the
speaker system
You can use the following buttons.
Notes
• If you select the input other than TV on the
remote control supplied with the speaker
system, the TV sound is not output from
the speaker system. To output the TV
sound, press TV on the remote control to
change to the TV input.
• While the TV is connected with the
BLUETOOTH function, the following
remote control buttons do not work.
///, (enter), BACK, HOME,
DISPLAY, OPTIONS, (play/pause),
/ (previous/next)
Listening to Music/Sound
with the BLUETOOTH
Function
Listening to Music by Pairing
the Mobile Device That Is
Connected for the First Time
To use the BLUETOOTH function, you
need to perform pairing of the speaker
system and mobile device in advance.
1 Press and hold the BLUETOOTH
button for 2 seconds.
25
GB
Page 26

2 Make sure that [PAIRING] appears
PAIRING
BLUETOOTH
BASS +/–
(volume) +/–
(play/
pause), /
(previous/next)
REAR (rear
speakers volume)
+/–
in the front panel display.
The speaker system enters the
pairing mode.
3 On the mobile device, search the
speaker system by performing the
pairing operation.
The list of the BLUETOOTH devices
that are detected appears on the
screen of the mobile device.
For the operation method to pair the
BLUETOOTH device to the mobile
device, refer to the operating
instructions of the mobile device.
4 Pair the speaker system and
mobile device by selecting “HTA9” from the list on the screen of
the mobile device.
If a passkey is requested, enter
“0000.”
5 Make sure that [BT] appears in the
front panel display.
A connection between the speaker
system and mobile device has been
established.
6 Start audio playback with the
music app on the connected
mobile device.
Sound is output from the speaker
system.
7 Adjust the volume (page 32).
You can play or pause the content
by using the playback operation
buttons on the remote control.
Tips
• If there is no mobile device that has been
paired (ex. immediately after the purchase
of the speaker system), the speaker
GB
26
system goes into pairing mode simply by
changing the input to the BLUETOOTH
input.
• Perform pairing for the second and
subsequent mobile devices.
Listening to Music from the
Paired Device
1 Turn the BLUETOOTH function of
the mobile device to on.
2 Press the BLUETOOTH button.
The speaker system automatically
reconnects to the mobile device it
was most recently connected to.
3 Make sure that [BT] appears in the
front panel display.
A connection between the speaker
system and mobile device has been
established.
4 Start audio playback with the
music app on the connected
mobile device.
Sound is output from the speaker
system.
Page 27

5 Adjust the volume (page 32).
You can play or pause the content
by using the playback operation
buttons on the remote control.
Note
If sound delay occurs, it may be improved
by setting [Setup] - [Advanced
Settings] - [Bluetooth Settings] - [Bluetooth
Connection Quality] to [Priority on Stable
Connection].
Tip
When the connection is not established,
select “HT-A9” on the mobile device.
To disconnect the mobile device
Perform any of the following items.
• Disable the BLUETOOTH function on
the mobile device.
• Press the BLUETOOTH button while the
[Bluetooth Audio] screen appears on
the TV screen.
• Set [Setup] - [Advanced Settings] [Bluetooth Settings] - [Bluetooth
Mode] to [Transmitter] or [Off].
• Turn off the speaker system or mobile
device.
Listening to Sound of the
Connected TV or Device
Using Headphones
Listening to Sound by Pairing
with Headphones
1 Set the BLUETOOTH compatible
headphones to pairing mode.
Refer to the operating instructions
of the headphones for the pairing
method.
2 Press HOME.
The home menu appears on the TV
screen.
3 Select [Setup] - [Advanced
Settings] on the home menu.
4 Select [Bluetooth Settings] -
[Bluetooth Mode] - [Transmitter].
The speaker system enters
BLUETOOTH transmission mode.
5 Select the name of the
headphones from the [Device List]
in [Bluetooth Settings].
When the BLUETOOTH connection is
established, [Connected] appears.
If you cannot find the name of your
headphones in [Device List], select
[Scan].
6 Return to the home menu, select
[Watch] or [Listen], and
select the input.
The image of the selected input
appears on the TV screen, [BT TX]
appears in the front panel display,
then the sound is output from the
headphones.
Sound from the speaker system is
muted at the same time.
27
GB
Page 28

7 Adjust the volume.
Adjust the volume level of the
headphones first. Then, adjust the
volume level of the headphones
with (volume) +/– on the remote
control.
To remove the paired
headphones from the device list
1 Press HOME.
The home menu appears on the TV
screen.
2 Select [Setup] - [Advanced
Settings] on the home menu.
3 Select [Bluetooth Settings] - [Device
List].
4 Move the cursor to the name of the
headphones that you want to remove,
and then press DISPLAY.
To remove all the paired headphones
from the device list, press AUDIO.
5 Follow the on-screen instructions to
remove the desired headphones from
the device list.
Note
To display the paired headphones on the
device list, Set [Setup] - [Advanced
Settings] - [Bluetooth Settings] - [Bluetooth
Mode] to [Transmitter].
Listening to Sound with
Paired Headphones
1 Set the BLUETOOTH function of the
headphones to on.
2 Press HOME.
The home menu appears on the TV
screen.
3 Select [Setup] - [Advanced
Settings] on the home menu.
4 Select [Bluetooth Settings] -
[Bluetooth Mode] - [Transmitter].
The speaker system enters
BLUETOOTH transm ission mode and
the speaker system automatically
reconnects to the headphones that
was most recently connected to.
5 Return to the home menu, select
[Watch] or [Listen], and
select the input.
The image of the selected input
appears on the TV screen, [BT TX]
appears in the front panel display,
then the sound is output from the
headphones.
Sound from the speaker system is
muted at the same time.
6 Adjust the volume.
Adjust the volume level of the
headphones first. Then, adjust the
volume level of the headphones
with (volume) +/– on the remote
control.
28
GB
Page 29

To disconnect the paired
headphones
Perform any of the following items.
– Disable the BLUETOOTH function on
the headphones.
– Set [Setup] - [Advanced Settings] -
[Bluetooth Settings] - [Bluetooth
Mode] to [Receiver] or [Off].
– Turn off the speaker system or
headphones.
– Select the device name of the
connected headphones from
[Setup] - [Advanced Settings] [Bluetooth Settings] - [Device List].
[Connected] of the device name
disappears.
About the Connection of the
Headphones
• You may not be able to adjust the
volume level depending on the
BLUETOOTH compatible headphones.
• Input of BLUETOOTH is disabled when
[Setup] - [Advanced Settings] [Bluetooth Settings] - [Bluetooth
Mode] is set to [Off] or [Transmitter].
• You can register up to 9 BLUETOOTH
devices. If a 10th BLUETOOTH device is
registered, the oldest connected
BLUETOOTH device will be overwritten
by the new one.
• The speaker system can display up to
15 detected BLUETOOTH devices in the
[Device List] (page 28).
• You cannot change the sound effect or
settings while transmitting sound to
the BLUETOOTH compatible
headphones.
• Playback of audio/music on the
BLUETOOTH device is delayed
compared to that on the speaker
system due to the characteristics of
BLUETOOTH wireless technology.
• You can enable or disable the
reception of LDAC audio from the
BLUETOOTH device in [Bluetooth
Settings].
29
GB
Page 30

Listening to Music by Connecting to a Network
iOS device/smartphone/
tablet
• 360 Reality Audio
•Spotify
•Chromecast built-in
•AirPlay
•Sony | Music Center
Computer
•AirPlay
• Home Network
Speaker system
What You Can Do by Connecting the Speaker System to
a Network
You can perform streaming playback of music content via the speaker system by
operating a smartphone, tablet, or iOS device, or play music stored on a computer via
the speaker system by connecting to the network.
For details of functions and operations, refer to Help Guide.
360 Reality Audio
You can play 360 Reality Audio contents
on the speaker system by selecting it on
the streaming service app compatible
with 360 Reality Audio.
Spotify
You can select music on the Spotify app
and play it on the speaker system.
Use your phone, tablet or computer as a
remote control for Spotify.
Go to spotify.com/connect to learn how.
GB
30
Chromecast built-in™
You can select music on the
Chromecast-enabled app and play it on
the speaker system.
AirPlay
The speaker system supports AirPlay.
You can play music on the speaker
system by operating an iOS device or a
computer.
Page 31

Sony | Music Center
You can control the speaker system
wirelessly by installing the “Sony | Music
Center” app on your smartphone or
tablet device.
Home Network
You can play music files stored on your
computer on a network location via your
home network.
31
GB
Page 32

Adjusting the Volume and Sound
BASS +/–
REAR (rear
speakers volume)
+/–
(volume) +/–
Quality
Adjusting the Volume
To adjust the speaker system
volume
Press (volume) +/–.
The volume level appears in the front
panel display.
To adjust the bass sound volume
Press BASS (bass sound volume) +/–.
The volume level appears in the front
panel display.
Note
The subwoofer is designed for playback of
bass or low frequency sound. When the
input source, such as in TV programs, does
not contain much bass sound, the bass
sound from the subwoofer may be difficult
to hear.
created from the 2-channel sound using
virtual processing. When the input source
does not contain much surround sound,
the surround sound from the rear speakers
may be difficult to hear.
To adjust the rear speaker volume
Press REAR (rear speakers volume)
+/–.
The volume level appears in the front
panel display.
Note
The rear speakers are designed for
playback of the surround part of the multichannel sound and surround sound that is
GB
32
Page 33

Enjoying Immersive
IMMERSIVE AE
Surround Experience
(IMMERSIVE AE)
You can feel immersed by the sound
from not only the horizontal direction,
but also from the upward direction by
working sound modes effectively
(page 34). This function also works for
the 2.0 channel signal such as TV
programs.
1 Press IMMERSIVE AE to set the
function on or off.
The Immersive Audio Enhancement
setting appears on the TV screen.
Mode Explanation
[Immersive
Audio
Enhancement:
On]
[Immersive
Audio
Enhancement:
Off]
Activates the
Immersive Audio
Enhancement
function.
Deactivates the
Immersive Audio
Enhancement
function.
• The Immersive Audio Enhancement
setting does not appear on the TV screen
while the TV input is selected. In this case,
you can check the Immersive Audio
Enhancement setting in the front panel
display.
• Depending on the source, this setting is
fixed and cannot be changed.
Notes
• The Immersive Audio Enhancement
function is available only when
[Setup] - [Advanced Settings] [Audio Settings] - [Sound Effect] is set to
[Sound Mode On].
• The surround effect from all directions
differs depending on the sound source.
33
GB
Page 34

Setting the Sound Effect
CINEMA
MUSIC
AUTO SOUND
STANDARD
That Is Tailored to Sound
Sources (Sound Mode)
You can easily enjoy pre-programmed
sound effects that are tailored to
different kinds of sound sources.
This function works when [Setup] [Advanced Settings] - [Audio Settings] [Sound Effect] is set to [Sound Mode On].
1 Press AUTO SOUND, CINEMA,
MUSIC, or STANDARD to select the
sound mode.
The selected sound mode appears
on the TV screen.
Sound mode Explanation
[Auto Sound]
[Cinema]
The appropriate
sound setting is
automatically
selected for the
sound source.
You feel immersed by
the sound th at travels
behind you and
surrounds your entire
body. This mode is
suitable for watching
movies.
Sound mode Explanation
[Music]
[Standard
Surround]
Notes
• The sound mode function is disabled in
the following conditions.
– Chromecast built-in is used.
– AirPlay is used.
–The BLUETOOTH device is connected in
BLUETOOTH transmission mode
(page 27).
– A test tone is emitted.
• The sound mode does not appear on the
TV screen while the TV input is selected. In
this case, you can check the sound mode
in the front panel display.
• Depending on the combination of the
sound mode setting and sound source,
the effect of [Sound Field Optimization]
may not be applied.
Vividness and
glossiness of the
sound are expressed
in detail. Th is mode is
suitable for enjoying
music in a way that
moves you.
The sound of a TV
program can be
heard clearly.
34
GB
Page 35

Making Dialogs Clearer
VOICE
NIGHT
(VOICE)
1 Press VOICE to set the function on
or off.
The voice mode setting appears on
the TV screen.
Mode Explanation
[Voice: On] Dialog is easily heard by
[Voice: Off] Deactivates the voice
Notes
• The voice mode setting does not appear
on the TV screen while the TV input is
selected. In this case, you can check the
voice mode setting in the front panel
display.
• When the BLUETOOTH device is
connected in BLUETOOTH transmission
mode (page 27), the voice mode is
disabled.
enhancing dialog
range.
mode function.
Enjoying Clear Sound
with Low Volume at
Midnight (NIGHT)
1 Press NIGHT to set the function on
or off.
The night mode setting appears on
the TV screen.
Mode Explanation
[Night: On] Sound is output at low
[Night: Off] Deactivates the night
Notes
• When you turn the speaker system off,
this setting is set to [Night: Off]
automatically.
• The night mode setting does not appear
on the TV screen while the TV input is
selected. In this case, you can check the
night mode setting in the front panel
display.
• When the BLUETOOTH device is
connected in BLUETOOTH transmission
mode (page 27), the night mode is
disabled.
volume with minimum
loss of fidelity and
clarity of dialog.
mode function.
35
GB
Page 36

Adjusting the Delay
AUDIO
Between the Picture and
Sound
When the sound does not match the
pictures on the TV screen, you can adjust
the delay between the picture and
sound.
The setting method differs depending
on the input.
For details, refer to Help Guide.
Enjoying Multiplex
Broadcast Sound (AUDIO)
You can enjoy multiplex broadcast
sound when the speaker system
receives a Dolby Digital multiplex
broadcast signal.
1 Press AUDIO repeatedly to select
the desired audio signal.
The audio signal appears on the TV
screen
.
Audio signal Explanation
[Audio:
Main]
[Audio: Sub] Sound of the sub
[Audio:
Main/Sub]
Sound of the main
language is output.
language is output.
Main sound is output
from the left speaker
and sub sound is
output from the right
speaker.
36
Notes
• To output Dolby Digital sound, you need
to connect a TV that is compatible with
eARC or ARC (page 14) to the HDMI OUT
(TV ARC/eARC) jack with the HDMI cable
(supplied), or other devices to the HDMI IN
jack with an HDMI cable (not supplied).
• The audio signal does not appear on the
TV screen while the TV input is selected. In
this case, you can check the audio signal
in the front panel display.
GB
Page 37

Adjusting the Dialog
OPTIONS
///,
(enter)
Volume While the DTS:X
Content is Played Back
By adjusting the dialog volume, you can
easily listen to dialog since it stands out
from the ambient noise. This function
works while playing content that is
compatible with the DTS:X dialog
control function.
The setting method differs depending
on the input.
When Watching the TV
1 Press OPTIONS, display [DIALOG]
in the front panel display using /
, then press (enter).
2 Adjust the dialog volume using /
, then press (enter).
You can adjust from 0.0 dB to 6.0 dB
in 1.0 dB increments.
3 Press OPTIONS.
The options menu in the front panel
display turns off.
When Playing Content on an
AV Device
1 Press OPTIONS.
The options menu appears on the
TV screen.
2 Select [DTS Dialog Control].
3 Adjust the dialog volume using /
, then press (enter).
You can adjust from 0.0 dB to 6.0 dB
in 1.0 dB increments.
37
GB
Page 38

Using the Speaker System by
TV remote control
Interlocking with a TV
Operating the Speaker
System by Interlocking
with a TV (Control for
HDMI Function)
Connecting a TV compatible with the
Control for HDMI function using an HDMI
cable enables you to interlock the
speaker system opera tion such as power
on/off or volume adjustment with a TV.
About the Control for HDMI
function
The Control for HDMI function is a
function that enables operation of
devices connected with an HDMI (HighDefinition Multimedia Interface) cable by
interlocking them.
Although this function works for devices
compatible with the Control for HDMI
function, it may not work if connecting
devices other than those manufactured
by Sony.
Preparing to Operate by
Interlocking with a TV
Enable the Control for HDMI function
settings of the TV connected to the
speaker system with an HDMI cable.
The default setting of the Control for
HDMI function of the speaker system is
[On].
Tips
• When connecting a device such as a Blura y D isc pl aye r to a T V w ith an H DM I ca bl e,
enable its Control for HDMI function.
• To enable the Control for HDMI function of
a TV or Blu-ray Disc player, refer to their
operating instructions.
• If you enable the Control for HDMI
(“BRAVIA” sync) function when using a TV
manufactured by Sony, the Control for
HDMI function of the speaker system is
also enabled automatically. When the
setting is complete , [DONE] appears in the
front panel display.
Performing Power Operation
or Volume Adjustment by a
TV Remote Control
When turning the TV on/off or adjusting
the volume using the TV remote control,
the speaker system power operation or
volume adjustment is interlocked.
Power interlocking
When you turn on or off the TV, the
speaker system will turn on or off
automatically.
Note
If you turn off the speaker system before
turning off the TV, the speaker system may
not turn on automatically even though you
turn on the TV next time. In this case,
perform the following operation.
– Select the speaker system for the sound
output device in the TV menu.
– When using Sony TV, turn on the
speaker system while the TV is turned
on.
38
GB
Page 39

Volume adjustment
The sound of the TV you are watching is
output from the speaker system
automatically. You can adjust the
speaker system volume by the TV
remote control.
Other Interlocking Functions
Menu Operation by TV Remote
Control
You can operate the menu of the
speaker system by selec ting the name of
the speaker system when changing
input or operating the Sync Menu on the
TV.
Note
Some Sony TVs support the Sync Menu.
Refer to the operating instructions of your
TV to see if your TV supports the Sync
Menu.
Language Follow
When you change the language for the
on-screen display of the TV, the speaker
system’s on-screen display language is
also changed.
Operating the Speaker
System by Interlocking
with a TV Compatible with
the “BRAVIA” Sync
Function
“BRAVIA” Sync is an extended function
developed by Sony based on the Control
for HDMI function. By connecting
“BRAVIA” Sync-compatible devices such
as a TV or a Blu-ray Disc player using an
HDMI cable, you can control the devices
by interlocking them with each other.
To use “BRAVIA” Sync
“BRAVIA” Sync is enabled by enabling
the Control for HDMI function of the
Sony device. For the operation to enable
the Control for HDMI function, see
“Preparing to Operate by Interlocking
with a TV” (page 38).
What You Can Do with
“BRAVIA” Sync
One-Touch Play Function
When you play content on a Blu-ray Disc
player or “PlayStation
to the TV, the speaker system and TV are
turned on automatically.
Tip
You can change the Control for HDMI
settings by selecting [Setup] [Advanced Settings] - [HDMI Settings] on
the home menu.
4,” etc. conn ected
®
Control for HDMI function
•Power interlocking (page38)
• Volume adjustment (page 39)
• Menu Operation by TV Remote Control
(page 39)
• Language Follow (page 39)
• One-Touch Play Function (page 39)
Sound mode/Scene Select
Function
The sound mode of the speaker system
is automatically switched according to
the setting of the TV’s Scene Select
function or sound mode. To use this
function, you need to set the sound
mode to [Auto Sound] (page 34).
39
GB
Page 40

Home Theatre Control
Function
Setting the speaker system, setting the
sound mode settings, input switching,
etc. can be done without switching the
TV input.
40
GB
Page 41

Changing the Settings
DIMMER
Changing the Brightness
of the Front Panel Display
and Indicators (DIMMER)
You can change the brightness of the
front panel display and power indicator
of the speaker. The brightness of the
power indicator for the optional
subwoofer also changes.
1 Press DIMMER repeatedly to select
the desired display mode.
The display mode appears on the TV
screen.
Mode Explanation
[Dimmer:
Bright]
[Dimmer:
Dark]
[Dimmer:
Off]
The front panel display
and indicators light
brightly.
The front panel display
and indicators light
darkly.
The front panel display
and indicators are
turned off.
about 10 seconds. However, in some
cases, the front panel display and
indicators may not turn off. In this case,
the brightness of the front panel display
and indicators are the same as [Dimmer:
Dark].
• The display mode does not appear on the
TV screen while the TV input is selected. In
this case, you can check the display mode
in the front panel display.
Notes
• The front panel display and indicators are
turned off when [Dimmer: Off] is se lected.
They turn on automatically when you
press any button, then turn off again if you
do not operate the speaker system for
41
GB
Page 42

Saving Power in Standby
Mode
Check that you have made the following
settings:
– [Setup] - [Advanced Settings] -
[HDMI Settings] - [Standby Through] is
set to [Off].
– [Setup] - [Advanced Settings] -
[System Settings] - [Network/
Bluetooth Standby] is set to [Off].
Performing Easy Setup
You can make basic initial settings,
speaker settings, and network settings
for the speaker system easily by
performing Easy Setup.
1 Press HOME.
The home menu appears on the TV
screen.
2 Select [Setup] - [Easy Setup]
on the home menu.
The [Easy Setup] screen appears on
the TV screen.
3 Select the desired setting.
• [Easy Initial Setup]: Performs the
basic initial settings including the
speaker settings and network
settings.
• [Easy Sound Setup]: Performs the
basic speaker settings for
optimizing the surround sound for
your environment.
• [Easy Network Setup]: Performs
the basic network settings.
4 Perform settings by following the
on-screen instructions.
42
GB
Page 43

Performing Advanced Settings
Using the [Advanced Settings] Menu
You can make various adjustments to items such as picture and sound on the
[Advanced Settings] menu.
1 Press HOME.
The home menu appears on the TV screen.
2 Select [Setup] - [Advanced Settings] on the home menu.
The [Advanced Settings] screen appears on the TV screen.
3 Select the setting item.
For details about the setting items, refer to Help Guide.
Setting item Explanation
[Speaker Settings]
[Audio Settings] Makes the audio output settings.
[HDMI Settings] Makes the HDMI settings.
[Bluetooth Settings]
[System Settings] Makes the speaker system-related settings.
[Network Settings] Makes detailed settings for the Internet.
[Resetting]
[Software Update]
Makes the speakers settings for installing and
connections.
Makes detailed settings for the BLUETOOTH
function.
Resets the speaker system to the factory default
settings.
Updates the software of the speaker system or
optional subwoofer.
43
GB
Page 44

Updating the Software
By updating your software to the latest
version, you can take advantage of the
newest functions.
For information about update functions,
visit the following website:
• For customers in Americas
https://www.sony.com/am/support
• For customers in Europe
https://www.sony.eu/support
• For customers in Asia-Pacific, Oceania,
Middle East, and Africa
https://www.sony-asia.com/support
Notes
• It may take up to 20 minutes for the
update to be completed.
• An Internet environment is necessary to
perform updates via the Internet.
• While the updating operation is in
progress, do not turn on or off the speaker
system, disconnect the AC power cord
(mains lead), disconnect/connect an
HDMI cable, or operate the speaker
system or TV. Wait for the software
update to complete.
• Set [Setup] - [Advanced Settings] -
[Network Settings] - [Auto Update
Settings] - [Auto Update] to [On] when you
want to perform software updates
automatically. Software update may be
performed even if you select [Off] in [Auto
Update] depending on the details of the
updates. For details, refer to Help Guide.
1 Make sure that the speakers are
turned on and connected to the
speaker system. When using the
optional subwoofer, make sure
that it is turned on and connected
to the speaker system.
The power indicators of the
speakers and optional subwoofer
light in green.
2 Press HOME.
The home menu appears on the TV
screen.
3 Select [Setup] - [Advanced
Settings] on the home menu.
If the speaker system detects
update information for the speaker
system on the network, the update
notification and [Software Update]
appear on the home menu. In this
case, select [Software Update] and
follow the on-screen instructions.
4 Select [Software Update].
The [Software Update] screen
appears on the TV screen.
5 Select the item for updating.
Select the updating item from the
following items by pressing / and
, then update the software by
following the on-screen
instructions.
When a software update starts, the
speaker system automatically
reboots.
During a software update, [UPDATE]
appears in the front panel display.
After the update is complete, the
speaker system automatically
reboots.
[Network Update]
Updates the software using the available
network. Make sure that the network is
connected to the Internet.
[USB Update]
Updates the software using a USB
memory. For details on updating, refer
to the instructions that are displayed
when downloading the update file.
[Wireless Speakers Update]
Updates the software of the speakers or
optional subwoofer when the software
of the speaker system is the latest
version.
Note
If updating of the speakers or optional
subwoofer does not work, move them to a
location near the control box and update.
44
GB
Page 45

Troubleshooting
Troubleshooting
If the speaker system does not work
properly, handle it in the following order.
1 Search for the cause and
solution of the issue by referring
to these Operating Instructions
or Help Guide.
The troubleshooting method is
listed in “Troubleshooting.”
For the functions that are not
mentioned in Operating
Instructions, refer to Help Guide.
• For customers in Americas
https://
rd1.so ny.net/he lp/
ht/a9/h_uc/
• For customers in other countries/
regions
https://
rd1.so ny.net/he lp/
ht/a9/h_zz/
2 Search for the cause and
solution of the issue on the Sony
support site.
Sony support site provides latest
support information and
Frequently Asked Questions.
• For customers in Americas
https://www.sony.com/am/
support
• For customers in Europe
https://www.sony.eu/support
• For customers in Asia-Pacific,
Oceania, Middle East, and Africa
https://www.sony-asia.com/
support
3 Reset the speaker system.
All the settings of the speaker
system return to their initial
status.
4 Should any problems persist,
consult your nearest Sony
dealer.
Be sure to bring your control box
and speakers, even if it seems as
though only one has a problem,
when you request to repair.
45
GB
Page 46

Power
The speaker system does not power
up.
Check that the AC power cord (mains
lead) is connected securely.
Disconnect the AC power cord (mains
lead) from the wall outlet (mains), and
then reconnect after several minutes.
The speaker system does not turn
on even when the TV is turned on.
Set [Setup] - [Advanced Settings]
- [HDMI Settings] - [Control for HDMI]
to [On]. The TV must support the
Control for HDMI function (page 38).
For details, refer to the operating
instructions of your TV.
Check the speaker settings of the TV.
The speaker system power syncs with
the speaker settings of the TV. For
details, refer to the operating
instructions of your TV.
Depending on the TV, if the sound
was output from the speakers of the
TV the previous time, the speaker
system may not turn on by
interlocking with the TV power even
when the TV is turned on.
The speaker system turns off when
the TV is turned off.
Check the setting of [Setup] -
[Advanced Settings] - [HDMI Settings]
- [Standby Linked to TV]. When
[Standby Linked to TV] is set to [On] or
[Auto], the speaker system turns off
automatically when you turn off the
TV.
The speaker system does not turn
off even when the TV is turned off.
Check the setting of [Setup] -
[Advanced Settings] - [HDMI Settings]
- [Standby Linked to TV]. To turn the
speaker system off automatically,
regardless of the input when you turn
off the TV, set [Standby Linked to TV]
to [On]. The TV must support the
Control for HDMI function (page 38).
For details, refer to the operating
instructions of your TV.
The speaker system cannot be
turned off.
The speaker system may be in demo
mode. To cancel demo mode, reset
the speaker system. Press and hold
(power) on the control box for more
than 10 seconds (page 53).
Picture
There is no picture or the picture is
not output correctly.
Select the appropriate input
(page 22).
When there is no picture while the TV
input is selected, select the TV
channel that you want using the TV
remote control.
When there is no picture while the
HDMI input is selected, press the
playback button of the connected
device.
Disconnect an HDMI cable, then
connect it again. Make sure that the
cable is firmly inserted.
When there is no picture from the
connected device or the picture from
the connected device is not output
correctly, change the setting of
[Setup] - [Advanced Settings] [HDMI Settings] - [HDMI Signal
Format] - [HDMI IN]. For details, refer
to Help Guide.
The speaker system is connected to
an input device that is not HDCP
(High-bandwidth Digital Content
Protection) compliant. In this case,
check the specifications of the
connected device.
The picture on the TV screen is
distorted.
Interference of the wireless function
between the TV/other wireless
devices and the control box may have
occurred. Move the control box,
change the direction of the control
46
GB
Page 47

box, or install the control box far away
from the TV/other wireless devices.
There is an interference of the
frequency band between the wireless
LAN and the wireless connection of
the speakers. Switch the band of the
wireless LAN connection of the TV or
device that is playing an image to 2.4
GHz.
3D content from the HDMI IN jack
does not appear on the TV screen.
Depending on the TV or video device,
3D content may not appea r. Check the
supported HDMI video format. For
details, refer to Help Guide.
High definition video signal (4K/60p
4:4:4, 4:2:2 and 4K/60p 4:2:0 10 bit,
etc.) from the HDMI IN jack does not
appear on the TV screen.
Depending on the TV or the video
device, high definition video signals
such as 4K may not appear. Check the
video capability and settings of your
TV and video device.
Change the setting of [Setup] -
[Advanced Settings] - [HDMI Settings]
- [HDMI Signal Format] - [HDMI IN]
according to the video signal that is
supported by a connected TV or
device. For details, refer to Help
Guide.
When you play high definition video
signals such as 4K video content that
is protected by copyright, connect the
speaker system to the H DMI input jack
that supports HDCP2.2 or HDCP2.3 on
the TV. For details, refer to the
operating instructions of your TV.
An image is not displayed on the
entire TV screen.
The aspect ratio on the media is fixed.
Picture and sound of the device that
is connected to the speaker system
are not output from the TV when the
speaker system is not turned on.
Set [Setup] - [Advanced Settings]
- [HDMI Settings] - [Control for HDMI]
to [On] on the speaker system, and
then set [Standby Through] to [Auto]
or [On].
Turn on the speaker system, and then
switch the input for the device
playing.
If connected to devices other than
those manufactured by Sony that
support the Control for HDMI function ,
set [Setup] - [Advanced Settings]
- [HDMI Settings] - [Standby Through]
to [On].
HDR contents cannot be shown in
high-dynamic range.
Check the settings of the TV and
connected device. For details, refer to
the operating instructions of your TV
and the connected device.
Depending on the [HDMI Signal
Format] setting, an AV device may not
be able to output HDR contents in
HDR format. Change the setting of
[Setup] - [Advanced Settings] [HDMI Settings] - [HDMI Signal
Format] - [HDMI IN] according to the
video format that is supported by the
AV device. For details, refer to Help
Guide.
Sound
No sound is output from the
speaker system.
Check that the AC power cords (mains
leads) of the control box and speakers
are connected securely.
If the power indicator of the speaker is
turned off, try the following.
– Check that the AC power cord
(mains lead) of the speaker is
connected securely.
– Press (power) on the bottom of
the speaker to turn on the speaker.
If the power indicator on the speaker
flashes slowly in green or lights in red,
try the following.
– Move the speaker to a location near
the control box so that the power
47
GB
Page 48

indicator on the speaker lights in
green.
– Connect the speaker and control
box manually (page 20).
– Check the status of the wireless
connection in [Setup] [Advanced Settings] - [Speaker
Settings] - [Wireless Speaker
Settings] - [Check wireless
connection].
It may take about 1 minute until the
sound is output if [Setup] [Advanced Settings] - [Speaker
Settings] - [Wireless Speaker Settings]
- [RF Channel] is switched from [Off] to
[On].
Press (volume) + on the remote
control to increase the volume or
cancel muting (page 10).
The speakers may be connected to
another compatible device. Try
manual connection (page 20).
The speaker system cannot connect
to a TV with the BLUETOOTH
function.
When you connect the speaker
system and TV with an HDMI cable,
the BLUETOOTH connection is
canceled.
No TV sound is output from the
speaker system.
Check the type and connection of an
HDMI cable or TV center speaker
mode cable that is connected to the
speaker system and the TV (page 14).
Disconnect the cables that are
connected to the TV and the speaker
system, then connect them firmly
again. Disconnect the AC power cords
(mains leads) of the TV and the
speaker system from the AC outlets
(mains), then connect them again.
When the speaker system and TV are
connected with an HDMI cable, check
the following.
– Th e H DM I j ac k o f t he co nn ect e d TV is
labeled with “eARC” or “ARC.”
– The Control for HDMI function of the
TV is set to on.
– The eARC or ARC function of the TV
is enabled.
– On the speaker system, [Setup]
- [Advanced Settings] - [HDMI
Settings] - [Control for HDMI] is set
to [On].
If your TV is not compatible with
eARC, set [Setup] - [Advanced
Settings] - [HDMI Settings] - [eARC] to
[Off].
Switch the input of the speaker
system to the TV input.
Increase the volume on the speaker
system or cancel muting.
If sound of a Blu-ray Disc player, set-
top box, gaming console, etc.
connected to the TV is not output,
connect the dev ice to the HDMI IN jack
of the speaker system and switch
input of the speaker system to the
input for the connected device
([HDMI]) (page 16).
Depending on the order in which you
turn on the TV and the speaker
system, the speaker system may be
muted and [MUTING] is displayed on
the front panel display of the speaker
system. If this happens, turn on the TV
first, then the speaker system.
Press TV/AUDIO SYSTEM on the
remote control to switch the output
for the connected TV sound or set the
speakers setting of your TV to Audio
System. Refer to the operating
instructions of your TV regarding how
to set the TV.
The sound skips or noise is
generated.
If a device that generates
electromagnetic radiation, such as a
wireless LAN device or a microwave
oven is nearby, move the speaker
system away from the device.
Interference may occur by a wireless
LAN connection of a peripheral
device. Change the network
48
GB
Page 49

connection of the peripheral device to
the wired LAN.
The control box and speakers are
installed too far away from each
other. Bring them closer together.
If there is any obstacle between the
control box and speakers, remove it or
move the control box and speakers
away from the obstacle.
Do not install the control box in the
inner position of a shelf. Install the
control box in or on a shelf so that the
front panel display is not hidden.
Move the control box, change the
direction of the control box, or install
the control box far away from a TV.
Set [Setup] - [Advanced Settings]
- [Speaker Settings] - [Wireless
Speaker Settings] - [Wireless Playback
Quality] to [Connection].
Set [Setup] - [Advanced Settings]
- [Speaker Settings] - [Wireless
Speaker Settings] - [RF Channel] to
[Off], then set to [On].
Interference of wireless bandwidth
between the network connection and
speaker connection may occur.
Change the wireless LAN connection
of the speaker system to the wired
LAN connection, or switch the band of
the wireless LAN connection to 2.4
GHz.
Picture and sound of the device that
is connected to the speaker system
are not output from the TV when the
speaker system is not turned on.
Set [Setup] - [Advanced Settings]
- [HDMI Settings] - [Control for HDMI]
to [On] on the speaker system, and
then set [Standby Through] to [Auto]
or [On].
Turn on the speaker system, and then
switch the input for the device
playing.
If connected to devices other than
those manufactured by Sony that
support the Control for HDMI function,
set [Setup] - [Advanced Settings]
- [HDMI Settings] - [Standby Through]
to [On].
The sound is output from both the
speaker system and TV.
Mu te the sound of the speaker system
or TV.
When you connect the speaker
system and TV with the TV center
speaker mode cable and set
[Setup] - [Advanced Settings] [Speaker Settings] - [TV Center
Speaker Mode] to [On], the c enter part
of the speaker system sound is output
from the TV. For detail, refer to Help
Guide.
The sound is interrupted while
watching a TV program or content
on a Blu-ray Disc, etc.
Check the sound mode setting
(page 34). If the sound mode is set to
[Auto Sound], the sound may be
interrupted when the sound mode is
changed automatically according to
the information of the program that is
being played. If you do not want to
change the sound mode
automatically, set the sound mode to
a setting other than [Auto Sound].
The TV sound from this speaker
system lags behind the image.
Set the adjustment value of the delay
between the picture and sound to 0
msec if it is set to the range between
25 msec and 300 msec. For details,
refer to Help Guide.
A time gap between the sound and
picture may occur depending on the
sound source. If your TV has a
function that delays the image, use it
for adjustment. For details, refer to
the operating instructions of your TV.
No sound or only a very low-level
sound of the device connected to
the speaker system is heard.
Press (volume) + on the remote
control and check the volume level
(page 10).
49
GB
Page 50

Press or (volume) + on the
remote control to cancel the muting
function (page 10).
Make sure the input source is selected
correctly. You should try other input
sources by pressing the input select
button on the remote control (TV/
HDMI/BLUETOOTH).
Make sure that the connectors are
firmly inserted.
When you play content compatible
with copyright protection technology
(HDCP), sound may not be output
from the speaker system.
Change the setting of [Setup] -
[Advanced Settings] - [HDMI Settings]
- [HDMI Signal Format] - [HDMI IN]. For
details, refer to Help Guide.
The surround effect cannot be
obtained.
Depending on the input signal and
the sound mode setting, surround
sound processing may not work
effectively. The surround effect may
be subtle, depending on the program
or disc.
To play multi-channel audio, check
the digital audio output setting on the
device connected to the speaker
system. For details, refer to the
operating instructions of the
connected device.
No sound is output from the
optional subwoofer.
It may be improved by setting
[Setup] - [Advanced Settings] [Speaker Settings] - [Wireless Speaker
Settings] - [Wireless Playback Quality]
to [Connection].
Refer to the operating instructions of
the optional subwoofer.
Sound is not output from some
speakers.
Some speakers may not output sound
depending on the contents or sound
mode.
Sound Field Optimization
Sound Field Optimization failed.
Speakers may not be correctly
located. Check the installation
location on the labels on the bottom
of the four speakers and install them
in the correct location.
Inst all the speakers upright so tha t the
labels on the bottom of the speakers
are directed downwards.
– If the speaker is installed sideways,
Sound Field Optimization cannot be
performed properly.
– If the speaker is installed in an
inclined state, the microphone for
measurement of the speaker is also
inclined and the sound for
measurement ceiling distance is
output in an inclined state. These
may be the cause that the Sound
Field Optimization failed.
Perform Sound Field Optimization
again in a situation where the
surrounding is quiet.
Install the speakers with a distance of
more than 50 cm (19 3/4 in). If the
distance between speakers is too
close, Sound Field Optimization
cannot be performed properly.
Bring the speakers closer if the
speakers are installed at a distance far
away from each other.
If there is any obstacle between
speakers or the microphone for
measurement of the speaker is
blocked by an obstacle, Sound Field
Optimization cannot be performed
properly. Remove it if there is any
obstacle between speakers or in front
of speakers.
Mobile Device Connection
Pairing cannot be achieved.
Bring this speaker system and the
BLUETOOTH device closer together.
50
GB
Page 51

Make sure this speaker system is not
receiving interference from a wireless
LAN device, other 2.4 GHz wireless
devices, or a microwave oven. If a
device that generates
electromagnetic radiation is nearby,
move the device away from this
speaker system.
BLUETOOTH connection cannot be
completed.
Make sure that [BT] appears in the
front panel display (page 25).
Make sure the BLUETOOTH device to
be connected with is turned on and
the BLUETOOTH function is enabled.
Bring this speaker system and the
BLUETOOTH device closer together.
Pair this speaker system and the
BLUETOOTH device again. You may
need to cancel the pairing with this
speaker system using your
BLUETOOTH device first.
Pairing information may be deleted.
Perform the pairing operation again
(page 25).
Sound of the connected BLUETOOTH
mobile device is not output from the
speaker system.
Make sure that [BT] appears in the
front panel display (page 25).
Bring this speaker system and the
BLUETOOTH device closer together.
If a device that generates
electromagnetic radiation, such as a
wireless LAN device, other
BLUETOOTH devices, or a microwave
oven is nearby, move the device away
from this speaker system.
Remove any obstacle between this
speaker system and the BLUETOOTH
device or move this speaker system
away from the obstacle.
Reposition the connected
BLUETOOTH device.
Switch the wireless LAN frequency of
any nearby wireless LAN router or PC
to the 5 GHz range.
In crease the volume on the connected
BLUETOOTH device.
Headphones Connection
with the BLUETOOTH
Function
Pairing cannot be achieved.
Bring this speaker system and the
BLUETOOTH headphones closer
together.
Make sure this speaker system is not
receiving interference from a wireless
LAN device, other 2.4 GHz wireless
devices, or a microwave oven. If a
device that generates
electromagnetic radiation is nearby,
move the device away from this
speaker system.
BLUETOOTH connection cannot be
completed.
Make sure that [BT TX] appears in the
front panel display (page 27).
Make sure the BLUETOOTH
headphones to be connected with is
turned on and the BLUETOOTH
function is enabled.
Bring this speaker system and the
BLUETOOTH headphones closer
together.
Pair this speaker system and the
BLUETOOTH headphones again. You
may need to cancel the pairing for the
BLUETOOTH headphones with this
speaker system first. See “To remove
the paired headphones from the
device list” (page 28).
Pairing information may be deleted.
Perform the pairing operation again
(page 27).
No sound is output from the
connected BLUETOOTH
headphones.
Make sure that [BT TX] appears in the
front panel display (page 27).
Bring this speaker system and the
BLUETOOTH headphones closer
together.
If a device that generates
electromagnetic radiation, such as a
51
GB
Page 52

wireless LAN device, other
BLUETOOTH devices, or a microwave
oven is nearby, move the device away
from this speaker system.
Remove any obstacle between this
speaker system and the BLUETOOTH
headphones, or move this speaker
system away from the obstacle.
Reposition the connected
BLUETOOTH headphones.
Switch the wireless LAN frequency of
any nearby wireless LAN router or PC
to the 5 GHz range.
Incr ease the volume on the connected
BLUETOOTH headphones.
Set [Setup] - [Advanced Settings]
- [Bluetooth Settings] - [Wireless
Playback Quality] to [LDAC Stable
Connection (Auto)] or [SBC Stable
Connection (Auto)].
Some content may not be output due
to content protection.
Remote Control
The remote control of this speaker
system does not function.
Point the remote control at the
remote control sensor on the control
box (page 8).
Remove any obstacles in the path
between the remote control and the
speaker system.
Replace both batteries in the remote
control with new ones if they are
weak.
Make sure you are pressing the
correct button on the remote control.
Others
The Control for HDMI function does
not work properly.
Check the connection with the
speaker system (page 14).
Enable the Control for HDMI function
on the TV. For details, refer to the
operating instructions of your TV.
Wait a while, and then try again. If you
unplug the speaker syste m, it will take
a while before operations can be
made. Wait for 15 seconds or longer,
and then try again.
Make sure the devices connected to
the speaker system support the
Control for HDMI function.
Enable the Control for HDMI function
on the devices connected to the
speaker system. For details, refer to
the operating instructions of your
device.
The type and number of devices that
can be controlled by the Control for
HDMI function are restricted by the
HDMI CEC standard as follows:
– Recording devices (Blu-ray Disc
recorder, DVD recorder, etc.): up to 3
devices
– Playback devices (Blu-ray Disc
player, DVD player, etc.): up to 3
devices (this speaker system uses
one of them)
– Tuner-related devices: up to 4
devices
– Audio system (receiver/
headphones): up to 1 device (used
by this speaker system)
[PRTCT], [PUSH], speake r name ([FL],
[FR], [RL], [RR], or [SUB]), and
[POWER] flash alternately in the
front panel display.
Press (power) on the corresponding
speaker ([FL]: left front speaker, [FR]:
right front speaker, [RL]: left rear
speaker, [RR]: right rear speaker,
[SUB]: optional subwoofer) to turn
each off. For the speaker, disconnect
the AC power cord (mains lead), then
restart the speaker system. For the
optional subwoofer, disconnect the
AC power cord (mains lead) and make
sure nothing is obstructing the
ventilation holes of the optional
subwoofer, then restart the speaker
system. If they are reconnected
properly, the display in the front panel
display returns to the normal display.
52
GB
Page 53

[HIGH], [TEMP], and [ERROR] appear
alternately for 2 seconds each in the
front panel display, [STANDBY]
appears in the front panel display,
then the speaker system is turned
off.
High-temperature is detected in the
speaker system. Press (power) to
restart the speaker system.
[BT TX] appears in the front panel
display.
Set [Setup] - [Advanced Settings]
- [Bluetooth Settings] - [Bluetooth
Mode] to [Receiver]. [BT TX] appears
in the front panel display if [Bluetooth
Mode] is set to [Transmitter].
Wireless functions (wireless LAN,
the BLUETOOTH function, speakers,
or optional subwoofer) are
unstable.
Do not place metal objects other than
a TV around the speaker system.
The speaker system restarts.
When connecting to a TV with a
resolution that is different from that of
the speaker system, the speaker
system may restart to reset the
picture output setting.
Resetting the Speaker
System
If the speaker system still does not
operate properly, reset the speaker
system as follows.
1 Press HOME.
The home menu appears on the TV
screen.
2 Select [Setup] - [Advanced
Settings] on the home menu.
3 Select [Resetting].
4 Select the menu item you want to
reset.
5 Select [Start].
To cancel resetting
Select [Cancel] in step 5.
If You Cannot Perform
Resetting Using the Home
Menu
1 Press and hold (power) on the
control box for more than 10
seconds.
The settings return to their initial
status.
Note
By resetting, the link with the speakers and
optional subwoofer may be lost. In this
case, reconnect the speakers (page 2 0) and
optional subwoofer by referring to its
operating instructions.
53
GB
Page 54

Resetting the Speakers
1 Press and hold (power) on the
bottom of the speaker for more
than 10 seconds.
The power indicator of the speaker
flashes slowly in red and resetting
starts.
The power indicator of the speaker
flashes in green and orange
alternately when resetting is
completed.
When resetting is completed,
disconnect the AC power cord
(mains lead), then connect the AC
power cord (mains lead) after the
power indicator turns off.
54
GB
Page 55

Additional Information
Specifications
Speakers (SA-FLA9/SAFRA9/SA-RLA9/SA-RRA9)
The following descriptions are the
specifications per speaker.
Amplifier section
POWER OUTPUT (rated)
Top speaker: 35 W (at 6 ohms, 1 kHz, 1%
THD)
Tweeter: 25 W (at 6 ohms, 10 kHz, 1%
THD)
Woofer: 35 W (at 6 ohms, 100 Hz, 1%
THD)
POWER OUTPUT (reference)
Top speaker: 42 W (at 6 ohms, 1 kHz)
Tweeter: 42 W (at 6 ohms, 10 kHz)
Woofer: 42 W (at 6 ohms, 100 Hz)
Front speaker section
Speaker system
2way speaker system bass reflex type
Woofer
70 mm × 82 mm cone type
Tweeter
19 mm soft dome type
Top speaker section
Speaker system
Full range speaker system acoustic
suspension type
Speaker
46 mm × 54 mm cone type
General
Power requirements
120 V - 240 V AC, 50 Hz/60 Hz
Power consumption
On: 22 W
Stand by mode: 1 W or less
Turned off: 0.5 W or less
Dimensions* (approx.) (w/h/d)
160 mm × 313 mm × 147 mm
* Not including projection portion
Mass (approx.)
2.7 kg
Control Box (TMR-A9WT)
Inputs
HDMI IN*
Outputs
HDMI OUT (TV ARC/eARC)*
S-CENTER OUT
* HDMI IN and HDMI OUT (TV ARC/eARC)
jacks support HDCP2.2 and HDCP2.3
protocols. HDCP2.2 and HDCP2.3 are
newly enhanced copyright protection
technology that is used to protect
content such as 4K movies.
HDMI Section
Connector
Type A (19pin)
USB section (For update use only)
(USB) port: Type A (For connecting USB
memory)
LAN section
LAN(100) terminal
100BASE-TX Terminal
Wireless LAN section
Communication system
IEEE 802.11 a/b/g/n/ac
Frequency band
2.4 GHz, 5 GHz
BLUETOOTH section
Communication system
BLUETOOTH Specification version 5.0
Output
BLUETOOTH Specification Power
Class 1
Maximum communication range
Line of sight approx. 30 m
Maximum number of devices to be
registered
9 devices
Frequency band
2.4 GHz band (2.4000 GHz -
2.4835 GHz)
Modulation method
FHSS (Freq Hopping Spread Spectrum)
1)
55
GB
Page 56

Compatible BLUETOOTH profiles2)
A2DP (Advanced Audio Distribution
Profile)
AVRCP (Audio Video Remote Control
Profile)
Supported Codecs
4)
SBC
Transmission range (A2DP)
20 Hz - 40,000 Hz (LDAC sampling
frequency 96 kHz with 990 kbps
transmission)
20 Hz - 20,000 Hz (Sampling frequency
44.1 kHz)
1)
The actual range will vary depending on
factors such as obstacles between
devices, magnetic fields around a
microwave oven, static electricity,
cordless phone use, reception
sensitivity, the operating system,
software applications, etc.
2)
BLUETOOTH standard profiles indicate
the purpose of BLUETOOTH
communication between devices.
3)
Codec: Audio signal compression and
conversion format
4)
Abbreviation for Subband Codec
5)
Abbreviation for Advanced Audio
Coding
3)
, AAC5), LDAC
General
Power requirements
DC 12 V (using the supplied AC adaptor
connected to AC 100 V - 240 V, 50 Hz/
60 Hz power supply)
Power consumption
On: 15 W
[Network/Bluetooth Standby] - [On]:
Less than 2.4 W
[Network/Bluetooth Standby] - [Off]:
Less than 0.5 W*
* When [Standby Through] is set to
[Off], or [Standby Through] is set to
[Auto] while the connected TV is
turned off.
Dimensions* (approx.) (w/h/d)
150 mm × 52 mm × 150 mm
* Not including projection portion
Mass (approx.)
730 g
Devices you can stream audio from
• iPhone, iPad, or iPod touch with iOS 11.4 or
later
• Apple TV 4K or Apple TV HD with tvOS11.4
or later
• HomePod with iOS 11.4 or later
• Mac with either iTunes 12.8 or later or
macOS Catalina
• PC with iTunes 12.8 or later
Wireless Transmitter/
Receiver Section
Communication system
Wireless Sound Specification version
4.0
Frequency band
5 GHz
Modulation method
OFDM
Supplied Accessories
• Remote control (1)
• R03 (size AAA) battery (2)
• HDMI cable (4K, 8K transmission
supported) (1)
• TV center speaker mode cable (1)
• AC adaptor (1), AC power cord (main s lead)
(2)
• AC power cord (mains lead) for the
speaker (8)
•Startup Guide
• Operating Instructions (this document)
Design and specifications are subject to
change without notice.
56
GB
Page 57

Supported Input Audio Formats
Supported audio formats differ depending on the input setting of the speaker system.
“” indicates the supported audio format and “–” indicates the unsupported audio
format in the table below.
Format HDMI
LPCM 2ch
LPCM 5.1ch –
LPCM 7.1ch –
Dolby Digital
Dolby TrueHD –
Dolby Digital Plus
Dolby Atmos –
Dolby Atmos - Dolby TrueHD –
Dolby Atmos - Dolby Digital Plus
DTS
DTS-ES Discrete 6.1, DTS-ES Matrix 6.1
DTS 96/24
DTS-HD High Resolution Audio –
DTS-HD Master Audio –
DTS:X –
Note
input
The HDMI IN jack does not support audio formats that contain copy protections, such as Super
Audio CD or DVD-Audio.
TV input
(eARC)
TV input
(ARC)
57
GB
Page 58

On BLUETOOTH
Communication
• BLUETOOTH devices should be used
within approximately 10 meters (33 feet)
(unobstructed distance) of each other.
The effective communication range may
become shorter under the following
conditions.
– When a person, metal object, wall or
other obstruction is between the
devices with a BLUETOOTH connection
– Locations where a wireless LAN is
installed
– Around microwave ovens that are in use
– Locations where other electromagnetic
waves occur
• BLUETOOTH devices and wireless LAN
(IEEE 802.11 b/g/n) use the same
frequency band (2.4 GHz). When using
your BLUETOOTH device near a device
with wireless LAN capability,
electromagnetic interference may occur.
This could result in lower data transfer
rates, noise, or inability to connect. If this
happens, try the following remedies:
– Use this speaker system at least
10 meters (33 feet) away from the
wireless LAN device.
– Turn off the power to the wireless LAN
device when using your BLUETOOTH
device within 10 meters (33 feet).
– Install this speaker system and
BLUETOOTH device as closer to each
other as possible.
• The radio waves broadcast by this speaker
system may interfere with the operation
of some medical devices. Since this
interference may result in malfunction,
always turn off the power on this speaker
system and BLUETOOTH device in the
following locations:
– In hospitals, on trains, in airplanes, at
gas stations, and any place where
flammable gasses may be present
– Near automatic doors or fire alarms
• This speaker system supports security
functions that comply with the
BLUETOOTH specification to ensure
secure connection during communication
using BLUETOOTH technology. However,
this security may be insufficient
depending on the setting content and
other factors, so always be careful when
performing communication using
BLUETOOTH technology.
• Sony cannot be held liable in any way for
damages or other loss resulting from
information leaks during communication
using BLUETOOTH technology.
• BLUETOOTH communication is not
necessarily guaranteed with all
BLUETOOTH devices that have the same
profile as this speaker system.
• BLUETOOTH devices connected with this
speaker system must comply with the
BLUETOOTH specification prescribed by
the Bluetooth SIG, Inc., and must be
certified to comply. However, even when
a device complies with the BLUETOOTH
specification, there may be cases where
the characteristics or specifications of the
BLUETOOTH device make it impossible to
connect, or may result in different control
methods, display or operation.
• Noise may occur or the audio may cut off
depending on the BLUETOOTH device
connected with this speaker system, the
communications environment, or
surrounding conditions.
If you have any questions or problems
concerning your speaker system, please
consult your nearest Sony dealer.
58
GB
Page 59

Precautions
On safety
• Should any solid object or liquid fall into
the speaker system, unplug the speaker
system and have it checked by qualified
personnel before operating it any further.
• Do not climb on the speaker system, as
you may fall down and injure yourself, or
speaker system damage may result.
On power sources
• Before operating the speaker system,
check that the operating voltage is
identical to your local power supply. The
operating voltage is indicated on the
nameplate on the bottom of the control
box.
• If you are not going to use the speaker
system for a long time, be sure to
disconnect the speaker system from the
wall outlet (mains). To disconnect the AC
power cord (mains lead), grasp the plug
itself; never pull the cord.
• One blade of the plug is wider than the
other for the purpose of safety and will fit
into the wall outlet (mains) only one way.
If you are unable to insert the plug fully
into the outlet, contact your dealer.
• AC power cord (mains lead) must be
changed only at a qualified service shop.
On heat buildup
Although the speaker system heats up
during operation, this is not a malfunction.
If you continuously use this speaker system
at high volume, the speaker system
temperature at the rear and bottom rises
considerably. To avoid burning yourself, do
not touch the speaker system.
On placement
• Do not place the speaker system near
heat sources or in a place subject to direct
sunlight, excessive dust, or mechanical
shock.
• Do not place anything at the side of the
control box that might block the
ventilation holes and cause malfunctions.
• Do not place metal objects other than a TV
around the speaker system. Wireless
functions may be unstable.
• If the speaker system is being used in
combination with a TV, VCR, or tape deck,
noise may result and picture quality may
suffer. In such a case, place the speaker
system away from the TV, VCR, or tape
deck.
• Use caution when placing the speaker
system on a surface that has been
specially treated (with wax, oil, polish,
etc.), as staining or discoloration of the
surface may result.
• Take care to avoid any possible injury from
the corners of the speaker system.
• Keep 3 cm (1 3/16 in) or more space under
the speaker system when you hang it on a
wall.
• The speakers of this speaker system are
not of magnetically shielded type. Do not
place magnetic cards on the speaker
system or near it.
On operation
Be for e c onn ec tin g o the r de vi ces , be su re t o
turn off and unplug the speaker system.
If you encounter color irregularity
on a nearby TV screen
Color irregularities may be observed on
certain types of TV sets.
If color irregularity is observed...
Turn off the TV set, then turn it on again
after 15 to 30 minutes.
If color irregularity is observed
again...
Place the speaker system further away from
the TV set.
On cleaning
Clean the speaker system with a soft, dry
cloth. Do not use any type of abrasive pad,
scouring powder, or solvent such as alcohol
or benzine.
If you have any question or problem
concerning your speaker system, please
consult your nearest Sony dealer.
59
GB
Page 60

Disclaimer regarding services
offered by third parties
Network services, content and the
(operating system and) software of this
product may be subject to individual terms
and conditions and ch anged, interrupted or
discontinued at any time and may require
fees, registration and credit card
information.
Notes on updating
This speaker system allows you to update
the software automatically when
connected to the Internet via a wireless or
wired network.
You can add new features and use the
speaker system with more convenience
and safety by updating the speaker system.
If you do not want to update automatically,
you can disable the function by using Sony
| Music Center installed on your
smartphone or tablet. However, the
speaker system may update the software
automatically for reasons such as safety,
even if this function is disabled. You can
also update the software using the settings
menu when this function is disabled. For
details, refer to Help Guide.
You may not use the speaker system while
the software is being updated.
Copyrights and
Trademarks
This speaker system incorporates Dolby*
Digital and the DTS** Digital Surround
System.
* Manufactured under license from Dolby
Laboratories. Dolby, Dolby Vision, Dolby
Atmos, and the double-D symbol are
registered trademarks of Dolby
Laboratories Licensing Corporation.
Confidential unpublished works.
Copyright © 2012–2020 Dolby
Laboratories. All rights reserved.
**For DTS patents, see http://
patents.dts.com. Manufactured under
license from DTS, Inc. DTS, DTS:X, and the
DTS:X logo are registered trademarks or
trademarks of DTS, Inc. in the United
States and other countries. © 2020 DTS,
Inc. ALL RIGHTS RESERVED.
The BLUETOOTH
registered trademarks owned by Bluetooth
SIG, Inc. and any use of such marks by Sony
Corporation is under license. Other
trademarks and trade names are those of
their respective owners.
The terms HDMI, HDMI High-Definition
Multimedia Interface, and the HDMI Logo
are trademarks or registered trademarks of
HDMI Licensing Administrator, Inc.
Google, Google Play, Google Home and
Chromecast built-in are trademarks of
Google LLC. Google Assistant is not
available in certain languages and
countries.
Apple, AirPlay, iPad, iPhone and iPod touch
are trademarks of Apple Inc., registered in
the U.S. and other countries.
®
word mark and logos are
60
Use of the Works with Apple badge means
that an accessory has been designed to
work specifically with the technology
identified in the badge and has been
certified by the developer to meet Apple
performance standards.
GB
Page 61

“BRAVIA” logo is a trademark of Sony
Corporation.
WALKMAN® and WALKMAN® logo are
registered trademarks of Sony Corporation.
“PlayStation” is a registered trademark or
trademark of Sony Interactive
Entertainment Inc.
MPEG Layer-3 audio coding technology and
patents licensed from Fraunhofer IIS and
Thomson.
Windows Media is either a registered
trademark or trademark of Microsoft
Corporation in the United States and/or
other countries.
This product is protected by certain
intellectual property rights of Microsoft
Corporation. Use or distribution of such
technology outside of this product is
prohibited without a license from Microsoft
or an authorized Microsoft subsidiary.
Wi-Fi®, Wi-Fi Protected Access® and Wi-Fi
Alliance® are registered trademarks of Wi-Fi
Alliance.
Wi-Fi CERTIFIED™, WPA™, and WPA2™ are
trademarks of Wi-Fi Alliance.
LDAC™ and LDAC logo are trademarks of
Sony Corporation.
LDAC is an audio coding technology
developed by Sony that enables the
transmission of High-Resolution (Hi-Res)
Audio content, even over a Bluetooth
connection. Unlike other Bluetooth
compatible coding technologies such as
SBC, it operates without any downconversion of the Hi-Res Audio content*,
and allows approximately three times more
data** than those other technologies to be
transmitted over a Bluetooth wireless
network with unprecedented sound
quality, by means of efficient coding and
optimized packetization.
* excluding DSD format contents
**in comparison with SBC (Subband
Coding) when the bitrate of 990 kbps (96/
48 kHz) or 909 kbps (88.2/44.1 kHz) is
selected
This product contains software that is
subject to the GNU General Public License
(“GPL”) or GNU Lesser General Public
License (“LGPL”). These establish that
customers have the right to acquire,
modify, and redistribute the source code of
said software in accordance with the terms
of the GPL or the LGPL.
For details of the GPL, LGPL and other
software licenses, please refer to [Software
License Information] under [Setup] [Advanced Settings] - [System Settings] on
the product.
The software included in this product
contains copyrighted software that is
licensed under the GPLv2 and other
licenses which may require access to
source code. You may find a copy of the
relevant source code as required under the
GPLv2 (and other licenses) at
http://www.sony.net/Products/Linux/.
You may obtain the source code as
required by the GPLv2 on a physical
medium from us for a period of three years
after our last shipment of this product by
applying through the form at
http://www.sony.net/Products/Linux/.
This offer is valid to anyone in r eceipt of this
information.
Please note that Sony cannot answer or
respond to any inquiries regarding the
content of this source code.
“TRILUMINOS” and “TRILUMINOS” logo are
a registered trademark of Sony
Corporation.
The Spotify Software is subject to third
party licenses found here:
https://www.spotify.com/connect/
third-party-licenses.
Spotify and Spotify logos are trademarks of
the Spotify Group.*
* Depending on the country and region,
this function may not be available.
61
GB
Page 62

All other trademarks are trademarks of their
respective owners.
62
GB
Page 63

Index
Buttons
AUDIO 36
BLUETOOTH
DIMMER
IMMERSIVE AE
NIGHT
VOICE
25
41
33
35
35
A
ARC 8
Audio format
Audio Return Channel
57
8
B
BLUETOOTH
Function
Pairing
“BRAVIA” Sync
25
25
39
C
Connection (See “Wired connection”
or “Wireless connection” in “Index”)
Control for HDMI
38
D
DTS Dialog control 37
E
eARC 8
Easy Setup
Enhanced Audio Return Channel
42
8
I
Immersive Audio Enhancement 33
Initial settings
Installation
42
13
M
Multiplex broadcast sound 36
N
Night mode 35
P
PRTCT 52
R
Remote control 10
Resetting
53
S
Settings
Resetting
Setting item
Software update
Sound Mode
53
43
44
34
V
Voice mode 35
32
Volume
W
Wall mount 13
Wired connection
AV devices
14
TV
Wireless connection
BLUETOOTH devices
Headphones
23
TV
16
27
25
63
GB
Page 64

IMPORTANT – Lisez le contrat de
licence logiciel utilisateur final avant
d’utiliser votre produit Sony. Le fait
d'utiliser votre produit implique votre
acceptation du contrat de licence
logiciel utilisateur final. Le contrat de
licence logiciel entre vous et Sony est
disponible à l'adresse URL suivante :
https://rd1.sony.net/help/ht/eula21/
h_zz/
AVERTISSEMENT
N’installez pas le système d’enceintes
dans un espace confiné, tel qu’une
bibliothèque ou un meuble encastré.
Pour réduire le risque d’incendie,
n’obstruez pas l’orifice de ventilation du
système d’enceintes avec un journal,
une nappe, une tenture, etc.
N’exposez pas le système d’enceintes à
une source de flamme nue (par
exemple, une bougie allumée).
Pour réduire le risque d’incendie ou
d’électrocution, n’exposez pas ce
système d’enceintes à des
éclaboussures ou des gouttes d’eau et
ne posez pas des objets remplis de
liquides, notamment des vases, sur ce
système d’enceintes.
L’adaptateur secteur et le système
d’enceintes ne sont pas déconnectés du
secteur tant qu’ils restent branchés sur
les prises murales, même si le système
d’enceintes proprement dit a été mis
hors tension.
Les fiches principales des cordons
d’alimentation secteur et de
l’adaptateur d’alimentation secteur
étant utilisées pour débrancher le
système d’enceintes du secteur,
branchez le système d’enceintes sur une
prise secteur facilement accessible. Si
vous observez une anomalie sur le
système d’enceintes, débranchez
immédiatement les fiches principales
des cordons d’alimentation secteur et
de l’adaptateur d’alimentation secteur
de la prise secteur.
ATTENTION
Risque d’explosion si la batterie est
remplacée par une batterie de type non
équivalent.
N’exposez pas les piles ou un appareil
contenant des piles à une chaleur
excessive, notamment aux rayons
directs du soleil ou à des flammes.
Ne placez pas ce produit près
d’appareils médicaux.
Ce produit (y compris les accessoires)
comporte un ou des aimants qui
peuvent perturber les stimulateurs
cardiaques, les valves de dérivation
programmables pour le traitement de
l’hydrocéphalie ou d’autres appareils
médicaux. Ne placez pas ce produit près
de personnes utilisant c e type d’appareil
médical. Consultez votre médecin avant
d’utiliser ce produit si vous utilisez ce
type d’appareil médical.
Pour la connexion réseau du système
d’enceintes, établissez la connexion via
le routeur ou le port LAN avec la fonction
routeur. Si ces connexions ne sont pas
établies, un problème de sécurité peut
survenir.
Utilisation en intérieur uniquement.
Câbles recommandés
Des câbles et des connecteurs blindés et
mis à la terre correctement doivent être
utilisés pour le raccordement aux
ordinateurs hôtes et/ou aux
périphériques.
Pour le boîtier de commande et
les enceintes
La plaque signalétique est située sur le
dessous du boîtier de commande et des
enceintes.
FR
2
Page 65

Pour l’adaptateur secteur
Les étiquettes portant le numéro du
modèle et le numéro de série de
l’adaptateur secteur se trouvent sous
l’adaptateur secteur.
Cet appareil a été testé et répond aux
normes définies dans la réglementation
EMC pour l’utilisation d’un câble de
connexion inférieur à 3 mètres.
FR
FR
3
Page 66

Table des matières
À propos des manuels du système
d’enceintes .............................. 6
Guide de
Contenu de
l’emballage
Ce que vous pouvez faire avec le
système d’enceintes ............... 8
Guide des pièces et des
commandes ............................10
Utilisation du menu d’accueil .......14
démarrage
(document
séparé)
Installation
Installation du système
d’enceintes .............................15
Connexion d’un téléviseur ...........16
Lorsque votre téléviseur dispose
d’une prise S-CENTER SPEAKER
IN .............................................17
Connexion d’un dispositif AV .......18
Raccordement à la prise
secteur ...................................20
Exécution des réglages initiaux ...21
Si les enceintes ne sont pas
connectées correctement ..... 23
Visualisation d’images
Regarder la télévision .................. 24
Lecture du dispositif AV
connecté ................................ 24
Écoute de la musique/du son
Écoute du son d’un téléviseur Sony à
l’aide de la fonction
BLUETOOTH® ......................... 25
Écoute de la musique/du son avec la
fonction BLUETOOTH ............27
Écoute du son du téléviseur ou du
dispositif connecté en utilisant
un casque .............................. 29
Écoute de la musique par
connexion à un réseau
Ce que vous pouvez faire en
connectant le système
d’enceintes à un réseau .........32
Réglage du volume et de la
qualité du son
Réglage du volume ..................... 34
Profiter de l’expérience surround
immersive (IMMERSIVE AE) ....35
Réglage de l’effet sonore
personnalisé pour différentes
sources sonores (mode
son) ........................................ 36
Rendre les dialogues plus audibles
(VOICE) ....................................37
Profiter d’un son clair associé à un
niveau de volume réduit durant
la nuit (NIGHT) ........................37
Réglage de l’écart temporel entre
l’image et le son .................... 38
Profiter d’un son de diffusion
multiplex (AUDIO) ................. 38
Réglage du volume des dialogues
pendant la lecture de contenus
DTS:X ..................................... 39
Utilisation du système
d’enceintes par
interverrouillage avec un
téléviseur
Commande du système d’enceintes
par interverrouillage avec un
téléviseur (fonction commande
pour HDMI) .............................41
Commande du système d’enceintes
par interverrouillage avec un
téléviseur compatible avec la
fonction « BRAVIA » Sync ...... 43
FR
4
Page 67

Modification des réglages
Modification de la luminosité de
l’afficheur du panneau avant et
des indicateurs (DIMMER) ..... 44
Économie d’énergie en mode de
veille ...................................... 45
Exécution de Régl. facile ............. 45
Exécution de Réglages
avancés .................................. 46
Mise à jour du logiciel ..................47
Dépannage
Dépannage .................................. 49
Réinitialisation du système
d’enceintes ............................ 58
Informations
complémentaires
Spécifications ..............................60
Formats audio en entrée pris en
charge .................................... 62
Communication BLUETOOTH ...... 63
Précautions .................................. 64
Droits d’auteur et marques
commerciales ........................ 66
Index ............................................ 68
FR
5
Page 68

À propos des manuels du
Home Theatre System
Startup Guide
Home Theatre System
système d’enceintes
Les informations incluses dans chaque
manuel s’organisent comme indiqué cidessous.
Guide de démarrage
Guide d’aide (manuel web)
Pour les clients des Amériques
https://rd1.sony.net/
help/ht/a9/h_uc/
Présente les procédures initiales
relatives à l’installation et à
l’établissement des connexions
nécessaires pour utiliser le système
d’enceintes, ainsi que les opérations à
effectuer avant de lire de la musique.
Mode d’emploi
(ce document)
Explique les opérations de base.
– Connexion à un téléviseur ou à
d’autres dispositifs
– Lecture de la musique/du son des
dispositifs connectés à l’aide d’un
câble HDMI ou via la fonction
BLUETOOTH
– Réglage du son, etc.
Pour les clients des autres pays/régions
https://rd1.sony.net/
help/ht/a9/h_zz/
Décrit toutes les opérations, y compris
l’utilisation avancée.
– Lecture de la musique/du son avec la
fonction réseau
– Détails des éléments de menu, etc.
Conseils
• Les instructions figurant dans ces manuels
décrivent les opérations utilisant les
commandes de la télécommande.
• Les caractères entre crochets [ ]
apparaissent sur l’écran du téléviseur ou
sur l’afficheur du panneau avant.
• Certains détails ne figurent pas sur les
illustrations.
FR
6
Page 69

Contenu de l’emballage
Reportez-vous au Guide de démarrage
(document séparé).
FR
7
Page 70

Ce que vous pouvez faire avec le système d’enceintes
Le système d’enceintes prend en charge des formats audio basés sur des objets
tels que Dolby Atmos et DTS:X ainsi que des formats vidéo HDR tels que HDR10,
HLG et Dolby Vision.
« Lecture du dispositif AV
connecté » (page 24)
Téléviseur
•« Regarder la télévision »
(page 24)
•« Écoute du son d’un
téléviseur Sony à l’aide de
la fonction BLUETOOTH® »
(page 25)
Lecteur Blu-ray Disc™, décodeur,
console de jeu, etc.
« Écoute du son du
téléviseur ou du
dispositif connecté en
utilisant un casque »
(page 29)
« Écoute de la musique/du son avec
la fonction BLUETOOTH » (page 27)
Casque
Dispositif mobile
Enceintes fournies
FR
8
Page 71

Internet
Routeur LAN
sans fil
Pour ce qui concerne les opérations
relatives au caisson de graves en option,
reportez-vous à son mode d’emploi.
Vérifiez la prise en charge du caisson de
graves en option sur le site web Sony.
Réseau
« Ce que vous pouvez faire en connectant le système d’enceintes à un
réseau » (page 32)
Caisson de graves en option
Pour ce qui concerne la méthode de connexion au réseau et les
fonctions activées avec la connexion réseau, reportez-vous au
Guide d’aide (manuel web).
Pour les clients des Amériques
https://rd1.sony.net/help/ht/a9/h_uc/
Pour les clients des autres pays/régions
https://rd1.sony.net/help/ht/a9/h_zz/
FR
9
Page 72

Guide des pièces et des commandes
Avant
Arrière
Boîtier de commande
Capteur de télécommande
Dirigez la télécommande vers le
capteur de télécommande afin
d’utiliser le système d’enceintes.
Afficheur du panneau avant
Port UPDATE (page 47)
Connectez la clé USB lorsque vous
mettez à jour le système
d’enceintes.
Prise S-CENTER OUT (page 17)
Touche (alimentation)
Met le système d’enceintes sous
tension ou en mode de veille.
Port LAN(100)
Prise HDMI OUT (TV ARC/eARC)
Permet de connecter un
téléviseur possédant une prise
d’entrée HDMI à l’aide d’un câble
HDMI.
Le système d’enceintes est
compatible eARC et ARC. ARC est
la fonction qui envoie le son du
téléviseur vers un dispositif AV tel
FR
10
que le système d’enceintes à
partir de la prise HDMI du
téléviseur. eARC est une
extension d’ARC et permet la
transmission de l’objet audio et
des contenus LPCM multicanal qui
ne peuvent être transmis par ARC.
Prise HDMI IN
Borne DC IN
Page 73

Enceintes
Avant
Arrière
Base
Indicateur d’alimentation
Affiche l’état de la connexion
entre le boîtier de commande et
l’enceinte ainsi que l’état de
l’alimentation de l’enceinte.
Rouge
– S’allume : l’enceinte est en
mode de veille.
Vert
– S’allume : l’enceinte est
connectée au boîtier de
commande.
– Clignote lentement : l’enceinte
tente de se connecter au boîtier
de commande.
– Clignote à deux reprises : le
jumelage de l’enceinte est en
mode de veille via une
connexion manuelle.
Se désactive
– L’enceinte est mise hors tension.
Touche (alimentation)
Met l’enceinte sous/hors tension.
Touche LINK (page 23)
Entrée secteur
Orifice de la fixation murale
Orifice de fixation pour le socle
standard de l’enceinte
Remarque
Lorsque vous utilisez l’orifice de fixation
murale () ou l’orifice de fixation pour le
socle standard de l’enceinte (), retirez le
cache qui les masque avec une épingle de
sûreté, etc. (page 15).
11
FR
Page 74

Télécommande
(alimentation)
Met le système d’enceintes sous
tension ou en mode de veille.
Touche (MUSIC SERVICE)
Si vous avez précédemment lu de
la musique sur Spotify sur le
système d’enceintes, vous
pouvez reprendre la lecture en
appuyant sur cette touche.
Cette touche peut ne pas être
disponible dans certains pays/
certaines régions.
BLUETOOTH (page 28)
TV (page 24)
HDMI (page 24)
AUTO SOUND (page 36)
VOICE (page 37)
NIGHT (page 37)
CINEMA (page 36)
MUSIC (page 36)
STANDARD (page 36)
IMMERSIVE AE (page 35)
DIMMER (page 44)
DISPLAY
Affiche sur l’écran du téléviseur
les informations de lecture.
Les informations de lecture
apparaissent sur l’afficheur du
panneau avant pour l’entrée TV.
/// (page 14)
(entrée) (page 14)
BACK (page 14)
OPTIONS (page 39)
Affiche le menu des options sur
l’écran du téléviseur.
Le menu des options apparaît sur
l’afficheur du panneau avant pour
l’entrée TV.
12
FR
Page 75

HOME (page 14)
REAR (volume des enceintes
arrière) +/–
Permet de régler le volume des
enceintes arrière.
(volume) +*/–
Règle le volume.
BASS (volume des graves) +/–
Permet de régler le volume des
graves ou d’un caisson de graves
en option lorsque vous le
raccordez.
(silencieux)
Coupe temporairement le son.
TV/AUDIO SYSTEM
Bascule la sortie du son du
téléviseur connecté entre le
téléviseur et le système
d’enceintes.
Remarque
Cette touche fonctionne dans les
conditions suivantes.
– Le téléviseur connecté est
compatible avec la fonction
Commande du son du système.
– La fonction commande pour HDMI du
système d’enceintes est activée
(page 41).
Touches de lecture
/ (précédent/suivant)
Sélectionne la plage ou le fichier
précédent/suivant.
Le maintien enfoncé effectue une
recherche vers l’arrière ou l’avant
(retour/avance rapide) pendant la
lecture.
(lecture/pause)*
Démarre, interrompt ou
redémarre la lecture (reprise).
AUDIO* (page 38)
tactile. Laissez-le vous guider pendant
l’utilisation.
À propos du remplacement des
piles de la télécommande
Lorsque le système d’enceintes ne
réagit plus aux commandes de la
télécommande, remplacez les deux
piles par des neuves.
Utilisez des piles au manganèse R03
(taille AAA) pour le remplacement.
* Les touches AUDIO, (lecture/pause)
et (volume) + comportent un point
13
FR
Page 76

Utilisation du menu
HOME
BACK
///,
(entrée)
d’accueil
Vous pouvez afficher le menu d’accueil
sur l’écran du téléviseur en connectant
le système d’enceintes et le téléviseur
avec un câble HDMI.
1 Appuyez sur HOME.
Le menu d’accueil apparaît sur
l’écran du téléviseur.
2 Appuyez sur // pour
sélectionner la catégorie
souhaitée, puis appuyez sur ou
(entrée).
Les éléments de la catégorie
sélectionnée apparaissent dans la
liste de catégorie sur l’écran du
téléviseur.
Catégorie Description
[Regarder]
Sélectionne l’entrée du
téléviseur ou du
dispositif AV connecté
au système
d’enceintes.
Catégorie Description
[Écouter] Sélectionne l’entrée du
[Config.] Effectue les réglages
dispositif audio
connecté au système
d’enceintes ou le
service de musique
pour le lire sur le
système d’enceintes.
initiaux de base en
utilisant la fonction
[Régl. facile] ou divers
paramètres avancés du
système d’enceintes.
3 Appuyez sur /// pour
sélectionner l’élément souhaité,
puis appuyez sur (entrée).
L’entrée sélectionnée ou
l’affichage de réglage apparaît sur
l’écran du téléviseur.
Pour revenir à l’écran précédent,
appuyez sur BACK.
14
FR
Page 77

Installation
Enceintes
Orifice à l’arrière de l’enceinte
4mm
Plus de 30 mm
4,2 mm
9,6 mm
7,35 mm
env.
Cache
Installation du système
d’enceintes
Installation du boîtier de
commande et des enceintes
Pour l’installation, reportez-vous au
Guide de démarrage (document
séparé).
1 Préparez des vis (non fournies)
adaptées aux orifices de la fixation
murale situés sur l’arrière de
l’enceinte.
Fixation des enceintes au
mur
Remarques
• Préparez des vis (non fournies) convenant
au matériau et à la solidité du mur. Si le
matériau du mur n’est pas suffisamment
résistant, le mur risque d’être
endommagé.
• Fixez fermement les vis dans une poutre
du mur.
• Accrochez les enceintes à l’horizontale sur
le mur renforcé.
• Confiez l’installation à un revendeur Sony
ou à un entrepreneur agréé et soyez
particulièrement attentif à la sécurité
pendant l’installation.
• Sony décline toute responsabilité en cas
d’accidents ou de dommages provoqués
par une installation incorrecte, la solidité
insuffisante du mur, la mauvaise fixation
des vis, des catastrophes naturelles, etc.
2 Fixez la vis dans le mur.
3 Retirez le cache à l’arrière de
l’enceinte avec une épingle de
sûreté, etc.
15
FR
Page 78

4 Accrochez les enceintes en
Téléviseur
Câble HDMI
(fourni)
vérifiant le type de chaque
enceinte.
Vérifiez l’étiquette figurant au bas
de l’enceinte.
• « FL » : avant gauche
• « FR » : avant droite
• « RL » : arrière gauche
• « RR » : arrière droite
Remarque
Conservez le cache retiré à l’étape 3 pour
l’utiliser lorsque vous ne fixez pas
l’enceinte au mur.
Installation des enceintes en
option
Reportez-vous au mode d’emploi des
enceintes en option.
Connexion d’un
téléviseur
Connexion d’un téléviseur
compatible ARC/eARC
1 Connectez la prise HDMI IN
compatible ARC/eARC du
téléviseur et la prise HDMI OUT (TV
ARC/eARC) du système
d’enceintes avec le câble HDMI
(fourni).
16
FR
Remarque
Assurez-vous que les connecteurs sont
correctement insérés.
Page 79

Lorsque votre téléviseur
Téléviseur
Câble du mode
haut-parleur
central TV (fourni)
dispose d’une prise SCENTER SPEAKER IN
Vous pouvez reproduire la partie
centrale du son du système d’enceintes
par le téléviseur en raccordant le
téléviseur comme suit.
1 Raccordez le système d’enceintes
et le téléviseur avec le câble HDMI
(fourni) (page 16).
2 Connectez la prise S-CENTER
SPEAKER IN du téléviseur et la
prise S-CENTER OUT du système
d’enceintes avec le câble du mode
haut-parleur central TV (fourni).
Remarque
Assurez-vous que les connecteurs sont
correctement insérés.
Conseil
Si la longueur du câble du mode hautparleur central TV n’est pas suffisante,
utilisez un mini-câble stéréo disponible
dans le commerce.
FR
17
Page 80

Connexion d’un dispositif
Lecteur Blu-ray Disc,
décodeur, console de jeu, etc.
Câble HDMI
(non fourni)
AV
Connexion d’un dispositif AV
compatible avec les formats
vidéo 2K/4K
Vous pouvez reproduire du son Dolby
Atmos ou Dolby TrueHD et du DTS:X en
haute qualité en connectant un
dispositif AV au système d’enceintes.
1 Connectez la prise HDMI OUT du
dispositif AV et la prise HDMI IN du
système d ’enceintes avec un câble
HDMI (non fourni).
Conseils
• Si le téléviseur est compatible eARC, vous
pouvez également reproduire du son
haute qualité en connectant un dispositif
AV à la prise HDMI IN du téléviseur. Dans
ce cas, activez la fonction eARC du
téléviseur.
• Choisissez le câble HDMI et le réglage
[Format du signal HDMI] appropriés en
fonction des formats vidéo en sortie du
dispositif connecté au système
d’enceintes. Pour plus d’informations,
reportez-vous au Guide d’aide.
Connexion d’un dispositif AV
compatible avec le format
vidéo 8K
Lorsque vous connectez un dispositif AV
en procédant comme suit, vous pouvez
lire de la vidéo 8K et du son haute
qualité, tel que Dolby Atmos, Dolby
TrueHD ou DTS:X.
1 Raccordez le système d’enceintes
et le téléviseur avec le câble HDMI
(fourni) (page 16).
2 Vérifiez que la prise HDMI IN
compatible eARC du téléviseur est
compatible avec l’entrée vidéo 8K.
Reportez-vous au mode d’emploi
du téléviseur.
3 Connectez un dispositif AV en
procédant comme suit, selon le
cas.
Remarque
Assurez-vous que les connecteurs sont
correctement insérés.
FR
18
Page 81

Lorsque la prise HDMI IN
Lecteur Blu-ray Disc,
décodeur, console de jeu, etc.
Câble HDMI
(non fourni)
Téléviseur
Compatible avec
une entrée vidéo 8K
Lecteur Blu-ray Disc,
décodeur, console de jeu, etc.
Câble HDMI
(non fourni)
Téléviseur
Compatible avec une
entrée vidéo 8K
compatible eARC du téléviseur
prend en charge l’entrée vidéo
8K :
Connectez la prise HDMI IN du
système d’enceintes et la prise
HD M I OU T d ’u n d is po si ti f A V a ve c u n
câble HDMI (non fourni).
Lorsque la prise HDMI IN
compatible eARC du téléviseur
ne prend pas en charge l’entrée
vidéo 8K :
Connectez la prise HDMI OUT d’un
dispositif AV à la prise HDMI IN
compatible avec l’entrée vidéo 8K
du téléviseur avec un câble HDMI
(non fourni).
Assurez-vous que la fonction eARC
du téléviseur est activée.
Remarque
Assurez-vous que les connecteurs sont
correctement insérés.
Conseil
Choisissez le câble HDMI et le réglage
[Format du signal HDMI] appropriés en
fonction des formats vidéo en sortie du
dispositif connecté au système
d’enceintes. Pour plus d’informations,
reportez-vous au Guide d’aide.
19
FR
Page 82

Raccordement à la prise
Adaptateur
secteur (fourni)
Cordon
d’alimentation
secteur (fourni)
Adaptateur
secteur (fourni)
Cordon d’alimentation
secteur (fourni)
secteur
1 Raccordez l’adaptateur secteur
(fourni) et le cordon
d’alimentation secteur (fourni)* à
la borne DC IN du boîtier de
commande, puis raccordez à la
prise secteur.
*Excepté pour les modèles nord-
américains
Pour les modèles nordaméricains
Pour les autres modèles
2 Raccordez les cordons
d’alimentation secteur (fourni) aux
entrées secteur des quatre
enceintes, puis raccordez aux
prises secteur.
FR
20
Page 83

Exécution des réglages
PLEASE WAIT SETUP
(alimentation)
Speaker connection check
Next
Speaker connection successful.
[
Vérification de la connexion des enceintes]
initiaux
1 Appuyez sur (alimentation) sur
la télécommande fournie avec le
système d’enceintes pour mettre
le système d’enceintes sous
tension.
Utilisez la télécommande en la
dirigeant vers l’avant du boîtier de
contrôle.
Lorsque le système d’enceintes est
mis sous tension, [SETUP] apparaît
sur l’afficheur du panneau avant.
3 Assurez-vous que la connexion
entre le boîtier de commande et
les quatre enceintes est effectuée
sur l’écran du téléviseur.
Le boîtier de commande et les
enceintes sont connectées
automatiquement.
Le son indiquant que les connexions
sont terminées est reproduit une
fois que les marques de contrôle
apparaissent sur toutes les
enceintes.
L'indicateur d'alimentation de
l'enceinte s'allume en vert lors de la
connexion au boîtier de commande.
2 Mettez le téléviseur sous tension.
Si l’écran [Vérification de la
connexion des enceintes] n'apparaît
pas sur l’écran du téléviseur, réglez
le paramètre de l’entrée TV sur
l’entrée à laquelle le système
d’enceintes est connecté.
FR
21
Page 84

4 Effectuez les réglages initiaux en
Sound Field Optimization
Later
Language
Select your language.
Easy Network Setup - Start
Optimize the surround sound for your environment.
Connect this unit to the Internet to:
Optimization takes about a minute. A loud sound
may come from your speakers during optimization.
Do not make loud noises, walk or stand in front of
the speakers during optimization.
- Use your mobile device to play streaming music on the unit.
- Install software updates to keep the latest functions available.
You can do this later from [Easy Setup] > [Easy Network Setup].
Start
Next Later
Français (France)
English
Français (Canada)
Español
Deutsch
[ Langue]
[ Optimisation du champ sonore]
[ Réglages réseau faciles - Début]
suivant les instructions affichées à
l’écran.
Quand [La configuration est
terminée.] apparaît, sélectez
[Terminer].
Remarques
• En fonction de l’ordre dans lequel vous
mettez sous tension le téléviseur et le
système d’enceintes, le système
d’enceintes peut être silencieux et
l’indication [MUTING] peut apparaître sur
l’afficheur du panneau avant du système
d’enceintes. Si cela se produit, mettez
tous les dispositifs hors tension, puis,
après avoir mis le téléviseur sous tension,
mettez le système d’enceintes sous
tension.
• Lorsque [Optimisation du champ sonore]
est en cours, un son de mesure est
reproduit pendant 1 minute environ.
FR
22
• Le système d’enceintes ne reproduit pas
le son jusqu’à ce que la connexion sans fil
entre le boîtier de commande et les
quatre enceintes soit établie.
• Si le boîtier de commande et les enceintes
ne sont pas automatiquement connectés
dans l'étape 3, réinitialisez les enceintes
(page 59).
Page 85

Si les enceintes ne sont
LINK
Indicateur
d’alimentation
pas connectées
correctement
Les enceintes sont co nnectées au boîtier
de commande automatiquement
lorsqu’elles sont mises sous tension.
Si vous utilisez plusieurs systèmes
d'enceintes et souhaitez spécifier le
boîtier de commande qui est connecté
sans fil aux enceintes, effectuez la
connexion manuelle en suivant les
étapes ci-dessous.
1 Appuyez sur HOME.
Le menu d’accueil apparaît sur
l’écran du téléviseur.
2 Sélectionnez [Config.] -
[Réglages avancés] dans le menu
d’accueil.
3 Sélectionnez [Réglages Enceintes]
- [Réglages des enceintes sans fil]
- [Démarrer la liaison manuelle].
L’écran [Démarrer la liaison
manuelle] apparaît sur l’écran du
téléviseur.
4 Appuyez sur LINK sur toutes les
enceintes.
Les indicateurs d’alimentation des
enceintes clignotent à deux reprises
en vert.
5 Sélectionnez [Lancer].
La connexion manuelle démarre.
Le processus de connexion apparaît
sur l’écran du téléviseur.
Pour annuler la connexio n manuelle,
sélectionnez [Annuler].
6 Lorsque toutes les enceintes
affichent [Connecté], sélectionnez
[Finir].
7 Appuyez sur (entrée).
La connexion manuelle est établie et
les indicateurs d’alimentation des
enceintes brillent en vert.
Remarques
• Si vous exécutez les commandes
[Démarrer la liaison manuelle],
[Config.] - [Réglages avancés] [Réglages Enceintes] - [Réglages des
enceintes sans fil] - [Mode En liaison] est
réglé sur [Manuelle] automatiquement.
• Seules les enceintes ayant affiché
[Connecté] à l’étape 6 sont connectées au
boîtier de commande. Si la connexion des
enceintes ne peut pas être établie,
exécutez l’opération à nouveau à partir de
l’étape 1.
23
FR
Page 86

Visualisation d’images
Regarder la télévision
1 Appuyez sur HOME.
Le menu d’accueil apparaît sur
l’écran du téléviseur.
2 Sélectionnez [Regarder] - [TV]
dans le menu d’accueil.
3 Sélectionnez le programme à
l’aide de la télécommande du
téléviseur.
Le programme de télévision
sélectionné apparaît sur l’écran du
téléviseur et le son du téléviseur est
reproduit par le système
d’enceintes.
4 Réglez le volume (page 34).
Conseil
Vous pouvez sélectionner [TV] directement
en appuyant sur TV sur la télécommande.
Lecture du dispositif AV
connecté
1 Appuyez sur HOME.
Le menu d’accueil apparaît sur
l’écran du téléviseur.
2 Sélectionnez [Regarder] -
[HDMI] dans le menu d’accueil.
L’image du dispositif sélectionné
apparaît sur l’écran du téléviseur et
le son est reproduit par le système
d’enceintes.
3 Réglez le volume (page 34).
Conseil
Vous pouvez sélectionner [HDMI]
directement en appuyant sur HDMI sur la
télécommande.
24
FR
Page 87

Écoute de la musique/du son
Lecteur Blu-ray Disc,
décodeur, console
de jeu, etc.
Téléviseur Sony
TV
(alimentation)
AUDIO
BLUETOOTH
système d’enceintes, connectez le système
d’enceintes et le téléviseur avec le câble
HDMI (fourni) (page 16).
Écoute du son d’un
téléviseur Sony à l’aide
de la fonction
BLUETOOTH®
Ce que vous pouvez faire en
connectant un téléviseur à
l’aide de la fonction
BLUETOOTH
Lorsque vous utilisez le téléviseur Sony*
avec la fonction BLUETOOTH, vous
pouvez écouter le son du téléviseur ou
du dispositif connecté au téléviseur en
connectant le système d’enceintes et le
téléviseur sans fil.
* Le téléviseur doit être compatible avec le
profil A2DP (Advanced Audio Distribution
Profile) du profil BLUETOOTH.
Écoute du son du téléviseur
en connectant le système
d’enceintes et le téléviseur
sans fil
Vous devez jumeler le système
d’enceintes et le téléviseur à l’aide de la
fonction BLUETOOTH.
Le jumela ge est le proces sus requis pour
enregistrer mutuellement à l’avance les
informations sur les dispositifs
BLUETOOTH à connecter.
Remarque
Si vous connectez le système d’enceintes et
le téléviseur à l’aide de la fonction
BLUETOOTH, vous ne pouvez pas afficher
l’écran de commande du système
d’enceintes tel que l’écran d’accueil sur le
téléviseur ; vous ne pouvez pas non plus
utiliser des fonctions du système
d’enceintes autres que la fonction d’écoute
du son du téléviseur ou du dispositif
connecté au téléviseur.
Pour utiliser toutes les fonctions du
1 Mettez le téléviseur sous tension.
2 Appuyez sur (alimentation)
pour mettre le système
d’enceintes sous tension.
3 Appuyez dans l’ordre sur TV,
AUDIO, puis sur BLUETOOTH sur la
télécommande.
25
FR
Page 88

4 Assurez-vous que [PAIRING]
PAIRING
apparaît sur l’afficheur du
panneau avant.
Le système d’enceintes entre en
mode de jumelage BLUETOOTH.
5 Sur le téléviseur, recherchez le
système d’enceintes en effectuant
l’opération de jumelage.
La liste des dispositifs BLUETOOTH
détectés apparaît sur l’écran du
téléviseur.
Pour savoir comment jumeler le
dispositif BLUETOOTH au téléviseur,
reportez-vous au mode d’emploi du
téléviseur.
6 Jumelez le système d’enceintes et
le téléviseur en sélectionnant
« HT-A9 » dans la liste affichée sur
l’écran du téléviseur.
7 Assurez-vous que [TV (BT)]
apparaît sur l’afficheur du
panneau avant.
Une connexion entre le système
d’enceintes et le téléviseur a été
établie.
8 Sélectionnez le programme ou
l’entrée du dispositif avec la
télécommande du téléviseur.
Le son de l’image affichée sur
l’écran du téléviseur est reproduit à
partir du système d’enceintes.
9 Réglez le volume du système
d’enceintes avec la télécommande
du téléviseur.
Lorsque vous appuyez sur la touche
Silencieux de la télécommande du
téléviseur, le son est coupé
temporairement.
Remarques
• Si le son du téléviseur n’est pas reproduit
à partir du système d’enceintes, appuyez
sur TV et vérifiez l’état de l’afficheur du
panneau avant.
– [TV (BT)] apparaît sur l’afficheur du
panneau avant : le système d’enceintes
et le téléviseur sont connectés et le son
du téléviseur est reproduit à partir du
système d’enceintes.
– [PAIRING] apparaît sur l’afficheur du
panneau avant : effectuez le jumelage
sur le téléviseur.
– [TV] apparaît sur l’afficheur du panneau
avant : exécutez les étapes depuis le
début.
• Lorsque vous connectez le système
d’enceintes et le téléviseur avec un câble
HDMI, la connexion BLUETOOTH est
annulée. Pour connecter à nouveau le
système d’enceintes et le téléviseur avec
la fonction BLUETOOTH, débranchez le
câble HDMI, puis recommencez la
procédure de connexion depuis le début.
Écoute du son du téléviseur
jumelé
1 Allumez le téléviseur avec la
télécommande du téléviseur.
Le système d’enceintes est mis sous
tension par interverrouillage avec
l’alimentation du téléviseur et le son
du téléviseur est reproduit à partir
du système d’enceintes.
2 Sélectionnez le programme ou
l’entrée du dispositif avec la
télécommande du téléviseur.
Le son de l’image affichée sur
l’écran du téléviseur est reproduit à
partir du système d’enceintes.
3 Réglez le volume du système
d’enceintes avec la télécommande
du téléviseur.
Lorsque vous appuyez sur la touche
Silencieux de la télécommande du
téléviseur, le son est coupé
temporairement.
26
FR
Page 89

Conseil
(alimentation)
BASS +/–
(volume) +/–
(silencieux)
REAR (volume
des enceintes
arrière) +/–
AUTO SOUND,
VOICE,
NIGHT,
CINEMA,
MUSIC,
STANDARD,
IMMERSIVE AE
BLUETOOTH
BASS +/–
(volume) +/–
(lecture/
pause), /
(précédent/suivant)
REAR (volume
des enceintes
arrière) +/–
Quand le téléviseur est mis hors tension, le
système d’enceintes l’est aussi à cause de
l’interverrouillage avec l’alimentation du
téléviseur.
À propos des commandes de la
télécommande fournie avec le
système d’enceintes
Vous pouvez utiliser les touches
suivantes.
Écoute de la musique/du
son avec la fonction
BLUETOOTH
Écoute de musique par
jumelage du dispositif
mobile connecté pour la
première fois
Pour utiliser la fonction BLUETOOTH,
vous devez au préalable jumeler le
système d’enceintes et le dispositif
mobile.
Remarques
• Si vous sélectionnez une entrée autre que
TV sur la télécommande fournie avec le
système d’enceintes, le son du téléviseur
n’est pas reproduit à partir du système
d’enceintes. Pour reproduire le son du
téléviseur, appuyez sur TV sur la
télécommande afin de basculer sur
l’entrée TV.
• Pendant que le téléviseur est connecté
avec la fonction BLUETOOTH, les touches
suivantes de la télécommande ne
fonctionnent pas.
///, (entrée), BACK, HOME,
DISPLAY, OPTIONS, (lecture/pause),
/ (précédent/suivant)
1 Maintenez la touche BLUETOOTH
enfoncée pendant 2 secondes.
27
FR
Page 90

2 Assurez-vous que [PAIRING]
PAIRING
BLUETOOTH
BASS +/–
(volume) +/–
(lecture/
pause),
/
(précédent/suivant)
REAR (volume
des enceintes
arrière) +/–
apparaît sur l’afficheur du
panneau avant.
Le système d’enceintes entre en
mode de jumelage.
3 Sur le dispositif mobile,
recherchez le système d’enceintes
en effectuant l’opération de
jumelage.
La liste des dispositifs BLUETOOTH
détectés apparaît sur l’écran du
dispositif mobile.
Pour savoir comment jumeler le
dispositif BLUETOOTH au dispositif
mobile, reportez-vous au mode
d’emploi du dispositif mobile.
4 Jumelez le système d’enceintes et
le dispositif mobile en
sélectionnant « HT-A9 » dans la
liste affichée sur l’écran du
dispositif mobile.
Si une clé d’accès est demandée,
saisissez « 0000 ».
5 Assurez-vous que [BT] apparaît
sur l’afficheur du panneau avant.
Une connexion a été établie entre le
système d’enceintes et le dispositif
mobile.
6 Démarrez la lecture audio à l’aide
de l’application musicale du
dispositif mobile connecté.
Le son est reproduit par le système
d’enceintes.
7 Réglez le volume (page 34).
FR
28
Vous pouvez lancer ou suspendre la
lecture du contenu en utilisant les
touches de lecture sur la
télécommande.
Conseils
• Si aucun dispositif mobile n’a été jumelé
(par exemple, immédiatement après
l’achat du système d’enceintes), le
système d’enceintes passe en mode de
jumelage en basculant simplement
l’entrée sur l’entrée BLUETOOTH.
• Effectuez le jumelage pour le second
dispositif mobile et les suivants.
Écoute de musique à partir
du dispositif jumelé
1 Activez la fonction BLUETOOTH du
dispositif mobile.
2 Appuyez sur la touche
BLUETOOTH.
Le système d’enceintes se
reconnecte automatiquement au
dispositif mobile auquel il était le
plus récemment connecté.
Page 91

3 Assurez-vous que [BT] apparaît
sur l’afficheur du panneau avant.
Une connexion a été établie entre le
système d’enceintes et le dispositif
mobile.
4 Démarrez la lecture audio à l’aide
de l’application musicale du
dispositif mobile connecté.
Le son est reproduit par le système
d’enceintes.
5 Réglez le volume (page 34).
Vous pouvez lancer ou suspendre la
lecture du contenu en utilisant les
touches de lecture sur la
télécommande.
Remarque
Si un décalage du son se produit, cela peut
être résolu en réglant [Config.] [Réglages avancés] - [Réglages de
Bluetooth] - [Qualité de connexion
Bluetooth] sur [Priorité à une connexion
stable].
Conseil
Lorsque la connexion n’est pas établie,
sélectionnez « HT-A9 » sur le dispositif
mobile.
Pour déconnecter le dispositif
mobile
Exécutez une des actions suivantes.
• Désactivez la fonction BLUETOOTH du
dispositif mobile.
• Appuyez sur la touche BLUETOOTH
pendant que l’écran [Bluetooth Audio]
apparaît sur l’écran du téléviseur.
• Réglez [Config.] - [Réglages
avancés] - [Réglages de Bluetooth] [Mode Bluetooth] sur [Émetteur] ou
[Non].
• Mettez le système d’enceintes ou le
dispositif mobile hors tension.
Écoute du son du
téléviseur ou du
dispositif connecté en
utilisant un casque
Écoute du son par jumelage
avec le casque
1 Réglez le casque compatible
BLUETOOTH sur le mode de
jumelage.
Pour en savoir plus sur la méthode
de jumelage, reportez-vous au
mode d’emploi du casque.
2 Appuyez sur HOME.
Le menu d’accueil apparaît sur
l’écran du téléviseur.
3 Sélectionnez [Config.] -
[Réglages avancés] dans le menu
d’accueil.
4 Sélectionnez [Réglages de
Bluetooth] - [Mode Bluetooth] [Émetteur].
Le système d’enceintes passe en
mode de transmission BLUETOOTH.
5 Sélectionnez le nom du casque
dans [Liste des dispositifs] sous
[Réglages de Bluetooth].
Lorsque la connexion BLUETOOTH
est établie, l’indication [Connecté]
apparaît.
Si vous ne trouvez pas le nom de
votre casque dans [Liste des
dispositifs], sélectionnez [Balayer].
6 Revenez au menu d’accueil,
sélectionnez [Regarder] ou
[Écouter], puis sélectionnez
l’entrée.
L’image de l’entrée sélectionnée
apparaît sur l’écran du téléviseur,
[BT TX] apparaît sur l’afficheur du
29
FR
Page 92

panneau avant, puis le son est
reproduit par le casque.
Le son du système d’enceintes est
coupé simultanément.
7 Réglez le volume.
Réglez d’abord le niveau de volume
du casque. Puis, réglez le niveau de
volume du casque à l’aide de
(volume) +/– sur la
télécommande.
Pour supprimer le casque jumelé
de la liste des dispositifs
1 Appuyez sur HOME.
Le menu d’accueil apparaît sur l’écran
du téléviseur.
2 Sélectionnez [Config.] - [Réglages
avancés] dans le menu d’accueil.
3 Sélectionnez [Réglages de Bluetooth]
- [Liste des dispositifs].
4 Déplacez le curseur sur le nom du
casque que vous souhaitez
supprimer, puis appuyez sur DISPLAY.
Pour supprimer tous les casques
jumelés de la liste des dispositifs,
appuyez sur AUDIO.
5 Suivez les instructions à l’écran pour
supprimer le casque souhaité de la
liste des dispositifs.
Remarque
Pour afficher les casques jumelés de la liste
des dispositifs, réglez [Config.] [Réglages avancés] - [Réglages de
Bluetooth] - [Mode Bluetooth] sur
[Émetteur].
Écoute du son avec le casque
jumelé
1 Activez la fonction BLUETOOTH du
casque.
2 Appuyez sur HOME.
Le menu d’accueil apparaît sur
l’écran du téléviseur.
3 Sélectionnez [Config.] -
[Réglages avancés] dans le menu
d’accueil.
4 Sélectionnez [Réglages de
Bluetooth] - [Mode Bluetooth] [Émetteur].
Le système d’enceintes passe en
mode de transmission BLUETOOTH
et se reconnecte automatiquement
au dernier casque auquel il était le
plus récemment connecté.
5 Revenez au menu d’accueil,
sélectionnez [Regarder] ou
[Écouter], puis sélectionnez
l’entrée.
L’image de l’entrée sélectionnée
apparaît sur l’écran du téléviseur,
[BT TX] apparaît sur l’afficheur du
panneau avant, puis le son est
reproduit par le casque.
Le son du système d’enceintes est
coupé simultanément.
6 Réglez le volume.
Réglez d’abord le niveau de volume
du casque. Puis, réglez le niveau de
volume du casque à l’aide de
(volume) +/– sur la
télécommande.
30
Pour déconnecter le casque
jumelé
Exécutez une des actions suivantes.
– Désactivez la fonction BLUETOOTH sur
le casque.
– Réglez [Config.] - [Réglages
avancés] - [Réglages de Bluetooth] -
FR
Page 93

[Mode Bluetooth] sur [Récepteur] ou
[Non].
– Mettez le système d’enceintes ou le
casque hors tension.
– Sélectionnez le nom de dispositif du
casque connecté à partir de
[Config.] - [Réglages avancés] [Réglages de Bluetooth] - [Liste des
dispositifs]. L’indication [Connecté] du
nom du dispositif disparaît.
À propos de la connexion du
casque
• Il se peut que vous ne puissiez pas
ajuster le niveau de volume, selon le
casque compatible BLUETOOTH.
• L’entrée BLUETOOTH est désactivée
lorsque [Config.] - [Réglages
avancés] - [Réglages de Bluetooth] [Mode Bluetooth] est réglé sur [Non]
ou sur [Émetteur].
• Vous pouvez enregistrer jusqu’à 9
dispositifs BLUETOOTH. Si un 10ème
dispositif BLUETOOTH est enregistré,
le plus ancien dispositif BLUETOOTH
connecté est remplacé par le nouveau.
• Le système d’enceintes peut afficher
jusqu’à 15 dispositifs BLUETOOTH
détectés dans la [Liste des dispositifs]
(page 30).
• Vous ne pouvez pas modifier les effets
sonores ou les réglages du son
pendant la transmission du son vers le
casque compatible BLUETOOTH.
• La lecture du son/de la musique sur le
dispositif BLUETOOTH est retardée par
rapport à celle du système d’enceintes
en raison des caractéristiques de la
technologie sans fil BLUETOOTH.
• Vous pouvez activer ou désactiver la
réception du son LDAC à partir du
dispositif BLUETOOTH dans [Réglages
de Bluetooth].
FR
31
Page 94

Écoute de la musique par connexion à un réseau
Dispositif/smartphone/
tablette iOS
• 360 Reality Audio
•Spotify
•Chromecast built-in
•AirPlay
•Sony | Music Center
Ordinateur
•AirPlay
• Réseau domestique
Système
d’enceintes
Ce que vous pouvez faire en connectant le système
d’enceintes à un réseau
Vous pouvez lire du contenu musical en streaming via le système d’enceintes en
utilisant un smartphone, une tablette ou un dispositif iOS, ou lire de la musique stockée
sur un ordinateur via le système d’enceintes en le connectant au réseau.
Pour plus d’informations sur les fonctions et opérations, reportez-vous au Guide d’aide.
360 Reality Audio
Vous pouvez lire du contenu 360 Reality
Audio sur le système d’enceintes en le
sélectionnant dans l’application du
service de streaming compatible avec
360 Reality Audio.
Spotify
Vous pouvez sélectionner de la musique
dans l’application Spotify et la lire sur le
système d’enceintes.
32
Utilisez votre téléphone, votre tablette
ou votre ordinateur comme une
télécommande pour contrôler Spotify.
Accédez à spotify.com connect pour en
savoir plus.
Chromecast built-in™
Vous pouvez sélectionner de la musique
dans l’application compatible
Chromecast et la lire sur le système
d’enceintes.
FR
Page 95

AirPlay
Le système d’enceintes est compatible
AirPlay.
Vous pouvez lire de la musique sur le
système d’enceintes en utilisant un
dispositif iOS ou un ordinateur.
Sony | Music Center
Vous pouvez commander le système
d’enceintes en installant l’application
« Sony | Music Center » sur votre
smartphone ou votre tablette.
Réseau domestique
Vous pouvez lire des fichiers de musique
stockés sur votre ordinateur via votre
réseau domestique.
33
FR
Page 96

Réglage du volume et de la qualité
BASS +/–
REAR (volume
des enceintes
arrière) +/–
(volume) +/–
du son
Réglage du volume
Pour régler le volume du système
d’enceintes
Appuyez sur (volume) +/–.
Le niveau de volume apparaît sur
l’afficheur du panneau avant.
Pour régler le volume des graves
Appuyez sur BASS (volume des graves)
+/–.
Le niveau de volume apparaît sur
l’afficheur du panneau avant.
Remarque
Le caisson de graves est conçu pour
reproduire les sons graves ou de basse
fréquence. Il est possible que les sons
graves reproduits par le caisson de graves
ne soient pas perceptibles si la source
d’entrée n’en contient pas beaucoup,
comme c’est le cas dans certains
programmes de télévision.
Remarque
Les enceintes arrière sont conçues pour lire
la partie surround du son multicanaux et le
son surround qui est créé à partir du son à
2 canaux à l’aide du traitement virtuel.
Lorsque la source d’entrée contient peu de
son surround, la reproduction de celui-ci à
partir des enceintes arrière peut être
difficile à entendre.
Pour régler le volume des
enceintes arrière
Appuyez sur REAR (volume des
enceintes arrière) +/–.
Le niveau de volume apparaît sur
l’afficheur du panneau avant.
FR
34
Page 97

Profiter de l’expérience
IMMERSIVE AE
surround immersive
(IMMERSIVE AE)
Vous pouvez vous imprégner du son
surround non seulement depuis
l’horizontale, mais aussi depuis le haut,
en utilisant efficacement les modes son
(page 36). Cette fonction est également
utilisable pour le signal du canal 2.0,
notamment pour les programmes de
télévision.
1 Appuyez sur IMMERSIVE AE pour
activer ou désactiver la fonction.
Le réglage Immersive Audio
Enhancement apparaît sur l’écran
du téléviseur.
Mode Description
[Immersive
Audio
Enhancement:
On]
[Immersive
Audio
Enhancement:
Off]
Active la fonction
Immersive Audio
Enhancement.
Désactive la fonction
Immersive Audio
Enhancement.
• L’effet surround spatial diffère selon la
source sonore.
• Le réglage Immersive Audio
Enhancement n’apparaît pas sur l’écran
du téléviseur quand l’entrée TV est
sélectionnée. Dans ce cas, vous pouvez
vérifier le paramètre Immersive Audio
Enhancement de l'afficheur du panneau
avant.
• Selon la source, ce réglage est fixe et ne
peut pas être modifié.
Remarques
• La fonction Immersive Audio
Enhancement est disponible uniquement
lorsque [Config.] - [Réglages
avancés] - [Réglages Audio] - [Effet
sonore] est réglé sur [Sound Mode activé].
35
FR
Page 98

Réglage de l’effet sonore
CINEMA
MUSIC
AUTO SOUND
STANDARD
personnalisé pour
différentes sources
sonores (mode son)
Vous pouvez facilement profiter des
effets sonores préprogrammés qui sont
personnalisés pour différents types de
sources sonores.
Cette fonction est utilisable uniquement
lorsque [Config.] - [Réglages
avancés] - [Réglages Audio] - [Effet
sonore] est réglé sur [Sound Mode
activé].
1 Appuyez sur AUTO SOUND,
CINEMA, MUSIC, ou STANDARD
pour sélectionner le mode son.
Le mode son sélectionné apparaît
sur l’écran du téléviseur.
Mode son Description
[Auto Sound]
[Cinema]
Le réglage du son
adapté est
automatiquement
sélectionné pour la
source sonore.
Vous avez
l’impression d’être
immergé dans le son
qui circule derrière
vous et enveloppe la
totalité de votre
corps. Ce mode
convient pour les
films.
Mode son Description
[Music]
[Standard
Surround]
Remarques
• La fonction de mode son est désactivée
dans les conditions suivantes.
– Chromecast built-in est utilisé .
– AirPlay est utilisé.
– Le dispositif BLUETOOTH est connecté
en mode de transmission BLUETOOTH
(page 29).
– Une tonalité de test est émise.
• Le mode son n’apparaît pas sur l’écran du
téléviseur quand l’entrée TV est
sélectionnée. Dans ce cas, vous pouvez
vérifier le mode audio sur l'afficheur du
panneau avant.
• Selon le réglage du mode son et la source
sonore associés, l’effet de [Optimisation
du champ sonore] peut ne pas être
appliqué.
La vivacité et la
brillance du son sont
exprimées en détail.
Ce mode convient
pour écouter de la
musique de manière
entraînante.
Le son d’un
programme télévisé
est reproduit
clairement.
36
FR
Page 99

Rendre les dialogues
VOICE
NIGHT
plus audibles (VOICE)
1 Appuyez sur VOICE pour activer ou
désactiver la fonction.
Le réglage du mode voix apparaît
sur l’écran du téléviseur.
Mode Description
[Voice: On] Les dialogues sont
[Voice: Off] Désactive la fonction
Remarques
• Le paramètre mode voix n’apparaît pas
sur l’écran du téléviseur quand l’entrée
téléviseur est sélectionnée. Dans ce cas,
vous pouvez vérifier le paramètre mode
voix sur l'afficheur du panneau avant.
• Quand le dispositif BLUETOOTH est
connecté en mode de transmission
BLUETOOTH (page 29), le mode voix est
désactivé.
facilement audibles en
améliorant la plage de
dialogue.
Mode voix.
Profiter d’un son clair
associé à un niveau de
volume réduit durant la
nuit (NIGHT)
1 Appuyez sur NIGHT pour activer
ou désactiver la fonction.
Le réglage du mode nocturne
apparaît sur l’écran du téléviseur.
Mode Description
[Night: On] Le son est reproduit à
[Night: Off] Désactive la fonction
Remarques
• Lorsque vous mettez le système
d’enceintes hors tension, ce paramètre se
règle automatiquement sur [Night: Off].
• Le paramètre mode nocturne n’apparaît
pas sur l’écran du téléviseur quand
l’entrée TV est sélectionnée. Dans ce cas,
vous pouvez vérifier le paramètre mode
nocturne sur l'afficheur du panneau
avant.
• Quand le dispositif BLUETOOTH est
connecté en mode de transmission
BLUETOOTH (page 29), le mode nocturne
est désactivé.
un niveau de volume
réduit avec une perte
minimale de fidélité et
des dialogues distincts.
Mode nocturne.
37
FR
Page 100

Réglage de l’écart
AUDIO
temporel entre l’image et
le son
Profiter d’un son de
diffusion multiplex
(AUDIO)
Quand le son ne correspond pas aux
images affichées sur l’écran du
téléviseur, vous pouvez régler l’écart
temporel entre l’image et le son.
La méthode de réglage varie selon
l’entrée.
Pour plus d’informations, reportez-vous
au Guide d’aide.
Vous pouvez bénéficier d’un son de
diffusion multiplex lorsque le système
d’enceintes reçoit un signal de diffusion
multiplex Dolby Digital.
1 Appuyez plusieurs fois sur AUDIO
pour sélectionner le signal audio
souhaité.
Le signal audio apparaît sur l’écran du
téléviseur
Signal audio Description
[Audio:
Main]
[Audio: Sub] Le son de la langue
[Audio:
Main/Sub]
.
Le son de la langue
principale est
reproduit.
secondaire est
reproduit.
Le son principal est
reproduit par l’enceinte
gauche et le son
secondaire est
reproduit par l’enceinte
droite.
38
Remarques
• Pour reproduire un son Dolby Digital, vous
devez connecter un téléviseur compatible
eARC ou ARC (page 16) à la prise HDMI
OUT (TV ARC/eARC) à l’aide du câ ble HDMI
(fourni) ou d’autres dispositifs à la prise
HDMI IN via un câble HDMI (non fourni).
FR
 Loading...