

Sony Honda XR-H594WG Operating Instructions Manual
OPERATING INSTRUCTIONS
AM/FM CASSETTE TAPE PLAYER
with CD CHANGER CONTROL
VOL
/
TUNE DISC
123 4 5 6
REPEAT
P/N; 08A50-S5H-7M0
MODE
TAPE
CLOCK CDRESMH
AM
/
FM
PUSH
PWR

Please write the serial number (on the bottom of the unit) in the space below.
Keep this booklet as a record of your purchase to help identify the unit if it’s stolen.
Serial No. ;
2

Contents
Precautions ....................................................................................................................................... 4
Cassette and Player Maintenance .................................................................................................... 5
Clock Operation Instructions ............................................................................................................. 6
Audio Operation Instructions............................................................................................................. 7
Radio Operation Instructions........................................................................................................... 11
Cassette Operation Instructions...................................................................................................... 14
CD changer Operation Instructions................................................................................................. 18
In case of Difficulty .......................................................................................................................... 21
What is the Difference Between AM and FM Radio?...................................................................... 24
FM Reception.................................................................................................................................. 25
Specifications .................................................................................................................................. 28
Explanation of the hand marks
Rotate the controller. Press Momentarily. Press and hold down. Press and hold according
to the instructions on
each page.
3

Precautions
VOLUME
For your driving safety, keep
the volume low enough to be
aware of road and traffic
conditions.
TEMPERATURE IN
THE VEHICLE
In order to ensure proper
performance, be sure the
temperature in your vehicle
is between 14°F (–10°C)
and 140°F (60°C) before
turning your player on. Good
air circulation is essential to
prevent heat build-up in the
unit (especially in hot
weather).
CAR W ASHING
Do not wash the radio,
speakers, or tape; moisture
can cause electrical shorts
or other damage.
TAPE MECHANISM
Keep magnets,
screwdrivers, and other
metallic objects away from
the tape mechanism and
tape head.
OUTSIDE
CLEANING
Use a soft cloth to clean the
radio.
Do not use kerosene,
thinner, or any other type of
solvent.
4

30kHz
0kHz
METAL
METAL
CHROME
CHROME
NORMAL
NORMAL
Cassette and Player Maintenance
TYPES OF TAPE AND USAGE
There are 5 basic types of tape, each with its own
formulation of material that can be magnetized, but for
convenience they are divided into two categories.
1) Normal (Type I) and low noise give average frequency
response and fidelity and can be played in all cassette
tape players.
2) FeCr (Type III), CrO
above average frequency response and fidelity, and
should be used in tape players with FeCr, CrO
tape capability.
2 (Type II), and Metal (Type IV) give
2, or Metal
CLEANING
Automotive cassette players
require at least the same
amount of care given to
home units, and then some.
This means a regular
schedule of head
demagnetization and
cleaning of the capstan,
roller, and head is necessary
to maintain optimum
performance.
THIN
NORMAL
VERY THIN
TAPE SLACK
Cassette Tapes require very
little maintenance, but do
require careful storage away
from direct sunlight,
magnetic sources, and dusty
areas. Check tape for slack
and tighten with a pencil or
similar object before
inserting in tape player.
TAPE LENGTHS
Use 100-minute or shorter
cassettes. Cassettes longer
than 100 minutes use
thinner tape that may break
or jam the tape mechanism.
5
Clock Operation Instructions
TO SET THE CLOCK
M (minutes)
TUNE DISC
/
123 456
REPEAT
H (hour)
RES (reset)
CLOCK
MODE
AM
TAPE
CLOCK CDRESMH
/
4
H
while
TAPE
CLOCK / CD
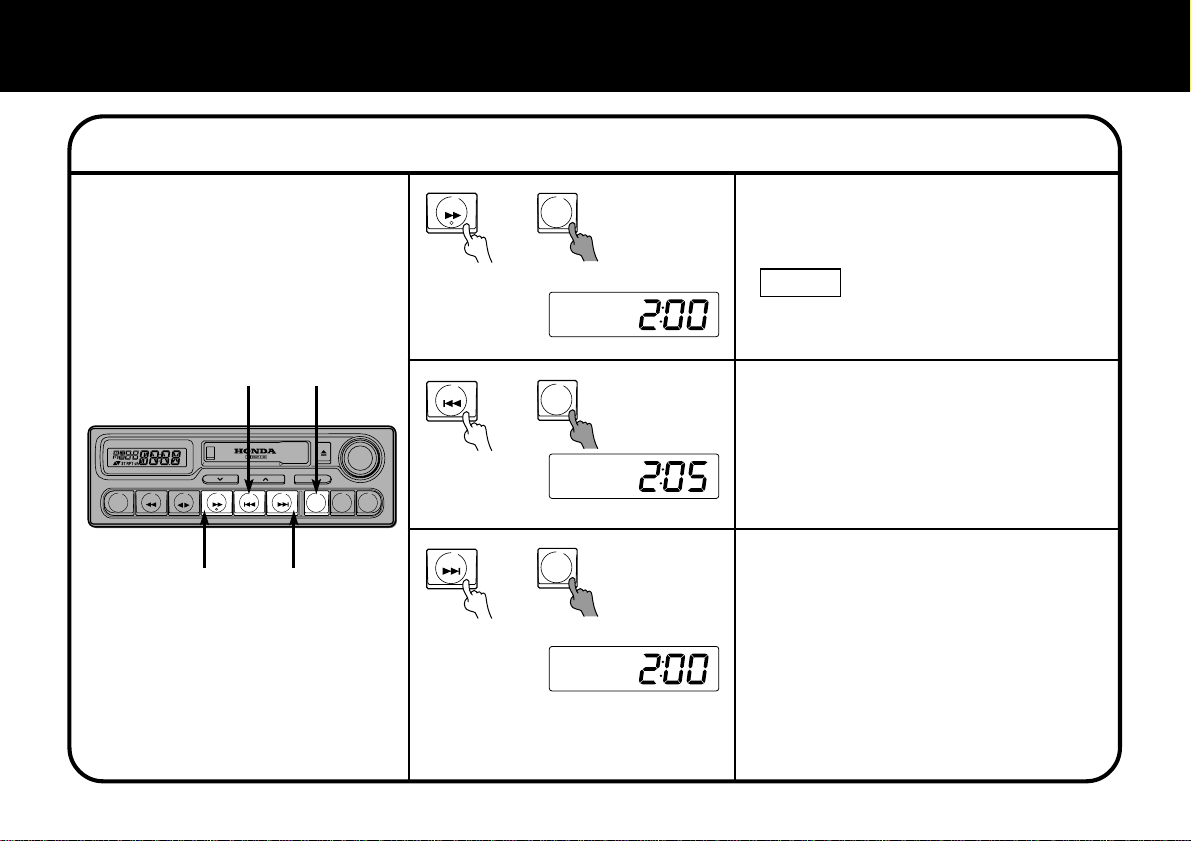
To set the hour
Press and while holding the CLOCK
button, press the H button.
NOTE
The clock uses a 12-hour digital
indication.
5
VOL
PUSH
PWR
FM
M
6
RES
while
while
TAPE
CLOCK / CD
TAPE
CLOCK / CD
To set the minutes
Press and while holding the CLOCK
button, press the M button.
To set by the time signal
Press and while holding the CLOCK
button, press the RES button.
You can set the time to the nearest hour. If
the displayed time is before the half hour,
pressing these button sets the clock back
to the previous hour. If the displayed time
is after the half hour, pressing these
button sets the clock forward to the
beginning of the next hour.
6

PO WER ON/OFF
Audio Operation Instructions
TAPE slot
TUNE DISC
/
123 456
REPEAT
TAPE/CD
PWR
(power)
ON/OFF
MODE
TAPE
CLOCK CDRESMH
/
VOL
POWER ON
Press the PWR button or follow one of
the operations listed below.
PUSH
PWR
TAPE
CLOCK / CD
VOL
AM
FM
MODE
TAPE
TUNER
OPERATION
Insert a cassette tape.
Press the TAPE button.
Press the AM or FM
button.
or
PUSH
PWR
FM
AM
CD
CHANGER
FMAM
TAPE
CLOCK / CD
VOL
POWER OFF
Press the CD button.
(Only if connected.)
Each time you press this
button, the source mode
changes as follows:
Tape bB CD
Press the PWR button again.
PUSH
PWR
7
Audio Operation Instructions
VOLUME UP/DOWN
TUNE DISC
/
123 456
REPEAT
VOL (volume)
VOL
MODE
TAPE
CLOCK CDRESMH
PUSH
PWR
FM
AM
/
VOL
PUSH
PWR
VOL
PUSH
PWR
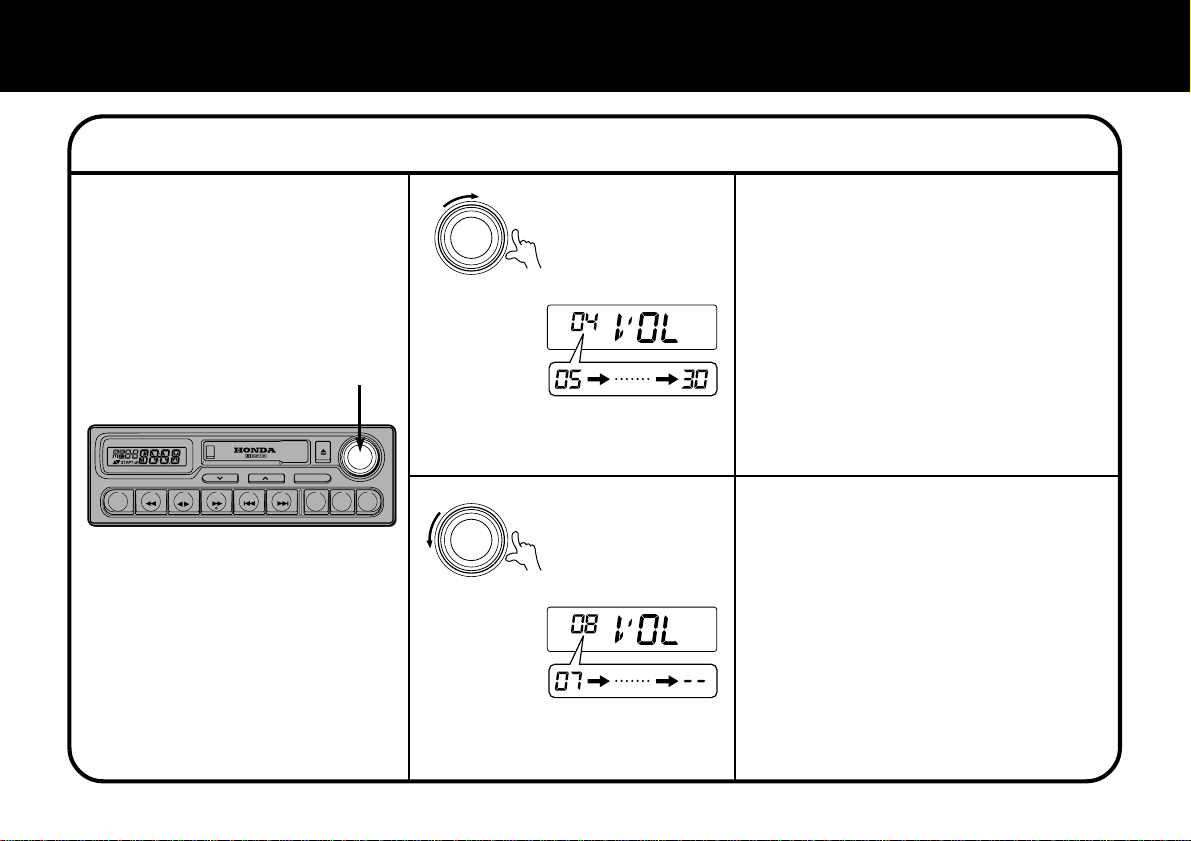
VOLUME UP
Turn the VOL controller clockwise to
increase the volume.
The volume level number will increase.
VOLUME DOWN
Turn the VOL controller
counterclockwise to decrease the
volume.
The volume level number will decrease.
8

AUDIO CONTROL
Audio Operation Instructions
TUNE DISC
/
123 4 5 6
REPEAT
2
1
To select the control mode
Press the MODE button.
MODE
Each time you press this button, the
source mode changes as follows:
B BAS B TRE B FAD B BAL
(normal mode) b
If you do not perform the next operation
1
within seven seconds, normal mode will
return.
VOL
MODE
TAPE
CLOCK CDRESMH
PUSH
PWR
FM
AM
/
2
TUNE DISC
/
To adjust each mode
Press the TUNE or button.
Adjust each mode according to the table.
or
9
 Loading...