

Page 1
4-078-615-12 (1)
Trinitron Color
Computer Display
Operating Instructions
Mode d’emploi
Bedienungsanleitung
Manual de instrucciones
Istruzioni per l’uso
Bruksanvisning
GB
FR
DE
ES
ITITITITIT
NL
HMD-A220
© 2000 Sony Corporation
Page 2

Owner’s Record
The model and serial numbers are located at the rear of the unit.
Record these numbers in the spaces provided below. Refer to them
whenever you call upon your dealer regarding this product.
Model No.
Serial No.
WARNING
To prevent fire or shock hazard, do not expose the
unit to rain or moisture.
Dangerously high voltages are present inside the
unit. Do not open the cabinet. Refer servicing to
qualified personnel only.
INFORMATION
This product complies with Swedish National Council for Metrology
(MPR) standards issued in December 1990 (MPR II) for very low
frequency (VLF) and extremely low frequency (ELF).
INFORMATION
Ce produit est conforme aux normes du Swedish National Council
for Metrology de décembre 1990 (MPR II) en ce qui concerne les
fréquences très basses (VLF) et extrêmement basses (ELF).
INFORMACIÓN
Este producto cumple las normas del Consejo Nacional Sueco
para Metrología (MPR) emitidas en diciembre de 1990 (MPR II)
para frecuencias muy bajas (VLF) y frecuencias extremadamente
bajas (ELF).
As an ENERGY STAR Partner , Sony
Corporation has determined that this
product meets the
guidelines for energy efficiency.
E
NERGY STAR
2
Page 3

Table of Contents
Precautions. . . . . . . . . . . . . . . . . . . . . . . . . . . . . . . . . . . . . . . . . . . . 4
Identifying parts and controls . . . . . . . . . . . . . . . . . . . . . . . . . . . . . . 5
Setup. . . . . . . . . . . . . . . . . . . . . . . . . . . . . . . . . . . . . . . . . .6
• Trinitron is a registered trademark of
Sony Corporation.
• Macintosh is a tr ademark license d to
Apple Computer, Inc., registered in the
U.S.A. and other countries.
• Windows
trademarks of Microsoft Corporation in
the United States and other countries.
• IBM PC/AT and VGA are registered
trademarks of IBM Corporation of the
U.S.A.
• VESA and DDC
Video Electronics Standard
Association.
•
E
mark.
• All other product names ment i one d
herein may be the trademarks or
registered trademarks of their respective
companies.
• Furthermore, “” and “” are not
mentioned in each case in this manual.
and MS-DOS are registered
are trademarks of the
NERGY STAR is a U.S. registered
Step 1:
Step 2:
Step 3:
Connect your monitor to your computer . . . . . . . . . . . . . . . 6
Connect the power cord. . . . . . . . . . . . . . . . . . . . . . . . . . . . 6
Turn on the monitor and computer . . . . . . . . . . . . . . . . . . . 6
Connecting Universal Serial Bus (USB) compliant peripherals . . . . 7
Selecting the on-screen menu language
(LANGUAGE/INFORMATION) . . . . . . . . . . . . . . . . . . . . . . . . . . . . . 8
Customizing Your Monitor . . . . . . . . . . . . . . . . . . . . . . . .8
Navigating the menu. . . . . . . . . . . . . . . . . . . . . . . . . . . . . . . . . . . . . 8
Adjusting the brightness and contrast
(BRIGHTNESS/CONTRAST) . . . . . . . . . . . . . . . . . . . . . . . . . . . . . 10
Adjusting the horizontal size or centering of the picture
(H-SIZE/CENTER) . . . . . . . . . . . . . . . . . . . . . . . . . . . . . . . . . . . . . 10
Adjusting the vertical size or centering of the picture
(V-SIZE/CENTER) . . . . . . . . . . . . . . . . . . . . . . . . . . . . . . . . . . . . . 10
Adjusting the curvature of the picture’s sides
(PIN/PIN BALANCE). . . . . . . . . . . . . . . . . . . . . . . . . . . . . . . . . . . . 10
Adjusting the angle of the picture’s sides
(KEY/KEY BALANCE) . . . . . . . . . . . . . . . . . . . . . . . . . . . . . . . . . . 11
Adjusting the picture’s rotation (ROTATION) . . . . . . . . . . . . . . . . . 11
Enlarging or reducing the picture (ZOOM) . . . . . . . . . . . . . . . . . . . 11
Adjusting the color of the picture (COLOR) . . . . . . . . . . . . . . . . . . 11
Additional settings
(DEGAUSS/CANCEL MOIRE) . . . . . . . . . . . . . . . . . . . . . . . . . . . . 12
Resetting the adjustments (RESET). . . . . . . . . . . . . . . . . . . . . . . . 12
Technical Features . . . . . . . . . . . . . . . . . . . . . . . . . . . . .13
Preset and user modes. . . . . . . . . . . . . . . . . . . . . . . . . . . . . . . . . . 13
Power saving function. . . . . . . . . . . . . . . . . . . . . . . . . . . . . . . . . . . 13
Troubleshooting. . . . . . . . . . . . . . . . . . . . . . . . . . . . . . . .13
If thin lines appear on your screen (damper wires). . . . . . . . . . . . . 13
On-screen messages . . . . . . . . . . . . . . . . . . . . . . . . . . . . . . . . . . . 13
Trouble symptoms and remedies . . . . . . . . . . . . . . . . . . . . . . . . . . 14
Self-diagnosis function . . . . . . . . . . . . . . . . . . . . . . . . . . . . . . . . . . 16
Specifications. . . . . . . . . . . . . . . . . . . . . . . . . . . . . . . . . .16
Appendix. . . . . . . . . . . . . . . . . . . . . . . . . . . . . . . . . . . . . . . i
Preset mode timing table . . . . . . . . . . . . . . . . . . . . . . . . . . . . . . . . . .i
GB
3
Page 4
Precautions
Warning on power connections
• Use the supplied power cord. If you use a different power cord,
be sure that it is compatible with your local power supply.
For the customers in the UK
If you use the monitor in the UK, be sure t o use the supplied UK
power cable.
Example of plug types
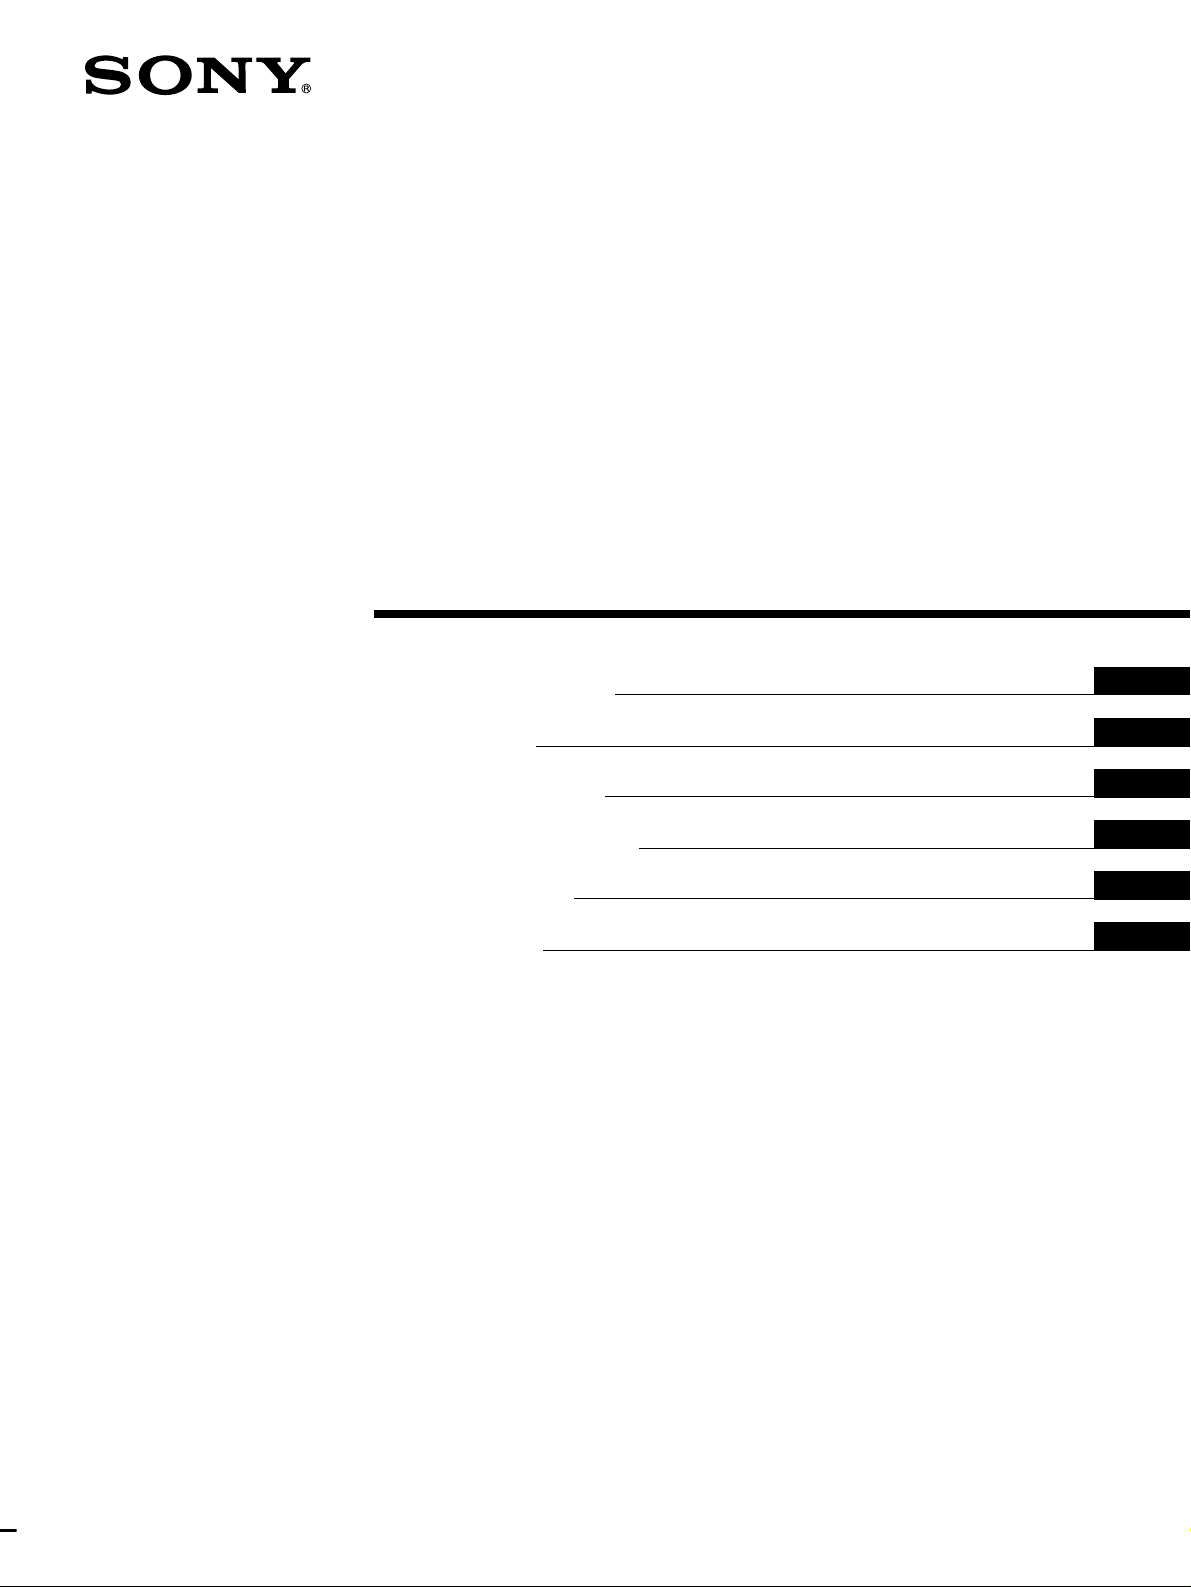
Use of the stand
Insert the supplied stand into the groo ve to adjust the angle of the
monitor. You can use the stand in either the vertical or horizontal
position.
for 100 to 120 V AC
• Before disconnecting the power cord, wait at least 30 seconds
after turning off the power to allow the static elec tricity on the
screen’s surface to discharge.
• After the power is turned on, the screen is demagnetized
(degaussed) for about 5 seconds. This generates a strong
magnetic field around the screen which may affect data stored
on magnetic tapes and disks placed near the monitor. Be sure to
keep magnetic recording equipment, tapes, a nd disks away
from the monitor.
The equipment should be in stalled near an easily accessible
outlet.
for 200 to 240 V AC
for 240 V AC only
Installation
Do not install the monitor in the following places:
• on surfaces (rugs, blankets, etc.) or near materials (curtains,
draperies, etc.) that may block the ventilation holes
• near heat sources such as radiators or air ducts, or in a place
subject to direct sunlight
• in a place subject to severe temperature changes
• in a place subject to mechanical vibration or shock
• on an unstable surface
• near equipment which generates magnetism, such as a
transformer or high volta g e po w er lines
• near or on an electrically charged metal surface
Use of the groove on top
You can put a photo frame or CD case in the groove.
Note
Never use the slit for any other purpose.
Maintenance
• Clean the screen with a soft cloth. If you use a glass cleaning
liquid, do not use any t ype of cleaner containing an anti-static
solution or similar additive as this may scratch the screen’s
coating.
• Do not rub, touch, or tap the surface of the screen with sharp or
abrasive items su ch as a ballpoint pe n or screwdrive r. This type
of contact may result in a scratched pict ure tube.
• Clean the cabine t, pane l and co nt rols wi th a soft cloth ligh tly
moistened with a mild detergent solution. Do not use any type
of abrasive pa d, sc ouring powder or solv ent, s uch as a lcohol o r
benzene.
Transportation
When you transport this monitor for repair or shipment, use the
original carton and packing materials.
4
Page 5
Identifying parts and controls
1 2 3 4
5
876
11 12 13 14 15
10
9
See the pages in parentheses for further details.
MENU
RearFront
AC IN
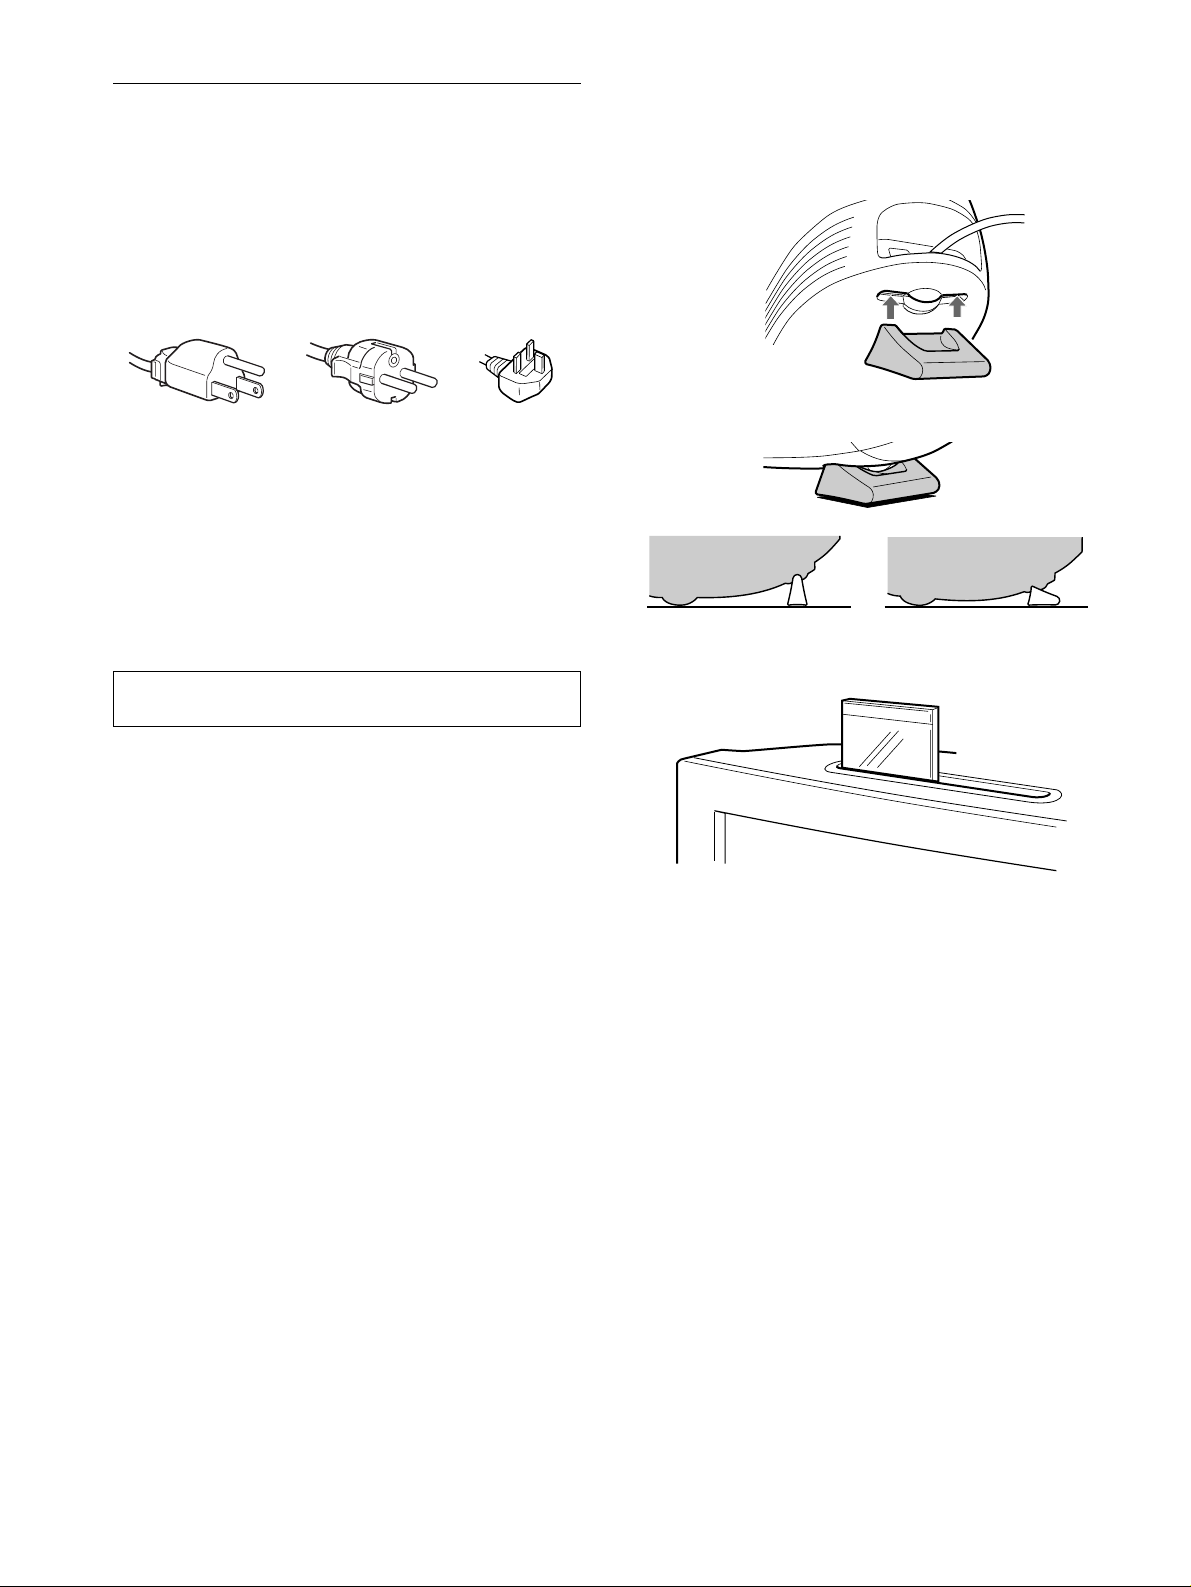
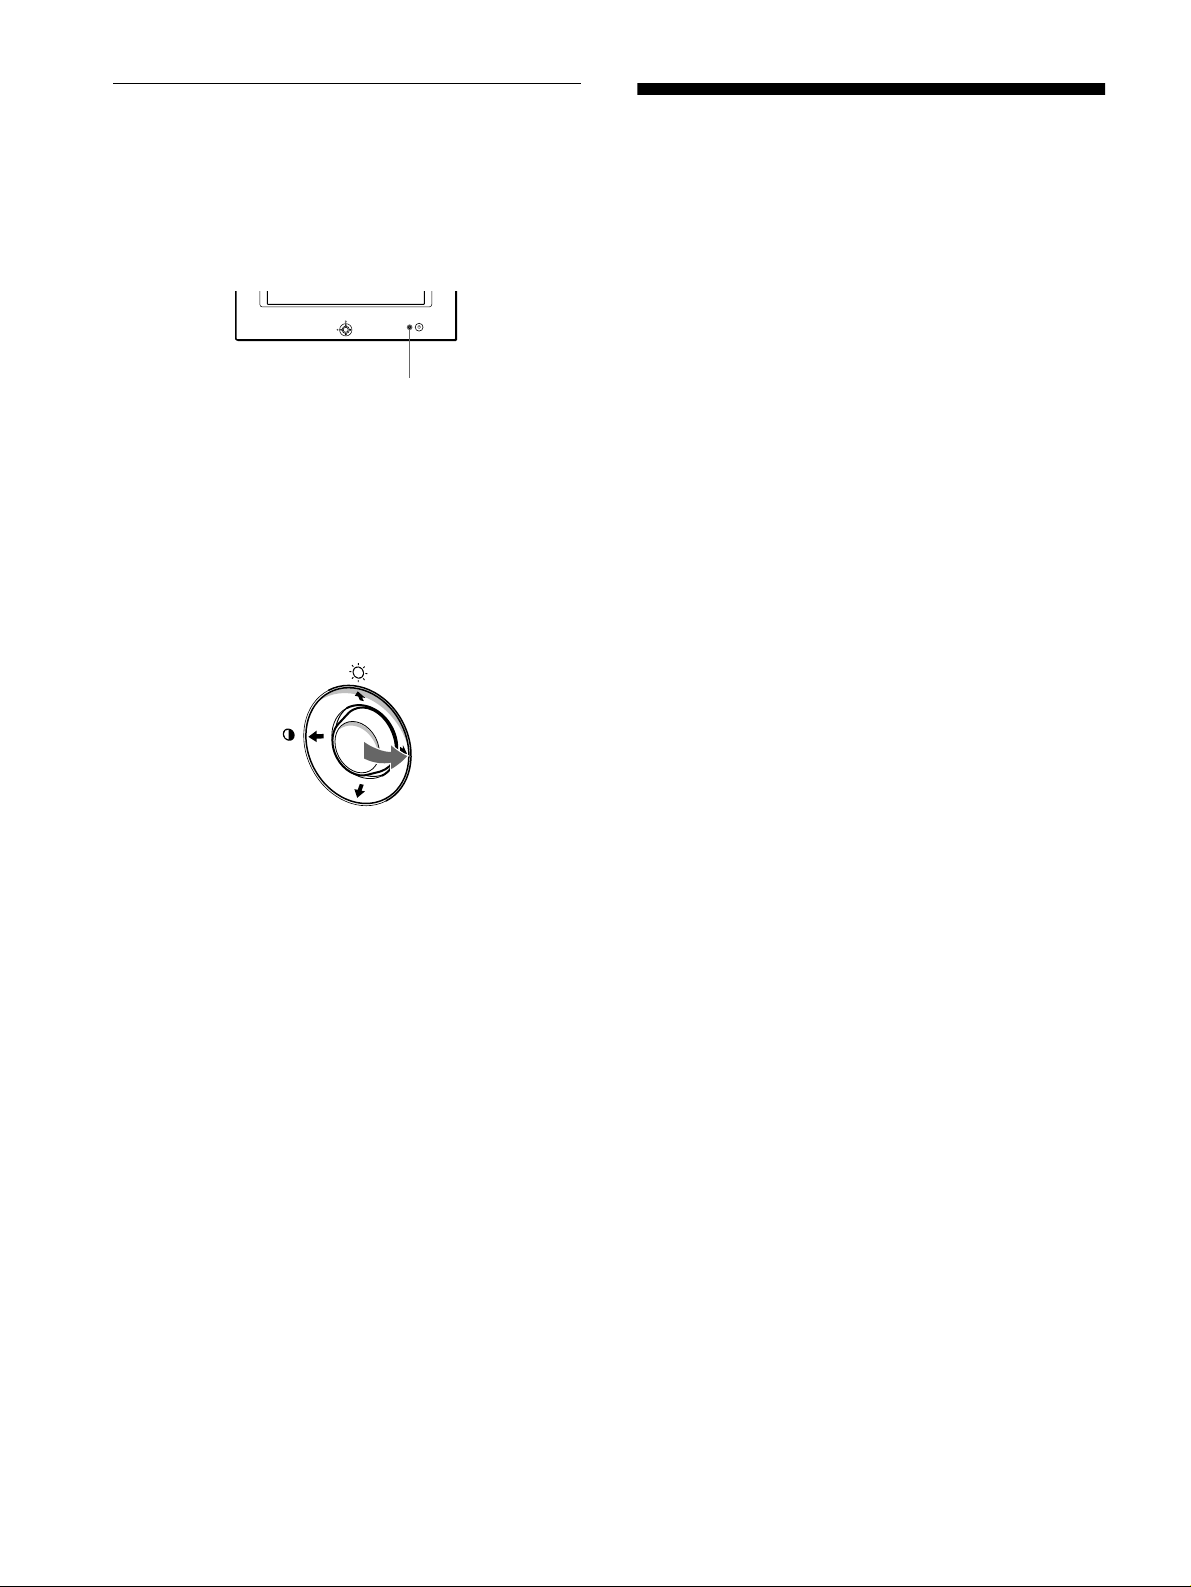
Control button (page 9)
1
The control button is used to display the menu and make
adjustments to the monitor, including brightn ess and contrast
adjustments.
(power) switch and indicator (pages 6, 13, 16)
2 1
This button turns the monitor on and off. The power ind icator
lights up in green when the monitor is turned on, and either
flashes in green and orange, or lights up in orange when the
monitor is in power saving mode.
AC IN connector (page 6)
3
This connector provides AC power to the monitor.
Video input connector (HD15) (page 6)
4
This connector inputs RGB video sign als (0.700 Vp-p,
positive) and sync signals.
Pin No. Signal
1Red
2 Green
3Blue
4 ID (Ground)
5 DDC Ground*
6 Red Ground
7 Green Ground
8 Blue Ground
9 DDC + 5V*
10 Ground
11 ID (Ground)
12 Bi-Directional Data (SDA )*
13 H. Sync
14 V. Sync
15 Data Clock (SCL)*
GB
* DDC (Display Data Channel) is a standard of VESA.
USB (universal serial bus) downstream connectors
5
(page 7)
Use these connectors to link USB peripheral devices to the
monitor.
USB (universal serial bus) upstream connector
6
(page 7)
Use this connector to link the monitor to a USB compliant
computer.
5
Page 6
Setup
AC IN
to AC IN
to a power outlet
power cord (supplied)
Before using your monitor, check that t he following accessories
are included in your carton:
• Power cord (1)
• USB ca b l e (1)
• Monitor stand (1)
• Warranty card (1)
• Notes on cleaning the screen’s surface (1)
• This instruction manual (1 )
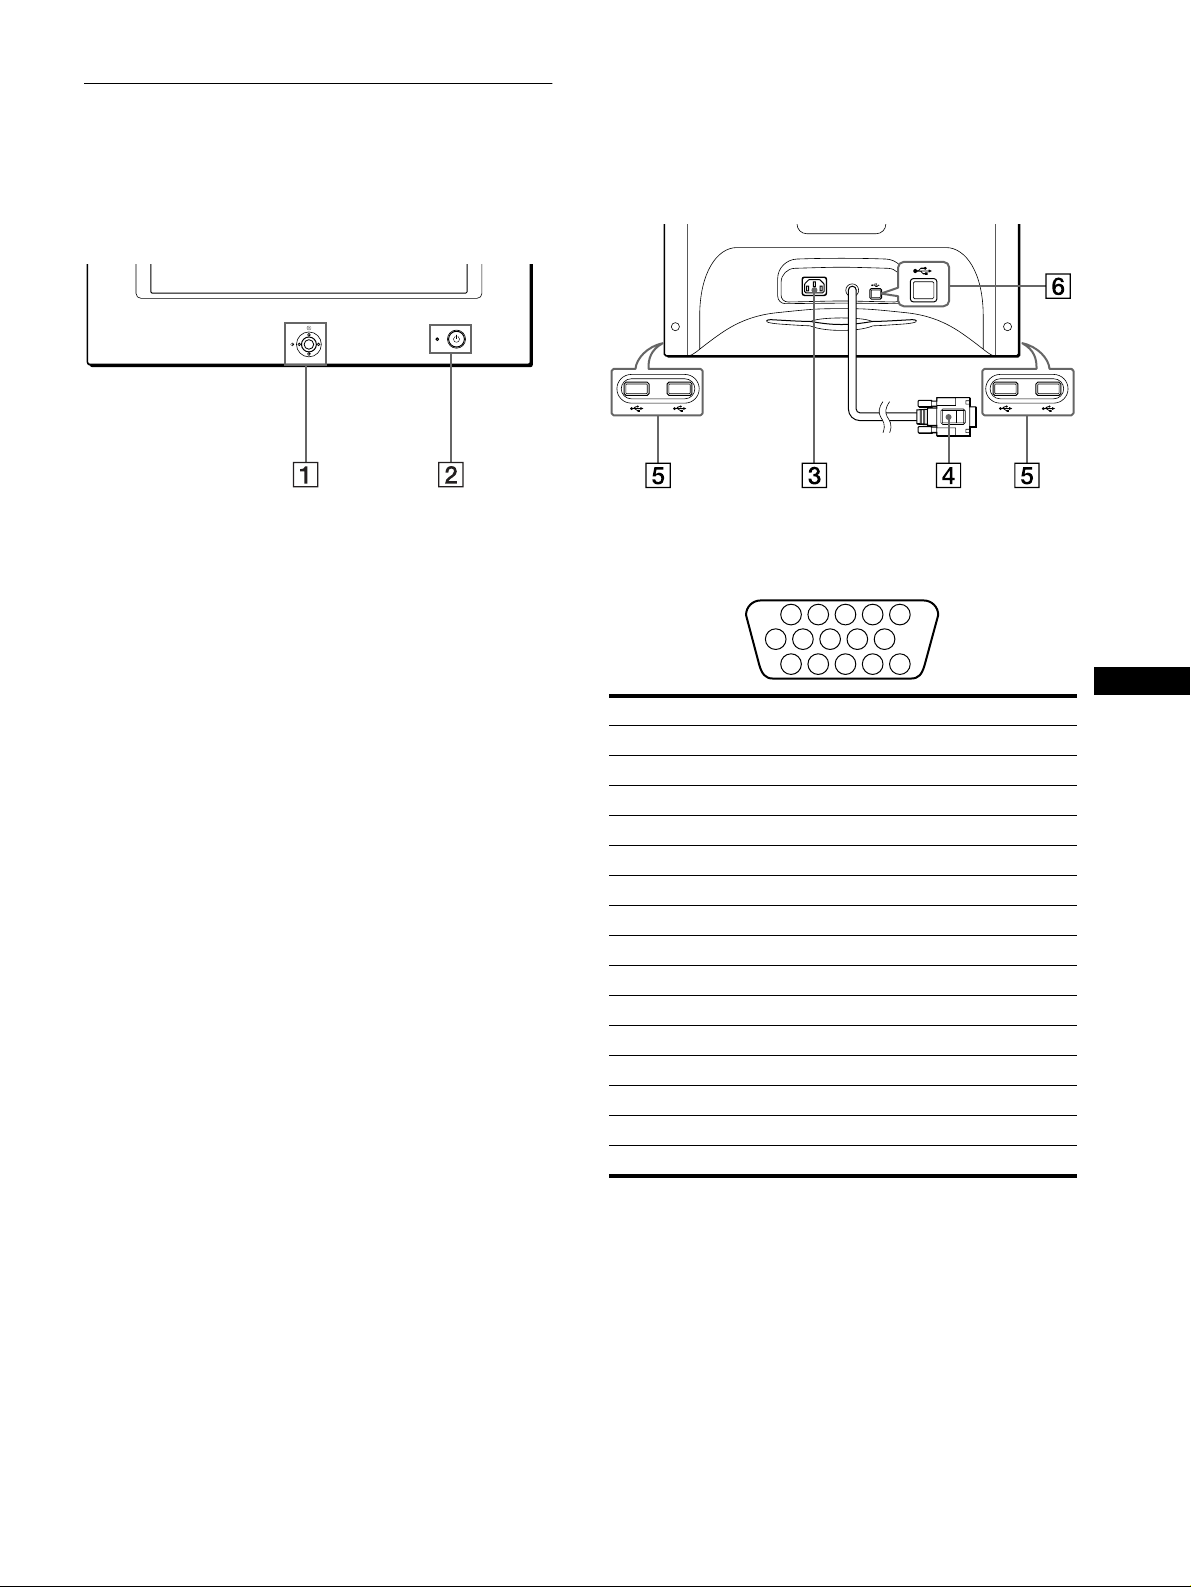
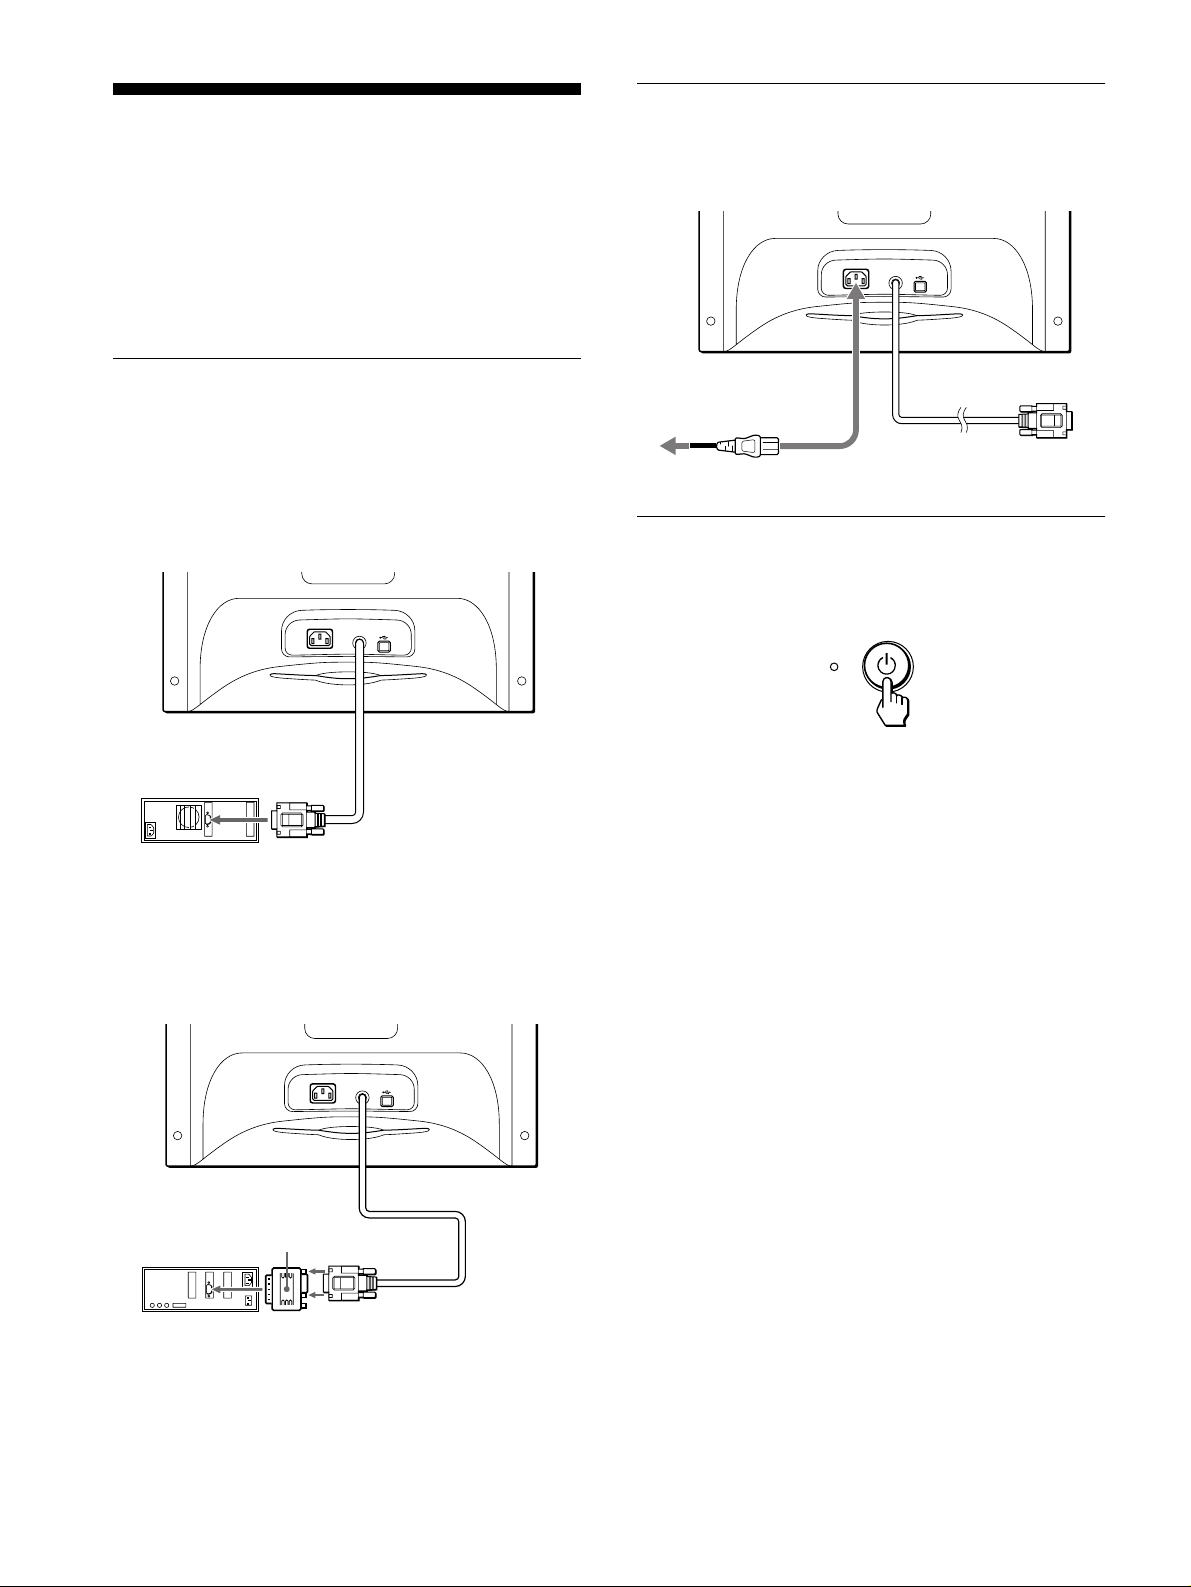
Step 1:Connect your monitor to
your computer
Turn off the monitor and computer before connecting.
Connecting to an IBM PC/A T or compatible
x
computer
Step 2:Connect the power cord
With the monitor and computer switched off, first connect the
power cord to the monitor, then connect it to a power outlet.
Step 3:Turn on the monitor and
computer
AC IN
to video output
IBM PC/AT or
compatible computer
Connecting to a Macintosh or compatible
x
computer
You will need a Macintosh adapter (not supplied).
AC IN
First turn on the monitor, then turn on the computer.
The installation of your monitor is complete.
If necessary, use the monitor’s controls to adjust the picture.
Macintosh or
compatible computer
6
Macintosh adapter
(not supplied)
to video
output
Page 7
If no picture appears on your screen
• Check that the monitor is correctly connected to the computer.
• If NO INPUT SIGNAL appears on the screen, confirm that
your computer’s graphic board is completely seated in the
correct bus slot.
• If you are replacing an old monitor with this model and OUT
OF SCAN RANGE appears on the screen, reconnect the old
monitor. Then adjust the computer’s graphic board so that the
horizontal frequency is between 30 – 70 kHz, and the vertical
frequency is between 48 – 120 Hz.
For more information about the on-screen messages, see “Trouble
symptoms and remedies” on page 14.
Setup on various OS (Operating System)
This monitor complies with the “DDC” Plug & Play standard and
automatically detects all the monitor’s information. No specific driver
needs to be installe d to the computer.
If you connect the monitor to your PC, and then boot your PC for the first
time, the setup Wizard may be displayed on the screen. Click on “Next”
several times according to the instructions from the Wizard until the Plug
& Play Monitor is automati cally sele cted so that you can us e this moni tor.
For customers using Windows NT4.0
Monitor setup in Windows NT4.0 does not use the display driver. Re fer
to the Windows NT4.0 instruction manual for further details on adjusting
the resolution, refresh rate, an d num ber of colors.
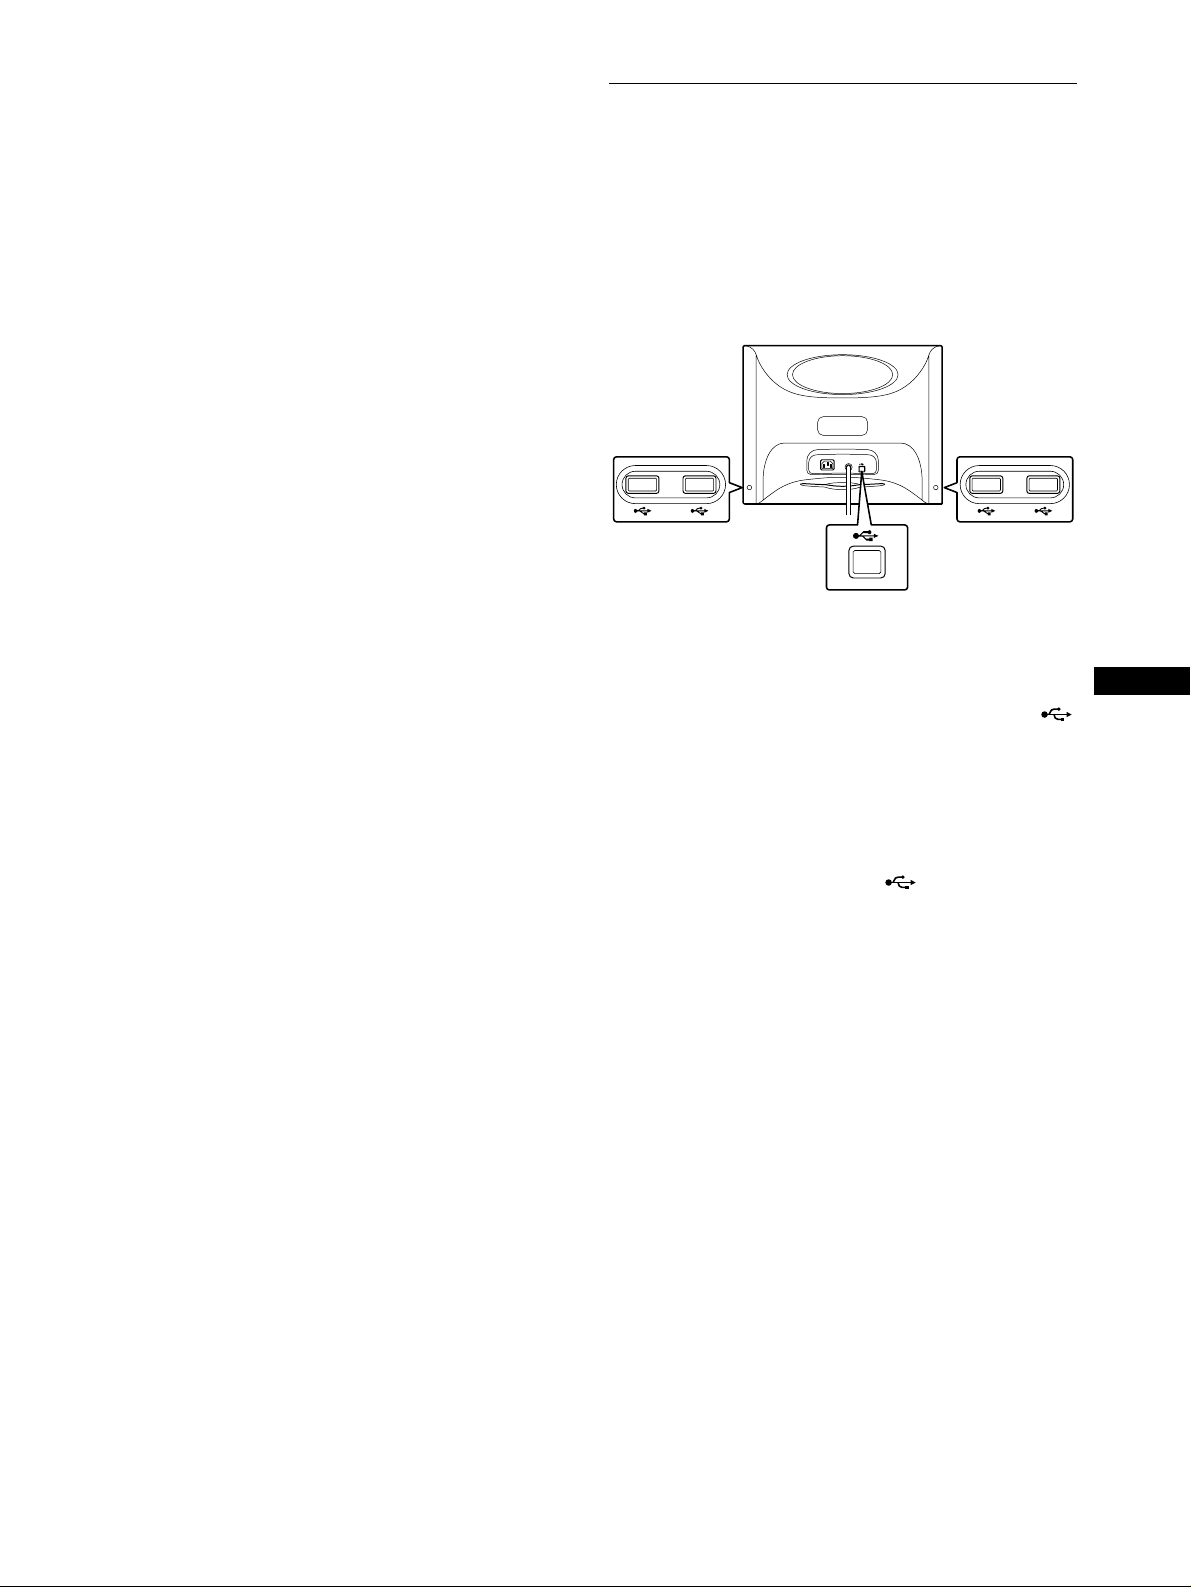
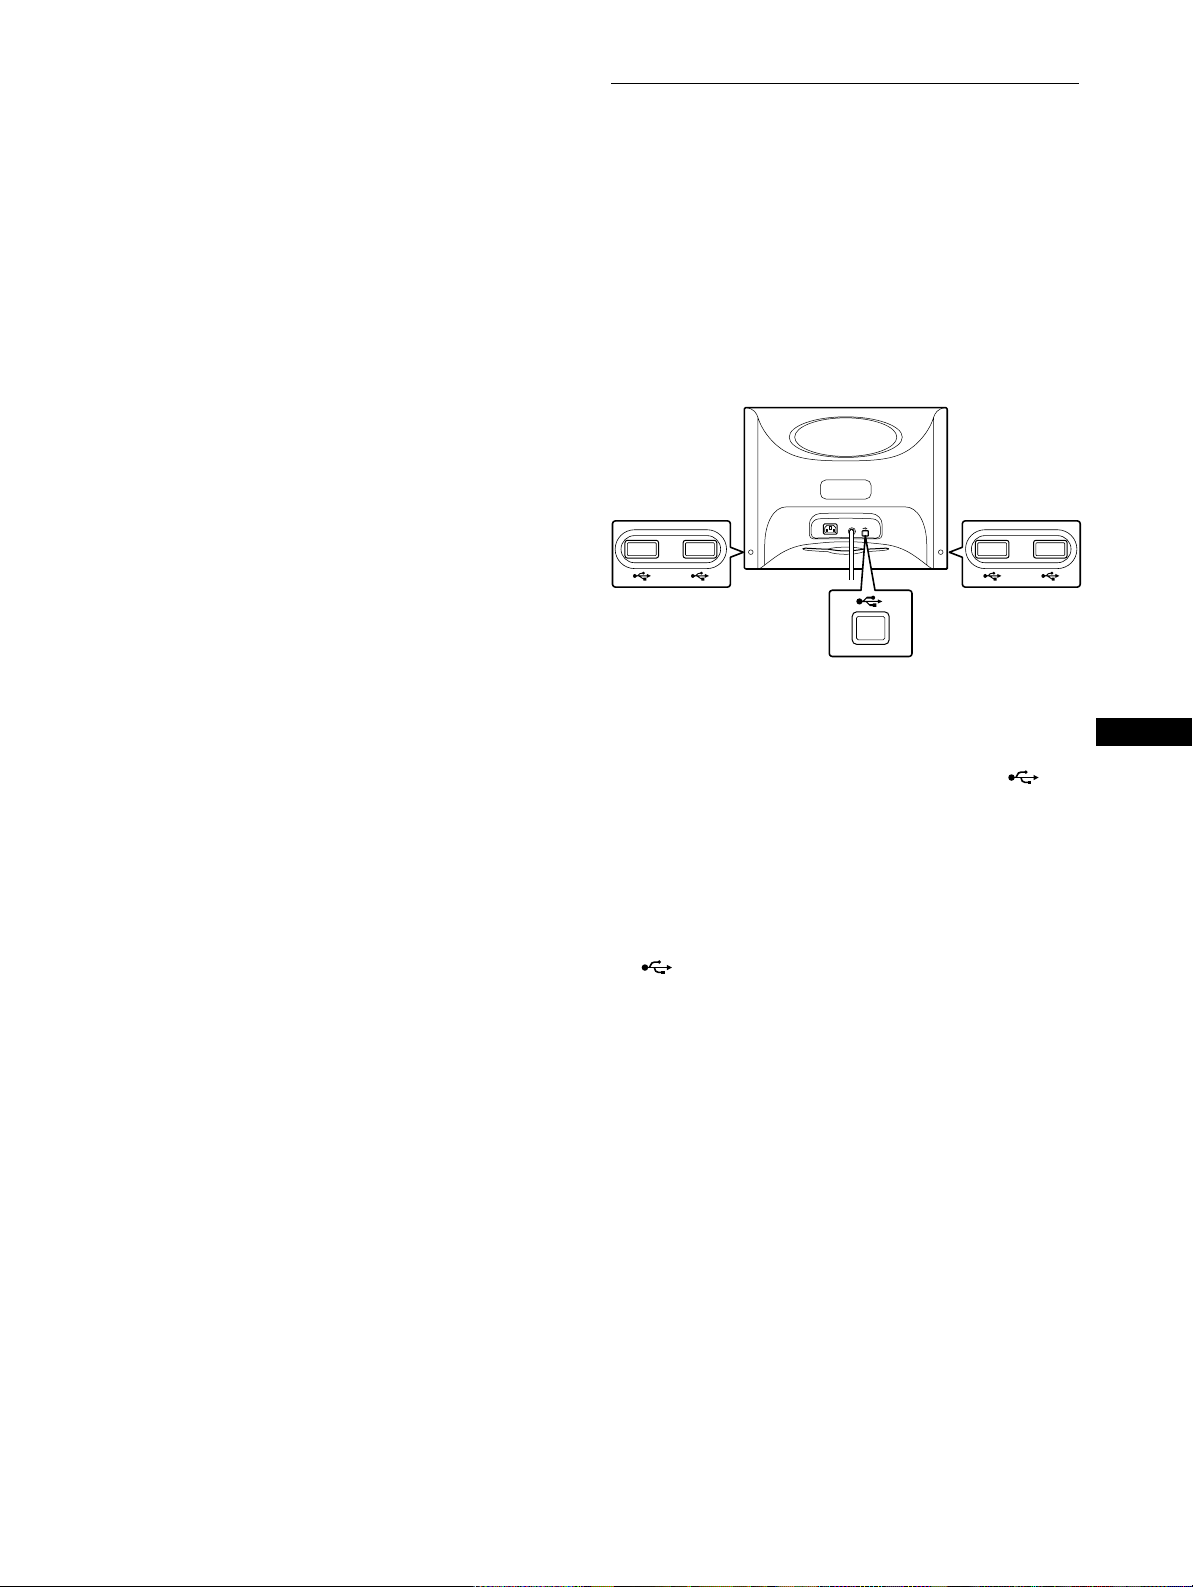
Connecting Universal Serial Bus
(USB) compliant peripherals
Your monitor has one upstream USB connector (on the rear
panel) and four downstream USB connectors (two on both the left
and right sides). They provide a fast and easy way to connect USB
compliant peripheral devices (such as keyboards, mice, pr inters
and scanners) to your computer using a standardized USB cable.
To use your monitor as a hub for your peripheral devices, connect
the USBs as illustrated below.
AC IN
to USB compliant
peripheral devices
to a USB compliant
computer
1
Turn on the monitor and computer.
2
Connect your computer to the square up stream
connector using the supplied USB cable.
to USB compliant
peripheral devices
GB
For customers using Windows
If a message appears on your screen, follow the on-screen instructions
and select Gen eric USB Hub as the de fault setting.
3
Connect your USB compliant peripheral devices to
the rectangular downstream USB connectors.
Notes
• Not all computers and/ or operating systems support USB
configurations. Check your computer’s instruction manual to see if you
can connect USB devices.
• In most cases, USB driver softw are needs to be installed on the host
computer. Refer to the peripheral device’s instruction manual for
further details.
• The monitor functions as a USB hub as long as the monitor is either
“on” or in power saving mode.
• If you connect a keybo ard or mouse to the USB conn ectors and then
boot your computer for the first time, the pe ripheral devices may not
function. First connect the keyboard and mouse directly to the
computer and set up the USB compliant devices. Then connect them to
this monitor.
• Do not lean on the mon it or whe n plugging in the USB cables. T he
monitor may suddenly shift and cause injur y .
7
Page 8
Selecting the on-screen menu
MENU
language
(LANGUAGE/INFORMATION)
English, French, German, Italian, Spanish, Russian, and Japanese
versions of the on-screen menus are available. The de fault setting
is English.
1
Press the center of the control button.
See page 9 for more information on using the control button.
MENU
EX I T
H- S I ZE /CENTER
V-SIZE/CENTER
PIN/PIN BALANCE
b
MENU
KEY / KEY BALANCE
ROTAT ION
ZOOM
COLOR
LANGUAGE / I NFORMAT NOI
DEGAUSS/ CANCEL MO ERI
RESET
Customizing Your Monitor
You can make numero us ad jus tments to your moni tor us in g the
on-screen menu.
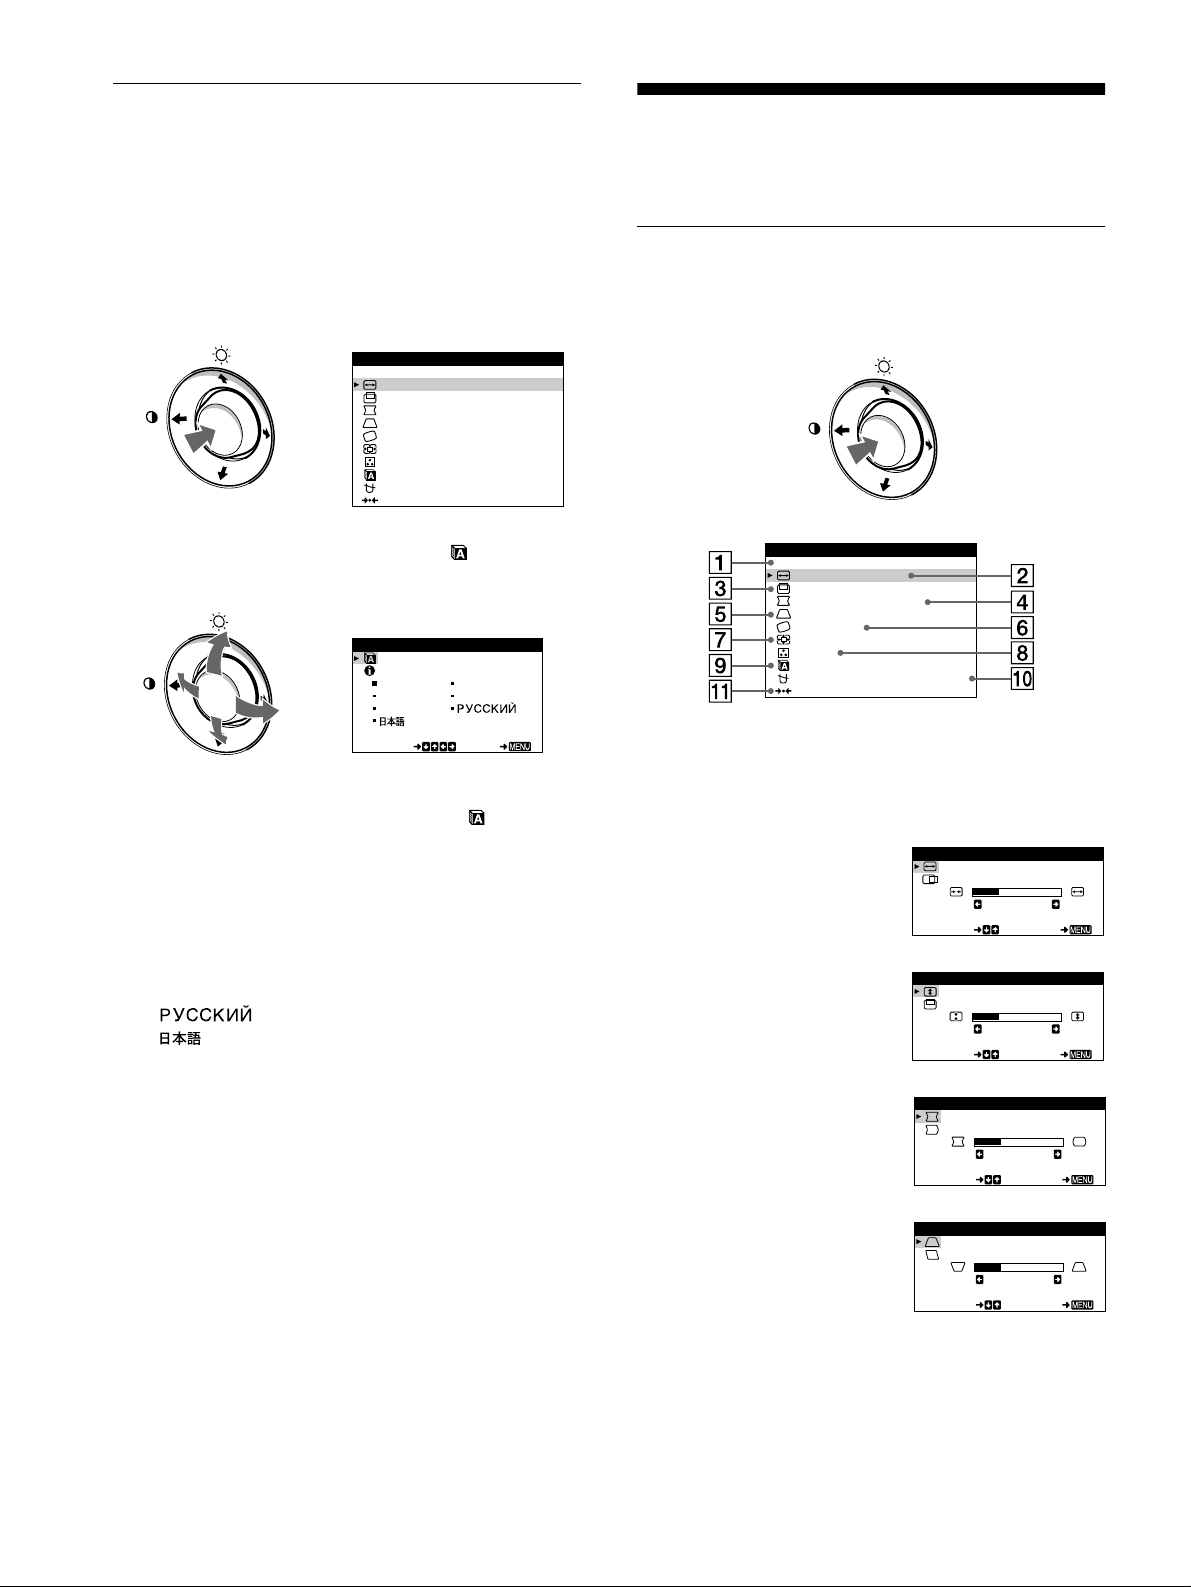
Navigating the menu
Press the center of the control button to display the main MENU
on your screen. See page 9 for more inform ation on using the
control button.
2
Move the control button to highlight LANGUAGE/
INFORMATION and press the the center of the
control button again.
LANGUAGE / I NFORMAT ION
b
ENGL I SH FRANÇA I S
DEUTSCH I TAL I ANO
ESPAÑOL
SELECT EX I T
MENU
3
Move the control button m/M to select
(LANGUAGE), and press the center of the control
button. Then move the control b utton m/M to select
a language.
• ENGLISH
• FRANÇAIS: French
• DEUTSCH: German
• ITALIANO: Italian
• ESPAÑOL: Spanish
• : Russian
• : Japanese
To close the menu
Press the center of the control button once to return to the main MENU,
and twice to return to normal viewing. If no buttons are pressed, the menu
closes automa tically after about 30 s econds.
To reset to English
See “Resetting the a djustments (RESET)” on pa ge 12.
MENU
EX I T
H- S I ZE /CENTER
V-SIZE/CENTER
PIN/PIN BALANCE
KEY / KEY BALANCE
ROTAT ION
ZOOM
COLOR
LANGUAGE / I NFORMAT NOI
DEGAUSS/ CANCEL MO ERI
RESET
Use the control button to select one of the following menus.
EXIT
1
Select EXIT to close the menu.
H-SIZE/CENTER (page 1 0)
2
Select the H-SIZE/CENTER
menu to adjust the picture’s
horizontal size and centeri ng.
V-SIZE/CENTER (page 10)
3
Select the V-SIZE/CENTER
menu to adjust the picture’s
vertical size and centering.
PIN/PIN BALANCE (page 10)
4
Select the PIN/PIN BALANCE
menu to adjust the curvature
picture’s sides.
KEY/KEY BALANCE
5
(page 11)
Select the KEY/KEY BALANCE
menu to adjust the angle of the
picture’s sides.
H -S IZE / CENTER
H-SIZE
26
SELECT EX I T
V-SIZE/CENTER
V-SIZE
26
SELECT EX I T
PIN/PIN BALANCE
PIN
26
SELECT EX I T
KEY/ KEY BAL ANCE
KEY
26
SELECT EX I T
8
Page 9
ROTATION (page 11)
MENU
MENU
MENU
6
Select the ROTATION menu to
adjust the picture’s rotation.
ZOOM (page 11)
7
Select the ZOOM menu to enlarge
or reduce the picture.
COLOR (page 11)
8
Select the COLOR me nu to adjust
the picture’s color temperature.
You can use this to match the
monitor’s colors to a printed
picture’s colors.
LANGUAGE/INFORMATION
9
(page 8, 15)
Select the LANGUAGE/
INFORMATION menu to choose
the on-screen menu’s lan gu a ge
and display this monitor’s
information box.
Using the control button
ROTAT ION
ROTAT ION
26
EXI T
ZOOM
ZOOM
26
EXI T
COLOR
R50
G50
B50
SELECT EXI T
KKK
5000 6500 9300
USER
x
1
Display the main MENU.
Press the center of the control button to display the main
MENU on your screen.
2
Select the menu you want to adjust.
Highlight the desi red menu by moving t he control button up
(M), down (m), and left (<) or right (,) to move sideways.
LANGUAGE / I NFORMAT ION
ENGL ISH FRANÇA I S
DEUTSCH I TAL I ANO
ESPAÑOL
SELECT EXI T
MENU
b
MENU
DEGAUSS/CANCEL MOIRE
0
(page 12)
Select the DEGAUSS/CANCEL
MOIRE menu to dega u s s the
screen and cancel the moire.
RESET (page 12)
qa
Select the RESET menu to reset
the adjustments.
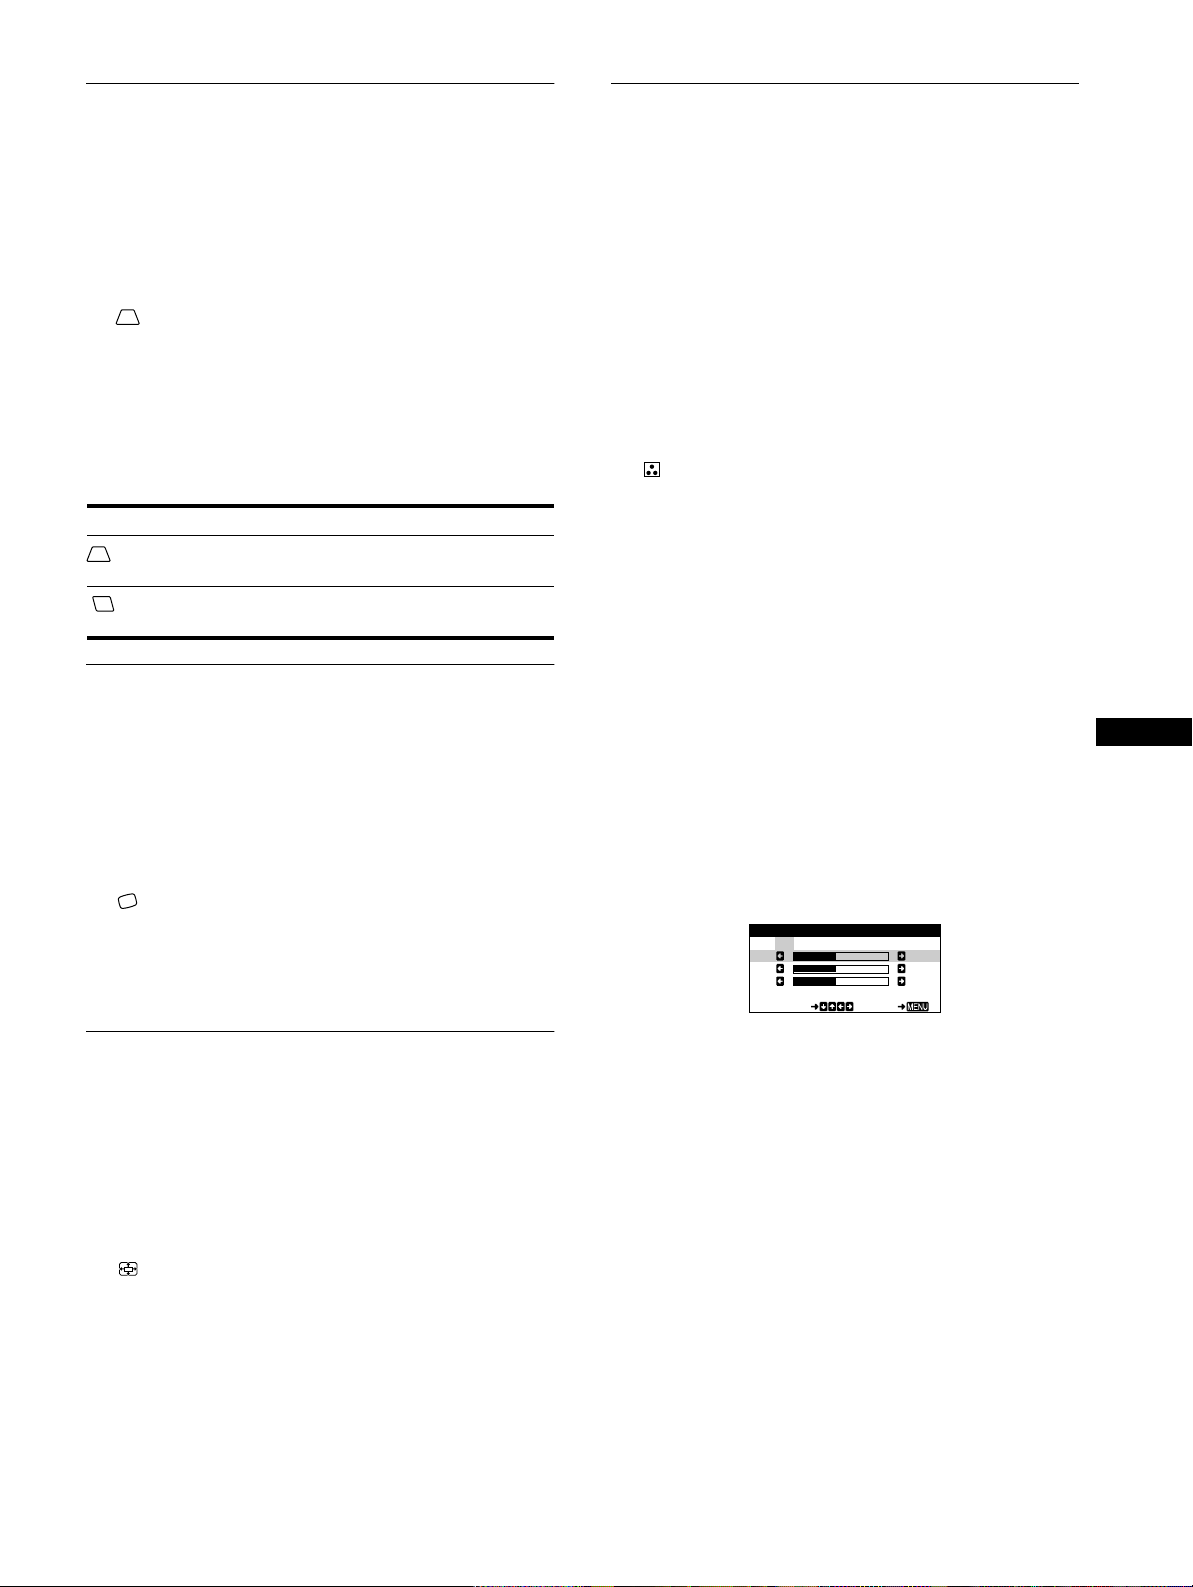
Displaying the current input signal
x
DEGAUSS/ CANCEL MOI RE
DEGAUSS
ON
SELECT EXI T
RESET
RESET
MODE AL L
EXI T
The horizontal and vertical frequencies of the current input signal
are displayed in the BRIGHTNESS/CONTRAST menu. If the
signal matches one of this monitor’s factory preset modes, the
resolution is also displayed.
BRIGHTNESS/CONTRAST
26 26
the resolution
of the current
input signal
68.7kHz/85.0Hz
1024X768
the horizontal
and vertical
frequencies of
the current
input signal
3
Adjust the menu.
Move the control button left (<) or right (,) to make the
adjustment.
4
Close the menu.
Press the center of the control button once to return to the
main MENU, and twice to return to normal viewing. If no
buttons are pressed, the menu closes automatically after about
30 seconds.
GB
Resetting the adjustments
x
You can reset the adjustments using the RESET menu. See
page 12 for more information on resetting the adjustments.
9
Page 10
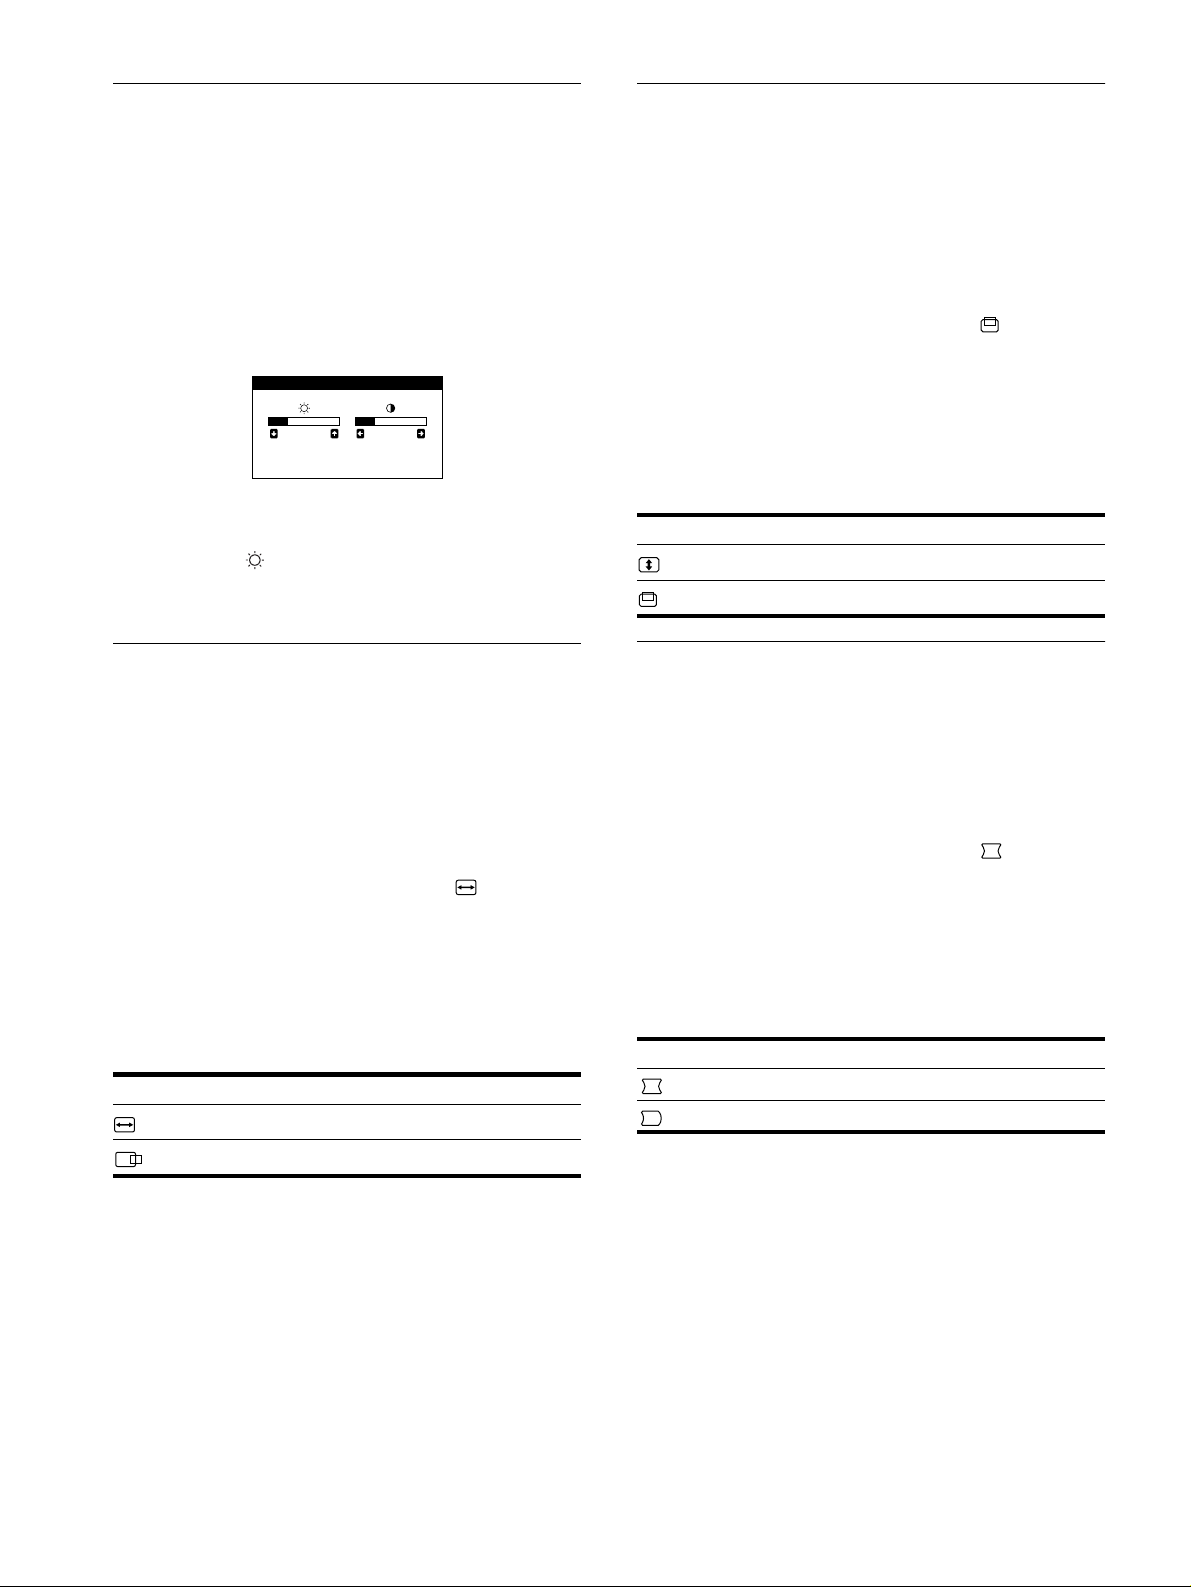
Adjusting the brightness and
Adjusting the vertical size or
contrast
(BRIGHTNESS/CONTRAST)
Brightness and contrast adjust ments are made using a separate
BRIGHTNESS/CONTRAST menu.
These settings are stored in memory for all input signals.
1
Move the control button in any direction.
The BRIGHTNESS/CONTRAST menu appears on the
screen.
BR I GHTNESS/ CONTRAST
26 26
68.7kHz/85.0Hz
1024X768
2
Move the control button m/M to adjust the
brightness ( ), and </, to adjust the contrast
(6).
The menu automatically d isappears after about 3 seconds.
Adjusting the horizontal size or
centering of the picture
(H-SIZE/CENTER)
centering of the picture
(V-SIZE/CENTER)
These settings are stored in memory for the current input signal.
1
Press the center of the control button.
The main MENU appears on the screen.
2
Move the control button to highlight V-SIZE/
CENTER, and press the center of the control butto n
again.
The V-SIZE/CENTER menu appears on the screen.
3
First move the control button m/M to select the
desired adjustment item. Then move the control
button </, to make the adjustment.
Select To
V-SIZE
V-CENTER
adjust the vertical size
adjust the vertical centering
Adjusting the curvature of the
picture’s sides (PIN/PIN BALANCE)
These settings are stored in memory for the current input signal.
These settings are stored in memory for the current input signal.
1
Press the center of the control button.
The main MENU appears on the screen .
2
Move the control button to highlight H-SIZE/
CENTER, and press the center of the control butto n
again.
The H-SIZE/CENTER menu appears on the screen.
3
First move the control button m/M to select the
desired adjustment item. Then move the control
button </, to make the adjustment.
Select To
H-SIZE
H-CENTER
adjust the horizontal size
adjust the horizontal centering
1
Press the center of the control button.
The main MENU appears on the screen.
2
Move the control button to highlight PIN/PIN
BALANCE, and press the center of the control
button again.
The PIN/PIN BALANCE menu appears on the screen.
3
First move the control button m/M to select the
desired adjustment item. Then move the control
button </, to make the adjustment.
Select To
PIN
PIN BALANCE
expand or contract the picture sides
shift the picture sides to the left or right
10
Page 11

Adjusting the angle of the picture’ s
KKK
R50
G50
B50
SELECT EX I T
COLOR
5000 6500 9300
USER
Adjusting the color of the picture
sides (KEY/KEY BALANCE)
These settings are stored in memory for the current input signal.
1
Press the center of the control button.
The main MENU appears on the screen.
2
Move the control button to highlight KEY/KEY
BALANCE, and press the center of the control
button again.
The KEY/KEY BALANCE menu appears on the screen.
3
First move the control button m/M to select the
desired adjustment item. Then move the control
button </, to make the adjustment.
Select To
KEY
KEY BALANCE
adjust the picture width at the top of
the screen
shift the picture to the left or right at
the top of the screen
Adjusting the picture’s rotation
(ROTATION)
This setting is stored in memory for all input signals.
(COLOR)
The COLOR settings allow you to adjust the picture’s color
temperature by changing th e color level of the white color field.
Colors appear reddish if the temperature is low, and bluish if the
temperature is high. This adjustment is useful for matching the
monitor’s colors to a printed picture’s colors.
This setting is stored in memory for all input signals.
1
Press the center of the control button.
The main MENU appears on the screen .
2
Move the control button to highlight COLOR and
press the center of the control button again.
The COLOR menu appears on the screen.
3
Move the control button </, to select a color
temperature.
The preset color temperatures are 5000K, 6500K, and 9300K.
Since the default setting is 9300K, the whites will change
from a bluish hue to a reddish hue as the temperature is
lowered to 6500K and 500 0K .
4
If necessary, fine tune the color temperature.
First move the control button </, to select USER. Then
move the control but ton m/M button to select R (red), G
(green), or B (blue) and move the control button </, to
make the adjustment.
GB
1
Press the center of the control button.
The main MENU appears on the screen.
2
Move the control button to highli ght ROTATION,
and press the center of the control button again.
The ROTATION menu appears on the screen.
3
Move the control button </, to rotate the picture.
Enlarging or reducing the picture
(ZOOM)
This setting is stored in memory for the current input signal.
1
Press the center of the control button.
The main MENU appears on the screen.
2
Move the control button to highlight ZOOM and
press the center of the control button again.
The ZOOM menu appears on the screen.
3
Move the control button </, to enlarge or reduce
the picture.
Note
Adjustment stops when either the horizontal or vertical size rea ches its
maximum or minimum value.
If you fine tune the color temperature, the new color settings
are stored in memory and recalled whenever you select
USER.
11
Page 12
Additional settings
Resetting the adjustments (RESET)
(DEGAUSS/CANCEL MOIRE)
You can manually degauss (demagnetize) the screen, and cancel
the moire.
1
Press the center of the control button.
The main MENU appears on the screen .
2
Move the control button m/M to highlight
DEGAUSS/CANCEL MOIRE and press the center of
the control button again.
The DEGAUSS/CANCEL MOIRE menu appears on the
screen.
3
Move the control button m/M to select the desired
adjustment item.
Adjust the selected item according to the following
instructions.
Degaussing the screen
The monitor is automatically demagnetized when the power is
turned on.
To manually degauss the monitor, first move the
control button m/M to select (DEGAUSS). Then move
the control button ,.
The screen is degaussed for about 5 seconds. If a second degauss
cycle is needed, allow a minimum interval of 20 minutes for the
best result.
This monitor has the following two reset methods. Use the
RESET menu to reset the adjustments.
1
Press the center of the control button.
The main MENU appears on the screen.
2
Move the control button m/M to highlight 0 RESET
and press the center fo the control button again.
The RESET menu appears on the screen.
Reset the settings according to the following instructions.
Resetting all of the adjustment data for the
current input signal (MODE)
Move the control button <.
The MODE item is selected. All of the adjustment data for the
current input signal is reset.
Note that the following items are not reset by this method.
• on-screen menu language (p age 8)
• picture’s rotation (page 11)
Resetting all of the adjustment data to factory
preset levels (ALL)
Move the control button ,.
The ALL item is selected. All of the adjustment data for the
current input signal is reset. All of the adjustment d ata (except for
the USER settings in the COLOR menu) is reset to the factory
preset levels.
Cancelling the moire*
If elliptical or wavy patterns appear on the screen, adjust the
moire cancellation level.
To adjust the amount of moire cancellation, first move
the control button m/M to select (CANCEL MOIRE).
Then move the control button </, until the moire
effect is at a minimum.
* Moire is a type of natural interference which produces soft, wavy lines
on your screen. It may appear due to interference betwee n the pattern
of the picture on the screen and the phosphor pitch pattern of the
monitor.
Example of moire
MENU
Note
The monitor
selected.
s buttons will not operate for about 5 seconds when ALL is
’
12
Page 13
Technical Features
INFORMATION
OUT OF SCAN RANGE
Preset and user modes
Troubleshooting
Before contacting technical support, refer to this section.
When the monitor receives an input signal, it automatically
matches the signal to one of the factory preset modes stored in the
monitor’s memory to provide a high qual ity picture at the cent er
of the screen. (See Appendix for a list of the factor y preset
modes.) For input signals that do not match one of the factory
preset modes, the digital Multiscan technology of this monitor
ensures that a clear picture appears on the screen for any timing in
the monitor’s frequency ran ge ( ho rizon ta l: 30 – 7 0 kHz, vertical:
48 – 120 Hz) . If the picture is adjusted, the adjustment data is
stored as a user mode and automati cally recalled whenever the
same input signal is received.
Note for Windows users
For Windows users, check your graphic board manual or the
utility program which comes with your graphic board and select
the highest available refresh rate to maximize monitor
performance.
Power saving function
This monitor meets the power-saving guidelines set by VESA,
E
NERGY STAR, and NUTEK. If no signal is received by the
monitor from the connected co mputer, the monitor will
automatically reduce power consumption as shown below.
Power mode Power
consumption
normal
operation
active off**
power off 0 W off
* Figures reflect powe r co nsumption when no USB compatibl e
peripherals are connected to the monitor.
** When your computer enters the “active off” mode, the input signal is
cut and NO INPUT SIGNAL appears on the screen. After 20 seconds,
the monitor enters the power saving mode.
*** If the horizontal or vertical sync signal is received by the monitor, the
power indicator may alternately blink green and orange.
≤
115 W green
≤
5 W orange***
(power) indicator
1
*
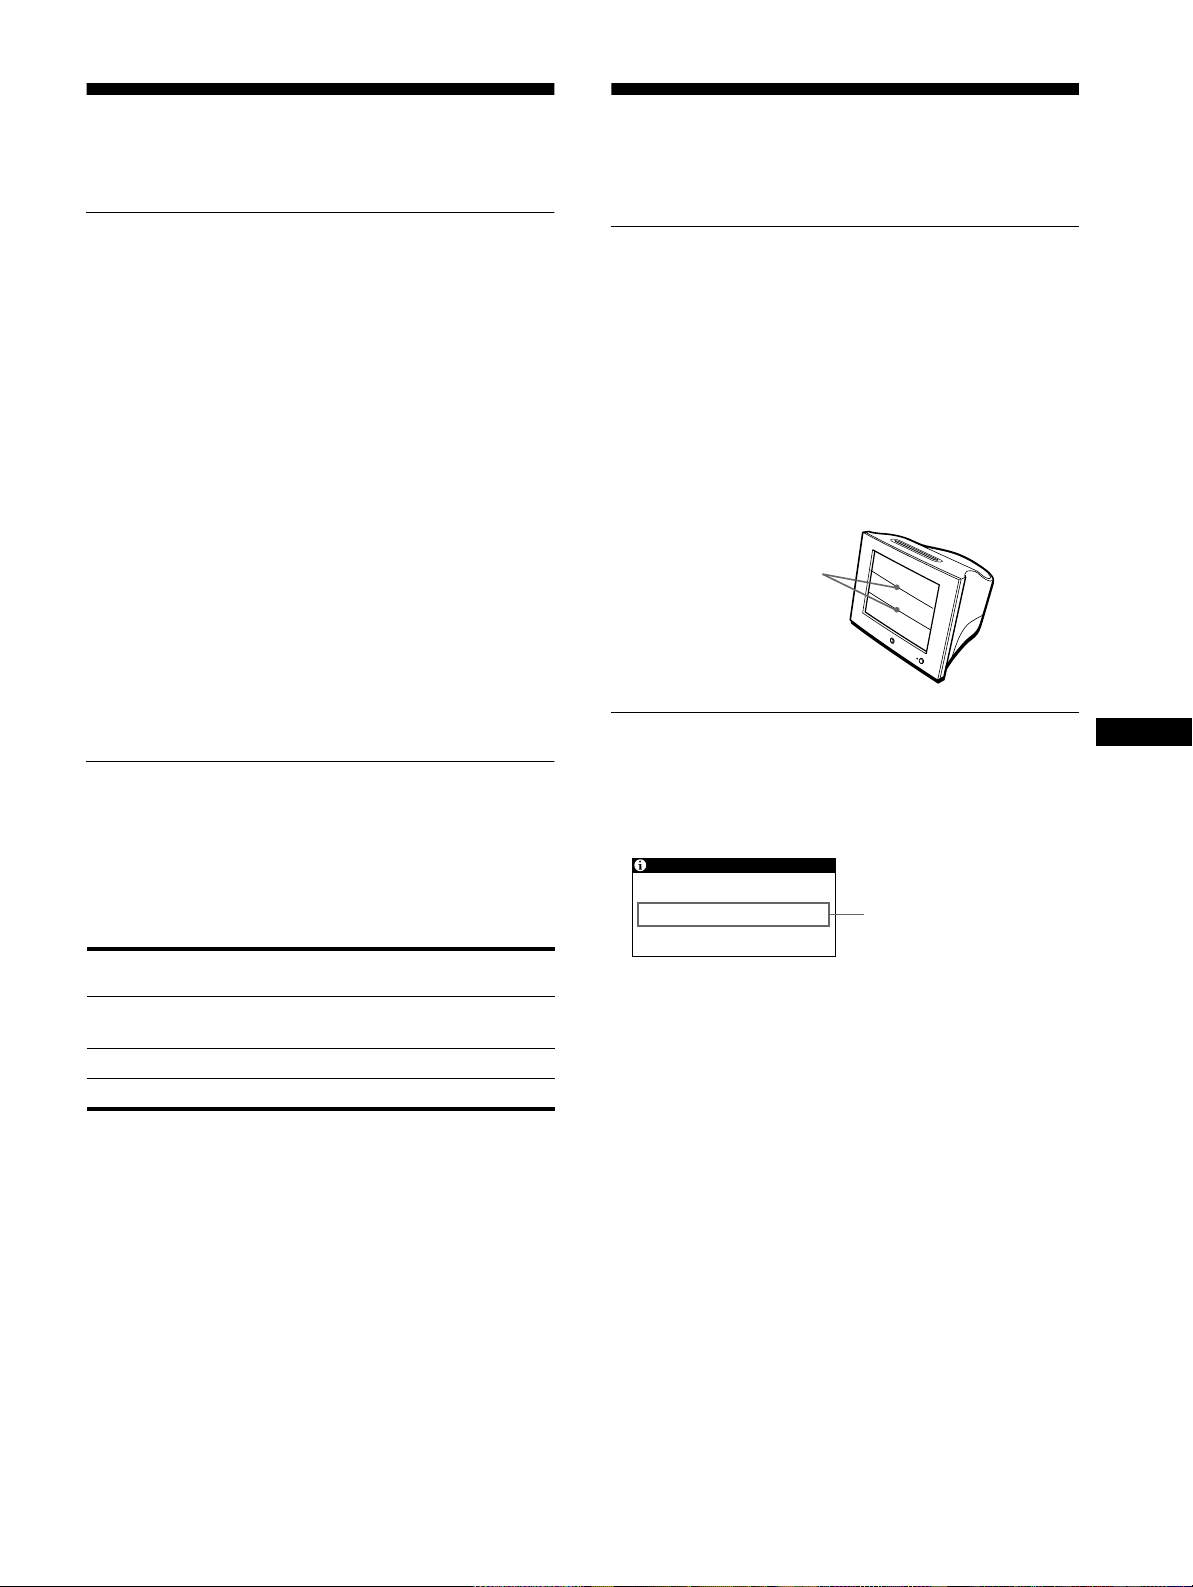
If thin lines appear on your screen
(damper wires)
The visible lines on your screen especially when the background
screen color is light (usually white), are normal for the Trinitron
monitor. This is not a malfunction. These are shadows from the
damper wires used to stabilize the aperture grill e. The aperture
grille is the essential element that makes a Trinitron picture tube
unique by allowing more light to reach the screen, resulting in a
brighter, more detailed picture.
Damper wires
On-screen messages
If there is something wrong with the input signal, one of the
following messages appears on the screen. To solve the problem,
see “Trouble symptoms and r e me dies” on pag e14.
Input signal condition
The input signal condition
OUT OF SCAN RANGE
indicates that the input signal is not supported by the
monitor’s specifications.
NO INPUT SIGNAL
indicates that no signal is being input to the monitor.
GB
13
Page 14

Trouble symptoms and remedies
If the problem is caused by the con nected computer or other equip ment, please refer to the connected equ ip ment’s instruction manual.
Use the self-diagnosis function (page 16) if the following recommendations do not resolve the problem.
Symptom Check these items
No picture
If the 1 (power) indicator is not lit • Check that the power cord is properly connected.
• Check that the 1 (power) switch is in the “on” position.
If the NO INPUT SIGNAL message
appears on the screen, or if the 1
(power) indicator is either orange or
alternating between green and
orange
If the OUT OF SCAN RANGE
message appears on the screen
If no message is displayed and the 1
(power) indicator is green or flashing
orange
If using a Macintosh system • Check that the Macintosh adapter (not supplied) and the video signal cable are properly
Picture flickers, bounces,
oscillates, or is scrambled
Picture is fuzzy
Picture is ghosting
• Check that the video signal cable is properly connected and all plugs are firmly seated in
their sockets (page 6).
• Check that the HD15 video input connector’s pins are not bent or pushed in.
Problems caused by the connected computer or other equipment
x
• The computer is in power saving mode. Try pressing any key on the keyboard or moving
the mouse.
• Check that the computer’s power is “on.”
• Check that the graphic board is completely seated in the proper bus slot.
Problems caused by the connected computer or other equipment
xxxx
• Check that the video frequency range is within that specified for the monitor. If you
replaced an old monitor with this monitor, reconnect the old monitor and adjust the
frequency range to the following.
Horizontal: 30 – 70 kHz
Vertical: 48 – 120 Hz
• Use the Self-diagnosis function (page 16).
connected (page 6).
• Isolate and eliminate any potential sources of electric or magnetic fields such as oth er
monitors, laser printers, electric fans, fluorescent lighting, or televisions.
• Move the monitor away from power lines or place a magnetic shield near the monitor.
• Try plugging the monitor into a different AC outle t, pre fe ra bly on a different circuit.
• Try turning the monitor 90° to the left or right.
Problems caused by the connected computer or other equipment
x
• Check your graphic board manual for the proper monitor setting.
• Confirm that the graphics mode (VESA, Macintosh 16" Color, etc.) and the frequency of
the input signal are su pp ort ed by this monitor (Appendix) . Even if the frequency is within
the proper range, some graphic boards may have a sync pulse that is too narrow for the
monitor to sync correctly.
• Adjust the comput er’s refresh rate (vertical frequency) to obtain the best possible picture.
• Adjust the brightness and co ntrast (page 10).
• Degauss the monitor* (page 12).
• Decrease the moire cancellation effect (page 12).
• Eliminate the use of video cable extensions and/or video switch boxes.
• Check that all plugs are firmly seated in their sockets.
14
Page 15
Symptom Check these items
Picture is not centered or sized
properly
Edges of the image are curved
Wavy or elliptical pattern (moire)
• Adjust the size or centering (page 10). Note that some video modes do not fill the screen
to the edges.
• Adjust the shape of the picture (page 10).
• Cancel the moire (page 12).
is visible
Problems caused by the connected computer or other equipment
x
• Change your desktop pattern.
Color is not uniform
• Degauss the monitor* (page 12). If y ou place equipment that generates a magnetic field,
such as a speaker, nea r the monitor, or if you change the direction the monitor fa ces, color
may lose uniformity.
White does not look white
USB peripherals do not function
• Adjust the color temperature (page 11).
• Check that the appropriate USB connectors are securely connected (page 7).
• Check that the 1 (power) switch is in the “on” position.
Problems caused by the connected computer or other equipment
x
• Check that the power of any self-powered USB compliant peripheral devices is “on.”
• Install the latest version of the d evice dr iver on your computer. Contact your device’s
manufacturer for information about the appropriate device driver.
• If your USB compliant keyboard or mouse does not function, connect them direct ly to
your computer, reboot your computer, and make any necessary adjustments to the USB
settings. Then reconnect the keyboard or mouse to the monitor.
• For customers using Windows 95
1. Right-click on My Computer and select Properties.
2. Click on the Device Manager tab. Scroll down and select Universal Serial Bus
Controller.
,If Universal Serial Bus Controller does not appear, you need to load a USB
supplement disk. Co n tac t your computer’s manufacturer for mo r e information about
obtaining a USB supplement disk.
3. Select Generic USB Device from the USB controller list and click on Properties.
4. If there is a check in the box next to “Disable in this hardware profile,” remove the
check.
5. Click on Refresh.
A hum is heard right after the
power is turned on
• This is the sound of the auto-degauss cycle. When the power is turned on, the monit or i s
automatically degaussed for 5 seconds.
GB
* If a second degauss cycle is ne eded, allow a minimum in terval of 20 minutes for the best result. A humming noise may be he ard, but this is not a
malfunction.
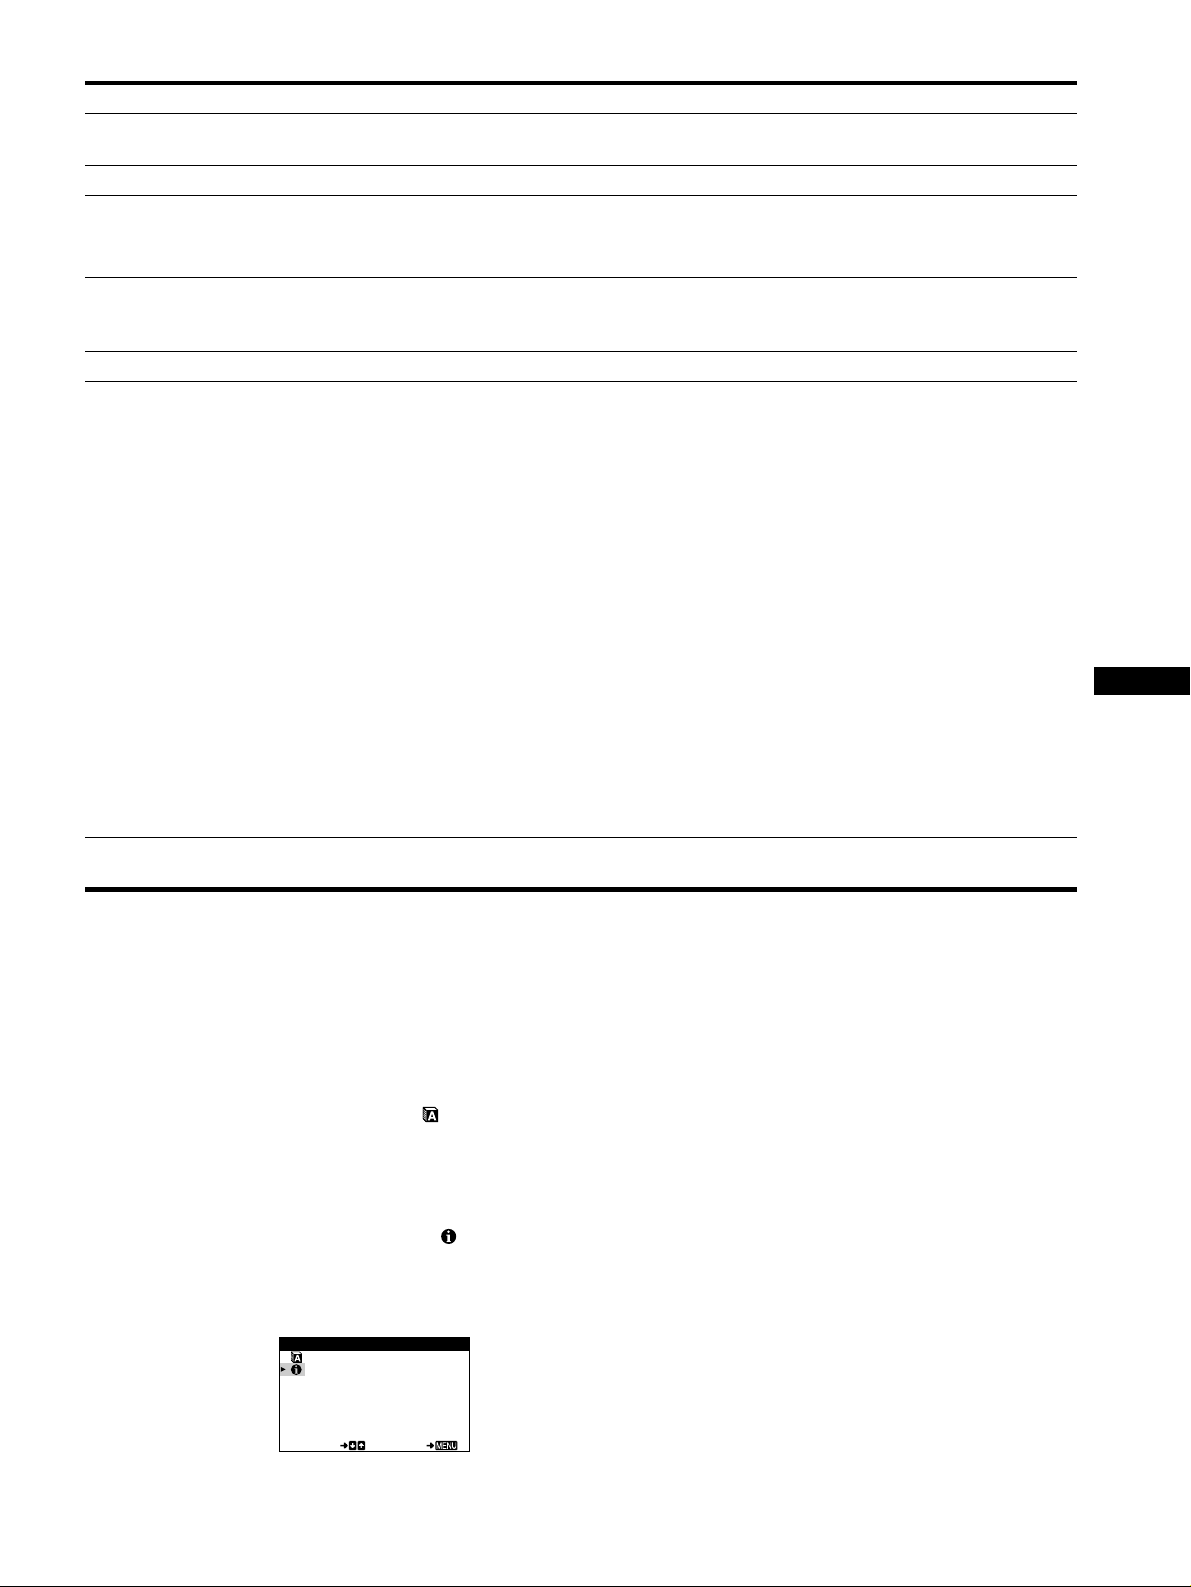
Displaying this monitor’s name, serial number,
and date of manufacture (INFORMATION)
If the problem persists, call your authorized Sony dealer and give
the following information.
• Model name: HMD-A220
1
Press the center of the control button.
The main MENU appears on the screen.
2
Move the control button to highlig ht LANGUAGE/
• Serial number
• Name and specifications of your computer and graphics board.
INFORMATION and press the center of the control
button.
The LANGUAGE/INFORMATION menu appears on the
screen.
3
Move the control button m/M to select
(INFORMATION) and press the center of the co ntrol
button.
This monitor’s information box appears on the screen.
Example
LANGUAGE / I NFORMAT ION
MODE L : HMD - A 22 0
SERI AL: 12345678
MANUF ACTURED: 2 0 0 0 - 5 2
SELECT EX I T
15
Page 16
Self-diagnosis function
This monitor is equipped with a self-diagnosis function . If there is
a problem with your monitor or computer, the screen will go
blank and the 1 (power) indicator will either light up green or
flash orange. If the 1 (power) indicator is lit in orange, the
computer is in power saving mode. Try pressing any key on the
keyboard or movi ng the mouse.
MENU
(power) indicator
1
If the 1 (power) indicator is green
1
Disconnect the video input cable, or turn off the
connected computer.
2
Press the 1 (power) button to turn the monitor off
and on.
3
Move the control button , for 2 seconds before the
monitor enters power saving mode.
Specifications
CRT 0.24 mm apertu re grille pi tch (cent er)
17 inches measured diag onally
90-degree deflection
Viewable image size Approx. 327 × 243 mm (w/h)
Resolution
Maximum Horizontal: 1280 dots
Recommended Horizontal: 1024 dots
Standard image area Approx. 312 × 234 mm (w/h)
Deflection frequency* Horizontal: 30 to 70 kHz
AC input voltage/current 220 to 240 V, 50 – 60 Hz, 0.9 A
Power consumption Max. 115 W (with no USB devi ces
Operating temperature 10°C to 40°C
Dimensions
Mass Approx. 19 kg (41 lb 14 oz)
Plug and Play DDC1/DDC2B
Supplied accessories See page 6
7
(12
/8 × 9 5/8 inches)
16.0" viewing image
Vertical: 1024 lines
Vertical: 768 lines
3
(12
/8 × 9 1/4 inches)
Vertical: 48 to 120 Hz
connected)
Approx. 460 × 378 × 441 mm (w/h/d)
1
(18
/8 × 15 × 17 3/8 inches)
MENU
If all three color bars appear (red, green, blue), the monitor is
working properly. Reconnect the video input cables and check the
condition of your computer.
If the color bars do not appear, there is a potential m onitor failure.
Inform your authorized Sony dealer of the monitor’s condition.
If the 1 (power) indicator is flashing orange
Press the 1 (power) button to turn the monitor off and
on.
If the 1 (power) indicator l ights up green , the monitor i s working
properly.
If the 1 (power) indicator is still flashing, there is a potential
monitor failure. Count the number of seconds between orange
flashes of the 1 (power) indicator and inform your authorized
Sony dealer of the mo nitor’s condi tion. Be sure to note the m odel
name and serial number of your monitor. Also note the make and
model of your computer and graphic board.
* Recommended horizontal and vertical timing condition
• Horizontal sync width should be more than 1.0 µsec.
• Horizontal blank ing width should be m ore than 3.0 µsec.
• Vertical blanking width should be more than 500 µsec.
Design and specifications are subject to change without noti ce.
16
Page 17
Table des Matières
Précautions. . . . . . . . . . . . . . . . . . . . . . . . . . . . . . . . . . . . . . . . . . . . 4
Identification des composants et des commandes. . . . . . . . . . . . . . 5
Installation . . . . . . . . . . . . . . . . . . . . . . . . . . . . . . . . . . . . .6
• Trinitron est une marque comm ercial e
déposée de Sony Corporation .
• Macintosh est une marque commerciale
sous licence d’Apple Com puter, Inc.,
déposée aux Etats-Unis et dans d’autres
pays.
• Windows
marques déposées de Microsoft
Corporation aux Etats-Unis et dans
d’autres pays.
• IBM PC/AT et VGA sont des marques
commerciales déposées d’IBM
Corporation aux Etats-Unis.
• VESA et DDC
commerciales de Video Electronics
Standard Association.
•
E
déposée aux Etats-Unis.
• Tous les autres noms de produ it s
mentionnés dans le pré sent mode
d’emploi peuvent ê tre de s m a rques
commerciales ou des marqu es
commerciales déposées de leurs
sociétés respectives.
• Les symboles “” et “” ne sont pas
mentionnés systématiquement dans le
présent mode d’emploi.
et MS-DOS sont des
sont des marques
NERGY STAR est une marque
1re étape:
2e étape:
3e étape:
Raccordez le moniteur à l’ordinateur . . . . . . . . . . . . . . . 6
Branchez le cordon d’alimentation. . . . . . . . . . . . . . . . . . 6
Mettez le moniteur et l’ordinateur sous tension . . . . . . . . 6
Raccordement de périphériques compatibles USB
(Universal Serial Bus). . . . . . . . . . . . . . . . . . . . . . . . . . . . . . . . . . . . 7
Sélection de la langue d’affichage des menus
(LANGUE/INFORMATION) . . . . . . . . . . . . . . . . . . . . . . . . . . . . . . . 8
Personnalisation de votre moniteur. . . . . . . . . . . . . . . . .8
Pilotage par menus. . . . . . . . . . . . . . . . . . . . . . . . . . . . . . . . . . . . . . 8
Réglage de la luminosité et du contraste
(LUMINOSITÉ/CONTRASTE) . . . . . . . . . . . . . . . . . . . . . . . . . . . . 10
Réglage de la taille horizontale ou du centrage de l’image
(TAILLE H/POSITION) . . . . . . . . . . . . . . . . . . . . . . . . . . . . . . . . . . 10
Réglage de la taille verticale ou du centrage de l’image
(TAILLE V/POSITION) . . . . . . . . . . . . . . . . . . . . . . . . . . . . . . . . . . 10
Réglage de l’incurvation des côtés de l’image
(COUSSIN/PIN BALANCE) . . . . . . . . . . . . . . . . . . . . . . . . . . . . . . 10
Réglage de l’angle des côtés de l’image
(TRAPÉZOÏD/PARALLÉL) . . . . . . . . . . . . . . . . . . . . . . . . . . . . . . . 11
Réglage de la rotation de l’image (ROTATION) . . . . . . . . . . . . . . . 11
Agrandissement ou réduction de l’image (ZOOM) . . . . . . . . . . . . . 11
Réglage des couleurs de l’image (COULEUR). . . . . . . . . . . . . . . . 11
Réglages supplémentaires (DÉMAGNÉTISÉ/MOIRÉ). . . . . . . . . . 12
Réinitialisation des réglages (RAPPEL) . . . . . . . . . . . . . . . . . . . . . 12
Caractéristiques techniques. . . . . . . . . . . . . . . . . . . . . .13
Modes présélectionné et utilisateur . . . . . . . . . . . . . . . . . . . . . . . . 13
Fonction d’économie d’énergie. . . . . . . . . . . . . . . . . . . . . . . . . . . . 13
Dépannage . . . . . . . . . . . . . . . . . . . . . . . . . . . . . . . . . . . .13
Si de fines lignes apparaissent à l’écran (fils d’amortissement) . . . 13
Messages affichés à l’écran . . . . . . . . . . . . . . . . . . . . . . . . . . . . . . 13
Symptômes et remèdes . . . . . . . . . . . . . . . . . . . . . . . . . . . . . . . . . 14
Fonction d’autodiagnostic. . . . . . . . . . . . . . . . . . . . . . . . . . . . . . . . 16
Spécifications. . . . . . . . . . . . . . . . . . . . . . . . . . . . . . . . . .16
Appendix. . . . . . . . . . . . . . . . . . . . . . . . . . . . . . . . . . . . . . . i
Preset mode timing table . . . . . . . . . . . . . . . . . . . . . . . . . . . . . . . . . .i
FR
3
Page 18
Précautions
Avertissement sur le raccordement à la source
d’alimentation
• Utilisez le cordon d’alimentation fourni. Si vous utilisez un
cordon d’alimentation différent, assurez-vous qu’il est
compatible avec votre tension d’alimentation secteur locale.
Pour les clients au Royaume-Uni
Si vous utilisez ce mon iteur au Royaume-Uni, utilisez le cordon
d’alimentation fourni au Royaume-Uni.
Exemple de types de fiches
Utilisation du support
Insérez le support fourni dans la rainure pour ajuster l’angle du
moniteur. Vous pouvez utiliser le support en position ve rticale ou
horizontale.
pour 100 à 120 V CA pour 200 à 240 V CA pour 240 V CA
uniquement
• Avant de débrancher le cordon d’alimentation, attendez au
moins 30 secondes après avoir mis l’appareil hors tension de
manière à permettre la décharg e de l’électricité statique à la
surface de l’écran.
• Après que le courant a été branché, l’écran est démagnét isé
pendant environ 5 secondes. Cela génère un puissant champ
magnétique autour de l’écran qui peut affecter les données
mémorisées sur une bande magnétique ou des disquettes situées
à proximité. Placez ces systèmes d’enregistrement magnétique
et ces bandes, et disquettes à l ’ écart du moniteur.
L’appareil doit être installé à proximité d’une prise murale
aisément accessible.
Installation
N’installez pas le moniteur dans les endroits suivants:
• sur des surfaces molles (moquette , nappe, etc.) ou à proximité
de tissus (rideaux, t entures, etc.) qui risquent d’obstruer les
orifices de ventilation;
• à proximité de sources de chale ur co mme d es radi ateu rs ou de s
conduits d’air, ni dans un endr oi t di re cte m e nt ex po s é au
rayonnement solaire;
• sujet à de fortes variations de température;
• soumis à des vibrations ou à des chocs mécaniques;
• sur une surface instable;
• à proximité d’appareils g énérant un champ m agnétiq ue comme
un transformateur ou des lignes à haute tension;
• à proximité ou sur une surface métallique chargée
électriquement.
Utilisez la rainure sur le dessus
Vous pouvez placer un cadre avec une photo ou un CD dans la
rainure.
Remarque
N’utilisez en aucune circonstance la fente à d’autres fins.
Entretien
• Nettoyez l’écran à l’aide d’un chif fon doux . Si vous utilisez u n
produit nettoyant pour vitres, n’utilisez aucun type de produit
contenant une solution antistatique ou des additifs similaires
parce que vous risquez sinon de rayer le revêtement de l’écran.
• Ne frottez pas, ne touchez pas et ne tapotez pas la surface de
l’écran avec des objets abrasifs ou aux arêtes vives comme un
stylo à bille ou un tourne vi s. Ce type de c ontact risqu e e n effet
de rayer le tube image.
• Nettoyez le châssis, le panneau et les commandes à l’aide d’un
chiffon doux légèrement imprégné d’une solution détergente
neutre. N’utilisez jamais de tampons abrasifs, de poudre à
récurer ou de solvants tels que de l’alcool ou de la benzine.
Transport
Pour transporter ce moniteur en vue de réparations ou de son
expédition, utilisez le carton d’emballage et les matériaux de
conditionnement d’origine .
4
Page 19
Identification des composants et
1 2 3 4
5
876
11 12 13 14 15
10
9
des commandes
Pour plus de détails, reportez-vous aux pages indiquées entre
parenthèses.
MENU
ArrièreAvant
AC IN
1 Manette de commande (page 9)
La manette de commande sert à affic her l e menu et à ajuster
les paramètres de réglage du moniteur, y compris la
luminosité et le contraste.
2 Commutateur et indicateur 1 (alimentation)
(pages 6, 13, 16)
Cette touche met le moniteur sous et hors tension.
L’indicateur d’alimentation s’allume en vert lorsque le
moniteur est sous tension et clignote en vert et en orange ou
s’allume en orange lorsque le moniteur se trouve en mode
d’économie d’énergie.
3 Connecteur AC IN (page 6)
Ce connecteur assure l’alimentation du moniteur.
4 Connecteur d’entrée vidéo (HD15) (page 6)
Ce connecteur assure l’entrée des signaux vidéo RVB
(0,700 Vp-p, positifs) et des signaux de synchronisation.
FR
Broche nº Signal
1 Rouge
2Vert
3Bleu
4 ID (masse)
5 Masse DDC*
6 Masse rouge
7 Masse vert
8 Masse bleu
9 DDC + 5V*
10 Masse
11 ID (masse)
12 Données bidirectionnelles (SDA)*
13 Synchro H
14 Synchro V
15 Données d’horloge (SCL )*
* DDC (Display Data Channel) est une norm e de VESA.
5 Connecteurs d’aval USB (bus sériel universel)
(page 7)
Utilisez ces connecteurs pour relier des appareils
périphériques USB au moniteur.
6 Connecteur d’amont USB (bus sériel universel)
(page 7)
Utilisez ce connecteur pour relier le moniteu r à un o rdinate ur
compatible USB.
5
Page 20
Installation
AC IN
vers AC IN
vers une prise murale
cordon d’alimentation
(fourni)
Avant de mettre ce moniteur en service, vérifiez si tous les
accessoires suivants se trouvent bien dans le carton:
• Cordon d’alimentation (1)
• Câble USB (1)
• Support du moniteur (1)
• Carte de garantie (1)
• Remarques sur l’entretien de la surface de l’écran (1)
• Ce mode d’emploi (1)
1re étape: Raccordez le moniteur à
l’ordinateur
Mettez le moniteur et l’o rdina teur hor s tensio n av ant de pro céde r
au raccordement.
Raccordement à un PC/AT IBM ou à un
x
ordinateur compatible
2e étape: Branchez le cordon
d’alimentation
Le moniteur et l’ordina te ur étant hors tension, bra n ch e z d’a b or d
le cordon d’alimentation sur le moniteur et ensuite sur une prise
murale.
3e étape: Mettez le moniteur et
AC IN
vers la sortie vidéo
PC/AT IBM ou ordinateur
compatible
Raccordement à un ordinateur Macintosh
x
ou compatible
Vous avez besoin d’un adaptateur Macintosh (non fourni).
AC IN
l’ordinateur sous tension
Mettez d’abord le moniteur sous tension et puis l’ordinateur.
L’installation de votre moniteur est à présent terminée.
Si nécessaire, utilisez les commandes du moniteur pour régler
l’image.
Macintosh ou
ordinateur
compatible
6
Adaptateur Macintosh (non fourni)
vers la sortie vidéo
Page 21
Si aucune image n’apparaît à l’écran
• Vérifiez si le moniteur est correctement raccordé à l’ordinateur.
• Si l’indication PAS ENTREE VIDEO apparaît à l’écran,
vérifiez si la carte graphique de votre ordinateur est
complètement introduite dans la fente de bus correcte.
• Si vous remplacez un ancien moniteur par ce modèle et si
l’indication HORS PLAGE DE BALAYAGE apparaît à
l’écran, rebranchez l’ancien moniteur. Ajustez ensuite la carte
graphique de l’ordinateur de façon à ce que la fréquence
horizontale soit comprise entre 30 et 70 kHz, et la fréquence
verticale entre 48 et 120 Hz.
Pour plus d’informations sur les messages affichés à l’écran,
reportez-vous à la section “Symptômes et remèdes” à la page 14.
Installation sous différents systèmes d’exploitation
Ce moniteur est co nforme à la norme Plug & Play “DCC” permett ant la
détection automat iq ue de l’ensemble des inform at ions relatives au
moniteur. Aucun pilote spécifique ne doit être installé sur l’ordinateur.
Si vous raccordez le moniteur à votre PC et si vous démarrez votre PC
pour la première fois, il se peut que l’assistant d’installation s’a ffi che à
l’écran. Cliquez plusieurs fois de suite sur “Next” suivant les instructions
de l’assistant jusqu’à ce que le moniteur Plug & Play soit
automatiquement séle c ti onné de façon à ce que vous puissie z ut il iser ce
moniteur.
Pour les clients utilisant Windows NT4.0
L’installation du moniteu r sous Wi ndows NT4.0 ne fait pas appel au
pilote d’affichage. Reportez-vous au mode d’emploi de Windows NT4.0
pour des informations plus détaillées sur la résolution, le taux de
régénération et le nombre de couleurs.
Raccordement de périphériques
compatibles USB (Universal Serial
Bus)
Votre moniteur est doté d’un connecteur USB d’amont (sur le
panneau arrière) et de quatre connecteurs USB d’aval (deux sur
les côtés gauche et droit). Ces connecteurs offrent un moyen
simple et rapide de raccorder des périphériques compatibles USB
(comme des claviers, une souris, des imprimantes et des scanners)
à votre ordinateur au moyen d’un câble USB standardisé.
Pour pouvoir utiliser votre moniteu r comme une plate-forme pou r
vos périphériques, raccordez les USB comme illustré ci-dessous.
AC IN
vers les
périphériques
compatibles USB
vers un ordinateur
compatible USB
1
Mettez le moniteur et l’ordinateur sous tension.
2
Raccordez votre ordinateur au connecteur
d’amont rectangulaire au moyen du câble USB
fourni.
vers les
périphériques
compatibles USB
FR
Pour les clients utilisant Windows
Si un message apparaît à l’éc ran, suivez les instructions affich ée s et
sélectionnez Generic USB Hub comme réglage par défaut.
3
Raccordez vos périphériques au x connecteurs USB
d’aval rectangulaires.
Remarques
• Tous les ordinateurs et/ou systèm e s d’exploitation supportent les
configurations USB. Vérifiez dans le mode d’emploi de vot re
ordinateur si vous pouvez raccorder des systèmes USB.
• Dans la plupart des cas, le logiciel de pilotage USB doit être installé sur
l’ordinateur hôte. Pour plus de détails, reportez-vous au mode d’emploi
du périphérique.
• Le moniteur fonctionne comme une plate-form e USB ta nt que le
moniteur est sous tension (“on”) ou en mode d’économie d’énergie.
• Si vous raccordez un clavier ou une souris aux connect eurs USB et si
vous démarrez ensuite votre ordinateur pour la première fois, il se peut
que les périphériques ne fonctionnent pas. Raccordez d’abord le clavier
et la souris directemen t à l’ordinateur et installez les appareils
compatibles USB. Raccordez-les ensuite à ce moniteur.
• Ne vous appuyez pas sur le moniteur lorsque vous branchez les câbles
USB. Le moniteur risque de pivoter et de vous blesser.
7
Page 22
Sélection de la langue d’affichage
MENU
MENU
des menus
(LANGUE/INFORM ATION)
Les écrans de menu peuvent être affichés en franç ais, anglais,
allemand, italien, espagnol, russe et japonais. La langue
sélectionnée par défaut est l’anglais.
1
Appuyez au centre de la manette de commande.
Voir page 9 pour plus d’informations sur l’utilisation de la
manette de commande.
MENU
QU I TT ER
TA I L L E H / POS I T I ON
TA I L L E V/ POS I T I ON
COUSSIN/PINBALANEC
TRAPÉZOÏ D / PARALL ÉL
b
2
Déplacez la manette de commande de façon à
mettre en évidence LANGUE/INFORMATION et
appuyez ensuite de nouveau sur le centre de la
manette de commande.
b
MENU
3
Déplacez la manette de commande m/M pour
sélectionner (LANGUE) et appuyez ensuite au
centre de la manette de commande. Déplacez
ensuite la manette de commande m/M pour
sélectionner la langue de votre choix.
• ENGLISH: anglais
• FRANÇAIS
• DEUTSCH: allemand
• ITALIANO: italien
• ESPAÑOL: espagnol
• : russe
• : japonais
Pour quitter le menu
Appuyez une fois au centre de la manette de commande pour revenir au
MENU principal et deux fois po ur re ve nir à la visualisation normale. Si
aucune touche n’est a ctionnée, le menu se referme aut omatiquement au
bout d’environ 30 secondes.
Pour restaurer l’anglais
Voir “Réinitiali s at ion des réglages (RAP PEL)” à la page 12.
ROTAT ION
ZOOM
COUL EUR
LANGUE / I NFORMAT I ON
DÉMAGNÉT I SÉ / MOI RÉ
RAPPEL
LANGUE / I NFORMATI ON
ENGL I SH FRANÇA I S
DEUTSCH I TAL I ANO
ESPAÑOL
SELECT EX I T
Personnalisation de votre
moniteur
Vous pouvez effectuer de multip les réglages sur vo tre moniteur à
l’aide des écrans de menu.
Pilotage par menus
Appuyez au centre de la manette de commande pour afficher le
MENU principal à l’écran. Voir page 9 pour plus d’informations
sur l’utilisation de la manette de commande.
MENU
QU I TT ER
TA I L L E H / POS I T I ON
TA I L L E V/ POS I T I ON
COUSSIN/PINBALANEC
TRAPÉZOÏ D / PARALL ÉL
ROTAT ION
ZOOM
COUL EUR
LANGUE / I NFORMAT I ON
DÉMAGNÉT I SÉ / MOI RÉ
RAPPEL
Utilisez la manette de commande pour sélectionner l’un des
menus suivants.
1 QUITTER
Sélectionnez QUI TTER pour
quitter le menu.
2 TAILLE H/POSITION
(page 10)
Sélectionnez le menu TAILLE H/
POSITION pour régler la taille
horizontale et le centrage de
l’image.
3 TAILLE V/POSITION
(page 10)
Sélectionnez le menu TAILLE V/
POSITION pour régler la taille
verticale et le centrage de l’image.
4 COUSSIN/PIN BALANCE
(page 10)
Sélectionnez le menu COUSSIN/
PIN BALANCE pour régler
l’incurvation des côtés de l’image .
5 TRAPÉZOÏD/PARALLÉL
(page 11)
Sélectionnez le menu
TRAPÉZOÏD/PARALLÉL pour
régler l’angle des côtés de
l’image.
TA I LLE H / POS I T I ON
TA I LL E H
26
SELECT EX I T
TA I LLE V/ POS I T I ON
TA I LL E V
26
SELECT EX I T
COUSS I N / P I N BALANCE
COUS S I N
26
SELECT EX I T
TRAPÉZO Ï D/ PARALLÉL
TRAPÉZO Ï D
26
SELECT EX I T
8
Page 23
6 ROTATION (page 11)
MENU
MENU
MENU
Sélectionnez le menu
ROTATION pour régler la
rotatio n de l’image.
ROTAT ION
ROTAT ION
26
EX I T
Utilisation de la manette de commande
x
1
Affichez le MENU principal.
Appuyez au centre de la manette de commande pour afficher
le MENU principal sur l’écran.
7 ZOOM (page 11)
Sélectionnez le menu ZOOM
pour agrandir ou pour réduire
l’image.
8 COULEUR (page 11)
Sélectionnez le menu COULEUR
pour régler la température des
couleurs de l’image. Vous pouvez
utiliser ce menu pour faire
correspondre les couleurs du
moniteur aux couleurs d’une
image imprimée.
9 LANGUE/INFORMATION
(pages 8, 15)
Sélectionnez le menu LANGUE/
INFORMATION pour
sélectionner la langue d’affichage
des menus et afficher la fenêtre
d’information de ce moniteur.
0 DÉMAGNÉTISÉ/MOIRÉ
(page 12)
Sélectionnez le menu
DÉMAGNÉTISÉ/MOIRÉ
pour démagnétiser l’écran et
supprimer le moiré.
ZOOM
ZOOM
26
EX I T
COULEUR
R50
G50
B50
SELECT EX I T
KKK
5000 6500 9300
USER
2
Sélectionnez le menu que vous voulez régler.
Mettez en évidence le me nu de votre choix en déplaçant la
manette de commande vers le haut (M) ou le bas (m), et vers
la gauche (<) ou la droite (,) pour les déplacements
latéraux.
LANGUE / I NFORMATI ON
ENGL I SH FRANÇA I S
DEUTSCH I TAL I ANO
ESPAÑOL
SELECT EX I T
DÉMAGNÉT I SÉ / MOI R É
DÉMAGN É T I S É
OU I
SELECT EX I T
3
Réglez le menu.
Déplacez la manette de commande vers la gauche (<) ou la
droite (,) pour effectuer le réglage.
MENU
b
MENU
FR
qa RAPPEL (page 12)
Sélectionnez le menu RAPPEL
pour réinitialiser les réglages.
Affichage du signal d’entrée en cours
x
RAPPEL
RAPPEL
MODE TOT AL
EX I T
Les fréquences horizontales et vertica les du signal d’entrée en
cours sont affichées dans le menu LUMINOSITÉ/CONTRASTE.
Si le signal correspond à l’un des modes présélectionnés par
défaut de ce moniteur, la résolut ion s’affiche également.
LUMINOSI TÉ/CONTRASTE
26 26
la résolution
du signal
d’entrée en
cours
68.7kHz/85.0Hz
1024X768
les fréquences
horizontales et
verticales du
signal d’entrée
en cours
4
Quittez le menu.
Appuyez une fois au centre de la manette de commande pour
revenir au MENU principal et deux fois pour reve nir à la
visualisation normale. Si vous n’actionnez aucune touche, le
menu se referme automatiquement au bout de 30 secondes
environ.
Réinitialisation des réglages
x
Vous pouvez réinitialiser le s réglages à l ’aide du menu RAPPEL.
Voir page 12 pour plus d’informations sur la réinitialisation des
réglages.
9
Page 24
Réglage de la luminosité et du
Réglage de la taille verticale ou du
contraste
(LUMINOSITÉ/CONTRASTE)
Les réglages de la luminosit é et du contraste sont effectués au
moyen d’un menu LUMI NOSITÉ/CONTRASTE séparé.
Ces réglages sont enregistrés dans la mémoire pour tous les
signaux d’entrée.
1
Déplacez la manette de commande dans n’importe
quel sens.
Le menu LUMINOSITÉ/CONTRASTE apparaît à l’écran.
LUMINOSI TÉ/CONTRASTE
26 26
68.7kHz/85.0Hz
1024X768
2
Déplacez la manette de commande vers le haut ou
le bas m/M pour régler la luminosité ( ), et vers la
gauche ou la droite </, pour régler le contraste
(6).
Le menu disparaît automatiquement au bout d’environ
3 secondes.
Réglage de la taille horizontale ou
du centrage de l’image
(TAILLE H/POSITION)
Ces réglages sont enre gistrés dans la mémoire pour le signal
d’entrée en cours.
1
Appuyez au centre de la manette de commande.
Le MENU principal apparaît à l’écran.
2
Déplacez la manette de commande pour mettre
TAILLE H/POSITION en évidence et appuyez à
nouveau au centre de la manette de commande.
Le menu TAILLE H/POSITION apparaît à l’écran.
3
Déplacez d’abord la manette de commande vers le
haut ou le bas m/M pour sélectionner le paramètre
de réglage voulu. Déplacez ensuite la manette de
commande vers la gauche ou la droite </, pour
exécuter le réglage.
Sélectionnez Pour
TAILLE H
POSITION H
régler la taille horizontale
régler le centra ge ho r iz on t a l
centrage de l’image
(TAILLE V/POSITION)
Ces réglages so nt en r e gistrés dans la mé m oire pour le signal
d’entrée en cours.
1
Appuyez au centre de la manette de commande.
Le MENU principal apparaît à l’écran.
2
Déplacez la manette de commande pour mettre
TAILLE V/POSITION en évidence et appuyez à
nouveau au centre de la manette de commande.
Le menu TAILLE V/POSITION apparaît à l’écran.
3
Déplacez d’abord la manette de commande vers le
haut ou le bas m/M pour sélectionner le paramètre
de réglage voulu. Déplacez ensuite la manette de
commande vers la gauche ou la droite </, pour
exécuter le réglage.
Sélectionnez Pour
TAILLE V
POSITION V
régler la taille verticale
régler le centrage vertical
Réglage de l’incurvation des côtés
de l’image
(COUSSIN/PIN BALANCE)
Ces réglages so nt en r e gistrés dans la mé m oire pour le signal
d’entrée en cours.
1
Appuyez au centre de la manette de commande.
Le MENU principal apparaît à l’écran.
2
Déplacez la manette de commande pour mettre
COUSSIN/PIN BALANCE en évidence e t appuyez
à nouveau au centre de la manette de commande.
Le menu COUSSIN/PIN BALANCE apparaît à l’écran.
3
Déplacez d’abord la manette de commande vers le
haut ou le bas m/M pour sélectionner le paramètre
de réglage voulu. Déplacez ensuite la manette de
commande vers la gauche ou la droite </, pour
exécuter le réglage.
Sélectionnez Pour
COUSSIN
PIN BALANCE
élargir ou rétrécir les côtés de l’image
décaler les côtés de l’image vers la
gauche ou la droite
10
Page 25
Réglage de l’angle des côtés de
KKK
R50
G50
B50
SELECT EX I T
COULEUR
5000 6500 9300
USER
l’image (TRAPÉZOÏD/PARALLÉL)
Réglage des couleurs de l’image
(COULEUR)
Ces réglages sont enr egistrés dans la mémoire po ur le signal
d’entrée en cours.
1
Appuyez au centre de la manette de commande.
Le MENU principal apparaît à l’écran.
2
Déplacez la manette de commande pour mettre
TRAPÉZOÏD/PARALLÉL en évidence et ap puyez
à nouveau au centre de la manette de commande.
Le menu TRAPÉZOÏD/PARALLÉL apparaît à l’écran.
3
Déplacez d’abord la manette de commande vers le
haut ou le bas m/M pour sélectionner le paramètre
de réglage voulu. Déplacez ensuite la manette de
commande vers la gauche ou la droite </, pour
exécuter le réglage.
Sélectionnez Pour
TRAPÉZOÏD
PARALLÉL
régler la largeur de l’image dans le
haut de l’écran
décaler l’image vers la gauche ou la
droite dans le h a ut de l’écran
Réglage de la rotation de l’image
(ROTATION)
Ce réglage est enregistré dans la mémoire pour tous les signaux
d’entrée.
1
Appuyez au centre de la manette de commande.
Le MENU principal apparaît à l’écran.
2
Déplacez la manette de commande pour mettre
ROTATION en évidence et appuyez à nouveau
au centre de la manette de commande.
Le menu ROTATION apparaît à l’écran.
Les réglages COULEUR vous permettent de régler la température
des couleurs de l’image en changeant le niveau de couleur du
champ de couleur blanche. Les couleurs semblent rougeâtres si la
température est basse ou bleuâtres si la température est élevée. Ce
réglage s’avère très pratique pour faire correspondre les couleurs
du moniteur aux couleurs d’une image imprimée.
Ce réglage est enregistré dans la mémoire pour tous les signaux
d’entrée.
1
Appuyez au centre de la manette de commande.
Le MENU principal apparaît à l’écran.
2
Déplacez la manette de commande pour mettre
COULEUR en évidence et app uyez à nouveau au
centre de la manette de commande.
Le menu COULEUR apparaît à l’écran.
3
Déplacez la manette de commande vers la gauche
ou la droite </, pour sélectionner une
température de couleur.
Les températures de couleur présélectionnées sont 5000 K,
6500K et 9300K. Comme le réglage par défaut est 9300K, les
blancs passent d’une nuance bleuâtre à une nuance rougeâtre
lorsque la température est aba issée de 6500K à 5000K.
4
Si nécessaire, ajustez avec précision la temp érature
des couleurs.
Déplacez d’abord sur la manette de commande vers la gauche
ou la droite </, pour sélectionner USER. Déplacez
ensuite sur la manette de commande vers le haut ou le bas
m/M pour sélectionner R (rouge), G (vert) ou B (bleu) et
déplacez ensuite sur la manette de commande vers la gauche
ou la droite </, pour exécuter le réglage.
FR
3
Déplacez la manette de commande vers la gauche
ou la droite </, pour faire pivoter l’image.
Agrandissement ou réduction de
l’image (ZOOM)
Ce réglage est enregistré dans la mémoire pour le signal d’entrée
en cours.
1
Appuyez au centre de la manette de commande.
Le MENU principal apparaît à l’écran.
2
Déplacez la manette de commande pour mettre
ZOOM en évidence et appuyez à nouveau au
centre de la manette de commande.
Le menu ZOOM apparaît à l’écran.
3
Déplacez la manette de commande vers la gauche
ou la droite </, pour agrandir ou réduire l’im age .
Remarque
Le réglage s’arrête lorsque la plage de réglage horizontal ou vertic al
atteint sa valeur limite maximum ou minimum.
Si vous procédez au réglage pr écis de la température des
couleurs, le nouveau régla ge des couleurs est mémorisé et
rappelé chaque fois que vous sélectionne z USER.
11
Page 26
Réglages supplémentaires
Réinitialisation des réglages
(DÉMAGNÉTISÉ/MOIRÉ)
Vous pouvez dégausser (démag nétiser) l’écran manuellement et
supprimer le moiré.
1
Appuyez au centre de la manette de commande.
Le MENU principal apparaît à l’écran.
2
Déplacez la manette de commande vers le haut ou
le bas m/M de façon à mettre en évidence
DÉMAGNÉTISÉ/MOIRÉ et appuyez ensuite de
nouveau sur le centre de la manette de commande.
Le menu DÉMAGNÉTISÉ/MOIRÉ apparaît à l’écran.
3
Déplacez la manette de commande vers le haut ou
le bas m/M pour sélectionner le paramètre de
réglage voulu.
Ajustez le paramètre sélectionné selon les instructions
suivantes.
Démagnétisation de l’écran
Le moniteur est automatiquement démagnétisé lors de la mise
sous tension.
Pour démagnétiser manuellement l’écran, déplacez
d’abord la manette de comm ande vers le haut ou le bas
m/M afin de sélectionner (DÉMAGNÉTISÉ).
Déplacez ensuite la manette de commande vers la
droite ,.
L’écran est démagnétisé pendant environ 5 secondes. Si un
second cycle de démagnétisation s’avère nécessaire, laissez
s’écouler un intervalle d’au moins 20 minutes de manière à
obtenir les meilleurs résultats.
Suppression du moiré
Si des motifs elliptiques ou ondulatoires apparaissent à l’écran,
ajustez le niveau de suppression du moiré.
Pour régler le niveau de suppression du moiré,
déplacez d’abord la ma nette de comma nde vers le hau t
ou le bas m/M afin de sélectionner (ADAPTE
MOIRÉ). Déplacez ensuite la manette de commande
vers la gauche ou la droite </, jusqu’à ce que l’effet
de moiré soit minimal.
*
(RAPPEL)
Ce moniteur est doté des deux modes de réinitialisation suiv ants.
Utilisez le menu RAPPEL pour réinitialiser les réglages.
1
Appuyez au centre de la manette de commande.
Le MENU principal apparaît à l’écran.
2
Déplacez la manette de commande vers le haut ou
le bas m/M de façon à mettre en évidence
0 RAPPEL et appuyez ensuite de nouveau sur le
centre de la manette de commande.
Le menu RAPPEL apparaît à l’écran .
Réinitialisez les réglages selon les instructions suivantes.
Réinitialisation de toutes les données de réglage
pour le signal d’entrée en cours (MODE)
Déplacez la manette de commande vers la gauche <.
Le paramètre MODE est sélectionné. Toutes les do nn ées de
réglage pour le signal d’entrée en cours sont réinitialisées.
Attention que les paramètres suiva nts ne peuvent être réin itialisés
suivant cette méthode.
• langue d’affichage des menus (page 8)
• rotat ion de l’ima ge (pag e11)
Réinitialisation de toutes les données de réglage
aux valeurs par défaut (TOTAL)
Déplacez la manette de commande vers la droite ,.
Le paramètre TOTAL est sélectionné. Toutes les donn é es de
réglage pour le signal d’entrée en cours sont réinit ialisées. Toutes
les données de réglage (excepté pour les réglages USER dans le
menu COULEUR) sont réinitialisées aux valeurs par défaut.
Remarque
Les touches du moniteur sont in opérantes pendant environ 5 seco ndes
lorsque TOTAL est sélectio nn é.
* La moire est un genre d’i nterférence naturelle qui produit de douce s
lignes ondulatoires sur l’écran. Ce phénomène peut se produire à la
suite d’interférenc es entre le motif de l’image à l’écran et le moti f des
luminophores du moni teur.
Exemple de moire
MENU
12
Page 27
Caractéristiques
INFORMATION
HORS PLAGE DE BALAYAGE
Dépannage
techniques
Modes présélectionné et utilisateur
Lorsque le moniteur reçoit un signal d’entrée, il le fait
automatiquement correspondre à l’un des modes présélectionnés
par défaut enregistrés dans la mémoire du moniteur de manière à
produire une image de haute qua lité au centre de l’écran. (Voir la
liste des modes présélectionnés par déf a ut en Appendix.)
Pour les signaux d’entrée qui ne correspondent pas à l’un des
modes présélectionnés, la technologie Multiscan numérique
intégrée dans ce moniteur fait en sorte qu’une image claire
apparaisse à l’écran pour toutes les synchronisations dans la plage
de fréquence du moniteur (horizontale: 30 à 70 kHz, verticale: 48
à 120 Hz). Lorsque l’image est réglée, les données de réglage sont
mémorisées comme un mode utilisateur et sont rappelées
automatiquement chaqu e fois que le même signal d’entrée est
reçu.
Remarque à l’intention des utilisateurs de
Windows
Pour les utilisateurs de Windows, consultez le manuel de votre
carte graphique ou le programme d’utilitaire livré avec votre carte
graphique et sélectionn ez le taux de rafraîchis sement le pl us élevé
possible afin de maximiser les performances du moniteur.
Consultez cette section avant de faire appel au service
d’assistance technique.
Si de fines lignes apparaissent à
l’écran (fils d’amortissement)
L’apparition de lignes fines sur l’écran de votre moniteur
Trinitron, tout spécialement lorsque la couleur de l’arrière-plan
est claire (en général blanc), est normale. Il ne s’agit pas d’un
mauvais fonctionnement. Ces lignes sont en fait les ombres de fils
d’amortissement utilisés pour stabiliser la grille d’ouverture. La
grille d’ouverture est l’élément essentiel qui rend les tubes image
Trinitron uniq ues en permettant le pa ssage d’une plus grande
quantité de lumière vers l’écran, ce qui garantit une image plus
lumineuse et plus finement détaillé e .
Fils d’amortissement
Messages affichés à l’écran
FR
Fonction d’économie d’énergie
Ce moniteur est co nforme aux spécifications VESA, ENERGY
S
TAR et NUTEK relatives aux économies d’énergie. Si aucun
signal n’est reçu par le moniteur en provenance de l’ordina teur
raccordé, le moniteur ré duira auto matiquement sa consomm ation
d’énergie comme illustré ci -dessous.
Mode
d’alimentation
fonctionnement
normal
inactif**
hors tension 0 W désactivé
* Les chiffres indiquent la consommation d’énergie lorsqu’aucun
périphérique compatible USB n’est ra ccordé au moniteur.
** L orsque votre ordinateur passe en m ode “inactif”, le signal d’e nt rée
est coupé et l’indication PAS ENTREE VIDEO apparaît à l’écran. Au
bout de 20 secondes, le moni te ur passe en mode d’économ ie
d’énergie.
*** Si le signal de synchronisation horizontal ou vertical est reçu par le
moniteur, il est possible que le voyant de mise sous tension clignote
tour à tour en vert ou en orange.
Consommation
d’énergie*
115 W vert
≤
5 W orange***
≤
Indicateur
1 (alimentation)
Lorsqu’une anomalie du signal d’entrée est détectée, l’un des
messages suivants apparaît à l’é cran. P our re mé dier au problème
survenu, voir “Symptômes et remèdes” à la page 14.
Condition du signal d’entrée
La condition du signal d’entrée
HORS PLAGE DE BALAYAGE
indique que le signal d’entrée n’est pas supp orté par les
spécifications du monite ur.
PAS ENTREE VIDEO
indique qu’aucun signal n’est entré sur le moniteur.
13
Page 28

Symptômes et remèdes
Si le problème est provoqué par l’ordinateur ou tout autre appareil raccordé, veuillez vous référer au mode d’emploi de l’appareil raccordé.
Utilisez la fonction d’autodiagnostic (page 16) si les recommandations suivantes ne vous permettent pas de résoudre le problème survenu.
Symptôme Vérifiez
Pas d’image
Si l’indicateur 1 (alimentation) n’est
pas allumé.
Si le message PAS ENTREE VIDEO
apparaît à l’écran, ou si l’indicateur
1 (alimentation) est allumé en
orange ou clignote alte rnativ emen t en
vert et en orange
Si le message HORS PLAGE DE
BALAYAGE apparaît à l’écran
Si aucun message ne s’affiche et si
l’indicateur 1 (alimentation) est vert
ou clignote en orange
Si vous utilisez un système
Macintosh
L’image scintille, sautille, o scille ou
est brouillée
L’image est floue • Ajustez la luminosité et le contraste (page 10).
Des images fantômes apparaissent • N’utilisez pas de prolongateurs de câble vidéo et/ou de boîtiers de commutation vidéo.
L’image n’est pas centrée ou de
taille incorrecte
• Vérifiez si le cordon d’alimentation est correctement branché.
• Vérifiez si le commutateur 1 (alimentation) est réglé sur la position “on”.
• Vérifiez si le câble de signal vidéo est correctement branché et si les fiches sont fermement
enfoncées dans leurs prises respectives. (page 6).
• Vérifiez si les broches du connecteur d’entrée vidéo HD15 ne sont pas faussées ou
enfoncées.
xProblèmes causés par l’ordinateur ou tout autre appareil raccordé
• L’ordinateur se trouve en mode d’économie d’énergie. Essay ez d’appuyer sur une touche
ou de déplacer la souris.
• Vérifiez si le commutateur d’alimentation de l’ordinateur est sur “on”.
• Vérifiez si la carte graphique est complèteme nt enfon c é e dans la fente de b u s app rop rié e.
xProblèmes causés par l’ordinateur ou tout autre appareil raccordé
• Vérifiez si la plage de fréquence vidéo correspond aux spécifications du moniteur. Si vous
remplacez un ancien moniteur par ce moniteur, reconnectez l’ancien moniteur et ajustez la
plage de fréquence comme suit:
Horizontale: 30 – 70 kHz
–
Verticale: 48
• Activez la fonction d’autodiagnostic (page 16).
• Vérifiez si l’adaptateur Macintosh (n on fourni) et le câble de signal vidéo sont
correctement raccordés (page 6).
• Isolez et éliminez les sources potentielles de champs électriques ou magnétiques tels que
d’autres moniteurs, des impri mantes laser, des ventilateurs électriques, des lampes
fluorescentes ou des téléviseurs.
• Eloignez le moniteur des lig nes à haute tension ou placez un blindage magnétique à
proximité du moniteur.
• Branchez le moniteur sur une autre prise secteur, de préférence raccordée à un autre circuit.
• Fai te s pivoter le moniteur de 90° vers la gauche ou la droite.
xProblèmes causés par l’ordinateur ou tout autre appareil raccordé
• Vérifiez le réglage adéquat pour l e moniteur dans le mode d’ emploi de votre carte
graphique.
• Assurez-vous que le mode graphique (VESA, Macintosh 16" Color, etc.) et la fréquence du
signal d’entrée sont supportés par ce moniteur ( A ppendix). Même si la fréquence est
comprise dans la plage appropri ée, il est possible que certaines cartes graphique aient une
impulsion de synchronisation trop étroite pour que le moniteur se synchronise
correctement.
• Ajustez le taux de régénération de l’ordinateur (fréquence verticale) de façon à obtenir la
meilleure image possible.
• Démagnétisez le moniteur* (page 12).
• Réduisez le niveau de suppression du moiré (page 12).
• Vérifiez si toutes les fiches sont fermement connectées dans leurs prises respectives.
• Ajustez la ta ille ou le centra ge de l’imag e (page 10). Attention que certain s modes vidéo n e
remplissent pas l’écran jusqu’aux bords.
120 Hz
14
Page 29

Symptôme Vérifiez
Les bords de l’image sont incurvés • Ajustez la forme de l’image (page 10).
Un motif ondulatoire ou elliptique
(moire) est visible
• Supprimez la moire (page 12).
xProblèmes causés par l’ordinateur ou tout autre appareil raccordé
• Changez le motif de votre bureau.
Les couleurs ne sont pas
uniformes
• Démagnétisez le moniteur* (page 12). Si vous placez à côté du moniteur un appareil qui
génère un champ magné ti que, comme un haut-p ar leur, ou si vous changez l’orientation du
moniteur, il se peut que les couleurs perdent leur uniformité.
Le blanc n’est pas blanc • Ajust ez la température de couleur (page 11).
Les périphériques USB ne
fonctionnent pas
• Vérifiez si les connecteurs USB appropriés sont correctement raccordé s (page 7).
• Vérifiez si le commutateur 1 (alimentation) est réglé sur la position “on”.
xProblèmes causés par l’ordinateur ou tout autre appareil raccordé
• Vérifiez si l’un des périphériques auto-alimentés compatibles USB est sous tension (“on”).
• Installez la dernière version du gestionnaire de périphérique sur votre ordinateur. Consultez
le fabricant de votre appareil pour déterminer le gestionnaire de périphérique approprié.
• Si votre clavier ou votre souris compatible USB ne fonctionne pas, raccordez-le
directement à votre ordinateur, redémarrez l’ordinateur et effectuez les ajustements
nécessaires aux réglages USB. Rebranchez ensuite le clavier ou la souris sur le moniteur.
• Pour les clients utilisant Windows 95
1. Cliquez à l’aide de la touche droite sur “My Computer” et sélectionnez “Properties”.
2. Cliquez sur l’onglet “Devic e Manag er”. F a ite s déf iler vers le bas et sélectionnez
“Universal Serial Bus Controller”.
,Si “Universal Serial Bus Controller” n’apparaît pas, vous devez charger une disquette
USB supplémentair e. Consultez le fabricant de votre ordinateur pour plus
d’informations sur l’obtention d’une disquette USB supplémentaire.
3. Sélectionnez “G eneric USB Device” dans la liste de systèmes de commande USB et
cliquez sur “Properties”.
4. Si la case en regard de “Disable in th is hardware profile” est cochée, désactivez-la.
5. Cliquez sur “Refresh”.
Un souffle est audible juste après
la mise sous tension
• C’est le son provoqué par le cycle de démagnétisation automatique. Lorsque le moniteur
est mis sous tension, il est automatiquement démagnétisé pendant 5 secondes.
FR
* Si un second cycle de démag n é ti s at ion s’avère nécessaire, laissez s’écouler un interva l le de 20 minutes pour obtenir de m ei ll eu rs résultats. Un bruit de
souffle peut se faire entend re, m ai s il ne s’agi t pas d’un dysfonctionnement.
Affichage de la désignation, du numéro de série et
de la date de fabrication du moniteur
(INFORMATION)
1
Appuyez au centre de la manette de commande.
Le MENU principal apparaît à l’écran.
2
Déplacez la manette de commande pour mettre
Si le problème persiste, appelez votre revendeur Sony agréé et
fournissez-lui les informations suivantes:
• Désignation du modèle: HMD-A220
• Numéro de série
• Marque et spécifications de vot re ordinateur et de votre carte
graphique.
LANGUE/INFORMATION en év idence et appuyez
au centre de la manette de commande.
Le menu LANGUE/INFORMATION apparaît à l’écran.
3
Déplacez la manette de commande m/M pour
sélectionner (INFORMATION) et appuyez
ensuite sur le centre de la manette de commande.
Cette fenêtre d’information sur le monit eur apparaît à l’
Exemple
LANGUE / I NFORMAT I ON
MODE L : HMD - A 22 0
SERI AL: 12345678
MANUF ACTURED: 2 0 0 0 - 5 2
SELECT EX I T
éc
ran.
15
Page 30

Fonction d’autodiagnostic
Ce moniteur est doté d’une fonction d’autodiagnostic. S’il y a un
problème avec votre moniteur ou votre ordinateur, l’écran devient
blanc et l’indicateur 1 (alimentation) s’allume en vert ou clignote
en orange. Si l’indicateur 1 (alimentation) est allumé e n orange ,
c’est que l’ordinateur se trouve en mode d’économie d’énergie.
Essayez d’appuyer sur une touche ou de dépl acer la souris.
MENU
Indicateur 1 (alimentation)
Si l’indicateur 1 (alimentation) est allumé en vert
1
Débranchez le câble d’entrée vidéo ou mettez
l’ordinateur connecté hors tension.
2
Appuyez sur la touche 1 (alimentatio n) pour mettre
le moniteur sous et hors tension.
3
Déplacez la manette de com mande vers la droite ,
pendant 2 secondes avan t que le moniteur passe en
mode d’économie d’énergie.
Spécifications
Tube cathodique Pas d’ouvertur e de gr ille de 0,24 mm
(centre)
17 pouces mesurés en diagonale
Déflexion de 90 degr é s
Taille de l’image affichée Approx. 327 × 243 mm (l/h)
Zone de visualisation de 16,0"
Résolution
Maximum Horizontale: 1280 points
Verticale: 1024 lignes
Recommandée Horizontale: 1024 points
Verticale: 768 lignes
Zone d’image standa rd Approx. 312 × 234 mm (l/h)
Fréquence de déflexion* Horiz ontale: 30 à 70 kHz
Verticale: 48 à 120 Hz
Tension/courant d’entrée 220 à 240 V CA, 50 – 60 Hz,
0,9 A
Consommation él ectrique Max. 115 W (sans périphérique USB
raccordé)
Température d’utilisation 10°C à 40°C
Dimensions Approx. 460 × 378 × 441 mm
(l/h/p)
Masse Approx. 19 kg
Plug & Play DDC1/DDC2B
Accessoires fournis Voir page 6
* Condition de synchronisation horizontale et verticale
• La largeur de synchronisation horizontale doit êtr e
supérieure à 1,0 µs.
• La largeur de suppression horizontale doit être supérieure à
3,0 µs.
• La largeur de suppression verticale doit être supérieure à
500 µs.
MENU
Si les trois barres de couleur apparaissent (rouge, vert, bleu), c’est
que le moniteur fonctionne co rrectement. Rebranchez les câbles
d’entrée vidéo et vérifiez le statut de votre ordinateur.
Si les barres de couleur n’apparaissent pas, c’est probablement
parce qu’une anomalie s’est pr oduite au niveau du moniteur.
Informez votre revendeur Sony agréé de l’état du moniteur.
Si l’indicateur 1 (alimentation) clignote en orange
Appuyez sur le commutateur 1 (alimentation) pour
mettre le moniteur hors et puis sous tension.
Si l’indicateur 1 (alimentation) s’allume en vert, c’est que le
moniteur fonctionne correctement.
Si l’indicateur 1 (alimentation) clignote toujours, c’est
probablement parce qu’il y a une anomalie au niveau du moniteur.
Comptez le nombre de secondes ent re les clignotements oranges
de l’indicateur 1 (alimentation) et informez votre revendeur
Sony agréé de l’état du moniteur. Notez également la désignation
du modèle et le numéro de série de votre moniteur. Veuillez
également noter la marque et le modèle de votre ordinateur et de
votre carte graphique.
La conception et les spécifications sont sujettes à modifications
sans préavis.
16
Page 31

Inhalt
Hinweis
Dieses Gerät erfüllt bezüglich
tieffrequenter (very low frequency) und
tiefstfrequenter (extremely low frequency)
Strahlung die Vorschriften des „Swedish
National Council for Metrology (MPR)“
vom Dezember 1990 (MPR II).
Dieses Garät entspricht den folgenden
europäischen EMV-Vorschriften für
Betrieb in Wohngebieten, gewerblicher
Gebleten und Leichtindustriegebieten.
EN55022/1994 Klasse B
EN55024/1998
EN61000-3-2/1995
Hinweise
• Aus ergonomischen Grü nde n wird
empfohlen, die Grun dfa rbe Blau nicht
auf dunklem Untergrund zu verwenden
(schlechte Erkennbarkeit,
Augenbelastung bei z u geringem
Zeichenkontras t).
• Aus ergonomischen Gründen
(flimmern) sollten nur Darstellungen
bei Vertikalfrequenzen ab 70 Hz (ohne
Zeilensprung) verwen de t werden.
• Die Konvergenz des Bildes ka nn sic h
auf Grund des Magnetfeldes am Ort der
Aufstellung aus der korrek te n
Grundeinstellung verän dern. Zur
Korrektur empfiehlt es sich deshalb, die
Regler an der Frontseite für Konvergenz
so einzustellen, daß die getre nnt
sichtbaren Farblinien für Rot, Grün und
Blau bei z.B. der Darstellung eines
Buchstabens zur Deckung
(Konvergenz) gela ngen.
• Siehe hierzu auc h die Erklärungen zu
Konvergenz.
• Trinitron ist ein eingetragenes
Warenzeichen de r Sony Corporation.
• Macintosh ist ein Warenzeichen der
Apple Computer, Inc., in den USA und
anderen Ländern.
• Windows
eingetragene Warenzeichen der
Microsoft Corporation in den USA und
anderen Ländern.
• IBM PC/AT und VGA sind
eingetragene Warenzeichen der IBM
Corporation in den USA.
• VESA und DDC
der Video Electronics Stand ard
Association.
•
E
Warenzeichen in den USA.
• Alle anderen in diesem Handbuch
erwähnten Produktnamen können
Warenzeichen oder eingetragene
Warenzeichen der jeweiligen
Eigentümer sein.
• Im Handbuch sind die Waren ze i che n
und eingetragenen Warenzeichen nicht
überall ausdrücklich durch „“ und „“
gekennzeichnet.
und MS-DOS sind
sind Warenzeichen
NERGY STAR ist ein eingetragenes
Sicherheitsmaßnahmen . . . . . . . . . . . . . . . . . . . . . . . . . . . . . . . . . . 4
Lage und Funktion der Teile und Bedienelemente . . . . . . . . . . . . . . 5
Anschließen des Geräts . . . . . . . . . . . . . . . . . . . . . . . . . .6
Schritt 1:
Schritt 2:
Schritt 3:
Anschließen von USB-kompatiblen Peripheriegeräten
(USB - Universeller Serieller Bus) . . . . . . . . . . . . . . . . . . . . . . . . . . 7
Auswählen der Sprache für die Bildschirmmenüs
(SPRACHE/INFORMATION) . . . . . . . . . . . . . . . . . . . . . . . . . . . . . . 8
Anschließen des Monitors an den Computer. . . . . . . . . . 6
Anschließen des Netzkabels . . . . . . . . . . . . . . . . . . . . . . 6
Einschalten des Monitors und des Computers. . . . . . . . . 6
Einstellen des Monitors. . . . . . . . . . . . . . . . . . . . . . . . . . .8
Navigieren in den Menüs . . . . . . . . . . . . . . . . . . . . . . . . . . . . . . . . . 8
Einstellen von Helligkeit und Kontrast
(HELLIGKEIT/KONTRAST) . . . . . . . . . . . . . . . . . . . . . . . . . . . . . . 10
Einstellen von Breite oder Position des Bildes
(H-GRÖSSE/LAGE) . . . . . . . . . . . . . . . . . . . . . . . . . . . . . . . . . . . . 10
Einstellen von Höhe oder Position des Bildes
(V-GRÖSSE/LAGE) . . . . . . . . . . . . . . . . . . . . . . . . . . . . . . . . . . . . 10
Korrigieren der Wölbung der Bildränder
(KISSENVERZ/BALANCE). . . . . . . . . . . . . . . . . . . . . . . . . . . . . . . 10
Einstellen des Winkels der Bildränder
(TRAPEZFORM/PARALLEL) . . . . . . . . . . . . . . . . . . . . . . . . . . . . . 11
Einstellen der Bildrotation (DREHUNG) . . . . . . . . . . . . . . . . . . . . . 11
Vergrößern oder Verkleinern des Bildes (ZOOMEN) . . . . . . . . . . . 11
Einstellen der Farbe des Bildes (FARBE). . . . . . . . . . . . . . . . . . . . 11
Weitere Einstellungen (ENTMAGNETIS/MOIRE). . . . . . . . . . . . . . 12
Zurücksetzen der Einstellungen (ZURÜCKSETZEN). . . . . . . . . . . 12
Technische Merkmale . . . . . . . . . . . . . . . . . . . . . . . . . . .13
Vordefinierte Modi und Benutzermodi . . . . . . . . . . . . . . . . . . . . . . 13
Die Energiesparfunktion . . . . . . . . . . . . . . . . . . . . . . . . . . . . . . . . . 13
Störungsbehebung . . . . . . . . . . . . . . . . . . . . . . . . . . . . .13
Wenn auf dem Bildschirm dünne Linien (Dämpfungsdrähte)
erscheinen . . . . . . . . . . . . . . . . . . . . . . . . . . . . . . . . . . . . . . . . . . . 13
Bildschirmmeldungen . . . . . . . . . . . . . . . . . . . . . . . . . . . . . . . . . . . 13
Symptome für Fehler und Abhilfemaßnahmen. . . . . . . . . . . . . . . . 14
Selbstdiagnosefunktion. . . . . . . . . . . . . . . . . . . . . . . . . . . . . . . . . . 16
Technische Daten . . . . . . . . . . . . . . . . . . . . . . . . . . . . . .16
Anhang (Appendix) . . . . . . . . . . . . . . . . . . . . . . . . . . . . . . i
Preset mode timing table . . . . . . . . . . . . . . . . . . . . . . . . . . . . . . . . . .i
DE
3
Page 32

Sicherheitsmaßnahmen
Warnhinweis zum Netzanschluß
• Verwenden Sie ausschließlich das mitgelieferte Netzkabel.
Wenn Sie ein anderes Netzkabel verwenden, achten Sie darauf,
daß es für die Stromversorgung in Ihrem Land geeignet ist.
Für Kunden in Großbrita nn i en
Wenn Sie den Monitor in Gr oßbritannie n verwenden, ben utzen
Sie bitte das mitgelieferte Kabel mit dem für Großbritannien
geeigneten Stecker.
Beispiele für Steckertypen
Transport
Wenn Sie den Monitor zur Reparatur oder bei einem Umzug
transportieren müssen, verpacken Sie ihn mit Hilfe der
Originalverpackungsmaterialien wieder im Originalkarton.
Verwenden des Ständers
Setzen Sie den mitgelieferten Ständer in die Kerbe ein, um den
Winkel des Monitors einzustellen. Sie können den Ständer in
vertikaler oder horizontaler Position benutzen.
für 100 bis 120 V
Wechselstrom
• Warten Sie nach dem Ausschalten des Geräts mindestens
30 Sekunden, bevor Sie das Netzkabel lösen. In dieser Zeit
kann sich die statische Elektrizitä t auf der Oberfläche des
Bildschirms entladen.
• Wenn Sie das Gerät einschalten, wird der B ildschirm etw a
5 Sekunden lang entmagnetisiert. Dadurch entsteht um den
Bildschirm ein starkes magnetisches Feld, das Daten auf
Magnetbändern, D is ketten oder anderen Dat enträgern in der
Nähe beschädigen kann. Legen Sie magnetische Datenträg er und
Bänder/Disketten da her nicht zu nahe bei diesem M onitor ab.
Die Netzsteckdose sollte sich in der Nähe des Geräts befinden
und leicht zugänglich sein.
für 200 bis 240 V
Wechselstrom
nur für 240 V
Wechselstrom
Aufstellung
Stellen Sie den Monitor nicht an folgenden Standorten auf:
• Auf Oberflächen wie Teppichen oder Decken oder in der Nähe
von Materialien wie Gardinen und Wandbehängen, die die
Lüftungsöffnungen blockie ren könnten.
• In der Nähe von Wärmequellen wie Heizkörpern oder
Warmluftauslässen oder an einem Ort, an dem der Monitor
direktem Sonnenlicht ausgesetzt ist.
• An einem Ort, an dem der Monitor starken
Temperaturschwankungen ausgesetzt ist.
• An einem Ort, an dem der Monitor mechanischen Vibrationen
oder Stößen ausgesetzt ist.
• Auf einer instabilen Oberfläche.
• In der Nähe anderer Geräte, die ein starkes Magnetfeld
generieren, wie zum Beispiel ein Transformator oder eine
Hochspannungsleitung.
• In der Nähe von oder auf einer elektrisch geladenen Metallfläche.
Zweck der Vertiefung an der Oberseite
Sie können einen F otorahmen oder eine CD -Hülle in die
Vertiefung stellen.
Hinweis
Verwenden Sie die Vertiefung auf keinen Fall für einen ande re n Zwe ck.
Wartung
• Reinigen Sie den Bildschirm mit einem weichen Tuch. Wenn Sie
ein Glasreinigungsmittel verwenden, achten Sie darauf, daß es
keine Antistatik-Lösung oder ähnliche Zusätze enthält, da diese zu
Kratzern auf der Beschichtung des Bildschirms führen könnten.
• Berühren Sie die Bildschirmoberfläche nicht mit scharfen,
rauhen oder spitzen Gegenständen wie zum Beispiel
Kugelschreiber n oder Schraubenziehern. Andernfalls könnte
die Bildschirmoberfläche zerkratzt werden.
• Reinigen Sie Gehäuse, Bedienfeld und Bedienelemente mit
einem weichen Tuch, das Sie leicht mit einem milden
Reinigungsmittel angefeuchtet haben. Verwenden Sie keine
Scheuermittel, Scheuerschwämme oder Lösungsmittel wie
Alkohol oder Benzin.
4
Page 33

Lage und Funktion der Teile und
Bedienelemente
Weitere Informationen finden Sie auf den in Klammern
angegebenen Seiten.
MENU
RückseiteVorderseite
AC IN
1111 Steuertaste (Seite 9)
Mit der Steuerta ste können Sie die Menüs aufrufen und die
Einstellungen des Monitors, einschließlich der Helligkeitsund Kontrasteins tellungen, ändern.
2222 Netzschalter und -anzeige 1 (Seite 6, 13, 16)
Dieser Schalter dient zum Ein- und Ausschalten des
Monitors. Die Netzanzeige leuchtet grün, wenn der Monitor
eingeschaltet ist, und blinkt grün und orange bzw. leuchtet
orange, wenn sich der Monitor im Energiesparmodus
befindet.
3333 Netzeingang AC IN (Seite 6)
Dieser Anschluß dient zur Stromversorgung des Monitors.
4444 Videoeingang (HD15) (Seite 6)
Dieser Anschluß dient zum Einspeisen von RGBVideosignalen (0,700 Vp-p, positiv) und
Synchronisationssignalen.
1 2 3 4
876
5
10
9
11 12 13 14 15
Stift Nr. Signal
1Rot
2 Grün
3Blau
4 ID (Masse)
5 DDC-Masse*
6 Masse Rot
7 Masse Grün
8 Masse Blau
9 DDC + 5V*
10 Masse
11 ID (Masse)
12 Bidirektionale Daten (SDA)*
13 H. Sync
14 V. Sync
15 Datentakt (SCL)*
* DDC (Display Data Channe l) ist ei n Standard der VESA.
5555 USB-Anschlüsse (Universeller Serieller Bus) für
nachgeschaltete Geräte (Seite 7)
Über diese Anschlüsse können Sie USB-Peripheriegeräte mit
dem Monitor verbinden.
DE
6666 USB-Anschluß (Universeller Serieller Bus) für
vorgeschaltetes Gerät (Seite 7)
Über diesen Anschluß können Sie den Monitor mit einem
USB-kompatiblen Computer verbinden.
5
Page 34
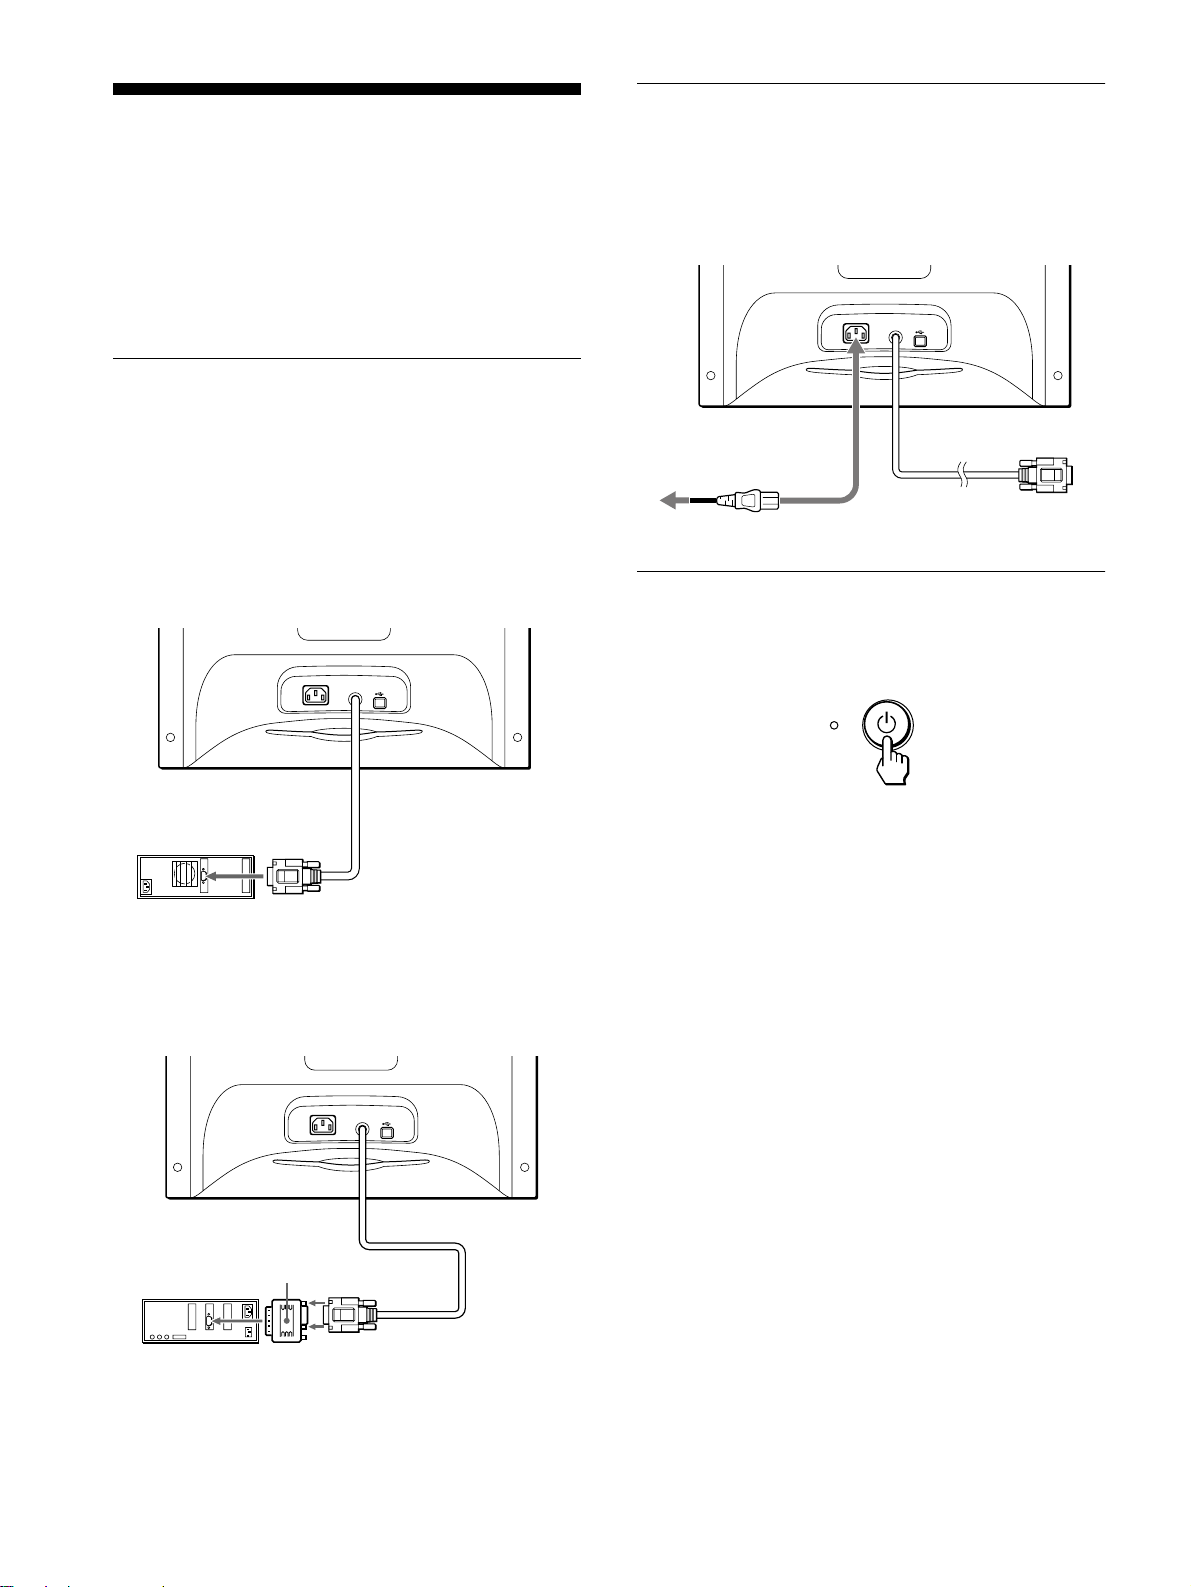
Anschließen des Geräts
AC IN
an AC IN
an eine Netzsteckdose
Netzkabel (mitgeliefert)
Bevor Sie mit dem Monitor arbeiten, überprüfen Sie bitte, ob
folgende Zubehörteile mitgeliefert wurden:
• Netzkabel (1)
• USB-Kabel (1)
• Monitorständer (1)
• Garantiekarte (1)
• Hinweise zum Reinigen der Bildschirmoberfläche (1)
• Diese Bedienungsanleitung (1)
Schritt 1:Anschließen des
Monitors an den
Computer
Schalten Sie vor dem Anschließen den Monitor und den
Computer aus.
Anschließen an einen IBM PC/AT oder
x
kompatiblen Computer
Schritt 2:Anschließen des
Netzkabels
Schließen Sie bei ausgeschaltetem Monitor und Computer das
Netzkabel an den Monitor an, und stecken Sie den Netzstecker in
eine Netzsteckdose.
Schritt 3:Einschalten des Monitors
und des Computers
AC IN
an Videoausgang
IBM PC/AT oder kompatibler
Computer
Anschließen an einen Macintosh oder
x
kompatiblen Computer
Dazu benötigen Sie einen Macintosh-Adapter (nicht mitgeliefert).
AC IN
Schalten Sie zunächst den Monitor und dann den Computer ein.
Die Installation des Monitors ist damit abgeschlossen.
Stellen Sie gegebenenfalls das Bild mit den Bedienelementen des
Monitors nach Ihren Wünschen ein.
Macintosh oder
kompatibler
Computer
6
Macintosh-Adapter
(nicht mitgeliefert)
an Videoausgang
Page 35

Wenn auf dem Bildschirm kein Bild erscheint
• Überprüfen Sie, ob der Monitor korrekt an den Computer
angeschlossen ist .
• Wird KEIN EINGANGSSIGNAL auf dem Bildschirm
angezeigt, überprüfen Sie, ob die Grafikkarte des Computers
korrekt in den richtigen Steckplatz eingebaut ist.
• Wenn Sie einen älteren Monitor durch diesen Monitor ersetzt
haben und NICHT IM ABTASTBEREICH auf dem
Bildschirm erscheint, schließen Sie den alten Monitor wieder
an. Stellen Sie dann die Grafikkarte des Comp uters auf eine
Horizontalfrequenz zwischen 30 und 70 kHz und eine
Vertikalfrequenz zwischen 48 und 120 Hz ein.
Weitere Informationen über die Bildschirmmeldungen finden Sie
unter „Symptome für Fehler und Abhilfemaßnahmen“ auf Seite 14.
Konfigurieren des Monitors mit verschiedenen
Betriebssystemen
Dieser Monitor entspricht dem Plug-and-Play-Standard „DDC “, so da ß
alle Daten des Monitors automatisch erkannt werden. Daher muß kein
spezifischer Treiber auf dem Computer install i ert w erd en.
Wenn Sie den Monitor an Ihren PC anschließen und den PC dann zum
ersten Mal starten, wird möglicherweise der Hardware-Assistent auf dem
Bildschirm angezeigt. Klicken Sie entsprec hend den Anweisungen des
Assistenten mehrmals auf „Next“, bis der Plug-and-Play-Monitor
automatisch ausgewählt ist und Sie ihn benutzen können.
Anschließen von USB-k ompatiblen
Peripheriegeräten (USB Universeller Seriell er Bus)
Ihr Monitor ist mit einem USB-Anschluß für vorgeschaltete
Geräte (auf der Rückseite) und vier USB-Anschlüssen für
nachgeschaltete Geräte (jeweils zwei auf der linken und rechten
Seite) ausgestattet. Über diese Anschlüsse lassen sich mit Hilfe
eines USB-Standardkabels schnell und proble mlos USBkompatible Peripheriegeräte (Tastatur, Maus, Drucker, Scanner
usw.) an den Computer an schließen.
Wenn Sie den Monitor als Hub für Periph eriegeräte verwenden
möchten, stellen Sie die USB-Anschlüsse wie unten abgebildet
her.
AC IN
an USB-kompatible
Peripheriegeräte
an USB-kompatible
Peripheriegeräte
Für Benutzer von Windows NT4.0
Beim Konfigurieren des Monitors unter Windows NT4.0 wird der
Bildschirmtreiber ni cht verwendet. Näheres zum E instellen der
Auflösung, der Auffrischungsrate und der Anzahl der Farben finden Sie
im Benutzerhandbuch zu Windows NT4.0.
an USB-kompatiblen
Computer
1
Schalten Sie Monitor und Computer ein.
2
Schließen Sie Ihren Computer mit dem
mitgelieferten USB-Kabel an den quadratischen
USB-Anschluß für das vorgeschaltete Gerät an.
Für Benutzer von Windows
Wenn eine Meldung auf Ihrem Bildschirm erscheint, gehen Sie nach
den Anweisungen auf dem Bildschirm vor, und wählen Sie Generic
USB Hub als Standardeinstellun g.
3
Schließen Sie die USB-kompatiblen
Peripheriegeräte an die rechteckigen USBAnschlüsse für die nachgeschalteten Geräte
an.
Hinweise
• Nicht alle Computer und/oder Betriebssysteme unterstützen USBKonfigurationen. Schlagen Sie im Handbuch zu Ihrem Computer nach,
ob Sie USB-Geräte anschließen können.
• In den meisten Fällen muß USB-Treibersoftware auf dem HostComputer installiert werden. Näheres hierzu finden Sie in den
Bedienungsanleitungen zu den Peripherie geräten.
• Der Monitor fungiert als USB-Hub , we nn er eingeschaltet und
betriebsbereit ist od er si ch im Energiesparmodus be findet.
• Wenn Sie den Compute r zum ersten Mal starten, na chdem Sie eine
Tastatur oder eine Maus an die USB-Anschlüsse angeschlossen haben,
funktionieren die Peripheriegeräte möglicherweise nicht. Schließen Sie
in diesem Fall die Tasta tu r und di e Ma us direkt an den Computer an,
und installieren Sie die USB-kompatiblen Geräte. Schließen Sie sie
dann an diesen Monitor an.
• Lehnen Sie sich nicht auf den Mon it or, wenn Sie die USB-Kabel
einstecken. Der Monitor könnte kippen, und Sie könnten sich verletzen.
DE
7
Page 36
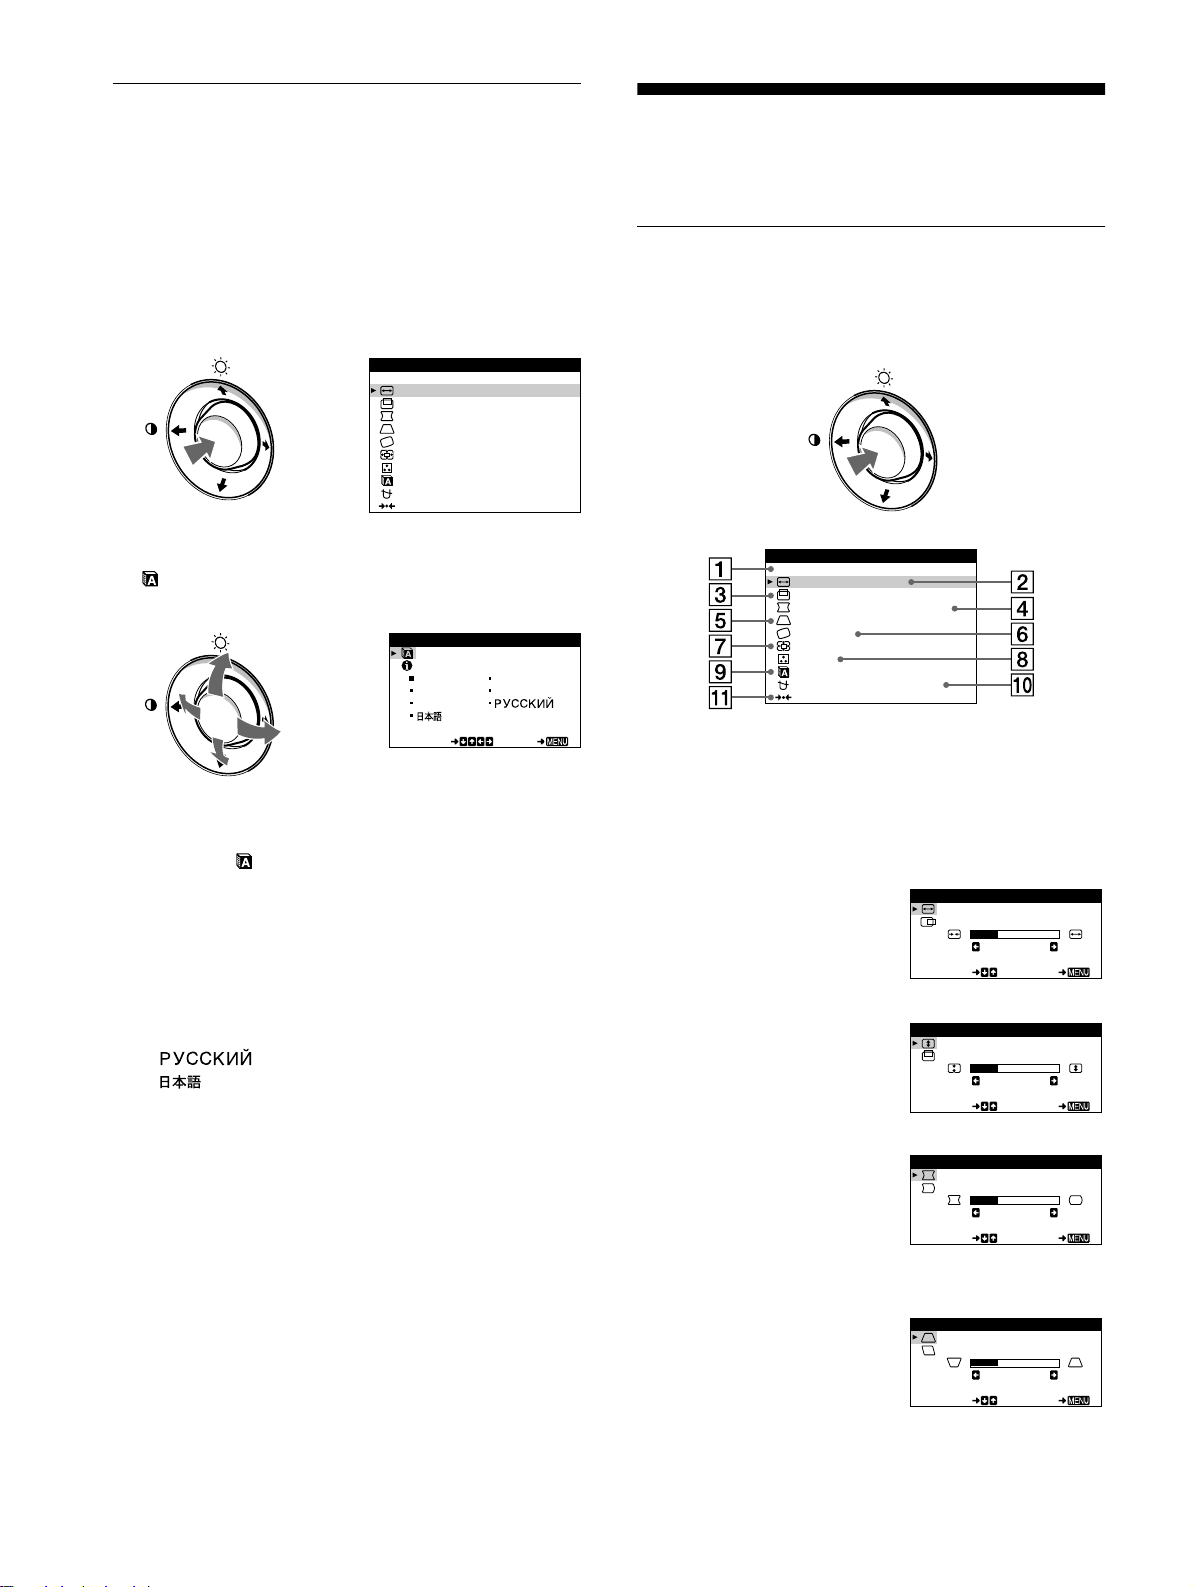
Auswählen der Sprache für die
MENU
Bildschirmmenüs
(SPRACHE/INFORMATION)
Für die Bildschirmmenüs stehen die Sprachen Englisch,
Französisch, Deutsch, Italienisch, Spanisch, Russisch und
Japanisch zur Verfügung. Die Standardeinstellung ist Englisch.
1
Drücken Sie auf die Mitte der Steuertaste.
Weitere Informationen zur Steuertaste finden Sie auf Seite 9.
MENÜ
VERLASSEN
H - GRÖSSE / L AGE
V -GRÖSSE / LAGE
K I SSENVER Z / BAL ANCE
TRAPEZFORM / PARAL L LE
DREHUNG
ZOOMEN
FARBE
SPRACHE / I NFORMA T I NO
ENTMAGNET I S / MO I RE
MENU
ZZURÜCKSE ENT
Einstellen des Monitors
Mit den Bildschirmmenüs können Sie eine Vielzahl von
Einstellungen vornehmen.
Navigieren in den Menüs
Drücken Sie auf die Mitt e der Steuertaste, um das Hauptmenü
MENÜ auf dem Monitor aufzurufen. Weitere Informationen zur
Steuertaste finden Sie auf Se ite 9.
2
Bewegen Sie die Steuertaste, um die Option
SPRACHE/INFORMATION hervorzuheben, und
drücken Sie erneut auf die Mitte der Steuertaste.
SPRACHE / INFORMAT ION
ENGL I SH FRANÇA I S
DEUTSCH I TAL I ANO
ESPAÑOL
SELECT EX I T
MENU
3
Bewegen Sie die Steuertaste in Richtung m/M, um
die Option (SPRACHE) hervorzuheben, und
drücken Sie auf die Mitte der Steu ertas te. Be wegen
Sie die Steuertaste dann in Richtung m/M, um eine
Sprache auszuwählen.
• ENGLISH: Englisch
• FRANÇAIS: Französisch
• DEUTSCH
• ITALIANO: Italienisch
• ESPAÑOL: Spanisch
• : Russisch
• : Japanisch
So schließen Sie das Menü
Drücken Sie einmal auf die Mitte der Steuertaste, um zum Hauptmenü
MENÜ zu wechseln. Wenn Sie zur normalen Anzeige wechseln wollen,
drücken Sie die Taste zweimal. Wenn Sie keine weitere Taste drücken,
wird das Bildschirmmenü nach etwa 30 Sekunden automatisch
ausgeblendet.
So setzen Sie die Menüsprache auf Englisch zurück
Informationen dazu finden Sie unter „Zurüc kset zen der Einstellungen
(ZURÜCKSETZEN)“ auf Seite 12.
MENÜ
VERLASSEN
H - GRÖSSE / L AGE
V -GRÖSSE / LAGE
K I SSENVERZ /BALANCE
TRAPEZFORM/ PARALL LE
DREHUNG
ZOOMEN
FARBE
SPRACHE / I NFORMA T I NO
ENTMAGNET I S / MO I RE
ZZURÜCKSE ENT
Wählen Sie mit der Steuertaste eines der folgenden Menüs aus.
1 VERLASSEN
Wählen Sie VERLASSEN, wenn
Sie das Hauptmenü schließen
wollen.
2222 H-GRÖSSE/LAGE
(Seite 10)
Im Menü H-GRÖSSE/LAGE
können Sie Breite und Position
des Bildes einstellen.
3333 V-GRÖSSE/LAGE (Seite 10)
Im Menü V-GRÖSSE/LAGE
können Sie Höhe und Position d es
Bildes einstellen.
4444 KISSENVERZ/BALANCE
(Seite 10)
Im Menü KISSENVERZ/
BALANCE können Sie die
Wölbung der Bildränder
H -GRÖSSE / LAGE
H - GRÖ S S E
26
SELECT EX I T
V -GRÖSSE / LAGE
V -GRÖ S S E
26
SELECT EX I T
K IS SENVERZ / BALANCE
K I SS ENVERZ
26
SELECT EX I T
korrigieren.
5555 TRAPEZFORM/PARALLEL
(Seite 11)
Im Menü TRAPEZFORM/
PARALLEL können Sie den
Winkel der Bildränder einstellen.
TRAPEZFORM/ PARAL LEL
TRAPEZFORM
26
SELECT EX I T
8
Page 37

6666 DREHUNG (Seite 11)
MENU
MENU
MENU
Im Menü DREHUNG können Sie
die Rotation des Bildes einst ellen.
DREHUNG
DREHUNG
26
EX I T
Die Steuertas te
x
1
Rufen Sie das Hauptmenü MENÜ auf.
Drücken Sie auf die Mitte der Steuertaste, um das Hauptmenü
MENÜ auf dem Monitor aufzurufen.
7777 ZOOMEN (Seite 11)
Im Menü ZOOMEN können Sie
das Bild vergrößern oder
verkleinern.
8888 FARBE (Seite 11)
Im Menü FARBE können Sie die
Farbtemperatur des Bildes
einstellen. Mit Hilfe dieser
Funktion können Sie die Farben
auf dem Monitor an die Farben
eines gedruck ten Bildes anpassen.
9999 SPRACHE/INFORMATION
(Seite 8, 15)
Im Menü SPRACHE/
INFORMATIO N könne n Sie die
Sprache für die
Bildschirmanzeigen wäh len und
Informationen zu diesem
Monitor anzeigen lassen.
q;
q; ENTMAGNETIS/MOIRE
q;q;
(Seite 12)
Im Menü ENTMAGNETIS/
MOIRE können Sie den
Bildschirm entmagnetisieren und
den Moiré-Effekt korrigieren.
ZOOMEN
ZOOMEN
26
EX I T
FARBE
R50
G50
B50
SELECT EX I T
KKK
5000 6500 9300
USER
2
Wählen Sie das Menü aus, in dem Sie Einstellunge n
vornehmen wollen.
Heben Sie das gewünschte Menü hervor, indem Si e die
Steuertaste nach oben (M), unten (m), links (<) oder
rechts (,) bewegen.
SPRACHE / INFORMAT ION
ENGL ISH FRANÇA I S
DEUTSCH I TAL I ANO
ESPAÑOL
SELECT EX I T
3
ENTMAGNET I S /MOIRE
ENTMAGNE T I S
EIN
SELECT EX I T
Nehmen Sie im Menü die gewünschten
Einstellungen vor.
Bewegen Sie die Steuert a ste nach links (<) oder
rechts (,), um den Wert oder d ie Einstellung auszuwählen.
MENU
b
MENU
DE
qa
qa ZURÜCKSETZEN (Seite 12)
qaqa
Im Menü ZURÜCKSETZEN
können Sie die Einstellungen
zurücksetzen.
Anzeigen des aktuellen Eingangssignals
x
ZURÜCKSETZEN
ZURÜCK SE T Z EN
IG
JETZ
TOTA L
EX I T
Die Horizontal- und die Vertikalfrequenz des aktuellen
Eingangssignals werden im Menü HELLIGKEIT/KONTRAST
angezeigt. Wenn das Eingangssignal einem der werkseitig
voreingestellten Modi des Monito rs entspr icht, wird auch die
Auflösung angezeigt .
HELL IGKEI T /KONTRAST
26 26
Auflösung des
aktuellen
Eingangssignals
68.7kHz/85.0Hz
1024X768
Horizontal- und
Vertikalfrequenz
des aktuellen
Eingangssignals
4
Schließen Sie das Menü.
Drücken Sie einmal auf die Mitte der Steuertaste, um zum
Hauptmenü MENÜ zu wechseln . Wenn Sie zur normalen
Anzeige wechseln wollen, drücken Sie die Taste zweimal.
Wenn Sie keine weitere Taste drücken, wird das
Bildschirmmenü nach etwa 30 Sekunden automatisch
ausgeblendet.
Zurücksetzen der Einstellungen
x
Sie können die E inste llun gen übe r das Men ü ZUR ÜCKSETZ EN
zurücksetzen. Weitere Informationen zum Zurücksetzen der
Einstellungen finden Sie auf Seite 12.
9
Page 38
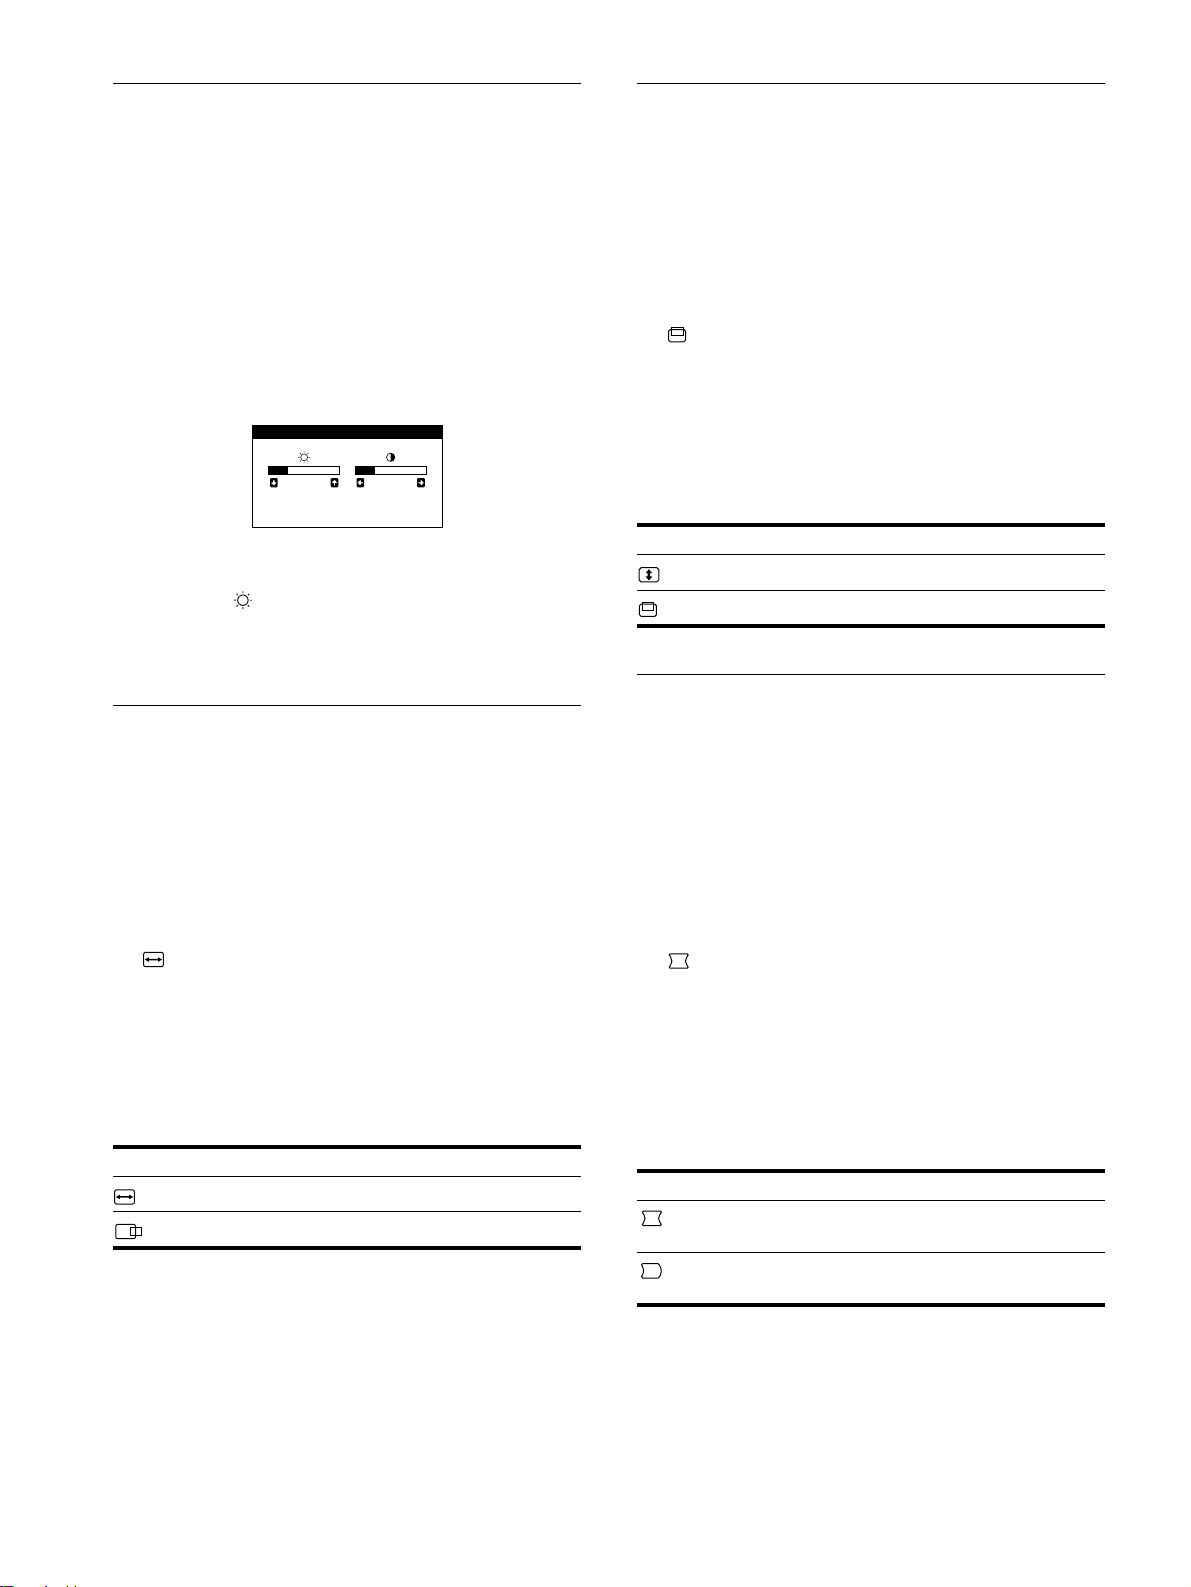
Einstellen von Helligkeit und
Einstellen von Höhe oder P osition
Kontrast
(HELLIGKEIT/KONTRAST)
Helligkeit und Kontrast können Sie über ein spezielles Menü,
HELLIGKEIT/KONTRAST, einstellen.
Diese Einstellungen werden gespeichert und gelten für alle
Eingangssignale.
1
Bewegen Sie die Steuertaste in eine beliebige
Richtung.
Das Menü HELLIGKEIT/KONTRAST erscheint auf dem
Bildschirm.
HELL IGKEI T /KONTRAST
26 26
68.7kHz/85.0Hz
1024X768
2
Bewegen Sie die Steuertaste zum Einstellen der
Helligkeit ( ) in Richtung m/M und zum Einstellen
des Kontrasts (6666) in Richtung </,.
Nach etwa 3 Sekunden wird das Menü automatisch
ausgeblendet.
Einstellen von Breite oder Position
des Bildes (H-GRÖSSE/LAGE)
des Bildes (V-GRÖSSE/LAGE)
Diese Einstellungen werden nur für das gerade eingespeiste
Eingangssignal gespeichert.
1
Drücken Sie auf die Mitte der Steuertaste.
Das Hauptmenü MENÜ erscheint auf dem Bildschirm.
2
Bewegen Sie die Steuertaste, um die Option
V-GRÖSSE/LAGE hervorzuheben, und drücken
Sie erneut auf die Mitte der Steuertaste.
Das Menü V-GRÖSSE/LAGE erscheint auf dem Bildschirm.
3
Bewegen Sie die Steuertaste in Richtung m/M, um
die gewünschte Einstelloption auszuwählen.
Bewegen Sie dann die Steuertaste in Richtung
</,, um die Einstellung vorzunehmen.
Option Funktion
V-GRÖSSE
V-LAGE
Einstellen der Höhe
Einstellen der vertikalen Bildposition
Korrigieren der Wölbung der
Bildränder
(KISSENVERZ/BALANCE)
Diese Einstellungen werden nur für das gerade eingespeiste
Eingangssignal gespeichert.
1
Drücken Sie auf die Mitte der Steuertaste.
Das Hauptmenü MENÜ erscheint auf dem Bildschirm.
2
Bewegen Sie die Steuertaste, um die Option
H-GRÖSSE/LAGE hervorzuheben, und drücken
Sie erneut auf die Mitte der Steuertaste.
Das Menü H-GRÖSSE/LAGE erscheint auf dem Bildschirm.
3
Bewegen Sie die Steuertaste in Richtung m/M, um
die gewünschte Einstelloption auszuwählen.
Bewegen Sie dann die Steuertaste in Richtung
</,, um die Einstellung vorzunehmen.
Option Funktion
H-GRÖSSE
H-LAGE
Einstellen der Breite
Einstellen der horizontalen Bild position
Diese Einstellungen werden nur für das gerade eingespeiste
Eingangssignal gespeichert.
1
Drücken Sie auf die Mitte der Steuertaste.
Das Hauptmenü MENÜ erscheint auf dem Bildschirm.
2
Bewegen Sie die Steuertaste, um die Option
KISSENVERZ/BALANCE hervorzuheben, und
drücken Sie erneut auf die Mitte der Steuertaste.
Das Menü KISSENVERZ/BALANCE erscheint auf dem
Bildschirm.
3
Bewegen Sie die Steuertaste in Richtung m/M, um
die gewünschte Einstelloption auszuwählen.
Bewegen Sie dann die Steuertaste in Richtung
</,, um die Einstellung vorzunehmen.
Option Funktion
KISSENVERZ
KIS BALANCE
Wölben der Bildränder nach außen oder
innen
Verschieben der Bildränder nach links
oder rechts
10
Page 39

Einstellen des Winkels der Bildränder
KKK
R50
G50
B50
SELECT EX I T
FARBE
5000 6500 9300
USER
Einstellen der Farbe des Bildes
(TRAPEZFORM/P ARALLEL)
Diese Einstellungen werden nur für das gerade eingespeiste
Eingangssignal gespeichert.
1
Drücken Sie auf die Mitte der Steuertaste.
Das Hauptmenü MENÜ erscheint auf dem Bildschirm.
2
Bewegen Sie die Steuertaste, um die Option
TRAPEZFORM/PARALLEL hervorzuheben, und
drücken Sie erneut auf die Mitte der Steuertaste.
Das Menü TRAPEZFORM/PARALLEL erscheint auf dem
Bildschirm.
3
Bewegen Sie die Steuertaste in Richtung m/M, um
die gewünschte Einstelloption auszuwählen.
Bewegen Sie dann die Steuertaste in Richtung
</,, um die Einstellung vorzunehmen.
Option Funktion
TRAPEZFORM
PARALLEL
Einstellen der Bildbreite im oberen
Bildschirmbereich
Verschieben des Bildes nach links oder
rechts im oberen Bildschirmbereich
Einstellen der Bildrotation (DREHUNG)
Diese Einstellung wird gespeichert und gilt für alle Eingangssignale.
1
Drücken Sie auf die Mitte der Steuertaste.
Das Hauptmenü MENÜ erscheint auf dem Bildschirm.
2
Bewegen Sie die Steuertaste, um die Option
DREHUNG hervorzuheben, und drücken Sie
erneut auf die Mitte der Steuertaste.
Das Menü DREHUNG wird auf dem Bildschirm angezeigt.
3
Bewegen Sie die Steuertaste in Richtung </,, um
das Bild zu drehen.
(FARBE)
Mit den Optionen im Menü FARBE können Sie die
Farbtemperatur des Bildes einstellen. Dabei ändert sich der
Farbwert im weißen Farbfeld. Farben erscheinen bei einer
niedrigen Farbtemperatur rötlich, bei einer hohen Farbtemperatur
bläulich. Mit Hilfe dieser Funktion können Sie die Farben auf
dem Monitor an die Farben ei nes gedruckten Bildes anpassen.
Diese Einstellung wird gespeichert und gilt für alle
Eingangssignale.
1
Drücken Sie auf die Mitte der Steuertaste.
Das Hauptmenü MENÜ erscheint auf dem Bildschirm.
2
Bewegen Sie die Steuertaste, um die Option
FARBE hervorzuheben, und drücken Sie erneut
auf die Mitte der Steuertaste.
Das Menü FARBE wird auf dem Bildschirm angezeigt.
3
Bewegen Sie die Steuertaste in Ric htung </,, um
eine Farbtemperatur auszuwählen.
5000K, 6500K und 9300K sind die voreingestellten
Farbtemperatu ren. Der Standardw ert ist 9300 K. Wenn S ie die
Farbtemperat ur auf 6500K und 5000K se nken, erscheinen
weiße Flächen nicht mehr bläulich, sondern rötlich.
4
Nehmen Sie bei Bedarf eine Feineinstellung der
Farbtemperatur vor.
Bewegen Sie zunächst die Steuertaste in Richtung </,,
um USER auszuwählen. Bewegen Sie die Steuertaste in
Richtung m/M, um R (rot), G (grün) oder B (blau)
auszuwählen, und dann in Richtu ng </,, um die
Einstellung vorzunehm en .
DE
Vergrößern oder Verkleinern des
Bildes (ZOOMEN)
Diese Einstellung wird gespeichert und gilt nur für das aktuelle
Eingangssignal.
1
Drücken Sie auf die Mitte der Steuertaste.
Das Hauptmenü MENÜ erscheint auf dem Bildschirm.
2
Bewegen Sie die Steuertaste, um die Option
ZOOMEN hervorzuheben, und drücken Sie
erneut auf die Mitte der Steuertaste.
Das Menü ZOOMEN erscheint auf dem Bildschirm.
3
Bewegen Sie die Steuertaste in Richtung </,, um
das Bild zu vergrößern bzw. zu verkleinern.
Hinweis
Sobald die maximale bzw. minimale Höhe bzw. Breite des Bildes erreicht
ist, läßt sich der Zoom nicht weiter änder n.
Wenn Sie die Farbtemperatur fei neinstellen, werden die
neuen Farbeinste llu ngen gespeicher t und immer abgeruf en ,
wenn Sie USER auswählen.
11
Page 40

Weitere Einstellungen
Zurücksetzen der Einstellungen
(ENTMAGNETIS/MOIRE)
Sie können den Bildschirm manuell entmagnetisieren und den
Moiré-Effekt korrigieren.
1
Drücken Sie auf die Mitte der Steuertaste.
Das Hauptmenü MENÜ erscheint auf dem Bildschirm.
2
Bewegen Sie die Steuertaste in Richtung m/M, um
ENTMAGNETIS/MOIRE hervorzuheben, und
drücken Sie erneut auf die Mitte der Steuertaste.
Das Menü ENTMAGNETIS/MOIRE erscheint auf dem
Bildschirm.
3
Bewegen Sie die Steuertaste in Richtung m/M, um
die gewünschte Einstelloption auszuwählen.
Stellen Sie die ausgewählte Option dann anhand der
folgenden Anweisungen ein.
Entmagnetisieren d es Bildschirms
Der Monitor wird automatisch entmagnetisiert, wenn das Gerät
eingeschaltet wird.
Um den Monitor manuell zu entmagnetisieren,
bewegen Sie zunächst die Steuerta ste in Richtung m/M
und wählen die Option (ENTMAGNETIS) aus.
Bewegen Sie dann die Steuertaste in Richtung ,.
Der Bildschirm wird etwa 5 Sekunden lang entmagnetisiert. Ist
ein zweiter Entmagnetisierungszyklus erforderlich, warten Sie
nach dem ers ten Zyk lus mi ndeste ns 20 Mi nuten . Auf di ese Wei se
erzielen Sie die besten Ergebnisse.
Korrigieren des Moiré-Effekts
Wenn elliptische oder wellenförmige Muster auf dem Bildschirm
erscheinen, stellen Sie den Grad der Moiré-Korrektur ein.
Zum Einstellen der Moiré-Korrektur bewegen Sie die
Steuertaste zunächst in Richt ung m/M, um (CANCEL
MOIRE) auszuwählen. Bewegen Sie die Steuertaste
dann in Richtung </,, bis der Moiré-Effekt auf ein
Minimum reduziert ist.
* Moiré ist eine natürliche Interferenz, die weiche, wellenförmige Linien
auf dem Bildschirm verursacht. Diese Linien können durch die
Interferenz zwischen dem Muster des Bildes au f de m Bildschirm und
dem Phosphor-Pitch-Muster des Monitors verursacht werden.
Beispiel für den
Moiré-Effekt
*
(ZURÜCKSETZEN)
Bei diesem Monitor haben Sie zwei Möglichkeite n, die
Einstellungen zurückzusetzen. Im Menü ZURÜCKSETZEN
können Sie die Einstellungen zurücksetzen.
1
Drücken Sie auf die Mitte der Steuertaste.
Das Hauptmenü MENÜ erscheint auf dem Bildschirm.
2
Bewegen Sie die Steuertaste in Richtung m/M, um
0 ZURÜCKSETZEN hervorzuheben, und drücken
Sie erneut auf die Mitte der Steuertaste.
Das Menü ZURÜCKSETZEN erscheint auf dem Bi ldsc hirm.
Setzen Sie die Einstellungen dann anhand der folgenden
Anweisungen zurück.
Zurücksetzen aller Einstellungen für das aktuelle
Eingangssignal (JETZIG)
Bewegen Sie die Steuertaste in Richtung <.
Die Option JETZIG wird ausgewählt. Alle Einstellungen für das
aktuelle Eingangssignal werden zurückgesetzt.
Beachten Sie, daß die fol genden Einstellungen bei diesem
Verfahren nicht zurückgeset zt werden.
• Sprache der Bildschirmmenüs (Seite 8)
• Bildrotation (Seite 11)
Zurücksetzen aller Einstellungen auf die
werkseitigen Werte (TOTAL)
Bewegen Sie die Steuertaste in Richtung ,.
Die Option TOTAL wird ausgewählt. Alle Einstellungen für das
aktuelle Eingangssignal werden zurückgesetzt. Für Signal e, die
einem der voreingestellten Modi entsprechen, werden all e
Einstellungen auf die werkseitigen Werte zurückgesetzt , mit
Ausnahme der USER-Einstellungen im Menü FARBE.
Hinweis
Wenn Sie TOTAL w
5 Sekunden lang nicht.
hlen, funktionieren die T ast en des Monitors etwa
ä
12
MENU
Page 41

Technische Merkmale
INFORMATION
N I CHT I M
ABTASTBERE I CH
Vordefinierte Modi und
Benutzermodi
Wenn ein Eingang ssignal in den Monito r eingespeist wird,
vergleicht der Monitor dieses Signal mit den werkseitig
vordefinierten Modi im Speich er des Monitors und wählt
automatisch den Modus aus, bei dem sich in der Bildschirm mitte
eine hohe Bildqualität erzielen läßt. (Eine Liste der werkseitig
vordefinierten Modi finden Sie im Appendix.) Bei
Eingangssignalen, die keinem der werkseitig vord efinierten Modi
entsprechen, sorgt der Monitor mit Hilfe seiner digitalen
Multiscan-Technologie dafür, daß bei einem beliebigen Timing
innerhalb des für den Monitor gültigen Frequenzbereichs ein
scharfes Bild angezeigt wird (horizontal: 30 – 70 kHz, vertikal:
48 – 120 Hz). Wenn Sie das Bild einstellen, werden die
Einstellungen als Benutzermo dus automatisch gespeiche r t und
abgerufen, wann immer das betreffende Eingangssignal eingeht.
Störungsbehebung
Lesen Sie bitte im folgenden Abschnitt nach, bevor Sie sich an
den Kundendienst wenden.
Wenn auf dem Bildschirm dünne
Linien (Dämpfungsdrähte)
erscheinen
Die Linien, die vor allem bei einem hellen (normalerweise
weißen) Bildschirmhintergrund a uf dem Bildschirm zu sehen
sind, sind bei einem Trinitron-Monitor normal und keine
Fehlfunkti on. Es handelt sich dabei um Schatten der
Dämpfungsdrähte, mit denen die Streife n mask e stabilisie rt wird .
Die Streifenmaske ist ein wichtiges Merkmal der TrinitronBildröhre. Sie bewirkt, daß mehr Licht auf den Bildschirm
gelangt, und ermöglicht eine höhere Farbintensität und
Detailgenauigkeit.
Hinweis für Benutzer von Windows
Wenn Sie mit Window s arbeiten, seh en Sie in der D okumentatio n
oder im Dienstprogramm zu Ihrer Grafikkarte nac h, wel ches die
höchste Auffrischungsrate ist, und wählen Sie diese aus, um die
Leistung des Geräts zu optimieren.
Die Energiesparfunktion
Dieser Monitor erfüllt die Energiesparrichtlini en der VESA, des
E
NERGY STAR-Programms und des NUTEK-Standards. Wenn
am Monitor kein Signal vom angeschlossenen Computer eingeht,
wird der Stromverbrauch des Monitors automatisch wie unten
erläutert reduziert.
Betriebsmodus
Normalbetrieb
Deaktiviert**
Ausgeschaltet 0 W aus
* Die Zahlen gebe n den Stromverbrauch an, wenn keine USB-
kompatiblen Periphe rie geräte an den Monitor angeschl ossen sind.
** Wenn der Computer in den Modus „Deaktiviert“ wechselt, geht kein
Eingangssignal mehr ein, und KEIN EINGANGSSIGNAL erscheint
auf dem Bildschirm. Nach 20 Sekunde n schaltet der Monitor in den
Energiesparmodus.
*** W e nn am Monitor ein horizontales ode r ve rtikales
Synchronisationssignal eingeht, blinkt die Ne tzanzeige unter
Umständen abwechselnd grün und orange.
Leistungsaufnahme
115 W grün
≤
5 W orange***
≤
* Netzanzeige
1
Dämpfungsdrähte
Bildschirmmeldungen
Wenn am Eingangssignal ein Fehler vor li egt, erscheint eine der
folgenden Warn meldungen auf dem Bildschirm. Wie Sie das
Problem beheben, schlagen Sie unter „Symptome für Fehler und
Abhilfemaßnahmen“ auf Seite 14 nach.
Status des
Eingangssignals
Status des Eingangssignals
NICHT IM ABTASTBEREICH
Gibt an, daß das Eingangssignal nicht den technischen Daten
des Monitors entspricht.
KEIN EINGANGSSIGNAL
Zeigt an, daß kein Signal in den Monitor eingespeist wird.
DE
13
Page 42

Symptome für Fehler und Abhilfemaßnahmen
Wenn ein Problem auf den angeschlossenen Computer oder andere Geräte zurückzuführen ist, schlagen Sie bitte in der Dokumentation zu
dem angeschlossene n Gerät nach.
Führen Sie die Selbstdiagnosefunktion (Seite 16) aus, wenn sich ein Problem mit den im folgenden empfohlenen Maßnahmen nicht beheben
läßt.
Symptom Überprüfen Sie bitte folgendes:
Kein Bild
Die Netzan zeige 1 leuchtet nicht • Das Netzkabel muß korrekt angeschlossen sein.
• Der Monitor muß am Netzsch al ter 1 eingeschaltet sein.
Die Meldung KEIN
EINGANGSSIGNAL erscheint auf
dem Bildschirm, oder die Netzanzeige
leuchtet orange oder wechselt
1
zwischen grün und orange
Die Meldung NICHT IM
ABTASTBEREICH erscheint auf dem
Bildschirm
Es wird keine Meldung angeze igt, und
die Netzanze ige 1 leuchtet grün oder
blinkt orange
Sie arbeiten mit eine m Ma cintoshSystem
Das Bild flimmert, springt, oszilliert
oder ist gestört
Das Bild ist verschwommen
Doppelbilder sind zu sehen
• Das Videosignalkabel muß korrekt angesc hl ossen sein, und alle Stecker müssen fest in den Buchsen
sitzen (Seite 6).
• Achten Sie darauf, daß am HD15- Videoeingangsanschl uß keine Stifte verbogen oder eingedrückt sind.
Durch den angeschlossenen Computer oder andere Geräte verursachte Probleme
xxxx
• Der Computer befindet sich im Energiesparmodus.
Computer-Tastatur, oder bewegen Sie die Maus
• Überprüfen Sie, ob der Com puter eingeschaltet ist.
• Die Grafikkarte muß korrekt im richtigen Bus-Steckp latz sitzen.
Durch den angeschlossenen Computer oder andere Geräte verursachte Probleme
x
• Die Videofrequenz muß im für den Monitor angegebenen Bereich liegen. W enn Sie einen älteren Monitor
durch diesen Monitor ersetzt haben, schließen Sie den alten Monitor wieder an und stellen eine Frequenz im
folgenden Bereich ein:
–
70 kHz
–
120 Hz
Horizontal: 30
Vertikal: 48
• Ve rwe nde n Sie die Selbstdiagnosefunktion (Seite 16 ).
• Der Macintosh-Adapter (ni cht mitgeliefert) und das Videosignalkabel müssen ric htig angeschlossen sein
(Seite 6).
• Entfernen Sie all e möglichen Quell en elektrischer oder mag netischer Felder wi e an d ere Monitore,
Laserdrucker, Ventilatoren, Leuchtstoffröhren oder Fernsehgeräte aus der Nähe des Monitors.
• Halten Sie den Monitor von Stromleitungen fern, oder schützen Sie den Monitor durch eine
Magnetabschirmung.
• Schließen Sie das Netzkabel des Monitors an eine andere Steckdose, möglichst an einem anderen Stromkreis,
an.
• Ve rsuc he n Sie, den Monitor um 90 Grad nach links ode r rechts zu drehen.
Durch den angeschlossenen Computer oder andere Geräte verursachte Probleme
xxxx
• Schlagen Sie i n der Anleitung zur Gra fik karte die korrekte Monitoreinstellu ng nach.
• Überprüfen Sie, ob der Grafikmodu s (VESA, Macintosh 16 Zoll, Farbe usw.) und die Frequenz des
Eingangssignals von diesem Monitor unterstützt werden (Appendix). Auch wenn die Frequenz innerhalb
des unterstützten Bereichs liegt, arbeiten einig e Gra fikkart e n möglicherweise mit ei nem
Synchronisationsimpuls, der für e in e korrekt e Synchronisation des Monitors zu kurz ist .
• Stellen Sie die Auffrischungsrate am Computer (Vertikalfrequenz) auf den Wert ein, mit dem Sie die besten
Bilder erzielen .
• Stellen Sie Kontrast und Helligkeit ei n (Seite 10).
• Entmagnetisieren Sie den Monitor* (Seite 12).
• Schwächen Sie den Grad der Moi ré -Korrektur ab (Seite 12).
• Ve rwe nde n Sie keine Bildschirmverlängerungskabel und/oder Videoschaltboxen, wenn dieses Phänomen
auftritt.
• Überprüfen Sie, ob alle Stecker fest in den jeweiligen Buchsen sitzen.
Drücken Sie eine beliebige Taste auf der
.
14
Page 43

Symptom Überprüfen Sie bitte folgendes:
Das Bild ist nicht zentriert, oder die
Bildgröße ist nicht korrekt
Die Bildränder sind gekrümmt
Wellenförmige oder elliptische Moiré-
Effekte sind sichtbar
Die Farbe ist nicht gleichmäßig
Weiß sieht nicht weiß aus
Die USB-Peripheriegeräte
funktionieren nicht
Unmittelbar nach dem Einschalten ist
ein Summgeräusch zu hören
• Stellen Sie die Bildgröße bzw. die Zentrierung (Seite 10) ein. Beachten Sie, daß bei bestimmten
Videomodi die Anzeige nicht den gesam ten Bildschirm füllt.
• Stellen Sie die Bildform ein (Seite 10 ).
• Korrigieren Sie den Moiré-Effekt (Seite 12).
Durch den angeschlossenen Computer oder andere Geräte verursachte Probleme
xxxx
• Wählen Sie ein anderes Mu ste r für Ihren Desktop.
• Entmagnetisieren Sie den Monitor* (Seite 1 2). Wenn Sie ein Gerät, das ein Magnetfel d e rzeugt (z. B.
einen Lautsprecher), in der Näh e de s M oni tors aufstellen oder wenn Sie die Richtung des Monitors
ändern, sind die Farben mög li ch erwe ise nicht mehr gleichm ä ßig.
• Stellen Sie die Farbtemperatur ein (Seite 11).
• Die richtigen USB-Ansch lüsse müssen fest angeschlossen sein (Seite 7).
• Der Monitor muß am Netzsch al te r 1 eingeschaltet sein.
Durch den angeschlossenen Computer oder andere Geräte verursachte Probleme
xxxx
• Alle USB-kompatiblen Peri phe ri egerä te mit eigener Stromversorgung müssen eingeschaltet sein.
• Installieren Sie die neueste Version des Gerätetreibers auf Ihrem Computer. Informationen zum
geeigneten Gerä te treiber erhalten Sie be im Hersteller des Gerä ts .
• Wenn USB-kompatible Peripheriegeräte wie Tastatur oder Maus nicht funktionieren, schli eßen Sie sie
zunächst direkt an de n Com puter an, starten Sie den Co mputer neu, und nehmen Sie da nn di e
erforderlichen USB-Ein stellungen vor. Schließen Sie Tastatur und Maus danach wieder an den Monitor
an.
• Für Benutzer von Windows 95
1. Klicken Sie mit der rechten Maustaste auf „My C omputer“, und wählen Sie „ Properties“.
2. Klicken Sie auf die Registerkarte „Dev ice Manager“. Blättern Sie nach un ten, und wählen Sie
„Universal Serial Bus Controller“.
,
Wenn „Universal Serial Bus Controlle r“ nic ht ersch ei nt , müssen Sie eine USB-Ergänzungsdiskette
einlegen. Wenden Sie sich an Ihren Computer-Herstel ler, wenn Sie weitere Informationen zum
Erwerb einer USB-Ergänzungsdiskette benötigen.
3. Wählen Sie „Generi c USB Device“ aus de r US B-Controller-Liste, und klicken Sie a uf „Properties“.
4. Wenn das Kästchen neben „Disable in this hardware profile“ aktiviert, d. h. markiert ist, entfernen Sie
die Markierung.
5. Klicken Sie auf „Refresh“ .
• Dieses Geräusch wird vom automatischen Entm a gne ti sie rungszyklus verursacht. Wenn Sie das Gerät
einschalten, wird der Monitor automatisch etwa 5 Sekunden la ng entmagnetisiert.
DE
* Ist ein zweiter Entmagnetisierungszyklus erforderlich , wa rte n Sie nach dem ersten Zyklus minde stens 20 Minuten. Auf diese Weise erreichen Sie die
besten Ergebnisse. Dabei ist möglicherweise ein Summgeräusch zu hören, ab er di es ist keine Fehlfunktion.
Anzeigen des Namens, der Seriennummer und
des Herstellungsdatums des Monitors
(INFORMATION)
Bleibt das Problem bestehen, wenden Sie sich an Ihren
autorisierten Sony - H än dl er . Ha lte n Sie die folge n de n
Informationen bereit:
• Modellbezeichnung: HMD-A220
1
Drücken Sie auf die Mitte der Steuertaste.
Das Hauptmenü MENÜ erscheint auf dem Bildschirm.
2
Bewegen Sie die Steuertaste, um die Option
• Seriennummer
• Modellbezeichnung und technische Daten des Computers und
der Grafikkarte
SPRACHE/INFORMATION hervorzuheben, und
drücken Sie auf die Mitte der Steuertaste.
Das Menü SPRACHE/INFORMATION erscheint auf dem
Bildschirm.
3
Bewegen Sie die Steuertaste in Richtung m/M, um
die Option (INFORMATION) hervorzuheben, und
drücken Sie auf die Mitte der Steuertaste.
Ein Feld mit Informatione n zu d ie sem M on itor wird auf dem
Bildschirm angezeigt.
Beispiel
SPRACHE / INFORMATION
MODE L : HMD - A 22 0
SERI AL: 12345678
MANUF ACTURED: 2 0 0 0 - 5 2
SELECT EX I T
15
Page 44

Selbstdiagnosefunktion
Dieser Monitor verfügt über eine Selbstdiagn osef unktion. Wenn
an dem Monitor oder am Com puter ein Problem auft ritt, erscheint
ein leerer Bildschirm, und die Netzanzei ge 1 le uchtet grün auf
oder blinkt orange. Wenn di e Netzanzeige 1 orange leuchtet,
befindet sich der Computer im En er g i e s pa rmodus. Drück en Si e
eine beliebige Taste auf der Computer-Tastatur, oder bewegen
Sie die Maus.
MENU
Netzanzeige
Wenn die Netzanzeige 1 grün leuchtet
1
Lösen Sie das Videoeingangskabel, oder schalten
Sie den angeschlossenen Computer aus.
2
Schalten Sie den Monitor am Netzschalter 1 aus
und wieder ein.
3
Bewegen Sie die Steuertaste 2 Sekunden lang in
Richtung ,, bevor der Monitor in den
Energiesparmodus wechselt.
1
Technische Daten
Kathodenstrahlröhre Streifenabstand 0,24 mm (Mitte)
Bildschirmdiagonale 43 cm (17 Zoll)
Ablenkung 90 Grad
Effektive Bildgröße ca. 327 × 243 mm (B/H)
Anzeigegröße 41 cm (16,0 Zol l)
Auflösung
Maximum Horizontal: 1280 Punkte
Vertikal: 1024 Zeilen
Empfohlen Horizontal: 1024 Punkte
Vertikal: 768 Zeilen
Standardanzeigegröße ca. 312 × 234 mm (B/H)
Ablenkfrequenz* Horizontal: 30 bis 70 kH z
Vertikal: 48 bis 120 Hz
Betriebsspannung 220 bis 240 V Wechselstr o m,
50 – 60 Hz, 0,9 A
Leistungsaufnahme max. 115 W (wenn keine USB-Geräte
angeschlossen sind)
Betriebstemperatur 10°C bis 40°C
Abmessungen ca. 460 × 378 × 441 mm (B/H/T)
Gewicht ca. 19 kg
Plug and Play DDC1/DDC2B
Mitgeliefertes Zubehör Siehe Seite 6
* Empfohlene Werte für das horizontale und vertikale Timing
• Das horizontale Synchronbr eitenverhältni s sollte über
1,0 µSek. liegen.
• Die horizontale Austastbreite sollte über 3,0 µSek. liegen.
• Die vertikale Austastbreite sollte über 500 µSek. liegen.
MENU
Wenn alle drei Farbbalken (rot, grün, blau) angezeigt werden,
funktioniert der Monitor ordnungsgemäß. Schließen Sie die
Videoeingangskab el wieder an, und überprüfen Sie den Zustand
des Computer.
Wenn die Farbbalken nicht erschein en, liegt möglicherweise ein
Fehler am Monitor vor. Wenden Sie sich mit der Beschreibun g
des Problems an einen autori sierten Sony-Händler.
Wenn die Netzanzeige 1 orange blinkt
Schalten Sie den Monitor am Netzschalter 1 aus und
wieder ein.
Wenn die Netzanzeige 1 jetzt grün leuchtet, funktioniert der
Monitor ordnung s gem ä ß.
Wenn die Netzanzeige 1 immer noch blinkt, liegt
möglicherweise ein Fehler am Monitor vor. Ermitteln Sie das
Intervall, in dem die Netzanzeige 1 blinkt (in Sekunden), und
wenden Sie sich mit der B eschreibung des Problem s an einen
autorisierten Sony-Händler. Notieren Sie sich unbedingt die
Modellbezeichnun g und die Seriennummer des Monitors.
Notieren Sie sich außerdem das Fabrikat und Modell Ihres
Computers und der Grafi kkarte.
Änderungen, die dem technischen Fortschritt dienen, bleiben
vorbehalten.
16
Page 45
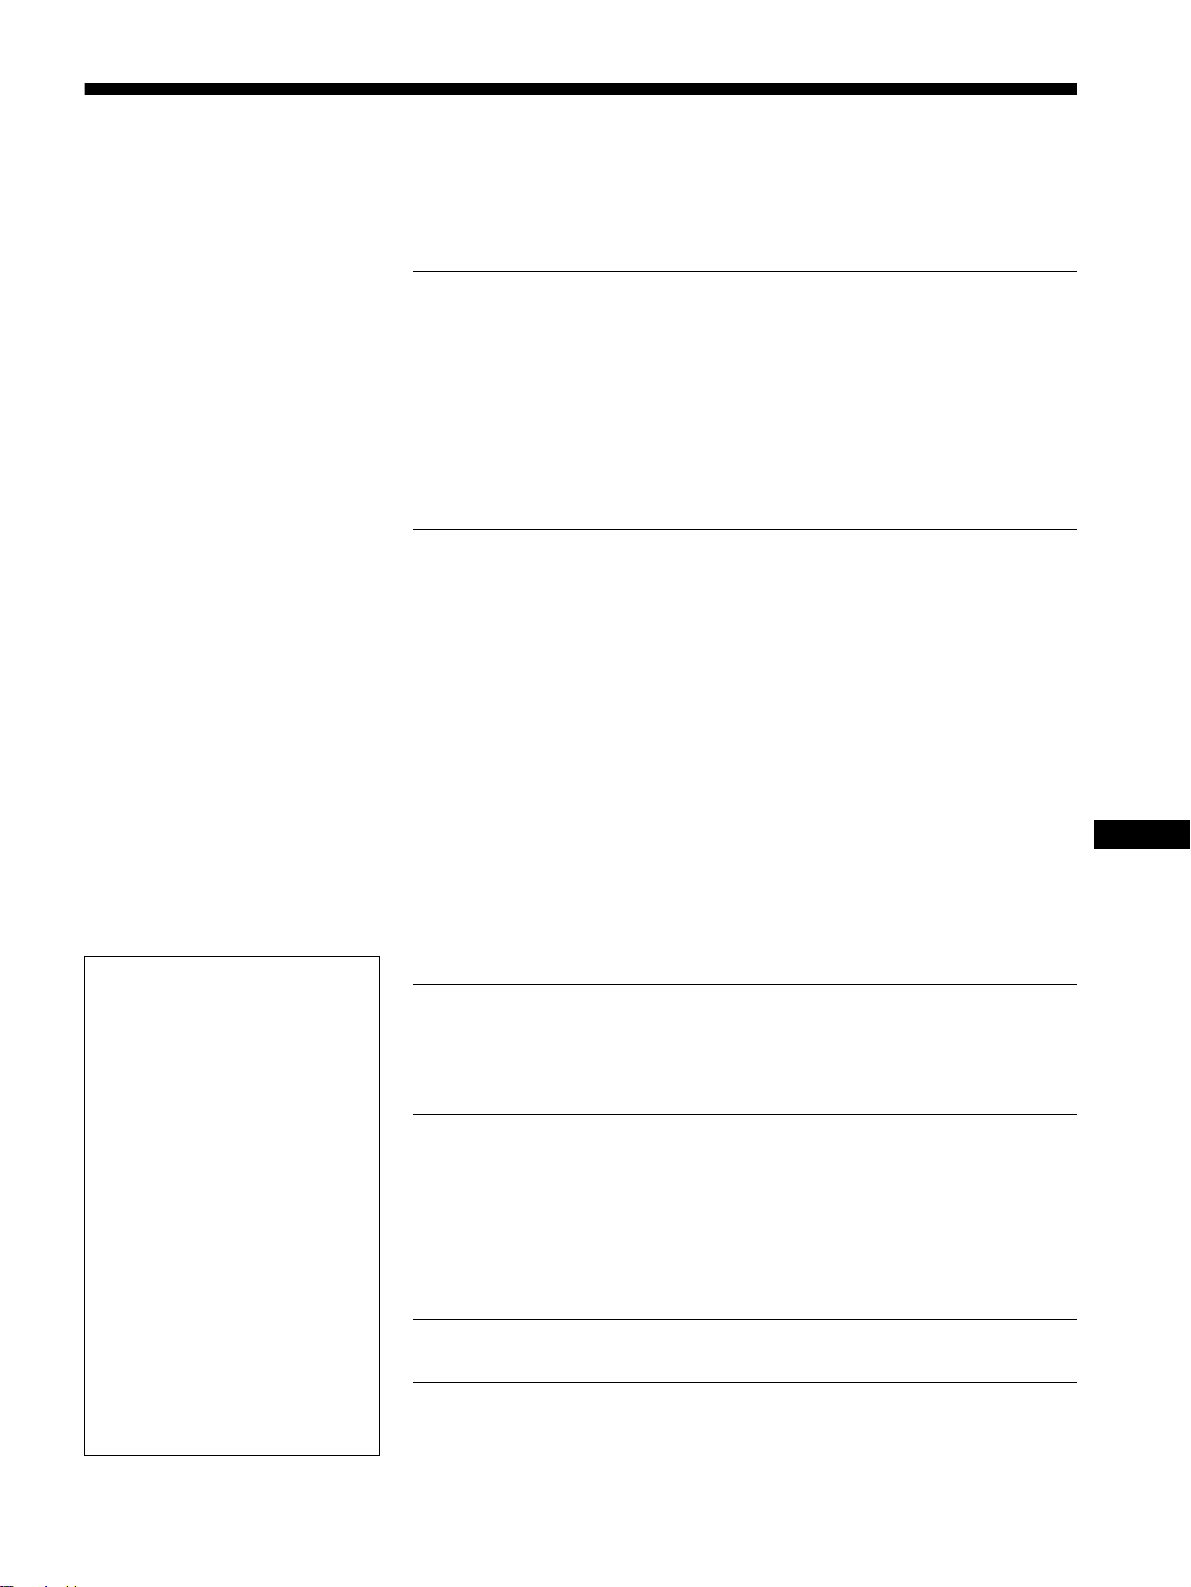
Índice
Precauciones . . . . . . . . . . . . . . . . . . . . . . . . . . . . . . . . . . . . . . . . . . 4
Identificación de los componentes y los controles . . . . . . . . . . . . . . 5
Instalación . . . . . . . . . . . . . . . . . . . . . . . . . . . . . . . . . . . . .6
• Trinitron es una marca comercial
registrada de Sony Corporation.
• Macintosh es una marca comercial de
Apple Computer, Inc., registrada en
EE.UU. y otros países.
• Windows
comerciales registrada s de Mi crosoft
Corporation en Estad os Unidos y otros
países.
• IBM PC/AT y VGA son marcas
comerciales registradas de IBM
Corporation de EE.UU.
• VESA y DDC
de Video Electronics Standard
Association.
•
E
registrada de EE.UU.
• El resto de los nombres de productos
mencionados en este manual pueden ser
marcas comerc iales o marcas
comerciales registradas de sus
respectivas compañías.
•Además, “” y “” no se mencionan en
cada caso en este manual.
y MS-DOS son marcas
son marcas comerciales
NERGY STAR es una marca
Paso 1:
Paso 2:
Paso 3:
Conexión del monitor al ordenador. . . . . . . . . . . . . . . . . . . 6
Conexión del cable de alimentación . . . . . . . . . . . . . . . . . . 6
Encendido del monitor y del ordenador . . . . . . . . . . . . . . . 6
Conexión de periféricos conformes con USB
(Bus serie universal). . . . . . . . . . . . . . . . . . . . . . . . . . . . . . . . . . . . . 7
Selección del idioma de los menús en pantalla
(LENGUAJE/INFORMACIÓN) . . . . . . . . . . . . . . . . . . . . . . . . . . . . . 8
Personalización del monitor. . . . . . . . . . . . . . . . . . . . . . .8
Navegación por el menú. . . . . . . . . . . . . . . . . . . . . . . . . . . . . . . . . . 8
Ajuste del brillo y del contraste (BRILLO/CONTRASTE) . . . . . . . . 10
Ajuste del tamaño o centrado horizontal de la imagen
(TAMAÑO H/POSICIÓN) . . . . . . . . . . . . . . . . . . . . . . . . . . . . . . . . 10
Ajuste del tamaño o centrado vertical de la imagen
(TAMAÑO V/POSICIÓN) . . . . . . . . . . . . . . . . . . . . . . . . . . . . . . . . 10
Ajuste de la curvatura de los lados de la imagen
(COJÍN/BAL COJÍN). . . . . . . . . . . . . . . . . . . . . . . . . . . . . . . . . . . . 10
Ajuste del ángulo de los lados de la imagen
(TRAPECIO/PARALELO). . . . . . . . . . . . . . . . . . . . . . . . . . . . . . . . 11
Ajuste de la rotación de la imagen (ROTACIÓN) . . . . . . . . . . . . . . 11
Aumento o disminución de la imagen (ZOOM). . . . . . . . . . . . . . . . 11
Ajuste del color de la imagen (COLOR) . . . . . . . . . . . . . . . . . . . . . 11
Ajustes adicionales (DESMAGNETIZAR/MUARE). . . . . . . . . . . . . 12
Restauración de los ajustes (RECUPERAR) . . . . . . . . . . . . . . . . . 12
Características técnicas . . . . . . . . . . . . . . . . . . . . . . . . .13
Modos predefinidos y de usuario . . . . . . . . . . . . . . . . . . . . . . . . . . 13
Función de ahorro de energía . . . . . . . . . . . . . . . . . . . . . . . . . . . . 13
Solución de problemas . . . . . . . . . . . . . . . . . . . . . . . . . .13
Si aparecen líneas finas en la pantalla
(hilos de amortiguación) . . . . . . . . . . . . . . . . . . . . . . . . . . . . . . . . . 13
Mensajes en pantalla . . . . . . . . . . . . . . . . . . . . . . . . . . . . . . . . . . . 13
Problemas y soluciones . . . . . . . . . . . . . . . . . . . . . . . . . . . . . . . . . 14
Función de autodiagnóstico . . . . . . . . . . . . . . . . . . . . . . . . . . . . . . 16
Especificaciones . . . . . . . . . . . . . . . . . . . . . . . . . . . . . . .16
Appendix. . . . . . . . . . . . . . . . . . . . . . . . . . . . . . . . . . . . . . . i
Preset mode timing table . . . . . . . . . . . . . . . . . . . . . . . . . . . . . . . . . .i
ES
3
Page 46
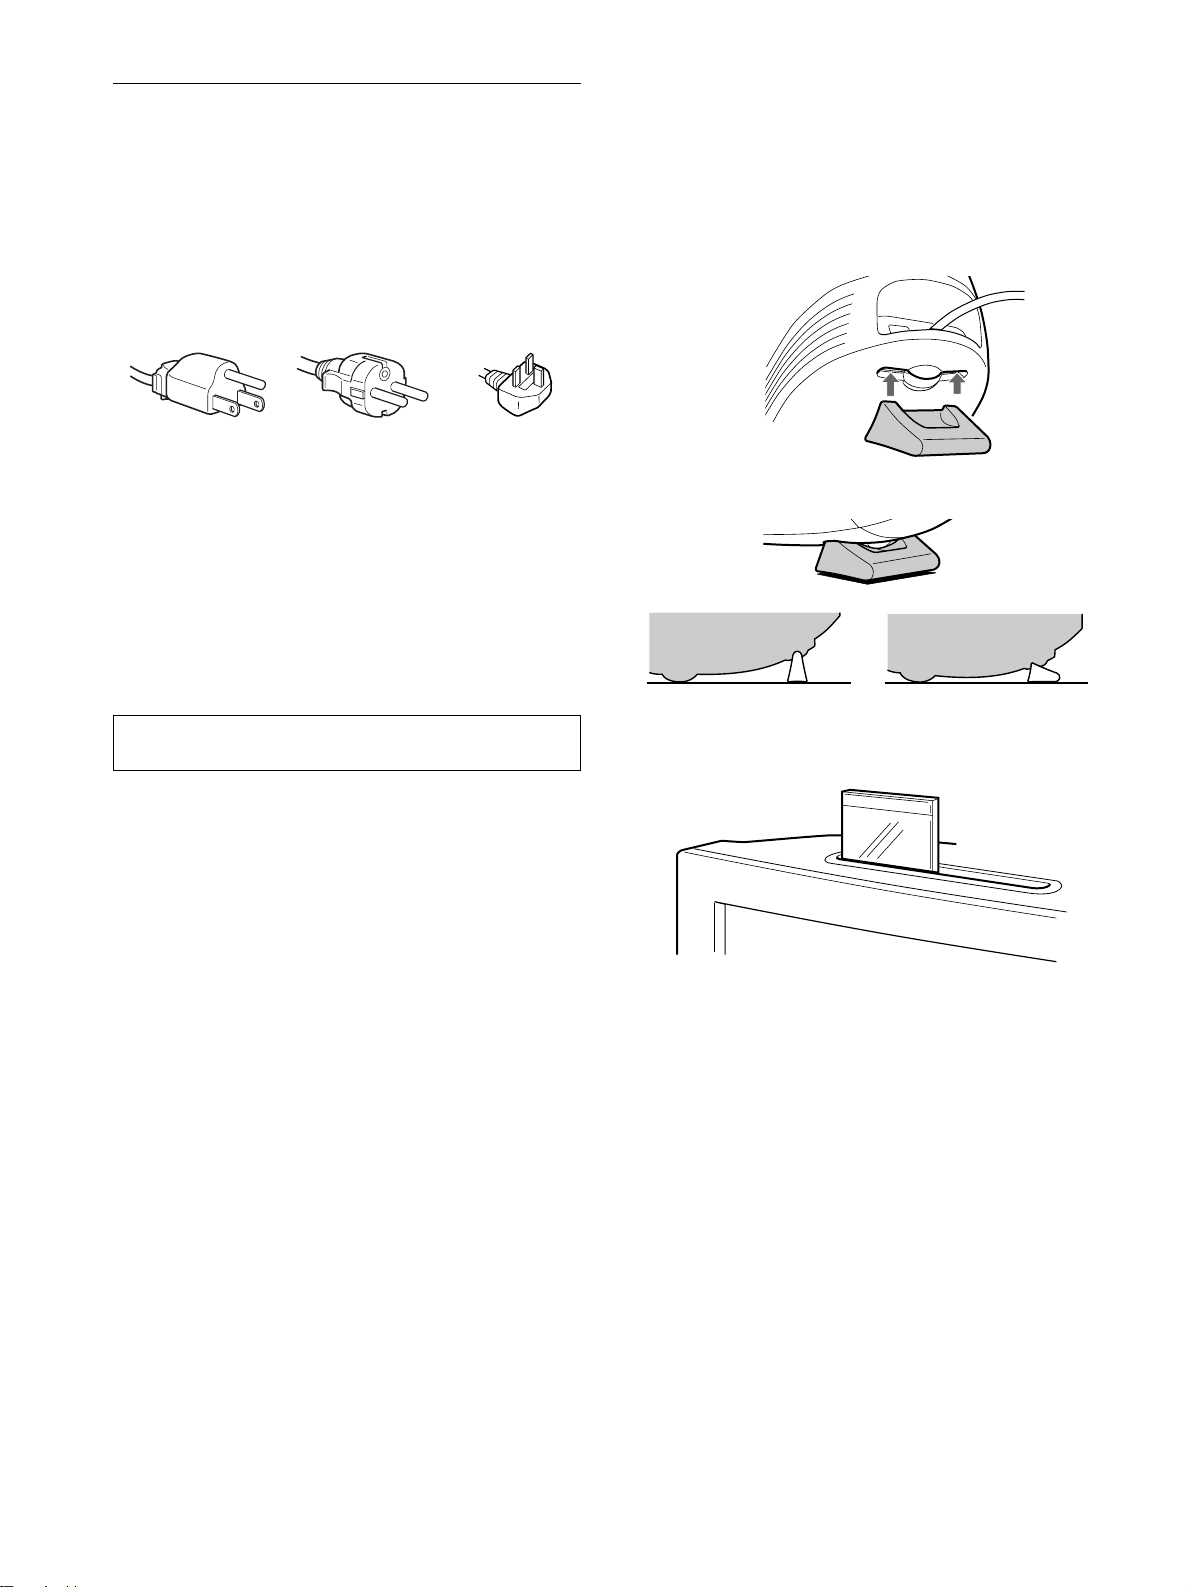
Precauciones
Aviso sobre las conexiones de alimentación
• Utilice el cable de alimentación suministrado. Si utiliza un
cable diferente, asegúrese de que sea compatible con el
suministro de alimentación local.
Para los clientes en el Reino Unido
Si utiliza el monit or en e l Rein o Uni do, ase gúres e de u tilizar el
cable de alimentació n suministrado para dicho país.
Ejemplo de tipos de enchufe
Transporte
Cuando transporte este monitor para su reparación o traslado,
utilice los materiales y la caja de embalaje originales.
Uso del soporte
Inserte el soporte suministrado en la ranura para ajustar el ángulo
del monitor. Es posible emplear el soporte en posición vertical u
horizontal.
para 100 a 120 V CA para 200 a 240 V CA para 240 V CA
• Antes de desconectar el cable de alimentación, espere al menos
30 segundos después de desactivar la alimentación para
permitir la descarga de la electricidad estática de la superficie
de la pantalla.
• Después de activar la alimentación, la pantalla se desmagnetiza
durante unos 5 segundos. Esto genera un intenso campo
magnético alrededor de la pantalla que puede afectar a los datos
almacenados en discos o cin tas magnéticas situados cerca del
monitor. Asegúrese de mantener las cintas, discos, y equipos de
grabación magnéticos alejados del monitor.
El equipo debe instalarse cerca de una toma de corriente de
fácil acceso.
solamente
Instalación
No instale el monitor en los siguientes lugares:
• sobre superficies (mantas, colchas, etc.) o cerca de materiales
(cortinas, tapices, etc.) que puedan bloquear los orificios de
ventilación
• cerc a de fuent es de calo r, com o radi ad ore s o con du ctos de air e
caliente, ni en lugares expuestos a la luz sola r di rect a
• en lugares expuestos a cambios bruscos de temp eratura
• en lugares expuestos a vibraciones mecánicas o golpes
• sobre superficies inestables
• cerca de equipos que generen magnetismo, como
transformadores o líneas eléc tricas de alta tensión
• cerca o sobre superficies metálicas con carga eléctrica
Uso de la ranura de la parte superior
Es posible colocar un marco para fotografías o una caja de CD en
la ranura.
Nota
No utilice la ranura para otra finalidad.
Mantenimiento
• Limpie la pantalla con un paño suave. Si utiliza algún líquido
de limpieza de crista les, no emp lee n ingún tipo de pro ducto d e
limpieza que contenga soluciones antiestáticas ni aditivos
similares, ya qu e pu e de raya r la c ap a de la su p erf icie de la
pantalla.
• No frote, toque ni manipule la superficie de la pantalla con
objetos afilados o abrasivos, como un bolígrafo o un
destornillador. Este tipo de contacto puede rayar el tubo de
imagen.
• Limpie el exterior, el panel y los controles con un paño suave
ligeramente humedecido con una solución detergente poco
concentrada. No utilice estropajos abrasivos, detergente en
polvo ni disolventes , com o alc oh ol o benc in a .
4
Page 47
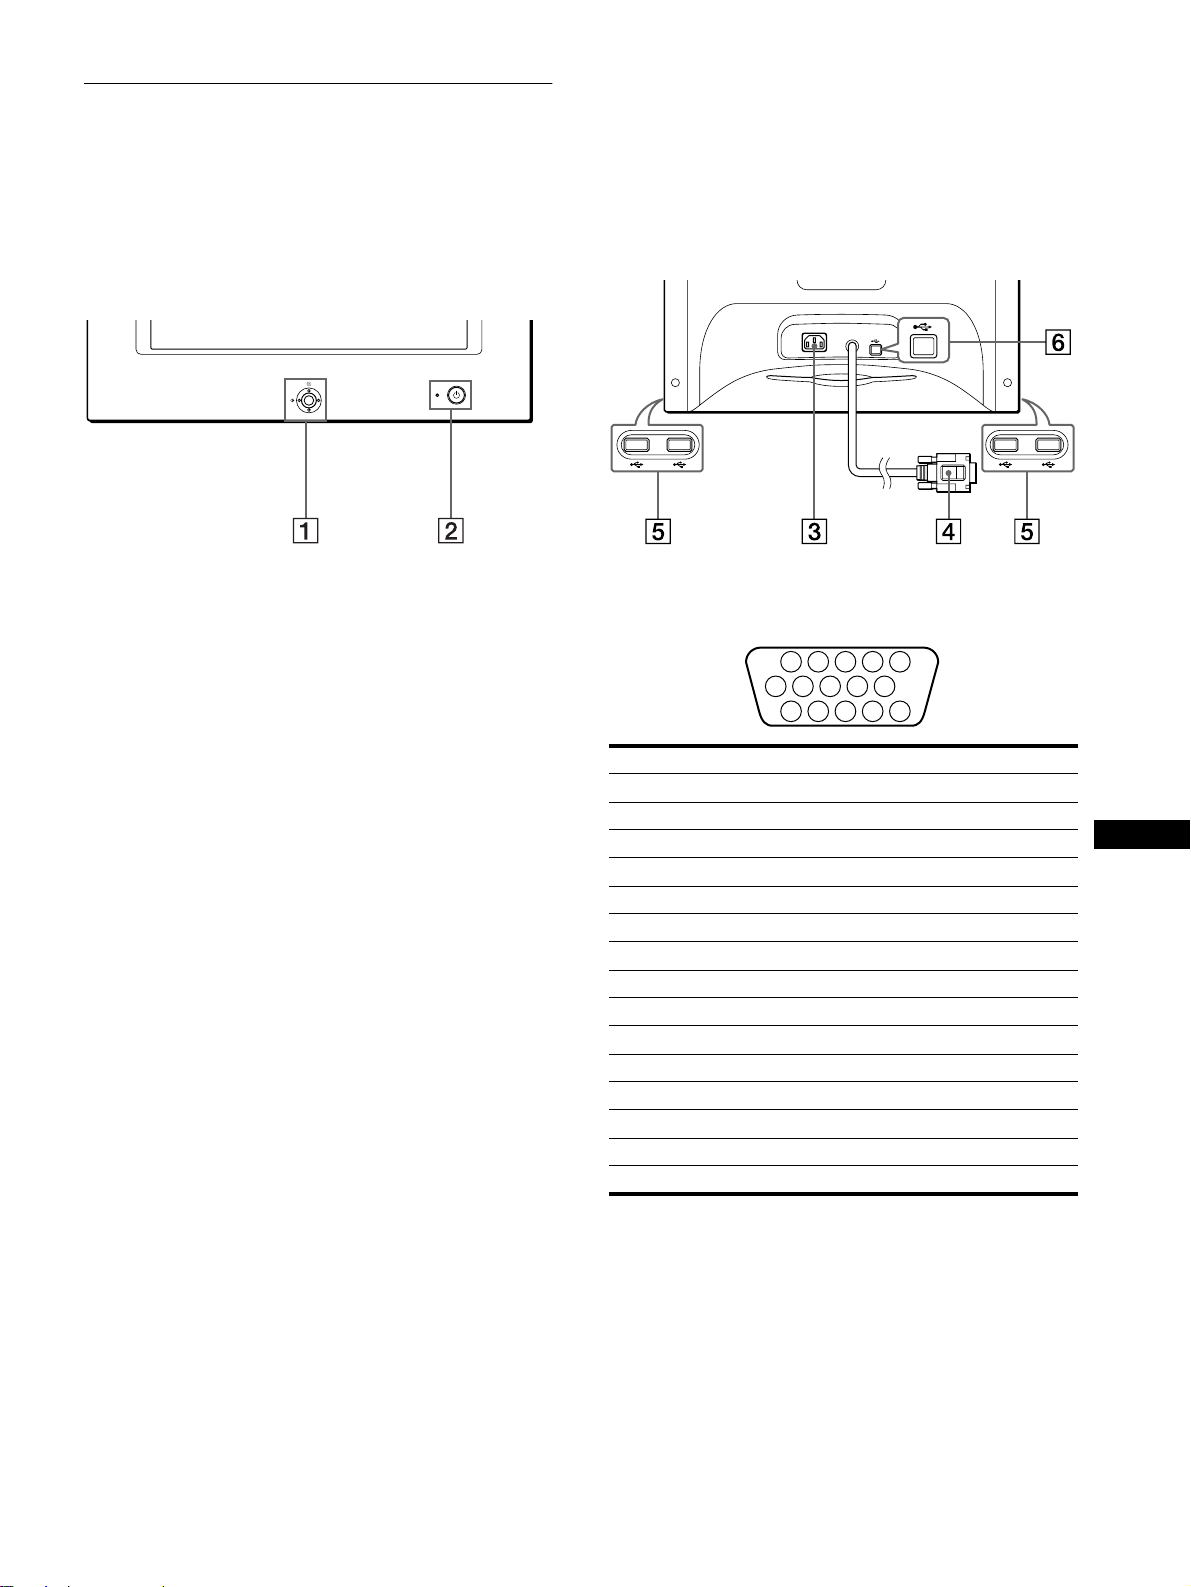
Identificación de los componentes
1 2 3 4
5
876
11 12 13 14 15
10
9
y los controles
Consulte las páginas entre paréntesis para obtener más
información.
MENU
Parte posteriorParte frontal
AC IN
1 Botón de control (página 9)
El botón de control se utiliza para most rar el men ú y rea liz ar
ajustes del monitor, incluidos los de brillo y contraste.
2222 Interruptor e indicador 1 (alimentación)
(páginas 6, 13, 16)
Este botón enciende y a paga el monitor. El indicador de
alimentación se ilumina en verde cuando se enciende el
monitor, y parpadea en verde y naranja o se ilumin a en
naranja cuando dicho monitor se encuentra en el modo de
ahorro de energía.
3333 Conector AC IN (página 6)
Este conector proporciona al imentación de CA al monitor.
4444 Conector de entrada de vídeo (HD15) (página 6)
Este conector int r oduce las señales de vídeo RVA
(0,700 Vp-p, positivo) y de sincronización.
Terminal n° Señal
1Roja
2Verde
3Azul
4 Identificación (masa )
5 Masa DDC *
6Masa roja
7 Masa verde
8 Masa azul
9 DDC + 5V*
10 Masa
11 Identificación (masa)
12 Datos bidireccionales (SDA)*
13 Sincronización H.
14 Sincronización V .
15 Reloj de datos (SCL)*
* DDC (Display Data Chan ne l) es un estándar de VESA.
ES
5555 Conectores de flujo de entrada USB (bus serie
universal) (página 7)
Utilice estos conectores para conectar los dispositivos
periféricos USB al monitor.
6666 Conector de flujo de salida USB (bus serie
universal) (página 7)
Emplee este conector para conectar el monitor a un ordenador
conforme con USB.
5
Page 48

Instalación
AC IN
a AC IN
a una toma de corriente
Cable de alimentación
(suministrado)
Antes de utilizar el monitor, compruebe que ha rec ibido los
siguientes accesorios:
• Cable de alimentación (1)
• Cable USB (1)
• Soporte para monitor (1)
• Tarjeta de garantía (1)
• Notas so br e la lim pi ez a de la sup e rf ic i e de la pa ntalla (1)
• Este manual de instrucciones (1)
Paso 1: Cone xión del monitor al
ordenador
Apague el monitor y el ordenador antes de r ealizar la conexión .
Conexión a un ordenador IBM PC/AT o
x
compatible
Paso 2: Conexión del cable de
alimentación
Con el monitor y el ordenador apagados, conecte primero el cable
de alimentación al monitor y, a continuación, a una toma de
corriente.
AC IN
a salida de vídeo
Ordenador IBM PC/AT o
compatible
Conexión a un ordenador Macintosh o
x
compatible
Es necesario un adaptador Macintosh (no suministrado).
AC IN
Paso 3: Encendido del monitor y
del ordenador
Encienda primero el monitor y, a continuación, el ordenador.
La instalación del monitor se ha completado.
Si es necesario, utilice los controles del monitor para ajustar la
imagen.
Ordenador
Macintosh o
compatible
6
Adaptador Macintosh
(no suministrado)
a salida de vídeo
Page 49
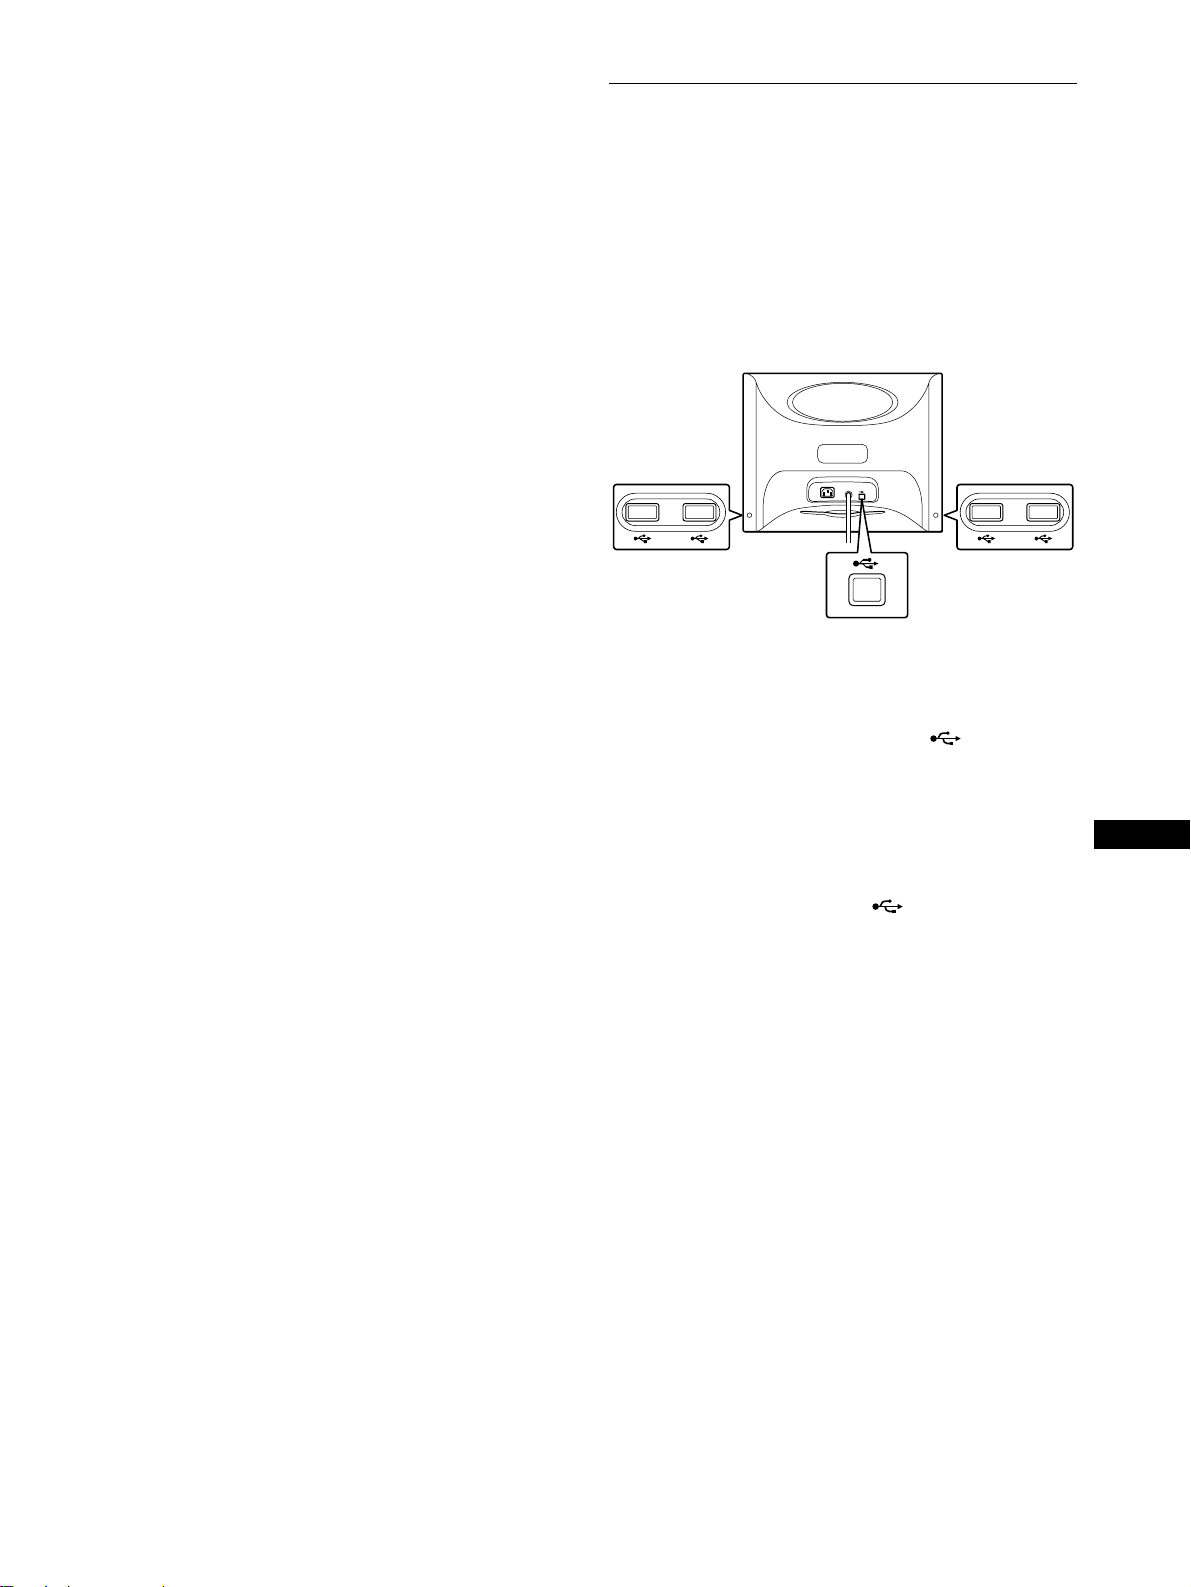
Si no aparece ninguna imagen en la pantalla
• Compruebe que el monitor esté correctamente co nectado al
ordenador.
• Si NO SEÑAL aparece en pantalla, compruebe que la tarjeta
gráfica del ordenador esté completamente insertada en la ranura
de bus correcta.
• Si sustituye un monitor an tiguo po r este mode lo y FUERA DE
RANGO EXPLORACION aparece en la pantalla, vuelva a
conectar el monitor antiguo. A continuación, ajuste la tarjeta
gráfica del ordenador de forma que la frecuencia horizontal se
encuentre entre 30 y 70 kHz, y la vertical entre 48 y 120 Hz.
Para obtener más información sobre los mensajes en pantalla,
consulte “Problemas y soluciones” en la página 14.
Instalación en distintos sistemas operativos (OS)
Este monitor cumple con el estándar Plug & Play “DDC” y detect a
automáticamente t oda la información de dicho monitor. No es preciso
instalar ningún contr o la dor específico en el ordena dor.
Si conecta el monitor al PC y, a continuación, inicia éste por primera vez,
es posible que el asistente de instalación aparezca en pantalla. Haga clic
en “Next” varias veces, según las instrucciones del asistente, hasta que el
monitor Plug & Play se seleccione automática m ente para que pueda
utilizar este monito r.
Para los usuarios que utilicen Windows NT4.0
En la instalación del m oni tor en Windows NT4.0 no se utiliz a el
controlador de pantalla. Consulte el manual de instrucciones de Windows
NT4.0 para obtener información detallada sobre el ajuste de la resolución,
frecuencia de barrido y núm ero de colores.
Conexión de periféricos conformes
con USB (Bus serie universal)
El monitor dispone de un conector USB de flujo de salida (en el
panel posterior) y de cuatro conectores USB de flujo de entrada
(dos en el lado izquierdo y dos en el derecho). Éstos permiten
conectar rápida y fácilment e dispositivos periféricos confor mes
con USB (como teclados, ratones, impresoras y escáneres) al
ordenador con un cable USB estandarizado.
Para emplear el monitor como hub para los dispositivos
periféricos, conecte los USB como se ilustra a continuación.
AC IN
a dispositivos
periféricos
conformes con USB
a un ordenador
conforme con USB
1
Encienda el monitor y el ordenador.
2
Conecte el ordenador al conector de flujo de
salida cuadrado con el cable USB suministrado.
a dispositivos
periféricos
conformes con
USB
Para los usuarios que utilicen Windows
Si aparece un mensaje, siga las instrucciones en pantalla y seleccione
Generic USB Hub como ajuste por defecto.
3
Conecte los dispositivos periféricos c onformes con
USB a los conectores USB de flujo de entrada
rectangulares.
Notas
• No todos los ordenadores y/o sistemas operativos admiten las
configuraciones USB. Consulte el manual de instrucciones del
ordenador para averiguar si puede conectar dispositivos USB.
• En la mayoría de los casos, es preciso instalar software de controlador
USB en el ordenador central. Consulte el manual de instrucciones del
dispositivo periférico para más información.
• El monitor funciona com o un hub USB siempre que se encu entra
encendido o en modo de ahorro de energía.
• Si conecta un teclado o un ratón a los conectores USB y después
arranca el ordenador por pri m era ve z, los dispositivos periféricos
pueden no funcionar. Primero conecte el teclado y el ratón directamente
al ordenador e instale los dispositivos conformes con USB. Desp ué s,
conéctelos a este monitor.
• No se apoye en el monitor cuando enchufe los cables USB, ya que
puede moverse repent inamente y causar daños.
ES
7
Page 50

Selección del idioma de los menús
MENU
en pantalla
(LENGUAJE/INFORMACIÓN)
Puede seleccionar inglés , fran cés, alemán, italiano, españo l, ruso
o japonés como idioma de los menús en pantalla. El ajuste de
fábrica es inglés.
1
Pulse el centro del botón de control.
Consulta la pági na 9 para obtener más infor mación sobre el
uso del botón de control.
MENÚ
SAL I DA
TAMAÑO H / POS I CI ÓN
TAMAÑO V / POS I C IÓN
COJÍN/ BAL COJÍN
b
MENU
2
Desplace el botón de control para resaltar
LENGUAJE/INFORMACIÓN y pulse de nuevo el
centro del botón de control.
b
MENU
3
Desplace el botón de control m/M para seleccionar
(LENGUAJE) y pulse el centro del botón de
control. A continuación, desplace el botón de
control m/M para seleccionar un idioma.
• ENGLISH: inglés
• FRANÇAIS: francés
• DEUTSCH: alemán
• ITALIANO: italiano
• ESPAÑOL
•: Ruso
• : Japonés
Para cerrar el menú
Pulse el centro del botón de con tro l una vez para volver al MENU
principal, y dos veces para volver a la visualización normal. Si no pulsa
ningún botón, el menú se ce rra rá aut om át i ca m ent e transcurridos unos
30 segundos.
Para recuperar el idioma inglés
Consulte “Restauración de los ajustes (RECUPERAR)” en la pág ina 12.
TRAPECIO / PARALELO
ROTAC I ÓN
ZOOM
COLOR
LENGUAJ E / I NFORMAC NÓI
DESMAGNE T I ZAR /MUA ER
RECUPERAR
LENGUAJ E / INFORMAC IÓN
ENGL I SH FRANÇA I S
DEUTSCH I TAL I ANO
ESPAÑOL
SELECT EX I T
Personalización del
monitor
Es posible realizar diversos ajustes en el monitor median te el
menú en pantalla.
Navegación por el menú
Pulse el centro del botón de co ntrol para que aparezca el MENU
principal en pantalla. Consulte la página 9 para obtener más
información sobre el empleo del botón de control.
MENÚ
SAL I DA
TAMAÑO H / POS I CI ÓN
TAMAÑO V / POS I C IÓN
COJÍN/BAL COJÍN
TRAPECIO / PARALELO
ROTAC I ÓN
ZOOM
COLOR
LENGUAJ E / I NFORMAC NÓI
DESMAGNE T I ZAR /MUA ER
RECUPERAR
Utilice el botón de control para seleccionar uno de los sigu iente s
menús.
1 SALIDA
Seleccione SALIDA para cerrar
el menú.
2222 TAMAÑO H/POSICIÓN
(página 10)
Seleccione el menú TAMAÑO H/
POSICIÓN para ajustar el tamaño
y centrado horizontal de la
imagen.
3333 TAMAÑO V/POSICIÓN
(página 10)
Seleccione el menú TAMAÑO V/
POSICIÓN para ajustar el tamaño
y centrado vertical de la imagen.
4444 COJÍN/BAL COJÍN
(página 10)
Seleccione el menú COJÍN/BAL
COJÍN para ajustar la curvatura
de los lados de la imagen.
TAMAÑO H / POS I C I ÓN
T AMAÑO H
26
SELECT EX I T
TAMAÑO V / POS I C I ÓN
T AMAÑO V
26
SELECT EX I T
COJ ÍN/BAL COJÍN
CO J Í N
26
SELECT EX I T
8
Page 51

5555 TRAPECIO/PARALELO
MENU
MENU
MENU
(página 11)
Seleccione el menú TRAPECIO/
PARALELO para ajustar el
ángulo de los lados de la imagen.
TRAPECIO / PARALELO
TRAPEC IO
26
SELECT EX I T
Uso del botón de control
x
1
Acceda al MENU principal.
Pulse el centro del botón de control para que el ME NU
principal aparezca en pantalla.
6666 ROTACIÓN (página 11)
Seleccione el menú ROTACIÓN
para ajustar la rotación de la
imagen.
7777 ZOOM (página 11)
Seleccione el menú ZOOM para
aumentar o reducir la imagen.
8888 COLOR (página 11)
Seleccione el menú COLOR para
ajustar la temperatura del color de
la imagen. Puede utilizar esta
función para hacer que los colores
del monitor coin cidan con los de
una imagen impresa.
9999 LENGUAJE/INFORMACIÓN
(páginas 8, 15)
Seleccione el menú LENGUAJE/
INFORMACIÓN para
seleccionar el idioma de los
menús en pantalla y visualizar el
cuadro de información sobre este
monitor.
q; DESMAGNETIZAR/MUARE
(página 12)
Seleccione el menú
DESMAGNETIZAR/MUARE
para desmagnetizar la pantalla y
cancelar el muaré.
qa RECUPERAR (página 12)
Seleccione el menú
RECUPERAR para restaurar los
ajustes.
ROTAC I ÓN
ROT A C I ÓN
26
EX I T
ZOOM
ZOOM
26
EX I T
2
Seleccione el menú que desee ajustar.
Resalte el menú deseado desplazando el botón de control
arriba (M), abajo (m) y a izquierda (<) o derecha (,) para
COLOR
KKK
5000 6500 9300
USER
R50
G50
B50
SELECT EX I T
LENGUAJ E / INFORMACIÓN
ENGL I SH FRANÇA I S
DEUTSCH I TAL I ANO
ESPAÑOL
desplazarse hacia los lados.
3
Ajuste el menú.
Desplace el botón de control hacia la izquierda (<) o la
SELECT EX I T
DESMAGNET I ZAR /MUARE
DE SMAGN E T I Z A R
SI
SELECT EX I T
RECUPERAR
RECUPERAR
MODO TODO
EX I T
derecha (,) para realizar el ajuste.
4
Cierre el menú.
Pulse el centro de l botón de control una vez para volver al
MENU principal, y dos veces para vo lver a la visualización
normal. Si no pulsa ningún botón, el menú se cerrará
automáticamente t ranscurridos unos 30 segundos.
MENU
b
MENU
ES
Visualización de la señal de entrada actual
x
Las frecuencias horizontal y vertical de la señal de entrada actual
aparecen en el menú BRILLO/CONTRASTE. Si la señal se
corresponde con alguno de los modos predefinidos de fábrica de
este monitor, también aparecerá la resolución.
BRI L LO /CONTRASTE
26 26
resolución de
la señal de
entrada actual
68.7kHz/85.0Hz
1024X768
frecuencias
horizontal y
vertical de la
señal de
entrada actual
Restauración de los ajustes
x
Puede restaurar los ajustes mediante el menú RECUPERAR.
Consulte la página 12 para obtener más información sobre la
restauración de los ajustes.
9
Page 52

Ajuste del brillo y del contraste
Ajuste del tamaño o centrado
(BRILLO/CONTRASTE)
Los ajustes de brillo y contraste se realizan mediante un menú
BRILLO/CONTRASTE independiente.
Estos ajustes se almacenan en memoria para todas las señales de
entrada.
1
Desplace el botón de control en cualq uier dirección.
El menú BRILLO/CONTRASTE aparece en pantalla.
BR I LLO / CONTRASTE
26 26
68.7kHz/85.0Hz
1024X768
2
Desplace el botón de control m/M para ajustar el
brillo ( ), y </, para ajustar el contraste (6).
El menú desaparece automá ticamente transcurridos unos
3 segundos.
Ajuste del tamaño o centrado
horizontal de la imagen
(TAMAÑO H/POSICIÓN)
Estos ajustes se almacenan en memoria para la señal de entrada
actual.
vertical de la imagen
(TAMAÑO V/POSICIÓN)
Estos ajustes se almacenan en memoria para la señal de entrada
actual.
1
Pulse el centro del botón de control.
El MENÚ principal aparece en pantalla.
2
Desplace el botón de control para resaltar
TAMAÑO V/POSICIÓN y vuel va a pulsar el centro
de dicho botón.
El menú TAMAÑO V/POSICIÓN aparece en pantalla.
3
Primero, desplace el botón de control m/M para
seleccionar la opción de ajuste que desee. A
continuación, desplace el botón </, para realizar
el ajuste.
Seleccione Para
TAMAÑO V
POSICIÓN V
ajustar el tamaño vertical
ajustar el centrado vertical
Ajuste de la curvatura de los lados
de la imagen (COJÍN/BAL COJÍN)
1
Pulse el centro del botón de control.
El MENÚ principal aparece en pantalla.
2
Desplace el botón de control para resaltar
TAMAÑO H/POSICIÓN y vuelva a pu lsar el centro
de dicho botón.
El menú TAMAÑO H/POSICIÓN aparece en pantalla.
3
Primero, desplace el botón de control m/M para
seleccionar la opción de ajuste que desee. A
continuación, desplace el botón </, para realizar
el ajuste.
Seleccione Para
TAM AÑO H
POSICIÓN H
ajustar el tamaño horizontal
ajustar el centrado horizontal
Estos ajustes se almacenan en memoria para la señal de entrada
actual.
1
Pulse el centro del botón de control.
El MENÚ principal aparece en pantalla.
2
Desplace el botón de control para resaltar
COJÍN/BAL COJÍN y vuelva a pulsar el centro de
dicho botón.
El menú COJÍN/BAL COJÍN aparece en pantalla.
3
Primero, desplace el botón de control m/M para
seleccionar la opción de ajuste que desee. A
continuación, desplace el botón </, para realizar
el ajuste.
Seleccione Para
COJÍN
BAL COJÍN
expandir o contraer los lados de la
imagen
desplazar los lados de la imagen hacia
la izquierda o la derecha
10
Page 53

Ajuste del ángulo de los lados de
KKK
R50
G50
B50
SELECT EX I T
COLOR
5000 6500 9300
USER
la imagen (TRAPECIO/PARALELO)
Ajuste del color de la imagen
(COLOR)
Estos ajustes se almacenan en memoria para la señal de entrada
actual.
1
Pulse el centro del botón de control.
El MENÚ principal aparece en pantalla.
2
Desplace el botón de control para resaltar
TRAPECIO/PARALELO y vuelva a pulsar el
centro de dicho botón.
El menú TRAPECIO/PARALELO aparece en pantalla.
3
Primero, desplace el botón de control m/M para
seleccionar la opción de ajuste que desee. A
continuación, desplace el botón </, para realiza r
el ajuste.
Seleccione Para
TRAPECIO
PARALELO
ajustar la anchura de la imagen en la
parte superior de la pantalla
desplazar la imagen hacia la izquierda
o la derecha en la parte superior de la
pantalla
Ajuste de la rotación de la imagen
(ROTACIÓN)
Este ajuste se almacena en memoria para todas l as señales de
entrada.
1
Pulse el centro del botón de control.
El MENÚ principal aparece en pantalla.
Los ajustes de COLOR permiten definir la temperatura del color
de la imagen media nte el cambio del nivel de color del campo
blanco. Los colores aparecen rojizos cuand o la t emperatura es
baja, y azulados cuando es alta. Este a juste resul ta útil para h acer
coincidir los colores del monitor con los de las imágenes
impresas.
Este ajuste se almacena en memoria para todas las señales de
entrada.
1
Pulse el centro del botón de control.
El MENÚ principal aparece en pantalla.
2
Desplace el botón de control para resaltar
COLOR y vuelva a pulsar el centro de dicho
botón.
El menú COLOR aparece en pantalla.
3
Desplace el botón de control </, para
seleccionar una temperatura del color.
Las temperaturas predefinidas son 5000K, 6500K y 9300K.
Puesto que el valor ajustado en fábrica es de 9300K, la
tonalidad del color blanco cambiará de azulada a rojiza al
disminuir la temperatura hasta 6500K y 5000K.
4
Si es necesario, sintonice la temperatura del color
con precisión.
Primero desplace el botón de control </, para seleccionar
USER. Después desplace el botón de control m/M para
seleccionar R (rojo), G (verde) o B (azul), y desplace el botón
de control </, para realizar el ajuste.
ES
2
Desplace el botón de control para resaltar
ROTACIÓN y vuelva a pulsar el centro de dicho
botón.
El menú ROTACIÓN aparece en pantal la.
3
Desplace el botón de control </, para girar la
imagen.
Aumento o disminución de la
imagen (ZOOM)
Este ajuste se almacena en memoria para la señal de entrada
actual.
1
Pulse el centro del botón de control.
El MENÚ principal aparece en pantalla.
2
Desplace el botón de control para re saltar ZOOM
y vuelva a pulsar el centro de dicho botón.
El menú ZOOM aparece en pantalla.
3
Desplace el botón de contro l </, para aumentar o
reducir la imagen.
Nota
El ajuste se detiene cuando el tamaño horizontal o vertical alcanza su valor
máximo o mínimo.
Si sintoniza la temperatu ra con precisión, lo s valores del color
nuevos se almacenan en memoria y se recuperan siempre que
seleccione USER.
11
Page 54
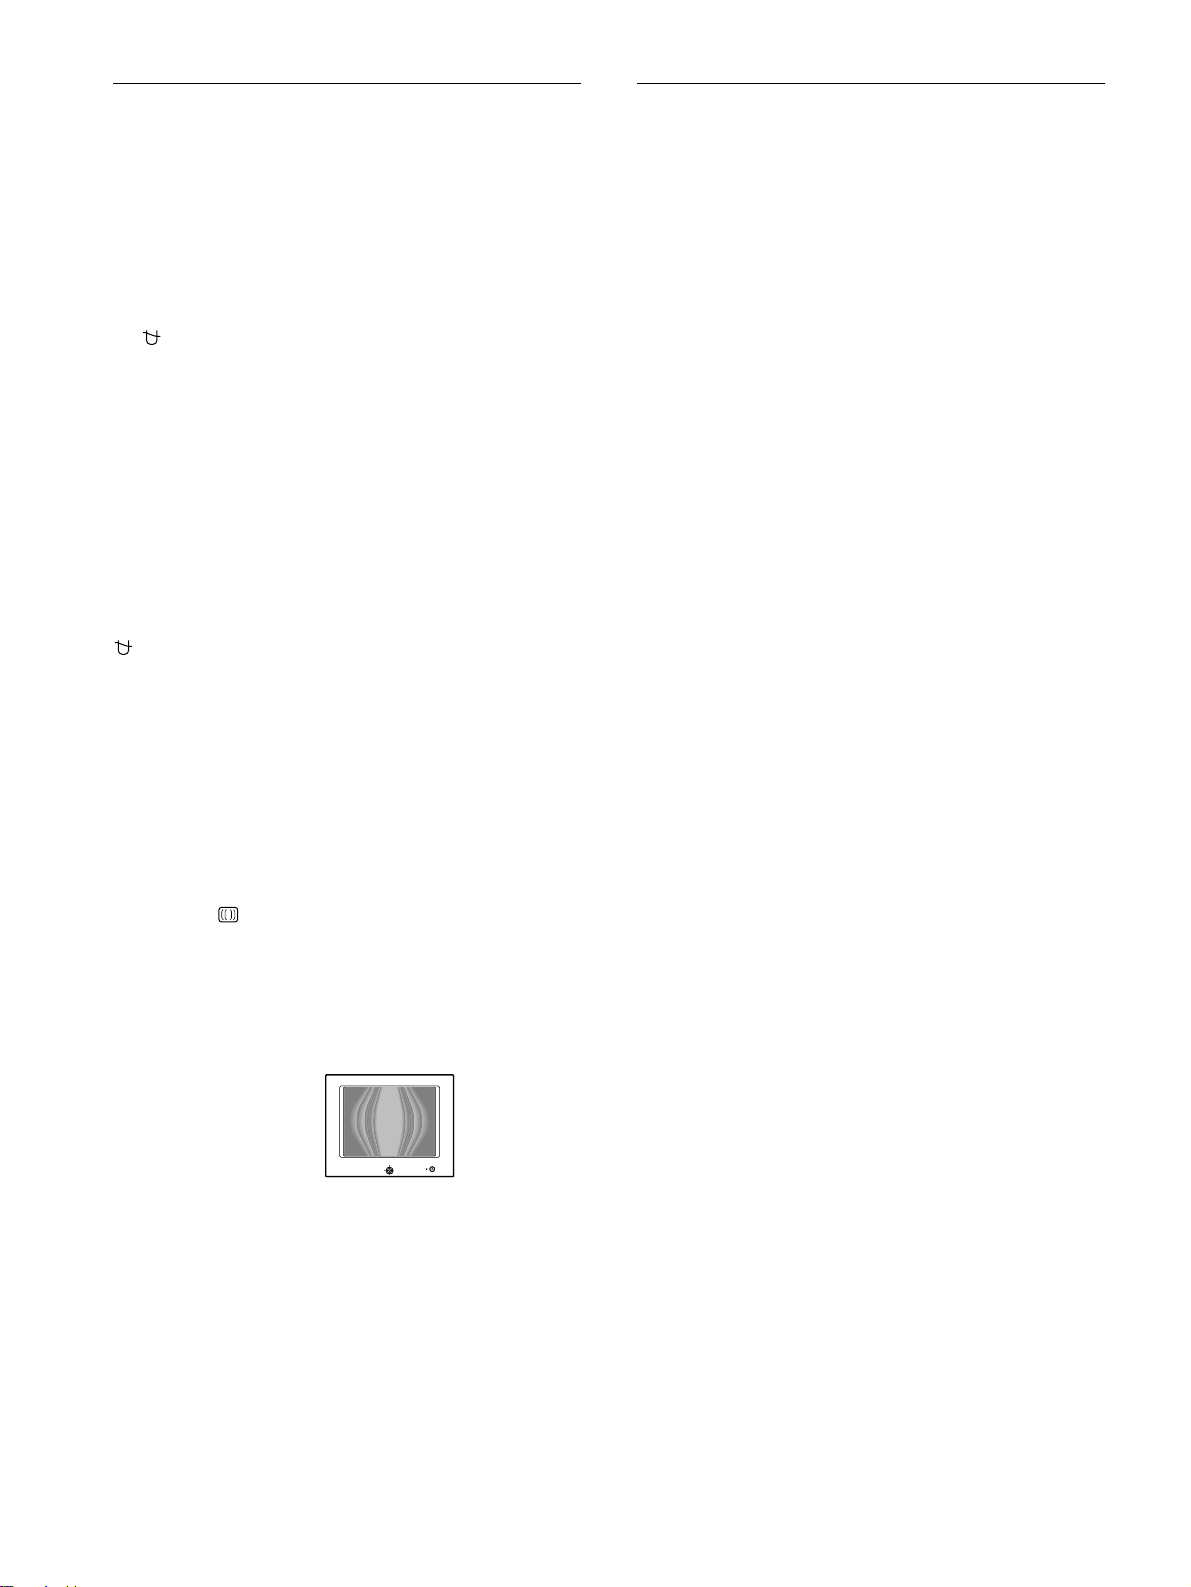
Ajustes adicionales
Restauración de los ajustes
(DESMAGNETIZAR/MUARE)
Es posible desmagneti zar manualmente la pan talla y cancelar el
muaré.
1
Pulse el centro del botón de control.
El MENÚ principal aparece en pantalla.
2
Desplace el botón de control m/M para resaltar
DESMAGNETIZAR/MUARE y pulse de nuevo el
centro del botón de control.
El menú DESMAGNETIZAR/MUARE aparece en pantalla.
3
Desplace el botón de control m/M para seleccionar
la opción de ajuste que desee.
Ajuste la opción seleccionada segú n las siguientes
instrucciones.
Desmagnetización de la pantalla
El monitor se desmagnetiza automáticamente al activar la
alimentación.
Para desmagnetizarlo m anualm ente, p rimero despla ce
el botón de control m/M para seleccionar
(DESMAGNETIZAR). A continuación, desplace el
botón ,.
La pantalla se desmagnet iza durante unos 5 segundos. Si es
necesario aplicar un segundo ciclo de desmagnetización, deje que
transcurra un intervalo mínimo de 20 minutos pa ra obtener el
mejor resultado posible.
Cancelación del muaré
Si aparecen en pantalla patrones elípticos u ondulados, ajuste el
nivel de cancelación de muaré.
Para ajustar la cantidad de cancelación de muaré,
primero desplace el botón de control m/M para
seleccionar (CANCELAR MUARE). A continuación,
desplace el botón </, hasta que el efecto de muaré
sea mínimo.
*
(RECUPERAR)
Este monitor dispone de los siguientes métodos de restauración.
Utilice el menú RECUPERAR para restaurar los ajustes.
1
Pulse el centro del botón de control.
El MENÚ principal aparece en pantalla.
2
Desplace el botón de control m/M para resaltar
0 RECUPERAR y pulse de nuevo el centro del
botón de control.
El menú RECUPERAR aparece en pant alla.
Restaure los valores según las siguientes instrucciones.
Restauración de todos los datos de ajuste para la
señal de entrada actual (MODO)
Desplace el botón de control <.
MODO se selecciona la opción y se restauran todos los datos de
ajuste para la señal de entrada actual.
Tenga en cuenta que las sigu ientes opciones no se restauran
mediante este método:
• idioma del menú en pantalla (página 8)
• rotación de la imagen (página 11)
Restauración de todos los datos de ajuste a los
niveles predefinidos de fábrica (TODO)
Desplace el botón de control ,.
Se selecciona la opción TODO y se restauran todos los datos de
ajuste para la señal de entrada actual. Todos los datos de ajuste
(excepto los ajustes de USER del menú COLOR) recuperan los
niveles predefinidos de fábrica.
Nota
Si TODO se encuentra selecc io nado, los botones del monitor no
funcionarán durante unos 5 segundos.
* El muaré es un tipo de int erferencia natur al que produce líneas suaves
y onduladas en la pantalla. Puede aparecer debido a interferencias entre
el patrón de la imagen en pantalla y el de paso de fósforo del monitor.
Ejemplo de muaré
MENU
12
Page 55

Características técnicas
INFORMACIÓN
FUERA DE
RANGO EXPLORACION
Modos predefinidos y de usuario
Solución de problemas
Antes de ponerse en contacto con el servicio té cnico, consulte esta
sección.
Cuando el monitor recibe una se ñal de entrada, hace coincidir
automáticamente la señal con alguno de los modos predefinidos
de fábrica almacenados en la memoria del monitor, con el fin de
mostrar imágenes de alta calidad en el centro de la pantalla.
(Consulte la lista de los modos predefinidos de fábrica en la
sección Appendix.) Con respecto a las señales de entrada que no
se correspondan con ni nguno de los modos predefi nidos de
fábrica, la tecnología digital Mu ltisca n de este monitor garantiza
la presentación en pantalla de imágenes nítidas para cua lquier
sincronización dentro del margen de frecuencias del monitor
(horizontal: 30 – 70 kHz , v e rtica l: 4 8 – 1 20 Hz) . Si la im age n se
ajusta, los datos de ajuste se almacenan como modo de usuario y
se recuperan automáticament e al recibirse la misma señal de
entrada.
Nota para los usuarios de Windows
Para los usuarios de Windows, consulte el manual de la tarjeta
gráfica o el programa de utilidades suministrado con la tarjeta
gráfica y seleccione la frecuen cia de barrido más alta disponible
para maximizar el rendimiento del monitor.
Función de ahorro de energía
Este monitor cumple con las directrices de ahorro de energía
E
definidas por VESA,
ninguna señal mediante el monitor desde el ordenador conectado,
dicho monit or reducirá aut omáticame nt e el co ns umo de energí a
como se muestra a continuación.
NERGY STAR y NUTEK. Si no se recibe
Si aparecen líneas finas en la
pantalla (hilos de amortiguación)
Las líneas que se aprecian en pantalla, especialmente cuando el
color de fondo es luminoso (normalmente bl anco), son normales
en los monitores Trinitron. No se trata de un fallo de
funcionamiento. Son sombras de los hilos de amortiguación
utilizados para estabilizar la rejilla de apertura. La rejilla de
apertura es el elemento esencial por el que el tubo de imagen
Trinitron es único, permitiendo que la pantalla reciba más
iluminación, por lo que las imágenes aparecen con más brillo y
más detalle.
Hilos de amortiguación
Mensajes en pantalla
Si la señal de entrada presenta algún problema, la pantalla
mostrará uno de los siguientes mensajes. Para solucionar el
problema, consulte “Problemas y soluciones” en la página 14.
ES
Modo de
alimentación
funcionamiento
normal
activo
inactivo**
alimentación
desactivada
* Las cifras refleja n el consumo de energía cuando no hay ningún
periférico comp a ti b le con USB conectado al monitor.
** Cuando el ordenador en tra en el modo “activo-inac tivo”, la señal de
entrada se interrumpe y la pant al la muestra NO SEÑAL.
Transcurridos 20 segundos, el monitor entra en el modo de ahorro de
energía.
*** Si la señal de sincronización horizontal o vertical se recibe mediante
el monitor, el indicador de alimentación puede pa rpadear de forma
alterna en verde y naranja.
Consumo de
energía*
115 W verde
≤
5 W naranja***
≤
0 W apagado
Indicador
1 (alimentación)
Condición de la señal
de entrada
Condición de la señal de entrada
FUERA DE RANGO EXPLORACION
indica que las especificacio nes del monitor no aceptan la
señal de entrada.
NO SEÑAL
indica que el monitor no recibe ninguna señal.
13
Page 56

Problemas y soluciones
Si el problema lo causa el ordenador u otro equipo conectado, c onsulte el manual de instrucciones del equi po conectado.
Si lo expuesto a continuación no resuelve el problema utilice la función de autodiagnóstico (página 16).
Problema Compruebe lo siguiente
Ausencia de imagen
Si el indicador 1 (alimentación) no
está iluminado
Si el mensaje NO SEÑAL aparece en
pantalla, o si el ind icador
1 (alimentación) está iluminado en
naranja o alternando entre verde y
naranja
Si el mensaje FUERA DE RANGO
EXPLORACION aparece en pantalla
Si no aparece ningún mensaje y el
indicador 1 (alimentac ión ) está
iluminado en verde o parpadea en
naranja
Si utiliza un sistema Macintosh • Compruebe que el adaptador Macintosh (no suministrado) y el cable de señal de vídeo
La imagen parpadea, se ondula,
oscila o aparece codificada
La imagen es borrosa • Ajuste el brillo y el contraste (página10).
Aparecen imágenes fantasma • No utilice cables prolongadores de vídeo y/o cajas de conmutación de vídeo.
La imagen no está centrada o el
tamaño es incorrecto
Los bordes de la imagen son
curvos
Aparece un patrón ondulado o
elíptico (muaré)
• Compruebe que el cable de alimentación esté correctamente conectado.
• Compruebe que el interrupt or 1 (alimentación) se encuentre en la posición de activado.
• Compruebe que el cable de señal de vídeo esté correctamente conectad o y que todos los
enchufes estén firmemente insertados en las tomas (página 6).
• Compruebe que los terminales del conector de entrada de vídeo HD15 no estén doblados ni
arrancados.
xProblemas causados por el ordenador u otro equipo conectado
• El ordenador se encuentra en el modo de ahorro de energía. Pulse cualquier tecla del
teclado o mueva el ratón.
• Compruebe que el ordenador esté encendido.
• Compruebe que la tarjeta gráfica esté completamente insertada en la ranura bus adecuada.
xProblemas causados por el ordenador u otro equipo conectado
• Compruebe que el margen de frecuencia de vídeo se encuen tre dentro de lo especificado
para el monitor. Si ha sustituido un monitor a ntigu o por éste, vue lv a a cone ctar el ant igu o y
ajuste el margen de frecuencia de la siguiente forma:
Horizontal: 30 – 70 kHz
–
Vertical: 48
• Utilice la fun c ión de auto dia g nó stic o (página 16).
estén correctamente conectados (página 6).
• Aísle y elimine las fuentes potenciales de campos eléctricos o magnéticos, como otros
monitores, impresoras láser, ventiladores eléctricos, lámparas fluorescentes o televisores.
• Aleje el monitor de líneas eléctricas o coloque una protección magnética cerca de dicho
monitor.
• Enchufe el monitor en una toma de CA diferente, prefer iblemente de otro c ircuito.
• Gire el monitor 90° a la izquierda o la derecha.
xProblemas causados por el ordenador u otro equipo conectado
• Consulte el manual de la tarjeta gráfica para obtener información sobre el ajuste adecuado
del monitor.
• Asegúrese de que este monitor acepta el modo gráfico (VESA, Macintos h 16" Color, etc.)
y la frecuencia de la señal de entrada (Appendix). Aunque la frecuencia se encuentre
dentro del margen adecuado, algun as tarjetas gráficas pueden tener un impulso de
sincronización demasiado estrecho para que el monitor se sincronice correctamente.
• Ajuste el índice de barrido del ordenador (frecuencia vertical) para obtener imágenes de la
mejor calidad posible.
• Desmagnetice el monitor* (página 12).
• Disminuya el efecto de canc elación de muaré (página 12).
• Compruebe que todos los enchufes estén firmemente insertados en sus tomas.
• Ajuste el tamaño o el centrado (página 10). Tenga en cuenta que ciertos modos de vídeo no
llenan la pantalla hasta los bordes.
• Ajuste la forma de la imagen (página 10).
• Cancele el muaré (página 12).
xProblemas causados por el ordenador u otro equipo conectado
• Cambie el patrón del escritorio.
120 Hz
14
Page 57
Problema Compruebe lo siguiente
El color no es uniforme • Desmagnetice el moni tor* (página 12). Si sitúa un equip o que genere campos magnéticos,
como un altavoz, cerca del monitor, o cambia la orientación de éste, el color puede perder
uniformidad.
El blanco no parece blanco • Ajuste la temperatura del color (página11).
Los periféricos USB no funcionan • Compruebe que los conectores USB apro piados estén firmemente conecta dos (página 7).
• Compruebe que el interrupt or 1 (alimentación) se encuentre en la posición de activación.
xProblemas causados por el ordenador u otro equipo conectado
• Compruebe que se hayan encendido los dispositivos periféricos USB que tengan fuentes de
alimentación inde pe nd ie nt es .
• Instale la última versión del controlador de dispositivo en el ordenador. Póngase en
contacto con el fabricante del dispositivo para obtener más información sobre el
controlador de dis p os itivo apropiado.
• Si el teclado o el ratón conforme con USB no funciona, conéctelos directamente al
ordenador, reinicie éste y realice los cambios necesarios en los ajustes USB. A
continuación vuelva a conectar el teclado o el ratón al monitor.
• Para los usuarios que utilicen Windows 95
1. Haga clic con el botón derecho en My Computer y sel eccione Properties.
2. Haga clic en la ficha Device Manager. Desplácese hacia abajo y seleccione Universal
Serial Bus Controller.
,Si no aparece Universal Serial Bus Controller, es necesario cargar un disco USB
complementario. Póngase en contacto con el fabricante del ordenador para obtener
más información sobre cómo obtener un disco USB complementario.
3. Seleccione Generic USB Device en la lista de controladores USB y haga clic en
Properties.
4. Si aparece una marca de verificación en la ca silla junto a “Disable in this hardware
profile”, elimine dicha marca.
5. Haga clic en Refre s h.
Se oye un zumbido
inmediatamente después de
activar la alimentación
• Este es el sonido del ciclo de desmagnetización automática. Al activar la alimentación, el
monitor se desmagnetiza automáticamente durante 5 segundos.
* Si es necesario aplicar un segundo ciclo de desmagnetización, deje que transcurran al menos 20 minutos antes de volver a aplicarlo para obtener el mejor
resultado posible. Es po sibl e que se oiga un zumbido, per o no es un fallo de funcionamient o.
Visualización del nombre, número de serie y fecha
de fabricación de este monitor (INFORMACIÓN)
Si el problema no s e soluciona, póngase e n contacto con un
proveedor Sony a utorizado y proporci ónele la siguiente
información.
1
Pulse el centro del botón de control.
El MENÚ principal aparece en pantalla.
• Nombre del modelo: HMD-A220
• Número de serie
• Nombre y especificaciones del ordenador y de la tarjeta gráfica
2
Desplace el botón de control para resaltar
LENGUAJE/INFORMACIÓN y pulse el centro de
dicho botón.
El menú LENGUAJE/INFORMACIÓN aparece en pantalla.
3
Desplace el botón de control m/M para seleccionar
(INFORMACIÓN) y pulse el centro del botón de
control.
Aparece en pantalla el cuadro de información de este monitor.
Ejemplo
LENGUAJ E / I NFORMAC I ÓN
MODE L : HMD - A 22 0
SERI AL: 12345678
MANUF ACTURED: 2 0 0 0 - 5 2
SELECT EX I T
ES
15
Page 58

Función de autodiagnóstico
Este monitor dispone de una fu nción de autodiag nóstico. Si existe
algún problema con el monitor o con el ordenador, la pantalla se
mostrará en blanco y el indicador 1 (alimentación) se iluminará
en verde o parpadeará en naranja. Si el indicador
1 (alimentación) se ilumina en naranja, significa que el
ordenador se encuentra en el modo de ahorro de energía. Pulse
cualquier tecla del teclad o o mueva el ratón.
MENU
Indicador 1 (alimentación)
Si el indicador 1 (alimentación) está iluminado en
verde
1
Desconecte el cable de entrada de vídeo o apague
el ordenador conectado.
2
Pulse el botón 1 (alimentación) para apagar y
encender el monitor.
3
Mantenga desplazado el botón de control ,
durante 2 segundos antes de que el monitor entre
en el modo de ahorro de energía.
Especificaciones
TRC Paso de la rejilla de apertura de
0,24 mm (centro)
17 pulgadas, medida diagonal
90 grados de deflexión
Tamaño de imagen vis ualizable
Aprox. 327 × 243 mm (an/al)
Imagen de visualización de
16,0 pulgadas
Resolución
Máxima Horizontal: 1280 puntos
Vertical: 1024 líneas
Recomendada Ho rizontal: 10 24 puntos
Vertical: 768 líneas
Área de imagen estándar Ap rox. 312 × 234 mm (an/al)
Frecuencia de deflexión* Horizontal: 30 a 70 kHz
Vertical: 48 a 120 Hz
Corriente/tensión de entrada de CA
220 a 240 V, 50 – 60 Hz, 0,9 A
Consumo de energía Máx. 115 W (sin dispositivos USB
conectados)
Temperatura de funcionamiento
10°C a 40°C
Dimensiones Aprox. 460 × 378 × 441 mm
(an/al/prf)
Peso Aprox. 19 kg
Característica Plug and play
DDC1/DDC2B
Accesorios suministrados Consulte la página 6
* Parámetros de sincronización horizontal y vertical
recomendados
• La anchura de sincronización horiz ontal debe ser superior a
1,0 µseg.
• La anchura de supresión horizontal debe ser superior a
3,0 µseg.
• La anchura de supresión vertical debe ser superior a 500 µseg.
MENU
Si aparecen las tres barras de color (rojo, verde, azul), significa
que el monitor funciona correctamente. Vuelva a conectar los
cables de entrada de vídeo y compruebe el estado del ordenador.
Si las barras de color no aparecen, sig ni fica que hay un fallo
potencial del monitor. Info rme al prov e ed or Sony au to rizad o del
estado del monitor.
Si el indicador 1 (alimentación) parpadea en
naranja
Pulse el botón 1 (alimentación) para apagar y
encender el monitor.
Si el indicador 1 (alimentación) se ilumina en verde, significa
que el monitor funciona correctamente.
Si el indicador 1 (alimentación) sigue parpadeando, significa que
hay un fallo potencial del monitor. Cuente el número de segundos
entre los parpadeos en naranj a del indicador 1 (alimentación) e
informe al proveedor Sony autorizado sobre el estado del monitor.
Asegúrese de anotar el nombre del modelo y el número de serie
de dicho monitor. Igualmente, tome nota del fabricante y del
modelo del orde nador y de la tarjeta gráfica.
Diseño y especificaciones sujetos a cambios sin previo avi so.
16
Page 59

Indice
Precauzioni. . . . . . . . . . . . . . . . . . . . . . . . . . . . . . . . . . . . . . . . . . . . 4
Identificazione dei componenti e dei comandi . . . . . . . . . . . . . . . . . 5
Installazione . . . . . . . . . . . . . . . . . . . . . . . . . . . . . . . . . . . .6
• Trinitron è un marchio di fabbrica
registrato di Sony Corporation.
• Macintosh è un marchio di fabbrica
concesso in licenza a Ap p le Computer,
Inc., registrato negli U.S.A. e in altri
paesi.
• Windows
fabbrica registrati di Microsoft
Corporation negli U.S.A. e in altri paesi.
• IBM PC/AT e VGA sono marchi di
fabbrica registrati di IBM Corporation
degli U.S.A.
• VESA e DDC
di Video Electronics Standard
Association.
•
E
fabbrica registrato negli U.S.A.
• Tutti i nomi degli altri prodotti citati in
questo manu al e potrebbero es s ere
marchi di fabbrica o marchi di fabbrica
registrati delle rispettive compagnie.
• Inoltre, “” e “” non sempre vengono
riportati nel manuale.
e MS-DOS sono marchi di
sono marchi di fabbrica
NERGY STAR è un marchio di
Punto 1:
Punto 2:
Punto 3:
Collegamento del monitor al computer . . . . . . . . . . . . . . . 6
Collegamento del cavo di alimentazione. . . . . . . . . . . . . . 6
Accensione del monitor e del computer . . . . . . . . . . . . . . 6
Collegamento delle periferiche conformi a USB. . . . . . . . . . . . . . . . 7
Selezione della lingua del menu a schermo
(LINGUA/INFORMAZIONE) . . . . . . . . . . . . . . . . . . . . . . . . . . . . . . . 8
Personalizzazione del monitor . . . . . . . . . . . . . . . . . . . . .8
Come spostarsi tra i menu . . . . . . . . . . . . . . . . . . . . . . . . . . . . . . . . 8
Regolazione della luminosità e del contrasto
(LUMINOSITA/CONTRASTO) . . . . . . . . . . . . . . . . . . . . . . . . . . . . 10
Regolazione della dim ens i one oriz zo ntale o della centratura
dell’immagine
(DIM.ORIZ/POSIZIONE). . . . . . . . . . . . . . . . . . . . . . . . . . . . . . . . . 10
Regolazione della dim ens i one ve rti cale o della centratura
dell’immagine
(DIM.VERT/POSIZIONE) . . . . . . . . . . . . . . . . . . . . . . . . . . . . . . . . 10
Regolazione della curvatura dell’immagine ai lati
(CUSCINO/PIN BALANCE) . . . . . . . . . . . . . . . . . . . . . . . . . . . . . . 10
Regolazione dell’angolo dei lati dell’immagine
(TRAPEZIO/PARALL). . . . . . . . . . . . . . . . . . . . . . . . . . . . . . . . . . . 11
Regolazione della rotazione dell’immagine (ROTAZIONE) . . . . . . 11
Ingrandimento o riduzione dell’immagine (ZOOM). . . . . . . . . . . . . 11
Regolazione del colore dell’immagine (COLORE) . . . . . . . . . . . . . 11
Impostazioni aggiuntive (SMAGNETIZ/MOIRE) . . . . . . . . . . . . . . 12
Reimpostazione delle regolazioni (RICHIAMO) . . . . . . . . . . . . . . . 12
Caratteristiche tecniche . . . . . . . . . . . . . . . . . . . . . . . . .13
Modo preimpostato e modo utente. . . . . . . . . . . . . . . . . . . . . . . . . 13
Funzione di risparmio energetico . . . . . . . . . . . . . . . . . . . . . . . . . . 13
Guida alla soluzione dei problemi . . . . . . . . . . . . . . . . .13
Se sullo schermo appaiono delle righe sottili
(cavi di smorzamento) . . . . . . . . . . . . . . . . . . . . . . . . . . . . . . . . . . 13
Messaggi a schermo. . . . . . . . . . . . . . . . . . . . . . . . . . . . . . . . . . . . 13
Sintomi e soluzioni dei problemi . . . . . . . . . . . . . . . . . . . . . . . . . . . 14
Funzione di autodiagnostica. . . . . . . . . . . . . . . . . . . . . . . . . . . . . . 16
Caratteristiche tecniche . . . . . . . . . . . . . . . . . . . . . . . . .16
Appendix. . . . . . . . . . . . . . . . . . . . . . . . . . . . . . . . . . . . . . . i
Preset mode timing table . . . . . . . . . . . . . . . . . . . . . . . . . . . . . . . . . .i
IT
3
Page 60
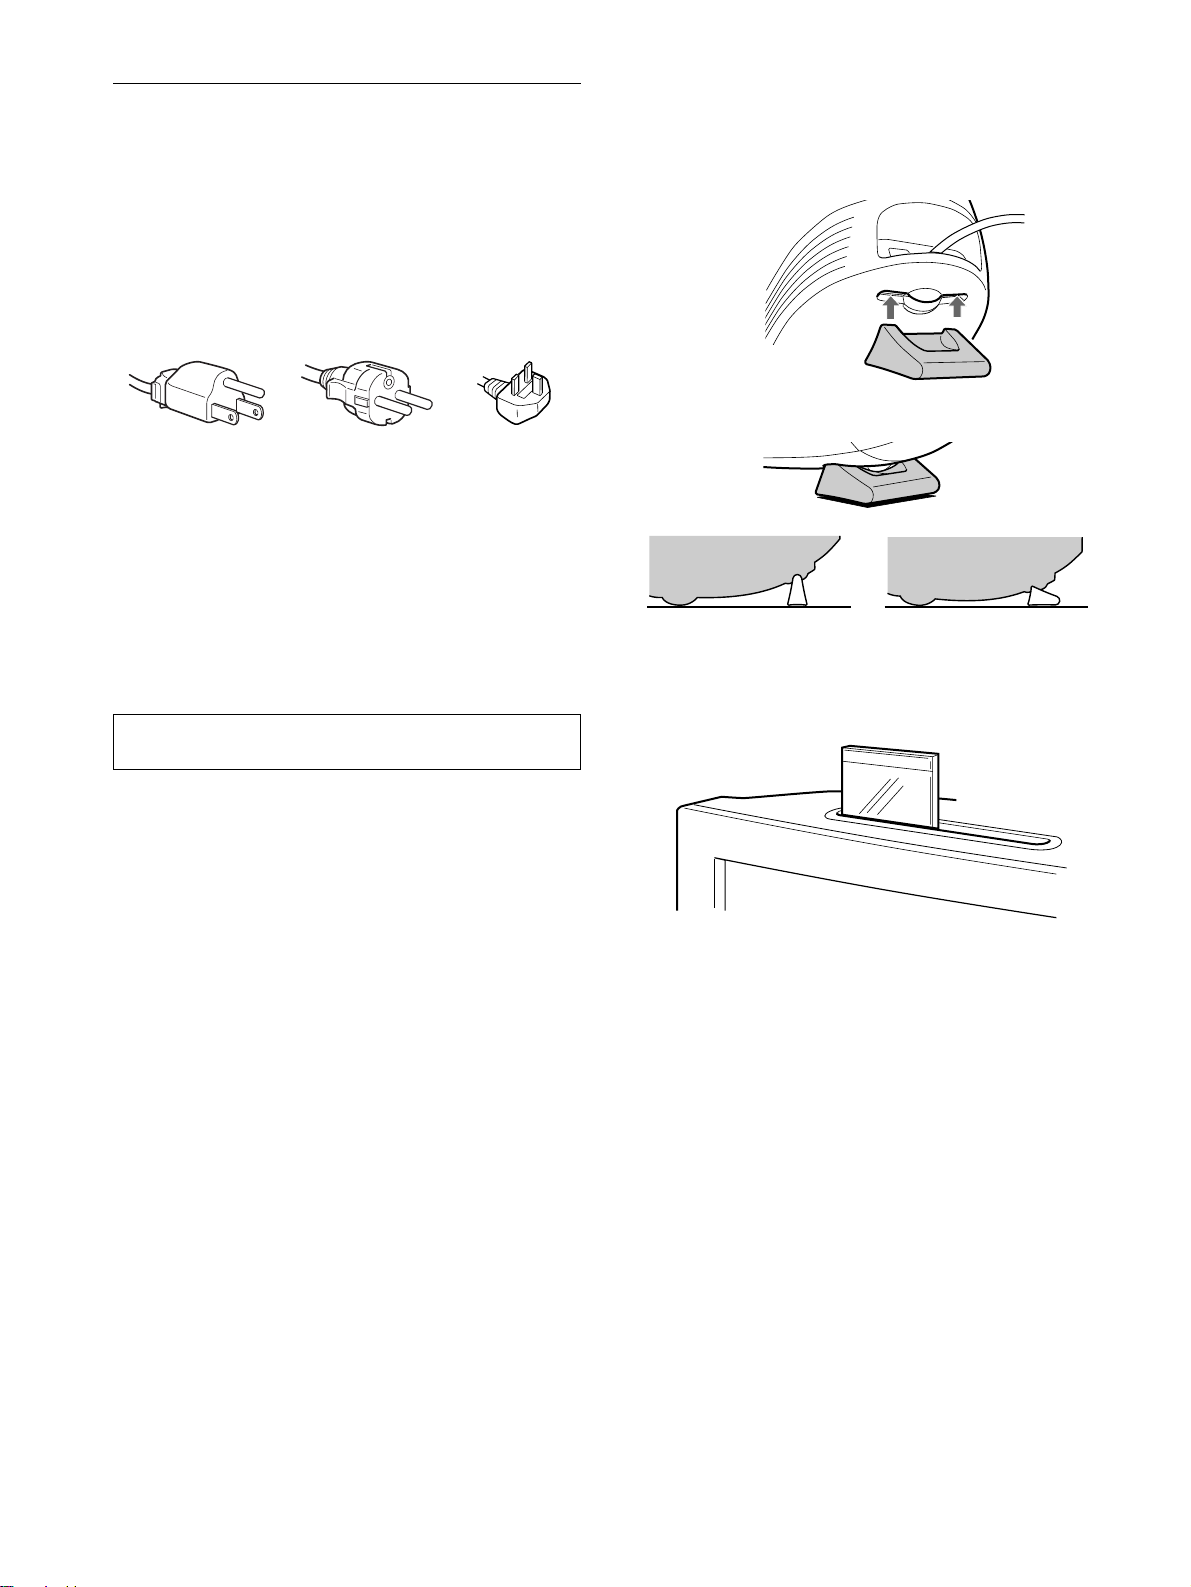
Precauzioni
Avvertenza per i collegamenti di alimentazione
• Utilizzare il cavo di alimentazione in dotazione. Se si utilizza
un cavo diverso, accertarsi che sia compatibile con la tensione
operativa locale.
Per i clienti nel Regno Unito
Se si utilizza il monitor nel Regno Unito, utilizzare il cavo di
alimentazione per il Regno Unito in do ta zi on e.
Esempio di tipi di spina
Utilizzo del supporto
Per regolare l’angolatura del monitor, inserire il supporto in
dotazione nella scanalatura. È possibile utilizzare il supporto in
posizione orizzontale o in posizione verticale.
da 100 a 120 V CA
• Prima di scollegare il cavo di alimentazione, attendere almeno
30 secondi dallo spegnimento dell’apparecchio per consentire
la dispersione dell’elettricità statica sulla superficie dello
schermo.
• Non appena si accende l’apparecchio, lo schermo viene
smagnetizzato per circa 5 secon di . Questa operazione crea un
forte campo magnetico attorno allo schermo che potrebbe
danneggiare i dati memorizzati su nastri magnetici o dischi
situati vicino al monitor. Collocare eventuali apparecchiature di
registrazione magnetica, nastri e dischi lontano dal monitor.
L’apparecchiatura dovrebbe essere installata vicino ad una
presa di rete facilmente accessibile.
da 200 a 240 V CA
solo per 240 V CA
Installazione
Non installare il monitor nei luoghi descritti di seguito:
• su superfici quali tap petin i, cop ert e e simili né vicin o a
materiali quali tendaggi, tessuti e simili che potrebbero
bloccarne le prese di ventilazione
• vicino a fonti di calore qu ali radiatori o condo tti d’aria calda, n é
in luoghi esposti alla luce diretta del sole
• in luoghi soggetti a significativi sbalzi di temperatura
• in luoghi soggetti a urti o vibrazioni meccaniche
• su una super fici e instab ile
• vicino ad apparecchiature che generano campi magnetici, quali
trasformatori o linee ad alta tensione
• vicino o sopra superfici metalliche con carica el ettrica
Utilizzo della fessura situata nella parte superiore
del monitor
Questa fessura può essere utilizzata per inserirvi la custo dia di un
CD o una fotografia in cornice.
Nota
Non utilizzare la fessura per altri scopi.
Manutenzione
• Pulire lo schermo con un panno morbido. Se si usa un
detergente per vetro, accertarsi che non contenga una soluzione
antistatica o un additivo simile che potrebbe graffiare il
rivestimento dello sche r m o.
• Non strofinare, toccare o tamburellare sulla superficie dello
schermo con oggetti abrasivi o appu ntiti quali un a penna a sfera
o un cacciavite, onde evitare di graffiare il cinescopio a colori.
• Pulire il rivestimento, il pannello e i comandi con un panno
morbido leggermente inumidito con una soluzione detergente
delicata. Non usare alcun tipo di spugnetta o polvere abr a siva,
né solventi quali alco ol o benzene.
Trasporto
Per spedire il monitor o inviarlo in riparazion e, usare il mat eriale
di imballaggio originale.
4
Page 61
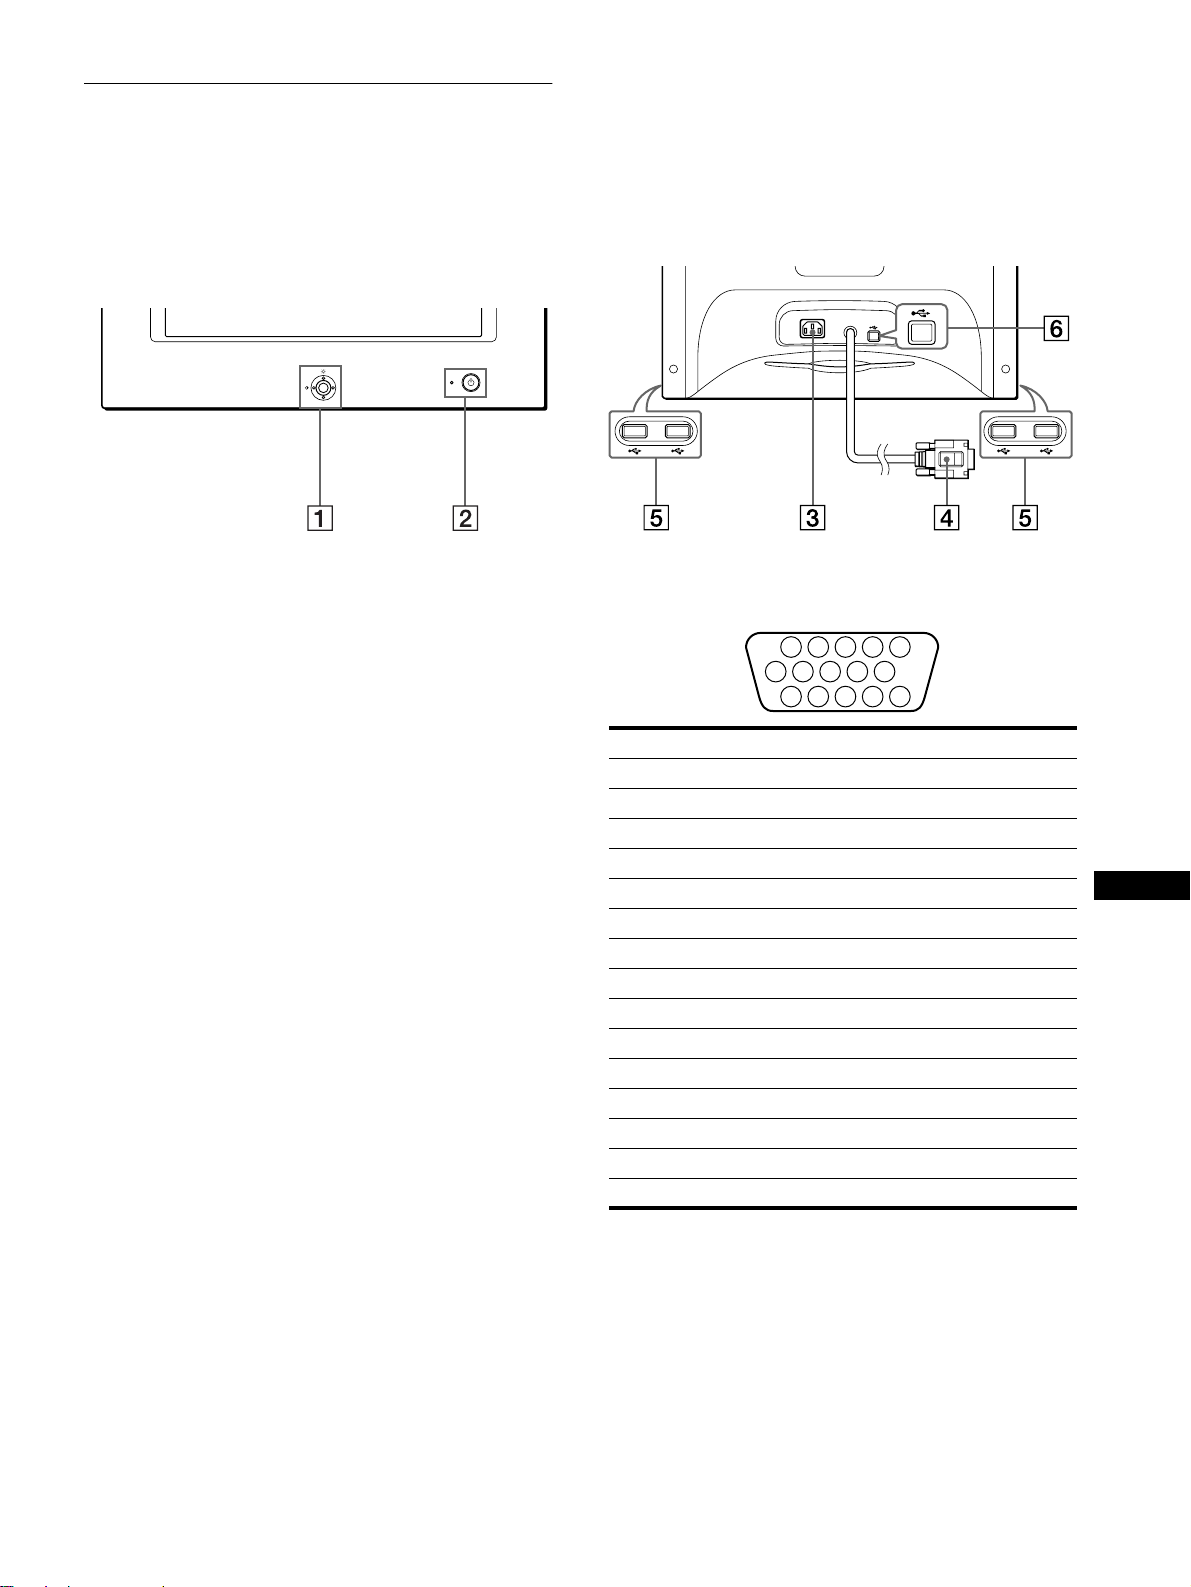
Identificazione dei componenti e
1 2 3 4
5
876
11 12 13 14 15
10
9
dei comandi
Per maggiori informazioni, vedere le pagine fra parentesi.
MENU
Parte posterioreParte anteriore
AC IN
1111 Tasto di comando (pagina 9)
Il tasto di comando viene utilizzato per visu alizzare il menu
ed effettuare le regolazioni del monitor, incluse le regol azioni
della luminosità e del contrasto.
2222 Interruttore e indicatore di accensione 1
(pagine 6, 13, 16)
Per accendere e spegnere il monitor. L’indicatore si illumina
in verde quando il monitor viene acceso e lampeggia in verde
e arancion e oppu re si il lumina in aran cione q uando il monit or
è nel modo di risparmio energetico.
3333 Connettore AC IN (pagina 6)
Per collegare il cavo di alimentazione CA al monitor.
4444 Connettore di ingresso video (HD15) (pagina 6)
Questo connettore immette segnali video RGB (0,700 Vp-p,
positivo) e segnali sincronici.
N. piedino Segnale
1Rosso
2Verde
3Blu
4 ID (Terra)
5 Terra DDC*
6 Terra rosso
7 Terra verde
8 Terra blu
9 DDC + 5V*
10 Terra
11 ID (Terra)
12 Dati bidireziona li (SDA)*
13 Sinc O.
14 Sinc V.
15 Orologio dati (SCL)*
IT
* Standard del Displa y Dat a Channel (DDC) del marc hi o VESA.
5555 Connettori downstream USB (bus seriale
universale) (pagina 7)
Usare questi connettori per collegare le periferiche USB al
monitor.
6666 Connettore upstream USB (bus seriale universale)
(pagina 7)
Usare questo connettore per collegare il monitor ad un
computer conforme a USB.
5
Page 62

Installazione
AC IN
a AC IN
alla presa di rete
cavo di alimentazione
(in dotazione)
Prima di utilizzare il monitor, verificare che la confezione
contenga i seguenti accessori.
• Cavo di alimentazione (1)
• Cavo USB (1)
• Supporto del monitor (1)
• Scheda di garanzia (1)
• Note sulla pulizia della superficie dello schermo (1)
• Il presente manuale di istruzioni (1)
Punto 1:Collegamento del monitor
al computer
Spegnere il monitor e il computer prima del collegamento.
Collegamento ad un computer IBM PC/A T o
xxxx
compatibile
AC IN
Punto 2:Collegamento del cavo di
alimentazione
Con il monitor e il computer spenti, collegare prima il cavo di
alimentazione al monitor, quindi collegarlo alla presa di rete.
Punto 3:Accensione del monitor e
del computer
Accendere prima il monitor, quindi accendere il computer.
all’uscita video
computer IBM PC/AT o compatibile
Collegamento ad un computer Macintosh o
xxxx
compatibile
È necessario un adattatore Macintosh (non in dotazione).
AC IN
adattatore Macintosh
(non in dotazione)
computer
Macintosh o
compatibile
all’uscita video
L’installazione del monitor è completata.
Se necessario, usare i comandi del monitor per regolare
l’immagine.
6
Page 63

Se sullo schermo non appare alcuna immagine
• Verificare che il monitor sia collega to al compute r
correttamente.
• Se sullo schermo appare il messaggio NO SEGNALE
INGRESSO, verificare che la scheda grafica del computer sia
completamente inserita nel corretto alloggiamento del bus.
• Se si sostituisce un vecchio monitor con q uesto modello e sul lo
schermo appare FUORI GAMMA SCANS, ricollegare il
vecchio monitor. Quindi regolare la scheda grafica del
computer in modo che la frequenza orizzontale sia fra 30 e 70
kHz e la frequenza verticale sia fra 48 e 120 Hz.
Per maggiori informazioni sui messaggi a schermo, vedere la
sezione “Sintomi e soluzioni dei problemi” a pagina 14.
Installazione su diversi sistemi operativi (OS)
Il presente monitor è conform e allo standard Plug & Play “DDC” ed
individua automaticamente tutte le informazioni relative al monitor.
L’installazione di un driv er spe ci fi co non è ne cessaria.
Se si collega il monitor al co mputer e si riavvia il comput er per la prima
volta, sullo schermo pot rebbe apparire la finestra del programma di
installazione guida ta. Fare clic su “Next” per alcune volte secondo le
istruzioni del programma di installazione guidata fino a quando non viene
automaticamente selezionato il monitor Plug & Play.
Per gli utenti di Windows NT4.0
Per l’installazi one di questo monito r con Windows NT4.0 non è
necessario il driver del video. Per maggiori informazioni sulla regolazione
della risoluzione, della frequenza di refresh e de l numero di colori,
consultare le istruzion i pe r l’u so di W in dows NT 4. 0.
Collegamento delle periferiche
conformi a USB
Il monitor è dotato di un connettore upstream USB (sul pannello
posteriore) e di quattro connettori downstream USB (due sul lato
destro e due sul lato sinistro). Questi consentono di collegare al
computer, in modo facile e veloce, le periferiche conformi a USB
quali tastiere, mouse, stampanti e scanner usando un cavo USB
standard.
Per usare il monitor come hub per le periferiche, collegare i
connettori USB come descritto qui sotto.
AC IN
alle periferiche
conformi a USB
al computer
conforme a USB
1
Accendere il monitor e il computer.
2
Collegare il computer al connettore upstream
quadrato usando il cavo USB in dotazione.
alle periferiche
conformi a USB
Per gli utenti di Windows
Se appare un messaggio sullo schermo, seguire le istruzioni a
schermo e selezionare Generic USB Hub come impostazione
predefinita.
3
Collegare le periferiche conformi a USB ai
connettori USB downstream rettangolari.
Note
• Non tutti i computer e /o i siste mi operativi supportano c onfigurazioni
USB. Per verificare se è possibile collegare le periferiche USB,
consultare le istruzioni per l’uso del computer.
• Nella maggior parte dei casi, occorre in sta llare sul computer host il
software del driver USB. Per maggiori informazioni, consultare le
istruzioni per l’uso delle periferiche.
• Il monitor funziona come hub USB se è acceso o in modo di risparmio
energetico.
• Se si collega una tastiera o un mouse ai connettori USB e si av via il
computer per la prima volta, le periferiche potrebbero non funzionare.
Collegare prima la tastiera e il m ous e direttamente a l computer e
configurare le periferiche conformi a USB, quindi collegarle al
monitor.
• Durante il collega me nt o dei cavi USB non appoggia rsi sul monitor
onde evitare il rischio di farl o sli tt are e di provocare danni.
IT
7
Page 64

Selezione della lingua del menu a
MENU
schermo
(LINGUA/INFORMAZIONE)
I menu a schermo sono disponibili in inglese, francese, tedesco,
italiano, spagnolo, russo e giapponese. La lingua preimpostata è
l’inglese.
1
Premere il tasto di comando al centro.
Per ulteriori informazioni sull’utilizzo del tasto di comando,
vedere a pagina 9.
MENU
ESC I
DIM.ORIZ/POSIZIONE
D I M . VERT / POSI Z IONE
CUSCINO/PINBALANEC
b
MENU
2
Spostare il tasto di comando per evidenziare
LINGUA/INFORMAZIONE, quindi premere di
nuovo il tasto di comando al centro.
b
MENU
3
Spostare il tasto di comando m/M per selezionare
(LINGUA) e premere il tasto di comando al centro,
quindi spostare il tasto di comando m/M per
selezionare una lingua.
• ENGLISH: Inglese
• FRANÇAIS: Francese
• DEUTSCH: Tedesco
• ITALIANO
• ESPAÑOL: Spagnolo
• : Russo
• : Giapponese
Per chiudere il menu
Premere una volta il ta sto di comando al centro per torna re al MENU
principale, premerlo due volte per tornare al modo di visualizzazione
normale. Se non viene premuto alcun tasto, il me nu si chiude
automaticamente dopo c irc a 30 secondi.
Per reimpostare la lingua inglese
Vedere “Reimpostazione delle regolazioni (RICHIAMO)” a pagina 12.
TRAPEZ I O/ PARALL
ROTAZ IONE
ZOOM
COLORE
L I NGUA / I NFORMAZ I O EN
SMAGNETIZ/MOIRE
RICHIAMO
L I NGUA / I NFORMAZIONE
ENGL I SH FRANÇA I S
DEUTSCH I TAL I ANO
ESPAÑOL
SELECT EX I T
Personalizzazione del
monitor
È possibile effettuare numerose regolazioni del monitor usando il
menu a schermo.
Come spostarsi tra i menu
Premere il tasto di comando al centro per visualizzare il MENU
principale. Per ulteriori informazioni sull’utilizzo del tasto di
comando, vedere a pagina 9.
MENU
ESC I
DIM.ORIZ/POSIZIONE
D I M . VERT / POS I Z I ONE
CUSCINO/PINBALANEC
TRAPEZ I O/ PARALL
ROTAZ IONE
ZOOM
COLORE
L I NGUA / I NFORMAZ I O EN
SMAGNETIZ/MOIRE
RICHIAMO
Utilizzare il tasto di comando per selezionare uno dei seguenti
menu.
1111 ESCI
Selezionare ESCI per chiudere il
menu.
2222 DIM.ORIZ/POSIZIONE
(pagina 10)
Selezionare il menu DIM.ORIZ/
POSIZIONE per regolare la
dimensione orizzontale e la
centratura dell’immagine.
3333 DIM.VERT/POSIZIONE
(pagina 10)
Selezionare il menu DIM.VERT/
POSIZIONE per regolare la
dimensione verticale e la centratura
dell’immagine.
4444 CUSCINO/PIN BALANCE
(pagina 10)
Selezionare il menu CUSCINO/
PIN BALANCE per regolare la
curvatura ai lati dell’immagine.
DIM.ORIZ/POSIZIONE
DIM.ORIZ
26
SELECT EX I T
DIM. VERT/ POSI ZIONE
D I M. VERT
26
SELECT EX I T
CUSCINO/PIN BALANCE
CUSCINO
26
SELECT EX I T
5555 TRAPEZIO/PARALL
(pagina 11)
Selezionare il menu TRAPEZIO/
PARALL per regolare l’angolo dei
lati dell’immagine.
TRAPEZ IO /PARALL
TRAPEZ I O
26
SELECT EX I T
8
Page 65

6666 ROTAZIONE (pagina 11)
MENU
MENU
MENU
Selezionare il menu ROTA ZIONE
per regolare la rotazione
dell’immagine.
ROTAZIONE
ROTAZ IONE
26
EX I T
Utilizzo del tasto di comando
xxxx
1
Visualizzazione del MENU principale.
Per visualizzare il MENU principale, premere il tasto di
comando al centro.
7777 ZOOM (pagina 11)
Selezionare il menu ZOOM per
ingrandire o ridurre l’immagine.
8888 COLORE (pagina 11)
Selezionare il menu COLORE per
regolare la temperatura di colore
dell’immagine. È possibile usare
questo menu per far corrispondere i
colori del monitor ai colori di
un’immagine stampata.
9999 LINGUA/INFORMAZIONE
(pagine 8, 15)
Selezionare il menu LINGUA/
INFORMAZIONE per scegliere
la lingua del menu a schermo e
visualizzare il riquadro
informazioni del monitor.
0000 SMAGNETIZ/MOIRE
(pagina 12)
Selezionare il menu
SMAGNETIZ/MOIRE per
smagnetizzare lo schermo ed
eliminare l’effetto moiré.
ZOOM
ZOOM
26
EX I T
COLORE
R50
G50
B50
SELECT EX I T
KKK
5000 6500 9300
USER
2
Selezione del menu che si desidera regolare.
Per evidenziare il menu desiderato, spostare il tasto di
comando verso l’alto (M), vers o il basso (m) e a sinistra (<)
o a destra (,) per spostarsi lateralmente.
L I NGUA / I NFORMAZIONE
ENGL I SH FRANÇA I S
DEUTSCH I TAL I ANO
ESPAÑOL
SELECT EX I T
SMAGNETIZ / MOIRE
SMAGNET I Z
SI
SELECT EX I T
3
Regolazione del menu.
Per effettuare la regolazione, spostare il tasto di comando
verso sinistra (<) o verso destra (,).
MENU
b
MENU
qa
qa RICHIAMO (pagina 12)
qaqa
Selezionare il menu RICHIAMO
per reimpostare le regolazioni.
Visualizzazione del segnale di ingresso cor-
xxxx
RICHIAMO
IRCHIAMO
MODO DEERPF
EX I T
rente
Le frequenze orizzontali e verticali del segnale di ingresso
corrente sono visualizzate nel menu LUMINOSITA/
CONTRASTO. Se il segnale corrisponde ad uno dei modi
preimpostati in fabbrica di questo monitor, anche la risoluzione è
visualizzata.
LUMINOSI TA / CONTRASTO
26 26
la risoluzione
del segnale di
ingresso
corrente
68.7kHz/85.0Hz
1024X768
le frequenze
orizzontali e
verticali del
segnale di
ingresso
corrente
4
Chiusura del menu.
Premere una volta il tasto di comando al centro per tornare al
MENU principale, premerlo due volte per tornare al modo di
visualizzazione normale. Se non viene premuto alcun tasto, il
menu si chiude automaticamente dopo circa 30 s econdi.
Reimpostazione delle regolazioni
xxxx
È possibile reimpostare le regolazioni utilizzando il menu
RICHIAMO. Per ulteriori informazioni sulla reimpostazione
delle regolazioni, vedere pagina 12.
IT
9
Page 66

Regolazione della luminosità e del
Regolazione della dimensione
contrasto
(LUMINOSITA/CONTRASTO)
Le regolazioni relative alla luminosità e al contrasto vengono
effettuate utilizzando il menu LUMINOSITA/CONTRASTO.
Queste impostazioni vengono memorizzate per tutti i segnali
d’ingresso.
1
Spostare il tasto di comando in qualsiasi direzione.
Sullo schermo appare il menu LUMINOSITA/
CONTRASTO.
LUMINOS I TA /CONTRASTO
26 26
68.7kHz/85.0Hz
1024X768
2
Spostare il tasto di comando m/M per regolare la
luminosità ( ) e </, per regolare il contrasto (6).
Il menu scompare automaticam ente dopo circa 3 secondi.
Regolazione della dimensione
orizzontale o della centratura
verticale o della centratura
dell’immagine
(DIM.VERT/POSIZIONE)
Queste impostazioni vengono memorizzate per il segnale di
ingresso corrente.
1
Premere il tasto di comando al centro.
Sullo schermo appare il MENU principale.
2
Spostare il tasto di comando per evidenziare
DIM.VERT/POSIZIONE, quindi premere di n uovo
il tasto di comando al centro.
Sullo schermo appare il menu DIM.VERT/POSIZIONE.
3
Spostare prima il tasto di comando m/M per
selezionare la voce di regolazione desiderata,
quindi spostare il tasto di comando </, per
effettuare la regolazione.
Selezionare Per
DIM.VERT
POSIZIONE V
regolare la dimensione verticale
regolare la centratura verticale
dell’immagine
(DIM.ORIZ/POSIZIONE)
Queste impostazioni vengono memorizzate per il segnale di
ingresso corrente.
1
Premere il tasto di comando al centro.
Sullo schermo appare il MENU principale.
2
Spostare il tasto di comando per evidenziare
DIM.ORIZ/POSIZIONE, quindi premere di nuovo
il tasto di comando al centro.
Sullo schermo appare il menu DIM.ORIZ/POSIZIONE.
3
Spostare prima il tasto di comando m/M per
selezionare la voce di regolazione desiderata,
quindi spostare il tasto di comando </, per
effettuare la regolazione.
Selezionare Per
DIM.ORIZ
POSIZIONE O
regolare la dimensione orizzontale
regolare la centratura orizzontale
Regolazione della curvatura
dell’immagine ai lati
(CUSCINO/PIN BALANCE)
Queste impostazioni vengono memorizzate per il segnale di
ingresso corrente.
1
Premere il tasto di comando al centro.
Sullo schermo appare il MENU principale.
2
Spostare il tasto di comando per evidenziare
CUSCINO/PIN BALANCE, quindi premere di
nuovo il tasto di comando al centro.
Sullo schermo appare il menu CUSCINO/PIN BALANCE.
3
Spostare prima il tasto di comando m/M per
selezionare la voce di regolazione desiderata,
quindi spostare il tasto di comando </, per
effettuare la regolazione.
Selezionare Per
CUSCINO
PIN BALANCE
espandere o ridurre l’immagine ai lati
spostare i lati dell’immagine verso
sinistra o verso destra
10
Page 67

Regolazione dell’angolo dei lati
KKK
R50
G50
B50
SELECT EXI T
COLORE
5000 6500 9300
USER
Regolazione del colore
dell’immagine
(TRAPEZIO/PARALL)
Queste impostazioni vengono memorizzate per il segnale di
ingresso corre nte .
1
Premere il tasto di comando al centro.
Sullo schermo appare il MENU principale.
2
Spostare il tasto di comando per evidenziare
TRAPEZIO/PARALL, quindi premere di nuovo il
tasto di comando al centro.
Sullo schermo appare il menu TRAPEZIO/PARALL.
3
Spostare prima il tasto di comando m/M per
selezionare la voce di regolazione desiderata,
quindi spostare il tasto di comando </, per
effettuare la regolazione.
Selezionare Per
TRAPEZIO
PARALL
regolare la larghezza dell’immagine
nella parte superi ore dello schermo
spostare l’immagine verso sinistra o
verso destra nella parte superiore dello
schermo
Regolazione della rotazione
dell’immagine (ROTAZIONE)
Questa impostazione viene memorizzata per tutti i segnali
d’ingresso.
1
Premere il tasto di comando al centro.
Sullo schermo appare il MENU principale.
2
Spostare il tasto di comando per evidenziare
ROTAZIONE, quindi premere di nuovo i l tasto di
comando al centro.
Sullo schermo appare il menu ROTAZIONE.
3
Spostare il tasto di comando </, per ruotare
l’immagine.
dell’immagine (COLORE)
Le impostazioni del menu COLORE consentono di rego la re la
temperatura di colore dell’immagine modificando il livello del
campo di colore bianco. I colori appaiono rossastri se la
temperatura è bassa e bluast ri se l a temperatura è alta. Questa
regolazione è utile per far corrispondere i colori del monitor ai
colori di un’immagine stampata.
Questa impostazione viene memorizzata per tutti i segnali
d’ingresso.
1
Premere il tasto di comando al centro.
Sullo schermo appare il MENU principale.
2
Spostare il tasto di comando per evidenziare
COLORE, quindi premere di nuovo il tasto di
comando al centro.
Sullo schermo appare il menu COLORE.
3
Spostare il tasto di coman do </, per selezi onare
una temperatura di colore.
Le temperature di colore preimpostate sono 5000K, 6500K e
9300K. Poiché l’impostazion e prede finita è 9300K, i bianchi
cambieranno da una tinta bluastra ad una tinta rossastra
abbassando la temperat ura a 6500K e 5000K.
4
Se necessario, effettuare la sintonia fine della
temperatura di colore.
Spostare prima il tasto di comando </, per selezionare
USER; quindi spostare il tasto di comando m/M per
selezionare R (rosso), G (verde) o B (blu) e spostare il tasto di
comando </, per effettuare la regolazione.
Se si effettua la sintonia fine della temperatura di colore, le
nuove impostazioni di co lo re vengono memorizzate e
richiamate ogni volta che si seleziona USER.
IT
Ingrandimento o riduzione
dell’immagine (ZOOM)
Questa impostazione viene memorizzata par il segnale di ingresso
corrente.
1
Premere il tasto di comando al centro.
Sullo schermo appare il MENU principale.
2
Spostare il tasto di comando per evidenziare
ZOOM, quindi premere di nuovo il tasto di
comando al centro.
Sullo schermo appare il menu ZOOM.
3
Spostare il tasto di comando </, per ingran dire o
ridurre l’immagine.
Nota
La regolazione termina non appena la dimensione orizzontale o verticale
raggiunge il valore massimo o minimo.
11
Page 68

Impostazioni aggiuntive
Reimpostazione delle regolazioni
(SMAGNETIZ/MOIRE)
È possibile smagnetizzare lo schermo manualmente ed eliminare
l’effetto moiré.
1
Premere il tasto di comando al centro.
Sullo schermo appare il MENU principale.
2
Spostare il tasto di comando m/M per evidenziare
SMAGNETIZ/MOIRE, quindi pre mere di nuovo il
tasto di comando al centro.
Sullo schermo appare il menu SMAGNETIZ/MOIRE.
3
Spostare il tasto di comando m/M per sele zionare la
voce di regolazione desiderata.
Regolare la voce s e lezionata secondo le istruzioni seguenti.
Smagnetizzazione dello schermo
Il monitor viene automaticamente smagnetizzato quando viene
acceso.
Per effettuare la smagnetizzazione manuale del
monitor, spostare prima il tasto di comando m/M per
selezionare (SMAGNETIZ), quindi spostare il tasto di
comando ,.
Lo schermo viene smagnetizzato per circa 5 secondi. Se fosse
necessario un secondo ciclo di smagnetizzazione, attendere
almeno 20 minuti per ottenere un risultato migliore.
Eliminazione dell’effetto moiré*
Se sullo schermo appaiono linee ondulate o ellittiche, regolare il
livello di eliminazione dell’eff ett o moiré.
Per regolare il livello di elim inazione dell’effetto moiré,
spostare il tasto di comando m/M per selezionare
(ELIMINA MOIRE), quindi spostare il tasto di
comando </, finché l’effetto moiré non è ridotto al
minimo.
* L’effetto moiré è un tipo di interferenz a naturale che produce leggere
linee ondulate sullo schermo. Questo effetto può verificarsi a causa
dell’interferenza tra il motivo regolato dell’immagine dal segnale di
ingresso e il motivo a punti di fosfo ro del tubo a raggi catodici.
(RICHIAMO)
Questo monitor dispone dei due metodi di reimpostazione
descritti di seguito. Per reimpostare le regolazioni usare il menu
RICHIAMO.
1
Premere il tasto di comando al centro.
Sullo schermo appare il MENU principale.
2
Spostare il tasto di comando m/M per evidenziare
0 RICHIAMO, quindi premere di nuovo il tasto di
comando al centro.
Sullo schermo appare il menu RICHIAMO.
Reimpostare le impostazioni secondo le istruzioni seguenti.
Reimpostazione di tutti i dati di regolazione per il
segnale di ingresso corrente (MODO)
Spostare il tasto di comando <.
Viene selezionata la voce MODO. Tutti i dati di regolazione del
segnale di ingresso corrente sono reimpostati.
Si noti che con que sto metodo non vengono reimpostate le
seguenti opzioni.
• la lingua per il menu a schermo (pagina 8)
• la rotazione dell’immagine (pagina11)
Per riportare tutti i dati di regolazione ai valori
preimpostati in fabbrica (PREDEF)
Spostare il tasto di comando ,.
Viene selezionata la voce PR EDEF. Tutti i dati di rego lazione del
segnale di ingresso corrente vengono reimpostati. Per i segnali di
modo predefinito, tutti i dati di regolazione, (ad eccezione delle
impostazioni USER nel menu COLORE), ven gono reimpostati a i
livelli preimpostati in fabbrica.
Nota
Se viene selezionato PREDEF, i tasti del monitor non funzioneranno per
circa 5 secondi.
12
Esempio di
effetto moiré
MENU
Page 69

Caratteristiche tecniche
INFORMAZIONE
FUORI GAMMA SCANS
Modo preimpostato e modo utente
Quando il monitor riceve un segnale di ingresso , lo fa
corrispondere automaticamente ad uno dei modi preimpostati in
fabbrica e memorizzati nel monitor, per fornire un’immagine di
alta qualità al centro dello schermo. Per un elenco dei modi
preimpostati in fabbrica, veder e l’App end ix. Per i segnali di
ingresso che non corrispondono ad uno dei modi preimpostati in
fabbrica, la tecnologia Multiscan digitale di questo monitor
assicura una visualizzazione dell’immagine nitida per qualsiasi
sincronizzazione nella gamma di frequenza del monitor
(orizzontale: da 30 a 70 kHz, verticale: da 48 a 120 Hz). Se
l’immagine viene regolata, i dati di regolazione vengono
memorizzati come modo utente e richiamati automaticamente
qualora venga ricevuto lo stesso segnale di ingresso.
Nota per gli utenti di Windows
Gli utenti di Windows devono controllare il manuale della scheda
grafica o il programma di utilità fornito con la scheda graf ica,
quindi selezionare la frequenza di re fresh più alta per
massimizzare le prestazioni del monitor.
Funzione di risparmio energetico
Guida alla soluzione dei
problemi
Prima di rivolgersi ad un cent ro di assistenza tecnica
specializzato, consult are questa sezione.
Se sullo schermo appaiono delle
righe sottili (cavi di smorzamento)
La presenza di linee sullo scherm o, sop ra ttu tto quan do lo sfo nd o
dello schermo è chiaro (in genere bianco), è normale nei monitor
Trinitron e non indica problemi di funzion a men to. Si tratta
dell’ombra dei cavi di smorzamento utilizzati per stabilizzare la
griglia di apertura. La griglia di apertur a è l’eleme n to essenz iale
che caratterizza il cinescopio a colori Trinitron, consentendo una
maggiore illuminazione dello schermo con il risultato di
un’immagine più luminosa e dettagliata.
Cavi di smorzamento
Il presente monitor è conforme alle direttive sul risparmio
energetico di VESA,
non riceve alcun segnale dal computer collegato, il consumo
energetico viene auto maticamente ridotto come indicato di
seguito.
Modo di
alimentazione
funzionamento
normale
attivo-spento**≤ 5 W arancione
spento 0 W spento
* Le cifre indicano il consumo energe tico quando al monitor vengono
collegate periferiche non conformi a USB.
** Qu ando il computer en tra nel modo “attivo-spento”, il segnale di
ingresso viene interrotto e sullo s c hermo appare il mes s aggio NO
SEGNALE INGRESSO. Dopo circa 20 secondi il monitor entra nel
modo di risparmio ene rgetico.
*** S e il monitor riceve il segna le si ncronico orizzonta le o verticale,
l’indicatore di accensione potrebbe lampeggiare in modo alternato in
verde e in arancione.
E
NERGY STAR e NUTEK. Se il monitor
Consumo
energetico
115 W verde
≤
*
Indicatore di
accensione 1
***
Messaggi a schermo
In caso di problemi per il segnale di ingresso, sullo schermo
appare uno dei seguenti messaggi. Per risolvere il problema,
vedere la sezione “Sintomi e soluzioni dei problemi” a pagina 14.
IT
Condizione del segnale
di ingresso
La condizione del segnale di ingresso
FUORI GAMMA SCANS
Indica che il segnale di ingresso non è supportato dalle
caratteristiche tecniche del monitor.
NO SEGNALE INGRESSO
indica che non viene i mmesso alcun segnale al moni tor.
13
Page 70

Sintomi e soluzioni dei problemi
Se il problema è causato dal computer o da altre apparecchiature collegate, consultare le istru zioni per l’uso di qu este apparecchiature.
Se le indicazioni descritte qui di seguito non aiutano a risolvere il problema, usare la funzione di autodiagnostica (pagina 16).
Sintomo Controllare quanto segue
Assenza d’immagine
Se l’indicatore di accensione 1 non è
illuminato
Se sullo schermo appare il messaggio
NO SEGNALE INGRESSO o se
l’indicatore di accensione 1 è di
colore arancione o si alterna tra i l
verde e l’arancione
Se sullo schermo appare il messaggio
FUORI GAMMA SCANS
Se non viene visualiz zato alcun
messaggio e l’indicatore di accensione
1 è illuminato in verde o
lampeggiante in arancione.
Se si usa un sistema Macintosh • Controllare che l’adattatore Macint osh (non in dotazione) ed il cavo del segnale video
L’immagine è tremolante, salta,
oscilla oppure è confusa
L’immagine è sfocata • Regolare la contrasto e il luminosità (pagina 10).
L’immagine è sdoppiata • Eliminare l’uso di prolunghe del cavo video e/o di cassette per l’interruttore video.
• Controllare che il cavo di alimentazione sia collegato correttament e.
• Controllare che l’interruttore 1 sia nella posizione di accensione.
• Controllare che il cavo del segnale video sia collegato correttamente e che tutt e le spine
siano saldamente inserite nelle prese (pagina 6).
• Controllare che nel connettore di ingresso video HD15 non vi siano piedini piegati o
danneggiati.
xProblemi causati dal computer o da altre apparecchiature collegate
• Il computer è nel modo di rispar mio energetico. Premer e un tasto qualsiasi sulla tastiera o
muovere il mouse.
• Controllare che l’alimentazione del computer sia attivata.
• Controllare che la scheda grafica sia completamente inserita nell’alloggiamento del bus
appropriato.
xProblemi causati dal computer o da altre apparecchiature collegate
• Controllare che il campo di frequenza video rientri in quello specificato per il monitor. Se
con questo monitor è stato sostituito un vecchio monitor, ricollegare il vecchio monitor e
regolare il campo di frequenza come descritto di seguito.
Orizzontale: 30 – 70 kHz
Verticale: 48 – 120 Hz
• Usare la funzione di autodiag nostica (pagina 16).
siano collegati correttamente (pagina 6).
• Isolare ed eliminare le potenziali origini di campi elettrici o magnetici, quali altri monitor,
stampanti laser, ventilatori elettrici, illuminazioni fluorescenti o televisori.
• Spostare il monitor lontano dalle linee di alimentazione oppure collocare uno schermo
magnetico vicino al monitor.
• Provare a collegare il monitor ad un’altra presa di rete CA, preferibilmente su un circuito
differente.
• Provare a girare il monitor di 90° verso sinistra o verso destra.
xProblemi causati dal computer o da altre apparecchiature collegate
• Controllare il manuale della scheda grafica per le appropriate impostazioni del monitor.
• Controllare che il modo grafica (VESA, Macintosh 16" Color, ecc.) e la frequenza del
segnale di ingre s s o sia no supportati da qu esto monitor (A pp en dix). Anche se l a fr e qu enza
rientra nella gamm a prevista, alcune schede grafiche potr ebbero presentare un impulso
sincronico troppo piccolo per potere permettere al monitor di sincronizzarsi in modo
corretto.
• Regolare la frequenza di refresh del computer (frequenza verticale) per ottenere la migliore
immagine possibile.
• Smagnetizzare il monitor* (pagina 12).
• Diminuire il livello di eliminazione dell’effetto moiré (pagina 12).
• Controllare che tutte le spine siano saldamente inserite nelle apposite prese.
14
Page 71

Sintomo Controllare quanto segue
L’immagine non è centrata o della
dimensione corretta
• Regolare la dimensione o la centratura (pag ina 10). Si noti che alcuni modi video non
riempiono lo sch er m o fino ai bordi.
I bordi dell’imma gine sono incurvati • Regolare il formato dell’immagine (pagina 10).
Sono visibili disturbi ondulati o
ellittici (effetto moiré)
• Eliminare l’effetto moiré (pagina 12).
xProblemi causati dal computer o da altre apparecchiature collegate
• Modificare il modello del desktop.
Il colore non è uniforme • Smagnetizzare il monitor* (pagina 12). Se si colloca vicino al monitor un’apparecchiatura
che genera un campo magnetico, quale un diffus ore, oppure se si modifica la direzione del
monitor, il colore potrebbe perdere uniformità.
Il bianco non è perfetto • Regolare la temperatura di colore (pagina 11).
Le periferiche USB non funzionano • Controllare che gli appositi connettori USB siano saldamente collegati (pagina 7).
• Controllare che l’interruttore 1 sia nella posizione di accensione.
xProblemi causati dal computer o da altre apparecchiature collegate
• Controllare che l’alimentazione di tutte le periferiche ad alimentazione autonoma conformi
a USB sia accesa.
• Installare nel computer l’ultima versione del driver delle periferiche. Per informazioni sul
driver delle periferiche adeguato, contattare la casa costruttrice della peri ferica.
• Se la tastiera o il mouse conform i a USB non funzio na n o, collegarli direttamente al
computer, riavviare il computer ed effettuare tutte le regolazioni necessarie alle
impostazioni USB. Quindi ricollegare la tastiera o il mouse al monitor.
• Per gli utenti di Windows 95
1. Fare clic col pulsante destro del mouse su My Computer e selezionare Pr operties.
2. Fare clic sulla scheda Device Manager. Scorrere in basso e selezionare Universal Serial
Bus Controller.
,Se Universal Serial Bus Controller non appare, è necessario caricare un disco USB
supplementare. Per ulteriori informazioni su come ricevere un disco USB
supplementare, contattare la casa costruttrice del computer.
3. Selezionare Generic USB Device dall a lista dei controller USB e fare clic su Properties.
4. Se la casella a fianco di “Disable in this hardware profile” è attivata, rimuovere
l’attivazione.
5. Fare clic su Refresh.
Non appena si accende
l’apparecchio si sente un ronzio
• È il rumore del ciclo di smagnetizzazione autom atica. Quando si attiva l’alimentazione, il
monitor viene automaticamente smagnetizzato per 5 secondi.
* Nel caso in cui sia necessario un secondo ciclo di smagnetizzazione, attendere almeno 20 minuti per ottenere un risultato migliore. Potrebbe venire udito
un ronzio che non è un problema di funzionamento.
Visualizzazione del nome del monitor, del numero
di serie e della data di produzione
(INFORMAZIONE)
1
Premere il tasto di comando al centro.
Sullo schermo appare il MENU principale.
2
Spostare il tasto di comando per evidenziare
Se il problema persiste, rivo lgersi al rivendi tore autorizz ato Sony
comunicando le seguenti informazioni.
• Nome del modello: HMD-A220
• Nume ro di s er i e
• Nome e caratteristiche tecniche del proprio computer e della
scheda grafica.
LINGUA/INFORMAZIONE, quind i premere il tasto
di comando al centro.
Sullo schermo appare il menu LINGUA/INFORMAZIONE.
3
Spostare il tasto di comando m/M per selezionare
(INFORMAZIONE), quindi premere il tasto di
comando al centro.
Sullo schermo apparirà la finestra con le informazioni sul
monitor.
Esempio
L I NGUA / I NFORMAZIONE
MODE L : HMD - A 22 0
SERI AL: 12345678
MANUF ACTURED: 2 0 0 0 - 5 2
SELECT EX I T
IT
15
Page 72
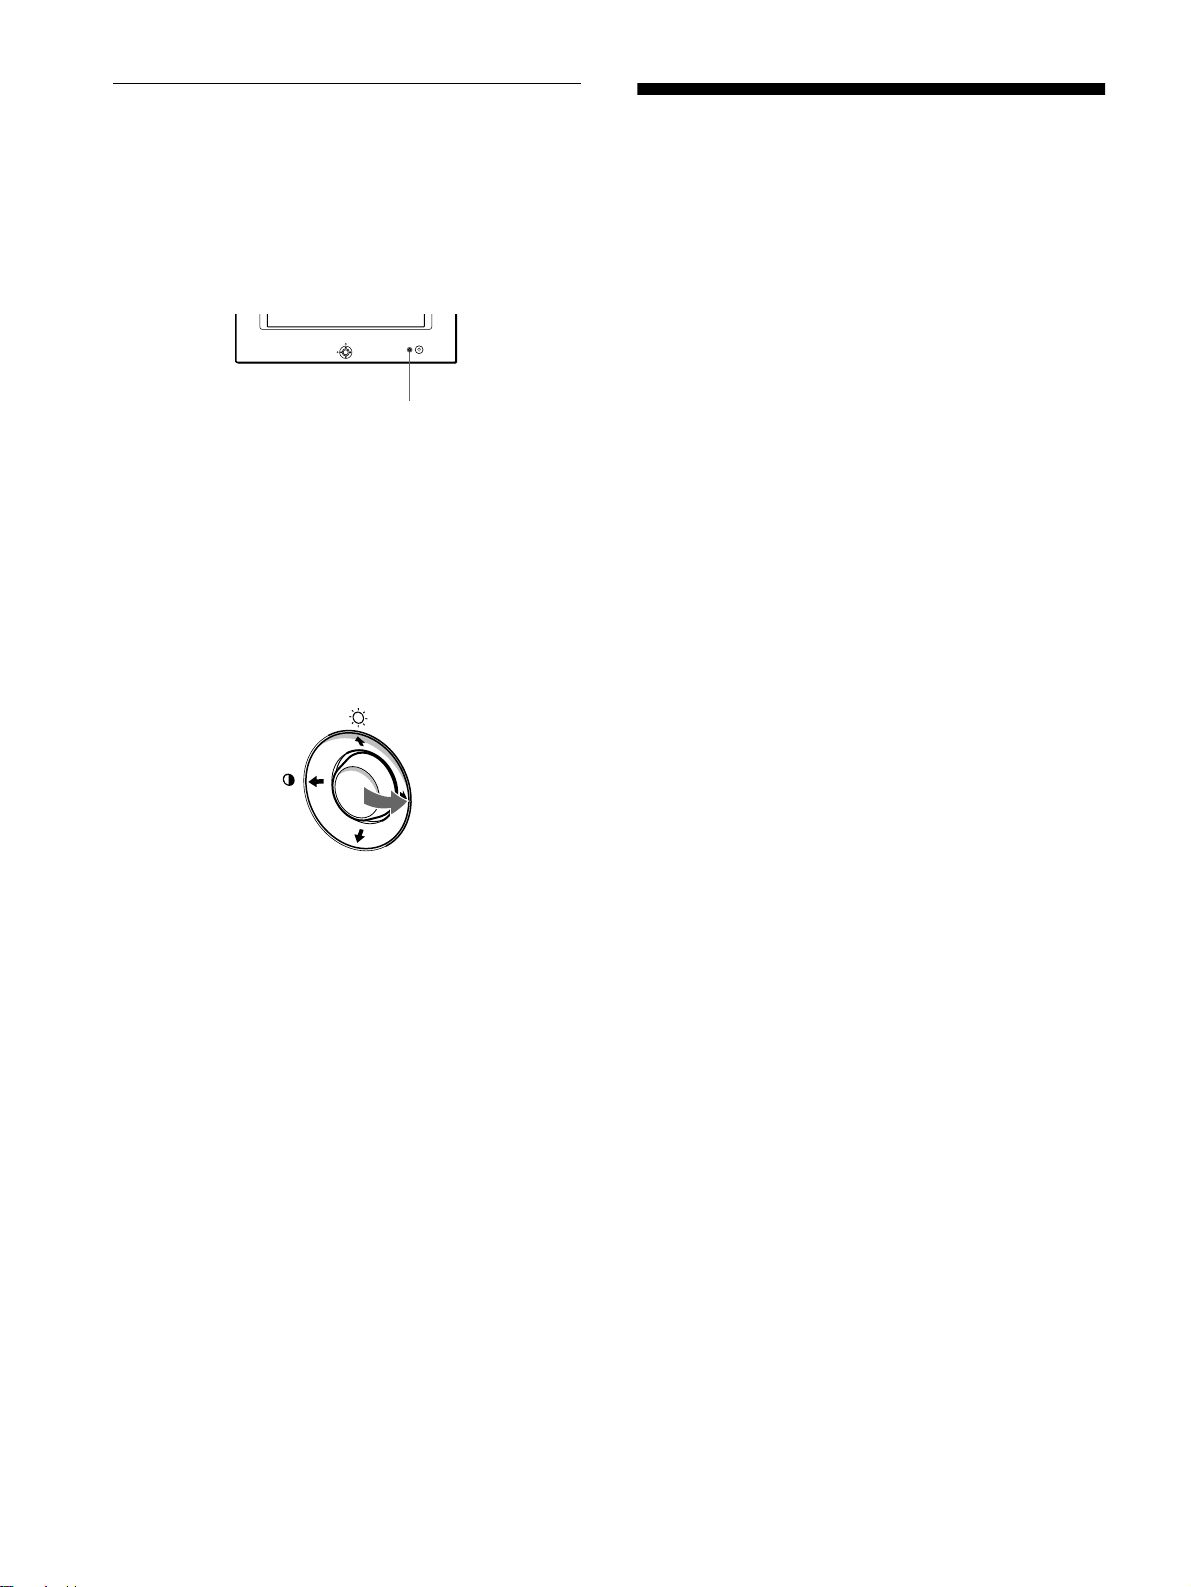
Funzione di autodiagnostica
Questo monitor dispone di una funzione di autodiagnostica. Se si
presentano problemi al monitor o ai computer collegati, lo
schermo si oscurerà e l’indica to re di accensione 1 si illuminerà
in verde o lampeggerà in arancione. Se l’indicatore di accensione
1 è illuminato in arancione, il co mputer è nel modo di risp armio
energetico. Premere un tasto qualsiasi sulla tastiera o muov ere il
mouse.
MENU
Indicatore di accensione
Se l’indicatore di accensione 1 è verde
1
Scollegare il cavo di ingresso video o spegnere il
computer collegato.
2
Premere il tasto 1 (accensione) per spegnere e
riaccendere il monitor.
3
Spostare il tasto di coman do , per 2 secondi prima
che il monitor entri nel modo di risparmio
energetico.
1
Caratteristiche tecniche
Cinescopio Apertura centrale della griglia
0,24 mm
17 pollici misurati in diagonale
Deflessione di 90
Dimensioni dell’immagine visibile
Circa 327 × 243 mm (l/a)
Immagine visibile 16,0"
Risoluzioni
Massimo Orizzontale : 1280 punti
Verticale: 1024 linee
Consigliate Orizzontale: 1024 punti
Verticale: 768 linee
Area dell’immagine standard
Circa 312 × 234 mm (l/a)
Frequenza di deflessione* Orizzontale: da 30 a 70 kHz
Verticale: da 48 a 120 Hz
Tensione/corrente di ingresso CA
da 220 a 240 V, 50 – 60 Hz, 0,9 A
Consumo energetico 115 W max. (senza dispositivi USB
collegati)
Temperatura di utilizzo Da 10°C a 40°C
Dimensioni Circa 460 × 378 × 441 mm (l/a/p)
Peso Circa 19 kg
Plug & Play DDC1/DDC2B
Accessori in dotazione Vedere a pagina 6
* Condizioni di sincronizzazione orizzontale e verticale
consigliate
• L’ampiezza di sincronizzazione orizzontale dovrebbe essere
superiore a 1,0 µsec.
• L’ampiezza di oscuramento orizzontale dovrebbe essere
superiore a 3,0 µsec.
• L’ampiezza di oscuramento verticale dovrebbe essere
superiore a 500 µsec.
Il design e le caratteristiche tecniche sono soggetti a modifi che
senza preavviso.
MENU
Se appaiono tutte le tre barre a colori (rosso, verde, blu), il
monitor funziona in modo corretto. Ricollegare i cavi di ingresso
video e controll ar e le co n diz io ni de l co mputer.
Se le barre a colori non appaiono, si tratta di un potenzia le guasto
al monitor. Rivolgersi al rivenditore aut orizzato Sony.
Se l’indicatore di accensione 1 lampeggia in
arancione
Premere il tasto di accensione 1 per spegnere e
riaccendere il monitor.
Se l’indicatore di accensione 1 si illumina in verde, il monitor
funziona in modo corretto.
Se l’indicatore di accensione 1 continua a lampeggiare, si tratta
di un potenziale guasto al monitor. Contare il numero di secondi
tra il lampeggiamento nel colore aranci on e dell’indicatore di
accensione 1 e rivolgersi al rivenditore autorizzato Sony.
Annotare il nome del modello e il numero di serie del monitor.
Annotare inoltre la marca e il modello del proprio computer e
della scheda graf ica.
16
Page 73
Inhoud
Voorzorgsmaatregelen . . . . . . . . . . . . . . . . . . . . . . . . . . . . . . . . . . . 4
Onderdelen en bedieningselementen. . . . . . . . . . . . . . . . . . . . . . . . 5
Opstelling . . . . . . . . . . . . . . . . . . . . . . . . . . . . . . . . . . . . . .6
• Trinitron is een geregistreerd
handelsmerk van Sony Corporation.
• Macintosh is een handelsme rk in
licentie gegeven aan App le Com puter,
Inc., geregistreerd in de U. S.A. en
andere landen.
• Windows
geregistreerde hande l s merken van
Microsoft Corporation in de Vereni gde
Staten en andere landen.
• IBM PC/AT en VGA zijn geregistreerde
handelsmerken van IBM Corporation of
the U.S.A.
• VESA en DDC
van de Video Electronics Standard
Association.
•
E
geregistreerd merk.
• Alle andere verm el de productnamen
kunnen handelsmerken of
geregistreerde handelsmerken zijn van
hun respectieve bedrijven.
• Bovendien zijn “” en “” niet telkens
vermeld in deze handleiding .
en MS-DOS zijn
zijn handelsmerken
NERGY STAR is een in de V. S .
Stap 1:
Stap 2:
Stap 3:
Sluit uw monitor aan op uw computer . . . . . . . . . . . . . . . . . 6
Sluit het netsnoer aan . . . . . . . . . . . . . . . . . . . . . . . . . . . . . 6
Zet de monitor en de computer aan. . . . . . . . . . . . . . . . . . . 6
Universal Serial Bus (USB) compatibele randapparatuur
aansluiten . . . . . . . . . . . . . . . . . . . . . . . . . . . . . . . . . . . . . . . . . . . . . 7
De schermmenutaal kiezen (LANGUAGE/INFORMATION). . . . . . . 8
Uw monitor persoonlijk instellen . . . . . . . . . . . . . . . . . . .8
Het menu overlopen . . . . . . . . . . . . . . . . . . . . . . . . . . . . . . . . . . . . . 8
Helderheid en contrast instellen
(BRIGHTNESS/CONTRAST) . . . . . . . . . . . . . . . . . . . . . . . . . . . . . 10
Het horizontale formaat of de horizontale centrering van het beeld
regelen (H-SIZE/CENTER). . . . . . . . . . . . . . . . . . . . . . . . . . . . . . . 10
Het verticale formaat of de verticale centrering van het beeld regelen
(V-SIZE/CENTER) . . . . . . . . . . . . . . . . . . . . . . . . . . . . . . . . . . . . . 10
De buiging van de zijkanten van het beeld regelen
(PIN/PIN BALANCE). . . . . . . . . . . . . . . . . . . . . . . . . . . . . . . . . . . . 10
De hoek van de zijkanten van het beeld regelen
(KEY/KEY BALANCE) . . . . . . . . . . . . . . . . . . . . . . . . . . . . . . . . . . 11
Het beeld roteren (ROTATION) . . . . . . . . . . . . . . . . . . . . . . . . . . . 11
Het beeld vergroten of verkleinen (ZOOM). . . . . . . . . . . . . . . . . . . 11
De beeldkleur regelen (COLOR) . . . . . . . . . . . . . . . . . . . . . . . . . . 11
Bijkomende instellingen (DEGAUSS/CANCEL MOIRE). . . . . . . . . 12
De instellingen terugstellen (RESET) . . . . . . . . . . . . . . . . . . . . . . . 12
Technische kenmerken. . . . . . . . . . . . . . . . . . . . . . . . . .13
Voorinstel- en gebruikersmodes. . . . . . . . . . . . . . . . . . . . . . . . . . . 13
Stroomspaarfunctie. . . . . . . . . . . . . . . . . . . . . . . . . . . . . . . . . . . . . 13
Storingzoeken . . . . . . . . . . . . . . . . . . . . . . . . . . . . . . . . .13
Als dunne draden verschijnen op het scherm (demperdraden) . . . 13
Schermberichten. . . . . . . . . . . . . . . . . . . . . . . . . . . . . . . . . . . . . . . 13
Storingen en oplossingen. . . . . . . . . . . . . . . . . . . . . . . . . . . . . . . . 14
Zelfdiagnosefunctie. . . . . . . . . . . . . . . . . . . . . . . . . . . . . . . . . . . . . 16
Specificaties. . . . . . . . . . . . . . . . . . . . . . . . . . . . . . . . . . .16
Appendix. . . . . . . . . . . . . . . . . . . . . . . . . . . . . . . . . . . . . . . i
Preset mode timing table . . . . . . . . . . . . . . . . . . . . . . . . . . . . . . . . . .i
NL
3
Page 74

Voorzorgsmaatregelen
Transport
Transporteer deze monito r altijd in de originele verpakking.
Waarschuwing betreffende
voedingsaansluitingen
• Gebruik het meegeleverde netsnoer. Als u een an der netsnoer
gebruikt, moet u nagaan of het compatibel is met de lokale
stroomvoorziening.
Voor klanten in het VK
Als u de monitor in het VK gebruikt, moet u de bijgeleverde
VK stroomkabel gebruiken.
Voorbeeld van stekkertypes
alleen voor 100 tot
120 V wisselstroom
• Wacht na het afzetten van het toestel minstens 30 seconden
alvorens de stekker uit het stopcontact te trekken, zodat de
statische elektriciteit op het scherm kan ontladen.
• Na het aanschakelen wordt het scherm gedurende ongeveer 5
seconden ge dem agn etisee rd (de gaus sed) . Hi erb ij on ts taat ron d
het scherm een sterk magnetisch veld dat gegevens op
magneetbanden en diskettes kan beschadigen. Hou dergelij ke
zaken dan ook uit de buurt va n de mon ito r.
Het toestel moet in de buurt van een makkelijk bereikbaar
stopcontact worden geplaatst.
voor 200 tot 240 V
wisselstroom
alleen voor 240 V
wisselstroom
Gebruik van de standaard
Breng de meegeleverde standaard aan in de gleuf om de hoek van
de monitor te verstellen. U kunt de standaard zowel in verticale
als in horizontale positie gebruiken.
Gebruik van de groef bovenaan
In deze gleuf kunt een fotolijstje of een CD-doosje stoppen.
Installatie
Installeer de moni tor niet op de volgende plaatsen:
• op een ondergrond (tapijt, deken, enz.) of nabij materialen
(gordijnen, overgord ijnen ) die de ve ntila tie-ope ning en ku nnen
blokkeren
• nabij warmtebronnen zoals radiatoren of lucht kanalen, of op
een plak waar hij bloot s taat aan directe zonnestra ling
• op een plek waar hij blootstaat aan grote
temperatuurschommelingen
• op een plek waar hij blootstaat aan mechanische trillingen of
schokken
• op een onstabiele ondergrond
• nabij apparatuur die een magnetisch veld opwekt, zoals een
transformator of hoogspanningsl ijnen
• nabij of op een elektrisch geladen metalen oppervlak
Onderhoud
• Reinig het scherm met een zachte doek. Gebruik geen
glansreinigingsmiddel dat een antistatische oplossing of
soortgelijk additief be vat omdat de scherm coating hierdoor kan
worden gekrast.
• Wrijf, druk of tik niet op het scherm met een scherp of schurend
voorwerp zoals een balpen of schro evendraaier. Daardoor kan
de beeldbuis immers worden gekrast.
• Reinig de behuizing, het paneel en de bedieningselementen met
een zachte doek die lichtjes is bevochtigd met een mild
zeepsopje. Gebruik geen schuurspons, schuu rpoeder noch
solventen of benzine.
Opmerking
Gebruik de sleuf nooit voor iets anders.
4
Page 75

Onderdelen en
1 2 3 4
5
876
11 12 13 14 15
10
9
bedieningselementen
Meer details vin dt u op de pagina’s tu ssen haakjes.
MENU
AchterkantVoorkant
AC IN
1111 Regeltoets (pagina 9)
Met de regeltoets kan men het menu op het scherm laten
verschijnen en kunnen regelingen, waaronder helderhe id en
contrast, worden verricht.
2222 1 (aan/uit) schakelaar en indicator
(pagina 6, 13, 16)
Om de monitor aan en uit te schakelen. De indicator licht
groen op wanneer de monitor aan staat en knippert ofwel
groen en oranje, of licht oranje op in de stroomspaarstand.
3333 AC IN aansluiting (pagina 6)
Netvoedingsingang van de monitor .
4 Video-ingang (HD15) (pagina 6)
Via deze aansluiting worden RGB-vid eosi gnalen (0,700
Vp-p, positief) en sync-signalen ingevoerd.
Pin nr. Signaal
1Rood
2Groen
3Blauw
4 ID (massa)
5 DDC massa*
6Rode massa
7 Groene massa
8 Blauwe ma s s a
9 DDC + 5V*
10 Massa
11 ID (massa)
12 Bi-directionele data (SDA)*
13 H. Sync
14 V. Sync
15 Dataklok (SCL)*
NL
* DDC (Display Data Channel) is e en norm van VESA.
5555 USB (universal serial bus) downstream conn ecto rs
(pagina 7)
Gebruik deze connectors om USB randapparatuur aan te
sluiten op de monitor.
6666 USB (universal serial bus) upstream connector
(pagina 7)
Gebruik deze connector om de monitor aan te sluiten op een
USB compatibele computer.
5
Page 76

Opstelling
AC IN
naar AC IN
naar een stopcontact
netsnoer (meegeleverd)
Alvorens de monitor in gebruik te nemen , moet u controleren of
de verpakking de volgende zaken bevat:
• Netsnoer (1)
• USB kabe l (1)
• Monitorstandaard (1)
• Garantiekaar t (1)
• Opmerkingen betreffende he t reinigen van het sche rm (1)
• Deze gebruiksaanwijzin g (1)
Stap 1:Sluit uw monitor aan op uw
computer
Zet de monitor en de computer af voor u ze aansluit.
Aansluiting op een IBM PC/AT of
xxxx
compatibele computer
Stap 2:Sluit het netsnoer aan
Zet de monitor en de computer af en sluit het netsnoer eerst aan
op de monitor en pas dan op een stopcontact.
Stap 3:Zet de monitor en de
computer aan
AC IN
naar video-uitgang
IBM PC/AT of
compatibele computer
Aansluitin g op een Macintosh of
xxxx
compatibele computer
U hebt een Macintosh adapter nodig (niet meegeleverd).
AC IN
Zet eerst de monitor en pas dan de computer aan.
De installatie van uw monitor is voltooid.
Regel eventueel het beeld met behulp van de
bedieningsel e m en te n op de mo nitor.
Macintosh of
compatibele computer
6
Macintosh adapter
(niet meegeleverd)
naar video-uitgang
Page 77

Als er geen beeld verschijnt op het scherm
• Controle er of de monitor cor rect is aangesloten op de computer.
• Als NO INPUT SIGNAL verschijnt op het scherm, controleer
dan of de grafische kaart van uw computer goed vastzit in de
juiste busgleuf.
• Als u een oude monitor vervangt door dit model en OUT O F
SCAN RANGE verschijnt op het scherm, sl uit dan de oude
monitor weer aan. Stel vervolgens de grafische kaart van de
computer zo in dat de horizontale frequentie 30 – 70 kHz
bedraagt en de vert icale frequentie 48 – 120 Hz bedraagt.
Voor meer informatie over schermberichten, zie “Storingen en
oplossingen” op pagina 14.
Installatie voor diverse besturingssystemen
Deze monitor beantwoordt aan de “DDC” Plug & Play norm en detecteert
automatisch alle monitorinformatie. Er hoeven geen specifieke drivers te
worden geïnstalleerd.
Als u de monitor aansluit op uw PC en die voor de eerste maal
aanschakelt, kan de Setup W i za rd op het scherm verschijnen. Klik dan
herhaaldelijk op “Next” afhankelijk van de instructies van de Wizard tot
de Plug & Play Monitor aut omatisch wordt geselecteerd zodat u deze
monitor kunt gebruike n.
Universal Serial Bus (USB)
compatibele randapparatuur
aansluiten
Uw monitor is voorzien van een upstream USB connector (op het
achterpaneel) en vier downstream USB connectors (twee aan de
linker- en twee aan de rechterkant). Hiermee kan snel en
makkelijk USB compa ti bele randapparatuur (zoals
toetsenborden, muizen, printers e n scanners) op uw computer
worden aangesloten met behulp van een genor maliseerde USB
kabel.
Om uw monitor te gebr uik e n als ve rde e l p un t (hub ) voo r
randapparatuur, sluit u de USB’s aan zoals hieronder afgebeeld.
AC IN
Voor gebruikers van Windows NT4.0
Bij het installeren van de moni t or onder Windows NT4.0 wordt geen
schermdriver gebruikt. Raadpleeg de gebruiksaanwijzing van Windows
NT4.0 voor meer informatie over resolutie, refresh rate en aantal kleuren.
naar USB
compatibele
randapparatuur
naar een USB
compatibele
computer
1
Zet de monitor en de computer aan.
2
Sluit uw computer aan op de vierkante upstream
naar USB
compatibele
randapparatuur
connector met behulp van de meegeleverde
USB kabel.
Voor klanten die werken met Windows
Als een boodschap op het scherm verschijnt, volg da n de instructies
op het scherm en kies Generic USB Hub als standaard instelling.
3
Sluit uw USB compatibele randapparatuur aan op
de rechthoekige downstream USB connectors.
Opmerkingen
• Niet alle computers en/of besturingssystemen ondersteunen USB
configuraties. Raadpleeg de handleiding van uw computer om na te
gaan of er USB apparatuur op kan wo rde n aangesloten.
• Meestal dient USB driver software te worden geïnstalleerd op de host
computer. Raadpleeg de handleiding van de randapparatuur voor meer
details.
• De monitor werkt als USB hub wanneer hij in de “ON” of
stroomspaarstand staat.
• Als u een toetsenbord of muis aansluit op de USB connectors en
vervolgens uw computer voor het eerst start, kunnen de randapparaten
eventueel niet wer ken. Sluit eerst het toetsenbo rd en de muis
rechtstreeks a an op de computer, in s ta lleer de USB comp at ibele
apparatuur en sluit ze pas da n aan op de monitor.
• Leun niet op de monitor bij het aansluiten van de USB kabels. De
monitor kan plots verschuiven en verwondingen veroorza ke n.
NL
7
Page 78

De schermmenutaal kiezen
MENU
(LANGUAGE/INFORMATION)
Schermmenu’s zijn beschikbaar in het Engels, Frans, Duits,
Italiaans, Spaans, Rus s isch en Japans. Standaard is Engels
ingesteld.
1
Druk in het midden van de regeltoets.
Zie pagina 9 voor meer informatie over het gebruik van de
regeltoets.
MENU
EX I T
H- S I ZE /CENTER
V-SIZE/CENTER
PIN/PIN BALANCE
b
MENU
2
Beweeg de regeltoets om LANGUAGE/
INFORMATION te laten oplichten en druk nogmaals
in het midden van de regeltoets.
b
MENU
3
Beweeg de regeltoets m/M om (LANGUAGE) te
kiezen en druk in het midden van de regeltoets.
Beweeg de regeltoets dan m/M om een taal te kiezen.
• ENGLISH
• FRANCAIS: Frans
• DEUTSCH: Duits
• ITALIANO: Italiaans
• ESPANOL: Spaans
• : Russisch
•: Japans
KEY / KEY BALANCE
ROTAT ION
ZOOM
COLOR
LANGUAGE / I NFORMAT NOI
DEGAUSS/ CANCEL MO ERI
RESET
LANGUAGE / I NFORMAT ION
ENGL I SH FRANÇA I S
DEUTSCH I TAL I ANO
ESPAÑOL
SELECT EX I T
Uw monitor persoonlijk
instellen
Via het schermmenu kunt u talrijke instellin gen verrichten aan de
monitor.
Het menu overlopen
Druk in het mid den van de regeltoe ts om het hoofdm enu opnieu w
op het scherm te laten verschijnen. Zie pagina9 voor meer
informatie omtrent het gebruik van de regeltoets.
MENU
EXI T
H- S I ZE / CENTER
V-SIZE/CENTER
PIN/PIN BALANCE
KEY/ KEY BALANCE
ROTAT ION
ZOOM
COLOR
LANGUAGE / I NFORMAT NOI
DEGAUSS/ CANCEL MO ERI
RESET
Kies de volgende menu’s met behulp van de regeltoets.
1 EXIT
Kies EXIT om het menu te
sluiten.
2222 H-SIZE/CENTER (pagina 10)
Kies het H-SIZE/CENTER menu
om het horizontale formaat of de
centrering van het beeld te
regelen.
H -S IZE / CENTER
H-SIZE
26
SELECT EX I T
Het menu sluiten
Druk eenmaal in het midden van de regeltoets om terug te keren naar het
hoofdmenu en twee m aa l om te rug te keren naar normale we ergave. Als
geen toetsen worden ingedrukt, sluit het menu aut o m a tisch na ongeveer
30 seconden.
Terugkeren naar Engels
Zie “De instellingen ter ugst el len (RESET)” op pagina 12.
8
3333 V-SIZE/CENTER (pagina 10)
Kies het V-SIZE/CENTER menu
om het verticale formaat of de
centrering van het beeld te
regelen.
4444 PIN/PIN BALANCE
(pagina 10)
Kies het PIN/PIN BALANCE
menu om de buiging van de
zijkanten van het bee ld te regelen .
5555 KEY/KEY BALANCE
(pagina 11)
Kies het KEY/KEY BALANCE
menu om de hoek van de
zijkanten van het bee ld te regelen .
V-SIZE/CENTER
V-SIZE
26
SELECT EX I T
PIN/PIN BALANCE
PIN
26
SELECT EX I T
KEY/ KEY BAL ANCE
KEY
26
SELECT EX I T
Page 79

6666 ROTATION (pagina 11)
MENU
MENU
MENU
Kies het ROTATION menu om
het beeld te roteren.
ROTAT ION
ROTAT ION
26
EX I T
Gebruik van de regeltoets
x
1
Het hoofdmenu laten verschijnen.
Druk in het midden van de regeltoets om het hoofdmenu op
het scherm te laten verschijnen.
7777 ZOOM (pagina 11)
Kies het ZOOM menu om het
beeld te vergroten of te
verkleinen.
8888 COLOR (pagina 11)
Kies het COLOR menu om de
beeldkleurtemperatuu r te regelen.
Hiermee kunt u de
monitorkleuren afstemmen op
drukkleuren.
9999 LANGUAGE/INFORMATION
(pagina 8, 15)
Kies het LANGUAGE/
INFORMATION menu om de
schermmenutaal te kiezen en de
informatiebox van deze monit or
weer te geven.
0 DEGAUSS/CANCEL MOIRE
(pagina 12)
Kies het DEGAUSS/CANCEL
MOIRE menu om het scherm te
demagnetiseren en de moiréannulering te regelen.
ZOOM
ZOOM
26
EX I T
COLOR
R50
G50
B50
SELECT EX I T
KKK
5000 6500 9300
USER
2
Kies het gewenste menu.
Laat het gewenste menu oplichten door de regeltoets
omhoog (M) of omlaag (m) te bewegen, of naar links (<) of
naar rechts (,) om opzij te gaan.
LANGUAGE / I NFORMAT ION
ENGL I SH FRANÇA I S
DEUTSCH I TAL I ANO
ESPAÑOL
SELECT EX I T
DEGAUSS/ CANCEL MOI RE
3
DEGAUSS
ON
SELECT EX I T
Stel het menu in.
Beweeg de regeltoets naar links (<) of naar rechts (,) om
de instelling te verrichten.
MENU
b
MENU
qa RESET (pagina 12)
Kies het RESET menu om de
instellingen terug te stellen.
Het huidige ingangssignaal laten
xxxx
RESET
RESET
MODE AL L
EX I T
verschijnen
De horizontale en verticale frequ entie van het huidige
ingangssignaal verschijnen in het BRIGHTNESS/CONTRAST
menu. Als het signaal overeen komt met één van de
fabrieksinstellingen, verschijnt ook de resolutie.
BRIGHTNESS/CONTRAST
26 26
de resolutie
van het huidige
ingangssignaal
68.7kHz/85.0Hz
1024X768
de horizontale
en verticale
frequentie van
het huidige
ingangssignaal
4
Sluit het menu.
Druk eenmaal in het midden van de regeltoets om terug te
keren naar het h oofdmenu en twee maal om terug te keren naar
de normale weergave. Als geen toetsen worden ingedrukt,
sluit het menu aut omatisch na ongeveer 30 seconden.
De instellingen terugstellen
xxxx
U kunt de instellingen terugstellen met behul p van het RESET
menu. Zie pagi na 1 2 voor meer informatie over het
terugstellen van de instellingen.
NL
9
Page 80

Helderheid en contrast instellen
Het verticale formaat of de
(BRIGHTNESS/CONTRAST)
Helderheid en contrast worden ingesteld via een apart
BRIGHTNESS/CONTRAST menu.
Deze instellingen worden gememoriseerd voor alle
ingangssignalen.
1
Beweeg de regeltoets in om het even w elke richting .
Het BRIGHTNESS/CONTRAST menu verschijnt op het
scherm.
BRIGHTNESS/CONTRAST
26 26
68.7kHz/85.0Hz
1024X768
2
Beweeg de regeltoets m/M om de helderheid ( ), en
</, om het contrast (6666) te regelen.
Het menu verdwijnt automatisch na ongeveer 3 seconden.
Het horizontale formaat of de
horizontale centrering van het
beeld regelen (H-SIZE/CENTER)
Deze instellingen worden gememoriseerd voor het huidige
ingangssignaal.
1
Druk in het midden van de regeltoets.
Het hoofdmenu verschijnt op het scherm.
2
Beweeg de regeltoets om H-SIZE/CENTER te
laten oplichten en druk nogmaals in het midden van
de regeltoets.
Het H-SIZE/CENTER menu verschijnt op het scherm.
3
Beweeg eerst de regeltoets m/M o m het onderdeel te
kiezen dat u wilt regelen. Beweeg vervolgens de
regeltoets </, om te regelen.
Kies Om
H-SIZE
H-CENTER
het horizontale formaat te regelen
de horizontale centrering te regelen
verticale centrering van het beeld
regelen (V-SIZE/CENTER)
Deze instellingen worden gememoriseerd voor het huidige
ingangssignaal.
1
Druk in het midden van de regeltoets.
Het hoofdmenu verschijnt op het scherm.
2
Beweeg de regeltoets om V-SIZE/CENTER te
laten oplichten en druk nogmaals in h et midden van
de regeltoets.
Het V-SIZE/CENTER menu verschijnt op het scherm.
3
Beweeg eerst de regel toets m/M om het onderdeel te
kiezen dat u wilt regelen. Beweeg vervolgens de
regeltoets </, om te regelen.
Kies Om
V-SIZE
V-CENTER
het verticale formaat te regelen
de verticale centre ring te regelen
De buiging van de zijkanten v an het
beeld regelen
(PIN/PIN BALANCE)
Deze instellingen worden gememoriseerd voor het huidige
ingangssignaal.
1
Druk in het midden van de regeltoets.
Het hoofdmenu verschijnt op het scherm.
2
Beweeg de regeltoets om PIN/PIN BALANCE te
laten oplichten en druk nogmaals in h et midden van
de regeltoets.
Het PIN/PIN BALANCE menu verschijnt op het scherm.
3
Beweeg eerst de regel toets m/M om het onderdeel te
kiezen dat u wilt regelen. Beweeg vervolgens de
regeltoets </, om te regelen.
Kies Om
PIN
PIN BALANCE
de zijkanten van het beeld uit te ze tten
of in te trekken
de zijkanten van het beeld naar links of
naar rechts te schuiven
10
Page 81

De hoek van de zijkanten van het
KKK
R50
G50
B50
SELECT EX I T
COLOR
5000 6500 9300
USER
beeld regelen
(KEY/KEY BALANCE)
Deze instellingen worden gememoriseerd voor het huidige
ingangssignaal.
1
Druk in het midden van de regeltoets.
Het hoofdmenu ve rschijnt op het scher m.
2
Beweeg de regeltoets om KEY/KEY BALANCE te
laten oplichten en druk nogmaals in het midden van
de regeltoets.
Het KEY/KEY BALANCE menu verschijnt op het scherm.
3
Beweeg eerst de regeltoets m/M om het onderdeel te
kiezen dat u wilt regelen. Beweeg vervolgens de
regeltoets </, om te regelen.
Kies Om
KEY
KEY BALANCE
de beeldbreedte bovenaan het scher m
te regelen
het beeld bovenaan het scherm naar
links of naar rechts te schuiven
Het beeld roteren (ROTATION)
Deze instelling wordt gememoriseerd voor alle ingangssignalen.
De beeldkl eur regelen (COL OR)
Met de COLOR instellingen kunt u de beeldkleurte mperatuur
regelen door het kleurniveau van het witte kleurveld te
veranderen. De kle uren he bben ee n rode tint bij lage temp eratu ur
en een blauwe kleur bij hoge temperatuur. Deze regeling is handig
om de monitorkleur en af te stemmen op drukkleuren.
Deze instelling wordt gememoriseerd voor al le inga ng ssign a len.
1
Druk in het midden van de regeltoets.
Het hoofdmenu verschijnt op het scherm.
2
Beweeg de regeltoets om COLOR te laten
oplichten en druk nogmaals in het midden van de
regeltoets.
Het COLOR menu verschijnt op het scherm.
3
Beweeg de regeltoets </, om een
kleurtemperatuur te kiezen.
De vooringestelde kleurtemperaturen zijn 5000K, 6500K en
9300K. Doordat standaar d 9300K is ingesteld, krijgt wit een
rode in plaats van een blauwe kleur wanneer de temperatuur
wordt verlaagd tot 6500K en 5000K.
4
Regel de kleurtemperatuur desgeval lend handmatig
bij.
Beweeg eerst de regeltoets </, om USER te kiezen.
Beweeg vervolgens de regeltoets m/M om R (rood), G (groen)
of B (blauw) te kiezen en beweeg de regeltoets </, om te
regelen.
1
Druk in het midden van de regeltoets.
Het hoofdmenu ve rschijnt op het scher m.
2
Beweeg de regeltoets om ROTATION te laten
oplichten en druk nogmaals in het midden van de
regeltoets.
Het ROTATION menu verschijnt op het scherm.
3
Beweeg de regeltoets </, om het beeld te
roteren.
Het beeld vergroten of verkleinen
(ZOOM)
Deze instelling wordt gememoriseerd voor het huidige
ingangssignaal.
1
Druk in het midden van de regeltoets.
Het hoofdmenu ve rschijnt op het scher m.
2
Beweeg de regeltoets om ZOOM te laten
oplichten en druk nogmaals in het midden van de
regeltoets.
Het ZOOM menu verschijnt op het scherm.
3
Beweeg de regeltoets </, om het beeld te
vergroten of te verkleinen.
Als u de kleurtemperatuur bijstelt, wordt de nieuwe
kleurinstelling gememoriseerd en opnieuw opgeroepen
telkens wanneer u USER kiest.
NL
Opmerking
De regeling stopt wanneer de maximum of minimum waarde horizontaal
of verticaal is bereikt.
11
Page 82

Bijkomende instellingen
De instellingen terugstellen
(DEGAUSS/CANCEL MOIRE)
U kunt het scherm hand matig demagnetiseren (degauss) en de
moiré-annule ring te regelen.
1
Druk in het midden van de regeltoets.
Het hoofdmenu verschijnt op het scherm.
2
Beweeg de regeltoets m/M om DEGAUSS/
CANCEL MOIRE te laten oplichten en druk
nogmaals in het midden van de regeltoets.
Het DEGAUSS/CANCEL MOIRE menu verschijnt op het
scherm.
3
Beweeg de regeltoets m/M om het onderdeel te
kiezen dat u wilt regelen.
Regel het gekozen onderdeel als volgt.
Het scherm demagnetiseren
De monitor wordt automatisch gedemagnetiseerd bij het
aanschakelen.
Om de monitor handmatig te d emagnetiseren, bew eegt
u eerst de regeltoets m/M om (DEGAUSS) te kiezen.
Beweeg vervolgens de regeltoets ,.
Het scherm wordt gedurende ongeveer 5 seconden
gedemagnetiseerd. Als het een tweede maal moet worden
gedemagnetiseerd , moet u min stens 20 mi nuten wach ten voor he t
beste resultaat.
Moiré-annulering regelen
Wanneer er ellips- of golfpatronen op het scherm verschijnen,
moet u de moiré-annulering reg elen.
Om de mate van moiré-annulering te regelen, beweegt
u eerst de regeltoets m/M om (CANCEL MOIRE) te
kiezen. Beweeg vervolgens de reg eltoets </, tot het
moiré-effect minimaal is.
*
(RESET)
Deze monitor beschikt over de vol gende twee
terugstelmoge lijkheden. Gebruik het RESET menu om de
instellingen terug te stellen.
1
Druk in het midden van de regeltoets.
Het hoofdmenu verschijnt op het scherm.
2
Beweeg de regeltoets m/M om 0000 RESET te laten
oplichten en druk opnieuw in het midden van de
regeltoets.
Het RESET menu verschijnt op het scherm.
Stel de instellingen als volgt terug.
Alle instelgegevens voor het huidige
ingangssignaal terugstellen (MODE)
Beweeg de regeltoets <.
Het onderdeel MODE wo r d t gek oz e n. Alle ins te l g eg e ve ns vo or
het huidige ingang ssignaal worden teruggesteld.
Merk op dat de volgende zaken op deze manier niet worden
teruggesteld.
• de schermmenutaal (pagina 8)
• de beeldrotatie (pagina 11)
Alle instelgegevens terugstellen naar de
fabrieksmatig ingestelde niveaus (ALL)
Beweeg de regeltoets ,.
Het onderdeel ALL word t geko zen. A lle inste lgeg eve ns voor het
huidige ingangssignaal worden teruggesteld. Alle instelgegevens
(behalve de USER instellingen in het COLOR menu) worden
teruggesteld naar de fabrieksmatig ingestelde niveaus.
Opmerking
De toetsen van de monitor werken ongeveer 5 seconden niet wanneer
ALL wordt gekozen.
* Moiré is een natuurlijke storing die zachte, golvende lijnen op het
scherm doet verschijnen. Dit fenomeen ontst aa t door de interferentie
tussen het patroon van het beeld op het scherm en het fosforpatroon van
de monitor.
Voorbeeld van moiré
MENU
12
Page 83
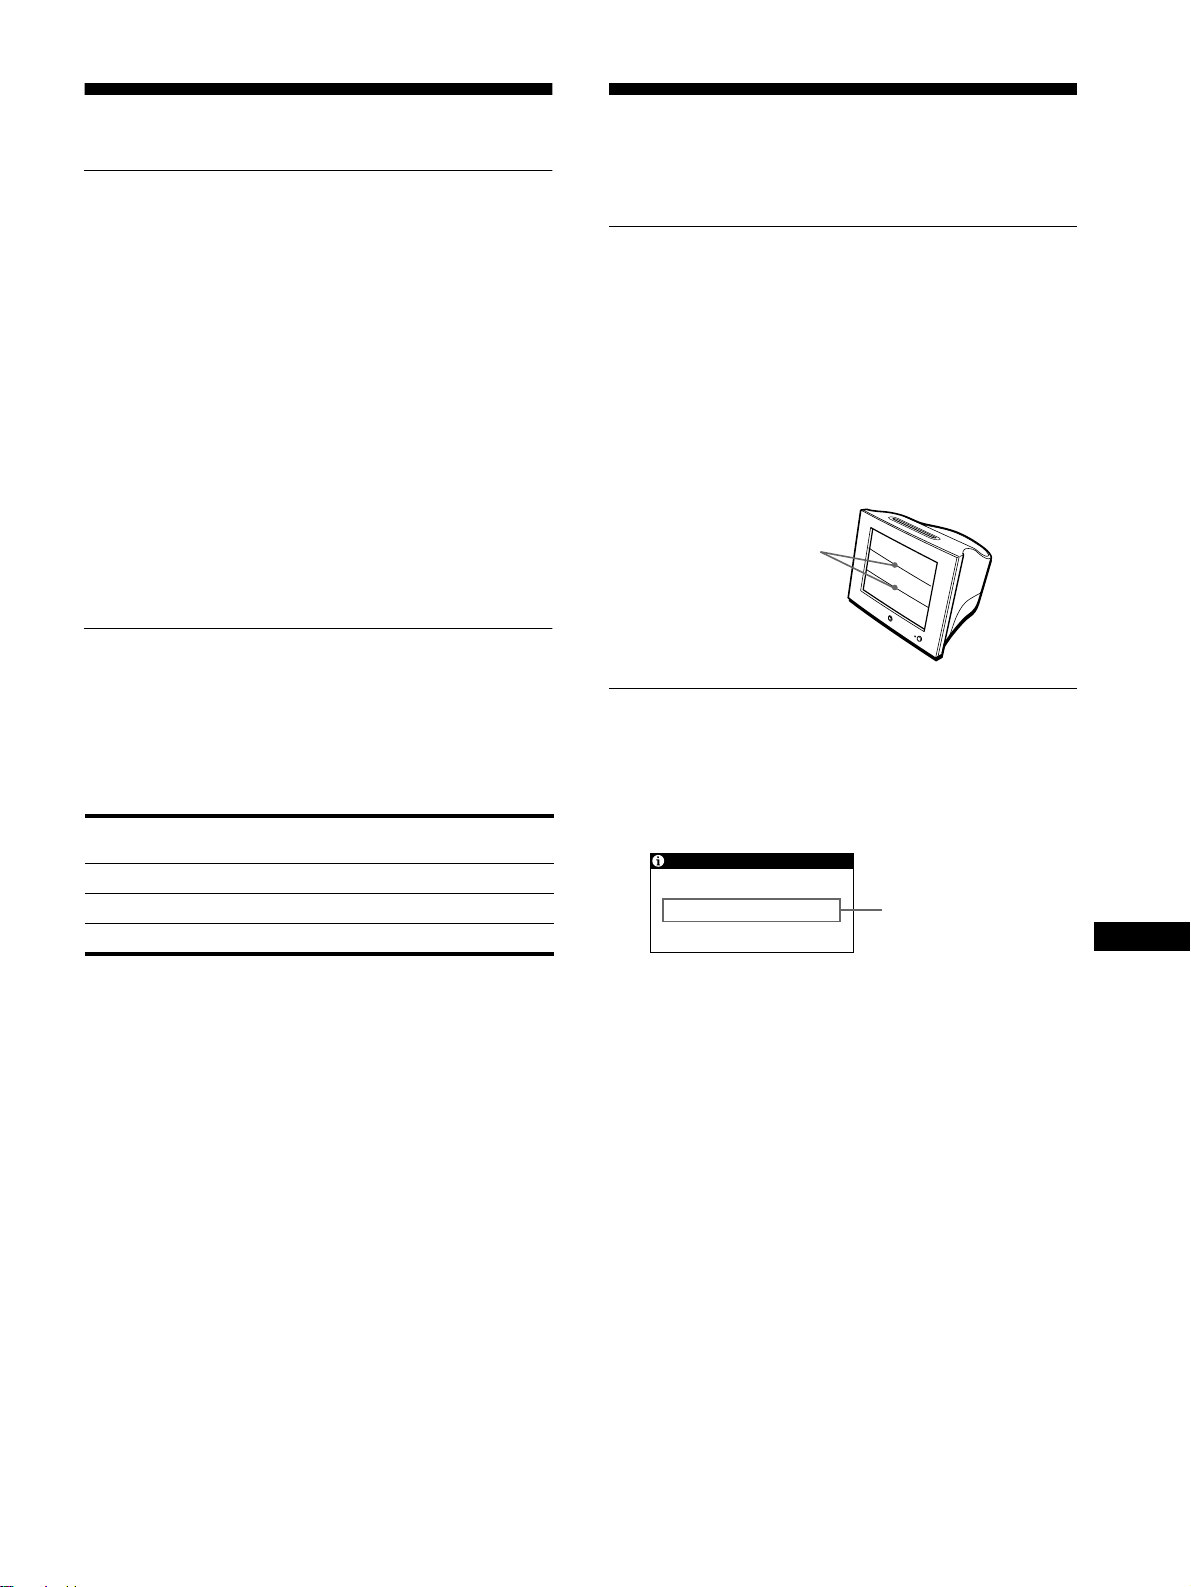
Technische kenmerken
INFORMATION
OUT OF SCAN RANGE
Voorinstel- en gebruikersmodes
Storingzoeken
Raadpleeg dit hoofdstuk alvorens de hulp van een technicus in te
roepen.
Als de monitor een ingangssignaal ontvangt, wor dt dit signaal
automatisch afgestemd op één van de fabrieksmatig ingestelde
modes die zijn opge sla gen in het mon itorge heu gen om een beeld
van hoge kwaliteit in het midden van het scherm te bekomen.
(Een lijst van voorinstelmodes vindt u in Appendix.) Bij
ingangssignalen die ni et overeenstemmen met één van de
voorinstelmodes, zorgt de digitale Multiscan-technologie van
deze monitor ervoor dat er een helder beeld verschijnt binnen het
hele frequentiebereik van de monitor (horizontaal: 30 - 70 kHz,
verticaal: 48 - 12 0 H z) . A ls h et be e ld wordt bijgereg el d, w o r d en
de regelingen opgeslagen als gebruikersmode en automatisch
opgeroepen wanneer eenzelfde ingangssignaal wordt ontv angen.
Opmerking voor Windows gebruikers
Voor Windows gebruikers: raadpleeg de gebruiksaanwijzing van
uw videokaart of het functieprogramma van de grafische kaart en
kies de hoogste refresh rate voor optimale monitorprestaties.
Stroomspaarfunctie
Deze monitor beantwoordt aan de stroomspaarnormen van
VESA, ENERGY STAR en NUTEK. Wanneer de monitor geen
signaal ontvangt van de aangesloten computer, verlaagt deze
monitor automati sch het stroomverbruik zoals hieronder
afgebeeld.
*
Werkingsstand Stroomverbruik
normale werking
active off**
uit 0 W uit
115 W groen
≤
5 W oranje***
≤
1 (aan/uit)
indicator
Als dunne draden verschijnen op
het scherm (demperdraden)
De lijnen die u op uw scherm ziet, vooral bij een lichte
achtergrondkleur (meestal wit), zijn no rm aal vo or de Trinit ron
monitor en duiden niet op een storing. Dit zijn de schaduwen van
de dempingsdrad en die gebruikt w orden om het apertu urrooster te
stabiliseren. Het apertuurrooster is het fundam e ntele e lemen t da t
een Trinitron beeldbuis onderscheidt van alle anderen, doordat er
meer licht bij het scherm kan komen, hetgeen resulteert in een
contrastrijker, meer gedetaill eerd beeld .
Demperdraden
Schermberichten
Als er iets verkeerd is met het ingangssignaal, verschijnt één van
de volgende be richten op het scher m. Om het probleem op te
lossen, raadpleegt u het hoofdstuk “Storingen en oplossingen” op
pagina 14.
Toestand ingangssignaal
NL
* De cijfers geven het stroomverbruik wanneer geen USB compatibele
randapparatuur op de m onitor is aangesloten.
** Wa nneer uw computer in de “active off” st and staat, wordt het
ingangssignaal onderbroken en verschijnt NO INPUT SIGNAL op
het scherm. Na 20 seconden schakelt de monitor dan over naar de
stroomspaarstand.
*** Al s de monitor een horizontaal of verti caal sync signaal ontvangt, is
het mogelijk dat de aa n/ uit - i ndi cator groen en oranje knippert.
Toestand van het ingangssignaal
OUT OF SCAN RANGE
geeft aan dat de monitor het ingangssignaal niet kan
verwerken.
NO INPUT SIGNAL
geeft aan dat er geen signaal wordt ingev oerd.
13
Page 84

Storingen en oplossingen
Als het proble em te wijten is aan de aangesloten computer of andere app a ratuur, moet u de handleiding van de betreffende toestellen
raadplegen.
Gebruik de zelfdia gnosefunctie (pagina 16) als u het probleem niet kunt oplossen zoals hieronder beschreven.
Symptoom Controleer het volgende
Geen beeld
Als de 1 (aan/uit) indicator niet
oplicht
Als het bericht NO INPUT SIGNAL
verschijnt op het scherm, of de
1 (aan/uit) indicator oranje of
afwisselend groen en oranje oplicht.
Als het OUT OF SCAN RANGE
bericht op het sche rm verschijnt
Als er geen bericht op het scherm
staat en de 1 (aan/uit) indicator
groen oplicht of oranje knippert
Als u werkt met een Macintosh
systeem
Het beeld knippert, springt, golft
of is gestoord
• Controleer of het netsnoer goed is aangesloten.
• Controleer of de 1 (aan/uit) schakelaar aan staat.
• Controleer of de videosign aalkabel correct is a angesloten en alle stekkers goed vastzitten
(pagina 6).
• Controleer of de pennen van de HD15 videostekker niet zijn verbo gen of ingedrukt.
xProblemen ver oorza akt door de aa ngesloten compute r of andere appara tuur
• De computer bevindt zich in de stroomspaarstand. Druk op een w illekeurige toets op het
toetsenbord of verplaats d e muis.
• Controleer of de computer aan staat .
• Controleer of de grafische kaart goed in de juiste gleuf zit.
xProblemen ver oorza akt door de aa ngesloten compute r of andere appara tuur
• Controleer of het videofrequentiebereik is afgestemd op de monitor. Als u een oude
monitor hebt vervangen door deze monitor, sluit dan de oude monitor weer aan en regel
het frequentiebereik als vo lgt:
Horizontaal: 30 – 70 kHz
Verticaal: 48 – 120 Hz
• Gebruik de zelfdiagnosefunctie (pagina 16).
• Controleer of de Macintosh adapter (niet bijgeleverd) en de videokabel goed zijn
aangesloten (pagina 6).
• Isoleer en verwijder potentiële bronnen van elektrische of magnet ische velden zoals
monitors, laser printers, elektrische ventilatoren, fluorescentieverlichting en
televisietoestellen.
• Plaats de m onitor u it de b u urt v an elektri citeitsleidi ngen o f scherm de m onitor mag netisch
af.
• Sluit de monitor aan op een ander stopcontact, bij voorkeur op een afzonderlijk circuit.
• Draai de monitor 90° naar links of naar rechts.
xProblemen ver oorza akt door de aa ngesloten compute r of andere appara tuur
• Raadpleeg de handleiding van uw grafische kaart voor de juiste monitorinstelling.
• Controleer of de graphics mode (VESA, Macintosh 16" Color, enz.) en de
ingangssignaal frequentie voor deze monit or (Appendix) worden ondersteund. Ook al l igt
de frequentie binnen het goede bereik, toch kunnen sommige videokaarten een sync pulse
produceren die te smal is voor deze monitor.
• gel de refresh rate (verticale frequentie) van de computer tot u het best mogelijke beeld
bekomt.
Beeld is vaag • Regel helderheid en contrast (pagina 10).
• Demagnetiseer de monitor* (pagina 12).
• Verminder het moiré-annuleereffect (pagina 12).
Spookbeelden • Gebruik geen videoverlengkabels en/of video switch boxes.
• Controleer of alle stekkers goed vastzitten.
14
Page 85

Symptoom Controleer het volgende
Beeldcentrering of -formaa t niet in
orde
• Regel het formaat of de centrering (pagina 10). Merk op dat het scherm in sommige video
modes niet tot aan de randen is gevuld.
Beeldranden zijn gebogen • Regel de vorm van het beeld (pagina10).
Golf- of ellipsvormig patroon
• Regel het moiré-annuleereffect (pagina 12).
(moiré) zichtbaar
xProblemen v eroorzaakt door de aangesloten computer of andere a ppa ra tuur
• Wijzig de schikking op uw bureau.
Kleur ongelijkmatig • Demagnetiseer de monitor* (pagina 12). Als u apparatuur die een magnetisch veld
opwekt, zoals bijvoorb eeld een lui dspreker , d ichtbij de monito r plaatst, of als u de monitor
in een andere richting zet, kunnen de kleuren minder gelijkmatig zijn.
Wit oog niet wit • Regel de kleurtemperatuur (pagina 11).
De USB randapparatuur werkt niet • Controleer of de juiste USB connectors stevig zijn aangesloten (pagina 7).
• Controleer of de 1 (aan/uit) schakelaar aan staat.
xProblemen v eroorzaakt door de aangesloten computer of andere a ppa ra tuur
• Controleer of een autonoom USB compatibel randapparaat aan staat.
• Installeer de meest recente versie van de device driver op uw computer. Neem contact op
met de fabrikant van het apparaat voor meer informatie omtrent de juiste device driver.
• Als uw USB compatibel toetsenbord of muis niet werken, moet u die rechtstreeks
aansluiten op uw computer, uw computer opnieu w starten en de USB instellingen
wijzigen. Sluit dan het toetsenbord of de muis weer aan op de monitor.
• Voor klanten die werken met Windows 95
1. Klik met de rechter muisknop op “My Computer” en kies “Properties”.
2. Klik op het tabblad Apparaatbeheer. Scroll naar beneden en kies “Universal Serial Bus
Controller”.
,Als “Universal Serial Bus Controller” niet verschijnt, moet u een USB supplement
disk laden. Neem contact op met uw computerfabrikan t om te weten hoe u een USB
supplement disk ku nt bekomen.
3. Kies “Generic USB Device” uit de USB controllerlijst en klik op “Properties”.
4. Als het vakje na ast “Disable in this hardw are prof ile,” is a ange vinkt, v erwijder het v inkje
dan.
5. Klik op “Refr e sh”.
Vlak na het aanschakelen is een
brommend geluid hoorbaar
• Dit is het geluid van de automatische demagnetisering. Als de monitor wordt aangezet,
wordt hij gedurende 5 seconden automatisch gedemagnetiseerd.
* Als het een tweede maal m oe t worden gedemagnetisee rd, moet u minstens 20 minute n wachten voor het beste result aa t. Het is mogelijk dat u een
brommend geluid hoo rt, maar dat is volkomen norma a l.
Model, serienummer en productiedatum van de
monitor laten verschijnen (INFORMATION)
Als het probleem niet is opgelost, ne em dan contact op met uw
erkende Sony dealer en bezorg hem de volgende informatie.
• Modelnaam: HMD-A220
1
Druk in het midden van de regeltoets.
Het hoofdmenu ve rschijnt op het scher m.
2
Beweeg de regeltoets om LANGUAGE/
• Serienummer
• Naam en specificaties van uw computer en grafis che
videokaart.
INFORMATION te laten oplichten en druk in het
midden van de regeltoets.
Het LANGUAGE/INFORMATION menu verschijnt op het
scherm.
3
Beweeg de regeltoets m/M om (INFORMATION) te
kiezen en druk in het midden van de regeltoets.
De informatiebox van deze monitor verschijnt op het scherm.
Voorbeeld
LANGUAGE / I NFORMAT ION
MODE L : HMD - A 22 0
SERI AL: 12345678
MANUF ACTURED: 2 0 0 0 - 5 2
SELECT EX I T
NL
15
Page 86

Zelfdiagnosefunctie
Deze monitor is uitgerust met een zelfdia gnosefunctie. Als er iets
mis is met uw monitor of computer, verschijnt een blanco beeld
en licht de 1 (aan/uit) indicator groen op of knippert hij oranje.
Als de 1 (aan/uit) in dicator oranje oplicht, bevindt de computer
zich in de stroomspaarstand. Druk op een willekeurige toets op
het toetsenbord of verplaats de muis.
MENU
(aan/uit) indicator
1
Als de
1
2
3
(aan/uit) indicator groen oplicht
1111
Trek de videokabel uit of zet de aangesloten
computer af.
Druk op de 1111 (aan/uit) toets om de monitor af en
weer aan te zetten.
Beweeg de regeltoets , gedurende 2 seconden
voor de monitor overschakelt naar de
stroomspaarstand.
Specificaties
CRT apertuurroosterpitch 0,24 mm
(midden)
17 duim diagonaal ge m eten
90 graden afbuiging
Zichtbaar beeldformaat Ong. 327 × 243 mm (b/h)
16,0" beeld
Resolutie
Maximaal Horizontaal: 1280 punten
Verticaal: 1024 lijnen
Aanbevolen Horizontaal: 1024 punten
Verticaal: 768 lijnen
Standaard beeldzone Ong. 312 × 234 mm (b/h)
Afbuigfrequentie* Horizontaal: 30 tot 70 kHz
Verticaal: 48 tot 120 Hz
Voedingsspanning/stroomsterkte
220 tot 240 V, 50 – 60 Hz, 0,9 A
Stroomverbruik Max. 115 W (zonder USB apparatuur
aangesloten)
Bedrijfstemperatuur 10°C tot 40°C
Afmetingen Ong. 460 × 378 × 441 mm (b/h/d)
Gewicht Ong. 19 kg
Plug and Play DDC1/DDC2B
Meegeleverde toebehoren Zie pagina 6
* Aanbevolen horizontale en verticale timing
• De horizontale sync breedte moet meer da n 1,0 µsec
bedragen.
• De horizontale blanking breedte moet meer dan 3,0 µsec.
• De verticale blanking breedte moet meer dan 500 µsec
bedragen.
MENU
Als alle drie de kleurbalkjes (rood, groen, blauw) verschijnen,
werkt de monitor zoals het hoort. Sluit de videokabel weer aan en
controleer de staat van uw computer.
Als de kleurbalkjes niet verschijnen, is de monitor mogelijk
defect. Informeer uw Sony dealer over de staat van de monitor.
Als de
Druk op de 1111 (aan/uit) toets om de monitor af en weer
aan te zetten.
Als de 1 (aan/uit) indicator groen oplich t, werkt de monitor zoals
het hoort.
Als de 1 (aan/uit) indicator nog altijd knippert, is de monitor
mogelijk defect. Tel het aantal seconden tussen de oranje
knipperingen v a n de 1 (aan/uit) indicator en informeer uw S ony
dealer over de staat van de monitor. Noteer de modelnaam en het
serienummer van uw m onit or. Note er ook merk e n mode l van u w
computer en videokaart.
(aan/uit) indicator oranje knippert
1111
Wijzigingen aan ontwerp en specificaties voorbehouden zonder
voorafgaande kennisgeving.
16
Page 87

Appendix
Preset mode timing table
No. Resolution
(dots × lines)
1640 × 480 31.5 kHz 60 Hz VGA-G
2640 × 480 43.3 kHz 85 Hz VESA
3720 × 400 31.5 kHz 70 Hz VGA-Text
4800 × 600 46.9 kHz 75 Hz VESA
5800 × 600 53.7 kHz 85 Hz VESA
6832 × 624 49.7 kHz 75 Hz Macintosh 16"
7 1024 × 768 60.0 kHz 7 5 Hz VESA
8 1024 × 768 68.7 kHz 8 5 Hz VESA
9 1280 × 1024 64.0 kHz 60 Hz VESA
Horizontal
Frequency
Vertical
Frequency
Graphics
Mode
Color
i
Page 88

Sony Corporation Printed in Thailand
 Loading...