

Page 1
"Handycam" User Guide
1
PrintSearch
Top page
Operation Search
Before use
Getting started
Recording
Playback
Saving images with a PC
Customizing your camcorder
Troubleshooting
Maintenance and precautions
Contents list
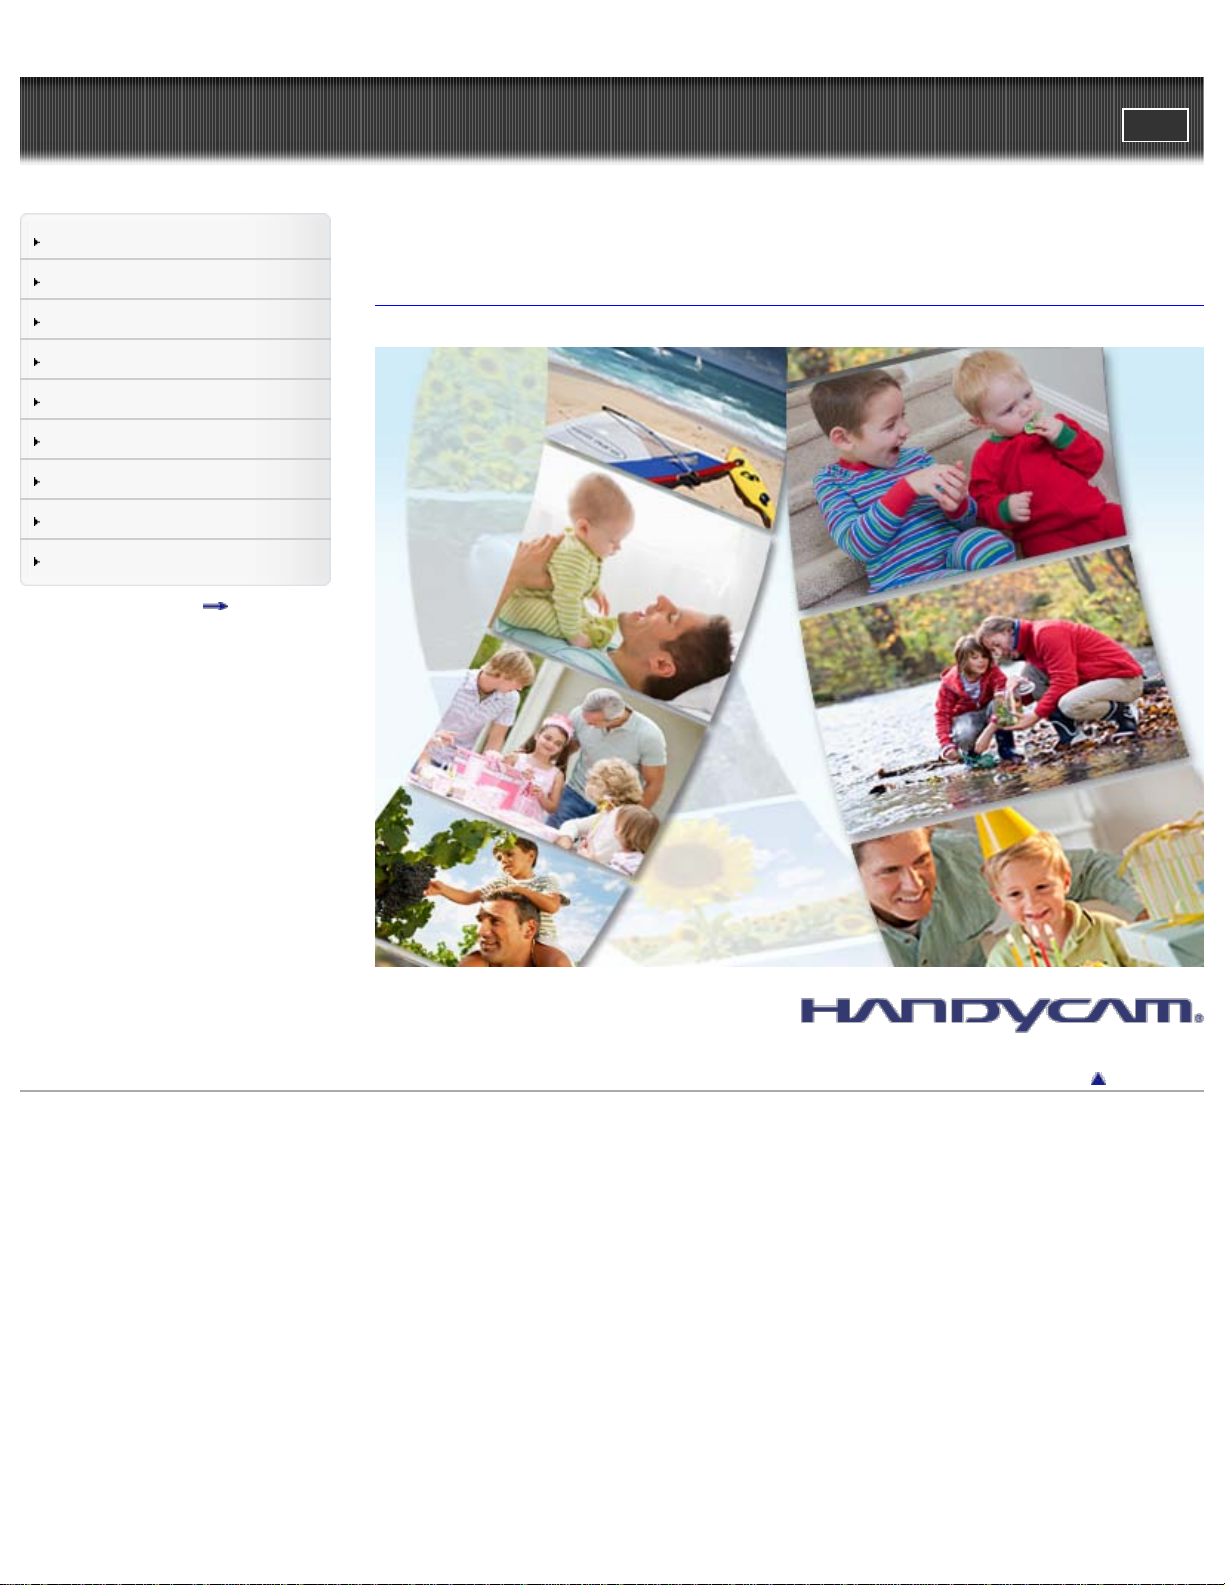
HDR-GW77/GW77V
User Guide
Use this manual if you encounter any problems, or have any questions about the camcorder.
Back to top
Copyright 2012 Sony Corporation
Page 2
"Handycam" User Guide
2
PrintSearch
Top page > Operation Search
Operation Search
Before use
Getting started
Recording
Playback
Saving images with a PC
Customizing your camcorder
Troubleshooting
Maintenance and precautions
Contents list
Operation Search
Operation Search
Search by operation
Back to top
Copyright 2012 Sony Corporation
Page 3
"Handycam" User Guide
3
PrintSearch
Top page > Before use
Operation Search
Before use
Getting started
Recording
Playback
Saving images with a PC
Customizing your camcorder
Troubleshooting
Maintenance and precautions
Contents list
Before use
How to use this User Guide
How to use this User Guide
Models and illustrations used in this User Guide
Parts and controls/Screen indicators
Parts and controls
Screen indicators
About water-proof, dust-proof, and shock-proof performance of the camcorder
About water-proof, dust-proof, and shock-proof performance of the camcorder
Notes before using the camcorder under/near water
Notes on using the camcorder under/near water
Cleaning after using the camcorder under/near water
About the message displayed on the screen
Back to top
Copyright 2012 Sony Corporation
Page 4
"Handycam" User Guide
4
PrintSearch
Top page > Getting started
Operation Search
Before use
Getting started
Recording
Playback
Saving images with a PC
Customizing your camcorder
Troubleshooting
Maintenance and precautions
Contents list
Getting started
Checking the supplied items
Supplied items
Charging the battery pack
Charging the battery pack using the AC Adaptor
Charging the battery pack using your computer
Charging the battery pack abroad
Turning the power on, and setting the date and time
Turning the power on, and setting the date and time
Preparing the recording media
Selecting a recording medium
Inserting a memory card
Back to top
Copyright 2012 Sony Corporation
Page 5
"Handycam" User Guide
5
PrintSearch
Top page > Recording
Operation Search
Before use
Getting started
Recording
Playback
Saving images with a PC
Customizing your camcorder
Troubleshooting
Maintenance and precautions
Contents list
Recording
Recording
Recording movies
Shooting photos
Screen indicators during recording
To record in mirror mode
Useful functions for recording images
Zooming
Intelligent Auto
Recording the selected subject clearly (Face Priority)
Using the GPS function (HDR-GW77V)
Back to top
Copyright 2012 Sony Corporation
Page 6
"Handycam" User Guide
6
PrintSearch
Top page > Playback
Operation Search
Before use
Getting started
Recording
Playback
Saving images with a PC
Customizing your camcorder
Troubleshooting
Maintenance and precautions
Contents list
Playback
Playback
Playing movies and photos from the Event View screen
Playing movies and photos from a map (HDR-GW77V)
Dividing a movie
Capturing a photo from a movie
Highlight Playback
Enjoying a digest of your movies (Highlight Playback)
Saving Highlight Playback in high definition image quality (HD) (Scenario Save)
Converting Highlight Playback scenes or Highlight Scenarios to standard definition image
quality (STD) (Highlight Movie)
Playing images on a TV
Connecting the camcorder to a TV
Using “BRAVIA” Sync
Back to top
Copyright 2012 Sony Corporation
Page 7
"Handycam" User Guide
7
PrintSearch
Top page > Saving images with a PC
Operation Search
Before use
Getting started
Recording
Playback
Saving images with a PC
Customizing your camcorder
Troubleshooting
Maintenance and precautions
Contents list
Saving images with a PC
Using the “PlayMemories Home” software
Starting the “PlayMemories Home” software
Back to top
Copyright 2012 Sony Corporation
Page 8
"Handycam" User Guide
8
PrintSearch
Top page > Customizing your camcorder
Operation Search
Before use
Getting started
Recording
Playback
Saving images with a PC
Customizing your camcorder
Troubleshooting
Maintenance and precautions
Contents list
Customizing your camcorder
Using menu items
Setting up menu items
Shooting Mode
Movie
Photo
Smth Slw REC (Smooth slow rec)
Golf Shot
iSweep Panorama
Camera/Mic
White Balance
Spot Meter/Fcs (Spot meter/focus)
Spot Meter (Flexible spot meter)
Spot Focus
Exposure
Focus
Low Lux
Scene Selection
Fader
Self-Timer
Tele Macro
SteadyShot (movie)
SteadyShot (photo)
Digital Zoom
Auto Back Light
Face Detection
Smile Shutter
Smile Sensitivity
Flash
Flash Level
Red Eye Reduction
Blt-in Zoom Mic
Wind Noise Reduct.
Micref Level (Microphone reference level)
My Button
Guide Frame
Display Setting
Image Quality/Size
REC Mode
Frame Rate
HD/STD Setting
Page 9

Wide Mode
9
x.v.Color
Image Size
Playback Function
Event View
Map View (HDR-GW77V)
Highlight Movie
Scenario
Edit/Copy
Delete
Protect
Copy
Setup
Media Select
Media Info
Format
Repair Img. DB F.
File Number
Data Code
Volume
Download Music
Empty Music
TV Type
HDMI Resolution
CTRL FOR HDMI (Control for HDMI)
USB Connect
USB Connect Setting
USB Power Supply
USB LUN Setting
Disc Burn
Beep
LCD Brightness
Your Location (HDR-GW77V)
Airplane Mode
GPS Setting (HDR-GW77V)
Language Setting
Power Save
Initialize
Demo Mode
Date & Time Setting
Area Setting
Auto Clock ADJ (HDR-GW77V)
Auto Area ADJ (HDR-GW77V)
Back to top
Copyright 2012 Sony Corporation
Page 10
"Handycam" User Guide
10
PrintSearch
Top page > Troubleshooting
Operation Search
Before use
Getting started
Recording
Playback
Saving images with a PC
Customizing your camcorder
Troubleshooting
Maintenance and precautions
Contents list
Troubleshooting
If you have problems
If you have problems
Troubleshooting
Overall operations
Batteries/power sources
LCD screen
Memory card
Recording
Playback
Playing back images stored on memory card on other devices
Editing movies/photos on your camcorder
Playback on the TV
Copying/Connecting to other devices
Connecting to a computer
Self-diagnosis display/Warning indicators
Self-diagnosis display
Warning Indicators
Copyright 2012 Sony Corporation
Back to top
Page 11
"Handycam" User Guide
11
PrintSearch
Top page > Maintenance and precautions
Operation Search
Before use
Getting started
Recording
Playback
Saving images with a PC
Customizing your camcorder
Troubleshooting
Maintenance and precautions
Contents list
Maintenance and precautions
Maintenance and precautions
About the AVCHD format
About GPS (HDR-GW77V)
About the memory card
About the battery pack
About x.v.Color
About the AC Adaptor
About handling of your camcorder
On use and care
On moisture condensation
On charging the pre-installed rechargeable battery
Notes on disposal/transfer of the camcorder
Recording time of movies/number of recordable photos
Charging time
Expected time of recording and playback with each battery pack
Expected recording time of movies
Expected number of recordable photos
Bit-rate and recording pixels
Using your camcorder abroad
Using your camcorder abroad
On trademarks
On trademarks
Copyright 2012 Sony Corporation
Back to top
Page 12
"Handycam" User Guide
12
PrintSearch
Top page > Contents list
Operation Search
Before use
Getting started
Recording
Playback
Saving images with a PC
Customizing your camcorder
Troubleshooting
Maintenance and precautions
Contents list
Contents list
Operation Search
Operation Search
Search by operation
Back to top
Before use
How to use this User Guide
How to use this User Guide
Models and illustrations used in this User Guide
Parts and controls/Screen indicators
Parts and controls
Screen indicators
About water-proof, dust-proof, and shock-proof performance of the camcorder
About water-proof, dust-proof, and shock-proof performance of the camcorder
Notes before using the camcorder under/near water
Notes on using the camcorder under/near water
Cleaning after using the camcorder under/near water
About the message displayed on the screen
Getting started
Checking the supplied items
Supplied items
Charging the battery pack
Charging the battery pack using the AC Adaptor
Charging the battery pack using your computer
Charging the battery pack abroad
Turning the power on, and setting the date and time
Turning the power on, and setting the date and time
Preparing the recording media
Selecting a recording medium
Inserting a memory card
Recording
Recording
Back to top
Back to top
Page 13

Recording movies
Shooting photos
13
Screen indicators during recording
To record in mirror mode
Useful functions for recording images
Zooming
Intelligent Auto
Recording the selected subject clearly (Face Priority)
Using the GPS function (HDR-GW77V)
Playback
Playback
Playing movies and photos from the Event View screen
Playing movies and photos from a map (HDR-GW77V)
Dividing a movie
Capturing a photo from a movie
Highlight Playback
Enjoying a digest of your movies (Highlight Playback)
Saving Highlight Playback in high definition image quality (HD) (Scenario Save)
Converting Highlight Playback scenes or Highlight Scenarios to standard definition image
quality (STD) (Highlight Movie)
Back to top
Playing images on a TV
Connecting the camcorder to a TV
Using “BRAVIA” Sync
Saving images with a PC
Using the “PlayMemories Home” software
Starting the “PlayMemories Home” software
Customizing your camcorder
Using menu items
Setting up menu items
Shooting Mode
Movie
Photo
Smth Slw REC (Smooth slow rec)
Golf Shot
iSweep Panorama
Back to top
Back to top
Camera/Mic
White Balance
Spot Meter/Fcs (Spot meter/focus)
Spot Meter (Flexible spot meter)
Spot Focus
Page 14

Exposure
14
Focus
Low Lux
Scene Selection
Fader
Self-Timer
Tele Macro
SteadyShot (movie)
SteadyShot (photo)
Digital Zoom
Auto Back Light
Face Detection
Smile Shutter
Smile Sensitivity
Flash
Flash Level
Red Eye Reduction
Blt-in Zoom Mic
Wind Noise Reduct.
Micref Level (Microphone reference level)
My Button
Guide Frame
Display Setting
Image Quality/Size
REC Mode
Frame Rate
HD/STD Setting
Wide Mode
x.v.Color
Image Size
Playback Function
Event View
Map View (HDR-GW77V)
Highlight Movie
Scenario
Edit/Copy
Delete
Protect
Copy
Setup
Media Select
Media Info
Format
Repair Img. DB F.
File Number
Data Code
Volume
Download Music
Page 15

Empty Music
TV Type
15
HDMI Resolution
CTRL FOR HDMI (Control for HDMI)
USB Connect
USB Connect Setting
USB Power Supply
USB LUN Setting
Disc Burn
Beep
LCD Brightness
Your Location (HDR-GW77V)
Airplane Mode
GPS Setting (HDR-GW77V)
Language Setting
Power Save
Initialize
Demo Mode
Date & Time Setting
Area Setting
Auto Clock ADJ (HDR-GW77V)
Auto Area ADJ (HDR-GW77V)
Troubleshooting
If you have problems
If you have problems
Troubleshooting
Overall operations
Batteries/power sources
LCD screen
Memory card
Recording
Playback
Playing back images stored on memory card on other devices
Editing movies/photos on your camcorder
Playback on the TV
Copying/Connecting to other devices
Connecting to a computer
Self-diagnosis display/Warning indicators
Self-diagnosis display
Warning Indicators
Back to top
Back to top
Maintenance and precautions
Maintenance and precautions
About the AVCHD format
Page 16

About GPS (HDR-GW77V)
About the memory card
16
About the battery pack
About x.v.Color
About the AC Adaptor
About handling of your camcorder
On use and care
On moisture condensation
On charging the pre-installed rechargeable battery
Notes on disposal/transfer of the camcorder
Recording time of movies/number of recordable photos
Charging time
Expected time of recording and playback with each battery pack
Expected recording time of movies
Expected number of recordable photos
Bit-rate and recording pixels
Using your camcorder abroad
Using your camcorder abroad
On trademarks
On trademarks
Copyright 2012 Sony Corporation
Back to top
Page 17
"Handycam" User Guide
17
Operation Search
PrintSearch
Top page > Operation Search > Operation Search > Search by operation
Before use
Getting started
Recording
Playback
Saving images with a PC
Customizing your camcorder
Troubleshooting
Maintenance and precautions
Contents list
Search by operation
Setting the date and time
Date & Time Setting
Area Setting
Auto Clock ADJ (HDR-GW77V)
Identifying part names
Parts and controls
Displaying the data code
Data Code
Checking your golf swing
Golf Shot
Smth Slw REC (Smooth slow rec)
Selecting the suitable setting automatically for the recording situation
Intelligent Auto
Recording people clearly
Face Detection
Recording the selected subject clearly (Face Priority)
Smile Shutter
Scene Selection (Portrait)
Scene Selection (Spotlight)
Scene Selection (Night Portrait)
Recording a panoramic photo
iSweep Panorama
Recording in underwater
Intelligent Auto
Scene Selection (Underwater)
Recording images with the selected image quality
REC Mode
Frame Rate
HD/STD Setting
Image Size
Recording images without blurring
SteadyShot (movie)
SteadyShot (photo)
Adjusting the focus
Spot Focus
Tracking focus: Recording the selected subject clearly (Face Priority)
Focus
Using the GPS function
Page 18

GPS Setting (HDR-GW77V)
18
Your Location (HDR-GW77V)
Recording images in a dim place
Low Lux
Scene Selection (Night Portrait)
Scene Selection (Night Scene)
Flash
Recording sound clearly
Wind Noise Reduct.
Blt-in Zoom Mic
Micref Level (Microphone reference level)
Capturing photos during movie recording
Recording high quality photos during movie recording (Dual capture): Recording movies
Smile Shutter
Recording sunset or fireworks beautifully
Scene Selection (Fireworks)
Scene Selection (Sunrise&Sunset)
Selecting a recording medium
Media Select
Saving battery power
Power Save
Playing movies and photos from an event
Event View
Playing movies and photos from a map
Map View (HDR-GW77V)
Enjoying a digest of your movies
Enjoying a digest of your movies (Highlight Playback)
Playing images on a TV
Connecting the camcorder to a TV
Editing movies and photos
Capturing a photo from a movie
Dividing a movie
Delete
Copyright 2012 Sony Corporation
Back to top
Page 19
"Handycam" User Guide
19
Operation Search
PrintSearch
Top page > Before use > How to use this User Guide > How to use this User Guide
Before use
Getting started
Recording
Playback
Saving images with a PC
Customizing your camcorder
Troubleshooting
Maintenance and precautions
Contents list
How to use this User Guide
Selecting a topic to display
Searching a topic by keyword
Returning to a previous page
Printing out a page
Marks and notations used in this User Guide
This User Guide explains how to use each function of the camcorder, how to change settings, and how
to troubleshoot a problem.
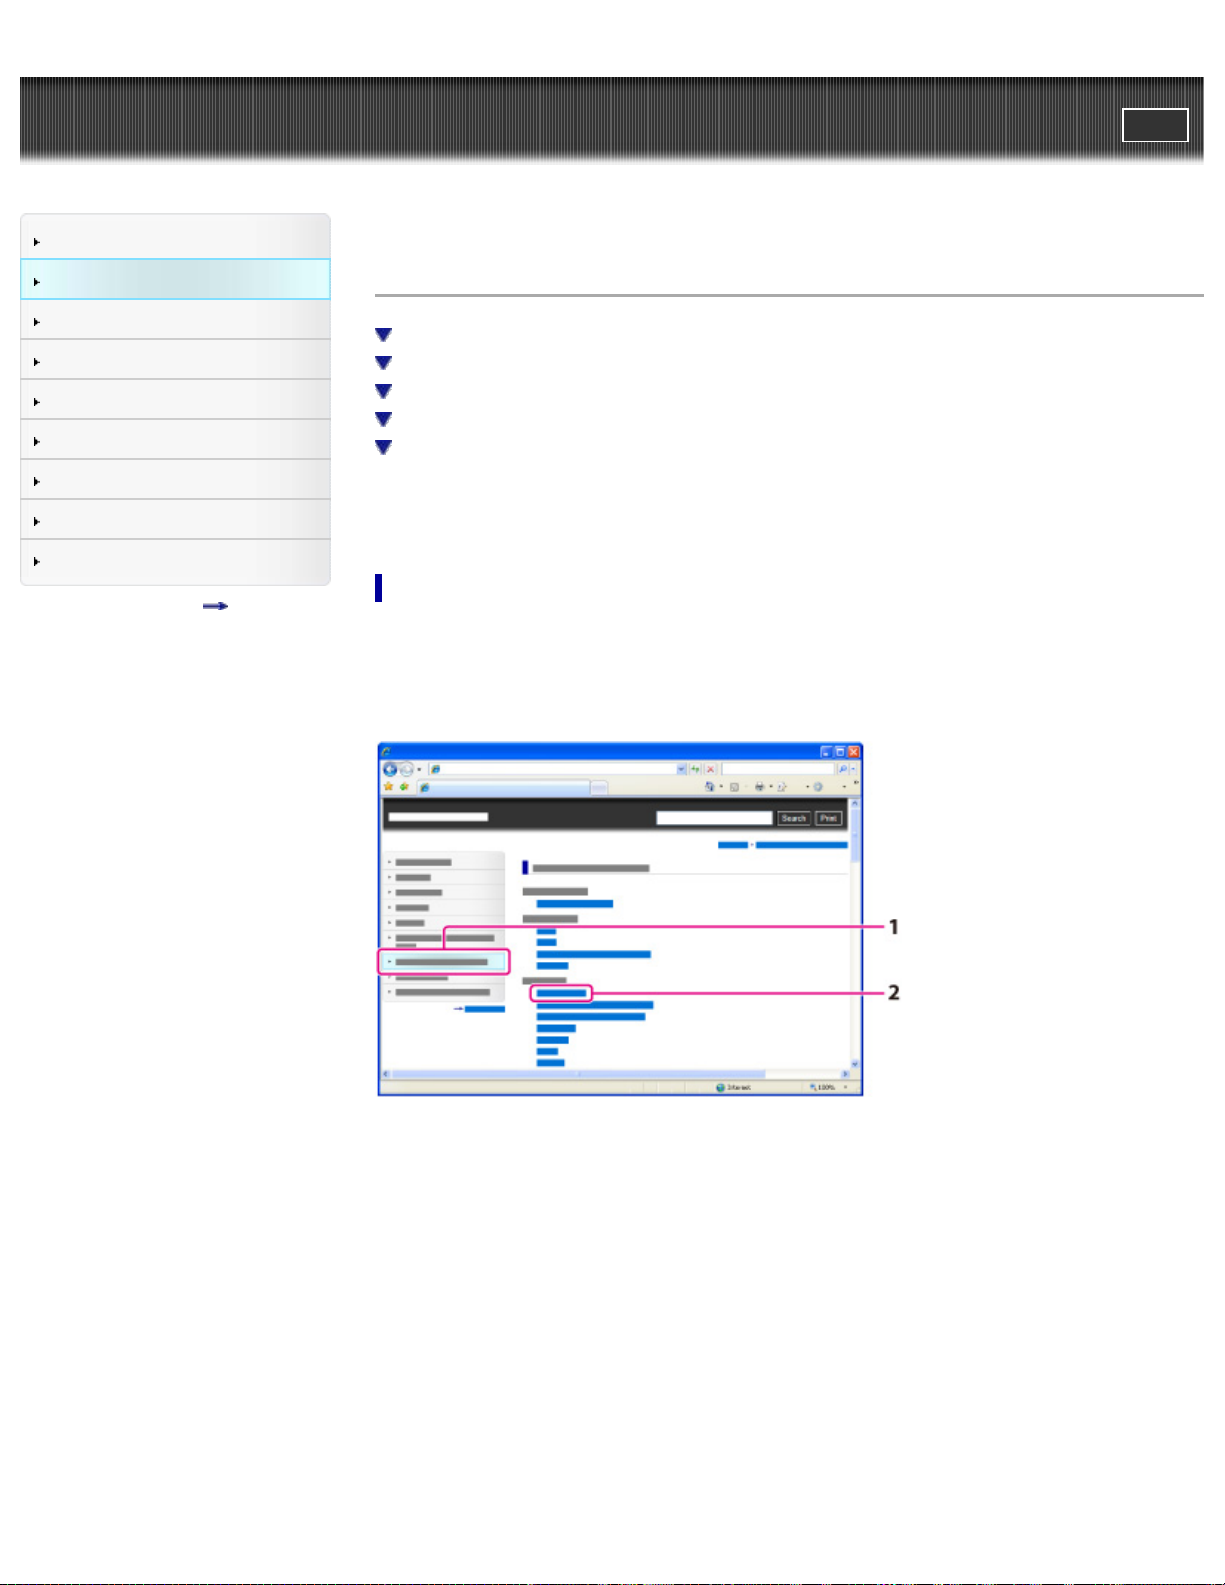
Selecting a topic to display
The following illustrations take Internet Explorer 7 as an example.
1. Click a title in the side bar on the left of the browser window.
A list of topic titles appears in the right pane.
2. Click a topic title in the list.
Descriptions appear in the right pane.
Page 20
Changing the font size
20
Change the font size by changing the setting of your web browser. For how to change the font size
setting, refer to the Help of your web browser.
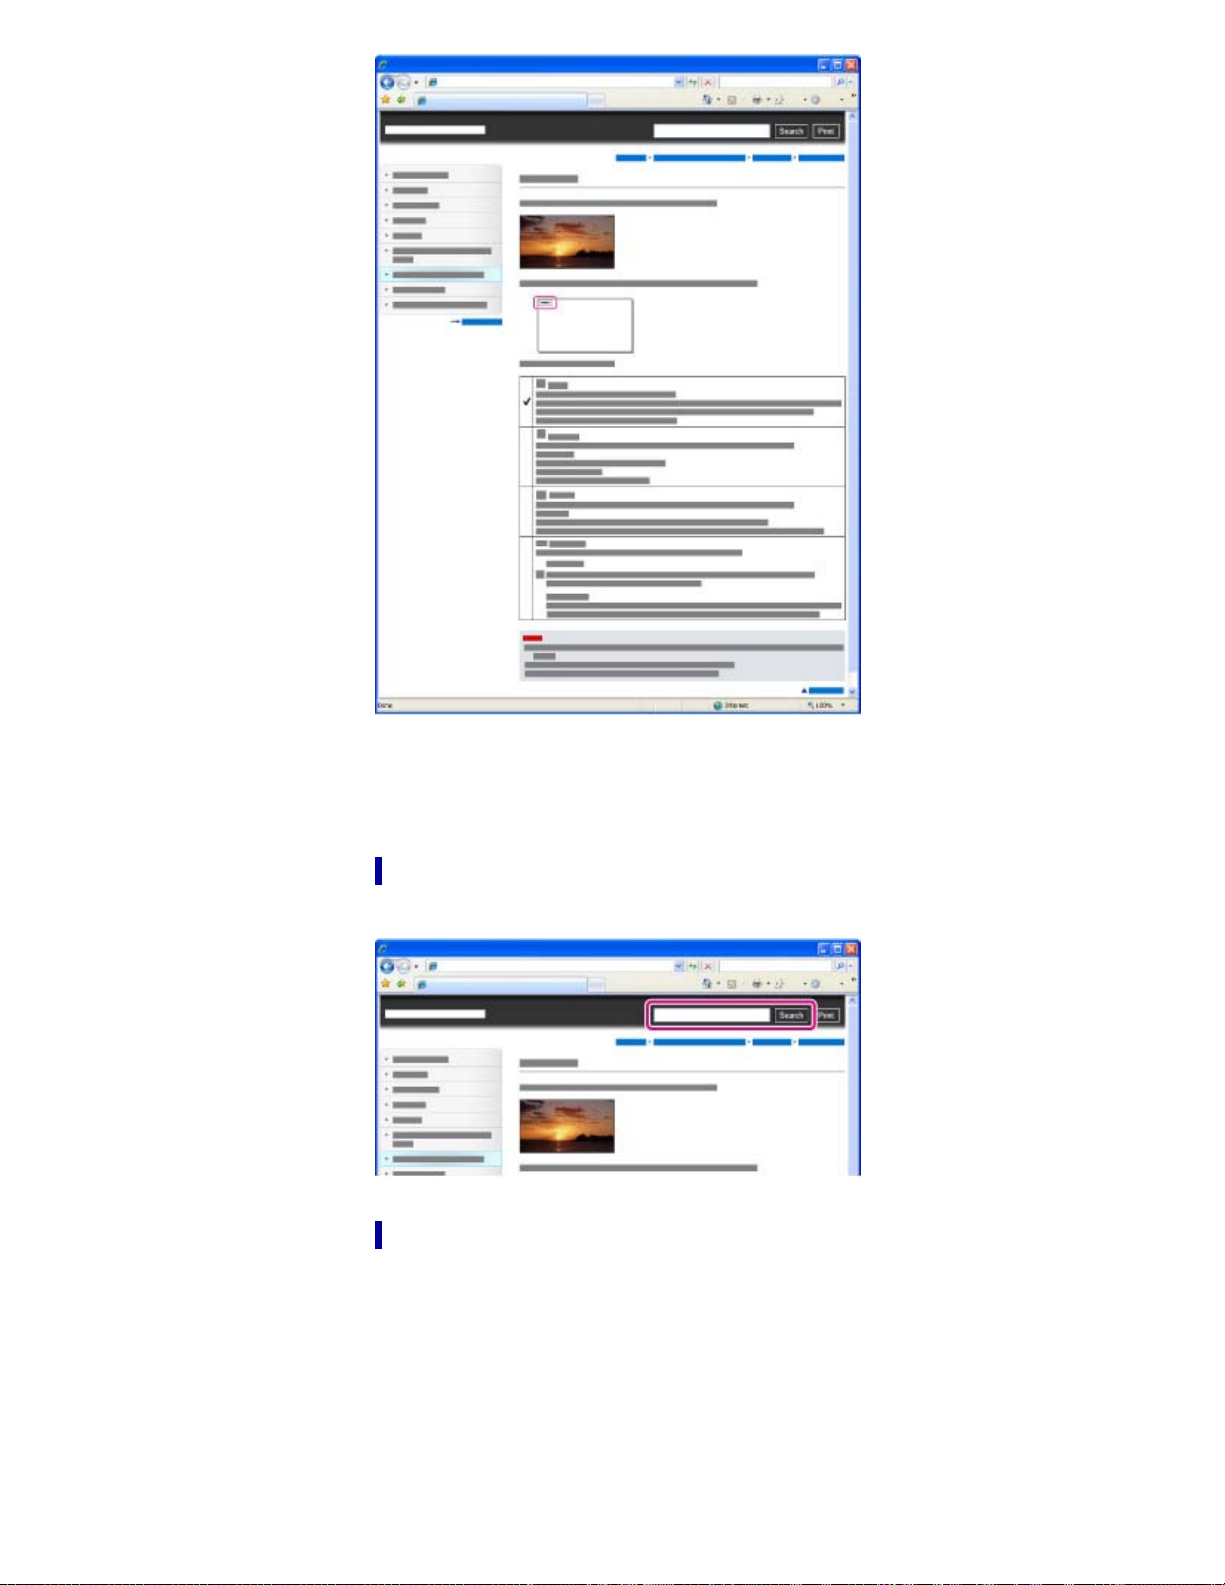
Searching a topic by keyword
Enter the keyword in the search window, then click the [Search] button.
Returning to a previous page
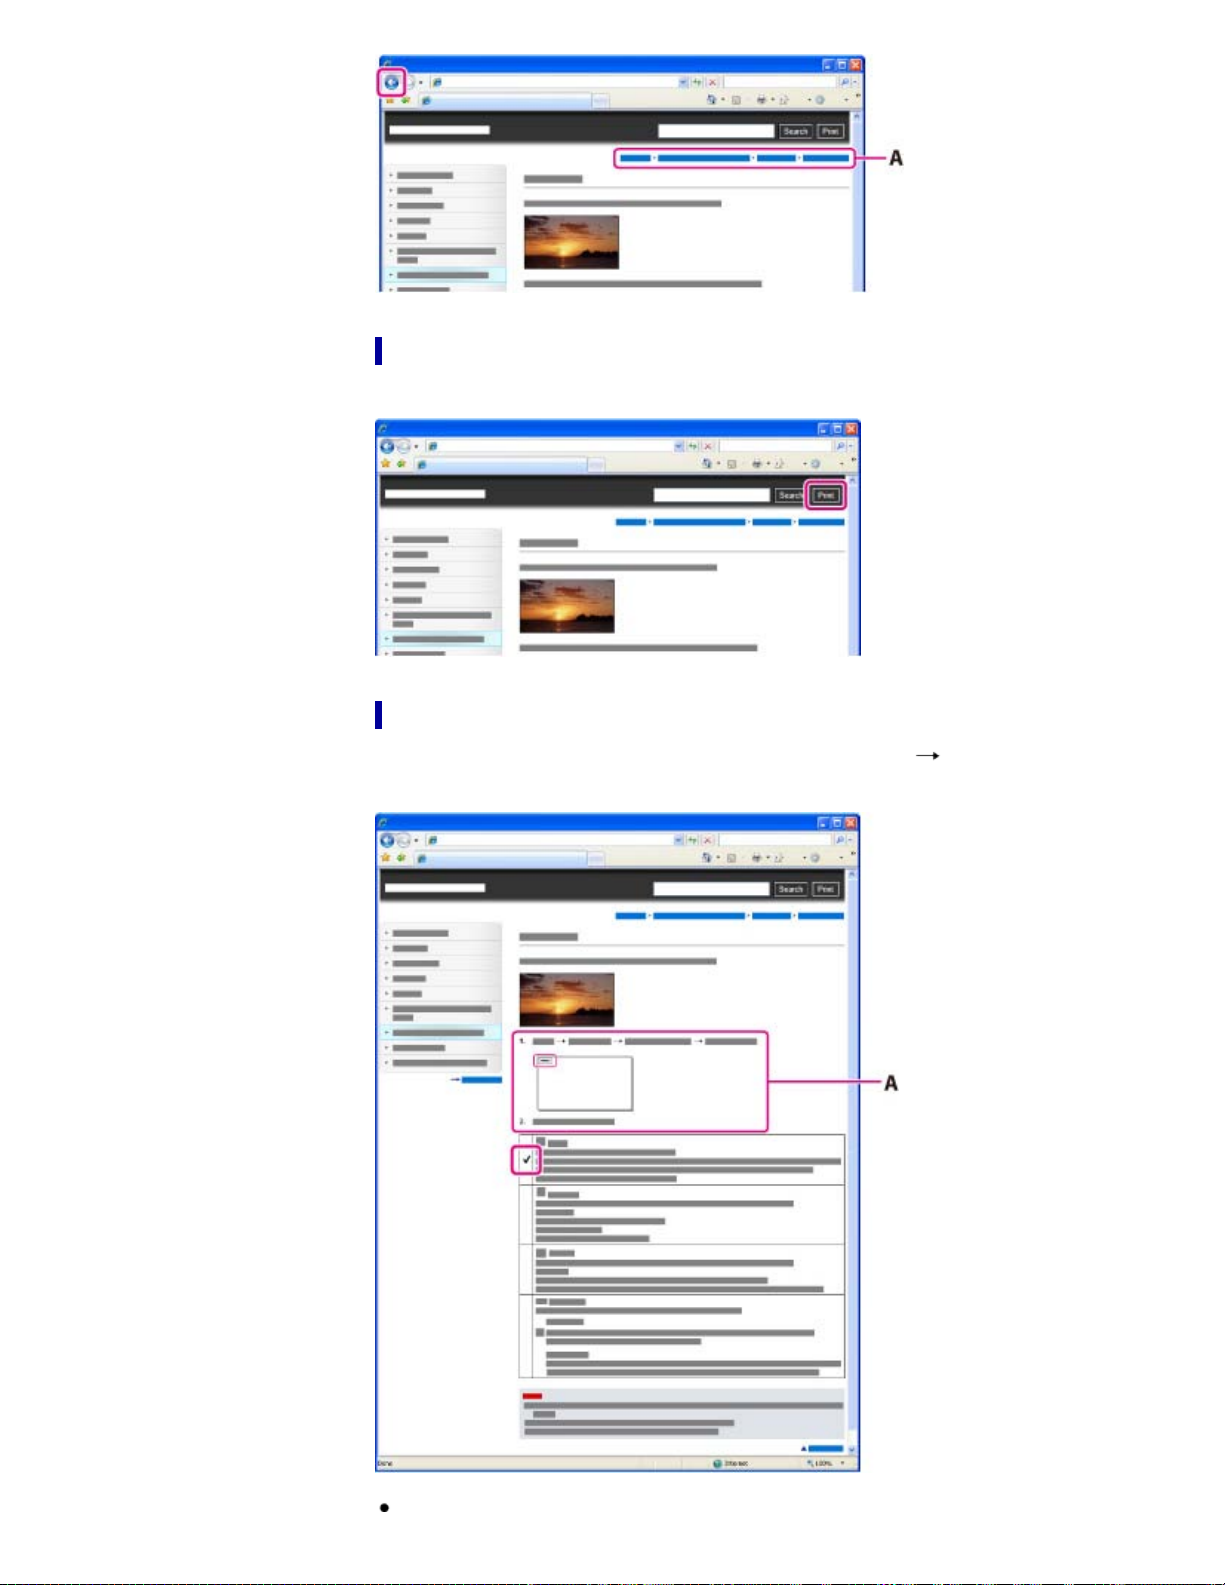
Use the back button of your web browser or the breadcrumb trail navigation (A) to return to a page you
previously viewed.
Page 21
Printing out a page
21
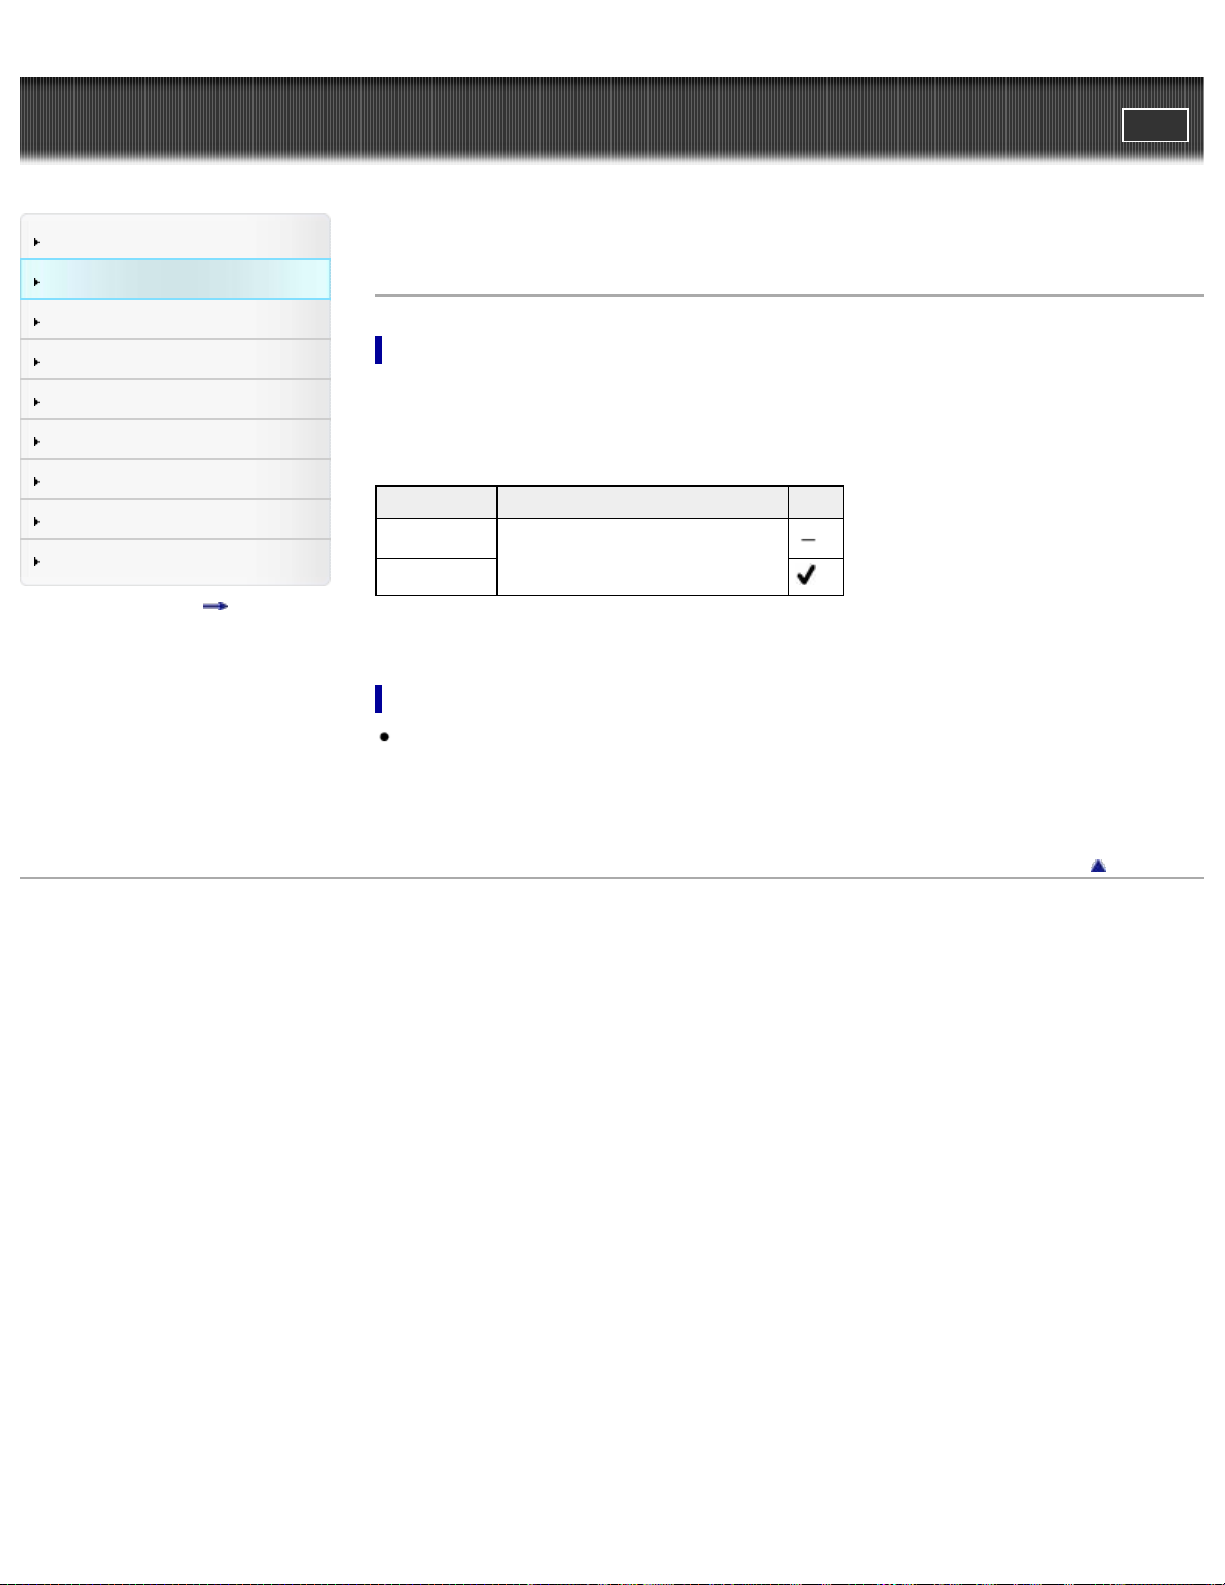
Click the [Print] button to print out a page you are viewing.
Marks and notations used in this User Guide
In this User Guide, the sequence of operations is shown by arrows ( ) (A).
Operate the camcorder in the order indicated.
Page 22

Icons in the operating procedure sentences appear when the camcorder is in its default settings.
22
The default setting is indicated by
.
Back to top
Copyright 2012 Sony Corporation
Page 23
"Handycam" User Guide
23
Operation Search
PrintSearch
Top page > Before use > How to use this User Guide > Models and illustrations used in this User Guide
Before use
Getting started
Recording
Playback
Saving images with a PC
Customizing your camcorder
Troubleshooting
Maintenance and precautions
Contents list
Models and illustrations used in this User Guide
Models described in this User Guide
The model name is shown in this User Guide when there is a difference in specification between models.
Confirm the model name on the bottom of your camcorder.
Difference of each model are as follows.
Capacity of internal memory GPS
HDR-GW77
16 GB
HDR-GW77V
Illustrations and on- screen displays used in this User Guide
The example images used in this User Guide for illustration purposes are captured using a digital still
camera, and therefore may appear different from images and screen indicators that actually appear
on your camcorder.
And, the illustrations of your camcorder and its screen indication are exaggerated or simplified for
understandability.
Copyright 2012 Sony Corporation
Back to top
Page 24
"Handycam" User Guide
24
Operation Search
PrintSearch
Top page > Before use > Parts and controls/Screen indicators > Parts and controls
Before use
Getting started
Recording
Playback
Saving images with a PC
Customizing your camcorder
Troubleshooting
Maintenance and precautions
Contents list
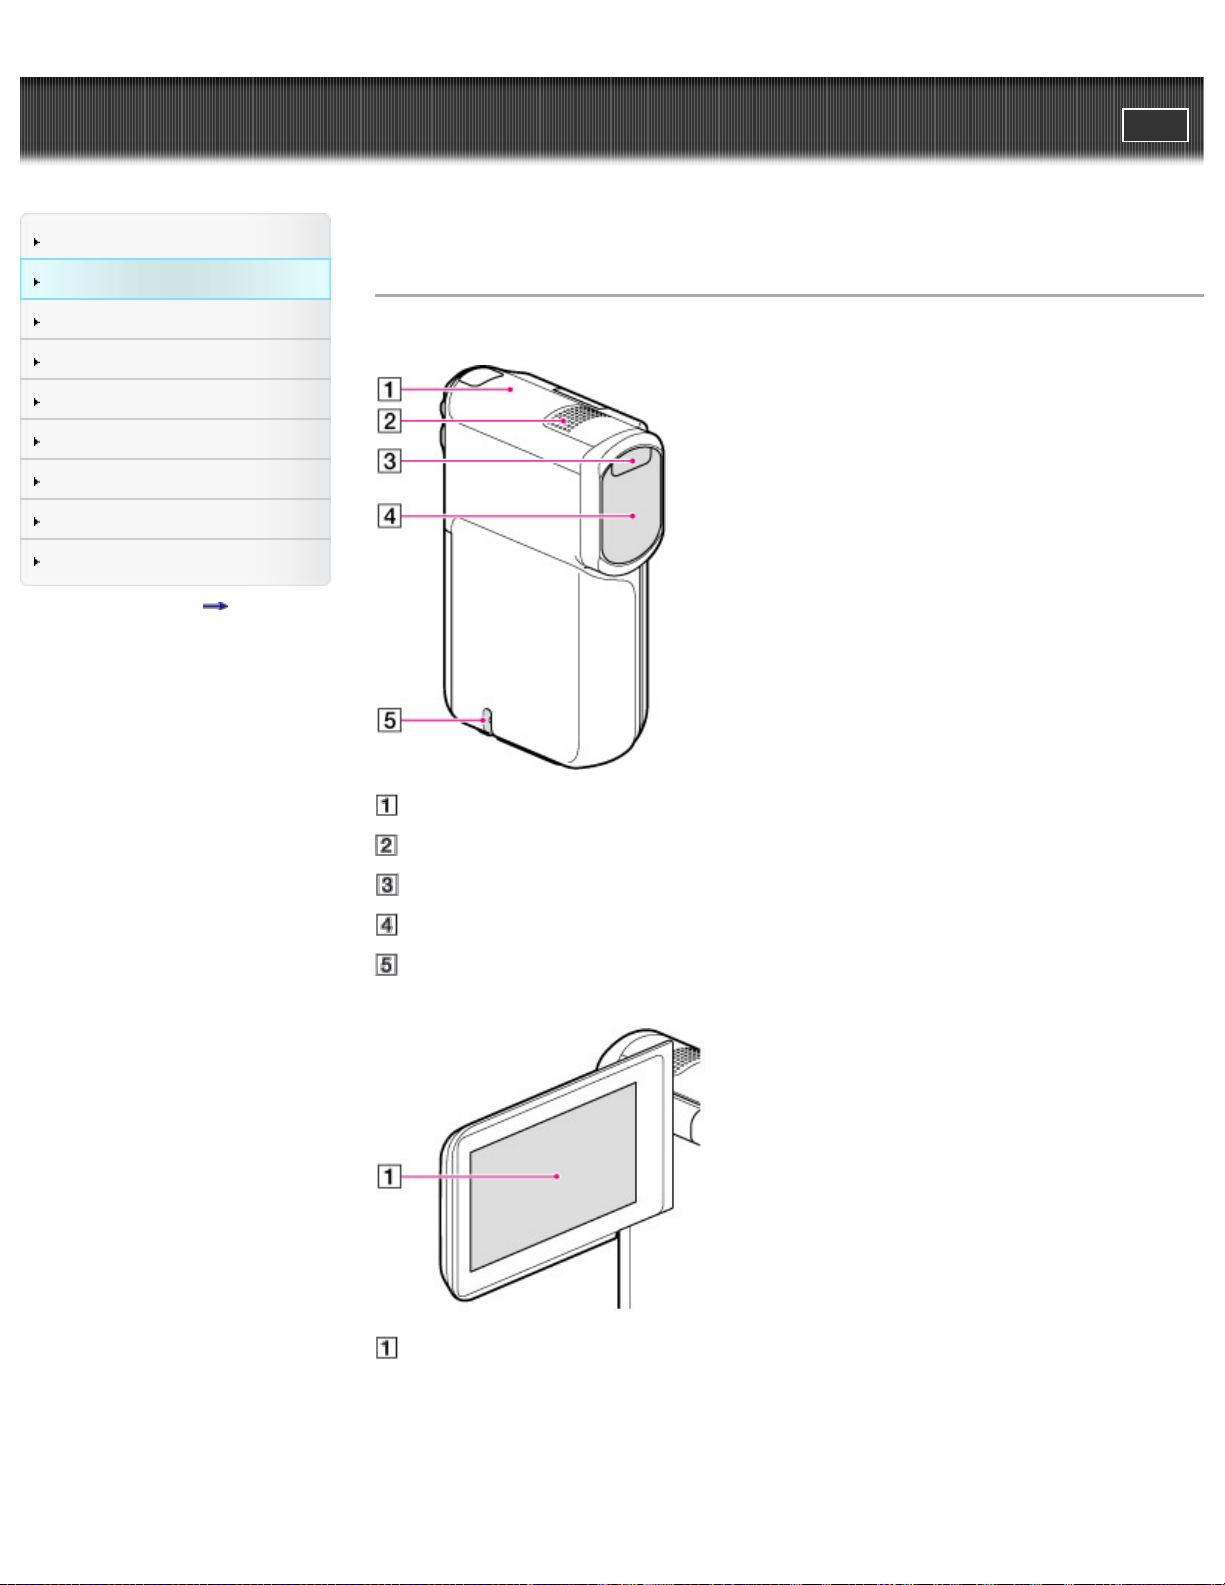
Parts and controls
GPS antenna (HDR-GW77V)
Built-in microphone
Flash
Lens (G lens)
Loop for the Wrist strap
LCD screen/Touch panel
If you rotate the LCD panel 180 degrees, you can close the LCD panel with the LCD screen facing
out. This is convenient during playback operations.
Page 25
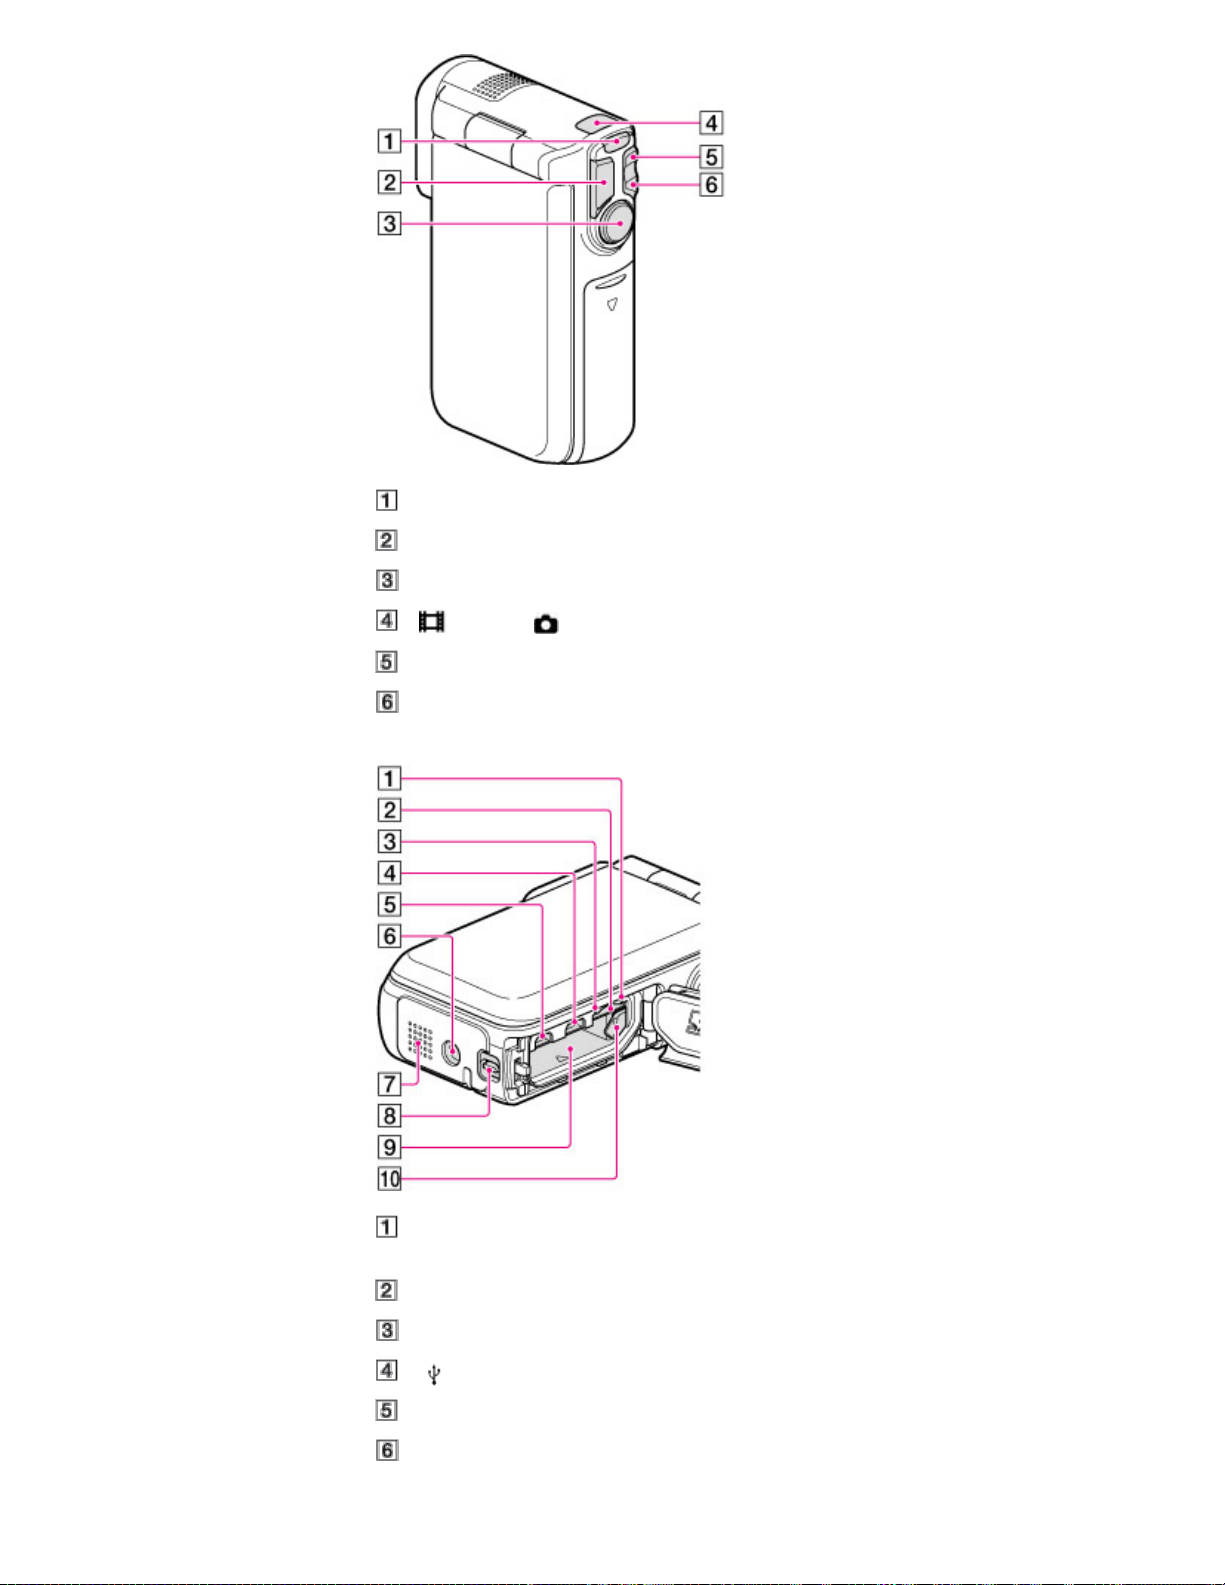
MODE button
25
PHOTO button
START/STOP button
(Movie)/ (Photo) lamp
W (Wide) zoom button
T (Telephoto) zoom button
Memory card access lamp
While the lamp is lit or flashing, the camcorder is reading or writing data.
Memory card slot
CHG (charge) lamp
(USB) jack
HDMI OUT jack
Tripod receptacle
Attach a tripod (sold separately: the length of the screw must be less than 5.5 mm (7/32 in.))
Page 26

Speaker
26
Cover lock lever
Battery slot
Battery release lever
Copyright 2012 Sony Corporation
Back to top
Page 27
"Handycam" User Guide
x.v.Color
27
Operation Search
PrintSearch
Top page > Before use > Parts and controls/Screen indicators > Screen indicators
Before use
Getting started
Recording
Playback
Saving images with a PC
Customizing your camcorder
Troubleshooting
Maintenance and precautions
Contents list
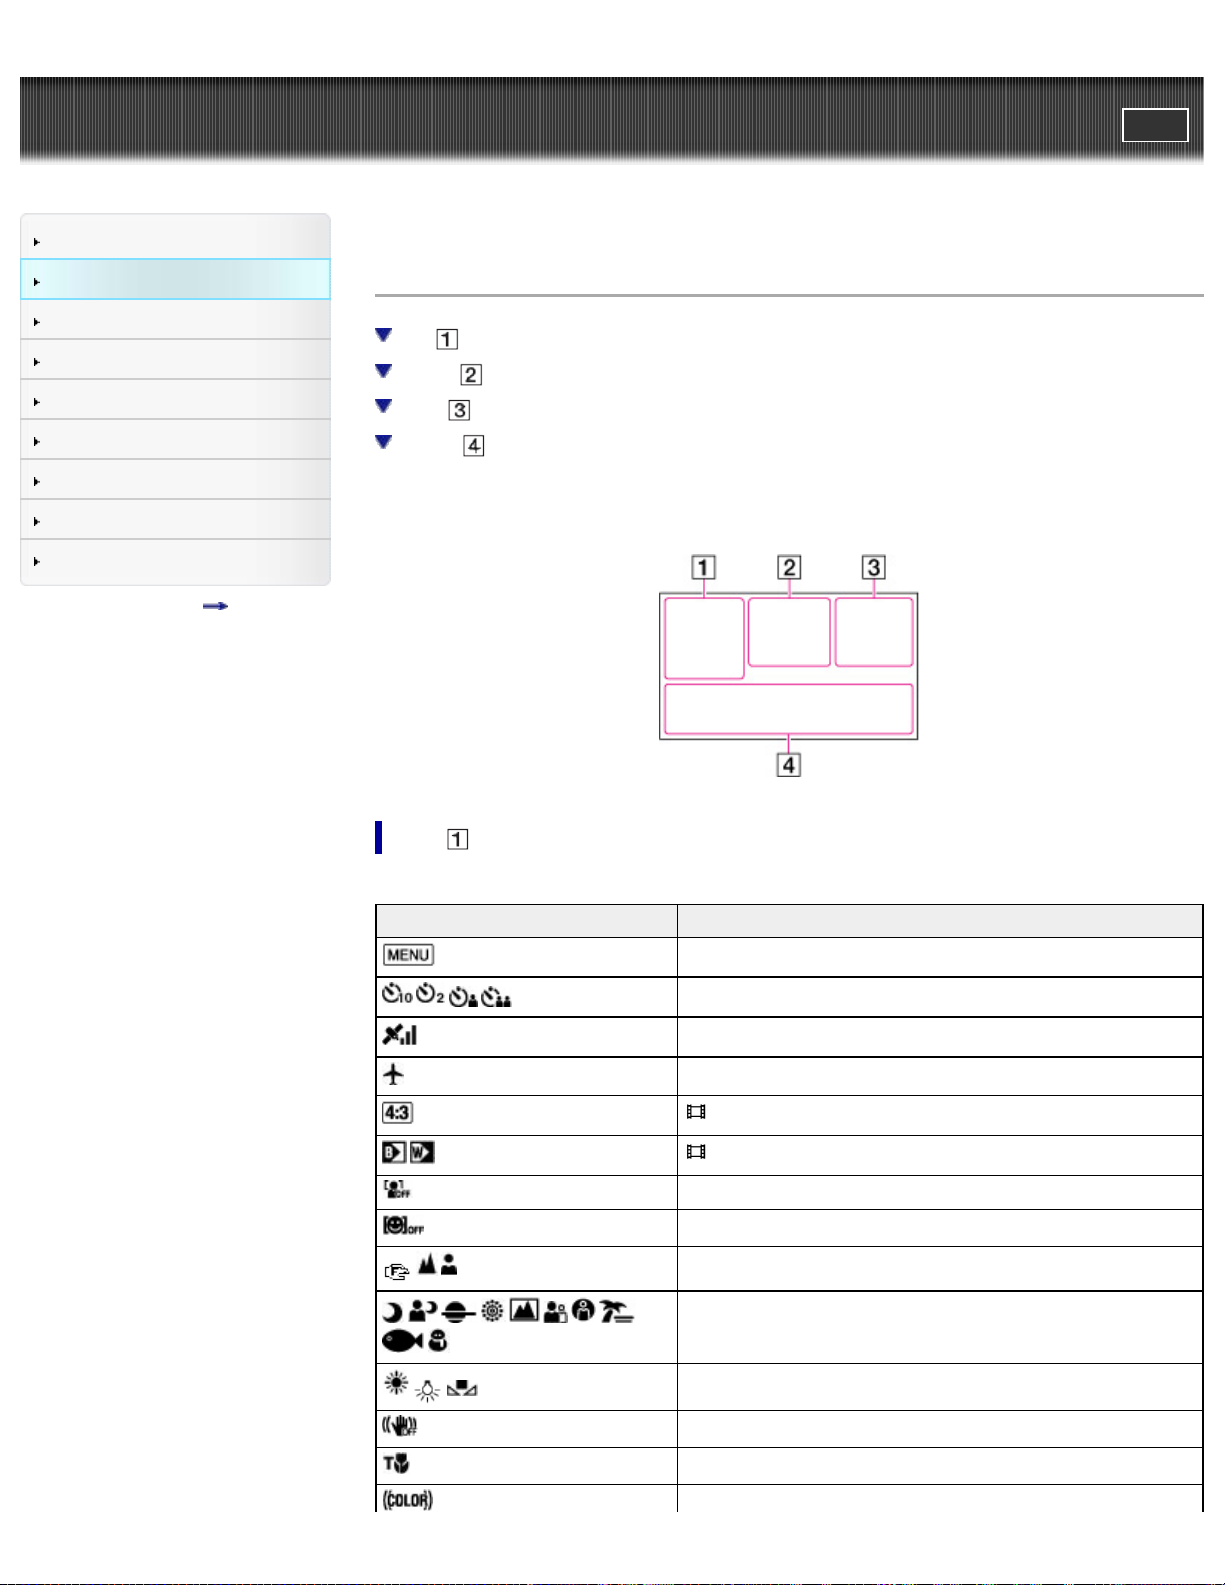
Screen indicators
Left
Center
Right
Bottom
The following indicators appear when you change the settings.
Check also for the indicators that appear during recording or playing.
Left
Indicator Meaning
MENU button
Self-timer recording
GPS triangulating status
[Airplane Mode] set to [On]
Wide Mode
Fader
[Face Detection] set to [Off]
[Smile Shutter] set to [Off]
Manual focus
Scene Selection
White Balance
SteadyShot off
Tele Macro
Page 28
Destination
Flash/Red Eye Reduction
28
Intelligent Auto (face detection/scene detection/camera-shake
detection)
Center
Indicator Meaning
Slideshow Set
Warning
Playback mode
Right
Indicator Meaning
60i
0:00:00 Counter (hour:minute:second)
00min Estimated recording remaining time
20.4M
100/112 Current playing movie or photo/Number of total recorded movies or photos
Recording image quality (HD/STD), frame rate (60p/60i) and recording mode
(PS/FX/FH/HQ/LP)
Recording/playback/editing media
Photo size
Playback folder
Touch pad deactivated
Bottom
Indicator Meaning
Micref Level low
Wind Noise Reduct.
Blt-in Zoom Mic
Low Lux
Spot Meter/Fcs/Spot Meter/Exposure
Intelligent Auto
101-0005
Data file name
Protect
Page 29

29
Indicators and their positions are approximate and may differ from what you actually see.
Some indicators may not appear, depending on your camcorder model.
Copyright 2012 Sony Corporation
Back to top
Page 30
"Handycam" User Guide
30
Operation Search
Before use
Getting started
Recording
Playback
Saving images with a PC
Customizing your camcorder
Troubleshooting
Maintenance and precautions
Contents list
PrintSearch
Top page > Before use > About water-proof, dust-proof, and shock-proof performance of the
camcorder > About water-proof, dust-proof, and shock-proof performance of the camcorder
About water-proof, dust-proof, and shock-proof performance of the
camcorder
This camcorder is equipped to be water-proof, dust-proof and shock-proof.
Damage caused from misuse, abuse or failure to properly maintain the camcorder is not covered by the
limited warranty.
This camcorder is water-proof/dust-proof equivalent to IEC60529 IP58. The camcorder is operable up
to a water depth of 5 m (16 feet) for 60 minutes.
Do not subject the camcorder to pressurized water, such as from a tap.
Do not use in hot springs.
Use the camcorder in the recommended operating water temperature range of 0 °C to 40 °C (32 °F
to 104 °F).
Meeting MIL-STD 810F Method 516.5-Shock standards, this product has passed the required tests
when dropped from a height of 1.5 m (4 feet) above a 5 cm (2 in.) -thick plywood board (with the LCD
screen closed, facing toward the camcorder body)*.
* Depending on use conditions and circumstances, no guarantee is made regarding damage to,
malfunction of, or the water-proof performance of this camcorder.
As for dust-proof/shock-proof performance, there is no guarantee that the camcorder will not become
scratched or dented.
Sometimes water-proof performance is lost if the camcorder is subjected to a strong shock such as
from being dropped. We recommend the camcorder be inspected at an authorized repair shop for a
fee.
Accessories supplied do not meet water-proof, dust-proof, and shock-proof specifications.
Copyright 2012 Sony Corporation
Back to top
Page 31

"Handycam" User Guide
31
Operation Search
Before use
Getting started
PrintSearch
Top page > Before use > About water-proof, dust-proof, and shock-proof performance of the
camcorder > Notes before using the camcorder under/near water
Notes before using the camcorder under/near water
Recording
Playback
Saving images with a PC
Customizing your camcorder
Troubleshooting
Maintenance and precautions
Contents list
Make sure that no foreign matter such as sand, hair, or dirt gets inside the battery/memory card/jack
cover. Even a small amount of foreign matter may lead to water entering the camcorder.
Confirm that the sealing gasket and its mating surfaces have not become scratched. Even a small
scratch may lead to water entering the camcorder. If the sealing gasket or its mating surfaces
become scratched, take the camcorder to an authorized repair shop to have the sealing gasket
replaced for a fee.
Sealing gasket
The sealing surfaces of the sealing gasket
If dirt or sand gets on the sealing gasket or its mating surfaces, wipe the area clean with a soft cloth
that will not leave behind any fibers. Prevent the sealing gasket from becoming scratched by touching
it while charging a battery or using a cable.
Do not open/close the battery/memory card/jack cover with wet or sandy hands or near water. There
is a risk this will lead to sand or water getting inside. Before opening the cover, perform the procedure
described in “Cleaning after using the camcorder under/near water”.
Open the battery/memory card/jack cover with the camcorder completely dry.
Always confirm that the battery/memory card/jack cover has been securely locked.
Back to top
Copyright 2012 Sony Corporation
Page 32

"Handycam" User Guide
32
Operation Search
Before use
Getting started
PrintSearch
Top page > Before use > About water-proof, dust-proof, and shock-proof performance of the
camcorder > Notes on using the camcorder under/near water
Notes on using the camcorder under/near water
Recording
Playback
Saving images with a PC
Customizing your camcorder
Troubleshooting
Maintenance and precautions
Contents list
The touch panel may be activated by water splashes on the screen icons.
The touch panel cannot be operated underwater. Use the buttons of the camcorder to perform
shooting operations.
Do not subject the camcorder to shock such as from jumping into water.
Do not open and close the battery/memory card/jack cover while under/near water.
This camcorder sinks in water. Place your hand through the Wrist strap to prevent the camcorder
from sinking.
Faint, white, circular spots may appear in under-water flash photos due to reflections off of floating
objects. This is not a malfunction.
Select
If water drops or other foreign matter is present on the lens, you will not be able to record clear
images.
(Underwater) in Scene Selection to shoot underwater with less distortion.
Back to top
Copyright 2012 Sony Corporation
Page 33

"Handycam" User Guide
33
Operation Search
Before use
Getting started
PrintSearch
Top page > Before use > About water-proof, dust-proof, and shock-proof performance of the
camcorder > Cleaning after using the camcorder under/near water
Cleaning after using the camcorder under/near water
Recording
Playback
Saving images with a PC
Customizing your camcorder
Troubleshooting
Maintenance and precautions
Contents list
Always clean the camcorder with water after use within 60 minutes, and do not open the battery/
memory card/jack cover before cleaning is finished. Sand or water may get inside places where it
cannot be seen. If not rinsed, water-proof performance will be degraded.
Allow the camcorder to sit in pure water poured into a cleaning bowl for about 5 minutes. Then,
gently shake the camcorder, press each button inside the water to clean away any salt, sand or
other matter lodged around the buttons.
After rinsing, wipe away water drops with a soft cloth. Allow the camcorder to dry completely in a
shady location with good ventilation. Do not blow dry with a hair dryer as there is a risk of
deformation and/or degraded water-proof performance.
Wipe away water drops or dust on the battery/memory card/jack cover with a soft dry cloth.
This camcorder is constructed to drain water. Water will drain from openings around the zoom
buttons, etc. After removing from water, place the camcorder on a dry cloth for a while to allow water
to drain.
Bubbles may appear when the camcorder is placed under water. This is not a malfunction.
The camcorder body may become discolored if it comes in contact with sunscreen or suntan oil. If the
camcorder does come in contact with sunscreen or suntan oil, quickly wipe it clean.
Do not allow the camcorder to sit with salt water inside or on the surface. This may lead to corrosion
or discoloration, and degradation of water-proof performance.
Iron sands may adhere to the frame around the LCD screen. If iron sands adhere to the camcorder,
gently wipe them off with a soft cloth so that you will not scrape the camcorder case or the LCD
screen.
To maintain the water-proof performance, we recommend that once a year you take the camcorder
to your dealer, or to an authorized repair shop, to have the sealing gasket of the battery/memory
card/jack cover replaced for a fee.
Back to top
Copyright 2012 Sony Corporation
Page 34

"Handycam" User Guide
34
Operation Search
Before use
Getting started
PrintSearch
Top page > Before use > About water-proof, dust-proof, and shock-proof performance of the
camcorder > About the message displayed on the screen
About the message displayed on the screen
Recording
Playback
Saving images with a PC
Customizing your camcorder
Troubleshooting
Maintenance and precautions
Contents list
The following message will appear on the LCD screen of the camcorder after you replace or charge the
battery, or you set [Scene Selection] to [Beach], [Underwater], or [Snow].
This does not indicate a malfunction of the camcorder.
It displays a message that you should confirm before use to maintain the waterproof performances.
Touch the area the message is displayed in order to erase the message.
Back to top
Copyright 2012 Sony Corporation
Page 35

"Handycam" User Guide
35
Operation Search
PrintSearch
Top page > Getting started > Checking the supplied items > Supplied items
Before use
Getting started
Recording
Playback
Saving images with a PC
Customizing your camcorder
Troubleshooting
Maintenance and precautions
Contents list
Supplied items
To attach the Wrist strap
The numbers in ( ) are the supplied quantity.
Camcorder (1)
AC Adaptor (1)
Power cord (mains lead) (1)
HDMI cable (1)
USB cable (micro USB cable) (1)
Wrist strap (1)
Rechargeable battery pack NP-BG1/battery case (1)
“Operating Guide” (1)
Notes
The “PlayMemories Home” (Lite Version) software and “PlayMemories Home” Help Guide are preinstalled in this camcorder.
“Expanded Feature” of the “PlayMemories Home” software can be downloaded from the web.
To attach the Wrist strap
A: Loop for the Wrist strap
Copyright 2012 Sony Corporation
Back to top
Page 36

"Handycam" User Guide
36
Operation Search
PrintSearch
Top page > Getting started > Charging the battery pack > Charging the battery pack using the AC
Adaptor
Before use
Getting started
Recording
Playback
Saving images with a PC
Customizing your camcorder
Troubleshooting
Maintenance and precautions
Contents list
Charging the battery pack using the AC Adaptor
Charging time
To remove the battery pack
On the power supply
To check the remaining battery power
1. Close the LCD screen.
2. Open the battery/memory card/jack cover.
To open the battery/memory card/jack cover, slide and hold the cover lock lever ( ), then slide
the cover down slightly (
3. Insert the battery.
Insert the battery ( ) while pressing and holding the battery release lever ( ).
4. Connect the AC Adaptor (
camcorder and the wall outlet (wall socket) ( ).
) and flip it open ( ).
), the power cord (mains lead) ( ) and the USB cable ( ) to your
Page 37

The CHG (charge) lamp ( ) turns on.
37
The CHG (charge) lamp turns off when the battery pack is fully charged. Disconnect the USB
cable from the USB jack of your camcorder.
5. Close the battery/memory card/jack cover.
Flip the battery/memory card/jack cover back ( ), then slide ( ) and close the cover firmly
until the yellow mark of the cover lock lever is hidden.
Notes
You cannot insert any battery pack other than an NP-BG1 (supplied) or NP-FG1 (sold separately)
into your camcorder.
You cannot use a Sony CP-AH2R, CP-AL, or AC-UP100 portable power supply device (sold
separately) to charge camcorder.
In the default setting, the LCD screen turns dark if you do not operate the camcorder for about 1
minute, and the power turns off if you do not opearate the camcorder for 2 minutes, to save battery
power ([Power Save]).
Charging time
Approximately 140 minutes required when you fully charge a fully discharged battery pack with AC
Adaptor.
The charging times shown in the table above are measured when charging the camcorder at a
temperature of 25 °C (77 °F). It is recommended that you charge the battery in a temperature range
of 10 °C to 30 °C (50 °F to 86 °F).
To remove the battery pack
1. Close the LCD screen, then slide down and open the battery/memory card/jack cover while sliding
and holding the cover lock lever.
2. Slide the battery release lever (
) and remove the battery pack ( ).
Page 38

Make sure that the battery does not fall out.
38
On the power supply
You can connect the USB cable to an AC Adaptor that is connected to a wall outlet (wall socket) so that
the power can be supplied to the camcorder.
You can also connect your camcorder to a computer using the USB cable, so that the power will be
supplied from the computer, then you do not have to worry about the amount of power remaining in the
battery while copying images from the camcorder, etc.
Insert the battery into the camcorder before connecting it to a power supply either by connecting the
camcorder to the AC Adaptor or the computer.
The recording mode can be selected only when the camcorder is connected to the AC Adaptor or a
computer which is compatible with a 1,500 mA standard power supply.
When you connect the camcorder to a computer using the USB cable during playback, the USB
connection screen appears. It will turn to the Playback screen if you touch
Images).
(View
To check the remaining battery power
An icon indicating the remaining battery power is displayed.
High Low Empty
It will take approximately 1 minute to display the correct remaining battery power.
The remaining battery power may not be displayed correctly depending on ambient conditions and
the environment in which you are using your camcorder.
Your camcorder cannot display the remaining battery life in minutes using the “InfoLITHIUM” battery.
Related topics
Expected time of recording and playback with each battery pack
Using your camcorder abroad
[Power Save]
Back to top
Copyright 2012 Sony Corporation
Page 39

"Handycam" User Guide
39
Operation Search
PrintSearch
Top page > Getting started > Charging the battery pack > Charging the battery pack using your
computer
Before use
Getting started
Recording
Playback
Saving images with a PC
Customizing your camcorder
Troubleshooting
Maintenance and precautions
Contents list
Charging the battery pack using your computer
Charging time
To remove the battery pack
On the power supply
To check the remaining battery power
1. Close the LCD screen.
2. Open the battery/memory card/jack cover.
To open the battery/memory card/jack cover, slide and hold the cover lock lever ( ), then slide
the cover down slightly (
3. Connect the camcorder to a running computer using the USB cable (
: To the wall outlet (wall socket)
) and flip it open ( ).
).
Page 40

Charging time
40
Approximately 200 minutes required when you fully charge a fully discharged battery pack with your
computer.
The charging times shown in the table above are measured when charging the camcorder at a
temperature of 25 °C (77 °F). It is recommended that you charge the battery in a temperature range
of 10 °C to 30 °C (50 °F to 86 °F).
To remove the battery pack
1. Close the LCD screen, then slide down and open the battery/memory card/jack cover while sliding
and holding the cover lock lever.
2. Slide the battery release lever (
Make sure that the battery does not fall out.
) and remove the battery pack ( ).
On the power supply
You can connect the USB cable to an AC Adaptor that is connected to a wall outlet (wall socket) so that
the power can be supplied to the camcorder.
You can also connect your camcorder to a computer using the USB cable, so that the power will be
supplied from the computer, then you do not have to worry about the amount of power remaining in the
battery while copying images from the camcorder, etc.
Insert the battery into the camcorder before connecting it to a power supply either by connecting the
camcorder to the AC Adaptor or the computer.
The recording mode can be selected only when the camcorder is connected to the AC Adaptor or a
computer which is compatible with a 1,500 mA standard power supply.
When you connect the camcorder to a computer using the USB cable during playback, the USB
connection screen appears. It will turn to the Playback screen if you touch
Images).
(View
To check the remaining battery power
An icon indicating the remaining battery power is displayed.
High Low Empty
It will take approximately 1 minute to display the correct remaining battery power.
The remaining battery power may not be displayed correctly depending on ambient conditions and
the environment in which you are using your camcorder.
Your camcorder cannot display the remaining battery life in minutes using the “InfoLITHIUM” battery.
Related topics
Charging the battery pack using the AC Adaptor
Page 41

Expected time of recording and playback with each battery pack
41
Copyright 2012 Sony Corporation
Back to top
Page 42

"Handycam" User Guide
42
Operation Search
PrintSearch
Top page > Getting started > Charging the battery pack > Charging the battery pack abroad
Before use
Getting started
Recording
Playback
Saving images with a PC
Customizing your camcorder
Troubleshooting
Maintenance and precautions
Contents list
Charging the battery pack abroad
You can charge the battery pack in any countries/regions using the AC Adaptor supplied with your
camcorder within the AC 100 V – 240 V, 50 Hz/60 Hz range.
Notes
Do not use an electronic voltage transformer.
Related topics
Charging the battery pack using the AC Adaptor
Charging the battery pack using your computer
Back to top
Copyright 2012 Sony Corporation
Page 43

"Handycam" User Guide
43
Operation Search
PrintSearch
Top page > Getting started > Turning the power on, and setting the date and time > Turning the power
on, and setting the date and time
Before use
Getting started
Recording
Playback
Saving images with a PC
Customizing your camcorder
Troubleshooting
Maintenance and precautions
Contents list
Turning the power on, and setting the date and time
To change the language setting
To turn off the power
To adjust the angle of the LCD screen
1. Open the LCD screen of your camcorder and turn the power on.
2. Select the desired language, then select [Next].
Touch the button on the LCD screen.
3. Select the desired geographical area with
4. Set [Daylight Savings] or [Summer Time], select the date format and the date and time.
If you set [Daylight Savings] or [Summer Time] to [On], the clock advances 1 hour.
When you select the date and time, select one of the items and adjust the value with
When you select
, the date and time setting operation is complete.
/ , then select [Next].
/ .
Page 44

To change the language setting
44
You can change the on-screen displays to show messages in a specified language.
Select
[Setup] [ General Settings] [Language Setting] a desired language.
To turn off the power
Close the LCD screen.
To adjust the angle of the LCD screen
First open the LCD panel 90 degrees to the camcorder ( ), and then adjust the angle ( ).
Notes
The recording date, time and condition, and coordinates (HDR-GW77V) are recorded automatically
on the recording media. They are not displayed during recording. However, you can check them as
[Data Code] during playback. To display them, select
[Data Code] [Date/Time].
Once the clock is set, the clock time is automatically adjusted with [Auto Clock ADJ ] and [Auto
Area ADJ] set to [On]. The clock may not be adjusted to the correct time automatically, depending
on the country/region selected for your camcorder. In this case, set [Auto Clock ADJ ] and [Auto
Area ADJ] to [Off] (HDR-GW77V).
Related topics
To set the date and time again: [Date & Time Setting]
Copyright 2012 Sony Corporation
[Setup] [ Playback Settings]
Back to top
Page 45

"Handycam" User Guide
45
Operation Search
PrintSearch
Top page > Getting started > Preparing the recording media > Selecting a recording medium
Before use
Getting started
Recording
Playback
Saving images with a PC
Customizing your camcorder
Troubleshooting
Maintenance and precautions
Contents list
Selecting a recording medium
The recording media that can be used are displayed on the screen of your camcorder as following icons.
Default recording medium Alternative recording medium
Internal memory Memory card
You can select a recording medium from the menu.
1. Select
Notes
You cannot select a different recording medium for movies and for photos.
[Setup] [ Media Settings] [Media Select] the desired medium.
Related topics
Screen indicators during recording
Expected recording time of movies
Expected number of recordable photos
Copyright 2012 Sony Corporation
Back to top
Page 46

"Handycam" User Guide
46
Operation Search
PrintSearch
Top page > Getting started > Preparing the recording media > Inserting a memory card
Before use
Getting started
Recording
Playback
Saving images with a PC
Customizing your camcorder
Troubleshooting
Maintenance and precautions
Contents list
Inserting a memory card
Types of memory card you can use with your camcorder
To eject the memory card
1. Open the battery/memory card/jack cover, and insert the memory card until it clicks.
: Access lamp
A: “Memory Stick Micro” (M2) media: Insert the memory card in the direction shown in figure A until
it clicks.
B: microSD memory card: Insert the memory card in the direction shown in figure B until it clicks.
The [Preparing image database file. Please wait.] screen appears if you insert a new memory
card. Wait until the screen disappears.
Insert the card squarely in the correct direction, otherwise it will not be recognized by the
camcorder.
Types of memory card you can use with your camcorder
SD Speed
Class
“Memory Stick Micro”
(Mark2) media
microSD memory card
microSDHC memory card
Operation with all memory cards is not assured.
Notes
The camcorder is guaranteed to operate within the temperature range of 0 °C to 40 °C (32 °F to
— Up to 32 GB
Class 4 or
faster
Capacity (operation
verified)
Up to 32 GB microSD card
Described in this
manual
“Memory Stick Micro”
media
Page 47

104 °F) but the guaranteed operation temperature range may differ depending on each type of
47
memory card. See the operating instruction of the memory card for details.
To eject the memory card
Open the cover and lightly push the memory card in once.
Notes
To ensure stable operation of the memory card, it is recommended to format the memory card with
your camcorder before the first use. Formatting the memory card will erase all the data stored on it
and the data will be irrecoverable. Save your important data on your PC, etc.
If [Failed to create a new Image Database File. It may be possible that there is not enough free
space.] is displayed, format the memory card.
Confirm the direction of the memory card. If you forcibly insert the memory card in the wrong
direction, the memory card, memory card slot, or image data may be damaged.
Do not insert any memory card other than those that fit into the memory card slot. If you do, it may
cause a malfunction.
When inserting or ejecting the memory card, be careful so that the memory card does not pop out
and drop.
Copyright 2012 Sony Corporation
Back to top
Page 48

"Handycam" User Guide
48
Operation Search
PrintSearch
Top page > Recording > Recording > Recording movies
Before use
Getting started
Recording
Playback
Saving images with a PC
Customizing your camcorder
Troubleshooting
Maintenance and precautions
Contents list
Recording movies
To record clear images
To display items on the LCD screen
In the default setting, movies and photos are recorded on the internal memory. Movies are recorded with
high definition image quality (HD).
1. Open the LCD screen and press MODE to turn on the
2. Press START/STOP to start recording.
: Built-in microphone
(Movie) lamp.
To stop recording, press START/STOP again.
You can record photos during movie recording by pressing PHOTO (Dual Capture).
To record clear images
When the lens is dirty or dusty, clean the surface of the lens.
To display items on the LCD screen
Items on the LCD screen disappear if you do not operate the camcorder for a few seconds after you turn
the camcorder on or switch between the movie recording and photo shooting modes. Touch anywhere
except the buttons on the LCD screen to display information on icons with functions convenient for
recording.
Page 49

Notes
If you close the LCD screen while recording movies, the camcorder stops recording.
49
Do not touch the built-in microphone while recording.
The maximum continuous recordable time of movies is about 13 hours.
When a movie file exceeds 2 GB, the next movie file is created automatically.
The flash does not work while the
When[
Frame Rate] is set to [60p], you cannot record photos during movie recording.
(Movie) lamp is lit.
The following states will be indicated if data is still being written onto the recording media after
recording has finished. During this time, do not apply shock or vibration to the camcorder, or
remove the battery or AC Adaptor.
Access lamp is lit or flashing
The media icon in the upper right of the LCD screen is flashing
The LCD screen of your camcorder can display recording images across the entire screen (full pixel
display). However, this may cause slight trimming of the top, bottom, right, and left edges of images
when played back on a TV which is not compatible with full pixel display. It is recommended you
record images with [Guide Frame] set to [On] and using the outer frame of [Guide Frame] as a
guide.
Related topics
Expected recording time of movies
[Media Select]
To display items on the LCD screen all the time: [Display Setting]
Recordable time, remaining capacity: [Media Info]
Zooming
Screen indicators during recording
Copyright 2012 Sony Corporation
Back to top
Page 50

"Handycam" User Guide
50
Operation Search
PrintSearch
Top page > Recording > Recording > Shooting photos
Before use
Getting started
Recording
Playback
Saving images with a PC
Customizing your camcorder
Troubleshooting
Maintenance and precautions
Contents list
Shooting photos
In the default setting, movies and photos are recorded on the internal memory.
1. Open the LCD screen and press MODE to turn on the
2. Press PHOTO lightly to adjust the focus, then press it fully.
(Photo) lamp.
When the focus is adjusted properly, AE/AF lock indicator appears on the LCD screen.
Notes
The flash does not work while the
Related topics
Screen indicators during recording
Zooming
Expected number of recordable photos
[Flash]
To change the image size: [Image Size]
Copyright 2012 Sony Corporation
(Movie) lamp is lit.
Back to top
Page 51

"Handycam" User Guide
51
Operation Search
PrintSearch
Top page > Recording > Recording > Screen indicators during recording
Before use
Getting started
Recording
Playback
Saving images with a PC
Customizing your camcorder
Troubleshooting
Maintenance and precautions
Contents list
Screen indicators during recording
Described here are icons for both movie recording and photo recording modes.
Zoom button (W: Wide/T: Telephoto), START/STOP button (in movie recording
mode), PHOTO button (in photo recording mode)
MENU button
Status detected by Intelligent Auto
Recording status ([STBY]/[REC])
AE/AF (automatic exposure/automatic focus) lock
Touch pad deactivated (Underwater)
GPS triangulating status*
Tracking focus
Zoom, Remaining battery
Counter (hour: minute: second), Capturing a photo, Recording/playback/editing
media
Tracking focus cancel button
Intelligent Auto button
Approximate number of recordable photos, Aspect ratio (16:9 or 4:3), and photo
size (L/M/S)
Estimated recording remaining time, Recording image quality (HD/STD), Frame
rate (60p/60i) and recording mode (PS/FX/FH/HQ/LP)
View Images button
My Button (you can assign your favorite functions to icons displayed in this
area)
* HDR-GW77V
Related topics
Page 52

Setting up menu items
52
Intelligent Auto
Using the GPS function (HDR-GW77V)
Recording the selected subject clearly (Face Priority)
[My Button]
Copyright 2012 Sony Corporation
Back to top
Page 53

"Handycam" User Guide
53
Operation Search
PrintSearch
Top page > Recording > Recording > To record in mirror mode
Before use
Getting started
Recording
Playback
Saving images with a PC
Customizing your camcorder
Troubleshooting
Maintenance and precautions
Contents list
To record in mirror mode
1. Open the LCD panel 90 degrees to the camcorder ( ), then rotate it 270 degrees to the lens side
).
(
A mirror-image of the subject appears on the LCD screen, but the image will be normal when
recorded.
Using [Self-portrait 1 Person] or [Self-portrait 2 People] of the [ Self-Timer] setting will reduce
camera shake when shooting photos in mirror mode.
Related topics
[Self-Timer]
Copyright 2012 Sony Corporation
Back to top
Page 54

"Handycam" User Guide
54
Operation Search
PrintSearch
Top page > Recording > Useful functions for recording images > Zooming
Before use
Getting started
Recording
Playback
Saving images with a PC
Customizing your camcorder
Troubleshooting
Maintenance and precautions
Contents list
Zooming
1. Press and hold the power zoom button (W or T) to magnify or reduce the size of the image.
W (Wide angle): Wider range of view
T (Telephoto): Close view
You can magnify images up to 17 times (Extended Zoom) the original size with the power zoom
button.
You can siwitch the zoom speed between high and low, by changing the pressure on the power zoom
button.
Notes
Be sure to keep your finger on the power zoom buttons. If you move your finger off the power zoom
button, the operation sound of the power zoom button may also be recorded.
You cannot change the zoom speed with the
The minimum possible distance between camcorder and subject while maintaining sharp focus is
about 1 cm (about 13/32 in.) for wide angle and about 80 cm (about 31 1/2 in.) for telephoto.
You can magnify images up to 10 times using optical zooming in the following cases:
When [
When the
Related topics
Further zooming: [Digital Zoom]
SteadyShot] is set to other than [Active]
(Photo) is lit.
Copyright 2012 Sony Corporation
/ button on the LCD screen.
Back to top
Page 55

"Handycam" User Guide
55
Operation Search
PrintSearch
Top page > Recording > Useful functions for recording images > Intelligent Auto
Before use
Getting started
Recording
Playback
Saving images with a PC
Customizing your camcorder
Troubleshooting
Maintenance and precautions
Contents list
Intelligent Auto
To record images brighter than that of when using the Intelligent Auto function
Your camcorder records movies after selecting the most suitable setting for the subjects or the situation
automatically. ([On] is the default setting.)
1. Select
2. Point the camcorder toward the subject and start recording.
The icons that correspond to the conditions detected are displayed.
[On] at the right bottom of the recording screen of movies or photos.
Face detection: (Portrait), (Baby)
Scene detection:
light),
Camera-shake detection:
To cancel the Intelligent Auto function, select
(Macro), (Underwater)
(Backlight), (Landscape), (Night Scene), (Spotlight), (Low
(Walk), (Tripod)
[Off].
To record images brighter than that of when using the Intelligent Auto
function
Select [Camera/Mic] [ Manual Settings] [Low Lux].
Notes
The camcorder may not detect the expected scene or subject, depending on the recording
conditions.
Back to top
Copyright 2012 Sony Corporation
Page 56

"Handycam" User Guide
56
Operation Search
PrintSearch
Top page > Recording > Useful functions for recording images > Recording the selected subject clearly
(Face Priority)
Before use
Getting started
Recording
Playback
Saving images with a PC
Customizing your camcorder
Troubleshooting
Maintenance and precautions
Contents list
Recording the selected subject clearly (Face Priority)
To record subjects other than people (Tracking focus)
Your camcorder can track a face you select and adjust the focus, exposure, and skin tone of the face
automatically.
1. Touch one of the faces targeted.
A: You can release the selection.
Notes
The subject you touched may not be detected, depending on the surrounding brightness or hairstyle
of the subject.
Make sure to set the [Face Detection] setting to other than [Off] ([Auto] is the default setting).
To record subjects other than people (Tracking focus)
Touch the subject you want to record.
Your camcorder adjusts the focus automatically.
Copyright 2012 Sony Corporation
Back to top
Page 57

"Handycam" User Guide
57
Operation Search
PrintSearch
Top page > Recording > Useful functions for recording images > Using the GPS function (HDR-
GW77V)
Before use
Getting started
Recording
Playback
Saving images with a PC
Customizing your camcorder
Troubleshooting
Maintenance and precautions
Contents list
Using the GPS function (HDR-GW77V)
If you do not want to record location information
To obtain a map of the current location (triangulating priority mode)
To check the triangulating status
On the satellite map and triangulating gauge
How to check the GPS satellite icons/triangulating gauge
If data on your current location cannot be obtained
Hints for better reception
The following features are available if you use the GPS (Global Positioning System) function.
Recording location information on movies or photos ([On] is the default setting.)
Playing movies and photos by searching for them from a map (Map View)
Displaying a map of your current location
GPS triangulating status
A: Number of dots changes while the camcorder is searching for the satellites.
B: Triangulating meters appear when the satellites are found.
When the camcorder cannot triangulate
A: The camcorder does not have location information.
B: The camcorder displays the location information that was previously obtained.
If you do not want to record location information
Select [Setup] [ General Settings] [GPS Setting] [Off].
Page 58

Notes
58
It may take a while before the camcorder starts triangulating.
Use the GPS function outdoors and in open areas, as the radio signals can best be received in
such areas.
The map always displays the north at the top.
To obtain a map of the current location (triangulating priority mode)
This feature is useful for checking a map of your current location while traveling.
As the camcorder turns other functions off to search for satellites, obtaining triangulating information can
take priority.
1. Select
A: A marker that indicates your current location
Notes
If you select a certain point on the screen, the map shows an area with that point at the center.
Select
If the camcorder cannot acquire current location information, the triangulating information appears.
If the camcorder cannot obtain current location information, a marker which indicates the location
last acquired is displayed on a map. If the location information that was previously obtained is
invalid, the marker does not appear.
[Setup] [ General Settings] [Your Location].
to move your current location back to the center again.
To check the triangulating status
The camcorder displays the status of the GPS signal reception when you are unable to obtain the
triangulating information.
1. Touch
A: Satellite map
B: Satellite icons
C: Triangulating gauge
D: Information for the location that was previously obtained.
on [Your Location] screen.
On the satellite map and triangulating gauge
The center of the satellite map shows your current location. You can check the direction
(north/south/east/west) of the satellites with the satellite icons (
) that appear on the satellite map.
Page 59

When the camcorder succeeds in triangulating your location, the triangulating gauge turns to green.
59
How to check the GPS satellite icons/triangulating gauge
The color of the GPS satellite icons and the triangulating gauge change according to the current status
of triangulation.
GPS satellite icons/triangulating
gauge
/ (black)
/ (gray)
/ (brown)
/ (ocher)
/ (green)
Status
No signal, but orbit information for the satellite is available.
Part of the satellite orbit information has been obtained.
About a half of the satellite orbit information has been
obtained.
Most of the satellite orbit information has been obtained.
Triangulating is completed and the satellite is currently
being used.
If data on your current location cannot be obtained
A display that allows you to triangulate the location again appears. In this case, follow the instructions
that appears on the LCD screen.
Hints for better reception
Use the GPS function outdoors and in open areas.
For details on locations or situations where radio signals cannot be received, see “About GPS (HDR-
GW77V).”
Direct the GPS antenna toward the sky. Do not place your hand on the GPS antenna.
Select [Your Location] in the menu to use the triangulating priority mode.
Use GPS Assist Data. If you import GPS Assist Data from your computer to your camcorder using
the built-in “PlayMemories Home” software, the time it takes the camcorder to acquire your location
information can be shortened. Connect the camcorder to a computer that is connected to the
Internet. The GPS Assist Data will be updated automatically.
Notes
In the following situations, the current location of the camcorder shown on the map may be different
from the actual location. The margin of error can be as wide as several hundred meters.
When the camcorder receives GPS signals that have been reflected off the surrounding buildings
When the GPS signal is too weak
The GPS Assist Data may not function in the following cases:
When the GPS Assist Data are not updated for about 30 days or more
When the date and time of the camcorder are not correctly set
When the camcorder is moved for a long distance
If you are using a Mac, you cannot import GPS Assist Data.
Page 60

Related topics
Locations or situations where radio signals cannot be received: About GPS (HDR-GW77V)
60
Copyright 2012 Sony Corporation
Back to top
Page 61

"Handycam" User Guide
61
Operation Search
PrintSearch
Top page > Playback > Playback > Playing movies and photos from the Event View screen
Before use
Getting started
Recording
Playback
Saving images with a PC
Customizing your camcorder
Troubleshooting
Maintenance and precautions
Contents list
Playing movies and photos from the Event View screen
Screen display on the Event View screen
To play back images with other devices
You can search for recorded images by date and time of recording (Event view).
1. Open the LCD screen and select
mode.
You can display the Event View when the LCD screen is folded with the reverse (screen) side
facing out.
(View Images) on the LCD screen to enter the playback
2. Select
3. Select the image.
4. Select the appropriate buttons on the LCD screen for various playback operations.
/ to move the desired event to the center ( ) and then select it ( ).
The camcorder displays recorded images as an event automatically, based on the date and
time.
The camcorder plays from the selected image to the last image in the event.
Page 62

Volume
62
/
Previous/Next
Delete
Context
Fast-reverse/fast-forward
/
Play/Pause
/
Stop Play/stop slide show
Some buttons described above may not appear, depending on the image being played back.
As you repeat selecting
/ during playback, movies are played as fast as about 5 times
about 10 times about 30 times about 60 times.
Select
To repeat Slideshow, select
/ during pause to play movies slowly.
[Slideshow Set] when is selected with the Switch Image
Type button.
Screen display on the Event View screen
: To the MENU screen
: Event name
: To the previous event
: Change to the movie/photo recording mode
: To play back short movies (Highlight Playback)
: Remaining battery
: To the Map View screen*
: Events
: To the next event
: Time-line bar
: Change Event Scale button
* HDR-GW77V
Page 63

: Event title
63
: To go back to the Event View screen
: Previous/next
: Change to the movie/photo recording mode
: Last played image
: Recorded time/number of photos
: Switch image type button
: Movie
: Photo
Reduced-size images which enable you to view many images at the same time on an index screen
are called “thumbnails.”
To play back images with other devices
You may not be able to play back normally images recorded on your camcorder with other devices.
Also, you may not be able to play back images recorded on other devices with your camcorder.
Standard definition image quality (STD) movies recorded on SD memory cards cannot be played on
AV equipment of other manufacturers.
Notes
To prevent your image data from being lost, save all your recorded images on external media
periodically.
Copyright 2012 Sony Corporation
Back to top
Page 64

"Handycam" User Guide
64
Operation Search
PrintSearch
Top page > Playback > Playback > Playing movies and photos from a map (HDR-GW77V)
Before use
Getting started
Recording
Playback
Saving images with a PC
Customizing your camcorder
Troubleshooting
Maintenance and precautions
Contents list
Playing movies and photos from a map (HDR-GW77V)
When you use the map data for the first time
Screen display on the Map View
To play back images with other devices
You can search for recorded images by location of recording (Map View).
1. Open the LCD screen and select
mode.
2. Switch to the Map View by touching [Map View].
(View Images) on the LCD screen to enter the playback
3. Select the recording location.
Touch the direction on the map in which you want the map to be scrolled. Keep touching that
point to scroll the map continuously.
If you change the map scale using the power zoom button, the clusters of thumbnails will change
as well.
4. Select the desired image.
Page 65

5. Select the appropriate buttons on the LCD screen for various playback operations.
65
Volume
Delete
Context
Stop Play/stop slide show
Some buttons described above may not appear, depending on the image being played back.
As you repeat selecting
about 10 times about 30 times about 60 times.
Select
To repeat Slideshow, select
Type button.
/ during pause to play movies slowly.
Previous/Next
/
Fast-reverse/fast-forward
/
Play/Pause
/
/ during playback, movies are played as fast as about 5 times
[Slideshow Set] when is selected with the Switch Image
When you use the map data for the first time
A message appears asking you to confirm whether you agree with the terms of the license agreement of
the map data. You can use the map data by touching [Yes] on the screen after agreeing to the terms of
the license agreement. (For details on the license agreement, refer to the “Operating Guide” supplied
with your camcorder.)
You cannot use the map data if you touch [No]. However, when you try to use the map data for the
second time, the same message will appear on the screen, and you can use the map data by touching
[Yes].
Screen display on the Map View
Page 66

: To the MENU screen
66
: To the movie recording display
: To the Event View screen
: To play back short movies
: To the Map View
: Previous/next
: To the movie recording display
: Switch Image Type button
To play back images with other devices
You may not be able to play back normally images recorded on your camcorder with other devices.
Also, you may not be able to play back images recorded on other devices with your camcorder.
Standard definition image quality (STD) movies recorded on SD memory cards cannot be played on
AV equipment of other manufacturers.
Copyright 2012 Sony Corporation
Back to top
Page 67

"Handycam" User Guide
67
Operation Search
PrintSearch
Top page > Playback > Playback > Dividing a movie
Before use
Getting started
Recording
Playback
Saving images with a PC
Customizing your camcorder
Troubleshooting
Maintenance and precautions
Contents list
Dividing a movie
1. Select [Divide] on the movie playback screen.
2. Select the point where you want to divide the movie into scenes using / , and then select
.
A: Returns to the beginning of the selected movie
B: Adjusts the dividing point with more precision
Notes
A slight difference may occur from the point where you select and the actual dividing point, as your
camcorder selects the dividing point based on about half-second increments.
Some basic editing operations can be done on the camcorder. If you want to do advanced editing
operations, use the built-in “PlayMemories Home” software.
Do not remove the battery pack or the AC Adaptor from your camcorder while dividing the images. It
may damage the recording media.
Do not eject the memory card while dividing images from the memory card.
If you divide movies that are included in saved scenarios, the scenarios will also be deleted.
Related topics
[Delete]
Back to top
Copyright 2012 Sony Corporation
Page 68

"Handycam" User Guide
68
Operation Search
PrintSearch
Top page > Playback > Playback > Capturing a photo from a movie
Before use
Getting started
Recording
Playback
Saving images with a PC
Customizing your camcorder
Troubleshooting
Maintenance and precautions
Contents list
Capturing a photo from a movie
On recording date and time of captured photos
1. Select
2. Select the point where you want to capture a photo using / , and then select .
[Photo Capture] that appears on the playback screen of a movie.
A: Returns to the beginning of the selected movie
B: Adjusts the capturing point with more precision
If the movie was recorded with one of the following image quality levels, the image size will be set
as shown below.
High definition image quality (HD): 2.1 M (16:9)
Wide aspect ratio (16:9) with standard definition image quality (STD): 0.2 M (16:9)
4:3 aspect ratio with standard definition image quality (STD): 0.3 M (4:3)
On recording date and time of captured photos
The recording date and time of captured photos is the same as the recording date and time of the
movies.
If the movie you are capturing from has no data code, the recording date and time of the photo will
be the date and time you captured from the movie.
Back to top
Copyright 2012 Sony Corporation
Page 69

"Handycam" User Guide
69
Operation Search
PrintSearch
Top page > Playback > Highlight Playback > Enjoying a digest of your movies (Highlight Playback)
Before use
Getting started
Recording
Playback
Saving images with a PC
Customizing your camcorder
Troubleshooting
Maintenance and precautions
Contents list
Enjoying a digest of your movies (Highlight Playback)
Enhancing the Highlight Playback experience
To change the settings for Highlight Playback
You can enjoy a digest of high definition image quality (HD) movies and photos, similar to a short movie.
1. Select
2. Display the desired event at the center of the Event View, and select [
The camcorder starts Highlight Playback.
(View Images) on the LCD screen to enter the playback mode.
Highlight].
A: Volume adjustment
B: Context
C: To stop
D: Previous
E: To pause
F: Next
Enhancing the Highlight Playback experience
You can replay or save Highlight Playback scenes by selecting (Context) on the screen after a
Highlight Playback has finished or while playing a Highlight Playback scene.
To change the settings for Highlight Playback
You can change the Highlight Playback settings by selecting [Highlight Setting] on the screen after
Highlight Playback has finished.
You can also change the setting by selecting
highlight scenes.
[Playback Range]: You can set the playback range (starting and ending date) of the Highlight
Playback.
[Theme]: You can select a theme for Highlight Playback.
[Music]: You can select music.
[Audio mix]: The original sound is played back with the music.
[Highlight Setting] while the camcorder is playing
Page 70

[Length]: You can set the length of the Highlight Playback segment.
70
[Highlight Point]: You can set the points in a movie or photo that will be used in a Highlight Playback.
Play the desired movie, and select
. Or play the desired photo and select .
appears on the movie or photo that is used in a Highlight Playback.
To erase the points, select
[Clear All Points].
Notes
Highlight Playback scenes will change each time you select a Highlight Playback.
The [Playback Range] setting is cleared when the Highlight Playback stops.
After the music file is transferred to the camcorder, if you cannot play the music, the music file may
be damaged. Delete the music file by selecting
[Setup] [ Playback Settings]
[Empty Music], then transfer the music file again. You can restore the music data recorded on your
camcorder at the default using “Music Transfer.” For operating instructions, see “Music Transfer”
help.
If the Highlight Playback function was started from the Map View, [Highlight Point] cannot be set.
However, if the Highlight Playback function was started from the Event View screen and you set the
[Highlight Point], the point can take effect on the Map View also (HDR-GW77V).
When you connect the camcorder to an external device, such as a TV, and watch Highlight
Playback, these images do not appear on the LCD screen of the camcorder.
Back to top
Copyright 2012 Sony Corporation
Page 71

"Handycam" User Guide
71
Operation Search
PrintSearch
Top page > Playback > Highlight Playback > Saving Highlight Playback in high definition image quality
(HD) (Scenario Save)
Before use
Getting started
Recording
Playback
Saving images with a PC
Customizing your camcorder
Troubleshooting
Maintenance and precautions
Contents list
Saving Highlight Playback in high definition image quality (HD) (
Scenario Save)
To play back a saved scenario
You can save your favorite Highlight Playback as a “Scenario” with high definition image quality (HD). Up
to 8 scenarios can be saved and these scenarios can be played on the camcorder only.
1. Select [Replay] on the screen after a Highlight Playback has finished.
2. When the Highlight Playback starts again, select
To play back a saved scenario
1. Select [Playback Function] [ Scenario], select the desired scenario, and then
select
.
[ Scenario Save].
To erase a saved scenario, select [Erase]/[Erase All] while playing the scenario.
Notes
When you connect the camcorder to an external device, such as a TV, and watch Highlight
Scenario, these images do not appear on the LCD screen of the camcorder.
Back to top
Copyright 2012 Sony Corporation
Page 72

"Handycam" User Guide
72
Operation Search
PrintSearch
Top page > Playback > Highlight Playback > Converting Highlight Playback scenes or Highlight
Scenarios to standard definition image quality (STD) (Highlight Movie)
Before use
Getting started
Recording
Playback
Saving images with a PC
Customizing your camcorder
Troubleshooting
Maintenance and precautions
Contents list
Converting Highlight Playback scenes or Highlight Scenarios to
standard definition image quality (STD) (Highlight Movie)
To play back a Highlight Movie
You can convert the data format of Highlight Playback or Highlight Scenarios to standard definition
image quality (STD) and save them as a “Highlight Movie.” Highlight movies can be uploaded to the
Web.
1. Select [Save and Share] on the screen after Highlight Playback or Highlight Scenario playback has
finished.
2. Select the desired operation when the item has been saved.
A: Selecting [Share] allows you to upload the Highlight movie to the Web using the built-in
“PlayMemories Home” software. [Details]
B: Your camcorder plays the Highlight Movie saved.
To play back a Highlight Movie
1. Select [Playback Function] [Highlight Movie] and select the desired Highlight Movie.
To erase Highlight Movie, select
Copyright 2012 Sony Corporation
while the Highlight Movie is playing.
Back to top
Page 73

"Handycam" User Guide
73
Operation Search
PrintSearch
Top page > Playback > Playing images on a TV > Connecting the camcorder to a TV
Before use
Getting started
Recording
Playback
Saving images with a PC
Customizing your camcorder
Troubleshooting
Maintenance and precautions
Contents list
Connecting the camcorder to a TV
On an HDMI cable
Use the HDMI cable to connect the camcorder to a TV which has an HDMI input jack.
: Supplied
1. Switch the input on the TV to HDMI IN.
2. Connect the HDMI cable (
jack (
) on the TV.
) to the HDMI OUT jack ( ) on the camcorder and to the HDMI IN
3. Play a movie or a photo on the camcorder.
On an HDMI cable
Use an HDMI cable with the HDMI logo.
Use an HDMI mini connector on one end (for the camcorder), and a plug suitable for connecting your
TV on the other end.
Copyright-protected images are not output from the HDMI OUT jack of your camcorder.
Some TVs may not function correctly (e.g., no sound or image) with this connection.
Do not connect the camcorder HDMI OUT jack to an external device HDMI OUT jack, as malfunction
may result.
HDMI (High Definition Multimedia Interface) is an interface to send both video/audio signals. The
HDMI OUT jack outputs high quality images and digital audio.
Notes
Refer to the instruction manuals of the TV as well.
Connect the camcorder to the wall outlet (wall socket) using the supplied AC Adaptor and the USB
cable. [Details]
When movies are recorded with standard image quality (STD), they are played back in standard
definition image quality (STD) even on a high definition TV.
Back to top
Copyright 2012 Sony Corporation
Page 74

"Handycam" User Guide
74
Operation Search
PrintSearch
Top page > Playback > Playing images on a TV > Using “BRAVIA” Sync
Before use
Getting started
Recording
Playback
Saving images with a PC
Customizing your camcorder
Troubleshooting
Maintenance and precautions
Contents list
Using “BRAVIA” Sync
You can operate your camcorder with the remote commander of your TV by connecting your camcorder
to a “BRAVIA” Sync compatible TV launched in 2008 or later with the HDMI cable.
You can operate the menu of your camcorder by pressing the SYNC MENU button of the remote
commander of your TV. You can display the camcorder screens such as Event View, play selected
movies or display selected photos by pressing up/down/left/right/enter buttons of the remote commander
of your TV.
Notes
Set [CTRL FOR HDMI] to [On].
Also set your TV accordingly. Refer to the instruction manual of the TV for details.
The operation of “BRAVIA” Sync differs according to each model of BRAVIA. Refer to the
instruction manual of your TV for details.
If you turn off the TV, your camcorder is turned off simultaneously.
Back to top
Copyright 2012 Sony Corporation
Page 75

"Handycam" User Guide
75
Operation Search
PrintSearch
Top page > Saving images with a PC > Using the “PlayMemories Home” software > Starting the
“PlayMemories Home” software
Before use
Getting started
Recording
Playback
Saving images with a PC
Customizing your camcorder
Troubleshooting
Maintenance and precautions
Contents list
Starting the “PlayMemories Home” software
1. Double-click the “PlayMemories Home” icon on the computer screen.
The “PlayMemories Home” software starts up.
2. Double-click the ““PlayMemories Home” Help Guide” short-cut icon on the computer screen to see
how to use “PlayMemories Home.”
If the icon is not displayed on the computer screen, click [Start] [All Programs]
[PlayMemories Home] the desired item.
Back to top
Copyright 2012 Sony Corporation
Page 76

"Handycam" User Guide
76
Operation Search
PrintSearch
Top page > Customizing your camcorder > Using menu items > Setting up menu items
Before use
Getting started
Recording
Playback
Saving images with a PC
Customizing your camcorder
Troubleshooting
Maintenance and precautions
Contents list
Setting up menu items
To find a menu item quickly
When you cannot select a menu item
The camcorder has various menu items under each of 6 menu categories.
Shooting Mode (Items for selecting a shooting mode)
Camera/Mic (Items for customized shooting)
Image Quality/Size (Items for setting up image quality or size)
Playback Function (Items for playback)
Edit/Copy (Items for editing images such as copy or protect)
Setup (Other setup items)
1. Select
2. Select a category.
.
3. Select your desired menu item.
Notes
Select
to finish setting the menu or to return to the previous screen.
To find a menu item quickly
The [Camera/Mic] and [Setup] menus have sub-categories. Select the sub-category icon so that the
Page 77

LCD screen displays the list of menus in the sub-category selected.
77
A: Sub-category icons
When you cannot select a menu item
Grayed out menu items or settings are not available.
When you select the grayed out menu item, your camcorder displays the reason why you cannot select
the menu item or the instruction of under which condition you can set the menu item.
Copyright 2012 Sony Corporation
Back to top
Page 78

"Handycam" User Guide
78
Operation Search
PrintSearch
Top page > Customizing your camcorder > Shooting Mode > Movie
Before use
Getting started
Recording
Playback
Saving images with a PC
Customizing your camcorder
Troubleshooting
Maintenance and precautions
Contents list
Movie
You can select the movie recording mode.
1.
[Shooting Mode] [Movie].
Copyright 2012 Sony Corporation
Back to top
Page 79

"Handycam" User Guide
79
Operation Search
PrintSearch
Top page > Customizing your camcorder > Shooting Mode > Photo
Before use
Getting started
Recording
Playback
Saving images with a PC
Customizing your camcorder
Troubleshooting
Maintenance and precautions
Contents list
Photo
You can select the photo shooting mode.
1.
[Shooting Mode] [Photo].
Copyright 2012 Sony Corporation
Back to top
Page 80

"Handycam" User Guide
80
Operation Search
PrintSearch
Top page > Customizing your camcorder > Shooting Mode > Smth Slw REC (Smooth slow rec)
Before use
Getting started
Recording
Playback
Saving images with a PC
Customizing your camcorder
Troubleshooting
Maintenance and precautions
Contents list
Smth Slw REC (Smooth slow rec)
To change the timing at which the camcorder starts recording
The camcorder records approximately 3-second-long fast actions or motions as an approximately 12second-long slow-motion movie.
1.
2. Press the START/STOP button.
To change the timing at which the camcorder starts recording
Select [ ]/[ ] to make the setting.
[Shooting Mode] [Smth Slw REC].
[Recording...] disappears when recording is finished.
[3sec After] (default setting)
The camcorder records a movie of approximately 3 seconds after the START/STOP button is
pressed.
[3sec Before]
The camcorder records a movie of approximately 3 seconds before the START/STOP button is
pressed.
Notes
You cannot record sound.
Image quality is not as good as that of normal recording.
[
REC Mode] will be set to [Standard ] automatically.
Copyright 2012 Sony Corporation
Back to top
Page 81

"Handycam" User Guide
81
Operation Search
PrintSearch
Top page > Customizing your camcorder > Shooting Mode > Golf Shot
Before use
Getting started
Recording
Playback
Saving images with a PC
Customizing your camcorder
Troubleshooting
Maintenance and precautions
Contents list
Golf Shot
Timing that the camcorder starts recording
To check your form using self-timer
Divides 2 seconds of fast movement into frames which are then recorded as a movie and photos. You
can view a series of movement when playing back, which is convenient in cases such as checking golf
swing or tennis form.
1.
2. On the [Golf Shot] screen, frame the subject in the white frame in the center of the screen, then
[Shooting Mode] [Golf Shot].
press START/STOP right after the subject has taken a swing.
Timing that the camcorder starts recording
If the moment when the largest sound in 1 second after the START/STOP button is pressed has been
detected, the camcorder assumes the moment as the sound of a club hitting the ball.
When the sound of a club hitting the ball is detected, the recording time period is automatically adjusted
according to at that moment.
A: The sound of a club hitting the ball*
B: The point when you press START/STOP
C: The camcorder records images in this 2 seconds period.
* The camcorder sets the point when the loudest sound in the past 1 second is detected, as the sound of a club
hitting the ball.
To check your form using self- timer
Select [ ]/[ ] [On].
Page 82

The camcorder starts countdown of the timer after you press the START/STOP button.
82
The point when the count reaches 0 is assumed as the moment of impact and motion before and after 0
is recorded.
Notes
If the camcorder cannot detect the sound of a club hitting the ball, the camcorder automatically sets
the impact point at 0.5 second before the START/STOP button has been pressed, and records a
movie in the time period between 1.5 seconds before the impact point to 0.5 second after the
impact point.
The size of photos becomes 1,920
1,080.
You cannot record sound.
Image quality is not as good as that of normal recording.
[
REC Mode] will be set to [Standard ] automatically.
The image recorded may be noisy when your camcorder has failed to analyze the shot properly
because there may be movement in background of the [Golf Shot] recording screen. It is
recommended that you record images under stable conditions (for example, using a tripod).
Back to top
Copyright 2012 Sony Corporation
Page 83

"Handycam" User Guide
83
Operation Search
PrintSearch
Top page > Customizing your camcorder > Shooting Mode > iSweep Panorama
Before use
Getting started
Recording
Playback
Saving images with a PC
Customizing your camcorder
Troubleshooting
Maintenance and precautions
Contents list
iSweep Panorama
To select the image size of the photo taken by iSweep Panorama
Tips on shooting panoramic photos
You can make a panoramic photo by taking multiple photos as you sweep the camcorder and combining
them into one.
1.
2. Align the camcorder with the end of the subject to be shot and press PHOTO.
[Shooting Mode] [iSweep Panorama].
A: This part will not be recorded.
You can select the direction in which you move the camcorder by touching
LCD screen.
3. Sweep the camcorder to the end point of the guide (B), following the indication on the screen.
B: Guide
You can play the panoramic photos using the built-in “PlayMemories Home” software.
/ / / on the
To select the image size of the photo taken by iSweep Panorama
Select / before you start shooting.
Page 84

[Standard] (the default setting)
84
Horizontal: 4,912 × 1,080
Vertical: 3,424 × 1,920
[Wide]
Horizontal: 7,152 × 1,080
Vertical: 4,912 × 1,920
Tips on shooting panoramic photos
Sweep the camcorder around you at slow and steady speed (about 5 seconds for 180 degrees). A
message will alert you if the speed is too high or too low. It is recommended that you practice the
sweeping movement in advance before you take a panoramic photo.
For taking a good panoramic photo, it is also important to keep sufficient distance between the
subject and the background or to shoot in bright places such as outdoors.
Copyright 2012 Sony Corporation
Back to top
Page 85

"Handycam" User Guide
Notes
85
Operation Search
PrintSearch
Top page > Customizing your camcorder > Camera/Mic > White Balance
Before use
Getting started
Recording
Playback
Saving images with a PC
Customizing your camcorder
Troubleshooting
Maintenance and precautions
Contents list
White Balance
You can adjust the color balance to the recording environment.
1. [Camera/Mic] [ Manual Settings] [White Balance].
2. Select the desired setting.
(Auto)
The white balance is adjusted automatically.
If you have changed the battery pack while [Auto] was selected, or taken your camcorder outdoors
after inside use (or vice versa), aim your camcorder at a nearby white object for about 10 seconds
for better color balance adjustment.
(Outdoor)
The white balance is appropriately adjusted for the following recording conditions:
Outdoors
Night views, neon signs and fireworks
Sunrise or sunset
Under daylight fluorescent lamps
(Indoor)
The white balance is appropriately adjusted for the following recording conditions:
Indoors
At party scenes or studios where the lighting conditions change quickly
Under video lamps in a studio, or under sodium lamps or incandescent-like color lamps
(One Push)
The white balance will be adjusted according to the ambient light.
Select [
Keep framing white object such as a piece of paper, to fill the screen under the same lightning
conditions as you will shoot the subject.
Select [
If the lighting conditions changed by bringing your camcorder outdoors from inside the house,
or vice versa, you need to redo the [One Push] procedure to readjust the white balance.
].
].
Page 86

Set [White Balance] to [Auto] or adjust the color in [One Push] under white or cool white fluorescent
86
lamps.
While you are recording a movie,
(One Push) cannot be set.
If you set [White Balance], [Scene Selection] is set to [Auto].
Back to top
Copyright 2012 Sony Corporation
Page 87

"Handycam" User Guide
87
Operation Search
PrintSearch
Top page > Customizing your camcorder > Camera/Mic > Spot Meter/Fcs (Spot meter/focus)
Before use
Getting started
Recording
Playback
Saving images with a PC
Customizing your camcorder
Troubleshooting
Maintenance and precautions
Contents list
Spot Meter/Fcs (Spot meter/focus)
Brightness and focus can be adjusted for the selected subject automatically.
1.
2. Touch the subject of which you want to adjust the brightness and focus.
Notes
[Camera/Mic] [ Manual Settings] [Spot Meter/Fcs].
To adjust the brightness and focus automatically, touch [Auto].
[Exposure] and [Focus] are automatically set to [Manual].
Copyright 2012 Sony Corporation
Back to top
Page 88

"Handycam" User Guide
88
Operation Search
PrintSearch
Top page > Customizing your camcorder > Camera/Mic > Spot Meter (Flexible spot meter)
Before use
Getting started
Recording
Playback
Saving images with a PC
Customizing your camcorder
Troubleshooting
Maintenance and precautions
Contents list
Spot Meter (Flexible spot meter)
Exposure can be adjusted and set for the selected subject automatically. This function is useful when
there is strong contrast between the subject and the background, such as subjects in the spotlight on
stage.
1.
2. Touch the subject of which you want to adjust the exposure.
[Camera/Mic] [ Manual Settings] [Spot Meter].
To return the setting to automatic exposure, touch [Auto].
Notes
[Exposure] is automatically set to [Manual].
Copyright 2012 Sony Corporation
Back to top
Page 89

"Handycam" User Guide
89
Operation Search
PrintSearch
Top page > Customizing your camcorder > Camera/Mic > Spot Focus
Before use
Getting started
Recording
Playback
Saving images with a PC
Customizing your camcorder
Troubleshooting
Maintenance and precautions
Contents list
Spot Focus
Focus can be adjusted automatically for the subject selected.
1.
2. Touch the subject of which you want to adjust the focus.
Notes
[Camera/Mic] [ Manual Settings] [Spot Focus].
To adjust the focus automatically, touch [Auto].
[Focus] is automatically set to [Manual].
Copyright 2012 Sony Corporation
Back to top
Page 90

"Handycam" User Guide
90
Operation Search
PrintSearch
Top page > Customizing your camcorder > Camera/Mic > Exposure
Before use
Getting started
Recording
Playback
Saving images with a PC
Customizing your camcorder
Troubleshooting
Maintenance and precautions
Contents list
Exposure
You can fix the brightness of a picture manually. Adjust the brightness when the subject is too bright or
too dark.
1.
2. Select the desired item.
[Camera/Mic] [ Manual Settings] [Exposure].
Auto
The exposure is adjusted automatically.
Manual
Select
or the light is dim.
if the subject is white or the backlight is bright, or select if the subject is black
Back to top
Copyright 2012 Sony Corporation
Page 91

"Handycam" User Guide
91
Operation Search
PrintSearch
Top page > Customizing your camcorder > Camera/Mic > Focus
Before use
Getting started
Recording
Playback
Saving images with a PC
Customizing your camcorder
Troubleshooting
Maintenance and precautions
Contents list
Focus
To adjust the focus
On focal distance information
You can adjust the focus manually. You can select this function also when you want to focus on a
certain subject intentionally.
1.
2. Select the desired item.
[Camera/Mic] [ Manual Settings] [Focus].
Auto
The focus is adjusted automatically.
Manual
Adjust the focus using
appears when the focus cannot be adjusted any closer, and appears when the focus cannot
be adjusted farther away.
(nearby subject) or (distant subject).
To adjust the focus
It is easier to focus on the subject by pressing the T (telephoto) zoom button to adjust the focus, then
pressing W (wide angle) to adjust the zoom for recording. When you want to record a subject at close
range, press the W (wide angle) zoom button, then adjust the focus.
On focal distance information
Your camcorder displays the focal distance information for a few seconds when the focus mode is
switched from automatic to manual or when you set the focus manually. You can use this information as
a guide when the subject is dark and focus adjustment is difficult.
Notes
When you set [Focus] to [Manual],
The minimum possible distance between camcorder and subject while maintaining sharp focus is
appears.
Page 92

about 1 cm (about 13/32 in.) for wide angle and about 80 cm (about 31 1/2 in.) for telephoto.
92
Back to top
Copyright 2012 Sony Corporation
Page 93

"Handycam" User Guide
93
Operation Search
PrintSearch
Top page > Customizing your camcorder > Camera/Mic > Low Lux
Before use
Getting started
Recording
Playback
Saving images with a PC
Customizing your camcorder
Troubleshooting
Maintenance and precautions
Contents list
Low Lux
You can record bright color images, even in dim light.
1.
2. Select the desired item.
[Camera/Mic] [ Manual Settings] [Low Lux].
Off
The Low Lux function is not used.
)
On (
The Low Lux function is used.
Copyright 2012 Sony Corporation
Back to top
Page 94

"Handycam" User Guide
94
Operation Search
PrintSearch
Top page > Customizing your camcorder > Camera/Mic > Scene Selection
Before use
Getting started
Recording
Playback
Saving images with a PC
Customizing your camcorder
Troubleshooting
Maintenance and precautions
Contents list
Scene Selection
You can record images effectively in various situations.
1.
2. Select the desired item.
[Camera/Mic] [ Camera Settings] [Scene Selection].
(Auto)
Adjusts image quality automatically.
(Night Scene)*
1
Maintains the darkening atmosphere of the distant surroundings in
night scenes.
(Night Portrait)
Enables to take photos of people and background using a flash.
(Sunrise&Sunset)*
1
Reproduces the atmosphere of scenes such as sunsets or sunrises.
(Fireworks)*
1
Takes spectacular shots of fireworks.
(Landscape)*
1
Shoots distant subjects clearly. This setting also prevents your
camcorder from focusing on glass or metal mesh in windows
Page 95

between the camcorder and the subject.
95
(Portrait)
Brings out the subject such as people or flowers while creating a soft
background.
(Spotlight)*
2
Prevents people’s faces from appearing excessively white when
subjects are lit by strong light.
(Beach)*
2
Takes the vivid blue of the ocean or a lake.
(Underwater)*
2
Takes a vivid picture underwater.
(Snow)*
2
Takes bright pictures of a white landscape.
*1 Adjusted to focus on subjects farther away only.
2
*
Adjusted not to focus on subjects a short distance away.
Notes
Even if you set [Night Portrait], the setting changes to [Auto] when the
If you set [Scene Selection], the [White Balance] setting is canceled.
Copyright 2012 Sony Corporation
(Movie) lamp is lit.
Back to top
Page 96

"Handycam" User Guide
96
Operation Search
PrintSearch
Top page > Customizing your camcorder > Camera/Mic > Fader
Before use
Getting started
Recording
Playback
Saving images with a PC
Customizing your camcorder
Troubleshooting
Maintenance and precautions
Contents list
Fader
You can record a transition with the following effects adding to the interval between scenes.
Select the desired effect in [STBY] (to fading in) or [REC] (to fading out) mode.
1.
2. Select the desired item.
[Camera/Mic] [ Camera Settings] [ Fader].
Off
Does not use an effect.
White Fader (
Fades in/out with the white effect.
Out
In
)
Black Fader ( )
Fades in/out with the black effect.
Out
Notes
When you press START/STOP, the setting is cleared.
In
Copyright 2012 Sony Corporation
Back to top
Page 97

"Handycam" User Guide
97
Operation Search
PrintSearch
Top page > Customizing your camcorder > Camera/Mic > Self-Timer
Before use
Getting started
Recording
Playback
Saving images with a PC
Customizing your camcorder
Troubleshooting
Maintenance and precautions
Contents list
Self-Timer
Press PHOTO to start the count down. A photo is recorded after about 10 seconds.
Using [Self-portrait 1 Person] or [Self-portrait 2 People] will alleviate the camera shake that occurs when
you press the PHOTO when shooting a photo.
1.
2. Select the desired item.
[Camera/Mic] [ Camera Settings] [ Self-Timer].
Off
Cancels the self-timer.
10sec (
Sets the self-timer to a 10-second delay.
Pressing the PHOTO button starts the countdown.
)
2sec (
Sets the self-timer to a 2-second delay.
Pressing the PHOTO button starts the countdown.
Self-portrait 1 Person (
When the camcorder detects a face, a beep sounds, and the shutter operates 2 seconds later.
Self-portrait 2 People (
When the camcorder detects two faces, a beep sounds, and the shutter operates 2 seconds later.
)
)
)
Back to top
Copyright 2012 Sony Corporation
Page 98

"Handycam" User Guide
98
Operation Search
PrintSearch
Top page > Customizing your camcorder > Camera/Mic > Tele Macro
Before use
Getting started
Recording
Playback
Saving images with a PC
Customizing your camcorder
Troubleshooting
Maintenance and precautions
Contents list
Tele Macro
You can blur out backgrounds and the subject stands out clearer. This is useful to shoot small subjects,
such as flowers or insects.
1.
2. Select the desired item.
[Camera/Mic] [ Camera Settings] [Tele Macro].
Off
Cancels Tele Macro. (Tele Macro is also canceled when you press the W zoom button.)
On (
The zoom moves to the top of the T (telephoto) side automatically and allows recording subjects
at close range down to about 38 cm (15 in.).
)
Notes
When recording a distant subject, focusing may be difficult and can take some time.
Adjust the focus manually when it is hard to focus automatically.
Related topics
Zooming
Focus
Back to top
Copyright 2012 Sony Corporation
Page 99

"Handycam" User Guide
99
Operation Search
PrintSearch
Top page > Customizing your camcorder > Camera/Mic > SteadyShot (movie)
Before use
Getting started
Recording
Playback
Saving images with a PC
Customizing your camcorder
Troubleshooting
Maintenance and precautions
Contents list
SteadyShot (movie)
You can compensate for camera shake.
Set [
natural.
SteadyShot] to [Off] ( ) when using a tripod (sold separately), then the image becomes
1.
2. Select the desired item.
[Camera/Mic] [ Camera Settings] [ SteadyShot].
Active
Provides a more powerful SteadyShot effect.
Standard
Provides a SteadyShot effect, performing wide-angle recording under relatively stable recording
conditions.
Off (
The SteadyShot function is not used.
Notes
If you change the setting, the imaging field will also change accordingly.
You can zoom images up to 10 times, unless [
)
SteadyShot] is set to [Active].
Copyright 2012 Sony Corporation
Back to top
Page 100

"Handycam" User Guide
100
Operation Search
PrintSearch
Top page > Customizing your camcorder > Camera/Mic > SteadyShot (photo)
Before use
Getting started
Recording
Playback
Saving images with a PC
Customizing your camcorder
Troubleshooting
Maintenance and precautions
Contents list
SteadyShot (photo)
You can compensate for camera shake.
Set [
natural.
SteadyShot] to [Off] ( ) when using a tripod (sold separately), then the image becomes
1.
2. Select the desired item.
[Camera/Mic] [ Camera Settings] [ SteadyShot].
On
The SteadyShot function is used.
Off (
The SteadyShot function is not used.
)
Copyright 2012 Sony Corporation
Back to top
 Loading...