

Sony FST-ZUX9 Operating Manual

Mini Hi-Fi
Component
System
Operating Instructions
3-100-770-12(1)
FST-ZUX9
©2007 Sony Corporation
WARNING
To reduce the risk of fire or
electric shock, do not expose
this apparatus to rain or
moisture.
To prevent fire, do not cover the ventilation
of the apparatus with newspapers, tablecloths, curtains, etc. And don’t place lighted
candles on the apparatus.
To prevent fire or shock hazard, do not place
objects filled with liquids, such as vases, on
the apparatus.
To avoid electrical shock, do not open the
cabinet. Refer servicing to qualified
personnel only.
Batteries or batteries installed apparatus
shall not be exposed to excessive heat such
as sunshine, fire or the like.
Do not install the appliance in a confined
space, such as a bookcase or built-in cabinet.
Install this system so that the power cord can
be unplugged from the wall socket
immediately in the event of trouble.
This appliance is classified as a CLASS 1
LASER product. This label is located on the
rear exterior.
Don’t throw away the
battery with general
house waste, dispose of it
correctly as chemical
waste.
About this manual
The FST-ZUX9 consists of:
– Unit HCD-ZUX9
– Speaker System
• Front speakers SS-ZUX9
• Surround speakers SS-ZUX9
“WALKMAN” and “WALKMAN” logo are
registered trademarks of Sony Corporation.
MICROVAULT is a trademark of Sony
Corporation.
MPEG Layer-3 audio coding techno logy and
patents licensed from Fraunhofer IIS and
Thomson.
GB
2

Table of Contents
About this manual ........................2
Playable discs...............................4
Playable/Recordable USB
devices.....................................5
Guide to parts and controls ..........6
Getting Started
Hooking up the system...............14
Positioning the speakers.............16
Setting the clock.........................17
Disc
Playing an AUDIO CD/MP3
disc ........................................18
Using play mode ........................20
USB Device
Recording from a disc onto a
USB device ...........................23
Listening to music of a USB
device ....................................25
Using play mode ........................27
Sound Adjustment
Adjusting the sound .................. 34
Creating a party atmosphere ..... 35
— X-TRANCE PRO
Singing along ............................ 40
Other Operations
Using the timer.......................... 41
Changing the display................. 42
Viewing information in the
display during CD and
USB function........................ 44
Hooking up the optional
components .......................... 45
Additional Information
Troubleshooting ........................ 47
Precautions ................................ 55
Specifications ............................ 56
Index.......................................... 59
Tuner
Listening to the radio .................29
Tape
Playing a tape .............................31
Recording onto a tape ................32
GB
3
Playable discs
Format of discs Logo
• AUDIO CD
• CD-R/-RW in
AUDIO CD format
• CD-R/-RW in
DATA CD format,
containing MP3
audio tracks1) that
conforms to
2)
ISO 9660
Level 2, Joliet (in
expansion format),
or Multi Session
1)
MP3 (MPEG 1 Audio Layer 3) is a standard
format defined by ISO/MPEG which
compresses audio data. MP3 audio tracks
must be in MPEG 1 Audio Layer 3 format.
2)
A logical format of files and folders on CDROMs, defined by ISO (International
Organization for Standardization).
3)
This is a recording method that enables
adding of data using the Track-At-Once
method. Conventional discs begin at a disc
control area called the Lead-in and end at an
area called Lead-out. A Multi Session disc is
a disc having multiple sessions, with each
segment from Lead-in to Lead-out regarded as
a single session.
Level 1/
3)
Discs that cannot be played
back
• Data part of CD-Extras
• Data part of Mixed CDs
• CD-R/-RW discs that have not been
correctly finalized (processing to allow
play back by a normal CD player).
• CD-R/-RW discs recorded in Multi
Session that have not ended by “closing
the session”.
• A disc recorded in packet write format.
• Audio side of a DualDisc.
• A disc that has a non-standard shape
(e.g., heart, square, star).
• A disc that has the adhesive cellophane
tape or a sticker still left on it.
1)
CD-Extra: This format records audio
(AUDIO CD data) on the tracks in session 1
and data on the tracks in session 2.
2)
Mixed CD: This format records data on the
first track and audio (AUDIO CD data) on the
second and subsequent tracks of a session.
1)
2)
Note on DualDiscs
A DualDisc is a two sided disc product
which mates DVD recorded material on
one side with digital audio material on the
other side. However, since the audio
material side does not conform to the
Compact Disc (CD) standard, playback
on this product is not guaranteed.
Note on CD-R/-RW
In some cases, CD-Rs/-RWs cannot be
played back on this system due to the
recording quality or physical condition of
the disc, or the characteristics of the
recording device and authoring software.
The disc will not be played back if it has
not been correctly finalized. For more
information, see the operating
instructions of the recording device.
GB
4

Music discs encoded with
copyright protection
technologies
This product is designed to play back
discs that conform to the Compact Disc
(CD) standard. Recently, various music
discs encoded with copyright protection
technologies are marketed by some record
companies. Please be aware that among
those discs, there are some that do not
conform to the CD standard and may not
be playable by this product.
Note on Multi Session disc
When you play back Multi Session discs
with different formats for each session,
the format of the first session is
recognized as the disc type. Tracks in the
second and subsequent sessions are
played back if they are the same formats
as the first session.
Playable/Recordable USB devices
You can use the following Sony USB
devices on this system.
Verified Sony digital music player
(as of April 2007)
Product name Model name
®
Walkman
Verified Sony IC Recorder
(as of April 2007)
Product name Model name
IC Recorder ICD-U50/U60/U70
Verified Sony USB storage media
(as of April 2007)
Product name Model name
MICROVAULT USM256J/512J/1GJ/2GJ/
Notes
• Do not use USB devices other than these USB
devices. Operation of models not listed here is
not guaranteed.
• Operation may not always be ensured even
when using these USB devices.
• Some of these USB devices may not be
available for purchase in certain areas.
• See the operating instructions supplied with
the USB device for details on the operation
method.
• If you want to format the above USB devices,
be sure to use the models or formatter
software supplied with the USB device.
However, if the formatting process is
performed using other method, the recording
may not be properly done.
NWD-B103/B105/
B103F/B105F
4GJ
USM512JX/1GJX/2GJX/
4GJX
USM256H/512H/1GH/
2GH/4GH
GB
5
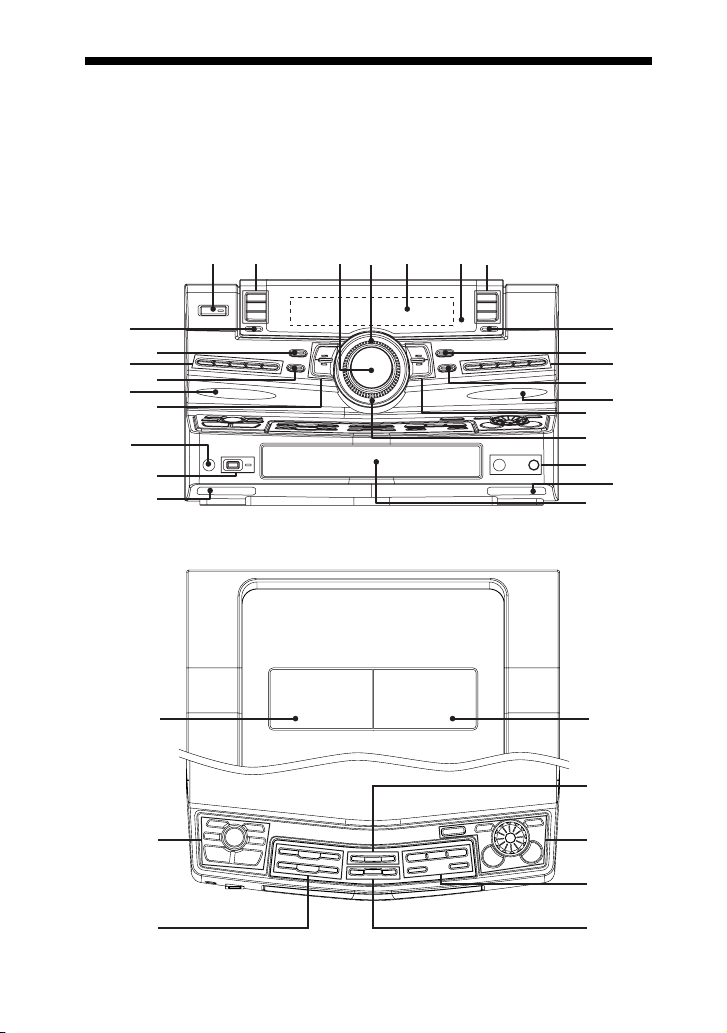
Guide to parts and controls
12 34 657
This manual mainly explains operations using the buttons on the unit, but the same
operations can also be performed using the buttons on the remote having the same or
similar names.
Unit
– Front view
wh
wg
wf
wd
ws
wa
w;
ql
qk
– Top view
wk
ef
9
qa
qd
qf
qg
qj
wj
wl
e;
ea
8
q;
qs
qh
ed
GB
6
es

1 "/1 (on/standby) (pages 15, 16,
17, 24, 30, 42, 47, 53)
Press to turn the system on or off.
B Function buttons:
CD (pages 16, 18, 20, 23, 30, 32,
43)
TUNER/BAND (pages 29, 43)
TAPE A/B (pages 31, 43)
Press to select a function.
C MASTER VOLUME (pages 18,
25, 42, 47)
Turn to adjust the volume.
D OPERATION DIAL (pages 18,
26, 34, 38, 42)
Turn to select a track or folder.
Turn to select a setting.
E Display (pages 10, 42, 44, 54)
F IR Receptor (page 48)
G Function buttons:
AUDIO (pages 36, 43, 46)
VIDEO (pages 36, 43, 46)
USB
(pages 24, 25, 36, 43)
Press to select a function.
H DISPLAY (pages 43, 44)
Press to change the information on
the display.
I GROOVE (page 34)
Press to reinforce the bass.
J FLAT (page 34)
SAMBA (page 34)
REGGAE (page 34)
HIP HOP (page 34)
TECHNO (page 34)
Press to select a preset effect.
K SPEAKERS (page 40)
Press to select the speaker system.
L FRONT BEAM (Right) (page 43)
M CHORUS (pages 36, 48, 53)
AQUA (pages 36, 48, 53)
Press to select an effector mode.
N Power illuminator (page 42)
O MIC (jack) (pages 40, 47, 57)
Connect an optional microphone.
MIC LEVEL (pages 33, 40, 47)
Turn to adjust the microphone
volume.
P BOTTOM BEAM (Right)
(page 43)
Q Disc tray (pages 16, 18, 49)
R BOTTOM BEAM (Left) (page 43)
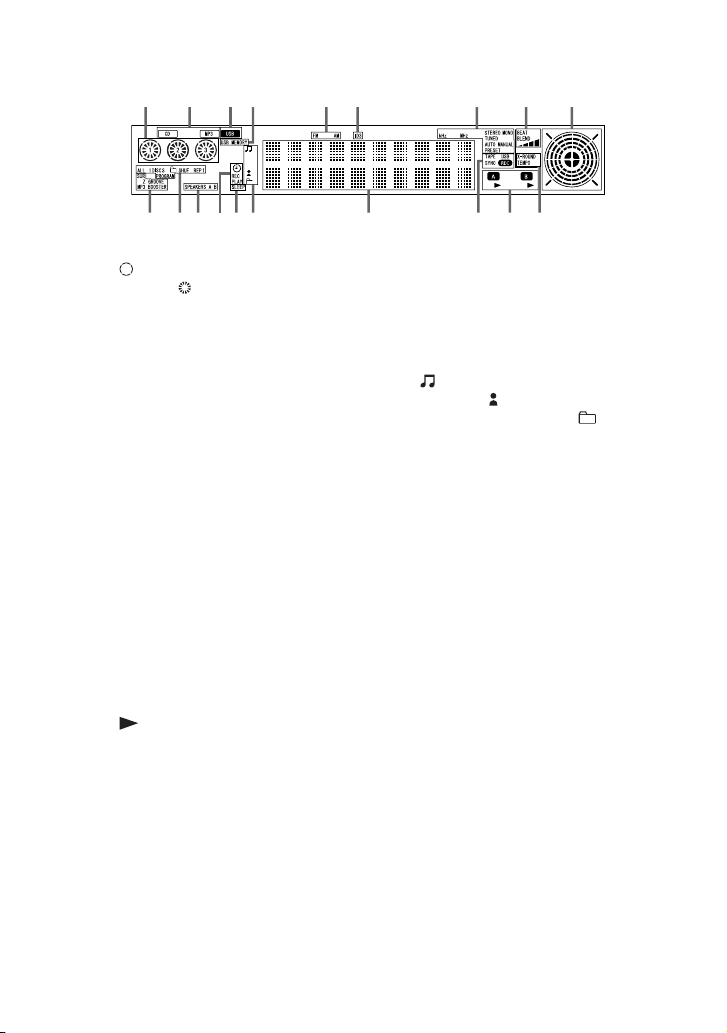
S (USB) port (pages 23, 24,
25, 51, 57)
Connect an optional USB device
(Digital music player or USB storage
media).
REC/ERASE (indicator)
(pages 24, 26)
Lights up when recording from a disc
onto the connected optional USB
device (Digital music player or USB
storage media).
Lights up when erasing MP3 audio
tracks from the connected optional
USB device (Digital music player or
USB storage media).
Continued
l
GB
7

T PHONES (jack) (pages 37, 40,
47, 57)
Connect the headphones.
U FLANGER (pages 35, 48, 53)
DELAY (pages 35, 48, 53)
Press to select an effector mode.
V FRONT BEAM (Left) (page 43)
W EQ BAND/MEMORY (page 34)
Press to select a frequency band
when adjusting the graphic
equalizer.
X ROCK (page 34)
POP (page 34)
JAZZ (page 34)
DANCE (page 34)
Press to select a preset effect.
USER EQ (page 34)
Press to select a user equalizer
setting.
Y AMP MENU (page 42)
Press to change the spectrum
analyser display, adjust the
brightness of the display and built-in
beam or change the power
illuminator pattern.
Z BEAM MODE (page 43)
Press to change the lighting effect of
a beam.
wj B PUSH Z OPEN/CLOSE
(Deck B) (page 31)
Press to insert or eject a tape.
Deck B (pages 32, 42, 53)
wk A Z PUSH OPEN/CLOSE
(Deck A) (page 31)
Press to insert or eject a tape.
Deck A (pages 31, 53)
wl ENTER (pages 17, 18, 21, 24,
26, 29, 35, 42, 43, 53)
Press to enter the selection.
ERASE (page 24)
Press to erase MP3 audio tracks or
folders on the connected optional
USB device (Digital music player or
USB storage media).
RETURN (pages 18, 26)
Press to return to the parent folder.
e; X-ROUND ON/OFF (pages 36,
37)
Press to turn on or off the X-ROUND
function.
X-ROUND MODE (pages 36, 37)
Press to select an X-ROUND mode.
MAX/JUMP MODE (page 37)
Press to select the way of creating
“MAX” and “JUMP” effect.
X-ROUND JOG (page 37)
Turn to change the sound movement
or the speed of the sound movement.
JUMP PAD (page 37)
Press to switch the sound position to
the opposite direction instantly.
MAX PAD (page 37)
Press to enhance the sound.
ez DISC SKIP/EX-CHANGE
(pages 16, 18, 19, 21)
Press to select the next disc.
Press to exchange other discs during
playback.
Z OPEN/CLOSE (pages 16, 18,
49)
Press to load or eject a disc.
DISC 1 ~ 3 (pages 19, 21)
Press to select a disc.
Press to switch to the CD function
from the other functions.
GB
8

es CD- SYNC/REC 1 (page 23)
USB
Press to record from a disc onto the
connected optional USB device
(Digital music player or USB storage
media).
Press to record a track from a disc
onto the connected optional USB
device (Digital music player or USB
storage media).
TAPE REC PAUSE/START
(page 32)
Press to record onto a tape.
CD-TAPE SYNC (page 32)
Press to record a disc onto a tape.
ed NX (play/pause) (pages 18, 20,
23, 25, 31, 49, 52)
Press to start or pause playback.
x (stop) (pages 18, 24, 26, 29,
31, 33, 49, 53)
Press to stop playback or recording.
./> (go forward/go
backward) (pages 17, 18, 21, 24,
26, 32, 41, 53)
Press to select a track.
TUNING +/– (pages 29, 30)
Press to tune in a radio station.
ef BEAT ON/OFF (page 39)
Press to turn on or off the rhythms of
the beat.
BEAT LEVEL (page 38)
Press to adjust the beat level.
BEAT SPEED (page 39)
Press to change the beat speed.
BEAT PATTERN (pages 39)
Press to select the rhythms of the
beat.
BPM CONTROL (page 39)
Press to input the tempo of the audio
source.
PAD A/PAD B (page 38)
Press to add percussion sound.
+/– (pages 18, 21, 24, 26, 32)
Press to select a folder.
m/M (rewind/fast forward)
(pages 18, 26, 31)
Press to find a point in a track or tape.
Continued
l
GB
9
– Display
qaq
1
ql
qk
2
qj
qh
3
qg
qf
546
A Indicators for the disc tray (page 18).
“ ” lights up when the disc is
selected. “ ” lights up when there is
a disc on the disc tray.
B “MP3” lights up when an MP3 audio
track is recognized. “CD” lights up
when a disc is recognized.
C Lights up when the USB function is
selected (page 25).
D Lights up when an optional USB
device (Digital music player or USB
storage media) is recognized.
E Indicators for the tuner band
(page 29).
F Lights up when the MP3 audio track
contains ID3 tag information.
G Indicators for the TUNER function
(page 29).
H Indicators for the BEAT BLEND
function (page 38).
I Indicators for the X-ROUND mode
(page 36).
J Indicators for the X-ROUND
function (page 36).
K Indicators for the TAPE function
(page 31).
“ ” lights up when there is a tape in
the deck.
789
qd
qs
;
L Indicators for the recording type
(page 32).
M Displays the current status and
information (page 44).
N Indicators for the information type of
an MP3 audio track that displayed on
qd (page 44).
“ ” lights up when a track name is
displayed. “ ” lights up when an
artist name is displayed. “ ” lights
up when a folder name is displayed.
O Lights up when the Sleep Timer is
activated (page 41).
P Lights up when the Play Timer or
Recording Timer is set (page 41).
Q Indicators for the speaker system
(page 40).
R Indicators for the selected play mode
(page 20).
S Indicators for the activated sound
effect (pages 34, 35).
10
GB
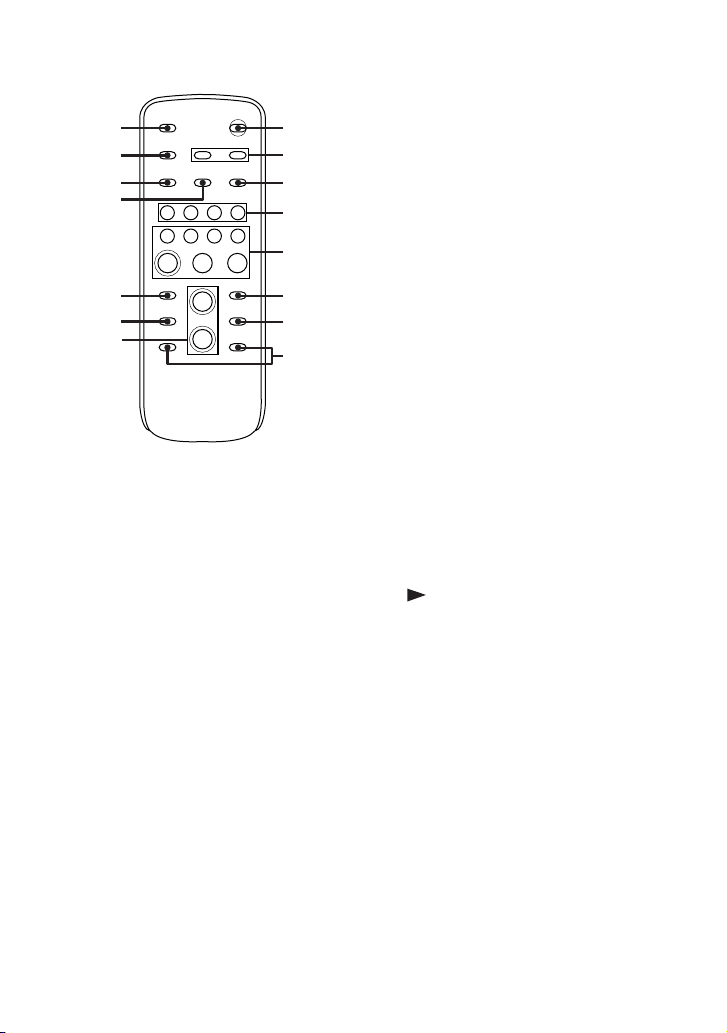
Remote
D USB (page 25)
Press to select the USB function.
qg
qf
qd
qs
qa
q;
9
1
2
3
4
5
6
7
8
1 "/1 (on/standby) (pages 15, 17,
47)
Press to turn the system on or off.
B CLOCK/TIMER SELECT
(page 42)
CLOCK/TIMER SET (pages 17,
41)
Press to set the clock and the timers.
C REPEAT/FM MODE (pages 22,
30, 52)
Press to change the Repeat Play
setting.
Press to select the FM monaural or
stereo reception.
CD (page 18)
Press to select the CD function.
TUNER/BAND (page 29)
Press to select the TUNER function.
Press to select FM or AM band.
FUNCTION (pages 18, 29, 43,
46)
Press to select a function.
E ./> (go backward/go
forward) (pages 18, 21, 24, 26,
32, 41, 53)
Press to select a track.
Press to adjust the time when setting
the clock or timer.
+/– (tuning) (pages 29, 30)
Press to tune in a radio station.
m/M (rewind/fast forward)
(pages 18, 26, 31)
Press to find a point in a track or tape.
(play) (pages 18, 23, 31, 49,
52)
X (pause) (pages 18, 31)
Press to start or pause playback.
x (stop) (pages 18, 29, 31)
Press to stop playback or recording.
F ENTER (pages 17, 24, 26, 29,
35, 41)
Press to enter the selection.
Continued
l
11
GB
G DISC SKIP (pages 16, 18, 19, 21)
Press to select the next disc.
H +/– (pages 18, 21, 24, 26, 32)
Press to select a folder.
I VOLUME +/–* (pages 18, 25, 42,
47)
Press to adjust the volume.
* The VOLUME + button has a tactile dot.
Use the tactile dot as a reference when
operating the system.
J EQ (page 34)
Press to select a preset effect.
K CLEAR (page 22)
Press to delete a programmed step.
L PLAY MODE/TUNING MODE
(pages 20, 29, 30)
Press to select the play mode of CD
or USB function.
Press to select the tuning mode.
qd TUNER MEMORY (page 29)
Press to preset a radio station.
qf DISPLAY (pages 43, 44)
Press to change the information on
the display.
qg SLEEP (page 41)
Press to activate the Sleep Timer.
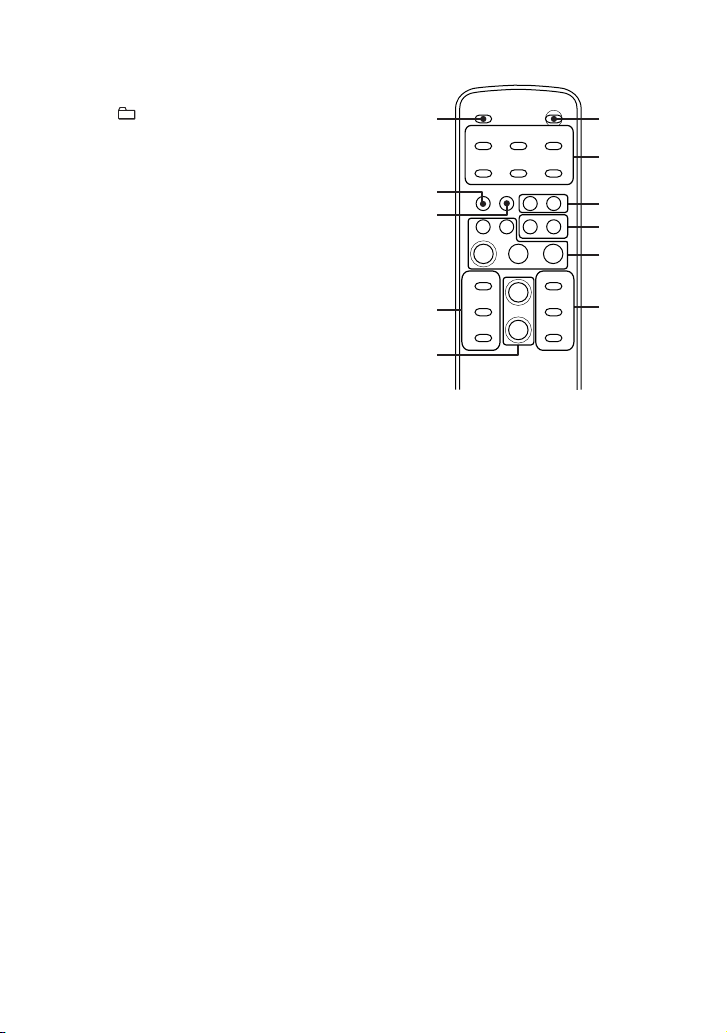
X-TRANCE PRO Remote
qa
q;
9
8
7
1 "/1 (on/standby) (pages 15, 17,
47)
Press to turn the system on or off.
B X-ROUND ON/OFF (pages 36,
37)
Press to turn on or off the X-ROUND
function.
MAX PAD (page 37)
Press to enhance the sound.
JUMP PAD (page 37)
Press to switch the sound position to
the opposite direction instantly.
1
2
3
4
5
6
12
X-ROUND MODE (pages 36, 37)
Press to select an X-ROUND mode.
X-ROUND +/– (page 37)
Press to change the sound movement
or the speed of the sound movement.
GB

C PAD A (page 38)
PAD B (page 38)
Press to add percussion sound.
D FRONT BUILT-IN BEAM
(page 43)
BOTTOM BUILT-IN BEAM
(page 43)
Press to change the lighting effect of
the beam.
E ./> (go backward/go
forward) (pages 18, 53)
Press to select a track.
+/– (tuning) (page 29)
Press to tune in a radio station.
(play) (page 18)
X (pause) (pages 18, 31)
Press to start or pause playback.
x (stop) (pages 18, 29, 31)
Press to stop playback or recording.
F BEAT LEVEL (page 38)
Press to adjust the beat level.
BEAT PATTERN + (pages 39)
BEAT PATTERN – (pages 39)
Press to select the rhythms of the
beat.
G VOLUME +/–* (pages 18, 25, 42,
47)
Press to adjust the volume.
*
The VOLUME + button has a tactile
dot. Use the tactile dot as a reference
when operating the system.
H BEAT ON/OFF (page 39)
Press to turn on or off the rhythms of
the beat.
BEAT SPEED + (page 39)
BEAT SPEED – (page 39)
Press to change the beat speed.
I GROOVE (page 34)
Press to reinforce the bass.
J SOUND EFFECT (page 36)
Press to select an effector mode.
K FUNCTION (pages 18, 29, 43,
46)
Press to select a function.
13
GB
Getting Started
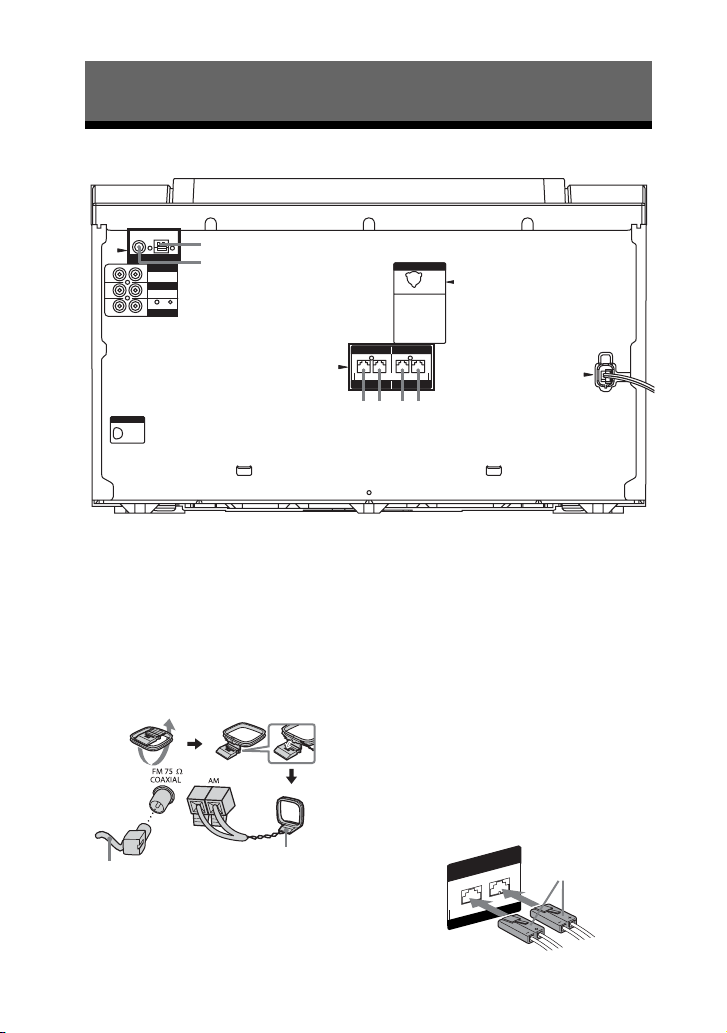
Hooking up the system
A
1
2
B
1 To AM loop antenna
2 To FM lead antenna
3 To front speaker (right)
4 To front speaker (left)
5 To surround speaker (right)
6 To surround speaker (left)
A Antennas
Set up the AM loop antenna, then connect
it.
Extend the FM lead
antenna horizontally
AM loop antenna
C
D
6
435
Note
Keep the antennas away from the speaker cords,
the power cord and the USB cable to avoid
picking up noise.
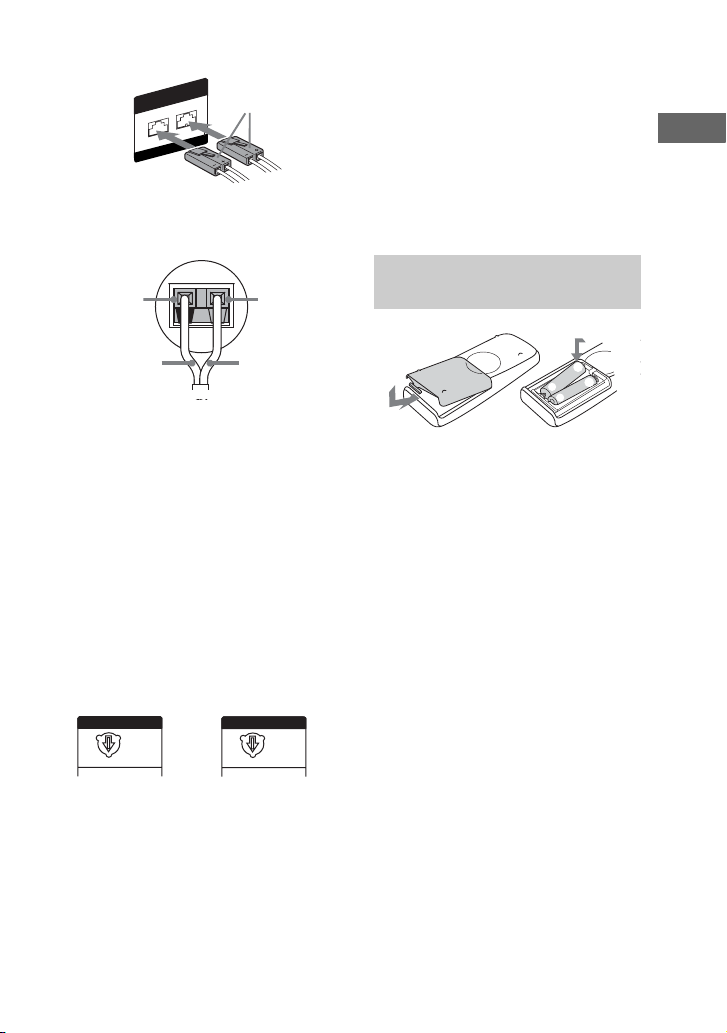
B Speakers
The speaker connectors are color-coded
with their respective speaker terminals on
the unit.
Front speakers
SPEAKER
R
Y FOR SS-ZUX9
ONL
FRONT
White
L
14
GB
Surround speakers
)
SURROUND
R
Y FOR SS-ZUX9
ONL
SPEAKER
Grey
L
Tip
Connect the speaker cords to the terminals on
the front and surround speakers.
Black (#)
Black (#)
1)
Front speakers only
2)
Surround speakers only
Red
Red (3)
1)
/Grey
2)
(3
Notes
• Be sure to use only the supplied speakers.
• Be sure to connect the speakers securely and
correctly. When connecting speaker cords,
insert the connector straight into the
terminals.
C VOLTAGE SELECTOR
For models equipped with a voltage
selector, set VOLTAGE SELECTOR to
the position of your local power line
voltage.
Depending on the model, the VOLTAGE
SELECTOR may differ.
Brazil model only Other models
VOLTAGE SELECTOR
220V
127V
220V
VOLTAGE SELECTOR
220V
120V
230-240V
D Power
Connect the power cord to a wall outlet.
The demonstration appears in the display.
When you press "/1, the system turns on
and the demonstration automatically
ends.
If the supplied adaptor on the plug does
not fit your wall outlet, detach it from the
plug (only for models equipped with an
adaptor).
Inserting two R6 (size AA)
batteries into the remote
e
E
E
e
Note
If you do not use the remote for a long period of
time, remove the batteries to avoid possible
damage from battery leakage and corrosion.
Tip
With normal use, the batteries should last for
about six months. When the remote no longer
operates the system, replace both batteries with
new ones.
Getting Started
GB
15
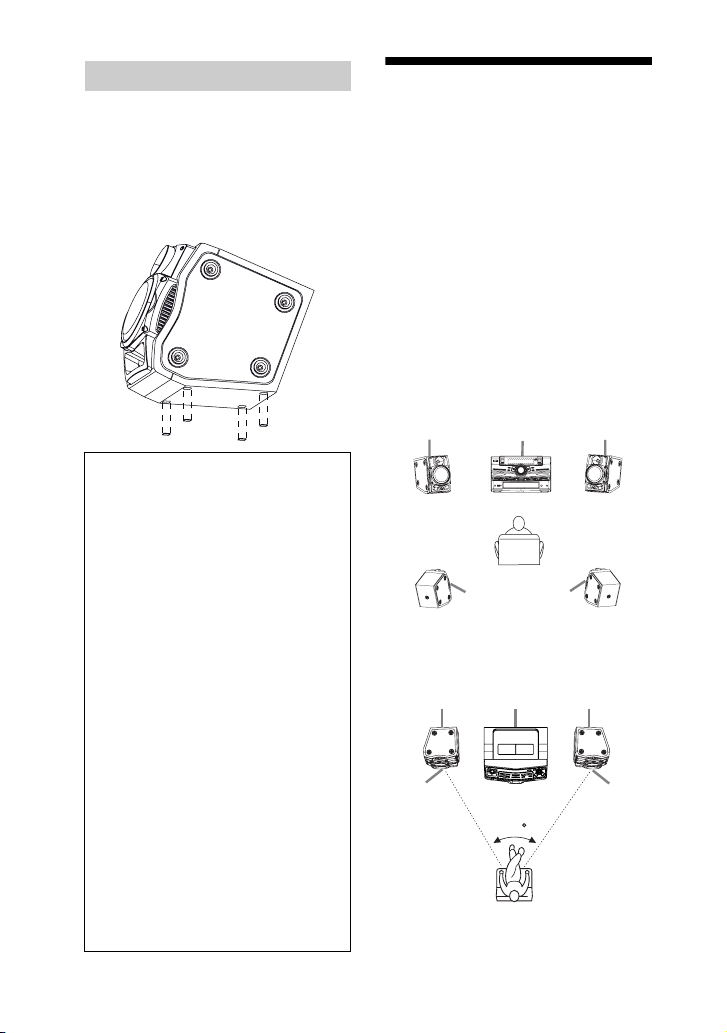
Attaching the speaker pads
AB
E
Attach the supplied speaker pads at each
corner on the bottom of the speakers to
stabilize the speakers and to prevent them
from slipping.
Example
Front speakers
When carrying the unit
Do the following procedure to protect
the disc mechanism.
Use the buttons on the unit for the
operation.
1 Press "/1 to turn on the system.
2 Press CD.
3 Press Z OPEN/CLOSE to open
the disc tray and remove the
disc. If there are more than one
disc in the disc tray, press
DISC SKIP/EX-CHANGE to
remove the discs.
4 Press Z OPEN/CLOSE again to
close the disc tray.
5 Hold down CD and then press
"/1 until “STANDBY” appears
in the display. Then, “MECHA
LOCK” appears in the display.
6 Release "/1 before you release
CD.
7 Unplug the AC power cord.
GB
16
Positioning the speakers
There are 2 ways to place front speakers
and the surround speakers.
To create a party environment, we
recommend that you place your speakers
as shown in example 1.
A Front speaker (left)
B Front speaker (right)
C Surround speaker (left)
D Surround speaker (right)
EUnit
Example 1:
Place the speakers at an equal distance
from your listening position as shown
below.
E
Listener
C
Example 2:
Place the surround speakers on the top of
the front speakers as shown below.
C
AB
D
D
45
Listener

Setting the clock
Use buttons on the remote for the
operation.
1 Press "/1 to turn on the system.
2 Press CLOCK/TIMER SET.
The hour indication flashes in the
display.
If “PLAY SET?” flashes in the
display, press . or > repeatedly
to select “CLOCK SET?”, then press
ENTER.
3 Press . or > repeatedly to
set the hour.
4 Press ENTER.
The minute indication flashes in the
display.
5 Press . or > repeatedly to
set the minute.
6 Press ENTER.
The clock starts functioning.
Note
The clock settings are canceled when you
disconnect the power cord or if a power failure
occurs.
Getting Started
17
GB
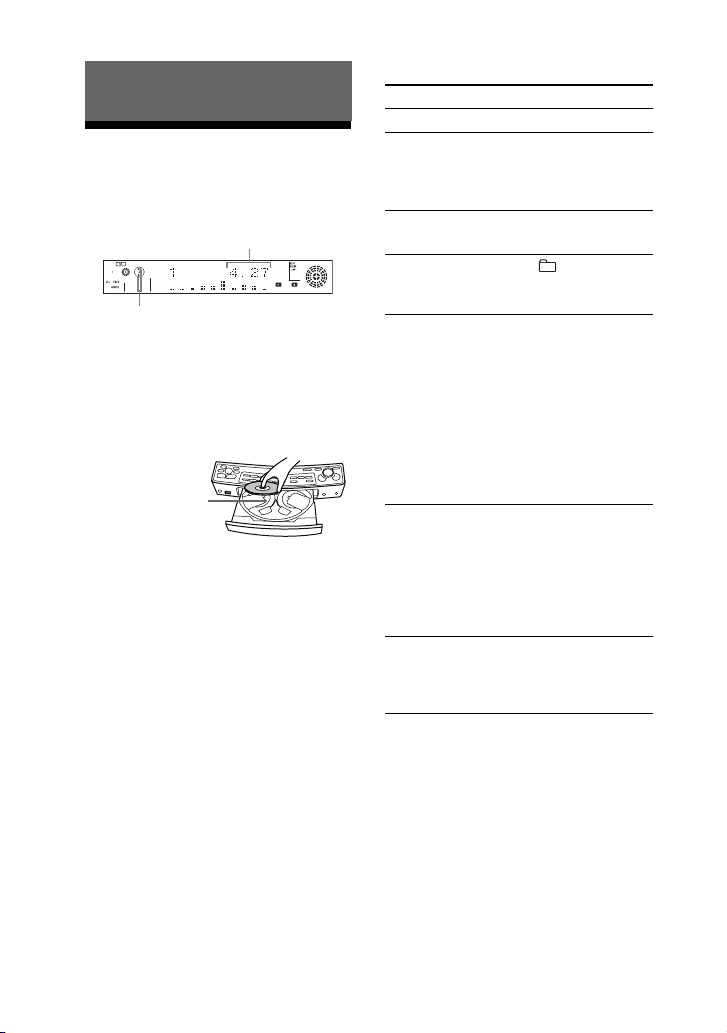
Disc
Playing an AUDIO CD/ MP3 disc
Example: When playing an AUDIO CD
Elapsed playing time
Disc playing indicator
1 Press CD.
2 Press Z OPEN/CLOSE.
3 Load a disc with the label side
facing up on the disc tray.
When you play
back an 8 cm
disc such as a
CD single, place
it on the inner
circle of the tray
To load additional discs, press
DISC SKIP/EX-CHANGE to rotate
the disc tray.
4 Press Z OPEN/CLOSE to close
the disc tray.
Do not forcibly push the disc tray to
close it as this may cause a
malfunction.
5 Press NX (or N on the
remote).
6 Turn MASTER VOLUME
(or press VOLUME +/– on the
remote) to adjust the volume.
Other operations
To Do this
Stop playback Press x.
Pause playback Press NX (or X on the
Select the next or
previous track
Select the next or
previous folder on
an MP3 disc
Search for a track
on an MP3 disc by
its folder name and
track name and
start playback the
track (TRACK
SEARCH)
Search for a
track on an
AUDIO CD by
its track number
and start playback
the track (TRACK
SEARCH)
Find a point in a
track*
remote). To resume
playback, press NX (or
X on the remote) again.
Press . or >.
Press +/–.
1 Turn OPERATION
DIAL to select the
folder you want, then
press ENTER.
2 Turn OPERATION
DIAL to select the
track you want, then
press ENTER.
To return to the parent
folder, press RETURN.
Turn OPERATION
DIAL to select the track
you want, then press
ENTER.
Hold down m or M
on the remote during
playback, then release it
at the point you want.
18
GB
 Loading...