

Page 1

3-860-253-12 (1)
Digital Camcorder
Operating Instructions
Before operating the unit, please read this manual thoroughly,
and retain it for future reference.
Mode d’emploi
Avant d’utiliser cet appareil, lisez attentivement ce mode
d’emploi et conservez-le pour toute référence ultérieure.
Owner‘s Record
The model and serial numbers are located on the bottom. Record the
serial number in the space provided below. Refer to these numbers
whenever you call upon your Sony dealer regarding this product.
Model No. DSR-PD1 Serial No.
DSR-PD1
©1997 by Sony Corporation
Page 2

English
WARNING
To prevent fire or shock hazard, do
not expose the unit to rain or
moisture.
This symbol is intended to alert the
user to the presence of uninsulated
“dangerous voltage” within the
product’s enclosure that may be of
sufficient magnitude to constitute a
risk of electric shock to persons.
This symbol is intended to alert the
user to the presence of important
operating and maintenance
(servicing) instructions in the
literature accompanying the
appliance.
— Reorient or relocate the receiving antenna.
— Increase the separation between the equipment and
receiver.
— Connect the equipment into an outlet on a circuit
different from that to which the receiver is connected.
— Consult the dealer or an experienced radio/TV
technician for help.
For the customers in CANADA
CAUTION
TO PREVENT ELECTRIC SHOCK, DO NOT USE THIS
POLARIZED AC PLUG WITH AN EXTENSION CORD,
RECEPTACLE OR OTHER OUTLET UNLESS THE
BLADES CAN BE FULLY INSERTED TO PREVENT
BLADE EXPOSURE.
For the customers in the U.S.A.
CAUTION
You are cautioned that any changes or modifications not
expressly approved in this manual could void your
authority to operate this equipment.
Note:
This equipment has been tested and found to comply
with the limits for a Class B digital device, pursuant to
Part 15 of the FCC Rules. These limits are designed to
provide reasonable protection against harmful
interference in a residential installation. This equipment
generates, uses, and can radiate radio frequency energy
and, if not installed and used in accordance with the
instructions, may cause harmful interference to radio
communications. However, there is no guarantee that
interference will not occur in a particular installation. If
this equipment does cause harmful interference to radio
or television reception, which can be determined by
turning the equipment off and on, the user is
encouraged to try to correct the interference by one or
more of the following measures:
2
Français
AVERTISSEMENT
Pour éviter tout risque d’incendie ou de décharge
électrique, ne pas exposer cet appareil à la pluie ou à
l’humidité.
Pour éviter tout risque de décharge électrique, ne pas
ouvrir le coffret de cet appareil et ne confier son
entretien qu’à un personnel qualifié.
Pour les utilisateurs au Canada
ATTENTION
POUR PREVENIR LES CHOCS ELECTRIQUES, NE
PAS UTILISER CETTE FICHE POLARISEE AVEC UN
PROLONGATEUR, UNE PRISE DE COURANT OU
UNE AUTRE SORTIE DE COURANT, SAUF SI LES
LAMES PEUVENT ETRE INSEREES A FOND SANS EN
LAISSER AUCUNE PARTIE A DECOUVERT.
Page 3

Table of contents
Table des matières
Before you begin
Using this manual.................................................. 4
Checking supplied accessories ............................ 6
Identifying the parts.............................................. 7
Getting started
Charging and installing the battery pack ........ 17
Inserting a cassette .............................................. 21
Basic operations
Camera recording ................................................ 22
Using the zoom feature .................................... 25
Selecting the START/STOP mode ................. 26
Shooting with the LCD screen ........................ 27
Letting the subject monitor the shot ................. 29
Hints for better shooting .................................... 30
Playing back a tape.............................................. 32
Searching for the end of the picture.................. 35
Advanced operations
Using alternative power sources ....................... 36
Using the house current................................... 36
Changing the mode settings .............................. 39
—for camera recording—
Fade-in and fade-out ........................................... 42
Locking the exposure .......................................... 43
Photo recording ................................................... 44
Releasing the SteadyShot function.................... 46
Using the PROGRAM AE function................... 48
Focusing manually .............................................. 50
Adjusting the white balance .............................. 52
—for playing back/editing—
Connecting to a monitor ..................................... 54
Displaying recording data – data code function
.......................................................................... 55
Returning to a pre-registered position ............. 56
Locating the beginning of each scene ............... 57
Editing onto another tape................................... 58
Replacing recording on a tape – insert editing
.......................................................................... 61
Audio dubbing..................................................... 62
Additional Information
Charging the vanadium-lithium battery in the
camcorder .......................................................... 64
Resetting the date and time................................ 65
Compatibility of DVCAM and DV formats..... 67
Usable cassettes and playback modes .............. 71
Tips for using the battery pack .......................... 73
Maintenance information and precautions...... 78
Using your camcorder abroad ........................... 83
Trouble check ....................................................... 84
Specifications........................................................ 92
Warning indicators.............................................. 94
Index ...................................................................... 95
Avant de commencer
Utilisation de ce mode d’emploi ......................... 4
Vérification des accessoires fournis .................... 6
Nomenclature......................................................... 7
Préparatifs
Charge et installation de la batterie .................. 17
Insertion d’une cassette ...................................... 21
Opérations de base
Prise de vue ......................................................... 22
Utilisation du zoom .......................................... 25
Sélection du mode START/STOP .................. 26
Prise de vue à l’aide de l’écran LCD .............. 27
Contrôle de la prise de vue par le sujet ............ 29
Conseils pour une meilleure prise de vue ....... 30
Lecture d’une cassette ......................................... 32
Recherche de la fin d’un enregistrement ......... 35
Opérations avancées
Utilisation d’autres sources d’alimentation..... 36
Utilisation sur le secteur .................................. 36
Changement des réglages de mode .................. 39
—pour la prise de vue—
Fondus enchaînés ................................................ 42
Verrouillage de l’exposition ............................... 43
Enregistrement en mode photo ......................... 44
Mise hors service de la fonction STEADYSHOT
.......................................................................... 46
Utilisation de la fonction PROGRAM AE ........ 48
Mise au point manuelle ...................................... 50
Réglage de la balance des blancs....................... 52
—pour la lecture et le montage—
Raccordement à un moniteur ............................ 54
Affichage des données d’enregistrement
– Code de données........................................... 55
Pour revenir à un endroit prédéfini .................. 56
Localisation du début de chaque scène ............ 57
Montage sur une autre cassette ......................... 58
Remplacement d’un enregistrement sur une
cassette – montage par insertion .................... 61
Doublage audio.................................................... 62
Informations complémentaires
Charge de la batterie au vanadium-lithium
sur le camescope ............................................... 64
Réglage de la date et de l’heure......................... 65
Compatibilité entre les formats DVCAM et DV
.......................................................................... 67
Cassettes utilisables et modes de lecture ......... 71
Utilisation optimale de la batterie rechargeable
.......................................................................... 73
Entretien et précautions...................................... 78
Utilisation du camescope à l’étranger .............. 83
Dépannage ............................................................ 88
Spécifications........................................................ 93
Indicateurs d’avertissement ............................... 94
Index ............................................... Couverture dos
Before you begin / Avant de commencer
3
Page 4

Before you begin
Avant de commencer
Using this manual
As you read through this manual, buttons and
settings on the camcorder are shown in capital
letters.
e.g., Set the POWER switch to CAMCORDER.
As indicated with in the illustrations, you can
hear the beep sound to confirm your operation.
Note on TV color systems
TV color systems differ from country to country.
To view your recordings on a TV, you need an
NTSC system-based TV.
Precaution on copyright
Television programs, films, video tapes, and
other materials may be copyrighted.
Unauthorized recording of such materials may
be contrary to the provision of the copyright
laws.
Utilisation de ce
mode d’emploi
Dans le présent mode d’emploi, les touches et les
réglages sur le camescope sont indiqués en lettres
capitales.
Par ex. : Réglez le commutateur POWER sur
CAMCORDER.
Comme indiqué par dans les illustrations, un
signal sonore confirme chaque opération.
Remarque sur les systèmes
couleur de télévision
Les systèmes couleur diffèrent d’un pays à
l’autre.
Pour regarder vos enregistrements sur un
téléviseur, vous devez utiliser un téléviseur
fonctionnant suivant le système NTSC.
Remarque sur les droits
d’auteur
Les émissions télévisées, les films, les cassettes
vidéo et autres matériaux peuvent être protégés
par des droits d’auteur. L’enregistrement non
autorisé de tels matériaux peut être en infraction
avec la législation sur les droits d’auteur.
4
Page 5

Using this manual
Utilisation de ce mode d’emploi
Precautions on camcorder care
• The LCD screen and/or the color viewfinder
are manufactured using high-precision
technology. However, there may be some
tiny black points and/or bright points (red,
blue or green in color) that constantly
appear on the LCD screen and/or in the
viewfinder. These points are normal in the
manufacturing process and do not affect
the recorded picture in any way. Over
99.99% are operational for effective use.
• Do not let the camcorder get wet. Keep the
camcorder away from rain and sea water.
Letting the camcorder get wet may cause the
unit to malfunction, and sometimes this
malfunction cannot be repaired [a].
• Never leave the camcorder exposed to
temperatures above 140°F (60°C), such as in a
car parked in the sun or under direct sunlight
[b].
[a]
Précautions d’utilisation du
camescope
• L’écran LCD et/ou le viseur couleur sont le
produit d’une technologie de haute
précision. Cependant, de minuscules points
noirs et/ou lumineux (de couleur rouge,
bleue ou verte) peuvent apparaître
constamment sur l’écran LCD et/ou dans le
viseur couleur. Ces points sont normaux et
n’affectent pas l’image enregistrée. Plus de
99,99% des points sont opérationnels.
• Evitez de mouiller le camescope. Protégez le
camescope de la pluie et de l’eau de mer. L’eau
peut en effet provoquer une défaillance de
l’appareil, qu’il sera peut-être impossible de
réparer [a].
• N’exposez jamais le camescope à des
températures supérieures à 140°F (60°C), par
exemple dans une voiture garée au soleil ou en
le laissant en plein soleil [b].
[b]
Before you begin / Avant de commencer
DISPOSAL OF LITHIUM ION BATTERY.
LITHIUM ION BATTERY.
DISPOSE OF PROPERLY.
You can return your unwanted lithium ion batteries to
your nearest Sony Service Center or Factory Service
Center.
Note: In some areas the disposal of lithium ion batteries
in household or business trash may be prohibited.
For the Sony Service Center nearest you call
1-800-222-SONY (United States only).
For the SONY Factory Service Center nearest you call
416-499-SONY (Canada only).
Caution: Do not handle damaged or leaking lithium ion
batteries.
DEPOT DES BATTERIES AU LITHIUMION
DEPOSEZ LES BATTERIES AU LITHIUMION AUX ENDROITS RECOMMANDES.
Vous pouvez rapporter les batteries au lithium-ion dans
un centre de Service Sony ou dans un point de
ramassage.
Remarque: Dans certain pays, il est interdit de jeter les
batteries au lithium-ion avec les ordures
ménagères ou dans les poubelles de bureau.
Pour connaître le centre de Service Sony le plus proche
de chez vous, composez le 1-800-222-SONY (Etats-Unis
uniquement)
Pour connaître le point de ramassage le plus proche de
chez vous, composez le 416-499-SONY (Canada
uniquement)
Avertissement: Ne pas utiliser des batteries au lithium-
ion qui sont endommagées ou qui
fuient.
5
Page 6

Checking supplied
accessories
Vérification des
accessoires fournis
Check that the following accessories are supplied
with your camcorder.
13
2
Vérifiez si les accessoires suivants vous ont été
fournis avec le camescope.
4
1 Wireless Remote Commander (1) (p. 11)
2 Size AA (R6) battery for Remote
Commander (2) (p. 12)
3 S video connecting cable (1) (p. 54, 59)
4 A/V connecting cable (1) (p. 54, 59)
Contents of the recording cannot be
compensated if recording or playback is not
made due to a malfunction of the camcorder,
video tape, etc.
1 Télécommande sans fil (1) (p. 11)
2 Piles AA (R6) pour la télécommande (2)
(p.12)
3 Câble S-vidéo (1) (p. 54, 59)
4 Câble de liaison A/V (1) (p. 54, 59)
Aucun dédommagement ne pourra être
accordé si l’enregistrement ou la lecture ont été
impossibles suite à un mauvais
fonctionnement du camescope ou de la
cassette.
6
Page 7

6
Identifying the parts
1
2
Nomenclature
7
8
Before you begin / Avant de commencer
9
!º
3
4
5
1 Lens cap (p. 22)
2 LCD screen (p. 27)
3 START/STOP MODE switch (p. 26)
Set to select the mode of the START/STOP
button.
4 CHARGE lamp (p. 17, 37)
Lights while charging the battery pack
installed in the camcorder.
5 Battery mounting surface (p. 20)
6 AE LOCK button (p. 43)
7 Built-in microphone
8 Accessory shoe
9 Eyecup (p. 31)
!¡
!™
!£
1 Capuchon d’objectif (p. 22)
2 Ecran LCD (p. 27)
3 Commutateur de mode marche/arrêt
(START/STOP MODE) (p. 26)
Sert à sélectionner la fonction de la touche
START/STOP.
4 Témoin de charge (CHARGE) (p. 17, 37)
Il s’allume pendant la charge de la batterie
installée dans le camescope.
5 Surface de montage de la batterie (p .20)
6 Touche de verrouillage d’exposition
automatique (AE LOCK) (p. 43)
7 Microphone intégré
8 Griffe porte-accessoire
0 Viewfinder (p. 15)
!¡ POWER switch (p. 22, 32)
!™ Video controls buttons (p. 32)
p STOP (stop)
0 REW (rewind)
· PLAY (playback)
) FF (fastforward)
P PAUSE (pause)
!£ FADER button (p. 42)
9 Oculaire du viseur (p. 31)
!º Viseur (p. 15)
!¡ Commutateur d’alimentation (POWER)
(p. 22, 32)
!™ Touches de commande vidéo (p. 32)
p STOP (arrêt)
0 REW (rembobinage)
· PLAY (lecture)
) FF (avance rapide)
P PAUSE (pause)
!£ Touche de fondu (FADER) (p. 42)
7
Page 8

Identifying the parts
!¢
!∞
!§
Nomenclature
!¶
!•
!¢ Cassette compartment (p. 21)
!∞ 6 EJECT button (p. 21)
Press to eject the cassette.
!§ Cassette compartment lid (p. 21)
!¶ Grip strap (p. 30)
!• RESET button (p. 84)
Press using a sharp-pointed object if the
camcorder does not operate after the power
is turned on.
!¢ Logement de la cassette (p. 21)
!∞ Touche d’éjection (6 EJECT) (p. 21)
Appuyez dessus pour éjecter la cassette.
!§ Couvercle du logement de la cassette
(p. 21)
!¶ Sangle (p. 30)
!• Touche de réinitialisation (RESET) (p. 84)
Appuyez sur cette touche avec un objet
pointu si le camescope ne fonctionne pas
après la mise sous tension.
8
Page 9

@
Identifying the parts
Nomenclature
§
!ª
@º
@¡
@™
@£
@¢
@∞
!ª LCD BRIGHT button (p. 27, 32)
@º VOLUME button (p. 32)
Press to adjust the volume of the headphones
or built-in speaker.
@¡ Speaker
@™ DISPLAY button (p. 32)
@£ 26-pin connector (p. 36)
@¢ S VIDEO jack (p. 54, 59)
@∞ AUDIO VIDEO OUT/2 (headphones) jack
(p. 33, 54, 59)
@§ END SEARCH button (p. 35)
Press to search for the end of the recorded
picture.
@¶ MENU button (p. 39)
@• V/v buttons (p. 39)
@ª START/STOP button (p. 22)
#º EXECUTE button (p. 39)
#¡ BATT(battery) LOCK/RELEASE switch (p. 20)
Slide to hold or release the battery pack.
#™ Tripod receptacle (p. 31)
Make sure that the length of the tripod screw
is less than 9/32 inch (6.5 mm). Otherwise,
you cannot attach the tripod securely and the
screw may damage the camcorder.
@¶
@•
@ª
#º
#¡
#™
!ª Touche de réglage de luminosité du LCD
(LCD BRIGHT) (p. 27, 32)
@º Touche de réglage du volume (VOLUME)
(p. 32)
Appuyez sur cette touche pour ajuster le
volume du casque ou du haut-parleur du
camescope.
@¡ Haut-parleur
@™ Touche d’affichage des indicateurs
(DISPLAY) (p. 32)
@£ Connecteur à 26 broches (p. 36)
@¢ Prise S vidéo (S VIDEO) (p. 54, 59)
@∞ Prise de sortie audio vidéo (AUDIO VIDEO
OUT) / 2 (casque d’écoute) (p. 33, 54, 59)
@§ Touche de recherche de fin
d’enregistrement (END SEARCH) (p. 35)
Appuyez sur cette touche pour localiser la fin
d’un enregistrement.
@¶
Touche d’affichage du menu (MENU)
@• Touches V/v (p. 39)
@ª
Touche de marche/arrêt (START/STOP)
#º Touche de validation (EXECUTE) (p. 39)
#¡ Commutateur de libération de la batterie
(BATT LOCK/RELEASE) (p. 20)
Poussez-le pour bloquer ou débloquer la
batterie.
#™ Douille de trépied (p. 31)
Assurez-vous que la longueur de la vis du
trépied est inférieure à 9/32 pouce (6,5 mm),
sinon le trépied ne pourra pas être fixé
correctement ou la vis risque d’endommager
le camescope.
(p. 39)
(p. 22)
Before you begin / Avant de commencer
9
Page 10

Identifying the parts
#£
#¢
Nomenclature
#§
#¶
#∞
#£ Viewfinder lens adjustment dial (p. 23)
#¢ Zoom switch (p. 25)
#∞ FOCUS/(INFINITY) button (p. 51)
#§ Focus ring (p. 51)
#¶ Lens
#• Recording lamp (p. 22)
#ª Remote sensor
Aim the Remote Commander here for remote
control.
$º DV IN/OUT jack (p. 58)
Connect DV products using the DV
connecting cable.
#•
#ª
$º
#£ Molette de réglage de l’oculaire (p. 23)
#¢ Commutateur de zoom (p. 25)
#∞ Touche de mise au point manuelle/Infini
(FOCUS (INFINITY)) (p. 51)
#§ Bague de mise au point (p. 51)
#¶ Objectif
#• Témoin d’enregistrement (p. 22)
#ª Capteur de télécommande
Dirigez la télécommande vers ce capteur
pour la commande à distance.
$º Prise d’entrée/sortie DV (DV IN/OUT)
(p. 58)
Branchez un appareil DV sur cette prise en
utilisant un câble de liaison DV.
10
Page 11
Identifying the parts
Nomenclature
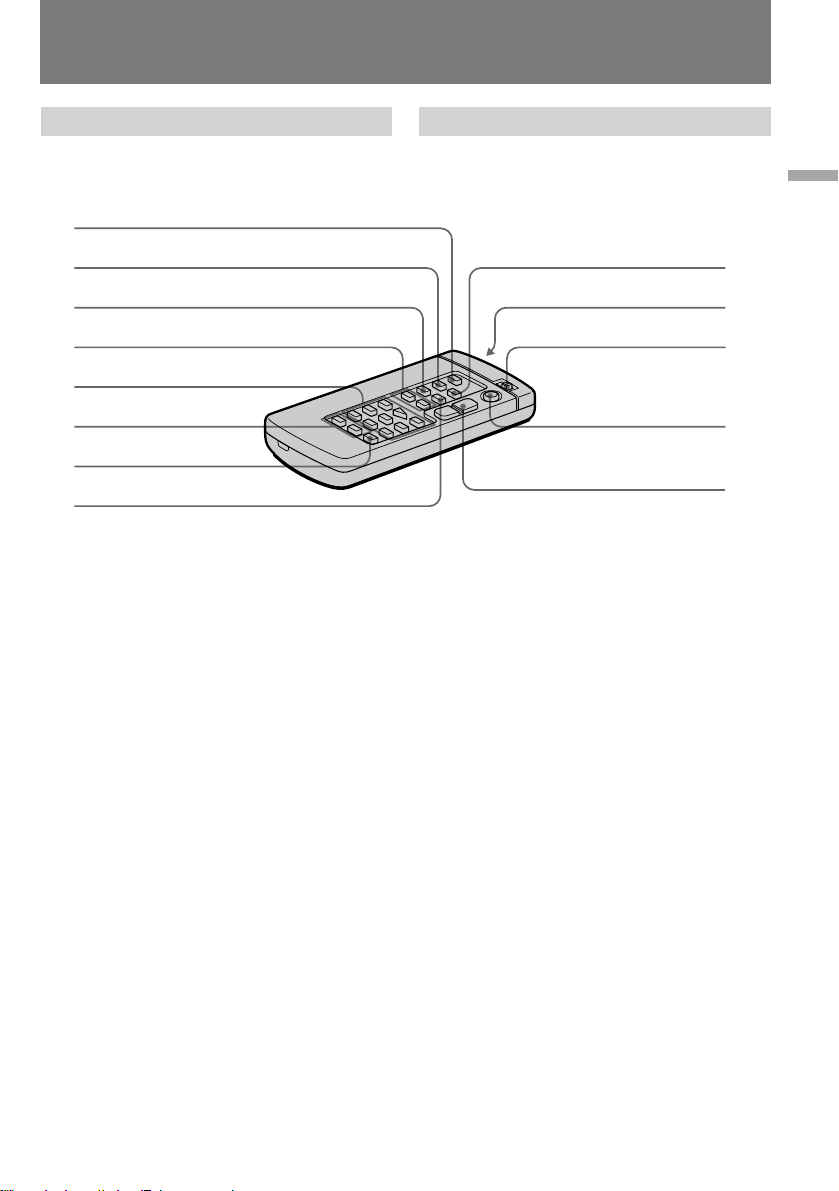
Remote Commander
The buttons that have the same name on the
Remote Commander as on the camcorder
function identically.
1
2
3
4
5
6
7
8
1 PHOTO button (p. 44)
2 DISPLAY button (p. 32)
3 SEARCH MODE button (p. 57)
Press to select date search or photo search.
4 =/+ buttons (p. 57)
5 Video controls buttons (p. 32)
6 Recording buttons (p. 61)
7 AUDIO DUB button (p.63)
8 DATA CODE button (p. 55)
9 ZERO SET MEMORY button (p. 56)
0 Transmitter
Point toward the remote sensor to control the
camcorder after turning on the camcorder.
!¡ VTR4/ID/VTR2 selector (p. 13)
Select VTR4 or ID, the same setting as
COMMANDER in the menu system. Select
VTR2 when using with 8mm camcorder.
!™ START/STOP button (p. 22)
!£ Power zoom button (p. 25)
Télécommande
Les touches de la télécommande et du camescope
qui portent le même nom remplissent les mêmes
fonctions.
9
!º
!¡
!™
!£
1 Touche d'enregistrement de photo
(PHOTO) (p. 44)
2 Touche d'affichage des indicateurs
(DISPLAY) (p. 32)
3 Touche de mode de recherche (SEARCH
MODE) (p. 57)
Appuyez dessus pour sélectionner la
recherche de date ou la recherche de
photographie.
4 Touches =/+ (p. 57)
5 Touches de commande vidéo (p. 32)
6 Touches d’enregistrement (p. 61)
7
Touche de doublage audio (AUDIO DUB)
8 Touche d'enregistrement de code (DATA
CODE) (p. 55)
9 Touche de mémorisation du point zéro
(ZERO SET MEMORY) (p. 56)
0 Emetteur
Dirigez l’émetteur vers le capteur pour faire
fonctionner le camescope après l’avoir mis
sous tension.
!¡ Sélecteur VTR4/ID/VTR2 (p. 13)
Sélectionnez VTR4 ou ID, le même réglage
que celui du paramètre COMMANDER dans
le menu. Sélectionnez VTR2 pour utiliser un
camescope 8mm.
!™
Touche de marche/arrêt (START/STOP)
(p. 22)
!£ Touche de zoom (p. 25)
(p. 63)
Before you begin / Avant de commencer
11
Page 12

Identifying the parts
Nomenclature
To prepare the Remote Commander
Insert two size AA (R6) batteries by matching the
+ and – on the batteries to the diagram inside the
battery compartment.
Note on battery life
The batteries for the Remote Commander last
about 6 months under normal operation. When
the batteries become weak or dead, the Remote
Commander does not work.
To avoid damage from possible battery
leakage
Remove the batteries when you will not use the
Remote Commander for a long time.
To use the Remote Commander
Make sure that the COMMANDER is set to VTR4
or ID in the menu system on the camcorder.
Préparation de la télécommande
Pour utiliser la télécommande, vous devez mettre
deux piles format AA (R6) en place, en faisant
correspondre les indications + et – des piles avec
celles du logement.
Remarque sur l’autonomie des piles
Les piles de la télécommande ont une autonomie
d’environ 6 mois dans des conditions
d’utilisation normales. La télécommande cesse de
fonctionner quand les piles sont faibles ou
épuisées.
Pour éviter les dommages dus à une fuite
éventuelle des piles
Retirez les piles si vous prévoyez de ne pas
utiliser la télécommande pendant une période
prolongée.
Utilisation de la télécommande
Assurez-vous que le mode COMMANDER est
réglé sur VTR4 ou ID dans le menu du
camescope.
12
MENU
COMMANDER
[MENU]:END
VTR4
OFF
ID
ID SET
Page 13

Identifying the parts
Nomenclature
About the ID of the Remote
Commander
You can avoid misoperation from other remote
commanders by setting the VTR4/ID/VTR2
selector to ID. Use the supplied Remote
Commander when you set the selector to ID.
When you use the Remote Commander for the
first time, register the ID following the procedure
below. Once you register the ID, you do not
need to do again.
(1) Open the LCD panel.
(2) Press MENU to display the menu on the LCD
screen.
(3) Press V or v to select COMMANDER, then
press EXECUTE.
(4) Press v to select ID SET.
(5) Set the VTR4/ID/VTR2 selector on the
Remote Commander to ID.
(6) Point the Remote Commander at the
camcorder and press p STOP on the Remote
Commander.
After the beep sound, the ID of the Remote
Commander is registered, and the
COMMANDER is set to ID in the menu
system.
(7) Press MENU to erase the menu display.
A propos du numéro ID de la
télécommande
Vous pouvez éviter les interférences d’autres
télécommandes en réglant le sélecteur VTR4/ID/
VTR2 sur ID. Lorsque vous réglez le sélecteur sur
ID, utilisez la télécommande fournie. Si vous
utilisez la télécommande pour la première fois,
enregistrez l’ID de la façon suivante. Il suffit
d’enregistrer une fois l’ID.
(1) Ouvrez l’écran LCD.
(2) Appuyez sur MENU pour afficher le menu
sur l’écran LCD.
(3) Appuyez sur V ou v pour sélectionner
COMMANDER, puis appuyez sur
EXECUTE.
(4) Appuyez sur v pour sélectionner ID SET.
(5) Réglez le sélecteur VTR4/ID/VTR2 de la
télécommande sur ID.
(6) Dirigez la télécommande vers le camescope
et appuyez sur la touche p STOP de la
télécommande.
Après le signal sonore, l’ID de la
télécommande est enregistré et l’option
COMMANDER est réglée sur ID dans le
menu.
(7) Appuyez sur MENU pour faire disparaître le
menu.
MENU
2
Before you begin / Avant de commencer
STOP
6
5
When the BEEP is set to OFF in the menu
system
The beep does not sound at step 6.
ID
VTR 2VTR 4
1
3,
4
EXECUTE
MENU
7
Si l’option BEEP est sur réglée OFF dans le
menu
Le signal sonore ne retentit pas à l’étape 6.
13
Page 14

Identifying the parts
Nomenclature
Remote control direction
Aim the Remote Commander to the remote
sensor.
The operative range of the Remote Commander
is about 16.4 feet (5 m) indoors. Depending on
the angle, Remote Commander may not activate
the camcorder.
Notes on the Remote Commander
• Keep the remote sensor away from strong light
sources such as direct sunlight or illumination.
Otherwise, the remote control may not be
effective.
• Be sure that there is no obstacle between the
remote sensor on the camcorder and the
Remote Commander.
• This camcorder works at commander mode
VTR4 or ID. The commander modes (VTR4 or
ID) are used to distinguish this camcorder
from other Sony VCRs to avoid remote control
misoperation. If you use another Sony VCR at
commander mode ID, we recommend you
change the commander mode or cover the
remote sensor of the VCR with black paper.
• You do not need to register the ID again once
you have done so. Set the COMMANDER to
ID in the menu system, and set the VTR4/ID/
VTR2 selector ID on the Remote Commander
to ID.
• The registered ID is not erased even if the
built-in rechageable vanadium-lithium battery
gets discharged.
Orientation de la télécommande
Dirigez la télécommande vers le capteur de
télécommande.
La portée de la télécommande est d’environ 16,4
pieds (5 m) en intérieur. Selon l’angle
d’incidence, il se peut que la télécommande
n’active pas le camescope.
A propos de la télécommande
• Eloignez le capteur de télécommande de toute
source de lumière intense, telle que la lumière
directe du soleil ou un éclairage puissant,
sinon la télécommande ne fonctionnera pas
correctement.
• Assurez-vous qu’il n’y a aucun obstacle entre
le capteur de télécommande et la
télécommande.
• Ce camescope fonctionne en mode de
télécommande VTR4 ou ID. Les modes de
télécommande (VTR4 ou ID) servent à
distinguer le camescope des autres
magnétoscopes Sony afin d’éviter une
interférence des signaux de commande. Si
vous utilisez un autre magnétoscope Sony en
mode ID, nous vous recommandons de
changer de mode ou de couvrir de papier noir
le capteur de télécommande du magnétoscope.
• Vous n’avez pas besoin de réenregistrer l’ID si
vous l’avez déjà fait. Réglez COMMANDER
sur ID dans le menu et le sélecteur VTR4/ID/
VTR2 de la télécommande sur ID.
• L’ID enregistré n’est pas effacé même lorsque
la batterie au vanadium-lithium est déchargée.
14
Page 15

Identifying the parts
Nomenclature
Operation indicators
1
2
3
4
T
5
6
AE LOCK
FADER
W
VOL
7
8
9
1 Manual focus/Infinity indicator (p. 51)
2 PROGRAM AE indicator (p. 48)
3 White balance indicator (p. 52)
4 SteadyShot indicator (p. 46)
5 AE LOCK indicator (p. 43)
6 FADER indicator (p. 42)
7 Zoom indicator (p. 25)
8 BRT (bright) indicator (p. 27)/VOL (volume)
indicator (p. 32)
9 Warning indicator (p. 94)
0 Mirror mode indicator (p. 29)
Indicateurs de fonctionnement
!º
!¡
!™
!£
DV
STBY
0:13:46:05
26min
PHOTO
48k
!¢
!∞
!§
40min
DV IN
!¶
!•
1 Indicateur de mise au point manuelle/
infini (p. 51)
2 Indicateur d'exposition automatique
(p. 48)
3 Indicateur de balance des blancs (p. 52)
4 Indicateur de stabilisation de prise de la
vue (p. 46)
5 Indicateur de verrouillage d'exposition
(p. 43)
6 Indicateur de fondu (p. 42)
7 Indicateur de zoom (p. 25)
8 Indicateur de luminosité (p. 27)/Indicateur
de volume (p. 32)
Before you begin / Avant de commencer
Continued to the next page
9 Indicateur d’avertissement (p. 94)
0 Indicateur de mode miroir (p. 29)
Voir page suivante
15
Page 16

Identifying the parts
Nomenclature
!¡ DV indicator (p. 33)
Lights up when playing a DV-formatted
tape.
!™ Recording standby mode indicator (p. 22)/
Tape transport mode indicator
!£ Time code indicator (p. 24)
!¢ Remaining tape indicator (p. 24)
!∞ Audio mode indicator (p. 71)
!§ Photo recording indicator (p. 44)/Electronic
flash indicator
!¶ DV IN indicator (p. 58)
!• Remaining battery indicator (p. 73)/
Remaining time in minutes indicator
!¡ Indicateur de lecture de cassette DV (p. 33)
Il s’allume quand une cassette formatée dans
le système DV est reproduite.
!™ Indicateur de mode d'attente
d’enregistrement (p. 22)/Indicateur de
mode de transport de la bande
!£ Code de temps (p. 24)
!¢ Indicateur de longueur de bande restante
(p. 24)
!∞ Indicateur de mode audio (p. 71)
!§ Témoin d’enregistrement de photo (p. 44)/
Indicateur de flash électronique
!¶ Indicateur d’enregistrement de cassette
DV (p. 58)
!• Indicateur de capacité restante de la
batterie (p. 73)/Indicateur de temps restant
en minutes
16
Page 17

Getting started
Préparatifs
Charging and installing
the battery pack
Before using your camcorder, you first need to
charge and install the battery pack. To charge
the battery pack, use the AC-V100 AC power
adaptor (not supplied).
This camcorder operates with the NP-F220/NPF200/NP-F100 “InfoLITHIUM” battery pack.
“InfoLITHIUM” is a trademark of Sony
Corporation.
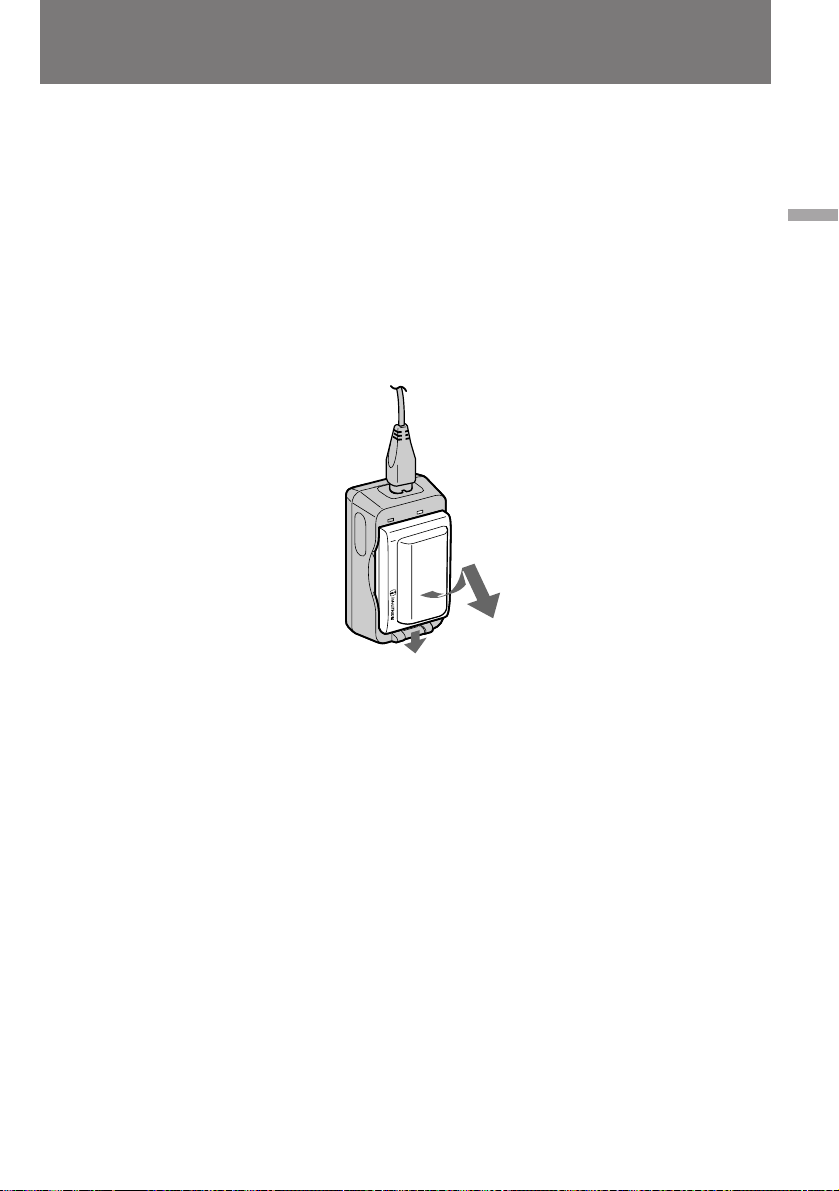
Charging the battery pack
(1) Connect the power cord to the AC power
adaptor.
(2) Fit the hooks of the battery pack to the AC
power adaptor. Then place the battery pack
down in the direction of the arrow.
(3) Connect the AC power cord to a wall outlet.
The CHARGE lamp (orange) lights up.
Charging begins.
When the CHARGE lamp goes out, normal
charge is completed (Normal charge). For a full
charge, which allows you to use the battery
longer than usual, leave the battery pack in place
for approximately one hour (Full charge).
Unplug the cord from the wall outlet, then
remove the battery pack and install it into the
camcorder. You can also use the battery pack
before it is completely charged.
Charge et installation de
la batterie
Avant d’utiliser votre camescope, vous devez
d’abord charger et installer la batterie. Servezvous de l’adaptateur secteur AC-V100 (non
fourni) pour charger la batterie.
Ce camescope fonctionne avec une batterie
“InfoLITHIUM” NP-F220/NP-F200/NP-F100.
“InfoLITHIUM” est une marque de fabrique de
Sony Corporation.
Charge de la batterie
(1) Branchez le cordon d’alimentation sur
l’adaptateur secteur.
(2) Mettez la batterie rechargeable dans
l’adaptateur en prenant soin d’emboîter les
crochets dans les orifices. Ensuite, insérez la
batterie dans l’adaptateur secteur dans le
sens de la flèche.
(3) Branchez le cordon d’alimentation secteur
sur une prise murale. Le témoin CHARGE
(orange) s’allume. La charge commence.
Lorsque le témoin CHARGE s’éteint, la charge
normale est terminée (charge normale). Pour
une charge complète, qui vous permet d’utiliser
la batterie plus longtemps, laissez la batterie en
place pendant environ une heure (charge
complète). Débranchez le cordon de la prise
murale, retirez la batterie et installez-la sur le
camescope. Vous pouvez utiliser la batterie avant
qu’elle soit complètement chargée.
Getting started / Préparatifs
1
2
3
CHARGE
17
Page 18

Charging and installing the
battery pack
Charge et installation de la
batterie
Charging time
Battery pack Charging time *
NP-F220/F200 170 (110)
NP-F100 130 (70)
Numbers in parentheses indicate the time for a
normal charge. (Normal charge)
* Approximate number of minutes to charge an
empty battery pack fully using the AC-V100
AC power adaptor. (Full charge) (Lower
temperatures require a longer charging time.)
Battery life
While using with viewfinder
Battery Continuous Typical
pack recording recording
NP-F220 120(110) 60 (55)
NP-F200 100 (85) 50 (45)
NP-F100 55 (45) 30 (25)
While using with LCD
Battery
pack recording
NP-F220 95 (85) 50 (45) 110 (100)
NP-F200 75 (70) 40 (35) 90 (80)
NP-F100 45 (40) 25 (20) 50 (45)
Numbers before the parentheses indicate the
time when you use a fully charged battery pack.
Numbers in parentheses indicate the time when
you use a normal charged battery pack.
When using both the viewfinder and the LCD
screen, the battery life is shorter.
When recording in a cold environment, the
battery life is shorter
** Approximate number of minutes to record at
normal temperature
*** Approximate number of minutes when
recording with repeated recording start/stop,
standby, zooming and turning the power on/
off. The actual battery life may be shorter.
time ** time ***
Continuous
Typical Playing
recording
time ** time ***
time
with LCD
Temps de charge
Batterie Temps de charge *
NP-F220/F200 170 (110)
NP-F100 130 (70)
Les chiffres entre parenthèses indiquent le temps
nécessaire pour une charge normale.
(Charge normale)
* Temps approximatif en minutes pour la charge
d’une batterie vide avec l’adaptateur secteur
AC-V100. (Charge complète) (A basse
température, la charge dure plus longtemps.)
Autonomie de la batterie
Quand le viseur est utilisé
Batterie
NP-F220
NP-F200
NP-F100
Temps
d’enregistrement
continu **
120 (110)
100 (85)
55 (45)
Quand le LCD est utilisé
Batterie
NP-F220
NP-F200
NP-F100
Temps
d’enregistrement
continu **
95 (85)
75 (70)
45 (40)
Temps
d’enregistrement
moyen ***
50 (45)
40 (35)
25 (20)
Les chiffres devant les parenthèses indiquent le
temps d’enregistrement quand vous utilisez une
batterie complètement rechargée.
Les chiffres entre parenthèses indiquent le temps
avec une batterie chargée normalement.
Lors de l’utilisation conjointe du viseur et de
l’écran LCD, l’autonomie de la batterie est
réduite.
Lors de la prise de vue dans un environnement
froid, l’autonomie de la batterie est plus courte.
** Temps approximatif en minutes
d’enregistrement à température normale.
*** Temps approximatif en minutes lors de
l’enregistrement avec marche/arrêt, mise en
attente, zooming et mise sous/hors tension
répétés. L’autonomie réelle de la batterie peut
être plus courte.
Temps
d’enregistrement
moyen ***
60 (55)
50 (45)
30 (25)
Temps de
lecture sur le
LCD
110(100)
90 (80)
50 (45)
18
Page 19
Charging and installing the
battery pack
Charge et installation de la
batterie
Note on remaining battery time indication
during recording
Remaining battery time is displayed on the LCD
screen or in the viewfinder. It may not be
displayed properly, however, depending on the
conditions and circumstances of use.
To remove the battery pack
While holding the battery pack firmly, press the
button on the AC power adpator and take out the
battery pack in the direction of the arrow.
Remarque sur l’indication de capacité de la
batterie en cours d’enregistrement
La capacité restante de la batterie est indiquée en
minutes sur l’écran LCD ou dans le viseur. Cette
indication peut ne pas être très exacte, cela
dépend des conditions d’utilisation et des
circonstances.
Pour enlever la batterie
Tout en maintenant fermement la batterie,
appuyez sur le bouton de l’adaptateur secteur
et sortez la batterie en tirant dans le sens de la
flèche.
Getting started / Préparatifs
When removing the battery pack
Be careful not to drop it.
Notes on charging the battery pack
• The CHARGE lamp will remain lit for a while
even if the battery pack is removed and the
power cord is unplugged after charging the
battery pack. This is normal.
• If the CHARGE lamp does not light,
disconnect the power cord. After about one
minute, reconnect the power cord again.
• You cannot charge the battery pack while
operating the camcorder using the AC power
adaptor.
• When a fully charged battery pack is installed,
the CHARGE lamp will light once, then go out.
Lorsque vous retirez la batterie
Veillez à ne pas la laisser tomber.
Remarques sur la charge de la batterie
• Le témoin CHARGE reste allumé pendant un
certain temps après que vous avez retiré la
batterie et débranché le cordon d’alimentation
lorsque la recharge est terminée. C’est normal.
• Si le témoin CHARGE ne s’allume pas,
débranchez le cordon d’alimentation. Au bout
d’une minute environ, rebranchez le cordon
d’alimentation.
• Vous ne pouvez pas charger la batterie
pendant que vous utilisez le camescope avec
l’adaptateur secteur.
• Lorsque vous installez une batterie
complètement chargée, le témoin CHARGE
s’allume une fois et puis s’éteint.
19
Page 20

Charging and installing the
battery pack
Charge et installation de la
batterie
Installing the battery pack
Make sure that the BATT LOCK/RELEASE
switch is set to RELEASE.
(1) Align the hooks of the battery pack with the
catches of the camcorder and place the
battery pack in place.
(2) Set the BATT LOCK/RELEASE switch to
LOCK.
1
2
To remove the battery pack
Follow the procedure above and in step 1,
remove the battery pack. When removing the
battery pack, be careful not to drop it.
Installation de la batterie
Assurez-vous que le commutateur BATT LOCK/
RELEASE est réglé sur RELEASE.
(1) Mettez la batterie rechargeable dans
l’adaptateur en prenant soin d’emboîter les
crochets dans les orifices.
(2) Réglez le commutateur BATT LOCK/
RELEASE sur LOCK
RELEASE
LOCK
Pour enlever la batterie
Procédez comme indiqué ci-dessus et à l’étape 1,
retirez la batterie. Veillez à ne pas laisser tomber
la batterie lorsque vous la retirez.
Note on BATT LOCK/RELEASE switch
Be sure that the BATT LOCK/RELEASE switch is
set to LOCK when the battery pack is installed.
Otherwise, it may drop out when you use the
camcorder.
To prevent malfunction
In the following cases, make sure that the
POWER switch is set to OFF first.
• Installing and removing the battery pack.
• Inserting and ejecting a cassette.
20
Remarque sur le commutateur BATT LOCK/
RELEASE
Assurez-vous que le commutateur BATT LOCK/
RELEASE est sur LOCK lorsque la batterie est en
place. Sinon, elle pourrait tomber lorsque vous
utiliserez le camescope.
Pour éviter tout dysfonctionnement
Veillez à mettre le commutateur POWER en
position OFF avant:
• L’installation et le retrait de la batterie
• L’introduction et l’éjection d’une cassette
Page 21
4
5
Inserting a cassette
Insertion d’une
cassette
You can use mini DVCAM cassette with
Make sure that the power source is installed.
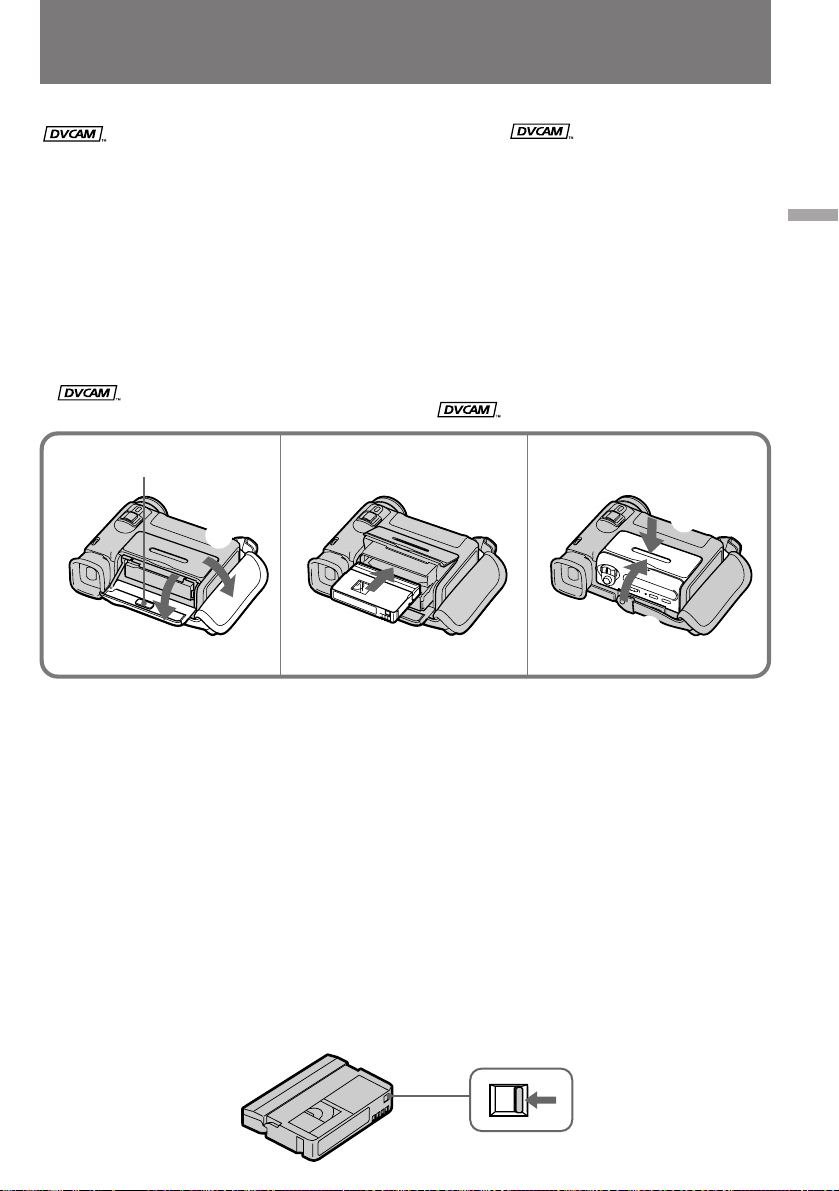
(1) Place the grip strap away from the lid of the
(2) Open the lid of the cassette compartment and
(3) Insert a cassette with the window facing out.
(4) Press the cassette compartment. The cassette
(5) Close the lid until it clicks.
* is a trademark.
logo* only.
cassette compartment to avoid damaging the
lid.
press 6 EJECT inside the lid. The cassette
compartment automatically lifts up and
opens.
compartment is automatically pulled down.
1, 2
6EJECT
3 4, 5
3
1
2
Vous pouvez utiliser une minicassette DVCAM
avec le logo * uniquement.
Assurez-vous que la source d’alimentation est
raccordée.
(1)
Ecartez la sangle du couvercle du logement
cassette pour éviter d’endommager le couvercle
(2) Ouvrez le couvercle du logement à cassette et
appuyez sur 6 EJECT à l’intérieur du
couvercle. Le logement à cassette s’élève et
s’ouvre automatiquement.
(3) Insérez une cassette avec la fenêtre orientée
vers l’extérieur.
(4) Appuyez sur le logement à cassette. Le
logement à cassette descend
automatiquement.
(5) Fermez le couvercle jusqu’au déclic.
* est une marque de fabrique.
à
.
Getting started / Préparatifs
Note
Before you close the lid of the cassette
compartment, make sure the cassette
compartment is completely pulled down.
To eject the cassette
Follow the procedure above and in step 3, take
out the cassette.
To prevent accidental erasure
Slide and open the tab on the cassette to expose
the red mark. If you insert the cassette with the
red mark exposed and close the cassette
compartment, the beeps sound for a while. If
you try to record with the red mark exposed, the
L and 6 indicators flash on the LCD screen or
in the viewfinder, and you cannot record on the
tape. To rerecord on this tape, slide and close the
tab to cover the red mark.
Remarque
Avant de refermer le couvercle du logement à
cassette, assurez-vous qu’il est complètement
rentré.
Pour éjecter la cassette
Procédez comme indiqué ci-dessus et à l’étape 3,
retirez la cassette.
Pour empêcher un effacement
accidentel
Faites glisser le taquet de la cassette de manière à
faire apparaître la marque rouge. Si vous insérez
une cassette et fermez le logement alors que le
repère rouge est visible, un signal sonore
retentira. Si vous essayez d’enregistrer alors que
la marque rouge est visible, les indicateurs L et
6 clignotent sur l’écran LCD ou dans le viseur et
vous ne pouvez pas enregistrer sur la cassette.
Pour réenregistrer sur une cassette protégée,
faites glisser le taquet de manière à couvrir la
marque rouge.
21
Page 22

Basic operations
Opérations de base
Camera recording
Make sure that the power source is installed and
a cassette is inserted. When you use the
camcorder for the first time, turn on it and reset
the date and time to your local date and time
before you start recording (p. 65).
Before you record one-time events, you may
want to make a trial recording to make sure that
the camcorder is working correctly.
(1) Remove the lens cap and hook it onto the
grip strap.
(2) While pressing the small green button on the
POWER switch, set it to CAMCORDER. The
camcorder is set to Standby mode.
(3) Slide START/STOP MODE to .
(4) Press START/STOP.
The camcorder starts recording. “REC”
appears in the viewfinder. The camera
recording lamp on the front of the camcorder
also lights up.
Do not press START/STOP strongly; if you
do, the switching tone will be recorded.
2
POWER
VTR
OFF
CAM
CORDER
PHOTO
STBY
0:00:00:00
40min
40min
Prises de vue
Vérifiez si une source d’alimentation est
raccordée et si une cassette a été introduite dans
le camescope. Si vous utilisez le camescope pour
la première fois, mettez-le sous tension et réglez
la date et l’heure avant de commencer à filmer
(p. 65).
Avant de filmer un événement important, faites
un essai pour voir si le camescope fonctionne
correctement.
(1) Enlevez le capuchon de l’objectif et attachez-
le à la sangle.
(2) Tout en appuyant sur le petit bouton vert du
commutateur POWER, réglez celui-ci sur
CAMCORDER. Le camescope passe en mode
d’attente.
(3) Réglez START/STOP MODE sur .
(4) Appuyez sur START/STOP.
L’enregistrement commence et l’indicateur
“REC” apparaît dans le viseur. Le témoin
d’enregistrement à l’avant du camescope
s’allume également.
N’appuyez pas trop fort sur START/STOP,
sinon, le bruit de commutation sera
enregistré.
1
4
POWER
VTR
OFF
CAM
CORDER
PHOTO
To stop recording momentarily [a]
Press START/STOP. The “STBY” indicator
appears in the viewfinder (Standby mode).
22
0:00:00:01
40min
40min
REC
3
START/STOP MODE
SEC
5
Pour interrompre momentanément
l’enregistrement [a]
Appuyez sur START/STOP. L’indicateur “STBY”
apparaît dans le viseur (mode d’attente).
Page 23

Camera recording Prises de vue
To finish recording [b]
Press START/STOP again to stop recording. Set
the POWER switch to OFF. Then, eject the
cassette and remove the battery pack.
[a]
POWER
VTR
OFF
CAM
CORDER
PHOTO
To focus the viewfinder lens
If you cannot see the indicators in the viewfinder
clearly, or after someone else has used the
camcorder, focus the viewfinder lens. Turn the
viewfinder lens adjustment dial so that the
indicators in the viewfinder come into sharp
focus.
STBY
0:35:20:00
4min
Pour terminer un enregistrement [b]
Appuyez à nouveau sur START/STOP pour
arrêter l’enregistrement. Réglez le commutateur
POWER sur OFF. Ejectez ensuite la cassette et
retirez la batterie.
[b]
POWER
VTR
OFF
CAM
CORDER
PHOTO
Mise au point de l’oculaire
Si vous ne voyez pas nettement les indicateurs
dans le viseur, ou si une autre personne a utilisé
le camescope avant vous, faites la mise au point
de l’oculaire. Tournez la molette de réglage de
l’oculaire jusqu’à ce que les indicateurs sont nets.
POWER
VTR
OFF
CAM
CORDER
PHOTO
Basic operations / Opérations de base
Note on Standby mode
If you leave the camcorder in Standby mode for 5
minutes while the cassette is inserted, the
camcorder turns off automatically. This prevents
wearing down the battery and wearing out the
tape. To resume Standby mode, while pressing
the small green button on the POWER switch, set
it to OFF once, and then to CAMCORDER. To
start recording, press START/STOP.
Remarque sur le mode d’attente
Si vous laissez le camescope pendant plus de 5
minutes en mode d’attente alors qu’une cassette
se trouve à l’intérieur, le camescope se met
automatiquement hors tension afin de prévenir la
décharge de la batterie et l’usure de la bande.
Pour revenir en mode d’attente, tout en appuyant
sur le petit bouton vert, réglez le commutateur
POWER sur OFF puis sur CAMCORDER. Pour
enregistrer, appuyez sur START/STOP.
23
Page 24

Camera recording Prises de vue
Note on recording
When you record from the beginning of a tape,
run the tape by recording for about 15 seconds
before you start the actual recording. This will
ensure that you won’t miss any start-up scenes
when you play back the tape.
Notes on the time code
• The time code indicates the recording or
playback time “0:00:00:00” (hours : minutes :
seconds : frames).
• Be sure not make a blank portion when
recording, because the time code will start
from “0:00:00:00” again. You cannot rewrite
the time code on the tape if there is a blank
portion between pictures.
Note on connecting an external microphone
You can record audio sound by connecting the
VMC-LM7 adaptor (not supplied) and an
external microphone. Connect the microphone to
the MIC jack of the VMC-LM7 adaptor. While
recording through an external microphone, the
built-in microphone of the camcorder does not
work.
Note on the beep sound
As indicated with in the illustrations, a beep
sounds when you turn the power on or when
you start recording, and two beeps sound when
you stop recording, confirming the operation.
Several beeps also sound as a warning of any
unusual condition of the camcorder.
Note that the beep sound is not recorded on the
tape. If you do not want to hear the beep sound,
select “OFF” in the menu system.
Note on remaining tape indicator
The indicator may not be displayed accurately
depending on the tape. Though the indicator
does not appear at the time of recording, it will
appear in a few seconds.
Remarque sur l’enregistrement
Quand vous enregistrez dequis le début d’une
cassette, faites défiler la bande en mode
d’enregistrement pendant 15 secondes environ
avant de commencer l’enregistrement
proprement dit. Vous ne manquerez pas le début
de la scène lors de la lecture.
A propos du code de temps
• Le code de temps indique le temps
d’enregistrement ou de lecture dans le format
“0:00:00:00” (heures : minutes : secondes :
images).
• Veillez à ne pas créer un blanc à
l’enregistrement, sinon le code de temps
redémarrera à partir de “0:00:00:00”. Vous ne
pouvez pas réinscrire le code de temps sur la
cassette s’il y a un passage blanc entre des
images.
Remarque sur la connexion d’un microphone
extérieur
Vous pouvez enregistrer le son en raccordant
l’adaptateur VMC-LM7 (non fourni) et un
microphone extérieur. Raccordez le microphone
à la prise MIC de l’adaptateur VMC-LM7. Lors
d’un enregistrement via un microphone
extérieur, le microphone intégré du camescope
ne fonctionne pas.
Remarque sur le signal sonore
Comme indiqué par le symbole dans les
illustrations, le camescope émet un signal sonore
chaque fois que vous le mettez sous tension ou
que vous commencez à enregistrer, et deux
signaux sonores quand vous arrêtez
l’enregistrement. Le camescope émet une série
de signaux pour vous avertir d’un problème.
Notez que les signaux sonores ne sont pas
enregistrés sur la cassette. Si vous voulez
désactiver cette fonction, sélectionnez “OFF”
dans le menu.
24
Remarque sur de l’indicateur de bande
restante
Il est possible que l’indicateur ne soit pas très
précis avec certaines cassettes. Bien que
l’indicateur n’apparaisse pas au moment de
l’enregistrement, il apparaîtra quelques secondes
plus tard.
Page 25

Camera recording Prises de vue
Using the zoom feature
Zooming is a recording technique that lets you
change the size of the subject in the scene.
For more professional-looking recordings, use
the zoom function sparingly.
“T” side: for telephoto (subject appears closer)
“W” side: for wide-angle (subject appears farther
away)
Zooming speed (Variable speed
zooming)
Press the power zoom switch a little for a
relatively slow zoom; press it still more for a
high-speed zoom. Zooming speed while the
camcorder is in the Standby mode is faster than
that in the recording mode making it easier to
compose the scene.
When you shoot a subject using a telephoto
zoom
If you cannot get a sharp focus while in extreme
telephoto zoom, press the “W” side of the power
zoom switch until the focus is sharp. You can
shoot a subject that is at least about 2 5/8 feet
(about 80 cm) away from the lens surface in the
telephoto position, or about 1/2 inch (about 1
cm) away in the wide-angle position.
Utilisation du zoom
Le zooming est une technique de prises de vue
qui permet de modifier la taille du sujet dans la
scène.
Pour réaliser des enregistrements vidéo d’aspect
professionnel, n’abusez pas du zoom.
Côté “T”: téléobjectif (le sujet se rapproche)
Côté “W”: grand angle (le sujet s’éboigne)
T
W
T
W
Vitesse de zooming (zoom à vitesse
variable)
Appuyez légèrement sur le commutateur de
zoom électrique pour effectuer un zooming
relativement lent; appuyez davantage pour
effectuer un zooming plus rapide. La vitesse du
zooming est plus élevée lorsque le camescope est
en mode d’attente que lorsqu’il est en mode
d’enregistrement, ce qui vous permet de cadrer
plus facilement une scène.
Prise de vue avec le zoom en position
téléobjectif
Si vous ne parvenez pas à obtenir une image
nette lorsque vous avez réglé le zoom en position
téléobjectif, appuyez sur le côté “W” du
commutateur zoom jusqu’à ce que l’image soit
nette. Vous pouvez filmer un sujet distant
d’environ 2 5/8 pieds (80 cm) de la surface de
l’objectif en position téléobjectif ou d’environ 1/2
pouce (1 cm) en position grand angle.
T
ZOOM
W
Basic operations / Opérations de base
25
Page 26

Camera recording Prises de vue
Notes on digital zoom
• More than 10x zoom is performed digitally if
you set the D ZOOM function to ON in the
menu system, and the picture quality
deteriorates as you go toward the “T” side.
• The horizontal bar in the power zoom
indicator separates the digital zooming zone
(the [a] zone) and the optical zooming zone
(the [b] zone). If you set the D ZOOM
function to OFF, the part above the bar
disappears.
[a]
[b]
T
W
Selecting the START/STOP mode
Your camcorder has two modes besides normal
start/stop mode. These modes enable you to take
a series of quick shots resulting in a lively video.
(1)Open the LCD panel.
(2) Set START/STOP MODE to the desired
mode.
: Recording starts when you press START/
STOP, and stops when you press it again
(normal mode).
: The camcorder records only while you press
down START/STOP so that you can avoid
recording unnecessary scenes.
5SEC: When you press START/STOP, the
camcorder records for 5 seconds and then
stops automatically.
(3) Press START/STOP. Recording starts.
If you selected 5SEC, the remaining tape
indicator disappears and five dots appear. The
dots disappear at a rate of one per second as
illustrated below.
2
A propos du zoom numérique
• Un grossissement supérieur à 10 est effectué
numériquement, si vous réglez la fonction D
ZOOM sur ON dans le menu, mais la qualité
de l’image se détériore quand vous allez vers
la position “T”.
• La barre horizontale dans l’indicateur de zoom
sépare la zone de zoom numérique (zone [a])
de la zone de zoom optique (zone [b]). Si vous
mettez la fonction D ZOOM sur OFF, la zone
au-dessus de la barre disparaît.
T
W
Sélection du mode START/STOP
Le camescope offre deux modes
d’enregistrement, outre le mode de marche/arrêt
normal. Ces modes vous permettent de prendre
une série de courtes scènes qui rendront vos
enregistrements plus vivants.
(1) Ouvrez l’écran LCD.
(2) Réglez START/STOP MODE sur le mode
souhaité.
: L’enregistrement commence quand vous
appuyez sur START/STOP et il s’arrête
quand vous appuyez de nouveau sur la
touche (mode normal).
:
Le camescope enregistre uniquement quand
vous appuyez sur START/STOP ce qui vous
permet d’éviter d’enregistrer des scènes
inutiles.
5SEC: Quand vous appuyez sur la touche START/
STOP, le camescope enregistre pendant 5
secondes puis s’arrête de lui-même
(3) Appuyez sur START/STOP.
L’enregistrement commence.
Si vous sélectionnez 5SEC, l’indicateur de bande
restante disparaît et cinq points apparaissent. Ces
points disparaissent un à un chaque seconde
quand vous filmez comme illustré ci-dessous.
START/STOP MODE
.
26
1
3
POWER
VTR
OFF
CAM
CORDER
SEC
5
PHOTO
REC
0:00:00:00
REC
0:00:04:00
Page 27

Camera recording Prises de vue
To extend the recording time in 5SEC
mode
Press START/STOP again before all the dots
disappear. Recording continues for about 5
seconds from the moment you press START/
STOP.
Notes on START/STOP mode
• If you have turned off the indicators on the
LCD screen, the dots do not appear.
• You cannot use FADER in 5SEC or mode.
Shooting with the LCD screen
You can also record the picture while looking at
the LCD screen.
When using the LCD screen, the viewfinder
screen turns off automatically. You cannot
monitor the sound from the speaker during
recording.
(1) Open the LCD panel.
(2) Adjust angle of the LCD panel
The LCD panel moves about 90 degrees to
this side and about 180 degrees to the other
side.
To adjust the brightness of the LCD screen,
press LCD BRIGHT.
+ side: to brighten the LCD screen
– side: to dim the LCD screen
The battery life is longer when the LCD panel is
closed. Use the viewfinder instead of the LCD
screen to save the battery power.
Pour prolonger l’enregistrement de 5
secondes
Appuyez de nouveau sur START/STOP avant
que tous les points disparaissent.
L’enregistrement se prolonge de 5 secondes à
compter du moment où vous appuyez sur la
touche START/STOP.
Remarques sur le mode START/STOP
• Si vous avez désactivé l’affichage des
indicateurs sur l’écran LCD, les points
n’apparaissent pas.
• Vous ne pouvez pas utiliser le fondu dans le
mode 5SEC ou .
Prise de vue à l’aide de l’écran
LCD
Vous pouvez enregistrer l’image tout en
regardant l’écran LCD.
Lorsque vous utilisez l’écran LCD, le viseur
s’éteint automatiquement. Vous ne pouvez pas
contrôler le son par le haut-parleur pendant
l’enregistrement.
(1) Ouvrez l’écran LCD.
(2) Ajustez l’angle de l’écran LCD
L’écran LCD tourne d’environ 90 degrés dans
un sens et d’environ 180 degrés dans l’autre.
Pour ajuster la luminosité de l’écran LCD,
appuyez sur LCD BRIGHT.
Côté +: pour éclaircir l’écran LCD
Côté –: pour assombrir l’écran LCD
L’autonomie de la batterie est plus longue
lorsque l’écran LCD est fermé. Utilisez le viseur
au lieu de l’écran LCD pour économiser l’énergie
de la batterie.
Basic operations / Opérations de base
1
2
180˚
LCD BRIGHT
90˚
27
Page 28

Camera recording Prises de vue
Notes on the LCD panel
• When closing the LCD panel, turn it vertically
until it clicks [a].
• When turning the LCD panel, turn it always
vertically; otherwise, the camcorder body may
be damaged or the LCD panel may not close
properly [b].
• Close the LCD panel completely when not in
use.
• You may find it difficult to view the LCD
screen due to glare when using the camcorder
outdoors.
[a]
Remarques sur l’écran LCD
• Lorsque vous refermez l’écran LCD, tournez-le
verticalement jusqu’au déclic [a].
• Lorsque vous tournez l’écran LCD, tournez-le
toujours en position verticale, sinon vous
risquez d’endommager le camescope, ou
l’écran LCD risque de ne pas se fermer
convenablement [b].
• Refermez complètement l’écran LCD lorsque
vous ne l’utilisez pas.
• Quand vous utilisez le camescope à l’extérieur,
vous ne verrez peut-être pas nettement l’image
sur l’écran LCD.
[b]
28
Page 29

Letting the subject
monitor the shot
Contrôle de la prise
de vue par le sujet
You can turn the LCD panel over so that it faces
the other way and you can let the subject monitor
the shot while shooting with the viewfinder.
Turn the LCD panel up vertically. When you
turn the LCD panel 180 degrees, the indicator
appears on the LCD screen (mirror mode) and
the time code and remaining tape indicators
disappear.
You can also use the Remote Commander.
To cancel mirror mode
Turn the LCD panel down toward the camcorder
body.
Notes on mirror mode
• Using the mirror mode, you can record
yourself while watching yourself on the LCD
screen.
• The picture on the LCD screen appears as a
mirror-image while recording in mirror mode.
Pr appears in Standby mode, and r during
recording. Other indicators appear as mirrorimage. Some indicators do not appear.
• While recording in mirror mode, you cannot
operate the following functions: MENU, ZERO
SET MEMORY on the Remote Commander.
Vous pouvez tourner l’écran LCD de façon à ce
qu’il soit orienté dans la direction opposée pour
permettre au sujet de contrôler la prise de vue
tandis que vous filmez en regardant dans le
viseur.
Tournez l’écran LCD pour le mettre à la verticale.
Quand l’écran est à 180°, l’indicateur apparaît
(mode miroir) et le code de temps et l’indicateur
de bande restante disparaissent.
Vous pouvez également utiliser la
télécommande.
Pour désactiver le mode miroir
Rabattez l’écran LCD contre le camescope.
Remarques sur le mode miroir
• Le mode miroir vous permet de vous filmer
tout en vous regardant sur l’écran LCD.
• L’image affichée sur l’écran LCD est inversée
lors d’un enregistrement en mode miroir.
L’indication Pr apparaît en mode d’attente et
r en cours d’enregistrement. D’autres
indicateurs sont inversés. Certains indicateurs
n’apparaissent pas.
• Pendant un enregistrement en mode miroir,
vous ne pouvez pas activer les fonctions
MENU et ZERO SET MEMORY avec la
télécommande.
Basic operations / Opérations de base
29
Page 30

Hints for better
shooting
Conseils pour une
meilleure prise de
vue
For hand-held shots, you will get better results
by holding the camcorder according to the
following suggestions:
• Hold the camcorder firmly and secure it with
the grip strap so that you can easily manipulate
the controls with your thumb. [a]
[a]
1
3
• Place your elbows against your side.
• Hold the camcorder with your left hand to
keep it steadier.
• Adjust the LCD panel angle.
• Keep your fingers away from the lens.
• Place your eye firmly against the viewfinder
eyecup.
• Be sure not to touch the built-in microphone.
• Be sure not to touch the FOCUS button by
accident.
• Use the LCD panel frame or the viewfinder
frame as a guide to determine the horizontal
plane.
• You can record in a low position to get an
interesting recording angle. Lift the LCD
panel up to record from a low position. [b]
• You can also record in a high position. Lift the
LCD panel down to record from a high
position. [c]
Pour les prises de vue à main levée, vous
obtiendrez de meilleurs résultats en tenant le
camescope selon les recommandations suivantes:
• Maintenez le camescope fermement et serrez la
sangle de façon à pouvoir actionner facilement
les commandes avec le pouce. [a]
2
• Placez les coudes le long du corps.
• Tenez le camescope de la main gauche pour un
soutien plus ferme.
• Réglez l’angle de l’écran LCD.
• Evitez de toucher l’objectif avec les doigts.
• Appliquez l’oeil contre l’oeilleton du viseur.
• Veillez à ne pas toucher le microphone intégré.
• Prenez garde à ne pas activer la touche
FOCUS.
• Utilisez le cadre de l’écran LCD comme guide
pour déterminer le plan horizontal.
• Vous pouvez aussi vous accroupir pour
obtenir un angle de prise de vue intéressant.
Relevez le panneau de l’écran LCD pour des
prises de vue à partir d’une position basse. [b]
• Vous pouvez également réaliser des prises de
vue depuis une position surélevée. Abaissez
dans ce cas l’écran LCD vers le bas pour des
prises de vue à partir d’une position surélevée.
[c]
30
[b]
[c]
Page 31

Hints for better shooting
[f]
Conseils pour une meilleure
prise de vue
Place the camcorder on a flat surface or use a
tripod
Try placing the camcorder on a table top or any
other flat surface of suitable height. If you have a
tripod for a still camera, you can also use it with
the camcorder. When attaching a non-Sony
tripod, make sure that the length of the tripod
screw is less than 9/32 inch (6.5 mm). Otherwise,
you cannot attach the tripod securely and the
screw may damage the inner parts of the
camcorder.
If you wear glasses
You can bend back the eyecup to get a better
view of viewfinder [d].
Cautions on the LCD panel and on the
viewfinder
• Do not pick up the camcorder by the
viewfinder or the LCD panel [e].
• Do not place the camcorder so as to point the
viewfinder or the LCD panel toward the sun.
The inside of the viewfinder or the LCD panel
may be damaged. Be careful when placing the
camcorder under sunlight or by a window [f].
• Do not point the lens toward the sun with a
close-up lens attached. Doing so may damage
the camcorder.
[d]
[e]
Posez le camescope sur une surface plane ou
utilisez un trépied
Essayez de poser le camescope sur une table ou
sur une surface plane à la hauteur adéquate. Si
vous disposez d’un trépied pour appareil photo,
vous pouvez également l’utiliser pour votre
camescope. Assurez-vous cependant que la
longueur de la vis du trépied ne dépasse pas 9/
32 pouce (6,5 mm), sinon le trépied ne pourra pas
être fixé correctement ou la vis risque
d’endommager le camescope.
Si vous portez des lunettes
Vous pouvez replier l’oeilleton de façon à mieux
voir l’image dans le viseur [d].
Précautions concernant l’écran LCD et le viseur
• Ne prenez pas le camescope par l’objectif ou
l’écran LCD. [e].
• Ne posez pas le camescope avec le viseur ou
l’écran LCD tourné vers le soleil. L’intérieur du
viseur ou de l’écran LCD pourrait être
endommagé. Faites attention quand vous
posez le camescope près d’une fenêtre ou le
laissez exposé au soleil [f].
• Quand un convertisseur gros plans est fixé sur
l’objectif du camescope, ne tournez pas
l’objectif vers le soleil. Le camescope pourrait
être endommagé.
Basic operations / Opérations de base
31
Page 32

Playing back a tape
Lecture d’une
cassette
You can monitor the playback picture on the
LCD screen or in the viewfinder.
(1) Insert the recorded tape with the window
facing out.
(2) Open the LCD panel.
(3) While pressing the small green button on the
POWER switch, set it to VTR. The tape
transport buttons light up.
(4) Press 0 to rewind the tape.
(5) Press · to start playback.
(6) Adjust the volume using VOLUME +/– and
the brightness of the LCD screen using LCD
BRIGHT +/–.
You can also monitor the picture on a monitor
screen, after connecting the camcorder to a
monitor or VCR.
1
LCD BRIGHT
VOLUME
Vous pouvez contrôler l’image de lecture sur
l’écran LCD ou l’objectif.
(1) Introduisez une cassette enregistrée avec la
fenêtre orientée vers l’extérieur.
(2) Ouvrez l’écran LCD.
(3) Tout en appuyant sur le petit bouton vert du
commutateur POWER, réglez celui-ci sur
VTR. Les touches de transport de bande
s’allument.
(4) Appuyez sur 0 pour rembobiner la
cassette.
(5) Appuyez sur · pour démarrer la lecture.
(6) Ajustez le volume à l’aide de VOLUME +/–
et la luminosité de l’écran LCD à l’aide de
LCD BRIGHT +/–.
Vous pouvez également contrôler l’image sur
l’écran d’un moniteur après avoir raccordé le
camescope à un moniteur ou à un magnétoscope.
STOP
REW
4
PLAY
PAUSE
FF
2
3
POWER
VTR
OFF
CAM
CORDER
PHOTO
To stop playback, press p.
To rewind the tape, press 0.
To fast-forward the tape rapidly, press ).
Using the Remote Commander
You can control playback using the supplied
Remote Commander. Before using the Remote
Commander, insert the size AA (R6) batteries.
To display the LCD screen/viewfinder screen
indicators
Press DISPLAY.
To erase the indicators, press again.
32
STOP
REW
5
Pour arrêter la lecture, appuyez sur p.
Pour rembobiner la cassette, appuyez sur 0.
Pour faire avancer rapidement la bande,
appuyez sur ).
PLAY
PAUSE
FF
Utilisation de la télécommande
Vous pouvez commander les fonctions de lecture
au moyen de la télécommande fournie. Avant
d’utiliser la télécommande, insérez les piles AA
(R6) à l’intérieur.
Pour afficher les indicateurs sur l’écran LCD ou
dans le viseur
Appuyez sur la touche DISPLAY.
Pour effacer les indicateurs, appuyez de nouveau
sur la touche.
Page 33

Playing back a tape Lecture d’une cassette
Using headphones
Connect headphones (not supplied) to the
AUDIO VIDEO OUT/2 jack (p. 9). You can
adjust the volume of the headphones using
VOLUME +/–.
To view the playback picture in the viewfinder
Close the LCD panel. The viewfinder turns on
automatically.
When using the viewfinder, you can monitor the
sound only by using headphones.
To view on the LCD screen again, open the LCD
panel. The viewfinder turns off automatically.
Note on DV-formatted tapes
You can play back DV-formatted tapes on this
camcorder if the tape is recorded in SP mode.
DV appears on the LCD screen or in the
viewfinder during playback.
You cannot play back DV-formatted tapes
recorded in LP mode.
Various playback modes
To view a still picture (playback
pause)
Press P during playback. To resume playback,
press P or ·.
To locate a scene (picture search)
Keep pressing 0 or ) during playback. To
resume normal playback, release the button.
To monitor the high-speed picture
while advancing the tape or
rewinding (skip scan)
Keep pressing 0 while rewinding or ) while
advancing the tape. To resume normal
rewinding or fast-forward, release the button.
To view the picture at 1/3 speed
(slow playback)
Press & on the Remote Commander during
playback. For slow playback in reverse direction,
press <, then press &. To resume normal
playback, press ·.
To view the picture at double speed
For double speed playback in the reverse
direction, press <, then press ×2 on the Remote
Commander during playback. For double speed
playback in the forward direction, press >, then
press ×2 during playback. To resume normal
playback, press ·.
Utilisation d’un casque d’écoute
Branchez un casque d’écoute (non fourni) sur la
prise AUDIO VIDEO OUT/2 (p. 9). Vous
pouvez régler le volume du casque d’écoute à
l’aide de la commande VOLUME +/–.
Pour regarder l’image de lecture dans le viseur
Refermez l’écran LCD. Le viseur s’allume
automatiquement.
Lorsque vous utilisez le viseur, vous pouvez
contrôler le son à l’aide d’un casque uniquement.
Pour regarder à nouveau l’image sur l’écran
LCD, ouvrez l’écran LCD. Le viseur s’éteint
automatiquement.
Lecture d’une cassette formatée en
DV
Vous pouvez reproduire une cassette formatée en
DV sur ce camescope, si elle a été enregistrée en
mode SP. Pendant la lecture, l’indicateur DV
apparaît dans le viseur ou sur l’écran LCD.
Vous ne pouvez pas reproduire les cassettes
enregistrées en mode LP (longue durée).
Différents modes de lecture
Pour faire un arrêt sur image (pause
de lecture)
Appuyez sur P en cours de lecture. Pour
reprendre la lecture, appuyez sur P ou ·.
Pour localiser une scène (recherche
d’image)
Maintenez la touche 0 ou ) enfoncée en
cours de lecture. Pour reprendre la lecture
normale, relâchez la touche.
Pour regarder une image à grande
vitesse en cours d’avance rapide ou
de rembobinage (recherche visuelle)
Maintenez la touche 0 enfoncée pendant le
rembobinage ou ) pendant l’avance rapide.
Pour reprendre le rembobinage ou l’avance
rapide normale, relâchez la touche.
Pour regarder l’image à 1/3 de la
vitesse (lecture au ralenti)
Appuyez sur & de la télécommande en mode de
lecture. Pour une lecture au ralenti en marche
arrière, appuyez sur <, puis sur &. Pour
revenir à la lecture normale, appuyez sur ·.
Pour regarder l’image à une vitesse
double
Pour activer la lecture arrière à une vitesse
double de la normale, appuyez sur < et ensuite
sur la touche ×2 de la télécommande pendant la
lecture. Pour activer la lecture dans le sens
normal à une vitesse double, appuyez sur > et
ensuite sur la touche ×2 de la télécommande
pendant la lecture. Pour reprendre la lecture
normale, appuyez sur ·.
Basic operations / Opérations de base
33
Page 34

Playing back a tape
Lecture d’une cassette
To view the picture frame-by-frame
Press ' or 7 on the Remote Commander in
playback pause mode. If you keep pressing the
button, you can view the picture at 1/30 speed.
To resume normal playback, press ·.
To change the playback direction
Press < on the Remote Commander for reverse
direction or > on the Remote Commander for
forward direction during playback. To resume
normal playback, press ·.
Notes on playback
• The sound is muted in the various playback
modes.
• During playback other than normal playback,
the previous recording may appear in mosaic
image. This is not malfunction.
• When playback pause mode lasts for 5
minutes, the camcorder automatically enters
stop mode. To resume playback, press ·.
Note on slow playback
The slow playback can be performed smoothly
on this camcorder; however, this function does
not work for an output signal from the DV IN/
OUT jack.
Pour activer la lecture image par
image
Appuyez sur la touche ' ou 7 de la
télécommande en mode de pause de lecture. Si
vous maintenez la touche enfoncée, vous pouvez
voir l’image à 1/30e de la vitesse normale. Pour
reprendre la lecture normale, appuyez sur ·.
Pour changer le sens de lecture
Appuyez sur < de la télécommande pour aller
en arrière ou sur > de la télécommande pour
avancer pendant la lecture. Pour revenir à la
lecture normale, appuyez sur ·.
Remarques sur la lecture
• Le son est coupé dans ces différents modes de
lecture.
• Dans ces différents modes de lecture, l’image
enregistrée peut être en mosaïque. Il ne s’agit
pas d’un mauvais fonctionnement.
• Lorsque la pause de lecture dure plus de 5
minutes, le camescope se met
automatiquement en mode d’arrêt. Pour
revenir la lecture, appuyez sur ·.
Remarque sur la lecture au ralenti
La lecture au ralenti peut s’effectuer sans
problème sur ce camescope, cependant, cette
fonction n’agit pas pour un signal fourni par la
prise DV IN/OUT.
34
Page 35

Searching for the end
of the picture
Recherche de la fin
d’un enregistrement
You can go to the end of the recorded portion
after you record and play back the tape. The tape
starts rewinding or fast-forwarding and the last
about 5 seconds of the recorded portion plays
back. Then the tape stops at the end of the
recorded picture (End Search).
Open the LCD panel and press END SEARCH
during recording standby.
This function works when the POWER switch is
set to CAMCORDER, VTR or PHOTO.
Note on End Search
The End Search function does not work once you
have ejected the cassette after you recorded in the
tape or if you do not record after you have
inserted a tape.
Après l’enregistrement et la lecture d’une
cassette, vous pouvez facilement localiser la
dernière image enregistrée. Quand vous utilisez
cette fonction, la bande est bobinée vers l’avant
ou l’arrière et les 5 dernières secondes du
passage enregistré sont reproduites. La bande
s’arrête ensuite sur la dernière image enregistrée
(recherche de fin d’enregistrement).
Basic operations / Opérations de base
Ouvrez l’écran LCD et appuyez sur END
SEARCH en mode d’attente d’enregistrement.
Cette fonction est opérante lorsque le
commutateur POWER est réglé sur
CAMCORDER, VTR ou PHOTO.
END SEARCH
Remarque sur la recherche de fin
d’enregistrement
Cette fonction n’agit pas si vous avez éjecté la
cassette après l’enregistrement ou si vous
n’enregistrez pas après avoir inséré une cassette.
35
Page 36

Advanced operations
Opérations avancées
Using alternative
power sources
You can choose any of the following power
sources for your camcorder: battery pack, house
current, and 12/24 V car battery. Choose the
appropriate power source depending on where
you want to use your camcorder.
Place Power Accessory to be used
source
Indoors House AC power adaptor AC-V100
current
Outdoors Battery Battery pack NP-F220, NP-
pack F200, NP-F100
In the car 12 V or Sony car battery charger DC-
24 V car V515
battery
Note on power sources
Disconnecting the power source or removing the
battery pack during recording or playback may
damage the inserted tape. If this happens,
restore the power supply again immediately.
Using the house current
To use the AC power adaptor:
(1) Connect the connecting plug on the
camcorder to the DC OUT jack on the AC
power adaptor using the DK-626 connecting
cord (not supplied).
(2) Connect the AC power cord to the AC power
adaptor.
(3) Connect the AC power cord to the wall
outlet.
Utilisation d’autres
sources d’alimentation
Vous pouvez utiliser les sources d’alimentation
suivantes pour votre camescope: une batterie
rechargeable, le courant secteur et une batterie de
voiture 12/24 V. Choisissez la source
d’alimentation appropriée en fonction du lieu de
tournage.
Lieu
A l’intérieur
A l’extérieur
Dans une voiture
Remarque sur les sources d’alimentation
Si vous débranchez la source d’alimentation ou
retirez la batterie pendant l’enregistrement ou la
lecture, la bande insérée risque d’être
endommagée. Si le cas se présente, rétablissez
immédiatement l’alimentation du camescope
Utilisation sur le secteur
Pour utiliser l’adaptateur secteur:
(1) Reliez la prise du camescope à la prise DC
OUT de l’adaptateur secteur au moyen du
câble de liaison DK-626 (non fourni).
(2) Branchez le cordon d’alimentation sur
l’adaptateur secteur.
(3) Branchez le cordon d’alimentation sur une
prise murale.
Source
d’alimentation
Secteur
Batterie
rechargeable
Batterie de
voiture
12 V ou 24 V
Accessoire à
utiliser
Adaptateur
secteur ACV100
Batterie NPF220, NP-F200,
NP-F100
Bloc CC Sony
DC-V515
36
1
32
Page 37

Using alternative power
sources
Utilisation d’autres sources
d’alimentation
Charging the battery pack
You can charge the battery pack installed in the
camcorder by connecting the AC power adaptor
to the camcorder and setting the POWER switch
to OFF. Charging time of the NP-F220 battery
pack is as follows:
Full charge: approx. 3 hours and 30 minutes
Normal charge: approx. 2 hours and 30 minutes
Charging two battery packs at the same time
Install one battery pack in the camcorder and
another one on the AC power adaptor. The
CHARGE lamps on the camcorder and on the AC
power adaptor light up, and go out when normal
charge is completed. If either of the CHARGE
lamps remains lit, charging both battery packs is
not completed. Time taken to charge two
NP-F220 battery packs simultaneously is as
follows:
Full charge: approx. 4 hours
Normal charge: approx. 3 hours
Notes on the CHARGE lamp
• The CHARGE lamp will remain lit for a while
even if the unit is unplugged after use. This is
normal.
• If the CHARGE lamp does not light,
disconnect the AC power cord. After about
one minute, reconnect the AC power cord.
Charge de la batterie
Vous pouvez charger la batterie installée sur le
camescope en raccordant l’adaptateur secteur au
camescope et réglant le commutateur POWER
sur OFF. Le temps de charge de la batterie NPF220 est le suivant:
Charge complète: approx. 3 heures et 30 minutes
Change normale: approx. 2 heures et 30 minutes
Charge de deux batteries en même temps
Installez une batterie sur le camescope et l’autre
sur l’adaptateur secteur. Les témoins de
CHARGE du camescope et de l’adaptateur
secteur s’allument. Ils s’éteignent lorsque la
charge normale est terminée. Si l’un des témoins
CHARGE reste allumé, cela signifie que la charge
des deux batteries n’est pas terminée. Le temps
requis pour la charge simultanée de deux
batteries NP-F220 est le suivant:
Charge complète: environ 4 heures
Charge normale: environ 3 heures
Remarques sur le témoin CHARGE
• Le témoin CHARGE reste allumé un certain
temps, même si l’appareil a été débranché
après utilisation. C’est normal.
• Si le témoin CHARGE ne s’allume pas,
débranchez l’adaptateur secteur. Rebranchezle au bout d’une minute environ.
Advanced operations / Opérations avancées
37
Page 38

Using alternative power
sources
Utilisation d’autres sources
d’alimentation
To remove the connecting cord
While pressing the button on the connecting
plug, pull out the connecting cord. Never pull
the connecting cord itself.
When you use the AC power with the connecting
cord, the battery pack installed in the camcorder
is not used because the AC power has priority
over the battery pack.
WARNING
The power cord must only be changed at a
qualified service shop.
PRECAUTION
The set is not disconnected from the AC power
source (mains) as long as it is connected to the
wall outlet, even if the set itself has been turned
off.
Using a car battery
Use a car battery charger such as Sony DC-V515
(not supplied). Connect the car battery cord to
the cigarette lighter socket of a car (12 V or 24 V).
Connect the car battery charger and the
camcorder using the DK-626 connecting cord
(not supplied).
Note on the battery pack
You cannot charge the battery pack (NP-F220,
NP-F200, NP-F100) using the car battery charger
DC-V515.
This mark indicates that this
product is a genuine accessory for
Sony video product.
When purchasing Sony video
products, Sony recommends that
you purchase accessories with this
“GENUINE VIDEO
ACCESSORIES” mark.
Pour retirer le câble de liaison
Tout en appuyant sur le bouton de la fiche,
débranchez le câble de liaison. Ne tirez jamais
sur le cordon proprement dit.
Quand vous raccordez le camescope au secteur
avec le câble de liaison, la batterie rechargeable
en place dans le camescope n’est pas utilisée
parce qu’elle est automatiquement désactivée.
AVERTISSEMENT
Le cordon d’alimentation ne peut être remplacé
que par un professionnel.
PRECAUTION
L’appareil n’est pas débranché de la source
d’alimentation (secteur) aussi longtemps qu’il
reste branché sur une prise murale, même si
l’appareil proprement dit a été mis hors tension.
Utilisation d’une batterie de
voiture
Utilisez un bloc CC tel que le Sony DC-V515 (non
fourni). Branchez le cordon allume-cigares sur
l’allume-cigares de la voiture (12 V ou 24 V).
Raccordez le bloc CC et le camescope au moyen
du câble de liaison DK-626 (non fourni).
Remarque sur la batterie rechargeable
Vous ne pouvez pas la batterie (NP-F220, NPF200, NP-F100) à l’aide du bloc CC DC-V515.
Ce sigle indique qu’il s’agit d’un
accessoire d’origine pour les
produits vidéo Sony.
Lorsque vous achetez des produits
vidéo Sony, Sony vous conseille de
n’acheter que des accessoires
portant la mention “GENUINE
VIDEO ACCESSORIES”
(accessoires d’origine Sony).
38
Page 39

Changing the mode
settings
Changement des
réglages de mode
You can change the mode settings in the menu
system to further enjoy the features and
functions of the camcorder.
(1) Press MENU to display the menu on the LCD
screen.
(2) Press v or V to select the desired item, then
press EXECUTE. Only the selected item is
displayed.
(3) Press v or V to select the desired mode, then
press EXECUTE. If you want to change the
other modes, repeat steps 2 and 3.
(4) Press MENU to erase the menu display.
Vous pouvez changer les réglages de mode dans
le menu pour mieux profiter des fonctions et
caractéristiques de votre camescope.
(1) Appuyez sur MENU pour afficher le menu
sur l’écran LCD.
(2) Appuyez sur v ou V pour sélectionner le
paramètre souhaité puis appuyez sur
EXECUTE. Seul le paramètre sélectionné est
affiché.
(3) Appuyez sur v ou V pour sélectionner le
mode souhaité puis appuyez sur EXECUTE.
Si vous voulez changer les autres modes,
répétez les étapes 2 et 3.
(4) Appuyez sur MENU pour quitter l’écran de
menu.
12
MENU
MENU
PGM AE
WHT BAL
D ZOOM
S SHOT
COMMANDER
BEEP
REC LAMP
[MENU]:END
AUTO
EXECUTE
MENU
PGM AE
WHT BAL
D ZOOM
MENU
PGM AE
WHT BAL
D ZOOM
MENU
D ZOOM OFF
AUTO
AUTO
MENU
PGM AE
WHT BAL
D ZOOM OFF
ON
Advanced operations / Opérations avancées
4
MENU
Note on changing the mode settings
Menu items differs depending on the setting of
the POWER switch to VTR or CAMCORDER/
PHOTO.
3
EXECUTE
MENU
D ZOOM OFF
MENU
D ZOOM OFF
MENU
PGM AE
WHT BAL
D ZOOM ON
ON
ON
Remarques sur le changement des réglages de
mode
Les paramètres de menu diffèrent suivant que le
commutateur POWER est réglé sur VTR ou
CAMCORDER/PHOTO.
39
Page 40

Changing the mode settings
Changement des réglages de
mode
Selecting the mode setting of
each item
Items for both CAMCORDER/PHOTO
and VTR modes
COMMANDER <VTR4/OFF/ID/ID SET>
• Select VTR4 when using the supplied Remote
Commander for the camcorder.
• Select OFF when not using the Remote
Commander.
• Select ID when using the Remote Commander
set to the ID number.
• Select ID SET when setting the ID number to
the Remote Commander.
BEEP <ON/OFF>
• Select ON so that beeps sound when you
start/stop recording, etc.
• Select OFF when you do not want to hear the
beep sound.
LCD COLOR
Select this item and change the level of the
indicator by pressing + or – to adjust the color
intensity of the picture.
Items for CAMCORDER/PHOTO mode
only
PGM AE* <AUTO/SPORTS/SUNSETMOON/
LANDSCAPE>
• Select AUTO to set PROGRAM AE (Auto
Exposure) automatically depending on your
shooting situation.
• Select SPORTS to set PROGRAM AE to the
sports lesson mode.
• Select SUNSETMOON to set PROGRAM AE to
the sunset and moon mode.
• Select LANDSCAPE to PROGRAM AE to the
landscape mode.
WHT BAL* <AUTO/HOLD/OUTDOOR/INDOOR>
• Normally select AUTO to adjust the white
balance automatically.
• Select HOLD when recording monochromatic
subject or background.
• Select OUTDOOR when recording in the
outdoor mode.
• Select INDOOR when recording in the indoor
mode.
Sélection du réglage de mode
de chaque paramètre
Paramètres des modes CAMCORDER/
PHOTO et VTR
COMMANDER <VTR4/OFF/ID/ID SET>
• Sélectionnez VTR4 si vous utilisez la
télécommande fournie avec le camescope.
• Sélectionnez OFF lorsque vous n’utilisez pas la
télécommande.
• Sélectionnez ID lors de l’utilisation de la
télécommande réglée sur le numéro ID.
• Sélectionnez ID SET lorsque vous réglez le
numéro ID de la télécommande.
BEEP <ON/OFF>
• Sélectionnez ON pour que des signaux sonores
retentissent lorsque vous commencez/finissez
l’enregistrement, etc.
• Sélectionnez OFF si vous ne voulez pas
entendre le signal sonore.
LCD COLOR
Sélectionnez ce paramètre et modifiez le niveau
de l’indicateur en appuyant sur + ou – pour
ajuster l’intensité de la couleur de l’image.
Paramètres du mode CAMCORDER/
PHOTO uniquement
PGM AE* <AUTO/SPORTS/SUNSETMOON/
LANDSCAPE>
• Sélectionnez AUTO pour que l’exposition se
règle automatiquement en fonction de la
situation de prise de vue.
• Sélectionnez SPORTS pour régler PROGRAM
AE en mode de leçon de sport.
• Sélectionnez SUNSETMOON pour régler
PROGRAM AE en mode de crépuscule et de
lune.
• Sélectionnez LANDSCAPE pour régler
PROGRAM AE en mode de paysage.
WHT BAL* <AUTO/HOLD/OUTDOOR/INDOOR>
• Sélectionnez en principe AUTO pour le réglage
automatique de la balance des blancs.
• Sélectionnez HOLD pour enregistrer un sujet
ou un arrière-plan monochrome.
• Sélectionnez OUTDOOR lorsque vous
enregistrez en extérieur.
• Sélectionnez INDOOR lorsque vous enregistrez
en intérieur.
40
Page 41

Changing the mode settings
Changement des réglages de
mode
D ZOOM <OFF/ON>
• Select OFF not to use the digital zoom.
• Select ON to activate digital zooming. More
than 10x zoom is performed digitally.
S SHOT <ON/OFF>
• Normally select ON.
• Select OFF when you do not have to worry
about camera-shake.
REC LAMP <ON/OFF>
• Normally select ON.
• Select OFF when you do not want the camera
recording/battery lamp at the front of the unit
to light up.
When recording a close subject
When REC LAMP is set to ON, the red camera
recording lamp on the front of the camcorder
may reflect on the subject if it is close. In this
case, we recommend you set REC LAMP to
OFF.
CLOCK SET
Select this item to reset the date or time.
Items for VTR mode only
AUDIO MIX*
Select this item and adjust the balance between
the stereo 1 and stereo 2 by pressing v or V.
Note
When playing back a tape recorded in the Fs
48k (16-bit) mode, you cannot adjust the
balance in AUDIO MIX.
D ZOOM <OFF/ON>
• Sélectionnez OFF quand vous n’utilisez pas le
zoom numériquement.
• Sélectionnez ON pour activer le zoom
numérique. Un zoom supérieur à 10x est
effectué numériquement.
S SHOT <ON/OFF>
• Sélectionnez ON.
• Sélectionnez OFF lorsqu’il n’y a aucun risque
de bougé.
REC LAMP <ON/OFF>
• En principe, sélectionnez ON.
• Sélectionnez OFF si vous ne voulez pas que le
témoin d’enregistrement/batterie situé à
l’avant du camescope s’allume.
Prise de vue d’un sujet rapproché
Lorsque REC LAMP est réglé sur ON, le
témoin d’enregistrement rouge situé à l’avant
du camescope risque de se refléter sur le sujet
s’il est très rapproché. Dans ce cas, nous vous
conseillons de régler REC LAMP sur OFF.
CLOCK SET
Sélectionnez ce paramètre pour régler la date ou
l’heure.
Paramètres pour le mode VTR
uniquement
AUDIO MIX*
Sélectionnez ce paramètre et ajustez la balance
entre les voies stéréo 1 et stéréo 2 en appuyant
sur v ou V.
Advanced operations / Opérations avancées
DATA CODE <DATE/CAM or DATE>
• Select DATE/CAM to display date and
recording data during playback.
• Select DATE to display date during playback.
* These settings are retained even when the
battery is removed, as long as the vanadiumlithium battery is charged. As far as the items
without an asterisk are concerned, their
settings return to the default 5 minutes or
more after the battery is removed.
Remarque
Lors de la lecture d’une cassette enregistrée en
mode Fs48k (16 bits), vous ne pouvez pas
régler la balance avec AUDIO MIX.
DATA CODE <DATE/CAM ou DATE>
• Sélectionnez DATE/CAM pour afficher la date
et les données d’enregistrement en cours de
lecture.
• Sélectionnez DATE pour afficher la date en
cours de lecture.
* Ces réglages sont conservés tant que la batterie
au vanadium-lithium est chargée, même si la
batterie est retirée. Les réglages initiaux des
paramètres sans astérisque sont rétablis 5
minutes environ après le retrait de la batterie.
41
Page 42

Fade-in and fade-out
Fondus enchaînés
You can fade in or out to give your recording a
professional appearance.
When fading in, the picture gradually fades in
from black while the sound increases. When
fading out, the picture gradually fades to black
while the sound decreases.
When fading in [a]
(1) While the camcorder is in Standby mode,
press FADER. The fade indicator starts
flashing.
(2) Press START/STOP to start recording. The
fade indicator stops flashing.
When fading out [b]
(1) During recording, press FADER. The fade
indicator starts flashing.
(2) Press START/STOP to stop recording. The
fade indicator stops flashing, and then
recording stops.
[a]
STBY REC
FADER
Vous pouvez réaliser des fondus enchaînés pour
donner une touche professionnelle à vos prises
de vue.
Avec le fondu enchaîné d’entrée, l’image
apparaît progressivement du noir tandis que le
son augmente lui aussi peu à peu. Lors d’un
fondu enchaîné de sortie, l’image disparaît
progressivement pour devenir noire tandis que le
son diminue également.
Fondu enchaîné à l’entrée [a]
(1) Appuyez sur FADER lorsque le camescope
est en mode d’attente. L’indicateur de fondu
enchaîné se met à clignoter.
(2) Appuyez sur START/STOP pour commencer
l’enregistrement. L’indicateur de fondu
enchaîné cesse de clignoter.
Fondu enchaîné à la sortie [b]
(1) Appuyez sur FADER en cours
d’enregistrement. L’indicateur de fondu
enchaîné se met à clignoter.
(2) Appuyez sur START/STOP pour arrêter
l’enregistrement. L’indicateur de fondu
enchaîné cesse de clignoter et
l’enregistrement s’arrête.
STBY REC
FADER
FADER
To cancel the fade-in/fade-out
function
Before pressing START/STOP, press FADER
until the fade indicator disappears.
When the START/STOP MODE control is set to
or 5SEC
You cannot use the fade-in/fade-out function.
42
[b]
21
POWER
VTR
OFF
CAM
CORDER
PHOTO
Pour désactiver la fonction de fondu
enchaîné
Avant d’appuyer sur START/STOP, appuyez sur
FADER jusqu’à ce que l’indicateur de fondu
enchaîné disparaisse.
Si le commutateur START/STOP MODE est
réglé sur ou 5SEC
Vous ne pouvez pas activer le fondu enchaîné.
Page 43

Locking the exposure
Verrouillage de
l’exposition
When to lock the exposure
Lock the exposure by pressing the AE LOCK
under the following cases.
• The background is too bright (backlighting)
• Insufficient light: most of the picture is dark
• Bright subject and dark background
• To record the darkness faithfully
• The subject is in the spotlight on a stage
Locking the exposure
Press AE LOCK during recording, Standby or
PHOTO mode. The AE LOCK indicator appears
on the LCD screen or in the viewfinder. The
exposure is locked at the actual brightness.
Quand verrouiller l’exposition
Verrouillez l’exposition en appuyant sur AE
LOCK dans les cas suivants:
• L’arrière-plan est trop lumineux (contre-jour)
• Lumière insuffisante: la majeure partie de
l’image est sombre
• Sujet lumineux et arrière-plan sombre
• Pour enregistrer fidèlement dans l’obscurité
• Le sujet se trouve sur une scène éclairée par
des spots.
Verrouillage de l’exposition
Appuyez sur AE LOCK en mode
d’enregistrement, d’attente ou PHOTO.
L’indicateur AE LOCK apparaît sur l’écran LCD
ou dans le viseur. L’exposition est verrouillée sur
la luminosité actuelle.
AE LOCK
Advanced operations / Opérations avancées
To return to automatic exposure
mode
Press AE LOCK to turn off the AE LOCK
indicator.
Shooting with the sun behind you
If the light source is behind your subject, or in the
following situation, the subject will be recorded
too dark.
• The subject is indoors and there is a window
behind the subject.
• Bright light sources are included in the scene.
• When shooting a person wearing white or
shiny clothes in front of a while background,
the face will be recorded too dark.
Shooting in the dark
We recommend you to use a video light (not
supplied). To get the best color, you must
maintain a sufficient light level.
Pour revenir en mode d’exposition
automatique
Appuyez sur AE LOCK pour faire disparaître
l’indicateur AE LOCK.
Prise de vue avec le soleil dans le dos
Dans les cas suivants et si la source lumineuse se
trouve derrière le sujet, l’image enregistrée sera
trop sombre:
• Le sujet se trouve à l’intérieur, devant une
fenêtre.
• La scène comporte des sources de lumière
vive.
• Si vous filmez un sujet portant des vêtements
blancs ou brillants avec un arrière-plan blanc,
le visage sera trop sombre.
Prises de vue dans l’obscurité
Nous vous conseillons d’utiliser une torche vidéo
(non fournie). Pour obtenir de belles couleurs,
vous devez maintenir un niveau de luminosité
constant.
43
Page 44

Photo recording
Enregistrement en
mode photo
You can record a still picture like a photograph
for about seven seconds. This mode is useful
when you want to enjoy a picture such as a
photograph or when you print a picture using a
video printer (not supplied). You can record
about 340 pictures on a 40-minute tape.
Shutter speed is automatically adjusted up to
1/1000 depending on the exposure.
(1) While pressing the small green button on the
POWER switch, set it to PHOTO.
(2) Keep pressing START/STOP lightly until a
still picture and “PHOTO CAPTURE” appear
on the LCD screen or in the viewfinder.
Recording does not start yet. To change the
still picture, release START/STOP, select still
picture again, and keep pressing START/
STOP lightly again.
If you press the PHOTO button on the
Remote Commander when a still picture
appears on the LCD screen or in the
viewfinder, the camcorder will record that
still picture. However, you cannot select
other still pictures by using this button.
(3) Press START/STOP deeper.
“PHOTO REC” flashes and the still picture
on the LCD screen or in the viewfinder is
recorded for about seven seconds. The
sound during those seven seconds is also
recorded and the pictures appear like an
animation on the LCD screen or in the
viewfinder. You cannot change the position
of the POWER switch or press START/STOP
during recording.
Vous pouvez enregistrer une image fixe comme
une photo pendant environ sept secondes. Ce
mode est pratique pour enregistrer une photo ou
pour imprimer une image sur une imprimante
vidéo (non fournie). Vous pouvez enregistrer
environ 340 images sur une cassette de 40
minutes.
La vitesse d’obturation est automatiquement
ajustée jusqu’à 1/1000, selon l’exposition.
(1) Tout en appuyant sur le petit bouton vert du
commutateur POWER, réglez-le sur PHOTO.
(2) Appuyez doucement sur START/STOP
jusqu’à ce qu’une image fixe et “PHOTO
CAPTURE” apparaissent sur l’écran LCD ou
dans le viseur.
L’enregistrement ne commence pas encore.
Pour changer d’image fixe, relâchez la touche
START/STOP, sélectionnez de nouveau
l’image fixe et maintenez la touche START/
STOP légèrement enfoncée.
Si vous appuyez sur la touche PHOTO de la
télécommande lorsqu’une image fixe est
affichée sur l’écran LCD et dans le viseur, le
camescope enregistrera l’image fixe. Vous ne
pouvez cependant pas sélectionner d’autres
images fixes à l’aide de cette touche.
(3) Appuyez plus fort sur START/STOP.
“PHOTO REC” clignote et l’image fixe sur
l’écran LCD ou dans le viseur est enregistrée
pendant sept secondes environ. Le son est
également enregistré pendant ces sept
secondes et les images apparaissent sous
forme d’animation sur l’écran LCD ou dans
le viseur. Vous ne pouvez pas changer la
position du commutateur POWER ou
appuyer sur START/STOP pendant
l’enregistrement.
44
1,2,3
POWER
VTR
OFF
CAM
CORDER
PHOTO
Page 45

Photo recording
Enregistrement en mode
photo
Notes on photo recording
• During photo recording, you cannot use the
FADER button.
• When recording a still picture, do not shake
the camcorder. The picture may fluctuate.
• When flashes, the appropriate brightness
may not be obtained.
Note on the still picture
When the still picture recorded on this camcorder
is played back on another VCR, the picture may
be blurred. This is not malfunction.
Printing the still picture
You can print a still picture by using the video
printer (not supplied). Connect the video printer
using the supplied S video connecting cable.
Refer to the instruction manual of the video
printer as well.
AUDIO VIDEO OUT/2
Remarques sur l’enregistrement d’images
fixes
• Pendant l’enregistrement d’une image fixe,
vous ne pouvez pas utiliser la touche FADER.
• Pendant l’enregistrement d’une image fixe, ne
pas secouer le camescope, sinon l’image risque
de ne pas être stable.
• Quand clignote, l’éclairage approprié ne
peut pas être obtenu.
Remarque sur l’image fixe
Lorsque l’image fixe enregistrée sur ce
camescope est reproduite sur un autre
magnétoscope, il est possible que l’image soit
floue. Il ne s’agit pas d’un mauvais
fonctionnement.
Impression d’une image fixe
Vous pouvez imprimer une image fixe à l’aide
d’une imprimante vidéo (non fournie). Raccordez
l’imprimante vidéo à l’aide du câble de liaison S
vidéo fourni. Reportez-vous également au mode
d’emploi de l’imprimante vidéo.
Video printer
Imprimante vidéo
LINE IN
VIDEO S VIDEO
Advanced operations / Opérations avancées
S VIDEO OUT
:
Signal flow/Sens du singal
If the video printer is not equipped with S
VIDEO input
Use the supplied A/V connecting cable. Connect
it to the AUDIO VIDEO OUT/2 jack and
connect the yellow plug of the cable to the
VIDEO input of the video printer.
Si l’imprimante vidéo n’est pas équipée d’une
entrée S VIDEO
Utilisez le câble de liaison A/V fourni et
raccordez-le à la prise AUDIO VIDEO OUT/2.
Dans ce cas, raccordez la fiche jaune à l’entrée
VIDEO de l’imprimante vidéo.
45
Page 46

Releasing the
SteadyShot function
Mise hors service de la
fonction STEADYSHOT
When you shoot, the indicator appears on the
LCD screen or in the viewfinder. This indicates
that the SteadyShot function is working and the
camcorder compensates for camera-shake.
You can release the SteadyShot function when
you do not need to use the SteadyShot function.
Do not use the SteadyShot function when
shooting a stationary object with a tripod.
(1) Press MENU to display the menu on the LCD
screen.
(2) Press v or V to select S SHOT, then press
EXECUTE.
(3) Press v to select OFF, then press EXECUTE.
(4) Press MENU to erase the menu display.
1
MENU
PGM AE
WHT BAL
D ZOOM
S SHOT
COMMANDER
BEEP
REC LAMP
[MENU]:END
MENU
AUTO
2
L’indicateur est affiché sur l’écran LCD ou
dans le viseur pendant la prise de vue. Il indique
que la fonction de stabilisation de prise de vue
est activée et que les bougés du camescope sont
compensés.
Vous pouvez désactiver la fonction de
stabilisation de prise de vue lorsque vous estimez
ne pas en avoir besoin. N’utilisez pas la fonction
de stabilisation pour une prise de vue d’un sujet
stationnaire à l’aide d’un trépied.
(1) Appuyez sur MENU pour afficher le menu
sur l’écran LCD.
(2) Appuyez sur v ou V pour sélectionner S
SHOT puis appuyez sur EXECUTE.
(3) Appuyez sur v pour sélectionner OFF puis
appuyez sur EXECUTE.
(4) Appuyez sur MENU pour quitter l’écran de
menu.
EXECUTE
MENU
PGM AE
WHT BAL
D ZOOM
S SHOT
COMMANDER
BEEP
REC LAMP
[MENU]:END
ON
MENU
S SHOT
[MENU]:END
ON
OFF
46
4
MENU
3
MENU
S SHOT
[MENU]:END
ON
OFF
EXECUTE
MENU
PGM AE
WHT BAL
D ZOOM
S SHOT
COMMANDER
BEEP
REC LAMP
[MENU]:END
OFF
Page 47

Releasing the SteadyShot
function
Mise hors service de la
fonction STEADYSHOT
To activate the SteadyShot function
again
Select ON in step 3, then press EXECUTE.
Notes on the SteadyShot function
• The SteadyShot function will not correct
excessive camera-shake.
• When the SteadyShot function is released, the
indicator does not appear.
Pour remettre la fonction de
stabilisation de prise de vue en
service
Sélectionnez ON à l’étape 3 puis appuyez sur
EXECUTE.
Remarques sur la fonction de stabilisation
• La fonction de stabilisation ne corrige pas les
bougés excessifs du camescope.
• L’indicateur n’est pas affiché lorsque la
fonction de stabilisation de prise de vue est
désactivée.
Advanced operations / Opérations avancées
47
Page 48

Using the PROGRAM
AE function
Utilisation de la
fonction PROGRAM AE
You can select from three PROGRAM AE (Auto
Exposure) modes to suit your shooting situation.
When you use PROGRAM AE, you can get a
capture high-speed action, record night views,
etc.
Selecting the best mode
Select a proper PROGRAM AE mode referring to
the description on each PROGRAM AE mark in
the viewfinder or the PROGRAM AE mode
indication on the LCD screen or in the
viewfinder.
/ SPORTS: Sports lesson mode
Capturing high-speed action in sports such as
golf or tennis
/SUNSETMOON: Sunset & Moon mode
Recording sunset, night views, fireworks or neon
signs
/LANDSCAPE: Landscape mode
Recording a landscape through a window or
wire net
Notes on focus setting
• In the Sports lesson mode, you cannot take
close-ups because the camcorder is set to focus
only on subjects in the middle to far distance.
• In the Sunset & Moon and Landscape modes,
the camcorder is set to focus only on distant
subjects.
Vous pouvez choisir l’un des trois modes
d’exposition automatique (PROGRAM AE) en
fonction des conditons de prise de vue. La
fonction PROGRAM AE vous permet de saisir
une action rapide, de réaliser des prises de vue la
nuit, etc.
Sélection du mode le mieux
approprié
Sélectionnez le mode PROGRAM AE approprié
en vous référant à la description de chaque
repère PROGRAM AE dans le viseur ou à
l’indication du mode PROGRAM AE sur l’écran
LCD ou dans le viseur.
/ SPORTS: Mode Sports
Prise de vue de mouvements très rapides comme
le golf ou le tennis.
/SUNSETMOON: Mode Crépuscule & Clair
de lune
Prise de vue au coucher du soleil, la nuit, de feux
d’artifice ou d’enseignes au néon.
/LANDSCAPE: Mode Paysage
Prise de vue d’un paysage au travers d’une
fenêtre ou d’une clôture.
Remarques sur la mise au point
• Dans les modes Sports, vous ne pouvez pas
réaliser de gros plans parce que le camescope
est réglé pour la mise au point sur des sujets
situés à une distance moyenne ou éloignés.
• Dans les modes Crépuscule & Clair de lune et
Paysage, le camescope fait uniquement la mise
au point sur des sujets éloignés.
48
Page 49

Using the PROGRAM AE
function
Utilisation de la fonction
PROGRAM AE
Using the PROGRAM AE
function
(1) While the camcorder is in recording or
Standby mode press MENU to display the
menu.
(2) Press v or V to select PGM AE, then press
EXECUTE.
(3) Press v or V to select the desired mode, then
press EXECUTE. If you want to change the
other modes, repeat steps 2 and 3.
The symbol of the selected mode appears on
the LCD screen.
(4) Press MENU to erase the menu display.
Utilisation de la fonction
PROGRAM AE
(1) Lorsque le camescope est en mode
d’enregistrement ou d’attente, appuyez sur
MENU pour afficher le menu.
(2) Appuyez sur v ou V pour sélectionner PGM
AE, puis appuyez sur EXECUTE.
(3) Appuyez sur v ou V pour sélectionner le
mode souhaité, puis appuyez sur EXECUTE.
Si vous voulez modifier les autres modes,
répétez les étapes 2 et 3.
Le symbole du mode sélectionné apparaît sur
l’écran LCD.
(4) Appuyez sur MENU pour faire disparaître
l’affichage du menu.
MENU
EXECUTE
Advanced operations / Opérations avancées
To return to automatic adjustment
mode
Select AUTO in the PGM AE menu. The symbol
of the PROGRAM AE mode disappears.
Note on shutter speed
The shutter speed in Sports lesson mode is from
1/250 to 1/4000.
Note on locking the exposure
If the exposure is locked when using the
PROGRAM AE function, the exposure is
automatically released when the PROGRAM AE
mode is changed.
Note on white balance setting
• In the Sunset & Moon and Landscape modes,
the white balance is automatically set to
outdoor mode.
• If the white balance is set to AUTO, it is
automatically set when using the PROGRAM
AE function.
Pour revenir au mode d’ajustement
automatique
Sélectionnez AUTO dans le menu PGM AE. Le
symbole du mode PROGRAM AE disparaît.
Remarque sur la vitesse d’obturation
La vitesse d’obturation dans le mode Sport va de
1/250 jusqu’à 1/4000.
Remarque sur le verrouillage de l’exposition
Si l’exposition est verrouillée lorsque vous
utilisez la fonction PROGRAM AE, elle est
automatiquement libérée lorsque vous changez
de mode PROGRAM AE.
Remarque sur le réglage de la balance des
blancs
• Dans les modes Crépuscules & Clair de lune et
Paysage, la balance des blancs est
automatiquement réglée sur le mode
d’extérieur.
• Si la balance des blancs est réglée sur AUTO,
elle est automatiquement réglée lors de
l’utilisation de la fonction PROGRAM AE.
49
Page 50

Focusing manually
Mise au point
manuelle
When to use manual focus
In the following cases you should obtain better
results by adjusting the focus manually.
[a] [b] [c] [d]
• Insufficient light [a]
• Subjects with little contrast — walls, sky, etc.
[b]
• Too much brightness behind the subject [c]
• Horizontal stripes [d]
• Subjects through frosted glass
• Subjects beyond nets, etc.
• Bright subject or subject reflecting light
• Shooting a stationary subject when using a
tripod
Quand utiliser la mise au point
manuelle
Une mise au point manuelle donnera de
meilleurs résultats dans les cas suivants.
• Lumière insuffisante [a]
• Sujets faiblement contrastés — murs, ciel, etc.
[b]
• Trop grande luminosité derrière le sujet [c]
• Bandes horizontales [d]
• Sujets à travers une vitre gelée
• Sujets derrière une clôture, etc.
• Sujet lumineux ou réfléchissant
• Enregistrement d’un sujet fixe avec un trépied
50
Page 51

Focusing manually Mise au point manuelle
Focusing manually
When focusing manually, first focus in telephoto
before recording, and then reset the shot length.
(1) Press FOCUS lightly. The f indicator
appears on the LCD secreen or in the
viewfinder.
(2) Turn the focus ring to focus on the subject.
FOCUS
To focus in infinity
Press FOCUS deeply. indicator appears on
the LCD secreen or in the viewfinder.
To return to the autofocus mode
Press FOCUS lightly to turn off f or
indicator.
Shooting in relatively dark places
Shoot at wide-angle after focusing in the
telephoto position.
If lights up
Subject is too close.
Mise au point manuelle
Effectuez la mise au point manuelle en mode
téléobjectif avant d’enregistrer, puis réglez la
longueur focale.
(1) Appuyez légèrement sur FOCUS.
L’indicateur f apparaît sur l’écran LCD ou
dans le viseur.
(2) Tournez la bague de mise au point jusqu’à ce
que le sujet soit net.
Advanced operations / Opérations avancées
21
Pour effectuer une mise au point sur
l’infini
Appuyez plus fort sur FOCUS. L’indicateur
apparaît sur l’écran LCD ou dans le viseur.
Pour revenir au mode de mise au
point automatique
Appuyez légèrement sur FOCUS pour éteindre
l’indicateur f ou .
Prise de vue dans des endroits relativement
sombres
Réalisez une prise de vue à grand angle après
avoir effectué la mise au point en position
téléphoto.
Si s’allume
Vous ne pouvez pas effectuer de mise au point
plus proche.
51
Page 52

Adjusting the white
balance
Réglage de la balance
des blancs
White balance adjustment makes white subjects
look white and allows more natural color balance
for camera recording. Normally white balance is
automatically adjusted. You can obtain better
results by adjusting the white balance manually
when lighting conditions change quickly or when
recording outdoors: e.g., neon signs, fireworks.
Selecting the appropriate mode
Select the appropriate white balance mode under
the following conditions.
Le réglage de la balance des blancs permet
d’avoir des sujets blancs qui apparaissent
vraiment blancs et d’obtenir un meilleur
équilibre des couleurs naturelles. La balance des
blancs est normalement ajustée
automatiquement. Vous pouvez cependant
obtenir de meilleurs résultats en réglant
manuellement la balance des blancs lorsque les
conditions d’éclairage varient rapidement ou que
vous enregistrez en extérieur (p. ex. enseignes au
néon, feux d’artifice).
Sélection du mode approprié
Sélectionnez le mode de balance des blancs dans
les conditions suivantes.
[a] [b] [c]
e Indoor mode
• Lighting condition changes quickly. [a]
• Too bright place such as photography studios
• Under sodium lamps or mercury lamps
w Outdoor mode
• Under a color matching fluorescent lamp
• Recording a sunset/sunrise, just after sunset,
just before sunrise [b], neon signs, or
fireworks [c]
HOLD mode
Recording a monochromatic subject or
background
e En intérieur
• Conditions d’éclairage qui changent
rapidement. [a]
• Milieu trop lumineux, par exemple studio de
photographie
• Lampes au sodium ou au mercure
w En extérieur
• Sous une lampe fluorescente
• Coucher/lever de soleil, prise de vue juste
après le coucher du soleil ou juste avant le
lever du soleil [b], enseignes au néon ou feux
d’artifice [c]
Mode HOLD
Enregistrement de sujet ou d’arrière-plan
monochrome.
52
Page 53

Adjusting the white balance
Réglage de la balance des
blancs
Setting the white balance
(1) Press MENU to display the menu on the LCD
screen during recording or Standby mode.
(2) Press v or V to select WHT BAL, then press
EXECUTE.
(3) Press v or V to select the appropriate white
balance mode, then press EXECUTE.
Each time you press the button, the indicator
changes:
AUTO (no indicator) nHOLD n
w (outdoor) n e (indoor)
(4) Press MENU to erase the menu display.
1
MENU
PGM AE
WHT BAL
D ZOOM
S SHOT
COMMANDER
BEEP
REC LAMP
[MENU]:END
MENU
AUTO
2
Réglage de la balance des
blancs
(1) Appuyez sur MENU pour afficher le menu
sur l’écran LCD en mode d’enregistrement
ou d’attente.
(2) Appuyez sur v ou V pour sélectionner WHT
BAL, puis appuyez sur EXECUTE.
(3) Appuyez sur v ou V pour sélectionner le
mode de balance des blancs approprié, puis
appuyez sur EXECUTE.
Chaque fois que vous appuyez sur cette
touche, l’indicateur change comme suit:
AUTO (pas d’indicateur) nHOLDn w
(extérieur) ne (intérieur)
(4) Appuyez sur MENU pour faire disparaître
l’affichage du menu.
EXECUTE
MENU
PGM AE
WHT BAL
D ZOOM
S SHOT
COMMANDER
BEEP
REC LAMP
[MENU]:END
AUTO
MENU
WHT BAL
[MENU]:END
AUTO
HOLD
OUTDOOR
INDOOR
Advanced operations / Opérations avancées
3
4
MENU
To return to automatic white balance
mode
Select AUTO in step 3, then press EXECUTE.
EXECUTE
MENU
WHT BAL
[MENU]:END
AUTO
HOLD
OUTDOOR
INDOOR
MENU
PGM AE
WHT BAL
D ZOOM
S SHOT
COMMANDER
BEEP
REC LAMP
[MENU]:END
OUTDOOR
Pour revenir au mode de balance des
blancs automatique
Sélectionnez AUTO à l’étape 3, puis appuyez sur
EXECUTE.
53
Page 54

Connecting to a
monitor
Raccordement à un
moniteur
Connect the camcorder to your monitor to watch
the playback picture on the monitor screen.
There are some ways to connect the camcorder to
your monitor. When monitoring the playback
picture by connecting the camcorder to your
monitor, we recommend you to use the hous
current for the power source.
Connecting directly to a
monitor with Video/Audio
input jack
Open the jack cover. With using the supplied
A/V connecting cable, connect the camcorder to
the LINE IN inputs on the monitor or VCR
connected the monitor. When connecting to the
VCR, set the input selector on the VCR to LINE.
Procedure to play back is the same as when
playing back on the LCD screen or in the
viewfinder.
Turn down the volume of the camcorder.
To get higher quality pictures in DV format,
connect the camcorder to your monitor using the
S video connecting cable.
If you are going to connect the camcorder using
the supplied S video connecting cable [a], you do
not need to connect the yellow (video) plug of
the A/V connecting cable [b].
Pour regarder vos vidéogrammes vous pouvez
aussi raccorder le camescope à un moniteur.
Il existe plusieurs méthodes de raccordement du
camescope à un moniteur. Lorsque vous
contrôlez l’image reproduite en raccordant le
camescope à un moniteur, nous vous
recommandons d’utiliser le secteur comme
source d’alimentation électrique.
Raccordement direct à un
moniteur avec prises d’entrée
audio/vidéo
Ouvrez le cache-prises et raccordez le camescope
aux entrées LINE IN du magnétoscope ou
moniteur avec le câble de liaison audio/vidéo
fourni. Quand vous reliez le camescope à un
magnétoscope, réglez le sélecteur d’entrée du
magnétoscope sur LINE.
La procédure de lecture est la même que pour la
lecture sur l’écran LCD ou dans le viseur. Baissez
le volume du camescope.
Pour obtenir des images d’une qualité supérieure
en format DV, raccordez le camescope au
moniteur à l’aide du câble S-Vidéo.
Si vous voulez raccorder le camescope à l’aide du
câble S-Vidéo fourni [a], vous n’avez pas besoin
de brancher la fiche jaune (vidéo) du câble de
liaison A/V [b].
S VIDEO
If your monitor or VCR is a monaural type
Connect the yellow plug of the A/V connecting
cable for video to the monitor or VCR. Connect
only the white or red plug for audio to the
monitor or VCR. If you connect the white plug,
the sound is L (left) signal. If you connect the red
plug, the sound is R (right) signal.
54
[a]
[b]
:
Signal flow / Sens du signal
Si votre magnétoscope ou moniteur est de
type monaural
Branchez la fiche jaune du câble de liaison
A/V pour le signal vidéo sur le magnétoscope ou
le moniteur. Branchez uniquement la fiche
blanche ou rouge pour le signal audio sur le
magnétoscope ou le moniteur. Si vous branchez
la fiche blanche, le son correspond au signal L
(gauche). Si vous branchez la fiche rouge, le son
correspond au signal R (droit).
Page 55

Displaying recording
data – data code
function
Affichage des données
d’enregistrement —
Code de données
You can display recording data (date/time or
various settings when recorded) on the LCD
screen or in the viewfinder during playback
(Data Code). The Data Code is also displayed on
the monitor.
(1) Press MENU to display the menu on the LCD
screen.
(2) Press v or V to select DATA CODE, then
press EXECUTE.
(3) Press v or V to select DATE/CAM or DATE,
then press EXECUTE.
(4) Press MENU to erase the menu display.
MENU
COMMANDER
1
4
MENU
MENU
BEEP
AUDIO MIX
DATA CODE
LCD COLOR
[MENU]:END
VTR4
Vous pouvez afficher les données
d’enregistrement (date/heure ou différents
paramètres s’ils ont été enregistrés) sur l’écran
LCD ou dans le viseur en cours de lecture (Code
de données). Le Code de données s’affiche
également sur le moniteur.
(1) Appuyez sur MENU pour afficher le menu
sur l’écran LCD.
(2) Appuyez sur v ou V pour sélectionner DATA
CODE, puis appuyez sur EXECUTE.
(3) Appuyez sur v ou V pour sélectionner
DATE/CAM ou DATE, puis appuyez sur
EXECUTE.
(4) Appuyez sur MENU pour faire disparaître
l’affichage du menu.
2
EXECUTE
MENU
COMMANDER
BEEP
AUDIO MIX
DATA CODE
LCD COLOR
[MENU]:END
DATE/CAM
MENU
DATA CODE
[MENU]:END
EXECUTE
DATE/CAM
DATE
3
MENU
DATA CODE
[MENU]:END
DATE/CAM
DATE
MENU
COMMANDER
BEEP
AUDIO MIX
DATA CODE
LCD COLOR
[MENU]:END
DATE
Advanced operations / Opérations avancées
To display recording data during
playback
Press DATA CODE on the Remote Commander.
Each time you press the button, the indicator
changes as follows:
When DATE/CAM is selected in the menu
system: date n various settings (AE LOCK,
white balance, gain, shutter speed, aperture
value) n no indicator.
When DATE is selected in the menu system:
date n no indicator.
When bars (--:--:--) appear
• A blank portion of the tape is being played
back.
• The tape was recorded by a camcorder without
having date and time set.
• The tape is unreadable due to tape damage or
noise.
Pour afficher les données
d’enregistrement en cours de lecture
Appuyez sur DATA CODE sur la télécommande.
Chaque fois que vous appuyez sur cette touche,
l’indicateur change comme suit:
Lorsque DATE/CAM est sélectionné dans le
menu: date n différents paramètres (AE LOCK,
balance des blancs, gain, vitesse d’obturation,
valeur d’ouverture) n aucune indication.
Lorsque DATE est sélectionné dans le menu: date
n aucune indication.
Lorsque les barres (--:--:--) apparaissent
• Une portion vierge de la cassette est
reproduite.
• La cassette a été enregistrée sur un camescope
ne disposant pas de la fonction de date et
d’heure.
• La cassette est illisible en raison de la mauvaise
qualité de la bande ou de parasites.
55
Page 56

Returning to a preregistered position
Pour revenir à un
endroit prédéfini
Using the Remote Commander, you can easily go
back to the desired point on a tape after
playback.
(1) During playback, press ZERO SET MEMORY
at the point you later want to locate. The
counter shows “0:00:00” and “ZERO SET
MEMORY” appears on the LCD screen or in
the viewfinder.
(2) Press p when you want to stop playback.
(3) Press 0 to rewind or press ) to fast-
forward the tape to the counter’s zero point.
The tape stops automatically when the
counter reaches approximately zero. “ZERO
SET MEMORY” disappears and the time
code appears.
(4) Press ·.
ZERO SET
MEMORY
1
STOP
24
0:00:00
0:12:34
ZERO SET
MEMORY
Avec la télécommande, vous pouvez revenir
facilement à un endroit déterminé d’une cassette
après la lecture.
(1) En cours de lecture, appuyez sur ZERO SET
MEMORY à l’endroit que vous désirez
retrouver ultérieurement. Le compteur
indique “0:00:00” et “ZERO SET MEMORY”
apparaît sur l’écran LCD ou dans le viseur.
(2) Appuyez sur p lorsque vous souhaitez
arrêter la lecture.
(3) Appuyez sur 0 pour rembobiner ou sur
) pour faire avancer rapidement la bande
jusqu’au point zéro du compteur. La bande
s’arrête automatiquement lorsque le
compteur a atteint approximativement le
point zéro. “ZERO SET MEMORY” disparaît
et le code de temps apparaît.
(4) Appuyez sur ·.
3
REW
FF
PLAY
Note on the tape counter
There may be a discrepancy of several seconds
from the time code.
Notes on ZERO SET MEMORY
• When you press ZERO SET MEMORY, the
counter’s zero point is memorized. Press
ZERO SET MEMORY again before step 3 to
cancel the memory .
• Zero set memory may not function when there
is a blank portion between pictures on a tape.
• Zero set memory functions in recording
standby mode.
56
Remarque sur le compteur de bande
Il peut y avoir un décalage de plusieurs secondes
par rapport à la durée réelle.
Remarques sur ZERO SET MEMORY
• Lorsque vous appuyez sur ZERO SET
MEMORY, le point zéro du compteur est
mémorisé. Appuyez de nouveau sur ZERO
SET MEMORY avant l’étape 3 pour annuler le
point mémorisé.
• Il est possible que cette fonction n’opère pas
lorsqu’il y a une portion vierge entre les
images d’une cassette.
• Vous pouvez utiliser cette fonction en mode
d’attente d’enregistrement.
Page 57

Locating the
beginning of each
scene
Localisation du début
de chaque scène
You can search for the beginning of the recorded
picture with the date using the Remote
Commander. You can also search for the photorecorded pictures only in the backward and
forward direction from the preset position.
(1) Make sure that the POWER switch is set to
VTR.
(2) Press SEARCH MODE on the Remote
Commander to select date search (search
with the date) or photo search (search the
photo-recorded pictures only).
(3) Press + for upward or = for downward
on the Remote Commander to select the
desired picture.
Each time you press + or =, the
camcorder searches for the next scene.
SEARCH
2
MODE
3
Vous pouvez localiser le début d’une scène en
recherchant la date correspondante à l’aide de la
télécommande. Vous pouvez aussi localiser une
image enregistrée en mode Photo, à partir de la
position définie, en faisant une recherche avant
ou arrière.
(1) Assurez-vous que le commutateur POWER
est sur VTR.
(2) Appuyez sur SEARCH MODE de la
télécommande pour sélectionner la recherche
de la date (recherche par la date) ou la
recherche de photo (recherche d’images
enregistrées en mode PHOTO seulement).
(3) Appuyez sur + et = de la
télécommande pour rechercher vers l’avant
ou l’arrière respectivement et sélectionner
l’image souhaitée.
Chaque fois que vous appuyez sur + ou
=, le camescope recherche la scène
suivante.
POWER
1
VTR
OFF
CAM
CORDER
PHOTO
Advanced operations / Opérations avancées
To stop searching
Press p STOP.
When you use a recorded tape which has
blank portions between pictures
The camcorder may not search for the recorded
picture or data may not be stored.
Note on cassette memory
The cassette memory function cannot be used
with this camcorder.
Notes on searching
• The camcorder may not search if the beginning
of the search portion is too close to the tape
head position.
• When you use date search, the camcorder
plays back the search picture, and when you
use photo search, the camcorder enters
playback pause at the point.
Pour arrêter la recherche
Appuyez sur p STOP.
Lorsque vous utilisez une cassette enregistrée
qui contient des portions vierges entre les
images
Il est possible que le camescope ne ne puisse pas
localiser l’image enregistrée ou que les données
ne soient pas conservées.
Remarque sur de la mémoire de la cassette
La fonction de mémoire de cassette ne peut pas
être utilisée avec ce camescope.
Remarques sur de la recherche
• Il est possible que le camescope n’effectue pas
la recherche si le début du passage recherché
est trop proche de la tête de lecture.
• Lorsque vous utilisez la recherche par date, le
camescope reproduit l’image recherchée et
lorsque vous utilisez la recherche de photo, le
camescope passe en mode de pause de lecture
à cet endroit.
57
Page 58

Editing onto another
tape
Montage sur une
autre cassette
You can create your own video programs by
editing with any other VCRs that have DV IN or
audio/video inputs. You can edit with little
deterioration of picture and sound quality when
using the DV connecting cable (not supplied).
Before editing
To connect using the DV connecting
cable
Connect DV IN/OUT of the camcorder and the
DV IN (or DV IN/OUT) jack of the VCR using
the VMC-2DV DV connecting cable (not
supplied).
You can use this camcorder either as a player or
as a recorder without reconnecting the DV
connecting cable. The direction of signal flow
changes automatically.
When using as a recorder, make sure DV IN
appears on the LCD screen or in the viewfinder.
DV IN may also appear on the connected VCR.
Vous pouvez créer vos propres vidéogrammes
en faisant une copie sur un autre magnétoscope
équipé d’entrées DV IN ou vidéo/audio. Le
montage peut se faire sans détérioration de la
qualité d’image et de la qualité sonore en
utilisant un câble de liaison DV (non fourni).
Avant le montage
Pour raccorder le camescope à l’aide
d’un câble de liaison DV
Raccordez la prise DV IN/OUT du camescope à
la prise DV IN (ou DV IN/OUT) du
magnétoscope à l’aide du câble de liaison DV
VMC-2DV (non fourni).
Vous pouvez utiliser ce camescope comme
lecteur ou comme enregistreur sans avoir à
changer les liaisons, car le sens du signal change
automatiquement.
Quand vous utilisez le camescope comme
enregistreur, assurez-vous que DV IN apparaît
sur l’écran LCD ou dans le viseur. DV IN peut
aussi apparaître sur le magnétoscope raccordé.
Recorder with DV IN/
Magnétoscope avec entrée
DV IN
DV IN/OUT
:
Signal flow / Sens du signal
About DV connecting cable
You can record picture, sound and system data at
the same time on the DV products by using the
DV connecting cable only.
58
S VIDEO LANC
DV
DV IN
A propos du câble de liaison DV
Vous pouvez enregistrer à la fois l’image, le son
et les données système sur les appareils DV à
condition d’utiliser le câble de liaison DV.
Page 59

Editing onto another tape
Montage sur une autre
cassette
To connect the VCR without DV IN
jack
Connect the camcorder to the VCR using the
supplied S video connecting cable [a] and A/V
connecting cable [b]. Set the input selector on
the VCR to LINE.
VCR
:
Signal flow/ Sens du signal
Starting editing
(1) Insert a blank tape (or a tape you want to
record over) into the VCR, and insert your
recorded tape into the camcorder.
(2) Play back the recorded tape on the
camcorder until you locate the point where
you want to start editing, then press P to set
the camcorder in playback pause mode.
(3) On the VCR, locate the recording start point
and set the VCR in recording pause mode.
(4) Press P on the camcorder and VCR
simultaneously to start editing.
To edit more scenes
Repeat steps 2 to 4.
To stop editing
Press p on both the camcorder and the VCR.
Pour raccorder un magnétoscope
sans prise DV IN
Raccordez le camescope au magnétoscope en
utilisant le câble de liaison S-vidéo [a] et le câble
de liaison audio/vidéo [b]. Réglez le sélecteur
d’entrée du magnétoscope sur LINE.
Advanced operations / Opérations avancées
[a]
[b]
Début du montage
(1) Introduisez une cassette vierge (ou une
cassette que vous souhaitez réenregistrer)
dans le magnétoscope. Introduisez ensuite la
cassette enregistrée dans le camescope.
(2) Lisez la cassette enregistrée sur le camescope
jusqu’à ce que vous trouviez l’endroit où
vous souhaitez commencer le montage.
Appuyez ensuite sur P pour mettre le
camescope en mode de pause de lecture.
(3) Sur le magnétoscope, localisez le point où
l’enregistrement doit commencer et mettez le
magnétoscope en mode de pause
d’enregistrement.
(4) Appuyez simultanément sur les touches P
du camescope et du magnétoscope pour
commencer le montage.
Pour monter d’autres scènes
Répétez les étapes 2 à 4.
Pour arrêter le montage
Appuyez sur les touches STOP p du camescope
et du magnétoscope.
59
Page 60

Editing onto another tape
Montage sur une autre
cassette
Notes on editing when using the DV
Editing onto another tape
connecting cable
• When this camcorder is used as a recorder, the
player’s format must be DVCAM.
• Depending on signal conditions, DVCAMformatted tapes may not be able to edit using
the DV connecting cable. Edit using the
supplied A/V connecting cable in this case.
• You can connect one VCR only.
• When using this camcorder as a recorder, only
the recording buttons on the Remote
Commander can be used. Press both red and
black buttons simultaneously. When using
this camcorder as a recorder, the pictures on a
monitor may be uneven, however, these on the
LCD screen, in the viewfinder or recorded
pictures are not affected.
• If you edit playback pause picture, the edited
picture becomes rough.
Notes on editing when using the A/V
connecting cable
• Press DATA CODE button to turn off the
display indicators. Otherwise, the indicators
will be recorded on the tape.
• If your VCR is a monaural type, connect the
yellow plug of the A/V connecting cable for
video to the VCR. Connect only the white or
red plug for audio to the VCR. If you connect
the white plug, the sound is L (left) signal. If
you connect the red plug, the sound is R (right)
signal.
• If your video equipment has the audio input
impedance selector, set it to high impedance
side. You may not be able to edit at low
impedance. Refer to the instruction manual of
your video equipment as well.
• You can edit precisely by connecting VMCLM7 adaptor (not supplied) and a LANC cable
to this camcorder and other video equipment
having fine synchro-editing function, using
this camcorder as a player.
A propos du montage avec le câble de liaison
DV
• Quand le camescope est utilisé comme
enregistreur, le lecteur doit être de format
DVCAM.
• Selon l’état du signal, vous ne pourrez peutêtre pas copier des cassettes formatées en
DVCAM quand vous utilisez le câble de
liaison DV. Le cas échéant, utilisez le câble de
liaison A/V fourni.
• Vous ne pouvez raccorder qu’un seul
magnétoscope.
• Lorsque vous utilisez ce camescope comme
enregistreur, seules les touches
d’enregistrement de la télécommande peuvent
être utilisées. Appuyez simultanément sur les
touches rouge et noire. Lorsque vous utilisez
ce camescope comme enregistreur, il est
possible que les images du moniteur soient
irrégulières; celles apparaissant sur l’écran
LCD ou dans le viseur n’en sont cependant pas
affectées.
• Si vous copiez une image en pause de lecture,
l’image enregistrée sera de moins bonne
qualité.
A propos du montage avec le câble de liaison
A/V
• Appuyez sur la touche DATA CODE pour
éteindre les indicateurs affichés. Sinon, les
indicateurs seront enregistrés sur la bande.
• Si votre magnétoscope est de type
monophonique, branchez la fiche jaune du
câble de liaison A/V pour le signal vidéo sur le
magnétoscope. Branchez uniquement la fiche
blanche ou rouge pour le signal audio. Si vous
branchez la fiche blanche, le son correspond au
signal L (gauche). Si vous branchez la fiche
rouge, le son signal R (droit).
• Si l’appareil vidéo que vous utilisez a un
sélecteur d’impédance audio, réglez-le sur
l’impédance la plus élevée. Le montage ne sera
peut-être pas possible à basse impédance.
Reportez-vous également au mode d’emploi
de l’appareil vidéo.
• Vous pouvez effectuer un montage précis en
raccordant l’adaptateur VMC-LM7 (non
fourni) et un câble LANC à ce camescope et à
un autre appareil vidéo disposant de la
fonction de montage synchronisé fin, en
utilisant ce camescope comme lecteur.
60
Page 61

Replacing recording
on a tape – insert
editing
Remplacement d’un
enregistrement sur une cassette
– montage par insertion
You can insert a new scene from a VCR onto your
originally recorded tape by specifying starting
and ending points.
Connection is the same as in “To connect using
the DV connecting cable” on page 58. In
recording and recording pause mode, DV IN/
OUT jack automatically works as input jack.
(1) While pressing the small green button on the
POWER switch, set it to VTR.
(2) On the VCR, locate the start point to be
inserted and set it to playback pause mode.
(3) On the camcorder, press · to set it to
playback mode, and then locate the point
where the insert should end by pressing 0
or ). Then press P to set it to playback
pause mode.
(4) Press ZERO SET MEMORY on the Remote
Commander. The ZERO SET MEMORY
indicator flashes and the end point of the
insert is stored in memory.
(5) On the camcorder, locate the point where the
insert should begin by pressing 0, then
press r REC on the Remote Commander to
set it to recording pause mode.
(6) Press P on the camcorder and the VCR
simultaneously to start insert editing.
The insert editing stops automatically near the
counter's zero point. Press p to set the
camcorder to stop mode.
To change the end point
Press ZERO SET MEMORY on the Remote
Commander so that the ZERO SET MEMORY
indicator disappears and begin from step 3.
Vous pouvez insérer une nouvelle scène d’un
magnétoscope sur une cassette déjà enregistrée
en spécifiant les points de départ et de fin.
Le raccordement est le même que dans “Pour
raccorder le camescope à l’aide d’un câble de
liaison DV” à la page 58. En mode
d’enregistrement et de pause d’enregistrement, la
prise DV IN/OUT fonctionne automatiquement
comme prise d’entrée.
(1) Tout en appuyant sur le petit bouton vert du
commutateur POWER, mettez-le sur VTR.
(2) Sur le magnétoscope, localisez le point où
l’insertion doit commencer et mettez le
magnétoscope en mode de pause de lecture.
(3) Sur le camescope, appuyez sur · pour le
mettre en mode de lecture, puis localisez le
point où l’insertion doit se terminer en
appuyant sur 0 ou ). Appuyez ensuite
sur P pour mettre le camescope en mode de
pause de lecture.
(4) Appuyez sur ZERO SET MEMORY de la
télécommande. L’indicateur ZERO SET
MEMORY clignote et le point de fin de
l’insertion est mémorisé.
(5) Sur le camescope, localisez le point où
l’insertion doit commencer en appuyant sur
0, puis appuyez sur r REC de la
télécommande pour mettre le camescope en
mode de pause d’enregistrement.
(6) Appuyez simultanément sur P du
camescope et du magnétoscope pour
commencer le montage par insertion.
Le montage par insertion s’arrête
automatiquement près du point zéro du
compteur. Appuyez sur p pour mettre le
camescope en mode d’arrêt.
Advanced operations / Opérations avancées
To record without setting the end point
Skip steps 3 and 4. Press p when stopping insert
editing.
Notes on the inserted picture
• The picture may be distorted at the end of the
inserted portion when it is played back.
• The picture and sound recorded on the portion
where you insert a new scene will be erased
when you insert a new scene.
• If you insert a new scene (picture and sound)
on a tape recorded by other camcorder
(including DSR-PD1), the picture and sound
quality may become worse.
Pour modifier le point de fin
Appuyez sur ZERO SET MEMORY de la
télécommande de sorte que l’indicateur ZERO
SET MEMORY disparaisse et commencez à partir
de l’étape 3.
Pour enregistrer sans définir de point de fin
Passez les étapes 3 et 4. Appuyez sur p pour
arrêter le montage par insertion.
Remarques sur l’image insérée
• Il est possible que l’image soit déformée à la
fin du passage inséré lorsqu’elle est reproduite.
• L’image et le son enregistrés où vous insérez
une nouvelle scène seront effacés.
• Si vous insérez une nouvelle scène (image et
son) sur une cassette enregistrée sur un autre
camescope (notamment sur un autre DSRPD1), la qualité du son et de l’image risque
d’être moins bonne.
61
Page 62

Audio dubbing
Doublage audio
You can record an audio sound to add to the
original sound on a tape by connecting audio
equipment or a microphone. If you use the
VMC-LM7 adaptor (not supplied) to connect the
audio equipment, you can add a sound on your
recorded tape by specifying starting and ending
points. The original sound will not be erased.
You can only operate with the Remote
Commander.
VMC-LM7 adaptor (not
supplied)
Adaptateur VMC-LM7
(non fourni)
RK-G128 connecting cable (not supplied)
Câble de liaison RK-G128 (non fourni)
:
Signal flow/ Sens du signal
When using an external microphone, connect it
to the MIC jack of the VMC-LM7 adaptor.
If you record the sound using the built-in
microphone, you do not need to connect the
VMC-LM7 adaptor.
Notes on audio dubbing
• A new sound can be recorded only on a
DVCAM-formatted tape already recorded in
the Fs 32k (12-bit) mode (32 kHz).
• When an external microphone is not
connected, the recording will be made through
the built-in microphone of the camcorder.
• If you add a new sound on a tape recorded by
other camcorder (including DSR-PD1), the
sound quality may become worse.
Vous pouvez enregistrer un son pour compléter
le son original d’une cassette en raccordant un
appareil audio ou un microphone. Si vous
utilisez l’adaptateur VMC-LM7 (non fourni) pour
raccorder un appareil audio, vous pouvez
enregistrer un son sur votre cassette enregistrée
en spécifiant les points de départ et de fin. Le son
original ne sera pas effacé.
Cette fonction n’est opérationnelle qu’à partir de
la télécommande.
Audio equipment
Appareil audio
LINE OUT
Lorsque vous utilisez un microphone extérieur,
branchez-le sur la prise MIC de l’adaptateur
VMC-LM7.
Si vous enregistrez le son à l’aide du microphone
intégré, il n’est pas nécessaire de raccorder
l’adaptateur VMC-LM7.
Remarques sur le doublage audio
• Un nouveau son ne peut être enregistré que
sur une cassette formatée en DVCAM et déjà
enregistrée en mode Fs 32k (12 bits) (32 kHz).
• Si aucun microphone externe n’est raccordé,
l’enregistrement se fera via le microphone
intégré du camescope.
• Si vous ajoutez un nouveau son à une cassette
enregistrée par un autre camescope (y compris
le DSR-PD1), il est possible que la qualité
sonore soit moins bonne.
62
Page 63

Audio dubbing Doublage audio
Adding an audio sound on a
recorded tape
(1) Insert your recorded tape into the camcorder.
(2) While pressing the small green button on the
POWER switch, set it to VTR.
(3) On the camcorder, press · to set it to
playback mode, and then locate the point
where the recording ends by pressing 0 or
). Then press P to set it to playback pause
mode.
(4) Press ZERO SET MEMORY on the Remote
Commander. The ZERO SET MEMORY
indicator flashes and the end point of the
recording is stored in memory.
(5) On the camcorder, locate the point where the
recording should begin by pressing 0 or
). Then press P to set it to playback pause
mode.
(6) Press AUDIO DUB on the Remote
Commander.
(7) Press P on the camcorder and at the same
time start playing back the audio you want to
record. The new sound will be recorded in
stereo 2. The recorded sound in stereo 1 is
not heard.
The recording stops automatically near the
counter's zero point. Press p to set the
camcorder to stop mode.
You can add the sound not using zero set
memory function.
To change the end point
Press ZERO SET MEMORY on the Remote
Commander so that the ZERO SET MEMORY
indicator disappears and begin from step 3.
To play back the new recorded sound
Adjust the balance between the original sound
(stereo 1) and the new sound (stereo 2) by
selecting AUDIO MIX in menu system.
Enregistrement d’un son sur
une cassette enregistrée
(1) Insérez la cassette enregistrée dans le
camescope.
(2) En appuyant sur le petit bouton vert du
commutateur POWER, mettez-le sur VTR.
(3) Sur le camescope, appuyez sur · pour
mettre le camescope en mode de lecture, puis
localisez le point où l’enregistrement doit se
terminer en appuyant sur 0 ou ).
Appuyez ensuite sur P pour passer en mode
de pause de lecture.
(4) Appuyez sur ZERO SET MEMORY de la
télécommande. L’indicateur ZERO SET
MEMORY clignote et le point correspondant
à la fin de l’enregistrement est mémorisé.
(5) Sur le camescope, localisez le point où
l’enregistrement doit commencer en
appuyant sur 0 ou ). Appuyez ensuite
sur P pour passer en mode de pause de
lecture.
(6) Appuyez sur AUDIO DUB de la
télécommande.
(7) Appuyez sur P du camescope et commencez
en même temps la lecture du son que vous
voulez enregistrer. Le nouveau son sera
enregistré en stéréo 2. Le son enregistré en
stéréo 1 n’est pas audible.
L’enregistrement s’arrête automatiquement à
proximité du point zéro du compteur. Appuyez
sur p pour mettre le camescope en mode d’arrêt.
Vous pouvez enregistrer le son sans utiliser la
fonction de compteur.
Pour modifier le point de fin
Appuyez sur ZERO SET MEMORY de la
télécommande de sorte que l’indicateur ZERO
SET MEMORY disparaisse et commencez à
l’étape 3.
Pour reproduire le nouveau son
enregistré
Réglez la balance entre le son original (stéréo 1)
et le nouveau son (stéréo 2) en sélectionnant
AUDIO MIX dans le menu.
Advanced operations / Opérations avancées
63
Page 64

Additional information
Informations complémentaires
Charging the vanadiumlithium battery in the
camcorder
Your camcorder is supplied with a vanadiumlithium battery installed so as to retain the date
and time, etc., regardless of the setting of the
POWER switch. The vanadium-lithium battery
is always charged as long as you are using the
camcorder. The battery, however, will get
discharged gradually if you do not use the
camcorder. It will be completely discharged in
about 1/2 year if you do not use the camcorder at
all. Even if the vanadium-lithium battery is not
charged, it will not affect the camcorder
operation. To retain the date and time, etc.,
charge the battery if the battery is discharged.
The following are charging methods:
• Connect the camcorder to mains using the ACV100 AC power adaptor, and leave the
camcorder with the POWER switch turned off
for more than 24 hours.
• Or, install the fully charged battery pack in the
camcorder, and leave the camcorder with the
POWER switch turned off for more than 24
hours.
Charge de la batterie
au vanadium-lithium
sur le camescope
Le camescope contient une batterie au vanadiumlithium qui fait fonctionner l’horloge interne
(date et heure) même lorsque le camescope est
hors tension. La batterie au vanadium-lithium se
recharge toujours quand vous utilisez le
camescope, mais elle se décharge peu à peu si
vous n’utilisez pas le camescope pendant un
certain temps. Si vous n’utilisez pas du tout le
camescope pendant 6 mois, elle sera
complètement déchargée. Le camescope
fonctionne toutefois normalement même si la
batterie au vanadium-lithium est déchargée.
Pour conserver la date et l’heure, ou d’autres
réglages, chargez la batterie quand elle est vide.
Vous pouvez recharger la batterie de deux
façons:
• Raccordez le camescope à une prise secteur au
moyen de l’adaptateur secteur AC-V100 et
laissez le camescope branché pendant plus de
24 heures avec le commutateur POWER sur
OFF.
• Installez la batterie rechargeable complètement
chargée sur le camescope et laissez le
camescope avec le commutateur POWER sur
OFF pendant plus de 24 heures.
64
Page 65

Resetting the date
and time
Réglage de la date et
de l’heure
The date and time are set at the factory. Set the
time according to your local time. If you do not
use the camcorder for about a year, the date and
time settings may be released (bars may appear)
because the vanadium-lithium battery installed
in the camcorder will have been discharged. In
this case, first charge the vanadium-lithium
battery, then reset the date and time.
(1) While pressing the small green button on the
POWER switch, set it to CAMCORDER.
(2) Press MENU to display the menu on the LCD
screen.
(3) Select CLOCK SET, then press EXECUTE.
(4) Press v or V to adjust the year, and then press
EXECUTE.
(5) Set the month, day, hour and minutes by
pressing v or V and pressing EXECUTE.
(6) Press MENU to erase the menu display.
1
POWER
VTR
OFF
CAM
CORDER
PHOTO
2,6
MENU
La date et l’heure sont réglées en usine. Réglez
l’horloge sur l’heure de votre pays. Si toutefois
vous n’utilisez pas le camescope pendant une
période d’une année, la date et l’heure risquent
de disparaître (apparition de tirets) car la batterie
au vanadium-lithium en place dans le camescope
est déchargée. Dans ce cas, chargez la batterie au
vanadium-lithium avant de régler la date et
l’heure.
(1) Tout en appuyant sur le petit bouton vert du
commutateur POWER, réglez celui-ci sur
CAMCORDER.
(2) Appuyez sur MENU pour afficher le menu
sur l’écran LCD.
(3) Sélectionnez CLOCK SET et appuyez sur
EXECUTE.
(4) Appuyez sur v ou V pour régler l’année et
appuyez sur EXECUTE.
(5) Réglez le mois, le jour, l’heure et les minutes
en appuyant sur v ou V et sur EXECUTE.
(6) Appuyez sur MENU pour quitter l’écran de
menu.
MENU
CLOCK SET
[MENU]:END
EXECUTE
1997 JAN 1
12 00 AM
3
MENU
D ZOOM
S SHOT
COMMANDER
BEEP
REC LAMP
LCD COLOR
CLOCK SET
[MENU]:END
JAN 1 1997
12:00:00 AM
Additional information /Informations complémentaires
1997 JAN 1
12 00 AM
1998 JAN 1
12 00 AM
EXECUTE
1998 JAN 1
12 00 AM
54
1998 JUL 1
12 00 AM
EXECUTE EXECUTE EXECUTE
1998 JUL 4
12 00 AM
1998 JUL 4
5 00 PM
65
Page 66

Resetting the date and time
Réglage de la date et de
l’heure
To correct the date and time setting
Repeat steps 2 to 5.
The year indicators changes as follows:
1997 1998 20292000
Note on the time indicator
The internal clock of this camcorder operates on
a 12-hour cycle.
• 12:00 AM stands for midnight.
• 12:00 PM stands for noon.
... 1997 1998 20292000
...
Pour rectifier la date et l’heure
Répétez les étapes 2 à 5.
L’indication de l’année change ainsi:
...
...
Remarque sur l’indication de l’heure
L’horloge interne de ce camescope fonctionne
suivant un cycle de 12 heures.
• 12:00 AM désigne midi
• 12:00 PM désigne minuit
66
Page 67

Compatibility of
DVCAM and DV formats
Compatibilité entre les
formats DVCAM et DV
DVCAM format is developed as a more reliable
and higher end format than consumer DV
format. Here are explained about DVCAM and
DV formats: the differences, compatibility, and
limitations on editing.
Differences between DVCAM and
DV formats
Item
Paramètre
Track pitch
Pas des pistes
Audio sampling
frequency 12 bit : 32 kHz 12 bit : 32 kHz
Fréquence 16 bit : 48 kHz 16 bit : 32 kHz, 44.1 kHz, 48 kHz
d’échantillonnage audio
Audio recording mode
Mode d’enregistrement Mode verrouillé Mode non verrouillé
1)
audio
Time code Drop frame system or Drop frame system only
Code de temps Système d’image annulée ou Système d’image annulée seulement
1)
There are two modes for audio recording, lock
mode and unlock mode. In lock mode, the
sampling frequencies of audio and video are
synchronized. In unlock mode, which
consumer DV format adopts, the two sampling
frequencies are independent. Therefore, lock
mode is more effective than unlock mode in
digital processing and smooth transition
during audio editing.
1)
DVCAM DV
15 µm 10 µm
Lock mode Unlock mode
Non-drop frame system
(SMPTE time code)
système d’image non annulée
(Code de temps SMPTE)
Le format DVCAM est un nouveau format plus
fiable et de meilleure qualité que le format DV
grand public. Voici quelques informations
concernant les formats DVCAM et DV, en
particulier les différences, la compatibilité et les
limites lors du montage.
Différences entre les formats DVCAM
et DV
1)
Il y a deux modes pour l’enregistrement audio,
le mode verrouillé ou le mode non verrouillé.
Dans le mode verrouillé, les fréquences
d’échantillonnage du son et de l’image sont
synchronisées. Dans le mode non verrouillé,
mode adopté par le format DV grand public,
les deux fréquences d’échantillonnage sont
indépendantes. Ainsi le mode verrouillé est
plus efficace que le mode non verrouillé dans
le traitement numérique du signal et permet
des transitions plus douces lors de la copie
d’une bande son.
Additional information /Informations complémentaires
67
Page 68

Compatibility of DVCAM and
DV formats
Compatibilité entre les
formats DVCAM et DV
DVCAM and DV cassettes
Both DVCAM and DV cassettes can be used on
DVCAM or DV video equipment. The recording
format of picture is defined according to
recorder’s format as described below.
Recorder’s format Cassette’s format Recording format
Format de l’enregistreur Format de la cassette Format de l’enregistrement
DVCAM DVCAM DVCAM
DV DVCAM
DV DVCAM DV
DV DV
This camcorder complies with DVCAM format.
Though DV cassettes can be used for recording,
we recommend you to use DVCAM cassettes to
get the most out of high reliability of DVCAM
format. The recording time of DV cassettes is 2/3
shorter than that indicated on the DV cassettes.
Compatibility on playback
Some tapes cannot be played back on DVCAM or
DV video equipment.
Tape On DV video equipment On DVCAM video equipment
Cassette Appareil vidéo DV Appareil vidéo DVCAM
DV-formatted Can be played back Can be played back
Formatée DV Lecture possible Lecture possible
DVCAM-formatted Some equipments may be Can be played back
able to play back
Formatée DVCAM Lecture possible sur certains Lecture possible
appareils
Cassettes DVCAM et DV
Les cassettes DVCAM et DV peuvent être
utilisées avec des appareils DVCAM ou DV. Le
format d’enregistrement de l’image est déterminé
par le format de l’enregistreur, tel qu’il apparaît
ci-dessous.
Ce camescope est conforme au format DVCAM.
Bien que des cassettes DV puissent être utilisées
pour l’enregistrement, il est conseillé d’utiliser
des cassettes DVCAM pour tirer le meilleur parti
de la haute fiabilité du format DVCAM. Le temps
d’enregistrement des cassettes DV ne correspond
en outre qu’au 2/3 du temps indiqué sur les
cassettes DV.
Compatibilité lors de la lecture
Certaines cassettes ne peuvent pas être
reproduites sur les appareils vidéo DVCAM ou
DV.
(only when recorded in SP mode)
(seulement si la cassette est
enregistrée en mode SP)
68
Page 69

Compatibility of DVCAM and
DV formats
Compatibilité entre les
formats DVCAM et DV
Compatibility on editing using DV
connectors
When this camcorder is connected to other
DVCAM or DV video equipment using DV
connectors, the recording format of edited tapes
is defined according to recorder’s format as
described below.
Compatibilité lors du montage
quand les prises DV sont utilisées
Quand le camescope est raccordé à un autre
appareil vidéo DVCAM ou DV par les prises DV,
le format d’enregistrement des cassettes copiées
est déterminé par l’enregistreur, tel qu’il apparaît
ci-dessous.
Source tape Player’s format Recorder’s format Recording format
Cassette source Format du lecteur Format de Format de
l’enregistreur l’enregistrement
DVCAM-formatted
Formatée DVCAM
DVCAM-formatted
Formatée DVCAM
DVCAM-formatted
Formatée DVCAM
DVCAM-formatted
Formatée DVCAM
DV-formatted Not editable
Formatée DV Copie impossible
DV-formatted
Formatée DV
DV-formatted Not editable
Formatée DV Copie impossible
DV-formatted
Formatée DV
1)
1)
DVCAM DVCAM DVCAM
DVCAM DV DV
3)
DV
DV
3)
DVCAM DVCAM
DV DV
2)
2)
5)
DVCAM DVCAM
4)
4)
DVCAM DV DV
DV DVCAM
DV DV DV
Additional information /Informations complémentaires
1)
Depending on signal conditions of the source
tape, you may not be able to edit the tape
using the DV connectors.
2)
Audio recording mode of the edited tape is
lock mode.
3)
Some DV video equipment may be able to play
back a DVCAM-formatted tape. Even if the
tape is played back, contents of the playback
cannot be guaranteed.
4)
DV-formatted tapes recorded in SP mode only
can be used as source tapes.
5)
Depending on model of video equipment, you
may not be able to edit.
1)
Selon l’état du signal de la cassette source,
vous ne pourrez peut-être pas copier la
cassette quand vous utilisez les prises DV.
2)
Le mode d’enregistrement du son de la
cassette copiée est le mode verrouillé.
3)
Certains appareils DV peuvent reproduire les
cassettes formatées en DVCAM, mais il n’est
pas possible de garantir la qualité du contenu à
la lecture.
4)
Seules les cassettes formatées en DV et
enregistrées en mode SP peuvent être utilisées
comme cassettes source.
5)
Avec certains modèles d’appareils vidéo le
montage peut être impossible.
69
Page 70

Compatibility of DVCAM and
DV formats
Compatibilité entre les
formats DVCAM et DV
Limitations on editing
You will find the following limitations when
editing.
• Due to the difference of a track pitch, you
cannot record or edit on DV-formatted tapes
using DVCAM video equipment.
• Depending on signal conditions, you may not
be able to record or edit on DVCAM-formatted
tapes.
In these cases, do the following:
• Edit using audio/video jacks.
• Dub a DV-formatted tape using audio/video
jacks, then use the dubbed tape as a source
tape.
Limites concernant le montage
Pendant le montage, vous serez confronté aux
limites suivantes.
• Etant donné la différence de pas de pistes,
vous ne pourrez pas enregistrer ou copier sur
des cassettes formatées en DV si vous utilisez
un appareil vidéo DVCAM.
• Selon l’état du signal, vous ne pourrez peutêtre pas enregistrer ou copier des cassettes
formatées en DVCAM.
Dans ces cas, procédez comme suit:
• Utilisez les prises audio/vidéo pour la copie.
• Copiez une cassette formatée en DV en
utilisant les prises audio/vidéo, puis utilisez la
copie comme cassette source.
70
Page 71

Usable cassettes and
playback modes
Cassettes utilisables
et modes de lecture
Selecting cassette types
We recommend using a mini DVCAM cassette
You can get the highest quality pictures with this
camcorder using a mini DVCAM cassette which
is the highest quality cassette.
You can also use a mini DV cassette. However,
you may not get as good a quality.
You cannot use any other standard
DVCAM, standard DV, h 8 mm, H Hi8,
j VHS, k S-VHS, VHSC, K SVHSC, l Betamax or ¬ ED Betamax type
cassettes.
When you play back
Copyright signal
When you play back
Using this camcorder, you cannot play back a
tape that has recorded a copyright control signals
for copyright protection of software. “COPY
INHIBIT” appears on the LCD screen, in the
viewfinder or on the monitor screen if you try to
play back such a tape. This camcorder does not
record copyright control signals on the tape
when it records.
When you record
You cannot use this camcorder and the DV
connecting cable to copy a tape that has recorded
the copyright control signals for copyright
protection of software. “COPY INHIBIT”
appears on the LCD screen, in the viewfinder or
on the monitor screen if the play back signal of
such a tape is input to this camcorder.
Audio mode
Fs 32k (12-bit) mode: The original sound can be
recorded in stereo 1, and the new sound in stereo
2 in 32 kHz. The balance between stereo 1 and
stereo 2 can be adjusted by selecting AUDIO MIX
in the menu system during playback. Both
sounds can be played back.
Fs 48k (16-bit) mode: A new sound cannot be
recorded but the original sound can be recorded
in high quality. When playing back a tape
recorded in the Fs 48k (16-bit) mode, 48k
indicator appears on the LCD screen or in the
viewfinder.
You cannot record in the Fs 48k (16-bit) mode
using this camcorder.
Note on cassette memory
The cassette memory function cannot be used
with this camcorder.
Sélection du type de cassette
L’utilisation d'une cassette mini DVCAM est
recommandée
Vous obtiendrez des images de meilleure qualité
avec ce camescope si vous utilisez des cassettes
mini DVCAM, les meilleures cassettes que l’on
puisse trouver.
Vous pouvez aussi utiliser une cassette mini DV,
cependant vous n’obtiendrez probablement pas
la même qualité.
Vous ne pouvez pas utiliser de cassette
standard DVCAM, standard DV, h 8 mm,
H Hi8, j VHS, k S-VHS, VHSC,
K S-VHSC, l Betamax ou ¬ ED
Betamax.
Lecture d’une cassette
Signal de protection de copyright
Lorsque vous reproduisez une cassette
Ce camescope ne permet pas de lire une cassette
contenant des signaux de protection de
copyright. L’indication “COPY INHIBIT”
apparaît sur l’écran LCD, dans le viseur ou sur
l’écran du moniteur si vous essayez de lire une
telle cassette. Ce camescope n’enregistre pas de
signaux de copyright sur la cassette.
Lorsque vous enregistrez
Vous ne pouvez pas utiliser ce camescope et le
câble de liaison DV pour copier une cassette qui
contient des signaux de protection de copyright
pour la protection du logiciel. “COPY INHIBIT”
apparaît sur l’écran LCD, dans le viseur ou sur
l’écran du moniteur si une telle cassette est
enregistrée sur ce camescope.
Mode audio
Mode Fs 32k (12 bits): Le son original peut être
enregistré sur la piste stéréo 1 et le nouveau son
en stéréo 2 à 32 kHz. La balance entre stéréo 1 et
stéréo 2 se règle en sélectionnant AUDIO MIX
dans le menu en cours de lecture. Les deux sons
peuvent être reproduits.
Mode Fs 48k (16 bits): Un nouveau son ne peut
pas être enregistré mais le son original peut être
enregistré avec une haute qualité. Lors de la
lecture d’une cassette enregistrée dans le mode
Fs 48k (16 bits), l’indicateur 48k apparaît sur
l’écran LCD ou dans le viseur.
Vous ne pouvez pas enregistrer en mode Fs 48k
(16 bits) avec ce camescope.
Remarque sur la mémoire de cassette
La fonction de mémoire de cassette ne peut pas
être utilisée avec ce camescope.
Additional information /Informations complémentaires
71
Page 72

Usable cassettes and playback
modes
Cassettes utilisables et modes
de lecture
Notes on the mini DVCAM
cassette
To prevent accidental erasure
Slide out the protect tab on the cassette so that
the red portion is visible. [a]
When affixing a label on the mini
DVCAM cassette
Be sure to affix a label on only the location as
illustrated below so as not to cause malfunction
of the camcorder. [b]
After using the mini DVCAM cassette
Rewind the tape to the beginning, put the
cassette in its case, and store it in an upright
position.
Remarques sur la minicassette
DVCAM
Pour éviter tout effacement
accidentel
Faites glisser le taquet de protection de la cassette
de manière à ce que la partie rouge soit visible.
[a]
Application d’une étiquette sur une
minicassette DVCAM
Appliquez l’étiquette exclusivement à l’endroit
illustré ci-dessous pour éviter tout
dysfonctionnement du camescope. [b]
Après avoir utilisé la minicassette
DVCAM
Rembobinez la cassette jusqu’au début, placez-la
dans son étui et rangez-la en position verticale.
[a]
To record/Pour enregistrer
Slide out to prevent accidental erasure.
/Faites glisser pour éviter toute
effacement accidentel.
72
[b]
Page 73

Tips for using the
battery pack
Utilisation optimale
de la batterie
rechargeable
This section shows you how you can get the most
out of your battery pack.
Preparing the battery pack
Always carry additional batteries
Have sufficient battery pack power to do 2 to 3
times as much recording as you have planned.
Battery life is shorter in a cold
environment
Battery efficiency is decreased, and the battery
will be used up more quickly, if you are
recording in a cold environment.
To save battery power
Do not leave the camcorder in Standby mode
when not recording to save the battery power.
A smooth transition between scenes can be made
even if recording is stopped and started again.
While you are positioning the subject, selecting
an angle, or looking at the LCD screen or through
the viewfinder, the lens moves automatically and
the battery is used. The battery is also used
when a tape is inserted or removed.
Cette section vous indique comment tirer le
meilleur parti de votre batterie.
Préparation de la batterie
Emportez toujours des batteries de
réserve
Emmenez toujours une réserve d’alimentation
pour une durée d’enregistrement 2 à 3 fois
supérieure à celle que vous avez prévue.
L’autonomie de la batterie est plus
courte par temps froid
Le rendement de la batterie diminue et la batterie
s’épuise plus rapidement si vous effectuez des
prises de vue par temps froid.
Pour économiser la batterie
Ne laissez pas le camescope en mode d’attente
lorsque vous n’effectuez pas de prise de vue afin
de préserver la charge de la batterie.
Une transition douce entre les scènes est possible
même si vous interrompez et reprenez la prise de
vue plusieurs fois de suite. Lorsque vous cadrez
le sujet, sélectionnez un angle ou regardez l’écran
LCD ou dans le viseur, l’objectif se règle
automatiquement et la batterie s’use. La batterie
s’use également lorsque vous introduisez et
retirez une cassette.
Additional information /Informations complémentaires
When to replace the battery
pack
While you are using your camcorder, the
remaining battery indicator on the LCD screen or
in the viewfinder decreases gradually as battery
power is used up.
The remaining time in minutes also appears.
When the remaining battery indicator reaches the
lowest point, the i indicator appears and starts
flashing in the viewfinder.
When the i indicator in the viewfinder changes
from slow flashing to rapid flashing while you
are recording, set the POWER switch to OFF on
the camcorder and replace the battery pack.
Leave the tape in the camcorder to obtain a
smooth transition between scenes after the
battery pack has been replaced.
Quand remplacer la batterie
Quand vous utilisez le camescope, l’indicateur de
capacité de la batterie affiché sur l’écran LCD ou
dans le viseur diminue progressivement jusqu’à
ce que la batterie soit épuisée.
La capacité restante est indiquée en minutes.
Quand l’indicateur de capacité de la batterie
atteint le dernier point, l’indicateur i apparaît
et se met à clignoter lentement dans le viseur.
Lorsque l’indicateur i dans le viseur
clignotement plus rapidement lors de
l’enregistrement, réglez le commutateur POWER
sur OFF et remplacez la batterie rechargeable.
Laissez la cassette dans le camescope pour
obtenir une transition douce entre les scènes
après le remplacement de la batterie.
73
Page 74

Tips for using the battery pack
Utilisation optimale de la
batterie rechargeable
Notes on the rechargeable
battery pack
Caution
Never leave the battery pack in temperatures
above 140°F (60°C), such as in a car parked in the
sun or under direct sunlight.
The battery pack heats up
During charging or recording, the battery pack
heats up. This is caused by energy that has been
generated and a chemical change that has
occurred inside the battery pack. This is not
cause for concern, and is normal.
Battery pack care
• Remove the battery pack from the
camcorder after using it, and keep it in a cool
place. When the battery pack is installed to the
camcorder, a small amount of current flows to
the camcorder even if the POWER switch is set
to OFF. This shortens battery life.
• The battery pack is always discharging even
when it is not in use after charging. Therefore,
you should charge the battery pack right
before using the camcorder.
Be sure to observe the following
• Keep the battery pack away from fire.
• Keep the battery pack dry.
• Do not open nor try to disassemble the battery
pack.
• Do not expose the battery pack to any
mechanical shock.
The life of the battery pack
If the battery indicator flashes rapidly just after
turning on the camcorder with a fully charged
battery pack, the battery pack should be replaced
with a new fully charged one.
Charging temperature
You should charge batteries at temperatures
from 50°F to 86°F (from 10°C to 30°C). Lower
temperatures require a longer charging time.
Remarques sur la batterie
rechargeable
Attention
Ne laissez jamais la batterie à des températures
supérieures à 140°F (60°C) comme en plein soleil
ou dans une voiture garée au soleil.
La batterie chauffe
Pendant la charge ou la prise de vue, la batterie
chauffe. Ce phénomène est dû à l’énergie générée
et aux réactions chimiques qui se produisent
dans la batterie. Il n’y a pas lieu de s’alarmer.
Précautions d’utilisation de la
batterie
• Retirez la batterie du camescope après
utilisation et gardez-la dans un endroit frais.
Lorsque la batterie est installée sur le
camescope, un courant de faible intensité passe
dans le camescope même si le commutateur
POWER est réglé sur OFF, ce qui réduit
l’autonomie de la batterie.
• La batterie se décharge constamment, même si
elle n’est pas utilisée après la charge. C’est
pourquoi il est préférable de charger la batterie
juste avant d’utiliser le camescope.
Respectez les points suivants
• N’approchez pas la batterie du feu.
• Ne mouillez pas la batterie rechargeable.
• N’ouvrez pas et n’essayez pas de démonter la
batterie rechargeable.
• N’exposez pas la batterie rechargeable à des
chocs mécaniques.
Longévité de la batterie
Si l’indicateur de batterie clignote rapidement
juste après la mise sous tension du camescope
avec une batterie complètement chargée,
remplacez la batterie par une neuve
complètement chargée.
Température de charge
Il est conseillé de charger les batteries à une
température comprise entre 50°F à 86°F (10°C à
30°C). Des températures inférieures allongent le
temps de charge.
74
Page 75

Tips for using the battery pack
Utilisation optimale de la
batterie rechargeable
Notes on the “InfoLITHIUM”
battery pack
battery pack
The “InfoLITHIUM” is a lithium ion battery pack
which can exchange data with compatible video
equipment about its battery consumption.
Sony recommends that you use the
“InfoLITHIUM” battery pack with video
equipment having the mark. When
you use this battery pack with video equipment
having the mark, the video
equipment will indicate the remaining battery
time in minutes*. However, if you use it with
video equipment not having this mark, the
remaining battery capacity will not be indicated
in minutes.
* The indication may not be accurate depending
on the condition and environment which the
equipment is used under.
How the battery consumption is displayed
The power consumption of the camcorder
changes depending on its use, such as how the
autofocusing is working.
While checking the condition of the camcorder,
the “InfoLITHIUM” battery pack measures the
battery consumption and calculates the
remaining battery power. If the condition
changes drastically, the remaining battery
indication may suddenly decrease or increase by
more than 2 minutes.
Even if 5 to 10 minutes is indicated as the battery
remaining time on the LCD screen or in the
viewfinder, the i indicator may also flash under
some conditions.
Remarques sur la batterie
rechargeable “InfoLITHIUM”
Batterie rechargeable
La batterie “InfoLITHIUM” est une batterie au
lithium rechargeable qui peut échanger des
informations concernant la consommation
d’énergie avec les appareils vidéo compatibles.
Sony conseille d’utiliser une batterie
“InfoLITHIUM” avec les appareils portant le
logo .
Quand vous utilisez cette batterie avec des
appareils portant le logo , l’appareil
vidéo indique le temps restant en minutes*. Si
vous l’utilisez avec des appareils qui ne portent
pas ce logo, la capacité de la batterie ne sera pas
indiquée en minutes.
* L’indicateur peut ne pas être exact. Cela
dépend des conditions et de l’environnement
dans lequel l’appareil est utilisé.
Affichage de la consommation d’énergie
La consommation d’énergie du camescope varie
en fonction de l’utilisation qui en est faite. Par
exemple, la façon dont l’autofocus fonctionne a
un effet sur la consommation.
Tout en contrôlant le statut du camescope, la
batterie rechargeable “InfoLITHIUM” mesure la
consommation de la batterie et calcule la capacité
restante. Si les conditions changent sensiblement,
l’indicateur de temps restant pourra montrer une
baisse ou une augmentation soudaine de plus de
2 minutes
Même si 5 à 10 minutes sont indiquées comme
temps restant sur l’écran LCD ou dans le viseur,
l’indicateur i peut clignoter dans certains cas.
Additional information /Informations complémentaires
75
Page 76

Tips for using the battery pack
Utilisation optimale de la
batterie rechargeable
To obtain more accurate remaining
battery indication
Set the camcorder to recording standby mode
and point towards a stationary object. Do not
move the camcorder for 30 seconds or more.
• If the indication seems incorrect, use up the
battery pack and then recharge it fully (Full
1)
charge
). Note that if you have used the
battery in a hot or cold environment for long
time, or you have repeated charging many
times, the battery pack may not be able to
show the correct time even after being fully
charged.
• After you have used the “InfoLITHIUM”
battery pack with an equipment not having the
the battery pack on the equipment having the
mark, make sure that you use up
mark and then recharge fully.
Why the remaining battery
indication does not match the
continuous recording time in the
operation manual
The recording time is affected by the
environmental temperature and conditions. The
recording time becomes very short in a cold
environment. The continuous recording time in
the operation manual is measured under the
condition of using a fully charged (or normal
2)
charged
environmental temperature and condition are
different when you actually use the camcorder,
the remaining battery time is not same as the
continuous recording time in the operation
manual.
1)
2)
) battery back in 77°F (25°C). As the
Full charge: Charging for about 1 hour after
the CHARGE lamp of the AC power adaptor
goes off.
Normal charge: Charging just until the
CHARGE lamp of the AC power adaptor goes
off.
Pour obtenir une indication plus
précise du temps restant d’utilisation
de la batterie
Réglez le camescope sur le mode d’attente
d’enregistrement et dirigez-le vers un objet
immobile. Ne déplacez pas le camescope pendant
30 secondes ou plus.
• Si l’indication semble fausse, utilisez jusqu’au
bout la batterie rechargeable et rechargez-la
complètement (Recharge complète
avez utilisé la batterie dans un environnement
chaud ou froid pendant longtemps, ou si vous
l’avez rechargée un grand nombre de fois à la
suite, elle risque de ne plus pouvoir indiquer le
temps exact même après avoir été rechargée
complètement.
• Après avoir utilisé la batterie rechargeable
“InfoLITHIUM” avec un appareil ne portant
pas le logo , n’oubliez pas d’utiliser
la batterie rechargeable jusqu’au bout sur un
appareil portant le logo , puis de la
recharger complètement.
1)
). Si vous
Pourquoi l’indication du temps
restant ne correspond pas au temps
d’enregistrement continu indiqué
dans le mode d’emploi
Le temps d’enregistrement disponible dépend
des conditions et de la température
environnantes. Le temps d’enregistrement peut
être réduit considérablement dans un
environnement froid. Le temps d’enregistrement
continu du mode d’emploi est mesuré en
utilisant une batterie complètement chargée (ou
chargée normalement
conditions et la température environnantes étant
différentes quand vous utilisez le camescope, le
temps d’utilisation restant de la batterie est
différent du temps d’enregistrement continu
indiqué dans le mode d’emploi.
1)
Recharge complète: Recharge pendant 1 heure
environ après l’extinction du voyant CHARGE
de l’adaptateur secteur.
2)
Recharge normale: Recharge jusqu’à ce que le
voyant CHARGE de l’adaptateur secteur
s’éteigne.
2)
) à 77°F (25°C). Les
76
Page 77

Tips for using the battery pack
Utilisation optimale de la
batterie rechargeable
Notes on charging
A brand-new battery pack
A brand-new battery pack is not charged. Before
using the battery pack, charge it completely.
Recharge the battery pack whenever
you like
You do not have to discharge it before
recharging. If you charged the battery pack fully
but you did not use it for a long time, it becomes
discharged. Then recharge the battery pack
before use.
Notes on the terminals
If the terminals (metal parts on the back)
are not clean, the battery charge duration
will be shortened.
When the terminals are not clean or when the
battery pack has not been used for a long time,
repeatedly install and remove the battery pack a
few times. This improves the contact condition.
Also, wipe the +, – and C terminals with a soft
cloth or paper.
Remarques sur la charge
Charge d’une batterie neuve
Une batterie neuve n’est pas chargée. Avant de
l’utiliser, il convient donc de la charger
complètement.
Rechargez la batterie quand bon
vous semble
Vous n’avez pas besoin de décharger la batterie
avant de la recharger. Même chargée
complètement, une batterie qui reste inutilisée
pendant une période prolongée se décharge. Par
conséquent, rechargez la batterie avant de
l’utiliser.
Remarques sur les bornes
Si les bornes (parties métallique au dos
de la batterie) ne sont pas propres,
l’autonomie de la batterie sera réduite.
Si les bornes sont sales ou si la batterie n’a pas été
utilisée pendant longtemps, installez et retirez la
batterie plusieurs fois de suite pour améliorer les
contacts électriques. Vous pouvez aussi essuyer
les bornes +, – et C avec un chiffon doux ou du
papier.
Additional information /Informations complémentaires
77
Page 78

Maintenance
information and
precautions
Entretien et
précautions
Moisture condensation
If the camcorder is brought directly from a cold
place to a warm place, moisture may condense
inside the camcorder, on the surface of the tape,
or on the lens. In this condition, the tape may
stick to the head drum and be damaged or the
camcorder may not operate correctly. To prevent
possible damage under these circumstances, the
camcorder is furnished with moisture sensors.
Take the following precautions.
Inside the camcorder
If there is moisture inside the camcorder, the
beep sounds and the { indicator flashes. If this
happens, none of the function except cassette
ejection will work. Open the cassette
compartment, turn off the camcorder, and leave
it about 1 hour. When 6 indicator flashes at the
same time, the cassette is inserted in the
camcorder. Eject the cassette, turn off the
camcorder, and leave also the cassette about 1
hour. The camcorder can be used again if the {
indicator does not appear when the power is
turned on again.
On the lens
If moisture condenses on the lens, no indicator
appears, but the picture becomes dim. Turn off
the power and do not use the camcorder for
about 1 hour.
How to prevent moisture
condensation
When bringing the camcorder from a cold place
to a warm place, put the camcorder in a plastic
bag and allow it to adapt to room conditions over
a period of time.
(1) Be sure to tightly seal the plastic bag
containing the camcorder.
(2) Remove the bag when the air temperature
inside it has reached the temperature
surrounding it (after about 1 hour).
Condensation d’humidité
Si le camescope est transporté directement d’un
endroit froid dans un endroit chaud, de
l’humidité risque de se condenser à l’intérieur du
camescope, sur la surface de la bande
magnétique ou sur l’objectif. Si le cas se présente,
la bande peut adhérer au tambour de la tête et
être endommagée, et le camescope risque de mal
fonctionner. Le camescope est équipé de capteurs
d’humidité de façon à prévenir de tels
dommages. Vous devez néanmoins prendre les
précautions suivantes.
A l’intérieur du camescope
S’il y a de l’humidité à l’intérieur du camescope,
des signaux sonores retentissent et l’indicateur {
clignote. Si le cas se présente, seule la fonction
d’éjection de la cassette reste opérationnelle.
Ouvrez le logement de la cassette, mettez le
camescope hors tension et laissez-le pendant
environ une heure. Si l’indicateur 6 clignote en
même temps, cela signifie qu’une cassette se
trouve dans le camescope. Ejectez la cassette,
mettez le camescope hors tension et laissez la
cassette pendant environ une heure. Vous
pouvez utiliser le camescope si l’indicateur {
n’apparaît pas quand vous remettez le
camescope sous tension.
Sur l’objectif
Si de l’humidité s’est condensée sur l’objectif,
aucun indicateur n’apparaît, mais l’image
devient floue. Mettez le camescope hors tension
et attendez environ une heure avant de l’utiliser
à nouveau.
Comment éviter la condensation
d’humidité
Lorsque vous transportez le camescope d’un
endroit froid dans un endroit chaud, mettez-le
dans un sac en plastique et laissez-le tel quel
pendant un certain temps pour qu’il s’adapte aux
conditions ambiantes.
(1) Mettez le camescope dans un sac en plastique
que vous refermez hermétiquement.
(2) Retirez le camescope du sac quand la
température à l’intérieur du sac a atteint la
température ambiante (au bout d’une heure
environ).
78
Page 79

Maintenance information and
precautions
Entretien et précautions
Video head cleaning
To ensure normal recording and clear pictures,
clean the video heads.
The video heads may be dirty when:
• mosaic-pattern noise appears on the playback
picture
• playback pictures do not move
• playback pictures are hardly visible
• playback pictures do not appear
• the v indicator and “ Ò CLEANING
CASSETTE” message appear one after another
or the v indicator flashes on the LCD screen
or in the viewfinder
/
If [a] or [b] happens, clean the video heads with
the Sony DVM12CL cleaning cassette (not
supplied). Check the picture and if the above
problem persists, repeat the cleaning. (Do not
repeat cleaning more than 5 times in one session.)
Note
If the DVM12CL cleaning cassette (not supplied)
is not available in your area, consult your nearest
Sony dealer.
Nettoyage de la tête vidéo
Pour obtenir un enregistrement normal et des
images nettes, nettoyez les têtes vidéo.
Les têtes vidéo sont sales lorsque:
• l’image de lecture apparaît en mosaïque
• les images lues ne bougent pas
• les images lues sont à peine visibles
• l’image n’apparaît pas
• l’indicateur v et le message “Ò CLEANING
CASSETTE” apparaissent l’un après l’autre ou
lorsque l’indicateur v clignote sur l’écran LCD
ou dans le viseur.
[a] [b]
or/ou
Dans le cas de [a] ou [b], nettoyez les têtes vidéo
avec la cassette de nettoyage Sony DVM12CL
(non fournie). Contrôlez ensuite l’image et, si le
problème persiste, répétez le nettoyage. (Ne
répétez pas le nettoyage plus de cinq fois de
suite.)
Remarque
Si la cassette de nettoyage DVM12CL (non
fournie) n’est pas disponible dans votre région,
demandez conseil auprès de votre revendeur
Sony.
Additional information /Informations complémentaires
79
Page 80

Maintenance information and
precautions
Entretien et précautions
Precautions
Camcorder operation
• Operate the camcorder on 7.2 V (battery pack)
or 8.4 V (AC power adaptor).
• For DC or AC operation, use only the
recommend accessories.
• Should any solid object or liquid get inside the
casing, unplug the camcorder and have it
checked by Sony dealer before operating it any
further.
• Avoid rough handling or mechanical shock.
Be particularly careful of the lens.
• Keep the POWER switch set to OFF when not
using the camcorder.
• Do not wrap up the camcorder and operate it
since heat may build up internally.
• Keep the camcorder away from strong
magnetic fields or mechanical vibration.
On handling tapes
• Do not insert anything into the small holes on
the cassette.
• Do not open the tape protect cover or touch the
tape.
• Avoid touching or damaging the terminals. To
remove dust, clean the terminals with a soft
cloth.
Camcorder care
• When the camcorder is not to be used for a
long time, disconnect the power source and
remove the tape. Periodically turn on the
power, operate the camera and player sections
and play back a tape for about 3 minutes.
• Clean the lens with a soft brush to remove
dust. If there are fingerprints on the lens,
remove them with a soft cloth.
• If there are fingerprints on the LCD screen,
remove them using an LCD cleaning kit (not
supplied).
Précautions
Utilisation du camescope
• Faites fonctionner le camescope sur une
tension de 7,2 V (batterie rechargeable) ou de
8,4 V (adaptateur secteur).
• Pour le fonctionnement sur le courant secteur
ou le courant continu, utilisez les accessoires
recommandés dans le mode d’emploi.
• Si un objet solide ou liquide pénétrait dans le
boîtier, mettez le camescope hors tension et
faites-le vérifier par votre revendeur Sony
avant de le remettre en service.
• Evitez les manipulations brusques et les chocs
mécaniques. Faites particulièrement attention à
l’objectif.
• Réglez le commutateur POWER sur OFF
quand vous n’utilisez pas le camescope.
• N’enveloppez pas le camescope lorsque vous
l’utilisez pour éviter toute surchauffe interne.
• Gardez le camescope à l’écart des champs
magnétiques puissants et ne le soumettez pas à
des vibrations mécaniques.
Manipulation des cassettes
• N’insérez aucun objet dans les orifices de la
cassette.
• N’ouvrez pas le couvercle de protection de la
bande et ne touchez pas la bande.
• Evitez de toucher ou d’endommager les
bornes. Utilisez un chiffon propre pour les
nettoyer.
Entretien du camescope
• Si vous prévoyez de ne pas utiliser le
camescope pendant un certain temps,
débranchez la source d’alimentation et retirez
la cassette. Remettez-le ensuite de temps en
temps sous tension, activez les fonctions de
lecture et d’enregistrement et reproduisez une
cassette pendant environ trois minutes.
• Nettoyez l’objectif à l’aide d’une brosse douce
pour éliminer la poussière. S’il y a des traces
de doigts sur l’oculaire, éliminez-les avec un
chiffon doux.
• Quand l’écran LCD est sale (traces de doigts
ou autres saletés), nous vous conseillons
d’utiliser le kit de nettoyage LCD (non fourni)
pour le nettoyer.
80
Page 81

Maintenance information and
precautions
Entretien et précautions
• Clean the camcorder body with a dry soft
cloth, or a soft cloth lightly moistened with a
mild detergent solution. Do not use any type
of solvent which may damage the finish.
• Do not let sand get into the camcorder. When
you use the camcorder on a sandy beach or in
a dusty place, protect it from the sand or dust.
Sand or dust may cause the unit to
malfunction, and sometimes this malfunction
cannot be repaired.
AC power adaptor
Charging
• Use only a lithium ion type battery pack NPF220/NP-F200/NP-F100.
• Place the battery pack on a flat surface without
vibration during charging.
• The battery pack will get hot during charging.
This is normal.
Others
• Unplug the unit from the wall outlet when not
in use for a long time. To disconnect the
power cord, pull it out by the plug. Never pull
the cord itself.
• Do not operate the unit with a damaged cord
or if the unit has been dropped or damaged.
• Do not bend the AC power cord forcibly, or
put a heavy object on it. This will damage the
cord and may cause a fire or an electrical
shock.
• Be sure that nothing metallic comes into
contact with the metal parts of the connecting
plate. If this happens, a short may occur and
the unit may be damaged.
• Always keep the metal contacts clean.
• Do not disassemble the unit.
• Do not apply mechanical shock or drop the
unit.
• Nettoyez le boîtier du camescope avec un
chiffon doux et sec ou légèrement imbibé
d’une solution détergente neutre. N’employez
aucun type de solvant, qui risquerait d’abîmer
la finition.
• Ne laissez pas rentrer de sable dans le
camescope. Quand vous utilisez le camescope
sur une plage sableuse ou dans un endroit
exposé à la poussière, protégez le camescope
du sable ou de la poussière.
Le sable et la poussière peuvent provoquer une
panne qu’il ne sera peut-être pas possible de
réparer.
Adaptateur secteur
Charge
• Utilisez uniquement une batterie de type
lithium-ion NP-F220/NP-F200/NP-F100.
• Chargez la batterie sur une surface plane et
non soumise à des vibrations.
• La batterie devient chaude en cours de charge.
C’est normal.
Divers
• Débranchez l’appareil de la prise murale
(secteur) si vous ne l’utilisez pas pendant un
certain temps. Pour débrancher le cordon
d’alimentation, tirez sur la fiche. Ne tirez
jamais sur le cordon proprement dit.
• N’employez pas l’appareil avec un cordon
endommagé ou si l’appareil est tombé ou est
endommagé.
• Ne pliez pas exagérément le cordon
d’alimentation et ne posez pas d’objet lourd
dessus. Le cordon pourrait être endommagé et
provoquer un incendie ou une électrocution.
• Veillez à ce qu’aucun objet métallique n’entre
en contact avec les parties métalliques ou la
plaque de raccordement, ce qui risque de
provoquer un court-circuit et d’endommager
l’appareil.
• Veillez à ce que les contacts métalliques soient
toujours propres.
• Ne démontez pas l’appareil.
• Ne soumettez pas l’appareil à des chocs
mécaniques et ne le laissez pas tomber.
Additional information /Informations complémentaires
81
Page 82

Maintenance information and
precautions
Entretien et précautions
• While the unit is in use, particularly during
charging, keep it away from AM receivers and
video equipment because it will disturb AM
reception and video operation.
•The unit becomes warm while in use. This is
normal.
• Do not place the unit in locations that are:
– Extremely hot or cold
– Dusty or dirty
– Very humid
– Vibrating
Notes on dry batteries
To avoid possible damage from battery leakage
or corrosion, observe the following.
• Be sure to insert the batteries in the correct
direction.
• Dry batteries are not rechargeable.
• Do not use a combination of new and old
batteries.
• Do not use different types of batteries.
• The batteries slowly discharge while not in
use.
• Do not use a battery that is leaking.
If battery leakage occurred
• Wipe off the liquid in the battery case carefully
before replacing the batteries.
• If you touch the liquid, wash it off with water.
• If the liquid get into your eyes, wash your eyes
with a lot of water and then consult a doctor.
If any difficulty should arise, unplug the unit and
contact your nearest Sony dealer.
• Pendant l’utilisation de l’appareil et en
particulier pendant la charge, éloignez-le des
récepteurs AM et des équipements vidéo, car il
perturbe la réception AM et le fonctionnement
des appareils vidéo.
• L’appareil devient chaud en cours
d’utilisation. C’est normal.
• Ne posez pas l’appareil dans des endroits:
– extrêmement chauds ou froids;
– poussiéreux ou sales;
– très humides;
– soumis à des vibrations.
Remarques sur les piles sèches
Pour éviter toute corrosion suite à l’écoulement
de l’électrolyte des piles, respectez les consignes
suivantes.
• Insérez les piles dans le bon sens.
• Ne jamais recharger de piles sèches.
• Ne pas utiliser en même temps des piles usées
et des piles neuves.
• Ne pas utiliser en même temps des piles de
type différent.
• Les piles se déchargent lentement même si
elles ne sont pas utilisées.
• Ne pas utiliser de pile qui fuit.
En cas de fuite de l’électrolyte des piles
• Essuyez soigneusement le liquide dans l’étui
avant de mettre des piles neuves en place.
• Si vous touchez le liquide, lavez-vous bien les
mains.
• Si du liquide entre dans vos yeux, lavez-vous
les yeux à grande eau, puis consultez un
médecin.
82
En cas de problème, débranchez l’appareil et
consultez votre revendeur Sony.
Page 83

Using your camcorder
abroad
Utilisation du camescope
à l’étranger
Each country or area has its own electric and TV
color systems. Before using your camcorder
abroad, check the following points.
Power sources
You can use your camcorder in any country or
area with the AC-V100 AC power adaptor within
100 V to 240 V AC, 50/60 Hz.
Use a commercially available AC plug adaptor
[a], if necessary, depending on the design of the
wall outlet [b].
AC-V100
Difference in color systems
This camcorder is an NTSC system-based
camcorder. If you want to view the playback
picture on a TV, it must be an NTSC systembased TV.
Check the following list.
NTSC system
Bahama Islands, Bolivia, Canada, Central
America, Chile, Colombia, Ecuador, Jamaica,
Japan, Korea, Mexico, Peru, Surinam, Taiwan, the
Philippines, the U.S.A., Venezuela, etc.
PAL system
Australia, Austria, Belgium, China, Czech
Republic, Denmark, Finland, Germany, Great
Britain, Holland, Hong Kong, Italy, Kuwait,
Malaysia, New Zealand, Norway, Portugal,
Singapore, Slovak Republic, Spain, Sweden,
Switzerland, Thailand, etc.
PAL-M system
Brazil
PAL-N system
Argentina, Paraguay, Uruguay
SECAM system
Bulgaria, France, Guiana, Hungary, Iran, Iraq,
Monaco, Poland, Russia, Ukraine, etc.
Chaque pays ou région dispose d’un réseau
électrique et d’un système couleur de télévision
spécifiques. Avant d’utiliser le camescope à
l’étranger, contrôlez les points suivants.
Sources d’alimentation
Vous pouvez utiliser le camescope dans
n’importe quel pays ou région avec l’adaptateur
secteur AC-V100 sur le courant secteur de 100 V
à 240 V CA, 50/60 Hz.
Au besoin, utilisez un adaptateur de fiche secteur
disponible dans le commerce [a] suivant le
modèle de la prise murale [b].
[a]
[b]
Différences entre les systèmes
couleur
Ce camescope est de standard NTSC. Pour
regarder vos vidéogrammes sur une téléviseur,
vous avez besoin d’un téléviseur de standard
NTSC.
Vérifiez dans la liste suivante, les différents
standards.
Standard NTSC
Amérique centrale, Bahamas, Bolivie, Canada,
Chili, Colombie, Corée, Equateur, Etats-Unis,
Jamaïque, Japon, Mexique, Pérou, Surinam,
Taïwan, Philippines, Venezuela, etc.
Standard PAL
Allemagne, Australie, Autriche, Belgique, Chine,
Danemark, Espagne, Finlande, Grande-Bretagne,
Hongkong, Italie, Koweit, Malaysia, Norvège,
Nouvelle-Zélande, Pays-Bas, Portugal,
République slovaque, République tchèque,
Singapour, Suède, Suisse, Thaïlande, etc.
Standard PAL-M
Brésil
Standard PAL-N
Argentine, Paraguay, Uruguay
Standard SECAM
Bulgarie, France, Guyane, Hongrie, Iran, Iraq,
Monaco, Pologne, Russie, Ukraine, etc.
Additional information /Informations complémentaires
83
Page 84

English
Trouble check
If you run into any problem using the camcorder, use the following table to troubleshoot the problem.
Should the difficulty persist, disconnect the power source and contact your Sony dealer or local
authorized Sony service facility.
Camcorder
Power
Symptom
The power is not on.
The power goes off.
The battery pack is quickly discharged.
The battery pack cannot be installed.
Cause and/or corrective actions
• The battery pack is not installed.
m Install the battery pack. (p. 20)
• The battery is dead.
m Use a charged battery pack. (p. 17)
• The AC power adaptor is not connected to the AC outlet.
m Connect the AC power adaptor to the AC outlet. (p. 36)
• If the power is still not on after you tried the corrective actions
above, press the RESET button on the back of the cassette
compartment lid using a sharp-pointed object. (If you press
the RESET button, all the settings including the date and time
return to the default.) (p. 8)
• While being operated in CAMCORDER mode, the camcorder
has been in Standby mode for more than 5 minutes.
m Set the POWER switch to OFF, then to CAMCORDER. (p.
23)
• The battery is dead.
m Use a charged battery pack. (p. 17)
• The ambient temperature is too low. (p. 73)
• The battery pack has not been charged fully.
m Charge the battery pack again. (p. 17)
• The battery pack is completely dead, and cannot be recharged.
m Use another battery pack. (p. 36)
• Only an NP-F220/NP-F200/NP-F100 battery pack can be used.
Operation
Symptom
START/STOP does not operate.
The cassette cannot be removed from
the holder.
{ and 6 indicators flash and no function
except for cassette ejection works.
“CLOCK SET” appears when the
camcorder is turned on.
84
Cause and/or corrective actions
• The tape is stuck to the drum.
m Eject the tape. (p. 21)
• The tape has run out.
m Rewind the tape or use a new one. (p. 32)
• The POWER switch is set to VTR.
m Set it to CAMCORDER. (p. 22)
• The tab on the cassette is out (red).
m Use a new tape or slide the tab. (p. 21)
• The battery is dead.
m Use a charged battery pack or the AC power adaptor.
(p. 17, 36)
• Moisture condensation has occurred.
m Remove the cassette and leave the camcorder for at least 1
hour. (p. 78)
• Reset the date and time. (p. 65)
Page 85

Trouble check
Operation
Symptom
The End Search function does not
activate.
The tape does not move when a tape
transport button is pressed.
No sound or only a low sound is heard
when playing back a tape.
The SteadyShot function does not activate.
Recording stops at once.
Recording stops in a few seconds.
The autofocus function does not activate.
The fader function does not work.
Audio dubbing does not work.
Cause and/or corrective actions
• The cassette was ejected after you recorded on it.
m The End Search function will not activate until you
make a new recording after reinserting the cassette.
• The POWER switch is set to CAMCORDER or OFF.
m Set it to VTR. (p. 32)
• The tape has run out.
m Rewind the tape or use a new one. (p. 32)
• The volume is turned to the minimum.
m Open the LCD panel and press VOLUME +. (p. 32)
• S SHOT is set to OFF in the menu system.
m Set it to ON. (p. 46)
• The POWER switch is set to PHOTO.
m Set it to CAMCORDER.
• The START/STOP MODE switch is set to 5SEC or .
m Set it to . (p. 26)
• Focus is set to the manual mode.
m Set it to autofocus. (p. 51)
• Shooting conditions are not suitable for autofocus.
m Set focus to manual mode to focus manually. (p. 51)
• The START/STOP MODE switch is set to 5SEC or .
m Set it to . (p. 26)
• The signal of recording tape is no condition to operate
audio dubbing.
m Dub the tape into another DVCAM cassette in Fs 32k.
(p. 62)
Additional information / Informations complémentaires
Picture
Symptom
The image on the viewfinder screen is not
clear.
A vertical band appears when a subject
such as lights or a candle flame is shot
against a dark background.
The picture is “noisy" or does not appear.
v indicator flashes on the LCD screen or
in the viewfinder.
The picture is too bright or too dark.
A vertical band appears when shooting a
very bright subject.
The picture does not appear in the
viewfinder.
The picture does not appear on the LCD
screen or in the viewfinder.
Cause and/or corrective actions
• The viewfinder lens is not adjusted.
m Adjust the viewfinder lens. (p. 23)
• The contrast between the subject and background is too
high. The camcorder is not malfunctioning.
m Change locations.
• The video heads may be dirty.
m Clean the heads using the Sony DVM12CL (not
supplied) cleaning cassette. (p. 79)
• The video heads may be dirty.
m Clean the heads using the Sony DVM12CL (not
supplied) cleaning cassette. (p. 79)
• LCD BRIGHT is not adjuted properly.
m Press + or – to obtain the brightness you want. (p. 27)
• The camcorder is not malfunctioning.
• The LCD panel is open.
m Close the LCD panel.
• Incorporated fluorescent tube is worn out.
m Please contact your nearest Sony dealer.
(To be continued)
85
Page 86

Trouble check
Picture
Symptom
While editing using the DV connecting
cable, recording picture cannot be
monitored.
Others
Symptom
The camcorder becomes warm.
The supplied Remote Commander does
not work.
The CHARGE lamp flashes after you
charge the battery pack installed in the
camcorder.
No function works though the power is
on.
Cause and/or corrective actions
• Remove the DV connecting cable, and connect it
again.
Cause and/or corrective actions
• If the power of the cammcorder is on for a long time,
it becomes warm, which is not mulfunction.
• COMMANDER is set to OFF in the menu system.
m Set it to VTR4 or ID. (p. 12)
• Something is blocking the infrared rays.
m Remove the obstacle.
• The battery is not inserted with the correct polarity.
m Insert the battery with the correct polarity. (p. 12)
• The batteries are dead.
m Insert new ones. (p. 12)
• The camcorder is not malfunctioning.
• Disconnect the connection plug on the battery pack or
on the AC power adaptor, then reconnect it in about 1
minute. Turn the power on. If the functions still do
not work, press the RESET button on the back of the
cassette compatment lid using a sharp-pointed object.
(If you press the RESET button, all the settings
including the date and time return to the default.)
(p. 8)
AC power adaptor
Symptom
The VTR/CAMERA or CHARGE lamp
does not light.
The CHARGE lamp flashes.
86
Corrective actions
• Disconnect the power cord. After about 1 minute,
reconnect the power cord. (p. 17)
• See the chart on the next page.
Page 87

Trouble check
When the CHARGE lamp flashes
Check through the following chart.
Remove the battery pack from the AC
power adaptor. Then install the same
battery pack again.
Additional information / Informations complémentaires
When the CHARGE lamp flashes
again
Install another battery pack.
When the CHARGE lamp flashes
again
The problem is with the AC power
adaptor.
Please contact your nearest Sony dealer
in connection with the product with the
problem.
When the CHARGE lamp does not
flash again
If the CHARGE lamp lights up and
goes out after a while, there is no
problem. *
When the CHARGE lamp does not
flash again
If the CHARGE lamp lights up and
goes out after a while, the problem is
with the battery pack installed first.
* If you use a battery pack which you have just bought or which has been left unused for a long time, the CHARGE
lamp may flash at the first charging. This does not indicate a problem. Repeat again to charge with same battery
pack.
87
Page 88

Français
Dépannage
Si vous rencontrez un problème lors de l’utilisation de votre camescope, consultez le tableau suivant de
manière à pouvoir y remédier. Si le problème persiste, débranchez la source d’alimentation et
consultez votre revendeur Sony ou un centre de service après-vente agréé Sony.
Camescope
Alimentation
Symptôme
Le camescope ne se met pas
sous tension.
Le camescope se met hors tension.
La batterie se décharge rapidement.
Impossible d’installer la batterie.
Cause et/ou solutions
• La batterie n’a pas été installée.
m Installez la batterie (p. 20)
• La batterie est épuisée.
m Utilisez une batterie chargée. (p. 17)
• L’adaptateur secteur n’est pas raccordé à une prise murale.
m Branchez l’adaptateur secteur sur une prise murale. (p. 36)
• Si après avoir essayé les différentes solutions, vous ne
parvenez pas à mettre le camescope sous tension, appuyez sur
la touche RESET au dos du logement de la cassette à l’aide
d’un objet pointu. (Lorsque vous appuyez sur la touche
RESET, tous les réglages, y compris la date et l’heure, sont
réinitialisés.) (p. 8)
• Utilisé en mode CAMCORDER, le camescope est resté plus de
5 minutes en mode d’attente.
m Réglez le commutateur POWER sur OFF puis sur
CAMCORDER. (p. 23)
• La batterie est épuisée.
m Utilisez une batterie chargée. (p. 17)
• La température ambiante est trop basse. (p. 73)
• La batterie n’a pas été chargée complètement.
m Chargez à nouveau la batterie. (p. 17)
• La batterie est complètement épuisée et ne peut pas être
chargée.
m Utilisez une autre batterie. (p. 36)
• Utilisez uniquement une batterie NP-F220/NP-F200/NP-F100.
Fonctionnement
Symptôme
La touche START/STOP ne
fonctionne pas.
La cassette ne peut pas être retirée du
logement.
Les indicateurs { et 6 clignotent et seule
la fonction d’éjection de la cassette reste
opérationnelle.
“CLOCK SET” apparaît lorsque le
magnétoscope est mis sous tension.
88
Cause et/ou solutions
• La bande magnétique est collée au tambour.
m Ejectez la cassette. (p. 21)
• La cassette est terminée.
m Rembobinez la bande ou utilisez une nouvelle cassette.
(p. 32)
• Le commutateur POWER est réglé sur VTR.
m Réglez-le sur CAMCORDER. (p. 22)
• Le taquet de la cassette laisse apparaître la partie rouge.
m Utilisez une nouvelle cassette ou faites glisser le taquet
dans l’autre sens. (p. 21)
• La batterie est épuisée.
m Utilisez une batterie chargée ou l’adaptateur secteur.
(p. 17, 36)
• De l’humidité s’est condensée.
m Retirez la cassette et n’utilisez pas le camescope pendant
au moins une heure. (p. 78)
• Réglez la date et l’heure. (p. 65)
Page 89

Dépannage
Fonctionnement
Symptôme
La fonction de recherche de fin
d’enregistrement ne peut pas être activée.
La bande magnétique ne défile pas
lorsque vous appuyez sur l’une des
touches de transport.
Aucun son ou son faible lors de la lecture
d’une cassette.
La fonction de stabilisation de prise de
vue est inopérante.
L’enregistrement s’arrête subitement.
L’enregistrement s’arrête au bout de
quelques secondes.
La fonction de mise au point automatique
est inopérante.
La fonction de fondu enchaîné est
inopérante.
La copie d’une autre bande son ne
fonctionne pas.
Image
Symptôme
L’image dans le viseur n’est pas claire.
Une bande verticale apparaît lors de la prise
de vue d’un sujet comme une lampe ou une
flamme de bougie sur un arrière-plan
sombre
.
L’image est “neigeuse” ou n’apparaît pas.
L’indicateur v clignote sur l’écran LCD
ou dans le viseur.
L’image est trop claire ou trop sombre.
Une bande verticale apparaît lors de la
prise de vue d’un sujet très lumineux.
Cause et/ou solutions
• La cassette a été éjectée après un enregistrement.
m
Vous ne pourrez faire une recherche de fin
d’enregistrement seulement après avoir inséré la
cassette et enregistré.
•
Le commutateur POWER est réglé sur CAMCORDER ou OFF
m Réglez-le sur VTR. (p. 32)
• La cassette est finie.
m Rembobinez la bande ou utilisez une nouvelle
cassette. (p. 32)
• Le volume est réglé au minimum.
m
Ouvrez l’écran LCD et appuyez sur VOLUME +. (p.32)
• S SHOT est mis sur OFF dans le menu.
m Mettez-le sur ON. (p. 46)
• Le commutateur POWER est mis sur PHOTO.
m Mettez-le sur CAMCORDER.
• Le commutateur START/STOP MODE est réglé sur
5SEC ou .
m Réglez-le sur . (p. 26)
• La mise au point est en mode manuel.
m Réglez sur la mise au point automatique (p. 51).
• Les conditions de prise de vue ne conviennent pas à la
mise au point automatique.
m Effectuez la mise au point manuellement après avoir
sélectionné le mode manuel. (p. 51)
• Le commutateur START/STOP MODE est réglé sur
5SEC ou .
m Réglez-le sur . (p. 26)
• Le signal de la cassette d’enregistrement n’est pas en état
de permettre la copie audio.
m Copiez la cassette sur une autre cassette DVCAM en
Fs 32k. (p.62)
Cause et/ou solutions
• L’oculaire n’est pas réglé.
m Réglez-le. (p. 23)
•
Le contraste entre le sujet et l’arrière-plan est trop important.
Il ne s’agit pas d’un dysfonctionnement du camescope
m Changez d’endroit.
• Les têtes vidéo sont peut-être sales.
m Nettoyez les têtes vidéo à l’aide d’une cassette de
nettoyage Sony DVM12CL (non fournie). (p. 79)
• Les têtes vidéo sont peut-être sales.
m Nettoyez les têtes vidéo à l’aide d’une cassette de
nettoyage Sony DVM12CL (non fournie). (p. 79)
• LCD BRIGHT n’est pas réglé correctement.
m Appuyez sur + ou – pour obtenir la luminosité
appropriée. (p. 27)
• Il ne s’agit pas d’un dysfonctionnement du camescope.
(Voir page suivante)
.
Additional information / Informations complémentaires
.
89
Page 90

Dépannage
Image
Symptôme
L’image n’apparaît pas dans le viseur.
L’image n’apparaît pas sur l’écran LCD ou
dans le viseur.
Pendant le montage à l’aide du câble de
liaison DV, il n’est pas possible de voir
l’image enregistrée.
Divers
Symptôme
Le camescope devient chaud.
La télécommande fournie ne fonctionne
pas.
Le témoin CHARGE clignote après que
vous avez chargé la batterie installée sur le
camescope.
Aucune fonction ne peut être activée alors
que le camescope est sous tension.
Cause et/ou solutions
• L’écran LCD est ouvert.
m Fermez l’écran LCD.
• Le tube fluorescent intégré est usé.
m Consultez votre revendeur Sony.
• Retirez le câble de liaison DV et rebranchez-le.
Cause et/ou solutions
• Si le camescope est en service depuis longtemps, il est
normal qu’il soint chaud.
• COMMANDER est réglé sur OFF dans le menu.
m Réglez-le sur VTR4 ou ID. (p. 12)
• Un obstacle bloque les rayons infrarouges.
m Retirez l’obstacle.
• Les piles n’ont pas été installées dans le bon sens.
m Introduisez les piles en respectant la polarité.
(p. 12)
• Les piles sont épuisées.
m Introduisez des piles neuves. (p. 12)
• Il ne s’agit pas d’un dysfonctionnement du
camescope.
• Débranchez la fiche de connexion de la batterie ou de
l’adaptateur secteur et rebranchez-la ensuite au bout
d’environ une minute. Mettez le camescope sous
tension. Si les fonctions sont toujours inopérantes,
appuyez sur la touche RESET au dos du logement de
la cassette avec d’un objet pointu. (Lorsque vous
appuyez sur la touche RESET, tous les réglages, y
compris la date et l’heure, sont réinitialisés.) (p. 8)
Adaptateur secteur
Symptôme
Le témoin VTR/CAMERA ou CHARGE
ne s’allume pas.
Le témoin CHARGE clignote.
90
Solutions
• Débranchez le cordon d’alimentation. Rebranchez-le
ensuite au bout d’une minute environ. (p. 17)
• Voir le tableau page suivante.
Page 91

Dépannage
Si le témoin CHARGE clignote
Parcourez le tableau suivant.
Retirez la batterie de l’adaptateur
secteur puis réinstallez-la.
Si le témoin CHARGE clignote à
nouveau
Installez une autre batterie.
Additional information / Informations complémentaires
Si le témoin CHARGE ne clignote
plus
Si le témoin CHARGE s’allume et
s’éteint ensuite au bout d’un moment,
cela signifie que tout est en ordre. *
Si le témoin CHARGE clignote à
nouveau
Le problème se situe au niveau de
l’adaptateur secteur.
Demandez conseil à votre revendeur
Sony au sujet du problème.
* Si vous utilisez une batterie que vous venez d’acheter ou qui est restée longtemps inutilisée, il se peut que le témoin
CHARGE clignote lors du premier cycle de charge. Il ne s’agit pas d’un problème. Répétez le cycle de charge avec la
même batterie.
Si le témoin CHARGE ne clignote plus
Si le témoin CHARGE s’allume puis
s’éteint au bout d’un moment, le
problème se situe au niveau de la
batterie installée en premier lieu.
91
Page 92

English
Specifications
System
Video recording system
Two rotary heads, Helical
scanning system
Audio recording system
Rotary heads, PCM system
Video signal
NTSC color, EIA standards
Usable cassette
Mini DVCAM cassette with
logo printed
Tape speed
Approx. 9/8 in. (28.22 mm)/s
Recording/playback time
40 min. (PDVM-40ME)
Fastforward/rewind time
Approx. 2 min. 30 s (PDVM40ME) (using with battery
pack)
Approx. 1 min. 45 s (PDVM40ME) (using with AC power
adaptor)
Image device
CCD (Charge Coupled Device
1/3”)
Viewfinder
Electric viewfinder (color)
Lens
Combined power zoom lens,
20x (Digital), 10x (Optical)
Focal distance
f = 5/32 to 1 9/16 in.
(4.0 to 40 mm )
1 1/2 to 15 in. (38 to 380 mm)
when converted into a 35 mm
still camera
F 1.8 – 2.6
TTL autofocus system inner
focus wide macro system
Color temperature
Auto
Minimum illumination
3 lux at F 1.8
Illumination range
3 to 100,000 lux
Recommended illumination
More than 100 lux
LCD screen
Picture
2.5 inches measured diagonally
2 x 1 1/2 in. (50.05 x 37.1 mm)
On-screen display
TN LCD/TFT active matrix
method
Total dot number
84,480 (384 x 220)
Input and output
connectors
S video output
4-pin mini DIN
Luminance signal: 1 Vp-p,
75 ohms, unbalanced,
sync negative
Chrominance signal:
0.286 Vp-p, 75 ohms,
unbalanced
Audio/Video output/
Headphones jack
Special minijack, 1 Vp-p,
75 ohms, unbalanced, sync
negative
327 mV, (at output impedance
more than 47 kilohms)
Output impedance with less
than 2.2 kilohms/Stereo
minijack (ø 3.5 mm)
DV input/output
4-pin special connector
Speaker
Piezo-electric-speaker
Connection
26-pin connector
General
Power requirements
7.2 V (battery insertion input)
8.4 V (26-pin connector)
Average power consumption
5.0 W during camera recording
using viewfinder
6.0 W during camera recording
using LCD screen
Operating temperature
32°F to 104°F (0°C to 40°C)
Storage temperature
–4°F to 140°F (–20°C to 60°C)
Dimensions
Approx. 2 3/8 x 5 1/8 x 4 5/8
in.
(w/h/d) (59 x 129 x 118 mm)
Mass
Approx. 1 lb 2 oz (520 g)
(excluding the battery pack and
cassette)
Approx. 1 lb 6 oz (640 g)
(including the battery pack
NP-F220 and cassette PDVM40ME)
Microphone
Electret condenser microphone,
Stereo type
Supplied accessories
See page 6.
Design and specifications are
subject to change without
notice.
92
Page 93

Français
Spécifications
Système
Système d’enregistrement
vidéo
Deux têtes rotatives, balayage
hélicoïdal
Système d’enregistrement
audio
Têtes rotatives, PCM
Signal vidéo
Standards NTSC couleur, EIA
Cassette utilisable
Cassette mini DVCAM avec
logo
Vitesse de bande
Env. 9/8 pouce (28,22 mm)/sec
Temps d’enregistrement/
lecture
40 min. (PDVM-40ME)
Temps d’avance/rembobinage
rapide
Environ 2 min. 30 s (PDVM40ME) (avec batterie)
Environ 1 min. 45 s (PDVM40ME)(avec adaptateur secteur)
Capteur d’image
CCD (Charge Coupled Device
- Circuit à couplage de charges
1/3”)
Viseur
Electrique (couleur)
Objectif
Objectif combiné avec zoom
électrique, 20x (numérique),
10x (optique)
Longueur focale
f = 5/32 à 1 9/16 pouces (4,0 à
40 mm)
1 1/2 à 15 pouces (38 à 380
mm) converti en focale
d’appareil photo 24 x 36
F = 1,8 à 2,6
Système TTL
Système d’autofocus à
exposemètre incorporé (TTL)
Température de couleur
Auto
Eclairement minimal
3 lux à F 1,8
Plage d’éclairement
3 à 100 000 lux
Eclairement recommandé
Plus de 100 lux
Ecran LCD
Image
2,5 pouces mesurés en
diagonale
2 x 1 1/2 pouce (50,05 x 37,1
mm)
Affichage sur écran
Méthode à matrice active TN
LCD/TFT
Nombre total de points
84 480 (384 x 220)
Connecteurs d’entrée
et sortie
Sortie S-video
Prise Din 4 broches
Signal de luminance : 1 Vc-c,
75 ohms, asymétrique,
synchronisation négative
Signal de chrominance :
0,286 Vc-c, 75 ohms,
asymétrique
Sortie audio/vidéo/prise
écouteurs
Miniprise spéciale, 1 Vc-c, 75
ohms, asymétrique, synchro
négative
327 mV, (à impédance de sortie
de plus de 47 kilohms)
Impédance de sortie inférieure
à 2,2 kilohms/miniprise stéréo
(ø 3,5mm)
Entrée/Sortie DV
Connecteur spécial 4 broches
Haut-parleur
Haut-parleur piézoélectrique
Raccordement
Connecteur à 26 broches
Généralités
Alimentation
7,2 V (entrée batterie)
8,4 V (connecteur 26 brouches)
Consommation moyenne
5 W pendant l’enregistrement
avec viseur
6 W pendant l’enregistrement
avec l’écran LCD
Température d’utilisation
32°F à 104°F (0°C à 40°C)
Température de stockage
–4°F à 140°F (–20°C à 60°C)
Dimensions
Env. 2 3/8 x 5 1/8 x 4 5/8
pouces (l/h /p) (59 × 129 × 118
mm)
Poids
Env. 1 livre 2 onces (520 g)
(sans batterie rechargeable au
cassette)
Env. 1 livre 6 onces (640 g)
(avec batterie NP-F220 et
cassette PDVM-40ME
Microphone
Microphone électrostatique,
type stéréo
Accessoires fournis
Voir page 6.
La conception et les
spécifications sont sujettes à
modifications sans préavis.
Additional information / Informations complémentaires
93
Page 94

Warning indicators
0
min
Indicateurs
d’avertissement
If indicators flash on the LCD screen or in the
viewfinder or warning messages appear on the
display window , check the following:
: you can hear the beep sound when BEEP is
set to ON in the menu system.
Si les indicateurs clignotent sur l’écran LCD ou
dans le viseur, ou si des messages
d’avertissement apparaissent sur l’afficheur,
contrôlez les points suivants:
: vous entendez un signal sonore lorsque le
paramètre BEEP est réglé sur ON dans le
menu.
213
5
min
456
789
1 The battery is weak or dead.
Slow flashing: The battery is weak.
Fast flashing: The battery is dead.
Depending on conditions, the i indicator
may flash, even if there are 5 to 10 minutes
remaining.
2 The tape is near the end.
The flashing is slow.
3 The tape has run out.
The flashing becomes rapid.
4 No tape has been inserted.
5 The tab on the tape is out (red).
6 Moisture condensation has occurred. (p.
78)
7 The video heads may be contaminated.
(p. 79)
8 The clock is not set.
If the clock is not set when you press START/
STOP button in the CAMCORDER mode, the
message appears for 5 seconds.
9 Some other trouble has occurred.
Disconnect the power source and contact your
Sony dealer or local authorized facility.
94
1 La batterie est faible ou épuisée.
Clignotement lent: la batterie est faible.
Clignotement rapide: la batterie est épuisée.
Dans certains cas, l’indicateur i peut
clignoter bien que la capacité de la batterie soit
suffisante pour filmer encore pendant 5 ou 10
minutes
.
2 La cassette est presque terminée.
Le clignotement est lent.
3 La cassette est terminée.
Le clignotement est rapide.
4 Aucune cassette n’a été introduite.
5 Le taquet de la cassette laisse apparaître la
partie rouge.
6 De l’humidité s’est condensée (p. 78).
7
Les têtes vidéo sont probablement sales
8 L’horloge n’est pas réglée.
Si l’horloge n’est pas réglée lorsque vous
appuyez sur START/STOP en mode
CAMCORDER, le message apparaît pendant
5 secondes.
9 Un autre problème est survenu.
Débranchez la source d’alimentation et
consultez votre revendeur Sony ou un centre
de service après-vente agréé.
(p. 79).
Page 95

Index
A, B
AE LOCK .................................... 43
Audio dubbing...........................62
Audio mode................................ 71
BATT(LOCK/RELEASE) ......... 20
BEEP ......................................24, 40
C
Camera recording ...................... 22
Car battery .................................. 38
Charging battery pack .............. 17
Charging vanadium-lithium
battery ...................................... 64
Cleaning video heads................79
Clock set ...................................... 65
Color TV system .................... 4, 83
Connection............................ 54, 58
COPY INHIBIT .......................... 71
D, E
Data Code ...................................55
DISPLAY ..................................... 32
Digital zoom ............................... 27
DV connecting cable.................. 58
DV format ................................... 54
DV IN/OUT ...............................58
Editing ......................................... 58
EJECT .......................................... 21
END SEARCH............................ 24
Exposure ..................................... 43
F, G, H
Fade-in/fade-out .......................42
FADER ........................................ 42
FOCUS......................................... 51
Full charge ..................................17
I, J, K, L
ID.................................................. 13
InfoLITHIUM ............................. 75
LCD BRIGHT ............................. 27
M, N
Manual focus .............................. 50
Menu system ..............................39
Mirror mode ............................... 29
Moisture condensation ............. 78
Normal charge ........................... 17
O, P, Q
PHOTO ....................................... 44
Playback on a monitor ..............54
Playback pause........................... 33
Power sources ............................ 36
Power zoom................................25
PROGRAM AE........................... 48
R
Remaining battery indicator ....73
Remaining tape indicator ......... 24
Remote Commander ................. 11
S
Skip scan ..................................... 33
Standby mode ............................ 22
START/STOP MODE switch... 29
SteadyShot .................................. 46
T, U, V
Time code.................................... 24
Tripod mounting ....................... 31
Trouble check ............................. 84
VOLUME ....................................32
W, X, Y, Z
Warning indicators ....................94
White balance ............................. 52
ZERO SET MEMORY................ 57
Zoom ........................................... 25
Additional information / Informations complémentaires
95
Page 96

Index
A, B
AE LOCK .................................... 43
Balance des blancs ..................... 52
BATT (LOCK/RELEASE) ........ 20
BEEP ......................................24, 40
Batterie de voiture .....................38
C
Câble de liaison DV ...................58
Charge complète ........................ 17
Charge de la batterie ................. 17
Charge de la batterie au
vanadium-lithium .................. 64
Charge normale ......................... 17
Code de données ....................... 55
Code de temps ........................... 24
Commutateur START/STOP
MODE ...................................... 29
Condensation d’humidité ........ 78
COPY INHIBIT .......................... 71
D, E
Dépannage ..................................88
DISPLAY .....................................32
Doublage audio.......................... 62
DV IN/OUT ...............................58
EJECT .......................................... 21
END SEARCH............................ 24
Exposition ................................... 43
F
FADER ........................................ 42
FOCUS......................................... 51
Fondu enchaîné.......................... 42
Format DV ..................................54
G, H, I, J, K, L
ID.................................................. 13
Indicateurs d’avertissement ..... 94
Indicateur de bande restante ... 24
Indicateur de capacité de la
batterie...................................... 73
InfoLITHIUM ............................. 75
LCD BRIGHT .............................27
M, N
Menu............................................ 39
Mise au point manuelle ............50
Mode audio ................................ 71
Mode d'attente ...........................22
Mode miroir ............................... 29
Montage ......................................58
Nettoyage des têtes vidéo ........ 79
O, P
Pause de lecture ......................... 33
Prise de vue ................................22
PHOTO ....................................... 44
PROGRAM AE........................... 48
Q, R
Raccordement....................... 54, 58
Raccordement à un moniteur .. 54
Recherche visuelle ..................... 33
Réglage de l’horloge.................. 65
S
Sources d’alimentation ............. 36
SteadyShot .................................. 46
Système couleur de télévision
..................................................4, 83
T, U, V, W, X, Y
Télécommande ...........................11
Trépied ........................................ 31
VOLUME ....................................32
Z
ZERO SET MEMORY................ 57
Zoom ........................................... 25
Zoom numérique ....................... 27
Zoom électrique ......................... 25
Sony Corporation Printed in Japan
 Loading...