

Page 1

Digital Still Camera
Operating Instructions
Before operating the unit, p leas e read this manual and the separate sheet
“Waterproof specifications” thoro ughly, and retain it fo r future reference.
Owner’s Record
The model and seria l nu mbers are located on the bot tom. Record the
serial number in the space provided be low. Refer to th ese numbers
whenever you call upon your Son y dea l er regarding this product.
Model No. DSC-U60
Serial No.
3-078-724-11(1)
Page 2
WARNING
On the battery charger
To prevent fire or shock hazard, do
not expose the unit to rain or
moisture.
For the Customers in the U.S.A.
This symbol is intend e d to
alert the user to the presence
of uninsulated “dangerous
voltage” within the product’s
enclosure that may be of
sufficient magnitude to
constitute a risk of electric
shock to persons.
This symbol is intend e d to
alert the user to the presence
of important operating and
maintenance (servicing)
instructio ns in the literature
accompanying the appli an ce.
If you have any questions about this product,
you may call:
Sony Customer Information Serv ices Center
1-800-222-SONY (7669)
The number below is for the FCC related
matters only.
Regulatory Information
Declaration of Conformity
Trade Name: SONY
Model No.: DSC-U60
Responsible Party:Sony Electronics Inc.
Address: 680 Kinderkamack
Road, Oradell, NJ 07649
U.S.A.
Telephone No.: 201-930-6972
This device complies with Part 15 of the
FCC Rules. Operation is subject to the
following two conditions: (1) This device
may not cause harmful interfe renc e , a nd
(2) this device m u st accept any interference
received, including interference that may
cause undesired operation.
CAUTION
You are cautioned that any changes or
modifications not expressly approved in this
manual could void your authority to operate
this equipment.
Note:
This equipment has been tested and found to
comply with the limits for a Class B digital
device, pursuant to Part 15 of the FCC Rules.
These limits are des igne d to provide
reasonable protection aga ins t harmful
interference in a re sidential installat ion. This
equipment generates, uses, and can r ad iate
radio frequency energy and, if not installed
and used in accordance with the instructions,
may cause harmful interference to radio
communications. However, there is no
guarantee that interference will not occur in a
particular installation. If this equipment does
cause harmful interference to radio or
television reception, which can be determined
by turning the equipment off and on, the user
is encouraged to try to corre ct the int erferen ce
by one or more of the following measures:
– Reorient or relocate the receiving
antenna.
– Increase the separation between the
equipment and receiver.
– Connect the equipment into an outlet on a
circuit differ en t fro m th at to which the
receiver is connected.
– Consult the dealer or an experienced
radio/TV technician for help.
The supplied interface cable mus t be used
with the equipment in order to comply with
the limits for a digital device pur sua n t to
Subpart B of Part 15 of FCC Rules.
2
Page 3

For the Customers in the U .S.A.
and Canada
RECYCLING NICKEL METAL
HYDRIDE BATTERIES
Nickel Metal Hydride
batteries are recyclable.
You can help preserve our
environment by returning your
used rechargeabl e b att eries to
the collection and recycling location
nearest you.
For more information regard ing recycling
of rechargeable batt eri es, call toll free
1-800-822-8837, or visit
http://www.rbrc.org/
CAUTION:
Do not handle damaged or leaking Nickel
Metal Hydride batteries.
CAUTION
TO PREVENT ELECTRIC SHOCK, MATCH
WIDE BLADE OF PLUG TO WIDE SLOT,
FULLY INSERT.
A moulded plug complying with BS1363 is fitted
to this equipment for your safety and
convenience.
Should the fuse in the plug supplied need to be
replaced, a fuse of the same rating as the supplied
one and approved by ASTA or BSI to BS1362,
(i.e., marked with or mark) must be used.
If the plug supplied with this equipment has a
detachable fuse cover, be sure to attach the fuse
cover after you change the fuse. Never use the
plug without the fuse cover. If you should lose the
fuse cover, please contact your nearest Sony
service station.
This product has been tested and found
compliant with the limits sets out in the EM C
Directive for using connection cables shorter
than 3 meters (9.8 feet).
Attention
The electromagnetic fields at the specific
frequencies may influen ce the pic tur e of this
camera.
Notice
If static electricity or electromagnetism causes
data transfer to discontinue midway (fail),
restart the application or disc onnect and
connect the USB cable again.
Certain countries may regulate disposal of the
battery used to power this product. Please
consult with your local authority.
For the Cu stomers in the U.S.A.
and Canada
THIS DEVICE COMPLIES WITH PART 15
OF THE FCC RULES. OPERATION IS
SUBJECT TO THE FOLLOWING TWO
CONDITIONS:
(1) THIS DEVICE MAY NOT CAUSE
HARMFUL INTERFERENCE, AND
(2) THIS DEVICE MUST ACCEPT ANY
INTERFERENCE RECEIVED,
INCLUDING INTERFERENCE THA T MAY
CAUSE UNDESIRED OPERATION.
THIS CLASS B DIGITAL APPARATUS
COMPLIES WITH CANADIAN ICES-003.
3
Page 4

Before using your camera
Notes on waterproof performance
• This camera conforms to IEC60529 IPX6* and
IPX7**, and can be used in places exposed to
splashing water or underwater up to depths of
1.5 m (5 feet).
* Water shall not enter the interior even when
exposed to direct jet streams of water (normal
temperature fresh water) from any direction.
** Water shall not seep into the interior even
when left submerged in normal temperature
fresh water at a depth of 1 m (3 fe et
3 1/4 inches) in a stationary condition for
approximately 30 minutes.
• You can use this camera in the following
places: underwater (ocean, swimming pools) up
to depths of 1.5 m (5 feet), beachside, riv erside,
poolside, ski slopes, in the rain, etc.
• Do not use this camera in the following places:
places where the camera might be subject to
high water pressure, hot springs or bathtubs,
etc.
Notes on use
• Before using this camera underwater or in
places exposed to water, be sure to inspect the
O-ring and the O-ring mating surface on the
inside of the camera.
• Do not immerse the camera in water containing
soap, detergent, bath salts, etc., or in hot water
with a temperature of more than 30°C.
• Never open the waterproof cover underwater or
in places exposed to water. Lock the lock
switch to prevent the waterproof cover from
opening by accident.
4
• This camera does not float in water.
• Before opening the waterproof cover, be sure to
rinse off any sand and completely wipe away
any water that may be present on the camera
body.
• Should you find any evidence of water leaks
inside the waterproof cover, stop using the
camera at once and contact your Sony dealer or
local authorized Sony service facility.
• Sony cannot be held responsible for
malfunctions or irreparable problems arising
from water or foreign objects entering the
inside of the camera due to improper handling.
• Note that waterproof performance is not
guaranteed under all environments and
conditions.
Trial recording
Before you record one-time events, you may want
to make a trial recording to make sure that the
camera is working correctly.
No compensation for contents of the
recording
Contents of the recording cannot be compensated
for if recording or playback is not possible due to
a malfunction of your camera or recording media,
etc.
Back up recommendation
To avoid the potential risk of data loss, always
copy (back up) data to a disk.
Notes on image data compatibility
• This camera conforms with the Design rule for
Camera File system univ ersal standard
established by the JEITA (Japan Electronics
and Information Technology Industries
Association).
• Playback of images recorded with your camera
on other equipment and playback of images
recorded or edited with other equipment on
your camera are not guaranteed.
Note on “Memory Stick”
This camera turns off when you open the inner
cover. Do not open the inner cover while the
access lamp is lit.
Precaution on copyright
Television programs, films, video tapes, and other
materials may be copyrighted. Unauthorized
recording of such materials may be contrary to
the provision of the copyright laws.
Do not shake or strike the camera
In addition to malfunctions and inability to record
images, this may render the “Memory Stick”
unusable or image data breakdown, damage or
loss may occur.
Page 5

LCD screen, LCD finder (only models
5
Page 6

Table of contents
Before using your camera.........................4
How to hold the camera............................5
Identifying the parts.................................. 8
Getting started
Preparing batteries..................................10
Charging the batteries.............................10
Inserting the batteries..............................12
Using your camera abroad......................15
Turning on/off your camera....................15
How to use the buttons............... .............16
Setting the date and time.........................16
Shooting still images
Inserting and remo vin g a “Memory
Stick” ..............................................18
Setting the still image size......................20
Image size............................ ...................21
Basic still image shooting
— Using auto adjustment mode .....22
Using the self-timer............................ 24
Selecting a flash mode........................25
Creating or selecting a folder..................26
Creating a new folder .............. ...........27
Selecting the recording folder.............28
Shooting according to sce ne conditions
— Scene Selection.......... ................30
Setting the distance to the subject
— Focus preset...............................32
Shooting five images continuou sly
— Burst .......................................... 33
Adding special effects
— Picture Effect ............................34
Viewing still images
Viewing st ill images on the LCD
screen .............................................36
Viewing single images....................... 36
Viewing an index screen
(four-image)...................................37
Selecting the folder and playing back
images — Folder............................38
Enlarging an image
— Enlarged playback..................... 40
Choosing images to print
— Print (DPOF) mark.................... 41
Enjoying movies
Shooting movies.................. ...................43
Viewing movies on the LCD screen....... 44
Deleting images
Deleting images........................... ........... 46
Formatting a “Memory Stick”................47
Enjoying images on your
computer
Copying images to your comput er
— For Windows users....................49
Installing the USB driver....................50
Installing “Image Transfer ”............. ...51
Installing “ImageMixer”.....................52
Connecting the camera to your
computer.........................................53
Copying images using “Ima ge
Transfer”.........................................54
Changing “Image Transfer” settings...55
Copying images without usi ng “Image
Transfer”.........................................55
Viewing images on your com puter.....56
Image file storage de stinations and file
names..............................................57
Copying images to your comput er
— For Macintosh users ............... ...58
Creating a Video CD using
“ImageMixer”.................................60
6
Page 7

Troubleshooting
Troubleshooting......................................61
Warnings and messages..........................68
Self-diagnosis display
— If a code starting with an alphabet
letter appears...................................70
Additional information
Menu items....................................... .......71
Precautions..............................................74
On “Memory Stick” ............................ ....76
On Nickel-Metal Hydrid e batteries.........78
On the battery charger...................... .......79
On the O-ring .............................. ............79
Specifications..........................................82
LCD screen displays .......... .................... .83
Index
Index........................................................85
7
Page 8
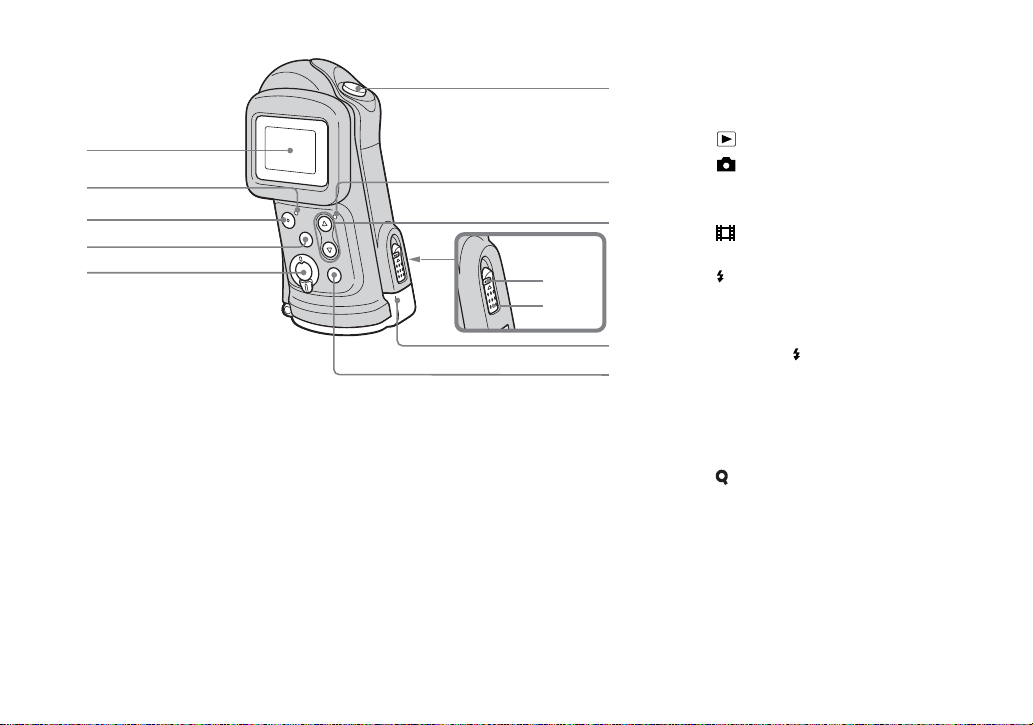
Identifying th e parts
See the pages in parentheses for details of ope ra tion.
8
Page 9
1
2
3
4
5
9
0
6
7
8
qa
qs
A LCD screen
B POWER lamp (15)
C POWER button (15)
D MENU button (16)
E Mode switch
: To view images (36)
: To shoot still images (22)
To shoot five images
continuously (33)
: To shoot movies (43)
F Shutter button (22)
G (Flash charge) lamp (orange)
(26)
H Control b uttons
Menu on: v/V (16)
Menu off: /SCENE (25, 30)
I Lock switch (12)
J OPEN button (12)
K Slide lock lever (12)
L EXEC button (16)
When viewing images:
(Enlarged playback) (40)
9
Page 10

Getti
ng starte
d
Preparing batteries
Charging the batteries
Use the following batterie s in this camera.
Acceptable batteries
HR11/45: HR03 (size AAA) Nickel-Metal
Hydride batteries (2)
– NH-AAA-DA (2) (supplied)
– NH-AAA-2DA twin-pack (not supplied)
Batteries that cannot be used
Manganese batteries, li th iu m bat te ries, NiCd batteries, alkaline bat te ri es
• When the above batteries are used, operation is
not guaranteed due to possible voltage drops or
other characteristics of the batteries.
In addition, the battery remaining indicator is
not displayed correctly.
10
1
, Insert Nickel-Metal Hydride
batteries into the batte ry
charger (supplied) with the
correct po larity +/–.
• You cannot use any battery other than a Nickel-
Metal Hydride battery. Also, operations are not
guaranteed when using a Nickel-Metal Hydride
battery from a manufacturer other than Sony.
• Be sure to charge the Nickel-Metal Hydride
batteries supplied with your camera before
using them for the first time.
• Connect the battery charger to an easily
accessible wall outlet (wall socket) close by.
• Even if the CHARGE lamp is not lit, the battery
charger is not disconnected from the AC power
source (mains) as long as it is connected to the
wall outlet (wall socket). If some trouble occurs
while using the battery charger, immediately
shut off the power by disconnecting the plug
from the wall outlet (wall socket).
CHARGE lamp
Power cord
2
(mains lead)
To the wall outlet
(wall socket)
, Connect the ba tter y cha rge r to
a wall outlet (wall socket) using
the power cord (mains lead) .
The CHARGE lamp lights up when
charging begins, and goes off when
charging is comple t ed.
For details on the supplied battery cha rger,
see page 79.
• When charging is finished, disconnect the
power cord (mains lead) from the wall outlet
(wall socket), and remove the Nickel-Metal
Hydride batteries from the battery charger.
Page 11

Charging time
Nickel-Metal Hydride
battery
NH-AAA-DA × 2 (supplied) Approx. 6 hours
This represents the time required to charge
fully depleted Nickel-Metal Hydride
batteries using the supplied battery charger
in an environment wher e th e ambient
temperature is 25°C (77°F) .
• It takes about six hours to completely charge
the batteries. The CHARGE lamp may remain
lit longer than six hours, but this is not a
malfunction.
• If you use the BC-CSQ2 battery charger
supplied with the STAMINA “Super Quick
charge” kit (not supplied), the batteries will
charge faster.
Charging time for Size AAA Nickel-Metal
Hydride batteries
2 batteries: Approx. 1 hour 25 minutes
4 batteries: Approx. 2 hours 50 minutes
Charging time
Notes on the Nickel-Metal
Hydride batteries
• If the poles of the Nickel-Metal Hydride
batteries are dirty, the batteries may not charge
properly. Occasionally clean the poles of the
batteries and the terminals of the charger by
wiping them with a dry cloth.
• Always use the supplied case when transporting
the Nickel-Metal Hydride batteries. If the
positive and negative terminals come into
contact with metallic material and are shorted,
the batteries could overheat or catch fire.
• At the time of purchase, or when the Nickel-
Metal Hydride batteries have not been used for
a long time, they may not fully charge. This is
typical of this type of battery, and is not a
malfunction. If this happens, repeatedly using
up the batteries fully, and then charging them,
should correct the problem.
• Even when Nickel-Metal Hydride batteries are
not being used they lose their charge naturally
over time. It is recommended that you recharge
the batteries just before using them.
• If you recharge Nickel-Metal Hydride batteries
before fully using up the existing charge, the
low battery warning may be displayed sooner
than expected. This is called the “memory
effect.”* If this problem occurs, charging the
batteries only after using up the existing charge
will correct it.
* The “memory effect” – the situation in which
the capacity of the battery is temporarily
lowered.
• Do not peel off the external seal s or damage the
batteries. Never use batteries from which the
seals have been partially or completely
removed, or batteries that have been split in any
way. These may cause leakage, explosion, or
heat-up of the battery, and personal scald or
injury may be caused. These may cause a
malfunction of the battery charger.
Getting started
11
Page 12
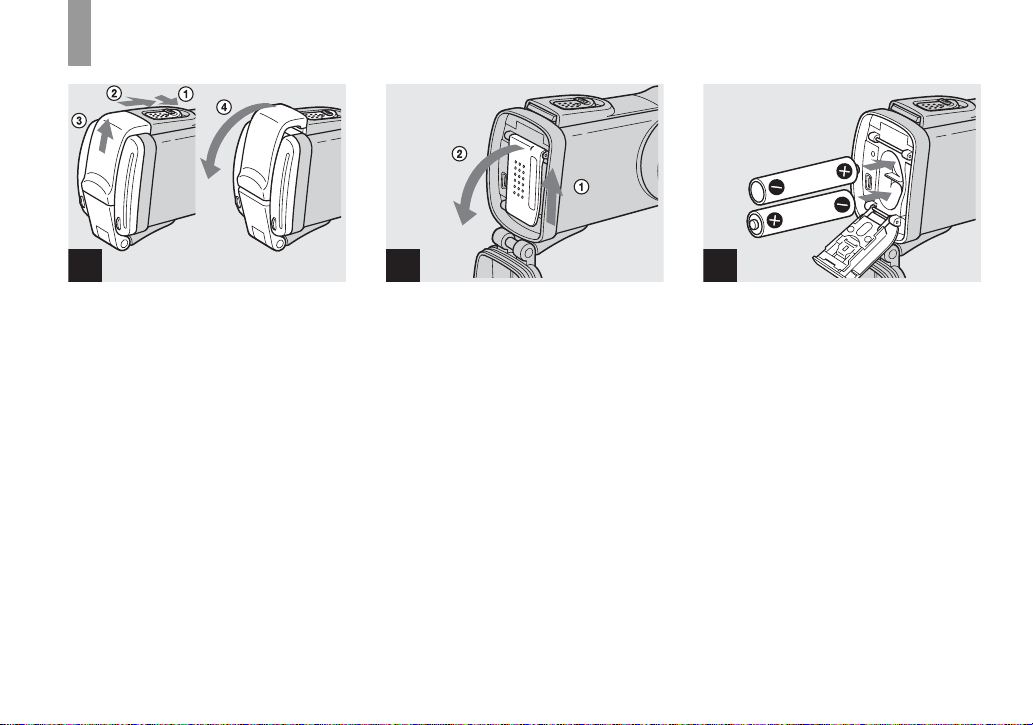
Inserting the batteries
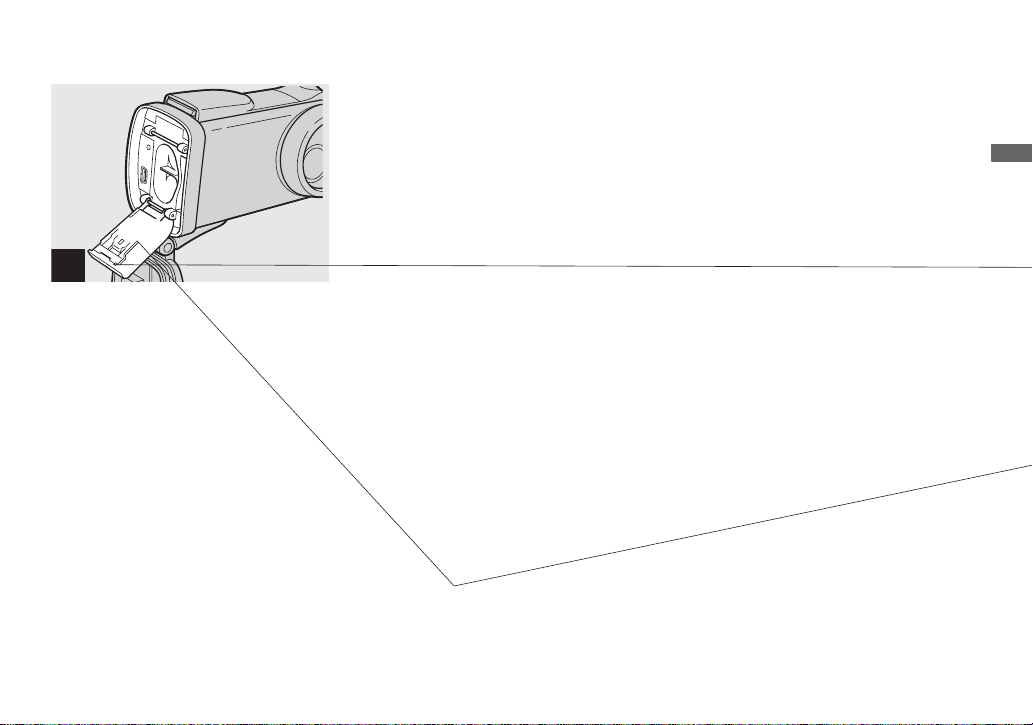
1
, Slide the lo ck switch and th e
OPEN button in the direction of
the arrow and op en the
waterproof co ver .
The waterproof cover opens toward you.
• Before opening the waterproof cover, be
sure to rinse off any sand and
completely wipe away any water that
may be present on the camera body.
• Never open the waterproof cover underwater or
in places exposed to water, as this may allow
water to enter the inside of the camera and
cause a malfunction.
• Immediately after the camera is brought from a
warm place to a cold place such as from
indoors to outdoors, the difference in pressure
between the inside of the camera and the
outside air may make it difficult to open the
waterproof cover.
12
2
, Slide the inner cover in the
direction of the arrow to open
it.
The inner cover opens toward you whe n
you slide it in the direction of the arrow.
3
, Insert the batteries.
Match the +/– p oles of the batteries to the
+/– marks inside the battery case.
• From time to time, use a dry cloth to wipe any
dirt off of the battery terminals and the contacts
inside the inner cover. Skin oil and other dirt on
the battery terminals and contacts can
significantly shorten the operating time
provided by the batteries.
Page 13

Getting started
4
, Close the inn er cover an d slide
it in the direction of the arrow
to lock it.
Close the inner cov er while holding the
batteries in. Make sure the cover is closed
securely.
To remove the batteries
Perform steps 1 and 2 and remove the
batteries.
• Be careful not to drop the batteries when
opening or closing the inner cover.
, Inspect the waterproof cov er .
Inspect the O-ring and the O-ring m at in g
surface for scratches, deformation, dirt, hair
or other pr oblems.
• Note that if the O-ring and the O-ring mating
surface are damaged, dirty or have other
problems, the waterproof performance may be
impaired. In this case, water may enter the
inside of the camera and cause irreparable
damage.
• Replace the O-ring with a new one if it
becomes scratched or deformed, or after
approximately two years of use even if there are
no problems (page 81).
, Close the waterproof co ve r.
Close the waterproof cover and slide the
slide lock l ev er back into pl ace until the
OPEN button clicks.
• When using the camera underwater or in places
exposed to water, slide the lock switch (page 9)
to lock the waterproof cover. This prevents the
waterproof cover from opening by accident.
13
Page 14
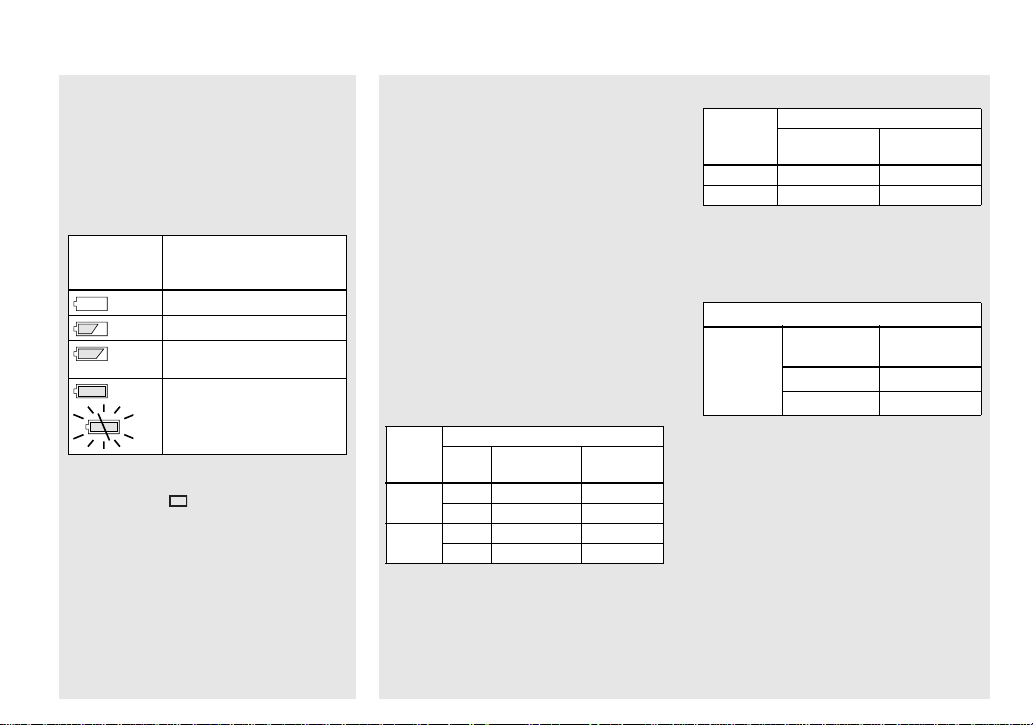
Battery remaining indicator
(When using Nickel-Metal
Hydride batteries)
As the battery po wer decreases with use, the
battery remaining indicator displ a ys the
amount of power remaining using the
following symbols.
Battery
remaining
indicator
• If the LCD screen display is off, set
[DISPLAY] in [ ] to [ON].
• Based on the conditions under which the
camera is being used and the state of the
charge, or on the environment, this information
may not be correctly indicated.
• The battery remaining indicator is not
displayed in USB connecting.
Battery remaining
guidelines
Sufficient power remaining
Battery half full
Battery low, recording/
playback will stop soon.
Change the batteries for fully
charged ones, or charge these
batteries.
(The warning indicator flashes.)
Battery life and number of
images that can be recorded/
viewed
The tables show the approximate battery
life and the number of image s tha t c an be
recorded/viewed with fully charged
batteries at a temp eratur e of 25°C ( 77°F) in
auto adjustment mode. The numbers of
images that can be recorded/viewed take
into account changing the supplied
“Memory Stick” as necess ary. Not e that th e
actual numbers may be less than indicated
depending on the conditi ons of use.
Shooting still images
Under the average conditions
NH-AAA-DA (2) (supplied)
Image
LCD
size
2.0M
VGA
1) Shooting in the following situations:
– Shooting one time every 30 seconds
– The flash strobes once every two times
– The power turns on and off once every ten
times.
No. of
LIGHT
images
ON Approx. 140 Approx. 70
OFF Approx. 160 Approx. 80
ON Approx. 140 Approx. 70
OFF Approx. 160 Approx. 80
1)
Battery
life (min.)
Viewing still images
Image
size
2.0M Approx. 3000 Approx. 150
VGA Approx. 3000 Approx. 150
2) Viewing single images in order at about 3-
NH-AAA-DA (2) (supplied)
No. of
images
second intervals with [LCD LIGHT] set to
[ON]
Shooting movies
NH-AAA-DA (2) (supplied)
Continuous
recording
3) The maximum shooting time is 15 seconds.
• The remaining indicator will decrease in the
following situations:
– The surrounding temperature is low
– The flash is used
– The camera has been turned on and off many
– [LCD LIGHT] is set to [ON]
– The battery capacity decreases as you use it
LCD LIGHT
ON Approx. 80
OFF Approx. 90
times
more and more and as time passes (page 78).
2)
Battery life
(min.)
3)
Battery life
(min.)
14
Page 15
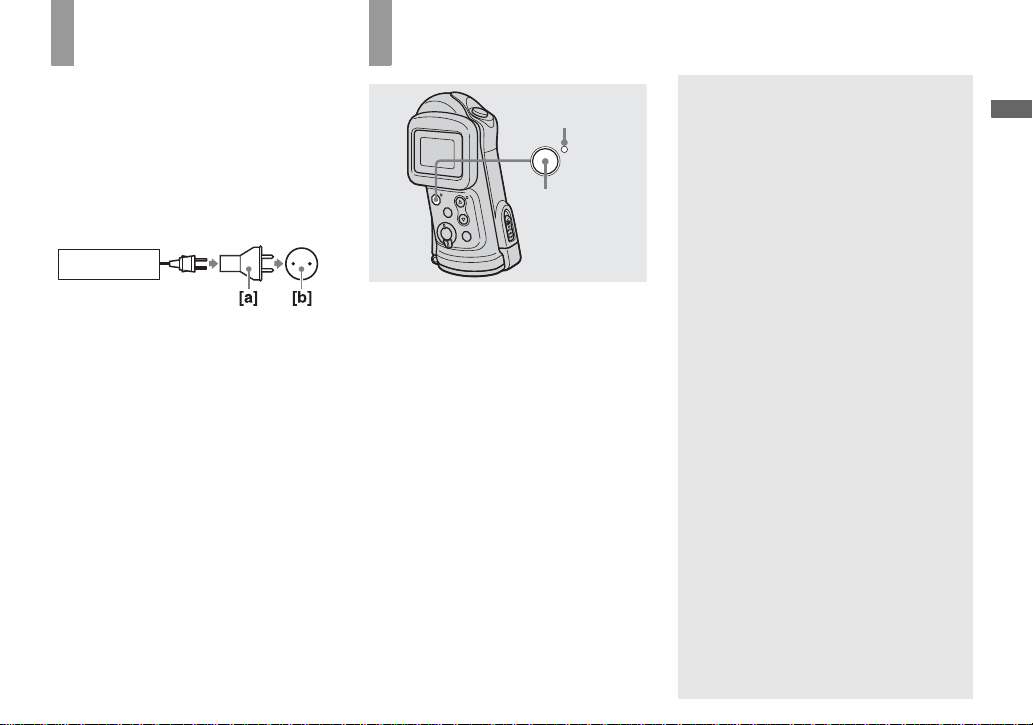
Using your camera abroad
Power sources
You can use your camera in any country or
region with the supplied battery charger
within 100 V to 240 V AC, 50/60 Hz. Use a
commercially available AC plug adaptor
[a], if necessary, depending on the design of
the wall outlet (wall socket ) [b].
BC-CS2A/CS2B
Turning on/off your camera
Auto power-off function
POWER lamp
W
E
R
O
P
POWER
If you do not operate the cam era for about
three minutes, the camera tu rns off
automatically to pr ev en t wearing down the
batteries.
However, the auto power-off function will
not operate when the camera is connected to
a computer with the USB cable.
Getting started
• Do not use an electronic transformer (travel
converter), as this may cause a malfunction.
, Press POWER to turn on the
power.
The POWER lamp (g reen) li ghts u p and th e
power is on. When you turn on your camera
for the first time, the DATE NOTATION
screen appears o n the LCD screen
(page 16).
To turn off the power
Press POWER again. The POWER lamp
goes out, and the cam era turns off.
15
Page 16
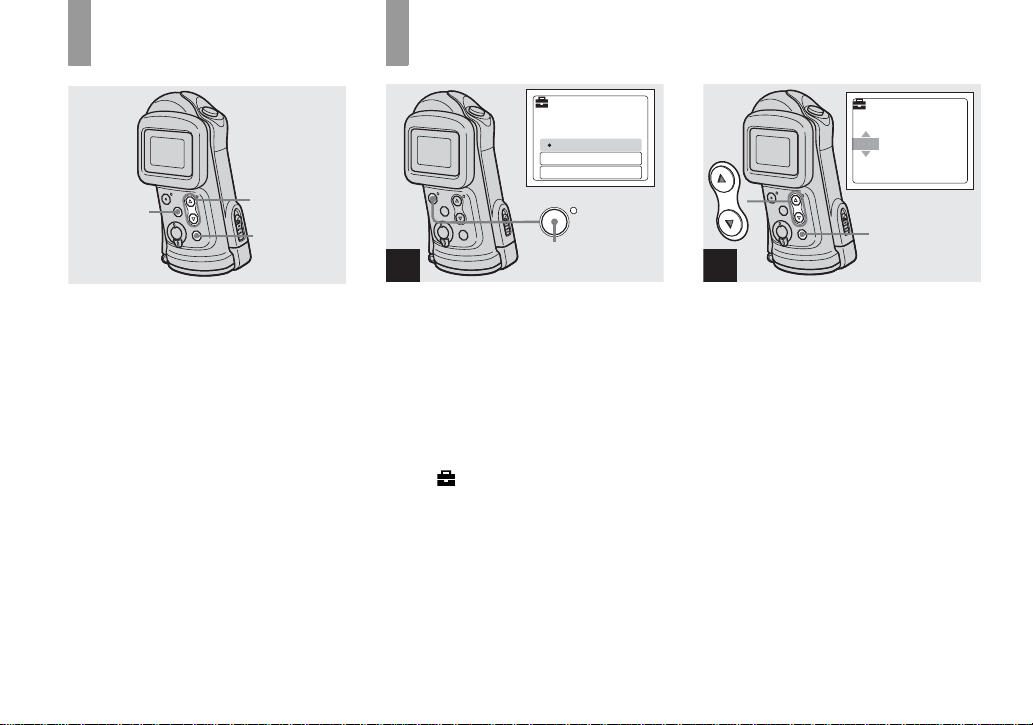
How to use the buttons
Setting the date and time
MENU
Control
buttons
EXEC
To change the current settings of the
camera, bring up the menu, and use the
control buttons to make the cha nge s.
For each item, press MENU to display the
menu and press the control buttons v/V to
select the desired value, then press EXEC to
make the setting.
Press MENU, then the menu disappears
from the LCD screen.
DATE NOTATION
11
2003
AM
12:00:00
Y/M/D
M/D/Y
D/M/Y
W
E
R
O
P
POWER
1
, Press POWER to turn on the
power.
The POWER lamp (g reen) l ights up and the
DATE NOTATION screen appears on the
LCD screen.
• To change the date and time, press MENU and
select [DATE&TIME SET] in [CLOCK SET]
under [ ] (page 73), then perform step 3.
When the setting is complete, press MENU so
that the CLOCK SET screen disappears from
the LCD screen.
• This operation is available no matter what
position the mode switch is in.
DATE&TIME SET
Y/M/D
12:00
AM
1 12003
EXEC
2
, Select the desired date display
format with the control buttons
v/V, then press EXEC.
Select from [Y/M/D] (year/ mo nth/day),
[M/D/Y] (month/day/yea r) or [D/ M / Y ]
(day/month/year). Then DATE&TIME
SET screen appears on the LC D scre en.
• If the rechargeable button battery, which
provides the power for saving the time data, is
ever fully discharged (page 76), the DATE
NOTATION screen will appear again. When
this happens, reset the date and time, by starting
from step 2.
16
Page 17
DATE&TIME SET
Y/M/D
2003 1 1
12:00
DATE&TIME SET
Y/M/D
AM
2003 7 4
CANCEL
OK
10:30
AM
Getting started
EXEC
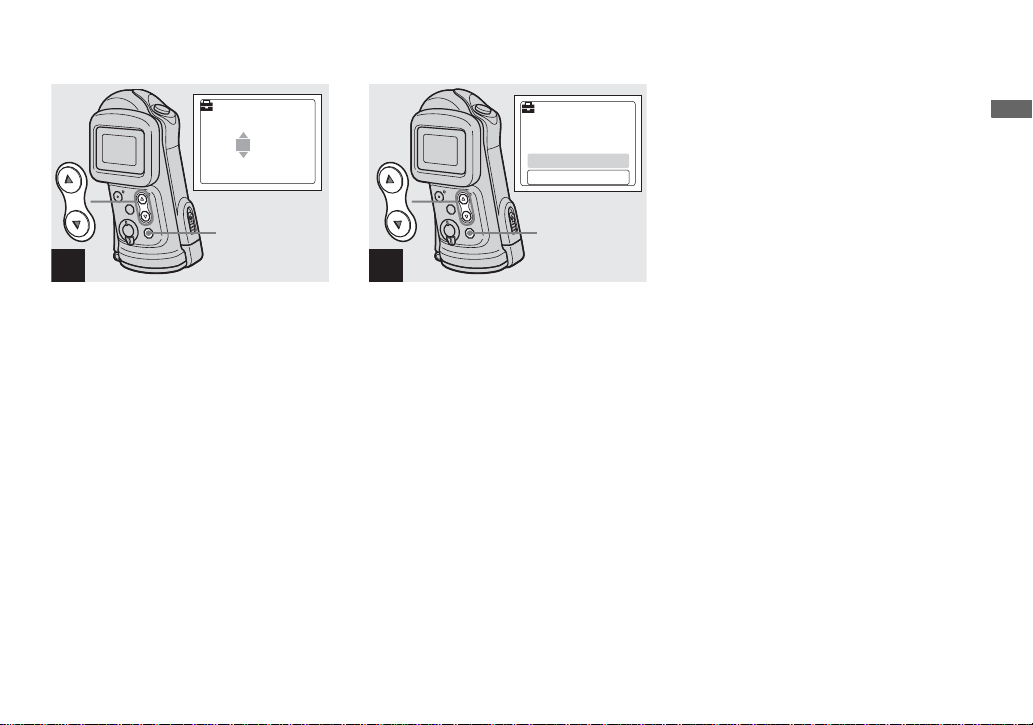
3
, Set the numeric value with the
control buttons v/V, then
press EXEC.
The item to b e s et is indicate d w ith v/V.
After ente r ing the number, v/V moves to
the next item. Repeat this step until all of
the items are set.
• If you selected [D/M/Y] in step 2, set the time
on a 24-hour cycle.
EXEC
4
, Select [OK] with the control
button v, then press EXEC .
The date and time are en tered a nd the cloc k
starts to keep time.
• If you make a mistake, select [CANCEL] in
step 4 to disp lay the DATE NOTAT ION
screen, then repeat the procedure from step 2.
• To cancel the date and time setting, select
[CANCEL], then press EXEC.
17
Page 18

Inserting and removing a “Memory Stick”
1
, Slide the lo ck switch and th e
OPEN button in the direction of
the arrow and op en the
waterproof co ver .
The waterproof cover opens toward you.
• Before opening the waterproof cover, be
sure to rinse off any sand and
completely wipe away any water that
may be present on the camera body.
• Never open the waterproof cover underwater or
in places exposed to water, as this may allow
water to enter the inside of the camera and
cause a malfunction.
• Immediately after the camera is brought from a
warm place to a cold place such as from
indoors to outdoors, the difference in pressure
between the inside of the camera and the
outside air may make it difficult to open the
waterproof cover.
18
, Slide the inner cover in the
direction of the arrow to open
it.
The inner cover opens toward you whe n
you slide it in the direction of the arrow.
• For details on the “Memory Stick,” see page 76.
, Insert the “Memory Stick.”
Holding the “Memory Stick” as shown in
the illustr ation, insert it all the way in until
it clicks.
• Push the “Memory Stick” all of the way in so
that it is securely seated in the connector. If the
“Memory Stick” is not inserted correctly, you
may not be able to record or display images in
the “Memory Stick.”
• Be careful not to drop the batteries when
opening or closing the inner cover.
Page 19
Shooting still images
4
, Close the inn er cover an d slide
it in the direction of the arrow
to lock it.
Make sure the cover is cl os ed securely.
To remove a “Memory Stick”
Perform steps 1 and 2, and push the
“Memory Stick” to pop it out. When doing
so, be careful not to drop the “Memory
Stick.”
• When the access lamp is lit up, it means
that image data is being read or written.
Never open the inner cover or turn off
the power at this time, as the data may
be damaged.
, Inspect the waterproof cov er .
Inspect the O-ring and the O-ring m at in g
surface for scratches, deformation, dirt, hair
or other pr oblems.
• Note that if the O-ring and the O-ring mating
surface are damaged, dirty or have other
problems, the waterproof performance may be
impaired. In this case, water may enter the
inside of the camera and cause irreparable
damage.
• Replace the O-ring with a new one if it
becomes scratched or deformed, or after
approximately two years of use even if there are
no problems (page 81).
, Close the waterproof co ve r.
Close the waterproof cover and slide the
slide lock l ev er back into pl ace until the
OPEN button clicks.
• When using the camera underwater or in places
exposed to water, slide the lock switch (page 9)
to lock the waterproof cover. This prevents the
waterproof cover from opening by accident.
19
Page 20
Setting the still image size
2.0M
2.0M
2.0M
VGA
VGA
RETURN
BURST
•
SIZE
FOCUS
SELFTIMER
P.EFFECT
2.0M
2.0M
AUTO
OFF
OFF
MENU
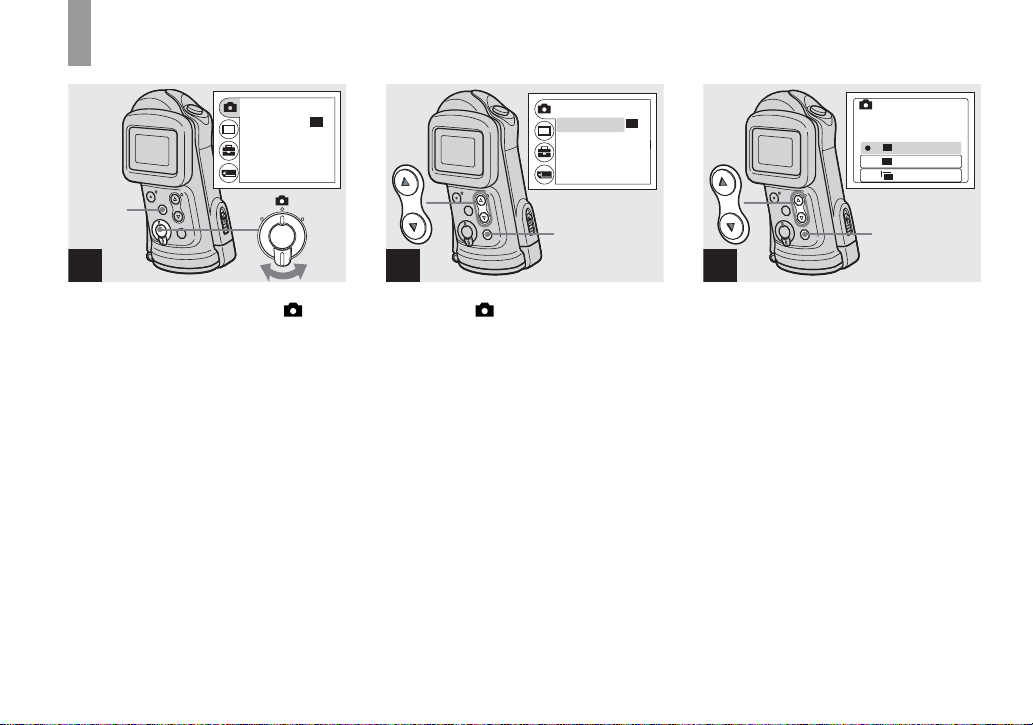
1
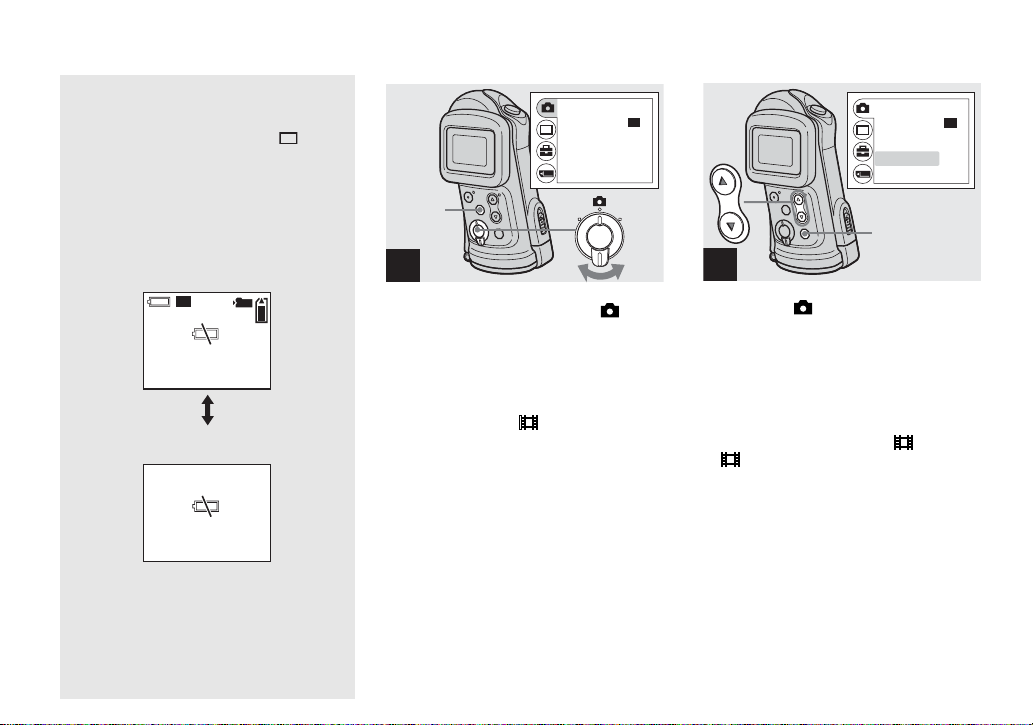
, Set the mode switch to , and
turn on the power, then pres s
MENU.
The menu appears on the LCD sc r een.
RETURN
BURST
•
SIZE
FOCUS
AUTO
SELFTIMER
P.EFFECT
EXEC
2
, Select [ ] with the control
button v, then press EXEC.
Select [SIZE·BURST] with the
control buttons v/V, then
press EXEC.
The image size is displayed.
• For details on the image size, see page 21.
2.0M
2.0M
OFF
OFF
SIZE • BURST
2.0M
2.0M
2.0M
VGA
VGA
VGA
BURST
VGA
VGA
EXEC
3
, Select the desired image size
with the control buttons v/V,
then press EXEC.
The image size is set.
When the setting is co mplete, press MENU
so that the menu disappears from the LCD
screen.
• The image size selected here is maintained even
when the power is turned off.
20
Page 21
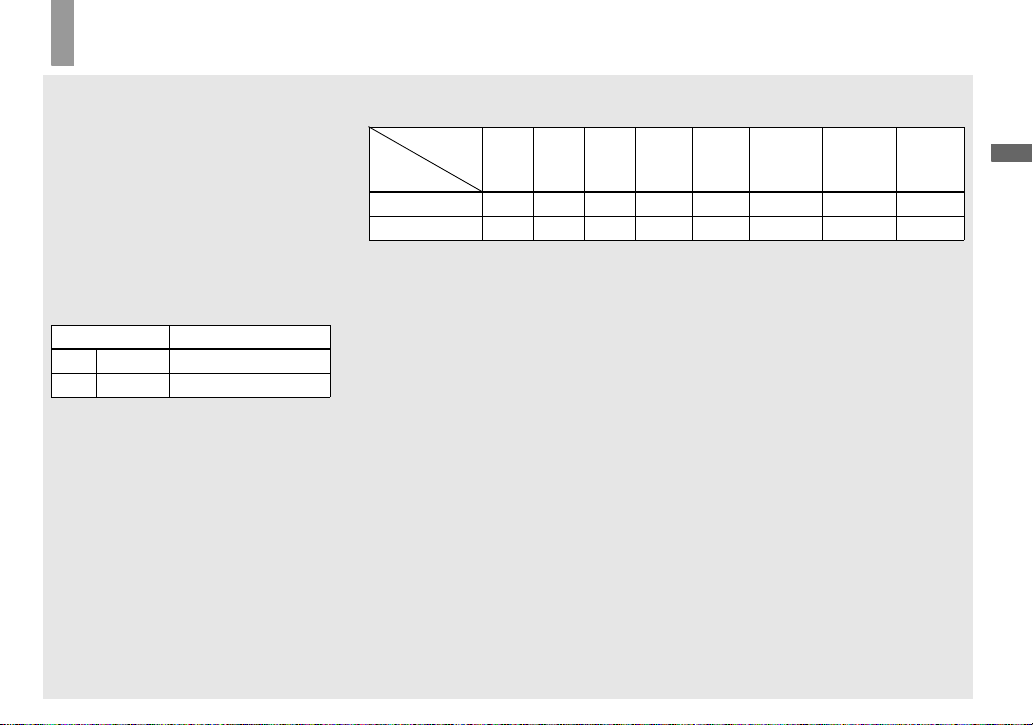
Image size
You can choose the image size (number of
pixels) according to the kind of images you
want to shoot. The larger you make the
image size, the better your image, but also
the larger the amount of data nee ded to
preserve your image. This means you can
save fewer images in your “Memory Stick.”
Choose an image size appropriate for the
kind of images you want to shoot.
You can choose from th e fol lowing table.
The below image size is a minimu m setting
for examples.
Image size Examples
2.0M
VGA
1632×1224
640×480
Printing A5 s ize images
Creating home pages
Number of images that can be saved in a “Memory Stick”
(Units: number of images)
Capacity
Image
size
2.0M 14 29 60 122 245 445 906 1851
VGA 80 161 326 656 1316 2380 4840 9880
• When the images recorded using earlier Sony
models are played back, the image size
indication may be different from the actual
image size.
• Images viewed on the LCD screen of the
camera all appear the same size.
8MB 16MB 32MB 64MB 128MB MSX-256 MSX-512 MSX-1G
• The actual number of images may differ
depending on the shooting conditions.
• When the number of remaining shooting
images is greater than 9999, >9999 indicator
appears on the LCD screen.
Shooting still images
21
Page 22
Basic still image shooting — Using auto adjustment mode
2.0M
1
2
3
101
2.0M
2.0M
10
AE/AF lock
indicator
Flashes green
t Lights up
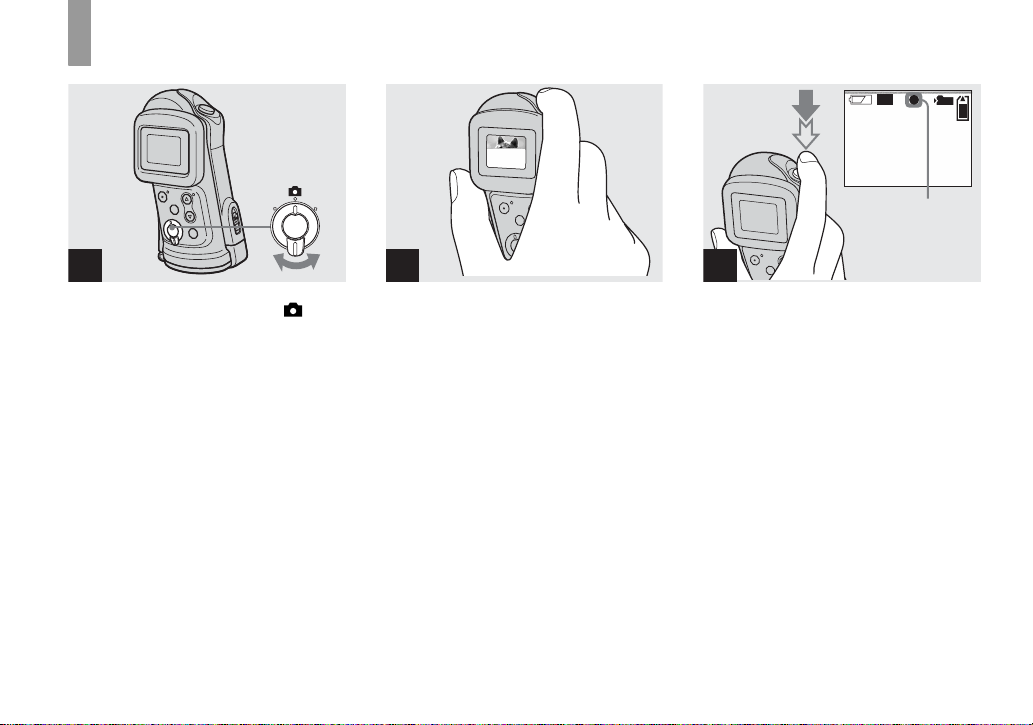
, Set the mode switch to , and
turn on the power.
The name of the folder where th e image will
be recorded ap pears on the LCD sc r een for
approximately five seconds.
• [FOCUS] is set to [AUTO] at the factory.
• The exposure is automatically adjusted.
• This camera can create new folders and select
folders to be stored in the “Memory Stick”
(page 26).
22
, Hold the camera st eadily with a
hand and position the subject
in the center of the LCD screen.
Do not cover the lens or flash with your
fingers.
• Check the LCD screen to make sure the image
is level.
• When recording outdoors during clear weather
or under other intense light, undesired light
(ghosting) may enter the screen. If this
happens, shade the lens with your hand or other
object while recording.
• The exposure and focus are adjusted to the
center of the LCD screen.
, Press and hold the shutter
button halfway down.
A beep sounds. W h en the AE/AF lock
indicator changes from flashing to lighted
up, the camera is ready for shoot ing.
• If you release the shutter button, the recording
will be canceled.
• When the camera does not beep, the AF
adjustment is not complete. Y ou can continue to
shoot, but the focus is not adjusted properly.
• This camera employs an auto-macro AF
function. The minimum focal distance to the
subject is 10 cm (4 inches) (or 15 cm (6 inches)
underwater).
Page 23

, Press the shutter but to n fu lly
down.
A beep sounds. When “RECOR D IN G”
disappears fro m the L CD sc reen , re cor ding
is complete. The image will be reco rded in
the “Memory Stick,” and you can shoot the
next image.
• If you do not operate the camera for about three
minutes during recording or playback, the
camera turns off automatically to prevent
wearing down the batteries (page 15).
Auto Focus
When you try to shoot a subject that is
difficult to f ocus on, the AE/AF lock
indicator changes to flas hi ng slowly.
The Auto Focus fun c tion may have
difficulty working und er the following
conditions. In such cases, release the shutter
button, then recompose the shot and focus
again. If the Auto Focus function can still
not bring the subject into focus, use the
Focus preset function (page 32).
• The subject is distant from the camera and dark.
• The contrast between the subject and its
background is poor.
• The subject is seen through glass, such as a
window.
• A fast-moving subject.
• The subject reflects or has a lustrous finish,
such as a mirror or a luminous body.
• A flashing subject.
• A backlit subject.
LCD light
You can use [LCD LIGHT ] under [ ]
with MENU and the control buttons v/V to
turn the LCD light on and off. This is useful
for extending the battery li fe.
• This camera is equipped with a Hybrid-type
LCD screen that allows you to see the LCD
screen even when the LCD light is turned off,
as long as there is some ambient illumination.
• Even if the LCD light setting is [OFF], the LCD
light will turn on when menu operations are
being performed. When the menu operation is
completed, the LCD light will turn off again.
Shooting still images
23
Page 24
Using the self-timer
2.0M
2.0M
2.0M
LCD screen display during
shooting
You can use [DISPLAY] under [ ] with
MENU and the control buttons v/V to turn
the display on and off. Th is is useful when
recording under conditi ons w he re it is
difficult to check the image on the LCD
screen.
When [DISPLAY] is [ON]
101
2.0M
2.0M
10
When [DISPLAY] is [OFF]
• For detailed descriptions of the indicators, see
page 83.
• Indicators on the LCD screen are not recorded.
RETURN
BURST
•
SIZE
FOCUS
SELFTIMER
P.EFFECT
MENU
2.0M
2.0M
AUTO
OFF
OFF
1
, Set the mode switch to , and
press MENU.
The menu appears on the LCD screen.
• You can also carry out this operation when the
mode switch is set to .
RETURN
•
BURST
SIZE
FOCUS
SELFTIMER
P.EFFECT
EXEC
AUTO
2
, Select [ ] with the control
button v, then press EXEC.
Select [SELFTIMER] with the
control buttons v/V, then
press EXEC.
• When the mode switch is set to , select
[ ] with the control button v.
2.0M
2.0M
OFF
OFF
24
Page 25
SELFTIMER
2.0M
2.0M
2.0M
ON
OFF
2.0M
2.0M
Selecting a flash mode
101
10
2.0M
2.0M
101
10
2.0M
2.0M
101
10
Shooting still images
EXEC
3
, Select [ON] with the control
button v, then press EXEC.
When you press MENU, the m en u
disappears and the (self-timer) indicator
appears on the LCD screen.
• When placing the camera in a standing
position, make sure the LCD screen is level.
Self-timer lamp
4
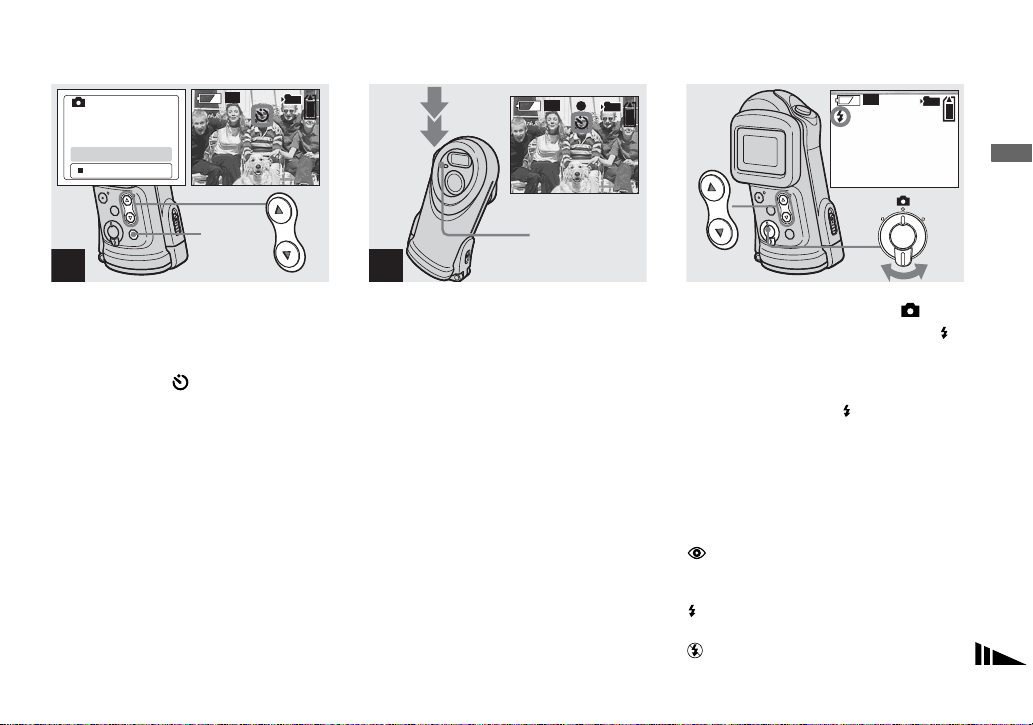
, Center the subject in the LCD
screen and press the shu tter
button fully down.
The self-timer lamp flashes red and a
continuous beep sounds. The image will be
shot after approximately 10 seconds.
To cancel the self-timer in the middle
of the operation
Press POWER to turn off the power.
• If you press the shutter button while standing in
front of the camera, the focus and the exposure
may not be correctly set.
, Set the mode switch to , and
press the control button v ()
repeatedly to select a flash
mode.
Each time you press v ( ), the indicator
changes as follows.
No indicator (Auto): Based on the
lighting conditions, the camera will decide
if there is enough light, and will use the
flash accord ingly.
(Red-eye reduction): Flash mode is
set to Auto, and the red-e ye reduction
operates if the flash strobes.
(Forced flash): The flash strobes
regardless of the surrounding brightness.
(No flash): The flash does not strobe.
25
Page 26
• You cannot use the flash in the Burst mode.
• If the menu is currently displayed, press MENU
first so that the menu disappears.
• The recommended shooting distance using the
flash is approximately 0.5 m to 1.9 m (1 foot
7 3/4 inches to 6 feet 2 3/4 inches).
• When using the Auto,
or
(Forced flash) mode, you may notice
some noise in the image when you look at the
LCD screen in a dark place, but this will have
no effect on the shot image.
• While you are using (No flash) mode, the
shutter speed is slower in a dark place. Be
careful not to allow your hand to shake while
holding the unit.
• While charging the flash, the
lamp flashes. After the charging is complete,
the lamp goes out.
• This setting is maintained even when the power
is turned off.
(Red-eye reduction)
(Flash charge)
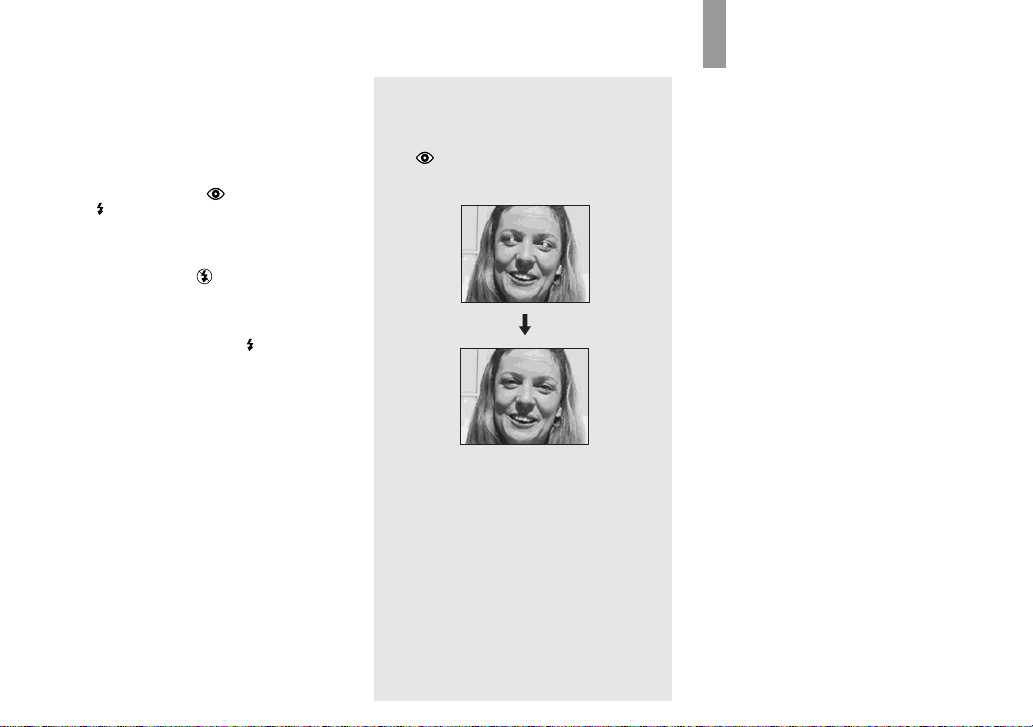
Red-eye reduction
The flash pre-strobes before shooting to
reduce the red-eye phenomenon.
The indicator appears on the L CD
screen.
• Red-eye reduction may not produce the desired
effects depending on individual differences, the
distance to the subject, if the subject does not
see the pre-strobe, or other conditions.
Creating or selecting a folde r
Your camera can create multiple folder s in
a “Memory Stick.” Also, you can select the
folder used to store images.
When not creating a new folder,
“101MSDCF” folder is selected as the
recording folder.
You can create folders up to “999MSDCF.”
• Up to 4000 images can be stored in one folder.
When the folder capacity is exceeded, a new
folder is automatically created.
26
Page 27

Creating a new folder
2.0M
RETURN
SIZE
FOCUS
SELFTIMER
P.EFFECT
MENU
BURST
•
2.0M
2.0M
AUTO
OFF
OFF
Shooting still images
1
, Set the mode switch to , then
press MENU.
The menu appears on the LCD screen.
• You can also carry out this operation when the
mode switch is set to .
2
, Select [ ] with the control
button V, then press EXEC.
Select [ CREAT E FOLDER ] with
the control buttons v/V, then
press EXEC.
The CREATE REC. FOLDER screen
appears.
• Once you create a new folder, you cannot delete
the new folder with the camera.
• Images are recorded in the newly created folder
until a different folder is created or selected.
, Select [OK] with the control
button v, then press EXEC.
A new folder is created with a number one
higher than the larges t num ber in the
“Memory Stick,” and the folder becomes
the recording fol der.
When you press MENU, the menu
disappears and the create d f older is
displayed.
To cancel folder creation
Select [CANCEL] in step 3.
27
Page 28

Selecting the recording folder
2.0M
RETURN
BURST
•
SIZE
FOCUS
SELFTIMER
P.EFFECT
MENU
2.0M
2.0M
AUTO
OFF
OFF
1
, Set the mode switch to ,
then press MENU.
The menu appears on the LCD sc r een.
• You can also carry out this operation when the
mode switch is set to .
28
2
, Select [ ] with the control
button V, then press EXEC .
Select [CHANGE FOLDER]
with the control button V, then
press EXEC.
The CHANGE REC. FOLDER screen
appears.
, Select the desired folder with
the control buttons v/V, then
press EXEC.
• Y ou cannot select the “100MSDCF” folder as a
recording folder.
• The image is stored in the newly selected
folder. You cannot move recorded images to a
different folder with this camera.
Page 29

CHANGE REC. FOLDER
: 102MSDCF
OK
CANCEL
EXEC
4
, Select [OK] with the control
button v, then press EXEC.
When you press MENU, the m en u
disappears and the selected folder is
displayed.
To cancel changing the recording
folder
Select [CANCEL] in step 4.
Shooting still images
29
Page 30

Shooting according to scene conditions — Scene Selection
When shooting und erwater, moving
subjects, portraits, people a t ni ght , night
scenes, or landscapes, use the modes below
to improve the quality of your images.
Underwater mode
This mode is used when shooting
underwater where t here is sunlight (up to
depths of 1.5 m (5 feet)). The white balance
is automatically adj usted to th e app ropr iate
setting to e n able impressive underwater
photographs of your subjects.
• When the camera is suddenly brought from a
warm place into cold water, the lens may cloud.
Allow the camera to adapt to the underwater
temperature beforehand.
• When using underwater, see “Before using your
camera” on page 4, “Precautions” on page 74
and “On the O-ring” on page 79 before use.
Active outdoor mode
This mode lets you stop the movement of
your subject and get lively shots of fastmoving objects in bright outdoor
conditions.
• When setting the focus to [AUT O], the focus i s
adjusted to approximately 1 m to (infinite).
Soft snap mode
This mode lets you shoot skin colors in
brighter and warmer to ne s fo r mo re
beautiful pictures. In addition, the soft focus
effect creates a gentle atmosph ere for
portraits of people, flowers, etc.
Illumination snap mode
This mode lets you capture beautiful images
of both subjects and night scene
backgroun ds at the same time. In addit ion,
the cross filter effect enhances street lamps
or other lights with cross-shaped rays.
• Note that as shutter speeds decrease, shaking
increases.
• The flash strobes in red-eye reduction mode.
• When setting the focus to [AUTO], the focus is
adjusted to approximately 1 m to (infinite).
To record subjects closer than 1 m, use the
Focus preset (page 32).
30
Page 31

Twilight mode
2.0M
This mode lets you shoot night scenes at far
distances without losing the dark
atmosphere of the surroundings.
• Note that as shutter speeds decrease, shaking
increases.
• The focus setting changes to [ ].
• The flash cannot be used in this mode.
• When the focus setting is set to [AUTO], the
focus is adjusted to telephoto.
Vivid nature mode
This mode enhances blues and greens such
as the sky, ocean and mountains, letting you
shoot natural landscapes with vivid, striking
colors.
• The focus setting changes to [ ].
• The flash cannot be used in this mode.
• When the focus setting is set to [AUTO], the
focus is adjusted to telephoto.
101
2.0M
2.0M
10
, Set the mode switch to , and
press the control button
V (SCENE) repeatedly to select
a desired mode.
Each time you press V (SCENE), the
indicator changes as foll ow s:
(Underwater mode) t (Active
outdoor mode) t (Soft snap mode) t
(Illumination snap mode) t
(Twilight mode) t (Vivid nature
mode) t No indicator (Auto)
To cancel Scene Selection
Press V (SCENE) repeatedly to set to No
indicator (Auto).
• If the menu is currently displayed, press MENU
first so that the menu disappears.
• You cannot use the Scene Selection when
shooting movies.
• The setting selected here is not maintained
when the power is turned off.
Shooting still images
31
Page 32

Setting the distance to the subject — Focus preset
When shooting an image using a previously
set distance to the subject, or when shooting
a subject through a net or wind ow glass, it
is difficult to achieve a proper focus using
the auto focus f unc tion. The Focu s pre set is
useful in these cases.
• When shooting underwater, select the
underwater mode for the Scene Selection
function (page 30).
32
, Set the mode switch to , and
press MENU.
The menu appears on the LCD screen.
• You can also carry out this operation when the
mode switch is set to [ ].
, Select [ ] with the control
button v, then press EXEC.
Select [FOCUS] with the
control buttons v/V, then
press EXEC.
• When the mode switch is set to , select
[ ] with the control button v.
• Focus setting information is approximate, and
should be used as a reference.
Page 33

Shooting five images conti nuously — Burst
2.0M
2.0M
FOCUS
AUTO
0.2m
0.5m
1.0m
EXEC
3
, Select the desired focus
setting with the control but tons
v/V, then press EXEC.
You can select from the following distance
settings:
AUTO (No indicator), 0.2 m, 0.5 m,
1.0 m, and (infinity)
When you press MENU, the m en u
disappears and the indicator is displayed on
the LCD screen.
To return to auto focus mode
Select [AUTO] in step 3.
• The setting selected here is not maintained
when the power is turned off.
RETURN
BURST
•
SIZE
FOCUS
SELFTIMER
P.EFFECT
MENU
2.0M
2.0M
AUTO
OFF
OFF
1
, Set the mode switch to , and
press MENU.
The menu appears on the LCD screen.
• You cannot use the flash in this mode.
• You can shoot up to five images in succession
by holding down the shutter button. If you
release the shutter button before all five images
are shot, the camera stops shooting as soon as
you release the button.
• The recording interval is approximately
0.5 seconds. However, the recording interval
may be longer in the Illumination snap mode or
the Twilight mode.
RETURN
•
BURST
SIZE
FOCUS
AUTO
SELFTIMER
P.EFFECT
EXEC
2
, Select [ ] with the control
button v, then press EXEC.
Select [SIZE·BURST] with the
control buttons v/V, the n
press EXEC.
2.0M
2.0M
OFF
OFF
Shooting still images
33
Page 34

SIZE • BURST
2.0M
VGA
VGA
VGA
2.0M
2.0M
2.0M
VGA
VGA
VGA
BURST
VGA
VGA
EXEC
2.0M
VGA
Adding special effects — Picture Effect
101
10
You can digitally process images to ob t ain
special effects.
SEPIANEG. ART
3
, Select [BURST] with th e
control button V, then press
EXEC.
Press MENU so that the menu disappears
from the LCD screen.
34
4
, Press the shutter button
halfway down, then hold the
shutter button fully down.
Up to five images are re co r ded as long as
you hold down the shutter button.
The images are recorded in VGA size.
• If you release the shutter button before the
camera records five images, only the images
that were shot while the shutter button was held
down are recorded.
The color and
brightness of the
picture are reversed
as in a negative.
The picture is
monochrome (black
and white).
The picture is sepiatoned like an old
photograph.
SOLARIZEB&W
The light contrast is
clearer and the
picture looks like an
illustration.
Page 35

2.0M
MENU
2.0M
RETURN
BURST
•
SIZE
FOCUS
SELFTIMER
P.EFFECT
2.0M
2.0M
AUTO
OFF
OFF
RETURN
•
BURST
SIZE
FOCUS
SELFTIMER
P.EFFECT
EXEC
2.0M
2.0M
AUTO
OFF
OFF
P.EFFECT
OFF
NEG. ART
SEPIA
B&W
SOLARIZE
EXEC
Shooting still images
1
, Set the mode switch to , and
press MENU.
The menu appears on the LCD screen.
• You can also carry out this operation when the
mode switch is set to .
2
, Select [ ] with the control
button v, then press EXEC .
Select [P.EFFECT] with the
control button V, then press
EXEC.
• When the mode switch is set to , select
[ ] with the control button v.
3
, Select the desired mode with
the control buttons v/V, then
press EXEC.
When you press MENU, the menu
disappears and the selected mod e i s
displayed on the LCD screen.
To cancel Picture Effects
Select [OFF] in step 3.
• The setting selected here is not maintained
when the power is turned off.
35
Page 36

Viewing still images
2.0M
2.0M
2.0M
s
on the LCD screen
Single (singleimage) screen
101
2.0M
2.0M
101-0007
2003
7 4
12:00
7
/ 8
PM
Index (four-image)
screen
Viewing still image
Viewing single images
2.0M
2.0M
101-0007
2003
7 4
101
12:00
7
/ 8
PM
101-0006
2003
2.0M
2.0M
7 4
101
10:30
6
/ 8
AM
You can view imag es shot with yo ur camera
almost immediately on the LCD screen.
You can select the followi ng t w o me t hods
for viewing images.
Single (single-image) screen
You can view one image at a time,
displayed over the entire screen.
Index (four-image) screen
Four images are displayed simultaneously
in separate panels on the screen.
• For detailed descriptions of the screen
indicators, see page 84.
• For details on viewing movies, see page 44.
36
1
, Set the mode switch to , and
turn on the power.
The last image in the selected recording
folder (page 28) appears on the LCD
screen.
2
, Select the desired still image
with the control buttons v/V.
v : To display the preceding image
V : To display the next image
Page 37

Viewing an index screen (four-image)
RETURN
DELETE
DELETE IN FOLDER
INDEX
DPOF
MENU
1
, Set the mode switch to , and
press MENU.
The menu appears on the LCD screen.
RETURN
DELETE
DELETE IN FOLDER
INDEX
DPOF
EXEC
2
,
Select [ ] with the control
button
v
, then press EXEC.
Select [INDEX] with the control
buttons
The display switches to the index (fourimage) screen.
To display the next (previous) index
screen
Press the control buttons v/V to move the
yellow border.
To return to the single-image screen
Select [SINGLE ] in step 2, or press EXEC
to display the single image shown with the
yellow border wh en fo ur frames are
displayed.
v/V
, then press EXEC.
Viewing still image s
37
Page 38

Selecting the folder an d playing back images — Folder
RETURN
DELETE
DELETE IN FOLDER
INDEX
DPOF
MENU
1
, Set the mode switch to ,
then press MENU.
The menu appears on the LCD sc r een.
38
2
, Select [ ] with the control
button V, then press EXEC .
Select [CHANGE FOLDER]
with the control buttons v/V,
then press EXEC.
The CHANGE FOLDER screen appears.
, Select the desired folder with
the control buttons v/V, then
press EXEC.
Page 39

4
, Select [OK] with the control
button v, then press EXEC.
When you press MENU, the m en u
disappears and the selected folder is
displayed.
When multiple folders are created in
the “Memory Stick”
When the first or last image in the folder is
displayed, the followi n g indicators appear
on the LCD screen.
: Moves to the previous folder.
: Moves to the next folder.
: Moves to both the previous an d next
folders.
Viewing still image s
To cancel the selection
Select [CANCEL] in step 4.
• When no images are stored in the folder, “NO
FILE IN THIS FOLDER” appears.
• You can play back images from the last-shot
one without selecting the folder.
39
Page 40

Enlarging an image — Enlarged playback
2.0M
2.5
You can zoom in on an image shot with
your camera to enlarge it to 2.5 or 5 times
the original size.
1× (normal) 2.5×
5×
101
2.0M
2.0M
7
/ 8
101-0007
2003
7 4
1:30
PM
1
, Set the mode switch to , and
select the image you want to
enlarge with the control
buttons v/V.
• Enlarged playback does not function for
movies.
• Y ou may not be able to enlarge images recorded
using other devices.
• The enlarged image cannot be recorded as a
new file.
2.5
2.5
EXEC ( )
2
, Press EXEC ( ) repeatedly to
select the desired enlargement
level.
The center of the screen is enlarged. Each
time you press EXEC ( ), the enlargement
level changes as follows.
2.5× t 5× t No indicator (normal) t
To cancel Enlarged playback
Press EXEC ( ) repeatedly to set to No
indicator (normal).
• You can only enlarge the center of the screen.
...
40
Page 41

Choosing images to print — Print (DPOF) mar k
2.0M
You can mark still images shot with your
camera that you want to have printed. This
function is convenient when you have
images printed at a shop or using a printer
that conforms with the DP OF (Digital Print
Order Format) standard.
• You cannot mark movies.
101
2.0M
2.0M
6
/ 8
101-0006
2003
7 4
10:30
AM
1
, Set the mode switch to , and
display the image you wa nt to
print with the control buttons
v/V.
RETURN
DELETE
DELETE IN FOLDER
INDEX
DPOF
Viewing still image s
EXEC
MENU
2
, Press MENU, and selec t [ ]
with the control button v, then
press EXEC.
To mark the print (DPOF) mark in
index-image screen
Perform step 2 on page 37 a nd sw i tc h to
index screen.
41
Page 42

RETURN
DELETE
DELETE IN FOLDER
INDEX
DPOF
DPOF
ON
OFF
EXEC
3
, Select [DPOF] with the control
button V, then press EXEC.
42
EXEC
4
, Select [ON] with the control
button v, then press EXEC.
When you press MENU, the menu
disappears and the mark is marke d on
the displa yed image.
To unmark the print (DPOF) mark
Select [OFF] in step 4. The mark
disappears.
Page 43

Shooting movies
1
, Set the mode switch to , and
turn on the power.
• Sound cannot be recorded in movies.
, Press the shutter button full y
down.
“REC” appears on the LCD screen and the
camera starts recording the image. The
maximum recording time is 15 seconds per
recording.
• The auto focus function can set the focus at any
distance from approximately 1.0 m to
(infinity). To shoot a subject at a closer
distance than 1.0 m, select 0.2 m or
0.5 m with the Focus preset function (page 32).
• Recording stops when the “Memory Stick” is
full.
• The flash does not function when shooting
movies.
Enjoying movies
, To stop recording, press the
shutter button fully again.
Indicators during sho oting
Indicators on the LCD screen are not
recorded. You can use [DISPLAY ] under
[ ] with MENU and the control buttons
v/V to turn the disp l ay on and off
(page 24).
For detailed descriptions of th e in di cators,
see page 83.
To use the self-timer
Set the mod e s witch to and fo llow the
procedure on page 24.
43
Page 44

Viewing movies on the LCD screen
Shooting time
The shooting time is different, de pending
on the capacity of the “Memory St ick.”
Refer to the following chart when you
choose a “Memory Stick.”
• The maximum shooting time is 15 seconds per
recording.
• The shooting time may vary, depending on the
shooting conditions.
• For numbers of still images that can be
recorded, see page 21.
• When shooting time exceeds 99 minutes 59
seconds “>99:59” is displayed.
Image size
Capacity
8MB 5 min. 35 sec.
16MB 11 min. 13 sec.
32MB 22 min. 43 sec.
64MB 45 min. 40 sec.
128MB 1 h. 31 min. 34 sec.
MSX-256 2 h. 45 min. 35 sec.
MSX-512 5 h. 36 min. 43 sec.
MSX-1G 11 h. 27 min. 19 sec.
160×112
101
18
0:00
101–0018
2003
7 4
12:00
PM
1
, Set the mode switch to , and
turn on the power.
The last image in the selected recording
folder (page 28) appears on the LCD
screen.
2
, Select the des i red movie with
the control buttons v/V.
v : To display the preceding image
V : To display the next image
44
Page 45

101–0016
101
16
0:05
EXEC
3
, Press EXEC.
The movie is pl ayed back.
To stop playback
Press EXEC.
Indicators while viewing movies
Indicators on the LCD screen are not
recorded. You can use [DISPL A Y ] under
[ ] with MENU and the control buttons
v/V to turn the display on and off
(page 24).
For detailed descriptions of t he i ndicators,
see page 84.
Enjoying movies
45
Page 46

Deleting images
2.0M
Deleti
s
101
2.0M
2.0M
101-0007
2003
7 4
12:00
ng image
7
/ 8
PM
RETURN
DELETE
DELETE IN FOLDER
INDEX
DPOF
RETURN
DELETE
DELETE IN FOLDER
INDEX
DPOF
1
, Set the mode switch to , and
turn on the power.
Press the control buttons v/V
to select th e image y ou want to
delete.
46
EXEC
2
MENU
, Press MENU and sele ct [ ]
with the control button v, then
press EXEC.
To delete an image in index-image
screen
Perform step 2 on page 37 and switch to
index screen.
EXEC
3
, Select [DELETE] with the
control buttons v/V, then
press EXEC.
The image has not yet been deleted at this
point.
To delete all the images in the folder
Select [DELETE IN FOLDER] in step 3.
• You cannot delete images write-protected by
another device.
Page 47

Formatting a “Memory Stick”
DELETE
OK
CANCEL
EXEC
4
, Select [OK] with the control
button v, then press EXEC.
When the message “MEMORY STICK
ACCESS” disappears, the image has been
deleted.
To cancel deleting
Select [CANCEL] in step 4.
1
, Insert the “Memory Stick” you
want to format into the camera.
Do not open the inner cover while
formatting the “Memory Stick” as this may
damage the “Memory Stick.”
• Before opening the waterproof cover, be
sure to rinse off any sand and
completely wipe away any water that
may be present on the camera body.
• Inspect the O-ring and the O-ring mating
surface on the inside of the camera for
scratches, deformation, dirt, hair or other
problems.
RETURN
DELETE
DELETE IN FOLDER
INDEX
DPOF
MENU
2
, Turn on the pow e r, and press
MENU.
The menu appears on the LC D scre en.
• When you format a “Memory Stick,” be sure
that sufficient power remains, otherwise a
“FORMAT ERROR” may occur.
• This operation is available no matter what
position the mode switch is in.
Deleting images
47
Page 48

3
, Select [ ] with the control
button V, then press EXEC.
Select [FORMAT] with the
control buttons v/V, the n
press EXEC.
• The term “formatting” means preparing a
“Memory Stick” to record images; this process
is also called “initialization.” The “Memory
Stick” provided with this camera, and those
available commercially, are already formatted,
and can be used immediately.
• When you format a “Memory Stick,”
note that all data in the “Memory Stick,”
including images that were writeprotected by another device, will be
permanently er ased.
48
, Select [OK] with the control
button v, then press EXEC.
When the message “FORMATTING”
disappears, the format is complete.
To cancel formatting
Select [CANCEL] in step 4.
Page 49

Enjoyi
ng images on your compute
r
Copying images to your computer — For Windows users
Recommended computer
environment
OS: Microsoft Windows 98, Windows
98SE, Windows 2000 Professional,
Windows Millennium Edition, Windows
XP Home Edition, or Windows XP
Professional
The above OS must be installed at the
factory. Operation is not assured in an
environment upgraded to the operating
systems described above or in a multi-boot
environment.
CPU: MMX Pentium 200 MHz or faster
USB connector: Provided as standard
Display: 800 × 600 dots or more
High Color (16-bit color, 65,000 colors) or
more
• If you connect two or more USB equipment to
a single computer at the same time, some
equipment, including your camera, may not
operate depending on the type of USB
equipment.
• Operations are not guaranteed when using a
USB hub.
• Operations are not guaranteed for all the
recommended computer environments
mentioned above.
USB mode
There are two modes for a USB connection,
[NORMAL] and [PTP]* modes. The
factory setting is the [NORMAL] m ode.
This section describes the USB connection
using the [NORMAL] mode.
When the camera is connected to your
computer via a USB cable, the camera can
draw its power from your co m puter (USB
Bus Powered).
* Compatible only with Windows XP. When
connected to a computer, only the data in the
folder selected by the camera is copied to the
computer. To select a folder when the camera is
connected to your computer, press MENU and
perform the procedures to change a folder for
playback.
Communication with your
computer
When your computer resum es from the
suspend or sleep mode, communication
between your camera and your computer
may not recover at the same time.
When a USB connector is not
provided on your computer
When neither a USB connector nor a
“Memory Stick” slot is provided, you can
copy images using an additional device. See
the Sony Website for details.
http://www.sony.net/
Contents of the CD-ROM
x USB Driver
This driver is n eeded in order to c onnect t he
camera to a com put er.
• When using Windows XP, you need not install
the USB driver.
x Image Transfer
This application is used to easily transfer
images from the camera to a comp uter.
x ImageMixer
This application is used to display and edit
images that are stored in a co mputer.
• This section describes the Windows Me screen
as an example. The required operations may
differ depending on your OS.
• Close down all applications running on
the computer before installing the US B
driver and application.
• When using Windows XP or Windows 2000,
log on as Administrator.
• The display settings should be 800 × 600 dots
or more and High Color (16-bit color, 65 000
colors) or more. When set to less than 800 ×
600 dots or 256 colors or less, the model
selection screen does not appear.
Enjoying images on your computer
49
Page 50

Installing the USB driver
When using Windows XP, you nee d not
install the U S B driver.
Once the USB driver is installed, you need
not install the USB driver again.
a Start up your computer, and
insert the supp l i ed CD-ROM
into the CD-ROM drive.
Do not connect your camera to
your computer at this time.
The model selection screen appears. If
it does not appear, double-click
(My Computer) t [ImageMixer] in
that order.
b Click [Cyber-shot] on th e
model selection screen.
c Click [USB Driver] on the
installing menu screen.
The “InstallShield Wizard” scr een
appears.
d Click [Next]. When the
“Information” screen appears,
click [Next].
e Click [Yes, I want to restart my
computer now], then click
[Finish].
Your computer restarts. Then, you can
establish USB connec ti on.
50
The installing menu screen ap pears.
The USB driver installation starts.
When the installation is completed, the
screen informs you of completi on.
Page 51

Installing “Image Transfer”
You can use the “Image Transfer” software
to copy images to your computer
automatically when you connect the camera
to your computer with the supplied USB
cable.
a Click [Cyber-shot] on the
model selection scree n.
The installing menu screen appears.
b Click [Image Transfer] on the
installing menu screen.
Select the desired language,
then click [OK].
c Click [Next]. When the
“Licence Agreement” screen
appears, click [Yes].
Read the agreement carefully. If you
accept the terms of the ag r eement,
proceed with the in sta l la ti on. The
“Information” screen appears.
d Click [Next].
e Select the folder to be
installed, then click [Next].
Select th e pr ogra m fo lder, then
click [Next].
f Confirm that the checkbox is
checked on the “Image
Transfer Settings” screen,
then click [Next].
When the installation is completed, the
screen informs you of completi on.
Enjoying images on your computer
The “Welcome to the InstallS hield
Wizard” screen appears.
• This section describes the English screen.
51
Page 52

g Click [Fin ish].
The “InstallS h i eld Wizard” screen
closes.
If you wish to continue with the
installation of “ImageMixer,” click
[ImageMixer] on the installing menu
screen and then follow the instructions
that appear on the screen.
• The USB driver is needed in order to use
“Image Transfer.” If the necessary driv er is not
already installed on your computer, a screen
that asks if you want to install the driver will
appear. Follow the instructions that appear on
the screen.
Installing “ImageMixer”
You can use the “ImageMix e r Ver.1.5 for
Sony” software to copy, view and edit
images. For details, see the software’s help
files.
a Click [ImageMixer] on the
installing menu screen.
Select the desired language,
then click [OK].
The “W elcome to the InstallS h ield
Wizard” screen appears.
• This section describes the English screen.
b Follow the instructions on
each succeeding screen.
Install “ImageMixer” according to the
instructions that appear on the screen.
• When you use Windows 2000 or Windows XP,
install “WinASPI.”
• If DirectX8.0a or a later version is not installed
in your computer, the “Information” screen
appears. Follow the instructions that appear on
the screen.
c Restart your computer
accordin g to the instructi ons
that appear on the scree n.
d Remove the CD-ROM.
52
Page 53

Connecting the camera to your computer
a Insert the “Memory Stick” with
the images you want to copy
into the camera, then c lose the
inner cover.
• The camera can receive power supply from
most of the computers that are recommended
for use through the USB connection (USB Bus
Powered), so in this case there is no need to
insert batteries into the camera.
• Removing the batteries before connecting the
camera is recommended in order to prevent
battery deterioration.
• For further details on inserting the “Memory
Stick,” see page 18.
b Turn on your computer.
c Connect the supplied USB
cable to the (USB) jack of
the camera.
• Operations are not guaranteed when
using a USB hub. Connect the camera
directly to your computer.
d Connect the USB cable to your
computer.
The camera turns on.
• Note that the power cannot be turned on if a
“Memory Stick” is not inserted in the camera.
• When you use a desktop computer, we
recommend that you connect the USB cable to
the USB connector on the rear panel.
• When using Windows XP, the AutoPlay wizard
automatically appears on the desktop. Proceed
to page 56.
“USB MODE: NORMAL” appears on
the LCD screen o f the ca mer a. Wh en a
USB connection is established for the
first time, your computer automatically
runs a program to recognize the
camera. Wait for a while.
* During communication, the access indicators
turn red.
• If “USB MODE: NORMAL” is not shown in
step 4
Enjoying images on your computer
53
Page 54

PDisconnecting the USB
cable from your computer or
removing the “Memory Stick”
from your camera during USB
connection
For Windows 2000, Me, or XP users
1 Double-click on the tasktray.
2 Click (Sony DS C), the n c li ck [Stop ].
3 C on f irm the device on the confirmation
screen, then click [OK].
4 Click [OK].
Step 4 is unnecessary for Windows XP
users.
5 Disconnect the USB cable or remove the
“Memory Stick.”
For Windows 98 or 98SE users
Confirm that the access ind icators (page 53)
on the LCD screen are turned white and
carry out only Step 5 above.
Copying images using “Image Transfer”
— Windows 98/98SE/200 0/ M e
Connect the camera and your
computer with the USB cable.
“Image Transfer” launches and the images
are automatically copied to the computer.
• Normally “Image Transfer” and “Date” folders
are created inside the “My Documents” folder,
and all of the image files recorded with the
camera are copied into these folders.
• You can change the “Image Transfer” settings
(page 55).
• When “ImageMixer” (page 52) is installed and
image copying is completed using “Image
Transfer,” “ImageMixer” automatically
launches and images appear.
— Windows XP
Connect the camera and your
computer with the USB cable.
“Image Transfer” starts up automatically
and the images are automatically copied to
the computer.
Windows XP is set so that the OS AutoPlay
Wizard activates.
If you want to cancel the setting, follow the
procedure below.
a Click [Start], then click [My
Computer].
b Right-click [Sony
MemoryStick], then clic k
[Properties].
c Cancel the setting.
1 Click [AutoPlay].
2 Set [Content type] to [Pictures].
3 Check [Select an action to perform]
under [Actions], select [Take no
action], then click [Apply].
4 Set [Content type] to [Video files]
and repeat step 3. Then, set
[Content type] to [Mixed content]
and repeat step 3 again.
5 Click [OK].
The “Properties” screen close s.
The OS AutoPlay Wizard does not
start up automatically even if the
USB connection is made next time.
54
Page 55

Changing “Image Transfer” settings
You can change “Image Transfer” settings.
Right-click the “Image Transfer” icon on
the tasktray, and select [Open Settings]. The
settings you can set are as follows: [Basic],
[Copy], and [Delete].
Right-click here
When “Image Tr an s fer” starts, the window
below appears .
When you select [ Set ting s] fro m t he ab ove
window, you can only change the [Ba s ic ]
setting.
Copying images without using “Image Transfer”
— Windows 98/98SE/2000/Me
If “Image Transfer” is not set to launch
automatically, you can copy images as
following procedu re.
a Double-click [My Computer],
then double-click [Removable
Disk].
The contents of the “Memory Stick”
inserted in your ca mer a appear .
• This section describes an example of copying
images to the “My Documents” folder.
• When the “Removable Disk” icon is not shown,
see the following column.
• When using Windows XP, see page 56.
b Double-click [DCIM], then
double-click the folder which
contains the desired images.
The folder opens.
c Drag and drop the image files
into the “My Docume nt s”
folder.
The image files are copied to the “My
Documents” folder.
• When you try to copy an image to a folder in
which an image with the same file name is
stored, the overwrite confirmation message
appears. When you overwrite the existing
image with the new one, the original file is
deleted.
When the removable disk icon is
not shown
1 Right-click [My Computer], then click
[Properties].
The “System Properties” screen appears.
• When using Windows 2000, click [Hardware]
on the “System Properties” screen.
2 Confirm if other devices are already
installed.
1 Click [Device Manager].
2 Confirm if the re is a “ Sony DSC”
with a mark.
3 If you find either of the devices above,
follow the steps below to dele te th em.
1 Click [ Sony DSC].
• When using Windows 2000, right-click
[ Sony DSC].
2 Click [Remove] (or [Uninstall] in
Windows 2000).
The “Confirm Device Removal”
screen appears.
3 Click [OK].
The device is deleted.
Try the USB driver installation again using
the supplied CD-ROM (page 50).
Enjoying images on your computer
55
Page 56

— Windows XP
Copying images using the
Windows XP AutoPlay Wizard
a Make a USB connection
(page 53). Click [Copy pictures
to a folder on my computer
using Microsoft Scanner and
Camera Wizard], then click
[OK].
The “Scanner and Ca mera Wizard”
screen appears.
b Click [Next].
The images stored on the “Memory
Stick” are displayed.
c Click the checkbox of images
that you do not want to cop y to
your computer and remove the
checkmark, then click [Next].
The “Picture Name and Destination”
screen appears.
d Select a name and destinat io n
for yo ur pictures , t hen click
[Next].
Image copying starts. When the
copying is completed, t he “Other
Options” screen appears.
e Select [Nothing. I’m finished
working with these pictures],
then click [Next].
The “Completing the Scanner and
Camera Wizard” scree n appears.
f Click [Fin ish].
The wizard closes.
• To continue copying other images, follow the
procedure given under
disconnect the USB cable and reconnect it.
Then, perform the procedure from step 1
again.
P on page 54 to
Viewing images on your computer
— Windows 98/98SE/2 00 0/ M e/ XP
a Double-clic k [My Documents]
on the desktop.
The “My Documents” fold er contents
are displayed.
• This section describes the procedure for
viewing images copied in the “My Documents”
folder.
• When using Windows XP, click [Start] t [My
Document s ] in that orde r.
• Y ou can use the “ImageMixer Ver.1.5 for Sony”
software to view and edit images on your
computer. For details, see the software’s help
files.
b Double-click the desired folder
and image file.
The image is displayed.
56
Page 57

Image file storage destinations and file names
Image files recorded with you r ca mera are
grouped as folders in the “Memor y S ti ck.”
Example: For Windows Me users
Folder containi ng ima ge da ta reco rd ed usin g a
camera without the folder creation function
Folder containi ng ima ge da ta re co rd ed with th is
camera
When no new folders have been created, this is
only “101MSDCF”
Folder containing E-mail mode image data, movie
data and Voice mode audio data recorded using a
camera without the folder creation function
Folder File name File meaning
101MSDCF
up to 999MSDCF
DSC0ssss.JPG Still image files
MOV0ssss.MPG Movie files
Enjoying images on your computer
• Data in the “100MSDCF” or “MSSONY”
folders is for playback only, and your camera
cannot record images in these folders.
• For more information about the folder, see
page 26.
• ssss stands for any number within the
range from 0001 to 9999.
57
Page 58

Copying images to your computer — For Macintosh users
Recommended computer
environment
OS: Mac OS 8.5.1, 8.6, 9.0, 9.1, 9.2, or
Mac OS X (v10.0/v10.1/v10.2)
The above OS must be installed at the
factory. For the following models, update
your OS to Mac OS 9.0, 9.1 or 9.2.
– iMac with Mac OS 8.6 installed at the
factory, and a slot loading type CD-ROM
drive
– iBook or Power Mac G4 with the Mac OS
8.6 installed at the factory
USB connector: Provided as standard
Display: 800 × 600 dots or more
32,000-color mode or more
• If you connect two or more USB equipment to
a single computer at the same time, some
equipment, including your camera, may not
operate depending on the type of USB
equipment.
• Operations are not guaranteed when using a
USB hub.
• Operations are not guaranteed for all the
recommended computer environments
mentioned above.
USB mode
There are two modes for a USB connection,
[NORMAL] and [PTP]* modes. The
factory setting is the [NORMAL] mode.
This section describes the USB co nne ction
using the [NORMAL] mode.
When the camera i s connected to your
computer via a USB cable, the camera can
draw its power from your computer (USB
Bus Powered).
* Compatible only with Mac OS X. When
connected to a computer, only the data in the
folder selected by the camera is copied to the
computer. To select a folder when the camera is
connected to your computer, press MENU and
perform the procedures to change a folder for
playback.
Communication with your
computer
When your computer resum es from the
suspend or sleep mode, communication
between your camera and your computer
may not recover at the same time.
When a USB connector is not
provided on your computer
When neither a USB connector nor a
“Memory Stick” slot is provide d, you can
copy images usin g an additional device. See
the Sony Website for details.
http://www.sony.net/
Steps required by your OS
Follow the steps below, according to your
OS.
OS Steps
Mac OS 8.5.1/8.6/9.0 Ste ps 1 to 4
Mac OS 9.1/9.2/
Mac OS X
(v10.0/v10.1/v10.2)
Steps 2 to 4
58
Page 59

a Installing the USB driver
1 Turn on your computer, and set the
supplied CD-ROM into the C D - ROM
drive.
The model selection screen appears.
2 Click [Cyber-shot] on th e model
selection screen.
The installing menu screen appears.
3 Click [USB Driver].
The “USB Driver” screen app ear s .
4 Double-click the icon of the hard disk
containing the OS to op e n the screen.
5 Drag and drop the following two files
from the screen opened in step 3 into the
System Folder icon in the screen opened
in step 4.
• Sony USB D ri ve r
• Sony USB Shi m
6 When the message for confirmation is
shown, click [OK].
7 Resta r t yo u r co mp ut er, then remove the
CD-ROM.
b Connecting your camera to
your computer
For details, see page 53.
Disconnecting the USB cable from
your computer or removing the
“Memory Stick” from your camera
during USB connection
Drag and drop the drive ic on or the
“Memory Stick” icon to the “Trash” icon,
then disconnect the US B ca ble or remove
the “Memory Stick.”
• If you are using Mac OS X v10.0, disconnect
the USB cable, etc., after you have turned your
computer off.
c Copying images
1 Double-click the newly recognized icon
on the desktop.
The contents of the “Memory Stick”
inserted in your camer a appear.
2 Do uble-cl ic k [DCIM].
3 Do ub le-click the folder containing the
desired image files.
4 Drag and drop the image files to the hard
disk icon.
The image files are copied to your hard
disk.
• See page 57 for details about the image file
storage destinations and file names.
d Viewing the images on your
computer
1 Double-click the hard disk icon.
2 Double-click the desi red image file in
the folder containing the copied files.
The image file opens.
• Close down all applications running on
the computer before installing the US B
driver and application.
• Y ou can use the “ImageMixer Ver.1.5 for Sony”
software to copy images to your computer and
to view images on your computer. See the
operation manual supplied with the CD-ROM
for details about the installation method, or see
the software’s help files for the operation
method.
• “ImageMixer” is not compatible with Mac
OS X.
• “Image Transfer” cannot be used with
Macintosh.
Enjoying images on your computer
59
Page 60

Creating a Video CD using “ImageMixer”
You can create a V ideo CD using
“ImageMixer Ver.1.5 for Sony .” You can
play back created Vide o CDs on a Video
CD-compatible DVD player, or on a
computer using Video CD appli cati on
software.
a Start “ImageMixer.”
b Click .
The video CD creating mode tur ns on.
c Drag & drop the desired file or
album to the menu screen.
The selected image is added to the
menu screen.
• This section describes the English screen.
d Click .
You can preview the image.
e Click .
The disc creating dial ogue appears.
f Insert a blank CD-R into the
CD-R drive and click [OK].
The disc creation st arts.
• You cannot use CD-RW discs.
• The CD-R drive is required to create a Video
CD.
For the Macintosh edition
• Roxio-manufactured “Toast” (not
supplied) is required to create a Video CD.
• The playback time of the movie file
becomes shorter on the preview screen.
60
Page 61

Troubleshooting
Troubleshooting
If you experience trouble with your camera,
try the following solutions.
1 Fir st check the it ems on the tabl es below.
If code “C:ss:ss” is displayed
on the LCD screen, the selfdiagnosis display function is
2 Should your camera still not work
properly, open the waterproof cover to
press the RESET button using a finetipped object, then close the cover and
turn on the power again. (All the settings
including date and tim e are cleared.)
working (page 70).
RESET
button
Batteries and power
Symptom Cause Solution
The battery remaining
indicator is incorr ect, or
sufficient battery remaining
indicator is displayed but
the power runs out soon.
The battery life is short.
• You have used the camera in an extremely cold
location.
• The batteries are discharged.
• The battery contacts or the terminals on the inner
cover are dirty.
• The batteries are exhibiting the “memory effect ”
(page 11).
• The batteries are dead (page 78) .
• Y ou are shooting/viewing images in an
extremely cold location.
• The batteries are not charged enough.
• The batteries are dead (page 78) .
—
p Install charged batteries (page 10) .
p Wipe any dirt off from them wit h a dry cloth (p age 11).
p To restore the batteries to their original condition, use them until
they are fully drained before recharging them.
p Replace the batt eries with new ones.
—
p Charge the batteries (page 10).
p Replace the batt eries with new ones.
3 Should your camera still not work
properly, consult your Sony deale r or
local autho r ized Sony ser vice facility.
Troubleshooting
61
Page 62

Symptom Cause Solution
You cannot turn on the
camera.
The power tur ns off
suddenly.
• The batteries are not installed correctly.
• T he batteries are discharged.
• The batteries are dead (page 78).
• If you do not operate the camera for about three
minutes when using batteries, the camera turns
p Install the b at teries correctly (page 12).
p Replace them with charged batteries (page 10).
p Replace the bat ter ies with new ones.
p Turn on the camera again (page15).
off automatically to pr ev en t wearing down the
batteries (page 15).
• T he batteries are discharged.
p Replace them with charged batteries (page 10).
Shooting still images/movies
Symptom Cause Solution
The subject does not appear
on the LCD screen.
The image is out of focus.
• The mode switch is set to . p Set the mode switch to or (pages 22 and 43).
• The subject is too close.
p Make sure to position the lens farther awa y from the subject
than the minimum shooting dis ta nc e of 10 cm (4 inches) (or
15 cm (6 inches) underwater) when shooting (page 32).
• When shooting still images, (Active outdoor
p Cancel the Scene Selec ti o n fun ct ion (page31).
mode), (Illuminat ion sna p mode),
(Twilight mode) or
(Vivid nature mode) is
selected for the Scene Selection f unc ti on.
• Y ou are shooting movies at a distance closer
p Select the Focus preset function (page 32).
than 1.0 m (3 feet 3 3/8 inches).
The image is too dark.
The image is too bright.
The image is monochrome
(black and white).
Vertical streaks appear
when you are shooting a
very bright subject.
• The Focus preset function is selected.
• T he LCD screen is too dark. p Set [LCD LIGHT] to [ON] (pages 23 and 73).
• The LCD screen is too bright. p Set [LCD LIGHT] to [OFF] (pages 23 and 73).
• [P. EFFECT] is set to [B&W] mode. p Cancel [B&W] mode (page 34).
• The smear phenomenon is occurring. p This is not a malfunction.
p Set it to [AUTO] (page 33).
62
Page 63

Your camera cannot record
images.
Viewing images
• No “Memory Stick” is inserted.
• The capacity of the “Memory Stick” is
insufficient.
• The write-protect switch on the “Memory Stick”
is set to the LOCK position.
• Y ou cannot shoot while the flash is charg ing.
• The mode switch is not set to when shooting
a still image.
• The mode switch is not set to
a movie.
when shooting
p Insert a “Memory Stick” (page 18).
p Delete the images saved in the “Memory Stick” (pag e 46), or
format it (page 47).
p Change the “Memory Stick.”
p Set it to the recording position (page 77(7(7 8.4(()(a)-8.9()()8347 Be)-253(aen .3(g)8.3(e4816.2mR0s(S)7.805)23.8( .)23.8t1.129 TD
Troubleshooting
63
Page 64

Symptom Cause Solution
Your camera cannot
perform enlarged playback.
You cannot display a print
(DPOF) mark.
• E nlarged playback is not available fo r file s
created or processed using other devices.
• You cannot display print (DPOF) marks on
movies.
—
—
Deleting images
Symptom Cause Solution
Your camera cannot delete
an image.
You have deleted an image
by mistake.
• The write-protect switch on the “Memory Stick”
is set to the LOCK position.
• O nce you have deleted an image, you cannot
restore it.
p Set it to the recordi n g pos i tion (page 76).
p The write-protect switch on the “Memory Stick” will prevent
you from deleting images by mistak e (pa g e 76).
Computers
Symptom Cause Solution
You do not know if the OS of
your computer is
compatible.
Y ou cannot install the USB
driver.
— p Check “Recommended computer environment” (pages 49 and
58).
—
p In Windows 2000, log on as Administrator (authorized
Administrator) (page 49).
64
Page 65

Symptom Cause Solution
Your computer does not
recognize your c amera.
• Y ou are not using the supplied USB cable.
• The USB cable is not connected firmly.
p Use the supplied USB cable (page 53).
p Disconnect the USB cable, and connect it again firmly. Make
sure that “USB MODE” is displ ayed on t he LCD scree n (pa ges
53 and 59).
• [USB] is set to [PTP] under [ ] in the menu
settings.
• The USB connectors on your computer are
connected to other equipment besides the
p Set it to [NORMAL] (page 73).
p Disconnect the USB cables except for the ones connected to the
keyboard, the mouse, and your camera.
keyboard, the mouse, and you r came ra.
• The camera is not connected direct ly to your
computer.
• The USB driver is not installed.
• The camera was connected to a computer with
the USB cable before installing the USB driver,
p Connect the camera directly to your computer without passing
through a hub or other device.
p Install the USB dr iv er (pages 50 and 59).
p Delete the device which is not recognized, then install the USB
driver (pages 50, 55 and 59).
so the device was not recognized by the
computer.
You cannot turn on the
camera during USB
connection.
You cannot copy images.
• The camera is not connected direct ly to your
computer.
• No “Memory Stick” is inserted.
• The camera is not correctly conn ecte d to your
computer.
• You are not using the correct copy procedure for
your OS.
—
—
p Connect the camera directly to your computer without passing
through a hub or other device.
p Insert a “Memory Stick” (page 18).
p Connect the camera and your com put er co rrectly using the
supplied USB cable (page 53) .
p Follow the designated copy procedure for your OS (pages 54, 55
and 59).
p If you are using the “Image Transfer” software, see page 54.
p If you are using the “ImageMixer Ver.1.5 for Sony” application
software, click on HELP.
After making a USB
connection, “Image
Transfer” does not
automatically start.
The image cannot be played
back on a computer.
—
p Select [Launch Image Tran sfer automat ically wh en the came ra,
etc., is connected.] at [Basic] sett i ng (p ag e55).
—
p Make a USB connection when the computer is turned on
(page 53).
—
p If you are using the “ImageMixer Ver.1.5 for Sony” application
software, click on HELP.
—
p Consult the computer or software manufacturer.
Troubleshooting
65
Page 66

Symptom Cause Solution
The image is interrupted by
noise when you view a
movie on a computer.
You cannot print an image.
• You are playing back the movie directly from
the “Memory Stick.”
—
—
p Copy the movie to the hard disk of your computer and then play
back the movie from the hard disk (pages 54, 55 and 59).
p Check the printer settings.
p Click on HELP for the “ImageMixer Ver.1.5 for Sony”
application software.
An error message appears
when you set the supplied
CD-ROM in your computer.
• The computer display is not set correctly. p Set the computer display as follows:
Windows: 800 × 600 dots or more
Macintosh: 800 × 600 dots or more
“Memory Stick”
Symptom Cause Solution
You cannot insert a
“Memory Stick.”
You cannot record on a
“Memory Stick.”
You cannot format a
“Memory Stick.”
You have formatted a
“Memory Stick” by mistake.
• You are inserting it backwards. p Insert it from the right side (page 18).
• The write-protect switch on the “Memory Stick”
p Set it to the recordi n g pos i tion (page 76).
is set to the LOCK position.
• The “Memory Stick” is full.
• The write-protect switch on the “Memory Stick”
p Delete unnecessary images (page 46).
p Set it to the recording position (page 76).
is set to the LOCK position.
• When you format a “Memory Stick,” all data in
the “Memory Stick,” including images that were
write-pr otected by an other device, will be
p We recommend that you set the “Memory Stick” write -protect
switch to the LOCK position to prevent accidental erasure
(page 76).
permanently erased and cannot be rest or ed .
High Color (16-bit color, 65,000 colors) or more
32,000-color or more
66
Page 67

Others
Symptom Cause Solution
Your camera does not work.
The power is on, but the
camera does not work.
You cannot identify an
indicator on the LCD screen.
The lens portion gets
fogged.
• The battery level is low. (The E indica tor
appears.)
• The USB cable is connected.
• The built-in microcomputer is not work ing
properly.
— p Check the indicator (pages 83 and 84).
• Moisture condensation has occurred. p Turn off the came r a and le av e it for ab out a n hour at the room
p Charge the batteries (page 10).
p Disconnect the USB cable (pages 54 and 59).
p Remove the batteries, then install them again after about one
minute and turn on the camera. If the functions still do not work,
open the waterproof cover to press the RESET button using a
fine-tipped object, then close the cover and turn the power on
again (page 61). (If you press the RESET button, all settings
including the date and time are cleared.)
temperature for the moisture to evaporate before use (page 75).
Troubleshooting
67
Page 68

Warnings and messages
The following messages appear on the LCD screen.
Message Meaning/Corrective Action
NO MEMORY STICK
SYSTEM ERROR
MEMORY STICK ERROR
MEMORY STICK TYPE ERROR
FORMAT ERROR
MEMORY STICK LOCKED
NO MEMORY SPACE
NO FILE IN THIS FOLDER
FOLDER ERROR
CANNOT CREATE MORE
FOLDERS
CANNOT RECORD
FILE ERROR
FILE PROTECT
IMAGE SIZE OVER
INVALID OPERATION
• Insert a “Memory Stick” (page 18).
• Turn the power off and on again (page 15).
• The inserted “Memory Stick” cannot be used in your camera (page 76).
• The “Memory Stick” is damaged, or the terminal section of the “Memory Stick” is dirty.
• Insert the “Memory Stick” correctly (page 18).
• The inserted “Memory Stick” cannot be used in your camera (page 76).
• The “Memory Stick” format failed. Format the “Memory Stick” again (page 47).
• The write-protect switch on the “Me mory Stick” is set to the LOCK position. Set it to the recording position
(page 76).
• The capacity of the “Memory Stick” is insufficient. You cannot record images. Delete unnecessary images
(page 46).
• No images have been recorded in this folder.
• A folder with the same first three digits number already exists in the “Memory Stick.” (For example:
123MSDCF and 123ABCDE) Select other folde r s, or create a new fo lde r .
• The folder whose first three digits of the n ame is “9 99” exi sts in the “Memory Stick.” You cannot crea te an y
folders.
• The camera cannot record images in the selected folder. Select a different folder (page 28).
• An error occurred while playing back the image.
• The image is write-protected by another device. Release the protection by another device.
• Y ou are attempting to play back an image of a size that cannot be played back on your camera.
• You are attempting to assign the print (DPOF) mark to a file that was created by another device.
• The battery level is low or zero. Charge the batteries (page 10). Depending on the conditions of use, the indicator
may flash even though there are still 5 to 10 minutes of remaining batter y tim e le f t.
68
Page 69

Message Meaning/Corrective Action
ENLARGED PLAYBACK ERROR
• Y ou are at te mpt ing to perform enlarged playback for a fi le created using other devices.
• E nla rge d playback is not available for images proce sse d using a computer.
• An error occurred while your camera was performing enlarged playback.
Troubleshooting
69
Page 70

Self-diagnosis display — If a code starting with an al phabet letter appears
Your camera has a self-diagnosis display.
This function displays t he camera condit ion
on the LCD screen with a combination of a
letter and four numerical digits.
If this occurs, check the following code
chart and attempt the corresponding
corrective actions. The last t w o digits
(indicated by ss) will differ depending on
the state of the camera.
C:32:ss
Self-diagnosis display
Code Cause Countermeasure
C:32:ss There is trouble with your
C:13:ss The camera cannot read or write
E:61:ss
E:91:ss
camera’s hardware.
data on the “Memory Stick.”
An unformatted “Memory Stick”
is inserted.
The inserted “Memory Stick”
cannot be used with your camera,
or the data is damaged.
A camera malfunction that you
cannot reverse has occurred.
• Turn the power off and on again (page 15).
• Re-insert the “Memory Stick” several times.
• Format the “Memory Stick” (page 47).
• Insert a new “Memory Stick” (page 18).
• Open the waterproof cover to press the
RESET button (page 61), then close the cover
and turn the power on again.
If you are unable to so lve the problem even
after trying th e corrective actions a few
times, repairs may be necessary. Contact
your Sony dealer or local aut horized Sony
service facility and inform them of the 5digit code.
Example: E:61:10
70
Page 71

Additional informatio
n
Menu items
Menu items that can be modi fi ed di ffer
depending on the position of the mode
switch.
The LCD screen shows onl y th e it em s you
can operate at the moment. Factory settings
are indicated with x.
When the mode switch is set to (when [ ] is selected in the menu settings)
Item Setting Description
SIZE·BURST x2.0M / VGA / BURST Selects the image size when shooting still images (pages 20 and 33).
FOCUS
SELFTIMER ON / xOFF Sets the self-timer (page 24).
P.EFFECT xOFF / NEG. ART / SEPIA / B&W /
xAUTO / 0.2 m / 0.5 m /
1.0 m /
SOLARIZE
When the mode switch is set to (when [ ] is selected in the menu settings)
Item Setting Description
FOCUS
SELFTIMER ON / xOFF Sets the self-timer (page 24).
P.EFFECT xOFF / NEG. ART / SEPIA / B&W /
xAUTO / 0.2 m / 0. 5 m /
1.0 m /
SOLARIZE
Selects the auto focus method or sets the focus preset distance (page 32).
Sets the image sp ec ial effects (page 34).
Selects the auto focus method or sets the focus preset distance (page 32).
Sets the image sp ec ial effects (page 34).
Additional informat io n
71
Page 72

When the mode switch is set to or (when [ ] is selected in the menu settings)
Item Setting Description
FORMAT OK / CANCEL Formats the “Memory Stick.” When you format a “Memory Stick,” note that all
CREATE FOLDER OK / CANCEL Creates a folder for recording images (page 27).
CHANGE FOLDER OK / CANCEL Change s a folder for recording images (page 28).
data in the “Memory Stick,” including images that were write-protected by another
device, will be permanently erased (p ag e47).
When the mode switch is set to (when [ ] is selected in the menu settings)
Item Setting Description
DELETE OK / CANCEL Deletes the displaye d image (page 46).
DELETE IN
FOLDER
INDEX / SINGLE — Switches between four-image display and single image display (p age 36).
DPOF ON / xOFF Marks/unmarks the print (DPOF) mark on still images you want to print (page 41).
OK / CANCEL Deletes all images in the folder (page 46).
When the mode switch is set to (when [ ] is selected in the menu settings)
Item Setting Description
FORMAT OK / CANCEL For mats the “Memory Stick.” When you format a “Memory St ick, ” not e th at all
CHANGE FOLDER OK / CANCEL Sele cts the fold er cont aining the images you want to play back (page 38 ).
data in the “Memory Stick,” including images that were write-protected by another
device, will be permanently erased (p ag e47).
72
Page 73

The following menus are available no matter what position the mode switch is in.
When [ ] is selected in the menu settings
Item Setting Description
LCD LIGHT xON / OFF Selects the br ightness of the LCD screen. Selecting [ON] m akes the screen bright
DISPLAY xON
OFF
and easy to see when using the camera in dark locations, but also uses up the battery
charge faster (page 23).
– Displays all indicators.
– Displays warning message s, etc.
When [ ] is selected in the menu settings
Item Setting Description
CLOCK SET DATE NOTATION
DATE&TIME SET
BEEP xON
USB xNORMAL / PTP Switches the USB mode (page 49).
LANGUAGE
A
SHUTTER
OFF
— Displays the menu items, warnings and messages in selected language .
– Sets the date notation (page 16).
x[Y/M/D] / [M/D/Y] / [D/M/Y]
– Sets the date and time (page 16).
– Turns on the beep when you press the control button/shutter button.
– Turns on the beep when you press the shutter button.
– Turns off the beep.
Additional informat io n
73
Page 74

Precautions
Do not leave the camera in the
following places
• In extremely hot place, such as in a car
parked in the sun. Th e camera body may
become deformed or this may cau se a
malfunction.
• Under direct sunligh t or near a heater.
The camera body may become deformed
or this may cause a malfunctio n.
• On rocking vibration.
• Near strong magnetic place.
Notes on use
• Do not open the waterproof cover
underwater, in places exp osed to wat er, at
the seashore or other places w it h lots of
sand dust. Water or sand entering the
inside of the camera may cau se a
malfunction or irreparable damage.
• When no t usi ng th e camera for a long
period of time, turn on the power once
every so often.
74
Page 75

2 Wipe the camera.
• Wipe away the water on the camera using a
clean, dry, soft cloth, then leave the camera in
the shade to dry.
• Water that is not completely wiped away may
seep out later, so place the camera on a soft
cloth.
Other precautions
• If there is mud on the O-ring, or if the camera
has been in seawater, remo ve the O-ring to
clean and inspect it (page 81).
• When sun oil or other oily substances adhere to
the camera, wash the camera in tap water.
Leaving these substances on the camera may
cause surface discoloration or other damage.
• Do not wash the camera in a washing machine,
etc.
• Do not swing the camera violently to shake off
the water or forcibly dry the camera using a
hair dryer, etc.
• When the O-ring or the O-ring mating surface
is extremely dirty, consult your Sony dealer or
local authorized Sony service facility.
On storage
Avoid storage in hot, cold or humid places,
or places expos e d to nap h thal en e, camp hor
or other ch emicals, as thi s may damage the
camera.
Note on operating temperature
Your camera is designed for use between
the temperatu res of 0°C and 40 °C (32°F and
104°F). Shooting in extremely cold or hot
places that exceed this range is not
recommended.
On moisture condensation
If the camera is brought directly from a cold
to a warm location, or is placed in a very
damp room, moisture may condense inside
or outside the camera. Using the camera
with water droplets inside may cause a
malfunction of the camera.
Moisture condensation occurs easily
when:
• The came ra is brought from a cold
location such as a ski slope into a warmly
heated room.
• The camera is taken from an airconditioned room or car interior to the hot
outdoors.
• The camera is brought suddenly from a
damp, warm place to underwater, etc.
How to prevent moisture
condensation
When bringing the cam era from a cold
place to a warm place, seal the camera in a
plastic bag and allow it to adapt to
conditions at the new location over a period
of time (about an hour).
If moisture condensation occurs
Turn off the camera and wait about an hour
with the waterproof cover and inner cover
opened for the moisture to evap or ate. Note
that if you attempt to shoot with moisture
remaining inside the lens, you will be
unable to reco rd cl ear images.
Additional informat io n
75
Page 76

On “Memory Stick”
On internal rechargeable
button battery
This camera has an inte rnal rechargeable
button battery for maintaining the date and
time and other settings regardless of
whether the power is on or o ff.
This rechargeable butt on battery is
continually charged as long as you are using
the camera. However, if you use the camer a
for only short periods it discharges
gradually, and if you do not use the camera
at all for about one month it becomes
completely discharg ed. In this ca se, be sure
to charge this re chargeable button ba ttery
before using the camera.
However, even if thi s rec h a r ge able button
battery is not char ged, you can still use the
camera as long as you do not record the date
and time.
Charging method
Install charged si ze A AA Nickel-Metal
Hydride batteries, and leave the camera for
24 hours or more with the power off.
“Memory Stick” is a n ew compact, port able
and versatile IC recordin g m edi um w it h a
data capacit y that exceeds the capacity of a
floppy disk.
In addition to exchanging data between
“Memory Stick” comp a ti ble equipment,
you can also use a “Memory Stick” to store
data as a type of detachable external
recording media.
There are two types of “Mem ory St ic k” :
ordinary “Memory Stick” and “MagicGate
Memory Stick” that is equipped with the
MagicGate* copyrig ht pr ot ec ti on
technology. You can use both ty pes of
“Memory Stick” with your c amera.
However, because your c am e ra does not
support the MagicGate standards, data
recorded with your camera is not subject to
MagicGate copyr igh t protection.
In addition, you can also use “Memory
Stick Duo” or “Memory Stick PRO” wi th
your camera.
* MagicGate is copyright protection technology
that uses encryption technology.
• “Memory Stick” formatted with a computer is
not guaranteed to operate with this camera.
“Memory Stick” type
Memory Stick
(Memory Stick Duo)
Recording/
Playback
a
MagicGate Memory
Stick
(MagicGate Memory
a**
Stick Duo)
Memory Stick PRO
** The camera cannot record or play back the
data needed by the MagicGate function.
All “Memory Stick” media operations are not
necessarily guaranteed.
a**
Notes on using the supplied
“Memory Stick”
• You cannot record, edit or delete images when
the write-protect switch is set to LOCK.
The position or the shape of the write-protect
switch may differ depending on the “Memory
Stick” you use.
Terminal
Write-protect
switch
Labeling position
76
Page 77

• Do not remove the “Memory Stick” while
reading or writing data.
• Data may be corrupted in the following cases.
– When the “Memory Stick” is removed or the
camera is turned off during read or write
operation
– When the “Memory Stick” is used in
locations subject to static electricity or
electrical noise
• We recommend backing up important data.
• Do not attach any other material than the
supplied label on the labeling position.
• Attach the label in the prescribed label location,
taking care that the label does not extend from
this location.
• When you carry or store the “Memory Stick,”
put it in the case supplied with it.
• Do not touch the terminal of the “Memory
Stick” with your hand or a metal object.
• Do not strike, bend or drop the “Memory
Stick.”
• Do not disassemble or modify the “Memory
Stick.”
• Do not expose the “Memory Stick” to water.
• Do not use or keep the “Memory Stick” under
the following conditions:
– High temperature locations such as the hot
interior of a car parked in direct sunlight
– Locations exposed to direct sunlight
– Humid locations or locations with corrosive
substances
Notes on using “Memory Stick
Duo” (not supplied)
• When using a “Memory Stick Duo” with your
camera, be sure to insert the “Memory Stick
Duo” into a Memory Stick Duo adaptor.
• When inserting a “Memory Stick Duo” into a
Memory Stick Duo adaptor, make sure the
“Memory Stick Duo” is inserted facing the
correct direction.
• When using a “Memory Stick Duo” inserted
into a Memory Stick Duo adaptor with this
camera, make sure that the “Memory Stick
Duo” is inserted facing the correct direction.
Note that improper use may damage the
equipment.
• Do not insert a “Memory Stick Duo” without a
Memory Stick Duo adaptor into “Memory
Stick” compatible equipment, as this may cause
equipment trouble.
Note on using “Memory Stick
PRO” (
• “Memory Stick PRO” with a capacity up to
not supplied)
1GB have been confirmed to operate properly
with this camera.
Additional informat io n
77
Page 78

On Nickel-Metal Hy dr id e ba tteries
Effective use of the battery
• Battery performance decreases in lowtemperature surroundings, and the battery
life is shortened under such
circumstances. To use the battery longer,
we recommend you keep the battery in its
case in a pocket close to your body to
warm it, an d insert it in your camera just
before you start shooting.
• If you set [LCD LIGHT] to [OFF], the
battery will run for a longer am ount of
time.
• If you shoot a lot using the flash, the
battery power will be used up faster.
• We recommend having spare batteries
handy for two or three times the expected
shooting time, and try test shooting
before actually using the camera.
• Do no t expose the ba ttery to water. The
battery is not water-resistant.
Battery life
• The battery life is limited. The battery
capacity decreases little by li t tl e as yo u
use it more and more, and as time passes.
When the batte ry opera ting time seems to
have been considerably shortened, a
probable cause is that the bat teries have
reached the end of their life .
• The battery l ife va rie s dep en ding on
storage, operating conditions, and
environment, and is different for each
battery.
78
Page 79

On the battery cha rger
On the O-rin g
• Do not charge any other batteries except
Sony Nickel-M etal Hydride batt eries in
the battery charger supplied with your
camera. If you try to charge any other
type of battery (e.g., manganese batteries,
alkaline dry cells, primary lithium
batteries, or Ni-Cd batteries) than the
batteries specified, those batterie s may
leak, overheat, or ex plode, causing the
danger of bur ns or other injur ies.
• Do not charge fully charged NickelMetal Hydride batteries again.
Otherwise, there is a da nge r of le a ks,
excessive heat, explosions, or electric
shock.
• When charging a high capacity battery
other than the supplied batt ery using the
supplied batte ry charger, th e full capa city
of the battery may not be a va il able.
• When the CHARGE lamp flashes, this
may indicate a batter y er r or or that
batteries other than the speci fied type
have been inser ted. Check that the
batteries are the specified type. If the
batteries are the specified type , re m ove
all the batteries, replace them with new
ones or another ones and check if th e
battery charger op erates correctly. I f th e
battery charger operates correctly, a
battery error may have oc curred.
• The batt ery charger is not waterproof.
Do not allow the battery charger to
become wet.
O-rings are a type of waterproof packing
that is used in underwater cameras and
watches, diving equipment, etc. This
camera uses an O-ring in th e w a te rproof
cover portion.
O-ring mating
surface
O-ring
Before use
Before using this camera un de rw a te r or in
places exposed to water, be sure to inspect
the O-ring and the O-ring mating surf ace.
If the O-ring or the O-ring mating surface is
cracked, scratched or otherwise damaged,
or if sand particles, hair or other minute dirt
has adhered, the waterproofing
performance may be im pa ire d. Note that
water entering the insi de of the camera may
cause irreparabl e da mage.
Additional informat io n
79
Page 80

Inspecting the O-ring and the
O-ring mating surface
Inspect the O-ring and the O-ring m at in g
surface in a location that is free from sand,
dust or moisture.
a Before opening the waterproof
cover, rinse off any sand and
completely wipe away any
water that may be present on
the camera body.
• Sand or water getting inside the camera may
cause a malfunction.
b Open the waterproof cover.
• For details on how to open and close the
waterproof cover, see page 12.
c Inspect the O-ring an d the O -
ring mating surface.
•
80
Page 81

Removing/Setting the O-ring
When removing the O-ring for replacement,
cleaning or inspection, take care for the
following points.
If there is mud on the O-ring, or if the
camera has been in seawater, be sure to
remove the O-ring to clean and inspect it.
Removing the O-ring
Press lightly on the O-ring with your fingers
to shift it from the groove, grasp the slack
portion, and remove the O-ri ng.
• Do not use a pointed, sharp or metal object to
remove the O-ring. This can scratch the O-ring
or the O-ring mating surface which may allow
water to leak inside the camera.
• Do not place excessive tension on the O-ring.
Cleaning the O-ring and the O-r ing
groove
• Use tap water at 30°C or less to wash the O-
ring that you removed. Wipe away any water
when finished.
• The O-ring is specially treated, so take care not
to allow grease or oil to adhere to the O-ring.
• When sand particles or encrusted salt may be
present in the O-ring groove, clean the groove
carefully using a cotton swab. Take care that
fibers from the cotton swab do not remain in the
groove.
• Do not use a pointed, sharp or metal object for
cleaning, as this may scratch the O-ring groove.
Setting the O-ring
Place the O-ring in the groove, taking care
for the following points.
• Do not place excessive tension on the O-ring.
• After setting, run a final check for any of the
following problems.
– Are there any water droplets on the O-ring?
– Is the O-ring twisted?
– Has any dirt, etc. adhered to the O-ring?
– Is the O-ring protruding from the groove?
O-ring life
• Rep lace the O-ring with a new one if it
becomes cracked, warp ed, crushed,
twisted, split, scratched, rough or
otherwise damag ed. Even if the O-ring
has no problems, deformat ion and wear
over time can cause the waterproof
performance to drop, so replace the Oring with a new one after approximat ely
two years of use.
• Consult your Sony dealer or local
authorized Sony service facility for
replacement of O-rings. Order the
following parts number when purchasing
the O-ring:
3-081-956-ss
Additional informat io n
81
Page 82

Specifications
x Camera
[System]
Image device
Total pixels number of camera
Effective pixel s number of camera
Lens Single focal lens
Exposure control
Data formats
Recording media
Flash Recommended distance: 0.5 m to
6.72 mm (1/2.7 type) color CCD
Primary color filter
Approx. 2 112 000 pixels
Approx. 2 020 000 pixels
f = 5.0 mm (7/32 inches)
(35 mm camera conversion: 33 mm
(1 5/16inches))
F2.8
Automatic, Scene Selection
(6 modes)
Still images: DCF compliant
(Exif Ver. 2.2 JPEG compliant),
DPOF compatible
Movies: MPEG1 compliant (without
audio)
“Memory Stick”
1.9 m (1 foot 7 3/4 inches to 6 feet
2 3/4 inches)
[Output connector]
USB jack mini-B
[LCD screen]
LCD panel used
Total number of dots
2.5 cm (1.0 type) TFT drive
64 460 (293×220) dots
[Power, general]
Used batteries
Power consumption (w hen shooting)
Operating tem perature range
Storage temperature range
Dimensions
Mass Approx. 191 g (6.7 oz) (two
Exif Print Compatible
PRINT Image Matching II Compatible
AAA Nickel-Metal Hydride
batteries (2) 2.4 V
5 V (from USB cable)
1.35 W
0°C to +40°C (+32°F to +104°F)
–20°C to +60°C (–4°F to +140°F)
60.2 × 116.8 × 43.3 mm
(2 3/8 × 4 5/8 × 1 3/4 inches)
(W/H/D, protruding portions not
included)
batteries, “Memory Stick,” and hand
strap included)
x BC-CS2A/CS2B Ni-MH battery
charger
Input rating
Output rating
Operating tem perature range
Storage temperature range
Dimensions
Mass Approx. 90 g (3 oz)
100 –240V AC, 50/60Hz, 3W
DC OUT AA: 1.4V, 400 mA × 2
AAA: 1.4V, 160 mA × 2
0°C to +40°C (+32°F to +104°F)
–20°C to +60°C (–4°F to +140°F)
Approx. 71 × 30 × 91 mm
(2 7/8 × 1 3/16 × 3 5/8 inches)
(W/H/D)
Accessories
• HR 11/45: HR03 (size AAA) Ni-MH batte ries (2)
• Battery case (1)
• BC-CS2A/CS2B Ni-MH battery charger (1)
• Power cord (mains lead) (1)
• USB cable (1)
• Hand strap (1)
• “Memory Stick” (8MB) (1)
• CD-ROM (USB driver SPVD-010) (1)
• Operating instructions (1)
Design and specifications are subject to change
without notice.
82
Page 83

LCD screen displays
2.0M
6
q
When shooting still images
7
8
2.0M
2.0M
101
15
C:32:ss
9
q;
qa
5
SLRZ
6
A Imag e size indicator (20, 33)
B Battery remaining indicator (14)
C Flash mode indicator (25)/
Red-eye reduction indicator (26)
D Focus preset indicator (32)
E P icture effect indicator (34)
F Scene Selection indicator (30)
G A E/AF lock indicator (22)
H Recording folder indicator (26)
I R emaini ng “Memory Stick”
capacity indicator
J Remaining number of recordable
images indicator (21)
K Self-diagnosis display (70)
L Self-timer indicator (24)
M Low battery warning indicator
(68)
qs
qd
When shooting movies
1
2
101
STBY
12:55
3
4
SLRZ
C:32:ss
5
A Recording mode ind ic a t or (43)
B Battery remaining indicator (14)
C Focus preset indicator (32)
D P icture effect indicator (34)
E Low battery warning indicator
(68)
F S tatus indicato r (43)
G Recording folder indicator (26)
H Re maining “Memory Stick”
capacity indicator
I Recording time [maximum
recordable time] indicator (44)
J Self-diagnosis display (70)
K Self-timer indicator (24)
7
8
9
0
a
Additional informat io n
Page numbers in parentheses indicate the
location of additional important
information.
83
Page 84

When playing back still images
2.0M
5
2.5
q
1
101
2.0M
2.5
101-0012
2003
7 4
2.0M
2.5
2
3
4
A Image size indicator (20, 33)
B P rint (DPO F) mark indicato r (41)
C Enlarged playback/Enlargement
level indicator (40)
D Folder-file name (57)
E Playback folder indicator (38)
F Image number/Number of
images recorded in selected
folder
G Change folder indicator (39)
H Recording date/time of the
playback image
12
/12
9:30AM
84
6
7
8
When playing back movies
9
101
8
0:12
q;
I Recording mode indicator (44)
J Folder_file name (57)
K P layback folder indicator (38)
L Image number
M Counter
N Change folder indicator (39)
O Recording date/time of the
101_0008
2003 7 4
playback image
10:30AM
a
qs
qd
qf
qg
Page numbers in parentheses indicate the
location of additional important
information.
Page 85

Index
x
Inde
A
Access lamp ......................................................19
AE/AF lock indicator ........................... ............22
Auto adjustment mode ..................... ................2 2
Auto Focus ....................... ................ ................23
Auto power-off function ............................ .......15
B
Battery
battery life ....................................................14
charging time .............................................. .11
preparing batteries .......................................10
remaining indicator ......................................14
Beep/shutter sound ...........................................73
Burst .................................................................33
C
CD-ROM ..........................................................49
Changing the recording fo lder ..........................28
Charging
batteries .......................................................10
charging time .............................................. .11
Cleaning .....................................................74, 81
Clock set ...........................................................16
Computer
copying images .................................. ....54, 59
Image Transfer ...................... .......................51
ImageMixer .................................................52
USB cable .................................... ................53
USB driver ............................ ................ .50, 59
Control buttons .............................................9, 16
Copying images ......................................... 54, 59
Creating a new folder ......................................27
D
Deleting images .................................. .............46
DPOF ...............................................................41
E
Enlarged playback ........................................... 40
EXEC ......................................................... 16, 40
Exif .................................................................. 82
F
File
file names ............ ................ ........................57
image file storage destinations ................... 57
Flash
Red-eye reduction .................................25, 26
selecting a flash mode ................................. 25
Focusing
Focus preset ................................................32
shooting (using auto adjustment mode) ...... 22
Folder
changing the recording folder ..................... 28
creating a new folder ..................................27
playback folder ........................................... 38
recording folder .......................................... 26
Formatting a “Memory Sti ck ” ......................... 47
I
Image
copying images to your
computer .................................... 54, 55, 59
file names ....................................................57
image file storage destinations .................... 57
image size .............................................20, 21
Image Transfer ........................................... ......51
ImageMixer ..................................................... 52
Index screen ................. ................ ................ .... 36
Inner cover ....................................................... 12
Installation
Image Transfer ............................. .. .............51
ImageMixer ................................................. 52
USB driver ............................................50, 59
J
JPG ...................................................................57
L
LCD screen
LCD light .................................................... 23
screen display ................................... ..... 24, 83
Lock switch ....................... ................ ...........9, 12
M
Memory Stick
formatting a “Memory Stick” .....................47
inserting/removing a “Memory Stick” ........ 18
number of shooting images ......................... 2 1
shooting time ................... ...........................44
Index
85
Page 86

Page 87

Page 88

307872411
Printed on 100% recycled paper
using VOC (Volatile Organic
Compound)-free vegetable oil
based ink.
Sony Corporation Printed in Japan
Additional information on this product and answers to frequently
asked questions can be found at our Customer Support Website.
 Loading...