

Page 1
DSC-U60
English
IMPORTANT!
Waterproof
specifications
Notes on waterproof
performance
This camera conforms to IEC60529 IPX6* and IPX7**, and can be
used in places exposed to splashin g w ater or underwate r up to
depths of 1.5 m (5 feet).
* Water shall not enter the interior even when exposed to direct jet streams
of water (normal temperature fresh water) from any direction .
** Water shall not seep into the interior even when left submerged in
normal temperature fresh water at a depth of 1 m (3 feet 3 1/4 inches) in
a stationary condition for approxim a te ly 30 minutes.
You can use this camera in the fo llow i ng places:
Underwater (ocean, swimming pools) up to depths of 1.5 m (5 fee t),
beachside, rive rside, poolside, ski slopes, in the rain, et c.
Do not use this camera in the following places:
Places where the camera might be subject to hi gh w ater pressure,
hot springs or bathtubs, etc.
Notes on use
• Before using this camera underwater or in places exposed to
water, be sure to inspect the O-ring and the O-ring mating surface
on the inside of th e camera.
• Do not immerse the camera in water containing soap, detergent,
bath salts, etc., or in hot water with a temperature of more than
30°C.
• Never open the waterproof cover underwater or in places exposed
to water.
Lock the lock switch to prevent the waterproof cover from opening by
accident.
• This camera does not float in water.
• Before opening the waterproof cover, be sure to rinse off any
sand and completely wipe away any wa ter that may be prese nt on
the camera body.
• Should you find any evidence of water leaks inside the
waterproof cover, stop using the camera at once and contact your
Sony dealer or local authorized Sony service facility.
• Sony cannot be hel d responsible for ma lf unctions or irre parable
problems arising fro m water or foreign objects enterin g the inside
of the camera due to improper handling.
• Note that waterproof performance is not guaranteed under all
environment s an d conditions.
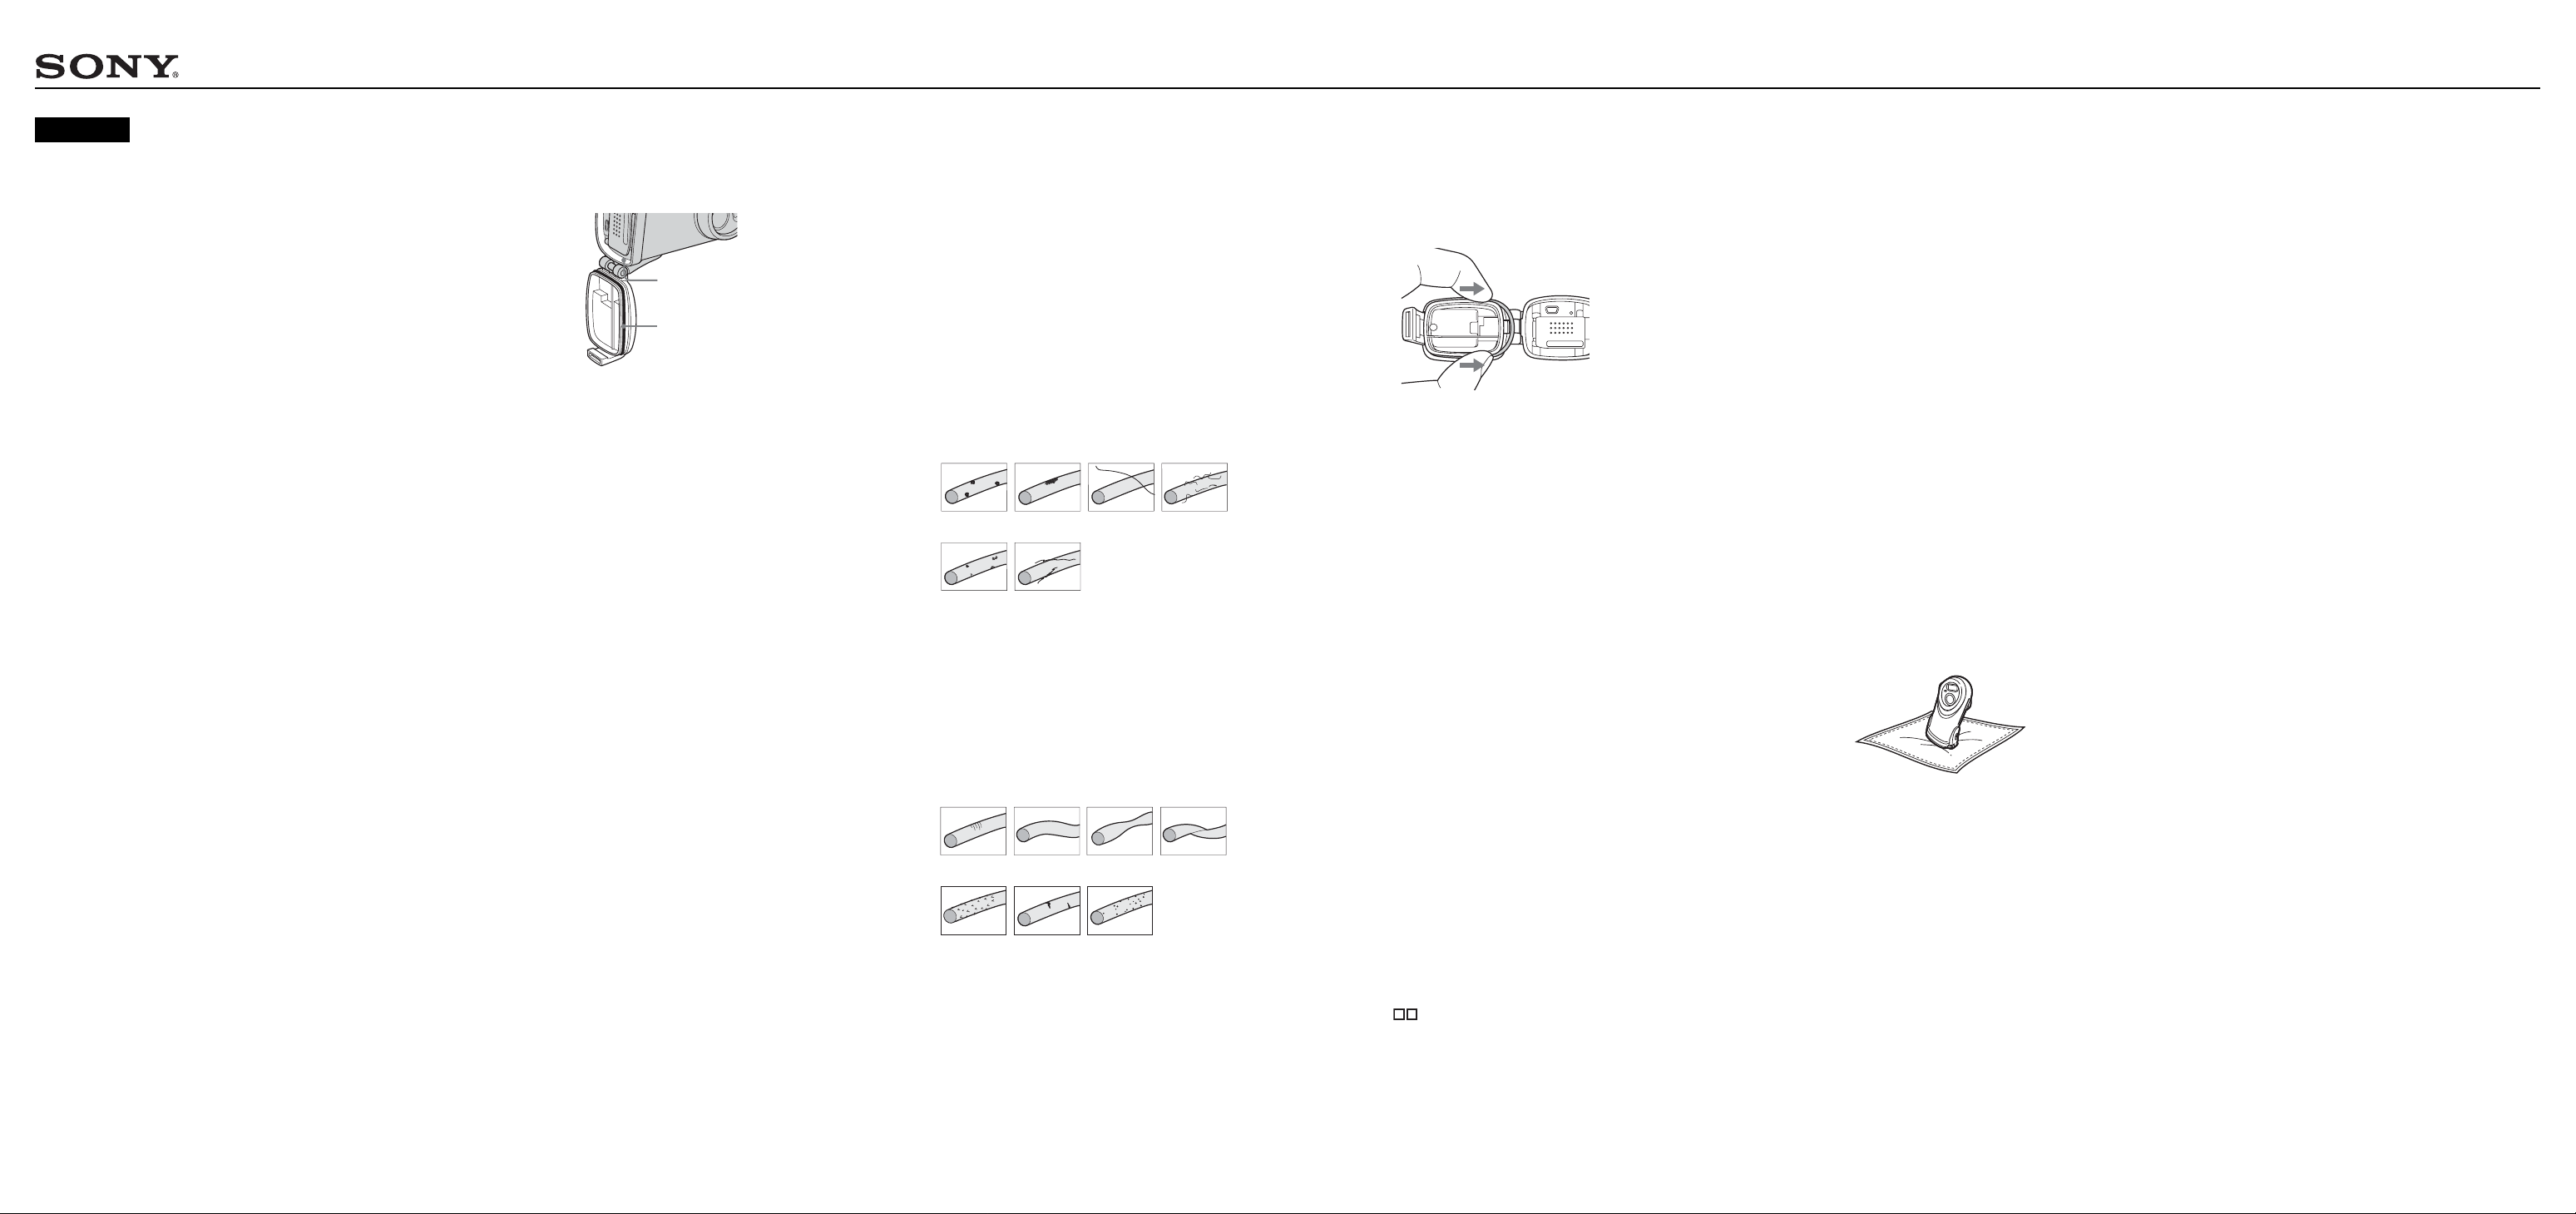
On the O-ring
O-rings are a t ype of wate rproof pack ing th at is u sed in under wate r
cameras and wat ches, diving equip m ent , etc. This camera use s a n
O-ring in the waterproof cover portion.
O-ring mating surface
O-ring
5
Before use
Before using this camera underwater or in places exposed to water,
be sure to inspect the O-ring and the O-ring mating surface.
If the O-ring or th e O -r i ng mating surface is cracked, scratc hed or
otherwise dam aged, or if sa nd particl es, hair or o ther minute dirt has
adhered, the wa te rproofing perfor m ance may be impair ed. Note
that water entering the inside of the camera may cause irreparable
damage.
Inspecting the O-ring and the O-ring mating
surface
Inspect the O-ring and the O-ring mating surface in a location that
is free from sand, dus t or moisture.
1 Before opening the waterproof cover, rin se off any
sand and completely wipe away any water that
may be present on the camera body.
• Sand or water get t i ng inside the camera m ay cause a
malfunction.
2 Open the waterproof cover.
• For details o n how to open and clos e t he w aterproof cover ,
see page 12 in the operating instruction s.
3 Inspect the O-ring and the O-ring mating surface.
• Be sure to wipe away any dirt, sand particles, hair, dust, salt,
lint or other foreign matter adhering to the O-ri ng with a soft,
lint-free cloth. Even a single hair adheri ng to the O-ring may
cause a water leak.
Dirt
Salt Lint
• Tiny dirt parti cl es that are difficult to see may have adhered
to the O-ring, so inspect the O-ring by running it through
your fingers.
• When wiping a w ay dirt from t he O-ring, ta ke care that c l o t h
fibers do not remain on the O-ring.
• When it is difficult to wipe away the dirt from the O-ring,
remove the O-ring a n d wash it with water.
• Be sure to replace the O-ring w it h a new one if it becomes
cracked, warpe d, crushed, twisted, spli t, scratched, rough or
otherwise dam age d.
Crack Warp
Split Scratch
Sand
Hair
Crush Twist
Rough
Dust
4 Close the waterproof cover.
5 Lock t he lock switch.
Removing/Setting the O-ring
When removing the O-ring for replacement, cleaning or inspection,
take care for the following points .
Removing the O-ring
Press lightly on the O-ring with your fingers to shift it from the
groove, grasp the slack portion, and remove the O-ring.
• Do not use a pointed, sharp or me tal objec t to remove th e O-ring.
This can scratch the O-ring or the O-ring mating surface which
may allow water to leak inside the camera.
• Do not place excessive tension on the O-ring.
Cleaning the O-ring and the O-ring groove
• Use tap water at 30°C or less to wash the O-ri ng t hat you
removed. Wipe away any water when finished.
• The O-ring is specially tr eated, so ta ke care not to all ow grease or
oil to adhere to the O-ring.
• When sand particles or encrusted salt may be present in the Oring groove, clean the groove carefully using a cotton swab. Take
care that fibers from the cotton swab do not remain in the groove.
• Do not use a pointed, sharp or metal object for cleaning, as this
may scratch the O-ring groove.
Setting the O-ring
Place the O-ring in th e groo ve, t akin g ca re for t he fo llowin g po ints.
• Do not place excessive tension on the O-ring.
• After setting, run a final check for any of the following problems.
– Are ther e any water droplets on the O-ring?
– Is the O-ring twisted?
– Has any dirt, etc. adhered to the O-ring?
– Is the O-ring protruding from the groove ?
O-ring life
• Replace the O-ring with a new one if it becomes cracked, warped,
crushed, twisted, split, scratched, rough or otherwise damaged.
Even if the O-ring has no problems, deformation and wear ove r
time can cause the waterproof performance to drop, so replace the
O-ring with a new one after approximatel y t w o years of use.
• Consult your Sony dealer or local authorized Sony service
facility for replacement of O-rings. Order the following parts
number when purc hasing the O-ring:
“3-081-956- ”
Cleaning after use
After getting the camera wet
• Wipe away any w at er droplets on the camera body with a clean,
dry, soft cloth.
• Note that water remaining in the gaps on the camera body m ay
get your clothes or th e i nside of your bag wet.
• In cold places, wat er dr oplets may freeze on the camera body.
Note that using the camera with water droplets frozen on it may
cause a malfunctio n.
When sand, dirt or seawater adhere to the
camera
If salt or other dirt is left encrusted on the camera, th e metal
portions may become damaged or rusted and result in water leaks.
Follow the pr ocedure below and cl ean the camera before opening
the waterproof cover. Use tap water at 30°C or less to wash the
camera.
1 Leave the camera immersed in a bucket or other
container filled with fresh water.
• Wash the came ra by gently moving it back and forth to
thoroughly remove any dirt, sand and salt. Then, let it soak
for approximately 30 minutes.
• Do not rub the lens or the LCD screen when they are dirty as
this may cause scratches.
2 Wipe the camera.
• Wipe away the water on the camera using a clean, dry, soft
cloth, then leave th e camera in the shade to dr y.
• Water that is not completely wiped a way may se ep out late r,
so place the camer a on a soft cloth.
Other precautions
• If there is mud on the O-ring, or if the camera has been in
seawater, remove the O-ring to clean and inspect it.
• When sun oil or other oily substa nces adhe re to the ca mera, wash
the camera in tap water. Leaving these substances on the camera
may cause surface discoloration or other damage.
• Do not wash the camera in a washing machine, etc.
• Do not swing the camera violently to shake off the water or
forcibly dry the camera using a hair dr yer, etc.
• When the O-ring or the O- ring mating s urfac e is ex treme ly dirt y,
consult your Sony d eal er or local authorized Sony service
facility.
On storage
Avoid storage in hot, cold or humid plac es, or places exposed to
naphthalene, camphor or other chem i cals, as this may dam age the
camera.
Sony Corporation © 2003 Printed in Japan 3-082-427-11(1)
 Loading...