

Sony DSC-TX55 User Manual [en, es]

4-294-603-21(1)
Digital Still Camera / Instruction Manual GB
Cámara fotografía digital / Manual de instrucciones ES
DSC-TX55

English
Owner’s Record
The model and serial numbers are located on the bottom. Record the serial number in the
space provided below. Refer to these numbers whenever you call your Sony dealer
regarding this product.
Model No. DSC-TX55
Serial No. ______________________________
Model No. AC-UB10/UB10B
Serial No. ______________________________
WARNING
To reduce fire or shock hazard, do not expose the unit to rain or
moisture.
IMPORTANT SAFETY INSTRUCTIONS
-SAVE THESE INSTRUCTIONS
DANGER
TO REDUCE THE RISK OF FIRE OR ELECTRIC
SHOCK, CAREFULLY FOLLOW THESE
INSTRUCTIONS
If the shape of the plug does not fit the power outlet, use an attachment plug adaptor of the
proper configuration for the power outlet.
CAUTION
[ Battery pack
If the battery pack is mishandled, the battery pack can burst, cause a fire or even chemical
burns. Observe the following cautions.
• Do not disassemble.
• Do not crush and do not expose the battery pack to any shock or force such as
hammering, dropping or stepping on it.
• Do not short circuit and do not allow metal objects to come into contact with the battery
terminals.
• Do not expose to high temperature above 60°C (140°F) such as in direct sunlight or in a
car parked in the sun.
GB
• Do not incinerate or dispose of in fire.
2

• Do not handle damaged or leaking lithium ion batteries.
• Be sure to charge the battery pack using a genuine Sony battery charger or a device that
can charge the battery pack.
• Keep the battery pack out of the reach of small children.
• Keep the battery pack dry.
• Replace only with the same or equivalent type recommended by Sony.
• Dispose of used battery packs promptly as described in the instructions.
[ AC Adaptor
Connect the AC Adaptor to the nearest wall outlet (wall socket).
If some trouble occurs while using the AC Adaptor, immediately shut off the power by
disconnecting the plug from the wall outlet (wall socket).
The power cord (mains lead), if supplied, is designed specifically for use with this camera
only, and should not be used with other electrical equipment.
For Customers in the U.S.A. and Canada
[ RECYCLING LITHIUM-ION BATTERIES
Lithium-Ion batteries are recyclable.
You can help preserve our environment by returning your used
rechargeable batteries to the collection and recycling location nearest
you.
For more information regarding recycling of rechargeable batteries,
call toll free
1-800-822-8837, or visit http://www.rbrc.org/
Caution: Do not handle damaged or leaking Lithium-Ion batteries.
[ Battery pack
This device complies with Part 15 of the FCC Rules. Operation is subject to the following
two conditions:
(1) This device may not cause harmful interference, and (2) this device must accept any
interference received, including interference that may cause undesired operation.
This Class B digital apparatus complies with Canadian ICES-003.
GB
For Customers in the U.S.A.
UL is an internationally recognized safety organization.
The UL Mark on the product means it has been UL Listed.
If you have any questions about this product, you may call:
Sony Customer Information Center
1-800-222-SONY (7669).
The number below is for the FCC related matters only.
GB
3

[ Regulatory Information
Declaration of Conformity
Trade Name: SONY
Model No.: DSC-TX55
Responsible Party: Sony Electronics Inc.
Address: 16530 Via Esprillo,
Telephone No.: 858-942-2230
This device complies with Part15 of the FCC Rules. Operation is subject to the
following two conditions: (1) This device may not cause harmful interference, and (2)
this device must accept any interference received, including interference that may cause
undesired operation.
San Diego, CA 92127 U.S.A.
[ CAUTION
You are cautioned that any changes or modifications not expressly approved in this manual
could void your authority to operate this equipment.
[ Note:
This equipment has been tested and found to comply with the limits for a Class B digital
device, pursuant to Part 15 of the FCC Rules.
These limits are designed to provide reasonable protection against harmful interference in
a residential installation. This equipment generates, uses, and can radiate radio frequency
energy and, if not installed and used in accordance with the instructions, may cause
harmful interference to radio communications. However, there is no guarantee that
interference will not occur in a particular installation. If this equipment does cause harmful
interference to radio or television reception, which can be determined by turning the
equipment off and on, the user is encouraged to try to correct the interference by one or
more of the following measures:
– Reorient or relocate the receiving antenna.
– Increase the separation between the equipment and receiver.
– Connect the equipment into an outlet on a circuit different from that to which the
receiver is connected.
– Consult the dealer or an experienced radio/TV technician for help.
The supplied interface cable must be used with the equipment in order to comply with the
limits for a digital device pursuant to Subpart B of Part 15 of FCC Rules.
GB
4

For Customers in Europe
[ Notice for the customers in the countries applying EU Directives
The manufacturer of this product is Sony Corporation, 1-7-1 Konan Minato-ku Tokyo,
108-0075 Japan. The Authorized Representative for EMC and product safety is Sony
Deutschland GmbH, Hedelfinger Strasse 61, 70327 Stuttgart, Germany. For any service or
guarantee matters please refer to the addresses given in separate service or guarantee
documents.
This product has been tested and found compliant with the limits set out in the EMC
Directive for using connection cables shorter than 3 meters (9.8 feet).
[ Attention
The electromagnetic fields at the specific frequencies may influence the picture and sound
of this unit.
[ Notice
If static electricity or electromagnetism causes data transfer to discontinue midway (fail),
restart the application or disconnect and connect the communication cable (USB, etc.)
again.
[ Disposal of Old Electrical & Electronic Equipment (Applicable in
the European Union and other European countries with separate
collection systems)
please contact your local Civic Office, your household waste disposal service or the shop
where you purchased the product.
This symbol on the product or on its packaging indicates that this product
shall not be treated as household waste. Instead it shall be handed over to
the applicable collection point for the recycling of electrical and electronic
equipment. By ensuring this product is disposed of correctly, you will help
prevent potential negative consequences for the environment and human
health, which could otherwise be caused by inappropriate waste handling
of this product. The recycling of materials will help to conserve natural
resources. For more detailed information about recycling of this product,
GB
GB
5

[ Disposal of waste batteries (applicable in the European Union
and other European countries with separate collection systems)
This symbol on the battery or on the packaging indicates that the battery
provided with this product shall not be treated as household waste.
On certain batteries this symbol might be used in combination with a
chemical symbol. The chemical symbols for mercury (Hg) or lead (Pb) are
added if the battery contains more than 0.0005% mercury or 0.004% lead.
potentially negative consequences for the environment and human health which could
otherwise be caused by inappropriate waste handling of the battery. The recycling of the
materials will help to conserve natural resources.
In case of products that for safety, performance or data integrity reasons require a
permanent connection with an incorporated battery, this battery should be replaced by
qualified service staff only. To ensure that the battery will be treated properly, hand over
the product at end-of-life to the applicable collection point for the recycling of electrical
and electronic equipment.
For all other batteries, please view the section on how to remove the battery from the
product safely.
Hand the battery over to the applicable collection point for the recycling of waste batteries.
For more detailed information about recycling of this product or battery, please contact
your local Civic Office, your household waste disposal service or the shop where you
purchased the product.
By ensuring these batteries are disposed of correctly, you will help prevent
Notice for customers in the United Kingdom
A moulded plug complying with BS 1363 is fitted to this equipment for your safety and
convenience.
Should the fuse in the plug supplied need to be replaced, a fuse of the same rating as the
supplied one and approved by ASTA or BSI to BS 1362, (i.e., marked with an or
mark) must be used.
If the plug supplied with this equipment has a detachable fuse cover, be sure to attach the
fuse cover after you change the fuse. Never use the plug without the fuse cover. If you
should lose the fuse cover, please contact your nearest Sony service station.
GB
6

Refer to “Cyber-shot User Guide” (HTML) on supplied CD-ROM
For details on advanced operations, please read “Cyber-shot User Guide”
(HTML) on the CD-ROM (supplied) using a computer.
Insert the CD-ROM into the CD-ROM drive.
For Windows users:
1 Click [User Guide] t [Install].
2 Start “User Guide” from the shortcut on the desktop.
For Macintosh users:
1 Select the [User Guide] folder and copy [eng] folder stored in [User Guide]
folder to your computer.
2 After copying is complete, double-click “index.html” in [eng] folder.
Checking the supplied items
• Camera (1)
• Rechargeable battery pack NP-BN (1)
(This rechargeable battery pack cannot be used with Cyber-shot that are
supplied with the NP-BN1 battery pack.)
• Multi-use terminal USB cable (1)
• AC Adaptor AC-UB10/UB10B (1)
• Power cord (mains lead) (not supplied in the USA and Canada) (1)
• Paint pen (1)
• Wrist strap (1)
• Tripod adaptor (1)
•CD-ROM (1)
– Cyber-shot application software
– “Cyber-shot User Guide”
• Instruction Manual (this manual) (1)
GB
GB
7
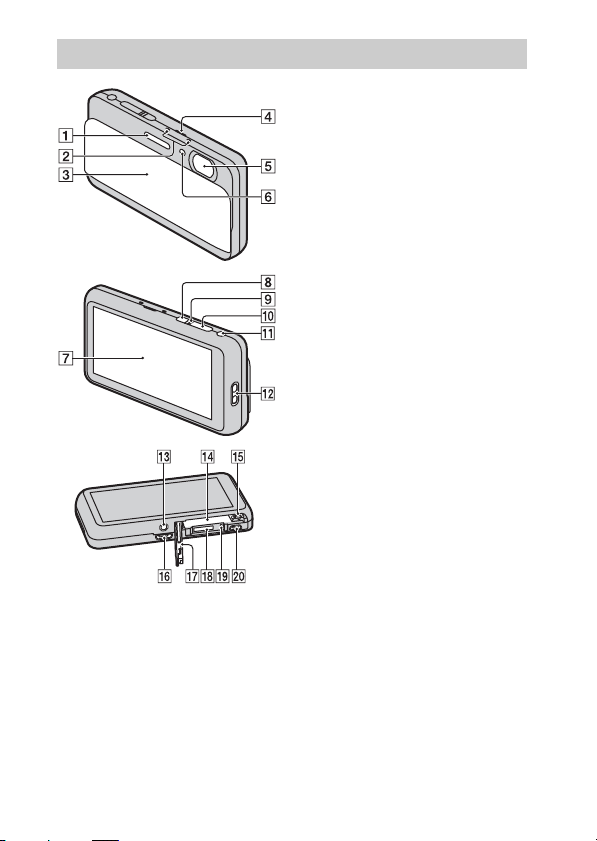
Identifying parts
A Flash
B Microphone
C Lens cover
D Speaker
E Lens
F Self-timer lamp/Smile Shutter
lamp/AF illuminator
G Screen/Touch panel
H ON/OFF (Power) button
I Power/Charge lamp
J Shutter button
K W/T (zoom) lever
L Hook for wrist strap
M Thread groove
N Battery insertion slot
O Battery eject lever
P Multi connector (Type3b)
Q Battery/Memory card cover
R Memory card slot
S Access lamp
T HDMI connector
GB
8
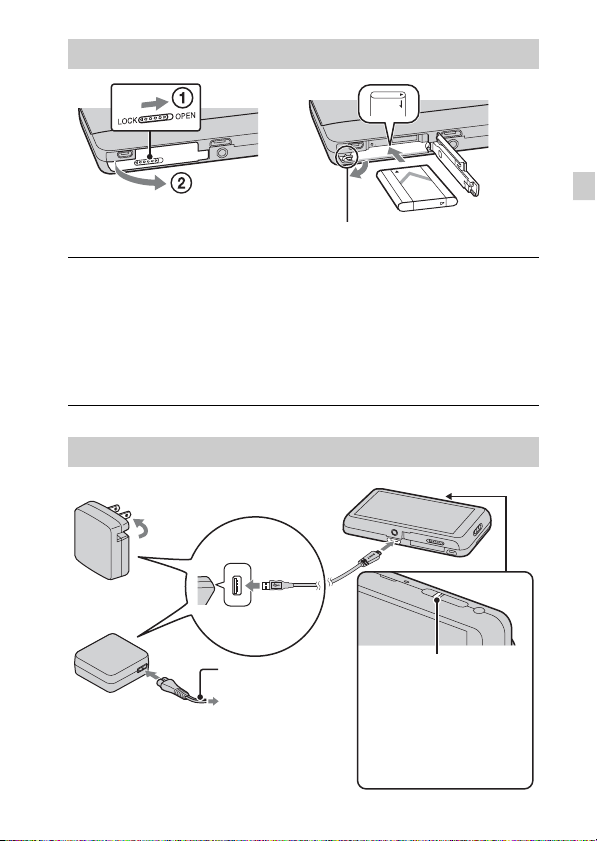
Inserting the battery pack
Battery eject lever
Open the cover.
1
Insert the battery pack.
2
• While sliding the battery eject lever, insert the battery pack as
illustrated. Make sure that the battery eject lever locks after insertion.
• Closing the cover with the battery inserted incorrectly may damage the
camera.
Charging the battery pack
For customers in the USA, Canada
GB
Power cord (Mains
lead)
For customers in countries/regions
other than the USA and Canada
Power/Charge lamp
Lit: Charging
Off: Charging finished
Flashing:
Charging error
Charging paused due to
overheating
GB
9

Connect the camera to the AC Adaptor (supplied),
1
using the multi-use terminal USB cable (supplied).
Connect the AC Adaptor to the wall outlet (wall socket).
2
The Power/Charge lamp lights orange, and charging starts.
• Turn off the camera while charging the battery.
• You can charge the battery pack even when it is partially charged.
• When the Power/Charge lamp flashes and charging is not finished,
remove and re-insert the battery pack.
Notes
• If the Power/Charge lamp on the camera flashes when the AC Adaptor is
connected to the wall outlet (wall socket), this indicates that charging is
temporarily stopped because the temperature is outside the recommended range.
When the temperature gets back within the appropriate range, the charging
resumes. We recommend charging the battery pack in an ambient temperature of
between 10°C to 30°C (50ºF to 86ºF).
• Connect the AC Adaptor (supplied) to the nearest wall outlet (wall socket). If
malfunctions occur while using the AC Adaptor, disconnect the plug from the wall
outlet (wall socket) immediately to disconnect from the power source.
• When charging is finished, disconnect the AC Adaptor from the wall outlet (wall
socket).
• Be sure to use only genuine Sony brand battery packs, multi-use terminal USB
cable (supplied) and AC Adaptor (supplied).
• BC-TRN2 battery charger (sold separately) is able to quick-charge the NP-BN
rechargeable battery pack supplied with this model. BC-TRN battery charger (sold
separately) is not able to quick-charge the NP-BN rechargeable battery pack
supplied with this model.
x
Charging time
The charging time is approximately 140 min. using the AC Adaptor
(supplied).
Note
• The above charging time applies when charging a fully depleted battery pack at a
temperature of 25°C (77°F). Charging may take longer depending on conditions of
use and circumstances.
10
GB
x
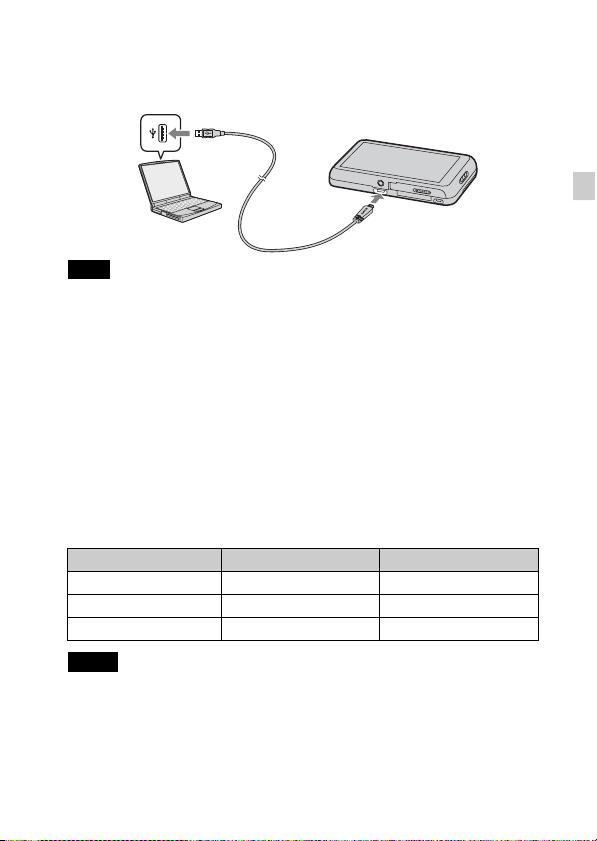
Charging by connecting to a computer
The battery pack can be charged by connecting the camera to a computer using
a multi-use terminal USB cable.
Note
• Note the following points when charging via a computer:
– If the camera is connected to a laptop computer that is not connected to a power
source, the laptop battery level decreases. Do not charge for an extended period
of time.
– Do not turn on/off or restart the computer, or wake the computer to resume from
sleep mode when a USB connection has been established between the computer
and the camera. The camera may cause a malfunction. Before turning on/off, or
restarting the computer or waking the computer from sleep mode, disconnect the
camera and the computer.
– No guarantees are made for charging using a custom-built computer or a
modified computer.
x
Battery life and number of images can be recorded
and played back
Battery life Number of images
Shooting (still images) Approx. 125 min. Approx. 250 images
Viewing (still images) Approx. 180 min. Approx. 3600 images
Shooting (movies) Approx. 60 min. —
GB
Notes
• The above number of images applies when the battery pack is fully charged. The
number of images may decrease depending on the conditions of use.
• The number of images that can be recorded is for shooting under the following
conditions:
– Using Sony microSD memory card (Class 4 or faster) (sold separately)
– The battery pack is used at an ambient temperature of 25°C (77°F).
GB
11

• The number for “Shooting (still images)” is based on the CIPA standard, and is for
shooting under the following conditions:
(CIPA: Camera & Imaging Products Association)
– [Panel Brightness] is set to [3].
– Shooting once every 30 seconds.
– The zoom is switched alternately between the W and T ends.
– The flash strobes once every two times.
– The power turns on and off once every ten times.
• The battery life for movies applies shooting under the following conditions:
– Movie quality: AVC HD HQ
– When continuous shooting ends because of set limits (page 22), touch
(Movie button) again and continue shooting. Shooting functions such as the
zoom do not operate.
x
Supplying power
The camera can be supplied with power from the wall outlet (wall socket) by
connecting to the AC Adaptor, using the multi-use terminal USB cable.
You can import images to a computer without worrying about draining the
battery pack by connecting the camera to a computer using the multi-use
terminal USB cable.
In addition, you can use the AC Adaptor AC-UD10 (sold separately) for
shooting to supply power when shooting.
Notes
• Power cannot be supplied when the battery pack is not inserted in the camera.
• When the camera is connected directly to a computer or to a power outlet using the
supplied AC Adaptor AC-UB10/UB10B, power supply is available only in
playback mode. If the camera is in shooting mode or while you are changing the
settings of the camera, power is not supplied even if you make a USB connection
using the multi-use terminal USB cable.
• If you connect the camera and a computer using the multi-use terminal USB cable
while the camera is in playback mode, the display on the camera will change from
the playback screen to the USB connection screen. Touch (Playback) to
switch to the playback screen.
12
GB
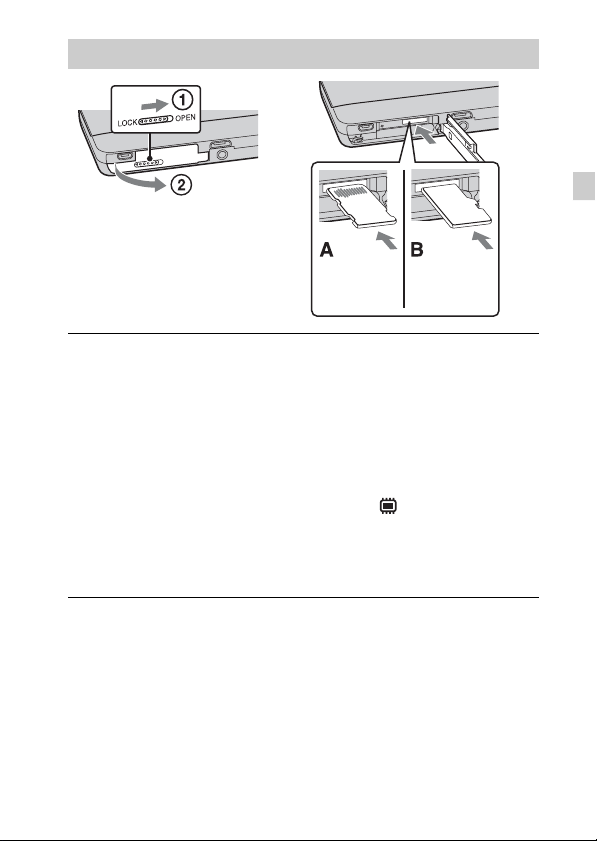
Inserting a memory card (sold separately)
Make sure that the correct
side is facing up.
Open the cover.
1
Insert the memory card (sold separately).
2
“Memory Stick Micro” (M2) media: Insert the memory card until it clicks
into place as shown (A).
microSD memory card: Insert the memory card until it clicks into place as
shown (B).
• If the memory card is not inserted straight and in the correct direction,
the camera cannot read the memory card and (Internal Memory) is
displayed.
• Only one memory card can be inserted.
Close the cover.
3
“Memory
Stick Micro”
media
microSD
memory card
GB
GB
13

x
Memory cards that can be used
Memory card For still images For movies
Memory Stick Micro a —
A
Memory Stick Micro (Mark2) aa
microSD memory card aa (Class 4 or faster)
B
microSDHC memory card aa (Class 4 or faster)
• In this manual, products in A are collectively referred to as “Memory Stick Micro”
media, and products in B are collectively referred to as microSD memory card.
x
To remove the memory card/battery pack
Memory card: Push the memory card in once to eject the memory card.
Battery pack: Slide the battery eject lever. Be sure not to drop the battery pack.
Note
• Never remove the memory card/battery pack when the access lamp (page 8) is lit.
This may cause damage to data in the memory card/internal memory.
14
GB
Setting the clock
GB
ON/OFF (Power)
1
2
3
4
5
6
7
button
Lens cover
Lower the lens cover.
The camera is turned on. The power lamp lights up green only when the
camera starts up.
Date & Time setting is displayed when you turn on the camera for the first
time.
• You can also turn on the camera by pressing the ON/OFF (Power)
button.
• It may take time for the power to turn on and allow operation.
Select a desired language.
Select a desired geographic location by following the
on-screen instructions, then touch [Next].
Set [Daylight Savings] or [Summer Time], [Date & Time
Format] and [Date & Time], then touch [Next].
• Midnight is indicated as 12:00 AM, and noon as 12:00 PM.
Touch [OK].
Select the desired display color, following the
instructions on the screen, then touch [OK].
When an [In-Camera Guide] introductory message is
appeared on the screen, touch [OK].
GB
15
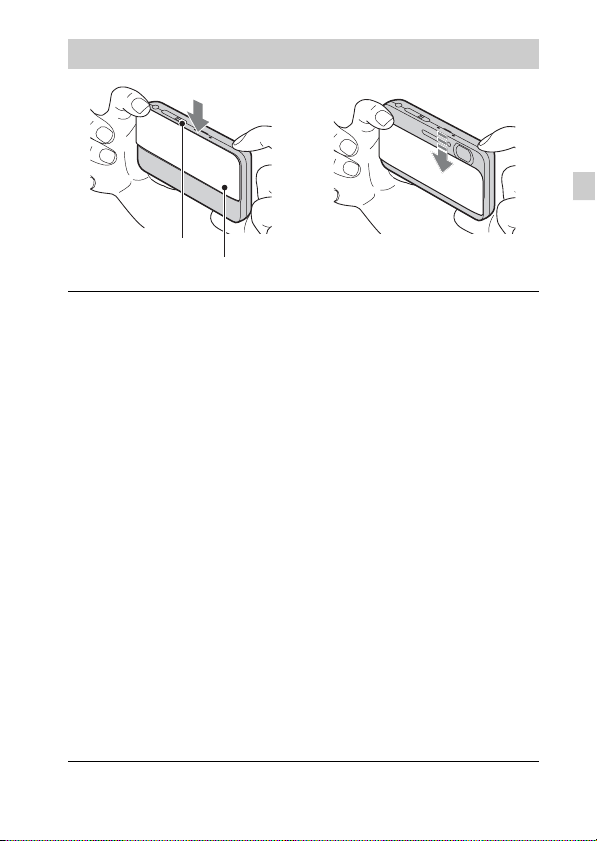
Shooting still images/movies
Shutter button
Shooting still images
Press the shutter button halfway down to focus.
1
When the image is in focus, a beep sounds and the z indicator lights.
Press the shutter button fully down to shoot an image.
2
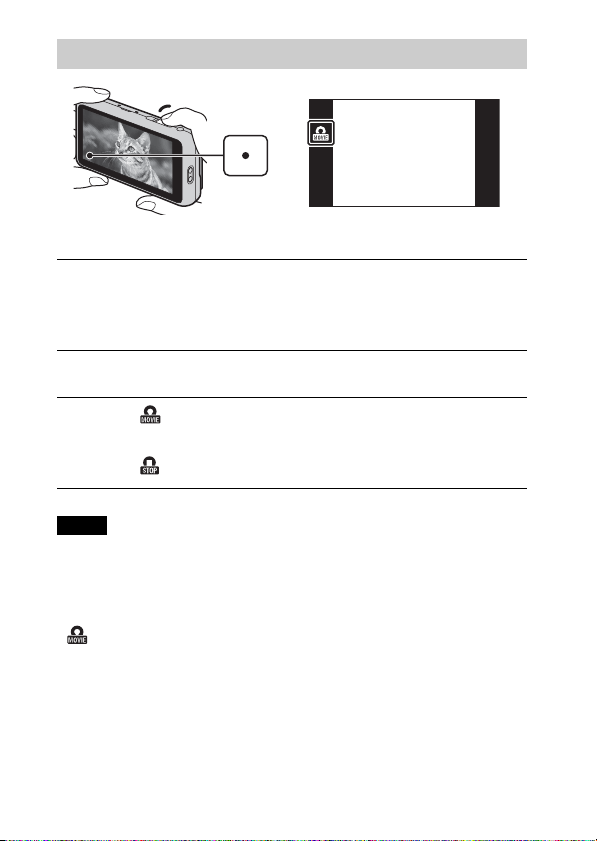
Shooting movies
Touch (Movie button) to start recording.
1
• Use the W/T (zoom) lever to change the zoom scale.
Touch (Movie button) to stop recording.
2
Notes
• The sound of the lever operating will be recorded when the zoom function
operates while shooting a movie.
• Continuous shooting is possible for approximately 29 minutes at one time at the
camera’s default settings and when the temperature is approximately 25°C (77°F).
When movie recording is finished, you can restart recording by touching
(Movie button) again. Recording may stop to protect the camera depending
on the ambient temperature.
16
GB
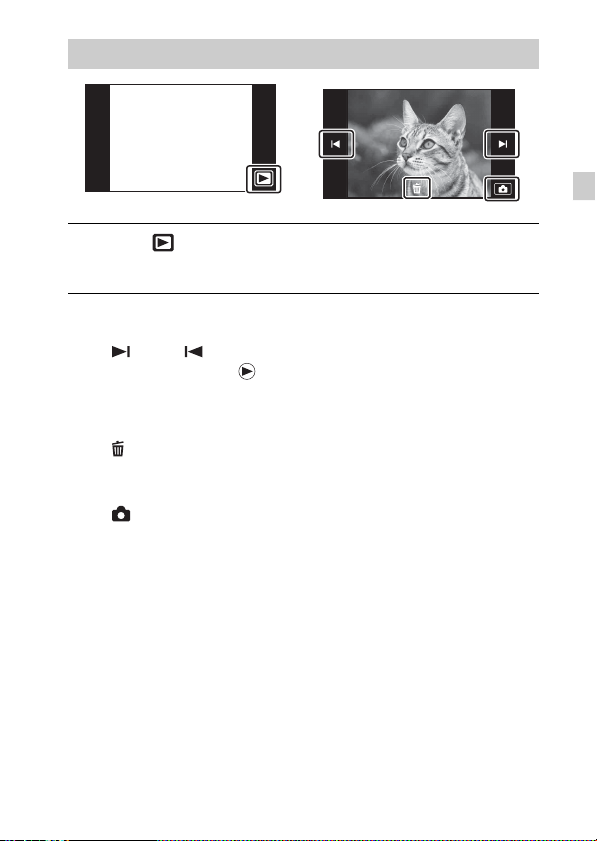
Viewing images
Touch (Playback).
1
• When images on a memory card recorded with other cameras are played
back on this camera, the registration screen for the data file appears.
x
Selecting next/previous image
Touch (Next)/ (Previous) on the screen.
• To play back movies, touch (Playback) in the center of the screen.
• To zoom in, touch the still image being played back.
x
Deleting an image
Touch (Delete) t [This Image].
x
Returning to shooting images
Touch on the screen.
• You can also return to shooting mode by pressing the shutter button halfway
down.
GB
GB
17
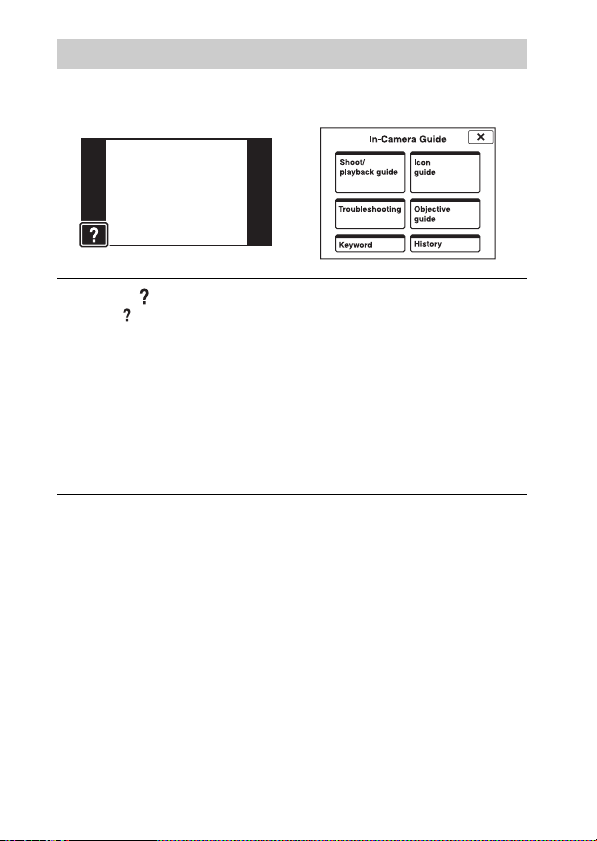
In-Camera Guide
This camera is equipped with built-in instruction guide. This allows you to
search the camera’s functions according to your needs.
Touch (In-Camera Guide).
1
• The mark will appear on the bottom left of the screen while viewing.
Select a search method from [In-Camera Guide].
2
Shoot/ playback guide: Search for various operation functions in
shooting/viewing mode.
Icon guide: Search the function and meaning of displayed icons.
Troubleshooting: Search common problems and their solution.
Objective guide: Search functions according to your needs.
Keyword: Search functions by keywords.
History: View the last 10 items displayed in [In-Camera Guide].
18
GB
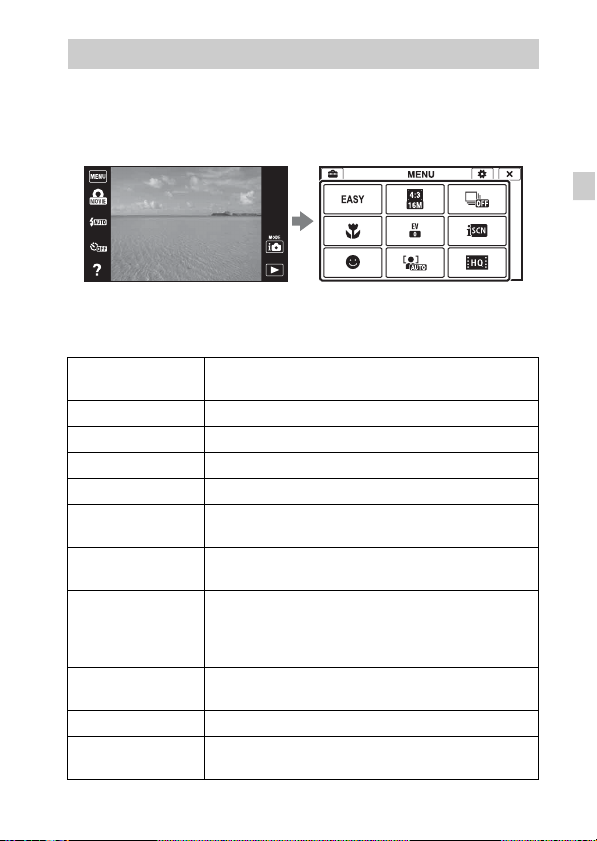
Introduction of other functions
Other functions used when shooting or playing back can be operated touching
the MENU on the screen. This camera is equipped with a Function Guide that
allows you to easily select from the functions. While displaying the guide, you
can use various functions.
x
Menu Items
Shooting
Movie shooting
scene
Easy Mode Shoot still images using minimal functions.
Movie button Shoots movies from all shooting modes quickly.
Flash Sets the flash settings.
Self-Timer Sets the self-timer settings.
Defocus Effect
Still Image
Size(Dual Rec)
Still Image Size/
Panorama Image
Size/Movie Quality/
Movie Size
Cont. Shooting
Settings
Macro Shoots beautiful close-up images of small subjects.
HDR Painting
effect
Select movie recording mode.
Set the level of background defocus effect when
shooting in Background Defocus mode.
Sets the still image size shot while recording a movie.
Select the image size and the quality for still images,
panoramic images or movie files.
Sets the burst shooting settings.
When [HDR Painting] is selected in Picture Effect, sets
the effect level.
GB
GB
19

Area of emphasis
Color hue
Extracted Color
EV Adjust the exposure manually.
ISO Adjust the luminous sensitivity.
White Balance Adjust color tones of an image.
Focus Select the focus method.
Metering Mode
Scene Recognition Set to automatically detect shooting conditions.
Soft Skin Effect Set the Soft Skin Effect and the effect level.
Smile Shutter
Smile Detection
Sensitivity
Face Detection
Anti Blink
Movie SteadyShot Sets the strength of SteadyShot in movie mode.
In-Camera Guide Search the camera’s functions according to your needs.
When [Miniature] is selected in Picture Effect, sets the
part to focus on.
When [Toy camera] is selected in Picture Effect, sets the
color hue.
When [Partial Color] is selected in Picture Effect, selects
the color to extract.
Select the metering mode that sets which part of the
subject to measure to determine the exposure.
Set to automatically release the shutter when a smile is
detected.
Set the Smile Shutter function sensitivity for detecting
smiles.
Select to detect faces and adjust various settings
automatically.
Set to automatically shoot two images and select image
in which the eyes are not blinking.
Viewing
Easy Mode Increase the text size on the screen for ease of use.
Date Select Selects the desired image to view by date.
Calendar Selects the date to be played back on Calendar.
Image Index Displays multiple images at the same time.
Slideshow Select a method of continuous playback.
GB
Delete Delete an image.
20
 Loading...