

Sony DSC-TX200V User Manual [en, es]

4-417-939-21(1)
Digital Still Camera / Instruction Manual GB
Cámara fotografía digital / Manual de instrucciones ES
DSC-TX200/TX200V

English
Learning more about the camera (“Cyber-shot User Guide”)
“Cyber-shot User Guide” is an on-line manual. Refer to it for
in-depth instructions on the many functions of the camera.
1 Access the Sony support page.
http://www.sony.net/SonyInfo/Support/
2 Select your country or region.
3 Search for the model name of your camera within the
support page.
• Check the model name on the bottom of your camera.
Checking the supplied items
The number in parentheses indicates the number of pieces.
• Camera (1)
• Rechargeable battery pack NP-BN (1)
(This rechargeable battery pack cannot be used with Cyber-shot that are
supplied with the NP-BN1 battery pack.)
• Paint pen (1)
• Micro USB cable (1)
• AC Adaptor AC-UB10/UB10B (1)
• Power cord (mains lead) (not supplied in the USA and Canada) (1)
• Wrist strap (1)
• Cleaning Cloth (1)
• Instruction Manual (this manual) (1)
• Notes on the water-proofing (1)
GB
2

Owner’s Record
The model and serial numbers are located on the bottom. Record the serial number in the
space provided below. Refer to these numbers whenever you call your Sony dealer
regarding this product.
Model No. DSC-TX200/DSC-TX200V
Serial No. _____________________________
Model No. AC-UB10/AC-UB10B
Serial No. _____________________________
WARNING
To reduce fire or shock hazard, do not expose the unit to rain or
moisture.
IMPORTANT SAFETY INSTRUCTIONS
-SAVE THESE INSTRUCTIONS
DANGER
TO REDUCE THE RISK OF FIRE OR ELECTRIC
SHOCK, CAREFULLY FOLLOW THESE
INSTRUCTIONS
If the shape of the plug does not fit the power outlet, use an attachment plug adaptor of the
proper configuration for the power outlet.
CAUTION
[ Battery pack
If the battery pack is mishandled, the battery pack can burst, cause a fire or even chemical
burns. Observe the following cautions.
• Do not disassemble.
• Do not crush and do not expose the battery pack to any shock or force such as
hammering, dropping or stepping on it.
• Do not short circuit and do not allow metal objects to come into contact with the battery
terminals.
• Do not expose to high temperature above 60°C (140°F) such as in direct sunlight or in a
car parked in the sun.
• Do not incinerate or dispose of in fire.
• Do not handle damaged or leaking lithium ion batteries.
GB
GB
3

• Be sure to charge the battery pack using a genuine Sony battery charger or a device that
can charge the battery pack.
• Keep the battery pack out of the reach of small children.
• Keep the battery pack dry.
• Replace only with the same or equivalent type recommended by Sony.
• Dispose of used battery packs promptly as described in the instructions.
[ AC Adaptor
Connect the AC Adaptor to the nearest wall outlet (wall socket).
If some trouble occurs while using the AC Adaptor, immediately shut off the power by
disconnecting the plug from the wall outlet (wall socket).
The power cord (mains lead), if supplied, is designed specifically for use with this camera
only, and should not be used with other electrical equipment.
For Customers in the U.S.A. and Canada
[ RECYCLING LITHIUM-ION BATTERIES
Lithium-Ion batteries are recyclable.
You can help preserve our environment by returning your used
rechargeable batteries to the collection and recycling location nearest
you.
For more information regarding recycling of rechargeable batteries,
call toll free
1-800-822-8837, or visit http://www.rbrc.org/
Caution: Do not handle damaged or leaking Lithium-Ion batteries.
[ Battery pack
This device complies with Part 15 of the FCC Rules. Operation is subject to the following
two conditions:
(1) This device may not cause harmful interference, and (2) this device must accept any
interference received, including interference that may cause undesired operation.
This Class B digital apparatus complies with Canadian ICES-003.
GB
4

For Customers in the U.S.A.
UL is an internationally recognized safety organization.
The UL Mark on the product means it has been UL Listed.
If you have any questions about this product, you may call:
Sony Customer Information Center
1-800-222-SONY (7669).
The number below is for the FCC related matters only.
[ Regulatory Information
Declaration of Conformity
Trade Name: SONY
Model No.: DSC-TX200V
Responsible Party: Sony Electronics Inc.
Address: 16530 Via Esprillo,
Telephone No.: 858-942-2230
This device complies with Part15 of the FCC Rules. Operation is subject to the
following two conditions: (1) This device may not cause harmful interference, and (2)
this device must accept any interference received, including interference that may cause
undesired operation.
[ CAUTION
You are cautioned that any changes or modifications not expressly approved in this manual
could void your authority to operate this equipment.
[ Note:
This equipment has been tested and found to comply with the limits for a Class B digital
device, pursuant to Part 15 of the FCC Rules.
These limits are designed to provide reasonable protection against harmful interference in
a residential installation. This equipment generates, uses, and can radiate radio frequency
energy and, if not installed and used in accordance with the instructions, may cause
harmful interference to radio communications. However, there is no guarantee that
interference will not occur in a particular installation. If this equipment does cause harmful
interference to radio or television reception, which can be determined by turning the
equipment off and on, the user is encouraged to try to correct the interference by one or
more of the following measures:
– Reorient or relocate the receiving antenna.
– Increase the separation between the equipment and receiver.
– Connect the equipment into an outlet on a circuit different from that to which the
receiver is connected.
– Consult the dealer or an experienced radio/TV technician for help.
The supplied interface cable must be used with the equipment in order to comply with the
limits for a digital device pursuant to Subpart B of Part 15 of FCC Rules.
San Diego, CA 92127 U.S.A.
GB
GB
5

About water-proof and dust-proof performance of the camera
This camera is equipped to be water-proof and dust-proof. Damage caused
from misuse, abuse or failure to properly maintain the camera is not covered
by the limited warranty.
• This camera is water-proof/dust-proof equivalent to IEC60529 IP58. The
camera is operable up to a water depth of 5 m for 60 minutes.
• Do not subject the camera to pressurized water, such as from a tap.
• Do not use in hot springs.
• Use the camera in the recommended operating water temperature range of
–10°C to +40°C (14°F to 104°F).
• As for dust-proof performance, there is no guarantee that the camera will not
become scratched or dented.
• Sometimes water-proof performance is lost if the camera is subjected to a
strong shock such as from being dropped. We recommend the camera be
inspected at an authorized repair shop for a fee.
• Accessories supplied do not meet water-proof and dust-proof specifications.
Notes before using the camera under/near water
• Make sure that no foreign matter such as sand, hair, or dirt gets inside the
battery/memory card cover. Even a small amount of foreign matter may lead
to water entering the camera.
• Confirm that the sealing gasket and its
mating surfaces have not become
scratched. Even a small scratch may
lead to water entering the camera. If the
sealing gasket or its mating surfaces
become scratched, take the camera to an
authorized repair shop to have the
sealing gasket replaced for a fee.
• If dirt or sand gets on the sealing gasket
or its mating surfaces, wipe the area
clean with a soft cloth that will not leave
behind any fibers. Prevent the sealing
gasket from becoming scratched by touching it while charging a battery or
using a cable.
• Do not open/close the battery/memory card cover with wet or sandy hands or
near water. There is a risk this will lead to sand or water getting inside.
Before opening the cover, perform the procedure described in “Cleaning
GB
after using the camera under/near water”.
6
1 Sealing gasket
2 Surface contacting
the sealing gasket

• Open the battery/memory card cover with the camera completely dry.
• Always confirm that the battery/memory card cover has been securely
locked.
Notes on using the camera under/near water
• The touch panel may be activated by water splashes on the screen icons.
When using the camera under/near water, it is recommended that you hide
the icons by touching on the right side of the screen. Touch for a few
seconds to display the icons again.
• The touch panel cannot be operated underwater. Use the buttons of the
camera to perform shooting operations.
• Do not subject the camera to shock such as from jumping into water.
• Do not open and close the battery/memory card cover while under/near
water.
• This camera sinks in water. Place your hand through the wrist strap to
prevent the camera from sinking.
• Faint, white, circular spots may appear in under-water flash photos due to
reflections off of floating objects. This is not a malfunction.
• Select (Underwater) in Scene Selection to shoot underwater with less
distortion.
Cleaning after using the camera under/near water
• Always clean the camera with water after use
within 60 minutes, and do not open the
battery/memory card cover before cleaning is
finished. Sand or water may get inside places
where it cannot be seen. If not rinsed, waterproof performance will be degraded.
• Allow the camera to sit in pure water poured
into a cleaning bowl for about 5 minutes.
Then, gently shake the camera, press each button, slide the zoom lever inside
the water, to clean away any salt, sand or other matter lodged around the
buttons.
• After rinsing, wipe away water drops with a soft cloth. Allow the camera to
dry completely in a shady location with good ventilation. Do not blow dry
with a hair dryer as there is a risk of deformation and/or degraded waterproof performance.
• Wipe away water drops or dust on the memory card/battery cover or terminal
cover with a soft dry cloth.
GB
GB
7

• This camera is constructed to drain water. Water will drain from openings
around the ON/OFF (Power) button, zoom lever, and other controls. After
removing from water, place the camera on a dry cloth for a while to allow
water to drain.
• Bubbles may appear when the camera is placed under water. This is not a
malfunction.
• The camera body may become discolored if it comes in contact with
sunscreen or suntan oil. If the camera does come in contact with sunscreen or
suntan oil, quickly wipe it clean.
• Do not allow the camera to sit with salt water inside or on the surface. This
may lead to corrosion or discoloration, and degradation of water-proof
performance.
• To maintain the water-proof performance, we recommend that once a year
you take the camera to your dealer, or to an authorized repair shop, to have
the sealing gasket of the battery/memory card cover replaced for a fee.
GB
8

Identifying parts
A Shutter button
B W/T (Zoom) lever
C Self-timer lamp/Smile Shutter
lamp/AF illuminator
D Flash
E ON/OFF (Power) button
F Power/Charge lamp
G GPS sensor (built-in,
DSC-TX200V only)
H Lens
I OLED/Touch panel
J Microphone
K Speaker
L Hook for wrist strap
M HDMI Micro jack
N Access lamp
O Memory card slot
P Micro USB connector
Q Battery/memory card cover
R Battery insertion slot
S Battery eject lever
T Tripod receptacle
• Use a tripod with a screw less
than 5.5 mm (7/32 inches) long.
Otherwise, you cannot firmly
secure the camera, and damage to
the camera may occur.
GB
GB
9

Inserting the battery pack
Battery eject lever
Open the cover.
1
Insert the battery pack.
2
• Align the battery pack with the guide inside the battery insertion slot.
Insert the battery pack until the battery eject lever locks into place.
• Securely close the battery cover until you hear the slide lock on the
cover catch in place and so that the yellow mark under the slide lock can
no longer be seen.
• Closing the cover with the battery inserted incorrectly may damage the
camera.
10
GB

Charging the battery pack
For customers in the USA, Canada
GB
Power cord
(Mains lead)
For customers in countries/regions
other than the USA and Canada
Connect the camera to the AC Adaptor (supplied),
1
using the micro USB cable (supplied).
Connect the AC Adaptor to the wall outlet (wall socket).
2
The Power/Charge lamp lights orange, and charging starts.
• Turn off the camera while charging the battery.
• You can charge the battery pack even when it is partially charged.
• When the Power/Charge lamp flashes and charging is not finished,
remove and re-insert the battery pack.
Power/Charge lamp
Lit: Charging
Off: Charging finished
Flashing:
Charging error
Charging paused due to
overheating
GB
11

Notes
• If the Power/Charge lamp on the camera flashes when the AC Adaptor is
connected to the wall outlet (wall socket), this indicates that charging is
temporarily stopped because the temperature is outside the recommended range.
When the temperature gets back within the appropriate range, the charging
resumes. We recommend charging the battery pack in an ambient temperature of
between 10°C to 30°C (50ºF to 86ºF).
• The battery pack may not be effectively charged if the terminal section of the
battery is dirty. In this case, wipe any dust off lightly using a soft cloth or a cotton
swab to clean the terminal section of the battery.
• Connect the AC Adaptor (supplied) to the nearest wall outlet (wall socket). If
malfunctions occur while using the AC Adaptor, disconnect the plug from the wall
outlet (wall socket) immediately to disconnect from the power source.
• When charging is finished, disconnect the AC Adaptor from the wall outlet (wall
socket).
• Be sure to use only genuine Sony brand battery packs, micro USB cable (supplied)
and AC Adaptor (supplied).
• BC-TRN2 battery charger (sold separately) is able to quick-charge the NP-BN
rechargeable battery pack supplied with this model. BC-TRN battery charger (sold
separately) is not able to quick-charge the NP-BN rechargeable battery pack
supplied with this model.
x
Charging time (Full charge)
The charging time is approximately 115 min. using the AC Adaptor
(supplied).
Note
• The above charging time applies when charging a fully depleted battery pack at a
temperature of 25°C (77°F). Charging may take longer depending on conditions of
use and circumstances.
12
GB
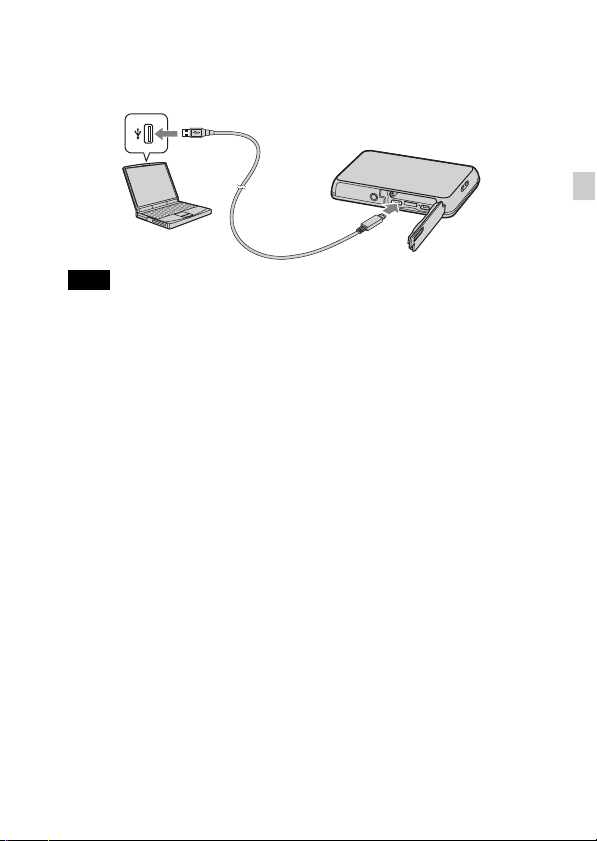
x
Charging by connecting to a computer
The battery pack can be charged by connecting the camera to a computer using
a micro USB cable.
Note
• Note the following points when charging via a computer:
– If the camera is connected to a laptop computer that is not connected to a power
source, the laptop battery level decreases. Do not charge for an extended period
of time.
– Do not turn on/off or restart the computer, or wake the computer to resume from
sleep mode when a USB connection has been established between the computer
and the camera. The camera may cause a malfunction. Before turning on/off, or
restarting the computer or waking the computer from sleep mode, disconnect the
camera and the computer.
– No guarantees are made for charging using a custom-built computer or a
modified computer.
GB
GB
13

x
Battery life and number of images that can be
recorded and played back
Battery life Number of images
Shooting (still images) Approx. 110 min. Approx. 220 images
Viewing (still images) Approx. 160 min. Approx. 3200 images
Shooting (movies) Approx. 55 min. —
Notes
• The above number of images applies when the battery pack is fully charged. The
number of images may decrease depending on the conditions of use.
• The number of images that can be recorded is for shooting under the following
conditions:
– Using Sony microSD memory card (Class 4 or faster) (sold separately)
– The battery pack is used at an ambient temperature of 25°C (77°F).
– [GPS setting] is set to [Off] (DSC-TX200V only).
– [Disp. Resolution] is set to [Standard].
• The number for “Shooting (still images)” is based on the CIPA standard, and is for
shooting under the following conditions:
(CIPA: Camera & Imaging Products Association)
– [Panel Brightness] is set to [3(Normal)].
– Shooting once every 30 seconds.
– The zoom is switched alternately between the W and T ends.
– The flash strobes once every two times.
– The power turns on and off once every ten times.
• The battery life for movies applies shooting under the following conditions:
– Movie quality: AVC HD HQ
– When continuous shooting ends because of set limits (page 27), press the shutter
button down again and continue shooting. Shooting functions such as the zoom
do not operate.
14
GB

x
Supplying power
The camera can be supplied with power from the wall outlet (wall socket) by
connecting to the AC Adaptor, using the micro USB cable (supplied).
You can import images to a computer without worrying about draining the
battery pack by connecting the camera to a computer using the micro USB
cable.
In addition, you can use the AC Adaptor AC-UD10 (sold separately) for
shooting to supply power when shooting.
Notes
• Power cannot be supplied when the battery pack is not inserted in the camera.
• When the camera is connected directly to a computer or to a power outlet using the
supplied AC Adaptor AC-UB10/UB10B, power supply is available only in
playback mode. If the camera is in shooting mode or while you are changing the
settings of the camera, power is not supplied even if you make a USB connection
using the micro USB cable.
• If you connect the camera and a computer using the micro USB cable while the
camera is in playback mode, the display on the camera will change from the
playback screen to the USB connection screen. Touch (Playback) button to
switch to the playback screen.
GB
GB
15

Inserting a memory card (sold separately)
“Memory Stick
Micro” media (M2)
Make sure that the correct
side is facing up.
Open the cover.
1
Insert the memory card (sold separately).
2
• With the camera lens facing upward, as illustrated, insert the memory
card straight in until it clicks into place.
• Pushing down on the microSD memory card (in the direction of the
battery insertion slot) while inserting it may damage the camera.
• Be careful when removing the microSD memory card, as it may pop out
quickly.
Close the cover.
3
Check the icon displayed on the upper right screen and
4
make sure the memory card is inserted correctly.
• A: The memory card is inserted
correctly.
• B: The memory card is not inserted
correctly. Confirm the direction of the
memory card and reinsert it straight into
the camera.
• Only one memory card can be inserted.
GB
Terminal
microSD memory
card
Printing
surface
16

x
Memory cards that can be used
Memory card For still images For movies
Memory Stick Micro a —
A
Memory Stick Micro (Mark2) aa
microSD memory card aa (Class 4 or faster)
B
microSDHC memory card aa (Class 4 or faster)
• In this manual, products in A are collectively referred to as “Memory Stick Micro”
media, and products in B are collectively referred to as microSD memory card.
x
To remove the memory card/battery pack
Memory card: Push the memory card in once to eject the memory card.
Battery pack: Slide the battery eject lever. Be sure not to drop the battery pack.
Note
• Never remove the memory card/battery pack when the access lamp (page 9) is lit.
This may cause damage to data in the memory card/internal memory.
GB
GB
17

Setting the clock
ON/OFF (Power) button
Press the ON/OFF (Power) button.
1
The camera is turned on. The power lamp lights up green only when the
camera starts up.
Date & Time setting is displayed when you turn on the camera for the first
time.
• It may take time for the power to turn on and allow operation.
Select a desired language.
2
Select a desired geographic location by following the
3
on-screen instructions, then touch [Next].
Set [Daylight Savings] or [Summer Time], [Date & Time
4
Format] and [Date & Time], then touch [Next].
• Midnight is indicated as 12:00 AM, and noon as 12:00 PM.
Touch [OK].
5
Follow the instructions on the screen.
6
• If you set [GPS setting] to [On], the battery charge may be depleted
faster.
• If you set [Disp. Resolution] to [High], the battery charge may be
depleted faster.
18
GB

Shooting still images/movies
Shutter button
Shooting still images
Press the shutter button halfway down to focus.
1
When the image is in focus, a beep sounds and the z indicator lights.
Press the shutter button fully down to shoot an image.
2
Shooting movies
Touch (REC Mode) t (Movie Mode).
1
Press the shutter button to start recording.
2
• Do not cover the microphone with your fingers.
• Use the W/T (zoom) lever to change the zoom scale.
• When (REC Mode) is not set to (Movie Mode), you can start
or stop recording by touching (Movie button) on the screen.
Press the shutter button again to stop recording.
3
GB
Notes
• The sound of the lever operating will be recorded when the zoom function
operates while shooting a movie.
• Continuous shooting is possible for approximately 29 minutes at one time at the
camera’s default settings and when the temperature is approximately 25°C (77°F).
When movie recording is finished, you can restart recording by performing the
steps above from the beginning. Recording may stop to protect the camera
depending on the ambient temperature.
GB
19

Viewing images
Touch (Playback).
1
• When images on a memory card recorded with other cameras are played
back on this camera, the registration screen for the data file appears.
x
Selecting next/previous image
Touch (Next)/ (Previous) on the screen.
• To play back movies, touch (Playback) in the center of the screen.
• To zoom in, slide the W/T (Zoom) lever to T side.
x
Deleting an image
Touch (Delete) t [This Image].
x
Returning to shooting images
Touch on the screen.
• You can also return to shooting mode by pressing the shutter button halfway
down.
20
GB

In-Camera Guide
This camera is equipped with a built-in instruction guide. This allows you to
search the camera’s functions according to your needs.
Touch MENU.
1
Touch (In-Camera Guide), then select the desired
2
MENU item.
The operating guide for the selected item is displayed.
• If you touch (In-Camera Guide) when the MENU screen is not
displayed, you can search the guide using keywords or icons.
GB
GB
21
 Loading...